Sony Group XAV701HD AV Center User Manual XAV 701HD
Sony Corporation AV Center XAV 701HD
Contents
- 1. User Manual 1
- 2. User Manual 2
User Manual 1
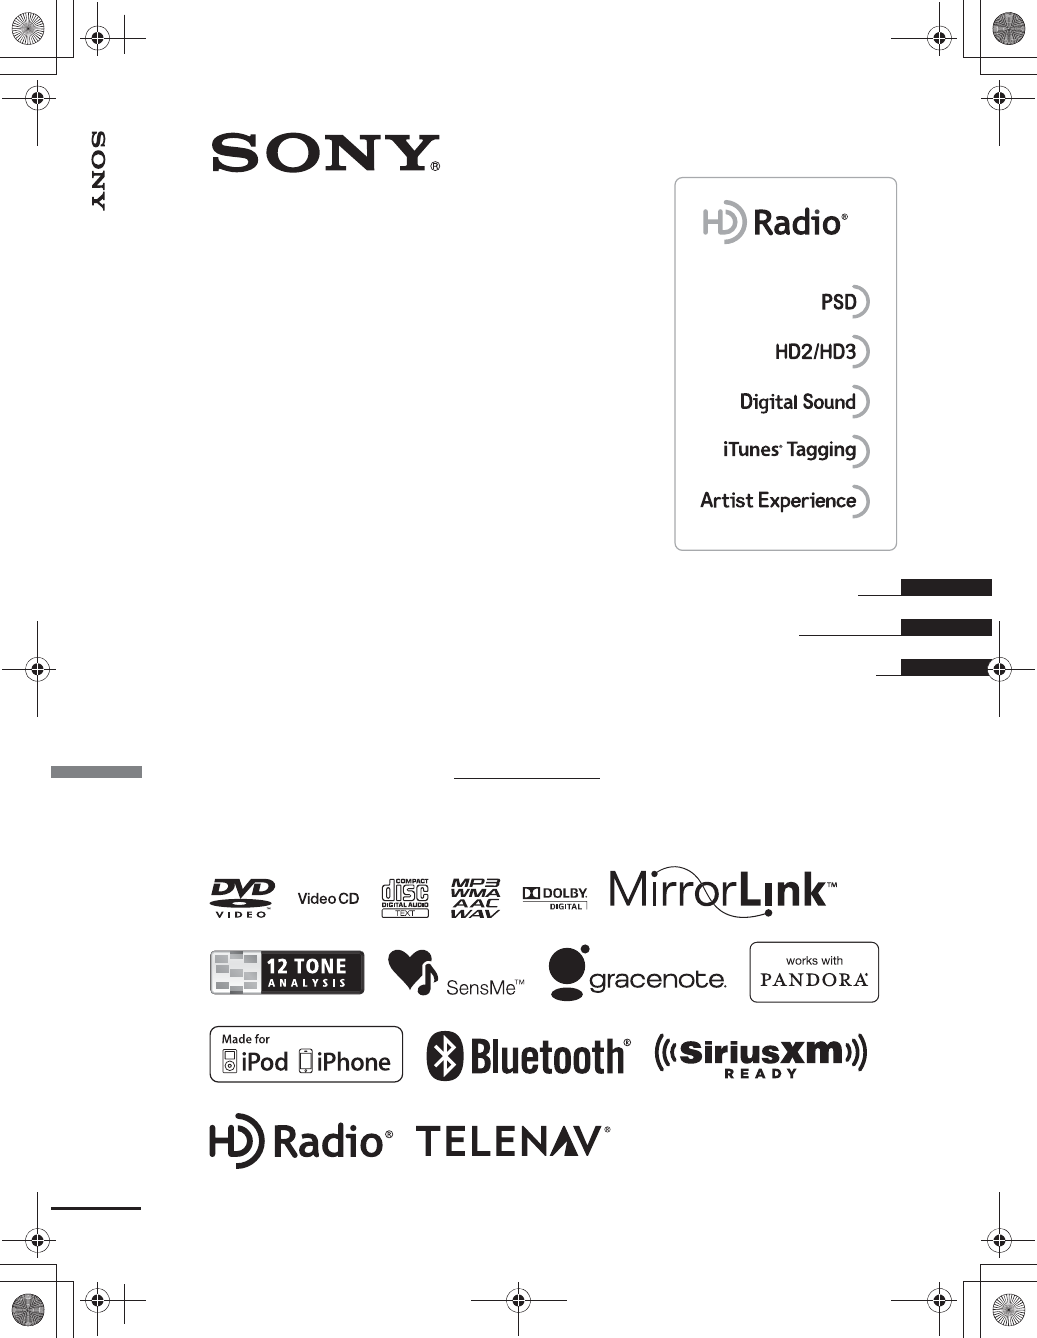
This HD Radio receiver enables:
AV Center
©2012 Sony Corporation
4-422-720-11(1)
XAV-701HD
masterpage:RightM:\001\XPML A7.0\ML\4422720111_XAV-701HD_CaFR-LaES(FM7.1
600dpi)\4422720111_XAV-701HD_ML\01US_XAV701HD\01US+00COV-U.fm
XAV-701HD
4-422-720-11(1)
Operating Instructions
Mode d’emploi
Manual de instrucciones
GB
FR
ES
Owner’s Record
The model and serial numbers are located on the
bottom of the unit.
Record the serial number in the space provided below.
Refer to these numbers whenever you call upon your
Sony dealer regarding this product.
Model No. XAV-701HD Serial No.
AV Center
01US+00COV-U.fm Page 1 Friday, June 15, 2012 2:55 PM

2
M:\001\XPML A7.0\ML\4422720111_XAV-701HD_CaFR-LaES(FM7.1
600dpi)\4422720111_XAV-701HD_ML\01US_XAV701HD\01US01INT-U.fm
masterpage:Left
XAV-701HD
4-422-720-11(1)
Warning
To prevent fire or shock hazard, do not
expose the unit to rain or moisture.
To avoid electrical shock, do not open the
cabinet. Refer servicing to qualified
personnel only.
CAUTION
The use of optical instruments with this product
will increase eye hazard. As the laser beam used
in this CD/DVD player is harmful to eyes, do not
attempt to disassemble the cabinet. Refer
servicing to qualified personnel only.
Be sure to install this unit in the dashboard of
the car for safety. For installation and
connections, refer to the supplied
“Installation/Connections” guide.
FOR UNITED STATES CUSTOMERS. NOT
APPLICABLE IN CANADA, INCLUDING
IN THE PROVINCE OF QUEBEC.
POUR LES CONSOMMATEURS AUX
ÉTATS-UNIS. NON APPLICABLE AU
CANADA, Y COMPRIS LA PROVINCE DE
QUÉBEC.
This equipment has been tested and found to
comply with the limits for a Class B digital
device, pursuant to Part 15 of the FCC Rules.
These limits are designed to provide reasonable
protection against harmful interference in a
residential installation. This equipment
generates, uses, and can radiate radio frequency
energy and, if not installed and used in
accordance with the instructions, may cause
harmful interference to radio communications.
However, there is no guarantee that interference
will not occur in a particular installation. If this
equipment does cause harmful interference to
radio or television reception, which can be
determined by turning the equipment off and on,
the user is encouraged to try to correct the
interference by one or more of the following
measures:
– Reorient or relocate the receiving antenna.
– Increase the separation between the equipment
and receiver.
– Connect the equipment into an outlet on a
circuit different from that to which the receiver
is connected.
– Consult the dealer or an experienced radio/TV
technician for help.
You are cautioned that any changes or
modifications not expressly approved in this
manual could void your authority to operate this
equipment.
00US+00COV-U.book Page 2 Friday, June 15, 2012 2:52 PM
3
M:\001\XPML A7.0\ML\4422720111_XAV-701HD_CaFR-LaES(FM7.1
600dpi)\4422720111_XAV-701HD_ML\01US_XAV701HD\01US01INT-U.fm
masterpage:Right
XAV-701HD
4-422-720-11(1)
This device complies with Part 15 of the FCC
Rules and Industry Canada licence-exempt RSS
standard(s). Operation is subject to the following
two conditions: (1) this device may not cause
harmful interference, and (2) this device must
accept any interference received, including
interference that may cause undesired operation
of the device.
Under Industry Canada regulations, this radio
transmitter may only operate using an antenna of
a type and maximum (or lesser) gain approved
for the transmitter by Industry Canada. To reduce
potential radio interference to other users, the
antenna type and its gain should be so chosen
that the equivalent isotropically radiated power
(e.i.r.p.) is not more than that necessary for
successful communication.
For the State of California, USA only
Perchlorate Material – special handling may
apply, See
www.dtsc.ca.gov/hazardouswaste/perchlorate
Perchlorate Material: Lithium battery contains
perchlorate
Warning if your car’s ignition has no
ACC position
Be sure to set the Auto Off function
(page 51).
The unit will turn off automatically in the set
time when no source is selected, which
prevents battery drainage.
If you do not set the Auto Off function, press
and hold (SOURCE/OFF) until the display
disappears each time you turn the ignition off.
To cancel the demonstration (Demo) display,
see page 51.
This transmitter must not be co-located or
operated in conjunction with any other antenna
or transmitter.
This equipment complies with FCC/IC radiation
exposure limits set forth for an uncontrolled
environment and meets the FCC radio frequency
(RF) Exposure Guidelines in Supplement C to
OET65 and RSS-102 of the IC radio frequency
(RF) Exposure rules. This equipment has very
low levels of RF energy that it deemed to
comply without maximum permissive exposure
evaluation (MPE). But it is desirable that it
should be installed and operated keeping the
radiator at least 20 cm or more away from
person’s body (excluding extremities: hands,
wrists, feet and ankles).
00US+00COV-U.book Page 3 Friday, June 15, 2012 2:52 PM
4
M:\001\XPML A7.0\ML\4422720111_XAV-701HD_CaFR-LaES(FM7.1
600dpi)\4422720111_XAV-701HD_ML\01US_XAV701HD\01US+00COV-UTOC.fm
masterpage:Left
Table of Contents
XAV-701HD
4-422-720-11(1)
Notes on safety. . . . . . . . . . . . . . . . . . . . . . . . . .7
Notes on installation. . . . . . . . . . . . . . . . . . . . . .7
Copyrights . . . . . . . . . . . . . . . . . . . . . . . . . . . . .7
Notes on Bluetooth function . . . . . . . . . . . . . . .9
Notice on license . . . . . . . . . . . . . . . . . . . . . . .10
Playable discs and file types . . . . . . . . . . . . . .11
Location and function of controls . . . . . . . . . .12
Main unit . . . . . . . . . . . . . . . . . . . . . . . . . . .12
RM-X271 Remote Commander . . . . . . . . .14
Getting Started
Resetting the unit . . . . . . . . . . . . . . . . . . . . . . .15
Performing initial settings . . . . . . . . . . . . . . . .15
Setting the clock. . . . . . . . . . . . . . . . . . . . . . . .16
Preparing the remote commander . . . . . . . . . .16
Radio
Listening to the radio . . . . . . . . . . . . . . . . . . . .17
Reception controls. . . . . . . . . . . . . . . . . . . .17
Reception indications . . . . . . . . . . . . . . . . .18
Storing and receiving stations . . . . . . . . . . . . .18
Storing automatically — BTM . . . . . . . . . .18
Storing manually . . . . . . . . . . . . . . . . . . . . .18
Receiving stored stations. . . . . . . . . . . . . . .18
About FM Multicasting . . . . . . . . . . . . . . . .18
iTunes Tagging. . . . . . . . . . . . . . . . . . . . . . . . .18
Using iTunes Tagging . . . . . . . . . . . . . . . . .19
Discs
Playing discs. . . . . . . . . . . . . . . . . . . . . . . . . . .20
Playback controls. . . . . . . . . . . . . . . . . . . . .20
Playback indications . . . . . . . . . . . . . . . . . .21
Using PBC (playback control) functions . . . . .22
Configuring audio settings . . . . . . . . . . . . . . . .22
Changing the audio language/format. . . . . .22
Changing the audio channel . . . . . . . . . . . .23
Adjusting the audio output level
— Dolby D level . . . . . . . . . . . . . . . . . . . . .23
Repeat and shuffle play . . . . . . . . . . . . . . . . . .23
Direct search play. . . . . . . . . . . . . . . . . . . . . . .24
Listing up tracks/video files — List . . . . . . . . 25
Selecting a track/video file . . . . . . . . . . . . . 25
Selecting a file type. . . . . . . . . . . . . . . . . . . 25
USB Music
Playing music . . . . . . . . . . . . . . . . . . . . . . . . . 25
Playback controls . . . . . . . . . . . . . . . . . . . . 25
Options . . . . . . . . . . . . . . . . . . . . . . . . . . . . 26
Repeat and shuffle play . . . . . . . . . . . . . . . . . . 26
Selecting music files . . . . . . . . . . . . . . . . . . . . 26
Selecting songs from the library . . . . . . . . . . . 26
Enjoying music according to your mood
— SensMe™ . . . . . . . . . . . . . . . . . . . . . . . . . . 26
Installing “Media Go” to your
computer . . . . . . . . . . . . . . . . . . . . . . . . . . . 26
Transferring tracks to the USB device using
“Media Go”. . . . . . . . . . . . . . . . . . . . . . . . . 26
Playing tracks in channels
— SensMe™ channels . . . . . . . . . . . . . . . . 27
Selecting an album by cover art . . . . . . . . . . . 28
Options . . . . . . . . . . . . . . . . . . . . . . . . . . . . 28
USB Video
Playing video. . . . . . . . . . . . . . . . . . . . . . . . . . 28
Playback controls . . . . . . . . . . . . . . . . . . . . 28
Options . . . . . . . . . . . . . . . . . . . . . . . . . . . . 29
Selecting video files . . . . . . . . . . . . . . . . . . . . 29
Options . . . . . . . . . . . . . . . . . . . . . . . . . . . . 29
USB Photo
Viewing Photos . . . . . . . . . . . . . . . . . . . . . . . . 30
Playback controls . . . . . . . . . . . . . . . . . . . . 30
Options . . . . . . . . . . . . . . . . . . . . . . . . . . . . 30
Selecting photo files . . . . . . . . . . . . . . . . . . . . 31
Options . . . . . . . . . . . . . . . . . . . . . . . . . . . . 31
Notes on USB playback
00US+00COV-U.book Page 4 Friday, June 15, 2012 2:52 PM
5
M:\001\XPML A7.0\ML\4422720111_XAV-701HD_CaFR-LaES(FM7.1
600dpi)\4422720111_XAV-701HD_ML\01US_XAV701HD\01US+00COV-UTOC.fm
masterpage:Right
XAV-701HD
4-422-720-11(1)
iPod
Playing an iPod . . . . . . . . . . . . . . . . . . . . . . . . 32
Listing up tracks/video files — List . . . . . . . . 33
Selecting a track/video file . . . . . . . . . . . . . 33
Selecting a file type. . . . . . . . . . . . . . . . . . . 33
Selecting the play mode. . . . . . . . . . . . . . . . . . 33
Repeat and shuffle play . . . . . . . . . . . . . . . . . . 33
Operating an iPod directly
— Passenger App Control. . . . . . . . . . . . . . . . 34
Useful Functions
Searching for a track by listening to track
passages — ZAPPIN™ . . . . . . . . . . . . . . . . . . 34
Controlling applications on your smartphone
— MirrorLink™ . . . . . . . . . . . . . . . . . . . . . . . 35
Controlling applications on your iPhone
— Telenav® GPS App. . . . . . . . . . . . . . . . . . . 35
Enjoying different sources in front and rear
— Zone × Zone . . . . . . . . . . . . . . . . . . . . . . . . 35
Changing the color of buttons
—Dynamic Color Illuminator . . . . . . . . . . . . . 35
Customizing the button color
— Custom Color. . . . . . . . . . . . . . . . . . . . . 36
Using Gesture Command . . . . . . . . . . . . . . . . 36
Handsfree Calling and Audio
Streaming — Bluetooth function
Before using the Bluetooth function . . . . . . . . 37
Basic procedure of the Bluetooth
function . . . . . . . . . . . . . . . . . . . . . . . . . . . . 37
Bluetooth status indications . . . . . . . . . . . . 37
Installing the microphone . . . . . . . . . . . . . . 37
Pairing . . . . . . . . . . . . . . . . . . . . . . . . . . . . . . . 38
Searching from the Bluetooth device . . . . . 38
Connecting. . . . . . . . . . . . . . . . . . . . . . . . . . . . 38
Handsfree calling. . . . . . . . . . . . . . . . . . . . . . . 39
Making calls . . . . . . . . . . . . . . . . . . . . . . . . 39
Receiving calls . . . . . . . . . . . . . . . . . . . . . . 40
Operations during a call . . . . . . . . . . . . . . . 40
Phonebook management . . . . . . . . . . . . . . . . . 41
Selecting phonebook data . . . . . . . . . . . . . . 41
Browsing a phonebook . . . . . . . . . . . . . . . . 41
Deleting phonebook data . . . . . . . . . . . . . . 41
Call data management . . . . . . . . . . . . . . . . . . . 42
Deleting call history . . . . . . . . . . . . . . . . . . 42
Preset dial . . . . . . . . . . . . . . . . . . . . . . . . . . 42
Phone option menu . . . . . . . . . . . . . . . . . . . . . 42
Audio streaming . . . . . . . . . . . . . . . . . . . . . . . 43
Listening to a Bluetooth device via
this unit. . . . . . . . . . . . . . . . . . . . . . . . . . . . 43
Operating a Bluetooth device with
this unit. . . . . . . . . . . . . . . . . . . . . . . . . . . . 43
General Settings about Bluetooth . . . . . . . . . . 43
Pandora® internet radio
Streaming Pandora®. . . . . . . . . . . . . . . . . . . . 44
To connect the mobile device via the
Bluetooth function . . . . . . . . . . . . . . . . . . . 44
To connect the iPhone . . . . . . . . . . . . . . . . 44
“Thumbs” feedback . . . . . . . . . . . . . . . . . . 44
Station list. . . . . . . . . . . . . . . . . . . . . . . . . . 44
Bookmarking . . . . . . . . . . . . . . . . . . . . . . . 44
Creating a Station. . . . . . . . . . . . . . . . . . . . 45
Deleting a Station. . . . . . . . . . . . . . . . . . . . 45
Sound Adjustment
Selecting the sound quality — EQ7 . . . . . . . . 45
Customizing the equalizer curve
— EQ7 Tune . . . . . . . . . . . . . . . . . . . . . . . 45
Adjusting the sound characteristics . . . . . . . . 46
Optimizing sound for the listening position
— Intelligent Time Alignment . . . . . . . . . . . . 46
Calibrating the listening position
— Intelligent Time Alignment Tune . . . . . 47
Speaker configuration and volume setup . . . . 47
Creating a virtual center speaker
— CSO. . . . . . . . . . . . . . . . . . . . . . . . . . . . 47
Using rear speakers like subwoofers
— Rear Bass Enhancer. . . . . . . . . . . . . . . . 47
Adjusting the speaker volume . . . . . . . . . . 48
Monitor Adjustment
Adjusting the monitor angle . . . . . . . . . . . . . . 48
Touch panel calibration . . . . . . . . . . . . . . . . . 48
Adjusting the picture — Picture EQ. . . . . . . . 48
Customizing the picture . . . . . . . . . . . . . . . 49
Selecting the aspect ratio . . . . . . . . . . . . . . . . 49
Settings
Basic setting operation . . . . . . . . . . . . . . . . . . 50
General Settings . . . . . . . . . . . . . . . . . . . . . . . 51
Sound Settings . . . . . . . . . . . . . . . . . . . . . . . . 53
00US+00COV-U.book Page 5 Friday, June 15, 2012 2:52 PM
6
M:\001\XPML A7.0\ML\4422720111_XAV-701HD_CaFR-LaES(FM7.1
600dpi)\4422720111_XAV-701HD_ML\01US_XAV701HD\01US+00COV-UTOC.fm
masterpage:Left
XAV-701HD
4-422-720-11(1)
Visual Settings . . . . . . . . . . . . . . . . . . . . . . . . .55
Source Settings. . . . . . . . . . . . . . . . . . . . . . . . .56
Using Optional Equipment
Auxiliary audio/video equipment. . . . . . . . . . .58
SiriusXM Connect Tuner . . . . . . . . . . . . . . . . .58
Rear view camera. . . . . . . . . . . . . . . . . . . . . . .59
Rear view camera settings. . . . . . . . . . . . . .59
Additional Information
Precautions . . . . . . . . . . . . . . . . . . . . . . . . . . . .60
Notes on LCD panel . . . . . . . . . . . . . . . . . .60
Notes on discs . . . . . . . . . . . . . . . . . . . . . . .60
Playback order of MP3/WMA/AAC/Xvid/
MPEG-4 files. . . . . . . . . . . . . . . . . . . . . . . .61
About iPod. . . . . . . . . . . . . . . . . . . . . . . . . .63
About Bluetooth function . . . . . . . . . . . . . .63
Maintenance . . . . . . . . . . . . . . . . . . . . . . . . . . .64
Removing the unit . . . . . . . . . . . . . . . . . . . . . .64
Specifications . . . . . . . . . . . . . . . . . . . . . . . . . .65
Troubleshooting . . . . . . . . . . . . . . . . . . . . . . . .66
Error displays/messages . . . . . . . . . . . . . . .69
Language code list . . . . . . . . . . . . . . . . . . . . . .73
00US+00COV-U.book Page 6 Friday, June 15, 2012 2:52 PM
7
M:\001\XPML A7.0\ML\4422720111_XAV-701HD_CaFR-LaES(FM7.1
600dpi)\4422720111_XAV-701HD_ML\01US_XAV701HD\01US02CD-U.fm
masterpage:RightM:\001\XPML A7.0\ML\4422720111_XAV-701HD_CaFR-LaES(FM7.1
600dpi)\4422720111_XAV-701HD_ML\01US_XAV701HD\01US02CD-U.fm
masterpage:Right
XAV-701HD
4-422-720-11(1)
Notes on safety
• Comply with your local traffic rules, laws and
regulations.
• While driving
– Do not watch or operate the unit, as it may lead
to distraction and cause an accident. Park your
car in a safe place to watch or operate the unit.
– Do not use the setup feature or any other
function which could divert your attention from
the road.
– When backing up your car, be sure to
look back and watch the surroundings
carefully for your safety, even if the rear
view camera is connected. Do not
depend on the rear view camera
exclusively.
• While operating
– Do not insert your hands, fingers or foreign
object into the unit, as it may cause injury or
damage to the unit.
– Keep small articles out of the reach of children.
– Be sure to fasten seatbelts to avoid injury in the
event of a sudden movement of the car.
Notes on installation
• We recommend this unit should be installed by a
qualified technician or service personnel.
– If you try to install this unit by yourself, refer to
the supplied “Installation/Connections” guide
and install the unit properly.
– Improper installation may cause battery drain or
a short circuit.
• If the unit does not work properly, check the
connections first, referring to the supplied
“Installation/Connections” guide. If everything is
in order, check the fuse.
• Protect the unit surface from damage.
– Do not expose the unit surface to chemicals,
such as insecticide, hair spray, insect repellent,
etc.
– Do not leave rubber or plastic materials in
contact with the unit for a long time. Otherwise,
the finish of the unit may be impaired, or
deformation may occur.
• When installing, be sure to fix securely.
• When installing, be sure to turn the ignition off.
Installing the unit with the ignition on may cause
battery drain or a short circuit.
• When installing, be sure not to damage any car
parts such as pipes, tubes, fuel tank or wiring by
using a drill, as it may cause a fire or an accident.
Copyrights
Manufactured under license
from Dolby Laboratories. Dolby
and the double-D symbol are
trademarks of Dolby
Laboratories.
Microsoft, Windows, Windows Vista and Windows
Media and logos are trademarks or registered
trademarks of Microsoft Corporation in the United
States and/or other countries.
This product contains technology subject to certain
intellectual property rights of Microsoft. Use or
distribution of this technology outside of this
product is prohibited without the appropriate
license(s) from Microsoft.
“DVD VIDEO,” “DVD-R,” “DVD-RW,” “DVD+R,”
and “DVD+RW” are trademarks.
The Bluetooth word mark and logos are owned by
the Bluetooth SIG, Inc. and any use of such marks
by Sony Corporation is under license. Other
trademarks and trade names are those of their
respective owners.
Preventing an accident
Pictures appear only after you park the car and set
the parking brake.
If the car starts moving during video playback,
the picture is automatically switched to the
background screen after displaying the caution
below.
“Video blocked for your safety.”
The monitor connected to the REAR OUT is
active while the car is in motion.
The picture on the display is switched to the
background screen, but audio source can be
heard.
Do not operate the unit or watch the monitor
while driving.
00US+00COV-U.book Page 7 Friday, June 15, 2012 2:52 PM
8
M:\001\XPML A7.0\ML\4422720111_XAV-701HD_CaFR-LaES(FM7.1
600dpi)\4422720111_XAV-701HD_ML\01US_XAV701HD\01US02CD-U.fm
masterpage:Left
XAV-701HD
4-422-720-11(1)
ZAPPIN is a trademark of Sony Corporation.
12 TONE ANALYSIS and its
logo are trademarks of Sony
Corporation.
“WALKMAN” and
“WALKMAN” logo are
registered trademarks of
Sony Corporation.
SensMe and the SensMe logo are
trademarks or registered
trademarks of Sony Ericsson
Mobile Communications AB.
Music recognition technology and related data
are provided by Gracenote®. Gracenote is the
industry standard in music recognition
technology and related content delivery. For
more information, please visit
www.gracenote.com.
CD, DVD, Blu-ray Disc, and music and video-
related data from Gracenote, Inc., copyright ©
2000 to present Gracenote. Gracenote Software,
copyright © 2000 to present Gracenote. One or
more patents owned by Gracenote apply to this
product and service. See the Gracenote website
for a non-exhaustive list of applicable Gracenote
patents.
Gracenote, CDDB, MusicID, MediaVOCS, the
Gracenote logo and logotype, and the “Powered
by Gracenote” logo are either registered
trademarks or trademarks of Gracenote in the
United States and/or other countries.
iPhone, iPod, iPod classic, iPod nano, and
iPod touch are trademarks of Apple Inc., registered
in the U.S. and other countries.
Apple, Macintosh and iTunes are trademarks of
Apple Inc., registered in the U.S. and other
countries.
MirrorLink™ and the MirrorLink Logo are
certification marks of the Car Connectivity
Consortium LLC. Unauthorized use is strictly
prohibited.
THIS PRODUCT IS LICENSED UNDER THE
MPEG-4 VISUAL PATENT PORTFOLIO
LICENSE FOR THE PERSONAL AND NON-
COMMERCIAL USE OF A CONSUMER FOR
DECODING MPEG-4 VIDEO THAT WAS
ENCODED BY A CONSUMER ENGAGED IN A
PERSONAL AND NON-COMMERCIAL
ACTIVITY AND/OR WAS OBTAINED FROM A
VIDEO PROVIDER LICENSED BY MPEG LA
TO PROVIDE MPEG-4 VIDEO. NO LICENSE IS
GRANTED OR SHALL BE IMPLIED FOR ANY
OTHER USE. ADDITIONAL INFORMATION
INCLUDING THAT RELATING TO
PROMOTIONAL, INTERNAL AND
COMMERCIAL USES AND LICENSING MAY
BE OBTAINED FROM MPEG LA, LLC. SEE
HTTP://WWW.MPEGLA.COM
THIS PRODUCT IS LICENSED UNDER THE
AVC PATENT PORTFOLIO LICENSE FOR
THE PERSONAL AND NON-COMMERCIAL
USE OF A CONSUMER TO
(i)ENCODE VIDEO IN COMPLIANCE WITH
THE AVC STANDARD (“AVC VIDEO”)
AND/OR
(ii)DECODE AVC VIDEO THAT WAS
ENCODED BY A CONSUMER ENGAGED IN
A PERSONAL AND
NON-COMMERCIAL ACTIVITY AND/OR
WAS OBTAINED FROM A VIDEO
PROVIDER LICENSED TO PROVIDE AVC
VIDEO. NO LICENSE IS GRANTED OR
SHALL BE IMPLIED FOR ANY OTHER USE.
ADDITIONAL INFORMATION MAY BE
OBTAINED FROM MPEG LA, L.L.C. SEE
HTTP://WWW.MPEGLA.COM
THIS PRODUCT IS LICENSED UNDER THE
AVC PATENT PORTFOLIO LICENSE AND
VC-1 PATENT PORTFOLIO LICENSE FOR
THE PERSONAL AND NON-COMMERCIAL
USE OF A CONSUMER TO DECODE VIDEO
IN COMPLIANCE WITH THE AVC
STANDARD (“AVC VIDEO”) AND/OR THE
VC-1 STANDARD (“VC-1 VIDEO”) THAT
WAS ENCODED BY A CONSUMER
ENGAGED IN A PERSONAL AND
NONCOMMERCIAL ACTIVITY AND/OR
WAS OBTAINED FROM A VIDEO
PROVIDER LICENSED TO PROVIDE AVC
VIDEO AND/OR VC-1 VIDEO. NO LICENSE
IS GRANTED OR SHALL BE IMPLIED FOR
ANY OTHER USE. ADDITIONAL
INFORMATION MAY BE OBTAINED FROM
MPEG LA, L.L.C. SEE
HTTP://WWW.MPEGLA.COM
Pandora, the Pandora logo, and the Pandora trade
dress are trademarks or registered trademarks of
Pandora Media, Inc., used with permission.
00US+00COV-U.book Page 8 Friday, June 15, 2012 2:52 PM
9
M:\001\XPML A7.0\ML\4422720111_XAV-701HD_CaFR-LaES(FM7.1
600dpi)\4422720111_XAV-701HD_ML\01US_XAV701HD\01US02CD-U.fm
masterpage:RightM:\001\XPML A7.0\ML\4422720111_XAV-701HD_CaFR-LaES(FM7.1
600dpi)\4422720111_XAV-701HD_ML\01US_XAV701HD\01US02CD-U.fm
masterpage:Right
XAV-701HD
4-422-720-11(1)
Android is a trademark of Google Inc. Use of this
trademark is subject to Google Permissions.
BlackBerry® is the property of Research In
Motion Limited and is registered and/or used in
the U.S. and countries around the world. Used
under license from Research In Motion Limited.
SiriusXM subscriptions and Connect Tuner are
sold separately.
www.siriusxm.com.
Sirius, XM and all related marks and logos are
trademarks of Sirius XM Radio Inc. and its
subsidiaries. All other marks and logos are the
property of their respective owners.
All rights reserved.
HD Radio Technology manufactured under
license from iBiquity Digital Corporation. U.S.
and Foreign Patents. HD Radio™ and the HD,
HD Radio, and “Arc” logos are proprietary
trademarks of iBiquity Digital Corp.
Telenav® and Telenav logo are registered trademark
or trademark of Telenav, Inc.
All other trademarks are trademarks of their
respective owners.
This product uses NCM driver software which is
licensed to Sony by MCCI corporation.
Notes on Bluetooth function
Caution
IN NO EVENT SHALL SONY BE LIABLE FOR
ANY INCIDENTAL, INDIRECT OR
CONSEQUENTIAL DAMAGES OR OTHER
DAMAGES INCLUDING, WITHOUT
LIMITATION, LOSS OF PROFITS, LOSS OF
REVENUE, LOSS OF DATA, LOSS OF USE OF
THE PRODUCT OR ANY ASSOCIATED
EQUIPMENT, DOWNTIME, AND
PURCHASER’S TIME RELATED TO OR
ARISING OUT OF THE USE OF THIS
PRODUCT, ITS HARDWARE AND/OR ITS
SOFTWARE.
IMPORTANT NOTICE!
Safe and efficient use
Changes or modifications to this unit not expressly
approved by Sony may void the user’s authority to
operate the equipment.
Please check for exceptions, due to national
requirement or limitations, in usage of Bluetooth
equipment before using this product.
Driving
Check the laws and regulations on the use of cellular
phones and handsfree equipment in the areas where
you drive.
Always give full attention to driving and pull off the
road and park before making or answering a call if
driving conditions so require.
Connecting to other devices
When connecting to any other device, please read its
user guide for detailed safety instructions.
Radio frequency exposure
RF signals may affect improperly installed or
inadequately shielded electronic systems in cars,
such as electronic fuel injection systems, electronic
antiskid (antilock) braking systems, electronic speed
control systems or air bag systems. For installation
or service of this device, please consult with the
manufacturer or its representative of your car. Faulty
installation or service may be dangerous and may
invalidate any warranty that may apply to this
device.
Consult with the manufacturer of your car to ensure
that the use of your cellular phone in the car will not
affect its electronic system.
Check regularly that all wireless device equipment
in your car is mounted and operating properly.
Emergency calls
This Bluetooth car handsfree and the electronic
device connected to the handsfree operate using
radio signals, cellular, and landline networks as well
as user-programmed function, which cannot
guarantee connection under all conditions.
Therefore do not rely solely upon any electronic
device for essential communications (such as
medical emergencies).
Remember, in order to make or receive calls, the
handsfree and the electronic device connected to the
handsfree must be switched on in a service area with
adequate cellular signal strength.
Emergency calls may not be possible on all cellular
phone networks or when certain network services
and/or phone features are in use.
Check with your local service provider.
00US+00COV-U.book Page 9 Friday, June 15, 2012 2:52 PM
10
M:\001\XPML A7.0\ML\4422720111_XAV-701HD_CaFR-LaES(FM7.1
600dpi)\4422720111_XAV-701HD_ML\01US_XAV701HD\01US02CD-U.fm
masterpage:Left
XAV-701HD
4-422-720-11(1)
Notice on license
This product contains software that Sony uses
under a licensing agreement with the owner of its
copyright. We are obligated to announce the
contents of the agreement to customers under
requirement by the owner of copyright for the
software.
For details on software licenses, see page 52.
Notice on GNU GPL/LGPL applied
software
This product contains software that is subject to
the following GNU General Public License
(hereinafter referred to as “GPL”) or GNU
Lesser General Public License (hereinafter
referred to as “LGPL”). These establish that
customers have the right to acquire, modify, and
redistribute the source code of said software in
accordance with the terms of the GPL or LGPL
displayed on this unit.
The source code for the above-listed software is
available on the Web.
To download, please access the following URL
then select the model name “XAV-701HD.”
URL: http://www.sony.net/Products/Linux/
Please note that Sony cannot answer or respond
to any inquiries regarding the content of the
source code.
00US+00COV-U.book Page 10 Friday, June 15, 2012 2:52 PM
11
M:\001\XPML A7.0\ML\4422720111_XAV-701HD_CaFR-LaES(FM7.1
600dpi)\4422720111_XAV-701HD_ML\01US_XAV701HD\01US02CD-U.fm
masterpage:RightM:\001\XPML A7.0\ML\4422720111_XAV-701HD_CaFR-LaES(FM7.1
600dpi)\4422720111_XAV-701HD_ML\01US_XAV701HD\01US02CD-U.fm
masterpage:Right
XAV-701HD
4-422-720-11(1)
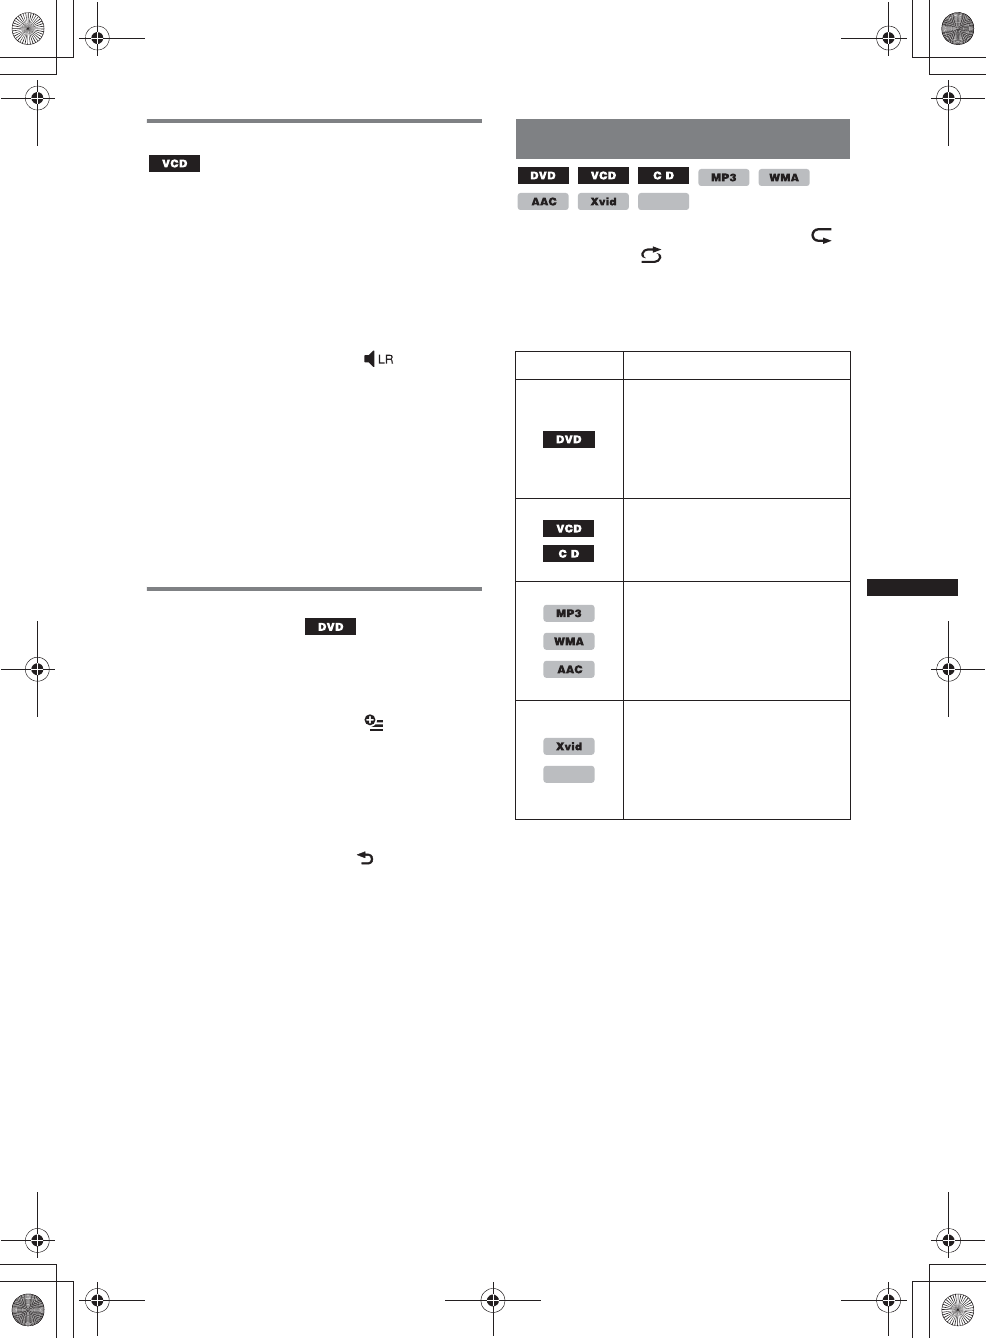
Playable discs and file types
This unit can play various video/audio discs.
The following chart helps you to check if a disc is supported by this unit, as well as what functions are
available for a given disc type.
*1 Audio files can also be stored.
*2 Video files can also be stored.
Note
“DVD” may be used in these Operating Instructions as a general term for DVD VIDEOs, DVD-Rs/DVD-RWs, and
DVD+Rs/DVD+RWs.
The following chart shows the supported file types and their symbols.
Available functions differ depending on the format, regardless of disc type. The format symbols below
appear in these Operating Instructions next to the description of functions available for their
corresponding file types.
Tip
For details on compression formats, see page 61.
Note
Even compatible discs may not be playable on this unit, depending on their recording condition.
Disc symbol in manual Disc format
VIDEO
DVD VIDEO
DVD-R*1/DVD-R DL*1/DVD-RW*1
(Video mode/VR mode)
DVD+R*1/DVD+R DL*1/DVD+RW*1
Video CD
(Ver. 1.0/1.1/2.0)
AUDIO
Audio CD
CD-ROM*2/CD-R*2/CD-RW*2
Format symbol in manual File type
MP3 audio file
WMA audio file
AAC audio file
WAVE audio file
Xvid video file
WMV video file
MPEG-4 video file
AVC (H.264 baseline) video file
MPEG-4
00US+00COV-U.book Page 11 Friday, June 15, 2012 2:52 PM
12
M:\001\XPML A7.0\ML\4422720111_XAV-701HD_CaFR-LaES(FM7.1
600dpi)\4422720111_XAV-701HD_ML\01US_XAV701HD\01US02CD-U.fm
masterpage:Left
XAV-701HD
4-422-720-11(1)
Location and function of controls
Main unit
For details, see the pages listed below.
ADisc slot page 20
(located behind the front panel)
BVOL (Volume) –/+*1 buttons
CDSPL/M.OFF button
Press to change display items.
Press and hold to turn off the monitor and the
button illumination. To turn back on, touch
anywhere on the display.
DReset button page 15
EDisplay/touch panel
FReceptor for the remote commander
GHOME/ATT button
Press to open HOME menu.
Press and hold to attenuate the sound.
HSOURCE/OFF button
Press to turn on the power/change the source:
“Tuner” (HD Radio), “Telenav,” “Pandora,”
“MirrorLink™,” “SXM,*2” “iPod,” “USB
Music,” “USB Video,” “Disc,” “BT Audio”
(Bluetooth Audio), “AUX” (Auxiliary
equipment).
Press and hold for 1 second to exit the
source.
Press and hold for more than 2 seconds to
turn off.
IZ (Eject) TILT button page 20, 48
Press and hold to adjust the monitor angle.
*1 There is a tactile dot to the right of the VOL +
button.
*2 If a SAT tuner is connected, the connected device
(“SXM”) will active on the display.
5
00US+00COV-U.book Page 12 Friday, June 15, 2012 2:52 PM
13
M:\001\XPML A7.0\ML\4422720111_XAV-701HD_CaFR-LaES(FM7.1
600dpi)\4422720111_XAV-701HD_ML\01US_XAV701HD\01US02CD-U.fm
masterpage:RightM:\001\XPML A7.0\ML\4422720111_XAV-701HD_CaFR-LaES(FM7.1
600dpi)\4422720111_XAV-701HD_ML\01US_XAV701HD\01US02CD-U.fm
masterpage:Right
XAV-701HD
4-422-720-11(1)
Screen displays AATT (Attenuate)
BZONE × ZONE
CTAG
DBluetooth status indications page 37
EClock page 16
F“ZONE × ZONE” key
Touch to activate Zone × Zone.
GOption key
Touch to open HOME Option menu.
The items in the Home Option menu are as
follows:
To return to the Home screen, touch .
HSource select keys
Touch to change the source:
“Tuner” (HD Radio), “Telenav,” “Pandora,”
“MirrorLink™,” “SXM,*3” “Phone,” “iPod”,
“USB Music,” “USB Video,” “USB Photo,”
“Disc,” “BT Audio,” “Navigation,*4” “Rear
Camera,” “AUX” (Auxiliary equipment),
“Settings”.
*1 Available after setting a photo file as a wallpaper
while the “USB Photo” source is selected.
*2 Select 2D/3D Mode to display icons in 2D/3D. In
3D Mode, you can operate by drawing icons back
and forth.
*3 If a SAT tuner is connected, the connected device
(“SXM”) will active on the display.
*4 If the navigation module (not supplied) is
connected, the Navigation source icon on the
Home screen becomes active.
Tip
Touch and hold anywhere on the screen to display the
menu item list.
Indication list:
Home Screen:
“Icon Priority”
Displays the icon depending on the
frequency of use: “Default,” “Frequency
Used.”
“Background Theme”*1
Changes the Background Theme:
“Default,” “User.”
“Icon View”
Changes the display of icons: “2D Mode,”
“3D Mode.*2”
“Touch Effect”
Displays a light trail where you have
touched the display: “ON,” “OFF.”
00US+00COV-U.book Page 13 Friday, June 15, 2012 2:52 PM
14
M:\001\XPML A7.0\ML\4422720111_XAV-701HD_CaFR-LaES(FM7.1
600dpi)\4422720111_XAV-701HD_ML\01US_XAV701HD\01US02CD-U.fm
masterpage:Left
XAV-701HD
4-422-720-11(1)
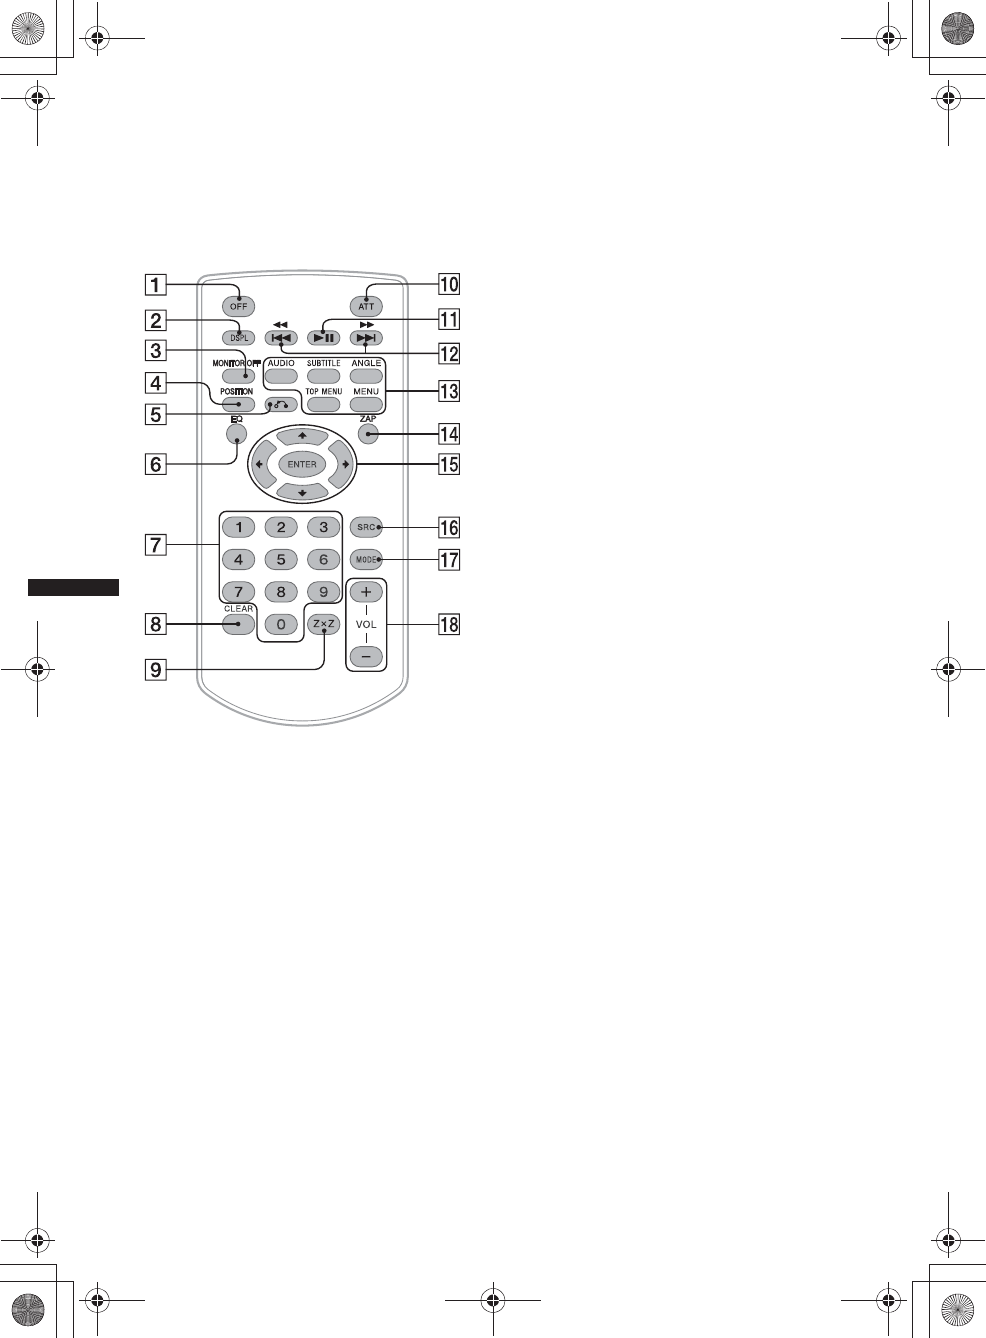
RM-X271 Remote Commander
• The remote commander can be used to operate
the audio controls. For menu operations, use
the touch panel.
• For details, see the pages listed below.
• Remove the insulation film before use
(page 16).
AOFF button
Press to exit the source/stop the source.
Press and hold to turn off.
BDSPL button
Press to change display items.
CMONITOR OFF button
Press to turn off the monitor and the button
illumination. To turn back on, press again.
DPOSITION button
Press to switch the listening position (“Front
L”/“Front R”/“Front”/“All”/“Custom”/
“OFF”).
EO (Return) button
Press to return to the previous display/return
to the menu on a VCD*1.
FEQ (Equalizer) button
Press to select an equalizer curve from 7
music types (“Xplod”/“Vocal”/“Edge”/
“Cruise”/“Space”/“Gravity”/“Custom”/
“OFF”).
GNumber buttons page 24
Tuner:
Press to receive stored stations.
Press and hold to store stations.
Disc:
Press to locate a title/chapter/track.
HCLEAR button
Press to delete an entered number.
IZ×Z (Zone × Zone) button page 35
Press to activate Zone × Zone.
JATT (Attenuate) button
Press to attenuate the sound. To cancel, press
again.
Ku (Play/Pause) button
L.m/M> buttons
Tuner/SXM:
Press to tune to stations automatically.
Press and hold to find a station manually.
Press to search the stored contents
automatically (SXM).
Disc*2/USB/iPod:
Press to skip a chapter/track/scene/file.
Press and hold momentarily to reverse/
fast-forward video.
Press and hold to reverse/fast-forward a
track.
Bluetooth Audio*3:
Press to skip a track.
Press and hold to reverse/fast-forward a
track.
Pandora:
Press to skip a track.
MDVD playback setting buttons
(AUDIO):
Press to change the audio language/format.
(For a VCD, to change the audio channel.)
(SUBTITLE):
Press to change the subtitle language.
(ANGLE):
Press to change the viewing angle.
(TOP MENU):
Press to open the top menu on a DVD.
(MENU):
Press to open the menu on a disc.
00US+00COV-U.book Page 14 Friday, June 15, 2012 2:52 PM
15
M:\001\XPML A7.0\ML\4422720111_XAV-701HD_CaFR-LaES(FM7.1
600dpi)\4422720111_XAV-701HD_ML\01US_XAV701HD\01US02CD-U.fm
masterpage:RightM:\001\XPML A7.0\ML\4422720111_XAV-701HD_CaFR-LaES(FM7.1
600dpi)\4422720111_XAV-701HD_ML\01US_XAV701HD\01US02CD-U.fm
masterpage:Right
XAV-701HD
4-422-720-11(1)
NZAP button
Press to enter ZAPPIN™ mode.
O</M/m/, (Cursor)/ENTER buttons
page 18, 20
Tuner/SXM:
Press to tune to stations automatically.
Press and hold to find a station manually.
Disc(DVD):
Press to control the menu on a DVD.
PSRC (Source) button
Press to turn on/change the source: “Tuner”
(HD Radio), “Telenav,” “Pandora,”
“MirrorLink™,” “SXM,” “iPod,” “USB
Music,” “USB Video,” “Disc,” “BT Audio”
(Bluetooth Audio), “AUX” (Auxiliary
equipment).
QMODE button
Press to select the radio band (FM/AM)/
select an auxiliary device (AUX1/AUX2)*4.
RVOL (Volume) +/– buttons
*1 When playing with PBC functions.
*2 Operation differs depending on the disc (page 21).
*3 Operation differs depending on the connected
Bluetooth device.
*4 When two auxiliary devices are used.
Note
The remote commander will not operate when the unit
is turned off and the display has disappeared. Press
(SOURCE/OFF) on the main unit, or insert a disc to
activate the unit and enable operation via the remote
commander.
Getting Started
Resetting the unit
Before operating the unit for the first time, or
after replacing the car battery or changing the
connections, you must reset the unit.
Press the reset button (page 12) with a pointed
object, such as a ballpoint pen.
Note
Pressing the reset button will erase the clock setting
and some stored contents.
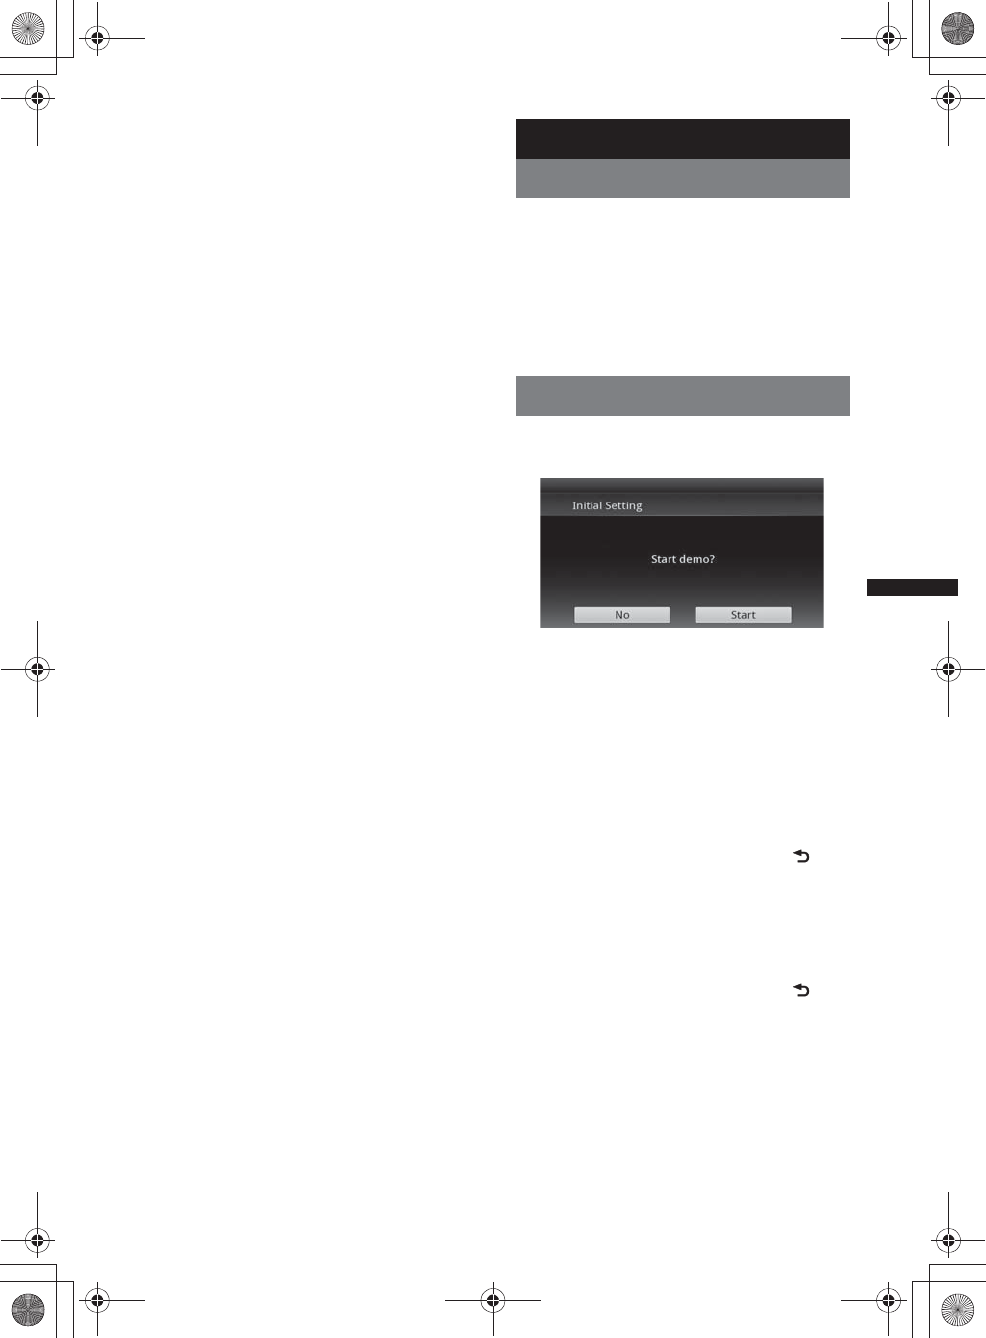
Performing initial settings
After resetting, the display for the initial settings
appears.
1Touch “No” on the demo setting
display.
2Touch “Subwoofer” to set the
subwoofer connection status.
Set to “ON” if a subwoofer is connected, or
“OFF” if not.
3Touch “Listening Position” to set the
listening position.
Set to “Front L” if your listening position is
front left, or “Front R” if front right.
To return to the Initial Setting, touch .
4Touch “Language” to set the display
language.
Move the scrollbar up and down, then select
the desired language (English/Français/
Español/Português/Русский/Nederlands/
Deutsch/Italiano).
To return to the Initial Setting, touch .
5Touch “OK.”
The setting is complete.
This setting can then be further configured in the
setting menu.
• For details on setting the subwoofer connection
status, see page 54.
• For details on setting the listening position, see
“Optimizing sound for the listening position —
Intelligent Time Alignment” on page 46.
00US+00COV-U.book Page 15 Friday, June 15, 2012 2:52 PM
16
M:\001\XPML A7.0\ML\4422720111_XAV-701HD_CaFR-LaES(FM7.1
600dpi)\4422720111_XAV-701HD_ML\01US_XAV701HD\01US02CD-U.fm
masterpage:Left
XAV-701HD
4-422-720-11(1)
• For details on setting the character encoding,
see page 51.
• For details on setting the display language, see
page 51.
Note
Some characters may not be displayed correctly,
depending on the language/country/region.
Setting the clock
The clock uses a 12-hour indication.
1Press (HOME), then touch “Settings.”
2Touch , then touch “Clock Adjust.”
The setting display appears.
3Set the hour and minute.
For example, to set to 8:30, touch “0830.”
4Touch “AM” or “PM.”
5Touch “OK.”
The setting is complete.
To activate/deactivate the CT function, touch
“CT” in step 3. (page 51)
To delete an entered number, touch “Clear.”
To return to the previous display, touch .
Notes
•The CT function may not work even though an RDS
station is being received.
•There may be a difference between the time set by
the CT function and the actual time.
Preparing the remote
commander
Before using the remote commander for the first
time, remove the insulation film.
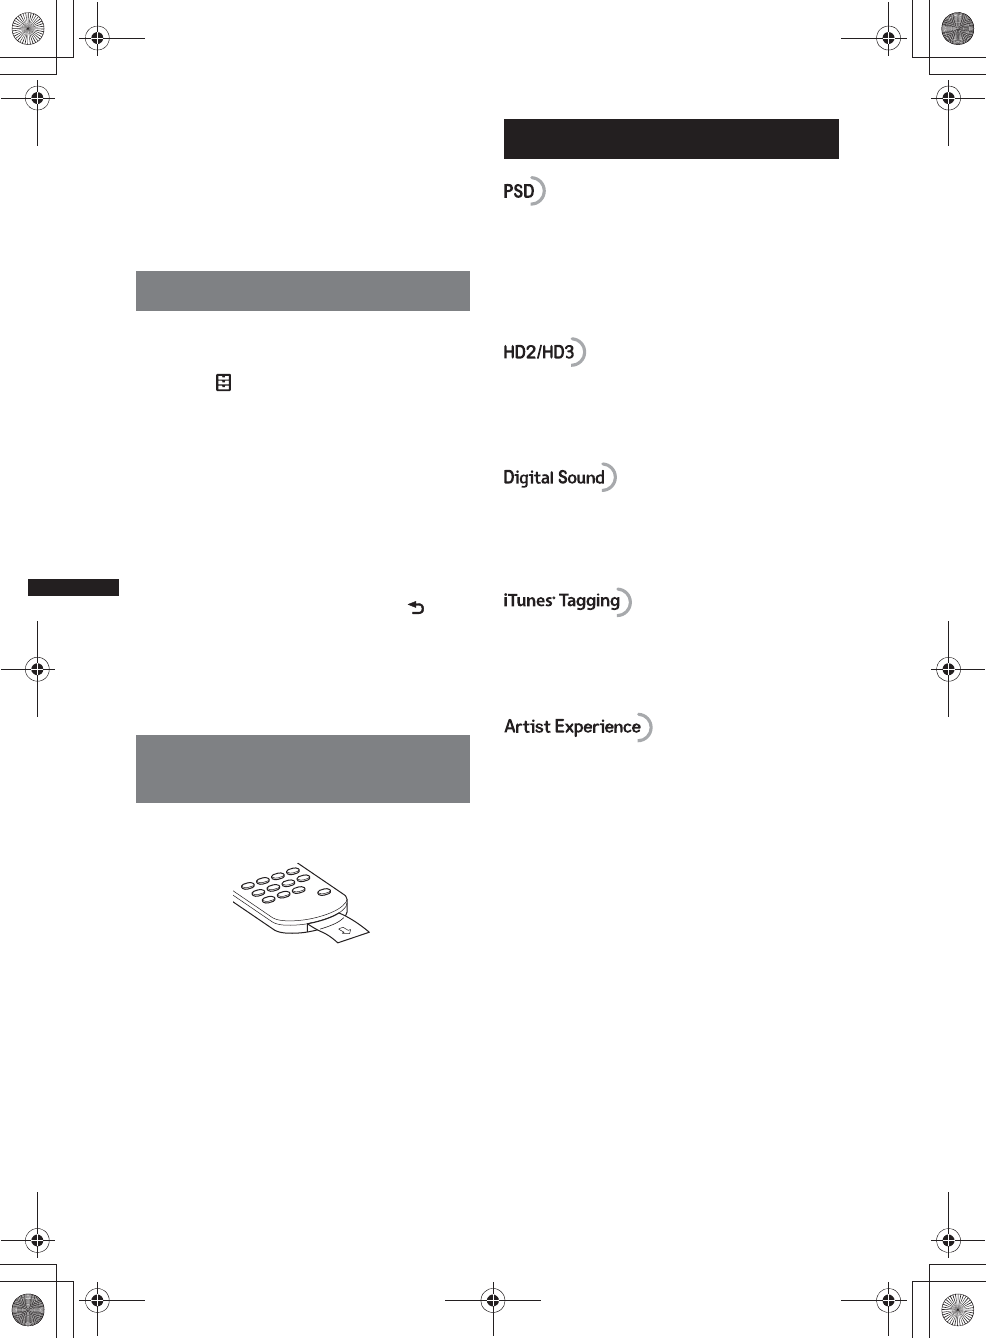
Radio
Program Service Data: Contributes to the
superior user experience of HD Radio
Technology.
Presents song name, artist, station IDs, HD2/
HD3 Channel Guide, and other relevant data
streams.
Adjacent to traditional main stations are extra
local FM channels. These HD2/HD3 Channels
provide new, original music as well as deep cuts
into traditional genre.
Digital, CD-quality sound. HD Radio
Technology enables local radio stations to
broadcast a clean digital signal. AM sounds like
today’s FM and FM sounds like a CD.
iTunes® Tagging provides you the opportunity to
discover a wide range of content and the means
to “tag” that content for later review and
purchase from the iTunes® Store.
Visual information related to content being
played on your HD Radio receiver, such as
Album Art, historical photographs, still art from
live broadcasts, among other related content.
For more information, visit the following
website:
http://www.hdradio.com/
00US+00COV-U.book Page 16 Friday, June 15, 2012 2:52 PM
17
M:\001\XPML A7.0\ML\4422720111_XAV-701HD_CaFR-LaES(FM7.1
600dpi)\4422720111_XAV-701HD_ML\01US_XAV701HD\01US02CD-U.fm
masterpage:RightM:\001\XPML A7.0\ML\4422720111_XAV-701HD_CaFR-LaES(FM7.1
600dpi)\4422720111_XAV-701HD_ML\01US_XAV701HD\01US02CD-U.fm
masterpage:Right
XAV-701HD
4-422-720-11(1)
Listening to the radio
1Press (HOME), then touch “Tuner.”
The radio reception display appears.
2Touch the current band.
The band list appears.
3Touch the desired band (“FM1,” “FM2,”
“FM3,” “AM1,” or “AM2”).
4Perform tuning.
To tune automatically
Touch /.
Scanning stops when the unit receives a
station. Repeat this procedure until the
desired station is received.
For operations during HD Radio reception,
see “About FM Multicasting” (page 18).
To tune manually
Touch / repeatedly until the desired
frequency is received.
To skip frequencies continuously, touch and
hold /.
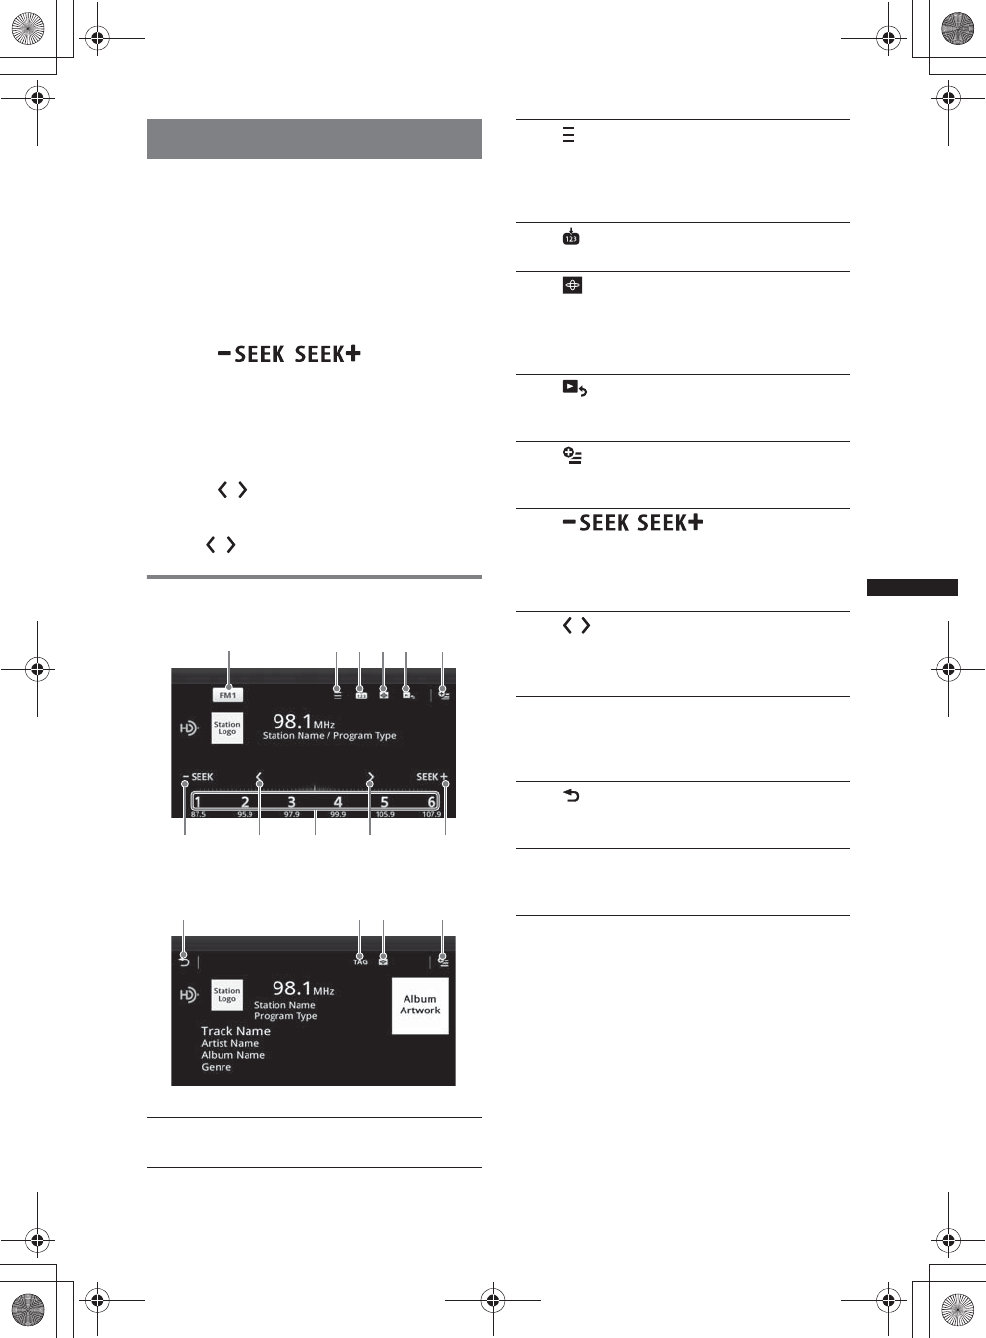
Reception controls
Play operation display:
Play display (HD Radio reception only):
*Cannot select during an analogue radio reception.
1“Current band icon”
Touch to open the band list.
78987
123456
0q
a
46
2 (List)*
Touch to display the list for selecting the
main/supplemental program (only when
digital broadcast is being received)
(page 18).
3
Touch to register the preset item.
4
Touch to change Visualizer, which
contains the following items:
Gate/Balloon/Glow/Animal/Graffiti/Ink/
Random/OFF
5 (Playback Display)*
Touch to display the HD Radio play
display.
6 (Option)
Touch to delete all the iTunes tags
registered (page 19).
7/
Touch to tune automatically.
For operations during HD Radio
reception, see “About FM Multicasting”
(page 18).
8/
Touch to tune manually.
Touch and hold to continuously skip
frequencies.
9“1” to “6”
Touch to select stations.
Touch and hold to store the currently
displayed frequency in a preset.
0 (Back)
Touch to display the HD Radio play
operation display.
qa “TAG”
Touch to register the tag to the track
currently played (page 19).
00US+00COV-U.book Page 17 Friday, June 15, 2012 2:52 PM
18
M:\001\XPML A7.0\ML\4422720111_XAV-701HD_CaFR-LaES(FM7.1
600dpi)\4422720111_XAV-701HD_ML\01US_XAV701HD\01US02CD-U.fm
masterpage:Left
XAV-701HD
4-422-720-11(1)
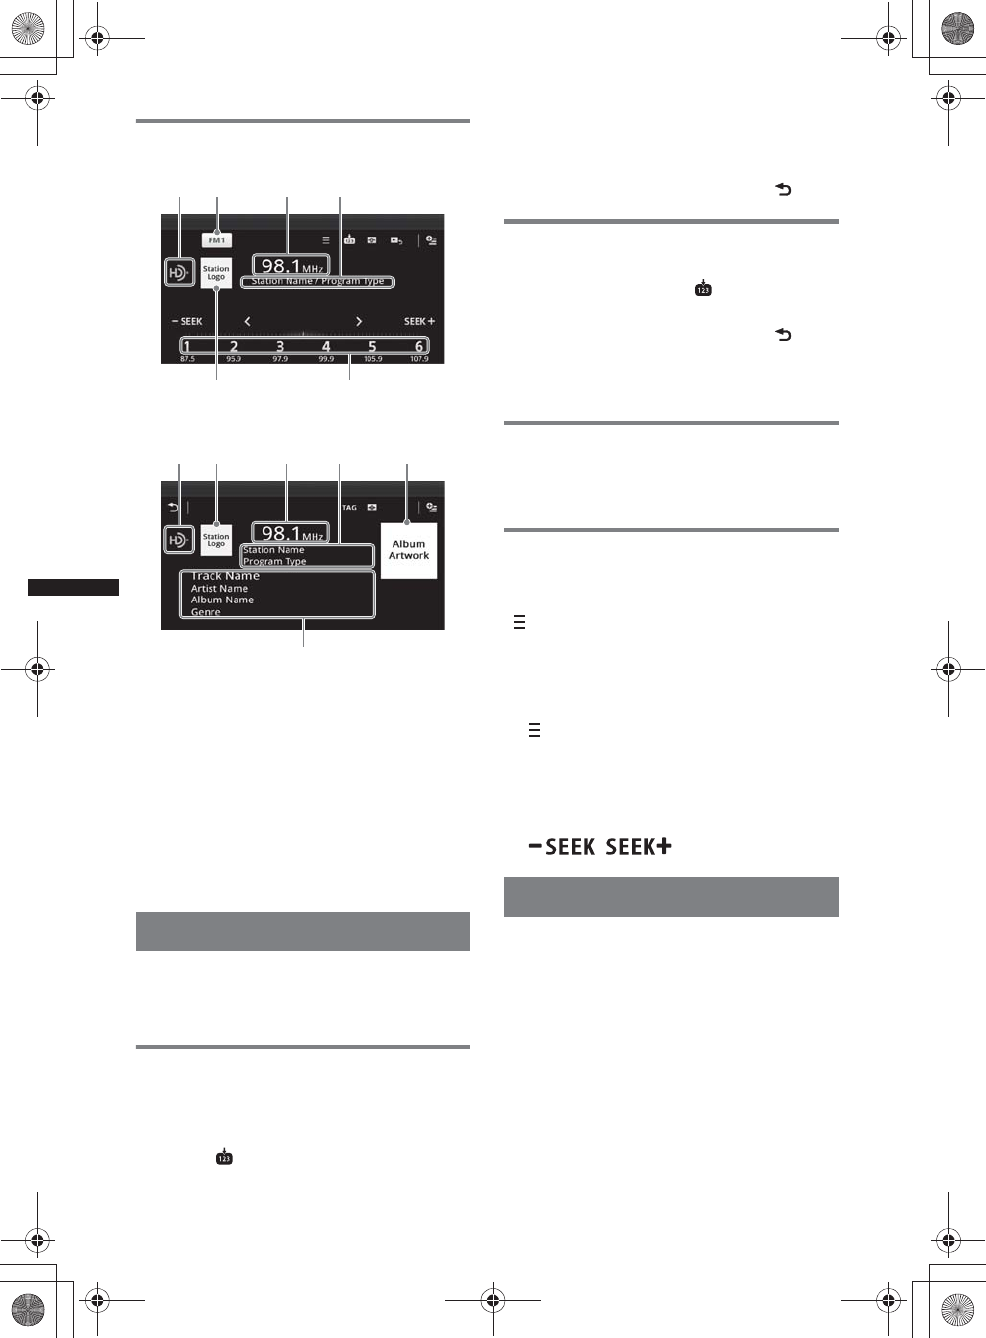
Reception indications
Play operation display:
Play display (HD Radio reception only):
ACurrent source icon*
BBand name
CFrequency/status
DStation name/Program type
EStation logo
FPreset number
GAlbum artwork*
HTrack name, Artist name, Album name,
Genre*
*Does not appear during an analogue radio
reception.
Storing and receiving stations
Caution
When tuning to stations while driving, use Best
Tuning Memory (BTM) to prevent an accident.
Storing automatically — BTM
1Press (HOME), then touch “Tuner.”
Select the desired band (“FM1,” “FM2,”
“FM3,” “AM1,” or “AM2”).
2Touch .
BTM display appears.
3Touch “BTM.”
The unit stores the first six available stations
in the preset list (“1” to “6”).
To return to the playback screen, touch .
Storing manually
1While receiving the station that you
want to store, touch , then touch a
number in the list (“1” to “6”).
To return to the playback screen, touch .
Note
If you try to store another station to the same number,
the previously stored station will be replaced.
Receiving stored stations
1Select the band.
2Touch the desired number (“1” to “6”).
About FM Multicasting
Some FM HD Radio stations provide a main
program and supplemental program(s) (up to 7)
at the same frequency.
“ ” appears when a station with a supplemental
program is received.
Selecting a program from the list
1During main program reception, touch
.
2Touch the desired program.
Searching a program automatically
1During main program reception, touch
/.
iTunes Tagging
The iTunes Tag button on this unit allows you to
tag songs you like that are broadcast by HD
Radio stations. Information about these tagged
songs is stored by the receiver and transferred to
your iPod. When you connect your iPod to your
computer, iTunes automatically presents songs in
a new Tagged playlist so you can preview, buy,
and download them. iTunes Tagging is a great
way to discover new music, and add it to your
collection!
A
EF
BCD
A
H
ECDDG
00US+00COV-U.book Page 18 Friday, June 15, 2012 2:52 PM
19
M:\001\XPML A7.0\ML\4422720111_XAV-701HD_CaFR-LaES(FM7.1
600dpi)\4422720111_XAV-701HD_ML\01US_XAV701HD\01US02CD-U.fm
masterpage:RightM:\001\XPML A7.0\ML\4422720111_XAV-701HD_CaFR-LaES(FM7.1
600dpi)\4422720111_XAV-701HD_ML\01US_XAV701HD\01US02CD-U.fm
masterpage:Right
XAV-701HD
4-422-720-11(1)
Using iTunes Tagging
You can save the name of a song broadcast on an
HD Radio station to this unit with a few easy
steps.
After transferring the song information to the
connected iPod using this unit, sync your iPod to
your computer. These songs will show up in a
“Tagged” playlist in iTunes, enabling easy
preview or purchase of songs.
For details on iTunes Tagging and the latest
iTunes Tagging compatible models, check the
iTunes website at - http://www.apple.com/itunes/
For details on purchasing a song using “Tagged”
information, check the iTunes website at - http://
www.apple.com/support/itunes/
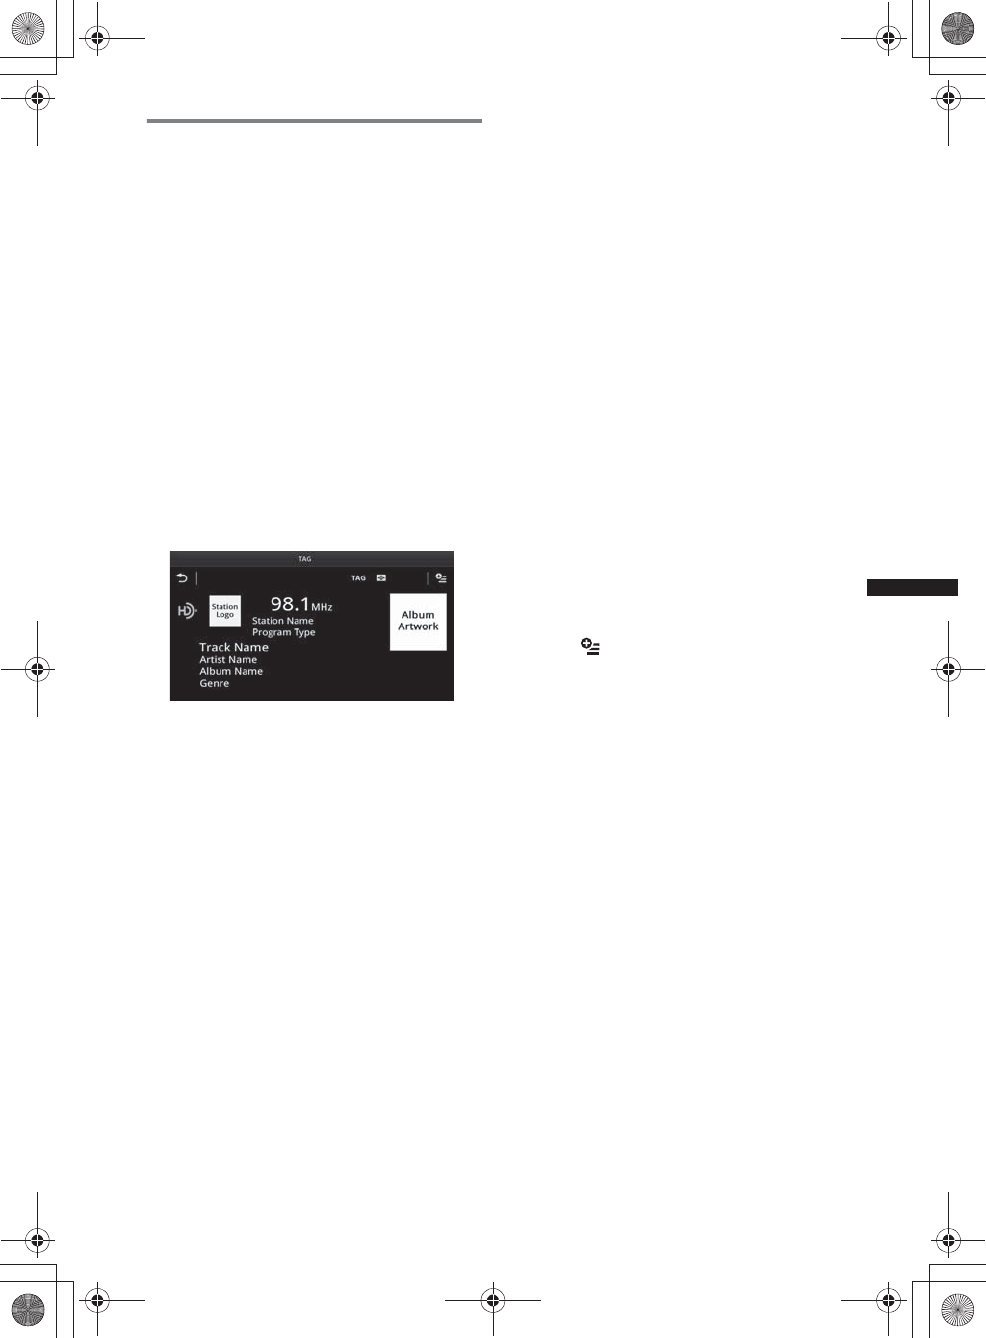
Retrieving song information
“TAG” appears when song information is
broadcast on an HD Radio station.
1Press “TAG.”
The unit starts retrieving song information.
After retrieving the song information, the unit
starts saving the data, and the completion
message of tag registration appears.
Notes
•If the song information is not included in the HD
Radio station broadcast, the error message
appears.
•It takes up to 10 seconds to retrieve song
information.
•If “TAG” is touched immediately after the beginning
of a song, the unit may retrieve the information of the
previously broadcast song as well as the current
song.
•If “TAG” is touched just before the end of a song, the
unit may retrieve the information of the next song, in
addition to the current song.
•The maximum number of tagged songs that you can
save to this unit is 50. If you touch “TAG” when 50
tagged songs are already saved, an error message
will appear in the display and song information will
not be retrieved.
Transferring retrieved song
information
You can transfer song information retrieved and
saved to an iPod using this unit.
For details on compatible iPod models, see
“About iPod” on page 63.
1Place your iPod on the connector of the unit.
The unit automatically starts transferring
saved song information. A message appears in
the display during the transfer.
If an iPod is inserted into the unit during tagged
song retrieval, the unit immediately starts
transferring the data to the iPod, after the data is
saved.
Once the unit completes transferring tagged song
information to the iPod, the saved data will be
erased from the unit.
Notes
•Do not remove the iPod during the transfer. The unit
cannot transfer song information if the iPod is
removed.
•If the connected iPod does not support for iTunes
Tagging, song information will not be transferred,
even after this unit saves the data, and the error
message will appear in the display.
•If the connected iPod does not have enough free
space in the memory, song information will not be
transferred, even after this unit saves the data, and
the error message appears in the display.
Deleting tagged song information
You can delete all tagged song information
before transferring to iPod.
1Press (HOME), then touch “Tuner.”
2Touch .
The confirmation display for deleting the tag
appears.
3Touch “Delete.”
To cancel deletion, touch “Cancel.”
Note
Song information once deleted cannot be restored.
00US+00COV-U.book Page 19 Friday, June 15, 2012 2:52 PM
20
M:\001\XPML A7.0\ML\4422720111_XAV-701HD_CaFR-LaES(FM7.1
600dpi)\4422720111_XAV-701HD_ML\01US_XAV701HD\01US02CD-U.fm
masterpage:Left
XAV-701HD
4-422-720-11(1)
Discs
Playing discs
Depending on the disc, some operations may be
different or restricted.
Refer to the operating instructions supplied with
your disc.
1Press Z on the main unit.
The front panel opens automatically.
2Insert the disc (label side up).
The front panel closes automatically, then
playback starts.
If the DVD menu appears
Touch the item in the DVD menu.
You can also use the menu control panel, which
can be displayed by touching outside of the DVD
menu. Touch B/V/v/b to move the cursor, then
touch “ENTER” to confirm.
If the menu control panel does not appear by
touching the display, use the remote commander.
About the DVD menu
A DVD is divided into several sections, which make up
a picture or music feature. These sections are called
“titles.” When you play a DVD that contains several
titles, you can select a desired title using the DVD’s top
menu. For DVDs that allow you to select items such as
subtitle/sound language(s), select these items using
the DVD menu.
To stop playback
Press and hold (SOURCE/OFF) for 1 second.
Note
Discs in DTS format are not supported. The sound is
not output if the DTS format is selected.
To eject the disc
1Press Z on the main unit.
The front panel opens automatically, then the
disc is ejected.
2Press Z on the main unit to close the
front panel.
Note
The front panel closes automatically after the caution
alarm sounds.
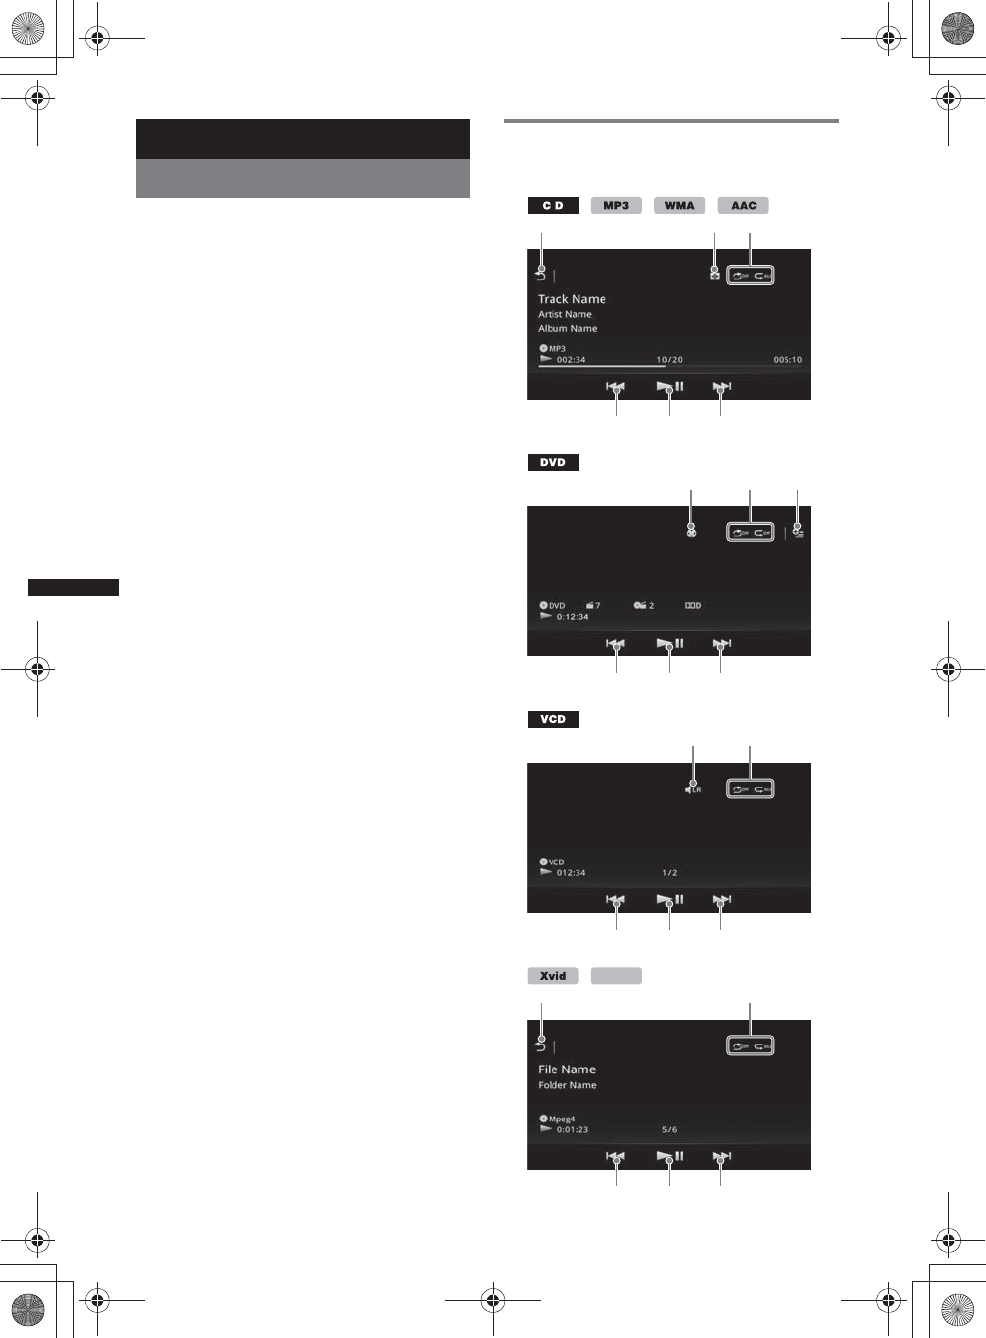
Playback controls
Touch the display if the playback controls are not
displayed.
123
454
637
454
83
454
MPEG-4
13
454
00US+00COV-U.book Page 20 Friday, June 15, 2012 2:52 PM
21
M:\001\XPML A7.0\ML\4422720111_XAV-701HD_CaFR-LaES(FM7.1
600dpi)\4422720111_XAV-701HD_ML\01US_XAV701HD\01US02CD-U.fm
masterpage:RightM:\001\XPML A7.0\ML\4422720111_XAV-701HD_CaFR-LaES(FM7.1
600dpi)\4422720111_XAV-701HD_ML\01US_XAV701HD\01US02CD-U.fm
masterpage:Right
XAV-701HD
4-422-720-11(1)
*1 The speed depends on the format or the recording
method.
*2 Availability depends on the disc.
*3 When the 4-digit input prompt appears, input the
language code (page 73) for the desired language.
Note
If the disc contains multiple file types, only the
selected file type (audio/video) can be played. For
details on how to select the file type, see “Selecting a
file type” on page 25.
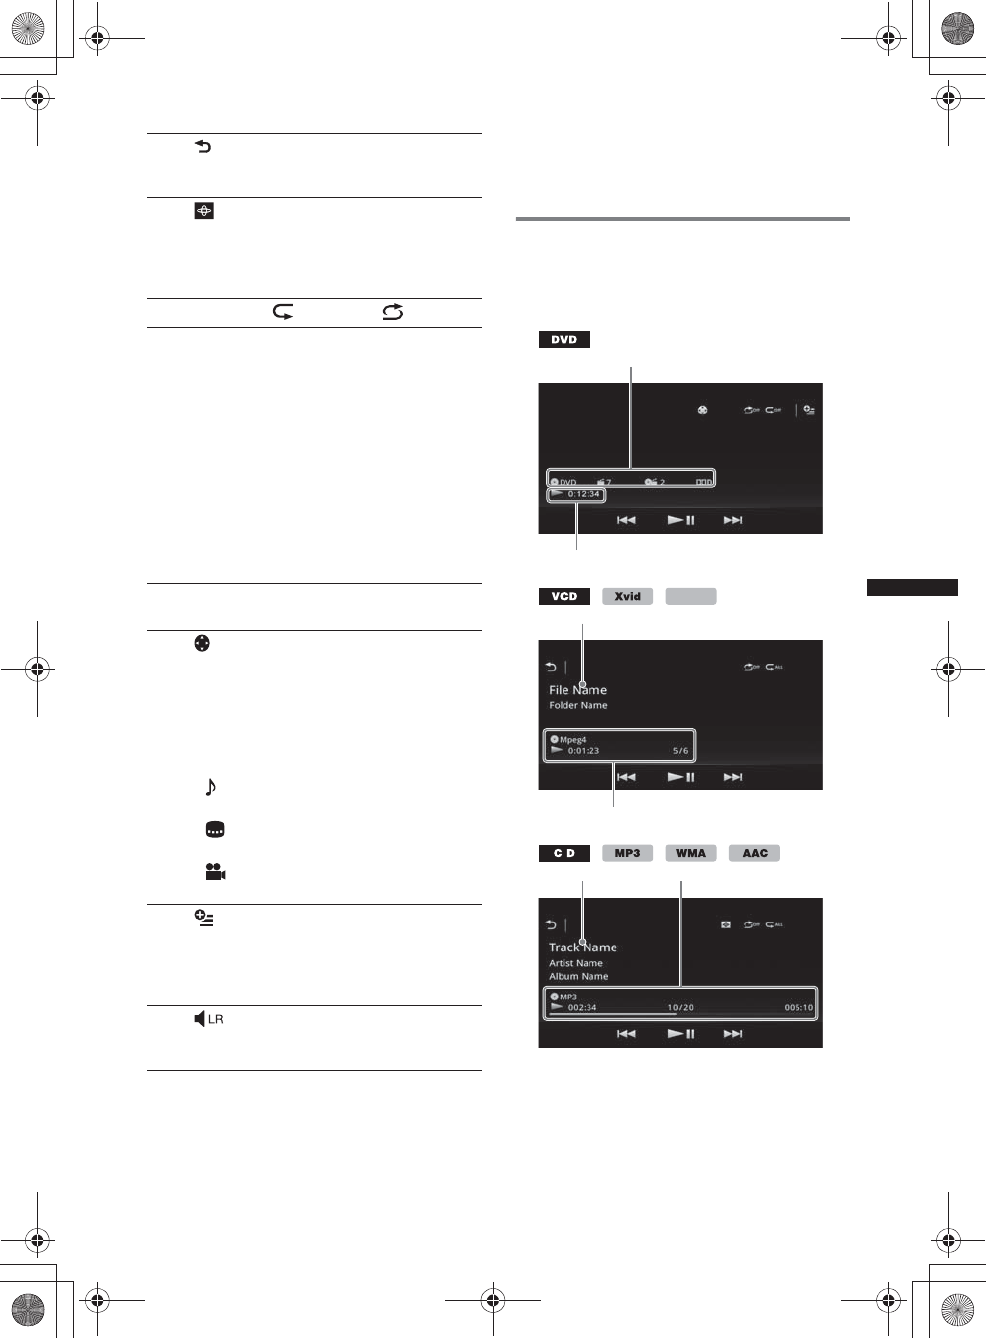
Playback indications
Touch the display if the indications are not
displayed.
For audio discs, some indications are always
displayed during playback.
ACurrent source icon, format, chapter/title
number*1, audio format*3
BPlayback status, elapsed playback time
CTrack/artist/album name*1*5
File/folder name*6
DCurrent source icon, format, track (file)
number*2, playback status, elapsed playback
time*4
1
Touch to list up tracks/video files.
(page 25)
2
Touch to change Visualizer, which
contains the following items:
Gate/Balloon/Glow/Animal/Graffiti/Ink/
Random/OFF
3“Repeat” /“Shuffle” (page 23)
4./>
Touch to skip a chapter/track/scene file.
Touch and hold momentarily to reverse/
fast-forward the video; and then
repeatedly to switch the speed (× 2 t
×12 t × 120 t ×2…)*
1. To cancel,
touch u.
Touch and hold to reverse/fast-forward
the audio track.
During pause, touch and hold down >
to play the video in slow motion. To
cancel, release the key.
5u
Touch to pause/resume play after pause.
6
Touch to open the DVD control menu,
which contains the following items.
•“Top Menu”: Touch to open the top
menu on the DVD.*2
•“Menu”: Touch to open the menu on
the disc.*2
•: Touch repeatedly to select the audio
language/format. (page 22)*2
•: Touch repeatedly to turn off/select
the subtitle language.*2*3
•: Touch repeatedly to change the
viewing angle.*2
7 (DVD VIDEO playback only)
Touch to open the option menu.
• CSO (Center Speaker Organizer)
(page 47)
• DVD Audio Level (page 23)
8
Touch to change the audio channel.
(page 23)
A
B
MPEG-4
C
D
CD
00US+00COV-U.book Page 21 Friday, June 15, 2012 2:52 PM
22
M:\001\XPML A7.0\ML\4422720111_XAV-701HD_CaFR-LaES(FM7.1
600dpi)\4422720111_XAV-701HD_ML\01US_XAV701HD\01US02CD-U.fm
masterpage:Left
XAV-701HD
4-422-720-11(1)
*1 Indications differ depending on the content.
*2 When playing a VCD with PBC functions
(page 22), “PBC” appears.
*3 DVD only.
*4 During VCD playback with PBC functions, no
indication appears.
*5CD/MP3/WMA/AAC only.
*6 Xvid/MPEG-4 only.
Using PBC (playback control)
functions
The PBC menu interactively assists with
operations while a PBC-compatible VCD is
played.
1Start playing a PBC-compatible VCD.
The PBC menu appears.
2Press the number buttons on the
remote commander to select the
desired item, then press (ENTER).
3Follow the instructions in the menu for
interactive operations.
To return to the previous display, press O on
the remote commander.
Playing without PBC functions
1Press (HOME), then touch “Settings.”
2Touch .
The source setting menu appears.
3Move the scrollbar up and down, then
touch “Video CD PBC” to set to “OFF.”
4Start playing a VCD.
The PBC menu does not appear during
playback.
Notes
•The items on the menu, and operation procedures
differ depending on the disc.
•During PBC playback, the track number, playback
item, etc., do not appear on the playback display.
•Resume playback is unavailable during playback
with PBC.
Configuring audio settings
Note
Discs in DTS format are not supported. The sound is
not output if the DTS format is selected.
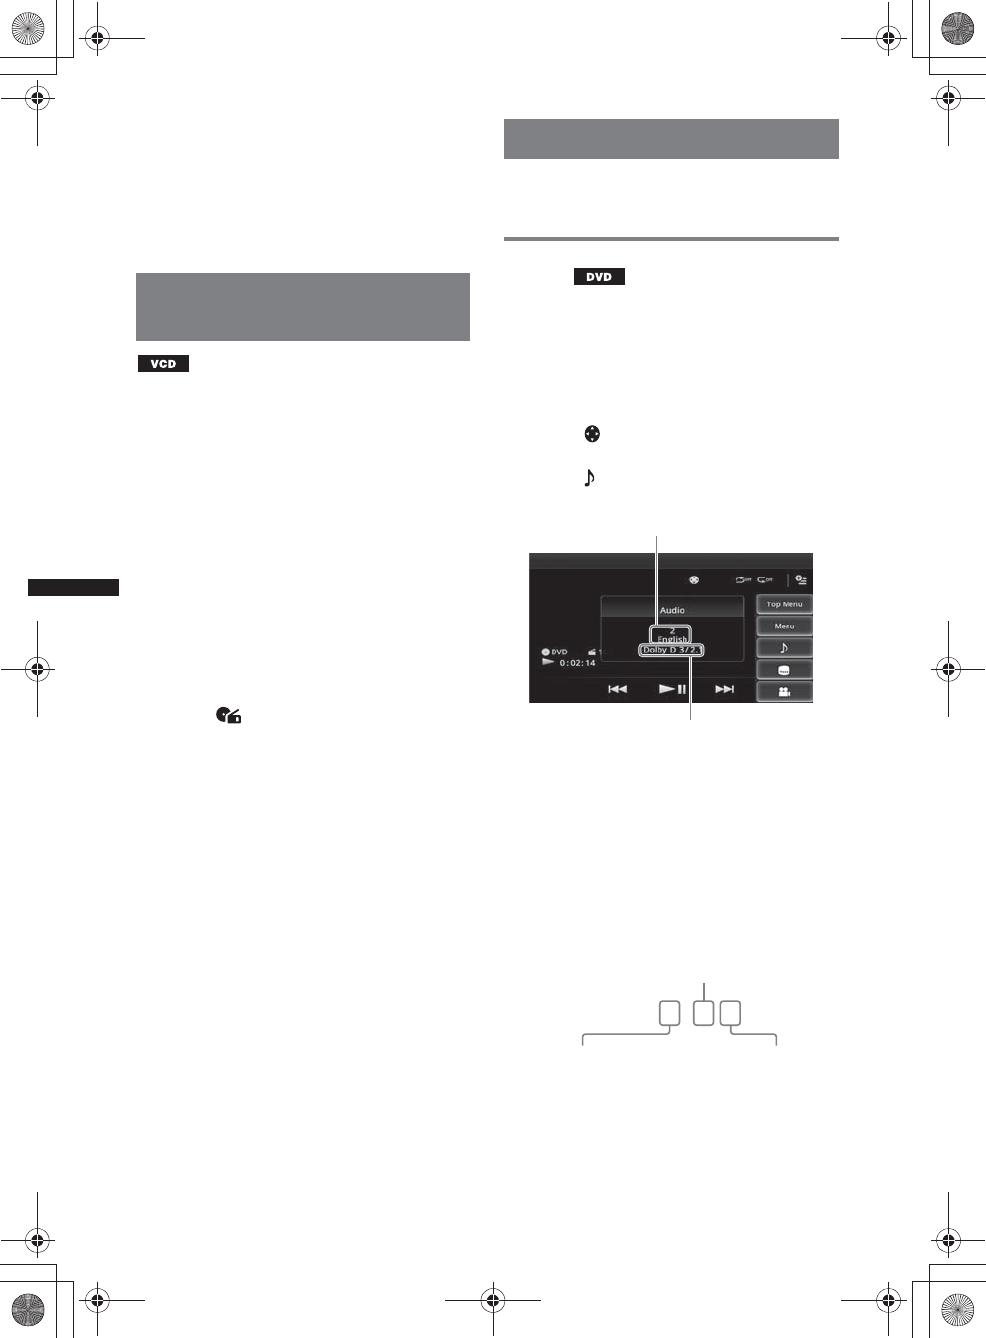
Changing the audio language/
format
The audio language can be changed if the disc is
recorded with multilingual tracks. You can also
change the audio format when playing a disc
recorded in multiple audio formats (e.g., Dolby
Digital).
1During playback, touch the screen.
2Touch .
The audio language menu appears.
3Touch repeatedly until the desired
audio language/format appears.
The audio language switches among the
available languages.
When the 4-digit input prompt appears, input
the language code (page 73) for the desired
language.
When the same language is displayed two or
more times, the disc is recorded in multiple
audio formats.
*The format name and channel numbers appear as
follows:
Example: Dolby Digital 5.1 ch
Audio language
Audio format/channel numbers*
Dolby D 3 / 2 . 1
Rear channel × 2
Front channel × 2 +
Center channel × 1 LFE channel × 1
00US+00COV-U.book Page 22 Friday, June 15, 2012 2:52 PM
23
M:\001\XPML A7.0\ML\4422720111_XAV-701HD_CaFR-LaES(FM7.1
600dpi)\4422720111_XAV-701HD_ML\01US_XAV701HD\01US02CD-U.fm
masterpage:RightM:\001\XPML A7.0\ML\4422720111_XAV-701HD_CaFR-LaES(FM7.1
600dpi)\4422720111_XAV-701HD_ML\01US_XAV701HD\01US02CD-U.fm
masterpage:Right
XAV-701HD
4-422-720-11(1)
Changing the audio channel
When playing a VCD, you can listen to both the
right and left channel, only the right channel, or
only the left channel via both the right and left
speakers.
The options are indicated below.
“Stereo”: Standard stereo sound (default)
“1/Left”: Left channel sound (monaural)
“2/Right”: Right channel sound (monaural)
1During playback, touch
repeatedly until the desired audio
channel appears.
Note
You may not be able to change the audio setting
depending on the disc.
Tips
•Operation via the remote commander by pressing
(AUDIO) repeatedly is also available.
•The audio channels can be changed by pressing
AUDIO on the remote commander when VCD is
selected.
Adjusting the audio output level
— Dolby D level
You can adjust the audio output level for a DVD
recorded in Dolby Digital format, to reduce the
volume level differences between discs.
1During playback, touch .
2Touch “DVD Audio Level.”
3Touch –/+ repeatedly to adjust the
output level.
The output level is adjustable in single steps,
between –10 and +10.
To close the play menu, touch .
Repeat and shuffle play
1During playback, touch “Repeat”
or “Shuffle” repeatedly until the
desired option appears.
Repeat or shuffle play starts.
The repeat options and switching order of each
disc/format are indicated below.
Disc/format Options
“OFF”: Returns to normal play
mode.
“Chapter”: Repeats the
current chapter.
“Title”: Repeats the current
title.
*1“All”: Repeats all tracks on the
disc.
“Track”: Repeats the current
track.
“All”: Repeats all tracks on the
disc.
“Track”: Repeats the current
track.
“Album”: Repeats the current
album (folder).
“All”: Repeats all video files on
the disc.
“Movie”: Repeats the current
video file.
“Album”: Repeats the current
album (folder).
MPEG-4
MPEG-4
00US+00COV-U.book Page 23 Friday, June 15, 2012 2:52 PM
24
M:\001\XPML A7.0\ML\4422720111_XAV-701HD_CaFR-LaES(FM7.1
600dpi)\4422720111_XAV-701HD_ML\01US_XAV701HD\01US02CD-U.fm
masterpage:Left
XAV-701HD
4-422-720-11(1)
The shuffle options and switching order of each
disc/format are indicated below.
*1 Available only when playing a version 1.0/1.1 VCD,
or a version 2.0 VCD without PBC functions.
*2 Excluding a DVD-R/DVD-R DL/DVD-RW in VR
mode.
Direct search play
You can directly locate a desired point by
specifying the title number, chapter number, etc.
1During playback, press the number
buttons on the remote commander to
enter an item (track, title, etc.) number,
then press (ENTER).
Playback starts from the beginning of the
selected point.
The search items for a disc/format are as follows:
DVD: Title or chapter*1
VCD*2/CD/MP3/WMA/AAC: Track
Xvid/MPEG-4: Movie
*1 The search item depends on the setting.
*2 Available only when playing a VCD without PBC
functions.
Setting the search item (DVD only)
You can set the search item (title or chapter) for
DVD playback.
1Press (HOME), then touch “Settings.”
2Touch .
The source setting menu appears.
3Touch “DVD Direct Search” to set to
“Chapter” or “Title.”
The setting is complete.
To return to the previous display, touch .
Disc/format Options
*2
“OFF”: Returns to normal play
mode.
“Title”: Plays chapters in the
current title in random order.
*1“OFF”: Returns to normal play
mode.
“Disc”: Plays tracks in the
current disc in random order.
“OFF”: Returns to normal play
mode.
“Album”: Plays tracks/video
files in the current album
(folder) in random order.
MPEG-4
MPEG-4
00US+00COV-U.book Page 24 Friday, June 15, 2012 2:52 PM
25
M:\001\XPML A7.0\ML\4422720111_XAV-701HD_CaFR-LaES(FM7.1
600dpi)\4422720111_XAV-701HD_ML\01US_XAV701HD\01US02CD-U.fm
masterpage:RightM:\001\XPML A7.0\ML\4422720111_XAV-701HD_CaFR-LaES(FM7.1
600dpi)\4422720111_XAV-701HD_ML\01US_XAV701HD\01US02CD-U.fm
masterpage:Right
XAV-701HD
4-422-720-11(1)
Listing up tracks/video files —
List
Selecting a track/video file
You can list up albums/folders/tracks/video files,
and select a desired one to play.
This function is convenient especially for the
disc in MP3/WMA/AAC/Xvid/MPEG-4 format
containing many albums/tracks, etc.
1During playback, touch .
The list of categories or files from the
currently played item appears.
To move to the upper level, touch .
To move to the top level, touch .
To scroll the list, move the scrollbar up and
down.
2Touch the desired item.
Playback starts.
Selecting a file type
If the disc contains multiple file types, only the
selected file type (audio/video) can be played.
The playback priority order of file type is
initially set to audio, video (e.g., if the disc
contains audio and video files, only audio files
are played). You can select the file type to list up,
then select the desired file to play.
1During playback, touch .
2Touch or to select the file type.
3Touch the desired file.
Playback of the selected file starts.
USB Music
Playing music
1Connect the USB device to the USB
port.
2Press (HOME), then touch “USB
Music.”
Playback starts.
Playback controls
MPEG-4
MPEG-4
1
Touch to list up track files.
2“ZAP”
Touch to search for a track by listening to
track passages. (page 34)
3
Touch to change to the screen with
Visualizer.
4“Repeat” /“Shuffle”
5
Touch to open the option menu.
6/
Touch to skip a track file.
Touch and hold to reverse/fast-forward
the audio track.
7
Touch to play a track file.
Touch to pause playback.
123
676
45
00US+00COV-U.book Page 25 Friday, June 15, 2012 2:52 PM
26
M:\001\XPML A7.0\ML\4422720111_XAV-701HD_CaFR-LaES(FM7.1
600dpi)\4422720111_XAV-701HD_ML\01US_XAV701HD\01US02CD-U.fm
masterpage:Left
XAV-701HD
4-422-720-11(1)
Options
To change the setting menu (Normal
playback screen only)
1Touch .
The menu list appears.
2Touch .
The options are indicated below.
To change the Visualizer settings
1Touch .
The normal playback screen will change to
the playback screen with Visualizer.
2Touch .
The menu list appears.
3Touch .
The Visualizer list appears.
4Select the following items:
Gate/Balloon/Glow/Animal/Albums/
Graffiti/Ink/Random
Repeat and shuffle play
1During playback, touch “Repeat”
or “Shuffle” repeatedly until the
desired option appears.
Repeat or shuffle play starts.
The repeat options are as follows:
The shuffle options are as follows:
Note
The playback screen with Visualizer is not available
with repeat and shuffle play.
Selecting music files
1During playback (Normal playback
screen only), touch .
The list of categories or files from the
currently played item appears.
To scroll the list, move the scrollbar up and
down.
2Touch the desired item.
Playback starts.
To return to the Playback screen, touch .
Selecting songs from the library
1While the list screen appears, touch
.
The menu list appears.
2Select the desired item.
You can search by the following items.
“All songs,” “Albums,” “Artists,”
“Genres,” “Release year,” “Recently
added,” “Playlists,” “Folders.”
The selected list appears.
3Touch the desired item.
Playback starts.
Enjoying music according to
your mood — SensMe™
Sony’s unique “SensMe™ channels” feature
automatically group tracks by channel or mood,
and allow you to enjoy music intuitively.
Installing “Media Go” to your
computer
Software (“Media Go”) is required to enable the
SensMe™ function on this unit.
1Download “Media Go” software from
the support site on the back cover.
2Follow the on-screen instructions to
complete the installation.
Transferring tracks to the USB
device using “Media Go”
To enable the SensMe™ function on this unit,
tracks need to be analyzed and transferred to the
registered USB device using “Media Go.”
1Connect the registered USB device to
your computer.
For “WALKMAN,” connect via MTP mode.
“ZAPPIN Time”
Selects the playback on time for the ZAPPIN
function: “6 sec.,” “15sec.,” “30 sec..”
“Update database”
Searches for music files and adds them to the
database.
“About Music player”
Displays the application version.
: Repeats the current group.
: Repeats the current music file.
: Returns to normal play mode.
: Plays music files in the current group in
random order.
: Returns to normal play mode.
00US+00COV-U.book Page 26 Friday, June 15, 2012 2:52 PM

27
M:\001\XPML A7.0\ML\4422720111_XAV-701HD_CaFR-LaES(FM7.1
600dpi)\4422720111_XAV-701HD_ML\01US_XAV701HD\01US02CD-U.fm
masterpage:RightM:\001\XPML A7.0\ML\4422720111_XAV-701HD_CaFR-LaES(FM7.1
600dpi)\4422720111_XAV-701HD_ML\01US_XAV701HD\01US02CD-U.fm
masterpage:Right
XAV-701HD
4-422-720-11(1)
For USB devices other than “WALKMAN,”
connect via MSC mode.
“Media Go” starts automatically.
If a message appears, follow the on-screen
instructions to proceed.
2Drag and drop tracks from Windows
Explorer or iTunes, etc., to “Media Go.”
The analysis and transfer of tracks starts.
For details on operations, refer to the Help of
“Media Go.”
Note
The track analysis by 12 TONE ANALYSIS may take
time, depending on the computer environment.
Tip
Not only audio files but also image or video files can
be transferred using “Media Go.” For details, refer to
the Help of “Media Go.”
Playing tracks in channels
— SensMe™ channels
“SensMe™ channels” automatically group tracks
into channels by their tunes. You can select and
play a channel that fits your mood, activity, etc.
1Connect a USB device set up for the
SensMe™ function.
2Press (HOME), then touch “USB
Music.”
3Touch , then .
4Flick the channel list left or right.
Playback of the first track in the current
channel starts from the track’s most melodic
or rhythmical section*.
*May not be detected correctly.
5Touch the desired channel.
Playback of tracks in the selected channel
starts.
Notes
•Depending on the track, it may not be detected
correctly or may be grouped in a channel not suited
to the track’s mood.
•If the connected USB device contains many tracks, it
may take time for “SensMe™ channels” to start, due
to data reading.
Tip
Tracks are played in random order. The order will vary
with each channel selection.
Channel list
xBasic channels
Plays tracks according to the music type.
xRecommended
xShuffle All
Plays all analyzed tracks in random order.
“SensMe™ channels” playback
controls and indications
ATo scroll the list and select another channel.
BIndicates the current channel.
COption key
DIndicates the album artwork display*.
EIndicates the elapsed playback time, track
name and artist name.
FTo pause/resume play after pause.
GTo skip a track.
*The recommended size is from 240 × 240 to 960 ×
960 pixels.
“Energetic”: Plays up-tempo and high-energy
music.
“Emotional”: Plays ballads.
“Lounge”: Plays jazz and easy listening music.
“Dance”: Plays rhythm, rap and R & B music.
“Extreme”: Plays loud and powerful music.
“Upbeat”: Plays cheerful and uplifting music.
“Relax”: Plays calm and relaxing music.
“Mellow”: Plays soft and slow-tempo music.
“Morning,” “Daytime,” “Evening,”
“Night,” “Midnight”
AB C
DE F G
00US+00COV-U.book Page 27 Friday, June 15, 2012 2:52 PM
28
M:\001\XPML A7.0\ML\4422720111_XAV-701HD_CaFR-LaES(FM7.1
600dpi)\4422720111_XAV-701HD_ML\01US_XAV701HD\01US02CD-U.fm
masterpage:Left
XAV-701HD
4-422-720-11(1)
Selecting an album by cover art
1While the list screen appears, touch
.
2Touch the cover art of the album you
want to play.
Playback starts.
Options
To change the setting menu
1Touch .
The menu list appears.
2Touch .
The options are indicated below.
To change the album display format
(while selecting “Albums” from Library)
1Touch .
The menu list appears.
2Touch , then select “List view” or
“Grid view.”
To change the cover art sort order
(Cover art view only)
1Touch .
The menu list appears.
2Touch , then select “Sort by album,”
or “Sort by artist.”
To return to the playback screen, touch or
“Cancel.”
USB Video
Playing video
1Connect the USB device to the USB
port.
2Press (HOME), then touch “USB
Video.”
Playback starts.
Playback controls
Touch the display if the playback controls are not
displayed.
“ZAPPIN Time”
Selects the playback on time for the ZAPPIN
function: “6 sec.,” “15sec.,” “30 sec..”
“Update database”
Searches for music files and adds them to the
database.
“About Music player”
Displays the application version.
1
Touch to list up video files.
2
Touch to open the option menu. (page 29)
3/
Touch to skip a track file.
4/
Touch and hold momentarily to fast-
forward the video; and then repeatedly to
switch the speed (× 1.5 t × 10 t ×30
t × 100)*.
Touch and hold momentarily to reverse
the video; and then repeatedly to switch
the speed (× 10 t ×30 t ×100)*.
To cancel, touch .
/
Touch to skip up/down a track.
During pause, touch to skip
forwards 15 sec.
During pause, touch to skip back10
sec.
Touch and hold to reverse/fast-forward
the video track.
MPEG-4
1
5
2
34 43
00US+00COV-U.book Page 28 Friday, June 15, 2012 2:52 PM
29
M:\001\XPML A7.0\ML\4422720111_XAV-701HD_CaFR-LaES(FM7.1
600dpi)\4422720111_XAV-701HD_ML\01US_XAV701HD\01US02CD-U.fm
masterpage:RightM:\001\XPML A7.0\ML\4422720111_XAV-701HD_CaFR-LaES(FM7.1
600dpi)\4422720111_XAV-701HD_ML\01US_XAV701HD\01US02CD-U.fm
masterpage:Right
XAV-701HD
4-422-720-11(1)
*The speed depends on the format or the recording
method.
Tip
You can change the playing speed dynamically by
dragging the screen of the video file left or right.
Options
To display Audio options
1During playback, touch .
The menu list appears.
2Touch .
The audio option list appears.
3Select the desired item.
To display detailed information
1During playback, touch .
The menu list appears.
2Touch .
To view detailed information, move the
scrollbar up and down.
To delete the file
1During playback, touch .
The menu list appears.
2Touch .
3Touch “OK.”
To change the settings
1During playback, touch .
The menu list appears.
2Touch .
The options are indicated below.
To return to the playback screen, touch or
“Cancel.”
Selecting video files
1During playback, touch .
The list of categories or files from the
currently played item appears.
To scroll the list, move the scrollbar up and
down.
2Touch the desired item.
Playback starts.
To return to the Playback screen, touch .
To change the album display format
1While the list screen appears, touch
.
The options are indicated below.
Options
To change the video list sort order
1Touch .
The menu list appears.
2Touch , then “Oldest first,” “Newest
first,” “A to Z,” or “Z to A.”
To change the Settings
1Touch .
The menu list appears.
2Touch .
The options are indicated below.
To return to the playback screen, touch or
“Cancel.”
5
Touch to play a track file.
Touch to pause playback.
“Zoom settings”
Adjusts the video display: “Normal mode,”
“Full mode,” “Off.”
“Update database”
Searches for video files and adds them to the
database.
“About Video player”
Displays the application version.
: Grid view
Displays video files as a grid.
: List view
Displays video files as a list.
: Cover art view
Displays video files as angled graphics.
“Zoom settings”
Adjusts the video display: “Normal mode,”
“Full mode,” “Off.”
“Update database”
Searches for video files and adds them to the
database.
“About Video player”
Displays the application version.
00US+00COV-U.book Page 29 Friday, June 15, 2012 2:52 PM
30
M:\001\XPML A7.0\ML\4422720111_XAV-701HD_CaFR-LaES(FM7.1
600dpi)\4422720111_XAV-701HD_ML\01US_XAV701HD\01US02CD-U.fm
masterpage:Left
XAV-701HD
4-422-720-11(1)
USB Photo
Viewing Photos
1Connect the USB device to the USB
port.
2Press (HOME), then touch “USB
Photo.”
3Touch “All pictures,” or “Folders,”
then select the picture or folders.
Playback controls
Touch the display if the playback controls are not
displayed.
Tip
You can reverse/fast-forward a photo file by flicking the
photo list left or right.
Options
To play slideshow
1During playback, touch .
The menu list appears.
2Touch .
The slideshow starts.
To set as wallpaper
1During playback, touch .
The menu list appears.
2Touch .
3Touch “OK.”
To remove the picture
1During playback, touch .
The menu list appears.
2Touch .
3Touch “OK.”
To display detailed information
1During playback, touch .
The menu list appears.
2Touch .
To view detailed information, move the
scrollbar up and down.
To change the settings
1During playback, touch .
The menu list appears.
2Touch .
The options are indicated below.
To return to the playback screen, touch or
“Cancel.”
1
Touch to list up photo files.
2
Touch to open the option menu.
3/
Touch to skip a photo file.
Touch and hold to reverse/fast-forward
the photo file.
4
Touch to start slideshow.
Touch the screen to stop the slideshow.
5 Rotate the photo file to the left.
Rotate the photo file to the right.
12
34 5
“Slideshow interval settings”
Adjusts the time interval: “0.5sec.” -
“20.0 sec..”
“Play continuously”
Sets continuous playback (slideshow).
“Update database”
Searches for picture files and adds them to the
database.
“About Photo viewer”
Displays the application version.
00US+00COV-U.book Page 30 Friday, June 15, 2012 2:52 PM
31
M:\001\XPML A7.0\ML\4422720111_XAV-701HD_CaFR-LaES(FM7.1
600dpi)\4422720111_XAV-701HD_ML\01US_XAV701HD\01US02CD-U.fm
masterpage:RightM:\001\XPML A7.0\ML\4422720111_XAV-701HD_CaFR-LaES(FM7.1
600dpi)\4422720111_XAV-701HD_ML\01US_XAV701HD\01US02CD-U.fm
masterpage:Right
XAV-701HD
4-422-720-11(1)
Selecting photo files
1During playback, touch .
The list of categories or files from the
currently played item appears.
To move to the upper level, touch .
To scroll the list, move the scrollbar up and
down.
2Touch the desired item.
Playback starts.
To play slideshow
1Touch .
The slideshow starts.
To change the display format
1Touch .
The options are indicated below.
Options
To play slideshow
1During playback, touch .
The menu list appears.
2Touch .
The slideshow starts.
To change the Photo list sort order
1Touch .
The menu list appears.
2Touch , then “Oldest first,” “Newest
first,” “A to Z,” or “Z to A.”
To change the settings
1While the list screen appears, touch
.
The menu list appears.
2Touch .
The options are indicated below.
To return to the playback screen, touch or
“Cancel.”
: Grid view
Displays photo files as a grid.
: List view
Displays photo files as a list.
: Cover art view
Displays photo files as angled graphics.
: Date view (All pictures only)
Displays photo files in order of date.
: Expanded view (Folders only)
Displays folders, below which are displayed
subfolders, and any photo file images that are
contained.
“Slideshow interval settings”
Adjusts the time interval: “0.5sec.” -
“20.0 sec..”
“Play continuously”
Sets continuous playback (slideshow).
“Update database”
Searches for picture files and adds them to the
database.
“About Photo viewer”
Displays the application version.
00US+00COV-U.book Page 31 Friday, June 15, 2012 2:52 PM
32
M:\001\XPML A7.0\ML\4422720111_XAV-701HD_CaFR-LaES(FM7.1
600dpi)\4422720111_XAV-701HD_ML\01US_XAV701HD\01US02CD-U.fm
masterpage:Left
XAV-701HD
4-422-720-11(1)
Notes on USB playback
• MSC (Mass Storage Class) can be used.
• Compatible codecs are MP3 (.mp3), WMA
(.wma), AAC/HE-AAC (.m4a), JPEG (.jpg),
Xvid (.avi/.xvid), and MPEG-4 (.mp4).
• Backup of data in a USB device is
recommended.
Notes
•During USB Video playback, if the playback is
intermittent:
– Press (HOME) or launch the System settings.
– During the USB Photo, (Navigation), etc.
•Connect the USB device after starting the engine.
Depending on the USB device, malfunction or
damage may occur if it is connected before starting
the engine.
•A large-sized file or many files may take time to start
playing.
•This unit does not recognize multiple MSC devices.
•The signal of USB Video or USB Photo playback is
not output from the REAR OUT terminal.
To disconnect the USB device
Stop playback, then disconnect.
Do not disconnect during playback, as data in the
USB device may be damaged.
Notes on use
•Do not use USB devices so large or heavy that they
may fall down due to vibration, or cause a loose
connection.
•Do not leave a USB device in a parked car, as
malfunction may result.
•This unit cannot recognize USB devices via a USB
hub.
•Be sure to use the USB cable supplied with the
device if a cable is needed when making a USB
connection.
Notes on playback
•Select “USB Music,” “USB Video,” or “USB Photo”
depending on the file type of USB device.
•Displayed indications will differ, depending on the
USB device, recorded format and settings. For
details, visit the support site on the back cover.
•A folder/file name of up to 254 bytes can be
recognized.
•The maximum number of displayable music files is
as follows:
– files (tracks): 10,000
•It may take time for playback to begin, depending on
the amount of recorded data.
•DRM (Digital Rights Management) files may not be
played.
•During playback or reverse/fast-forward of a VBR
(Variable Bit Rate) MP3/WMA/AAC file, elapsed
playing time may not display accurately.
•Playback of a lossless compression file is not
supported.
iPod
For details on the compatibility of your iPod, see
“About iPod” on page 63 or visit the support site
on the back cover.
In these Operating Instructions, “iPod” is used as
a general reference for the iPod functions on the
iPod and iPhone, unless otherwise specified by
the text or illustrations.
Note
This unit does not recognize multiple iPods.
Playing an iPod
1Reduce the volume on this unit.
If the iPod is turned off, turn it on.
2Connect the iPod to the USB port.
Use of the optional USB connection cable
RC-202IPV is recommended.*1
A connection process indicator appears on the
iPod screen*2, then playback starts from the
item last played.
If an iPod is already connected, to start
playback, touch “iPod.”
*1 To play videos from an iPod with video, use of
the RC-202IPV is required.
*2 May not appear in the case of an iPod touch or
iPhone being connected, when the iPod was
last played using Passenger App Control, or
when the Telenav Touch Panel Control is
performed.
3Adjust the volume on this unit.
Notes
•If an iPod touch or iPhone is connected to this unit, a
display recommending application installation may
appear on this unit.
•The signal of iPod video playback is not output from
the REAR OUT terminal.
About playback controls and
indications
You can control iPod playback in the same way
as disc playback. For details, see “Playback
controls” on page 20.
For details on playback indications, see
“Playback indications” on page 21.
To stop playback
Press and hold (SOURCE/OFF) for 1 second.
To disconnect the iPod
Stop playback, then disconnect.
Do not disconnect during playback, as data in the
iPod may be damaged.
00US+00COV-U.book Page 32 Friday, June 15, 2012 2:52 PM
33
M:\001\XPML A7.0\ML\4422720111_XAV-701HD_CaFR-LaES(FM7.1
600dpi)\4422720111_XAV-701HD_ML\01US_XAV701HD\01US02CD-U.fm
masterpage:RightM:\001\XPML A7.0\ML\4422720111_XAV-701HD_CaFR-LaES(FM7.1
600dpi)\4422720111_XAV-701HD_ML\01US_XAV701HD\01US02CD-U.fm
masterpage:Right
XAV-701HD
4-422-720-11(1)
To enter ZAPPIN mode
For details on this procedure, see “Searching for
a track by listening to track passages —
ZAPPIN™” on page 34.
About resuming mode
When the iPod currently playing is connected to
the dock connector, the mode of this unit changes
to resuming mode and playback starts in the
mode set by the iPod.
In resuming mode, repeat/shuffle play are not
available.
Caution for iPhone
When you connect an iPhone via USB, telephone
volume is controlled by the iPhone itself. In order to
avoid emitting sudden loud sound after a call, do not
increase the volume on the unit during a call.
Note
This unit cannot recognize an iPod via a USB hub.
Tips
•When the ignition key is turned to the ACC position
with the unit on, the iPod will be recharged.
•If the iPod is disconnected during playback, “No
Device” appears on the display of the unit.
Listing up tracks/video files —
List
Selecting a track/video file
You can list up albums/folders/tracks/video files,
and select a desired one to play.
1During playback, touch .
The list of categories or files from the
currently played item appears.
To move to the upper level, touch .
To scroll the list, move the scrollbar up and
down.
To search files by alphabetical order, touch
.
To return to the top screen, touch .
2Touch the desired item.
Playback starts.
Selecting a file type
You can select the file type to list up, then select
the desired file to play.
1During playback, touch .
2Touch or to select the file type.
3Touch the desired file.
Playback of the selected file starts.
To return to the Playback screen, touch .
Selecting the play mode
You can set one of the following play modes.
For audio playback
“Track,” “Album,” “Artist,” “Genre,”
“Playlist,” “Podcast”*
*May not appear depending on iPod setting.
For video playback
Same as audio playback, but display item
depends on the iPod.
1During playback, touch .
2Touch or .
3Touch .
4Touch the desired play mode.
To start playback, touch the desired item(s) in
the list.
To scroll the list, move the scrollbar up and
down.
Repeat and shuffle play
1During playback, touch “Repeat”
or “Shuffle” repeatedly until the
desired option appears.
Repeat or shuffle play starts.
The repeat options are as follows:
For audio playback
“All”: Repeats all tracks in the iPod.
“Track”: Repeats the current track.
“Album”/“Podcast”/“Artist”/“Playlist”/
“Genre”*: Repeats the current item of the
selected play mode.
00US+00COV-U.book Page 33 Friday, June 15, 2012 2:52 PM
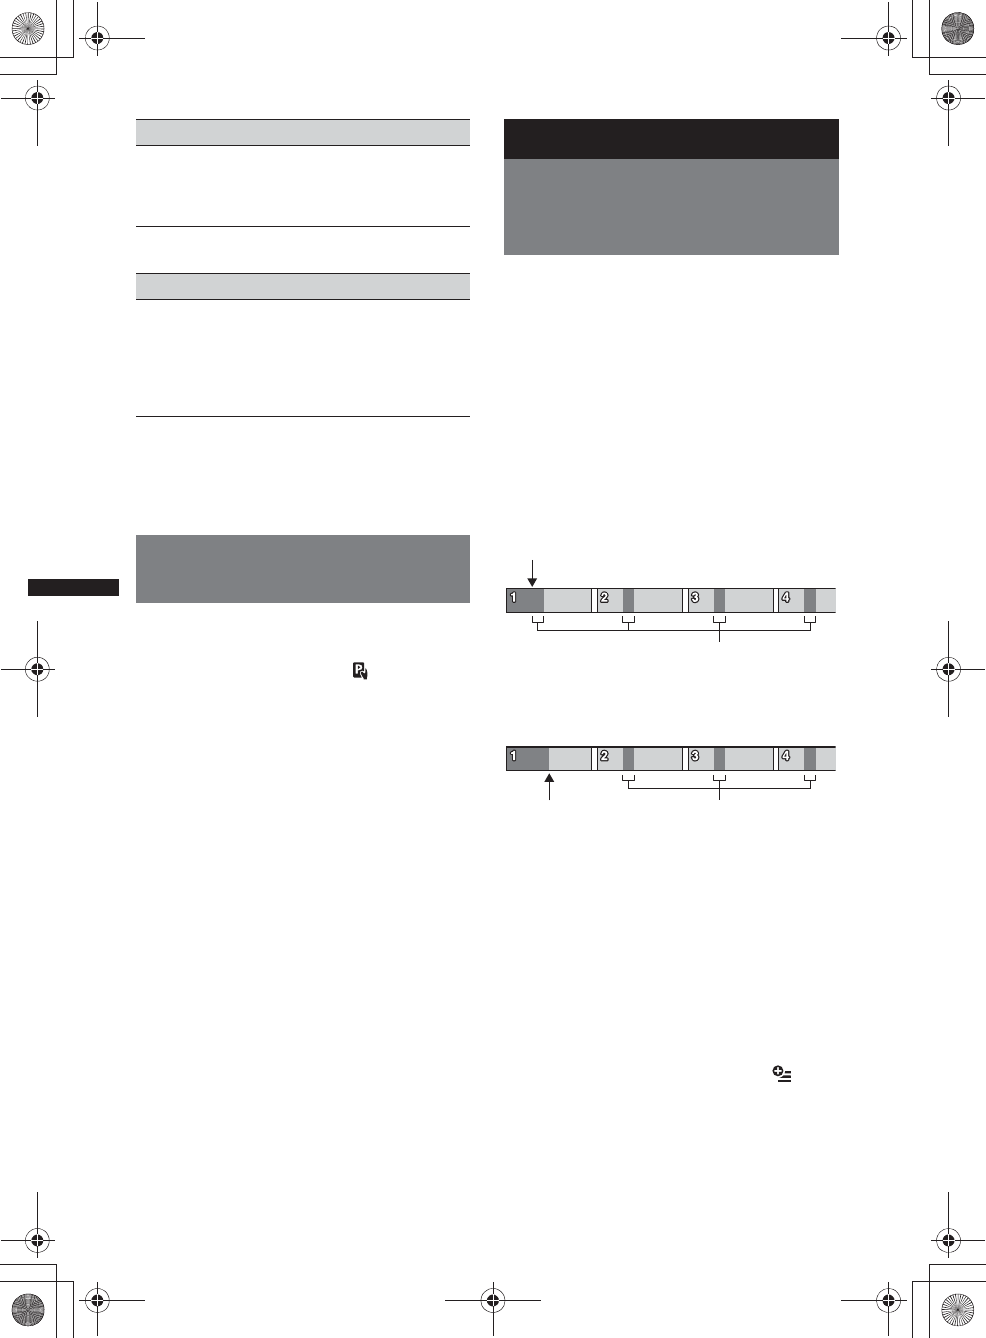
34
M:\001\XPML A7.0\ML\4422720111_XAV-701HD_CaFR-LaES(FM7.1
600dpi)\4422720111_XAV-701HD_ML\01US_XAV701HD\01US02CD-U.fm
masterpage:Left
XAV-701HD
4-422-720-11(1)
The shuffle options are as follows:
*Differs depending on the selected play mode.
Note
Displayed options may not conform to actual
operation.
Operating an iPod directly
— Passenger App Control
You can directly operate an iPod connected to
this unit.
1During playback, touch .
Deactivating the Passenger App
Control
During “Passenger App Control”, touch screen,
then “Cancel” button.
The play mode changes to resuming mode.
Notes
•App image and Video can only be displayed on this
unit while the parking brake is applied.
•App and Video are only controllable from iPhone
and iPod.
•Apps compatible with Passenger App Control are
limited.
•To output video to this unit, you need to activate the
video output of the iPod.
•The volume can be adjusted only by this unit.
•The repeat and shuffle settings will be off if the
Passenger App Control mode is canceled.
Useful Functions
Searching for a track by
listening to track passages
— ZAPPIN™
While playing short track passages from a USB
device or an iPod in sequence, you can search for
a track you want to listen to.
This function is convenient, for example, when
searching for a track in shuffle or shuffle repeat
mode.
1During audio playback, touch “ZAP.”
In the case of USB Music, ZAP mode starts
from the currently playing track.
The most melodic or rhythmical sections of
tracks are played.
Those passages are played for the set time.
Note
Tracks need to be analyzed by 12 TONE ANALYSIS.
In the case of iPod, ZAP mode starts from a
passage in the next track.
2Touch “ZAP” when a track you want to
listen to is played.
In the case of USB Music, playback returns to
normal from the current position until the end
of the track.
In the case of iPod, the selected track plays
from the beginning.
To search for a track via ZAPPIN mode again,
repeat steps 1 and 2.
Tips
•You cannot select the track passage to play.
•You can select the playback time. Touch , then
select the playback on time for the ZAPPIN function:
“6 sec.,” “15 sec.,” “30 sec..”
For video playback
“All”: Repeats all video files in the iPod.
“Track”: Repeats the current video.
“Group”*: Repeats the current item of the
selected play mode.
For audio playback
“OFF”: Returns to normal play mode.
“Album”/“Podcast”/“Artist”/“Playlist”/
“Genre”*: Plays tracks of the selected play
mode in random order.
“Device”: Plays all tracks in an iPod in random
order.
“ZAP” touched.
The playback section of each
track in ZAPPIN mode.
“ZAP”
touched. The playback section of each
track in ZAPPIN mode.
00US+00COV-U.book Page 34 Friday, June 15, 2012 2:52 PM
35
M:\001\XPML A7.0\ML\4422720111_XAV-701HD_CaFR-LaES(FM7.1
600dpi)\4422720111_XAV-701HD_ML\01US_XAV701HD\01US02CD-U.fm
masterpage:RightM:\001\XPML A7.0\ML\4422720111_XAV-701HD_CaFR-LaES(FM7.1
600dpi)\4422720111_XAV-701HD_ML\01US_XAV701HD\01US02CD-U.fm
masterpage:Right
XAV-701HD
4-422-720-11(1)
Controlling applications on your
smartphone — MirrorLink™
This function duplicates the smartphone’s display
on the in-car display, so you can control applications
on your smartphone with the bigger screen.
Only a smartphone compatible with the
MirrorLink™ function can be used.
1Connect your smartphone and the unit
via USB cable.
2Press (HOME), then touch
“MirrorLink™.”
The smartphone’s display appears on the in-
car display.
Touch and control applications in the same
way as you do on your smartphone.
Note
For your safety, when the parking brake is not
engaged, some smartphone screen content may not
be displayed on AVC.
Controlling applications on your
iPhone — Telenav® GPS App
Telenav’s navigation on your iPhone makes
finding and getting to your destination faster,
easier, and more convenient than ever before.
Now you can use Telenav® GPS with your
Sony® receiver. Simply connect your Telenav®
GPS to the car and see directions on your
receiver screen while hearing them over the car
speakers.
1Connect your iPhone to the USB port.
2Launch the Telenav application on the
iPhone.
3Press (HOME), then touch “Telenav.”
The display of the Telenav application
appears on the display of the unit, and the
touch panel operation enables you to control
the application on your iPhone.
Note
The Telenav function is only available on iPhone 4S
and iPhone 4, and downloading the Telenav app to
your iPhone is required.
Enjoying different sources in
front and rear — Zone × Zone
You can simultaneously enjoy different sources
in the front and rear of the car.
Selectable sources for this unit (front) and the
rear monitor (rear) are indicated below.
Front: Any source.
Rear: Disc inserted in this unit.
1Press (HOME) on the main unit.
2Touch “ZONE × ZONE” to activate
Zone × Zone.
To operate the source in the front, use the
touch panel and buttons on the main unit.
To operate the source in the rear, use the
remote commander.
Tip
You can also activate/deactivate Zone × Zone by
pressing (Z x Z) on the remote commander.
To deactivate Zone × Zone
Touch “ZONE × ZONE” again in the HOME
menu.
Notes
•Once (SOURCE/OFF) on the main unit or remote
commander is pressed, Zone × Zone is deactivated.
•While Zone × Zone is activated, the following buttons
on the remote commander become inactive:
(SRC), (MODE), (ATT), (VOL) +/–, (CLEAR),
number buttons.
•While Zone × Zone is activated, you can only
operate rear DVD playback by the remote
commander.
•While Zone × Zone is activated, the following are
deactivated.
– EQ7 (page 45)
– Balance/Fader/Subwoofer (page 53)
– Intelligent Time Alignment (page 46)
– CSO (page 47)
– HPF, LPF (page 54)
– Rear Bass Enhancer (page 47)
Changing the color of buttons
—Dynamic Color Illuminator
Dynamic Color Illuminator allows you to change
the color of the buttons on the main unit to match
the car's interior.
You can select from 12 preset colors, customized
color and 5 preset patterns.
xPreset colors
“Red,” “Amber,” “Medium Amber,” “Yellow,”
“White,” “Light Green,” “Green,” “Light Blue,”
“Sky Blue,” “Blue,” “Purple,” “Pink.”
xPreset patterns
“Rainbow,” “Ocean,” “Sunset,” “Forest,”
“Random.”
1Press (HOME), then touch “Settings.”
2Touch , and move the scrollbar up
and down, then touch “Key
Illumination.”
00US+00COV-U.book Page 35 Friday, June 15, 2012 2:52 PM
36
M:\001\XPML A7.0\ML\4422720111_XAV-701HD_CaFR-LaES(FM7.1
600dpi)\4422720111_XAV-701HD_ML\01US_XAV701HD\01US02CD-U.fm
masterpage:Left
XAV-701HD
4-422-720-11(1)
3Move the scrollbar up and down to
select the desired preset color, then
press it.
Customizing the button color —
Custom Color
You can register a customized color for the
buttons.
1Press (HOME), then touch “Settings.”
2Touch , and move the scrollbar up
and down, then touch “Key
Illumination.”
3Move the scrollbar up and down to
select “Custom,” then press “Tune >.”
4Move the scrollbar left and right or
press +/– to adjust the color range of
“R” (red), “G” (green), or “B” (blue).
Adjustable color range: “0” – “63.”
You can set the color while observing the
button illumination.
Using Gesture Command
You can perform frequently-used operations by
drawing the following command stroke on the
reception/playback display.
Do this To
Draw a
horizontal line
(left to right)
Radio reception:
seek forward stations.
(The same as >.)
DVD/VCD playback:
skip forward a chapter/track.
(The same as >.)
Xvid/MPEG-4/audio
playback:
skip forward a file/track.
(The same as >.)
Pandora® playback:
skip a song.
(The same as >.)
Draw a
horizontal line
(right to left)
Radio reception:
seek backward stations.
(The same as ..)
DVD/VCD playback:
skip backward a chapter/track.
(The same as ..)
Xvid/MPEG-4/audio
playback:
skip backward a file/track.
(The same as ..)
Draw a vertical
line
(upwards)
Radio reception:
receive stored stations (go
forward).
DVD/VCD/Xvid/MPEG-4
playback:
fast-forward the video.
Audio playback:
skip forward an album (folder).
Pandora® playback:
Thumbs up.
(The same as .)
Draw a vertical
line
(downwards)
Radio reception:
receive stored stations (go
backward).
DVD/VCD/Xvid/MPEG-4
playback:
reverse the video.
Audio playback:
skip backward an album
(folder).
Pandora® playback:
Thumbs down.
(The same as .)
00US+00COV-U.book Page 36 Friday, June 15, 2012 2:52 PM
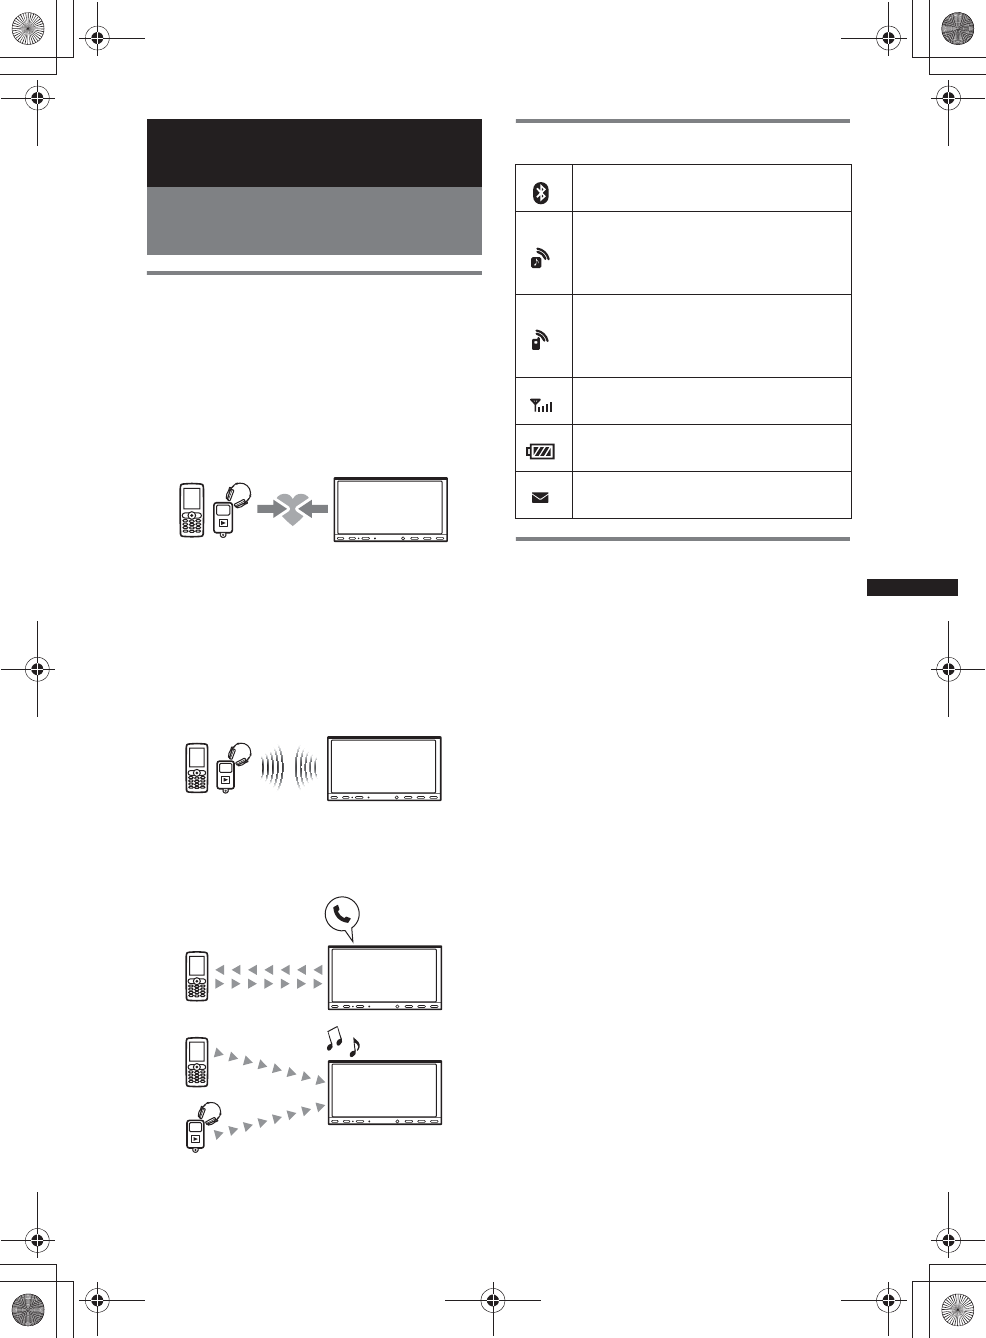
37
M:\001\XPML A7.0\ML\4422720111_XAV-701HD_CaFR-LaES(FM7.1
600dpi)\4422720111_XAV-701HD_ML\01US_XAV701HD\01US02CD-U.fm
masterpage:RightM:\001\XPML A7.0\ML\4422720111_XAV-701HD_CaFR-LaES(FM7.1
600dpi)\4422720111_XAV-701HD_ML\01US_XAV701HD\01US02CD-U.fm
masterpage:Right
XAV-701HD
4-422-720-11(1)
Handsfree Calling and Audio
Streaming — Bluetooth function
Before using the Bluetooth
function
Basic procedure of the Bluetooth
function
1Pairing
When connecting Bluetooth devices for the
first time, mutual registration is required. This
is called “pairing.” This registration (pairing)
is required only for the first time, as this unit
and the other devices will recognize each
other automatically from the next time.
Note
If you delete the device registration from this unit,
you need to perform pairing again.
2Connecting
After pairing is made, connect this unit and
the Bluetooth device. Depending on the
device, connection is automatically made
along with the pairing.
3Handsfree calling/audio streaming
You can make/receive a handsfree call, or
listen to audio through this unit.
Bluetooth status indications
Installing the microphone
To capture your voice during handsfree calling,
you need to install the microphone (supplied).
For details on how to connect the microphone,
refer to the supplied “Installation/Connections”
guide.
None: Bluetooth signal is off.
Lit: Bluetooth signal is on.
None: No device is connected for
audio streaming.
Flashing: Connection is in progress.
Lit: A device is connected.
None: No cellular phone is connected
for handsfree calling.
Flashing: Connection is in progress.
Lit: A cellular phone is connected.
Indicates the signal strength status of
the connected cellular phone.
Indicates the remaining battery status
of the connected cellular phone.
None: No unread SMS messages
Lit: Unread SMS message(s)
00US+00COV-U.book Page 37 Friday, June 15, 2012 2:52 PM
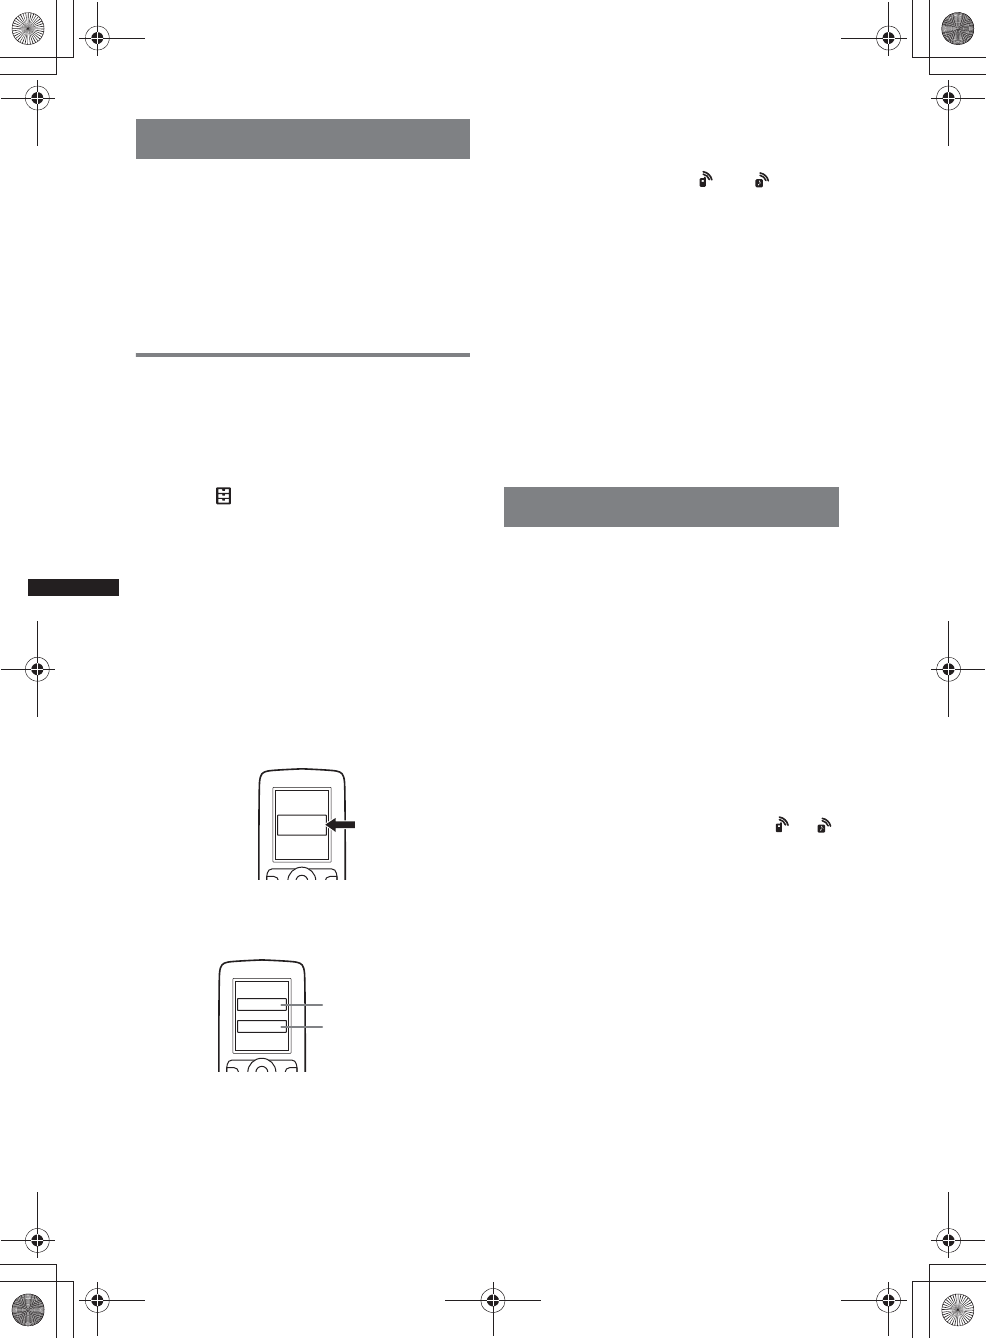
38
M:\001\XPML A7.0\ML\4422720111_XAV-701HD_CaFR-LaES(FM7.1
600dpi)\4422720111_XAV-701HD_ML\01US_XAV701HD\01US02CD-U.fm
masterpage:Left
XAV-701HD
4-422-720-11(1)
Pairing
Pairing is required only the first time you connect
to a Bluetooth device (cellular phone, etc.).*
For details, refer to the manual of the Bluetooth
device.
*If you delete the device registration from this unit,
you need to perform pairing again.
Tip
You can pair up to 9 devices.
Searching from the Bluetooth
device
The procedure to search for this unit from the
other Bluetooth device is explained below.
1Press (HOME), then touch “Settings.”
2Touch , and move the scrollbar up
and down.
3Touch “Bluetooth Connection,” then
set the signal to “ON.”
The Bluetooth signal of this unit is activated.
4Touch “Pairing >.”
This unit is ready to be detected by the other
Bluetooth device.
5Operate the Bluetooth device to
search for this unit.
A device list appears on the display of the
device. This unit is displayed as “Sony
Automotive.”
6If passkey* input is required on the
display of the device, input “0000.”
This unit and the Bluetooth device memorize
each other’s information, and when pairing is
made, this unit is ready for connection to the
device.
7Operate the Bluetooth device to
connect to this unit.
Bluetooth device name appears and
connection is complete. “ ” or “ ” appears
when the connection is made.
*Passkey may be called “passcode,” “PIN code,” “PIN
number,” “password,” etc., depending on the
Bluetooth device.
Notes
•While connecting to a Bluetooth device, this unit
cannot be detected from another device. To enable
detection, disconnect the current connection.
•It may take time to search or connect.
•Depending on the device, the connection
confirmation display may appear before inputting the
passkey.
•The time limit for inputting the passkey differs
depending on the device.
•This unit cannot be connected to a device that
supports only HSP (Head Set Profile).
Connecting
When the ignition is turned to on with the
Bluetooth signal activated, this unit searches for
the last-connected Bluetooth device, and
connection is made automatically if possible.
This chapter explains how to connect manually
to registered Bluetooth devices.
Before starting, be sure to activate the Bluetooth
signal both on this unit (page 43) and the other
Bluetooth device.
To connect from the other Bluetooth
device
Operate the other Bluetooth device to connect to
this unit.
When connection is made successfully, or
appears at the top of the display.
Note
If connection is made during audio streaming, noise
may occur over playback sound.
Tip
You can connect a cellular phone for audio streaming
if it supports A2DP (Advanced Audio Distribution
Profile).
XXXXXXX
DR-BT30Q
Sony
Automotive
XXXX
Input passkey.
“0000”
00US+00COV-U.book Page 38 Friday, June 15, 2012 2:52 PM
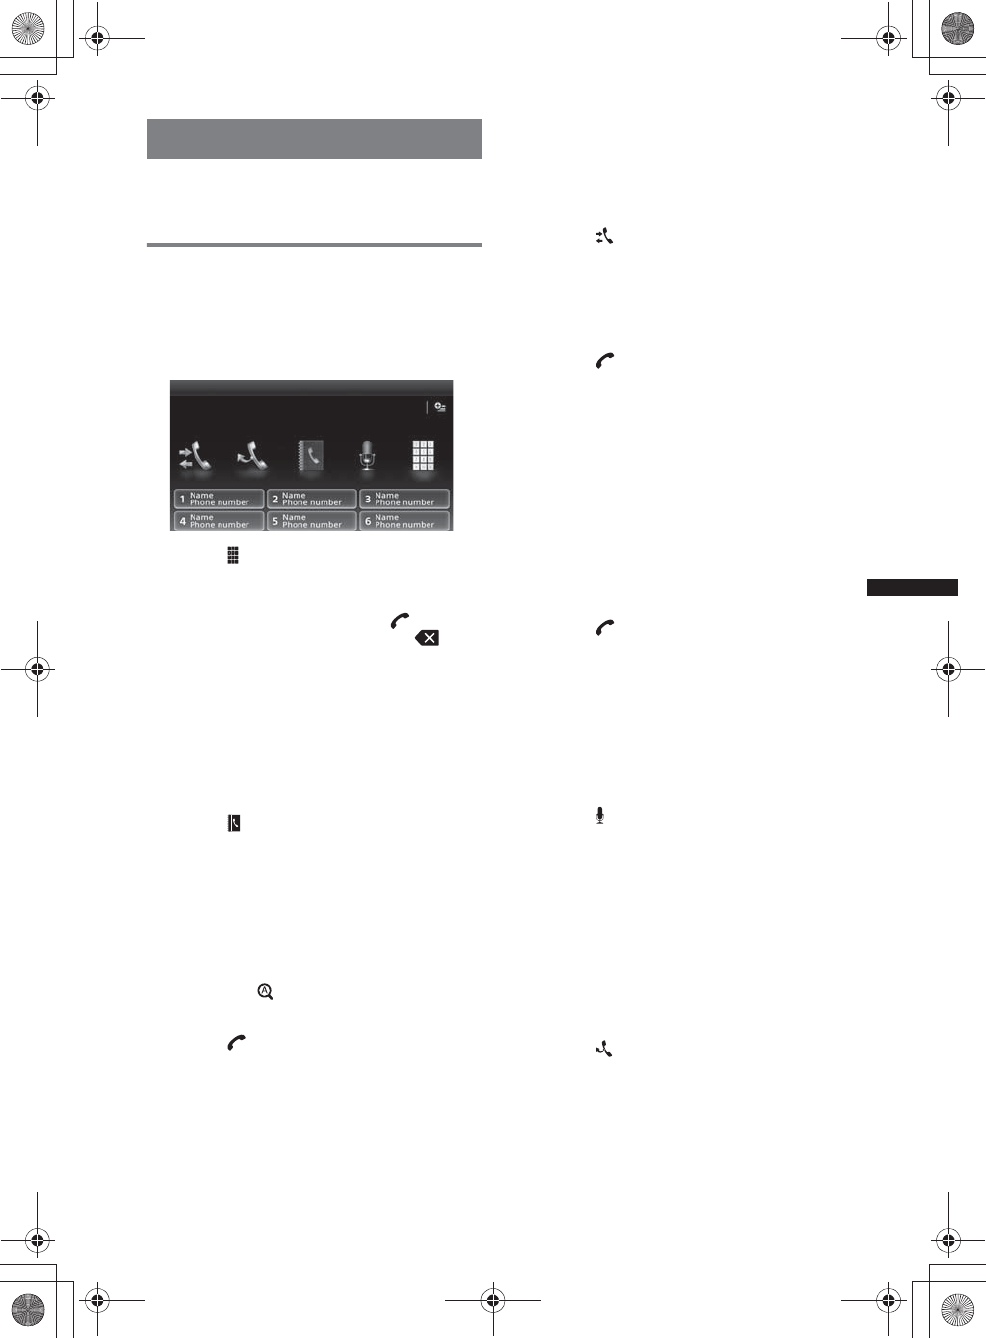
39
M:\001\XPML A7.0\ML\4422720111_XAV-701HD_CaFR-LaES(FM7.1
600dpi)\4422720111_XAV-701HD_ML\01US_XAV701HD\01US02CD-U.fm
masterpage:RightM:\001\XPML A7.0\ML\4422720111_XAV-701HD_CaFR-LaES(FM7.1
600dpi)\4422720111_XAV-701HD_ML\01US_XAV701HD\01US02CD-U.fm
masterpage:Right
XAV-701HD
4-422-720-11(1)
Handsfree calling
Once the unit is connected to the cellular phone,
you can make/receive handsfree calls by
operating this unit.
Making calls
By dialing a phone number
1Press (HOME), then touch “Phone.”
The Bluetooth Phone display appears.
2Touch .
The number input display appears.
3Touch the number keys to enter the
phone number, then touch .
To delete an entered number, touch .
The call is made and the calling display
appears until the other party answers.
By the phonebook
For details on how to manage the phonebook
data, see “Phonebook management” on page 41.
1Press (HOME), then touch “Phone.”
The Bluetooth Phone display appears.
2Touch .
The phonebook appears.
3Select the desired contact.
1In the name list, touch the name of the
contact.
2In the number list, touch the phone
number.
To search the desired contact by alphabetical
order, touch , then select alphabet.
The contact confirmation display appears.
4Touch .
The call is made and the calling display
appears until the other party answers.
Tip
You can also browse the phonebook of the connected
cellular phone on this unit and make a call (page 41).
By the call history
The unit stores the last 20 calls, allowing you to
select one quickly from the list.
1Press (HOME), then touch “Phone.”
The Bluetooth Phone display appears.
2Touch .
The call history list appears.
To scroll the list, move the scrollbar up and
down.
3Touch the desired item in the list.
The contact confirmation display appears.
4Touch .
The call is made and the calling display
appears until the other party answers.
By the preset dial
You can store up to 6 contacts in the preset dial.
For details on how to store, see “Preset dial” on
page 42.
1Press (HOME), then touch “Phone.”
The Bluetooth Phone display appears.
2Touch the number in the list (“1” to
“6”).
The contact confirmation display appears.
3Touch .
The call is made and the calling display
appears until the other party answers.
By the voice dial function
You can make a call using the voice tag stored on
the connected cellular phone.
1Press (HOME), then touch “Phone.”
The Bluetooth Phone display appears.
2Touch .
3Say the voice tag stored on the cellular
phone.
Your voice is recognized, then the call is
made.
The calling display appears until the other
party answers.
By the redial function
1Press (HOME), then touch “Phone.”
The Bluetooth Phone display appears.
2Touch .
The call is made and the calling display
appears until the other party answers.
Notes
•Say the voice tag in the same way as you stored it
on the cellular phone.
•If the voice dial function is activated on the
connected cellular phone, it may not work via this
unit.
00US+00COV-U.book Page 39 Friday, June 15, 2012 2:52 PM
40
M:\001\XPML A7.0\ML\4422720111_XAV-701HD_CaFR-LaES(FM7.1
600dpi)\4422720111_XAV-701HD_ML\01US_XAV701HD\01US02CD-U.fm
masterpage:Left
XAV-701HD
4-422-720-11(1)
•Do not use the voice dial function on the cellular
phone while it is connected to this unit.
•Noises such as the engine running may interfere
with sound recognition. In order to improve
recognition, operate under conditions where noise is
minimized.
•Voice dial may not work depending on the
recognition specification of the cellular phone. For
details, visit the support site on the back cover.
To adjust the talker’s voice volume
Press (VOL) +/– while making a call.
The level of the talker’s voice volume will be
stored into memory, independently from the
regular volume level.
Receiving calls
With the unit connected to the cellular phone,
you can receive a call in any status (except for
MirrorLink™ mode).
To answer the call
Touch .
To adjust the ringtone volume
Press (VOL) +/– while receiving a call.
The level of ringtone volume will be stored into
memory, independently from the regular volume
level.
To reject a call
Touch .
Note
The ringtone and talker’s voice are output only from
the front speakers.
Tips
•You can set to answer a call automatically
(page 42).
•You can set to use the ringtone of the cellular phone
or this unit (page 42).
Operations during a call
To adjust the talker’s voice volume
Press (VOL) +/– during a call.
The level of the talker’s voice volume will be
stored into memory, independently from the
regular volume level.
To send DTMF (Dual Tone Multiple
Frequency) tones
Touch , then the required number keys.
To transfer the current call to the
cellular phone
Touch .
To transfer back to the handsfree call, touch
again.
Note
Depending on the cellular phone, connection may be
cut off when call transfer is attempted.
To adjust the volume for the other
party
1Touch , then “MIC Gain.”
2Touch “Low,” “Middle,” or “High” to
adjust the level.
3Touch repeatedly to return to the
previous displays.
To end a call
Touch .
00US+00COV-U.book Page 40 Friday, June 15, 2012 2:52 PM
41
M:\001\XPML A7.0\ML\4422720111_XAV-701HD_CaFR-LaES(FM7.1
600dpi)\4422720111_XAV-701HD_ML\01US_XAV701HD\01US02CD-U.fm
masterpage:RightM:\001\XPML A7.0\ML\4422720111_XAV-701HD_CaFR-LaES(FM7.1
600dpi)\4422720111_XAV-701HD_ML\01US_XAV701HD\01US02CD-U.fm
masterpage:Right
XAV-701HD
4-422-720-11(1)
Phonebook management
You can store up to 500 contacts in the
phonebook and up to 5 phone numbers can be
registered to each contact.
Notes
•Prior to disposal or changing ownership of your car
with this unit still installed, be sure to erase all the
phonebook data in this unit to prevent possible
unauthorized access, by doing any of the following:
– Delete the phonebook data by initializing
(page 43).
– Press the reset button.
– Disconnect the power supply lead.
•Downloaded phonebook data from a cellular phone
cannot be overwritten by subsequent data. However,
some data (name, etc.), may be duplicated as a
result.
•Phonebook data may be lost if this unit is damaged.
Selecting phonebook data
You can select the phonebook data of a cellular
phone, or the internal data on this unit.
1Press (HOME), then touch “Phone.”
The Bluetooth Phone display appears.
2Touch , then “Phonebook Select.”
3Touch the desired item.
To return to the previous display, touch .
Storing phonebook data (When
“Internal” has been selected from
“Phonebook Select”)
You can send phonebook data from the
connected cellular phone and receive it on this
unit.
1Press (HOME), then touch “Phone.”
The Bluetooth Phone display appears.
2Touch , then “Receive Phonebook.”
This unit is ready for receiving phonebook
data.
3Send the phonebook data by
operating the connected cellular
phone.
When receiving is complete, Bluetooth device
name appears and the phonebook data is
stored on this unit.
Browsing a phonebook
You can browse its phonebook data.
You can also make a call to a contact.
1Press (HOME), then touch “Phone.”
The Bluetooth Phone display appears.
2Touch .
The phonebook appears.
3Select the desired contact.
1In the name list, touch the name of the
contact.
2In the number list, touch the phone
number.
To search the desired contact by alphabetical
order, touch , then select alphabet.
The contact confirmation display appears.
To call the contact
Select the desired contact from the phonebook,
then touch .
Deleting phonebook data
To delete all phonebook data on this
unit
1Press (HOME), then touch “Phone.”
The Bluetooth Phone display appears.
2Touch .
The phonebook appears.
3Touch .
The confirmation display appears.
4Touch “OK.”
All phonebook data is deleted.
To delete an individual contact from
the phonebook
1Follow steps 1 to 2 above.
2Select the contact to delete.
In the name list, touch the name of the
contact.
To search the desired contact by alphabetical
order, touch , then select alphabet.
3Touch .
The confirmation display appears.
4Touch “OK.”
The contact is deleted from the phonebook.
00US+00COV-U.book Page 41 Friday, June 15, 2012 2:52 PM
42
M:\001\XPML A7.0\ML\4422720111_XAV-701HD_CaFR-LaES(FM7.1
600dpi)\4422720111_XAV-701HD_ML\01US_XAV701HD\01US02CD-U.fm
masterpage:Left
XAV-701HD
4-422-720-11(1)
Call data management
Deleting call history
You can delete the items in the call history.
To delete all items in the call history
1Press (HOME), then touch “Phone.”
The Bluetooth Phone display appears.
2Touch .
The call history list appears.
3Touch .
The confirmation display appears.
4Touch “OK.”
All items in the call history are deleted.
Preset dial
You can store contacts in the phonebook or call
history into the preset dials.
To store from the phonebook
1Press (HOME), then touch “Phone.”
The Bluetooth Phone display appears.
2Touch .
The phonebook appears.
3Select the contact to store in the
preset dial.
1In the name list, touch the name of the
contact.
2In the number list, touch the phone
number.
To search the desired contact by alphabetical
order, touch , then select alphabet.
The contact confirmation display appears.
4Touch “Preset,” then the desired
preset number (“1” to “6”).
The contact is stored to the selected preset
number.
To change the registration of the
preset dial
Follow the procedure above and overwrite a
registered preset dial.
Phone option menu
The Phone option menu can be configured in
“Phone.”
1Press (HOME), then touch “Phone.”
2Touch .
The Phone option menu appears.
3Touch the desired item in the list and
configure the setting.
The items in the Phone option menu are as
follows:
*1 Cannot be configured during a handsfree call.
*2 Depending on the cellular phone, this unit’s
ringtone may be output even if set to “Cellular.”
During a handsfree call, the items in the Phone
option menu are as follows:
“Ringtone”*1*2
Uses the ringtone of this unit or the connected
cellular phone: “Internal,” “Cellular.”
“Auto Answer”*1
Answers an incoming call automatically.
– “OFF”: to not answer automatically.
–“3sec”: to answer automatically after 3
seconds.
– “10 sec”: to answer automatically after 10
seconds.
“Phonebook Select”
Browses the phonebook data on this unit or
cellular phone: “Internal,” “Cellular.”
“Receive Phonebook”
Sends phonebook data from the connected
cellular phone.
When receiving is complete, Bluetooth device
name appears.
“Background Visualizer”
Sets Background Visualizer: “ON,” “OFF.”
“Speech Quality” (Echo Canceller/Noise
Canceller Mode)
Reduces echo and noise during a call.
For normal use, set to “Mode 1.”
If the outgoing sound quality is unsatisfactory,
set to “Mode 2.”
“MIC Gain” (page 40)
Adjusts the microphone volume for the other
party: “Low,” “Middle,” “High.”
00US+00COV-U.book Page 42 Friday, June 15, 2012 2:52 PM
43
M:\001\XPML A7.0\ML\4422720111_XAV-701HD_CaFR-LaES(FM7.1
600dpi)\4422720111_XAV-701HD_ML\01US_XAV701HD\01US02CD-U.fm
masterpage:RightM:\001\XPML A7.0\ML\4422720111_XAV-701HD_CaFR-LaES(FM7.1
600dpi)\4422720111_XAV-701HD_ML\01US_XAV701HD\01US02CD-U.fm
masterpage:Right
XAV-701HD
4-422-720-11(1)
Audio streaming
Listening to a Bluetooth device via
this unit
If the other device supports A2DP (Advanced
Audio Distribution Profile), you can listen to the
playback sound via this unit.
1Connect this unit and the Bluetooth
device (page 38).
2Reduce the volume on this unit.
3Press (HOME), then touch “BT Audio.”
The Bluetooth Audio display appears.
4Operate the other Bluetooth device to
start playback.
5Adjust the volume on this unit.
Note
During disconnection to the last-connected device,
touch “Reconnect” to search for the last-connected
Bluetooth device.
If the problem is not solved, touch “BT Settings,” then
set the signal to “ON.” Touch “Pairing >” to enter the
Paring mode.
For details on the procedure of the Paring, see
page 38.
Operating a Bluetooth device with
this unit
If the other device supports AVRCP (Audio
Video Remote Control Profile), you can control
playback via this unit.
Operations can be performed in the same way as
disc playback (page 20), except for the
following:
Notes
•The available operation differs depending on the
Bluetooth device. Perform unavailable operations on
the Bluetooth device.
•Depending on the Bluetooth device, it may be
necessary to touch u twice to start/pause the
playback.
•During audio streaming, some indications such as
track name, etc., may not appear on this unit.
General Settings about
Bluetooth
The Bluetooth settings can be configured in
“General Settings.”
1Touch , and move the scrollbar up
and down.
The Bluetooth setting menu appears.
2Touch the desired item in the list and
configure the setting.
The items in the Bluetooth setting menu are as
follows:
*Cannot be configured during a handsfree call.
Note
For details on the setting of other Bluetooth devices,
refer to their respective manuals.
Do this To
Touch reduce the volume level
differences between this
unit and the other Bluetooth
device. The level is
adjustable in single steps,
between –8 and +18.
“Bluetooth Connection”*
Activates the Bluetooth signal: “ON,” “OFF.”
Touch “Pairing >” to enter the Paring mode.
“Bluetooth Initialize”*
Initializes all Bluetooth-related settings. Touch
“Initialize” to confirm.
“Bluetooth Initialize” deletes all Bluetooth-
related settings such as phonebook data, call
history, preset dial, history of connected
Bluetooth devices, etc.
00US+00COV-U.book Page 43 Friday, June 15, 2012 2:52 PM
44
M:\001\XPML A7.0\ML\4422720111_XAV-701HD_CaFR-LaES(FM7.1
600dpi)\4422720111_XAV-701HD_ML\01US_XAV701HD\01US02CD-U.fm
masterpage:Left
XAV-701HD
4-422-720-11(1)
Pandora® internet radio
Pandora® internet radio is available to stream
music through your Android, BlackBerry phones
and iPhone.
You can control Pandora® on a connected device
from this unit.
Download the latest version of the Pandora®
application and obtain more information from
www.pandora.com
For details on usable devices, visit the support
site on the back cover.
Notes
•Certain Pandora® service functions may not be
available.
•You can control Pandora® via the Bluetooth function
on Android and BlackBerry phones only.
•You can also operate Pandora® from an iPhone
connected via USB.
•The Pandora® service is only available in the U.S.
Streaming Pandora®
Before connecting the mobile device or iPhone,
turn down the volume of the unit.
To connect the mobile device via
the Bluetooth function
1Connect this unit and the mobile
device via the Bluetooth function
(page 38).
2Launch the Pandora® application on
the mobile device.
3Press (HOME), then touch “Pandora.”
4Touch , then “Bluetooth connection
for Android or Blackberry*.”
Playback starts.
*When the mobile device is connected, the device
number may appear. Make sure that the same
numbers are displayed (e.g., 123456) in this unit
and the mobile device, then touch “OK” on this
unit and confirm on the mobile device.
Note
During disconnection to the last-connected device,
touch “Reconnect” to search for the last-connected
Bluetooth device.
If the problem is not solved, touch “BT Settings,” then
set the signal to “ON.” Touch “Pairing >” to enter the
Paring mode.
For details on the procedure of the Paring, see
page 38.
Adjusting the volume level
During playback, touch , then touch +/– in the
“Volume Level Adjust.”
To connect the iPhone
1Press (HOME), then touch “Pandora.”
2Launch the Pandora® application on
the iPhone.
3Connect this unit and iPhone.
Playback starts.
To pause playback, touch u. To resume
playback, touch again.
To skip a song, touch >.
Notes
•You cannot skip back to the previous song.
•Pandora® limits the number of skips allowed.
“Thumbs” feedback
“Thumbs Up” or “Thumbs Down” feedback
allows you to personalize stations to suit your
preference.
Thumbs Up
During playback, touch .
Thumbs Down
During playback, touch .
Station list
The station list allows you to easily select a
desired station.
1During playback, touch .
The station list appears.
2Touch the desired station name.
Playback starts.
To change the sorting order, touch or .
To scroll the list, move the scrollbar up and
down.
Shuffle
Shuffle allows you to listen to songs played on
one or more Pandora® stations in your station list
randomly.
Edit your Shuffle station selections on the device
before connection.
Bookmarking
The song or artist currently being played can be
bookmarked and stored in your Pandora®
account.
1During playback, touch , then
or .
00US+00COV-U.book Page 44 Friday, June 15, 2012 2:52 PM
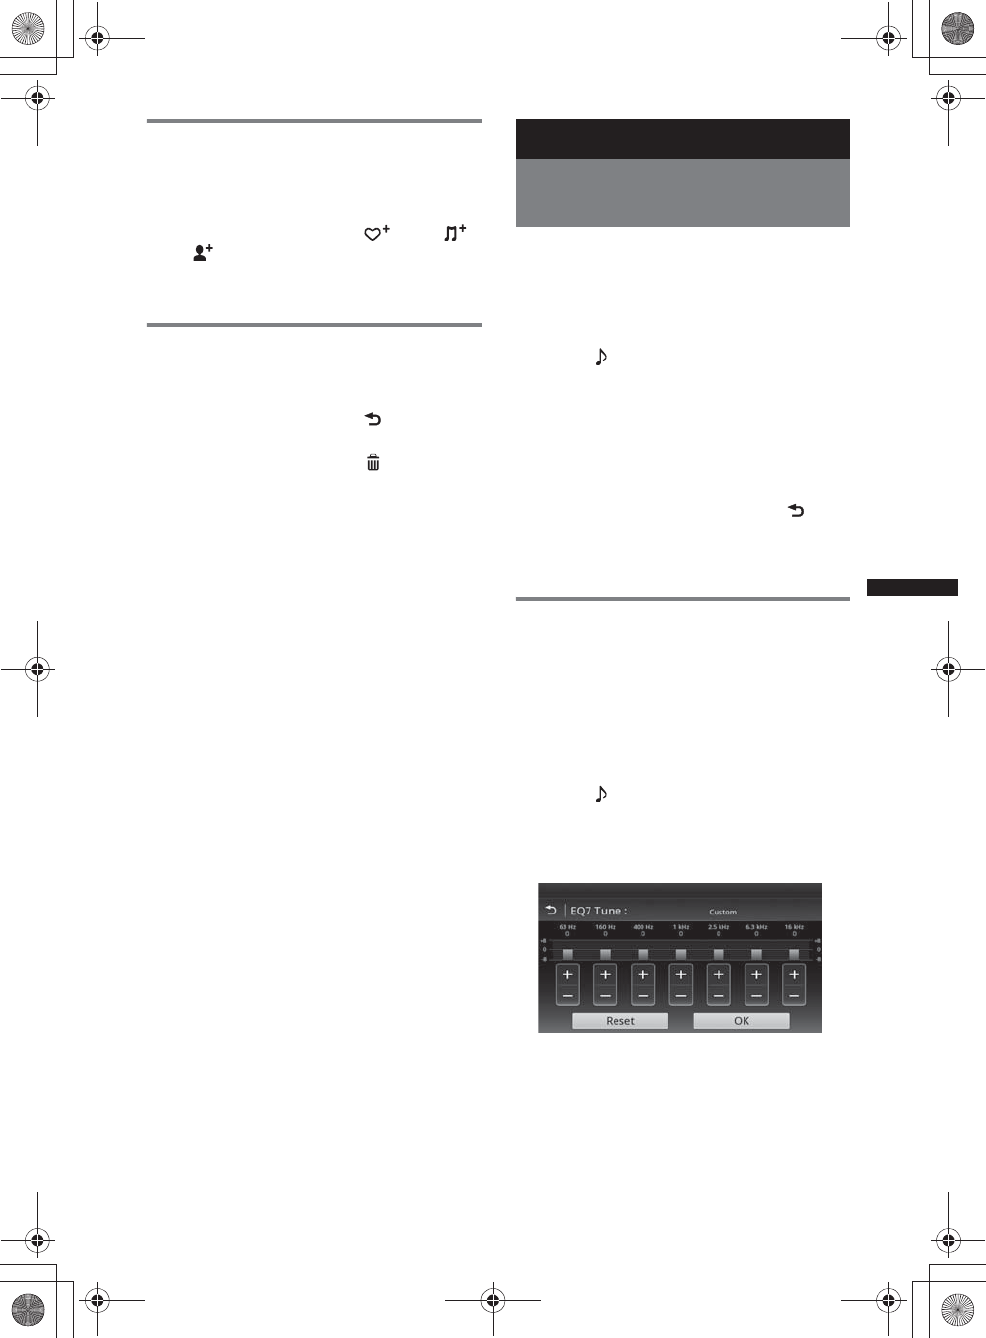
45
M:\001\XPML A7.0\ML\4422720111_XAV-701HD_CaFR-LaES(FM7.1
600dpi)\4422720111_XAV-701HD_ML\01US_XAV701HD\01US02CD-U.fm
masterpage:RightM:\001\XPML A7.0\ML\4422720111_XAV-701HD_CaFR-LaES(FM7.1
600dpi)\4422720111_XAV-701HD_ML\01US_XAV701HD\01US02CD-U.fm
masterpage:Right
XAV-701HD
4-422-720-11(1)
Creating a Station
A new station can be created based on the song
or artist being played. It will be accessible from
your Pandora® account immediately.
1During playback, touch , then
or .
Note
Pandora® limits the number of stations per account.
Deleting a Station
Stations can be deleted from the station list in
order to make room for new stations.
1During playback, touch .
The station list appears.
2In the station list, touch .
The delete mode will be activated and
checkboxes will be shown next to station
names.
3Check the stations to be deleted and
press “Delete.”
A confirmation box will show “OK” to
confirm deletion.
4Touch “OK.”
Sound Adjustment
Selecting the sound quality
— EQ7
You can select an equalizer curve from 7 music
types (“Xplod,” “Vocal,” “Edge,” “Cruise,”
“Space,” “Gravity,” “Custom,” or “OFF”).
1During reception/playback, press
(HOME), then touch “Settings.”
2Touch .
The sound setting menu appears.
3Touch “EQ7.”
The options appear.
4Touch the desired equalizer curve.
The setting is complete.
To cancel the equalizer curve, select “OFF.”
To return to the previous display, touch .
Note
During USB Video playback, you cannot operate the
sound adjustment while listening.
Customizing the equalizer curve
— EQ7 Tune
The EQ7 “Custom” curve allows you to make
your own equalizer settings. You can adjust the
level of 7 different bands: 63 Hz, 160 Hz,
400Hz, 1kHz, 2.5kHz, 6.3 kHz, and 16 kHz.
1During reception/playback, press
(HOME), then touch “Settings.”
2Touch , then “EQ7.”
Set the equalizer curve to other than “OFF.”
3Touch “Custom,” then “Tune >.”
The tuning display appears.
4Touch +/– of each frequency to adjust
their levels.
The level is adjustable in single steps,
between –8 and +8.
To restore the factory-set equalizer curve,
touch “Reset.”
00US+00COV-U.book Page 45 Friday, June 15, 2012 2:52 PM
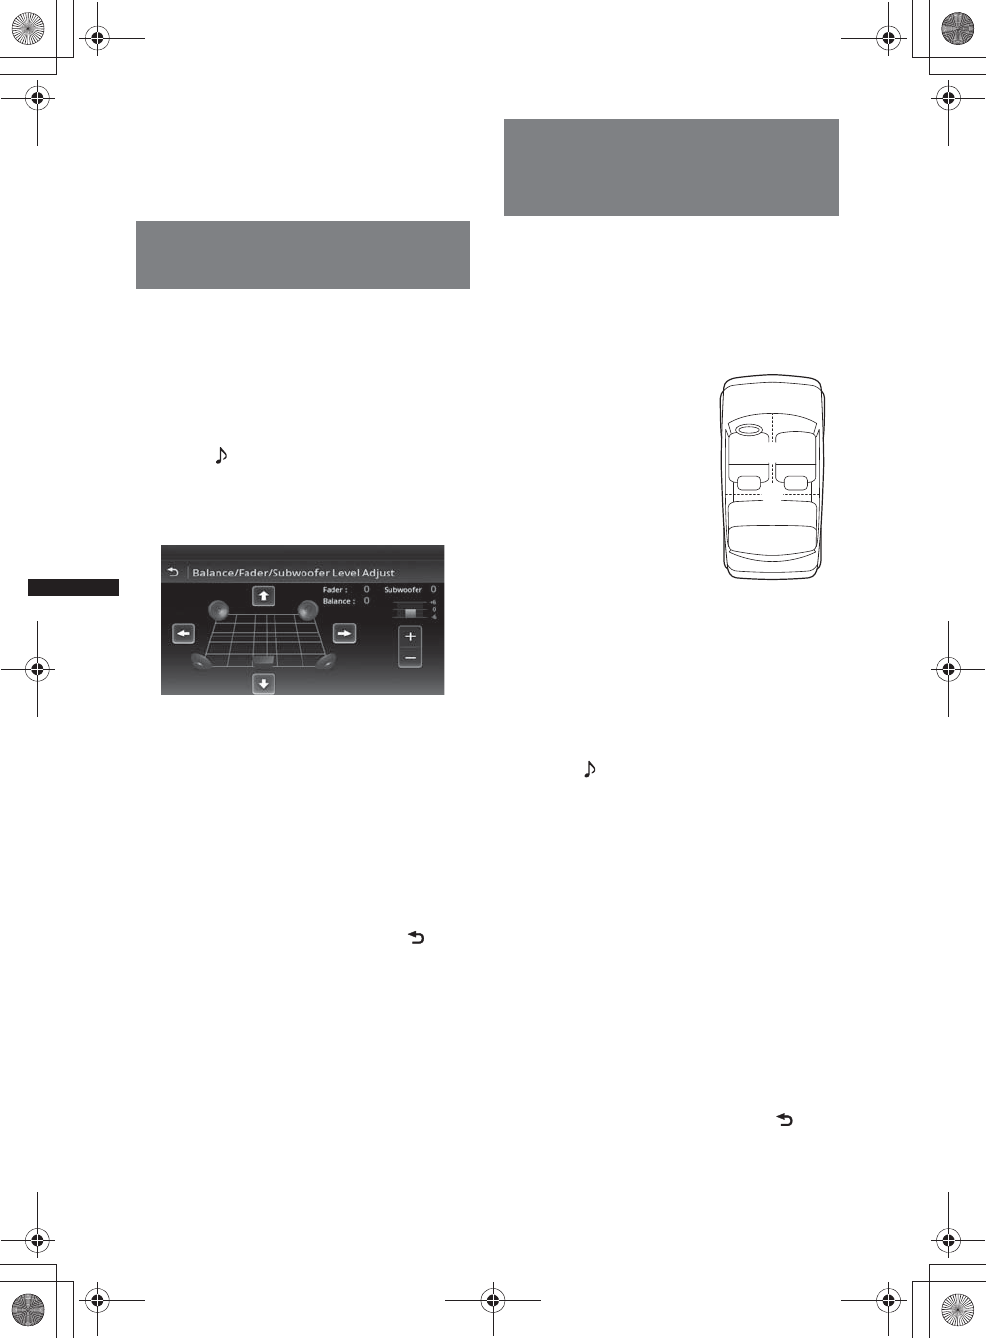
46
M:\001\XPML A7.0\ML\4422720111_XAV-701HD_CaFR-LaES(FM7.1
600dpi)\4422720111_XAV-701HD_ML\01US_XAV701HD\01US02CD-U.fm
masterpage:Left
XAV-701HD
4-422-720-11(1)
5Touch “OK.”
The setting is complete.
Tip
Other equalizer types are also adjustable.
Adjusting the sound
characteristics
The sound balance between left and right
speakers (“Balance”) and front and rear speakers
(“Fader”) can be adjusted to your preference.
You can also adjust the volume level of the
subwoofer if it is connected.
1During reception/playback, press
(HOME), then touch “Settings.”
2Touch .
The sound setting menu appears.
3Touch “Balance/Fader/Subwoofer.”
The setting display appears.
4Touch B/V/v/b to adjust the balance/
fader.
The level is adjustable in single steps between
–15 and +15 (Balance)/–15 and +15 (Fader).
5Touch +/– to adjust the volume level of
the subwoofer.
This setting is adjustable only when a
subwoofer is connected and “Subwoofer” is
set to “ON” (page 54).
The level is adjustable in single steps,
between –6 and +6.
To return to the previous display, touch .
Optimizing sound for the
listening position
— Intelligent Time Alignment
The unit can change the localization of sound by
delaying the sound output from each speaker to
suit your position, and simulate a natural sound
field with the feeling of being in the center of it
wherever you sit in the car.
The options for “Listening Position” are
indicated below.
You can also set the approximate subwoofer
position from your listening position if:
– the subwoofer is connected and “Subwoofer” is
set to “ON” (page 54).
– the listening position is set to “Front L,” “Front
R,” “Front,” or “All.”
1During reception/playback, press
(HOME) then touch “Settings.”
2Touch .
The sound setting menu appears.
3Touch “Listening Position.”
The setting display appears.
4Touch “Front L,” “Front R,” “Front,” or
“All.”
5Set the subwoofer position.
If you select “Front L,” “Front R,” “Front,” or
“All” in step 4 above, you can set the
subwoofer position.
Touch “Near,” “Normal,” or “Far.”
The setting is complete.
To customize the listening position, touch
“Custom >.” If you want to restore the default
setting, touch “Reset.”
To cancel Intelligent Time Alignment, select
“OFF.”
To return to the previous display, touch .
“Front L” (1): Front left
“Front R” (2): Front right
“Front” (3): Center front
“All” (4): In the center of
your car
“Custom”: Precisely
calibrated position (page 47)
“OFF”: No position set
12
4
3
00US+00COV-U.book Page 46 Friday, June 15, 2012 2:52 PM
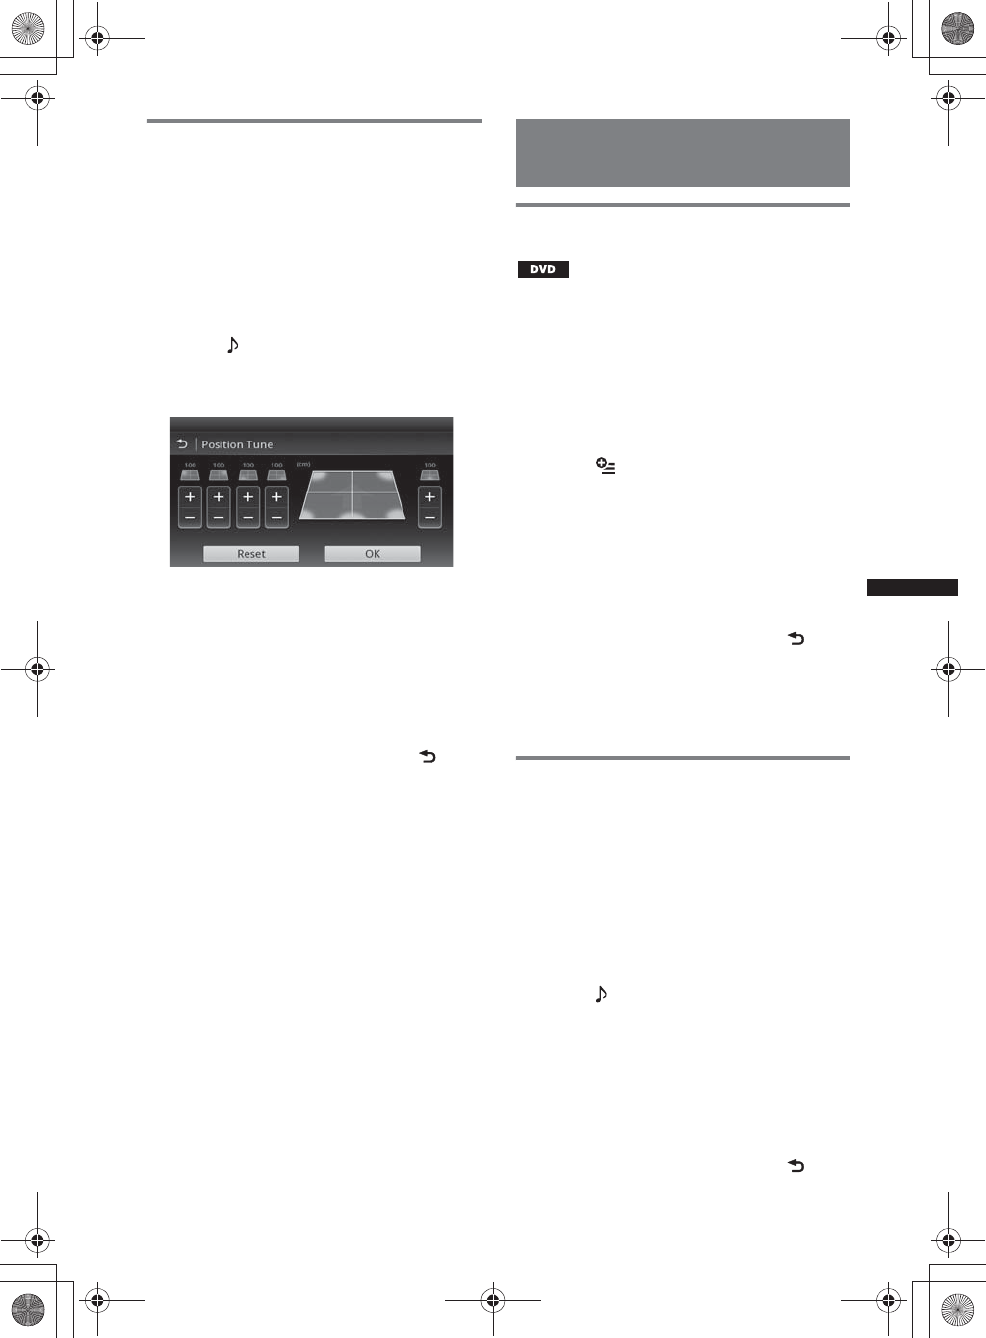
47
M:\001\XPML A7.0\ML\4422720111_XAV-701HD_CaFR-LaES(FM7.1
600dpi)\4422720111_XAV-701HD_ML\01US_XAV701HD\01US02CD-U.fm
masterpage:RightM:\001\XPML A7.0\ML\4422720111_XAV-701HD_CaFR-LaES(FM7.1
600dpi)\4422720111_XAV-701HD_ML\01US_XAV701HD\01US02CD-U.fm
masterpage:Right
XAV-701HD
4-422-720-11(1)
Calibrating the listening position
— Intelligent Time Alignment Tune
You can precisely calibrate your listening
position from each speaker so that the sound
delay reaches the listener more correctly.
Before starting, measure the distance between
your listening position and each speaker.
1During reception/playback, press
(HOME) then touch “Settings.”
2Touch , then “Listening Position.”
3Touch “Custom >.”
The setting display appears.
4Touch +/– of each speaker to set the
distance between your listening
position and the speakers.
The distance is adjustable in 2 cm (13/16 in)
steps, between 0 and 400 cm (0 and 13 1/10 ft).
5Touch “OK.”
The setting is complete.
To restore the default setting, touch “Reset.”
To return to the previous display, touch .
Note
The setting is applied only after “OK” is touched.
Speaker configuration and
volume setup
Creating a virtual center speaker
— CSO
To fully enjoy surround sound, it is preferable to
have 5 speakers (front left/right, rear left/right,
center) and 1 subwoofer. CSO (Center Speaker
Organizer) allows you to create a virtual center
speaker even though a real center speaker is not
connected.
1During DVD playback, touch the
display.
2Touch .
The Disc Option menu appears.
3Touch “CSO (Center Speaker
Organizer).”
The options appear.
4Touch “CSO1,” “CSO2,” or “CSO3.”
The setting is complete.
To cancel CSO, touch “OFF” in step 4.
To return to the previous display, touch .
Note
“CSO (Center Speaker Organizer)” is effective only
when “Multi Channel Output” is set to “Multi”
(page 56), as it is effective only for playback of multi-
channel sources.
Using rear speakers like
subwoofers — Rear Bass
Enhancer
Rear Bass Enhancer enhances the bass sound by
applying the low pass filter setting (page 53) to
the rear speakers. This function allows the rear
speakers to work like a pair of subwoofers if one
is not connected.
1During reception/playback, press
(HOME), then touch “Settings.”
2Touch .
The sound setting menu appears.
3Move the scrollbar up and down, then
touch “RBE (Rear Bass Enhancer).”
The options appear.
4Touch “RBE1,” “RBE2,” or “RBE3.”
The setting is complete.
To cancel RBE, touch “OFF” in step 4.
To return to the previous display, touch .
00US+00COV-U.book Page 47 Friday, June 15, 2012 2:52 PM
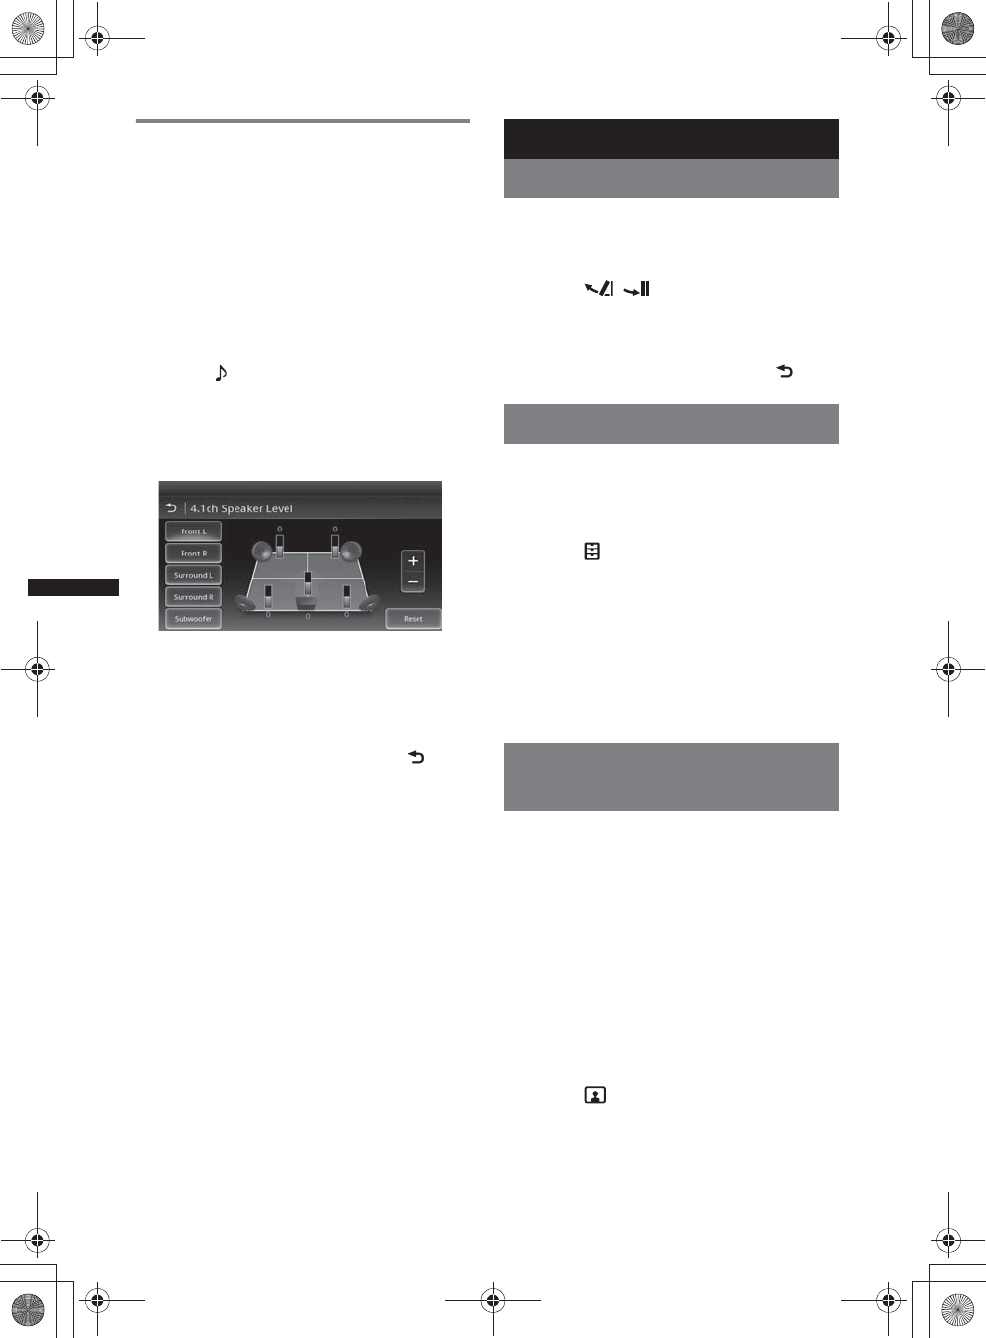
48
M:\001\XPML A7.0\ML\4422720111_XAV-701HD_CaFR-LaES(FM7.1
600dpi)\4422720111_XAV-701HD_ML\01US_XAV701HD\01US02CD-U.fm
masterpage:Left
XAV-701HD
4-422-720-11(1)
Adjusting the speaker volume
You can adjust the volume level of each
connected speaker.
The adjustable speakers are “Front R” (Front
Right), “Front L” (Front Left), “Surround L”
(Rear Left), “Surround R” (Rear Right) and
“Subwoofer*.”
*Adjustable only when a subwoofer is connected and
“Subwoofer” is set to “ON” (page 54).
1While no source is selected, press
(HOME), then touch “Settings.”
2Touch .
The sound setting menu appears.
3Move the scrollbar up and down, then
touch “4.1ch Speaker Level.”
The setting display appears.
4Touch the desired item, then +/– to
adjust the level.
Repeat this step to adjust each speaker’s
volume.
To restore the default setting, touch “Reset.”
To return to the previous display, touch .
Monitor Adjustment
Adjusting the monitor angle
You can adjust the monitor angle for best
viewing.
1Press and hold Z on the main unit.
2Touch / to adjust the angle.
The adjustment is stored.
The monitor retains the angle even after the
front panel is opened and closed.
To return to the previous display, touch .
Touch panel calibration
Touch panel calibration is required if the
touching position does not correspond with the
proper item.
1Press (HOME), then touch “Settings.”
2Touch .
The general setting menu appears.
3Move the scrollbar up and down, then
touch “Touch Panel Adjust.”
The setting display appears.
4Touch the targets in sequence.
The calibration is complete.
To cancel calibration, touch “Cancel.”
Adjusting the picture
— Picture EQ
You can adjust the picture to suit the interior
brightness of the car.
The options are indicated below.
“Dynamic”: Vivid picture with bright, clear
colors.
“Standard”: Standard picture.
“Theater”: Brightens the monitor; suitable for
darkly-lit movies.
“Sepia”: Applies a sepia tone to the picture.
“Custom 1,” “Custom 2”: User-adjustable
settings (page 49).
1During video playback, press (HOME),
then touch “Settings.”
2Touch .
The Visual Settings menu appears.
3Touch “Picture EQ.”
The options appear.
4Touch the desired option.
00US+00COV-U.book Page 48 Friday, June 15, 2012 2:52 PM
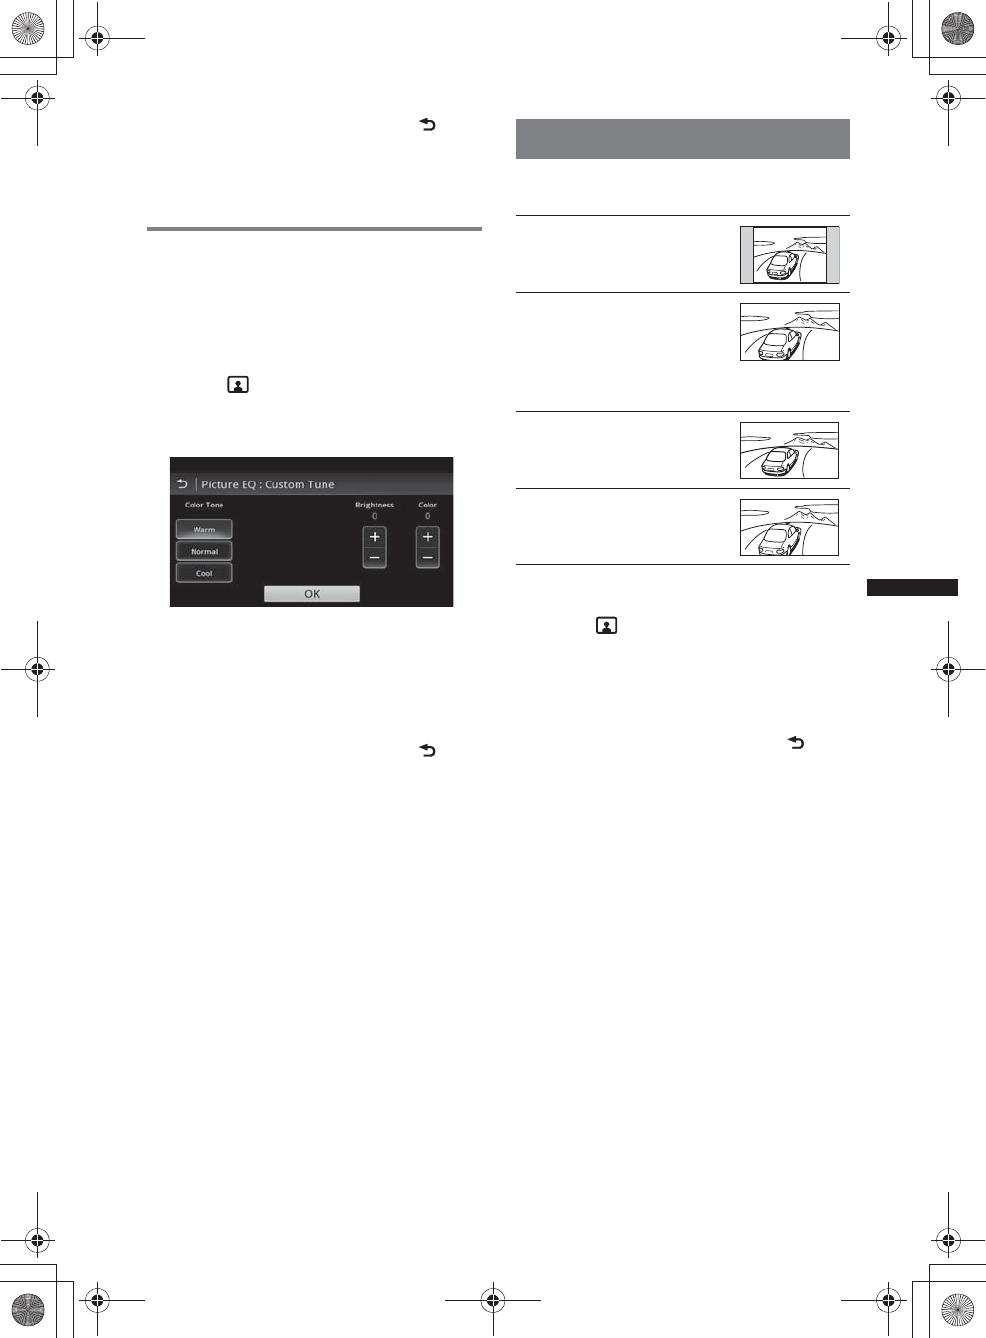
49
M:\001\XPML A7.0\ML\4422720111_XAV-701HD_CaFR-LaES(FM7.1
600dpi)\4422720111_XAV-701HD_ML\01US_XAV701HD\01US02CD-U.fm
masterpage:RightM:\001\XPML A7.0\ML\4422720111_XAV-701HD_CaFR-LaES(FM7.1
600dpi)\4422720111_XAV-701HD_ML\01US_XAV701HD\01US02CD-U.fm
masterpage:Right
XAV-701HD
4-422-720-11(1)
To return to the previous display, touch .
Notes
•This setting is available only when the parking brake
is set.
•This setting is not available for USB Video.
Customizing the picture
The options “Custom 1” and “Custom 2” of
Picture EQ allow you to make your own picture
setting by adjusting the picture tones.
1During video playback, press (HOME),
then touch “Settings.”
2Touch , then “Picture EQ.”
3Touch “Custom 1 >” or “Custom 2 >.”
The setting display appears.
4Touch “Warm,” “Normal,” or “Cool” to
select “Color Tone.”
5Touch +/– of “Brightness” and “Color”
to adjust their levels.
6Touch “OK.”
To return to the previous display, touch .
Note
The picture of the rear view camera cannot be
adjusted.
Selecting the aspect ratio
You can change the screen aspect ratio.
The options are indicated below.
1During video playback, press (HOME),
then touch “Settings.”
2Touch .
The screen setting menu appears.
3Touch “Aspect.”
The options appear.
4Touch the desired option.
To return to the previous display, touch .
Notes
•This setting is available only when the parking brake
is set.
•The screen aspect ratio of the rear view camera
cannot be changed.
•When you change the screen aspect of USB Video,
enter the option menu of USB Video. (page 29)
“Normal”: Picture with 4:3
aspect ratio (regular picture).
“Wide”: Picture with 4:3
aspect ratio enlarged to the left
and right edges of the screen,
with overflowing parts of the
top and bottom cut off to fill the
screen.
“Full”: Picture with 16:9
aspect ratio.
“Zoom”: Picture with 4:3
aspect ratio enlarged to the left
and right edges of the screen.
00US+00COV-U.book Page 49 Friday, June 15, 2012 2:52 PM
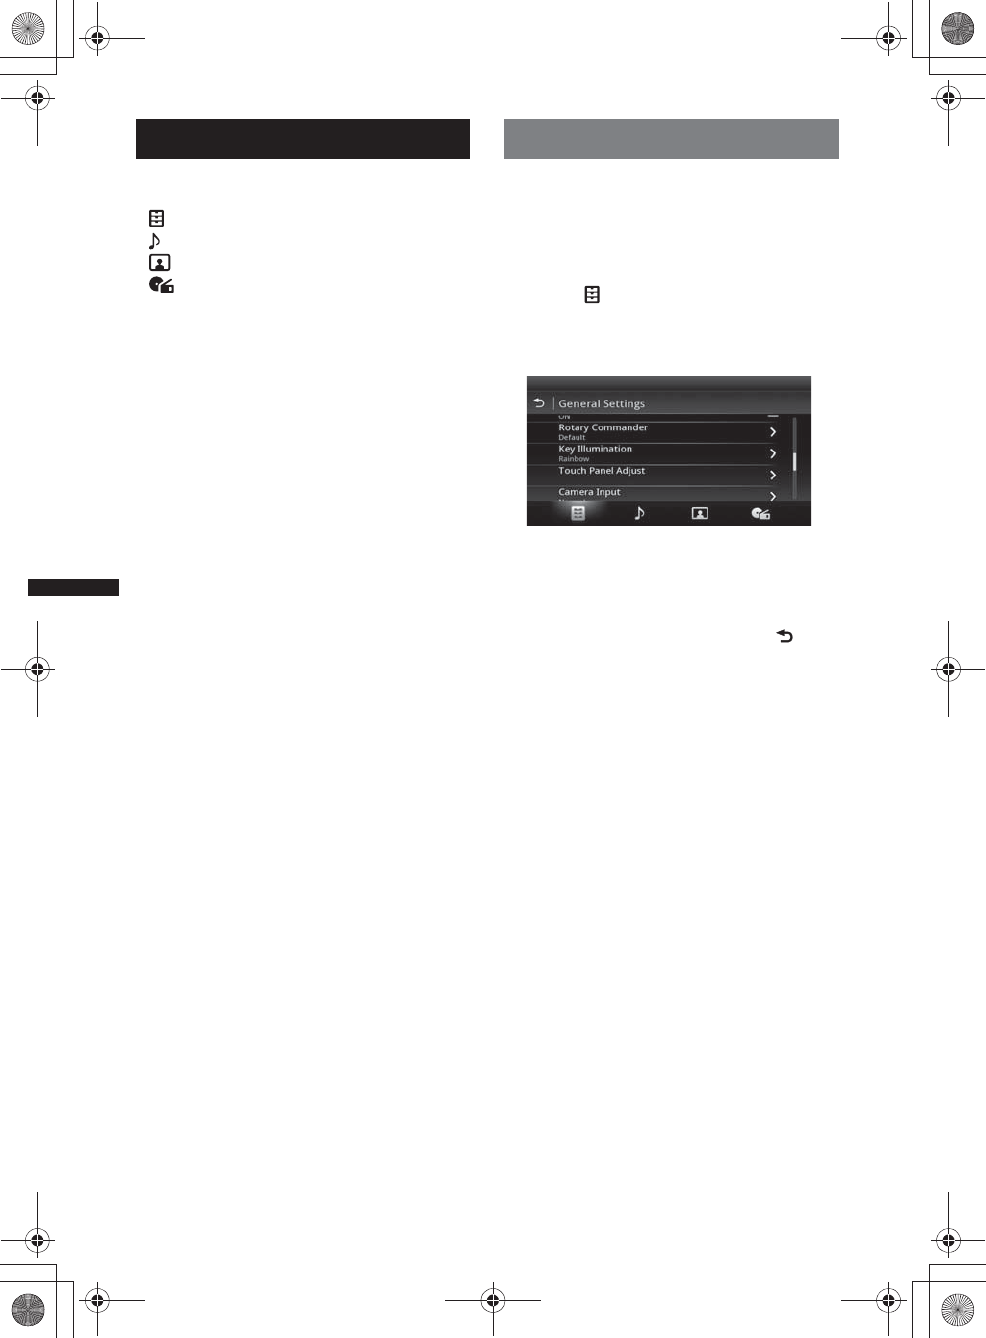
50
M:\001\XPML A7.0\ML\4422720111_XAV-701HD_CaFR-LaES(FM7.1
600dpi)\4422720111_XAV-701HD_ML\01US_XAV701HD\01US02CD-U.fm
masterpage:Left
XAV-701HD
4-422-720-11(1)
Settings
The setting menu includes the following
categories.
•: General Settings (page 51)
•: Sound Settings (page 53)
•: Visual Settings (page 55)
•: Source Settings (page 56)
Basic setting operation
You can set items in the menu via the following
procedure.
For example, when setting the Key Illumination:
1Press (HOME), then touch “Settings.”
The setting menu appears.
2Touch , and move the scrollbar up
and down, then touch “Key
Illumination.”
The general setting display appears.
3Move the scrollbar up and down to
select the desired preset color, then
press it.
The setting is complete.
To return to the previous display, touch .
00US+00COV-U.book Page 50 Friday, June 15, 2012 2:52 PM
51
M:\001\XPML A7.0\ML\4422720111_XAV-701HD_CaFR-LaES(FM7.1
600dpi)\4422720111_XAV-701HD_ML\01US_XAV701HD\01US02CD-U.fm
masterpage:RightM:\001\XPML A7.0\ML\4422720111_XAV-701HD_CaFR-LaES(FM7.1
600dpi)\4422720111_XAV-701HD_ML\01US_XAV701HD\01US02CD-U.fm
masterpage:Right
XAV-701HD
4-422-720-11(1)
General Settings
Touch “Settings” c c the desired item c the desired option. For details on this procedure, see “Basic
setting operation” on page 50.
For details, see the pages listed below. “z” indicates the default setting.
Item Option Purpose Unit status
Navigation Source
Playback Control L-Audio/
R-Nav (z),
R-Audio/
L-Nav,
Navigation
Only
To change the Navigation
mode.
Any status
Clock Adjust (page 16, 18) ––Any status
Language English (z),
Français,
Español,
Português,
Русский,
Nederlands,
Deutsch,
Italiano
To select the display
language.
Any status
Name Characters Latin
Characters
(z), Russian
Characters,
Simplified
Chinese,
Traditional
Chinese,
Korean
Characters,
Thai
Characters
To select the character
encoding.
Any status
Auto OFF
Shuts off automatically after a
desired time when no source is
selected.
OFF (z)To deactivate the Auto Off
function. Any status
30 sec, 30 min,
60 min To select the desired time.
Demo ON (z)To activate the
demonstration. Any status
OFF To deactivate the
demonstration.
Beep ON (z)To activate the operation
sound. Any status
OFF To deactivate the operation
sound.
Rotary Commander
Changes the operative
direction of rotary commander
controls.
Default (z)To use in the factory-set
position. Any status
Reverse To use on the right side of
the steering column.
00US+00COV-U.book Page 51 Friday, June 15, 2012 2:52 PM
52
M:\001\XPML A7.0\ML\4422720111_XAV-701HD_CaFR-LaES(FM7.1
600dpi)\4422720111_XAV-701HD_ML\01US_XAV701HD\01US02CD-U.fm
masterpage:Left
XAV-701HD
4-422-720-11(1)
*“Bluetooth Initialize” deletes all Bluetooth-related settings such as phonebook data, call history, preset dial,
history of connected Bluetooth devices, etc.
Item Option Purpose Unit status
Key Illumination (page 35)Rainbow (z)
(12 preset
colors,
customized
color and 5
preset
patterns)
To change the color of the
buttons.
Any status
Touch Panel Adjust
(page 48)
––Any status
Camera Input
Activates the video input from
the connected rear view
camera.
OFF To deactivate the input.
Any status
Normal (z)To display the picture from
the rear view camera when
the back lamp lights up.
Reverse To display the picture from
the rear view camera when
the shift lever is set to the R
(reverse) position.
Rear View Camera Setting
(page 59)
––Any status
Output Color System
Changes the color system
according to the connected
monitor.
(SECAM is not supported.)
NTSC (z)To set to NTSC.
No source
selected
PAL To set to PAL.
Bluetooth Connection
(page 38)
ON To search from the
Bluetooth device. Any status
OFF (z)To not connect the
Bluetooth device.
Bluetooth Initialize*–To initialize the Bluetooth
settings. Any status
Firmware Version –To update the Firmware
version. Any status
Open Source Licenses –To display the software
licenses. Any status
00US+00COV-U.book Page 52 Friday, June 15, 2012 2:52 PM

53
M:\001\XPML A7.0\ML\4422720111_XAV-701HD_CaFR-LaES(FM7.1
600dpi)\4422720111_XAV-701HD_ML\01US_XAV701HD\01US02CD-U.fm
masterpage:RightM:\001\XPML A7.0\ML\4422720111_XAV-701HD_CaFR-LaES(FM7.1
600dpi)\4422720111_XAV-701HD_ML\01US_XAV701HD\01US02CD-U.fm
masterpage:Right
XAV-701HD
4-422-720-11(1)
Sound Settings
Touch “Settings” c c the desired item c the desired option. For details on this procedure, see “Basic
setting operation” on page 50.
For details, see the pages listed below. “z” indicates the default setting.
Item Option Purpose Unit status
EQ7 (page 45)OFF (z)To cancel the equalizer
curve.
During reception/
playback
Xplod, Vocal,
Edge, Cruise,
Space,
Gravity,
Custom
To select the equalizer
curve; customize the
equalizer curve.
Balance/Fader/Subwoofer
(page 46)
Balance :
(–15 ~ +15)
Fader :
(–15 ~ +15)
z: 0
To adjust the level.
During reception/
playback
Subwoofer:
(–6 ~ +6)
z: 0
To adjust the volume level
of the subwoofer.
(Available only when
“Subwoofer” is set to
“ON.”)
Listening Position (page 46)
Sets the listening position and
subwoofer position.
Front L (z)To set to front left.
Any status
Front R To set to front right.
Front To set to center front.
All To set to the center of your
car.
OFF To not set the listening
position.
Subwoofer:
Near,
Normal (z),
Far
To select the subwoofer
position. (Available only
when “Subwoofer” is set to
“ON,” and the listening
position is set to “Front L,”
“Front R,” “Front,” or
“All.”)
Custom To precisely calibrate the
listening position
(page 47).
RBE (Rear Bass Enhancer)
(page 47)
Uses rear speakers like
subwoofers.
OFF (z),
RBE1, RBE2,
RBE3
To select the mode. During reception/
playback
00US+00COV-U.book Page 53 Friday, June 15, 2012 2:52 PM
54
M:\001\XPML A7.0\ML\4422720111_XAV-701HD_CaFR-LaES(FM7.1
600dpi)\4422720111_XAV-701HD_ML\01US_XAV701HD\01US02CD-U.fm
masterpage:Left
XAV-701HD
4-422-720-11(1)
Item Option Purpose Unit status
Crossover Filter
Selects the cut-off frequency
of the front/rear speakers
(HPF) and subwoofer (LPF).
LPF: 50 Hz,
60 Hz, 80 Hz,
100 Hz (z),
120 Hz
To select the cut-off
frequency. (Available only
when “Subwoofer” is set to
“ON.”)
During reception/
playback
HPF: OFF (z)To not cut out the
frequencies.
HPF: 50 Hz,
60 Hz, 80 Hz,
100 Hz, 120 Hz
To select the cut-off
frequency.
Subwoofer
Phase:
Normal (z),
Reverse
To select the subwoofer
phase. (Available only
when “Subwoofer” is set to
“ON.”)
Subwoofer
Sets the subwoofer connection
status.
ON (z)To set the connection status
to on. No source
selected
OFF To set the connection status
to off.
4.1ch Speaker Level
(page 48)
–– No source
selected
00US+00COV-U.book Page 54 Friday, June 15, 2012 2:52 PM
55
M:\001\XPML A7.0\ML\4422720111_XAV-701HD_CaFR-LaES(FM7.1
600dpi)\4422720111_XAV-701HD_ML\01US_XAV701HD\01US02CD-U.fm
masterpage:RightM:\001\XPML A7.0\ML\4422720111_XAV-701HD_CaFR-LaES(FM7.1
600dpi)\4422720111_XAV-701HD_ML\01US_XAV701HD\01US02CD-U.fm
masterpage:Right
XAV-701HD
4-422-720-11(1)
Visual Settings
Touch “Settings” c c the desired item c the desired option. For details on this procedure, see
“Basic setting operation” on page 50.
For details, see the pages listed below. “z” indicates the default setting.
*1 This setting is available only when the parking brake is set.
*2 When you change the screen aspect of USB Video, enter the option menu of USB Video. (page 29)
Item Option Purpose Unit status
Dimmer
Changes the display
brightness.
OFF To deactivate the dimmer.
Any status
Auto (z)To dim the display
automatically when you
turn lights on. (Available
only when the illumination
control lead is connected.)
ON To dim the display.
Dimmer Level
Sets the brightness level when
the dimmer is activated.
(–5 ~ +5)
z: 0 To select the level. Any status
Picture EQ*1 (page 48) Dynamic (z),
Standard,
Theater, Sepia
To select the picture
quality. During video
playback
Custom 1,
Custom 2 To customize the picture
quality.
Aspect*1*2 (page 49) Normal,
Wide,
Full (z),
Zoom
To select the screen aspect
ratio. During video
playback
00US+00COV-U.book Page 55 Friday, June 15, 2012 2:52 PM
56
M:\001\XPML A7.0\ML\4422720111_XAV-701HD_CaFR-LaES(FM7.1
600dpi)\4422720111_XAV-701HD_ML\01US_XAV701HD\01US02CD-U.fm
masterpage:Left
XAV-701HD
4-422-720-11(1)
Source Settings
Touch “Settings” c c the desired item c the desired option. For details on this procedure, see
“Basic setting operation” on page 50.
For details, see the pages listed below. “z” indicates the default setting.
Item Option Purpose Unit status
DVD Direct Search
(page 24)
Sets the search item for DVD
direct search play.
Chapter (z)To search for a chapter.
Any status
Title To search for a title.
DVD Menu Language English (z),
Chinese,
German,
French, Italian,
Spanish,
Portuguese,
Dutch, Danish,
Swedish,
Finnish,
Norwegian,
Russian, Other
To change the disc’s menu
language.
No source
selected
DVD Audio Language English (z),
Chinese,
German,
French, Italian,
Spanish,
Portuguese,
Dutch, Danish,
Swedish,
Finnish,
Norwegian,
Russian, Other
To change the soundtrack
language.
No source
selected
DVD Subtitle Language English (z),
Chinese,
German,
French, Italian,
Spanish,
Portuguese,
Dutch, Danish,
Swedish,
Finnish,
Norwegian,
Russian, Other
To change the subtitle
language recorded on the
disc.
No source
selected
Audio DRC
Makes the sound clear when
the volume is low. Only for a
DVD* conforming to Audio
DRC (Dynamic Range
Control).
*Excluding DVD-R/DVD-R DL/
DVD-RW in VR mode.
Standard (z)To select the standard
setting.
No source
selected
Wide To obtain the feeling of
being at a live performance.
Multi Channel Output
Switches the method of
outputting multi channel
sources.
Multi (z)To output in 4.1 channels. No source
selected
Stereo To downmix to 2 channels.
00US+00COV-U.book Page 56 Friday, June 15, 2012 2:52 PM
57
M:\001\XPML A7.0\ML\4422720111_XAV-701HD_CaFR-LaES(FM7.1
600dpi)\4422720111_XAV-701HD_ML\01US_XAV701HD\01US02CD-U.fm
masterpage:RightM:\001\XPML A7.0\ML\4422720111_XAV-701HD_CaFR-LaES(FM7.1
600dpi)\4422720111_XAV-701HD_ML\01US_XAV701HD\01US02CD-U.fm
masterpage:Right
XAV-701HD
4-422-720-11(1)
Item Option Purpose Unit status
Monitor Type
Selects an aspect ratio suitable
for the connected monitor.
(The screen aspect ratio of this
unit also changes.)
Depending on the disc, “4:3
Letter Box” may be selected
automatically instead of “4:3
Pan Scan,” and vice versa.
16:9 (z)To display a wide picture.
Suitable when connecting
to a wide-screen monitor or
a monitor with a wide
mode function.
No source
selected
4:3 Letter Box To display a wide picture
with bands on the upper
and lower positions of the
screen.
Suitable when connecting
to a 4:3 screen monitor.
4:3 Pan Scan To display a wide picture
on the entire screen and
automatically cut off the
portions that do not fit.
DVD Playlist Play
(For DVD-R/DVD-R DL/
DVD-RW in VR mode only)
Original (z)To play titles as they were
originally recorded. No source
selected
Playlist To play an edited playlist.
Video CD PBC (page 22) ON (z)To play a VCD with PBC
functions. No source
selected
OFF To play a VCD without
PBC functions.
Multi Disc Resume ON (z)To store the resume settings
in memory for up to 5
video* discs.
*DVD VIDEO/VCD/Xvid/
MPEG-4 only. Any status
OFF To not store the resume
settings in memory.
Resume playback is
available only for the
current disc in the unit.
SXM Parental Control
(page 58)
Locked To activate the parental
lock. During SiriusXM
tuner reception
Unlocked (z)To deactivate the parental
lock.
Source Skip –To reduce the number of
presses required to change
sources. Check any unused
sources in the Source skip
screen. (pages 12, 15)
Any status
00US+00COV-U.book Page 57 Friday, June 15, 2012 2:52 PM
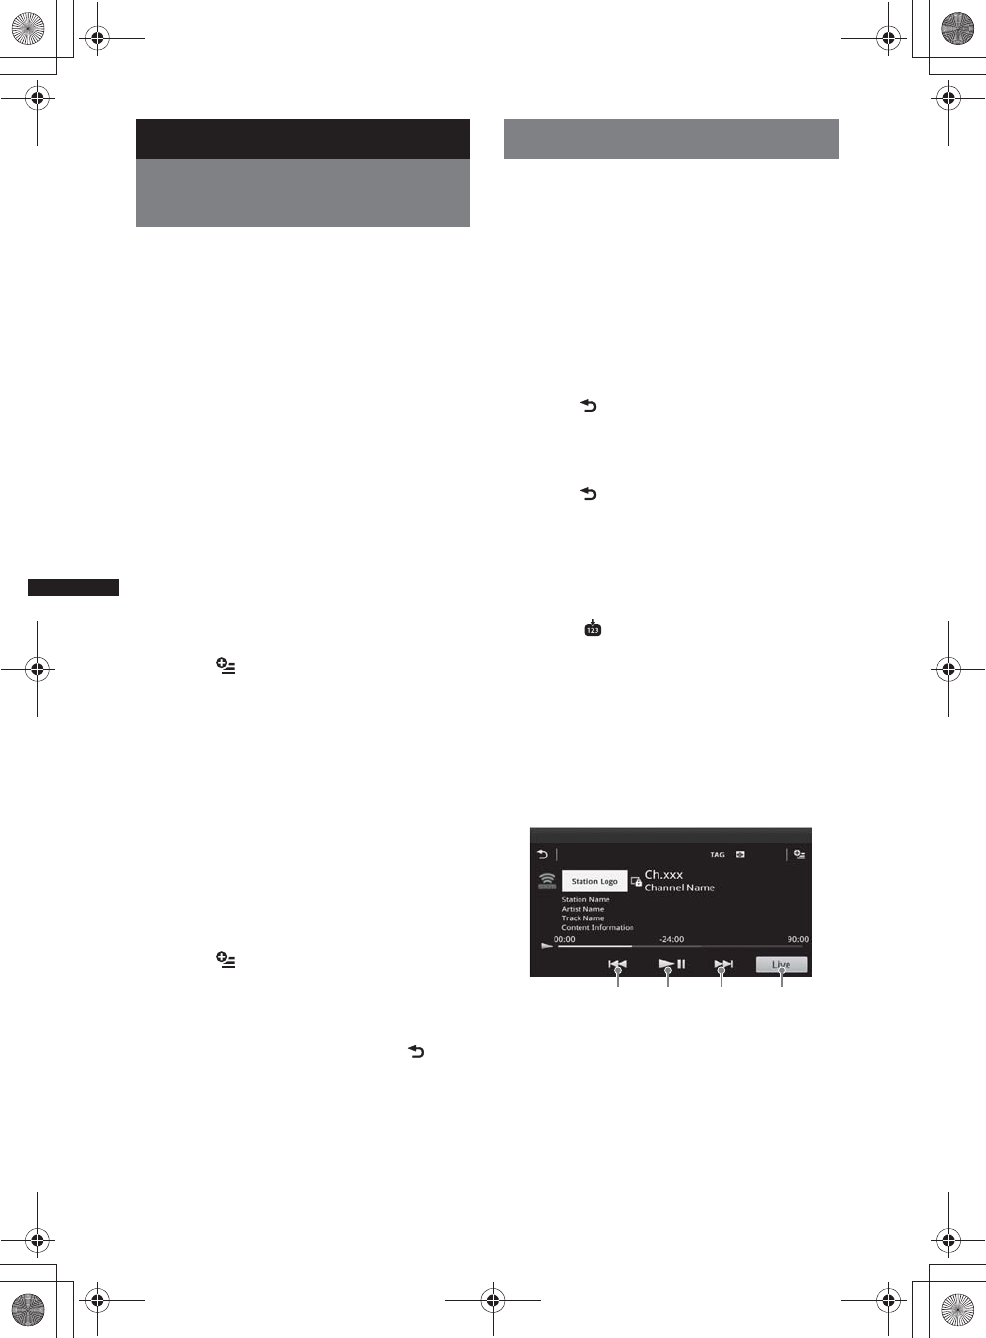
58
M:\001\XPML A7.0\ML\4422720111_XAV-701HD_CaFR-LaES(FM7.1
600dpi)\4422720111_XAV-701HD_ML\01US_XAV701HD\01US02CD-U.fm
masterpage:Left
XAV-701HD
4-422-720-11(1)
Using Optional Equipment
Auxiliary audio/video
equipment
You can connect up to 2 optional devices, such as
a portable media player, game console, etc., to
the AUX1 IN and AUX2 IN terminals on the
unit.
Selecting an auxiliary device
1Press (HOME), then touch “AUX.”
The AUX playback display appears.
2Touch “AUX1” or “AUX2” to select the
device.
Operate via the portable device itself.
Adjusting the volume level
Be sure to adjust the volume for each connected
device before playback.
The volume level is common to “AUX1” and
“AUX2.”
1Reduce the volume on the unit.
2Press (HOME), then touch “AUX.”
The AUX playback display appears.
3Touch to open the menu, then
touch “Adjust Input Level.”
4Set your usual listening volume on the
unit.
5Touch –/+ repeatedly to adjust the
level.
The level is adjustable in single steps,
between –8 and +18.
Setting the type of device
By setting the type (video or audio) of each
connected device, the background screen can be
switched accordingly.
1Press (HOME), then touch “AUX.”
2Touch to open the menu, then
touch “AUX1 Input” or “AUX2 Input.”
3Touch “Audio” or “Video.”
The setting is complete.
To return to the previous display, touch .
SiriusXM Connect Tuner
By connecting an optional SiriusXM Connect
Tuner, you can use the features and functions of
the SiriusXM satellite radio (SiriusXM
subscriptions sold separately).
For more details on services, visit the following
web site:
http://www.siriusxm.com/
1Press (HOME), then touch “SXM.”
Selecting Channel List or Category
List
1Press .
The Channel List appears on the display.
2Touch the desired channel. To scroll
the list, touch V/v.
3Press .
The Category List appears on the display.
4Touch the desired category. To scroll
the list, touch V/v.
Storing channels
1Touch to enter the Preset Edit
mode.
2Select the number that you want to
store.
Instant Replay
Stores up to 90 minutes of broadcast content in
the memory of the SiriusXM Connect Tuner. You
can perform operations on that stored content,
such as playing back music.
1Touch to skip to the next/previous content.
Touch and hold to reverse/fast-forward the
contents.
2Touch to pause/resume play after pause.
3Touch to locate to the current content being
broadcast.
12 1 3
00US+00COV-U.book Page 58 Friday, June 15, 2012 2:52 PM
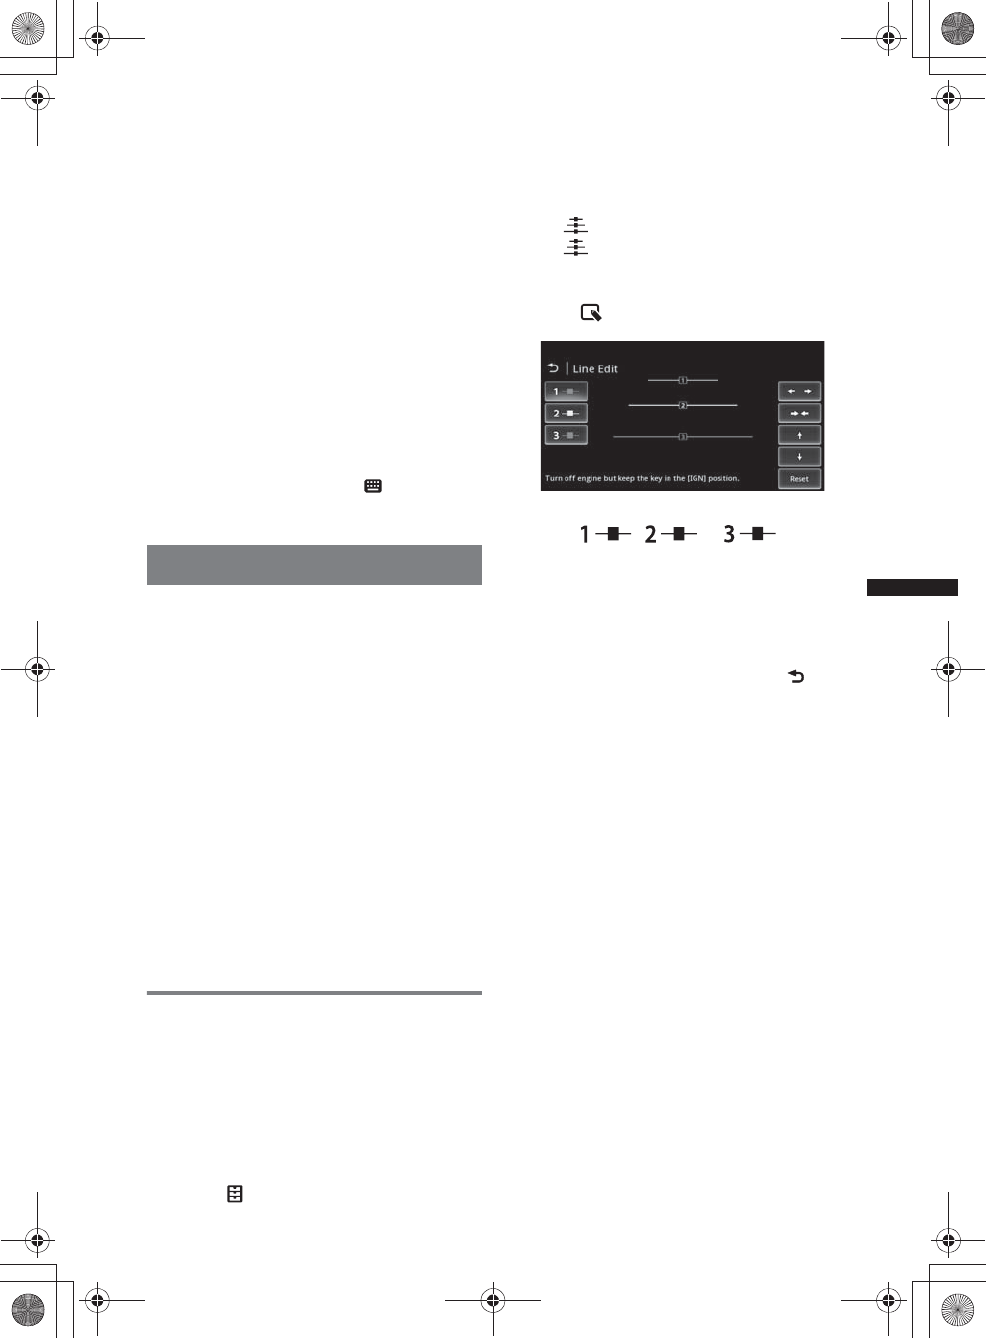
59
M:\001\XPML A7.0\ML\4422720111_XAV-701HD_CaFR-LaES(FM7.1
600dpi)\4422720111_XAV-701HD_ML\01US_XAV701HD\01US02CD-U.fm
masterpage:RightM:\001\XPML A7.0\ML\4422720111_XAV-701HD_CaFR-LaES(FM7.1
600dpi)\4422720111_XAV-701HD_ML\01US_XAV701HD\01US02CD-U.fm
masterpage:Right
XAV-701HD
4-422-720-11(1)
iTunes Tagging
You can save the name of a song broadcast from
an HD Radio station to this unit with a few easy
steps. For details, see “iTunes Tagging”
(page 18).
Parental control
Some SiriusXM channels contain content that is
not suitable for children. You can enable a
parental control passkey for these channels.
1On the Source Settings (page 56),
move the scrollbar up and down to
select “SXM Parental Control.”
2Enter the passkey, then touch “OK.”
To unblock the channels, enter the passkey.
Displaying the SiriusXM Radio ID
1During playback, touch .
2Enter “000,” then touch “OK.”
Rear view camera
By connecting the optional rear view camera to
the CAMERA terminal, you can display the
picture from the rear view camera.
The picture from the rear view camera appears
when:
– the back lamp lights up (or the shift lever is set
to the R (reverse) position).
– you press (HOME) then touch “Rear
Camera.”*
– you press (DSPL) repeatedly.*
*The marker lines you edit in Rear view camera
settings do not appear.
Note
When backing up your car, watch the surroundings
carefully for safety. Do not depend on the rear view
camera exclusively.
Tip
Even if a rear view camera is connected, you can set
the unit to not display the picture from a rear view
camera by deactivating the camera input (page 52).
Rear view camera settings
You can display setting items on the picture from
the rear view camera to assist operation.
This setting is available only when:
– “Camera Input” is set to “Normal” or
“Reverse” (page 52).
– the parking brake is applied.
1Press (HOME), then touch “Settings.”
2Touch .
3Move the scrollbar up and down, then
touch “Rear View Camera Setting.”
The setting items appear.
Displaying marker lines
Touch .
Touch again to hide the marker lines.
Editing lines
1Touch .
2Select the line to edit.
Touch , or
corresponding to the line to edit.
3Edit the line.
To increase the length, touch B b.
To reduce the length, touch bB.
To adjust the position, touch V or v.
To restore the default setting, touch “Reset.”
To return to the previous display, touch .
00US+00COV-U.book Page 59 Friday, June 15, 2012 2:52 PM
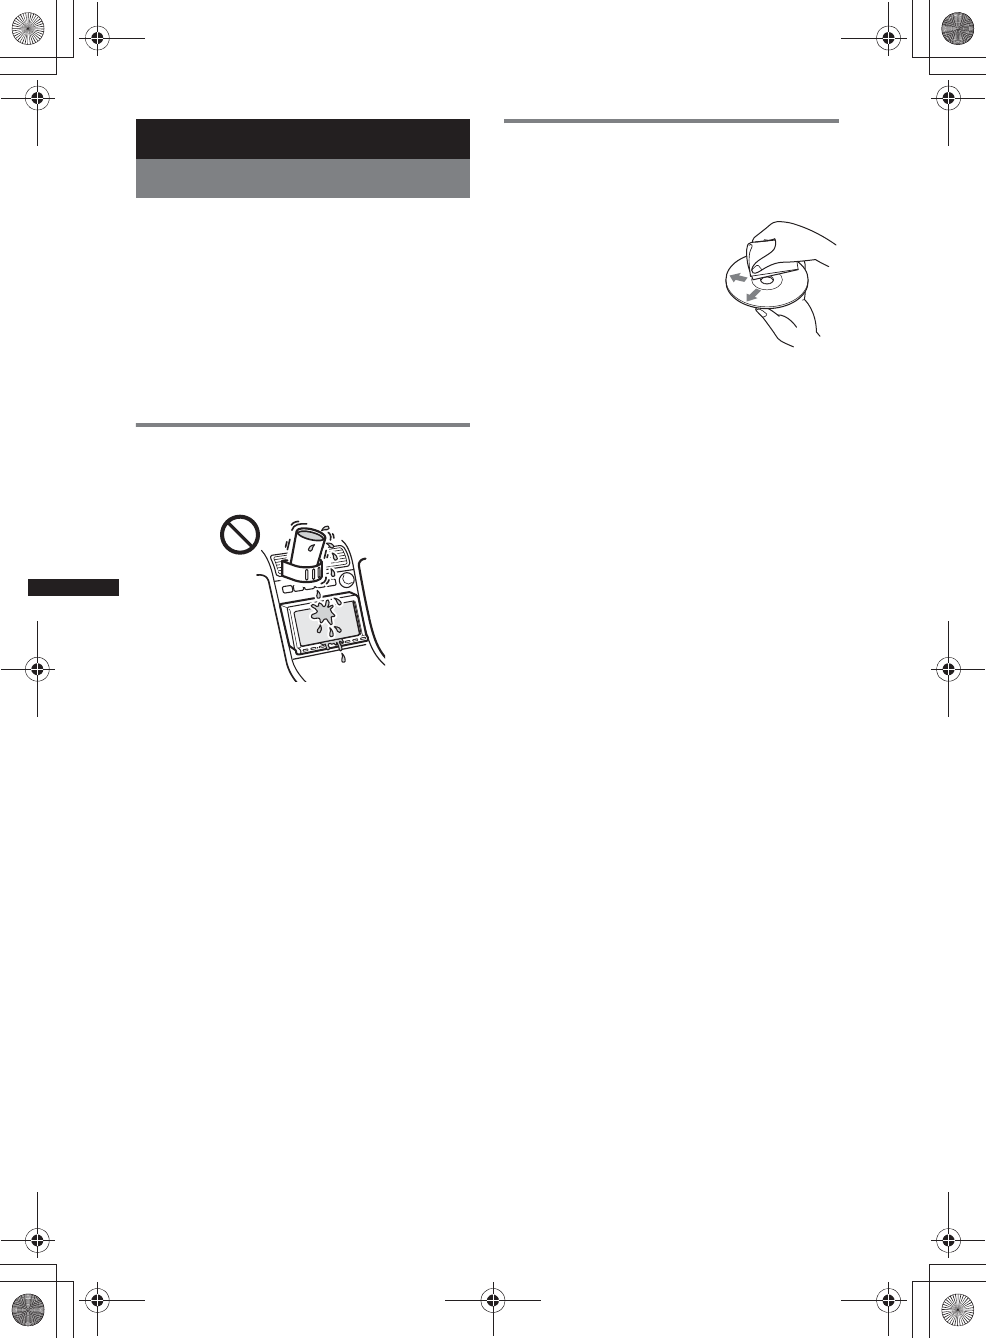
60
M:\001\XPML A7.0\ML\4422720111_XAV-701HD_CaFR-LaES(FM7.1
600dpi)\4422720111_XAV-701HD_ML\01US_XAV701HD\01US02CD-U.fm
masterpage:Left
XAV-701HD
4-422-720-11(1)
Additional Information
Precautions
• Cool off the unit beforehand if your car has been
parked in direct sunlight.
• Power antenna (aerial) extends automatically.
Moisture condensation
Should moisture condensation occur inside the unit,
remove the disc and wait for about an hour for it to
dry out; otherwise the unit will not operate properly.
To maintain high sound quality
Do not splash liquid onto the unit or discs.
Notes on LCD panel
•Do not wet the LCD panel or expose it to
liquids. This may cause a malfunction.
• Do not press on the LCD panel as doing so can
distort the picture or cause a malfunction (i.e., the
picture may become unclear, or the LCD panel
may be damaged).
• Do not touch other than with the finger, as it may
damage or break the LCD panel.
• Clean the LCD panel with a dry soft cloth. Do not
use solvents such as benzine, thinner,
commercially available cleaners, or antistatic
spray.
• Do not use this unit outside the temperature range
5 – 45ºC (41 – 113 ºF).
• If your car was parked in a cold or hot place, the
picture may not be clear. However, the monitor is
not damaged, and the picture will become clear
after the temperature in your car becomes normal.
• Some stationary blue, red or green dots may
appear on the monitor. These are called “bright
spots,” and can happen with any LCD. The LCD
panel is precision-manufactured with more than
99.99% of its segments functional. However, it is
possible that a small percentage (typically 0.01%)
of the segments may not light up properly. This
will not, however, interfere with your viewing.
Notes on discs
• Do not expose discs to direct sunlight or heat
sources such as hot air ducts, nor leave it in a car
parked in direct sunlight.
• Before playing, wipe the discs
with a cleaning cloth from the
center out. Do not use solvents
such as benzine, thinner,
commercially available
cleaners.
• This unit is designed to play
discs that conform to the
Compact Disc (CD) standard.
DualDiscs and some of the music discs encoded
with copyright protection technologies do not
conform to the Compact Disc (CD) standard,
therefore, these discs may not be playable by this
unit.
•Discs that this unit CANNOT play
– Discs with labels, stickers, or sticky tape or
paper attached. Doing so may cause a
malfunction, or may ruin the disc.
– Discs with non-standard shapes (e.g., heart,
square, star). Attempting to do so may damage
the unit.
–8 cm (3 1/4 in) discs.
Note on playback operations of DVDs
and VCDs
Some playback operations of DVDs and VCDs may
be intentionally set by software producers. Since
this unit plays DVDs and VCDs according to the
disc contents the software producers designed, some
playback features may not be available. Also, refer
to the instructions supplied with the DVDs or
VCDs.
Notes on DATA CDs and DATA DVDs
• Some DATA CDs/DATA DVDs (depending on the
equipment used for its recording, or the disc
condition) may not play on this unit.
• Finalization is required for some discs (page 61).
• The unit is compatible with the following
standards.
For DATA CDs
– ISO 9660 level 1/level 2 format, Joliet/Romeo in
the expansion format
– Multi Session
For DATA DVDs
– UDF Bridge format (combined UDF and ISO
9660)
–Multi Border
•The maximum number of:
– folders (albums): 256 (including root and empty
folders).
– files (tracks/videos) and folders contained in a
disc: 2,000 (if a folder/file names contain many
characters, this number may become less than
2,000).
– displayable characters for a folder/file name: 64
(Joliet/Romeo).
00US+00COV-U.book Page 60 Friday, June 15, 2012 2:52 PM

61
M:\001\XPML A7.0\ML\4422720111_XAV-701HD_CaFR-LaES(FM7.1
600dpi)\4422720111_XAV-701HD_ML\01US_XAV701HD\01US02CD-U.fm
masterpage:RightM:\001\XPML A7.0\ML\4422720111_XAV-701HD_CaFR-LaES(FM7.1
600dpi)\4422720111_XAV-701HD_ML\01US_XAV701HD\01US02CD-U.fm
masterpage:Right
XAV-701HD
4-422-720-11(1)
Notes on finalizing discs
The following discs are required to be finalized to
play on this unit.
• DVD-R/DVD-R DL (in video mode/VR mode)
• DVD-RW in video mode
• DVD+R/DVD+R DL
•CD-R
•CD-RW
The following discs can be played without
finalization.
• DVD+RW – automatically finalized.
• DVD-RW in VR mode – finalization not required.
For details, refer to the manual supplied with the
disc.
Notes on Multi Session CDs/Multi
Border DVDs
This unit can play Multi Session CDs/Multi Border
DVDs under the following conditions. Note that the
session must be closed and the disc must be
finalized.
• When CD-DA (Compact Disc Digital Audio) is
recorded in the first session:
The unit recognizes the disc as CD-DA and only
CD-DA of the first session is played, even if
another format (e.g., MP3) is recorded in other
sessions.
• When CD-DA is recorded other than in the first
session:
The unit recognizes the disc as a DATA CD or
DATA DVD, and all CD-DA sessions are skipped.
• When an MP3/WMA/AAC/Xvid/MPEG-4 is
recorded:
Only the sessions containing the selected file type
(audio/video)* are played (if CD-DA or other data
exists in other sessions, they are skipped).
*For details on how to select the file type, see
page 25.
Playback order of MP3/WMA/AAC/
Xvid/MPEG-4 files
About WMA files
WMA*1 files meeting the following
requirements can be played. Playback is not be
guaranteed for all WMA files meeting the
requirements.
Codec for Disc
• Media File format: ASF file format
•File extension: .wma
•Bit rate: 64 to 192 kbps (Supports variable bit rate
(VBR))
• Sampling frequency *2: 44.1 kHz
Codec for MSC
• Media File format: ASF file format
•File extension: .wma
•Bit rate: 64 to 192 kbps (Supports variable bit rate
(VBR)) *4
• Sampling frequency *2: 44.1 kHz
About MP3 files
MP3 files meeting the following requirements
can be played. Playback is not be guaranteed for
all MP3 files meeting the requirements.
Codec for Disc
• Media File format: MP3 (MPEG-1 Layer3) file
format
•File extension: .mp3
•Bit rate: 48 to 192 kbps (Supports variable bit rate
(VBR))
• Sampling frequency *2: 32, 44.1, 48 kHz
Codec for MSC
• Media File format: MP3 (MPEG-1 Layer3) file
format
•File extension: .mp3
•Bit rate: 32 to 320 kbps (Supports variable bit rate
(VBR)) *4
• Sampling frequency *2: 32, 44.1, 48 kHz
About AAC files
AAC*3 files meeting the following requirements
can be played. Playback is not be guaranteed for
all AAC files meeting the requirements.
Codec for Disc
• Media File format: MP4 file format
•File extension: .mp4, .m4a,
•Bit rate: 40 to 320 kbps (Supports variable bit rate
(VBR))
• Sampling frequency *2: 44.1, 48 kHz
Codec for MSC
• Media File format: MP4 file format
•File extension: .mp4, .m4a, .3gp
•Bit rate: 48 to 288 kbps (Supports variable bit rate
(VBR)) *4
• Sampling frequency *2: 8, 11.025, 12, 16, 22.05,
24, 32, 44.1, 48 kHz
Folder
(album)
MP3/WMA/AAC/
Xvid/MPEG-4
file (track/
video)
MP3/WMA/AAC/
Xvid/MPEG-4
00US+00COV-U.book Page 61 Friday, June 15, 2012 2:52 PM
62
M:\001\XPML A7.0\ML\4422720111_XAV-701HD_CaFR-LaES(FM7.1
600dpi)\4422720111_XAV-701HD_ML\01US_XAV701HD\01US02CD-U.fm
masterpage:Left
XAV-701HD
4-422-720-11(1)
About Linear PCM files
Linear PCM files meeting the following
requirements can be played. Playback is not be
guaranteed for all Linear PCM files meeting the
requirements.
Codec for MSC
• Media File format: Wave-Riff file format
•File extension: .wav
•Bit rate: 1,411 kbps
• Sampling frequency *2: 44.1 kHz
About HE-AAC files
HE-AAC files meeting the following
requirements can be played. Playback is not be
guaranteed for all HE-AAC files meeting the
requirements.
Codec for MSC
• Media File format: MP4 file format
•File extension: .mp4, .m4a, .3gp
•Bit rate: 32 to 144 kbps *4
• Sampling frequency *2: 8, 11.025, 12, 16, 22.05,
24, 32, 44.1, 48 kHz
About AVC (H.264/AVC) files
AVC (H.264/AVC) files meeting the following
requirements can be played. Playback is not be
guaranteed for all AVC (H.264/AVC) files
meeting the requirements.
Codec for MSC
• Media File format: MP4 file format
•File extension: .mp4, .m4v
•Profile: Baseline Profile/Main Profile
•Level: 3.1
•Bit rate: Max. 14 Mbps
• Frame rate: Max. 30 fps (30p/60i)
• Resolution: Max. 1,280 x 720 *5
About MPEG-4 files
MPEG-4 files meeting the following
requirements can be played. Playback is not be
guaranteed for all MPEG-4 files meeting the
requirements.
Codec for Disc
• Media File format: MP4 file format
•File extension: .mp4
•Profile: Simple Profile
•Bit rate: Max. 10Mbps on DVD, 7Mbps on CD
• Frame rate: Max. 30 fps (30p/60i)
• Resolution: Max. 720 x 576 pixel
• Media File format: Xvid file format
Codec for MSC
• Media File format: MP4 file format
•File extension: .mp4, .m4v
•Profile: Simple Profile
•Bit rate: Max. 12 Mbps
• Frame rate: Max. 30 fps (30p/60i)
• Resolution: Max. 1,280 x 720 *5
• Media File format: MP4 file format
•File extension: .mp4, .m4v
•Profile: Advanced Simple Profile
•Bit rate: Max. 8 Mbps
• Frame rate: Max. 30 fps (30p/60i)
• Resolution: Max. 720 x 576 *5
About Xvid files
Xvid files meeting the following requirements
can be played. Playback is not be guaranteed for
all Xvid files meeting the requirements.
Codec for Disc
• Media File format: Xvid file format
•File extension: .avi, .xvid
•Profile: Advanced Simple Profile
•Bit rate: Max. 10 Mbps on DVD, 7 Mbps on CD
• Frame rate: Max. 30 fps (30p/60i)
• Resolution: Max. 720 x 576 *5
Codec for MSC
• Media File format: Xvid file format
•File extension: .avi, .xvid
•Profile: Advanced Simple Profile
•Bit rate: Max. 8 Mbps
• Frame rate: Max. 30 fps (30p/60i)
• Resolution: Max. 720 x 576 *5
About Windows Media files
Windows Media files meeting the following
requirements can be played. Playback is not be
guaranteed for all Windows Media files meeting
the requirements.
Codec for MSC
Video 9 *1*6
• Media File format: ASF file format
•File extension: .wmv
•Bit rate: Max. 20 Mbps
• Frame rate: Max. 30 fps (30p/60i)
• Resolution: Max. 1,280 x 720 *5
About JPEG files
JPEG*7 files meeting the following requirements
can be played. Playback is not be guaranteed for
all JPEG files meeting the requirements.
Codec for MSC
• Media File format: Compatible with DCF 2.0/Exif
2.21 file format
•File extension: .jpg, jpeg
•Profile: Baseline Profile
• Number of pixels: Max. 6,048 x 4,032 pixels
(24,000,000 pixels)
*1 Copyright protected WMA/WMV files cannot be
played back.
00US+00COV-U.book Page 62 Friday, June 15, 2012 2:52 PM
63
M:\001\XPML A7.0\ML\4422720111_XAV-701HD_CaFR-LaES(FM7.1
600dpi)\4422720111_XAV-701HD_ML\01US_XAV701HD\01US02CD-U.fm
masterpage:RightM:\001\XPML A7.0\ML\4422720111_XAV-701HD_CaFR-LaES(FM7.1
600dpi)\4422720111_XAV-701HD_ML\01US_XAV701HD\01US02CD-U.fm
masterpage:Right
XAV-701HD
4-422-720-11(1)
*2 Sampling frequency may not correspond to all
encoders.
*3 Copyright protected AAC-LC files cannot be played
back.
*4 Non-standard bit rates or non-guaranteed bit rates
are included depending on the sampling frequency.
*5These numbers indicate the maximum resolution of
playable video, and do not indicate the player’s
display resolution. The display resolution is 800 x
480.
*6 Some WMV files can be played back only by
transferring using Windows Media Player.
*7 Some photo files cannot be played back,
depending on their file formats.
About iPod
• You can connect to the following iPod models.
Update your iPod devices to the latest software
before use.
Made for
– iPod touch (4th generation)
– iPod touch (3rd generation)
– iPod touch (2nd generation)
– iPod classic
– iPod nano (6th generation)
–iPodnano (5th generation)
– iPod nano (4th generation)
– iPod nano (3rd generation)
– iPod nano (2nd generation)*1
– iPod nano (1st generation)*1*2
–iPhone 4S
–iPhone 4
– iPhone 3GS
–iPhone 3G
*1 iTunes Tagging is not available for iPod nano 1st or
2nd generation models.
*2 Passenger App Control is not available for
iPod nano (1st generation).
• “Made for iPod,” and “Made for iPhone” mean
that an electronic accessory has been designed to
connect specifically to iPod or iPhone respectively
and has been certified by the developer to meet
Apple performance standards. Apple is not
responsible for the operation of this device or its
compliance with safety and regulatory standards.
Please note that the use of this accessory with iPod
or iPhone may affect wireless performance.
About Bluetooth function
What is Bluetooth technology?
• Bluetooth wireless technology is a short-range
wireless technology that enables wireless data
communication between digital devices, such as a
cellular phone and a headset. Bluetooth wireless
technology operates within a range of about 10 m
(about 33 feet). Connecting two devices is
common, but some devices can be connected to
multiple devices at the same time.
• You do not need to use a cable for connection
since Bluetooth technology is a wireless
technology, neither is it necessary for the devices
to face one another, such is the case with infrared
technology. For example, you can use such a
device in a bag or pocket.
• Bluetooth technology is an international standard
supported by millions of companies all over the
world, and employed by various companies
worldwide.
On Bluetooth communication
• Bluetooth wireless technology operates within a
range of about 10 m.
Maximum communication range may vary
depending on obstacles (person, metal, wall, etc.)
or electromagnetic environment.
• The following conditions may affect the
sensitivity of Bluetooth communication.
– There is an obstacle such as a person, metal, or
wall between this unit and Bluetooth device.
– A device using 2.4 GHz frequency, such as a
wireless LAN device, cordless telephone, or
microwave oven, is in use near this unit.
• Because Bluetooth devices and wireless LAN
(IEEE802.11b/g) use the same frequency,
microwave interference may occur and result in
communication speed deterioration, noise, or
invalid connection if this unit is used near a
wireless LAN device. In such as case, perform the
following.
– Use this unit at least 10 m away from the
wireless LAN device.
– If this unit is used within 10 m of a wireless
LAN device, turn off the wireless LAN device.
– Install this unit and Bluetooth device as near to
each other as possible.
• Microwaves emitting from a Bluetooth device may
affect the operation of electronic medical devices.
Turn off this unit and other Bluetooth devices in
the following locations, as it may cause an
accident.
– where inflammable gas is present, in a hospital,
train, airplane, or petrol station
– near automatic doors or a fire alarm
• This unit supports security capabilities that
comply with the Bluetooth standard to provide a
secure connection when the Bluetooth wireless
technology is used, but security may not be
enough depending on the setting. Be careful when
communicating using Bluetooth wireless
technology.
• We do not take any responsibility for the leakage
of information during Bluetooth communication.
• Connection with all Bluetooth devices cannot be
guaranteed.
– A device featuring Bluetooth function is
required to conform to the Bluetooth standard
specified by Bluetooth SIG, and be
authenticated.
– Even if the connected device conforms to the
above mentioned Bluetooth standard, some
devices may not be connected or work correctly,
depending on the features or specifications of the
device.
00US+00COV-U.book Page 63 Friday, June 15, 2012 2:52 PM
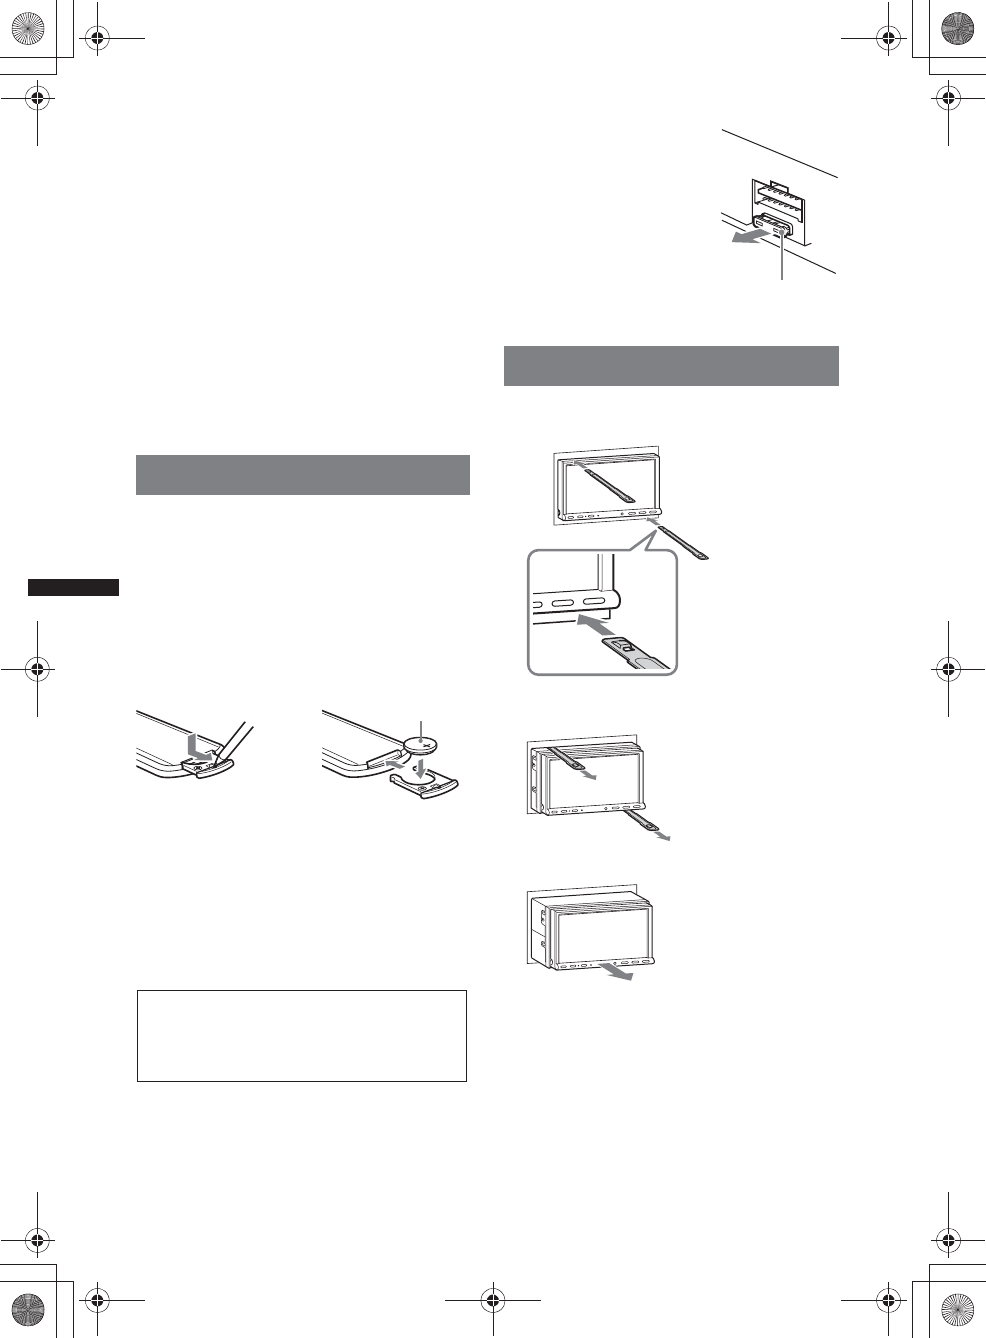
64
M:\001\XPML A7.0\ML\4422720111_XAV-701HD_CaFR-LaES(FM7.1
600dpi)\4422720111_XAV-701HD_ML\01US_XAV701HD\01US02CD-U.fm
masterpage:Left
XAV-701HD
4-422-720-11(1)
– While talking on the phone handsfree, noise may
occur, depending on the device or
communication environment.
• Depending on the device to be connected, it may
require some time to start communication.
Others
• Using the Bluetooth device may not function on
cellular phones, depending on radio wave
conditions and location where the equipment is
being used.
• If you experience discomfort after using the
Bluetooth device, stop using the Bluetooth device
immediately. Should any problem persist, consult
your nearest Sony dealer.
If you have any questions or problems concerning
your unit that are not covered in these Operating
Instructions, consult your nearest Sony dealer.
Maintenance
Replacing the lithium battery of the
remote commander
Under normal conditions, the battery will last
approximately 1 year. (The service life may be
shorter, depending on the conditions of use.)
When the battery becomes weak, the range of the
remote commander becomes shorter. Replace the
battery with a new CR2025 lithium battery. Use of
any other battery may present a risk of fire or
explosion.
Notes on the lithium battery
•Keep the lithium battery out of the reach of children.
Should the battery be swallowed, immediately
consult a doctor.
•Wipe the battery with a dry cloth to assure a good
contact.
•Be sure to observe the correct polarity when
installing the battery.
•Do not hold the battery with metallic tweezers,
otherwise a short-circuit may occur.
Fuse replacement
When replacing the fuse, be
sure to use one matching the
amperage rating stated on the
original fuse. If the fuse blows,
check the power connection and
replace the fuse. If the fuse
blows again after replacement,
there may be an internal
malfunction. In such a case,
consult your nearest Sony
dealer.
Removing the unit
1Insert both release keys
simultaneously until they click.
2Pull the release keys to unseat the
unit.
3Slide the unit out of the mounting.
c
+ side up
WARNING
Battery may explode if mistreated.
Do not recharge, disassemble, or dispose of
in fire.
Fuse (10A)
Hook facing
inwards.
00US+00COV-U.book Page 64 Friday, June 15, 2012 2:52 PM
65
M:\001\XPML A7.0\ML\4422720111_XAV-701HD_CaFR-LaES(FM7.1
600dpi)\4422720111_XAV-701HD_ML\01US_XAV701HD\01US02CD-U.fm
masterpage:RightM:\001\XPML A7.0\ML\4422720111_XAV-701HD_CaFR-LaES(FM7.1
600dpi)\4422720111_XAV-701HD_ML\01US_XAV701HD\01US02CD-U.fm
masterpage:Right
XAV-701HD
4-422-720-11(1)
Specifications
Monitor section
Display type: Wide LCD color monitor
Dimensions: 7.0 in
System: TFT active matrix
Number of pixels:
1,152,000 pixels (800 u 3 (RGB) u 480)
Color system:
PAL/NTSC/SECAM/PAL-M/PAL-N automatic
select
Tuner section
FM
Tuning range: 87.5 – 107.9 MHz
Antenna (aerial) terminal:
External antenna (aerial) connector
Intermediate frequency: 25 kHz
Usable sensitivity: 9 dBf
Selectivity: 75 dB at 400 kHz
Signal-to-noise ratio(stereo):
77dB (Conventional broadcast)
78dB (HD Radio broadcast)
Separation at 1 kHz:
50 dB (Conventional broadcast)
78 dB (HD Radio broadcast)
Frequency response:
20 – 15,000 Hz (Conventional broadcast)
20 – 20,000 Hz (HD Radio broadcast)
AM
Tuning range: 530 – 1,710 kHz
Antenna (aerial) terminal:
External antenna (aerial) connector
Intermediate frequency:
9,115 kHz or 9,125 kHz/5 kHz
Sensitivity: 26 μV
DVD/CD Player section
Signal-to-noise ratio: 120 dB
Frequency response: 10 – 20,000 Hz
Wow and flutter: Below measurable limit
Harmonic distortion: 0.01%
Region code: Labeled on the bottom of the unit
USB Player section
Interface: USB (High-speed)
Maximum current: 1 A
Wireless Communication
Communication System:
Bluetooth Standard version 2.1 + EDR
Output:
Bluetooth Standard Power Class 2 (Max. +4 dBm)
Maximum communication range:
Line of sight approx. 10 m (33 ft)*1
Frequency band:
2.4 GHz band (2.4000 – 2.4835 GHz)
Modulation method: FHSS
Compatible Bluetooth Profiles*2:
A2DP (Advanced Audio Distribution Profile) 1.2
AVRCP (Audio Video Remote Control Profile) 1.3
HFP (Handsfree Profile) 1.5
PBAP (Phone Book Access Profile)
OPP (Object Push Profile)
*1 The actual range will vary depending on factors
such as obstacles between devices, magnetic
fields around a microwave oven, static electricity,
reception sensitivity, antenna’s performance,
operating system, software application, etc.
*2 Bluetooth standard profiles indicate the purpose of
Bluetooth communication between devices.
Power amplifier section
Outputs: Speaker outputs
Speaker impedance: 4 – 8 ohms
Maximum power output: 52 W u 4 (at 4 ohms)
General
Outputs:
Video output terminal (rear)
Audio output terminals (front/rear)
Audio output terminal (ZuZ)
Subwoofer output terminal
Power antenna (aerial)/Power amplifier control
terminal (REM OUT)
Inputs:
Illumination control terminal
SiriusXM input terminal
Remote controller input terminal
Antenna (aerial) input terminal
Parking brake control terminal
Microphone input terminal
Reverse input terminal
Speed input terminal
Camera input terminal
AUX audio input terminals
AUX video input terminals
Component Video input terminal (for iPod/iPhone)
USB port
Power requirements: 12 V DC car battery
(negative ground (earth))
Dimensions: Approx. 178 u 100 u 185 mm
(7 1/8 u 4 u 7 3/8 in) (w/h/d)
Mounting dimensions: Approx. 182 u 111 u 160 mm
(7 1/4 u 4 3/8 u 6 3/8 in) (w/h/d)
Mass: Approx. 2.4 kg (5 lb 5 oz)
Supplied accessories:
Parts for installation and connections (1 set)
Microphone
Remote Commander: RM-X271
USB and Component Video connection cable for
iPod/iPhone: RC-300ICPV
Optional accessories/equipment:
FOR UNITED STATES CUSTOMERS. NOT
APPLICABLE IN CANADA, INCLUDING
IN THE PROVINCE OF QUEBEC.
POUR LES CONSOMMATEURS AUX
ÉTATS-UNIS. NON APPLICABLE AU
CANADA, Y COMPRIS LA PROVINCE DE
QUÉBEC.
CEA2006 Standard
Power Output: 17 Watts RMS
4 Ohms < 1% THD+N
SN Ratio: 80 dBA
(reference: 1 Watt into 4 Ohms)
AUDIO POWER SPECIFICATIONS
4 at
00US+00COV-U.book Page 65 Friday, June 15, 2012 2:52 PM
66
M:\001\XPML A7.0\ML\4422720111_XAV-701HD_CaFR-LaES(FM7.1
600dpi)\4422720111_XAV-701HD_ML\01US_XAV701HD\01US02CD-U.fm
masterpage:Left
XAV-701HD
4-422-720-11(1)
Mobile monitor: XVM-B62
Rear View Camera: XA-R800C
Navigation Module: XA-NV100T
Your dealer may not handle some of the above listed
accessories. Please ask the dealer for detailed
information.
Design and specifications are subject to change
without notice.
Region code
The region system is used to protect software
copyrights.
The region code is located on the bottom of the unit,
and only DVDs labeled with an identical region code
can be played on this unit.
DVDs labeled can also be played.
If you try to play any other DVD, the message “Disc
playback prohibited by region code.” will appear on the
monitor screen. Depending on the DVD, no region code
may be labeled even though playing the DVD is
prohibited by area restrictions.
Troubleshooting
The following checklist will help you remedy
problems you may encounter with your unit.
Before going through the checklist below, check the
connection and operating procedures.
If the problem is not solved, visit the support site on
the back cover.
General
No power is being supplied to the unit.
• Check the connection or fuse.
• If the unit is turned off and the display disappears, it
cannot be operated with the remote commander.
tTurn on the unit.
The power antenna (aerial) does not extend.
The power antenna (aerial) does not have a relay box.
There is no beep sound.
• The beep sound is canceled (page 51).
• An optional power amplifier is connected and you are
not using the built-in amplifier.
The contents of the memory have been erased.
• The reset button has been pressed.
tStore again into the memory.
• The power supply lead or battery has been
disconnected or it is not connected properly.
US and foreign patents licensed from Dolby
Laboratories.
MPEG Layer-3 audio coding technology and
patents licensed from Fraunhofer IIS and Thomson.
ALL
Stored stations and correct time are erased.
The fuse has blown.
The unit makes noise when the position of the
ignition is switched.
The leads are not matched correctly with the car’s
accessory power connector.
The display disappears from/does not appear
on the monitor.
• The dimmer is set to “ON” (page 55).
• The display disappears if you press and hold
(SOURCE/OFF).
tPress (SOURCE/OFF) on the unit until the
display appears.
• “M.OFF” is set to on and the Monitor Off function is
activated (page 12).
tTouch anywhere on the display to turn the display
back on.
The display does not respond to your touch
correctly.
• Touch one part of the display at a time. If two or more
parts are touched simultaneously, the display will not
operate correctly.
• Calibrate the touch panel of the display (page 48).
• Touch the pressure sensitive panel firmly.
The Auto Off function does not operate.
The unit is turned on. The Auto Off function activates
after turning off the unit.
tExit the source.
The menu items cannot be selected.
Unavailable menu items are displayed in gray.
USB Music, USB Video, AUX, BT Audio and
Pandora cannot be selected as the source.
Some sources are not displayed on the Source select
screen.
tRemove the check mark from the source item you
cannot select (page 57).
The monitor angle cannot be adjusted.
The monitor was opened while the unit was being
reset.
tBe sure to close the front panel before you reset the
unit.
Radio reception
The stations cannot be received.
The sound is hampered by noises.
The connection is not correct.
tConnect an REM OUT lead (blue/white striped)
or accessory power supply lead (red) to the power
supply lead of a car’s antenna (aerial) booster
(only when your car has built-in radio antenna
(aerial) in the rear/side glass).
tCheck the connection of the car antenna (aerial).
tIf the auto antenna (aerial) will not extend, check
the connection of the power antenna (aerial)
control lead.
Preset tuning is not possible.
• Store the correct frequency in the memory.
• The broadcast signal is too weak.
00US+00COV-U.book Page 66 Friday, June 15, 2012 2:52 PM
67
M:\001\XPML A7.0\ML\4422720111_XAV-701HD_CaFR-LaES(FM7.1
600dpi)\4422720111_XAV-701HD_ML\01US_XAV701HD\01US02CD-U.fm
masterpage:RightM:\001\XPML A7.0\ML\4422720111_XAV-701HD_CaFR-LaES(FM7.1
600dpi)\4422720111_XAV-701HD_ML\01US_XAV701HD\01US02CD-U.fm
masterpage:Right
XAV-701HD
4-422-720-11(1)
Automatic tuning is not possible.
The broadcast signal is too weak.
tPerform manual tuning.
Sound skips or repeats.
This may happen while this unit switches from analog
signal to digital signal or vice versa, because the radio
station does not synchronize the signal.
RDS
PTY displays “None.”
• The current station is not an RDS station.
• RDS data has not been received.
• The station does not specify the program type.
Picture
There is no picture/picture noise occurs.
• A connection has not been made correctly.
• Check the connection to the connected equipment,
and set the input selector of the equipment to the
source corresponding to this unit.
• The disc is defective or dirty.
• Installation is not correct.
tInstall the unit at an angle of less than 45° in a
sturdy part of the car.
• The parking cord (light green) is not connected to the
parking brake switch cord, or the parking brake is not
applied.
The picture does not fit in the screen.
The aspect ratio is fixed on the DVD.
There is no picture/picture noise occurs in the
rear monitor.
• A source/mode which is not connected is selected. If
there is no input, no picture appears in the rear
monitor.
• The color system setting is incorrect.
tSet the color system to “PAL” or “NTSC”
according to the connected monitor (page 52).
• The picture of the rear view camera is displayed on
this unit.
tNo picture appears in the rear monitor if the
picture of the rear view camera is displayed on
this unit.
Sound
There is no sound/sound skips/sound cracks.
• A connection has not been made correctly.
• Check the connection to the connected equipment,
and set the input selector of the equipment to the
source corresponding to this unit.
• The disc is defective or dirty.
• Installation is not correct.
tInstall the unit at an angle of less than 45° in a
sturdy part of the car.
• The MP3 file sampling rate is not 32, 44.1, or
48 kHz.
• The WMA file sampling rate is not 32, 44.1, or
48 kHz.
• The AAC file sampling rate is not 44.1 or 48 kHz.
• The MP3 file bit rate is not 48 to 192 kbps.
• The WMA file bit rate is not 64 to 192 kbps.
• The AAC file bit rate is not 40 to 320 kbps.
• The unit is in pause/reverse/fast-forward mode.
• The settings for the outputs are not made correctly.
• The DVD output level is too low (page 23).
• The volume is too low.
• The ATT function is activated.
• The format is not supported (such as DTS).
tCheck if the format is supported by this unit
(page 11).
Sound is noisy.
Keep cords and cables away from each other.
Disc operation
The disc cannot be loaded.
• Another disc is already loaded.
• The disc has been forcibly inserted upside down or in
the wrong way.
The disc does not play.
• The disc is defective or dirty.
• The disc is not playable.
• The DVD is not playable due to the region code.
• The disc is not finalized (page 61).
• The disc format and file version are incompatible
with this unit (page 11, 60).
• Press Z to remove the disc.
MP3/WMA/AAC/Xvid/MPEG-4 files do not play.
• Recording was not performed according to the ISO
9660 level 1 or level 2 format or the Joliet or Romeo
expansion format (DATA CD), or the UDF Bridge
format (DATA DVD) (page 60).
• The file extension is incorrect (page 61).
• Files are not stored in MP3/WMA/AAC/Xvid/
MPEG-4 format.
• If the disc contains multiple file types, only the
selected file type (audio/video) can be played.
tSelect the appropriate file type using the list
(page 25).
MP3/WMA/AAC/Xvid/MPEG-4 files take longer
to play than others.
The following discs take a longer time to start
playback.
– a disc recorded with a complicated tree structure.
– a disc recorded in Multi Session/Multi Border.
– a disc to which data can be added.
00US+00COV-U.book Page 67 Friday, June 15, 2012 2:52 PM
68
M:\001\XPML A7.0\ML\4422720111_XAV-701HD_CaFR-LaES(FM7.1
600dpi)\4422720111_XAV-701HD_ML\01US_XAV701HD\01US02CD-U.fm
masterpage:Left
XAV-701HD
4-422-720-11(1)
The disc does not start playing from the
beginning.
Resume playback or multi-disc resume playback
(page 57) has taken effect.
Certain functions cannot be performed.
Depending on the disc, you may not be able to perform
operations such as stop, search, or repeat/shuffle play.
For details, refer to the manual supplied with the disc.
The soundtrack/subtitle language or angle
cannot be changed.
• Use the DVD menu instead of the direct selection
button on the remote commander (page 20).
• Multilingual tracks, multilingual subtitles, or multi-
angles are not recorded on the DVD.
• The DVD prohibits changing.
The operation buttons do not function.
The disc will not eject.
Press the reset button (page 15).
USB playback
Items cannot be played via a USB hub.
This unit cannot recognize USB devices via a USB
hub.
Items cannot be played.
Reconnect the USB device.
The USB device takes longer to play.
The USB device contains large-sized files or files with
a complicated tree structure.
The sound is intermittent.
• The sound may be intermittent at a high bit rate of
more than 320 kbps.
• During USB Video playback, if the playback is
intermittent:
– Press (HOME) or launch the System settings.
– During the USB Photo, (Navigation), etc.
Bluetooth function
The other Bluetooth device cannot detect this
unit.
• Set “Signal” to “ON” (page 43).
• While connecting to a Bluetooth device, this unit
cannot be detected from another device. Disconnect
the current connection and search for this unit from
the other device. The disconnected device can be
reconnected by selecting from the list of registered
devices.
Connection is not possible.
Check the pairing and connection procedures in the
manual of the other device, etc., and perform the
operation again.
The name of the detected device does not
appear.
Depending on the status of the other device, it may not
be possible to obtain the name.
There is no ringtone.
• Raise the volume while receiving a call.
• Depending on the connecting device, the ringtone
may not be sent properly.
tSet “Ringtone” to “Internal” (page 42).
The talker’s voice volume is low.
Raise the volume during a call.
The other party says that the volume is too low
or high.
Adjust the “MIC Gain” level (page 40).
Echo or noise occurs during call
conversations.
• Reduce the volume.
• “Speech Quality” is set to “Mode 1.”
tSet “Speech Quality” to “Mode 2” (page 42).
• If ambient noise other than the phone call sound is
loud, try reducing this noise.
tShut the window if road noise is loud.
tLower the air conditioner if the air conditioner is
loud.
The phone sound quality is poor.
Phone sound quality depends on reception conditions
of the cellular phone.
tMove your car to a place where you can enhance
the cellular phone’s signal if the reception is poor.
The volume of the connected Bluetooth device
is low or high.
Volume level will differ depending on the Bluetooth
device.
tReduce the volume level differences between this
unit and the Bluetooth device (page 43).
No sound is output during audio streaming.
The connected Bluetooth device is paused.
tCancel pause of the Bluetooth device.
The sound skips during audio streaming.
• Reduce the distance between the unit and the
Bluetooth device.
• If the Bluetooth device is stored in a case which
interrupts the signal, remove the case while using the
device.
• Several Bluetooth devices or other devices which
emit radio waves are used nearby.
tTurn off the other devices.
tIncrease the distance from the other devices.
• The playback sound stops momentarily when this
unit is connecting to a cellular phone. This is not a
malfunction.
You cannot control the connected Bluetooth
device during audio streaming.
Check that the connected Bluetooth device supports
AVRCP.
Some functions do not work.
Check that the connecting device supports the
functions in question.
The name of the other party does not appear
when a call is received.
• The other party is not stored in the phonebook.
tAdd the other party to the phonebook (page 41).
• The calling phone is not set to send the phone
number.
A call is answered unintentionally.
• The connecting phone is set to start a call
automatically.
• “Auto Answer” of this unit is set to “3 sec” or
“10 sec” (page 42).
00US+00COV-U.book Page 68 Friday, June 15, 2012 2:52 PM
69
M:\001\XPML A7.0\ML\4422720111_XAV-701HD_CaFR-LaES(FM7.1
600dpi)\4422720111_XAV-701HD_ML\01US_XAV701HD\01US02CD-U.fm
masterpage:RightM:\001\XPML A7.0\ML\4422720111_XAV-701HD_CaFR-LaES(FM7.1
600dpi)\4422720111_XAV-701HD_ML\01US_XAV701HD\01US02CD-U.fm
masterpage:Right
XAV-701HD
4-422-720-11(1)
Error displays/messages
Pairing failed due to time out.
Depending on the connecting device, the time limit for
pairing may be short. Try completing the pairing
within the time by setting a single digit passkey.
The Bluetooth function cannot be operated.
Exit the source by pressing and holding
(SOURCE/OFF) for 1 second, then turn on the unit.
No sound is output from the car speakers
during a handsfree call.
If the sound is output from the cellular phone, set the
cellular phone to output the sound from the car
speakers.
An error occurred. You will be returned to the
playback screen.
Visualizer is not operating due to an internal error.
tChange to another source, then select USB
Music.
Bluetooth Connection Error
An error has occurred between this unit and the BT
phone.
tCheck the BT signal is set to ON for this unit or
the BT phone.
tTry pairing again.
tReconnect the BT phone.
Bluetooth device is not found.
• The unit cannot detect a connectable Bluetooth
device.
tCheck the Bluetooth setting of the connecting
device.
• No device is in the list of registered Bluetooth device.
tPerform pairing with a Bluetooth device
(page 38).
Busy now… Please try again.
The unit is busy.
tWait for a moment and try again.
Call Data Error
An error has occurred while accessing phonebook data
via PBAP or call history from the BT phone.
tReconnect the BT phone.
Cannot display folders beyond this level. Place
songs no more than eight folders deep.
While browsing contents, a level beyond eight was
selected.
tThis unit can display folders a maximum of eight
folders deep. Transfer contents beyond this level.
Cannot read.
• The unit cannot read the data due to some problem.
• The data is damaged or corrupted.
• The disc is corrupted.
• The disc is incompatible with this unit.
• The disc is not finalized.
Database error encountered.
A database error was encountered due to a problem.
tChange to another source, then select USB
Music.
Database update couldn’t be completed.
Database update was canceled due to a problem.
tTry to update the database again.
Data Listing Error
An error has occurred while displaying phonebook
data via PBAP or call history from the BT phone.
tReconnect the BT phone.
Delete failed.
Video contents cannot be deleted due to a problem.
tTry to delete it again. Otherwise, delete it using a
PC, etc.
Disc Error
• The disc is dirty or inserted upside down.
tClean or insert the disc correctly.
• A blank disc has been inserted.
• The disc cannot play due to a problem.
tInsert another disc.
• The disc is not compatible with this unit.
tInsert a compatible disc.
• Press Z to remove the disc.
Disc playback prohibited by region code.
The DVD’s region code differs from the unit’s region
code.
Error - Please select ‘Bluetooth Initialize’ from
the General Settings menu.
A memory error has occurred.
tInitialize the Bluetooth setting (page 43).
Handsfree device is not available.
A cellular phone is not connected.
tConnect a cellular phone (page 38).
High Temperature Error
An error has occurred due to a high temperature.
tLower the temperature.
iPod video cable reconnected. Reconnect the
USB cable.
The iPod video cable is unplugged and plugged.
tUnplug the USB cable, then plug it in again.
New firmware not found.
• There is no firmware update available in the USB
memory.
tTry to update to the latest version of firmware.
• The firmware file is damaged or corrupted.
tRewrite the file in the USB memory.
No audio, confirm smartphone compatibility.
• The sound adjustment of the smartphone is incorrect.
tCheck the smartphone’s sound adjustment.
• The smartphone is not compatible with
MirrorLink™.
tCheck the smartphone’s compatibility with
MirrorLink™ (page 35).
No Device
iPod is selected as source without an iPod connected.
A USB connection cable with iPod connected has been
removed during playback.
tBe sure to connect the USB connection cable and
the iPod securely.
No Playable Data
• The disc does not contain playable data.
• The iPod has no playable data.
tInsert a music or video file into the iPod.
00US+00COV-U.book Page 69 Friday, June 15, 2012 2:52 PM
70
M:\001\XPML A7.0\ML\4422720111_XAV-701HD_CaFR-LaES(FM7.1
600dpi)\4422720111_XAV-701HD_ML\01US_XAV701HD\01US02CD-U.fm
masterpage:Left
XAV-701HD
4-422-720-11(1)
For HD Radio:
For Telenav®:
No Navigation Signal
• Navigation is not connected with this unit.
tCheck the connection with this unit and
Navigation.
• Navigation is not operating correctly.
tCheck the Navigation is operating correctly.
Offset
There may be an internal malfunction.
tCheck the connection. If the error indication
remains on the display, consult your nearest Sony
dealer.
Output connection failure.
(Displays until any button is pressed.)
The connection of speakers/amplifiers is incorrect.
tSee the supplied “Installation/Connections” guide
to check the connection.
Overcurrent caution on USB.
The USB device is overloaded.
tDisconnect the USB device, then change the
source by pressing (SOURCE/OFF).
tIndicates that the USB device is out of order, or
an unsupported device is connected.
Playback has stopped because an error
occurred.
Playback of video contents stopped due to a problem.
tSelect another source, then select USB Video.
Reestablish your smartphone connection.
• The smartphone is not connected with this unit.
tCheck the connection between this unit and the
smartphone.
• The smartphone is turned off.
tCheck the power supply of the smartphone.
• The smartphone is not compatible with
MirrorLink™.
tCheck the smartphone’s compatibility with
MirrorLink™ (page 35).
Remove failed.
Photo contents cannot be deleted due to a problem.
tTry to delete it again. Otherwise delete it by using
PC, etc.
Screen content blocked while vehicle in
motion.
MirrorLink™ is being operated while driving.
tSome MirrorLink™ functions are restricted while
driving.
Set wallpaper failed.
• The file is damaged or corrupted.
tSelect another photo.
• The file size is too large.
tMinimize the size of the picture, then try again.
Smartphone Connection Error
• The smartphone is not connected with this unit.
tCheck the connection between this unit and the
smartphone.
• The smartphone is turned off.
tCheck the power supply of the smartphone.
• The smartphone is not compatible with
MirrorLink™.
tCheck the smartphone’s compatibility with
MirrorLink™ (page 35).
The application will quit because an error
occurred.
An internal error has occurred.
tChange to another source, then select USB
Music.
The playback list is empty.
The playlist contains unplayable files.
tCheck if any contents in the USB application are
playable.
The sound in DTS format is not audible.
Discs in DTS format are not supported. Sound is not
output if the DTS format is selected.
tDTS formatted discs are not playable on this unit.
Use a compatible disc format (page 11).
USB device not supported
For details on the compatibility of your USB device,
visit the support site on the back cover.
USB hub not supported
USB hubs are not supported on this unit.
“”
The character cannot be displayed with the unit.
Internal memory full. Connect iPod to transfer
tags.
iTunes tags cannot be registered due to insufficient
memory.
tAfter connecting iPod, transfer the iTunes tags to
iPod to secure the memory of the unit.
iTunes tag already stored.
An iTunes tag already registered is attempted to
register again.
iTunes tag delete failed.
An iTunes tag cannot be deleted due to a problem.
tTry to delete it again.
iTunes tag failed.
An iTunes tag cannot be registered due to a problem.
tTry to register it again.
Linking
The reception of supplemental program become poor.
tMove to an area with better reception.
tSelect the other stations with better receptions.
No Video Signal
The video connection cable of iPod is not connected to
the unit, or no video signal is being output.
tMake sure iPod and the unit are securely
connected.
00US+00COV-U.book Page 70 Friday, June 15, 2012 2:52 PM

71
M:\001\XPML A7.0\ML\4422720111_XAV-701HD_CaFR-LaES(FM7.1
600dpi)\4422720111_XAV-701HD_ML\01US_XAV701HD\01US02CD-U.fm
masterpage:RightM:\001\XPML A7.0\ML\4422720111_XAV-701HD_CaFR-LaES(FM7.1
600dpi)\4422720111_XAV-701HD_ML\01US_XAV701HD\01US02CD-U.fm
masterpage:Right
XAV-701HD
4-422-720-11(1)
For Pandora® internet radio:
For SiriusXM:
Please launch Telenav application on mobile
device.
• Telenav application on the iPhone is not launched.
tInstall the Telenav application (if not instaled),
then launch the application.
• iPhone is not connected to the unit with the
connection cable.
tConnect iPhone and the unit securely with the
connection cable.
• Telenav application on the iPhone is running in the
background.
tActivate the application on the iPhone.
• iPhone and the unit cannot communicate properly
due to a problem.
tDisconnect the cable, and connect it again, then
launch the application.
Allow connection? Check number on mobile
device.
Check the number on your mobile device. If the
number is correct, touch “OK” to allow the connection.
Already bookmarked
A station already bookmarked is attempted to
bookmark again.
API Version Error
The API versions differ.
tSelect a source other than “Pandora,” then select
the Pandora® source again.
Application error on mobile device. Do not
check the mobile device while driving.
If your mobile device has a problem, make sure your
car is parked in a safe place.
tCheck other operations on your mobile device,
then launch the Pandora® application again.
tSelect a source other than “Pandora,” then select
the Pandora® source again.
Bookmark Error
Bookmarking a track or artist failed.
tTry bookmarking again.
Cannot connect Pandora due to poor
reception.
The mobile network signal is poor.
tMove to an area with better reception.
Cannot skip.
Skip (Next) is prohibited for the current content.
tWait until the commercial ends.
tPandora® limits the number of skips allowed.
Wait until the next song begins, or select another
station on the list.
Invalid Login
The mobile device has not logged in to Pandora®.
tTry logging in again.
No Station
There is no station on your Pandora® account.
tCreate a station on your mobile device.
tSelect a source other than “Pandora,” then select
the Pandora® source again.
Pandora Error
An error occurred while using Pandora®.
tDisconnect, then reconnect the mobile device
with this unit.
(For a USB device, unplug and plug into the
device again. For a Bluetooth device, disconnect
and connect the device again.)
tLaunch the Pandora® application again from the
mobile device.
Pandora original licensing restricted.
Use the service is being attempted outside the US.
tPandora® service license has been granted in the
US only.
Please disconnect and reconnect to sync
device.
An error has occurred between this unit and the mobile
device.
tDisconnect then reconnect the mobile device with
this unit.
(For USB device, unplug and plug into the device
again. For a Bluetooth device, disconnect and
connect the device again.)
Please launch Pandora application on mobile
device and touch “Connect”.
The Pandora® application has not been launched.
tLaunch Pandora® on your mobile device, then
touch “Connect.”
Server Error
The Pandora® server may have a problem.
tSelect a source other than “Pandora,” then select
the Pandora® source again.
Station does not exist.
The condition of the mobile device has changed
between compiling the station list and selecting from
the list.
tWait until the station list refreshes.
Thumbs Up/Down Error
Thumbs Up/Down feedback failed.
tTry Thumbs Up/Down again.
Channel Locked
The selected channel is locked by the parental control
function.
Channel not included in current subscription.
The subscription to the active channel has been
terminated.
tCheck the subscription of SiriusXM channel
map.
Channel not subscribed.Call Sirius XM to
subscribe.
There is no subscription to the selected channel.
tProcess the subscription in SiriusXM.
Check SXM antenna.
The antenna (aerial) is not being used properly.
tMake sure the antenna (aerial) is connected and
being used properly.
00US+00COV-U.book Page 71 Friday, June 15, 2012 2:52 PM

72
M:\001\XPML A7.0\ML\4422720111_XAV-701HD_CaFR-LaES(FM7.1
600dpi)\4422720111_XAV-701HD_ML\01US_XAV701HD\01US02CD-U.fm
masterpage:Left
XAV-701HD
4-422-720-11(1)
If these solutions do not help improve the situation,
consult your nearest Sony dealer.
If you take the unit to be repaired because of disc
playback trouble, bring the disc that was used at the
time the problem began.
Check SXM tuner.
The SiriusXM Connect tuner is not functioning
properly.
tDisconnect the SiriusXM Connect tuner, and
connect it again.
Current channel unavailable.
The active channel has become unavailable.
tCheck the SiriusXM channel map.
Invalid Language Code
Passkey input failed.
tCheck that the passkey has been entered
correctly.
Invalid Parental Code
Passkey input failed.
tCheck that the passkey has been entered
correctly.
No Signal
The service is stopped due to a signal interruption.
tMove to another area with better reception.
tUnplug the SiriusXM tuner, then plug it in again.
Requested channel not available.
• The active channel has become unavailable.
• The selected channel is not available.
tCheck the SiriusXM channel map.
SXM instant playback buffer exceeded.
The point attempted to play back has not been stored
yet.
tWait until the desired point of contents stored.
00US+00COV-U.book Page 72 Friday, June 15, 2012 2:52 PM
73
M:\001\XPML A7.0\ML\4422720111_XAV-701HD_CaFR-LaES(FM7.1
600dpi)\4422720111_XAV-701HD_ML\01US_XAV701HD\01US02CD-U.fm
masterpage:RightM:\001\XPML A7.0\ML\4422720111_XAV-701HD_CaFR-LaES(FM7.1
600dpi)\4422720111_XAV-701HD_ML\01US_XAV701HD\01US02CD-U.fm
masterpage:Right
XAV-701HD
4-422-720-11(1)
Language code list
Language code list
The language spellings conform to the ISO 639: 1988 (E/F) standard.
Code Language Code Language Code Language Code Language
1027 Afar
1028 Abkhazian
1032 Afrikaans
1039 Amharic
1044 Arabic
1045 Assamese
1051 Aymara
1052 Azerbaijani
1053 Bashkir
1057 Byelorussian
1059 Bulgarian
1060 Bihari
1061 Bislama
1066 Bengali;
Bangla
1067 Tibetan
1070 Breton
1079 Catalan
1093 Corsican
1097 Czech
1103 Welsh
1105 Danish
1109 German
1130 Bhutani
1142 Greek
1144 English
1145 Esperanto
1149 Spanish
1150 Estonian
1151 Basque
1157 Persian
1165 Finnish
1166 Fiji
1171 Faroese
1174 French
1181 Frisian
1183 Irish
1186 Scots Gaelic
1194 Galician
1196 Guarani
1203 Gujarati
1209 Hausa
1217 Hindi
1226 Croatian
1229 Hungarian
1233 Armenian
1235 Interlingua
1239 Interlingue
1245 Inupiak
1248 Indonesian
1253 Icelandic
1254 Italian
1257 Hebrew
1261 Japanese
1269 Yiddish
1283 Javanese
1287 Georgian
1297 Kazakh
1298 Greenlandic
1299 Cambodian
1300 Kannada
1301 Korean
1305 Kashmiri
1307 Kurdish
1311 Kirghiz
1313 Latin
1326 Lingala
1327 Laothian
1332 Lithuanian
1334 Latvian;
Lettish
1345 Malagasy
1347 Maori
1349 Macedonian
1350 Malayalam
1352 Mongolian
1353 Moldavian
1356 Marathi
1357 Malay
1358 Maltese
1363 Burmese
1365 Nauru
1369 Nepali
1376 Dutch
1379 Norwegian
1393 Occitan
1403 (Afan)Oromo
1408 Oriya
1417 Punjabi
1428 Polish
1435 Pashto;
Pushto
1436 Portuguese
1463 Quechua
1481 Rhaeto-
Romance
1482 Kirundi
1483 Romanian
1489 Russian
1491 Kinyarwanda
1495 Sanskrit
1498 Sindhi
1501 Sangho
1502 Serbo-
Croatian
1503 Singhalese
1505 Slovak
1506 Slovenian
1507 Samoan
1508 Shona
1509 Somali
1511 Albanian
1512 Serbian
1513 Siswati
1514 Sesotho
1515 Sundanese
1516 Swedish
1517 Swahili
1521 Tamil
1525 Telugu
1527 Tajik
1528 Thai
1529 Tigrinya
1531 Turkmen
1532 Tagalog
1534 Setswana
1535 Tonga
1538 Turkish
1539 Tsonga
1540 Tatar
1543 Twi
1557 Ukrainian
1564 Urdu
1572 Uzbek
1581 Vietnamese
1587 Volapük
1613 Wolof
1632 Xhosa
1665 Yoruba
1684 Chinese
1697 Zulu
1703 Not specified
00US+00COV-U.book Page 73 Friday, June 15, 2012 2:52 PM

masterpage:NoneM:\001\XPML A7.0\ML\4422720111_XAV-701HD_CaFR-LaES(FM7.1
600dpi)\4422720111_XAV-701HD_ML\01US_XAV701HD\01US02CD-U.fm
XAV-701HD
4-422-720-11(1)
00US+00COV-U.book Page 74 Friday, June 15, 2012 2:52 PM

masterpage:NoneM:\001\XPML A7.0\ML\4422720111_XAV-701HD_CaFR-LaES(FM7.1
600dpi)\4422720111_XAV-701HD_ML\01US_XAV701HD\01US02CD-U.fm
XAV-701HD
4-422-720-11(1)
00US+00COV-U.book Page 75 Friday, June 15, 2012 2:52 PM
2
M:\001\XPML A7.0\ML\4422720111_XAV-701HD_CaFR-LaES(FM7.1
600dpi)\4422720111_XAV-701HD_ML\02CaFR_XAV701HD\02CaFR01INT-U.fm
masterpage:Left
XAV-701HD
4-422-720-11(1)
Avertissement
Pour prévenir les risques d’incendie ou
d’électrocution, tenir cet appareil à l’abri
de la pluie ou de l’humidité.
Ne pas ouvrir le boîtier pour éviter un
choc électrique. Confier la réparation de
l’appareil à un technicien qualifié
uniquement.
ATTENTION
L’utilisation d’instruments optiques avec cet
appareil augmente le danger pour les yeux. Ne
pas tenter de désassembler le boîtier de l’appareil
étant donné que le faisceau laser utilisé dans ce
lecteur CD/DVD est dangereux pour les yeux.
Confier la réparation de l’appareil à un
technicien qualifié uniquement.
Le présent appareil est conforme aux CNR
d’Industrie Canada applicables aux appareils
radio exempts de licence. L’exploitation est
autorisée aux deux conditions suivantes : (1)
l’appareil ne doit pas produire de brouillage, et
(2) l’utilisateur de l’appareil doit accepter tout
brouillage radioélectrique subi, même si le
brouillage est susceptible d’en compromettre le
fonctionnement.
Cet équipement ne doit pas être placé au même
endroit ni utilisé avec une autre antenne ou un
autre émetteur.
Conformément à la réglementation d’Industrie
Canada, le présent émetteur radio peut
fonctionner avec une antenne d’un type et d’un
gain maximal (ou inférieur) approuvé pour
l’émetteur par Industrie Canada. Dans le but de
réduire les risques de brouillage radioélectrique à
l’intention des autres utilisateurs, il faut choisir le
type d’antenne et son gain de sorte que la
puissance isotrope rayonnée équivalente (p.i.r.e.)
ne dépasse pas l’intensité nécessaire à
l’établissement d’une communication
satisfaisante.
Uniquement pour l’État de la Californie,
États-Unis
Matériaux de perchlorate – une manutention
spéciale peut s’appliquer. Voir
www.dtsc.ca.gov/hazardouswaste/perchlorate
Matériaux de perchlorate : La pile au lithium
contient du perchlorate
Pour votre propre sécurité, assurez-vous
d’installer cet appareil dans le tableau de bord
de la voiture. Pour l’installation et les
connexions, consultez le guide « Installation/
Raccordement » fourni.
Avertissement si le contact de votre
véhicule ne comporte pas de position
ACC
Veillez à activer la fonction Auto Off (arrêt
automatique) (page 52).
Lorsqu’aucune source n’est sélectionnée,
l’appareil se met automatiquement hors
tension après un délai donné, ce qui empêche
d’épuiser la batterie.
Si vous n’activez pas la fonction d’arrêt
automatique, appuyez sur la touche
(SOURCE/OFF) et maintenez-la enfoncée
jusqu’à ce que l’affichage disparaisse chaque
fois que vous coupez le contact.
Pour annuler l’affichage de démonstration
(Démo), reportez-vous à la page 52.
Cet émetteur est conforme aux limitations
concernant l’exposition aux radiations établies
par la FCC/IC définies dans un environnement
non contrôlé ainsi qu’aux directives relatives à
l’exposition aux fréquences radio (RF) FCC du
supplément C du bulletin OET65 et au
règlement CNR-102 relatif à l’exposition aux
radiofréquences (RF) IC. Cet équipement
présente des niveaux d’énergie RF très bas
considérés comme conformes et ne nécessite pas
d’évaluation d’exposition maximale admise
(MPE). Il est toutefois souhaitable de l’installer
et l’utiliser en laissant l’appareil rayonnant à une
distance d’au moins 20 cm de votre corps (sans
compter les extrémités : mains, poignets, pieds
et jambes).
00US+00COV-U.book Page 2 Friday, June 15, 2012 2:52 PM
3
M:\001\XPML A7.0\ML\4422720111_XAV-701HD_CaFR-LaES(FM7.1
600dpi)\4422720111_XAV-701HD_ML\02CaFR_XAV701HD\02CaFR+00COV-
UTOC.fm
masterpage:Right
Table des matières
XAV-701HD
4-422-720-11(1)
Remarques sur la sécurité . . . . . . . . . . . . . . . . . 6
Remarques sur l’installation . . . . . . . . . . . . . . . 6
Droits d’auteur. . . . . . . . . . . . . . . . . . . . . . . . . . 6
Remarques sur la fonction Bluetooth . . . . . . . . 8
Avis au sujet de la licence . . . . . . . . . . . . . . . . . 8
Disques et types de fichier pouvant être lus . . . 9
Emplacement et fonction des commandes. . . . 10
Appareil principal . . . . . . . . . . . . . . . . . . . . 10
Télécommande RM-X271 . . . . . . . . . . . . . 12
Préparation
Réinitialisation de l’appareil . . . . . . . . . . . . . . 14
Réglage initial . . . . . . . . . . . . . . . . . . . . . . . . . 14
Réglage de l’horloge . . . . . . . . . . . . . . . . . . . . 14
Préparation de la télécommande . . . . . . . . . . . 14
Radio
Écoute de la radio . . . . . . . . . . . . . . . . . . . . . . 15
Commandes de réception . . . . . . . . . . . . . . 15
Indications pendant la réception . . . . . . . . . 16
Mémorisation et réception des stations . . . . . . 16
Mémorisation automatique — BTM. . . . . . 16
Mémorisation manuelle . . . . . . . . . . . . . . . 17
Réception des stations mémorisées. . . . . . . 17
À propos de la multidiffusion FM . . . . . . . 17
iTunes Tagging . . . . . . . . . . . . . . . . . . . . . . . . 17
Utilisation de l’étiquetage iTunes
Tagging . . . . . . . . . . . . . . . . . . . . . . . . . . . . 17
Disques
Lecture de disques . . . . . . . . . . . . . . . . . . . . . . 19
Commandes de lecture . . . . . . . . . . . . . . . . 19
Indications de lecture . . . . . . . . . . . . . . . . . 20
Utilisation des fonctions PBC (contrôle de la
lecture). . . . . . . . . . . . . . . . . . . . . . . . . . . . . . . 21
Configuration des paramètres audio . . . . . . . . 21
Modification de la langue/du format du
son. . . . . . . . . . . . . . . . . . . . . . . . . . . . . . . . 21
Changement du canal audio . . . . . . . . . . . . 22
Réglage du niveau de sortie audio
— Niveau Dolby D . . . . . . . . . . . . . . . . . . . 22
Lecture répétée et aléatoire . . . . . . . . . . . . . . . 22
Recherche directe . . . . . . . . . . . . . . . . . . . . . . 23
Affichage de la liste des plages/fichiers vidéo
— Liste . . . . . . . . . . . . . . . . . . . . . . . . . . . . . . 23
Sélection d’une plage/d’un fichier
vidéo. . . . . . . . . . . . . . . . . . . . . . . . . . . . . . 23
Sélection d’un type de fichier . . . . . . . . . . 23
USB Musique
Lecture de musique. . . . . . . . . . . . . . . . . . . . . 24
Commandes de lecture. . . . . . . . . . . . . . . . 24
Options . . . . . . . . . . . . . . . . . . . . . . . . . . . . 24
Lecture répétée et aléatoire. . . . . . . . . . . . . . . 24
Sélection des fichiers de musique. . . . . . . . . . 25
Sélection des chansons à partir de la
bibliothèque . . . . . . . . . . . . . . . . . . . . . . . . . . 25
Profitez de la musique en fonction de votre
humeur — SensMe™ . . . . . . . . . . . . . . . . . . . 25
Installation de « Media Go » sur votre
ordinateur . . . . . . . . . . . . . . . . . . . . . . . . . . 25
Transfert de plages vers le périphérique
USB à l’aide de « Media Go » . . . . . . . . . . 25
Lecture des plages dans les canaux
— Station SensMe™ . . . . . . . . . . . . . . . . . 26
Sélection d’un album par illustration de
pochette. . . . . . . . . . . . . . . . . . . . . . . . . . . . . . 26
Options . . . . . . . . . . . . . . . . . . . . . . . . . . . . 26
USB Vidéo
Lecture de vidéo . . . . . . . . . . . . . . . . . . . . . . . 27
Commandes de lecture. . . . . . . . . . . . . . . . 27
Options . . . . . . . . . . . . . . . . . . . . . . . . . . . . 28
Sélection des fichiers vidéo . . . . . . . . . . . . . . 28
Options . . . . . . . . . . . . . . . . . . . . . . . . . . . . 29
USB Photo
Affichage des photos . . . . . . . . . . . . . . . . . . . 29
Commandes de lecture. . . . . . . . . . . . . . . . 29
Options . . . . . . . . . . . . . . . . . . . . . . . . . . . . 30
Sélection des fichiers de photo . . . . . . . . . . . . 30
Options . . . . . . . . . . . . . . . . . . . . . . . . . . . . 30
00US+00COV-U.book Page 3 Friday, June 15, 2012 2:52 PM
4
M:\001\XPML A7.0\ML\4422720111_XAV-701HD_CaFR-LaES(FM7.1
600dpi)\4422720111_XAV-701HD_ML\02CaFR_XAV701HD\02CaFR+00COV-
UTOC.fm
masterpage:Left
XAV-701HD
4-422-720-11(1)
iPod
Utilisation du iPod . . . . . . . . . . . . . . . . . . . . . .32
Affichage de la liste des plages/fichiers vidéo
— Liste. . . . . . . . . . . . . . . . . . . . . . . . . . . . . . .33
Sélection d’une plage/d’un fichier vidéo. . .33
Sélection d’un type de fichier . . . . . . . . . . .33
Sélection du mode de lecture . . . . . . . . . . . . . .33
Lecture répétée et aléatoire . . . . . . . . . . . . . . .34
Fonctionnement direct d’un iPod
— Commande d’application passager . . . . . . .34
Fonctions utiles
Recherche d’une plage en écoutant des passages
des plages — ZAPPIN™ . . . . . . . . . . . . . . . . .35
Contrôle des applications sur votre téléphone
intelligent — MirrorLink™ . . . . . . . . . . . . . . .35
Contrôle des applications sur votre iPhone
— Application Telenav® GPS . . . . . . . . . . . . .35
Utilisation de sources différentes à l’avant et
l’arrière — Zone × Zone . . . . . . . . . . . . . . . . .36
Changement de couleur des touches
— Illuminateur de couleur dynamique. . . . . . .36
Personnalisation de la couleur des touches
— Couleur personnalisée . . . . . . . . . . . . . .36
Utilisation des Commandes gestuelles. . . . . . .37
Appels mains-libres et audio en
continu — Fonction Bluetooth
Avant d’utiliser la fonction Bluetooth . . . . . . .38
Procédure de base de la fonction
Bluetooth . . . . . . . . . . . . . . . . . . . . . . . . . . .38
Indications d’état Bluetooth . . . . . . . . . . . .38
Installation du microphone . . . . . . . . . . . . .38
Pairage . . . . . . . . . . . . . . . . . . . . . . . . . . . . . . .39
Recherche à partir du périphérique
Bluetooth . . . . . . . . . . . . . . . . . . . . . . . . . . .39
Connexion . . . . . . . . . . . . . . . . . . . . . . . . . . . .39
Appel en mains libres. . . . . . . . . . . . . . . . . . . .40
Appels . . . . . . . . . . . . . . . . . . . . . . . . . . . . .40
Réception d’appels . . . . . . . . . . . . . . . . . . .41
Fonctionnements en cours d’appel . . . . . . .41
Gestion du répertoire . . . . . . . . . . . . . . . . . . . .42
Sélection des données de répertoire. . . . . . .42
Navigation dans un répertoire . . . . . . . . . . .42
Suppression des données de répertoire . . . .42
Gestion des données d’appel . . . . . . . . . . . . . .43
Suppression de l’historique des appels . . . . 43
Numéros présélectionnés . . . . . . . . . . . . . . 43
Menu d’options du téléphone . . . . . . . . . . . . . 43
Transmission audio en continu . . . . . . . . . . . . 44
Écoute d’un périphérique Bluetooth par le
biais de cet appareil. . . . . . . . . . . . . . . . . . . 44
Fonctionnement d’un périphérique Bluetooth
avec cet appareil . . . . . . . . . . . . . . . . . . . . . 44
Réglages généraux de la fonction
Bluetooth . . . . . . . . . . . . . . . . . . . . . . . . . . . . . 45
Radio Internet Pandora®
Transmission en continu à l’aide de
Pandora® . . . . . . . . . . . . . . . . . . . . . . . . . . . . . 45
Pour connecter le périphérique mobile à l’aide
de la fonction Bluetooth . . . . . . . . . . . . . . . 45
Pour connecter le iPhone . . . . . . . . . . . . . . 46
Appréciation positive ou négative . . . . . . . 46
Liste des stations. . . . . . . . . . . . . . . . . . . . . 46
Mise en signet . . . . . . . . . . . . . . . . . . . . . . . 46
Création d’une station. . . . . . . . . . . . . . . . . 46
Suppression d’une station . . . . . . . . . . . . . . 46
Réglage du son
Sélection de la qualité du son
— EQ7. . . . . . . . . . . . . . . . . . . . . . . . . . . . . . . 47
Personnalisation de la courbe d’égaliseur
— Réglages EQ7 . . . . . . . . . . . . . . . . . . . . 47
Réglage des caractéristiques du son . . . . . . . . 47
Optimisation du son pour la position d’écoute
— Synchronisation intelligente . . . . . . . . . . . . 48
Étalonnage de la position d’écoute
— Réglage de synchronisation
intelligente . . . . . . . . . . . . . . . . . . . . . . . . . 48
Configuration du haut-parleur et réglage du
volume . . . . . . . . . . . . . . . . . . . . . . . . . . . . . . . 49
Création d’un haut-parleur central virtuel
— CSO . . . . . . . . . . . . . . . . . . . . . . . . . . . . 49
Utilisation des haut-parleurs arrière comme
caissons de graves
— Amélioration des basses à l’arrière . . . . 49
Réglage du volume des haut-parleurs. . . . . 49
00US+00COV-U.book Page 4 Friday, June 15, 2012 2:52 PM
5
M:\001\XPML A7.0\ML\4422720111_XAV-701HD_CaFR-LaES(FM7.1
600dpi)\4422720111_XAV-701HD_ML\02CaFR_XAV701HD\02CaFR+00COV-
UTOC.fm
masterpage:Right
XAV-701HD
4-422-720-11(1)
Ajustement du moniteur
Réglage de l’angle du moniteur. . . . . . . . . . . . 50
Calibration de l’écran tactile . . . . . . . . . . . . . . 50
Réglage de l’image — Picture EQ . . . . . . . . . 50
Réglage personnalisé de l’image . . . . . . . . 50
Sélection du format de l’image . . . . . . . . . . . . 51
Réglages
Configuration de base . . . . . . . . . . . . . . . . . . . 51
Réglages généraux. . . . . . . . . . . . . . . . . . . . . . 52
Réglages du son. . . . . . . . . . . . . . . . . . . . . . . . 54
Réglages visuels . . . . . . . . . . . . . . . . . . . . . . . 56
Réglages de la source . . . . . . . . . . . . . . . . . . . 57
Utilisation d’un équipement en
option
Appareil audio/vidéo auxiliaire . . . . . . . . . . . . 60
Récepteur SiriusXM Connect . . . . . . . . . . . . . 60
Caméra arrière . . . . . . . . . . . . . . . . . . . . . . . . . 61
Réglages de la caméra arrière . . . . . . . . . . . 61
Informations complémentaires
Précautions . . . . . . . . . . . . . . . . . . . . . . . . . . . 62
Remarques sur l’écran ACL . . . . . . . . . . . . 62
Remarques sur les disques . . . . . . . . . . . . . 62
Ordre de lecture des fichiers MP3/WMA/
AAC/Xvid/MPEG-4 . . . . . . . . . . . . . . . . . . 63
À propos du iPod . . . . . . . . . . . . . . . . . . . . 65
À propos de la fonction Bluetooth . . . . . . . 65
Entretien . . . . . . . . . . . . . . . . . . . . . . . . . . . . . 66
Retrait de l’appareil . . . . . . . . . . . . . . . . . . . . . 67
Caractéristiques techniques . . . . . . . . . . . . . . . 67
Dépannage . . . . . . . . . . . . . . . . . . . . . . . . . . . . 68
Affichage des erreurs et messages . . . . . . . 72
Liste des codes de langues. . . . . . . . . . . . . . . . 76
00US+00COV-U.book Page 5 Friday, June 15, 2012 2:52 PM
6
M:\001\XPML A7.0\ML\4422720111_XAV-701HD_CaFR-LaES(FM7.1
600dpi)\4422720111_XAV-701HD_ML\02CaFR_XAV701HD\02CaFR02CD-U.fm
masterpage:Left
XAV-701HD
4-422-720-11(1)
Remarques sur la sécurité
• Respectez les règles, lois et règlements de
conduite locaux.
• Lors de la conduite
– Ne regardez pas et ne faites pas fonctionner
l’appareil car cela peut provoquer une distraction
et un accident. Stationnez votre véhicule dans un
endroit sûr pour regarder ou faire fonctionner
l’appareil.
– N’utilisez pas la fonction de configuration
pendant que vous conduisez, ni aucune autre
fonction susceptible de diminuer l’attention
portée à la route.
– En reculant votre véhicule, assurez-vous
de regarder attentivement vers l’arrière
et aux alentours pour votre propre
sécurité, même si la caméra arrière
fonctionne. Ne vous fiez pas
exclusivement à la caméra arrière.
• Lors de l’utilisation
– N’insérez pas les mains, les doigts ou un corps
étranger dans l’appareil car cela peut causer des
blessures ou endommager l’appareil.
– Tenez les petits objets hors de portée des enfants.
– Assurez-vous d’attacher les ceintures de sécurité
afin de prévenir les blessures lors d’un
mouvement brusque du véhicule.
Remarques sur l’installation
• Nous vous recommandons de laisser un technicien
qualifié installer cet appareil.
– Si vous essayez de l’installer vous-même,
consultez le guide « Installation/Raccordement »
fourni et installez l’appareil correctement.
– Une installation incorrecte peut décharger la
batterie ou provoquer des courts-circuits.
• Si l’appareil ne fonctionne pas correctement,
vérifiez d’abord les connexions en consultant le
guide « Installation/Raccordement » fourni. Si
tout est en bon état, vérifiez le fusible.
• Protégez la surface de l’appareil contre les
dommages.
–N’exposez pas la surface de l’appareil à des
produits chimiques tels les insecticides, la laque,
les anti-moustiques, etc.
– Évitez le contact prolongé de matériaux de
caoutchouc ou de plastique avec l’appareil.
Sinon, le fini de l’appareil peut être abîmé ou il
peut y avoir déformation.
• Lors de l’installation, assurez-vous de fixer
solidement l’appareil.
• Lors de l’installation, assurez-vous de couper le
contact. L’installation de l’appareil avec le contact
activé peut épuiser la batterie ou provoquer un
court-circuit.
• Lors de l’installation, assurez-vous de
n’endommager aucune pièce du véhicule, comme
les conduites, les tuyaux, le réservoir d’essence ou
les câbles en utilisant une perceuse; il y a risque
d’incendie ou d’accident.
Droits d’auteur
Fabriqué sous licence de Dolby
Laboratories. Dolby et le
symbole double-D sont des
marques déposées de Dolby
Laboratories.
Microsoft, Windows, Windows Vista et Windows
Media et leurs logos sont des marques de commerce
ou des marques déposées de Microsoft Corporation
aux États-Unis et dans d’autres pays.
Ce produit incorpore une technologie sujette à
certains droits de propriété intellectuelle de
Microsoft. L’utilisation ou la distribution de cette
technologie hors de ce produit est interdite sans
licence(s) appropriée(s) de Microsoft.
« DVD VIDEO », « DVD-R », « DVD-RW »,
« DVD+R » et « DVD+RW » sont des marques de
commerce.
Le logotype et les logos
Bluetooth
sont la propriété de
Bluetooth SIG, Inc. et toute utilisation de ces marques
est accordée sous licence à Sony Corporation. Les
autres marques et noms de commerce appartiennent à
leurs propriétaires respectifs.
ZAPPIN est une marque de commerce de Sony
Corporation.
12 TONE ANALYSIS et son
logo sont des marques de
commerce de Sony
Corporation.
« WALKMAN » et le
logo « WALKMAN »
sont des marques de
commerce déposées de
Sony Corporation.
Prévention contre les accidents
Les images ne s’affichent que lorsque le véhicule
est stationné et le frein à main appliqué.
Si le véhicule se met en mouvement pendant la
lecture de vidéo, l’affichage des images est
désactivé automatiquement après l’affichage de
l’avertissement suivant.
« Vidéo bloquée pour votre sécurité. »
Le moniteur raccordé à la prise REAR OUT est
actif lorsque le véhicule roule.
L’image affichée est remplacée par l’image
d’arrière-plan, mais la source audio est toujours
en fonction.
N’utilisez pas le lecteur et ne regardez pas le
moniteur lorsque vous conduisez.
00US+00COV-U.book Page 6 Friday, June 15, 2012 2:52 PM
7
M:\001\XPML A7.0\ML\4422720111_XAV-701HD_CaFR-LaES(FM7.1
600dpi)\4422720111_XAV-701HD_ML\02CaFR_XAV701HD\02CaFR02CD-U.fm
masterpage:RightM:\001\XPML A7.0\ML\4422720111_XAV-701HD_CaFR-LaES(FM7.1
600dpi)\4422720111_XAV-701HD_ML\02CaFR_XAV701HD\02CaFR02CD-U.fm
masterpage:Right
XAV-701HD
4-422-720-11(1)
SensMe et le logo SensMe sont
des marques de commerce ou des
marques de commerce déposées
de Sony Ericsson Mobile
Communications AB.
Technologie de reconnaissance musicale et
données connexes fournies par Gracenote®.
Gracenote constitue la norme de l’industrie en
matière de technologie de reconnaissance
musicale et de fourniture de contenus connexes.
Pour plus de détails, visitez www.gracenote.com.
Les données sur CD, DVD ou/et Blu-ray et les
données associées aux morceaux de musique et
aux clips vidéo sont fournies par Gracenote, Inc.,
copyright © 2000-Date actuelle Gracenote.
Gracenote Software, copyright © 2000-Date
actuelle Gracenote. Ce produit et ce service sont
protégés par un ou plusieurs brevets appartenant
à Gracenote. Visitez le site Web de Gracenote
pour consulter une liste non exhaustive des
brevets Gracenote applicables.
Gracenote, CDDB, MusicID, MediaVOCS, le
logo et le graphisme Gracenote ainsi que la
mention « Powered by Gracenote » sont des
marques ou des marques déposées de Gracenote
aux Etats-Unis et/ou dans d’autres pays.
iPhone, iPod, iPod classic, iPod nano et iPod touch
sont des marques de commerce de Apple Inc.,
déposées aux États-Unis et dans d’autres pays.
Apple, Macintosh et iTunes sont des marques de
commerce de Apple Inc., déposées aux États-Unis et
dans d’autres pays.
MirrorLink™ et le logo MirrorLink sont des
marques de certification de Car Connectivity
Consortium LLC. L’utilisation non autorisée est
strictement interdite.
CE PRODUIT EST SOUS LICENCE « MPEG-4
VISUAL PATENT PORTFOLIO LICENSE »
POUR TOUT USAGE STRICTEMENT
PERSONNEL ET NON COMMERCIAL PAR UN
CONSOMMATEUR POUR LE DÉCODAGE DE
VIDÉO MPEG-4 PRÉALABLEMENT ENCODÉE
PAR UN CONSOMMATEUR ENGAGÉ DANS
UNE ACTIVITÉ PERSONNELLE ET NON
COMMERCIALE ET/OU OBTENUE D’UN
FOURNISSEUR DE VIDÉOS HABILITÉ PAR
MPEG À FOURNIR DE LA VIDÉO MPEG-4.
AUCUNE LICENCE EXPRESSE OU TACITE
N’EST ACCORDÉE POUR AUCUN AUTRE
USAGE. DES INFORMATIONS
COMPLÉMENTAIRES, NOTAMMENT
RELATIVES AUX LICENCES ET USAGES
PROMOTIONNELS, INTERNES ET
COMMERCIAUX, PEUVENT ÊTRE OBTENUES
AUPRÈS DE MPEG LA, LLC. CONSULTEZ LE
SITE HTTP://WWW.MPEGLA.COM
Pandora, le logo Pandora et la présentation
Pandora sont des marques commerciales ou des
marques déposées de Pandora Media, Inc.,
utilisées avec permission.
Android est une marque commerciale de Google
Inc. L’utilisation de cette marque commerciale
est soumise aux dispositions Google
Permissions.
BlackBerry® est la propriété de Research In
Motion Limited et une marque déposée et/ou
utilisée aux États-Unis et dans d’autres pays.
Utilisée sous licence de Research In Motion
Limited.
Les abonnements SiriusXM et le récepteur
Connect sont vendus séparément.
www.siriusxm.com.
Sirius, XM et la totalité des marques et logos
associés sont des marques commerciales de
Sirius XM Radio Inc. et de ses filiales. Toutes les
autres marques et tous les autres logos
appartiennent à leurs détenteurs respectifs.
Tous droits réservés.
HD Radio Technology est fabriqué sous licence
par iBiquity Digital Corporation. Brevets U.S. et
Étrangers. HD Radio™ et HD, HD Radio et
“Arc” logos sont des marques déposées par
iBiquity Digital Corp.
TelenavMD et le logo Telenav sont des marques
déposées ou des marques de commerce de Telenav,
Inc.
Toutes les autres marques commerciales sont des
marques appartenant à leurs détenteurs
respectifs.
Ce produit utilise un pilote logiciel NCM qui est
concédé sous licence à Sony par la corporation
MCCI.
00US+00COV-U.book Page 7 Friday, June 15, 2012 2:52 PM
8
M:\001\XPML A7.0\ML\4422720111_XAV-701HD_CaFR-LaES(FM7.1
600dpi)\4422720111_XAV-701HD_ML\02CaFR_XAV701HD\02CaFR02CD-U.fm
masterpage:Left
XAV-701HD
4-422-720-11(1)
Remarques sur la fonction
Bluetooth
Attention
EN AUCUN CAS SONY EST RESPONSABLE
POUR TOUT DOMMAGES ACCESSOIRES,
INDIRECT OU POUR TOUS AUTRES
DOMMAGES, Y COMPRIS, SANS S’Y
LIMITER, LES DOMMAGES RÉSULTANTS
D’UNE PERTE DE PROFITS, DE REVENUS, DE
DONNÉES, D’UNE PERTE D’UTILISATION DU
PRODUIT OU DE L’ÉQUIPEMENT CONNEXE,
DES ARRÊTS DE TRAVAIL ET DES PERTES DE
TEMPS DE L’ACHETEUR RÉSULTANTS DE
L’UTILISATION DE CE PRODUIT, DU
MATÉRIEL ET/OU DU LOGICIEL.
AVIS IMPORTANT!
Utilisation efficace et en sécurité
Les changements ou modifications apportés à cet
appareil et qui ne sont pas expressément autorisés
par Sony peuvent annuler l’autorisation accordée à
l’utilisateur de faire fonctionner l’appareil.
Veuillez vérifier les exceptions en vigueur de
l’équipement Bluetooth en raison d’exigences ou de
limitations nationales avant d’utiliser ce produit.
Conduite
Vérifiez la législation et la réglementation en
vigueur concernant l’utilisation des téléphones
cellulaires et des appareils mains libres dans les
endroits où vous circulez.
Soyez toujours très attentif au volant et garez-vous
avant d’effectuer ou de répondre à un appel si les
conditions de circulation l’exigent.
Connexion à d’autres périphériques
Avant de connecter un autre périphérique, lisez
attentivement son mode d’emploi pour plus de
détails concernant les instructions de sécurité.
Exposition aux fréquences radio
Les signaux RF peuvent influer négativement sur les
systèmes électroniques mal installés ou mal isolés
dans les véhicules. Ces systèmes électroniques
comprennent l’injection du carburant, le freinage
antipatinage (antiblocage), le régulateur de vitesse
ou les coussins gonflables. Consultez le fabricant ou
son représentant quant à l’installation ou à
l’entretien de cet appareil. Une mauvaise installation
ou un entretien mal effectué peut être dangereux et
invalider toute garantie qui s’applique à cet appareil.
Vérifiez auprès du constructeur de votre véhicule
que l’utilisation de votre téléphone cellulaire ne
risque pas d’affecter les systèmes électroniques
embarqués.
Vérifiez régulièrement que tous les appareils
périphériques sans fil installés dans votre véhicule
sont bien montés et fonctionnent correctement.
Appels d’urgence
Cet appareil mains-libres Bluetooth de véhicule et le
périphérique électronique auquel il est raccordé
fonctionnent à l’aide de signaux radio, des réseaux
cellulaires et par lignes terrestres, ainsi qu’à l’aide
de fonctions programmables par l’utilisateur qui ne
peuvent garantir la connexion dans toutes les
conditions.
Par conséquent, ne vous fiez pas uniquement à des
périphériques électroniques pour vos
communications importantes (telles les urgences
médicales).
Rappelez-vous que pour faire ou recevoir des
appels, le périphérique mains libres et le
périphérique électronique connecté à celui-ci
doivent être activés dans une zone de service dans
laquelle la puissance des signaux cellulaires est
adaptée.
Les appels d’urgence peuvent ne pas être possibles
sur tous les téléphones cellulaires ou lorsque
certains services de réseau ou certaines fonctions du
téléphone sont utilisés.
Consultez votre fournisseur de service local pour
plus de renseignements.
Avis au sujet de la licence
Ce produit contient un logiciel que Sony utilise
en vertu d’un accord de licence avec le détenteur
de son droit d’auteur. Nous avons l’obligation de
communiquer le contenu de cet accord aux
consommateurs pour nous conformer aux
exigences du détenteur de droit d’auteur du
logiciel.
Pour plus de détails sur les licences de logiciel,
consultez la page 53.
Avis au sujet de la LPG/LPGL GNU
applicable au logiciel
Ce produit contient un logiciel soumis à la
Licence Publique Générale GNU (ci-après
nommée « LPG ») ou à la Licence Publique
Générale Limitée GNU (ci-après nommée
« LPGL »). Ces licences indiquent que les
consommateurs ont le droit d’acquérir, de
modifier et de redistribuer le code source dudit
logiciel en se conformant aux modalités de la
LPG ou LPGL affichée sur cet appareil.
Le code source pour le logiciel mentionné ci-
dessus est disponible sur le Web.
Pour le télécharger, veuillez accéder à l’adresse
URL suivante, puis sélectionnez le nom de
modèle « XAV-701HD ».
URL : http://www.sony.net/Products/Linux/
Veuillez noter que Sony n’est pas en mesure de
répondre aux questions concernant le contenu du
code source.
00US+00COV-U.book Page 8 Friday, June 15, 2012 2:52 PM
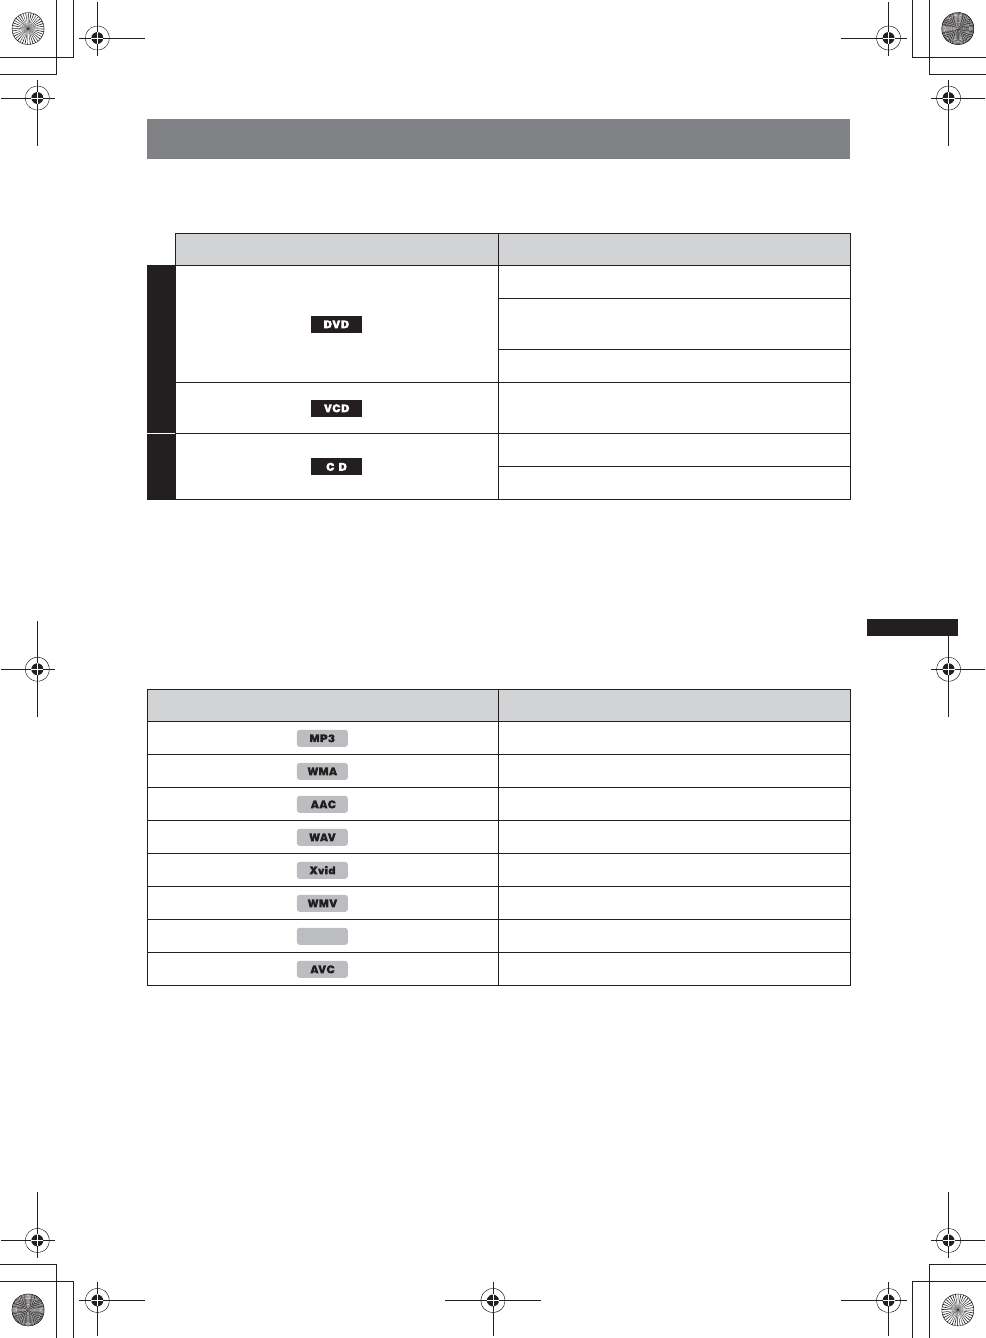
9
M:\001\XPML A7.0\ML\4422720111_XAV-701HD_CaFR-LaES(FM7.1
600dpi)\4422720111_XAV-701HD_ML\02CaFR_XAV701HD\02CaFR02CD-U.fm
masterpage:RightM:\001\XPML A7.0\ML\4422720111_XAV-701HD_CaFR-LaES(FM7.1
600dpi)\4422720111_XAV-701HD_ML\02CaFR_XAV701HD\02CaFR02CD-U.fm
masterpage:Right
XAV-701HD
4-422-720-11(1)
Disques et types de fichier pouvant être lus
Cet appareil peut lire différents disques vidéo/audio.
Le tableau suivant vous permet de vérifier si un disque est pris en charge par cet appareil, ainsi que les
fonctions disponibles pour un type de disque donné.
*1 Les fichiers audio peuvent également être enregistrés.
*2 Les fichiers vidéo peuvent également être enregistrés.
Remarque
« DVD » peut être utilisé comme terme générique dans ce Mode d’emploi pour décrire les DVD VIDEO, DVD-R/
DVD-RW et DVD+R/DVD+RW.
Le tableau suivant illustre les types de fichiers pris en charge ainsi que leurs symboles.
Les fonctions disponibles dépendent du format, sans égard au type de disque. Les symboles de formats
ci-dessous apparaissent dans ce Mode d’emploi à la suite de la description des fonctions disponibles
pour les types de fichiers correspondants.
Conseil
Pour plus de détails sur les formats de compression, reportez-vous à la page 63.
Remarque
Même les disques compatibles peuvent ne pas être lus sur cet appareil; cela dépend de l’état de l’enregistrement.
Symbole du disque dans le manuel Format du disque
VIDEO
DVD VIDEO
DVD-R*1/DVD-R DL*1/DVD-RW*1
(Mode vidéo/mode VR)
DVD+R*1/DVD+R DL*1/DVD+RW*1
CD vidéo
(Ver. 1.0/1.1/2.0)
AUDIO
CD audio
CD-ROM*2/CD-R*2/CD-RW*2
Symbole du format dans le manuel Type de fichier
Fichier audio MP3
Fichier audio WMA
Fichier audio AAC
Fichier audio WAVE
Fichier vidéo Xvid
Fichier vidéo WMV
Fichier vidéo MPEG-4
Fichier vidéo AVC (ligne de base H.264)
MPEG-4
00US+00COV-U.book Page 9 Friday, June 15, 2012 2:52 PM
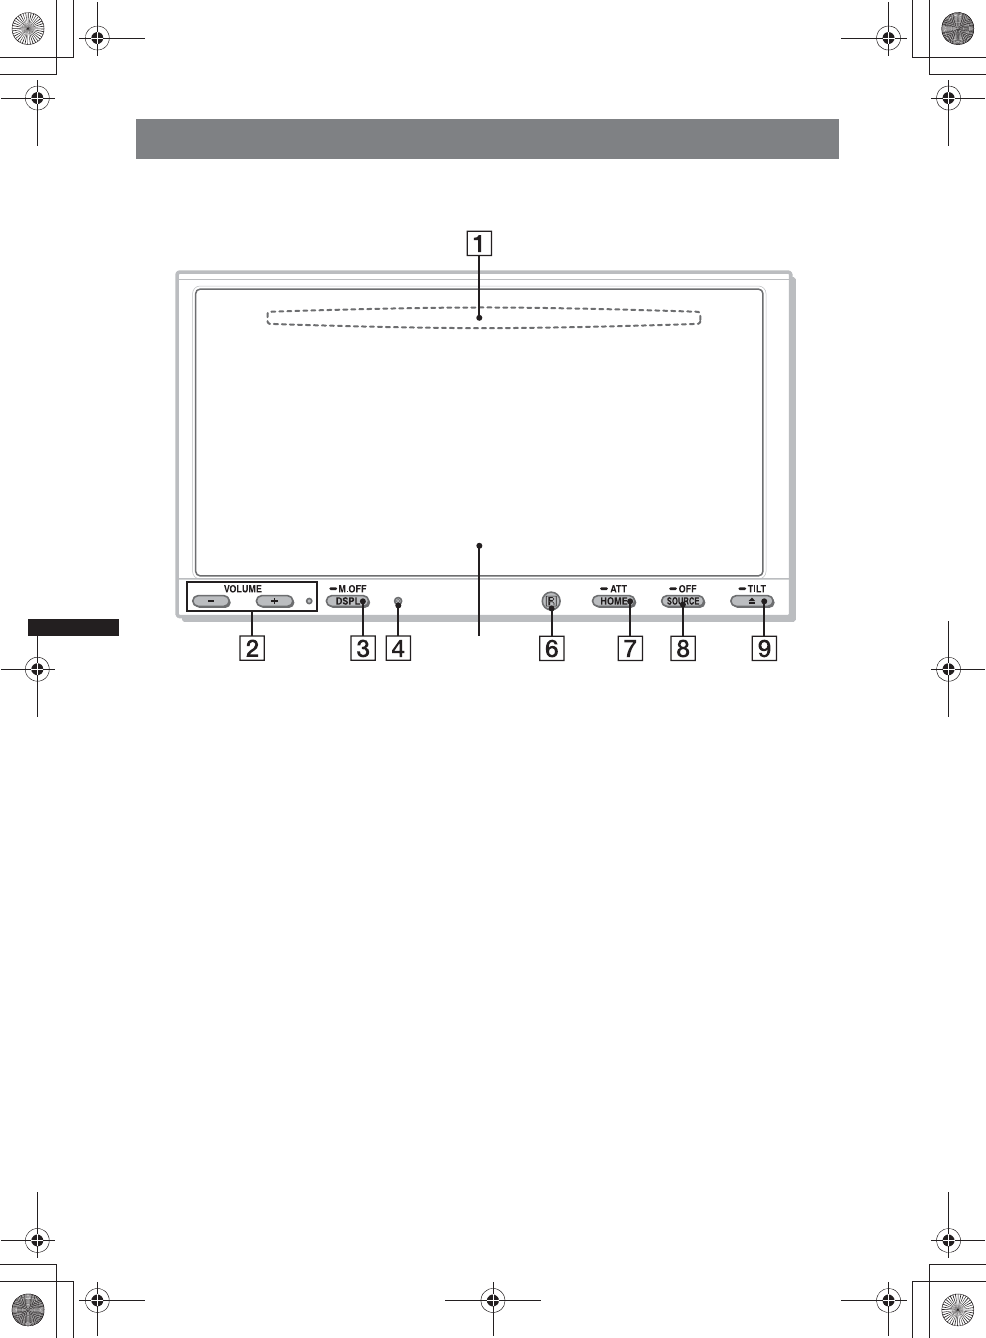
10
M:\001\XPML A7.0\ML\4422720111_XAV-701HD_CaFR-LaES(FM7.1
600dpi)\4422720111_XAV-701HD_ML\02CaFR_XAV701HD\02CaFR02CD-U.fm
masterpage:Left
XAV-701HD
4-422-720-11(1)
Emplacement et fonction des commandes
Appareil principal
Pour plus de détails, consultez les pages
mentionnées ci-dessous.
AFente d’insertion des disques
page 19
(située derrière la façade)
BTouches VOL (Volume) –/+*1
CTouche DSPL/M.OFF
Appuyez sur la touche pour changer les
éléments d’affichage. Maintenez la touche
enfoncée pour éteindre le moniteur et
l’illumination de la touche. Pour les
réactiver, touchez l’écran en un point
quelconque.
DTouche de réinitialisation page 14
EÉcran d’affichage/tactile
FRécepteur pour la télécommande
GTouche HOME/ATT
Appuyez sur la touche pour ouvrir le menu
HOME.
Maintenez la touche enfoncée pour atténuer
le son.
HTouche SOURCE/OFF
Appuyez sur la touche pour mettre en
marche/modifier la source : « Radio » (HD
Radio), « Telenav », « Pandora »,
« MirrorLink™ », « SXM*2 », « iPod »,
« USB Musique », « USB Video »,
« Disque », « Audio BT » (Audio
Bluetooth), « AUX » (Équipement
auxiliaire).
Maintenez la touche enfoncée pendant
1 seconde pour quitter la source.
Maintenez la touche enfoncée pendant plus
de 2 secondes pour mettre l’appareil hors
tension.
ITouche Z (Éjecter) TILT page 19, 50
Maintenez la touche enfoncée pour régler
l’angle du moniteur.
*1 Un point tactile est situé à droite de la touche
VOL +.
*2 Si un syntoniseur SAT est connecté, le
périphérique raccordé (« SXM ») s’active à l’écran.
5
00US+00COV-U.book Page 10 Friday, June 15, 2012 2:52 PM
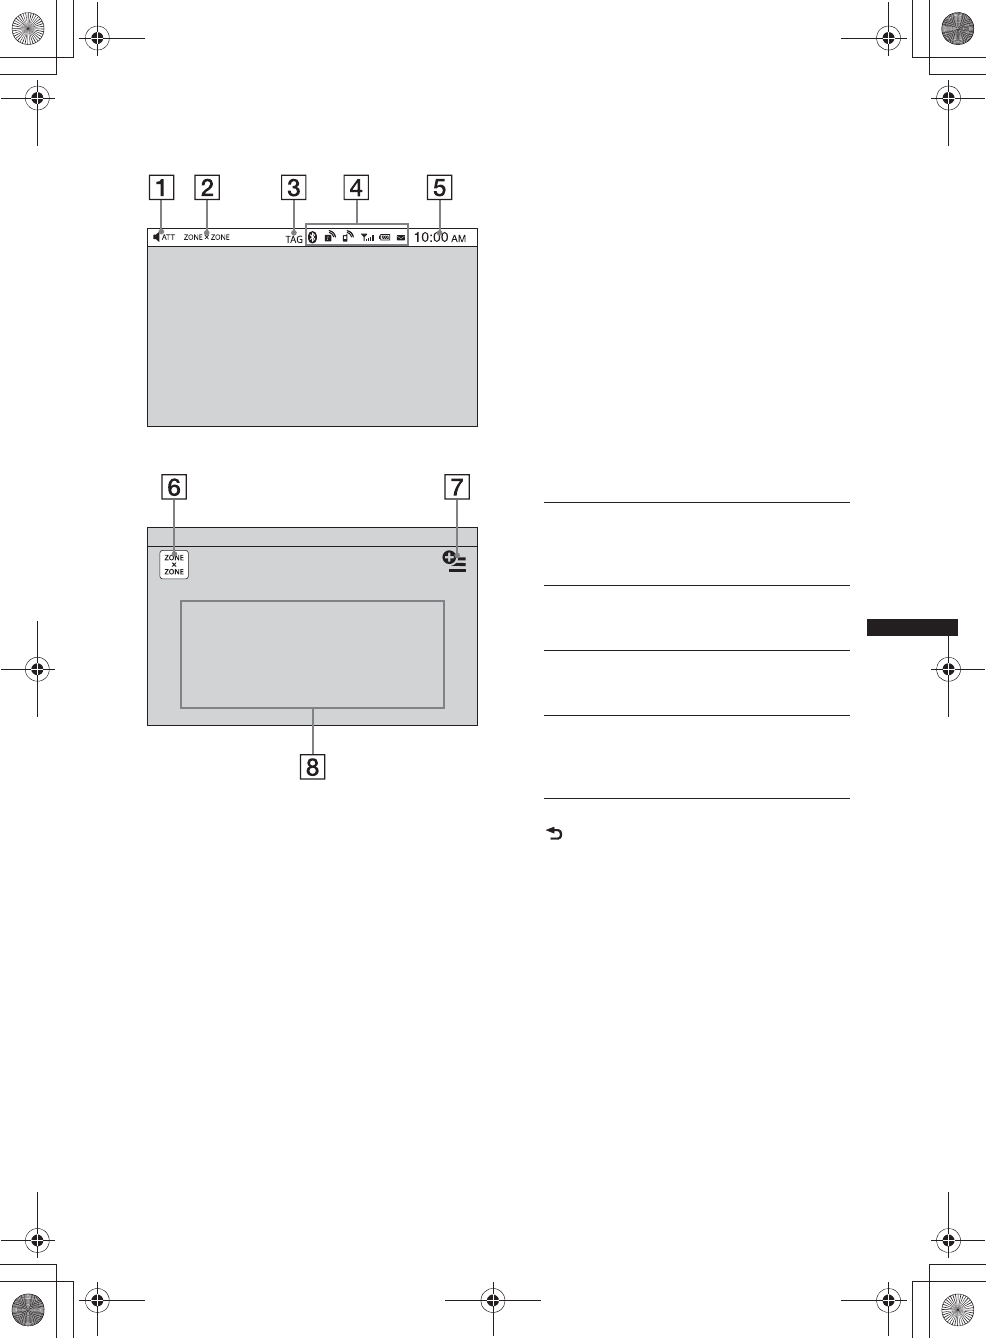
11
M:\001\XPML A7.0\ML\4422720111_XAV-701HD_CaFR-LaES(FM7.1
600dpi)\4422720111_XAV-701HD_ML\02CaFR_XAV701HD\02CaFR02CD-U.fm
masterpage:RightM:\001\XPML A7.0\ML\4422720111_XAV-701HD_CaFR-LaES(FM7.1
600dpi)\4422720111_XAV-701HD_ML\02CaFR_XAV701HD\02CaFR02CD-U.fm
masterpage:Right
XAV-701HD
4-422-720-11(1)
Affichage à l’écran AATT (Atténuer)
BZONE × ZONE
CTAG
DIndications d’état Bluetooth page 38
EHorloge page 14
FTouche « ZONE × ZONE »
Touchez pour activer la fonction Zone ×
Zone.
GTouche Option
Touchez pour ouvrir le menu Option HOME.
Les éléments du menu d’options d’accueil
sont les suivants :
Pour retourner à l’écran d’accueil, touchez à
.
HTouches de sélection de source
Touchez pour modifier la source :
« Radio » (HD Radio), « Telenav »,
« Pandora », « MirrorLink™ », « SXM*3 »,
« Téléphone », « iPod », « USB Musique »,
« USB Video », « Photo USB », « Disque »,
« Audio BT », « Navigation*4 », « Cam.
recul », « AUX » (Équipement
auxiliaire), « Réglages ».
*1 Disponible après le réglage d’un fichier de photo
comme arrière-plan pendant que la source « Photo
USB » est sélectionnée.
*2 Sélectionnez le Mode 2D/3D pour afficher les
icônes en 2D/3D. En Mode 3D, vous pouvez utiliser
l’affichage en déplaçant les icônes dans les deux
sens.
*3 Si un syntoniseur SAT est connecté, le
périphérique raccordé (« SXM ») s’active à l’écran.
Liste d’indications :
Écran d’accueil :
« Classement des icônes »
Affiche les icônes en fonction de la
fréquence d’utilisation : « Par défaut »,
« Fréquences utilisées ».
« Thème de fond d’écran »*1
Change le thème de fond d’écran : «Par
défaut », « Utilisateur ».
« Affichage Icône »
Change l’affichage des icônes : « Mode
2D », « Mode 3D*2».
« Effet tactile »
Affiche une traînée lumineuse à l’endroit où
vous touchez l’affichage : « ACTIVÉ »,
«DÉSACTIVÉ».
00US+00COV-U.book Page 11 Friday, June 15, 2012 2:52 PM
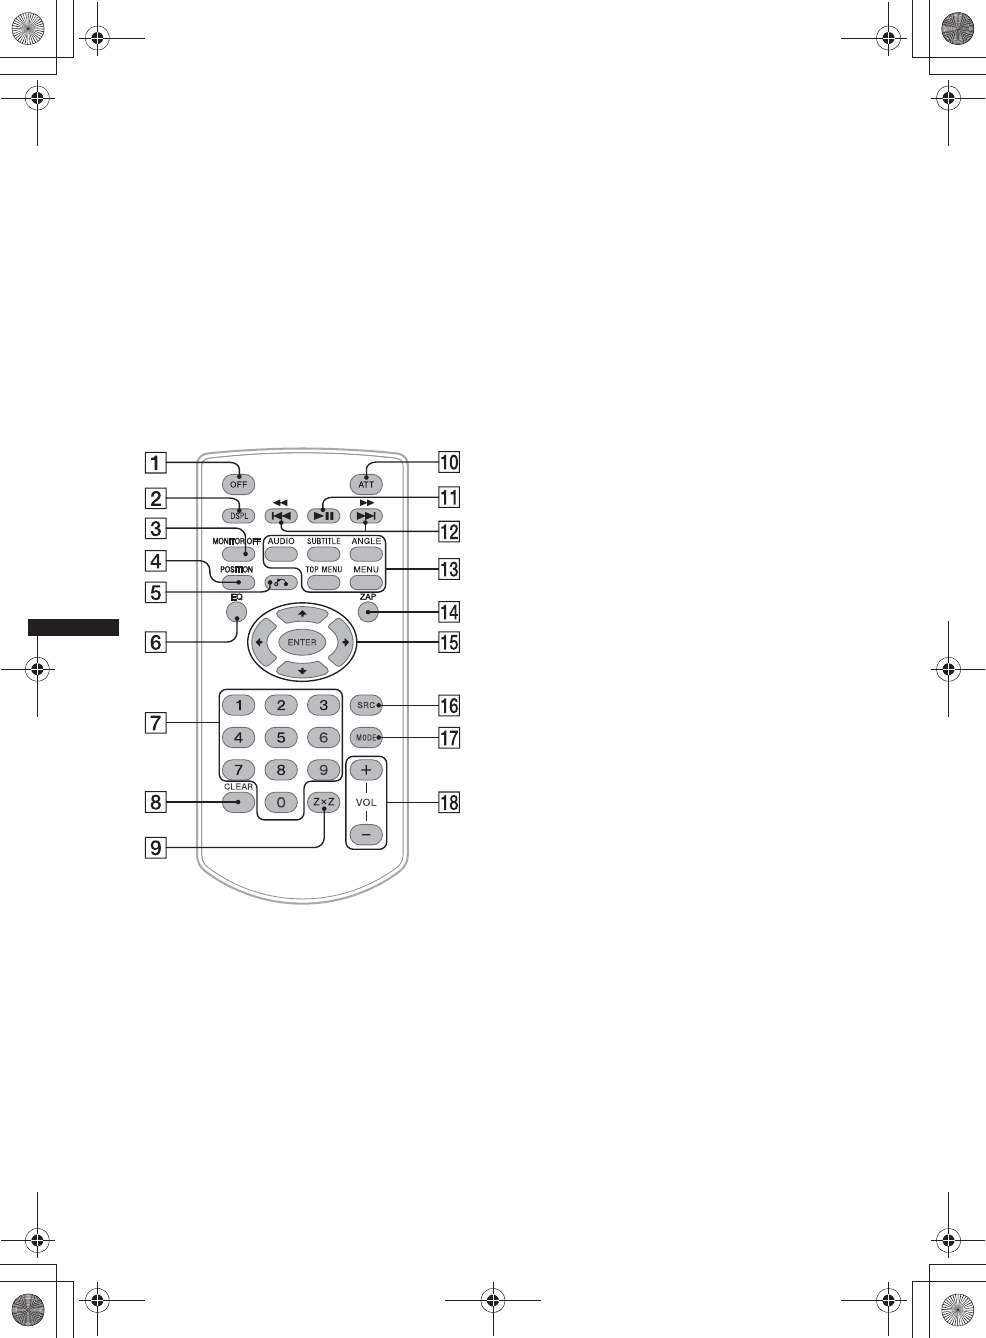
12
M:\001\XPML A7.0\ML\4422720111_XAV-701HD_CaFR-LaES(FM7.1
600dpi)\4422720111_XAV-701HD_ML\02CaFR_XAV701HD\02CaFR02CD-U.fm
masterpage:Left
XAV-701HD
4-422-720-11(1)
*4 Si le module de navigation (non fourni) est
connecté, l’icône de source Navigation s’active sur
l’écran d’accueil.
Conseil
Touchez et maintenez votre doigt à n’importe quel
endroit sur l’écran pour afficher la liste des éléments
de menu.
Télécommande RM-X271
• Vous pouvez utiliser la télécommande pour
faire fonctionner les commandes audio.
Utilisez l’écran tactile pour les opérations du
menu.
• Pour plus de détails, consultez les pages
mentionnées ci-dessous.
• Enlevez la pellicule isolante avant l’utilisation
(page 14).
ATouche OFF
Appuyez sur la touche pour quitter ou arrêter
la source.
Maintenez la touche enfoncée pour mettre
hors tension.
BTouche DSPL
Appuyez sur la touche pour changer les
éléments d’affichage.
CTouche MONITOR OFF
Appuyez sur la touche pour mettre le
moniteur hors tension et éteindre
l’illumination de la touche. Pour remettre
sous tension, appuyez de nouveau sur la
touche.
DTouche POSITION
Appuyez sur la touche pour modifier la
position d’écoute (« Avant G »/« Avant D »/
« Avant »/« Tous »/« Personnalisé »/
« DÉSACTIVÉ »).
ETouche O (Retour)
Appuyez sur la touche pour revenir à l’écran
précédent/revenir au menu précédent sur un
VCD*1.
FTouche EQ (Égaliseur)
Appuyez sur la touche pour choisir une
courbe d’égaliseur en fonction de 7 types de
musique (« Xplod »/« Vocal »/« Extrême »/
« Balade »/« Aéré »/« Basses profondes »/
« Personnalisé »/« DÉSACTIVÉ »).
GTouches numériques page 23
Radio :
Appuyez sur ces touches pour syntoniser des
stations mémorisées.
Maintenez enfoncée cette touche pour
mémoriser des stations.
Disque :
Appuyez sur la touche pour chercher un titre/
chapitre/plage.
HTouche CLEAR
Appuyez sur la touche pour supprimer un
numéro saisi.
ITouche Z×Z (Zone × Zone) page 36
Appuyez sur la touche pour activer la
fonction Zone × Zone.
JTouche ATT (Atténuer)
Appuyez sur la touche pour atténuer le son.
Pour annuler, appuyez de nouveau sur la
touche.
KTouche u (Lecture/Pause)
LTouches .m/M>
Radio/SXM :
Appuyez sur les touches pour syntoniser
automatiquement les stations radio.
Appuyez sur cette touche et maintenez-la
enfoncée pour trouver une station
manuellement.
00US+00COV-U.book Page 12 Friday, June 15, 2012 2:52 PM
13
M:\001\XPML A7.0\ML\4422720111_XAV-701HD_CaFR-LaES(FM7.1
600dpi)\4422720111_XAV-701HD_ML\02CaFR_XAV701HD\02CaFR02CD-U.fm
masterpage:RightM:\001\XPML A7.0\ML\4422720111_XAV-701HD_CaFR-LaES(FM7.1
600dpi)\4422720111_XAV-701HD_ML\02CaFR_XAV701HD\02CaFR02CD-U.fm
masterpage:Right
XAV-701HD
4-422-720-11(1)
Appuyez sur la touche pour rechercher
automatiquement les contenus enregistrés
(SXM).
Disque*2/USB/iPod :
Appuyez sur cette touche pour sauter un
chapitre/une plage/une scène/un fichier.
Appuyez sur la touche et maintenez-la
enfoncée momentanément pour faire reculer/
avancer rapidement la vidéo.
Maintenez la touche enfoncée pour faire
reculer/avancer rapidement une plage.
Audio Bluetooth*3 :
Appuyez sur cette touche pour sauter une
plage.
Maintenez la touche enfoncée pour faire
reculer/avancer rapidement une plage.
Pandora:
Appuyez sur cette touche pour sauter une
plage.
MTouches de réglage de la lecture des
DVD
(AUDIO):
Appuyez sur la touche pour modifier la
langue/le format audio.
(Pour changer le canal audio dans le cas
d’un VCD.)
(SUBTITLE):
Appuyez sur la touche pour modifier la
langue des sous-titres.
(ANGLE):
Appuyez sur la touche pour modifier
l’angle de vue.
(TOP MENU):
Appuyez sur la touche pour ouvrir le menu
principal sur un DVD.
(MENU):
Appuyez sur la touche pour ouvrir le menu
sur un disque.
NTouche ZAP
Appuyez sur la touche pour aller en mode
ZAPPIN™.
OTouches </M/m/, (Curseur)/ENTER
page 19, 19
Radio/SXM:
Appuyez sur la touche pour syntoniser des
stations automatiquement.
Appuyez sur la touche et maintenez-la
enfoncée pour rechercher une station
manuellement.
Disque(DVD):
Appuyez sur la touche pour commander le
menu sur un DVD.
PTouche SRC (Source)
Appuyez sur la touche pour activer/modifier
la source : « Radio » (HD Radio),
« Telenav », « Pandora », « MirrorLink™ »,
« SXM », « iPod », « USB Musique »,
« USB Video », « Disque », « Audio BT »
(Audio Bluetooth), « AUX » (Équipement
auxiliaire).
QTouche MODE
Appuyez sur la touche pour sélectionner la
bande radio (FM/AM)/sélectionner un
périphérique auxiliaire (AUX1/AUX2)*4.
RTouches de VOL (Volume) +/–
*1 Lors de l’activation des fonctions PBC.
*2 Selon le disque, le fonctionnement est différent
(page 20).
*3 Les fonctionnements sont différents selon le
périphérique Bluetooth raccordé.
*4 Lorsque deux périphériques auxiliaires sont
utilisés.
Remarque
La télécommande ne fonctionne pas lorsque l’appareil
est hors tension et que l’affichage est éteint. Appuyez
sur la touche (SOURCE/OFF) de l’appareil principal ou
insérez un disque pour activer l’appareil et permettre
son fonctionnement à l’aide de la télécommande.
00US+00COV-U.book Page 13 Friday, June 15, 2012 2:52 PM
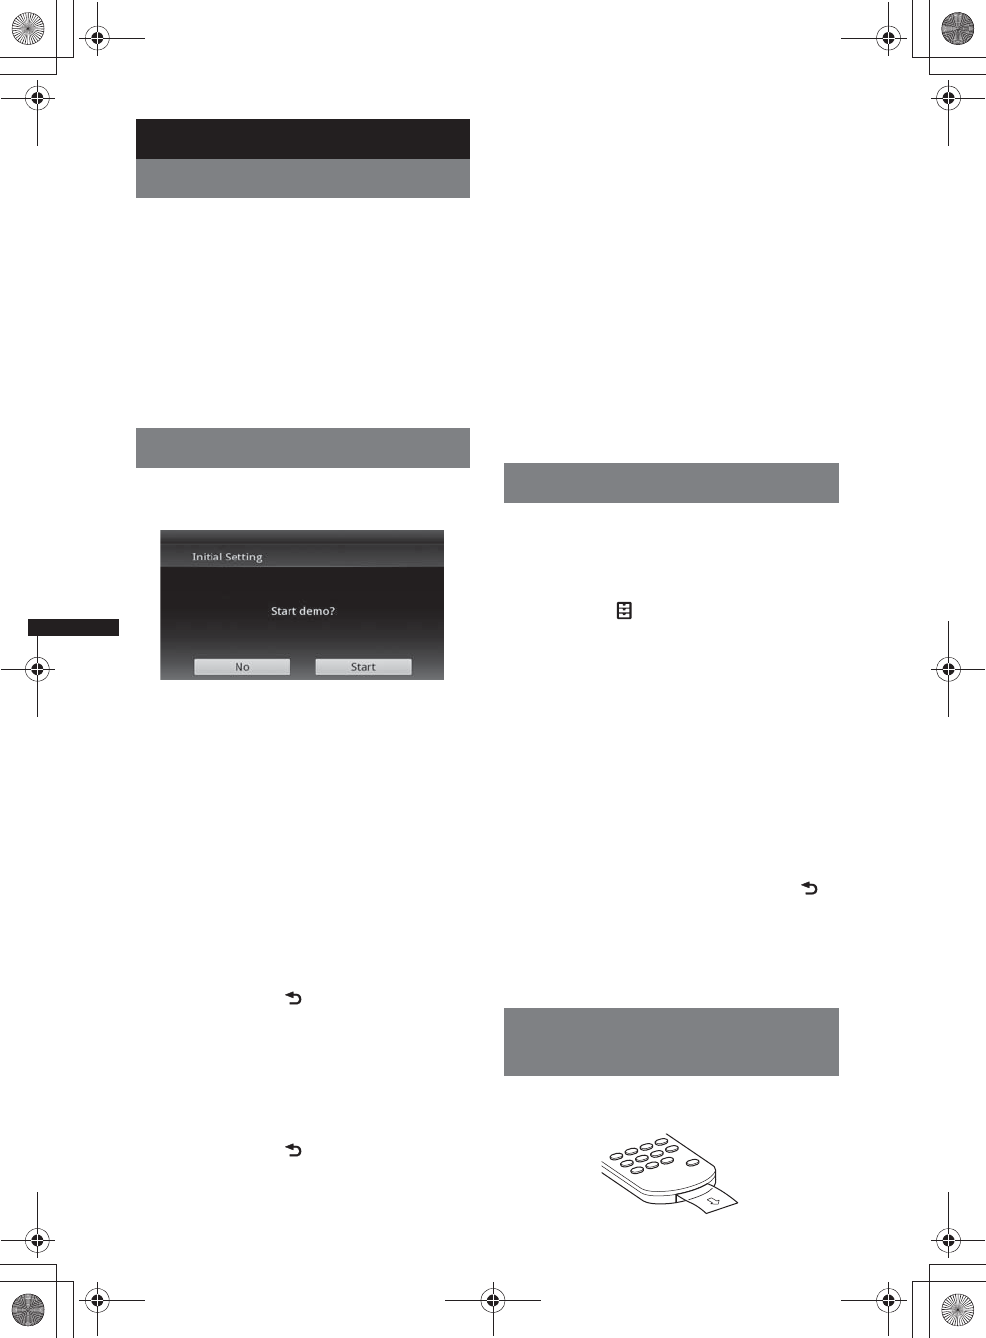
14
M:\001\XPML A7.0\ML\4422720111_XAV-701HD_CaFR-LaES(FM7.1
600dpi)\4422720111_XAV-701HD_ML\02CaFR_XAV701HD\02CaFR02CD-U.fm
masterpage:Left
XAV-701HD
4-422-720-11(1)
Préparation
Réinitialisation de l’appareil
Avant la première mise en service de l’appareil
ou après avoir remplacé la batterie du véhicule
ou modifié les raccordements, vous devez
réinitialiser l’appareil.
Appuyez sur la touche de réinitialisation
(page 10) à l’aide d’un objet pointu comme un
stylo à bille.
Remarque
Une pression sur la touche de réinitialisation efface le
réglage de l’heure et certaines informations
mémorisées.
Réglage initial
Après la réinitialisation de l’appareil, l’écran de
réglage initial s’affiche.
1Touchez à « No » sur l’écran de
réglage de la démonstration.
2Touchez à « Caisson de basses » pour
régler le statut de connexion du
caisson de graves.
Réglez à « ACTIVÉ » si un caisson de graves
est connecté ou à « DÉSACTIVÉ » si aucun
caisson de graves n’est connecté.
3Touchez à « Position d’écoute » pour
régler la position d’écoute.
Réglez à « Avant G » si votre position
d’écoute est dans la partie avant gauche ou
réglez à « Avant D » si elle est dans la partie
avant droite.
Pour retourner à l’écran Configuration
initiale, touchez à .
4Touchez à « Langue » pour régler la
langue d’affichage.
Déplacez la barre de défilement vers le haut et
le bas, puis sélectionnez la langue souhaitée
(English/Français/Español/Português/
Русский/Nederlands/Deutsch/Italiano).
Pour retourner à l’écran Configuration
initiale, touchez à .
5Touchez à « OK ».
La configuration est terminée.
Vous pouvez ensuite configurer ce réglage plus
en détail dans le menu de réglage.
• Pour plus de détails sur le réglage du statut de
connexion du caisson de graves, reportez-vous
à la page 55.
• Pour plus de détails sur le réglage de la position
d’écoute, voir « Optimisation du son pour la
position d’écoute — Synchronisation
intelligente » à la page 48.
• Pour plus de détails sur le réglage de
l’encodage des caractères, reportez-vous à la
page 52.
• Pour plus de détails sur le réglage de la langue
d’affichage, reportez-vous à la page 52.
Remarque
Certains caractères peuvent ne pas s’afficher
correctement, selon la langue/le pays/la région.
Réglage de l’horloge
L’horloge fonctionne suivant un cycle de
12 heures.
1Appuyez sur (HOME), puis touchez à
«Réglages».
2Touchez à , puis touchez à
« Réglage horloge ».
L’écran de réglage s’affiche.
3Réglez l’heure et les minutes.
Par exemple, pour régler l’horloge à 8 h 30,
touchez à « 0830 ».
4Touchez à « AM » ou « PM ».
5Touchez à « OK ».
La configuration est terminée.
Pour activer/désactiver la fonction CT, touchez à
« CT » à l’étape 3. (page 52)
Pour supprimer un numéro entré, touchez à
« Effacer ».
Pour revenir à l’écran précédent, touchez à .
Remarques
•La fonction CT peut être inopérante, même si vous
recevez une station RDS.
•Il peut y avoir une différence d’heure entre l’heure
réglée par la fonction CT et l’heure réelle.
Préparation de la
télécommande
Enlevez la pellicule isolante avant d’utiliser la
télécommande pour la première fois.
00US+00COV-U.book Page 14 Friday, June 15, 2012 2:52 PM
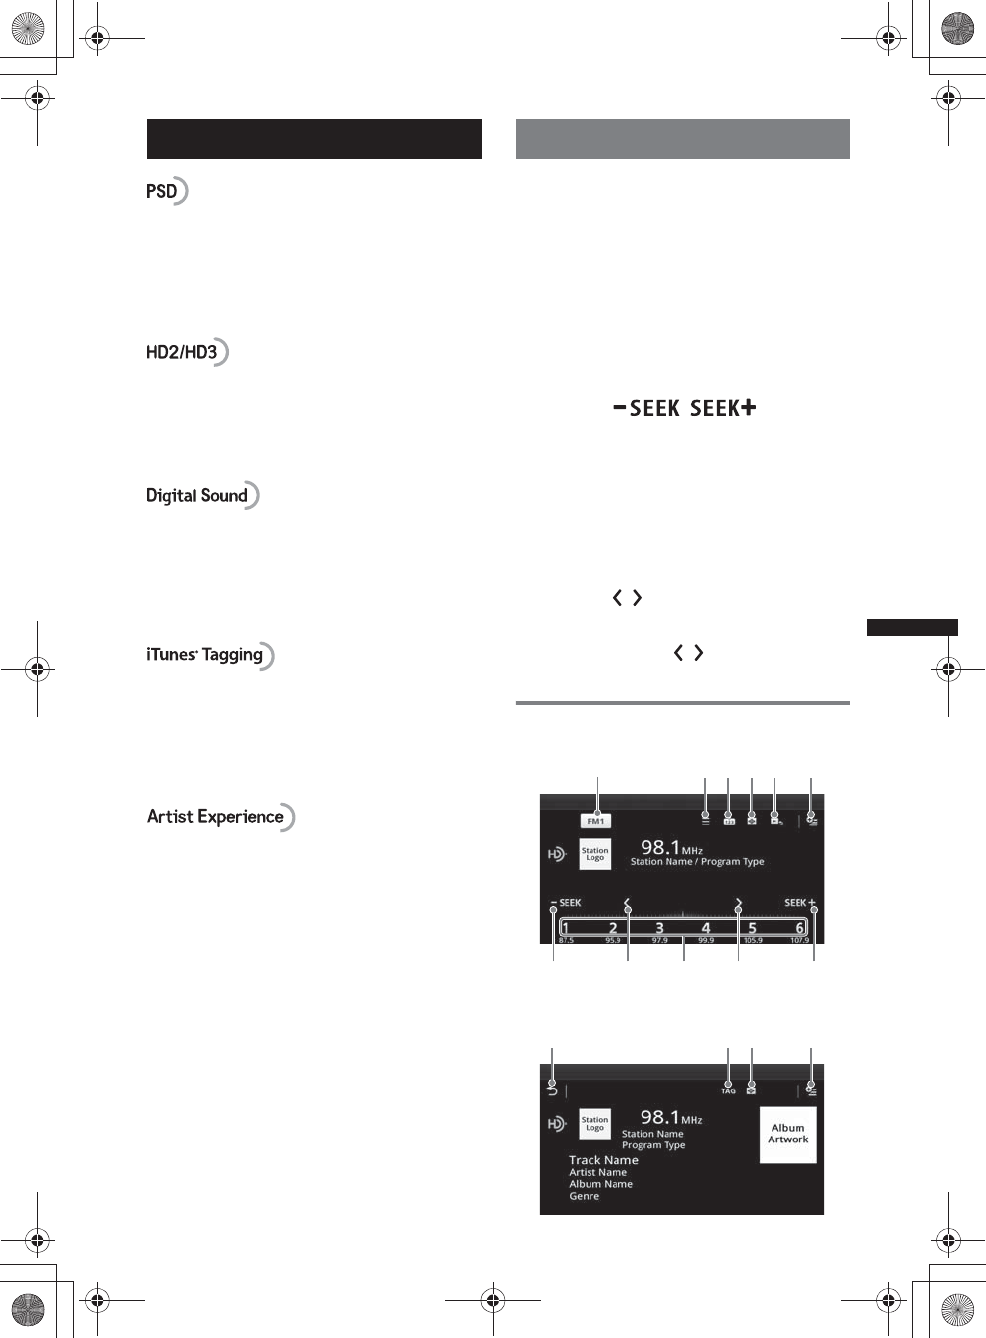
15
M:\001\XPML A7.0\ML\4422720111_XAV-701HD_CaFR-LaES(FM7.1
600dpi)\4422720111_XAV-701HD_ML\02CaFR_XAV701HD\02CaFR02CD-U.fm
masterpage:RightM:\001\XPML A7.0\ML\4422720111_XAV-701HD_CaFR-LaES(FM7.1
600dpi)\4422720111_XAV-701HD_ML\02CaFR_XAV701HD\02CaFR02CD-U.fm
masterpage:Right
XAV-701HD
4-422-720-11(1)
Radio
Données de service d’émission : Contribuent à
l’expérience supérieure offerte par la technologie
HD Radio Technology.
Présente le nom de chanson, l’artiste, les
identifiants de station, le guide de canal HD2/
HD3 et d’autres données pertinentes.
Canaux FM locaux supplémentaires adjacents
aux principales stations conventionnelles. Ces
canaux HD2/HD3 Channels proposent de
nouvelles musiques originales, ainsi que des
innovations dans les genres conventionnels.
Son numérique de qualité CD. La technologie
HD Radio Technology permet aux stations radio
locales de diffuser un signal numérique cristallin.
Le son des stations AM est comparable à celui
des stations FM actuelles, et celui des stations
FM, à celui des CD.
L’étiquetage iTunes® Tagging vous donne la
possibilité de découvrir une multitude de
contenus et permet d’« étiqueter » ces derniers
pour les passer en revue et les acheter
ultérieurement à partir de la boutique iTunes®
Store.
Informations visuelles reliées au contenu en
cours de lecture sur votre récepteur HD Radio,
telles que la pochette d’album, les photographies
historiques, les images fixes transmises en direct,
parmi d’autres contenus reliés.
Pour plus d’informations, visitez le site Web
suivant :
http://www.hdradio.com/
Écoute de la radio
1Appuyez sur (HOME), puis touchez à
«Radio».
L’écran de réception radio s’affiche.
2Touchez la bande actuelle.
La liste des bandes s’affiche.
3Touchez à la bande souhaitée
(«FM1», «FM2», «FM3», «AM1» ou
«AM2»).
4Réglez la fréquence.
Pour régler automatiquement la
fréquence
Touchez à /.
Le balayage cesse lorsque l’appareil reçoit
une station. Répétez cette procédure jusqu’à
ce que vous receviez la station voulue.
Pour le fonctionnement pendant la réception
HD Radio, reportez-vous à la section « À
propos de la multidiffusion
FM » (page 17).
Pour régler manuellement la
fréquence
Touchez à / plusieurs fois, jusqu’à ce que
la fréquence voulue soit syntonisée.
Pour sauter les fréquences de manière
continue, touchez à / aussi longtemps que
nécessaire.
Commandes de réception
Affichage de l’opération de lecture :
Affichage de lecture (réception HD Radio
uniquement) :
78987
123456
0q
a
46
00US+00COV-U.book Page 15 Friday, June 15, 2012 2:52 PM
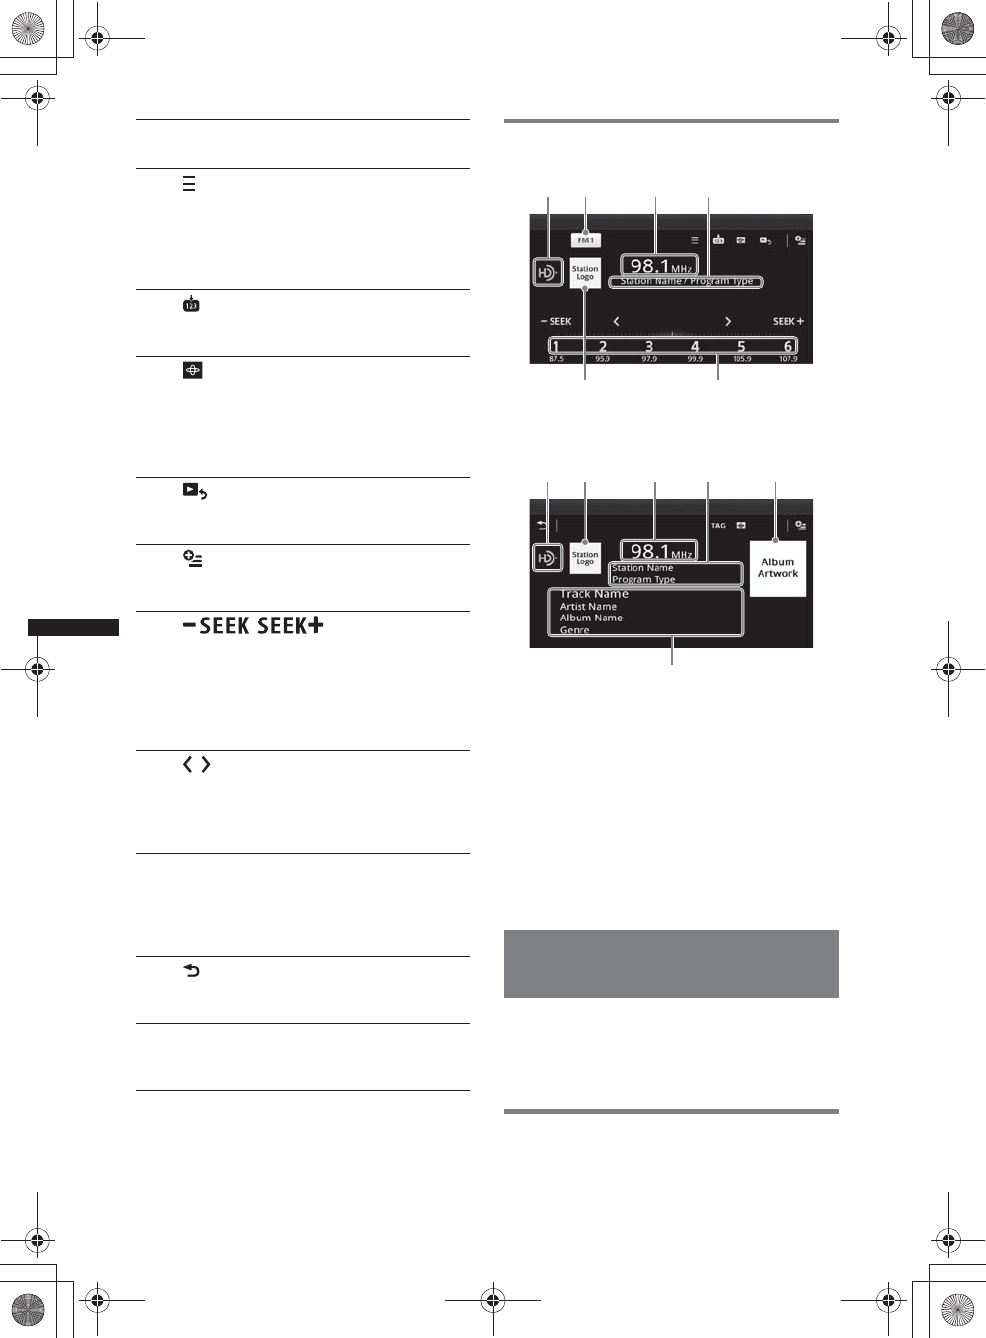
16
M:\001\XPML A7.0\ML\4422720111_XAV-701HD_CaFR-LaES(FM7.1
600dpi)\4422720111_XAV-701HD_ML\02CaFR_XAV701HD\02CaFR02CD-U.fm
masterpage:Left
XAV-701HD
4-422-720-11(1)
*La sélection est impossible pendant la réception
radio analogique.
Indications pendant la réception
Affichage de l’opération de lecture :
Affichage de lecture (réception HD Radio
uniquement) :
AIcône de source courante*
BNom de bande
CFréquence/état
DNom de station/Type d’émission
ELogo de station
FNuméro préréglé
GPochette d’album*
HNom de plage, nom de l’artiste, nom d’album,
genre*
*Ne s’affiche pas pendant la réception radio
analogique.
Mémorisation et réception des
stations
Attention
Pour syntoniser des stations pendant la conduite,
utilisez la mémorisation des meilleures
syntonisations (BTM) afin d’éviter les accidents.
Mémorisation automatique — BTM
1Appuyez sur (HOME), puis touchez à
« Radio ».
1« Icône de bande actuelle »
Touchez pour ouvrir la liste des bandes.
2 (Liste)*
Touchez pour afficher la liste permettant
de sélectionner l’émission principale/
complémentaire (uniquement pendant la
réception d’une diffusion numérique)
(page 17).
3
Touchez pour enregistrer l’élément
présélectionné.
4
Touchez pour changer le système de
visualisation, qui contient les éléments
suivants :
Portail/Ballon/Brillant/Animal/Graffiti/
Encre/Aléatoire/DÉSACTIVÉ
5 (Affichage de lecture)*
Touchez pour afficher l’affichage de
lecture HD Radio.
6 (Option)
Touchez pour supprimer toutes les
étiquettes iTunes enregistrées (page 18).
7/
Touchez pour syntoniser
automatiquement.
Pour le fonctionnement pendant la
réception HD Radio, reportez-vous à la
section « À propos de la multidiffusion
FM » (page 17).
8/
Touchez pour syntoniser manuellement.
Pour sauter les fréquences de manière
continue, touchez aussi longtemps que
nécessaire.
9«1» à «6»
Touchez pour sélectionner des stations.
Touchez et maintenez votre doigt pour
mémoriser la fréquence actuellement
affichée dans une présélection.
0 (Arrière)
Touchez pour afficher l’affichage
d’opération de lecture HD Radio.
qa «TAG»
Touchez pour enregistrer l’étiquette avec
la plage en cours de lecture (page 17).
A
EF
BCD
A
H
ECDDG
00US+00COV-U.book Page 16 Friday, June 15, 2012 2:52 PM
17
M:\001\XPML A7.0\ML\4422720111_XAV-701HD_CaFR-LaES(FM7.1
600dpi)\4422720111_XAV-701HD_ML\02CaFR_XAV701HD\02CaFR02CD-U.fm
masterpage:RightM:\001\XPML A7.0\ML\4422720111_XAV-701HD_CaFR-LaES(FM7.1
600dpi)\4422720111_XAV-701HD_ML\02CaFR_XAV701HD\02CaFR02CD-U.fm
masterpage:Right
XAV-701HD
4-422-720-11(1)
Sélectionnez la bande souhaitée (« FM1 »,
« FM2 », « FM3 », « AM1 » ou « AM2 »).
2Touchez à .
L’écran BTM s’affiche.
3Touchez à « BTM ».
L’appareil mémorise les six premières
stations dans la liste des stations
présélectionnées (« 1 » à « 6 »).
Pour retourner à l’écran de lecture, touchez à .
Mémorisation manuelle
1Lorsque vous captez la station que
vous souhaitez mémoriser, touchez à
, puis touchez à un numéro dans la
liste («1» à «6»).
Pour retourner à l’écran de lecture, touchez à .
Remarque
Si vous essayez de mémoriser une autre station au
même numéro, la station mémorisée précédemment
est effacée.
Réception des stations
mémorisées
1Sélectionnez la bande.
2Touchez au numéro souhaité (« 1 » à
«6»).
À propos de la multidiffusion FM
Certaines stations FM HD Radio proposent une
émission principale et une ou plusieurs
émission(s) complémentaire(s) (jusqu’à 7) sur la
même fréquence.
« » s’affiche pendant la réception d’une
station avec une émission complémentaire.
Sélection d’une émission à partir de
la liste
1Pendant la réception de l’émission
principale, touchez à .
2Touchez à l’émission souhaitée.
Recherche automatique d’une
émission
1Pendant la réception de l’émission
principale, touchez à /
.
iTunes Tagging
La touche iTunes Tag de cet appareil vous permet
d’étiqueter les chansons de votre choix qui sont
diffusées par les stations HD Radio. Les
informations relatives à ces chansons étiquetées
sont enregistrées par le récepteur et transférées
vers votre iPod. Lorsque vous raccordez votre
iPod à votre ordinateur, iTunes présente
automatiquement les chansons dans une nouvelle
liste de lecture Étiquetée pour vous permettre de
les passer en revue, les acheter et les télécharger.
L’étiquetage iTunes Tagging représente un
excellent moyen de découvrir de nouvelles
pièces musicales et d’ajouter celles-ci à votre
collection!
Utilisation de l’étiquetage iTunes
Tagging
Vous pouvez enregistrer le nom d’une chanson
diffusée par une station HD Radio sur cet
appareil en suivant quelques étapes très simples.
Après avoir transféré l’information de chanson
au iPod raccordé à l’aide de cet appareil,
synchronisez votre iPod avec votre ordinateur.
Ces chansons s’afficheront dans la liste de
lecture « Étiquetée » d’iTunes, qui vous permet
de facilement passer en revue ou acheter des
chansons.
Pour plus de détails sur l’étiquetage
iTunes Tagging et les plus récents modèles
compatibles avec l’étiquetage iTunes Tagging,
consultez le site Web iTunes à l’adresse :
http://www.apple.com/itunes/
Pour plus de détails sur l’achat d’une chanson à
l’aide de l’information « Étiquetée », consultez le
site Web iTunes à l’adresse :
http://www.apple.com/support/itunes/
Collecte d’information de chanson
« TAG » s’affiche lorsque des informations de
chanson sont diffusées par une station HD Radio.
1Appuyez sur « TAG ».
00US+00COV-U.book Page 17 Friday, June 15, 2012 2:52 PM

18
M:\001\XPML A7.0\ML\4422720111_XAV-701HD_CaFR-LaES(FM7.1
600dpi)\4422720111_XAV-701HD_ML\02CaFR_XAV701HD\02CaFR02CD-U.fm
masterpage:Left
XAV-701HD
4-422-720-11(1)
L’appareil commence la collecte
d’information de chanson. Après la collecte
d’information de chanson, l’appareil
commence l’enregistrement des données, puis
un message indique que l’enregistrement
d’étiquette est terminé.
Remarques
•Si l’information de chanson n’est pas incluse dans la
diffusion de la station HD Radio, un message
d’erreur s’affiche.
•La collecte d’information de chanson prend jusqu’à
10 secondes.
•Si vous touchez à « TAG » immédiatement après le
début d’une chanson, il est possible que l’appareil
récupère l’information de la chanson diffusée
précédemment en plus de la chanson actuelle.
•Si vous touchez à « TAG » juste avant la fin d’une
chanson, il est possible que l’appareil récupère
l’information de la chanson suivante en plus de la
chanson actuelle.
•Le nombre maximum de chansons étiquetées
pouvant être enregistrées dans cet appareil est 50.
Si vous touchez à « TAG » pendant que 50
chansons étiquetées sont déjà enregistrées, un
message d’erreur s’affiche et l’information de
chanson n’est pas récupérée.
Transfert de l’information de
chanson récupérée
Vous pouvez transférer l’information de chanson
récupérée et enregistrée vers un iPod à l’aide de
cet appareil.
Pour plus de détails sur les modèles iPod
compatibles, reportez-vous à la section « À
propos du iPod » à la page 65.
1Placez votre iPod sur le connecteur de
l’appareil.
L’appareil commence automatiquement à
transférer l’information de chanson
enregistrée. Un message s’affiche pendant le
transfert.
Si un iPod est inséré dans l’appareil pendant la
récupération de chanson étiquetée, l’appareil
commence immédiatement à transférer les
données vers le iPod, après l’enregistrement des
données.
Après le transfert de l’information de chanson
étiquetée de l’appareil vers le iPod, les données
enregistrées sont supprimées de l’appareil.
Remarques
•Ne retirez pas le iPod pendant le transfert. L’appareil
ne peut pas transférer l’information de chanson si le
iPod est retiré.
•Si le iPod raccordé ne prend pas en charge
l’étiquetage iTunes Tagging, l’information de
chanson ne sera pas transférée, même après
l’enregistrement des données par cet appareil, et le
message d’erreur s’affiche.
•Si le iPod raccordé ne dispose pas de suffisamment
d’espace mémoire, l’information de chanson ne sera
pas transférée, même après l’enregistrement des
données par cet appareil, et le message d’erreur
s’affiche.
Suppression de l’information de
chanson étiquetée
Vous pouvez supprimer toutes les informations
de chanson étiquetée avant le transfert vers votre
iPod.
1Appuyez sur (HOME), puis touchez à
«Radio».
2Touchez à .
L’affichage de confirmation pour la
suppression d’étiquette apparaît.
3Touchez à « Supprimer ».
Pour annuler la suppression, touchez à
« Annuler ».
Remarque
Une fois supprimée, l’information de chanson ne peut
pas être récupérée.
00US+00COV-U.book Page 18 Friday, June 15, 2012 2:52 PM
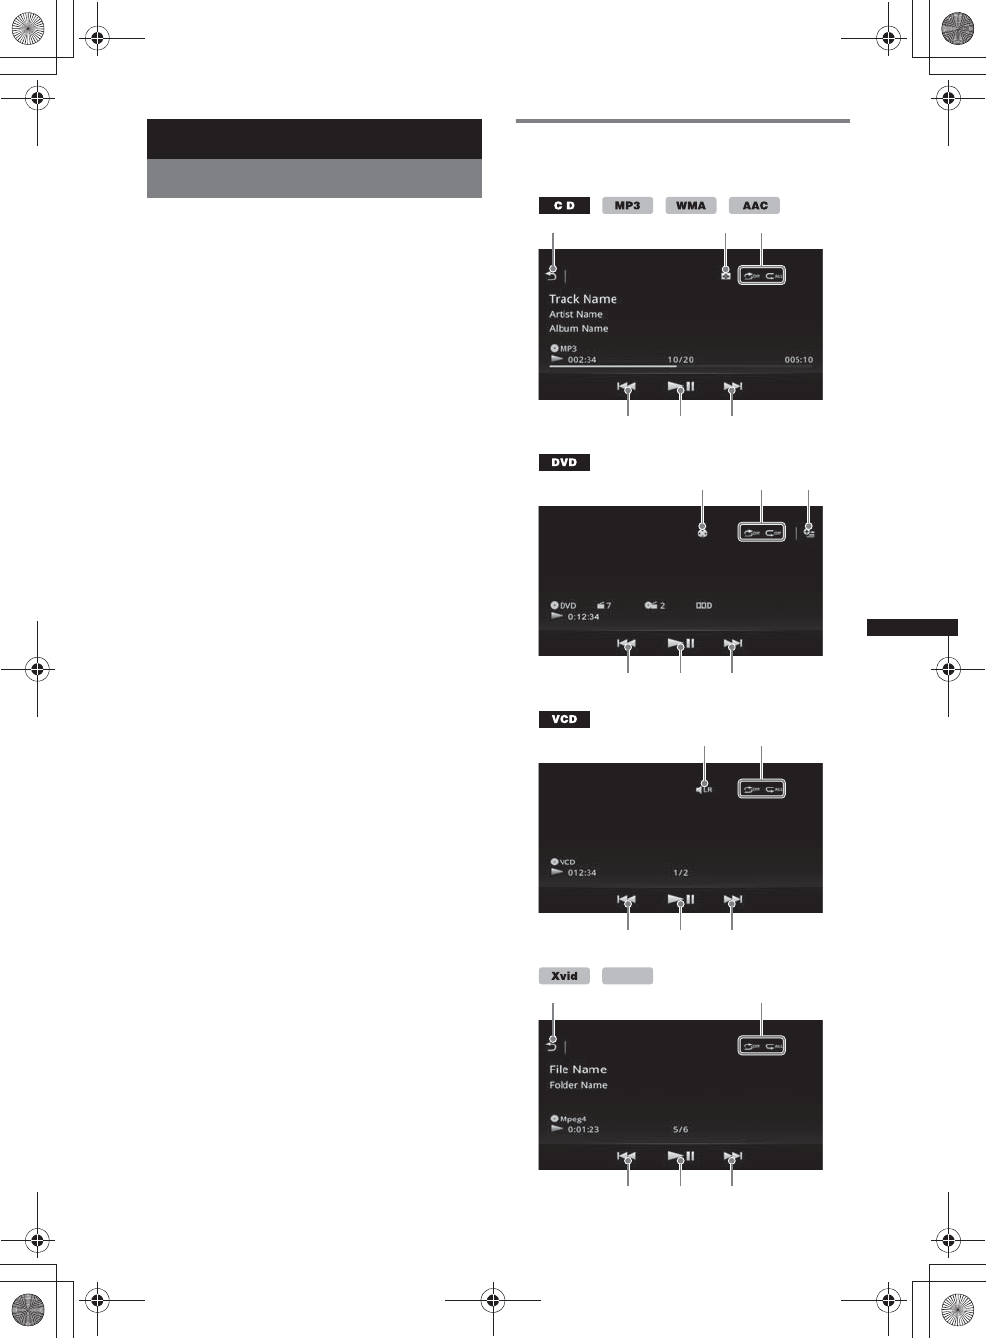
19
M:\001\XPML A7.0\ML\4422720111_XAV-701HD_CaFR-LaES(FM7.1
600dpi)\4422720111_XAV-701HD_ML\02CaFR_XAV701HD\02CaFR02CD-U.fm
masterpage:RightM:\001\XPML A7.0\ML\4422720111_XAV-701HD_CaFR-LaES(FM7.1
600dpi)\4422720111_XAV-701HD_ML\02CaFR_XAV701HD\02CaFR02CD-U.fm
masterpage:Right
XAV-701HD
4-422-720-11(1)
Disques
Lecture de disques
Suivant les disques, certaines opérations peuvent
varier ou être limitées.
Reportez-vous au mode d’emploi fourni avec
votre disque.
1Appuyez sur la touche Z sur l’appareil
principal.
La façade s’ouvre automatiquement.
2Insérez le disque (côté imprimé vers le
haut).
La façade se ferme automatiquement, puis la
lecture démarre.
Si le menu de DVD s’affiche
Touchez à l’option sur le menu du DVD.
Vous pouvez aussi utiliser l’écran de commande
de menu qui peut s’afficher en touchant
l’extérieur du menu de DVD. Touchez à B/V/v/b
pour déplacer le curseur, puis touchez à
« ENTR. » pour confirmer.
Si l’écran de contrôle de menu ne s’affiche pas
lorsque vous touchez l’écran, utilisez la
télécommande.
À propos du menu DVD
Un DVD est divisé en plusieurs sections qui
composent un film ou une pièce musicale. Ces
sections sont désignées comme « titres ». Lorsque
vous lisez un DVD qui comporte plusieurs titres, vous
pouvez choisir le titre voulu à l’aide du menu principal
du DVD. Dans le cas des DVD qui vous permettent de
sélectionner des options comme un ou plusieurs sous-
titres/langues, sélectionnez ces options à l’aide du
menu DVD.
Pour interrompre la lecture
Maintenez enfoncée la touche (SOURCE/OFF)
pendant 1 seconde.
Remarque
Les disques en format DTS ne sont pas pris en
charge. Le son n’est pas reproduit lorsque le format
DTS est choisi.
Pour éjecter le disque
1Appuyez sur la touche Z sur l’appareil
principal.
La façade s’ouvre automatiquement, puis le
disque est éjecté.
2Appuyez sur la touche Z sur l’appareil
principal pour fermer la façade.
Remarque
La façade se ferme automatiquement après l’alarme
d’avertissement.
Commandes de lecture
Touchez l’écran si les commandes de lecture ne
s’affichent pas.
123
454
637
454
83
454
MPEG-4
13
454
00US+00COV-U.book Page 19 Friday, June 15, 2012 2:52 PM
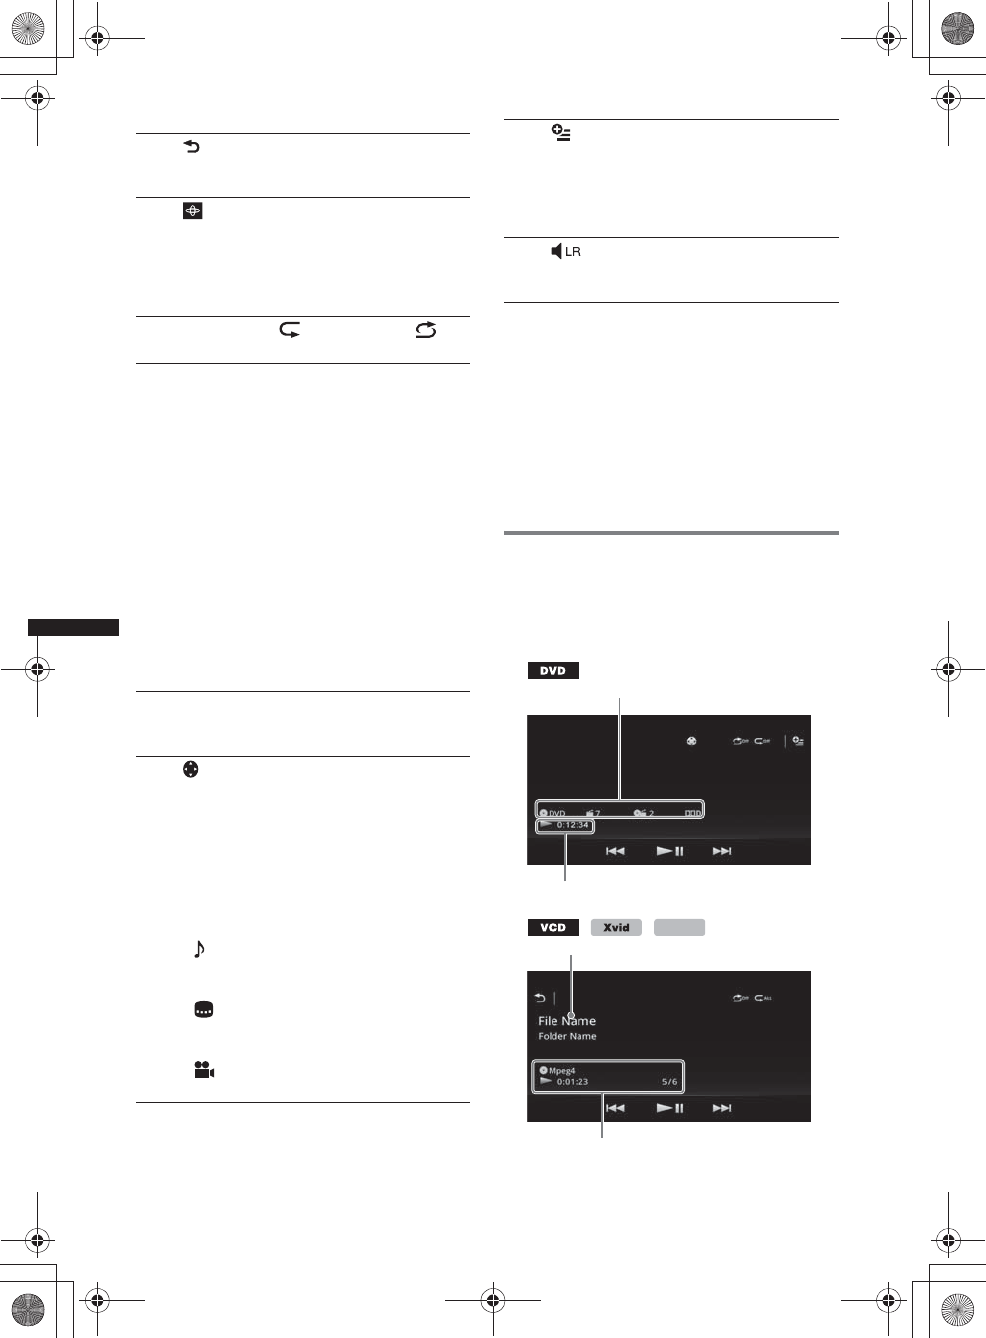
20
M:\001\XPML A7.0\ML\4422720111_XAV-701HD_CaFR-LaES(FM7.1
600dpi)\4422720111_XAV-701HD_ML\02CaFR_XAV701HD\02CaFR02CD-U.fm
masterpage:Left
XAV-701HD
4-422-720-11(1)
*1 La vitesse dépend du format ou de la méthode
d’enregistrement utilisée.
*2 La disponibilité dépend du disque.
*3 Lorsqu’un message vous invitant à entrer un code
à 4 chiffres s’affiche, entrez le code de la langue
(page 76) souhaitée.
Remarque
Si le disque contient plusieurs types de fichiers, seul le
type de fichier sélectionné (audio/vidéo) peut être lu.
Pour des détails sur la manière de sélectionner le type
de fichier, voir « Sélection d’un type de fichier » à la
page 23.
Indications de lecture
Touchez l’écran si les indications ne s’affichent
pas.
Dans le cas de disques audio, certaines
indications sont toujours affichées au cours de la
lecture.
1
Touchez pour afficher la liste des plages/
fichiers vidéo. (page 23)
2
Touchez pour changer le système de
visualisation, qui contient les éléments
suivants :
Portail/Ballon/Brillant/Animal/Graffiti/
Encre/Aléatoire/DÉSACTIVÉ
3« Répéter » /« Aléatoire »
(page 22)
4./>
Touchez pour sauter un chapitre/une
plage/une scène.
Appuyez sur la touche et maintenez-la
enfoncée momentanément pour faire
reculer/avancer rapidement la vidéo, puis
touchez plusieurs fois pour modifier la
vitesse (× 2 t × 12 t × 120 t
×2…)*
1. Pour annuler, touchez à u.
Appuyez sur la touche et maintenez-la
enfoncée pour reculer/avancer rapidement
dans une plage audio.
Au cours de la pause, touchez et
maintenez enfoncée la touche > pour
lire la vidéo au ralenti. Pour annuler,
libérez la touche.
5u
Touchez pour effectuer une pause/
reprendre la lecture après une pause.
6
Touchez pour ouvrir le menu des
commandes DVD qui contient les
éléments suivants.
•« Menu sup. » : Touchez à cette
option pour ouvrir le menu principal du
DVD.*2
•«Menu» : Touchez à cette option pour
ouvrir le menu du disque.*2
• : Touchez plusieurs fois à cette option
pour sélectionner le format/la langue
audio. (page 21)*2
• : Touchez plusieurs fois à cette
option pour désactiver/sélectionner la
langue des sous-titres.*2*3
• : Touchez plusieurs fois à cette
option pour modifier l’angle de vue.*2
7 (lecture de DVD VIDEO
uniquement)
Touchez pour ouvrir le menu d’option.
• CSO (Réglages du haut-parleur central)
(page 49)
• Volume Audio DVD (page 22)
8
Touchez pour changer le canal audio.
(page 22)
A
B
MPEG-4
C
D
00US+00COV-U.book Page 20 Friday, June 15, 2012 2:52 PM
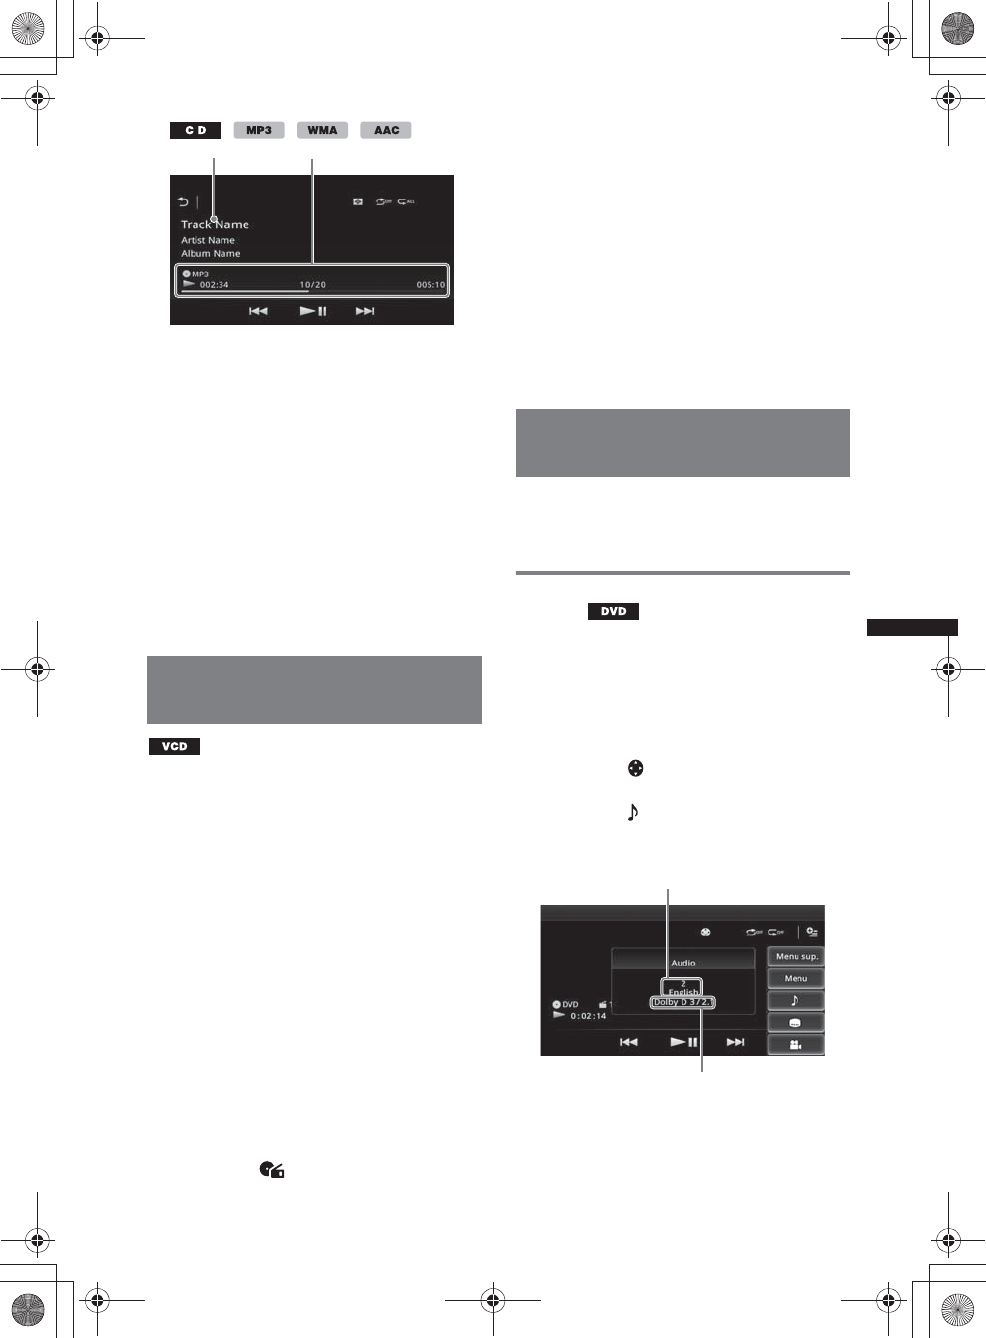
21
M:\001\XPML A7.0\ML\4422720111_XAV-701HD_CaFR-LaES(FM7.1
600dpi)\4422720111_XAV-701HD_ML\02CaFR_XAV701HD\02CaFR02CD-U.fm
masterpage:RightM:\001\XPML A7.0\ML\4422720111_XAV-701HD_CaFR-LaES(FM7.1
600dpi)\4422720111_XAV-701HD_ML\02CaFR_XAV701HD\02CaFR02CD-U.fm
masterpage:Right
XAV-701HD
4-422-720-11(1)
AIcône de source courante, format, numéro de
chapitre/titre*1, format audio*3
BÉtat de la lecture, temps de lecture écoulé
CNom de plage/d’artiste/d’album*1*5
Nom de fichier/dossier*6
DIcône de source courante, format, numéro de
plage (fichier)*2, état de la lecture, temps de
lecture écoulé*4
*1 Selon le contenu, les indications sont différentes.
*2 Lors de la lecture d’un VCD avec fonctions PBC
(page 21), « PBC » s’affiche.
*3 DVD uniquement.
*4 Aucune indication ne s’affiche lors de la lecture
d’un VCD avec fonctions PBC.
*5CD/MP3/WMA/AAC uniquement.
*6 Xvid/MPEG-4 uniquement.
Utilisation des fonctions PBC
(contrôle de la lecture)
Le menu PBC aide interactivement aux
opérations pendant la lecture d’un VCD
compatible avec PBC.
1Commencez la lecture d’un VCD
compatible avec PBC.
Le menu PBC s’affiche.
2Appuyez sur les touches numériques
de la télécommande pour sélectionner
l’élément souhaité, puis appuyez sur
(ENTER).
3Suivez les instructions du menu
concernant les opérations
interactives.
Pour revenir à l’écran précédent, appuyez sur
la touche O de la télécommande.
Lecture sans les fonctions PBC
1Appuyez sur (HOME), puis touchez à
«Réglages».
2Touchez à .
Le menu de réglage de la source s’affiche.
3Déplacez la barre de défilement vers le
haut et le bas, puis touchez à « PBC
Vidéo CD » pour sélectionner
« DÉSACTIVÉ ».
4Démarrez la lecture d’un VCD.
Le menu PBC ne s’affiche pas en cours de
lecture.
Remarques
•Les paramètres du menu et les procédures
d’utilisation varient suivant le disque.
•Au cours de la lecture PBC, le numéro de plage,
l’élément de lecture, etc., ne s’affiche pas à l’écran
de lecture.
•La reprise de lecture n’est pas disponible au cours
de la lecture avec PBC.
Configuration des paramètres
audio
Remarque
Les disques en format DTS ne sont pas pris en
charge. Le son n’est pas reproduit lorsque le format
DTS est choisi.
Modification de la langue/du format
du son
La langue de l’audio peut être modifiée si le
disque est enregistré avec des plages de plusieurs
langues. Vous pouvez modifier le format audio
lorsque vous faites jouer un disque enregistré en
plusieurs formats audio (par ex. : Dolby Digital).
1Pendant la lecture, touchez à l’écran.
2Touchez à .
Le menu de langue audio s’affiche.
3Touchez à plusieurs fois jusqu’à ce
que la langue/le format audio souhaité
apparaisse.
La langue du son change selon les langues
disponibles.
Lorsqu’un message vous invitant à entrer un
code à 4 chiffres s’affiche, entrez le code de la
langue (page 76) souhaitée.
CD
Langue du son
Format audio/numéros de canaux*
00US+00COV-U.book Page 21 Friday, June 15, 2012 2:52 PM
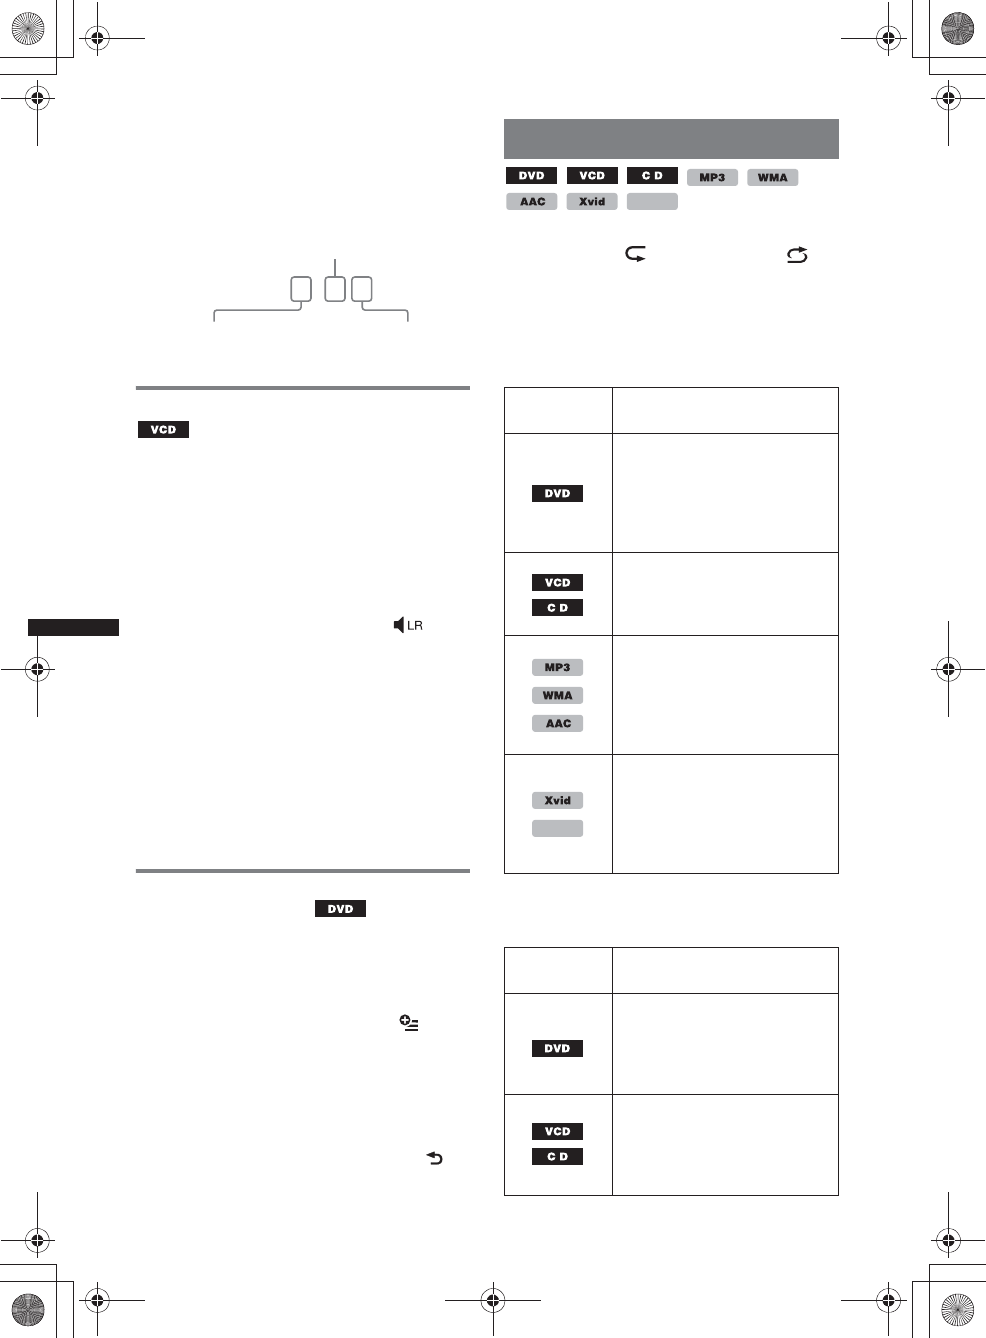
22
M:\001\XPML A7.0\ML\4422720111_XAV-701HD_CaFR-LaES(FM7.1
600dpi)\4422720111_XAV-701HD_ML\02CaFR_XAV701HD\02CaFR02CD-U.fm
masterpage:Left
XAV-701HD
4-422-720-11(1)
Lorsque la même langue est affichée deux
fois ou plus, le disque est enregistré en
plusieurs formats audio.
*Le nom du format et les numéros de canaux
s’affichent de la manière suivante :
Exemple : Dolby Digital 5.1 ch
Changement du canal audio
Lorsque vous faites jouer un VCD, vous pouvez
écouter les canaux droit et gauche, uniquement le
canal droit ou uniquement le canal gauche par le
biais des haut-parleurs droit et gauche.
Les options sont indiquées ci-dessous.
«Stereo» : son stéréo standard (par défaut)
« 1/Gauche » : son du canal gauche (mono)
«2/Droite» : son du canal droit (mono)
1Lors de la lecture, touchez à
plusieurs fois jusqu’à ce que le canal
audio souhaité apparaisse.
Remarque
Il est possible que vous ne puissiez pas changer les
réglages audio selon le disque.
Conseils
•Le fonctionnement à l’aide de la télécommande en
appuyant plusieurs fois sur (AUDIO) est aussi
disponible.
•Vous pouvez changer les canaux audio en appuyant
sur la touche AUDIO de la télécommande lorsqu’un
VCD est sélectionné.
Réglage du niveau de sortie audio
— Niveau Dolby D
Vous pouvez régler le niveau de sortie audio d’un
DVD enregistré en format Dolby Digital pour
réduire la différence de niveau de volume entre
les disques.
1Pendant la lecture, touchez à .
2Touchez à « Volume Audio DVD ».
3Touchez à –/+ plusieurs fois pour
régler le niveau de sortie.
Le niveau de sortie peut être réglé par
incréments uniques, entre –10 et +10.
Pour fermer le menu de lecture, touchez à .
Lecture répétée et aléatoire
1Pendant la lecture, touchez à
« Répéter » ou « Aléatoire »
plusieurs fois, jusqu’à ce que l’option
souhaitée s’affiche.
La lecture répétée ou aléatoire commence.
Les options de répétition et l’ordre de
changement de chaque disque/format sont
indiqués ci-dessous.
Les options de lecture aléatoire et l’ordre de
changement de chaque disque/format sont
indiqués ci-dessous.
Dolby D 3 / 2 . 1
Canal arrière × 2
Canal avant × 2 + canal
central × 1 Canal LFE × 1
Disque/
format Options
« DÉSACTIVÉ » : revient en
mode de lecture normale.
«Chapitre» : répète le
chapitre en cours.
«Titre» : répète le titre en
cours.
*1«Tous» : répète toutes les
plages sur le disque.
«Piste» : répète la plage en
cours.
«Tous» : répète toutes les
plages sur le disque.
«Piste» : répète la plage en
cours.
« Album » : répète l’album (le
dossier) en cours.
«Tous» : répète tous les
fichiers vidéo sur le disque.
«Film» : répète le fichier
vidéo en cours.
« Album » : répète l’album (le
dossier) en cours.
Disque/
format Options
*2
« DÉSACTIVÉ » : revient en
mode de lecture normale.
«Titre» : lit les chapitres en
ordre aléatoire dans le titre en
cours.
*1
« DÉSACTIVÉ » : revient en
mode de lecture normale.
« Disque » : lit les plages en
ordre aléatoire sur le disque en
cours.
MPEG-4
MPEG-4
00US+00COV-U.book Page 22 Friday, June 15, 2012 2:52 PM
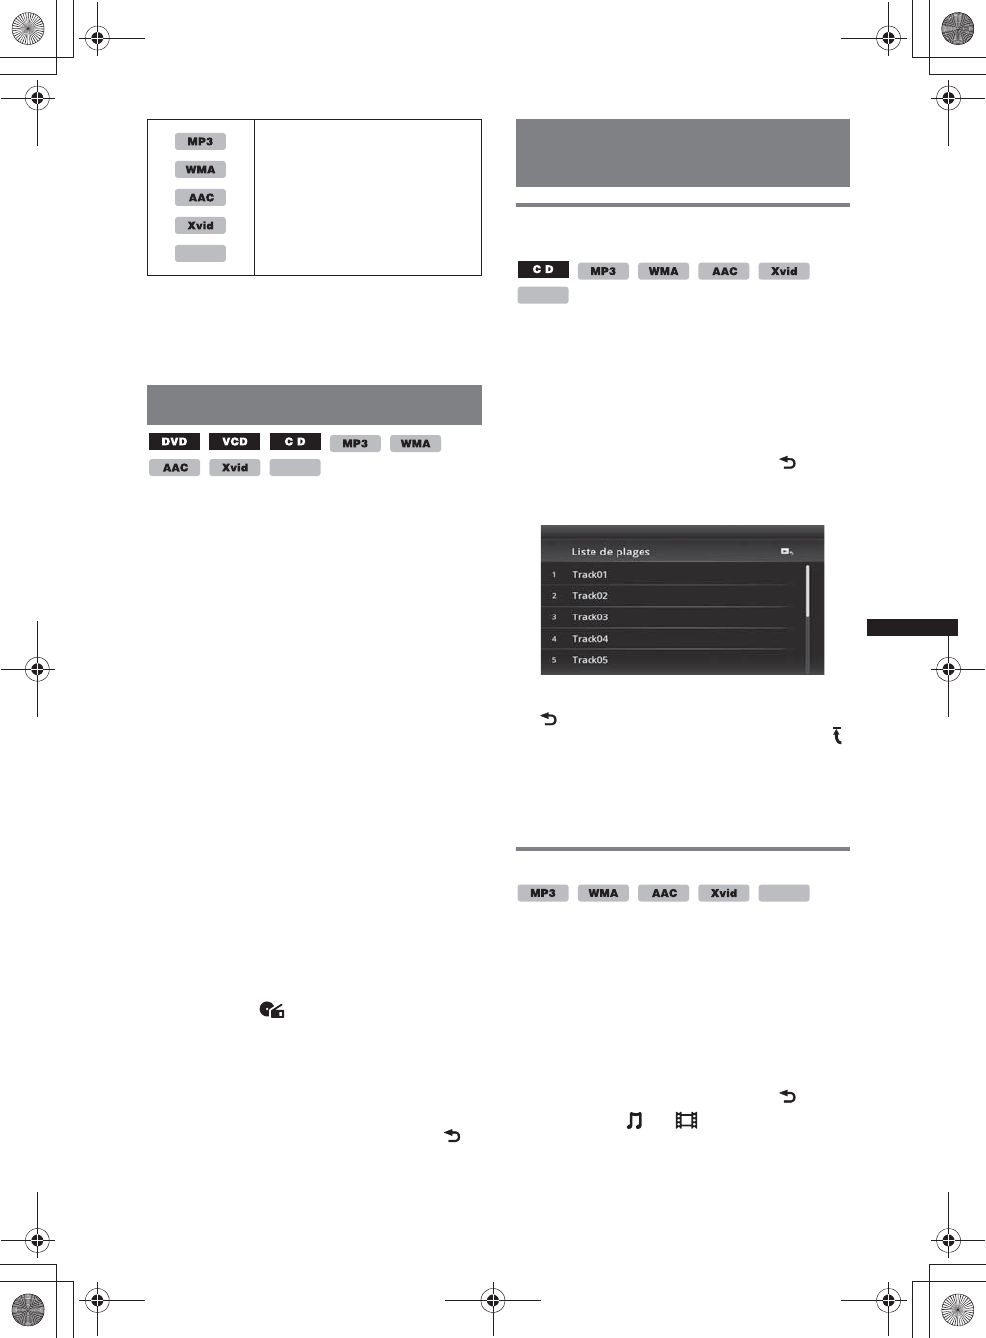
23
M:\001\XPML A7.0\ML\4422720111_XAV-701HD_CaFR-LaES(FM7.1
600dpi)\4422720111_XAV-701HD_ML\02CaFR_XAV701HD\02CaFR02CD-U.fm
masterpage:RightM:\001\XPML A7.0\ML\4422720111_XAV-701HD_CaFR-LaES(FM7.1
600dpi)\4422720111_XAV-701HD_ML\02CaFR_XAV701HD\02CaFR02CD-U.fm
masterpage:Right
XAV-701HD
4-422-720-11(1)
*1 Disponible uniquement lors de la lecture d’un VCD
de version 1.0/1.1, ou d’un VCD de version 2.0
sans fonctions PBC.
*2 Excluant un DVD-R/DVD-R DL/DVD-RW en mode
VR.
Recherche directe
Vous pouvez localiser directement un point de
votre choix en précisant le numéro du titre, du
chapitre, etc.
1Au cours de la lecture, appuyez sur les
touches numériques de la
télécommande pour saisir le numéro
d’un élément (plage, titre, etc.), puis
appuyez sur (ENTER).
La lecture commence au début du point
sélectionné.
Les éléments recherchés pour un disque/format
sont les suivants :
DVD : Titre ou chapitre*1
VCD*2/CD/MP3/WMA/AAC : Plage
Xvid/MPEG-4 : Film
*1 La rubrique de recherche dépend des réglages.
*2 Disponible uniquement lors de la lecture d’un VCD
sans fonctions PBC.
Réglage de la rubrique de recherche
(DVD seulement)
Vous pouvez régler la rubrique de recherche (titre
ou chapitre) pour la lecture de DVD.
1Appuyez sur (HOME), puis touchez à
«Réglages».
2Touchez à .
Le menu de réglage de la source s’affiche.
3Touchez à « Recherche directe DVD »
pour sélectionner « Chapitre » ou
«Titre».
La configuration est terminée.
Pour revenir à l’écran précédent, touchez à .
Affichage de la liste des plages/
fichiers vidéo — Liste
Sélection d’une plage/d’un fichier
vidéo
Vous pouvez afficher les albums/dossiers/plages/
fichiers vidéo, puis sélectionner l’élément
souhaité pour la lecture.
Cette fonction est surtout pratique pour les
disques en format MP3/WMA/AAC/Xvid/
MPEG-4 comportant plusieurs albums/plages,
etc.
1Pendant la lecture, touchez à .
La liste de catégories ou de fichiers de
l’élément en cours de lecture s’affiche.
Pour passer au niveau supérieur, touchez à
.
Pour passer au niveau supérieur, touchez à .
Pour faire défiler la liste, déplacez la barre de
défilement vers le haut et le bas.
2Touchez à l’élément de votre choix.
La lecture commence.
Sélection d’un type de fichier
Si le disque contient plusieurs types de fichiers,
seul le type de fichier sélectionné (audio/vidéo)
peut être lu. L’ordre de priorité de lecture du type
de fichier est initialement réglé à audio, puis à
vidéo (par ex.: si le disque comporte des fichiers
audio et vidéo, seuls les fichiers audio sont lus).
Vous pouvez sélectionner le type de fichier à
afficher, puis sélectionner le fichier que vous
souhaitez lire.
1Pendant la lecture, touchez à .
2Touchez à ou pour sélectionner
le type de fichier.
3Touchez au fichier de votre choix.
La lecture du fichier sélectionné commence.
« DÉSACTIVÉ » : revient en
mode de lecture normale.
«Album» : lit les plages/
fichiers vidéo en ordre aléatoire
dans l’album (le dossier) en
cours.
MPEG-4
MPEG-4
MPEG-4
MPEG-4
00US+00COV-U.book Page 23 Friday, June 15, 2012 2:52 PM
24
M:\001\XPML A7.0\ML\4422720111_XAV-701HD_CaFR-LaES(FM7.1
600dpi)\4422720111_XAV-701HD_ML\02CaFR_XAV701HD\02CaFR02CD-U.fm
masterpage:Left
XAV-701HD
4-422-720-11(1)
USB Musique
Lecture de musique
1Connectez le périphérique USB au
port USB.
2Appuyez sur (HOME), puis touchez à
« USB Musique ».
La lecture commence.
Commandes de lecture
Options
Pour changer le menu de réglage
(Écran de lecture normale uniquement)
1Touchez à .
La liste de menu s’affiche.
2Touchez à .
Les options sont indiquées ci-dessous.
Pour modifier les réglages du
système de visualisation
1Touchez à .
L’écran de lecture normal sera remplacé par
l’écran de lecture avec système de
visualisation.
2Touchez à .
La liste de menu s’affiche.
3Touchez à .
La liste du système de visualisation s’affiche.
4Sélectionnez les éléments suivants :
Portail/Ballon/Brillant/Animal/Albums/
Graffiti/Encre/Aléatoire
Lecture répétée et aléatoire
1Pendant la lecture, touchez à
« Répéter » ou « Aléatoire »
plusieurs fois, jusqu’à ce que l’option
souhaitée s’affiche.
La lecture répétée ou aléatoire commence.
Les options de lecture répétée sont les suivantes :
Les options de lecture aléatoire sont les suivantes :
Remarque
L’écran de lecture avec système de visualisation n’est
pas disponible lors de la lecture répétée ou aléatoire.
1
Touchez pour afficher la liste des fichiers
de plage.
2«ZAP»
Touchez pour rechercher une plage en
écoutant des passages des plages.
(page 35)
3
Touchez pour passer à l’écran du système
de visualisation.
4« Répéter » /« Aléatoire »
5
Touchez pour ouvrir le menu d’option.
6/
Touchez pour sauter un fichier de plage.
Appuyez sur la touche et maintenez-la
enfoncée pour reculer/avancer rapidement
dans une plage audio.
7
Touchez pour lire un fichier de plage.
Touchez pour effectuer une pause de
lecture.
123
676
45
« Temps de ZAPPIN »
Sélectionne le temps de lecture pour la fonction
ZAPPIN : « 6 secondes », « 15secondes »,
« 30 secondes ».
« Mettre à jour base de données »
Recherche les fichiers de musique et les ajoute
à la base de données.
« A propos du Lecteur de musique »
Affiche la version de l’application.
: répète la totalité du groupe en cours.
: répète le fichier de musique en cours.
: revient en mode de lecture normale.
: lit les fichiers de musique de la totalité du
groupe en cours dans un ordre aléatoire.
: revient en mode de lecture normale.
00US+00COV-U.book Page 24 Friday, June 15, 2012 2:52 PM
25
M:\001\XPML A7.0\ML\4422720111_XAV-701HD_CaFR-LaES(FM7.1
600dpi)\4422720111_XAV-701HD_ML\02CaFR_XAV701HD\02CaFR02CD-U.fm
masterpage:RightM:\001\XPML A7.0\ML\4422720111_XAV-701HD_CaFR-LaES(FM7.1
600dpi)\4422720111_XAV-701HD_ML\02CaFR_XAV701HD\02CaFR02CD-U.fm
masterpage:Right
XAV-701HD
4-422-720-11(1)
Sélection des fichiers de
musique
1En cours de lecture (Écran de lecture
normale uniquement), touchez à .
La liste de catégories ou de fichiers de
l’élément en cours de lecture s’affiche.
Pour faire défiler la liste, déplacez la barre de
défilement vers le haut et le bas.
2Touchez à l’élément de votre choix.
La lecture commence.
Pour retourner à l’écran de lecture, touchez à
.
Sélection des chansons à partir
de la bibliothèque
1Pendant que l’écran de liste apparaît,
touchez à .
La liste de menu s’affiche.
2Sélectionnez l’élément de votre choix.
Vous pouvez effectuer la recherche à l’aide
des éléments suivants.
« Ttes chansons », « Albums »,
«Artistes», «Genres», «Année de
sortie », « Ajoutés récemm. »,
«Playlists», «Dossiers».
La liste sélectionnée s’affiche.
3Touchez à l’élément de votre choix.
La lecture commence.
Profitez de la musique en
fonction de votre humeur
— SensMe™
La fonction « Station SensMe™ » novatrice de
Sony regroupe automatiquement des plages par
canal ou humeur et vous permet d’apprécier la
musique de façon intuitive.
Installation de « Media Go » sur
votre ordinateur
Le logiciel (« Media Go ») est nécessaire pour
activer la fonction SensMe™ de cet appareil.
1Téléchargez le logiciel « Media Go » à
partir du site d’assistance à l’adresse
indiquée sur la couverture arrière.
2Suivez les instructions à l’écran pour
terminer l’installation.
Transfert de plages vers le
périphérique USB à l’aide de
«Media Go»
Pour activer la fonction SensMe™ sur cet
appareil, les plages doivent être analysées et
transférées au périphérique USB enregistré à
l’aide de « Media Go ».
1Raccordez le périphérique USB
enregistré à votre ordinateur.
Dans le cas d’un « WALKMAN », raccordez-
le par le mode MTP.
Dans le cas de périphériques USB autres que
« WALKMAN », raccordez-les par le mode
MSC.
« Media Go » démarre automatiquement.
Si un message est affiché à l’écran, suivez les
instructions affichées pour continuer.
2Faites glisser et déposer les plages de
Windows Explorer ou de iTunes, etc.,
vers « Media Go ».
L’analyse et le transfert des plages
commencent.
Pour plus de détails sur ces opérations, consultez
la rubrique Aide de « Media Go ».
Remarque
L’analyse des plages par 12 TONE ANALYSIS peut
prendre un certain temps, selon l’ordinateur.
Conseil
Ce ne sont pas seulement les fichiers audio qui
peuvent être transférés à l’aide de « Media Go », mais
aussi les fichiers image et vidéo. Pour plus de détails,
consultez la rubrique Aide de « Media Go ».
00US+00COV-U.book Page 25 Friday, June 15, 2012 2:52 PM
26
M:\001\XPML A7.0\ML\4422720111_XAV-701HD_CaFR-LaES(FM7.1
600dpi)\4422720111_XAV-701HD_ML\02CaFR_XAV701HD\02CaFR02CD-U.fm
masterpage:Left
XAV-701HD
4-422-720-11(1)
Lecture des plages dans les
canaux — Station SensMe™
« Station SensMe™ » groupe automatiquement
les plages en canaux en fonction de leurs
chansons. Vous pouvez choisir et écouter un
canal qui répond à votre humeur, activité, etc.
1Raccordez un périphérique USB
configuré pour la fonction SensMe™.
2Appuyez sur (HOME), puis touchez à
« USB Musique ».
3Touchez à , puis à .
4Parcourez la liste des canaux vers la
gauche ou la droite.
La lecture de la première plage du canal
courant débute à la section la plus mélodique
ou rythmique de la plage*.
*Celle-ci pourrait ne pas être détectée
correctement.
5Touchez au canal de votre choix.
La lecture des plages dans les canaux
sélectionnés commence.
Remarques
•Certaines plages pourraient ne pas être détectées
correctement ou être regroupées dans un canal ne
correspondant pas à l’humeur de la plage.
•Si le périphérique USB raccordé contient un grand
nombre de plages, le démarrage de « Station
SensMe™ » peut prendre un certain temps, à cause
de la lecture des données.
Conseil
Les plages sont lues en ordre aléatoire. Cet ordre
varie avec chaque sélection de canal.
Liste des canaux
xCanaux de base
Lit les plages selon le type de musique.
xRecommandé
xTout lire aléat.
Lit toutes les plages analysées dans un ordre
aléatoire.
Commandes et indications de lecture
« Station SensMe™ »
APour faire défiler la liste et sélectionner un
autre canal.
BIndique le canal courant.
CTouche Option
DIndique l’affichage de la pochette de
l’album*.
EIndique le temps écoulé de lecture, le nom de
la plage et le nom de l’artiste.
FPermet de faire une pause/reprendre la lecture
après une pause.
GPermet de sauter une plage.
*La taille recommandée se situe entre 240 × 240 et
960 × 960 pixels.
Sélection d’un album par
illustration de pochette
1Pendant que l’écran de liste apparaît,
touchez à .
2Touchez à l’illustration de pochette de
l’album dont vous souhaitez effectuer
la lecture.
La lecture commence.
Options
Pour changer le menu de réglage
1Touchez à .
La liste de menu s’affiche.
2Touchez à .
Les options sont indiquées ci-dessous.
«Énergique» : musique entraînante et pleine
d’énergie.
«Émotionnelle» : ballades.
« Lounge » : jazz et musique d’ambiance.
«Danse» : musique rythmée de rap et R & B.
«Extrême» : musique intense et puissante.
«Gaie» : musique joyeuse et stimulante.
« Détente » : musique calme et relaxante.
« Sereine » : musique douce et lente.
«Matin», « Journée », «Soir», «Nuit»,
«Minuit»
« Temps de ZAPPIN »
Sélectionne le temps de lecture pour la fonction
ZAPPIN : « 6 secondes », « 15secondes »,
« 30 secondes ».
AB C
DE F G
00US+00COV-U.book Page 26 Friday, June 15, 2012 2:52 PM
27
M:\001\XPML A7.0\ML\4422720111_XAV-701HD_CaFR-LaES(FM7.1
600dpi)\4422720111_XAV-701HD_ML\02CaFR_XAV701HD\02CaFR02CD-U.fm
masterpage:RightM:\001\XPML A7.0\ML\4422720111_XAV-701HD_CaFR-LaES(FM7.1
600dpi)\4422720111_XAV-701HD_ML\02CaFR_XAV701HD\02CaFR02CD-U.fm
masterpage:Right
XAV-701HD
4-422-720-11(1)
Pour modifier le format d’affichage
de l’album (lors de la sélection de
« Albums » à partir de la bibliothèque)
1Touchez à .
La liste de menu s’affiche.
2Touchez à , puis sélectionnez
« Liste » ou « Grille ».
Pour changer l’ordre de tri des
illustrations de pochette (Vue de la
pochette uniquement)
1Touchez à .
La liste de menu s’affiche.
2Touchez à , puis sélectionnez « Trier
par album » ou « Trier par artiste ».
Pour retourner à l’écran de lecture, touchez à
ou « Annuler ».
USB Vidéo
Lecture de vidéo
1Connectez le périphérique USB au
port USB.
2Appuyez sur (HOME), puis touchez à
« USB Video ».
La lecture commence.
Commandes de lecture
Touchez l’écran si les commandes de lecture ne
s’affichent pas.
« Mettre à jour base de données »
Recherche les fichiers de musique et les ajoute
à la base de données.
« A propos du Lecteur de musique »
Affiche la version de l’application.
1
Touchez pour afficher la liste des fichiers
vidéo.
2
Touchez pour ouvrir le menu d’option.
(page 28)
3/
Touchez pour sauter un fichier de plage.
MPEG-4
1
5
2
34 43
00US+00COV-U.book Page 27 Friday, June 15, 2012 2:52 PM
28
M:\001\XPML A7.0\ML\4422720111_XAV-701HD_CaFR-LaES(FM7.1
600dpi)\4422720111_XAV-701HD_ML\02CaFR_XAV701HD\02CaFR02CD-U.fm
masterpage:Left
XAV-701HD
4-422-720-11(1)
*La vitesse dépend du format ou de la méthode
d’enregistrement utilisée.
Conseil
Vous pouvez modifier la vitesse de lecture de manière
dynamique en faisant glisser l’écran du fichier vidéo
vers la gauche ou la droite.
Options
Pour afficher les options Audio
1Pendant la lecture, touchez à .
La liste de menu s’affiche.
2Touchez à .
La liste d’options audio s’affiche.
3Sélectionnez l’élément de votre choix.
Pour afficher des informations
détaillées
1Pendant la lecture, touchez à .
La liste de menu s’affiche.
2Touchez à .
Pour afficher les informations détaillées,
déplacez la barre de défilement vers le haut et
le bas.
Pour supprimer le fichier
1Pendant la lecture, touchez à .
La liste de menu s’affiche.
2Touchez à .
3Touchez à « OK ».
Pour modifier les réglages
1Pendant la lecture, touchez à .
La liste de menu s’affiche.
2Touchez à .
Les options sont indiquées ci-dessous.
Pour retourner à l’écran de lecture, touchez à
ou « Annuler ».
Sélection des fichiers vidéo
1Pendant la lecture, touchez à .
La liste de catégories ou de fichiers de
l’élément en cours de lecture s’affiche.
Pour faire défiler la liste, déplacez la barre de
défilement vers le haut et le bas.
2Touchez à l’élément de votre choix.
La lecture commence.
Pour retourner à l’écran de lecture, touchez à
.
Pour modifier le format d’affichage
de l’album
1Pendant que l’écran de liste apparaît,
touchez à .
Les options sont indiquées ci-dessous.
4/
Touchez et maintenez votre doigt
momentanément pour faire avancer
rapidement la vidéo, puis touchez
plusieurs fois pour modifier la vitesse
(× 1,5 t ×10 t ×30 t × 100)*.
Touchez et maintenez votre doigt
momentanément pour faire reculer la
vidéo, puis touchez plusieurs fois pour
modifier la vitesse (× 10 t ×30 t
× 100)*.
Pour annuler, touchez à .
/
Touchez pour passer à la plage suivante/
précédente.
Pendant la pause, touchez à pour
faire un saut vers l’avant de 15secondes.
Pendant la pause, touchez à pour
faire un saut vers l’arrière de 10 secondes.
Appuyez sur la touche et maintenez-la
enfoncée pour reculer/avancer rapidement
dans une plage vidéo.
5
Touchez pour lire un fichier de plage.
Touchez pour effectuer une pause de
lecture.
« Paramètres de zoom »
Règle l’affichage vidéo : « Mode standard »,
« Mode plein écran », « Désactiver ».
« Mettre à jour base de données »
Recherche les fichiers vidéo et les ajoute à la
base de données.
« À propos du lecteur vidéo »
Affiche la version de l’application.
: Grille
Affiche les fichiers vidéo sous forme de grille.
: Liste
Affiche les fichiers vidéo sous forme de liste.
: Vue de la pochette
Affiche les fichiers vidéo sous forme
d’illustrations inclinées.
00US+00COV-U.book Page 28 Friday, June 15, 2012 2:52 PM
29
M:\001\XPML A7.0\ML\4422720111_XAV-701HD_CaFR-LaES(FM7.1
600dpi)\4422720111_XAV-701HD_ML\02CaFR_XAV701HD\02CaFR02CD-U.fm
masterpage:RightM:\001\XPML A7.0\ML\4422720111_XAV-701HD_CaFR-LaES(FM7.1
600dpi)\4422720111_XAV-701HD_ML\02CaFR_XAV701HD\02CaFR02CD-U.fm
masterpage:Right
XAV-701HD
4-422-720-11(1)
Options
Pour changer l’ordre de tri de la liste
des vidéos
1Touchez à .
La liste de menu s’affiche.
2Touchez à , puis à « La plus
ancienne en premier », « La plus
récente en premier », « De A à Z » ou
« De Z à A ».
Pour modifier les réglages
1Touchez à .
La liste de menu s’affiche.
2Touchez à .
Les options sont indiquées ci-dessous.
Pour retourner à l’écran de lecture, touchez à
ou « Annuler ».
USB Photo
Affichage des photos
1Connectez le périphérique USB au
port USB.
2Appuyez sur (HOME), puis touchez à
«Photo USB».
3Touchez à « Ttes images » ou
« Dossiers », puis sélectionnez
l’image ou les dossiers.
Commandes de lecture
Touchez l’écran si les commandes de lecture ne
s’affichent pas.
Conseil
Vous pouvez faire reculer/avancer rapidement un
fichier de photo en parcourant la liste des photos vers
la gauche ou la droite.
« Paramètres de zoom »
Règle l’affichage vidéo : «Mode standard»,
« Mode plein écran », « Désactiver ».
« Mettre à jour base de données »
Recherche les fichiers vidéo et les ajoute à la
base de données.
« À propos du lecteur vidéo »
Affiche la version de l’application.
1
Touchez pour afficher la liste des fichiers
de photo.
2
Touchez pour ouvrir le menu d’option.
3/
Touchez pour sauter un fichier de photo.
Appuyez sur la touche et maintenez-la
enfoncée pour faire reculer/avancer
rapidement un fichier de photo.
4
Touchez pour démarrer le diaporama.
Touchez l’écran pour arrêter le
diaporama.
5 Fait pivoter le fichier de photo vers la
gauche.
Fait pivoter le fichier de photo vers la
droite.
12
34 5
00US+00COV-U.book Page 29 Friday, June 15, 2012 2:52 PM

30
M:\001\XPML A7.0\ML\4422720111_XAV-701HD_CaFR-LaES(FM7.1
600dpi)\4422720111_XAV-701HD_ML\02CaFR_XAV701HD\02CaFR02CD-U.fm
masterpage:Left
XAV-701HD
4-422-720-11(1)
Options
Pour afficher un diaporama
1Pendant la lecture, touchez à .
La liste de menu s’affiche.
2Touchez à .
Le diaporama démarre.
Pour définir comme arrière-plan
1Pendant la lecture, touchez à .
La liste de menu s’affiche.
2Touchez à .
3Touchez à « OK ».
Pour retirer l’image
1Pendant la lecture, touchez à .
La liste de menu s’affiche.
2Touchez à .
3Touchez à « OK ».
Pour afficher des informations
détaillées
1Pendant la lecture, touchez à .
La liste de menu s’affiche.
2Touchez à .
Pour afficher les informations détaillées,
déplacez la barre de défilement vers le haut et
le bas.
Pour modifier les réglages
1Pendant la lecture, touchez à .
La liste de menu s’affiche.
2Touchez à .
Les options sont indiquées ci-dessous.
Pour retourner à l’écran de lecture, touchez à
ou « Annuler ».
Sélection des fichiers de photo
1Pendant la lecture, touchez à .
La liste de catégories ou de fichiers de
l’élément en cours de lecture s’affiche.
Pour passer au niveau supérieur, touchez à
.
Pour faire défiler la liste, déplacez la barre de
défilement vers le haut et le bas.
2Touchez à l’élément de votre choix.
La lecture commence.
Pour afficher un diaporama
1Touchez à .
Le diaporama démarre.
Pour modifier le format d’affichage
1Touchez à .
Les options sont indiquées ci-dessous.
Options
Pour afficher un diaporama
1Pendant la lecture, touchez à .
La liste de menu s’affiche.
2Touchez à .
Le diaporama démarre.
« Définition de l’intervalle entre 2
diapos »
Règle l’intervalle de temps : «0,5s» -
«20,0s».
« Lire en continu »
Sélectionne la lecture en continu (diaporama).
« Mettre à jour bdd »
Recherche les fichiers d’image et les ajoute à la
base de données.
« À propos de la visionneuse de
photos »
Affiche la version de l’application.
: Grille
Affiche les fichiers de photo sous forme de
grille.
: Liste
Affiche les fichiers de photo sous forme de
liste.
: Vue de la pochette
Affiche les fichiers de photo sous forme
d’illustrations inclinées.
: Vue par date (Toutes les images
uniquement)
Affiche les fichiers de photo dans l’ordre
chronologique.
: Vue détaillée (Dossiers uniquement)
Affiche les dossiers, suivis des sous-dossiers,
ainsi que toutes les images de fichier photo
contenues.
00US+00COV-U.book Page 30 Friday, June 15, 2012 2:52 PM
31
M:\001\XPML A7.0\ML\4422720111_XAV-701HD_CaFR-LaES(FM7.1
600dpi)\4422720111_XAV-701HD_ML\02CaFR_XAV701HD\02CaFR02CD-U.fm
masterpage:RightM:\001\XPML A7.0\ML\4422720111_XAV-701HD_CaFR-LaES(FM7.1
600dpi)\4422720111_XAV-701HD_ML\02CaFR_XAV701HD\02CaFR02CD-U.fm
masterpage:Right
XAV-701HD
4-422-720-11(1)
Pour changer l’ordre de tri de la liste
des photos
1Touchez à .
La liste de menu s’affiche.
2Touchez à , puis à « La plus
ancienne en premier », « La plus
récente en premier », « De A à Z » ou
« De Z à A ».
Pour modifier les réglages
1Pendant que l’écran de liste apparaît,
touchez à .
La liste de menu s’affiche.
2Touchez à .
Les options sont indiquées ci-dessous.
Pour retourner à l’écran de lecture, touchez à
ou « Annuler ».
Remarques sur la lecture USB
• Un périphérique MSC (stockage de masse)
peut être utilisé.
• Les codecs compatibles sont MP3 (.mp3),
WMA (.wma), AAC/HE-AAC (.m4a), JPEG
(.jpg), Xvid (.avi/.xvid) et MPEG-4 (.mp4).
• Il est recommandé d’effectuer des copies de
sauvegarde des données contenues sur le
périphérique USB.
Remarques
•Si la lecture en mode USB Video est intermittente :
– Appuyez sur (HOME) ou accédez aux réglages du
système.
– En mode Photo USB, (Navigation), etc.
•Branchez le périphérique USB après avoir démarré
le moteur.
Certains périphériques USB pourraient être
endommagés ou ne pas fonctionner correctement si
vous les raccordez avant de démarrer le moteur.
•La lecture d’un fichier de grande taille ou de
nombreux fichiers peut prendre un certain temps à
démarrer.
•Cet appareil ne peut pas reconnaître plusieurs
périphériques MSC.
•Le signal de lecture USB Vidéo ou USB Photo n’est
pas émis depuis la borne REAR OUT.
Pour débrancher le périphérique
USB
Arrêtez la lecture, puis débranchez-le.
Ne débranchez pas l’appareil pendant la lecture,
car des données stockées sur le périphérique
USB pourraient être endommagées.
Remarques sur l’utilisation
•N’utilisez pas de périphériques USB de grande taille
ou lourds, qui risquent de tomber à cause des
vibrations ou d’entraîner un raccordement peu
fiable.
•Ne laissez pas de périphérique USB dans un
véhicule en stationnement, car cela peut entraîner
des problèmes de fonctionnement.
•Cet appareil ne peut pas reconnaître les
périphériques USB raccordés à l’aide d’un
concentrateur USB.
•Assurez-vous d’utiliser le câble USB fourni avec le
périphérique si un câble est nécessaire lors d’un
raccordement USB.
Remarques sur la lecture
•Sélectionnez « USB Musique », « USB Video » ou
« Photo USB », selon le type de fichier du
périphérique USB.
•Les indications affichées varient selon le
périphérique USB, le format d’enregistrement et les
réglages. Pour plus de détails, visitez le site
d’assistance à l’adresse indiquée sur la couverture
arrière.
•Un nom de dossier/fichier d’un maximum de 254
octets peut être reconnu.
•Le nombre maximum de fichiers de musique
pouvant être affichés est le suivant :
– fichiers (plages) : 10 000
« Définition de l’intervalle entre 2
diapos »
Règle l’intervalle de temps : «0.5s» -
« 20.0 s ».
« Lire en continu »
Sélectionne la lecture en continu (diaporama).
« Mettre à jour bdd »
Recherche les fichiers d’image et les ajoute à la
base de données.
« À propos de la visionneuse de
photos »
Affiche la version de l’application.
00US+00COV-U.book Page 31 Friday, June 15, 2012 2:52 PM
32
M:\001\XPML A7.0\ML\4422720111_XAV-701HD_CaFR-LaES(FM7.1
600dpi)\4422720111_XAV-701HD_ML\02CaFR_XAV701HD\02CaFR02CD-U.fm
masterpage:Left
XAV-701HD
4-422-720-11(1)
•Le démarrage de la lecture peut prendre un certain
temps, selon la quantité de données enregistrées.
•Les fichiers DRM (Digital Rights Management)
peuvent ne pas être lus.
•Au cours de la lecture ou de l’avance ou du recul
rapide d’un fichier VBR (Variable Bit Rate) MP3/
WMA/AAC, le temps de lecture écoulé peut ne pas
s’afficher exactement.
•La lecture d’un fichier avec compression sans perte
n’est pas prise en charge.
iPod
Pour plus de détails sur la compatibilité de votre
iPod, voir « À propos du iPod » à la page 65 ou
visitez le site d’assistance à l’adresse indiquée
sur la couverture arrière.
Dans ce mode d’emploi, « iPod » est utilisé
comme référence générale pour les fonctions du
iPod sur le iPod et le iPhone, à moins
d’indication contraire dans le texte ou les
illustrations.
Remarque
Cet appareil ne peut pas reconnaître plusieurs iPod.
Utilisation du iPod
1Réduisez le niveau du volume sur cet
appareil.
Si le iPod est éteint, mettez-le en marche.
2Connectez le iPod au port USB.
Il est recommandé d’utiliser le câble de
raccordement USB RC-202IPV en option.*1
Un témoin de procédure de raccordement
s’affiche sur l’écran du iPod*2, puis la lecture
commence à partir de la pièce jouée en
dernier.
Si un iPod est déjà raccordé, touchez à
«iPod» pour débuter la lecture.
*1 Pour regarder des vidéos à partir d’un iPod
avec vidéo, il est nécessaire d’utiliser le cable
RC-202IPV.
*2 Peut ne pas apparaître lorsqu’un iPod touch ou
un iPhone est raccordé, ou lorsque la dernière
lecture du iPod a été effectuée au moyen de la
commande d’application passager.
3Réglez le volume sur cet appareil.
Remarques
•Si un iPod touch ou iPhone est raccordé à cet
appareil, un écran recommandant l’installation d’une
application peut s’afficher sur cet appareil.
•Le signal de lecture iPod vidéo n’est pas émis
depuis la borne REAR OUT.
Commandes et indications de lecture
Vous pouvez contrôler la lecture du iPod de la
même façon que pour la lecture d’un disque.
Pour plus de détails, voir « Commandes de
lecture » à la page 19.
Pour des détails sur les indications de lecture,
voir « Indications de lecture » à la page 20.
Pour interrompre la lecture
Maintenez enfoncée la touche (SOURCE/OFF)
pendant 1 seconde.
00US+00COV-U.book Page 32 Friday, June 15, 2012 2:52 PM
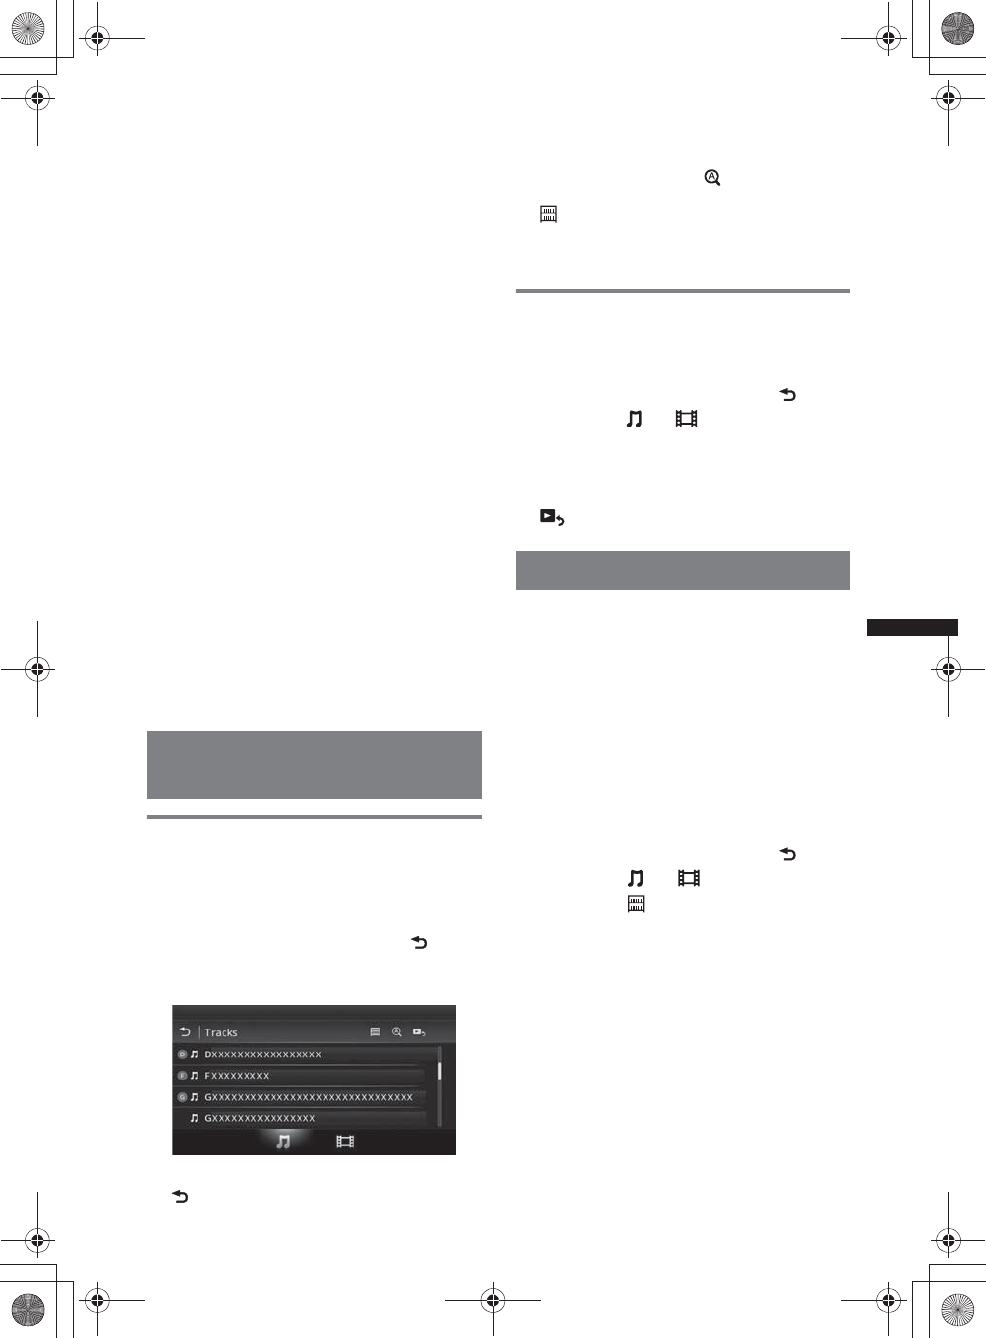
33
M:\001\XPML A7.0\ML\4422720111_XAV-701HD_CaFR-LaES(FM7.1
600dpi)\4422720111_XAV-701HD_ML\02CaFR_XAV701HD\02CaFR02CD-U.fm
masterpage:RightM:\001\XPML A7.0\ML\4422720111_XAV-701HD_CaFR-LaES(FM7.1
600dpi)\4422720111_XAV-701HD_ML\02CaFR_XAV701HD\02CaFR02CD-U.fm
masterpage:Right
XAV-701HD
4-422-720-11(1)
Pour débrancher le iPod
Arrêtez la lecture, puis débranchez-le.
Ne débranchez pas le iPod au cours de la lecture
car les données pourraient être endommagées.
Pour aller en mode ZAPPIN
Pour plus de détails sur cette procédure, reportez-
vous à la section « Recherche d’une plage en
écoutant des passages des plages —
ZAPPIN™ » à la page 35.
Mode de reprise
Lorsque le iPod en cours d’utilisation est
raccordé à un connecteur d’accueil, le mode de
cet appareil passe au mode de reprise et la lecture
débute dans le mode configuré par le iPod.
En mode de reprise, la lecture répétée/aléatoire
n’est pas disponible.
Mise en garde pour le iPhone
Lorsque vous raccordez un iPhone par câble USB, le
volume du téléphone est commandé par le iPhone lui-
même. N’augmentez pas le volume de l’appareil au
cours d’un appel afin d’éviter l’émission de sons
assourdissants après l’appel.
Remarque
Cet appareil ne peut pas reconnaître un iPod par le
biais d’un concentrateur USB.
Conseils
•Lorsque la clé de contact est en position ACC et que
l’appareil est allumé, le iPod se recharge.
•Si le iPod est débranché au cours de la lecture,
« Aucun appareil » s’affiche à l’écran de l’appareil.
Affichage de la liste des plages/
fichiers vidéo — Liste
Sélection d’une plage/d’un fichier
vidéo
Vous pouvez afficher les albums/dossiers/plages/
fichiers vidéo, puis sélectionner l’élément
souhaité pour la lecture.
1Pendant la lecture, touchez à .
La liste de catégories ou de fichiers de
l’élément en cours de lecture s’affiche.
Pour passer au niveau supérieur, touchez à
.
Pour faire défiler la liste, déplacez la barre de
défilement vers le haut et le bas.
Pour rechercher les fichiers par ordre
alphabétique, touchez à .
Pour retourner à l’écran principal, touchez à
.
2Touchez à l’élément de votre choix.
La lecture commence.
Sélection d’un type de fichier
Vous pouvez sélectionner le type de fichier à
afficher, puis sélectionner le fichier que vous
souhaitez lire.
1Pendant la lecture, touchez à .
2Touchez à ou pour sélectionner
le type de fichier.
3Touchez au fichier de votre choix.
La lecture du fichier sélectionné commence.
Pour retourner à l’écran de lecture, touchez à
.
Sélection du mode de lecture
Vous pouvez régler un des modes de lecture
suivants :
Pour la lecture audio
«Piste», «Album», «Artiste»,
« Genre », « Liste de lecture »,
« Podcast »*
*Peut ne pas s’afficher selon le réglage du iPod.
Pour la lecture vidéo
Les modes sont identiques à ceux de la
lecture audio, mais les éléments affichés
varient en fonction du iPod.
1Pendant la lecture, touchez à .
2Touchez à ou .
3Touchez à .
4Touchez au mode de lecture souhaité.
Pour débuter la lecture, touchez aux éléments
souhaités dans la liste.
Pour faire défiler la liste, déplacez la barre de
défilement vers le haut et le bas.
00US+00COV-U.book Page 33 Friday, June 15, 2012 2:52 PM
34
M:\001\XPML A7.0\ML\4422720111_XAV-701HD_CaFR-LaES(FM7.1
600dpi)\4422720111_XAV-701HD_ML\02CaFR_XAV701HD\02CaFR02CD-U.fm
masterpage:Left
XAV-701HD
4-422-720-11(1)
Lecture répétée et aléatoire
1Pendant la lecture, touchez à
« Répéter » ou « Aléatoire »
plusieurs fois, jusqu’à ce que l’option
souhaitée s’affiche.
La lecture répétée ou aléatoire commence.
Les options de lecture répétée sont les suivantes :
Les options de lecture aléatoire sont les suivantes :
*Varie selon le mode de lecture sélectionné.
Remarque
Les options affichées pourraient ne pas correspondre
au fonctionnement réel.
Fonctionnement direct d’un
iPod — Commande
d’application passager
Vous pouvez faire fonctionner directement un
iPod raccordé à cet appareil.
1Pendant la lecture, touchez à .
Désactivation de la commande
d’application passager
Pendant que l’option « Contrôle app passager »
est activée, touchez à l’écran, puis à la touche
« Annuler ».
Le mode de lecture passe en mode de reprise de
lecture.
Remarques
•L’image de l’application et la vidéo peuvent s’afficher
sur cet appareil uniquement lorsque le frein à main
est appliqué.
•L’application et la vidéo peuvent être contrôlées
uniquement à partir du iPhone et du iPod.
•Les applications compatibles avec la commande
d’application passager sont limitées.
•Pour émettre une vidéo à partir de cet appareil, vous
devez activer la sortie vidéo du iPod.
•Le volume peut uniquement être réglé sur l’appareil.
•Les réglages de lecture répétée et lecture aléatoire
sont désactivés lorsque vous annulez le mode de
commande d’application passager.
Pour la lecture audio
« Tous » : répète toutes les plages du iPod.
«Piste» : répète la plage en cours.
«Album»/«Podcast»/«Artiste»/«Liste
de lecture »/« Genre »* : répète l’élément en
cours du mode de lecture sélectionné.
Pour la lecture vidéo
« Tous » : répète tous les fichiers vidéo du
iPod.
«Piste» : répète la vidéo en cours.
« Groupe »* : répète l’élément en cours du
mode de lecture sélectionné.
Pour la lecture audio
« DÉSACTIVÉ » : revient en mode de lecture
normale.
«Album»/«Podcast»/«Artiste»/«Liste
de lecture »/« Genre »* : lit les plages du
mode de lecture sélectionné dans un ordre
aléatoire.
« Périphérique » : lit toutes les plages en
ordre aléatoire dans le iPod.
00US+00COV-U.book Page 34 Friday, June 15, 2012 2:52 PM
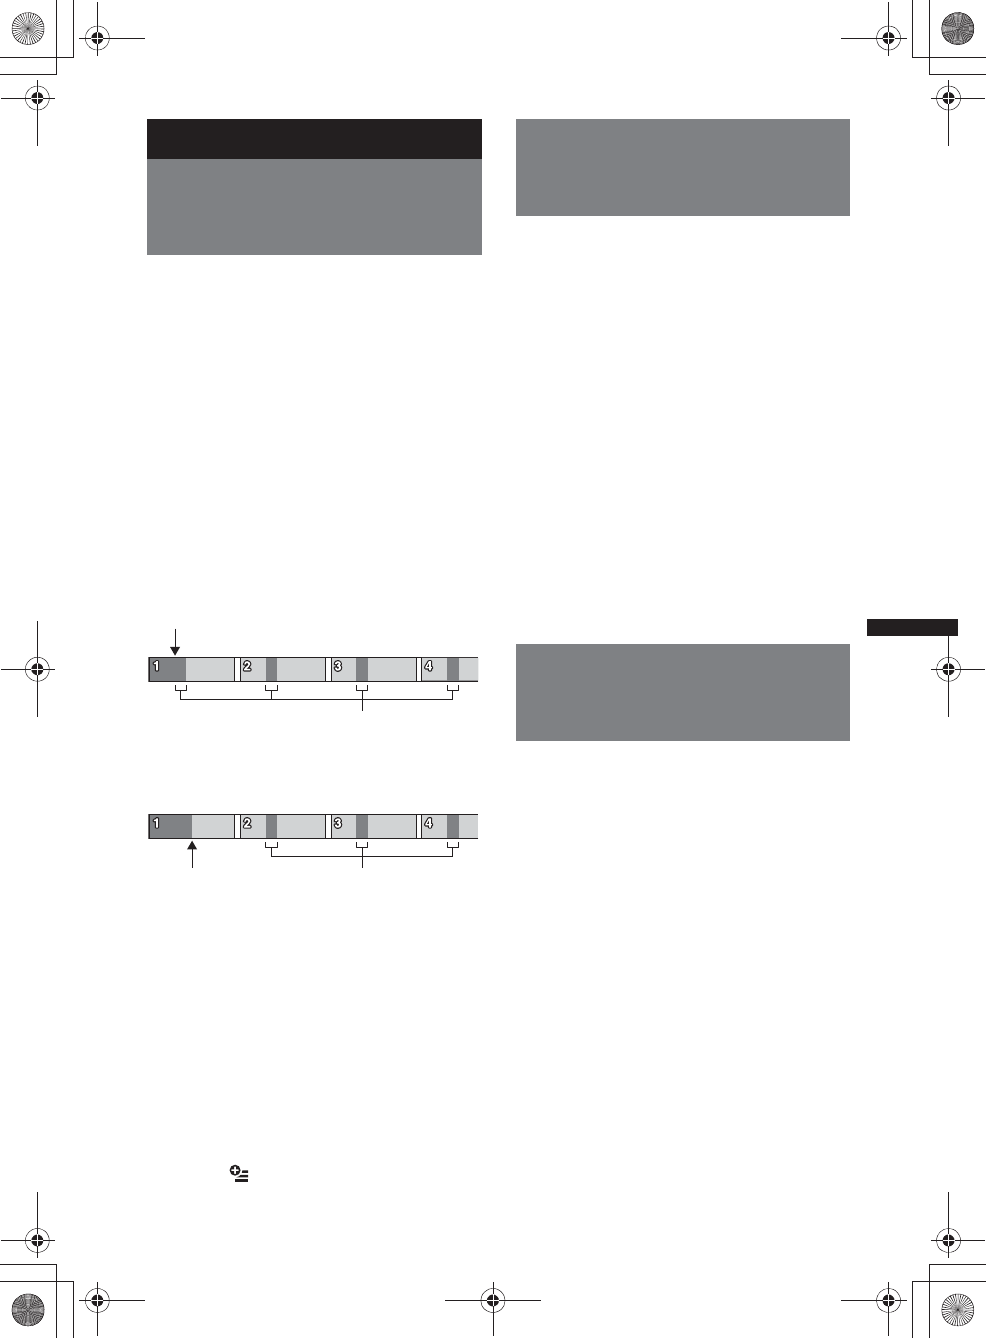
35
M:\001\XPML A7.0\ML\4422720111_XAV-701HD_CaFR-LaES(FM7.1
600dpi)\4422720111_XAV-701HD_ML\02CaFR_XAV701HD\02CaFR02CD-U.fm
masterpage:RightM:\001\XPML A7.0\ML\4422720111_XAV-701HD_CaFR-LaES(FM7.1
600dpi)\4422720111_XAV-701HD_ML\02CaFR_XAV701HD\02CaFR02CD-U.fm
masterpage:Right
XAV-701HD
4-422-720-11(1)
Fonctions utiles
Recherche d’une plage en
écoutant des passages des
plages — ZAPPIN™
Vous pouvez rechercher la plage de votre choix
en écoutant successivement de courts passages
des plages d’un périphérique USB ou d’un iPod.
Cette fonction est pratique, par exemple, pour
rechercher une plage en mode de lecture
aléatoire ou de lecture aléatoire répétée.
1Au cours de l’écoute, touchez à
«ZAP».
Dans le cas du mode USB Musique, le mode
ZAP démarre à partir de la plage en cours de
lecture.
Les sections les plus mélodieuses ou
rythmées des plages sont lues.
Ces passages sont lus pendant la durée
définie.
Remarque
Les plages doivent être analysées par 12 TONE
ANALYSIS.
Dans le cas du iPod, le mode ZAP démarre à
partir d’un passage dans la plage suivante.
2Touchez à « ZAP » lorsque la plage
que vous souhaitez écouter est lue.
Dans le cas du mode USB Musique, la lecture
retourne à la normale, de la position actuelle
jusqu’à la fin de la plage.
Dans le cas du iPod, la plage sélectionnée est
lue à partir du début.
Pour chercher de nouveau une plage par le biais
du mode ZAPPIN, répétez les étapes 1 et 2.
Conseils
•Vous ne pouvez pas sélectionner le passage de la
plage devant être lu.
•Vous pouvez sélectionner la durée de lecture.
Touchez à , puis sélectionnez le temps de
lecture pour la fonction ZAPPIN : « 6 secondes »,
« 15 secondes », « 30 secondes ».
Contrôle des applications sur
votre téléphone intelligent —
MirrorLink™
Cette fonction reproduit l’affichage du téléphone
intelligent sur l’affichage dans la voiture pour vous
permettre de contrôler les applications de votre
téléphone intelligent avec un écran de plus grande
taille.
Seul un téléphone intelligent compatible avec la
fonction MirrorLink™ peut être utilisé.
1Connectez votre téléphone intelligent
à l’appareil à l’aide d’un câble USB.
2Appuyez sur (HOME), puis touchez à
« MirrorLink™ ».
L’affichage du téléphone intelligent apparaît
sur l’affichage dans la voiture.
Touchez et contrôlez les applications de la
même manière que sur le téléphone
intelligent.
Remarque
Pour votre sécurité, certains contenus d’écran du
téléphone intelligent peuvent ne pas s’afficher sur le
système AVC lorsque le frein à main n’est pas
enclenché.
Contrôle des applications sur
votre iPhone — Application
Telenav® GPS
La navigation Telenav sur votre iPhone vous
permet d’atteindre votre destination plus
rapidement, facilement et efficacement que
jamais auparavant. Vous pouvez maintenant
utiliser Telenav® GPS avec votre récepteur
Sony®. Raccordez simplement votre Telenav®
GPS à la voiture et visionnez les directions sur
l’écran de votre récepteur pendant qu’elles sont
émises à l’aide des haut-parleurs de la voiture.
1Raccordez votre iPhone au port USB.
2Démarrez l’application Telenav sur le
iPhone.
3Appuyez sur (HOME), puis touchez à «
Telenav ».
L’affichage de l’application Telenav apparaît
sur l’affichage de l’appareil et le
fonctionnement à l’aide de l’écran tactile
vous permet de contrôler l’application sur
votre iPhone.
Remarque
La fonction Telenav est disponible uniquement sur les
iPhone 4S ou iPhone 4 et le téléchargement de
l’application Telenav sur votre iPhone est requis.
« ZAP » touché.
La section lue de chaque
plage en mode ZAPPIN.
«ZAP»
touché. La section lue de chaque
plage en mode ZAPPIN.
00US+00COV-U.book Page 35 Friday, June 15, 2012 2:52 PM
36
M:\001\XPML A7.0\ML\4422720111_XAV-701HD_CaFR-LaES(FM7.1
600dpi)\4422720111_XAV-701HD_ML\02CaFR_XAV701HD\02CaFR02CD-U.fm
masterpage:Left
XAV-701HD
4-422-720-11(1)
Utilisation de sources
différentes à l’avant et l’arrière
— Zone × Zone
Vous pouvez utiliser simultanément des sources
différentes à l’avant et l’arrière de la voiture.
Les sources sélectionnables pour cet appareil
(avant) et le moniteur arrière (arrière) sont
indiquées ci-dessous.
Avant : N’importe quelle source.
Arrière : Disque inséré dans cet appareil.
1Appuyez sur la touche (HOME) de
l’appareil principal.
2Touchez à « ZONE × ZONE » pour
activer la fonction Zone × Zone.
Pour faire fonctionner la source à l’avant,
utilisez l’écran tactile et les touches de
l’appareil principal.
Pour faire fonctionner la source à l’arrière,
utilisez la télécommande.
Conseil
Vous pouvez également activer/désactiver la fonction
Zone × Zone en appuyant sur la touche (Z x Z) de la
télécommande.
Pour désactiver la fonction Zone ×
Zone
Touchez de nouveau à « ZONE × ZONE » dans
le menu HOME.
Remarques
•Lorsque vous appuyez sur la touche (SOURCE/OFF)
de l’appareil principal ou de la télécommande, la
fonction Zone × Zone est désactivée.
•Lorsque la fonction Zone × Zone est activée, les
touches suivantes de la télécommande sont
inopérantes :
(SRC), (MODE), (ATT), (VOL) +/–, (CLEAR),
touches numériques.
•Lorsque la fonction Zone × Zone est activée, la
télécommande permet uniquement de contrôler la
lecture de DVD à l’arrière.
•Lorsque la fonction Zone × Zone est activée, les
éléments suivants sont désactivés.
– EQ7 (page 47)
– Balance/Équilibreur avant/arrière/Caisson de
graves (page 54)
– Synchronisation intelligente (page 48)
– Haut-parleur central virtuel (page 49)
– HPF, LPF (page 55)
– Optimiseur de basses arrière (page 49)
Changement de couleur des
touches — Illuminateur de
couleur dynamique
L’illuminateur de couleur dynamique vous
permet de changer la couleur des touches de
l’appareil principal pour l’adapter à l’intérieur du
véhicule.
Vous pouvez sélectionner 12 couleurs préréglées,
une couleur personnalisée et 5motifs préréglés.
xCouleurs préréglées
« Rouge », « Ambre », « Ambre moyen »,
«Jaune», «Blanc», «Vert clair», «Vert»,
« Bleu clair », « Bleu ciel », « Bleu », « Violet »,
«Rose».
xMotifs préréglés
« Arc-en-ciel », « Océan », « Coucher de
soleil », « Forêt », « Aléatoire ».
1Appuyez sur (HOME), puis touchez à
«Réglages».
2Touchez à , déplacez la barre de
défilement vers le haut et le bas, puis
touchez à « Éclairage des touches ».
3Déplacez la barre de défilement vers le
haut et le bas pour sélectionner la
couleur préréglée souhaitée, puis
appuyez sur celle-ci.
Personnalisation de la couleur des
touches — Couleur personnalisée
Vous pouvez enregistrer une couleur
personnalisée pour les touches.
1Appuyez sur (HOME), puis touchez à
«Réglages».
2Touchez à , déplacez la barre de
défilement vers le haut et le bas, puis
touchez à « Éclairage des touches ».
3Déplacez la barre de défilement vers le
haut et le bas pour sélectionner
« Personnalisé », puis appuyez sur
«Régler >».
4Déplacez la barre de défilement vers la
gauche et la droite ou appuyez sur +/–
pour régler la gamme de couleur de
« R » (rouge), « G » (vert) ou « B »
(bleu).
Gamme de couleur réglable : « 0 » – « 63 ».
Vous pouvez régler la couleur tout en
observant l’éclairage des touches.
00US+00COV-U.book Page 36 Friday, June 15, 2012 2:52 PM
37
M:\001\XPML A7.0\ML\4422720111_XAV-701HD_CaFR-LaES(FM7.1
600dpi)\4422720111_XAV-701HD_ML\02CaFR_XAV701HD\02CaFR02CD-U.fm
masterpage:RightM:\001\XPML A7.0\ML\4422720111_XAV-701HD_CaFR-LaES(FM7.1
600dpi)\4422720111_XAV-701HD_ML\02CaFR_XAV701HD\02CaFR02CD-U.fm
masterpage:Right
XAV-701HD
4-422-720-11(1)
Utilisation des Commandes
gestuelles
Vous pouvez effectuer des opérations répétitives
en dessinant le trait de commande suivant sur
l’écran de réception/lecture.
Faire ceci Pour
Dessiner une
ligne
horizontale
(gauche à
droite)
Réception radio :
recherche des stations vers
l’avant.
(Semblable à >.)
Lecture de DVD/VCD :
sauter vers l’avant un chapitre/
une plage.
(Semblable à >.)
Xvid/MPEG-4/lecture
audio :
sauter vers l’avant un fichier/
une plage.
(Semblable à >.)
Lecture de Pandora® :
sauter une chanson.
(Semblable à >.)
Dessiner une
ligne
horizontale
(droite à
gauche)
Réception radio :
recherche des stations vers
l’arrière.
(Semblable à ..)
Lecture de DVD/VCD :
sauter vers l’arrière un
chapitre/une plage.
(Semblable à ..)
Xvid/MPEG-4/lecture
audio :
sauter vers l’arrière un fichier/
une plage.
(Semblable à ..)
Dessiner une
ligne verticale
(vers le haut)
Réception radio :
réception des stations
mémorisées (avancer à la
prochaine station mémorisée).
Lecture de DVD/VCD/Xvid/
MPEG-4 :
avancer rapidement la vidéo.
Lecture audio :
sauter un album vers l’avant
(dossier).
Lecture de Pandora® :
Évaluation positive.
(Semblable à .)
Dessiner une
ligne verticale
(vers le bas)
Réception radio :
réception des stations
mémorisées (revenir à la station
mémorisée précédente).
Lecture de DVD/VCD/Xvid/
MPEG-4 :
recul rapide de la vidéo.
Lecture audio :
sauter un album vers l’arrière
(dossier).
Lecture de Pandora® :
Évaluation négative.
(Semblable à .)
00US+00COV-U.book Page 37 Friday, June 15, 2012 2:52 PM
38
M:\001\XPML A7.0\ML\4422720111_XAV-701HD_CaFR-LaES(FM7.1
600dpi)\4422720111_XAV-701HD_ML\02CaFR_XAV701HD\02CaFR02CD-U.fm
masterpage:Left
XAV-701HD
4-422-720-11(1)
Appels mains-libres et audio en
continu — Fonction Bluetooth
Avant d’utiliser la fonction
Bluetooth
Procédure de base de la fonction
Bluetooth
1Pairage
Un enregistrement mutuel est nécessaire
lorsque vous connectez des périphériques
Bluetooth la première fois. Cela est désigné
comme le « pairage ». Cet enregistrement
(pairage) est uniquement nécessaire la
première fois car cet appareil et les autres
périphériques se reconnaissent
automatiquement la prochaine fois.
Remarque
Si vous effacez l’enregistrement du périphérique
sur cet appareil, vous devez effectuer de nouveau
le pairage.
2Connexion
Après le pairage, raccordez cet appareil et le
périphérique Bluetooth. Selon le périphérique,
la connexion se fait automatiquement en
même temps que le pairage.
3Appels mains-libres/audio en continu
Vous pouvez effectuer et recevoir des appels
en mains libres ou écouter une transmission
audio avec cet appareil.
Indications d’état Bluetooth
Installation du microphone
Vous devez installer un microphone (fourni) pour
capter votre voix au cours des appels mains-
libres.
Consultez le guide « Installation/Raccordement »
fourni pour avoir des détails sur la manière de
raccorder le microphone.
Éteint : le signal Bluetooth est absent.
Allumé : le signal Bluetooth est
présent.
Éteint : aucun périphérique connecté
pour audio en continu.
Clignotant : connexion en cours.
Allumé : un périphérique est
connecté.
Éteint : aucun téléphone cellulaire
connecté pour appel mains-libres.
Clignotant : connexion en cours.
Allumé : un téléphone cellulaire est
connecté.
Indique l’état de la force du signal du
téléphone cellulaire connecté.
Indique l’état de la charge restante de
la batterie du téléphone cellulaire
connecté.
Éteint : aucun message SMS non lu.
Allumé : un ou plusieurs messages
SMS non lus sont disponibles.
00US+00COV-U.book Page 38 Friday, June 15, 2012 2:52 PM
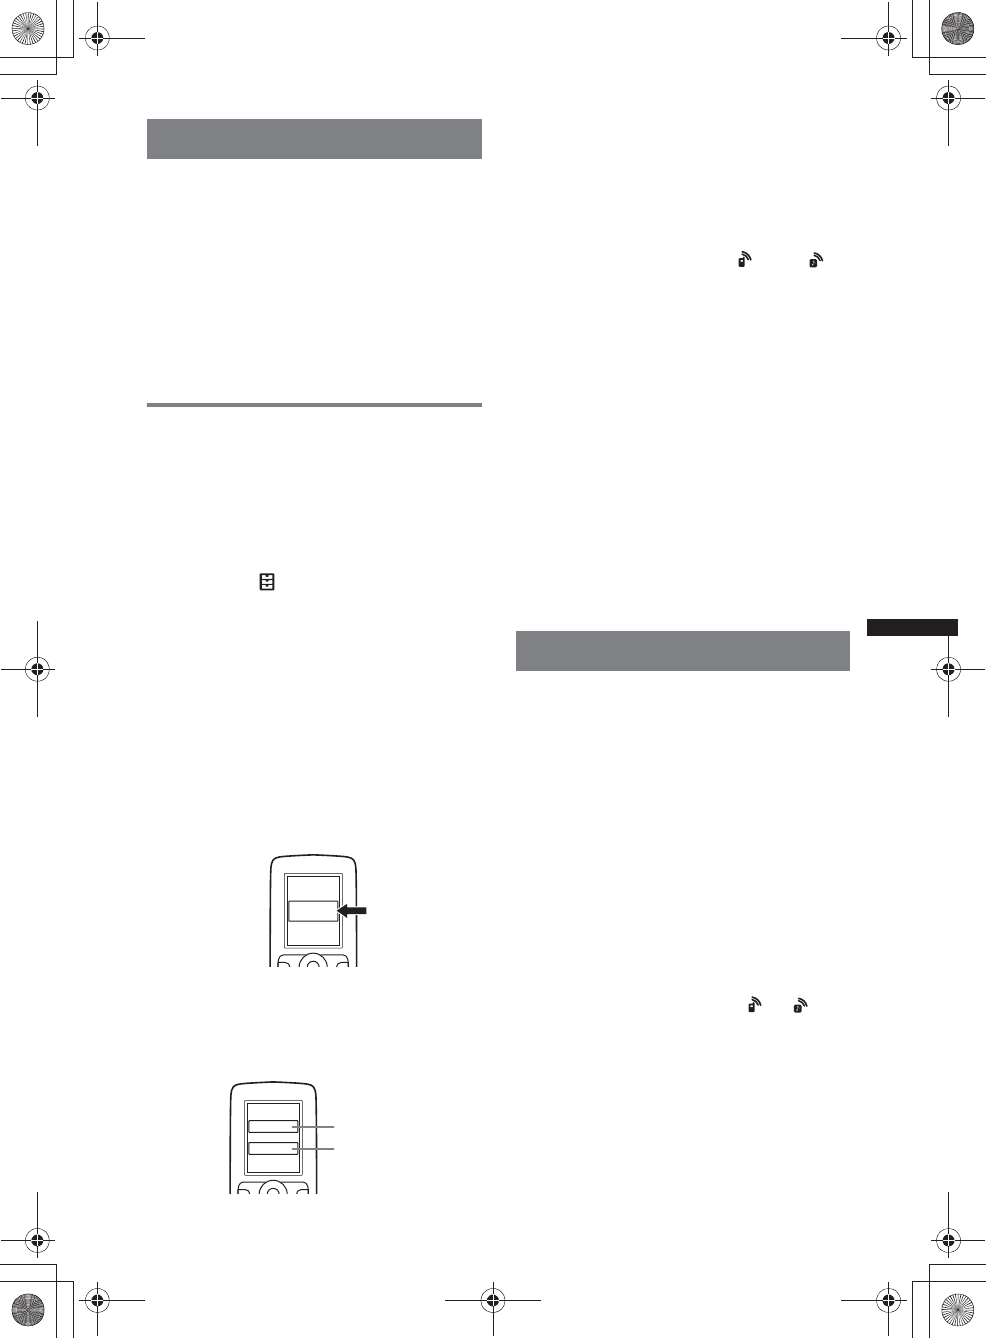
39
M:\001\XPML A7.0\ML\4422720111_XAV-701HD_CaFR-LaES(FM7.1
600dpi)\4422720111_XAV-701HD_ML\02CaFR_XAV701HD\02CaFR02CD-U.fm
masterpage:RightM:\001\XPML A7.0\ML\4422720111_XAV-701HD_CaFR-LaES(FM7.1
600dpi)\4422720111_XAV-701HD_ML\02CaFR_XAV701HD\02CaFR02CD-U.fm
masterpage:Right
XAV-701HD
4-422-720-11(1)
Pairage
Le pairage est nécessaire lors de la première
connexion à un périphérique Bluetooth
(téléphone cellulaire, etc.).*
Pour des détails, consultez le manuel du
périphérique Bluetooth.
*Si vous effacez l’enregistrement du périphérique sur
cet appareil, vous devez effectuer de nouveau le
pairage.
Conseil
Le pairage peut s’effectuer pour 9 appareils
maximum.
Recherche à partir du périphérique
Bluetooth
La procédure visant à rechercher cet appareil à
partir de l’autre périphérique Bluetooth est
expliquée ci-dessous.
1Appuyez sur (HOME), puis touchez à
«Réglages».
2Touchez à , puis déplacez la barre
de défilement vers le haut et le bas.
3Touchez à « Connexion Bluetooth »,
puis réglez le signal à « ACTIVÉ ».
Le signal Bluetooth de cet appareil est activé.
4Touchez à « Pairage > ».
Cet appareil est prêt à être détecté par l’autre
périphérique Bluetooth.
5Utilisez le périphérique Bluetooth pour
rechercher cet appareil.
Une liste de périphériques apparaît sur la
fenêtre d’affichage du périphérique. Cet
appareil est nommé « Sony Automotive ».
6Si la saisie d’un code
d’authentification* est requise sur la
fenêtre d’affichage du périphérique,
entrez « 0000 ».
Cet appareil et le périphérique Bluetooth
mémorisent leurs informations respectives et,
une fois le pairage effectué, l’appareil est prêt
pour la connexion au périphérique.
7Utilisez le périphérique Bluetooth pour
établir la connexion à cet appareil.
Le nom du périphérique Bluetooth s’affiche
et la connexion est établie. « » ou « »
s’affiche lorsque la connexion est établie.
*La clé d’authentification peut également être
nommée « code d’authentification », « code PIN »,
« numéro PIN », « mot de passe », etc., en fonction
du périphérique Bluetooth.
Remarques
•Pendant la connexion à un périphérique Bluetooth,
cet appareil ne peut être détecté par un autre
périphérique. Pour activer la détection, débranchez
l’appareil de la connexion en cours.
•La recherche ou la connexion peut prendre
quelques instants.
•Selon le périphérique, l’affichage de confirmation de
la connexion peut apparaître avant la saisie de la clé
d’authentification.
•Le délai de saisie de la clé d’authentification varie en
fonction du périphérique.
•Cet appareil ne peut pas être connecté à un
périphérique compatible uniquement avec le profil
HSP (Head Set Profile).
Connexion
Lorsque le contact est mis et que le signal
Bluetooth est activé, cet appareil recherche le
dernier périphérique Bluetooth connecté et la
connexion se fait automatiquement si cela est
possible.
Ce chapitre explique la manière de se connecter
manuellement à des périphériques Bluetooth
enregistrés.
Assurez-vous d’abord d’activer le signal
Bluetooth sur cet appareil (page 45) et sur l’autre
périphérique Bluetooth.
Pour se connecter à partir de l’autre
périphérique Bluetooth
Mettez en marche l’autre périphérique Bluetooth
pour le connecter à cet appareil.
Lorsque la connexion est réussie, ou
s’affiche dans le haut de l’écran.
Remarque
Si la connexion est établie pendant une transmission
audio en continu, des bruits peuvent être entendus
dans la sortie audio.
Conseil
Vous pouvez connecter un téléphone cellulaire pour la
transmission audio en continu si ce dernier est
compatible avec le profil A2DP (Advanced Audio
Distribution Profile).
XXXXXXX
DR-BT30Q
Sony
Automotive
XXXX
Entrez le code
d’authentification.
« 0000 »
00US+00COV-U.book Page 39 Friday, June 15, 2012 2:52 PM