Sony Group XMGS6DSP 6/5 Channel Class-D Amplifier with DSP User Manual XM GS6DSP
Sony Corporation 6/5 Channel Class-D Amplifier with DSP XM GS6DSP
UserManual.wiki
>
Sony Group
>
XMGS6DSP User Manual
05 (Short-Term Confidential) User Manual
Navigation menu
Upload a User Manual
Namespaces
Wiki Guide
HTML
PDF
Info
Views
User Manual
Discussion / Help
Navigation
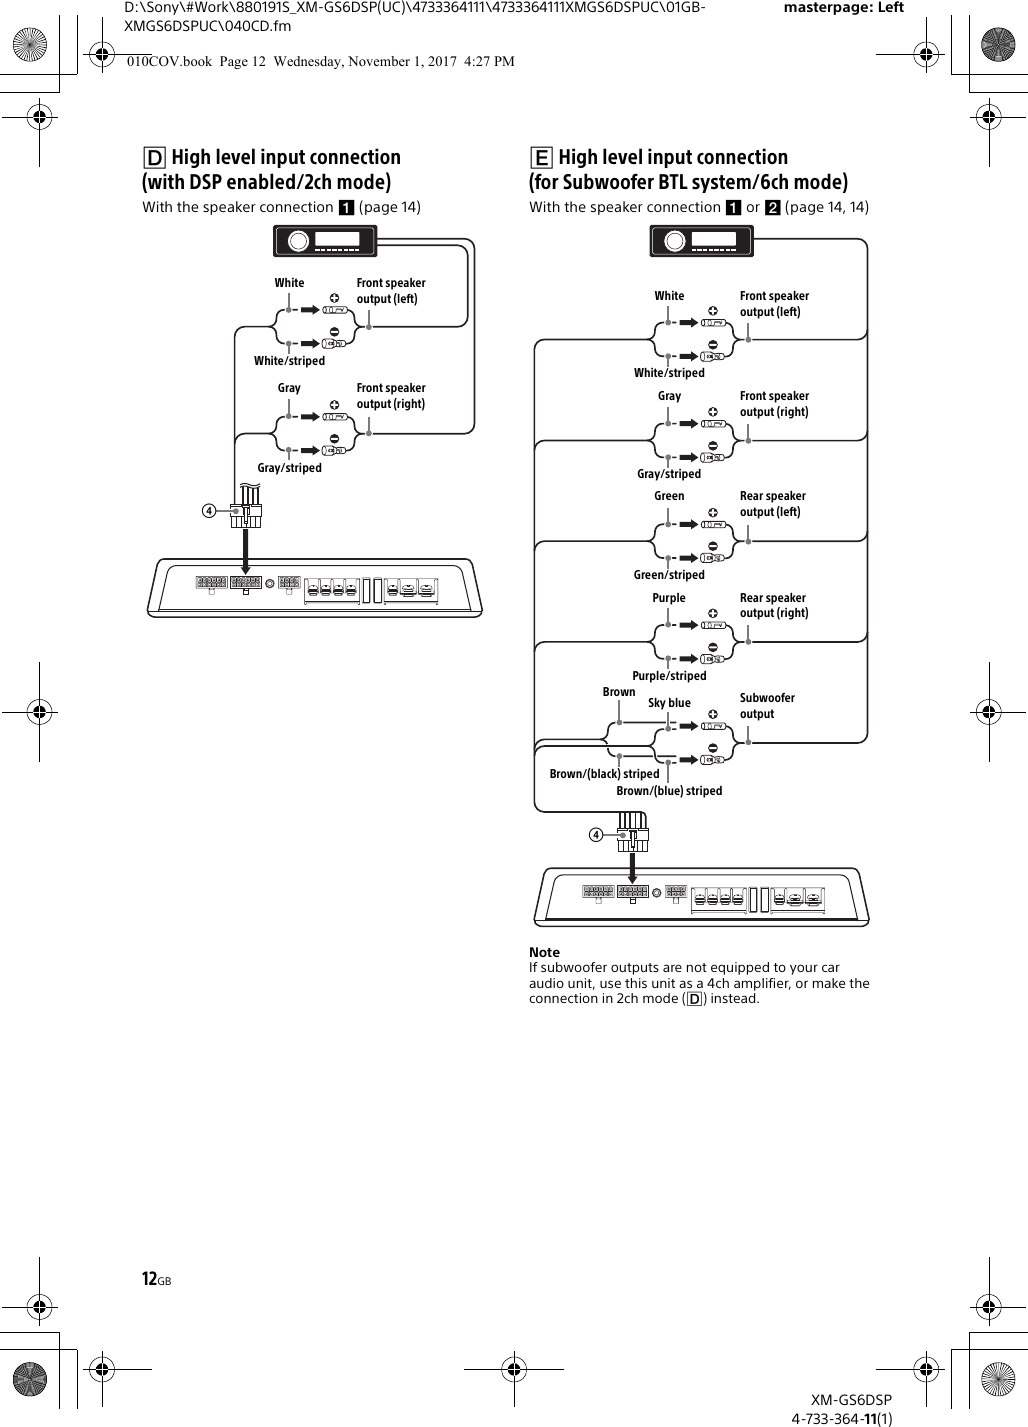
![10GBD:\Sony\#Work\880191S_XM-GS6DSP(UC)\4733364111\4733364111XMGS6DSPUC\01GB-XMGS6DSPUC\040CD.fmmasterpage: LeftXM-GS6DSP4-733-364-11(1)Set the SELECT switch to the appropriate position according to the speaker system.2ch/BT mode and 6ch modeSelect “2ch/BT” or “6ch” mode depending on the use/non-use of the DSP. When selecting the “2ch/BT” mode, also select the sensitivity “2V” or “5V” depending on the pre-output level of your car audio unit.*1 While a bridged subwoofer connection is made, this unit functions as a 5ch amplifier.*2 When adjusting the volume balance of the front speakers, rear speakers and subwoofer while the unit is in 2ch mode (DSP mode), operate your iPhone/Android smartphone to adjust the [Fader], [Balance] and [Subwoofer Level] settings of the “Sony | Music Center” application.*3 The sound settings of the DSP (page 17) can be made by the “Sony | Music Center” application on the iPhone/Android smartphone. Before setting, operate your iPhone/Android smartphone to establish the BLUETOOTH connection with this unit (page 15).Line input connection (with DSP enabled/2ch mode)With the speaker connection (page 14)NotesWhen making this connection, set the SELECT switch to the “2V” position.Set the SELECT switch to the “5V” position if the sound is distorted when increasing the volume of the car audio unit (only for car audio unit with a pre-output level of 5 V).Input connectionsMode For6ch (Through mode)using this unit as a 6ch amplifier (no built-in DSP is used)*1. For details on the connections, see:–“ Line input connection (for Subwoofer BTL system/6ch mode)” (page 11).–“ High level input connection (for Subwoofer BTL system/6ch mode)” (page 12).using this unit with a 3-way speaker system. With this connection, a 3-ways speaker system can be driven without a crossover network. For details on the connections, see:–“ Line input connection (for 3-way speaker system/6ch mode)” (page 11).–“ High level input connection (for 3-way speaker system/6ch mode)” (page 13).2ch/BT (DSP mode)*2*3encoding 2ch input signals into 4.1ch output signals (the built-in DSP is used). For details on the connections, see:–“ Line input connection (with DSP enabled/2ch mode)” (page 10).–“ High level input connection (with DSP enabled/2ch mode)” (page 12).playing a BLUETOOTH device by operating the “Sony | Music Center” application. For details, see “Playing a BLUETOOTH Device” (page 16).2VSetting the sensitivity “2V” or “5V” of the “2ch/BT” mode. Normally, use this unit set to “2V”. When using a car audio unit with a high pre-output level, set to “5V” if the sound is distorted while increasing the volume.5V010COV.book Page 10 Wednesday, November 1, 2017 4:27 PM](https://usermanual.wiki/Sony-Group/XMGS6DSP/User-Guide-3631189-Page-10.png)
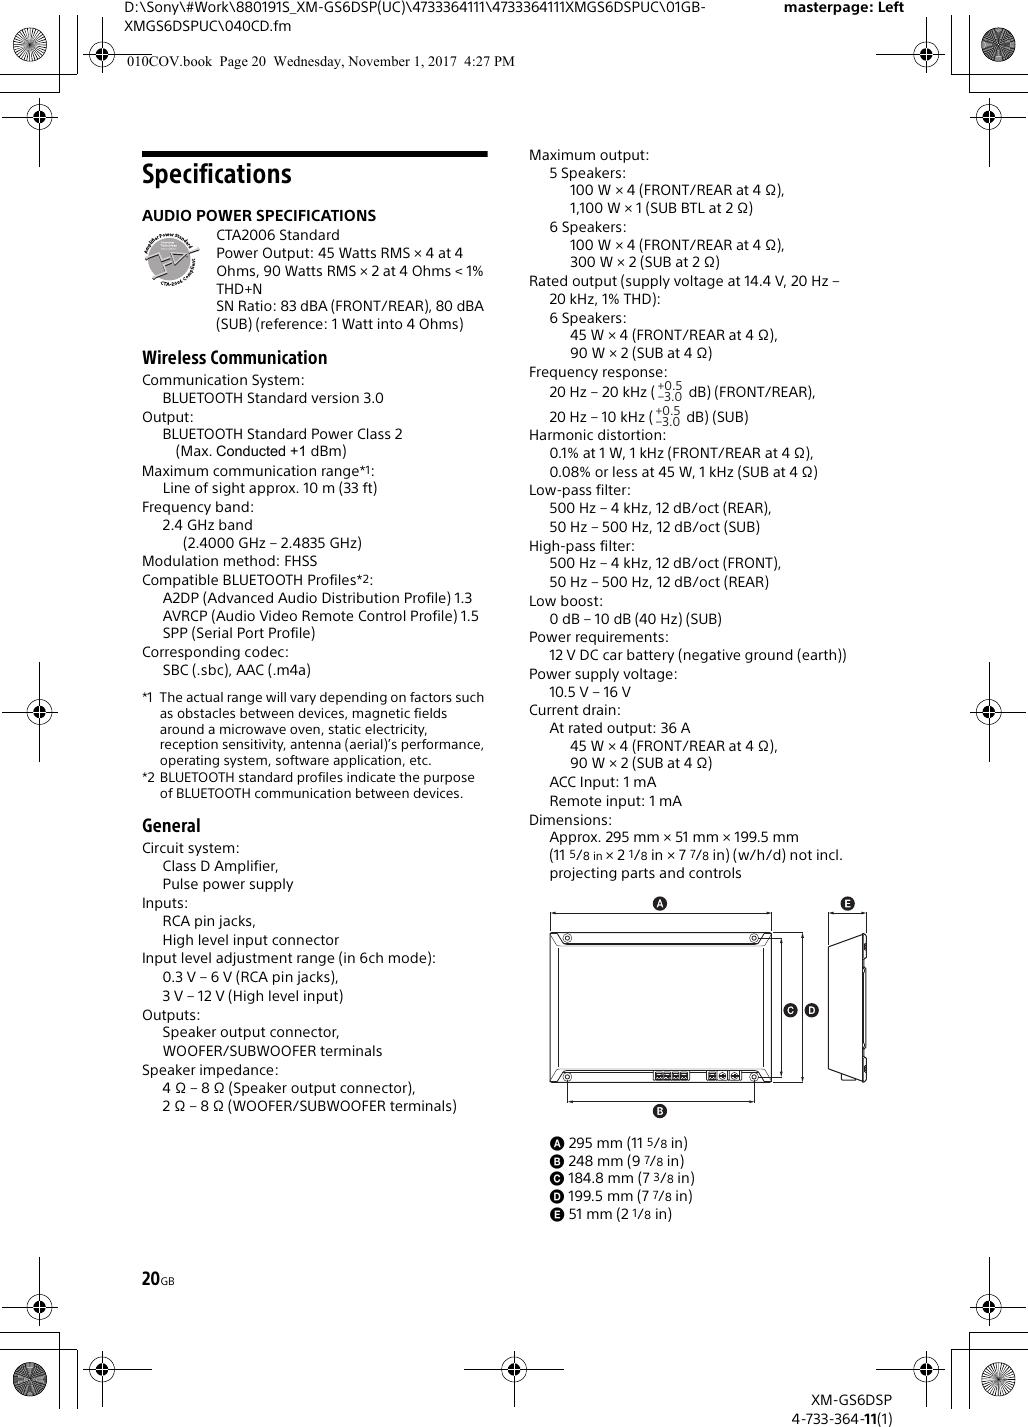
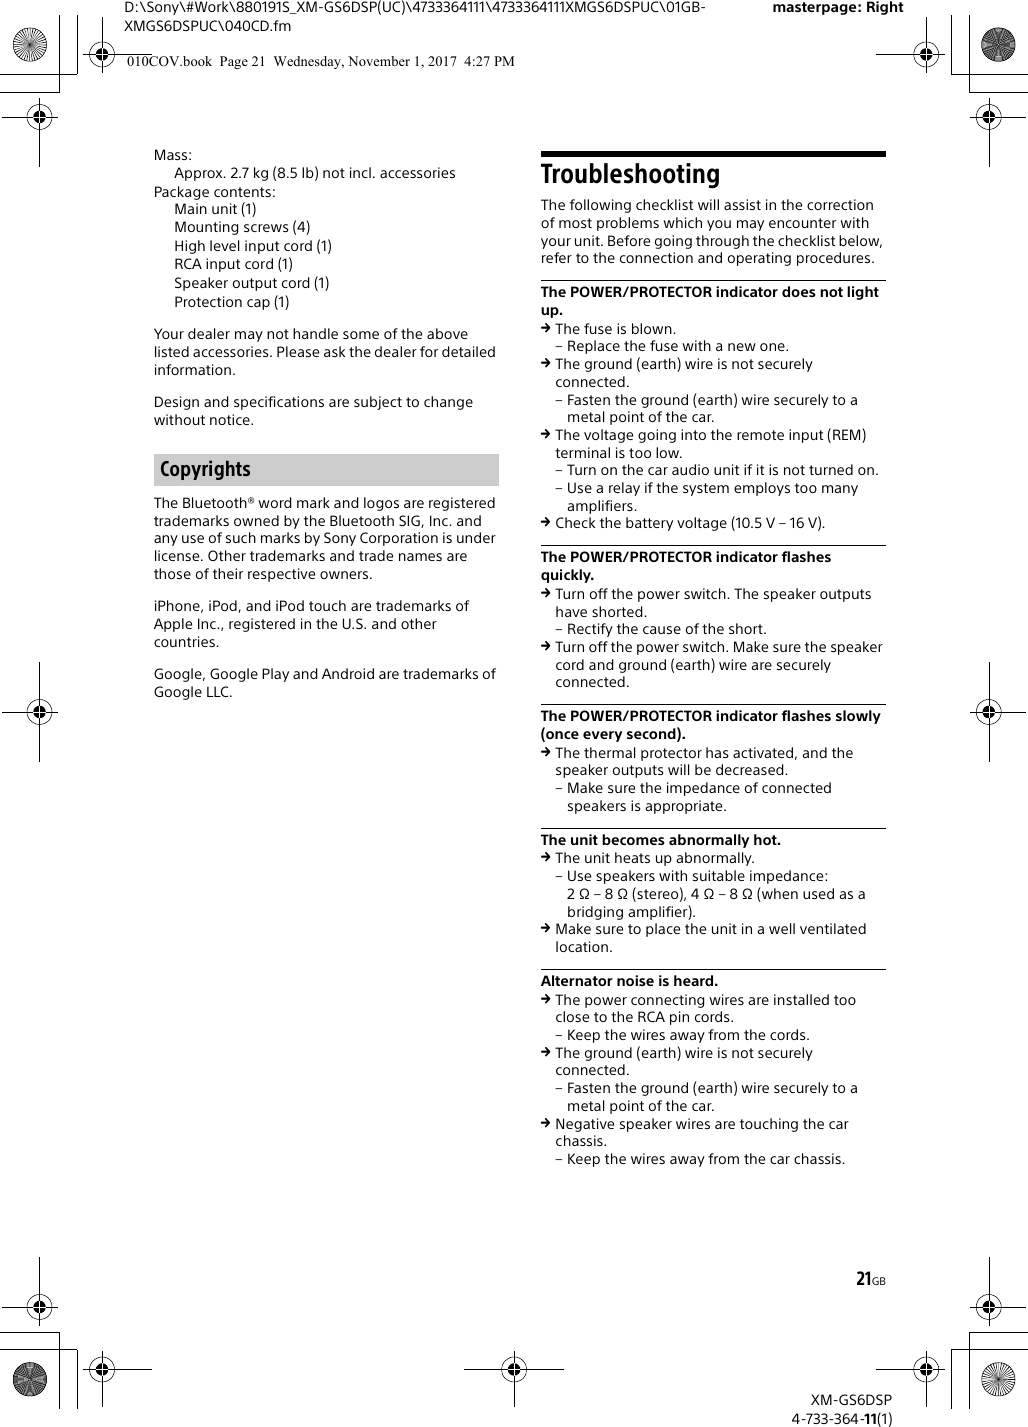
![14GBD:\Sony\#Work\880191S_XM-GS6DSP(UC)\4733364111\4733364111XMGS6DSPUC\01GB-XMGS6DSPUC\040CD.fmmasterpage: LeftXM-GS6DSP4-733-364-11(1)Set the HIGH PASS FILTER switch, FILTER switch and LOW PASS FILTER switch on the control panel to the appropriate positions according to the speaker system.Also, refer to the manual supplied with your speakers for further details.4.1ch speaker system with a bridged subwoofer connectionWith the input connection or (page 10, 11)NotesWhen making this connection, set the filter switches to the following positions:–HIGH PASS FILTER: OFF–FILTER: OFF–LOW PASS FILTER: ONWhen adjusting the volume balance of the front speakers, rear speakers and subwoofer while the unit is in 2ch mode (DSP mode), operate your iPhone/Android smartphone to adjust the [Fader], [Balance] and [Subwoofer Level] settings of the “Sony | Music Center” application.2-way speaker system with a bridged subwoofer connectionWith the input connection or (page 10, 11)NoteWhen making this connection, set the filter switches to the following positions:–HIGH PASS FILTER: ON– FILTER: HPF+LPF–LOW PASS FILTER: ONSpeaker connectionsBTLLOW PASS FILTEROFF ONFILTER OFFHPF HPF+LPFOFF ONHIGH PASS FILTERRear speaker (min. 4 Ω)Subwoofer (min. 2 Ω)Front speaker (min. 4 Ω)BTLLOW PASS FILTEROFF ONFILTER OFFHPF HPF+LPFOFF ONHIGH PASS FILTERTweeter (min. 4 Ω)Subwoofer (min. 2 Ω)Woofer (min. 4 Ω)010COV.book Page 14 Wednesday, November 1, 2017 4:27 PM](https://usermanual.wiki/Sony-Group/XMGS6DSP/User-Guide-3631189-Page-14.png)
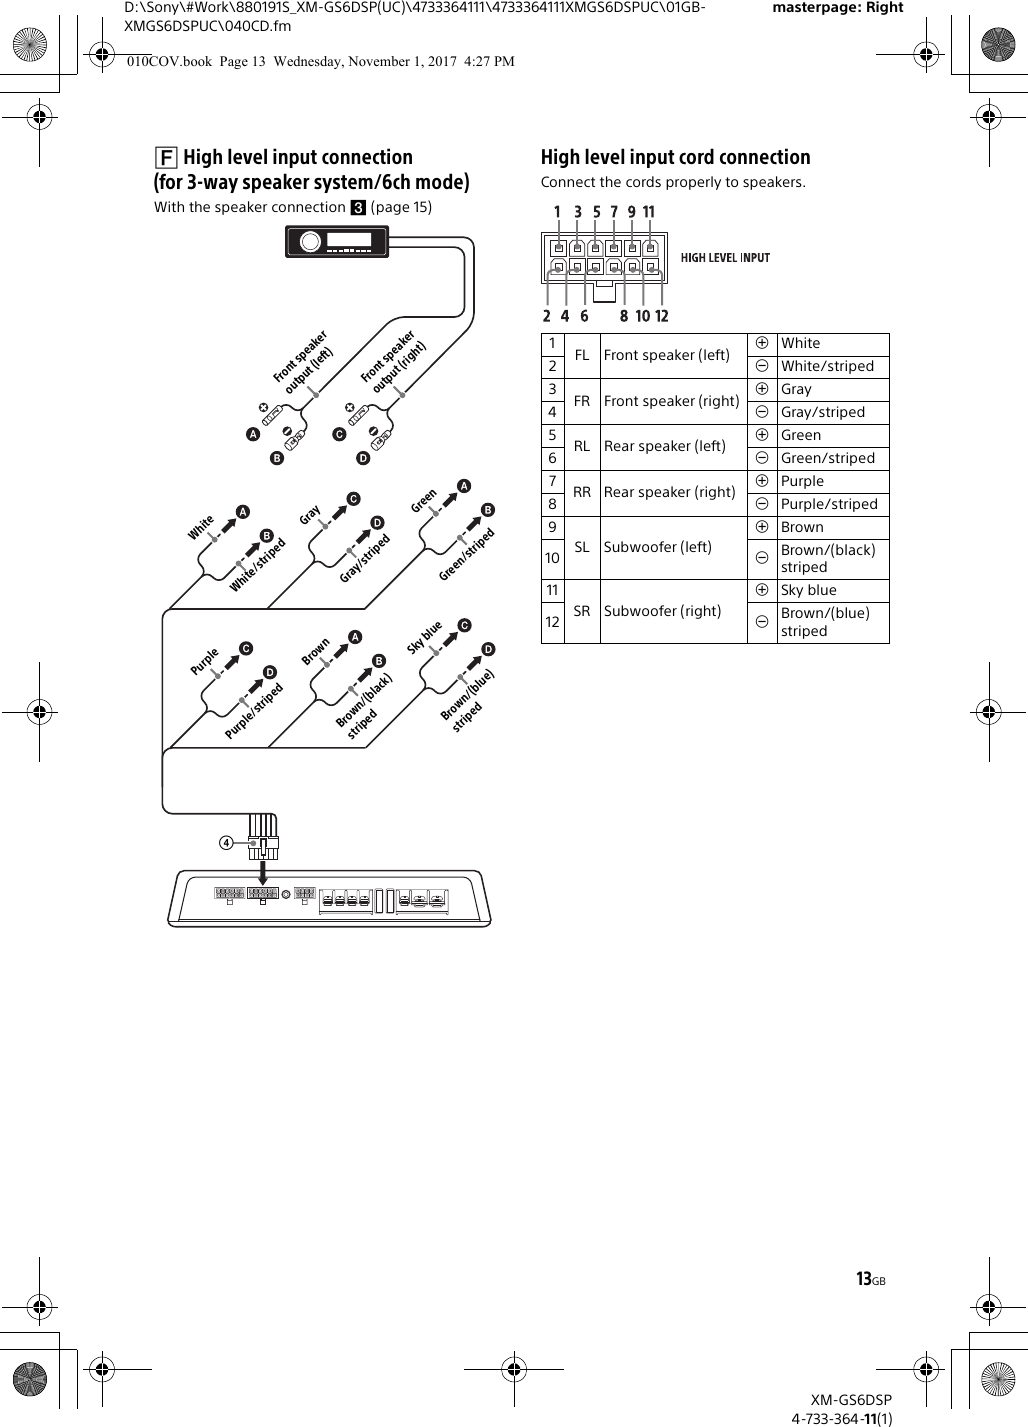
![15GBD:\Sony\#Work\880191S_XM-GS6DSP(UC)\4733364111\4733364111XMGS6DSPUC\01GB-XMGS6DSPUC\040CD.fmmasterpage: RightXM-GS6DSP4-733-364-11(1)3-way speaker systemWith the input connection (page 11)Using Sony 3 Way Component Speaker System XS-GS1631C is recommended.NoteWhen making this connection, set the filter switches to the following positions:–HIGH PASS FILTER: ON– FILTER: HPF+LPF–LOW PASS FILTER: ONSpeaker cord connectionConnect the cords properly to speakers.Preparing a BLUETOOTH DeviceYou can enjoy music on a BLUETOOTH compatible device such an iPhone/Android smartphone (hereafter “BLUETOOTH device” if not otherwise specified). For details on connecting, refer to the operating instructions supplied with the device.Before connecting the device, turn down the volume of the BLUETOOTH device; otherwise, a loud sound may result.(Available only when the SELECT switch is set to the “2V” or “5V” position.)When connecting a BLUETOOTH device for the first time, mutual registration (called “pairing”) is required. Pairing enables this unit and other devices to recognize each other.1Place the BLUETOOTH device within 1 m (3 ft) of this unit.2Press and hold PAIRING for 2 seconds.The indicator flashes quickly while the unit is in pairing standby mode.3Perform pairing on the BLUETOOTH device so it detects this unit.4Select [XM-GS6DSP] shown in the display of the BLUETOOTH device.If your model name does not appear, repeat from step 2.5If passkey input is required on the BLUETOOTH device, input [0000].When pairing is made, the indicator flashes slowly.6Select this unit on the BLUETOOTH device to make the BLUETOOTH connection.The indicator lights up when the connection is established.NoteWhile connected to a BLUETOOTH device, this unit cannot be detected from another device. To enable detection, press PAIRING to enter the pairing standby mode and search for this unit from another device.1FL Front speaker (left) White2White/striped3FR Front speaker (right) Gray4Gray/striped5RL Rear speaker (left) Green6Green/striped7RR Rear speaker (right) Purple8Purple/stripedLOW PASS FILTEROFF ONFILTER OFFHPF HPF+LPFOFF ONHIGH PASS FILTERTweeter (min. 4 Ω)Woofer (min. 2 Ω)Midrange speaker (min. 4 Ω)BLUETOOTHPairing and connecting with a BLUETOOTH device010COV.book Page 15 Wednesday, November 1, 2017 4:27 PM](https://usermanual.wiki/Sony-Group/XMGS6DSP/User-Guide-3631189-Page-15.png)
![16GBD:\Sony\#Work\880191S_XM-GS6DSP(UC)\4733364111\4733364111XMGS6DSPUC\01GB-XMGS6DSPUC\040CD.fmmasterpage: LeftXM-GS6DSP4-733-364-11(1)To start playbackFor details, see “Playing a BLUETOOTH Device” (page 16).To disconnect the paired devicePerform step 2.To use this unit with BLUETOOTH, connection with a paired device is required. Some paired devices will connect to this unit automatically.Operate the BLUETOOTH device to make the BLUETOOTH connection with this unit (page 15).Playing a BLUETOOTH DeviceYou can play contents on a connected BLUETOOTH device that supports BLUETOOTH A2DP (Advanced Audio Distribution Profile).(Available only when the SELECT switch is set to the “2V” or “5V” position.)To play the BLUETOOTH device, installing the “Sony | Music Center” application to your iPhone/Android smartphone is required.Download the latest version of “Sony | Music Center” application from the App Store for iPhone or from Google Play for Android smartphone.1Operate the BLUETOOTH device to make the BLUETOOTH connection with this unit (page 15).2Launch the “Sony | Music Center” application.3Start up your audio playback application on the BLUETOOTH device.4Operate the BLUETOOTH device to start playback.To adjust the volumeDuring playback, adjust the volume of your iPhone/Android smartphone, or adjust the sound settings of the “Sony | Music Center” application.To switch to the line input connection (in 2ch mode)Select [Audio In] on the “Sony | Music Center” application.To turn off the BLUETOOTH functionsPress and hold PAIRING for 7 seconds.The BLUETOOTH pairing information stored on the unit is erased.TipIf the car’s ignition is turned off while the BLUETOOTH connection is established, this unit reconnects automatically to the last-connected BLUETOOTH device when the car’s ignition is turned to on.Connecting with a paired BLUETOOTH device010COV.book Page 16 Wednesday, November 1, 2017 4:27 PM](https://usermanual.wiki/Sony-Group/XMGS6DSP/User-Guide-3631189-Page-16.png)
![17GBD:\Sony\#Work\880191S_XM-GS6DSP(UC)\4733364111\4733364111XMGS6DSPUC\01GB-XMGS6DSPUC\040CD.fmmasterpage: RightXM-GS6DSP4-733-364-11(1)DSP SettingsYou can configure the DSP settings using the “Sony | Music Center” application with the “Advanced car audio setting” app embedded in as a plug-in.(Available only when the SELECT switch is set to the “2V” or “5V” position.)Downloading the latest version of the “Sony | Music Center” application is required from the App Store for iPhone or from Google Play for Android smartphone.NotesFor your safety, follow your local traffic laws and regulations, and do not operate the application while driving.“Sony | Music Center” is an app for controlling Sony audio devices which are compatible with “Sony | Music Center”, by your iPhone/Android smartphone.What you can control with “Sony | Music Center” varies depending on the connected device.To make use of “Sony | Music Center” features, see the details on your iPhone/Android smartphone.For further details on “Sony | Music Center,” visit the following URL: http://www.sony.net/smcqa/Visit the website below and check the compatible iPhone/Android smartphone models.For iPhone: visit the App StoreFor Android smartphone: visit Google PlayAbout the “Advanced car audio setting” application“Advanced car audio setting” is a plug-in application enabling you to configure further sound settings by the “Sony | Music Center” application.Downloading the latest version of the “Advanced car audio setting” application is required from the App Store for iPhone or from Google Play for Android smartphone.1Make the BLUETOOTH connection with your iPhone/Android smartphone (page 15).2Launch the “Sony | Music Center” application.Connection to iPhone/Android smartphone starts.For details on the operations on iPhone/Android smartphone, see the Help of the application.If the device number appearsMake sure that the number is displayed (e.g., 123456), then select [Yes] on the iPhone/Android smartphone.1Operate your iPhone/Android smartphone to activate the “Sony | Music Center” application, then touch the [Settings] icon.Alternatively, touch [Advanced car audio setting] to enter the setting mode.2Tap [Sound].3Tap the desired setup item, then make the sound settings.The following items can be set.Equalizer (equalizer)Selects an equalizer curve from 10 equalizer curves or off:[Off], [R&B], [Rock], [Pop], [Hip-Hop], [EDM], [Jazz], [Soul], [Country], [Karaoke], [Custom].The equalizer curve setting can be memorized for each source.* [Karaoke] reduces the vocal sound but cannot fully remove it during playback. Also, using a microphone is not supported.SettingsSony | Music Center with iPhone/Android smartphoneEstablishing the Sony | Music Center connectionConfiguring the DSP settings010COV.book Page 17 Wednesday, November 1, 2017 4:27 PM](https://usermanual.wiki/Sony-Group/XMGS6DSP/User-Guide-3631189-Page-17.png)
![18GBD:\Sony\#Work\880191S_XM-GS6DSP(UC)\4733364111\4733364111XMGS6DSPUC\01GB-XMGS6DSPUC\040CD.fmmasterpage: LeftXM-GS6DSP4-733-364-11(1)Listening Position (listening position)Front/Rear Position (front/rear position)Simulates a natural sound field by delaying the sound output from speakers to suit your position: [Front Left] (front left), [Front Right] (front right), [Front] (center front), [All] (center of your car), [Custom] (position set by “Advanced car audio setting” of “Sony | Music Center”)[OFF] (no position set)Adjust Position (adjust position)Fine-tunes the listening position setting: [+3] – [Center] – [-3].(Available only when [Front/Rear Position] is not set to [Off] or [Custom].)Subwoofer Position (subwoofer position) [Near] (near), [Normal] (normal), [Far] (far)(Available only when [Front/Rear Position] is not set to [Off] or [Custom].)Balance (balance)Adjusts the sound balance: [15] – [0] – [-15].Alternatively, adjust the setting point to the left/right in the “BAL/FAD/SW Level” setting of “Advanced car audio setting”.Fader (fader)Adjusts the relative level: [15] – [0] – [-15].Alternatively, adjust the setting point to up/down in the “BAL/FAD/SW Level” setting of “Advanced car audio setting”.Subwoofer Level (subwoofer level)Adjusts the subwoofer volume level: [-11.0] – [0.0] – [10.0].Alternatively, touch SW Level +/– in the “BAL/FAD/SW Level” setting of “Advanced car audio setting”.PrecautionsThis unit is designed for negative ground (earth) 12 V DC operation only.Use speakers with an impedance of 2 Ω to 8 Ω (SUB), and 4 Ω to 8 Ω (FRONT/REAR).Do not connect any active speakers (with built-in amplifiers) to the speaker terminals of the unit. Doing so may damage the active speakers.Avoid installing the unit in areas subject to: – high temperatures such as from direct sunlight or hot air from the heater –rain or moisture –dust or dirt. If your car is parked in direct sunlight and there is a considerable rise in temperature inside the car, allow the unit to cool down before use.When installing the unit horizontally, be sure not to cover the fins with the floor carpet, etc.If this unit is placed too close to the car audio unit or antenna (aerial), interference may occur. In this case, relocate this unit away from the car audio unit or antenna (aerial).If no power is being supplied to the car audio unit, check the connections.This power amplifier employs a protection circuit* to protect the transistors and speakers if the amplifier malfunctions. Do not attempt to test the protection circuits by covering the heat sink or connecting improper loads.Do not use the unit on a weak battery as its optimum performance depends on a good power supply. For safety, keep your car audio unit volume moderate so that you can still hear other sounds.*Protection circuitThis amplifier is provided with a protection circuit that operates in the following cases: – when the unit overheats – when a DC current is generated – when the speaker terminals are short-circuited. The POWER/PROTECTOR indicator will blink, and the unit will shut down. If this happens, take out the cassette tape or disc, turn off the connected equipment, and determine the cause of the malfunction. If the unit has overheated, wait until it cools down before use.If you have any questions or problems concerning your unit that are not covered in this manual, please consult your nearest Sony dealer.Additional Information010COV.book Page 18 Wednesday, November 1, 2017 4:27 PM](https://usermanual.wiki/Sony-Group/XMGS6DSP/User-Guide-3631189-Page-18.png)