Sony 54254H GSM/WCDMA/LTE Phone with BT, DTS/UNII a/b/g/n/ac, GPS & NFC User Manual PY7 54254H UG English
Sony Mobile Communications Inc GSM/WCDMA/LTE Phone with BT, DTS/UNII a/b/g/n/ac, GPS & NFC PY7 54254H UG English
Sony >
Contents
- 1. PY7-54254H_UG_English
- 2. PY7-54254H_SAR leaflet_US
PY7-54254H_UG_English
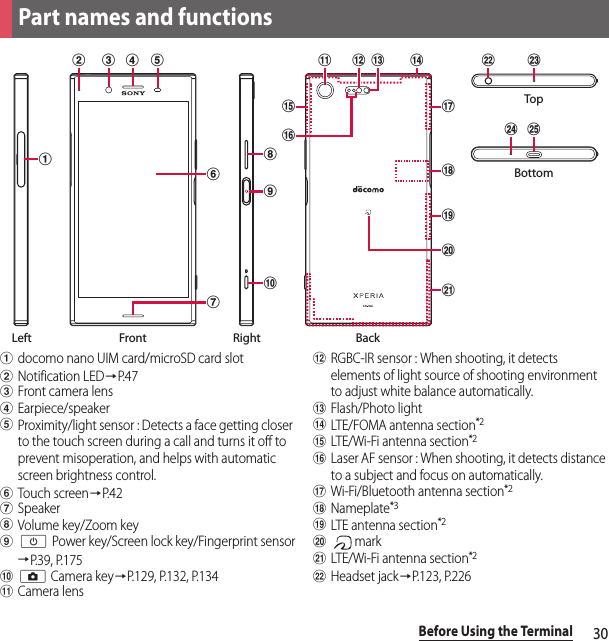
![34Before Using the TerminalThe internal battery is not fully charged at the time of purchase.・Estimated charging time (P.224)The charging time varies by the internal battery condition or operating environment.・"Continuous standby time", "Continuous call time" (P.226)・The internal battery is a consumable part. Each time the internal battery is recharged, the battery usage time per one charge gradually decreases.・When the battery usage time per one charge becomes about half of that at the time of purchased, replacing the internal battery is recommended because the internal battery is near the end of life.・Watching TV etc. for a long time while charging may shorten the lifetime of the internal battery.・To check the charging performance, from the Home screen, tap u[Settings]u[About phone]u[Status]u[Battery life].・It is recommended to use the AC Adapter 06 (optional) for charging. For details on the AC Adapter 06, refer to the AC Adapter 06 manual.・The AC Adapter 06 is compatible with 100V to 240V AC. For using the terminal overseas, a plug adapter that fits the electrical outlets in the country you stay is needed. Do not use an electrical transformer for overseas use to charge the terminal.ChargingOperation time on full charge (estimate)Continuous stand-by timeFOMA/3GStationary (Auto) : Approx. 650 hoursGSMStationary (Auto) : Approx. 480 hoursLTEStationary (Auto) : Approx. 590 hoursContinuous call timeFOMA/3GApprox. 850 min.GSMApprox. 740 min.VoLTE call (voice)VoLTE : Approx. 1,350 min.VoLTE (HD+) : Approx. 1,150 min.Life of the internal batteryBefore charging](https://usermanual.wiki/Sony/54254H.PY7-54254H-UG-English/User-Guide-3361370-Page-5.png)
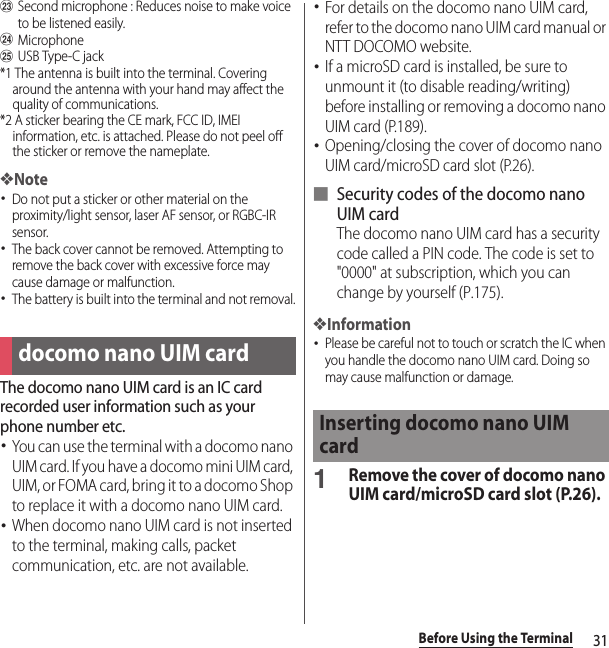
![35Before Using the Terminal・Use a compatible AC adapter or USB cable A to C for charging. If you use a charger other than compatible ones, charging may not be available or operations may not be performed correctly.・Insert and remove the AC adapter cord or USB cable A to C slowly and evenly so that excessive force is not applied.・When charging starts while the power is on, a sound to indicate the start of charging is heard, and the notification LED of the terminal turns on (P.47).・To check the battery level, see the status bar at the top of the screen or from the Home screen, tap u[Settings]u[About phone]u[Status] to see "Battery level".・If you start charging with the terminal powered off, a screen indicating charging status activates although you cannot operate the terminal. Therefore, do not charge the battery in a place where the use of the terminal is prohibited.Battery Care is a function that learns your charging habit (time zone for connecting to charging equipment long) to adjust charging speed and keep battery performance better so as to extend battery life.■ Starting "Battery Care" functionIt predicts the time when charging equipment will be disconnected by learned charging habit and adjusts charging speed so that the battery become fully charged at the time.After start of charging with Battery Care, charging pauses once short of full charge. And then charging resumes near estimated full charge time to be on time for full charge■ Switching normal charging・From the Home screen, u[Settings]u[Battery]u[Battery Care]uTap to turn off Battery Care.・To stop Battery Care charging temporarily to switch to normal charging, drag the status bar downuTap [Charging with Battery Care].❖Note・It may take 7 days or more to complete learning your habit.Saving battery life (Battery Care)](https://usermanual.wiki/Sony/54254H.PY7-54254H-UG-English/User-Guide-3361370-Page-6.png)
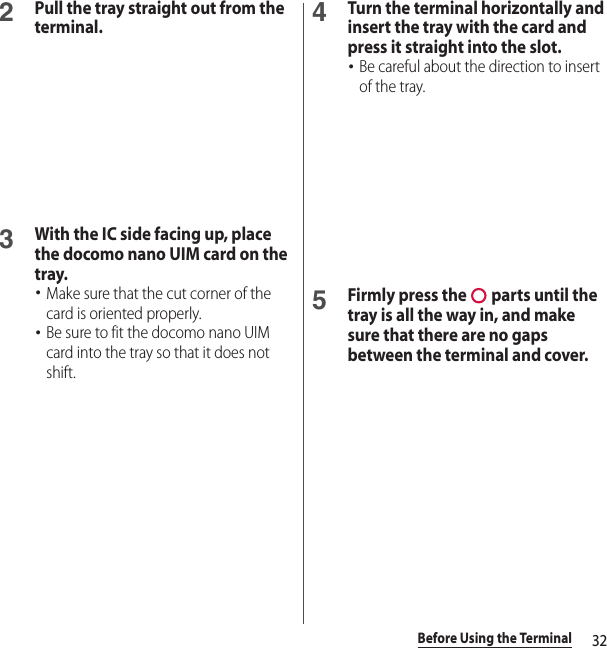
![38Before Using the Terminal3When charging is complete, remove the power plug of the AC adapter, and then remove the Type-C plug horizontally from the terminal.❖Note・Connect the AC adapter correctly. Wrong connection may cause damage.DC Adapter 04 (optional) is an adapter for supplying power from a car accessory socket (12V/24V).When using DC Adapter 04, microUSB conversion adapter B to C 01 (optional) is required.For details, refer to manuals of DC Adapter and microUSB conversion adapter.When charging using USB cable A to C 01 (optional), do the following procedures.1Insert a Type-C plug of the USB cable A to C horizontally into the USB Type-C jack of the terminal.2Insert a USB plug of the USB cable A to C to a USB port of a PC.・A sound to indicate the start of charging is heard, and the notification LED of the terminal turns on (P.47).・If the installation screen for the terminal's driver software appears on your PC, please wait a moment for the installation to complete.・When "Install software" screen appears on the terminal, tap [SKIP] or [CANCEL].・When the "Use USB for" confirmation screen appears, tap [CANCEL].Charging with DC adapterCharging with a PC](https://usermanual.wiki/Sony/54254H.PY7-54254H-UG-English/User-Guide-3361370-Page-9.png)
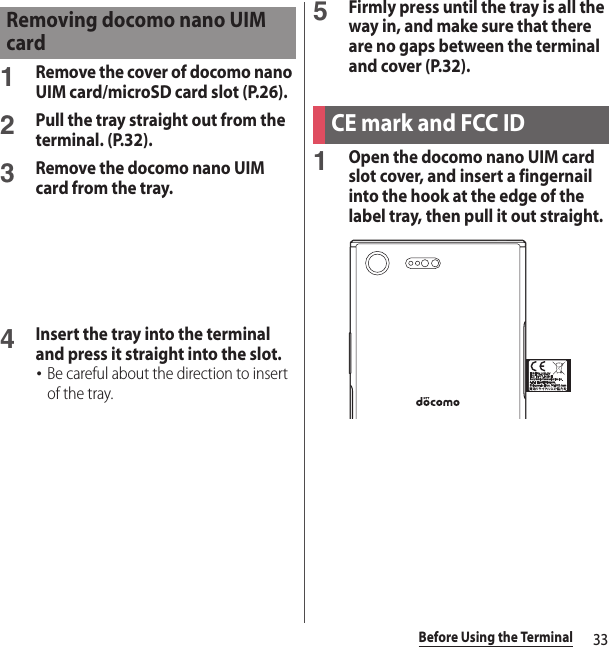
![40Before Using the Terminal・When SIM card lock (P.175) is set, enter PIN code on the PIN code entry screen (P.175).1Press and hold O for at least 1 second.2[Power off].Using a menu when pressing and holding O at least 1 secondThe following operations are available from the menu.When the sleep mode is set, the screen backlight turns off so that you can avoid misoperations of the touch screen and keys, and lock the screen.1Press O.・Press O again to exit sleep mode and turn on the screen backlight.❖Information・Also, when the screen backlight goes off after a specified time elapses, the terminal goes into sleep mode. You can change the time-out period for turning off the screen backlight (P.164).The lock screen appears when you turn the power on or press O to exit sleep mode.1Swipe (or flick) up/left on the lock screen.・Alternatively, touch O to cancel the screen lock.❖Information・On the lock screen, swipe (or flick) to open the "Phone" application, or swipe (or flick) to open the "Camera" application.・You can change screen unlock method (P.177).・Once you register your fingerprint in the Fingerprint Manager, you can use fingerprint authentication to unlock the screen (P.175).Turning power offPower offP. 4 0RestartRestarts the terminal.Emergency modeP. 4 5Take screenshotP. 4 5Setting sleep modeCanceling the screen lock](https://usermanual.wiki/Sony/54254H.PY7-54254H-UG-English/User-Guide-3361370-Page-11.png)