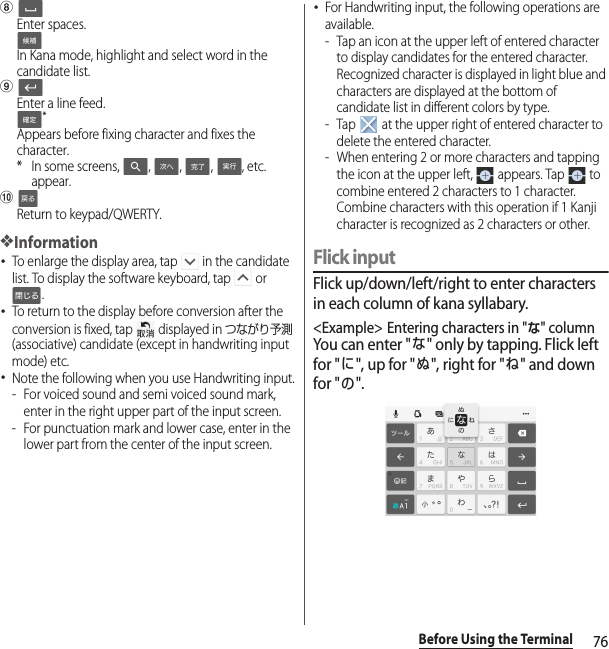
Sony 65365K GSM/WCDMA/LTE Phone with BT, DTS/UNII a/b/g/n/ac, GPS & NFC User Manual PY7 65365K UserGuide
Sony Mobile Communications Inc GSM/WCDMA/LTE Phone with BT, DTS/UNII a/b/g/n/ac, GPS & NFC PY7 65365K UserGuide
Sony >
Contents
- 1. PY7-65365K_UserGuide
- 2. PY7-65365K_SAR leaflet_US
PY7-65365K_UserGuide
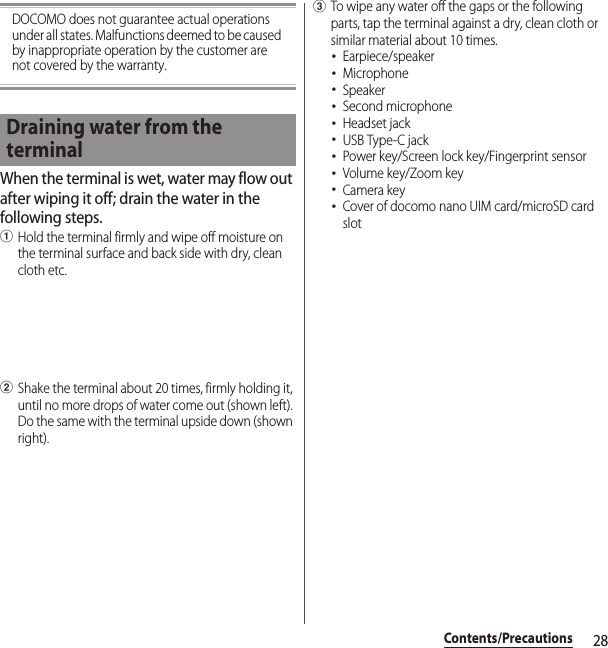
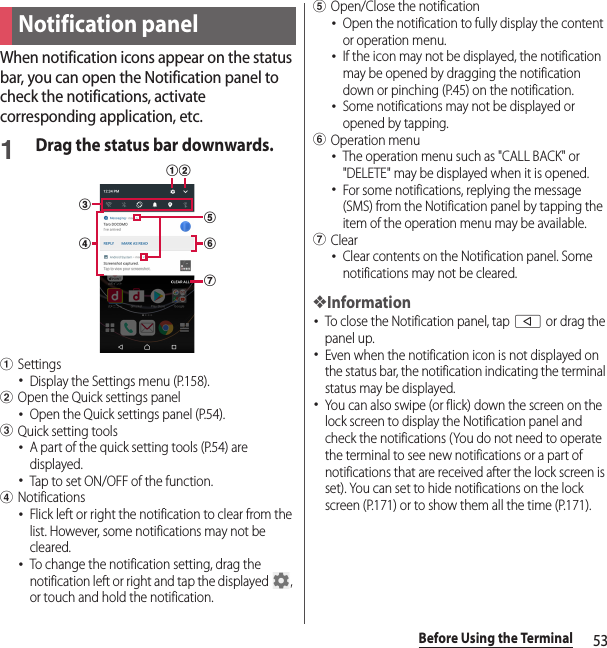
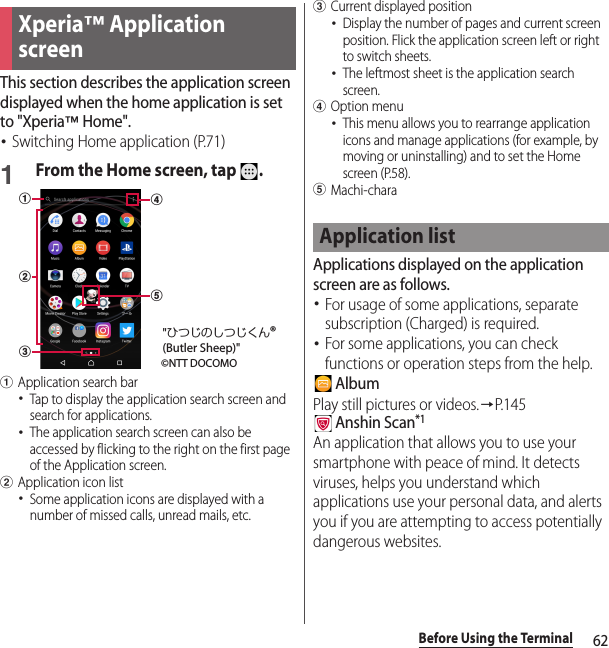
![IntroductionThank you for your purchase of "SO-01K".For proper use, read this manual carefully before and while you use the SO-01K.About manuals of SO-01K●"クイックスタートガイド (Quick Start Guide)" (Supplied accessories)Part names and functions are explained.●"Instruction Manual" (Application of the terminal)Operations and settings of each function are explained. To use "Instruction Manual" application, from the Home screen, u[Instruction Manual]. When using for the first time, download and install the application according to the onscreen instructions.You can use the application as an electronic book. You can also shift to actual operations by tapping the description in the contents or view reference contents.If you uninstall "Instruction Manual" application, access Google Play from Play Store for installing it again. From the Home screen, tap [Play Store], search "取扱説明書 (Instruction Manual)" application to select, then install it following the onscreen instructions.●"Instruction Manual" (PDF file)Operations and settings of each function are explained. It can be downloaded from NTT DOCOMO website.https://www.nttdocomo.co.jp/english/support/trouble/manual/download/so01k/index.html* The latest information can be downloaded. The URL and contents are subject to change without prior notice.❖Note・Reproduction or reprint of all or part of this manual without prior permission is prohibited.・Important information for SO-01K is posted in the following website. Be sure to check before using.http://www.sonymobile.co.jp/support/ (In Japanese only)](https://usermanual.wiki/Sony/65365K.PY7-65365K-UserGuide/User-Guide-3492114-Page-2.png)
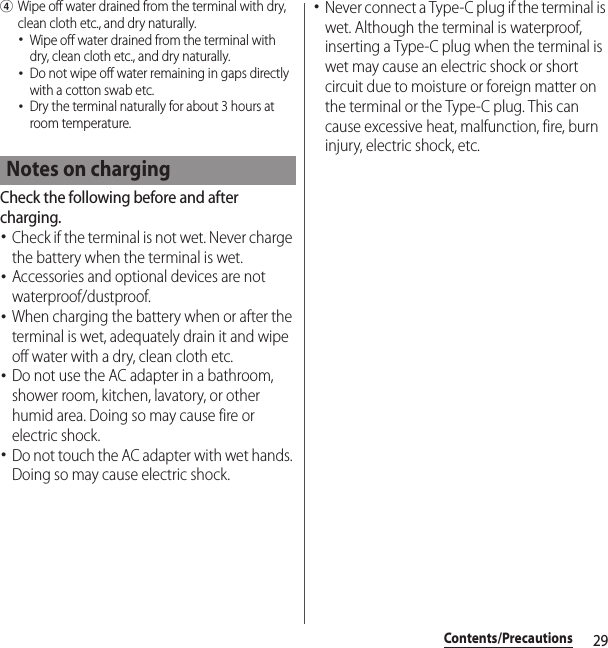
![1Operation descriptionsIn this manual, keys (P.30) and key icons (P.45) are described with O, k, b, h, n.And operations for selecting icons or items in the key operations on the screens are described as follows.❖Information・Display examples and illustrations used in this manual are just images for explanations and may be different from actual screens or products.・In this manual, the easier procedure is described for the functions and settings which have multiple operating procedures.・Please note that "SO-01K" is called "the terminal" in this manual.・In this manual, explanations for the theme "Xperia™ Loops" are provided.・In this manual, explanations for "docomo LIVE UX" as Home application are provided (P.71). If you set the other home application, the operations may differ from the descriptions.Description OperationPress and hold k for at least 1 second.Press and hold Camera key (k) on the side of the terminal for at least 1 second.On the TV watching screen, b.On the TV watching screen, tap .From the Home screen, u[Settings]u[About phone].From the Home screen, tap (Apps button), and then tap "Settings" on the next screen and "About phone" on the following screen.Touch and hold an icon.Keep touching an icon longer (1-2 seconds).](https://usermanual.wiki/Sony/65365K.PY7-65365K-UserGuide/User-Guide-3492114-Page-3.png)
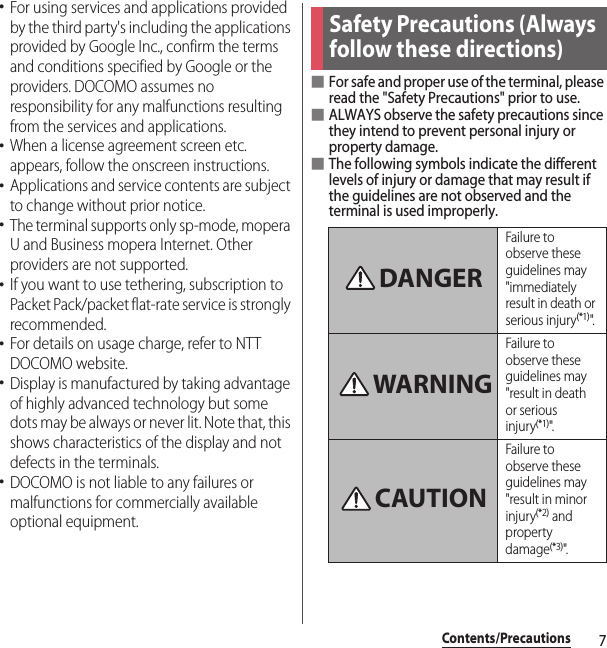
![6Contents/Precautions・The terminal automatically performs communication for synchronizing data, checking the latest software version, and maintaining a connection with the server, and for other purposes. If you transmit a large amount of data, such as when downloading applications or watching video, a packet communication charge becomes high. Subscription to Packet Pack/packet flat-rate service is highly recommended.・Depending on the applications or service you use, packet communication charge may be applied even in Wi-Fi® communication.・Public mode (Driving mode) is not supported.・Even when silent mode is on, the following sounds are not muted: the shutter sound; the sounds produced when starting and ending video recording; alarms; sounds from video and music; and the sound produced when you tap during a call.・The name of the operator is displayed on the lock screen (P.43).・To check your phone number (own number), from the Home screen, u[Settings]u[About phone]u[Status]u[SIM status] to see "My phone number".・To check the software version, from the Home screen, u[Settings]u[About phone].・If available memory in the microSD card or the terminal is low, running applications may not operate correctly. In that case, delete the saved data.・You can update software on the terminal to the latest one (P.226, P.229).・The operating system (OS) may be upgraded via software updates to improve the quality of the terminal. For this reason, you always need to use the latest OS version. And some applications that used in the previous OS version may not be available or some unintended bugs may occur.・You can use the terminal only with a docomo nano UIM card. If you have a docomo mini UIM card, UIM, or FOMA card, bring it to a docomo Shop to replace it with a docomo nano UIM card.・Set password etc. for screen lock to ensure the security of your terminal for its loss (P.181).・If your terminal is lost, change your each account password to invalidate authentication using a PC to prevent other persons from using Google services such as Gmail or Google Play, or SNS, etc.](https://usermanual.wiki/Sony/65365K.PY7-65365K-UserGuide/User-Guide-3492114-Page-8.png)
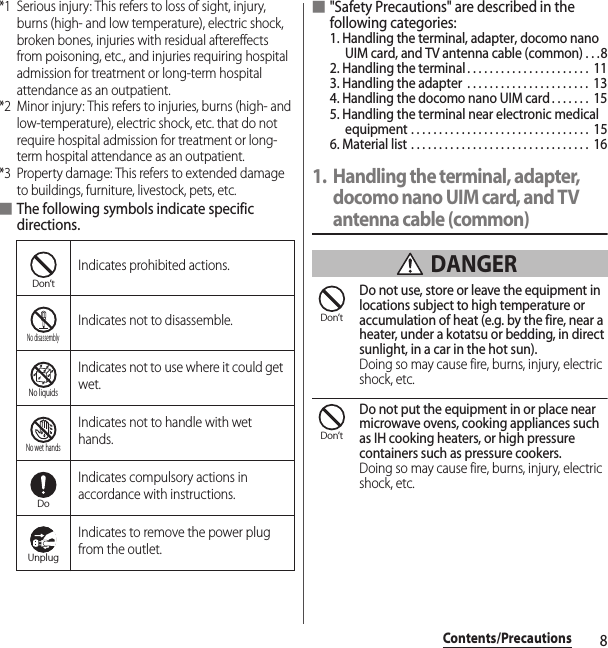


![23Contents/Precautions■ FeliCa® and NFC reader/writer function precautions・FeliCa and NFC reader/writer, P2P function of the terminal use weak waves requiring no licenses for radio stations.・They use 13.56 MHz frequency band. When the other FeliCa or NFC reader/writer, P2P function is used in the surroundings, keep the terminal away sufficiently from them. Before using, confirm that there are no radio stations using the same frequency band nearby.・For use in an aircraft, contact the airline beforehand. Some countries may restrict the use of the function. Check the regulations of the country/region before using it.■ Note・Do not use a remodeled terminal. Using a remodeled terminal violates the Radio Law/Telecommunications Business Act.The terminal is compliant with rules on the technical standard conformance of specified wireless equipment based on the Radio Law/Telecommunications Business Act, and as a proof of it, the "Technical Compliance Mark " is depicted on the electronic nameplate of the terminal. To check the certificate, from the Home screen, u[Settings]u[About phone]u[Certificates].If you remove the screws and alter the inside of the terminal, the technical regulations conformity certification becomes invalid.Do not use the terminal with the certification invalid, as it is a violation of the Radio Law and Telecommunications Business Act.・Be careful when using the terminal while driving.Use of the terminal holding with your hand while driving will result in a penalty.However, absolutely necessary cases such as rescue of a sick person or maintaining public safety are exempted.・The FeliCa and the NFC reader/writer functions are compliant with the wireless standards of Japan. Check the regulations of the country/region beforehand if you try to use the function overseas.・Do not alter the basic software illegally.It is regarded as the software modification and Repairs may be refused.](https://usermanual.wiki/Sony/65365K.PY7-65365K-UserGuide/User-Guide-3492114-Page-25.png)
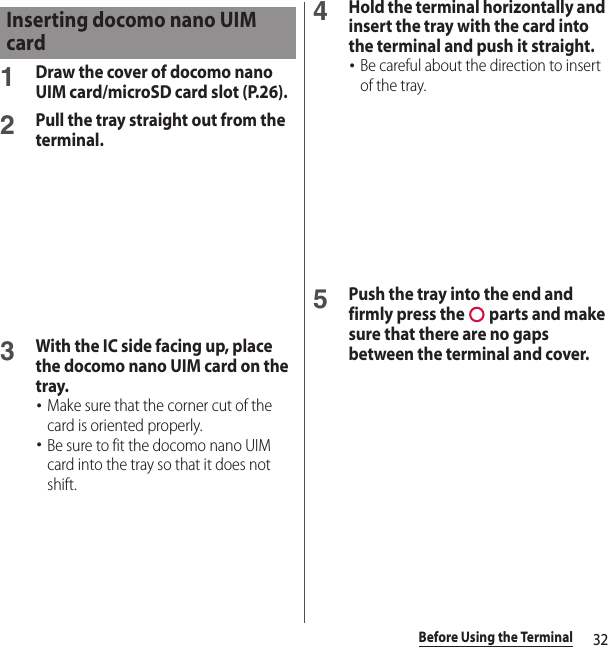
![35Before Using the Terminal5Push the tray into the end and firmly press parts and make sure that there are no gaps between the terminal and the cover.・ appears on the status bar and writing to the microSD card is enabled.Make sure to unmount microSD card (make reading/writing unavailable) before removing.・Opening/closing the cover of docomo nano UIM card/microSD card slot (P.25).1From the Home screen, u[Settings]u[Storage & memory].2[Storage usage]uTap of "SD Card".・The microSD card is unmounted.3Draw the cover of docomo nano UIM card/microSD card slot out (P.26).4Pull the tray out straight from the terminal to remove (P.34).5Remove the microSD card from the tray.6Hold the terminal horizontally and insert the tray and press it straight into the slot.・Be careful about the direction to insert of the tray.Removing microSD card](https://usermanual.wiki/Sony/65365K.PY7-65365K-UserGuide/User-Guide-3492114-Page-37.png)
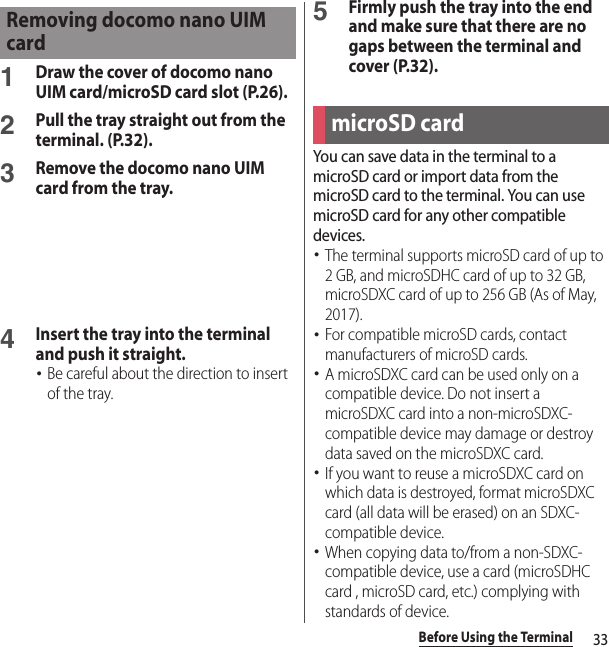
![36Before Using the Terminal7Firmly push the tray into the end and make sure that there are no gaps between the terminal and the cover (P.35).1Open the docomo nano UIM card slot cover, and insert a fingernail into the hook at the edge of the label tray, then pull it out straight.The internal battery is not fully charged at the time of purchase.・Estimated charging time (P.229)The charging time varies by the internal battery condition or operating environment.・Estimated usage time (P.229)・The internal battery is a consumable part. Each time the internal battery is recharged, the battery usage time per one charge gradually decreases.・When the battery usage time per one charge becomes about half of that at the time of purchased, replacing the internal battery is recommended because the internal battery is near the end of life.・Watching TV etc. for a long time while charging may shorten the lifetime of the internal battery.・To check the charging performance, from the Home screen, tap u[Settings]u[About phone]u[Status]u[Battery life].CE mark and FCC IDChargingOperation time on full charge (estimate)Life of the internal battery](https://usermanual.wiki/Sony/65365K.PY7-65365K-UserGuide/User-Guide-3492114-Page-38.png)
![37Before Using the Terminal・It is recommended to use the AC Adapter 06 (optional) for charging. For details on the AC Adapter 06, refer to the AC Adapter 06 manual.・The AC Adapter 06 is compatible with 100V to 240V AC. For using the terminal overseas, a plug adapter that fits the electrical outlets in the country you stay is needed. Do not use an electrical transformer for overseas use to charge the terminal.・Use a compatible AC adapter or USB cable A to C for charging. If you use a charger other than compatible ones, charging may not be available or operations may not be performed correctly.・Insert and remove the AC adapter cord or USB cable A to C slowly and evenly so that excessive force is not applied.・When charging starts while the power is on, a sound to indicate the start of charging is heard, and the notification LED of the terminal turns on (P.50).・To check the battery level, see the status bar at the top of the screen or from the Home screen, tap u[Settings]u[About phone]u[Status] to see "Battery level".・If you start charging with the terminal powered off, the screen indicating charging status activates although you cannot operate the terminal. Therefore, do not charge the battery in a place where the powering off is required.Battery Care is a function that learns your charging habit (time zone for connecting to charging equipment long) to adjust charging speed and keep battery performance better so as to extend battery life.■ Starting "Battery Care" functionIt predicts the time when charging equipment will be disconnected by learned charging habit and adjusts charging speed so that the battery become fully charged at the time.After start of charging with Battery Care, charging pauses once short of full charge. And then charging resumes near estimated full charge time to be on time for full charge.Before chargingSaving battery life (Battery Care)](https://usermanual.wiki/Sony/65365K.PY7-65365K-UserGuide/User-Guide-3492114-Page-39.png)
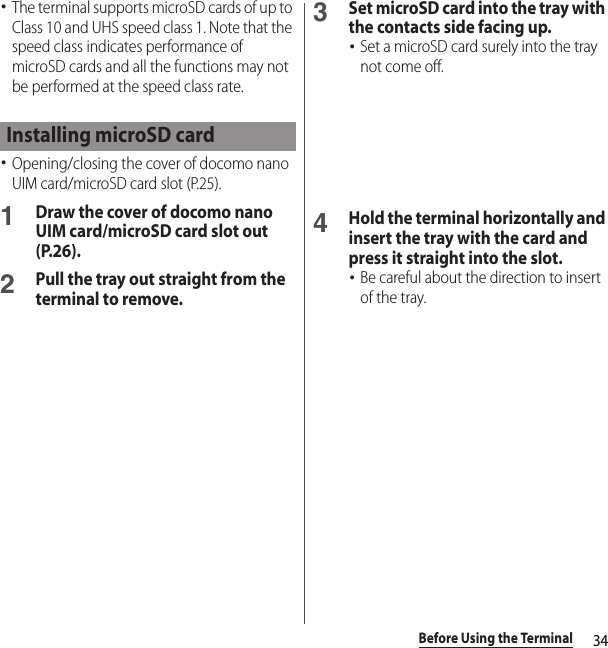
![38Before Using the Terminal■ Switching normal charging・From the Home screen, u[Settings]u[Battery]u[Battery Care]uTap to turn off Battery Care.・To temporarily stop Battery Care charging and switch to normal charging, drag the status bar down and tap the notification of Battery Care charging.❖Note・It may take 7 days or more to complete learning your habit.・If regularity in your charging habit cannot be found, Battery Care does not start because incomplete of the learning and normal charging will be performed.・If you remove charging equipment during Battery Care charging, the terminal may not be fully charged.To charge the battery using the Desktop Holder SO27 (optional) and AC Adapter 06 (optional), operate the following steps.・Depending on the thickness of the terminal, please install the attachment that was included with the desktop holder before charging. Placing the terminal on the desktop holder without the attachment on it may damage the USB Type-C jack or other parts.・When you do not attach a commercially available case or cover to the terminal, attach the Attachment 52B (P.39) to the desktop holder to use.1Insert a Type-C plug of the AC adapter into the charging jack on the back of the desktop holder.2Unfold the power plug of the AC adapter and insert it into a power outlet. Then place the terminal on the desktop holder.・A sound to indicate the start of charging is heard, and the notification LED of the terminal turns on (P.50).Charging with desktop holder](https://usermanual.wiki/Sony/65365K.PY7-65365K-UserGuide/User-Guide-3492114-Page-40.png)
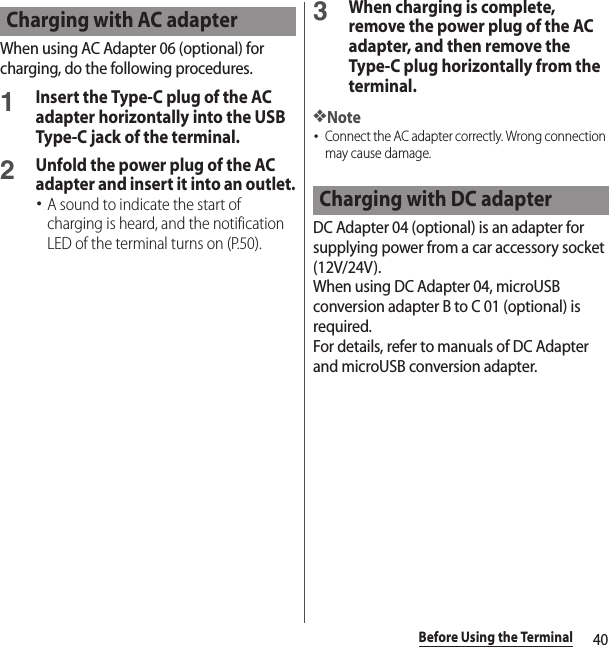
![41Before Using the TerminalWhen charging using USB cable A to C 01 (optional), do the following procedures.1Insert a Type-C plug of the USB cable A to C horizontally into the USB Type-C jack of the terminal.2Insert a USB plug of the USB cable A to C to a USB port of a PC.・A sound to indicate the start of charging is heard, and the notification LED of the terminal turns on (P.50).・If the installation screen for the terminal's driver software appears on your PC, please wait a moment for the installation to complete.・When "Install software" screen appears on the terminal, tap [SKIP] or [CANCEL].・When the "Use USB to" confirmation screen appears, tap [CANCEL].3When charging is complete, remove the USB plug of the USB cable A to C from the USB port of PC and then remove the Type-C plug horizontally from the terminal.❖Note・Connect the USB cable A to C correctly. Wrong connection may cause damage.Charging with a PC](https://usermanual.wiki/Sony/65365K.PY7-65365K-UserGuide/User-Guide-3492114-Page-43.png)
![42Before Using the Terminal1Press and hold O for at least 1 second.・The terminal vibrates and the lock screen appears after a while.・When you first turn on the power and "ようこそ (Welcome)" is displayed, follow the onscreen instructions to make initial settings (P.43).2Cancel the screen lock.・Canceling the screen lock (P.43).❖Information・If the notification LED flashes red multiple times or an icon appears indicating that the battery is low when you press O with the terminal powered off, the battery is running low. Charge the terminal (P.36).・When SIM card lock (P.181) is set, enter PIN code on the PIN code entry screen (P.181).1Press and hold O for at least 1 second.2[Power off].Using a menu when pressing and holding O at least 1 secondThe following operations are available from the menu.When sleep mode is set, the screen backlight turns off so that you can avoid an incorrect action of the touch screen or the keys, and set the screen lock.1Press O.・Press O again to exit from sleep mode and turn on the screen backlight.❖Information・Also, when the screen backlight goes off after a specified time elapses, the terminal goes into sleep mode. You can change the time-out period for turning off the screen backlight (P.169).Turning power on/offTurning power onTurning power offPower offP. 4 2RestartRestarts the terminal.Emergency modeP. 4 8Take screenshotP. 4 7Setting sleep mode](https://usermanual.wiki/Sony/65365K.PY7-65365K-UserGuide/User-Guide-3492114-Page-44.png)
![43Before Using the TerminalThe lock screen appears when you turn the power on or press O to exit sleep mode.1Swipe (or flick) up/left on the lock screen.・Alternatively, touch O to cancel the screen lock.❖Information・On the lock screen, swipe (flick) or to use the phone or the camera.・You can change screen unlock method (P.181).・Once you register your fingerprint in the Fingerprint Manager, you can use fingerprint authentication to unlock the screen (P.182).When you first turn on the power and "ようこそ (Welcome)" is displayed, follow the onscreen instructions to make initial settings, such as individual functions and services.1[GET STARTED].・Tap [日本語 (Japanese)] to change the language.・Tap [VISUAL AIDS] to make settings related to the accessibility functions.・Follow the onscreen instructions to make the following settings.- Important information setting- Selecting the setup method- Setting the network connection- Set your Google account- Setting the unlock method with fingerprint- Setting the Google services- Setting the Google apps-Xperia™ services setting- Setting the Xperia Intelligence engine™- Home application settingCanceling the screen lockInitial settings](https://usermanual.wiki/Sony/65365K.PY7-65365K-UserGuide/User-Guide-3492114-Page-45.png)
![44Before Using the Terminal2When the initial settings screen for docomo services appears, mark "Agree to all"u[NEXT].・Follow the onscreen instructions to make the following settings.- d ACCOUNT settings- docomo cloud settings- Install all apps setting- "Anything else?" settings3When the setup completion screen appears, [FINISH].❖Information・The displayed setting items may differ depending on operation of the terminal.・Some settings can be changed later (P.71, P.159, P.181, P.182, P.186, P.187, P.190, P.191, P.193, P.194).・Make sure that the data connection is available (LTE/3G/GPRS) or the terminal is connected to a Wi-Fi network before setting up online services (P.50).・You can use the terminal without setting your Google account, however the Google services such as Gmail, Google Play, etc. are not available.Precautions on using touch screen・Touch screen is designed for being touched lightly with fingers. Do not push the touch screen hard with a finger or press sharp objects (nail, ballpoint pen, pin, etc.) against the screen.・Touching the touch screen may not work in the following cases. Note that it may cause malfunction.- Operation with tip of fingernail- Operation with foreign object on the screen- Operation with protective sheet or seal on the screen- Operation on the wet touch screen- Operation with fingers wet with sweat or water- Operation under waterOperations on the touch screen■ TapTouch an item such as icon or menu with your finger lightly and release it.・Double-tap means tapping twice quickly.■ Touch and holdTouch and hold an icon or menu item long.Basic operationsUsing the touch screen](https://usermanual.wiki/Sony/65365K.PY7-65365K-UserGuide/User-Guide-3492114-Page-46.png)
![46Before Using the TerminalYou can set the screen orientation to switch between landscape and portrait view automatically according to the terminal orientation.1From the Home screen, u[Settings]u[Display].2[When device is rotated].3[Rotate the contents of the screen].・Select "Stay in portrait view" to lock the screen in portrait orientation.❖Information・Some displayed screens are fixed in portrait orientation or landscape orientation.・Changing orientation of the terminal in nearly horizontal state against the ground does not switch to portrait view/landscape view automatically.・Even when silent mode is on, the following sounds are not muted: the shutter sound; the sounds produced when starting and ending video recording; alarms; sounds from video and music; and the sound produced when you tap during a call.・Silent mode is canceled when you press the volume up key to increase volume or when you adjust the "Ring volume" (P.173) in "Sound" while Silent mode (Vibrate) is set.・Tap on the volume control bar to adjust the volume for media playback and alarms. However the alarm volume set via the "Clock" application has precedence.Setting silent mode (Vibrate)1Press the volume up or down key.2Tap .・The icon in the volume control bar changes to (white).Switching portrait or landscape view automaticallySetting silent mode](https://usermanual.wiki/Sony/65365K.PY7-65365K-UserGuide/User-Guide-3492114-Page-48.png)
![47Before Using the TerminalSetting silent mode (Mute)1Press the volume up or down key.2Tap .3Press the volume down key.・The icon in the volume control bar changes to (gray).・Tap [END NOW] on the volume control bar to cancel silent mode (mute).・Silent mode (mute) can also be set by selecting the "Alarms only" or "Total silence" of the Do not disturb function in the Quick settings panel (P.54). Before using the Do not disturb function, tap and set "Do not disturb" to the available quick setting tool.You can capture the currently displayed screen as a still image (Take screenshot).・For some applications, the capturing of the screenshot is not available.1On the screen to capture, press and hold O and the volume down key at the same time for at least 1 second.・The still image is saved and appears on the status bar.❖Information・Alternatively, press and hold O for at least 1 seconduTap [Take screenshot] to capture a screenshot.・Drag the status bar downwardsuTap [Screenshot captured.] to view the captured image in the "Album", "Photos", or "Sketch" application. Also, open the notification of "Screenshot captured" (P.53) and tap [SHARE] to send the image or tap [DELETE] to delete the image.Capturing the displayed screen](https://usermanual.wiki/Sony/65365K.PY7-65365K-UserGuide/User-Guide-3492114-Page-49.png)
![48Before Using the TerminalIn case of emergency such as disaster, restrict functions to save the battery power.1Press and hold O for at least 1 second.2[Emergency mode]uConfirm "IMPORTANT INFORMATION"uMark "I have read the important information"u[TURN ON].・All running applications end and the terminal restarts.❖Information・To cancel emergency mode, press and hold O for at least 1 seconduTap [Emergency mode]u[TURN OFF], or drag the status bar downuTap [Emergency mode is on]u[TURN OFF]. Emergency mode is canceled and the terminal restarts.・For details on available applications in emergency mode, from the Home screen, u[Settings]u[Battery]u[Emergency mode]u[IMPORTANT INFORMATION]uTap [Available apps] to see the information.・If you set/cancel the emergency mode, you may need to reconfigure widgets etc. on the Home screen.If you have more than one application available when sending an email or displaying an image, an application selection screen appears.<Example> Selecting an application to send an email from the phonebook1From the Home screen, [ドコモクラウド (docomo cloud)]u[docomo phonebook]uTap "Contacts" tabuSelect a contact.2Select an email address.・An application selection screen appears.3Select an applicationu[JUST ONCE]/[ALWAYS].・Select "JUST ONCE" to view available applications each time, or "ALWAYS" to use the same application all the time. If you select "ALWAYS", an application selection screen does not appear the next time you perform the same task.・If you previously selected "JUST ONCE" for an application, then a screen with that application selected appears when you perform the same task. Select another application in the "Use a different app" area as needed.Setting Emergency mode Selecting an application to use](https://usermanual.wiki/Sony/65365K.PY7-65365K-UserGuide/User-Guide-3492114-Page-50.png)
![49Before Using the Terminal❖Information・Some tasks may require you to select an application each time, with "JUST ONCE" or "ALWAYS" not displayed on an application selection screen.・To deselect the application set to "ALWAYS", from the Home screen, u[Settings]u[Apps]uTap the application you want to deselectu[Open by default]u[CLEAR DEFAULTS].The first time you launch an application or function that accesses other functions and information on your terminal, the confirmation screens requesting permissions of the access rights appear.When you approve these access rights, the corresponding functions and information become available to the application/function.<Example> If launching the "Music" application for the first time1From the Home screen, u[Music].・A confirmation screen appears.・When a screen that describes the permissions appears, follow the onscreen instructions.2[DENY]/[ALLOW].・Depending on the application/function, multiple confirmation screens may appear or the display may be different. Check the displayed contents carefully and follow the onscreen instructions.❖Information・If the permission is not granted, some applications/functions may not work, or use of the functions may be limited.・To change the permissions, from the Home screen, u[Settings]u[Apps]uTap the application whose permissions you want to changeu[Permissions]uTap / for the item you want to change.Setting an application's permissions](https://usermanual.wiki/Sony/65365K.PY7-65365K-UserGuide/User-Guide-3492114-Page-51.png)
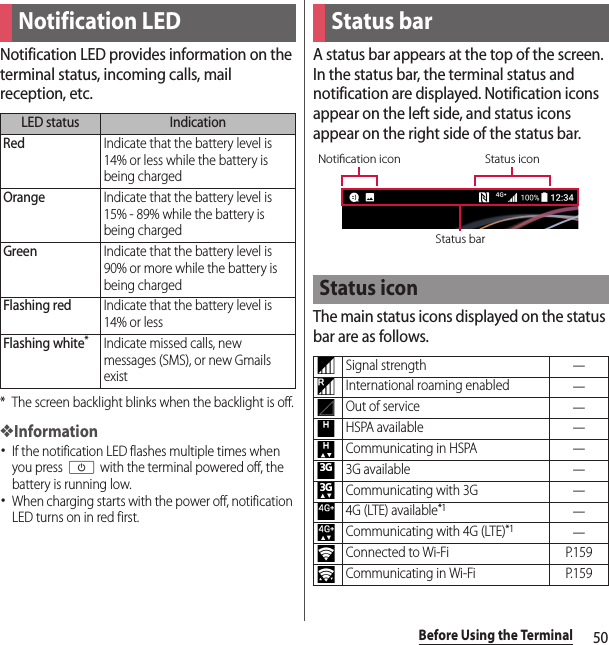
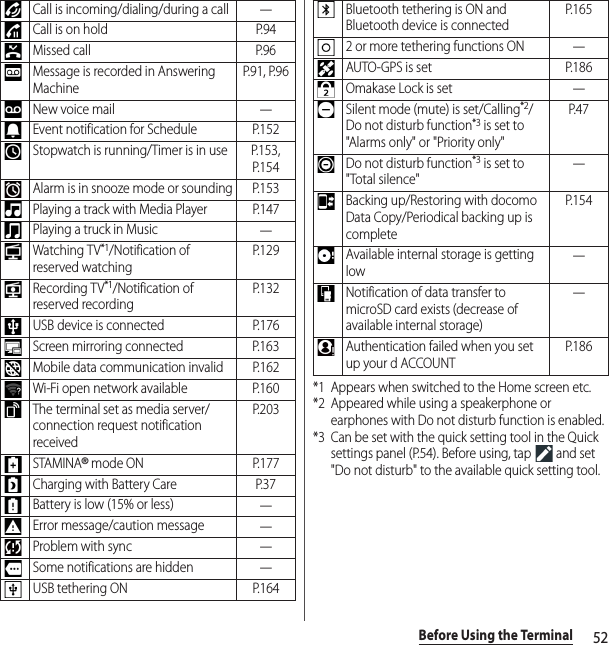
![51Before Using the Terminal*1 is always displayed when the terminal is connected with LTE.*2 Can be set with the quick setting tool in the Quick settings panel (P.54). Before using, tap and set "Do not disturb" to the available quick setting tool.❖Information・You can select icons to be displayed in the status bar in "System icons" (P.169).The main notification icons displayed on the status bar are as follows.Connected to a Wi-Fi network with no access to the Internet. The Wi-Fi signal is poor.P. 1 5 9Portable hotspot (Wi-Fi tethering) ON P.164Bluetooth function ON P.197Connected to Bluetooth device P.198Airplane mode activated P.163Silent mode (Vibrate) ON P.46Silent mode (mute) is set/Do not disturb function*2 is set to [Alarms only] or [Total silence]P. 4 7Speakerphone ON P.93Microphone put on mute P.93Alarm is set P.153NFC Reader/Writer, P2P function ON P.200Positioning with GPS―Connected to VPN P.166Data Saver is set P.162Battery status―The battery is charging P.36Battery is low―Charging is required―docomo nano UIM card is not insertedP. 3 1Notification iconNew email message P.111New Gmail message―New message (SMS) P.108New Area Mail P.115Screenshot saved P.47Receiving/downloading data―Sending/uploading data―Notification of data reception etc. via Bluetooth communicationP. 1 9 9microSD card is detected/currently mountedP. 3 5Update notification―Installation completed P.121Application update notification―Software update notification P.226NFC / Osaifu-Keitai lock set on the terminal and docomo nano UIM cardP. 1 2 4NFC / Osaifu-Keitai lock set on the terminal or docomo nano UIM cardP. 1 2 4Omakase Lock set on the terminal and docomo nano UIM card―Omakase Lock set on the terminal or docomo nano UIM card―](https://usermanual.wiki/Sony/65365K.PY7-65365K-UserGuide/User-Guide-3492114-Page-53.png)
![54Before Using the TerminalYou can open the quick settings panel to enable or disable functions.1Drag the status bar downwards with two fingers.aName of network operatorbUsers・Add or switch a guest/user who use the terminal, or delete a guest.・Tap [MORE SETTINGS] to display "Users" in the Settings menu (P.185).cEDIT・Display the edit screen to add, delete or rearrange the quick setting tools.・When the icon indicating the number of pages and the current page appears below the quick setting tools, flick the quick setting tools left or right to switch the page.・In the edit screen, u[Reset] to restore to the default.dSettings・Display the Settings menu (P.158).eClose the Quick settings panel・Close the Quick settings panel and display the Notification panel.fQuick settings* In the Quick settings panel, the remaining battery and remaining standby time (estimate) are displayed.Quick settings panelfa decbBrightness levelAdjust the screen brightness.Wi-FiSet ON/OFF of Wi-Fi function, or scan Wi-Fi networks and connect a Wi-Fi network.BluetoothSet ON/OFF of Bluetooth function, or scan the paired Bluetooth devices to connect.Auto-rotateSet whether to switch portrait/landscape view automatically according to the terminal orientation.SoundEnable sound, silent mode (Vibrate), or silent mode (Mute).LocationEnable/disable location information.FlashlightSet ON/OFF of the flash/photo light.Airplane modeEnable/disable Airplane mode.Battery*Set ON/OFF of STAMINA mode.Glove modeEnable/disable Glove mode.](https://usermanual.wiki/Sony/65365K.PY7-65365K-UserGuide/User-Guide-3492114-Page-56.png)
![56Before Using the Terminal❖Information・You can add widgets and shortcuts, change the wallpaper, and perform other tasks by touching and holding an area of the Home screen where no icons are displayed or by pinching in on the Home screen.・To change the page of the start screen for operations, display the page you want to change to and touch and hold the area of the Home screen where no icons are displayeduTap displayed in the upper left of screen. However, when "Google Now™" (P.58) is set to ON, a start screen cannot be changed.・If you swipe (flick) down on an area of the Home screen where no icons are displayed, the applications search screen appears.Adding a home screenUp to 20 pages can be added.1Touch and hold an area of the Home screen where no icons are displayed.2Flick left or right on the Home screenuTap .❖Information・To return to the Home screen, tap h or b, or tap any home screen.・To delete a home screen, switch to the home screen and then touch and hold the area of the home screen where no icons are displayeduTap displayed in the upper right of screen.・When "Google Now™" (P.58) is set to ON, up to 20 pages and Google Now screen can be added. However, new pages cannot be located at the left of Google Now screen.Adding a widget to the Home screenWidget is an application which can be added to the Home screen to use. Use a widget to start an application easily.1Touch and hold an area of the Home screen where no icons are displayed.2[Widgets]uSelect the widget.・If a settings screen etc. appears, follow the onscreen instructions.❖Information・To return to the Home screen, tap h, or tap any home screen.・If a frame is displayed around the added widget, you can drag the frame to resize the widget.・To remove a widget, on the Home screen, touch and hold the widgetuDrag it to "Remove from home screen" which appears at the top of the screen.](https://usermanual.wiki/Sony/65365K.PY7-65365K-UserGuide/User-Guide-3492114-Page-58.png)
![57Before Using the TerminalAdding a shortcut to the Home screenYou can add shortcuts of contact, etc. to the Home screen.1Touch and hold an area of the Home screen where no icons are displayed.2[Widgets]u[Shortcuts].3Select the shortcut.・When a data selection screen or setting screen appears, follow the onscreen instructions.❖Information・To return to the Home screen, tap h, or tap any home screen.・To remove a shortcut, on the Home screen, touch and hold the shortcutuDrag it to "Remove from home screen" which appears at the top of the screen.Adding folders on the Home screenYou can put shortcuts, etc. added to the Home screen into a folder to manage them.1From the Home screen, touch and hold an iconuDrag it over another icon.❖Information・To move an icon into a folder, touch and hold the icon on the Home screenuDrag it over the folder.・To change a folder name, tap a folderuTap the folder nameuEnter a folder nameuTap [DONE].・To delete a folder, touch and hold the folder on the Home screenuDrag it to "Remove from home screen" which appears at the top of the screenuTap [DELETE]. Shortcuts, etc. in the folder are also deleted.Changing wallpaperYou can change the wallpaper of the Home screen and the lock screen.1Touch and hold an area of the Home screen where no icons are displayed.2[Wallpapers].3Tap [Album]/[Live Wallpapers]/[Photos]/your desired image.・If you tap any of [Album], [Live Wallpapers], or [Photos], select an image and follow the onscreen instructions to set the wallpaper.❖Information・To return to the Home screen, tap h, or tap any home screen.](https://usermanual.wiki/Sony/65365K.PY7-65365K-UserGuide/User-Guide-3492114-Page-59.png)
![58Before Using the TerminalChanging themeYou can change themes for the Home screen, wallpaper of the lock screen, etc.1Touch and hold an area of the Home screen where no icons are displayed.2[Themes].3Select the themeu[APPLY THEME]u[OK].❖Information・Tap [GET MORE THEMES] in Step 3 to download themes and add.Setting Home screen1Touch and hold an area of the Home screen where no icons are displayed.2[Settings].Auto rotationSet whether to switch the Home screen or application screen to portrait/landscape view automatically according to the terminal orientation when "When device is rotated" (P.46) is set to "Rotate the contents of the screen".Icon sizeSet the size of icons on the Home and application screens.Icon appearanceChange the design of the icons.Show names in dockSet whether to display the names of shortcuts and other items arranged on the dock at the bottom of the Home screen (on either side of Apps button).Automatically place icons togetherSet whether to automatically arrange shortcuts, etc. that are on the Home screen so that there are no gaps.Pane transitionSet the type of transition that occurs when you switch between panes of the Home screen.App recommendationsSet whether to show app recommendations on the applications search screen.Google Now™Set whether to add Google Now screen to the Home screen.Add icons to home screenSet whether to add a shortcut to the Home screen simply by touching and holding an icon on the application screen.Icon on home screenSet whether to permit addition of duplicative application shortcuts to the Home screen.LicenseDisplay the licenses.VersionDisplay the app versions.](https://usermanual.wiki/Sony/65365K.PY7-65365K-UserGuide/User-Guide-3492114-Page-60.png)
![59Before Using the TerminalSet Simple Home to use Home screen and the setting menu limited to basic functions.1From the Home screen, u[Settings]u[Apps].2u[Home app]u[Simple Home]u[OK].3[OK].・To set the font size to "Largest", mark "Set font size to Largest".■ Applications on the Simple Home screen* The list of applications such as "Anshin Scan", "docomo phonebook", etc. is displayed.❖Information・To change to the standard Home screen, from the Simple Home screen, tap [Settings]u[Exit Simple Home]u[OK]u[docomo LIVE UX]/[Xperia™ Home].Using speed dialsSave frequently used contacts to "Speed dial" to easily make a call or send a message.■ Saving contactsSave phone numbers and mail addresses to "Contacts" beforehand.1On the Simple Home screen, [Speed dial]u[OK].Simple Home screenMapsP. 1 5 0ChromeP. 1 1 7SettingsP. 6 0My AppsP. 6 1Tools ContactsP. 6 5CalendarP. 6 3ClockP. 1 5 3CalculatorP. 6 4GmailP. 1 1 4Play StoreP. 1 2 1dメニュー (dmenu)P. 1 2 0d POINTP. 6 5Media MusicP. 6 5AlbumP. 1 4 5VideoP. 6 5TVP. 1 2 7YouTubeP. 6 7CameraP. 1 3 3docomo mailP. 1 0 7MessagingP. 1 0 7DialP. 6 3Apps*―Speed dialP. 5 9](https://usermanual.wiki/Sony/65365K.PY7-65365K-UserGuide/User-Guide-3492114-Page-61.png)
![60Before Using the Terminal2Select a contact to save.・The name "Speed dial" on the Simple Home screen will change to the name saved in the "Contacts" application.■ Making a call1On the Simple Home screen, select a speed dialu[Call].・Operation during a call (P.93)■ Sending messages (SMS)/mail1On the Simple Home screen, select a speed dialu[Send message]/[Send email].・How to send a message (SMS) (P.107)・How to send email (P.111)・How to send Gmail (P.114)❖Information・To change/delete/edit contacts saved in the speed dials, from the Simple home screen, select a contact saved in the speed dialu[MENU]uTap any of [Edit entry]/[Delete entry]/[Edit contact].Using Settings1On the Simple Home screen, [Settings].My profileCheck your own phone number and mail address, etc.Display WallpaperSet the wallpaper for the Simple Home screen or the lock screen.ThemesSet the theme for the wallpaper of Simple Home screen or the lock screen, or download themes.BrightnessAdjust the screen brightness.Auto-rotate screenSet whether to switch portrait/landscape view automatically according to the terminal orientation.Font sizeSet font size for the "Contacts" application, etc.SleepSelect a time duration before the screen back light turns off.Screen lockSet screen unlock method.](https://usermanual.wiki/Sony/65365K.PY7-65365K-UserGuide/User-Guide-3492114-Page-62.png)
![61Before Using the TerminalSaving applications in My AppsIf frequently used applications, etc. are saved in the "My Apps" folder, the applications can easily be activated.1On the Simple Home screen, [My Apps]u[EDIT]u[OK].2Mark applications to saveu[DONE].❖Information・To delete applications saved in the "My Apps" folder, in Step 2, unmark applicationsuTap [DONE].Changing applications on the Simple Home screen1On the Simple Home screen, [Settings]u[Customize Home].2[Change apps]/[Reorder apps].3Select the applicationuSelect the application to display/select the location to move to.・Grayout applications cannot be changed.4[OK].❖Information・In Step 2, tap [Reset]u[OK] to restore the defaults. Note that contacts saved in the speed dials and applications saved in "My Apps" folder are not restored.Sound Silent/Vibrate modeSet silent mode.RingtoneSet ringtone.Vibrate on touchSet whether to vibrate the terminal for some operations such as specified software key operation.Touch soundsSet whether to emit sound when selecting menu.Vibrate when ringingSet whether to vibrate the terminal when receiving a call.Customize HomeChange appsP. 6 1Reorder appsResetMore settingsDisplay Settings menu on the standard Home screen (P.158).Exit Simple HomeChange to the standard Home screen.](https://usermanual.wiki/Sony/65365K.PY7-65365K-UserGuide/User-Guide-3492114-Page-63.png)
![68Before Using the TerminalAdd shortcuts of application to the Home screen.1On the application screen, touch and hold the icon to add to the Home screen.・For the application icons in a folder, drag out from the folder.・Touch and hold the folder to add the folder containing the application shortcuts to the Home screen.2Drag it to "Add to home screen" displayed at the top of the screen.・When the Home screen is displayed, drag it to a position to locate the shortcut.❖Information・When "Add icons to home screen" (P.58) is set to ON, you can add application shortcuts to the Home screen just by touching and holding application icon you want to add in Step 1.・When "Icon on home screen" (P.58) is set to ON, previously added shortcut will be deleted automatically if application shortcut added to the Home screen is duplicated.・Before uninstalling application, back up contents related to the application that you want to save including data saved in the application.・Some applications may not be uninstalled.1Touch and hold an area of the application screen where no icons are displayed.・Tap the folder to uninstall the application contained to the folder.2Tap an application icon with .3[OK].・When uninstalling application is unavailable, "DISABLE" is displayed to disable the application (P.175).❖Information・Alternatively, pinch-in on the application screen to operate.Adding an application to the Home screenUninstalling an application](https://usermanual.wiki/Sony/65365K.PY7-65365K-UserGuide/User-Guide-3492114-Page-70.png)
![69Before Using the TerminalWhen the order of application icons is set to "Own order" in the option menu (P.62), you can manage your application icons on the application screen by putting them in folders.1On the application screen, touch and hold an application iconuDrag it over another one.❖Information・To move an icon to a folder, on the application screen, touch and hold the iconuDrag it over a folder.・To take out an application icon from a folder, tap the folderuTouch and hold the application iconuDrag it to a place you want to locate.・To change a folder name, tap a folderuTap the folder nameuEnter a folder nameuTap [DONE].When the order of application icons is set to "Own order" in the option menu (P.62), you can rearrange your application icons as you like.1On the application screen, touch and hold an iconuDrag it to any position you like.❖Information・To add a new page of the application screen, while rearranging the application icons, drag the icon to the right end of the rightmost page.・Automatically sort the icons by selecting the order "Most used", "By name", or "By date" in the option menu (P.62).Adding a folder to the application screenRearranging application icons](https://usermanual.wiki/Sony/65365K.PY7-65365K-UserGuide/User-Guide-3492114-Page-71.png)
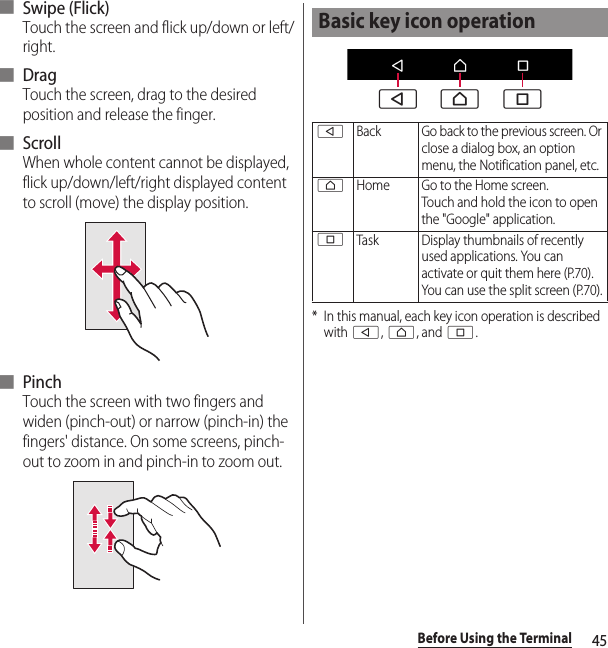
![70Before Using the TerminalDisplay recently used applications as thumbnails to confirm, open, switch between, or close them.1n.・Applications are displayed as thumbnails.❖Information・Tap a thumbnail to open or switch the application. Although, depending on the displayed thumbnails, the application may not accessible.・To delete the application thumbnail, flick the thumbnail left or right or tap [×] displayed at the upper right of the thumbnail. To clear all thumbnails, tap [CLEAR ALL] displayed at the upper right of the screen.・Clearing the thumbnail of an application closes the application.・If "Screen pinning" (P.178) is turned on, you will see on the thumbnail of your most recently opened application. You can tap it to pin the screen. If a screen is pinned, you cannot use the applications other than displayed one. To cancel pinning, follow the onscreen instructions.Split the screen in up and down to display and operate two applications.・Activate the application to display beforehand.・If the application does not support the split screen, it cannot be displayed with this function.1n.・Applications are displayed as thumbnails.2Touch and hold the application thumbnail to displayuDrag to the "Drag here to use split screen" appeared at the top of screen.・When "App doesn't support split screen" appears at the top of the screen, the application cannot be displayed in the split screen.3Tap the application thumbnail to display from the lower part of the screen.・If the application thumbnail is not displayed, tap h to activate the application to display.Task manager Split screen](https://usermanual.wiki/Sony/65365K.PY7-65365K-UserGuide/User-Guide-3492114-Page-72.png)
![71Before Using the Terminal❖Information・The application windows in the split screen can be displayed up and down in the portrait view and left and right in the landscape view.・The application window displayed in the lower part (right part for the landscape view) can be switched. To switch the application window, tap and select the application thumbnail, or tap h to activate the application.・In portrait view, drag of the split line displayed in the center of the split screen up or down to change the range of the application window.・To end the split screen, drag to the upper or lower of the screen (left end or right end for the landscape view), or touch and hold .・When is displayed at the bottom of the screen, the split screen is still functioning. When the application window is displayed in full screen, tap to return to the split screen.You can switch the Home application of the terminal to "docomo LIVE UX", "Xperia™ Home" or "Simple Home".1From the Home screen, u[Settings]u[Apps].2u[Home app].3Tap [docomo LIVE UX]/[Xperia™ Home]/[Simple Home]u[OK].・If you tap "Simple Home", see how it looks and tap [OK].・A home application, lock screen, phonebook application, and music and video player applications are set all at once for "docomo" or "Xperia™".❖Information・When the home application is switched, widgets or shortcuts on the screen may not be displayed correctly depending on home screen layout etc.・To set a home application, lock screen, phonebook application, and music and video player applications individually, from the Home screen, tap u[Settings]u[Apps]uu[Preferred apps settings].Switching Home application](https://usermanual.wiki/Sony/65365K.PY7-65365K-UserGuide/User-Guide-3492114-Page-73.png)
![72Before Using the TerminalEnter a word in the search box to browse the information in the terminal or on the Internet.1From the Home screen, tap the Google search widget.・When the screen that explains the feed appears, follow the onscreen instructions.2Enter a search word.・Character entry (P.73)・The search candidate list appears.3Tap the search suggestion or on the software keyboard.❖Information・Alternatively, from the Home screen, tap [Google]u[Google] to open the "Google" application.・When applications appear in Step 2, select an application to activate.・When is displayed in the search result screen etc., tap u[Settings] to make settings for the search function.Using Google Voice SearchEnter a search word by voice.1From the Home screen, tap on the Google Search widget.2Speak a search word to the microphone.❖Information・Alternatively, from the Home screen, tap u[Voice Search] to activate the "Voice Search" application.Searching information in the terminal and web pages](https://usermanual.wiki/Sony/65365K.PY7-65365K-UserGuide/User-Guide-3492114-Page-74.png)
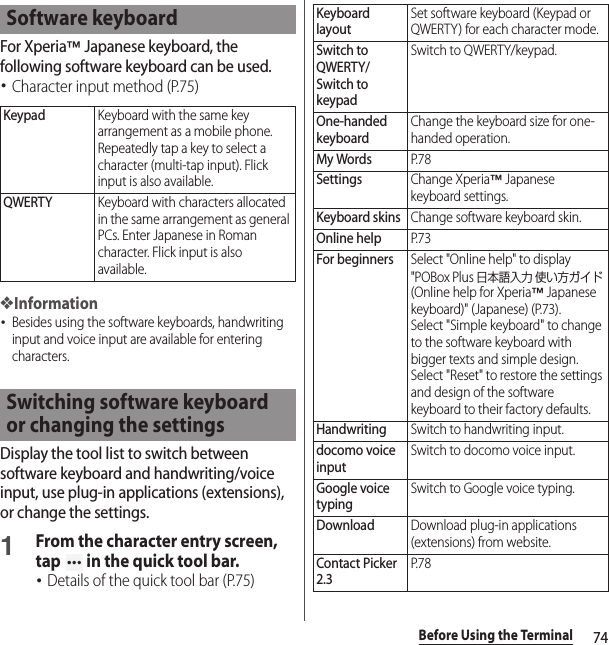
![73Before Using the TerminalEnter characters using the software keyboard (keyboard on the screen) which appears when you tap the character input box in a mail, phonebook, etc.❖Information・To hide software keyboard, tap displayed at the lower left of the screen.・A magnifier appears when you touch and hold a text, and you can enlarge the text.Character input method for the terminal is set to "Xperia™ Japanese keyboard" by default when the language is set to 日本語 (Japanese). Details on using Xperia Japanese keyboard are explained in "POBox Plus 使い方ガイド (Online help)".1From the character entry screen, tap in the quick tool bar.・Details of the quick tool bar (P.75)2[Online help].Switch the software keyboard to use for entering characters.1While entering characters, tap at the bottom of the screen.・The screen for changing the software keyboard appears.2Select the software keyboard.❖Information・When the language is set to English, the default keyboard is set to "SwiftKey Keyboard". To use the Japanese keyboard, tap [Xperia™ Japanese keyboard] in Step 2. In this manual, explanations are given only for "Xperia™ Japanese keyboard".・If the software keyboard you want use is not displayed on the screen for changing the software keyboard, from the Home screen, u[Settings]u[Languages & input]u[On-screen keyboard]u[Manage keyboards]uTap of the keyboard.Character entryPOBox Plus 日本語入力 使い方ガイド (Xperia™ Japanese keyboard Online help)Selecting the software keyboard](https://usermanual.wiki/Sony/65365K.PY7-65365K-UserGuide/User-Guide-3492114-Page-75.png)

![77Before Using the TerminalMulti-tap inputTap the same key continuously to enter the assigned character.To enter a character assigned to the same key, wait for changing the color of tapped key to the original (approx. 1 second), then enter the next character (for entering the next character soon, tap to change the color of key to the original). With the key in the original color, tap to enter the last entered character again.<Example> Entering "あお"1Tap "あ" onceuWait approximately 1 second (until the key color returns to the original).2Tap "あ" 5 times.or1Tap "あ" onceuTap (immediately).2Tap "あ" 5 times.❖Information・To switch the input method used on the keypad between "Flick input" and "Multi-tap input", tap in the quick tool bar on the character entry screenu[Settings]u[Input style & sensitivity]u[Input style], then select your desired item.In the character entry screen, when you double-tap a character to edit, or touch and hold or double-tap a text to copy in a web page etc., the edit menu appears near the selected text. Drag or to change the character string to select.❖Information・To paste a copied or cut character string, touch and hold a position to insertuTap [PASTE]. When text is already entered, tap a position to insertuuTap [PASTE].・On some applications, these functions may not be available or the editing menu may appear different.Editing textCUTCut a selected character string.COPYCopy a selected character string.PASTEPaste a copied/cut character string.SHAREAttach and send the selected character string to an application.SELECT ALLSelect all text.WEB SEARCHSearch for online information related to the selected character string.Display the editing menu that could not be shown. Tap to return to the previous editing menu.](https://usermanual.wiki/Sony/65365K.PY7-65365K-UserGuide/User-Guide-3492114-Page-79.png)
![78Before Using the TerminalIf contacts are registered to the Contacts, you can use "Contact Picker 2.3" to enter contact information when entering characters.1From the character entry screen, tap in the quick tool bar.・Details of the quick tool bar (P.75)2[Contact Picker 2.3]uTap "CONTACTS" tab.3Select a contact to quote.4Mark items to quoteu[OK].・If the quoted information is not displayed, tap the character entry field.❖Information・The "HISTORY" tab displays your own contact information and contact information you retrieved when you entered characters previously.You can add words to My Words beforehand to have them appear as preferred candidates when entering characters.1From the character entry screen, tap in the quick tool bar.・Details of the quick tool bar (P.75)2[My Words].3Tap .4Enter the reading into the character input box for "Reading".5Tap the character input box for "Word"uEnter the word.6[OK].❖Information・To delete registered words, in Step 3, mark words to deleteuuTap [DELETE].Quoting contacts My Words](https://usermanual.wiki/Sony/65365K.PY7-65365K-UserGuide/User-Guide-3492114-Page-80.png)
![79Before Using the TerminalFor each input method, you can make settings related to character entry or check application information.1From the Home screen, u[Settings]u[Languages & input].2[On-screen keyboard]uSelect the software keyboard.・Tap an item displayed on the screen to set.・If the introduction screen etc. appears, follow the onscreen instructions.❖Information・The items vary depending on the input method.・When entering characters with Xperia™ Japanese keyboard, on the character entry screen, tap of the quick tool baru[Settings] to display the settings screen for Xperia™ Japanese keyboard.・If the software keyboard is not displayed, in Step 2, [On-screen keyboard]u[Manage keyboards]uTap of the keyboard.Setting the character entry](https://usermanual.wiki/Sony/65365K.PY7-65365K-UserGuide/User-Guide-3492114-Page-81.png)
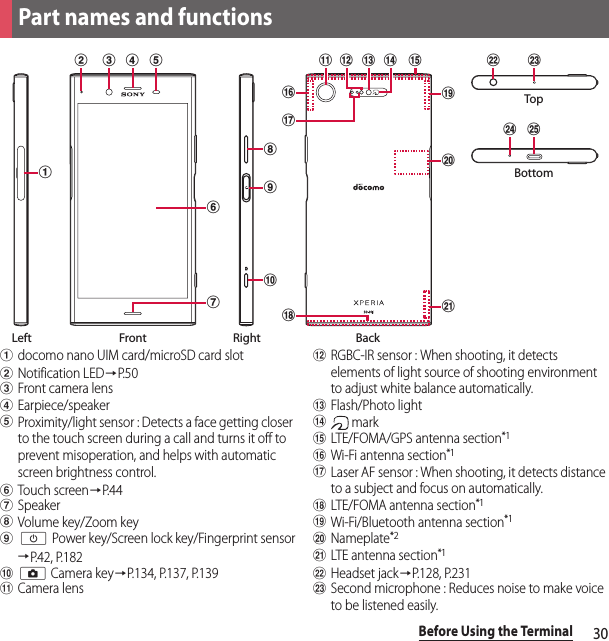
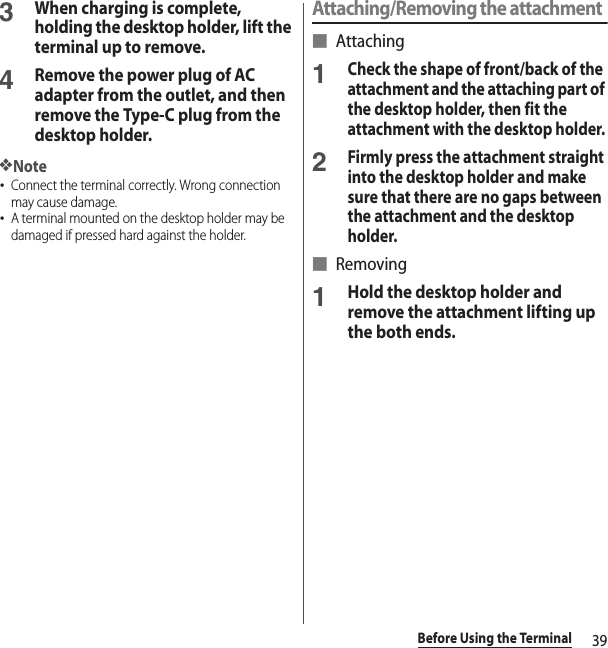
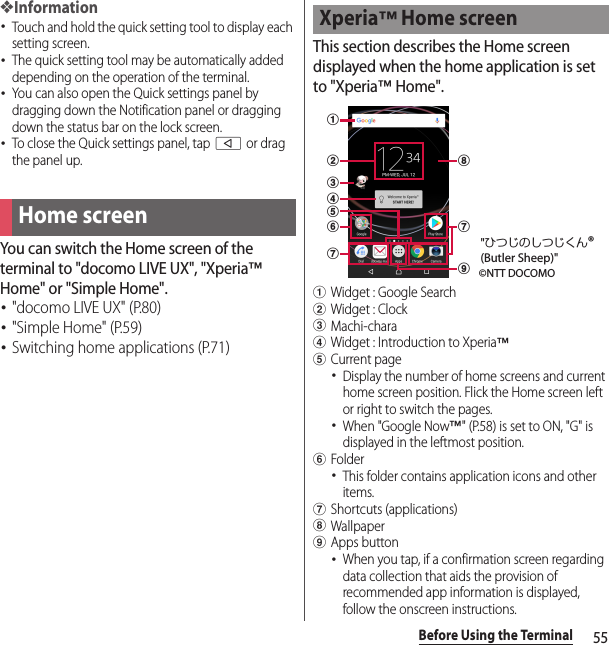
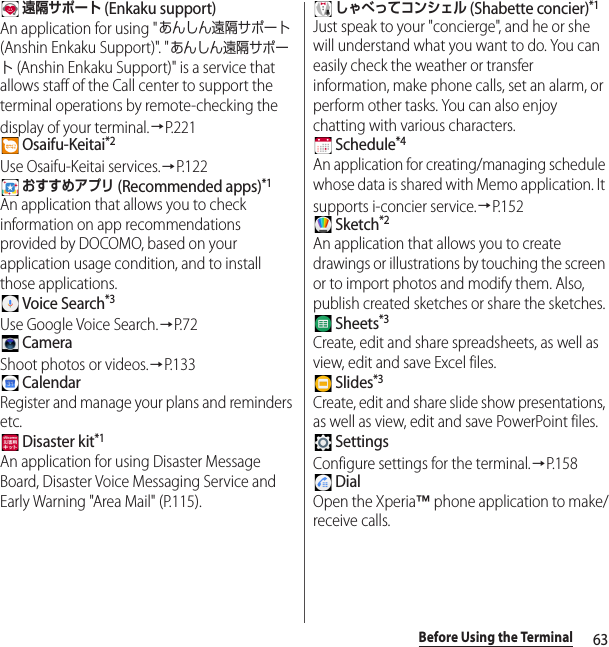
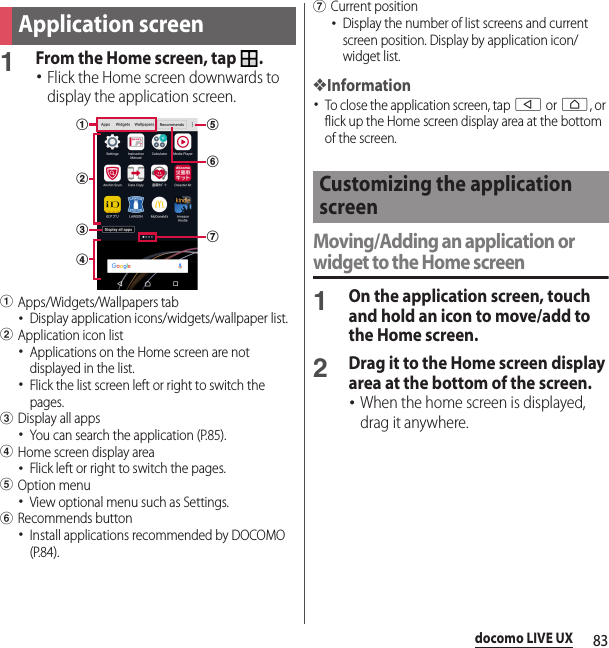
![80docomo LIVE UXdocomo LIVE UXHome screen is displayed when h is tapped. You can activate applications, widgets, etc. or display the applications screen from it.・Flick the Home screen left or right to switch the pages.aWidget : Google SearchbMachi-characApplication icondApps button・Display the application list screen (P.83).eApplication icons・This icons are always displayed even when the Home screen page is switched.fWallpapergFolder・Several application icons are stored in the folder.hCurrent position・Display the number of home screens and current home screen position.iMy Magazine button・Display My Magazine (P.86).Move application icons or add widgets or folders to the Home screen.1Touch and hold an area of the Home screen where no icons are displayed.2Tap any of [Show apps]/[Show widgets]/[Create folder].・To move/add applications or widgets, touch and hold the iconuDrag it to the Home screen display area at the bottom of the screen.❖Information・To move an application icon into a folder, touch and hold the icon on the Home screenuDrag it over the folder.・To change a folder name, tap a folderuTap the folder nameuEnter a folder nameuTap of software keyboard.・If a frame appears when you release your finger after touching and holding a widget, drag the frame to change the display size.Home screenabcedfghi©NTT DOCOMO"ひつじのしつじくん®(Butler Sheep)"Managing the Home screenAdding/Moving applications etc. to the Home screen](https://usermanual.wiki/Sony/65365K.PY7-65365K-UserGuide/User-Guide-3492114-Page-82.png)
![81docomo LIVE UX1From the Home screen, touch and hold an icon.2Drag it anywhere.・To move to the next home screen, touch and hold the home screen and drag it to left or right.1From the Home screen, touch and hold an icon.2Drag to "Back to apps list"/"Remove from Home" displayed in the top of the screen.Uninstalling an application or widget from the Home screen・Before uninstalling application, back up contents related to the application or widget that you want to save including data saved in the application or widget.・Some applications or widgets may not be uninstalled.1From the Home screen, touch and hold an icon.2Drag to "Uninstall" displayed in the top of the screenu[OK].❖Information・You can disable some applications or widgets which cannot be uninstalled by dragging to "Disable app" displayed in the top of the screen in Step 2 (P.175).1Touch and hold an area of the Home screen where no icons are displayed.2[Change Kisekae].3Tap a Kisekae to change tou[Set].❖Information・Alternatively, from the Home screen, uu[Kisekae].・You can add Kisekae contents by tapping [Search on the web] to download from website. To delete added Kisekae contents, tap a Kisekae to delete in Step 3u[DELETE]u[Delete].Moving an icon on the Home screenDeleting an icon from the Home screenChanging Kisekae](https://usermanual.wiki/Sony/65365K.PY7-65365K-UserGuide/User-Guide-3492114-Page-83.png)
![82docomo LIVE UXYou can change wallpaper of the displayed home screen.・Display a home screen page to change in advance.1Touch and hold an area of the Home screen where no icons are displayed.2[Change wallpaper].3Tap the wallpaper to change to.・Tap [Select another wallpaper] to select from "Photos", "Images" or "Live Wallpapers".4Follow the onscreen instructions to set wallpaper.1Touch and hold an area of the Home screen where no icons are displayed.2[Machi-Chara setting].3[表示する (Show)]/[表示しない (Do not show)] of "キャラ表示 (Chara display)".・Tap the tab to make settings of 基本設定 (Basic settings)/キャラ設定 (Chara setting)/音声起動設定 (Voice activation setting) as required.❖Information・For details on Machi-chara, in Step 3, u[ヘルプ (Help)] to refer to the Help. (in Japanese only)1Touch and hold an area of the Home screen where no icons are displayed.2[Home screens].3Tap .・To delete the home screen, tap of the home screen thumbnail.・To sort home screens, touch and hold a home screen thumbnail you want to sortuDrag it to any position.❖Information・Alternatively, pinch-in on the Home screen to display the home screen list.・Up to 7 pages can be set.・To return to the Home screen, tap h or b, or pinch-out.Changing wallpaperChanging Machi-Chara display settingAdding a home screen page](https://usermanual.wiki/Sony/65365K.PY7-65365K-UserGuide/User-Guide-3492114-Page-84.png)
![84docomo LIVE UXUninstalling an application or widgetSome application icons and widgets can be uninstalled from the application screen.・Before uninstalling, see "Uninstalling an application or widget from the Home screen" (P.81).1On the application screen, touch and hold the icon of application.2Drag to "Uninstall" displayed in the top of the screenu[OK].❖Information・You can disable some applications or widgets which cannot be uninstalled by dragging to "Disable app" displayed in the top of the screen in Step 2 (P.175).Moving application in the application icon list1On the application screen, touch and hold the icon.2Drag it anywhere.Install applications recommended by DOCOMO.1On the application screen, [Recommends].・When using the service for the first time, you will see the introduction screen for Osusume App. Tap [ENABLE] to display the application list screen and enable notification of Osusume App.2Select an application.・An introduction screen for app appears.❖Information・On the application screen, uTap / of "Notification settings" to switch on/off of Osusume App notification.Installing "Recommends" applications](https://usermanual.wiki/Sony/65365K.PY7-65365K-UserGuide/User-Guide-3492114-Page-86.png)
![85docomo LIVE UXIt is a function to search the applications.1From the Home screen, u[Display all apps].・All applications are displayed in a list.2Tap an application.・The application activates.・To sort the applications, tap [By app name] in the upper right of the screen.・Tap to display the screen where the application is located with the application focused.❖Information・Alternatively, from the Home screen, uu[Display all apps] to display the list of all applications.You can use docomo LIVE UX data backed up on the docomo cloud to restore the layout of applications, widgets, and other items on the Home screen. Once it is restored, a page for docomo services is added to the bottom of the Home screen.・To use the backup and restore features, you need to set up your d ACCOUNT (P.186).1On the Home screen, uu[Layout backup & Restore].2u[BACKUP].1On the Home screen, uu[Layout backup & Restore].2[Restore the latest backup data]/[Restore from backup data list].Display all apps Backing up and restoring the Home screenBacking up the Home screenRestoring the Home screen](https://usermanual.wiki/Sony/65365K.PY7-65365K-UserGuide/User-Guide-3492114-Page-87.png)
![86docomo LIVE UX3[Restore].・If you selected "Restore from backup data list", select the data you want to restoreuTap [Restore].1On the Home screen, uu[Layout backup & Restore].2Tap .My Magazine is a search service for displaying articles for categories you selected. By your tendency of read articles or profile information, the more you use, the more it comes close to your preference. Also, you can set to enable notifications of notice, or customizing of My Magazine using your docomo service subscription information etc.1From the Home screen, tap .・When you activate the application for the first time, select categories on the selection screen and then tap [OK].・Flick the article list screen left or right to switch categories.・Tap [See more info] to show other articles in the category.2Tap an article you want to read.❖Information・Alternatively, flick the Home screen up to display the article list.・You can change the settings of My Magazine or check the help by tapping in Step 2.Backup settingsBackup automaticallySet whether to periodically back up when the home screen information for the docomo LIVE UX is updated.Multi-Device SyncSet whether to send a notification to your other devices when an application has been installed.Sync on Wi-Fi onlySet whether to back up or sync data only when the terminal is connected via Wi-Fi.Sync while RoamingSet whether to back up or sync data during international roaming.Usage statisticsSet whether to send usage status.Delete backup dataDelete your backup information from the server.Open source licensesView open source licenses.Terms of useView the terms of use.HelpView the operation guide.AboutView the application's version and other information.Using My Magazine](https://usermanual.wiki/Sony/65365K.PY7-65365K-UserGuide/User-Guide-3492114-Page-88.png)
![87docomo LIVE UX1From the Home screen, uu[Display category setting].2Put marks to the categories.1From the Home screen, uu[My Magazine settings]u[My Magazine use setting].2[Use]/[Not use]u[OK].❖Information・You can also set by tapping on the application screenu[My Magazine use setting].1On the application screen, u[About].❖Information・If the update of docomo LIVE UX is available, "Update now" is displayed in the application information screen. Tap it to update docomo LIVE UX.Setting a categoryChanging My Magazine use settingChecking Home application information](https://usermanual.wiki/Sony/65365K.PY7-65365K-UserGuide/User-Guide-3492114-Page-89.png)
![88PhonePhone1From the Home screen, u"Dial" tab.2Enter a phone numberuTap .・To make a video call, enter a phone numberuuTap [Video call].・Tap to delete the number.3When the call is finished, tap .❖Information・In Step 2, tap without entering a phone number to enter the phone number registered as the latest call in Recent calls.・To activate Xperia™ phone application, from the Home screen, tap u[Dial].・With VoLTE, you can make high-quality voice and video calls. You can also switch between voice and video calls.To use VoLTE, both parties must meet the following requirements.- Both terminals support VoLTE- Within the area where VoLTE is available- "Preferred network type" (P.207) in "Mobile networks" is set to "4G (preferred)/3G/GSM" or "4G/3G", and "Enable VoLTE" (P.207) is ON・With VoLTE (HD+), you can make voice and video calls with sound that is much higher quality than with VoLTE.To use VoLTE (HD+), the usage requirements of VoLTE must be met, and both you and the other party must have models which support VoLTE (HD+).・On a video call, both speakers can see each other while talking.- When you make a video call, voice call and packet communication charges will apply. When you receive a video call, packet communication charges will apply.- Video calls are based on best-effort communication (which optimizes transmission speed depending on how busy your network is), so the quality of video images varies depending on your network environment.- If your terminal fails to switch to the video call during a voice call, the massage appears on the screen and the voice call continues.- Since imaging for video call varies by terminal model, your terminal and the other party's terminal may show different image in scope.Making/Receiving a callMaking a call/video call](https://usermanual.wiki/Sony/65365K.PY7-65365K-UserGuide/User-Guide-3492114-Page-90.png)
![89PhoneEmergency call❖Note・This terminal supports "Emergency call location information". If you use the terminal to place a call to emergency numbers such as 110, 119, or 118, the information of a location where you are calling from (location information) is automatically notified to the Emergency call acceptance organization such as the Police Station.However, the Emergency call acceptance organization may not be able to figure out your exact location depending on the location where you place a call or radio wave condition. If you make a call hiding your caller ID, such as by entering a phone number with "184" for each call, your location information and phone number are not reported. However, when the Emergency call acceptance organization deems it necessary for lifesaving purposes, etc., they may decide to obtain your phone number and accurate location information from your GPS, regardless of your settings. Note that the areas/time for which the "Emergency call location information" is ready to be used vary depending on the preparatory state of each Emergency call acceptance organization.・When calling 110, 119 or 118 for emergency from the terminal, tell that you are calling from a mobile phone, and give your phone number and your current location precisely for checking callback from the police/fire department. Also, make a point to call in a stationary position to prevent the call from being dropped. Do not power off the terminal for at least 10 minutes after the emergency call just in case the Police or Fire/Ambulance may have to get in contact with you.・Note that you may not connect to the local Fire Department or Police Station depending on where you are calling from.❖Information・If docomo nano UIM card is not inserted to the terminal, emergency calls (110, 119, 118) cannot be made in Japan.・You can make an emergency call by tapping [EMERGENCY CALL/INFO] on the lock screen.・If you make an emergency call with Call Blocking is ON, the setting of the Call Blocking turns off automatically. However, the Call Blocking will be set 120 minutes later again only when Block numbers is set.・Emergency calls may not be available on some networks.・The video call feature does not support emergency calls to 110, 119, and 118.Emergency call Phone numberPolice call110Fire and emergency rescue119Coast guard118](https://usermanual.wiki/Sony/65365K.PY7-65365K-UserGuide/User-Guide-3492114-Page-91.png)
![90PhoneEntering pause (,)/(;) to sendFor using services requiring entry of number during a call such as check of the balance of a bank account, reservation of tickets, etc., enter an additional number to a phone number beforehand and make a call.■ Using 2-second pause (,)Added number will automatically be sent approximately 2 seconds after a call is accepted.1From the Home screen, u"Dial" tab.2Enter a phone numberuu[Add 2–sec pause]uEnter an additional numberuTap .3When the call is finished, tap .■ Using a wait (;)Sending is automatically on standby when the call is made and a confirmation screen asking if you send the additional number appears.1From the Home screen, u"Dial" tab.2Enter a phone numberuu[Add wait]uEnter an additional numberuTap .3On a confirmation screen, [YES].4When the call is finished, tap .Making an international call (WORLD CALL)For details on the WORLD CALL, refer to NTT DOCOMO website.1From the Home screen, u"Dial" tab.2Dial + (touch and hold [0])uEnter Country code, Area code (City code), recipient number in the orderuTap .3When the call is finished, tap .❖Information・If the area code begins with "0", omit "0". However, "0" may be required to dial to some countries or areas such as Italy.](https://usermanual.wiki/Sony/65365K.PY7-65365K-UserGuide/User-Guide-3492114-Page-92.png)
![91Phone・When a phone or video call comes in, the incoming call screen appears.If the screen backlight is on (except on the lock screen) or an application is running, the notification appears at the top of the screen (P.92).1On the incoming call screen, drag (left) to (right).・To accept a video call, drag (left) to (right) for "Answer video". To answer a call with voice only, drag (left) to (right) for "Answer voice".2When the call is finished, tap .❖Information・When "Answer" of "Suguden setting" (P.99) is ON, an incoming call can be answered just by holding up the terminal to your ear.・When "Disconnect" of "Suguden setting" (P.99) is ON, a call can be disconnected by the motion or voice keyword during a call.Answering a video call with the camera turned offYou can answer a video call without sending your image to the other party.1On the incoming call screen, [RESPONSE OPTIONS].2[Answer without video].Answering calls with Answering MachineEven when Answering Machine is not set, you can activate Answering Machine manually.1On the incoming call screen, [RESPONSE OPTIONS].2[Reject with Answering Machine].❖Information・If there is a recorded message, is displayed in the status bar. Drag the status bar downwardsuTap the notification of the Answering Machine to display the Messages screen and you can check the recorded messages.Receiving a phone/video call](https://usermanual.wiki/Sony/65365K.PY7-65365K-UserGuide/User-Guide-3492114-Page-93.png)
![92PhoneMuting the ringtone for an incoming call1While receiving a call, press the volume key or O.❖Information・You can stop vibration by pressing the volume key or O when silent mode (Vibrate) is set.・On the Home screen etc., press the volume key to adjust the ringtone volume.Declining a call1On the incoming call screen, drag (right) to (left).Rejecting an incoming call and sending a message (SMS)If you are not available to answer a phone or a video call, you can decline the call and send a message (SMS). Messages for sending are pre-registered, and you can edit them if necessary.1On the incoming call screen, [RESPONSE OPTIONS].2Tap a message to send.・Tap [Write new message] to create and send a message.❖Information・To edit/add a message beforehand, from the Home screen, tap uu[Call settings]u[Reject call with message]uSelect an existing message or blank space and edit itu[OK].Receiving a phone/video call when an application is runningIf the screen backlight is turned on (except on the lock screen) or an application is running when a call comes in, the notification appears in the upper screen.1[ANSWER].You can start a voice conversation.・To accept a video call, tap [VIDEO CALL].・To decline a call, tap [DECLINE].・Tap the upper part of displayed notification to open the incoming call screen.2When the call is finished, tap .](https://usermanual.wiki/Sony/65365K.PY7-65365K-UserGuide/User-Guide-3492114-Page-94.png)
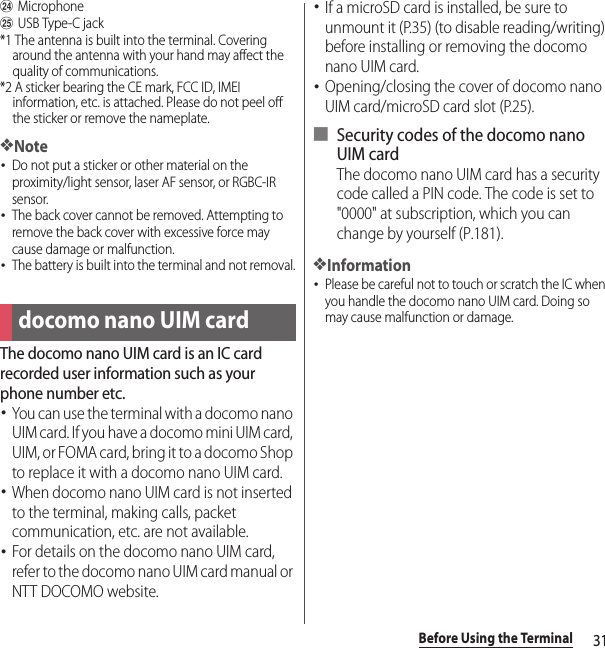
![93PhoneOn the Calling screen, you can set voice output or mute, or enter a phone number to make a call to another party.■ Screen displayed during a voice call■ Screen displayed during a video callWhile on a video call, you will see the other party's image in a parent window, and your image in a child window, with the control icons hidden. Tap the screen to show the control icons.aName, phone number, etc. of the other partybSound quality of VoLTE call・ (super high sound quality) is displayed during calls in VoLTE (HD+), and (high sound quality) is displayed during calls in VoLTE (HD).cPhone number registered in the phonebook entrydPhoto/image set in the phonebook entryeMute : Turn the microphone on/off during a call.fAudio output : Turn the speakerphone on/off.・Other party's voice can be heard from the speaker and handsfree call can be made.・Video calls are made or received with the speakerphone turned on.・When the terminal is connected to a Bluetooth device, you can tap the icon to switch the audio output.gDial key : Send a push signal while on a call.hCall duration timeiEnd a calljVideo call : Switch from a voice call to a video call.・When you tap this icon, the other party will see a message asking for permission to switch to a video call. If the other party accepts it, you can switch to a video call.・If the other party has declined to switch to a video call, is outside a VoLTE service area, or is using a terminal that does not support VoLTE, a message appears indicating that the call cannot be switched. Tap [OK] to continue the voice call.・"Hold call" is displayed during a 3G voice call.Operations during a callihjkabcdfegihmnopabcfel](https://usermanual.wiki/Sony/65365K.PY7-65365K-UserGuide/User-Guide-3492114-Page-95.png)
![94PhonekMore (voice call)・Hold a call[More]uTap [Hold call]/[Resume call] to put a voice call on hold or resume the call.・To hold a call, "Call waiting" subscription is required (P.97).・Add call[More]uTap [Add call] to add a voice call.・"Add call" is displayed during a 3G voice call.・To add a call, "Call waiting" subscription is required (P.97).lSwitch camera・Tap this icon to switch between cameras for shooting your image.mChild window for a video call (your image)・ is displayed if the camera is hidden.nParent window for a video call (other party's image)・ is displayed if your terminal cannot receive the other party's image.oCamera・Select whether to send your image to the other party or hide it.pMore (video call)・Change to voice[More]uTap [Change to voice] to switch to a voice call.・DialpadOpen a dialpad while on a video call.・Switch videos[More]uTap [Switch videos] to switch the display area between the parent window (showing the other party's image) and the child window (showing your image).❖Note・Do not bring the terminal close to your ear with the speakerphone on to avoid from hearing damage.❖Information・The notification icon is displayed on the status bar while dialing, incoming, calling or holding. Even if you switch the screen to the other screen such as the Home screen, returning to the Phone application screen is available by dragging the status bar down and then tap the notification.・When you switch to the other screen such as the Home screen during a video call, the camera is turned off.Adjusting the earpiece volume1Press the volume key during a call.](https://usermanual.wiki/Sony/65365K.PY7-65365K-UserGuide/User-Guide-3492114-Page-96.png)
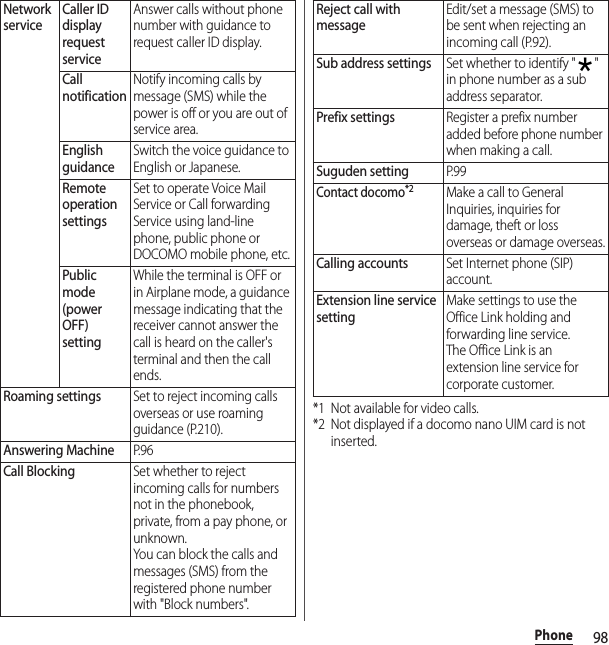
![95PhoneIncoming calls and outgoing calls are displayed by chronological order in the Recent calls screen.1From the Home screen, uTap "Recent calls" tab.■ Recent calls screenaPhonebook・The phonebook list screen appears.bOption menucAll tabdPhone number/name・Tap to make a voice call or video call, create an SMS message, etc.・Touch and hold to display "Edit number before call", "Delete from call log", "Register as blocked number" or "Search location".eIncoming tabfOutgoing tabgVoice call button・Tap this button to make a voice call to the corresponding phone number in the call log.hDateiHistory・The details of an incoming or outgoing calls (Outgoing, Incoming, or Missed call) are displayed.❖Information・The number of call history that can be stored depends on the amount of available memory on your terminal.Adding a number from the Recent calls to Phonebook1From the Home screen, uTap "Recent calls" tabuTap a phone numberu[Register].・Alternatively, in the Recent calls screen, touch and hold a phone numberu[Edit number before call]u[Register].2[Add new contact]/[Add to the existing contact].・When "Add to the existing contact" is selected, select a contact to save to.3On the profile edit screen, enter necessary information such as name.・To add items, tap [Add other items].4[Save].Call historyShowing call historycdabfheig](https://usermanual.wiki/Sony/65365K.PY7-65365K-UserGuide/User-Guide-3492114-Page-97.png)
![96PhoneDeleting a call history1From the Home screen, u"Recent calls" tabuTouch and hold the incoming/outgoing history to delete.2[Delete from call log]u[OK].❖Information・To delete all the call history, in the Recent calls screen, tap the "All" tabuu[Delete log]uMark "Select all"u[Delete]uTap [Delete].・Voice and video calls are not distinguished in the Recent calls.When you have missed calls, appears in the status bar.1Drag the status bar downwards.2[Missed call].❖Information・When there is a missed call, you can make a call or send message (SMS) to the caller of the missed call from "CALL BACK"/"MESSAGE" below "Missed call" in the Notification panel.For multiple missed calls, number of calls appears below "Missed call".・A missed call notification and the number of missed calls are displayed on the lock screen. Double-tap the notification to see the Recent calls screen.When Answering Machine is set, the answering message is played when you cannot answer an incoming call and message from the caller can be recorded even if you are not subscriber of Voice Mail Service. Up to approximately 60 seconds per one can be recorded.・Answering Machine is not available for video calls.1From the Home screen, uTap .2[Call settings]u[Answering Machine].Displaying missed callsAnswering MachineAnswering MachineSet whether to use Answering Machine.Pick up afterSet a ringing time for answering.Use while roamingSet whether to use Answering Machine when you stay abroad.GreetingsSwitch the answering message language to Japanese or English.MessagesCheck recorded messages.](https://usermanual.wiki/Sony/65365K.PY7-65365K-UserGuide/User-Guide-3492114-Page-98.png)
![97Phone❖Information・If there is a recorded message, is displayed in the status bar. Drag the status bar downwardsuTap the notification of the Answering Machine to display the Messages screen and you can check the recorded messages.・To delete recorded message, touch and hold a messageuTap [Delete]/[Delete all]u[OK].・The number of messages that can be stored depends on the amount of available memory on your terminal.You can set the network services, set call rejection, or edit Reject call with message.1From the Home screen, uTap .2[Call settings].Call settingsNetwork serviceVoicemail service*1Record caller's message when you cannot answer an incoming call.Call forwarding service*1Forward a call when you cannot answer an incoming call.Call Waiting*1Put the current call on hold and answering an incoming call or making a call to another party.Caller ID notificationNotify the display of the other party's phone of your phone number when calling.Nuisance call blocking serviceRegister phone numbers of nuisance call to reject.](https://usermanual.wiki/Sony/65365K.PY7-65365K-UserGuide/User-Guide-3492114-Page-99.png)
![99PhoneMake settings for "Suguden" which allows you to operate phone with the motions and the voice command.1From the Home screen, uTap .2[Call settings]u[Suguden setting].Notes on using Suguden・Suguden allows you to operate the phone by the motions of the terminal or the voice commands, but the function does not work properly in the following situations.- When using speakerphone- When using earphones or a headset- When connected to a Bluetooth device that supports calling function- When making or receiving an additional call during a call- While lying down- When you perform vigorous exercise such as running, going up and down stairs, etc.- The display is covered with a book type smartphone case etc.Suguden settingAnswerSet whether to answer calls by holding up the terminal to ear.Disconnect (Motion/Voice command)Set whether to end a call by motion or voice command. When the "Motion" is ON, a call can be disconnected by placing the terminal horizontally with the screen faced down while calling, or by shaking the terminal twice. When the "Voice command" is ON, a call can be disconnected by saying the disconnect keyword while calling and then detaching your ear from the terminal.CallSet whether to make a call to the other party that is registered in advance or saved to call history by shaking the terminal once with the Home screen displayed and then holding up to ear.Mute, RejectSet whether to reject calls by placing the terminal horizontally with the screen faced down while a call is incoming, or shaking the terminal twice. You can select from "Mute", "Reject", or "Reject and send SMS".Call rankingCheck the other party whom you called many times.Hide the name when receivingSet whether to hide the names of people registered to the phonebook when receiving their calls.Sending of use informationSet whether to send your user information to DOCOMO via Suguden.Disable Suguden during roamingSet whether to disable the settings for Suguden when you stay abroad.](https://usermanual.wiki/Sony/65365K.PY7-65365K-UserGuide/User-Guide-3492114-Page-101.png)
![102PhoneOn the phonebook, you can enter various information for contacts, for example, phone numbers, mail addresses and various service accounts.1From the Home screen, [ドコモクラウド (docomo cloud)]u[docomo phonebook]u"Contacts" tab.・The phonebook list screen appears.❖Information・To use cloud service for the phonebook, "docomo phonebook" application is needed. When you use the "docomo phonebook" for the first time (including after resetting the application) or log in to cloud from the "docomo phonebook", the "Use of Cloud" screen appears and you can start using cloud.・Cloud service for docomo phonebook is not available when user is switched to the other than the owner.・From the Home screen, uTap [Phonebook] to display the phonebook list.・Use docomo Data Copy application to back up/restore the phonebook data to/from a microSD card (P.155).・From the Home screen, uTap [Contacts] to activate Xperia™ phonebook.■ Phonebook list screenOn the phonebook list screen, you can view details of your contacts. You can add a photo or image to a phonebook entry, and display phonebook entries by group.aGroup tab・Display the phonebook group.bCloud・Log in to cloud ("Use of Cloud" screen is displayed) or log out of cloud ("Suspend sync" screen is displayed).cOption menudContacts tabeName registered in the phonebook entry・Tap to display the profile screen.fPhoto/image set in the phonebook entrygSearchhRegisteriMy profile tab・Check your own phone number.jIndex character area・Tap index character to display phonebook entries allocated to the index character.PhonebookDisplaying phonebookkdbfgeahicj](https://usermanual.wiki/Sony/65365K.PY7-65365K-UserGuide/User-Guide-3492114-Page-104.png)
![103PhonekIndex・Display the index character to search entries in the order of Japanese syllabary, alphabet, etc.Adding a new phonebook entry1From the Home screen, [ドコモクラウド (docomo cloud)]u[docomo phonebook]uTap "Contacts" tabu[Register].2On the profile edit screen, enter necessary information such as name.・To add items, tap [Add other items].3[Save].❖Information・The contacts are listed in the order of Japanese syllabary of the reading of last name or first name and alphabet of last name or first name. If the reading field is vacant, the contacts are displayed in the order of Japanese syllabary of last name or first name and alphabet of first name or last name, however last name and first name in Kanji are displayed in "他 (other)" field.・Alphabet (one-byte) last and first name are displayed in the order of first name - last name.Making a call/video call from the phonebook1From the Home screen, [ドコモクラウド (docomo cloud)]u[docomo phonebook]uTap "Contacts" tabuSelect a phonebook entry you want to make a call to.2On the profile screen, tap a phone number.3[Call]/[Video call].Editing a phonebook entry1From the Home screen, [ドコモクラウド (docomo cloud)]u[docomo phonebook]uTap "Contacts" tabuSelect a phonebook entry to edit.2On the profile screen, [Edit].3Select a required item and edit.4[Save].Managing phonebook](https://usermanual.wiki/Sony/65365K.PY7-65365K-UserGuide/User-Guide-3492114-Page-105.png)
![104PhoneRegistering a phonebook entry to Favorites1From the Home screen, [ドコモクラウド (docomo cloud)]u[docomo phonebook]uTap "Contacts" tabuSelect a phonebook entry to add to Favorites.2On the profile screen, tap .❖Information・To display phonebook entries added to Favorites, on the phonebook list screen, tap "Group" tabu[Favorites].Using optional menu1From the Home screen, [ドコモクラウド (docomo cloud)]u[docomo phonebook]uTap "Contacts" tab/"My profile" tab.2On the Contacts/My profile screen, tap .・On the Contacts screen, select a contactuOn the Profile screen, tap to display the option menu of the profile screen.■ Phonebook list screen*1 Signing in to cloud is required.*2 Subscription to i-concier is required.Delete contactSelect and delete several/all phonebook entries.Cloud menu*1Display cloud menu.SD card/SIM card/commonExport/import phonebook entries or send them via Bluetooth or Email (P.106).Settings International use setting for docomo phonebookSet for using docomo phonebook overseas.d ACCOUNT/Wi-Fi settingsSet a d ACCOUNT to use docomo services via Wi-Fi.Contacts display orderSet display order of phonebook entries.Accounts to displaySet a phonebook to be displayed in the phonebook list screen.i-concier menu*2Set the phonebook support function for i-concier.HelpDisplay Help of docomo phonebook.Number of registered contactsDisplay the number of contacts registered to each account.AboutDisplay version etc. of docomo phonebook.](https://usermanual.wiki/Sony/65365K.PY7-65365K-UserGuide/User-Guide-3492114-Page-106.png)
![105Phone■ Profile screen■ My profile screenSetting phonebook entries to Group1From the Home screen, [ドコモクラウド (docomo cloud)]u[docomo phonebook]uTap "Group" tab.2Tap a group.3[Add member]uMark phonebook entries to addu[OK]u[OK].❖Information・To cancel group setting, in Step 3, [Delete member]uMark phonebook entriesu[OK]u[OK].・When you set Google account etc., display groups by account. You can set/cancel group in the same account.Creating a new group in the phonebook1From the Home screen, [ドコモクラウド (docomo cloud)]u[docomo phonebook]uTap "Group" tab.2[Add group].3On the group adding screen, select the account and enter account, group name, icon, coloru[OK].・The items vary depending on the account type.❖Information・Groups in docomo account can be sorted. To do so, tap [Sort] in Step 2 and follow the onscreen instructions.・Groups added to your docomo account, as well as your Google account, etc. can be edited/deleted. To edit/delete a group, touch and hold a groupu[Edit group]/[Delete group].ShareSend a displayed phonebook entry with Bluetooth function, Email, etc.DeleteDelete a displayed phonebook entry.Set ringtoneSet a ringtone for displayed phonebook entry.Join/SeparateJoin/separate displayed phonebook entry.Send My profileIf you change the My profile content, send the changed content to mail addresses that are registered to the docomo phonebook all at once.ShareSend a content saved to My profile using Bluetooth function, Email, etc.](https://usermanual.wiki/Sony/65365K.PY7-65365K-UserGuide/User-Guide-3492114-Page-107.png)
![106PhoneChecking My profile and editing information1From the Home screen, [ドコモクラウド (docomo cloud)]u[docomo phonebook]uTap "My profile" tabu[Edit].2On the My profile screen, enter necessary information such as name.3[Save].Phonebook entries can be imported from a microSD card or docomo nano UIM card, or exported to a microSD card. This is useful, for example, when you want to move the contact information to another phone. Also, sending all phonebook data via Bluetooth function, Email, etc. is available.・To backup to/restore from a microSD card, use docomo Data Copy (P.155).・You can also use a synchronization service for synchronizing your phonebook (P.188).・For exporting to/importing from a microSD card, insert a microSD card in advance (P.34).1From the Home screen, [ドコモクラウド (docomo cloud)]u[docomo phonebook]uTap "Contacts" tabuu[SD card/SIM card/common].2Select an item.・When [Send all data (common)] is tapped, confirm the displayed content and the drag the status baruTap [Finished exporting contacts.] and select the application to send.・After this step, follow the onscreen instructions.Importing/Exporting/Sharing phonebook entries](https://usermanual.wiki/Sony/65365K.PY7-65365K-UserGuide/User-Guide-3492114-Page-108.png)
![107Mail/Web browserMail/Web browserSend/receive mails using DOCOMO mail address (@docomo.ne.jp).Data can be easily transferred when changing models or restored when you have lost the terminal since sent and received mails are saved on the docomo mail server. Also, your d ACCOUNT allows you to use the same email address to send, receive, and view email on several devices, such as tablets and computers.For details of docomo mail, refer to NTT DOCOMO website.https://www.nttdocomo.co.jp/service/docomo_mail/ (in Japanese only)1From the Home screen, tap .・After this step, follow the onscreen instructions.You can send/receive text message to/from a mobile phone number as a recipient.For details of available number of characters etc., refer to "Short Message Service (SMS)" on NTT DOCOMO website.1From the Home screen, u[Messaging].2Tap (Write new message).3Enter the recipient's phone number.・Tap to select a contact from the registered contacts. Tap [Index] to search contacts from the index character.4[Write message]uEnter a message.・When the number of entered characters comes close to a limit, a number of enterable characters appears on the lower right of the text box.5Tap (Send).docomo mail Message (SMS)Sending message (SMS)](https://usermanual.wiki/Sony/65365K.PY7-65365K-UserGuide/User-Guide-3492114-Page-109.png)
![108Mail/Web browser❖Information・You can also send/receive text messages to/from customers of overseas network operators. Refer to NTT DOCOMO website for details on the countries and overseas network operators that provide this service.・To send SMS to users of overseas network operators, enter "+", "Country code" and then "the recipient mobile phone number". Enter the phone number without a leading "0", if any. Alternatively, enter "010", "Country code" then "the recipient mobile phone number" in order.Sent/received message (SMS) is displayed in thread by recipient/sender.1From the Home screen, u[Messaging].・Senders with unread messages (SMS) are displayed in bold font.2Select a sender whose messages (SMS) you want to read.❖Information・When you receive a message (SMS), appears on the status bar. Drag the status bar downwards to read the received message (SMS).・Touch and hold a message (SMS)uTap [Add star] to add a star. To check starred messages (SMS) in a list, from the Home screen, tap u[Messaging]uu[Starred messages].1From the Home screen, u[Messaging].2Tap an image part for a phone number to saveu[SAVE].3[Add new contact]/[Add to the existing contact].・When "Add to the existing contact" is selected, select a contact to save to.4On the profile edit screen, enter necessary information such as nameu[Save].❖Information・If the sender is already saved in the phonebook, you can tap photo or image part in Step 2 to check the registered information in the phonebook.Reading message (SMS)Saving phone number of message (SMS) to phonebook](https://usermanual.wiki/Sony/65365K.PY7-65365K-UserGuide/User-Guide-3492114-Page-110.png)
![109Mail/Web browser1From the Home screen, u[Messaging].2Select a sender/recipient whose messages (SMS) to delete.3Touch and hold a message (SMS) to delete.4[Delete message]u[DELETE].❖Information・To delete several messages (SMS), in Step 3, u[Delete messages]umark the messages (SMS)uu[DELETE].1From the Home screen, u[Messaging].2Touch and hold a sender/recipient you want to delete.3u[DELETE].❖Information・To delete messages (SMS) of several senders and recipients, in Step 3, mark the senders/recipientsuu[DELETE].1From the Home screen, u[Messaging].2u[Settings].* With silent mode (Mute) turned on, the terminal does not vibrate when receiving messages (SMS).Deleting a message (SMS)Deleting messages (SMS) by sender/recipientChanging settings for Messaging (SMS)Notification soundSet notification sound for receiving.NotificationsSet whether to show message (SMS) arrival notification in the status bar.Notification vibration*Set whether to notify with vibration when receiving.Notification lightSet whether to notify with the notification LED for receiving when the backlight is turned off.Delivery reportSet whether to mark to the messages (SMS) that you send when the recipient receives them.Default SMS appSet a default messaging application.Blocked numbersSet whether to block the incoming calls and messages (SMS) from the registered phone number.Cost savingSet whether to convert the special characters for foreign countries to send more text.SIM messagesManage messages (SMS) saved to a docomo nano UIM card.SMS center numberCheck SMS center number.](https://usermanual.wiki/Sony/65365K.PY7-65365K-UserGuide/User-Guide-3492114-Page-111.png)
![110Mail/Web browserYou can add a POP3 or IMAP compatible email account provided by general provider, or an Exchange ActiveSync account to send or receive email.You can set multiple Email accounts.Set an Email account following the onscreen instructions.1From the Home screen, u[Email].・To set a second or subsequent email account, from the Home screen, u[Email]uu[Settings]uTap [Add account].2Enter an email addressu[NEXT].3Enter a passwordu[NEXT].・To set up an email account manually, tap [MANUAL SETUP] and follow the onscreen instructions.4Follow the onscreen instructions to configure necessary itemsuTap [NEXT] to finish the setting.・If the screen for selecting type of account appears, tap the type of the email account and follow the onscreen instructions to set.5Enter your account name and the name to be displayed in your outgoing emailsu[FINISH SETUP].・Inbox for set email account appears.❖Information・If you need to make the settings manually, contact your email service provider or system administrator for the correct email account settings.・If you set an Exchange ActiveSync account as an email account, and if server manager sets Remote wipe, the data saved in the terminal may be deleted.EmailMaking initial setting for Email](https://usermanual.wiki/Sony/65365K.PY7-65365K-UserGuide/User-Guide-3492114-Page-112.png)
![111Mail/Web browser1From the Home screen, u[Email].2Tap (Write new message).3Enter the email address of recipient.・When you enter a name or email address in the email address field, contacts matched to the entered numbers or letters are listed.・To enter multiple email addresses in characters directly, separate with a comma (,) or a space input and then enter the next email address.・To add Cc or Bcc recipients, uMark "Show Cc"/"Show Bcc".4Enter a subject and message.5Tap (Send).❖Information・To attach a file, while creating an email, tap and select a file.・To save an email as draft, when creating an email, tap u[Save as draft] or change screen to another one.・Email is handled as an email from a PC. Your email cannot be received if rejecting emails from PCs is set on a recipient terminal.1From the Home screen, u[Email].・If you have set up more than one email account, tap uuTap the email account to receive the emails.2On the Inbox, flick the screen down.・This refreshes the Inbox.3Tap an email you want to read.❖Information・The sender name of a received email is the name set on sender's terminal.・If you specified "Notification" in the email account settings (P.113) and set "Check frequency" to an option other than "Manual", appears in the status bar to notify you when you have received a new email. Drag the status bar downwards to read the received email.・Tap an address of received email to register the address to the phonebook. For addresses already registered, displaying phonebook entries is available.・Tap / in the Inbox or the email message window to highlight the star and add the email to the "Starred" filter. To see a list of starred emails, tap in the InboxuuTap the email accountuuTap of "Filters"u[Starred].Creating and sending email Receiving and reading email](https://usermanual.wiki/Sony/65365K.PY7-65365K-UserGuide/User-Guide-3492114-Page-113.png)
![112Mail/Web browserSaving attachment file of email1From the Home screen, u[Email].2Tap an email with attached files.・When attached file is not loaded, tap [LOAD].3Tap [SAVE] of fileuSelect a saving destinationu[SAVE].1From the Home screen, u[Email].2Tap an email to reply or forwarduTap any of [REPLY]/[REPLY ALL]/[FORWARD].・When you tap [FORWARD], enter an email address to forward to.3Enter a message.4Tap (Send).❖Information・To delete the original email content, unmark "Quoted text".・When you forward an email, the attachment file of the original message is attached. To delete attached file, tap .1From the Home screen, u[Email].2Tap an email to delete.3Tap .❖Information・To delete more than one email, in Step 2, touch and hold an emailuMark the emailsuTap .・If "Delete confirmation" is ON in the Settings for "Email" application, the confirmation screen appears after / is tapped. Tap [DELETE].Replying/Forwarding emailDeleting email](https://usermanual.wiki/Sony/65365K.PY7-65365K-UserGuide/User-Guide-3492114-Page-114.png)
![113Mail/Web browser<Example> Setting up an email account that supports IMAP1From the Home screen, u[Email].2u[Settings].3Tap an Email account you want to change the settings for.* With silent mode (Mute) turned on, the terminal does not vibrate when receiving emails.❖Information・The items vary depending on the account type.・If you set "Check frequency" to an option other than "Manual", and you are using a pay-as-you-go data communication plan, packet communication charges may apply every time you check for new emails.Changing Email account settingsNotificationConfigure Status bar notification, Notification sound, Vibrate*, and Notification light settings.Sync settingsCheck frequencySet how often the Email application checks for new emails.Days to syncSet a period of emails for sync.Auto download attachmentsSet whether to download attached file automatically when connecting via Wi-Fi.Pre-download limitSet whether to download whole email including the message text before the email is opened.General settingsAccount nameChange account name.Your nameChange your name (sender name).Incoming settingsSpecify a username, password, and other settings for the incoming server.Outgoing settingsSpecify a username, password, and other settings for the outgoing server.SignatureChange your signature or specify how to insert it.Quick replyRegister phrase that can be inserted when creating an email.SecuritySelect certifications, set digital signature or encryption.Temporar y filesDelete temporary files.Delete accountDelete Email account.](https://usermanual.wiki/Sony/65365K.PY7-65365K-UserGuide/User-Guide-3492114-Page-115.png)
![114Mail/Web browser・You can change the settings for the "Email" application with the setting items displayed below the account in Step 3.You can use the email services provided by Google or by general providers.・Set up your Google account (P.187) or email account by following the onscreen instructions, if you have not already done so.・If you do not synchronize Gmail after Google account is set, "Account not synced" screen appears. Follow the onscreen instructions.❖Information・For details on Gmail, from the Home screen, tap [Google]u[Gmail]uu[Help & feedback] to see Gmail Help.1From the Home screen, [Google]u[Gmail].2Tap (Compose).3Enter the email address of recipient.・When you enter a name or email address in the email address field, contacts matched to the entered numbers or letters are listed.・Tap to add Cc or Bcc recipients.4Enter a subject and message.5Tap (Send).❖Information・To attach a file, when creating a Gmail, tap u[Attach file] and select the file.1From the Home screen, [Google]u[Gmail].2On the Inbox, flick the screen down.・This refreshes the Inbox.GmailSending GmailRefreshing Gmail](https://usermanual.wiki/Sony/65365K.PY7-65365K-UserGuide/User-Guide-3492114-Page-116.png)
![116Mail/Web browserViewing received Area Mail later1From the Home screen, u[Disaster kit].2[Early Warning "Area Mail"].3Select an Area Mail from the Area Mail list.❖Information・Up to 50 messages can be saved. If savable amount of Area Mail exceeds the limit of maximum, the oldest one is deleted in order.Deleting Area Mail1From the Home screen, u[Disaster kit].2[Early Warning "Area Mail"].3Mark the Area Mail in the listu[Delete]u[OK].1From the Home screen, u[Disaster kit].2[Early Warning "Area Mail"].3u[Settings].* Not displayed when the language is set to English.❖Information・To set Emergency mode, from the Home screen, u[Disaster kit]uTap (P.48).Setting Early Warning "Area Mail"Receive settingSet whether to receive Area Mail.Beep toneSet the sounding time or the sound volume for Area Mail reception, and whether to sound a dedicated ringtone even in silent mode.Check screen image and beep toneCheck the ringtone and the screen for reception of earthquake early warning, tsunami warning, or disaster/evacuation information (including emergency warning related to weather etc.).やさしい日本語表示 (Simple Japanese display)Set whether to display earthquake early warning, tsunami warning in simple Japanese.翻訳・アプリ連携設定 (Translation/App link setting)*Set whether to translate the received content or use the link with the other applications.](https://usermanual.wiki/Sony/65365K.PY7-65365K-UserGuide/User-Guide-3492114-Page-118.png)
![117Mail/Web browserUse "Chrome" application to view web pages like on a PC.You can use "Chrome" application via packet communication and Wi-Fi network with the terminal.1From the Home screen, tap .2Tap the web page address entry field on the top of the screen.・When address entry field is not displayed, flick down the screen to display.3Enter a web page address or keyword to search.・Tap for address entry field to enter search words in voice sound.・As you enter an address or characters, retrieved web pages list appears.4Select a candidate or tap on the software keyboard.・To zoom-in/-out web pages, pinch-out/-in or double-tap the screen.・To go back to the previous page, tap b.❖Information・To copy text on web page, touch and hold a textuDrag or to select a range of textuTap [COPY ].Adding a new tabOpen multiple tabs and view web pages.1From the Home screen, uu[New tab].2Display a web page.・A number in the icon next to the address entry field indicates the number of tabs that are opened.Opening incognito tabYou can browse web pages without viewing history and search history.1From the Home screen, uu[New incognito tab].2Display a web page.❖Information・Around address entry field is displayed in gray with incognito tab.・To close an incognito tab, see "Closing a tab" (P.118).・Web pages opened with incognito tab are not displayed in History. When the tab is closed, record of Cookie etc. is erased. Downloaded files or bookmarked web pages can be saved with incognito tab.ChromeDisplaying web pages](https://usermanual.wiki/Sony/65365K.PY7-65365K-UserGuide/User-Guide-3492114-Page-119.png)
![118Mail/Web browserChanging tabs1Tap .・Currently opened tabs are displayed with thumbnails in a list.2Tap the tab.❖Information・A number in the icon explained in Step 1 varies by the number of tabs that are opened.Closing a tab1uTap of tab you want to close.・Alternatively, flick a tab left or right to close it.❖Information・A number in the icon explained in Step 1 varies by the number of tabs that are opened.Searching text in a web page1From the Home screen, uu[Find in page].2Enter a search word.・Tap / to move the highlight to the next/previous item.❖Information・Tap to close the search bar.1From the Home screen, tap .2u[Settings].Changing Chrome settingsSign in to ChromeSign in to Chrome with your Google account.Search engineSet the search engine.Autofill formsSet an address or credit card information to be used for the automatic input.Save passwordsSet whether to save the passwords entered to web pages.Home pageSet the Home page.PrivacySet the display of suggestions for navigation error or suggestions for the address entry field, or clear the browsing history data.AccessibilitySet the font size or zooming.Site settingsMake settings related to webpage such as Cookie or Javascript.Data SaverSet whether to reduce data communication amount.About ChromeCheck the versions of Chrome etc.](https://usermanual.wiki/Sony/65365K.PY7-65365K-UserGuide/User-Guide-3492114-Page-120.png)
![119Mail/Web browserTouch and hold a link or an image in a web page to copy the URL or download the image.❖Information・In some website, downloading of files etc. may not be available.You can check history, save bookmarks, etc.Bookmarking a web page1From the Home screen, uDisplay a web page.2uTap .Opening a bookmark1From the Home screen, uu[Bookmarks].2Tap the bookmark you want to open.❖Information・You can edit, delete, etc. a bookmark in the bookmark list by tapping or touching and holding a bookmark.Checking history1From the Home screen, uu[History].2Tap a history to check.❖Information・To delete history, tap of history.・To delete all history, [CLEAR BROWSING DATA...]uSelect a period to clear the datauCheck that a checkmark is put to "Browsing history", then tap [CLEAR DATA].Operating linksManaging bookmarks and history](https://usermanual.wiki/Sony/65365K.PY7-65365K-UserGuide/User-Guide-3492114-Page-121.png)
![120AppsAppsIn dmenu, you can easily access sites recommended by DOCOMO or convenient applications.1From the Home screen, [dメニュー (dmenu)].・Browser is activated, "dメニュー (dmenu)" appears.❖Information・To use dmenu, Internet connection by packet communication (LTE/3G/GPRS) or Wi-Fi is required.・For connecting dmenu and downloading applications introduced in dmenu, packet communication charge is applied separately. Some applications automatically perform packet communications.・Paid applications are included to the applications introduced in dmenu.dmarket provides a variety of services, offering digital content, such as music, videos, and books, and giving you access to a shopping site, travel booking site, and other sites.1From the Home screen, [dmarket].❖Information・For details on dmarket, refer to the following website.https://d.dmkt-sp.jp/common/about/index.html (in Japanese only)dメニュー (dmenu) dmarket](https://usermanual.wiki/Sony/65365K.PY7-65365K-UserGuide/User-Guide-3492114-Page-122.png)
![121AppsWith Google Play, you can directly access useful applications or fun games and you can download and install them on the terminal.・To use Google Play, you need to set a Google account (P.187).・For details on purchasing applications, returning your purchases, or requesting a refund, see Google Play Help.・Once you accept the installation of an application, you will be held responsible for its use. Be careful especially about applications which access many functions or large amount of data.・Make sure the security of application, then install it at your own risk. The terminal may be infected with a virus and the data may be damaged.・NTT DOCOMO is not liable for any malfunctions or disadvantage brought to you or any third party due to application which you installed and provided by a third party including Google Inc.・For the application which you installed from Play Store and provided by the third party including Google Inc., contact each provider.1From the Home screen, [Play Store].2Search applicationsuTap an application to install.・Check the displayed contents carefully and follow the onscreen instructions.❖Information・Some applications automatically perform packet communications. Packet communication is kept active unless you disconnect it or the time-out error occurs. To cut off packet communication manually, from the Home screen, tap u[Settings]u[More]u[Mobile networks]u for "Mobile data traffic"u[OK].・Some applications may be updated automatically.1From the Home screen, [Play Store].2u[My apps & games].3Tap the applications to uninstallu[UNINSTALL]u[OK].・When you uninstall a charged application, a screen for refund may appear. For details, see Google Play Help.Play StoreInstalling an applicationUninstalling an application](https://usermanual.wiki/Sony/65365K.PY7-65365K-UserGuide/User-Guide-3492114-Page-123.png)
![123AppsPlease note the following when holding the terminal over an IC card reader or NFC module equipped device.・Bring the NFC / Osaifu-Keitai position close to the device slowly without hitting it strongly.・Hold the NFC / Osaifu-Keitai position over the center of the device and parallel to it. If scanning fails even with it held in front of the center of the scanner, slightly lift up the terminal, or move it backwards/forwards or to the left/right.・If there are metal objects between the NFC / Osaifu-Keitai position for holding over and the other device, scanning may fail. Putting the terminal into a case or cover may affect communication. In that case, remove the case or cover.NFC / Osaifu-Keitai position for holding overThe position for holding over when using NFC / Osaifu-Keitai is on the front of the terminal.1From the Home screen, u[Osaifu-Keitai].2Select the service from the service list.・Download an application compatible with service site or service.3Hover the NFC / Osaifu-Keitai position near the IC card reader.Notes on holding over the deviceUsing "Osaifu-Keitai compatible service"](https://usermanual.wiki/Sony/65365K.PY7-65365K-UserGuide/User-Guide-3492114-Page-125.png)
![124Apps❖Information・You can scan and write data to or from an IC card reader without activating Osaifu-Keitai compatible application.・These services are available even when the terminal is off. However, they may not be available if the terminal has been off for a long time or the battery is too low.・The Osaifu-Keitai compatible application performs communication which is necessary for providing the Osaifu-Keitai service in the background regardless of the setting of "STAMINA mode" (P.177) or "Data saver" (P.162), and the packet communication charge may be incurred.・Depending on your installed Osaifu-Keitai compatible application or its settings, your terminal may not respond even when you hover it over an IC card reader if the screen is locked or if the screen backlight of the terminal is off.・After the power of the terminal is turned on or the terminal is restarted, cancel the screen lock and then hold over a reader to use the Osaif-Keitai service.・You can use Osaifu-Keitai compatible service even when the PIN code for docomo nano UIM card cannot be unlocked or PIN locked.・Note that when you do not subscribe to sp-mode, some functions of Osaifu-Keitai compatible service may not be available.1From the Home screen, u[Settings]u[More].2[NFC / Osaifu-Keitai settings]uTap for "Reader/Writer, P2P"u[OK].・NFC Reader/Writer, P2P function is enabled, and appears in the status bar.3Hold the NFC / Osaifu-Keitai position over a device with the NFC module or a smart poster, etc.Use "NFC / Osaifu-Keitai lock" settings to restrict the use of Osaifu-Keitai function and related services.・NFC / Osaifu-Keitai lock is different from screen lock for the terminal, SIM card lock.1From the Home screen, u[Settings]u[More].2[NFC / Osaifu-Keitai settings]u[NFC / Osaifu-Keitai lock].Using " かざしてリンク対応サービス (Kazashite-Link compatible service)"Locking Osaifu-Keitai function](https://usermanual.wiki/Sony/65365K.PY7-65365K-UserGuide/User-Guide-3492114-Page-126.png)
![125Apps3Enter a passwordu[NEXT].・When using "NFC / Osaifu-Keitai lock" for the first time, enter a password to set.・Osaifu-Keitai function is locked, and or is displayed in the status bar.❖Information・Note that you cannot cancel "NFC / Osaifu-Keitai lock", if the battery runs out while "NFC / Osaifu-Keitai lock" is set. Be careful about remaining battery level. If you cancel "NFC / Osaifu-Keitai lock", charge the terminal before canceling.・You need to unlock to use Osaifu-Keitai menu while "NFC / Osaifu-Keitai lock" is set.・"NFC / Osaifu-Keitai lock" password is not be deleted even if you reset the terminal.・When unlocking "NFC / Osaifu-Keitai lock", insert the same docomo nano UIM card as the one inserted when "NFC / Osaifu-Keitai lock" was set, then unlock.■NFCNFC is an abbreviation for Near Field Communication and a short range wireless communication method of international standard defined by ISO (International Organization for Standardization). You can use a contactless IC card function, Reader/Writer function, P2P function, and others.You can set whether to enable or disable Osaifu-Keitai compatible services or other services that you can use by hovering your terminal over an IC card reader.・For details on the Tap & pay feature, from the Home screen, u[Settings]u[More]u[NFC / Osaifu-Keitai settings]u[Tap & pay]uuTap [Help] to see Tap & pay Help.1From the Home screen, u[Settings]u[More].2[NFC / Osaifu-Keitai settings]u[Tap & pay].3Select a service."iD" refers to electronic money offered by docomo. Once you have set up "iD" on your Osaifu-Keitai, you can hover the terminal over an IC card reader at various shops to make your shopping easier and more comfortable. You can register the information of up to two cards, and use either one depending on the privilege.・To use iD with your Osaifu-Keitai, you need to configure settings using the iD application.・The charges required for iD service (including the annual charge) vary by card issuer.Tap & payiDアプリ (iD application)](https://usermanual.wiki/Sony/65365K.PY7-65365K-UserGuide/User-Guide-3492114-Page-127.png)
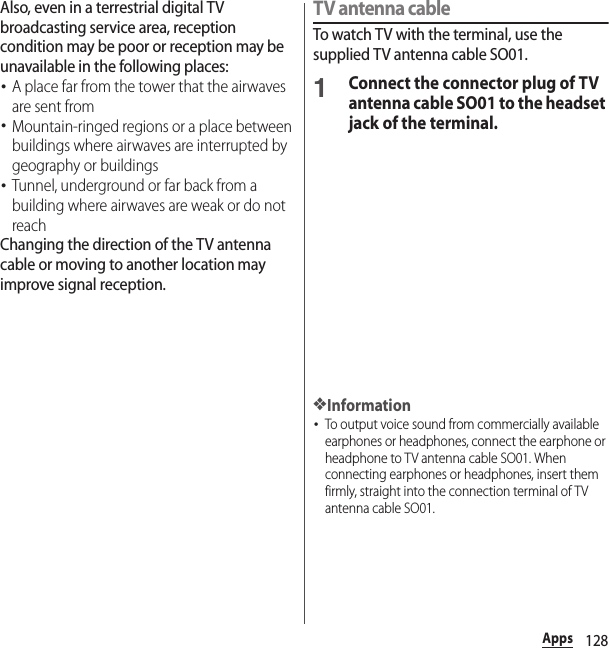
![129Apps1From the Home screen, u[TV].・When using for the first time, make channel settings according to the onscreen instructions (P.131).■ TV watching screenaFull seg/1Seg switching iconbData broadcasting iconcRemote control buttondOption menueBroadcasting service in watching (Full seg/1Seg)fImagegSubtitleshChannel, broadcasting station and program informationiReception signal leveljRecord iconkChannel selection key・Touch and hold / to search available channels.lData broadcasting・For 1Seg programs, data broadcasting can be viewed only in the portrait screen.mData broadcasting remote control❖Information・In portrait screen in Full seg, you can see a remote control for data broadcasts, and you can display a channel list and program information.・To view data broadcasting in full screen, in portrait screen in 1Seg, touch and hold the data broadcasting areau[Broadcast data full-screen].・To show/hide icon such as option menu, on the TV watching screen, tap an image.・While watching TV, press the volume key to adjust the sound volume.・You can watch TV in the portrait screen or landscape screen (P.46).・To switch channels for watching, operate any of the following.- Tap the channel selection key.- Flick an image on the TV watching screen left or right.- Touch and hold an image on the TV watching screenuSelect a channel from the displayed channel list.・It may take a time to acquire image data or broadcasted data when you activate TV or change channels due to characteristic of digital broadcasting.・According to the airwave condition, image or sound may be interrupted or stopped.Watching TVhidkjcbagfeTV watching screen (Full seg, Full screen)hidkcbajfgelmTV watching screen (Full seg, with Data broadcasting)](https://usermanual.wiki/Sony/65365K.PY7-65365K-UserGuide/User-Guide-3492114-Page-131.png)
![130Apps・Answering an incoming call while watching TV temporarily pauses the program. The program resumes automatically after the call ends.・To watch data broadcasting, call charge or packet communication charge is not required. If you use additional services of data broadcasting, etc. via packet communication, packet communication charge is applied.Exiting TV1On the TV watching screen, b.❖Information・You cannot exit TV even if you tap h to return to the Home screen. If TV remains activated, the battery may be consumed quickly.You can set TV watching screen, data broadcasting and channel settings.Using optional menuReserve recording/viewing TV program or make each setting.1From the Home screen, u[TV].2Tap .Setting TVProgram Program guideDisplay the program guide.Program detail infoDisplay detailed information of the program currently watched.Program informationDisplay program information of the channel currently watched.Recorded program listDisplay recorded program list (P.133).Reserve Recording/ViewingReserve programs to record/view, or display the failed reservation list.TV linkDisplay TV link list screen.For some data broadcasting programs, TV links are displayed, and by registering, you can connect to related websites.* 1Change areaRegister or change broadcasting area (P.131).](https://usermanual.wiki/Sony/65365K.PY7-65365K-UserGuide/User-Guide-3492114-Page-132.png)
![131Apps*1 Some TV links have period of validity.*2 You can set subtitle position only in landscape view in 1Seg. Also, you have a choice of audio channels only when watching a program with a sub audio channel.Saving channels in the current locationAvailable channels vary depending on the area (broadcasting service area) you are using in.1From the Home screen, u[TV].2u[Change area].3Touch and hold an unregistered item.4[Area info setting]uSelect region, prefecture and locality.5[OK].❖Information・By touching and holding the area registered in Step 3, you can display details, set area information, refresh channels, rename area, and deleting settings.Changing numbers for TV remoteChange TV remote number assigned to each broadcasting station. Each broadcasting station can be called up via the corresponding TV remote number.1From the Home screen, u[TV].2Touch and hold an image.Subtitle/Sound/Video settingTurn subtitles on or off, set their position, or select the main or sub audio channel.* 2SettingsSuperimpose settingSet whether to display superimpose for Full seg or select a superimpose language.Data Broadcasting settingsSet whether to use the location information or the terminal information, clear the broadcasting station memory, or postal code.Auto Exit TimerMake a timer setting to end TV watching.Device ID of receiverDisplay device ID of receiver.NotesDisplay information before use.](https://usermanual.wiki/Sony/65365K.PY7-65365K-UserGuide/User-Guide-3492114-Page-133.png)
![132Apps3Tap the broadcasting station to change the remote control numberuTouch and hold the image.4Touch and hold the number of remote control to set to.5[YES].・If you select a number of remote control which is already assigned to another broadcasting station, [Overwrite registered channel]uTap [YES].❖Information・To delete set broadcasting stations, touch and hold a broadcasting station in Step 3u[Delete channel]uTap [ YES].Record images, sound, captions or data broadcasting while displaying.・Data broadcasts can be recorded only in 1Seg mode.1From the Home screen, u[TV].2Tap to start recording.3u[Stop recording]/[Stop recording as end of program].・To end the recording when the program ends, tap [Stop recording as end of program].❖Information・In Full seg, the maximum size of a single recording file that can be saved is 198 GB, and the maximum continuous recording time is about 1,440 minutes (on a 200 GB microSD card).In 1Seg, the maximum size of a single recording file that can be saved is 2 GB, and the maximum continuous recording time is about 640 minutes.You can save up to 99 Full seg and 1Seg recordings.・Recorded data is saved on a microSD card. Recording is not available if a microSD card is not attached.・When you use the microSD card from another application while recording, recording may fail.Recording TV](https://usermanual.wiki/Sony/65365K.PY7-65365K-UserGuide/User-Guide-3492114-Page-134.png)
![133AppsPlaying a recorded program1From the Home screen, u[TV].2u[Recorded program list].3Tap a program to play.❖Information・To delete a recorded program, touch and hold the program in Step 3uuTap [ YES].・To change the title of a program, touch and hold the program in Step 3uuEnter a titleuTap [OK ].・Tap in Step 3 to set the playback mode and see and sort the amount of available memory.・All still pictures or videos that you capture on the terminal are stored into the internal storage or a microSD card.・To save still pictures and videos to a microSD card, insert one and specify it as the destination where you want to save them, before using the camera (P.142).・When the terminal temperature becomes high, the camera may not activate or may stop.■About the Copyright and Portrait rightsMovies, still images, and sounds recorded on the terminal are prohibited by the copyright law from use without consent of the copyright holders, unless intended for personal use or any other purpose permitted by law. Also, using or transformation of other person’s portrait or name without his or her permission may violate the portrait right. When you post recorded images etc. on the Internet web pages etc., make sure to be aware of the copyright and portrait right. Note that some performances, shows, and exhibitions may be restricted to record even for personal use. Transmission of images related to copyright or beyond the scope provided in the copyright law is not available.Shooting/sending imagesPlease be considerate of the privacy of individuals around you when taking and sending photos using camera-equipped mobile phones.If you cause the public any trouble using the terminal, you may be punished under law or regulations (for example, nuisance prevention ordinance).Camera](https://usermanual.wiki/Sony/65365K.PY7-65365K-UserGuide/User-Guide-3492114-Page-135.png)
![134Apps1From the Home screen, [Camera].・A shooting screen appears.❖Information・When the camera is turned on via Quick launch, the capturing mode is automatically set to "SUPERIOR AUTO" or "VIDEO".・The camera turns off if you do not touch the shooting screen for about 3 minutes (or about 30 seconds if you have turned on the camera in Quick launch mode).Using Quick launch"Quick launch" refers to turning on the camera by pressing and holding k for at least 1 second or by swiping (or flicking) on the lock screen.・Quick launch operations can be changed (P.144).aAuto focus framebZooming indicator・An image is shot in magnification displayed with the indicator.cDisplay area for status icons・When settings such as Smile Shutter and Save location (Geotagging) are selected, their icons are displayed here.dThumbnail・Tap to display the play screen of shot photo or the preview screen of video (P.146).eSwitching to the front camera iconfCurrent capturing mode (P.135)gFlash setting iconhShutter icon (still picture)Start/stop/pause recording icon (video)・Depending on setting, an icon of Self-timer or Touch capture is displayed.iScene/conditions selection icon・When the capturing mode is "SUPERIOR AUTO" or "VIDEO", the camera determines and detects the scene and display the icon.Also, this area displays an icon when your terminal detects that the camera is moving ( ), your camera is still ( ), or your subject is moving ( ).jOption menuActivating the camera Shooting screenegdhaijcbf](https://usermanual.wiki/Sony/65365K.PY7-65365K-UserGuide/User-Guide-3492114-Page-136.png)
![135Apps❖Information・When using "AR effect" and other camera applications, the display and operations are different.・To zoom in or out, set "Use Volume key as" (P.142) to "Zoom" and operate with the volume key, or pinch in or out on the screen.・Zooming is not available when "AR effect" or "Panorama" is set or when shooting with the front camera.・The scene mode in "SUPERIOR AUTO" or "VIDEO" may not be recognized correctly depending on shooting conditions.Changing the capturing modeYou can switch between "SUPERIOR AUTO", "MANUAL", "VIDEO" and "CAMERA APPS".1From the Home screen, [Camera].2Swipe (or flick) the screen.・Swipe (or flick) up or down in landscape view, or right or left in portrait view.・About CAMERA APPS (P.135)■ Capturing modes and resolution/Video resolution* "Super slow motion", "Super slow (one-shot)" and "Slow motion" are shot in HD (30fps/960fps), HD (960fps) and HD (120fps), respectively.Using the camera appsYou can use the camera apps to shoot many types of photos or videos.1From the Home screen, [Camera].2Swipe (or flick) the screen to display the CAMERA APPS list.・Swipe (or flick) down in landscape view, or left in portrait view.3Select an app.・To switch to the other camera app, tap the camera app icon located in the bottom right of the shooting screen (bottom left for portrait view).Capturing modeCapturing mode Resolution (aspect ratio)/Video resolution"SUPERIOR AUTO""MANUAL"19MP (4:3)17MP (16:9)12MP (4:3)12MP (16:9)"VIDEO"Full HD (30 fps/60 fps)HD*VGA](https://usermanual.wiki/Sony/65365K.PY7-65365K-UserGuide/User-Guide-3492114-Page-137.png)

![137Apps■ Shooting with the shutter icon1From the Home screen, [Camera].2Swipe (or flick) the screen to display "SUPERIOR AUTO" or "MANUAL" shooting screen.3Tap the shutter icon ( ).■ Shooting with "Touch capture"Set "Touch capture" (P.142) to "On".1From the Home screen, [Camera].2Swipe (or flick) the screen to display "SUPERIOR AUTO" or "MANUAL" shooting screen.3Tap the shooting screen.❖Information・To use "Touch capture" with the camera app, switch to the camera app and then set "Touch capture" to On.■ Shooting with the camera key1From the Home screen, [Camera].2Swipe (or flick) the screen to display "SUPERIOR AUTO" or "MANUAL" shooting screen.3Press k.・When shooting with auto focus, press k halfway, and after the auto focus frame turns blue, firmly press k the rest of the way until it stops.■ Shooting with Hand ShutterWhen shooting with the front camera, turn your palm toward the camera to shoot automatically. You can take picture of yourself without operations such as tapping an icon etc.・Set "Auto capturing" (P.141) to "Hand Shutter".1From the Home screen, [Camera].2Swipe (or flick) the screen to display "SUPERIOR AUTO" or "MANUAL" shooting screen.3Switch to the front camera and then turn your palm toward the camera.・Tap to set self-timer.・When a palm mark appears, a photo is taken.Shooting still pictures](https://usermanual.wiki/Sony/65365K.PY7-65365K-UserGuide/User-Guide-3492114-Page-139.png)
![138Apps❖Information・When the auto focus frame does not appear, focusing may be failed.・When a face of subject is detected, an auto focus frame is displayed at the position of the face (up to 5 frames). The frames around faces that the camera has automatically focused on—autofocus frames—are displayed in yellow.To select the face you want to focus on, tap the frame around that face.・When "Object tracking" (P.141) is turned on, tap the subject on the shooting screen to display the object tracking frame.・When you connect a commercially available earphone or Bluetooth device, shutter sound may be softer than usual.■ Shooting with the start/stop icon1From the Home screen, [Camera].2Swipe (or flick) the screen to display "VIDEO" shooting screen.3Tap the start shooting icon ( ).4Tap the stop icon ( ).・Tap the pause/start shooting icon ( / ) to pause/resume recording.■ Shooting with "Touch capture"Set "Touch capture" (P.142) to "On".1From the Home screen, [Camera].2Swipe (or flick) the screen to display "VIDEO" shooting screen.3Tap the shooting screen.・Tap the shooting screen again to stop recording.❖Information・To use "Touch capture" with the camera app, switch to the camera app and then set "Touch capture" to ON.Recording videos](https://usermanual.wiki/Sony/65365K.PY7-65365K-UserGuide/User-Guide-3492114-Page-140.png)
![139Apps■ Shooting with the camera key1From the Home screen, [Camera].2Swipe (or flick) the screen to display "VIDEO" shooting screen.3Press k.・Press k again to stop recording.❖Information・Do not cover the microphone with fingers etc. when recording videos.・When you connect a commercially available earphone or Bluetooth device, shooting start/stop sound may be softer than usual.・When shooting video, you can tap the shutter icon ( ) to take a photo.・When you set "Auto capturing (video)" (P.141) to "Smile Shutter", the terminal does not emit shutter sound for shooting a still image by detecting smile while recording video.・When shooting videos with "4K video", set "SteadyShot™" to "Standard" to avoid image distortion (P.142).Changing settings in the option menu・The displayed items vary by the capturing mode and camera app.1From the Home screen, [Camera].2uSelect a setting item.・Tap "More" to view additional settings and share items.・For some camera apps, tap on the shooting screen to change the settings.3Change the setting.■ Self-timer (only for still pictures)Set the number of seconds for the self-timer.The shutter icon changes into a timer icon. Tap it to shoot after set period of time (seconds) elapses.You are recommended to use the self-timer for avoiding camera shake.Changing settings when shooting](https://usermanual.wiki/Sony/65365K.PY7-65365K-UserGuide/User-Guide-3492114-Page-141.png)
![140Apps■ Color and brightness (when "SUPERIOR AUTO" or "VIDEO" is set)Adjust brightness and color. To make adjustments, drag the marker on the bar that appears on the shooting screen.Tap on the shooting screen and then tap the setting item [Reset Color and brightness] to reset the settings.■ ISO (only when "MANUAL" is set)Set ISO sensitivity.・With ISO sensitivity up, you can shoot clear picture reducing blur even in a place where lightning is poor. However, noise stands out.・With ISO sensitivity down, you can shoot with noise kept low. However, images may be dim and blurred when shot under poor lighting condition.■ HDR (only when "MANUAL" is set)Take lifelike, natural-looking images even in high-contrast scenes, for example when shooting a picture against the sun.・When "HDR" is set to ON, "ISO" is automatically set to "Auto".■ Resolution (only for still picture)Set the resolution for photos. The higher the resolution of a photo, the larger its file size.■ Video resolution (only when "VIDEO" is set)Set the resolution for video. The higher the resolution of a video, the larger its file size.■ Slow motion mode (only when "VIDEO" is set)To select the mode, tap on the shooting screen to set the Slow motion mode. Super slow motionShoot a moment when is tapped while shooting a video with the Super slow motion mode.Super slow (one-shot)Shoot a moment when is tapped with the Super slow motion mode.Slow motionShoot a video with 120fps and select a moment to shoot in the Slow motion mode.・When Slow motion is set, setting the video resolution is not available.・For shooting in Super slow motion or Slow motion, sufficient brightness is needed for shooting due to high- shutter speed.・If you shoot in a place where the quantity of light is lacked such as indoors or a dark place, the quality of image may be rough or the image may be darkened.](https://usermanual.wiki/Sony/65365K.PY7-65365K-UserGuide/User-Guide-3492114-Page-142.png)

![143Apps■ Preview (when "Creative effect" or "Sound Photo" is set)Set whether to display the preview screen or the edit screen after a still image is shot.■ Recording file type (only when "4K video" is set)Select the file type from "H.264" or "H.265".❖Information・Some settings cannot be used in combination with one another.・The operation may differ depending on the capturing mode or camera app.Changing settings using iconsTap the icon displayed on the shooting screen to change the setting.・The displayed icons vary by the capturing mode, camera apps, etc.■ Flash Auto Fill flash Red-eye reduction Off Flashlight■ White balance (when "MANUAL" or "4K video" is set)Set according to the ambient light source.uTap [WB] to set. / AUTO Incandescent Fluorescent Daylight Cloudy■ Brightness (EV correction) (When "MANUAL" or "4K video" is set)u[EV]uTap a bar or drag a marker to set.■ Shutter speed (only when "MANUAL" is set)Set a shutter speed according to a moving speed of subject etc.u[SS]uTap a bar or drag a marker to set.■ Focus (only when "MANUAL" is set)Set according to a distance from a subject.u[Focus]uTap a bar or drag a marker to set.■ FlashSet whether to use flash when shooting video in a backlit or dark scene. On Off](https://usermanual.wiki/Sony/65365K.PY7-65365K-UserGuide/User-Guide-3492114-Page-145.png)
![144Apps■ Slow motion shooting (only when "VIDEO" is set)Tap to switch to the capturing mode with slow motion. Shoot a moment when is tapped with Super slow motion.・To change the capturing mode, uTap [Slow motion mode] (P.140).■ Self-timer (only when shooting with Front camera)Tap to set a number of seconds for self-timer. Each time you tap, it switches in the order of 3 sec.→10 sec.→Off.The shutter icon changes into a timer icon. Tap it to shoot after set period of time (seconds) elapses.Use the self-timer to take a self-portrait or group photo.You are recommended to use the self-timer for avoiding camera shake.■ Switch creative effect (only when "Creative effect" is set)Tap to switch a type of effect.❖Information・Some settings cannot be used in combination with one another.・The operation may differ depending on the capturing mode or camera app.You can change how the camera works when it is turned on via Quick launch.1From the Home screen, [Camera].2u[More]u[Quick launch].3Tap any of [Launch only]/[Launch and capture]/[Launch and record video]/[Off].❖Information・When the camera is turned on via Quick launch, the capturing mode is automatically set to "SUPERIOR AUTO" or "VIDEO".Changing the Quick launch settings](https://usermanual.wiki/Sony/65365K.PY7-65365K-UserGuide/User-Guide-3492114-Page-146.png)
![145AppsView/play photos or videos.1From the Home screen, [Album].・A list of images are displayed in chronological order.■ Image list screenaDisplay the menubFile shot with Predictive CapturecVideo filedOption menu・u[Select items]uTap an image to select for displaying a menu of deletion, share, etc. Tap images continuously to select multiple files.eFile shot with Slow motion mode・Files shot with 120fps and not including slow motion images are marked with .fSound Photo fileg4K video file❖Information・Depending on the number of saved images, it may take some times to load images.・To zoom in/out an image, flick the image list screen right/left or pinch out/in.・For some DRM protected contents or transfer applications, sharing may be limited.・Touch and hold an image in the image list screen to select the image.・When is displayed at the upper right of screen, an image or video can be played with Google Cast devices. Tap and then follow the onscreen instructions to connect. To play with Google Cast devices, connect the terminal to the Wi-Fi network same with a Google Cast device connected to in advance (P.159).1From the Home screen, [Album]uTap an image.・With Sound Photo files, audio is played back with the image.・Tap the screen to display information such as shooting date, option menu icons, etc.・For the files shot with Predictive Capture, tap [SELECT THE BEST] to select the photo to save.AlbumDisplaying photos/videosbcdfegaViewing a photo](https://usermanual.wiki/Sony/65365K.PY7-65365K-UserGuide/User-Guide-3492114-Page-147.png)
![146Apps■ Photo viewing screenaReturn to the image list・Alternatively, on the photo viewing screen, flick up/down to return to the image list screen.bShot date・When a location information is saved, its relevant country or place name is displayed. Tap u[Show on map] to view the image on a map.cSharing menu・Upload files to online services, send them via Bluetooth or email.dEdit photoseDeletefOption menu・Add/remove to/from the favorites, play slideshows, configure image settings, rotate images, check detailed information, or add geotags (location information).❖Information・To zoom in/out image display, pinch out/in on the photo viewing screen or double-tap.・The menu displayed may differ depending on the operation or selected file. Also, some files cannot be operated.1From the Home screen, [Album]uTap a video.・A preview screen appears.2Tap .・Tap the screen to display information such as shooting date, option menu icons, etc.■ Video playback screenaEdit a videobOption menucPlay/PausedVideo file name/Recorded dateeShow/Hide operation icons・Show/hide operation icon such as fast forward or a setting icon for repeat play.fProgress bar・Tap on the bar or drag a marker left or right to change a playback position.abdcfePlaying a videoabcdfe](https://usermanual.wiki/Sony/65365K.PY7-65365K-UserGuide/User-Guide-3492114-Page-148.png)
![147Apps❖Information・To zoom in/out a video display, pinch out/in on the video playing screen.・The displayed menu may differ depending on the operation or selected video file. Also, some files cannot be operated.Play back music and videos stored on the internal storage or a microSD card using Media Player.・File formats of playable data (P.232)❖Information・For details on Media Player, from the Home screen, u[Media Player]uuTap [Help] to refer to the manual of Media Player.1From the Home screen, u[Media Player].2Tap the appropriate tab at the top of the screen or flick left or right on the screen.3Tap a song/video.■ Music playback screenaAccess dmarketbBack to song listcPlayback pointdAlbum art・Tap here to display the operation bar or the icons to adjust the audio volume, post to SNS, display the album information, etc.Alternatively, on the playback screen, press the volume key to adjust the volume.eRepeat is off/Repeat all songs/Repeat current songfOperate a song : Go back to the beginning of the song or to the previous song : Fast rewind : Pause : Play : Fast forward : Skip to the next songgOption menuhSong informationiShuffle is off/Shuffle is onMedia PlayerPlaying music/videobdecahgfi](https://usermanual.wiki/Sony/65365K.PY7-65365K-UserGuide/User-Guide-3492114-Page-149.png)
![148Apps❖Information・You can return to the Home screen to perform another operation while listening to music in the background. To return to the music playback screen, from the Home screen, tap u[Media Player], or drag the status bar downwardsuTap the name of song that is being played.■ Video playback screenaPlayback pointbShare a video between screen mirroring compatible device and the terminalcBack to video listdOperate a video : Go back to the beginning of the video or to the previous video : Fast rewind : Pause : Play : Fast forward : Skip to the next videoeOption menufVideo informationgAuto-rotate screen ON/OFF・Tap to turn red and disable Auto-rotate screen.hVolume control・Alternatively, on the playback screen, press the volume key to adjust the volume.❖Information・Tap the screen to display option menu icons and other items.Ending Media Player1On the Media Player screen/song player screen/movie player screen, / u[Exit].adbgcefh](https://usermanual.wiki/Sony/65365K.PY7-65365K-UserGuide/User-Guide-3492114-Page-150.png)
![150Apps■ Where radio waves are difficult to receiveNote that radio waves may not be received or it may be difficult to receive radio waves in the following conditions, since GPS uses radio waves from a satellite.・Inside or immediately under a building・Inside a bag or box・Inside or under a thick covering of trees・In a car, inside a train compartment・When there are obstructions (people or objects) near the terminal・Inside a basement or tunnel, and below the ground or water・In buildings-clustered or residential area・Near a high-voltage cable・Bad weather such as heavy rain or snow❖Note・If you cannot use a part of or entire GPS function, check that the use of internet is included in your subscription and Wi-Fi (P.158) and Mobile data traffic (P.162) is enabled.・NTT DOCOMO is not liable for navigation services or for the accuracy of location services.Activating GPS/Location servicesYou can position your current location using GPS, Wi-Fi, and information sent from mobile network base stations.1From the Home screen, u[Settings]u[Location].2Tap .3Read the notes on location information and tap [AGREE].❖Information・Your location information is sent to Google without specifying who you are. Your location information may be sent even when the application is not running.The Google Maps application allows you to view your current location, find other locations and search routes.・To use Google Maps, enable Mobile data traffic (LTE/3G/GPRS) or connect to Wi-Fi.・Google Maps does not cover the whole world.Using Google Maps](https://usermanual.wiki/Sony/65365K.PY7-65365K-UserGuide/User-Guide-3492114-Page-152.png)
![151AppsFinding the current location on the mapYou can detect your current location using location information service.・To detect current location, enable "Location" (P.150) beforehand.1From the Home screen, [Google]u[Maps].・When a message appears, follow the onscreen instructions.2Tap .・Current location is shown by blue mark.・If you tap , the icon changes to , and then the terminal's geomagnetic compass links the direction displayed on the map.・To zoom in/out the map, pinch out/in on the map screen, or double-tap/tap the screen with two fingers.・If the confirmation screen etc. appears, follow the onscreen instructions.Viewing Street view1From the Home screen, [Google]u[Maps].2Touch and hold a point to show in the street view.3Tap a photo displayed at the lower left of screen.Searching for a location1From the Home screen, [Google]u[Maps].2Fill out the search bar.3Tap on the software keyboard.4Tap a destination.Displaying informationDisplay information such as traffic information etc. on the map.1From the Home screen, [Google]u[Maps].2uSelect information to display.NavigatingYou can receive detailed guides for your destination.1From the Home screen, [Google]u[Maps].2uSelect a transporting method.3Enter a start point in the upper entry fielduEnter an end point in the lower entry field.](https://usermanual.wiki/Sony/65365K.PY7-65365K-UserGuide/User-Guide-3492114-Page-153.png)
![152Apps1From the Home screen, [ドコモクラウド (docomo cloud)]u[Schedule].2uTap [Monthly]/[Week]/[Daily].・Flick the calendar left or right to display the next or previous month/week/day.❖Information・To move the cursor to the current date, in Step 2, tap u[Jump to]u[TODAY]. To move the cursor to the desired date, in Step 2, u[Jump to]uFlick the calendar left or right to select month and then tap a dayuTap [JUMP].・To display all registered schedules in a list, in Step 2, u[Schedule list].・To switch to the "Memo" application screen, in Step 2, uTap [Memo list].1From the Home screen, [ドコモクラウド (docomo cloud)]u[Schedule].2uEnter the item.・For setting alarms, tap [Display input option].3[Save].❖Information・When an alarm of event is set, appears on the status bar at the set time. Drag the status baruTap [It's time] to display details of the event.Displaying events of Schedule1From the Home screen, [ドコモクラウド (docomo cloud)]u[Schedule]uDisplay a scheduled date/time.・In Monthly view or Week view, tap a scheduled date.2Tap an event to view description.・To edit an event, tap [Edit].❖Information・To delete an event, touch and hold an event in Step 2uTap [Delete one]u[DELETE].・To delete all events, from the Home screen, tap [ドコモクラウド (docomo cloud)]u[Schedule]uu[Delete all]u[DELETE].Setting display conditions in ScheduleWhen a search criteria is set, specified data can be displayed.1From the Home screen, [ドコモクラウド (docomo cloud)]u[Schedule].2u[Conditions].3Select the display conditionu[OK]ub.ScheduleDisplaying scheduleCreating schedule event](https://usermanual.wiki/Sony/65365K.PY7-65365K-UserGuide/User-Guide-3492114-Page-154.png)
![153Apps❖Information・To search the contents entered in "title", "text" and "Where?", in Step 3, [Free word search]uEnter a search wordu[OK]u[OK]ub.Use alarm, world clock, stop watch and timer.1From the Home screen, u[Clock].2uSet the item such as time.3[SAVE].❖Information・To delete alarms, in Step 2, tap u[Delete alarms]uMark alarmsu[DELETE]*u[YES].* A number of marked alarm is displayed at the right side of "DELETE".Enabling/Disabling alarm1From the Home screen, u[Clock].2Tap / for the alarm you want to turn on or off.Stopping alarm1While alarm is sounding, drag to the right.❖Information・If you tap [SNOOZE], the alarm sounds again when the set time has passed.・If the screen backlight is on (except on the lock screen), tap the notification at the top of the screen to operate.Display the date and time etc. in cities around the world.1From the Home screen, u[Clock]u"" tab.2uSelect a city.❖Information・Time display during day-light saving time may differ from time difference displayed on the screen when adding a city in Step 2.1From the Home screen, u[Clock]u"" tab.2[START].3[STOP].ClockSetting an alarmUsing World clockUsing Stopwatch](https://usermanual.wiki/Sony/65365K.PY7-65365K-UserGuide/User-Guide-3492114-Page-155.png)
![154Apps1From the Home screen, u[Clock]u"" tab.2[SET TIME].3Drag the number up or down to set timeu[OK].4[START].5[STOP].docomo Data Copy application allows you to copy the data saved to the terminal to the other terminal or back up/restore the data. Use this application for transferring the data when changing the model or for the regular backup of important data.You can copy the phonebook entries, images, etc. directly to the destination device using the one-to-one direct communication which does not use the internet. Activate "Data Copy" applications on both a data sending terminal and a copy destination terminal, then align the two terminals.1From the Home screen, u[Data Copy]u[Data transfer].・After this step, follow the onscreen instructions.・This application is needed for both a data sending terminal and a copy destination terminal. If it is not installed, download from NTT DOCOMO website.・Communication method differ depending on your model or the OS.Using Timerdocomo Data CopyData transfer](https://usermanual.wiki/Sony/65365K.PY7-65365K-UserGuide/User-Guide-3492114-Page-156.png)
![155Apps・For the supported models or detailed use method, refer to NTT DOCOMO website.You can transfer or back up the data such as phonebook entries or images using a microSD card.・Do not remove the microSD card of turn off the terminal during backup or restoring. The data may be damaged.・If phonebook item names (e.g. phone number, etc.) of the other terminal are different from ones of your terminal, the item names may be changed or deleted. Also, some text may be deleted in copied destination, because savable characters in a phonebook entry vary by terminal.・Contacts that can be backed up are the registered contacts in the docomo account.・When backing up the phonebook entries to a microSD card, the data without Name registered cannot be copied.・If microSD card is low on memory, backup may not be done. In that case, delete unnecessary files to make available space.・If the battery is low, backup or restoration may not be done. In that case, charge the terminal and retry to back up or restore.・You can back up only the data such as still images and movies stored in the internal storage with this application. The data stored in a microSD card cannot be backed up.Backing upBack up the data such as phonebook entries or media files to a microSD card.1From the Home screen, u[Data Copy]u[Backup & Restore].2[Backup].3Mark the data to back up.4[Start backup]u[BACKUP].・The selected data can be saved to the microSD card.5[Back to top].Backing up/Restoring to/from a microSD card](https://usermanual.wiki/Sony/65365K.PY7-65365K-UserGuide/User-Guide-3492114-Page-157.png)
![156AppsRestoringRestore the data such as phonebook entries or media files backed up to the microSD card to the terminal.1From the Home screen, u[Data Copy]u[Backup & Restore].2[Restore].3Tap [Select] on data type to restoreuMark data to restoreu[Select].・Tap [Select latest data] to select the latest data for each data type.4Select the restoration methodu[Start restore]u[RESTORE].・For some data types, selecting the restoration method is not necessary.・The selected data is restored to the terminal.5[Back to top].Copying phonebook entries registered in Google account to docomo accountYou can copy the contacts data in your Google account to the docomo account.1From the Home screen, u[Data Copy]u[Backup & Restore].2[Phonebook account copy]u[Select] on Google account contacts to copyu[Overwrite]/[Add].・The copied contacts are saved to your docomo account.3[OK].](https://usermanual.wiki/Sony/65365K.PY7-65365K-UserGuide/User-Guide-3492114-Page-158.png)
![157AppsYou can transfer or back up the data such as call history or music using the Data Storage BOX (Cloud).1From the Home screen, u[Data Copy].2u[Backup/Restore to Cloud].3[Backup] or [Restore].・After this step, follow the onscreen instructions.・When you do not log in to docomo cloud, on the confirmation screen, tap [Log in], then follow the onscreen instructions to log in.❖Information・The periodical backup may not be executed at the specified time while the screen lock is set or "STAMINA mode" (P.177) is enabled. In the case, the backup will be executed when the activation is possible next time.・Note that use of Periodical backup with Data Storage BOX (Cloud) may incur a high packet communication charge.Backing up/Restoring to/from Data Storage BOX](https://usermanual.wiki/Sony/65365K.PY7-65365K-UserGuide/User-Guide-3492114-Page-159.png)
![158SettingsSettings1From the Home screen, u[Settings].❖Information・The item indicating the set function may be displayed above the "Wireless & networks" depending on the condition of usage of the terminal.With Wi-Fi function, you can connect to an access point for your home, company network or public wireless LAN services to use mail and Internet.■ Reception interference caused by Bluetooth devicesWireless LAN (IEEE802.11b/g/n) devices and the Bluetooth devices use the same frequency band (2.4GHz). If you use the terminal near Bluetooth devices, reception interference may occur or the communications speed may lower. Also, you may hear noise or have a connection problem. Communication may be interrupted or sound may be lost when playing back streaming data, etc. In these cases, do the following:・Keep the terminal approximately 10 m or more away from the Bluetooth device.・For using within approximately 10 m, turn off the Bluetooth device.Turning on Wi-Fi1From the Home screen, u[Settings]u[Wi-Fi].2Tap .・It may take a few seconds to turn on the Wi-Fi.Viewing the setting menuWireless & networksP. 1 5 8Themes & wallpaperP. 1 6 8DeviceP. 1 6 8Accounts & servicesP. 1 8 6SystemP. 1 9 0Wireless & networksWi-FiP. 1 5 8BluetoothP. 1 9 7Data usageP. 1 6 1Device connectionP. 1 6 3More Airplane modeP. 1 6 3Tethering & portable hotspotP. 1 6 4VPNP. 1 6 6Mobile networksP.167, P.206, P. 2 0 7Network settings resetP. 1 6 8NFC / Osaifu-Keitai settingsP.122, P.199Wi-Fi](https://usermanual.wiki/Sony/65365K.PY7-65365K-UserGuide/User-Guide-3492114-Page-160.png)
![159Settings❖Information・Even when Wi-Fi is on, packet communication is available. When a Wi-Fi network is disconnected, the connection is automatically switched to the LTE/3G/GSM network mode. Note that packet communication charge may be applied if the network connection is kept switched.・Turn the Wi-Fi function to off when you do not use Wi-Fi to cut battery power consumption.・Make sure to receive signal strong enough for using Wi-Fi function.Connecting to a Wi-Fi network1From the Home screen, u[Settings]u[Wi-Fi].2Select a Wi-Fi network to connect.・To connect to a protected Wi-Fi network, enter the passwordu[CONNECT].・To connect a Wi-Fi network with WPS compatible device, u[More features]uTap [WPS Push Button]/[WPS PIN Entry] and follow the onscreen instructions.・To scan Wi-Fi networks manually, u[Refresh].❖Information・Depending on your environment, the connection speed may be slow, or Wi-Fi may not be available.・When the terminal is connected to Wi-Fi network successfully, "Connected" appears. When a different message appears, make sure the password (security key).When the connection is not established even if you enter a correct password (security key), the correct IP address may not have been acquired. Check the signal status and reconnect. It may take 5 minutes or more to display the connection result after the operation of the connecting to Wi-Fi network.・If you connect to an access point that is not connected to the Internet, appears and communication may be performed via mobile network, not via Wi-Fi.・To use docomo services via Wi-Fi, you need to set up your d ACCOUNT. From the Home screen, u[Settings]u[docomo service/cloud]u[d ACCOUNT setting] to set.Deleting connecting Wi-Fi network setting1From the Home screen, u[Settings]u[Wi-Fi].2Tap the Wi-Fi network that is currently connected.3[FORGET].](https://usermanual.wiki/Sony/65365K.PY7-65365K-UserGuide/User-Guide-3492114-Page-161.png)
![160SettingsAdding a Wi-Fi network manually・Turn Wi-Fi on beforehand (P.158).1From the Home screen, u[Settings]u[Wi-Fi].2[Add network]uEnter the name (SSID) of the Wi-Fi network.3Tap "Security" setting itemuTap a security type of the Wi-Fi network you want to add.・Select from the 4 options: "None", "WEP", "WPA/WPA2 PSK", or "802.1x EAP"4If required, enter security information for the Wi-Fi network you want to add.5[SAVE].Using optional menu1From the Home screen, u[Settings]u[Wi-Fi]uTap .Setting up Wi-Fi1From the Home screen, u[Settings]u[Wi-Fi]uTap .RefreshP. 1 5 9More featuresInstall certificatesInstall certificates.Wi-Fi DirectP. 1 6 1WPS Push ButtonP. 1 5 9WPS PIN EntrySaved networksDisplay saved Wi-Fi networks.Network notificationSet whether to notify when Wi-Fi open network is detected.・Turn Wi-Fi on beforehand (P.158).Avoid poor connectionsSet whether to use the LTE/3G/GSM network mode when Wi-Fi radio waves are weak or communication quality is bad.Keep Wi-Fi on during sleepSet whether to disable the Wi-Fi function when the screen backlight turns off.・By default, "Only when plugged in" is set.MAC addressCheck MAC address.IP addressCheck IP address.](https://usermanual.wiki/Sony/65365K.PY7-65365K-UserGuide/User-Guide-3492114-Page-162.png)
![161SettingsUsing the Wi-Fi Direct functionYou can connect among the devices compatible with Wi-Fi Direct® via Wi-Fi even without configuring access point.・Turn Wi-Fi on beforehand (P.158).1From the Home screen, u[Settings]u[Wi-Fi].2u[More features]u[Wi-Fi Direct].3Select a Wi-Fi Direct compatible device name to connect.・Tap [SEARCH FOR DEVICES] to refresh the list of detected devices.・To change your terminal's name displayed on the detected Wi-Fi Direct compatible device, tap [RENAME DEVICE].❖Information・Wi-Fi Direct function becomes available when you install a compatible application.Check the data usage or make settings for mobile data communication.Data usageUsageDisplays the mobile data usage of the period that is set to "Billing cycle". Tap to set the warning volume of data usage.Data SaverP. 1 6 2Mobile data trafficP. 1 6 2Cellular data usageThe mobile data usage of the period that is set to "Billing cycle" can be checked with a graph.・To set the restriction of data communication in the background for each application, select the application displayed below the graph.Billing cycleP. 1 6 2Wi-Fi data usageCheck the used volume of the Wi-Fi data usage.Network restrictionsSet to restrict use of specified Wi-Fi network.](https://usermanual.wiki/Sony/65365K.PY7-65365K-UserGuide/User-Guide-3492114-Page-163.png)
![162SettingsEnabling Data saverRestrict the data communication in the background by the applications to reduce the data usage.1From the Home screen, u[Settings]u[Data usage].2[Data saver]uTap .❖Information・To set the applications to be unrestricted in Data saver, in Step 2, [Data saver]u[Unrestricted data access]uTap of the application.Enabling/Disabling mobile data communication1From the Home screen, u[Settings]u[Data usage].2Tap / for "Mobile data traffic".3Read the note and tap [OK].Setting Billing cycleSet the billing period (measuring period) of data communication, or the warning volume or the upper limit of data usage amount.1From the Home screen, u[Settings]u[Data usage].2[Billing cycle].❖Information・Displayed data usage volume is an estimate. It may be different from the actual one. You can check your data usage volume at My docomo.・Note that mobile data communication will suspend when data usage volume reaches to the set limit volume.To resume the mobile data communication, on the pause screen, tap [RESUME], or drag the status bar downu[Mobile data limit reached]uTap [RESUME].Billing cycleSet the billing period (measuring period) of data communication.Set data warningSet whether to notify with a warning when the data usage reaches to the set warning volume.Data warningSet a warning volume of data usage.Set data limitSet whether to temporarily stop the data communication when the data usage reaches to the limit volume.Data limitSet a limit volume of data usage.](https://usermanual.wiki/Sony/65365K.PY7-65365K-UserGuide/User-Guide-3492114-Page-164.png)
![163Settings* Compatible with Wi-Fi CERTIFIED Miracast™Depending on usage environment, image or sound may be interrupted or stopped.Covering around the Wi-Fi antenna area with your hand may affect the quality of transferring images.In this mode, the functions of using radio wave transmissions such as calling, accessing to the Internet (including sending/receiving mails), etc. are disabled.1From the Home screen, u[Settings]u[More].2Tap for "Airplane mode".・ appears on the status bar.❖Information・Even if Airplane mode is ON, Wi-Fi, Bluetooth function and NFC Reader/Writer, P2P function can be turned on. Do not turn on these functions in a place where the use of radio wave is prohibited.Device connectionScreen mirroring*Connect to a TV or tablet compatible with Screen mirroring to display the screen on the terminal.CastDisplay the terminal's screen on a device that supports Google Cast.Media serverP. 2 0 3Keep your device's screen onSet whether to light the terminal backlight while an external device is connected.DUALSHOCK™4Set to allow a wireless controller (DUALSHOCK™4) to operate the terminal.USB ConnectivityInstall softwareSet whether to display a screen for installing software that can manage the contents of the terminal from a PC when the terminal is connected to a PC.PrintingInstall print service applications.Airplane mode](https://usermanual.wiki/Sony/65365K.PY7-65365K-UserGuide/User-Guide-3492114-Page-165.png)
![164SettingsUse tethering function to enable the terminal to use as modem to allow USB compatible devices, wireless LAN devices or Bluetooth devices to access the Internet.❖Information・If you want to use tethering, subscription to Packet Pack/packet flat-rate service is strongly recommended.・When the docomo nano UIM card is not inserted, mobile data communication is disabled, or the terminal is out of service area, USB tethering, the portable hotspot and Bluetooth tethering that use mobile network are not available.Enabling USB tethering1Connect the terminal to a PC with USB cable A to C 01 (optional) etc. (P.41).・The "Use USB to" screen appears on the terminal.・When a screen for installing driver software appears, wait for a while until the installation is complete.・When the "Install software" screen appears on the terminal, tap [SKIP] or [CANCEL].2[USB tethering].3Tap for "USB tethering".・When you use this function for the first time, the driver software for the terminal is installed to a PC. Wait for a while until installation is complete.❖Information・System requirements (OS) for USB tethering are as follows.- Microsoft Windows 10- Microsoft Windows 8.1- Microsoft Windows 7・In USB tethering mode, you cannot access your terminal's internal storage or microSD card from the PC.・USB tethering can be used with the portable hotspot or Bluetooth tethering at the same time.Enabling Portable hotspotYou can use the terminal as a Wi-Fi access point to connect up to 10 wireless LAN devices to the Internet simultaneously.1From the Home screen, u[Settings]u[More]u[Tethering & portable hotspot].2Tap for "Portable hotspot".Using tethering function](https://usermanual.wiki/Sony/65365K.PY7-65365K-UserGuide/User-Guide-3492114-Page-166.png)
![165Settings❖Information・If the portable hotspot starts while connecting to Wi-Fi network, Wi-Fi connection is disconnected. Wi-Fi network is automatically connected when the portable hotspot ends.・The portable hotspot can be used with USB tethering or Bluetooth tethering at the same time.・To connect a wireless LAN device via NFC, tap [One-touch portable hotspot] in Step 2.・If you operate from [Portable hotspot settings] in Step 2u[Power save] to enable power saving, the portable hotspot turns off automatically when the specified time arrives without connecting to wireless LAN devices.Changing the portable hotspot settingsYou can change the network name (SSID), security setting, or password set by default.1From the Home screen, u[Settings]u[More]u[Tethering & portable hotspot].2[Portable hotspot settings]u[Configure hotspot].3Enter the network name (SSID) of the Wi-Fi access point you want to set.・The device name of the terminal is set by default.4Tap "Security" setting itemuTap a security type of the Wi-Fi access point you want to set.5Enter a password of the Wi-Fi access point to set as required.・By default, a password is set in a random manner.6[SAVE].Enabling Bluetooth tetheringUp to 4 Bluetooth devices can be connected to the Internet.1From the Home screen, u[Settings]u[More]u[Tethering & portable hotspot].2Tap for "Bluetooth tethering".❖Information・To connect the terminal from a Bluetooth device, perform pairing (P.198) and operate the internet access on the Bluetooth device. For operation on a Bluetooth device, refer to the manuals of the Bluetooth device.・Bluetooth tethering can be used with USB tethering or the portable hotspot at the same time.](https://usermanual.wiki/Sony/65365K.PY7-65365K-UserGuide/User-Guide-3492114-Page-167.png)
![166SettingsUse Virtual Private Network (VPN) to connect to the information in a protected local network such as companies, schools or other facilities from outside.・To set up a VPN on the terminal, you need to retrieve the information related to security from your network administrator. For details, see the following website.http://www.sonymobile.co.jp/support/ (In Japanese only) Adding a VPN1From the Home screen, u[Settings]u[More]u[VPN].2Tap .・When the note appears, follow the onscreen instructions to set unlocking method of screen lock (P.181).3When an editing screen is displayed, follow the instruction of the network administrator to enter/set required items of VPN settings.4[SAVE].❖Information・To edit VPN, tap of VPN in Step 2uEnter or set each itemu[SAVE].・To delete VPN, tap of VPN in Step 2u[FORGET].Connecting to a VPN1From the Home screen, u[Settings]u[More]u[VPN].2Tap a VPN to connect to.3[CONNECT].・When you are connected to a VPN, appears in the status bar.・If the username or the password is not entered when the VPN is added, enter the necessary informationuTap [CONNECT].Disconnecting a VPN1From the Home screen, u[Settings]u[More]u[VPN].2Tap a connected VPNu[FORGET].Connecting to a VPN (Virtual Private Network)](https://usermanual.wiki/Sony/65365K.PY7-65365K-UserGuide/User-Guide-3492114-Page-168.png)
![167SettingsAn access point for connecting to the Internet (sp-mode) is already registered. You can add or change it if necessary.For details of sp-mode, refer to NTT DOCOMO website.https://www.nttdocomo.co.jp/service/spmode/ (in Japanese only)For using mopera U and Business mopera Internet, add the access point manually.For details on mopera U, refer to mopera U website.https://www.mopera.net/ (in Japanese only)Checking the access point in use1From the Home screen, u[Settings]u[More]u[Mobile networks]u[Access Point Names].・The radio button on the right of current access point is marked.Setting an access point additionally1From the Home screen, u[Settings]u[More]u[Mobile networks]u[Access Point Names].2Tap .・To edit the access point, tap the access point.3[Name]uEnter a nameu[OK].4[APN]uEnter an access point nameu[OK].5Tap and enter all other information required by your network operator.6u[Save].❖Information・Do not change the MCC/MNC. If you change them to the values other than the default (440/10), the access point will not be displayed on the APN screen. If the set access point is not displayed, in Step 2uTap [Reset to default] or , then set the access point again.・It is recommended that you use the access point that is registered by default as it is.Initializing an access point1From the Home screen, u[Settings]u[More]u[Mobile networks]u[Access Point Names].2u[Reset to default].Setting an access point](https://usermanual.wiki/Sony/65365K.PY7-65365K-UserGuide/User-Guide-3492114-Page-169.png)
![168SettingsAll network settings set to the terminal can be reset.1From the Home screen, u[Settings]u[More]u[Network settings reset].2[RESET SETTINGS]u[RESET SETTINGS].Resetting the network settingsThemes & wallpaperThemesP. 5 8WallpaperP.57, P.82DeviceDisplayP. 1 6 9NotificationsP. 1 7 0SoundP. 1 7 1AppsP. 1 7 3Storage & memoryP. 1 7 5BatteryP. 1 7 7Lock screen & securityP. 1 7 8UsersP. 1 8 5CallP.97, P.210LocationP. 1 8 6](https://usermanual.wiki/Sony/65365K.PY7-65365K-UserGuide/User-Guide-3492114-Page-170.png)
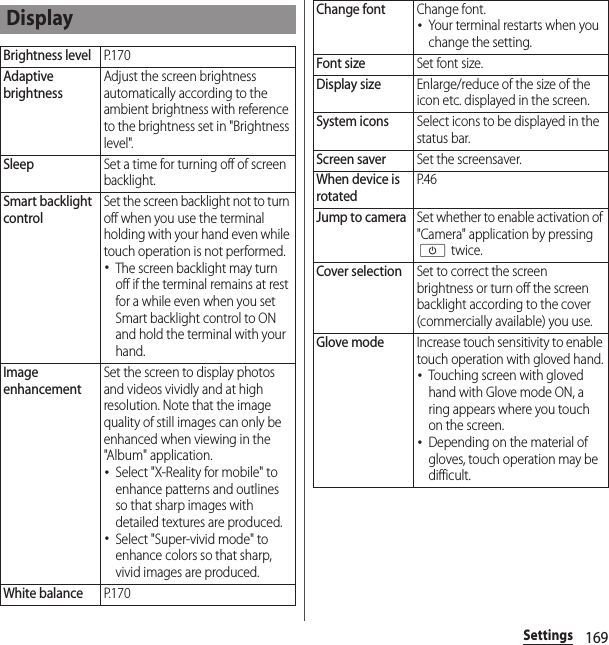
![170SettingsAdjusting the screen brightness1From the Home screen, u[Settings]u[Display]u[Brightness level].2Drag the slider to the right or left.Adjusting the white balance1From the Home screen, u[Settings]u[Display]u[White balance].2Tap the slider at the position to set or drag it to the right or left.・Touch and hold the area displaying "Press and hold here to see previous setting" to check the setting before adjusting.3[DONE].❖Information・In Step 2, u[Default values]u[DONE] to reset back to the default status.Set the notifications of each application or function. Also, you can change the operation of the notification LED or the setting of notifications for the lock screen.Setting the notification of application1From the Home screen, u[Settings]u[Notifications].・Tap u[Show system] to show all applications.・To select the condition of displaying applications, tap [All apps] in the upper part of the screen.2Tap an application.・Drag the screen up or down to display the scroll bar in the right end of the screen, and then drag the scroll bar up or down. The index character appears in a pop-up and you can search the application by the index character.NotificationsBlock allSet to block the all notifications.Sound and vibrations offSet to notify only with the display of notifications.On the lock screen*1Set whether to display the notifications on the lock screen.Interrupts Priority onlySet whether to notify with sound when Do not disturb function *2 is set to "Priority only".](https://usermanual.wiki/Sony/65365K.PY7-65365K-UserGuide/User-Guide-3492114-Page-172.png)
![171Settings*1 Displayed when the screen lock unlocking method is set to "Pattern"/"PIN"/"Password".*2 Set from the quick setting tool of the quick settings panel (P.54). Before using, tap and set "Do not disturb" as an available quick setting tool.❖Information・The items that can be set vary depending on the settings of the terminal or application/function.・To reset the settings for the application, tap in Step 2u[Reset app references] (P.175).Changing the notification settings1From the Home screen, u[Settings]u[Notifications].2Tap .* Displayed items that are displayed vary depending on the settings of "Screen lock" (P.181).Notification lightSet whether to notify missed calls etc. with blinking notification LED (P.50).On the lock screenSet whether to show notification details on the lock screen.*Keep notification on lockscreenSet whether to keep the notification content displayed on the lock screen when you have any notifications.SoundAudio settingsDSEE HXSet whether to reproduce sound with the quality equivalent to high-resolution audio when playing back compressed music files. This feature works only when the headphone that support high-resolution audio is connected to the headset jack.ClearAudio+The sound setting for music recommended by Sony. It helps optimize the settings for digital signal processing technology with a one-touch operation.Sound effectsSet sound effects.Dynamic normalizerSet to play at a comparable volume when songs with different volume levels are played.](https://usermanual.wiki/Sony/65365K.PY7-65365K-UserGuide/User-Guide-3492114-Page-173.png)
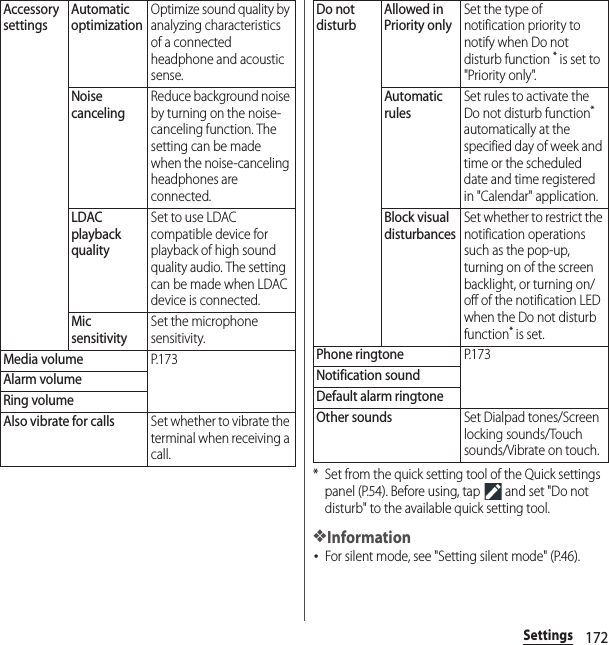
![173SettingsAdjusting sound volumesAdjust the volumes for playing media, alarm, ringtone and notification sounds.1From the Home screen, u[Settings]u[Sound].2Drag the slider of "Media volume"/"Alarm volume"/"Ring volume" left or right.❖Information・The alarm volume set via the "Clock" application has precedence (P.153).・You can also press the volume key to adjust the ringtone volume. Pressing the volume key or O mutes ringtone for incoming calls.Setting the ringtone/notification sound/alarm ringtone1From the Home screen, u[Settings]u[Sound].2Tap any of [Phone ringtone]/[Notification sound]/[Default alarm ringtone].3Select the soundu[DONE].❖Information・To set a ringtone, notification sound, alarm ringtone other than the ones stored by default, tap in Step 3.・When the sound is selected in Step 3, it sounds with the volume set in "Ring volume" or "Alarm volume". However, if the volume is set to 0, it does not sound.Manage and uninstall installed applications. Also, show memory usage status or change the settings.Managing applications1From the Home screen, u[Settings]u[Apps].・Tap u[Show system] to show all applications.・To select the condition of displaying applications, tap [All apps] in the upper part of the screen.2Tap an application.・Drag the screen up or down to display the scroll bar in the right end of the screen, and then drag the scroll bar up or down. The index character appears in a pop-up and you can search the application by the index character.AppsUNINSTALL/DISABLEP.174, P.175FORCE STOPP. 1 7 4StorageClear data or cache.Data usageCheck data usage amount.](https://usermanual.wiki/Sony/65365K.PY7-65365K-UserGuide/User-Guide-3492114-Page-175.png)
![174Settings❖Information・Tap in Step 2 to set Preferred apps settings, App permissions, App links, default application setting, etc.・The displayed items may differ or the item may not be selected depending on application or usage condition.Force-quitting an application1From the Home screen, u[Settings]u[Apps].・Tap u[Show system] to show all applications.2Tap the application to force-stop.3[FORCE STOP]uRead the notes and tap [OK].Uninstalling applications・Before uninstalling application, back up contents you want to save including data saved in the application.1From the Home screen, u[Settings]u[Apps].2Tap the application to uninstall.3[UNINSTALL]u[OK].❖Information・Some pre-installed applications may not be uninstalled. For some applications which cannot be uninstalled, disabling is possible (P.175).・Applications downloaded from Google Play are recommended to be uninstalled from the Google Play screen (P.121).・In Step 3, tap uIf [UNINSTALL UPDATES] is displayed, you can restore the application to the default.PermissionsChange access authorization setting.NotificationsChange notification setting.Open by defaultClear the setting of default application.BatteryCheck the battery use condition after the previous full-charging.MemoryCheck memory usage amount.](https://usermanual.wiki/Sony/65365K.PY7-65365K-UserGuide/User-Guide-3492114-Page-176.png)
![175SettingsDisabling applicationYou can disable services or applications that cannot be uninstalled.・Disabled applications are not displayed on the Home screen or application screen and you cannot execute them, but they are not uninstalled.1From the Home screen, u[Settings]u[Apps].・Tap u[Show system] to show all applications.2Tap the application to disable.3[DISABLE]uRead the notes and tap [DISABLE APP].❖Information・When you disabled an application, some other applications linked to the disabled application may not be operated correctly. Enable the disabled application again to operate them correctly.Resetting applicationsYou can reset the disabled applications (P.175), the default applications (P.173), and the restriction of background data (P.161).1From the Home screen, u[Settings]u[Apps].2u[Reset app preferences].3[RESET APPS].Optimize the storage and memory, transfer data, or uninstall applications to improve operations of the terminal or make available memory space for the internal storage.* Only data in specific folders stored in the internal storage will be transferred to the microSD card.❖Information・To set applications for not clearing cache by Smart cleaner, from the Home screen, u[Settings]u[Storage & memory]uu[Advanced]u[Keep cache]uTap "APPS" tabuMark applications to be set.Storage & memoryStorage usageThe storage usage is displayed. Tap to check the details of the storage usage, or initialize the microSD card/USB storage (formatting) (P.176).Smart cleanerSet whether to optimize the storage and memory automatically depending on use frequency.Transfer data*Transfer data in the internal storage to the microSD card.Free up spaceSelect files to delete or applications to uninstall.](https://usermanual.wiki/Sony/65365K.PY7-65365K-UserGuide/User-Guide-3492114-Page-177.png)
![176SettingsViewing the storage use conditionCheck memory volume of the internal storage, microSD card, USB storage, or format microSD card or USB storage.1From the Home screen, u[Settings]u[Storage & memory].2[Storage usage].・Alternatively, u[Advanced]u[Storage].*1 Displayed items vary depending on condition of microSD card or USB storage recognition.*2 Only data in specific folders stored in the internal storage will be transferred to the microSD card.❖Information・After the operation in Step 2, [Internal shared storage]u[Explore], or tap [SD Card]/[USB drive] to display the data list, you can check the saved data or copy/move/delete/share the data (P.195).・To release the recognition of microSD card/USB storage, tap of "SD Card"/"USB drive" after the operation in Step 2. To recognize again, tap [SD Card]/[USB drive]u[MOUNT].・To format a microSD card/USB storage, tap [SD Card]/[USB drive] after the operation in Step 2uu[Storage settings]u[Format]u[ERASE & FORMAT].Be aware that formatting will erase all their data.Checking the condition of memory usageCheck the average memory use of the applications installed to the terminal.1From the Home screen, u[Settings]u[Storage & memory].2u[Advanced]u[Memory].❖Information・To change the period, tap any of [3 hours]/[6 hours]/[12 hours]/[1 day] at the upper screen.XX.XX GB (Total used of 32.00 GB)Used memory and total memory of the internal storage is displayed.Internal shared storage*1Total memory and used memory of the internal storage is displayed.SD Card*1Total memory and used memory of microSD card is displayed.USB drive*1Total memory and used memory of USB storage is displayed.Transfer data to SD card*1*2Transfer data in the internal storage to the microSD card.Average memory useAverage memory use for a specified period is displayed.Memory used by appsCheck memory use by application/function for a specified period.](https://usermanual.wiki/Sony/65365K.PY7-65365K-UserGuide/User-Guide-3492114-Page-178.png)
![177Settings❖Information・To reduce battery power for each application, disable applications when the terminal is not used or the applications are not used for several days (Battery optimization).To avoid the effect of the battery optimization against the application, register the applications to "NOT OPTIMIZED".To change the battery optimization setting, from the Home screen, u[Settings]u[Battery]uu[Battery optimization]uTap "APPS"/"ALL OTHERS" tabuMark applications to set.・To manage the applications consuming the battery to reduce the battery consumption, operate from the Home screen, u[Settings]u[Battery]uuTap [App power consumption].BatteryBattery level and estimated battery timeThe battery level and remaining standby time (estimate) are displayed. Tap [SHOW BATTERY USAGE] to check remaining battery and applications/functions that use the battery from the last full-charging.STAMINA modeRestrict the operations and a part of functions of the terminal to save the battery power.・Select "Auto start at XX% battery" to set to enable STAMINA mode when the battery level becomes to a specified level. Tap to specify a battery level to enable the function.・Tap [STAMINA level] to set restriction level.・Turn on the "Smart STAMINA notification" to notify you with the notification when there is not enough battery until the next charging is predicted.・The remaining standby time is displayed in "Battery level and estimated battery time" linking with the STAMINA mode settings.Emergency modeP. 4 8Battery CareP. 3 7](https://usermanual.wiki/Sony/65365K.PY7-65365K-UserGuide/User-Guide-3492114-Page-179.png)

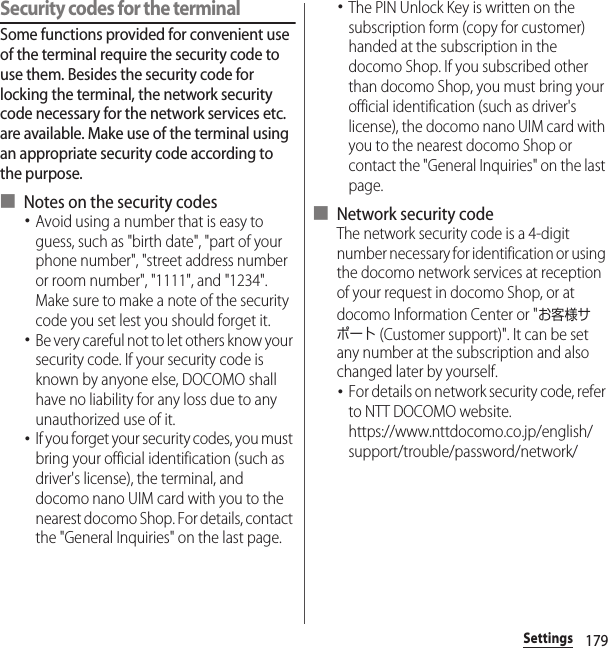
![180Settings■ PIN codeYou can set up a security code called a PIN code for your docomo nano UIM card. The code is set to "0000" at the time of subscription; however, you can change the code by yourself.PIN code is a 4- to 8-digit security number (code) that must be entered for user confirmation to prevent unauthorized use of docomo nano UIM card by a third party every time you insert the docomo nano UIM card into the terminal or when the terminal is powered on. Entering the PIN code enables making/receiving calls and terminal operation.・If you use a newly purchased terminal with docomo nano UIM card you have been using, use the PIN code set on the former terminal. If you did not change the setting, the code is "0000".・If you enter a wrong PIN code 3 times consecutively, the PIN code is locked and cannot be used anymore. In this case, unlock with "PIN Unlock Key (PUK code)" (P.180).■ PIN Unlock Key (PUK code)The PUK code is an 8-digit number for canceling the locked PIN code. The PUK code cannot be changed by yourself.・If you failed to enter PUK code 10 times consecutively, the docomo nano UIM card is locked. Please contact a docomo Shop.■ d ACCOUNTd ACCOUNT is an ID/password to use applications or services provided by DOCOMO. With d ACCOUNT, you can use various services more convenient regardless of line type such as LTE, Wi-Fi, etc., or device type such as smartphone, tablet, PC.・For details on d ACCOUNT, from the Home screen, u[Settings]u[docomo service/cloud]u[d ACCOUNT setting]uu[ヘルプ (Help)] to see the Help.■ Google accountGoogle account is an ID/password to use Google services. By setting Google account to the terminal, you can use Gmail to send Email, use Google Play to download applications or contents such as games.・For setup of Google account, see "Setting up a Google account" (P.187).](https://usermanual.wiki/Sony/65365K.PY7-65365K-UserGuide/User-Guide-3492114-Page-182.png)
![181SettingsEnabling SIM card lockBy entering PIN code when powered on, you can protect from improper use.1From the Home screen, u[Settings]u[Lock screen & security]u[Set up SIM card lock]u[Lock SIM card].2Enter PIN codeu[OK].Entering the PIN code when powered on1On the PIN code entry screen, enter the PIN code.2Tap .Changing the PIN code・You can change only when you activate the SIM card lock.1From the Home screen, u[Settings]u[Lock screen & security]u[Set up SIM card lock]u[Change SIM PIN].2Enter the current PIN codeu[OK].3Enter a new PIN codeu[OK].4Enter the new PIN code againu[OK].Unlocking PIN lock1Enter the PUK codeuTap .2Enter a new PIN codeuTap .3Enter the PIN code againuTap .Setting screen unlock methodFor reinforcing security, you can set the terminal to require the entry of a pattern, PIN, or password to cancel the screen lock every time the terminal is turned on or woken from sleep mode.1From the Home screen, u[Settings]u[Lock screen & security]u[Screen lock].2Tap any of [Pattern]/[PIN]/[Password].3Follow the onscreen instructions to set.・Set whether to require entry of the specified unlocking method every time you turn on the power of the terminal.・When the setting is complete, "Lock screen & security" menu screen reappears.・If you select "PIN", enter 4- to 16-digit of numeric characters. If you select "Password", enter 4- to 16-digit alphanumeric characters.](https://usermanual.wiki/Sony/65365K.PY7-65365K-UserGuide/User-Guide-3492114-Page-183.png)
![182Settings4Tap of "Screen lock" as required.* Appeared only when the "Pattern" is set.Locking the screenOnce you specify the screen unlock method (P.181), the screen is locked when you press O to put the terminal into sleep mode or when the backlight turns off automatically.■ To unlock the screen1When the screen is locked, press O to turn the backlight onuSwipe (or flick) up/left on the screenuEnter the unlock PIN, pattern, or password.■ To turn off the screen lock1From the Home screen, u[Settings]u[Lock screen & security]u[Screen lock]uEnter the current unlock pattern, PIN, or passwordu[None]u[YES, REMOVE].❖Information・Entering incorrect pattern/PIN/password 5 times consecutively disables canceling the screen lock. Wait for approximately 30 seconds and then operate the canceling of screen lock again.・If you forget unlocking pattern/PIN/Password, contact a docomo Shop.Setting up fingerprint authenticationYour terminal features a fingerprint sensor (O). Once you register your fingerprint for O, you can touch the key with your finger to unlock the screen (fingerprint authentication).■ Notes on using fingerprint authentication・Your terminal recognizes a fingerprint based on its unique characteristics. For this reason, some users may not be able to use fingerprint authentication if their fingerprints are not sufficiently unique.Make pattern visible*Set whether to show pattern when entering pattern.Automatically lockSet the time from when the screen backlight turns off to when the screen automatically locks.Power button instantly locksSet whether to instantly lock the screen when the screen backlight is turned off by pressing O.](https://usermanual.wiki/Sony/65365K.PY7-65365K-UserGuide/User-Guide-3492114-Page-184.png)
![184Settings■ Registering your fingerprint1From the Home screen, u[Settings]u[Lock screen & security]u[Fingerprint Manager].・If you have already registered fingerprint, the entry screen for unlocking the screen lock appears. Enter the unlocking method to display the fingerprint setting screen.2[NEXT].・After this step, follow the onscreen instructions. When the registration is complete, the screen that notifies the fingerprint is added appears. Tap [DONE] to end the registration or tap [Add another] to register the other fingerprint.・When the screen for setting the unlocking method of the screen lock appears, follow onscreen instructions to set. Use the selected unlocking method if fingerprint authentication does not work.・When the entry screen for unlocking the screen lock appears, enter the set unlock method and then follow onscreen instructions.❖Information・On the Fingerprint Manager screen, you can perform the following actions:- To rename a fingerprint, tap a registered fingerprintuEnter a nameuTap [OK].- To delete a fingerprint, tap a registered fingerprintu[DELETE]u[DELETE].- To register the other fingerprint, tap [Add fingerprint].■ Using your fingerprint for authentication1When the lock screen is displayed, press O .・Touch O with your registered finger.・Swipe (or flick) up/left on the lock screen to display a screen for entering unlocking screen method you set.❖Information・If fingerprint authentication failed 5 times consecutively, the fingerprint authentication is disabled. Wait for a while and then perform fingerprint authentication, or swipe (or flick) the screen and then enter the unlocking screen method that you set.](https://usermanual.wiki/Sony/65365K.PY7-65365K-UserGuide/User-Guide-3492114-Page-186.png)
![186Settings1From the Home screen, u[Settings]u[Location].2Tap .3Read the notes on location information and tap [AGREE].・When a screen for asking whether to improve location information is displayed, follow the onscreen instructions to operate.❖Information・ in Step 2u[Scanning]uTap for "Wi-Fi scanning"/"Bluetooth scanning" to allow the system application or services to detect Wi-Fi network/Bluetooth devices and then improve accuracy of location information.LocationModeSet a mode to identify location information.Recent location requestsDisplay the application using the recent location information data.Location servicesSet or check Google Location History.・You may need to set a Google account.Accounts & servicesdocomo service/cloudP. 1 8 6Accounts & syncP. 1 8 7GoogleP. 1 8 8Backup & resetP. 1 8 9docomo service/cloudd ACCOUNT settingSet up your d ACCOUNT to use docomo applications. You can also use your biological information (fingerprint) registered on the terminal to set up your d ACCOUNT.docomo cloudMake settings for docomo cloud compatible service.docomo apps managementManage to install applications provided by DOCOMO and set to check updates for applications regularly.Osusume hintSet whether to display Osusume hint, check hints displayed in the past, etc.AUTO-GPSSet to use the services supporting AUTO-GPS.docomo location informationSet location information function for imadoco search, imadoco kantan search and Keitai-Osagashi Service.](https://usermanual.wiki/Sony/65365K.PY7-65365K-UserGuide/User-Guide-3492114-Page-188.png)
![187Settings❖Information・You can disable applications displayed in docomo service/cloud. Disabled applications may not be displayed in the list of docomo service. Also, if you newly download an application provided by DOCOMO, an item may be added in the list of docomo service/cloud.Manage (add or delete) online service accounts or synchronize contacts, calendar, etc. saved in online services with the terminal.・Auto-sync data (P.188)Setting up a Google accountYou can set a Google account on your terminal and use Google services such as Gmail, Google Play, etc.You can set multiple Google accounts on the terminal.1From the Home screen, u[Settings]u[Account & sync]u[Add account]u[Google].2Follow the onscreen instructions to set up a Google account.❖Information・If you turn on the item for backing up data to your Google account on the "Google services" screen when registering, the account is registered as a backup account.・You can use the terminal without setting your Google account, however the Google services such as Gmail, Google Play, etc. are not available.・Tap a Google account to set ON/OFF of auto sync for each item.Profile settingCheck or change your profile information used for docomo services.docomo service initial settingsP. 4 3Switch USB debuggingMake the settings for using the dedicated terminal at a docomo Shop etc.Open source licensesView open source licenses.Account & sync](https://usermanual.wiki/Sony/65365K.PY7-65365K-UserGuide/User-Guide-3492114-Page-189.png)
![188SettingsSetting other account1From the Home screen, u[Settings]u[Account & sync]u[Add account].2Tap an account type.・After this step, follow the onscreen instructions.❖Information・docomo account is set by default.Removing account1From the Home screen, u[Settings]u[Account & sync]uSelect an account typeuSelect the account as required.2u[Remove account]u[REMOVE ACCOUNT].❖Information・You cannot remove the docomo account.Configuring sync settings for your accounts■ To sync automaticallySynchronize information of online service with the terminal. You can display and edit information on the terminal or a PC.・Setting Auto-sync data, communication occurs to synchronize and a packet communication charge may be applied.1From the Home screen, u[Settings]u[Account & sync].2u[Auto-sync data]u[OK].■ To sync manuallyWhen the auto-sync function is off, you can sync your registered account(s) manually.1From the Home screen, u[Settings]u[Account & sync].2Select the account typeuSelect an account as requireduSelect items to sync.Check, change, or delete information or settings related to your Google account and the services.Google](https://usermanual.wiki/Sony/65365K.PY7-65365K-UserGuide/User-Guide-3492114-Page-190.png)
![189SettingsResetting the terminalResetting the terminal deletes all data and accounts, and resets the terminal back to the initial (default) state.・The downloaded applications and data in the internal storage (music, images, etc.) are included to the data to be deleted.・Make sure to back up the important data you have on the terminal before resetting.・Reset the terminal while charging the battery, or when the battery is sufficiently charged.・Initial settings (P.43).1From the Home screen, u[Settings]u[Backup & reset]u[Factory data reset]u[RESET PHONE].2[ERASE EVERYTHING].❖Information・Some pre-installed content can be re-downloaded, even if it is deleted when you reset your terminal.To download, from the Home screen, u[Xperia™ Lounge Japan]uu[サポート (ブラウザで開きます)(Support (Open the window by the browser))]u[スマートフォン/タブレット関連(プリインストールコンテンツなどの再ダウンロード) (For smartphone/tablet (For re-downloading preinstalled contents))]u[ドコモ (DOCOMO)] (in Japanese only) and then select the terminal on the displayed screen.Backup & resetBack up my dataSet whether to back up settings for applications, data, etc. to Google server.Backup accountSet an account for backup to Google server.Automatic restoreSet to restore the backup settings or data when re-installing application.Factory data resetP. 1 8 9](https://usermanual.wiki/Sony/65365K.PY7-65365K-UserGuide/User-Guide-3492114-Page-191.png)
![190SettingsCheck the introduction of the function of the terminal, customize the terminal, set data protection, etc. Also, you can make settings for displaying the hints of the terminal, the operations performed automatically by the terminal and the battery or memory.*1 If the screen for selecting the previous mobile phone, select the type of the mobile phone. The screen of the introduction of Xperia™ appears and you can select the item.*2 The items vary depending on the selected previous mobile phone. To change a mobile phone type, in the Xperia™ introduction screen, uTap [Select phone].SystemAssistP. 1 9 0Date & timeP. 1 9 1Languages & inputP. 1 9 1AccessibilityP. 1 9 3About phoneP. 1 9 4AssistIntroduction to Xperia™*1Essentials*2Check the latest applications/functions.Learn the basics*2Check the basic function of Android and Xperia™.Make it yoursCustomize the theme or wallpaper, lock screen clock, ringtone, notification sound.Keep your stuff secureSet up fingerprint function (P.182) or Backup and restore settings (P.189).Xperia™ servicesSign in for using Xperia™ services.Xperia™ TipsSet whether to notify you of convenient functions for the terminal with notification.Xperia™ ActionsSet the operations that the terminal can operate automatically when you are sleeping or want to concentrate, or overseas.STAMINA modeSet STAMINA mode (P.177).Smart cleanerSet Smart cleaner (P.175).Battery CareSet Battery Care (P.37).](https://usermanual.wiki/Sony/65365K.PY7-65365K-UserGuide/User-Guide-3492114-Page-192.png)
![192Settings*1 Displayed when the language is set to English.*2 Downloading a spell checker application is required.Changing the phone language1From the Home screen, u[Settings]u[Languages & input]u[Languages].2[Add a language]uSelect the languageuSelect the country or region as required.3Drag of the language to the top layer ("1" position).❖Information・If you choose the wrong language and cannot read the menu texts, see the FAQ of the following website.http://www.sonymobile.co.jp/support/ (In Japanese only)Setting Text-to-speech output1From the Home screen, u[Settings]u[Languages & input]u[Text-to-speech output].Pointer speedSet pointer speed when a mouse or trackpad is used.Google Text-to-speech EngineSet the language or the Google Text-to-speech engine, or install the voice data.Speech rateSet speed at reading out text.PitchSet the pitch of voice to read out text.Reset speech rateReset the setting of "Speech rate" to the normal speed.Reset speech pitchReset the setting of "Pitch" to the default pitch.Listen to an examplePlayback sample of audio synthesis.Default language statusDisplay the supporting status of the language set for text-to-speech.](https://usermanual.wiki/Sony/65365K.PY7-65365K-UserGuide/User-Guide-3492114-Page-194.png)
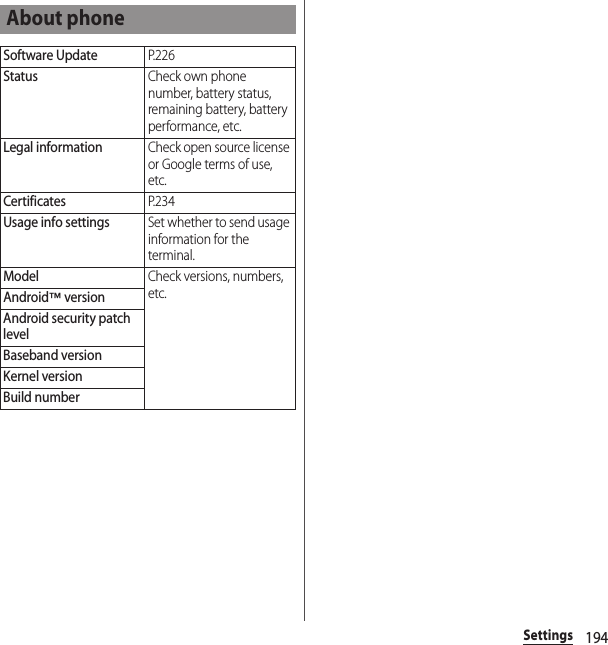
![195File managementFile managementFolders in the internal storage (/storage/emulated/0) by default are as follows.・Displayed folders may differ depending on the terminal operations.You can save data in the terminal to a microSD card or import data from the microSD card to the terminal.・For installing/removing a microSD card (P.34)Use "File manager" application to operate various data saved in the internal storage or the microSD card.1From the Home screen, u[File manager].・The internal storage of the terminal is displayed. Tap to display the menu.・When a microSD card is installed, "SD Card" appears in the menu.2Tap the folder as required.3Tap a file.・Data can be displayed with the compatible application.❖Information・To search data, tap in Step 2 and enter a file name, then tap of the software keyboard.Storage structurePhone (Internal storage)AlarmsStores alarm sounds etc.AndroidStores setting data for system or each application, temporary files, etc.DCIMStores still pictures/videos shot by Camera.DownloadStores downloaded data through the web browser.MoviesStores videos (except shots by Camera).MusicStores music data.NotificationsStores notification sounds etc.PicturesStores still pictures (except shots by Camera).PodcastsStores Podcast files etc.RingtonesStores ringtones etc.microSD card (External storage)File operations](https://usermanual.wiki/Sony/65365K.PY7-65365K-UserGuide/User-Guide-3492114-Page-197.png)
![196File management■ Creating a folder1From the Home screen, u[File manager].2Tap the folder as required.3u[New folder].4Enter a folder nameu[OK].■ Renaming folder or file1From the Home screen, u[File manager].2Tap the folder as required.3Touch and hold a folder or file you want to rename.4u[Rename]uEnter a nameu[OK].■ Deleting a folder or file1From the Home screen, u[File manager].2Tap the folder as required.3Touch and hold a folder or file you want to delete.4u[OK].■ Copying/Moving a folder or file1From the Home screen, u[File manager].2Tap the folder as required.3Touch and hold a folder or file you want to copy/move.4u[Copy to...]/[Move to...].5In the desired location, [COPY]/[MOVE].](https://usermanual.wiki/Sony/65365K.PY7-65365K-UserGuide/User-Guide-3492114-Page-198.png)
![197Data communicationData communicationBluetooth function is a technology which enables to connect with Bluetooth device such as PC, handsfree headset wirelessly.・The terminal does not communicate wirelessly with all types of Bluetooth devices.・Supported Bluetooth profiles (P.230)❖Information・If you turn off the terminal with Bluetooth turned on, Bluetooth function turns off. When you turn on the terminal again, Bluetooth function turns on automatically.・When you do not use Bluetooth function, turn it off to save the battery.■ Reception interference caused by wireless LAN devicesThe terminal's Bluetooth function and wireless LAN devices use the same frequency band (2.4GHz). If you use the terminal near a wireless LAN device, reception interference may occur or the communications speed may lower. Also, you may hear noise or have a connection problem. In these cases, do the following:・Keep the Bluetooth device approximately 10 m or more away from a wireless LAN device.・Within approximately 10 m, turn off either the Bluetooth device or the wireless LAN device.1From the Home screen, u[Settings].2[Bluetooth]uTap .・ appears on the status bar.Using optional menu1From the Home screen, u[Settings]u[Bluetooth]uTap .Bluetooth functionMaking the terminal detectableRefreshSearch available devices again.Rename this deviceRename the terminal which appears on other Bluetooth devices.Show received filesDisplay transfer history with other Bluetooth devices.](https://usermanual.wiki/Sony/65365K.PY7-65365K-UserGuide/User-Guide-3492114-Page-199.png)
![198Data communicationTo connect the terminal and Bluetooth device, pair them first.・Once paired, the setting with the Bluetooth device is saved.・For make pair setting, entering passcode (PIN) may be required. Passcode (PIN) of the terminal is "0000". If you cannot make pair setting when you enter "0000", see the documentation of your Bluetooth device.・Make sure that the Bluetooth function and Bluetooth detection function of the target device are on in advance.1From the Home screen, u[Settings]u[Bluetooth].・Detected Bluetooth devices are displayed in "Available devices".2Tap a name of Bluetooth device for pairing.3Confirm the Bluetooth pairing code (pass code) on the confirmation screenu[PAIR].・Paired Bluetooth devices are displayed in "Paired devices".■ When pairing request is sent from a Bluetooth deviceConfirm the Bluetooth pairing code (pass code) on the confirmation screen and then tap [PAIR].❖Information・To unpair, tap for the Bluetooth device to be unpairedu[FORGET].1From the Home screen, u[Settings]u[Bluetooth].2Tap a name of Bluetooth device to connect.❖Information・To rename a Bluetooth device, tap for Bluetooth device you want to change the nameuEnter a nameuTap [OK ].・Up to 7 devices can be connected at the same time. Depending on profile, operation may not be correct or number of devices that can be connected at the same time may be different.Disconnecting a Bluetooth device1From the Home screen, u[Settings]u[Bluetooth].2Tap a name of connected Bluetooth device.Making pair setting for the terminal and Bluetooth deviceConnecting the terminal with a Bluetooth device](https://usermanual.wiki/Sony/65365K.PY7-65365K-UserGuide/User-Guide-3492114-Page-200.png)
![199Data communication3[OK].・To reconnect, tap the Bluetooth device name.Turn on Bluetooth function in advance, then pair with a target Bluetooth device.Sending data via Bluetooth function1[Bluetooth] from the sharing menu of each application.2Tap the other Bluetooth device.Receiving data1Send data from the other Bluetooth device.・ appears on the status bar.2Drag the status bar downwardsu[Incoming file]u[ACCEPT].You can send/receive data to/from a device with NFC such as a mobile phone.・To send/receive data, enable NFC Reader/Writer, P2P function in advance (P.200).・Hold 2 terminals in parallel and place NFC / Osaifu-Keitai position for holding over face to face. Do not move them until sending/receiving is complete.・NFC / Osaifu-Keitai position for holding over differs depending on mobile phone.Check NFC / Osaifu-Keitai position for holding over ( mark) on each mobile phone.・Operations to send/receive and available data to send/receive depend on the compatible applications. Follow the onscreen instructions.Sending/Receiving data via Bluetooth functionNFC communication](https://usermanual.wiki/Sony/65365K.PY7-65365K-UserGuide/User-Guide-3492114-Page-201.png)
![200Data communication・Even if NFC / Osaifu-Keitai position for holding over is placed face to face, sending/receiving may fail. In such case, operate again to send/receive.・The terminal does not communicate with all NFC devices.・For notes when holding over the other device (P.123).1From the Home screen, u[Settings]u[More].2[NFC / Osaifu-Keitai settings]uTap of "Reader/Writer, P2P"u[OK].・"Reader/Writer, P2P" and "Android Beam" are turned on.・ appears on the status bar.❖Information・While "NFC / Osaifu-Keitai lock" is set, the NFC Reader/Writer, P2P function cannot be turned on.By using the Android Beam with a NFC compatible Android device, you can send or receive images, music, photos or videos taken with the terminal with simple operations.・Turn on Reader/Writer, P2P function in advance (P.200).Sending data1Display data to send on the screen.2Place the NFC / Osaifu-Keitai positions for holding over face to face with a mobile phone for receiving (P.123).・"Tap your screen to beam" appears.3Tap the shrunk screen.Enabling NFC Reader/Writer, P2P functionSending/Receiving data by one-touch function](https://usermanual.wiki/Sony/65365K.PY7-65365K-UserGuide/User-Guide-3492114-Page-202.png)
![201Data communicationReceiving data1Perform data sending operation on a sender's terminal.2Place the NFC / Osaifu-Keitai positions for holding over face to face with a mobile phone for sending (P.123).・When you receive data, appears on the status bar. Drag the status bar downwardsuTap [Beam complete] to launch the application associated with the received data. Follow the onscreen instructions.Selecting NFC Type1From the Home screen, u[Settings]u[More].2[NFC / Osaifu-Keitai settings]u[NFC Type].3Tap any of [FeliCa / Type A / Type B (standard)]/[FeliCa / Type A]/[FeliCa / Type B].](https://usermanual.wiki/Sony/65365K.PY7-65365K-UserGuide/User-Guide-3492114-Page-203.png)
![202External device connectionExternal device connectionConnect to a PC to exchange data between the internal storage or the microSD card and a PC.❖Information・Appeared screen may vary depending on the operating system (OS) of a PC.・You may not be able to operate copyrighted data of images, music, etc.・The following operating systems (OS) are supported.- Microsoft Windows 10- Microsoft Windows 8.1- Microsoft Windows 7・To operate on Mac, downloading "Xperia Companion" is required.For details on compatible models or recommended system, see the following website.http://www.sonymobile.co.jp/support/software/xperia-companion/ (in Japanese only)1Connect the terminal to a PC with USB cable A to C 01 (optional) etc. (P.41).・When a screen for installing driver software appears, wait for a while until the installation is complete.・When "Install software" screen appears on the terminal, tap [SKIP] or [CANCEL].・The "Use USB to" screen appears on the terminal.❖Information・To change the USB connection mode, drag the status bar downwardsuTap the notification of USB connection mode and then select a USB connection mode.Connecting to PCConnecting to PC with USB cable A to CCharge this deviceOnly charging is performed.Supply powerCharge a connected device.・It is required that the connected device is compatible with the function.Transfer filesThe terminal is displayed on the PC screen as a portable device and you can access the internal storage and a microSD card in the terminal.Use device as MIDIUse the terminal for MIDI input.USB tetheringP. 1 6 4](https://usermanual.wiki/Sony/65365K.PY7-65365K-UserGuide/User-Guide-3492114-Page-204.png)
![203External device connectionRemoving USB cable A to C safely・Do not remove the USB cable A to C during while transferring data. Data may be damaged.1Confirm that it is not transferring data, remove the USB cable A to C.Using Wi-Fi function, you can share media files with other client (DLNA : Digital Living Network Alliance) devices.・Connect the terminal to the Wi-Fi network same with a DLNA device connected to in advance (P.159).1From the Home screen, u[Settings]u[Device connection]u[Media server].2Tap of "Share media".・ appears on the status bar.・Tap [Change server name] to rename the terminal (media server) displayed on a DLNA device.3Connect the DLNA device to the terminal using an application on the DLNA device.・Access request for media server is notified to the terminal.4On the Media server settings screen of the terminal, tap the pending DLNA deviceuSet the access level.・The DLNA device is registered.・If you tapped [Allow this time], read the message that appearsuTap [OK].5Select a media file on your terminal using the DLNA device to play it back.Connecting DLNA deviceSetting Media server](https://usermanual.wiki/Sony/65365K.PY7-65365K-UserGuide/User-Guide-3492114-Page-205.png)
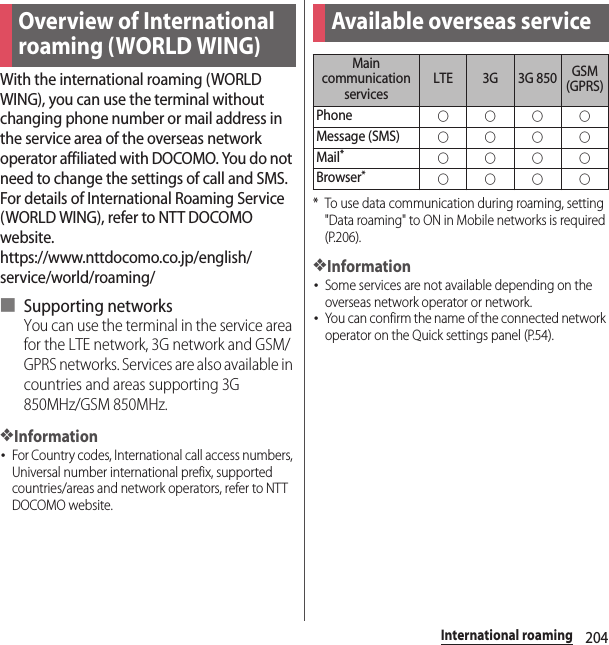
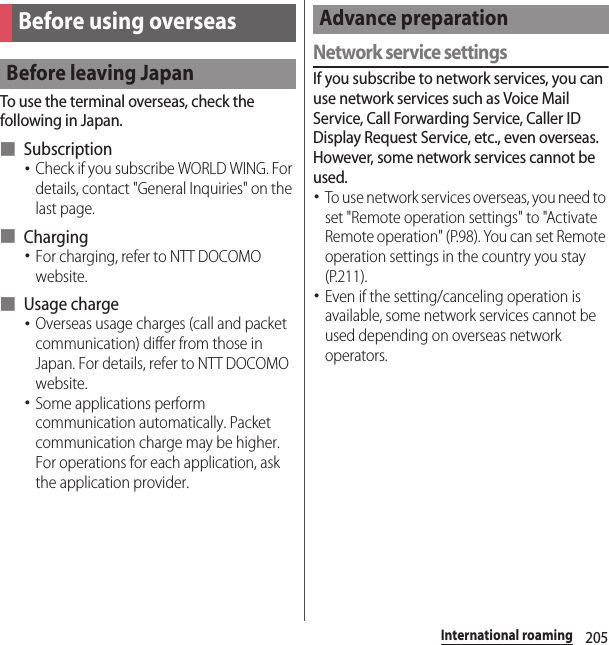
![206International roamingWhen you arrive overseas and turn on the terminal, an available network is automatically set.ConnectivityWhen you have set "Search mode" of "Service providers" (P.206) in Mobile networks to "Automatic", optimized network is automatically selected.Setting data roamingTo perform packet communication overseas, setting "Data roaming" to ON in Mobile networks is required.1From the Home screen, u[Settings]u[More]u[Mobile networks].2Tap of "Data roaming"uRead the notes and tap [OK].Setting a network operatorBy default, the terminal automatically searches available network and connect to it. To switch network manually, set as follows.1From the Home screen, u[Settings]u[More]u[Mobile networks]u[Service providers].・If the note appears, tap [OK].・Perform network search.2[Search mode]u[Manual].・To display available networks, tap [Search networks].3Tap a network to use from "AVAILABLE NETWORKS".❖Information・If you set a network manually, the terminal is not reconnected to another network automatically even if you move out of the network area.・To return to "Automatic", tap [Search mode] in Step 2u[Automatic]uTap [OK] if the Note appears.After arriving overseasSettings for overseas use](https://usermanual.wiki/Sony/65365K.PY7-65365K-UserGuide/User-Guide-3492114-Page-208.png)
![207International roamingSetting the preferred network type1From the Settings screen, u[Settings]u[More]u[Mobile networks]u[Preferred network type].2Tap any of [4G (preferred)/3G/GSM]/[4G/3G]/[3G/GSM]/[GSM only].・Select "4G (preferred)/3G/GSM" to switch available network automatically.Using VoLTE during international roamingSet to enable VoLTE when VoLTE is available during international roaming.1From the Home screen, u[Settings]u[More]u[Mobile networks].2Tap of "Enable VoLTE".Date & time settingsWhen "Automatic date & time", "Automatic time zone" in "Date & time" are ON, the date, time and time differences of the terminal clock are corrected by receiving the information related to time and time differences from the network of overseas network operator you connect to. ・Correction of the time/time differences may not be performed correctly depending on the network of overseas network operator. In that case, set time zone manually.・Timing of correction varies by the overseas network operator.・Setting Date & time (P.191)About inquiries・For loss or theft of the terminal or docomo nano UIM card, immediately contact DOCOMO from the spot to take the necessary steps for suspending the use. For inquiries, refer to the last page. You can also suspend the use from My docomo. Note that you are still liable for the call and communication charge incurred after the loss or theft occurred.・For using from land-line phone, entering "International call access number" or "Universal number international prefix" for the country is needed.](https://usermanual.wiki/Sony/65365K.PY7-65365K-UserGuide/User-Guide-3492114-Page-209.png)
![208International roamingWhen you arrive overseas and turn on the terminal, an available network is automatically set.・Check that the battery and signal levels are high enough.・Depending on the network operator, even if the Caller ID notification is active, the caller ID may not be notified or appear properly.In this case, calls cannot be made from the call log.You can make a call from overseas using the international roaming service.・You can easily make international calls from the country you stay to Japan or to other countries by entering prefix "+" and then the country code and phone number.1From the Home screen, u"Dial" tab.2Dial + (touch and hold [0])uEnter Country code, Area code (City code), a phone number in the order.・If the area code (city code) begins with "0", omit "0". However, "0" may be required to dial to some country or area such as Italy.・To call an overseas "WORLD WING" user, enter "81" (Japan) for the country code.3Tap .・When "Auto conversion" (P.211) in International dial assist is turned on, "International dial assist" screen appears when sending. To make a call to Japan, tap [CALL].・To make a video call, uTap [ Video call].4When the call is finished, tap .❖Information・For details on the Video call, see "Making/Receiving a call" (P.88).Making/Receiving a call in the country you stayMaking a call to outside country you stay (including Japan)](https://usermanual.wiki/Sony/65365K.PY7-65365K-UserGuide/User-Guide-3492114-Page-210.png)
![209International roamingYou can make a call by entering the phone number of the other party's land-line phone or mobile phone in the same way you do in Japan.1From the Home screen, u"Dial" tab.2Enter a phone number.・To make a call to land-line phone, enter the area code (city code), other party's phone number in order.3Tap .・When "International dial assist" screen is displayed, tap [CALL ORIGINAL].4When the call is finished, tap .When the other party uses international roaming service, make a call as an international call to Japan even when you stay in the same country as the other party.You can receive a call using the international roaming service.1On the incoming call screen, drag (left) to (right).2When the call is finished, tap .❖Information・When you received a call during the international roaming, regardless of which country the call is from, it is forwarded internationally from Japan. A caller is charged for a call fee to Japan, and the receiver is charged for a reception fee.Making a call from the other party■ Having someone make a call from Japan to the country you stayTo have the other party make a call from a land-line phone or mobile phone in Japan to the terminal in the country you stay, the other party only needs to dial the phone number as in Japan.Making a call within the country you stayMaking a call to WORLD WING user overseasReceiving a call in the country you stay](https://usermanual.wiki/Sony/65365K.PY7-65365K-UserGuide/User-Guide-3492114-Page-211.png)
![210International roaming■ Having someone make a call from other than Japan to the country you stayYou have to receive a call through Japan no matter where you are; therefore, the other party needs to enter the international call access number and "81" (Country code of Japan).International access number - 81 - 90 (or 80, 70) - XXXX - XXXXMake settings for using international roaming services.・For some overseas network operators, settings may not be made.1From the Home screen, uTap .2[Call settings]u[Roaming settings].International roaming settingsRestricting incoming callsSet to restrict incoming calls during international roaming.Incoming calls notificationSet to notify with SMS if you cannot receive calls because of out of service etc. during international roaming.Roaming guidanceSet to notify a caller of international roaming with a guidance indicating it is a call during international roaming.International dial assistP. 2 1 1Network serviceP. 2 1 1](https://usermanual.wiki/Sony/65365K.PY7-65365K-UserGuide/User-Guide-3492114-Page-212.png)
![211International roaming1From the Home screen, uTap .2[Call settings]u[Roaming settings].3[International dial assist].Set network service such as voice mail from overseas.・You need to set "Remote operation settings" (P.98) to "Activate Remote operation" in advance.・If you make the settings overseas, you are charged a call fee to Japan from the country you stay.・For some overseas network operators, settings may not be made.1From the Home screen, uTap .2[Call settings]u[Roaming settings].3[Network service]uSelect a target service.4[OK]uOperate according to the onscreen instructions or voice guidance.Setting International dialing assistAuto conversionAdd international prefix or country code automatically.Country codeSelect a country code used for auto conversion.International prefixSelect an international prefix used for auto conversion.Setting Network service (overseas)Remote operation (charged)Set whether to start Remote operation.Caller ID request (charged)Play a guidance asking for notifying caller ID when there is an incoming call without caller ID.Incoming call notific. (charged)P. 2 1 0Roaming guidance (charged)P. 2 1 0Voicemail(charged)Take messages from callers when you are in a place the signal does not reach or turn off the terminal.Separate subscription is required.Call forwarding (charged)Forward incoming calls to another mobile phone etc. that is registered in advance.Separate subscription is required.](https://usermanual.wiki/Sony/65365K.PY7-65365K-UserGuide/User-Guide-3492114-Page-213.png)

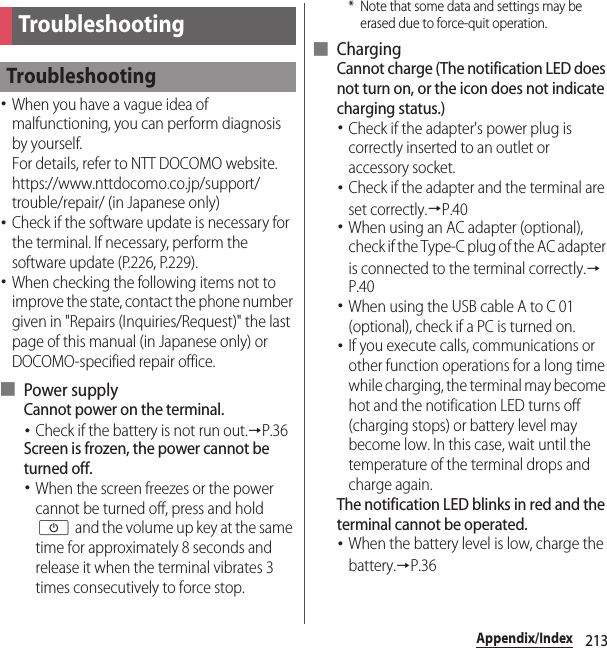
![214Appendix/IndexBattery Care charging does not start・Battery Care charging cannot start when learning is not complete because regularity in your charging habit has not been found.→P.37Cannot charge fully・If you remove charging equipment during Battery Care charging, the terminal may not be fully charged.To charge fully, from the Home screen, u[Settings]u[Battery]u[Battery Care]uTap to turn off Battery Care and then switch to normal charge. →P.37■ Terminal operationBecome hot while operating/charging.・While calling, depending on the radio wave condition or call duration time, the terminal may become hot around the earpiece/speaker. This condition is not abnormal.・While operating or charging, or if you use application, watch TV, record video, etc. for a long time while charging the battery, the terminal, internal battery or adapter may become hot. There is no problem about operation and continue to use it.・When the temperature of the terminal is raised, a message appears on the Notification panel and some applications or services may become unavailable.In this case, wait until the temperature of the terminal drops and use again.The operation time provided by the battery is short.・Is the terminal left for a long time under the state of out of service area?Out of service area, a lot of power is consumed to search available radio waves. If you are out of service area for a long time, set Airplane mode or power off the terminal. →P.42 , P.163・The operating time of the battery varies depending on the operating environment and the degradation level of the internal battery.→P.36・The internal battery is a consumable part. Each time the internal battery is recharged, the battery usage time per one charge gradually decreases.If the operation time becomes too short with fully charged state, contact "Repairs (Inquiries/Request)" on the last page (in Japanese only) or a DOCOMO-specified repair office.・Check if multiple applications are activated. Exit the unused applications. →P.67](https://usermanual.wiki/Sony/65365K.PY7-65365K-UserGuide/User-Guide-3492114-Page-216.png)
![215Appendix/Index・When the Wi-Fi function or Bluetooth function is not used, turn off the setting. →P.158 , P.197・When STAMINA mode is set, the operations and a part of functions of the terminal are restricted so that the consumption of the battery power can be reduced. →P.177Operations are not possible when tapping or pressing keys.・Check if the power is turned off.→P.42・Check if you activate the screen lock.→P.181・When you touch the screen at a right angle by gloved finger with "Glove mode" ON, operation may not be performed well. Use a ball of finger to touch the screen for operation.→P.169The screen reacts slowly when you tap or press the keys.・When large amount of data is saved in the terminal or transferring large-size data between the terminal and microSD card, the reactions on the screen may be delayed.The docomo nano UIM card is not recognized.・Check if the docomo nano UIM card is attached in the right direction.→P.32The clock is not on time.・The clock time may become wrong when the power is turned on for a long time. Check if "Automatic date & time" and "Automatic time zone" are ON and turn the power off and on in a place with strong radio wave conditions.→P.191The terminal operation is unstable.・Instability may be caused by applications that you installed after purchasing the terminal. If the symptom is improved when you boot the terminal in safe mode (near default state), uninstalling the installed application may improve the symptom.To boot the terminal in safe mode, press and hold O for at least 1 second with the terminal OFF until XPERIA logo appears, and then press and hold the volume down key for a while.When the power is turned on, press and hold O for at least 1 seconduTouch and hold [Power off]uTap [OK] to restart the terminal in Safe mode.When safe mode is booted, "Safe mode" is displayed at the lower left of the screen.To exit from the safe mode, turn power OFF and then ON.* Back up necessary data before using safe mode.* Some applications or widgets may be erased.](https://usermanual.wiki/Sony/65365K.PY7-65365K-UserGuide/User-Guide-3492114-Page-217.png)
![221Appendix/Index ●Memory is getting lowAvailable memory space in the terminal is low. If you continue to use the terminal, some functions or applications may not work. Activate the setting menu and select unnecessary applications, then tap [UNINSTALL] to uninstall the applications (P.174). ●Memory full.There is no memory space in the microSD card. Delete unnecessary data (P.196) to save the memory space.By sharing screens of your terminal with NTT DOCOMO, you can receive technical support to make settings, use applications, or connect peripheral devices such as PC. (in Japanese only).・This service is not available when your docomo nano UIM card is not inserted, during international roaming, or in Airplane mode.・Anshin Enkaku Support is a paid service requiring subscription.・Some operations and settings are not supported.・For details on Anshin Enkaku Support, refer to NTT DOCOMO website.1Call あんしん遠隔サポートセンター(Anshin Enkaku Support center).From DOCOMO mobile phones(No prefix) 15710 (toll free)From land-line phones 0120-783-360Business hours: 9:00 a.m. to 8:00 p.m., open all year roundあんしん遠隔サポート (Anshin Enkaku Support)](https://usermanual.wiki/Sony/65365K.PY7-65365K-UserGuide/User-Guide-3492114-Page-223.png)
![222Appendix/Index・To make a call to the Anshin Enkaku Support center from the terminal, from the Home screen, u[遠隔サポート (Enkaku support)]u[このスマートフォンから発信する (Make a call from this smartphone)]uTap .2From the Home screen, u[遠隔サポート (Enkaku support)].3[遠隔サポートの接続画面に進む (Go to Enkaku support connection screen)]u[同意する (Agree)].4Enter the connection number notified by DOCOMOu[開始 (Start)].5Enkaku support starts when you are connected.・Make sure that the warranty is received with the terminal upon purchase. Check to be sure that "販売店名・お買い上げ日 (the name of the retailer, date of purchase)", and other items have been filled out on the warranty before storing it in a safe place. If any necessary information is not provided, immediately contact the retailer and request to complete the warranty. The terminal comes with a year's warranty starting from the date of purchase.* TV antenna cable SO01 is not covered by the cost-free repair warranty.・The specifications and the outer appearance of the terminal including the accessories are subject to change for improvement without prior notice.・Data saved in the Contacts etc. may be changed/lost due to the trouble/repairs or handling of the terminal. DOCOMO recommends making a copy of the Phonebook data etc., in case.* You can save Phonebook data in a microSD card inserted to the terminal.* Data such as phonebook entries can be backed up by using docomo cloud.Warranty and After Sales ServicesWarranty](https://usermanual.wiki/Sony/65365K.PY7-65365K-UserGuide/User-Guide-3492114-Page-224.png)
![227Appendix/Index・If the update failed and all operations become disabled, please contact a DOCOMO-specified repair office.・Messages (SMS) sent while updating are stored in the SMS center.・Performing update may take time.・Updating is unavailable in the following cases.-During a call- When 圏外 (out of service area) is displayed- Tethering in use as an access point- When date and time are not set correctly- When the remaining battery is not sufficient- When the remaining memory is not sufficient- When the basic software is altered illegally.・Exit from all applications before installing.・Update the software with the battery fully charged.・Do not turn off the terminal while updating.・Stay in a place with strong radio wave condition when downloading. The update may be canceled if the radio wave condition is not good enough.・If an update is not needed, "No upgrade is needed. Use it as it is." appears.・For update available period, refer to NTT DOCOMO website.・You need to perform the installation by yourself for updating software. Drag the status bar downuTap a notificationuTap [install].・To change the auto-update setting, from the Home screen, u[Settings]u[About phone]u[Software Update]uTap of / of "Auto download".・When "Auto download" is OFF, perform operation of "When the icon does not appear in the status bar" (P.227).When the icon does not appear in the status barPerform the update as follows.1From the Home screen, u[Settings]u[About phone]u[Software Update]u[Update now].・Download starts.2After a message for installation start appearsu[INSTALL].・Installation starts.Updating software](https://usermanual.wiki/Sony/65365K.PY7-65365K-UserGuide/User-Guide-3492114-Page-229.png)
![228Appendix/Index■ When the confirmation screen for update appearsDepending on update, a confirmation screen for performing update appears after [Update now] is tapped.1Select a updating method.・"Perform now (only via Wi-Fi)" : Immediately download the update file via Wi-Fi connection.・"Perform at scheduled time (via Wi-Fi/Xi)"* : Download the update file via Wi-Fi connection or Xi/FOMA at the time that is reserved automatically.* If downloading via Xi/FOMA is not available, "Perform at scheduled time (only via Wi-Fi)" appears. If you does not set spモード (sp-mode), the update cannot be performed even if [Perform at scheduled time (only via Wi-Fi)] is tapped. Use Wi-Fi connection.2[Download and install]/[Download].・"Download and install" : After downloading is complete, the installation is performed automatically. Installation is performed after approximately 10 seconds even if you do not tap [OK].・"Download" : Even when downloading update file is complete, the installation is not performed automatically. To install, perform installation by yourself.❖Information・When the latest software is already applied to the terminal, "No upgrade is needed. Use it as it is." appears.・If downloading stops halfway, data downloaded before interruption is retained for up to 14 days. To resume downloading, resume from (Download stopped) on the Notification panel.・When "Perform at scheduled time (via Wi-Fi/Xi)" is selected, time for downloading is automatically set. Tap [BACK]u[Perform at scheduled time (via Wi-Fi/Xi)] to set time for downloading again automatically.After the update is done, check if updates for applications are available. Without updating applications, operations may become unstable or functions may not work properly. Be sure to update to the latest version.・Updating from the notification iconWhen the update is complete, the terminal restarts and the notification icon (Update completed) appears.Drag the status bar downu[Update completed]uFollow the onscreen instructions to update applications in the update list.・Updating from Play StoreFrom the Home screen, tap [Play Store]uuTap [My apps & games] to update each application.Updating applications](https://usermanual.wiki/Sony/65365K.PY7-65365K-UserGuide/User-Guide-3492114-Page-230.png)

![234Appendix/IndexYou can check details of certificate and compliance mark specific to the terminal (including certificate number/compliance number).1From the Home screen, u[Settings].2[About phone]u[Certificates].■VCCIThe terminal complies with a technical standards based on VCCI RULES FOR VOLUNTARY CONTROL MEASURES and the mark of conformity is depicted electronically on the screen.Software delivered with this device and its media is owned by Sony Mobile Communications Inc., and/or its affiliated companies and its suppliers and licensors.Sony Mobile grants you a non-exclusive limited license to use the Software solely in conjunction with the Device on which it is installed or delivered.Ownership of the Software is not sold, transferred or otherwise conveyed.Do not use any means to discover the source code or any component of the Software, reproduce and distribute the Software, or modify the Software.You are entitled to transfer rights and obligations to the Software to a third party, solely together with the Device with which you received the Software, provided the third party agrees in writing to be bound by the terms of this Licence.This licence exists throughout the useful life of this Device.It can be terminated by transferring your rights to the Device to a third party in writing.Failure to comply with any of these terms and conditions will terminate the licence immediately.Certificate and compliance End User Licence Agreement](https://usermanual.wiki/Sony/65365K.PY7-65365K-UserGuide/User-Guide-3492114-Page-236.png)
![239Appendix/IndexThis terminal supports SIM unlock. If you release SIM lock, you can use SIM by a carrier other than NTT DOCOMO.・Available services and functions may be limited. DOCOMO is not liable to any failures or malfunctions.・For details of SIM unlock procedure, refer to NTT DOCOMO website.1Insert SIM card provided by other company.2Power on the terminal.3Enter the SIM unlock codeu[UNLOCK].SIM unlock](https://usermanual.wiki/Sony/65365K.PY7-65365K-UserGuide/User-Guide-3492114-Page-241.png)
![Don't forget your mobile phone ... or your manners!Remember to be courteous to others when you use your terminal.Turn the power off when you are:■In places where use is prohibitedFollow the instructions of each airline or medical facility for the use of mobile phones on their premises. Power off the terminal in a place where the use is prohibited.Always set to public mode in case below■DrivingUse of the terminal holding with your hand while driving will result in a penalty.However, absolutely necessary cases such as rescue of a sick person or maintaining public's safety are exempted.■In places such as theaters, cinemas, and art galleriesUsing the terminal in a public place, where you need to be quiet, annoys people around you.Keep your voice and ring tone down■Keep your voice down in quiet places like restaurants and hotel lobbies.■If you are in an outdoor public place, make sure you do not disturb others.Respect privacy■Please be considerate of the privacy of individuals around you when taking and sending photos using camera-equipped terminals.Do not use smartphone while walking■Use of smartphone while walking on station platform or road makes your eyesight extremely narrow. It may cause accident.■Stop and stay in a safe place and then use smartphone.Have good manners【Silent mode】 (P.46)Mutes the terminal ringtone or operation sounds.* Shutter sound cannot be muted.【Public mode (power OFF)】 (P.98)Informs the caller that you are required to turn off the terminal and ends the call automatically.【Vibrate】 (P.172)Vibrates when there is an incoming call.【Answering Machine】 (P.96)When you cannot answer a call, the terminal records a message from the caller.You can also use optional services such as the Voice Mail Service (P.97) and Call Forwarding Service (P.97).Make various applications, check your subscription, and more onlineThe terminal: dメニュー (dmenu) u[My docomo(お客様サポート) (My docomo (Customer support))]u[ドコモオンライン手続き (docomo online procedures)]PC: My docomo (https://www.nttdocomo.co.jp/mydocomo/ ) u Select the item in "ドコモオンライン手続き (docomo online procedures)" (in Japanese only)* There are cases where the site may not be available due to system maintenance, etc.* When using "ドコモオンライン手続き (docomo online procedures)", "Network security code" and "ID/password of d ACCOUNT" are required.We collect old phones, etc. regardless of brands and manufacturers. Bring them to your nearest docomo Shop.* Items to be collected: mobile phones, PHS, battery packs, chargers, desktop holders (regardless of brands and manufacturers)](https://usermanual.wiki/Sony/65365K.PY7-65365K-UserGuide/User-Guide-3492114-Page-250.png)