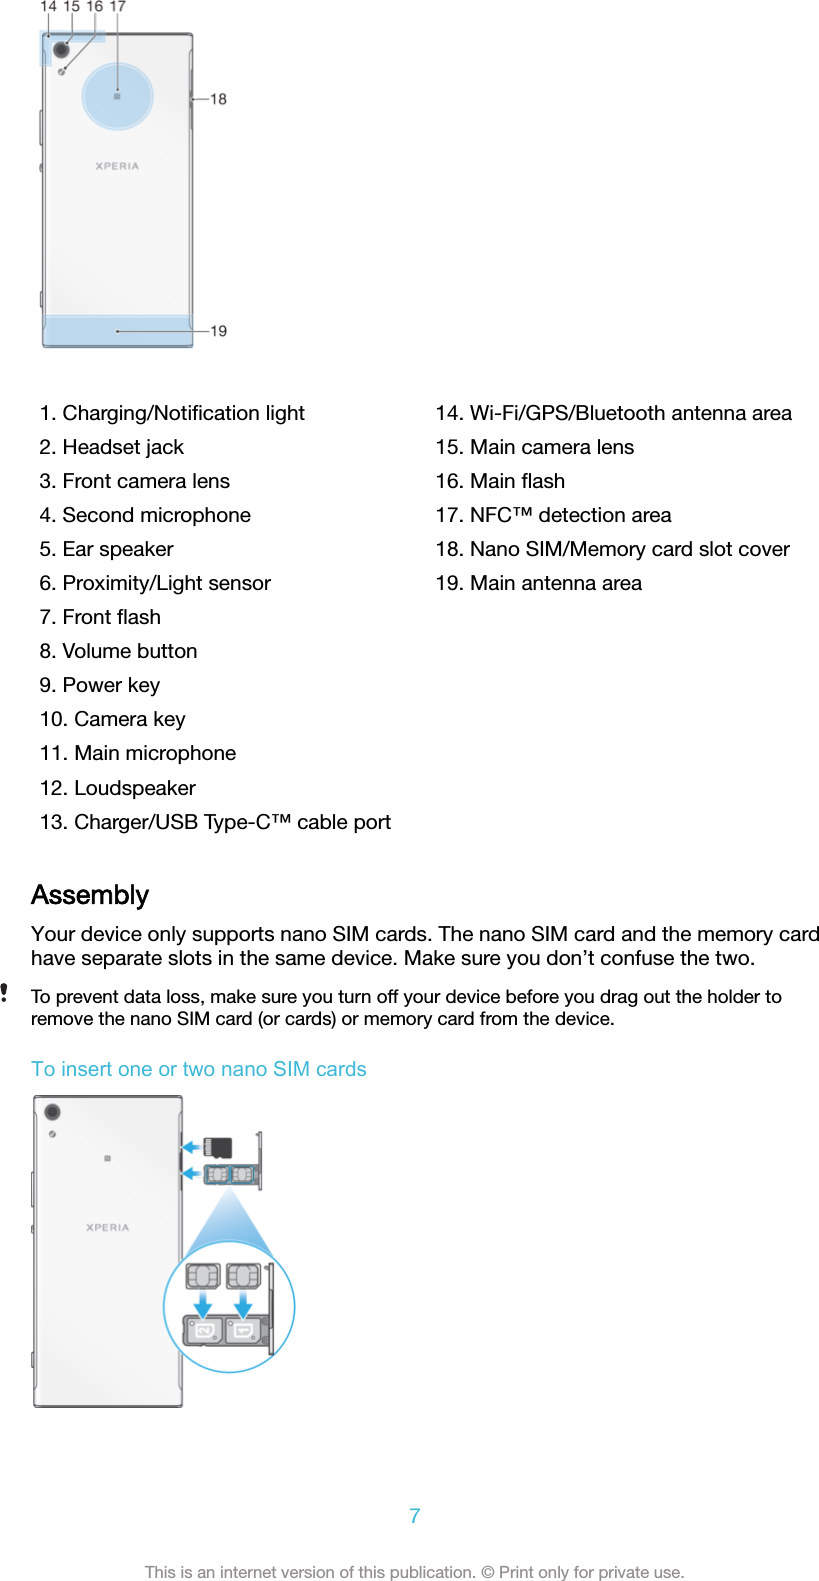
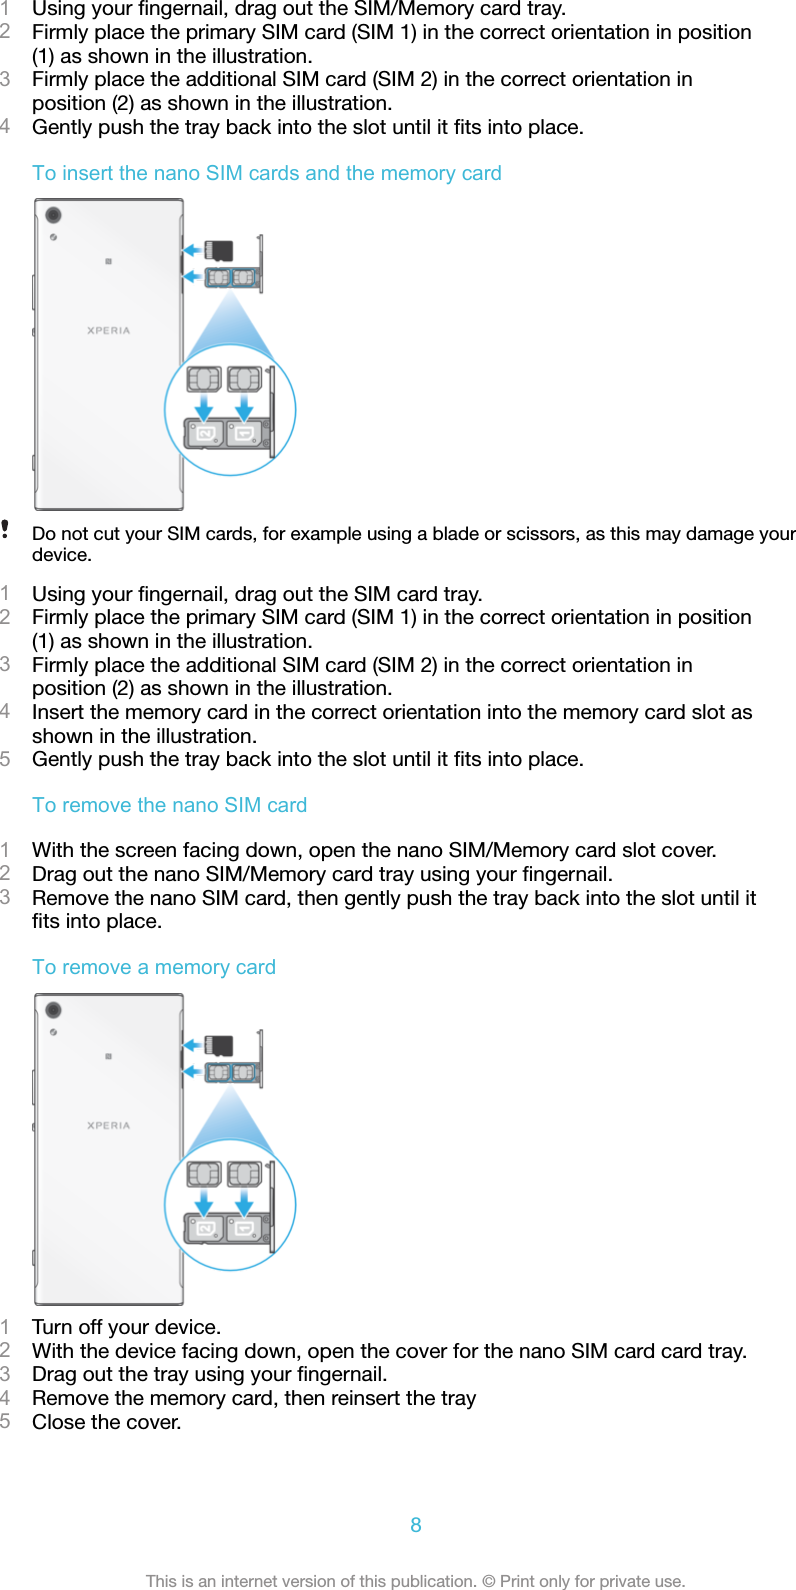
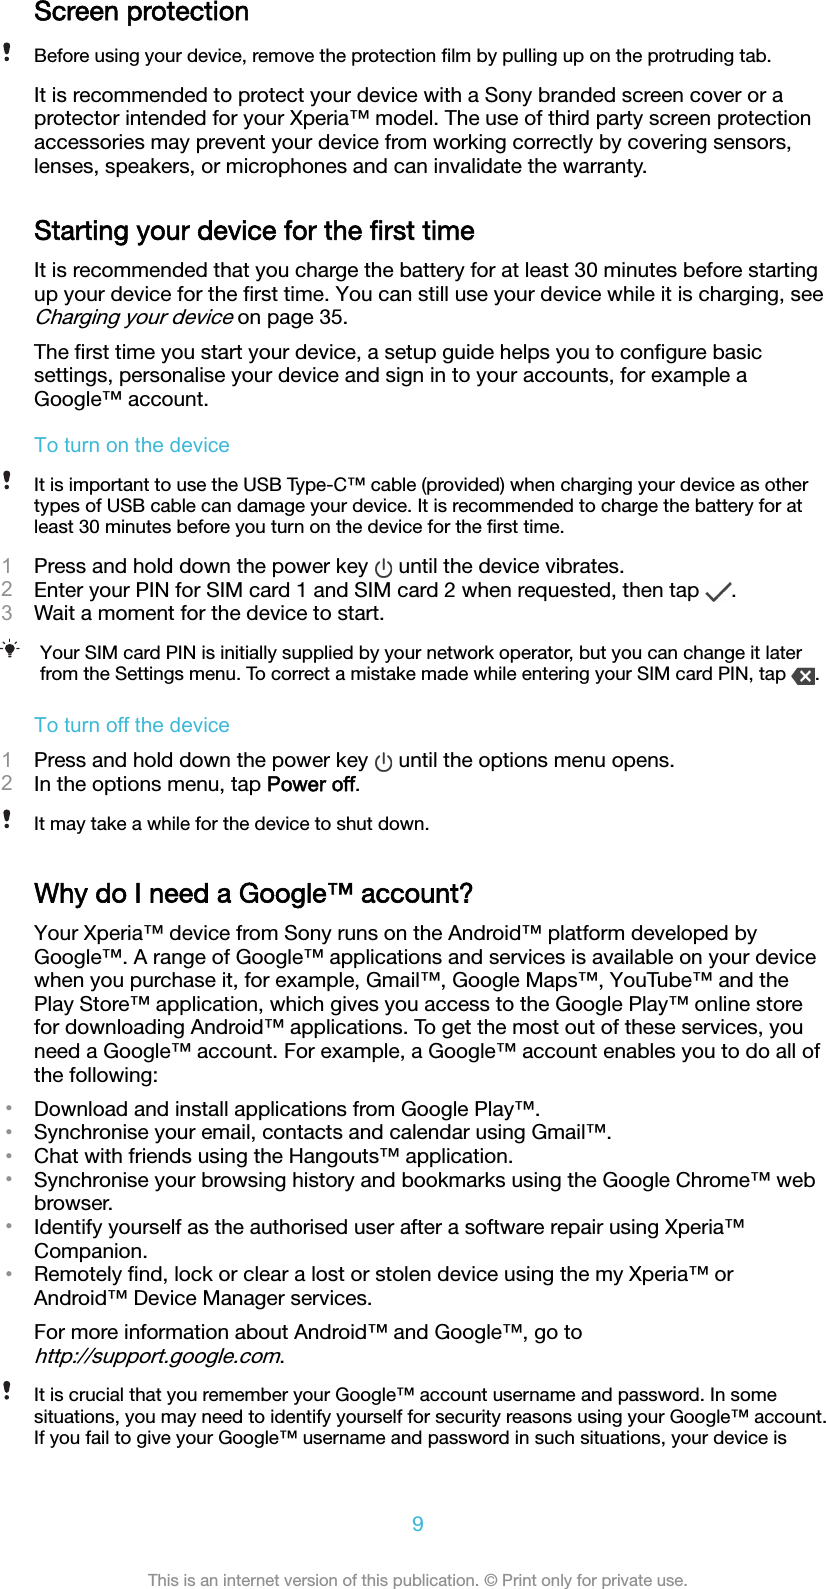
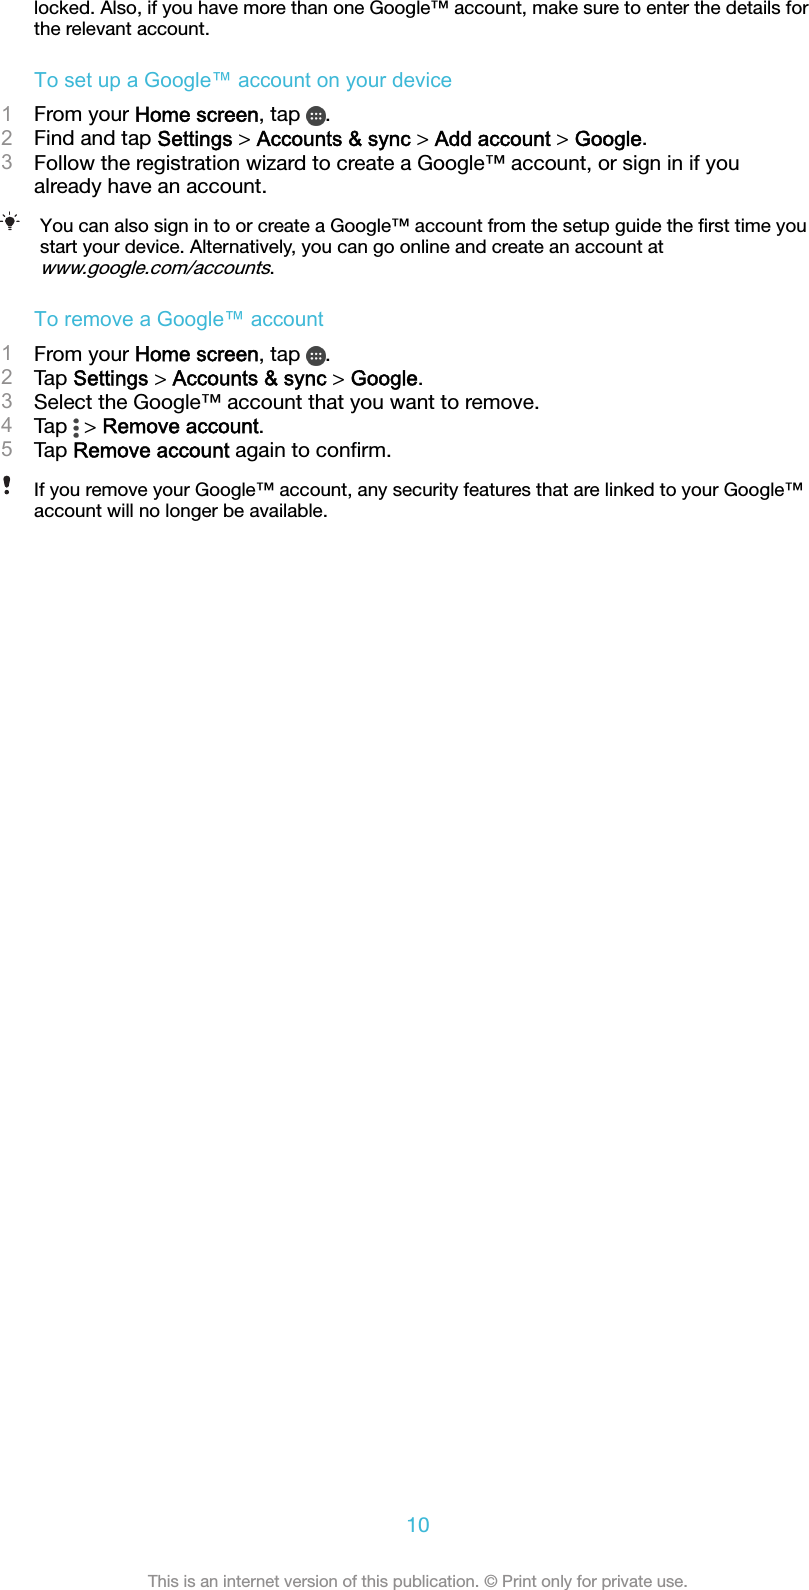
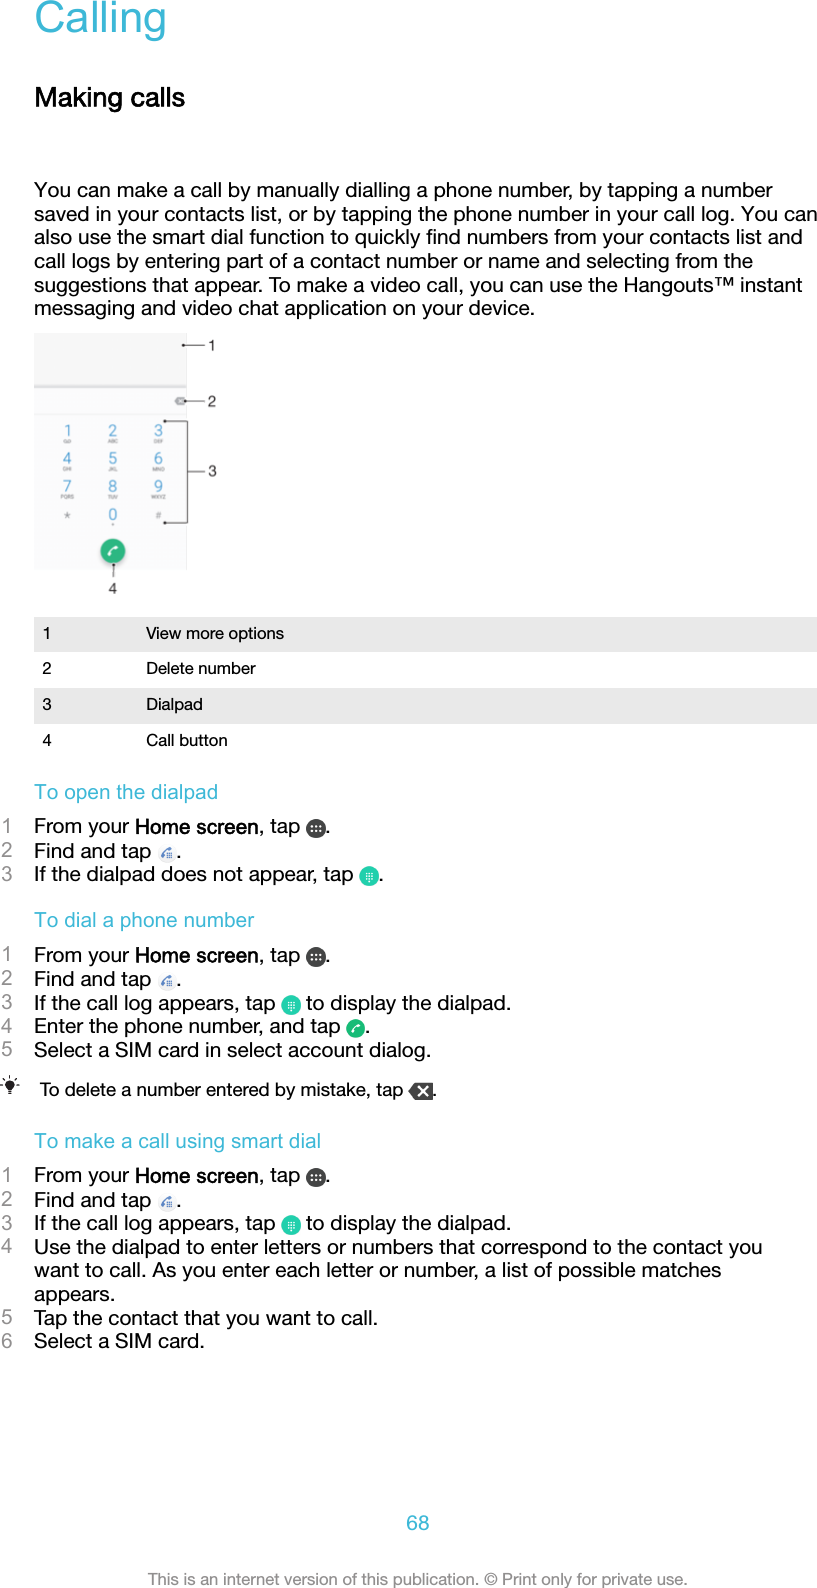
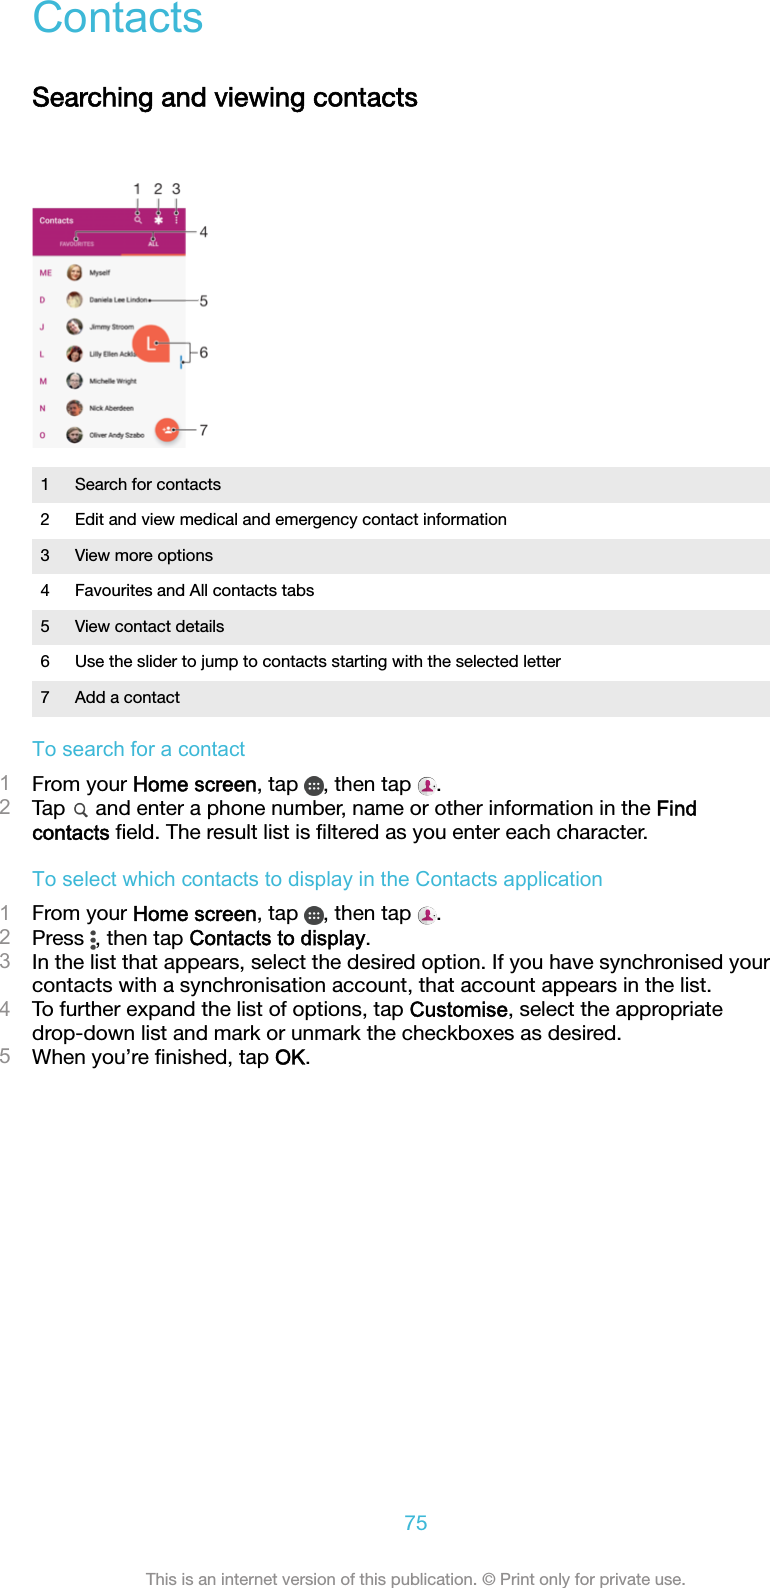
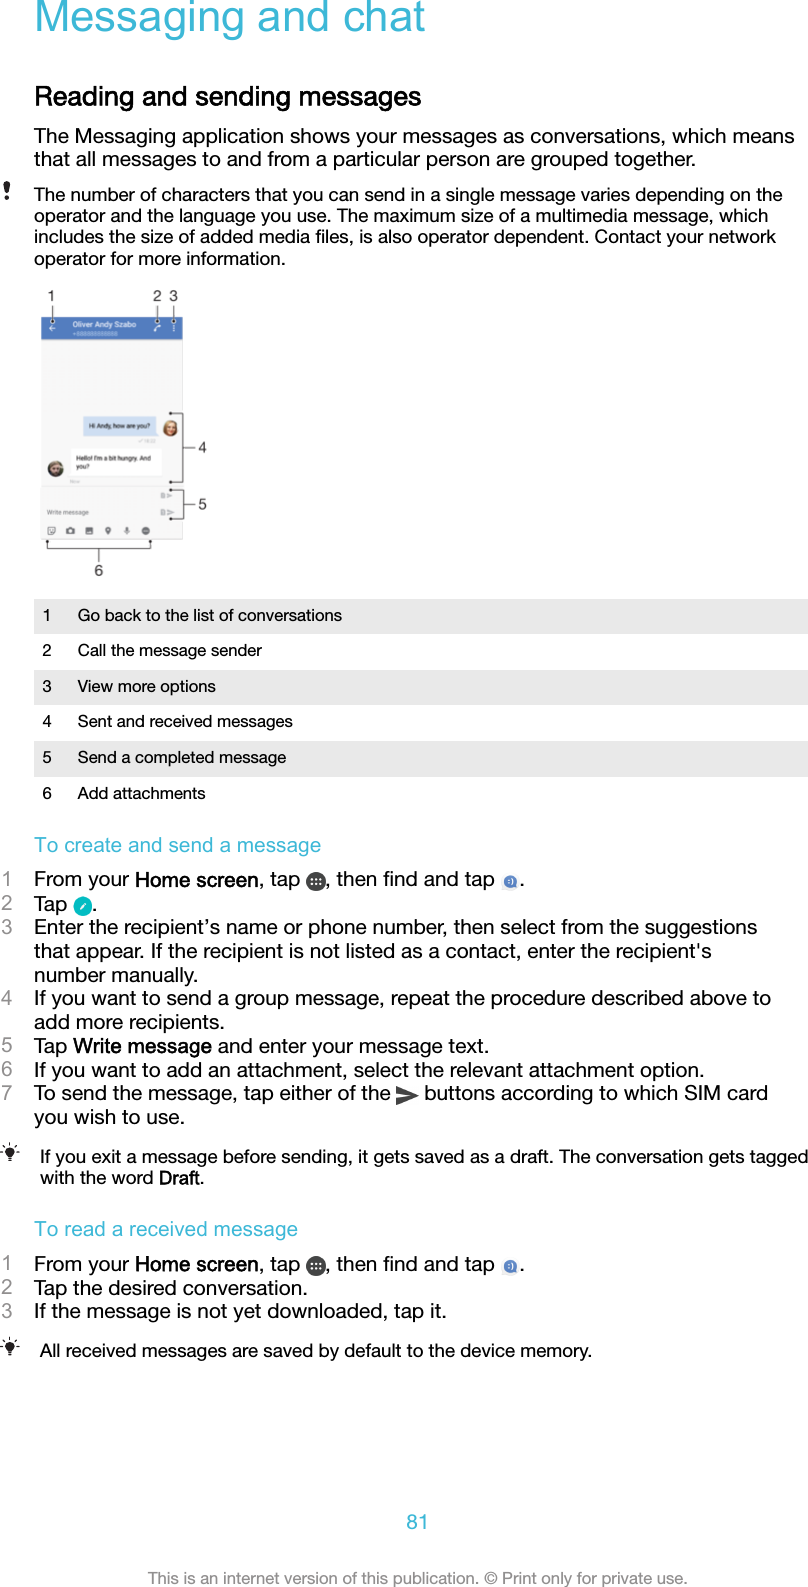
Sony 75946T GSM/WCDMA/LTE Phone+Bluetooth, DTS/UNII a/b/g/n and NFC User Manual PY7 75946T User Guide

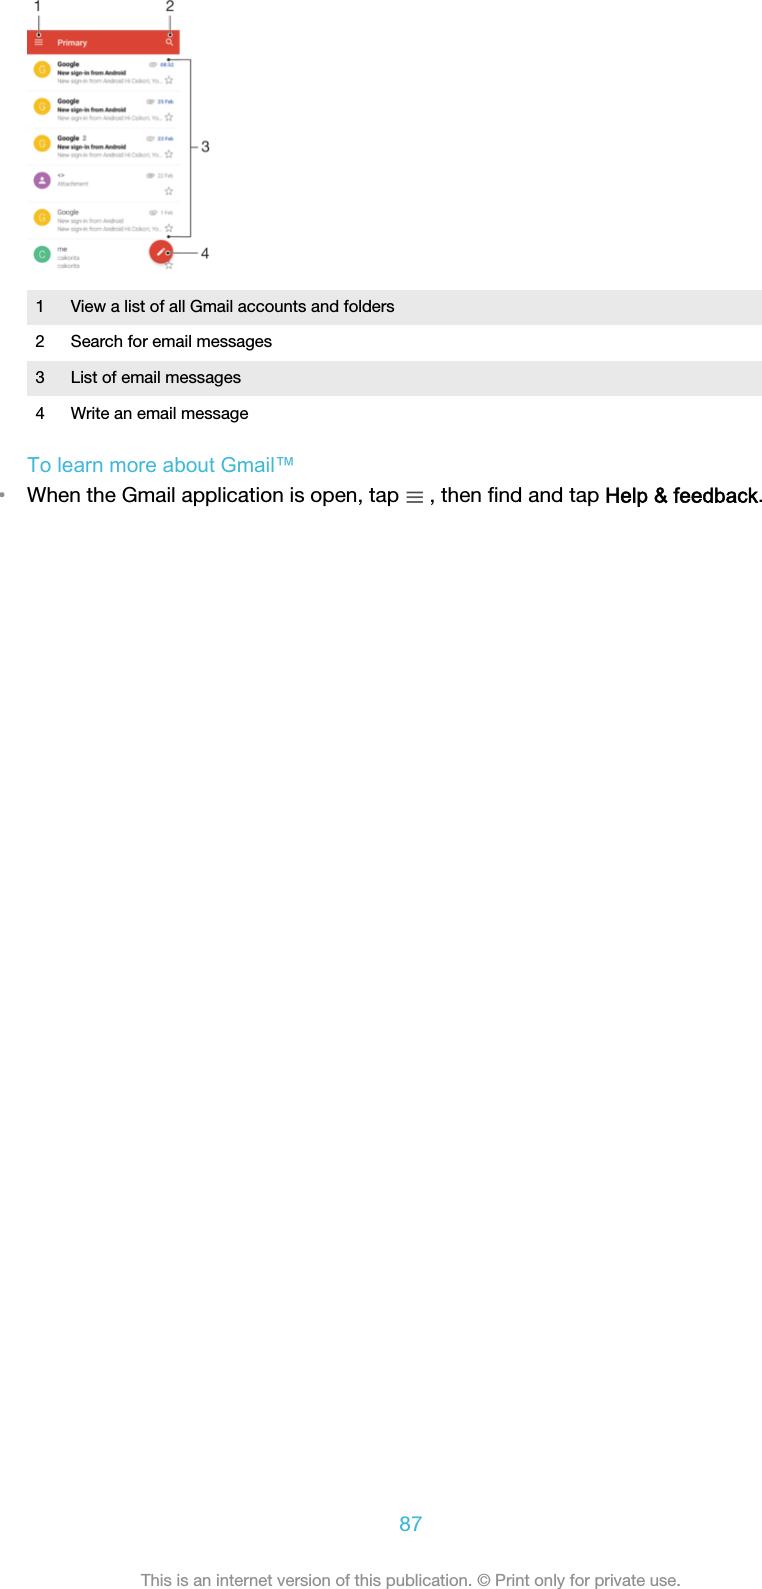
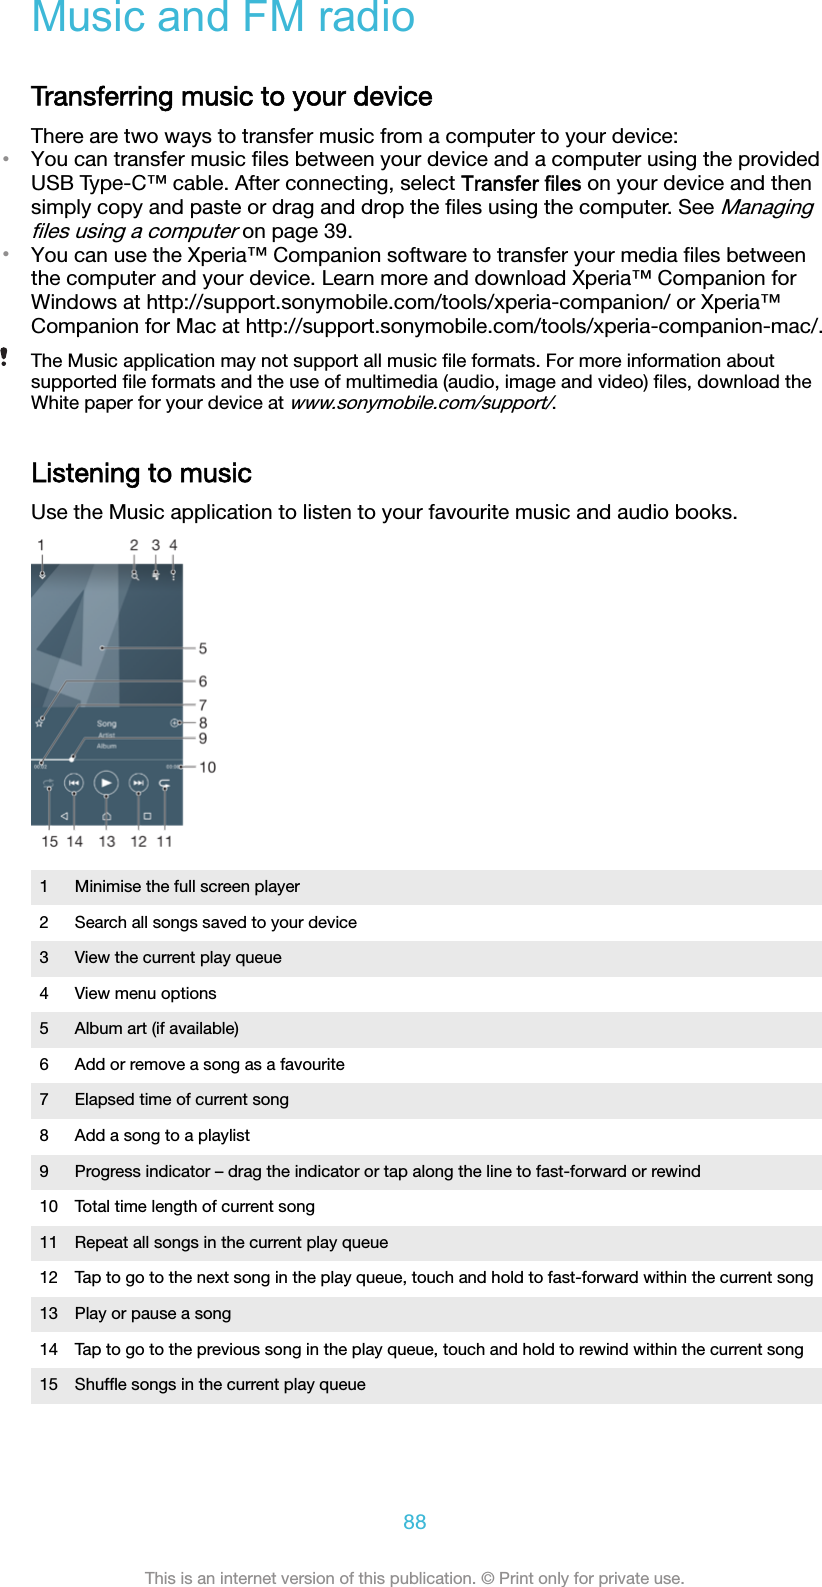
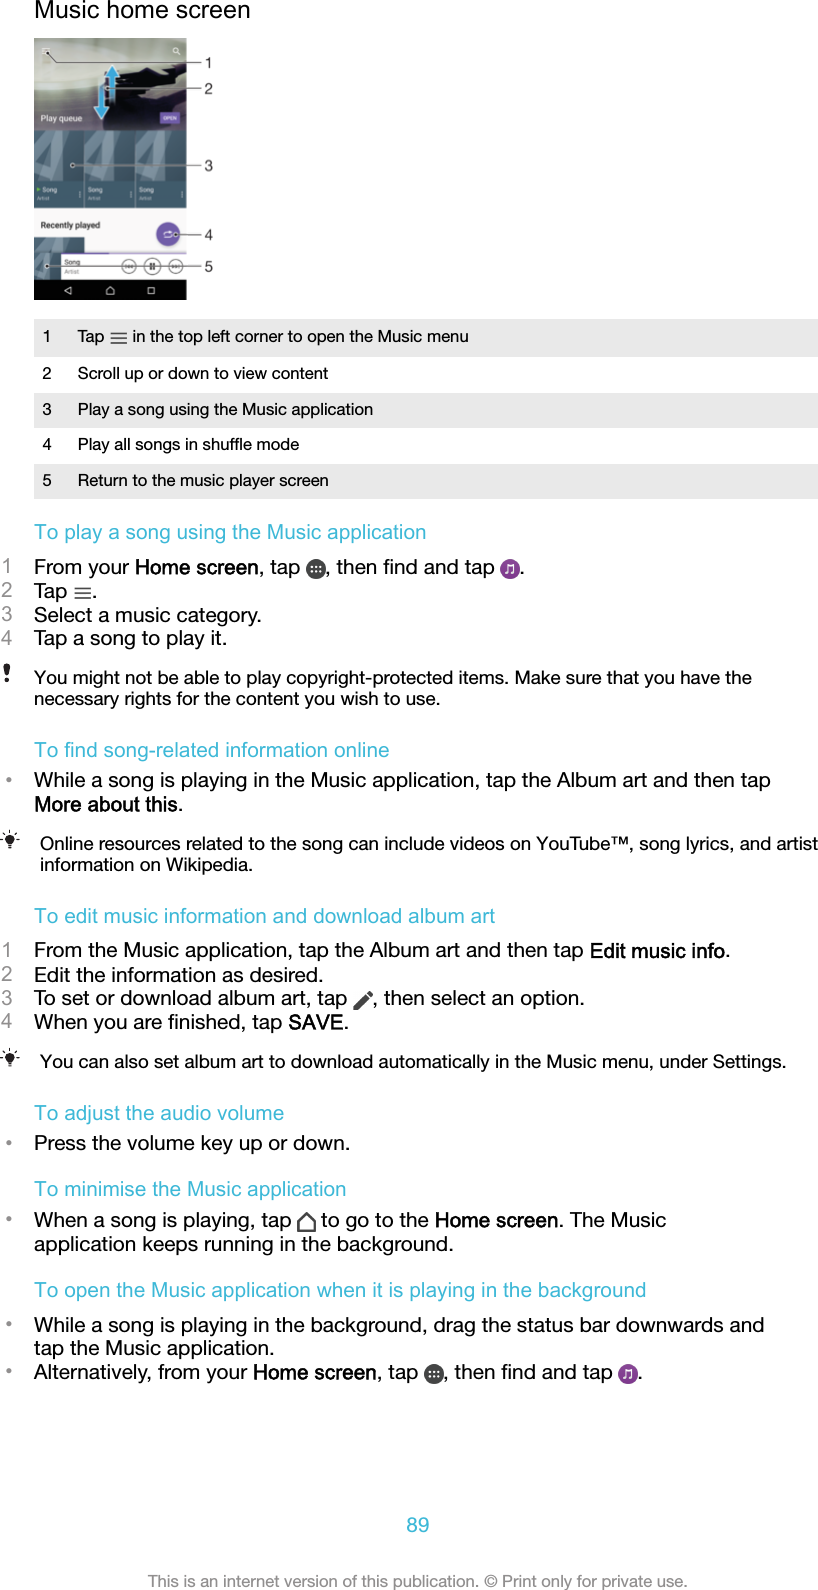
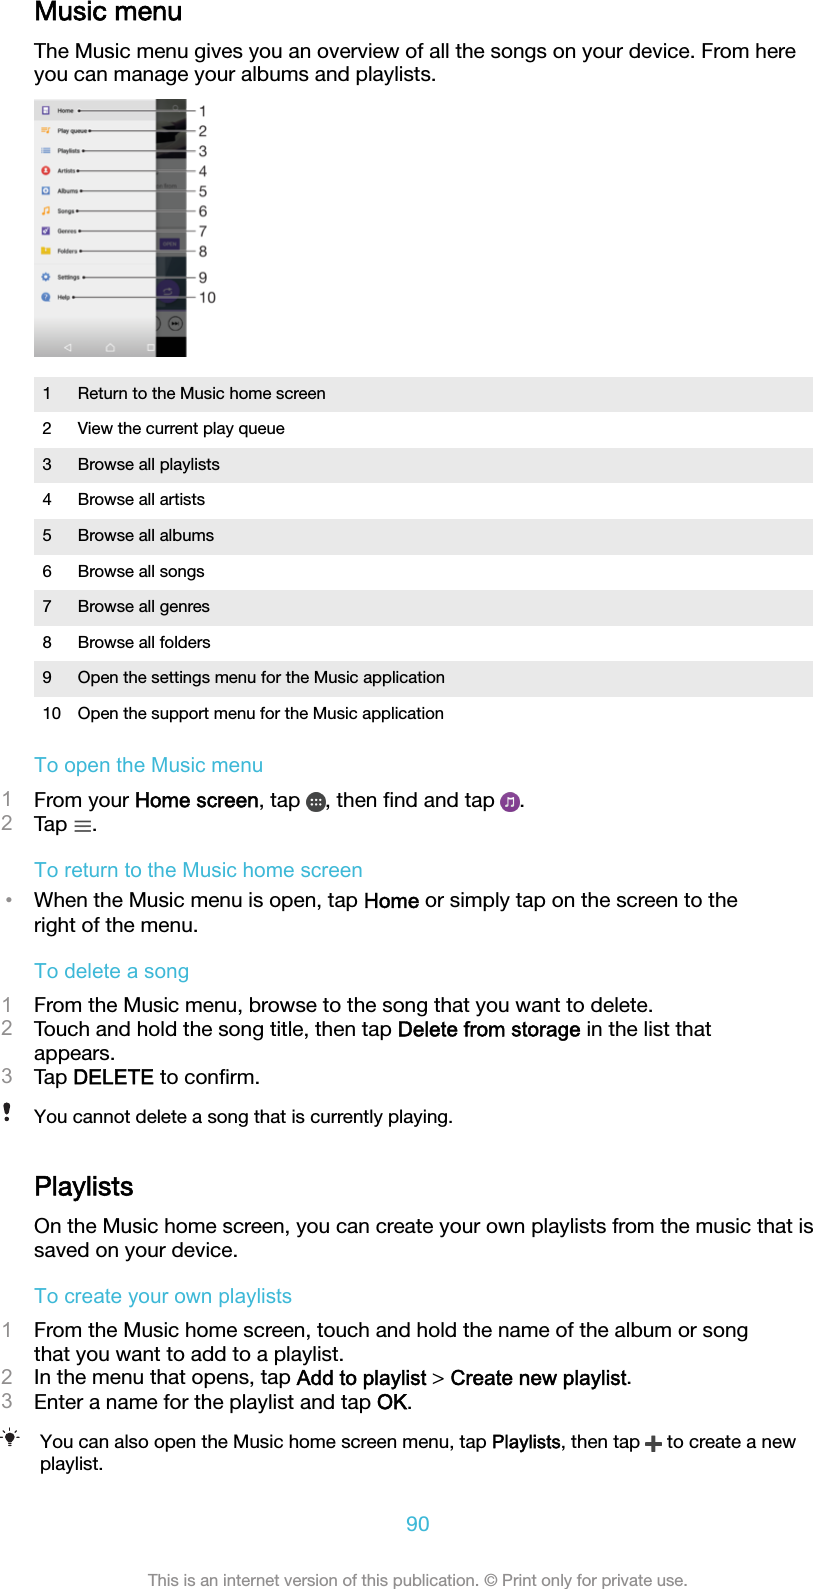
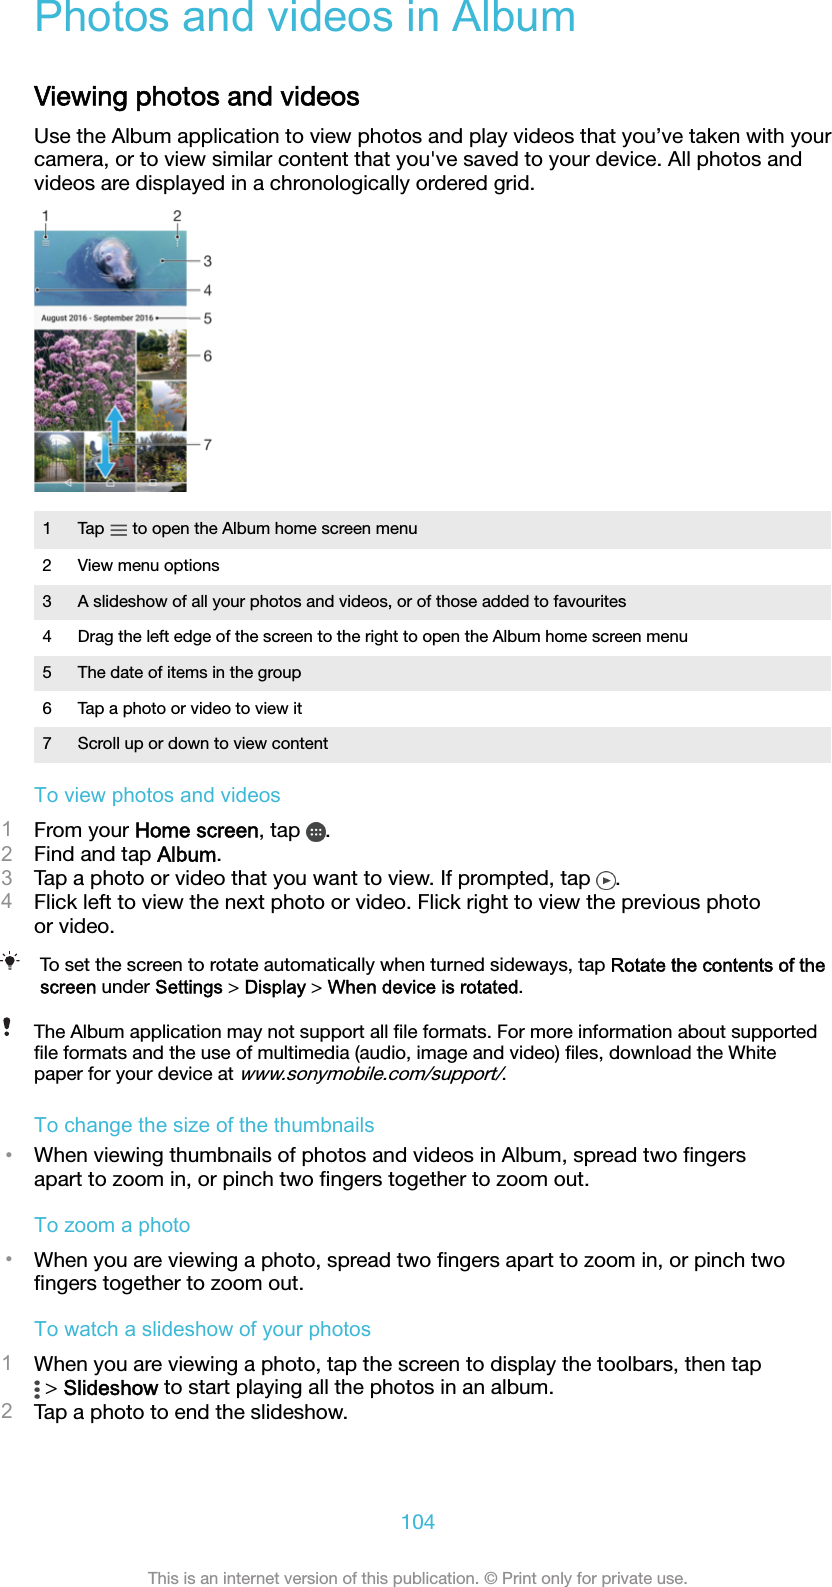
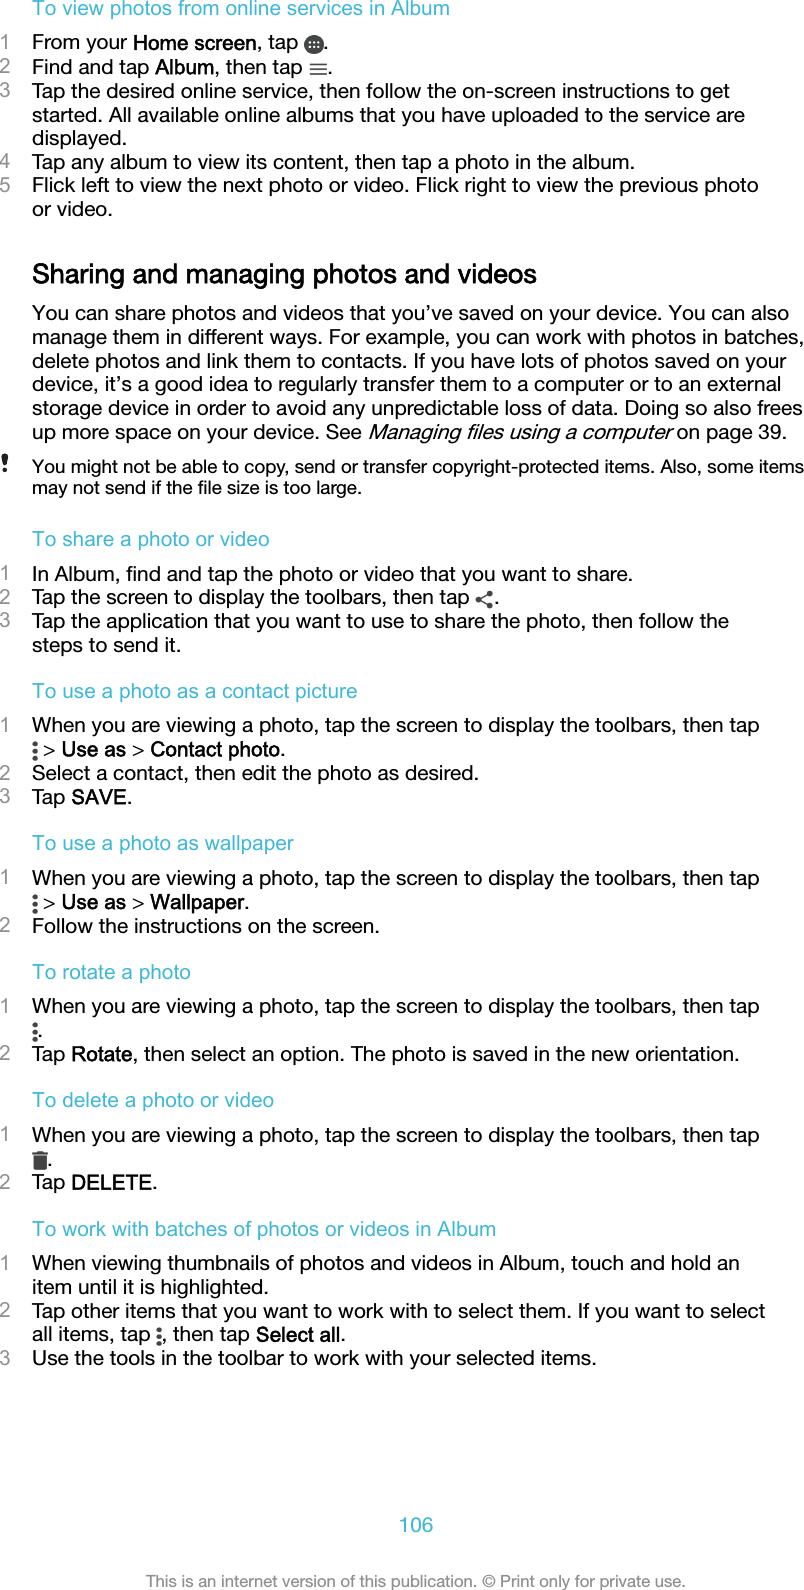
Sony Mobile Communications Inc GSM/WCDMA/LTE Phone+Bluetooth, DTS/UNII a/b/g/n and NFC PY7 75946T User Guide

PY7-75946T_User Guide

DraftUser guideG3212/G3226
ContentsGetting started............................................................................... 6About this User guide........................................................................ 6Overview............................................................................................ 6Assembly........................................................................................... 7Screen protection...............................................................................9Starting your device for the first time.................................................9Why do I need a Google™ account?.................................................9Device security.............................................................................11Making sure your device is protected..............................................11Screen lock...................................................................................... 11Unlocking your device automatically............................................... 13SIM card protection......................................................................... 16Using multiple SIM cards.................................................................16Finding the identification number of your device.............................17Finding a lost device ....................................................................... 18Learning the basics...................................................................... 20Using the touchscreen.....................................................................20Locking and unlocking the screen................................................... 22Home screen....................................................................................22Application screen........................................................................... 24Navigating applications....................................................................25Widgets............................................................................................26Shortcuts and folders...................................................................... 27Background and themes..................................................................28Taking a screenshot......................................................................... 28Notifications..................................................................................... 29Icons in the status bar..................................................................... 31Applications overview...................................................................... 33Battery and maintenance............................................................. 35Charging your device....................................................................... 35Battery and power management..................................................... 36Updating your device.......................................................................38Maintenance using a computer....................................................... 39Storage and memory....................................................................... 40Backing up and restoring content....................................................42Downloading applications............................................................45Downloading applications from Google Play™............................... 45Downloading applications from other sources................................ 452This is an internet version of this publication. © Print only for private use.
Internet and networks.................................................................. 46Browsing the web............................................................................ 46Internet and MMS settings ............................................................. 46Wi-Fi.................................................................................................47Sharing your mobile data connection.............................................. 49Controlling data usage.....................................................................50Selecting a SIM card for data traffic................................................ 51Selecting mobile networks...............................................................52Virtual private networks (VPNs)........................................................52Synchronising data on your device..............................................54Synchronising with online accounts................................................ 54Synchronising with Microsoft® Exchange ActiveSync®................. 54Basic settings...............................................................................56Accessing settings...........................................................................56Volume settings................................................................................56Do not disturb mode........................................................................ 57Screen settings................................................................................ 58Application settings......................................................................... 59Resetting your applications............................................................. 60Screen saver.................................................................................... 61Language settings............................................................................61Date and time...................................................................................61Super-vivid mode.............................................................................62Enhancing the sound output............................................................62Noise cancellation............................................................................63Multiple user accounts.....................................................................63Typing text....................................................................................66On-screen keyboards...................................................................... 66Editing text....................................................................................... 67Calling.......................................................................................... 68Making calls..................................................................................... 68Receiving calls................................................................................. 69Ongoing calls................................................................................... 70Using the call log............................................................................. 71Forwarding calls...............................................................................71Restricting calls................................................................................72Multiple calls.................................................................................... 73Conference calls.............................................................................. 73Voicemail..........................................................................................74Emergency calls...............................................................................74Contacts.......................................................................................75Searching and viewing contacts......................................................753This is an internet version of this publication. © Print only for private use.
Adding and editing contacts............................................................76Transferring contacts....................................................................... 77Backing up contacts........................................................................ 78Adding medical and emergency contact information...................... 78Favourites........................................................................................ 79Sending contact information............................................................79Avoiding duplicate entries in the Contacts application................... 80Messaging and chat.....................................................................81Reading and sending messages......................................................81Organising your messages.............................................................. 82Calling from Messaging................................................................... 83Messaging settings.......................................................................... 83Video chat........................................................................................ 83Email.............................................................................................84Setting up email............................................................................... 84Sending and receiving email messages...........................................84Organising your email messages..................................................... 85Email account settings.....................................................................86Gmail™............................................................................................ 86Music and FM radio..................................................................... 88Transferring music to your device....................................................88Listening to music............................................................................88Music menu..................................................................................... 90Playlists............................................................................................ 90Sharing music.................................................................................. 91Enhancing the sound....................................................................... 91Listening to the radio....................................................................... 91Favourite radio channels..................................................................93Radio sound settings....................................................................... 93Camera.........................................................................................94Taking photos and recording videos................................................94General camera settings.................................................................. 95Still camera settings.........................................................................99Video camera settings................................................................... 102Photos and videos in Album...................................................... 104Viewing photos and videos............................................................104Album home screen menu............................................................. 105Sharing and managing photos and videos.................................... 106Editing photos with the Photo editor application...........................107Editing videos with the Video editor application............................107Hiding photos and videos.............................................................. 108Viewing your photos on a map...................................................... 1084This is an internet version of this publication. © Print only for private use.
Videos.........................................................................................110The Video application.................................................................... 110Transferring video content to your device..................................... 111Managing video content................................................................ 111Movie Creator................................................................................ 111Connectivity............................................................................... 113Mirroring the screen of your device wirelessly on a TV................. 113Displaying files on another device using Cast............................... 113Connecting your device to USB accessories................................ 114NFC................................................................................................115Bluetooth® wireless technology....................................................117Smart apps and features that save you time............................. 120Google Search & Now....................................................................120Using the News Suite application..................................................120Using your device as a wallet........................................................ 120Travel and maps......................................................................... 121Using location services.................................................................. 121Google Maps™ and navigation..................................................... 121Using data traffic when travelling.................................................. 122Aeroplane mode.............................................................................122Clock and Calendar....................................................................123Calendar.........................................................................................123Clock..............................................................................................123Accessibility............................................................................... 126Magnification gesture.................................................................... 126Font size.........................................................................................126Display size.................................................................................... 126Colour correction........................................................................... 126TalkBack.........................................................................................126Mono audio.................................................................................... 127TTY (Teletypewriter) mode............................................................. 127Switch Access............................................................................... 127Support and legal.......................................................................129Support application....................................................................... 129Xperia™ Tips..................................................................................129Help in menus and applications.....................................................129Running diagnostic tests on your device.......................................129Restarting, resetting and repairing.................................................129Help us improve our software........................................................131Warranty, SAR and usage guidelines.............................................131Recycling your device....................................................................131Legal information........................................................................... 1315This is an internet version of this publication. © Print only for private use.
Getting startedAbout this User guideThis is the Xperia™ XA1 Ultra User guide for the Android™ 7.1.1 software version. Ifyou're not sure which software version your device is running, you can check it in theSettings menu.System and application updates can present the features in your device in another way thandescribed in this User guide. The Android™ version might not be affected in an update. Formore information about software updates, see Updating your device on page 38.To check the current software version of your device1From your Home screen, tap  .2Find Settings > About phone > Android™ version.Limitations to services and featuresSome of the services and features described in this User guide may not be supportedin all countries or regions, or by all networks or service providers. The GSMInternational Emergency Number can always be used in all countries, regions,networks and by all service providers, provided that the device is connected to themobile network. Please contact your network operator or service provider todetermine the availability of any specific service or feature and whether additionalaccess or usage fees apply.The use of certain features and applications described in this guide may requireaccess to the internet. You may incur data connection charges when you connect tothe internet with your device. Contact your wireless service provider for moreinformation.Overview   6This is an internet version of this publication. © Print only for private use.
   1. Charging/Notification light2. Headset jack3. Front camera lens4. Second microphone5. Ear speaker6. Proximity/Light sensor7. Front flash8. Volume button9. Power key10. Camera key11. Main microphone12. Loudspeaker13. Charger/USB Type-C™ cable port14. Wi-Fi/GPS/Bluetooth antenna area15. Main camera lens16. Main flash17. NFC™ detection area18. Nano SIM/Memory card slot cover19. Main antenna areaAssemblyYour device only supports nano SIM cards. The nano SIM card and the memory cardhave separate slots in the same device. Make sure you don’t confuse the two.To prevent data loss, make sure you turn off your device before you drag out the holder toremove the nano SIM card (or cards) or memory card from the device.To insert one or two nano SIM cards7This is an internet version of this publication. © Print only for private use.
1Using your fingernail, drag out the SIM/Memory card tray.2Firmly place the primary SIM card (SIM 1) in the correct orientation in position(1) as shown in the illustration.3Firmly place the additional SIM card (SIM 2) in the correct orientation inposition (2) as shown in the illustration.4Gently push the tray back into the slot until it fits into place.To insert the nano SIM cards and the memory cardDo not cut your SIM cards, for example using a blade or scissors, as this may damage yourdevice.1Using your fingernail, drag out the SIM card tray.2Firmly place the primary SIM card (SIM 1) in the correct orientation in position(1) as shown in the illustration.3Firmly place the additional SIM card (SIM 2) in the correct orientation inposition (2) as shown in the illustration.4Insert the memory card in the correct orientation into the memory card slot asshown in the illustration.5Gently push the tray back into the slot until it fits into place.To remove the nano SIM card1With the screen facing down, open the nano SIM/Memory card slot cover.2Drag out the nano SIM/Memory card tray using your fingernail.3Remove the nano SIM card, then gently push the tray back into the slot until itfits into place.To remove a memory card1Turn off your device.2With the device facing down, open the cover for the nano SIM card card tray.3Drag out the tray using your fingernail.4Remove the memory card, then reinsert the tray5Close the cover.8This is an internet version of this publication. © Print only for private use.
Screen protectionBefore using your device, remove the protection film by pulling up on the protruding tab.It is recommended to protect your device with a Sony branded screen cover or aprotector intended for your Xperia™ model. The use of third party screen protectionaccessories may prevent your device from working correctly by covering sensors,lenses, speakers, or microphones and can invalidate the warranty.Starting your device for the first timeIt is recommended that you charge the battery for at least 30 minutes before startingup your device for the first time. You can still use your device while it is charging, seeCharging your device on page 35.The first time you start your device, a setup guide helps you to configure basicsettings, personalise your device and sign in to your accounts, for example aGoogle™ account.To turn on the deviceIt is important to use the USB Type-C™ cable (provided) when charging your device as othertypes of USB cable can damage your device. It is recommended to charge the battery for atleast 30 minutes before you turn on the device for the first time.1Press and hold down the power key   until the device vibrates.2Enter your PIN for SIM card 1 and SIM card 2 when requested, then tap  .3Wait a moment for the device to start.Your SIM card PIN is initially supplied by your network operator, but you can change it laterfrom the Settings menu. To correct a mistake made while entering your SIM card PIN, tap  .To turn off the device1Press and hold down the power key   until the options menu opens.2In the options menu, tap Power off.It may take a while for the device to shut down.Why do I need a Google™ account?Your Xperia™ device from Sony runs on the Android™ platform developed byGoogle™. A range of Google™ applications and services is available on your devicewhen you purchase it, for example, Gmail™, Google Maps™, YouTube™ and thePlay Store™ application, which gives you access to the Google Play™ online storefor downloading Android™ applications. To get the most out of these services, youneed a Google™ account. For example, a Google™ account enables you to do all ofthe following:•Download and install applications from Google Play™.•Synchronise your email, contacts and calendar using Gmail™.•Chat with friends using the Hangouts™ application.•Synchronise your browsing history and bookmarks using the Google Chrome™ webbrowser.•Identify yourself as the authorised user after a software repair using Xperia™Companion.•Remotely find, lock or clear a lost or stolen device using the my Xperia™ orAndroid™ Device Manager services.For more information about Android™ and Google™, go tohttp://support.google.com.It is crucial that you remember your Google™ account username and password. In somesituations, you may need to identify yourself for security reasons using your Google™ account.If you fail to give your Google™ username and password in such situations, your device is9This is an internet version of this publication. © Print only for private use.
locked. Also, if you have more than one Google™ account, make sure to enter the details forthe relevant account.To set up a Google™ account on your device1From your Home screen, tap  .2Find and tap Settings > Accounts & sync > Add account > Google.3Follow the registration wizard to create a Google™ account, or sign in if youalready have an account.You can also sign in to or create a Google™ account from the setup guide the first time youstart your device. Alternatively, you can go online and create an account atwww.google.com/accounts.To remove a Google™ account1From your Home screen, tap  .2Tap Settings > Accounts & sync > Google.3Select the Google™ account that you want to remove.4Tap   > Remove account.5Tap Remove account again to confirm.If you remove your Google™ account, any security features that are linked to your Google™account will no longer be available.10This is an internet version of this publication. © Print only for private use.
Device securityMaking sure your device is protectedYour device includes several security options, strongly recommended in case of lossor theft.These options are as follows:•Set a secure screen lock on your device using a PIN, password or pattern to preventanyone from accessing or resetting your device.•Add a Google™ account to prevent others from using your device if it gets stolen orwiped.•Activate either the “Protection by my Xperia” or the Android™ Device Manager webservice. Using one of these services, you can remotely locate, lock or clear a lostdevice.Verifying the ownership of your deviceCertain protection features require you to either unlock your screen with your PIN,password, pattern, or enter your Google™ account information. Below are examplesof protection features and some of the required credentials:Factory DataResetprotectionYou must unlock your screen before you are allowed to perform aFactory Data Reset.Protection bymy Xperia If you remotely reset your device using this service, you must enterthe username and password for a Google™ account associated withthe service. The device must be connected to the internet before thesetup process can be completed. Otherwise, you will not be able touse your device after the reset.Android™DeviceManagerIf you remotely reset your device using this service, you must enterthe username and password for a Google™ account. The device mustbe connected to the internet before the setup process can becompleted. Otherwise, you will not be able to use your device afterthe reset.Software repair If you use the Xperia™ Companion software to perform a softwarerepair, you’re asked to enter your Google™ account username andpassword when you start the device after the repair is complete.For Android™ Device Manager, it is necessary to enter information from a Google™ account.This can be any Google™ account which you have set up on the device as an owner. If youcannot provide the relevant account information during a setup process, you won't be able touse the device at all.Screen lockThere are several screen lock options available. The security level of each lock type islisted below in order of weakest to strongest:•Swipe: no protection, but you have quick access to the Home screen.•Pattern: draw a simple pattern with your finger to unlock your device.•PIN: enter a numeric PIN of at least four digits to unlock your device.•Password: enter an alpha-numeric password to unlock your device.It is very important that you remember your screen lock pattern, PIN or password. Ifyou forget this information, it may not be possible to restore important data such ascontacts and messages. If you have set up a Microsoft® Exchange ActiveSync®(EAS) account on your Xperia™ device, the EAS security settings may limit the lockscreen type to only a PIN or password. This occurs when your network administratorspecifies a lock screen type for all EAS accounts for enterprise security reasons.11This is an internet version of this publication. © Print only for private use.
Contact the network administrator of your company or organisation to check whatnetwork security policies are implemented for mobile devices.For more settings for each screen lock type tap   beside Screen lock.To create a screen lock pattern1From your Home screen, tap   .2Find and tap Settings > Lock screen & security > Screen lock > Pattern.3Choose an option and follow the instructions on your device.If you enter an incorrect lock pattern five times in a row, you must wait 30 seconds beforetrying again.To change your screen lock type1From your Home screen, tap   .2Find and tap Settings > Lock screen & security > Screen lock.3Choose an option and follow the instructions on your device.To change the screen lock pattern1From your Home screen, tap   .2Find and tap Settings> Lock screen & security > Screen lock.3Draw your screen unlock pattern.4Tap Pattern, choose an option and follow the instructions on your device.To create a screen lock PIN1From your Home screen, tap  .2Find and tap Settings > Lock screen & security > Screen lock > PIN.3Choose an option. Enter a numeric PIN, then tap CONTINUE.4Re-enter and confirm your PIN, then tap OK.To create a screen lock password1From your Home screen, tap  .2Find and tap Settings > Lock screen & security > Screen lock > Password.3Choose an option and follow the instructions on your device.To activate the Swipe unlock function1From your Home screen, tap  .2Find and tap Settings > Lock screen & security > Screen lock.3Draw your screen unlock pattern, or enter your PIN or password depending onwhich of these screen lock types is enabled.4Tap Swipe, then tap YES, REMOVE.Resetting a forgotten screen lockIf you’ve forgotten your screen lock PIN, password or pattern, you may be able toreset it using the Protection by my Xperia service. No content on your device is lostafter you have performed a screen lock reset using this service.To reset the screen lock using Protection by my Xperia1Make sure you know your Google™ account username and password and thatyou have enabled the Protection by my Xperia service on your device.2Go to myxperia.sonymobile.com using any internet-connected device.3Sign in using the same Google™ account that you have set up on your device.4Click the picture of your device under Your devices.5Select Lock to replace the current screen lock with a new PIN code.6Follow the on-screen instructions provided by Protection by my Xperia.Depending on your security settings, your device may lock after a screen lock reset. You thenneed to enter your Google™ account username and password in order to use the device.12This is an internet version of this publication. © Print only for private use.
Unlocking your device automaticallyThe Smart Lock feature makes unlocking your device easier by letting you set it tounlock automatically in certain situations. You can keep your device unlocked, forexample, when it’s connected to a Bluetooth® device or when you’re carrying it withyou. With Smart Lock enabled you still need to unlock your device manually afterrestarting, and after leaving the device inactive for 4 hoursYou can set Smart Lock to keep your device unlocked using the following settings:•On-body detection: Keep your device unlocked when you're carrying it with you.•Trusted places: Keep your device unlocked when you're in a familiar, secure locationsuch as your home.•Trusted devices: Keep your device unlocked when a trusted Bluetooth® or NFCdevice is connected.•Trusted face: Unlock your device by looking at it.•Trusted voice: Set up voice recognition to search in any screen.The Smart Lock feature is developed by Google™ and its exact functionality may change overtime due to updates from Google™. Furthermore the feature may not be available in everymarket, country or region.To enable Smart Lock1Set a pattern, PIN or password as a screen lock if you have not already doneso.2From your Home screen, tap  .3Find and tap Settings > Lock screen & security > Trust agents.4Tap the Smart Lock (Google) slider to enable the function.5Tap the back arrow next to Trust agents.6Find and tap Smart Lock.7Enter your pattern, PIN or password. You need to enter these credentialswhenever you want to change your Smart Lock settings.8Select a Smart Lock type.To set up or remove trusted face1From your Home screen, tap  .2Find and tap Settings > Lock screen & security > Smart Lock > Trusted face.3Tap SET UP > NEXT. Follow the instructions on your device, then tapFINISHED.4To remove a trusted face, tap Remove trusted face > REMOVE.For enhanced accuracy, tap Trusted face > Improve face-matching.To set up trusted voice1From your Home screen, tap  .2Find and tap Settings > Lock screen & security > Smart Lock > Trusted voice.3Follow the instructions on your device.Keeping your device unlocked while you’re carrying itUsing the On-body detection feature, you can keep your device unlocked whileyou're carrying it in your hand or in a pocket or bag. The accelerometer in your devicekeeps your device unlocked while it senses that it's being carried. The device lockswhen the accelerometer detects that the device has been put down.When you use the On-body detection feature, you need to be aware of the followingbehaviours:•Any time you put your device down and it senses that it's no longer being carried, itlocks automatically.•The device can take up to one minute to lock.•After you get into a car, bus, train or other land vehicle, your device can take between5 and 10 minutes to lock.13This is an internet version of this publication. © Print only for private use.
•Note that when you get on an aeroplane or a boat (or another non-land basedvehicle), your device may not lock automatically, so make sure to lock it manually ifneeded.•When you pick up your device again or get out of the vehicle, just unlock it once andyour device then stays unlocked for as long as you have it on you.The On-body detection feature can't distinguish whose body is connected. If you give yourdevice to someone else while it's unlocked using On-body detection, your device may stayunlocked for the other user. Keep in mind that On-body detection as a security feature is lesssecure than a pattern, PIN, or password.To enable or disable On-body detection1From your Home screen, tap  .2Find and tap Settings > Lock screen & security > Smart Lock > On-bodydetection.3Tap the slider to enable the function, then tap CONTINUE. To disable thefunction tap the slider beside On.Connecting to trusted devicesYou can designate a connected device as trusted and keep your Xperia™ deviceunlocked while connected. If you have a device that you connect to regularly usingBluetooth® or NFC, for example, a home entertainment system or a fitness tracker,you can add it as a trusted device and bypass the added security of the lock screento save time. This feature is suitable if you’re normally in a relatively secure placewhen you use these devices. In some cases, you may still need to manually unlockyour device before a trusted device can be connected.It is not recommended to add devices that are constantly connected to your device as trusteddevices, for example, Bluetooth® keyboards or cases.As soon as a trusted device is switched off or moves out of range, your screen locks and youneed your PIN, pattern or password to unlock it.To add or remove a trusted Bluetooth® device1Make sure your device is paired and connected to the Bluetooth® device thatyou want to add as a trusted device.2From your Home screen, tap  .3Find and tap Settings > Lock screen & security > Smart Lock.4In the Smart lock menu tap Trusted devices > ADD TRUSTED DEVICE >Bluetooth.5Tap a device name to select it from the list of connected and paired devices,then tap YES, ADD.6To remove a paired device, select it from the list and tap REMOVE TRUSTEDDEVICE.To add or remove a trusted NFC device1Make sure your device is paired and connected to the Bluetooth® device thatyou want to add as a trusted device.2Find and tap Settings > Lock screen & security > Smart Lock.3Tap Trusted devices > ADD TRUSTED DEVICE > NFC.4Follow the on-screen instructions.5To remove a paired device, select it from the list and tap REMOVE TRUSTEDDEVICEMaking sure you're secure when using trusted devicesDifferent Bluetooth® devices support different Bluetooth® standards and securitycapabilities. There's a possibility that someone could keep your Xperia™ deviceunlocked by imitating your Bluetooth® connection, even if your trusted device is nolonger nearby. Your device is not always able to determine whether your connectionis secure from someone trying to imitate it.14This is an internet version of this publication. © Print only for private use.
When your device can't determine whether you're using a secure connection, you'llget a notification on your Xperia™ device and may need to manually unlock it beforethe trusted device can keep it unlocked.Bluetooth® connectivity range can vary depending on factors like the model of your device,the connected Bluetooth® device, and your environment. Depending on these factors,Bluetooth® connections can work over distances up to 100 metres.Connecting to trusted placesWhen the Trusted places feature is set up, the lock screen security on your Xperia™device gets disabled when you are in a designated trusted location. For this feature towork, you must have an internet connection (preferably over Wi-Fi) and allow yourdevice to use your current location.To set up trusted places, first make sure that high accuracy location mode or battery-saving location mode is enabled on your device before you add home or customlocations.The exact dimensions of a trusted location are an estimate and may extend beyond thephysical walls of your home or other areas that you have added as a trusted locations. Thisfeature can keep your device unlocked within a radius of up to 80 metres. Also be aware thatlocation signals can be replicated or manipulated. Someone with access to specialisedequipment could unlock your device.To add your home location1From your Home screen, tap  .2Find and tap Settings > Lock screen & security > Smart Lock > Trusted places> Home.3To enter the desired location type the address in the search bar. Your devicesearches for the entered location.To edit your home location1From your Home screen, tap  .2Find and tap Settings > Lock screen & security > Smart Lock > Trusted places.3Select your home location.4Tap Edit.5In the search bar, enter the location that you want to use as your homelocation.If other residences share your street address, you can add the actual location of your homewithin the building complex as a custom place.To remove your home location1From your Home screen, tap  .2Find and tap Settings > Lock screen & security > Smart Lock > Trusted places> Home.3Tap Edit >  .Using custom locationsYou can add any location as a trusted, custom place where your device can remainunlocked.To add a custom place1From your Home screen, tap  .2Find and tap Settings > Lock screen & security > Smart Lock > Trusted places.3Tap Add trusted place.4To use your current location as a custom place, tap Select this location.5Alternatively, to enter another location, tap   and type the address. Yourdevice searches for the entered location. Tap the suggested address, to use it.6To fine-tune the location, tap the back arrow next to the address, drag thelocation pin to the desired location, then tap Select this location.15This is an internet version of this publication. © Print only for private use.
To edit a custom place1From your Home screen, tap  .2Find and tap Settings > Lock screen & security > Smart Lock > Trusted places.3Select the place that you want to edit.4Tap Edit Address.5To enter another location, tap   and then type the address. Your devicesearches for the entered location. To use the suggested address, tap theaddress.6To fine-tune the location, tap the back arrow next to the address, drag thelocation pin to the desired location, then tap Select this location.To remove a custom place1From your Home screen, tap  .2Find and tap Settings > Lock screen & security > Smart Lock > Trusted places.3Select the place that you want to remove.4Tap Delete.SIM card protectionYou can lock and unlock each SIM card that you use in your device with a PIN(Personal Identification Number). When a SIM card is locked, the subscription linkedto the card is protected against misuse, meaning that you have to enter a PIN everytime you start your device.If you enter the PIN incorrectly too many times, your SIM card will get blocked. Youthen need to enter your PUK (Personal Unblocking Key) and a new PIN. Your PIN andPUK are supplied by your network operator.To set up or remove a SIM card lock1From the Home screen, tap  .2Find and tap Settings > Lock screen & security > Set up SIM card lock.3Select a SIM card.4Tap the Lock SIM card slider to enable or disable the SIM card lock.5Enter the SIM card PIN and tap OK. The SIM card lock is now active and youwill be prompted to enter the PIN every time you restart the device.To change the SIM card PIN1From the Home screen, tap  .2Find and tap Settings > Lock screen & security > Set up SIM card lock.3Select a SIM card.4Tap Change SIM PIN.5Enter the old SIM card PIN and tap OK.6Enter the new SIM card PIN and tap OK.7Re-type the new SIM card PIN and tap OK.To unlock a blocked SIM card using the PUK code1Enter the PUK code and tap  .2Enter a new PIN code and tap  .3Re-enter the new PIN code and tap  .If you enter an incorrect PUK code too many times, you need to contact your network operatorto get a new SIM card.Using multiple SIM cardsYour device works with either one or two SIM cards inserted. You get incomingcommunication to both SIM cards and you can select from which number you wantto place outgoing communication. Before you can use both SIM cards, you need toenable them and select the SIM card that will handle data traffic.16This is an internet version of this publication. © Print only for private use.
You can forward calls that come in on SIM card 1 to SIM card 2 when SIM card 1 isunreachable, and vice versa. This function is called Dual SIM reachability. You mustenable it manually. See Forwarding calls on page 71.To enable or disable the use of two SIM cards1From the Home screen, tap  .2Find and tap Settings > SIM cards.3Tap the SIM1 and SIM2 sliders to enable or disable the SIM cards.To rename a SIM card1From the Home screen, tap  .2Find and tap Settings > SIM cards.3Select a SIM card and enter a new name for it.4Tap OK.To select which SIM card handles data traffic1From your Home screen, tap  .2Find and tap Settings > Dual SIM > Cellular data.3Select the SIM card you want to use for data traffic.For higher data speeds, select the SIM card that supports the fastest mobile network, forexample, 3G.Finding the identification number of your deviceYour device has a unique identification number. This number is referred to as the IMEI(International Mobile Equipment Identity). You should keep a copy of this number.You may require it, for example, when you access the Xperia™ Care support serviceto register your device. Also, if your device is stolen, some network providers can usethis number to stop the device from accessing the network in your country or region.For devices with two SIM cards, there are two IMEI numbers, one for each SIM card slot.To view your IMEI numbers on the label strip1Open the cover for the nano SIM and memory card slot.2Remove the SIM Card tray.3Drag the strip outwards using your fingernail. The IMEI numbers are displayedon the strip.You can also view the IMEI numbers by opening the phone dialer and entering *#06#.To view your IMEI numbers via the device settings1From your Home screen, tap  .2Find and tap Settings > About phone > Status >IMEI information.17This is an internet version of this publication. © Print only for private use.
Finding a lost deviceIf you have a Google™ account, the “Protection by my Xperia” web service can helpyou locate and secure your device if you ever lose it. If you have activated this serviceon your device, you can:•Locate your device on a map.•Sound an alert even if the device is in Do not disturb mode.•Remotely lock the device and make the device display your contact details to anyonewho finds it.•Remotely clear the internal and external memory of the device as a last resort.If you’ve cleared the internal memory of the device using the “Protection by my Xperia” webservice, you must sign in to a Google™ account that was previously synced on this device thenext time you turn on the device.The “Protection by my Xperia” service may not be available in all countries or regions.To activate Protection by my Xperia1Make sure you have an active data connection, and enable location serviceson your device.2From your Home screen, tap  .3Find and tap Settings > Lock screen & security > Protection by my Xperia >ACTIVATE.4Mark the checkbox to agree to the terms and conditions of the service, thentap ACCEPT.5If prompted, sign in to your Google™ account, or create a new account if youdon’t already have one.6To verify that Protection by my Xperia can locate your device, go tomyxperia.sonymobile.com and sign in to your Google™ account.If you are sharing a device with multiple users, note that the Protection by my Xperia service isonly available to the user who is logged in as the owner.Finding a lost device using Android™ Device ManagerGoogle™ offers a location and security web service called Android™ DeviceManager. You can use it in parallel with, or as an alternative to, the Protection by myXperia service. If you lose your device, you can use Android™ Device Manager to:•Find and show where your device is located.•Ring or lock your device, erase everything on it, or add a phone number to the lockscreen.For additional information about Android™ Device Manager, go towww.support.google.com.Android™ Device Manager does not work if your device is turned off or if it does not have aconnection to the internet. The Android™ Device Manager service may not be available in allcountries or regions.18This is an internet version of this publication. © Print only for private use.
To activate Android™ Device Manager1If you are sharing a device with multiple users, make sure that you are loggedin as the owner.2Make sure that you have an active data connection and that location servicesare enabled.3From your Home screen, tap  .4Find and tap Settings > Google > Security.5Tap the sliders beside Remotely locate this device and Allow remote lock anderase to enable both functions.6If prompted, agree to the terms and conditions by tapping Activate this deviceadministrator.7To verify that Android™ Device Manager can locate your device after youactivate the service, go to www.android.com/devicemanager and sign in usingyour Google™ account.You can also activate Android™ Device Manager from Lock screen & security under Deviceadministrators.19This is an internet version of this publication. © Print only for private use.
Learning the basicsUsing the touchscreenTapping•Open or select an item.•Mark or unmark a checkbox or option.•Enter text using the on-screen keyboard.Touching and holding•Move an item.•Activate an item-specific menu.•Activate selection mode, for example, to select several items from a list.20This is an internet version of this publication. © Print only for private use.
Pinching and spreading•Zoom in or out on web pages, photos and maps, and when you’re taking photos orshooting videos.Swiping•Scroll up or down a list.•Scroll left or right, for example, between Home screen panes.•Swipe left or right to reveal more options.Flicking•Scroll quickly, for example, in a list or on a web page. You can stop the scrollingmovement by tapping the screen.21This is an internet version of this publication. © Print only for private use.
Locking and unlocking the screenWhen your device is on and left idle for a set period of time, the screen darkens tosave battery power and locks automatically. This lock prevents unwanted actions onthe touchscreen when you are not using it. When you buy your device, a basic screenswipe lock is already set. This means that you have to swipe left or upwards on thescreen to unlock it. You can change the security settings later and add other kinds oflocks. See Screen lock on page 11.To activate the screen•Briefly press the power key  .To lock the screen1When the screen is active, briefly press the power key  .2Alternatively, double tap any empty area on the Home screen. To enable thisfunction, touch and hold any area on your Home screen until the devicevibrates, then tap   and tap the slider beside Double-tap to sleep.Home screenThe Home screen is the starting point for using your device. It's similar to the desktopon a computer screen. Your Home screen can have up to twenty panes, whichextend beyond the regular screen display width. The number of Home screen panesis represented by a series of dots at the lower part of the Home screen. Thehighlighted dot shows the pane that is currently displayed.1 Welcome to Xperia™ widget — Tap to open the widget and select a task such as copying contentfrom your old device or setting up Xperia™ services2 Dots — Represents the number of Home screen panesTo go to the Home screen•Press  .22This is an internet version of this publication. © Print only for private use.
To browse the Home screenHome screen panesYou can add new panes to your Home screen (up to a maximum of twenty panes)and delete panes. You can also set the pane that you want to use as the main Homescreen pane.To set a pane as the main Home screen pane1Touch and hold any area on your Home screen until the device vibrates.2Flick left or right to browse to the pane that you want to set as your main Homescreen pane, then tap   .When Google Search & Now is enabled, the left-most pane is reserved for this service and themain Home screen pane cannot be changed. For more information, see Google Search & Nowon page 120.To add a pane to your Home screen1Touch and hold any area on your Home screen until the device vibrates.2To browse the panes, flick all the way to the right or left, then tap  .When Google Search & Now is enabled, the left-most pane is reserved for this service andadditional panes cannot be added to the left. For more information, see Google Search & Nowon page 120.To delete a pane from your Home screen1Touch and hold any area on your Home screen until the device vibrates.2Flick left or right to browse to the pane that you want to delete, then tap   onthe top right corner of the pane.23This is an internet version of this publication. © Print only for private use.
Home screen settingsTo disable or uninstall an application from the Home screenDisabling a pre-installed app deletes all data, but the app can be enabled again from Settings> Apps. Only downloaded apps can be fully uninstalled.1Touch and hold any area on your Home screen until the device vibrates.2Flick left or right to browse the panes. All applications that can be disabled oruninstalled are indicated by  .3Tap the relevant application, then tap DISABLE if the app came pre-installedon your device or OK if the app was downloaded and you would like touninstall it.To adjust the size of icons on your Home screen1Touch and hold any area on your Home screen until the device vibrates, thentap  .2Tap Icon size, then select an option.Application screenThe Application screen, which you open from the Home screen, contains theapplications that come pre-installed on your device as well as applications that youdownload.To view all applications on the Application screen1From your Home screen, tap  .2Flick left or right on the Application screen.To enable or disable the recommended apps listingsThe first time you access the application screen you get the option to enable ordisable recommended apps listings. You can also enable or disable this feature laterby following the steps below:1Touch and hold any area on your Home screen until the device vibrates, thentap  .2Tap the App recommendations slider.To open an application from the Application screen•When the Application screen is open, flick left or right to find the application,and then tap the application.To search for an application from the Application screen1When the Application screen is open, tap Search applications or simply swipedown on the Application screen or Home screen.2Enter the name of the application that you want to search for.24This is an internet version of this publication. © Print only for private use.
To arrange applications on the Application screen1When the Application screen is open, tap  .2Tap Sort apps, then select an option.To add an application shortcut to the Home screen1On the Application screen, touch and hold an application icon until the devicevibrates, then drag the icon to the top of the screen. The Home screen opens.2Drag the icon to the desired location on the Home screen, then release it.To move an application on the Application screen1When the Application screen is open, tap  .2Make sure that Own order is selected under Sort apps.3Touch and hold the application until the device vibrates, then drag it to the newlocation.To disable or uninstall an application from the Application screenDisabling a pre-installed app deletes all data, but the app can be enabled again from Settings> Apps. Only downloaded apps can be fully uninstalled.1Touch and hold any area on the Application screen until the device vibrates. Allapplications that can be disabled or uninstalled are then indicated by  .2Tap the relevant application, then tap DISABLE if the app came pre-installedon your device or OK if the app was downloaded and you would like touninstall it.Navigating applicationsYou can navigate between applications using the navigation keys and the recentlyused applications window, which lets you switch easily between all recently usedapplications. The navigation keys are the Back key, the Home key, and the Recentapps key. You can also pop open two applications on the screen at once using thesplit screen mode, if the application supports multi-window function. Someapplications get closed when you press the Home key   to exit while others arepaused or continue to run in the background. If an application is paused or running inthe background, you can continue where you left off the next time you open theapplication.1 Clear all – Close all the recently used applications2 Recently used applications window – Open a recently used application3 Recent apps key – Open the recently used applications window and the favourites bar4 Home key – Exit an application and go back to the Home screen5 Back key – Go back to the previous screen within an application or close the application25This is an internet version of this publication. © Print only for private use.
To open the recently used applications window•Press  .To quickly switch between recently used applications•Quickly press   twice.To close all the recently used applications•Tap   and then tap CLEAR ALL.To open a menu in an application•While using the application, tap  .A menu is not available in all applications.Split screen modeSplit screen mode enables you to view two applications at once, for example, if youwant to view your email inbox and a web browser at the same time.1 Application 1 in upper window2 Split screen border – Drag to resize windows3 Application 2 in lower window4 Split screen key – Select a recently used application5 Home key – Go back to the Home screen6 Back key – Go back to the previous screen within an application or close the applicationNot all applications support split screen mode.To use split screen mode1Make sure that the two applications that you want to use in split screen modeare open and running in the background.2Tap  , and then drag and drop the desired application to the top part of thescreen.3In the lower part of the screen, tap the second desired application.4In portrait orientation drag the black bar in the centre up or down to resize thewindows.5To exit split screen mode, tap and hold  .WidgetsWidgets are small applications that you can use directly on your Home screen. Theyalso function as shortcuts. For example, the Weather widget allows you to see basicweather information directly on your Home screen. When you tap the widget, the fullWeather application opens. You can download additional widgets from GooglePlay™.26This is an internet version of this publication. © Print only for private use.
To add a widget to the Home screen1Touch and hold any empty area on your Home screen until the device vibrates,then tap Widgets.2Find and tap the widget that you want to add.To resize a widget1Touch and hold a widget until the device vibrates, then release it. If the widgetcan be resized, for example, the Calendar widget, then a highlighted frame andresizing dots appear.2Drag the dots inward or outward to shrink or expand the widget.3To confirm the new size of the widget, tap anywhere on the Home screen.To move a widget•Touch and hold the widget until the device vibrates, then drag it to the newlocation.To remove a widget•Touch and hold the widget until the device vibrates, then drag it to Removefrom home screen.Shortcuts and foldersUse shortcuts and folders to manage your applications and keep your Home screentidy.1 Access an application using a shortcut2 Access a folder containing applicationsTo add an application shortcut to your Home screen1Touch and hold an empty area on your Home screen.2In the customisation menu, tap Widgets > Shortcuts.3Scroll through the list and select an application. The selected application getsadded to the Home screen.To move an item on the Home screen•Touch and hold the item until the device vibrates, then drag the item to the newlocation.To remove an item from the Home screen•Touch and hold the item until the device vibrates, then drag the item toRemove from home screen on the top of the screen.To create a folder on the Home screen•Touch and hold an application icon or a shortcut until the device vibrates, thendrag and drop it on top of another application icon or shortcut.27This is an internet version of this publication. © Print only for private use.
To add items to a folder on the Home screen•Touch and hold an item until the device vibrates, then drag the item to thefolder.To rename a folder on the Home screen1Tap the folder to open it.2Tap the folder's title bar to show the Folder name field.3Enter the new folder name and tap DONE .Background and themesYour device comes with a default background, but you can adapt the Home screenand Lock screen to your own style using wallpapers and themes featuring differentcolours and patterns.A wallpaper may be used without changing any of the other elements of your Homescreen and Lock screen. Live wallpapers add visual effects to your interactions withthe touch screen, letting the display change dynamically.Themes can include a wallpaper, a screensaver, title bars, and a sound scheme thatall fit together to create a unique look and feel for your device.To change your wallpaper1Touch and hold any empty area on your Home screen until the device vibrates.2Tap Wallpapers and select an option.You can also change your Lock screen wallpaper or set the same image for both your Homescreen and Lock screen. Follow the steps above, then tap Album. Tap the desired image andchoose an option.To set a theme1Touch and hold an empty area on your Home screen until the device vibrates.2Tap Themes.3Choose an option:•To use an existing theme, select the theme, then tap APPLY THEME.•To download a new theme, tap GET MORE THEMES.When you change a theme, the background also changes in some applications.Taking a screenshotYou can capture still images of any screen on your device as a screenshot.Screenshots you take are automatically saved in Album.To take a screenshot1Press and hold down the power key until a prompt window appears.2Tap  .You can also take a screenshot by pressing and holding the power key and volume down keyat the same time.To view your screenshot1Double-tap the status bar to display the Notification panel.2Tap the screenshot.You can also view your screenshots in the Album application.28This is an internet version of this publication. © Print only for private use.
NotificationsNotifications inform you of events such as new messages and calendar notificationsas well as activities in progress such as file downloads. Notifications appear in thefollowing places:•The status bar•The Notification panel•The lock screenTo open or close the Notification panel1To open the Notification panel, drag the status bar downwards, or simplydouble-tap it.2To close the Notification panel, drag or flick the panel upwards.After opening the Notification panel, you can access the Quick settings panel by dragging thestatus bar down again.To take action on a notification in the Notification panel•Tap the notification.You can directly reply to chat or email messages in the Notification panel.To dismiss a notification from the Notification panel•Swipe the notification left or right.Not all notifications can be dismissed.To change settings for notifications, simply drag the notification slowly to the left or right, thentap  .To expand a notification on the Notification panel•Drag the notification downwards to expand and view more information aboutthe notification without opening the app.Not all notifications are expandable.To clear all notifications from the Notification panel•Tap CLEAR ALL.To take action on a notification from the lock screen•Double-tap the notification.To dismiss a notification from the lock screen•Swipe the notification left or right.29This is an internet version of this publication. © Print only for private use.
To expand a notification on the lock screen•Drag the notification downwards.Not all notifications are expandable.Managing notifications on the lock screenShow allnotification contentGet all notifications on the lock screen. When you have this setting turned on, keepin mind that all content (including the content of incoming emails and chatmessages) will be visible on your lock screen unless you designate the relevantapps as Hide sensitive content in the App notifications settings menu.Hide sensitivenotification contentYou must have a PIN, password, or pattern set up as your screen lock in order forthis setting to be available. Contents hidden is displayed on the lock screen whensensitive notifications arrive. For example, you'll get a notification for an incomingemail or chat, but the content won't be visible on your lock screen.Don't shownotifications at allYou won't get any notifications on the lock screen.To select the notifications to display on the lock screen1From your Home screen, tap  .2Find and tap Settings > Notifications.3Tap  , and then tap On the lock screen.4Select an option.You can keep notifications on the lock screen until you swipe to dismiss them. To enable thisfeature, tap the Keep notifications on lock screen slider.Setting the notification level for an appBlock all Never receive notifications from the selected app.Sounds and vibrations off Receive notifications but without sound, vibration or peeking into view.Interrupts in Priority only Receive notifications from this app even when Do not disturb is set to Priorityonly.To set the notification level for an app1From your Home screen, tap  .2Find and tap Settings > Notifications.3Select the desired app.4Tap the sliders to adjust notification settings as desired.Notification lightThe notification light informs you about battery status and some other events. Forexample, a flashing white light means there is a new message or a missed call. Thenotification light is enabled by default but can be disabled manually.When the notification light is disabled, it only lights up when there is a battery status warning,for example, when the battery level goes below 15 percent.30This is an internet version of this publication. © Print only for private use.
To enable or disable the notification light1From your Home screen, tap  .2Find and tap Settings > Notifications >  .3Tap the slider beside Notification light to enable or disable the function.Icons in the status barStatus iconNo SIM cardSignal strengthNo signalRoamingSending and downloading LTE dataSending and downloading GPRS dataSending and downloading EDGE dataSending and downloading 3G dataSending and downloading HSPA+ dataA Wi-Fi connection is enabled and data is being transmittedA Wi-Fi connection is enabled but there is no internet connection.This icon also appears when you are trying to connect to a secured Wi-Finetwork. After a successful login, the exclamation mark disappears.If Google™ is blocked in your area, the exclamation mark may appear evenwhen the device is connected to a Wi-Fi network and there is a workinginternet connection.Battery statusThe battery is chargingAirplane mode is activatedThe Bluetooth® function is activatedThe microphone is mutedThe speakerphone is onDo not disturb mode is activatedVibrate modeAn alarm is setGPS is activatedSynchronisation is ongoingProblem with sign-in or synchronisationDepending on your service provider, network or region, the functions or services representedby some icons in this list may not be available.31This is an internet version of this publication. © Print only for private use.
To manage status bar icons1From your Home screen, tap  .2Find and tap Settings > Display> System icons.3Mark the checkboxes for the system icons that you want to appear in thestatus bar.Notification iconsNew text message or multimedia messageOngoing callMissed callCall on holdCall forwarding is turned onNew voicemail messageNew email messageDownloading dataUploading dataMobile data is disabledPerform a basic setup of your deviceA software update is availableSystem updates are availableDownloading system updatesTap to install the downloaded system updatesSTAMINA mode is activatedUltra STAMINA mode is activatedScreenshot capturedVideo chat with friends using the Duo™ applicationA song is playingThe radio is onThe device is connected to a computer via a USB cableInternal storage is 75% full — tap to transfer data to a memory cardWarningMore undisplayed notificationsNot all icons that may appear on your device are listed here. This list is for reference purposesonly, and changes may be made without notice.To block an application from sending notifications1From your Home screen, tap  .2Find and tap Settings > Notifications.3Select an application.4Tap the Block all slider.32This is an internet version of this publication. © Print only for private use.
Applications overviewSome applications may not be included on your device or may not be supported by allnetworks or service providers in all areas.Use the Album application to manage, view and edit your photos and videos.Browse, search and buy thousands of products right from your device.Protect your device against viruses, malware, spyware, phishing attempts andonline exploitation.Use the Calculator application to perform basic calculations.Use the Calendar application to keep track of events and manage yourappointments.Use the Camera to take photos and record video clips.Use the Chrome web browser to navigate and view web pages, managebookmarks, text and images.Use the Clock application to set various kinds of alarms and timers.Use the Contacts application to manage phone numbers, email addressesand other information related to your contacts.Create, edit and collaborate with others on documents.Access your downloaded applications, documents and pictures.Use the Duo™ application to make video calls.Save your documents and files for easy access from any device, share themwith your friends, and collaborate with colleagues.Use the Email application to send and receive emails through both personaland work accounts.Use the Facebook™ application for social networking with friends, familymembers and colleagues around the world.Browse and listen to FM radio stations.Use the Gmail™ application to read, write and organise email messages.Search for information on your device and on the web.Enjoy music, movies, apps and games on your device, and get exclusiveaccess to unique content available only with Xperia™ devices.View your current location, find other locations and plan routes using GoogleMaps™.Use the Messaging application to send and receive text and multimediamessages.The Xperia™ Movie Creator automatically creates short video collages usingyour existing photo and video collection.Use the Music application to organise and play music and audio books.View news stories from News Suite.Make phone calls by dialling the number manually or by using the smart dialfunction.Organise, search or browse through all your photos and videos.33This is an internet version of this publication. © Print only for private use.
Use the Google Play Movies & TV application to watch movies and TV showspurchased or rented on Google Play.Discover and play thousands of songs with the Google Play Musicapplication.Use the Play Store™ application to find applications to buy or download free.Stay connected with your gaming friends and the games you love to play,shop on the PlayStation®Store, and more.Optimise settings to suit your own requirements.Create, edit and collaborate with others on spreadsheets.Use the Sketch application to create and explore images, then share themwith your friends.Create, edit and collaborate with others on presentations.Use the Support application to access user support on your device. Forexample, you can access a User guide, troubleshooting information, plus tipsand tricks.Use the Video application to play videos on your device and share contentwith your friends.Search content on the web using your voice.Use the Weather application to view weather forecasts.Use the What’s New application to discover new games, apps and mediacontent.Use YouTube™ to watch videos from users around the world, and share yourown.34This is an internet version of this publication. © Print only for private use.
Battery and maintenanceCharging your deviceAlways use an original Sony charger and USB Type-C™ cable intended for your specificXperia™ model. Other chargers and cables may increase charging time, not charge at all, ormay even damage your device. Make sure all USB ports and connectors are completely dry,before inserting the USB Type-C™ cable.A wall socket charger will charge your device faster than charging via your computer.You can still use your device while charging.If the battery is depleted, it may take up to 30 minutes for your device to respond tothe charging. During this time, the screen may remain completely dark, not showingthe charging icon. Also note that it can take up to 4 hours for a completely drainedbattery to be fully charged.Your device has an embedded, rechargeable battery that can only be replaced by anauthorised Sony repair centre. You should never try to open or take apart the device yourself.Doing so can cause damage and void your warranty.To charge your device1Plug the charger into a power outlet.2Plug one end of the USB Type-C™ cable into the charger (or into the USB portof a computer).3Plug the other end of the cable into the USB Type-C™ port on your device. Thenotification light illuminates when charging begins.4When the device is fully charged, disconnect the cable from your device bypulling it straight outwards. Make sure not to bend the connector.It is important to use the USB Type-C™ cable (provided) when charging your device as othertypes of USB cables can damage your device.If the battery is completely depleted, it may take a few minutes before the notification lightilluminates and the charging icon appears.35This is an internet version of this publication. © Print only for private use.
Battery notification light statusGreen The battery is charging and the battery charge level is greater than 90%Orange The battery is charging and the battery charge level is less than 90%Red The battery is charging and the battery charge level is less than 15%Battery and power managementYour device has an embedded battery. To get the most use from it, keep track of thepower consumed by different apps and features. Background power saving featuresare activated by default to help you reduce battery consumption, and additionalpower saving modes are available to help you reduce battery consumption furtherwhen necessary.Power saving features lower the priority for certain non-essential device functions,such as higher grade image performance, network activities such as locationservices, app synchronisation and background Wi-Fi scanning. If you do not want anapplication to be affected, you can exempt it in the Battery optimisation menu. Phonecalls and SMS are not affected.System updates may change the power saving features available on your device.To view battery consumption, estimated time, and power saving tips1From your Home screen, tap  .2Find and tap Settings > Battery. An overview appears showing the batterypercentage and an estimated battery time.3Tap SHOW BATTERY USAGE to view a list of features and services that haveconsumed battery power since the last charging cycle. Tap an item to getinformation on how to reduce its battery consumption.To view battery consumption for applications1From your Home screen, tap  .2Find and tap Settings > Apps.3Select an application and review its battery consumption under Battery usage.General usage tips to improve battery performanceThe following tips can help you improve battery performance:•Lower the screen brightness level, see Screen settings on page 58.•Turn off Bluetooth®, Wi-Fi and location services when you don't need thesefeatures.•Turn off your device or use Airplane mode if you are in an area with no or lownetwork coverage. Otherwise, your device repeatedly scans for availablenetworks, and this consumes power.•Use a Wi-Fi network instead of roaming when abroad. Roaming is scanning foryour home network and puts additional demands on your battery as yourdevice must transmit with a higher output power, see Wi-Fi on page 47.•Change the synchronisation settings for your email, calendar and contacts, seeSynchronising with online accounts on page 54.•Check the applications that have a high battery consumption and consider thebattery saving tips provided on your device for these applications.•Change the notification level for an application, see Notifications on page 29.•Turn off the location-sharing permission for an application, see Applicationsettings on page 59.•Uninstall applications that you are not using, see Application screen onpage 24.•Use a Sony original handsfree device to listen to music. Handsfree devicesconsume less battery than your device's loudspeakers.•Restart your device every now and then.36This is an internet version of this publication. © Print only for private use.
To make exceptions to power saving features for apps1From your Home screen, tap  .2Find and tap Settings > Battery.3Tap   and select Battery optimisation. You will see a list of applications that arenot optimised.4To add or remove applications from this list, tap APPS and select or de-selectan application from the list to edit its optimisation settings.5The list of applications that are not optimised will get updated according toyour settings.You cannot exempt applications from being optimised by Ultra STAMINA mode.You can also configure Battery optimisation from Settings > Apps >   > Special access.STAMINA modeDepending on the STAMINA level, different features will be restricted or disabled inorder to reduce battery consumption. These include rendering performance,animation and screen brightness, image enhancement, background app datasyncing, vibration (except for incoming calls), streaming and GPS (while the screen isoff).   appears in the status bar.If you are sharing a device with multiple users, you may need to log in as the owner, that is, theprimary user, to activate or deactivate STAMINA mode.To activate or deactivate STAMINA mode1From your Home screen, tap  .2Find and tap Settings > Battery.3Tap STAMINA mode and tap the slider to activate or deactivate the function.When STAMINA mode is activated you can select additional options, forexample you can adjust the Auto-start percentage according to yourpreferences.You can exempt applications from being optimised by STAMINA mode in the Batteryoptimisation menu.Ultra STAMINA modeYour battery time is extensively prolonged, but available apps are limited and mobiledata and Wi-Fi are disabled. Calling and SMS are still available. Your Home screen ischanged and   appears in the status bar.If you are sharing a device with multiple users, you may need to log in as the owner, that is, theprimary user, to activate or deactivate Ultra STAMINA mode.To activate Ultra STAMINA mode1From your Home screen, tap  .2Find and tap Settings > Battery.3Tap Ultra STAMINA mode and then tap ACTIVATE .4Confirm to activate.You cannot exempt applications from being optimised by Ultra STAMINA mode.To deactivate Ultra STAMINA mode1Drag down the status bar to access the Notification panel.2Tap Deactivate Ultra STAMINA mode.3Tap OK.Deactivating Ultra STAMINA mode will restart your device.37This is an internet version of this publication. © Print only for private use.
Updating your deviceYou should update the software on your device to get the latest functionality,enhancements and bug fixes in order to ensure optimal performance. When asoftware update is available,   appears in the status bar. You can also check for newupdates manually, or schedule an update.The easiest way to install a software update is to do it wirelessly from your device.However, some updates are not available for wireless download. You then need touse the Xperia™ Companion software on a PC or on an Apple® Mac® computer toupdate your device.Before updating your device, consider the following:•Ensure you have sufficient storage capacity before attempting to update.•If you are using a device with multiple users, you must log in as the owner, that is, theprimary user, to update the device.•System and application updates can present the features on your device in anotherway than described in this User guide. The Android™ version might not be affectedafter an update.For more information about software updates, go to www.sonymobile.com/update/.To check for new software1If you are using a device with multiple users, make sure you are logged in asthe owner.2From your Home screen, tap  .3Find and tap Settings > About phone > Software update.If no new software is available, it’s possible that you may not have enough free memory onyour device. If your Xperia™ device has less than 500 MB of free internal memory available,you do not receive any information about new software. In this case you receive a warning inthe Notification panel: “Storage space running out. Some system functions may not work.” Ifyou receive this notification, you must free up internal memory to get notifications about newavailable software.Updating your device wirelesslyUse the Software update application to update your device software wirelessly. Theupdates you can download over a mobile network depend on your operator. It isrecommended to use a Wi-Fi network instead of a mobile network to download newsoftware so that you can avoid data traffic costs.To install a system update1If you are sharing a device with multiple users, make sure you are logged in asthe owner.2From your Home screen, tap  .3Find and tap Settings > About phone > Software update.4If a system update is available, tap CONTINUE, then tap INSTALL NOW.To schedule a system update1If you are sharing a device with multiple users, make sure you are logged in asthe owner.2From your Home screen, tap  .3Find and tap Settings > About phone > Software update.4If a system update is available, tap CONTINUE, then tap the Scheduleinstallation slider.5Tap OK > Set time.6Set the desired time for the software update, then tap OK.7Your device will be updated at the set time automatically.38This is an internet version of this publication. © Print only for private use.
To set up automatic download of system updates1From your Home screen, tap  .2Find and tap Settings > About phone > Software update.3Tap  , then tap Settings > Auto download system updates.4Select an option.To enable or disable automatic updates for applications1From your Home screen, tap  .2Find and tap Settings > About phone > Software update.3Tap  , then tap Settings > Auto-update apps.4Select the preferred option.To update your device using a computer1Using a USB Type-C™ cable, connect your device to the computer.2Make sure that the screen of your device is unlocked, and that the USBconnection mode on the device is set to Transfer files.3Open Xperia™ Companion, if it is not automatically launched.4Make sure that the computer can access the internet.5Computer: If a new software update is detected, a popup window appears.Follow the on-screen instructions to run the relevant software updates.If you don’t have the Xperia™ Companion software installed on the relevant computer, connectyour device to the computer and follow the on-screen installation instructions. Make sure thatyou are using the USB Type-C cable that came with your device and that it is properlyconnected to the device and computer.Maintenance using a computerXperia™ CompanionXperia™ Companion is a software service which provides a collection of tools andapplications you can use when you connect your device to a computer. With Xperia™Companion, you can:•Update or repair your device’s software.•Transfer your content from an old device using Xperia™ Transfer.•Back up and restore content on your computer.•Sync multimedia content – photos, videos, music and playlists – between your deviceand computer.•Browse files on your device.To use Xperia™ Companion, you need an internet-connected computer running oneof the following operating systems:•Microsoft® Windows® 7 or later•Mac OS® X 10.11 or laterLearn more and download Xperia™ Companion for Windows athttp://support.sonymobile.com/tools/xperia-companion/ or Xperia™ Companion forMac at http://support.sonymobile.com/tools/xperia-companion-mac/.Managing files using a computerUse a USB Type-C™ cable connection between a Windows® computer and yourdevice to transfer and manage your files.Once the two devices are connected, you can choose whether to charge your device,transfer files or use it for MIDI input. Your computer will detect your device when youselect the Transfer files connection mode. The default connection mode is set toCharge this device.39This is an internet version of this publication. © Print only for private use.
With Xperia™ Companion you can access the file system of your device. If you donot have Xperia™ Companion installed, you are requested to install it when youconnect your device to the computer.Always use the USB cable type intended for your Xperia™ model and make sure it iscompletely dry.USB connection modeYou can use the Transfer files connection mode for managing files and updatingdevice software. This USB mode is used with Microsoft® Windows® computers.Charging is enabled by default.Using the Use device as MIDI mode, your device can function as a MIDI input formusical instrument apps.To change USB connection mode1Attach a USB connector to your device.2Drag down the Status bar, and then tap Charge this device.3Tap either Transfer files or Use device as MIDI as desired.Storage and memoryYour device has several different storage and memory options.•The internal storage is about 64 GB and is used to store downloaded or transferredcontent along with personal settings and data. Some examples of data saved to theinternal storage are alarm, volume and language settings, emails, bookmarks,calendar events, photos, videos and music.•You can use a removable memory card with a storage capacity of up to 256 GB toget more storage space. Media files and some apps, along with their associated data,can be moved to this type of memory to free up internal storage. Some apps, forexample, the Camera app, can save data directly to a memory card.•The dynamic memory (RAM) is about 4 GB and cannot be used for storage. RAM isused to handle running applications and the operating system.You may have to purchase a memory card separately.Read more about the use of memory in Android devices by downloading the White paper foryour device at www.sonymobile.com/support/.Improving memory performanceYour device memory tends to fill up as a result of normal usage. If the device starts toslow down, or applications suddenly shut down, you should consider the following:•Always try to keep at least 500 MB of free internal storage available.•Close running applications that you are not using.•Clear the cache memory for all applications.•Uninstall downloaded applications that you don't use.•Move applications to the memory card if the internal storage is full.•Transfer photos, videos and music from the internal memory to the memory card.40This is an internet version of this publication. © Print only for private use.
•If your device can't read content on the memory card, you may need to format thecard. Note that all content on the card gets erased when you format it.If you are sharing a device with multiple users, you must log in as the owner, that is, theprimary user, to be able to perform certain actions, such as transferring data to the memorycard and formatting the memory card.To view the memory status1From your Home screen, tap  .2Find and tap Settings > Storage & memory.To view the amount of free and used RAM1From your Home screen, tap  .2Find and tap Settings > Storage & memory.3Tap  , then tap Advanced > Memory.To clear the cache memory for all applications1From your Home screen, tap  .2Find and tap Settings > Storage & memory.3Tap  , then tap Advanced > Storage, then find and tap Cached data > OK. Ifyou have a memory card inserted, select Internal shared storage after tappingStorage.When you clear the cache memory, you don't lose any important information or settings.To transfer media files to the memory card1Make sure you have a memory card inserted into your device.2From your Home screen, tap  .3Find and tap Settings > Storage & memory > Transfer data.4Mark the files that you want to transfer to the memory card.5Tap Transfer.To stop applications and services from running1From your Home screen, tap  .2Find and tap Settings > Apps.3Select an application or service, then tap FORCE STOP > OK.To format the memory card1From your Home screen, tap  .2Find and tap Settings > Storage & memory.3Tap  , then tap Advanced > Storage > SD Card >  , then tap Settings > Format> Erase & format.All content on the memory card gets erased when you format it. Make sure you first makebackups of all data that you want to save. To back up your content, you can copy it to acomputer. For more information, see Managing files using a computer on page 39.Smart cleanerUsing Smart cleaner you can improve device performance by automaticallyoptimising storage and memory depending on frequency of app use.To enable or disable Smart cleaner1From your Home screen, tap  .2Find and tap Settings > Storage & memory.3Tap the slider beside Smart cleaner.You can also modify, copy or delete files manually if you go to Settings > Storage & memory > > Advanced > Storage > Explore41This is an internet version of this publication. © Print only for private use.
Backing up and restoring contentGenerally, you should not save photos, videos and other personal content solely onthe internal memory of your device. If your device is damaged, lost or stolen, the datastored on its internal memory may be impossible to recover. It is recommended touse the Xperia™ Companion software to make backups which save your data safelyto an external device. This method is especially recommended if you are updatingyour device software to a newer Android version.The Xperia™ Backup & restore application is recommended for backing up databefore you do a factory data reset. With this application you can back up data to anonline account, an SD card or to an external USB storage device that you haveconnected to your device using a USB host adapter.With the Google Backup & restore application, you can back up data to a Googleserver.Backing up data to a computerUse the Xperia™ Companion software to back up data from your device to a PC oran Apple® Mac® computer. You can back up the following types of data:•Call logs•Text messages•Calendar•Settings•Media files such as music and videos•Photos and imagesTo back up your data using a computer1Unlock the screen of your device and connect it to the computer using a USBType-C™ cable.2Open the Xperia™ Companion software on your computer if it is notautomatically launched. After a few moments, the computer detects yourdevice. Make sure to select Transfer files mode on your device.3Click on Backup on the Xperia™ Companion main screen.4Follow the on-screen instructions to back up data from your device.If you do not have Xperia™ Companion installed, you are requested to install it when youconnect your device to the computer.To restore your data using a computer1Unlock the screen of your device and connect it to the computer using a USBType-C™ cable.2Open the Xperia™ Companion software on your computer if it is notautomatically launched. After a few moments, the computer detects yourdevice. Make sure to select Transfer files mode on your device.3Click on Restore on the Xperia™ Companion main screen.4Select a backup file from the backup records, then click on Next and follow theon-screen instructions to restore data to your device.If you do not have Xperia™ Companion installed, you are requested to install it when youconnect your device to the computer.Backing up data with the Xperia™ Backup & restore applicationUsing the Xperia™ Backup & restore application, you can make an online or a localdata backup. You can do so manually or turn on the automatic backup function tosave data periodically.The Xperia™ Backup & restore application is recommended for backing up databefore you do a factory data reset. With this application you can back up thefollowing types of data to an online account, an SD card or to an external USBstorage device that you have connected to your device using a USB host adapter:42This is an internet version of this publication. © Print only for private use.
•Contacts•Conversations•Call log•Calendar•Email accounts•Wi-Fi accounts•Device settings•Applications•Xperia™ Home layoutTo set up the automatic backup function1If you are backing up content to a USB storage device, make sure the storagedevice is connected to your device using a USB host adapter. If you arebacking up to an SD card, make sure that the SD card is mounted properly intoyour device. If you are backing up content to an online account, make sure youhave signed in to your Google ™ account.2From your Home screen, tap  .3Find and tap Settings > Backup & reset.4Under Xperia™ Backup & Restore, tap Automatic backup.5To enable the automatic backup function, tap the on-off switch.6Select where to save backup files.7If desired, select a backup frequency, when to back up and the specific data toback up. Otherwise the backup is completed according to the default settings.8To save your settings, tap  .To back up content manually1If you are backing up content to a USB storage device, make sure the storagedevice is connected to your device using a USB host adapter. If you arebacking up to an SD card, make sure the SD card is properly inserted into yourdevice. If you are backing up content to an online account, make sure you havesigned in to your Google ™ account.2From your Home screen, tap  .3Find and tap Settings > Backup & reset.4Under Xperia™ Backup & Restore, tap More.5Tap Manual backup, then select a backup destination and the data that youwant to back up.6Tap Back up.7After the data is backed up, tap Finish.To edit a backup file1From your Home screen, tap  .2Find and tap Settings > Backup & reset.3Under Xperia™ Backup & Restore, tap More.4Tap Edit backup file, then select a backup source and the data types that youwant to delete.5Tap Delete data.6Tap OK to confirm.7After the data is deleted, tap Finish.43This is an internet version of this publication. © Print only for private use.
To restore backed up content1If you are restoring content from a USB storage device, make sure that thestorage device is connected to your device using the USB Host adapter. If youare restoring content from an SD card, make sure that the SD card is properlyinserted into your device. If you are restoring content from Xperia Backup &Restore service, make sure you have signed in to your Google™ account.2From your Home screen, tap  .3Find and tap Settings > Backup & reset.4Under Xperia™ Backup & Restore, tap Restore data, then select a restoresource and the data that you want to restore.5Tap Restore data.6After the content is restored, tap Finish.Remember that any changes that you make to your data and settings after you create abackup - such as any new apps you install - get deleted during any subsequent restoreprocedure.Backing up data with the Google Backup & restore applicationUsing the Google Backup & restore application, you can back up data to a Googleserver. You can also turn on the automatic restore function to restore application dataand settings when you reinstall an application.With this application you can back up the following types of data:•Applications•Bookmarks•Wi-Fi networks•Other settingsTo back up data to a Google™ account1From your Home screen, tap  .2Find and tap Settings > Backup & reset.3Under Google™ Backup & Restore, tap Back up my data and then tap theslider.To enable or disable automatic restore when you reinstall an application1From your Home screen, tap  .2Find and tap Settings > Backup & reset.3Under Google™ Backup & Restore, tap the Automatic restore slider.44This is an internet version of this publication. © Print only for private use.
Downloading applicationsDownloading applications from Google Play™Google Play™ is the official online Google store for downloading applications,games, music, movies and books. It includes both free and paid applications. Beforeyou start downloading from Google Play™, make sure that you have a workinginternet connection, preferably over Wi-Fi to limit data traffic charges.To use Google Play™, you need to have a Google™ account. Google Play™ may not beavailable in all countries or regions.To download an application from Google Play™1From the Home screen, tap  .2Find and tap Play Store.3Find an item you wish to download by browsing categories, or by using thesearch function.4Tap the item to view its details, and follow the instructions to complete theinstallation.Some applications may need to access data, settings and various functions on your device inorder to work properly. Only install and give permissions to applications that you trust. You canview the permissions granted to a downloaded application and also change their status bytapping the application under Settings > Apps.Downloading applications from other sourcesWhen your device is set to allow downloads from sources other than Google Play™,you can download applications directly from other websites by following the relevantdownload instructions.Installing applications of unknown or unreliable origin can damage your device. Downloadapplications only from reliable sources. Contact the application provider if you have anyquestions or concerns.If you are using a device with multiple users, only the owner, that is, the primary user, canallow downloads from sources other than Google Play™. Changes made by the owner affectall other users.To enable or disable the downloading of applications from other sources1From your Home screen, tap  .2Find and tap Settings > Lock screen & security.3Tap the Unknown sources slider.4Tap OK.Some applications may need to access data, settings and various functions on your device inorder to work properly. Only install and give permissions to applications that you trust. You canview the permissions granted to a downloaded application and also change their status bytapping the application under Settings > Apps.45This is an internet version of this publication. © Print only for private use.
Internet and networksBrowsing the webThe Google Chrome™ web browser for Android™ devices comes pre-installed inmost markets. Go to http://support.google.com/chrome and click the "Chrome forMobile" link to get more detailed information about how to use this web browser.To browse the web1From your Home screen, tap  .2Find and tap  .3If you are using Google Chrome™ for the first time, select to either sign in to aGoogle™ account or browse with Google Chrome™ anonymously.4Enter a search term or web address in the search and address field, then tap on the keyboard.Internet and MMS settingsTo send multimedia messages, or to access the internet when there is no availableWi-Fi network, you must have a working mobile data connection with the correctinternet and MMS (Multimedia Messaging Service) settings. Here are some tips:•For most mobile networks and operators, internet and MMS settings come pre-installed on your device. You can then start using the internet and send multimediamessages right away.•It is possible to download these settings via Wi-Fi.•You can manually add, change or delete internet and MMS settings on your device atany time. If you change or delete an internet or MMS setting by mistake, downloadthe internet and MMS settings again.•If you cannot access the internet over a mobile network or if multimedia messaging isnot working, even though the internet and MMS settings have been downloadedsuccessfully to your device, refer to the troubleshooting tips for your device atwww.sonymobile.com/support/ for network coverage, mobile data, and MMS issues.•If the Battery time preferred setting of STAMINA mode is activated to save power, allmobile data traffic gets paused when the screen is off. If this causes connectionproblems, try excluding some applications and services from being paused, ordeactivate STAMINA mode temporarily.•If you are sharing a device with multiple users, only the owner, that is, the primaryuser, can download internet and messaging settings from the Settings menu, but thedownloaded settings are applicable to all users.To download internet and MMS settings1From your Home screen, tap  .2Find and tap Settings > More > Internet settings.3Tap ACCEPT. Once the settings have been downloaded successfully, appears in the status bar and mobile data traffic is turned on automatically.If the settings cannot be downloaded to your device, check the signal strength of your mobileor Wi-Fi network connections. Move to an open location free from obstructions or get close toa window and then try again.46This is an internet version of this publication. © Print only for private use.
To add internet and MMS settings1From your Home screen, tap  .2Find and tap Settings > More > Mobile networks.3Select a SIM card.4Tap Access Point Names >  .5Tap Name and enter a name of your choice, then tap OK.6Tap APN and enter the access point name, then tap OK.7Enter all other required information. If you don’t know what information isrequired, contact your network operator for more details.8When you're done, tap  , then tap Save.To view downloaded internet and MMS settings1From your Home screen, tap  .2Find and tap Settings > More > Mobile networks.3Select a SIM card.4Tap Access Point Names.5To view more details, tap any of the available items.Wi-FiUse Wi-Fi to surf the internet, download applications, or send and receive emails.Once you have connected to a Wi-Fi network, your device remembers the networkand automatically connects to it the next time you come within range.Some Wi-Fi networks require you to log in to a web page before you can get access.Contact the relevant Wi-Fi network administrator for more information.Available Wi-Fi networks may be open or secured:•Open networks are indicated by   next to the Wi-Fi network name.•Secured networks are indicated by   next to the Wi-Fi network name.Some Wi-Fi networks do not show up in the list of available networks because they do notbroadcast their network name (SSID). If you know the network name, you can add it manuallyto your list of available Wi-Fi networks.To turn Wi-Fi on or off1From your Home screen, tap  .2Find and tap Settings > Wi-Fi.3Tap the slider to enable or disable Wi-Fi.It may take a few seconds before Wi-Fi is enabled.To connect to a Wi-Fi network1From your Home screen, tap  .2Find and tap Settings > Wi-Fi.3Tap the slider to turn on Wi-Fi. All available Wi-Fi networks are displayed.4Tap a Wi-Fi network to connect to it. For secured networks, enter the relevantpassword.   is displayed in the status bar once you are connected.To search for new available networks, tap  , then tap Refresh. If you cannot connect to a Wi-Finetwork successfully, refer to the relevant troubleshooting tips for your device atwww.sonymobile.com/support/.47This is an internet version of this publication. © Print only for private use.
To add a Wi-Fi network manually1From your Home screen, tap  .2Find and tap Settings > Wi-Fi.3Scroll down and tap   at the end of the listed items.4Enter the Network name (SSID) information.5To select a security type, tap the Security field.6If required, enter a password.7To edit advanced options such as proxy and IP settings, tap Advanced optionsand then edit the options as desired.8Tap SAVE.Contact your Wi-Fi network administrator to get the network SSID and password.Increasing Wi-Fi signal strengthThere are a number of things you can do to improve Wi-Fi reception:•Move your device closer to the Wi-Fi access point.•Move the Wi-Fi access point away from any potential obstructions or interference.•Don’t cover the Wi-Fi antenna area of your device (the highlighted area in theillustration).Wi-Fi settingsWhen you are connected to a Wi-Fi network or when there are Wi-Fi networksavailable in your vicinity, you can view the status of these networks. You can alsoenable your device to notify you whenever an open Wi-Fi network is detected.To enable or disable Wi-Fi network notifications1Turn on Wi-Fi , if it is not already on.2From your Home screen, tap  .3Find and tap Settings > Wi-Fi.4Tap  , then tap the Network notification slider.To view detailed information about a connected Wi-Fi network1From the Home screen, tap   .2Find and tap Settings > Wi-Fi.3Tap the Wi-Fi network that you are currently connected to. Detailed networkinformation is displayed.To add a Wi-Fi sleep policy1From the Home screen, tap   .2Find and tap Settings > Wi-Fi.3Tap  , then tap Keep Wi-Fi on during sleep.4Select an option.48This is an internet version of this publication. © Print only for private use.
To find the MAC address for your device1From the Home screen, tap   .2Find and tap Settings > Wi-Fi.3Tap  . The MAC address is displayed in the list.WPSWPS (Wi-Fi Protected Setup™) is a wireless networking standard that helps youestablish secure wireless network connections. WPS makes it easy for you to set upWi-Fi Protected Access® (WPA) encryption to secure your network. You can also addnew devices to an existing network without entering long passwords.Use one of these methods to enable WPS:•Push button method – simply push a button on a WPS-supported device, forexample, a router.•PIN method – your device creates a random PIN (Personal Identification Number),which you enter on the WPS-supported device.To connect to a Wi-Fi network using a WPS button1From the Home screen, tap   .2Find and tap Settings > Wi-Fi.3Turn on Wi-Fi if it is not already on.4Tap  , then tap Advanced > WPS Push Button, then press the WPS button onthe WPS-supported device.To connect to a Wi-Fi network using a WPS PIN1From your Home screen, tap  .2Find and tap Settings > Wi-Fi.3Turn on Wi-Fi if it is not already on.4Tap   > Advanced > WPS PIN Entry.5On the WPS-supported device, enter the PIN that appears on your device.Sharing your mobile data connectionYou can share your mobile data connection with other devices in several ways, listedbelow.•USB tethering: share your mobile data connection with a single computer using aUSB cable.•Portable Wi-Fi hotspot: share your mobile data connection simultaneously with up to10 other devices, including devices that support WPS technology.•One-touch portable hotspot: touch devices to start sharing your mobile connection over Wi-Fi.•Bluetooth® tethering: share your mobile data connection with up to four otherdevices via Bluetooth®.To share your data connection using a USB cable1Connect your device to a computer, using the USB cable that came with it.2From your Home screen, tap  .3Find and tap Settings > More > Tethering & portable hotspot.4Tap the USB tethering slider, then tap OK if prompted.   is displayed in thestatus bar once you are connected.5To stop sharing your data connection, tap the USB tethering slider ordisconnect the USB cable.You cannot share your device's data connection and SD card over a USB cable at the sametime.49This is an internet version of this publication. © Print only for private use.
To share your mobile data connection with another Bluetooth® device1Make sure that your device and the other Bluetooth® device are paired witheach other and that mobile data traffic is activated on your device.2Your device: From your Home screen, tap  .3Find and tap Settings > More > Tethering & portable hotspot and then tap theBluetooth tethering slider to enable the function.4Bluetooth® device: Set up the device so that it obtains its network connectionusing Bluetooth®. If the device is a computer, refer to the relevant instructionsto complete the setup. If the device runs on the Android™ operating system,tap the settings icon beside the name of the device that it is paired with underSettings > Bluetooth > Paired devices, then mark the Internet access checkbox.5Your device: Wait for   to appear in the status bar. Once it appears, the setupis complete.6Tap the Bluetooth tethering slider again to disable the function.The Bluetooth tethering function is turned off every time you turn off your device or turn off theBluetooth® function.To use your device as a portable Wi-Fi hotspot1From your Home screen, tap  .2Find and tap Settings > More > Tethering & portable hotspot.3Tap Portable hotspot settings > Configure hotspot.4Enter the Network name (SSID) information.5To select a security type, tap the Security field. If required, enter a password.6Tap SAVE.7Tap  , then tap the Portable hotspot slider to enable the function.8If prompted, tap OK to confirm.  appears in the status bar once the portableWi-Fi hotspot is active.To allow a WPS-supported device to use your mobile data connection1Make sure that your device is functioning as a portable hotspot.2From your Home screen, tap  .3Find and tap Settings > More > Tethering & portable hotspot > Portable hotspotsettings.4Under Configure hotspot, make sure that your portable hotspot is secured by apassword.5Enable Discoverable, if it was disabled.6Tap WPS Push Button, then follow the relevant instructions. Alternatively, tap > WPS PIN Entry, then enter the PIN that appears on the WPS-supporteddevice.To rename or secure your Mobile Hotspot1From the Home screen, tap  .2Find and tap Settings > More > Tethering & portable hotspot.3Tap Portable hotspot settings > Configure hotspot.4Enter the Network name (SSID) information.5To select a security type, tap the Security field.6If required, enter a password.7Tap SAVE.Controlling data usageYou can keep track of the amount of data transferred to and from your device overyour mobile data or Wi-Fi connection during a given period. For example, you canview the amount of data used by individual applications. For data transferred overyour mobile data connection, you can also set data usage warnings and limits toavoid additional charges.Adjusting data usage settings can help you keep greater control over data usage, but cannotguarantee the prevention of additional charges.50This is an internet version of this publication. © Print only for private use.
To help reduce data usage1From your Home screen, tap  .2Find and tap Settings > Data usage > Data Saver.3Tap the slider to enable or disable the function.To turn data traffic on or off1From your Home screen, tap  .2Find and tap Settings > Data usage.3Tap the Mobile data slider to turn data traffic on or off.When data traffic is turned off, your device can still establish Wi-Fiand Bluetooth®connections.To set a data usage warning1Make sure that mobile data traffic is turned on.2From your Home screen, tap  .3Find and tap Settings > Data usage > Billing cycle.4To set the warning level, tap Data warning, enter the desired data limit and tapSET. You receive a warning notification when the amount of data trafficreaches the level you set.To set a mobile data limit1Make sure that mobile data traffic is turned on.2From your Home screen, tap  .3Find and tap Settings > Data usage.4Tap the slider beside Set data limit.Once your mobile data usage reaches the set limit, mobile data traffic on your device getsturned off automatically.To control the data usage of individual applications1From your Home screen, tap  .2Find and tap Settings > Apps.3Tap the application that you want to control, then tap Data usage.The performance of individual applications may be affected if you change the related datausage settings.To check your data usage1From your Home screen, tap  .2Find and tap Settings > Data usage.3To view information about the amount of data transferred via mobile dataconnection, tap Mobile data usage.4To view information about the amount of data transferred via Wi-Fi connection,tap the Wi-Fi data usage.Selecting a SIM card for data trafficEither of the two SIM cards inserted in your device can handle data traffic, but onlyone SIM card can be selected to handle data at any given time. You can select theSIM card to use for data traffic during the initial setup of your device, or you canselect or change it later via the Settings menu.To change the SIM card used for data traffic1From your Home screen, tap  .2Find and tap Settings > Dual SIM > Cellular data.3Select the SIM card that you want to use for data traffic.For higher data speeds, select the SIM card that supports the fastest mobile network, forexample, 3G.51This is an internet version of this publication. © Print only for private use.
Selecting mobile networksYour device supports the use of two different networks at the same time. You canselect from the following network mode combinations when two SIM cards areinserted in your device:•One WCDMA network•One GSM network•One WCDMA and one GSM network•One LTE, one WCDMA and one GSM networkFor each SIM card, you can set your device to switch automatically between mobilenetworks depending on which mobile networks are available where you are. Yourdevice automatically switches between mobile networks depending on which mobilenetworks are available where you are. You can also manually set your device to use aparticular mobile network mode for each SIM card, for example, WCDMA or GSM.Different status icons are displayed in the status bar depending on the type or modeof network that you are connected to. Refer to Status icon on page 31 to see whatthe different status icons look like.To select a network mode1From your Home screen, tap  .2Find and tap Settings > More > Mobile networks.3Select a SIM card.4Tap Preferred network type, then select a network mode.To select another network manually1From your Home screen, tap  .2Find and tap Settings > More > Mobile networks.3Select a SIM card.4Tap Network operators.5Tap Search mode, then select Manual.6Select a network.If you select a network manually, your device will not search for other networks, even if youmove out of range of the manually selected network.To activate automatic network selection1From your Home screen, tap  .2Find and tap Settings > More > Mobile networks.3Select a SIM card.4Tap Network operators.5Tap Search mode, then select Automatic.Virtual private networks (VPNs)Use your device to connect to virtual private networks (VPNs), which allow you toaccess resources inside a secured local network from a public network. For example,VPN connections are commonly used by corporations and educational institutions forusers who need to access intranets and other internal services when they are outsideof the internal network, for example, when they are travelling.VPN connections can be set up in many ways, depending on the network. Somenetworks may require you to transfer and install a security certificate on your device.For detailed information about how to set up a connection to your virtual privatenetwork, contact the network administrator of your company or organisation.If you are using a device with multiple users, you may need to log in as the owner, that is, theprimary user, to adjust the settings for VPN.52This is an internet version of this publication. © Print only for private use.
To add a virtual private network1From your Home screen, tap  .2Find and tap Settings > More > VPN.3Tap  .4Select the type of VPN to add.5Enter your VPN settings.6Tap SAVE.To connect to a virtual private network1From your Home screen, tap  .2Find and tap Settings > More > VPN.3In the list of available networks, tap the VPN that you want to connect to.4Enter the required information.5Tap Connect.To disconnect from a virtual private network1Double-tap the status bar to open the Notification panel.2Tap the notification for the VPN connection to turn it off.53This is an internet version of this publication. © Print only for private use.
Synchronising data on your deviceSynchronising with online accountsSynchronise your device with contacts, email, calendar events and other informationfrom online accounts, for example, email accounts such as Gmail™ and ExchangeActiveSync, Facebook™ and Flickr™. You can synchronise data automatically forsuch accounts by activating the auto-sync function, or you can synchronise eachaccount manually.To set up an online account for synchronisation1From your Home screen, tap  .2Tap Settings > Accounts & sync > Add account, then select the account thatyou want to add.3Follow the instructions to create or sign in to an account.To synchronise manually with an online account1From your Home screen, tap   > Settings > Accounts & sync.2Tap the name of the account that you want to synchronise with. A list of itemsappears showing what can be synchronised with the account.3Tap the slider next to the item that you want to synchronise.To remove an online account1From your Home screen, tap   > Settings > Accounts & sync.2Select the account type, then tap the account you want to remove.3Tap  , then tap Remove account.4Tap REMOVE ACCOUNT again to confirm.Synchronising with Microsoft® Exchange ActiveSync®If your company uses a Microsoft Exchange ActiveSync account, you can accessyour corporate email messages, calendar appointments and contacts directly on yourdevice. After setup, you can find your information in the Email, Calendar andContacts applications.If you have set up a Microsoft® Exchange ActiveSync® (EAS) account on your Xperia™device, the EAS security settings may limit the lock screen type to only a PIN or password.This occurs when your network administrator specifies a lock screen type for all EAS accountsfor enterprise security reasons. Contact the network administrator of your company ororganisation to check what network security policies are implemented for mobile devices.Fingerprint functionality is not available in the United States.To set up an EAS account for synchronisation1From your Home screen, tap  .2Tap Settings > Accounts & sync > Add account > Exchange ActiveSync.3Enter your corporate email address and password.4Tap NEXT. If a failure occurs, enter the domain and server details for youraccount manually and then tap NEXT.5Tap OK to allow your corporate server to control your device.6Select a synchronisation method, a synchronisation interval and the data thatyou want to sync with your device.7Tap NEXT, then select how you want to be notified when a new email arrives.8Tap NEXT, enter a name for the corporate account, then tap FINISH SETUP.9If prompted, activate the device administrator to allow your corporate server toset certain security rules on your device, such as disabling voice recording andusing storage encryption.54This is an internet version of this publication. © Print only for private use.
To remove an EAS account1From your Home screen, tap   > Settings > Accounts & sync.2Tap Exchange ActiveSync, then select the EAS account that you want toremove.3Tap  , then tap Remove account.4Tap REMOVE ACCOUNT again to confirm.55This is an internet version of this publication. © Print only for private use.
Basic settingsAccessing settingsView and change settings for your device from the Settings menu. The Settings menuis accessible from both the Application screen and the Quick settings panel.To open the device settings menu from the Application screen1From your Home screen, tap  .2Find and tap Settings.To view information about your device1From your Home screen, tap  .2Find and tap Settings > About phone.To access the Quick settings panel•Drag the status bar downwards using two fingers.To select which settings to display on the Quick settings panel1Using two fingers, drag the status bar fully downwards, then tap EDIT.2To add a setting to the quick settings panel, drag and drop the icon into theupper part of the screen. To remove a setting, drag and drop the icon into thelower part of the screen.To rearrange the Quick settings panel1Drag the status bar fully downwards, then tap EDIT.2Touch and hold an icon, then move it to the desired position.Volume settingsYou can adjust the ringtone volume for incoming calls and notifications as well as formusic and video playback.To adjust the ringtone volume with the volume key•Press the volume key up or down.To adjust the media playing volume with the volume key•When playing music or watching video, press the volume key up or down evenwhen the screen is locked.To turn on vibrate mode•Press the volume key up or down until   appears.To adjust the volume levels1From your Home screen, tap  .2Find and tap Settings > Sound.3Drag the volume sliders to the desired positions.You can also press the volume key up or down and tap   to adjust the ringtone, mediaplayback or alarm volume levels separately.To set your device to vibrate for incoming calls1From your Home screen, tap  .2Find and tap Settings > Sound.3Tap the Also vibrate for calls slider to enable the function.56This is an internet version of this publication. © Print only for private use.
To set a ringtone1From your Home screen, tap  .2Find and tap Settings > Sound > Phone ringtone.3Select an option from the list or tap   and select a music file that is saved onyour device.4To confirm, tap Done.To select the notification sound1From your Home screen, tap  .2Find and tap Settings > Sound > Default notification ringtone.3Select an option from the list or tap   and select a music file that is saved onyour device.4To confirm, tap Done.Some applications have their own specific notification sounds, which you can select from theapplication settings.To enable touch tones1From your Home screen, tap  .2Find and tap Settings > Sound > Other sounds.3Tap the sliders to enable or disable the different touch tones as desired.Do not disturb modeYou can set your device to Do not disturb mode and decide how long your device willbe in Do not disturb mode manually. You can also preset when your device will be inDo not disturb mode automatically.To activate Do not disturb mode1Using two fingers, drag the status bar fully downwards to access the Quicksettings panel.2Find and tap  .3Select an option, then tap Done.To quickly shift between Do not disturb/Vibrate/Sound mode1Press the volume key up or down until  ,   or   appears.2Tap   or   to quickly shift between Vibrate/Sound mode. To activate Do notdisturb mode, press the volume key down when in vibrate mode.To schedule Do not disturb mode time intervals1From your Home screen, tap  .2Find and tap Settings > Sound > Do not disturb> Automatic rules.3Select the time or event to schedule Do not disturb mode for, or add a newrule.4Enter the desired name for the rule, then tap OK5Find and tap Days and mark the checkboxes for the relevant days, then tapDone.6To adjust the start time, tap Start time and select a value, then tap OK.7To adjust the end time, tap End time and select a value, then tap OK. Yourdevice stays in Do not disturb mode during the selected time interval.Setting exceptions for Do not disturb modeYou can select which types of notifications are allowed to sound in Do not disturbmode and you can filter exceptions based on who the notifications come from. Themost common types of exceptions include:•Events and reminders•Calls•Messages57This is an internet version of this publication. © Print only for private use.
•AlarmsTo associate exceptions with specific contact types1From the Home screen, tap  .2Find and tap Settings > Sound > Do not disturb > Priority only allows.3Tap Calls or Messages.4Select an option.Screen settingsTo adjust the screen brightness manually regardless of lighting condition1From your Home screen, tap   .2Find and tap Settings > Display and tap the Adaptive brightness slider todisable this function, if it is not already disabled.3Tap Brightness level.4Drag the slider to adjust the brightness.Lowering the brightness level helps the battery last longer.To enable or disable vibrate on touch1From your Home screen, tap  .2Find and tap Settings > Sound > Other sounds.3Tap the Vibrate on tap slider to enable or disable the function.To adjust the idle time before the screen turns off1From your Home screen, tap  .2Find and tap Settings > Display > Sleep.3Select an option.To turn off the screen quickly, briefly press the power key  .To adjust the font size1From your Home screen, tap   .2Find and tap Settings > Display > Font size.3Select the preferred option.To adjust the display size1From your Home screen, tap   .2Find and tap Settings > Display > Display size.3Drag the slider to select the preferred option.To adjust the white balance of the display1From your Home screen, tap  .2Find and tap Settings > Display > White balance.3Drag the sliders to the desired positions to adjust the white balance.To revert the white balance setting back to its default values, tap  > Default values.Smart backlight controlThe smart backlight control keeps the screen on as long as the device is held in yourhand. Once you put down the device, the screen turns off according to your sleepsetting.To enable or disable the Smart backlight control function1From your Home screen, tap  .2Find and tap Settings > Display > Smart backlight control.3Tap the slider to enable or disable the function.58This is an internet version of this publication. © Print only for private use.
Screen pinningUse screen pinning to set your device to display only the screen for a specificapplication. For example, if you are playing a game and you accidentally touch theHome navigation key, the screen pinning feature prevents the active game app screenfrom being minimised. You can also use this feature when you lend your device toanother person to make it harder for them to access more than one application. Forexample, you can lend your device to somebody to take a photo and pin the screento the Camera application so that the person can't easily use other apps such asEmail.Screen pinning is not a security feature and does not fully prevent other users from unpinning ascreen and accessing your device. To protect your data, you should set up your device torequest a screen lock PIN, password or pattern before someone can unpin the screen.To enable or disable screen pinning1From your Home screen, tap  .2Find and tap Settings > Lock screen & security > Screen pinning.3Tap the slider to enable or disable the function.4If you have enabled Screen pinning, you can tap the Require unlock pattern forunpinning slider to enable or disable this additional security function, asdesired.A pattern, PIN or password is not mandatory for screen pinning to work.To pin a screen1Make sure that screen pinning is activated on your device.2Open an app and go to the screen that you want to pin.3Tap  .4To display the screen pinning icon  , swipe upwards.5Tap  .6In the popup window that appears, tap Got it.To unpin a screen•On the pinned screen, touch and hold   until the screen is unpinned.If you selected a security option when you activated the screen pinning function, you have toenter your pattern, PIN or password to unlock the device before the screen can be unpinned.Application settingsSome apps will ask for permissions once you start using them. You can allow or denypermissions individually for each app, either from the Settings menu or from thePermission confirm dialog. Permission requirements depend on the app’s design.Allowing or denying permissionsYou can choose whether to allow or deny permissions when the dialog is shown. Ifyou have used another Android version previously, most apps will have already beengranted the necessary permissions.To allow a permission1To allow a permission, tap Allow.2When the confirm dialog appears for the second time, you can choose theDon't ask again option if you wish.3A dialog will also explain why the app needs the permissions and what it usesthem for specifically. To dismiss this dialog, tap OK.To deny a permission•To deny a permission, tap Deny when the dialog is shown.Some applications can still be used even if you have denied permissions.59This is an internet version of this publication. © Print only for private use.
Critical permissionsSome permissions are mandatory for apps to work as intended. In such cases, adialog will inform you.To configure applications1From your Home screen, tap  .2Find and tap Settings > Apps >  .3Select a configuration option, for example App permissions, then choose anapplication that you want to configure.To allow critical permissions1To allow a permission, tap Continue > APP INFO > Permission.2Find the critical permission you need.3Tap the relevant slider to adjust permissions.You can also manage permissions in Settings > Apps. Tap an app and change the permissionsas desired.Application linkingYour device can determine the default app to handle a particular web link. Thismeans that if the link is set, you don’t need to select an app each time you open alink. You can change the default app any time you want.To manage app links from the Settings menu1From your Home screen, tap  .2Find and tap Settings > Apps.3Tap   and find Opening links.4Select an app, and adjust the settings as desired.Resetting your applicationsYou can reset an application or clear application data if your application stopsresponding or causes issues with your device.To reset application preferences1From your Home screen, tap  .2Find and tap Settings > Apps.3Tap  , then tap Reset app preferences > Reset apps.Resetting application preferences does not delete any application data from your device.To clear application data1From your Home screen, tap  .2Find and tap Settings > Apps.3Select an application or service, then tap Storage > CLEAR DATA > OK.When you clear application data, data for the selected application is deleted from your devicepermanently. The option to clear application data is not available for every application orservice.To clear application cache1From your Home screen, tap  .2Find and tap Settings > Apps.3Select an application or service, then tap Storage > CLEAR CACHE.The option to clear the application cache is not available for every application or service.60This is an internet version of this publication. © Print only for private use.
To clear the application default setting1From your Home screen, tap  .2Find and tap Settings > Apps.3Select an application or service, then tap Open by default > CLEARDEFAULTS.The option to clear the application default setting is not available for every application orservice.Screen saverSet up an interactive screen saver that automatically displays colours, photos or aslideshow while your device is docked or charging and the screen is idle.On a device with multiple users, each user can have individual Screen saver settings.To enable or disable the screen saver1From your Home screen, tap   .2Find and tap Settings > Display > Screen saver.3Tap the slider to enable or disable the function.To select content for the Screen saver1From your Home screen, tap   .2Find and tap Settings > Display > Screen saver.3Tap the slider to enable the function.4Select what you want to display when the screen saver is active.To start the Screen saver manually1From your Home screen, tap   .2Find and tap Settings > Display > Screen saver.3Tap the slider to enable the function.4To activate the Screen saver immediately, tap  , then tap Start now.Language settingsYou can select a default language for your device and change it again at a later time.You can also change the writing language for text input.To change the language1From the Home screen, tap  .2Find and tap Settings > Languages & input > Languages.3Select a language.4Select a region.5Tap OK.If you select the wrong language and cannot read the menu texts, find and tap  . Then selectthe text beside   and select the first entry in the menu that opens. You can then select thelanguage you want.Date and timeYou can change the date and time on your device.61This is an internet version of this publication. © Print only for private use.
To set the date manually1From the Home screen, tap  .2Find and tap Settings > Date & time.3Disable the Automatic date & time function by tapping the slider.4Tap Set date.5Flick left or right, or use the arrows to set the desired date.6Tap OK.To set the time manually1From your Home screen, tap  .2Find and tap Settings > Date & time.3Disable the Automatic date & time function by tapping the slider.4Tap Set time.5Select the relevant values for the hour and minute.6Tap OK.To set the time zone1From your Home screen, tap  .2Find and tap Settings > Date & time.3Disable the Automatic time zone function by tapping the slider.4Tap Select time zone.5Select an option.Super-vivid modeSuper-vivid mode enhances the colour brightness and saturation of your photos andvideos while you view them on your device.To turn on Super-vivid mode1From your Home screen, tap   .2Find and tap Settings > Display > Image enhancement.3Tap the Super-vivid mode radio button if it is not already selected.Enhancing the sound outputYou can enhance the sound of your device by manually enabling individual soundsettings such as Equaliser and Surround sound. You can enable the Dynamicnormaliser to minimise volume differences between songs or videos. You can alsoimprove the quality of compressed music files to near High-resolution Audio qualitywhen you are using a wired headphone.To enhance the sound output automatically1From your Home screen, tap  .2Find and tap Settings > Sound > Audio settings.3Enable the ClearAudio+ function by tapping the slider.To adjust the sound settings manually1From the Home screen, tap  .2Find and tap Settings > Sound > Audio settings.3If the ClearAudio+ function is enabled, tap the slider to disable it.4Tap Sound effects > Equaliser.5Adjust the sound settings by dragging the frequency band buttons up or down.The manual adjustment of sound output settings has no effect on voice communicationapplications. For example, there is no change in the voice call sound quality.62This is an internet version of this publication. © Print only for private use.
To minimise volume differences using the Dynamic normaliser1From your Home screen, tap  .2Find and tap Settings > Sound > Audio settings.3Enable the Dynamic normaliser function by tapping the slider.Noise cancellationYour device supports noise cancelling headsets. By using a noise cancelling headsetwith your device, you can get much clearer audio quality when listening, for example,to music in a noisy environment, such as on a bus, a train or a plane. You can alsouse this feature to create a silent environment in which to study, work or read.To ensure optimal performance, noise cancelling headsets from Sony are recommended.To use a noise cancelling headset1Connect the noise cancelling headset to your device.2From your Home screen, find and tap   > Settings > Sound > Accessorysettings > Noise cancelling, then enable the Noise cancelling function bytapping the slider.3Tap Headset/Headphone type, and select the type of your headset/headphone.4If you want Noise cancelling to be enabled only during music or video playbackor when the screen is active, tap the Power saver mode slider to enable thisfunction.5If you want Noise cancelling to be enabled for as long as the headset isconnected, tap the Power saver mode slider to disable this function.A noise cancelling headset may not be included with your device at purchase.You can also enable the Noise cancelling function via the Quick settings panel when a noisecancelling headset is connected to your device.To adjust the settings to the noise environment1Make sure a noise cancelling headset is connected to your device.2From your Home screen, tap  .3Find and tap Settings > Sound > Accessory settings > Noise cancelling > Noiseenvironment.4Select the relevant noise environment type, then tap OK.Multiple user accountsYour device supports multiple user accounts so that different users can log inseparately to the device and use it. Multiple user accounts work well in situationswhere you share the same device with other people or lend your device to someoneto use for a while. The user who sets up the device for the first time becomes theowner of the device. Only the owner can manage the accounts of other users. Apartfrom the owner account, there are two different types of accounts:•Regular User: This account type is suitable for someone who regularly uses yourdevice.•Guest User: Enable the guest account option for someone who just wants to use yourdevice temporarily.Some features are only available to the owner. For example, only the owner can allowdownloads from sources other than Google Play™.About the Regular User accountBy adding Regular User accounts, you can allow different users to have differenthome screens, wallpapers and general settings. They also get separate access toapplications and memory storage for files such as music and photos. You can add upto seven regular user accounts on your device.63This is an internet version of this publication. © Print only for private use.
To add a regular user account1Make sure you are logged in as the owner, that is, the user who set up thedevice for the first time.2From your Home screen, tap  .3Find and tap Settings > Users > Add user.4Tap OK. The new account is created.5Tap SET UP NOW. The screen locks and an icon representing the newly addeduser appears in the top right corner.6Unlock the screen by swiping upwards.7Follow the on-screen instructions to set up the account for the user.You can also add a regular user account from the status bar on any screen. Just drag thestatus bar fully downwards and tap the user icon, then tap Add user.To delete a regular user account from your device1Make sure you are logged in as the owner.2From your Home screen, tap  .3Find and tap Settings > Users.4Tap   beside the name of the user that you want to delete, then tap Removeuser > Delete .About the Guest User accountIf someone just wants to use your device temporarily, you can enable a guestaccount for this user. In guest mode, your device starts up as a freshly installedsystem with only the pre-installed apps. Once your guest is finished using yourdevice, you can wipe the session clean so that the next guest can start fresh. Theguest user account is pre-installed and cannot be deleted.To activate the guest user account1Make sure you are logged in as the owner, that is, the user who set up thedevice for the first time.2From your Home screen, tap  .3Find and tap Settings > Users > Guest.You can also activate the guest user account from the status bar on any screen. Just drag thestatus bar fully downwards and tap the user icon, then tap Add guest.To clear the guest session data1Make sure you are logged in to the guest account.2From your Home screen, tap  .3Find and tap Settings > Users.4Find and tap Remove guest.5Tap Remove.You can also clear the guest session from the status bar on any screen as long as you arelogged in to the guest account. Just drag the status bar downwards and tap the user icon,then tap Remove guest.Switching between multiple user accountsTo switch between multiple user accounts1To view the list of users, drag the status bar downwards, then tap the user iconat the top right of the screen.2Tap the icon representing the user account that you want to switch to. The lockscreen for that user account appears.When you switch to the guest account, tap Start again if you want to wipe the previoussession or tap Yes, continue to continue the previous session.64This is an internet version of this publication. © Print only for private use.
Settings for multiple user accountsThere are three different types of settings on devices with multiple users:•Settings that can be changed by any user and affect all users. Examples includelanguage, Wi-Fi, Aeroplane mode, NFC and Bluetooth®.•Settings that only affect an individual user account. Examples include automatic datasyncing, screen lock, various accounts added, and wallpaper.•Settings that are only visible to the owner and affect all users, for example, VPNsettings.65This is an internet version of this publication. © Print only for private use.
Typing textOn-screen keyboardsThere are a number of pre-installed text entry providers on your device.The default text entry provider may depend on the regional or language settings you use. Oneor more text entry providers might not be available in your region.SwitfKey® keyboardYou can enter text using the on-screen keyboard by tapping each letter individually,or you can use the SwitfKey® flow feature and slide your finger from letter to letter toform words.1 Delete a character before the cursor.2 Tap to enter a carriage return, or touch and hold to access smileys.3 Enter punctuation.4 Enter a space.5 Tap to enter a comma, or touch and hold to enter text using voice input.6 Display numbers and symbols.7 Switch between lower case, upper case and all caps.For more information about SwiftKey®, go to https://swiftkey.com/Google keyboard overviewYou can enter text using the on-screen keyboard by tapping each letter individually,or you can slide your finger from letter to letter to form words.1 Tap to delete a character before the cursor.2 Tap to enter a hard return, access smileys, or search the content. Functionality may depend on textfield type.3 Tap to enter punctuation.4 Tap to insert space.5 Tap to enter a comma.6 Tap to display numbers and symbols.7 Tap to switch between lower case, upper case and all caps.66This is an internet version of this publication. © Print only for private use.
To display the on-screen keyboard to enter text•Tap a text entry field.To use the on-screen keyboard in landscape orientation•When the on-screen keyboard is displayed, turn the device sideways.You may need to adjust the settings in some applications to enable landscape orientation.To enter text character by character1To enter a character visible on the keyboard, tap the character.2To enter a character variant, touch and hold a regular keyboard character toget a list of available options, then select from the list. For example, to enter"é", touch and hold "e" until other options appear, then, while keeping yourfinger pressed on the keyboard, drag to and select "é".To enter a period•After you enter a word, double-tap the space bar.To enter text using the gesture input function1When the on-screen keyboard is displayed, slide your finger from letter to letterto trace the word that you want to write.2After you finish entering a word, lift up your finger. A word suggestion appearsbased on the letters that you have traced.3If the word that you want does not appear, tap   to see other options andselect accordingly. If the desired option does not appear, delete the entire wordand trace it again, or enter the word by tapping each letter individually.Editing textYou can select, cut, copy and paste text as you write. You can access the editingoptions by double-tapping the entered text. The editing options then becomeavailable via an application bar.Text editing barAfter selecting text by double-tapping on a word, an editing bar appears with severaltools available:•Cut•Copy•Paste•Share•Select all•AssistThe Paste option only appears when you have text saved on the clipboard.To select text1Double-tap a word to highlight it.2You can drag the tabs on both sides of the highlighted word to select moretext.To edit text1Double-tap a word to make the application bar appear.2Select the text that you want to edit, then use the application bar to make yourdesired changes.To use the magnifier•When you enter text, tap and hold on the text field to view the text magnifiedand to place the cursor where you want within the text field.67This is an internet version of this publication. © Print only for private use.
CallingMaking callsYou can make a call by manually dialling a phone number, by tapping a numbersaved in your contacts list, or by tapping the phone number in your call log. You canalso use the smart dial function to quickly find numbers from your contacts list andcall logs by entering part of a contact number or name and selecting from thesuggestions that appear. To make a video call, you can use the Hangouts™ instantmessaging and video chat application on your device.1 View more options2 Delete number3 Dialpad4 Call buttonTo open the dialpad1From your Home screen, tap  .2Find and tap  .3If the dialpad does not appear, tap  .To dial a phone number1From your Home screen, tap  .2Find and tap  .3If the call log appears, tap   to display the dialpad.4Enter the phone number, and tap  .5Select a SIM card in select account dialog.To delete a number entered by mistake, tap  .To make a call using smart dial1From your Home screen, tap  .2Find and tap  .3If the call log appears, tap   to display the dialpad.4Use the dialpad to enter letters or numbers that correspond to the contact youwant to call. As you enter each letter or number, a list of possible matchesappears.5Tap the contact that you want to call.6Select a SIM card.68This is an internet version of this publication. © Print only for private use.
To make an international call1From your Home screen, tap  .2Find and tap  . The call log is displayed.3Tap   to display the dialpad.4Touch and hold 0 until a “+” sign appears.5Enter the country code, the area code without the initial zeros, followed by thephone number. Then tap  .6Select a SIM card in select account dialog.To add a direct dial number to your Home screen1Touch and hold an empty area on your Home screen until the device vibratesand the customisation menu appears.2In the customisation menu, tap Widgets > Shortcuts.3Scroll through the list of applications and select Direct dial.4Select the contact and the number that you want to use as the direct dialnumber.Showing or hiding your phone numberYou can select to show or hide your phone number on call recipients' devices whenyou call them.To show or hide your phone number during outgoing calls1From the Home screen, tap  .2Find and tap Settings > Call.3Select a SIM card.4Tap Additional settings > Caller ID, and choose an option.This option may not be provided by every operator.Receiving callsIf you receive an incoming call when the device is in sleep mode or the screen islocked, the phone application opens in fullscreen format, with a SIM icon indicatingwhich SIM card the call is for. If you receive an incoming call when the screen isactive, the incoming call is displayed as a floating notification, that is, in a minimisedwindow that floats at the top of whatever screen is open, with SIM1 or SIM2indicating which SIM card the call is for. When such a notification arrives, you canchoose to answer the call and open the phone application screen, or you can rejectthe call and stay on the current screen.To answer a call when the screen is inactive•When a call comes in, drag   to the right.To answer an incoming call when the screen is active•When a call comes in, in the heads-up notification that appears at the top ofthe screen, tap ANSWER.Instead of answering the call, you can go to the main phone application screen by tapping theheads-up notification window. Using this method, you get more options to manage the call.For example, you can decide to reject the call with a message.To reject a call when the screen is inactive•When a call comes in, drag   to the left.69This is an internet version of this publication. © Print only for private use.
To reject a call when the screen is active•When a call comes in, in the heads-up notification that appears at the top ofthe screen, tap DECLINE.Instead of rejecting the call, you can go to the main phone application screen by tapping theheads-up notification window. This way you get more options to manage the call. Forexample, you can decide to reject the call with a message.To mute the ringtone for an incoming call•When you receive the call, press the volume key.Rejecting a call with a text messageYou can reject a call with a text message, sent automatically to the caller and storedin the Messaging conversation with the contact.You can select from a number of predefined messages available on your device, oryou can create a new message. You can also create your own personalisedmessages by editing the predefined ones.To reject a call with a text message when the screen is inactive1When an incoming call arrives, tap RESPONSE OPTIONS.2Select a predefined message or tap Write new message.To reject a call with a text message when the screen is active1When you receive a call, tap the notification window where the phone numberor the name of the contact is displayed.2Tap RESPONSE OPTIONS.3Select a predefined message or tap Write new message.To reject a second call with a text message1When you hear repeated beeps during a call, tap RESPONSE OPTIONS.2Select a predefined message or tap Write new message.To edit the text message used to reject a call1From your Home screen, tap  .2Find and tap Settings > Call, choose a SIM card, and then tap Reject call withmessage.3Tap the message that you want to edit, then make the necessary changes.4Tap OK.Ongoing calls1 End a call2 Make a second call70This is an internet version of this publication. © Print only for private use.
3 Put the current call on hold or retrieve a call on hold4 Enter DTMF digits during a call5 Mute the microphone during a call6 Turn on the loudspeaker during a callTo change the volume during a call•Press the volume key up or down.Using the call logIn the call log, you can view missed calls   with   or   indicating which SIM card thecall was for, received calls   and dialled calls  .To open the call log1From your Home screen, tap  .2Find and tap  .To view your missed calls1When you have missed a call,   appears in the status bar. Drag the status bardownwards.2Tap Missed call.To call a number from your call log1From your Home screen, tap  .2Find and tap  . The call log is displayed.3To call a number directly from the call log, tap the   beside the number, andselect a SIM card. To edit a number before calling, touch and hold the number,then tap Edit number before call.To add a number from the call log to your contacts1From your Home screen, tap  .2Find and tap  .3Tap a number displayed in the call log, then select Create new contact or Addto Contacts.4Edit the contact details, then tap  .To view call log options1From your Home screen, tap  .2Find and tap  .3Tap  .You can also access general call settings by following the steps above.Forwarding callsYou can direct calls to a different recipient, such as another phone number, anotherdevice or to an answering service. You can also forward calls that come in on SIMcard 1 to SIM card 2 when SIM card 1 is unreachable, and vice versa. This function iscalled Dual SIM reachability. You must enable it manually.To forward calls1From your Home screen, tap  .2Find and tap Settings > Call.3Select a SIM card.4Tap Call forwarding > Voice and select an option.5Enter the number you want to forward calls to, then tap Turn on.71This is an internet version of this publication. © Print only for private use.
To turn off call forwarding1From your Home screen, tap  .2Find and tap Settings > Call.3Select a SIM card.4Tap Call forwarding.5Select an option, then tap Turn off.To enable the Dual SIM reachability function1From your Home screen, tap  .2Find and tap Settings > SIM cards > Dual SIM reachability.3Under Dual SIM reachability, tap the slider to enable the function.4Follow the on-screen instructions to complete the procedure.If the Dual SIM reachability function does not work after you enable it, check that you haveentered the phone numbers correctly for each SIM card. In some cases, the numbers aredetected automatically during setup. Otherwise, you are prompted to enter them manually.Restricting callsYou can block all or certain categories of incoming and outgoing calls. If you havereceived a PIN2 code from your service provider, you can also use a list of FixedDialling Numbers (FDNs) to restrict outgoing calls. If your subscription includes avoicemail service, you can send all incoming calls from a specific contact directly tovoicemail.FDN is not supported by all network operators. Contact your network operator to verify if yourSIM card or network service supports this feature.To block calls and messages from a specific number1From your Home screen, tap  .2Find and tap   > Settings > Block numbers > ADD A NUMBER.3Enter the phone number you want to block calls and texts from, then tapBLOCK .To enable or disable fixed dialling1From your Home screen, tap  .2Find and tap Settings > Call.3Select a SIM card.4Tap Fixed dialling numbers.5If you want to enable fixed dialling, select Activate fixed dialling. If you want todisable fixed dialling, select Deactivate fixed dialling.6Enter your PIN2 and tap OK.To access the list of accepted call recipients1From your Home screen, tap  .2Find and tap Settings > Call.3Tap Fixed dialling numbers > Fixed dialling numbers.To change the SIM card PIN21From the Home screen, tap  .2Find and tap Settings > Call.3Select a SIM card.4Tap Fixed dialling numbers > Change PIN2.5Enter the old SIM card PIN2 and tap OK.6Enter the new SIM card PIN2 and tap OK.7Confirm the new PIN2 and tap OK.72This is an internet version of this publication. © Print only for private use.
To send incoming calls from a specific contact directly to voicemail1From your Home screen, tap  .2Find and tap  .3Select the desired contact.4Tap   >  .5Mark the checkbox beside All calls to voicemail.6Tap SAVE.Multiple callsIf you have activated call waiting, you can handle multiple calls at the same time.When it is activated, you will be notified by a beep if you receive another call.Mobile data is unavailable during calls. Applications like email, internet and social networkingwill work if you connect to a Wi-Fi network.To activate or deactivate call waiting1From your Home screen, tap  .2Find and tap Settings > Call.3Select a SIM card.4Tap Additional settings.5To activate or deactivate call waiting, tap Call waiting.To answer a second call and put the ongoing call on hold1When you hear repeated beeps during a call, drag   to the right.2Tap Hold call.To reject a second call•When you hear repeated beeps during a call, drag   to the left.To make a second call1During an ongoing call, tap  . The call log is displayed.2Tap   to display the dialpad.3Enter the number of the recipient and tap  . The first call is put on hold.To switch between multiple calls•To switch to another call and put the current call on hold, tap On hold.Conference callsWith a conference or multiparty call, you can have a joint conversation with two ormore persons.For details about the number of participants that you can add to a conference call, contactyour network operator.To make a conference call1During an ongoing call, tap  . The call log appears.2To display the dialpad, tap  .3Dial the number of the second participant and tap  . The first participant is puton hold temporarily.4To add the second participant to the call and start the conference call, tap  .5To add more participants to the call, repeat the relevant steps as describedabove.73This is an internet version of this publication. © Print only for private use.
To have a private conversation with a conference call participant1During an ongoing conference call, tap Manage conference.2Tap the separate button of the participant with whom you want to have aprivate conversation.3To end the private conversation and return to the conference call, tap  .To release a participant from a conference call1During an ongoing conference call, tap Manage conference.2Tap   next to the participant you want to release.To end a conference call•During the conference call, tap  .VoicemailIf your subscription includes a voicemail service, callers can leave voice messages foryou when you can't answer calls. Your voicemail service number is normally saved onyour SIM card. If not, you can get the number from your service provider and enter itmanually.To enter your voicemail number1From the Home screen, tap  .2Find and tap Settings > Call > Voicemail > Voicemail settings > Voicemailnumber.3Enter your voicemail number.4Tap OK.To call your voicemail service1Open the dialpad.2Touch and hold 1, then select a SIM card.The first time you call your voicemail number, your network operator’s voicemail systemnormally prompts you to set up your voicemail. For example, you may be asked to record agreeting and set a password.Emergency callsYour device supports international emergency numbers, for example, 112 or 911.You can normally use these numbers to make emergency calls in any country, with orwithout a SIM card inserted if you are within range of a network.To make an emergency call1Open the dialpad.2Enter the emergency number, then tap  .You can make emergency calls even when no SIM card is inserted or when all outgoing callsare blocked.To make an emergency call while the SIM card is locked1Tap EMERGENCY.2Enter the emergency number and tap  .To make an emergency call while the screen is locked1If the active screen lock type is Swipe, swipe up and tap , then tap   todisplay the dialpad, then enter the emergency number and tap  .2If your screen is locked with a pattern, PIN or password, swipe up and tapEmergency, then enter the emergency number and tap  .74This is an internet version of this publication. © Print only for private use.
ContactsSearching and viewing contacts1 Search for contacts2 Edit and view medical and emergency contact information3 View more options4 Favourites and All contacts tabs5 View contact details6 Use the slider to jump to contacts starting with the selected letter7 Add a contactTo search for a contact1From your Home screen, tap  , then tap  .2Tap   and enter a phone number, name or other information in the Findcontacts field. The result list is filtered as you enter each character.To select which contacts to display in the Contacts application1From your Home screen, tap  , then tap  .2Press  , then tap Contacts to display.3In the list that appears, select the desired option. If you have synchronised yourcontacts with a synchronisation account, that account appears in the list.4To further expand the list of options, tap Customise, select the appropriatedrop-down list and mark or unmark the checkboxes as desired.5When you’re finished, tap OK.75This is an internet version of this publication. © Print only for private use.
Adding and editing contactsTo add a contact1From your Home screen, tap  , then tap  .2Tap  .3If you have synchronised your contacts with one or more accounts and you areadding a contact for the first time, you must select the account that you wantto add the contact to. Alternatively, tap Phone contact if you only want to useand save this contact on your device.4Enter or select the desired information for the contact.5When you are finished, tap SAVE.Once you save a contact to an account, that account will show as the default account to saveto the next time you add a contact. If you want to change which account a contact is saved to,you need to create the contact again and save it to the correct account.If you add a plus sign and the country code before a contact's phone number, you do nothave to edit the number again when you make calls from abroad.To edit a contact1From your Home screen, tap  , then tap  .2Tap the contact that you want to edit, then tap  .3Edit the desired information.4When you are finished, tap SAVE.Some synchronisation services do not allow you to edit contact details.To add a picture to a contact1From your Home screen, tap  , then tap  .2Tap the contact that you want to edit, then tap  .3Tap  , then select a method for adding the contact picture and edit it asdesired.4After you add the picture, tap SAVE.You can also add a picture to a contact directly from the Album application. If you want to adda picture that is saved to an online account, you must download the picture first.To personalise the ringtone for a contact1From your Home screen, tap  , then tap  .2Tap the contact that you want to edit, then tap  .3Tap   > Set ringtone.4Select an option from the list or tap   to select a music file saved on yourdevice, then tap DONE.5Tap SAVE.To send all calls to voicemail for a contact1From your Home screen, tap  , then tap  .2Tap the contact that you want to edit, then tap  .3Tap  , then mark the All calls to voicemail checkbox.4When you are finished, tap SAVE.To block a phone number1From your Home screen, tap  , then tap  .2Tap  , then tap Blocked numbers.3Tap ADD A NUMBER, then enter the phone number you want to block callsand texts from.4Tap BLOCK.76This is an internet version of this publication. © Print only for private use.
To delete contacts1From your Home screen, tap  , then tap  .2Touch and hold the contact that you want to delete.3To delete several or all contacts, mark the checkboxes beside the contacts thatyou want to delete.4Tap  , then tap Delete contact.5Tap DELETE to confirm.To edit contact information about yourself1From your Home screen, tap  , then tap  .2Tap ME, then tap  .3Enter the new information or make the changes you want.4When you are finished, tap SAVE.To create a new contact from a text message1From your Home screen, tap  , then find and tap  .2Tap the icon next to the phone number, then tap SAVE.3Select an existing contact, or tap Create new contact.4Edit the contact information and tap SAVE.Transferring contactsThere are several ways to transfer contacts to your new device. You can synccontacts from an online account or import contacts directly from another device.If you sync the contacts in your old device with an online account, for example,Google Sync™ or Microsoft® Exchange ActiveSync®, you can transfer your contactsto your new device using that account.You can also copy contacts to a memory card, use Bluetooth® technology, or savecontacts to a SIM card. For more specific information about transferring the contactsfrom your old device, refer to the relevant User guide.Find out more about choosing a transfer method at www.sonymobile.com/support/.To synchronise contacts on your new device with a synchronisation account1From your Home screen, tap  , then tap  .2Tap  , then tap Manage accounts.3Select the account that you want to sync your contacts with, then tap   > Syncnow.You need to be signed in to the relevant sync account before you can sync your contacts withit.To import contacts from a SIM cardWhen transferring contacts to or from a SIM card, some contacts may get duplicated at thedestination. For information on how to resolve this, see Avoiding duplicate entries in theContacts application on page 80.1From your Home screen, tap  , then tap  .2Tap  , then tap Import/export.3Select a SIM card.4Select where to store your contacts.5Select contacts to import. To import an individual contact, find and tap thecontact. To import all contacts, tap  , then tap Import all.77This is an internet version of this publication. © Print only for private use.
To import contacts from a memory card1From your Home screen, tap  , then tap  .2Press  , then tap Import/export > Import from SD card or internal storage (.vcffile).3Select where to store your contacts.4Tap SD card.5Select the files that you want to import by tapping them.To import contacts using Bluetooth® technology1Make sure you have the Bluetooth® function turned on and that your device isset to visible.2When you are notified of an incoming file to your device, drag the status bardownwards and tap the notification to accept the file transfer.3Tap Accept to start the file transfer.4Drag the status bar downwards. When the transfer is complete, tap thenotification.5Tap the received file and select where to store your contacts.Backing up contactsYou can use internal storage, a memory card or a SIM card to back up contacts.To export all contacts to internal storage1From your Home screen, tap  , then tap  .2Press  , then tap Import/export > Export to SD card or internal storage (.vcf file).3Tap   > Show internal storage.4Tap  , then tap your device’s model number beside  .5Select a destination folder or simply tap SAVE.To export all contacts to a memory card1From your Home screen, tap  , then tap  .2Press  , then tap Import/export > Export to SD card or internal storage (.vcf file).3Tap   > SD card.4Tap SAVE.To export contacts to a SIM cardWhen you export contacts to a SIM card, not all information may get exported. This is due tomemory limitations on SIM cards.1From your Home screen, tap  , then tap  .2Tap   > Import/export.3Select a SIM card.4Tap OK.Adding medical and emergency contact informationYou can add and edit emergency information in the Contacts application. You canenter medical details, such as allergies and medications that you are using, plusinformation about relatives and friends who can be contacted in case of emergency.After setup, your emergency information can be accessed from the security lockscreen. This means that even if the screen is locked, for example, by a PIN, pattern orpassword, emergency personnel can still retrieve your emergency information.78This is an internet version of this publication. © Print only for private use.
1 Go back to the main Contacts screen2 View more options3 Medical and personal information and emergency contacts tab4 Medical and personal informationTo enter your medical information1From your Home screen, tap  , then tap  .2Tap  .3Edit the desired information.To add a new emergency contact1From your Home screen, tap  , then tap  .2Tap  , then tap CONTACTS > Add contact.3Tap the contact that you want to use as an emergency contact.The emergency contact must have at least a phone number which emergency personnel cancall. If your device is locked by a security screen lock, emergency personnel can only see thephone number of the emergency contact, even if there is other information entered in theContacts application.FavouritesContacts that you mark as favourites appear under the favourites tab in the Contactsapplication along with your most frequently called contacts or "top contacts". Thisway you get quicker access to these contacts.To mark or unmark a contact as a favourite1From the Home screen, tap  , then tap  .2Tap the contact you want to add to or remove from your favourites.3Tap  .To view your favourite contacts1From your Home screen, tap  , then tap  .2Tap FAVOURITES.Sending contact informationTo send your business card1From your Home screen, tap  , then tap  .2Tap ME.3Tap  , then tap Share.4Select an available transfer method and follow the on-screen instructions.79This is an internet version of this publication. © Print only for private use.
To send a contact1From your Home screen, tap  , then tap  .2Tap the contact whose details you want to send.3Tap  , then tap Share.4Select an available transfer method and follow the on-screen instructions.To send several contacts at once1From your Home screen, tap  , then tap  .2Touch and hold a contact then mark or unmark the checkboxes beside thecontacts that you want to share.3Tap  , then tap Share.4Select an available transfer method and follow the on-screen instructions.To send all contacts1From your Home screen, tap  , then tap  .2Press  , then tap Import/export > Share all contacts to start exporting all yourcontacts.3Drag the status bar downwards. When the export is complete, tap thenotification.4Select an available transfer method and follow the on-screen instructions.Avoiding duplicate entries in the Contacts applicationIf you synchronise your contacts with a new account or import contact information inother ways, you could end up with duplicate entries in the Contacts application. If thishappens, you can link such duplicates to create a single entry. If you link entries bymistake, you can unlink them again later.To link contacts1From your Home screen, tap  , then tap  .2Tap and hold the contact that you want to link with another contact.3Tick the checkbox beside the contact that you want to link.4Tap  , then tap Link. The information from the first contact is merged with thesecond contact, and the linked contacts are displayed as one contact in theContacts list.5Tap LINK to confirm.To separate linked contacts1From your Home screen, tap  , then tap  .2Tap the linked contact that you want to edit, then tap  .3Tap  , then tap Unlink.4Tap UNLINK to confirm.80This is an internet version of this publication. © Print only for private use.
Messaging and chatReading and sending messagesThe Messaging application shows your messages as conversations, which meansthat all messages to and from a particular person are grouped together.The number of characters that you can send in a single message varies depending on theoperator and the language you use. The maximum size of a multimedia message, whichincludes the size of added media files, is also operator dependent. Contact your networkoperator for more information.1 Go back to the list of conversations2 Call the message sender3 View more options4 Sent and received messages5 Send a completed message6 Add attachmentsTo create and send a message1From your Home screen, tap  , then find and tap  .2Tap  .3Enter the recipient’s name or phone number, then select from the suggestionsthat appear. If the recipient is not listed as a contact, enter the recipient'snumber manually.4If you want to send a group message, repeat the procedure described above toadd more recipients.5Tap Write message and enter your message text.6If you want to add an attachment, select the relevant attachment option.7To send the message, tap either of the   buttons according to which SIM cardyou wish to use.If you exit a message before sending, it gets saved as a draft. The conversation gets taggedwith the word Draft.To read a received message1From your Home screen, tap  , then find and tap  .2Tap the desired conversation.3If the message is not yet downloaded, tap it.All received messages are saved by default to the device memory.81This is an internet version of this publication. © Print only for private use.
To reply to a message1From your Home screen, tap  , then find and tap  .2Tap the conversation containing the message.3Enter your reply and tap either of the   buttons according to which SIM cardyou wish to use.To forward a message1From your Home screen, tap  , then find and tap  .2Tap the conversation containing the message that you want to forward.3Touch and hold the message that you want to forward, then tap Forwardmessage.4Enter the recipient’s name or phone number, then select from the suggestionsthat appear. If the recipient is not listed as a contact, enter the recipient'snumber manually.5Edit the message if necessary, then tap either of the   buttons according towhich SIM card you wish to use.To save a file contained in a received message1From your Home screen, tap  , then find and tap  .2If the message has not been downloaded yet, tap it.3Touch and hold the file that you want to save, then select the desired option.Organising your messagesTo delete a message1From your Home screen, tap  , then find and tap  .2Tap the conversation containing the message that you want to delete.3Touch and hold the message that you want to delete, then tap Delete message> DELETE.To delete conversations1From your Home screen, tap  , then find and tap  .2Tap  , then tap Delete conversations.3Mark the checkboxes for the conversations that you want to delete, then tap > DELETE.To star a message1From your Home screen, tap  , then find and tap  .2Tap the conversation that you want to open.3Touch and hold the message that you want to star, then tap Add star.4To unstar a message, touch and hold the starred message, then tap Deletestar.To view starred messages1From your Home screen, tap  , then find and tap  .2Tap  , then tap Starred messages.3All starred messages appear in a list.To search for messages1From your Home screen, tap  , then find and tap  .2Tap  .3Enter your search keywords. The search results appear in a list.82This is an internet version of this publication. © Print only for private use.
Calling from MessagingTo call a message sender1From your Home screen, tap  , then find and tap  .2Tap a conversation and tap  , then select a SIM card.To save a sender's number as a contact1From your Home screen, tap  , then find and tap  .2Tap the icon next to the phone number, then tap SAVE.3Select an existing contact, or tap Create new contact.4Edit the contact information and tap SAVE.Messaging settingsTo change your message notification settings1From your Home screen, tap  , then find and tap  .2Tap  , then tap Settings.3To set a notification sound, tap Notification sound, then select an option or tap and select a music file that is saved on your device.4To confirm, tap DONE.5To adjust additional notification settings, tap the sliders.To enable or disable delivery reports for outgoing messages1From your Home screen, tap  , then find and tap  .2Tap  , then tap Settings.3Tap the Delivery report slider to enable or disable the function.After delivery reports are turned on, a check mark is displayed for messages that have beensuccessfully delivered.Video chatYou can use the Google Duo™ video chat application on your device to chat withfriends who also use the application on Android™ and iOS devices.Go to https://support.google.com/duo/ to get more detailed information about how touse this application.The video call function only works on devices with a front camera.To use the Duo™ application1From your Home screen, tap  .2Find and tap Duo.83This is an internet version of this publication. © Print only for private use.
EmailSetting up emailUse the email application on your device to send and receive email messagesthrough your email accounts. You can have one or several email accounts at thesame time, including corporate Microsoft Exchange ActiveSync accounts.To set up an email account1From your Home screen, tap  .2Find and tap Email.3Follow the instructions that appear on the screen to complete the setup.For some email services, you may need to contact your email service provider for informationon detailed settings for the email account.To add an extra email account1From your Home screen, tap  .2Find and tap Email.3Tap  , then tap Settings > Add account.4Follow the on-screen instructions. If the settings for the email account cannotbe downloaded automatically, complete the setup manually.5When you are finished, tap NEXT.Sending and receiving email messages1 Access settings, view a list of all email accounts and folders2 Search for email messages3 Access other options4 List of email messages5 Write an email messageTo download new email messages•When the email inbox is open, swipe downwards on the message list.Before trying to download new email messages, make sure that you have a working dataconnection. For more information about ensuring successful data connections, see Internetand MMS settings on page 46.84This is an internet version of this publication. © Print only for private use.
To read your email messages1From your Home screen, tap  .2Find and tap Email.3If you are using several email accounts, tap  , then tap   and select theaccount that you want to check. If you want to check all your email accounts atonce, tap  , then tap   and select Combined inbox.4In the email inbox, scroll up or down and tap the email message that you wantto read.To create and send an email message1From your Home screen, tap  , then find and tap Email.2If you are using several email accounts, tap  , then tap   and select theaccount from which you want to send the email.3Tap  , then type the recipient's name or email address and select one or morerecipients from the drop-down list.4Enter the email subject and message text, then tap  .To reply to an email message1In your email inbox, find and tap the message that you want to reply to, thentap REPLY or REPLY ALL.2Enter your reply, then tap  .To forward an email message1In your email inbox, find and tap the message that you want to forward, thentap FORWARD.2Enter the recipient's name or email address, then select one or more recipientsfrom the drop-down list.3Enter your message text, then tap  .To save or view an email message attachment1Find and tap the email message containing the attachment that you want toview. Email messages with attachments are indicated by  .2After the email message opens, find the attachment in the email body, then tapSAVE or VIEW next to it.To save a sender's email address to your contacts1Find and tap a message in your email inbox.2Tap the name of the sender, tap Add to Contacts then tap OK.3Select an existing contact, or tap Create new contact.4Edit the contact information if desired, then tap SAVE.Organising your email messagesTo sort your emails1From your Home screen, tap  .2Find and tap Email.3If you are using several email accounts, tap  , then tap   and select theaccount with the inbox that you want to sort. If you want to sort email in allyour email accounts at once, tap  , then tap   and select Combined inbox.4Tap  , then tap Sort.5Select a sorting option.85This is an internet version of this publication. © Print only for private use.
To search for emails1From your Home screen, tap  , then find and tap Email.2If you are using several email accounts, tap  , then tap   and select theaccount that you want to search. If you want to search all your email accountsat once, tap  , then tap   and select Combined inbox.3Tap  .4Enter your search text.5The search results appear in a list sorted by date. Tap the email message thatyou want to open.To view all folders for one email account1From your Home screen, tap  , then find and tap Email.2Tap  , then tap   and select the account that you want to check.3Under the account that you want to check, select Show all folders.To delete email messages1Tap and hold the message that you want to delete until the device vibrates.2Mark the checkboxes for the messages that you want to delete.3Tap You can also flick the message to the right to delete it.To move an email message to another folder1In your email inbox, flick the message that you want to move to the left.2Tap Move, then select a folder.Email account settingsTo remove an email account from your device1From your Home screen, tap  .2Find and tap Email.3Tap  , then tap Settings.4Select the account you want to remove.5Tap Delete account > OK.To change the inbox check frequency1From your Home screen, tap  .2Find and tap Email.3Tap  , then tap Settings.4Select the desired account.5Tap Check frequency > Check frequency and select an option.To set an Out of Office auto-reply in an Exchange ActiveSync account1From your Home screen, tap  , then find and tap Email.2Tap  , then tap Settings.3Select the EAS (Exchange ActiveSync) account for which you want to set anOut of Office auto-reply.4Tap Out of office.5Tap the slider to enable the function.6If needed, mark the Set time range checkbox and set the time range for theauto-reply.7Enter your Out of Office message in the body text field.8Tap OK to confirm.Gmail™If you have a Google™ account, you can use the Gmail™ application to read andwrite email messages.86This is an internet version of this publication. © Print only for private use.
1 View a list of all Gmail accounts and folders2 Search for email messages3 List of email messages4 Write an email messageTo learn more about Gmail™•When the Gmail application is open, tap   , then find and tap Help & feedback.87This is an internet version of this publication. © Print only for private use.
Music and FM radioTransferring music to your deviceThere are two ways to transfer music from a computer to your device:•You can transfer music files between your device and a computer using the providedUSB Type-C™ cable. After connecting, select Transfer files on your device and thensimply copy and paste or drag and drop the files using the computer. See Managingfiles using a computer on page 39.•You can use the Xperia™ Companion software to transfer your media files betweenthe computer and your device. Learn more and download Xperia™ Companion forWindows at http://support.sonymobile.com/tools/xperia-companion/ or Xperia™Companion for Mac at http://support.sonymobile.com/tools/xperia-companion-mac/.The Music application may not support all music file formats. For more information aboutsupported file formats and the use of multimedia (audio, image and video) files, download theWhite paper for your device at www.sonymobile.com/support/.Listening to musicUse the Music application to listen to your favourite music and audio books.1 Minimise the full screen player2 Search all songs saved to your device3 View the current play queue4 View menu options5 Album art (if available)6 Add or remove a song as a favourite7 Elapsed time of current song8 Add a song to a playlist9 Progress indicator – drag the indicator or tap along the line to fast-forward or rewind10 Total time length of current song11 Repeat all songs in the current play queue12 Tap to go to the next song in the play queue, touch and hold to fast-forward within the current song13 Play or pause a song14 Tap to go to the previous song in the play queue, touch and hold to rewind within the current song15 Shuffle songs in the current play queue88This is an internet version of this publication. © Print only for private use.
Music home screen1Tap   in the top left corner to open the Music menu2 Scroll up or down to view content3 Play a song using the Music application4 Play all songs in shuffle mode5 Return to the music player screenTo play a song using the Music application1From your Home screen, tap  , then find and tap  .2Tap  .3Select a music category.4Tap a song to play it.You might not be able to play copyright-protected items. Make sure that you have thenecessary rights for the content you wish to use.To find song-related information online•While a song is playing in the Music application, tap the Album art and then tapMore about this.Online resources related to the song can include videos on YouTube™, song lyrics, and artistinformation on Wikipedia.To edit music information and download album art1From the Music application, tap the Album art and then tap Edit music info.2Edit the information as desired.3To set or download album art, tap  , then select an option.4When you are finished, tap SAVE.You can also set album art to download automatically in the Music menu, under Settings.To adjust the audio volume•Press the volume key up or down.To minimise the Music application•When a song is playing, tap   to go to the Home screen. The Musicapplication keeps running in the background.To open the Music application when it is playing in the background•While a song is playing in the background, drag the status bar downwards andtap the Music application.•Alternatively, from your Home screen, tap  , then find and tap  .89This is an internet version of this publication. © Print only for private use.
Music menuThe Music menu gives you an overview of all the songs on your device. From hereyou can manage your albums and playlists.1 Return to the Music home screen2 View the current play queue3 Browse all playlists4 Browse all artists5 Browse all albums6 Browse all songs7 Browse all genres8 Browse all folders9 Open the settings menu for the Music application10 Open the support menu for the Music applicationTo open the Music menu1From your Home screen, tap  , then find and tap  .2Tap  .To return to the Music home screen•When the Music menu is open, tap Home or simply tap on the screen to theright of the menu.To delete a song1From the Music menu, browse to the song that you want to delete.2Touch and hold the song title, then tap Delete from storage in the list thatappears.3Tap DELETE to confirm.You cannot delete a song that is currently playing.PlaylistsOn the Music home screen, you can create your own playlists from the music that issaved on your device.To create your own playlists1From the Music home screen, touch and hold the name of the album or songthat you want to add to a playlist.2In the menu that opens, tap Add to playlist > Create new playlist.3Enter a name for the playlist and tap OK.You can also open the Music home screen menu, tap Playlists, then tap   to create a newplaylist.90This is an internet version of this publication. © Print only for private use.
To play your own playlists1Open the Music menu, then tap Playlists.2Under Playlists, select the playlist that you want to open.3If you want to play all songs, tap any song or Shuffle all.To add songs to a playlist1From the Music home screen, browse to the song or album that you want toadd to a playlist.2Touch and hold the song or the album title, then tap Add to playlist.3Tap the name of the playlist to which you want to add the album or song. Thealbum or song is now added to the playlist.To remove a song from a playlist1In a playlist, touch and hold the title of the song that you want to remove.2Tap Remove from playlist.To delete a playlist1Open the Music menu, then tap Playlists.2Touch and hold the playlist that you want to delete.3Tap DELETE.4Tap DELETE to confirm.You cannot delete smart playlists.Sharing musicTo share a song1From the Music home screen, browse to the song or album that you want toshare.2Touch and hold the song title, then tap Share.3Select an application from the list, then follow the on-screen instructions.You can also share albums and playlists in the same way.Enhancing the soundTo improve the sound quality using the Equaliser1Open the Music menu, then tap Settings > Audio settings > Sound effects >Equaliser.2Drag the frequency band buttons to adjust the sound manually. To choose apreset arrangement, tap   to select an arrangement, then tap OK to confirm.To turn on the Surround sound feature1Open the Music menu, then tap Settings > Audio settings > Sound effects >Surround sound (VPT).2Flick left or right to select a setting, then tap OK to confirm.Listening to the radioThe FM radio in your device works like any FM radio. For example, you can browseand listen to FM radio stations and save them as favourites. You must connect awired headset or headphones to your device before you can use the radio. This isbecause the headset or headphones act as an antenna. After one of these devices isconnected, you can then switch the audio to the speaker, if desired.91This is an internet version of this publication. © Print only for private use.
1 Favourites list2 Radio on/off button3 View menu options4 Tuned frequency5 Save or remove a channel as a favourite6 Tuning dial7 Frequency band – drag left or right to move between channels8 Move up the frequency band to search for a channel9 A saved favourite channel10 Move down the frequency band to search for a channelTo listen to the FM radio1Connect a headset or a set of headphones to your device.2From your Home screen, tap  .3Find and tap  . The available channels appear as you scroll through thefrequency band.When you start the FM radio, available channels appear automatically. If a channel has RDSinformation, it appears a few seconds after you start listening to the channel.To move between radio channels•Drag the frequency band left or right.•Alternatively, tap the arrows on either side of the band to jump to the next clearradio signal.To start a new search for radio channels1When the radio is open, tap  .2Tap Search for channels. The radio scans the whole frequency band and marksall available channels.To switch the radio sound to the speaker1When the radio is open, press  .2Tap Play in speaker.To switch the sound back to the wired headset or headphones, press   and tap Play inheadphones.92This is an internet version of this publication. © Print only for private use.
Favourite radio channelsTo save a channel as a favourite1When the radio is open, navigate to the channel that you want to save as afavourite.2Tap  .3Enter a name and select a colour for the channel, then press SAVE.To listen to a favourite radio channel1Tap  .2Select an option.To remove a channel as a favourite1When the radio is open, navigate to the channel that you want to remove.2Tap  , then tap DELETE.Radio sound settingsTo switch between mono and stereo sound mode1When the radio is open, press  .2Tap Enable stereo sound.3To listen to the radio in mono sound mode again, press   and tap Force monosound.To select the radio region1When the radio is open, press  .2Tap Set radio region.3Select an option.93This is an internet version of this publication. © Print only for private use.
CameraTaking photos and recording videos1 Front camera lens2 Select capturing mode3 Switch between the front and main camera4 Zoom in or out5 Camera key – Activate the camera/Take photos/Record videos6 View photos and videos7 Save location8Shutter button – Take photos   or record videos 9 Go back a step or exit the camera10 Capturing mode settings11 Flash settingsTo take a photo from the lock screen1To activate the screen, briefly press the power key  .2To activate the camera, touch and hold  , then swipe it anywhere.3After the camera opens, tap  .You can activate the camera when the screen is locked and inactive. To do this, press thecamera key fully. Press again to take a photo.To take a photo using the camera key1Activate the camera.2Press the camera key fully down.To take a selfie using the front camera1Activate the camera.2Tap  .3To take the photo, press the camera key.To use the still camera flash1When the camera is open, tap   .2Select your desired flash setting.3Take the photo.To use the zoom function•When the camera is open, pinch or spread on the camera screen.•You can also use the volume key, pressing up or down. To enable this function,tap   then tap More > Use Volume key as.94This is an internet version of this publication. © Print only for private use.
To record a video using the camera key1Activate the camera.2Swipe the screen to select  .3To start recording a video, press the camera key.4To stop recording, press the camera key again.To record a video1Activate the camera.2If video mode is not selected, swipe the screen to select  .3Point the camera towards the subject.4To start recording, tap  .5To pause when recording a video, tap  . To resume recording, tap   .6To stop recording, tap  .To take a photo when recording a video•To take a photo while recording a video, tap  . The photo is taken as soon asyou release the camera button.To view your photos and videos1Activate the camera, then tap a thumbnail to open a photo or video.2Flick left or right to view your photos and videos.To delete a photo or video1Find the photo or video that you want to delete.2Tap the screen to display the toolbar.3Tap  .4Tap DELETE to confirm.General camera settingsCapturing modes overviewYou can choose from a range of capturing modes and camera apps. Simply swipeleft or right on the camera screen to switch between them.ManualManually adjust camera settings such as resolution, white balance and ISO.Superior autoOptimise your settings to suit any scene.Video cameraManually adjust video settings to suit any scene.Camera appsSelect camera applications manually.To learn more about how to take better photos, go to support.sonymobile.com.Camera appsAR effectTake photos or videos with virtual scenes and characters.Creative effectApply effects to photos or videos.95This is an internet version of this publication. © Print only for private use.
Sound PhotoTake photos with background sound.PanoramaTake wide-angle and panoramic photos.PanoramaYou can take wide-angle and panoramic photos with an easy press-and-sweepmotion.To take a panoramic photo1Activate the camera.2Swipe the screen to select  , then select   .3Press the camera key and move the camera slowly and steadily in the directionof movement indicated on the screen.Auto face detectionThe camera automatically detects faces and indicates them with frames. A colouredframe shows which face has been selected for focus. Focus is set to the face closestto the centre of the camera. You can also tap one of the frames to select which faceshould be in focus.Auto-capturingTurn on auto-capturing to take pictures automatically using one of the options below.Hand ShutterTurn your palm towards the camera to turn on self-timer and take self-portraits in Manual and Superiorauto capturing modes.Smile ShutterUse Smile Shutter™ technology to photograph a face just as it smiles. The camera detects up to fivefaces and selects one face for smile detection and auto focus. When the selected face smiles, thecamera automatically takes a photo.OffWhen auto-capturing is off, you can take photos using the shutter button or the camera key.The Hand Shutter function is available for taking self-portraits only.To turn on Smile Shutter™1Activate the camera.2Tap  .3Find and tap Auto-capturing > Smile Shutter.4When the camera is open and Smile Shutter is turned on, point the camera atyour subject. The camera selects which face to focus on.5The face appears inside a coloured frame and the photo is taken automaticallyas soon as a smile is detected.6If no smile is detected, you can press the camera key to take the photomanually.To turn on Hand Shutter1Activate the camera.2Switch to the front camera by tapping 3Tap  .4Tap More.5Find and tap Auto-capturing > Hand Shutter.96This is an internet version of this publication. © Print only for private use.
Saving a photo's geographic locationEnable the Save location function to geotag your photos - saving the approximategeographical location as you shoot. The geographical location is determined bywireless networks and GPS technology.When   appears on the camera screen, Saving location is turned on but thegeographical position has not been found. When   appears, Saving location isturned on and the geographical location is available, so the geographical location canbe added to your photo. When neither of these two symbols appears, Saving locationis disabled.To turn on geotagging1Activate the camera.2Tap  .3Tap More, then tap the slider beside Save location to enable or disable thefunction.4If you are enabling geotagging, you are prompted to enable Location services ifthey are not already enabled. Tap OK, then tap the Location slider.Touch captureWith Touch capture, simply tap anywhere on the camera screen to take a photo.OnFront camera onlyOffTouch to adjustTouch the screen to choose an area to focus on while taking pictures.Focus onlyFocus and brightnessThis function is available in Superior auto mode only.Auto photo/video previewYou can choose to preview photos or videos just after you shoot them.OnAfter you shoot a photo or a video, a preview of it appears in the lower right corner of the screen for 3seconds.Front camera onlyAfter you shoot a photo or video with the front camera, a preview of it appears in the lower right corner ofthe screen for 3 seconds.OffThe photo or video is saved after you shoot it, and no preview appears.Use Volume key asYou can choose how you want to use the volume key when taking photos.ZoomUse the volume key to zoom in or out.VolumeUse the volume key to adjust the volume of notifications, ringtones and music.ShutterUse the volume key to take photos.97This is an internet version of this publication. © Print only for private use.
SoundWhen you take a photo or start recording a video, the Camera makes a shuttersound. If you use the self-timer, it will make a series of beeps to mark the countdown.You can choose to turn these sounds on or off.Data storageYou can choose to save your data either to a removable SD card or to your device'sinternal storage.Internal storagePhotos or videos are saved on the device memory.SD cardPhotos or videos are saved on the SD card.Grid linesYou can use grid lines as a visual aid while shooting to help you find the rightcomposition for your photo.Grid lines are only shown on the camera screen while shooting, and do not appear in the finalphoto.Quick launchUse Quick launch settings to launch the camera when the screen is locked.Launch onlyWhen this setting is activated, you can launch the camera when the screen is locked by pressing andholding down the camera key.Launch and captureWhen this setting is activated, you can launch the camera and capture a photo automatically when thescreen is locked by pressing and holding down the camera key.Launch and record videoWhen this setting is activated, you can launch the camera and start capturing video when the screen islocked by pressing and holding down the camera key.OffTo adjust colour and brightness1Activate the camera.2Tap   > Colour and brightness.3Drag the sliders to the desired positions to adjust colour and brightness.This setting is only available in the Superior auto and Video camera modes.White balance, focus, exposure and shutter speedWhite balance, which is only available in Manual capturing mode, adjusts the colourbalance according to the lighting conditions. You can also adjust the exposuremanually in the -2.0 EV to +2.0 EV range. For example, you can increase the imagebrightness or decrease the overall exposure by tapping the plus or minus controlsaccordingly when   is displayed. Focus and shutter speed can be set for eithermanual or automatic adjustment.White balance AutoAdjust the colour balance automatically. IncandescentAdjust the colour balance for warm lighting conditions, such asunder light bulbs.98This is an internet version of this publication. © Print only for private use.
 FluorescentAdjust the colour balance for fluorescent lighting. DaylightAdjust the colour balance for sunny outdoor conditions. CloudyAdjust the colour balance for a cloudy sky.Focus AF Adjust focus automatically.Focus MF Adjust focus manually.SS auto Adjust shutter speed automatically.SS 1/8 Adjust shutter speed manually.Still camera settingsTo adjust the still camera settings1Activate the camera.2To display all settings, tap  .3Select the setting that you want to adjust, then edit as desired.Still camera settings overviewResolutionChoose between several resolutions and aspect ratios before taking a photo. A photowith a higher resolution has a higher quality, but requires more memory.Main camera:23MP5520×4140(4:3)23 megapixel resolution with 4:3 aspect ratio. Suitable for photos you want to viewon non-widescreen displays or print in high resolution.20MP5984×3366(16:9)20 megapixel resolution with 16:9 aspect ratio. Suitable for photos you want to viewon widescreen displays.12MP4000×3000(4:3)12 megapixel resolution with 4:3 aspect ratio. Suitable for photos that you want toview on non-widescreen displays or print in high resolution.12MP4608×2592(16:9)12 megapixel resolution with 16:9 aspect ratio. Suitable for photos that you want toview on widescreen displays.3MP2048×1536(4:3)3 megapixel resolution with 4:3 aspect ratio. Suitable for photos you want to viewon non-widescreen displays or print in high resolution. This setting is only availablein Manual capturing mode.99This is an internet version of this publication. © Print only for private use.
2MP1920×1080(16:9)2 megapixel resolution with 16:9 aspect ratio. Suitable for photos you want to viewon widescreen displays. This setting is only available in Manual capturing mode.Front camera:16MP5344×3008(16:9)16 megapixel resolution with 16:9 aspect ratio. Suitable for photos that you want toview on widescreen displays.12MP4000×3000(4:3)12 megapixel resolution with 4:3 aspect ratio. Suitable for photos that you want toview on non-widescreen displays or print in high resolution.8MP3264×2448(4:3)8 megapixel resolution with 4:3 aspect ratio. Suitable for photos you want to viewon non-widescreen displays or print in high resolution.8MP3840×2160(16:9)8 megapixel resolution with 16:9 aspect ratio. Suitable for photos that you want toview on widescreen displays.3MP2048×1536(4:3)3 megapixel resolution with 4:3 aspect ratio. Suitable for photos you want to viewon non-widescreen displays or print in high resolution. This setting is only availablein Manual capturing mode.2MP1920×1080(16:9)2 megapixel resolution with 16:9 aspect ratio. Suitable for photos you want to viewon widescreen displays. This setting is only available in Manual capturing mode.Self-timerWith the self-timer, you can take a photo without holding the device. Use this functionto take self-portraits or group photos with everyone in the photo. You can also usethe self-timer if you want to avoid shaking the camera when taking photos.10 sec.Set a 10-second delay in taking the photo from when you tap the shutter button or press the camera key.3 sec.Set a 3-second delay in taking the photo from when you tap the shutter button or press the camera key.OffThe photo is taken as soon as you tap the shutter button or press the camera key.Soft Skin EffectYou can turn on the Soft Skin Effect on your device to make skin tones slightlysoftened while taking selfies in Manual and Superior auto capturing modes.100This is an internet version of this publication. © Print only for private use.
Object trackingWhen you select an object by touching it in the viewfinder, the camera tracks it foryou.HDRUse the HDR (High Dynamic Range) setting to take a photo against strong back lightor in conditions where the contrast is sharp. HDR compensates for the loss of detailand produces a picture that is representative of both dark and bright areas.This setting is only available in Manual capturing mode.ISOThe ISO sensitivity can be set to adjust automatically, or can be manually adjusted tosensitivity settings ranging from 50 to 3200.This setting is only available in Manual capturing mode.MeteringThis function automatically determines a well-balanced exposure by measuring theamount of light striking the subject you want to capture.FaceMeasures the amount of light on your subject’s face, and adjusts the exposure so that the face is neithertoo dark nor too bright.CentreDetermines the centre of the image, and sets the exposure based on the brightness of the subject there.SpotAdjusts the exposure in a very small part of the subject that you want to capture.TouchAdjusts the exposure to the desired part of the subject when you touch the screen.This setting is only available in Manual capturing mode.FlashUse the flash to take photos when lighting conditions are poor or when there is abacklight. The following options are available when you tap the flash icon   on thecamera screen:AutoThe camera automatically determines whether the lighting conditions require the use of a flash.Fill flashUse this setting when the background is brighter than the subject. This setting removes unwanteddark shadows.Red-eye reductionReduces the red colour of eyes when taking a photo.OffThe flash is turned off. Sometimes photo quality can be better without the flash, even if lightingconditions are poor. Taking a good photo without using the flash requires a steady hand. Use theself-timer to avoid blurred photos.TorchThe flash shines continuously while taking pictures.101This is an internet version of this publication. © Print only for private use.
Video camera settingsTo adjust the video camera settings1Activate the camera.2Swipe the screen to select  .3To display settings, tap  .4Select the setting that you want to adjust, then make your changes.Video camera settings overviewVideo resolutionAdjust the video resolution for different formats. HD refers to High Definition, whileFPS refers to Frames Per Second. A higher FPS rate provides a smoother video, atthe cost of a larger file size.Main camera:Full HD (30 fps)1920×1080(16:9)Full HD (Full High Definition) format with 30 FPS and 16:9 aspect ratio.HD1280×720(16:9)HD (High Definition) format with 16:9 aspect ratio.VGA640×480(4:3)VGA format with 4:3 aspect ratio.MMSRecord videos suitable for sending in multimedia messages. The recording time ofthis format is limited so that the video file can fit in a multimedia message.Front camera:Full HD1920×1080(16:9)Full HD (Full High Definition) format with 16:9 aspect ratio.HD1280×720(16:9)HD (High Definition) format with 16:9 aspect ratio.VGA640×480(4:3)VGA format with 4:3 aspect ratio.MMSRecord videos suitable for sending in multimedia messages. The recording time ofthis format is limited so that the video file can fit in a multimedia message.Auto-capturing (video)Turn on auto-capturing to take pictures automatically while recording a video. Usingthe Smile Shutter™ feature the camera automatically takes snapshots of smilingfaces while you continue to record your video.102This is an internet version of this publication. © Print only for private use.
To turn on Smile Shutter™ (video)1Activate the camera.2Tap  .3Find and tap Auto-capturing (video) > Smile Shutter.SteadyShot™When recording a video, it can be difficult to hold the device steady. The stabiliserhelps you by compensating for small movements of the hand.TorchUse the torch to provide lighting for videos when ambient lighting conditions are pooror when there is a backlight. The video flash icon   is available on the video camerascreen. Note that the video quality can sometimes be better without a light even iflighting conditions are poor.OnOffFurther Camera support informationUse the Help menu to search for camera-related tests and other useful information.To access support, follow the steps below.1Open the camera application.2Tap   then tap More > Help103This is an internet version of this publication. © Print only for private use.
Photos and videos in AlbumViewing photos and videosUse the Album application to view photos and play videos that you’ve taken with yourcamera, or to view similar content that you've saved to your device. All photos andvideos are displayed in a chronologically ordered grid.1Tap   to open the Album home screen menu2 View menu options3 A slideshow of all your photos and videos, or of those added to favourites4 Drag the left edge of the screen to the right to open the Album home screen menu5 The date of items in the group6 Tap a photo or video to view it7 Scroll up or down to view contentTo view photos and videos1From your Home screen, tap  .2Find and tap Album.3Tap a photo or video that you want to view. If prompted, tap  .4Flick left to view the next photo or video. Flick right to view the previous photoor video.To set the screen to rotate automatically when turned sideways, tap Rotate the contents of thescreen under Settings > Display > When device is rotated.The Album application may not support all file formats. For more information about supportedfile formats and the use of multimedia (audio, image and video) files, download the Whitepaper for your device at www.sonymobile.com/support/.To change the size of the thumbnails•When viewing thumbnails of photos and videos in Album, spread two fingersapart to zoom in, or pinch two fingers together to zoom out.To zoom a photo•When you are viewing a photo, spread two fingers apart to zoom in, or pinch twofingers together to zoom out.To watch a slideshow of your photos1When you are viewing a photo, tap the screen to display the toolbars, then tap > Slideshow to start playing all the photos in an album.2Tap a photo to end the slideshow.104This is an internet version of this publication. © Print only for private use.
To play a video1In Album, find and tap the video that you want to play.2Tap  .3If the playback controls are not displayed, tap the screen to display them. Tohide the controls, tap the screen again.To pause a video1When a video is playing, tap the screen to display the controls.2Tap  .To fast-forward and rewind a video1When a video is playing, tap the screen to display the controls.2Drag the progress bar marker left to rewind, or right to fast-forward.To adjust the sound volume of a video•Press the volume key up or down.Album home screen menuFrom the Album home screen menu you can browse your photo albums, includingphotos and videos taken using special effects, as well as content that you haveshared online via services such as Picasa™ and Facebook. Once you are logged in tosuch platforms, you can manage content and view online images. From the Albumapplication you can also add geotags to photos, perform basic editing tasks, and usemethods such as Bluetooth® wireless technology and email to share content.1 Return to the Album application home screen to view all content2 View all photos and videos taken with your device's camera3 View all photos and videos saved on your device in different folders4 View all videos saved on your device5 View your photos on a map or in Globe view6 View your favourite photos and videos7 Open the settings menu for the Album application8 Open web support9 View photos from online services105This is an internet version of this publication. © Print only for private use.
To view photos from online services in Album1From your Home screen, tap  .2Find and tap Album, then tap  .3Tap the desired online service, then follow the on-screen instructions to getstarted. All available online albums that you have uploaded to the service aredisplayed.4Tap any album to view its content, then tap a photo in the album.5Flick left to view the next photo or video. Flick right to view the previous photoor video.Sharing and managing photos and videosYou can share photos and videos that you’ve saved on your device. You can alsomanage them in different ways. For example, you can work with photos in batches,delete photos and link them to contacts. If you have lots of photos saved on yourdevice, it’s a good idea to regularly transfer them to a computer or to an externalstorage device in order to avoid any unpredictable loss of data. Doing so also freesup more space on your device. See Managing files using a computer on page 39.You might not be able to copy, send or transfer copyright-protected items. Also, some itemsmay not send if the file size is too large.To share a photo or video1In Album, find and tap the photo or video that you want to share.2Tap the screen to display the toolbars, then tap  .3Tap the application that you want to use to share the photo, then follow thesteps to send it.To use a photo as a contact picture1When you are viewing a photo, tap the screen to display the toolbars, then tap > Use as > Contact photo.2Select a contact, then edit the photo as desired.3Tap SAVE.To use a photo as wallpaper1When you are viewing a photo, tap the screen to display the toolbars, then tap > Use as > Wallpaper.2Follow the instructions on the screen.To rotate a photo1When you are viewing a photo, tap the screen to display the toolbars, then tap.2Tap Rotate, then select an option. The photo is saved in the new orientation.To delete a photo or video1When you are viewing a photo, tap the screen to display the toolbars, then tap.2Tap DELETE.To work with batches of photos or videos in Album1When viewing thumbnails of photos and videos in Album, touch and hold anitem until it is highlighted.2Tap other items that you want to work with to select them. If you want to selectall items, tap  , then tap Select all.3Use the tools in the toolbar to work with your selected items.106This is an internet version of this publication. © Print only for private use.
Editing photos with the Photo editor applicationYou can edit and apply effects to original photos that you’ve taken with your camera.For example, you can change the light effects. After you save the edited photo, theoriginal unchanged version of the photo remains on your device.To edit a photo•When you are viewing a photo, tap the screen to display the toolbars, then tap.To crop a photo1When you are viewing a photo, tap the screen to display the toolbars, then tap.2If prompted, select Photo editor.3Tap   > Crop.4Tap Crop to select an option.5To adjust the crop frame, touch and hold the edge of the crop frame. When thecircles at the edges disappear, drag inward or outward to resize the frame.6To resize all sides of the crop frame at the same time, touch and hold one ofthe four corners. When the circles at the edges disappear, drag the corneraccordingly.7To move the crop frame to another area of the photo, touch and hold inside theframe, then drag it to the desired position.8Tap  .9To save a copy of the cropped photo, tap SAVE.To apply special effects to a photo1When you are viewing a photo, tap the screen to display the toolbars, then tap.2If prompted, select Photo editor.3Tap  ,   or  , then select an option.4Edit the photo as desired, then tap SAVE.To add a photo frame effect to a photo1When you are viewing a photo, tap the screen to display the toolbars, then tap.2If prompted, select Photo editor.3Tap  , then select an option.4To save a copy of the edited photo, tap SAVE.To adjust the light settings for a photo1When you are viewing a photo, tap the screen to display the toolbars, then tap.2If prompted, select Photo editor.3Tap  , then select an option and edit as desired.4To save a copy of the edited photo, tap SAVE.To set the saturation level of colours in a photo1When you are viewing a photo, tap the screen to display the toolbars, then tap.2If prompted, select Photo editor.3Tap  , then select an option.4To save a copy of the edited photo, tap SAVE.Editing videos with the Video editor applicationYou can edit videos that you’ve taken with your camera. For example, you can trim avideo to the desired length or adjust the speed of a video. After you save the editedvideo, the original unchanged version of the video remains on your device.107This is an internet version of this publication. © Print only for private use.
To trim a video1In the Album, find and tap the video that you want to edit.2Tap the screen to display the toolbars, then tap  .3If prompted, select Video Editor then tap Trim.4To move the trim frame to another part of the timeline, touch and hold the edgeof the trim frame and drag it to the desired position, then tap Apply.5To save a copy of the trimmed video, tap SAVE.To adjust the speed of a video1In the Album, find and tap the video that you want to play.2Tap the screen to display the toolbars, then tap  .3If prompted, select Video Editor then tap Speed.4Select an option, then touch and hold the edge of the timeline and drag it tothe desired position and tap Apply.5To save a copy of the edited video, tap SAVE.To capture a photo from a video1In the Album, find and tap the video that you want to play.2Tap the screen to display the toolbars, then tap  .3If prompted, select Video Editor then tap Photo Capture.4With the help of the arrows, or by dragging the marker on the progress bar,select the preferred frame that you want to capture, then tap Save.Hiding photos and videosYou can hide any photos and videos from the Album home screen. Once photos andvideos are hidden from the Album home screen, they can only be viewed from theHidden folder.To hide a photo or video1In Album, find and tap the photo or video that you want to hide.2Tap the screen to display the toolbars, then tap  .3Tap Hide > OK.To view your hidden photos and videos1In Album, tap  , then tap Hidden.2Tap a photo or video to view it.3Flick left to view the next photo or video. Flick right to view the previous photoor video.To unhide a photo or video1In Album, tap  , then tap Hidden.2Tap a photo or video that you want to unhide.3Tap the screen to display the toolbars, then tap  .4Tap Don't hide.Viewing your photos on a mapAdding location information to photos is referred to as geotagging. You can view andtag your photos on a map and show friends and family where you were when youtook a particular photo. See Saving a photo's geographic location on page 97 formore information.108This is an internet version of this publication. © Print only for private use.
1 View geotagged photos in Globe view2 Search a location on the map3 View menu options4 Double tap to zoom in. Pinch to zoom out. Drag to view different parts of the map5 A group of photos or videos geotagged with the same location6 Thumbnails of the selected group of photos or videos. Tap an item to view it in full screenTo add or edit the geotag of a photo1When you are viewing a photo, tap the screen to display the toolbars.2Tap  , then tap Add geotag or Edit geotag to open the map screen.3Tap on the map to set the location for the photo.4To reset the location for the photo, tap the new location on the map.5When you are finished, tap OK.If you have turned on location detection and activated geotagging in the camera, you can tagyour photos directly for map viewing at a later stage.To view geotagged photos on a map1From your Home screen, tap  .2Find and tap Album.3Tap  , then tap Places.4Tap the photo that you want to view on a map.If several photos were taken at the same location, only one of them appears on the map. Thetotal number of photos appears in the top right corner, for example,  . To view all photos inthe group, tap the cover photo and then tap one of the thumbnails at the bottom of thescreen.To view geotagged photos on a globe1From your Home screen, tap  .2Find and tap Album.3Tap  , then tap Places >  .4Tap the photo that you want to view on a globe.To change the geotag of a photo1When viewing a photo on the map in Album, touch and hold the photo until itsframe turns blue, then tap the desired location on the map.2Tap OK.To change the map view•When viewing the map in Album, tap  , then switch between Classic view andSatellite view.109This is an internet version of this publication. © Print only for private use.
VideosThe Video applicationUse the Video application to play movies and other video content that you’ve savedor downloaded to your device. The application also serves as a TV programme guidewith the option to show detailed programme information and related content,including social media posts about the programme you are interested in. You can usethe application as a fully functioning remote controller with your compatible homedevice. You can also play your movies on other devices that are connected to thesame network or saved in the cloud.Some video files may not be playable in the Video application. The availability of the TVprogramme guide and the remote controller vary by market and connected device.1Tap   to open the Video home screen menu2 View the programme guide3 Refresh content4 Remote controller5 Search content6 Switch between viewing the contents of your library, Popular programmes, On Air programmes,Films, TV Series, and Recommended programmes7 Drag the left edge of the screen to the right to open the menu, browse content and adjust settings8 Tap a programme to get detailed information and related contentTo use your device as a remote controllerTo use your device as a remote controller with another compatible home networkdevice, you first need to pair the two devices. In order to do this, both devices needto be connected to the same network. For more information on compatible devices,visit Compatible device list.1From your Home screen, tap  , then find and tap Video.2Tap   to open the home screen menu, then tap Add device.3Select the home device from the list.4Enter the registration number shown on the home device and follow theinstructions to finish pairing.5After the successful pairing, the   icon for the remote controller functionappears. You can now use your device as a fully functional remote controllerfor the home device.110This is an internet version of this publication. © Print only for private use.
To change settings1From your Home screen, tap  , then find and tap Video.2Tap   to open the home screen menu, then tap Settings.3Change the settings as desired.To play a video1From your Home screen, tap  , then find and tap Video.2Find and tap the video that you want to play. If the video is not displayed onthe screen, tap   to open the home screen menu, then find and tap the videothat you want to play.3To display or hide the controls, tap the screen.4To pause playing, tap  . To resume playing, tap  .5To rewind, drag the progress bar marker to the left. To fast-forward, drag theprogress bar marker to the right.To change the sound settings while a video is playing1While a video is playing, tap the screen to display the controls.2Tap   > Audio settings, then change the settings as desired.To share a video1When a video is playing, tap  , then tap Share.2Tap the application that you want to use to share the selected video, thenfollow the instructions provided.Transferring video content to your deviceBefore you start using the Video application, it’s a good idea to transfer movies, TVshows and other video content to your device from other devices, such as acomputer. There are several ways to transfer your content:•For Windows® only: Connect your device to a computer using a USB Type-C™ cableand drag and drop the video files directly using the file manager application on thecomputer. See Managing files using a computer on page 39.•If you have a PC or an Apple® Mac® computer, use Xperia™ Companion to organisecontent and transfer video files to your device.Managing video contentTo view movie information1From your Home screen, tap  , then find and tap Video.2Tap   to open the home screen menu, then tap Mobile device.3Browse through the different categories and find the desired video.4Tap the video thumbnail.To delete a video1From your Home screen, tap  , then find and tap Video.2Tap   to open the home screen menu, then tap Mobile device.3Browse through the different categories and find the desired video.4Tap the video thumbnail, then tap  .5Tap Delete again to confirm.Movie CreatorThe Xperia™ Movie Creator automatically creates short videos using existing photosand videos. The application automatically determines the timeline to create its movie.For example, it can take a selection of photos and videos from a Saturday afternoonouting or from a weekly, monthly, even a yearly period and create a movie for you.When this highlight-style movie is ready, you get notified. You can then edit it asdesired. For example, you can edit the title, delete scenes, change the music or add111This is an internet version of this publication. © Print only for private use.
more photos and videos. You can create Highlight Movies by selecting photos andvideos manually. If you log in to a Facebook account, you can create HighlightMovies from your Facebook events, featuring photos from the event, friends’ names,and more.To open Movie Creator1From your Home screen, tap  .2Find and tap Movie Creator.To enable or disable Movie Creator notifications1From your Home screen, tap  .2Find and tap Movie Creator.3Tap  , then tap Settings, and tap the Notifications slider to enable or disablenotifications.To enable or disable the automatic creation of Highlight Movies1From your Home screen, tap  .2Find and tap Movie Creator.3Tap  , then tap Settings, and tap the Auto-creating slider to enable or disablethe function.To manually create a Highlight Movie1From your Home screen, tap  .2Find and tap Movie Creator.3Tap   > Create new.4Select the desired photos or videos by tapping them.5Tap CREATE. If you want to edit a Highlight Movie, tap View story, then usethe toolbar to edit as desired.To create a Highlight Movie from Facebook events1From your Home screen, tap  .2Find and tap Movie Creator.3Tap   > Settings.4Tap the slider beside Link Facebook.•Movie Creator is now linked with your Facebook account if you are alreadylogged in to Facebook.•If you are not yet logged in to Facebook, follow the on-screen instructions.5Tap  , then scroll down to browse your Facebook events.6Choose an event to create a Highlight Movie about and tap CREATE.112This is an internet version of this publication. © Print only for private use.
ConnectivityMirroring the screen of your device wirelessly on a TVYou can use the Screen mirroring feature to show the screen of your device on a TVor other large display without using a cable connection. Wi-Fi Direct™ technologycreates a wireless connection between the two devices, so you can sit back andenjoy your favourite photos from the comfort of your couch. You can also use thisfeature to listen to music from your device using the TV's speakers.When using Screen mirroring, the image quality may sometimes be negatively impacted ifthere is interference from other Wi-Fi networks.To mirror the screen of your device on a TV screen1TV: Follow the instructions in the User guide of your TV to turn on the Screenmirroring function.2Your device: From your Home screen, tap  .3Find and tap Settings > Device connection > Screen mirroring.4Tap START.5Tap OK and select a device.Your TV must support Screen mirroring based on Wi-Fi CERTIFIED Miracast™ for the functionto work. If your TV does not support Screen mirroring, you may need to purchase a wirelessdisplay adapter separately. Also, when using Screen mirroring, do not cover the Wi-Fi antennaarea of your device.To stop screen mirroring between devices1From your Home screen, tap  .2Find and tap Settings > Device connection > Screen mirroring.3Tap Disconnect, then tap OK.Displaying files on another device using CastUsing DLNA™ technology, you can push media content from your device to anotherdevice connected to the same Wi-Fi network. The receiving device must be able tofunction as a Digital Media Renderer (DMR) device and play content received fromyour device. A TV that supports DLNA™ or a PC running Windows® 7 or later areexamples of DMR devices.The steps for playing shared media may vary depending on the client device. Refer to the userguide of the DMR device for more information.Content secured with Digital Rights Management (DRM) cannot be played on a Digital MediaRenderer device using DLNA™ technology.To display photos or videos on a client device using Cast1Make sure that you have correctly set up the DMR or DLNA™ client device andthat it is connected to the same Wi-Fi network as your device.2From your Home screen, tap  .3Find and tap Album.4Browse and open the photos or videos that you want to view.5Swipe down the status bar with two fingers, then tap   and select the devicethat you want to share your content with.6To stop sharing the photo or video with the client device, tap   and thenselect Stop casting.You may also see Google Cast devices shown on the list when tapping  .113This is an internet version of this publication. © Print only for private use.
To play a music track on a client device using Cast1Make sure that you have correctly set up the DMR or DLNA™ client device andthat it is connected to the same Wi-Fi network as your device.2From your Home screen, tap  , then find and tap  .3Select a music category and browse to the track that you want to share, thentap the track.4Tap   and select a client device to share your content with. The track startsplaying on the device that you select.5To disconnect from the client device, tap   and then select Stop casting.You may also see Google Cast devices shown on the list when tapping  .Connecting your device to USB accessoriesYou can use a USB Type-C™ host adapter to connect your device to USBaccessories such as USB mass storage devices, game controllers, USB keyboardsand USB mice. If the USB accessory has a USB Type-C connector, a USB Type-Chost adapter is not necessary.USB Type-C host adapters are sold separately. Sony does not guarantee that all USBaccessories are supported by your device.This device has a capless USB Type-C port. If your device gets exposed to water, ensure thatthe port is completely dry before connecting a USB Type-C cable.To access content on a USB mass storage device using a USB Type-C™ hostadapter1Attach the USB Type-C host adapter to your device, then connect the adapterto the USB mass storage device.2To access files and folders on the USB storage device, use a file manager appsuch as File Commander.You can also open the relevant media application on your device to view content directly. Forexample, you can open the Album application to view photos stored on USB mass storagedevices.To disconnect a USB mass storage device1To open the Notification Panel, drag the status bar downwards.2Tap the drop-down arrow beside Android System.3Tap EJECT in the drop-down list.4Detach the USB Type-C™ host adapter from your device.If the notification does not appear, tap Settings > Storage & memory >   > Advanced > Storage>   next to Portable storage.To connect a USB accessory using a USB Type-C™ host adapter1Attach the USB Type-C host adapter to your device, then connect the adapterto the USB accessory.2From your Home screen , tap  .3Find and tap Settings > Device connection > USB Connectivity > Detect USBdevice.Additional steps or software may be required to set up game controllers, USB audio and USBEthernet accessories. Sony does not guarantee that all USB accessories are supported byyour device.114This is an internet version of this publication. © Print only for private use.
To connect a USB Type-C™ accessory using a USB Type-C connector1Attach the USB Type-C connector of the USB Type-C accessory to yourdevice.2From your Home screen , tap  .3Find and tap Settings > Device connection > USB Connectivity > Detect USBdevice.Sony does not guarantee that all USB Type-C accessories with a USB Type-C connector aresupported by your device.NFCUse Near Field Communication (NFC) to share data with other devices, such asvideos, photos, web page addresses, music files or contacts. You can also use NFCto scan tags that give you more information about a product or service as well astags that activate certain functions on your device.NFC is a wireless technology with a maximum range of one centimetre, so thedevices sharing data must be held close to each other. Before you can use NFC, youmust first turn on the NFC function, and the screen of your device must be active.The NFC detection area is located on the back of the device. Hold your device closeto another device or an NFC reader so that the NFC detection areas touch eachother.NFC may not be available in all countries or regions. Using certain apps, some NFC functionscan be enabled even when the device is switched off. Note that not all devices support thisfeature.To enable or disable the NFC function1From your Home screen, tap  .2Find and tap Settings > More.3Tap the NFC slider.To share a contact with another device using NFC1Make sure that both devices have the NFC function turned on, and that bothscreens are active and unlocked.2To view contacts, go to your Home screen, tap  , then tap  .3Tap the contact that you want to share.4Hold your device and the receiving device close to each other so that the NFCdetection areas of each device touch. When the devices connect, a thumbnailof the contact appears.5Tap the thumbnail to start the transfer.6When the transfer is done, the contact information is saved on the receivingdevice and displayed on its screen.115This is an internet version of this publication. © Print only for private use.
To share a music file with another device using NFC1Make sure that both your device and the receiving device have the NFCfunction turned on, and that both screens are active and unlocked.2To open the Music application, tap  , then find and tap  .3Select a music category and browse to the track you want to share.4Tap the track to play it. You can then tap   to pause the track. The transferworks whether the track is playing or paused.5Make sure the track is displayed on full screen.6Hold your device and the receiving device close to each other so that the NFCdetection areas of each device touch. When the devices connect, a thumbnailof the track appears.7Tap the thumbnail to start the transfer.8When the transfer is done, the music file is saved on the receiving device.9To display the music file, double-tap the status bar to open the Notificationpanel, and then tap Beam complete .To share a photo or video with another device using NFC1Make sure that both devices have the NFC function turned on, and that bothscreens are active and unlocked.2To view photos and videos on your device, go to your Home screen, tap  ,then find and tap Album.3Tap the photo or video that you want to share.4Hold your device and the receiving device close to each other so that the NFCdetection areas of each device touch. When the devices connect, a thumbnailof the photo or video appears.5Tap the thumbnail to start the transfer.6When the transfer is done, the photo or video is saved on the receiving device.To share a web address with another device using NFC1Make sure that both devices have the NFC function turned on, and that bothscreens are active and unlocked.2From your Home screen, tap  .3To open the web browser, find and tap  .4Load the web page that you want to share.5Hold your device and the receiving device close to each other so that the NFCdetection areas of each device touch. When the devices connect, a thumbnailof the web page appears.6Tap the thumbnail to start the transfer.7When the transfer is done, the web page is displayed on the screen of thereceiving device.Scanning NFC tagsYour device can scan various kinds of NFC tags to receive additional information,such as a web address. For example, it can scan embedded tags on a poster, on abillboard advertisement, or beside a product in a retail store.To scan an NFC tag1Make sure that your device has the NFC function turned on and that the screenis active and unlocked.2Place your device over the tag so that the NFC detection area touches it. Yourdevice scans the tag and displays the content collected. Tap the content of thetag to open it.116This is an internet version of this publication. © Print only for private use.
Connecting to an NFC compatible deviceYou can connect your device to other NFC compatible devices produced by Sony,such as a speaker or a headphone. When establishing this kind of connection, referto the User guide of the compatible device for more information.You may need to have Wi-Fi or Bluetooth® activated on both devices for the connection towork.Bluetooth® wireless technologyUse the Bluetooth® function to send files to other Bluetooth® compatible devices, orto connect to handsfree accessories. Bluetooth® connections work better within 10metres (33 feet), with no solid objects in between. In some cases you have tomanually pair your device with other Bluetooth® devices.Interoperability and compatibility among Bluetooth® devices can vary.If you are using a device with multiple users, each user can change the Bluetooth® settings,and the changes affect all users.To turn the Bluetooth® function on or off1From your Home screen, tap  .2Find and tap Settings > Bluetooth.3Tap the Bluetooth slider to enable or disable the function.Naming your deviceYou can give your device a name. This name is shown to other devices after youhave turned on the Bluetooth® function and your device is set to visible.To give your device a name1Make sure that the Bluetooth® function is turned on.2From your Home screen, tap  .3Find and tap Settings > Bluetooth.4Tap   > Rename this device.5Enter a name for your device.6Tap RENAME.Pairing with another Bluetooth® deviceWhen you pair your device with another device, you can for example connect yourdevice to a Bluetooth® headset or a Bluetooth® car kit, and use these other devicesto share music.Once you pair your device with another Bluetooth® device, your device remembersthis pairing. When pairing your device with a Bluetooth® device for the first time, youmay need to enter a passcode. Your device will automatically try the genericpasscode 0000. If this does not work, refer to the user guide for your Bluetooth®device to get the device passcode. You do not need to re-enter the passcode thenext time you connect to a previously paired Bluetooth® device.Some Bluetooth® devices, for example, most Bluetooth® headsets, require you to both pairand connect with the other device.You can pair your device with several Bluetooth® devices, but you can only connect to oneBluetooth® profile at the same time.117This is an internet version of this publication. © Print only for private use.
To pair your device with another Bluetooth® device1Make sure that the device you want to pair with has the Bluetooth® functionactivated and is visible to other Bluetooth® devices.2From your device’s Home screen, tap  .3Find and tap Settings > Bluetooth.4Tap the Bluetooth slider to enable the function. A list of the availableBluetooth® devices appears.5Tap the Bluetooth® device that you want to pair with.6Enter a passcode, if required, or confirm the same passcode on both devices.To connect your device to another Bluetooth® device1From your Home screen, tap  .2Find and tap Settings > Bluetooth.3Tap the Bluetooth® device that you want to connect to.To unpair a Bluetooth® device1From your Home screen, tap  .2Find and tap Settings > Bluetooth.3Under Paired devices, tap   beside the name of the device that you want tounpair.4Tap FORGET.Sending and receiving items using Bluetooth® technologyUse Bluetooth® technology to share items with other Bluetooth® compatible devicessuch as phones or computers. You can send and receive the following kinds of items:•Photos and videos•Music and other audio files•Web pagesTo send items using Bluetooth®1Receiving device: Make sure the Bluetooth® function is turned on and that thedevice is visible to other Bluetooth® devices.2Sending device: Open the application which contains the item that you want tosend, and scroll to the item.3Depending on the application and on the item that you want to send, you mayneed to, for example, touch and hold the item, open the item, and press  .4Select Bluetooth.5Turn on Bluetooth® if you are prompted to do so.6Tap the name of the receiving device.7Receiving device: If prompted, accept the connection.8Sending device: If prompted, confirm the transfer to the receiving device.9Receiving device: Accept the incoming item.To receive items using Bluetooth®1Make sure that the Bluetooth® function is on and is visible to other Bluetooth®devices.2The sending device now starts sending data to your device.3If prompted, enter the same passcode on both devices, or confirm thesuggested passcode.4When you are notified of an incoming file to your device, drag the status bardownwards and tap the notification to accept the file transfer.5Tap Accept to start the file transfer.6To view the progress of the transfer, drag the status bar downwards.7To open a received item, drag the status bar downwards and tap the relevantnotification.118This is an internet version of this publication. © Print only for private use.
To view files you have received using Bluetooth®1From your Home screen, tap  .2Find and tap Settings > Bluetooth.3Press   and select Show files received.119This is an internet version of this publication. © Print only for private use.
Smart apps and features that save youtimeGoogle Search & NowUse the Google app to search the internet. You can also enable a feed for regularupdates ‒ for example, you can get traffic information before commuting to work, findpopular restaurants in your area, see your favourite team's current score, and more.The app can be accessed by tapping   in the application list, or you can reserve apane on your Home screen for quick access and easy reading.To enable or disable Your feed1From your Home screen, tap  .2Find and tap Settings > Google > Search > Your feed.3Tap the slider to enable or disable the feed.To reserve a pane on the Home screen for Google Search & Now1Touch and hold any area on your Home screen until the device vibrates.2Tap  , then tap the Google Now™ slider.3You can now swipe to the left-most pane on the Home screen to access theGoogle Search & Now interface.If you reserve the left-most pane for Google Search & Now, the main Home screen panecannot be changed and additional panes cannot be added to the left. Only the left-most panecan be reserved.Using the News Suite applicationNews Suite is a two-in-one news app featuring a new two-tab concept: switchbetween the News tab, where you can find out about all the latest current affairs andthe My Feeds tab, where you can read up on all the news that's most relevant to yourown interests.The News Suite application is not available in all markets.To open the News Suite application1From your Home screen, tap  .2Find and tap  .Using your device as a walletYou can use your device to pay for goods without reaching for your real wallet andmanage all payment services in one place. When making a payment, remember toturn on the NFC function before you touch your device to a card reader. For moreinformation about NFC, see NFC on page 115.NFC-initiated payments are only supported when an NFC-enabled SIM card is inserted in SIMcard slot 1. Also, mobile payment services may not be available in your region.To manage payment services1From your Home screen, tap  .2Find and tap Settings > More > Tap & pay. A list of payment services appears.3Manage the payment services as desired, for example, you can change yourdefault payment service.120This is an internet version of this publication. © Print only for private use.
Travel and mapsUsing location servicesLocation services allow applications such as Maps and the camera to use informationfrom your mobile or Wi-Fi network as well as Global Positioning System (GPS)information to determine your approximate location. If you're not within a clear line ofsight to GPS satellites, your device can determine your location using the Wi-Fifunction. And if you're not within range of a network, your device can determine yourlocation using your mobile network.In order to use your device to find out where you are, you need to enable locationservices.You may incur data connection charges when you connect to the internet from your device.To enable or disable location services1From your Home screen, tap  .2Find and tap Settings > Location, then tap the slider to enable or disablelocation services.Improving GPS accuracyThe first time you use the GPS function in your device, it can take a few minutes foryour location to be found. To help the search, make sure you have a clear view of thesky. Stand still and don't cover the GPS antenna (the highlighted area in the image).GPS signals can pass through clouds and plastic, but not through most solid objectssuch as buildings and mountains. If your location isn't found after a few minutes,move to another location.Google Maps™ and navigationUse Google Maps™ to track your current location, view real-time traffic situationsand receive detailed directions to your destination.The Google Maps™ application requires an internet connection when used online.You may incur data connection charges when you connect to the internet from yourdevice. To get more detailed information about how to use this application, go tohttp://support.google.com and click the “Maps for mobile” link.The Google Maps™ application may not be available in every market, country or region.To use Google Maps™1From your Home screen, tap  .2Find and tap Google > Maps.121This is an internet version of this publication. © Print only for private use.
Using data traffic when travellingWhen you travel outside of your home mobile network, you may need to access theinternet using mobile data traffic. If so, you need to activate data roaming on yourdevice. You may incur additional charges when you activate data roaming. It isrecommended to check the relevant data transmission charges in advance.If you are using a device with multiple users, you may need to log in as the owner, that is, theprimary user, to activate or deactivate data roaming.To enable or disable data roaming1From your Home screen, tap  .2Find and tap Settings > More > Mobile networks.3Select a SIM card.4Tap the Data roaming slider to enable or disable the function.You can’t activate data roaming while mobile data traffic is turned off.Aeroplane modeIn Aeroplane mode, the network and radio transceivers are turned off to preventdisturbance to sensitive equipment. However, you can still make emergency calls,play games, listen to music, watch videos and other content, as long as all thiscontent is saved on your memory card or internal storage. You can also be notifiedby alarms, if alarms are activated.Turning on Aeroplane mode reduces battery consumption.To turn on Aeroplane mode1From your Home screen, tap  .2Find and tap Settings > More.3Tap the Airplane mode slider.122This is an internet version of this publication. © Print only for private use.
Clock and CalendarCalendarUse the Calendar application to manage your time schedule. If you have signed in toand synchronised your device with one or several online accounts that includecalendars, for example, your Google™ account, then calendar events from theseaccounts will also appear in the Calendar application. You can select whichcalendars you want to integrate into the combined Calendar view.When an appointment time approaches, your device plays a notification sound toremind you.1 Access settings, select a view type and the calendars that you want to view2 Access an overview of the current month3 Return to the current date4 Access other options5 Scroll up or down to browse the calendar6 Add a calendar entryTo learn more about Calendar•When the Calendar application is open, tap  , then find and tap Help &feedback.ClockYou can set one or several alarms and use any sound file saved on your device as thealarm signal. The alarm does not sound if your device is turned off.The alarm time format displayed is the same as the format you select for your generaltime settings, for example, 12-hour or 24-hour.1 Access the alarms tab2 Access the world clock tab123This is an internet version of this publication. © Print only for private use.
3 Access the stopwatch tab4 Access the timer tab5 View options for the current tab6 Open date and time settings7 Turn an alarm on or off8 Add a new alarmTo set a new alarm1From your Home screen, tap  .2Find and tap Clock.3Tap  .4Tap Time and select the desired value.5Tap OK.6If desired, edit other alarm settings.7Tap SAVE.To snooze an alarm when it sounds•Tap SNOOZE.To turn off an alarm when it sounds•Drag   to the right.To turn off a snoozed alarm, you can drag down the status bar to open the Notification paneland then tap  .To edit an existing alarm1Find and tap Clock, then tap the alarm that you want to edit.2Make the desired changes.3Tap SAVE.To turn an alarm on or off•Find and tap Clock, then tap the slider for the alarm you want to turn on or off.To delete an alarm1Find and tap Clock, then touch and hold the alarm that you want to delete.2Tap Delete alarm, then tap YES.To set the sound for an alarm1Find and tap Clock, then tap the alarm that you want to edit.2Tap Alarm sound and select an option, or tap   and select a music file.3Tap DONE, then tap SAVE.For more information about how to adjust the alarm volume levels, see Volume settings onpage 56.To adjust the volume level for an alarm1Find and tap Clock, then tap the alarm that you want to edit.2Drag the volume slider under Alarm volume to the desired position.3Tap SAVE.To set a recurring alarm1Find and tap Clock, then tap the alarm that you want to edit.2Tap Repeat.3Mark the checkboxes for the relevant days, then tap OK.4Tap SAVE.124This is an internet version of this publication. © Print only for private use.
To activate the vibrate function for an alarm1Find and tap Clock, then tap the alarm that you want to edit.2Tap the Vibrate slider to enable or disable the function.3Tap SAVE.To set the side keys behaviour1Find and tap Clock, then select the alarm that you want to edit.2Tap Side keys behaviour, then select the desired behaviour of side keys whenthey are pressed during the alarm.3Tap SAVE.125This is an internet version of this publication. © Print only for private use.
AccessibilityMagnification gestureMagnification gesture allows you to zoom in to parts of the screen by tapping an areaof the touchscreen three times in succession.To enable or disable Magnification gesture1From your Home screen, tap  .2Find and tap Settings > Accessibility > Magnification gesture.3Tap the slider under Magnification gesture.To magnify an area and pan across the screen1Make sure that Magnification gesture is enabled.2To temporarily magnify an area, tap it three times.3Move the area by dragging it with two or more fingers.4To exit zoom mode, tap the area three times again.With certain applications, you can also zoom in or out by pinching an area.Font sizeYou can enable the Font size option to increase the default size of text displayed onyour device.To set Font size1From your Home screen, tap  .2Find and tap Settings > Accessibility.3Tap Font size, and then set the desired font size by tapping the scale.Display sizeYou can use the Display size setting to increase or decrease all elements on yourscreen, not just text.To set Display size1From your Home screen, tap  .2Find and tap Settings > Accessibility.3Tap Display size, and then set the desired display size by tapping the scale.Colour correctionThe Colour correction setting adjusts how colours are displayed on the screen forusers who are colour blind or have difficulty distinguishing between colours.To enable Colour correction1From your Home screen, tap  .2Find and tap Settings > Accessibility > Colour correction.3Tap the slider under Colour correction.4Tap Correction mode, then select the appropriate colour sensitivity.Colour correction is currently an experimental feature and may affect device performance.TalkBackTalkBack is a screen reader service for visually impaired users. TalkBack uses spokenfeedback to describe any events or actions performed on your Android device.126This is an internet version of this publication. © Print only for private use.
TalkBack describes the user interface and reads out software errors, notifications andmessages.To enable TalkBack1From your Home screen, tap  .2Find and tap Settings > Accessibility > TalkBack.3Tap the slider under TalkBack and then tap OK.To change speech, feedback and touch preferences for TalkBack, tap Settings, then tap thescreen twice.TalkBack launches a tutorial immediately after you enable the feature. To exit the tutorial, tap, then tap the screen twice.To disable TalkBack1From your Home screen, tap  , then tap anywhere on the screen twice.2Find and tap Settings, then tap anywhere on the screen twice.3Find and tap Accessibility by scrolling through the list with two or more fingers,then tap anywhere on the screen twice.4Find and tap TalkBack by scrolling through the list with two or more fingers,then tap anywhere on the screen twice.5Tap the on-off switch, and then tap anywhere on the screen twice.6Tap OK, and then tap anywhere on the screen twice.Mono audioThe Mono audio setting makes both left and right audio channels get played backsimultaneously when playing audio. Using Mono instead of Stereo playback is mostuseful for users with certain types of hearing loss or for safety reasons, for examplewhen you need to listen to your surroundings.To enable or disable Mono audio1From your Home screen, tap  .2Find and tap Settings > Accessibility.3Tap the slider beside Mono audio.TTY (Teletypewriter) modeThe TTY (Teletypewriter) feature on your device allows people who are deaf, hard ofhearing, or who have speech or language disabilities, to communicate using a TTYdevice or a relay service.To enable TTY mode1From your Home screen, tap  .2Find and tap Settings > Call.3Choose a SIM card, then tap Accessibility > TTY mode.4Select the applicable TTY mode.Switch AccessWith Switch Access, you can interact with your Xperia™ device using one or moreswitches. A switch is a device used to send a keystroke signal to your Androiddevice. These can be helpful for users with mobility limitations. For more informationabout Switch Access, see Settings > Accessibility > Switch Access > SETTINGS >Help.127This is an internet version of this publication. © Print only for private use.
To enable or disable Switch Access1From your Home screen, tap  .2Find and tap Settings > Accessibility > Switch Access.3Tap the slider to enable or disable the function, then tap OK.128This is an internet version of this publication. © Print only for private use.
Support and legalSupport applicationUse the Support application on your device to browse User guides, troubleshootingguides, and to find information about software updates and other product-relatedinformation.To access the Support application1From your Home screen, tap  .2Find and tap  , then select the required support item.Connect to the internet when using the Support application for the best available support.Xperia™ TipsUsing Xperia™ Tips you can get useful information for your device via notifications,and learn all you need to get started.To enable or disable Xperia™ Tips1From your Home screen, tap  .2Find and tap Settings > Introduction & Tips.3Tap the Xperia™ Tips slider.Help in menus and applicationsSome applications and settings have help available in the options menu, which isnormally indicated by   in the individual applications.Running diagnostic tests on your deviceThe Xperia™ Diagnostics application can test a specific function or run a fulldiagnostic test to check if your Xperia™ device is working properly.Xperia™ Diagnostics can:•Assess potential hardware or software issues on your Xperia™ device.•Analyse how well applications perform on your device.•Log the number of dropped calls during the previous 10 days.•Identify installed software and provide useful details about your device.The Xperia™ Diagnostics application is pre-installed on most Android™ devices from Sony. Ifthe Diagnostics option is not available under Settings > About phone or from the TOOLSmenu in the Support application, you can download a light version using the Play Store™application.Restarting, resetting and repairingYou can force your device to restart or shut down if it stops responding or won'trestart normally. No settings or personal data get deleted.You can also reset your device to its original factory settings. This action issometimes necessary if your device stops functioning properly, but note that if youwant to keep any important data, you should first back up this data to a memory cardor other non-internal memory. For more information, see Backing up and restoringcontent on page 42.129This is an internet version of this publication. © Print only for private use.
If your device fails to turn on or you want to reset your device’s software, you can useXperia™ Companion to repair your device. For more information on using Xperia™Companion, see Xperia™ Companion on page 39.If you are sharing a device with multiple users, you may need to log in as the owner, that is,the primary user, to reset your device to its original factory settings.To restart your deviceYour device may fail to restart if the battery level is low. Connect your device to a charger andtry restarting again.1Press and hold down the power key  .2In the menu that opens, tap Restart. The device restarts automatically.To force the device to restart or shut down1Press and hold down the power key   and the volume up key at the same timefor 6 seconds.2Your device vibrates once. Depending on whether you wish to force the deviceto restart or shut down, proceed as follows.•If you wish to force restart the device: Release the keys at this point. Thedevice restarts.•If you wish to force shut down the device: Continue pressing the keys. Aftera few more seconds, the device vibrates three times and turns off.To perform a factory data resetTo avoid permanent damage to your device, do not interrupt a factory data reset procedure.1Back up any important data that is saved on the internal memory of yourdevice to a memory card or other non-internal memory. If you have anyencrypted files stored on an SD card, you should also remove the encryption toensure you can still access them after the reset.2From your Home screen, tap  .3Find and tap Settings > Backup & reset > Factory data reset.4Tap Reset phone.5If required, draw your screen unlock pattern or enter your screen unlockpassword or PIN to continue.6To confirm, tap Erase everything.Your device does not revert to an earlier software version of Android™ when you perform afactory data reset.Repairing the device softwareIf you forget your screen unlock password, PIN or pattern, you can use the devicerepair feature in Xperia™ Companion to erase the security layer. You need to provideyour Google account login details to perform this operation. By running the repairfeature, you reinstall software for your device and you may lose some personal datain the process.If you can’t turn off your device before performing a software repair, force it to shutdown.When you receive a new Google™ account username or password, you might not be able touse them to log in to and recover your device for 72 hours.To repair the device software using Xperia™ CompanionBefore performing a software repair, make sure you know your Google™ account usernameand password. Depending on your security settings, you may need to enter them in order torestart the device after a software repair.If your device seems to have frozen, restarts repeatedly or doesn’t start at all afteryou’ve updated the Xperia™ software or after you’ve performed a software repair or afactory data reset, try forcing the device to shut down then try turning it back on. If130This is an internet version of this publication. © Print only for private use.
the problem still exists, force the device to shut down then perform a software repairby following the steps below:1Make sure that Xperia™ Companion is installed on your PC or Mac®.2Open the Xperia™ Companion software on the computer and click on Softwarerepair on the main screen.3Follow the instructions that appear on the screen to reinstall the software andcomplete the repair.Help us improve our softwareYou can allow the sending of usage info from your device so that Sony Mobile canreceive anonymous bug reports and statistics that help improve our software. Noneof the information gathered includes personal data.To allow the sending of usage info1From your Home screen, tap  .2Find and tap Settings > About phone > Usage info settings.3Mark the Send usage info checkbox if it is not already marked.4Tap Agree.Warranty, SAR and usage guidelinesFor information about warranty, SAR (Specific Absorption Rate) and safety guidelines,please read the Important information provided under Settings > About phone > Legalinformation on your device.Recycling your deviceGot an old device lying around the house? Why not recycle it? By doing so, you willhelp us reuse its materials and components, and you’ll protect the environment too!Find out more about the recycling options in your region at www.sonymobile.com/recycle/.Legal informationSony G3212/G3226This User guide is published by Sony Mobile Communications Inc. or its local affiliated company, without anywarranty. Improvements and changes to this User guide necessitated by typographical errors, inaccuracies ofcurrent information, or improvements to programs and/or equipment, may be made by Sony MobileCommunications Inc. at any time and without notice. Such changes will, however, be incorporated into neweditions of this User guide. All illustrations are for illustration purposes only and may not accurately depict theactual device.All product and company names mentioned herein are the trademarks or registered trademarks of theirrespective owners. All other trademarks are property of their respective owners. Any rights not expresslygranted herein are reserved. Visit www.sonymobile.com/us/legal/ for more information.This User guide may reference services or applications provided by third parties. Use of such programming orservices may require separate registration with the third party provider and may be subject to additional termsof use. For applications accessed on or through a third-party website, please review such websites’ terms ofuse and applicable privacy policy in advance. Sony does not warrant or guarantee the availability orperformance of any third-party websites or offered services.Your mobile device has the capability to download, store and forward additional content, for example,ringtones. The use of such content may be restricted or prohibited by rights of third parties, including but notlimited to restriction under applicable copyright laws. You, and not Sony, are entirely responsible for additionalcontent that you download to or forward from your mobile device. Prior to your use of any additional content,please verify that your intended use is properly licensed or is otherwise authorized. Sony does not guaranteethe accuracy, integrity or quality of any additional content or any other third party content. Under nocircumstances will Sony be liable in any way for your improper use of additional content or other third partycontent.Visit www.sonymobile.com for more information.This product is protected by certain intellectual property rights of Microsoft. Use or distribution of suchtechnology outside of this product is prohibited without a licence from Microsoft.Content owners use Windows Media digital rights management technology (WMDRM) to protect theirintellectual property, including copyrights. This device uses WMDRM software to access WMDRM-protectedcontent. If the WMDRM software fails to protect the content, content owners may ask Microsoft to revoke thesoftware's ability to use WMDRM to play or copy protected content. Revocation does not affect unprotectedcontent. When you download licences for protected content, you agree that Microsoft may include arevocation list with the licences. Content owners may require you to upgrade WMDRM to access their content.If you decline an upgrade, you will not be able to access content that requires the upgrade.131This is an internet version of this publication. © Print only for private use.
This product is licensed under the MPEG-4 visual and AVC patent portfolio licences for the personal and non-commercial use of a consumer for (i) encoding video in compliance with the MPEG-4 visual standard("MPEG-4 video") or the AVC standard ("AVC video") and/or (ii) decoding MPEG- 4 or AVC video that wasencoded by a consumer engaged in a personal and non-commercial activity and/or was obtained from a videoprovider licenced by MPEG LA to provide MPEG-4 and/or AVC video. No licence is granted or shall be impliedfor any other use. Additional information including that relating to promotional, internal and commercial usesand licensing may be obtained from MPEG LA, L.L.C. See www.mpegla.com. MPEG Layer-3 audio decodingtechnology licenced from Fraunhofer IIS and Thomson.SONY MOBILE WILL NOT BE LIABLE FOR ANY LOSS, DELETION AND/OR DATA-OVERWRITING OFPERSONAL DATA OR FILES STORED ON YOUR DEVICE (INCLUDING BUT NOT LIMITED TO CONTACTS,MUSIC TRACKS AND PICTURES) ARISING OUT OF ANY UPDATE OF YOUR DEVICE BY ANY OF THEMETHODS DESCRIBED IN THIS USER GUIDE OR DOCUMENTATION. IN NO EVENT SHALL SONY MOBILE’SOR ITS SUPPLIERS’ TOTAL LIABILITY TO YOU FOR ANY AND ALL DAMAGES, LOSSES AND CAUSES OFACTION (WHETHER IN CONTRACT OR TORT, INCLUDING, BUT NOT LIMITED TO NEGLIGENCE OROTHERWISE) EXCEED THE AMOUNT ACTUALLY PAID BY YOU FOR YOUR DEVICE.© 2017 Sony Mobile Communications Inc.All rights reserved.132This is an internet version of this publication. © Print only for private use.

Navigation menu