Sony 89807R GSM/WCDMA/LTE Phone with BT, DTS/UNII a/b/g/n/ac & NFC User Manual PY7 89807R
Sony Mobile Communications Inc GSM/WCDMA/LTE Phone with BT, DTS/UNII a/b/g/n/ac & NFC PY7 89807R
Sony >
Contents
- 1. User manual_PY7-89807R
- 2. SAR leaflet_PY7-89807R
User manual_PY7-89807R
30
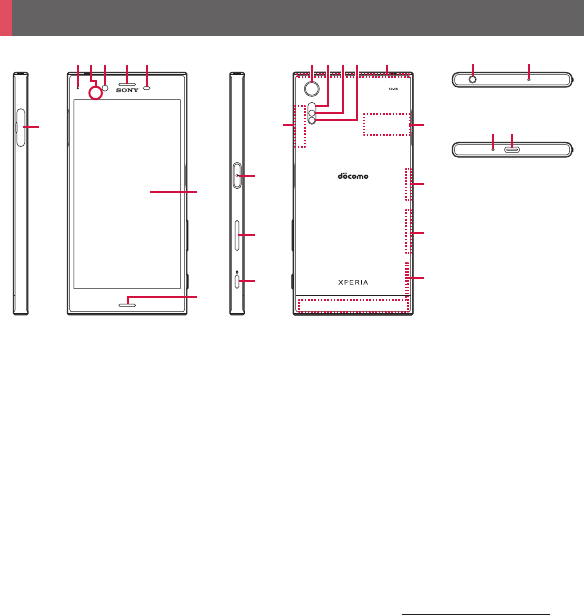
Before Using the Terminal
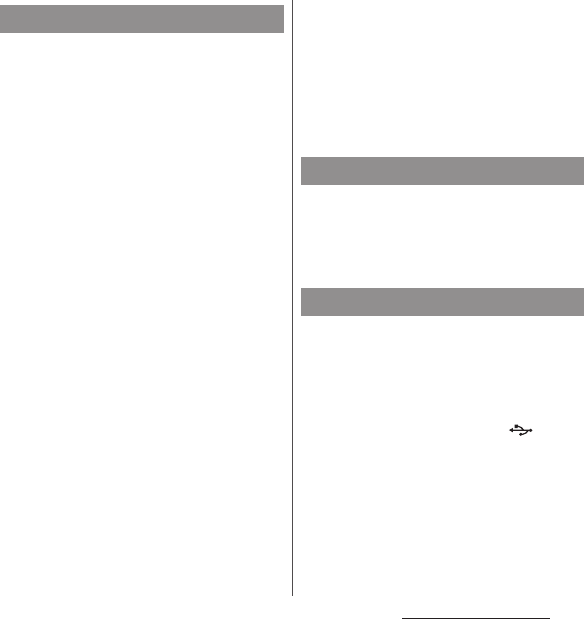
a
docomo nano UIM card/microSD card slot
b
Notification LED
c
NFC/Osaifu-Keitai position for holding over
*1
d
Front camera lens
e
Earpiece/Speaker
f
Proximity/light sensor : Detects a face getting closer
to the touch screen during a call and turns it off to
prevent misoperation, and helps with automatic
screen brightness control.
g
Touch screen
h
Speaker
iO
Power key/Screen lock key/Fingerprint sensor
j
Volume key/Zoom key
kk
Camera key
l
Camera lens
m
Laser AF sensor
n
RGBC-IR sensor
o
Flash/Photo light
p
LTE/FOMA/GPS antenna section
*2
q
Wi-Fi/Bluetooth antenna section
*2
r
Nameplate
*3
s
Wi-Fi antenna section
*2
t
LTE antenna section
*2
u
LTE/FOMA antenna section
*2
v
Headset jack
w
Second microphone : Reduces noise to make voice
to be listened easily.
x
Microphone
y
USB Type-C jack
Part names and functions
cb d e f
i
j
k
a
v w
x y
p
g
h
r
s
t
u
q
ml n o
Top
Bottom
RightLeft BackFront

31
Before Using the Terminal
*1 A sticker bearing mark is attached at the time of
purchase.
*2 The antenna is built into the terminal. Covering
around the antenna with your hand may affect the
quality of communications.
*3 A sticker bearing the CE mark, FCC ID, IMEI
information, etc. is attached. Please do not peel off
the sticker or remove the nameplate.
❖
Note
・
Do not put a sticker or other material on the
proximity/light sensor.
・
The back cover cannot be removed. Attempting to
remove the back cover with excessive force may
cause damage or malfunction.
・
The battery is built into the terminal and not removal.
The docomo nano UIM card is an IC card
recorded user information such as your
phone number etc.
・
You can use the terminal with a docomonano
UIM card. If you have a docomo mini UIM
card, UIM, or FOMA card, bring it to a Shop to
replace it with a docomo nano UIM card.
・
When docomo nano UIM card is not inserted
to the terminal, making calls, packet
communication, etc. are not available.
・
For details on the docomo nano UIM card,
refer to the docomo nano UIM card manual.
・
If a microSD card is installed, be sure to
unmount it (to disable reading/writing)
before installing or removing a docomo
nano UIM card (P.183).
・
Opening/closing the cover of the docomo
nano UIM card/microSD card slot (P.25).
■
Security codes of the docomo nano
UIM card
The docomo nano UIM card has a security
code called a PIN code. The code is set to
"0000" at subscription, which you can
change by yourself (P.170).
❖
Information
・
Please be careful not to touch or scratch the IC when
you handle the docomo nano UIM card. Doing
so may cause malfunction or damage.
nano UIM card

32
Before Using the Terminal
1
Remove the cover of the
ocomonano UIM card/microSD card
slot
2
Pull the tray straight out from the
terminal.
3
With the IC side facing up, place
the docomo nano UIM card on the
tray.
・
Make sure that the cut corner of the
card is oriented properly.
・
Be sure to fit the docomo nano UIM card
into the tray so that it does not shift.
4
Insert the tray with the card and
press it straight into the slot.
・
Be careful about the direction to insert
of the tray.
5
Firmly press the parts until the
tray is all the way in, and make
sure that there are no gaps
between the terminal and cover.
Inserting nano UIM card
33
Before Using the Terminal
1
Remove the cover of the domo
nano UIM card/microSD card slot
2
Pull the tray straight out from the
terminal. (P.32).
3
Remove the
nano UIM
card from the tray.
4
Insert the tray into the terminal
and press it straight into the slot.
・
Be careful about the direction to insert
of the tray.
5
Firmly press until the tray is all the
way in, and make sure that there
are no gaps between the terminal
and cover (P.32).
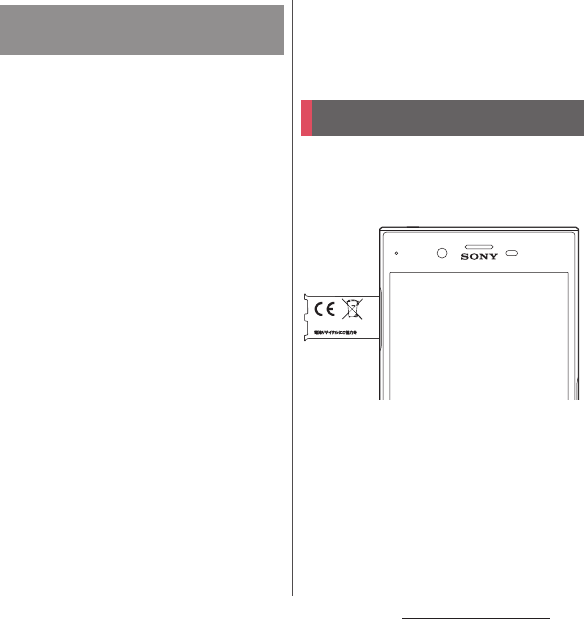
1
Open the doco nano UIM card
slot cover, and insert a fingernail
into the hook at the edge of the
label tray, then pull it out straight.
Removing nano UIM card
CE mark and FCC ID
FCC ID: PY7-89807R
PN:1304-9126 M
34
Before Using the Terminal
The internal battery is not fully charged at the
time of purchase.
・
Estimated charging time (P.216)
The charging time varies by the internal
battery condition or operating environment.
・
"Continuous standby time", "Continuous call
time" (P.218)
・
The internal battery is a consumable part.
Each time the internal battery is recharged,
the battery usage time per one charge
gradually decreases.
・
When the battery usage time per one charge
becomes about half of that at the time of
purchased, replacing the internal battery is
recommended because the internal battery is
near the end of life.
・
Watching TV etc. for a long time while
charging may shorten the lifetime of the
internal battery.
・
To check the charging performance, from the
Home screen, tap
u
[Settings]
u
[About
phone]
u
[Status]
u
[Battery life].
Charging
Operation time on full charge
(estimate)
Continuous
stand-by
time
FOMA/3G
Stationary (Auto) : Approx.
470 hours
GSM
Stationary (Auto) : Approx.
390 hours
LTE
Stationary (Auto) : Approx.
430 hours
Continuous
call time
FOMA/3G
Approx. 750 min.
GSM
Approx. 570 min.
VoLTE call
(voice)
Approx. 1,140 min.
Life of the internal battery
35
Before Using the Terminal
・
It is recommended to use the AC Adapter 05
(optional) for charging. For details on the AC
Adapter 05, refer to the AC Adapter 05
manual.
・
The AC Adapter 05 is compatible with 100V to
240V AC. For using the terminal overseas, a
plug adapter that fits the electrical outlets in
the country you stay is needed. Do not use an
electrical transformer for overseas use to
charge the terminal.
・
Use a compatible AC adapter or microUSB
cable for charging. If you use a charger other
than compatible ones, charging may not be
available or operations may not be performed
correctly.
・
Insert and remove the AC adapter cable or
microUSB cable slowly and evenly so that
excessive force is not applied.
・
When charging starts while the power is on, a
sound to indicate the start of charging is
heard, and the notification LED of the terminal
turns on (P.46).
・
To check the battery level, see the status bar at
the top of the screen or from the Home
screen, tap
u
[Settings]
u
[About phone]
u
[Status] to see "Battery level".
・
If you start charging with the terminal
powered off, the power turns on, although
you cannot operate the terminal. Therefore,
do not charge the battery in a place where
the use of the terminal is prohibited.
To charge the battery using the Desktop
Holder SO25 (optional) and AC Adapter 05
(optional), operate the following steps.
・
Depending on the thickness of the terminal,
please install the attachment that was
included with the desktop holder before
charging. Placing the terminal on the desktop
holder without the attachment on it may
damage the microUSB jack or other parts.
1
Insert the microUSB plug of the AC
adapter into the charging jack on
the back of the desktop holder,
with the engraved side (B) facing
up.
Before charging
Charging with desktop holder

36
Before Using the Terminal
2
Unfold the power plug of the AC
adapter and insert it into a power
outlet. Then place the terminal on
the desktop holder.
・
A sound to indicate the start of
charging is heard, and the notification
LED of the terminal turns on (P.46).
3
When charging is complete,
holding the desktop holder, lift the
terminal up to remove.
4
Unplug the AC adapter and then
disconnect the microUSB plug
from the desktop holder.
❖
Note
・
Check the terminal's connecting direction to
connect correctly. Wrong connection may cause
damage.
・
A terminal mounted on the desktop holder may be
damaged if pressed hard against the holder.
Attaching/Removing the attachment
■
Attaching
1
Check the shape of front/back of the
attachment and the attaching part of
the desktop holder, then fit the
attachment with the desktop holder.
2
Firmly press the attachment straight
into place and make sure that there
are no gaps between the attachment
and the desktop holder.
■
Removing
1
Lift both ends of the attachment to
remove it while holding the
desktop holder.
37
Before Using the Terminal
When using AC Adapter 05 (optional) for
charging, do the following procedures.
1
Insert the microUSB plug of the AC
adapter horizontally into the
microUSB jack of the terminal with
the engraved side (B) facing up.
2
Unfold the power plug of the AC
adapter and insert it into an outlet.
・
A sound to indicate the start of
charging is heard, and the notification
LED of the terminal turns on (P.46).
3
When charging is complete,
unplug the AC adapter and then
disconnect the microUSB plug
horizontally from the terminal.
❖
Note
・
Check the connecting direction to connect correctly.
Wrong connection may cause damage.
DC Adapter 04 (optional) supplies power
from a car cigarette lighter socket (12V/24V).
For details, refer to the DC Adapter 04
manual.
When using Micro USB Cable 01 (optional) for
charging, do the following procedures.
1
Insert the microUSB plug of the
microUSB cable horizontally into
the microUSB jack on the terminal
with the engraved side ( )
facing up.
2
Insert the USB plug of the
microUSB cable into a USB port of
a PC.
・
A sound to indicate the start of
charging is heard, and the notification
LED of the terminal turns on (P.46).
Charging with AC adapter
Charging with DC adapter
Charging with a PC

38
Before Using the Terminal
・
If the installation screen for the
terminal's driver software appears on
your PC, please wait a moment for the
installation to complete.
・
When "Install software" screen appears
on the terminal, tap [SKIP] or [CANCEL].
・
When the "Use USB for" confirmation
screen appears, tap [CANCEL].
3
When charging is complete,
disconnect the USB plug of the
microUSB cable from the USB port
on your PC and disconnect the
microUSB plug from the terminal.
❖
Note
・
Check the connecting direction to connect correctly.
Wrong connection may cause damage.
1
Press and hold
O
for at least 1
second.
・
The terminal vibrates and lock screen
appears after a while.
・
When you first turn on the power and
"
ようこそ
(Welcome)" is displayed,
follow the onscreen instructions to
make initial settings (P.40).
2
Cancel the screen lock.
・
Canceling the screen lock (P.39).
Turning power on/off
Turning power on
39
Before Using the Terminal
❖
Information
・
If the notification LED flashes red multiple times or an
icon appears indicating that the battery is low when
you press
O
with the terminal powered off, the
battery is running low. Charge the terminal (P.34).
・
When SIM card lock (P.169) is set, enter PIN code on
the PIN code entry screen (P.170).
1
Press and hold
O
for at least 1
second.
2
[Power off].
When the sleep mode is set, the screen
backlight turns off so that you can avoid
misoperations of the touch screen and keys,
and lock the screen.
1
Press
O
.
・
Press
O
again to exit sleep mode
and turn on the screen backlight.
❖
Information
・
Also, when the screen backlight goes off after a
specified time elapses, the terminal goes into sleep
mode. You can change the time-out period for
turning off the screen backlight (P.160).
The lock screen appears when you turn the
power on or press
O
to exit sleep mode.
1
Swipe (or flick) up/left on the lock
screen.
❖
Information
・
On the lock screen, swipe (or flick) to open the
"Phone" application, or swipe (or flick) to open
the "Camera" application.
・
You can change screen unlock method (P.172).
・
Once you register your fingerprint in the Fingerprint
Manager, you can use fingerprint authentication to
unlock the screen (P.170).
Turning power off
Setting sleep mode
Canceling the screen lock