Sony A1052061 Licensed transmitter User Manual PY7A1052061 UG K858c 1202 2149 1 AE

Sony Mobile Communications Inc Licensed transmitter PY7A1052061 UG K858c 1202 2149 1 AE

Contents

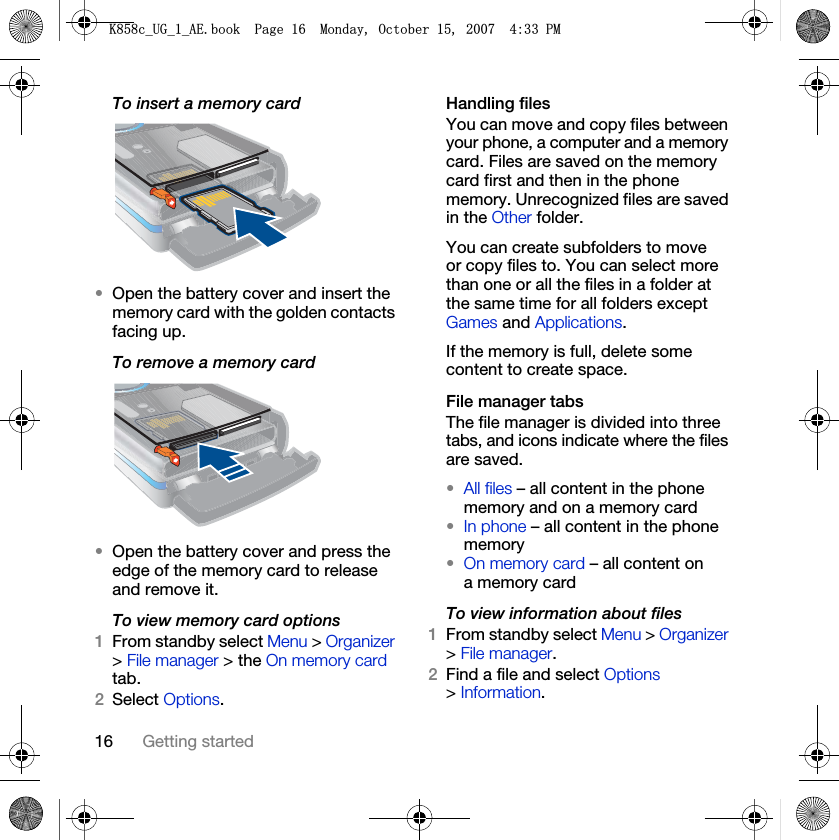
08 user manual part 1

Congratulations on your purchase of the Sony Ericsson K858c. Capture and share quality moments. For additional phone content, go to www.sonyericsson.com/fun.Register now to get a suite of tools, free online storage, special offers, news and competitions at www.sonyericsson.com/myphone.For product support, go to www.sonyericsson.com/cn..FB8*BB$(ERRN3DJH0RQGD\2FWREHU30
Accessories – More for your phoneCamera Phone Kit IPK-100Premium protection for your phone.Bluetooth™ Headset HBH-IV835Stylish discretion with excellent sound.Desk Stand CDS-65Your phone’s best assistant: connect a USB cable, charger and portable handsfree.These accessories can be purchased separately but may not be available in every market. To view the full range go to www.sonyericsson.com/accessories..FB8*BB$(ERRN3DJH0RQGD\2FWREHU30
1ContentsContentsGetting started  ................... 5Assembly ........................................  5Turning on the phone  .....................  5Help in your phone   ........................  7Charge the battery ..........................  7Using the USB charger  ...................  8Note: ...............................................  8Phone overview   ...........................  10Menu overview  .............................  12Navigation  ....................................  14File manager   ................................  15Phone language  ...........................  17Entering text  .................................  17Chinese input ................................  18Stroke input  ..................................  19Pinyin input  ...................................  21Calling ............................... 22Making and receiving calls  ...........  22Contacts .......................................  23Call list  ..........................................  27Speed dial .....................................  28Voicemail ......................................  28Voice control  ................................  28Diverting calls  ...............................  30More than one call  ........................  31My numbers ..................................  32Accept calls   .................................  32Restricted dialling  .........................  33Fixed dialling  ................................  33Call time and cost .........................  34Messaging ........................  34Text messages ..............................  35Picture messages  .........................  35Message options  ..........................  36Templates .....................................  37Voice messages ............................  37Email   ............................................  38My friends  .....................................  39Area and cell information ..............  41Imaging ............................  42Camera and video recorder  .........  42Viewfinder and camera keys  ........  42Using the camera ..........................  43Getting more from the camera  .....  44Camera icons and settings ...........  44Camera shortcuts  .........................  45Transferring pictures .....................  45Camera printing  ............................  46.FB8*BB$(ERRN3DJH0RQGD\2FWREHU30
2ContentsPictures .........................................  46PhotoDJ™ and VideoDJ™  ...........  47Themes .........................................  48Entertainment   .................. 48Stereo portable handsfree  ............  48Music and video players ...............  48Transferring music from a computer  ...................................  49TrackID™ ......................................  51Radio   ...........................................  52PlayNow™ ....................................  52Ringtones and melodies  ...............  53MusicDJ™ ....................................  54Sound recorder .............................  54Games ..........................................  54Applications ..................................  55Connectivity ...................... 56Settings  ........................................  56Phone name ..................................  56Using the Internet  .........................  57Web feeds .....................................  58Bluetooth™ wireless technology   ...................................  58Using the USB cable  ....................  60Synchronizing   ..............................  62Update service  .............................  64More features ...................  65Alarms ...........................................  65Calendar .......................................  65Tasks ............................................  67Notes ............................................  67Timer, stopwatch and calculator ......................................  68Code memo  ..................................  68Profiles ..........................................  69Time and date ...............................  70Locks ............................................  70Troubleshooting ...............  72Common questions  ......................  72Error messages .............................  73Important information ......  75Guidelines for Safe and Efficient Use ..................................  77End User Licence Agreement .......  81Limited Warranty  ..........................  82FCC Statement  .............................  84Declaration of Conformity for K858c  ......................................  84Index .................................  85.FB8*BB$(ERRN3DJH0RQGD\2FWREHU30
3Sony Ericsson K858cGSM 850/900/1800/1900This User guide is published by Sony Ericsson Mobile Communications AB or its local affiliated company, without any warranty. Improvements and changes to this User guide necessitated by typographical errors, inaccuracies of current information, or improvements to programs and/or equipment, may be made by Sony Ericsson Mobile Communications AB at any time and without notice. Such changes will, however, be incorporated into new editions of this User guide.All rights reserved.©Sony Ericsson Mobile Communications AB, 2007Publication number: 1202-2149.1Please note:Some of the services in this User guide are not supported by all networks. This also applies to the GSM International Emergency Number 112.Please contact your network operator or service provider if you are in doubt whether you can use a particular service or not.Please read the Guidelines for safe and efficient use and the Limited warranty chapters before you use your mobile phone.Your mobile phone has the capability to download, store and forward additional content, e.g. ringtones. The use of such content may be restricted or prohibited by rights of third parties, including but not limited to restriction under applicable copyright laws. You, and not Sony Ericsson, are entirely responsible for additional content that you download to or forward from your mobile phone. Prior to your use of any additional content, please verify that your intended use is properly licensed or is otherwise authorized. Sony Ericsson does not guarantee the accuracy, integrity or quality of any additional content or any other third party content. Under no circumstances will Sony Ericsson be liable in any way for your improper use of additional content or other third party content.Bluetooth™ is a trademark or registered trademark of Bluetooth SIG Inc.The marble logo, BestPic, PlayNow, MusicDJ, PhotoDJ, TrackID and VideoDJ are trademarks or registered trademarks of Sony Ericsson Mobile Communications AB.Sony and Cyber-shot are trademarks of Sony Corporation.Memory Stick Micro™ and M2™ are trademarks of Sony Corporation.Ericsson is a trademark or registered trademark of Telefonaktiebolaget LM Ericsson.Adobe® Photoshop® Album Starter Edition is a trademark or registered trademark of Adobe Systems Incorporated in the United States and/or other countries/regions.Microsoft, Windows, PowerPoint, Outlook and Vista are trademarks or registered trademarks of Microsoft Corporation in the US and other countries/regions.MicroSD is a trademark or registered trademark of SanDisk Corporation.T9™ Text Input is a trademark or a registered trademark of Tegic Communications. T9™ Text Input is licensed under one or more of the following: U.S. Pat. Nos. 5,818,437, 5,953,541, 5,187,480, 5,945,928, and 6,011,554; Canadian Pat. No. 1,331,057, United Kingdom Pat. No. 2238414B; Hong Kong Standard Pat. No. HK0940329; Republic of Singapore Pat. No. 51383; Euro.Pat. No. 0 842 463(96927260.8) DE/DK, FI, FR, IT, NL, PT, ES, SE, GB; and additional patents are pending worldwide.Java and all Java based trademarks and logos are trademarks or registered trademarks of Sun Microsystems, Inc. in the U.S. and other countries/regions.End-user license agreement for Sun™ Java™ J2ME™..FB8*BB$(ERRN3DJH0RQGD\2FWREHU30
4Restrictions: Software is confidential copyrighted information of Sun and title to all copies is retained by Sun and/or its licensors. Customer shall not modify, decompile, disassemble, decrypt, extract, or otherwise reverse engineer Software. Software may not be leased, assigned, or sublicensed, in whole or in part.Export Regulations: Software, including technical data, is subject to U.S. export control laws, including the U.S. Export Administration Act and its associated regulations, and may be subject to export or import regulations in other countries/regions. Customer agrees to comply strictly with all such regulations and acknowledges that it has the responsibility to obtain licenses to export, re-export, or import Software. Software may not be downloaded, or otherwise exported or re-exported (i) into, or to a national or resident of, Cuba, Iraq, Iran, North Korea, Libya, Sudan, Syria (as such listing may be revised from time to time) or any country/region to which the U.S. has embargoed goods; or (ii) to anyone on the U.S. Treasury Department's list of Specially Designated Nations or the U.S. Commerce Department's Table of Denial Orders.Restricted Rights: Use, duplication or disclosure by the United States government is subject to the restrictions as set forth in the Rights in Technical Data and Computer Software Clauses in DFARS 252.227-7013(c) (1) (ii) and FAR 52.227-19(c) (2) as applicable.Other product and company names mentioned herein may be the trademarks of their respective owners.Any rights not expressly granted herein are reserved.Note: Sony Ericsson advises users to backup their personal data information.All illustrations are for illustration only and may not accurately depict the actual phone.Some products may display a 17-digit number when you press *#06#. The first 15 digits are the IMEI number, and the last 2 digits are software update number.Instruction symbolsThese symbols appear in the User guide.NoteTipWarningA service or function is network- or subscription-dependent. Contact your network operator for details.> Use a touch option or navigation key to scroll and select. See Navigation on page 14..FB8*BB$(ERRN3DJH0RQGD\2FWREHU30
5Getting startedGetting startedAssemblyBefore you start using your phone, you need to insert a SIM card and the battery.To insert the SIM card 1Remove the battery cover.2Slide the SIM card into its holder with the golden contacts facing down.To insert the battery 1Insert the battery with the label side down and the connectors facing each other.2Close and slide the battery cover into place.Turning on the phoneTo turn on the phone 1Press and hold down  .2Select a mode: •Normal mode – full functionality.•Flight mode – limited functionality.3Enter your SIM card PIN, if requested and select OK.4Select a language.5Select Cont. > Yes to use the setup wizard while settings are downloaded.If you want to correct a mistake when you enter your PIN, press  ..FB8*BB$(ERRN3DJH0RQGD\2FWREHU30
6Getting startedSIM cardThe SIM (Subscriber Identity Module) card, which you get from your network operator, contains information about your subscription. Always turn off your phone and detach the charger before you insert or remove the SIM card.PINYou may need a PIN (Personal Identification Number) to activate the services in your phone. Your PIN is supplied by your network operator. Each PIN digit appears as *, unless it starts with emergency number digits, for example, 112 or 911. You can see and call an emergency number without entering a PIN.Flight mode In Flight mode the network and radio transceivers are turned off to prevent disturbance to sensitive equipment.Startup screenThe startup screen appears when you turn your phone on. See Using pictures on page 46.StandbyAfter you have turned your phone on and entered your PIN, the name of the network operator appears. This view is called standby.You can save contacts on the SIM card before you remove it from your phone. See To copy names and numbers to the SIM card on page 25.If you enter the wrong PIN three times in a row, the SIM card is blocked. See SIM card lock on page 70.You can use the Bluetooth™ function in Flight mode..FB8*BB$(ERRN3DJH0RQGD\2FWREHU30
7Getting startedHelp in your phone Help and information are available in your phone. See Navigation on page 14.To use the setup wizard1From standby select Menu > Settings > the General tab > Setup wizard.2Select an option.To view information about functions•Scroll to a function and select Info, if available. In some cases, Info appears under Options.To view the phone demonstration•From standby select Menu > Entertainment > Demo tour.To view status information•From standby press the volume key up.Charge the batteryYour phone battery is partly charged when you buy it.Non-USB Charger (old type)USB Charger (new type)A AC adapterA1 AC adapter connectorA2 AC adapter USB socketBUSB cableB1 USB cable connectorB2 USB cable plugIt may take 30 minutes for the battery icon to appear on the screen.A1AA2B2BB1.FB8*BB$(ERRN3DJH0RQGD\2FWREHU30
8Getting startedUsing the USB chargerTo connect the charger and charge the battery1Connect the USB cable plug to the AC adapter USB socket, as shown in the above illustration. The USB cable is supplied with your phone.2Connect the USB cable connector to your phone. Press a key to view the charging status on the screen. It takes approximately 2.5 hours to fully charge the battery.To remove the charger1Charge your battery until the battery icon indicates a full charge. 2Tilt the USB charger connector upwards to remove it.Note:1The USB cable for the new USB charger shown in the illustration (Part. B in the new-type charger illustration) on page 7 is only intended for charging your phone. Do not use it for transferring data. 2The USB cable for the USB charger shown in the illustration (Part. B in the new-type charger illustration) is only intended for connection to the AC adapter (Part. A in the new-type charger illustration) to charge your phone. It must not be used for connection to a PC. It can only be used for charging your phone. Never use it for charging accessories.3Sony Ericsson strongly recommends that you use only Sony Ericsson branded original batteries, the part of power supply device in accordance with YD/T 1591-2006 specifications of Communications Industry Standards of P. R. China (Part A in the new-type charger illustration) and the USB cable supplied with your phone to charge the phone. The use of third-party products may decrease the performance of your phone and/or pose a risk to your health or safety. | 2.5 h.FB8*BB$(ERRN3DJH0RQGD\2FWREHU30
9Getting started4Sony Ericsson recommends that you never mix the use the new USB charger and the old non-USB charger. The phone with new-type charger in box cannot be charged with the old-type charger, and vice versa. The use of both the chargers may decrease the performance of your phone and/or pose a risk to your health or safety. You can use the phone during charging. You can charge the battery for more or less than 2.5 hours. Interrupted charging will not damage the battery.Use only Sony Ericsson branded original batteries intended for use with your mobile phone. If you use other batteries you may not be able to charge your phone..FB8*BB$(ERRN3DJH0RQGD\2FWREHU30
10 Getting startedPhone overview 78910111213141234561Ear speaker2Screen3Touch options4Activity menu key5Call key6Navigation key7Volume, digital zoom keys8C key (Clear)9End key10 Camera switch mode key11 Camera key12 Camera on/off key13 Silent key14 Connector for charger, handsfree and USB cable.FB8*BB$(ERRN3DJH0RQGD\2FWREHU30
11Getting started15161715 On/off key16 Camera lens cover17 Flash.FB8*BB$(ERRN3DJH0RQGD\2FWREHU30
12 Getting startedMenu overview PlayNow™* Monternet* EntertainmentOnline services*GamesTrackID™VideoDJ™PhotoDJ™MusicDJ™ Remote controlRecord soundDemo tourCyber-shot™ Messaging MediaWrite newInboxEmailWeb feedsDraftsOutboxSent messagesSaved messagesMy friends*Call voicemailTemplatesManage messagesSettingsAlarms Contacts RadioMyselfNew contact.FB8*BB$(ERRN3DJH0RQGD\2FWREHU30
13Getting startedCalls** OrganizerAll Answered Dialled MissedFile manager**ApplicationsCalendarTasksNotesSynchronizationTimerStopwatchCalculatorCode memoSettings**GeneralProfilesTime & dateLanguageUpdate serviceVoice controlNew eventsShortcutsFlight modeSecuritySetup wizardAccessibilityPhone statusMaster resetSounds & alertsRing volumeRingtoneSilent modeIncreasing ringVibrating alertMessage alertKey soundDisplayWallpaperThemesStartup screenScreen saverClock sizeBrightnessEdit line names*CallsSpeed dialSmart searchDivert callsSwitch to line 2*Manage callsVideo share*Time & cost*Show/hide my no.HandsfreeConnectivity*BluetoothUSBPhone nameNetwork sharingSynchronizationDevice managementMobile networksInternet settingsStreaming settingsMessage settings*Accessories* Some menus are operator-, network- and subscription-dependent.** You can use the navigation key to scroll between tabs in submenus. For more information, see Navigation on page 14..FB8*BB$(ERRN3DJH0RQGD\2FWREHU30
14 Getting startedNavigation The main menus are shown as icons. Some submenus include tabs. To navigate the phone menus1From standby select Menu.2Use the navigation key to move through the menus.To scroll between the tabs•Scroll to a tab by pressing the navigation key left or right.To use the touch options•Select an action shown at the bottom of the screen by pressing the left, centre or right touch option.To view options for an item•Select Options to, for example, edit.To return to standby•Press .To end a function•Press .To navigate your media1From standby select Media.2Use the navigation key to move up, down, left and right through the menus.Touch options.FB8*BB$(ERRN3DJH0RQGD\2FWREHU30
15Getting startedTo delete items•Press   to delete items such as numbers, letters, pictures and sounds.ShortcutsYou can use keypad shortcuts to go directly to a menu. Menu numbering starts from the top left icon and moves across and then down row by row.To go directly to a main menu•From standby select Menu and press  –  ,  ,   or  .To use navigation key shortcuts•From standby press  ,  ,  or   to go directly to a function.To edit a navigation key shortcut1From standby select Menu > Settings > the General tab > Shortcuts. 2Scroll to an option and select Edit.3Scroll to a menu option and select Shortc.Activity menuThe activity menu gives you quick access to certain functions.To open the activity menu•Press .Activity menu tabs•New events – missed calls and new messages. •Running apps – applications that are running in the background.•My shortcuts – add your favourite functions to access them quickly.•Internet – quick access to the Internet.File manager You can use the file manager to handle files saved in the phone memory or on a memory card.Memory cardYour phone supports Memory Stick Micro™ (M2™) or MicroSD™ memory card adding more storage space to your phone. It can also be used as a portable memory card with other compatible devices.You may have to purchase a memory card separately..FB8*BB$(ERRN3DJH0RQGD\2FWREHU30
16 Getting startedTo insert a memory card•Open the battery cover and insert the memory card with the golden contacts facing up.To remove a memory card•Open the battery cover and press the edge of the memory card to release and remove it.To view memory card options1From standby select Menu > Organizer > File manager > the On memory card tab.2Select Options.Handling filesYou can move and copy files between your phone, a computer and a memory card. Files are saved on the memory card first and then in the phone memory. Unrecognized files are saved in the Other folder.You can create subfolders to move or copy files to. You can select more than one or all the files in a folder at the same time for all folders except Games and Applications.If the memory is full, delete some content to create space.File manager tabsThe file manager is divided into three tabs, and icons indicate where the files are saved.•All files – all content in the phone memory and on a memory card•In phone – all content in the phone memory•On memory card – all content on a memory cardTo view information about files1From standby select Menu > Organizer > File manager.2Find a file and select Options > Information..FB8*BB$(ERRN3DJH0RQGD\2FWREHU30
17Getting startedTo move a file in the file manager1From standby select Menu > Organizer > File manager.2Find a file and select Options > Manage file > Move.3Select an option.To select more than one file in a folder1From standby select Menu > Organizer > File manager.2Scroll to a folder and select Open.3Select Options > Mark > Mark several.4For each file you want to mark, scroll to the file and select Mark.To delete a file from the file manager1From standby select Menu > Organizer > File manager.2Find the file and press  .Phone language You can select a language to use in your phone.To change the phone language1From standby select Menu > Settings > the General tab > Language > Phone language.2Select an option.Entering textYou can use multitap text input or T9™ Text Input   to enter text. The T9 Text Input method uses a built-in dictionary.To change text input method•When you enter text, press and hold down .To shift between capitals and lower-case letters•When you enter text, press  .To enter numbers•When you enter text, press and hold down  – .To enter full stops and commas•When you enter text, press  .To enter text using T9™ Text Input 1From standby select, for example, Menu > Messaging > Write new > Text message.2If   is not displayed, press and hold down   to change to T9 Text Input. 3Press each key only once, even if the letter you want is not the first letter on the key. For example, to write the word “Jane”, press  ,  ,  , . Write the whole word before looking at the suggestions..FB8*BB$(ERRN3DJH0RQGD\2FWREHU30
18 Getting started4Use   or   to view suggestions.5Press   to accept a suggestion.To enter text using multitap 1From standby select, for example, Menu > Messaging > Write new > Text message. 2If   is displayed, press and hold down  to change to multitap text input.3Press   –   repeatedly until the desired letter appears.4When a word is written, press   to add a space.To add words to the built-in dictionary1When you enter text using T9 Text Input, select Options > Spell word.2Write the word using multitap input and select Insert.Chinese inputThis mobile phone has different input methods for entering Chinese characters:•Stroke input• Pinyin inputYou can use these methods, for example, to enter Chinese names and Chinese short messages.Switching between Chinese input methodsIn the Chinese editing mode, you can select and switch quickly to another input method by pressing and holding .General instructionsRegardless of which input method you choose, your phone has a function to speed up the entry of Chinese characters. Whenever you enter a stroke or a Pinyin letter, a candidate row of the most frequently used characters containing that stroke or relating to that letter appears at the bottom of the screen. If the character you want is not displayed in the candidate row, press  to present another candidate row. Continue pressing   until the character you want is displayed. Alternatively, you can enter the next stroke or Pinyin letter and a new set of characters will immediately be displayed in the candidate row. To go back to the previous row, press  . To select a character in the candidate row, press the navigation key or press and hold the key corresponding to the number above the character you want to enter.Multitap input only applies when Latin characters are selected as writing language..FB8*BB$(ERRN3DJH0RQGD\2FWREHU30
19Getting startedStroke inputA Chinese character is built up of strokes. There are more than 30 basic strokes, which are grouped into 5 stroke categories. Each category is represented on the keypad by one of the keys   - . The Wild Card key  , is used when you are not sure of which stroke to use.Stroke categoriesThe 5 stroke categories are defined in the table below:NumberKeyStroke CategoryBasicStrokeStroke NameCharacterOver ⥟क೼ϗ໽Lift ⍋㑶⠵⢊дDown ЁϮϞ䮼ϥDown-Hook ᇣ∈ᠧᄤᡓShortSlope Down Ⳉⳳ䋼㤝LongLeft SlopeܿбЍ亢⠛Over Slope 佭गࣩৢ϶Shortleft Slope㗠义䴶ᄺ↋Dot ݁ᄺ䳋ᖗᗻRight Slope Ҏ☿জ䗕ᵫDown-Curved-Overಯ㽓䜝䝌Down-Over ቅᎼቃ↡ߊLeft Slope-OverМএ݀㑺㛑Left Slope-Dotཇ㽕དᎵᎶDown-Lift 㸷ҹ佁ᬊ䭓Right Slope-Hook៥៪⇥៤ӤDown-Over-HookᖗᖙᗱᖬDown-Over-Curved-Hook⬉г↯ܘᄨDown-Over-Left SlopeϧӴ䕀Down-Over-Down-Hook偀Ϣᓴো䌍Down-Over-Down哢哤Over-Hook ݭᄫⲂ䗮ܡNumber KeyStroke CategoryBasic StrokeStroke NameCharacter.FB8*BB$(ERRN3DJH0RQGD\2FWREHU30
20 Getting startedComponentsThe basic building units of Chinese characters are components that are made up of strokes. After entering the first two strokes of the desired character, the component and character candidates that started with that stroke are displayed in the candidate row.Using components is a fast method for entering complex characters.For example, to enter “ֵᙃ”1 Enter “ ”, “ ” and “ ”.2 Move the cursor to “ ֵ”, press  .Move the cursor to “ ᙃ”, press   again to select “ ᙃ”.Example of using the wild card keyThe wild card key  , is used to supplement unclear strokes in entering characters. If you want to enter “ Ѧ”,but you only know that “ϔ” is the first and the last stroke of the character and that the total number of strokes is four, enter  ,  ,  ,  . The character is displayed in the candidate row.Over-Down ষᏆ᠋к偼Over-Down-Hook࡯дгৠ∌Over-Left SlopeজПⱏ໮⼒Over-Down-Over-Left SlopeঞᵕᓋᓎOver-Left Slope-Curved-Hook䰓䯳䰜䙷䚼Over-Down-Over-HookЗ䗣哤䲑ᴼOver-Down-Over-DownߌCurved-Hook⢫䉍ᆊ䗤⢖Over-Down-Curved-HookЭб⪺亲亢Over-Down-Overᡩ⊓㠍ߍOver-Down-Lift䆱䅵䅸䆃? (Wild card key)NumberKeyStroke CategoryBasicStrokeStroke NameCharacterThe smaller candidates surrounded by dotted frames are components, and the bigger candidates without dotted frames are characters..FB8*BB$(ERRN3DJH0RQGD\2FWREHU30
21Getting startedPinyin inputPress the keys containing the required Pinyin letters, and the phone will make various proposals on the screen, according to the pronunciation rules of Mandarin.Below is the key mapping of Pinyin letters on the keypad. For example, to enter “ֵᙃ”1 Press , , .2 When “xin” is highlighted, press  orand select “ ֵ”, then press  .(If you want to enter any of the other suggested Pinyin combinations, scroll up or down to the desired combination, then press  ).3 Press   again to select “ ᙃ”, when “ᙃ” is highlighted.Fuzzy Pinyin Fuzzy Pinyin is an option for the Pinyin input method, which contains additional spelling alternatives. When in Pinyin input mode, press More > Writing options > Fuzzy Pinyin > On.Input punctuation, symbols and smiliesUnder any Chinese input mode, press , to see the table of punctuation marks, symbols and smilies. Use the navigation key to make a selection. Press   to enter a space into the text.Number Key Pinyin Lettera b cd e fg h ij k lm n op q r st u üw x y zOn the keypad, the letter ü is replaced by v..FB8*BB$(ERRN3DJH0RQGD\2FWREHU30
22 CallingCallingMaking and receiving callsYou need to turn on your phone and be within range of a network.To make a call1From standby enter a phone number (with international country/region code and area code, if applicable).2Press .To make international calls1From standby press   until a “+” sign appears.2Enter the country/region code, area code (without the first zero) and phone number. 3Press  .To re-dial a number•When Retry? appears select Yes.To answer a call•Press .To reject a call•Press .To change the ear speaker volume during a call•Press the volume key up or down.To mute the microphone during a call1Press and hold down  .2Press and hold down   again to resume.To turn the loudspeaker on during a call•Select SpkrOn.To view missed calls from standby•Press   and scroll to the New events tab and select a number.•Press   to open the call list.You can call numbers from your contacts and call list. See Contacts on page 23, and Call list on page 27. You can also use your voice to make calls. See Voice control on page 28.Do not hold your phone to your ear when waiting. When the call connects, your phone gives a loud signal.Do not hold your phone to your ear when using the loudspeaker. This could damage your hearing..FB8*BB$(ERRN3DJH0RQGD\2FWREHU30
23CallingEmergency calls Your phone supports international emergency numbers, for example, 112 and 911. These numbers can normally be used to make emergency calls in any country/region, with or without the SIM card inserted, if a GSM network is within range.To make an emergency call•From standby enter 112 (the international emergency number) and press .To view your local emergency numbers1From standby select Menu > Contacts.2Scroll to New contact and select Options > Special numbers > Emergency nos.ContactsYou can save names, phone numbers and personal information in Contacts. Information can be saved in the phone memory or on the SIM card.Default contactYou can choose which contact information is shown as default. If Phone contacts is selected as default, your contacts show all the information saved in Contacts. If you select SIM contacts as default, your contacts show names and numbers saved on the SIM card.To select default contacts1From standby select Menu >Contacts.2Scroll to New contact and select Options > Advanced > Default contacts.3Select an option.Phone contactsPhone contacts can contain names, phone numbers and personal information. They are saved in the phone memory.To add a phone contact1From standby select Menu > Contacts.2Scroll to New contact and select Add.3Enter the name and select OK.4Enter the number and select OK.5Select a number option.6Scroll between tabs and select the fields to add information.7Select Save.In some countries/regions, other emergency numbers may also be promoted. Your network operator may therefore have saved additional local emergency numbers on the SIM card..FB8*BB$(ERRN3DJH0RQGD\2FWREHU30
24 CallingCalling contactsTo call a phone contactTo call a contact written in Chinese characters1>Contacts. Then enter the entire multi-letter name, pure initial or mixed initial pinyin of Chinese contacts you want to call. For example:2 When the contact is highlighted, press   or   to select a number and press  .To call a contact written in Latin characters1>Contacts. Scroll to, or enter the first letters or all letters of the contact you want to call (a maximum of 10 letters).Initial Input 'A' input 'AM'          input 'AMY'2 When the contact is highlighted, press   or   to select a number and press  .Note: Phone supports Chinese and English contacts mixed search. When a contact is written in Latin characters, the entered letter can reach the Latin contact you want to call; when a contact is written in Chinese characters, the entered letter can reach the pinyin of Chinese contact you want to call.Initial status Full name search Pure initial search Mixed initial search.FB8*BB$(ERRN3DJH0RQGD\2FWREHU30
25CallingTo call with Smart search1From standby press   –   to enter a contact name or a phone number. All entries which match the sequence of digits or letters are shown in a list.2Scroll to a contact or a phone number and press  .To turn Smart search on or off 1From standby select Menu > Settings > the Calls tab > Smart search.2Select an option.Editing contactsTo add information to a phone contact 1From standby select Menu > Contacts.2Scroll to a contact and select Options > Edit contact.3Scroll between the tabs and select Add.4Select an option and an item to add.5Select Save.To copy names and numbers to the SIM card1From standby select Menu > Contacts.2Scroll to New contact and select Options > Advanced > Copy to SIM.3Select an option.To automatically save names and phone numbers on the SIM card1From standby select Menu > Contacts.2Scroll to New contact and select Options > Advanced > Auto save on SIM.3Select an option.To save contacts on a memory card1From standby select Menu > Contacts.2Scroll to New contact and select Options > Advanced > Back up to m. card.SIM contactsSIM contacts can contain names and numbers only. They are saved on the SIM card.To add a SIM contact1From standby select Menu > Contacts. 2Scroll to New contact and select Add.3Enter the name and select OK.4Enter the number and select OK.5Select a number option and add more information, if available.6Select Save.If your subscription supports Calling Line Identification (CLI) service, you can assign personal ringtones to contacts.When you copy all contacts from your phone to the SIM card, all existing SIM card information is replaced..FB8*BB$(ERRN3DJH0RQGD\2FWREHU30
26 CallingTo call a SIM contact1From standby select Menu > Contacts.2Scroll to a contact and press  .To copy names and numbers to phone contacts1From standby select Menu > Contacts.2Scroll to New contact and select Options > Advanced > Copy from SIM.3Select an option.Deleting contactsTo delete a contact1From standby select Menu > Contacts.2Scroll to a contact and press  . To delete all phone contacts1From standby select Menu > Contacts.2Scroll to New contact and select Options > Advanced > Delete all contacts.Sending contactsTo send a contact1From standby select Menu > Contacts.2Scroll to a contact and select Options > Send contact.3Select a transfer method.Memory statusThe number of contacts you can save in your phone or on the SIM card depends on available memory.To view memory status1From standby select Menu > Contacts.2Scroll to New contact and select Options > Advanced > Memory status.Synchronizing contactsContacts can be synchronized with a Microsoft Exchange Server (Microsoft® Outlook®). For more information see Synchronizing on page 62.MyselfYou can enter information about yourself and, for example, send your business card.To enter Myself information1From standby select Menu > Contacts.2Scroll to Myself and select Open.3Scroll to an option and edit the information.4Select Save.Make sure the receiving device supports the transfer method you select..FB8*BB$(ERRN3DJH0RQGD\2FWREHU30
27CallingTo add your own business card1From standby select Menu > Contacts.2Scroll to Myself and select Open.3Scroll to My contact info and select Add > Create new.4Scroll between tabs and select the fields to add information.5Enter the information and select Save.To send your business card1From standby select Menu > Contacts.2Scroll to Myself and select Open.3Scroll to My contact info and select Send.4Select a transfer method.Groups You can create a group of phone numbers and email addresses from Phone contacts to send messages to. See Messaging on page 34. You can also use groups (with phone numbers) when you create accepted callers lists. See Accept calls on page 32.To create a group of numbers and email addresses1From standby select Menu > Contacts.2Scroll to New contact and select Options > Groups.3Scroll to New group and select Add.4Enter a name for the group and select Cont.5Scroll to New and select Add.6For each contact phone number or email address you want to mark, scroll to it and select Mark.7Select Cont. > Done.Call listYou can view information about recent calls.To call a number from the call list1From standby press   and scroll to a tab.2Scroll to a name or a number and press .To add a call list number to contacts1From standby press   and scroll to a tab.2Scroll to the number and select Save.3Select New contact to create a new contact or select an existing contact to add the number to.To enter a symbol select Options > Add symbol > Insert.Make sure the receiving device supports the transfer method you select..FB8*BB$(ERRN3DJH0RQGD\2FWREHU30
28 CallingTo clear the call list1From standby press  .2Scroll to the All tab and select Options > Delete all.Speed dialSpeed dialling lets you select nine contacts that you can dial quickly. The contacts can be saved in positions 1-9.To add contacts to speed dial numbers1From standby select Menu > Contacts.2Scroll to New contact and select Options > Speed dial.3Scroll to a position number and select Add.4Select a contact.To speed dial•From standby enter the position number and press  .VoicemailIf your subscription includes an answering service, callers can leave a voicemail message when you cannot answer a call.To enter your voicemail number1From standby select Menu > Messaging > Settings > Voicemail number.2Enter the number and select OK.To call your voicemail service•From standby press and hold down .Voice control By creating voice commands you can:•Voice dial – call someone by saying their name•Activate voice dialling by saying a “magic word”•Answer and reject calls when you use a handsfreeTo record a voice command using voice dialling1From standby select Menu > Settings > the General tab > Voice control > Voice dialling > Activate.2Select Yes > New voice command and select a contact. If the contact has more than one number, select the number to add the voice command to.3Record a voice command such as “John mobile”..FB8*BB$(ERRN3DJH0RQGD\2FWREHU30
29Calling4Follow the instructions that appear. Wait for the tone and say the command to record. The voice command is played back to you.5If the recording sounds OK, selectYes. If not, select No and repeat steps 3 and 4.To re-record a voice command1From standby select Menu > Settings > the General tab > Voice control > Voice dialling > Edit names.2Scroll to a command and select Options > Replace voice.3Wait for the tone and say the command.Voice diallingYou can hear your recorded contact name when you receive a call from that contact.To voice dial1From standby press and hold down a volume key.2Wait for the tone and say a recorded name, for example “John mobile”. The name is played back to you and the call is connected.The magic word You can record and use a voice command as a magic word to activate voice dialling without pressing any keys. Your handsfree must be connected to your phone when using the magic word.To activate and record the magic word1From standby select Menu > Settings > the General tab > Voice control > Magic word > Activate.2Follow the instructions that appear and select Cont. Wait for the tone and say the magic word.3Select Yes to accept or No for a new recording.4Follow the instructions that appear and select Cont.5Select where your magic word is to be activated.To make a call using the magic word1In standby make sure   is visible.2Say the magic word.3Wait for the tone and say a voice command.Voice commands are saved in the phone memory only. They cannot be used in another phone.You should choose a long, unusual word or phrase that can easily be distinguished from ordinary background speech. Bluetooth handsfree does not support this feature..FB8*BB$(ERRN3DJH0RQGD\2FWREHU30
30 CallingVoice answering When you use a handsfree, you can answer or reject incoming calls with your voice.To activate voice answering and record voice answer commands1From standby select Menu > Settings > the General tab > Voice control > Voice answer > Activate.2Follow the instructions that appear and select Cont. Wait for the tone and say “Answer”, or another word.3Select Yes to accept or No for a new recording.4Follow the instructions that appear and select Cont. Wait for the tone and say “Busy”, or another word.5Select Yes to accept or No for a new recording.6Follow the instructions that appear and select Cont.7Select where your voice answering is to be activated.To answer a call using voice commands•Say “Answer”.To reject a call using voice commands•Say “Busy”.Diverting callsYou can divert calls, for example, to an answering service.Divert call optionsStandard options are:•Divert always – divert all your calls•When busy – if a call is ongoing•Not reachable – if your phone is turned off or unreachable•No reply – if a call is not answered in a specified timeTo divert calls1From standby select Menu > Settings > the Calls tab > Divert calls.2Select a call type and a divert option.3Select Activate.4Enter the number to divert calls to and select OK.When Restrict calls is used, some divert call options are not available. See Restricted dialling on page 33..FB8*BB$(ERRN3DJH0RQGD\2FWREHU30
31CallingMore than one callYou can handle more than one call at a time. For example, you can put an ongoing call on hold, while you make or answer a second call. You can also switch between the two calls. You cannot answer a third call without ending one of the first two calls.Call waitingWhen call waiting is used, you hear a beep if you receive a second call.To activate call waiting •From standby select Menu > Settings > the Calls tab > Manage calls > Call waiting > Activate.To make a second call1During the call, select Options > Hold. This puts the ongoing call on hold.2Enter the number to call and select Options > Add call.To answer a second call•During the call, press  . This puts the ongoing call on hold.To reject a second call•During the call, press   and continue with the ongoing call.To end an ongoing call and answer a second call•During the call, select Replace active call.Handling two voice callsYou can have calls ongoing and on hold at the same time.To switch between two calls•During the call, press  .To join two calls•During the call, select Options > Join calls.To connect two calls •During the call, select Options > Transfer call. You are disconnected from both calls (operator dependent).To end an ongoing call and return to the call on hold•First press   and then  .Receiving a third voice callYou cannot answer a third call without ending one of the first two calls or joining them..FB8*BB$(ERRN3DJH0RQGD\2FWREHU30
32 CallingConference callsWith a conference call, you can have a joint conversation with up to five people.To add a new participant1During the call, select Options > Hold. This puts the joined calls on hold.2Select Options > Add call.3Enter the number to call and press  .4Select Options > Join calls to add the new participant.5Repeat this task to add more participants.To release a participant1Select Options > Release part.2Select the participant to release.To have a private conversation1During the call, select Options > Talk to and select the participant to talk to.2To resume the conference call, select Options > Join calls.My numbersYou can view, add and edit your own phone numbers.To check your phone numbers1From standby select Menu > Contacts.2Scroll to New contact and select Options > Special numbers > My numbers.3Select an option.Accept calls You can choose to receive calls from certain phone numbers only.To add numbers to the accepted callers list1From standby select Menu > Settings > the Calls tab > Manage calls > Accept calls > Only from list.2Scroll to New and select Add.3Scroll to a contact or select Groups.To accept all calls•From standby select Menu > Settings > the Calls tab > Manage calls > Accept calls > All callers.See Groups on page 27..FB8*BB$(ERRN3DJH0RQGD\2FWREHU30
33CallingRestricted diallingYou can restrict outgoing and incoming calls. A password from your service provider is required. Restrict calls optionsStandard options are:•All outgoing – all outgoing calls•Outgoing intl – all outgoing international calls•Outgoing intl roam. – all outgoing international calls except to your home country/region•All incoming – all incoming calls•Inc. when roaming – all incoming calls when you are abroadTo restrict calls1From standby select Menu > Settings > the Calls tab > Manage calls > Restrict calls.2Select an option.3Select Activate.4Enter your password and select OK.Fixed dialling Fixed dialling allows calls to be made only to certain numbers saved on the SIM card. The fixed numbers are protected by your PIN2.Partial numbers can be saved. For example, saving 0123456 allows calls to be made to all numbers starting with 0123456.To use fixed dialling1From standby select Menu > Contacts.2Scroll to New contact and select Options > Special numbers > Fixed dialling > Activate.3Enter your PIN2 and select OK.4Select OK again to confirm.To save a fixed number1From standby select Menu > Contacts.2Scroll to New contact and select Options > Special numbers > Fixed dialling > Fixed numbers > New number.3Enter the information and select Save.If you divert incoming calls, you cannot use some restrict calls options.When fixed dialling is used, you cannot view or manage any phone numbers saved on the SIM card but you can still call the international emergency number, 112..FB8*BB$(ERRN3DJH0RQGD\2FWREHU30

Navigation menu