Sony A1052101 GSM/EDGE mobile phone with Bluetooth and AGPS User Manual W760c Deena UG En China
Sony Mobile Communications Inc GSM/EDGE mobile phone with Bluetooth and AGPS W760c Deena UG En China
Sony >
Contents
- 1. 08 user guide part 1
- 2. 08 user guide part 2
08 user guide part 1

Congratulations on your purchase of the Sony Ericsson W760c.
A slim and stylish phone with everything you need to enjoy
your music wherever you go.
For additional phone content, go to
www.sonyericsson.com/fun. Register now to get a suite of
tools, free online storage, special offers, news and competitions
at www.sonyericsson.com/myphone.
For product support, go to www.sonyericsson.com/support.
:FB'HHQDB8*B(Q&KLQDERRN3DJH7XHVGD\-XQH$0

Accessories – More for your phone
Stereo Bluetooth™ Headset
HBH-DS205
Enjoy wireless music without missing a call.
Active Speaker MAS-100
Share your music while protecting your
phone.
Portable Bluetooth™ Speaker
MBS-100
A wireless sphere of music.
These accessories can be purchased separately but may not be available in every
market. To view the full range go to www.sonyericsson.com/accessories.
:FB'HHQDB8*B(Q&KLQDERRN3DJH7XHVGD\-XQH$0

1Contents
Contents
Getting started ................... 6
Assembly ........................................ 6
Turning on the phone ..................... 7
Help ................................................ 8
Charge the battery .......................... 9
Phone overview ............................ 11
Menu overview .............................. 13
Navigation ..................................... 15
Phone language ............................ 17
Entering text ................................. 17
Chinese input ................................ 18
Stroke input .................................. 19
Pinyin input ................................... 21
Walkman® and music ....... 22
Transferring content to and
from a computer ........................... 22
Stereo portable handsfree ............ 22
Walkman® player ......................... 23
PlayNow™ .................................... 26
TrackID™ ...................................... 26
Online music and video clips ........ 26
Calling ................................ 27
Making and receiving calls ........... 27
Contacts ....................................... 29
Call list .......................................... 32
Speed dial ..................................... 32
Voicemail ...................................... 32
Voice control ................................. 33
More than one call ........................ 34
Restricted dialing .......................... 36
Call time and cost ......................... 36
Showing or hiding your
phone number .............................. 36
Messaging......................... 37
Text messages .............................. 37
Picture messages ......................... 38
Message options .......................... 39
Voice messages ............................ 39
Email ............................................. 40
My friends ..................................... 41
Area and cell information .............. 43
Imaging ............................. 43
Camera and video recorder .......... 43
Using the camera .......................... 44
Camera icons and settings ........... 44
Transferring pictures ..................... 45
Pictures ......................................... 45
PhotoDJ™ and VideoDJ™ ........... 46
:FB'HHQDB8*B(Q&KLQDERRN3DJH7XHVGD\-XQH$0

2Contents
Internet............................... 47
Internet security and
certificates .................................... 48
Web feeds ..................................... 48
GPS .................................... 49
Using the GPS .............................. 49
More GPS features ....................... 50
Tracker .......................................... 51
Entertainment .................... 53
Video player .................................. 53
Radio ............................................ 53
Ringtones and melodies ............... 53
MusicDJ™ .................................... 54
Sound recorder ............................. 54
Games .......................................... 54
Applications .................................. 55
Connectivity....................... 56
Settings ......................................... 56
Phone name .................................. 56
Bluetooth™ wireless
technology .................................... 56
Using the USB cable .................... 58
Synchronizing ............................... 59
Update service .............................. 61
More features.................... 62
Flight mode ................................... 62
File manager ................................. 63
Alarms ........................................... 63
Calendar ....................................... 64
Notes ............................................ 65
Tasks ............................................ 66
Profiles .......................................... 66
Time and date ............................... 66
Theme ........................................... 67
Main menu layout ......................... 67
Locks ............................................ 67
Troubleshooting................ 69
Common questions ...................... 69
Error messages ............................. 71
Important information....... 72
Guidelines for Safe and
Efficient Use .................................. 72
Memory card ................................ 76
End User Licence Agreement ....... 76
Limited Warranty .......................... 77
FCC Statement ............................. 79
Declaration of Conformity
for W760c ..................................... 80
Index ................................. 81
:FB'HHQDB8*B(Q&KLQDERRN3DJH7XHVGD\-XQH$0

3
Sony Ericsson W760c
GSM EDGE 850/900/1800/1900
This User guide is published by Sony Ericsson
Mobile Communications AB or its local affiliated
company, without any warranty. Improvements
and changes to this User guide necessitated by
typographical errors, inaccuracies of current
information, or improvements to programs and/or
equipment, may be made by Sony Ericsson Mobile
Communications AB at any time and without notice.
Such changes will, however, be incorporated into
new editions of this User guide.
All rights reserved.
©Sony Ericsson Mobile Communications AB, 2007
Publication number: 1209-8694.1
Please note:
Some of the services in this User guide are not
supported by all networks. This also applies to the
GSM International Emergency Number 112.
Please contact your network operator or service
provider if you are in doubt whether you can use
a particular service or not.
Please read the Guidelines for safe and efficient use
and the Limited warranty chapters before you use
your phone.
Your phone has the capability to download, store
and forward additional content, for example,
ringtones. The use of such content may be restricted
or prohibited by rights of third parties, including but
not limited to restriction under applicable copyright
laws. You, and not Sony Ericsson, are entirely
responsible for additional content that you download
to or forward from your phone. Prior to your use
of any additional content, please verify that your
intended use is properly licensed or is otherwise
authorized. Sony Ericsson does not guarantee
the accuracy, integrity or quality of any additional
content or any other third party content. Under no
circumstances will Sony Ericsson be liable in any
way for your improper use of additional content
or other third party content.
Smart-Fit Rendering is a trademark or a registered
trademark of ACCESS Co., Ltd.
Bluetooth is a trademark or a registered trademark
of Bluetooth SIG Inc. and any use of such mark by
Sony Ericsson is under license.
The Liquid Identity logo, SensMe, PlayNow, MusicDJ,
PhotoDJ, TrackID and VideoDJ are trademarks
or registered trademarks of Sony Ericsson Mobile
Communications AB.
TrackID™ is powered by Gracenote Mobile
MusicID™. Gracenote and Gracenote Mobile
MusicID are trademarks or registered trademarks
of Gracenote, Inc.
Lotus Notes is a trademark or a registered trademark
of International Business Machines Corporation.
Sony, Memory Stick Micro™, M2™ and WALKMAN
are trademarks or registered trademarks of Sony
Corporation.
SyncML is a trademark or registered trademark
of Open Mobile Alliance LTD.
Ericsson is a trademark or registered trademark
of Telefonaktiebolaget LM Ericsson.
Adobe Photoshop Album Starter Edition is
a trademark or registered trademark of Adobe
Systems Incorporated in the United States and/or
other countries/regions.
Microsoft, ActiveSync, Windows, Outlook, and
Vista are registered trademarks or trademarks of
Microsoft Corporation in the United States and/or
other countries/regions.
T9™ Text Input is a trademark or a registered
trademark of Tegic Communications. T9™ Text
Input is licensed under one or more of the following:
U.S. Pat. Nos. 5,818,437, 5,953,541, 5,187,480,
5,945,928, and 6,011,554; Canadian Pat. No.
1,331,057, United Kingdom Pat. No. 2238414B;
Hong Kong Standard Pat. No. HK0940329; Republic
of Singapore Pat. No. 51383; Euro.Pat. No. 0 842
463(96927260.8) DE/DK, FI, FR, IT, NL, PT, ES, SE,
GB; and additional patents are pending worldwide.
:FB'HHQDB8*B(Q&KLQDERRN3DJH7XHVGD\-XQH$0

4
Java and all Java based trademarks and logos are
trademarks or registered trademarks of Sun
Microsystems, Inc. in the U.S. and other countries/
regions.
End-user license agreement for Sun™ Java™
J2ME™.
Restrictions: Software is confidential copyrighted
information of Sun and title to all copies is retained
by Sun and/or its licensors. Customer shall not
modify, decompile, disassemble, decrypt, extract,
or otherwise reverse engineer Software. Software
may not be leased, assigned, or sublicensed, in
whole or in part.
Export Regulations: This product, including any
software or technical data contained in or
accompanying the product, may be subject to
U.S. export control laws, including the U.S. Export
Administration Act and its associated regulations
and the U.S. sanctions programs administered by
the U.S. Treasury Department’s Office of Foreign
Assets Control, and may be additionally subject to
export or import regulations in other countries. The
user and any possessor of the product agrees to
comply strictly with all such regulations and
acknowledges that it is their responsibility to obtain
any required licenses to export, re-export, or import
this product. Without limitation this product, including
any software contained therein, may not be
downloaded, or otherwise exported or re-exported
(i) into, or to a national or resident of, or an entity in,
Cuba, Iraq, Iran, North Korea, Sudan, Syria (as
such listing may be revised from time to time) or
any country to which the U.S. has embargoed
goods; or (ii) to any person or entity on the U.S.
Treasury Department’s list of Specially Designated
Nationals or (iii) any person or entity on any other
export prohibition list that may be maintained from
time to time by the United States Government,
including but not limited to the U.S. Commerce
Department’s Denied Persons List or Entity List,
or the U.S. State Department’s Nonproliferation
Sanctions List.
Restricted Rights: Use, duplication or disclosure
by the United States government is subject to the
restrictions as set forth in the Rights in Technical
Data and Computer Software Clauses in DFARS
252.227-7013(c) (1) (ii) and FAR 52.227-19(c) (2)
as applicable.
This product is protected by certain intellectual
property rights of Microsoft. Use or distribution of
such technology outside of this product is prohibited
without a license from Microsoft.
Content owners use Windows Media digital rights
management technology (WMDRM) to protect their
intellectual property, including copyrights. This
device uses WMDRM software to access WMDRM
protected content. If the WMDRM software fails to
protect the content, content owners may ask
Microsoft to revoke the software’s ability to use
WMDRM to play or copy protected content.
Revocation does not affect unprotected content.
When you download licenses for protected content,
you agree that Microsoft may include a revocation
list with the licenses. Content owners may require
you to upgrade WMDRM to access their content.
If you decline an upgrade, you will not be able to
access content that requires the upgrade.
With respect to a Licensee offering MPEG-4 Video
Decoders and/or Encoders the following notice
shall be given: This product is licensed under the
MPEG-4 visual patent portfolio license for the
personal and non-commercial use of a consumer
for (i) encoding video in compliance with the MPEG-4
visual standard (“MPEG-4 video”) and/or (ii) decoding
MPEG-4 video that was encoded by a consumer
engaged in a personal and noncommercial activity
and/or was obtained from a video provider licensed
by MPEG LA to provide MPEG-4 video. No license
is granted or shall be implied for any other use.
Additional information including that relating to
promotional, internal and commercial uses and
licensing may be obtained from MPEG LA, LLC.
See http://www.mpegla.com.
:FB'HHQDB8*B(Q&KLQDERRN3DJH7XHVGD\-XQH$0

5
Notice Required for the License Granted under
Articles 2.1 and 2.6. As a condition to the licenses
granted pursuant to Articles 2.1 and 2.6 hereof,
Licensee agrees to provide to any party that receives
from Licensee an AVC Royalty Product the following
notice: This product is licensed under the AVC patent
portfolio license for the personal and non-commercial
use of a consumer to (i) encode video in compliance
with the AVC standard (“AVC video”) and/or (ii)
decode AVC video that was encoded by a consumer
engaged in a personal and non-commercial activity
and/or was obtained from a video was obtained
from a video provider licensed to provide AVC video.
No license is granted or shall be implied for any
other use. Additional information may be obtained
from MPEG LA, L.L.C. See http://www.mpegla.com.
MPEG Layer-3 audio decoding technology licensed
from Fraunhofer IIS and Thomson.
Other product and company names mentioned
herein may be the trademarks of their respective
owners.
Any rights not expressly granted herein are reserved.
Note: Sony Ericsson advises users to backup their
personal data information.
All illustrations are for illustration only and may not
accurately depict the actual phone.
Some products may display a 17-digit number
when you press *#06#. The first 15 digits are the
IMEI number, and the last 2 digits are software
update number.
Instruction symbols
These symbols may appear in the
User guide.
Note
Tip
Warning
A service or function is network-
or subscription-dependent.
Contact your network operator
for details.
> Use a selection or navigation
key to scroll and select. See
Navigation on page 15.
:FB'HHQDB8*B(Q&KLQDERRN3DJH7XHVGD\-XQH$0
6Getting started
Getting started
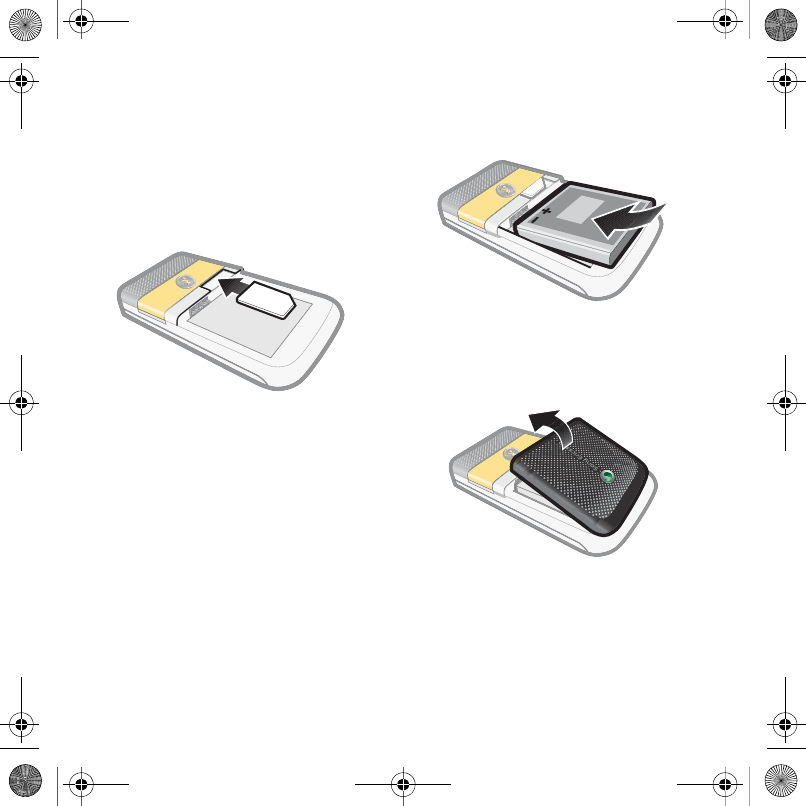
Assembly
Before you start using your phone,
you need to insert a SIM card and the
battery.
To insert the SIM card
1Remove the battery cover.
2Slide the SIM card into its holder with
the gold-colored contacts facing down.
To insert the battery
1Insert the battery with the label side up
and the connectors facing each other.
2Slide the battery cover into place.
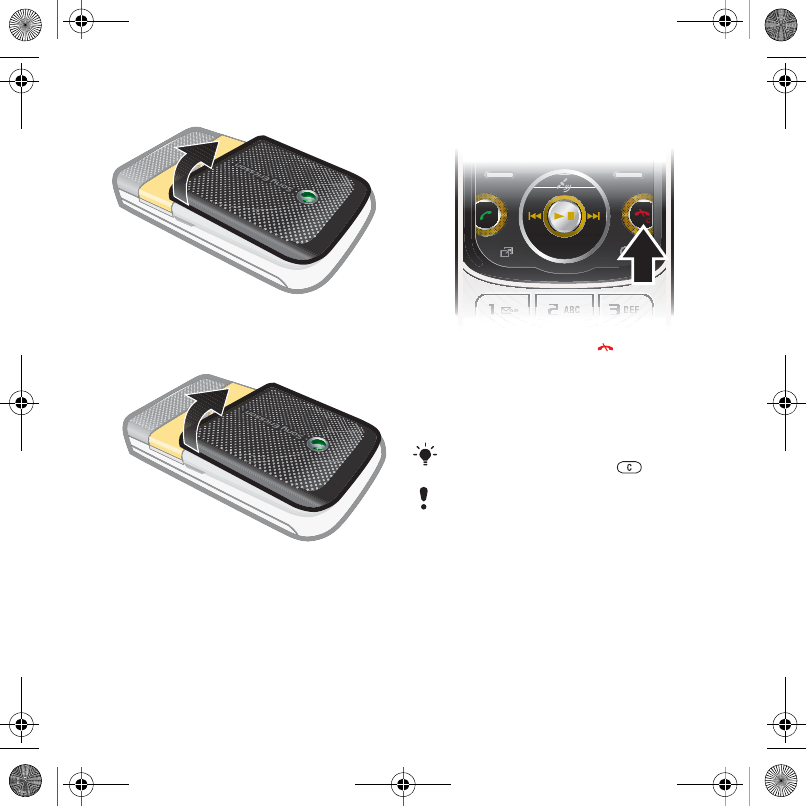
To attach the battery cover
1Align the tabs on the back of the
battery cover with the phone slots.
2Snap the cover into place on both sides.
:FB'HHQDB8*B(Q&KLQDERRN3DJH7XHVGD\-XQH$0
7Getting started
To remove the battery cover
•Use the slots to detach cover.
To remove the SIM card
1Remove the battery cover.
2Remove the SIM card from its holder.
Turning on the phone
To turn on the phone
1Press and hold down .
2Enter your SIM card PIN, if requested
and select OK.
3Select a language.
4Select Yes to use the setup wizard.
SIM card
The SIM (Subscriber Identity Module)
card, which you get from your network
operator, contains information about
your subscription. Always turn off your
phone and detach the charger before
you insert or remove the SIM card.
If you want to correct a mistake when
you enter your PIN, press .
Before turning the phone off, you must
return to standby.
:FB'HHQDB8*B(Q&KLQDERRN3DJH7XHVGD\-XQH$0
8Getting started
PIN
You may need a PIN (Personal
Identification Number) to activate
the services in your phone. Your PIN
is supplied by your network operator.
Each PIN digit appears as *, unless it
starts with emergency number digits,
for example, 112 or 911. You can see
and call an emergency number without
entering a PIN.
Startup screen
The startup screen appears when you
turn your phone on. See Using pictures
on page 46.
Standby
After you have turned your phone on
and entered your PIN, the name of the
network operator appears. This view
is called standby.
Help
In addition to this User guide, Getting
started guides and more information
are available at
www.sonyericsson.com/support.
Help in your phone
Help and information are available
in your phone. See Navigation on
page 15.
To view tips and tricks
1From standby select Menu > Settings
> the General tab > Setup wizard.
2Select Tips and tricks.
To view information about functions
•Scroll to a function and select Info, if
available. In some cases, Info appears
under Options.
To view the phone demonstration
•From standby select Menu
> Entertainment > Demo tour.
To view status information
•From standby press the volume key up.
You can save contacts on the SIM card
before you remove it from your phone.
See To copy names and numbers to the
SIM card on page 30.
If you enter the wrong PIN three times in
a row, the SIM card is blocked. See SIM
card lock on page 67.
:FB'HHQDB8*B(Q&KLQDERRN3DJH7XHVGD\-XQH$0
9Getting started
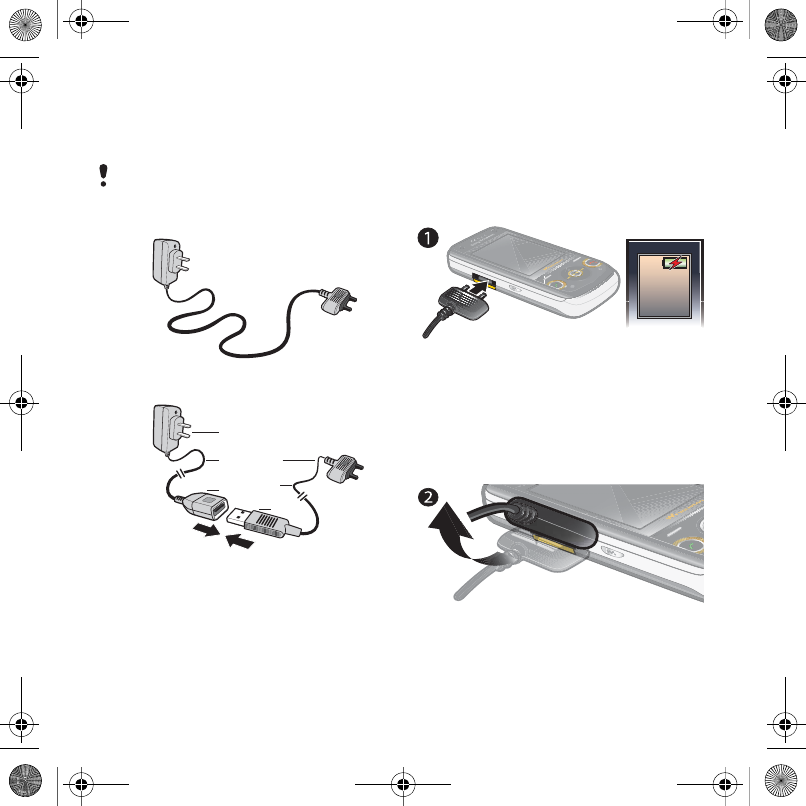
Charge the battery
Your phone battery is partly charged
when you buy it.
Non-USB Charger (old type)
USB Charger (new type)
AAC adapter
A1 AC adapter connector
A2 AC adapter USB socket
BUSB cable
B1 USB cable connector
B2 USB cable plug
Using the USB charger
To connect the charger and charge
the battery
1Connect the USB cable plug to the AC
adapter USB socket, as shown in the
above illustration. The USB cable is
supplied with your phone.
2Connect the USB cable connector to
your phone. Press a key to view the
charging status on the screen. It takes
approximately 2.5 hours to fully charge
the battery.
To remove the charger
1Charge your battery until the battery
icon indicates a full charge.
2Tilt the USB charger connector upwards
to remove it.
It may take 30 minutes for the battery
icon to appear on the screen.
A1
A
A2
B2
B
B1
:FB'HHQDB8*B(Q&KLQDERRN3DJH7XHVGD\-XQH$0
10 Getting started
Note:
1The USB cable for the new USB charger
shown in the illustration (Part. B in the
new-type charger illustration) on page 9
is only intended for charging your
phone. Do not use it for transferring
data.
2The USB cable for the USB charger
shown in the illustration (Part. B in the
new-type charger illustration) is only
intended for connection to the AC
adapter (Part. A in the new-type charger
illustration) to charge your phone. It
must not be used for connection to
a PC. It can only be used for charging
your phone. Never use it for charging
accessories.
3Sony Ericsson strongly recommends
that you use only Sony Ericsson
branded original batteries, the part
of power supply device in accordance
with YD/ T 1591-2006 specifications
of Communications Industry
Standards of P. R. China (Part A in the
new-type charger illustration) and the
USB cable supplied with your phone
to charge the phone. The use of third-
party products may decrease the
performance of your phone and/or
pose a risk to your health or safety.
4Sony Ericsson recommends that
you never mix the use the new USB
charger and the old non-USB charger.
The phone with new-type charger in
box cannot be charged with the old-
type charger, and vice versa. The use
of both the chargers may decrease the
performance of your phone and/or pose
a risk to your health or safety.
You can use the phone during charging.
You can charge the battery for more or
less than 2.5 hours.
Interrupted charging will not damage the
battery.
Use only Sony Ericsson branded original
batteries intended for use with your mobile
phone. If you use other batteries you may
not be able to charge your phone.
:FB'HHQDB8*B(Q&KLQDERRN3DJH7XHVGD\-XQH$0
11Getting started
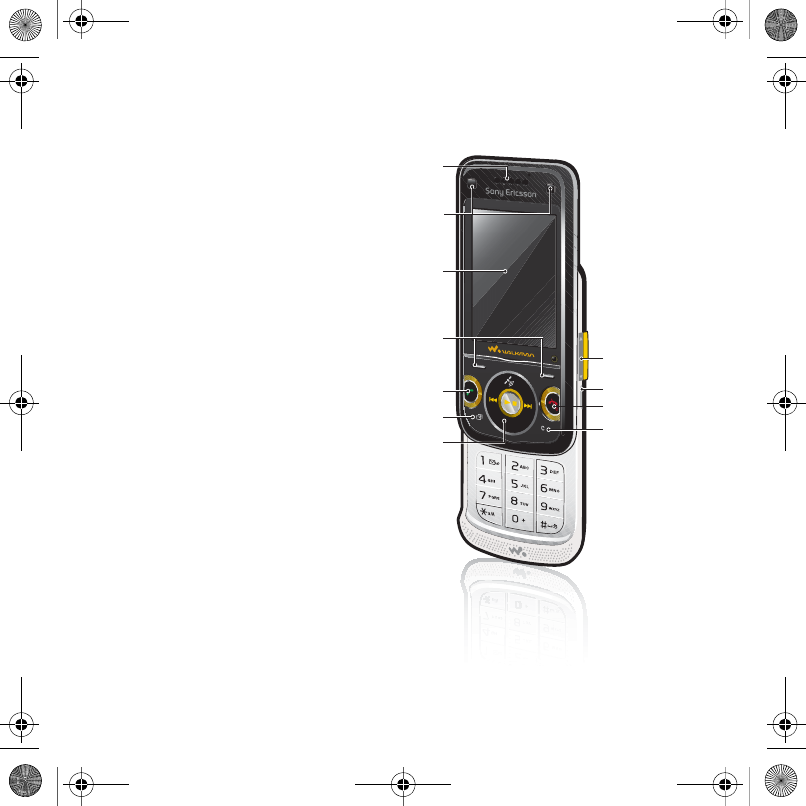
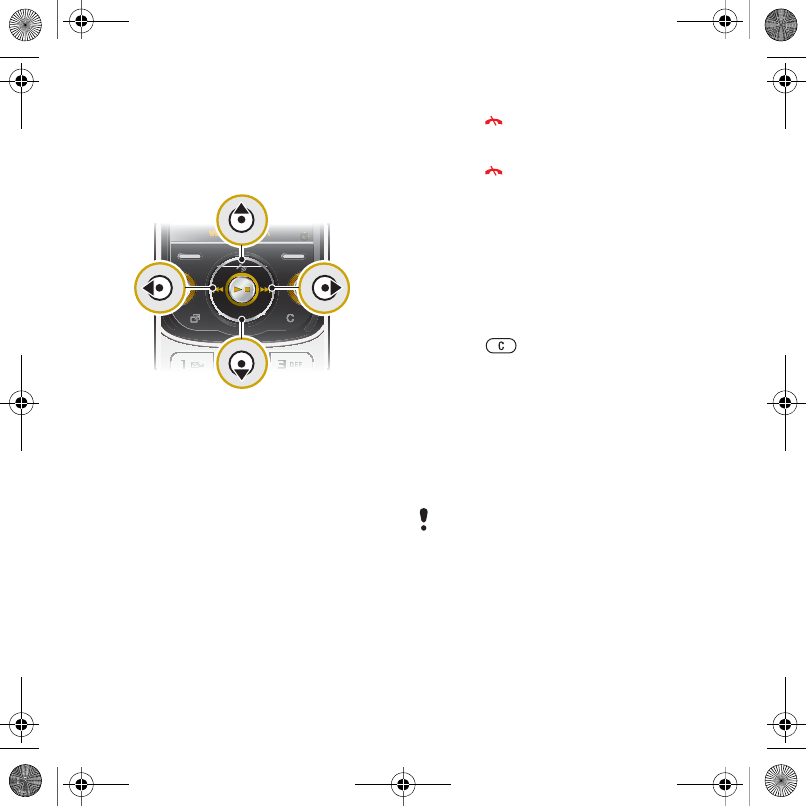
Phone overview
8
9
10
11
1
3
2
4
7
5
6
1Ear speaker
2Photo keys
3Screen
4Selection keys
5Call key
6Activity menu key
7Navigation key
8Volume keys
9Battery cover slot
10 End key, on/off key
11 C key (Clear)
:FB'HHQDB8*B(Q&KLQDERRN3DJH7XHVGD\-XQH$0
12 Getting started
12
13
14
15
16
17
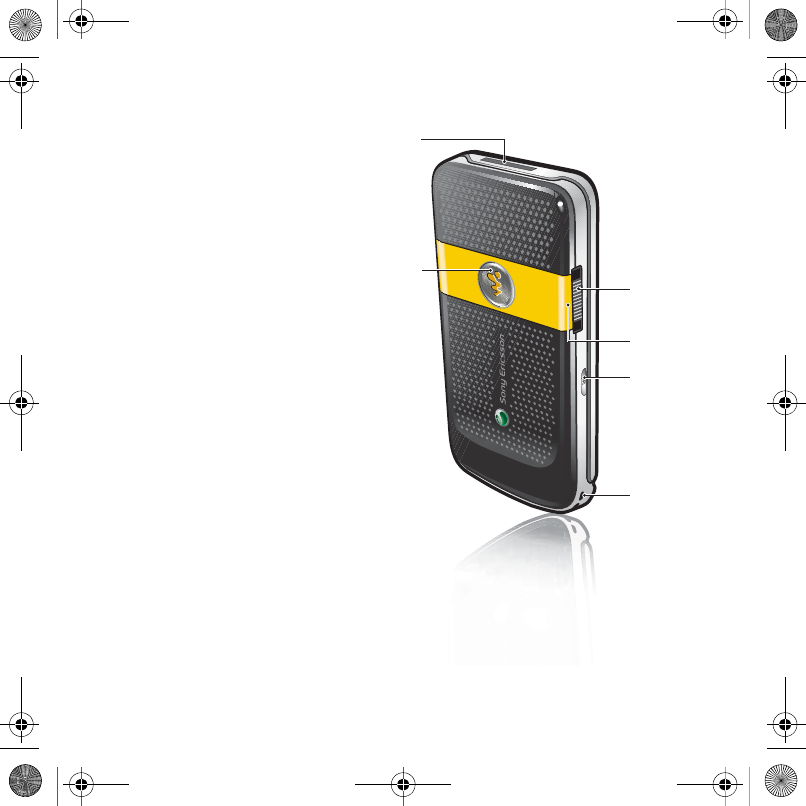
12 Memory card slot
13 Charging indicator
14 Connector for charger,
handsfree and USB cable
15 GPS antenna
16 Walkman® key
17 Strap holder
:FB'HHQDB8*B(Q&KLQDERRN3DJH7XHVGD\-XQH$0
13Getting started
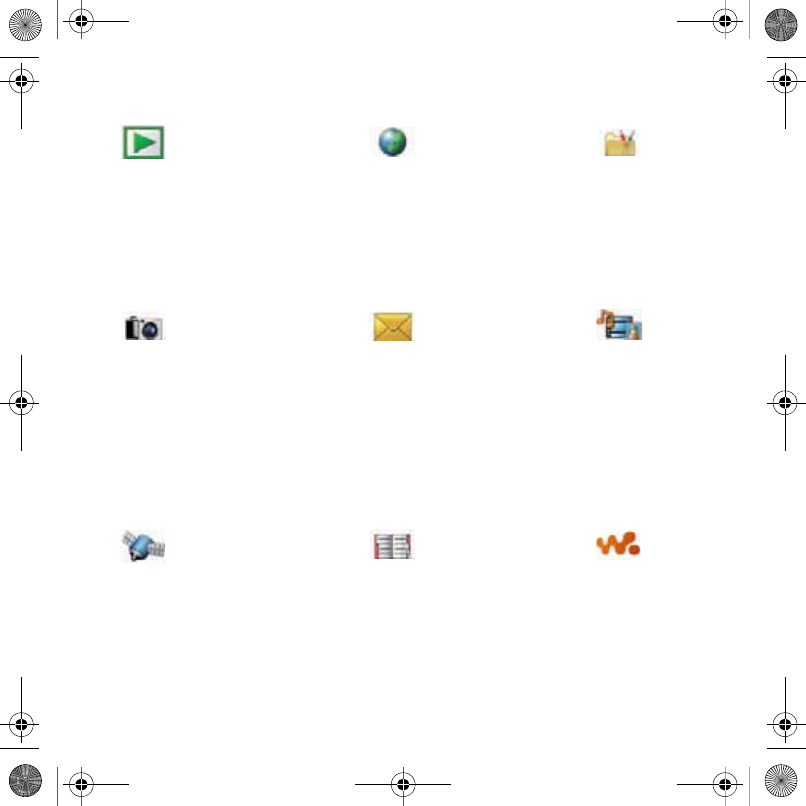
Menu overview
PlayNow™* Monternet* Entertainment
Online services*
Radio
TrackID™
Games
VideoDJ™
PhotoDJ™
MusicDJ™
Remote control
Record sound
Demo tour
Camera Messaging Media
Write new
Inbox
Email
Drafts
Outbox
Sent messages
Saved messages
My friends*
Call voicemail
Templates
Manage messages
Settings
Photo
Music
Video
Games
Web feeds
Settings
Location services Contacts WALKMAN
Navigation
Tracker
My favorites
Status info
Log
Settings
Myself
New contact
:FB'HHQDB8*B(Q&KLQDERRN3DJH7XHVGD\-XQH$0

14 Getting started
Calls** Organizer
All Answered Dialed Missed
File manager**
Alarms
Applications
Calendar
Tasks
Notes
Synchronization
Timer
Stopwatch
Calculator
Code memo
Settings**
General
Profiles
Time & date
Language
Update service
Voice control
New events
Shortcuts
Flight mode
Security
Setup wizard
Phone status
Master reset
Sounds & alerts
Ring volume
Ringtone
Silent mode
Increasing ring
Vibrating alert
Message alert
Key sound
Display
Wallpaper
Main menu layout
Theme
Startup screen
Screen saver
Clock size
Brightness
Edit line names*
Calls
Speed dial
Smart search
Forward calls
Switch to line 2*
Manage calls
Time & cost*
Show/hide my no.
Handsfree
Open to answer
Close to end call
Connectivity
Bluetooth
USB
Phone name
Network sharing
Synchronization
Device management
Mobile networks
Internet settings
Streaming settings
SIP Settings
Accessories
* Some menus are operator-, network- and subscription-dependent.
** You can use the navigation key to scroll between tabs in submenus. For more information, see Navigation
on page 15.
:FB'HHQDB8*B(Q&KLQDERRN3DJH7XHVGD\-XQH$0
15Getting started
Navigation
The main menus are shown as icons.
Some submenus include tabs.
To navigate the phone menus
1From standby select Menu.
2Use the navigation key to move through
the menus.
To select actions on the screen
•Press the left or right selection key,
or the center navigation key.
To view options for an item
•Select Options to, for example, edit.
To scroll between the tabs
•Scroll to a tab by pressing the
navigation key left or right.
To return to standby
•Press .
To end a function
•Press .
To navigate your media
1From standby select Menu > Media.
2Scroll to a menu item and press the
navigation key right.
3To go back, press the navigation key
left.
To delete items
•Press to delete items such as
numbers, letters, pictures and sounds.
To send items
1Scroll to an item such as a contact,
a picture or a sound.
2Select Options > Send to send items
such as contacts, pictures and sounds.
3Select a transfer method.
Shortcuts
You can use keypad shortcuts to go
directly to a menu. Menu numbering
starts from the top left icon and moves
across and then down row by row.
Make sure the receiving device supports
the transfer method you select.
:FB'HHQDB8*B(Q&KLQDERRN3DJH7XHVGD\-XQH$0
16 Getting started
To go directly to a main menu
•From standby select Menu and press
– , , or .
To use navigation key shortcuts
•From standby press , , or
to go directly to a function.
To edit a navigation key shortcut
1From standby select Menu > Settings
> the General tab > Shortcuts.
2Scroll to an option and select Edit.
3Scroll to a menu option and select
Shortc.
Activity menu
The activity menu gives you quick
access to certain functions.
To open the activity menu
•Press .
Activity menu tabs
•New events – missed calls and new
messages.
•Running apps – applications that are
running in the background.
•My shortcuts – add your favorite
functions to access them quickly.
•Monternet – quick access to the
Internet.
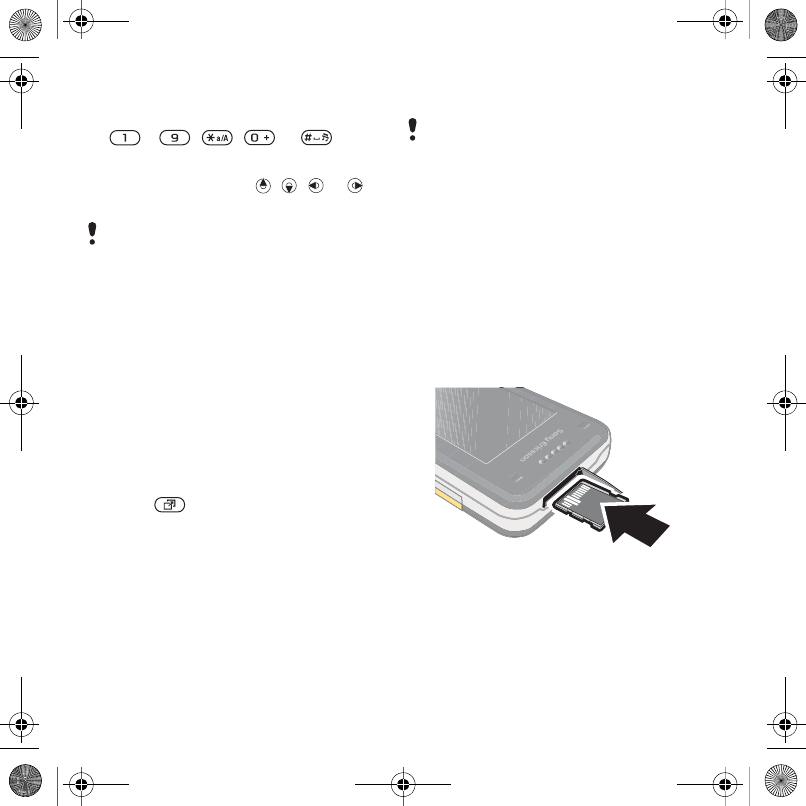
Memory card
Your phone supports Memory Stick
Micro™ (M2™) memory card adding
more storage space to your phone.
It can also be used as a portable
memory card with other compatible
devices.
You can use the file manager to move
files between the memory card and
the phone memory. See To move a file
in the file manager on page 63.
To insert a memory card
•Open the cover and insert the memory
card with the gold-colored contacts
facing up.
The Main menu layout must be set to
Grid. See To change the main menu
layout on page 67.
You may have to purchase a memory card
separately.
:FB'HHQDB8*B(Q&KLQDERRN3DJH7XHVGD\-XQH$0
17Getting started
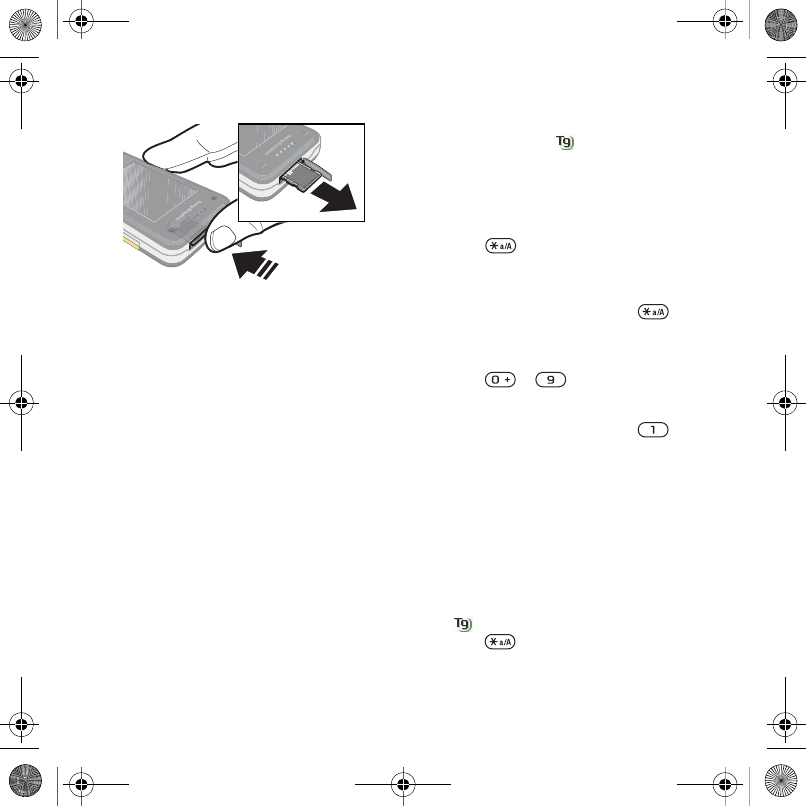
To remove a memory card
•Open the cover and press the edge
of the memory card to release and
remove it.
To view memory card options
1From standby select Menu > Organizer
> File manager > the On memory card
tab.
2Select Options.
Phone language
You can select a language to use in
your phone.
To change the phone language
1From standby select Menu > Settings
> the General tab > Language > Phone
language.
2Select an option.
Entering text
You can use multitap text input or
T9™ Text Input to enter text. The
T9 Text Input method uses a built-in
dictionary.
To change text input method
•When you enter text, press and hold
down .
To shift between capitals and lower-
case letters
•When you enter text, press .
To enter numbers
•When you enter text, press and hold
down – .
To enter periods and commas
•When you enter text, press .
To enter a symbol
1When you enter text, select Options
> Add symbol.
2Scroll to a symbol and select Insert.
To enter text using T9™ Text Input
1From standby select, for example,
Menu > Messaging > Write new > Text
message.
2If is not displayed, press and hold
down to change to T9 Text Input.
:FB'HHQDB8*B(Q&KLQDERRN3DJH7XHVGD\-XQH$0
18 Getting started
3Press each key only once, even if the
letter you want is not the first letter on
the key. For example, to write the
word “Jane”, press , , ,
. Write the whole word before
looking at the suggestions.
4Use or to view suggestions.
5Press to accept a suggestion.
To enter text using multitap
1From standby select, for example,
Menu > Messaging > Write new > Text
message.
2If is displayed, press and hold down
to change to multitap text input.
3Press – repeatedly until the
desired letter appears.
4When a word is written, press
to add a space.
To add words to the built-in dictionary
1When you enter text using T9 Text Input,
select Options > Spell word.
2Write the word using multitap input and
select Insert.
Chinese input
This mobile phone has different
input methods for entering Chinese
characters:
•Stroke input
•Pinyin input
You can use these methods, for
example, to enter Chinese names
and Chinese short messages.
Switching between Chinese input
methods
In the Chinese editing mode, you can
select and switch quickly to another
input method by pressing and holding
.
General instructions
Regardless of which input method
you choose, your phone has a function
to speed up the entry of Chinese
characters. Whenever you enter
a stroke or a Pinyin letter, a candidate
row of the most frequently used
characters containing that stroke
or relating to that letter appears at the
bottom of the screen.
Multitap input only applies when Latin
characters are selected as writing
language.
:FB'HHQDB8*B(Q&KLQDERRN3DJH7XHVGD\-XQH$0
19Getting started
If the character you want is not
displayed in the candidate row, press
to present another candidate row.
Continue pressing until the character
you want is displayed. Alternatively,
you can enter the next stroke or Pinyin
letter and a new set of characters will
immediately be displayed in the
candidate row. To go back to the
previous row, press . To select
a character in the candidate row, press
the navigation key or press and hold
the key corresponding to the number
above the character you want to enter.
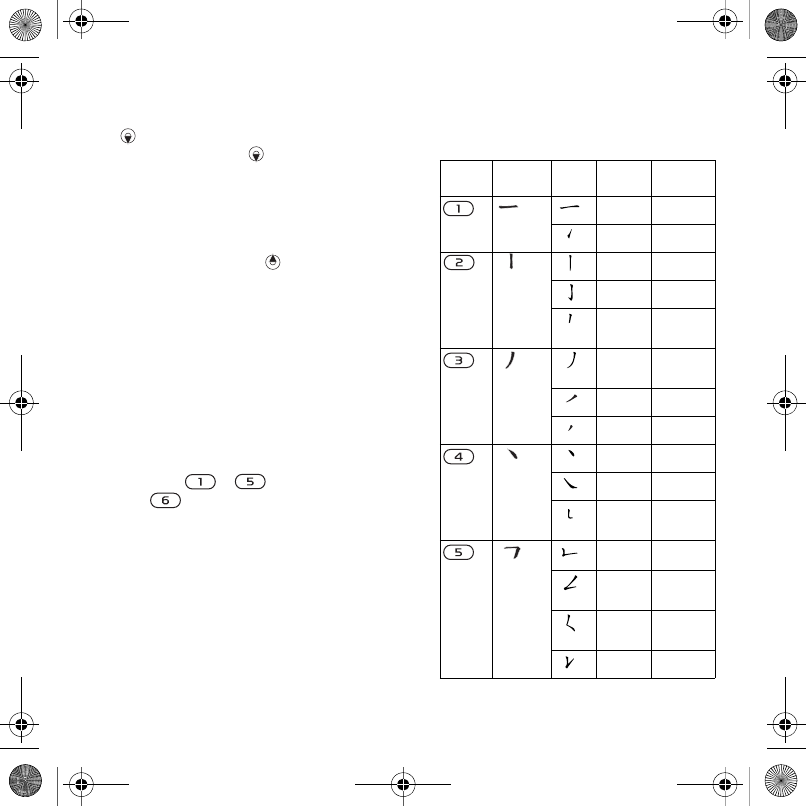
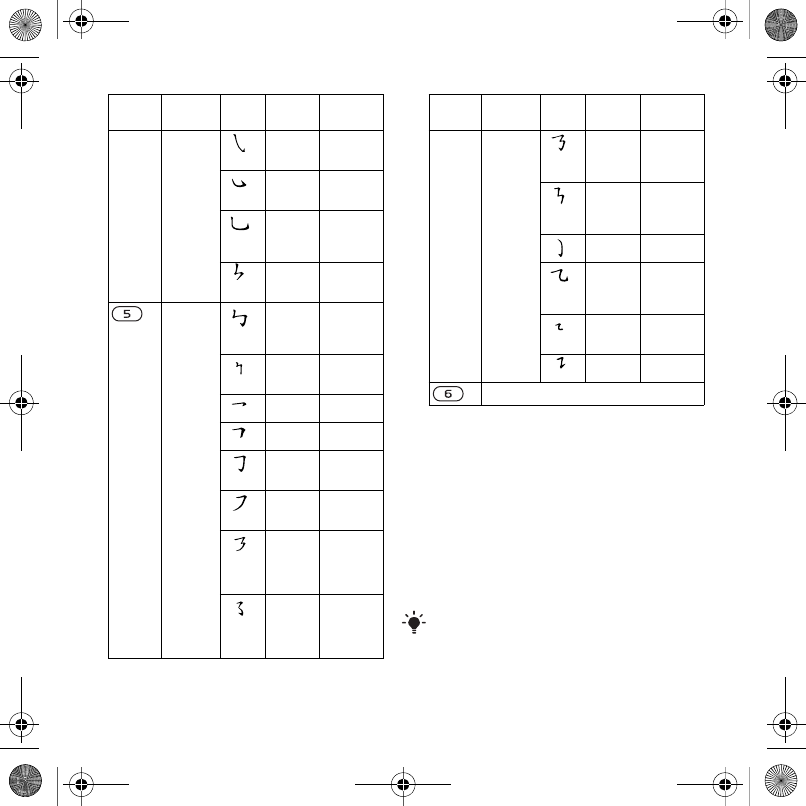
Stroke input
A Chinese character is built up of
strokes. There are more than 30 basic
strokes, which are grouped into 5 stroke
categories. Each category is
represented on the keypad by one of
the keys – . The Wild Card
key , is used when you are not
sure of which stroke to use.
Stroke categories
The 5 stroke categories are defined
in the table below:
Number
Key
Stroke
Category
Basic
Stroke
Stroke
Name Character
Over ⥟क
ϗ
Lift ⍋㑶⠵
⢊д
Down ЁϮϞ
䮼ϥ
Down-
Hook
ᇣ∈ᠧ
ᄤᡓ
Short
Slope Do
wn
Ⳉⳳ䋼
㤝
Long
Left Slop
e
ܿбЍ
亢⠛
Over
Slope
佭गࣩ
ৢ϶
Short
left Slope
㗠义䴶
ᄺ↋
Dot ݁ᄺ䳋
ᖗᗻ
Right
Slope
Ҏ☿জ
䗕ᵫ
Down-
Curved-
Over
ಯ㽓䜝
䝌
Down-
Over ቅᎼቃ
↡ߊ
Left
Slope-
Over
Мএ݀
㑺㛑
Left
Slope-
Dot
ཇ㽕ད
ᎵᎶ
Down-Lift 㸷ҹ佁
ᬊ䭓
:FB'HHQDB8*B(Q&KLQDERRN3DJH7XHVGD\-XQH$0
20 Getting started
Components
The basic building units of Chinese
characters are components that are
made up of strokes. After entering the
first two strokes of the desired
character, the component and character
candidates that started with that stroke
are displayed in the candidate row.
Using components is a fast method
for entering complex characters.
Right
Slope-
Hook
៥⇥
៤Ӥ
Down-
Over-
Hook
ᖗᖙᗱ
ᖬ
Down-
Over-
Curved-
Hook
⬉г↯
ܘᄨ
Down-
Over-Left
Slope
ϧӴ䕀
Down-
Over-
Down-
Hook
偀Ϣᓴ
ো䌍
Down-
Over-
Down
哢哤
Over-
Hook
ݭᄫⲂ
䗮ܡ
Over-
Down
ষᏆ᠋
к偼
Over-
Down-
Hook
дг
ৠ∌
Over-
Left Slop
e
জПⱏ
⼒
Over-
Down-
Over-
Left Slop
e
ঞᵕᓋ
ᓎ
Over-
Left Slop
e-
Curved-
Hook
䰓䯳䰜
䙷䚼
Number
Key
Stroke
Category
Basic
Stroke
Stroke
Name Character
Over-
Down-
Over-
Hook
З䗣哤
䲑ᴼ
Over-
Down-
Over-
Down
ߌ
Curved-
Hook
⢫䉍ᆊ
䗤⢖
Over-
Down-
Curved-
Hook
Эб⪺
亲亢
Over-
Down-
Over
ᡩ⊓㠍
ߍ
Over-
Down-Lift
䆱䅵䅸
䆃
? (Wild card key)
The smaller candidates surrounded by
dotted frames are components, and the
bigger candidates without dotted frames
are characters.
Number
Key
Stroke
Category
Basic
Stroke
Stroke
Name Character
:FB'HHQDB8*B(Q&KLQDERRN3DJH7XHVGD\-XQH$0
21Getting started
For example, to enter “
ֵᙃ
”
1Enter “ ”, “ ” and “ ”.
2Move the cursor to “ ֵ”, press Select.
Move the cursor to “ ᙃ”, press Select
again to select “ ᙃ”.
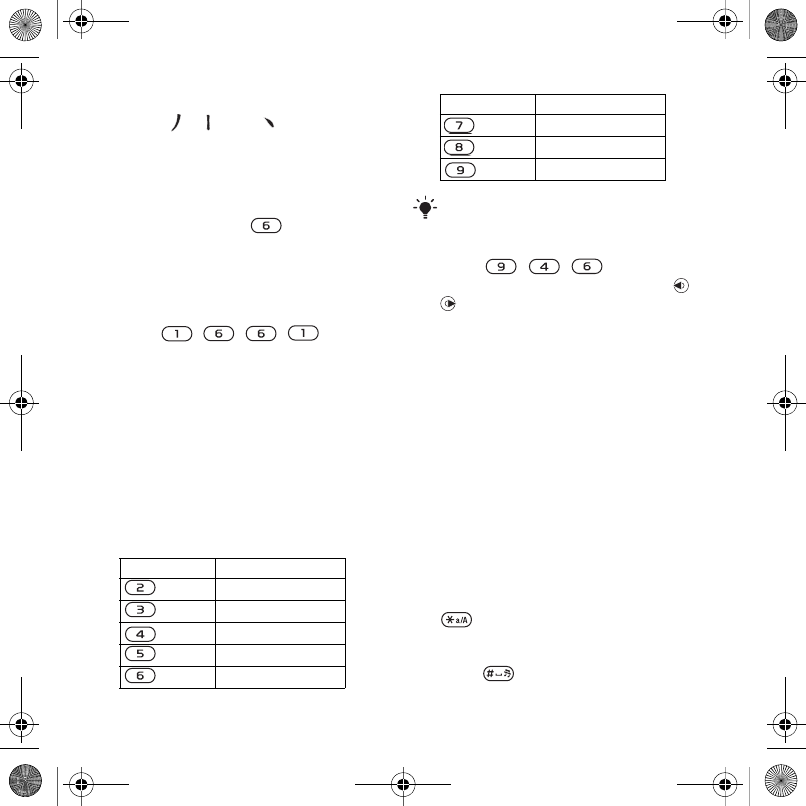
Example of using the wild card key
The wild card key , is used to
supplement unclear strokes in entering
characters. If you want to enter “ Ѧ”,
but you only know that “ϔ” is the first
and the last stroke of the character and
that the total number of strokes is four,
enter , , , . The
character is displayed in the candidate
row.
Pinyin input
Press the keys containing the required
Pinyin letters, and the phone will make
various proposals on the screen,
according to the pronunciation rules
of Mandarin.
Below is the key mapping of Pinyin
letters on the keypad.
For example, to enter “
ֵᙃ
”
1Press , , .
2When “xin” is highlighted, press or
and select “ ֵ”, then press Select.
(If you want to enter any of the other
suggested Pinyin combinations, scroll
up or down to the desired combination).
3Press Select again to select “ᙃ”, when
“ᙃ” is highlighted.
Fuzzy Pinyin
Fuzzy Pinyin is an option for the Pinyin
input method, which contains additional
spelling alternatives.
When in Pinyin input mode, press
Options > Writing language > Fuzzy
Pinyin > On.
Input punctuation, symbols and
smilies
Under any Chinese input mode, press
, to see the table of punctuation
marks, symbols and smilies. Use the
navigation key to make a selection.
Press to enter a space into the text.
Number Key Pinyin Letter
a b c
d e f
g h i
j k l
m n o
p q r s
t u ü
w x y z
On the keypad, the letter ü is replaced
by v.
Number Key Pinyin Letter
:FB'HHQDB8*B(Q&KLQDERRN3DJH7XHVGD\-XQH$0
22 Walkman® and music
Walkman® and music
You can listen to music, audio books
and podcasts. Use Sony Ericsson
Media Manager to transfer content
to your phone. For more information
go to the Getting started section at
www.sonyericsson.com/support.
Transferring content to and
from a computer
Required operating systems
You need one of these operating
systems to use the software included
on the CD:
•Microsoft ®Windows Vista™ 32 bit
or 64 bit versions of: Ultimate,
Enterprise, Business, Home
Premium, Home Basic)
•Microsoft ®Windows XP (Pro or
Home), Service Pack 2 or higher
To install Media Manager
1Turn on your computer and insert the
CD. The CD starts automatically and
the installation window opens.
2Select a language and click OK.
3Click Install Sony Ericsson Media
Manager and follow the instructions.
To transfer content using Media
Manager
1Connect the phone to a computer with
a USB cable supported by your phone.
2Computer: Start/Programs/
Sony Ericsson/Media Manager.
3Phone: Select Media transfer.
4Computer: Wait until the phone appears
in Media Manager.
5Move files between your phone and
the computer in Media Manager.
Stereo portable handsfree
To use the handsfree
•Connect the portable handsfree. Music
stops when you receive a call and
resumes when the call has ended.
Sony Ericsson Media Manager software
is available for download at
www.sonyericsson.com/support.
Do not remove the USB cable from your
phone or computer during transfer, as
this may corrupt the memory card or the
phone memory.
For details on transferring music, refer
to Media Manager Help. Click in the
top right corner of the Media Manager
window.
:FB'HHQDB8*B(Q&KLQDERRN3DJH7XHVGD\-XQH$0
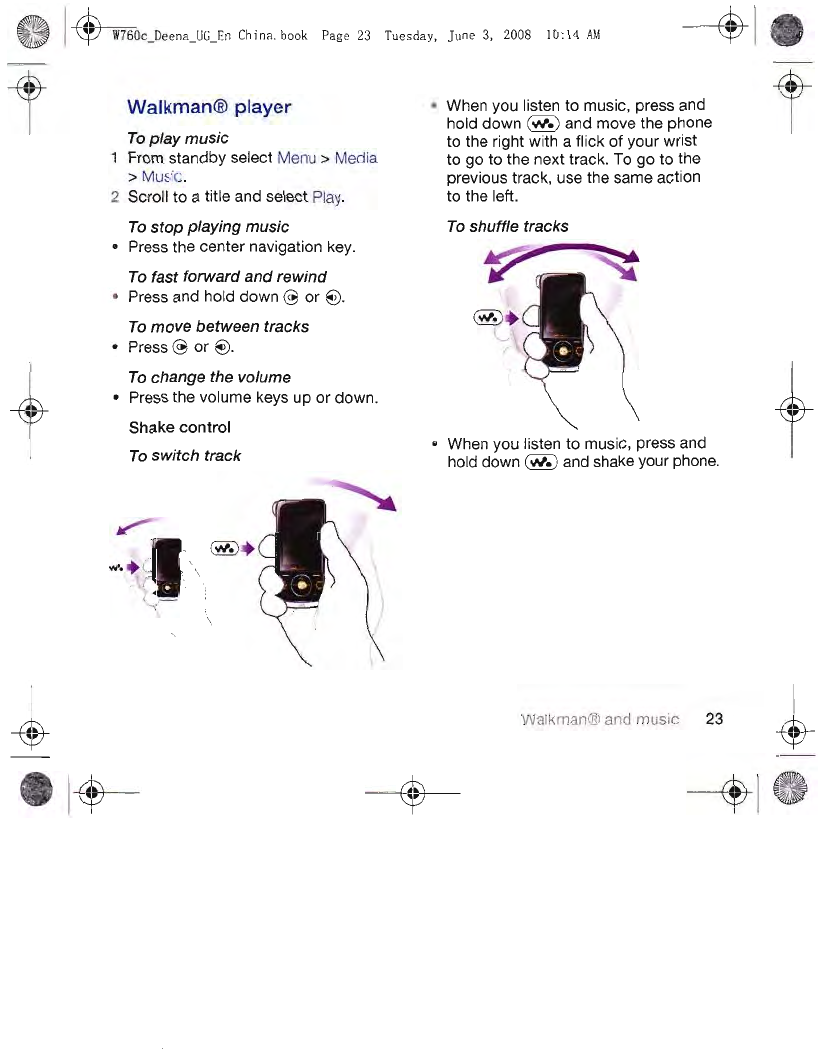

24 Walkman® and music
To change the volume
•When you listen to music, hold the
phone out in front of you facing
upwards. Press and hold down ,
and bend your arm upwards towards
you to increase the volume. To
decrease the volume, repeat the
action in the opposite direction.
Browsing files
Music is saved and categorized.
•Artists – list music by artist.
•Albums – list music by album.
•Tracks – list all music tracks.
•Playlists – create own lists of tracks.
•SensMe™ – list tracks by mood. For
the SensMe™ function to work, the
tracks need to be transferred using
Media Manager.
•Genre – list music by genre.
•Year – list music by year.
•Audio books – list audio books you
have transferred from your computer.
•Podcasts – list all podcasts.
Playlists
You can create playlists to organize
music files. Files can be added to more
than one playlist.
Deleting a playlist, or a file from
a playlist, does not delete the file from
the memory, just the reference to the
file.
To create a playlist
1From standby select Menu > Media
and scroll to Music > Playlists.
2Scroll to New playlist and select Add.
3Enter a name and select OK.
4For each track you want to add, scroll
to the track and select Mark.
5Select Add to add the tracks to the
playlist.
:FB'HHQDB8*B(Q&KLQDERRN3DJH7XHVGD\-XQH$0
25Walkman® and music
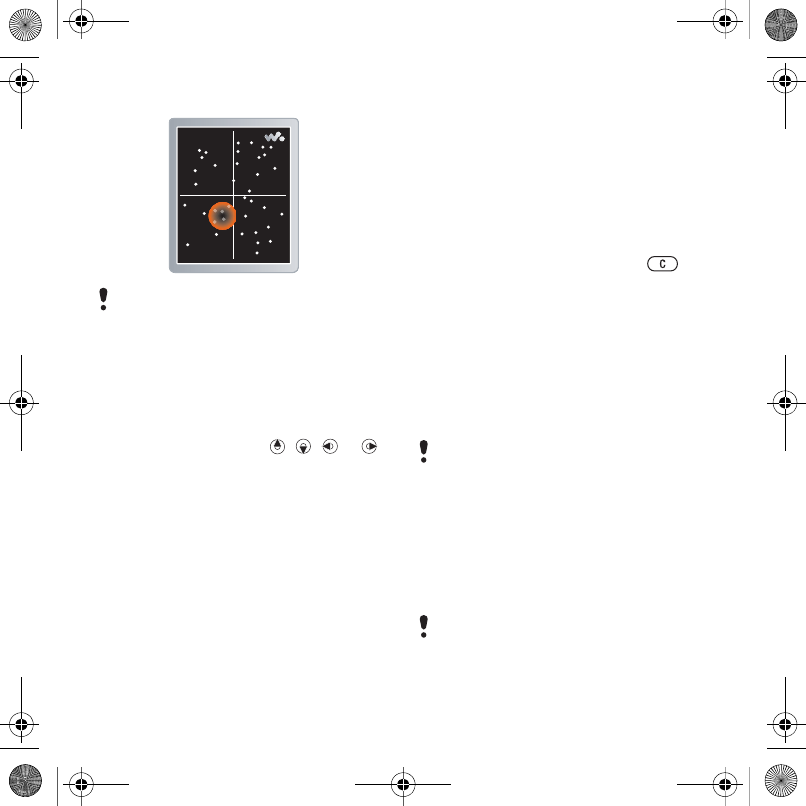
To create a playlist by mood
1From standby select Menu > Media.
2Scroll to Music > SensMe™ and select
Open.
3Press the navigation , , or
to preview different tracks.
4Select Add > Create > Options > Save
playlist.
5Enter a name and select OK.
To add files to a playlist
1From standby select Menu > Media
and scroll to Music > Playlists.
2Select a playlist.
3Scroll to Add music and select Add.
4For each track you want to add,
scroll to the track and select Mark.
5Select Add to add the tracks to the
playlist.
To remove tracks from a playlist
1From standby select Menu > Media
and scroll to Music > Playlists.
2Select a playlist.
3Scroll to the track and press .
To view information about a track
•Scroll to a track and select Options
> Information.
Audio books
You can listen to audio books that you
have transferred to your phone from
a computer using Media Manager.
To play audio books
1From standby select Menu > Media
> Music > Audio books.
2Select an audio book.
3Scroll to a chapter and select Play.
To create playlists by mood, your music
tracks must be transferred to your phone
using Media Manager. For information on
how to analyze your music, see Media
Manager Help.
It may take a few minutes before
a transferred audio book appears
in the list of available audio books.
Audio books in other formats than M4B
or audio books that do not have ID3v2
chapter tags can be found in the Tracks
folder.
:FB'HHQDB8*B(Q&KLQDERRN3DJH7XHVGD\-XQH$0
26 Walkman® and music
PlayNow™
You can connect to PlayNow™ to
download ringtones, games, music,
themes and wallpapers. You can
preview or listen to content before
you purchase and download it to your
phone.
Before you use PlayNow™
You must have the required Internet
connection settings in your phone.
See Settings on page 56.
To use PlayNow™
1From standby select Menu
> PlayNow™.
2Scroll the PlayNow™ Web site and
follow the instructions to preview and
purchase content.
TrackID™
TrackID™ is a music recognition
service. You can search for song titles,
artists and album names.
To search for song information
•When you hear a song through
a loudspeaker, from standby select
Menu > Entertainment > TrackID™
> Start.
•When the radio is playing select Options
> TrackID™.
Online music and video clips
You can view video clips and listen to
music by streaming them to your phone
from the Internet. If settings are not
already in your phone, see Settings on
page 56. For more information, contact
your network operator or go to
www.sonyericsson.com/support.
To select a data account for
streaming
1From standby select Menu > Settings
> the Connectivity tab > Streaming
settings > Connect using:.
2Select the data account to use.
3Select Save.
To stream music and video clips
1From standby select Menu >
Monternet.
2Select Options > Go to > Bookmarks.
3Select a link to stream from.
This service is not available in all
countries/regions.
For best results, use TrackID™ in a quiet
environment.
For cost information contact your service
provider.
:FB'HHQDB8*B(Q&KLQDERRN3DJH7XHVGD\-XQH$0
27Calling
Calling
Making and receiving calls
You need to turn on your phone and be within range of a network.
Calling contacts
To call a phone contact
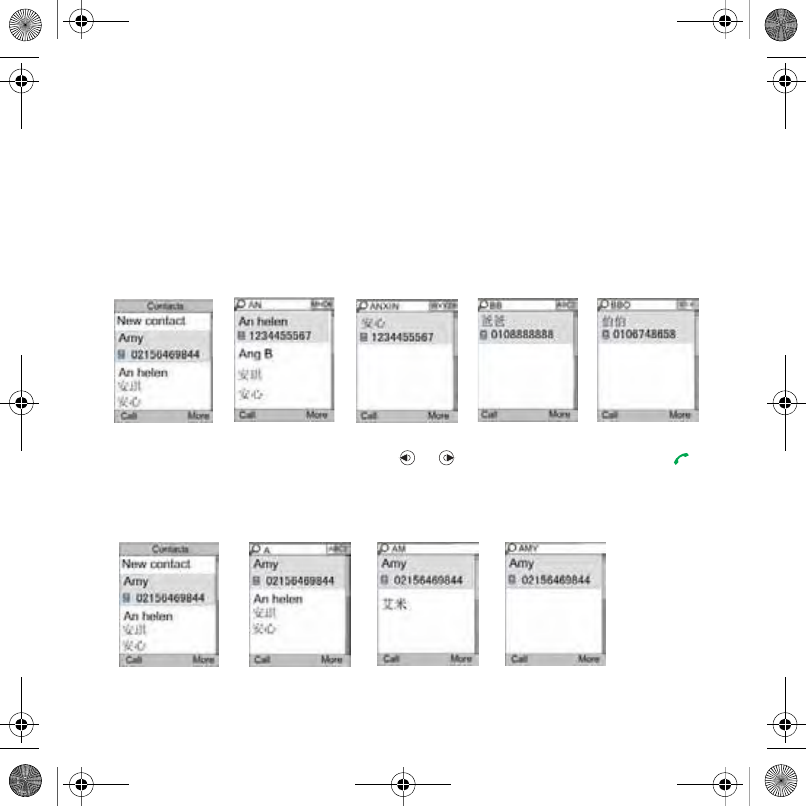
To call a contact written in Chinese characters
1Menu > Contacts. Then enter the entire multi-letter name, pure initial or mixed initial
pinyin of Chinese contacts you want to call. For example:
2When the contact is highlighted, press or to select a number and press .
To call a contact written in Latin characters
1Menu > Contacts. Scroll to, or enter the first letters or all letters of the contact you
want to call (a maximum of 10 letters).
Initial Input ‘A’ input ‘AM’ input ‘AMY’
Initial status Full name search Pure initial search Mixed initial search
:FB'HHQDB8*B(Q&KLQDERRN3DJH7XHVGD\-XQH$0
28 Calling
2When the contact is highlighted, press
or to select a number and press
.
Note: Phone supports Chinese and
English contacts mixed search. When
a contact is written in Latin characters,
the entered letter can reach the Latin
contact you want to call; when
a contact is written in Chinese
characters, the entered letter can reach
the pinyin of Chinese contact you want
to call.
To end a call
•Press .
To make international calls
1From standby press and hold down
until a “+” sign appears.
2Enter the country/region code, area
code (without the first zero) and phone
number.
3Press .
To answer a call
•Press .
To reject a call
•Press .
To redial a number
•When Retry? appears select Yes.
To change the ear speaker volume
during a call
•Press the volume key up or down.
To mute the microphone during a call
1Press and hold down .
2Press and hold down again to
resume.
To turn the loudspeaker on during
a call
•Select SpkrOn.
To view previous calls from standby
•Press to open the call list.
Emergency calls
Your phone supports international
emergency numbers, for example, 112
and 911. These numbers can normally
be used to make emergency calls in
You can call numbers from your contacts
and call list. See Contacts on page 29,
and Call list on page 32. You can also
use your voice to make calls. See Voice
control on page 33.
Do not hold your phone to your ear when
waiting. When the call connects, your
phone gives a loud signal.
Do not hold your phone to your ear when
using the loudspeaker. This could damage
your hearing.
:FB'HHQDB8*B(Q&KLQDERRN3DJH7XHVGD\-XQH$0

29Calling
any country/region, with or without the
SIM card inserted, if GSM network is
within range.
To make an emergency call
•From standby enter 112
(the international emergency
number) and press .
To view your local emergency
numbers
1From standby select Menu > Contacts.
2Scroll to New contact and select
Options > Special numbers
> Emergency nos.
Contacts
You can save names, phone numbers
and personal information in Contacts.
Information can be saved in the phone
memory or on the SIM card.
Default contacts
You can choose which contact
information is shown as default. If
Phone contacts is selected as default,
your contacts show all the information
saved in Contacts. If you select SIM
contacts as default, your contacts show
names and numbers saved on the SIM
card.
To select default contacts
1From standby select Menu > Contacts.
2Scroll to New contact and select
Options > Advanced > Default contacts.
3Select an option.
Phone contacts
Phone contacts can contain names,
phone numbers and personal
information. They are saved in the
phone memory.
To add a phone contact
1From standby select Menu > Contacts.
2Scroll to New contact and select Add.
3Enter the name and select OK.
4Scroll to New number: and select Add.
5Enter the number and select OK.
6Select a number type.
7Scroll between tabs and select the fields
to add information.
8Select Save.
In some countries/regions, other
emergency numbers may also be
promoted. Your network operator may
therefore have saved additional local
emergency numbers on the SIM card.
Please add area code when you save
fixed line number in your phone.
:FB'HHQDB8*B(Q&KLQDERRN3DJH7XHVGD\-XQH$0
30 Calling
Calling contacts
To call a phone contact
1From standby select Menu > Contacts.
2Scroll to a contact and press .
To go directly to the contacts list
•From standby press and hold down
– .
To call with Smart search
1From standby press –
to enter a contact name or a phone
number. All entries which match the
sequence of digits or letters are shown
in a list.
2Scroll to a contact or a phone number
and press .
To turn Smart search on or off
1From standby select Menu > Settings
> the Calls tab > Smart search.
2Select an option.
Editing contacts
To add information to a phone contact
1From standby select Menu > Contacts.
2Scroll to a contact and select Options
> Edit contact.
3Scroll between the tabs and select Add
or Edit.
4Select an option and an item to add
or edit.
5Select Save.
To copy names and numbers to phone
contacts
1From standby select Menu > Contacts.
2Scroll to New contact and select
Options > Advanced > Copy from SIM.
3Select an option.
To copy names and numbers to the
SIM card
1From standby select Menu > Contacts.
2Scroll to New contact and select
Options > Advanced > Copy to SIM.
3Select an option.
To automatically save names and
phone numbers on the SIM card
1From standby select Menu > Contacts.
2Scroll to New contact and select
Options > Advanced > Auto save on
SIM.
3Select an option.
If your subscription supports Calling Line
Identification (CLI) service, you can assign
personal ringtones and pictures to
contacts.
When you copy all contacts from your
phone to the SIM card, all existing SIM
card information is replaced.
:FB'HHQDB8*B(Q&KLQDERRN3DJH7XHVGD\-XQH$0

31Calling
To save contacts on a memory card
1From standby select Menu > Contacts.
2Scroll to New contact and select
Options > Advanced > Back up to m.
card.
SIM contacts
SIM contacts can contain names and
numbers only. They are saved on the
SIM card.
To add a SIM contact
1From standby select Menu > Contacts.
2Scroll to New contact and select Add.
3Enter the name and select OK.
4Enter the number and select OK.
5Select a number option and add more
information, if available.
6Select Save.
To call a SIM contact
1From standby select Menu > Contacts.
2Scroll to a contact and press .
Deleting contacts
To delete all contacts
1From standby select Menu > Contacts.
2Scroll to New contact and select
Options > Advanced > Delete all
contacts.
3Select an option.
Memory status
The number of contacts you can save
in your phone or on the SIM card
depends on available memory.
To view memory status
1From standby select Menu > Contacts.
2Scroll to New contact and select
Options > Advanced > Memory status.
Synchronizing contacts
The Sony Ericsson PC Suite is designed
to work with the following programs:
•Windows Contact (Vista Contacts
Manager)
•Windows Calendar (Vista Calendar)
•Microsoft Outlook 2007
•Microsoft Outlook 2003
•Microsoft Outlook 2002
•Microsoft Outlook 2000
•Lotus Notes™ 7
•Lotus Notes 6.5
•Lotus Notes 6
•Lotus Notes 5
•Windows Address Book (Outlook
Express)
•Sony Ericsson PC Suite proprietary
contact & calendar manager
For more information see Synchronizing
on page 59.
:FB'HHQDB8*B(Q&KLQDERRN3DJH7XHVGD\-XQH$0
32 Calling
Groups
You can create a group of phone
numbers and email addresses from
Phone contacts to send messages to.
See Messaging on page 37. You can
also use groups (with phone numbers)
when you create accepted callers lists.
To create a group of numbers and
email addresses
1From standby select Menu > Contacts.
2Scroll to New contact and select
Options > Groups.
3Scroll to New group and select Add.
4Enter a name for the group and select
Continue.
5Scroll to New and select Add.
6For each contact phone number
or email address you want to mark,
scroll to it and select Mark.
7Select Continue > Done.
Call list
You can view information about recent
calls.
To call a number from the call list
1From standby press and scroll
to a tab.
2Scroll to a name or a number and press
.
To add a call list number to contacts
1From standby press and scroll to
a tab.
2Scroll to the number and select Save.
3Select New contact to create a new
contact or select an existing contact
to add the number to.
Speed dial
Speed dialing lets you select nine
contacts that you can dial quickly. The
contacts can be saved in positions 1-9.
To add contacts to speed dial
numbers
1From standby select Menu > Contacts.
2Scroll to New contact and select
Options > Speed dial.
3Scroll to a position number and select
Add.
4Select a contact.
To speed dial
•From standby enter the position number
and press .
Voicemail
If your subscription includes an
answering service, callers can leave
a voicemail message when you cannot
answer a call.
:FB'HHQDB8*B(Q&KLQDERRN3DJH7XHVGD\-XQH$0

33Calling
To enter your voicemail number
1From standby select Menu > Messaging
> Settings > Voicemail number.
2Enter the number and select OK.
To call your voicemail service
•From standby press and hold down
.
Voice control
By creating voice commands you can:
•Voice dial – call someone by saying
their name
•Answer and reject calls when you
use a handsfree
To record a voice command using
voice dialing
1From standby select Menu > Settings
> the General tab > Voice control
> Voice dialing > Activate.
2Select Yes > New voice command and
select a contact. If the contact has more
than one number, select the number
to add the voice command to.
3Record a voice command such as
“John mobile”.
4Follow the instructions that appear.
Wait for the tone and say the command
to record. The voice command is played
back to you.
5If the recording sounds OK, select Yes.
If not, select No and repeat steps 3
and 4.
Voice dialing
You can hear your recorded contact
name when you receive a call from
that contact.
To voice dial
1From standby press and hold down
a volume key.
2Wait for the tone and say a recorded
name, for example “John mobile”. The
name is played back to you and the call
is connected.
Voice answering
When you use a handsfree, you can
answer or reject incoming calls with
your voice.
To activate voice answering and
record voice answer commands
1From standby select Menu > Settings
> the General tab > Voice control
> Voice answer > Activate.
2Follow the instructions that appear and
select Cont. Wait for the tone and say
“Answer”, or another word.
Voice commands are saved in the phone
memory only. They cannot be used in
another phone.
:FB'HHQDB8*B(Q&KLQDERRN3DJH7XHVGD\-XQH$0
34 Calling
3Select Yes to accept or No for a new
recording.
4Follow the instructions that appear and
select Continue. Wait for the tone and
say “Busy”, or another word.
5Select Yes to accept or No for a new
recording.
6Follow the instructions that appear and
select Continue.
7Select where your voice answering is
to be activated.
To answer a call using voice
commands
•Say “Answer”.
To reject a call using voice commands
•Say “Busy”.
Forwarding calls
You can forward calls, for example,
to an answering service.
To forward calls
1From standby select Menu > Settings
> the Calls tab > Forward calls.
2Select a call type and a forward option.
3Select Activate.
4Enter the number to forward calls to and
select OK.
More than one call
You can handle more than one call at
a time. For example, you can put an
ongoing call on hold, while you make
or answer a second call. You can also
switch between the two calls. You
cannot answer a third call without
ending one of the first two calls.
Call waiting
When call waiting is used, you hear
continuous beep if you receive
a second call.
To activate call waiting
•From standby select Menu > Settings
> the Calls tab > Manage calls > Call
waiting > Activate.
To make a second call
1During the call, select Options > Hold
call. This puts the ongoing call on hold.
2Select Options > Add call.
3Enter the number to call and press .
To answer a second call
•During the call, press . This puts the
ongoing call on hold.
When Restrict calls is used, some forward
call options are not available. See
Restricted dialing on page 36.
:FB'HHQDB8*B(Q&KLQDERRN3DJH7XHVGD\-XQH$0
35Calling
To reject a second call
•During the call, press and continue
with the ongoing call.
To end an ongoing call and answer
a second call
•During the call, select Replace active
call.
Handling two voice calls
You can have calls ongoing and on hold
at the same time.
To switch between two calls
•During the call, press .
To join two calls
•During the call, select Options > Join
calls.
To connect two calls
•During the call, select Options
> Transfer call. You are disconnected
from both calls.
To end an ongoing call and return
to the call on hold
•First press and then .
Conference calls
With a conference call, you can have
a joint conversation with up to five
people.
To add a new participant
1During the call, select Options > Hold
call. This puts the joined calls on hold.
2Select Options > Add call.
3Enter the number to call and press .
4Select Options > Join calls to add the
new participant.
5Repeat this task to add more
participants.
To release a participant
1Select Options > Release party.
2Select the participant to release.
To have a private conversation
1During the call, select Options > Talk to
and select the participant to talk to.
2To resume the conference call, select
Options > Join calls.
My numbers
You can view, add and edit your own
phone numbers.
To check your phone numbers
1From standby select Menu > Contacts.
2Scroll to New contact and select
Options > Special numbers > My
numbers.
3Select an option.
:FB'HHQDB8*B(Q&KLQDERRN3DJH7XHVGD\-XQH$0
36 Calling
Restricted dialing
You can restrict outgoing and incoming
calls. A password from your service
provider is required.
Restrict calls options
Standard options are:
•All outgoing – all outgoing calls
•Outgoing intl – all outgoing
international calls
•Outgoing intl roam. – all outgoing
international calls except to your
home country/region
•All incoming – all incoming calls
•Inc. when roaming – all incoming
calls when you are abroad
To restrict calls
1From standby select Menu > Settings
> the Calls tab > Manage calls
> Restrict calls.
2Select an option.
3Select Activate.
4Enter your password and select OK.
Call time and cost
During a call, the duration of the call is
shown. You can check the duration of
your last call, outgoing calls and the
total time of your calls.
To check the call time
•From standby select Menu > Settings
> the Calls tab > Time & cost > Call
timers.
Showing or hiding your phone
number
You can decide to show or hide your
phone number when you make a call.
To hide your phone number
1From standby select Menu > Settings
> the Calls tab > Show/hide my no.
2Select Hide number.
If you forward incoming calls, you cannot
use some restrict calls options.
:FB'HHQDB8*B(Q&KLQDERRN3DJH7XHVGD\-XQH$0

37Messaging
Messaging
Receiving and saving messages
You are notified when you receive
a message. Messages are automatically
saved in the phone memory. When the
phone memory is full, you can delete
messages or save them on a memory
card or on the SIM card.
To save a message on a memory card
•From standby select Menu > Messaging
> Settings > General > Save to
> Memory card.
To save a message on the SIM card
1From standby select Menu > Messaging
and select a folder.
2Scroll to a message and select Options
> Save message.
To view a message from the inbox
1From standby select Menu > Messaging
> Inbox.
2Scroll to the message and select View.
Text messages
Text messages can contain simple
pictures, sound effects, animations,
and melodies.
Before you use messaging
You must have a service center number.
The number is supplied by your service
provider and is usually saved on the
SIM card. If the number to your service
center is not saved on your SIM card,
you must enter the number yourself.
To enter a service center number
1From standby select Menu > Messaging
> Settings > Text message and scroll to
Service center. The number is shown if
it is saved on the SIM card.
2If there is no number shown, select
Edit.
3Scroll to New ServiceCentre and select
Add.
4Enter the number, including the
international “+” sign and country/region
code.
5Select Save.
To write and send a text message
1From standby select Menu > Messaging
> Write new > Text message.
2Write the message and select Continue
> Contacts lookup.
3Select a recipient and select Send.
If you send a text message to a group,
you will be charged for each member.
See Groups on page 32.
:FB'HHQDB8*B(Q&KLQDERRN3DJH7XHVGD\-XQH$0

38 Messaging
To copy and paste text in a text
message
1When you write the message, select
Options > Copy & paste.
2Select Copy all or Mark & copy. Scroll
to and mark text in the message.
3Select Options > Copy & paste > Paste.
To add an item to a text message
1When you write the message, select
Options > Add item.
2Select an option and then an item.
To call a number in a text message
•When you view the message, scroll
to the phone number and press .
To turn long messages on
1From standby select Menu > Messaging
> Settings > Text message.
2Select Max. msg length > Max.
available.
Picture messages
Picture messages can contain text,
pictures, slides, sound recordings,
video clips, signatures and attachments.
You can send picture messages to
a phone or an email address.
Before you use picture messaging
You must set an MMS profile and the
address of your message server. If no
MMS profile or message server exists,
you can receive all the settings
automatically from your network
operator or at
www.sonyericsson.com/support.
To select an MMS profile
1From standby select Menu > Messaging
> Settings > Picture message > MMS
profile.
2Select a profile.
To set the message server address
1From standby select Menu > Messaging
> Settings > Picture message.
2Scroll to MMS profile and select Edit.
3Select Options > Edit.
4Scroll to Message server and select
Edit.
5Enter the address and select OK
> Save.
To create and send a picture
message
1From standby select Menu > Messaging
> Write new > Picture msg.
2Enter text. To add items to the message,
press , scroll and select an item.
3Select Continue > Contacts lookup.
4Select a recipient and select Send.
:FB'HHQDB8*B(Q&KLQDERRN3DJH7XHVGD\-XQH$0