Sony A1052161 GSM 850/900/1800/1900/GPRS/EDGE mobile phone with Bluetooth User Manual A7 42P indd

Sony Mobile Communications Inc GSM 850/900/1800/1900/GPRS/EDGE mobile phone with Bluetooth A7 42P indd

Contents

User Manual

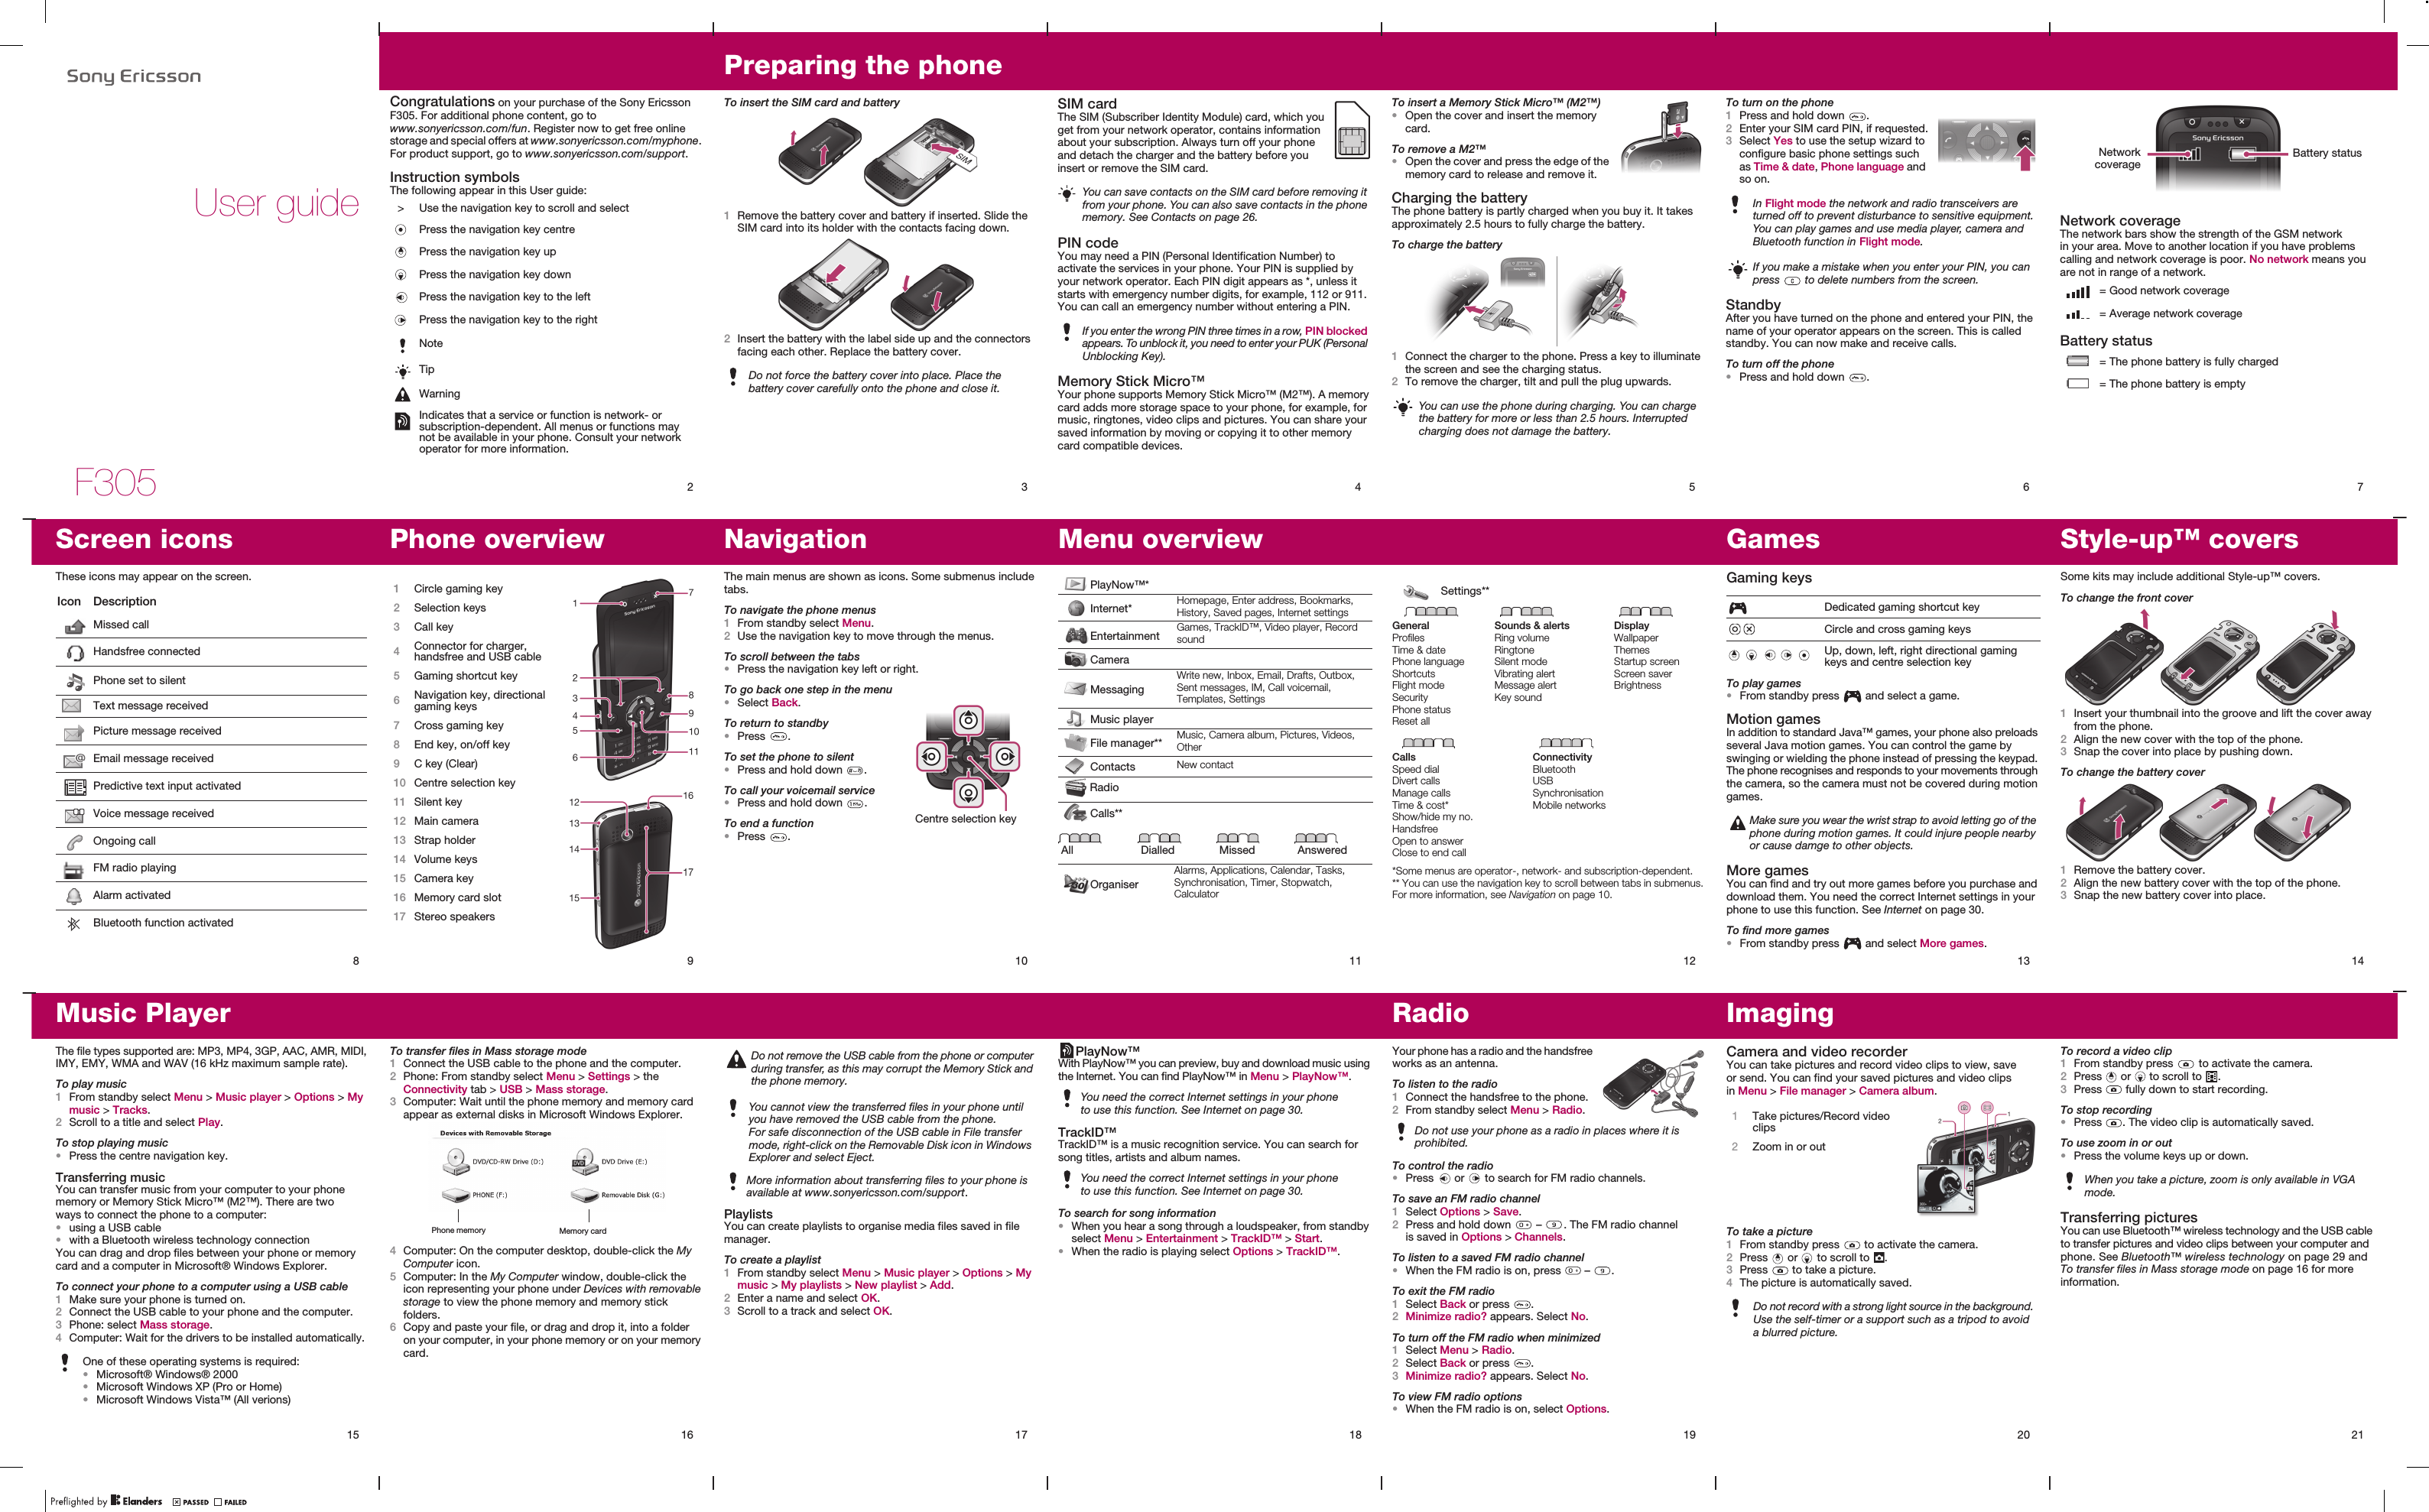
F305User guide2Congratulations on your purchase of the Sony Ericsson F305. For additional phone content, go to www.sonyericsson.com/fun. Register now to get free online storage and special offers at www.sonyericsson.com/myphone. For product support, go to www.sonyericsson.com/support.Instruction symbolsThe following appear in this User guide:  > Use the navigation key to scroll and selectPress the navigation key centrePress the navigation key upPress the navigation key downPress the navigation key to the leftPress the navigation key to the rightNoteTipWarningIndicates that a service or function is network- or subscription-dependent. All menus or functions may not be available in your phone. Consult your network operator for more information.3Preparing the phoneTo insert the SIM card and battery1Remove the battery cover and battery if inserted. Slide the SIM card into its holder with the contacts facing down.2Insert the battery with the label side up and the connectors facing each other. Replace the battery cover.Do not force the battery cover into place. Place the battery cover carefully onto the phone and close it.4SIM card The SIM (Subscriber Identity Module) card, which you get from your network operator, contains information about your subscription. Always turn off your phone and detach the charger and the battery before you insert or remove the SIM card.PIN codeYou may need a PIN (Personal Identification Number) to activate the services in your phone. Your PIN is supplied by your network operator. Each PIN digit appears as *, unless it starts with emergency number digits, for example, 112 or 911. You can call an emergency number without entering a PIN.Memory Stick Micro™Your phone supports Memory Stick Micro™ (M2™). A memory card adds more storage space to your phone, for example, for music, ringtones, video clips and pictures. You can share your saved information by moving or copying it to other memory card compatible devices.You can save contacts on the SIM card before removing it from your phone. You can also save contacts in the phone memory. See Contacts on page 26.If you enter the wrong PIN three times in a row, PIN blocked appears. To unblock it, you need to enter your PUK (Personal Unblocking Key).5To insert a Memory Stick Micro™ (M2™)•Open the cover and insert the memory card.To remove a M2™•Open the cover and press the edge of the memory card to release and remove it.Charging the batteryThe phone battery is partly charged when you buy it. It takes approximately 2.5 hours to fully charge the battery.To charge the battery 1Connect the charger to the phone. Press a key to illuminate the screen and see the charging status.2To remove the charger, tilt and pull the plug upwards.You can use the phone during charging. You can charge the battery for more or less than 2.5 hours. Interrupted charging does not damage the battery. 6To turn on the phone1Press and hold down  .2Enter your SIM card PIN, if requested.3Select Yes to use the setup wizard to configure basic phone settings such as Time & date, Phone language and so on.  StandbyAfter you have turned on the phone and entered your PIN, the name of your operator appears on the screen. This is called standby. You can now make and receive calls.To turn off the phone•Press and hold down  .In Flight mode the network and radio transceivers are turned off to prevent disturbance to sensitive equipment. You can play games and use media player, camera and Bluetooth function in Flight mode.If you make a mistake when you enter your PIN, you can press   to delete numbers from the screen.7Network coverageThe network bars show the strength of the GSM network in your area. Move to another location if you have problems calling and network coverage is poor. No network means you are not in range of a network.Battery status = Good network coverage = Average network coverage = The phone battery is fully charged = The phone battery is emptyBattery statusNetworkcoverage14Style-up™ coversSome kits may include additional Style-up™ covers.To change the front cover1Insert your thumbnail into the groove and lift the cover away from the phone.2Align the new cover with the top of the phone.3Snap the cover into place by pushing down.To change the battery cover1Remove the battery cover.2Align the new battery cover with the top of the phone.3Snap the new battery cover into place.13GamesGaming keysTo play games•From standby press   and select a game.Motion gamesIn addition to standard Java™ games, your phone also preloads several Java motion games. You can control the game by swinging or wielding the phone instead of pressing the keypad. The phone recognises and responds to your movements through the camera, so the camera must not be covered during motion games. More gamesYou can find and try out more games before you purchase and download them. You need the correct Internet settings in your phone to use this function. See Internet on page 30.To find more games•From standby press   and select More games.Dedicated gaming shortcut keyCircle and cross gaming keysUp, down, left, right directional gaming keys and centre selection keyMake sure you wear the wrist strap to avoid letting go of the phone during motion games. It could injure people nearby or cause damge to other objects.12Settings**GeneralProfilesTime & datePhone languageShortcutsFlight modeSecurityPhone statusReset allSounds & alertsRing volumeRingtoneSilent modeVibrating alertMessage alertKey soundDisplayWallpaperThemesStartup screenScreen saverBrightnessCallsSpeed dialDivert callsManage callsTime & cost*Show/hide my no.HandsfreeOpen to answerClose to end callConnectivityBluetoothUSBSynchronisationMobile networks*Some menus are operator-, network- and subscription-dependent.** You can use the navigation key to scroll between tabs in submenus. For more information, see Navigation on page 10.11Menu overviewPlayNow™*Internet* Homepage, Enter address, Bookmarks, History, Saved pages, Internet settingsEntertainment Games, TrackID™, Video player, Record soundCameraMessagingWrite new, Inbox, Email, Drafts, Outbox, Sent messages, IM, Call voicemail, Templates, SettingsMusic playerFile manager** Music, Camera album, Pictures, Videos, OtherContacts New contactRadioCalls**All Dialled Missed AnsweredOrganiserAlarms, Applications, Calendar, Tasks, Synchronisation, Timer, Stopwatch, Calculator9Phone overview1Circle gaming key2Selection keys3Call key4Connector for charger, handsfree and USB cable5Gaming shortcut key6Navigation key, directional gaming keys7Cross gaming key8End key, on/off key9C key (Clear)10 Centre selection key11 Silent key12 Main camera13 Strap holder14 Volume keys15 Camera key16 Memory card slot17 Stereo speakers8Screen iconsThese icons may appear on the screen.Icon DescriptionMissed callHandsfree connectedPhone set to silentText message receivedPicture message receivedEmail message receivedPredictive text input activatedVoice message receivedOngoing callFM radio playingAlarm activatedBluetooth function activated10NavigationThe main menus are shown as icons. Some submenus include tabs.To navigate the phone menus1From standby select Menu.2Use the navigation key to move through the menus.To scroll between the tabs•Press the navigation key left or right.To go back one step in the menu•Select Back.To return to standby•Press  .To set the phone to silent•Press and hold down  .To call your voicemail service•Press and hold down  .To end a function•Press  .Centre selection key15Music PlayerThe file types supported are: MP3, MP4, 3GP, AAC, AMR, MIDI, IMY, EMY, WMA and WAV (16 kHz maximum sample rate). To play music1From standby select Menu > Music player > Options > My music > Tracks.2Scroll to a title and select Play.To stop playing music•Press the centre navigation key.Transferring musicYou can transfer music from your computer to your phone memory or Memory Stick Micro™ (M2™). There are two ways to connect the phone to a computer: •using a USB cable•with a Bluetooth wireless technology connectionYou can drag and drop files between your phone or memory card and a computer in Microsoft® Windows Explorer.To connect your phone to a computer using a USB cable1Make sure your phone is turned on.2Connect the USB cable to your phone and the computer.3Phone: select Mass storage.4Computer: Wait for the drivers to be installed automatically. One of these operating systems is required:•Microsoft® Windows® 2000•Microsoft Windows XP (Pro or Home)•Microsoft Windows Vista™ (All verions)16To transfer files in Mass storage mode1Connect the USB cable to the phone and the computer.2Phone: From standby select Menu > Settings > the  Connectivity tab > USB > Mass storage.3Computer: Wait until the phone memory and memory card appear as external disks in Microsoft Windows Explorer. 4Computer: On the computer desktop, double-click the My Computer icon.5Computer: In the My Computer window, double-click the icon representing your phone under Devices with removable storage to view the phone memory and memory stick folders.6Copy and paste your file, or drag and drop it, into a folder on your computer, in your phone memory or on your memory card. Phone memory Memory card17   PlaylistsYou can create playlists to organise media files saved in file manager. To create a playlist1From standby select Menu > Music player > Options > My music > My playlists > New playlist > Add. 2Enter a name and select OK.3Scroll to a track and select OK.Do not remove the USB cable from the phone or computer during transfer, as this may corrupt the Memory Stick and the phone memory. You cannot view the transferred files in your phone until you have removed the USB cable from the phone. For safe disconnection of the USB cable in File transfer mode, right-click on the Removable Disk icon in Windows Explorer and select Eject.More information about transferring files to your phone is available at www.sonyericsson.com/support.18PlayNow™ With PlayNow™ you can preview, buy and download music using the Internet. You can find PlayNow™ in Menu > PlayNow™.TrackID™TrackID™ is a music recognition service. You can search for song titles, artists and album names.To search for song information•When you hear a song through a loudspeaker, from standby select Menu > Entertainment > TrackID™ > Start.•When the radio is playing select Options > TrackID™.You need the correct Internet settings in your phone to use this function. See Internet on page 30.You need the correct Internet settings in your phone to use this function. See Internet on page 30.19RadioYour phone has a radio and the handsfree works as an antenna.To listen to the radio1Connect the handsfree to the phone.2From standby select Menu > Radio.To control the radio•Press   or   to search for FM radio channels.To save an FM radio channel1Select Options > Save.2Press and hold down   –  . The FM radio channel is saved in Options > Channels.To listen to a saved FM radio channel•When the FM radio is on, press   –  . To exit the FM radio1Select Back or press  .2Minimize radio? appears. Select No.To turn off the FM radio when minimized1Select Menu > Radio.2Select Back or press  .3Minimize radio? appears. Select No.To view FM radio options •When the FM radio is on, select Options.Do not use your phone as a radio in places where it is prohibited.20ImagingCamera and video recorderYou can take pictures and record video clips to view, save or send. You can find your saved pictures and video clips in Menu > File manager > Camera album.To take a picture1From standby press   to activate the camera.2Press   or   to scroll to  .3Press   to take a picture.4The picture is automatically saved.Do not record with a strong light source in the background. Use the self-timer or a support such as a tripod to avoid a blurred picture.1Take pictures/Record video clips2Zoom in or out21To record a video clip1From standby press   to activate the camera.2Press   or   to scroll to  .3Press   fully down to start recording.To stop recording•Press  . The video clip is automatically saved.To use zoom in or out•Press the volume keys up or down.Transferring picturesYou can use Bluetooth™ wireless technology and the USB cable to transfer pictures and video clips between your computer and phone. See Bluetooth™ wireless technology on page 29 and To transfer files in Mass storage mode on page 16 for more information.When you take a picture, zoom is only available in VGA mode.
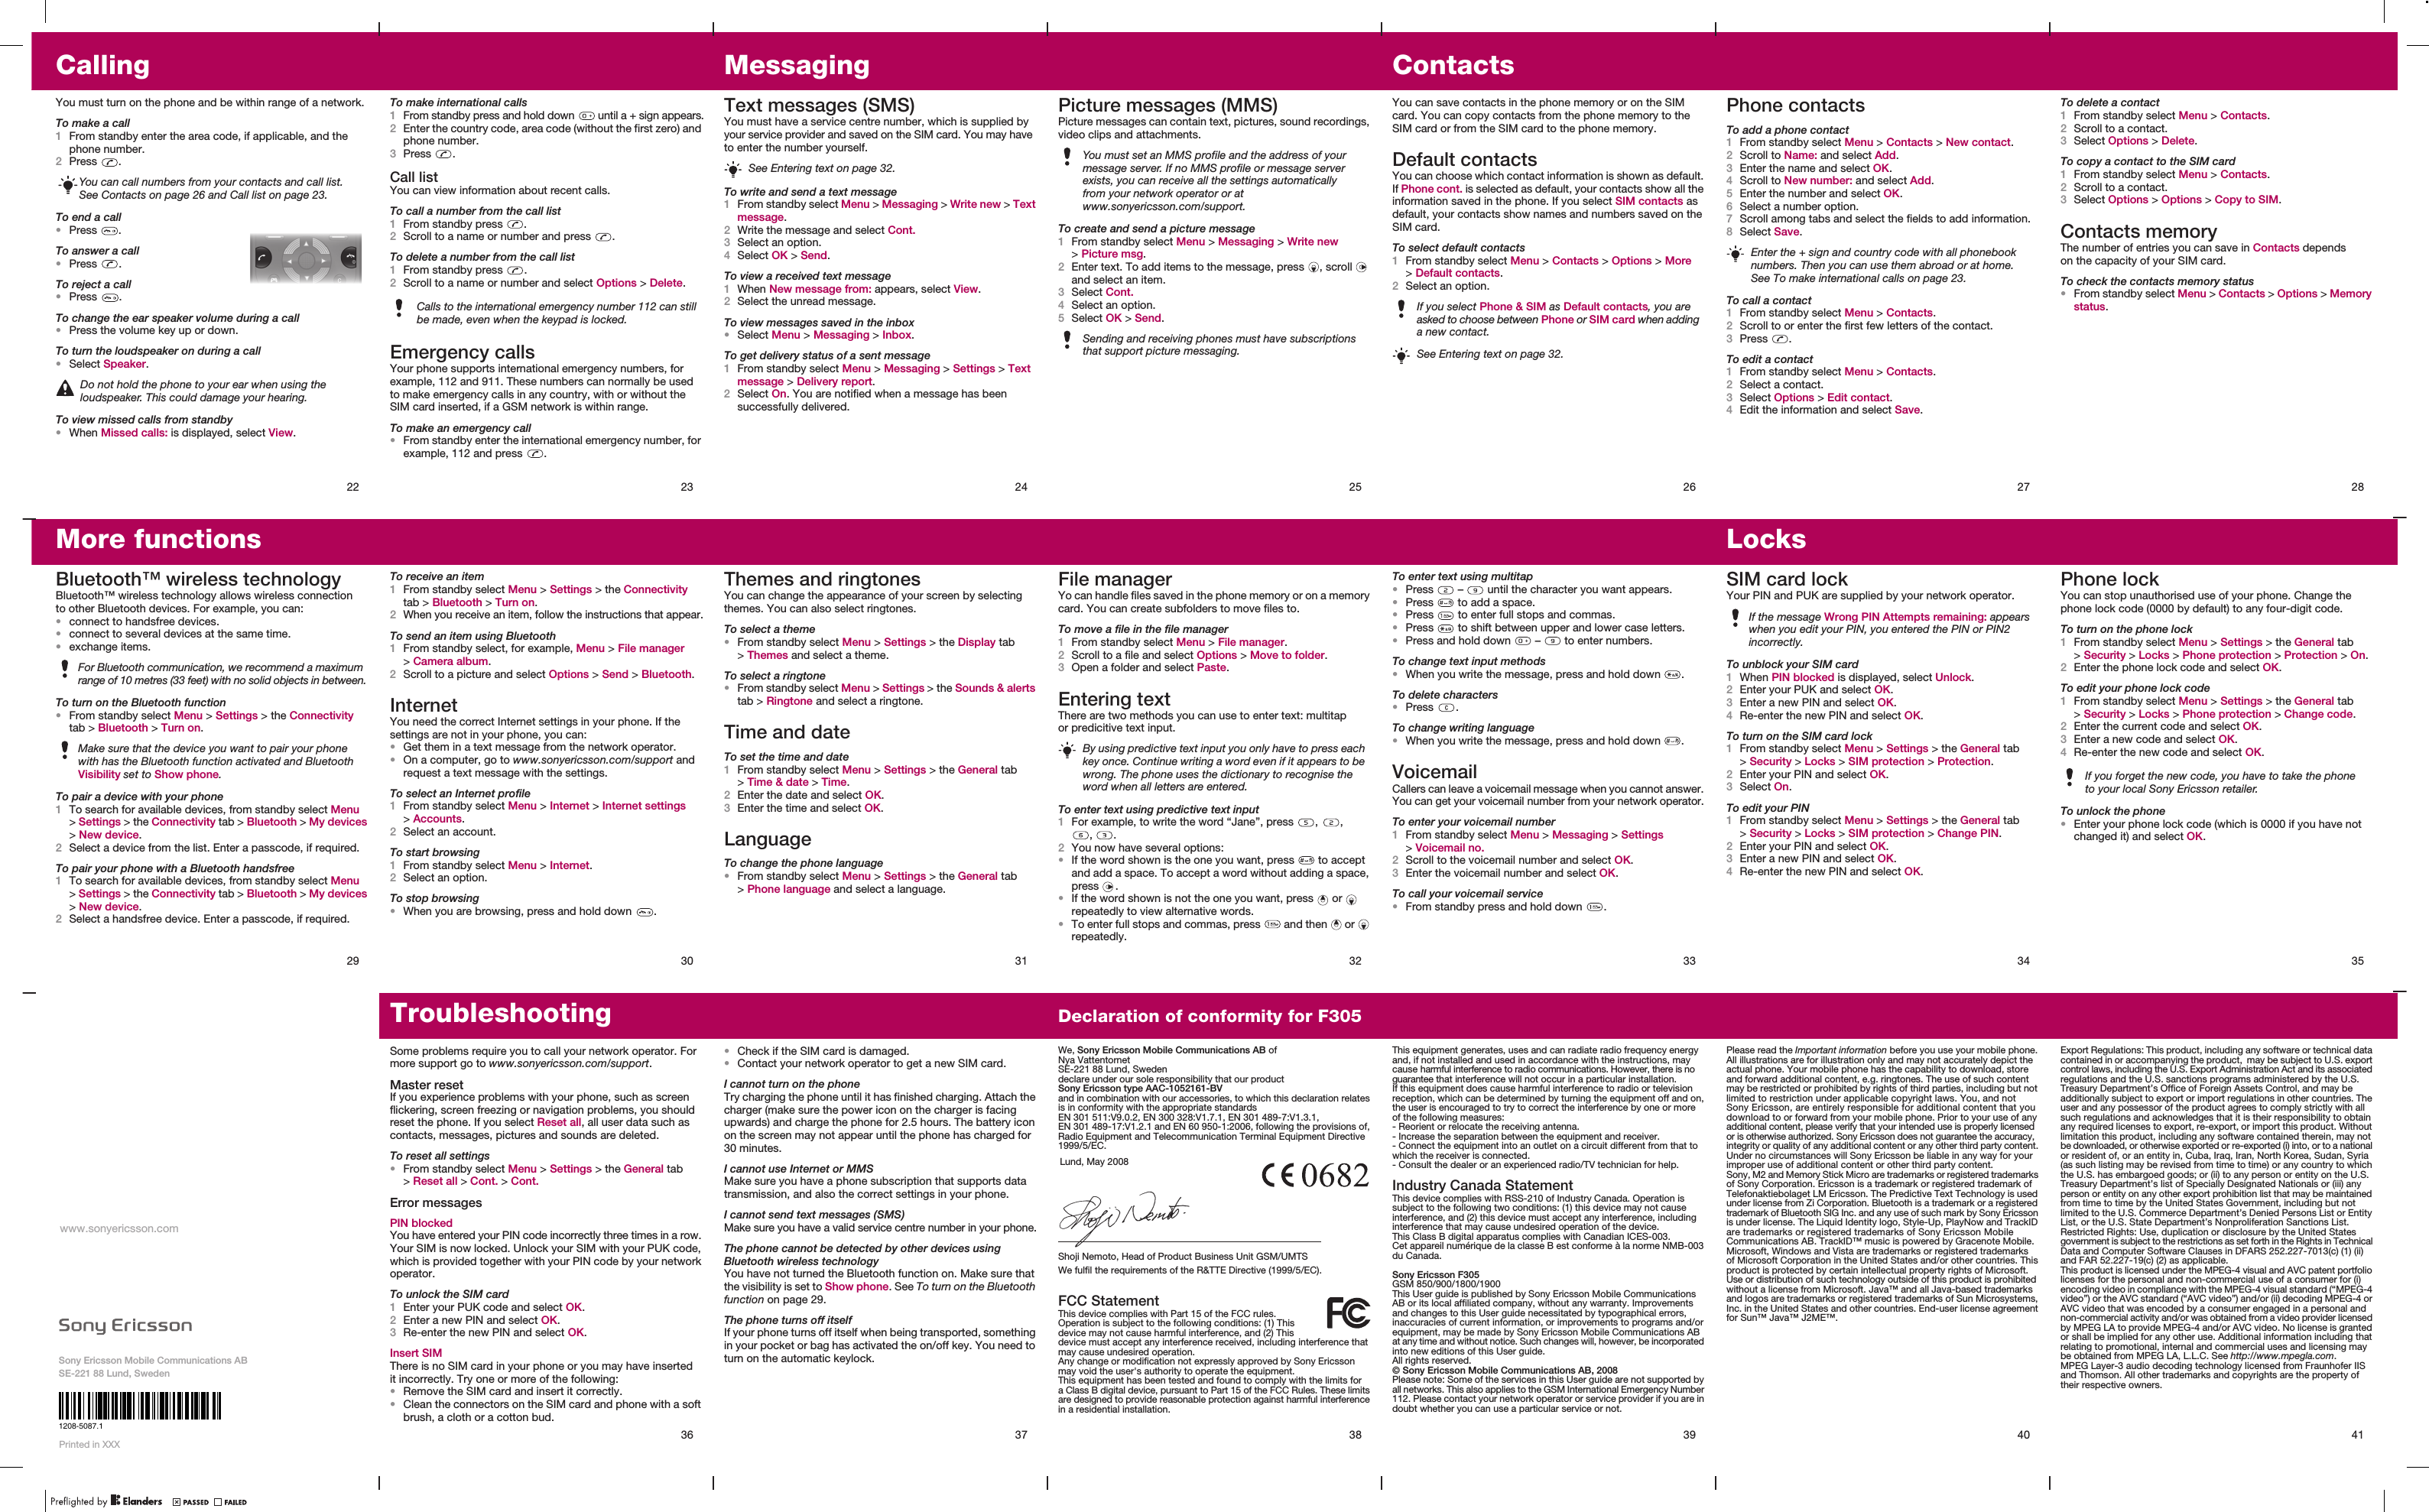
22CallingYou must turn on the phone and be within range of a network.To make a call1From standby enter the area code, if applicable, and the phone number.2Press  .To end a call•Press  .To answer a call•Press  .To reject a call•Press  .To change the ear speaker volume during a call•Press the volume key up or down.To turn the loudspeaker on during a call•Select Speaker.To view missed calls from standby•When Missed calls: is displayed, select View.You can call numbers from your contacts and call list. See Contacts on page 26 and Call list on page 23. Do not hold the phone to your ear when using the loudspeaker. This could damage your hearing.23To make international calls1From standby press and hold down   until a + sign appears.2Enter the country code, area code (without the first zero) and phone number.3Press  . Call listYou can view information about recent calls.To call a number from the call list1From standby press  .2Scroll to a name or number and press  .To delete a number from the call list1From standby press  .2Scroll to a name or number and select Options > Delete.Emergency callsYour phone supports international emergency numbers, for example, 112 and 911. These numbers can normally be used to make emergency calls in any country, with or without the SIM card inserted, if a GSM network is within range.To make an emergency call•From standby enter the international emergency number, for example, 112 and press  .Calls to the international emergency number 112 can still be made, even when the keypad is locked.24MessagingText messages (SMS)You must have a service centre number, which is supplied by your service provider and saved on the SIM card. You may have to enter the number yourself.To write and send a text message1From standby select Menu > Messaging > Write new > Text message.2Write the message and select Cont.3Select an option.4Select OK > Send.To view a received text message1When New message from: appears, select View.2Select the unread message.To view messages saved in the inbox•Select Menu > Messaging > Inbox.To get delivery status of a sent message1From standby select Menu > Messaging > Settings > Text message > Delivery report.2Select On. You are notified when a message has been successfully delivered.See Entering text on page 32.25Picture messages (MMS)Picture messages can contain text, pictures, sound recordings, video clips and attachments. To create and send a picture message1From standby select Menu > Messaging > Write new > Picture msg.2Enter text. To add items to the message, press  , scroll   and select an item.3Select Cont.4Select an option.5Select OK > Send.You must set an MMS profile and the address of your message server. If no MMS profile or message server exists, you can receive all the settings automatically from your network operator or at www.sonyericsson.com/support.Sending and receiving phones must have subscriptions that support picture messaging.26ContactsYou can save contacts in the phone memory or on the SIM card. You can copy contacts from the phone memory to the SIM card or from the SIM card to the phone memory. Default contactsYou can choose which contact information is shown as default. If Phone cont. is selected as default, your contacts show all the information saved in the phone. If you select SIM contacts as default, your contacts show names and numbers saved on the SIM card.To select default contacts1From standby select Menu > Contacts > Options > More > Default contacts.2Select an option. If you select Phone & SIM as Default contacts, you are asked to choose between Phone or SIM card when adding a new contact.See Entering text on page 32.27Phone contactsTo add a phone contact1From standby select Menu > Contacts > New contact. 2Scroll to Name: and select Add.3Enter the name and select OK.4Scroll to New number: and select Add.5Enter the number and select OK.6Select a number option.7Scroll among tabs and select the fields to add information.8Select Save.To call a contact1From standby select Menu > Contacts.2Scroll to or enter the first few letters of the contact.3Press  .To edit a contact1From standby select Menu > Contacts. 2Select a contact.3Select Options > Edit contact.4Edit the information and select Save.Enter the + sign and country code with all phonebook numbers. Then you can use them abroad or at home. See To make international calls on page 23.28To delete a contact1From standby select Menu > Contacts. 2Scroll to a contact.3Select Options > Delete.To copy a contact to the SIM card1From standby select Menu > Contacts.2Scroll to a contact.3Select Options > Options > Copy to SIM.Contacts memoryThe number of entries you can save in Contacts depends on the capacity of your SIM card.To check the contacts memory status•From standby select Menu > Contacts > Options > Memory status.35Phone lockYou can stop unauthorised use of your phone. Change the phone lock code (0000 by default) to any four-digit code.To turn on the phone lock1From standby select Menu > Settings > the General tab > Security > Locks > Phone protection > Protection > On.2Enter the phone lock code and select OK.To edit your phone lock code1From standby select Menu > Settings > the General tab > Security > Locks > Phone protection > Change code.2Enter the current code and select OK.3Enter a new code and select OK.4Re-enter the new code and select OK.To unlock the phone•Enter your phone lock code (which is 0000 if you have not changed it) and select OK.If you forget the new code, you have to take the phone to your local Sony Ericsson retailer.34LocksSIM card lockYour PIN and PUK are supplied by your network operator. To unblock your SIM card1When PIN blocked is displayed, select Unlock.2Enter your PUK and select OK.3Enter a new PIN and select OK.4Re-enter the new PIN and select OK.To turn on the SIM card lock1From standby select Menu > Settings > the General tab > Security > Locks > SIM protection > Protection.2Enter your PIN and select OK.3Select On.To edit your PIN1From standby select Menu > Settings > the General tab > Security > Locks > SIM protection > Change PIN.2Enter your PIN and select OK.3Enter a new PIN and select OK.4Re-enter the new PIN and select OK.If the message Wrong PIN Attempts remaining: appears when you edit your PIN, you entered the PIN or PIN2 incorrectly.33To enter text using multitap•Press   –   until the character you want appears.•Press   to add a space.•Press   to enter full stops and commas.•Press   to shift between upper and lower case letters.•Press and hold down   –   to enter numbers.To change text input methods•When you write the message, press and hold down  .To delete characters•Press  .To change writing language•When you write the message, press and hold down  .VoicemailCallers can leave a voicemail message when you cannot answer. You can get your voicemail number from your network operator.To enter your voicemail number1From standby select Menu > Messaging > Settings > Voicemail no.2Scroll to the voicemail number and select OK.3Enter the voicemail number and select OK.To call your voicemail service•From standby press and hold down  .32File managerYo can handle files saved in the phone memory or on a memory card. You can create subfolders to move files to.To move a file in the file manager1From standby select Menu > File manager.2Scroll to a file and select Options > Move to folder.3Open a folder and select Paste.Entering textThere are two methods you can use to enter text: multitap or predicitive text input.To enter text using predictive text input1For example, to write the word “Jane”, press  ,  , ,  .2You now have several options: •If the word shown is the one you want, press   to accept and add a space. To accept a word without adding a space, press  .•If the word shown is not the one you want, press   or   repeatedly to view alternative words. •To enter full stops and commas, press   and then   or   repeatedly.By using predictive text input you only have to press each key once. Continue writing a word even if it appears to be wrong. The phone uses the dictionary to recognise the word when all letters are entered. 30To receive an item1From standby select Menu > Settings > the Connectivity tab > Bluetooth > Turn on.2When you receive an item, follow the instructions that appear.To send an item using Bluetooth1From standby select, for example, Menu > File manager > Camera album.2Scroll to a picture and select Options > Send > Bluetooth.InternetYou need the correct Internet settings in your phone. If the settings are not in your phone, you can:•Get them in a text message from the network operator.•On a computer, go to www.sonyericsson.com/support and request a text message with the settings.To select an Internet profile1From standby select Menu > Internet > Internet settings > Accounts. 2Select an account.To start browsing1From standby select Menu > Internet.2Select an option.To stop browsing•When you are browsing, press and hold down  .29More functionsBluetooth™ wireless technologyBluetooth™ wireless technology allows wireless connection to other Bluetooth devices. For example, you can:•connect to handsfree devices.•connect to several devices at the same time.•exchange items.To turn on the Bluetooth function•From standby select Menu > Settings > the Connectivity tab > Bluetooth > Turn on.To pair a device with your phone1To search for available devices, from standby select Menu > Settings > the Connectivity tab > Bluetooth > My devices > New device. 2Select a device from the list. Enter a passcode, if required.To pair your phone with a Bluetooth handsfree1To search for available devices, from standby select Menu > Settings > the Connectivity tab > Bluetooth > My devices > New device.2Select a handsfree device. Enter a passcode, if required. For Bluetooth communication, we recommend a maximum range of 10 metres (33 feet) with no solid objects in between.Make sure that the device you want to pair your phone with has the Bluetooth function activated and Bluetooth Visibility set to Show phone.31Themes and ringtonesYou can change the appearance of your screen by selecting themes. You can also select ringtones. To select a theme•From standby select Menu > Settings > the Display tab > Themes and select a theme.To select a ringtone•From standby select Menu > Settings > the Sounds & alerts tab > Ringtone and select a ringtone.Time and dateTo set the time and date1From standby select Menu > Settings > the General tab > Time & date > Time.2Enter the date and select OK.3Enter the time and select OK.LanguageTo change the phone language•From standby select Menu > Settings > the General tab > Phone language and select a language.Sony Ericsson Mobile Communications ABSE-221 88 Lund, Swedenwww.sonyericsson.comPrinted in XXX36TroubleshootingSome problems require you to call your network operator. For more support go to www.sonyericsson.com/support.Master resetIf you experience problems with your phone, such as screen flickering, screen freezing or navigation problems, you should reset the phone. If you select Reset all, all user data such as contacts, messages, pictures and sounds are deleted.To reset all settings•From standby select Menu > Settings > the General tab > Reset all > Cont. > Cont.Error messagesPIN blockedYou have entered your PIN code incorrectly three times in a row. Your SIM is now locked. Unlock your SIM with your PUK code, which is provided together with your PIN code by your network operator.To unlock the SIM card1Enter your PUK code and select OK.2Enter a new PIN and select OK.3Re-enter the new PIN and select OK.Insert SIMThere is no SIM card in your phone or you may have inserted it incorrectly. Try one or more of the following:•Remove the SIM card and insert it correctly.•Clean the connectors on the SIM card and phone with a soft brush, a cloth or a cotton bud.37•Check if the SIM card is damaged.•Contact your network operator to get a new SIM card.I cannot turn on the phoneTry charging the phone until it has finished charging. Attach the charger (make sure the power icon on the charger is facing upwards) and charge the phone for 2.5 hours. The battery icon on the screen may not appear until the phone has charged for 30 minutes.I cannot use Internet or MMSMake sure you have a phone subscription that supports data transmission, and also the correct settings in your phone.I cannot send text messages (SMS)Make sure you have a valid service centre number in your phone.The phone cannot be detected by other devices using Bluetooth wireless technologyYou have not turned the Bluetooth function on. Make sure that the visibility is set to Show phone. See To turn on the Bluetooth function on page 29.The phone turns off itselfIf your phone turns off itself when being transported, something in your pocket or bag has activated the on/off key. You need to turn on the automatic keylock. 38Declaration of conformity for F305We, Sony Ericsson Mobile Communications AB ofNya VattentornetSE-221 88 Lund, Swedendeclare under our sole responsibility that our productSony Ericsson type AAC-1052161-BV and in combination with our accessories, to which this declaration relates is in conformity with the appropriate standards EN 301 511:V9.0.2, EN 300 328:V1.7.1, EN 301 489-7:V1.3.1, EN 301 489-17:V1.2.1 and EN 60 950-1:2006, following the provisions of, Radio Equipment and Telecommunication Terminal Equipment Directive 1999/5/EC.We fulfil the requirements of the R&TTE Directive (1999/5/EC).FCC StatementThis device complies with Part 15 of the FCC rules. Operation is subject to the following conditions: (1) This device may not cause harmful interference, and (2) This device must accept any interference received, including interference that may cause undesired operation.Any change or modification not expressly approved by Sony Ericsson may void the user's authority to operate the equipment.This equipment has been tested and found to comply with the limits for a Class B digital device, pursuant to Part 15 of the FCC Rules. These limits are designed to provide reasonable protection against harmful interference in a residential installation. Lund, May 2008Shoji Nemoto, Head of Product Business Unit GSM/UMTS39This equipment generates, uses and can radiate radio frequency energy and, if not installed and used in accordance with the instructions, may cause harmful interference to radio communications. However, there is no guarantee that interference will not occur in a particular installation.If this equipment does cause harmful interference to radio or television reception, which can be determined by turning the equipment off and on, the user is encouraged to try to correct the interference by one or more of the following measures:- Reorient or relocate the receiving antenna.- Increase the separation between the equipment and receiver.- Connect the equipment into an outlet on a circuit different from that to which the receiver is connected.- Consult the dealer or an experienced radio/TV technician for help.Industry Canada StatementThis device complies with RSS-210 of Industry Canada. Operation is subject to the following two conditions: (1) this device may not cause interference, and (2) this device must accept any interference, including interference that may cause undesired operation of the device.This Class B digital apparatus complies with Canadian ICES-003.Cet appareil numérique de la classe B est conforme à la norme NMB-003 du Canada.Sony Ericsson F305GSM 850/900/1800/1900This User guide is published by Sony Ericsson Mobile Communications AB or its local affiliated company, without any warranty. Improvements and changes to this User guide necessitated by typographical errors, inaccuracies of current information, or improvements to programs and/or equipment, may be made by Sony Ericsson Mobile Communications AB at any time and without notice. Such changes will, however, be incorporated into new editions of this User guide.All rights reserved.© Sony Ericsson Mobile Communications AB, 2008Please note: Some of the services in this User guide are not supported by all networks. This also applies to the GSM International Emergency Number 112. Please contact your network operator or service provider if you are in doubt whether you can use a particular service or not.40Please read the Important information before you use your mobile phone. All illustrations are for illustration only and may not accurately depict the actual phone. Your mobile phone has the capability to download, store and forward additional content, e.g. ringtones. The use of such content may be restricted or prohibited by rights of third parties, including but not limited to restriction under applicable copyright laws. You, and not Sony Ericsson, are entirely responsible for additional content that you download to or forward from your mobile phone. Prior to your use of any additional content, please verify that your intended use is properly licensed or is otherwise authorized. Sony Ericsson does not guarantee the accuracy, integrity or quality of any additional content or any other third party content. Under no circumstances will Sony Ericsson be liable in any way for your improper use of additional content or other third party content.Sony, M2 and Memory Stick Micro are trademarks or registered trademarks of Sony Corporation. Ericsson is a trademark or registered trademark of Telefonaktiebolaget LM Ericsson. The Predictive Text Technology is used under license from Zi Corporation. Bluetooth is a trademark or a registered trademark of Bluetooth SIG Inc. and any use of such mark by Sony Ericsson is under license. The Liquid Identity logo, Style-Up, PlayNow and TrackID are trademarks or registered trademarks of Sony Ericsson Mobile Communications AB. TrackID™ music is powered by Gracenote Mobile. Microsoft, Windows and Vista are trademarks or registered trademarks of Microsoft Corporation in the United States and/or other countries. This product is protected by certain intellectual property rights of Microsoft. Use or distribution of such technology outside of this product is prohibited without a license from Microsoft. Java™ and all Java-based trademarks and logos are trademarks or registered trademarks of Sun Microsystems, Inc. in the United States and other countries. End-user license agreement for Sun™ Java™ J2ME™.41Export Regulations: This product, including any software or technical data contained in or accompanying the product,  may be subject to U.S. export control laws, including the U.S. Export Administration Act and its associated regulations and the U.S. sanctions programs administered by the U.S. Treasury Department’s Office of Foreign Assets Control, and may be additionally subject to export or import regulations in other countries. The user and any possessor of the product agrees to comply strictly with all such regulations and acknowledges that it is their responsibility to obtain any required licenses to export, re-export, or import this product. Without limitation this product, including any software contained therein, may not be downloaded, or otherwise exported or re-exported (i) into, or to a national or resident of, or an entity in, Cuba, Iraq, Iran, North Korea, Sudan, Syria (as such listing may be revised from time to time) or any country to which the U.S. has embargoed goods; or (ii) to any person or entity on the U.S. Treasury Department’s list of Specially Designated Nationals or (iii) any person or entity on any other export prohibition list that may be maintained from time to time by the United States Government, including but not limited to the U.S. Commerce Department’s Denied Persons List or Entity List, or the U.S. State Department’s Nonproliferation Sanctions List. Restricted Rights: Use, duplication or disclosure by the United States government is subject to the restrictions as set forth in the Rights in Technical Data and Computer Software Clauses in DFARS 252.227-7013(c) (1) (ii) and FAR 52.227-19(c) (2) as applicable.This product is licensed under the MPEG-4 visual and AVC patent portfolio licenses for the personal and non-commercial use of a consumer for (i) encoding video in compliance with the MPEG-4 visual standard (“MPEG-4 video”) or the AVC standard (“AVC video”) and/or (ii) decoding MPEG-4 or AVC video that was encoded by a consumer engaged in a personal and non-commercial activity and/or was obtained from a video provider licensed by MPEG LA to provide MPEG-4 and/or AVC video. No license is granted or shall be implied for any other use. Additional information including that relating to promotional, internal and commercial uses and licensing may be obtained from MPEG LA, L.L.C. See http://www.mpegla.com. MPEG Layer-3 audio decoding technology licensed from Fraunhofer IIS and Thomson. All other trademarks and copyrights are the property of their respective owners.1208-5087.1

Navigation menu