Sony A3880001 GSM 850/900/1800/1900/GPRS/EDGE UMTS FDD 1/2/8 mobile phone with Bluetooth and WLAN User Manual Sony Ericsson Mobile Communications AB
Sony Mobile Communications Inc GSM 850/900/1800/1900/GPRS/EDGE UMTS FDD 1/2/8 mobile phone with Bluetooth and WLAN Sony Ericsson Mobile Communications AB
Sony >
Contents
08 user manual
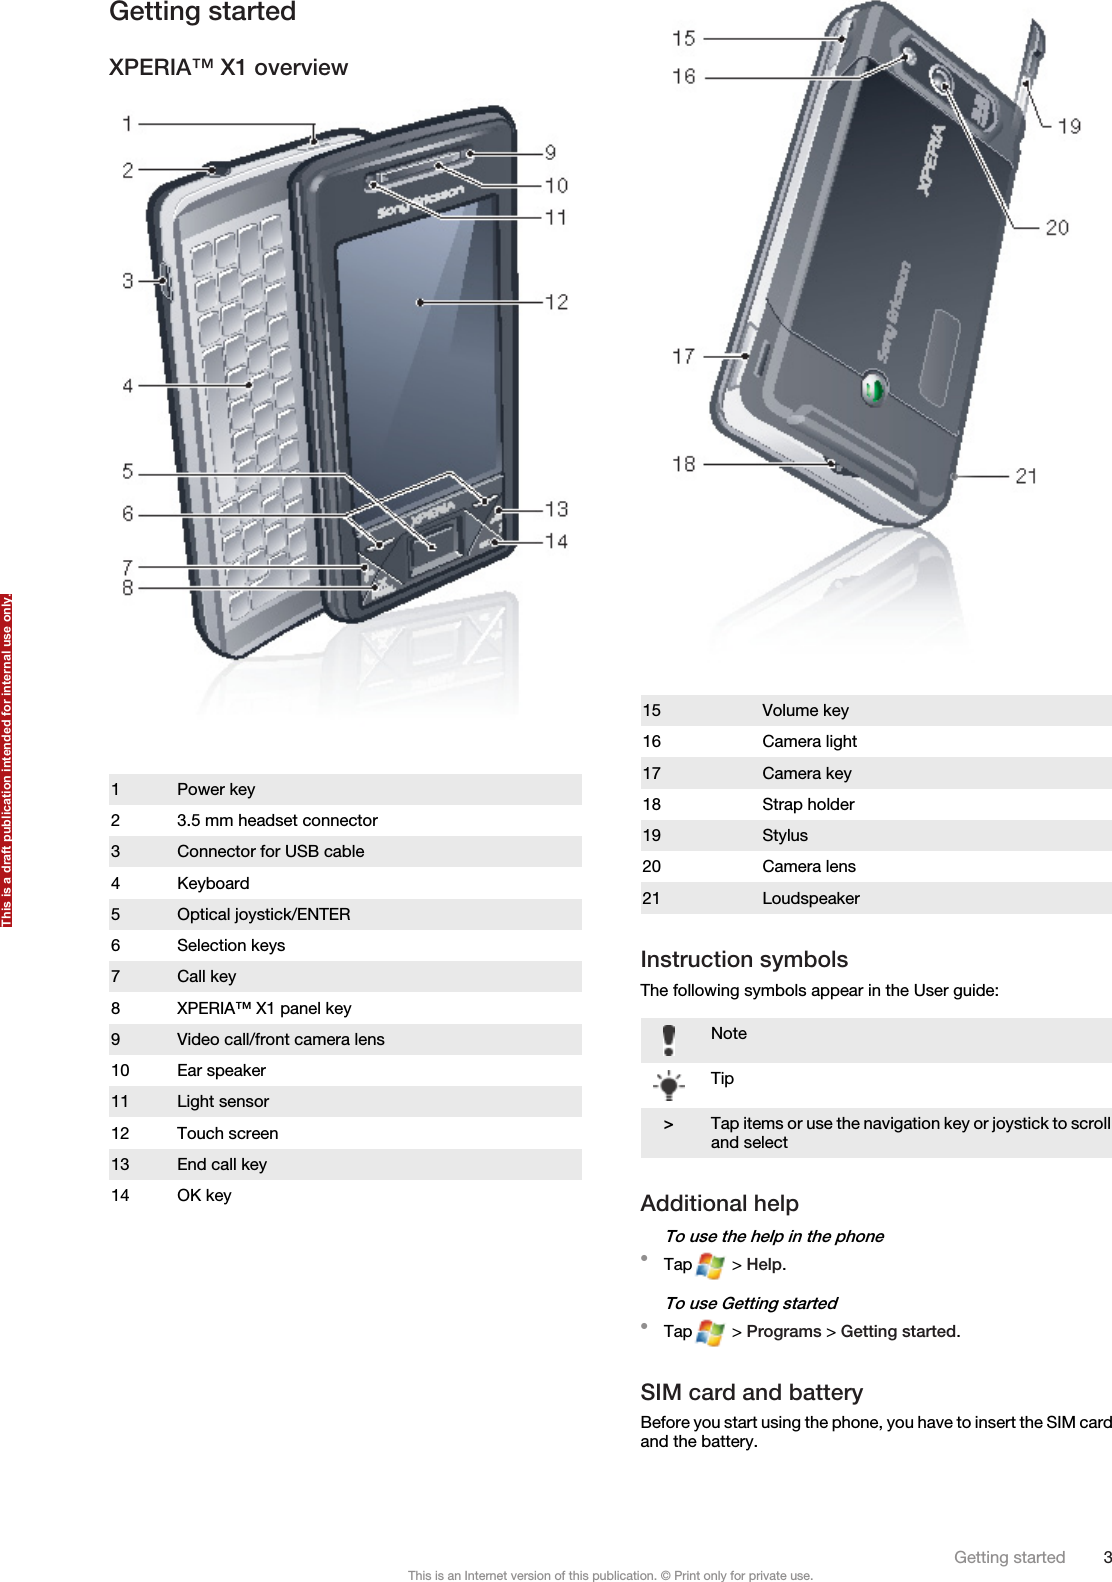


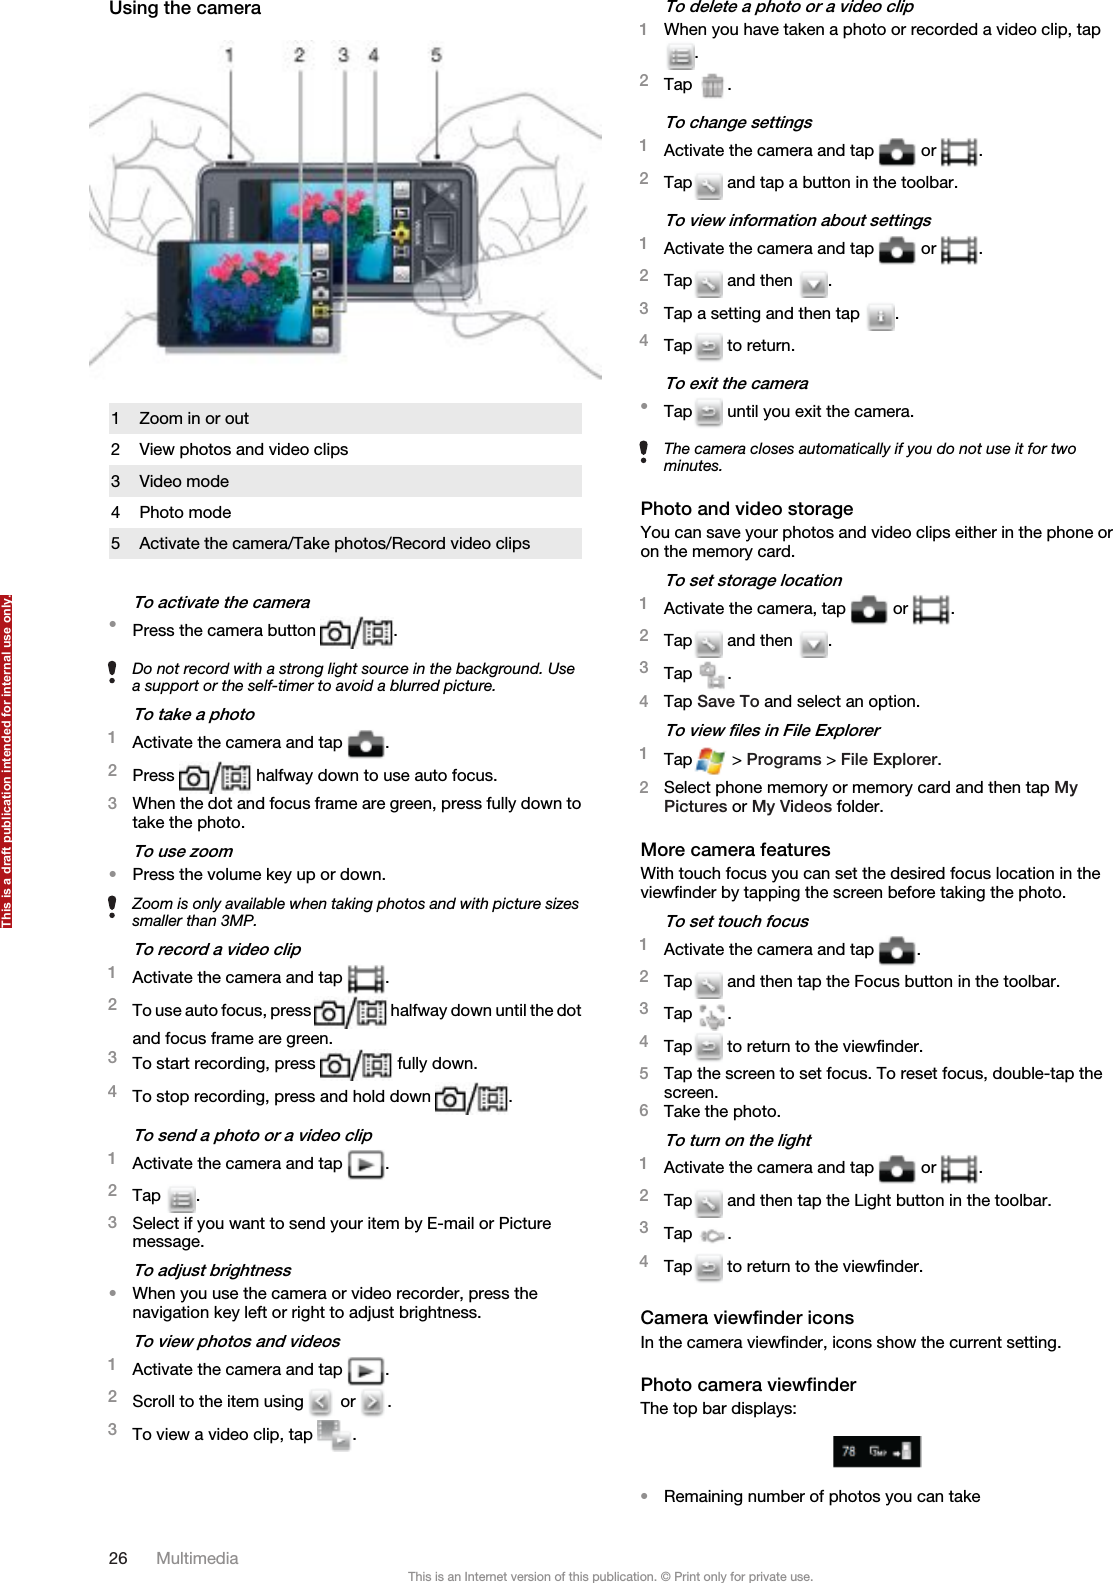
![5Tap Finish. You can now exchange information with thepaired device.To rename a Bluetooth partnership, tap and hold the name of thepartnership on the Devices tab of the Bluetooth settings screen,then tap Edit.To delete a Bluetooth partnership, tap and hold the name of thepartnership on the Devices tab of the Bluetooth settings screen,then tap Delete.Connecting a Bluetooth™ handsfree orstereo headsetFor handsfree phone conversation, you can use a Bluetooth™handsfree headset such as a car kit with your phone. Your phonealso supports A2DP (Advanced Audio Distribution Profile) whichmeans you can use a Bluetooth stereo headset for handsfreephone conversations and for listening to stereo music.To connect a Bluetooth™ handsfree or stereo headset1Make sure that both your phone and the Bluetooth™ headsetare turned on and within close range, and that the headset isvisible. Refer to the manufacturer’s documentation to find outhow to set the headset in visible mode.2Tap > Settings > Connections tab > Bluetooth.3On the Devices tab, tap Add new device. Your phone willthen search for other Bluetooth devices and display them inthe box.4Tap the name of the Bluetooth headset, then tap Next andyour phone will automatically pair with the Bluetooth headset.5Make sure the Hands Free check box is marked. If yourheadset is a stereo headset, also make sure WirelessStereo is marked.6Tap Finish. While the Bluetooth stereo headset is connected,the headset icon will appear on the title bar.If a Bluetooth stereo headset is disconnected, turn on the headsetand repeat steps 1 to 3 above. Tap and hold the name of theBluetooth stereo headset and tap Set as Wireless Stereo.Windows® Mobile will automatically try one of the preconfiguredpasscodes (0000, 1111, 8888, 1234) to pair the Bluetooth headsetwith the device. If this fails, you have to manually enter thepasscode delivered with your headset.Beaming information using a Bluetooth™connectionYou can beam information, such as contacts, calendar items,and tasks, as well as files from your phone to your computer orto another Bluetooth™-enabled device.If your computer does not have built-in Bluetooth capability, youneed to connect a Bluetooth adapter or dongle to your computer.To receive all incoming beams in your phone1Tap > Settings > Connections tab > Beam.2Make sure the Receive all incoming beams check box ismarked.To beam information to a computer1Turn on Bluetooth™ functionality in your phone, and make thephone visible. For more information, see To turn onBluetooth™ functionality and make your phone visible.2Create a Bluetooth partnership, then enable your computerto receive Bluetooth beams. If your computer has WindowsVista or Windows XP SP2 and your computer’s Bluetoothadapter is supported by your Windows version, do thefollowing:1In your computer, open Bluetooth Devices from theControl Panel, then click the Options tab.2For Windows Vista, select Allow Bluetooth devices to findthis computer. For Windows XP SP2, select Turndiscovery on and Allow Bluetooth devices to connect tothis computer.3Create a Bluetooth partnership between your phone andcomputer. For more information, see Bluetooth™partnership.4In the Options tab of Bluetooth Devices, select Show theBluetooth icon in the notification area.5To enable your computer to receive Bluetooth beams,right-click the Bluetooth icon at the bottom-right of yourcomputer screen and select Receive a File.3Now, you are ready to beam. In your phone, select an item tobeam. The item can be an appointment in your calendar, atask, a contact card, or a file.4To beam a contact, tap Menu > Send Contact > Beam. Tobeam other types of information, tap Menu > Beam [type ofitem].5Tap the name of the device to which you want to beam.6If you beam a calendar item, task, or contact to your computerand it is not automatically added to Outlook, select File >Import and Export in Outlook to import it.The default folder on your computer where beamed items arestored may be C:\Documents and Settings\your_username\MyDocuments in Windows XP or C:\Users\your_username\MyDocuments in Windows Vista.Using your phone as a Bluetooth™ modemThrough a Bluetooth™ connection you can connect your phoneto a notebook or desktop computer and use the phone as amodem for the computer.If your computer does not have built-in Bluetooth capability, youneed to connect a Bluetooth adapter or dongle to your computer.For your computer to use the Internet connection of your phone,activate Internet Sharing in your phone, then set up a BluetoothPersonal Area Network (PAN) between the computer and yourphone.To activate Internet Sharing and set up a PAN1In your phone, turn on Bluetooth™ functionality and set it tovisible mode.2Initiate a Bluetooth partnership from your phone. For moreinformation, see To create a Bluetooth™ partnership.3Tap > Programs > Accessories > Internet Sharing.4Select Bluetooth PAN as the PC Connection.5From the Network Connection list, select the name of theconnection that your phone uses to connect to the Internet.6Tap Connect.7In your computer, set up a Bluetooth Personal Area Network(PAN) with your phone.For Windows Vista:1Click Start > Control Panel > Network and Internet >Network and Sharing Center.2Click Manage network connections and then underPersonal Area Network, double-click Bluetooth NetworkConnection.3In the Bluetooth Personal Area Network Devices dialogbox, select your phone, then click Connect.For Windows XP SP2:1Click Start > Control Panel > Network Connections.2Under Personal Area Network, click Bluetooth NetworkConnection.3Under Network Tasks, click View Bluetooth networkdevices.4In the Bluetooth Personal Area Network Devices dialogbox, select your phone, then click Connect.8On the Internet Sharing screen in your phone, check that yourcomputer has been successfully connected to the Internetusing your phone as a Bluetooth modem.Wi-Fi/Wireless LANYou can connect your phone to a wireless network to access theInternet. You can connect at home (personal network) or in publicaccess zones (hot spots).•Personal networks – usually protected. A pass phrase or a keyis required from the owner.•Hot spots – usually unprotected but often requires you to logon the operator's service before you get Internet access.To connect to a wireless network1In the Sony Ericsson panel tap .2Select a network and tap OK.18 Getting connectedThis is an Internet version of this publication. © Print only for private use.This is a draft publication intended for internal use only.](https://usermanual.wiki/Sony/A3880001.08-user-manual/User-Guide-1011332-Page-18.png)