Sony A3880132 GSM/UMTS/HSPA Mobile Phone with WLAN, BT, RFID and ANT+ User Manual User Guide
Sony Mobile Communications Inc GSM/UMTS/HSPA Mobile Phone with WLAN, BT, RFID and ANT+ User Guide
UserManual.wiki
>
Sony
>
A3880132 User Manual
User Guide
Navigation menu
Upload a User Manual
Namespaces
Wiki Guide
HTML
PDF
Info
Views
User Manual
Discussion / Help
Navigation
![2In addition to this manual, the operations of SO-03D are described in "Quick Start Guide" (in Japanese only) and "Instruction Manual" application of the terminal.The initial operations and settings after purchasing the terminal, screen view contents and operations of main function are explained. (In Japanese only)Similarly to this manual, operations and settings of each function are explained.To use "Instruction Manual" application, from the Home screen, tap X [Instruction Manual]. For the first time using, download and install it according to the onscreen instructions. You can use the application as an electronic book. You can also shift to actual operations by tapping the description in the contents or view reference contents.❖Cautions・For downloading or updating the application, a high packet communication charge will be applied because of a large amount data communication. For this reason, subscription of packet flat-rate service is highly recommended.* If you use Wi-Fi function to download, packet communication charges are not applied.Operations and settings of each function are explained.It can be downloaded from NTT DOCOMO website.http://www.nttdocomo.co.jp/english/support/trouble/manual/download/index.html* The URL and contents are subject to change without prior notice.❖Cautions・Reproduction or reprint of all or part of this manual without prior permission is prohibited.・Important information for SO-03D is posted in the following website. Be sure to check before using.http://www.sonyericsson.co.jp/support/use_support/product/so-03d/About manuals of SO-03D"Quick Start Guide" (Supplied accessories)"Instruction Manual" (Application of the terminal)"Instruction Manual" (PDF file)](https://usermanual.wiki/Sony/A3880132/User-Guide-1627689-Page-4.png)
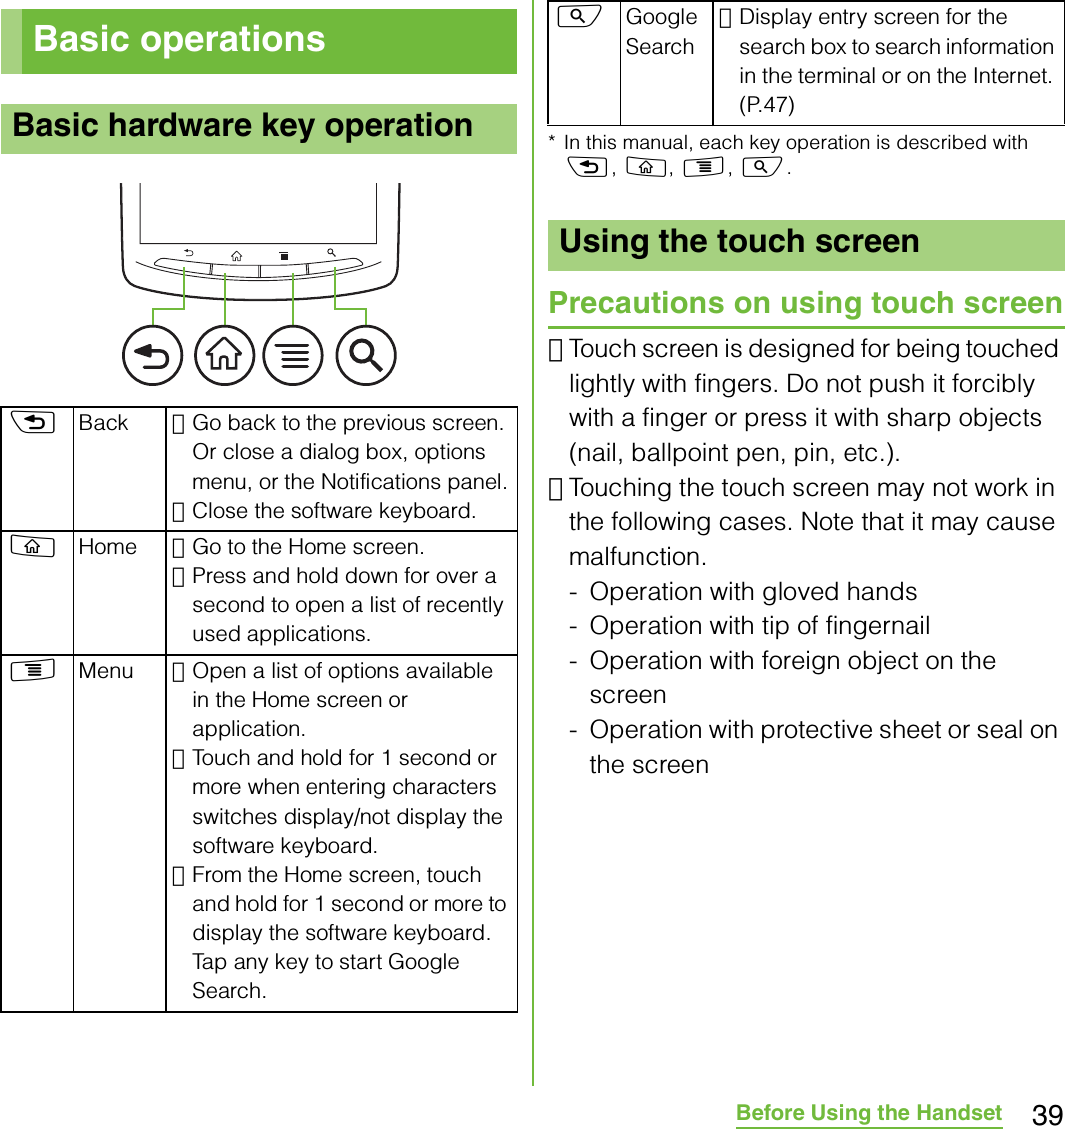
![3In this manual, each key operations are described with p, x, y, t, s, m. And selection operations of the icons or function items on the touch panel are described as follows.❖Information・In this manual, the instructions are described with the default Home screen. If you set the other application to the home screen, the operations may differ from the descriptions.・Display examples and illustrations used in this manual are just images for explanations and may be different from actual ones.・In this manual, the easier procedure is described for the functions and settings which have multiple operating procedures.・Please note that "SO-03D" is called the "the terminal" in this manual.Operation descriptionsDescription OperationFrom the Home screen, press t and tap [Settings].From the Home screen, press t (Menu) key and tap "Settings" on the screen.Tap [Settings] X [Date & time] X [Set date].Tap "Settings" displayed on the screen, and then tap "Date & time" on the next screen and "Set date" on the following screen in order.Tap to zoom out or in.Tap displayed on the screen to zoom out or in the map.Touch and hold an icon.Keep touching an icon on the screen longer (1-2 seconds).](https://usermanual.wiki/Sony/A3880132/User-Guide-1627689-Page-5.png)
![7Contents/PrecautionsNotes on usage・The terminal does not support i-mode sites (programs) or i-Dppli.・The terminal automatically performs communication for synchronizing data, checking the latest software version, maintain connection with the server, etc. If you transmit a large amount of data such as downloading applications or watching movie, a packet communication charge becomes high. Subscription of packet flat-rate service is highly recommended.・Public mode (Driving mode) is not supported.・Setting the phone to silent mode does not mute sounds (playback of video or music, alarm, etc.) other than the ringtone, operation sound, and notification sounds.・The names of the operators are displayed on the key unlocking screen (P.35).・Your phone number (own number) can be checked as follows:From the Home screen, press t and tap [Settings] X [About phone] X [Status].・The software version of your terminal can be checked as follows:From the Home screen, press t and tap [Settings] X [About phone].・You can perform software update by downloading an update file with a PC via Internet and connecting the PC to the terminal. For details, see "Connecting to a PC and updating" (P.202).・By some software updates, the operating system (OS) may be version-upgraded for improving the terminal quality. For this reason, you always need to use the latest OS version. And some applications that used in the previous OS version may not be available or some unintended bugs may occur.・If you use the terminal with a part of FOMA cards (green) inserted, voice calls and packet communication may not be available with some overseas network operators or in some overseas networks. For using overseas, please visit a docomo Shop near you. DOCOMO exchanges UIM (FOMA card) (green) free of charge.・Set the screen lock to ensure the security of your terminal for its loss. For details, see "Screen lock" (P.109).Continued on next page](https://usermanual.wiki/Sony/A3880132/User-Guide-1627689-Page-9.png)

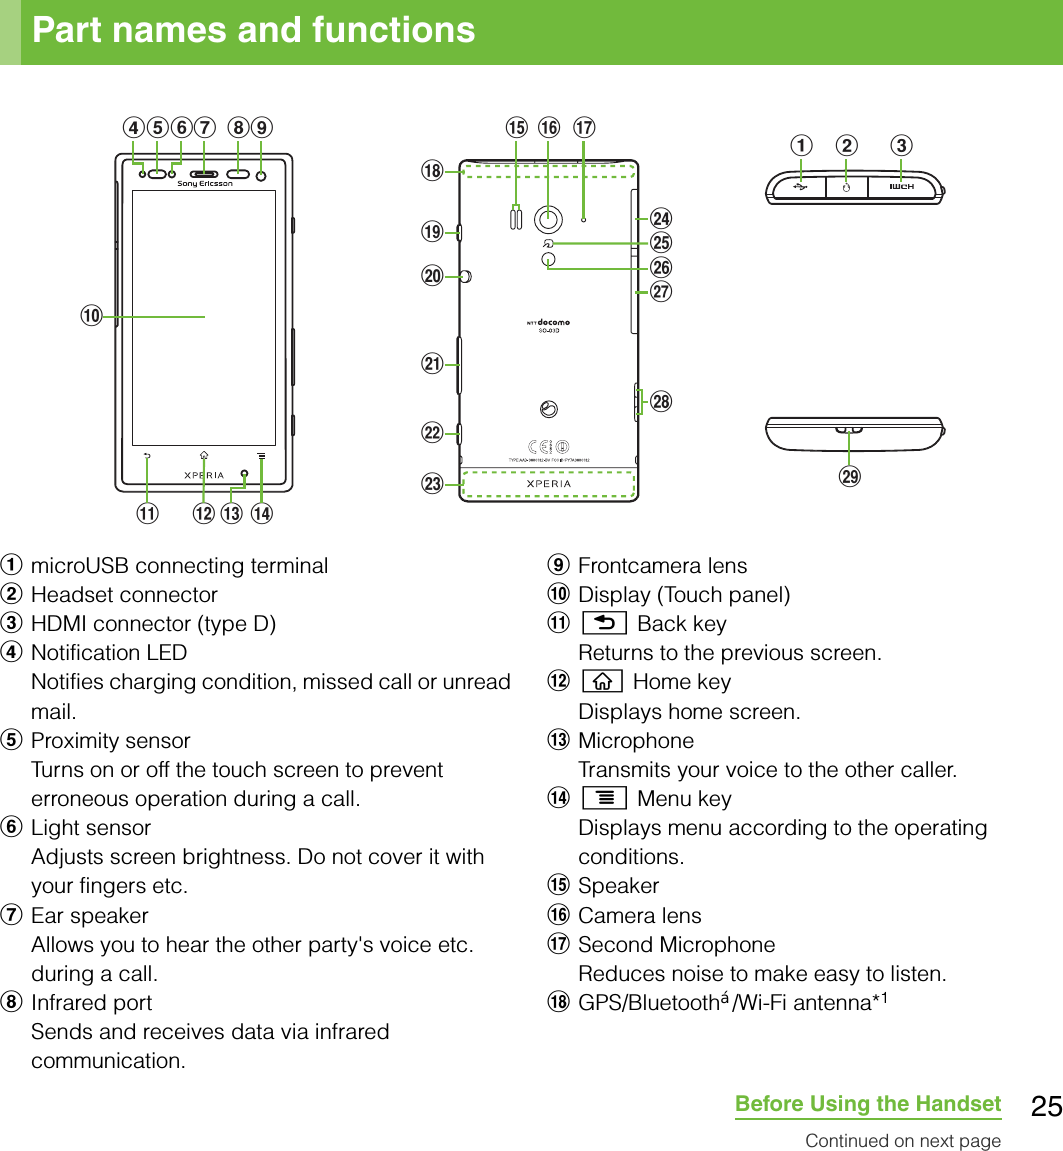

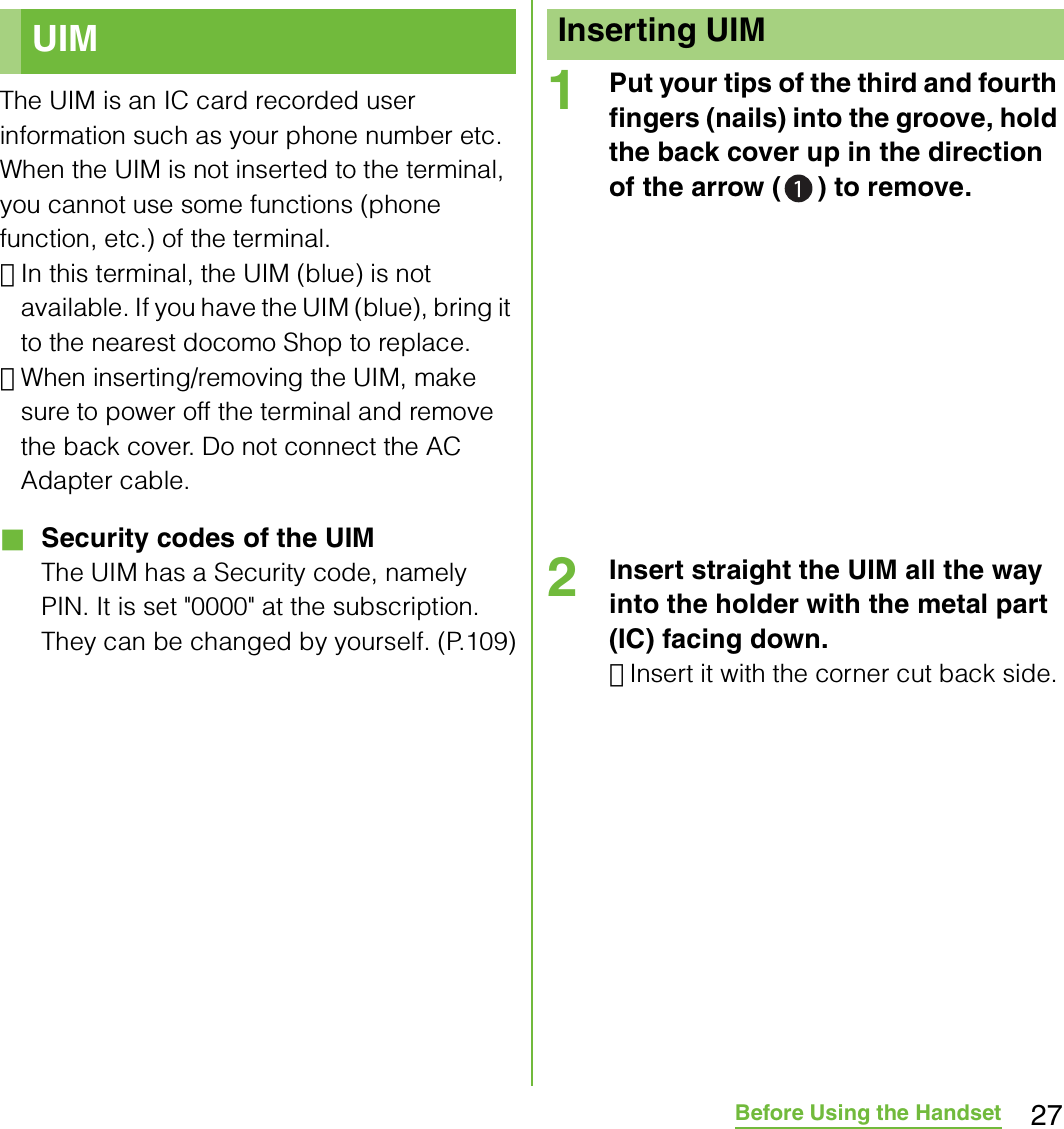
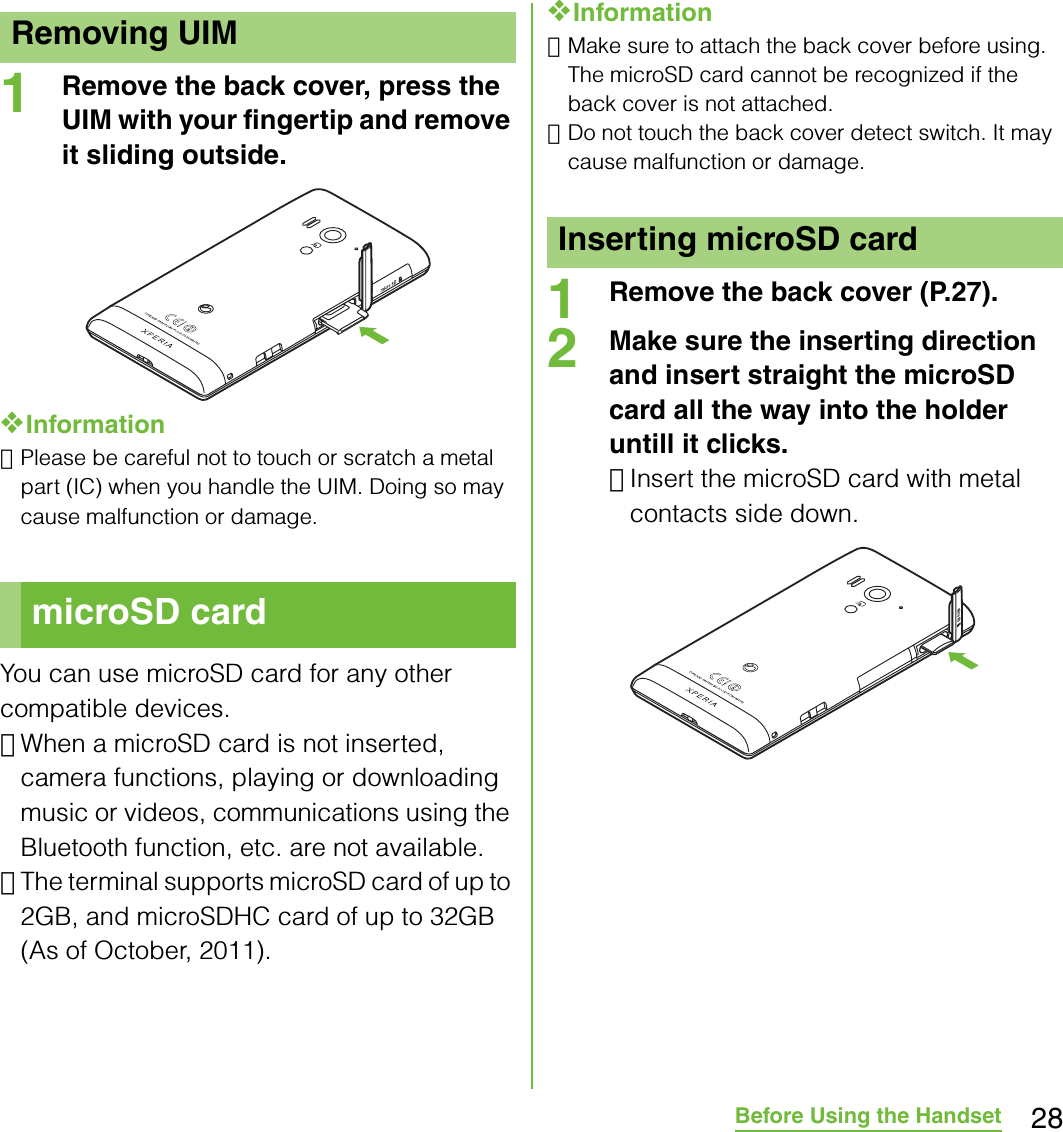
![30Before Using the Handset・The battery pack is a consumable accessory. The usage duration of the battery per one charge decreases gradually each time the battery is recharged.・When the usage duration per one charge becomes about half of a new battery pack, the life if the battery pack is assumed to be almost over. It is recommended that you replace the battery pack ahead of time. Depending on the usage condition, the battery pack may be inflated as it comes to be end of its life. This is not a malfunction.・Return all spent battery packs to NTT DOCOMO or a dealer, or a recycling shop to protect the environment. ・Make sure to charge with the Battery pack S004 designed for the SO-03D attached.・The included AC adapter's power plug is compatible with AC100V to 240V. For using the terminal overseas, a plug adapter that fits the electrical outlets in the country you stay is needed. Do not use an electrical transformer for overseas use to charge the terminal.・Use the included AC Adapter cable for charging.・When charging starts, the notification LED turns on in red/orange/green. Green means the remaining battery level reaches more than 90%. To check the battery level, press t from the Home screen, then tap [Settings] X [About phone] X [Status] and check "Battery level". When charging is completed, "100%" is displayed in the battery level.・When you start charging the battery with the terminal powered off, the power turns on. However, you cannot operate the terminal. Do not charge the battery in a place where the use is prohibited such as in airplane or hospital.Do not charge the battery pack for a long time (several days)・If you remain charging the terminal for a long time, the power supply starts from the battery pack after completion of charging. The usage time duration may be short. In that case, please charge it again correctly. For recharging, remove the terminal from the AC Adapter cable and reconnect it again.Battery pack lifeChargingLi-ion 00](https://usermanual.wiki/Sony/A3880132/User-Guide-1627689-Page-32.png)
![33Before Using the Handset2Insert the USB plug of the microUSB cable horizontally into the USB port of a PC.・When "PC Companion software" screen appears on the terminal, tap [Skip].・When a screen for new hardware detection etc. appears on the PC, select [Cancel].3When the charging is completed, remove the microUSB plug of the microUSB cable from the terminal.4Remove the USB plug of the microUSB cable from the USB port of the PC.❖Note・If the microUSB cable is connected into the USB connection jack for charging etc, the terminal is automatically powered on although the operations are not available. Be careful not to connect the microUSB cable in a place where the use is prohibited such as in airplane or hospital.・Check the connecting direction to connect correctly. Wrong connection may cause damage.ill](https://usermanual.wiki/Sony/A3880132/User-Guide-1627689-Page-35.png)
![34Before Using the Handset1Press p for over a second.・The key unlock screen appears.2Deactivate the key lock.・For deactivating the key lock, see "Unlocking the keys" (P.35).❖Information・The first time you turn ON, "Setup guide" (P.35) appears.・If you activate the screen lock (P.109) or SIM card lock (P.108), a PIN code entry screen appears when turning power on. Enter the PIN code and tap [OK]. To correct the wrong PIN entry, tap /.1Press p for over a second.・Phone options menu appears.2Tap [Power off].3Tap [OK].When the key lock is set, the screen light turns off. You can avoid the touch screen or button from false operations.・The terminal keys are locked with turning the screen light off after the specified time duration.1Press p.❖Information・For details on settings for turning the backlight off and the duration of time before the key lock activation, see "Adjusting the idle time before the screen turns off" (P.106).・There is no function to deactivate the key lock.・If you set the screen lock, entering the pattern, PIN or password is needed before the screen unlock. For details on the screen lock settings, see "Screen lock" (P.109).Turning power on and offTurning power onTurning power offSetting Key lock](https://usermanual.wiki/Sony/A3880132/User-Guide-1627689-Page-36.png)
![35Before Using the HandsetA key unlocking screen appears when turning the power on or the backlight on by pressing p/y.1Touch and drag to until it laps over.❖Information・ appears on the right until you touch . You can switch the ringtone ON/OFF without unlocking the keys and screen by touching and dragging to the left.When you turn on the terminal for the first time, Setup guide appears to set up the display language, wireless network, online services, etc. and to import contacts.❖Information・You can set or change the items later as required. To change the settings later, from the Home screen, tap , then tap [Settings] or [Setup guide] to set up from the menu.1Press p for over a second.・A screen for selecting language appears.2Tap [English (United States)] X [Done].・"Welcome!" screen appears. You can check the operations of functions and make initial settings.3Tap .・The Internet connection screen appears. Tap [Mobile network or Wi-Fi] or [Wi-Fi only] to select.4Tap .・The wireless network screen appears. Tap [Search for networks] to add Wi-Fi network.5Tap .・The Services screen appears. Make settings of "Google (P.114)" "Facebook (P.115)" "Exchange ActiveSync (P.124)".6Tap .・Automatic synchronization screen appears. Tap [Synchronize automatically] or [No thank you] to select.Unlocking the keysInitial settings (Setup guide)Key lockContinued on next page](https://usermanual.wiki/Sony/A3880132/User-Guide-1627689-Page-37.png)
![36Before Using the Handset7Tap .・The import contacts screen appears. If you have contacts saved in the UIM, from the Home screen, tap X Ta p [Contacts] then [Import] in "Import contacts" on the contacts import screen X Tap [SIM card]/[Memory card] to select "account" X Select "contacts to be imported".8Tap X [Finish].・The Home screen appears.❖Information・Make sure to check if the data connection is available (3G/GPRS) before setup online services. For checking the data connection status, see "Status icons" (P.36).A status bar appears at the top of the screen. In the status bar, the terminal status and notification are displayed. Notification icons appear on the left side, and the terminal status icons appear on the right side of the status bar.❖Note・If you cancel the "status bar" of application forcibly (P.112), operations may not be performed correctly.The main status icons displayed on the screen are as follows.Status barStatus barStatus iconsSignal strength Connecting to Bluetooth deviceDuring International roamingPostioning with GPSNo signal During Data synchronizationFOMA HIGH-SPEED availableAirplane mode activatedSending and downloading via FOMA HIGH-SPEEDSilent mode (vibration) ONGPRS available Sound OFF (Ringtone volume 0) Sending and downloading GPRS dataSpeakerphone ON3G available Microphone set to muteSending and downloading 3G dataAlarm is set.Connecting to Wi-Fi Battery statusContinued on next page](https://usermanual.wiki/Sony/A3880132/User-Guide-1627689-Page-38.png)
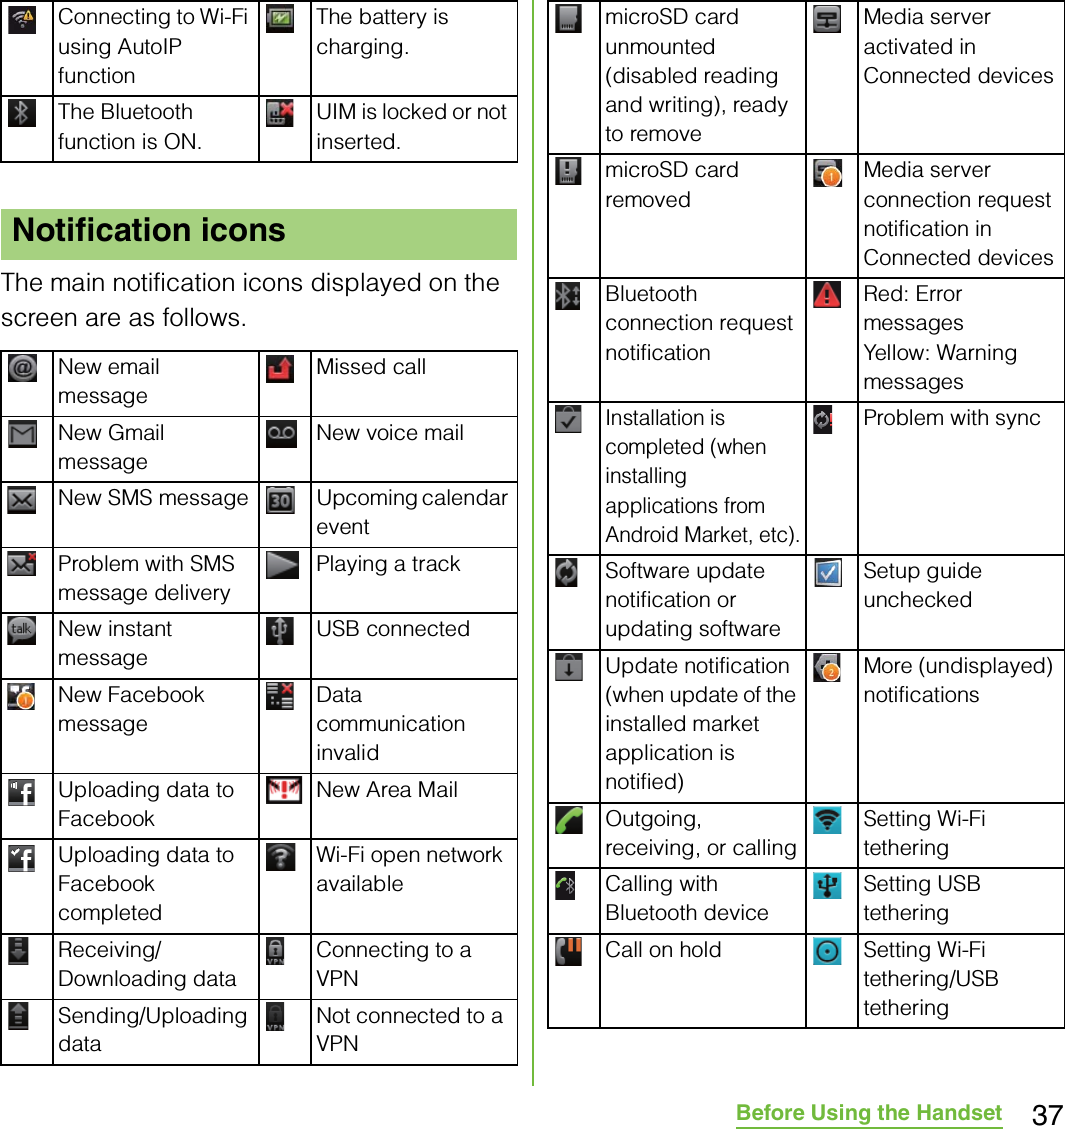
![38Before Using the HandsetNotification icons are displayed in the Notification panel. You can open notifications, such as messages, remainders, or event notifications directly from the Notification panel.1Drag the status bar downwards.・Press x to close the Notification panel.1From the Notification panel, tap [Clear].❖Information・Some notifications cannot be cleared.Notification LED provides information on the terminal status, incoming/receiving, etc.Notification panelOpening/Closing the Notification panelClearing the Notification panelNotification panelNotification LEDLED statusStatus IndicationRed The battery is charging when the remaining battery level is less than 10 %.Flashing red The battery level is not enough for activating the terminal for turning ON.Green The battery is charging when the remaining battery level is more than 90 %.Flashing green While backlight is off, missed calls/incoming messages (SMS)/new email messages exist.Flashing white A call is received.Flashing blue Received sp-mode mails while backlight is off exist.Orange The battery is charging when the remaining battery level is 11 % - 89 %.](https://usermanual.wiki/Sony/A3880132/User-Guide-1627689-Page-40.png)

![43Before Using the Handset1Flick the Home screen to left or right.・The Home screen switches.❖Information・You can check the current position of the Home screen with at the top of the screen.1From the Home screen, press t.2Tap [Add].・"Add to home screen" menu appears to change the Home screen.■ Add to home screen❖Information・"Add to home screen" appears also by touching and holding anywhere on the Home screen without icons.Adding a shortcut on the Home screen1In "Add to home screen" menu, tap [Shortcuts].2Select a shortcut you want to add.・The shortcut appears on the Home screen.❖Information・You can add shortcuts of applications on the Home screen also by the following operation.- From the Home screen, tap , touch and hold down an icon until the Home screen appears and release the finger where you want to place the shortcut.Adding widgets1In "Add to home screen" menu, tap [Widgets].・A list of widgets appears.Switching the Home screenChanging the Home screenShortcuts Add shortcuts of applications or setting screens. (P.43)Widgets Add widgets. (P.43)Folder Add folders to collect shortcuts, etc. (P.45)Wallpapers Change the wallpaper. (P.46)Themes Change the theme. (P.46)Analog clock Display the analog clock.Calendar Display the calendar.Data trafficSwitch ON/OFF of data communication.Digital clock Display the digital clock.Facebook View comments of members.Favorites and call logDisplay contacts registered to Favorites and related call log.Friends' games & applicationsSign in Facebook to acquire or check information on applications friends use.Continued on next page](https://usermanual.wiki/Sony/A3880132/User-Guide-1627689-Page-45.png)
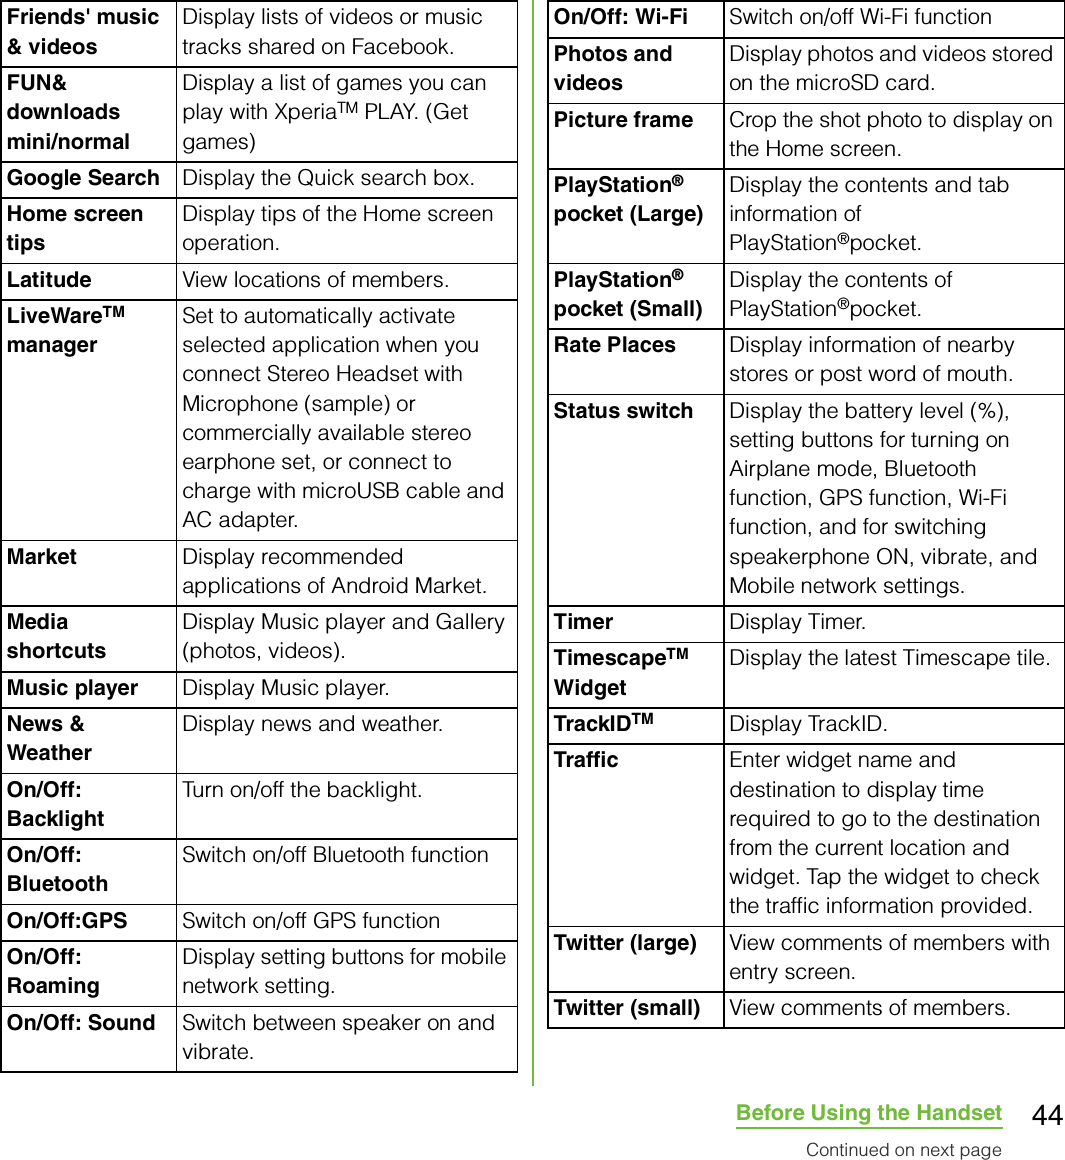
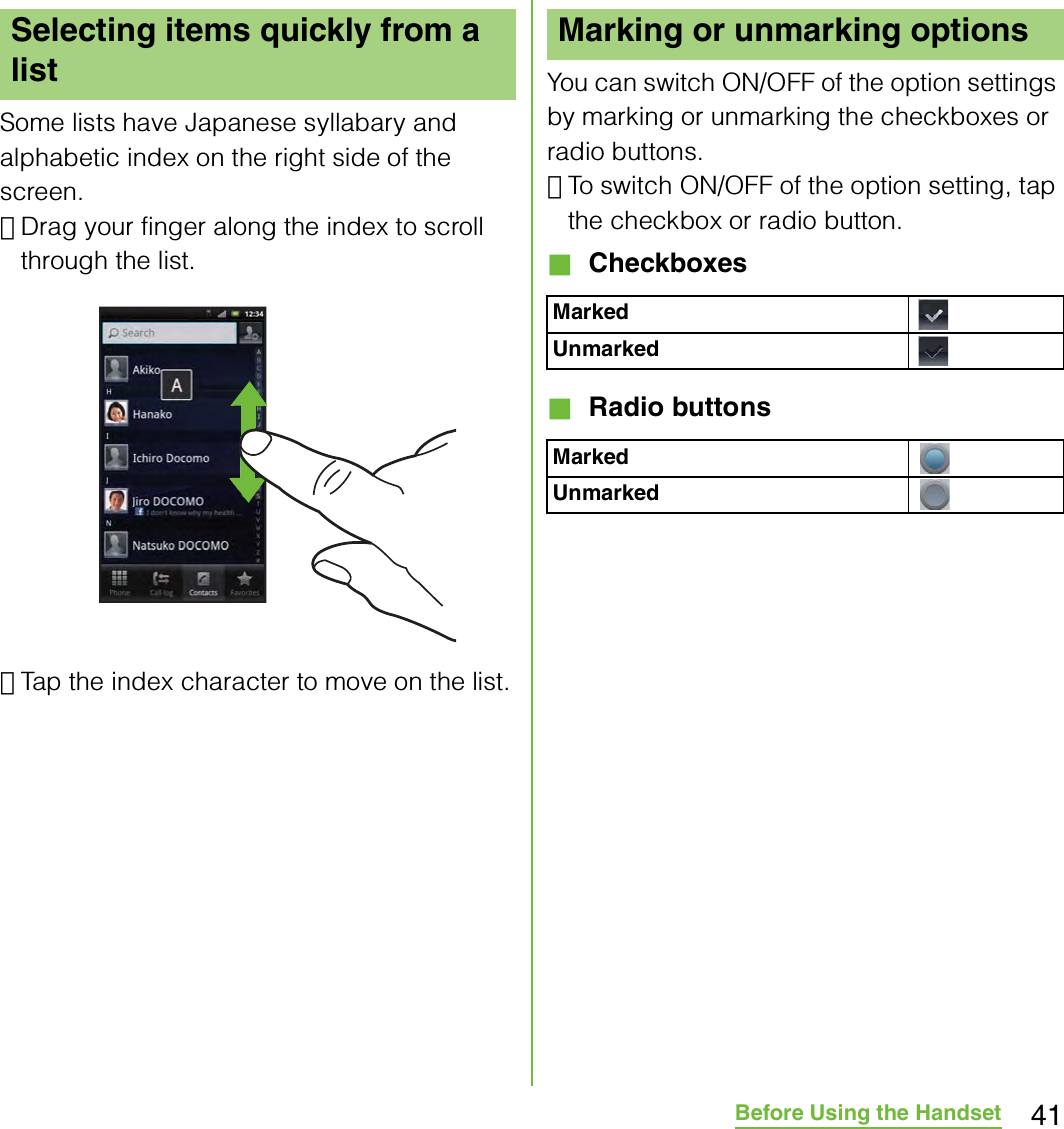
![45Before Using the Handset2Select an item.❖Information・If you install an application with widget from Android Market, the installed widget is added to the widget list.Displaying widget on the Home screen by a list1From the Home screen, pinch-in.・A list of the widgets on the Home screen appears.❖Information・To return to the Home screen, pinch-out or tap [Exit overview] or press x.Adding a folder to the Home screen1In "Add to home screen" menu, tap [Folder].2Tap [Done].・The folder appears on the Home screen.・To change the folder name, tap [Create new folder] entry box.Adding items to a folder1From the Home screen, touch and hold a shortcut icon until the terminal vibrates.2Drag the shortcut icon over to the folder.3Release your finger from the icon.・The shortcut is added in a folder.Renaming a folder1Tap the folder to open it.2Tap the title bar of the folder.・A dialog box for changing folder settings appears.3Tap entry box of [Folder name] and enter a folder name, and tap [Done].Weather widget View weather in the specified area.World clock Select time zones to display date and time of up to 3 cities in the world.YouTube Display the list of frequently played movies and recommended.](https://usermanual.wiki/Sony/A3880132/User-Guide-1627689-Page-47.png)
![46Before Using the HandsetChanging wallpaper1In "Add to home screen" menu, tap [Wallpapers].2Tap [Gallery]/[Live wallpapers]/ [Sony Ericsson wallpapers].・When you tap [Gallery], select an image to set to the wallpaper, pinch the cropping frame or drag it to area you want to use as wallpaper, and tap [Save].・When you tap [Live wallpapers], select a content, tap [Set wallpaper]. You can also download and add Live wallpaper content from a web page.・When you tap [Sony Ericsson wallpapers], select an image to set to the wallpaper, tap [Set wallpaper].❖Information・From the Home screen, you can also press t and tap [Wallpaper].Changing the themeSet the background image for the Home screen or settings menu from themes.1From "Add to home screen" menu, tap [Themes].2Select a theme you want to change.❖Information・Alternatively, you can change theme from the Home screen, press t and tap [Theme], or from the Home screen, press t and tap [Settings] X [Display] X [Theme].1From the Home screen, touch and hold an icon until the terminal vibrates.2Keep touching the icon and drag it.・To move to another Home screen, keep touching the icon and drag to left or right.3Release your finger from the icon.1From the Home screen, touch and hold an icon until appears at the bottom of the screen.2Drag the icon to .・The icon turns in red.3Release your finger from the icon.Moving an icon on the Home screenDeleting an icon from the Home screen](https://usermanual.wiki/Sony/A3880132/User-Guide-1627689-Page-48.png)
![48Before Using the Handset❖Information・Alternatively, from the Home screen, tap , then tap [Search] to display search screen.・Tap at the left of the search box to set the search range from "All", "Web" and "Apps".・Tap at the right of the search box to enter a search word by voice to browse the Internet.You can set search engines to use for Quick search box or set search objectives in the terminal.1Tap the search box (P.42 c) on the Home screen.2Press t, then tap [Search settings].・A search settings screen appears. You can set the following items.You can access the applications installed in the terminal using the Applications screen.1From the Home screen, tap .・On the Applications screen, flick left or right to switch the Applications screen.❖Information・To close the Applications screen, tap or press x or y.Search settingsGoogle search You can set whether to display search options when a search word is entered, or whether to reflect the previous search result in the search options. You can also open the web search log settings page by Browser.・You need to create your Google account.Searchable itemsYou can change the search range by marking/unmarking data categories (web, twitter, Apps, Music, Messaging, Contacts, Voice search) in the terminal to search.Clear shortcuts You can set not to display recently selected search results.Applications screenDisplaying applications screenApplication button](https://usermanual.wiki/Sony/A3880132/User-Guide-1627689-Page-50.png)
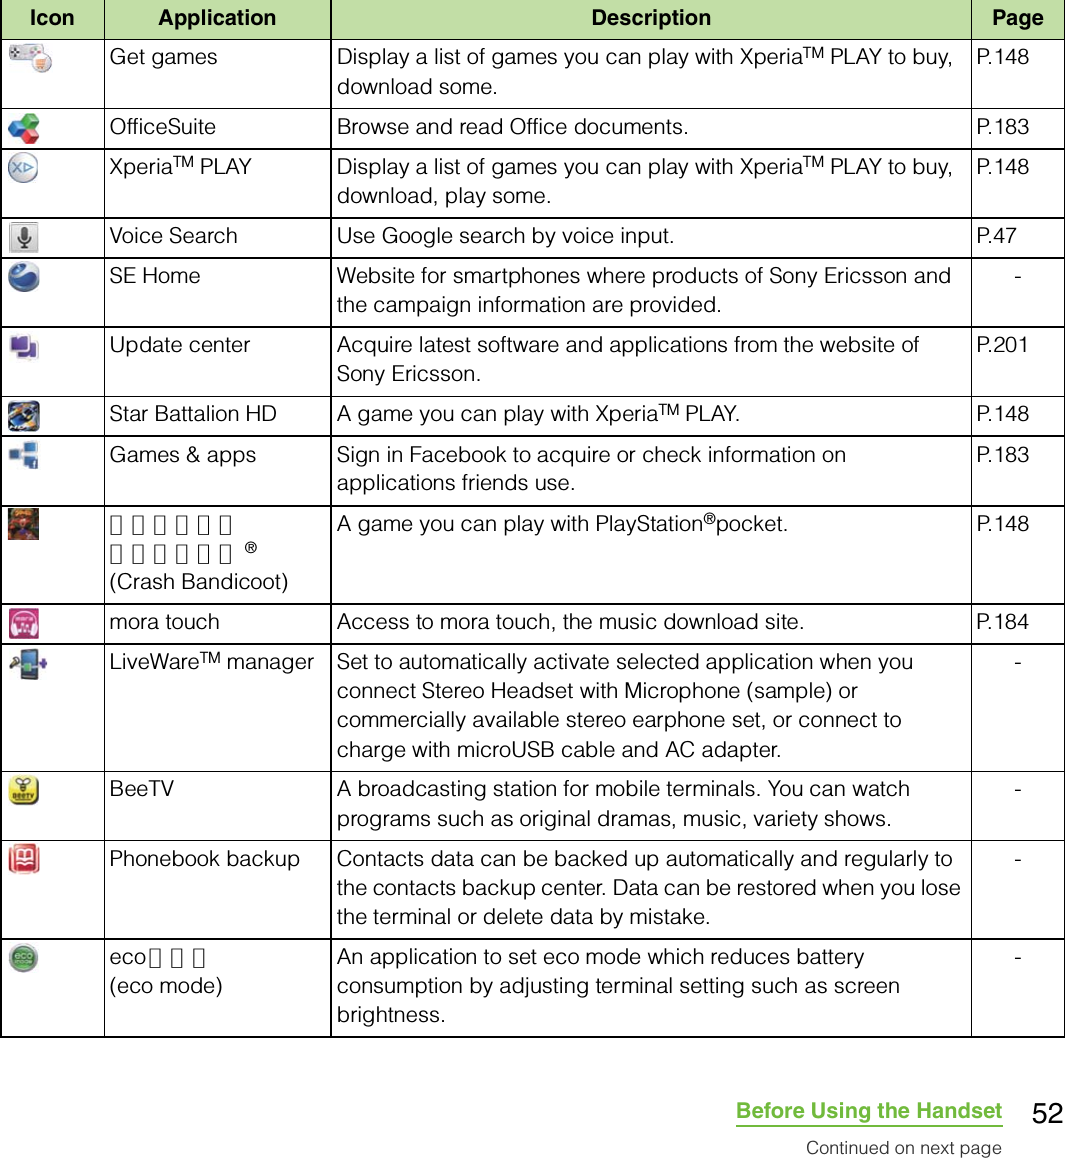

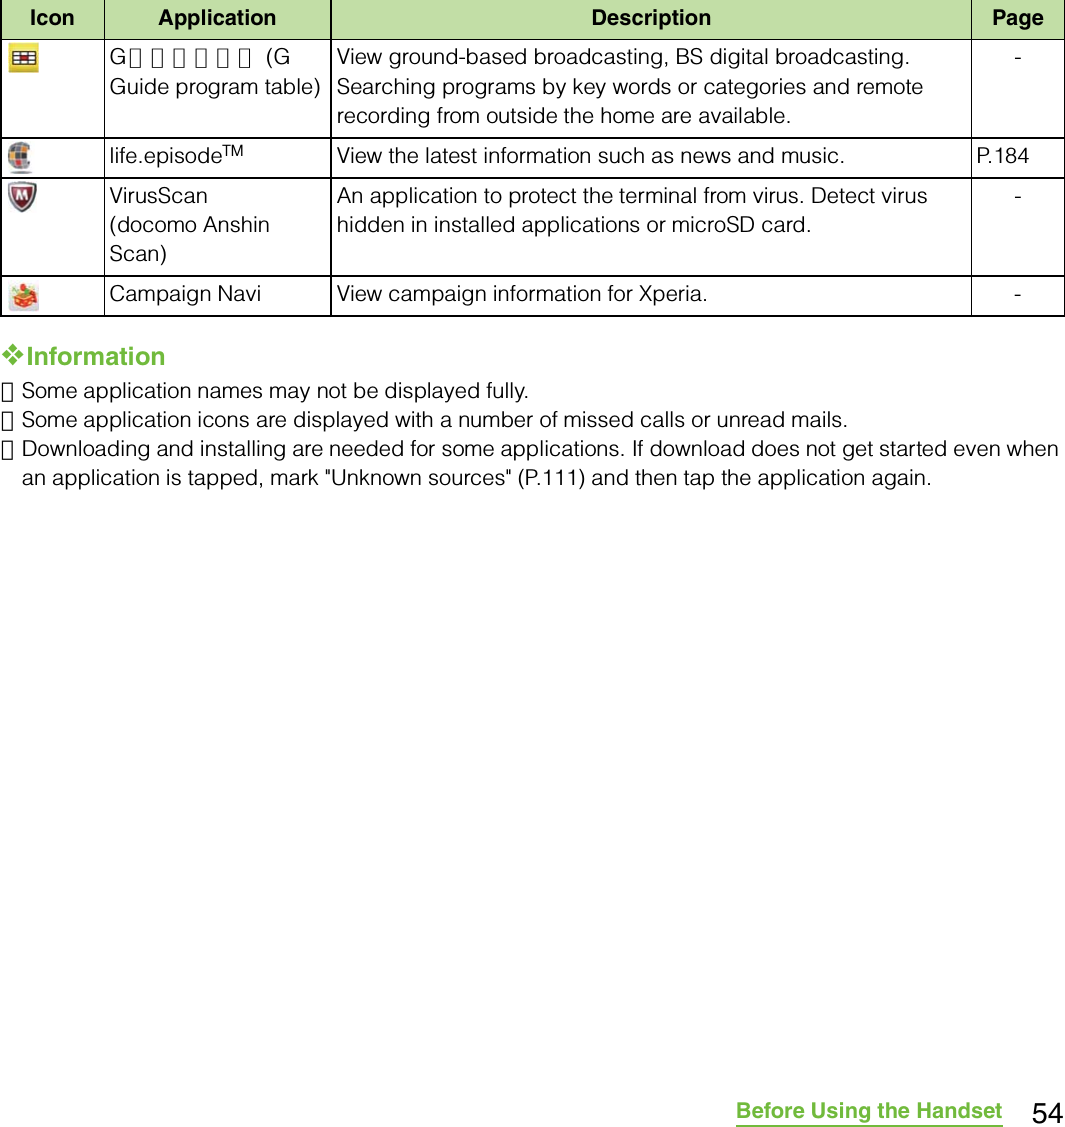
![55Before Using the HandsetYou can sort the applications displayed on the Applications screen from the "Arrange apps" menu.1On the Applications screen, tap .・"Arrange apps" menu appears.Selecting an application to move1On the Applications screen, tap , then touch and hold an application icon you want to move to drag.2Release your finger from the application icon.・The application icon moves.3Tap .❖Information・To move icons to another Applications screen, drag the icon to the side edge of the screen.・To add the Applications screen, drag the icon to the rightmost screen.Some application icons can be deleted from the Applications screen.・Before uninstalling application, back up contents related to the application that you want to save including data saved in the application.・Some applications cannot be uninstalled.1On the Applications screen, tap .2Tap an icon with .・Uninstall screen appears.3Tap [OK] X [OK].4Tap .❖Information・Some applications pre-installed in the terminal cannot be uninstalled.・Application icons can be deleted from the managing applications screen. For details, see "Deleting an installed application" (P.113).Sorting applicationsOwn order Select an application icon to sort. (P.55)Alphabetical Sort in alphabetical order.Most used Sort in frequency order.Recently installed Sort in install date order.Uninstalling applications](https://usermanual.wiki/Sony/A3880132/User-Guide-1627689-Page-57.png)
![56Before Using the HandsetYou can view and access recently used applications from this window.1Press y for over a second.・A recently used applications appear on a list.To enter characters, use the software keyboard which appears when you tap the character input box in a message, contacts, etc.❖Information・Press x to return to the previous screen from the character entry screen.In this terminal, you can select Input method (keyboard type) from "International keyboard" and "Japanese keyboard".1On a character entry screen, touch and hold the text box.2Tap [Input method] X [International keyboard]/[Japanese keyboard].❖Information・You can change Input method (keyboard type) during character entry.For Japanese keyboard, there are 3 types of software keyboards: QWERTY, 12 key and Japanese syllabary.❖Information・The key display of software keyboard varies depending on the entry screen, character mode or settings.Opening the recently used applications windowCharacter entrySelecting input methodInternational keyboardSelect a language for text entry.Select to enter language otherthan Japanese.Japanese keyboardSelect to enter Japanese.Software keyboard](https://usermanual.wiki/Sony/A3880132/User-Guide-1627689-Page-58.png)

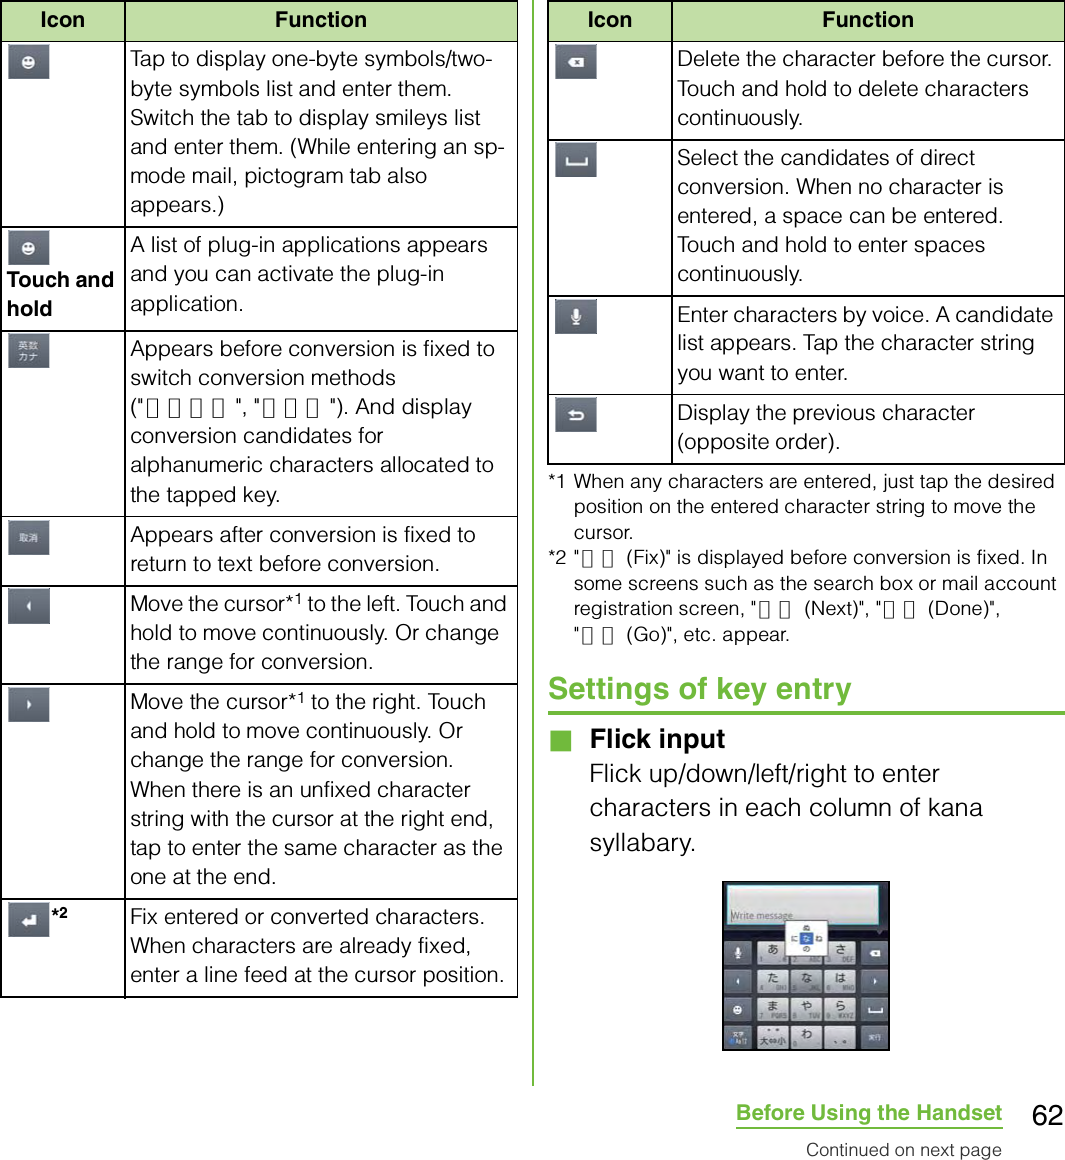
![58Before Using the Handset・Tap to display plug-in applications list. Tap [ 定型文 (Fixed phrase)] or [Contact Picker 2.3] to quote.❖Information・The QWERTY keyboard is set by default. Also, "Popup on key press", "Auto capitalization", "Word suggestions" and "Error correction" are set to on.Use the QWERTY keyboard to enter Japanese characters in "Romaji input" mode.The main functions of the touch-keys・To change character modes and other input operations, tap the following icons on the QWERTY keyboard.Entering characters on the QWERTY keyboardIcon Function/Each time you tap, the character mode switches "Number" → "Hiragana/Kanji → "Alphabet" in order and a status icon, →→ / / appears in the status bar.あ: Hiragana/KanjiAa: one-byte alphabet/A: two-byte alphabet12: one-byte number/1: two-byte number/Touch and holdDisplay a pop-up window./ : Keyboard switch (two-byte)/ (one-byte): Character mode switch: Display the setting screen for Japanese keyboard.: Display plug-in applications list.Tap to display one-byte symbols/two-byte symbols list and enter them. Switch the tab to display smileys list and enter them. (While entering an sp-mode mail, pictogram tab also appears.)Touch and holdA list of plug-in applications appears and you can activate the plug-in application.Enter punctuation marks such as ? and !.Flick from side to side and enter a space, ・, ∼, …, 「, 」, (, and ).Move the cursor*1 to the left. Touch and hold to move continuously. Or change the range for conversion.Move the cursor*1 to the right. Touch and hold to move continuously. Or change the range for conversion.When there is an unfixed character string with the cursor at the right end, tap to enter the same character as the one at the end.Icon FunctionContinued on next page](https://usermanual.wiki/Sony/A3880132/User-Guide-1627689-Page-60.png)
![59Before Using the Handset*1 When any characters are entered, just tap the desired position on the entered character string to move the cursor.*2 " 確定 (Fix)" is displayed before conversion is fixed. In some screens such as the search box or mail account registration screen, " 次へ (Next)", "完了 (Done)", "実行 (Go)", etc. appear.Changing display keys・For Japanese input, you can set not to display less-frequent-used keys (Q, X, C, etc.) on the QWERTY keyboard.1On the character entry screen, touch and hold the character mode icon .2Tap .3Tap [On-screen keyboard settings] X [Select display keys].・If the assistant keyboard (P.60) is set to "Off", "Select display keys" cannot be selected and the displayed keyboard cannot be changed.4Unmark the checkbox of the key you want to hide.5Tap [OK].Changing symbols・You can change symbols (12) displayed in (Symbol assistant area) to the ones you use frequently.1On the character entry screen, touch and hold the character mode icon .*2Fix input characters and converted characters. When characters are already fixed, enter a line feed at the cursor position.Delete the character before the cursor. Touch and hold to delete characters continuously.Enter characters by voice. A candidate list appears. Tap the character string you want to enter.Appears before conversion is fixed. Tap to switch conversion methods to "直変換"./In alphabet input mode, tap to switch upper case and lower case.In number input mode, tap to switch symbols possible to enter with the keyboard.Icon FunctionContinued on next page](https://usermanual.wiki/Sony/A3880132/User-Guide-1627689-Page-61.png)
![60Before Using the Handset2Tap .3Tap [On-screen keyboard settings] X [Change symbols].・A list of 12 symbols to be displayed on QWERTY keyboard appears.4Tap a symbol you want to change and delete character previously set, then enter a character to display.5Tap [OK].❖Information・In Step 3, press t and tap [Reset] X [OK] to restore to the default.Selecting an assistant keyboardWhen you enter in Hiragana/Kanji input mode using the QWERTY keyboard, you can change the assistant keyboard to make the frequent using keys to be displayed widely for easy tapping.1On the character entry screen, touch and hold the character mode icon .2Tap .3Tap [On-screen keyboard settings] X [Choose key type].4Tap any of [Static key resizing]/[Key highlight while typing]/[Dynamic key resizing with highlight]/[Off].■ Static key resizingWiden frequent using key for easy tapping.■ Key highlight while typingWiden frequent using key and highlight the key that is predicted for the next entry.](https://usermanual.wiki/Sony/A3880132/User-Guide-1627689-Page-62.png)

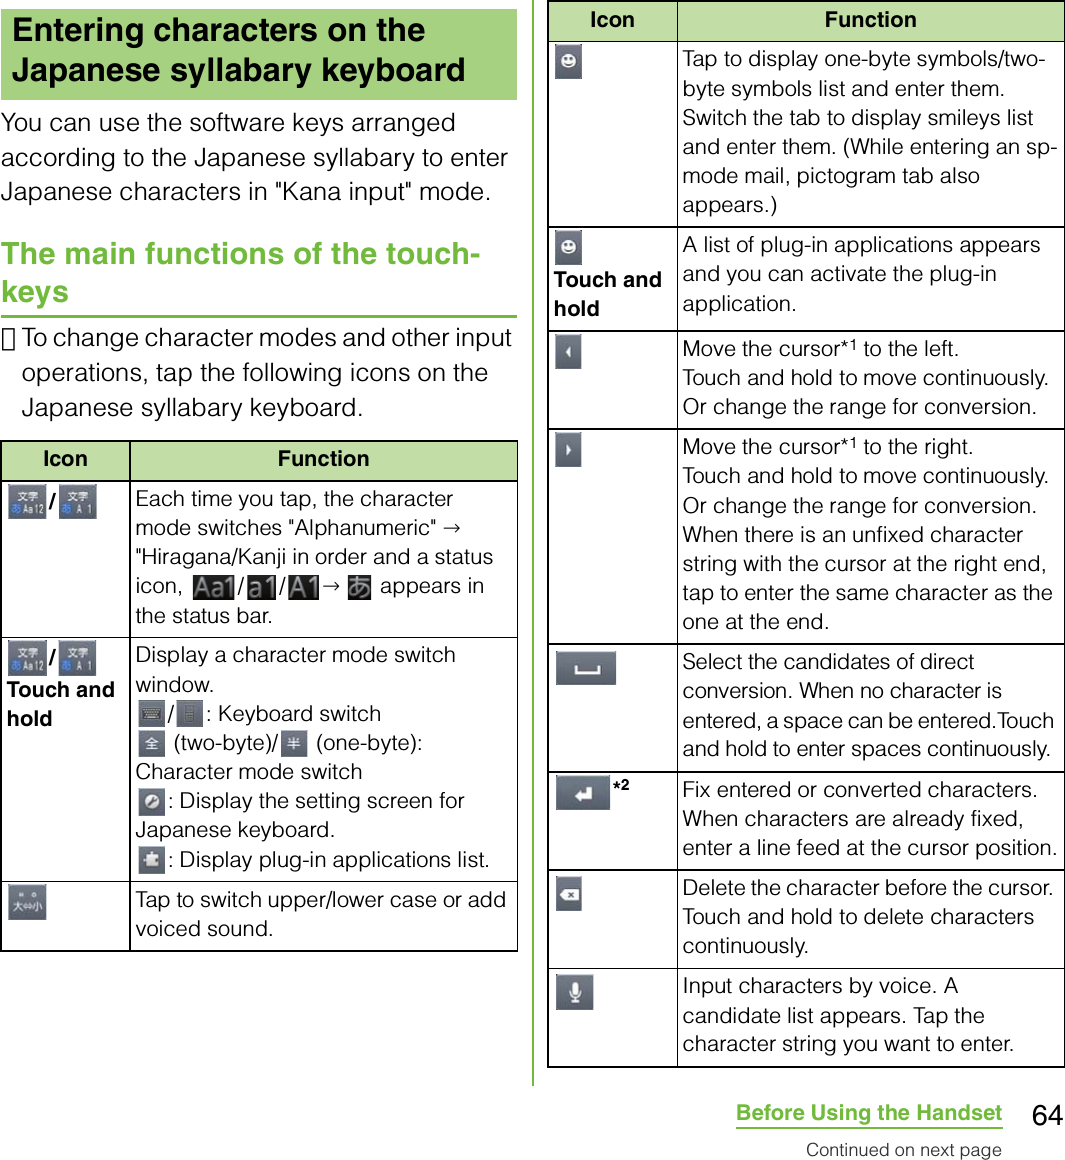
![63Before Using the Handset・Ex: Entering characters in "な" columnYou can enter "な" only by tapping. Flick left for " に", up for " ぬ", right for "ね" and down for "の".・To switch upper/lower case or change to voiced sound, flick or tap .・Flick input is available by default. You can cancel by the following operation beforehand.aFrom the Home screen, press t and tap [Settings].bTap [Language & keyboard] → [Japanese keyboard] → [On-screen keyboard settings].cUnmark the checkbox of [Flick input].■ Toggle entryTap the same key continuously to enter the assigned character.To enter characters assigned to the same key continuously, operate the followings.・Ex: To enter "あお"aTap " あ" once.bTap , and tap "あ" 5 times.・Ex: To enter "ca"aTap "ABC" 3 times.bTap , and tap "ABC" once.❖Information・When a certain time is passed after the key tapped, the tapped key's highlighter goes off and you can enter a character assigned to the same key consecutively without tapping .・To switch upper/lower case or change to voiced sound, tap .・Operate the following to enter characters in the toggle entry while Flick input is set.aFrom the Home screen, press t and tap [Settings].bTap [Language & keyboard] → [Japanese keyboard] → [On-screen keyboard settings].cMark [Multitap text input] checkbox.ぬねにのなFlick up TapFlick rightFlick leftFlick down](https://usermanual.wiki/Sony/A3880132/User-Guide-1627689-Page-65.png)
![65Before Using the Handset*1 When any characters are entered, just tap the desired position on the entered character string to move the cursor.*2 " 確定 (Fix)" is displayed before conversion is fixed. In some screens such as the search box or mail account registration screen, " 次へ (Next)", "完了 (Done)", "実行 (Go)", etc. appear.While entering characters, touch and hold the text box to display the "Edit text" menu and edit entered text.For each type of keyboard, you can make settings related to character entry.1From the Home screen, press t, then tap [Settings] X [Language & keyboard].2Tap [Japanese keyboard]/[International keyboard].・The settings screen for each keyboard appears. Tap an item displayed on the screen to set.❖Information・The items vary depending on the keyboard type./In alphanumerics input mode, tap to switch between upper case and lower case or switch to symbols which can be entered from the keyboard.Appears in landscape view. Change settings of Japanese keyboard.Editing textSelect word Drag the slider to select a part of entered text.Select all Select all entered text.Input method P. 5 6Add "xx" to dictionaryAdd the entered text to the dictionary.Cut Display when "Select word"/"Select all" is selected. Cut the text selected by "Select word"/"Select all".Copy Display when "Select word"/"Select all" is selected. Copy the text selected by "Select word"/"Select all".Icon Function Paste Display when "Cut"/"Copy" is selected. Paste the cut/copied text by "Cut"/"Copy".Settings of entering characters](https://usermanual.wiki/Sony/A3880132/User-Guide-1627689-Page-67.png)
![66Before Using the HandsetYou can make keyboard settings such as Key sound, Vibrate, etc.1From the Home screen, press t and tap [Settings] X [Language & keyboard] X [Japanese keyboard].・The setting screen for Japanese keyboard appears.2Tap [On-screen keyboard settings].・Tap (mark/unmark) to set an item in [common on-screen keyboard settings].Auto capitalizationSet to automatically capitalize the top letter you enter in English input mode.1From the Home screen, press t and tap [Settings] X [Language & keyboard] X [Japanese keyboard].2Mark [Auto capitalization] checkbox.You can change keyboard skin.1From the Home screen, press t, then tap [Settings] X [Language & keyboard].2Tap [Japanese keyboard] X [Select keyboard skin].3Tap [Set skin] from the displayed keyboard.❖Information・To download and add keyboard skins from a website, tap [Search for skin] in Step 3.Settings of Japanese keyboardCommon on-screen keyboard settingsKey sound Set whether to sound at the time of key tapping.Vibrate Set whether to vibrate at the time of key tapping.Pop-up on key pressSet to popup the key you have tapped at the time of key tapping.Keep keyboard typeSet to stabilize the last status of keyboard by screen orientation and kana/alphabet/number input mode.Keyboard skin settings](https://usermanual.wiki/Sony/A3880132/User-Guide-1627689-Page-68.png)
![67Before Using the HandsetThe Word suggestion function shows predicted conversion candidates when you enter Japanese/English characters. Mark the checkbox of Word suggestion checkbox to set options "Error correction" and "Auto space" These options help you entering characters with ease.Setting Word suggestions1From the Home screen, press t, then tap [Settings] X [Language & keyboard].2Tap [Japanese keyboard].3Mark [Word suggestions] checkbox.❖Information・Flick or drag downward in the word suggestion field to enlarge suggestion field in which you can see more word suggestions and to hide the keyboard. To show the software keyboard, tap [戻る (Back)] or press x.Setting Error correction・Error correction corrects mistyped characters and shows conversion candidates before conversion in one-byte alphabet input mode when entering characters with QWERTY keyboard.1From the Home screen, press t, then tap [Settings] X [Language & keyboard].2Tap [Japanese keyboard].3Mark [Error correction] checkbox.Setting Auto space・When selecting English word suggestion, Auto space enters a space next to the entered character. However, space is not entered automatically in the mail address or URL input fields.1From the Home screen, press t, then tap [Settings] X [Language & keyboard].2Tap [Japanese keyboard].3Mark [Auto space] checkbox.To display the word as the preferred candidate when entering characters, set the user dictionary beforehand.Word suggestion settingsUser dictionary settings](https://usermanual.wiki/Sony/A3880132/User-Guide-1627689-Page-69.png)
![68Before Using the HandsetRegistering words in user dictionariesThere are 2 types of user dictionaries: "My words Japanese" (Kana/Kanji) and "My words English" (one-byte alphabet).1From the Home screen, press t, then tap [Settings] X [Language & keyboard].2Tap [Japanese keyboard].3Tap [My words Japanese]/[My words English].4Press t, then tap [Add].5Tap the character input box for "Reading" and fill it out, then tap [次へ (Next)].6Enter words in the input box for "Word" and tap [完了 (Done)].7Tap [Save].❖Information・Up to 50 characters (regardless of one-byte or two-byte characters) can be stored for a "Reading" and "Word", and up to 500 items can be stored in the user dictionary.・When entering characters, tapping [直変換 (Direct conversion)] in the word suggestion field may give priority to some registered words.Editing user dictionary1On the user dictionary screen, select a word you want to edit.2Press t, then tap [Edit].3Edit the content and tap [Save].Deleting words from user dictionary1On the user dictionary screen, select a word you want to delete.2Press t, then tap [Delete] X [OK].・Tap [Delete all] X [OK] to delete all words in the list.Setting Words by learning1From the Home screen, press t, then tap [Settings] X [Language & keyboard].2Tap [Japanese keyboard] X [Learn words].3Mark [Save word while typing] checkbox.・To reset all learning, tap "Delete saved words" X [OK].Continued on next page](https://usermanual.wiki/Sony/A3880132/User-Guide-1627689-Page-70.png)
![69Before Using the Handset❖Information・To delete learned words individually, touch and hold a word you want to delete and tap [学習データ削除 (Delete learned word)]. Backing up and restoring dictionaryUser dictionary and Words by learning can be backed up onto a microSD card and restored when needed.1From the Home screen, press t and tap [Settings] X [Language & keyboard].2Tap [Japanese keyboard] X [Backup & restore].3Tap [Backup]/[Restore].4Mark a dictionary you want to back up or restore from among [My words Japanese], [My words English], or [Learn words].5Tap [Go].・If a backed up file exists on the microSD card when backing up, a screen asking whether to overwrite appears. When restoring, a screen asking whether to overwrite the user dictionary in the terminal appears.6Tap [OK] X [OK].・The data is backed up or restored.❖Information・If restoring data is failed, user dictionary in the terminal restores to the default.When entering characters, touch and hold or character mode icon and tap to view plug-in applications list. Tap a plug-in application, " 定型文 (Fixed phrase)" or "Contact Picker 2.3" to quote. Phrases are saved in 5 categories of " インターネット (Internet)", " あいさつ (Greeting)", " ビジネス (Business)", " 返事 (Reply)", "プライベート (Private)" in advance. You can add, delete and edit categories and phrases.If contacts are saved in Contacts, you can use "Contact Picker 2.3" when entering character. From the saved contents (name of contact, phone number, mail address, etc.) in Contacts, mark items you want to quote. On the contacts list screen, tap [History] or [Favorites] to display selected contacts.Using plug-in application "定型文 (Fixed phrase)", "Contact Picker 2.3"](https://usermanual.wiki/Sony/A3880132/User-Guide-1627689-Page-71.png)
![70Before Using the HandsetAdding a category of phrasesAdd a new category and register a phrase.1From the Home screen, tap , then tap [定型文 (Fixed phrase)].A list of categories appears.2Press t, then tap [カテゴリー追加 (Add category)].3Enter the category name and tap [OK].4Tap [ 新規追加 (Add phrase)] and enter a phrase.5Tap [OK].❖Information・When you tap each category, a list of registered phrases appears. Tap a phrase to edit/delete.・To restore the default phrases, in the category list, press t, then tap [初期化 (Reset)].You can install and add plug-in applications to use when entering characters.1From the Home screen, press t, then tap [Settings] X [Language & keyboard].2Tap [Japanese keyboard] X [Manage applications].3On the Info screen, tap [OK].The plug-in setting screen appears.4Tap [Download new applications].5Tap an application and follow the onscreen instructions.❖Information・Marked plug-in applications in the plug-in setting screen can be activated in the character entry screen. Checkboxes for preinstalled plug-in applications, "定型文 (Fixed phrase)" and "Contact Picker 2.3" are marked by default.You can view the detailed explanations on the high performance Japanese keyboard from the basic to application. The latest information can be obtained from the websites for plug-in applications or keyboard skins.1From the Home screen, press t and tap [Settings] X [Language & keyboard].2Tap [Japanese keyboard] X [POBox Touch User Guide].Adding a plug-in applicationPOBox Touch User Guide](https://usermanual.wiki/Sony/A3880132/User-Guide-1627689-Page-72.png)
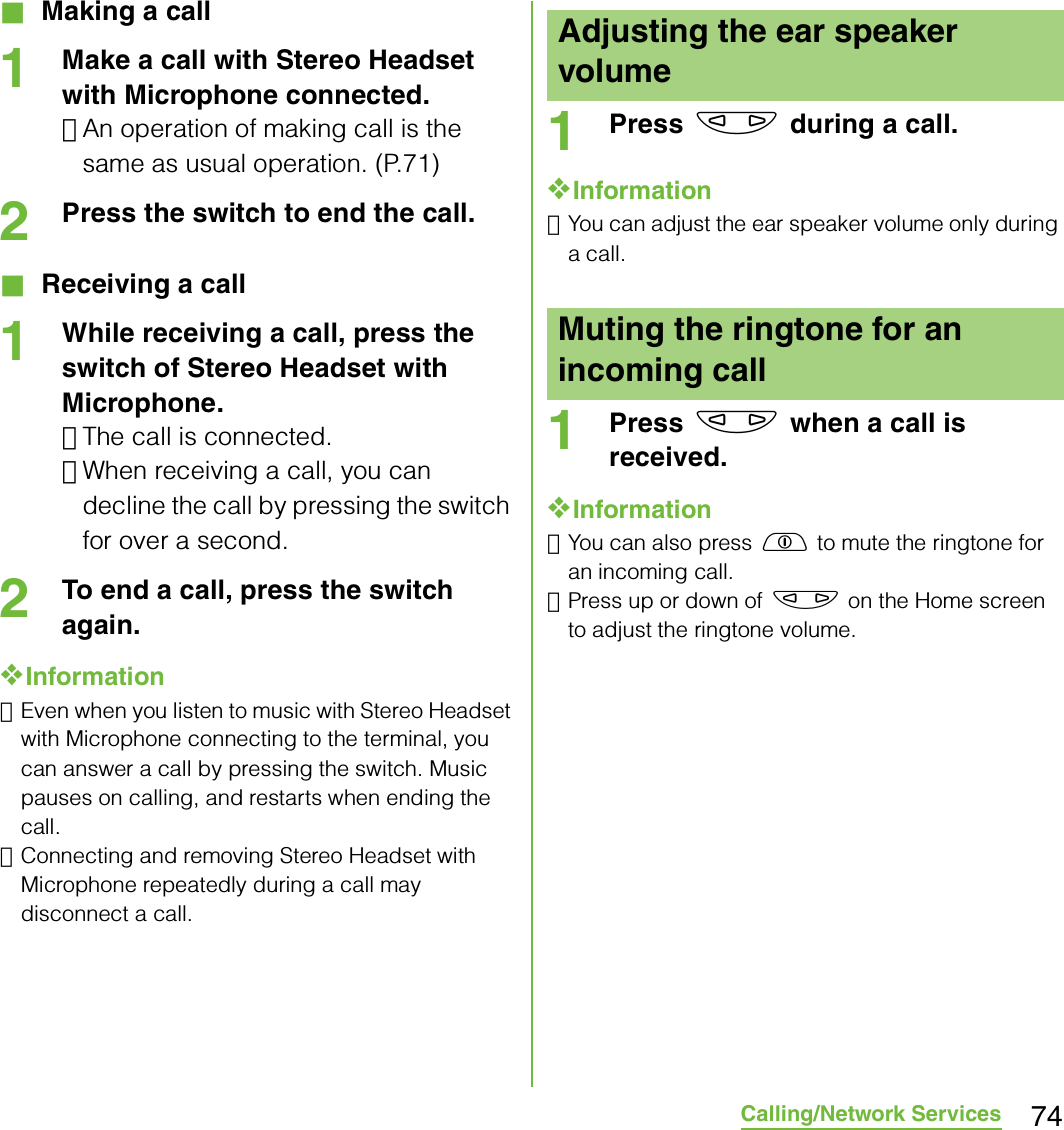
![71Calling/Network Services1From the Home screen, tap [Phone].2Enter the number of the recipient and tap [Call].・If a wrong number is entered, tap on the right of the phone number field to delete the number.❖Information・If the screen orientation does not change automatically when you turn the terminal sideways, from the Home screen, press t and tap [Settings] X [Display], then mark [Auto-rotate screen] checkbox.Entering pause (,)This function allows you to operate voice mail at home, to reserve tickets or to check the balance of a bank account, etc.1From the Home screen, tap [Phone].2Enter the number of the recipient and touch and hold the asterisk (*) key until a comma (,) appears.When the terminal is within range of the service area, you can make an emergency call of 110 (Police), 119 (Fire and ambulance) or 118 (Japan Coast Guard).1From the Home screen, tap [Phone].2Enter the emergency number and tap [Call].・If a wrong number is entered, tap on the right of the phone number field to delete the number.Making/Receiving callsMaking a callCalling/Network ServicesEmergency callContinued on next page](https://usermanual.wiki/Sony/A3880132/User-Guide-1627689-Page-73.png)
![72Calling/Network Services❖Note・In Japan, when UIM is not inserted to the terminal, the emergency numbers of 110, 119, 118 are not available.・This terminal supports "Emergency call location information". If you make a call to emergency numbers such as 110, 119, or 118, the information of a location where you are calling from (location information) is automatically notified to the Emergency call acceptance organization such as the Police Station.The Emergency call acceptance organization may not be able to figure out your exact location depending on the location where you place a call or radio wave condition.If you make a call without the caller ID, such as by entering a phone number with "184" for each call, the location information and phone number are not notified. However, the Emergency call acceptance organization may decide to obtain the location information and phone number regardless of your settings when they consider it is necessary for lifesaving, etc. Note that the areas/time for which the "Emergency call location information" is ready to be used vary depending on the preparatory state of each Emergency call acceptance organization.・When you call the Police (110), Fire/Ambulance (119), or Maritime rescue (118) from the terminal, clearly indicate that you are calling from a mobile phone, give your phone number and your current location precisely for checking callback from the police/fire department. Also, make a point to call in a stationary position to prevent the call from being dropped. Do not power off the terminal for at least 10 minutes after the emergency call just in case the Police or Fire/Ambulance may have to get in contact with you.・Note that you may not connect to the local Fire Department or Police Station depending on where you are calling from. In this case, try to call from a public phone or an ordinary phone in the neighborhood.Emergency call during SIM card lock1Tap [Emergency call].2Enter the emergency number and tap [Call].・If a wrong number is entered, tap on the right of the phone number field to delete the number.❖Note・In Japan, while entering PIN code on the screen (P.108) or during PUK lock (P.109), the emergency numbers of 110, 119, 118 are not available.1Tap [End call].For details on WORLD CALL, refer to DOCOMO International Services website.1From the Home screen, tap [Phone].Ending a callMaking an international call (WORLD CALL)Continued on next page](https://usermanual.wiki/Sony/A3880132/User-Guide-1627689-Page-74.png)
![73Calling/Network Services2Touch and hold [0] key until "+" sign appears.・When making an international call, "+" is replaced by an international access code.3Enter the country code X Area code X A phone number of recipient and tap [Call].・If the area code begins with "0", omit "0". However, "0" may be required to dial to some countries or areas such as Italy.1While receiving a call, touch (left) and drag it to (right).❖Information・If you are using regular headphones without a microphone, you need to speak to the microphone of the terminal.・The icon appears even during the screen lock or key lock, and you can answer a call by the same operation.1While receiving a call, touch (right) and drag it to (left).❖Information・The icon appears even during the screen lock or key lock, and you can decline a call by the same operation.You can make or answer a call with Stereo Headset with Microphone (Sample) connecting to the terminal.Receiving a callDeclining a callUsing Stereo Headset with MicrophoneMicrophoneSwitchHeadset connection jack](https://usermanual.wiki/Sony/A3880132/User-Guide-1627689-Page-75.png)
![75Calling/Network Services■ Calling screenaA photo saved in ContactsbName of the other partycSpeaker: Set speakerphone on/off.・Other party's voice can be heard from the speaker and handsfree call can be made.・When the speakerphone is on, a speakerphone icon appears in the status bar.dContacts: View contacts list screen.eCall duration timefNumber of the other partygMute: Set muting on/off of the microphone during a call.・When the microphone is muted, a mute icon appears in the status bar.hDial key: Enter the phone number you want to add to make a call.・The ongoing call is automatically on hold.・To add a call, "Call waiting" subscription is required. (P.88)iEnd callt: During a call, press t and tap [Hold], while a call is on hold, press t and tap [Retrieve call].・To set a call on hold, "Call waiting" subscription is required. (P.88)❖Note・Do not bring the terminal close to your ear with the speakerphone ON to avoid hearing damage.In the call log, missed ( ), received ( ), and dialed ( ) calls are displayed in the list in chronological order.When you have missed calls, appears in the status bar.1Drag the status bar downwards.2Tap [Missed call].1From the Home screen, tap [Phone] X [Call log].2Tap next to the desired number.Operations during callefaihdbc gCall logDisplaying missed callsCalling a number from the call log](https://usermanual.wiki/Sony/A3880132/User-Guide-1627689-Page-77.png)
![76Calling/Network Services1From the Home screen, tap [Phone] X [Call log].2Tap and hold the number, then tap [Add to Contacts].・You can select [Add to Contacts] from the menu displayed when you tap the number.3Tap desired contact, or tap [Create new contact].・Tap [Create new contact] to display a screen for selection of the saving locations appears. You can select Phone contact or docomo account as the saving location.4Edit the contact details and tap [Done].1From the Home screen, tap [Phone] X [Call log].2Press t, and tap [Clear call log].❖Information・You can delete only one contact by touching and holding a contact to delete on the call log list, then tapping [Delete from call log].In Contacts, you can enter various information for contacts, for example, phone numbers, email addresses and web service accounts. When you view a contact, you get quick access to all communication with that contact.1From the Home screen, tap , then tap [Contacts].・The contacts list screen appears.・You can also open Contacts from the Home screen, tap [Phone] X [Contacts].❖Information・The first time you open Contacts, a setup wizard starts. In the setup wizard, you can load contacts from UIM or microSD card, or synchronize contacts with the account that you specified in advance. To use Contacts, tap [Done].Adding a number from the call log to your contactsDeleting the call logContactsOpening ContactsContinued on next page](https://usermanual.wiki/Sony/A3880132/User-Guide-1627689-Page-78.png)
![77Calling/Network Services・If the screen orientation does not change automatically when you turn the terminal sideways, from the Home screen, press t and tap [Settings] X [Display], then mark [Auto-rotate screen] checkbox.On the contacts list screen, you can view details of your contacts. You can add a contact picture, and display updating status information of Social Networking Service (SNS).aContact search fieldbA picture saved in ContactscIcon for adding a new contactdMyself (your own phone number)eA contact saved in ContactsfJapanese syllabary or alphabetical index for browsing contactsgOnline status* of Google Talk (Chat) (P.131)hUpdating status information for the Social Networking Service (SNS)iScreen tabs (Phone/Call log/Contacts/Favorites)* Depending on the usage, it may be different from online display of Google Talk.Adding a contact1On the contacts list screen (P.77), tap at the top right.2Tap [docomo]/[Phone contact].・When you set Google account etc., it appears as a saving location.3Enter a name.4Enter or select the desired additional information for the contact.・You can add items other than phone number, email address and ringtone by tapping [Add field].5Tap [Done].❖Information・For using "Send calls directly to voicem.", a subscription of Voice Mail service is required. For details, see "Voice Mail Service" (P.86).・When you save "ふりがな(姓/名) (Reading (Last name/First name))", contacts list is displayed according to Japanese syllabary order or alphabets (only when Select language is set to 日本語 (Japanese)).Contacts list screenacdefgihbManaging contacts](https://usermanual.wiki/Sony/A3880132/User-Guide-1627689-Page-79.png)
![78Calling/Network ServicesUsing shortcuts of ContactsWhen you tap the photo (image) part on contacts list screen, shortcuts for phone number, mail, etc. appear. Tap the shortcut to make a call, or create and send a mail.* You can also use the registered Google Talk account, addresses, etc.❖Information・When you tap a part other than photo (image) on the contacts list screen, "Info" filter (P.82) screen of the contact appears instead of shortcuts.・Email shortcut appears when email address is saved in the selected contact and you have set your email account. If you have not set your email account, shortcut for Gmail / appears.* cannot be used.Searching for a contact1On the contacts list screen (P.77), enter searching name or reading in the search field.・All contacts beginning with those letters appear.Changing display conditions for contactsPress t and tap [Filter] on the contacts list screen to set display items, saving location (docomo, phone contact) and whether to show or hide for each account.■ Filter contactsMark the following items to set.■ Setting to show/hide contactsTap a Social Networking Service (SNS) name which is made contacts saving location setting or account setting (P.115) and mark [All contacts] checkbox to show synchronized contacts. Unmark to hide the contacts.Editing a contact1On the contacts list screen (P.77), tap the name part of contact you want to edit.・"Info" filter (P.82) screen of the contact appears.Make a call to saved phone number."Info" filter (P.82) screen of the contact appears.Create and send message (SMS).Select an email application to create and send an email.Contacts with phone numbersShow only contacts with phone numbers registered.Online contacts Show only the contacts of online Google talk users.Continued on next page](https://usermanual.wiki/Sony/A3880132/User-Guide-1627689-Page-80.png)
![79Calling/Network Services・When you tap the image (photo) part of the contact, contact shortcuts appear (P.78). Tap to display "Info" filter screen.2Tap [Edit].・By tapping (Add field) on the editing screen, you can add information to enter.3Edit the desired information and tap [Done].Linking contactsYou can bind multiple contacts together into one.1On the contacts list screen (P.77), touch and hold the desired contact, then tap [Join contacts].・The link candidates appear.2Tap the contact to link.3Tap [OK].❖Information・To cancel link of contacts, on Contact edit screen, press t, then tap [Separate] X [OK].Deleting contacts1On the contacts list screen (P.77), press t, then tap [Delete contacts].2Mark the contacts you want to delete.・If you want to delete all contacts, tap [Mark all].3Tap [Delete] X [OK].❖Information・You can also delete the contacts by touching and holding a contact on the contacts list screen, then tapping [Delete contact] X [OK].Calling a contact1On the contacts list screen (P.77), tap a name of contact to call to.2Tap a desired phone number.Checking Myself and editing contact information1On the contacts list screen (P.77), tap [XXX-XXXX-XXXX] (Myself) at the top of the contact list.2Tap [Edit].・The "Myself" edit screen appears.Continued on next page](https://usermanual.wiki/Sony/A3880132/User-Guide-1627689-Page-81.png)
![80Calling/Network Services3Enter the new information or make the changes you want.・By tapping (Add field) on the editing screen, you can add information to enter.4When you are done, tap [Done].❖Information・In "Myself", you can add multiple phone numbers, emails, etc. The history of dialed/received calls to/from the registered phone numbers is displayed in "Calls" of "Info" filter (P.82) screen.・If you set an email account by "Email" application, your email account is shown on the "Myself" detailed screen but not on the "Myself" edit screen.Sending your contact via Bluetooth/Email/GmailYou can send the saved contacts or "Myself" information by using Bluetooth function (P.143), email attachment, etc.1On the contacts list screen (P.77), press t, then tap [Send contacts].2Mark the contacts you want to send.・If you want to mark all contacts, tap [Mark all].3Tap [Send] X [OK].4Select sending method and follow the onscreen instructions.❖Information・To use Bluetooth function, tap [Turn on] to activate Bluetooth function, search destination Bluetooth devices, and send data.・If you want to send data as files attached to email/Gmail, send from the compose screen for the mail service in which you have set an account. If you select "Gmail" when you have not set an account, setup wizard appears. You can create and send email after settings are done.Marking a contact as a favoriteYou can mark a contact as a favorite. The favorite list provides quick access to the contacts you have marked.1On the contacts list screen (P.77), touch and hold the contact you want to mark.2Tap [Add to Favorites].❖Information・You can also add the contacts to favorites by tapping [Favorite] on "Info" filter (P.82) screen.・On the contacts list screen, tap [Favorites] to display contacts registered to Favorites.](https://usermanual.wiki/Sony/A3880132/User-Guide-1627689-Page-82.png)
![81Calling/Network ServicesSetting a photo to a contact1On the contacts list screen (P.77), tap the contact.2Tap [Edit].3Tap .4Tap [Gallery]/[Take new photo].・Select [Gallery] to select a saved photo and add it.・Select [Take new photo] to shoot a photo and save it.5Tap [Done].❖Information・You can also set photo to a contact by the following operation.- From the Home screen, [メディア (Media)] X Tap [Gallery]. Select an image to set, press t and tap [Set as] X [Contact picture]. Select a contact you want to register to and tap [Save].If you have an account set for a Social Networking Service (SNS) (P.115), you can synchronize contacts to display contacts information such as "Friends" on the contacts list screen. You can also display updating status information of each service.1On the contacts list screen (P.77), press t, and tap [Settings] X [Accounts & sync].・The screen for basic settings for synchronization and account management appears. If you do not have an account yet, you can tap [Add account] to set. (P.115)2Tap an account name.・Items which can be synchronized appear.3Tap [Sync Contacts].・After synchronization is complete, contacts information such as "Friends" appears on the contacts list screen.・You can mark [Activate auto-sync] checkbox in Step 2 to synchronize. For information on automatic synchronization, see "Setting automatic synchronization" (P.116).■ Setting to show or hide updating status information1On the contacts list screen (P.77), press t, and tap [Settings] X [Show status updates].・A selection screen of the service to display updating status information appears.Displaying contacts information for the Social Networking Service (SNS)Continued on next page](https://usermanual.wiki/Sony/A3880132/User-Guide-1627689-Page-83.png)
![82Calling/Network Services2Tap an item you want to display.・Tap [All] to show updating status information of all networking services. If 2 or more service links are set, single information of the most recently updated account can be seen.・Tap [Off] not to display status updating information.1On the contacts list screen (P.77), press t, and tap [Settings] X[Service dial number].・Service dial number (ドコモ総合案内・受付 (General Inquiries), ドコモ故障問合せ (Repairs), etc.) saved on the UIM appear.2Tap a contact you want to call.When you are viewing a contact details screen, you can flick the filter at the bottom of the screen right or left to show the following information.You can export/import contacts from/to microSD card or UIM. This is useful, for example, when you want to transfer the contact information to another phone.❖Information・You can also use a synchronization service for synchronizing your contacts. For details, see "Data synchronization" (P.116).・When contacts are imported to other mobile phone, phone number type "Home:/H", "Mobile:/M" or "Work:/W" may appear at the next to the name of the contacts backed up from the terminal to UIM. If there is no corresponding item, "/O" may appear.Dialing Service dial numberThe contact information filterFilter InformationInfo Contact phone numbers, mail addresses, Facebook profile, latest status information, etc.Photos Image posted by "Friends" in contacts or tagged imageInterests "いいね! (like)" information posted by "Friends" in contactsFacebook Facebook status updates for the contact・Appears if you have connected to update information from Facebook account in Timescape.Messages Message (SMS) conversations history with the contactCalls Call history with the contactExporting/Importing contactsFilter Information](https://usermanual.wiki/Sony/A3880132/User-Guide-1627689-Page-84.png)
![83Calling/Network ServicesExporting all contacts on microSD card1On the contacts list screen (P.77), press t, then tap [Back up contacts] X [Memory card].2Tap [OK].❖Information・If display conditions for contacts (P.78) are set, only contacts to be displayed are exported.Importing contacts from microSD card1On the contacts list screen (P.77), press t, then tap [Import contacts] X [Memory card].2Tap [docomo]/[Phone contact].・When you set Google account etc., it appears as an import destination.3Select the vCard file to import.・If there is only one vCard file, vCard file selection screen does not appear. The file is imported immediately.・If a vCard file has multiple contacts, they are imported all at once.・If there are 2 or more vCard files, tap any of [Import vCard file]/[Import vCard files]/[Import all vCard files] to select.4Tap [OK].❖Information・Some part of data may not be imported or exported depending on the contacts.Exporting names and numbers on UIM1On the contacts list screen (P.77), press t, then tap [Back up contacts] X [SIM card].2Mark the contacts you want to copy.・If you want to mark all contacts, tap [Mark all].3Tap [Back up].4Tap [Add contacts]/[Replace all contacts].・If you select [Replace all contacts], all existing UIM information is replaced.❖Information・When you copy a contact to the UIM, only the contact name and the first number is saved. This is due to limited memory on a UIM.・Contacts without phone number cannot be saved to the UIM.](https://usermanual.wiki/Sony/A3880132/User-Guide-1627689-Page-85.png)
![84Calling/Network ServicesImporting contacts from UIM1On the contacts list screen (P.77), press t, then tap [Import contacts] X [SIM card].2Tap [docomo]/[Phone contact].・When you set Google account etc., it appears as an import destination.3To import one contact, tap the contact you want to import.・To import all contacts, tap [Import all].・If there is a contact whose name is matched with the imported contact, the contact is imported as a separated one.❖Information・Names and phone numbers can be imported.You can copy the Contacts data to or from another terminal by using microSD card. You can also copy the Contacts data registered in Google account to docomo account.1From the Home screen, tap , then tap [PhoneBookCopy].・For the first time of use, agree to " 使用許諾契約書 (License Agreement)".Exporting contacts to microSD card1Attach a microSD card to the terminal.2On the "エクスポート (Export)" tab screen, tap [開始 (Start)].・The Contacts data saved in docomo account is saved onto the microSD card.Importing contacts on microSD card1Attach a microSD card contains the Contacts data to the terminal.2On the "インポート (Import)" tab screen, tap a file you want to import.3Tap [ 上書き (Overwrite)]/[追加 (Add)].・Imported Contacts data is saved in docomo account.Using PhoneBookCopy](https://usermanual.wiki/Sony/A3880132/User-Guide-1627689-Page-86.png)
![85Calling/Network ServicesCopying contacts registered in Google account to docomo account1On the "docomoアカウントへコピー (Copy to account)" tab screen, tap a Google account you want to copy.2Tap [ 上書き (Overwrite)]/[追加 (Add)].・Copied Contacts data is saved in docomo account.・You can also copy the Contacts data saved in "Phone contact" to docomo account as well as Google account.❖Information・If contact item names (e.g. Phone number, etc.) of the other terminal are different from ones of your terminal, the item names may be changed or deleted. Also, some text may be deleted in copied destination, because savable characters in a contact vary by terminal.・Group information cannot be imported.・When exporting contacts to microSD card, data without Name cannot be copied.・When importing contacts from microSD card, files created by "all backup" cannot be loaded.You can use the following DOCOMO network services on the terminal. For details on the outline and how to use each service, see the relevant pages indicated in the following table.・You cannot use the network services when you are outside of the service area or in a location without the radio wave.・"Stop of service" does not mean canceling the subscription such as Voice Mail service, Call Forwarding Service, etc.・For details, see the "Mobile Phone User's Guide [Network Services]".・For subscription and inquiry, contact "General Inquiries" on the last page of this manual.Network ServicesAvailable Network ServicesService name Monthly charge Application PageVoice Mail ServicePaid Required P.86Call Waiting ServicePaid Required P.88Call Forwarding ServiceFree Required P.90Caller ID Notification ServiceFree Not required P.91Continued on next page](https://usermanual.wiki/Sony/A3880132/User-Guide-1627689-Page-87.png)
![86Calling/Network Services❖Information・In this manual, the outlines of each network service are described with menu operations.The Voice Mail Service takes messages for you, as long as it answers a call with the answering message, if there is an incoming call when you are in a location without the radio wave, while the terminal is powered off, or when you cannot answer a call within the preset ring time.・When the Voice Mail Service is set to "Activate" and if you do not answer an incoming call, the call is saved in "Call log" as a "Missed call" and (Missed call) appears in the status bar.・The terminal does not support Voice Mail service of videophone call. Call "1412" to set "Not support".❖Information・This terminal does not have Record message function which records voice messages on internal memory. Use the Voice Mail Service.・The message can be recorded up to 3 minutes for 1 message, up to 20 messages, and stored up to 72 hours.・The number of Voice Mail messages appears until you have played all messages.Basic flow of the Voice Mail ServiceVoice Mail ServiceYour terminal receives a call.If you do not answer the call, it is connected to the Voice Mail service center.The caller leaves a message.The receiver is notified that the Voice Mail service center has taken the voice message.Play the voice message.If you are in a hurry and wish to leave a message without listening to the Voice Mail answering message, you can interrupt the answering message and switch to message recording mode immediately by tapping [Dialpad] → [#].▼Activate the Voice Mail Service.▼▼▼▼](https://usermanual.wiki/Sony/A3880132/User-Guide-1627689-Page-88.png)
![87Calling/Network ServicesSetting Voice Mail Service1From the Home screen, press t and tap [Settings].2Tap [Call settings] X [Network service setting].3Tap [Voicemail].・Select items you want to use from the following.* After operation is finished, you receive the "NTT DoCoMo VM:XX" SMS.❖Information・If you have the recorded messages stored at the Voice Mail service center, (New arrival SMS message) and (Voice Mail message) appear on the status bar. (Voice Mail message) disappears when you delete all messages.・The notification setting and notifications (message (SMS) reception) are not charged.Activate VoicemailTap [OK] to activate the Voice Mail Service.Set ring time Enter the ring time (0 to 120 seconds).It changes only the ring time.If the ring time is set to 0 seconds, an incoming call is not saved in "Call log".Deactivate VoicemailTap [OK] to deactivate the Voice Mail Service.Check Voicemail settingCheck the current service settings.Play messages* Tap [OK] to call the Voice Mail service center. After this step, follow the voice prompts to play the message.Voicemail setting*Tap [OK] to change the Voice Mail setting with the voice prompts. The call is connected to the Voice Mail service center. After this step, follow the voice prompts to operate.Check messages* Check if a new message is stored. After checking, the completion message appears.Notification settingsSet whether to alert you of a new message with the tone or vibration.Activate Missed Call Notif.When it is received while the terminal is powered off or outside of the service area, an SMS is sent to notify you of the information about the call (date, time and the caller ID) once you turn the terminal back on or move back in to the service area.Select [All Calls] to notify you of all received calls.Select [Calls with Caller ID] to notify you of only the calls with the caller ID.Deactiv. Missed Call Notif.While starting the notification, tap [OK] to deactivate the notification.Check setting Check the notification settings.](https://usermanual.wiki/Sony/A3880132/User-Guide-1627689-Page-89.png)
![88Calling/Network ServicesPlaying the voice message1When the SMS notification "NTT DoCoMo VM:XX" appears, tap [New message] from the Notification panel (P.38).・A recorded message plays.2Follow the voice prompts to operate.When there is another incoming call while you are on a call, the in-call ringtone notifies you of the second call. You can answer the second call by putting the first call on hold. You can also put your current call on hold and place a call to another party.❖Information・Even when the call is on hold, the caller is charged for a call fee.Setting Call Waiting1From the Home screen, press t and tap [Settings].2Tap [Call settings] X [Network service setting].3Tap [Call Waiting].You can select the following operations.Putting the current call on hold and answering an incoming call1When you hear the beep during a call, tap [Answer].The first call is put automatically on hold and the incoming call is received.・The terminal does not support Conference call.・Tap [Busy] to connect the incoming call to the Voice Mail service center. Activating Voice Mail service is required beforehand.Call WaitingActivate Call WaitingTap [OK] to activate the Call Waiting Service.Deactivate Call WaitingTap [OK] to deactivate the Call Waiting Service.Check settings You can check the current service settings.Continued on next page](https://usermanual.wiki/Sony/A3880132/User-Guide-1627689-Page-90.png)
![89Calling/Network Services2Switch to the first call.・To end the later call, tap [End call].The later call is terminated and switched to the first call.・To put the later call on hold, tap [Switch to this call].The later call is put on hold and switched to the first call. Tapping [Switch to this call] switches to the other party.Ending the current call and answering an incoming call1When you hear the beep during a call, tap [End current call and answer].・The first call is terminated and the incoming call is received.Putting the current call on hold and making a call to another party1During a call, tap [Contacts]/[Dialpad].2Enter the other party's phone number, then tap .・The first call is automatically on hold and switched to the new call you made. You can also search for a contact by tapping [Contacts] and [Call log].3Switch to the first call.・To terminate the new call, tap [End call].The new call is terminated and switched to the first call.・To put the new call on hold, tap [Switch to this call].The new call is put on hold and switched to the first call. Tapping [Switch to this call] switches to the other party.](https://usermanual.wiki/Sony/A3880132/User-Guide-1627689-Page-91.png)
![90Calling/Network ServicesThe Call Forwarding Service forwards a voice call to a preset forwarding number when you are in a location without the radio wave, the terminal is powered off, or you do not answer the call within the preset ring time.・When the Call Forwarding Service is set to "Activate Call Forwarding" and if you do not answer an incoming voice call, the call is saved in "Call log" as a "Missed call" and (Missed call) appears in the status bar.Basic flow of the Call Forwarding ServiceCall charge for the Call Forwarding Service❖Information・Even when the Call Forwarding Service is set to "Activate Call Forwarding", you can answer the call during a ringtone sounds.Setting Call Forwarding Service1From the Home screen, press t and tap [Settings].2Tap [Call settings] X [Network service setting].Call Forwarding ServiceActivate the Call Forwarding Service.Save the forwarding number.Your terminal receives a call.If you do not answer the call, it is automatically forwarded to the specified forwarding number.▼▼▼Call Forwarding Service subscriberCallerForwarding partyThe caller is charged for a call fee.The Call Forwarding Service subscriber is charged for a call fee.Continued on next page](https://usermanual.wiki/Sony/A3880132/User-Guide-1627689-Page-92.png)
![91Calling/Network Services3Tap [Call Forwarding].・Select items you want to use.* A subscription of Voice Mail service is required.Setting on/off of the Call Forwarding guidance1From the Home screen, tap [Phone].2[1] [4] [2] [9] X Tap [Call].・Follow the voice prompts to operate. For details, see the "Mobile Phone User's Guide [Network Services]".When making a call, your phone number can be shown in the display of the recipient's phone you are calling. The caller ID is important personal information. Carefully decide whether you notify a recipient of your caller ID.・You cannot set the Caller ID notification where the terminal indicates the outside of service area ( ).・The setting is available only the other party's phone can display the caller ID.・If an announcement requesting caller ID is heard when making a call, set Caller ID notification or add prefix 186 to the phone number to call again.1From the Home screen, press t and tap [Settings].Activate Call ForwardingEnter the forwarding number and ring time, then tap [OK] to activate the Call Forwarding Service.Change forwarding numberMark the checkbox and enter the forwarding number.Register ring timeMark the checkbox and enter the ring time (0 to 120 seconds).If the ring time is set to 0 seconds, an incoming call is not saved in "Call log".Deactivate Call ForwardingTap [OK] to deactivate the Call Forwarding Service.Register the forwarding numberChange the forwarding number. Enter the forwarding number and tap [OK].Activate Call ForwardingMark the checkbox to change the forwarding number and to activate the Call Forwarding Service simultaneously.If fwd number busy*When the forwarding number is busy, an incoming call is connected to the Voice Mail service center. Tap [Connect] to turn on the setting; tap [Do not connect] to turn off the setting.Check setting Check the current service settings.Caller ID NotificationContinued on next page](https://usermanual.wiki/Sony/A3880132/User-Guide-1627689-Page-93.png)
![92Calling/Network Services2Tap [Call settings] X [Network service setting].3Tap [Caller ID Notification].・Select items you want to use.Activate Caller ID NotificationEnter the Network security code, then tap [OK].Your phone number is notified to the other party.Deactivate Caller ID NotificationEnter the Network security code, then tap [OK].The caller ID notification is deactivated.Check settingsCheck the current settings.](https://usermanual.wiki/Sony/A3880132/User-Guide-1627689-Page-94.png)
![93Settings1From the Home screen, press t.2Tap [Settings].■ Setting menu❖Information・Alternatively, from the Home screen, tap , then tap [Settings].You can make network settings such as Wi-Fi, Bluetooth function, etc.An access point for connecting to the Internet (sp-mode, mopera U) is already registered. You can add or change it if necessary.By default, sp-mode (P.95) is set for the usual access point.Viewing the setting menuSony Ericsson Set Facebook synchronization function for the terminal (P.115), or make settings for connecting the terminal to a PC or another device via USB connection or Wi-Fi (P.138).Wireless & networks P. 9 3Call settings P.102Sound P.103Display P.105Location & security P.106Applications P.111Accounts & sync P.114Privacy P.117Storage P.118Language & keyboard P.119Voice input & output P.119Accessibility P.120Date & time P.120About phone P.121SettingsWireless & networksAirplane mode P. 9 5Wi-Fi/Wi-Fi settings P. 9 6Bluetooth/Bluetooth settings P.143Tethering & portable hotspot P.100VPN settings P.101Mobile networks P. 9 3 , P. 1 9 0Setting an access point](https://usermanual.wiki/Sony/A3880132/User-Guide-1627689-Page-95.png)
![94SettingsChecking the access point you use1From the Settings screen (P.93), tap [Wireless & networks] X [Mobile networks] X [Access Point Names].・Available access points (APN) appear.・It is recommended that you use the displayed access point without editing.❖Information・If you have several available connections, a marked radio button to the right indicates the active network connection.Setting an access point additionally1From the Settings screen (P.93), tap [Wireless & networks] X [Mobile networks] X [Access Point Names].2Press t.3Tap [New APN].4Tap [Name], enter a name and tap [OK].5Tap [APN] and enter the access point name and tap [OK].6Tap and enter all other information required by your network operator.7Press t, then tap [Save].❖Information・Do not change the MCC/MNC. If you change MCC/MNC to other than the default value (440/10), the settings do not appear on the APNs screen. When the MCC/MNC settings do not appear on the APNs screen, make APN settings with [Reset to default] or [New APN] again.・Note that, when using the prediction conversion by one-byte alphabet entry mode (English mode) with mark in [Auto space] checkbox on Japanese keyboard settings screen (P.67), spaces may be entered automatically. In this case, delete spaces.By initializing an access point, the default state is restored.1From the Settings screen (P.93), tap [Wireless & networks] X [Mobile networks] X [Access Point Names].2Press t, then tap [Reset to default].Initializing an access point](https://usermanual.wiki/Sony/A3880132/User-Guide-1627689-Page-96.png)
![95Settingssp-mode is ISP for NTT DOCOMO smartphone. In addition to accessing Internet, you can use the mail service using the same address as i-mode mail (@docomo.ne.jp), etc. sp-mode is a service requiring subscription. For details on sp-mode, refer to NTT DOCOMO website.mopera U is ISP of NTT DOCOMO's Internet connection. If you have subscribed to mopera U, you can use Internet after making the simple settings. mopera U is a service requiring subscription.Setting mopera U1From the Settings screen (P.93), tap [Wireless & networks] X [Mobile networks] X [Access Point Names].2Mark [mopera U (スマートフォン定額)] (mopera U (Smartphone flat-rate))/[mopera U設定] (mopera U settings) radio button.・Return to the Home screen and open the Browser. You can enjoy the nice Internet access.❖Information・"mopera U設定" (mopera U settings) is an access point for setting mopera U. When you use the access point for setting mopera U, packet communication charges for setting do not apply. Note that you can set only the initial setting screen or the change setting screen. For details on mopera U settings, refer to mopera U website.・Subscription to packet flat-rate service is required for using "mopera U (スマートフォン定額) (mopera U (Smartphone flat-rate))". For details on mopera U (Smartphone flat-rate), refer to NTT DOCOMO website.In this mode, the functions of using radio wave transmissions such as calling, accessing to the Internet (including sending/receiving mails), etc. are disabled. It can be useful when you want to operate the terminal with no interruption of incoming calls or mails.Turn ing on Airplane mode1From the Settings screen (P.93), tap [Wireless & networks].2Mark [Airplane mode] checkbox.・When you unmark [Airplane mode] checkbox, the Airplane mode turns off.sp-modemopera UAirplane modeContinued on next page](https://usermanual.wiki/Sony/A3880132/User-Guide-1627689-Page-97.png)
![96Settings❖Information・You can also switch on/off of the Airplane mode by pressing and holding p for over a second to switch to the Phone options menu, then tapping [Airplane mode].・Even if Airplane mode is on, Wi-Fi and Bluetooth function can be turned on.Using the Wi-Fi function, you can connect to an access point for your home, company network or public wireless LAN services to use mail and Internet.・Even when Wi-Fi is on, packet communication is available. However, while you connect Wi-Fi network, Wi-Fi comes first.・When a Wi-Fi network is disconnected, connection is automatically switched to a 3G/GPRS network. Note that packet communication fee applies for using 3G/GPRS network.・Turn the Wi-Fi function to off when you do not use Wi-Fi to cut battery power consumption.Before using Wi-FiTo use Wi-Fi, turn on Wi-Fi and search available Wi-Fi network, then connect it.・To access the Internet using Wi-Fi, connect to Wi-Fi network in advance.❖Information・Make sure to receive enough signal strength for using Wi-Fi. The signal strength of the Wi-Fi network varies by the location of the terminal. Moving closer to the Wi-Fi router might enhance the signal strength.■ Reception interference caused by Bluetooth devicesBluetooth devices and wireless LAN (IEEE802.11b/g/n) use the same frequency band (2.4GHz). If you use Bluetooth devices near a wireless LAN device, reception interference may occur or the communications speed may lower. Also, you may hear noise or have a connection problem. Communication may be interrupted or sound may be lost while streaming data, etc. In these cases, do the following:・Keep the terminal and Bluetooth device to be connected wirelessly over 10 meters away from a wireless LAN device.・Within 10 meters, turn off the Bluetooth device to be connected.About Wi-Fi](https://usermanual.wiki/Sony/A3880132/User-Guide-1627689-Page-98.png)
![97Settings1From the Settings screen (P.93), tap [Wireless & networks].2Mark [Wi-Fi] checkbox.・The terminal scans for available Wi-Fi networks.❖Information・It may take a few seconds before the Wi-Fi connection is on.1From the Settings screen (P.93), tap [Wireless & networks] X [Wi-Fi settings].・Available Wi-Fi networks are displayed under "Wi-Fi networks". The available networks may be open or secured. This is indicated by or next to the Wi-Fi network name.2Select Wi-Fi network you want to connect, tap [Connect].・If you are trying to connect to a protected Wi-Fi network, you are asked to enter the security key for that Wi-Fi network before you can connect to it.❖Information・The next time you connect to a Wi-Fi network, the security key is saved in the terminal.■ Wi-Fi network status icons on status barThe following icons appear according to the Wi-Fi network connection status.* Without connected to Wi-Fi network, you need to set Wi-Fi Network notification to ON beforehand. (P.98)1From the Settings screen (P.93), tap [Wireless & network] X [Wi-Fi settings].2Touch and hold the Wi-Fi network that you are connected to.3Tap [Forget network].Turning on Wi-FiConnecting to a Wi-Fi networkAppears when connected to Wi-Fi network.Appears when connected to Wi-Fi network using AutoIP function.Appears when any open network within the service area is detected*.Disconnecting a Wi-Fi network](https://usermanual.wiki/Sony/A3880132/User-Guide-1627689-Page-99.png)
![98SettingsWhen you are connected to a Wi-Fi network or when there are Wi-Fi networks available in your vicinity, you can see the status of these Wi-Fi networks. You can also set the terminal to notify you when an unsecured Wi-Fi network is detected.Setting the Wi-Fi network notification to ON1Confirm that Wi-Fi is turned on, and then on the Settings screen (P.93), tap [Wireless & networks] X [Wi-Fi settings].2Mark [Network notification] checkbox.Scanning for Wi-Fi networks manually1From the Settings screen (P.93), tap [Wireless & networks] X [Wi-Fi settings].2Press t.3Tap [Scan].・Scanning for Wi-Fi networks is started, and they are displayed under "Wi-Fi networks".4Tap a Wi-Fi network in the list to connect to it.Before you add a Wi-Fi network manually, you need to turn on the Wi-Fi setting. (P.97)Adding a Wi-Fi network manually1From the Settings screen (P.93), tap [Wireless & networks] X [Wi-Fi settings].2Tap [Add Wi-Fi network].3Enter [Network SSID] name of the Wi-Fi network you want to add.4Tap [Security] field, then mark a radio button of security type for the Wi-Fi network you want to add.・4 options, "Open", "WEP", "WPA/WPA2 PSK", or "802.1x EAP", appear.5If required, enter security information for the Wi-Fi network you want to add.6Tap [Save].Wi-Fi network statusAdvanced Wi-Fi settings](https://usermanual.wiki/Sony/A3880132/User-Guide-1627689-Page-100.png)
![99SettingsViewing detailed information on a connected Wi-Fi network1From the Settings screen (P.93), tap [Wireless & networks] X [Wi-Fi settings].2Tap the Wi-Fi network that you are currently connected to.・The detailed network information is displayed.❖Information・To check MAC address and IP address, [Wireless & networks] on the Settings menu screen (P.93) X Tap [Wi-Fi settings], press t, and tap [Advanced] .By changing a Wi-Fi sleep policy, you can choose to disable the Wi-Fi function in the terminal when the screen backlight turns off. You can also set the terminal to always turn ON the Wi-Fi function or to turn it ON when the terminal is charged.❖Information・When a Wi-Fi network is disconnected, connection is automatically switched to a 3G/GPRS network.Adding a Wi-Fi sleep policy1From the Settings screen (P.93), tap [Wireless & networks] X [Wi-Fi settings].2Press t.3Tap [Advanced].4Tap [Wi-Fi sleep policy].5Tap any of [When screen turns off]/[Never when plugged in]/[Never].You can set up the terminal to connect to a Wi-Fi network using a static IP address.Setting up a static IP address1From the Settings screen (P.93), tap [Wireless & networks] X [Wi-Fi settings].2Press t.3Tap [Advanced].4Mark [Use static IP] checkbox.・Item of IP settings can be selected.5Tap an item to enter necessary information.・Enter "IP address", "Gateway", "Netmask", "DNS 1" to use a static IP address.6Press t.7Tap [Save].Wi-Fi sleep policyUsing a static IP address](https://usermanual.wiki/Sony/A3880132/User-Guide-1627689-Page-101.png)
![100SettingsTethering stands for using mobile devices such as smartphone as modem to allow USB compatible devices or wireless LAN devices to access the Internet.❖Information・Packet communication charge when using tethering varies depending on the charging plan you use. Subscription of packet flat-rate service is highly recommended.If you subscribe packet flat-rate service, packet communication charge is treated as "communications connected to an external device such as a PC". If tethering is enabled, all packet communication charge is treated as "communications connected to an external device such as a PC" even if any external device is not connected.Make sure to deactivate tethering as soon as communication with an external device is completed.For details on usage charge, etc., refer to http://www.nttdocomo.co.jp/english/・For the details on tethering, from the Settings screen (P.93), tap [Wireless & networks] X [Tethering & portable hotspot] X [Help].Setting USB tetheringConnecting the terminal to the included microUSB cable, and using it as a modem, you can connect USB device to the Internet.1From the Settings screen (P.93), tap [Wireless & networks] X [Tethering & portable hotspot].2Connect the terminal to a PC with a microUSB cable (P.33).・When you connect a USB cable for the first time, driver software for the terminal is installed to the PC. Wait for a while until installation is completed. A confirmation screen for installation of PC Companion software appears when the driver software installation is completed.3Tap [Skip].・The terminal is connected to a PC in "Media transfer mode (MTP)", USB connection mode set by default.4Tap [USB tethering].5Check the cautions displayed, tap [OK].・[USB tethering] is marked.❖Information・System requirements (OS) for USB tethering are as follows. A required driver is automatically installed.- Microsoft Windows 7- Microsoft Windows Vista- Microsoft Windows XP・Set USB connection mode to "Media transfer mode (MTP)" when connecting the terminal and a PC using microUSB cable.Using tethering function](https://usermanual.wiki/Sony/A3880132/User-Guide-1627689-Page-102.png)
![101SettingsSetting up a portable Wi-Fi hotspotYou can use the terminal as Wi-Fi access point to connect up to 5 wireless LAN devices to the Internet simultaneously.1From the Settings screen (P.93), tap [Wireless & networks] X [Tethering & portable hotspot].2Tap [Port. Wi-Fi hotspot settings].3Enter [Network SSID] of the Wi-Fi hotspot to set.・By default, "SO-03D" is set.4Tap [Security] field and mark the radio button for the security type of Wi-Fi hotspot to set.・Either "WPA2 PSK" or "Open" appears.5Enter security information of the Wi-Fi hotspot to set as required.6Tap [Save].Using Wi-Fi tethering1From the Settings screen (P.93), tap [Wireless & networks] X [Tethering & portable hotspot].2Tap [Portable Wi-Fi hotspot].3Check the cautions displayed, tap [OK].・[Portable Wi-Fi hotspot] is marked.❖Information・If Wi-Fi tethering starts while connecting to Wi-Fi network, Wi-Fi network is disconnected and automatically connected when Wi-Fi tethering ends. Alternatively, when the terminal and DLNA device are connected via Wi-Fi network, starting/ending Wi-Fi tethering affects Wi-Fi connection.・USB tethering and Wi-Fi tethering can be used at the same time.Virtual Private Network (VPN) is a technology to connect to the information in a protected local network from another network. Generally, VPNs are provided to companies, schools and other facilities. A user can access to the information in the local network from outside of the premises.To set up a VPN access from the terminal, you need to retrieve the information related to security from your network administrator. For details, refer to http://www.sonyericsson.co.jp/support/❖Information・If you set sp-mode as an ISP, you cannot use PPTP.Connecting to a VPN (Virtual Private Network)](https://usermanual.wiki/Sony/A3880132/User-Guide-1627689-Page-103.png)
![102SettingsAdding a VPN1From the Settings screen (P.93), tap [Wireless & networks] X [VPN settings].2Tap [Add VPN].3Tap a VPN type to add.4If a setting screen appears, follow the instruction of the network administrator to set required items of VPN settings.5Press t, then tap [Save].・A new VPN is added in the list on VPN settings screen.❖Information・Added VPNs can be edited or deleted.To edit VPNs, touch and hold a desired VPN, then tap [Edit network]. Change the VPN settings, as required, press t and tap [Save]. To delete, touch and hold a VPN to be removed, then tap [Delete network] X [OK].Connecting to a VPN1From the Settings screen (P.93), tap [Wireless & networks] X [VPN settings].・Added VPNs are displayed in the list on the VPN setting screen.2Tap a VPN to connect to.3If the dialog box appears, enter the desired authentication information and tap [Connect].・When you are connected to a VPN, the connecting notification appears in the status bar. When you are disconnected, the notification indicating to return to the VPN setting screen appears, so that you can reconnect to. For details, see "Status bar" (P.36).Disconnecting a VPN1Open the Notification panel, tap the VPN connecting notification.・Tap a connecting VPN to disconnect.You can use the network services and search for available networks.Call settingsNetwork service settingP. 8 5Service providers When you start using overseas or move out of your operator's network, the terminal searches another available network and reconnects to it.Continued on next page](https://usermanual.wiki/Sony/A3880132/User-Guide-1627689-Page-104.png)
![103SettingsSet ringtones, operation sound, vibrator, etc.1Press p for over a second.・Phone options menu appears.2Tap [Silent mode].❖Information・Alternatively, you can set silent mode from the Settings screen (P.93), tap [Sound] and mark [Silent mode] checkbox.・Setting the phone to silent mode does not mute sounds (playback of video or music, alarm, etc.) other than the ringtone, operation sound, and notification sounds.1From the Settings screen (P.93), tap [Sound] X [Vibrate].2Tap any of [Always]/[Never]/[When sound is off]/[When sound is on].Noise suppression Make the voice clear to understand for the other party during a call.Accounts Set Internet phone (SIP) account.Use Internet calling Set Internet phone (SIP) call method.SoundxLOUDTM Set audio playback level enhancement technology ("xLOUD") to enjoy powerful sounds with the built-in speaker when playing music, YouTube, Gallery, etc.Silent mode P. 1 03Vibrate P. 1 03Volume P. 1 0 4Phone ringtone P. 1 04Notification ringtone P. 1 0 5Audible touch tones P. 1 0 5Audible selection P. 1 0 5Screen lock sounds Set sound ON/OFF when unlocking the screen.Haptic feedback Set whether to vibrate for some operations such as specified software key operation.Setting the terminal to silent modeSetting the vibrator](https://usermanual.wiki/Sony/A3880132/User-Guide-1627689-Page-105.png)
![104Settings1From the Settings screen (P.93), tap [Sound] X [Volume].・Adjust the volume of following items.- Ringtone- Media (sounds of the Music player and Gallery)-Alarm- Notification2Drag the slider left or right to adjust the level.・Drag the slider to the left for volume down, or to the right for volume up.3Tap [OK].❖Information・By default, Notification volume is adjusted to the same as Ringtone volume. To adjust Ringtone and Notification separately, unmark [Use incoming call volume for notifications] checkbox in Step 1. Ringtone and Notification volume adjustment sliders appear, then drag each slider to the right or left to adjust volume.1From the Home screen, press up or down of m.・The volume adjustment bar appears, you can adjust the volume up or down.❖Information・You can also press m or p to mute the ringtone for an incoming call.1From the Settings screen (P.93), tap [Sound] X [Phone ringtone].2Select a ringtone and tap [Done].・You can set voice file in ".wav", ".m4a" or in other format which is transferred from Media Go (P.142) or downloaded from the Internet as a ringtone. (P.167)❖Information・To set a ringtone other than the ones stored by default, you can also set from "Music library".Adjusting the volume Adjusting the ringer volume with the volume keySetting a ringtone](https://usermanual.wiki/Sony/A3880132/User-Guide-1627689-Page-106.png)
![105Settings1From the Settings screen (P.93), tap [Sound] X [Notification ringtone].2Select a ringtone and tap [Done].❖Information・To set a notification sound other than the ones stored by default, you can also set from "Music library".1From the Settings screen (P.93), tap [Sound].2Mark [Audible touch tones] checkbox, [Audible selection] checkbox.・If you unmarked them, any operation tone does not sound when you touch or tap.❖Information・"Audible touch tones" is a tone for numeric key operations. "Audible selection" is a tone when selecting menu item.・To set the key sound of software keyboard, from the Settings screen (P.93), tap [Language & keyboard], and select a type of software keyboard.Set brightness, orientation of the screen, etc.1From the Settings screen (P.93), tap [Display] X [Brightness].2Drag the slider to the right or left.・Drag the slider to the left for dimmer screen, or to the right for brighter screen.3Tap [OK].You can set the screen orientation to change automatically between landscape and portrait view when you turn the terminal sideways/paleways.Selecting a notification ringtoneSetting touch tones to ONDisplayBrightness P.105Auto-rotate screen P.105Animation P.106Screen timeout P.106Theme P. 4 6Adjusting the screen brightnessChanging orientation of the screenContinued on next page](https://usermanual.wiki/Sony/A3880132/User-Guide-1627689-Page-107.png)
![106Settings❖Information・Even when you change the orientation of the terminal, the screen may not change to landscape view depending on the screen such as Home screen, etc.Setting to change to landscape view1From the Settings screen (P.93), tap [Display].2Mark [Auto-rotate screen] checkbox.Set animation effect which shows transition of screen smoothly.1From the Settings screen (P.93), tap [Display] X [Animation].2Select an animation option.1From the Settings screen (P.93), tap [Display] X [Screen timeout].2Select a time option before the screen backlight turns off.❖Information・To turn the screen backlight off immediately, press p.Set options related to location information and security.Setting animation effect to transitionAdjusting the idle time before the screen turns offLocation & securityUse wireless networks P. 1 7 5Use GPS satellites P. 1 7 5Set up screen lock P. 1 0 9Set up SIM card lock P. 1 0 8Visible passwords Set whether to show the input character before "・" appears on the password entry screen.Select device administratorsSet whether to enable device administrators.Use secure credentials Allow applications to access secure certificates and other credentials.*1Install from SD card Install encrypted certificates from microSD card.Set password Set or change the credential storage*2 password.Continued on next page](https://usermanual.wiki/Sony/A3880132/User-Guide-1627689-Page-108.png)
![108Settings* For information on "My docomo", see the previons page of the last page of this manual.You can set a security code called PIN code to the UIM. The code is set to "0000" at the time of subscription. It can be changed by yourself.PIN code is a 4- to 8-digit number (code) that must be entered for user confirmation to prevent unauthorized use by a third party every time you insert the UIM into the terminal or when the terminal is powered on. Entering the PIN code enables making/receiving calls and terminal operation.・When you purchase a new terminal and use the UIM that you have used on the current terminal by inserting to the new one, use the set PIN code on the former terminal. If you did not change the setting, the code is "0000".・If you enter a wrong PIN code 3 times consecutively, the PIN code is locked and cannot be used anymore. In this case, unlock with "PUK". (P.108)PUK codeThe PUK code is an 8-digit number for canceling the locked PIN1/PIN2 code. The PUK code cannot be changed by yourself.・If you enter a wrong PUK code 10 times consecutively, the UIM is locked. Please contact a docomo Shop.By setting PIN (security code) and enter PIN1 code when powered on, you can protect the UIM from improper use.1From the Settings screen (P.93), tap [Location & security] X [Set up SIM card lock] X [Lock SIM card].2Enter the PIN code of the UIM and tap [OK].・[Lock SIM card] is marked.Entering the PIN code when powered on1On the PIN code entry screen, enter the PIN code of the UIM.2Tap [OK].PIN codeEnabling the UIM PINContinued on next page](https://usermanual.wiki/Sony/A3880132/User-Guide-1627689-Page-110.png)
![109Settings❖Information・Even if you do not unlock the SIM card lock, you can make an emergency call by tapping [Emergency call] on the unlock SIM card lock screen displayed after unlocking the screen. For details, see "Emergency call" (P.71).Changing the PIN code・You can change the PIN code when the UIM PIN is enabled.1From the Settings screen (P.93), tap [Location & security] X [Set up SIM card lock] X [Change SIM PIN].2Enter the current PIN code of the UIM and tap [OK].3Enter the new PIN code of the UIM and tap [OK].4Enter the new PIN code and tap [OK].Unblocking the locked UIM1On the PUK code entry screen, enter the PUK code and tap [OK].2Enter the new PIN code of the UIM and tap [OK].3Enter the new PIN code and tap [OK].You can secure your data by requiring a screen unlock pattern every time the terminal is turned on or every time it is activated from sleep mode.There are 3 types of screen lock settings: "Pattern", "PIN" and "Password". (P.109)❖Information・You can use Key lock (P.34) to prevent unintended operation or save the power consumption of the terminal without setting screen lock.Setting screen unlock pattern1From the Settings screen (P.93), tap [Location & security] X [Set up screen lock].2Tap [Pattern]/[PIN]/[Password].・When you tap [Pattern], follow the onscreen instructions to enter screen unlock pattern.Set security question and answer in case you forget the pattern.・When you tap [PIN], follow the onscreen instructions to enter 4 or more numbers. This "PIN" code is different from a PIN code to be set to UIM (P.108).Screen lockContinued on next page](https://usermanual.wiki/Sony/A3880132/User-Guide-1627689-Page-111.png)
![110Settings・When you tap [Password], follow the onscreen instructions to enter 4 or more characters including alphabets.Changing the screen unlock method1From the Settings screen (P.93), tap [Location & security] X [Change screen lock].・Enter current screen unlock pattern, PIN or password.・If you should fail 5 times when you enter the unlock pattern, wait 30 seconds and then try again.2Tap [Pattern]/[PIN]/[Password].・Select items you want to change into.For setting procedure, see Step 2 (P.109) of "Setting screen unlock pattern".Locking the screenOnce screen unlock pattern (P.109) is set, keys and screen are locked when the terminal enters in the sleep mode or when p is pressed.Unlocking the screen1Press y or p to activate the terminal.2Unlock the key lock, then enter the screen unlock pattern.・Enter preset screen unlock pattern, PIN or password.❖Information・Even if you do not unlock the screen lock, you can make an emergency call by tapping [Emergency call] on the unlock the screen lock screen displayed after unlocking the screen. For details, see "Emergency call" (P.71).If you forget how to unlock■ If you set "Pattern""Incorrect pattern" appears when you enter incorrect unlock pattern 5 times consecutively.・Tap [Next], then mark [Answer question], then tap [Next], and then answer the question made when the unlock pattern was set so that you can unlock screen.・If you registered Google account, on the "Incorrect pattern" screen, tap [Next], then mark [Enter Google account details], then tap [Next], and then enter Google account and password to unlock screen.Continued on next page](https://usermanual.wiki/Sony/A3880132/User-Guide-1627689-Page-112.png)
![111Settings❖Information・Tap [Try again] to retry entering pattern in 30 seconds.・Alternatively, when you tap [Try again] X [Forgot pattern?], the question screen that you set unlock pattern appears.・You can set multiple Google accounts. To unlock the screen with Google account and password, enter one of those accounts.■ If you set "PIN"/"Password"Please contact a docomo Shop.Canceling screen lockYou can cancel screen lock pattern after you set.1From the Settings screen (P.93), tap [Location & security] X [Change screen lock].・Enter preset screen unlock pattern, PIN or password.2Tap [None].You can set options related to application display and management.Before you can download unknown source's applications, set the terminal to enable downloading.Applications you download may be of unknown origin. To protect your terminal and personal data, only download applications from trusted sources such as the Android Market etc.1From the Settings screen (P.93), tap [Applications].2Tap [Unknown sources].3Read the cautions appeared, tap [OK].・[Unknown sources] checkbox is marked.ApplicationsUnknown sources P.111Manage applicationsP.112Running services Display/Manage the currently running services.Storage use Display size of all applications, usage condition, etc.Battery use Display operations which has been using the battery.Development Set options for application development.Permitting downloading unknown source's application](https://usermanual.wiki/Sony/A3880132/User-Guide-1627689-Page-113.png)
![112SettingsChecking downloaded applicationsYou can check data downloaded from websites, such as unknown source's applications, in the following steps.1From the Home screen, tap [Browser].2Press t, tap [More] X [Downloads].❖Information・Alternatively, you can tap from the home screen X [Downloads] to check applications.・Applications downloaded from Android Market do not appear.Manage and delete installed applications, display memory usage condition, etc. or change the settings.Viewing permitted operation of the applications in the terminalYou can check functions which are permitted to each application to access in the progress of performing, such as network communication function or location information function of the terminal.1From the Settings screen (P.93), tap [Applications] X [Manage applications].2Tap an application to view.3Scroll down the screen to view permitted operations.・If all permitted operations do not appear, tap [All].Shutting down an applicationIf a pop-up window that indicates the application does not reply appears, you can force quit the application.1From the Settings screen (P.93), tap [Applications] X [Manage applications].2Tap an application to force-quite.3Tap [Force stop].4Read the cautions displayed, tap [OK].❖Information・If you do not want to shut down the application, tap [Cancel] and wait for a reply of the application.❖Note・If you cancel the "status bar" of application forcibly, operations may not be performed correctly.Managing your applications](https://usermanual.wiki/Sony/A3880132/User-Guide-1627689-Page-114.png)
![113SettingsDeleting all data of the application・Before deleting all installed application data, back up contents related to the application that you want to save including data saved in the application.1From the Settings screen (P.93), tap [Applications] X [Manage applications].2Tap an application to delete the data.3Tap [Clear data].4Tap [OK].Deleting an installed application・Before deleting installed application, back up contents related to the application that you want to save including data saved in the application.・Some applications cannot be deleted.1From the Settings screen (P.93), tap [Applications] X [Manage applications].2Tap an application to be deleted.3Tap [Uninstall].4Tap [OK].5When uninstallation is completed, tap [OK].❖Information・You may not uninstall the applications pre-installed in the terminal.・Applications can be deleted from the Applications screen. For details, see "Uninstalling applications" (P.55).Deleting cache of the application1From the Settings screen (P.93), tap [Applications] X [Manage applications].2Tap an application to delete cache.3Tap [Clear cache].1From the Settings screen (P.93), tap [Applications] X [Development].2Mark [Stay awake] checkbox.Keeping the screen ON while charging](https://usermanual.wiki/Sony/A3880132/User-Guide-1627689-Page-115.png)
![114SettingsYou can manage (add or delete) online service accounts or synchronize contacts, messages, etc. saved in online services with the terminal.You can add or delete an online service account.Setting Google accountYou can create a Google account on your terminal and use Google services such as Gmail, Google Talk, Google Calendar, Android Market, etc.You can set multiple Google accounts on the terminal.1From the Settings screen (P.93), tap [Accounts & sync] X [Add account] X [Google].2Follow the registration wizard, set a Google account.・If you have no Google account, create an account.・If you have already the Google account, sign in.❖Information・You can use the terminal without creating your Google account, however the services such as Google Talk, Gmail, Android Market, etc. are not available.・To sign in, you need a Google account and a password.・If you set a Google account, you can tap your Google account displayed on the "Accounts & sync" screen in the setting menu to manually synchronize data from the following items.・If you set a Google account and use Picasa in it, "Sync Picasa Web Albums" appears. Tapping to synchronize displays Picasa Web Album in the Gallery on the terminal.Accounts & syncBackground data trafficAll the applications installed to the terminal perform automatic data communications.Activate auto-syncSynchronize online information such as your Gmail, calendar, contacts, etc. automatically. (P.116)Manage accounts P. 1 1 4Managing accounts Sync Contacts Synchronize contacts stored in Gmail with the phonebook stored in the terminal.Sync GmailSynchronize Mail logs used in Gmail account with Gmail on the terminal.Sync Calendar Synchronize calendar information such as schedule, etc., stored in Google account with Calendar in the terminal.Continued on next page](https://usermanual.wiki/Sony/A3880132/User-Guide-1627689-Page-116.png)
![115Settings・Make sure to check if the data connection is available before sign-in to the Google account. For checking the data connection status, see "Status icons" (P.36).Setting Facebook accountWhen you register or sign in Facebook, you can synchronize (register/update) profile information published by "Friend" online to Contacts.You can display image posted on Facebook by "Friends" onto the Gallery or Photo filter in Contacts, display information stored in " いいね (Like)" on the Interests filter in Contacts, and display Facebook updates of "Friends" in Timescape.❖Information・If you do not have a Facebook account, you can also create a new account at http://www.facebook.com.・If you download and install client applications for Twitter, mixi, you can setup accounts and synchronize contacts information in the same manner as Facebook.1From the Settings screen (P.93), tap [Accounts & sync] X [Add account] X [Facebook].・If you already have a Facebook account and set account from Phonebook or Timescape of the terminal, you need not add a new account.2Enter your login information.・If you have no Facebook account, register an account.・If you have Facebook account, login.❖Information・If you have set a Facebook account, 2 Facebook icons and set mail address are displayed on the "Accounts & sync" screen in the setting menu. Tap a Facebook icon, (Sony Ericsson Facebook for mobile), and tap the following items to synchronize and display corresponding data.・If synchronizing process is not completed, follow the onscreen instructions to drag the status bar downward and tap the notification, then tap [OK] on the connection screen. Synchronization will complete.Sync Calendar Synchronize events such as Friends' birthdays, etc., stored in Facebook with Calendar in the terminal.Sync Albums in GalleryDisplay images posted on Facebook onto Photo filter in the contact information filter or onto the album in Gallery of the terminal.Sync Contacts Synchronize profile of Friends stored in Facebook with the phonebook stored in the terminal.](https://usermanual.wiki/Sony/A3880132/User-Guide-1627689-Page-117.png)
![116SettingsSetting other account■ Exchange Active Sync account・If you have Exchange ActiveSync account, on the settings screen (P.93), tap [Accounts & sync] X [Add account] X [Exchange Active Sync], and then set the settings according to the onscreen instructions.■ docomo account・docomo account helps you to use "Phonebook backup" service (P.52) provided by NTT DOCOMO. a docomo account is set by default.Deleting a service account1From the Settings screen (P.93), tap [Accounts & sync] and select a service account you want to delete.2Tap [Remove account] X [Remove account].❖Information・The first set Google account cannot be removed from "Remove account". To remove the first set Google account, reset the terminal. For details on how to reset, see "Resetting the terminal" (P.117).Synchronize online information such as your Gmail, calendar, contacts, etc. to the terminal. You can display and edit information on the terminal or a PC.❖Information・You need to set your online service account such as Google account, etc. on the terminal to synchronize. You can set to synchronize manually or automatically through use of background data.Setting automatic synchronization1From the Settings screen (P.93), tap [Accounts & sync].2Mark [Background data traffic] checkbox.3Tap [Activate auto-sync].4Read the cautions displayed, tap [OK].・[Activate auto-sync] checkbox is marked.5Tap an online service whose account is set.Data synchronizationContinued on next page](https://usermanual.wiki/Sony/A3880132/User-Guide-1627689-Page-118.png)
![117Settings6Tap to mark an item for automatic synchronization.・If the items to be synchronized are marked and checkboxes are led by , synchronization starts. If no appears, press t and tap [Sync now] to start synchronization.❖Note・If you mark [Background data traffic] checkbox, all the applications installed to the terminal are permitted automatic data communications to online services whose accounts are set. And, if you mark [Activate auto-sync] checkbox, your Gmail, calendar, contacts, and profile information published by "Friend", etc. are permitted automatic data communications by Google account. These communications may cause you to pay packet communications charges.・If you do not mark [Activate auto-sync] checkbox, you can synchronize manually. On the settings screen (P.93), tap [Accounts & sync], tap the service where your account is set to display the synchronizing items, then tap items you want to synchronize.Canceling synchronization1During synchronization ( appears in the status bar), press t.2Tap [Cancel sync].Restore the terminal to default.Resetting the terminal deletes all data, including downloaded applications and Google accounts, and resets the terminal back to the initial (default) state. Make sure to back up important data you have on the terminal before you reset the terminal.For the initial settings, see "Initial settings (Setup guide)" (P.35).1From the Settings screen (P.93), tap [Privacy] X [Factory data reset] X [Reset phone].・Mark [Erase SD card] checkbox to delete all contents on the microSD card.・Enter your screen unlock method as required.2Tap [Erase everything].・By tapping [Erase everything], the terminal restarts automatically.PrivacyFactory data resetReset the terminal.Resetting the terminalContinued on next page](https://usermanual.wiki/Sony/A3880132/User-Guide-1627689-Page-119.png)
![118Settings❖Note・While restarting or resetting the terminal, wait for a while. Note that, if you remove the battery pack while restarting or resetting, it may cause malfunction of the terminal.You can check memory space of microSD card and terminal, and initialize microSD card.* Display changes depending on condition of microSD card recognition.Formatting a microSD card1From the Settings screen (P.93), tap [Storage] X [Unmount SD card].・If the confirmation screen appears, tap [OK].2Tap [Erase SD card].3Tap [Erase SD card] again, and tap [Erase everything].❖Information・Formatting a microSD card deletes all the data in it.Confirming how much space left is on a microSD card and the terminal1From the Settings screen (P.93), tap [Storage].・The total volume and free space of the microSD card appear at the top of the screen, and the free space of the terminal appears at the bottom of the screen.StorageTotal space Check memory of microSD card.Available spaceCheck memory space of microSD card.Unmount SD card*Cancel recognition of microSD card to remove it safely.Mount SD card*Recognize microSD card.Erase SD card P.118Available spaceCheck memory space of the terminal.Managing memory](https://usermanual.wiki/Sony/A3880132/User-Guide-1627689-Page-120.png)
![119SettingsIncreasing the free volume of the terminal and a microSD cardIf the terminal has a small memory, you can do the following to increase the available memory:・In the browser, you can clear all temporary Internet files and browser history information. For details, see "Clearing history" (P.137).・Uninstall programs that you no longer use. For details, see "Deleting an installed application" (P.113).You can select language and keyboard input.Changing the phone language1From the Settings screen (P.93), tap [Language & keyboard] X [Select language].2Select a language.❖Information・If you choose the wrong language and cannot read the menu texts, go to http://www.sonyericsson.co.jp/so-03d/faq.html for help.You can set Google voice recognizer and Text-to-speech settings.■ Voice recognizer settings■ Text-to-speech settingsLanguage & keyboardSelect language P.119User dictionary Register words.International keyboard P. 6 5Japanese keyboardVoice input & outputLanguage Select language used for Google voice search.SafeSearch Set filter explicit.Block offensive wordsSet whether to display recognized offensive voice results.Listen to an examplePlayback sample of audio synthesis.Always use my settingsOverwrite application settings with content of "Default Engine", "Install voice data", "Speech rate", "Language" and "Pico TTS".Default EngineSet audio synthesis engine to read out text. By default, "Pico TTS" is set.Install voice dataInstall voice data required to voice synthesis. If voice data is not installed, connect to Android Market to search voice data.Speech rate Set speed at reading out text.Continued on next page](https://usermanual.wiki/Sony/A3880132/User-Guide-1627689-Page-121.png)
![120Settings* Japanese is not supported.You can set call end operation and user support service which sounds or vibrates according to user's operation.❖Information・A user support application is not installed by default. For the first time of use, install a screen reader for terminal from the Android Market according the onscreen instructions.・To use Android Market, you need to set Google account (P.114).You can change the date and time in the terminal.To set date, time zone and time manually, unmark "Automatic" time setting (Use network-provided values) under Date & time settings.1From the Settings screen (P.93), tap [Date & time] X [Set date].2Tap numbers to adjust the date.3Tap [Set].❖Information・Correction of the time differences may not be performed correctly depending on the overseas telecommunication carrier. In that case, set time zone manually (P.121).Language Set language for reading out text.Pico TTS* Make settings for installed voice synthesis engine.AccessibilityAccessibility Set user support service ON/OFF.Power button ends callSet to end a call by pressing p.Date & timeAutomaticAdjust date, time zone, and time automatically by using network-provided information.Set date P. 1 2 0Select time zone P. 1 2 1Set time P. 1 2 1Use 24-hour format P. 1 21Select date format P. 1 2 1Setting the date](https://usermanual.wiki/Sony/A3880132/User-Guide-1627689-Page-122.png)
![121Settings1From the Settings screen (P.93), tap [Date & time] X [Select time zone].2Tap an item to set.1From the Settings screen (P.93), tap [Date & time] X [Set time].2Tap numbers to adjust the hour and minute.・When you unmark [Use 24-hour format] checkbox, you can change AM/PM. When you tap [AM], it changes to [PM] (or vice versa).3Tap [Set].1From the Settings screen (P.93), tap [Date & time] and mark/unmark [Use 24-hour format] checkbox.・Mark the checkbox to shift to 24-hour format, and unmark to shift to 12-hour format.1From the Settings screen (P.93), tap [Date & time] X [Select date format].2Tap an item to set.You can check your own phone number, signal level, legal information, etc.Setting the time zoneSetting the timeSetting the time formatSetting the date formatAbout phoneSoftware update P.201Status Check your own phone number, signal level, etc.Battery use Display operations which have been using the battery.Legal information Check license agreement, terms of use, etc.Model number Check version and number.Android versionBaseband versionKernel versionBuild number](https://usermanual.wiki/Sony/A3880132/User-Guide-1627689-Page-123.png)
![122Mail/InternetYou can send/receive mails using i-mode mail address (@docomo.ne.jp).You can use pictogram and Deco-mail. Mails can be received automatically. For details on sp-mode mail, refer to " ご利用ガイドブック (spモード編) Mobile Phone User's Guide [sp-mode] (in Japanese only)".1From the Home screen, tap [spモードメール (sp-mode mail)].・After this step, follow the onscreen instructions.Using a mobile phone number as the recipient address, you can send and receive text messages up to 70 two-byte characters (160 one-byte characters).1From the Home screen, tap , then tap [Messaging].2Tap [New message] X [Add recipient].3Mark the checkbox of the recipient you want to send a message from the contact list.・If a name or phone number is entered in the box at the top of the screen, a list of contacts beginning with the entered numbers or letters appears.・Alternatively, you can enter a phone number in the box at the top of the screen, then tap [Add] to add a recipient.4Tap [Done].5Tap [Write message] field and enter a message.・When the number of entered characters comes close to a limit, a counter appears on the upper left of the text box and you can check the remaining entry space.6Tap [Send].❖Information・For the character entry, see "Character entry" (P.56).・You can also send/receive text messages to/from customers of overseas network operators. See "Mobile Phone User's Guide [International Services]" or the DOCOMO International Services website.sp-mode mailMessage (SMS)Sending message (SMS)Mail/InternetContinued on next page](https://usermanual.wiki/Sony/A3880132/User-Guide-1627689-Page-124.png)
![123Mail/Internet・To send SMS to users of overseas network operators, enter "+", "Country code" and then "the recipient mobile phone number". Enter the phone number without a leading "0", if any. You can also enter "010", "Country code" and "the recipient mobile phone number" to send messages (To reply to the received SMS overseas, enter "010").1From the Home screen, tap , then tap [Messaging].2Tap someone whose messages you want to read from the recipient list.・A received message appears.❖Information・When you receive a message (SMS), appears on the status bar. To read the message, drag the status bar downwards, then tap the notified message (SMS) item.1From the Home screen, tap , then tap [Messaging].2Select a thread whose phone number you want to save.3Press t, then tap [Edit recipients].4Tap the phone number you want to add to a contact.5On the Sending screen, tap , then tap [Create new contact].6Tap [docomo]/[Phone contact].・When you set Google account etc., it appears as a saving location.7Enter required items and tap [Done].1From the Home screen, tap , then tap [Messaging].2Press t, then tap [Settings].・You can set the following options.Receiving and reading messages (SMS)Saving a number in a received message to a contactAdjusting messages (SMS) settingsDelivery report Mark to mark a message thread you sent each time a recipient receives the message.Notifications Mark if you want to receive a notification in the status bar when a new message arrives.Notification toneSet if you want to receive a notification in selected ringtone when a new message arrives.Continued on next page](https://usermanual.wiki/Sony/A3880132/User-Guide-1627689-Page-125.png)
![124Mail/Internet1From the Home screen, tap , then tap [Messaging].2Tap a thread to select.3Touch and hold a message you want to delete.4Tap [Delete message] X [Yes].1From the Home screen, tap , then tap [Messaging].2Touch and hold a thread to delete.3Tap [Delete conversation] X [Yes].1From the Home screen, tap , then tap [Messaging].2Press t, then tap [Delete several].3Tap [Mark all] X [Delete].・After tapping [Mark all], you can tap individual thread to unmark. Tap [Unmrk all] to unmark all of the threads.You can create an email account provided by mopera U mail, a POP3 or IMAP compatible email account provided by general service providers, or an Exchange ActiveSync account to send or receive email.Email setup wizard appears. Set according the onscreen instructions. Multiple email accounts can be set.1From the Home screen, tap , then tap [Email].2Enter your email address and password.3Tap [Next].・To make the email account settings manually, tap [Manual setup] and follow the onscreen instructions.Notification vibrationSet if you want to receive a notification by vibration when a new message arrives.SIM messages Manage messages saved to UIM.Push settings Reports of message settings can be received from the provider.Deleting a messageDeleting threadDeleting all threadsEmailSetting up an email accountContinued on next page](https://usermanual.wiki/Sony/A3880132/User-Guide-1627689-Page-126.png)
![125Mail/Internet4Enter account name and a name you want to display on outgoing mails.・If "What type of account is this?" appears, tap an email account type and follow the onscreen instructions to set.・If you set an Exchange ActiveSync account, name to be displayed on outgoing messages cannot be set.5Tap [Done].・Inbox for set email account appears.❖Information・If you need to make the settings manually, contact your email service provider or system administrator for the correct email account settings.・If you set an Exchange ActiveSync account as email account, and if server manager sets Remote wipe, the data saved in the terminal may be deleted.・Emails are not displayed in Timescape.1From the Home screen, tap , then tap [Email].2Tap [New mail].3Enter the email address of recipient.・Tap to display the Contacts list screen to select among the registered contacts.・If you enter an alphabet or a name, email address options appear from the contacts beginning with the entered character.・To add a Cc or Bcc, press t and tap [Add Cc/Bcc].・If you enter characters directly for multiple email addresses, separate with a comma (,) and then enter the next email address.・The sender name of a received email is the name set on sender's terminal.4Enter a subject.5Enter a message text.6To attach a file, tap [Add attachment] and attach a file in the following steps.Creating and sending an email message Add picture Select a file from the saved image file list.Take photo Start the camera to take a photo and attach it.Add video Select a file from the saved video file list.Record video Start the camera to record a video and attach it.Continued on next page](https://usermanual.wiki/Sony/A3880132/User-Guide-1627689-Page-127.png)
![126Mail/Internet・Only image/video/music file (up to 5 MB) can be attached to email.7Tap [Send].❖Information・You can save the message as a draft by tapping [Save draft]. Also, when you move to the other screen while creating a mail, the mail is automatically saved as draft.・In sent/received emails, a communication data is also included other than text and image displayed on the screen and charges will apply to the data.・Email is handled as an email from a PC. You cannot send or receive email if "Reject emails from PCs" is set on a recipient terminal.1From the Home screen, tap , then tap [Email].・When an account list appears, tap and select an email account to receive.2On the inbox, press t, then tap [Refresh].3Tap the email.❖Information・If you set "Email notifications" in Account settings (P.128) and set "Inbox check frequency" to an item other than "Manual", appears in the status bar when you receive a new message. Drag the status bar downwards to read the message.・If you set "Inbox check frequency" in Account settings (P.128) to an item other than "Manual", and if you are using the pay-as-you-go data communication, you may be charged every time you check your email.・If you tap the address of a received email, you can register it in a contact. If it has been already registered, you can display the details.・Tap (gray) to turn (yellow) on the mail message screen to add the marked mail to "Starred" on the email screen. From "Starred", you can quickly access to the mail you have marked.If is not shown on the mail message screen, tap to show.・When phone memory becomes low, a message indicating low memory space appears and receiving emails is not available. Delete saved messages etc. to make available memory space.Changing Inbox view1From the Home screen, tap , and then tap [Email].・When an account list appears, tap an email account you want to use for receiving mail to select.Add sound Select music: Select a saved music file.Sound Recorder: Record a voice message and attach it.Receiving and reading the emailContinued on next page](https://usermanual.wiki/Sony/A3880132/User-Guide-1627689-Page-128.png)
![127Mail/Internet2Press t, then tap [Preview pane].・You can set the following options.❖Information・If you have two or more accounts, change made in any of the accounts applies to all accounts.1From the Home screen, tap , then tap [Email].・When an account list appears, tap and select an email account whose attachment you want to save.2Tap an email.・The attachment list appears underneath the message field.3Tap [Save] of a file you want to save.・The attached file is saved on the microSD card.・You can display attachment files by tapping [Open].1From the Home screen, tap , then tap [Email].・When an account list appears, tap and select an email account whose email you want reply or forward.■ReplyingTap an email X Press t and tap [Reply] or [Reply all] X Enter text, then tap [Send].■ForwardingTap an email X Press t and tap [Forward] X Enter recipient email address X Enter text, then tap [Send].❖Information・On the mail message screen, you can also tap X (Reply)/ (Reply all)/ (Forward) to reply or forward an email.・When you reply or forward an email, the original message contents for replying or forwarding is quoted. To delete the quoted message text, tap .・When you forward an email, the attachment file of the original message is quoted. To cancel quoting attached file, tap .・You can also touch and hold the email to reply or forward an email.Off Inbox is not shown piecewise.On Tap in portrait view or in landscape view to cut the Inbox to show the selected mail body.Saving email message attachmentReplying to or forwarding emails](https://usermanual.wiki/Sony/A3880132/User-Guide-1627689-Page-129.png)
![128Mail/Internet1From the Home screen, tap , then tap [Email].・When an account list appears, tap and select an email account whose email you want to delete.2Touch and hold an email, then tap [Delete].❖Information・To delete multiple emails at the same time, tap checkboxes at the left of the mails you want to delete and then tap at the bottom of the screen.・To delete email while sending, press t and tap [Folders] X [Outbox], touch and hold a mail you want to delete and then tap [Discard].1From the Home screen, tap , then tap [Email].・When an account list appears, touch and hold an account that you want to change the settings and tap [Account settings], then go to Step 2.2Press t, then tap [Account settings].・You can set the following options.❖Information・You can also set "Inbox check frequency", "Sync contacts", and "Sync calendar" for an Exchange ActiveSync account. "Outgoing settings" cannot be set.・If you set "Inbox check frequency" to other than "Manual", and if you are using the pay-as-you-go data communication, you may be charged every time you check your email.Deleting an email messageChanging the settings for an email accountAccount nameChange account name. Your name Change your name (sender name).Signature Change your signature.Inbox check frequencySet whether to check new messages automatically and intervals of automatic check.Default accountSet to the default account to send email, if you set two or more email accounts.Email notificationsSet whether to show email arrival notification in the status bar. Select ringtoneSet ringtone when receiving an email.Vibrate Set whether to vibrate when receiving an email.Incoming settingsSet mail server for receiving.Outgoing settingsSet mail server for sending.](https://usermanual.wiki/Sony/A3880132/User-Guide-1627689-Page-130.png)
![129Mail/Internet1From the Home screen, tap , then tap [Email].・When a screen other than account list, press t and tap [Accounts].2Press t, tap [Add account].3Enter your email address and password.・If required, mark [Send email from this account by default.] checkbox.4Tap [Next].・To make the email account settings manually, tap [Manual setup] and follow the onscreen instructions.5Enter an account name and name you want to display on outgoing messages.・If "What type of account is this?" appears, tap an email account type and follow the onscreen instructions to set.・If you set an Exchange ActiveSync account, name to be displayed on outgoing messages cannot be set.6Tap [Done].・Inbox for set email account appears.❖Information・If you need to make the settings manually, contact your email service provider or system administrator for the correct email account settings.・If you set an Exchange ActiveSync account as email account, and if server manager sets Remote wipe, the data saved in the terminal may be deleted.・Press t on the inbox and tap [Accounts] to display the email screen and set account list.・All received mails for the set accounts are shown in the "Combined Inbox" on the email screen.・Tap an account name to open the inbox for selected account alone.・Emails are not displayed in Timescape.1From the Home screen, tap , then tap [Email].・When a screen other than account list, press t and tap [Accounts].2Touch and hold the account to be removed, then tap [Delete account] X [OK].Adding an extra email accountRemoving an email account from the terminal](https://usermanual.wiki/Sony/A3880132/User-Guide-1627689-Page-131.png)
![130Mail/Internetmopera U users (for the setting, see "Setting mopera U" (P.95)) can use mopera U Mail.In mopera U Mail, POP mail and IMAP mail are available. The mail box supports 50 MB. Also, the Web mail system is available.■ POP mail1From the Home screen, tap , then tap [Email].・If you have already set an email account, operate the following operations.- When an account list appears, press t and tap [Add account].- When a screen other than account list appears, press t and tap [Accounts], and then press t and tap [Add account].2Enter mopera U mail address and mopera U password, then tap [Manual setup]/[Next].・If you tap [Next], it changes automatically to POP3 account. Go to Step 4.3Tap [POP3] from the type of the mail account.4Check that you have entered [User name] and [Password] for mopera U correctly, and [mail.mopera.net] for the POP3 server.・If you tap [Next] in Step 2, "mail.mopera.net" is entered in the POP3 server field.5Select the security type.・If you do not select it, tap [Next] to go to Step 8.6On the security selection screen, mark the security radio button to be used.7Confirm the entry, then tap [Next].8Enter [mail.mopera.net] for the SMTP server and confirm the entry of [User name] and [Password] for mopera U.・If you tapped [Next] in Step 2, to confirm the entry of [User name] and [Password] for mopera U, mark [Require sign-in].・If you tap [Next] in Step 2, "mail.mopera.net" is entered in the SMTP server field. Set "587" in the Port field.9Tap [Next].Using mopera U mailContinued on next page](https://usermanual.wiki/Sony/A3880132/User-Guide-1627689-Page-132.png)
![131Mail/Internet10On the option setting screen, set frequency of checking Emails etc. and tap [More].11On the mail account registration screen, enter a name you want to display on outgoing messages, then tap [Done].・The mailer is displayed and the set mail account is available.❖Information・If [Require sign-in] is not marked on the SMTP server setting screen, mail cannot be sent. Mark [Require sign-in].If you have a Google account, you can send/receive emails by using Gmail on your terminal. If you have no Google account, see "Setting Google account" (P.114).❖Information・Gmail messages are not displayed in Timescape.1From the Home screen, tap , then tap [Gmail].2On the inbox, press t and tap [Refresh].・Synchronizing Gmail application in the terminal with your Gmail account starts, and the Inbox is refreshed.❖Information・For details of Gmail, press t on the Gmail screen, then tap [More] X [Help] to view the mobile help.You can use Google Talk instant messaging to chat with friends. To use Google Talk, you need to make settings of your Google account. For details, see "Setting Google account" (P.114).Signing in Google TalkSigning in is unnecessary if you have already set a Google account.1From the Home screen, tap , then tap [Talk].2Tap [Next] X [Sign in], enter your user name and password.3Tap [Sign in].Using GmailRefreshing GmailGoogle Talk (Chat)Sign in and online chatContinued on next page](https://usermanual.wiki/Sony/A3880132/User-Guide-1627689-Page-133.png)
![132Mail/Internet❖Information・For details of Google Talk, on the Google Talk screen, press t, then tap [Settings] X [Terms & privacy] X [Help Center] (Talk Help is displayed in English).Early warning "Area Mail" is a service with which you can receive earthquake early warning, etc. delivered by the Meteorological Agency.・Area mail is a free service for which subscription is not required.・You cannot receive Area Mails in the following case.- During a voice call- Out of service area- When power OFF- During International roaming- In Airplane mode- During updating software- When using UIM by a carrier other than NTT DOCOMO- During sending or receiving messages (SMS)・You may not be able to receive Area Mails while tethering is set or if packet communications are used.・Area Mail that could not be received cannot be received later.When terminal is in service area, Area Mail is sent automatically.1Receive an Area Mail automatically.2When you receive an Area Mail, dedicated ringtone sounds and the notification LED blinks.・Dedicated ringtone sounds for 10 seconds.・Ringtone and ringtone volume cannot be changed.3An Area Mail message appears automatically.Viewing received Area Mail later1From the Home screen, tap , then tap [Area Mail].2Select an Area Mail you want to view from the Area Mail list.・You can view the Area Mail message.1From the Home screen, tap , then tap [Area Mail].Early warning "Area Mail"Receiving Early warning "Area Mail"Setting Early warning "Area Mail"Continued on next page](https://usermanual.wiki/Sony/A3880132/User-Guide-1627689-Page-134.png)
![133Mail/Internet2Press t, then tap [Settings].❖Information・If the UIM is not inserted, you cannot set Area Mail.1From the Home screen, tap [Browser].❖Information・You can view the browser screen turning the terminal sideways. If the screen orientation does not change automatically when you turn the terminal sideways, from the Home screen, press t and tap [Settings] X [Display], then mark [Auto-rotate screen] checkbox.1On the Browser screen, press s.2Using the keyboard, enter the web page address or keyword to be searched for.・As you enter an address or characters, retrieved web pages list appears.3Tap the displayed candidates list or .・You can move the web page.❖Information・You can tap to enter search words by voice and search a web page.Going back to the previous page1Press x.1Press y.・All open windows are closed and Browser ends.Receive Area MailSet whether to receive Area Mails.Register Area MailTo receive Area Mails other than early warning, register the name of Area Mail about which you want to receive information and Message ID. Up to 20 items can be registered.Sound in silent modeSet whether to sound a dedicated ringtone even in silent mode.Sample screen & soundCheck the ringtone when an earthquake early warning or Area Mail for disaster/evacuation information is received.Using BrowserOpening BrowserMoving to a web pageExiting Browser](https://usermanual.wiki/Sony/A3880132/User-Guide-1627689-Page-135.png)
![134Mail/InternetBrowser offers advanced features that let you view web pages like on a PC.Opening a new browser windowYou can open up to 8 browser windows.1While viewing a web page, press t, and tap [New window].・A new browser window opens in the default home page.Switching between browser windowsYou can easily switch from one website to another by opening several windows.1On the Browser screen, press t, then tap [Windows].2Tap a browser window you want to view.Closing a browser window1On the Browser screen, press t, then tap [Windows].2Tap on the browser window you want to close.Zooming in/out a web pageTo zoom in/out a webpage, perform any of the following operations.・Double-tap at the point you want to zoom in/out.・Pinch-out at the point you want to zoom in or pinch-in at the point you want to zoom out.・Tap the zoom control icon (the zoom control icon may appear when you drag in any direction on the screen).❖Information・Web pages created to fit to the screen cannot be zoomed in/out.Searching for text within a web page1While viewing a web page, press t, then tap [More] X [Find on page].・The search bar appears in the upper part of the screen.2Enter the search item.・As you enter, matching characters are highlighted in green.Displaying web pagesZoom outZoom inBack to the previous matched itemGo to next matched itemContinued on next page](https://usermanual.wiki/Sony/A3880132/User-Guide-1627689-Page-136.png)
![135Mail/Internet3Tap to close the search bar.Copying text from a web page1While viewing a web page, press t, then tap [More] X [Select text].2Place your finger at the start of the text you want to copy and then drag to the end of the text you want to copy.・Copied text is highlighted in orange.3Take your finger away from the screen and tap the selected text.・After copying text is completed, a message "Text copied to clipboard." appears.4To paste text in an email, text message or multimedia message, touch and hold the text box on a message or email and tap [Paste] in the menu.❖Information・On some web pages, selecting characters may not available.Auto-fitting a web pageAdjust display size of web pages automatically to fit the screen.1On the Browser screen, press t, tap [More] X [Settings] X Mark [Auto-fit pages] checkbox.❖Information・Some web pages cannot be adjusted automatically.Adjusting Browser settings1On the Browser screen, press t, tap [More] X [Settings] to set Browser settings and options.Setting the home page1On the Browser screen, press t, tap [More] X [Settings].2Tap [Set home page], enter URL you want to set as the home page, tap [OK].❖Information・The URL set as the home page appears when opening a new browser window.](https://usermanual.wiki/Sony/A3880132/User-Guide-1627689-Page-137.png)
![136Mail/InternetOperating links in web pages1Open the web page you want to operate the links.2To open the web page, tap the link.・The links get enclosed in an orange box when selected.・If you touch and hold the link, the menus, "Open", "Open in new window", "Bookmark link", "Save link", "Share link" and "Copy link URL", appear. When you touch and hold an image or a link contained image, "Save image", "View image" and "Set as wallpaper" also appear. To share the link via email, Bluetooth function, Gmail or message, tap "Share the link".・Browser recognizes some phone numbers that allow you to call the phone number. Tap the phone number to call.・When you download a file by "Save link" from websites which require Basic authentication or SSL session, the downloading may be failed.You can check history and store many bookmarks on the terminal.Bookmarking a web page1On the Browser screen, go to the web page you want to bookmark.2Press t, then tap [Bookmarks].・A list of bookmarks appears.・You can also access the list screen by tapping on the right side of the URL.・You can switch thumbnail view and List view by pressing t on the bookmark list screen.■Thumbnail viewTa p [ ★Add] on the upper left of the screen X Edit the name of bookmark, if required, and tap [OK].■List viewTap [Add bookmark...] on the top of the screen X Edit the name of bookmark, if required and tap [OK].Operating links Managing bookmarks and historyContinued on next page](https://usermanual.wiki/Sony/A3880132/User-Guide-1627689-Page-138.png)
![137Mail/Internet❖Information・You can also bookmark the page by pressing t and tapping [Bookmark last-viewed page] in the bookmark list screen.・Tap [Most visited]/[History] tab in the bookmark list screen and tap on the right side of the record. turns into and the web page is added to the bookmark list.Opening a bookmark1On the Browser screen, press t, then tap [Bookmarks].2Tap the bookmark you want to open.・If you do not tap a bookmark but touch and hold it, the menus, "Open", "Open in new window", "Edit bookmark", "Add shortcut to Home", "Share link", "Copy link URL", "Delete bookmark" and "Set as homepage", appear. Tap "Add shortcut to Home" to create a shortcut on the Home screen. To share the link via email, Bluetooth function, Gmail or message, tap "Share link".Checking browsing history1On the Browser screen, press t, then tap [Bookmarks] X [History] tab.2Tap the time you browsed the web page, such as [Today], [Yesterday], etc.・To open the web page, tap an item.・To check your most visited web pages, tap [Most visited] tab.❖Information・You can also press and hold x over a second on the Browser screen to check the history.Clearing history1On the Browser screen, press t, then tap [Bookmarks] X [History] tab.2Press t, then tap [Clear history].・When you delete the history, a list in "Most visited" tab is also deleted.❖Information・To delete temporary internet file such as cache, on the Browser screen, press t and tap [More] X [Settings] and then set each item from "Privacy settings" menu on the appeared screen.](https://usermanual.wiki/Sony/A3880132/User-Guide-1627689-Page-139.png)
![139File management2Tap [Skip].・The terminal is connected to a PC in "Media transfer mode (MTP)", USB connection mode set by default. Follow the onscreen instructions on the PC to access "Memory Card" in the terminal.❖Information・Drag the status bar when connecting and tap [Connected in Media transf. mode] X [Connectivity settings] to check connectivity or change the following connection settings.・If you switch the USB connection mode to "Mass storage mode (MSC)" and connect to a PC, you can access the microSD card in the terminal as a removable disc. However accessing microSD card on the terminal is not available and you may not use functions or applications on the terminal such as Camera, Gallery and music player.・If you install PC Companion, you can use the following applications on a PC for managing media files, creating backup files, etc. when connecting the terminal and the PC. For details, check on the PC Companion screen after installation.・When the terminal is connected to a PC, charging starts automatically.Install PC CompanionDisplay PC Companion installation wizard when connected to a PC.USB connection modeSelect USB connection mode from "Media transfer mode (MTP)"/"Mass storage mode (MSC)" when connected to a PC.Auto connect in MSCAutomatically set USB connection mode to "MSC" when connected to a PC.Tethering & portable hotspotSet terminal data communication via USB cable or as portable Wi-Fi hotspot. (P.100)Trusted devices for wireless media transf.Connect the terminal and a host device in a pair via Wi-Fi network. (P.141)Media Go P.142Support Zone Update software of the terminal connecting to a PC. (P.202)Sync Zone Synchronize calendar and contacts between Outlook and the terminal.File Manager Check file type, update time, location, etc. of microSD card.](https://usermanual.wiki/Sony/A3880132/User-Guide-1627689-Page-141.png)
![140File managementDisconnecting the microUSB cable safely・Do not disconnect the microUSB cable during data transferring. Otherwise, data may be damaged.・If you connect the terminal in the Media transfer mode (MTP), make sure that data transfer is not in progress and just disconnect the microUSB cable.■ Mass storage mode (MSC)1Drag the status bar downwards.・When "Connect your phone" is displayed, go to Step 4. When "Phone memory card connected" is displayed, go to Step 2.2Tap [Phone memory card connected].3Tap [Disconnect].・"Connect your phone" appears in the status bar.4Disconnect the microUSB cable.Dragging and dropping data on the terminal and a PC■ Media transfer mode (MTP)1Connect the terminal to a PC using a microUSB cable.・"Connected in Media transf. mode" appears in the status bar.2Drag and drop data that you have selected between the terminal and a PC.■ Mass storage mode (MSC)1Connect the terminal to a PC using a microUSB cable.・"Phone memory card connected" appears in the status bar.2Drag and drop data that you have selected between the terminal and a PC.❖Information・You can transfer files using a microUSB cable on most devices and the following operating systems (OSs) that supports the USB mass-storage memory interface.- Microsoft Windows 7- Microsoft Windows Vista- Microsoft Windows XP](https://usermanual.wiki/Sony/A3880132/User-Guide-1627689-Page-142.png)
![141File managementIf the terminal and a PC*1 are connected in a pair on a Wi-Fi network, automatic connection/disconnection of microSD card and a PC is enabled when the terminal user comes in and out of the Wi-Fi area, You can easily access to a microSD card inserted in the terminal from a connected PC. *1 Use Microsoft Windows 7 to make a pair setting. Pair setting cannot be made under Microsoft Windows XP, Microsoft Windows Vista or other OS.1Connect a PC you want to set in a pair to a Wi-Fi network.2Set USB connection mode of the terminal to "Media transfer mode (MTP)".3Connect the terminal to a Wi-Fi network (P.97).4Connect the terminal to a PC using a microUSB cable. ・When a confirmation screen for installation of PC Companion software appears on the terminal, tap [Skip].5Make sure that "SO-03D" is displayed as a portable device on the explorer of the PC.6Right click the portable device icon, then click " ネットワーク構成 (network composition)".7Click [次へ (Next)].8On the terminal, tap [Pair].9On the network composition of the portable device screen of the PC, click " 完了 (Done)".10Disconnect the microUSB cable.11From the Home screen of the terminal, press t and tap [Settings], X [Sony Ericsson] X [Connectivity] X "Host name" (PC name) in the "Trusted devices..." field.12Tap [Connect].・The terminal and a PC are connected in "Media transfer mode (MTP)" on a Wi-Fi network, and you can exchange data files.Connecting the terminal to a PC on a Wi-Fi networkContinued on next page](https://usermanual.wiki/Sony/A3880132/User-Guide-1627689-Page-143.png)
![142File management❖Information・From the Home screen of the terminal, press t and tap [Settings], X [Sony Ericsson] X [Connectivity] to display "Host name" (PC name) in the "Trusted devices for wireless media transfer" field. Tap the host name and tap [Forget] to cancel connection setting. Until "Forget" is tapped, the connection setting retains even if you connect/disconnect repeatedly by coming in and out of a Wi-Fi area.The Media Go computer application helps you transfer and manage media content in the terminal and computer.With Media Go, you can load music from a CD to a PC and transfer to the terminal.You need one of these operating systems to use the Media Go application:・Microsoft Windows 7・Microsoft Windows Vista・Microsoft Windows XP, Service Pack 3 or higher❖Information・To transfer files, set USB connection mode to "Media transfer mode (MTP)" in advance when connecting the terminal and a PC using microUSB cable.・To learn more about how to use the Media Go application, see the help section in the main menu of the Media Go application.Installing Media Go1Connect the terminal to a PC using a microUSB cable.・"PC Companion software" screen appears.2Tap [Install].・An Installer screen appears on the PC screen.3On the Installer screen of PC, select "English (U.K.)" or "English (U.S.)" X Click "Install".・After this step, follow the instructions on the screen.4After the installation, on the "Sony Ericsson PC Companion" screen of the PC, install "Media Go".❖Information・You can also download Media Go from http://www.sonyericsson.co.jp/mediago/.Using Media Go](https://usermanual.wiki/Sony/A3880132/User-Guide-1627689-Page-144.png)
![143File managementTransferring data using Media Go1Connect the terminal to a PC using a microUSB cable.2Drag the status bar down to check the USB connection mode.・When "Connected in Media transf. mode" is displayed, go to Step 5. When "Phone memory card connected" is displayed, go to Step 3.3Tap [Phone memory card connected].4Tap [Connectivity settings] X [USB connection mode] X [Media transfer mode (MTP)] X [OK].5Select Media Go from the PC's start menu and activate Media Go.・Using Media Go, you can move files between the terminal and the PC.The Bluetooth function creates a wireless connection to other Bluetooth devices, for example, handsfree devices. A range within 10 m, with no solid objects in between, is recommended. You must turn on the Bluetooth function to communicate with Bluetooth devices. You may also have to make pair setting for your phone and Bluetooth devices.❖Information・By default, Bluetooth function is OFF. If you turn Bluetooth on and then turn off the terminal, Bluetooth function turns off. When you turn on the terminal again, Bluetooth function turns on automatically.・If you do not use Bluetooth function, turn it off to save the battery.■ Reception interference caused by wireless LAN devicesThe terminal's Bluetooth function and wireless LAN devices use the same frequency band (2.4GHz). If you use the terminal near a wireless LAN device, reception interference may occur or the communications speed may lower. Also, you may hear noise or have a connection problem. In these cases, do the following:Using Bluetooth functionContinued on next page](https://usermanual.wiki/Sony/A3880132/User-Guide-1627689-Page-145.png)
![144File management・Keep the Bluetooth device over 10 meters away from a wireless LAN device.・Within 10 meters, turn off either the Bluetooth device or the wireless LAN device.* The terminal does not communicate wirelessly with all types of Bluetooth devices. Bluetooth DUN is not supported.1From the Home screen, press t.2Tap [Settings] X [Wireless & networks].3Mark [Bluetooth] checkbox.・ appears on the status bar and Bluetooth function turns ON.4Tap [Bluetooth settings].5Mark [Discoverable] checkbox.・Bluetooth devices can detect the terminal for 120 seconds.You can name the terminal. The name appears on Bluetooth devices when you use the Bluetooth function.1Confirm that the Bluetooth function is ON.2From the Home screen, press t.3Tap [Settings] X [Wireless & networks] X [Bluetooth settings] X [Device name].4Enter a name.5Tap [OK].By making pair setting for the terminal and another Bluetooth device, you can use the device such as Bluetooth handsfree headset etc. connecting to the terminal to make and receive calls.Making the terminal detectable with the Bluetooth function ONEntering the terminal's nameMaking pair setting for the terminal and Bluetooth deviceContinued on next page](https://usermanual.wiki/Sony/A3880132/User-Guide-1627689-Page-146.png)
![145File managementOnce you have made pair setting for your terminal and a Bluetooth device, the setting is saved. When making pair setting for the terminal and a Bluetooth device, you may need to enter a pass code (PIN). Your terminal will automatically try the generic pass code 0000. If this does not work, see the documentation of your Bluetooth device for the pass code used by your Bluetooth device. You do not need to re-enter the pass code the next time you connect to a paired Bluetooth device already set.You cannot make pair setting for the terminal and two Bluetooth headsets. However, you can set it with two or more Bluetooth devices if the same profile is not in use. The terminal supports the following Bluetooth profiles: A2 D P, AV R C P, H F P, H S P, O P P, P B A P a n d SPP.1From the Home screen, press t.2Tap [Settings] X [Wireless & networks] X [Bluetooth settings].3Tap [Scan for devices].・A list of Bluetooth devices detected appears.4Tap a Bluetooth device name to pair with the terminal.5If necessary, enter the pass code (PIN).・You can use a Bluetooth device that has been paired. The pairing and connection status appear below the device name in the Bluetooth device list.・Some Bluetooth devices make connections continuously after making pair setting.❖Information・Make sure that the Bluetooth function of the device for making pair setting is ON, and that the Bluetooth detection function is on.・When you make pair setting with the Bluetooth device supporting Secure Simple Pairing (SSP) function, a passkey appears on the screen. After checking the appeared passkey is correct, the pair setting is mode.1From the Home screen, press t.2Tap [Settings] X [Wireless & networks] X [Bluetooth settings].Connecting the terminal with another Bluetooth deviceContinued on next page](https://usermanual.wiki/Sony/A3880132/User-Guide-1627689-Page-147.png)
![146File management3Touch and hold a Bluetooth device name that you are going to connect.・Touch and hold a device with "Pair with this device" displayed under the device name.4Tap [Pair].・Depending on the device type, connection status is displayed under the device name when pair setting is completed. While connecting to a device, appears in the status bar.1From the Home screen, press t.2Tap [Settings] X [Wireless & networks] X [Bluetooth settings].3Touch and hold the currently connected Bluetooth device name.・The device displayed under the device name is paired with the terminal and connected.4Tap [Disconnect].・Tap the device name and tap [OK] on the confirmation screen for disconnecting to disconnect. The display under the device name changes to "Paired but not connected" while the pair setting remains set. To reconnect, tap the device name.1From the Home screen, press t.2Tap [Settings] X [Wireless & networks] X [Bluetooth settings].3Touch and hold the currently connected Bluetooth device name.4Tap [Disconnect & unpair].・Connection disconnects and the pair setting is canceled.❖Information・When the terminal is only set to pair with Bluetooth device (not connected), "Unpair" appears.Deactivating the connection of a Bluetooth deviceDeactivating the pair setting of a Bluetooth device](https://usermanual.wiki/Sony/A3880132/User-Guide-1627689-Page-148.png)
![147File managementWith Media server, you can share media files with other client (DLNA: Digital Living Network Alliance) devices using Wi-Fi function.Set Wi-Fi connection (P.96) with another client device.1From the Home screen, tap , then tap [Connected devices].❖Information・Press t to set Wi-Fi connection or confirm Help.Sharing files with DLNA devices via Connected devices (Media server)Setting Connected devices (Media server)2Server informationRename the terminal (server) on a client device.Share contentsSet to connect from client devices to the terminal via Wi-Fi.Pending devicesManage pending client devices.Registered devicesManage client devices registered to the terminal.](https://usermanual.wiki/Sony/A3880132/User-Guide-1627689-Page-149.png)
![148GamesUse XperiaTM PLAY or PlayStation®pocket to enjoy playing games with the terminal.・Some games require downloading a large volume of data before using, they may be downloadable only via Wi-Fi connection. In that case, turn Wi-Fi connection to ON and then download it.・When you try to download games from other than Android Market, downloading may be blocked because of security protection. To continue downloading, mark [Unknown sources] in the settings menu and then download again. (P.111)・Because content files for a lot of games are saved to the microSD card, do not the following operations while playing a game. Playing the game may be interrupted.- Unmounting microSD card- Removing the back cover of the terminal- Connecting the terminal to a PC and read/write the microSD card・Content files for some games preinstalled in the terminal are saved in the microSD card attached at the time of purchase. If you erase data in the microSD card or attach another microSD card to the terminal, downloading content files may start automatically when activating a game.・The terminal could become warm if you play games for a long time. This condition is not abnormal.・The game keypad is designed for use of games. If you use the game keypad for applications other than games, the operations may be different from those of games.Use XperiaTM PLAY to enjoy playing many kinds of games with the terminal.1Slide out the gaming keypad.・XperiaTM PLAY is activated, and the game list screen appears.2Tap [XperiaTM PLAY Games].・The list of preinstalled games or downloaded games appear.3Tap a game you want to play.・Or press the directional buttons to select a tab or game, and press the ○ button to start a game.Use the terminal as a gaming consoleGamesUsing XperiaTM PLAYContinued on next page](https://usermanual.wiki/Sony/A3880132/User-Guide-1627689-Page-150.png)
![149Games・Press the × button to go back to the previous screen.・Tap [More games] tab to display the list of downloadable games.For the first time to tap [More games], a message confirming whether to agree to the privacy policy appears. Tap [Agree].・Tap to search games for XperiaTM PLAY in the Android Market.4Operate a game.・The operation of the gaming keypad varies by games. For details, refer to Help etc. of each game.❖Information・When there is an incoming call, a game pauses automatically and an incoming call screen appears. When a message (SMS) is received during a game, you are notified with notification sound or vibration (only when notification settings are set).・To set whether to activate XperiaTM PLAY automatically when you slide the gaming keypad, press the menu button or t on the game list screen and tap [Settings].・Tap [More games] tab and press the menu button or t, and then tap [Refresh], the list of downloadable games is updated to the latest one.・Alternatively, from the Home screen, tap , then tap [Get games] to display the downloadable game list.Use PlayStation®pocket to enjoy playing games for PlayStation with the terminal.1From the Home screen, tap X [PlayStation®pocket].・A list of PlayStation®pocket games appears.2Tap [All]/[Recently Played]/[Recently Added] tab, and then tap a game you want to play.・Or press the directional buttons to select a tab or game, and press the ○ button to start a game.・Press the × button to go back to the previous screen.・Tap to display website featuring "PS Store".3Operate a game.・The operation of the gaming keypad varies by games. For details, refer to Help etc. of each game.❖Information・When there is an incoming call, a game pauses automatically and an incoming call screen appears. When a message (SMS) is received during a game, you are notified with notification sound or vibration (only when notification settings are set).・To set the background theme, operation sound, etc., press the menu button or t on the game list screen and tap [Settings].Using PlayStation®pocket](https://usermanual.wiki/Sony/A3880132/User-Guide-1627689-Page-151.png)
![151Applications■ Still image shooting screen■ Video shooting screenaWhite balancebRecord of location information (photo)cSettingsdRecently shot log・Tap to switch to the playback screen for recently shot photos or videos.・Press t on the playback screen to display [Slideshow], [Share], [Delete], [Details], [Set as]*1, [More]*1, [Edit movie]*2.*1 Appears only on the photo viewing screen.*2 Appears only on the video playback screen.eSwitch between still and video camerafShutter (Photo)Start/Stop recording (Video)gFlash modehSelect cameraiVideo quality (Video)jRecording time for video (Video)❖Information・Ta p x to turn off the camera.Taking photos1From the Home screen, tap [メディア (Media)] X [Camera].・If the still image shooting screen does not appear, tap .2Tap .・The photo is taken as soon as focus is set. The photo is automatically saved in the microSD card.❖Information・To take a photo using auto-focus function, touch and hold and release your finger when the focus frame turns green and a beep sounds. The photo is taken as soon as you release the finger. If the focus frame turns red, auto-focus does not operate correctly.・Auto-focus cannot be operated if "Focus mode" (P.153) is set to "infinity".Shooting screen and key operationscehdfbagcehdfagijTaking photosContinued on next page](https://usermanual.wiki/Sony/A3880132/User-Guide-1627689-Page-153.png)
![152Applications・When you connect Stereo Headset with Microphone (sample), commercially available earphone set or other Bluetooth device, shutter sound may be softer.Taking a photo using in-camera1On the shooting screen, tap (Select camera), and then tap [Front].2Tap .・The photo is taken as soon as focus is set. The photo is automatically saved in the microSD card.❖Information・When using the in-camera, "Picture quality", "Color effect", "Camera setting", "Store location" and "Select camera" can be set. The in-camera does not support other still camera settings (P.153).Adjusting Exposure value1On the shooting screen, tap (Settings), and then tap a value (+2 - -2) in [Exposure].1From the Home screen, tap [メディア (Media)] X [Camera].・If the still image shooting screen does not appear, tap .2On the shooting screen, tap a setting item icon.・The displayed setting icon changes depending on the setting conditions.・For setting items and icons, see "Still camera settings" (P.153).3Tap one of the options in the setting that you have selected.・The setting option icon displayed on the shooting screen is changed to the selected one (Except for ).Changing the capturing settings](https://usermanual.wiki/Sony/A3880132/User-Guide-1627689-Page-154.png)
![155Applications❖Note・Some settings cannot be used in combination with one another.Recording videos1From the Home screen, tap [メディア (Media)] X [Camera].・If the movie recording screen does not appear, tap .2Tap to start recording.3Tap to stop the recording.・The recording data is automatically saved in the microSD card.❖Information・When you connect Stereo Headset with Microphone (sample), commercially available earphone set or other Bluetooth device, starting/stopping sound for recording may be smaller.White balanceThe white balance setting adjusts the color balance according to the light source.AutoAdjust the color balance automatically to the light source.IncandescentAdjust the color balance for lighting like incandescent bulb.DaylightAdjust the color balance for a sunny place.FluorescentAdjust the color balance for lighting like fluorescent.CloudyAdjust the color balance for a cloudy sky or shaded area.Flash modeSet whether to turn on the flash when shooting when lighting conditions are poor or when there is a backlight.AutoTurn on the flash automatically according to the shooting condition.On The Flash turns on.Off The flash does not turn on. Sometimes the video quality can be better without a flash, even if lighting conditions are poor. Shooting a good photo without using the flash requires a steady hand.ItemIcon/ValueDescriptionSelect cameraSwitch shooting camera between out-camera (Back)/in-camera (Front).Back Shoot with out-camera on rearside of the terminal.Front P. 1 5 2Recording videosItemIcon/ValueDescription](https://usermanual.wiki/Sony/A3880132/User-Guide-1627689-Page-157.png)
![156ApplicationsRecording videos using in-camera1On the shooting screen, tap (Select camera), and then tap [Front].2Tap to start recording.3Tap to stop the recording.・The recording data is automatically saved in the microSD card.❖Information・When using the in-camera, "Color effect", "Camera settings", "Video quality", and "Select camera" can be set. The in-camera does not support other video recording settings (P.157).Tap the recently recorded history displayed on the shooting screen to display video, and then press t and [Edit video] to crop the video partially.1On the recording screen, tap the shooting history to display video.2Press t, then tap [Edit video].・ (Progress bar) appears at the bottom of the screen.3Drag at the left of the progress bar to the right for starting point of cropping.4Drag at the right of progress bar to the left for ending point of cropping.・Tap the screen to play the cropped part for check.5Tap [Save].・Tap [Cancel] to return to the video playback screen without saving the edited video.❖Information・Cropped videos are stored in the album in "Camera" (P.160).1From the Home screen, tap [メディア (Media)] X [Camera].・If the video recording screen does not appear, tap .2On the shooting screen, tap a setting item icon.・The displayed setting icon changes depending on the setting conditions.・For setting items and icons, see "Video recording settings" (P.157).Cropping videoChanging the recording settingsContinued on next page](https://usermanual.wiki/Sony/A3880132/User-Guide-1627689-Page-158.png)
![158Applications❖Note・Some settings cannot be used in combination with one another.You can shoot a current displayed screen as an image (screen shot).Shot screen shot can be displayed in "Pictures" album in the Gallery.1On the screen you want to shoot a screen shot, press p for over a second.・Phone options menu appears.2Tap [Take screenshot].・A screen shot is taken and a notification message for saving location appears on the screen.❖Information・By tapping [Share]/[Set as] on the shooting completion screen, you can share (send) the image via Bluetooth or email, or register as wallpaper or contact image.You can play music files on "Music" and view photos and video files on "Gallery".You can play photos and videos shot by the terminal, transfer files to a microSD card by connecting to a PC, and play multimedia content of the following file formats downloaded from the Internet.For details on operations for copying files by connecting to a PC, see "Transferring and moving data" (P.138).Select cameraSwitch shooting camera between out-camera (Back)/in-camera (Front).Back Shoot with out-camera on rear side of the terminal.Front P.156Shooting screenshotItemIcon/ValueDescription Playing multimedia contentType File formatSound MP3, 3GPP, MP4, AMR, AMRWB, SMF, XMF, WAV, iMelody, RTTTL/RTX, OTA, Ogg vorbisStill image JPEG, GIF, PNG, BMPVideo 3GPP, MP4](https://usermanual.wiki/Sony/A3880132/User-Guide-1627689-Page-160.png)
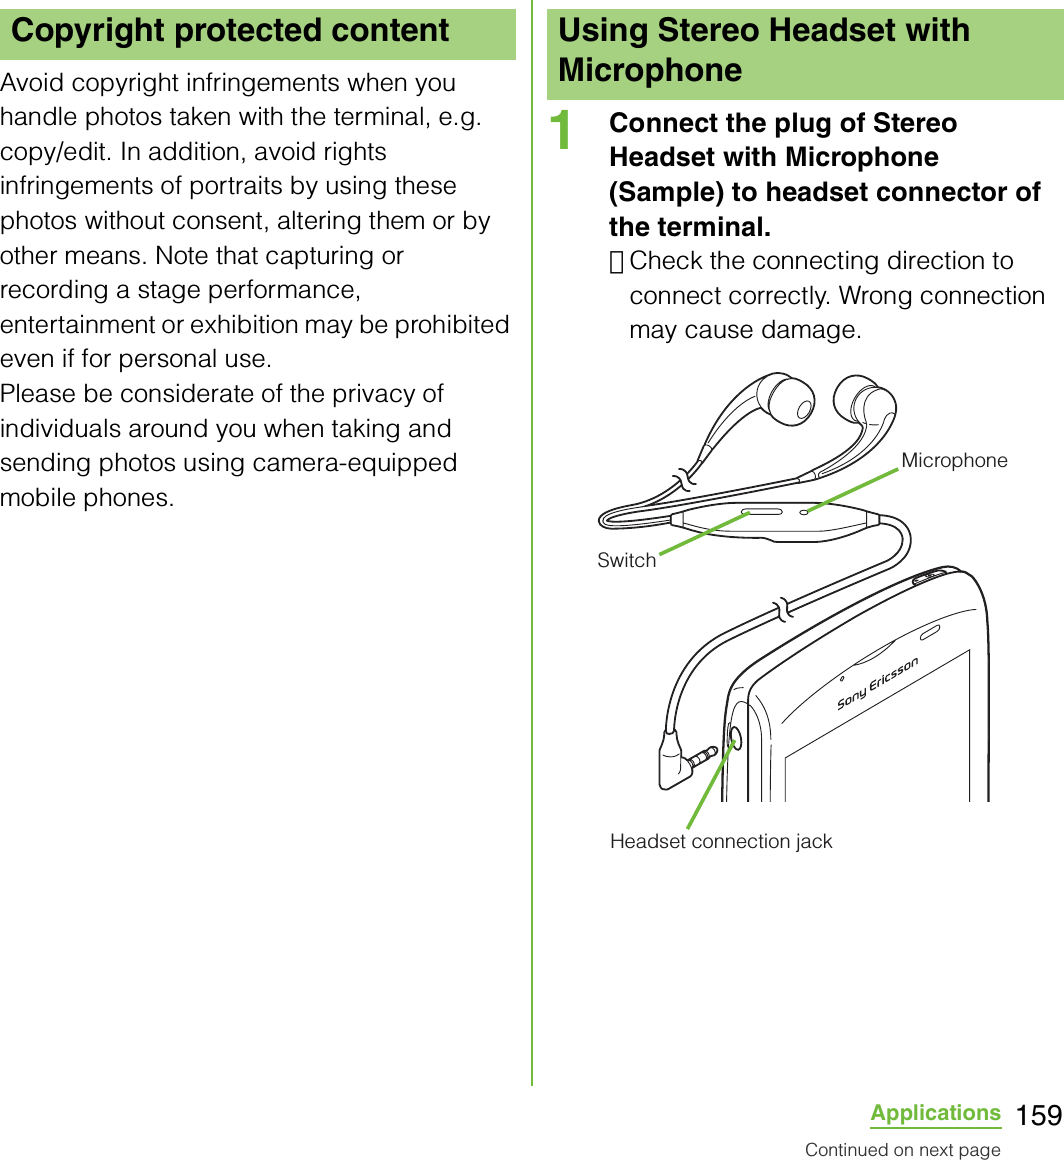
![160Applications❖Information・When you listen to Music player with Stereo Headset with Microphone connecting to the terminal, you can switch ON/OFF by pressing the switch of Stereo Headset with Microphone. However, operation may differ depending on the conditions of use.・If receiving a call when using Stereo Headset with Microphone, music stops, and resumes when the call ends.Use Gallery to view/play pictures, photos or videos you take. Also, use Media Go to transfer content to the terminal's microSD card and to take content from an external device. For details, see "Using microUSB cable" (P.138).Photos and videos that you took or saved in the microSD from a PC are displayed in an album.1From the Home screen, tap [メディア (Meida)] X [Gallery].・The following album list screen appears by default.・If you signed in an online service available to be synchronized such as Facebook and Picasa, online album appears after synchronization.2Tap an album you want to view.・A screen listing Photo/Video files in album appears.❖Information・When you tap an album, then tap in to the upper right of the screen, the albums sorted by date appear.When you tap the date album, the list of all files appears. However, the files of selected date appear with the thicker frame than the other files.・To display only videos in the list, set a widget on the Home screen and then tap of "Media shortcuts".Videos recorded by the terminal appear on the list screen.・Depending on the number of photos saved, it may take some times to load all photos on the screen.Viewing photos/videos with GalleryViewing photo/video albumCamera Photos and videos taken with the terminal・It does not appear when no photo nor video is taken.](https://usermanual.wiki/Sony/A3880132/User-Guide-1627689-Page-162.png)
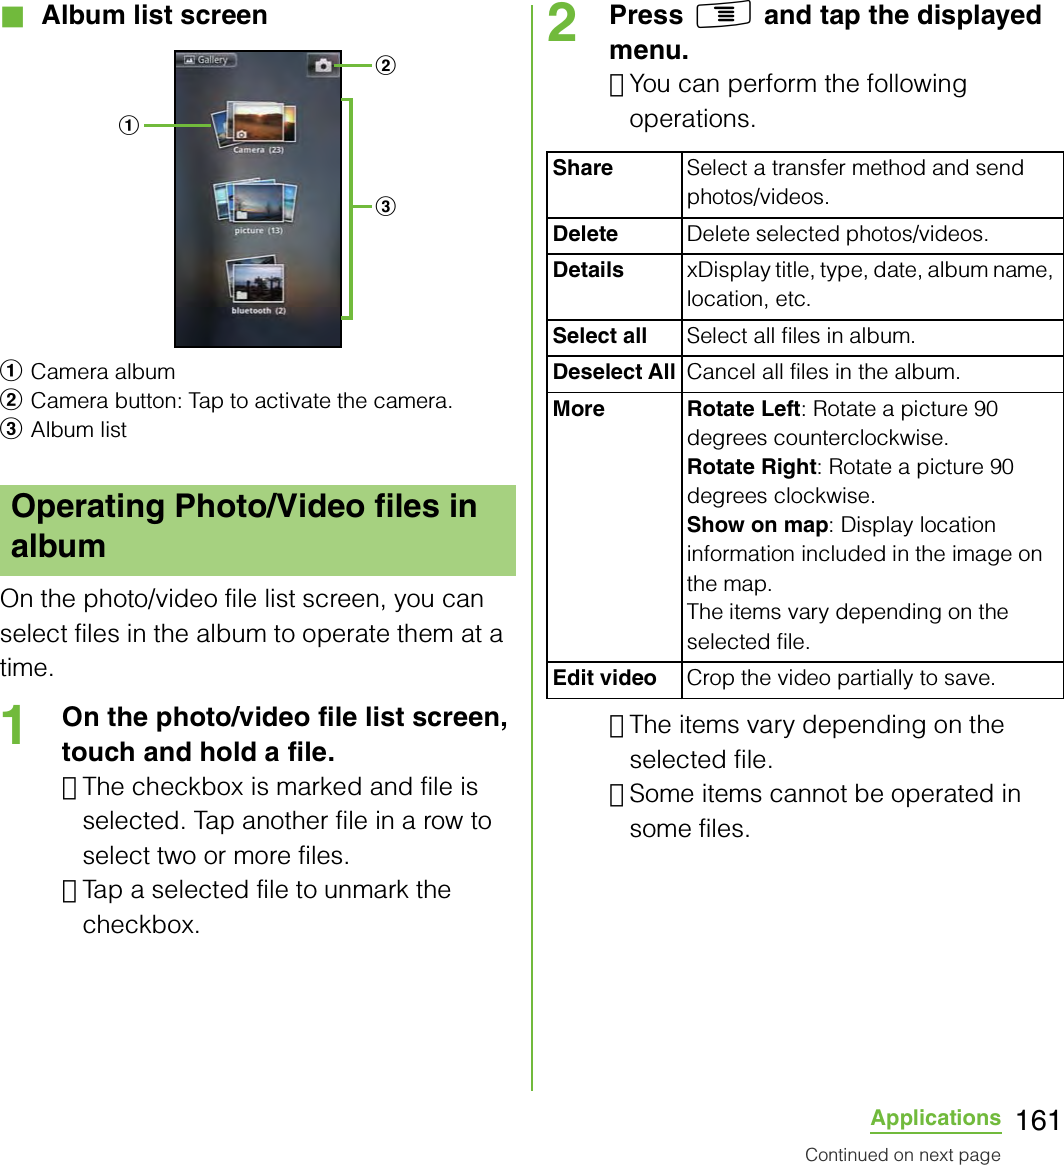
![162Applications❖Information・Press t while selecting a file, tap [Share] X [Play on Device] X [OK] to display Play on Device setting screen (if you do not connect to the Wi-Fi network, tap [Not connected] to open Wi-Fi setting screen). Connect to the Wi-Fi network, select a searched device from the list on the player device selection screen and tap [Play] to share the file between a DLNA device and the terminal.・For shared files, file size and the file type are not particularly limited, but may be limited by the application to transfer. DRM content cannot be shared.・When you press t before selecting a file, a file near the center among several files displayed on the screen is marked automatically. Note that once you select a file, a file near the center may not be marked.・Press t on the photo viewing screen to operate photo files individually.1From the Home screen, tap [メディア (Media)] X [Gallery].2Tap an album.・A list screen of files in the album appears.3Tap a photo to view it.■ Photo viewing screen of GalleryaAlbum informationbZoom out.cZoom In.❖Information・Press t on the playback screen to display "Slideshow", "Share", "Delete", "Details", "Set as", "More", "Set as wallpaper".* "Set as wallpape" only appears in the albums provided by an online service such as Facebook and Picasa.・The items vary depending on the selected file.・From the photo viewing screen for the Facebook album, you can post comments or "いいね (Like)" onto Facebook.Starting a slideshow1While viewing photo, press t and tap [Slideshow].・A slideshow of the photos or first frames of videos in the album starts.Viewing photosacb](https://usermanual.wiki/Sony/A3880132/User-Guide-1627689-Page-164.png)
![163Applications1From the Home screen, tap [メディア (Media)] X [Gallery].2Tap an album.・The file list screen in the album appears. appears on the moving picture file.3Tap a video to play it.❖Information・If the screen orientation does not change automatically when you turn the terminal sideways, from the Home screen, press t and tap [Settings] X [Display], then mark [Auto-rotate screen] checkbox.■ Video viewing screen of Gallerya[Rewind] key: Move the frame to be played backward.bProgress bar: Display the playback position in the playback duration.cMarker: Playback position. Drag to change the playback position.d[Play/Pause] keye[Fast forward] key: Fast-forward the playing position.Adjusting the volume of a video1On the video playback screen, press m up or down.Fast forwarding and rewinding a video1Drag the progress bar marker right or left.・Tap / to rewind/forward.YouTube is a free online video streaming service. You can play, search for and upload videos.・A packet communication charge is applied when downloading or uploading video content using 3G network.Playing a videoedabcPlaying video with YouTube](https://usermanual.wiki/Sony/A3880132/User-Guide-1627689-Page-165.png)
![164Applications1From the Home screen, tap , then tap [YouTube].・When you use for the first time, agree to "Terms of Service".・YouTube playback screen and list screen of videos appear.・You can also press t and tap [Browse] to select a video from each category.2Tap a video to play it.・While playing a video, tap the screen to display the play control keys which you can switch Play/Pause. Double-tap to switch landscape/portrait. In landscape, drag the marker on the progress bar at the bottom of the play screen left or right to change playing point.・Press x to stop the playback, and return to list screen of videos.・To exit YouTube, press y.❖Information・For movies with caption function which can display subtitles, "CC" appears on the playback screen in the landscape mode. For your first activation, tap "CC" to tap language for the subtitles.1While playing a video, double-tap the screen to switch to the landscape screen.2Tap the screen to display the play control keys, then tap [HQ].❖Information・A video plays in high quality when Wi-Fi is connected.・To play video in high quality on 3G network, on YouTube screen, press t, then tap [Settings] and mark [High quality on mobile] checkbox.1On YouTube screen, press t and tap [Search].2Enter the search keyword.3Scroll the result and tap a video you want to play it.1On YouTube screen, press t and tap [Settings].2Tap [Clear search history] X [OK].Playing YouTube video Playing YouTube videos in high qualitySearching for a video with keywordsDeleting search history](https://usermanual.wiki/Sony/A3880132/User-Guide-1627689-Page-166.png)
![165ApplicationsYou can browse and listen to your music, playlists and podcasts using Music.Tap on the Music player screen, you can browse and play audio content saved in microSD by detailed category.❖Note・Do not perform "Unmount SD card" while a track is playing.1From the Home screen, tap [メディア (Media)] X [Music].・The Music player screen appears.2Tap .3Browse to a track by tapping Artists/Albums/Tracks/Playlists by category.4Tap a track to play it.■ Music player screenaArtist name, song titlebAlbum artc[Previous] key: Go to the previous track, or to the beginning of the track in the current playlist.dProgress bar: Resume playback from the specified point by dragging or tapping.eSelect/Cancel "いいね (Like)" on Facebook.・Appears if you login to Facebook.fPlay/Pause keyg[Next] key: Go to the next track in the current playlist.hTrack play timeiDisplay the track list of artist/album/track/playlist.jInfinite button: Connect to Google, wikipedia or YouTube to display related information of the current track.kDisplay playing track and the list contains the track.・You can switch to play/pause the playing track, and change the track by tapping other track in the list.Music playerPlaying musicabcdghi j kefContinued on next page](https://usermanual.wiki/Sony/A3880132/User-Guide-1627689-Page-167.png)
![166Applications・Touch and hold a track to display menu for sharing the track, adding to a playlist, registering incoming ringtone, deleting, etc.・Tap [Save] to save the tracks displayed in the list to a playlist.・Drag at the left side of tracks to change the order of tracks in the list.・To add a track to the list, touch and hold a track you want to add from Artists/Albums/Tracks/Playlists categories and then tap [Queue artist].m: Adjust the volume.t: Select "Sound settings"/"Equalizer"/"Set as ringtone"/"Extensions" from the menu by pressing on the Music player screen.・On the track list of each category, tap to select "Send several"/"Delete several" from the menu.❖Information・You can return to the Home screen to perform another operation while listening to the Music player in the background. To return to the playback screen of the Music player, from the Home screen, tap [メディア (Media)] X [Music], or drag down the status bar and tap the current track name in the ongoing item.・If the Music player widget is displayed on the Home screen, tap Play/Pause/ / . Tap the album art to display the playback screen of the Music player.Adjusting the volume1While playing a track, press m up or down.Sharing a trackYou can share (send) files by Bluetooth or email attachment.1On the Music player screen, tap .2Tap a category in Artists, Albums, Tracks or Playlists.3Touch and hold a track you want to share.・To share two or more tracks, on the list screen, press t, tap [Send several] and mark taracks you want to share (send).4Tap [Send].5Select sending method and send.❖Information・For shared (to be sent) files, file size and the file type are not particularly limited, but may be limited by the application to transfer. DRM content cannot be shared.Deleting a track1On the Music player screen, tap .2Tap a category in Artists, Albums, Tracks or Playlists.Continued on next page](https://usermanual.wiki/Sony/A3880132/User-Guide-1627689-Page-168.png)
![167Applications3Touch and hold a track you want to delete.・To delete two or more tracks, on the list screen, press t, tap [Delete several], then mark tracks you want to delete.4Tap [Delete] X [Delete].Using a track as a ringtone1On the Music player screen of the Music player, press t.2Tap [Set as ringtone].In Music player, playlists named "Newly added", "Most played" and "Never played", are automatically created. You can also create new playlists with your desired tracks.You can use Media Go (P.142) to maintain your music library and create your own playlists. Playlists that you create yourself are stored on microSD in the terminal in the m3u format.You can connect the terminal to a PC using the included microUSB cable to use a microSD card as a removal disk. For details, refer to "Using microUSB cable" (P.138).Creating a playlist1On the Music player screen, tap .2Tap [Playlists] X [Create new playlist].3Mark a track you want to add to the playlist and then tap [Create].4Tap [Name] entry box and enter a playlist name, and tap [OK].Playing Playlists1On the Music player screen, tap .2Tap [Playlists].・The following playlists appear by default.3Tap a playlist you want to play X Tap a track.・The playlist plays from the track you tap.PlaylistNewly added Display the list of tracks newly added.Most played Display the list of frequently played tracks.Never played Display the list of available tracks which have not played wholly.](https://usermanual.wiki/Sony/A3880132/User-Guide-1627689-Page-169.png)
![168ApplicationsTrackID is a music recognition service. You can search for title, artist and album name for a track you hear playing through a loudspeaker. For best results, use TrackID in a quiet area. You can recommend tracks to others. You can also search for and view related content on YouTube. If you cannot use TrackID, see "Wireless & networks" (P.93) to check the Internet connection.1From the Home screen, tap , then tap [TrackIDTM].1Start TrackID, then hold the terminal towards the music source.2Tap [Record].・The track information appears in the result screen.・To return to the TrackID start screen, press x.When a track has been recognized by TrackID, you can recommend it, search for related content for the track on YouTube, or do some others. The track information appears when a track is recognized after a search, but also in a history list.To use TrackID results・When a recorded track is recognized, the track information appears. Tap one of the keys in the track information screen to recommend to others, or view the track on YouTube.・To view the track information, tap the desired track in the history list, or tap [Charts] and view the optional chart.With Android Market, you can access to useful applications or fun games directly which you can download and install on the terminal. And you can send feedback and comments about an application, or report objectionable application or incompatible application with the terminal as an inappropriate content.TrackIDStarting TrackIDSearching for the track informationUsing TrackID resultsUsing Android MarketContinued on next page](https://usermanual.wiki/Sony/A3880132/User-Guide-1627689-Page-170.png)
![169Applications・To use Android Market, you need to set Google account (P.114).・Some applications and games are free of charge, and the others are paid. In the applications list of Market, distinction between free and paid is clearly specified. For details on purchasing, returning and refunding of paid applications, see "Help" (P.169).1From the Home screen, tap , then tap [Market].・When you open Android Market for the first time, the Terms of Service for Android Market window appears. Tap [Accept].❖Information・Be sure to check the security of application, then install it at your own risk. The terminal may be infected with a virus and the data may be damaged.・NTT DOCOMO is not liable for malfunctions, if any, caused by the application you installed. In such case, the repair is charged even during the warranty period.・NTT DOCOMO is not liable for any disadvantage brought to you or any third party due to an application you installed.・Some applications automatically perform packet communications. Packet communication is kept active unless you disconnect it or the time-out is occurred. To disconnect packet communication manually, from the Home screen, press t and tap [Settings] X [Wireless & networks] X [Mobile networks], then unmark [Data enabled] checkbox by tapping.・Some applications may be updated automatically.When you need help or have any questions about Android Market, open Android Market, press t then tap [Help]. The Browser opens the Android Market Help web page.In the docomo market, you can quickly access DOCOMO recommended sites and useful applications.1From the Home screen, tap , then tap [docomo market].・The browser is activated and docomo market is displayed.Opening Android MarketHelpUsing docomo marketOpening the docomo marketContinued on next page](https://usermanual.wiki/Sony/A3880132/User-Guide-1627689-Page-171.png)
![171Applications・The first time you start Timescape, a setup wizard will guide you the necessary steps to set up account.1From the Home screen, tap , then tap [TimescapeTM].・The Timescape screen appears.2Tap a tile.3If you want, enter your Facebook/Twitter/mixi account information.4Tap [Done].❖Information・Timescape also can be started by tapping under the Timescape widget.・In the setup wizard, tap [Extension search] on the account registration screen to connect to Android Market and search new services for Timescape.・After completion of setup wizard, you can change the settings. On the Timescape screen, press t and tap [Settings].・If the screen orientation does not change automatically when you turn the terminal sideways, from the Home screen, press t and tap [Settings] X [Display], then mark [Auto-rotate screen] checkbox.・If the automatic update of Facebook/Twitter/mixi is set, you can check information update sooner; however, the battery runs out quickly. To save the battery, set to manual update.aLatest comment: Display the latest comments posted to Facebook/Twitter/mixi.・To narrow the services to post down, use filter.bTile: Display various information such as missed calls, received SMS, Facebook, Twitter or mixi friend's updates are displayed in chronological order.cFilter: Tap a filter item to narrow the information down to a certain type.・Display order of filters may differ.Scrolling through tiles in Timescape1Drag a tile up and down.Previewing tiles in TimescapeSelect a tile to view the content on the tile.1Tap a tile.Setting up Timescape Timescape screenabc](https://usermanual.wiki/Sony/A3880132/User-Guide-1627689-Page-173.png)
![172ApplicationsFiltering the displayed tile1Tap the filter icons on the Timescape screen.Refreshing the start screen in TimescapeWhen you refresh the start screen, the terminal connects to the Internet to update information from your Twitter, Facebook and mixi account set in Timescape.1In the Timescape screen, press t and tap [Refresh].Posting to Facebook, Twitter, mixi from Timescape1In the Timescape screen, press t and tap [Update status].2Mark the service you want to post and tap [Continue].3Enter the text and tap [Post].The following icons on a tile indicate a type of event.Viewing a tile information1On the Timescape screen, tap a tile.Filter iconsFilter Icon Displayed tileAll tilesReceived SMSMissed callsUpdates from your Twitter contactsUpdates from your Facebook contactsUpdates from your mixi contactsTile iconsIcon EventA missed call: Tap the tile to call the caller.An SMS message: Tap the tile to display the message.A Twitter update: Tap the tile to display the update.A Facebook update: Tap the tile to display the update.A mixi update: Tap the tile to display the update.](https://usermanual.wiki/Sony/A3880132/User-Guide-1627689-Page-174.png)
![173ApplicationsCalling back from Timescape when you have a missed call1On the Timescape screen, tap tile.2Tap the tile again.3Tap [Return call XXXXXXXX].Replying to an SMS message in Timescape1On the Timescape screen, tap tile.2Tap the tile again.3Enter a message text.4Tap [Send].When you tap a tile, (infinite button) may appear in the upper right corner. By tapping , you can view the communication log by registered information in the contacts or tile filter event.Viewing the registered information of contacts in Timescape1On the Timescape screen, tap a tile.2Tap .・Communication logs and information related to the selected tile by event appear. Flick the filter at the bottom of the screen to switch displayed information.Displaying the Timescape setting screen1On the Timescape screen, press t, then tap [Settings].・You can set the following operations.The infinite button in TimescapeSetting TimescapeUpdate mode Set your Twitter/Facebook/mixi account information to be updated manually/automatically when Timescape is activated.TimescapeTM contentChange a content type displayed in Timescape.Set up servicesSet Facebook/Twitter/mixi account and search new services for Timescape.](https://usermanual.wiki/Sony/A3880132/User-Guide-1627689-Page-175.png)
![175Applications・GPS is operated by the U.S. Department of Defense. The department controls the accuracy of the system, and manages the system. Therefore, GPS radio wave condition may be controlled (degradation of accuracy, suspension of radio wave transmission, etc.) at the discretion of the U.S. Department of Defense.・Some wireless communications products (mobile phone, data detectors and some others) block satellite signals and also causes instability of signal reception.・Some map displays based on location information (latitude/longitude information) may be not accurate due to some countries' or regions' regulations.■ Where radio waves are difficult to receiveNote that radio waves may not be received or it may be difficult to receive radio waves in the following conditions, since GPS uses radio waves from a satellite.・Inside or immediately under a building・Inside a bag or box・Inside or under a thick covering of trees・In a car, inside a train compartment・When there are obstructions (people or objects) near the terminal・Inside a basement or tunnel, and below the ground or water・In buildings-clustered or residential area・Near a high-voltage cable・Bad weather such as heavy rain or snow❖Note・If some of the GPS functions are not available, or if none of them are, check that your contract includes the use of the Internet, and see "Wireless & networks" (P.93).・NTT DOCOMO is not liable for navigation services or for the accuracy of location services.Enabling GPS function1From the Home screen, press t and tap [Settings].2Tap [Location & security].3Mark [Use GPS satellites] checkbox.4Read the note and tap [Agree].Enabling Wireless network to find your position・Enable to search a current location using mobile network and Wi-Fi.1From the Home screen, press t and tap [Settings].2Tap [Location & security].3Mark [Use wireless networks] checkbox.Continued on next page](https://usermanual.wiki/Sony/A3880132/User-Guide-1627689-Page-177.png)
![176Applications4Read the note and tap [Agree].5Read the note on location information and tap [Agree].・Wireless network users' location information is stored without specifying who they are. Some location information is stored even when the application is not running.The Google Maps application lets you view your current location, find other locations and calculate routes. When you start the Google Maps application, your approximate location is shown using information from nearby mobile towers. Your location is updated with a more precise position when the GPS receiver finds your location.❖Information・Make sure you enable the current location information setting before trying to get your position.・If the screen orientation does not change automatically when you turn the terminal sideways, from the Home screen, press t and tap [Settings] X [Display], then mark [Auto-rotate screen] checkbox.・To use Google Map, enable data connection (3G/GPRS) or connect to Wi-Fi.・Google Map does not cover the whole world.・Only using 3G/Wi-Fi connection may not detect some locations.・Google may provide updated service or function.1From the Home screen, tap .2Tap [Maps].Detecting the current location on a map1On the map screen, tap .・The blinking blue arrow shows the current location.Using Street View・Street View does not cover some areas.1Touch and hold a spot on the map that you are going to look at in Street View.2Tap the displayed balloon.3Tap (Street View).・When Street View is operating, press t and tap [Compass mode], and then the compass in Street View shows the same direction as the terminal's geomagnetic compass.・Uncovered area for Street View appears in gray.Using Google Map](https://usermanual.wiki/Sony/A3880132/User-Guide-1627689-Page-178.png)
![177ApplicationsSearching for a location you want to look at1On the map screen, press t and tap [Search].2Fill out the search box.・You can enter addresses, city names, business types and institution names (for example, London and art museum).・You can tap the search box to shows a list of all places entered and referred to previously. Tap an address, etc. on the list to check the location on the map. If you tap an address on the menu, you can check the location on the map.3Tap [ 実行 (Execute)]/ .・Search result appears on the map.・If appears, tap to select the place to display.・When "Do you mean..." appears at the top of the map, you can tap "Do you mean..." to select the place.4Tap a destination.・A detailed information screen appears.❖Information・You can use (Show on map), (Get directions), (Call XXXXXXXX), (More options), etc. on the detailed information screen. The options you can use vary depending on the location.・With (Places) on the map, select a category such as "Restaurants", "Cafe", etc. to search and show it on the map. You can add the search categories.Zooming in or out on a map1Tap to zoom in or out on a map.❖Information・Alternatively, double-tap or pinch on the screen to zoom in/out.Changing the layerYou can select information to overlay on the map.1On the map screen, tap .2Tap an item you want to see.・Traffic information and routes are not available in all locations.TrafficShow traffic condition.Satellite Display satellite photo.TerrainDisplay geological formation.Transit Lines Show route information.Latitude Join Latitude.Continued on next page](https://usermanual.wiki/Sony/A3880132/User-Guide-1627689-Page-179.png)
![178ApplicationsReceiving guidesGoogle Map helps you receive detailed guides for your destination.1On the map screen, press t, then tap [Directions].2Enter a departure point in the upper text box, and a destination in the lower text box.・Alternatively, tap at the right of the text box to select a Start point and End point from [My current location]/[Contacts]/[Point on map].3Select a transportation device from (Driving)/ (Transit)/ (Walking).4Tap [Go].・A list of guides for your destination appears.5If your search type is Transit, tap a route in the list.・A route is displayed if you search in car or walk option. Tap to display a route on the map.❖Information・With "Navigation" application, you can use easy route search with current location as a departure point.Clearing the MapsClear deleted layers, route search results and some others.1On the map screen, press t, then tap [Clear Map].・If there is nothing to clear, you cannot tap [Clear Map].My Maps View My Maps that you create on a PC. Only viewing: You cannot create My Maps on the terminal.Wikipedia appears.Tap to display a Wikipedia article related to the location.](https://usermanual.wiki/Sony/A3880132/User-Guide-1627689-Page-180.png)
![179ApplicationsGoogle Latitude enables you to check where a friend is on the map, and to share status messages. Latitude also enables you to send messages (SMS) and emails, to make phone calls, and to find the route to where a friend is.Location information cannot be automatically shared. You need to join Latitude and invite a friend who gives his or her location information, or to receive an invitation from him or her.Joining Latitude1While a map is displayed, press t, and tap [Join Latitude].・For the first time to join Latitude, a message confirming whether to allow friends and Google to share location information may appear.・Once you join Latitude, your menu item changes into [Latitude].❖Information・To set Latitude or log out, press t on the map screen, then tap [Latitude], press t and tap [Settings] to display the screen to operate.Opening LatitudeIf you join Latitude, you can confirm where a friend is, and check update with opening the screen.1When a map is displayed, press t, and tap [Latitude].❖Information・For details of Latitude, press t on the map screen, then tap [More] X [Help] X [Latitude] to view the mobile help.The terminal has a built-in calendar for the schedule. If you have a Google account, you can synchronize the terminal's calendar and web calendar. See "Accounts & sync" (P.114).・You need to create a Google account (P.114) before activating the calendar.After Google account registration, tap the Google account displayed in "Accounts & sync" and a sync item "Sync Calendar". You can create schedule etc.Confirming your friend's current location with Google LatitudeCalendar](https://usermanual.wiki/Sony/A3880132/User-Guide-1627689-Page-181.png)
![180Applications1From the Home screen, tap , then tap [Calendar].2Press t, tap [Day]/[Week] to select.・In "Day" view, [Week] and [Month] can be selected, and in "Week" view, [Day] and [Month] can be selected.To create a schedule in Calendar, register Google account and synchronize Google.1From the Home screen, tap , then tap [Calendar].2Tap [New event].・In Day view or Week view, press t and tap [New event].3Enter a schedule name and date.4If you have two or more calendar accounts, select one.5If necessary, select the repetition intervals of the calendar.6Select the notification intervals of the schedule.・Tap to add a new notification into the schedule.7Enter a place and some others of schedule.8Tap [Save].❖Information・Tap [More] and scroll the screen to set "Time zone", "Guests (Email addresses)", "Show me as", "Privacy".Displaying a calendar schedule1From the Home screen, tap , then tap [Calendar].2Tap a schedule you want to display.・Flick from side to side to display the next or previous month/day/week according to the view mode.❖Information・If you login to Facebook, events in Facebook appear on the calendar.1If a reminder icon ( ) appears in the status bar, drag the bar downward.・The notification panel opens.・The reminder icon appears at set notification time.Setting the calendar viewCreating a calendar scheduleReleasing the reminder of a schedule or setting the snoozeContinued on next page](https://usermanual.wiki/Sony/A3880132/User-Guide-1627689-Page-182.png)
![181Applications2Tap a schedule.3Tap [Snooze all]/[Dismiss all].・If you have any schedules on hold, they appear on the same screen.・If you tap [Snooze all], all the calendars can be put on snooze 5 minutes later. (Snooze is a function that sounds the alarm some time later even though you stop it.)Set Calendar view, reminder notifications, ringtone, vibration, reminder time.1From the Home screen, tap , then tap [Calendar].2Press t, tap [More] X [Settings].3Select an item to change.With "Clock" application, you can set an alarm; additionally, you can set to show the clock or photo slideshow on the display or to play with the Music player.1From the Home screen, tap .2Tap [Clock].The Clock screen appears.aAlarm display・Appear when there is a set alarm.b: Turn off the backlight.・Tap the screen to light up.cClock display・When 5 minutes are passed without touching the display, the day and time view appears.dNews & Weather・Tap to activate "News & Weather".* To view the weather of current location, set to position the current location (P.175).e: Set alarm.f: Set to slideshow display.g: Display the Music player screen.h: Go to the Home screen.Changing the calendar settingsClock/Alarmbace f g hd](https://usermanual.wiki/Sony/A3880132/User-Guide-1627689-Page-183.png)
![182Applications1From the Home screen, tap , then tap [Alarms].・The alarm list screen appears.・Alternatively, tap on the clock screen to display the alarm clock list.2Tap [Add alarm].・A new alarm time setting screen appears.3Tap numbers to adjust the time and then tap [Set].・An edit new alarm screen appears and you can set the following items.4Tap [Done].・Return to the alarms list screen.Turn ing the alarm ON/OFF1On the alarms list screen, tap .・If you set the alarm on, green line under lights on and appears in the status bar.・When you set the alarm off, the line under turns off.Setting the alarm settingsMake common settings such as alarm volume etc.1From the alarms list screen, press t.2Tap [Settings].・The alarm common settings screen appears and you can set the following items.Setting the alarmTurn alarm onMark to set the alarm on.Time When changing the time, tap to return to Step 3.Repeat Set a day of the week for the alarm.・No repetition without settingRingtone Select ringtone.Vibrate Mark to vibrate at the alarm time.Label Name the alarm.Alarm in silent modeSet not to sound the ringtone in silent mode.Alarm volume Set alarm volume.Snooze duration Set time interval to sound the ringtone again after stopping the ringtone.Side key behavior Set operation when side key (m) is pressed while alarm is sounding.](https://usermanual.wiki/Sony/A3880132/User-Guide-1627689-Page-184.png)
![183ApplicationsDeleting the alarm1On the alarms list screen, tap an alarm to delete.2Tap [Delete].3Tap [OK].Stopping an alarm while the alarm is sounding1On the dialog box for the alarm sounding, tap [Dismiss] or [Snooze].・[Dismiss] stops the alarm. [Snooze] stops the alarm in a given time and sounds again.With OfficeSuite, you can view files of Word, Excel, etc. from the terminal or the microSD card.1From the Home screen, tap .2Tap [OfficeSuite].OfficeSuite is activated.The following applications are preinstalled in the terminal to use the various services on the Web.Friends' music & videos is an application for viewing the list of music and videos that are shared on Facebook. You can also view a list of videos and tracks shared by Friends on Facebook. In addition, you can select a video or track to post or to view comments and "いいね! (Like)".To use the application, login to Facebook, then from the Home screen, tap and tap [Music & videos].Friends' games & applications is an application for viewing the list of games or applications that are shared on Facebook. You can download games and applications that are not installed on the terminal from here.To use the application, login to Facebook, then from the Home screen, tap and tap [Games & apps].OfficeSuiteActivating OfficeSuiteOther applicationsFriends' music & videosFriends' games & applications](https://usermanual.wiki/Sony/A3880132/User-Guide-1627689-Page-185.png)
![184ApplicationsSE Store displays Sony Ericsson Store.You can view information on accessories compatible the terminal and purchase them.To use SE Store, from the Home screen, tap and then tap [SE Store].PlayNow is a web application which allows you to use news flash, dictionary service, etc.To use the application, from the Home screen, tap and then tap [PlayNow] to connect the dedicated site. For membership registration etc., operate following the onscreen instructions.mora touch is an application which allows you to access music downloading service for Android terminal.To use the application, from the Home screen, tap and then tap [mora touch] to connect the dedicated site. You can operate after creating a new account or using your existing account.life.episode application is a new entertainment which allows you to discover the latest information for wide ranged categories such as news, music, animation, photos, gourmet, shopping, etc. corresponding specified age and gender. Use "Pocket" function, you can clip favorite information easily and take it out any time.To use life.episode, from the Home screen, tap and then tap [life.episode] to download the application. Set age and gender to complete installation.ToruCa is an electronic card that can be obtained to mobile terminals. It can be obtained from the site as store information, coupon ticket, etc. Obtained ToruCa is saved to the "ToruCa" application. Use the "ToruCa" application to display, search or update.For details on ToruCa, refer to " ご利用ガイドブック (sp モード編) (Mobile Phone User's Guide [sp-mode]) (in Japanese only)" or DOCOMO Market.SE StorePlayNowmora touchlife.episodeToruCaContinued on next page](https://usermanual.wiki/Sony/A3880132/User-Guide-1627689-Page-186.png)
![185Applications❖Information・For obtaining, displaying or updating ToruCa, a packet communication charge may be applied.・Some ToruCa provided to i-mode terminal may not be obtained/displayed/updated.・Depending on the settings of IP (Information Provider), the following functions may not be available.- Updating, sending attaching email, moving to microSD card, copying/displaying map・Some ToruCa which can be displayed in a map from ToruCa (details) may not be displayed in a map from the ToruCa list depending on the IP settings.・If you set 重複チェック (Duplication check) to "ON", obtaining the same ToruCa redundantly is not available. To obtain the same ToruCa redundantly, set it to "OFF".・When you send ToruCa attaching to email, it is sent in the condition before obtaining ToruCa (details).・Depending on email application, ToruCa received via the emails may not be saved.・Depending on browser, ToruCa cannot be obtained.・When ToruCa is moved/copied to the microSD card, it is moved/copied in the condition before obtaining ToruCa (details).This application allows you to use the online service "Video Unlimited" providing new entertainment world via Sony's internet compatible devices. You can download your favorite videos to the terminal to enjoy watching everywhere.To use the application, tap from the Home screen, tap [Video Unlimited] to install the application, and then back to the Home screen, X Tap [Video] to connect to the dedicated website.Video Unlimited](https://usermanual.wiki/Sony/A3880132/User-Guide-1627689-Page-187.png)
![186International roamingWith the international roaming (WORLD WING), you can use without changing phone number or mail address in the service area of the overseas network operator affiliated with DOCOMO. You do not need to change the settings of call and SMS.■ Service areaThe terminal works in a 3G roaming area and GSM/GPRS service area. Services are also available in countries and areas supporting 3G850MHz/GSM850MHz. Check available area.■ Before using the terminal overseas, refer to the followings.・"Mobile Phone User's Guide [International Services]"・DOCOMO International Services website・"ドコモ海外利用 (International roaming)" application help❖Information・For Country code, International call access code, Universal number international prefix, supported countries/area and network operator, refer to "Mobile Phone User's Guide [International Services]" or DOCOMO International Services Website.*1 To use data communication during roaming, mark [Data roaming] checkbox in Mobile network settings. (P.190)*2 For GPS positioning (Positioning location), a packet communication charge is applied.・Some services are not available depending on the overseas network operator or network.Overview of International roaming (WORLD WING)Inter national roamingAvailable ServicesMain communication service 3G GSM/GPRS GSMCall ○○○Message (SMS) ○○○Email*1○○×Browser*1○○×Position location of GPS*2○○×](https://usermanual.wiki/Sony/A3880132/User-Guide-1627689-Page-188.png)
![188International roamingConnectivityWhen you have set search mode of "Available networks" to "Select automatically" in "Network operators" settings, optimized network is automatically selected.When you connect to the network operator conducted in flat-rate service manually, you can use the service with flat-rate packet communication charges overseas up to the specified upper limit per day. To use this service, subscription of packet flat-rate service is required. For details, refer to "Mobile Phone User's Guide [International Services]" or DOCOMO International Services Website.DisplayIn the status bar, the type of your operator's network are displayed.: During International roaming/ : Connecting/Using GPRS/ : Connecting/Using 3G (packet)/ : Connecting/Using HSDPA ・You can confirm the name of the connected network operator on the Notification panel.Date & time settingsWhen "Date & time" is set to "Automatic", the date, time and time differences of the terminal clock are corrected by receiving the information related to time and time differences from the network of overseas network operator you connect to.・Correction of the time/time differences may not be performed correctly depending on the network of overseas network operator. In that case, set time zone manually.・Timing of correction varies by the overseas network operator.・Date & time (P.120)About inquiries・For loss or theft of the terminal or UIM, immediately contact DOCOMO from the spot to take the necessary steps for suspending the use. For inquiries, see the last page of this manual. Note that you are still liable for the call and communication charge incurred after the loss or theft occurred.・For using from land-line phone, entering "International call access code" or "Universal number international prefix" for the country is needed.](https://usermanual.wiki/Sony/A3880132/User-Guide-1627689-Page-190.png)
![189International roamingAfter returning to JapanWhen you return to Japan, the terminal is connected to DOCOMO's network automatically. If connection is failed, perform the following operations.・Set "Preferred network mode" of "Network Mode" to "GSM/WCDMA preferred". (P.190)・Set "Search mode" to "Select automatically" in "Network operators" settings. (P.189)When you start the international roaming or move out of your operator's network, you need to reconnect the terminal to another available network.❖Information・Some applications automatically perform packet communications. To disconnect packet communication manually, from the Home screen, press t and tap [Settings] X [Wireless & networks] X [Mobile networks] X [Data enabled] to unmark.Confirming and switching the network search modeBy default, network search mode is set to "Select automatically". When you connect manually to an overseas network operator conducted in flat-rate service, confirm the search mode with the following operations and switch to "Select manually".1From the Home screen, press t and tap [Settings].2Tap [Call settings] X [Service providers].3Tap [Search mode] X [Select manually].4From "Available networks", tap to unmark a network to use.・To display available networks, tap [Search networks].❖Information・If you set a network manually, the terminal is not reconnected to another network automatically even if you move out of the network area.・To return to "Select automatically", tap [Select automatically] in Step 3.Making a call to outside country you stay (including Japan)](https://usermanual.wiki/Sony/A3880132/User-Guide-1627689-Page-191.png)
![190International roamingChanging network modeYou can change network mode settings according to the network mode (communication method) adopted by the overseas network operator.1From the Home screen, press t and tap [Settings].2Tap [Wireless & networks] X [Mobile networks] X [Network Mode].3Select your preferred network mode.・You can select from [WCDMA only], [GSM only] or [WCDMA preferred/GSM]. If you select [WCDMA preferred/GSM], you can use both GSM and WCDMA.Activating data roaming1From the Home screen, press t and tap [Settings].2Tap [Wireless & networks] X [Mobile networks].3Tap [Data roaming].4Read the cautions displayed, tap [Yes].・[Data roaming] checkbox is marked.When you arrive overseas and turn on the terminal, an available network is automatically set.・Check that the battery and signal levels are high enough.・Depending on the network operator, even if the Caller ID notification is active, the caller ID may not be notified or appear properly.In this case, calls cannot be made from the call log screen.You can make a call from overseas using the international roaming service.・You can easily make international calls from the country you stay to Japan or to other countries by entering prefix "+" and then the country code and phone number.1From the Home screen, tap [Phone].Making/Receiving calls in the country you stayMaking a call to outside country you stay (including Japan)Continued on next page](https://usermanual.wiki/Sony/A3880132/User-Guide-1627689-Page-192.png)
![191International roaming2Dial + (press and hold [0]) X Country code X Area code (City code) X Enter a phone number.・If the area code begins with "0", omit "0". However, "0" may be required to dial to some country or area such as Italy.・To call an overseas "WORLD WING" user, enter "81" (Japan) for the country code.3Tap [Call].You can make a call by entering the phone number of the other party's land-line phone or mobile phone in the same way you do in Japan.1From the Home screen, tap [Phone].2Enter the other party's phone number.・To make a call to land-line phone, enter the area code (city code) + other party's phone number.3Tap [Call].When the other party uses international roaming service, make a call as an international call to Japan even when you stay in the same country as the other party.You can receive a call using the international roaming service.1While receiving a call, touch (left) and drag it to (right).2When the conversation is finished, tap [End call].❖Information・When you received a call during the international roaming, regardless of which country the call is from, it is forwarded internationally from Japan. A caller is charged for a call fee to Japan, and the receiver is charged for a reception fee.Making a call within the country you stayMaking a call to WORLD WING user overseasReceiving a call in the country you stay](https://usermanual.wiki/Sony/A3880132/User-Guide-1627689-Page-193.png)
![196Appendix/Index■ International roaming■ Data management・Check if clouds or dirt attach to the lens of camera.-Cannot use the terminal overseas.■When antenna mark is displayed・Do you subscribe WIRLD WING?Check if you subscribe WORLD WING.-■Out of service area indicator appears・Check if you are out of the international roaming service area or in an area with poor signal strength.Check if the service area and network operator are available, referring to "Mobile Phone User's Guide [International Services]" or DOCOMO International Services website.・Try to change the network settings or overseas network operator settings.Set "Search mode" of "Network operators" to "Select automatically".Set "Network Mode" to "GSM/WCDMA preferred".・Turning off the terminal and then turning on again may work for the restoration.P. 1 8 7P. 1 9 0P. 3 4Cannot perform data communication overseas.Mark the data roaming checkbox. P.190Cannot use the terminal suddenly while using overseas.・Check if usage amount exceeds the limit of maximum charges for use.For use of "International roaming (WORLD WING)", the limit of maximum charges for use is set in advance. If exceeding the limit of maximum charges for use, pay the charges.-Cannot receive calls overseas.・Is "Incoming Call" se to "active"? -No caller ID is notified/A notified caller ID is different from that of the caller/Functions for using contents saved in phonebook or those using Caller ID notification do not operate.・Even when a caller notifies its caller ID, it is not displayed on the terminal unless notified from the network or network operator used. And, a notified caller ID is different from that of the caller by some networks or networks operators you use.-Data transfer is not performed.・Check if USB hub is used. If you use USB hub, operations may not be performed correctly.-Data saved in microSD card is not displayed.・Remove the microSD card and insert it again.P. 2 8Continued on next page](https://usermanual.wiki/Sony/A3880132/User-Guide-1627689-Page-198.png)
![202Appendix/Index1From the Home screen, tap , then tap [Update center].2Press t, then tap [Refresh].・The terminal searches for software updates.Note❖Note・To download software updates by using Wi-Fi only, from the Home screen, tap , tap [Update center] X t, then tap [Settings] X [Automatic update] X [Via Wi-Fi only]. Note that if you select [Via 3G/Wi-Fi], a Wi-Fi connection automatically switches to 3G connection when the Wi-Fi connection is unstable and packet communication fee may apply.・For software update via mobile network, a high packet communication charge will be applied because of a large amount data communication. For this reason, subscription of packet flat-rate service is highly recommended.・While you are using roaming service overseas, you cannot search for or download update software through the mobile network.Updating software with the latest information automaticallyYou can update the software with the latest information automatically on regular basis. If software update is searched, appears on the status bar.1From the Home screen, tap , then tap [Update center].2Press t, then tap [Settings].3Tap [Automatic update] X [Via Wi-Fi only]/[Via 3G/Wi-Fi] X [OK].❖Note・Note that packet communication fee may apply for searching automatically.You can update software by using PC Companion that can be installed into a PC from the terminal.❖Information・To install PC Companion on a PC, an Internet connection is required.When PC Companion is not installed on your PC1Use the supplied microUSB cable to connect the terminal to a PC.2On the terminal, tap [Install].・Installer of PC Companion starts on the PC.Connecting to a PC and updatingContinued on next page](https://usermanual.wiki/Sony/A3880132/User-Guide-1627689-Page-204.png)
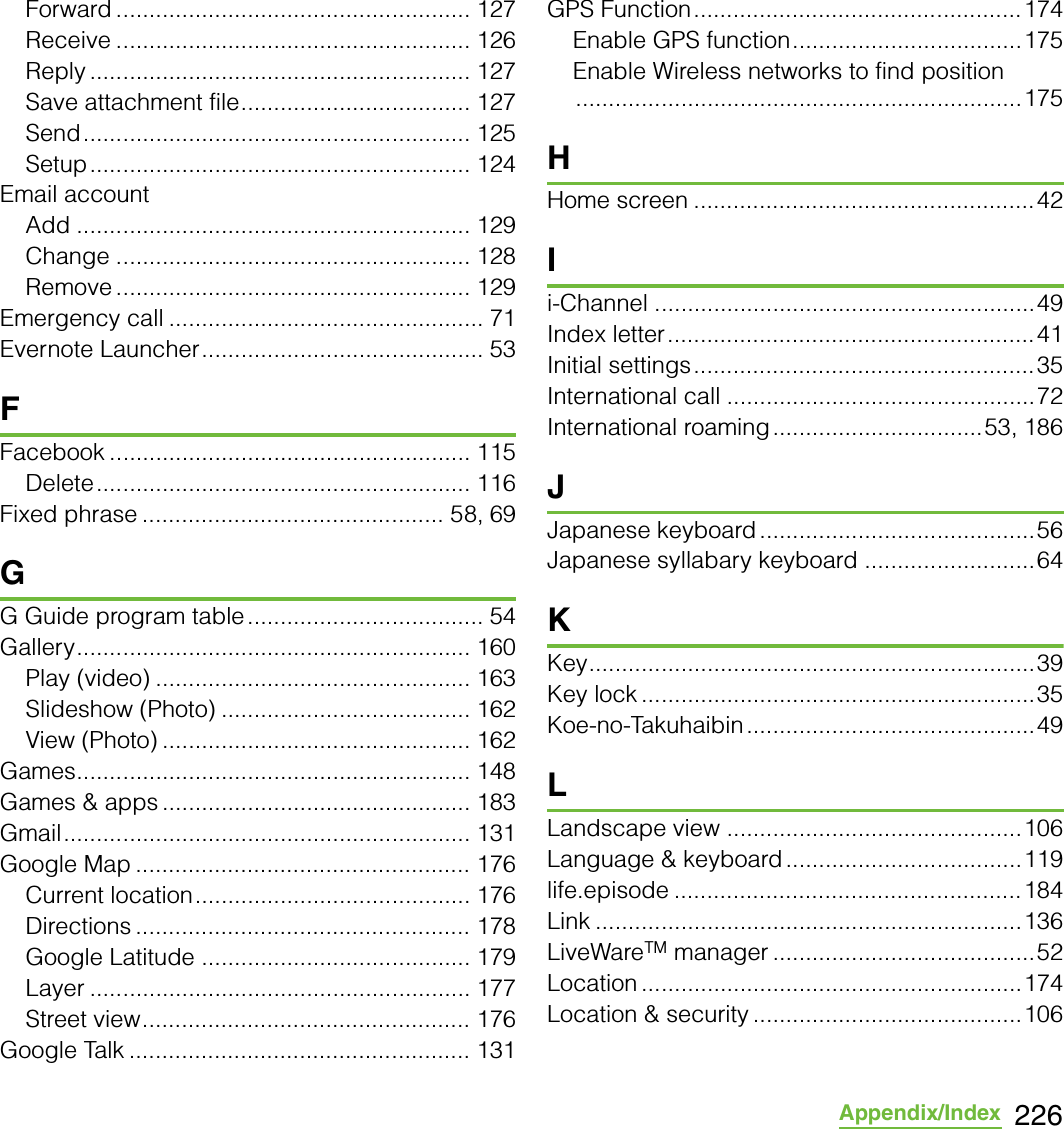
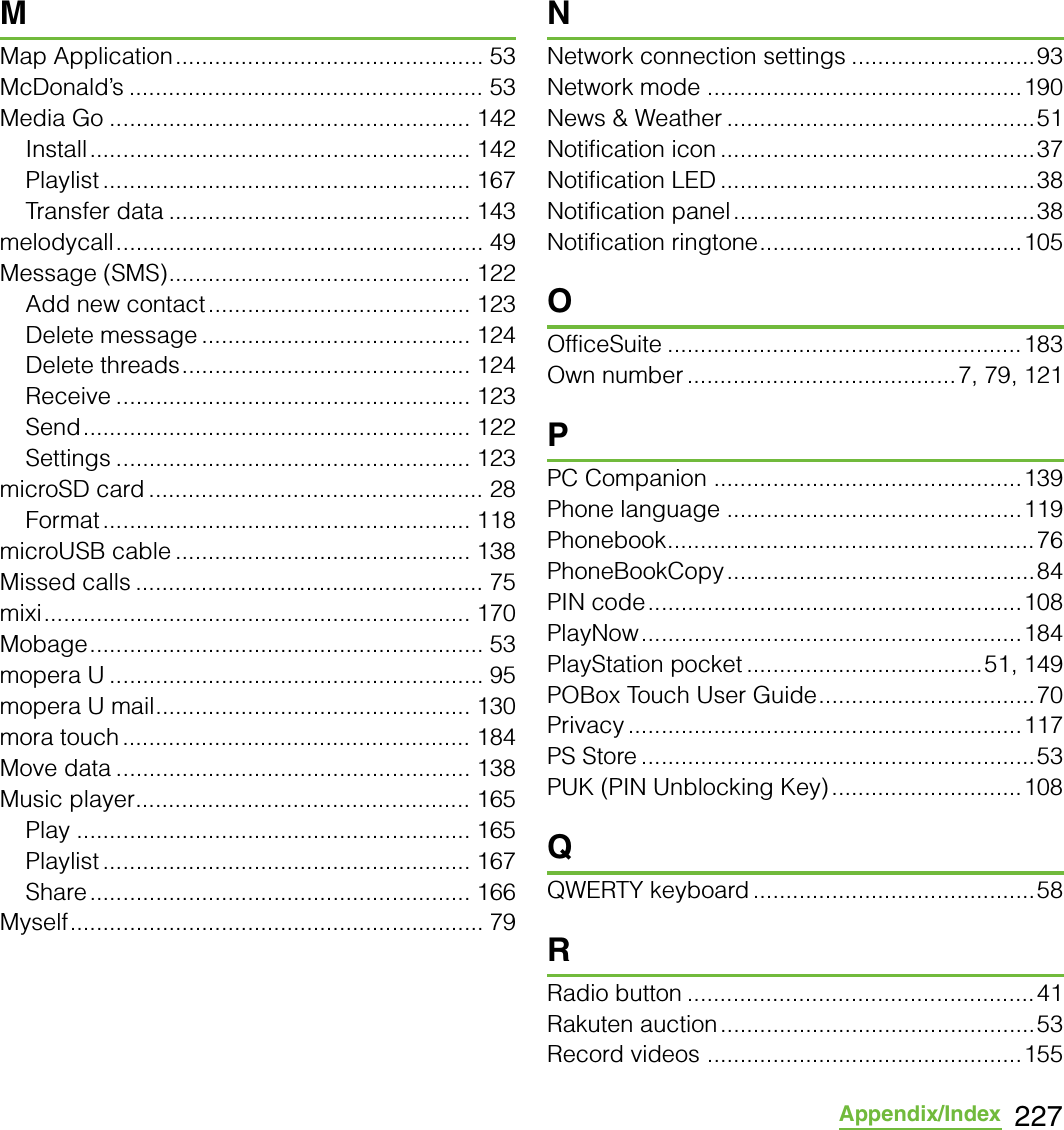
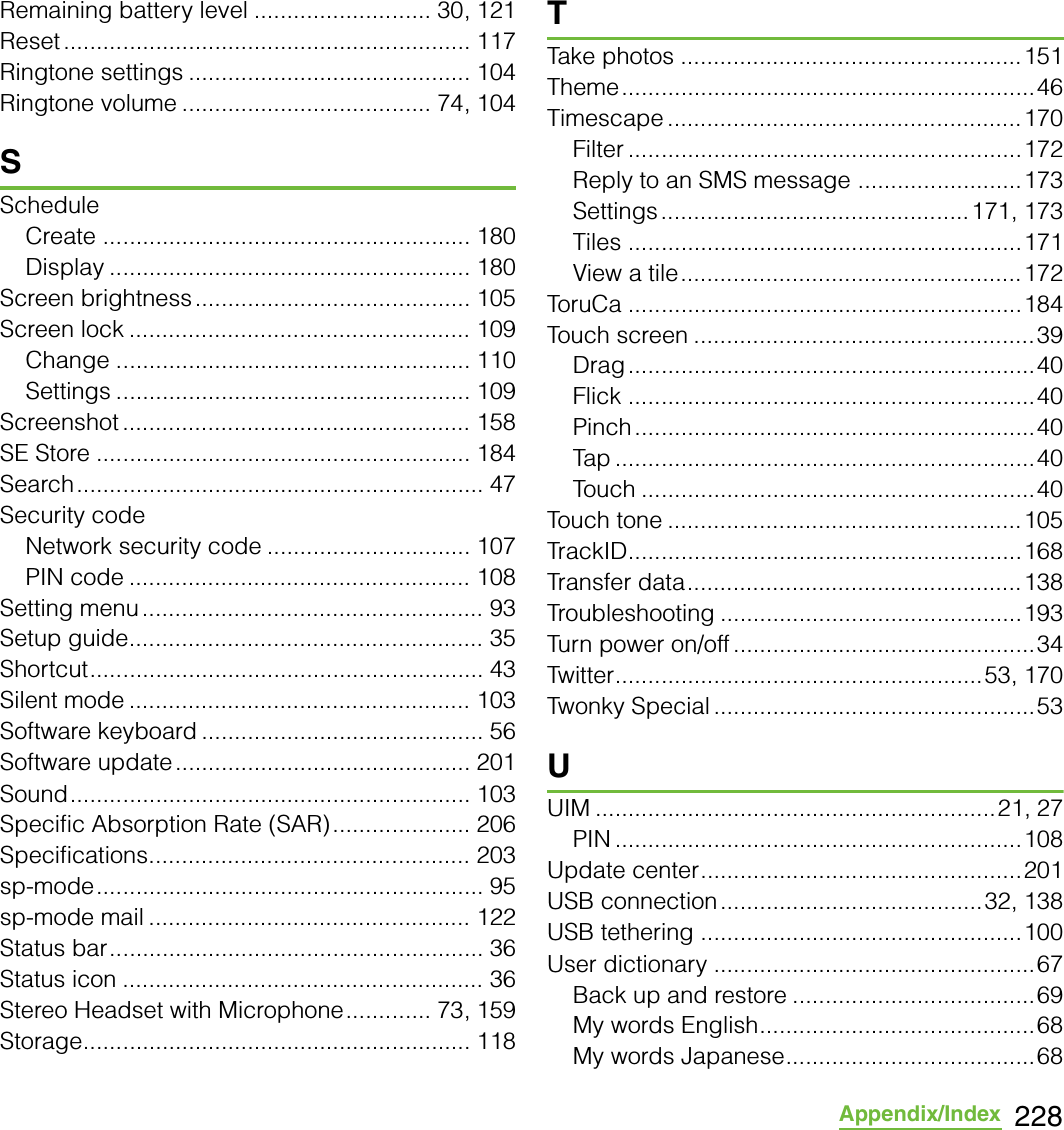

![Don't forget your mobile phone ... or your manners!Remember to be courteous to others when you use your terminal.Turn the power off when you are:■In places where use is prohibitedBe sure to switch the power off in an aircraft or a hospital.* Turn off your terminal even in hospital lobbies and waiting rooms as well as hospital wards if electronic medical devices may be in use near you.■In crowded places such as peak-hour trains if implanted electronic medical devices may be in use near youRadio waves emitted by the terminal may adversely affect implanted pacemakers and ICDs when used in close proximity.■DrivingUsing a handheld mobile phone while driving will result in a penalty.However, absolutely necessary cases such as rescue of a sick person or maintaining public's safety are exempted.■In places such as theaters, cinemas, and art galleriesUsing the terminal in a public place, where you need to be quiet, annoys people around you.Keep your voice and ring tone down■Keep your voice down in quiet places like restaurants and hotel lobbies.■If you are in an outdoor public place, make sure you do not disturb others.Respect privacyPlease be considerate of the privacy of individuals around you when taking and sending photos using camera-equipped mobile phones.Have good mannersThe terminal is equipped with useful functions not to answer an incoming call or to mute the sound.Make various applications or charge your billing plan, check your charges and points, and more online.My docomo (http://www.mydocomo.com/) ⇒ 各種お申込・お手続き (Various applications/procedures) *In Japanese only.* "docomo ID and password" are required for use.* Please contact "General Inquiries" described on the last page of this manual if you forget or do not have "docomo ID and password".* May not be available in some cases depending on the conditions of your subscription.* There are cases where the site may not be available due to system maintenance, etc.[Vibrate] (P.103)Vibrates when there is an incoming call.[Silent mode] (P.103)Silent mode mutes the sounds of the terminal such as the keypad sounds and the ring tone.* Shutter sound cannot be muted.You can also use optional services such as the Voice Mail Service (P.86) and Call Forwarding Service (P.90).](https://usermanual.wiki/Sony/A3880132/User-Guide-1627689-Page-232.png)