Sony A3880133 Mobile phone with Bluetooth, WLAN 802.11bgn, GPS/A-GPS, ANT+ and FM Rx User Manual Sony Ericsson Mobile Communications AB
Sony Mobile Communications Inc Mobile phone with Bluetooth, WLAN 802.11bgn, GPS/A-GPS, ANT+ and FM Rx Sony Ericsson Mobile Communications AB
Sony >
Contents
- 1. 08 user guide
- 2. 08 user manual
08 user guide

Xperia™ mini
Extended User guide
Contents
Important information..................................................................6
Android™ – what and why?.........................................................7
Applications........................................................................................7
Getting started..............................................................................8
Assembly............................................................................................8
Turning on the phone..........................................................................9
Screen lock.........................................................................................9
Setup guide........................................................................................9
Accounts and services......................................................................10
Getting to know your phone......................................................11
Phone overview.................................................................................11
Using the hardware keys...................................................................12
Charging the battery.........................................................................12
Using the touch screen.....................................................................13
Home screen....................................................................................14
Accessing and using applications......................................................17
Status and notifications.....................................................................18
Phone settings menu........................................................................19
Typing text........................................................................................19
Keyboard and Phonepad settings.....................................................22
Adjusting the volume.........................................................................22
Customising your phone...................................................................23
Battery..............................................................................................25
Memory............................................................................................26
Stereo portable handsfree.................................................................27
Internet and messaging settings........................................................27
Using Data monitor...........................................................................28
Turning off data traffic.......................................................................29
Data roaming....................................................................................29
Network settings...............................................................................29
Calling..........................................................................................31
Emergency calls................................................................................31
Call handling.....................................................................................31
Voicemail..........................................................................................32
Multiple calls.....................................................................................32
Conference calls...............................................................................33
Call settings......................................................................................34
Contacts .....................................................................................35
Opening Contacts for the first time....................................................35
2
This is an Internet version of this publication. © Print only for private use.
Getting contacts into your phone......................................................35
Contacts screen overview.................................................................36
Managing your contacts....................................................................36
Communicating with your contacts...................................................38
Sharing your contacts.......................................................................38
Backing up contacts.........................................................................39
Messaging...................................................................................40
Using text and multimedia messaging...............................................40
Text and multimedia message options..............................................41
Email............................................................................................42
Using email.......................................................................................42
Using email accounts........................................................................44
Gmail™ and other Google™ services ...............................................44
Google Talk™ ............................................................................46
Sony Ericsson Timescape™......................................................47
Timescape™ main view....................................................................47
Timescape™ widget.........................................................................47
Using Timescape™...........................................................................48
Timescape™ settings........................................................................50
Getting started with Android Market™....................................51
Payment options...............................................................................51
Downloading from Android Market™................................................51
Clearing your application data...........................................................52
Permissions......................................................................................52
Allowing applications not from Android Market™..............................53
PlayNow™ service.....................................................................54
Before you download content...........................................................54
Payment options...............................................................................54
Downloading from the PlayNow™ service.........................................54
Getting organised.......................................................................55
Calendar...........................................................................................55
Synchronising.............................................................................56
Google Sync™ synchronisation service.............................................56
Synchronising your corporate email, calendar and contacts..............56
Synchronising and storing your contacts and calendar......................57
Connecting to wireless networks.............................................59
Wi-Fi®..............................................................................................59
Virtual private networks (VPNs)..........................................................62
Web browser...............................................................................64
Toolbar.............................................................................................64
Browsing the web.............................................................................64
3
This is an Internet version of this publication. © Print only for private use.
Navigating web pages.......................................................................65
Managing bookmarks.......................................................................65
Managing text and images................................................................66
Multiple windows..............................................................................66
Downloading from the web...............................................................67
Browser settings...............................................................................67
Music...........................................................................................68
Copying media files to your memory card..........................................68
Using the music player......................................................................68
TrackID™ technology................................................................72
Using TrackID™ technology results...................................................72
FM radio......................................................................................73
FM radio overview.............................................................................73
Moving between radio channels........................................................73
Using your favourite radio channels...................................................73
Making a new search for radio channels............................................74
Switching between the speaker and the handsfree...........................74
Taking photos and recording videos........................................75
Camera controls...............................................................................75
Using the still camera........................................................................75
Using the video camera.....................................................................81
Viewing your photos and videos in Gallery..............................85
BRAVIA Engine ................................................................................85
Working with albums.........................................................................86
Working with photos.........................................................................87
Bluetooth™ wireless technology..............................................90
Phone name.....................................................................................90
Pairing with another Bluetooth™ device............................................90
Sending and receiving items using Bluetooth™ technology...............91
Connecting your phone to a computer....................................93
Transferring and handling content using a USB cable........................93
USB connection modes....................................................................93
Transferring files using Media transfer mode over a Wi-Fi® network..94
PC Companion.................................................................................95
Media Go™ .....................................................................................95
Location services.......................................................................96
Using GPS........................................................................................96
Google Maps™.................................................................................96
Getting directions..............................................................................97
Locking and protecting your phone.........................................98
IMEI number.....................................................................................98
4
This is an Internet version of this publication. © Print only for private use.
SIM card protection..........................................................................98
Setting a screen lock.........................................................................99
Updating your phone...............................................................101
Updating your phone wirelessly.......................................................101
Updating your phone using a USB cable connection.......................101
Phone settings overview.........................................................102
Icon overview............................................................................103
Status icons....................................................................................103
Notification icons.............................................................................103
Application overview................................................................105
User support.............................................................................107
Troubleshooting.......................................................................108
My phone is not working as expected.............................................108
Resetting the phone........................................................................108
I cannot charge the phone..............................................................108
No battery charging icon appears when phone starts charging.......108
The battery performance is low.......................................................108
I cannot transfer content between my phone and the computer,
when using a USB cable.................................................................108
I cannot use Internet-based services...............................................109
Error messages...............................................................................109
Legal information.....................................................................110
Index..........................................................................................111
5
This is an Internet version of this publication. © Print only for private use.

Important information
Please read the Important information leaflet before you use your mobile phone.
Some of the services and features described in this User guide are not supported in all countries/
regions or by all networks and/or service providers in all areas. Without limitation, this applies to
the GSM International Emergency Number 112. Please contact your network operator or service
provider to determine availability of any specific service or feature and whether additional access
or usage fees apply.
6
This is an Internet version of this publication. © Print only for private use.

Android™ – what and why?
An Android™ phone can perform many of the same functions as a computer. But you can
also adjust it to better suit your needs, to receive the information you want, and have fun
at the same time. You can add and delete applications, or enhance them to improve
functionality. At Android Market™ you can download a range of applications and games
from a constantly growing collection. You can also integrate applications on your Android™
phone with your personal data and online accounts. For example, you can back up your
phone contacts, access your different email accounts and calendars from one place, keep
track of your appointments, and engage in as much social networking as you like.
Android™ phones are constantly evolving. When a new software version is available and
your phone supports this new software, you can update your phone to get new features
and the latest improvements.
Your Android™ phone is pre-loaded with Google™ services. To get the most out of the provided
Google™ services, you should have a Google™ account and sign in to it when you first start
your phone. You also need to have Internet access to use many of the features in Android™.
Applications
An application is a phone program that helps you perform a task. For example, there are
applications to make calls, take photos and download more applications.
7
This is an Internet version of this publication. © Print only for private use.
Getting started
Assembly
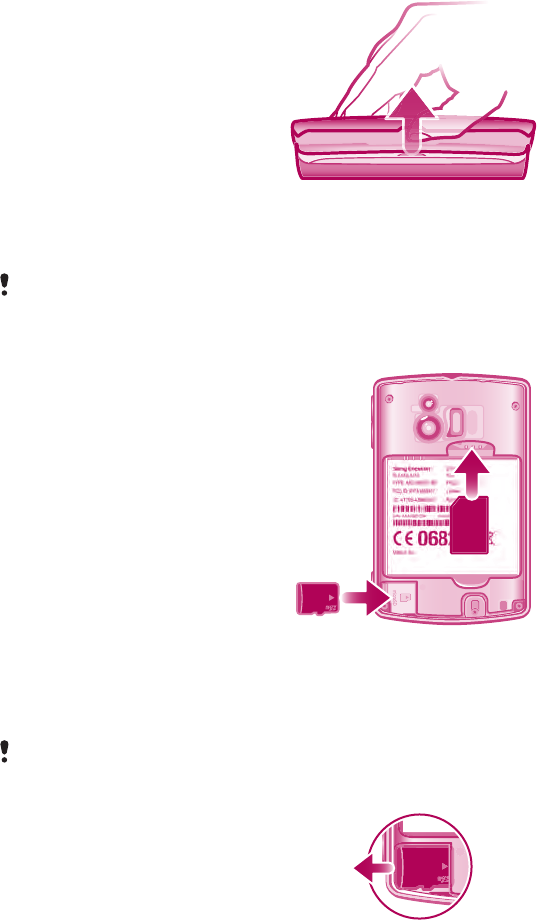
To remove the battery cover
•Insert the tip of your finger or a thin object firmly into the opening on one side of the
phone, between the phone and the battery cover. Then lift up the cover slowly but
firmly.
Do not use sharp objects that may damage parts of the phone.
To insert the SIM card and the memory card
•Remove the battery cover, then insert the SIM card and the memory card in the
relevant slots.
To remove the memory card
Your phone must be turned off before you can safely remove the memory card. For more
information, see Safely removing the memory card on page 26.
•Remove the battery cover, then draw the memory card outwards to remove it.
8
This is an Internet version of this publication. © Print only for private use.
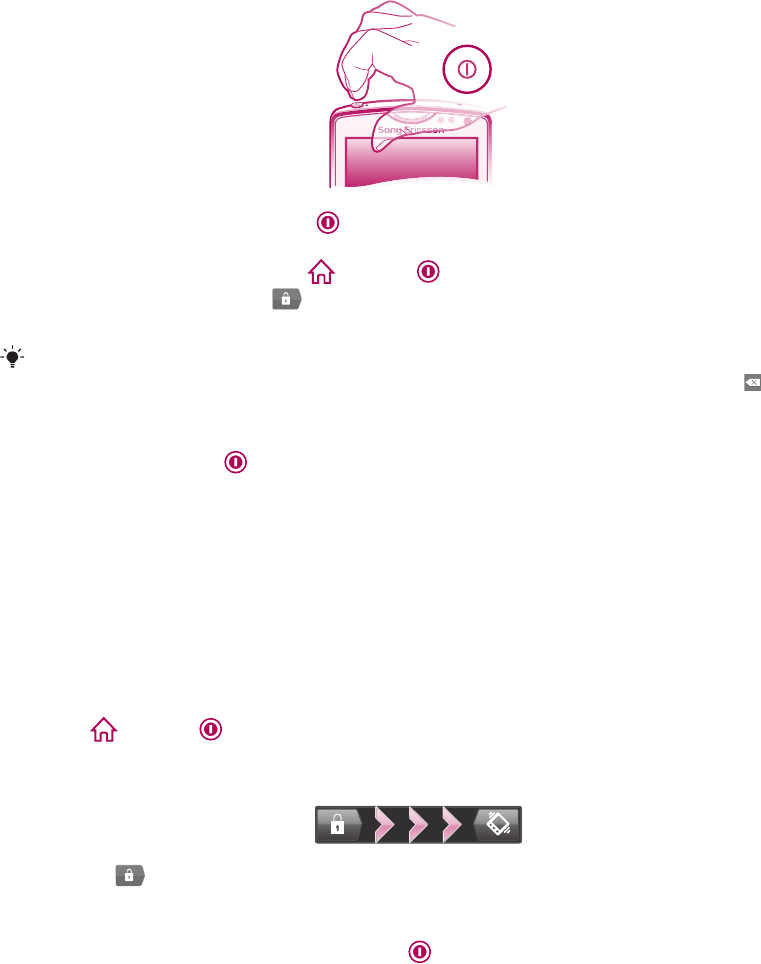
Turning on the phone
To turn on the phone
1Press and hold down the power key on the top of the phone until the phone
vibrates.
2If your screen goes dark, press or press briefly to activate the screen.
3To unlock the screen, drag to the right across the screen.
4Enter your SIM card PIN when requested, and select OK.
Your SIM card PIN is initially supplied by your network operator, but you can change it later from
the Settings menu. To correct a mistake made while entering your SIM card PIN, press .
To turn off the phone
1Press and hold down until the options menu opens.
2In the options menu, tap Power off.
3Tap OK.
Screen lock
When your phone is on and left idle for a set period of time, the screen darkens to save
battery power, and locks automatically. This lock prevents unwanted actions on the touch
screen when you are not using it.
To activate the screen
•Press or press briefly.
To unlock the screen
•Drag the icon to the right across the screen.
To lock the screen manually
•When the screen is active, briefly press the key.
Setup guide
The first time you start your phone, a setup guide opens to explain basic phone functions
and help you enter essential settings. Set up your phone so that it works to your needs.
Select your phone language, optimise your wireless network connection settings, import
your old contacts, and much more.
The setup guide covers the following:
•Basic phone settings such as language and Internet.
•Wi-Fi® settings – speed up your connection and decrease data transfer costs.
•Application settings – helps you with email setup, online service accounts, and contact
transfers.
9
This is an Internet version of this publication. © Print only for private use.

You can also refer to the respective chapters in the in-phone User guide, available through
the Support application in the phone and at www.sonyericsson.com/support, for more help
with the following:
•Wi-Fi®
•Sony Ericsson Sync
If you prefer, you can skip some steps and access the setup guide later from the Application
screen or change the settings from the Settings menu.
To access the setup guide
1From the Home screen, tap .
2Tap Setup guide.
Accounts and services
Sign in to your online service accounts from your phone and benefit from a range of services.
Combine services and get even more out of them. For example, collect contacts from your
Google™ and Facebook™ accounts and integrate them into your phonebook, so you have
everything in one place.
You can sign up to online services from your phone as well as from a computer. When you
sign up for the first time, an account is created with your user name, password, settings
and personal information. The next time you sign in, you get a personalised view.
Google™ account
A Google™ account is key to your Android™ phone. Use Gmail™ to send emails, Google
Talk™ to chat with friends, and Android Market™ to download applications.
Sony Ericsson account
Store your phone contacts on a secure Sony Ericsson server, and you'll always have a
backup online. You can also store your phone calendar and Internet bookmarks in your
Sony Ericsson account.
Exchange Active Sync account
Synchronise your phone with your corporate Exchange Active Sync account. This way, you
keep your work email, contacts and calendar events with you at all times.
10
This is an Internet version of this publication. © Print only for private use.
Getting to know your phone
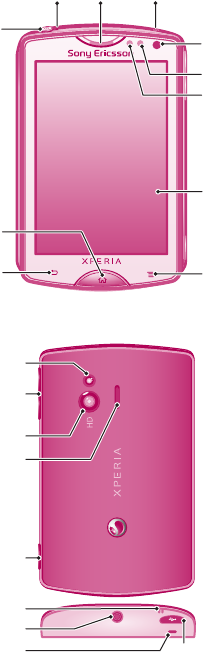
Phone overview
1 5
10
11
8
9
7
6
2 43
12
13
16
14
15
20
17
18
19
1. Power key/Screen lock
2. Notification LED/Battery status
3. Ear speaker
4. Second microphone
5. Light sensor
6. Proximity sensor 2
7. Proximity sensor 1
8. Touch screen
9. Menu key
10. Back key
11. Home key
12. Camera LED flash
13. Volume key/Zoom key
14. Camera lens
15. Speaker
16. Camera key
17. Strap hole
18. Headset connector
19. Main microphone
20. Connector for charger/USB cable
11
This is an Internet version of this publication. © Print only for private use.
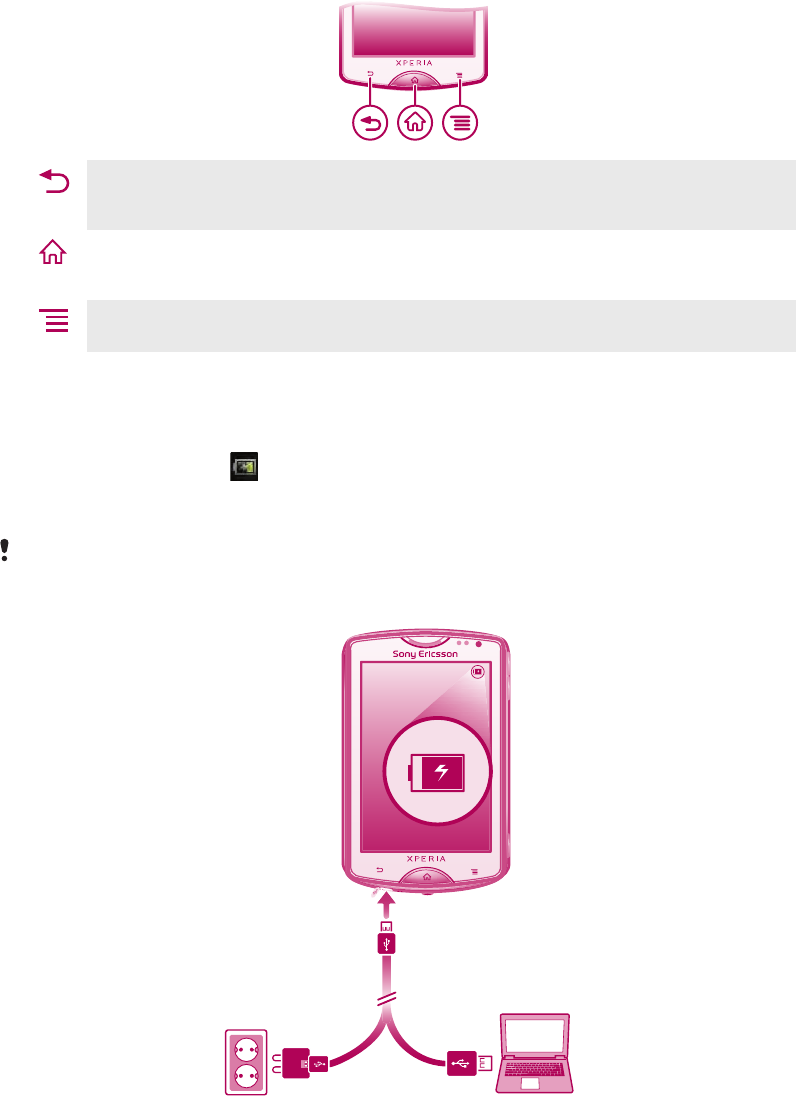
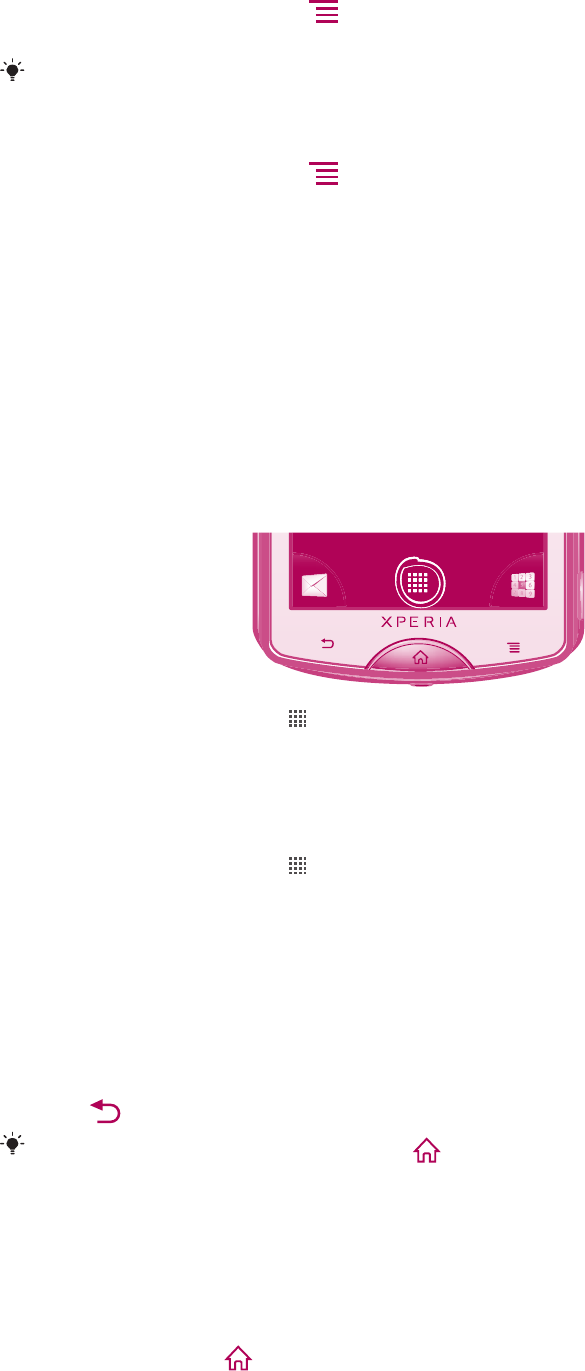
Using the hardware keys
Back
•Go back to the previous screen
•Close the on-screen keypad, a dialog box, an options menu, or the Notification panel
Home
•Go to the Home screen or to the Application screen from any application or screen
•Press and hold to open a window showing your most recently used applications
Menu
•Open a list of options available in the current screen or application
Charging the battery
Your phone battery is partly charged when you buy the phone. It may take a few minutes
before the battery icon appears on the screen when you connect the phone charger
cable to a power source, such as a USB port or a phone charger. You can still use your
phone while it is charging.
The battery will start to discharge a little after it is fully charged and then charges again after a
certain time when the phone charger is connected. This is to extend battery life and may result
in the charge status showing a level below 100 percent.
To charge the phone using the power adapter
•Connect the phone to a power outlet using the USB cable and the power adapter.
To charge the phone using a computer
•Connect the phone to a USB port on a computer using the USB cable included in
the phone kit.
12
This is an Internet version of this publication. © Print only for private use.
Using the touch screen
When your phone is on and left idle for a set period of time, the screen darkens to save
battery power, and locks automatically. This lock prevents unwanted actions on the touch
screen when you are not using it. You can also set personal locks to protect your
subscription and make sure only you can access your phone content.
Your phone screen is made from glass. Do not touch the screen if the glass is cracked or
shattered. Avoid trying to repair a damaged screen yourself. Glass screens are sensitive to drops
and mechanical shocks. Cases of negligent care are not covered by the Sony Ericsson warranty
service.
To open or highlight an item
•Tap the item.
To mark or unmark options
•Tap the relevant checkbox or in some cases the right side of the list option, to mark
or unmark an option.
Marked checkbox
Unmarked checkbox
Marked list option
Unmarked list option
Zooming
There are two ways to zoom. The zoom options available depend on the application you
are using.
To zoom
•When available, tap or to zoom in or out.
You may have to drag the screen (in any direction) to make the zoom icons appear.
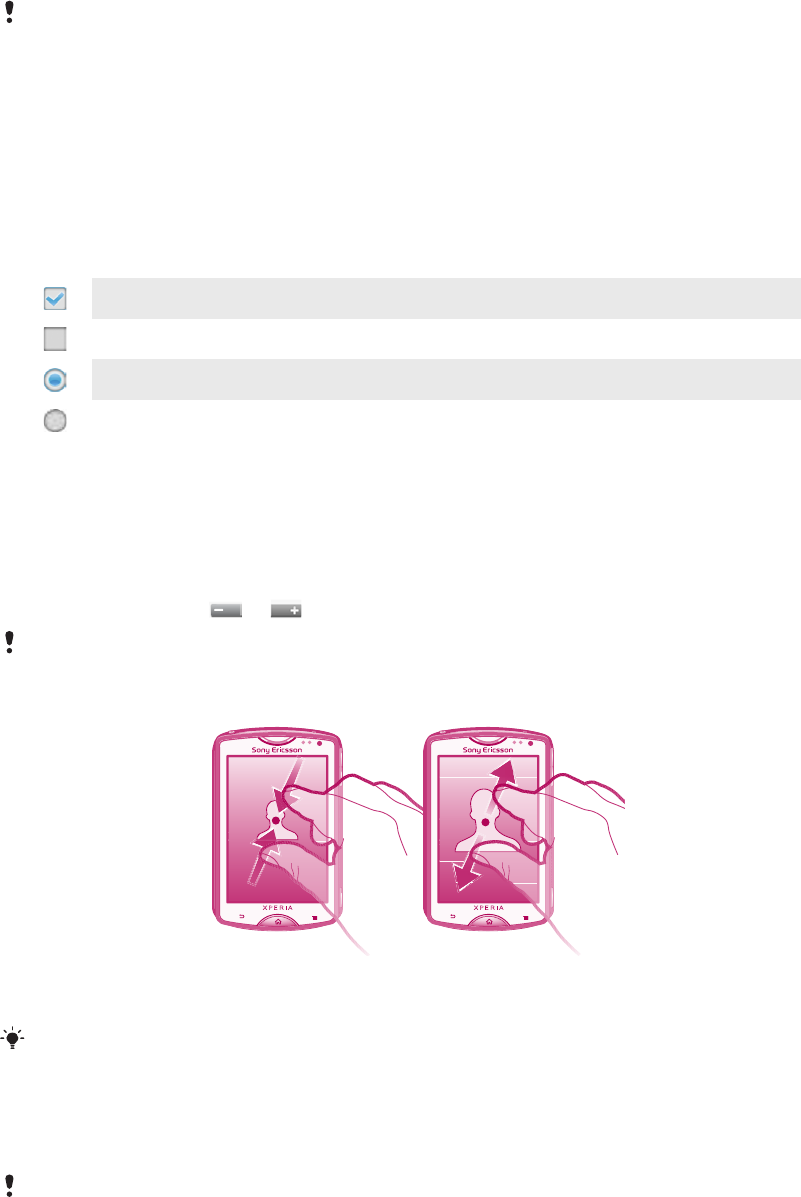
To zoom with two fingers
•Place two fingers on the screen at once and pinch them together (to zoom out) or
spread them apart (to zoom in).
Use the zoom function when viewing photos and maps, or when browsing the web.
Scrolling
Scroll by moving your finger up or down on the screen. On some web pages you can also
scroll to the sides.
Dragging or flicking will not activate anything on the screen.
13
This is an Internet version of this publication. © Print only for private use.
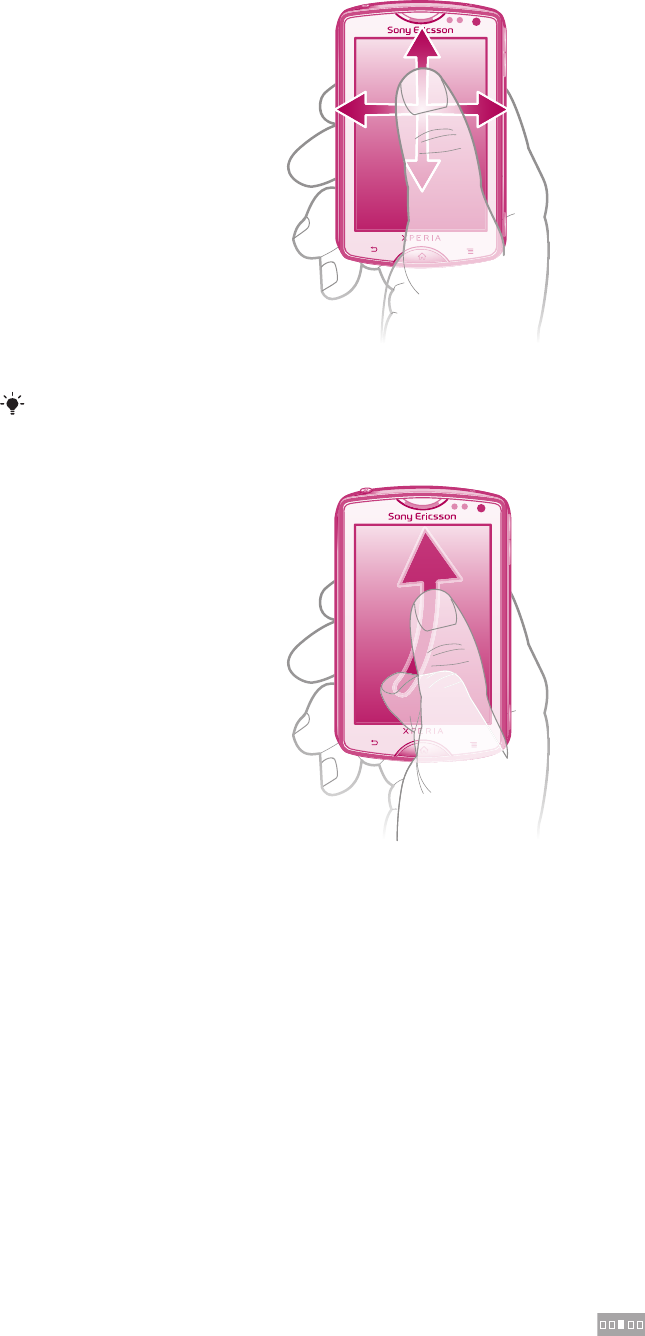
To scroll
•Drag or flick your finger in the direction you want to scroll on the screen.
To scroll more quickly, flick your finger in the direction you want to go on the screen.
To flick
•To scroll more quickly, flick your finger in the direction you want to go on the screen.
You can wait for the scrolling movement to stop by itself, or you can stop it
immediately by tapping the screen.
Sensors
Your phone includes a light sensor and a proximity sensor. The light sensor detects the
ambient light level and adjusts the brightness of the screen accordingly. The proximity
sensor turns the touch screen off when your face touches the screen. This prevents you
from unintentionally activating phone functions when you are engaged in a call.
Home screen
Your phone Home screen is the equivalent of the desktop on a computer. It's your gateway
to the main features in your phone. You can customise your Home screen with widgets,
shortcuts, folders, themes, wallpaper and other items.
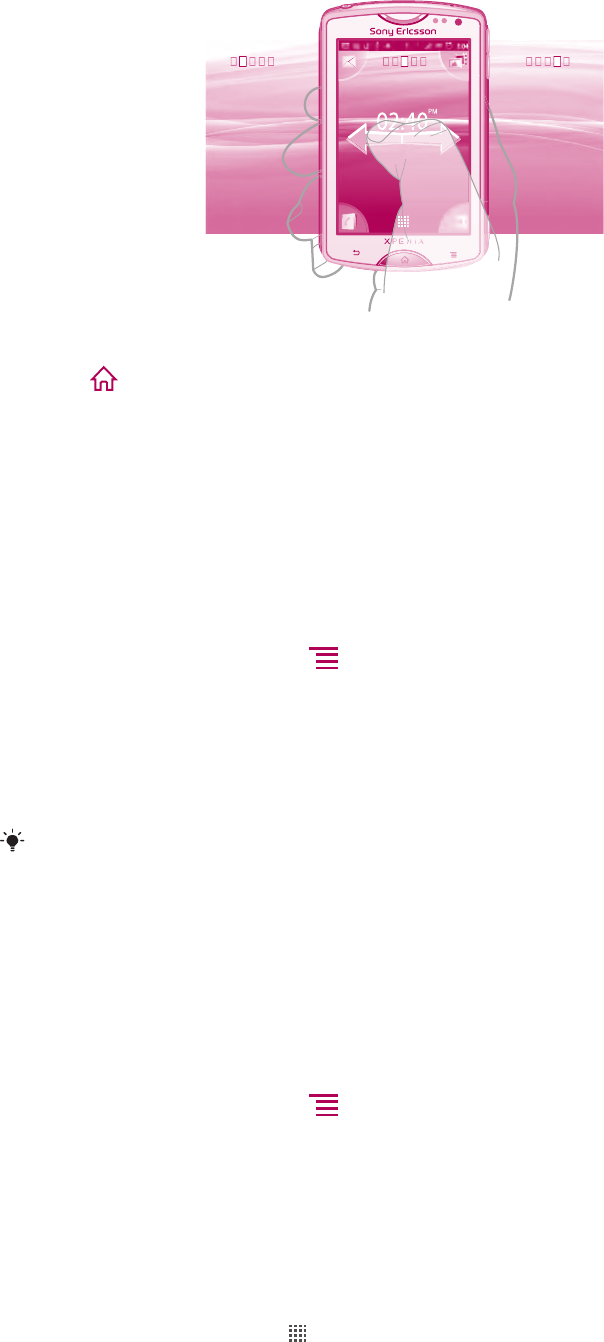
The four corners on the Home screen help you access applications or web page shortcuts
quickly.
The Home screen extends beyond the regular screen display width, so you need to flick
left or right to view content in one of the screen's four extensions. shows which part
of the Home screen you are in.
14
This is an Internet version of this publication. © Print only for private use.
To go to the Home screen
•Press .
To browse the Home screen
•Flick right or left.
Widgets
Widgets are small applications that you can use directly on your Home screen. For example,
the Music player widget allows you to start playing music directly and the Sony Ericsson
Timescape™ widget displays incoming messages.
To add widgets to the Home screen
1From your Home screen, press .
2Tap Add > Widgets.
3Tap a widget.
To get an overview of all widgets on your Home screen
•Pinch on any area of your Home screen. All widgets from different parts of your Home
screen are now displayed in one view.
When all Home screen widgets are combined in one view, tap on any widget to go to the part
of the Home screen containing that widget.
Rearranging your Home screen
Customise the appearance of your Home screen and change the features that you can
access from it. Change the screen background, move items around, create folders, and
add shortcuts to contacts.
To open the options menu of your Home screen
You can open the Home screen options menu in two ways:
•From your Home screen, press .
•Touch and hold on any part of your Home screen.
Rearranging your Home screen corners
Rearrange the items in your Home screen corners with the applications or web page
shortcuts (bookmarks) you access most frequently. You can add a maximum of four
shortcuts to each of the corners.
To add an application to a corner
1From your Home screen, tap .
2Touch and hold an application until the Home screen appears and the phone
vibrates, then drag the application to one of the corners.
15
This is an Internet version of this publication. © Print only for private use.
To add a web page shortcut to a corner
1From your Home screen, press .
2Tap Add > Shortcuts > Bookmark.
3Select a bookmark to add the bookmark to your Home screen.
4Drag the bookmark to one of the corners.
See To add a web page shortcut to your Home screen on page 65.
To delete an item from a corner
1From your Home screen, tap one of the corners to magnify the corner.
2Touch and hold an item in the corner until the phone vibrates, then drag the item to
.
To move an item away from a corner
1From your Home screen, tap one of the corners to magnify the corner.
2Touch and hold an item in the corner until the phone vibrates, then drag the item
away from the corner and drop the item on an area of your Home screen.
To add a shortcut to the Home screen
1From your Home screen, press .
2Tap Add > Shortcuts.
3Find and select a shortcut.
Add application shortcuts directly from the Application screen by touching and holding the
application.
To add a folder to the Home screen
1From your Home screen, press .
2Tap Add > Folder.
3Enter a name for the folder, select an icon, and tap Done.
Drop an item on top of another item on your Home screen to create a folder automatically.
To add items to a folder
•Touch and hold an item until it magnifies and the phone vibrates, then drag the item
to the folder.
To rename a folder
1Tap the folder to open it.
2Touch the folder's title bar to show the Folder name field.
3Enter the new folder name and tap Done.
To move an item on the Home screen
1Press to open your Home screen.
2Touch and hold an item until it magnifies and the phone vibrates, then drag the item
to the new location.
To delete an item from the Home screen
•Touch and hold an item until it magnifies and the phone vibrates, then drag the item
to .
Changing the background of your Home screen
Adapt the Home screen to your own style using wallpapers and different themes.
16
This is an Internet version of this publication. © Print only for private use.
To change your Home screen wallpaper
1From your Home screen, press .
2Tap Wallpaper, then select a wallpaper.
You can use a photo you have taken, or an animation. Go to Android Market™ and other sources
to download, for example, live wallpapers that change with the changing hours of the day.
To change your Home screen theme
1From your Home screen, press .
2Tap Theme, then select a theme.
Accessing and using applications
Open applications from shortcuts on your Home screen or from the Application screen.
Application screen
The Application screen, which you open from your Home screen, contains the applications
that come installed with your phone as well as the applications you download.
The Application screen extends beyond the regular screen width, so you need to flick left
and right to view all content.
To open the Application screen
•From your Home screen, tap .
To browse the Application screen
•Open the Application screen, then flick right or left.
To create a shortcut to an application on the Home screen
1From your Home screen, tap .
2Touch and hold an application until it appears on your Home screen, then drag it to
the desired location.
Opening and closing applications
To open an application
•From your Home screen or the Application screen, tap the application.
To close an application
•Press .
Some applications are paused when you press to exit, while other applications may continue
to run in the background. In the first case, the next time you open the application, you can
continue where you left off.
Recently used applications window
You can view and access recently used applications from this window.
To open the recently used applications window
•Press and hold down .
17
This is an Internet version of this publication. © Print only for private use.
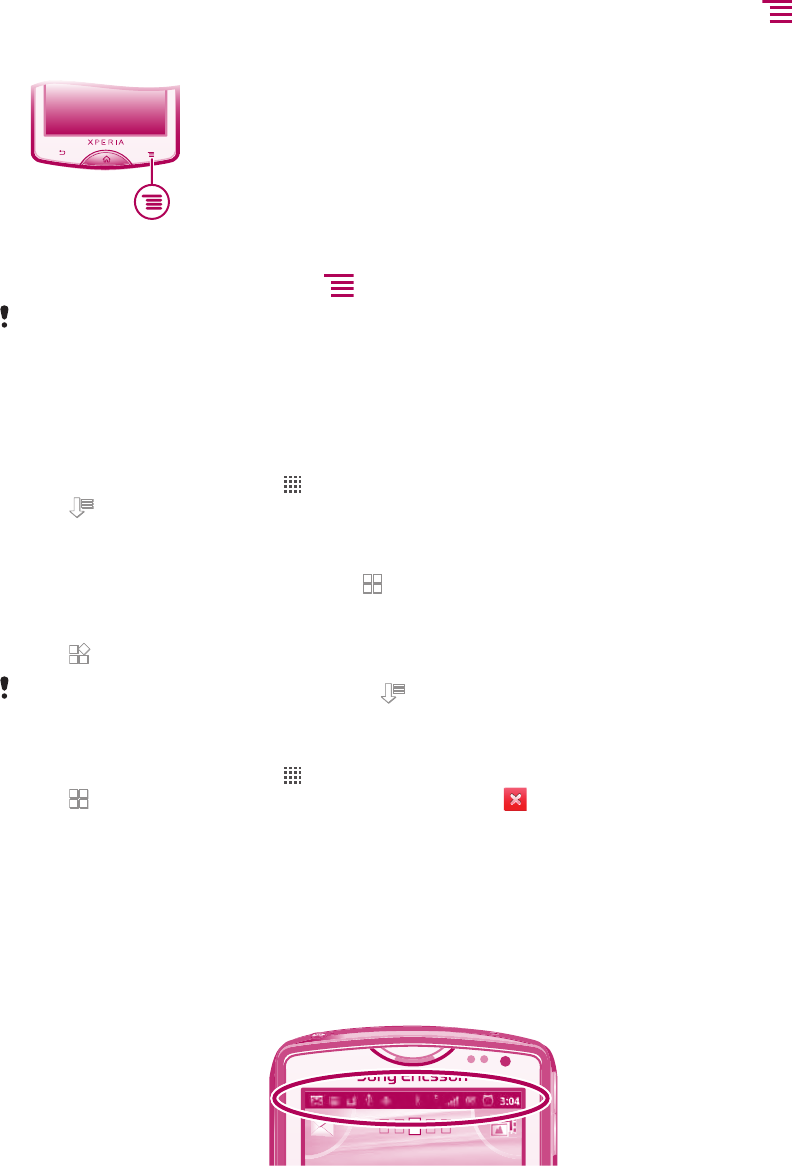
Application menu
You can open a menu at any time when you are using an application by pressing the
key on your phone. The menu will look different depending on which application you are
using.
To open a menu in an application
•While using the application, press .
A menu is not available in all applications.
Rearranging your Application screen
Move the applications around on the Application screen according to your preferences.
To arrange applications on the Application screen
1From your Home screen, tap to go to the Application screen.
2Tap and select an option.
To move an application on the Application screen
1Open the Application screen, then tap .
2Touch and hold an item until it magnifies and the phone vibrates, then drag the item
to the new location.
3Tap to exit edit mode.
You can only move your applications when is selected.
To uninstall an application from the Application screen
1From your Home screen, tap .
2Tap . All uninstallable applications are marked with a icon.
3Tap the application you want to uninstall, then tap OK.
Status and notifications
The status bar at the top of your screen shows what's going on in your phone. To the left
you get notifications when there is something new or ongoing. For example, new message
and calendar notifications appear here. The right side shows the signal strength, battery
status, and other information.
Checking notifications and ongoing activities
You can drag down the status bar to open the Notification panel and get more information.
For example, open a new message or view a calendar event from the Notification panel.
You can also open running applications, such as the music player.
18
This is an Internet version of this publication. © Print only for private use.
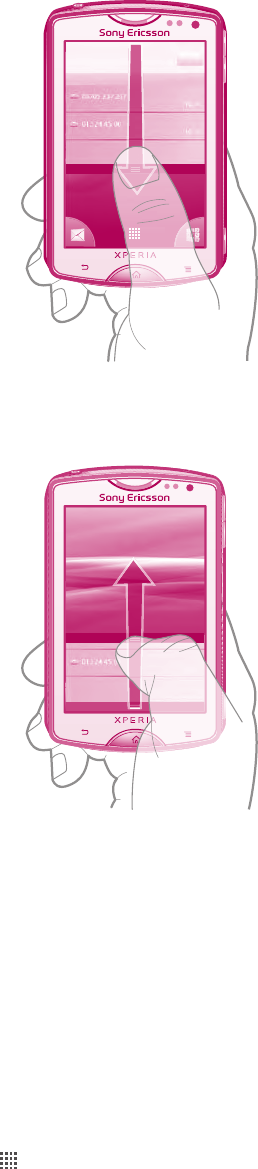
To open the Notification panel
•Drag the status bar downwards.
To close the Notification panel
•Drag the tab at the bottom of the Notification panel upwards.
To open a running application from the Notification panel
•From the Notification panel, tap the icon for the running application to open it.
To clear the Notification panel
•From the Notification panel, tap Clear.
Phone settings menu
View and change your phone settings from the Settings menu.
To access the phone settings
1From the Home screen, tap .
2Tap Settings.
Typing text
Use either the Phonepad or the on-screen keyboard to enter letters, numbers and other
characters. The Phonepad is similar to a standard 12-key telephone keypad while the on-
screen keyboard has a QWERTY layout.
19
This is an Internet version of this publication. © Print only for private use.

Phonepad
The Phonepad is similar to a standard 12-key telephone keypad. It gives you predictive text
and multi-tap input options. You can activate the Phonepad text input method via the
keyboard settings. The Phonepad is only available in portrait orientation.
Using the Phonepad
1
7
8
’
’’ .-ABC DEF ?
JKL MNOGHI !
TUV WXYZPQRS
5
123
3
4 6
2
1 Choose a text input option
2Change the character case and turn on the caps lock. For some languages, this key is used to access extra
characters in the language.
3 Display numbers
4 Display symbols and smileys
5 Enter a space
6 Open the input settings menu to change, for example, the Writing languages. This key also changes the
writing language when more than one input language is selected.
7 Enter a carriage return or confirm text input
8 Delete a character before the cursor
All illustrations are for illustration purposes only and may not accurately depict the actual phone.
To display the Phonepad to enter text
•While holding the phone in portrait orientation, tap a text entry field.
To enter text using the Phonepad
When using the Phonepad, you can choose from two input options:
•When appears in the Phonepad, tap each character key only once, even if the letter you
want is not the first letter on the key. Tap the word that appears or tap to view more
word suggestions and select a word from the list.
•When appears in the Phonepad, tap the on-screen key for the character you want to
enter. Keep pressing this key until the desired character is selected. Then do the same for
the next character you want to enter, and so on.
To hide the Phonepad
•When you enter text using the Phonepad, press .
To shift between upper-case and lower-case letters
•Before you enter a letter, tap to switch to upper-case , or vice versa.
To turn on the caps lock
•Before you type a word, tap or until appears.
20
This is an Internet version of this publication. © Print only for private use.
To enter numbers using the Phonepad
•When the Phonepad is open, tap . A Phonepad with numbers appears.
To insert symbols and smileys using the Phonepad
1When the Phonepad is open, tap . A grid with symbols and smileys appears.
2Scroll up or down to view more options. Tap a symbol or smiley to select it.
To delete characters
•Tap to place the cursor after the character you want to delete, then tap .
To enter a carriage return
•When you enter text, tap to enter a carriage return.
To edit text
1When you enter text, touch and hold the text field until the Edit text menu appears.
2Select an option.
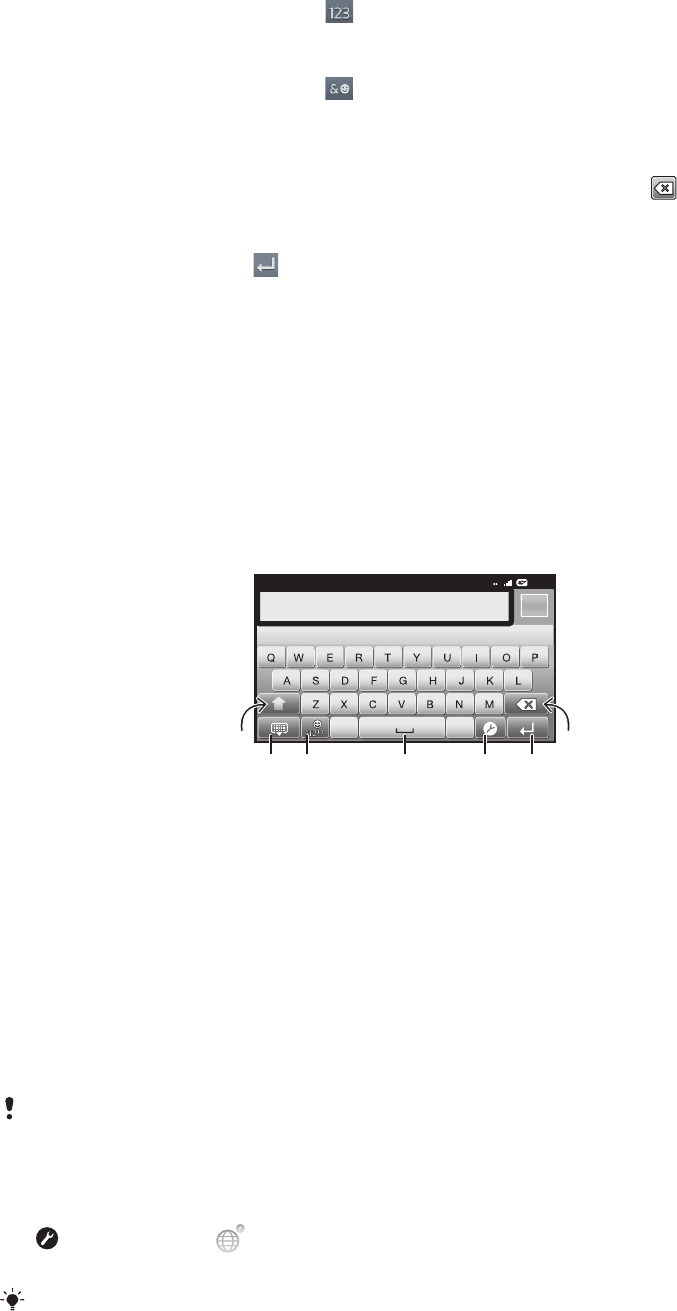
On-screen keyboard
Tap the keys of the on-screen QWERTY keyboard to enter text conveniently. Some
applications open the on-screen keyboard automatically. You can also open this keyboard
by touching a text field.
Using the on-screen keyboard
12:45
3G
.,
5
1
6
7
432
1Change the character case and turn on the caps lock. For some languages, this key is used to access extra
characters in the language.
2 Close the on-screen keyboard view
3 Display numbers and symbols. Touch and hold to display smileys.
4 Enter a space
5 Open the input settings menu to change, for example, the Writing languages. This key also changes the
writing language when more than one input language is selected.
6 Enter a carriage return or confirm text input
7 Delete a character before the cursor
All illustrations are for illustration purposes only and may not accurately depict the actual phone.
To open the on-screen keyboard for the first time
•Hold your phone horizontally and tap a text entry field.
•To use the on-screen keyboard in portrait orientation, tap a text entry field, then tap
or touch and hold if you have already selected more than one input language.
Tap Portrait keyboard and select an option.
Once you’ve made the setting, you can simply activate the on-screen keyboard by tapping a
text entry field.
21
This is an Internet version of this publication. © Print only for private use.
To switch between the on-screen keyboard and the Phonepad
1When you enter text, tap , or touch and hold if you have already selected more
than one input language.
2Tap Portrait keyboard and select an option.
Remember the Phonepad is only available in portrait orientation.
To enter text using the on-screen keyboard
•To enter a character visible on the keyboard, tap the character.
•To enter a character variant, touch and hold a regular keyboard character to get a
list of available options, then select from the list. For example, to enter "é", touch and
hold "e" until other options appear, then, while keeping your finger pressed on the
keyboard, drag to and select "é".
To enter numbers or symbols
•When you enter text, tap . A keyboard with numbers and symbols appears. Tap
to view more options.
To insert a smiley
1When you enter text, touch and hold .
2Select a smiley.
Keyboard and Phonepad settings
You can select settings for the on-screen keyboard and the Phonepad, such as writing
language and automatic correction.
To access the on-screen keyboard and the Phonepad settings
•When you enter text using the on-screen keyboard or Phonepad, tap . If you have
selected more than one writing language, touch and hold instead.
To change writing language using the on-screen keyboard or the Phonepad
1When you enter text, tap , or touch and hold if you have already selected more
than one input language.
2Tap Writing languages and select the languages you want to use for writing.
3If you have selected more than one input language, tap to switch between the
selected writing languages.
Text input settings
When entering text, you can access a text input settings menu that helps you set options
for text prediction. For example, you can decide how you want the phone to present word
alternatives and correct words as you type, or enable the text input application to remember
new words you write.
To change the text input settings
1When you enter text using the on-screen keyboard or the Phonepad, tap , or
touch and hold .
2Tap Text input settings.
3Select the desired settings.
Adjusting the volume
You can adjust the ringtone volume for phone calls and notifications as well as for music
and video playback.
To adjust the ring volume with the volume key
•Press the volume key up or down.
22
This is an Internet version of this publication. © Print only for private use.

To adjust the media playing volume with the volume key
•When playing music or watching video, press the volume key up or down.
To set the phone to silent and vibrate mode
1From the Home screen, tap .
2Find and tap Settings > Sound.
3Mark the Silent mode checkbox.
4Select Vibrate and choose an option.
To enhance the speaker loudness
1From the Home screen, tap .
2Find and tap Settings > Sound.
3Mark the xLOUD™ checkbox.
Customising your phone
Adapt the phone to your needs by adjusting, for example, your personal ringtone, phone
language and your Privacy settings.
Time and date
You can change the time and date in your phone.
To set the date manually
1From the Home screen, tap .
2Find and tap Settings > Date & time.
3Unmark the Automatic checkbox, if it is marked.
4Tap Set date.
5Adjust the date by scrolling up and down.
6Tap Set.
To set the time manually
1From the Home screen, tap .
2Find and tap Settings > Date & time.
3Unmark the Automatic checkbox, if it is marked.
4Tap Set time.
5Adjust the hour and minute by scrolling up and down.
6Tap AM to change to PM or vice versa.
7Tap Set.
If you want to use AM and PM, you have to unmark Use 24-hour format.
To set the time zone
1From the Home screen, tap .
2Find and tap Settings > Date & time.
3Unmark the Automatic checkbox, if it is marked.
4Tap Select time zone.
5Select an option.
To set the date format
1From your Home screen, tap .
2Find and tap Settings > Date & time > Select date format.
3Select an option.
Ringtone settings
To set a phone ringtone
1From your Home screen, tap .
2Find and tap Settings > Sound > Phone ringtone.
3Select a ringtone.
23
This is an Internet version of this publication. © Print only for private use.
To enable touch tones
1From your Home screen, tap .
2Find and tap Settings > Sound.
3Mark the Audible touch tones and Audible selection checkboxes.
To select a notification ringtone
1From your Home screen, tap .
2Find and tap Settings > Sound > Notification ringtone.
3Select a ringtone.
To set a vibrating alert
1From your Home screen, tap .
2Find and tap Settings > Sound.
3Select Vibrate and choose an option.
Screen settings
To adjust the screen brightness
1From your Home screen, tap .
2Find and tap Settings > Display > Brightness.
3To decrease the screen brightness, drag the slider to the left. To increase it, drag
the slider to the right.
4Tap OK.
The brightness level affects your battery performance. For tips on how to improve battery
performance, see Battery performance on page 25.
To set the screen to vibrate
1From your Home screen, tap .
2Find and tap Settings > Sound.
3Mark the Haptic feedback checkbox. The screen now vibrates when you tap soft
keys and certain applications.
To adjust the idle time before the screen turns off
1From your Home screen, tap .
2Find and tap Settings >Display > Screen timeout.
3Select an option.
To turn off the screen quickly, briefly press the power key .
To keep the screen on while charging the phone
1From the Home screen, tap .
2Find and tap Settings > Applications > Development.
3Mark the Stay awake check box.
Phone language
You can select a language to use in your phone.
To change the phone language
1From your Home screen, tap .
2Find and tap Settings > Language & keyboard > Select language.
3Select an option.
If you choose the wrong language and cannot read the menu texts, find and tap the Settings
icon . Then select the entry beside , and select the first entry in the following menu. You can
then select the language you want.
24
This is an Internet version of this publication. © Print only for private use.
Airplane mode
In Airplane mode, your phone's network and radio transceivers are turned off to prevent
disturbance to sensitive equipment. However, you can still play games, listen to music,
watch videos and other content, as long as all this content is saved on your memory card.
You can also be notified by alarms, if alarms are activated.
Turning on Airplane mode reduces battery consumption.
To turn on Airplane mode
1From your Home screen, tap .
2Find and tap Settings > Wireless & networks.
3Mark the Airplane mode checkbox.
You can also select Airplane mode from the Phone options menu. To access the Phone
options menu, press and hold the power key .
Battery
Your Android™ phone keeps you connected and updated wherever you are. This affects
the battery life of your phone. Below are some tips on how to prolong battery life while still
staying connected and up to date.
Battery performance
Standby time, a common term when it comes to battery performance, refers to the time during
which the phone is connected to the network and is not being used. The more time your phone
is in standby and not otherwise in operation, the longer the battery lasts.
The following tips can help you improve battery performance:
•Charge your phone often. This will not affect the lifetime of the battery.
•Downloading data from the Internet is power consuming. When you're not using the
Internet, you can save power by disabling all data connections over mobile networks. You
can do this from the Wireless & network settings. This setting does not prevent your
phone from transmitting data over other wireless networks.
•Turn off GPS, Bluetooth™ and Wi-Fi® when you don't need these features. You can turn
them on and off more easily by adding the Power control widget to your Home screen. You
do not need to turn off 3G.
•Set your synchronisation applications (used to synchronise your email, calendar and
contacts), to synchronise manually. You can also synchronise automatically, but increase
the intervals.
•Check the battery usage menu in the phone to see which applications use the most power.
Your battery consumes more power when you use video and music streaming applications
such as YouTube™. Some Android Market™ applications also consume more power.
•Close and exit applications that you are not using since multitasking affects the battery
performance.
•Lower the screen display brightness level.
•Turn off your phone or use Airplane mode if you are in an area with no network coverage.
Otherwise, your phone repeatedly scans for available networks, and this consumes power.
•Use a Sony Ericsson original handsfree device to listen to music. This consumes less battery
power than when you listen to music through the phone's loudspeakers.
For more information about how to maximise your battery performance, visit
www.sonyericsson.com/support.
To access the battery usage menu
1From the Home screen, tap .
2Find and tap Settings > About phone > Battery use to see which installed
applications consume the most battery power.
25
This is an Internet version of this publication. © Print only for private use.
To add the Status switch widget to your Home screen
1From your Home screen, press .
2Tap Add > Widgets.
3Select the Status switch widget. You can now turn on and off your data connections
more easily.
Battery LED status
Green The battery is fully charged
Flashing red The battery level is low
Orange The battery is charging. The battery level is between low and full
To check the battery level
1From the Home screen, tap .
2Find and tap Settings > About phone > Status.
Memory
You can save content on a memory card and in the phone memory. Music, video clips and
photos are saved on the memory card while applications, contacts and messages are
saved in the phone memory.
You can move some applications from the phone memory to the memory card.
To move an application to the memory card
1From your Home screen, tap .
2Find and tap Settings > Applications > Manage applications.
3Tap the desired application.
4Tap Move to SD card.
It is not possible to move some applications from the phone memory to the memory card.
Memory card
You may have to purchase a memory card separately.
Your phone supports a microSD™ memory card, which is used for media content. This
type of card can also be used as a portable memory card with other compatible devices.
Without a memory card you cannot use the camera, nor can you play or download music files
and video clips.
Safely removing the memory card
You can safely remove the memory card from your phone any time when your phone is
turned off. If you want to remove the memory card from your phone when your phone is
on, you must unmount the memory card from your phone first before you physically remove
the memory card from your phone. This can prevent damaging the memory card or losing
your data stored on the memory card.
To unmount the memory card
1From your Home screen, tap .
2Find and tap Settings > Storage > Unmount SD card.
Formatting the memory card
You can format the memory card in your phone, for example, to free up memory. This
means that you erase all data on the card.
All content on the memory card gets erased when you format it. Make sure you make backups
of everything you want to save before formatting the memory card. To back up your content, you
26
This is an Internet version of this publication. © Print only for private use.
can copy it to your computer. For more information, refer to the chapter Connecting your phone
to a computer on page 93.
To format the memory card
1From your Home screen, tap .
2Find and tap Settings > Storage > Unmount SD card.
3After you have unmounted the memory card, tap Erase SD card.
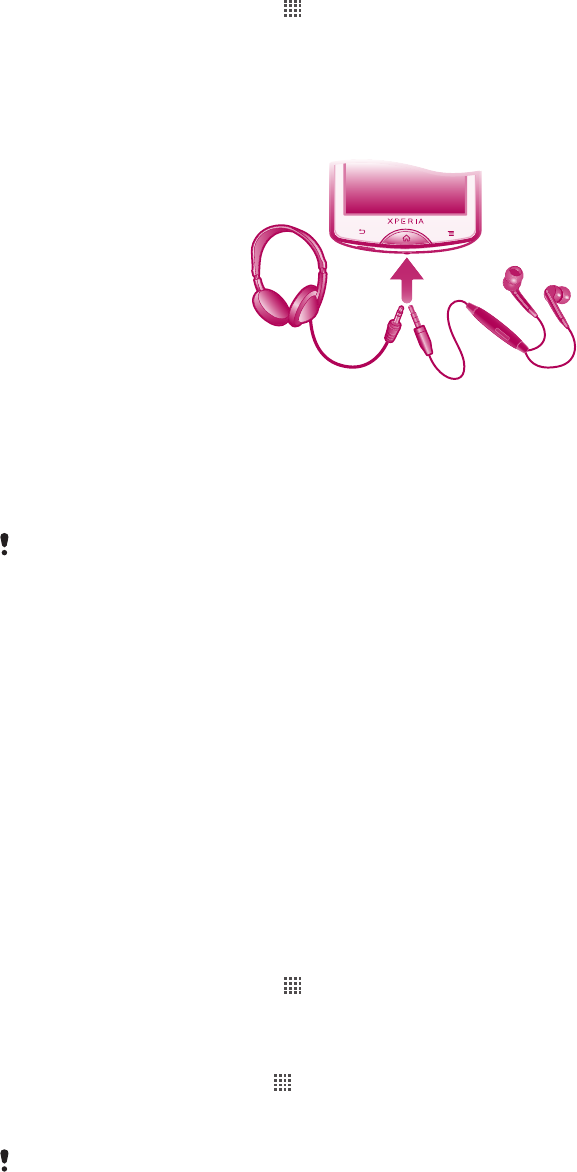
Stereo portable handsfree
To use a handsfree
1Connect a portable handsfree.
2To answer a call, press the call handling key. If you listen to music, it stops when
you receive a call and resumes when the call has ended.
3To end a call, press the call handling key.
If a portable handsfree is not included with the phone, you may purchase it separately.
Internet and messaging settings
To send text and multimedia messages and to access the Internet, you must have a 2G/
3G mobile data connection and the correct settings. There are different ways to get these
settings:
•For most mobile phone networks and operators, Internet and messaging settings come
preinstalled on your phone. You can then start using the Internet and send messages right
away.
•In some cases you will get the option to download Internet and messaging settings the first
time you turn on your phone. It is also possible to download these settings later from the
Settings menu.
•You can manually add and change Internet and network settings in your phone at any time.
Contact your network operator for detailed information on your Internet and messaging
settings.
To download Internet and messaging settings
1From your Home screen, tap .
2Find and tap Settings > Sony Ericsson > Settings download.
To view the current Access Point Name (APN)
1From the Home screen, tap .
2Find and tap Settings > Wireless & networks > Mobile networks.
3Tap Access Point Names.
If you have several available connections, the active network connection will be indicated by a
marked button to the right.
27
This is an Internet version of this publication. © Print only for private use.
To configure APN settings manually
1From the Home screen, tap .
2Find and tap Settings > Wireless & networks > Mobile networks > Access Point
Names.
3Press .
4Tap New APN.
5Tap Name and enter the name of the network profile you want to create.
6Tap APN and enter the access point name.
7Enter all other information required by your network operator.
8Press and tap Save .
Contact your network operator for detailed information about your network settings.
To reset the default Internet settings
1From the Home screen, tap .
2Tap Settings > Wireless & networks > Mobile networks > Access Point
Names.
3Press .
4Tap Reset to default.
Usage info
For quality purposes, Sony Ericsson collects anonymous bug reports and statistics
regarding your phone usage. None of the information gathered includes personal data. By
default, the usage info sending option is not activated. But you can choose to activate it if
you like.
To send usage info
1From your Home screen, tap .
2Find and tap Settings > Sony Ericsson > Usage info.
3Mark the Send usage info checkbox.
Using Data monitor
Use the Data monitor to keep track of the amount of data your phone sends and receives.
This application tracks the approximate data traffic over 2G/3G networks from a predefined
start day. The values are reset monthly. For example, if the start day is set to 15, the data
traffic counter is reset on the 15th day of every month. The first time you start the Data
monitor, the start day is set to 1.
Get the Data monitor to alert you when the amount of transferred data reaches a certain
limit. You can set limits separately for sent data, received data and total data. You can also
activate the Data monitor as a widget on the Home screen.
Data amounts indicated are approximate. Please consult your service provider to verify actual
data usage.
Data sent or received over Wi-Fi® or Bluetooth™ connections is not tracked.
To set the Data monitor start day
1From your Home screen, tap .
2Find and tap Data monitor.
3Tap Settings > Month period.
4Adjust the start day by scrolling up and down.
5When finished, tap OK.
28
This is an Internet version of this publication. © Print only for private use.

To set a Data monitor alert
1From your Home screen, tap .
2Find and tap Data monitor.
3Tap the bell icon next to Sent data, Received data or Total data, depending on
which alert you want to set.
4Adjust the values by scrolling up and down.
5When finished, tap OK.
To clear a Data monitor alert
1From your Home screen, tap .
2Find and tap Data monitor.
3Tap the bell icon next to Sent data, Received data or Total data, depending on
the alert you want to remove.
4Tap Reset. The alert limit is reset to zero and the alert is deactivated.
Turning off data traffic
You can disable all data connections over 2G/3G networks with your phone to avoid any
unwanted data downloads and synchronisations. Contact your network operator if you
need detailed information about your subscription plan and data traffic costs.
When data traffic is turned off, you can still use Wi-Fi® and Bluetooth™ connections. You can
also send and receive multimedia messages.
To turn off all data traffic
1From your Home screen, tap .
2Find and tap Settings > Wireless & networks > Mobile networks.
3Unmark the Data enabled checkbox.
Data roaming
Depending on your network operator, it might be possible to allow mobile data connections
via 2G/3G outside of your home network (roaming). Please note that data transmission
charges may apply. Contact your network operator for more information.
Applications may sometimes use the Internet connection in your home network without any
notification, for example, when sending search and synchronisation requests. Additional charges
may apply for data roaming. Consult your service provider.
To activate data roaming
1From the Home screen, tap .
2Find and tap Settings > Wireless & networks > Mobile networks.
3Mark the Data roaming checkbox.
You can’t activate data roaming when data connections have been deactivated
Network settings
Your phone automatically switches between networks depending on available networks
over different locations. Initially, your phone is configured to use the fastest mobile network
mode available for data. But you can configure your phone manually to use only a slower
2G network mode for data, to extend the life of your battery between charges. You can
also configure your phone to access a different set of network modes entirely, or to behave
in special ways when roaming.
To select a network mode
1From your Home screen, tap .
2Find and tap Settings > Wireless & networks > Mobile networks.
3Tap Network Mode.
4Select a network mode.
29
This is an Internet version of this publication. © Print only for private use.

To select another network manually
1From the Home screen, tap .
2Find and tap Settings > Wireless & networks > Mobile networks > Network
operators.
3Tap Search mode.
4When a popup window appears, tap Select manually.
5Select a network.
If you select a network manually, your phone will not search for other networks, even if you move
out of range of the manually selected network.
To activate automatic network selection
1From the Home screen, tap .
2Find and tap Settings > Wireless & networks > Mobile networks > Network
operators.
3Tap Search mode.
4Tap Select automatically.
30
This is an Internet version of this publication. © Print only for private use.
Calling
Emergency calls
Your phone supports international emergency numbers, for example, 112 or 911. You can
normally use these numbers to make emergency calls in any country, with or without the
SIM card inserted, if you are within range of a network.
To make an emergency call
1From your Home screen, tap .
2Find and Tap Phone.
3Enter the emergency number and tap Call. To delete a number, tap .
You can make emergency calls when no SIM card is inserted.
To make an emergency call while the SIM card is locked
1Tap Emergency call.
2Enter the emergency number and tap Call. To delete a number, tap .
Call handling
You can make a call by manually dialling a phone number, by tapping a number saved in
your phone's contact list, or by tapping next to a phone number in your Call log.
To make a call by dialling
1From your Home screen, tap .
2Find and tap Phone.
3Enter the number of the recipient and tap Call. To delete a number, tap .
To end a call
•Tap End call.
To make an international call
1From your Home screen, tap .
2Find and tap Phone.
3Touch and hold 0 until a “+” sign appears.
4Enter the country code, area code (without the first 0) and phone number, then tap
Call.
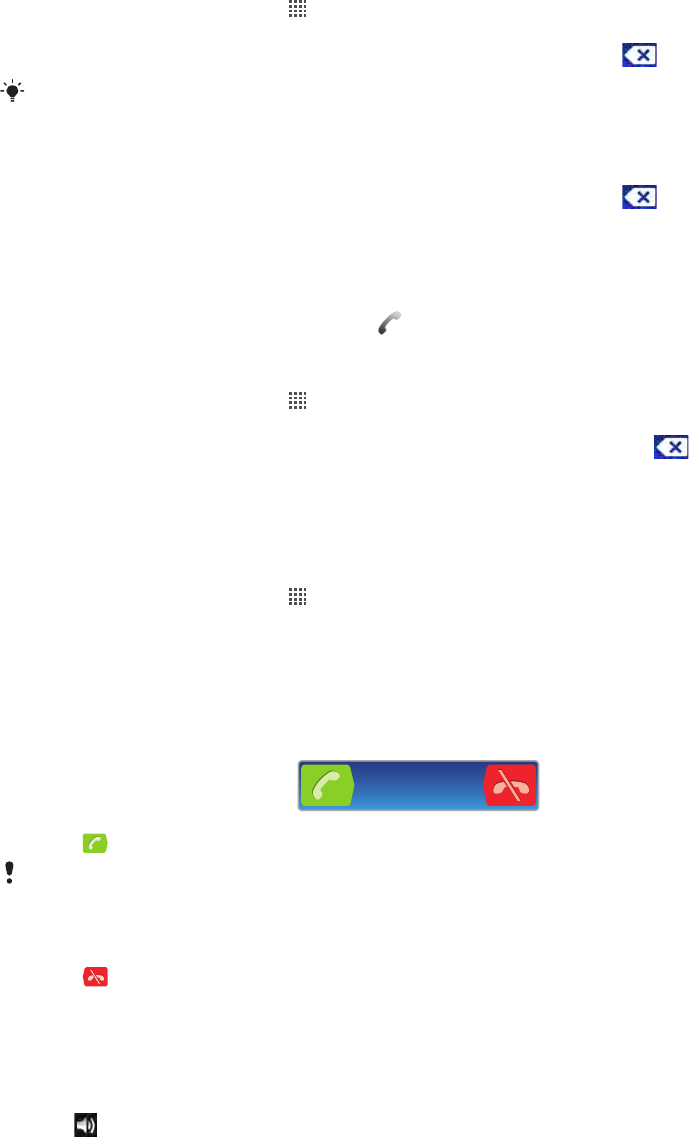
To answer a call
•Drag to the right across the screen.
If you are using regular headphones without a microphone, you have to remove the headphones
from the headset connector to be able to answer the call.
To decline a call
•Drag to the left across the screen.
To change the ear speaker volume during a call
•Press the volume key up or down.
To turn on the loudspeaker during a call
•Tap .
31
This is an Internet version of this publication. © Print only for private use.
To mute the microphone during a call
•Tap .
To activate the screen during a call
•Press .
To enter numbers during a call
1During a call, tap . A keypad appears.
2Enter numbers.
To mute the ringtone for an incoming call
•When you receive the call, press the volume key.
Recent calls
In the call log, you can view missed , received and dialled calls.
To view your missed calls
1When you have missed a call, appears in the status bar. Drag the status bar
downwards.
2Tap Missed call.
To call a number from your call log
1From your Home screen, tap .
2Find and tap Phone > Call log to enter the call log view.
3To call a number directly, tap next to the number. To edit a number before calling,
touch and hold the number, then select an option.
To add a number from the call log to your contacts
1From your Home screen, tap .
2Find and tap Phone > Call log.
3Touch and hold the number, then tap Add to Contacts.
4Tap the desired contact, or tap Create new contact.
5Edit the contact details and tap Done.
Voicemail
If your subscription includes an answering service, callers can leave a voicemail message
when you cannot answer a call. Usually, the voicemail number is saved on the SIM card. If
not, contact your service provider to get your voicemail number. You can then enter the
number manually.
To enter your voicemail number
1From the Home screen, tap .
2Find and tap Settings > Call settings > Voicemail settings > Voicemail number.
3Enter your voicemail number.
4Tap OK.
To call your voicemail service
1From your Home screen, tap .
2Find and tap Phone.
3Touch and hold 1.
Multiple calls
If you have activated call waiting, you can handle multiple calls at the same time. When it
is activated, you will be notified by a beep if you receive another call.
32
This is an Internet version of this publication. © Print only for private use.
To activate or deactivate call waiting
1From the Home screen, tap .
2Find and tap Settings > Call settings > Additional settings.
3To activate or deactivate call waiting, tap Call waiting.
To reject a second call
•When you hear repeated beeps during a call, tap Busy.
To answer a second call and end the ongoing call
•When you hear repeated beeps during a call, tap End current call & answer.
To answer a second call and put the ongoing call on hold
•When you hear repeated beeps during a call, tap Answer.
To make a second call
1During an ongoing call, tap .
2Enter the number of the recipient and tap .
3If the recipient answers, the first call is put on hold.
The same procedure applies to subsequent calls.
To switch between multiple calls
•To switch to another call and put the current call on hold, tap the desired number
or contact.
To end the ongoing call and return to the next call on hold
•Tap .
Conference calls
With a conference or multiparty call, you can have a joint conversation with two or more
persons.
To make a conference call
1During an ongoing call, tap .
2Dial the number of your second participant and tap .
3If the second participant answers, the first call is put on hold.
4Tap .
To add more participants, repeat steps 1 to 4.
To have a private conversation with a conference call participant
1During an ongoing conference call, tap the button showing the number of
participants. For example, tap 3 participantsif there are three participants on the
call.
2Tap the name of the participant you want to talk to privately.
3To end the private conversation and return to the conference call, tap .
To release a participant from a conference call
1During an ongoing conference call, tap the button showing the number of
participants. For example, tap 3 participants if there are three participants.
2Tap next to the participant you want to release.
To end a conference call
•During the call, tap .
33
This is an Internet version of this publication. © Print only for private use.

Call settings
Forwarding calls
You can forward calls, for example, to another phone number, or to an answering service.
To forward calls
1From the Home screen, tap .
2Find and tap Settings > Call settings > Call forwarding.
3Select an option.
4Enter the number you want to forward the calls to and tap Enable.
To turn off call forwarding
1From the Home screen, tap .
2Find and tap Settings > Call settings > Call forwarding.
3Select an option.
4Tap Disable.
Showing or hiding your phone number
You can select to show or hide your phone number on call recipients' devices when you
call them.
To show or hide your phone number
1From the Home screen, tap .
2Find and tap Settings > Call settings > Additional settings > Caller ID.
3Select an option.
Fixed Dialling Numbers
If you have received a PIN2 code from your service provider, you can use a list of Fixed
Dialling Numbers (FDN) to restrict outgoing calls.
To enable or disable fixed dialling
1From the Home screen, tap .
2Find and tap Settings > Call settings > Fixed dialling numbers.
3Tap Activate fixed dialling or Deactivate fixed dialling.
4Enter your PIN2 and tap OK.
To access the list of accepted call recipients
1From the Home screen, tap .
2Find and tap Settings > Call settings > Fixed dialling numbers > Fixed dialling
numbers.
34
This is an Internet version of this publication. © Print only for private use.
Contacts
Use the Contacts application to store and manage all your contacts. Keep your phone
numbers, email addresses, and other contact data in one place. Contacts shows you all
communication with a particular contact. Just tap on the contact to access this information
in one easy overview.
You can add new contacts in your phone and synchronise them with the contacts in your
Sony Ericsson Sync account, Google™ account, Microsoft® Exchange ActiveSync®
account, or other accounts that support syncing contacts. Contacts automatically tries to
join new addresses with existing contacts, to create a single entry. You can also manage
this process manually.
Opening Contacts for the first time
The first time you open the Contacts application, you get hints on how to start adding
contacts to your phone. This is a good time to choose a method that suits your situation
and setup.
Getting contacts into your phone
There are several methods to get your existing contacts and other data into your new
phone:
Synchronise your phone with contacts already stored with an online synchronisation service, such as
Sony Ericsson Sync or Google Sync™.
Import contacts from a SIM card. You may not be able to transfer all information from one phone to
another using this method because of limited memory on the SIM card.
Import contacts from a memory card.
Use a Bluetooth™ connection.
Send contacts via messaging services such as SMS, MMS or email.
The online synchronisation method works best for most users. This way, you always have a
backup online.
To view your contacts
•From your Home screen, tap , then tap . Your contacts are listed here.
To synchronise your phone contacts with a synchronisation account
1From your Home screen, tap , then tap .
2Press , then tap Settings > Accounts & sync.
3To set up a synchronisation account, tap Add account and follow the on-screen
instructions. If you have already set up a synchronisation account and you want to
sync with that account, tap the account, press , and tap Sync now.
To import contacts from a SIM card
1From your Home screen, tap , then tap .
2Press , then tap Import contacts > SIM card.
3If you have set up a synchronisation account, you can choose to add the SIM card
contacts under that account. Or you can choose to only use these contacts in the
phone. Select your desired option.
4To import an individual contact, find and tap the contact. To import all contacts,
press , then tap Import all.
To import contacts from a memory card
35
This is an Internet version of this publication. © Print only for private use.
1From your Home screen, tap , then tap .
2Press , then tap Import contacts > Memory card.
3If you have set up a synchronisation account, you can add the imported memory
card contacts under that account. Or you can choose to only use the imported
contacts in the phone. Select your desired option.
4If you have more than one vCard file on the SD card, a list appears showing different
batches of phone contacts, with the corresponding dates for when they were
created. Select the batch you want to import.
To receive contact data sent using Bluetooth™ technology
1Make sure you have the Bluetooth™ function turned on and your phone set to visible.
If not, then you cannot receive data from other devices.
2When you are asked to confirm whether you want to receive the file, tap Accept.
3Drag down the Notification panel and tap the file you received to import the contact
data.
To receive contacts sent using a messaging service
1When you receive a new text message, multimedia message, or email message,
open the message.
2The received contact data appears as a vCard attachment. Tap, or touch and hold
the vCard file to open a menu so you can save the contact data.
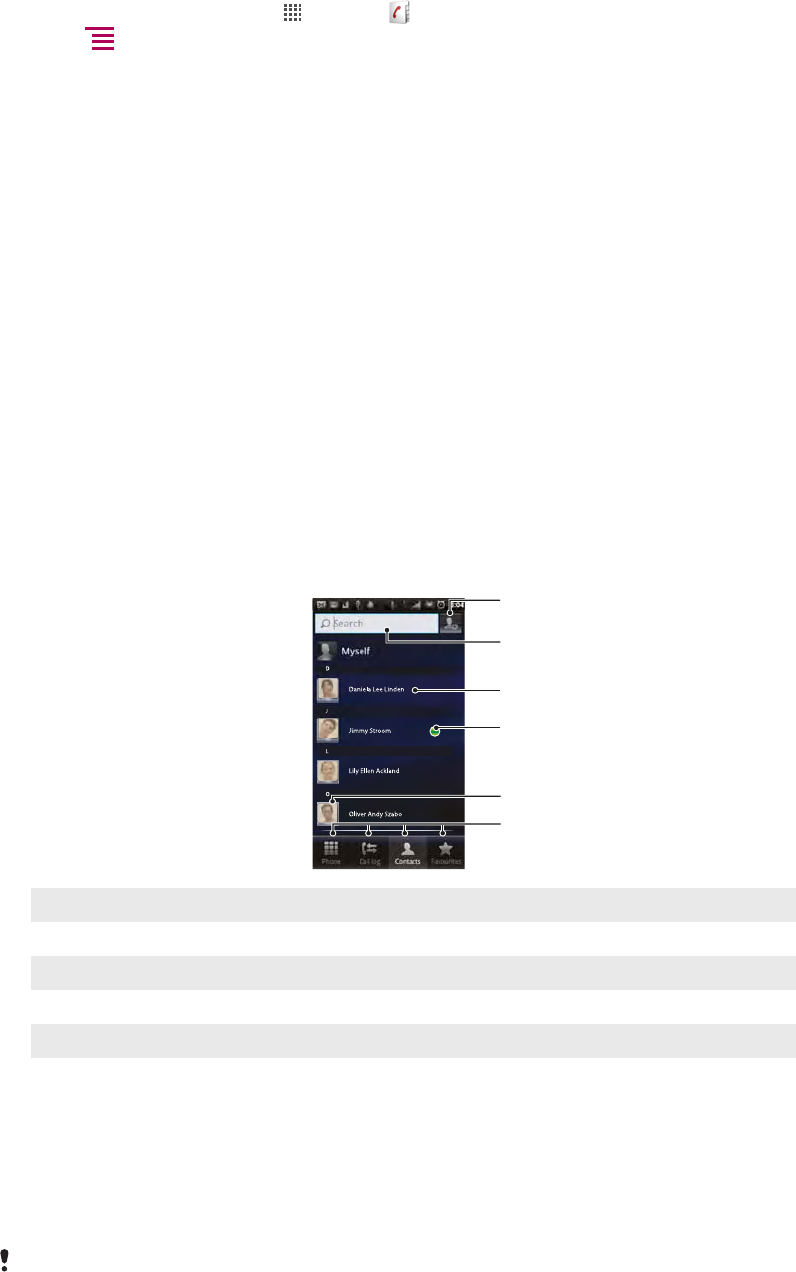
Contacts screen overview
4
6
5
3
2
1
1Tap here to create a contact
2 Contact search field
3 Touch a contact to view its details
4 Icon shows contact's status on instant messaging services
5 Tap a contact thumbnail to access the Quick Contact menu
6 Shortcut tabs
Managing your contacts
Create, edit and synchronise your contacts in a few simple steps. Select to display only the
contacts you want to use in the phone. If you synchronise your contacts with more than
one account, you can join contacts in your phone to avoid duplicates.
Some synchronisation services, for example some social networking services, do not allow you
to edit contact details.
36
This is an Internet version of this publication. © Print only for private use.
To select which contacts to display in the Contacts application
1From your Home screen, tap , then tap .
2Press , then tap Filter.
3In the list that appears, mark and unmark the desired options. If you have
synchronised your contacts with a synchronisation account, that account appears
in the list. You can tap the account to further expand the list of options. When you
are finished, tap OK.
To add a contact
1From your Home screen, tap , then tap .
2Tap .
3If you have synchronised your contacts with one or more accounts, select the
account to which you want to add this contact, or tap Phone contact if you only
want to use this contact in your phone.
4Enter or select the desired information for the contact.
5When you are finished, tap Done.
If you add a plus sign and the country code before a contact phone number, you can use the
number when you make calls from other countries.
To edit a contact
1From the Home screen, tap , then tap .
2Touch and hold the contact you want to edit, then tap Edit contact.
3Edit the desired information. When you are finished, tap Done.
To associate a picture with a contact
1From your Home screen, tap , then tap .
2Touch and hold the contact you want to edit, then tap Edit contact.
3Tap and select the desired method for adding the contact picture.
4When you have added the picture, tap Done.
You can also add a picture to a contact directly from the Gallery application.
To view your communication with a contact
1From the Home screen, tap , then tap .
2Tap the contact you want to view.
3To view your communication with the contact for different media, tap or flick through
the filter items at the bottom of the screen.
To delete contacts
1From the Home screen, tap , then tap .
2Press , then tap Delete contacts.
3Mark the contacts you want to delete, or tap Mark all if you want to delete all
contacts.
4Tap Delete > OK.
To edit contact information about yourself
1From the Home screen, tap , then tap .
2Touch and hold Myself at the top of the contact list, then tap Edit contact.
3Enter the new information or make the changes you want.
4When you are done, tap Done.
Avoiding duplicate entries in your Contacts
If you synchronise your contacts with a new account or import contact information in other
ways, you could end up with duplicate entries in your Contacts. If this happens, you can
join such duplicates to create a single entry. And if you join entries by mistake, you can
separate them again later.
37
This is an Internet version of this publication. © Print only for private use.
To join contacts
1From the Home screen, tap , then tap .
2Touch and hold the contact you want to join with another contact, then tap Join
contacts.
3From the list that appears, tap the contact whose information you want to join with
the first contact, then tap OK to confirm. The information from the second contact
is added to the first contact, and the second contact is no longer displayed in the
Contacts list.
To separate joined contacts
1From the Home screen, tap , then tap .
2Touch and hold the joined contact you want to edit, then tap Edit contact.
3Press , then tap Separate.
4Tap OK.
Favourites
You can mark a contact as a favourite. The Favourites tab gives you quick access to your
marked contacts. In Favourites, you can also find a list of the contacts you communicate
with most frequently.
To mark or unmark a contact as a favourite
1From the Home screen, tap , then tap .
2Tap the contact you want to add to or remove from your favourites.
3Tap .
Communicating with your contacts
To search for a contact
1From your Home screen, tap , then tap .
2Enter the first few letters of the contact name in the Search field. All contacts
beginning with those letters appear.
The quick contact menu
Tap a contact's thumbnail to view quick communication options for a particular contact.
Options include call the contact, sending a text or multimedia message, and starting a chat
using Talk.
For an application to appear as an option in the quick contact menu, you may need to set up the
application in your phone. For example, you need to start the Gmail™ application and enter
your login details before you can use it in the quick contact menu.
Sharing your contacts
To send your business card
1From your Home screen, tap , then tap .
2Tap Myself.
3Press , then tap Send contact > OK.
4Select an available transfer method and follow the on-screen instructions.
To send a contact
1From your Home screen, tap , then tap .
2Tap the contact whose details you want to send.
3Press , then tap Send contact > OK.
4Select an available transfer method and follow the on-screen instructions.
38
This is an Internet version of this publication. © Print only for private use.
To send several contacts at once
1From your Home screen, tap , then tap .
2Press , then tap Send contacts.
3Mark the contacts you want to send, or select all if you want to send all contacts.
4Tap Send, then tap OK to confirm.
5Select an available transfer method and follow the on-screen instructions.
Backing up contacts
You can use the memory card and the SIM card for backing up contacts.
To export all contacts to the memory card
1From your Home screen, tap , then tap .
2Press , then tap Back up contacts > Memory card.
3Tap OK.
To export contacts to a SIM card
1From your Home screen, tap , then tap .
2Press , then tap Back up contacts > SIM card.
3Mark the contacts you want to export, or tap Mark all if you want to export all your
contacts.
4Tap Back up.
5Select Add contacts if you want to add the contacts to existing contacts on your
SIM card, or select Replace all contacts if you want to replace the existing contacts
on your SIM card.
When you export contacts to a SIM card, not all information may get exported. This is due to
memory limitations on SIM cards.
39
This is an Internet version of this publication. © Print only for private use.
Messaging
Using text and multimedia messaging
You can send and receive text messages from your phone using SMS (Short Message
Service). If your subscription includes MMS (Multimedia Messaging Service), you can also
send and receive messages that contain media files, for example, pictures and videos. A
single text message may contain up to 160 characters. If you exceed 160 characters, then
all your single messages are linked and sent together. You are charged for each 160-
character message sent. When you view your messages, they appear as conversations,
which means that all messages to and from a particular person are grouped together.
To send multimedia messages, you need the correct MMS settings in your phone. See Internet
and messaging settings on page 27.
To create and send a message
1From your Home screen, tap , then find and tap .
2Tap New message.
3Tap Write message and enter your message text.
4To add a recipient, tap Add recipient, then select a contact or enter the full number
manually.
5If you want to add a media file, tap and select an option.
6If you want to add or remove recipients before sending the message, press . To
add a recipient, tap Add recipient. To remove a recipient, tap Edit recipients and
tap next to a recipient field. When you are finished, tap Done.
7To send the message, tap Send.
If you exit a message before sending, it gets saved as a draft. The conversation gets tagged with
the word Draft.
To read a received message
1From your Home screen, tap , then find and tap .
2Tap the desired conversation.
3If the message is not yet downloaded, tap and hold the message, then tap
Download message.
When you receive a text or multimedia message, appears in the status bar. To read the
message, you can also drag the status bar downwards and tap the received message when the
status bar is open.
To reply to a message
1From your Home screen, tap , then tap Messaging.
2Tap the desired conversation.
3Enter your reply and tap Send.
To forward a message
1From your Home screen, tap , then tap Messaging.
2Tap the desired conversation.
3Touch and hold the message you want to forward, then tap Forward message.
4Select a recipient from the list, or tap New conversation to add a recipient who is
not in the list.
5Edit the message and tap Send.
To delete a message
1From your Home screen, tap , then tap Messaging.
2Tap the desired conversation.
3Touch and hold the message you want to delete, then tap Delete message >
Yes.
40
This is an Internet version of this publication. © Print only for private use.
To delete conversations
1From your Home screen, tap , then tap Messaging.
2Press , then tap Delete several.
3Mark the checkboxes for the conversations you want to delete, then tap Delete.
To save a sender's number to a contact
1From your Home screen, tap , then tap Messaging.
2Tap a conversation.
3Tap the sender's number at the top of the screen.
4Tap .
5Select an existing contact, or tap if you want to create a new contact.
6Edit the contact information and tap Done.
To call a message sender
1From your Home screen, tap , then tap Messaging.
2Tap a conversation.
3Tap the recipient name or number at the top of the screen.
4If the recipient is saved in your contacts, tap the phone number you want to call. If
you have not saved the recipient in your contacts, tap .
To save a file contained in a message you receive
1From yourHome screen, tap , then tap Messaging.
2Tap the desired conversation.
3If the message has not been downloaded yet, tap and hold the message, then tap
Download message.
4Touch and hold the file you want to save, then select the desired option.
Text and multimedia message options
To change the notification settings for messages
1From your Home screen, tap , then tap Messaging.
2Press , then tap Settings.
3If desired, tap Notification tone and select a notification sound.
4If desired, tap Notification vibration and mark the checkbox to activate.
To change the delivery report settings for outgoing messages
1From your Home screen, tap , then tap Messaging.
2Press , then tap Settings.
3Tap Delivery report to activate or deactivate the delivery report.
When a message has been delivered to the recipient, appears in the message.
To view messages saved on the SIM card
1From your Home screen, tap , then tap Messaging.
2Press , then tap Settings > SIM messages.
41
This is an Internet version of this publication. © Print only for private use.
Email
Use the Email application in your phone to send and receive emails through your regular
email account or through your corporate account. Or you can do both. Your phone can
handle several email accounts at the same time. You can set up these accounts to run
through one combined inbox, or through separate inboxes.
Gmail™ has its own application, but it can also be combined in an inbox with other email
accounts.
Your corporate Microsoft® Outlook® email messages have to be stored on a
Microsoft® Exchange server for the functionality described above to work. See Synchronising
your corporate email, calendar and contacts on page 56 for more information.
To set up an email account in your phone
1From your Home screen, tap .
2Find and tap Email.
3Enter your email address and password, then tap Next.
4If the settings for the email account cannot be downloaded automatically, complete
the setup manually.
If you need to enter the settings manually, contact your email service provider for the correct
email account settings. For corporate email, select Exchange Active Sync as the account type.
You can set up more than one email account. See To add an extra email account in your
phone on page 44.
Using email
To create and send an email message
1From your Home screen, tap .
2Tap Email.
3If you are using several email accounts, tap the account you want to send the
message from.
4Tap New mail.
5Tap To and start typing the recipient's address. Matches are displayed in a dynamic
list. Tap the relevant match or continue typing the complete email address. To add
more recipients, enter a comma ( , ) or a semi colon ( ; ) and start typing another
name. To delete a recipient, tap the key.
6Tap Subject and enter the email subject.
7In the message area, enter your message text.
8To attach a file, tap Add attachment. Select the type of file, then tap the file you
want to attach from the list that appears.
9Tap Send.
To receive email messages
1From your Home screen, tap .
2Tap Email.
3If you are using several email accounts, tap the account that you want to check. If
you want to check all your email accounts at once, tap Combined Inbox.
4To download new messages, press , then tap Refresh.
For corporate accounts set to push mode, you do not have to refresh the inbox. When push
mode is enabled, your phone is updated automatically when new emails are received.
42
This is an Internet version of this publication. © Print only for private use.

To read your email messages
1From your Home screen, tap .
2Find and tap Email.
3If you are using several email accounts, tap the account you want to check. If you
want to check all your email accounts at once, tap Combined Inbox.
4In the email inbox, scroll up or down and tap the email you want to read.
To preview and read email using the preview pane
1From your Home screen, tap .
2Find and tap Email.
3If you are using several email accounts, tap the account you want to check. If you
want to check all your email accounts at once, tap Combined Inbox.
4If enabled, the email preview pane appears.
5Scroll up or down in the email inbox and tap the email you want to read. The email
opens in the preview pane.
6To view the email in fullscreen format, drag the split bar (located between the inbox
and the preview pane) accordingly. In fullscreen format, use the forward and back
arrows at the top of the screen to read your next or previous messages.
7To return to the inbox view, drag the split bar accordingly.
To change the preview pane settings
1From your Home screen, tap , then find and tap Email.
2Press , then tap Preview pane and select an option.
To view an email message attachment
1From your Home screen, tap .
2Find and tap Email.
3Find and tap the desired message in your email inbox.
4If necessary, scroll down in the email preview pane to see the attachment. Tap
Open or Save next to it.
To save a sender's email address to your contacts
1From your Home screen, tap .
2Find and tap Email.
3Find and tap the desired message in your email inbox.
4Tap the name of the sender at the top of the screen.
5Tap OK when you are prompted to add the name to your contacts.
6Select an existing contact, or tap Create new contact if you want to create a new
contact.
7Edit the contact information and tap Done.
To reply to an email message
1From your Home screen, tap .
2Tap Email.
3In your email inbox, touch and hold the message you want to reply to.
4Tap Reply or Reply all.
5Enter your reply, then tap Send.
To forward an email message
1From your Home screen, tap .
2Tap Email.
3In your email inbox, touch and hold the message you want to forward.
4Tap Forward.
5Tap To and enter the recipient's address.
6Enter your message, then tap Send.
43
This is an Internet version of this publication. © Print only for private use.
To delete an email message
1From your Home screen, tap .
2Tap Email.
3In your email inbox, touch and hold the message you want to delete, then tap
Delete.
To change the inbox checking frequency
1From your Home screen, tap .
2Find and tap Email.
3If you have set up more than one email account, tap the account you want to adjust.
4Press , then tap Account settings > Inbox check frequency and select an
option.
Using email accounts
To add an extra email account in your phone
1From your Home screen, tap .
2Find and tap Email.
3Press , then tap Accounts.
4Press , then tap Add account.
5Enter the email address and password, then tap Next. If the settings for the email
account cannot be downloaded automatically, complete the setup manually.
If you have more than one email account in your phone, you will see a list of your accounts when
you open the Email application. Just tap the name of the account you want to open.
To set an email account as your default account
1From your Home screen, tap .
2Find and tap Email.
3Tap the account you want to use as the default account for composing and sending
email.
4Press , then tap Account settings.
5Mark the Default account checkbox.
If you only have one email account, then this account is automatically the default account.
To remove an email account from your phone
1From your Home screen, tap .
2Find and tap Email.
3If you have several email accounts in your phone, go to step 4. If you only have one
email account, press , then tap Accounts.
4Touch and hold the account you want to remove, then tap Delete account > OK.
Gmail™ and other Google™ services
If you have a Google™ account, you can use the Gmail™ application in your phone to read,
write and organise email messages. After you set up your Google™ account to work in
your phone, you can also chat to friends using the Google Talk™ application, synchronise
your phone calendar application with your Google Calendar™, and download applications
and games from Android Market™.
44
This is an Internet version of this publication. © Print only for private use.

To set up a Google™ account in your phone
1From your Home screen, tap .
2Find and tap Settings > Accounts & sync > Add account > Google.
3Follow the registration wizard to create a Google™ account, or sign in if you already
have an account. Your phone is now ready to use with Gmail™, Google Talk™ and
Google Calendar™.
You can also sign in or create a Google™ account from the setup guide the first time you start
your phone. Or you can go online and create an account at www.google.com/accounts.
To open the Gmail™ application
1From the Home screen, tap .
2Find and tap Gmail™ .
45
This is an Internet version of this publication. © Print only for private use.

Google Talk™
You can use Google Talk™ instant messaging in your phone to chat with friends who also
use this application.
To start Google Talk™
1From your Home screen, tap .
2Find and tap Talk.
To reply to an instant message with Talk
1When someone contacts you on Talk, appears in the status bar.
2Drag the status bar downwards, then tap the message and begin to chat.
46
This is an Internet version of this publication. © Print only for private use.
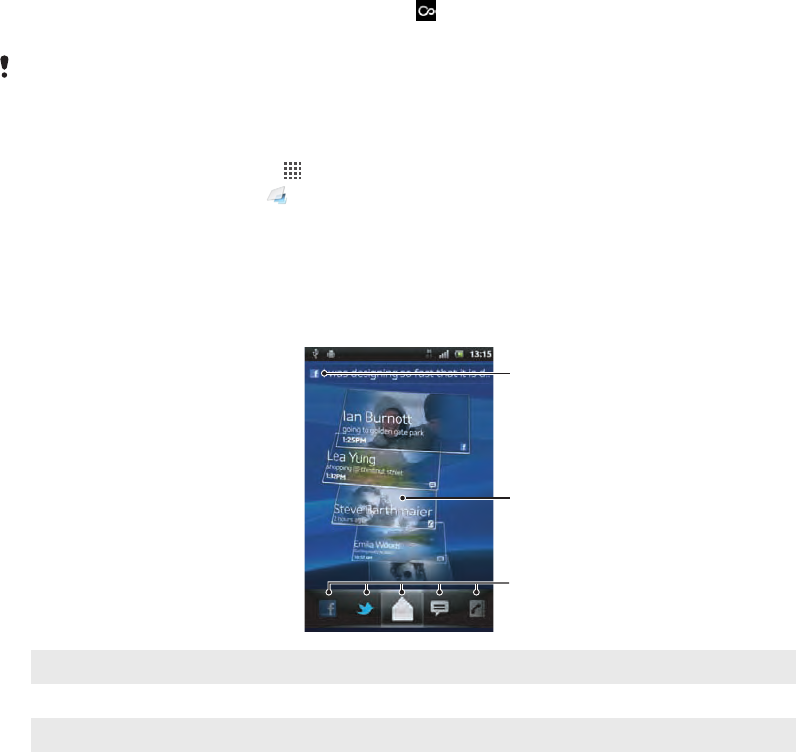
Sony Ericsson Timescape™
Sony Ericsson Timescape™ changes the way you interact with others by collecting all your
communications into one view. Every event (such as text and multimedia messages, missed
calls and web service updates) appears as a tile in a chronological flow on the screen. This
way, you can see a snack-size preview of events before choosing to open and view the full
content. Also, you can tap the infinite button to view a range of content related to the
item you are currently viewing in Timescape™.
The services and features described in this chapter may not be supported in all countries or
regions, or by all networks and/or service providers in all areas.
To start Timescape™
1From your Home screen, tap .
2Find and tap Timescape™ .
3The first time you start Timescape, you can tap the tile in the welcome screen to log
in to your Facebook or Twitter account. If you do not want to log in, tap Done.
Timescape™ main view
2
3
1
1Your status on the web services you have selected
2 Timescape™ tiles, in chronological order, with the most recent tile at the top
3 Timescape™ event filter
Timescape™ widget
The Timescape™ widget shows the latest Timescape™ events. For quick access, the
Timescape™ widget can be added on your Home screen. See Home screen on
page 14.
47
This is an Internet version of this publication. © Print only for private use.
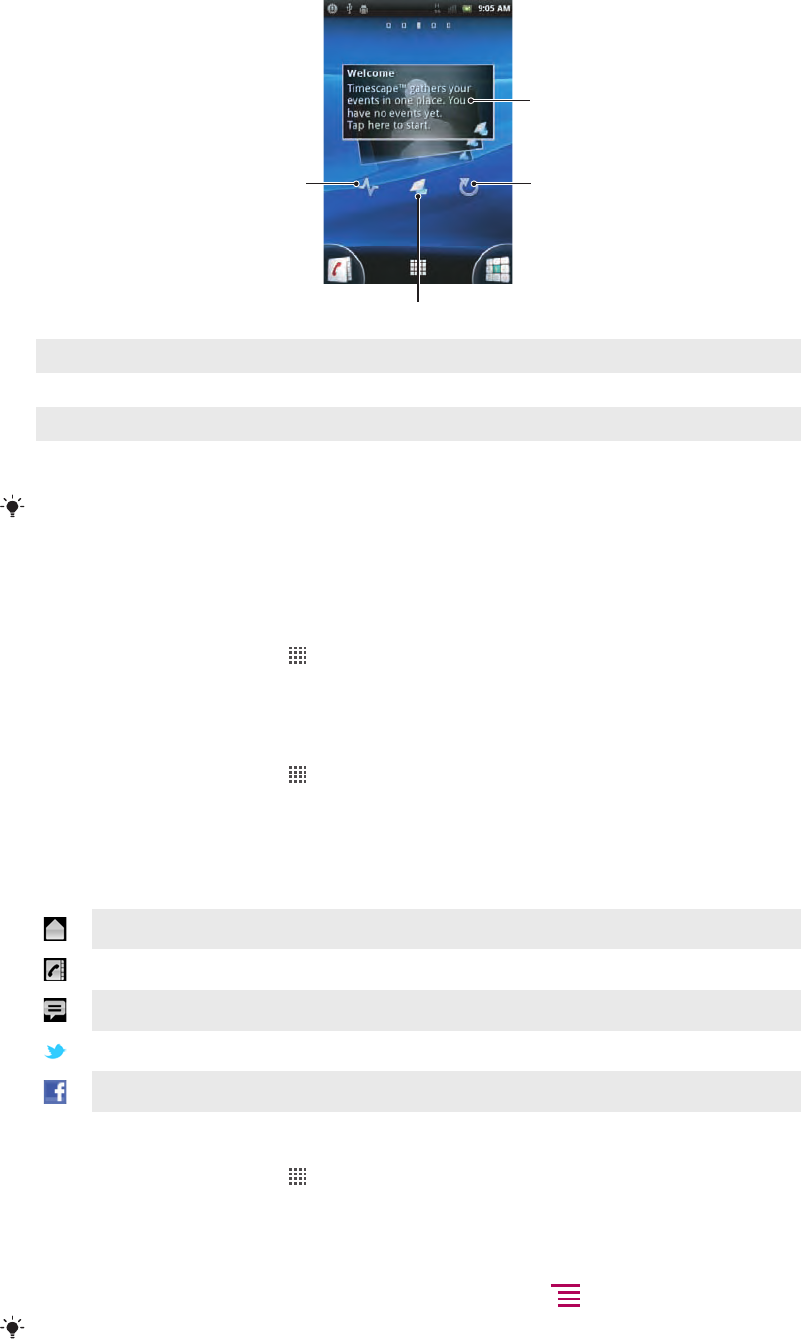
Timescape™ widget view
1
24
3
1 Timescape™ tile
2 Refresh
3 Shortcut to Timescape main view
4 Tap to update your status
You can not preview tiles in the Timescape™ widget.
Using Timescape™
To scroll through tiles in Timescape™
1From your Home screen, tap .
2Find and tap Timescape™.
3Flick up or down to scroll through the tiles.
To preview a tile in Timescape™
1From your Home screen, tap .
2Find and tap Timescape™.
3Scroll to the tile you want to preview, and then tap it.
Timescape™ event filter
All events
Missed calls
Received text and multimedia messages
Updates from your Twitter contacts
Updates from your Facebook contacts
To filter the events displayed in Timescape™
1From your Home screen, tap .
2Find and tap Timescape™.
3Tap or flick through the filter icons.
To refresh the main view in Timescape™
•When the Timescape™ event filter is set to all events, press , then tap Refresh.
When you refresh the main view, your phone connects to the Internet to update information from
the web service accounts you have linked to Timescape™.
48
This is an Internet version of this publication. © Print only for private use.
To log in to Facebook™ or Twitter™ from Timescape™
1From your Home screen, tap .
2Find and tap Timescape™.
3Press , then tap Settings > Set up services.
4Tap the service you want to log in to.
5Enter your login details.
When you have logged in to a web service, you can update your status or view updates from
the web service in Timescape™.
To update your Facebook™ or Twitter™ status in Timescape™
1From your Home screen, tap .
2Find and tap Timescape™.
3Tap > Update status.
4Tap the service for which you want to update your status. If you are not signed in to
the service, you need to sign in before proceeding. When you have selected the
desired service, tap Continue.
5Tap the text field and enter your new status, then tap Post.
To log out of Facebook™ or Twitter™ from Timescape™
1From your Home screen, tap .
2Find and tap Timescape™.
3Press , then tap Settings > Set up services.
4Tap the service you want to log out of.
Your account information gets deleted when you log out.
To view an event in Timescape™
1From the Home screen, tap .
2Find and tap Timescape™.
3Scroll to and tap the tile for the desired event so it appears in preview mode. Then
tap the tile again.
To call back from Timescape ™ when you have a missed call
1From the Home screen, tap .
2Find and tap Timescape™.
3Tap the tile representing the missed call, then tap the tile again.
4Tap Return call.
To reply to a text or multimedia message in Timescape™
1From the Home screen, tap .
2Find and tap Timescape™.
3Scroll to a text or multimedia message tile, then tap the tile.
4Edit the message and tap Send.
The infinite button in Timescape™
When you tap a tile, the infinite button appears in the upper right corner. If the tile is
connected to a contact, you can access related content by tapping the infinite button.
To view all communication with a contact
1From the Home screen, tap .
2Find and tap Timescape™.
3Tap a tile for an event related to a contact.
4Tap . All communication with the contact appears.
5Tap or flick the filter items at the bottom of the screen to view communication with
the contact through other media.
49
This is an Internet version of this publication. © Print only for private use.

Timescape™ settings
To access Timescape™ settings
1From the Home screen, tap .
2Find and tap Timescape™.
3Press , then tap Settings.
To schedule web service content updates in Timescape™
1From your Home screen, tap .
2Find and tap Timescape™.
3Press , then tap Settings > Update mode.
4Tap the desired option. If you select Manual, no automatic updates get scheduled.
50
This is an Internet version of this publication. © Print only for private use.

Getting started with Android Market™
Open Android Market™ and enter a world of applications and games. You can browse
these applications and games through different categories. You can also rate an application
or game and send feedback on it.
To use Android Market™, you need to have a Google ™ account. See To set up a
Google™ account in your phone on page 45.
Android Market™ may not be available in all countries or regions
To open Android Market™
1From the Home screen, tap .
2Find and tap Market.
Payment options
When you download paid applications from Android Market™, your purchase is handled
through Google Checkout™. In some cases, you can download free trial versions of
applications through Android Market™, but if you want to continue using the application,
the download and payment of the full version must be made through the manufacturer's
website.
•Google Checkout™ – Google Checkout™ is an online payment processing service. It
offers, for example, information about your purchase history and gives you protection from
credit card fraud by not giving your full credit card number to the vendor. You can use your
Google™ account to log in to Google Checkout™ from your phone. If you do not have a
Google Checkout™ account, you can sign up for a new account from your phone. Payment
can be made with a credit, debit, or gift card. Some vendors may also accept payment
through your phone billing account.
It may not be possible to buy applications through Android Market™ in all countries or regions.
Downloading from Android Market™
You can download all kinds of applications from Android Market™, including free
applications. If you pay for an application through Google Checkout™, the application is
tied to your Google™ account so that it can be installed an unlimited amount of times on
any device.
Before you download applications
Before you start downloading from Android Market™, make sure that you have a working
Internet connection.
Also, remember that you might incur data traffic charges when you download content to
your phone. Contact your operator for more information.
To download a free application
1In Android Market™, find an item you wish to download by browsing categories, or
by using the search function.
2Tap the item to view its details, and follow the instructions to complete the
installation.
3If the application you want to download requires access to your data or control of
any functions on your phone, an additional screen appears with details. Read this
screen carefully because the functionality of your phone may be seriously affected if
you proceed. Tap OK if you agree, or Cancel if you wish to cancel the download.
51
This is an Internet version of this publication. © Print only for private use.

To download a paid application
1In Android Market™, find an item you wish to download by browsing categories, or
by using the search function.
2Tap the item to view its details, and follow the instructions in your phone to complete
your purchase.
3If the application you want to download requires access to your data or control of
any functions on your phone, an additional screen appears with details. Read this
screen carefully because the functionality of your phone may be seriously affected if
you proceed. Tap OK if you agree, or Cancel if you wish to cancel the download.
To open a downloaded application
1In Android Market™, press , then tap My apps.
2Tap the downloaded application.
You can also access downloaded applications from the Application screen.
Clearing your application data
You may sometimes need to clear data for an application. This might happen if, for example,
the application memory becomes full, or you want to clear high scores for a game. You
might also want to erase incoming email, text and multimedia messages in some
applications.
To clear all cache for an application
1From the Home screen, tap .
2Find and tap Settings.
3Tap Applications > Manage applications.
4Tap the desired application.
5Tap Clear cache.
It is not possible to clear the cache for some applications.
To delete an installed application
1From the Home screen, tap .
2Find and tap Settings.
3Tap Applications > Manage applications.
4Tap the desired application.
5Tap Uninstall.
It is not possible to delete some preinstalled applications.
Permissions
Some applications need to access parts of your phone to be able to work properly. For
example, a navigation application needs permissions to send and receive data traffic, and
access your location. Some applications might misuse their permissions by stealing or
deleting data, or reporting your location. Make sure you only install and give permissions
to applications you trust.
To view permissions of an application
1From the Home screen, tap .
2Find and tap Settings.
3Tap Applications > Manage applications.
4Tap the desired application.
5Scroll down to view Permissions.
52
This is an Internet version of this publication. © Print only for private use.

Allowing applications not from Android Market™
Installing applications of unknown or unreliable origin can damage your phone. By default,
your phone is set to block such installations. However, you can change this setting and
allow installations from unknown sources.
Sony Ericsson does not warrant or guaranty the performance of any third-party applications or
content transferred via download or other interface to your phone. Similarly, Sony Ericsson is not
responsible for any damage or reduced performance of your phone attributable to the transfer
of third-party content. Only utilize content from reliable sources. Contact the content provider
with any questions or concerns.
To allow the installation of non-Android Market™ applications
1From the Home screen, tap .
2Find and tap Settings > Applications.
3Mark the Unknown sources checkbox.
53
This is an Internet version of this publication. © Print only for private use.

PlayNow™ service
You can use the PlayNow™ service to download applications, games and music. The
PlayNow™ service offers both free and non-free downloads.
The PlayNow™ service is not available in all countries.
Before you download content
Before you download, make sure that you have an Internet connection. Also, you may need
to have a memory card inserted in your phone to download content, such as music,
ringtones and themes.
When you download content to your phone, you might be charged for the amount of data
transferred. Contact your operator for information about data transfer rates in your country.
To start PlayNow™
1From the Home screen, tap .
2Find and tap .
Payment options
There is one way to pay for applications and other content you purchase from the
PlayNow™ service:
•Wap Billing – pay using your mobile internet connection when you are in your home
country. You do not have to be a registered user to pay for content using the Wap Billing
method. Payment will be deducted from your mobile phone provider bill. When your
purchase has been validated, you can start to download your content.
The payment options are not always available in all countries, or with all service providers.
Downloading from the PlayNow™ service
Download a range of content from the PlayNow™ service direct to your phone. Choose
from a variety of applications, games, music, ringtones and other content.
To download a PlayNow item to your phone
1From your Home screen, tap .
2Find and tap Store.
3Find an item you want to download by browsing categories, or by using the search
function.
4Tap the item to view its details.
5Click “Buy now!” to start the purchase process. After your purchase has been
validated, you can start to download your content.
54
This is an Internet version of this publication. © Print only for private use.
Getting organised
Calendar
Your phone has a calendar for managing your time schedule. If you have a
Sony Ericsson account or a Google™ account, you can also synchronise your phone
calendar with your web calendar. See Synchronising on page 56.
To set the calendar view
1From your Home screen, tap , then find and tap Calendar.
2Press and select an option.
To view multiple calendars
1From your Home screen, tap , then find and tap Calendar.
2Press , then tap More > My calendars.
3Select the calendars you want to view.
To create a calendar event
1From your Home screen, tap , then tap Calendar.
2Press , then tap New event.
3Enter the name, time, location and description for the event.
4If desired, select another option under Repetition.
5Select a reminder for the event. To add a new reminder for the event, tap .
6Tap Save.
When the appointment time approaches, your phone plays a short sound to remind you. Also,
appears in the status bar.
To view a calendar event
1From your Home screen, tap , then tap Calendar.
2Tap the event you want to view.
To change the calendar settings
1From your Home screen, tap , then tap Calendar.
2Press , then tap More > Settings.
3Tap to open the setting you want to change, and edit as desired.
55
This is an Internet version of this publication. © Print only for private use.

Synchronising
You can sync contacts, email, calendar events, and other information with your phone from
multiple email accounts, synchronisation services and other kinds of accounts, depending
on the applications installed on your phone. Synchronising your phone with other
information sources is an easy and practical way to stay up to date.
You can:
•reach your Gmail™, Google Calendar™ and Google™ contacts.
•reach your corporate email, contacts and calendar.
•synchronise your phone with an Internet server using SyncML™.
•synchronise, store and manage your contacts on the Sony Ericsson website and download
them to a new phone, or to several phones using Sony Ericsson Sync.
Make sure you make backups of everything you want to save before synchronising your phone.
Google Sync™ synchronisation service
You can use the Google Sync™ synchronisation service to synchronise your phone with
your Gmail™, Google Calendar™ and Google™ contacts.
To synchronise with your Google™ account, the account needs to be set up in your phone. See
To set up a Google™ account in your phone for synchronisation on page 56.
To set up a Google™ account in your phone for synchronisation
1From your Home screen, tap .
2Tap Settings > Accounts & sync.
3Make sure the Auto-sync checkbox is marked.
4Tap Add account > Google.
5Follow the registration wizard to create a Google™ account, or sign in if you already
have an account.
6Tap your newly created Google™ account and then tap the items you want to
synchronise.
To synchronise manually with your Google™ account
1From the Home screen, tap .
2Tap Settings > Accounts & sync.
3Tap the Google™ account you want to synchronise.
4Press , then tap Sync now.
To remove a Google™ account from your phone
1From the Home screen, tap .
2Tap Settings > Accounts & sync.
3Tap the Google™ account you want to remove from the accounts list.
4Tap Remove account.
5Tap Remove account again to confirm.
You can remove all your Google™ accounts from the accounts list, except for the first one. To
remove the first account, you have to completely reset your phone. See Resetting the phone on
page 108.
Synchronising your corporate email, calendar and contacts
Access your corporate email messages, calendar appointments and contacts directly from
your phone. View and manage them just as easily as you would from a computer. After
setup, you can find your information in the Email, Calendar and Contacts applications.
For you to access the functionality described above, your corporate information must be stored
on a Microsoft® Exchange server.
56
This is an Internet version of this publication. © Print only for private use.

To set up corporate email, calendar and contacts in your phone
1From your Home screen, tap .
2Tap Settings > Accounts & sync.
3Make sure the Auto-sync checkbox is marked.
4Tap Add account > Exchange Active Sync.
5Enter your corporate email address and password.
6Tap Next.
7Follow the steps to configure your account and select the kinds of data you want to
sync to the phone, such as contacts and calendar. If the settings for your corporate
account are not found automatically, complete the setup manually. Contact your
corporate network administrator if you need more information.
8When the setup is done, enter a name for this corporate account, so that it is easily
identifiable, then tap Done.
9If prompted, activate the device administrator to allow your corporate server to
control certain security features in your phone. Device administrators for your phone
are typically email, calendar, or other applications to which you grant authority to
implement security policies on the phone when you connect to enterprise services
that require this authority.
To edit the setup of corporate email, calendar and contacts
1From your Home screen, tap .
2Tap Settings > Accounts & sync and select your corporate account.
3Tap Account settings.
4Change the settings to suit your needs. For example, you can decide:
•how often the phone should check for new email messages.
•to get your corporate calendar and contacts in your phone.
•server settings in Incoming settings.
To set a synchronisation interval for a corporate account
1From your Home screen, tap .
2Tap Settings > Accounts & sync and select your corporate account.
3Tap Account settings.
4Tap Inbox check frequency and select an interval option.
To remove a corporate account from your phone
1From your Home screen, tap .
2Tap Settings > Accounts & sync, then tap your corporate account.
3Tap Remove account.
4Tap Remove account again to confirm.
Synchronising and storing your contacts and calendar
Use Sony Ericsson Sync to synchronise your contacts with a Sony Ericsson web page at
www.sonyericsson.com/user.
This way, your contacts are stored in one place and you can easily transfer them to other
phones. And you always have a backup online. You need a Sony Ericsson account for this
method to work.
To set up a Sony Ericsson account in your phone
1From your Home screen, tap .
2Tap Settings > Accounts & sync.
3Make sure the Auto-sync checkbox is marked.
4Tap Add account > Sony Ericsson Sync.
5Log in if you already have a Sony Ericsson account, or sign up and follow the
registration wizard to create one.
6Tap Sync interval and select how often you want the phone to synchronise
automatically.
7Tap Done.
57
This is an Internet version of this publication. © Print only for private use.

To synchronise manually using Sony Ericsson Sync
1From your Home screen, tap .
2Tap Settings > Accounts & sync, then tap your Sony Ericsson account.
3Press , then tap Sync now.
To edit your Sony Ericsson account
1From your Home screen, tap .
2Tap Settings > Accounts & sync, then tap your Sony Ericsson account.
3Mark or unmark the checkboxes for the items you want to synchronise.
4If you need to change your account settings, tap Account settings, edit the desired
information and tap Done.
To set a synchronisation interval
1From your Home screen, tap .
2Tap Settings > Accounts & sync, then tap your Sony Ericsson account.
3Tap Account settings.
4Tap Sync interval and select an interval option that suits you.
To remove a Sony Ericsson account from your phone
1From your Home screen, tap .
2Tap Settings > Accounts & sync, then tap your Sony Ericsson account.
3Tap Remove account.
4Tap Remove account again to confirm.
The account is removed from your phone, but it still exists on the Sony Ericsson server. You can
use your account details to log in to the Sony Ericsson website at www.sonyericsson.com/user.
58
This is an Internet version of this publication. © Print only for private use.
Connecting to wireless networks
You can access the Internet wirelessly from your phone using Wi-Fi® technology. This way
you can browse the web and access cheaper call and data rates.
If your company or organisation has a virtual private network (VPN) you can connect to this
network with your phone. This way you can, for example, access intranets and other internal
services at your company.
Wi-Fi®
Using Wi-Fi® technology you can access the Internet wirelessly with your phone. To access
the Internet using a Wi-Fi® connection, you first need to search for and connect to an
available Wi-Fi® network. The signal strength of the Wi-Fi® network may differ depending
on your phone's location. Moving closer to the Wi-Fi® access point may increase the signal
strength.
Before using Wi-Fi®
To browse the Internet using a Wi-Fi® connection, you need to search for and connect to
an available Wi-Fi® network and then open the Internet browser. The signal strength of the
Wi-Fi® network may differ depending on your phone's location. Move closer to the Wi-Fi®
access point to increase the signal strength.
To turn on Wi-Fi®
1From the Home screen, tap .
2Find and tap Settings > Wireless & networks.
3Mark the Wi-Fi checkbox. The phone scans for available Wi-Fi® networks.
It may take a few seconds before Wi-Fi® is enabled.
To connect to a Wi-Fi® network
1From the Home screen, tap .
2Find and tap Settings > Wireless & networks > Wi-Fi settings.
3Available Wi-Fi® networks are displayed under Wi-Fi networks. The available
networks may be open or secured. Open networks are indicated by and secured
networks are indicated by next to the Wi-Fi® network name.
4Tap a Wi-Fi® network to connect to it. If you are trying to connect to a secure Wi-
Fi® network, you are asked to enter a password. is displayed in the status bar
once you are connected.
Your phone remembers Wi-Fi® networks you connect to. The next time you come within reach
of a previously connected Wi-Fi® network, your phone automatically connects to it.
In some locations, open Wi-Fi® networks require you to log in to a web page before you can
get access to the network. Contact the relevant Wi-Fi® network administrator for more
information.
To connect to another Wi-Fi® network
1From the Home screen, tap .
2Find and tap Settings > Wireless & networks > Wi-Fi settings. Detected Wi-Fi®
networks are displayed in the Wi-Fi networks section.
3Tap another Wi-Fi® network to connect to it.
Wi-Fi® network status
When you are connected to a Wi-Fi® network or when there are Wi-Fi® networks available
in your vicinity, it is possible to see the status of these Wi-Fi® networks. You can also enable
the phone to notify you whenever an open Wi-Fi® network is detected.
59
This is an Internet version of this publication. © Print only for private use.
To enable Wi-Fi® network notifications
1Turn on Wi-Fi®, if it is not already on.
2From your Home screen, tap .
3Find and tap Settings > Wireless & networks > Wi-Fi settings.
4Mark the Network notification checkbox.
To scan for Wi-Fi® networks manually
1From the Home screen, tap .
2Find and tap Settings > Wireless & networks > Wi-Fi settings.
3Press .
4Tap Scan . The phone scans for Wi-Fi® networks and displays them in the Wi-
Fi networks section.
5Tap a Wi-Fi® network in the list to connect to the network.
Advanced Wi-Fi® settings
Before you add a Wi-FI® network manually, you need to turn on the Wi-Fi® setting in your
phone.
To add a Wi-Fi® network manually
1From the Home screen, tap .
2Find and tap Settings > Wireless & networks > Wi-Fi settings.
3Tap Add Wi-Fi network.
4Enter the Network SSID for the network.
5Tap the Security field to select a security type.
6If required, enter a password.
7Tap Save.
Contact your Wi-Fi® network administrator to get the Network SSID name and Wireless
password.
To view detailed information about a connected Wi-Fi® network
1From the Home screen, tap .
2Find and tap Settings > Wireless & networks > Wi-Fi settings.
3Tap the Wi-Fi® network that you are currently connected to. Detailed network
information is displayed.
Wi-Fi® sleep policy
By adding a Wi-Fi® sleep policy, you can specify when to switch from Wi-Fi to mobile data.
If you are not connected to a Wi-Fi® network, the phone uses mobile data connection to access
the Internet (if you have set up and enabled a mobile data connection in your phone).
To add a Wi-Fi® sleep policy
1From the Home screen, tap .
2Find and tap Settings > Wireless & networks > Wi-Fi settings.
3Press .
4Tap Advanced .
5Tap Wi-Fi sleep policy.
6Select a Wi-Fi sleep policy to use.
Using a static IP address
You can set up the phone to connect to a Wi-Fi® network using a static IP address.
60
This is an Internet version of this publication. © Print only for private use.
To set up a static IP address
1From the Home screen, tap .
2Find and tap Settings > Wireless & networks > Wi-Fi settings.
3Press .
4Tap Advanced .
5Mark the Use static IP checkbox.
6Tap and enter the information needed for your Wi-Fi® network:
•IP address
•Gateway
•Netmask
•DNS 1
•DNS 2
7Press and tap Save .
Connected devices
Share media files in your phone with other devices over a shared Wi-Fi® connection. When
your phone is connected to your home network via Wi-Fi® and has Connected devices
turned on, other client devices connected to the same home network can access, view
and play images saved in your phone. A client device can be, for example, a computer with
client software, a camera, TV, or a PlayStation®3. All devices must be DLNA™ (Digital
Living Network Alliance) certified.
To use Connected devices
1Connect your phone to a Wi-Fi® network.
2From your Home screen, tap , then find and tap Connected devices.
3Tap Change server name and edit your phone name if needed. This name will
appear on your client device(s) later to identify your phone.
4Mark the Media server check box. appears in the status bar. Your phone can
now work as a media server.
5Connect your computer or other client devices to the same Wi-Fi® network.
6Activate client software installed on your computer. Find and select your phone as
the server.
7A notification appears in the status bar of the phone. Tap it and set access
permissions.
8Transfer to and show your phone content on client devices. It may take a couple of
minutes to show all the content on the client devices if many photo or music files are
saved on the phone.
9To minimize the Connected devices, press . Connected devices stays running
in the background.
10 To disconnect from the server, go to the Connected devices view in the phone and
unmark the Media server checkbox.
The instructions described above may differ depending on the client devices. Also refer to your
client device User guide. If the device cannot connect, check that your home network is working.
To change the name of a client device
1From your Home screen, tap , then find and tap Connected devices.
2Tap Client device list.
3Select the client device connected to your phone, then select Change name.
4Enter a new name for the client device..
To change the access level of a client device
1From the Home screen, tap , then find and tap Connected devices.
2Tap Client device list and select the client device connected to your phone.
3Tap Change access level and select an option.
To get more information about Connected devices
•In Connected devices, tap About to get information about notification icons in the
status bar.
61
This is an Internet version of this publication. © Print only for private use.
Sharing your phone’s mobile data connection
You can share your phone’s mobile data connection with a single computer using a USB
cable. This process is called USB tethering. You can also share your phone’s data
connection with up to eight devices at once, by turning your phone into a portable Wi-Fi®
hotspot.
When your phone is sharing its data connection, the following icons may appear in the
status bar or in the Notification panel:
USB tethering is active
Portable Wi-Fi® hotspot is active
Both USB tethering and portable hotspot are active
To share your phone’s data connection using a USB cable
1Use the USB cable that came with your phone to connect your phone to a computer.
2From your Home screen, tap .
3Find and tap Settings > Wireless & networks > Tethering & portable hotspot.
4Mark the USB tethering check box. The phone starts sharing its mobile network
data connection with the computer over the USB connection. An ongoing notification
appears in the status bar and the Notification panel.
5Unmark the USB tethering checkbox, or disconnect the USB cable to stop sharing
your data connection.
You cannot share your phone’s data connection and SD card over a USB cable at the same time.
If you are using your USB connection to make your SD card available to your computer, you must
first deactivate this connection before you can start sharing your phone's data connection. See
Connecting your phone to a computer on page 93.
You may need to prepare your computer to establish a network connection via USB cable. Go
to android.com/tether for the most current information about which operating systems support
USB tethering and how to configure them.
To share your phone’s data connection as a portable Wi-Fi® hotspot
1From the Home screen, tap .
2Find and tap Settings > Wireless & networks > Tethering & portable hotspot.
3Mark the Portable Wi-Fi hotspot checkbox. The phone starts broadcasting its Wi-
Fi® network name (SSID). You can now connect to this network with up to 8
computers or other devices.
4Unmark the Portable Wi-Fi hotspot checkbox when you want to stop sharing your
data connection via Wi-Fi®.
To rename or secure your portable hotspot
1From the Home screen, tap .
2Find and tap Settings > Wireless & networks > Tethering & portable hotspot.
3Make sure the Portable Wi-Fi hotspot checkbox is marked.
4Tap Portable Wi-Fi hotspot settings > Configure Wi-Fi hotspot.
5Enter the Network SSID for the network.
6Tap the Security field to select a security type.
7If required, enter a password.
8Tap Save.
Virtual private networks (VPNs)
Use your phone to connect to virtual private networks (VPNs), which allow you to access
resources inside a secured local network from outside the actual network. For example,
VPN connections are commonly used by corporations and educational institutions for users
who need to access intranets and other internal services when they are outside of the
internal network, for example, when they are travelling.
62
This is an Internet version of this publication. © Print only for private use.

VPN connections can be set up in many ways, depending on the network. Some networks
may require you to transfer and install a security certificate in your phone. See Connecting
your phone to a computer on page 93 for more information on how to transfer content
to your phone. For detailed information on how to set up a connection to your virtual private
network, please contact the network administrator of your company or organisation.
To add a virtual private network
1From the Home screen, tap .
2Find and tap Settings > Wireless & networks > VPN settings.
3Tap Add VPN.
4Select the type of VPN to add.
5Enter your VPN settings.
6Press and tap Save.
To connect to a virtual private network
1From the Home screen, tap .
2Find and tap Settings > Wireless & networks > VPN settings.
3In the list of available networks, tap the VPN you want to connect to.
4Enter the required information.
5Tap Connect.
To disconnect from a virtual private network
1Drag the status bar downwards.
2Tap the notification for the VPN connection to turn it off.
63
This is an Internet version of this publication. © Print only for private use.
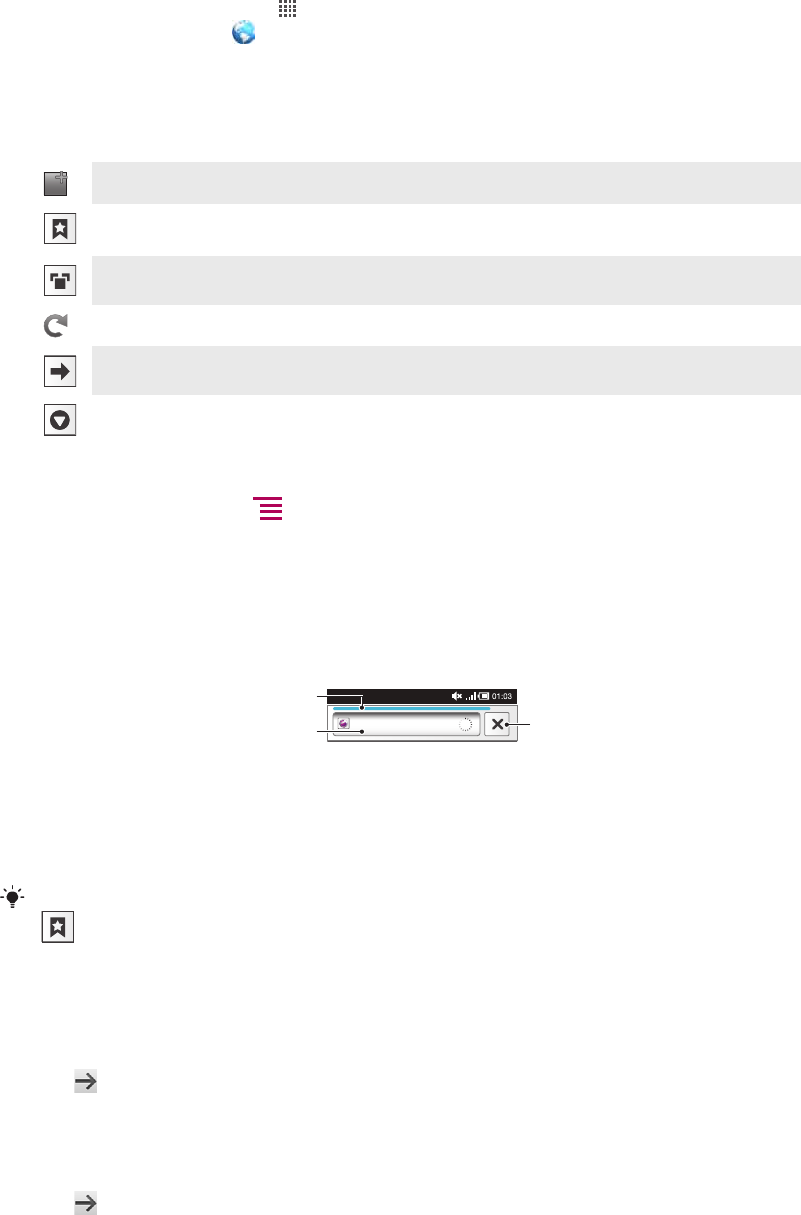
Web browser
Use your web browser to view and navigate web pages, add pages as bookmarks, and
create shortcuts to your Home screen. You can open several browser windows at the same
time and use the zoom function when navigating a web page.
To open the web browser
1From the Home screen, tap .
2Find and tap Browser .
Toolbar
The toolbar options make browsing easy:
Open a new browser window
Add, open or edit a bookmark. View your most visited web pages or open web pages from the browser
history
View open windows
Refresh the current web page
Go forward one page in the browsing history
Open a menu to see more options
To open the toolbar
•From the browser, press .
Browsing the web
Search and address bar
Use the search and address bar to browse the web:
http://www.sonye...
1
23
1View the download progress of the current web page
2 Enter a search word to search for a web page, or enter a web page address to load a web page
3 Cancel the download of the current web page
When a page has finished downloading, you can bookmark it by tapping the bookmark icon
next to the search and address bar.
To go to a web page
1In your Browser, tap the text field in the search and address bar to activate the
keypad.
2Enter a web address.
3Tap .
To search a web page
1Tap the search and address text field to activate the keypad.
2Enter a search word.
3Tap .
64
This is an Internet version of this publication. © Print only for private use.
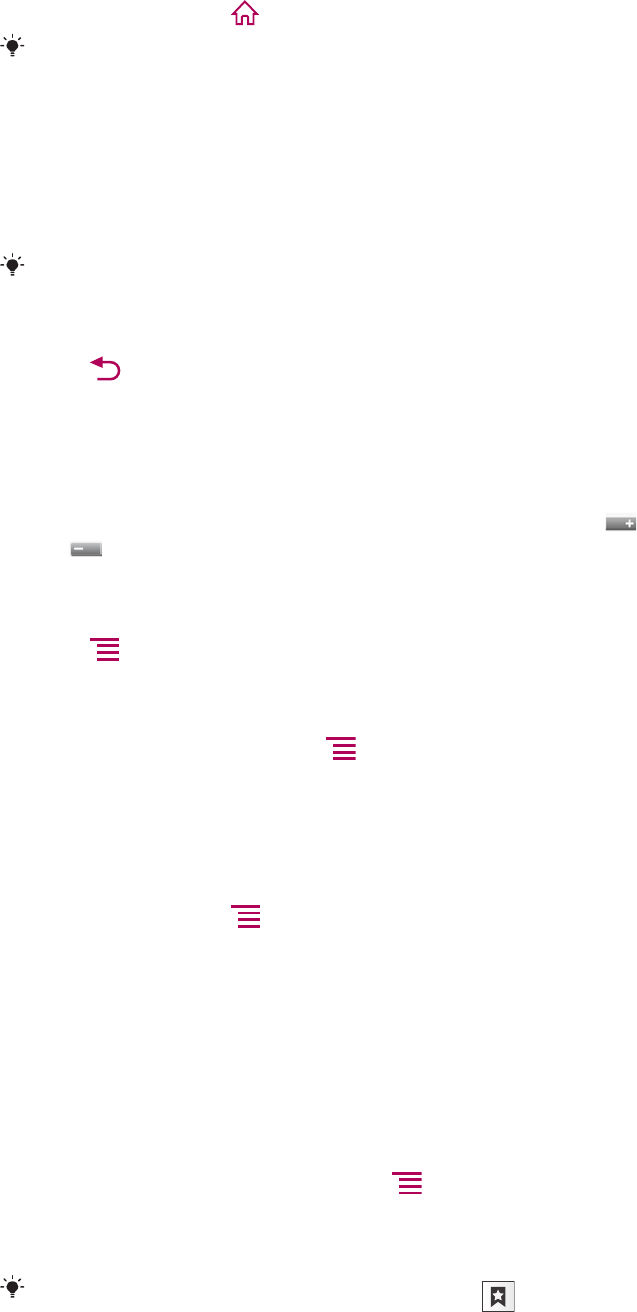
To exit the web browser
•While browsing, press .
When you open the browser again, the browser appears exactly as it did before you exited, that
is, with the same number of windows, position and zoom levels.
Navigating web pages
To select a link
•To select a link in a web page, tap the link. The selected link is highlighted in orange,
and the web page is loaded when you release your finger.
If you select a link by mistake before releasing your finger, you can deselect it by dragging your
finger away until the link is no longer highlighted.
To go to the previous page while browsing
•Press .
To zoom in or out on a web page
Use one of the following methods to zoom in or out on a web page:
•Touch an area of the page with two fingers at once and pinch them together to zoom out,
or spread them apart to zoom in.
•Slide your finger on the screen to reveal the zoom control. Tap the icon to zoom in, or
tap to zoom out.
•Double-tap to zoom in on the web page, or double-tap again to zoom out.
To reload the current web page
1Press .
2Tap Refresh
To add a web page shortcut to your Home screen
1When viewing a web page, press .
2Tap Bookmarks > Add.
3If desired, you can edit the name and the web address. Tap OK.
4Tap and hold the bookmark to open a menu.
5Tap Add shortcut to Home.
To share a link to the current web page
1While browsing, press .
2Tap More > Share page.
3Select an available transfer method, and follow the on-screen instructions.
Managing bookmarks
Bookmarks let you access your favourite and frequently visited web pages quickly.
Depending on your network operator, some bookmarks may be pre-installed on your
phone.
To bookmark a web page
1While you are viewing a web page, press .
2Tap Bookmarks > Add.
3If desired, you can edit the name and the web address.
4When you are done, tap OK.
To quickly bookmark a web page you can also tap the icon to the right of the search and
address field.
65
This is an Internet version of this publication. © Print only for private use.

To open a bookmark
1From the Browser screen, press .
2Tap Bookmarks.
3Tap the bookmark you want to open.
To edit a bookmark
1From the Browser screen, press .
2Tap Bookmarks.
3Touch and hold a bookmark to open a menu.
4Tap Edit bookmark.
5Edit the name and the web address, as desired.
6Tap OK.
To delete a bookmark
1From the Browser screen, press .
2Tap Bookmarks.
3Touch and hold a bookmark to open a menu.
4Tap Delete bookmark to delete the selected bookmark.
To bookmark a previously visited web page
1From the Browser screen, press .
2Tap Bookmarks.
3Tap the History tab, or the Most visited tab, to view a list of previously visited web
pages.
4Tap the icon to the right of the web page you want to add as a bookmark.
Managing text and images
To find text within a web page
1When you are viewing a web page, press .
2Tap More > Find on page.
3Enter your search text. Matching characters appear highlighted in green.
4Tap the left or right arrow to go to the previous or next matching item.
5Tap to close the search bar.
To copy text from a web page
1Locate the text you want to copy.
2Press .
3Tap More > Select text.
4Place your finger at the start of the text you want to select and then drag it to the
desired end point. The selected text is highlighted in pink.
5Tap the selected text to copy it.
6To paste text into an email, text message or multimedia message, touch and hold
the text field in the relevant application and tap Paste in the menu that appears.
To save an image
1Touch and hold the desired image until a menu appears.
2Tap Save image.
Multiple windows
Your browser can run in up to eight different windows at the same time. You can, for
example, log in to your webmail in one window and read today's news in another. You can
easily switch from one window to another.
To open a new browser window
1From the Browser screen, press .
2Tap New window.
66
This is an Internet version of this publication. © Print only for private use.

To open a link in a new browser window
1Touch and hold a link until a menu appears.
2Tap Open in new window.
To switch between browser windows
1From the Browser screen, press .
2Tap Windows to see a list of all open windows.
3Tap the window you want to switch to.
Downloading from the web
You can download applications and content when you browse the web using the web
browser in your phone. Usually you have to touch a download link for the desired file and
the download then starts automatically.
To view your downloaded files
1From the Browser screen, press .
2Tap More > Downloads.
To cancel an ongoing download
1From the Browser screen, press .
2Tap More > Downloads.
3Mark the checkbox of the downloading file.
4Tap Delete.
Browser settings
To change your browser settings
1From the Browser screen, press .
2Tap More > Settings.
Auto-fitting web pages
The auto-fit option makes it easier for you to read large websites with text and images, such
as news sites. For example, if you zoom in on a web page when auto-fit is enabled, the
text automatically adjusts to the new screen size. If auto-fit is disabled, you might need to
scroll sideways to read a full sentence.
To auto-fit web pages
1From the Browser screen, press .
2Tap More > Settings > Auto-fit pages.
67
This is an Internet version of this publication. © Print only for private use.
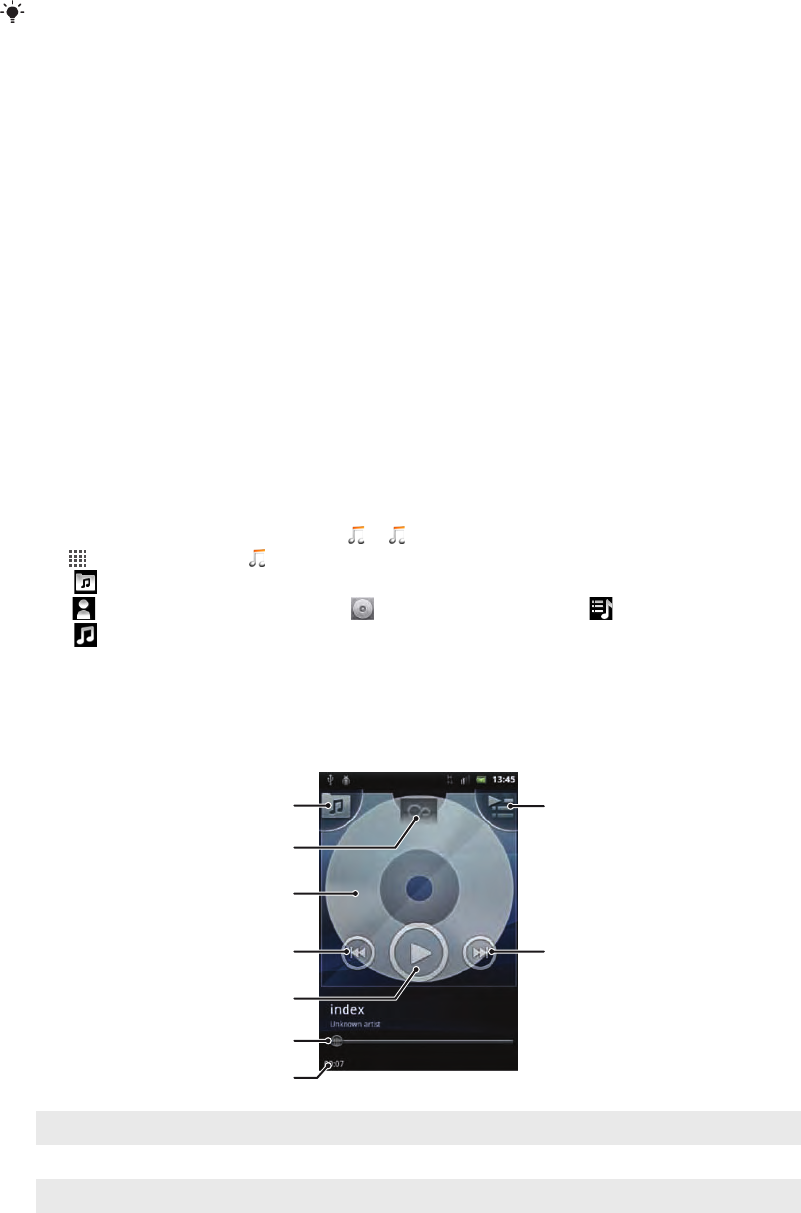
Music
Get the most out of your music player. Listen to and organise music, audio books and
podcasts you have transferred to your memory card from a computer, or purchased and
downloaded from online stores.
Install the Media Go™ application on your computer and transfer content to and from the
memory card in your phone. Media Go™ can be downloaded from
www.sonyericsson.com/support. For more information, see Connecting your phone to a
computer on page 93.
Copying media files to your memory card
Copy all your favourite media content from computer to phone and start using your phone's
entertainment features to the full. It's easy to transfer music, photos, videos and other files.
Just connect your phone to a computer with a USB cable and use one of the following
methods:
•Use a file manager application, for example, Windows Explorer. See To drag and drop
content between phone and computer using USB cable on page 93
•Use the Media Go™ computer application. See Media Go™ on page 95
See Connecting your phone to a computer on page 93 for more general information
about connecting your phone and transfering files.
Using the music player
To play audio content
1From your Home screen screen, tap . If does not appear on your Home screen,
tap , then find and tap .
2Tap .
3Tap to browse audio by artist. Tap to browse by album. Tap to use playlists.
Tap to browse audio by track.
4Scroll up or down and browse to a track.
5Tap a track to play it.
Music player overview
1
6
7
4 8
9
3
2
5
1Browse the music on your memory card
2 Infinite button: find related material online
3 Cover art (if available)
4 Go to the previous track in the current play queue, or rewind
68
This is an Internet version of this publication. © Print only for private use.
5 Play/Pause button
6 Progress indicator: fast forward or rewind by dragging or tapping
7 Elapsed time of current track
8 Go to the next track in the current play queue, or fast forward
9 View the current play queue
To change tracks
•In the music player, tap or .
To pause a track
•In the music player, tap .
To fast forward and rewind music
•In the music player, touch and hold or .
You can also drag the progress indicator marker right or left.
To adjust the audio volume
•In the music player, press the volume key.
To improve the sound with the equalizer
1In the music player, press .
2Tap Equalizer.
3Select a music style.
To view a current play queue
•In the music player, tap .
To minimise the music player
•In the music player, press to change screen, or press to go to the Home
screen. You are now free to use other applications while the music player plays in
the background.
To return to the music player when it is playing in the background
1Drag the status bar downwards to open the Notification panel.
2Tap the track title to open the music player.
Alternatively, if you have recently used the music player, you can press and hold down and
then tap to open it.
To delete a track
1When browsing your tracks in the music player library, touch and hold a track title.
2Tap Delete.
You can also delete albums this way.
To delete one or more tracks at the same time
1In the music player, tap .
2Press .
3Tap Delete several.
4Tap one or more tracks that you want to delete.
5Tap Delete.
69
This is an Internet version of this publication. © Print only for private use.
To share a track
1When browsing your tracks in the music player library, touch and hold a track title.
2Tap Send.
3Select an available transfer method, and follow the on-screen instructions.
You can also share albums and playlists this way.
You might not be able to copy, send or transfer copyright-protected items.
To share one or more tracks at the same time
1When browsing your tracks in the music player library, press .
2Tap Send several.
3Tap one or more tracks that you want to share.
4Tap Send.
5Select an available transfer method, and follow the on-screen instructions.
You might not be able to copy, send or transfer copyright-protected items.
Playing music in random order
You can play tracks in playlists in random order. A playlist can be, for example, a playlist
you have created yourself or an album.
To play tracks in random order
1In the music player, tap .
2Tap and navigate to an album, or tap and browse to a playlist.
3Open the album or playlist by tapping its name.
4Tap .
You can also tap and shuffle all tracks in the list.
Playlists
The music player automatically creates Smart playlists on the playlist tab in the music
player library. The music player also creates a playlist (called Most played) of the most
played songs of each artist in your audio library. You can create your own playlists from the
music on your memory card.
In addition, you can copy playlists from a computer to the memory card if you have the
Media Go™ application installed on the computer. When you connect and mount your
phone to the computer using a USB cable connection, your memory card appears in the
Media Go™ application on the computer. For more information, see Connecting your
phone to a computer on page 93.
To play smart playlists
1In the music player, tap .
2Tap .
3Under Smart playlists, tap a playlist.
4Tap a track to play it.
To play the most played songs of an artist
1In the music player, tap .
2Tap and tap an artist.
3Tap Top tracks. Up to ten tracks by the artist are displayed.
4Tap a track to play it.
70
This is an Internet version of this publication. © Print only for private use.
To create your own playlist
1In the music player, tap .
2To add an artist, album or a track to a playlist, touch and hold the name of the artist
or the title of the album or track to open a menu.
3Tap Add to playlist >Create new playlist.
4Enter a name for the playlist and tap OK. You have now created a playlist and added
an artist, an album or a track to that playlist. View your playlists by tapping in the
music player library.
To add tracks to a playlist
1When browsing the music player library, touch and hold the name of the artist or the
title of the album or track you want to add.
2Tap Add to playlist.
3Tap the name of the playlist to which you want to add the artist, album or track . The
artist, album or track is added to the playlist.
To play your own playlists
1In the music player, tap .
2Tap .
3Tap a playlist.
4Tap a track to play it.
To remove a track from a playlist
1In a playlist, touch and hold the title of the track you want to delete.
2Tap Delete from playlist.
To delete a playlist
1In the music player, tap , then select Playlists.
2Touch and hold the playlist you want to delete.
3Tap Delete.
4Tap Delete again to confirm.
71
This is an Internet version of this publication. © Print only for private use.
TrackID™ technology
Use the TrackID™ music recognition service to identify a music track you hear playing in
your surroundings. Just record a short sample of the song and you’ll get artist, title and
album info within seconds. You can also purchase tracks identified by TrackID™. For best
results, use TrackID™ technology in a quiet area. If you have problems using this
application, see I cannot use Internet-based services on page 109.
The TrackID™ application and the TrackID™ service are not supported in all countries/ regions,
or by all networks and/or service providers in all areas.
To open the TrackID™ application
1From the Home screen, tap .
2Find and tap TrackID™ .
To search for track information
1When the TrackID™ application is open, hold the phone towards the music source.
2Tap Record. The results are shown as track info in the result screen.
3To return to the TrackID™ start screen, press .
To view charts in TrackID™
1When the TrackID™ application is open, tap the Charts tab. The first time you view
a chart, it is set to your own region.
2To see charts of the most popular searches in other regions, tap > Regions.
3Select a country or region.
Using TrackID™ technology results
Track information appears after a track is recognised by a TrackID™ search. You can
choose to purchase the track, recommend it on Facebook, find related content on the
YouTube™ service, or get more information about the track's artist.
To buy a track using TrackID™ technology
1When the TrackID™ application is open, tap a track title.
2In the track information screen, tap Download.
3Follow the instructions in your phone to complete your purchase.
The track purchase feature may not be supported in all countries/regions, or by all networks and/
or service providers in all areas.
72
This is an Internet version of this publication. © Print only for private use.
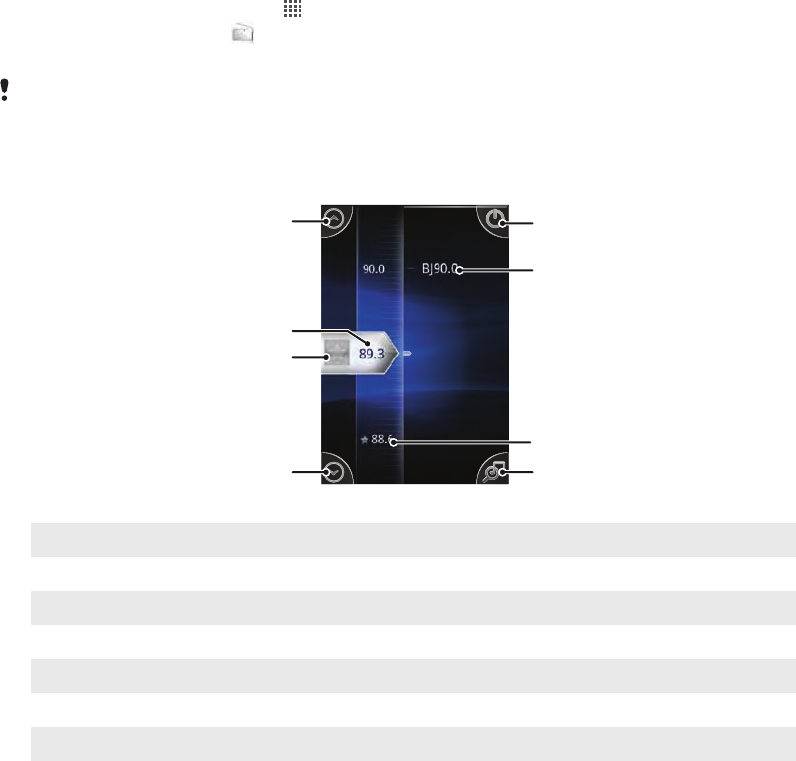
FM radio
You can browse and listen to FM radio stations, and save them as favourites. You can listen
to the radio either through a portable handsfree or headphones, or through the speaker in
the phone. You have to connect a portable handsfree or headphones, as they work as the
antenna for the FM radio. When you open the FM radio, available channels appear
automatically. If a channel has RDS information, it appears a few seconds after you start
listening.
To start the FM radio
1Connect a portable handsfree or a set of headphones to your phone.
2From your Home screen, tap .
3Find and tap FM radio . The available channels appear as you scroll through the
frequency band.
You have to connect a portable handsfree or headphones, which function as an antenna.
FM radio overview
5
3
2
1
4
7
6
8
1Move upwards to the next favourite (available when favourites are saved)
2 The tuned frequency
3 Assign or unassign a channel as a favourite
4 Move downwards to the next favourite (available when favourites are saved)
5 An assigned favourite channel
6 Radio on/off key
7 RDS (Radio Data System) information – not available in all countries/regions
8 Get into TrackID™ application
Moving between radio channels
You can move between radio channels along a frequency band by:
•Flicking up and down.
•Dragging.
•Tapping a channel or, if available, the RDS information (station identification).
Using your favourite radio channels
You can save the radio channels you most frequently listen to as favourites. By using
favourites you can quickly return to a radio channel.
73
This is an Internet version of this publication. © Print only for private use.
To save a channel as a favourite
1When the radio is open, navigate to the channel that you want to save as a favourite.
2Tap .
To remove a channel as a favourite
1When the radio is open, navigate to the channel that you want to remove as a
favourite.
2Tap .
To move between favourite channels
•When the radio is open, tap or .
To move between favourites, you need to save at least two channels as favourites.
Making a new search for radio channels
If you have moved to a new location or the reception has improved in your current location,
you can start a new scan for radio channels.
Any favourites you have saved are not affected by a new scan.
To start a new search for radio channels
1When the radio is open, press .
2Tap Search for channels. The radio scans the whole frequency band, and all
available channels are displayed.
Switching between the speaker and the handsfree
You can choose to listen to the radio either through the portable handsfree or headphones,
or through the speaker in the phone.
To switch between the speaker and handsfree
1When the radio is open, press .
2Tap Play in speaker.
3To play the sound through the portable handsfree or headphones again, press
and tap Play in handsfree.
74
This is an Internet version of this publication. © Print only for private use.

Taking photos and recording videos
Take a photo or record a video with the camera in your phone. You can hold the camera
horizontally or vertically. Photos and videos are saved automatically on the memory card.
Share a photo or a video with friends, or upload your photos and videos to a web service.
Camera controls
2
3
19 10 11
4
7 5
6
8
1 Camera key. Activate the camera/Take photos/Record videos
2 Display all settings
3 Go back a step or exit the camera
4 View photos and videos (still camera)
5 View photos and videos (video camera)
6 Activate the video function
7 Settings bar (video camera)
8 Settings bar (still camera)
9 Zoom in or out
10 Main camera screen
11 Activate the still camera function
To activate the camera
•Press and hold down the camera key.
To close the camera
•Press .
Using the still camera
To take a photo using the camera key
1From your Home screen, tap , then find and tap .
2If the still camera is not selected, tap .
3Press the camera key halfway down to activate auto-focus.
4When the focus frame or frames are green, press the camera key fully down.
75
This is an Internet version of this publication. © Print only for private use.

To take a photo by tapping the screen
1From your Home screen, tap , then find and tap .
2If the still camera is not selected, tap .
3To display all settings, press .
4Tap Touch capture and select On if it is not already selected.
5Tap a spot on the screen where you want the focus to be. The photo is taken as
soon as you release your finger.
Be careful not to touch , or other icons when tapping the screen to take a photo.
To use the zoom function
•When the camera is open, press the volume key up or down to zoom in or out.
To use the still camera flash
1When the camera is open, press .
2Tap Flash, and select your desired flash setting.
3Take the photo.
To view your photos
1When the camera is open, drag the thumbnail bar to the left. The thumbnail bar is
located to the right on the screen.
2Flick left or right to browse your photos and videos. Videos are identified by .
3Tap the photo you want to view.
4Flick up or down to browse other photos and videos.
To delete a photo
1When the camera is open, drag the thumbnail bar to the left to display all photos
and videos. The thumbnail bar is located on the right side of the screen.
2Tap the photo you want to delete.
3Press , and then tap .
Face detection
You can use face detection to bring an off-centre face into focus. The camera automatically
detects up to five faces, indicated by white frames. A yellow frame shows which face has
been selected for focus. Focus is set to the face closest to the camera. You can also tap
one of the frames to select which face should be in focus.
To set face detection
1From your Home screen, tap , then find and tap .
2If the still camera is not selected, tap .
3To display all settings, press .
4Tap Capturing mode > Normal.
5Tap Focus mode > Face detection.
To take a photo using face detection
1When the camera is open and Face detection is set, point the camera at your
subject. Up to five faces can be detected, and each detected face is framed.
2Tap the frame you want to select for focus. Do not tap if you want the camera to
select focus automatically.
3Press the camera key halfway down. A green frame shows which face is in focus.
4To take the photo, press the camera key fully down.
Smile detection
Smile detection allows you to capture a face just as it smiles. The camera detects up to
five faces and selects one face for smile detection and auto focus. A green frame shows
which face is selected. When the selected face smiles, the camera automatically takes a
photo.
76
This is an Internet version of this publication. © Print only for private use.
To turn on smile detection
1From your Home screen, tap , then find and tap .
2If the still camera is not selected, tap .
3To display all settings, press .
4Tap Capturing mode > Smile detection.
5Tap Smile level and select a setting.
To take a photo using smile detection
1When the camera is open and Smile detection is set, point the camera at your
subject. Each detected face is framed (not more than five faces). The camera selects
which face to focus on. A green frame shows the face in focus.
2The camera automatically takes the photo when the subject in focus smiles.
3If no smile is detected, press the camera key fully down to take the photo.
Adding the geographical position to your photos
Turn on geotagging to add the approximate geographical location (a geotag) to photos
when you take them. The geographical location is determined either by wireless networks
(mobile or Wi-Fi® networks) or GPS technology.
When appears on the camera screen, geotagging is turned on but the geographical
position has not been found. When appears, geotagging is turned on and the
geographical location is available, so your photo can get geotagged. When neither of these
two symbols appears, geotagging is turned off.
To turn on geotagging
1From your Home screen, tap , then find and tap .
2Press , then tap Geotagging.
3Tap On.
4Tap OK to agree to enable GPS and/or wireless networks.
5Check the options you want to select under My Location.
6After you confirm your settings, press to return to the camera screen.
7Make sure your location has been found. When appears on the camera screen,
your location is available and your photo can get geotagged.
Using still camera settings
To select still camera settings
1From your Home screen, tap , then find and tap .
2If the still camera is not selected, tap .
3To display all settings, press .
4Tap the setting you want to select.
To customise the still camera settings panel
1When the camera is open, press to display all settings.
2Touch and hold the setting you want to move and drag it to the desired position.
If you drag the setting outside of the settings panel, the change is cancelled.
Still camera settings overview
Capturing mode
Select the way you take a photo
Normal
Scene recognition
The camera determines which scene is most suitable. A scene icon and text appears when the scene is
selected.
77
This is an Internet version of this publication. © Print only for private use.
Smile detection
Capture a face just as it smiles. The camera detects up to five faces and selects one face for smile
detection and auto focus. When the selected face smiles, the camera automatically takes a photo.
Focus mode
The focus function controls which part of a photo should be sharp. When continuous autofocus is on, the camera
keeps adjusting focus so the area within the white focus frame stays sharp.
Single auto focus
The camera automatically focuses on the selected subject. Continuous autofocus is on. When the camera
key is pressed halfway down, the white focus frame turns green when the focus is set.
Multi auto focus
The focus is automatically set on several areas of the image. When the camera key is pressed halfway
down, the frame around the focused area turns green. Continuous autofocus is off.
Macro
Auto focus for extreme close-up photos. Continuous autofocus is on. When the camera key is pressed
halfway down, the white focus frame turns green once the focus is set.
Face detection
The camera automatically detects up to five human faces, indicated by frames on the camera screen.
The camera automatically focuses on the nearest face. You can also select which face to focus on by
tapping it on the screen. When the camera key is pressed halfway down, a green frame shows which
face is selected and in focus. Face detection cannot be used for all scene types. Continuous autofocus
is on.
Infinity
Use when taking photos from a distance. Focus is set on subjects far away. Subjects close to the camera
may be blurred. Continuous autofocus is off.
Touch focus
Touch a specific area on the camera screen to set the area of focus. Continuous autofocus is off. When
the camera key is pressed halfway down, the white focus frame turns green once the focus is set.
This setting is only available in Normal capturing mode.
Exposure value
Determine the amount of light in the photo you want to take. A higher value indicates an increased amount
of light.
This setting is only available in Normal capturing mode.
Metering
This function automatically determines a well-balanced exposure by measuring the amount of light striking the
image you want to capture.
Centre
Adjust the exposure to the centre of the image.
Average
Calculate the exposure based on the amount of light striking the whole image.
Spot
Adjust the exposure in a very small part of image you want to capture.
This setting is only available in Normal capturing mode.
White balance
The white balance setting adjusts the colour balance according to the lighting conditions.
Auto
Adjust the colour balance automatically to the lighting conditions.
Incandescent
Adjusts the colour balance for warm lighting conditions, such as under light bulbs.
Fluorescent
Adjust the colour balance for fluorescent lighting.
78
This is an Internet version of this publication. © Print only for private use.
Daylight
Adjust the colour balance for sunny outdoor conditions.
Cloudy
Adjust the colour balance for a cloudy sky.
This setting is only available in Normal capturing mode.
Image stabiliser
When taking a photo, it can be difficult to hold the phone steady. The stabiliser helps you by compensating for
small movements of the hand.
On
The image stabiliser is turned on. Captured images take longer to save when this
function is on.
Off
Take a photo with the stabiliser turned off.
This setting is only available in Normal capturing mode.
Scenes
Use the Scenes feature to quickly set up the camera for common situations using pre-programmed scenes.
The camera determines a number of settings for you to fit the selected scene, ensuring the best possible photo.
Off
The camera automatically adjusts settings for a photo
Portrait
Use for portrait photos. Settings are optimised to give slightly softer skin tones.
Landscape
Use for landscape photos. The camera focuses on distant objects. When Landscape is selected, focus
mode is changed to Infinity.
Night scene
Use when taking photos at night or in poorly lit environments (without the flash). Due to long exposure
time, the camera must be held still or placed on a stable surface. When Night scene is selected, focus
mode is changed to Infinity.
Night portrait
Use for portrait photos at night or in poorly lit environments (with or without the flash). Due to long exposure
time, the camera must be held still or placed on a stable surface.
Beach and snow
Use in bright environments to avoid underexposed photos.
Sports
Use for photos of fast-moving objects. Short exposure time minimises motion blurring.
Party
Use for indoor photos in poorly lit environments. This scene picks up indoor background lighting or
candlelight. Due to long exposure time, the camera must be held still or placed on a stable surface.
Document
Use for photos of text or drawings. Gives the photo increased, sharper contrast. When Document is
selected, focus mode is changed to Macro.
This setting is only available in Normal capturing mode.
Flash
Use the flash to take photos when lighting conditions are poor or when there is a backlight
Auto
The camera automatically determines if the lighting conditions require the use of a flash.
Fill flash
Use this setting when the background is brighter than the subject. This removes unwanted dark shadows.
Off
79
This is an Internet version of this publication. © Print only for private use.
The flash is turned off. Sometimes photo quality can be better without the flash, even if lighting conditions
are poor. Taking a good photo without using the flash requires a steady hand. Use the self-timer to avoid
blurred photos.
Red-eye reduction
Reduces the red colour of eyes when taking a photo.
Resolution
Choose between several picture sizes and aspect ratios before taking a photo. A photo with a higher resolution
requires more memory.
5MP 4:3
5 megapixel picture size with 4:3 aspect ratio. Suitable for photos you want to view on non-widescreen
displays or print in high resolution.
3MP 16:9
3 megapixel picture size with 16:9 aspect ratio. A high resolution widescreen format. Has a higher
resolution than full HD. Suitable for photos you want to view on widescreen displays.
2MP 4:3
2 megapixel picture size with 4:3 aspect ratio. Suitable for photos you want to view on non-widescreen
displays.
2MP 16:9
2 megapixel picture size with 16:9 aspect ratio. Suitable for photos you want to view on widescreen
displays.
Self-timer
With the self-timer you can take a photo without holding the phone. Use this function to take self-portraits, or
group photos where everyone can be in the photo. You can also use the self-timer to avoid shaking the camera
when taking photos
On (10 s.)
Set a 10-second delay from when the camera key is pressed until the
photo is taken
On (2 s.)
Set a 2-second delay from when the camera key is pressed until the photo
is taken
Off
The photo is taken as soon as you press the camera key
Touch capture
Identify a particular focus area by touching the camera screen with your finger. The photo is taken as soon as
you release your finger.
On
Tap an area of the screen to take a photo.
Off
You can only take a photo by pressing the camera key.
Smile level
Use the smile level function to determine what kind of smile the camera reacts to before taking a photo.
Big smile
Only take a photo when a big smile is detected.
Normal smile
Take a photo when an average smile is detected.
Faint smile
Take a photo when only a slight smile is detected.
Geotagging
Tag photos with details of where you took them
On
When geotagging is turned on, the approximate geographical location is added to photos when you take
them. To use geotagging, you must enable location features from the Settings menu.
80
This is an Internet version of this publication. © Print only for private use.
See Location services on page 96.
For geotags to be added to a photo, the location must be determined before you take the photo. Your
location is determined when appears on the camera screen. When the phone is searching for your
position, appears.
Off
When geotagging is turned off, you cannot view the location where you took a photo
Shutter sound
Select the sound that's heard when you press the camera key or tap the camera screen to take a photo.
Tips on using the camera
Rule of thirds
Don’t place your subject in the middle of the frame. By placing it a third of the way in, you
achieve a better result.
Hold it steady
Avoid blurry photos by holding the camera steady. Try to steady your hand by leaning it
against a solid object.
Get closer
By getting as close as possible to your subject, you can fill the camera screen view with
your subject.
Consider variety
Think about different angles, and move towards the subject. Take some vertical photos.
Try different positions.
Use a plain background
A plain background helps highlight your subject.
Keep your lens clean
Mobile phones are used in all kinds of weather and places, and carried in pockets and bags.
This results in the camera lens becoming dirty and covered with fingerprints. Use a soft
cloth to clean the lens.
Using the video camera
To record a video using the camera key
1From your Home screen, tap , then find and tap .
2If the video camera is not selected, tap .
3To start recording a video, press the camera key.
4To stop recording, press the camera key again.
To record a video by tapping the screen
1From your Home screen, tap , then find and tap .
2If the video camera is not selected, tap .
3To display all settings, press .
4Tap Touch capture and select On if it is not already selected.
5Tap the screen to start recording.
6Tap the screen to stop recording.
81
This is an Internet version of this publication. © Print only for private use.
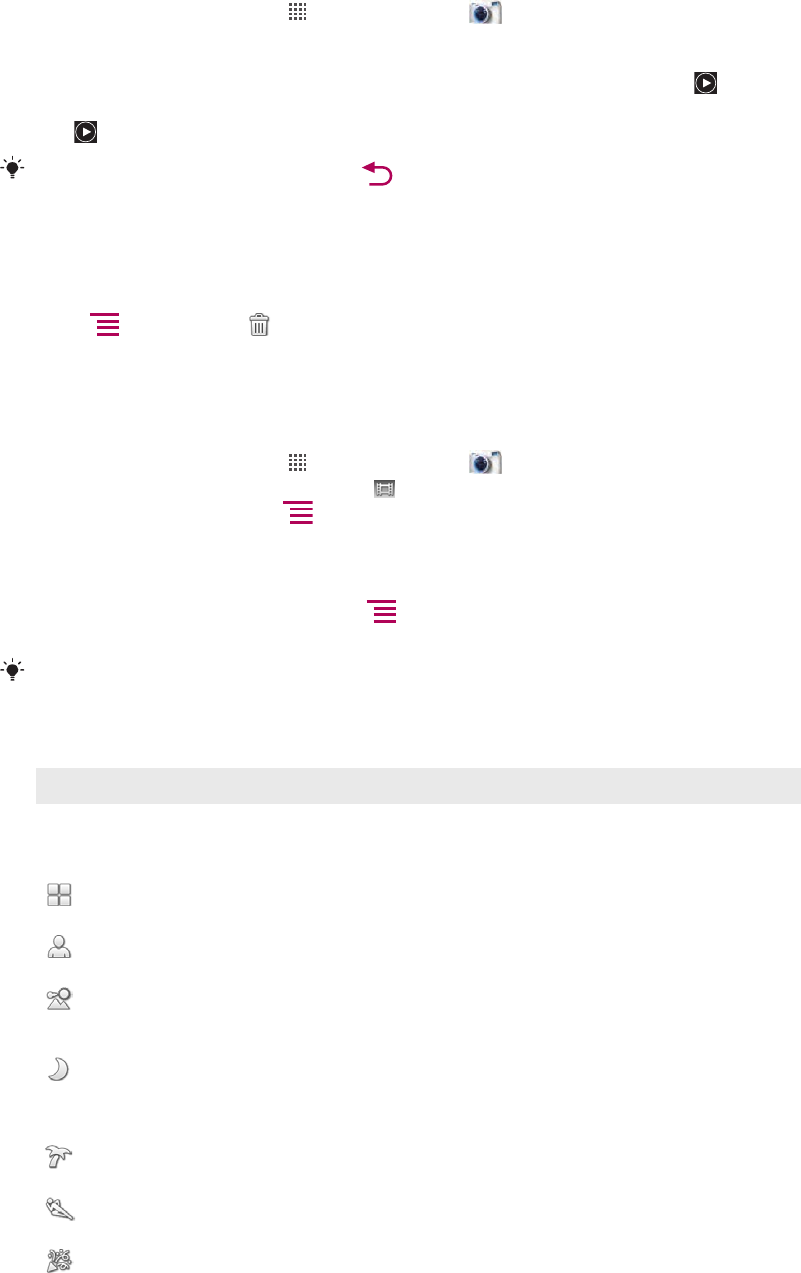
To view your recorded videos
1From your Home screen, tap , then find and tap .
2Drag the thumbnail bar (on the right of the screen) to the left to view all photos and
videos.
3Flick up or down to browse your photos and videos. Videos are identified by .
4Tap the video you want to view.
5Tap to play a video.
When a video is paused, you can press to view other photos and videos.
To delete a recorded video
1When the camera is open, drag the thumbnail bar (on the right of the screen) to the
left to display all photos and videos.
2Tap the video you want to delete.
3Press , and then tap .
Using video camera settings
To select video camera settings
1From your Home screen, tap , then find and tap .
2If the video camera is not selected, tap .
3To display all settings, press .
4Tap the setting you want to select.
To customise the video camera settings panel
1When the video camera is open, press to display all settings.
2Touch and hold the setting you want to move and drag it to the desired position.
If you drag the setting outside of the settings panel, the change is cancelled.
Video camera settings overview
Scenes
The Scenes feature helps you to quickly set up the camera for common situations using pre-programmed
scenes. The camera determines a number of settings for you to fit the selected scene, ensuring the best possible
video.
Off
The camera automatically adjusts settings for a video.
Portrait
Use for portrait videos. Settings are optimised to give slightly softer skin tones.
Landscape
Use for videos of landscapes. The camera focuses on distant objects. When Landscape is selected,
focus mode is changed to Infinity.
Night mode
When turned on, light sensitivity is increased. Use in poorly lit environments. Videos of fast-moving objects
may get blurred. Hold your hand steady, or use a support. Turn off night mode when lighting conditions
are good, to improve the video quality.
Beach and snow
Use in bright environments to avoid underexposed videos.
Sports
Use for videos of fast-moving objects. Short exposure time minimises motion blurring.
Party
Use for indoor videos in poorly lit environments. This scene picks up indoor background lighting or
candlelight. Videos of fast-moving objects may get blurred. Hold your hand steady, or use a support.
82
This is an Internet version of this publication. © Print only for private use.
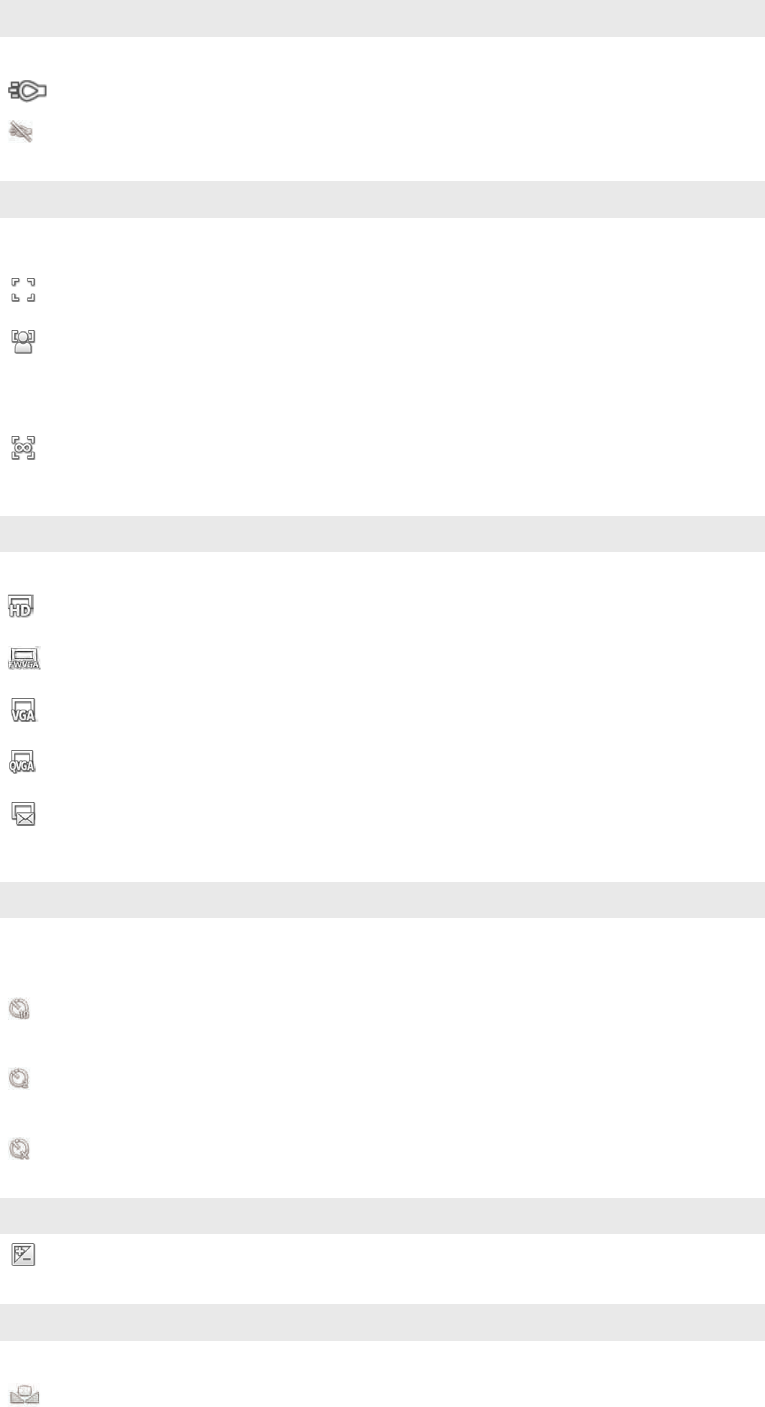
Photo light
Use the light to record videos when lighting conditions are poor or when there is a backlight
On
Off
Sometimes the video quality can be better without a light, even if lighting conditions are poor.
Focus mode
The focus setting controls which part of a photo should be sharp. When continuous autofocus is on, the camera
keeps adjusting focus so that the area within the white focus frame stays sharp.
Single auto focus
The camera automatically focuses on the selected subject. Continuous autofocus is on.
Face detection
The camera automatically detects up to five human faces, indicated by frames on the screen. The camera
automatically focuses on the nearest face. You can also select which face to focus on by tapping it on
the screen. When the camera key is pressed halfway down, a green frame shows which face is selected
and in focus. Face detection cannot be used for all scene types. Continuous autofocus is on.
Infinity
Use when recording videos from a distance. Focus is set on subjects far away. Subjects close to the
camera may be blurred.
Video size
Adjust the video size for different formats
HD 720p
HD (High Definition) format with 16:9 aspect ratio. 1280×720 pixels.
Full Wide VGA
Full Wide VGA format with 16:9 aspect ratio. 864×480 pixels.
VGA
VGA format with 4:3 aspect ratio. 640x480 pixels.
QVGA
Quarter VGA format with 4:3 aspect ratio. 320x240 pixels.
Multimedia message
Record videos suitable for sending in multimedia messages. The recording time of this video format is
limited to fit in a multimedia message.
Self-timer
With the self-timer you can record a video without holding the phone. Use it to record group videos where
everyone can be in the video. You can also use the self-timer to avoid shaking the camera when recording
videos.
On (10 s.)
Set a 10-second delay from when the camera key is pressed until the video
begins to record.
On (2 s.)
Set a 2-second delay from when the camera key is pressed until the video
begins to record.
Off
The video begins to record as soon as you press the camera key.
Exposure value
This setting allows you to determine the amount of light in the image you capture. A higher value indicates
an increased amount of light.
White balance
The white balance setting adjusts the colour balance according to the lighting conditions
Auto
Adjust the colour balance automatically to the lighting conditions.
83
This is an Internet version of this publication. © Print only for private use.
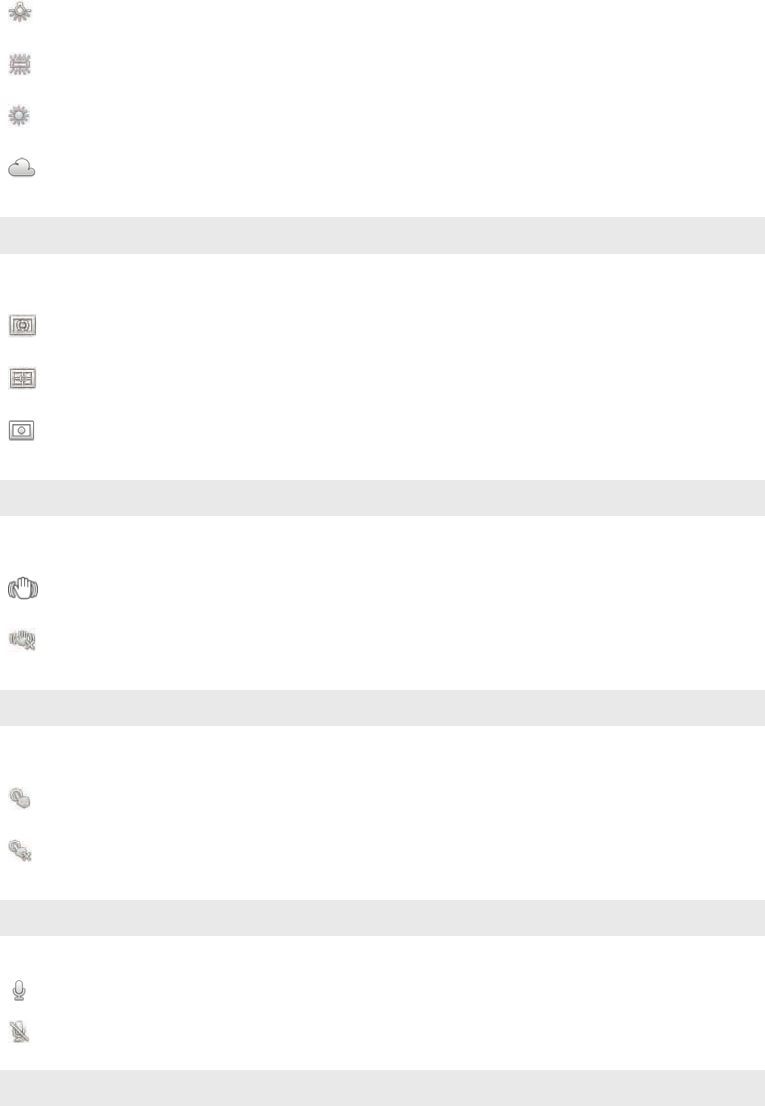
Incandescent
Adjusts the colour balance for warm lighting conditions, such as under light bulbs.
Fluorescent
Adjust the colour balance for fluorescent lighting.
Daylight
Adjust the colour balance for sunny outdoor conditions.
Cloudy
Adjust the colour balance for a cloudy sky.
Metering
This function automatically determines a well-balanced exposure by measuring the amount of light in the images
you want to capture.
Centre
Adjust the exposure to the centre of the image.
Average
Calculate the exposure based on the amount of light striking the whole image.
Spot
Adjust the exposure to a very small area of the image you want to capture.
Image stabiliser
When recording a video, it can be difficult to hold the phone steady. The stabiliser helps you by compensating
for small movements of the hand
On
You can record a video with the stabiliser turned on.
Off
You can record a video with the stabiliser turned off.
Touch capture
Identify a particular focus area on the camera screen. The video starts to record as soon as you release your
finger.
On
Tap the screen to start recording video.
Off
You can only record videos by pressing the camera key.
Microphone
Select whether to pick up the surrounding sound when recording videos.
On
Off
Shutter sound
Select the sound that is heard when you press the camera key or tap the camera screen to record a video.
84
This is an Internet version of this publication. © Print only for private use.
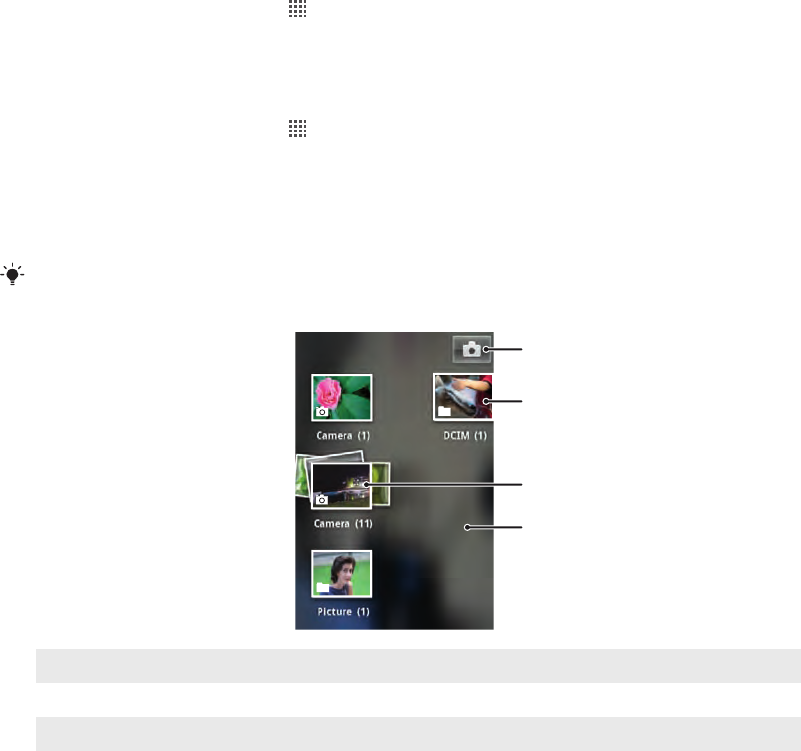
Viewing your photos and videos in
Gallery
Use Gallery to view photos and play videos that you’ve taken with your phone camera, or
to view similar content that you've downloaded or copied to the memory card. In Gallery,
you can also view photos and videos you've uploaded to an online service, for example, to
a Picasa™ web album or to the YouTube service. If you are a Facebook™ user, you can
view your Facebook™ photos in Gallery.
From Gallery, you can also share your favorite photos and videos with friends, via
Bluetooth™ wireless technology, email or messaging. And you can perform basic editing
tasks on photos and set them as wallpaper or contact pictures. It is recommended to use
the Media Go™ application to transfer content to and from the memory card in your phone.
For more information, see Connecting your phone to a computer on page 93.
BRAVIA Engine
Use the Mobile BRAVIA Engine to improve the quality of your pictures and videos. The
sharpness filter and noise reduction features help you get more vivid results.
To turn on Mobile BRAVIA Engine
1From your Home screen, tap .
2Find and tap Settings >Display.
3Mark the Mobile BRAVIA Engine checkbox if it is not already marked.
To open Gallery and view your albums
1From your Home screen, tap .
2Find and tap Gallery. Photos and videos on your memory card, including those
you’ve taken with the camera and those you downloaded from the web or other
locations, appear in albums. If you have a Picasa™ account associated with a
Google™ account that you’ve added to your phone, and if you have configured it to
sync with Picasa™, Gallery also displays your Picasa™ web albums.
If the screen orientation does not change automatically when you turn the phone sideways, mark
the Auto-rotate screen checkbox under Settings > Display.
1
2
4
3
1 Tap to open the camera
2 An album of the photos and videos you shot using the camera
3 Peek into a stack by touching it with two fingers and spreading them apart
4 Flick left or right on the screen to view more albums
85
This is an Internet version of this publication. © Print only for private use.
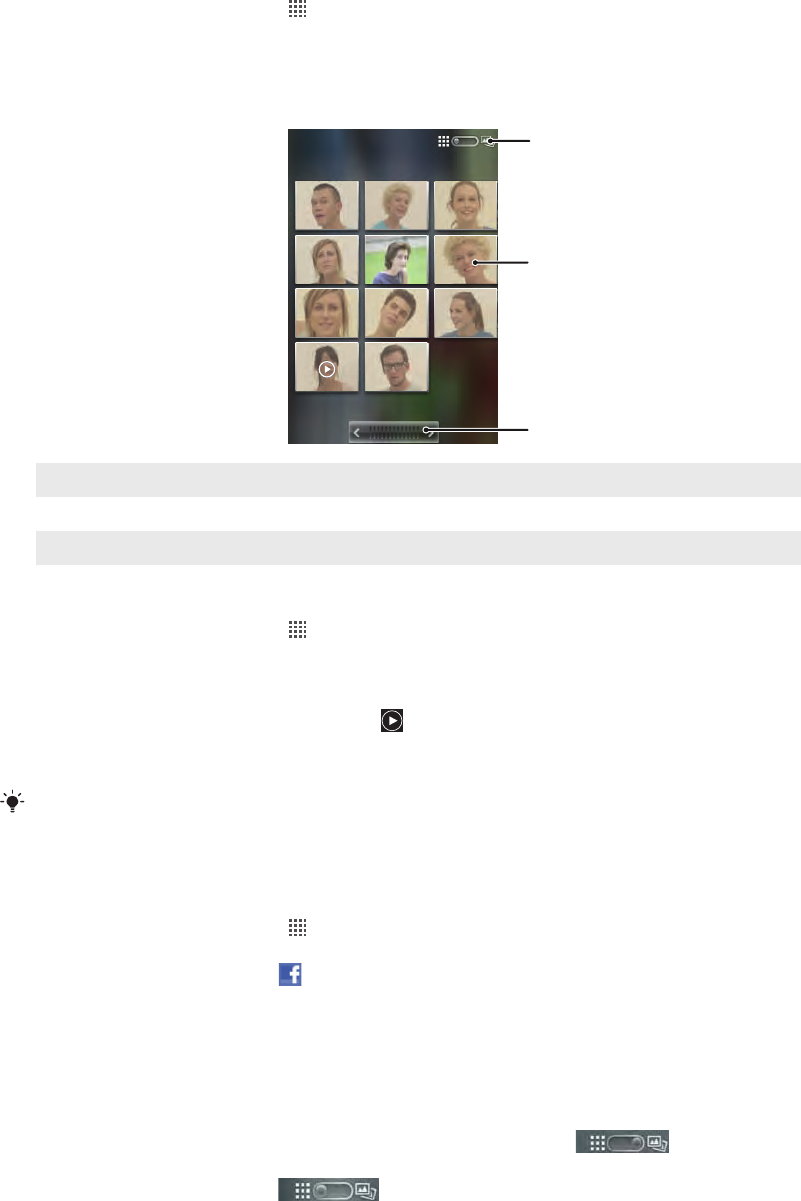
Working with albums
Albums are groups of photos and videos in folders on your memory card or in Picasa™
web albums.
To open an album in Gallery
1From your Home screen, tap .
2Find and tap Gallery.
3Tap the album you want to view. The album opens displaying its photo and video
content in a chronologically ordered grid. The name of the album appears at the top
of the screen.
1
2
3
1 Tap to switch from grid to stack view
2 Tap a photo or video to view it
3 Tap an arrow to scroll a screen at a time. Drag left or right to scroll rapidly.
To view photos and videos in Gallery
1From your Home screen, tap .
2Find and tap Gallery.
3Tap an album.
4Photos and videos are displayed in a chronologically ordered grid. Tap a photo or
video to view it. Videos are indicated by .
5In the photo viewer, flick left to view the next photo or video. Flick right to view the
previous photo or video.
If the screen orientation does not change automatically when you turn the phone sideways, mark
the Auto-rotate screen checkbox under Settings > Display.
To view Facebook™ photos in Gallery
1Make sure you are signed in to Facebook™.
2From your Home screen, tap .
3Find and tap Gallery.
4Tap any album showing the icon. The first time you tap a Facebook™ album
your Facebook™ photos are copied to Gallery.
5Photos are displayed in a chronologically ordered grid. Tap a photo to view it.
6In the photo viewer, flick left to view the next photo or video. Flick right to view the
previous photo or video.
To change how the contents of an album are displayed in Gallery
1When viewing an album in Gallery, drag the album view switch to the
right to view the contents of the album in stacks.
2Drag the album view switch to the left to view the album contents in a
chronological grid.
86
This is an Internet version of this publication. © Print only for private use.
Working with albums in Gallery
In addition to working with whole albums and with individual photos, you can select one or
more photos or videos in an album to work on them in batches, for example, to send a few
photos from an album to a friend.
To work with batches of photos or videos in Gallery
1From your Home screen, tap .
2Find and tap Gallery.
3Open the album containing the content you want to work with.
4Press twice.
5Check or uncheck the items you want to work with. You can uncheck all items you’ve
checked by pressing and tapping Deselect All.
6Use the controls at the bottom of the screen to adjust the checked items. The
controls available depend on the mix of items you’ve selected.
To share an album in Gallery
1From the main Gallery screen, press twice.
2Check the albums you want to share, then press .
3Tap Share.
4In the menu that opens, tap the application you want to use to share the selected
albums. The application that you selected opens with the photos or videos from the
selected albums or links attached to a new message.
If you are sharing an album via Gmail™, do not delete the original of an attachment before the
message is completely sent. Otherwise, the attachment will not be sent.
To delete an album in Gallery
1From the main Gallery screen, press twice.
2Check or uncheck the albums you want to delete, then press .
3Tap Delete. In the dialog that opens, tap Confirm Delete.
Working with photos
Use Gallery to view photos that you’ve taken with the camera, downloaded, copied to your
memory card, or stored in online web albums. You can also edit the photos on your memory
card and share them with friends.
To view photos in the album
1From your Home screen, tap .
2Find and tap Gallery.
3Tap an album to open it, then tap a photo.
4Flick left to view the next photo in the album. Flick right to view the previous photo.
To zoom a photo
•When you are viewing a photo in the photo viewer, double-tap a photo, or pinch two
fingers together or spread them apart, to zoom in or out. Then drag the photo to
view different parts of it.
To watch a slideshow of your photos
1From your Home screen, tap .
2Find and tap Gallery.
3Tap an album to open it, then tap a photo and press .
4In the toolbar at the bottom of the screen, tap Slideshow.
5Tap a photo to end the slideshow.
87
This is an Internet version of this publication. © Print only for private use.

To rotate a photo
1When you are viewing a photo in the photo viewer, tap the photo to view the controls.
2Press .
3Tap More, then tap either Rotate Left or Rotate Right. The photo is saved in the
new orientation.
To use a photo as a contact picture
1When you are viewing a photo in the photo viewer, press .
2In the toolbar at the bottom of the screen, tap Set as > Contact picture.
3Select the contact you want to associate with the photo.
4Crop the photo, if required.
5Tap Save.
To use a photo as wallpaper
1When you are viewing a photo in the photo viewer, press .
2In the toolbar at the bottom of the screen, tap Set as > Wallpaper.
3Crop the photo, if required.
4Tap Save.
To crop a photo
1When you are viewing a photo in the photo viewer, press .
2In the toolbar at the bottom of the screen, tap More > Crop.
3To adjust the crop frame, touch and hold the edge of the crop frame. When crop
arrows appear, drag inward to or outward from the centre of the crop frame to resize
it.
4To resize all sides of the crop frame at the same time, touch and hold one of the four
corners and then drag the frame.
5To move the crop frame to another area of the photo, touch and hold inside the
frame, then drag it to the desired position.
6To save a copy of the photo as you cropped it, tap Save. The original uncropped
version remains on your memory card.
To share a photo
1When you are viewing a photo in the photo viewer, press if no controls are
displayed.
2In the toolbar at the bottom of the screen, tap Share.
3Select one of the available transfer methods.
To delete a photo
1When you are viewing a photo in the photo viewer, press .
2In the toolbar at the bottom of the screen, tap Delete.
3In the dialog that opens, tap Confirm Delete.
Viewing your photos on a map
You can view on a map the location where a photo was taken. All you have to do is set
your camera to add geographical location information. Show friends and family where you
were, or find your way back to the location another time.
To view a photo taken by the camera on a map, you must enable location detection (under
location settings in the camera settings menu) before you take the photo. You must also enable
location features under Settings > Location & security. See Location services on page 96 for
more information.
To view your photos on a map
1When you are viewing a photo in the photo viewer, press .
2Tap More > Show on map.
88
This is an Internet version of this publication. © Print only for private use.
Working with videos
Use Gallery to watch videos that you’ve taken with the camera, downloaded, or copied to
your memory card. You can also share your videos with friends, or upload them to
YouTube™.
To play a video
1In Gallery, open an album and tap a video.
2Turn the phone to view the video in upright (portrait) or sideways (landscape)
orientation.
3Tap the video to view the playback controls.
If the screen orientation does not change automatically when you turn the phone sideways, mark
the Auto-rotate screen checkbox under Settings > Display.
To pause a video
1When a video is playing, tap the screen to display the controls.
2Tap .
To fast forward and rewind a video
1When a video is playing, tap the screen to display the controls.
2Drag the progress bar marker left to rewind, or right to fast forward.
Alternatively, you can tap or .
To adjust the volume of a video
•Press the volume key.
To share a video
1Open a Gallery album containing a video.
2Press twice.
3Check the video or videos you want to share.
4Press .
5Tap Share.
6In the menu that opens, tap the application you want to use to share the selected
video.
You might not be able to copy, send or transfer copyright-protected items. Also, some items may
not send if the file size is too large.
To delete a video
1Open a Gallery album containing a video.
2Press twice.
3Check the video or videos you want to delete.
4Press .
5Tap Delete.
6In the dialog that opens, tap Confirm Delete.
89
This is an Internet version of this publication. © Print only for private use.
Bluetooth™ wireless technology
Use the Bluetooth™ function to send files to other Bluetooth™ compatible devices, or to
connect to handsfree accessories. Turn on the Bluetooth™ function in your phone and
create wireless connections to other Bluetooth™ compatible devices such as computers,
handsfree accessories, and phones. Bluetooth™ connections work better within a 10
meter (33 foot) range, with no solid objects in between. In some cases you have to manually
pair your phone with other Bluetooth™ devices. Remember to set your phone to
"discoverable" if you want other Bluetooth™ devices to detect it.
Interoperability and compatibility among Bluetooth™ devices can vary.
To turn on the Bluetooth™ function and make your phone visible
1From your Home screen, tap .
2Find and tap Settings > Wireless & networks.
3Mark the Bluetooth checkbox. appears in the status bar.
4Tap Bluetooth settings.
5Mark the Discoverable checkbox. The phone will now be visible to other devices
for 120 seconds.
Phone name
You can give your phone a name. This name is shown to other devices after you have
turned on the Bluetooth™ function and your phone is set to visible.
To enter a phone name
1Make sure the Bluetooth™ function is turned on.
2From your Home screen, tap .
3Find and tap Settings > Wireless & networks > Bluetooth settings > Device
name.
4Enter a phone name of your choice.
5Tap OK.
Pairing with another Bluetooth™ device
When you pair your phone with another device, you can, for example, connect your phone
to a Bluetooth™ handsfree or a Bluetooth™ car kit and use these devices to make and
receive calls.
Once you have paired your phone with a Bluetooth™ device the phone will remember this
pairing. When pairing the phone with a Bluetooth™ device, you may need to enter a
passcode. Your phone will automatically try the generic passcode 0000. If this does not
work, refer to your Bluetooth™ device documentation for the device passcode. You do not
need to re-enter the passcode the next time you connect to a paired Bluetooth™ device.
Some Bluetooth™ devices, for example, most Bluetooth™ headsets, require you to both
pair and connect with the other device.
You can pair your phone with several Bluetooth™ devices, but you can only connect to
one Bluetooth™ profile at the same time.
90
This is an Internet version of this publication. © Print only for private use.

To pair your phone with another Bluetooth™ device
1From the Home screen, tap .
2Find and tap Settings > Wireless & networks > Bluetooth settings.
3Tap Scan for devices. The Bluetooth™ devices found will be listed under Bluetooth
devices.
4Tap the Bluetooth™ device that you want to pair with your phone.
5Enter a passcode, if required.
6The phone and the Bluetooth™ device are now paired. With some devices you also
need to connect before you can start using them. The status of the pairing and
connection is shown below the name of the Bluetooth™ device in the Bluetooth
devices list.
Make sure that the device you want to pair your phone with has the Bluetooth™ function activated
and Bluetooth™ visibility turned on.
To connect your phone to another Bluetooth™ device
Some Bluetooth™ devices, for example, most Bluetooth™ headsets, require you to first pair and
then connect with other Bluetooth™ devices before a successful connection can be established.
1From the Home screen, tap .
2Find and tap Settings > Wireless & networks > Bluetooth settings.
3In the Bluetooth devices list, touch and hold the Bluetooth™ device that you want
to connect to your phone.
4Tap Connect.
To disconnect a Bluetooth™ device
1From the Home screen, tap .
2Find and tap Settings > Wireless & networks > Bluetooth settings.
3In the Bluetooth devices list, touch and hold the name of the connected
Bluetooth™ device.
4Tap Disconnect.
Even if you disconnect a Bluetooth™ device, the device is still paired with your phone. To remove
the pairing, you need to tap Disconnect & unpair.
To unpair a Bluetooth™ device
1From the Home screen, tap .
2Find and tap Settings > Wireless & networks > Bluetooth settings.
3In the Bluetooth devices list, touch and hold the name of the connected
Bluetooth™ device.
4Tap Unpair.
Sending and receiving items using Bluetooth™ technology
Share items with other Bluetooth™ compatible devices such as phones or computers. You
can send and receive several kinds of items using the Bluetooth™ function, such as:
•Photos and videos
•Music and other audio files
•Contacts
•Web pages
91
This is an Internet version of this publication. © Print only for private use.
To send items using Bluetooth™
1Receiving device: Make sure the Bluetooth™ device you want to send the item to
has Bluetooth™ turned on and is in discoverable mode.
2In your phone, open the application which contains the item you want to send and
scroll to the item.
3Depending on the application and the item you want to send, you may need to, for
example, touch and hold the item, open the item or press . Other ways to send
an item may exist.
4Select a share or send menu item.
5In the menu that appears, select Bluetooth.
6Turn on Bluetooth™, if you are asked to do so.
7Under Bluetooth devices, tap the name of the receiving device.
8Receiving device: If asked, accept the connection.
9If asked, enter the same passcode on both devices, or confirm the suggested
passcode.
10 Receiving device: Accept the incoming item.
To receive items using Bluetooth™
1From the Home screen, tap .
2Find and tap Settings > Wireless & networks.
3Mark the Bluetooth checkbox. appears in the status bar.
4Tap Bluetooth settings.
5Mark the Discoverable checkbox. The phone will now be visible to other devices
for 120 seconds.
6Sending device: Send one or more items to your phone using Bluetooth™.
7If asked, enter the same passcode on both devices, or confirm the suggested
passcode.
8When you are notified of an incoming file to your phone, drag the status bar
downwards and tap the notification to accept the file transfer.
9Tap Accept to start the file transfer.
10 To view the progress of the transfer, drag the status bar downwards.
11 To open a received item straight away, drag the status bar downwards and tap the
relevant notification.
Your phone must have a memory card inserted to be able to receive items using Bluetooth™
wireless technology.
92
This is an Internet version of this publication. © Print only for private use.

Connecting your phone to a computer
Connect your phone to a computer and start transferring pictures, music and other file
types. The easiest ways to connect are using a USB cable or Bluetooth wireless technology.
When you connect your phone to the computer using a USB cable, you are prompted to
install the PC Companion application on your computer. PC Companion helps you access
additional computer applications to transfer and organise media files, update your phone,
synchronise phone content, and more.
You might not be able to transfer some copyright-protected material between your phone and
computer.
Transferring and handling content using a USB cable
Use a USB cable connection between your computer and phone for easy transfer and
management of your files. Once the two devices are connected, you can drag and drop
content between them using your computer's file explorer. If you're transferring music,
video, pictures or other media files to your phone, it's best to use the Media Go™
application on your computer. MediaGo converts media files so that you can use them on
your phone.
To drag and drop content between phone and computer using USB cable
1Connect your phone to a computer using a USB cable.
2Phone: Connected in Media transfer mode appears in the status bar.
3Computer: Open Microsoft® Windows® Explorer from the desktop and wait until
your phone's memory card appears as an external disk in Microsoft® Windows®
Explorer.
4Computer: Drag and drop the desired files between your phone and the computer.
USB connection modes
The two most common methods to share data between your phone and other devices
using a USB cable are Media transfer protocol (MTP) mode and Mass storage (MSC) mode.
•Media transfer mode (MTP) – the most common protocol for communication with
Windows computers. This mode is normally enabled by default.
•Mass storage mode (MSC) – the most common way to connect phones with media
devices such as TVs, car kits, and Mac OS/Linux computers lacking MTP support.
To set Mass storage as the default USB connection mode
1From your Home screen, tap .
2Find and tap Settings > Sony Ericsson > Connectivity > USB connection
mode.
3Tap Mass storage mode (MSC).
4Tap OK.
Media transfer mode is normally activated by default.
To connect your phone to a computer using Mass storage mode
1Connect your phone to a computer using a USB cable.
2Drag the status bar downwards.
3Tap Connect your phone > Connect phone memory card.
If you are running an application on your phone and the application is using the memory card,
you may need to close the application in order to access the memory card.
To disconnect the USB cable in Mass storage mode
Do not disconnect the USB cable when transferring content as this may corrupt the content.
93
This is an Internet version of this publication. © Print only for private use.

1Computer: Use the Safely Remove Hardware feature to disable the USB cable
connection.
2Phone: Drag the status bar downwards.
3Tap Phone memory card connected.
4Tap Disconnect in the screen that opens.
5Disconnect the USB cable from both devices.
Computer instructions may vary depending on your operating system. See the documentation
of your computer's operating system for more information.
Transferring files using Media transfer mode over a Wi-Fi®
network
You can transfer files between your phone and other MTP compatible devices, such as a
computer, using a Wi-Fi® connection. Before connecting, you first need to pair the two
devices. If you're transferring music, video, pictures or other media files between your
phone and a computer, it's best to use the Media Go™ application on the computer.
MediaGo converts media files so that you can use them on your phone.
In order to use this feature, you need a Wi-Fi enabled device that supports Media transfer, for
example, a computer running Microsoft® Windows Vista® or Windows® 7.
To pair your phone wirelessly with a computer using Media transfer mode
1Make sure Media transfer mode is enabled on your phone. It is normally enabled by
default.
2Connect your phone to the computer using a USB cable.
3Computer: Once the phone name appears on the screen, click Network
configuration and follow the instructions to pair the computer.
4When you are finished pairing, disconnect the USB cable from both devices.
The above instructions only work if Windows 7 is installed on your computer and the computer
is connected to a Wi-Fi Access Point via a network cable.
To connect paired devices wirelessly in Media transfer mode
1Make sure Media transfer mode is enabled on your phone. It is normally enabled by
default.
2From your Home screen, tap .
3Find and tap Settings > Sony Ericsson > Connectivity.
4Tap the paired device that you want to connect to under Trusted devices for
wireless media transf..
5Tap Connect.
Make sure your phone's Wi-Fi function is turned on.
To disconnect a wirelessly paired device in Media transfer mode
1From your Home screen, tap .
2Find and tap Settings > Sony Ericsson > Connectivity.
3Tap the paired device that you want to disconnect from under Trusted devices for
wireless media transf..
4Tap Disconnect.
To remove a pairing with another device
1From your Home screen, tap .
2Find and tap Settings > Sony Ericsson > Connectivity.
3Tap the paired device that you want to remove.
4Tap Forget.
94
This is an Internet version of this publication. © Print only for private use.

PC Companion
PC Companion helps you to access and use additional features and services connected
to your phone so that you can transfer music, video and pictures. You can also update your
phone to get the latest software available.
You need a computer running one of the following operating systems to use the PC
Companion application:
•Microsoft® Windows® 7
•Microsoft® Windows Vista®
•Microsoft® Windows® XP (Service Pack 3 or higher)
You need to connect your phone and computer using a USB cable to install and use PC
Companion.
To install PC Companion on a computer
1Connect your phone to a computer using a USB cable.
2Phone: Tap Install in the PC Companion installation window.
3Computer: PC Companion automatically starts after a few seconds. Follow the on-
screen instructions to install PC Companion.
The PC companion installer is enabled by default on your phone. You can disable this option in
your phone settings.
To start PC Companion
1Connect your phone to a computer using a USB cable.
2Phone: Connected in Media transfer mode appears in the status bar.
3Computer: PC Companion starts automatically on your computer after a few
seconds.
If PC Companion does not start automatically, you can start it from the start menu of your
computer.
Media Go™
The Media Go™ computer application helps you transfer and manage media content in
your phone and computer. Install the Media Go™ application from the PC Companion
application. See PC Companion on page 95 for more information.
You need one of these operating systems to use the Media Go™ application:
•Microsoft® Windows® 7
•Microsoft® Windows® Vista®
•Microsoft® Windows® XP, Service Pack 3 or higher
To be able to transfer files between Media Go™ and your phone, you must first connect
your phone and computer using a USB cable. You must also enable your phone to connect
to the computer. See To drag and drop content between phone and computer using
USB cable on page 93 for more information.
To learn more about how to use the Media Go™ application, see the help section in the main
menu of the Media Go™ application.
To transfer content using the Media Go™ application
1Connect your phone to a computer using a USB cable.
2Phone: Connected in Media transfer mode appears in the status bar.
3Computer: The PC Companion application launches automatically. In
PC Companion, click Media Go to start the Media Go™ application. In some cases,
you may have to wait for Media Go™ to install.
4Drag and drop files between your computer and phone using the Media Go interface.
Media Go™ can also be downloaded from www.sonyericsson.com/support.
95
This is an Internet version of this publication. © Print only for private use.
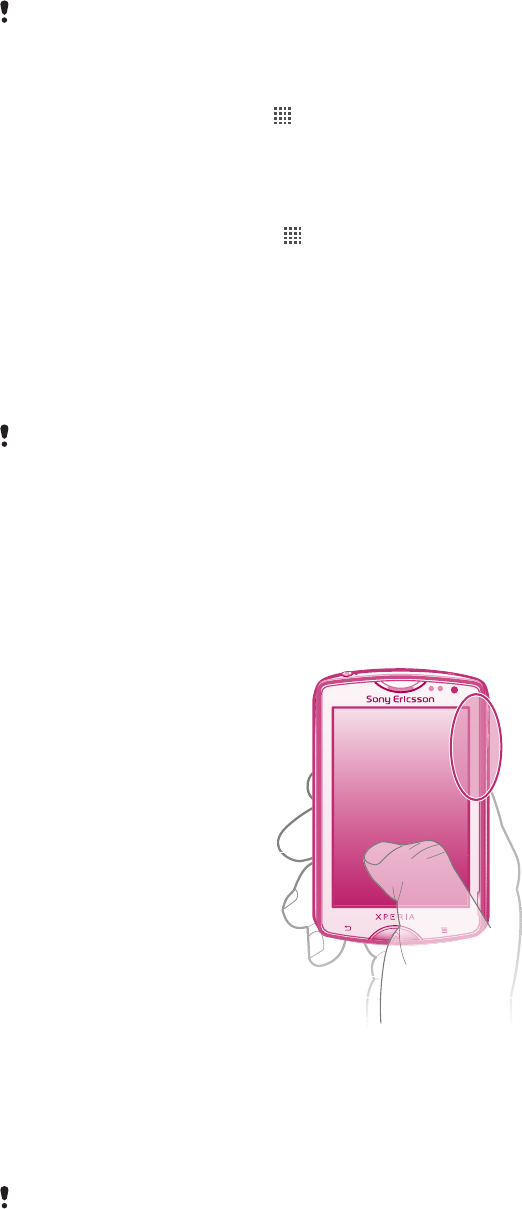
Location services
Use your phone to find out where you are. There are two methods: GPS or wireless
networks. It’s best to enable the wireless networks option if you only need your approximate
location, and want it fast. If you want a more exact position, and have a clear view of the
sky, enable the GPS option. You can enable both options to ensure your location is found
in situations where a network is weak.
Sony Ericsson does not warrant the accuracy of any location services including but not limited
to navigational services.
To enable GPS
1From the Home screen, tap .
2Tap Settings > Location & security.
3Mark the Use GPS satellites checkbox.
To enable wireless networks
1From your Home screen, tap .
2Tap Settings > Location & security.
3Mark the Use wireless networks checkbox.
Using GPS
Your phone has a global positioning system (GPS) receiver that uses satellite signals to
calculate your location.
When you use features that require the GPS receiver to find your location, make sure you have
a clear view of the sky.
Getting the best performance
The first time you use the GPS it can take 5 to 10 minutes for your location to be found. To
help the search, make sure you have a clear view of the sky. Stand still and don't cover the
GPS antenna (the highlighted area in the image). The GPS signals can pass through clouds
and plastic, but not through most solid objects such as buildings and mountains. If your
location isn't found after a few minutes, move to another location.
Google Maps™
Track your current location, view real-time traffic situations and receive detailed directions
to your destination. Before taking trips, you can download and save maps to your memory
card to avoid high roaming costs.
The Google Maps™ application requires the use of an Internet connection. You may incur data
connection charges when you connect to the Internet from your phone. Contact your network
96
This is an Internet version of this publication. © Print only for private use.

operator for more information. The Google Maps™ application may not be available in every
market, country or region.
To use Google Maps™
1From the Home screen, tap .
2Find and tap Maps.
If you want to use your location, enable at least one of the location methods available under
Settings > Location & security.
To learn more about Google Maps™
•When you use Maps, press , then tap More > Help.
Viewing your friends’ locations with Google Latitude™
Join Google Latitude™ to view your friends’ locations on maps and share your location and
other information with them.
Getting directions
Google Maps™ application can provide directions for travel by foot, public transportation,
or car. You can add a shortcut to a destination to your Home screen, so that you can simply
touch the shortcut to get directions to that location from wherever you are.
When you view a map, you make an Internet connection, and data is transferred to your
phone. Before taking trips, you can download and save maps to your memory card to avoid
high roaming costs.
Sony Ericsson does not warrant the accuracy of any directional services.
Using the Navigation application
Get turn-by-turn instructions on how to get places. The directions are both spoken and
displayed on the screen.
Navigation may not be available in every market.
To start Navigation
1From your Home screen, tap .
2Find and tap Navigation.
Using the Wisepilot™ application
Get turn-by-turn voice instructions on how to get places. You can also manage your trips
and share routes and locations with friends via SMS, Twitter™ or Facebook™.
Wisepilot may not be available in every market. For more information, including a Wisepilot User
manual, go to www.sonyericsson.wisepilot.com.
To start Wisepilot™
1From the Home screen, tap .
2Find and tap Wisepilot.
97
This is an Internet version of this publication. © Print only for private use.
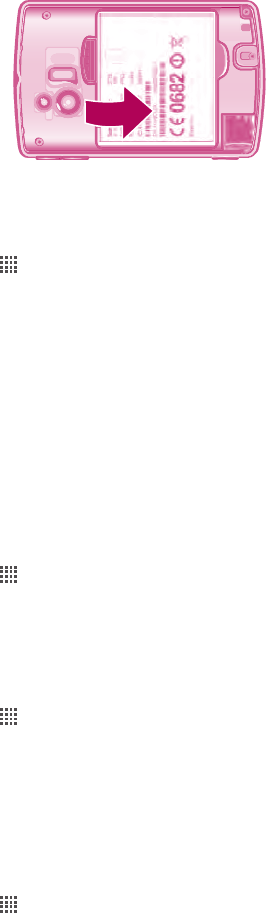
Locking and protecting your phone
IMEI number
Every phone has a unique IMEI (International Mobile Equipment Identity) number. You
should keep a copy of this number. If your phone is stolen, your network provider can use
your IMEI number to stop the phone from accessing the network in your country.
To view your IMEI number
•You can find the IMEI number under the battery.
To view your IMEI number in the phone
1From the Home screen, tap .
2Find and tap Settings > About phone > Status.
3Scroll to IMEI to view the IMEI number.
SIM card protection
The SIM card lock only protects your subscription. Your phone will still work with a new
SIM card. If the SIM card lock is on, you have to enter a PIN (Personal Identity Number). If
you enter your PIN incorrectly more times than the maximum number of attempts allowed,
your SIM card will become blocked. You need to enter your PUK (Personal Unblocking Key)
and then a new PIN. Your PIN, PIN2 and PUK are supplied by your network operator.
To enable the SIM card PIN lock
1From the Home screen, tap .
2Find and tap Settings > Location & security > Set up SIM card lock > Lock SIM
card.
3Enter the SIM card PIN and tap OK.
To change the SIM card PIN
1From the Home screen, tap .
2Find and tap Settings > Location & security > Set up SIM card lock > Change
SIM PIN.
3Enter the old SIM card PIN and tap OK.
4Enter the new SIM card PIN and tap OK.
5Re-type the new SIM card PIN and tap OK.
To change the SIM card PIN2
1From the Home screen, tap .
2Find and tap Settings > Call settings > Fixed dialling numbers > Change PIN2.
3Enter the old SIM card PIN2 and tap OK.
4Enter the new SIM card PIN2 and tap OK.
5Confirm the new PIN2 and tap OK.
98
This is an Internet version of this publication. © Print only for private use.

To unblock the locked SIM card
1When Your SIM card is PUK-locked. Type the PUK code to unlock it. appears,
enter the PUK code and tap OK.
2Enter a new PIN code and tap OK.
3Repeat the new PIN code and tap OK.
If you enter an incorrect PUK code too many times, the SIM card will be blocked. You will then
need to contact your service provider to get a new SIM card.
Setting a screen lock
To set a screen lock
1From your Home screen, tap > Settings > Location & security > Set up screen
lock.
2Select an option.
It is very important that you remember your screen unlock pattern, PIN or password. If you forget
this information, it may not be possible to restore important data such as contacts and
messages. Refer to your Sony Ericsson contact centre for more information.
To create a screen unlock pattern
1From the Home screen, tap .
2Find and tap Settings > Location & security > Set up screen lock > Pattern.
3Follow the instructions in your phone. You are asked to select a security question
that will be used to unlock the phone if you forget your screen unlock pattern.
To unlock the screen using a screen unlock pattern
1Activate the screen.
2Draw your screen unlock pattern.
If the unlock pattern you draw on the screen is rejected five times in a row, you can select to
either wait 30 seconds and then try again, or to answer the security question you have selected.
To change the screen unlock pattern
1From the Home screen, tap .
2Find and tap Settings > Location & security > Change screen lock.
3Follow the instructions in your phone.
To disable the screen unlock pattern
1From your Home screen, tap > Settings > Location & security > Change screen
lock.
2Draw the screen unlock pattern.
3Tap None.
To create a screen unlock PIN
1From your Home screen, tap > Settings > Location & security > Set up screen
lock > PIN.
2Enter a numeric PIN and tap Continue.
3Confirm you PIN and tap OK.
To disable the screen unlock PIN
1From your Home screen, tap > Settings > Location & security > Change screen
lock.
2Enter you PIN and tap Continue.
3Tap None.
99
This is an Internet version of this publication. © Print only for private use.

To create a screen lock password
1From your Home screen, tap > Settings > Location & security > Set up screen
lock > Password.
2Enter a password. The password must contain at least one letter and must be at
least four characters long.
3Tap Continue.
4Confirm your password and tap OK.
To disable the screen unlock password
1From your Home screen, Tap > Settings > Location & security > Change
screen lock.
2Enter your password and tap Continue.
3Tap None.
100
This is an Internet version of this publication. © Print only for private use.

Updating your phone
Update your phone to the most recent software version to get optimal performance and
the latest enhancements. Use the Update center application to download updates directly
to your phone. You can run updates automatically or manually over both 2G and 3G
connections, or over a Wi-Fi® network.
In certain cases, you may need to use the PC Companion application on a computer to
run updates. Just connect your phone to the computer with a USB cable, and the PC
Companion application guides you through the rest.
You may incur data connection charges when you connect to the Internet from your phone.
Contact your network operator for more information.
Updating your phone wirelessly
To download software updates manually
1From your Home screen, tap .
2Find and tap Update center.
3Select your desired application or system update option and follow the on-screen
instructions.
To activate automatic software updates
1From your Home screen, tap .
2Find and tap Update center.
3Press , then tap Settings.
4Check the Automatic update checkbox.
Once the Automatic update function is set, a notification appears in the status bar to inform you
about application or system updates.
Updating your phone using a USB cable connection
Some updates are not available for wireless download. Notifications appear in the status
bar to inform you of such updates. You need to use the PC Companion application on a
computer to start this kind of software update. And you need to connect your phone to the
computer with a USB cable. PC Companion can also be downloaded from
www.sonyericsson.com.
To download the PC Companion application from your phone
1Connect your phone to a computer using a USB cable.
2When prompted, follow the instructions in the phone to launch the installation of PC
Companion on the computer.
PC Companion can also be downloaded at www.sonyericsson.com/support.
To download software updates using a USB cable connection
1Make sure you have PC Companion installed on your computer.
2Connect your phone to a computer using a USB cable.
3Computer: Launch the PC Companion application. After a few moments, the phone
is detected by PC Companion and PC Companion searches for new phone
software.
4When notifications appear in the status bar, follow the on-screen instructions to carry
out the relevant software updates.
101
This is an Internet version of this publication. © Print only for private use.

Phone settings overview
Get to know the settings in your phone so that you can personalise them to your own
requirements.
Wireless &
networks Manage your wireless connections and connection settings
Call settings Configure settings for listening to and managing your voicemail, for
example.
Sound Configure how your phone rings, vibrates, or alerts you in other ways
when you receive communications. You can also use these settings
to set the volume for music or other media with audio, and some
related settings.
Display Select to switch orientation when you rotate your phone, or set the
screen brightness
Location &
security Set navigation settings and protect your phone by setting up
different locks and passwords
Applications Manage and remove installed applications
Accounts & sync Enable your applications to sync automatically and permit
applications to synchronise data in the background, whether or not
you are actively working in them
Privacy Manage your personal information, restore your settings and other
data when you install an application, and erase all of your personal
data from internal phone storage
Storage Check out the available space on your phone's internal storage and
on the SD card. You can also erase the SD card, or unmount it for
safe removal
Language &
keyboard Select phone language and adjust text input options
Voice input &
output Configure the voice input feature to enter text by speaking
Accessibility Enable your installed accessibility applications and adjust related
settings
Date & time Set the time and date or choose to use the network-provided values.
Select your preferred date and hour format
About phone View information about your phone, such as model number,
firmware version and battery status
102
This is an Internet version of this publication. © Print only for private use.

Icon overview
Status icons
The following status icons may appear on your screen:
Signal strength
No signal
Roaming
GPRS is available
EDGE is available
3G is available
Sending and downloading GPRS data
Sending and downloading EDGE data
Sending and downloading 3G data
Battery status
The battery is charging
GPS is activated
Airplane mode is activated
The Bluetooth™ function is activated
Connected to another Bluetooth™ device
The SIM card is not inserted
The microphone is muted
The speakerphone is on
Silent mode
Vibrate mode
An alarm is set
Synchronisation is ongoing
Problem with sign-in or synchronisation
A Wi-Fi® connection is enabled and wireless networks are available
Notification icons
The following notification icons may appear on your screen:
103
This is an Internet version of this publication. © Print only for private use.
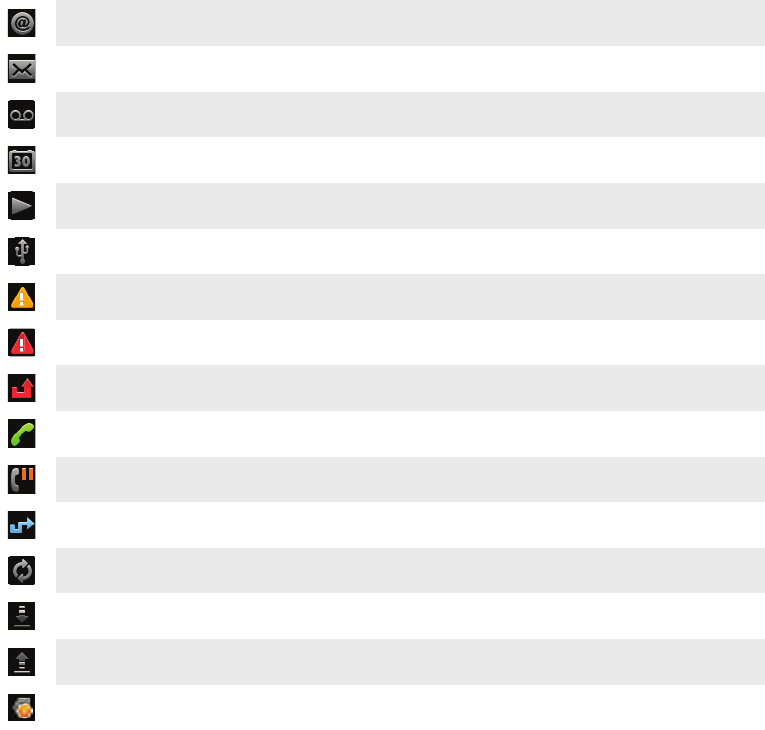
New email message
New text message or multimedia message
New voicemail
An upcoming calendar event
A song is playing
The phone is connected to a computer via a USB cable
Warning message
Error message
Missed call
Call ongoing
Call on hold
Call forwarding on
Software updates available
Downloading data
Uploading data
More (undisplayed) notifications
104
This is an Internet version of this publication. © Print only for private use.
Application overview
Alarm Set an alarm
Browser Browse the web and download new programs and files
Calculator Perform basic calculations
Calendar Keep track of your appointments
Camera Take photos and record video clips
Contacts Keep track of your friends and colleagues
Data monitor Track your data traffic
Downloads Access your downloaded applications
Email Send and receive emails
FM radio Listen to the radio in your phone
Gallery View your pictures and photos
Gmail™ An email application that supports Gmail™
Google Search Find information in your phone and on the web
Latitude View your friends’ locations on your maps and share your
location and other information with them
Maps View your current location, find other locations and calculate
routes
Market Go to Android Market™ to download free and paid applications
for your phone
Connected devices Share media files in your phone with other devices over a shared
Wi-Fi® connection
Messaging Send and receive text and multimedia messages
Music Play music and playlists
Navigation Navigate using spoken, turn-by-turn driving instructions
News and Weather View news stories and weather forecasts
Phone Make and receive calls, switch between calls, set up conference
calling and view your call history
Places Search for places. For example, you can search for restaurants.
Store Download a variety of exciting content to your phone
Settings Tailor phone settings to your own liking
Setup guide Explains basic phone functions and helps you enter essential
settings
Sync Synchronise your contacts, calendar and other information
Support Find out more on how to use your phone
Talk Chat online
105
This is an Internet version of this publication. © Print only for private use.
TrackID™ A music recognition service
Timescape™ Keep track of all daily communication
Voice Dialer Make a phone call by using voice commands
YouTube™ Share and view videos from around the world
Some applications are not supported by all networks and/or service providers in all areas.
Applications you download appear automatically in the Application screen.
106
This is an Internet version of this publication. © Print only for private use.

User support
Access user support directly in your phone through the Support application. For example,
you can open a User guide with instructions on how to use your phone. You can also get
troubleshooting and other help from the Sony Ericsson support zone, and from our contact
centers.
•Support application features:
•Tools – enhance battery and software performance, and improve connectivity.
•User guide in the phone – read and search an extended User guide.
•Educate yourself – read tips and tricks, get the latest news, and watch how-to videos.
•Email support – send an email to our support team.
•Support zone – visit www.sonyericsson.com/support for comprehensive support to get
the most for your phone.
•Troubleshooting – find common problems and error messages at the end of our User
guides and on the support zone.
•Call center – if all else fails. The relevant numbers are listed in the supplied Important
information leaflet.
An extended User guide is also available at www.sonyericsson.com/support.
To access the support application
1From your Application screen, find and tap .
2Find and tap the required support item.
107
This is an Internet version of this publication. © Print only for private use.
Troubleshooting
My phone is not working as expected
If you experience problems with your phone, check these tips before you try anything else:
•Restart your phone.
•Remove and re-insert the battery and SIM card. Then restart your phone.
•Update your phone. Updating your phone ensures optimal performance and provides the
latest enhancements. See Updating your phone on page 101 for more information.
•Reset your phone.
Be patient while resetting your phone. Restarting the phone during a reset procedure may
damage the phone permanently.
To force close an application
•When a popup window tells you that an application is not responding, tap Force
close.
If you do not want to force stop an application, you can wait for it to respond by tapping Wait.
Resetting the phone
You can reset your phone to its original settings, with or without deleting all of your personal
data. It is possible to reset the phone to the state it was in before you first turned it on. But
before you perform a reset, make sure to back up any important data saved on your phone.
To reset the phone
1From your Home screen, tap .
2Find and tap Settings > Privacy.
3Tap Factory data reset.
4To erase not only internal storage but also other user data such as pictures and
music, mark the Erase SD card checkbox.
5Tap Reset phone.
6To confirm, tap Erase everything.
I cannot charge the phone
The charger is not properly connected or the battery connection is poor. Remove the
battery and clean the connectors.
No battery charging icon appears when phone starts charging
It may take a few minutes before the battery icon appears on the screen.
The battery performance is low
Follow our smart tips on how to get more out of your battery. See Battery performance on
page 25.
I cannot transfer content between my phone and the computer,
when using a USB cable
The software or the USB drivers have not been properly installed. Go to
www.sonyericsson.com/support for more detailed installation instructions and
troubleshooting sections.
108
This is an Internet version of this publication. © Print only for private use.
I cannot use Internet-based services
Make sure your subscription covers data downloads and that the Internet settings in your
phone are correct. See Internet and messaging settings on page 27 for more information
on how to enable data traffic, data roaming, and download Internet settings. Contact your
network operator for more information about your subscription settings.
Error messages
No network coverage
•Your phone is in Airplane mode. Make sure Airplane mode is turned off.
•Your phone is not receiving any network signal, or the received signal is too weak. Contact
your network operator and make sure that the network has coverage where you are.
•The SIM card is not working properly. Insert your SIM card in another phone. If this works,
it is probably your phone that is causing the problem. In this case, contact the nearest
Sony Ericsson service center.
Emergency calls only
You are within range of a network, but you are not allowed to use it. However, in an
emergency, some network operators allow you to call the international emergency number
112. See Emergency calls on page 31 for more information.
SIM card is locked.
You have entered your PIN incorrectly 3 times in a row. To unlock the phone, you need the
PUK provided by your operator.
SIM card is PUK-locked.
You have entered your PUK (Personal Unblocking Key) incorrectly 10 times in a row. Please
contact your service provider.
109
This is an Internet version of this publication. © Print only for private use.
Legal information
Sony Ericsson ST15i/ST15a
This User guide is published by Sony Ericsson Mobile Communications AB or its local affiliated company, without any
warranty. Improvements and changes to this User guide necessitated by typographical errors, inaccuracies of current
information, or improvements to programs and/or equipment, may be made by Sony Ericsson Mobile Communications
AB at any time and without notice. Such changes will, however, be incorporated into new editions of this User guide.
All rights reserved.
©Sony Ericsson Mobile Communications AB, 2011
Publication number: 1252-0137.1
Your mobile phone has the capability to download, store and forward additional content, for example, ringtones. The
use of such content may be restricted or prohibited by rights of third parties, including but not limited to restriction
under applicable copyright laws. You, and not Sony Ericsson, are entirely responsible for additional content that you
download to or forward from your mobile phone. Prior to your use of any additional content, please verify that your
intended use is properly licensed or is otherwise authorized. Sony Ericsson does not guarantee the accuracy, integrity
or quality of any additional content or any other third party content. Under no circumstances will Sony Ericsson be
liable in any way for your improper use of additional content or other third party content.
This User guide may reference services or applications provided by third parties. Use of such programming or services
may require separate registration with the third party provider and may be subject to additional terms of use. For
applications accessed on or through a third-party website, please review such websites’ terms of use and applicable
privacy policy in advance. Sony Ericsson does not warrant or guarantee the availability or performance of any third-
party websites or offered services.
Remove the battery to see regulatory information such as the CE mark.
All product and company names mentioned herein are the trademarks or registered trademarks of their respective
owners. Any rights not expressly granted herein are reserved. All other trademarks are property of their respective
owners.
Visit www.sonyericsson.com/cws/corporate/common/legal/disclaimer for more information.
All illustrations are for illustration purposes only and may not accurately depict the actual phone.
This product is protected by certain intellectual property rights of Microsoft. Use or distribution of such technology
outside of this product is prohibited without a license from Microsoft.
Content owners use Windows Media digital rights management technology (WMDRM) to protect their intellectual
property, including copyrights. This device uses WMDRM software to access WMDRM-protected content. If the
WMDRM software fails to protect the content, content owners may ask Microsoft to revoke the software's ability to
use WMDRM to play or copy protected content. Revocation does not affect unprotected content. When you download
licenses for protected content, you agree that Microsoft may include a revocation list with the licenses. Content owners
may require you to upgrade WMDRM to access their content. If you decline an upgrade, you will not be able to access
content that requires the upgrade.
This product is licensed under the MPEG-4 visual and AVC patent portfolio licenses for the personal and non-
commercial use of a consumer for (i) encoding video in compliance with the MPEG-4 visual standard ("MPEG-4 video")
or the AVC standard ("AVC video") and/or (ii) decoding MPEG- 4 or AVC video that was encoded by a consumer
engaged in a personal and non-commercial activity and/or was obtained from a video provider licensed by MPEG LA
to provide MPEG-4 and/or AVC video. No license is granted or shall be implied for any other use. Additional information
including that relating to promotional, internal and commercial uses and licensing may be obtained from MPEG LA,
L.L.C. See http://www.mpegla.com. MPEG Layer-3 audio decoding technology licensed from Fraunhofer IIS and
Thomson.
End-user license agreement for Sun Java Platform, Micro Edition.
1. Restrictions: Software is confidential copyrighted information of Sun and title to all copies is retained by Sun and/
or its licensors. Customer shall not modify, decompile, disassemble, decrypt, extract, or otherwise reverse engineer
Software. Software may not be leased, assigned, or sublicensed, in whole or in part.
110
This is an Internet version of this publication. © Print only for private use.
/S51SE
Index
A
accounts ..................................................................10
Google™ .........................................................10
Microsoft® Exchange (corporate) ...................10
Sony Ericsson .................................................10
adjusting volume .....................................................69
airplane mode ..........................................................25
albums
deleting ............................................................87
Android Market™ ....................................................51
Android™ ..................................................................7
animated wallpaper .................................................16
answering service ....................................................32
applications ...............................................................7
overview ........................................................105
screen ..............................................................17
audio
adjusting volume .............................................69
playing .............................................................68
playing music in random order ........................70
audio books .............................................................68
B
back up
contacts ...........................................................39
battery .....................................................................12
cover ..................................................................8
removing ............................................................8
Bluetooth™ wireless technology .............................90
BRAVIA ....................................................................85
brightness ................................................................24
browsing - see web browser
business cards
send .................................................................38
C
calendar ...................................................................55
create an event ................................................55
calling ......................................................................27
calls ...................................................................31, 34
diverting ...........................................................34
emergency .......................................................31
forwarding .......................................................34
log ....................................................................32
missed .............................................................32
multiple ............................................................32
settings ............................................................34
waiting .............................................................33
camera ...............................................................75, 77
camera screen .................................................75
closing .............................................................75
continuous auto focus ...............................77, 82
controls ...........................................................75
face detection ..................................................76
geotagging ......................................................77
HD (High Definition) video ...............................82
icons ................................................................82
overview ..........................................................75
recording videos ..............................................81
settings ......................................................77, 82
smile detection ................................................77
taking photos ......................................75, 76, 77
using flash .......................................................76
video ................................................................81
viewing photos ................................................76
viewing videos .................................................82
zoom ................................................................76
caps lock .................................................................19
changing tracks .......................................................69
charging ...................................................................12
chat ..........................................................................46
conference calls ......................................................33
contacts ...................................................................35
back up ...........................................................39
copy .................................................................39
favourite ...........................................................38
importing from SIM card .................................35
join contact information ...................................37
picture .......................................................37, 88
sending ............................................................38
sharing .............................................................38
corporate email, calendar and contacts ..................56
cropping
photos .............................................................88
D
Data monitor ............................................................28
date
format ..............................................................23
deleting ....................................................................87
photos .............................................................88
tracks ...............................................................69
videos ..............................................................89
download
Internet settings ...............................................27
driving directions .....................................................97
E
email ........................................................................42
more than one account ...................................44
emergency numbers ................................................31
equalizer ..................................................................69
events
calendar ...........................................................55
in Timescape™ ...............................................48
extensions ...............................................................14
F
face detection ..........................................................76
Facebook™ .............................................................47
logging in to .....................................................49
status update ..................................................49
favourites
moving between in the radio ...........................74
removing radio channels as ............................74
saving radio channels as .................................74
filter
events in Timescape™ ....................................48
fixed dialling ............................................................34
flash
using when taking photos ...............................76
FM radio
favourites .........................................................74
front camera ............................................................75
G
Gallery .....................................................................85
changing views ................................................86
opening ...........................................................85
opening albums ...............................................86
viewing Facebook™ photos ............................86
geotagging
of photos .........................................................77
Gmail™ ....................................................................44
Google Latitude™ ...................................................97
Google Maps™ .......................................................96
111
This is an Internet version of this publication. © Print only for private use.
Google Sync™ synchronisation service ..................56
Google Talk™ ..........................................................46
Google™ account setup .........................................45
GPS .........................................................................96
H
handsfree .................................................................27
using ................................................................27
hardware keys .........................................................12
HD (High Definition) video .......................................82
Home screen ...........................................................14
customising .....................................................15
rearranging ......................................................15
I
icon ........................................................................103
icons ......................................................................103
in the camera ...................................................82
importing SIM contacts ...........................................35
Improving photos with BRAVIA Engine ...................85
infinite button
in Timescape™ ...............................................49
instant messaging ...................................................46
Internet
controlling data traffic .....................................28
settings ............................................................27
web browser ....................................................64
L
language ..................................................................24
writing ..............................................................22
Latitude ...................................................................97
LCD backlight control ..............................................24
light ..........................................................................18
live wallpaper ...........................................................16
location ....................................................................77
location services ......................................................96
locks
activating the screen .........................................9
locking the screen .............................................9
screen lock ........................................................9
M
mail See email
Maps ........................................................................96
Media Go™ .............................................................95
messages
settings ............................................................27
Microsoft® Exchange synchronisation ...................56
MMS
settings ............................................................27
Mobile BRAVIA Engine
BRAVIA Engine ................................................85
music ...........................................................27, 68, 73
adding tracks to playlists ................................71
adjusting volume .............................................69
audio books .....................................................68
changing tracks ...............................................69
creating playlists .............................................71
deleting ............................................................69
pausing a track ................................................69
player overview ...............................................68
playing .............................................................68
playing in random order ..................................70
playlists ...........................................................71
podcasts ..........................................................68
purchasing .......................................................72
searching using TrackID™ ..............................72
sharing .............................................................70
using handsfree ...............................................27
using the equalizer ..........................................69
music player ............................................................68
creating playlists .............................................71
deleting tracks .................................................69
equalizer ..........................................................69
minimising .......................................................69
playlists ...........................................................70
playlists made by you ......................................71
smart playlists .................................................70
top tracks ........................................................70
N
Navigation ...............................................................97
Navigation application .............................................97
notification .......................................................18, 103
panel ................................................................18
ringtone ...........................................................23
O
on-screen keyboard ................................................21
overview
music player ....................................................68
P
pausing a track ........................................................69
personal information ................................................35
phone
battery .............................................................25
performance ....................................................25
update ...........................................................101
phonebook ..............................................................35
Phonepad ..........................................................19, 20
settings ............................................................22
photo albums ..........................................................86
deleting ............................................................87
viewing ............................................................85
photos ...............................................................87, 88
add to contact .................................................37
adding the geographical position ....................77
cropping ..........................................................88
deleting ............................................................88
photo viewer ....................................................86
rotating ............................................................88
sharing .......................................................87, 88
slideshow ........................................................87
taking ...................................................75, 76, 77
using as a contact picture ...............................88
using as wallpaper ..........................................88
view same location ..........................................77
viewing ..........................................76, 85, 86, 87
viewing on a map ............................................88
zooming ...........................................................87
PIN ...........................................................................98
playing
music ...............................................................68
playlists ....................................................................70
adding a track .................................................71
creating ...........................................................71
deleting ............................................................71
playing your own .............................................71
removing tracks ...............................................71
smart (auto-generated) ....................................70
top tracks ........................................................70
power ........................................................................9
presets
removing radio channels as ............................74
saving radio channels as .................................74
PUK .........................................................................98
purchasing
music ...............................................................72
R
radio ........................................................................73
favourites .........................................................74
112
This is an Internet version of this publication. © Print only for private use.
listening through the speaker ..........................74
moving between channels ..............................73
navigating ........................................................73
opening ...........................................................73
overview ..........................................................73
searching for channels ....................................74
selecting channel ............................................73
receiving items using Bluetooth™ ...........................91
recently used applications window .........................17
recording videos ......................................................75
using the camera key ......................................81
reset .......................................................................108
resizing
photos .............................................................88
rotating
photos .............................................................88
S
screen ......................................................................24
cracked ............................................................13
glass ................................................................13
warranty ...........................................................13
screen unlock pattern ..............................................98
searching
music using TrackID™ ....................................72
track information .............................................72
self-portrait ..............................................................75
sending ..............................................................87, 88
business cards ................................................38
contacts ...........................................................38
sending items using Bluetooth™ ............................91
services ...................................................................10
settings ......................................................................9
call ...................................................................34
camera ......................................................77, 82
Internet ............................................................27
messaging .......................................................27
MMS ................................................................27
still camera ......................................................77
Timescape™ ...................................................50
video camera ...................................................82
setup guide ................................................................9
sharing
music ...............................................................70
photos .............................................................88
photos and videos ...........................................87
shuffle music ...........................................................70
silent mode ..............................................................22
SIM card ..................................................................98
exporting contacts to ......................................39
importing contacts from ..................................35
inserting .............................................................8
slideshow ................................................................87
smart playlists
playing .............................................................70
smile detection ........................................................77
Sony Ericsson Sync ................................................57
SOS See emergency numbers
status ...............................................................18, 103
still camera ..............................................................75
settings ............................................................77
using flash .......................................................76
store contacts .........................................................57
symbols ...................................................................19
synchronising ..........................................................56
contacts ...........................................................57
Google Sync™ ................................................56
Microsoft® Exchange contacts, calendar,
email ................................................................56
T
taking photos ...........................................................75
by tapping .......................................................76
using face detection ........................................76
using smile detection ......................................77
using the camera key ......................................75
telephony See calls
text input method ....................................................19
theme ......................................................................16
tiles ..........................................................................47
time ..........................................................................23
time management ....................................................55
Timescape™ ...........................................................47
filter icons ........................................................48
infinite button in ...............................................49
screen overview ..............................................47
settings ............................................................50
widget ..............................................................47
top tracks
playing .............................................................70
TrackID™ technology ..............................................72
buying a track ..................................................72
opening ...........................................................72
searching for track information .......................72
using results ....................................................72
viewing charts .................................................72
troubleshooting .....................................................108
turning off ..................................................................9
turning on ..................................................................9
Twitter™ ..................................................................47
logging in to .....................................................49
status update ..................................................49
U
update
status ...............................................................49
updating phone .....................................................101
usage info ................................................................28
USB connection ......................................................93
V
vibration ...................................................................23
video albums .....................................................86, 87
viewing ............................................................85
video camera .....................................................75, 81
continuous auto focus .....................................82
HD (High Definition) video ...............................82
recording videos ..............................................81
settings ............................................................82
video player
pausing a video ...............................................89
videos ......................................................................89
adjusting volume .............................................89
deleting ............................................................89
fast forwarding and rewinding .........................89
pausing ............................................................89
playing .............................................................89
recording .........................................................81
sending ............................................................89
sharing .............................................................89
viewing ..........................................82, 85, 86, 87
viewing
photos .............................................................76
videos recorded using the camera ..................82
voicemail .................................................................32
volume
adjusting video ................................................89
key ...................................................................22
W
wallpaper .................................................................16
using a photo as ..............................................88
113
This is an Internet version of this publication. © Print only for private use.
web browser ............................................................64
managing bookmarks ......................................65
settings ............................................................67
toolbar .............................................................64
Wi-Fi® .....................................................................59
widget
Timescape™ ...................................................47
widgets ....................................................................15
wireless networks ....................................................96
Wisepilot™ ..............................................................97
Z
zoom ........................................................................76
zooming
photos .............................................................87
114
This is an Internet version of this publication. © Print only for private use.
S51SE/emobile/PL/print
取扱説明書の内容は、予告なく変更されることがあります。取扱説明書では内
容の正確さを期するためにあらゆる努力をしておりますが、取扱説明書に記載
されているすべての記述、情報、および推奨事項は、明示、黙示を問わず、内
容を一切保証するものではありません。
無線機器を正しく安全にご使用いただくために、「安全上のご注意」および「ご
利用上のお願いとご注意」「Bluetoothおよび無線LAN使用に関するご注意」
をよくお読みください。
本機の使用周波数帯では、電子レンジなどの家庭用電化製品や産業・科学・医
療用機器のほか工場の製造ラインなどで使用されている移動体識別用の構内無
線局(免許を要する無線局)および特定小電力無線局(免許を要しない無線局)
ならびにアマチュア無線局(免許を要する無線局)が運用されています。
1. この機器を使用する前に、近くで移動体識別用の構内無線局および特定小電
力無線局ならびにアマチュア無線局が運用されていないことを確認してく
ださい。
2. 万が一、この機器から移動体識別用の構内無線局に対して有害な電波干渉の
事例が発生した場合には、速やかに使用周波数を変更するかご利用を中断し
ていただいた上で、混信回避のための処置(例えば、パーティションの設置
など)を行うか、使用場所を変更してください。
本機のBluetoothおよび無線LAN搭載機器が使用している周波数帯は、本機
に以下の表記で記載されています。
2.4:周波数2400MHz帯を使用する無線装置であることを示します。
FH/DS/OF:変調方式がFH-SS、DS-SS、OFDMであることを示します。
1:想定される与干渉距離が10m以下であることを示します。
4:想定される与干渉距離が40m以下であることを示します。
:2400MHz∼2483.5MHzの全帯域を使用し、かつ移動体識別装
置の帯域を回避できることを示しています。
・利用可能なチャンネルは国により異なります。
・航空機内の使用は、事前に各航空会社へご確認ください。
・無線LANを海外で利用する場合、ご利用の国によっては使用場所などが制限
される場合があります。その場合は、その国の使用可能周波数、法規制など
の条件をご確認の上、ご利用ください。
・他のBluetooth機器とは見通しの良い場所で通信してください。障害物や建
物の構造によっては通信距離が短くなる場合があります。
・電子レンジからの影響を受けやすいので、少なくとも 3m 以上離れた場所で
ご使用ください。また、AV機器・OA機器などの電気製品からは2m以上離
して通信をしてください。正常に通信できなかったり、テレビ、ラジオなど
の受信障害(映像や音声にノイズが発生するなど)の原因になったりする場
合があります。
・他の無線機や、放送局の近くでは正常に通信ができない場合があります。こ
のような場合には通信場所を変更してください。
・他のBluetooth機器との間に金属物や、鉄筋、コンクリートなどがある場合
には電波が届かずに通信できない場合があります。
電気製品・AV・OA機器などの磁気を帯びているところや電磁波が発生してい
るところで使用しないでください。
・磁気や電気雑音の影響を受けると雑音が大きくなったり、通信ができなくな
ることがあります。特に電子レンジ使用時には影響を受けることがあります。
・テレビ、ラジオなどに近いと受信障害の原因となったり、テレビ画面が乱れ
ることがあります。
・近くに複数の無線LANアクセスポイントが存在し、同じチャンネルを使用し
ていると、正しく検索できない場合があります。
802.11b/g/nの無線LAN機器と、本機などBluetooth機器は同一の2.4GHz
帯を使用するため、近い場所に無線LANのアクセスポイントや端末があり、運
用されている場合は、Bluetooth機器との間で電波障害が発生し、通信速度の
低下や接続不良になる場合があります。このような場合は、本機を離れた場所
でお使いいただくか、または使用していない機器の電源を切るなどにより電波
障害による干渉を防ぐようにしてください。
・本機の Bluetooth 通信機能には、Bluetooth 標準規格に準拠したセキュリ
ティシステムを採用していますが、設定内容によってはセキュリティが十分
機能しない場合があります。Bluetoothによる通信を行うときは十分ご注意
ください。
・Bluetoothを使用した通信からデータや情報が漏洩したとしても、当社では
責任を負いかねますのであらかじめご了承ください。
・無線 LAN では、LAN ケーブルを使用する代わりに、電波を利用してパソコ
ンなどと無線LANアクセスポイント間で情報のやり取りを行うため、電波の
届く範囲であれば自由にLAN接続が可能であるという利点があります。その
反面、電波はある範囲内であれば障害物(壁など)を越えてすべての場所に
届くため、セキュリティに関する設定を行っていない場合以下のような問題
が発生する可能性があります。
- 通信内容を盗み見られる
悪意ある第三者が、電波を故意に傍受し、IDやパスワードまたはクレジッ
トカード番号などの個人情報、メールの内容などの通信内容を盗み見られ
る可能性があります。
- 不正に進入される
悪意ある第三者が、無断で個人や会社内のネットワークへアクセスし、個
人情報や機密情報を取り出す(情報漏洩)、特定の人物になりすまして通信
し不正な情報を流す(なりすまし)、傍受した通信内容を書き換えて発信す
る(改ざん)、コンピュータウィルスなどを流しデータやシステムを破壊す
る(破壊)などの行為をされてしまう可能性があります。
本来、無線LANカードや無線LANアクセスポイントは、これらの問題に対応
するためのセキュリティの仕組みを持っていますので、無線LAN製品のセキュ
リティに関する設定を行って製品を使用することで、その問題が発生する可能
性は少なくなります。
セキュリティの設定を行わないで使用した場合の問題を充分理解した上で、お
客さま自身の判断と責任においてセキュリティに関する設定を行い、製品を使
用することをおすすめします。
・火災および地震などの災害、第三者による行為、その他の事故、お客さまの
故意または過失、誤用、その他異常な条件下での使用により生じた損害に関
して、当社は一切の責任を負いません。
・本機の使用または使用不能から生ずる付随的な損害(記録内容の変化・消失、
通信などの機会を逃したために生じた損害、事業利益の損失、事業の中断な
ど)に関して、当社は一切の責任を負いません。
・本書の記載内容を守らないことにより生じた損害に関して、当社は一切の責
任を負いません。
・当社が関与していない接続機器、ソフトウェアとの組み合わせによる誤作動
などから生じた損害に関して、当社は一切の責任を負いません。
・本機の故障、修理、その他取り扱いによって、撮影した静止画、動画データ
やダウンロードされたデータなどが変化または消失することがございます
が、これらのデータの修復や生じた損害・逸失利益に関して、当社は一切の
責任を負いかねますのであらかじめご了承ください。
・連絡先など、お客さまが登録された内容は、故障や障害の原因にかかわらず
保証いたしかねます。登録された内容の変化・消失に伴う損害を最小限にす
るために、重要な内容はあらかじめメモを取るなどして保管してくださるよ
うお願いいたします。
お買い上げいただくと、保証書が添付されています。保証書に「お買い上げ日」
および「販売店」の記載がされているかをご確認の上、内容をよくお読みになっ
て大切に保管してください。「お買い上げ日」や「販売店」の記載がない場合
や、納品書または領収書等にて「お買い上げ日」や「販売店」が特定できる書
類がない場合、改ざんのある場合には保証対象外となりますのでご注意くださ
い。保証内容については、保証書に記載されています。
また本機の故障、誤動作または不具合などにより、通話などの機会を逸したた
めにお客さままたは第三者が受けた損害につきましては、当社は責任を負いか
ねますのであらかじめご了承ください。
取扱説明書の「故障と思われる前に」をお読みになり、もう一度お調べくださ
い。それでも正常に戻らない場合には、お問い合わせ先(下記)までご連絡く
ださい。
・保証期間中の修理
保証書の記載内容に基づいて修理致します。
・保証期間経過後の修理
修理によって使用できる場合は、お客さまのご要望により有料にて修理致し
ます。
・本機は付属品を含め、改良のため予告なく製品の全部または一部を変更する
ことがありますので、あらかじめご了承ください。
・故障または修理により、お客さまが登録・設定した内容が消失・変化する場
合がありますので、電話帳など大切なデータは控えを取っておかれることを
お勧めします。
・故障または修理の際に、本機に登録したデータ(電話帳やデータフォルダの
内容など)または設定した内容が消失・変化した場合、その損害について当
社は責任を負いかねますのであらかじめご了承ください。
・本機を分解・改造すると電波法に触れることがあります。また、改造された
場合は修理をお引き受けできませんので、ご注意ください。
・アフターサービスについてご不明な場合は、お問い合わせ先(下記)までご
連絡ください。
本機および周辺機器の補修用性能部品の最低保有期間は生産終了後4年間で
す。補修用性能部品とは、その製品の機能を維持するために必要な部品です。
Mobile Phone GSM/GPRS/EGPRS 850/900/1800/1900 &UMTS
JP/EU
この機種S51SEの携帯電話機は、国が定めた電波の人体吸収に関する技術基
準に適合しています。
この技術基準は、人体頭部のそばで使用する携帯電話機などの無線機器から送
出される電波が人体の健康に影響を及ぼさないよう、科学的根拠に基づいて定
められたものであり、人体側頭部に吸収される電波の平均エネルギー量を表す
比吸収率(SAR:Specific Absorption Rate)について、これが2W/kg※
の許容値を超えないこととしています。この許容値は、使用者の年齢や身体の
大きさに関係なく十分な安全率を含んでおり、世界保健機構(WHO)と協力
関係にある国際非電離放射線防護委員会(ICNIRP)が示した国際的なガイド
ラインと同じものとなっています。
この携帯電話機S51SEのSARは、0.93W/kgです。
この値は、国が定めた方法に従い、携帯電話機の送信電力を最大にして測定さ
れた最大の値です。
個々の製品によってSARに多少の差異が生じることもありますが、いずれも許
容値を満足しています。また、携帯電話機は、携帯電話基地局との通信に必要
な最低限の送信電力になるよう設計されているため、実際に通話している状態
では、通常SARはより小さい値となります。
総務省のホームページ
http://www.tele.soumu.go.jp/j/sys/ele/index.htm
一般社団法人電波産業会のホームページ
http://www.arib-emf.org/
イー・モバイルのホームページ
http://www.emobile.jp/
ソニー・エリクソン・モバイルコミュニケーションズ株式会社のホームページ
http://www.sonyericsson.co.jp/product/SAR/
※技術基準については、電波法関連省令(無線設備規則第 14 条の 2)で規定
されています。
United States & Canada
THIS PHONE MODEL HAS BEEN CERTIFIED IN COMPLIANCE WITH THE
GOVERNMENT'S REQUIREMENTS FOR EXPOSURE TO RADIO WAVES.
The S51SE mobile phones have been designed to comply with applicable
safety requirements for exposure to radio waves. Your wireless phone is a radio
transmitter and receiver. It is designed to not exceed the limits* of exposure to
radio frequency (RF) energy set by governmental authorities. These limits
establish permitted levels of RF energy for the general population. The
guidelines are based on standards that were developed by international
scientific organizations through periodic and thorough evaluation of scientific
studies. The standards include a safety margin designed to assure the safety of
all individuals, regardless of age and health.
The radio wave exposure guidelines employ a unit of measurement known as
the Specific Absorption Rate (SAR). Tests for SAR are conducted using
standardized methods with the phone transmitting at its highest certified power
level in all used frequency bands. While there may be differences between the
SAR levels of various phone models, they are all designed to meet the relevant
guidelines for exposure to radio waves. For more information on SAR, please
refer to the safe and efficient use chapter in the User Guide.
The highest SAR value as reported to the authorities for this phone model when
tested for use by the ear is
0.76
W/kg*, and when worn on the body is
0.57
W/kg*
for speech and
1.04
W/kg* for data calls. For body-worn operation, the phone has
been tested when positioned a minimum of 15 mm from the body without any
metal parts in the vicinity of the phone or when properly used with an appropriate
Sony Ericsson accessory and worn on the body.
For devices which include "WiFi hotspot" functionality, body-worn SAR
measurements for operation of the device operating in WiFi hotspot mode were
taken using a separation distance of 9mm.
Use of third-party accessories may result in different SAR levels than those
reported.
注意事項
Bluetoothおよび無線LAN 使用に関するご注意
周波数帯域について
2.4FH1/DS4/OF4
良好な通信のために
無線LANに関するお願い
無線LANとBluetoothとの干渉について
セキュリティに関するご注意 免責事項について
保証とアフターサービス
保証について
修理について
ご注意
補修用部品について
携帯電話機の比吸収率などについて
携帯電話機の比吸収率(SAR)について
Radio Wave Exposure and Specific
Absorption Rate (SAR) Information
** Before a phone model is available for sale to the public in the US, it must be
tested and certified by the Federal Communications Commission (FCC) that it
does not exceed the limit established by the government-adopted requirement
for safe exposure*. The tests are performed in positions and locations (i.e., by
the ear and worn on the body) as required by the FCC for each model. The FCC
has granted an Equipment Authorization for this phone model with all reported
SAR levels evaluated as in compliance with the FCC RF exposure guidelines.
While there may be differences between the SAR levels of various phones, all
mobile phones granted an FCC equipment authorization meet the government
requirement for safe exposure. SAR information on this phone model is on file
at the FCC and can be found under the Display Grant section of http://
www.fcc.gov/oet/ea/fccid/ after searching on FCC ID PY7A3880133. Additional
information on SAR can be found on the Cellular Telecommunications &
Internet Association (CTIA) website at http://www.ctia.org/.
* In the United States and Canada, the SAR limit for mobile phones used by
the public is 1.6 watts/kilogram (W/kg) averaged over one gram of tissue. The
standard incorporates a margin of safety to give additional protection for the
public and to account for any variations in measurements.
** This paragraph is only applicable to authorities and customers in the United
States.
Europe
This mobile phone model S51SE has been designed to comply with applicable
safety requirements for exposure to radio waves. These requirements are
based on scientific guidelines that include safety margins designed to assure
the safety of all persons, regardless of age and health.
The radio wave exposure guidelines employ a unit of measurement known as
the Specific Absorption Rate, or SAR. Tests for SAR are conducted using
standardized methods with the phone transmitting at its highest certified power
level in all used frequency bands.
While there may be differences between the SAR levels of various phone
models, they are all designed to meet the relevant guidelines for exposure to
radio waves.
For more information on SAR, please refer to the safety chapter in the User's
Guide.
SAR data information for residents in countries that have adopted the SAR limit
recommended by the International Commission of Non-lonizing Radiation
Protection (ICNIRP), which is 2 W/kg averaged over ten (10) gram of tissue (for
example European Union, Japan, Brazil and New Zealand):
The highest SAR value for this model phone tested by Sony Ericsson for use at
the ear is 0.97 W/kg (10g).
Please follow these guidelines. Failure to do so might entail a potential
health risk or product malfunction. If in doubt as to its proper function,
have the product checked by a certified service partner before charging
or using it.
■Recommendations for care and safe use of our products
・Handle with care and keep in a clean and dust-free place.
・Warning! May explode if disposed of in fire.
・Do not expose to liquid or moisture or excess humidity.
・For optimum performance, the product should not be operated in
temperatures below +5°C(+41°F) or above +35°C(+95°F). Do not
expose the battery to temperatures above +60°C(+140°F).
・Do not expose to flames or lit tobacco products.
・Do not drop, throw or try to bend the product.
・Do not paint or attempt to disassemble or modify the product.
Only Sony Ericsson authorised personnel should perform
service.
・Consult with authorised medical staff and the instructions of the
medical device manufacturer before using the product near pacemakers or
other medical devices or equipment.
・Discontinue use of electronic devices, or disable the radio transmitting
functionality of the device, where required or requested to do so.
・Do not use where a potentially explosive atmosphere exists.
・Do not place the product, or install wireless equipment, in the area above
an air bag in a car.
・Caution: Cracked or broken displays may create sharp edges or splinters
that could be harmful upon contact.
・Do not use the Bluetooth Headset in positions where it is uncomfortable or
will be subject to pressure.
■Children
Warning! Keep out of the reach of children. Do not allow children
to play with mobile phones or accessories. They could hurt
themselves or others. Products may contain small parts that could become
detached and create a choking hazard.
■Power supply (Charger)
Connect the charger to power sources as marked on the product. Do not
use outdoors or in damp areas. Do not alter or subject the cord to damage
or stress. Unplug the unit before cleaning it. Never alter the plug. If it does
not fit into the outlet, have a proper outlet installed by an electrician. When a
power supply is connected there is a small drain of power. To avoid this
small energy waste, disconnect the power supply when the product is fully
charged. Use of charging devices that are not Sony Ericsson branded may
pose increased safety risks.
■Battery
New or idle batteries can have short-term reduced capacity. Fully charge the
battery before initial use. Use for the intended purpose only. Charge the
battery in temperatures between +5°C(+41°F) or above +35°C(+95°F). Do
not put the battery into your mouth. Do not let the battery contacts touch
another metal object. Turn off the product before removing the battery.
Performance depends on temperatures, signal strength, usage patterns,
features selected and voice or data transmissions. Only Sony Ericsson
service partners should remove or replace built-in batteries. Use of batteries
that are not Sony Ericsson branded may pose increased safety risks.
Replace the battery only with another Sony Ericsson battery that has been
qualified with the product per the standard IEEE-1725. Use of an unqualified
battery may present a risk of fire, explosion, leakage or other hazard.
■Personal medical devices
Mobile phones may affect implanted medical equipment. Reduce risk of
interference by keeping a minimum distance of 22 cm(8.7 inches) between
the phone and the device. Use the phone at your right ear. Do not carry the
phone in your breast pocket. Turn off the phone if you suspect interference.
For all medical devices, consult a physician and the manufacturer.
■Driving
Some vehicle manufacturers forbid the use of phones in their vehicles
unless a handsfree kit with an external antenna supports the installation.
Check with the vehicle manufacturer's representative to be sure that the
mobile phone or Bluetooth handsfree will not affect the electronic systems in
the vehicle. Full attention should be given to driving at all times and local
laws and regulations restricting the use of wireless devices while driving
must be observed.
■GPS/Location based functions
Some products provide GPS/Location based functions. Location
determining functionality is provided "As is" and "With all faults". Sony
Ericsson does not make any representation or warranty as to the accuracy
of such location information.
Use of location-based information by the device may not be uninterrupted
or error free and may additionally be dependent on network service
availability. Please note that functionality may be reduced or prevented in
certain environments such as building interiors or areas adjacent to
buildings.
Caution: Do not use GPS functionality in a manner which causes
distraction from driving.
■Emergency calls
Calls cannot be guaranteed under all conditions. Never rely solely upon
mobile phones for essential communication. Calls may not be possible in all
areas, on all networks, or when certain network services and/or phone
features are used.
■Antenna
Use of antenna devices not marketed by Sony Ericsson could damage the
phone, reduce performance, and produce SAR levels above the established
limits. Do not cover the antenna with your hand as this affects call quality,
power levels and can shorten talk and standby times.
■Radio Frequency (RF) exposure and Specific Absorption Rate
(SAR)
When the phone or Bluetooth handsfree is turned on, it emits low levels of
radio frequency energy. International safety guidelines have been
developed through periodic and thorough evaluation of scientific studies.
These guidelines establish permitted levels of radio wave exposure. The
guidelines include a safety margin designed to assure the safety of all
persons and to account for any variations in measurements.
Specific Absorption Rate (SAR) is used to measure radio frequency
energy absorbed by the body when using a mobile phone. The SAR value is
determined at the highest certified power level in laboratory conditions, but
because the phone is designed to use the minimum power necessary to
access the chosen network, the actual SAR level can be well below this
value. There is no proof of difference in safety based on difference in SAR
value.
Products with radio transmitters sold in the US must be certified by the
Federal Communications Commission (FCC). When required, tests are
performed when the phone is placed at the ear and when worn on the body.
For body-worn operation, the phone has been tested when positioned a
minimum of 15 mm from the body without any metal parts in the vicinity of
the phone or when properly used with an appropriate Sony Ericsson
accessory and worn on the body.
For more information about SAR and radio frequency exposure, go to:
http://www.sonyericsson.co.jp/product/SAR/.
■Flight mode
Bluetooth and WLAN functionality, if available in the device, can be enabled
in Flight mode but may be prohibited onboard aircraft or in other areas
where radio transmissions are prohibited. In such environments, please
seek proper authorisation before enabling Bluetooth or WLAN functionality
even in Flight mode.
■Malware
Malware (short for malicious software) is software that can harm the mobile
phone or other computers. Malware or harmful applications can include
viruses, worms, spyware, and other unwanted programs. While the device
does employ security measures to resist such efforts, Sony Ericsson does
not warrant or represent that the device will be impervious to the introduction
of malware. You can however reduce the risk of malware attacks by using
care when downloading content or accepting applications, refraining from
opening or responding to messages from unknown sources, using
trustworthy services to access the Internet, and only downloading content to
the mobile phone from known, reliable sources.
■Accessories
Use only Sony Ericsson branded original accessories and certified service
partners. Sony Ericsson does not test third-party accessories. Accessories
may influence RF exposure, radio performance, loudness, electric safety
and other areas. Third-party accessories and parts may pose a risk to your
health or safety or decrease performance.
■Disposal of old electrical and electronic equipment
Electronic equipment and batteries should not be included as
household waste but should be left at an appropriate collection
point for recycling. This helps prevent potential negative consequences for
the environment and human health. Check local regulations by contacting
your local city office, your household waste disposal service, the shop where
you purchased the product or calling a Sony Ericsson Contact Center. Do
not attempt to remove internal batteries. Internal batteries shall be removed
only by a waste treatment facility or trained service professional.
■Disposing of the battery
Check local regulations or call a Sony Ericsson Contact Center for
information. Never use municipal waste.
■Memory card
If the product comes complete with a removable memory card, it is generally
compatible with the handset purchased but may not be compatible with
other devices or the capabilities of their memory cards. Check other devices
for compatibility before purchase or use. If the product is equipped with a
memory card reader, check memory card compatibility before purchase or
use.
Memory cards are generally formatted prior to shipping. To reformat the
memory card, use a compatible device. Do not use the standard operating
system format when formatting the memory card on a PC. For details, refer
to the operating instructions of the device or contact customer support.
Warning!
If the device requires an adapter for insertion into the handset or another
device, do not insert the card directly without the required adapter.
■Precautions on memory card use
・Do not expose the memory card to moisture.
・Do not touch terminal connections with your hand or any metal object.
・Do not strike, bend, or drop the memory card.
・Do not attempt to disassemble or modify the memory card.
・Do not use or store the memory card in humid or corrosive locations or in
excessive heat such as a closed car in summer, in direct sunlight or near
a heater, etc.
・Do not press or bend the end of the memory card adapter with excessive
force.
・Do not let dirt, dust, or foreign objects get into the insert port of any memory
card adapter.
・Check you have inserted the memory card correctly.
・Insert the memory card as far as it will go into any memory card adapter
needed. The memory card may not operate properly unless fully inserted.
・We recommend that you make a backup copy of important data. We are
not responsible for any loss or damage to content you store on the memory
card.
・Recorded data may be damaged or lost when you remove the memory
card or memory card adapter, turn off the power while formatting, reading
or writing data, or use the memory card in locations subject to static
electricity or high electrical field emissions.
■Protection of personal information
Erase personal data before disposing of the product. To delete data,
perform a master reset. Deleting data from the phone memory does not
ensure that it cannot be recovered. Sony Ericsson does not warrant against
recovery of information and does not assume responsibility for disclosure of
any information even after a master reset.
Guidelines for Safe and Efficient Use
Loudness warning!
Avoid volume levels that may be harmful to your hearing.
This device complies with Part 15 of the FCC rules. Operation is
subject to the following two conditions:
(1) This device may not cause harmful interference, and
(2) This device must accept any interference received, including
interference that may cause undesired operation.
Any change or modification not expressly approved by Sony Ericsson may void
the user's authority to operate the equipment.
This equipment has been tested and found to comply with the limits for a Class
B digital device, pursuant to Part 15 of the FCC Rules. These limits are
designed to provide reasonable protection against harmful interference in a
residential installation. This equipment generates, uses and can radiate radio
frequency energy and, if not installed and used in accordance with the
instructions, may cause harmful interference to radio communications.
However, there is no guarantee that interference will not occur in a particular
installation.
If this equipment does cause harmful interference to radio or television
reception, which can be determined by turning the equipment off and on, the
user is encouraged to try to correct the interference by one or more of the
following measures:
・Reorient or relocate the receiving antenna.
・Increase the separation between the equipment and receiver.
・Connect the equipment into an outlet on a circuit different from that to which
the receiver is connected.
・Consult the dealer or an experienced radio/TV technician for help.
This Class B digital apparatus complies with Canadian ICES-003.
Cet appareil numérique de la classe B est conforme á la norme NMB-003 du
Canada.
This device complies with RSS-210 of Industry Canada.
Operation is subject to the following two conditions: (1) this device may not
cause interference, and (2) this device must accept any interference, including
interference that may cause undesired operation of the device.
We, Sony Ericsson Mobile Communications AB of Nya Vattentornet SE-221
88 Lund, Sweden
declare under our sole responsibility that our product
Sony Ericsson type AAD-3880133-BV and in combination with our
accessories, to which this declaration relates is in conformity with the
appropriate standards EN 301 511:V9.0.2, EN 301 908-1:V4.2.1,
EN 301 908-2:V4.2.1, EN 300 328:V1.7.1, EN 300 440-2:V1.4.1,
EN 301 489-7:V1.3.1, EN 301 489-17:V2.1.1, EN 301 489-24:V1.5.1,
EN 301 489-3:V1.4.1 and EN 60 950-1:2006+A11:2009+A1:2010 following the
provisions of, Radio Equipment and Telecommunication Terminal Equipment
directive 1999/5/EC.
Lund, September 2011
Pär Thuresson,
Corporate Vice President, Head of Development
われわれはR&TTE指令の要求事項を満たしています(1999/5/EC)
We fulfill the requirements of the R&TTE Directive (1999/5/EC).
Software delivered with this device and its media is owned by Sony Ericsson
Mobile Communications AB, and/or its affiliated companies and its suppliers
and licensors.
Sony Ericsson grants you a non-exclusive limited licence to use the Software
solely in conjunction with the Device on which it is installed or delivered.
Ownership of the Software is not sold, transferred or otherwise conveyed.
Do not use any means to discover the source code or any component of the
Software, reproduce and distribute the Software, or modify the Software. You
are entitled to transfer rights and obligations to the Software to a third party,
solely together with the Device with which you received the Software, provided
the third party agrees in writing to be bound by the terms of this Licence.
This licence exists throughout the useful life of this Device. It can be terminated
by transferring your rights to the Device to a third party in writing.
Failure to comply with any of these terms and conditions will terminate the
licence immediately.
Sony Ericsson and its third party suppliers and licensors retain all rights, title
and interest in and to the Software. To the extent that the Software contains
material or code of a third party, such third parties shall be beneficiaries of these
terms.
This licence is governed by the laws of Sweden. When applicable, the foregoing
applies to statutory consumer rights.
In the event Software accompanying or provided in conjunction with your device
is provided with additional terms and conditions, such provisions shall also
govern your possession and usage of the Software.
本製品及び付属のメディアに含まれるソフトウェア(以下「本ソフトウェア」
という)は、Sony Ericsson Mobile Communications AB(以下「ソニー・
エリクソン」という)及び/又はその子会社、サプライヤー、ライセンサーが
その権利を有するものとします。
ソニー・エリクソンは、お客様に対し、本ソフトウェアについて、本製品と共
に使用する場合に限り、非独占、限定的なライセンス(以下「本ライセンス」
という)を許諾します。
本ソフトウェアの権利は、何ら販売、移転、その他の方法で譲渡されるもので
はありません。
お客様は、いかなる手段を用いても、本ソフトウェアのソースコード及びコン
ポーネントを解読してはならず、また、本ソフトウェアを複製、頒布、修正す
ることは出来ません。
お客様が本ソフトウェアについての権利及び義務を第三者に譲渡出来るのは、
本ソフトウェアを本製品と共に第三者に譲渡し、かつ、当該第三者が、本ライ
センスの条件を遵守することにつき書面をもって合意した場合に限られます。
本ライセンスは、お客様の本製品使用期間中、有効に存続します。
本ライセンスは、お客様の権利を本製品と共に第三者に書面により譲渡するこ
とによって終了することが出来ます。
お客様が、本契約のいずれかの条項に違反した場合、本ライセンスは直ちに取
り消されます。
本ソフトウェアに関する全ての権利、権原、権益は、ソニー・エリクソン、サ
プライヤー、及びライセンサーに帰属するものとします。
本ソフトウェアに、サプライヤー又はライセンサーが権利を有する素材又は
コードが含まれている場合は、その限りにおいて、かかるサプライヤー又はラ
イセンサーは本契約における受益者となるものとします。
本契約の準拠法は、スウェーデン法とします。
上記準拠法は、適用可能な場合には、消費者の法定の権利にも適用されるもの
とします。
本ソフトウェアにつき追加的な条件が付された場合は、かかる条件は、本契約
の各条項に加えて、お客様の本ソフトウェアの保有及び使用について適用され
るものとします。
This product includes certain open source or other software originating from
third parties that is subject to the GNU General Public License (GPL), GNU
Library/Lesser General Public License (LGPL) and different and/or additional
copyright licenses, disclaimers and notices. The exact terms of GPL, LGPL and
some other licenses, disclaimers and notices are reproduced in the about box in
this product and are also available at http://opensource.sonyericsson.com.
Sony Ericsson offers to provide source code of software licensed under the
GPL or LGPL or some other open source licenses allowing source code
distribution to you on a CD-ROM for a charge covering the cost of performing
such distribution, such as the cost of media, shipping and handling, upon written
request to Sony Ericsson Mobile Communications AB, Open Source Software
Management, Nya Vattentornet, SE-221 88 Lund, Sweden. This offer is valid for
a period of three (3) years from the date of the distribution of this product by
Sony Ericsson.
本製品は、オープンソースソフトウェアまたはその他のGNU General Public
License (GPL)、GNU Library/Lesser General Public License (LGPL)及
び/またはその他の著作権ライセンス、免責条項、ライセンス通知の適用を受
ける第三者のソフトウェアを含みます。GPL、LGPL及びその他のライセンス、
免責条項及びライセンス通知の具体的な条件については、本製品の「端末情報」
から参照いただけるほか、http://opensource.sonyericsson.comでも参照
いただけます。
ソニー・エリクソンは、Sony Ericsson Mobile Communications AB, Open
Source Software Management, Nya Vattentornet, SE-221 88 Lund,
Sweden宛の書面による要求があった場合、GPL、LGPL又はその他のソース
コードの配布を要求しているオープンソースライセンスのもとでライセンスさ
れているソフトウェアのソースコードにつき、配布のために必要な費用(メディ
ア費用、物流費用、取扱い費用等)を負担いただくことを条件に、CD-ROMに
て配布をいたします。
上記のソースコードの提供の申し出は、本製品がソニー・エリクソンにより販売
されてから3年間有効なものとします。
本機及び付属品は、日本輸出管理規制(「外国為替及び外国貿易法」及びその関
連法令)の適用を受ける場合があります。本機及び付属品を輸出する場合は、
お客さまの責任及び費用負担において必要となる手続きをお取りください。詳
しい手続きについては経済産業省へお問い合わせください。
The products and accessories may be subject to the application of
the Foreign Exchange and Foreign Trade Act and other related laws
and regulations in Japan.
In cases of exporting the products and accessories, customers are
requested to follow the necessary procedures at their own
responsibility and cost.
Please contact the Ministry of Economy, Trade and Industry of
Japan for details about procedures.
著作権・肖像権について
お客さまが本機を利用して撮影またはインターネット上のホームページからダ
ウンロードなどにより取得した文章、画像、音楽、ソフトウェアなど第三者が
著作権を有するコンテンツは、私的使用目的の複製や引用など著作権法上認め
られた場合を除き、著作権者に無断で複製、改変、公衆送信などすることはで
きません。
実演や興行、展示物などには、私的使用目的であっても撮影または録音を制限
している場合がありますのでご注意ください。
また、お客さまが本機を利用して本人の同意なしに他人の肖像を撮影したり、
撮影した他人の肖像を本人の同意なしにインターネット上のホームページに掲
載するなどして不特定多数に公開することは、肖像権を侵害する恐れがありま
すのでお控えください。
商標について
商標に関しては、イー・モバイルのホームページより「取扱説明書」をご参照
ください。
http://emobile.jp/
FCC Statement for the USA
Industry Canada Statement
Declaration of Conformity for S51SE End User Licence Agreement/エンドユー
ザーライセンス契約
End User Licence Agreement
エンドユーザーライセンス契約 About Open Source Software/オープン
ソースソフトウェアについて
About Open Source Software
オープンソースソフトウェアについて
輸出管理規制について
知的財産権について
お困りのときや、ご不明な点などがございましたら、お気軽に下記お問い合わせ
窓口までご連絡ください。
電話番号はお間違いのないようおかけください。
イー・モバイル カスタマーセンター
発売元 イー・アクセス株式会社
(製造元
Sony Ericsson Mobile Communications AB)
Li-ion 00
イー・モバイル携帯電話から:157(無料)
一般電話から:0120-736-157(無料)
海外から:+81-3-6831-3333(有料)
受付時間 9:00∼21:00(日本時間/年中無休)
※ 他社の携帯電話、PHSからもご利用いただけます。
※ 間違い電話が多くなっております。
番号をよくお確かめの上、おかけください。
※ 一部の光電話、IP電話等からはご利用いただけない場合があり
ます。
ホームページ http://emobile.jp/
【お問い合わせ先】
21 22 23 24
28 29 30 31
35 36 37 38
25 26
32 33
39 40
27
34
smultron_PL leaflet.fm 2 ページ 2011年9月12日 月曜日 午後6時27分
Important information
February 15, 2011 18:05:56
Sony Ericsson Consumer Web site
At www.sonyericsson.com/support there is a support section
where help and tips are only a few clicks away. Here you will find
the latest computer software updates and tips on how to use your
product more efficiently.
Service and support
You have access to a portfolio of exclusive service advantages
such as:
•Global and local Web sites providing support.
•A global network of Contact Centers.
•An extensive network of Sony Ericsson service partners.
•A warranty period. Learn more about the warranty conditions in
theLimited warrantysection.
At www.sonyericsson.com/support, you can find the latest
support tools and information. For operator-specific services and
features, please contact your network operator.
You can also contact our Contact Centers. If your country/region
is not represented in the list below, please contact your local
dealer. (Calls are charged according to national rates, including
local taxes, unless the phone number is a toll-free number.)
If your product needs service, please contact the dealer from
whom it was purchased, or one of our service partners. For
warranty claims, save proof of purchase.
Guidelines for Safe and Efficient Use
Please follow these guidelines. Failure to do so might entail a
potential health risk or product malfunction. If in doubt as to
its proper function, have the product checked by a certified service
partner before charging or using it.
Recommendations for care and safe use of our products
•Handle with care and keep in a clean and dust-free place.
•Warning! May explode if disposed of in fire.
•Do not expose to liquid or moisture or excess humidity.
2
February 15, 2011 18:05:56
•For optimum performance, the product should not be
operated in temperatures below -10°C(+14°F) or above
+45°C(+113°F). Do not expose the battery to
temperatures above +60°C(+140°F).
•Do not expose to flames or lit tobacco products.
•Do not drop, throw or try to bend the product.
•Do not paint or attempt to disassemble or modify the
product. Only Sony Ericsson authorised personnel
should perform service.
•Consult with authorised medical staff and the instructions of the
medical device manufacturer before using the product near
pacemakers or other medical devices or equipment.
•Discontinue use of electronic devices, or disable the radio
transmitting functionality of the device, where required or
requested to do so.
•Do not use where a potentially explosive atmosphere exists.
•Do not place the product, or install wireless equipment, in the
area above an air bag in a car.
•Caution: Cracked or broken displays may create sharp edges or
splinters that could be harmful upon contact.
•Do not use the Bluetooth Headset in positions where it is
uncomfortable or will be subject to pressure.
Children
Warning! Keep out of the reach of children. Do not allow
children to play with mobile phones or accessories. They could
hurt themselves or others. Products may contain small parts that
could become detached and create a choking hazard.
Power supply (Charger)
Connect the charger to power sources as marked on the product.
Do not use outdoors or in damp areas. Do not alter or subject the
cord to damage or stress. Unplug the unit before cleaning it. Never
alter the plug. If it does not fit into the outlet, have a proper outlet
installed by an electrician. When a power supply is connected
there is a small drain of power. To avoid this small energy waste,
disconnect the power supply when the product is fully charged.
3
February 15, 2011 18:05:56
Use of charging devices that are not Sony Ericsson branded may
pose increased safety risks.
Battery
New or idle batteries can have short-term reduced capacity. Fully
charge the battery before initial use. Use for the intended purpose
only. Charge the battery in temperatures between +5°C(+41°F)
and +45°C(+113°F). Do not put the battery into your mouth. Do not
let the battery contacts touch another metal object. Turn off the
product before removing the battery. Performance depends on
temperatures, signal strength, usage patterns, features selected
and voice or data transmissions. Only Sony Ericsson service
partners should remove or replace built-in batteries. Use of
batteries that are not Sony Ericsson branded may pose increased
safety risks. Replace the battery only with another Sony Ericsson
battery that has been qualified with the product per the standard
IEEE-1725. Use of an unqualified battery may present a risk of fire,
explosion, leakage or other hazard.
Personal medical devices
Mobile phones may affect implanted medical equipment. Reduce
risk of interference by keeping a minimum distance of
15 cm(6 inches) between the phone and the device. Use the phone
at your right ear. Do not carry the phone in your breast pocket.
Turn off the phone if you suspect interference. For all medical
devices, consult a physician and the manufacturer.
Driving
Some vehicle manufacturers forbid the use of phones in their
vehicles unless a handsfree kit with an external antenna supports
the installation. Check with the vehicle manufacturer's
representative to be sure that the mobile phone or Bluetooth
handsfree will not affect the electronic systems in the vehicle. Full
attention should be given to driving at all times and local laws and
regulations restricting the use of wireless devices while driving
must be observed.
4
February 15, 2011 18:05:56
GPS/Location based functions
Some products provide GPS/Location based functions. Location
determining functionality is provided “As is” and “With all faults”.
Sony Ericsson does not make any representation or warranty as to
the accuracy of such location information.
Use of location-based information by the device may not be
uninterrupted or error free and may additionally be dependent on
network service availability. Please note that functionality may be
reduced or prevented in certain environments such as building
interiors or areas adjacent to buildings.
Caution: Do not use GPS functionality in a manner which causes
distraction from driving.
Emergency calls
Calls cannot be guaranteed under all conditions. Never rely solely
upon mobile phones for essential communication. Calls may not be
possible in all areas, on all networks, or when certain network
services and/or phone features are used.
Antenna
Use of antenna devices not marketed by Sony Ericsson could
damage the phone, reduce performance, and produce SAR levels
above the established limits. Do not cover the antenna with your
hand as this affects call quality, power levels and can shorten talk
and standby times.
Radio Frequency (RF) exposure and Specific Absorption
Rate (SAR)
When the phone or Bluetooth handsfree is turned on, it emits low
levels of radio frequency energy. International safety guidelines
have been developed through periodic and thorough evaluation of
scientific studies. These guidelines establish permitted levels of
radio wave exposure. The guidelines include a safety margin
designed to assure the safety of all persons and to account for any
variations in measurements.
Specific Absorption Rate (SAR) is used to measure radio
frequency energy absorbed by the body when using a mobile
5
February 15, 2011 18:05:57
phone. The SAR value is determined at the highest certified power
level in laboratory conditions, but because the phone is designed
to use the minimum power necessary to access the chosen
network, the actual SAR level can be well below this value. There is
no proof of difference in safety based on difference in SAR value.
Products with radio transmitters sold in the US must be certified
by the Federal Communications Commission (FCC). When
required, tests are performed when the phone is placed at the ear
and when worn on the body. For body-worn operation, the phone
has been tested when positioned a minimum of 15 mm from the
body without any metal parts in the vicinity of the phone or when
properly used with an appropriate Sony Ericsson accessory and
worn on the body.
For more information about SAR and radio frequency exposure,
go to: www.sonyericsson.com/health.
Flight mode
Bluetooth and WLAN functionality, if available in the device, can be
enabled in Flight mode but may be prohibited onboard aircraft or in
other areas where radio transmissions are prohibited. In such
environments, please seek proper authorisation before enabling
Bluetooth or WLAN functionality even in Flight mode.
Malware
Malware (short for malicious software) is software that can harm
the mobile phone or other computers. Malware or harmful
applications can include viruses, worms, spyware, and other
unwanted programs. While the device does employ security
measures to resist such efforts, Sony Ericsson does not warrant or
represent that the device will be impervious to the introduction of
malware. You can however reduce the risk of malware attacks by
using care when downloading content or accepting applications,
refraining from opening or responding to messages from unknown
sources, using trustworthy services to access the Internet, and
only downloading content to the mobile phone from known,
reliable sources.
6
February 15, 2011 18:05:57
Accessories
Use only Sony Ericsson branded original accessories and certified
service partners. Sony Ericsson does not test third-party
accessories. Accessories may influence RF exposure, radio
performance, loudness, electric safety and other areas. Third-
party accessories and parts may pose a risk to your health or
safety or decrease performance.
Accessible Solutions/Special Needs
In the US, compatible Sony Ericsson phones may offer
compatibility with TTY terminals (with use of necessary accessory).
For more information call the Sony Ericsson Special Needs Center
on 877 878 1996 (TTY) or 877 207 2056 (voice), or go to
www.sonyericsson-snc.com.
Disposal of old electrical and electronic equipment
Electronic equipment and batteries should not be included
as household waste but should be left at an appropriate collection
point for recycling. This helps prevent potential negative
consequences for the environment and human health. Check local
regulations by contacting your local city office, your household
waste disposal service, the shop where you purchased the product
or calling a Sony Ericsson Contact Center. Do not attempt to
remove internal batteries. Internal batteries shall be removed only
by a waste treatment facility or trained service professional.
Disposing of the battery
Check local regulations or call a Sony Ericsson Contact
Center for information. Never use municipal waste.
Memory card
If the product comes complete with a removable memory card, it is
generally compatible with the handset purchased but may not be
compatible with other devices or the capabilities of their memory
cards. Check other devices for compatibility before purchase or
use. If the product is equipped with a memory card reader, check
memory card compatibility before purchase or use.
7
February 15, 2011 18:05:57
Memory cards are generally formatted prior to shipping. To
reformat the memory card, use a compatible device. Do not use
the standard operating system format when formatting the memory
card on a PC. For details, refer to the operating instructions of the
device or contact customer support.
Warning!
If the device requires an adapter for insertion into the handset or
another device, do not insert the card directly without the required
adapter.
Precautions on memory card use
•Do not expose the memory card to moisture.
•Do not touch terminal connections with your hand or any metal
object.
•Do not strike, bend, or drop the memory card.
•Do not attempt to disassemble or modify the memory card.
•Do not use or store the memory card in humid or corrosive
locations or in excessive heat such as a closed car in summer, in
direct sunlight or near a heater, etc.
•Do not press or bend the end of the memory card adapter with
excessive force.
•Do not let dirt, dust, or foreign objects get into the insert port of
any memory card adapter.
•Check you have inserted the memory card correctly.
•Insert the memory card as far as it will go into any memory card
adapter needed. The memory card may not operate properly
unless fully inserted.
•We recommend that you make a backup copy of important data.
We are not responsible for any loss or damage to content you
store on the memory card.
•Recorded data may be damaged or lost when you remove the
memory card or memory card adapter, turn off the power while
formatting, reading or writing data, or use the memory card in
locations subject to static electricity or high electrical field
emissions.
8
February 15, 2011 18:05:57
Protection of personal information
Erase personal data before disposing of the product. To delete
data, perform a master reset. Deleting data from the phone
memory does not ensure that it cannot be recovered.
Sony Ericsson does not warrant against recovery of information
and does not assume responsibility for disclosure of any
information even after a master reset.
Loudness warning!
Avoid volume levels that may be harmful to your hearing.
End User Licence Agreement
Software delivered with this device and its media is owned by
Sony Ericsson Mobile Communications AB, and/or its affiliated
companies and its suppliers and licensors.
Sony Ericsson grants you a non-exclusive limited licence to use
the Software solely in conjunction with the Device on which it is
installed or delivered. Ownership of the Software is not sold,
transferred or otherwise conveyed.
Do not use any means to discover the source code or any
component of the Software, reproduce and distribute the
Software, or modify the Software. You are entitled to transfer rights
and obligations to the Software to a third party, solely together
with the Device with which you received the Software, provided the
third party agrees in writing to be bound by the terms of this
Licence.
This licence exists throughout the useful life of this Device. It can
be terminated by transferring your rights to the Device to a third
party in writing.
Failure to comply with any of these terms and conditions will
terminate the licence immediately.
Sony Ericsson and its third party suppliers and licensors retain
all rights, title and interest in and to the Software. To the extent
that the Software contains material or code of a third party, such
third parties shall be beneficiaries of these terms.
9
February 15, 2011 18:05:57
This licence is governed by the laws of Sweden. When
applicable, the foregoing applies to statutory consumer rights.
In the event Software accompanying or provided in conjunction
with your device is provided with additional terms and conditions,
such provisions shall also govern your possession and usage of
the Software.
Export regulations
Export regulations: Goods delivered under this Agreement may be
the subject to import and export regulations of the European
Union, the United States and other countries. Purchaser will
comply with these applicable laws and regulations and will obtain
and maintain any export and import license required for the
delivery of goods to Purchaser under this Agreement. Without
limiting the foregoing, and as an example, Purchaser will not
knowingly export or re-export goods to destinations identified
pursuant to Articles in Chapter II of European Council Regulation
(EC) 428/2009 and specifically, and without limitation, Purchaser
will also comply with U.S. government Export Administration
Regulations (“EAR”, 15 C.F.R. §§ 730-774, http://
www.bis.doc.gov/) administered by Department of Commerce,
Bureau of Industry and Security and economic sanctions
regulations (30 C.F.R. §§ 500 et. seq., http://www.treas.gov/
offices/enforcement/ofac/) administered by the U.S. Department
of Treasury, Office of Foreign Assets Control.
Limited Warranty
Sony Ericsson Mobile Communications AB, SE-221 88 Lund,
Sweden, (Sony Ericsson) or its local affiliated company, provides
this Limited Warranty for your mobile phone, original accessory
delivered with your mobile phone, and/or your mobile computing
product (hereinafter referred to as “Product”).
Should your Product need warranty service, please return it to
the dealer from whom it was purchased, or contact your local
10
February 15, 2011 18:05:57
Sony Ericsson Contact Center (national rates may apply) or visit
www.sonyericsson.com to get further information.
Our warranty
Subject to the conditions of this Limited Warranty, Sony Ericsson
warrants this Product to be free from defects in design, material
and workmanship at the time of its original purchase by a
consumer. This Limited Warranty will last for a period of two (2)
years as from the original date of purchase of the Product for your
mobile phone, and for a period of one (1) year following the original
purchase date of the Product for all original accessories (such as
the battery, charger or handsfree kit) which may be delivered with
your mobile phone.
What we will do
If, during the warranty period, this Product fails to operate under
normal use and service, due to defects in design, materials or
workmanship, Sony Ericsson authorised distributors or service
partners, in the country/region* where you purchased the Product,
will, at their option, either repair or replace the Product in
accordance with the terms and conditions stipulated herein.
Sony Ericsson and its service partners reserve the right to
charge a handling fee if a returned Product is found not to be under
warranty according to the conditions below.
Please note that some of your personal settings, downloads and
other information may be lost when your Sony Ericsson Product is
repaired or replaced. At present, Sony Ericsson may be prevented
by applicable law, other regulation or technical restrictions from
making a backup copy of certain downloads. Sony Ericsson does
not take any responsibility for any lost information of any kind and
will not reimburse you for any such loss. You should always make
backup copies of all the information stored on your Sony Ericsson
Product such as downloads, calendar and contacts before
handing in your Sony Ericsson Product for repair or replacement.
11
February 15, 2011 18:05:57
www.sonyericsson.com
Sony Ericsson Mobile Communications AB
SE-221 88 Lund, Sweden
February 15, 2011 18:05:58
1222-9269.5
February 15, 2011 21:53:57

Conditions
1. This Limited Warranty is valid only if the original proof of
purchase for this Product issued by a Sony Ericsson authorised
dealer specifying the date of purchase and serial number**, is
presented with the Product to be repaired or replaced.
Sony Ericsson reserves the right to refuse warranty service if this
information has been removed or changed after the original
purchase of the Product from the dealer.
2. If Sony Ericsson repairs or replaces the Product, the repair for
the defect concerned, or the replaced Product shall be warranted
for the remaining time of the original warranty period or for ninety
(90) days from the date of repair, whichever is longer. Repair or
replacement may involve the use of functionally equivalent
reconditioned units. Replaced parts or components will become
the property of Sony Ericsson.
3. This warranty does not cover any failure of the Product due to
normal wear and tear, or due to misuse, including but not limited
to use in other than the normal and customary manner, in
accordance with the Sony Ericsson instructions for use and
maintenance of the Product. Nor does this warranty cover any
failure of the Product due to accident, software or hardware
modification or adjustment, acts of God or damage resulting from
liquid.
A rechargeable battery can be charged and discharged more
than a hundred times. However, it will eventually wear out – this is
not a defect and corresponds to normal wear and tear. When the
talk-time or standby time is noticeably shorter, it is time to
replace the battery. Sony Ericsson recommends that you use
only batteries and chargers approved by Sony Ericsson.
Minor variations in display brightness and colour may occur
between phones. There may be tiny bright or dark dots on the
display. These are called defective pixels and occur when
individual dots have malfunctioned and can not be adjusted. Two
defective pixels are deemed acceptable.
Minor variations in camera image appearance may occur
between phones. This is nothing uncommon and is not regarded
as a defective camera module.
12
February 15, 2011 18:05:57
4. Since the cellular system on which the Product is to operate is
provided by a carrier independent from Sony Ericsson,
Sony Ericsson will not be responsible for the operation,
availability, coverage, services or range of that system.
5. This warranty does not cover Product failures caused by
installations, modifications, or repair or opening of the Product
performed by a non-Sony Ericsson authorised person.
6. The warranty does not cover Product failures which have been
caused by use of accessories or other peripheral devices which
are not Sony Ericsson branded original accessories intended for
use with the Product.
Sony Ericsson disclaims any and all warranties, whether
express or implied, for failures caused to the Product or
peripheral devices as a result of viruses, trojan horses, spyware,
or other malicious software. Sony Ericsson strongly recommends
that you install appropriate virus protection software on your
Product and any peripheral devices connected to it, as available,
and update it regularly, to better protect your device. It is
understood, however, that such software will never fully protect
your Product or its peripheral devices and Sony Ericsson
disclaims all warranties, whether express or implied, in case of
failure by such antivirus software to fulfil its intended purpose.
7. Tampering with any of the seals on the Product will void the
warranty.
8. THERE ARE NO EXPRESS WARRANTIES, WHETHER WRITTEN
OR ORAL, OTHER THAN THIS PRINTED LIMITED WARRANTY.
ALL IMPLIED WARRANTIES, INCLUDING WITHOUT LIMITATION
THE IMPLIED WARRANTIES OF MERCHANTABILITY OR
FITNESS FOR A PARTICULAR PURPOSE, ARE LIMITED TO THE
DURATION OF THIS LIMITED WARRANTY. IN NO EVENT SHALL
SONY ERICSSON OR ITS LICENSORS BE LIABLE FOR
INCIDENTAL OR CONSEQUENTIAL DAMAGES OF ANY NATURE
WHATSOEVER, INCLUDING BUT NOT LIMITED TO LOST
PROFITS OR COMMERCIAL LOSS TO THE FULL EXTENT
THOSE DAMAGES CAN BE DISCLAIMED BY LAW.
Some countries/states do not allow the exclusion or limitation of
incidental or consequential damages, or limitation of the duration
13
February 15, 2011 18:05:57
of implied warranties, so the preceding limitations or exclusions
may not apply to you.
The warranty provided does not affect the consumer’s statutory
rights under applicable legislation in force, nor the consumer’s
rights against the dealer arising from their sales / purchase
contract.
*Geographical scope of the warranty
If you have purchased your Product in a country member of the
European Economic Area (EEA) or in Switzerland or the Republic of
Turkey, and such Product was intended for sale in the EEA or in
Switzerland or in Turkey, you can have your Product serviced in
any EEA country or in Switzerland or in Turkey, under the warranty
conditions prevailing in the country in which you require servicing,
provided that an identical Product is sold in such country by an
authorised Sony Ericsson distributor. To find out if your Product is
sold in the country you are in, please call the local Sony Ericsson
Contact Center. Please observe that certain services may not be
available outside the country of original purchase, for example,
due to the fact that your Product may have an interior or exterior
which is different from equivalent models sold in other countries.
Please note in addition that it may sometimes not be possible to
repair SIM-locked Products.
** In some countries/regions additional information (such as a
valid warranty card) may be requested.
Trademarks and acknowledgements
The Liquid Identity logo and Xperia are trademarks or registered
trademarks of Sony Ericsson Mobile Communications AB.
Sony is a trademark or a registered trademark of Sony
Corporation.
Ericsson is a trademark or registered trademark of
Telefonaktiebolaget LM Ericsson.
Bluetooth is a trademark or a registered trademark of Bluetooth
SIG Inc. and any use of such mark by Sony Ericsson is under
license.
14
February 15, 2011 18:05:58
Other product and company names mentioned herein may be the
trademarks of their respective owners.
Any rights not expressly granted herein are reserved.
15
February 15, 2011 18:05:58
Support
Anguilla 1-800-080-9518
(Toll Free)
questions.CO@support.sonyericsson.com
Antigua and
Barbuda 1-800-081-9518
(Toll Free)
questions.CO@support.sonyericsson.com
Argentina 0800-333-7427
(número gratuito)
questions.CO@support.sonyericsson.com
Australia 1300 650-050 (Toll
Free)
questions.AU@support.sonyericsson.com
The Bahamas 1-800-205-6062
(Toll Free)
questions.CO@support.sonyericsson.com
Barbados 1-800-082-9518
(Toll Free)
questions.CO@support.sonyericsson.com
Belgique/
België 02-0745 1611 questions.BE@support.sonyericsson.com
Belize AN 815, PIN 5597
(Toll Free)
questions.CO@support.sonyericsson.com
Bermuda 1-800-083-9518
(Toll Free)
questions.CO@support.sonyericsson.com
Bolivia 800-100-542
(número gratuito)
questions.CO@support.sonyericsson.com
Brasil 4001-0444
(ligação gratuita)
questions.BR@support.sonyericsson.com
Canada 1 866 766 9374
(Toll Free / sans
frais)
questions.CA@support.sonyericsson.com
Cayman
Islands 1-800-084-9518
(Toll Free)
questions.CO@support.sonyericsson.com
Central and
Southern
Africa
+27 11 506 0123 questions.CF@support.sonyericsson.com
Česká
republika
844 550 055 questions.CZ@support.sonyericsson.com
Chile 800-646-425
(número gratuito)
questions.CO@support.sonyericsson.com
Colombia 01800-0966-080
(número gratuito)
questions.CO@support.sonyericsson.com
16
February 15, 2011 18:05:58
Costa Rica 0 800 011 0400
(número gratuito)
questions.CO@support.sonyericsson.com
Danmark 3331 2828 questions.DK@support.sonyericsson.com
Deutschland 0180 534 2020
(ortsübliche
Gebühren)
questions.DE@support.sonyericsson.com
Dominica 1-800-085-9518
(Toll Free)
questions.CO@support.sonyericsson.com
Ecuador 1-800-0102-50
(número gratuito)
questions.CO@support.sonyericsson.com
Eesti 06 032 032 questions.EE@support.sonyericsson.com
Egypt/رصم 16727 questions.EG@support.sonyericsson.com
Ελλάδα 801 11 810 810
+30 210 899 19 19
(από κινητό
τηλέφωνο)
questions.GR@support.sonyericsson.com
El Salvador 800-6323 (número
gratuito)
questions.CO@support.sonyericsson.com
España 902 180 576 (tarifa
local)
questions.ES@support.sonyericsson.com
France 09 69 32 21 21
09 69 32 21 22
(Xperia™
uniquement)
questions.FR@support.sonyericsson.com
Guatemala 1-800-300-0057
(número gratuito)
questions.CO@support.sonyericsson.com
Haïti/Ayiti AN 193, PIN 5598
(numéro gratuit /
nimewo gratis)
questions.CO@support.sonyericsson.com
Honduras AN 8000122, PIN
5599 (número
gratuito)
questions.CO@support.sonyericsson.com
Hong Kong/
香港
+852 8203 8863 questions.HK@support.sonyericsson.com
Hrvatska 062 000 000 questions.HR@support.sonyericsson.com
India/ê 1800 11 1800 (Toll
Free)
questions.IN@support.sonyericsson.com
17
February 15, 2011 18:05:58
+91 (011)
39011111
Indonesia 021 2701388 questions.ID@support.sonyericsson.com
Ireland 1850 545 888
(Local rate)
questions.IE@support.sonyericsson.com
Italia 06 48895206
(tariffa locale)
questions.IT@support.sonyericsson.com
Jamaica 1-800-442-3471
(Toll Free)
questions.CO@support.sonyericsson.com
Κύπρος/
Kıbrıs
0800 90 909 questions.CY@support.sonyericsson.com
Latvija 67 21 43 01 questions.LV@support.sonyericsson.com
Lietuva 8 700 55030 questions.LT@support.sonyericsson.com
Magyarország 01 880 47 47 questions.HU@support.sonyericsson.com
Malaysia 1800-88-9900 (Toll
Free / bebas tol)
questions.MY@support.sonyericsson.com
Maroc/ +212 2 2958 344 questions.MA@support.sonyericsson.com
México 0 1800 000 4722
(número gratuito)
questions.MX@support.sonyericsson.com
Nederland 0900 8998318 questions.NL@support.sonyericsson.com
Nederlandse
Antillen 001-866-509-8660
(gratis nummer)
questions.CO@support.sonyericsson.com
New Zealand 0800-100-150 (Toll
Free)
questions.NZ@support.sonyericsson.com
Nicaragua AN 1800-0166,
PIN 5600 (número
gratuito)
questions.CO@support.sonyericsson.com
Norge 815 00 840
(lokaltakst)
questions.NO@support.sonyericsson.com
Österreich 0810 200 245 questions.AT@support.sonyericsson.com
Pakistan/
021 - 111 22 55 73 questions.PK@support.sonyericsson.com
Panamá 00800-787-0009
(número gratuito)
questions.CO@support.sonyericsson.com
Paraguay 009 800 54 20032
(número gratuito)
questions.CO@support.sonyericsson.com
18
February 15, 2011 18:05:58
Perú 0800-532-38
(número gratuito)
questions.CO@support.sonyericsson.com
Philippines/
Pilipinas +63 2 7891860 questions.PH@support.sonyericsson.com
Polska +48 22 22 77 444 questions.PL@support.sonyericsson.com
Portugal 808 204 466
(chamada local)
questions.PT@support.sonyericsson.com
República
Dominicana 1-800-751-3370
(número gratuito)
questions.CO@support.sonyericsson.com
România +40 21 401 0401 questions.RO@support.sonyericsson.com
Saint Kitts
and Nevis 1-800-087-9518
(Toll Free)
questions.CO@support.sonyericsson.com
Saint Vincent
and the
Grenadines
1-800-088-9518
(Toll Free)
questions.CO@support.sonyericsson.com
Schweiz/
Suisse/
Svizzera
0848 824 040 questions.CH@support.sonyericsson.com
Singapore +65 6744 0733 questions.SG@support.sonyericsson.com
Slovenia 01 600 5000 questions.SI@support.sonyericsson.com
Slovensko 02 5443 6443 questions.SK@support.sonyericsson.com
South Africa 0861 632222 questions.ZA@support.sonyericsson.com
South
Κorea/대한
민국
(+82) 1588 4170 questions.KO@support.sonyericsson.com
Suomi 09 299 2000 questions.FI@support.sonyericsson.com
Sverige 013 24 45 00 (lokal
taxa)
questions.SE@support.sonyericsson.com
Trinidad and
Tobago 1-800-080-9521
(Toll Free)
questions.CO@support.sonyericsson.com
Türkiye +90 212 473 77 77 questions.TR@support.sonyericsson.com
United
Kingdom 08705 237 237
(Local rate)
questions.GB@support.sonyericsson.com
United States 1 866 766 9374 questions.US@support.sonyericsson.com
Uruguay 000-401-787-013
(número gratuito)
questions.CO@support.sonyericsson.com
Venezuela 0-800-1-00-2250
(número gratuito)
questions.CO@support.sonyericsson.com
19
February 15, 2011 18:05:58
Việt Nam 1900 1525 (miễn
phí) questions.VN@support.sonyericsson.com
Беларусь 8 82 00 361 0001 questions.BY@support.sonyericsson.com
България 0800 1 8778 questions.BG@support.sonyericsson.com
Россия +7 (495) 7870986 questions.RU@support.sonyericsson.com
Україна (+380) 44 590
1515
questions.UA@support.sonyericsson.com
+971 4 3919 880 questions.JO@support.sonyericsson.com
+971 4 3919 880
(UAE)
questions.AE@support.sonyericsson.com
+971 4 3919 880 questions.KW@support.sonyericsson.com
800-8200-727 questions.SA@support.sonyericsson.com
中国 +86 400 810 0000 questions.CN@support.sonyericsson.com
台灣 +886 2 25625511 questions.TW@support.sonyericsson.com
ไทย 02 2483 030 questions.TH@support.sonyericsson.com
20
February 15, 2011 18:05:58
November 15, 2010 10:55:47
November 15, 2010 10:55:47
November 15, 2010 10:55:47
February 15, 2011 21:53:58