Sony BDP S470 User Manual DVD PLAYER Manuals And Guides 1006815L
User Manual: Sony BDP-S470 BDP-S470 SONY DVD PLAYER - Manuals and Guides View the owners manual for your SONY DVD PLAYER #BDPS470. Home:Electronics Parts:Sony Parts:Sony DVD PLAYER Manual
Open the PDF directly: View PDF ![]() .
.
Page Count: 39
ON'&r 4-184-341-11(1)
The software of this player may be updated in the future, To find out details on any
available updates, please visit: http://www,sony,com/bluraysupport/
POWEREn Br
9
0
gracenoL, e
L_VC _,,-{DTM H_m|
®
0000
®
@_M
v ! D Eo DIGITAL AUDIO SUPIR AUDIO CD
http://www.sony.net/
Printed on 70% or more recycled
paper using VOC (Volatile Organic
Compound)-free vegetable oil
based ink. 4-184-341-11(1)
J
Java
POW[RED Operating Instructions
Blu-ray Disc TM /DVD Player
BDP-S470
Printed in Malaysia q-418434111 * _ @2010 Sony Corporation
WARNING
To reduce the risk of fire or electric
shock, do not expose Ibis apparatus
tu rain or muislure.
To avoid electrical shock, do 11ol
open tile cabinet. Refer servicing to
qualified personnel only.
The AC power cord must be
changed only at a qualified service
shop.
Batteries or batteries installed
apparatus shall not he exposed to
excessive heat such as sunshine,
fire or tile like.
CAUTION
Tile use ol uptical instruments with
this product will increase eye
hazard. As tile laser beam used in
this Bhl-ray Disc/DVD player is
harmful to eyes, do not attempt to
disassemble tile cabinel.
Reflzr servicing lu qualified
_ersunnel only.
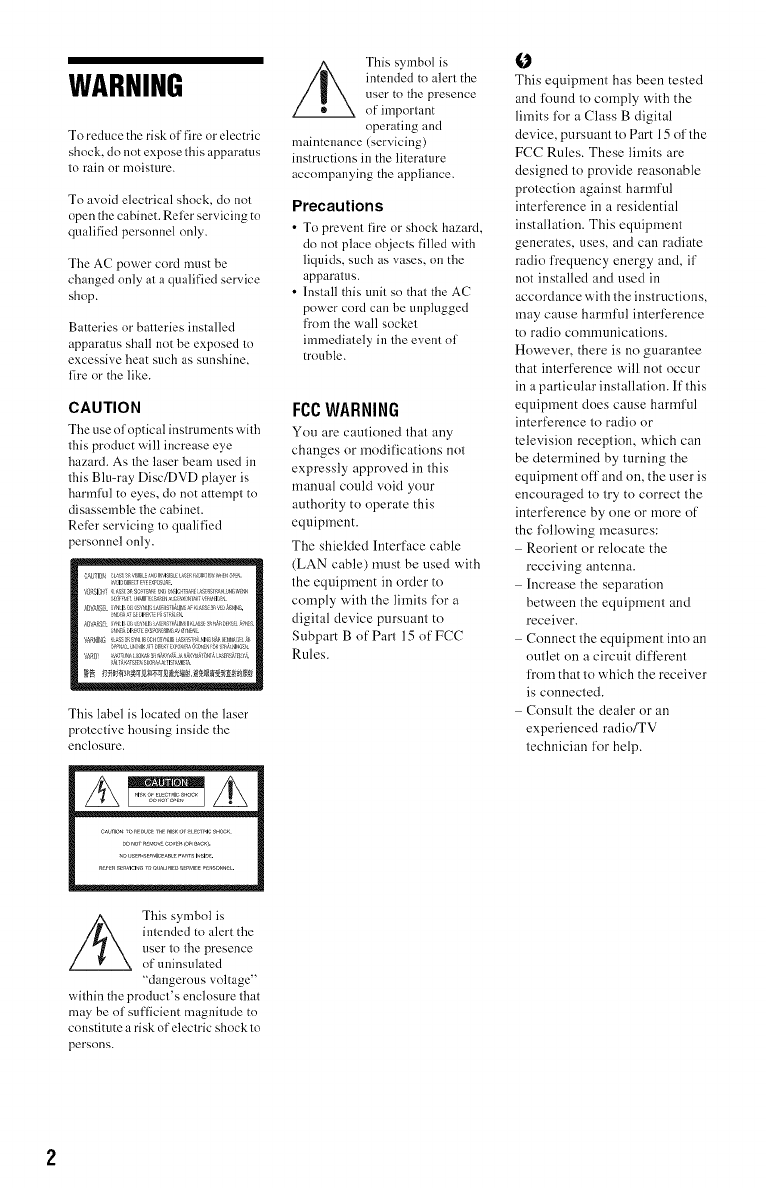
CA TIO_<
,,a _I:_E,Fxps_.
el, SEI_F_-r'_S a
' C _f
',:0
This lahel is located on tile laser
proleclive housing inside the
enclosure.
This symbol is
iutended to alert the
user to tile presence
of uninsulated
"dangerous voltage"
within tile product's enclosure that
may be of sufficient magnitude to
constitute a risk of electric shock to
persons.
/_ This symbol is
intended to alerl tile
user tu tile presence
of imporlant
operating anti
maintenance (servicing)
instructions in tile literature
accompanying tile appliance.
Precautions
•To prevent tire or shock hazm'd,
do not place objects tilled with
liquids, such as vases, on the
apparatus.
• Install this unit su that tile AC
power cord can be unplugged
from tile wall sucket
ilnmediately in tile event of
trouble.
FCCWARNING
You are cautioned that any
changes or modifications not
expressly approved in this
manual could void your
authority to operate this
equipment.
The shielded Interface cable
(LAN cable) must be used with
the equipment in order to
comply with the limits l\_r a
digital device pursuant to
Subpart B of Pan 15 of FCC
Rules.
O
This equipment has been tested
and found to comply with the
limits for a Class B digital
device, pursuant to Part 15 of the
FCC Rules. These limits are
designed to provide reasonable
protection against harmful
interference in a residential
installation. This equipment
generates, uses, and can radiate
radio frequency energy and, if
not installed and used in
accordance with the instructions,
may cause harmful interl)rence
to radio communications.
However, there is no guarantee
that interference will not occur
in a particular installation. If this
equipment does cause harmful
interfcrcnce to radio or
television reception, which can
be determined by turning the
equipment ofl' and on, the user is
encouraged to try to correct the
interfcrcnce by one or morc of
the following measures:
Reorient or relocate the
receiving antenna.
Increase the separation
between the equipment and
receiver.
Connect the equipment into an
outlet on a circuit difl)rent
from that to which the receiver
is connected.
Consult the dealer or an
experienced radio/TV
technician for help.
Owner's Record
Tile model and serial numbers are
located at the rear of the trait.
Record the serial number in the
space provided below. Refer to
them whenever you call upon your
Sony dealer regarding this product.
Model No.
Serial No.
For customers in the USA
If tilts product is not working
properly, please call 1=866=909=
7669.
For Customers in Canada
If this product is not working
properly, please call 1-877-602-
2008 lor Peace of Mind
Warranty Replacement
service.
For other product rehtted questions
please contact our Customer
Information Service Center at
1-877-899-7669 or write to us at:
Customer lnfk>rmation Service 115
Gordon Baker Road, Toronto,
Ontario, M2H 3R6
NotesAbouttheDiscs
• To keep the disc clean, handle
the disc by its edge. Do not
touch the surface.
Dust, fingerprints, or scratches
on the disc may cause it to
malfunction.
• Do not expose the disc to
direct sunlight or heat sources
such as hot air ducts, or leave it
in a car parked in direct
sunlight as the temperature
may rise considerably inside
the car.
• After playing, store the disc in
its case.
• Clean the disc with a cleaning
cloth. Wipe the disc from the
center out.
• Do not use the l%llowing discs.
A lens cleaning disc.
A disc that has a non-
standard shape (e.g., card,
heart).
A disc with a label or sticker
on it.
A disc that has cellophane
tape or sticker adhesive on it.
• Do not resurface the playing
side of a disc to remove
surface scratches.
• Do uot use solvents such as
benzine, thinner,
commercially available disc/
lens cleaners, or anti-static
spray intended for vinyl LPs.
• If you have printed the disc's
label, dry the label belk)rc
playing.
3
Precautions
The power requirements and
power consumption of this
player are indicated on the back
of the player. Check that the
player's operating voltage is
identical with your local power
supply.
Power requirements and
power consumption
!
Onplacement
• Place the player in a location
with adequate ventilation to
prevent heat build-up in the
player.
• Do not place the player on a
soft surface such as a rug that
might block the _entilation
holes,
• Do not install this player in a
confined space, such as a
bookshelf or similar unit.
• Do not place the player in a
location near heat sources, or
in a phtce subject to direct
sunlight, excessive dust, or
mechanical shock.
• Do not place the player
outdoors, in vehicles, on ships,
or ou other vessels.
• If the, player is brought directly
from a cold to a warm location,
or is placed in a very damp
roonl, nloisture may condense
on the lenses inside the player.
Should this occur, the player
may not operme properly. In
this case, remove the disc and
leave the player turned on for
about half an hour until the
moisture evaporates.
• Do not install the player in an
inclined position. It is
designed to be operated in a
horizontal position only.
• Do not place heavy or unstable
objects on the player.
• Do not place any objects other
than discs on the disc tray.
Doing so may cause damage to
the player or the object.
• Take out any discs when you
move the player. If you don't,
the disc may be damaged.
• Disconnect the AC power cord
and all other cables from the
player when you move the
player.
Onpowersources
• The player is not disconnected
from the AC power source as
long as it is connected to the
wall outlet, even if the player
itself has been turned off.
• Disconnect the player from the
wall outlet if you are not going
to use the player for a long
time. To disconnect the AC
power cord, grasp the plug
itself: never pull the cord.
• Observe following points to
prevent the AC power cord
being damaged. Do not use the
AC power coM if it is
damaged, as doing so may
result in an electric shock or
fire.
Do not pinch the AC power
cord between the player and
wall, shelf, etc.
- Do not put anything heavy
on the AC power cord or pull
on the AC power cord itself.
Forthemodelsupplied
withtheACplugadaptor
If the AC plug of your unit does
not fit into the wall outlet, attach
the supplied AC plug adaptor.
Onadjustingvolume
Do not turn up the _,olume while
listening to a section with very
low level inputs or no audio
signals. It"you do, your cars and
the speakers may be damaged
when a peak level section is
played.
Oncleaning
Clean tile cabinet, panel, and
controls with a soft cloth. Do not
use any type of abrasive pad,
scouring powder or solvent such
as alcohol or benzine.
Oncleaningdiscs,disc/
lenscleaners
Do not use cleaning discs or
disc/lens cleaners (including wet
or spray types). These may cause
the apparatus to malfunction.
Onreplacementof parts
In the events that this phtyer is
repaired, repaired parts may be
collected lk)r reuse or recycling
purposes.
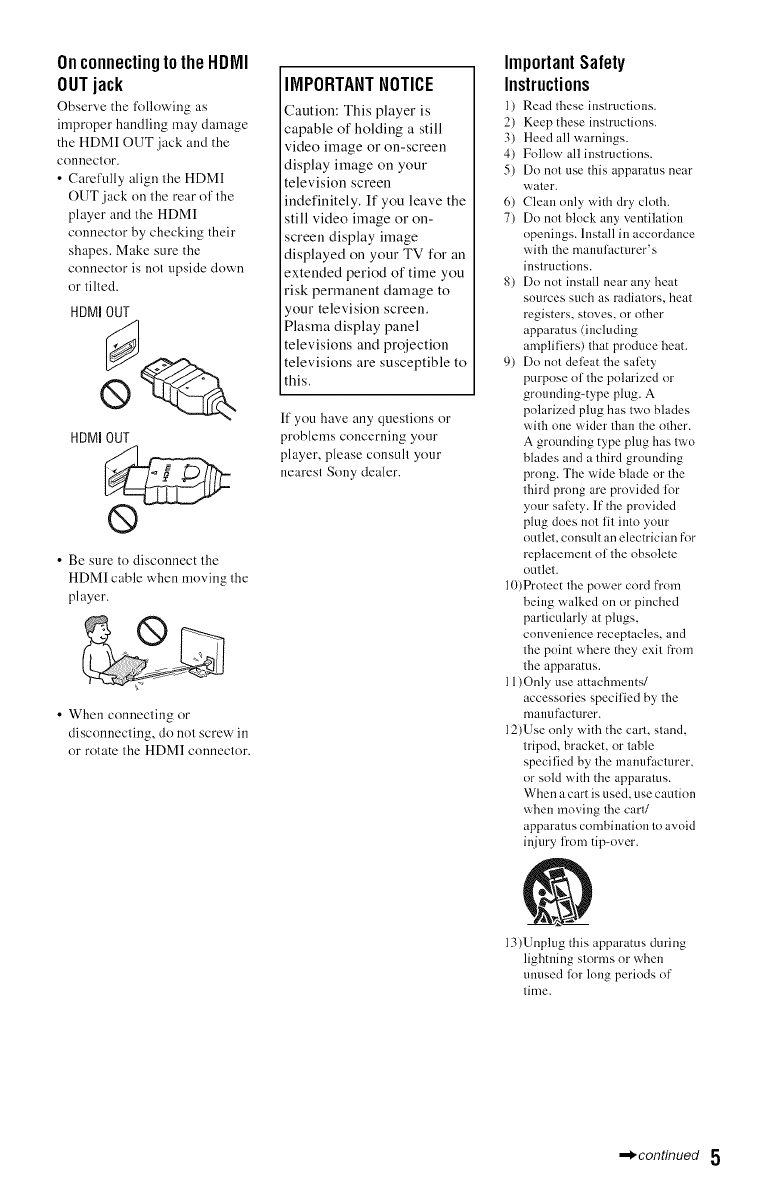
OnconnectingtotheHDMI
OUTjack
Obscr_,e the following as
improper handling may damage
the HDMI OUT jack and the
conlleCtOr.
• Carefully align the HDMI
OUT jack on the rear of the
player and the HDMI
connector by checking their
shapes. Make sure the
connector is not upside down
or tilted.
HDMI OUT
HDMI OUT
• Be sure to disconnect the
HDMI cable when moving the
player.
• When connecting or
disconnecting, do not screw in
or rotate the HDM] connector.
IMPORTANTNOTICE
Caution: This player is
capable of holding a still
video image or on-screen
display image on your
television screen
indefinitely. If you leave the
still video image or on-
screen display image
displayed on your TV for an
extended period of time you
risk permanent damage to
1our television screen.
Plasma display panel
televisions and projection
televisions are susceptible to
this.
If you have any questions or
problems concerning your
player, please consult your
nearest Sony dealer.
ImportantSafety
Instructions
1) Read these instructions.
2) Keep these instructions.
3) Heed all warnings.
4) Follow all instructions.
5) Do not use this apparatus near
water.
6) Clean only with dry cloth.
7) Do not block any ventilation
openings, lustall in accordance
with the manufacturer's
instructions.
8) Do not install near any heat
sources such as radiators, heat
registers, stoves, or other
apparatus (including
amplifiers) that produce heat.
9) Do not deleat the sali_ty
purpose of the polarized or
grounding-type plug. A
polarized plug has two blades
with one wider than the other.
A grounding type plug has two
blades and a third grounding
prong. The wide blade or the
third prong are provided for
your sali_ty. If the provided
plug does not fit into your
outlet, consult an electrician for
replacement of the obsolete
outlet.
lO)Protect the power cord h'om
being walked on or pinched
particularly at pings,
couveuience receptacles, aud
the point where they exit from
the apparatus.
1 l)Only use attachments/
accessories specified by the
manufacturer.
12)Use only with the cart, stand,
tripod, bracket, or table
specified by the manufacturer,
or sold with the apparatus.
When a cart is used, use caution
when moving the cart/
apparatus combination to avoid
injury l?om tip-over.
13)Unplug this apparatus during
lightning storms or when
unused lor long periods of
time.
,=_-condnued 5

14)Relier all servicing to qualified
service personnel. Servicing is
required when the apparatus
has been damaged in any way,
such as power-supply cord or
plug is damaged, liquid has
been spilled or objects have
fidlen into the apparatus, the
apparatus has been exposed to
rain or moisture, does not
nperate normally, or has been
drnpped.

Table of Contents
WARNING .................................................... 2
Precautions ................................................... 4
Guide to Parts and Controls ...................................... 8
Hookups and Settings
Step 1 : Preparing the Player ..................................... 11
Step 2: Connecting the Player .................................... 12
Step 3: Easy Setup ............................................ 14
Connecting to the Network ...................................... 14
Playback
Playing a Disc ................................................ 16
Playing from a USB Device ...................................... 17
Playing via a Network .......................................... 18
Available Options .............................................. 18
SettingsandAdjustments
Using the Settings Displays ...................................... 20
Network Update ............................................... 21
Screen Settings ............................................... 21
Audio Settings ................................................ 23
BD/DVD Viewing Settings ....................................... 24
Parental Control Settings ........................................ 24
Music Settings ................................................ 25
System Settings ............................................... 25
Network Settings .............................................. 26
Easy Setup .................................................. 26
Resetting .................................................... 26
Additional Information
Troubleshooting ............................................... 27
Specifications ................................................. 31
Index ....................................................... 38
7
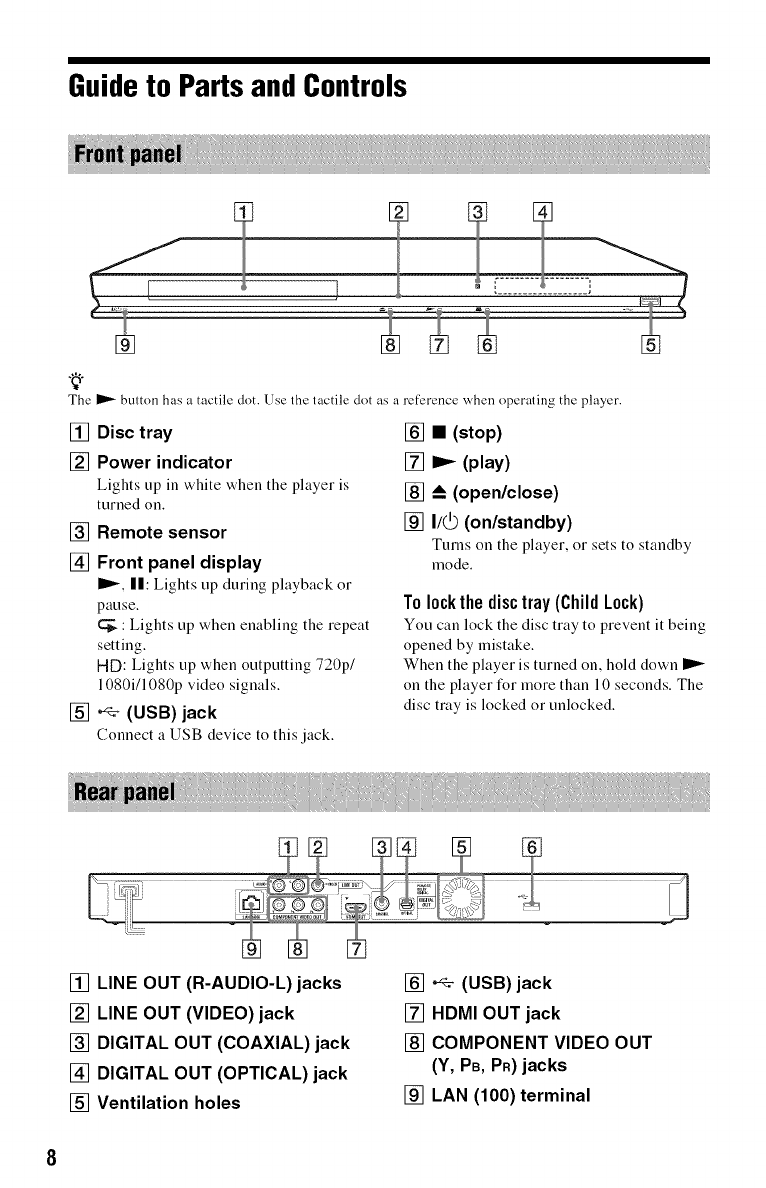
Guideto Parts and Controls
The
[]
button has a tactile dot. [Jse the tactile dot as a reference when operating the player.
[] Disc tray
[] Power indicator
Lights up in white when the player is
turned on.
[]
[]
[]
Remote sensor
Front panel display
I_, I1:Lights up during playback or
pause.
: Lights up when enabling the repeat
setting.
HD: Lights up when outputting 720p/
1080i11080p video signals.
•_(USB) jack
Connect a USB device to this jack.
[] • (stop)
[] Iz_ (play)
[] _ (open/close)
[] I/O (on/standby)
Turns on the player, or sets to standby
mode.
To lockthe disctray (Child Lock)
You can lock the disc tray to prevent it being
opened by mistake.
When the player is turned on, hold down I1_
on the player l_r more than 10 seconds. The
disc tray is locked or unlocked.
[] LINE OUT (R-AUDIO-L) jacks
[] LINE OUT (VIDEO)jack
[] DIGITAL OUT (COAXIAL) jack
[] DIGITAL OUT (OPTICAL) jack
[] Ventilation holes
[] ,_ (USB)jack
[] HDMI OUT jack
[] COMPONENT VIDEO OUT
(Y, PB, PR)jacks
[] LAN (100) terminal
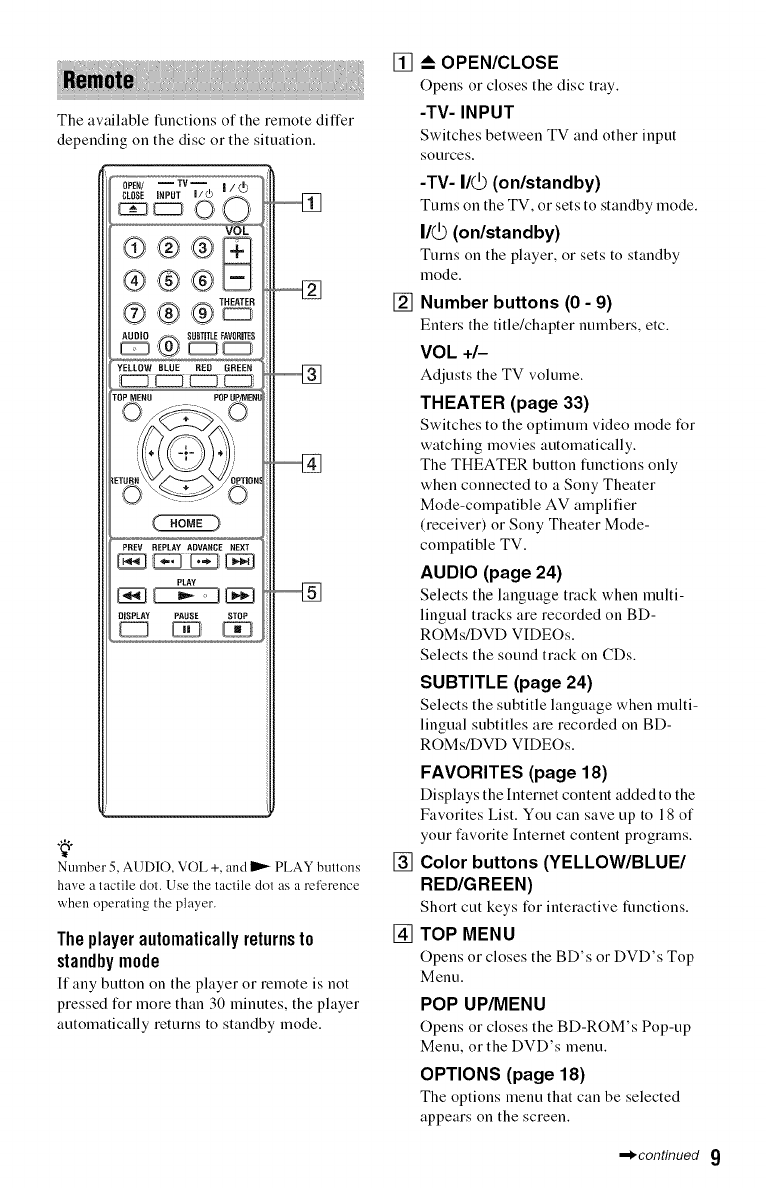
The awtilable functions of the remote differ
depending on the disc or the situation.
CLOSE iNPUT I/_
@ ® ®
®, <®,®,
,,®,®
_,._ SUBTITLEFAVORITES
YELLOW BLUE RED GREEN
POPUP EH
_. ....... ,_
/\<
PLAY
DISPLAY PAUSE STOP
Number 5, AUDIO, VOL +, and _ PLAY bultons
have a tactile dol. Use the lactile dot as areference
when operating the player.
Theplayerautomaticallyreturnsto
standbymode
If any button on the player or remote is not
pressed for more than 30 minutes, the player
automatically returns to standby mode.
[]
[]
[]
[]
OPEN/CLOSE
Opens or closes the disc tray.
-TV- INPUT
Switches between TV and other input
sources.
-TV- I1@(on/standby)
Turns on the TV, or sets to standby mode.
I/@ (on/standby)
Turns on the player, or sets to standby
mode.
Number buttons (0 - 9)
Enters the title/chapter numbers, etc.
VOk +/-
Adjusts the TV w)hune.
THEATER (page 33)
Switches to the optimum video mode for
watching movies automatically.
The THEATER button functions only
when connected to a Sony Theater
Mode-compatible AV amplifier
(receiver) or Sony Theater Mode-
compatible TV.
AUDIO (page 24)
Selects the language track when multi-
lingual tracks are recorded on BD-
ROMs/DVD VIDEOs.
Selects the sound track on CDs.
SUBTITLE (page 24)
Selects the subtitle language when multi-
lingual subtitles are recorded on BD-
ROMs/DVD VIDEOs.
FAVORITES (page 18)
Displays the Internet content added to the
Favorites List. You can save up to 18 of
your favorite Internet content programs.
Color buttons (YELLOW/BLUE/
RED/GREEN)
Short cut keys for interactive functions.
TOP MENU
Opens or closes the BD's or DVD's Top
Menu.
POP UP/MENU
Opens or closes the BD-ROM's Pop-up
Menu, or the DVD's menu.
OPTIONS (page 18)
The options menu that can be selected
appears on the screen.
,=_-condnued 9
[]
HOME
Enters the player's home menu.
Displays the wall paper when pressed on
the category icon of the home menu.
RETURN
Returns to the previous display.
_-/f/¢/,-_
Moves the highlight to select a displayed
item.
Center button (ENTER)
Enters the selected item.
PREV/NEXT
Skips to the previous/next chapter, track,
or file.
4=. REPLAY/ADVANCE ==_
Briefly replays the current scenes for
10 seconds/briefly fast forwards the
current scenes t_r 15 seconds.
_141/1_1_ (fast reverse/fast
forward)
•Fast reverses/fast forwards the disc
when pressed during playback. Each
time you press the button during
playback of videos, the search speed
changes.
• Plays in slow motion, when pressed for
more than one second in pause mode.
•Plays one fiame at a time, when pressed
briefly in pause mode.
I)_ PLAY
Starts or re-starts playback.
DISPLAY (page 17)
Displays the playback information on the
screen.
II PAUSE
Pauses or re-starts playback.
•STOP
Stops playback and remembers the stop
point (resume point).
The resume point tbr a title/track is the
last point you played or the last photo for
a photo folder.
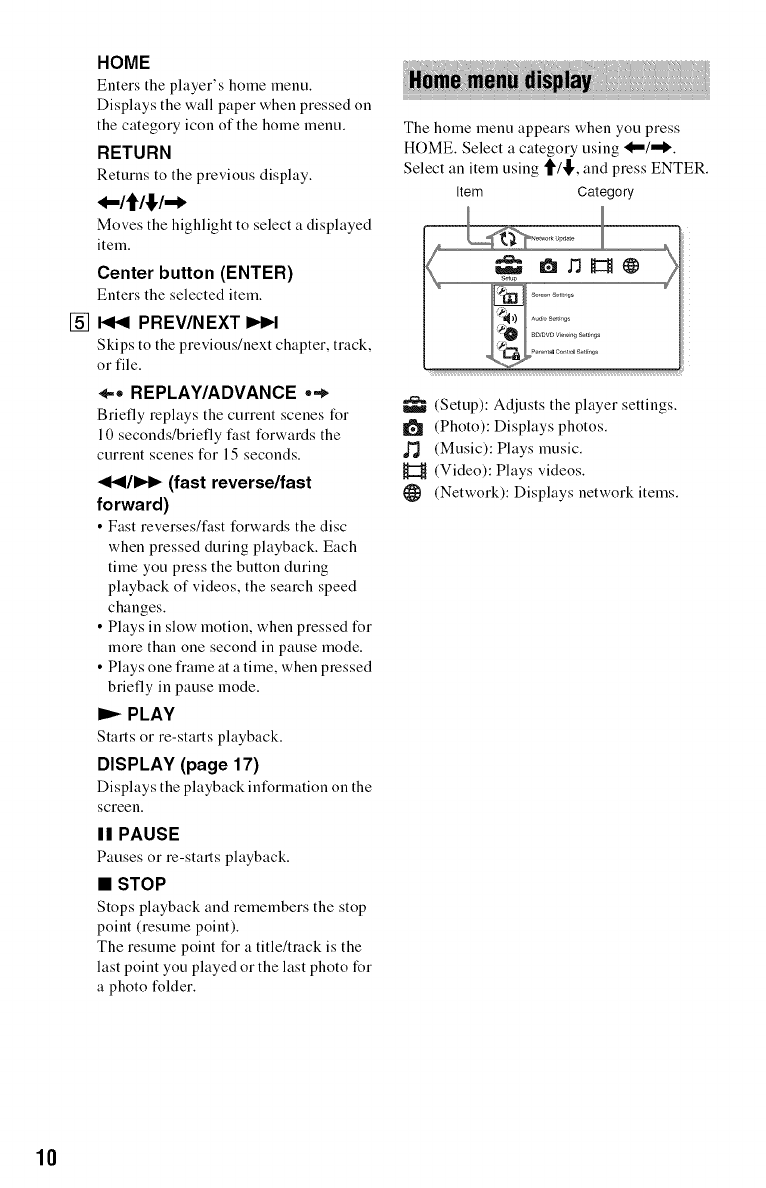
The home menu appears when you press
HOME. Select a category using <'/'_.
Select an item using _/_,, and press ENTER.
Item Category
_ (Setup): Adjusts the player settings.
(Photo): Displays photos.
(Music): Plays music.
H (Video): Plays videos.
(Network): Displays network items.
10
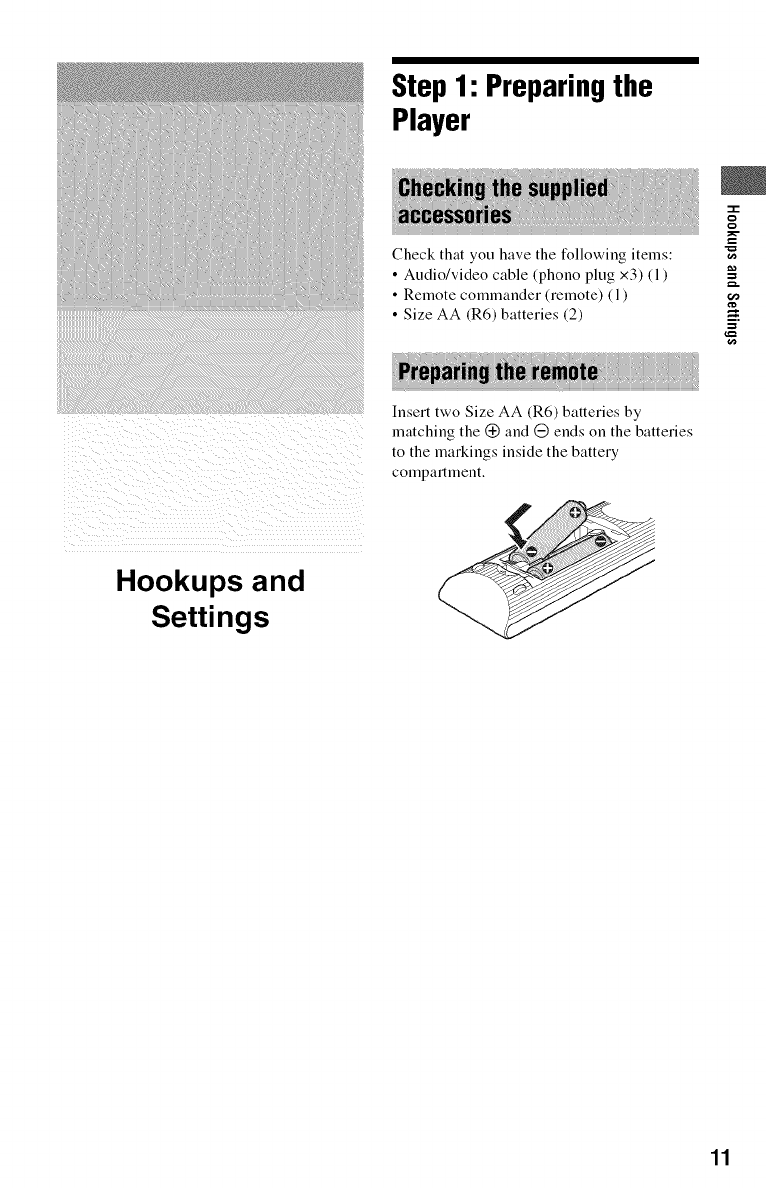
Step1: Preparingthe
Player
Check that you have the following items:
• Audio/video cable (phono plug x3) (1)
• Remote commander (remote) (1)
• Size AA (R6) batteries (2)
g
N
N
Hookups and
Settings
Insert two Size AA (R6) batteries by
matching the (_ and (_ ends on the batteries
to the markings inside the battery
compartment.
11
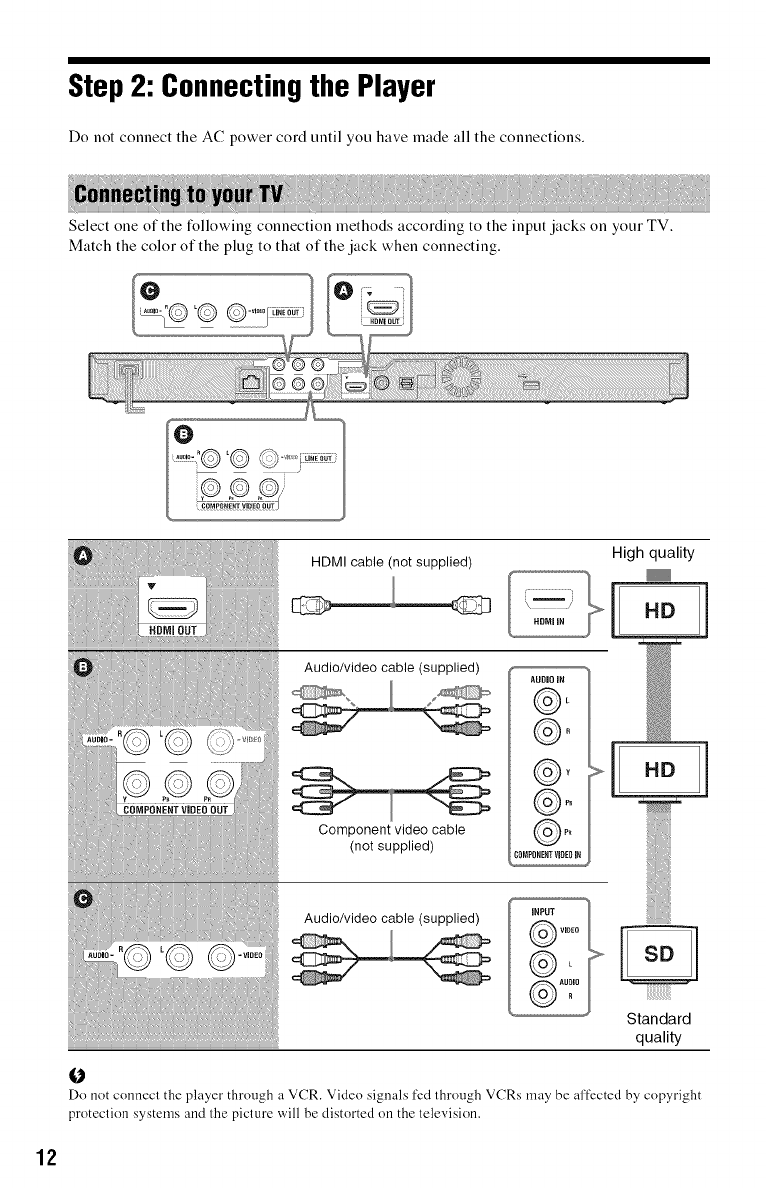
Step 2: Connectingthe Player
Do not connect the AC power cord until you have made all the connections.
Select one of the l_llowing connection methods according to the input jacks on your TV.
Match the color of the plug to that of the jack when connecting.
HDMI cable (not supplied) High quality
Audio/video cable (supplied) _ AUDIO iH
@"° W
Component video cable @ _
(not supplied)
COMPONEHTViOEOIR ,_
IT
Audio/video cable (supplied) INPUT
VIDeo _]®L
Standard
quality
O
Do not conned the player through a VCR. Video signals fed lhrough VCRs may be affected by copyright
protection systems and the picture will be distorted on the television.
12
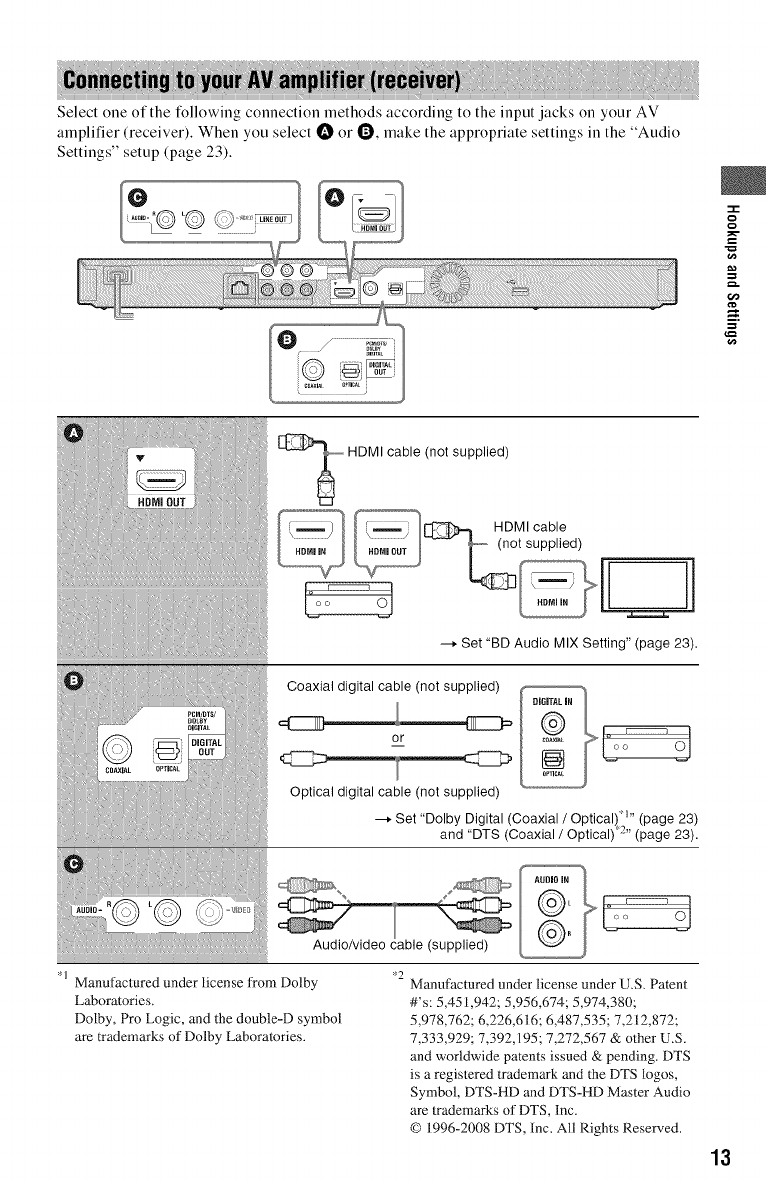
Select one of the tMlowing connection methods according to the input jacks on your AV
amplifier (receiver). When you select O or Q, make the appropriate settings in the "Audio
Settings" setup (page 23).
HDMI cable (not supplied)
"-i-
g
g
=.
--_ Set "BD Audio MIX Setting" (page 23).
Coaxial digital cable (not supplied)
or
Optical digital cable (not supplied)
--_ Set "Dolby Digital (Coaxial /Optical)' " (page 23)
and "DTS (Coaxial /Optical)"-"_ (page 23).
Manufactured under license from Dolby
Laboratories.
Dolby, Pro Logic, and the double-D symbol
are trademarks of Dolby Laboratories.
'_> O I
Audio/video cable (supplied)
*2 Manufactured under license under U.S. Patent
#'s: 5,451,942; 5,956,674; 5,974,380;
5,978,762; 6,226,616; 6,487,535; 7,212,872;
7,333,929; 7,392,195; 7,272,567 & other U.S.
and worldwide patents issued & pending. DTS
is a registered trademark and the DTS logos,
Symbol, DTS-HD and DTS-HD Master Audio
are trademarks of DTS, Inc.
© 1996-2008 DTS, Inc. All Rights Reserved.
13
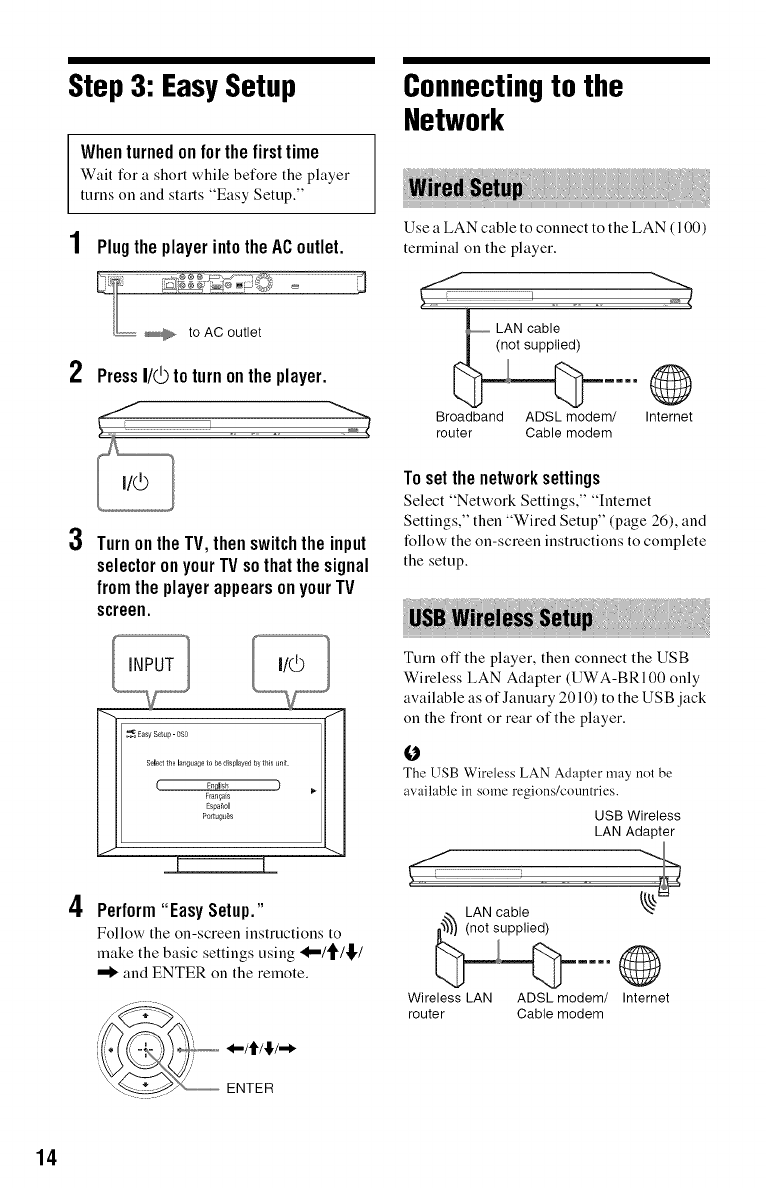
Step 3: EasySetup
Whenturnedonforthefirsttime
Wait for a short while before the player
turns on and starts "Easy Setup."
1Plugthe playerintotheACoutlet.
2PressI/_ to turnontheplayer.
3TurnontheTV,thenswitchthe input
selectoronyourTVsothatthesignal
fromtheplayer appearsonyourTV
screen.
4
Select the lat_guage to be displayed by this inst.
Frall_a_s
Espanol
Port,igloOs
[ I
Perform"EasySetup."
Follow the on-screen instructions to
make the basic settings using 'd="/_/,!,/
and ENTER on the remote.
" ENTER
Connectingto the
Network
Use a LAN cable to connect to the LAN (100)
terminal on the player.
LAN cable
Broadband ADSL modem/ Internet
router Cable modem
Tosetthenetworksettings
Select "Network Settings," "Intenaet
Settings," then "Wired Setup" (page 26), and
follow the on-screen instructions to complete
the setup.
Turn offthe player, then connect the USB
Wireless LAN Adapter (UWA-BRI00 only
awfilable as of January 2010) to the USB jack
on the fiont or rear of the player.
The USB Wireless LAN Adapter may not be
available in some regions/countries.
USB Wireless
LAN Adapter
@
Wireless LAN ADSL modem/ Internet
router Cable modem
14
Tosetthenetworksettings
Select "Network Settings," "Internet
Settings," then "USB Wireless Setup"
(page 26), and follow the on-screen
instructions to complete the setup.
"T"
15
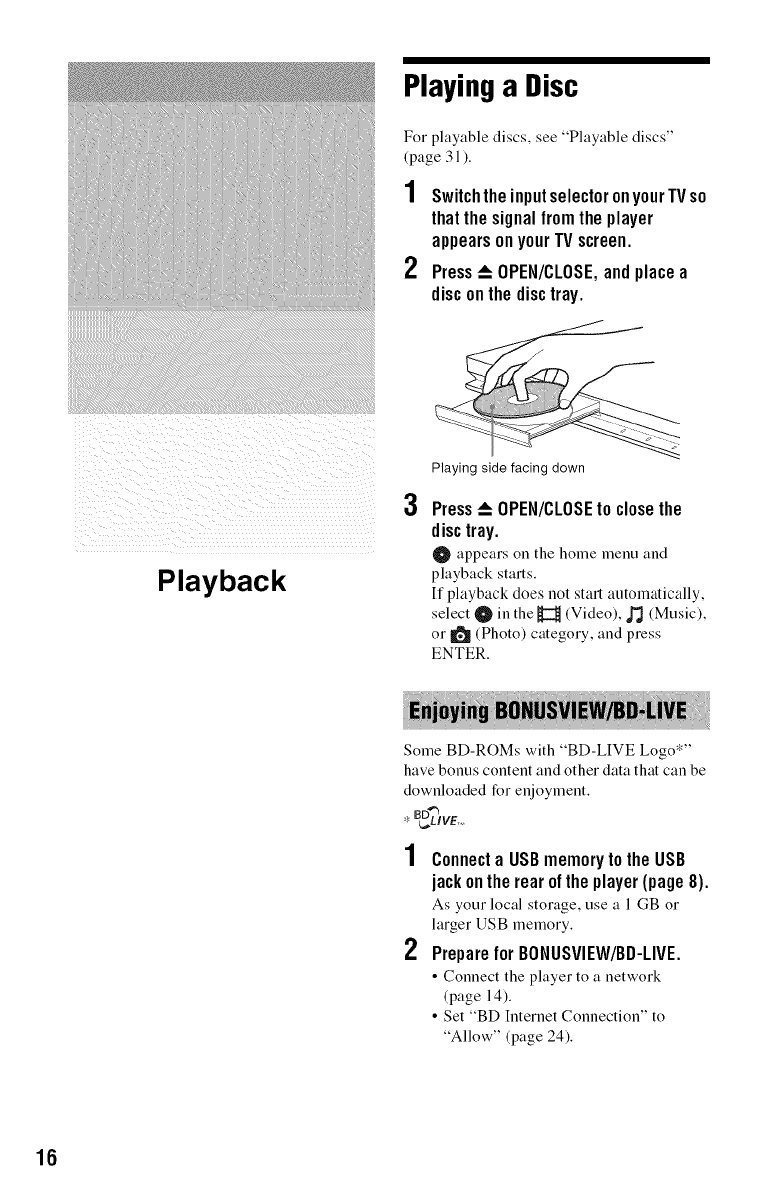
Playinga Disc
For playable discs, see "Playable discs"
(page 31 ).
2
SwitchtheinputselectoronyourTVso
thatthesignalfromtheplayer
appearsonyourTVscreen.
Press_ OPEN/CLOSE,andplacea
disconthe disctray.
Playback
3
Playing side facing down
Press_OPEN/CLOSEtoclosethe
disc tray.
O appears on the home menu and
playback starts.
If playback does not start automatically,
select O in the H (Video), _ (Music),
or II_ (Photo) category, and press
ENTER.
Some BD-ROMs with "BD-LIVE Logo*"
have bonus content and other data that can be
downloaded for enjoyment.
* _,D4"_IVE,__
2
Connecta USBmemorytothe USB
jackontherearoftheplayer(page8).
As your local storage, use a l GB or
larger USB memory.
Preparefor BONUSVIEW/BD-LIVE.
•Connect the player to a network
(page 14).
• Set "BD Internet Connection" to
"Allow" (page 24).
16
3Inserta BD-ROMwithBONUSVIEW/
BD-LIVE.
The operation method differs depending
on the disc. Refer to the instruction
manual supplied with the disc.
To delete data in the USB memory, select "Erase
BD Dala" in the _t (Video), and press ENTER.
All data stored in the buda/budb lk_lderwill be
erased.
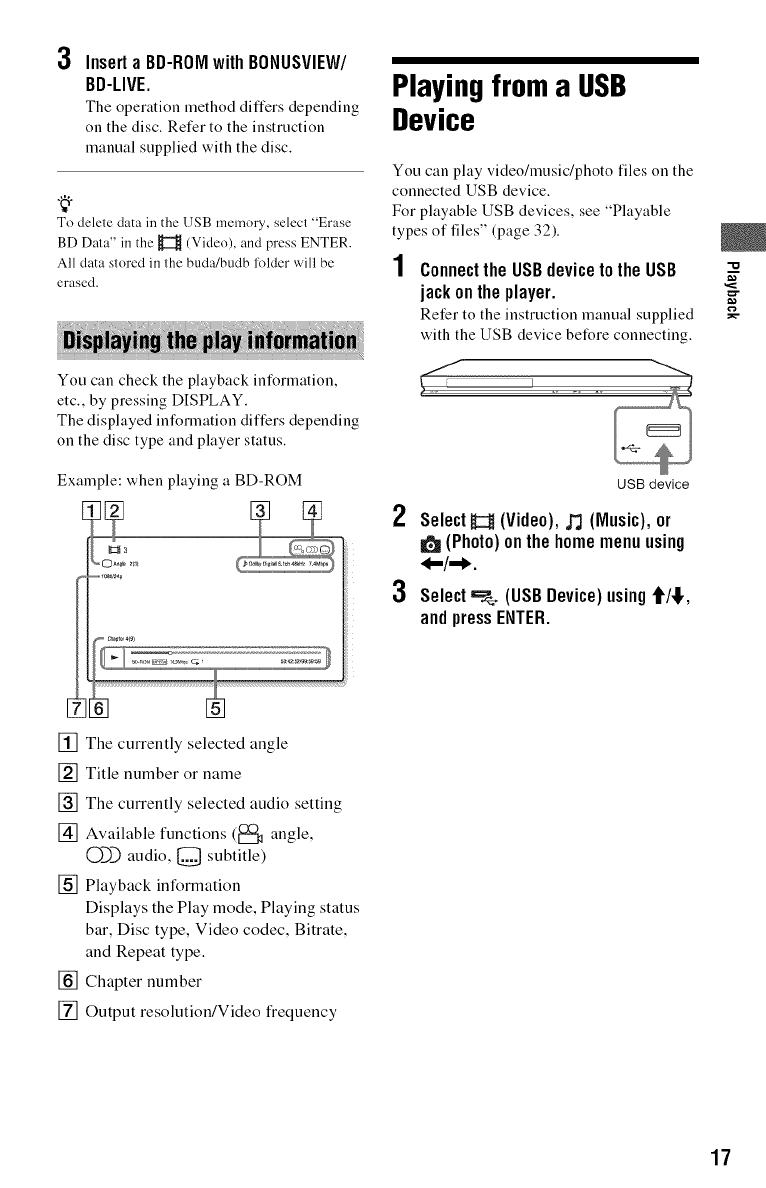
You can check the playback information,
etc., by pressing DISPLAY.
The displayed int_rmation differs depending
on the disc type and player status.
Example: when playing a BD-ROM
,?
II:II3
Playingfroma USB
Device
You can play video/music/photo files on the
connected USB device.
For playable USB devices, see "Playable
types of files" (page 32).
1Connectthe USBdevicetotheUSB
jackontheplayer, g
Refer to the instruction manual supplied _-
with the USB device before connecting.
2
3
USB device
SelectH (Video),,,_ (Music), or
(Photo)onthe homemenuusing
_-/,=_.
Select==_ (USBDevice)using1HI,,
andpressENTER.
[] The currently selected angle
[] Title number or name
[] The currently selected audio setting
[] Available functions (_t_ angle,
0_) audio, [_ subtitle)
[] Playback information
Displays the Play mode, Playing status
bar, Disc type, Video codec, Bitrate,
and Repeat type.
[] Chapter number
[] Output resolution/Video frequency
17
Playingvia a Network AvailableOptions
Serves as a gateway delivering the selected
Internet content and a wuiety of on-demand
entertainment straight to your player.
2
3
PrepareforBRAVIAInternetVideo.
Connect the player to a network
(page 14).
SelectH (Video),_(Music),or
(Photo) on the home menu using
_-/,-_.
Selectan Internetcontentprovider
iconusingt/!,, andpressENTER.
When an Internet content list has not
been acquired, an unacquired icon or a
new icon is displayed.
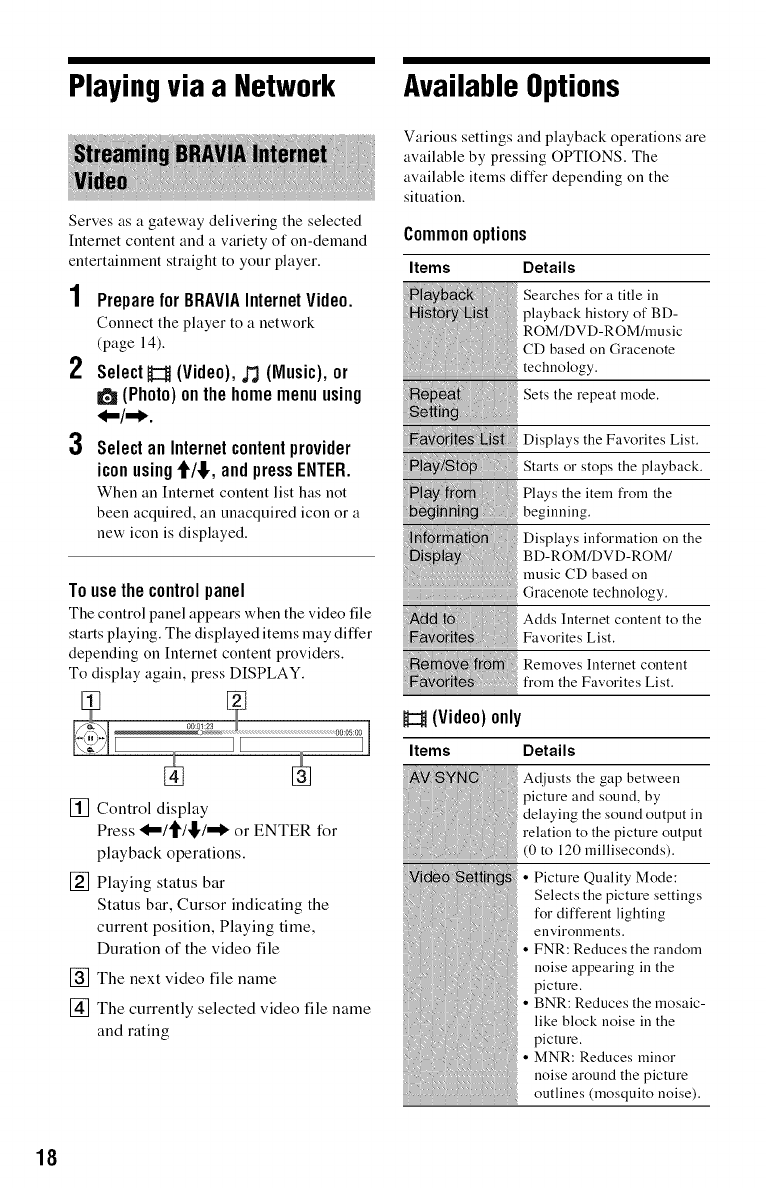
Tousethecontrolpanel
The control panel appears when the video tile
starts playing. The displayed items may differ
depending on Internet content providers.
To display again, press DISPLAY.
[] Control display
Press 'l--/_/l[,/"_ or ENTER for
playback operations.
[] Playing status bar
Status bar, Cursor indicating the
current position, Playing time,
Duration of the video file
[]
[]
The next video file name
The currently selected video file name
and rating
Various settings and playback operations are
awfilable by pressing OPTIONS. The
awfilable items differ depending on the
situation.
Commonoptions
Items Details
Searches for a title iu
playback history of BD-
ROM/DVD-ROM/music
CD based on Graceuote
technology.
Sets the repeat mode.
Displays the Favorites List.
Starts or stops the playback.
Plays the item from the
beginning.
Displays information on the
BD-ROM/DVD-ROM/
music CD based on
Gracenote technology.
Adds Iuternet content to the
Favorites List.
Removes Iuternet content
from the Favorites List.
H(Video)only
Items Details
Adjusts the gap between
picture and sound, by
delaying the sound output in
relation to the picture output
(0 to 120 milliseconds).
• Picture Quality Mode:
Selects the picture settings
for different lighting
euviromneuts.
• FNR: Reduces the random
noise appearing in the
picture.
• BNR: Reduces the mosaic-
like block noise in the
picture.
• MNR: Reduces minor
noise around the picture
outlines (mosquito noise).
18
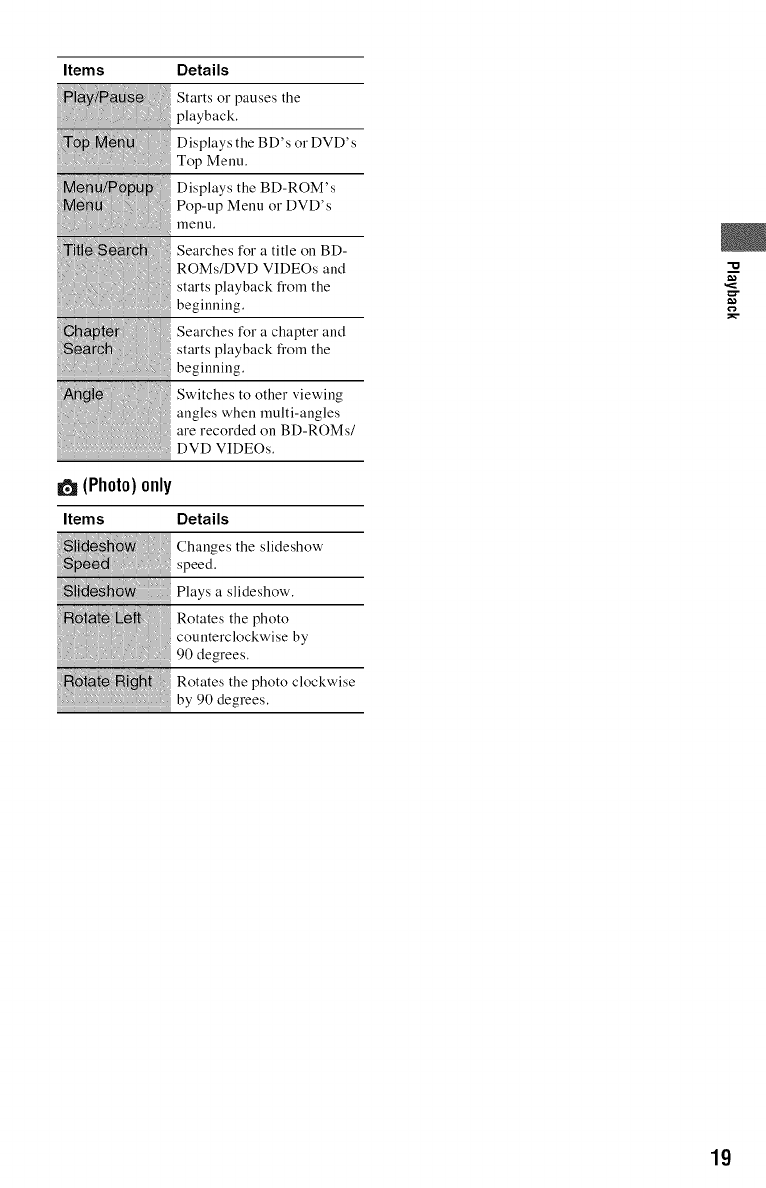
Items Details
(Photo)only
Starts or pauses the
playback.
Displays the BD's or DVD's
Top Menu.
Displays the BD-ROM's
Pop-up Menu or DVD's
l_leuu,
Searches for a title on BD-
ROMs/DVD VIDEOs and
starts playback fi'om the
beginning.
Searches for a chapter and
starts playback fi'om the
beginning.
Switches to other viewing
angles when multi-angles
are recorded on BD-ROMs/
DVD VIDEOs.
m
g
Items Details
Changes the slideshow
speed.
Plays a slideshow.
Rotates the photo
counterclockwise by
90 degrees.
Rotates the photo clockwise
by 90 degrees.
19
2O
Settings and
Adjustments
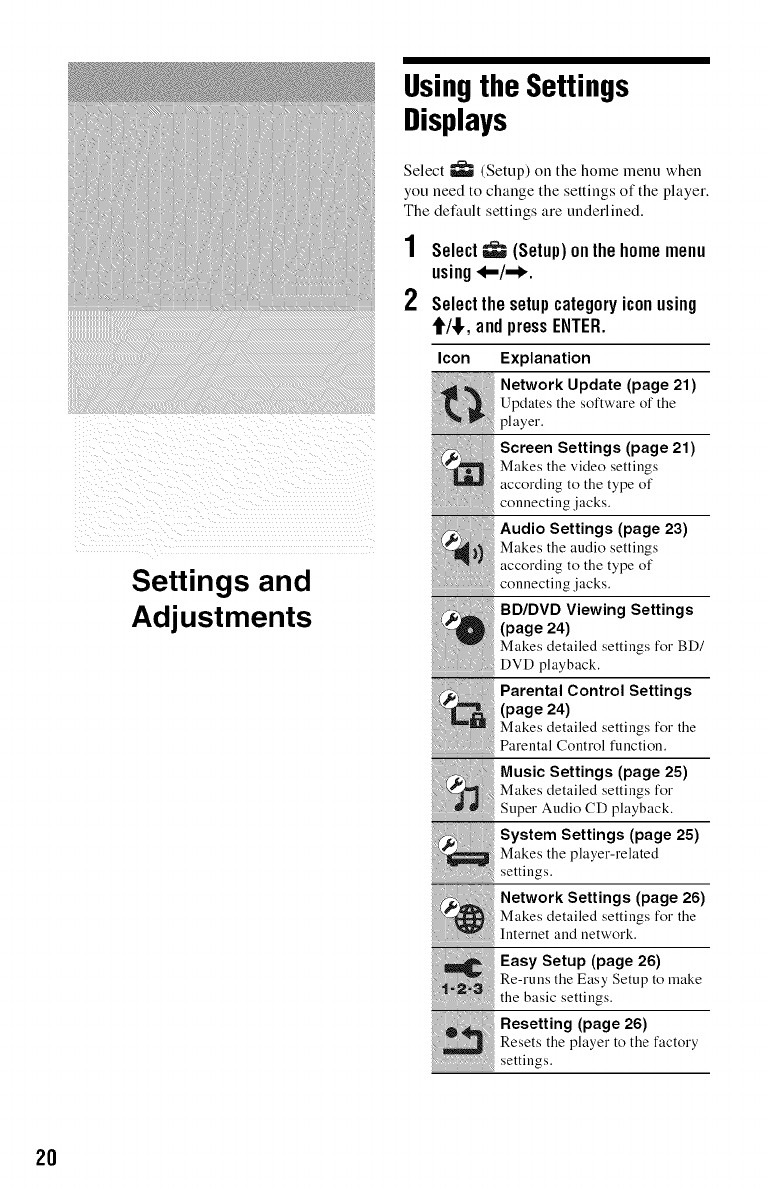
Usingthe Settings
Displays
Select _ (Setup) on the home menu when
you need to change the settings of the player.
The default settings are underlined.
1Select_ (Setup)onthehomemenu
using.I-/,,_.
2Selectthesetupcategoryiconusing
t/!,, andpressENTER.
Icon
_!!!!!,,,!!>!,!!!:_!_:!!!_!
Explanation
Network Update (page 21)
Updates the software of the
player.
Screen Settings (page 21)
Makes the video settings
according to the type of
connecting jacks.
Audio Settings (page 23)
Makes the audi___settings
according to the type of
connecting jacks.
BD/DVD Viewing Settings
(page 24)
Makes detailed settings for BD/
DVD playback.
Parental Control Settings
(page 24)
Makes detailed settings for the
Parental Control function.
Music Settings (page 25)
Makes detailed settings for
Super Audio CD playback.
System Settings (page 25)
_ akes the player-related
settings.
i_ etwork Settings !page 26)
Makes detailed settinzs for the
Internet and network.
i Re-runs the Easy Setup to make
J"2)_ thebascsett lgs
.esett,ng page
Resets the player to the factory
........................................settings.
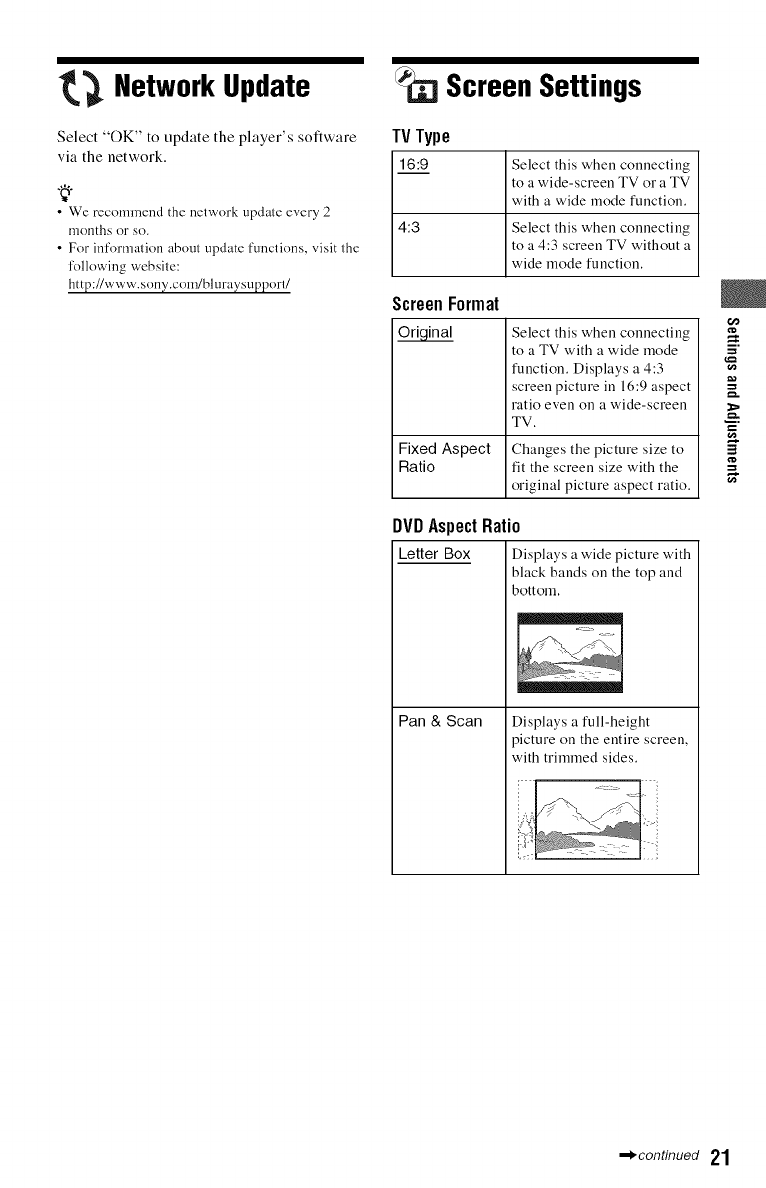
Network Update
Select "OK" to update the player's software
via the network.
•We recommend the network update every 2
months or so.
• For information about update functions, visit the
following website:
http://www.sony.com/bluraysupport/
Screen Settings
TV Type
16:9 Select this when connecting
to a wide-screen TV or a TV
with a wide mode function.
4:3 Select this when connecting
to a 4:3 screen TV without a
wide mode function.
ScreenFormat
Select this when connecting
to a TV with a wide mode
function. Displays a 4:3
screen picture in 16:9 aspect
ratio even on a wide-screen
TV.
Fixed Aspect Changes the picture size to
Ratio fit the screen size with the
original picture aspect ratio.
DVDAspect Ratio
Letter Box Displays a wide picture with
black bands on the top and
bottom.
Pan & Scan Displays a full-height
picture on the entire screen,
with trimmed sides.
E
=
,_conUnued 21
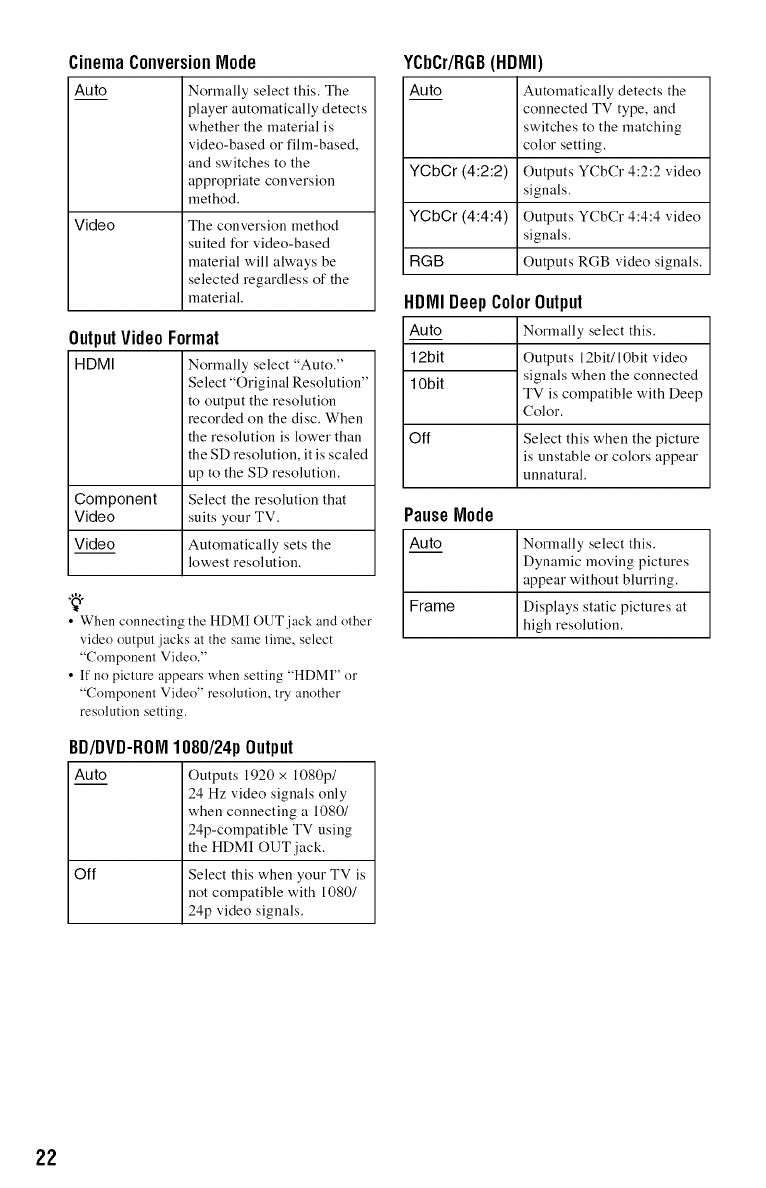
CinemaConversionNode
Auto Normally select this. The
player automatically detects
whether the material is
video-based or film-based,
and switches to the
appropriate conversion
method.
Video The conversion method
suited for video-based
material will always be
selected regardless of the
material.
OutputVideoFormat
HDMI Normally select "Auto."
Select "Original Resolution"
to output the resolution
recorded on the disc. When
the resolution is lower than
the SD resolution, it is scaled
up to the SD resolution.
Component Select the resolution that
Video suits your TV.
Video Automatically sets the
lowest resolution.
•When connecting the HDMI OUT jack and other
video output jacks at the same time, select
"Component Video."
• If no picture appears when setting "HDMI" or
"Component Video" resolution, try another
resolution setting.
BD/DVD-ROI 1080/24p Output
Auto Outputs 1920 x 1080p/
24 Hz video signals only
when connecting a 1080/
24p-compatible TV using
the HDMI OUT jack.
Off Select this when your TV is
not compatible with 1080/
24p video signals.
YCbCr/RGB(HDMI)
Auto Automatically detects the
connected TV type, and
switches to the matching
color setting.
Outputs YCbCr 4:2:2 video
signals.
Outputs YCbCr 4:4:4 video
signals.
Outputs RGB video signals.
YCbCr (4:2:2)
YCbCr (4:4:4)
RGB
HDMIDeepColorOutput
Auto Normally select this.
12bit Outputs 12bit/10bit video
10bit signals when the connected
TV is compatible with Deep
Color.
Off Select this when the picture
is unstable or colors appear
unnatural.
PauseNode
Auto
Frame
Normally select this.
Dynamic moving pictures
appear without blurring.
Displays static pictures at
high resolution.
22
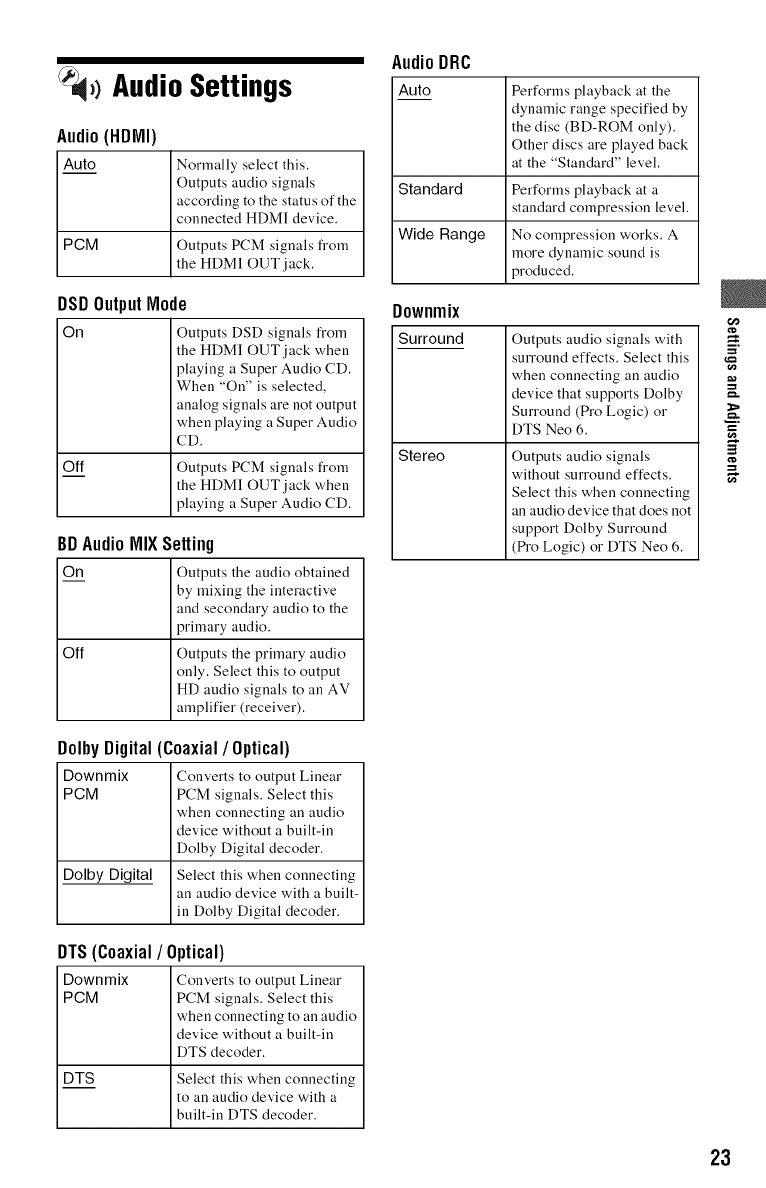
Audio Settings
Audio (HDMI)
Auto Normally select this.
Outputs audio signals
according to the status of the
connected HDMI device.
PCM Outputs PCM signals from
the HDMI OUT jack.
DSDOutputNode
On Outputs DSD signals from
the HDMI OUT jack when
playing a Super Audio CD.
When "On" is selected,
analog signals are not output
when playing a Super Audio
CD.
Off Outputs PCM signals from
the HDMI OUT,jack when
playing a Super Audio CD.
BDAudioNIXSetting
On Outputs the audio obtained
by mixing the interactive
and secondary audio to the
primary audio.
Off Outputs the primary audio
only. Select this to output
HD audio signals to all AV
amplifier (receiver).
AudioDRC
Auto Performs playback at the
dynamic range specified by
the disc (BD-ROM only).
Other discs are played back
at the "Standard" level.
Standard Performs playback at a
standard compression level.
Wide Range No compression works. A
more dynamic sound is
produced.
Downmix
Surround
Stereo
Outputs audio signals with
surround effects. Select this
when connecting an audio
device that supports Dolby
Surround (Pro Logic) or
DTS Neo 6.
Outputs audio signals
without surround effects.
Select this when connecting
an audio device that does not
support Dolby Surround
(_'o Logic) or DTS Neo 6.
=
DolbyDigital(Coaxial/Optical)
Downmix Converts to output Linear
PGM PCM signals. Select this
when connecting an audio
device without a built-in
Dolby Digital decoder.
Dolby Digital Select this when connecting
an audio device with a built-
in Dolby Digital decoder.
DTS(Coaxial/Optical)
Downmix Converts to output Liuear
PGM PCM signals. Select this
when connecting to an audio
device without a built-in
DTS decoder.
DTS Select this when connecting
to an audio device with a
built-in DTS decoder.
23
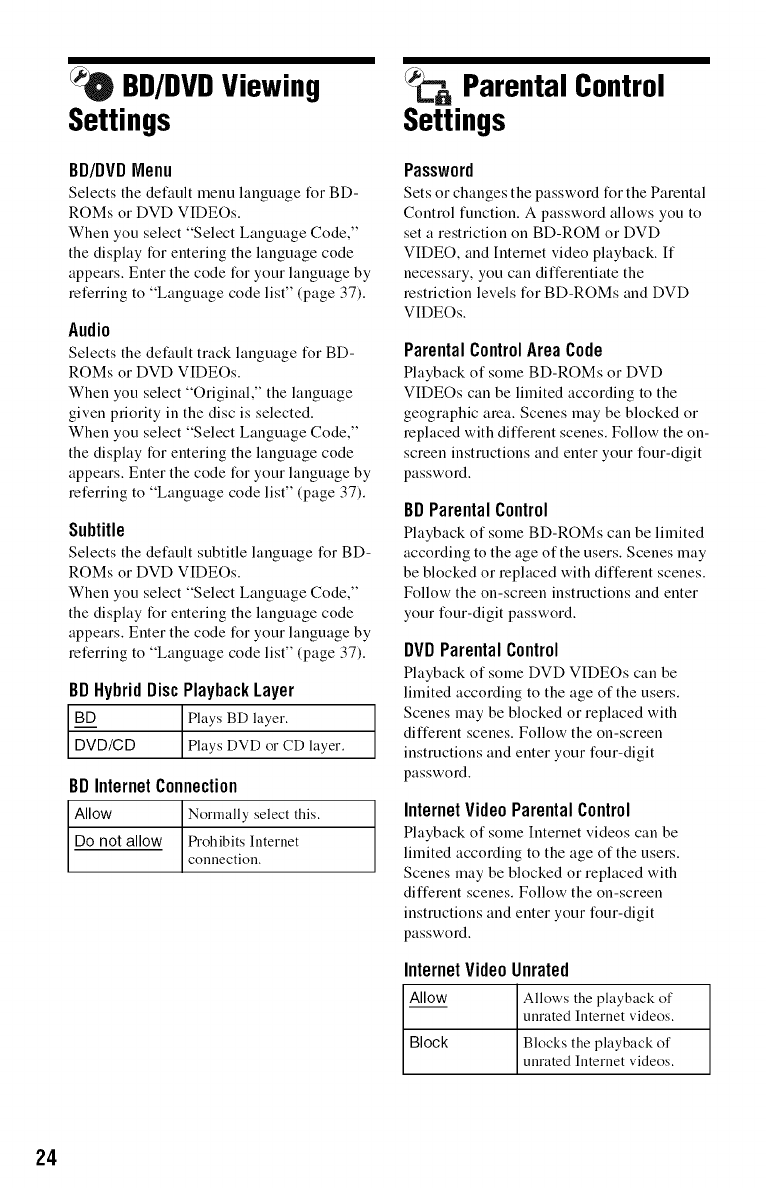
BD/DVDViewing
Settings
BD/DVDMenu
Selects the default menu language forBD-
ROMs or DVD VIDEOs.
When you select "Select Language Code,"
the display for entering the language code
appears. Enter the code for your language by
referring to "Language code list" (page 37).
Audio
Selects the default track language forBD-
ROMs or DVD VIDEOs.
When you select "Original," the language
given priority in the disc is selected.
When you select "Select Language Code,"
the display for entering the language code
appears. Enter the code for your language by
referring to "Language code list" (page 37).
Subtitle
Selects the default subtitle language for BD-
ROMs or DVD VIDEOs.
When you select "Select Language Code,"
the display for entering the language code
appears. Enter the code for your language by
referring to "Language code list" (page 37).
BDHybridDiscPlaybackLayer
B__DD ] Plays BD layer.
D-V'D/C D Plays DVD or CD layer.
BDInternetConnection
Allow Normally select this.
Do not allow _-ohibits Internet
connection.
ParentalControl
Settings
Password
Sets or changes the password for the Parental
Control function. A password allows you to
set a restriction on BD-ROM or DVD
VIDEO, and Intemet video playback. If
necessary, you can differentiate the
restriction levels for BD-ROMs and DVD
VIDEOs.
ParentalControlAreaCode
Playback of some BD-ROMs or DVD
VIDEOs can be limited according to the
geographic area. Scenes may be blocked or
replaced with different scenes. Follow the on-
screen instructions and enter your four-digit
password.
BDParentalControl
Playback of some BD-ROMs can be limited
according to the age of the users. Scenes may
be blocked or replaced with different scenes.
Follow the on-screen instructions and enter
your four-digit password.
DVDParentalControl
Playback of some DVD VIDEOs can be
limited according to the age of the users.
Scenes may be blocked or replaced with
different scenes. Follow the on-screen
instructions and enter your four-digit
password.
InternetVideoParentalControl
Playback of some Internet videos can be
limited according to the age of the users.
Scenes may be blocked or replaced with
different scenes. Follow the on-screen
instructions and enter your four-digit
password.
InternetVideoUnrated
Allow Allows the playback of
unrated Internet videos.
Block Blocks the playback of
unrated Internet videos.
24
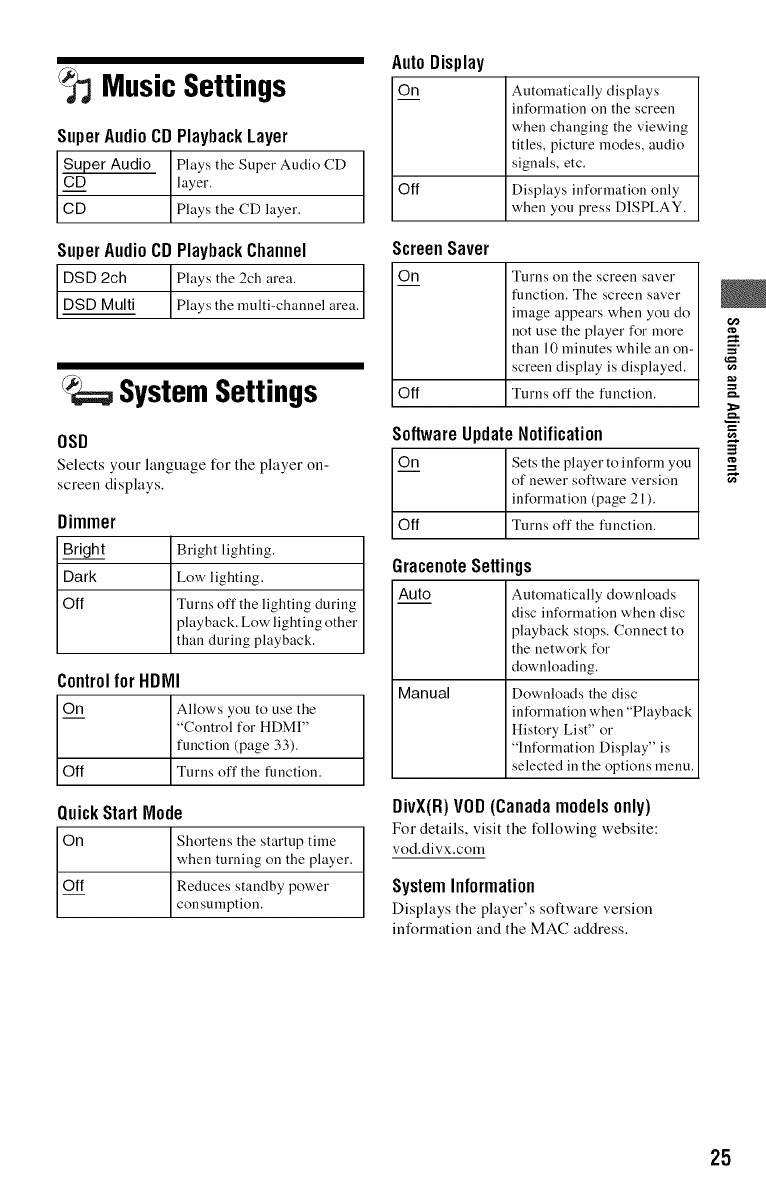
MusicSettings
SuperAudioCDPlaybackLayer
Super Audio
CD
CD
Plays the Super Audio CD
layer.
Plays the CD layer.
SuperAudioCDPlaybackChannel
DSD 2ch ] Plays the 2cb area. ]
DSD Multi Plays the multi-channel area.I
SystemSettings
OSD
Selects your language for the player on-
screen displays.
Dimmer
Bright
Dark
Off
Bright lighting.
Low lighting.
Turns off the lighting during
playback. Low lighting other
than during playback.
ControlforHDIVII
On Allows you to use the
"Control for HDMI"
function (page 33).
Off Turns off the function.
QuickStart Node
On Shortens the startup time
when turning on the player.
Off Reduces standby power
consumption.
Auto Display
On Automatically displays
information on the screen
when changing the viewing
titles, picture modes, audio
signals, etc.
Off Displays information only
when you press DISPLAY.
ScreenSaver
©n
Off
SoftwareUpdateNotification
On Sets the player to inform you
of newer software version
information (page 21).
Off Turns off the function.
Turns on the screen saver
function. The screen saver
image appears when you do
not use the player for more
than 10 minutes while an on-
screen display is displayed.
Turns off the function.
GracenoteSettings
Auto Automatically downloads
disc information when disc
playback stops. Connect to
the network for
downloading.
Manual Downloads the disc
information when "Playback
History List" or
"Information Display" is
selected in the options menu.
DivX(R)VOD(Canadamodelsonly)
For details, visit the following website:
vod.divx.com
SystemInformation
Displays the player's sottware version
information and the MAC address.
25
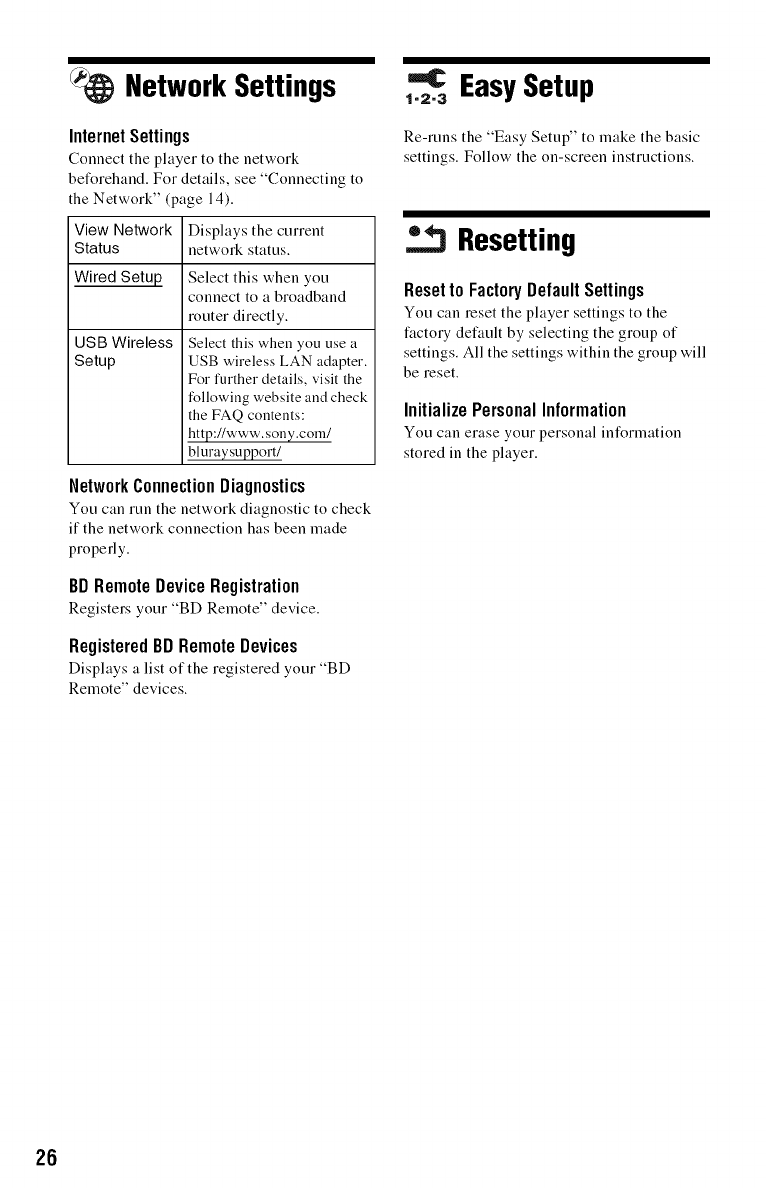
NetworkSettings
InternetSettings
Connect the player to the network
beforehand. For details, see "Connecting to
the Network" (page 14).
View Network Displays the current
Status network status.
Wired Setup
USB Wireless
Setup
Select this when you
connect to a broadband
router directly.
Select this when you use a
USB wireless LAN adapter.
For further details, visit the
following website and check
the FAQ contents:
http://www.sony.corn/
bluraysupport/
NetworkConnectionDiagnostics
Yon can run the network diagnostic to check
if the network connection has been made
properly.
BDRemoteDeviceRegistration
Registers your "BD Remote" device.
RegisteredBD Remote Devices
Displays a list of the registered your "BD
Remote" devices.
=€ EasySetup
1-2-3
Re-runs the "Easy Setup" to make the basic
settings. Follow the on-screen instructions.
Resetting
Resetto FactoryDefaultSettings
Yon can reset the player settings to the
factory default by selecting the group of
settings. All the settings within the group will
be reset.
InitializePersonalInformation
Yon can erase your personal information
stored in the player.
26
Troubleshooting
If you experience any of the following
difficulties while using the player, use this
troubleshooting guide to help remedy the
problem before requesting repairs. Should
any problem persist, consult your nearest
Sony dealer.
!) i )il¸/
Additional
Information
Thereis nopictureor thepictureisnot
outputcorrectly.
Check that all the conuectiug cables are
securely conuected (page 12).
Switch the input selector on your TV to
display the signal fi'om the player.
Reset the video output resolution to the
lowest resolution by pressing • on the
player for more than 10 seconds.
For HDMI connections, try the following:
@Turu the player off and on again. @Turn
the connected equipment off and on again.
@Disconnect and then reconnect the HDMI
cable.
The HDMI OUT jack is connected to a DVI
device that does not support copyright
protection technology.
For HDMI connections, check the "Output
Video Format" settings in the "Screen
Settings" setup (page 22).
When the analog signals are also output, set
"BD/DVD-ROM 1080/24p Output" to
"Oft _' in the "Screen Settings" setup
(page 22).
For B D-ROMs, check the "BD/DVD-ROM
1080/2@ Output" setting in the "Screen
Settings" setup (page 22).
Thedisplaylanguageonthescreen
switchesautomaticallywhenconnectedto
the HDMIOUTjack.
When "Control for HDMI" is set to "On"
(page 25), the display language on the
screen automatically switches according to
the language setting of the connected TV (if
you change the setting on your TV, etc.).
m.
m
m.
,_condnued 27
Thereisnosoundorthesoundis not
outputcorrectly.
Check that all the conuectiug cables are
securely conuected (page 12).
Switch the input selector on your AV
amplifier (receiver) so that the audio signals
of the player are output fi'om your AV
amplifier (receiver).
If the audio signal does not come through
the DIGITAL OUT (OPTICAL/
COAXIAL)/HDMI OUT jack, check the
audio settings (page 23).
For HDM! conuections, try the following:
@Turn the player off and on again. @Turn
the conuected equipment off and on again.
@Disconuect and then reconnect the HDMI
cable.
For HDMI connections, if the player is
connected to a TV through an AV amplifier
(receiver), try connecting the HDMI cable
directly to the TV. Refer also to the
instruction mauual supplied with the AV
amplifier (receiver).
The HDMI OUT jack is connected to a DVI
device (DVI jacks do not accept audio
signals).
The device connected to the HDMI OUT
jack does not support the audio format of
the player. Check the audio settings
(page 23).
TheHDAudio(DolhyDigitalPlus, Dolhy
TrueHD,DTS-HDHighResolutionAudio,
andDTS-HDMasterAudio)is notoutput
byhitstream.
Set "BD Audio MIX Setting" to "Oft _' in
the "Audio Settings" setup (page 23).
Check that the connected AV amplifier
(receiver) is compatible with each HD
Audio format.
Theinteractiveaudioisnotoutput.
Set "BD Audio MIX Setting" to "On" in tile
"Audio Settings" setup (page 23).
Thediscdoesnotplay.
Tile disc is dirty or skewed.
The disc is upside down. Insert the disc with
the playback side facing down.
The disc has a format that cannot be played
back by this player (page 31).
The player cannot play a recorded disc that
is not correctly finalized.
The region code on the BD or DVD does
not match the player.
Theplayerdoesnotdetecta USBdevice
connectedto theplayer.
Make sure that tile USB device is securely
connected to the USB jack.
Check if the USB device or a cable is
damaged.
Check if the USB device is on.
If the USB device is connected via a USB
hub, connect the USB device directly to the
player.
28
Thepicture/soundis poor/certain
programsdisplaya lossof detail,
especiallyduringfast-motionordark
scenes.
"_ Picture/sound quality ruay be poor
depending on Internet conteut providers.
"_ Picture/sound quality may be improved by
changing the conuection speed. We
recommend the conuection speed of at least
2.5 Mbps for standard definition video
(10 Mbps for high definition video).
"_ Not all videos will contain sound.
Thepictureissmall.
_'ess t to zoom in.
Theplayer cannotconnecttothenetwork.
'_ Check the network connection (page 14)
and the network settings (page 26).
Themessage"A newsoftwareversionhas
beenfoundonthenetwork.Perform
updateunder"NetworkUpdate.""appears
onthescreenwhenturningthe playeron.
"_ See "Network Update" (page 21) to update
the player to a newer software version.
The"ControlforHDIVII"functiondoesnot
work(BRAVIASync).
Check that "Control for HDMI" is set to
"On" (page 25).
"_ If you change the HDM! connection, turn
the player off and on again.
"_ If power failure occurs, set "Control for
HDMI" to "Off," then set "Control for
HDMI" to "On" (page 25).
"_ Check the following and refer to the
instruction manual supplied with the
component.
the connected component is compatible
with the "Control for HDMI" function.
the connected component's setting for
the "Control for HDMI" function is
correct.
,,_ When you connect the player to a TV
through an AV amplifier (receiver),
if the AV amplifier (receiver) is not
compatible with the "Control for HDMI"
function, you may be unable to control
the TV from the player.
if you change the HDM! connection,
disconnect and reconnect the AC power
cord, or a power failure occurs, try the
following: @Switch the input selector of
the AV amplifier (receiver) so that the
picture from the player appears on the
TV screen. @Set "Control for HDMI" to
"Off," then set "Control for HDMI" to
"On" (page 25). Refer to the instruction
manual supplied with the AV amplifier
(receiver).
m.
m_.
m
m.
,_condnued 29
Playbackdoesnotstartfromthe
beginningof content.
Press OPTIONS, and select "Play froru
beginning."
Playbackdoesnotstartfromtheresume
pointwhereyoulaststoppedplaying.
The resume point may be cleared from
memory depending on the disc when
you open the disc tray.
you disconnect the USB device.
you play other content.
you turn off the player.
Thedisctraydoesnotopenand
"LOCKED"or"TLK ON"appearsonthe
frontpaneldisplay.
Wheu "LOCKED" appears, the player is
locked. To cancel the Child Lock, hold
down I1_ on the player until "UNLOCK"
appears on the fi'ont panel display (page 8).
When "TLK ON" appears, contact your
Sony dealer or local authorized Sony
service facility.
Thedisctraydoesnotopenandyou
cannotremovethediscevenafteryou
press_.
Try the following: @Turn the player off,
and disconnect the AC power cord.
@Reconnect the AC power cord while
pressing down _ on the player. @Keep
pressing down _ on the player until the tray
opens. @Remove the disc. @When
"WAIT" appears on the front panel display,
hold down 1/(_) on the player for more than
10 seconds until the player turns on again.
"Exxxxx"or "FANERR"appearsonthe
frontpaneldisplay.
When "Exxxxx" appears, contact your
nearest Sony dealer or local authorized
Sony service facility and give the error
code.
When "FAN ERR" appears, try the
following: @Check that the ventilation
holes on the rear of the player are not
blocked. (_Place the player in a location
with adequate ventilation to prevent heat
build-up in the player.
Theplayerdoesnotrespondtoanybutton.
Moisture has condensed inside the player
(page 4).
Hold down |/Q) on the player for more than
10 seconds until the indicators on the front
panel display turn off.
If the player still does not respond to any
button, disconnect then reconnect the AC
power cord.
3O
Specifications
System
Laser: Semiconductor laser
Inputsandoutputs
(Jack name:
Jack type/Output level/Load irupedance)
LINE OUT R-AUDIO-L:
Phono jack/2 Vrms/10 kilohms
DIGITAL OUT (OPTICAL):
Optical output jack/18 dBm
(wave length 660 urn)
DIGITAL OUT (COAXIAL):
Phono jack/0.5 Vp-p/75 ohrus
HDMI OUT:
HDMI 19-piu staudard connector
COMPONENT VIDEO OUT (Y, Ps, PR):
Phono jack/Y: 1.0 Vp-p/
Pn, PR: 0.7 Vp-p/75 ohms
LINE OUT VIDEO:
Phono jack/1.0 Vp-p/75 ohms
LAN (100):
100BASE-TX Terminal
USB:
USB ,jack Type A (For conuectiug a USB
memory, memory card reader, digital still
camera, and digital video camera)
General
Power requirements:
U.S. aud Cauada models:
120 V AC, 60 Hz
Models for other areas:
110-240 V AC, 50/60 Hz
See page 4 for further information.
Power consumption:
22 w
Dimensions (approx.):
430 mmx 219 mmx 36 mm
(17 in. x 8 5/8 in. x I 7/16 in.)
(width/depth/height) incl. projecting parts
Mass (approx.):
2.0 kg (4 lb 6 I/2 oz)
Operating temperature:
5 °C to 35 °C (41 ':>Fto 95 ':>F)
Operating humidity:
25 </_to 80 </_
Suppliedaccessories
See page l l.
Specifications and design are subject to
change without notice.
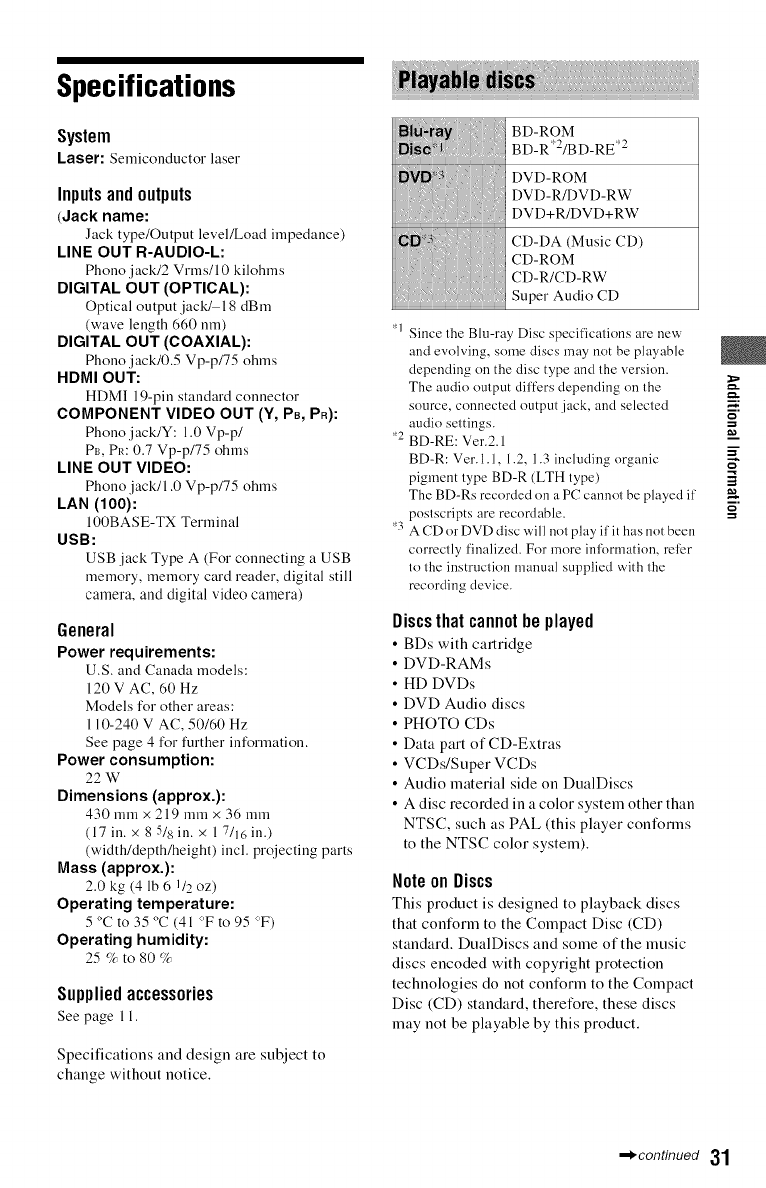
i_ii_i7iiii!ii_ii_ii{_} ii
_N_ iii DVD-ROM
DVD+R/DVD+RW
CD-DA (Music CD)
CD-ROM
CD-R/CD-RW
Super Audio CD
*1 Since the Blu-ray Disc specificalions are new
and evolving, some discs may not be playable
depending on the disc type and lhe version.
The audio oulput differs depending on lhe _.
source, connected output ,jack, and selected o
audio settings. =
*2 BD-RE: Ver.2.1 i
BD-R: Ver. 1.1, 1.2, 1.3 including organic
pigment lype BD-R (LTH type)
The BD-Rs recorded on a PC cannot be played il' i,
poslscripts are recordable.
*3 A CD or DVD disc will nol play il' it has not been
correclly finalized. For more inli_)rmation, rel)r
to lhe instruclion manual supplied v¢ith the
recording device.
Discsthatcannotheplayed
•BDs with cartridge
• DVD-RAMs
• HD DVDs
• DVD Audio discs
• PHOTO CDs
• Data part of CD-Extras
• VCDs/Super VCDs
• Audio material side on DualDiscs
• A disc recorded in a color system other than
NTSC, such its PAL (this player conforms
to the NTSC color system).
NoteonDiscs
This product is designed to playback discs
that conform to the Compact Disc (CD)
standard. DualDiscs and some of the music
discs encoded with copyright protection
technologies do not cont_rm to the Compact
Disc (CD) standard, therefore, these discs
may not be playable by this product.
,_condnued 31
Noteon playbackoperationsof BDs/DVDs
Some playback operations of BDs/DVDs
may be intentionally set by software
producers. Since this player plays BDs/
DVDs according to the disc contents the
software producers designed, some playback
features may not be awtilable.
Noteaboutdouble-layerBDs/DVDs
The playback pictures and sound may be
momentarily interrupted when the layers
switch.
Regioncode(BD-ROM/DVDVIDEOonly)
Your player has a region code printed on the
rear of the unit and will only play BD-ROMs/
DVD-ROMs labeled with identical region
codes or @.
Region code
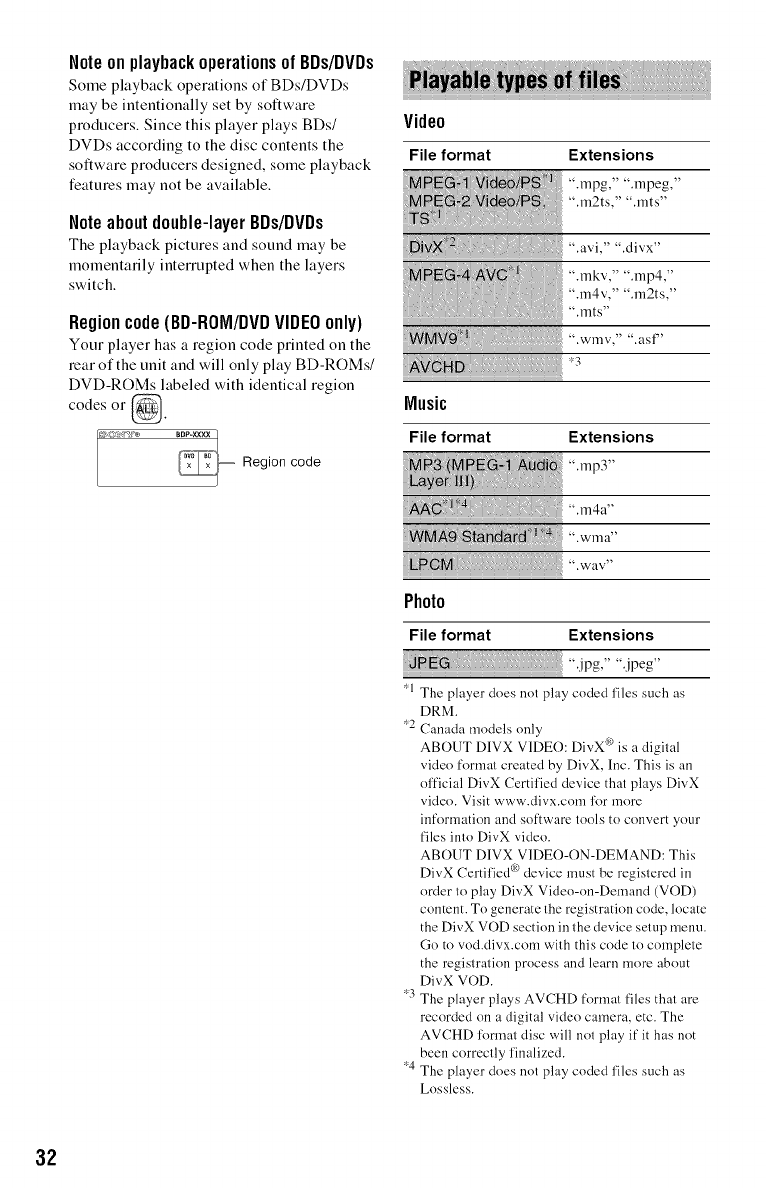
Video
File format Extensions
".mpg," ".mpeg,''
".lIiRts," ".lilts"
Music
File format Extensions
",rap3"
i i: i i ;i i
_! ",m4a"
?:
WMA9 SINNdi8 d t ".w ,n a"
Photo
File format Extensions
_1 The player does not play coded files such as
DRM.
-_2 Canada models only
ABOUT DIVX VIDEO: DivX ¢0is a digital
video format created by DivX, Inc. This is an
ol'ficial DivX Certil'ied device that plays DivX
video. Visit www.divx.com for more
inforl]qation and software tools to convert your
files into DivX video.
ABOUT DIVX VIDEO-ON-DEMAND: This
DivX Certil'ied ® device must be registered in
order Io play DivX Video-on-Demand (VOD)
content. To generate the registration code, locate
the DivX VOD section in the device setup nlenu.
Go to vod.divx.com with this code to comfqele
the registration process and learn more about
DivX VOD.
-_3The player plays AVCHD format files that are
recorded on a digital video camera, etc. The
AVCHD l'ormal disc will not play if it has not
been correclly l'inalized.
-_4The player does not play coded files such as
Lossless.
32
• Some files may not play depending on the format,
the encoding, or recording condition.
• Some files edited on a PC may not play.
• The player can recognize the following files or
folders in BDs, DVDs, CDs and USB devices:
up to folders in the 5th tree
up to 500 files in a single tree
• Some USB devices may not work with this
player.
• The player can recognize Mass Storage Class
(MSC) devices (such as flash memory or an
HDD) that are FAT-compatible and non-
partitioned, Still hnage Capture Device (SICD)
class devices and 101 keyboard (front USB .jack
only).
• To avoid data corruption or damage to the USB
memory or devices, turn the player off when
connecting or removing the USB memory or
devices.
• The player may not play high bit rate video files
on DATA CDs smoothly. You are recommended
to play such files using DATA DVDs.
By connecting Sony components that are
compatible with the "Control for HDMI"
function with an HDMI cable (not supplied),
operation is simplified as below:
• One-Touch Play
With one touch of the following buttons, the
connected TV turns on and the input
selector on the TV is switched to the player
automatically.
-li_
- HOME: The home lilenu appears
automatically (page 10, 16, 20).
- _ PLAY: Playback starts automatically.
•System Power-Off
When you turn off the TV using -TV- I/(._)
orthe power button on the TV's remote, the
player and HDMI-compatible components
turn off automatically.
• Theater
When you press THEATER, the player
automatically switches to the optimum
video mode for watching movies. When
connected with a Sony AV amplifier
(receiver) using the HDMI cable, the
speaker output also switches automatically.
When connected with a Theater Mode-
compatible TV using the HDMI cable, the
TV's video mode switches to Theater
Mode. Press the button again to return to the
original setting.
•Language Follow
When you change the language lBr the on-
screen display on your TV, the player's
language l_r the on-screen display is also
changed after turning the player off and on.
Toprepareforthe BRAVIASyncfeatures
Set "Control for HDMI" to "On" in the
"System Settings" setup (page 25).
For details on settings of your TV or other
connected components, refer to the
instruction manual supplied with the TV or
components.
m.
m
m.
,_,continued 33
• When connecting the Sony TV that is compatible
with the "Control for HDMI" Easy Setting
function using the HDMI cable, the "Control for
HDMI" setting of the player automatically
switches to "On" if the "Control for HDMI"
setting on the connected TV is set to "On." Refer
to the instruction manual supplied with the TV.
• When connecting the Sony TV that is compatible
with the BRAVIA Sync features using the HDMI
cable, you can control the basic functions of the
player with the TV's remote if the "Control for
HDMI" setting on the connected TV is set to
"On." Refer to the instruction manual supplied
with the TV.
Depending on the connected component, the
"Control for HDMI" function may not work. Refer
to the instruction manual supplied with the
COlilponent.
Since communication via the wireless LAN
function is established by radio waves, the
wireless signal may be susceptible to
interception. To protect wireless
communication, this player supports various
security functions. Be sure to correctly
configure the security settings in accordance
with your network environment.
4,No Security
Although you can easily make settings,
anyone can intercept wireless
communication or intrude into your wireless
network, even without any sophisticated
tools. Keep in mind that there is it risk of
unauthorized access or interception of data.
_WEP
WEP applies security to communications to
prevent outsiders fiom intercepting
communications or intruding into your
wireless network. WEP is a legacy security
technology that enables older devices, which
do not support TKIP/AES, to be connected.
•WPA-PSK (TKIP), WPA2-PSK (TKIP)
TKIP is a security technology developed to
correct for the deficiencies of WEP. TKIP
assures a higher security level than WEP.
4,WPA-PSK (AES), WPA2-PSK (AES)
AES is a security technology that uses an
advanced security method that is distinct
from WEP and TKIP.
AES assures a higher security level than
WEP or TKIP.
34
• This product incorporates copyright protection
technology that is protected by U.S. patents and
other intellectual property rights.
Use of this copyright protection technology must
be authorized by Macrovision, and is intended for
home and other limited viewing uses only unless
otherwise authorized by Macrovision.
Reverse engineering or disassembly is pa)hibited.
• "AVCHD" and the "AVCHD" log() are
trademarks of Panasonic Corporation and Sony
Corporation.
• Java and all Java-based trademarks and logos are
trademarks or registered trademarks of Sun
Microsystems, Inc.
• "i°°, "XMB," and "xross media bar" are
trademarks of Sony Corporation and Sony
Computer Entertainment Inc.
• This product incorporates High-Definition
Multimedia Interface (HDMI IM) technology.
HDMI, the HDMI log() and High-Definition
Multimedia Interface are trademarks or registered
trademarks of HDMI Licensing LLC.
• "Blu-ray Disc" is a trademark.
• "Blu-ray Disc," "DVD+RW," "DVD-RW,"
"DVD+R," "DVD-R," "DVD VIDEO," and
"CD" logos are trademarks.
• "BD-LIVE," "BD-LIVE" logo, and
"BONUSVIEW" are trademarks of Blu-ray Disc
Association.
• "x.v.Color" and "x.v.Color" logo are trademarks
of Sony Corporation.
• "BRAVIA" is a trademark of Sony Corporation.
• "PhotoTV HD" and the "PhotoTV HD" logo are
trademarks of Sony Corporation.
• MPEG Layer-3 audio coding technology and
patents licensed from Fraunhofcr lIS and
Thomson.
• DivX ®, DivX Certif'ied °_and associated logos are
registered trademarks of DivX, Inc. and are used
under license (Canada models only).
• This product meets ENERGY STAR °_guidelines
for energy efficiency.
ENERGY STAR and the ENERGY STAR mark
are registered U.S. marks. ENERGY STAR is a
registered mark owned by the U.S. goverumeut.
• Music and vide() recognition technology and
related data are provided by Gracenote ®.
Gracenote is the industry standard in music
recognition technology and related content
delivery. For more information, please visit
www.gracenote.colln.
CD, DVD, Blu-ray Disc, and music and video-
related data from Gracenote, Inc., copyright ©
2000-present Gracenote. Gracenote Software,
copyright © 2000-present Gracenote. One or
more patents owned by Gracenote apply to this
product and service. See the Gracenote website
lk}r a nonexhaustive list of applicable Gracenote
patents. Graceuote, CDDB, MusiclD,
MediaVOCS, the Gracenote logo and logotype,
and the "Powered by Gracenote" logo are either
registered trademarks or trademarks of Gracenote
in the United States and/or other countries.
gracenote.
• Other system and producl names are generally
trademarks or registered Irademarks of"the
manufacturers. IM and ® marks are not indicated
in this document.
,_condnued 35
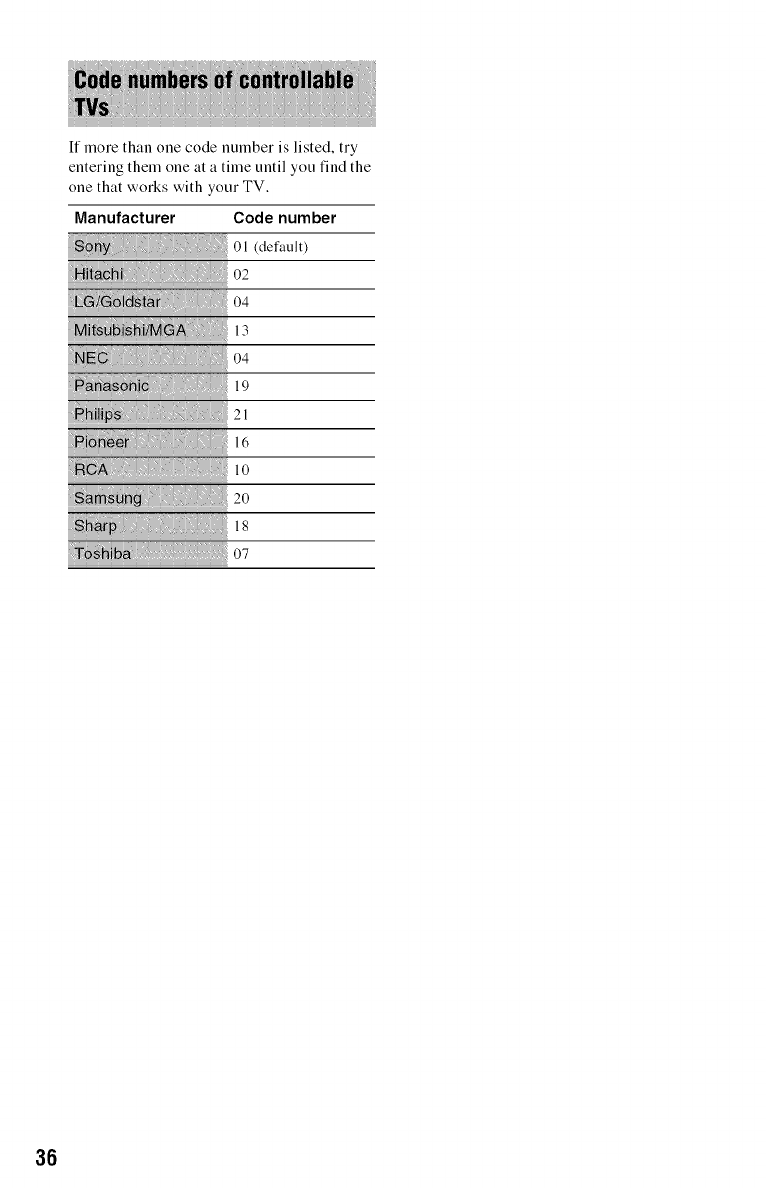
If more than one code number is listed, try
entering them one at a time until you find the
one that works with your TV.
Manufacturer Code number
o,_defao,t
13
i!!! _!_!!!!!!!!!!!!!!!!!!!!!!!!!!19
NN _ !: :l0
18
36
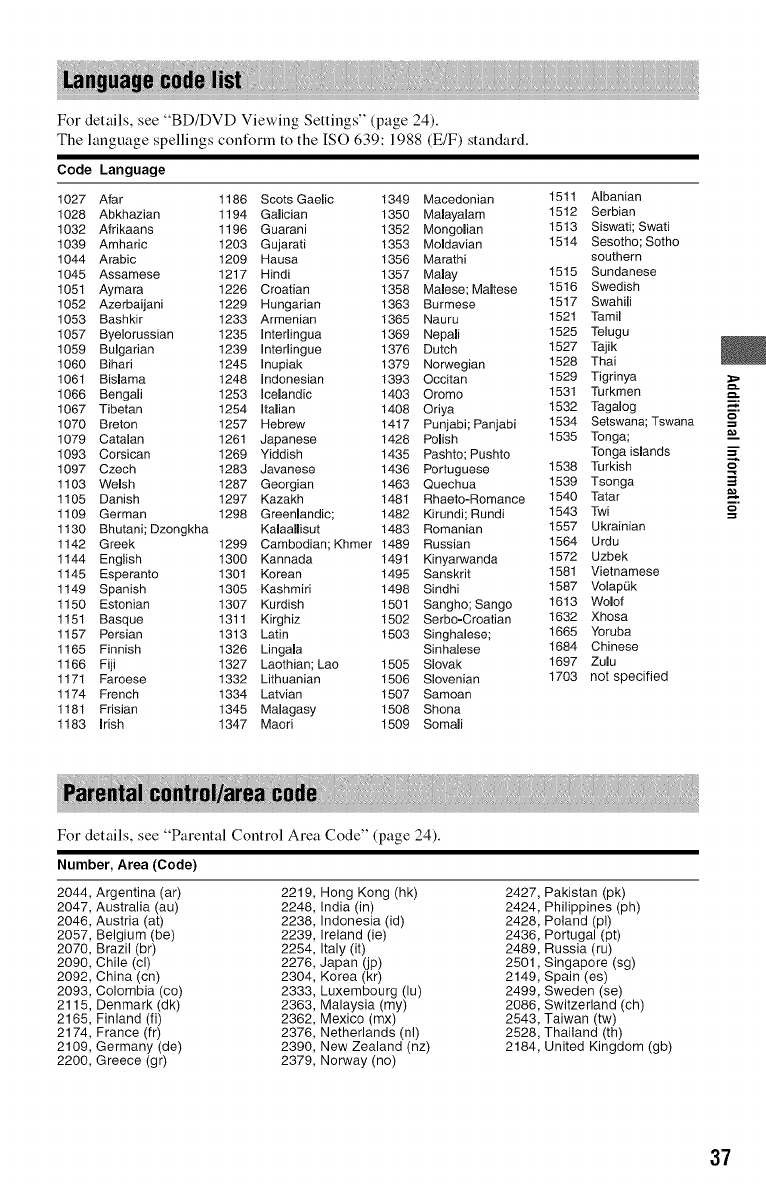
For details, see "BD/DVD Viewing Settings" (page 24).
The language spellings conform to the ISO 639:1988 (E/F) standard.
Code Language
1027 Afar 1186 Scots Gaelic 1349 Macedonian 1511 Albanian
1028 Abkhazian 1194 Galician 1350 Malayalam 1512 Serbian
1032 Afrikaans 1196 Guarani 1352 Mongolian 1513 Siswati; Swati
1039 Amharic 1203 Gujarati 1353 Moldavian 1514 Sesotho; Sotho
1044 Arabic 1209 Hausa 1356 Marathi southern
1045 Assamese 1217 Hindi 1357 Malay 1515 Sundanese
1051 Aymara 1226 Croatian 1358 Malese; Maltese 1516 Swedish
1052 Azerbaijani 1229 Hungarian 1363 Burmese 1517 Swahili
1053 Bashkir 1233 Armenian 1365 Nauru 1521 Tamil
1057 Byelorussian 1235 Interlingua 1369 Nepali 1525 Telugu
1059 Bulgarian 1239 Interlingue 1376 Dutch 1527 Tajik
1060 Bihari 1245 Inupiak 1379 Norwegian 1528 Thai
1061 Bislama 1248 Indonesian 1393 Occitan 1529 Tigrinya
1066 Bengali 1253 Icelandic 1403 Oromo 1531 Turkmen
1067 Tibetan 1254 Italian 1408 Oriya 1532 Tagalog
1070 Breton 1257 Hebrew 1417 Punjabi; Panjabi 1534 Setswana;Tswana
1079 Catalan 1261 Japanese 1428 Polish 1535 Tonga;
1093 Corsican 1269 Yiddish 1435 Pashto; Pushto Tonga islands
1097 Czech 1283 Javanese 1436 Portuguese 1538 Turkish
1103 Welsh 1287 Georgian 1463 Quechua 1539 Tsonga
1105 Danish 1297 Kazakh 1481 Rhaeto-Romance 1540 Tatar
1109 German 1298 Greenlandic; 1482 Kirundi; Rundi 1543 Twi
1130 Bhutani; Dzongkha Kalaallisut 1483 Romanian 1557 Ukrainian
1142 Greek 1299 Cambodian; Khmer 1489 Russian 1564 Urdu
1144 English 1300 Kannada 1491 Kinyarwanda 1572 Uzbek
1145 Esperanto 1301 Korean 1495 Sanskrit 1581 Vietnamese
1149 Spanish 1305 Kashmiri 1498 Sindhi 1587 VolapLik
1150 Estonian 1307 Kurdish 1501 Sangho; Sango 1613 Wolof
1151 Basque 1311 Kirghiz 1502 Serbo-Croatian 1632 Xhosa
1157 Persian 1313 Latin 1503 Singhalese; 1665 Yoruba
1165 Finnish 1326 Lingala Sinhalese 1684 Chinese
1166 Fiji 1327 Laothian; Lao 1505 Slovak 1697 Zulu
1171 Faroese 1332 Lithuanian 1506 Slovenian 1703 not specified
1174 French 1334 Latvian 1507 Samoan
1181 Frisian 1345 Malagasy 1508 Shona
1183 Irish 1347 Maori 1509 Somali
m,
=o
m
m,
=o
For details, see "Parental Control Area Code" (page 24).
Number, Area (Code)
2044
2047
2046
2057
2070
2090
2092
2093
2115
2165
2174
2109
2200
Argentina (ar) 2219
Australia (au) 2248
Austria (at) 2238
Belgium (be) 2239
Brazil (br) 2254
Chile (cl) 2276
China (cn) 2304
Colombia (co) 2333
Denmark (dk) 2363
Finland (fi) 2362
France (fr) 2376
Germany (de) 2390
Greece (gr) 2379
Hong Kong (hk) 2427, Pakistan (pk)
India (in) 2424, Philippines (ph)
Indonesia (id) 2428, Poland (pl)
Ireland (ie) 2436, Portugal (pt)
Italy (it) 2489, Russia (ru)
Japan (jp) 2501, Singapore (sg)
Korea (kr) 2149, Spain (es)
Luxembourg (lu) 2499, Sweden (se)
Malaysia (my) 2086, Switzerland (ch)
Mexico (mx) 2543, Taiwan (tw)
Netherlands (hi) 2528, Thailand (th)
New Zealand (nz) 2184, United Kingdom (gb)
Norway (no)
37
38
Index
Words in quotations appear
in the on-screen displays.
A
AUDIO 9
"Audio Settings" 23
B
Batteries 11
"BD/DVD Viewing
Settings" 24
BD-LIVE 16
BD-R 31
BD-RE 31
Bitstream 28
Blu-ray Disc 31
BONUSVIEW 16
BRAVIA Internet Video
18
BRAVIA Sync 29, 33
C
CD 31
Child Lock 8, 30
Color buttons 9
Connecting
AV amplifier
(Receiver) 13
Network 14
TV 12
"Control for HDMI" 25,
29, 33
D
Deep Color 22
"Dimmer" 25
DISPLAY 10
Dolby Digital 23
"DSD Output Mode" 23
DTS 23
DVD 31
E
"Easy Setup" 14, 26
F
FAVORITES 9
G
"Gracenote Settings" 25
H
HDMI 22, 23
HOME 10, 20
Home menu 20
I
Internet content 9, 18
L
Language Follow 33
M
MAC address 25
"Music Settings" 25
N
"Network Settings" 26
"Network Update" 21
O
One-Touch Play 33
OPTIONS 9
"OSD" 25
P
Parental Control 24
"Parental Control Settings"
24
Play information 17
Playable discs 31
POP UP/MENU 9
Q
"Quick Start Mode" 25
F1
Region code 32
Remote 9, 11
"Resetting" 26
Resetting the player 26
Resume 10, 30
S
"Screen Settings" 21
"Setup" 20
Software update 21, 25
SUBTITLE 9
System Power-Off 33
"System Settings" 25
T
THEATER 9, 33
TOP MENU 9
Troubleshooting 27
"TV Type" 21
U
Update 21
USB 17
W
WEP 34
WPA2-PSK (AES) 34
WPA2-PSK (TKIP) 34
WPA-PSK (AES) 34
WPA-PSK (TKIP) 34

39
