Sony BDV E2100 User Manual DVD HOME THEATER SYSTEM Manuals And Guides 1412090L
User Manual: Sony BDV-E2100 BDV-E2100 SONY DVD HOME THEATER SYSTEM - Manuals and Guides View the owners manual for your SONY DVD HOME THEATER SYSTEM #BDVE2100. Home:Electronics Parts:Sony Parts:Sony DVD HOME THEATER SYSTEM Manual
Open the PDF directly: View PDF ![]() .
.
Page Count: 70
Blu-ray DiscTM/
DVD Home Theatre
System
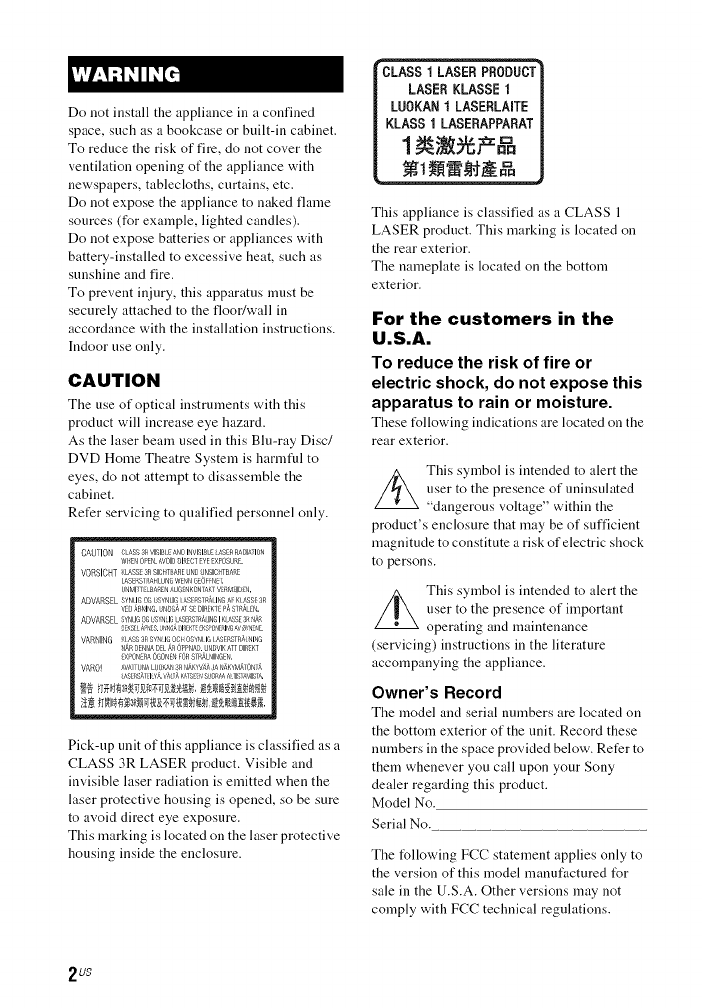
Do not install the appliance in a confined
space, such as a bookcase or built-in cabinet.
To reduce the risk of fire, do not cover the
ventilation opening of the appliance with
newspapers, tablecloths, curtains, etc.
Do not expose the appliance to naked flame
sources (for example, lighted candles).
Do not expose batteries or appliances with
battery-installed to excessive heat, such as
sunshine and fire.
To prevent in iury, this apparatus must be
securely attached to the floor/wall in
accordance with the installation instructions.
Indoor use only.
CAUTION
The use of optical instruments with this
product will increase eye hazard.
As the laser beam used in this Blu-ray Disc/
DVD Home Theatre System is harmtul to
eyes, do not attempt to disassemble the
cabinet.
Refer servicing to qualified personnel only.
CAUtiON {; ASS3RVISI8I ANDI,IVISlJ£1{ ASEI_RAI}IAflON
WIDI OPEN. AVOIDDI£_CT _YE [XPOSU£ ,
VO%IC T KASS[ 3RSICHTBARE 8ND UNSIOHTBAR£
LASEF'SP#,HLUNG _ ENI,IG O_R [
UNMIT_ LBA_£NAdO 4KONIAKT VE,_dEIDN.
ADVARSEL SYNLIGOg USYNLIG AS RSTRA IN8 A KLASSE3R
v88@_ING.u_#br_J,_ISEDIaKTEPASTRA N.
ADVARSEL SYNLIGOG _;SYNIG AS RSTRAIN61KASSE 3R ',#AR
OEKS[!A_ES.Jt_rGAOISEKTKSPONIRIrGA_'_YNill.
VARNING _ ASS3RSYT IGOCH OSYq IG ASERSTF_AINING
NAR DE_NA DEL AR 6PP JAD.U_DVIKATT DIREKT
£XPO ERA OGONE_,IFOfqSTRALNIIGEr.
VARO! AVArb_ALUOKAN3R_A_YV#&JAbg_KYNI,_TONL_,
AS R8),EIY_._AL,_ KATS_ SUOR_AA rlS_A_IST£
Pick-up unit of this appliance is classified as a
CLASS 3R LASER product. Visible and
invisible laser radiation is emitted when the
laser protective housing is opened, so be sure
to avoid direct eye exposure.
This marking is located on the laser protective
housing inside the enclosure.
ILASER
SE8 KLASSE I
LUOKAN ILASERLAITE
KLASS ILASERAPPARAT
1
This appliance is classified as a CLASS 1
LASER product. This marking is located on
the rear exterior.
The nameplate is located on the bottom
exterior.
For the customers in the
U.S.A.
To reduce the risk of fire or
electric shock, do not expose this
apparatus to rain or moisture.
These t_llowing indications are located on the
rear exterior.
This symbol is intended to alert the
user to the presence of uninsulated
"dangerous voltage" within the
product's enclosure that may be of sufficient
magnitude to constitute a risk of electric shock
to persons.
//_ This symbol is intended to alert the
user to the presence of importaut
operating and maintenance
(servicing) instructions in the literature
accompanying the appliance.
Owner's Record
The model and serial numbers are located on
the bottom exterior of the unit. Record these
numbers in the space provided below. Refer to
them whenever you call upon your Sony
dealer regarding this product.
Model No.
Serial No.
The following FCC statement applies only to
the version of this model manufactured t_r
sale in the U.S.A. Other versions may not
comply with FCC technical regulations.
2u$
NOTE:
This equipment has been tested and found to
comply with the limits for a Class B digital
device, pursuant to Part 15 of the FCC Rules.
These limits are designed to provide
reasonable protection against harmfld
interference in a residential installation. This
equipment generates, uses, and can radiate
radio frequency energy and, if not installed
and used in accordance with the instructions,
may cause harmful interference to radio
communications. However, there is no
guarantee that interference will not occur in a
particular installation. If this equipment does
cause harmfld interference to radio or
television reception, which can be determined
by turning the equipment off and on, the user
is encouraged to try to correct the interference
by one or more of the following measures:
Reorient or relocate the receiving antenna
(aerial).
Increase the separation between the
equipment and receiver.
Connect the equipment into an outlet on a
circuit different from that to which the
receiver is connected.
Consult the dealer or an experienced radio/
TV technician t_r help.
CAUTION
You are cautioned that any changes or
modifications not expressly approved in this
manual could void your authority to operate
this equipment.
Properly shiekted and grounded cables and
connectors must be used for connection to
host computers and/or peripherals in order to
meet FCC emission limits.
Blu-ray Disc/DVD receiver
(HBD-E6100/H BD-E4100/
HBD-E3100/HBD-E2100)
This equipment must not be co-located or
operated in conjunction with any other
antenna or transmitter.
This equipment complies with FCC radiation
exposure limits set forth for an uncontrolled
environment and meets the FCC radio
t_equency (RF) Exposure Guidelines in
Supplement C to OET65.
This equipment should be installed and
operated keeping the radiator at least 20cm or
more away from person's body (excluding
extremities: hands, wrists, feet and ankles).
Important Safety
Instructions
1) Read these instructions.
2) Keep these instructions.
3) Heed all warnings.
4) Follow all instructions.
5) Do not use this apparatus near water.
6) Clean only with dry cloth.
7) Do not block any ventilation openings.
Install in accordance with the
manufacturer's instructions.
8) Do not install near any heat sources such
as radiators, heat registers, stoves, or other
apparatus (including amplifiers) that
produce heat.
9) Do not defeat the safety purpose of the
polarized or grounding-type plug. A
polarized plug has two blades with one
wider than the other. A grounding type
ping has two blades and a third grounding
prong. The wide blade or the third prong
are provided for your safety. If the
provided plug does not fit into your outlet,
consult an electrician t_r replacement of
the obsolete outlet.
10) Protect the power cord from being walked
on or pinched particularly at plugs,
convenience receptacles, and the point
where they exit from the apparatus.
11 ) Only use attachments/accessories
specified by the manufacturer.
3US
12) Use only with the cart, stand, tripod,
bracket, or table specified by the
manufacturer, or sold with the apparatus.
When a cart is used, use caution when
moving the cart/apparatus combination to
avoid injury from tip-over.
13) Unplug this apparatus during lightning
storms or when unused for long periods of
time.
14) Refer all servicing to qualified service
personnel. Servicing is required when the
apparatus has been damaged in any way,
such as power-supply cord or plug is
damaged, liquid has been spilled or
objects have fallen into the apparatus, the
apparatus has been exposed to rain or
moisture, does not operate normally, or
has been dropped.
For the customers in
Canada
To reduce the risk of fire or electric shock, do
not expose this appliance to dripping or
splashing, and do not place objects filled with
liqnids, such as vases, on the appliance.
The serial number is located on the bottom
exterior.
Properly shielded and grounded cables and
connectors must be used for connection to
host computers and/or peripherals.
Blu-ray Disc/DVD receiver
(HBD-E6100/HB D-E4100/
HBD-E3100/HBD-E2100)
This device complies with Industry Canada
licence-exempt RSS standard(s). Operation is
subject to the following two conditions:
(1) this device may not cause interference, and
(2) this device must accept any interference,
including interference that may cause
undesired operation of this device.
This equipment complies with IC radiation
exposure limits set forth t_r an uncontrolled
environment and meets RSS-102 of the IC
radio frequency (RF) Exposure rules.
This equipment shoukt be installed and
operated keeping the radiator at least 20cm or
more away from person's body (excluding
extremities: hands, wrists, feet and ankles).
Precautions
On power sources
•The unit is not disconnected from the mains
as long as it is connected to the AC outlet,
even if the unit itself has been turned off.
• As the main plug is used to disconnect the
unit from the mains, connect the unit to an
easily accessible AC outlet. Shoukt you
notice an abnormality in the unit, disconnect
the main plug from the AC outlet
immediately.
On watching 3D video
images
Some people may experience discomt_rt
(such as eye strain, fatigue, or nausea) while
watching 3D video images. Sony recommends
that all viewers take regular breaks while
watching 3D video images. The length and
frequency of necessary breaks will vary from
person to person. You nmst decide what works
best. If you experience any discomt_rt, you
shoukt stop watching the 3D video images
until the discomfort ends; consult a doctor if
you believe necessary. You shoukt also
review (i) the instruction manual and/or the
caution message of any other device used
with, or Blu-ray Disc contents played with this
product and (ii) our website
(http://esnpport.sony.com/) t_r the latest
information. The vision of young children
(especially those under six years old) is still
under development. Consult your doctor (such
as a pediatrician or eye doctor) before
allowing young children to watch 3D video
images.
Adults should snper_.ise young children to
ensure they follow the recommendations
listed above.
4u$
Copy Protection
•Please be a&ised of tile ad_.anced content
protection systems used in both Blu-ray Disc
and DVD media. These systems, called
AACS (Advanced Access Content System)
and CSS (Content Scramble System), may
contain some restrictions on playback,
analog output, and other similar features.
The operation of this product and the
restrictions placed may vary depending on
the date of purchase, as the governing board
of the AACS may adopt or change its
restriction rules alter the time of purchase.
• Cinavia Notice
This product uses Cinavia technology to
limit the use of unauthorized copies of some
commercially-produced film and videos and
their sonndtracks. When a prohibited use of
an unauthorized copy is detected, a message
will he displayed and playback or copying
will be interrupted.
More information about Cinavia technology
is provided at the Cinavia Online Consumer
Information Center at
http://www.cinavia.com. To request
additional information about Cinavia by
mail, send a postcard with your mailing
address to: Cinavia Consumer Int_rmation
Center, P.O. Box 86851, San Diego, CA,
92138, USA.
Copyrights and Trademarks
• This system incorporates with Dolby*
Digital and Dolby Pro Logic adaptive matrix
surround decoder and the DTS *': Digital
Surround System.
* Manufactured under license from
Dolby Laboratories. Dolby, Pro Logic,
and the donble-D symbol are
trademarks of Dolby Laboratories.
*":Manufactured under license under
U.S. Patent Nos: 5,956,674;
5,974,380; 6,226,616; 6,487,535;
7,212,872; 7,333,929; 7,392,195;
7,272,567 & other U.S. and worktwide
patents issued & pending. DTS-HD,
the Symbol, & DTS-HD and the
Symbol together are registered
trademarks of DTS, Inc. Product
includes software. Q DTS, Inc. All
Rights Reserved.
• This system incorporates High-Definition
Multimedia Interface (HDMI TM)
technology.
The terms HDMI and HDMI High-
Defnition Multimedia Interface, and the
HDMI Logo are trademarks or registered
trademarks of HDMI Licensing LLC in the
United States and other countries.
• Java is a trademark of Oracle and/or its
affiliates.
• "DVD logo" is a trademark of DVD Format/
Logo Licensing Corporation.
• "Blu-ray Disc", "Blu-ray", "Blu-ray 3D",
"BD-LIVE", "BONUSVIEW", and logos
are trademarks of the Blu-ray Disc
Association.
• "Blu-ray Disc", "DVD+RW", "DVD-RW",
"DVD+R", "DVD-R", "DVD VIDEO", and
"CD" logos are trademarks.
• "BRAVIA" is a trademark of Sony
Corporation.
• "AVCHD 3D/Progressive" and the
"AVCHD 3D/Progressive" logo are
trademarks of Panasonic Corporation and
Sony Corporation.
• "_", "XMB", and "xross media bar" are
trademarks of Sony Corporation and Sony
Computer Entertainment Inc.
• "PlayStation" is a registered trademark of
Sony Computer Entertainment Inc.
• "Sony Entertainment Network logo" and
"Sony Entertainment Network" are
trademarks of Sony Corporation.
5u$
• Music and video recognition technology and
related data are provided by Gracenote ('°.
Gracenote is the industry standard in music
recognition technology and related content
delivery. For more information, please visit
www.gracenote.com.
CD, DVD, Blu-ray Disc, and music and
video-related data t}om Gracenote, Inc.,
copyright {) 2000-present Gracenote.
Gracenote Software, copyright {) 2000-
present Gracenote. One or more patents
owned by Gracenote apply to this product
and service. See the Gracenote website t_r a
nonexhaustive list of applicable Gracenote
patents. Gracenote, CDDB, MusiclD, the
Gracenote logo and logotype, and the
"Powered by Gracenote" logo are either a
registered trademark or a trademark of
Gracenote, Inc. in the United States and/or
other countries.
graoenote.
• Wi-Fi ('_,Wi-Fi Protected Access ¢) and Wi-Fi
Alliance _° are registered marks of the Wi-Fi
Alliance.
• Wi-Fi CERTIFIED TM, WPA TM, WPA2 TM
and Wi-Fi Protected Setup TM are marks of
the Wi-Fi Alliance.
• The N Mark is a trademark or registered
trademark of NFC Forum, Inc. in the United
States and in other countries.
• Android is a trademark of Google Inc.
• The Bh_etooth ('° word mark and logos are
registered trademarks owned by Bluetooth
SIG, Inc. and any use of such marks by Sony
Corporation is under license. Other
trademarks and trade names are those of their
respective owners.
• MPEG Layer-3 audio coding technology and
patents licensed from Fraunhofer IIS and
Thomson.
• This product incorporates proprietary
technology under license from Verance
Corporation and is protected by U.S. Patent
7,369,677 and other U.S. and worktwide
patents issued and pending as well as
copyright and trade secret protection for
certain aspects of such technology. Cinavia
is a trademark of Verance Corporation.
Copyright 2004-2010 Verance Corporation.
All rights reserved by Verance. Reverse
engineering or disassembly is prohibited.
• Windows Media is either a registered
trademark or trademark of Microsoft
Corporation in the United States and/or other
countries.
This product is protected by certain
intellectual property rights of Microsoft
Corporation. Use or distribution of such
technology outside of this product is
prohibited without a license from Microsoft
or an authorized Microsoft subsidiary.
Content owners use Microsoft °9
PlayReady TM content access technology to
protect their intellectual property, including
copyrighted content. This device uses
PlayReady technology to access PlayReady-
protected content and/or WMDRM-
protected content. If the device fails to
properly ent_rce restrictions on content
usage, content owners may require
Microsoft to revoke the device's ability to
consume PlayReady-protected content.
Revocation should not affect unprotected
content or content protected by other content
access technologies. Content owners may
require you to upgrade PlayReady to access
their content. If you decline an upgrade, you
will not be able to access content that
requires the upgrade.
• DLNAT:'L the DLNA Logo and DLNA
CERTIFIED TM are trademarks, service
marks, or certification marks of the Digital
Living Network Alliance.
6us
• Opera ® Devices SDK from Opera Software
ASA. Copyright 1995 - 2013 Opera
Software ASA. All rights reser_.ed.
POWERED
BY OPERA®
• All other trademarks are trademarks of their
respective owners.
• Other system and product names are
generally trademarks or registered
trademarks of the manufacturers. TMand @
marks are not indicated in this document.
End User License
Information
Gracenote ®End User License
Agreement
This application or de_.ice contains software
from Gracenote, Inc. of Emeryville, California
("Gracenote"). The software from Gracenote
(the "Gracenote Software") enables this
application to perform disc and/or file
identification and obtain music-related
int_rmation, including name, artist, track, and
title information ("Gracenote Data") from
online servers or embedded databases
(collectively, "Gracenote Ser\.ers") and to
perform other fimctions. You may use
Gracenote Data only by means of the intended
End-User functions of this application or
device.
You agree that yon will use Gracenote Data,
the Gracenote Software, and Gracenote
Servers for your own personal non-
commercial use only. You agree not to assign,
copy, transfer or transmit the Gracenote
Software or any Gracenote Data to any third
party. YOU AGREE NOT TO USE OR
EXPLOIT GRACENOTE DATA, THE
GRACENOTE SOFTWARE, OR
GRACENOTE SERVERS, EXCEPT AS
EXPRESSLY PERMITTED HEREIN.
You agree that your non-exclusive license to
use the Gracenote Data, the Gracenote
Software, and Gracenote Servers will
terminate if you violate these restrictions. If
your license terminates, you agree to cease
any and all use of the Gracenote Data, the
Gracenote Software, and Gracenote Servers.
Gracenote reserves all rights in Gracenote
Data, the Gracenote Software, and the
Gracenote Servers, including all ownership
rights. Under no circumstances will Gracenote
become liable for any payment to you for any
int_rmation that you provide. You agree that
Gracenote, Inc. may ent_rce its rights under
this Agreement against you directly in its own
name.
The Gracenote service uses a unique identifier
to track queries I_r statistical purposes. The
purpose of a randomly assigned numeric
identifier is to allow the Gracenote service to
count queries without knowing anything about
who you are. For more inl_rmation, see the
web page for the Gracenote Privacy Policy for
the Gracenote service.
The Gracenote Software and each item of
Gracenote Data are licensed to you "AS IS."
Gracenote makes no representations or
warranties, express or implied, regarding the
accuracy of any Gracenote Data from in the
Gracenote Servers. Gracenote reserves the
right to delete data from the Gracenote Servers
or to change data categories for any cause that
Gracenote deems sufficient. No warranty is
made that the Gracenote Software or
Gracenote Servers are error-free or that
functioning of Gracenote Software or
Gracenote Servers will be uninterrupted.
Gracenote is not obligated to provide you with
new enhanced or additional data types or
categories that Gracenote may provide in the
future and is free to discontinue its services at
any time.
7us
GRACENOTE DISCLAIMS ALL
WARRANTIES EXPRESS OR IMPLIED,
INCLUDING, BUT NOT LIMITED TO,
IMPLIED WARRANTIES OF
MERCHANTABILITY, FITNESS FOR A
PARTICULAR PURPOSE, TITLE, AND
NON-INFRINGEMENT. GRACENOTE
DOES NOT WARRANT THE RESULTS
THAT WILL BE OBTAINED BY YOUR
USE OF THE GRACENOTE SOFTWARE
OR ANY GRACENOTE SERVER. IN NO
CASE WILL GRACENOTE BE LIABLE
FOR ANY CONSEQUENTIAL OR
INCIDENTAL DAMAGES OR FOR ANY
LOST PROFITS OR LOST REVENUES.
Q Gracenote, Inc. 2009
About These Operating
Instructions
• The instructions in these Operating
Instructions describe the controls on the
remote control. You can also use the controls
on the unit if they have the same or similar
names as those on the remote control.
• In this manual, "disc" is used as a general
reference I_r BDs, DVDs, or CDs unless
otherwise specified by the text or
illustrations.
• The instructions in this manual are for
BDV-E6100, BDV-E4100, BDV-E3100,
and BDV-E2100. BDV-E6100 is the model
used I_r illustration purposes. Any
difference in operation is clearly indicated in
the text, for example, "BDV-E6100 only".
• Some illustrations are presented as
conceptual drawings, and may be different
from the actual products.
• The items displayed on the TV screen may
vary depending on the area.
• The default setting is underlined.
8US
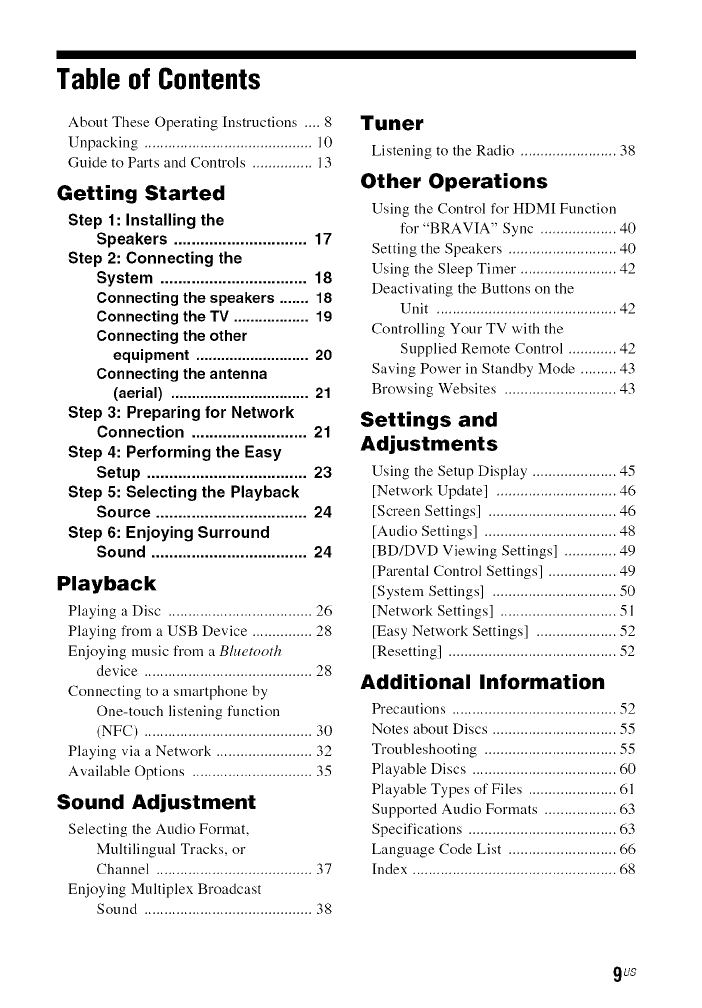
Table of Contents
About These Operating [nstructions .... 8
Unpacking .......................................... 10
Guide to Parts and Controls ............... 13
Getting Started
Step 1: Installing the
Speakers .............................. 17
Step 2: Connecting the
System ................................. 18
Connecting the speakers ....... 18
Connecting the TV .................. 19
Connecting the other
equipment ........................... 20
Connecting the antenna
(aerial) ................................. 21
Step 3: Preparing for Network
Connection .......................... 21
Step 4: Performing the Easy
Setup .................................... 23
Step 5: Selecting the Playback
Source .................................. 24
Step 6: Enjoying Surround
Sound ................................... 24
Playback
Playing a Disc .................................... 26
Playing fi'om a USB Device ............... 28
Enjoying music from a Bluetooth
device .......................................... 28
Connecting to a smartphone by
One-touch listening function
(NFC) .......................................... 30
Playing via a Network ........................ 32
Available Options .............................. 35
Sound Adjustment
Selecting the Audio Format,
Multilingual Tracks, or
Channel ....................................... 37
Enjoying Multiplex Broadcast
Sound .......................................... 38
Tuner
Listening to the Radio ........................ 38
Other Operations
Using the Control for HDM[ Function
for "BRAVIA" Sync ................... 40
Setting the Speakers ........................... 40
Using the Sleep Timer ........................ 42
Deactivating the Buttons on the
Unit ............................................. 42
Controlling Your TV with the
Supplied Remote Control ............ 42
Saving Power in Standby Mode ......... 43
Browsing Websites ............................ 43
Settings and
Adjustments
Using the Setup Display ..................... 45
[Network Update] .............................. 46
[Screen Settings] ................................ 46
[Audio Settings] ................................. 48
[BD/DVD Viewing Settings] ............. 49
[Parental Control Settings] ................. 49
[System Settings] ............................... 50
[Network Settings] ............................. 51
[Easy Network Settings] .................... 52
[Resetting] .......................................... 52
Additional Information
Precautions ......................................... 52
Notes about Discs ............................... 55
Troubleshooting ................................. 55
Playable Discs .................................... 60
Playable Types of Files ...................... 61
Supported Audio Formats .................. 63
Specifications ..................................... 63
Language Code List ........................... 66
[ndex ................................................... 68
9US
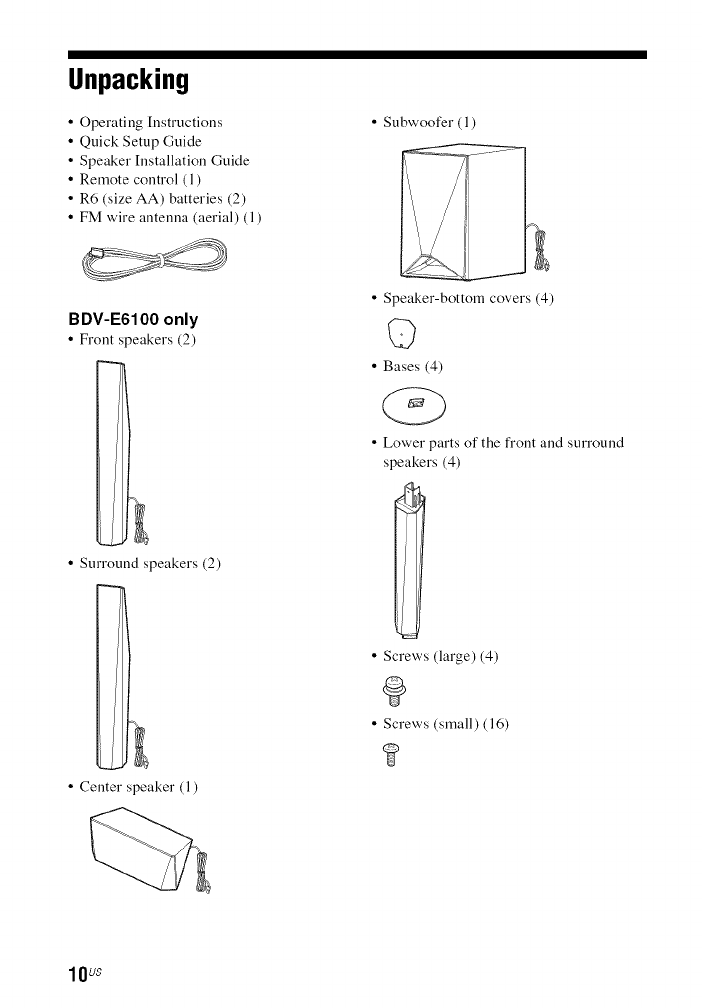
Unpacking
• Operating [nstructions
• Quick Setup Guide
• Speaker [nstallation Guide
• Remote control (1)
• R6 (size AA) batteries (2)
• FM wire antenna (aerial) (1)
BDV-E6100 only
•Front s _eakers (2)
L
• Surround speakers (2)
i
L
• Center speaker (1)
• Subwoofer (1)
• Speaker-bottom covers (4)
• Bases (4)
• Lower parts of the front and surround
speakers (4)
• Screws (large) (4)
• Screws (small) (16)
10uS
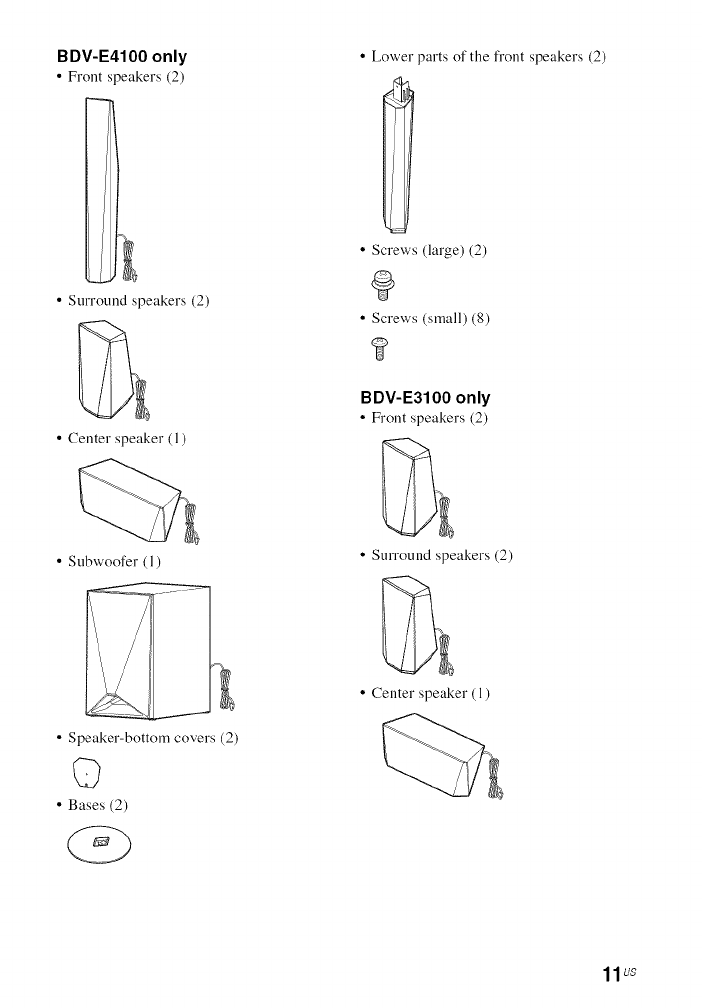
BDV-E4100 only
•Front speakers (2)
i
L
• Surround speakers (2)
• Center speaker (1)
• Subwoofer (1)
• Speaker-bottom covers (2)
q)
• Bases (2)
• Lower parts of the front speakers (2)
• Screws (large) (2)
0
• Screws (small) (8)
BDV-E3100 only
• Front speakers (2)
• Surround speakers (2)
• Center speaker (1)
11us
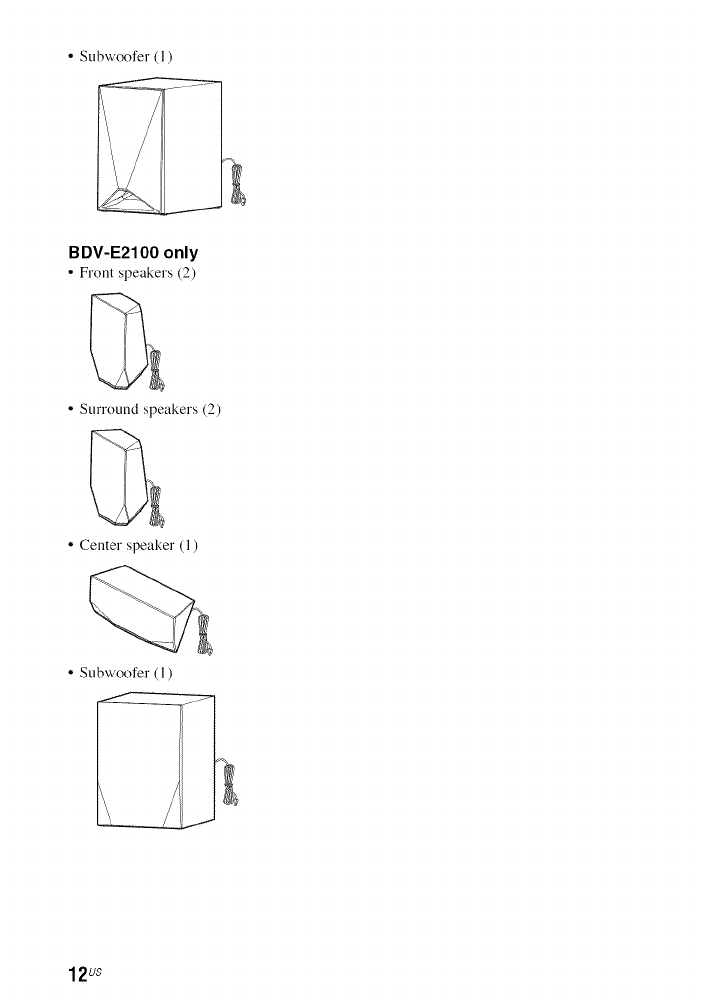
• Subwoofer (1)
BDV-E2100 only
• Front speakers (2)
• Surround speakers (2)
• Center speaker (1)
• Subwoofer (1)
12uS
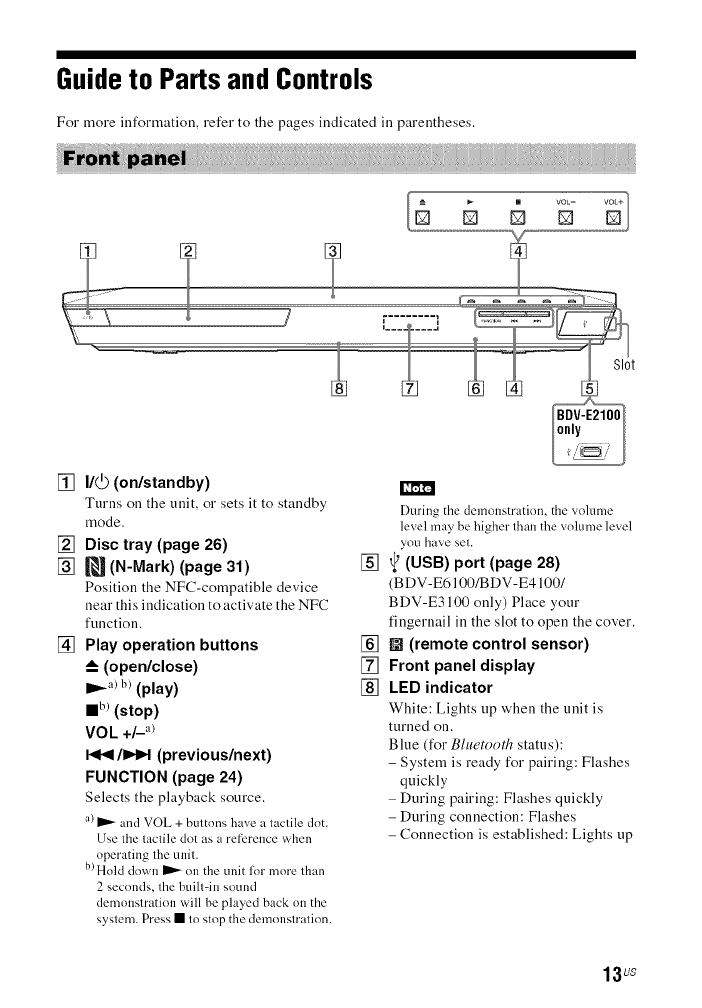
Guide to Parts and Controls
For more information, refer to the pages indicated ill parentheses.
Slot
[] I/@ (on/standby)
Turns on the unit, or sets it to standby
mode.
[] Disc tray (page 26)
[] _ (N-Mark) (page 31)
Position the NFC-compatible device
near this indication to activate the NFC
function.
[] Play operation buttons
--_ (open/close)
ID_0 b) (play)
m bi (stop)
VO L +/-'_
I<<1/IHIH (previous/next)
FUNCTION (page 24)
Selects the playback source.
a) _ and VOL + buttons ha,_e a tactile dot.
Use the tactile dot as a refizrence when
operating the unit.
b) Hold down _ on the unit li)r more than
2 seconds, the builtqn sound
demonstration will be played back on the
system. Press • to stop the demonstration.
I ,' m'l'l
[]
[]
[]
[]
During the demonstration, the volume
level may be higher than the volume level
you have set.
(USB) port (page 28)
(BDV-E6100/BDV-E4100/
BDV-E3100 only) Place your
fingernail in the slot to open the cover.
[] (remote control sensor)
Front panel display
LED indicator
White: Lights up when the unit is
turned on.
Blue (for Bluetooth status):
- System is ready for pairing: Flashes
quickly
- During pairing: Flashes quickly
- During connection: Flashes
- Connection is established: Lights up
13us
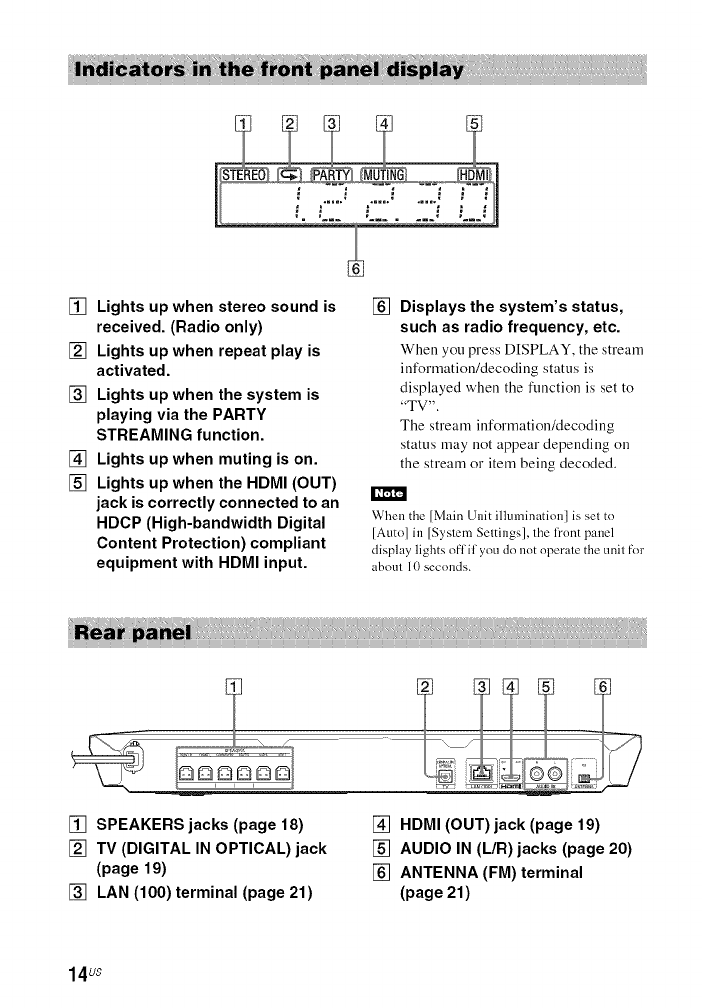
[] Lights up when stereo sound is
received. (Radio only)
[] Lights up when repeat play is
activated.
[] Lights up when the system is
playing via the PARTY
STREAMING function.
[] Lights up when muting is on.
[] Lights up when the HDMI (OUT)
jack is correctly connected to an
HDCP (High-bandwidth Digital
Content Protection) compliant
equipment with HDMI input.
[] Displays the system's status,
such as radio frequency, etc.
When you press DISPLAY, the stream
information/decoding status is
displayed when the function is set to
"TV'.
The stream information/decoding
status may not appear depending on
the stream or item being decoded.
When the [Main Unit illumination] is set to
[Auto] in [System Settings], the front panel
display lights off if you do not operate the unit for
about 10 seconds.
[] SPEAKERS jacks (page 18)
[] TV (DIGITAL IN OPTICAL) jack
(page 19)
[] LAN (100) terminal (page 21)
[] HDMI (OUT) jack (page 19)
[] AUDIO IN (L/R) jacks (page 20)
[] ANTENNA (FM) terminal
(page 21)
14us
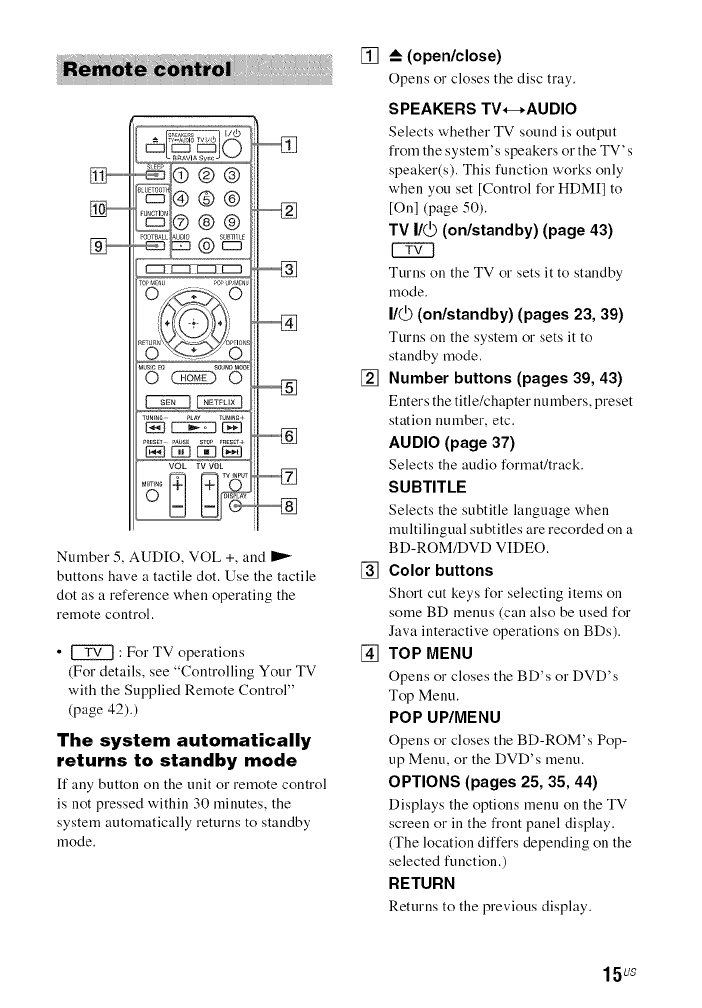
TOP t_ENU POP UPfk_ NU
E
M_s_cEQ _
©_©
Egg2_
TUNrNG _LAY TUNmG+
PRESETPAUSEST0_ _RES_T+
VOL TV VOL
Number 5, AUDIO, VOL +, and I_
buttons have a tactile dot. Use the tactile
dot as a reference when operating the
remote control.
•_ : For TV operations
(For details, see "Controlling Your TV
with the Supplied Remote Control"
(page 42).)
The system automatically
returns to standby mode
[f any button on the unit or remote control
ix not pressed within 30 minutes, the
system automatically returns to standby
mode.
[]
[]
[]
[]
--_(open/close)
Opens or closes the disc tray.
SPEAKERS TV*--,AUDIO
Selects whether TV sound is output
from the system' s speakers or the TV' s
speaker(s). This function works only
when you set [Control for HDM[] to
[On] (page 50).
TV I/_) (on/standby) (page 43)
Turns on the TV or sets it to standby
mode.
I/@ (on/standby) (pages 23, 39)
Turns on the system or sets it to
standby mode.
Number buttons (pages 39, 43)
Enters the title/chapter numbers, preset
station number, etc.
AUDIO (page 37)
Selects the audio format/track.
SUBTITLE
Selects the subtitle language when
multilingual subtitles are recorded on a
BD-ROM/DVD VIDEO.
Color buttons
Short cut keys for selecting items on
some BD menus (can also be used for
Java interactive operations on BDs).
TOP MENU
Opens or closes the BD's or DVD's
Top Menu.
POP UP/MENU
Opens or closes the BD-ROM's Pop-
up Menu, or the DVD's menu.
OPTIONS (pages 25, 35, 44)
Displays the options menu on the TV
screen or in the front panel display.
(The location differs depending on the
selected function.)
RETURN
Returns to the previous display.
15us

.Itlal.
Moves the highlight to a displayed
item.
@(enter)
Enters the selected item.
[] MUSmEO
Selects the pre-programmed equalizer
when listening to music.
HOME (pages 23, 40, 45)
Enters or exits the system's home
menu.
SOUND MODE (page 24)
Selects the sound mode.
SEN
Accesses the "Sony Entertainment
Network TM''online service.
NETFLIX
Accesses the "NETFLIX" online
service.
[] Playback operation buttons
See "Playback" (page 26).
<</1_1_ (fast/slow/freeze frame)
Fast reverse/fast forward during
playback. Each time you press the
button, the search speed changes.
Activates slow-motion play when
pressed for more than one second in
pause mode.
Plays one frame at a time when pressed
in pause mode.
I,'ml'l
During Blu-ray 3[) Disc playback, slow-
molion reverse play' and singleqrame
reverse play are not available.
I<.</_1_ (previous/next)
Selects the previous/next chapter,
track, or file.
I_ PLAY
Starts or re-starts playback (resume
play).
Activates One-Touch Play (page 40)
when the system is on and set to the
"BD/DVD" function.
II PAUSE
Pauses or re-starts playback.
•STOP
Stops playback and remembers the
stop point (resume point). The resume
point for a title/track is the last point
you played or the last photo for a photo
folder.
Stops the built-in sound
demonstration.
Radio operation buttons
See "Tuner" (page 38).
TUNING +/-
PRESET +/-
[] MUTING
Turns off the sound temporarily.
VO L +/-
Adjusts the volume.
TV VOk +/-
Adjusts the TV volume.
TV INPUT
Switches the TV's input source
between the TV and other input
sources.
[] DISPLAY (pages 27, 32, 39, 44)
Displays playback and web browsing
information on the TV screen.
Displays the preset radio station,
frequency, etc., in the front panel
display.
[] FOOTBALL
Produces optimized sound for
watching football match broadcasting.
16uS
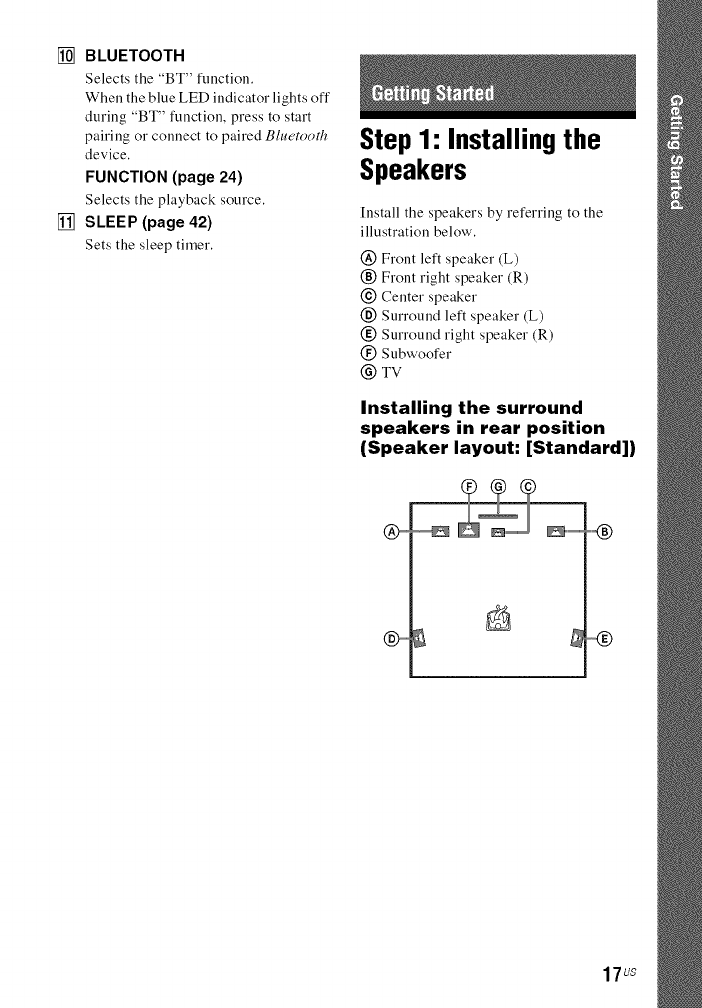
[] BLUETOOTH
Selects the "BT" function.
When the blue LED indicator lights off
during "BT" function, press to start
pairing or connect to paired Bluetooth
device.
FUNCTION (page 24)
Selects the playback source.
[] SLEEP (page 42)
Sets the sleep tiruer.
Step1: Installingthe
Speakers
Install the speakers by referring to the
illustration below'.
@ Front left speaker (L)
(_) Front right speaker (R)
@ Center speaker
(_) Surround left speaker (L)
(_) Surround right speaker (R)
(_) Subwoofer
@ TV
Installing the surround
speakers in rear position
(Speaker layout: [Standard])
17us

Installing all speakers in
front position
(Speaker layout: [All Front])
•Be sure to select the speakers layout setting
(page 41 ) according to your speakers
placement.
• Use caution when placing the speakers and/nr
speaker stands attached to the speakers oll a
specially treated (waxed, oiled, polished, etc.)
floor, as staining or discoloration may result.
•Do not lean or hang on a speaker, as it may f:dl
down.
You can install the speakers on a wall. For details,
relier to the supplied "Speaker Installation
Guide".
Step 2: Connecting the
System
Do not connect the AC power cord (mains
lead) of the unit to a wall outlet (mains)
until all the other connections are made.
(BDV-E6100/BDV-E4100 only) To
assemble the speakers, refer to the supplied
"Speaker [nstallation Guide".
When you colmect other equipment with a
volume control, turn down the volume of the
equipment to a level where sound is not distorted.
Connect the speaker cords to match the
color of the SPEAKERS jacks of the unit.
When connecting to the unit, insert the
connector until it clicks.
Red Gray
(Front right Purple (Surround right
speaker (R)) (Subwoofer) speaker (R))
White Green Blue
(Front left (Center (Surround left
speaker (L)) speaker) speaker (L))
18us
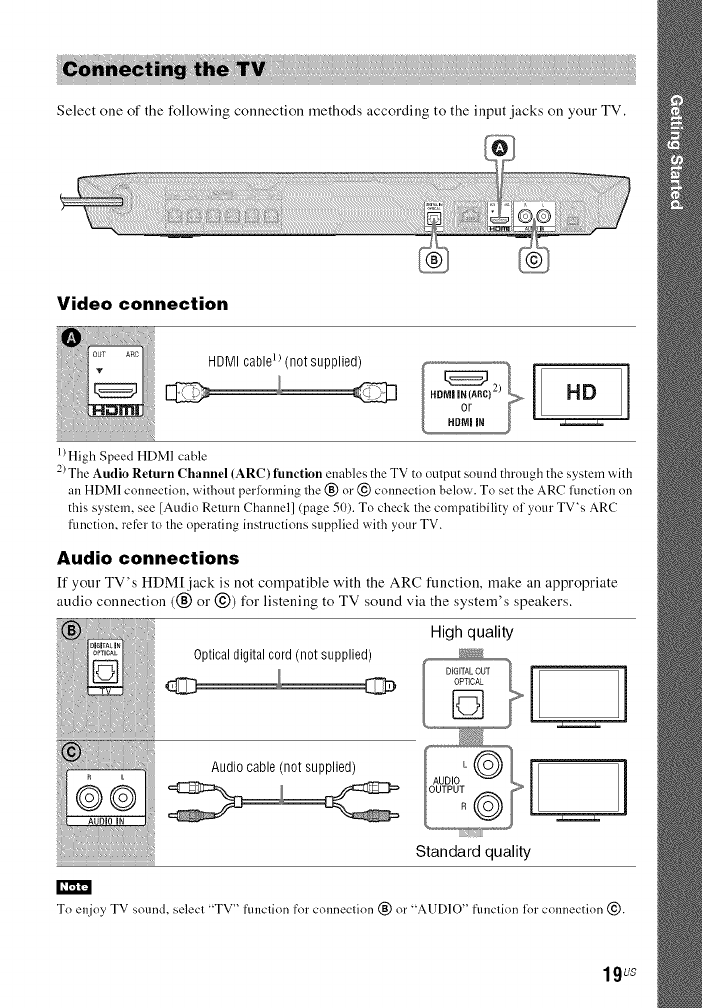
Select one of the following connection methods according to the input jacks on your TV.
Video connection
HDMI cablel) (not supplied)
HDNIIN(ARC)-
or
HDMIIN ,=======_
l)High Speed HDMI cable
2) The Audio Return Channel (ARC) function enables the TV to output sound through the s_stem with
an HDMI connection, without perlorming the (_) or @ connection below. To set the ARC Rmction on
this system, see [Audio Return Channel] (page 50). To check the compatibility of your TV's ARC
flmction, reflzr to the operating instructions supplied with your TV.
Audio connections
[f your TV's HDM[ jack is not compatible with the ARC function, make an appropriate
audio connection ((_ or @) for listening to TV sound via the system's speakers.
;___I Optical digital cord (not supplied) High quality
Audio cable (not supplied) _
Standard quality
To enjoy TV sound, select "TV" flmction ff)r connection (_) or "AUDIO" flmction h)r connection @.
lgus
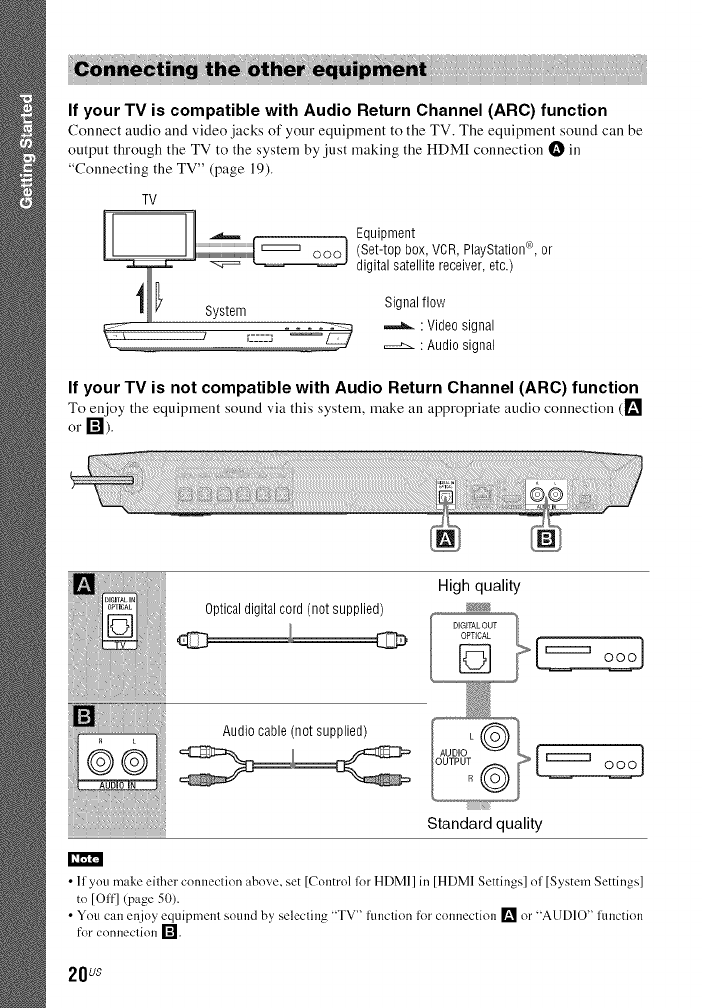
If your TV is compatible with Audio Return Channel (ARC) function
Connect audio and video jacks of your equipruent to the TV. The equipment sotmd call be
output through the TV to the systeru by just making the HDM[ connection O ill
"Connecting the TV" (page 19).
TV
Equipment
(Set-top box, VCR,PlayStation_'°,or
digital satellite receiver, etc.)
Signal flow
El ! .._ _ : Video signal
_ ____. r_-_-_-_-J _ _ : Audio signal
If your TV is not compatible with Audio Return Channel (ARC) function
To enjoy the equipment sound via this system, make an appropriate audio connection (_i_
or []_.
Optical digital cord (not supplied)
High quality
D]G[TAL OUT t[
OPTICAL oooJ
Audio cable (not supplied)
I AUDIO L @ t
Fo:®
Standard quality
oooJ
• If you make either connection above, set [Control lot HDMI] in [HDMI Settings] of [System Settings]
to [Off] (page 50).
• You can enjoy equipment sound by selecting "TV" fimction for colmection [] or "AUDIO" Rmction
for COnllectio]l _.
20us
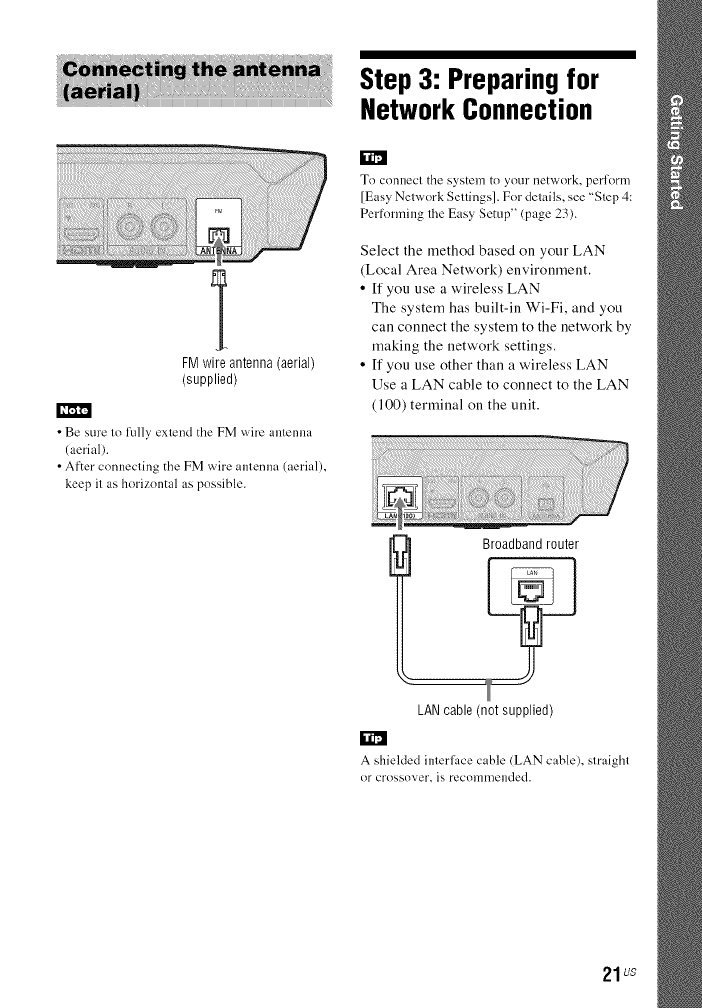
Step 3: Preparing for
Network Connection
k_
FM wire antenna (aerial)
(supplied)
• Be sure to liflly extend the FM wire antenna
(aerial).
• After connecting the FM wire antenna (aerial),
keep it as horizontal as possible.
To connect the system to your network, perform
[Easy Network Settings]. For details, see "Step 4:
Performing the Easy Setup" (page 23).
Select the method based on your LAN
(Local Area Network) environment.
• If you use a wireless LAN
The system has built-in Wi-Fi, and you
can connect the system to the network by
making the network settings.
• If you use other than a wireless LAN
Use a LAN cable to connect to the LAN
(100) terminal on the unit.
Broadband router
LAN cable (not supplied)
A shielded interl_._ce cable (LAN cable), straight
or crossover, is recomn/ended.
21us
Before performing the
network settings
When your wireless LAN router (access
point) is Wi-Fi Protected Setup (WPS)-
compatible, you can easily set the network
settings with the WPS button.
If not, check the following information ill
advance, and record it ill the space provided
below.
• The network name (SSID*) that
identifies your network**.
• ff security is set on your wireless
network, the security key (WEP key,
WPA key)**.
':' SS1D (Service Set Identifier) is a name that
identifies a particular wireless network.
'1'_r"YOU need to check the settings of your wireless
LAN muter to get the in[k>rmatinn abnut SS1D
and security key. For details:
visit the lbllnwing website:
http://www.snny.com/blurayhtsuppnr t/
re[izr to the operating instructions supplied
with the wireless LAN rnuter
consult the mamffactm'er of the wireless
LAN router
About wireless LAN
security
Since communication via the wireless LAN
function is established by radio waves, the
wireless signal may be susceptible to
interception. To protect wireless
communication, this system supports
various security functions. Be sure to
correctly configure the security settings in
accordance with your network
environment.
•No Security
Although you can easily make settings,
anyone can intercept wireless
communication or intrude into your
wireless network, even without any
sophisticated tools. Keep in mind that there
is a risk of unauthorized access or
interception of data.
•WEP
WEP applies security to communications
to prevent outsiders from intercepting
communications or intruding into your
wireless network. WEP is a legacy security
technology that enables older devices
which do not support TKIP/AES to be
connected.
•WPA-PSK (TKIP), WPA2-PSK
(TKIP)
TKIP is a security technology developed in
response to the deficiencies of WEP. TKIP
assures a higher security level than WEP.
•WPA-PSK (AES), WPA2-PSK
(AES)
AES is a security technology that uses an
advanced security method distinct from
WEP and TKIP. AES assures a higher
security level than WEP or TKIP.
22us
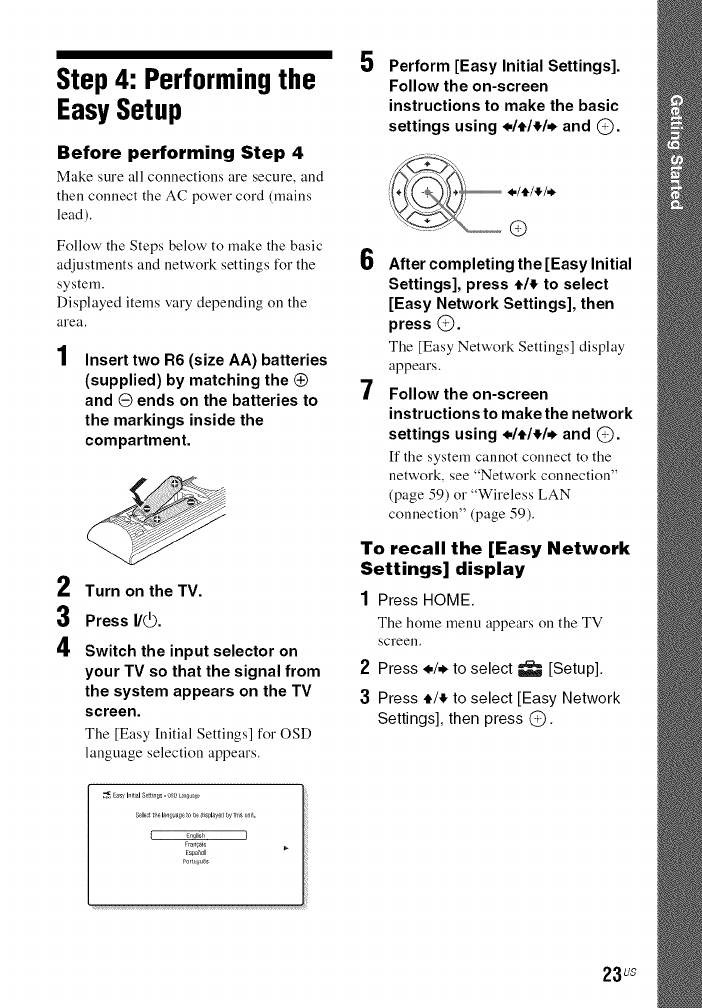
Step 4: Performing the
Easy Setup
Before performing Step 4
Make sure all connections are secure, and
then connect the AC power cord (mains
lead),
Follow' the Steps below to make the basic
adjustments and network settings for the
system.
Displayed items vary depending on the
area,
1Insert two R6 (size AA) batteries
(supplied) by matching the @
and Oends on the batteries to
the markings inside the
compartment.
2
3
4
Turn on the TV.
Press I/_.
Switch the input selector on
your TV so that the signal from
the system appears on the TV
screen.
The [Easy [nitial Settings] for OSD
language selection appears.
5Perform [Easy Initial Settings].
Follow the on-screen
instructions to make the basic
settings using ./4,/_/, and @.
6
7
,*/t/,!_/*
®
After completing the [Easy Initial
Settings], press t/_ to select
[Easy Network Settings], then
press @.
The [Easy Network Settings] display
appears.
Follow the on-screen
instructions to make the network
settings using ./4,/_/, and @.
[f the system cannot connect to the
network, see "Network connection"
(page 59) or "Wireless LAN
connection" (page 59).
To recall the [Easy Network
Settings] display
1 Press HOME.
The home menu appears on the TV
screen,
2 Press */, to select _ [Setup].
3Press t/_ to select [Easy Network
Settings], then press @.
23us
Step5: Selectingthe
PlaybackSource
Press FUNCTION repeatedly until
the function you want appears in the
front panel display.
When you press FUNCTION once, the
current function appears in the fl'ont panel
display, then each time you press
FUNCTION, the function changes
cyclically as follows.
"BD/DVD" --+ "USB" --+ "FM" --+
"TV" --+ "BT" --+ "AUDIO"
Function and playback source
"BD/DVD"
Disc or network device to be played by the
system
"USB"
USB device that is connected to the (USB)
port (page 13)
"FM"
FM radio (page 38)
"TV"
Equipment (TV, etc.) that is connected to the
TV (DIGITAL IN OPTICAL) jack, or a TV
compatible with the Audio Return Channel
function that is connected to the HDMI
(OUT)jack (page 19)
"BT"
Audio contents of a Blu(,too#z device
"AUDIO"
Eqnipment that is connected to the AUDIO
IN (L/R)jacks (page 20)
• Some lhnctions may be changed via the TV
screen by pressing FUNCTION, t/,t, and @.
• You can also press BLUETOOTH on the
remote control to select "BT" function.
Step 6: Enjoying
SurroundSound
After performing the previous Steps and
starting playback, you can easily enjoy pre-
programmed sound modes that are tailored
to different kinds of sound sources. They
bring the exciting and powerful sound of
movie theaters into your home.
Press SOUND MODE repeatedly
during playback until the mode you
want appears in the front panel
display or on the TV screen.
Auto
The system antomatically selects [Mox.ie] or
[Music] to produce the sound effect
depending on the disc or sound stream.
• 2-channel source: The system simulates
surround sound from 2-channel sources and
outputs sound from the 5.1 channel
speakers.
• Multi-channel source: The system outputs
sound I_om the speakers as it was recorded.
Movie
The system provides the optimized sound for
watching movies.
Music
The system provides the optimized sound for
listening to music.
Digital Music Enhancer
[Digital Music]
The system reproduces an enhanced sound
for compressed audio.
Night
Suitable for watching mox,ies at night by
reducing loud sounds while maintaining
clear dialog.
Demo Sound
The system pro_.ides ear-catching sound,
suitable for demonstration.
24us
To select the sound mode
from the option menu
1Press OPTIONS and t/,!, to select
[Sound Mode], then press @.
2Press t/,!, to select the sound mode,
then press @.
To select the pre-
programmed music
equalizer
Press MUSIC EQ repeatedly during
playback.
You call select the sound to suit your
preference.
Each time you press the button, the setting
changes cyclically as follows.
[Standard] ---+ [Rock] ---+ [Hiphop] ---+
[Electronica]
You call also select the music equalizer by
using the option menu ill [Music] sound
mode.
Press FOOTBALL during playback.
[Football] appears on the TV screen.
You call experience a feeling of presence ill
the stadium when watching a football
match broadcasting.
To turn off the football mode, press
FOOTBALL again to select [Football Off].
The sound mode is changed to the last
selected sound mode.
•Depending on the source, the li)otball mode may
not work well.
• The li)otball mode will be turned off when you
turn off the system.
You can also select the football mode from the
option menLi.
The sound mode can be selected only when
[Sound Elli_ct] is set to [Sotmd Mode On]
(page 48). When [Sound Efli_ct] is set to other
than [Sound Mode On], the sound mode setting
does not apply.
To eniny 2-channel sotn'ce such as a CD in nmlti-
channel output, we recommend you to select
[Auto].
25us
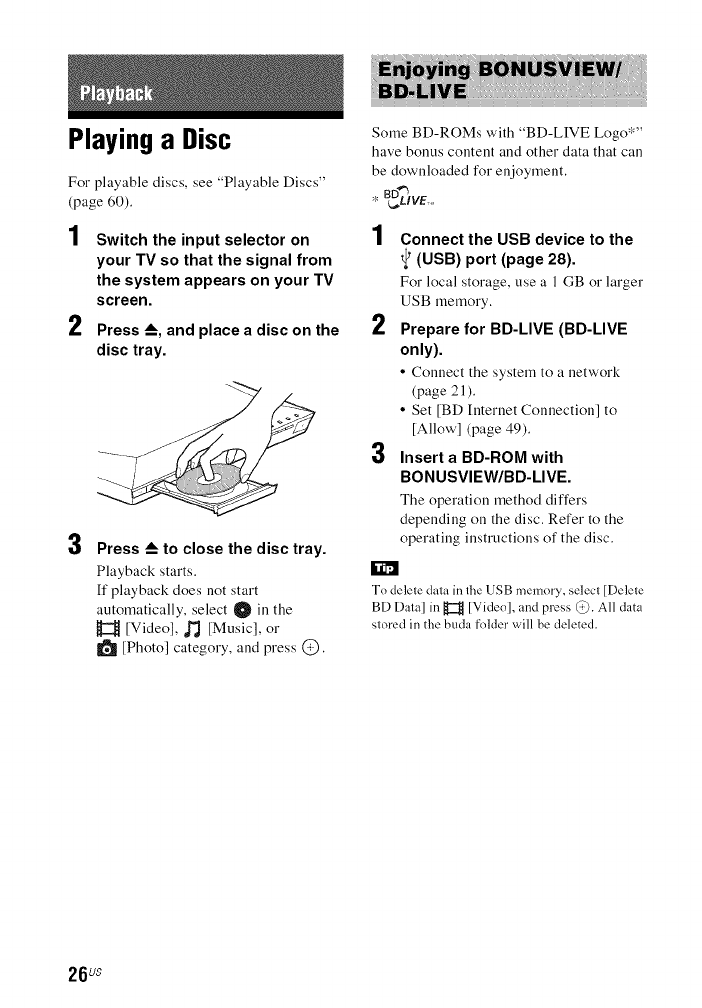
Playing a Disc
For playable discs, see "Playable Discs"
(page 60).
Some BD-ROMs with "BD-LIVE Logo*"
have bonus content and other data that call
be downloaded for enjoyment.
1
2
3
Switch the input selector on
your TV so that the signal from
the system appears on your TV
screen.
Press -_, and place a disc on the
disc tray.
1
2
3
Press -_ to close the disc tray.
Playback starts.
If playback does not start
automatically, select O ill the
H [Video], ,l_ [Music], or
[Photo] category, and press C).
Connect the USB device to the
(USB) port (page 28).
For local storage, use a l GB or larger
USB memory.
Prepare for BD-LIVE (BD-LIVE
only).
• Connect the system to a network
(page 21 ).
• Set [BD Internet Connection] to
[Allow] (page 49).
Insert a BD-ROM with
BONUSVIEW/BD-LIVE.
The operation method differs
depending on the disc. Refer to the
operating instructions of the disc.
To delete dala in the USB memor'y', selecl [Delete
BD Dala] in _ [Vide()], and press @. All data
slored in the buda folder will be deleted.
26us
You call enjoy Blu-ray 3D Discs with the
3D logo*.
1
2
Prepare for Blu-ray 3D Disc
playback.
• Connect the system to your
3D-compatible TV using a High
Speed HDM[ cable (page 19),
• Set [3D Output Setting] and [TV
Screen Size Setting for 3D] ill
[Screen Settings] (page 46),
Insert a Blu-ray 3D Disc.
The operation method differs
depending on the disc. Refer to the
operating instructions supplied with
the disc.
Relier also Io the operating inslructions ol your
3D-compalible TV.
You can check the playback information,
etc., by pressing DISPLAY.
The displayed information differs
depending on the disc type and system
status.
Example: when playing a BD-ROM
[]
[]
[]
[]
[]
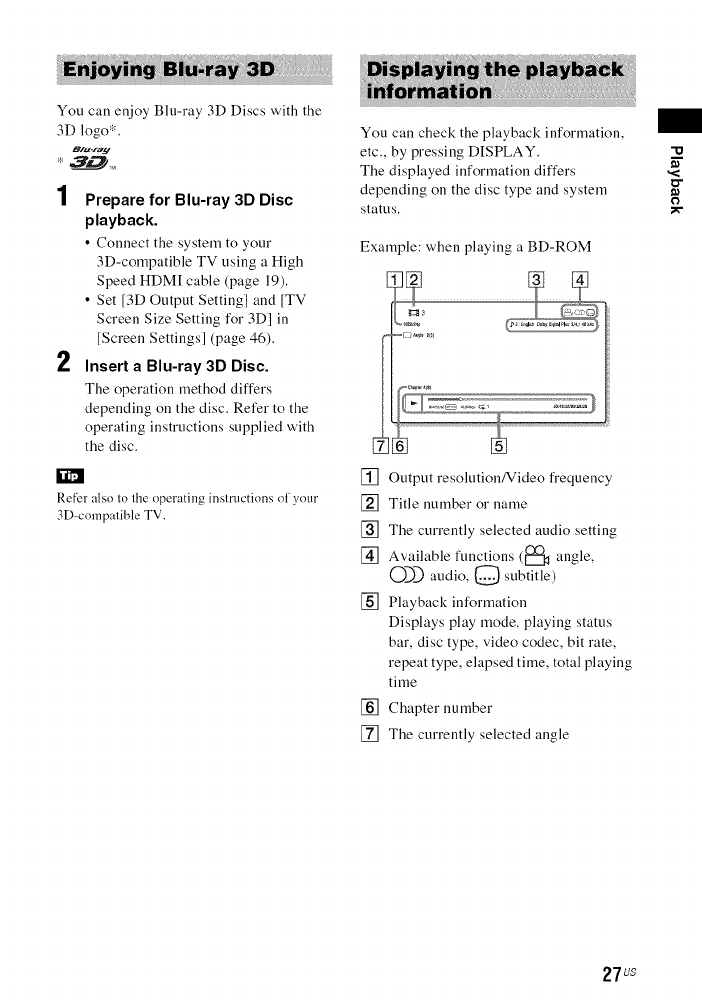
Output resolution/Video frequency
Title number or name
The currently selected audio setting
Available functions (_la angle,
C)_ audio, O subtitle)
Playback information
Displays play mode, playing status
bar, disc type, video codec, bit rate,
repeat type, elapsed time, total playing
time
[] Chapter number
[] The currently selected angle
¢3
27us
Playing from a USB
Device
You can play video/music/photo files on a
connected USB device.
For playable types of files, see "Playable
Types of Files" (page 61).
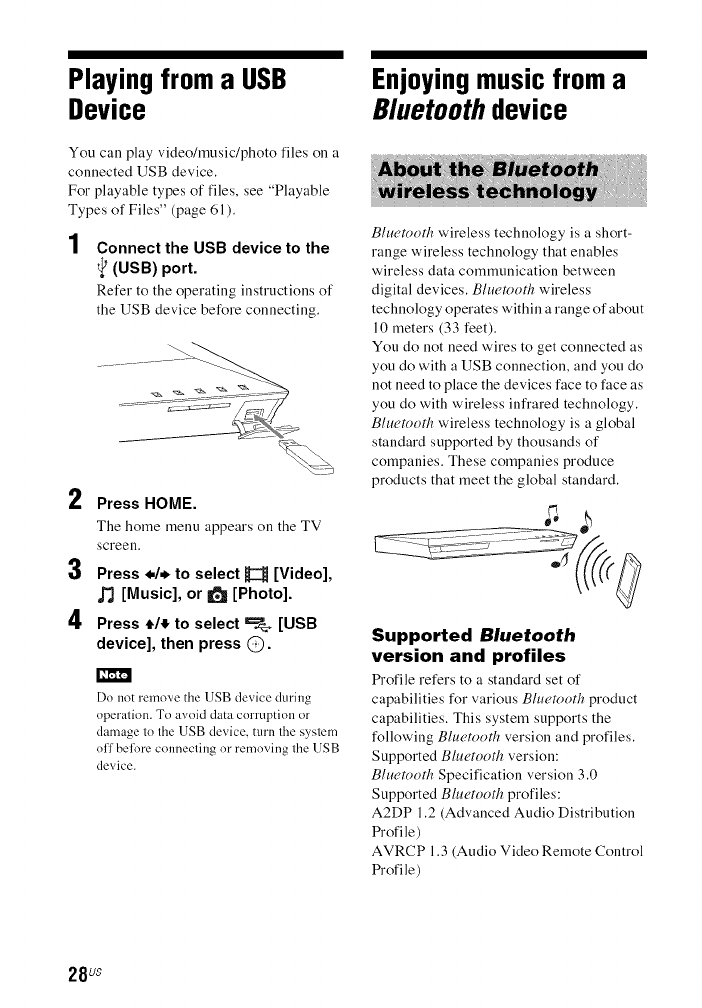
1Connect the USB device to the
(USB) port.
Refer to the operating instructions of
the USB device before connecting.
2
3
4
Press HOME.
The home menu appears on the TV
screen.
Press */* to select H [Video],
,_ [Music], or _[Photo].
Press tit to select _[USB
device], then press @.
Do not remove the USB device during
operation. To aw)id data corruption or
damage to the USB device, turn the system
off belore connecting or removing the USB
device.
Enjoyingmusic from a
Bluetooth device
Bluetooth wireless technology is a short-
range wireless technology that enables
wireless data communication between
digital devices. Bluetooth wireless
technology operates within a range of about
10 meters (33 feet).
You do not need wires to get connected as
you do with a USB connection, and you do
not need to place the devices face to face as
you do with wireless infrared technology.
Bluetooth wireless technology is a global
standard supported by thousands of
companies. These companies produce
products that meet the global standard.
Supported Bluetooth
version and profiles
Profile refers to a standard set of
capabilities for various Bluetooth product
capabilities. This system supports the
following Bluetooth version and profiles.
Supported Bluetooth version:
Bluetooth Specification version 3.0
Supported Bluetooth profiles:
A2DP 1.2 (Advanced Audio Distribution
Profile)
AVRCP 1.3 (Audio Video Remote Control
Profile)
28us
• To be able to use the Bluetnnth function, the
Bluetnoth device to be connected must support
the same profile as this system. Even if the
device supports the same profile, the lhnctions
may diffi_r depending on the specifications of
the Blueu_oth device.
• The audio playback on this system may be
delayed from that on the Bluetnoth device
because of the characteristics of the Bluetnnth
wireless technology.
Pairing is an operation where Bluetooth
devices register with each other
beforehand. Once a pairing operation is
performed, it does not need to be performed
again.
1 Place the Bluetooth device
within 1 meter (3.3 feet) from the
unit.
2 Press BLUETOOTH.
You can also select 0 [Bluetooth
AUDIO] from '_3 [Input] in home
menl.1.
3 Set the Bluetooth device in
pairing mode.
For details on setting the Blur'tooth
device in pairing mode, refer to the
operating instructions supplied with
the device.
4Select"BkU-RAY HOME
THEATRE SYSTEM" on the
Bluetooth device display.
Perform this step within 5 minutes,
otherwise pairing will be canceled.
If passkey is required on the Bluetnoth
device, enter "0000". Passkey may be called
"Passcode', "PIN code", "PIN number" or
"Password".
5Once pairing is completed, the
device is automatically
connected to the system.
Device name appears on the TV
screen.
6
7
You can pair up to 9 Bluetnnth devices. If
the 10th Bluetnoth device is paired, the least
recently connected device will be replaced
by the new one.
Start playback on the Bluetooth
device.
Adjust the volume.
Adjust the volume of the Blu('tooth
device first, if the volume level is still
too low', adjust the volume level on the
unit.
To cancel pairing operation
PressHOME or FUNCTION.
You can connect to a Bluetooth device
from this unit.
Check the following before playing music:
- The Bluetooth function of the Bluetooth
device is turned on.
- The pairing has been completed
(page 29).
1Press BLUETOOTH.
2
To connect to the most recellt connected
Bluetonth device, press _. Then proceed to
Step 5.
Press OPTIONS.
"13
,<
o-
O
29us
3
4
5
6
Press t/_ repeatedly to select
[Device List], then press @.
A list of paired Blu(,tooth devices
appears.
Press t/_ repeatedly to select
the device you want, then press
®.
Press ID_ to start playback.
Adjust the volume.
Adjust the volume of the Blu('tooth
device first, if the volume level is still
too low', adjust the volume level on the
unit.
Once the unit and the Bluetooth device are
connecled, you can control playback by pressing
Im,,_II, I. "41_/1_1_ and I',_1/1_=,t.
To disconnect the
Bluetooth device
Press HOME, FUNCTION or RETURN.
To delete a paired Bluetooth
device from the device list
1 Follow Steps 1 to 3 above.
2Press ,J/,!. repeatedly to select the
device, then press OPTIONS.
3Press ,J/,!. repeatedly to select
[Remove], then press @.
4 Follow the on-screen instructions to
delete the device using 4./,J/,!./. and
®.
While connected to a Bluetooth device, this
system cannot be detected and a connection
cannot be established from another Bluetooth
device.
Connecting to a
smartphone by One-
touch listening function
(NFC)
By holding an NFC-compatible
smartphoue near to the _ on the unit, the
unit and smartphone proceed to complete
pairing and the Bluetooth connection
automatically.
Compatible smartphones
Smartphoues with a built-in NFC function
(OS: Android 2.3.3 - 4.0.x, excluding
Audro d 3.x)
What is "NFC'?
NFC (Near Field Communication) is a
technology enabling short-range wireless
communication between various devices,
such as mobile phones and [C tags. Thanks
to the NFC function, data communication
can be achieved easily just by holding the
device near the _ on the NFC-compatible
devices.
1Download and install the app
"NFC Easy Connect".
"NFC Easy Connect" is a free app for
Android smartphones that can be
obtained on Google Play. Search for
the app using the keyword "NFC Easy
Connect" on the site, or access the
download site directly by reading the
two-dimensional code below.
Note that "NFC Easy Connect" is free
but data communication fees when
downloading are charged separately.
30 us
Two-dimensional code* for
direct access
rUse a two-dimensional code reader app.
11,' ['rli_
,' ['rll_
The app may not be available in some
countries/regions.
Start the "NFC Easy Connect"
app on the smartphone.
Make sure that the application screen
is displayed.
3 Hold the smartphone near to the
on the unit until the
smartphone vibrates. k_
Vibration cue is provided when the
smartphone is recognized by the unit.
After being recognized by the unit,
follow' the on-screen instructions
displayed on the smartphone, and
complete the procedure for Bin€tooth
couuectiou.
When the Bluetooth connection is
established, the blue LED indicator on
the front panel stops flashing. The
playback time appears in the front
panel display.
• The system only can recognizes and connects to
one NFC-compatible device at a time.
• Depending on your smartphone, you may need
to turn on the NFC function on your smartphone
in advance. For details, refer to the operating
instructions of the smartphone.
If pairing and the Blut, toodl connection lhil, do
the follnwing.
Relaunch "NFC Easy Connect" and move the
smartphnne slowly t_ver the _._.
Remove the case frnm the smartphone if using
a commercially available smartphone case.
To listen to music
Start playback of an audio source ou the
smartphone. For details on playback
operations, refer to the operating
instructions of your smartphoue.
If the volume level is low, adjust Ihe volume ol
lhe smartphone lirst, lllhe vohune level is still
l(}oln'_¥r,adjust the volmne level on the unit.
To stop playback
The playback will be stopped when you
perform any of the following items:
- Hold the smartphoue near to the _ on
the unit again.
- Stop the music player of the smartphoue.
- Turn off the unit or the smartphoue.
- Change the function.
- Disable the Bluetooth function on the
smartphoue.
"13
o"
O
31us
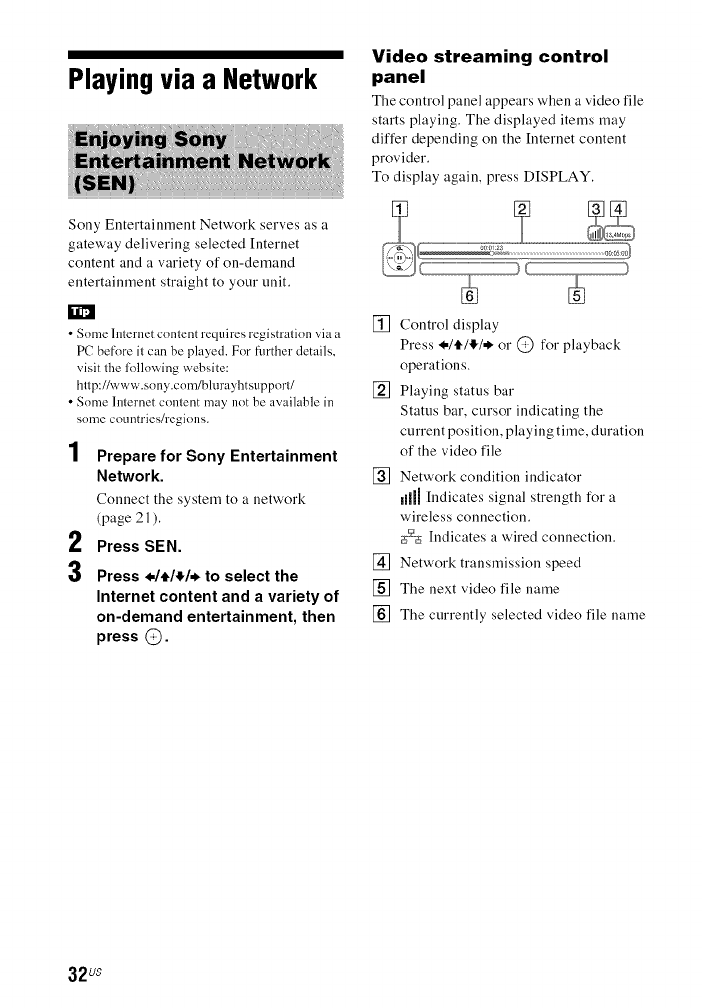
Playing via a Network Video streaming control
panel
The control panel appears when a video file
starts playing. The displayed items may
differ depending on the Internet content
provider.
To display again, press DISPLAY.
Sony Entertainment Network serves as a
gateway delivering selected [nternet
content and a variety of on-demand
entertainment straight to your unit.
r_
•Some lnternet content requires registration via a
PC before it can be played. For fin'ther details,
visit the li)llowing website:
http://www.sony.com/blurayhtsupport/
•Some lnternet content may not be available in
some countries/regions.
1
2
3
Prepare for Sony Entertainment
Network.
Connect the system to a network
(page 21 ).
Press SEN.
[] Control display
Press .*/ill!,/* or @ for playback
operations.
[] Playing status bar
Status bar, cursor indicating the
current position, playing time, duration
of the video file
[]
[]
Press ./e/_/. to select the
Internet content and a variety of []
on-demand entertainment, then []
press @.
Network condition indicator
dJJJ [ndicates signal strength for a
wireless connection.
_% [ndicates a wired connection.
Network transmission speed
The next video file name
The currently selected video file name
32us
You can play video/music/photo files on
other DLNA-certified equipment by
connecting them to your home network.
This unit call be used as a player and
renderer.
• Server: Stores and shares digital media
contents
• Player: Finds and plays digital media
content from the DMS
• Renderer: Receives and plays files from
the server, and call be operated by another
equipment (controller)
• Controller: Operates the renderer
equipment
Server
Jg iJg
Player
(This system) Player
Prepare for using the DLNA
function.
•Connect the system to a network
(page 21 ).
• Prepare other DLNA-certified
equipment. For details, refer to the
operating instructions of the equipment.
To play files stored on a
DLNA server via the system
(DLNA Player)
Select the DLNA server icon from
H [Video], j'J [Music], oriel [Photo] in
the home menu, then select the file that you
want to play.
Server
_-_\ 2_,, .....
..........Player
(This system)
To play remote files by
operating the system
(Renderer) via a DLNA
controller
You can operate the system with a
DLNA-certified controller (a mobile
phone, etc), when playing files stored on a
DLNA server.
Server
Controller
For details on operation, refer to the
operating instructions of the DLNA
controller.
Do nol operale lhe system with lhe supplied
remote control and a DLNA controller al the same
lime.
O
The syslem is compalible wilh 1he "Play To"
function of Windows Media ¢) Player 12 flint
comes slandard with Windows 7.
33us
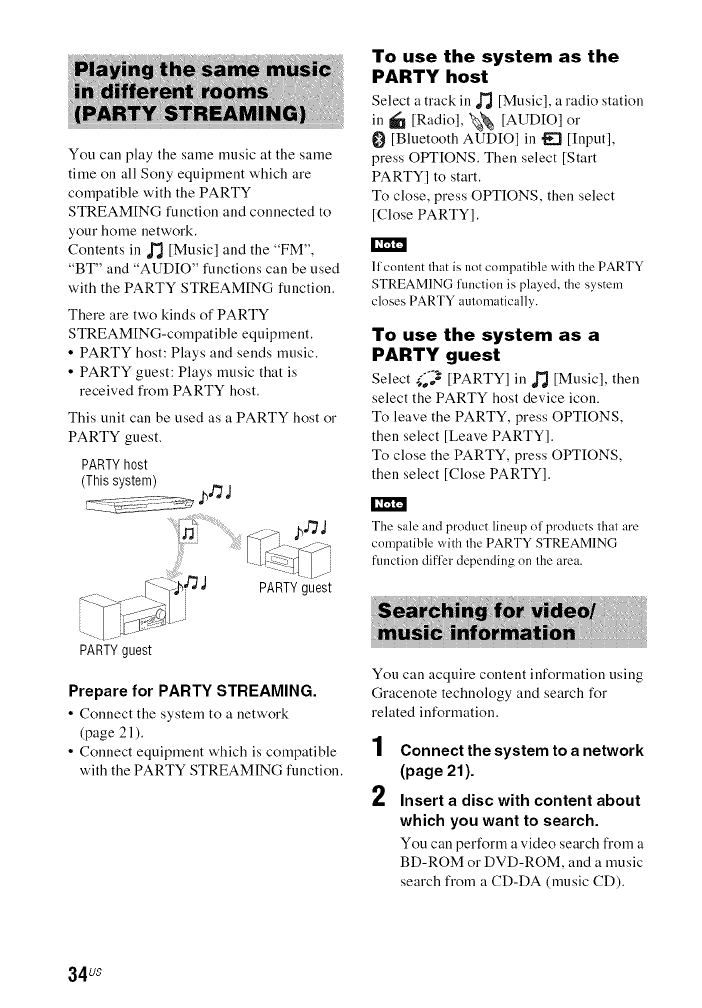
You can play the same music at the same
time on all Sony equipment which are
compatible with the PARTY
STREAMING function and connected to
your home network.
Contents ill J'J [Music] and the "FM",
"BT" and "AUDIO" functions can be used
with the PARTY STREAMING function.
There are two kinds of PARTY
STREAMING-compatible equipment.
• PARTY host: Plays and sends music.
• PARTY guest: Plays music that is
received fl'om PARTY host.
This unit call be used as a PARTY host or
PARTY guest.
PARTY host
(This system)
PARTY guest
To use the system as the
PARTY host
Select a track in ,_ [Music], a radio station
in _! [Radio], "_ [AUDIOIor
[Bluetooth AUDIO] in _ [Input],
press OPTIONS. Then select [Start
PARTY] to start.
To close, press OPTIONS, then select
[Close PARTY].
11conlent that is not compatible with the PARTY
STREAMING ltlllCliOll is played, the system
closes PARTY aulomatically.
To use the system as a
PARTY guest
Select t;_'_,_' [PARTY] in _ [Music], then
select the PARTY host device icon.
To leave the PARTY, press OPTIONS,
then select [Leave PARTY].
To close the PARTY, press OPTIONS,
then select [Close PARTY].
The sale and product lineup ol products lhal are
compalible with lhe PARTY STREAMING
funclion differ depending on the area.
PARTYguest
Prepare for PARTY STREAMING.
• Couuect the system to a network
(page 21 ).
• Connect equipment which is compatible
with the PARTY STREAMING function.
You cau acquire couteut iuformatiou using
Graceuote technology and search for
related information.
1
2
Connect the system to a network
(page 21).
Insert a disc with content about
which you want to search.
You cau perform a video search from a
BD-ROM or DVD-ROM, and a music
search from a CD-DA (music CD).
34us
3
4
Press ./. to select H[Video] or
_'_ [Music].
Press tit to select _[Video
Search] or _[Music Search].
The content information (such as title,
cast, track, or artist), [Playback
History] and [Search History] are
displayed.
• [Playback History]
Displays a list of previously played
BD-ROM/DVD-ROM/CD-DA
(music CD) titles. Select a title to
acquire content information.
• [Search History]
Displays a list of previous searches
performed via the [Video Search] or
[Music Search] function.
To search for further related
information
Select all item ill the lists, then select the
service for searches.
TV SideView is a free mobile application
for the remote device (smartphoue, etc). By
using the TV SideView with this system,
you can easily eujoy the system by the
operation on your remote device.
You can launch a service or application
directly from the remote device and view'
the disc information during the disc
playback. The TV SideView also can be
used as a remote control and software
keyboard.
Before you use the TV SideView device
with this system for the first time, be sure to
register the TV SideView device.
Follow the on-screen instructions on the
TV SideView device for registration.
]1_'["111_
The registration will be possible only when home
metal appears on the TV screen.
Available Options
Various settings and playback operations
are available by pressing OPTIONS. The
available items differ depending on the
situation.
Common options
[Sound Mode]
Changes the sound mode setting (page 24).
[Football]
Turns on or off the football mode (page 25).
[Repeat Setting]
Sets repeat playback.
[30 Menu]
[Simulated 3D]: Adjusts the simuhtted 3D
effect.
[3D Depth Adjustment]: Adjusts the depth of
3D images.
[2D Playback]: Sets playback to 2D image.
[Play/Stop]
Starts or stops playback.
[Play from beginning]
Plays the item from tile beginning.
[Start PARTY]
Starts a party with tile selected source.
This item may not appear depending on the
source.
[Leave PARTY]
Leaves a party which tile system is
participating in. The PARTY STREAMING
function continues anaong other participating
equipment.
[Close PARTY]
For PARTY host: Closes a party.
For PARTY guest: Closes a party which the
system is participating in. The PARTY
STREAMING function ends for all other
participating equipment.
[Change Category]
Switches among tile _ [Video], ,1_ ]Music]
and _ IPhoto] category in "BD/DVD" (I_r
disc only) or "USB" fimction. This item only
available when the display list is available
for the category.
'1:1
O"
O
35us
H[Video] only _[Music] only
[A/V SYNC]
Adjusts the time gap between picture and
sound (page 37).
[3D Output Setting]
Sets whether or not to output 3D _,ideo
automatically.
[Video Settings]
•[Picture Quality Mode]: Selects tile picture
settings for different lighting environments.
• [BNR]: Reduces the mosaic-like block
noise in the picture.
• [MNR]: Reduces minor noise around the
picture outlines (mosquito noise).
[Pause]
Pauses playback.
[Top Menu]
Displays the BD's or DVD's Top Menu.
[Menu/Popup Menu]
Displays the BD-ROM's Pop-up Menu or
DVD' s menu.
[Title Search]
Searches for a title on BD-ROMs!DVD
VIDEOs and starts playback from the
beginning.
[Chapter Search]
Searches for a chapter and starts playback
from the beginning.
[Audio]
Selects the audio t_rmat/track.
[Subtitle]
Selects the subtitle language when
multilingual subtitles are recorded on
BD-ROMs/DVD VIDEOs.
[Angle]
Switches tile _,iewing angles when multi-
angles are recorded on BD-ROMs/DVD
VIDEOs.
[IP Content Noise Reduction]
Adjusts the _,ideo quality for Intenlet
content.
[Video Search]
Displays int_rmation oil the BD-ROM/
DVD-ROM based on Gracenote technology.
[Add Slideshow BGM]
Registers music files in the USB memory as
slideshow background nmsic (BGM).
[Music Search]
Displays information oil the audio CD
(CD-DA) based on Gracenote technology.
[Photo] only
[Slideshow]
Starts a slideshow.
[Slideshow Speed]
Changes the slideshow speed.
[Slideshow Effect]
Sets tile effect when playing a slideshow.
[Slideshow BGM]
• [Off]: Turns off the function.
• [My Music from USB]: Sets the music files
registered in [Add Slideshow BGM].
• [Play from Music CD]: Sets the tracks on
CD-DAs (music CDs).
[Change Display]
Switches between [Grid View] and [List
View].
[Rotate Left]
Rotates the photo counterclockwise by
90 degrees.
[Rotate Right]
Rotates the photo clockwise by 90 degrees.
[View Image]
Displays the selected picture.
36us
(A/V S YNC)
When the sound does not match the
pictures on the TV screen, you call adjust
the delay between the picture and sound for
each function separately.
The setting method differs depending on
the function.
When other than the "BT" or
"TV" function is selected
1Press OPTIONS.
The option menu appears on the TV
screen.
2Press t_/_ to select [A/V SYNC],
then press @.
3Press */* to adjust the delay,
then press @.
You call adjust from 0 ms to 300 ms in
25 ms increments.
When the "TV" function is
selected
1Press OPTIONS.
"AV.SYNC" appears in the front panel
display.
2Press @or*.
3 Press 4,/_ to adjust the delay,
then press @.
You can adjust from 0 ms to 300 ms in
25 ms increments.
4Press OPTIONS.
The option menu in the front panel
display turns off.
Selecting the Audio
Format, Multilingual
Tracks, or Channel
When the system is playing a BD/DVD
VIDEO recorded in multiple audio formats
(PCM, Dolby Digital, MPEG audio, or
DTS) or multilingual tracks, you can
change the audio format or language.
With a CD, you can select the sound from
the right or left channel and listen to the
sound of the selected channel through both
the right and left speakers.
Press AUDIO repeatedly during
playback to select the audio signal
you want.
The audio information appears on the TV
screen.
• BD/DVD VIDEO
Depending on the BD/DVD VIDEO, the
option of language varies.
When 4 digits are displayed, they represent
a language code. See "Language Code
List" (page 66). When the same language is
displayed two or more times, the BD/DVD
VIDEO is recorded in multiple audio
formats.
• DVD-VR
The types of sound tracks recorded on a
disc are displayed.
Example:
• lab Stereo]
• [jh Stereo (Audiol)]
• [J5 Stereo (Audio2)]
• [j5 Main]
• [h Sub]
• [J5 Main/Sub]
o
I2
-1
o,,
12
3
37us
Ik,m'l'_
[j5 Stereo (Audinl)l and Ij5 Stereo/Audio2)] dn
not appear il only one audin slream is recorded nn
tlle disc.
ICD
• [j_ Stereo]: The standard stereo sound.
• [,b I/L]: The sound of the left channel 1
(monaural).
• [b 21R]: The sound of the right channel
(monaural).
• [j_ L+R]: The sound of both the left and L
right channels output from each
individual speaker.
Enjoying Multiplex
Broadcast Sound
(DUAL MONO)
You can enjoy multiplex broadcast sound
when the system receives or plays a Dolby
Digital multiplex broadcast signal.
Ik,m'l'_
To receive a Dnlby Digital signal, you need to
connect a TV or other equipment to the TV
(DIGITAL IN OPTICAL)jack with a optical
digital cord (pages 19, 20).
If your TV's HDMI IN jack is compatible with
the Audio Return Channel function (pages 19.
50), you can receive a Dolby Digital signal via an
HDMI cable.
Press AUDIO repeatedly until the
signal you want appears in the front
panel display.
• "MAIN": Sound of the main language
will be output.
• "SUB": Sound of the sub language will
be output.
• "MN/SUB": Mixed sound of both the
main and sub languages will be output.
Listeningto the Radio
Press FUNCTION repeatedly
until "FM" appears in the front
panel display.
Select the radio station.
Automatic tuning
Hold down TUNING +/- until the auto
scanning starts.
[Auto Tuning] appears on the TV
screen. Scanning stops when the
system tunes in a station.
To cancel automatic tuning, press any
buttons.
3
Manual tuning
Press TUNING +1- repeatedly.
Press VOL +/- repeatedly to
adjust the volume.
If an FM program is noisy
If an FM program is noisy, you can select
monaural reception. There will be no stereo
effect, but reception will improve.
1Press OPTIONS.
The option menu appears on the TV
screen,
2Press e/_ to select [FM Mode],
then press @.
3Press 4,/_ to select [Monaural],
then press @.
• [Stereo]: Stereo reception.
• [Monaural]: Monaural reception.
You can gel [FM Mode] fi_reach preset stalinn
separalely.
38us
To turn off the radio
Press I/_.
You call preset up to 20 stations. Before
tuning, make sure to turn down the volume
to minimum.
1
2
3
4
5
6
Press FUNCTION repeatedly
until "FM" appears in the front
panel display.
Hold down TUNING +/- until the
auto scanning starts.
Scanning stops when the system tunes
ill a station.
Press OPTIONS.
The option menu appears on the TV
screen,
Press tit to select [Preset
Memory], then press @.
Press tit to select the preset
number you want, then press @.
Repeat Steps 2 to 5 to store
other stations.
To change a preset number
Select the preset number you want by
pressing PRESET +/-, then perform the
procedure from Step 3.
1
2
Press FUNCTION repeatedly
until "FM" appears in the front
panel display.
The last received station is tuned in.
Press PRESET +/- repeatedly to
select the preset station.
The preset number and frequency
appear on the TV screen and front
panel display.
Each time you press the button, the
system tunes in one preset station.
•You can select the preset station number
directly by pressing the numher buttons.
•Each time you press DISPLAY, the
display in the front panel display changes
cyclically as follows:
Frequency --+ Preset mHnber--+Decoding
status:'.'
':' Appears when [Sound EflL'ct]is set to
[Dolby Pro Logic], [DTS Neo:6
Cinema], or [DTS Neo:6 Music]
(page 48).
-t
I2
-1
39us
Usingthe Control for
HDMI Function for
"BRAVIA" Sync
This function is available on TVs with the
"BRAVIA" Sync function.
By connecting Sony equipment that is
compatible with the Control for HDM[
function via all HDM[ cable, operation is
simplified.
To use the "BRAVIA" Sync ftmclion, be sure to
turn on lhe syslem and all connected equipment
after completed lhe HDMI conneclion.
Control for HDMI - Easy
Setting
You can set the system's [Control for
HDM[] function automatically by enabling
the corresponding setting on the TV.
For details about the Control for HDM[
function, see "[HDM[ Settings]" (page 50)
System Power Off
You can turn the system off in sync with the
TV.
The syslem does 11(71turn ofl aulomatically while
playing music or when "FM" function is selected.
One-Touch Play
When you press I_ on the remote control,
the system and TV turn on, and the TV's
input is switched to the HDM[ input which
the system is connected.
System Audio Control
You can enjoy the sound from TV or other
equipment by a simple operation.
You can use the System Audio Control
function as follows:
• When the system is turned on, the sound
of the TV or other equipment can be
output from the speakers of the system.
• When sound from the TV or other
equipment is output via the speakers of
the system, you can switch the sound to
output from the TV speakers by pressing
SPEAKERS TV_--_AUDIO.
• When sound from the TV or other
equipment is output via the speakers of
the system, you can adjust the volume
and turn off the sound of the system by
operating the TV.
Audio Return Channel
You can enjoy TV sound via the system by
using just one HDM[ cable. For details of
the setting, see "[Audio Return Channel]"
(page 50).
Language Follow
When you change the language for the
on-screen display of the TV, the system's
on-screen display language is also changed
after turning off and on the system.
Setting the Speakers
[Speaker Settings]
To obtain optimum surround sound, set the
speakers' distance from your listening
position. Then use the test tone to adjust the
balance of the speakers.
1Press HOME.
The home menu appears on the TV
screen,
40us
2 Press */. to select _[Setup].
3 Press *It to select [Audio
Settings], then press @.
4Press t/_ to select [Speaker
Settings], then press @.
The [Select speaker layout.] display
appears.
5 Press t/_ to select setting
according to your speakers
placement, then press @.
•[Standard]: The surround speakers
are installed ill the rear position.
•[All Front]: All speakers are installed
ill the front position.
The [Distance] and [Level] settings are reset
to deli.mlt settings each time you change the
speaker layout setting.
6Press t/,t to select the item, then
press @.
7 Press _/_ to adjust the
parameter.
8 Press ./. and @to confirm the
settings.
Check the following settings.
•[Distance]
Be sure to set the parameters of the distance
from the listening position to the speakers.
You can set the parameters from 0 to
23 feet (0.0 to 7.0 meters).
[Front Left/Right] 10 ft/3.0 m: Set the front
speaker distance.
[Center] 10 ft/3.0 m: Set the center speaker
distance.
[Surround Left/Right110 ft/3.0 m: Set the
surround speaker distance.
[Subwoofer] 10 ft/3.0 m: Set the subwoofer
distance.
You can change file unit of measuremem (feet or
meters) by pressing the color button (RE[)).
•[Level]
You can adjust the sound level of the
speakers. You can set the parameters from
-6.0 dB to +6.0 dB. Be sure to set [Test
Tone] to IOn] for easy adjustment.
[Front Left/Right] 0.0 dB: Set the front
speaker level.
[Center] 0.0 dB: Set the center speaker
level.
[Surround Left/Right I 0.0 dB: Set the
surround speaker level.
[Subwoofer] 0.0 dB: Set the subwoofer
level.
•[Test Tone]
The speakers will emit a test tone to adjust
[Level].
[Off]: The test tone is not emitted from the
speakers.
IOn]: The test tone ix emitted from each
speaker in sequence while adjusting level.
When you select one of the [Speaker
Settings] items, the test tone ix emitted
from each speaker in sequence.
Adjust the sound level as follows.
1Set [Test Tone] to [On].
2 Press 4./,t to select [Level], then
press @.
3 Press ,J/,t to select the speaker type
you want, then press @.
4 Press ./. to select the left or right
speaker, then press ,J/,t to adjust the
level.
5 Press @.
6 Repeat Steps 3 to 5.
o
0
(i)
-.t
41us
7 Press RETURN,
The system returns to the previous
display.
8 Press t/,!, to select [Test Tone], then
press Q),
9Press t/,!, to select [off], then press
Q,
The lesl tnne signals are nnl nutpul lrnm lhe
HDMI (OUT) jack.
To adjusl the volume nl all the speakers at one
time, press VOL +/ .
Usingthe Sleep Timer
You call set the system to turn off at a
preset time, so you call fall asleep listening
to music. The time call be preset ill intervals
of 10 minutes.
Press SLEEP.
Each time you press SLEEP, the minutes
display (the remaining time) in the front
panel display changes by 10 minutes.
When you set the sleep timer, the
remaining time appears every 5 minutes.
When the remaining time is less than
2 minutes, "SLEEP" flashes in the front
panel display.
To check the remaining
time
Press SLEEP once.
To change the remaining
time
Press SLEEP repeatedly.
Deactivating the
Buttons onthe Unit
(Child Lock)
You can deactivate the buttons on the unit
(except for I/Q)) for preventing
misoperation, such as child mischief.
Hold down • on the unit for more
than 5 seconds.
"LOCKED" appears in the front panel
display.
The child lock function is activated and the
buttons on the unit are locked. (You can
operate the system by using the remote
control.)
To cancel, hold down • for more than
5 seconds until "UNLOCK" appears in the
front panel display.
II you operate the bunons nn the unit while the
child lock Amclinn is on, "LOCKED" flashes in
the from panel display.
Controlling Your TV
with the Supplied
Remote Control
By adjusting the remote control signal, you
can control your TV with the supplied
remote control.
When you replace the batteries of the remote
control, the code nmnber may reset to the default
(SONY) setting. Set the appropriate code number
again.
42us
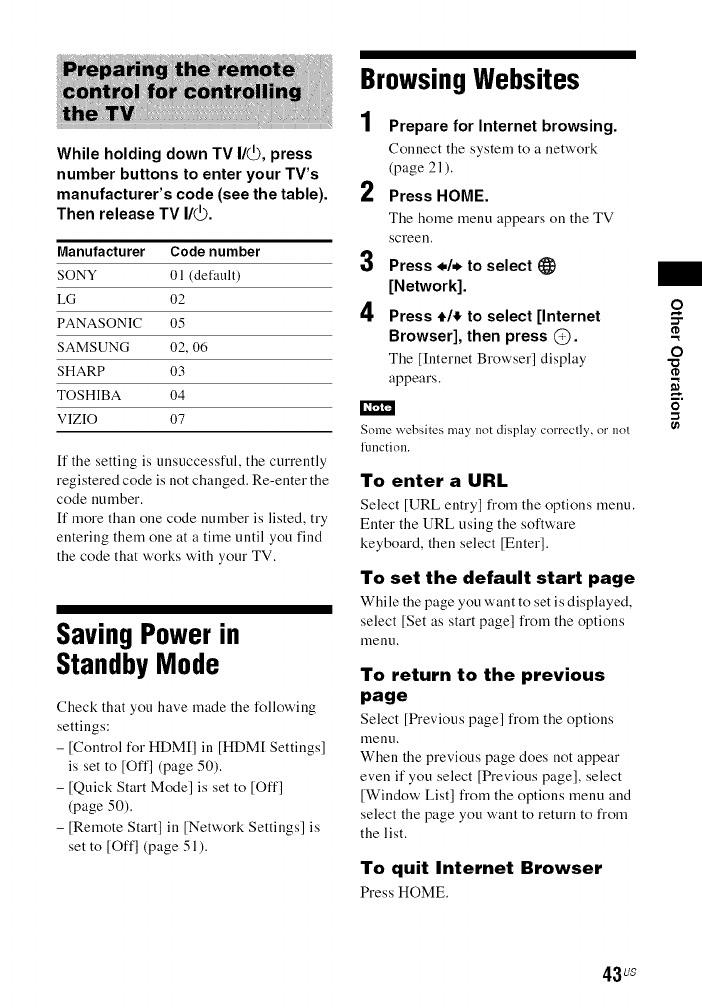
While holding down TV I/_, press
number buttons to enter your TV's
manufacturer's code (see the table).
Then release TV I/(_.
Manufacturer Code number
SONY 01 (default)
LG 02
PANASONIC 05
SAMSUNG 02, 06
SHARP 03
TOSHIBA 04
VlZIO 07
If the setting is unsuccessful, the currently
registered code is not changed. Re-enter the
code number.
If more than one code number is listed, try
entering them one at a time until you find
the code that works with your TV.
Saving Power in
Standby Mode
Check that you have made the following
settings:
-[Control for HDM[I in [HDM[ Settings]
is set to [Offl (page 50).
-[Quick Start Mode] is set to [Off]
(page 50).
-[Remote Start] in [Network Settings] is
set to [Off] (page 51 ).
BrowsingWebsites
1 Prepare for Internet browsing.
Connect tile system to a network
(page 21 ).
2 Press HOME.
Tile home menu appears on tile TV
screen.
3Press */* to select l_)
[Network].
4Press 4"/,1"to select [Internet
Browser], then press @.
Tile [Internet Browser] display
appears.
Some websites may not display correclly, or nol
l_mction.
To enter a URL
Select [URL entry] from tile options menu.
Enter the URL using the software
keyboard, then select [Enter].
To set the default start page
While tile page you want to set is displayed,
select [Set as start page] from the options
menu,
To return to the previous
page
Select [Previous page] from tile options
menu,
When the previous page does not appear
even if you select [Previous page], select
[Window List] from the options menu and
select the page you want to return to from
the list.
To quit Internet Browser
PressHOME.
o
O
"o
-I
43us
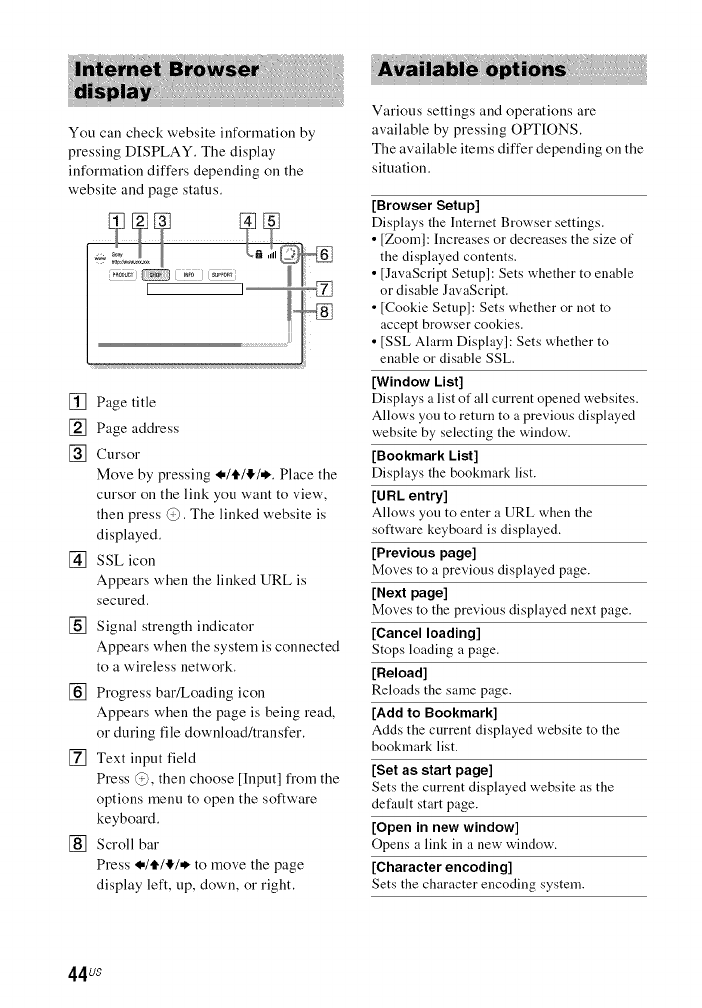
You call check website information by
pressing DISPLAY. The display
information differs depending on the
website and page status.
[] Page title
[] Page address
[] Cursor
Move by pressing .*/ill!,/*. Place the
cursor on the link you want to view',
then press @. The linked website is
displayed.
[] SSL icon
Appears when the linked URL is
secured.
[] Signal strength indicator
Appears when the system is connected
to a wireless network.
[] Progress barlLoadiug icon
Appears when the page is being read,
or during file dowuload/trausfer.
[] Text input field
Press @, then choose [Input] from the
options menu to open the software
keyboard.
[] Scroll bar
Press .*lt./l_/* to move the page
display left, up, down, or right.
Various settings and operations are
available by pressing OPTIONS.
The available items differ depending on the
situation.
[Browser Setup]
Displays the lnternet Browser settings.
• [Zoom]: Increases or decreases the size of
the displayed contents.
• [JavaScript Setup]: Sets whether to enable
or disable JavaScript.
• [Cookie Setup]: Sets whether or not to
accept browser cookies.
• [SSL Alarm Display]: Sets whether to
enable or disable SSL.
[Window List]
Displays a list of all current opened websites.
Allows you to return to a previous displayed
website by selecting the window.
[Bookmark List]
Displays the bookmark list.
[URL entry]
Allows you to enter a URL when the
software keyboard is displayed.
[Previous page]
Mo_,es to a pre_,ious displayed page.
[Next page]
Moves to the previous displayed next page.
[Cancel loading]
Stops loading a page.
[Reload]
Reloads the same page.
[Add to Bookmark]
Acids the current displayed website to the
bookmark list.
[Set as start page]
Sets the current displayed website as the
default start page.
[Open in new window]
Opens a link in a new window.
[Character encoding]
Sets the character encoding system.
44us

[Display certificate]
Displays server certificates sent from pages
that support SSL.
[Inputl
Displays the software keyboard to enter
characters while browsing a website.
[Break]
Moves the cursor to the next line in the text
input field.
[Delete]
Erases one character on the left side of the
cursor during text input.
Usingthe Setup Display
You call make various adjustments to items
such as picture and sound.
The default settings are underlined.
Playback settings stored ill the disc take priority
over the Selup Display settings. Therefi)re, some
of the funclinns may not be performed.
1
2
3
Press HOME.
The home menu appears on the TV
screen.
Press */* to select _[Setup].
Press tic to select the setup
category icon, then press @.
Icon Explanation
t'_ [Network Update](page 46)
Updates the software of the
system.
[Screen Settings]
"_m (page 46)
Makes the screen settings
according to the type of
TV.
_,) [Audio Settings]
_!_ }) (page 48)
Makes the audio settings
according to the type of
connecting jacks.
_'O [BD/DVD ViewingSettings] (page 49)
Makes detailed settings t_r
BD/DVD playback.
-1
-1
&
€-
3
-1
45us
Icon Explanation
_==_ [Parental Control
Settings] (page 49)
Makes detailed settings t_r
the Parental Control
flmction.
[System Settings]
'_(_'_ I(page50)
Makes the system-related
settings.
[Network Settings]
_'_ (page 51 )
Makes detailed settings t_r
Internet and network.
[Easy Network Settings]
(page 52)
1-2-3 Runs [Easy Network
Settings] to make the basic
network settings.
[Resetting] (page 52)
,_ Resets the system to the
factory settings.
[Network Update]
By updating your software to the latest
version, you can take advantage of the
newest functions.
For information about update functions,
refer to the following website:
http://www.sony.com/blurayhtsupport/
During a software update, "UPDATE"
appears in the front panel display. After the
update completes, the unit automatically
turns off.
While the updating operation is in progress,
do not turn on or off the unit, or operate the
unit or TV. Wait for the software update to
complete.
[Screen Settings]
•[3D Output Setting]
[Auto]: Normally select this.
[Off]: Select this to display all contents in
2D.
•[TV Screen Size Setting for 3D]
Sets the screen size of your 3D-compatible
TV.
•[TV Type]
[ 16:9]: Select this when connecting to a
wide-screen TV or a TV with a wide-mode
function.
[4:3]: Select this when connecting to a 4:3
screen TV without a wide-mode function.
• [Screen Format]
[Full]: Select this when connecting to a TV
with a wide-mode function. Displays a 4:3
screen picture in 16:9 aspect ratio even on
a wide-screen TV.
[Normal]: Changes the picture size to fit
the screen size with the original picture
aspect ratio.
46us
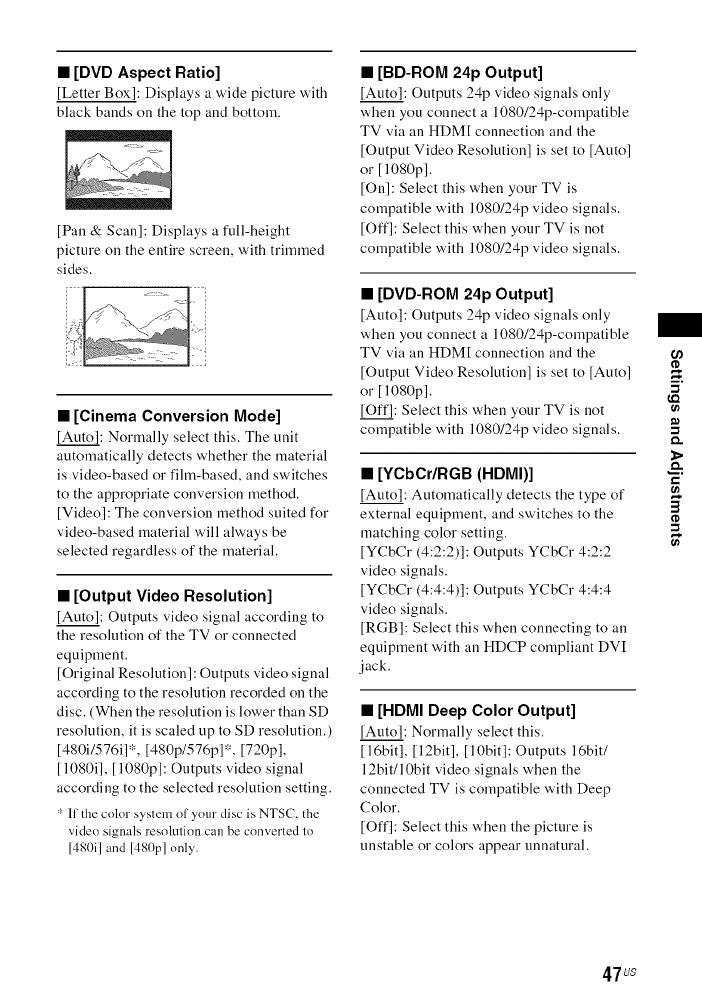
•[DVD Aspect Ratio]
[Letter Box]: Displays a wide picture with
black bands on the top and bottom.
[Pan & Scan]: Displays a full-height
picture on the entire screen, with trimmed
sides.
•[Cinema Conversion Mode]
[Auto]: Normally select this. The unit
automatically detects whether the material
is video-based or fihn-based, and switches
to the appropriate conversion method.
[Video]: The conversion method suited for
video-based material will always be
selected regardless of the material.
•[Output Video Resolution]
[Auto]: Outputs video signal according to
the resolution of the TV or connected
equipment.
[Original Resolution]: Outputs video signal
according to the resolution recorded on the
disc. (When the resolution is lower than SD
resolution, it is scaled up to SD resolution.)
[480i1576i1", [480p/576p]*, [720p],
[ 1080i], [ 1080p]: Outputs video signal
according to the selected resolution setting.
'- If the color system of your disc is NTSC, the
video signals resolution can be converted to
[480i] and [480p] only.
•[BD-ROM 24p Output]
[Auto]: Outputs 24p video signals only
when you connect a 1080/24p-compatible
TV via an HDM[ connection and the
[Output Video Resolution] is set to [Auto]
or [ 1080p].
[On]: Select this when your TV is
compatible with 1080/24p video signals.
[Offl: Select this when your TV is not
compatible with 1080/24p video signals.
•[DVD-ROM 24p Output]
[Auto]: Outputs 24p video signals only
when you connect a 1080/24p-compatible
TV via an HDM[ connection and the
[Output Video Resolution] is set to [Auto]
or [ 1080p].
[Offl: Select this when your TV is not
compatible with 1080/24p video signals.
•[YCbCr/RGB (HDMI)]
[Auto]: Automatically detects the type of
external equipment, and switches to the
matching color setting.
[YCbCr (4:2:2)]: Outputs YCbCr 4:2:2
video signals,
[YCbCr (4:4:4)]: Outputs YCbCr 4:4:4
video signals.
[RGB]: Select this when connecting to an
equipment with an HDCP compliant DVI
jack.
•[HDMI Deep Color Output]
[Auto]: Normally select this.
[ 16bit], [12bit], [10bit]: Outputs 16bit/
12bit/10bit video signals when the
connected TV is compatible with Deep
Color.
[Offl: Select this when the picture is
unstable or colors appear unnatural.
5'
-1
o,,
&
12
3
-1
47us
•[Pause Mode] (BD/DVD VIDEO/
DVD-R/DVD-RW only)
[Auto]: The picture, including subjects that
move dynamically, is output with no jitter.
Normally select this position.
[Frame]: The picture, including subjects
that do not move dynamically, is output ill
high resolution.
[Audio Settings]
•[Audio Output]
You call select the output method where the
audio signal is output.
[Speaker]: Outputs multi-channel sound
from the system's speakers only.
[Speaker + HDM[]: Outputs multi-channel
sound from the system's speakers and
2-channel linear PCM signals from the
HDM[ (OUT) jack.
[HDM[]: Outputs sound from the HDM[
(OUT)jack only. Sound format depends on
the connected equipment.
•[BD Audio MIX Setting]
[On]: Outputs the audio obtaiued by mixing
the interactive audio and secondary audio
to the primary audio.
[Offl: Outputs the primary audio only.
•[Audio DRC]
You can compress the dynamic range of the
sound track.
[Auto]: Performs playback at the dynamic
range specified by the disc (BD-ROM
only).
IOn]: The system reproduces the sound
track with the kind of dynamic range that
the recording engineer intended.
[Offl: No compression of dynamic range.
•[Attenuate - AUDIO]
Distortion may occur wheu you listen to all
equipment connected to the AUDIO IN
(L/R) jacks. You can prevent distortion by
attenuating the input level on the unit.
IOn]: Attenuates the input level. The output
level will decrease at this setting.
[Offl: Normal input level.
• When [Control lor HDMI] is set to [On]
(page 50), [Audio Output] is set to [Speaker +
HDMI] automatically and this setting cannot be
changed.
• When [Audio Output] is set to [HDMI], the
output signal lormat for the "TV" flmction is
2-channel linear PCM.
•[Sound Effect]
You can turn on or off the system's souud
effects (SOUND MODE setting (page 24)).
For a 2-channel source, you can select
[Dolby Pro Logic], [DTS Neo:6 Cinema],
or [DTS Neo:6 Music] to simulate surround
sound.
[Sound Mode On]: Enables the surround
effect of the sound mode (page 24) and
Football mode (page 25).
[Dolby Pro Logic]: The system simulates
surround sound from 2-channel sources
and outputs sound from all speakers
(5.1 channel) (Dolby Pro Logic decoding).
[DTS Neo:6 Ciuema]/[DTS Neo:6 Music]:
The system simulates surround sound from
2-channel sources and produces multi-
channel sound (DTS Neo:6 Cinema/DTS
Neo:6 Music mode decoding).
[2ch Stereo]: This system outputs the sound
from the front left/right speakers and
subwoofer only. Multi-channel surround
formats are dowumixed to 2-channel.
48us
[Off]: The sound effects are disabled. You
call hear sound as it is recorded.
•[Speaker Settings]
To obtain optimum surround sound, set the
speakers. For details, see "Setting the
Speakers" (page 40).
•[Bluetooth AUDIO - AAC]
You call enable and disable AAC audio.
[On]: AAC audio if the Bluetooth device
supports AAC.
[Off]: SBC audio.
You can enjoy high quality sound if the AAC is
enabled. In case you cannol listen lo AAC sound
h'om your device, select [Ofl].
[BD/DVDViewing
Settings]
•[BD/DVD Menu Language]
You cau select the default menu language
for BD-ROMs or DVD VIDEOs.
When you select [Select Language Code],
the display for entering the language code
appears. Enter the code for your language
by referring to "Language Code List"
(page 66).
•[Audio Language]
You cau select the default track language
for BD-ROMs or DVD VIDEOs.
When you select [Original], the language
given priority in the disc is selected.
When you select [Select Language Code],
the display for entering the language code
appears. Enter the code for your language
by referring to "Language Code List"
(page 66).
•[Subtitle Language]
You cau select the default subtitle language
for BD-ROMs or DVD VIDEOs.
When you select [Select Language Code],
the display for entering the language code
appears. Enter the code for your language
by referring to "Language Code List"
(page 66).
•[BD Hybrid Disc Playback Layer]
[BD]: Plays BD layer.
[DVD/CD]: Plays DVD or CD layer.
•[BD Internet Connection]
[Allow]: Normally select this.
[Do not allow']: Prohibits [nteruet
couuectiou.
[Parental Control
Settings]
•[Password]
Set or change the password for the Pareutal
Control function. A password allows you to
set a restriction on BD-ROM, DVD
VIDEO, or [nteruet video playback. If
necessary, you can differentiate the
restriction levels for BD-ROMs and DVD
VIDEOs.
•[Parental Control Area Code]
Playback of some BD-ROMs or DVD
VIDEOs can be limited according to the
geographic area. Scenes may be blocked or
replaced with different scenes. Follow' the
on-screen instructions and enter your four-
digit password.
-1
-1
o,.
&
€-
3
-1
49us
•[BD Parental Control]/[DVD
Parental Control]/[Internet Video
Parental Control]
By setting Parental Control, scenes can be
blocked or replaced with different scenes.
Follow the on-screen instructions and enter
your four-digit password.
•[Internet Video Unrated]
[Allow]: Allows the playback of tmrated
Internet videos,
[Block]: Blocks the playback of unrated
Internet videos,
[System Settings]
•[OSD Language]
You call select the language you want for
the system on-screen display.
•[Main Unit illumination]
[On]: The front panel display is always
turned on and the brightness of the LED
indicator is the maximum.
[Auto]: The front panel display is turned
off and the brightness of LED indicator is
reduced automatically if you do not operate
the system for about 10 seconds.
•[HDMI Settings]
[Control for HDM[]
[On]: Turns on the [Control for HDM[I
function. You can operate mutually
between equipment that are connected with
an HDM[ cable.
[Offl: off.
[Audio Return Channel]
This function is available when you
connect the system to a TV's HDM[ IN
jack that is compatible with the Audio
Return Channel function and [Control for
HDM[] is set to [On].
[Auto]: The system can receive the digital
audio signal of the TV automatically via an
HDM[ cable.
[Offl: off.
•[Quick Start Mode]
[On]: Shortens the startup time from
standby mode. You can operate the system
quickly after turning it on.
[Offl: The default setting.
•[Auto Display]
[On]: Automatically displays information
on the screen when changing the viewing
titles, picture modes, audio signals, etc.
[Off]: Displays information only w'hen you
press DISPLAY.
•[Screen Saver]
[On]: Turns on the screen saver function.
[Offl: off.
•[Software Update Notification]
[On]: Sets the system to inform you of
latest software version information
(page 46).
[Offl: off.
•[Gracenote Settings]
[Auto]: Automatically downloads disc
information when you stop playback of the
disc. To download, the system must be
connected to the netw'ork.
[Manual]: Downloads disc information
w'hen [Video Search] or [Music Search] is
selected.
50 us
•[System Information]
You call display the system's software
version information and the MAC address,
•[Software License Information]
You call display the Software License
Information.
[Network Settings]
•[Internet Settings]
Connect the system to the netw'ork
beforehand. For details, see "Step 3:
Preparing for Network Connection"
(page 21 ).
[Wired Setup]: Select this when you
connect to a broadband router using a LAN
cable.
[Wireless Setup(built-in)l: Select this when
you use the built-in wireless LAN of the
system for wireless network connection.
For fln'ther details, visit the following website and
check the FAQ:
http://www.sony.com/blurayhtsupport/
•[Network Connection Status]
Displays the current network connection
status.
•[Network Connection
Diagnostics]
You can run the netw'ork diagnostic to
check if the network connection has been
made properly.
•[Connection Server Settings]
Sets w'hether or not to display the
connected DLNA server.
•[Renderer Options]
[Auto Access Permission]: Sets whether or
not to allow automatic access from a newly
detected DLNA controller.
[Smart Select]: Allows a Sony DLNA
controller to find the system as the target
equipment to operate by using the infrared
ray. You can set this function to on or off.
[Renderer Name]: Displays the system's
name as it is listed on other DLNA devices
on the network.
•[Renderer Access Control]
Sets whether or not to accept commands
from DLNA controllers.
•[PARTY Auto Start]
[On]: Starts a PARTY or joins an existing
PARTY at the request of a networked
device compatible with the PARTY
STREAMING function.
[Off]: Off.
•[Registered Remote Devices]
Displays a list of your registered remote
devices.
To use this ffmction, be sure to pel'li)rm the
software update (page 46).
•[Remote Start]
[On]: Allows turn on the system by a
device linked via network when the system
is in standby mode.
[Offl: The system cannot be turned on by a
device linked via network.
00
-.t
-.t
o.
&
€-
3
-.t
51us
-,¢ [Easy Network
1-2-3
Settings]
Runs [Easy Network Settings] to make the
basic network settings. Follow' the on-
screen instructions.
[Resetting]
•[Reset to Factory Default Settings]
You call reset the system settings to the
factory default by selecting the group of
settings. All the settings within the group
will be reset.
•[Initialize Personal Information]
You call erase your personal information
stored in the system.
Precautions
On safety
•Should any solid object or liquid fall into
the cabinet, unplug the system and have it
checked by qualified personnel before
operating it any further.
• Do not touch the AC power cord (mains
lead) with wet hands. Doing so may cause
an electric shock.
On power sources
If you are not going to use the system for a
long time, be sure to disconnect the system
from the wall outlet. To disconnect the AC
power cord (mains lead), grasp the plug
itself; never pull the cord.
On placement
• Place the system in a location with
adequate ventilation to prevent heat
build-up in the system.
• Although the unit heats up during
operation, this is not a malfunction. If you
continuously use this unit at a large
volume, the cabinet temperature of the
top, side and bottom rises considerably.
To avoid burning yourself, do not touch
the cabinet.
• Do not place the unit on a soft surface
(rugs, blankets, etc.) that might block the
ventilation holes.
• Do not install the system near heat
sources such as radiators, air ducts, or in
a place subject to direct sunlight,
excessive dust, mechanical vibration, or
shock.
• Do not install the system in an inclined
position. It is designed to be operated in a
horizontal position only.
52us
•Keep the system and discs away fl'om
components with strong magnets, such as
microwave ovens, or large loudspeakers.
•Do not place heavy objects on the system.
• Do not place metal objects in fl'ont of the
front panel. It may limit reception of
radio waves.
• Do not place the system ill a place where
medical equipment is ill use. It may cause
a malfunction of medical equipment.
• If you use a pacemaker or other medical
device, consult your physician or the
manufacturer of your medical device
before using the wireless LAN function.
On operation
[fthe system is brought directly from a cold
to a warm location, or is placed in a very
damp room, moisture may condense on the
lenses inside the unit. Should this occur, the
system may not operate properly. [n this
case, remove the disc and leave the system
turned on for about half an hour until the
moisture evaporates.
On adjusting volume
Do not turn up the volume while listening
to a section with very low level inputs or no
audio signals. If you do, the speakers may
be damaged when a peak level section is
suddenly played.
On cleaning
Clean the cabinet, panel, and controls with
a soft cloth slightly moistened with a mild
detergent solution. Do not use any type of
abrasive pad, scouring powder or solvent
such as alcohol or benzine.
On cleaning discs, disc/lens
cleaners
Do not use cleaning discs or disc/lens
cleaners (including wet or spray types).
These may cause the apparatus to
malfunction.
On replacement of parts
[n the events that this system is repaired,
repaired parts may be retained for reuse or
recycling purposes.
On your TV's color
If the speakers cause the color irregularity
on your TV screen, turn off the TV then
turn it on after 15 to 30 minutes. If color
irregularity persist, place the speakers
further away from the TV set.
IMPORTANT NOTICE
Caution: This system is capable of
holding a still video image or on-screen
display image on your TV screen
indefinitely. [f you leave the still video
image or on-screen display image
displayed on your TV for an extended
period of time, you risk permanent
damage to your TV screen. Plasma
display panel televisions and projection
televisions are especially susceptible to
this.
On moving the system
Before moving the system, make sure that
there is no disc inserted, and disconnect the
AC power cord (mains lead) from the wall
outlet (mains).
3
o
-i
53us
On Bluetooth
communication
•Blue'tooth devices should be used within
approximately 10 meters (33 feet)
(unobstructed distance) of each other.
The effective communication range may
become shorter under the following
conditions.
- When a person, metal object, wall or
other obstruction is between the devices
with a Bluetooth connection
- Locations where a wireless LAN is
installed
-Around microwave ovens that are in
use
- Locations where other electromagnetic
waves OCCUr
•Bhwtooth devices and wireless LAN
(IEEE 802.1 I b/g) use the same frequency
band (2.4 GHz). When using your
Bhwtooth device near a device with
wireless LAN capability, electromagnetic
interference may occur. This could result
in lower data transfer rates, noise, or
inability to connect. [f this happens, try
the following remedies:
- Use this unit at least 10 meters (33 feet)
away from the wireless LAN device.
- Turn off the power to the wireless LAN
equipment when using your Bhwtooth
device within 10 meters (33 feet).
-[nstall this unit and Bluetooth device as
closer to each other as possible.
• The radio waves broadcast by this unit
may interfere with the operation of some
medical devices. Since this interference
may result in malfunction, always turn off
the power on this unit and Bluetooth
device in the following locations:
-[n hospitals, on trains, in airplanes, at
gas stations, and any place where
flammable gasses may be present
- Near automatic doors or fire alarms
• This unit supports security functions that
comply with the Blu(,tooth specification
to ensure secure connection during
communication using Blu(,tooth
technology. However, this security may
be insufficient depending on the setting
contents and other factors, so always be
careful when performing communication
using Bluetooth technology.
• Sony cannot be held liable in any way for
damages or other loss resulting from
information leaks during communication
using Bluetooth technology.
•Bhwtooth communication ix not
necessarily guaranteed with all Bhwtooth
devices that have the same profile as this
unit.
•Bhwtooth devices connected with this
unit must comply with the Bhwtooth
specification prescribed by the Bluetooth
SIG, Inc., and must be certified to
comply. However, even when a device
complies with the Bhwtooth
specification, there may be cases where
the characteristics or specifications of the
Bluetooth device make it impossible to
connect, or may result in different control
methods, display or operation.
• Noise may occur or the audio may cut off
depending on the Bhwtooth device
connected with this unit, the
communications environment, or
surrounding conditions.
If you have any questions or problems
concerning your system, please consult
your nearest Sony dealer.
54us
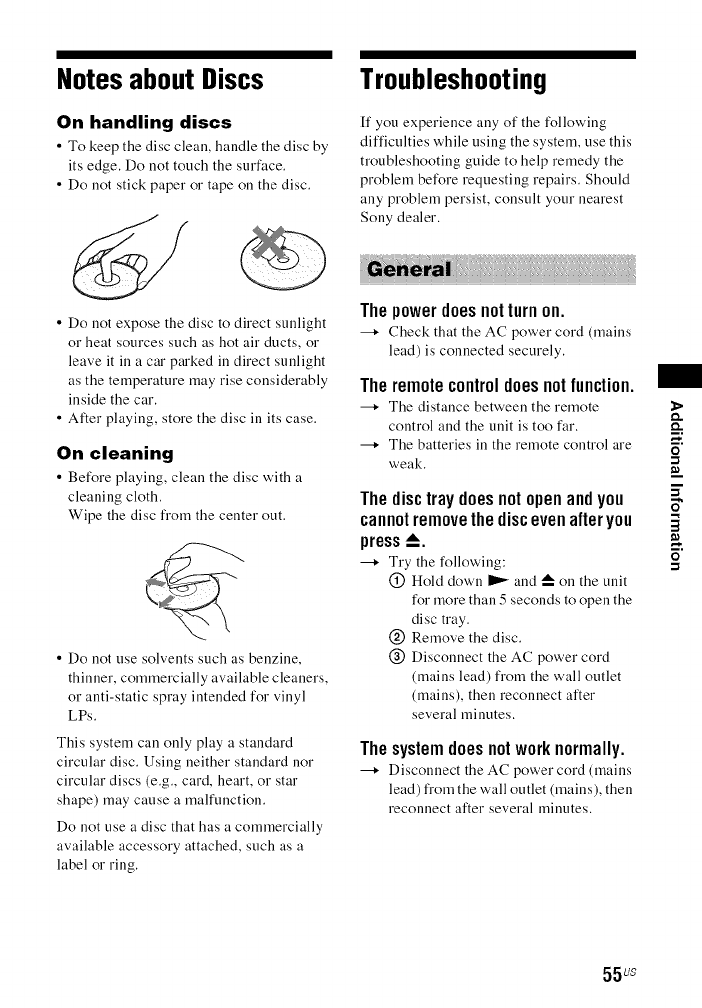
Notes about Discs
On handling discs
•To keep the disc clean, handle the disc by
its edge. Do not touch the surface.
• Do not stick paper or tape on the disc.
Troubleshooting
ff you experience ally of the following
difficulties while using the system, use this
troubleshooting guide to help remedy the
problem before requesting repairs. Should
ally problem persist, consult your nearest
Sony dealer.
• Do not expose the disc to direct sunlight
or heat sources such as hot air ducts, or
leave it ill a car parked ill direct sunlight
as the temperature may rise considerably
inside the car.
• After playing, store the disc ill its case.
On cleaning
• Before playing, clean the disc with a
cleaning cloth.
Wipe the disc from the center out.
• Do not use solvents such as benzine,
thinner, commercially available cleaners,
or anti-static spray intended for vinyl
LPs.
This system can only play a standard
circular disc. Using neither standard nor
circular discs (e.g., card, heart, or star
shape) may cause a malfunction.
Do not use a disc that has a commercially
available accessory attached, such as a
label or ring.
Thepowerdoesnotturnon.
---+ Check that the AC power cord (mains
lead) is connected securely.
Theremotecontroldoesnot function.
---+ The distance between the remote
control and the unit is too far.
---+ The batteries in the remote control are
weak.
Thedisctraydoesnot openandyou
cannotremovethediscevenafteryou
press_.
---+ Try the following:
@ Hold down I_ and _ on the unit
for more than 5 seconds to open the
disc tray.
@ Remove the disc.
@ Disconnect the AC power cord
(mains lead) from the wall outlet
(mains), then reconnect after
several minutes.
Thesystemdoesnotworknormally.
---+ Disconnect the AC power cord (mains
lead) from the wall outlet (mains), then
reconnect after several minutes.
D.
O
-1
O
-1
55 us
[Anewsoftwareversionisavailable.
Pleasego to the "Setup" sectionof
the menu andselect "Network
Update"to performthe update.]
appearson the TV screen.
--+ See [Network Update] (page 46) to
update the system to a latest software
version.
"PRTECT","PUSH"and"POWER"
appearalternatelyinthefrontpanel
display.
--+ Press I/(_) to turn off the system, and
check the following items after
"STBY" disappears.
• Are you using only the supplied
speakers'?
• Is anything blocking the ventilation
holes of the system?
• After checking the above items and
fixing any problems, turn on the
system. If the cause of the problem
cannot be found even after checking
all the above items, consult your
nearest Sony dealer.
"LOCKED"appearsinthefrontpanel
display.
---+ Set the child lock function to off
(page 42).
"D. LOCK"appearsinthefrontpanel
display.
---+ Contact your nearest Sony dealer or
local authorized Sony service facility.
"Exxxx"(xis a number)appearsin
thefrontpaneldisplay.
--+ Contact your nearest Sony dealer or
local authorized Sony service facility
and give the error code.
appearswithoutanymessageson
theentireTVscreen.
---+ Contact your nearest Sony dealer or
local authorized Sony service facility.
Thereisnopictureorthe pictureis
not outputcorrectly.
---+ Check the output rnethod on your
system (page 19).
---+ Hold down I1_ and VOL - on the unit
for more than 5 seconds to reset the
video output resolution to the lowest
resolution.
---+ For BD-ROMs, check the [BD-ROM
24p Output] settings in [Screen
Settings] (page 47).
Thereisnopicturewhenyoumakean
HDMIcableconnection.
---+ The unit is connected to an input
device that is not HDCP (High-
bandwidth Digital Content Protection)
compliant ("HDM[" in the front panel
does not light up) (page 19).
Thedarkareaof thepictureistoo
dark/thebrightareaistoobrightor
unnatural.
---+ Set [Picture Quality Mode] to
[Standard] (default) (page 36).
Picturenoiseappears.
--+ Clean the disc.
---+ If the picture output from your system
goes through your equipment to get to
your TV, the copy-protection signal
applied to some BD/DVD programs
could affect picture quality. If you still
experience problems even when you
connect your unit directly to your TV,
try connecting your unit to the other
input jacks.
56 Us
Animageisnotdisplayedonthe
entireTVscreen.
Check the setting of [TV Type] ill
[Screen Settings] (page 46).
The aspect ratio on the disc is fixed.
ColorirregularityoccursontheTV
screen.
[f the speakers are used with a CRT-
based TV or projector, install the
speakers at least 0.3 meters (1 foot)
from the TV set.
[f the color irregularity persists, turn
off the TV set once, then turn it on after
15 to 30 minutes.
Make sure that no magnetic object
(magnetic latch on a TV stand, health
care device, toy, etc.) is placed near the
speakers.
Thereisnosound.
The speaker coMs are not connected
securely.
Check the speaker settings (page 40).
Thereis nosoundfromtheTVvia the
HDMI(OUT)jackwhenusingthe
AudioReturnChannelfunction.
Set [Control for HDMI] in [HDM[
Settings] of [System Settings] to [On]
(page 50). Also, set [Audio Return
Channel] in [HDM[ Settings] of
[System Settings] to [Auto] (page 50).
Make sure that your TV is compatible
with the Audio Return Channel
function.
Make sure that an HDM[ cable is
connected to a jack on your TV that is
compatible with the Audio Return
Channel function.
Thesystemdoesnotoutputsoundof
TVprogramscorrectlywhen
connectedto aset-topbox.
Set [Audio Return Channel] in [HDM[
Settings] of [System Settings] to [Off]
(page 50).
Check the connections (page 20).
Severehumornoise is heard.
Move your audio equipment away
from the TV.
Clean the disc.
Thesoundlosesstereoeffectwhen
youplay aCD.
Select stereo sound by pressing
AUDIO (page 37).
Thesoundoutputsfromthecenter
speakeronly.
Depending on the disc, the sound may
output from the center speaker only.
Nosoundor only averylow-level
soundis heardfromthesurround
speakers.
---* Check the speaker connections and
settings (pages 18, 40).
Check the sound mode setting
(page 24).
Depending on the source, the effect of
the surround speakers may be less
noticeable.
A 2-channel source is being played.
Distortionoccursinthesoundof a
connectedequipment.
---* Reduce the input level for the
connected equipment by setting
[Attenuate - AUDIO] (page 48).
Asuddenloudmusicis heard.
The build-in sound demonstration is
activated. Press VOL - to reduce the
volume or press • to stop the
demonstration.
o.
-1
b"
3
o
-1
57 us
i!i lii iii llllllllllllllllllllllll iliI llllll!i
Radiostationscannotbetunedin.
---* Check that tile antenna (aerial) is
connected securely. Adjust the antenna
(aerial).
The signal strength of the stations is
too weak (when tuning in with
automatic tuning). Use manual tuning.
Thediscdoesnotplay.
The region code on the BD/DVD does
not match the system.
Moisture has condensed inside the unit
and may cause damage to the lenses.
Remove the disc and leave the unit
turned on for about half an hour.
The system cannot play a recorded disc
that is not correctly finalized
(page 60).
Filenamesarenotdisplayed
correctly.
The system can only display [SO
8859-1 compliant character formats.
Other character formats may be
displayed differently.
Depending on the writing software
used, the input characters may be
displayed differently.
A discdoesnotstartplayingfromthe
beginning.
Resume play has been selected. Press
OPTIONS and select [Play from
beginning], then press @.
Playbackdoesnotstartfromthe
resumepointwhereyoulaststopped
playing.
The resume point may be cleared from
memory depending on the disc when
•you open the disc tray.
• you disconnect the USB device.
• you play other content.
• you turn off the unit.
Thelanguagefor thesoundtrack/
subtitleor anglescannotbechanged.
---* Try using the BD's or DVD's menu.
Multi-lingual tracks/subtitles or multi-
angles are not recorded on the BD or
DVD being played.
Bonuscontentsorotherdatathatare
containedina BD-ROIVIcannotbe
played.
Try the following:
@ Remove the disc.
@ Turn the system off.
@ Remove and reconnect the USB
device (page 28).
@ Turn the system on.
(_) Insert the BD-ROM with
BONUSVIEW/BD-LIVE.
TheUSBdeviceisnotrecognized.
Try the following:
@ Turn the system off.
@ Remove and reconnect the USB
device.
@ Turn the system on.
Make sure that the USB device is
securely connected to the _) (USB)
port.
Check if the USB device or a cable is
damaged.
Check if the USB device is on.
58 us
If the USB device is connected via a
USB hub, disconnect it and connect
the USB device directly to the trait.
• The connected equipment's setting
for the [Control for HDMI] function
is correct.
Thepicture/soundis poor/certain
programsdisplaywitha lossofdetail,
especiallyduringfast-motionordark
scenes.
Picture/sound quality may be poor
depending on [nternet content
providers.
Picture/sound quality may be
improved by changing the connection
speed. Sony recommends a connection
speed of at least 2.5 Mbps for standard-
definition video and 10 Mbps for high-
definition video.
Not all videos contain sound.
Thepictureissmall.
---* Press 4" to zoom in.
The[ControlforHDMI]functiondoes
notwork("BRAVIA"Sync).
Check that [Coutrol for HDM[] is set
to [On] (page 50).
If you change the HDM[ connection,
turn the system off and on again.
If power failure occurs, set [Control
for HDM[] to [Off], then set [Control
for HDM[] to [On] (page 50).
Check the following and refer to the
operating instructions supplied with
the equipment.
• The connected equipment is
compatible with the [Control for
HDM[] function.
Thesystemcannotconnecttothe
network.
---* Check the network couuectiou
(page 21) and the network settings
(page 51 ).
YoucannotconnectyourPCto the
Internetafter[Wi-FiProtectedSetup
(WPS)]isperformed.
The wireless settings of the router may
change automatically if you use the
Wi-Fi Protected Setup function before
adjusting the settings of the router. In
this case, change the wireless settings
of your PC accordingly.
Thesystemcannotconnecttothe
networkorthenetworkconnectionis
unstable.
---* Check if the wireless LAN router is on.
Check the network connection
(page 21) and the network settings
(page 51 ).
Depending on the usage environment,
including the wall material, radio wave
reception conditions, or obstacles
between the system and the wireless
LAN router, the possible
communication distance may be
shortened. Move the system and the
wireless LAN router closer to each
other.
o.
o
-1
b"
3
o
-1
5gus
Devices that use a 2.4 GHz frequency
band, such as a microwave, Bluetooth,
or digital cordless device, may
interrupt communication. Move the
unit away from such devices, or turn
off such devices.
The wireless LAN connection may be
unstable depending on the usage
environment, especially while using
the Bhu, tooth function of the system.
[n this case, adjust the usage
environment.
Thewirelessrouteryouwantis not
showninthewirelessnetworklist.
Press RETURN to return to the
previous screen, and try [Wireless
Setup(built-in)] again. [f the wireless
router you want is still not detected,
select [Add a new' address.] from the
network list, then select [Manual
Registration] to input a network name
(SSID) manually.
Pairingcannothe done.
Move the Bhu'tooth device closer to
the unit.
Pairing may not be possible if other
B/uetooth devices are present around
the unit. In this case, turn off the other
Bluetooth devices.
Delete the system from your B/uetooth
device and perform pairing again
(page 29).
Connectingcannothedone.
The pairing registration information
has been erased. Perform the pairing
operation again (page 29).
Thereisnosound.
---* Make sure this system is not too far
from the Bluetooth device, or this
system is not receiving interference
from a Wi-Fi network, other 2.4 GHz
wireless device, or microwave oven.
---* Check that the Bhu, tooth connection is
made properly between this system
and the Bluetooth device.
Pair this system and the B/uetooth
device again.
Keep the system away from metal
objects or surfaces.
---* Make sure "BT" function is selected.
---* Adjust the volume of the Bluetooth
device first, if the volume level is still
too low', adjust the volume level on the
unit.
Thesoundskipsorfluctuates,orthe
connectionis lost.
The unit and the Blu('tooth device are
too far apart.
If there are obstacles between the unit
and your B/uetooth device, remove or
avoid the obstacles.
If there is equipment that generates
electromagnetic radiation, such as a
wireless LAN, other Bluetooth device,
or a microwave oven nearby, move
them away.
Playable Discs
Blu-ray Disc BD-ROM 1)
BD-R/BD-RE 2_
DVD 3) DVD-ROM
DVD-R/DVD-RW
DVD+R/DVD+RW
CD 3) CD-DA (Music CD)
CD-ROM
CD-R/CD-RW
60 us
l)Since Blu-ray Disc specifications are new and
evolving, some discs may not be playable
depending on the disc type and version. Also,
the audio nt/tput diffbrs depending on the
source, connected outpnt,jack, and selected
audio settings.
2) BD-RE: Vet.2.1
BD-R: Ver. l.l, 1.2, 1.3 including organic
pigment type BD-R (LTH type)
BD-Rs recorded on a PC cannot be played if
postscripts are recordable.
3) A CD or DVD disc will not play if it has not
been correctly finalized. For more infi_rmation,
reler to the operating instructions supplied with
the recording device.
Discs that cannot be played
•BDs with cartridge
• BDXLs
• DVD-RAMs
• HD DVDs
• DVD Audio discs
• PHOTO CDs
• Data part of CD-Extras
• Super VCDs
• Audio material side on DualDiscs
• For U.S.A. and Canada models: A disc
recorded in a color system other than
NTSC, such as PAL (This system
conforms to the NTSC color system.)
Notes on discs
This product is designed to play back discs
that conform to the Compact Disc (CD)
standard.
DualDiscs and some music discs encoded
with copyright protection technologies do
not conform to the Compact Disc (CD)
standard. Therefore, these discs may not be
compatible with this product.
Note on playback
operations of a BD/DVD
Some playback operations of a BD/DVD
may be intentionally set by software
producers. Since this system plays a
BD/DVD according to the disc contents the
software producers designed, some
playback features may not be available.
Note on double-layer
BDs/DVDs
The playback picture and sound may be
momentarily interrupted when the layers
switch.
Region code (BD-ROM/DVD
VIDEO only)
Your system has a region code printed on
the bottom of the unit and will only play a
BD-ROM/DVD VIDEO (playback only)
labeled with identical region codes or _7.
Playable Types of Files
Video >
HHHHHHHHHHHHHHHHHHHHHHHHHHHHHHHHHHHHHHHHHHHHHHHHHHHHHHHHHHHH_'
MPEG-I Video _1 PS .mpg, .mpeg _'
MPEG-2 Video _2 PS _3 .mpg, .mpeg
TS .4 .m2ts, .rots
Xvid AVI .avi
MKV .inky _.
MPEG4/AVC _5 MKV _1 .inky
MP4 '_1 .rap4, .m4v
TS *1 .m2ts, .mts
Quick .mov
Time _o
3gpp/% .3gp, .392,
3gppU { .3gpp, .3gp2
VC 1_1 WS .m2ts, .rots
WMV9 *1 ASF .wmv, .asf
Motion JPEG '_6 Quick .mov
Time
AVI .avi
61us
Music
MP3 (MPEG-I Audio .rap3, .mka .6
Layer lib
AAC"I .m4a, .aac .6, .mka '6
WMA9 Standard *l .wma
LPCM .way, .mka '6
FLAC *(_ .flac, .fla
AC3 %.ac3, .mka
Photo
!! !!!!!!i',,i i!ii!ii!ii!iiii'
JPEG .jpeg, .jpg, .jpe
PNG .png t9
GIF .gif *°
MPO .mpo*(_*l°
*1 The syslem may not play' this file lk)rmal nn a
DLNA server.
*2 The syslem can only play slandard delinitinn
video on a DLNA server.
*3 The syslem dnes not play' DTS %rmat files on
a DLNA server.
*4 The syslem can only play Dnlby Digilal
%rmat liles on a DLNA server.
*5 The syslern can support AVC up lo Level 4.1.
*6 The system dnes nol play' lhis lile %rmat nn a
DLNA server.
*7 The syslern can play AVCHD Ver.2.0 f,,trr'aal
(AVCHD 3D/Progressive).
*s The system play's AVCHD %rmat files thai are
recorded nn a digital video camera, elc.
The AVCHD formal disc will nol play ifil has
nol been cnrrectly finalized.
*9 The syslem does nol play animated PNG or
animaled GIF files.
*l°For MPO liles other than 3D, the key image nr
lhe lirsl image is displayed.
•Some files may not play depending on the file
format, the file encoding, the recording
condition, or DLNA server condition.
• Some files edited on a PC may not play.
• Some files may not be able to perlorm f;_st
forward or last reverse time(inn.
• The system does nnt play ended files such as
DRM and Lossless.
• The system can recognize the following files or
folders in BDs, DVDs, CDs and USB devices:
up to folders in the 9th layer (including the
root lolder)
up to 51)I)files/folders in a single layer
• The system can recognize the following files nr
folders stored in the DLNA server:
- up to folders in the 19th layer
up to 999 files/folders in a single layer
• The system can support frame rate:
up to 60 li_s for AVCHD only.
up to 30 t]_s for other video cndecs.
• The system can support video bit rate up to
40 Mbps.
• The system can support video resolution up to
1920 x 1080p.
•Some USB devices may not wnrk with this
system.
• The system can recognize Mass Storage Class
(MS(?) devices (such as flash memory or an
HDD), Still hnage Capture Devices (S1CDs),
and 101-key keyboards.
• The system may not play high bit rate vide() files
from a DATA CD smoothly. It is recommended
to play high bit rate video files using a DATA
DVD nr DATA BD.
62us
Supported Audio
Formats
Audio formats supported by this system are
as follows.
Function
Format "BD/DVD .... TV"
(DIGITAL IN)
LPCM 2ch O O
LPCM 5.1ch, ©
LPCM 7.1ch
Dolby Digital O O
Dolby TrueHD, ©
Dolby Digital
Plus
DTS O O
DTS-ES O* O*
Discrete 6.1,
DTS-ES Matrix
6.1
DTS96124O O *
DTS-HD High ©
Resolution
Audio
DTS-HD Master O
Audio
O: Supported lormat.
:Unsupported format.
" Decoded as DTS core.
Ii_,1";'I1_
For LPCM 2ch ti>rmat, the supported sampling
frequency of the digital signal is up to 48 kHz
when using the "TV" flmction.
Specifications
Amplifier Section
U.S.A. model only:
AUDIO POWER SPECIFICATIONS
POWER OUTPUT AND TOTAL
HARMONIC DISTORTION:
(FTC)
Front L + Front R:
With 3 ohms loads, both channels driven,
from 180 Hz 20,000 Hz; rated 50 watts
per channel nfininmm RMS power, with
no more than 1% total harmonic
distortion from 250 milliwatts to rated
output.
Other models:
POWER OUTPUT (rated)
Front L/Front R:
75 W + 75 W (at 3 ohms, 1 kHz,
1% THD)
POWER OUTPUT (reference)
Front L/Front R/Surround L/Surround R:
125 W (per channel at 3 ohms, 1 kHz)
Center:
250 W (at 6 ohms, 1 kHz)
Subwoofer:
250 W (at 6 ohms, 80 Hz)
Inputs (Analog)
AUDIO IN
Sensitivity: 1 V/400 mV
Inputs (Digital)
TV (Audio Return Channel/OPTICAL)
Supported formats: LPCM 2CH (up to
48 kHz), Dolby Digital, DTS
HDMI Section
Connector
Type A (19pin)
BD/DVD/CD System
Signal format system
NTSC
USB Section
(USB) port:
Type A (For connecting USB memory,
memory card reader, digital still camera,
and digital video camera)
O
-1
3
o
-1
63us
LAN Section
LAN (100) terminal
100BASE-TX Terminal
Wireless LAN Section
Blu-ray Disc/DVD receiver
(HBD-E6100/HBD-E4100/
HBD-E3100/HBD-E2100)
Standards Compliance
IEEE 802.11 b/g/n
Frequency and Channel
2.4 GHz band: channels 1 11
Bluetooth Section
Comnmnication system
Blur, tooth Specification version 3.0
Output
Bluetooth Specification Power Class 2
Maximum communication range
Line of sight approx. 10 m (33 ft) l)
Frequency band
2.4 GHz band
Modulation method
FHSS (Freq Hopping Spread Spectrum)
Compatible Bluetooth profiles 2)
A2DP 1.2 (Advanced Audio Distribution
Profile)
AVRCP 1.3 (Audio Video Remote
Control Profile)
Supported Codecs 3)
SBC 4), AAC
Transmission range (A2DP)
20 Hz 20,000 Hz (Sampling frequency
44.1 kHz, 48 kHz)
1)The actual range will vary depending on lactors
such as obstacles between devices, magnetic
fields around a microwave oven, static
electricity, cordless phone, reception
sensitivity, antenna's performance, operating
system, sol:ware application, etc.
2)Bluetonth standard profiles indicate the purpose
of Bluetnoth communication between devices.
3)Codec: Audio signal compression and
coIlversioI1 fktrmat
4) Subband Codec
FM Tuner Section
System
PLL quartz-locked digital synthesizer
Tuning range
87.5 MHz 108.0 MHz (100 kHz step)
Antenna (aerial)
FM wire antenna (aerial)
Speakers
Front/Surround (SS-TSB123) for
BDV-E6100
Front (SS-TSB123) for BDV-E4100
Dimensions (w/h/d) (approx.)
100 mm x 650 mmx 100 nma (4 in x
25 5/s in x 4 in) (wall-mounted part)
260 mm x 1,200 mmx 260 mm
(10 I/4 in x 47 I/4 in x 10 I/4 in) (whole
speaker)
Mass (approx.)
Front: 1.3 kg (2 lb 14 oz) (wall-mounted
part with speaker cord)
2.9 kg (6 lb 7 oz) (whole speaker)
Surround: 1.4 kg (3 lb 2oz)
(wall-mounted part with
speaker cord)
3.0 kg (6 lb 10 oz) (whole
speaker)
Front/Surround (SS-TSB122) for
BDV-E3100
Surround (SS-TSB122) for
BDV-E4100
Dimensions (w/h/d) (approx.)
90 mmx 205 mmx 91 nnn (3 5/8 in x
8 1/8 in x 3 5/8 in)
Mass (approx.)
Front: 0.53 kg (1 lb 3 oz) (with speaker
cord)
Surround: 0.62 kg (1 lb 6 oz) (with
speaker cord)
Front/Surround (SS-TSB121) for
BDV-E2100
Dimensions (w/h/d) (approx.)
95 mmx 189 mmx 80 mm (3 3/4 in x
7 1/2 in x 3 1/4 in)
Mass (approx.)
Front: 0.49 kg (1 lb 2oz) (with speaker
cord)
Surround: 0.54 kg (1 lb 4 oz) (with
speaker cord)
64us
Center (SS-CTB122) for BDV-E6100/
BDV-E4100/BDV-E3100
Dimensions (w/h/d) (approx.)
240 mmx 90 mmx 85 mm (9 1/2 in x
3 5/8 in x 3 3/8 in)
Mass (approx.)
0.58 kg (1 lb 5 oz) (with speaker cord)
Center (SS-CTB121) for BDV-E2100
Dimensions (w/hid) (approx.)
225 mmx 84 mm x 75 mm (8 7/8 in x
3 3/8 in x 3 in)
Mass (approx.)
0.5 kg (1 lb 2oz) (with speaker cord)
Subwoofer (SS-WSB123) for
BDV-E6100/BDV-E4100/BDV-E3100
Dimensions (w/h/d) (approx.)
225 mm x 365 mmx 345 mm (8 7/8 in x
14 3/8 in x 13 5/8 in)
Mass (approx.)
5.8 kg (12 lb 13 oz) (with speaker cord)
Subwoofer (SS-WSB122) for
BDV-E2100
Dimensions (w/h/d) (approx.)
220 mmx 305 mmx 255 mm (8 3/4 in x
12 1/8 in x 10 1/8 in)
Mass (approx.)
3.8 kg (8 lb 7 oz) (with speaker cord)
General
Power requirements
120 V AC, 60 Hz
Power consumption
On: 95 W
Standby: 0.3 W (For details on the
setting, see page 43.)
Dimensions (w/h/d) (approx.)
430 mmx 50.5 mmx 296 mm (17 in x
2 in x 11 3/,4in) incl. proiecting parts
Mass (approx.)
2.7 kg (5 lb 16oz)
Design and specifications are subject to
change without notice.
Standby power consumption: 0.3W
Over 85% power efficiency of amplifier
block is achieved with the full digital
amplifier, S-Master.
1>
O.
O
-1
3
o
-1
65 us
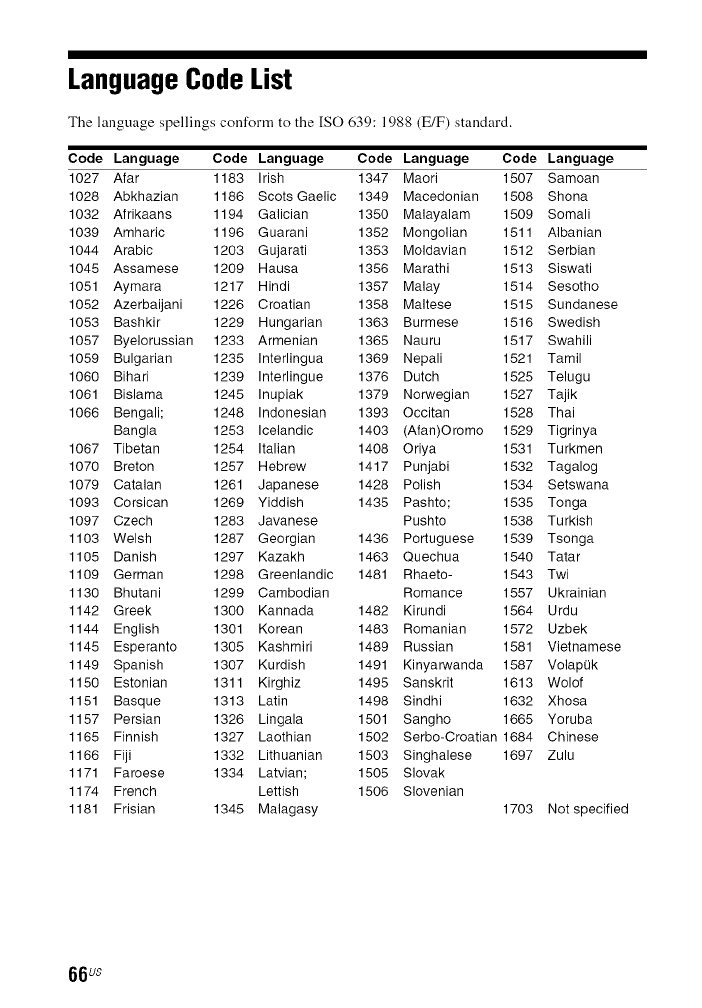
Language Code List
The language spellings conform to the [SO (739:1988 (E/F) standard.
Code Language Code Language Code Language
1027 Afar 1183 Irish 1347 Maori
1028 Abkhazian 1186 Scots Gaelic 1349 Macedonian
1032 Afrikaans 1194 Galician 1350 Malayalam
1039 Amharic 1196 Guarani 1352 Mongolian
1044 Arabic 1203 Gujarati 1353 Moldavian
1045 Assamese 1209 Hausa 1356 Marathi
1051 Aymara 1217 Hindi 1357 Malay
1052 Azerbaijani 1226 Croatian 1358 Maltese
1053 Bashkir 1229 Hungarian 1363 Burmese
1057 Byelorussian 1233 Armenian 1365 Nauru
Code Language
1507 Samoan
1508 Shona
1509 Somali
1511 Albanian
1512 Serbian
1513 Siswati
1514 Sesotho
1515 Sundanese
1516 Swedish
1517 Swahili
1059 Bulgarian 1235 Interlingua
1060 Bihari 1239 Interlingue
1061 Bislama 1245 Inupiak
1066 Bengali; 1248 Indonesian
Bangla 1253 Icelandic
1067 Tibetan 1254 Italian
1070 Breton 1257 Hebrew
1079 Catalan 1261 Japanese
1093 Corsican 1269 Yiddish
1097 Czech 1283 Javanese
1103 Welsh 1287 Georgian
1105 Danish 1297 Kazakh
1109 German 1298 Greenlandic
1130 Bhutani 1299 Cambodian
1142 Greek 1300 Kannada
1144 English 1301 Korean
1145 Esperanto 1305 Kashmiri
1149 Spanish 1307 Kurdish
1150 Estonian 1311 Kirghiz
1151 Basque 1313 Latin
1157 Persian 1326 Lingala
1165 Finnish 1327 Laothian
1166 Fiji 1332 Lithuanian
1171 Faroese 1334 Latvian;
1174 French Lettish
1181 Frisian 1345 Malagasy
1369 Nepali 1521 Tamil
1376 Dutch 1525 Telugu
1379 Norwegian 1527 Tajik
1393 Occitan 1528 Thai
1403 (Afan)Oromo 1529 Tigrinya
1408 Oriya 1531 Turkmen
1417 Punjabi 1532 Tagalog
1428 Polish 1534 Setswana
1435 Pashto; 1535 Tonga
Pushto 1538 Turkish
1436 Portuguese 1539 Tsonga
1463 Quechua 1540 Tatar
1481 Rhaeto- 1543 Twi
Romance 1557 Ukrainian
1482 Kirundi 1564 Urdu
1483 Romanian 1572 Uzbek
1489 Russian 1581 Vietnamese
1491 Kinyarwanda 1587 VolapQk
1495 Sanskrit 1613 Wolof
1498 Sindhi 1632 Xhosa
1501 Sangho 1665 Yoruba
1502 Serbo-Croatian 1684 Chinese
1503 Singhalese 1697 Zulu
1505 Slovak
1506 Slovenian
1703 Not specified
66us
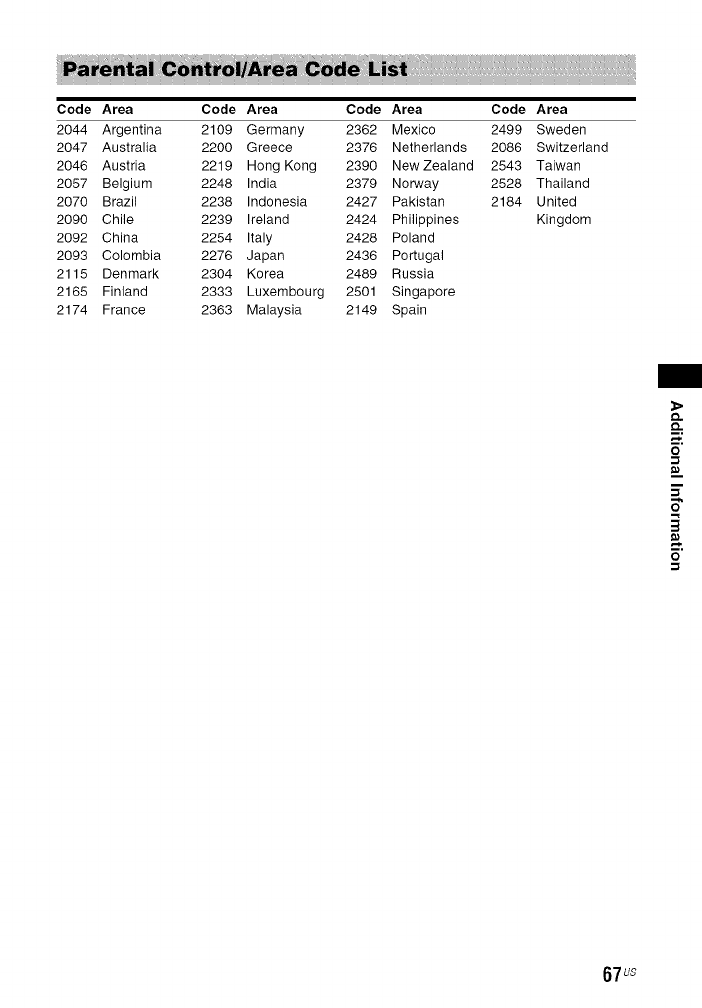
Code Area Code Area Code Area Code Area
2044 Argentina 2109 Germany 2362 Mexico 2499 Sweden
2047 Australia 2200 Greece 2376 Netherlands 2086 Switzerland
2046 Austria 2219 Hong Kong 2390 New Zealand 2543 Taiwan
2057 Belgium 2248 India 2379 Norway 2528 Thailand
2070 Brazil 2238 Indonesia 2427 Pakistan 2184 United
2090 Chile 2239 Ireland 2424 Philippines Kingdom
2092 China 2254 Italy 2428 Poland
2093 Colombia 2276 Japan 2436 Portugal
2115 Denmark 2304 Korea 2489 Russia
2165 Finland 2333 Luxembourg 2501 Singapore
2174 France 2363 Malaysia 2149 Spain
o.
O
5"
3
o
67 us
Index
Numerics
3D 27
3D Output Setting 46
A
A/V SYNC 37
Attenuate - AUDIO 48
Audio DRC 48
Audio Language 49
Audio Output 48
Audio Return Channel 50
Audio Settings 48
Auto Display 50
B
BD Audio MIX Setting 48
BD Hybrid Disc Playback Layer 49
BD Internet Connection 49
BD Parental Control 50
BD/DVD Menu Language 49
BD/DVD Viewing Settings 49
BD-LIVE 26
BD-ROM 24p Output 47
Blu_,tooth 28
BONUSVIEW 26
BRAVIA Sync 40
C
CD 60
Child Lock 42
Cinema Conversion Mode 47
Connection Server Settings 51
Control for HDM[ 40, 50
68 us
D
DLNA 33, 51
Dolby Digital 37
DTS 37
DVD 60
DVD Aspect Ratio 47
DVD Parental Control 50
DVD-ROM 24p Output 47
E
Easy Network Settings 52
Easy Setup 23
F
FM Mode 38
Front panel 13
Front panel display 14
O
Gracenote Settings 50
H
HDM[
YCbCffRGB (HDM[) 47
HDM[ Deep Color Output 47
I
Initialize Personal Information 52
[nternet content 32
[nternet Settings 51
[nternet Video Parental Control 50
[nternet Video Unrated 50
L
Language Code List 66
IV1
Main Unit illumination 50
Multiplex broadcast sound 38
N
Network Connection Diagnostics 51
Network Settings 51
Network Update 46
NFC 30
o
OSD Language 50
P
Parental Control Area Code 49
Parental Control Settings 49
PARTY Auto Start 51
Password 49
Pause Mode 48
Play information 27
Playable discs 60
O
Quick Start Mode 50
FI
Rear panel 14
Region code 61
Registered Remote Devices 51
Remote control 15
Remote Start 51
Renderer Access Control 51
Renderer Options 51
Reset to Factory Default Settings 52
Resetting 52
S
Screen Format 46
Screen Saver 50
Screen Settings 46
SLEEP 42
Slideshow 36
Software License [nformation 51
Sound Effect 48
Speaker Settings 40, 49
Distance 41
Level 41
Subtitle Language 49
System [nformation 51
T
Test Tone 41
TV Screen Size Setting for 3D 46
TV Type 46
u
Update 46
USB 28
W
WEP 22
WPA2-PSK (AES) 22
WPA2-PSK (TKIP) 22
WPA-PSK (AES) 22
WPA-PSK (TKIP) 22
o.
O
-1
3
o
-1
69us
The software of this system may be updated in the future. To find out details on any
available updates, please visit the following URL.
http://www.sony.com/blurayhtsupport/
I_ i_:::lI"1"111 ,IP gracenoL, e°
B/u-ray
B'l_-r_y _isc Java
POWERED
http://www.sony.net/
@2013 Sony Corporation Printed in Malaysia
"444673312"(1)
