Sony CCD TR416 User Manual 8MM VIDEO CAMERA RECORDER Manuals And Guides L0804276
SONY 8mm Camcorder Manual L0804276 SONY 8mm Camcorder Owner's Manual, SONY 8mm Camcorder installation guides
User Manual: Sony CCD-TR416 CCD-TR416 SONY 8MM VIDEO CAMERA RECORDER - Manuals and Guides View the owners manual for your SONY 8MM VIDEO CAMERA RECORDER #CCDTR416. Home:Electronics Parts:Sony Parts:Sony 8MM VIDEO CAMERA RECORDER Manual
Open the PDF directly: View PDF ![]() .
.
Page Count: 76

SONY
Video Camera
Recorder
Operating Instructions
I_ololo o_ui4tin_ tho unil, plea_;e read thi_ manual Iholou_ld}
_lfld rt_t_lifl il l!)I _IIIIlI'L' I't't_4(!1_(t2
Handtjram
CCD-TR516
Video 8
CCD- TR3151TR416 []
01998 by Sony Corporation
Welcotlle [
Long= alulations on your purdxase ot this Snnv Hand\ cam' camcorder. \Vith )our Hand) cam,
you can capture life's precious moments with superk_r picture and sound qualit). Your
Handycam is loaded with advanced features, but at the same time it is very easy to us_e. You will
soon be pr_Ktucing home vid_x_ that you can enjoy for years to come.
WARNING
To prevent fire or shock hazard, do not expose the unit to rain or moisture.
To avoid electrical shock, do not open the cabinet. Refer servicing to qualified persom_e] only.
Certain countries may regulate disposal of the battery used to power this product.
Please consult with your local authority.
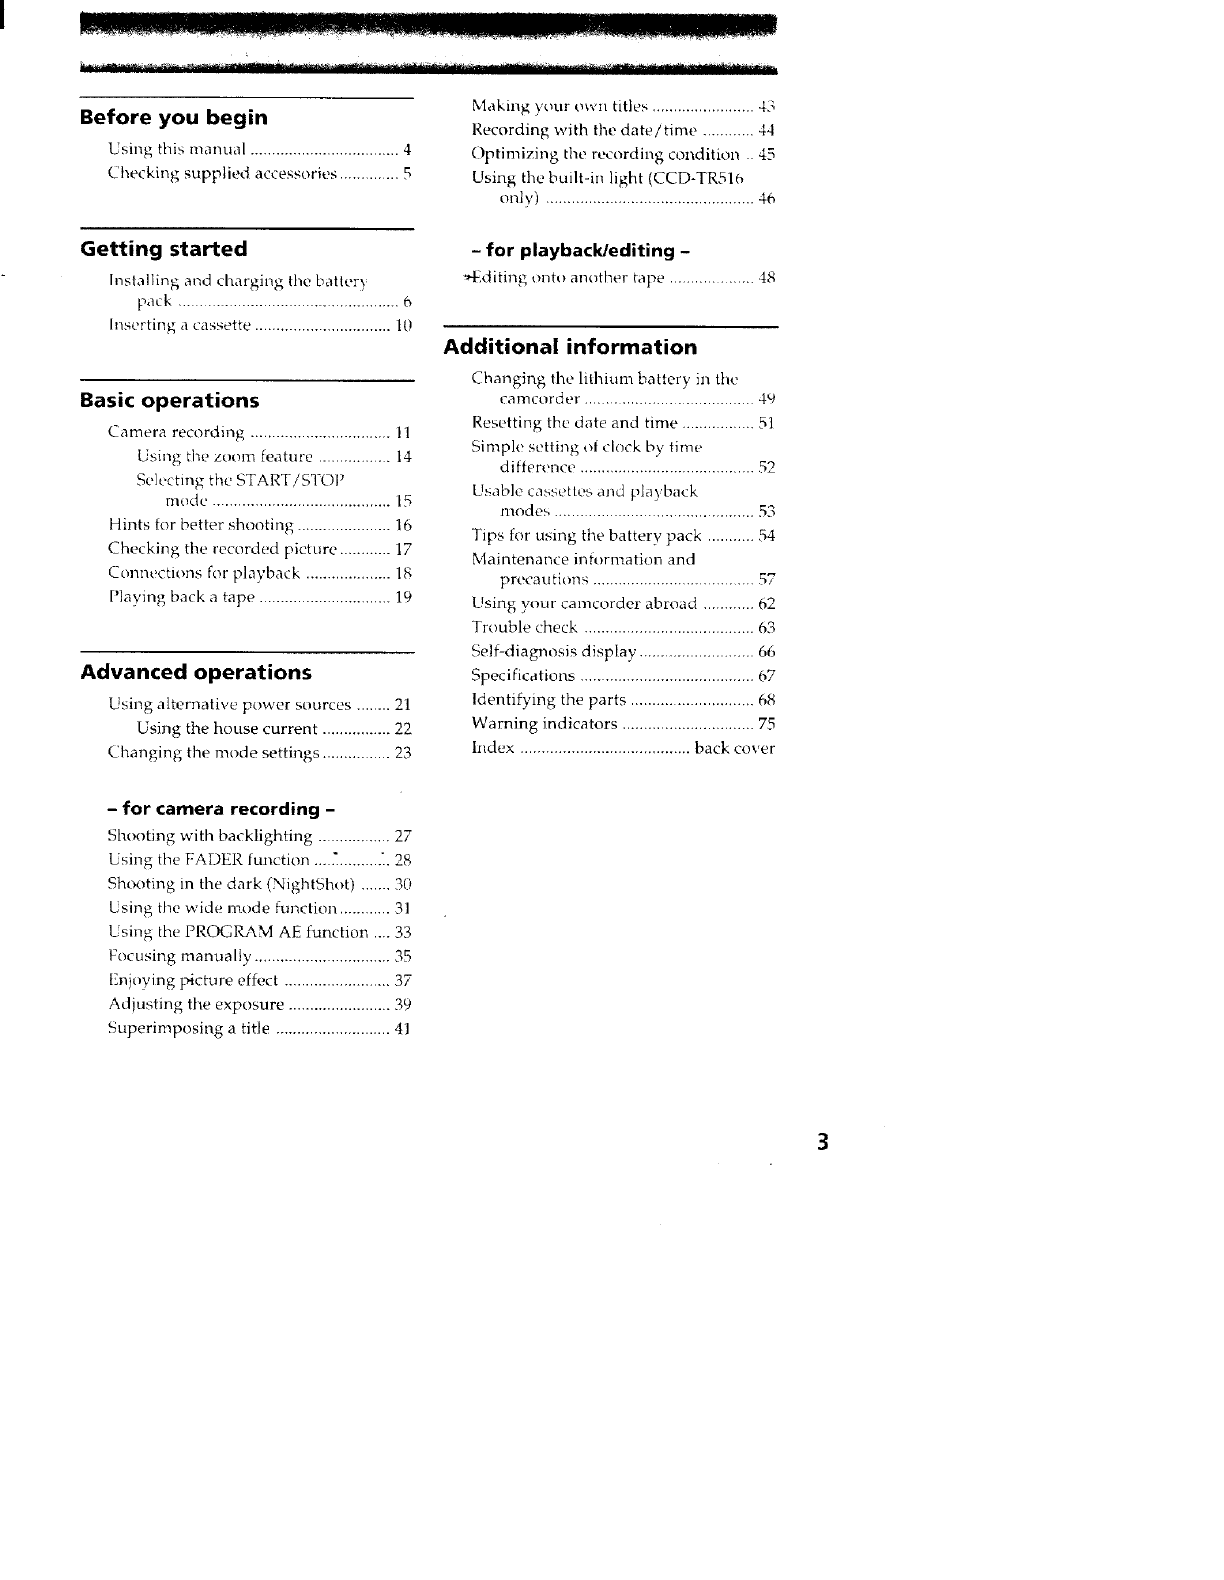
Before you begin
Using this manual ................................... 4
Checking supplied accessories .............. 5
Making your own titles ........................ 43
Recording with the date/time ............ 44
Optimizing the recording condition .. 45
Using the built-in light (CCD-TRSI(_
only) ................................................. 46
Getting started
Installing ancl charging tilt, batter,_
pack ............................................... 6
Inserting a cassette ................................ 10
Basic operations
Camera recording ................................. 11
Using the zoom teature ................ 14
Selecting the START!STOP
mode .......................................... 15
Hints for better shooting ...................... 16
Checking the recorded picture ............ 17
Connections for playback .................... 18
Playing back a tape ............................... 19
Advanced operations
Using alternative power sources ........ 21
Using the house current ..................
Changing the mode settings ................ 23
-for playback/editing -
%Miting onto an_ther tape .................. 48
Additional information
Changing the lithium battery in the
camcorder. .................................... 49
Resetting the date and time ................. 51
Simple setting ol clock by time
difference ......................................... 52
Usable cassettes and pla} back
modes ............................................... 53
Tips for using the battery pack ........... 54
Maintenance intormation and
precautions ...................................... 57
Using your camcorder abroad ............ 62
Trouble check ........................................ 63
Selt-diagnosis display ........................... 66
Specifications ......................................... 67
Identifying the parts ............................ 68
Warning indicators ............................... 75
Index ........................................ back co;er
- for camera recording -
Shooting with backlighting ................. 27
Using the FADER function ...._ .......... _. 28
Shooting in the clark (NightSbot) ....... 30
Using the wide mode hmction ............ 31
Using the PROGRAM AE function .... 33
Focusing manually ................................ 35
En}uying t_icture effect ......................... 37
Adjusting the exposure ........................ 39
Superimposing a title ........................... 41
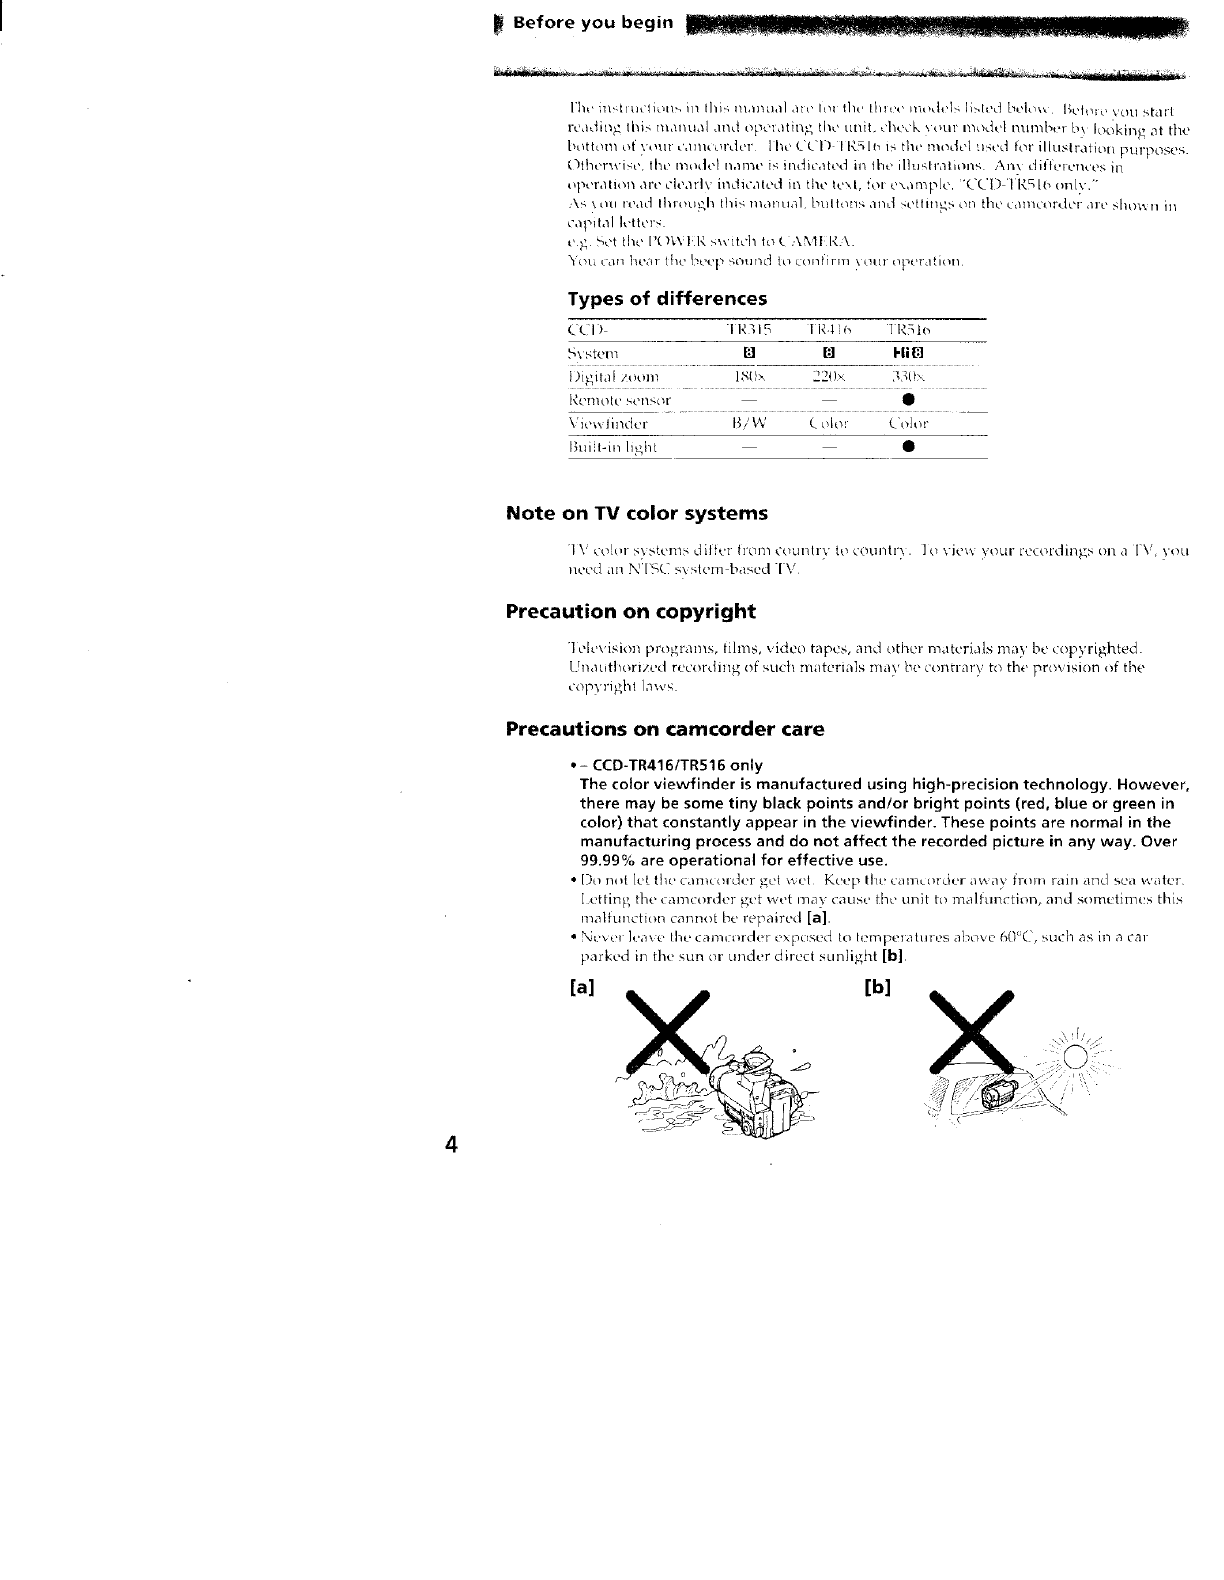
Before you begin _ .......................................... "7".................................
Ihc u_dt u_liou'+ in I]/i_ mm_lhl] ,lit" h_t the IIl_t'c niodcl> ]i>h'd bel_ _ Belo_o \rclu start
readh+_ tl_i> mat_ttaal and opctatm,_ the ut_it. ,:h,.x'k _.our model tmmbe+ b_ lo0kh+_ +t fl+te
bottom (ff ',out t:antt or,.ier I he (LI) I RSII_ t> the model used for illustrafiou purpo._c'-;.
Olhemvi.c, the model n,m'+c is indicated hl ih_'ilhpqralhm'< An\ diilett.,nces h_
t+pt,ration are clearly indicated it_ the teM, tot u\ampte, %'CD 'IR5 tO onb.',"
:\_ \tltl read lh+ou_h thim tlldtltla], bultot_!_ and >etlttl_s otl {[Ic uatltcoTder al+e sho>, u in
capHal h.tter>
e_ >et flee ['()WFII_ _,;',itch Io£ AMIR\.
_Otl Cdtl hcai the 12L'e[+ 5OtltIL'] 10 conP]rlll _ tl/tI operation
Types of differences
llx I l R4'i+ [RSIot_'¢+I>"'+
t)igita I zoom 18(>- +_ )'<
I'_I.'!110 ti.'y.elIsor
Viewiindt r _/W (_olo', Color
Bui t-in light •
Note on TV color systems
| V corer _-;_,stenl_-; di]fel h'ol+n ¢(xmtlv to cot.nqtl'_,. ] o vie':,: _,our recordillg_, o1/+a ['V, Vou
need an N'['S(" '+.\stem bd_ed "1V
Precaution on copyright
1 oh'vision programs, films, video tapes, and t ther materials may be copyrighted.
Unautllorized recording of such materials ma) be UOlItl arv to the pro,+ision of the
COpyl+ighl ]a\v%.
Precautions on camcorder care
• - CCD-TR4161TR516 only
The color viewfinder is manufactured using high-precision technology. However,
there may be some tiny black points andlor bright points (red, blue or green in
color) that constantly appear in the viewfinder. These points are normal in the
manufacturing process and do not affect the recorded picture in any way. Over
99.99% are operational for effective use.
*[)t} no[ let t}le cant((llc]er get _xet K_.!eptile t.au/__t_l+ci+_,ra_.*,av from ram and sea _<_lte_
[ ettin_; the camcorder get wet i+na) cause the unit to malfunction, and somt times this
malfunction cannot be repaired [a].
• Nc_el ]ca_ etilt' (i_l_/t ol+d(?l exposed to [ompeiatu+es aI0ove 60(, such as in a cal
parked in the sun or under direct sunligh_ [b],
[a] [b]
4
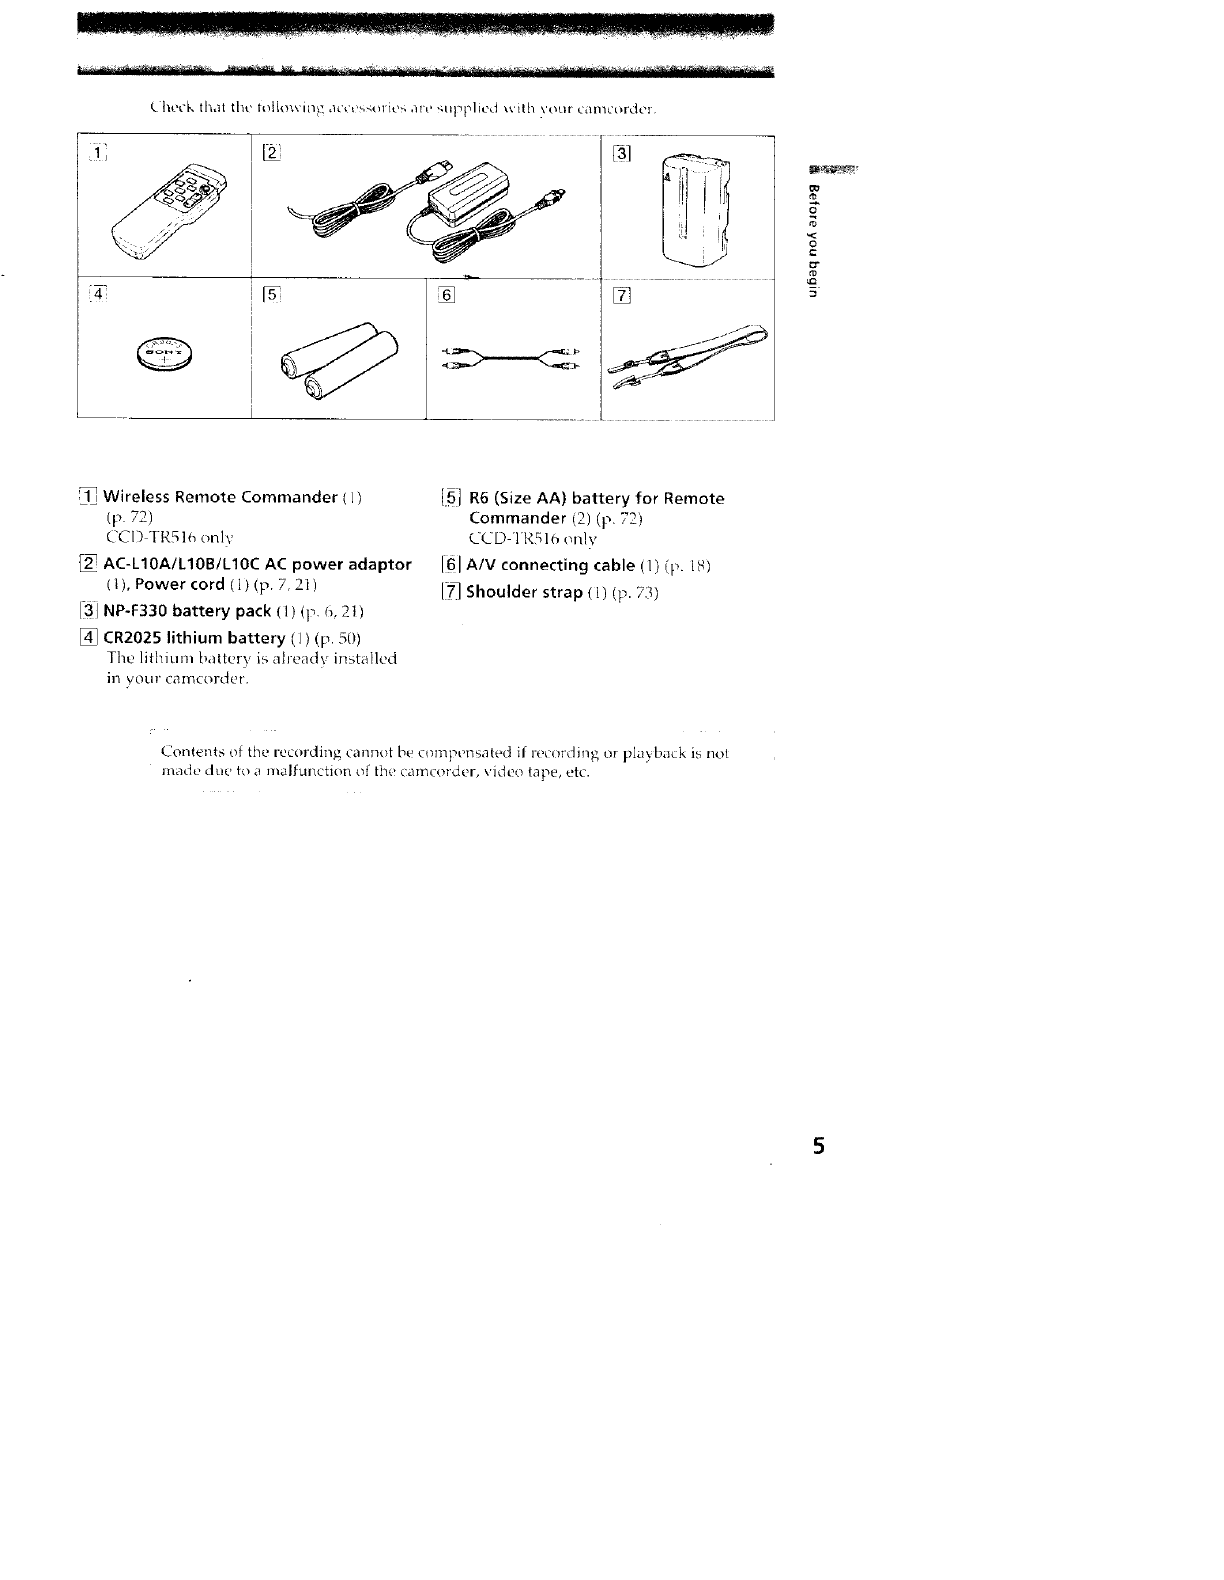
_i',,acktl_at tilt' foLbawingac,:e_-_orw_,au_ ,_uppik, d with _OLU camcorder
I
% []
o
Wireless Remote Commander ( L)
(p 72)
CCD TIe.5I_ one
AC-L10A/L10B/L10C AC power adaptor
( t), Power cord (]) (p. 7, 2] )
[_i NP-F330 battery pack (1) (p t}, 21)
[] CR2025 lithium battery (1) (p. 50)
The lithium battery is ahead) installed
in your camcorder.
{5] R6 (Size AA) battery for Remote
Commander (2) (p. 72)
CCD IR516 only
fISHA/V connecting cable (1) (p. 18)
[-7_Shoulder strap (1) (p. 73)
Contents of the recording cannot be compensated if recording or playback is not
made due t_ a malfunction of the camcorder, video tape, etc.
Getting started
I_.'10I'_.' LISlll_ \ tlUI can_coi'd,.'r. _£)tl tii_t ll(.t?_ to ii'_stall al;d charge the batter\ pack
lhi'_ camcc, rder operate,_ onl_ with the "Ln[oLI 1_tlbM" batter> pack (I serie,_)
"lnl:_H II ttILXI" is a irademark _t Son} corporalion
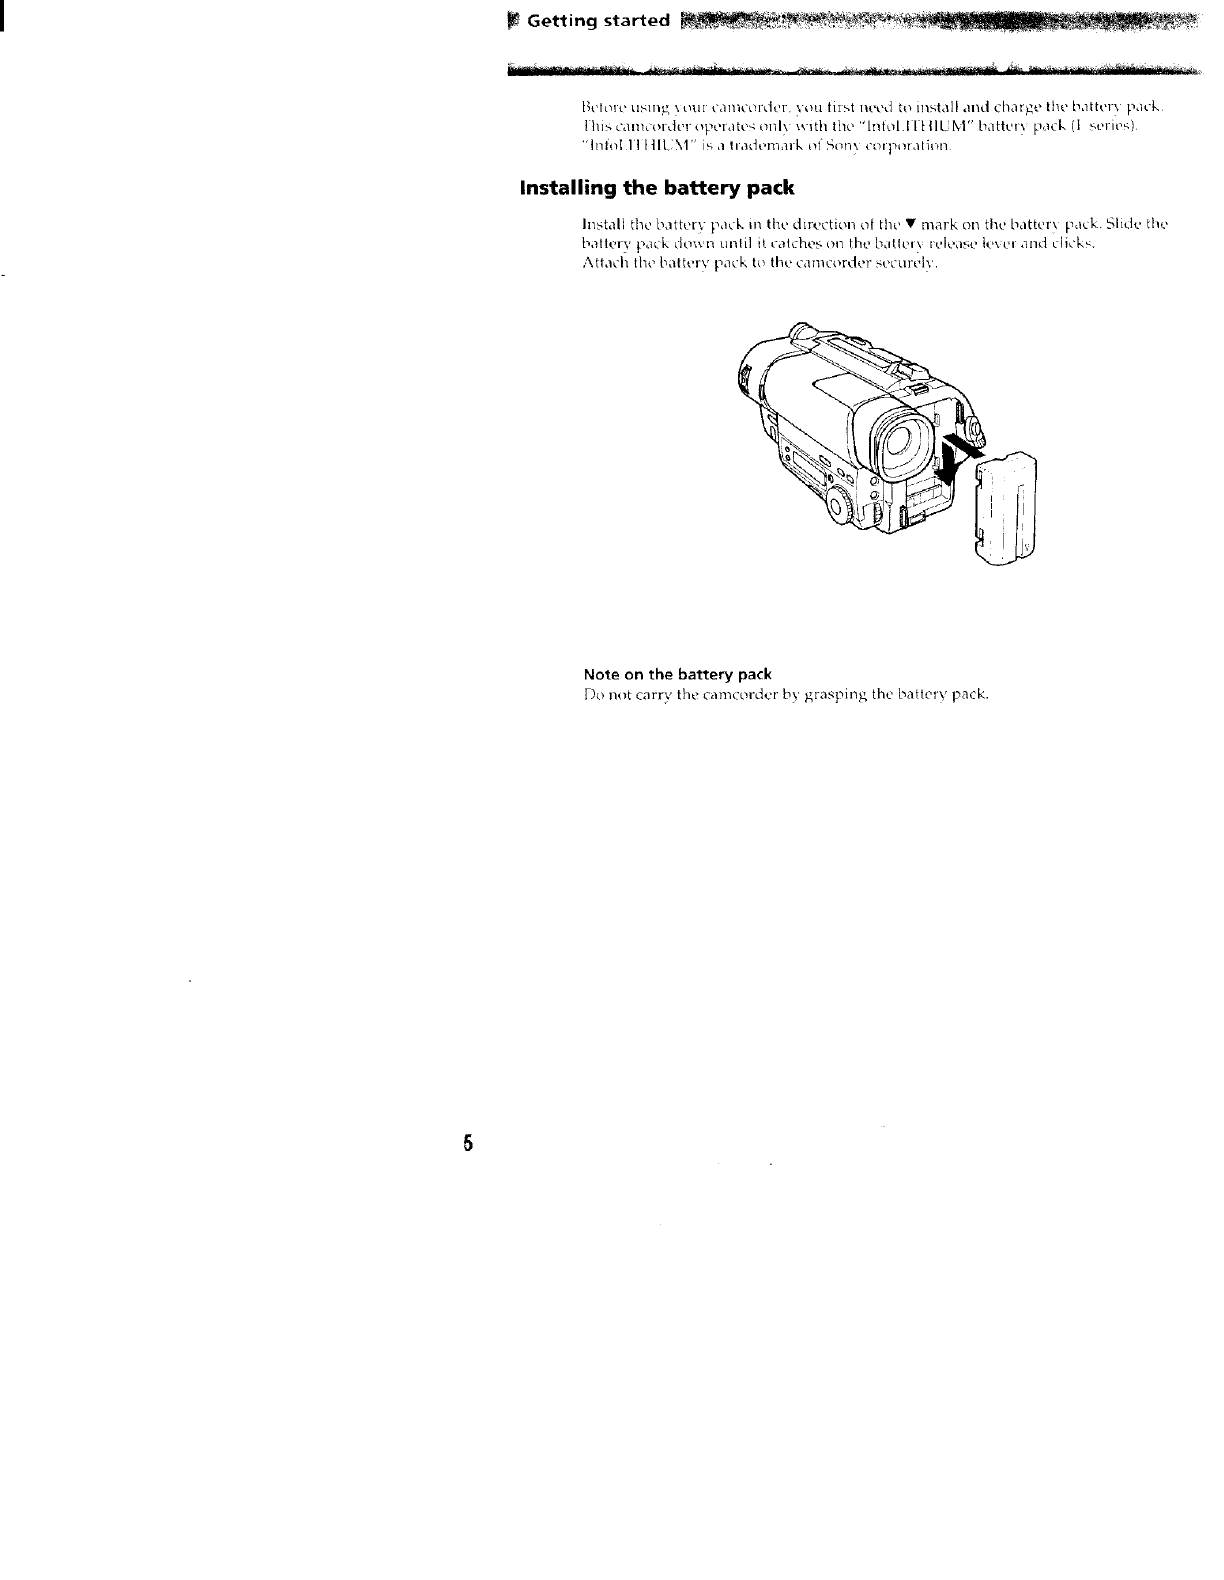
Installing the battery pack
h_stall the battery pack m the direction ot the •mark on tl_e batter) pack Slide file
ballery pm_k do_,,n mllil i_ calches on the b_dle_ _elease teve_ and click,,.
Attach the battery pack to th(, camcorder secm'_'lv.
iI _ [_
3
Note on the battery pack
Do not carry the camcorder by y,raspin_, the battery pack.
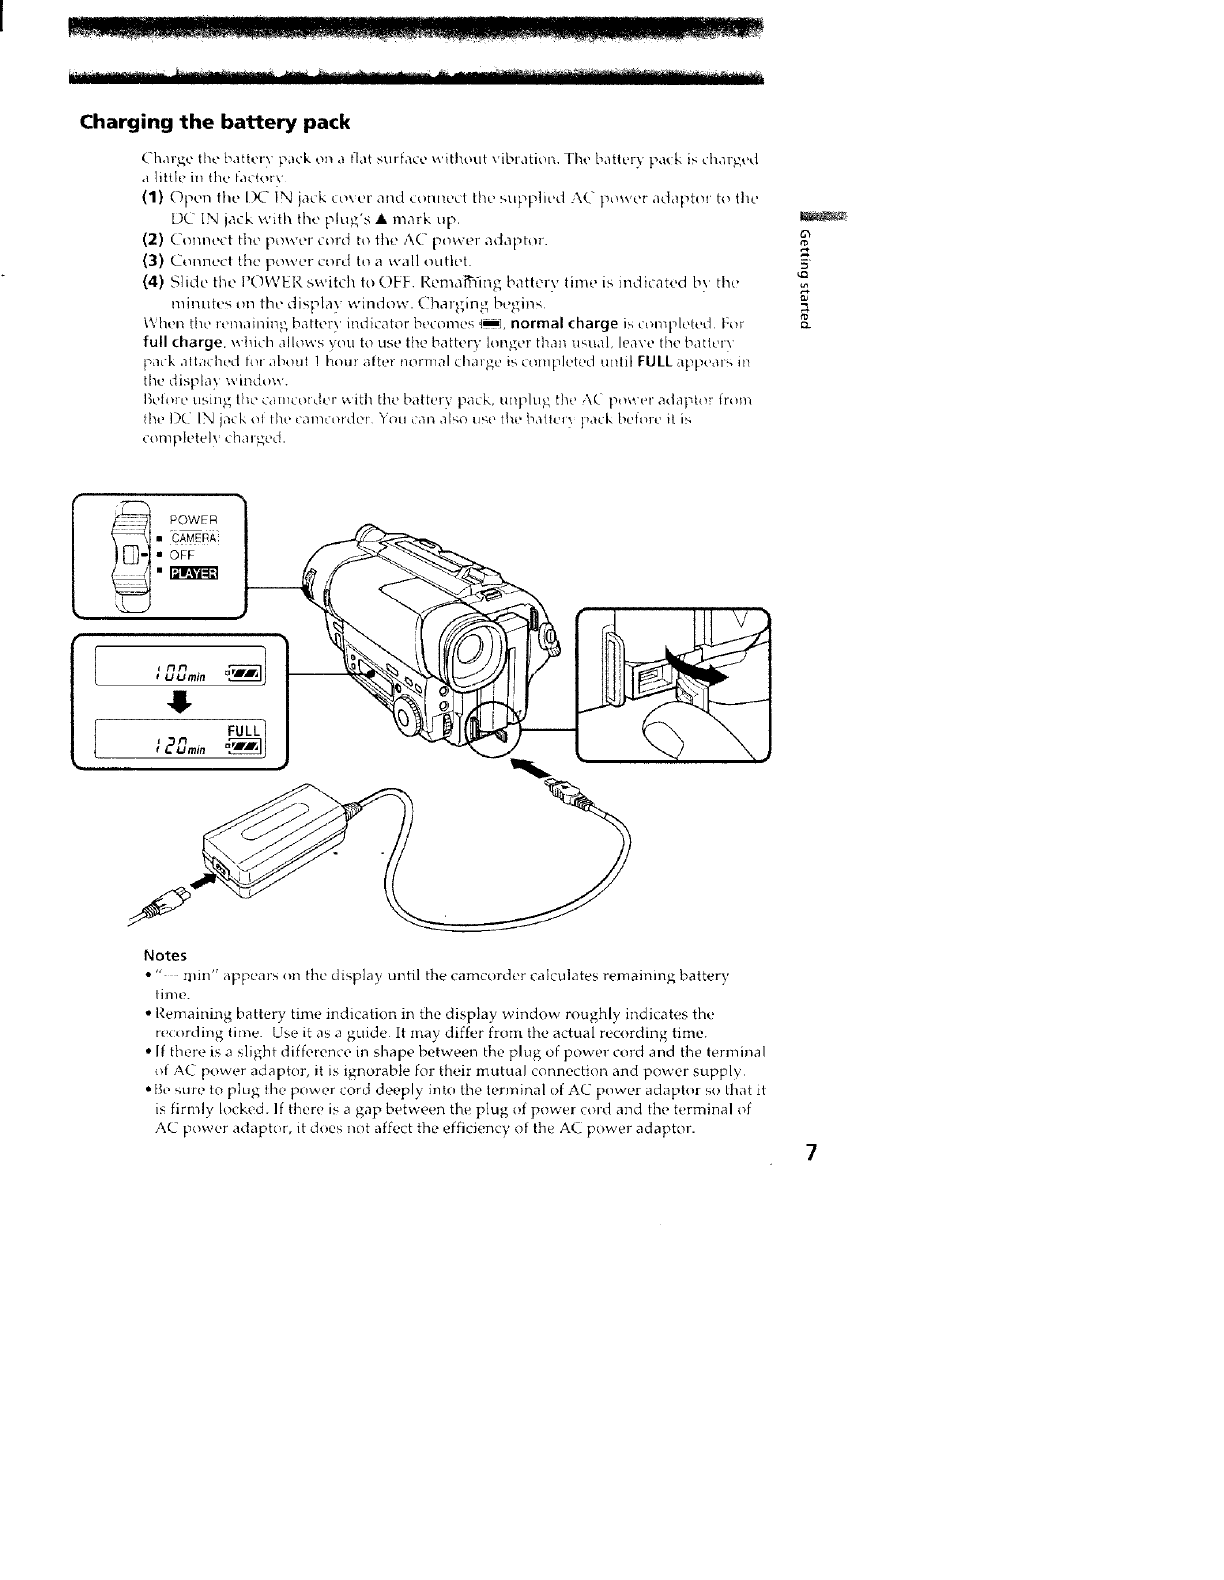
Charging the battery pack
Charge the battery pack on a flat surface without vibration. The batlery pack is charged
,Ilittleinfile hl_tor\
(1) Open lhe IX2 iN ia_.k covur and connect the supplied .,\C power adaptor to the
DC IN jack with the plug's • mark up.
(2) ( onneet the power cord to the AC power adaptor.
(3) Connect the power curd to a wall outlet.
(4) Slide the POWEI{ switch to OFF, Remai_ling battery time is indicated b\ the
minutes o1"1 the display window. Charging begins
_Ahen the remaining batter>' indk:ator becomes (i]; normal charge is completed For
full charge, which allows _uu to use the battery longer than u'_ual, leave the battery
pmk ath_ched h_ _d_.,m! ! hour alter normal charge it, completed until FULL appear', m
the displa} wiDdow,
I_elore using the can/colder v, ith the batter) pack, unplug the AC power adaptor irom
the 1")(7IN jack oi the camcc, rdel You call ,tlc,o ilge the hatlcl} }la(k befitrc it is
cumpletelv charged.
5_
Notes
•" l:llin" appears on the displa} until the eamcorder ealculates remaining battery
lime.
•Remaining battery time indication in the display window roughly indicates the
recording time. Use it as a g_fide It may differ from the actual recording time.
• If there is a slight difference in shape botween the plug of power cord and the terminal
of AC power adaptor, it is ignorable for their mutual connection and power supply
• B,, stm, to plug fl_e power cord deeply into the terminal of AC power adaptor so that it
is firmly locked. If there is a gap between the plug of power cord and the terminal of
AC power adaptor, it dues not affect the efficiency of the AC power adaptor.
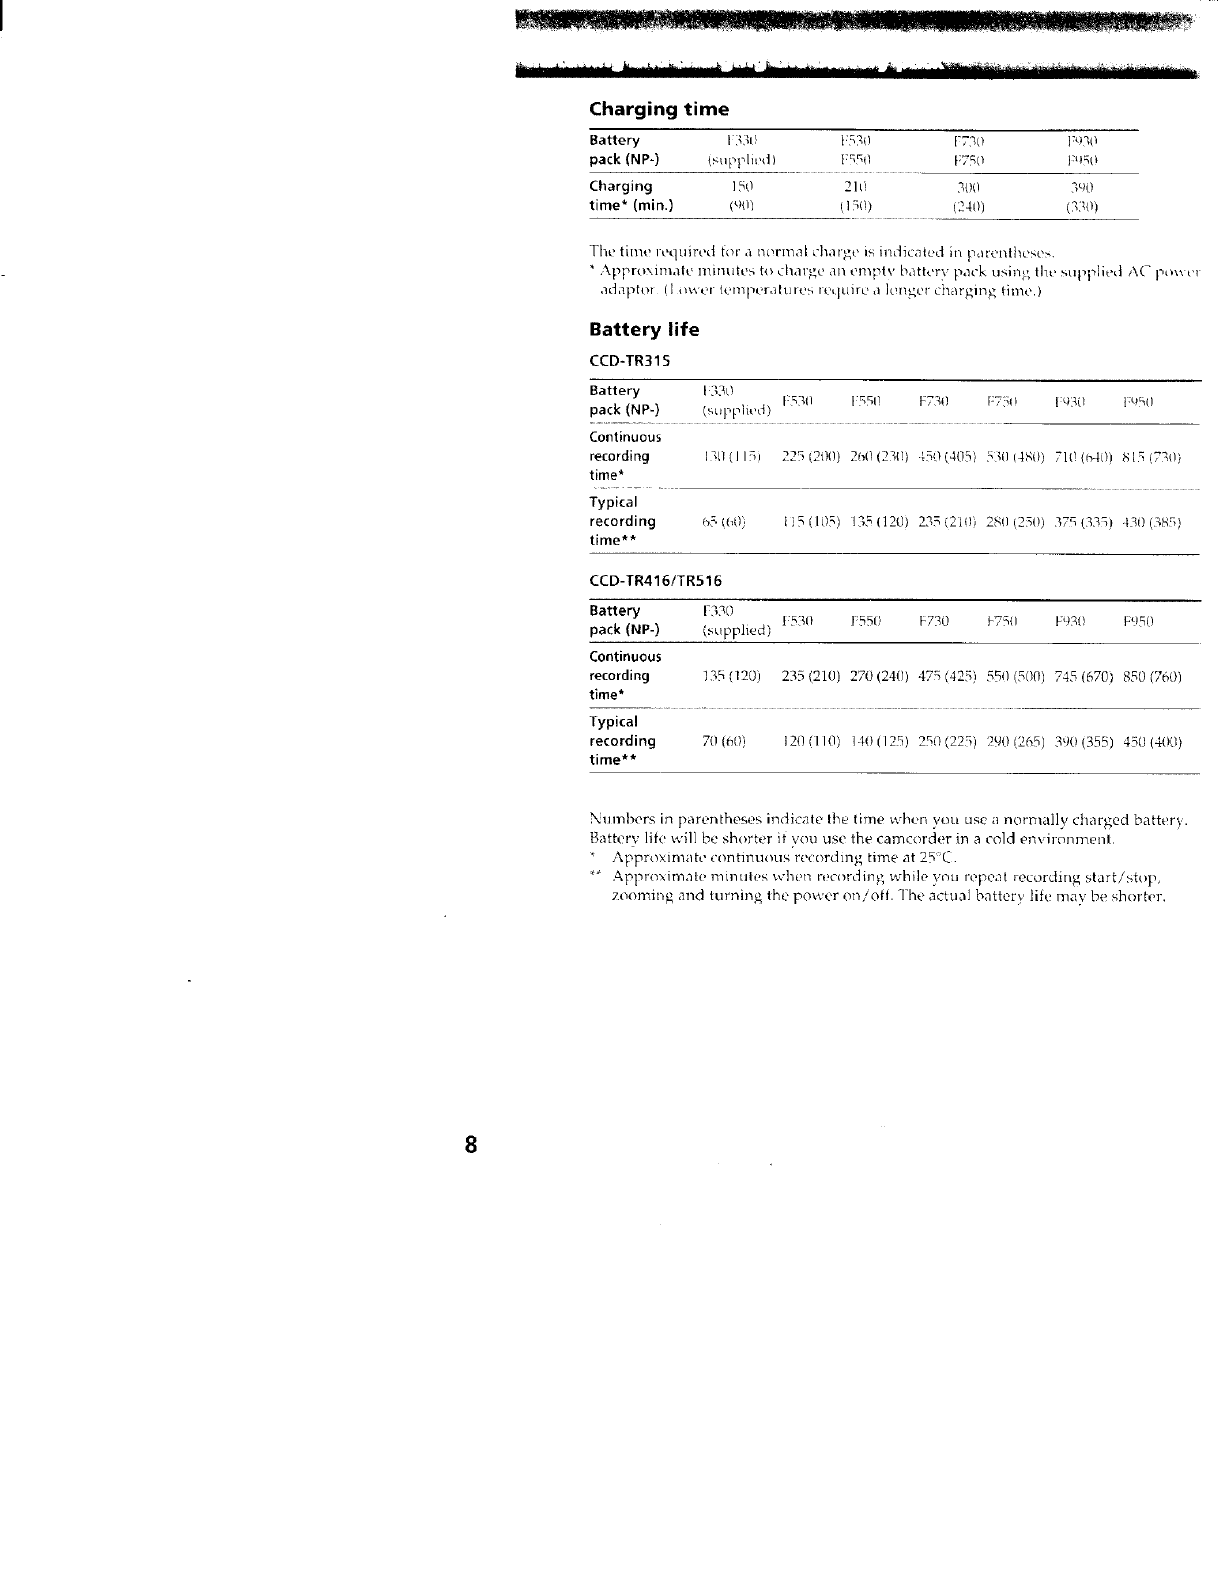
Charging time
Battery 13_U 153(1 [730 1:_]30
pack (NP-) tsupplied } F_Fil 1750 |alSO
Charging 15£) 210 300 3_0
time* (min.) ('_lq !150) (240/ (330)
The time required tor a i_l_rmal ci_arge is indicated in parenlhcsc>.
" .",.pproxmlale minutes to charge an emplv batter:, pack tJS, iI'l_ the supplied AC Po_x cl
adaptor (I _ner iempcralute5 require a kqlgcr charglng qme.)
Battery life
CCD-TR315
Battery F330 F530 i:551) F730 F73O D_3il la_0
pack (NP-} (supplied)
Continuous
recording I_l/(I 15) 225 (2tlO) 2_0 (231!) '_5(1(405) 5_(1 (4gO) Tit! ((_40) 815 (730)
time*
Typical
recording _5 (00) I ]5 (105) 135 (]20) 235 (210) 28(I 1250) 375 (335) 130 (385)
time**
CCD-TR416/TR516
Battery F330 !:530 F550 F730 k75(! F<)30 F950
pack (NP-) (supplied)
Continuous
recording 135 (120) 235 (210) 270 (240) 475 (425) 550 (500) 745 (670) 850 (7(_0)
time*
Typical
recording 70(60) 120(/10) 140(125) 25'3(223) Pch)(2(_5) 3_K!(355) 450(400)
time**
Numbers in parentheses indicale line lime ;x hef_ you use a normally charged batter}.
Battery life will be shorter if you use the camcorder in a cold environmenl
* Approximate continuous re(ording time at 2q(-.
*_ Appr(_ximale minuleswhen r(!cordilng while yruJ repeal recording start/stop,
zooming and turning the power on/off. 'lhe actual battery life may be shorter,
8
Note on remaining battery time indication during recording
1-_em<]ining baiter\ thole, it, displayed in the vie_*, fiitder, ttowever, tt_e indicalion n'la'<
not be displayed properly, depencimg on using conditions and circumstances
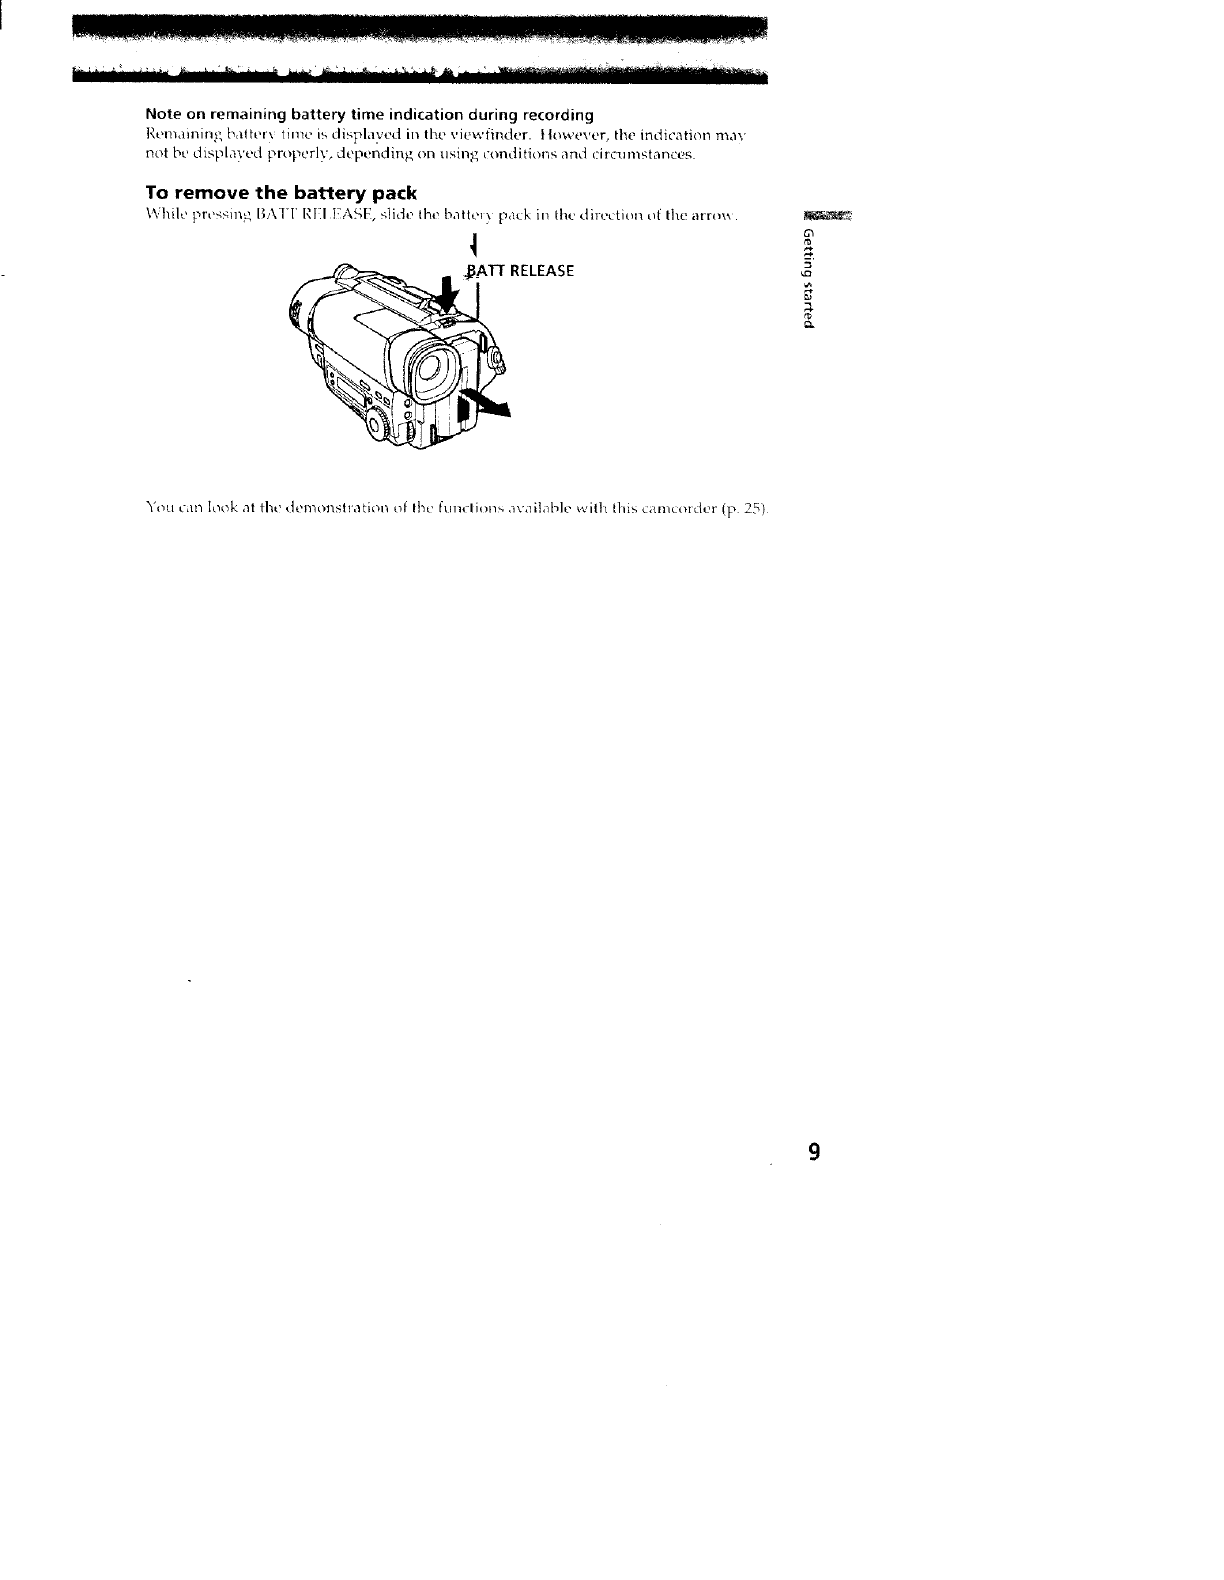
To remove the battery pack
\_ hih, pressing I_AIT RII ]_A5[_', slide ill_ batte_ ) pack in t}/_, direction _f H_e arrm_.
_BAT[ RELEASE u_
g.
You can look at the demonslration of It_t_ funclions <t",'ail_lblo vvilh this cltll/c_._r c|ei (p 25)
_iiP_"_llik_iil'_ i _ _ i _ l.'.._- ¸* .... :__._a_ ................ i,_._i
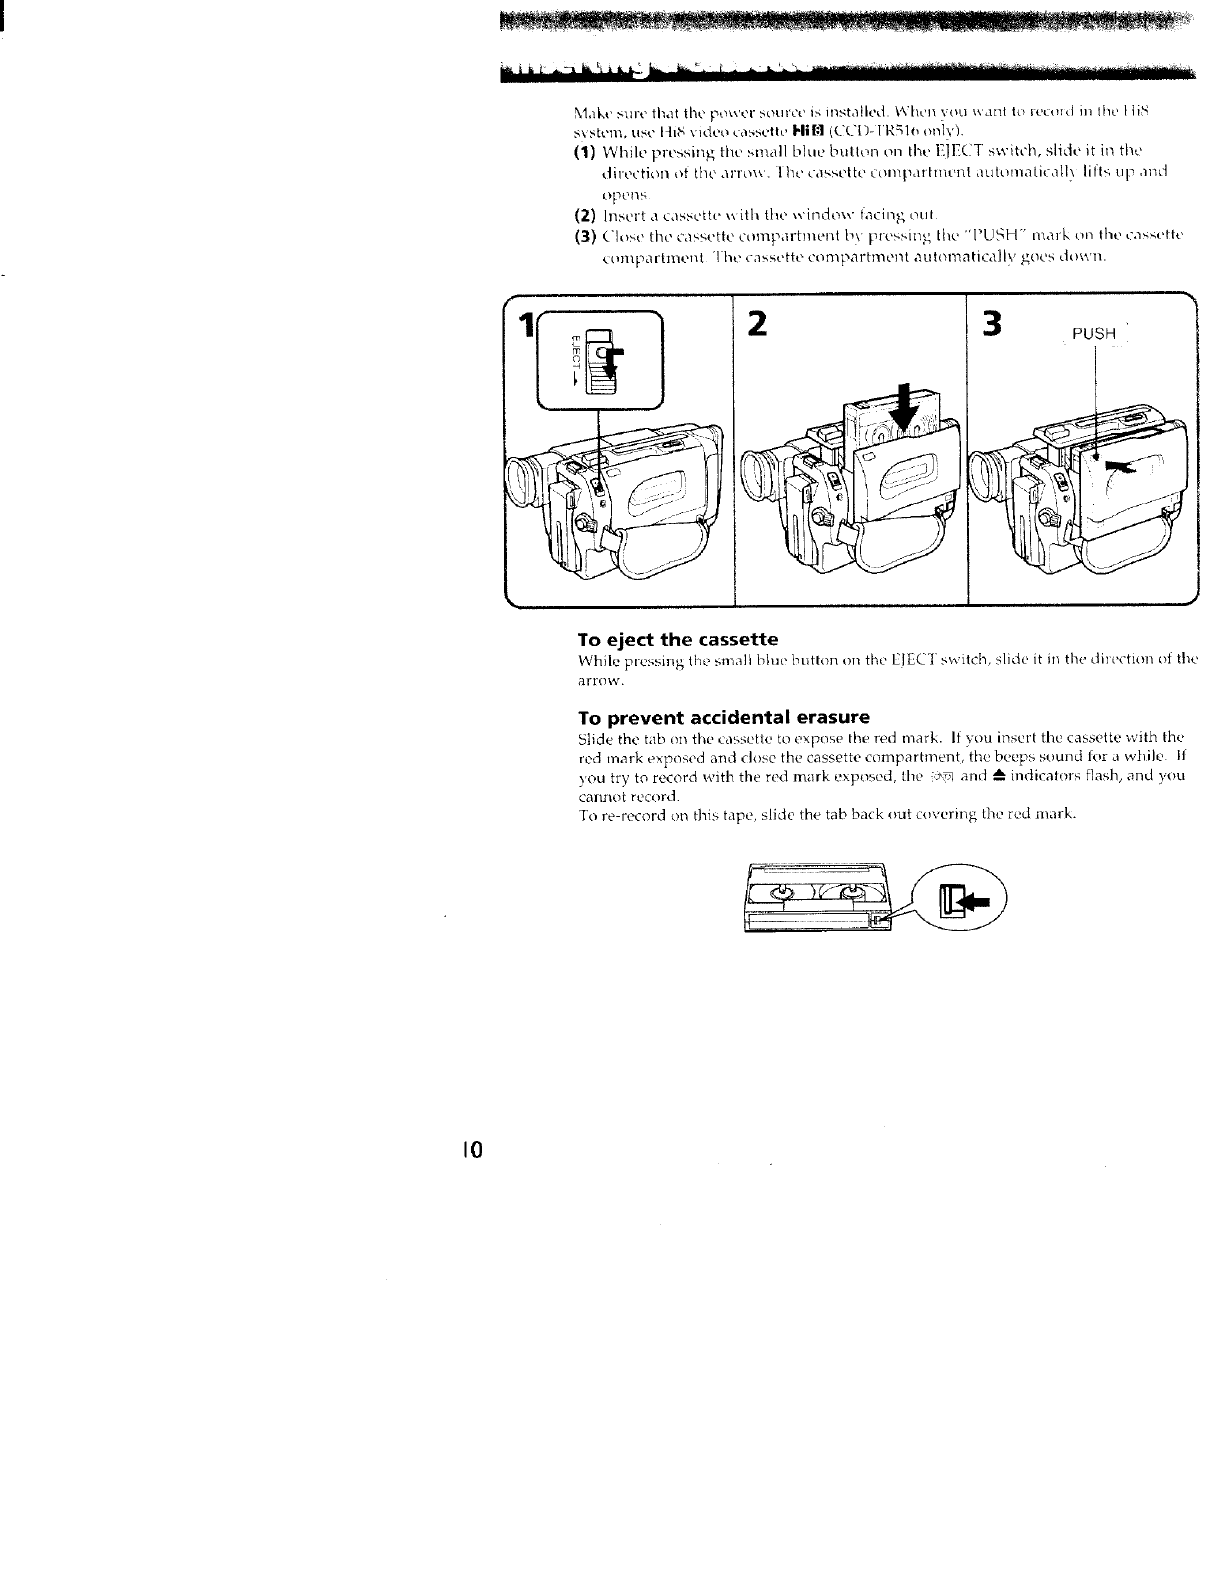
Mak_' sure that the power source Is JIlStail_'d. _ hell _Otl _ ail[ to i-eo_ld ill lhe I ]iS
SVStt'lll, USe I-li_ vidt'o t a>st'lte Hi[:] (CCt)-lR510 only).
(1) While prt'$sing the small blue butlon cm the E1ECI swffch, slide it in title
direction of the <llTO\_,. I }lt' t<t_4-,eltecOIllpdriillell{ automaticall} Iifl_ u!_ and
OpOllS
(2) Insert a cassette _ith tile \vindow facing Otli
(3) ('lose the cassette eolllpilrtll/el/l bv il_rt*ssiI1 _ the' "PUSH" mark nn the cassette
eOll/partlllt211[ 'Il_e CilSSetto eoll/par[lllt._ll[ aulon_atically goes dOv¢ll.
2L3Pus.
To eject the cassette
While pressing the small blue button on the I_IEC] s_ itch, slide it m the dh eetion of the
arro\_'.
To prevent accidental erasure
Slide the tab on thu cassette to expose the red mark, If you insert the cassette with the
red mark exposed and close the cassette compartment, the beeps sound tot a while If
you try to record with the red mark exposed, the :_,g and i. indicators flash, and you
call;riot rl_!c;ord
To re-record on this tape, slide the tab back out covering Lhe ied mark.
I0
Basic operations
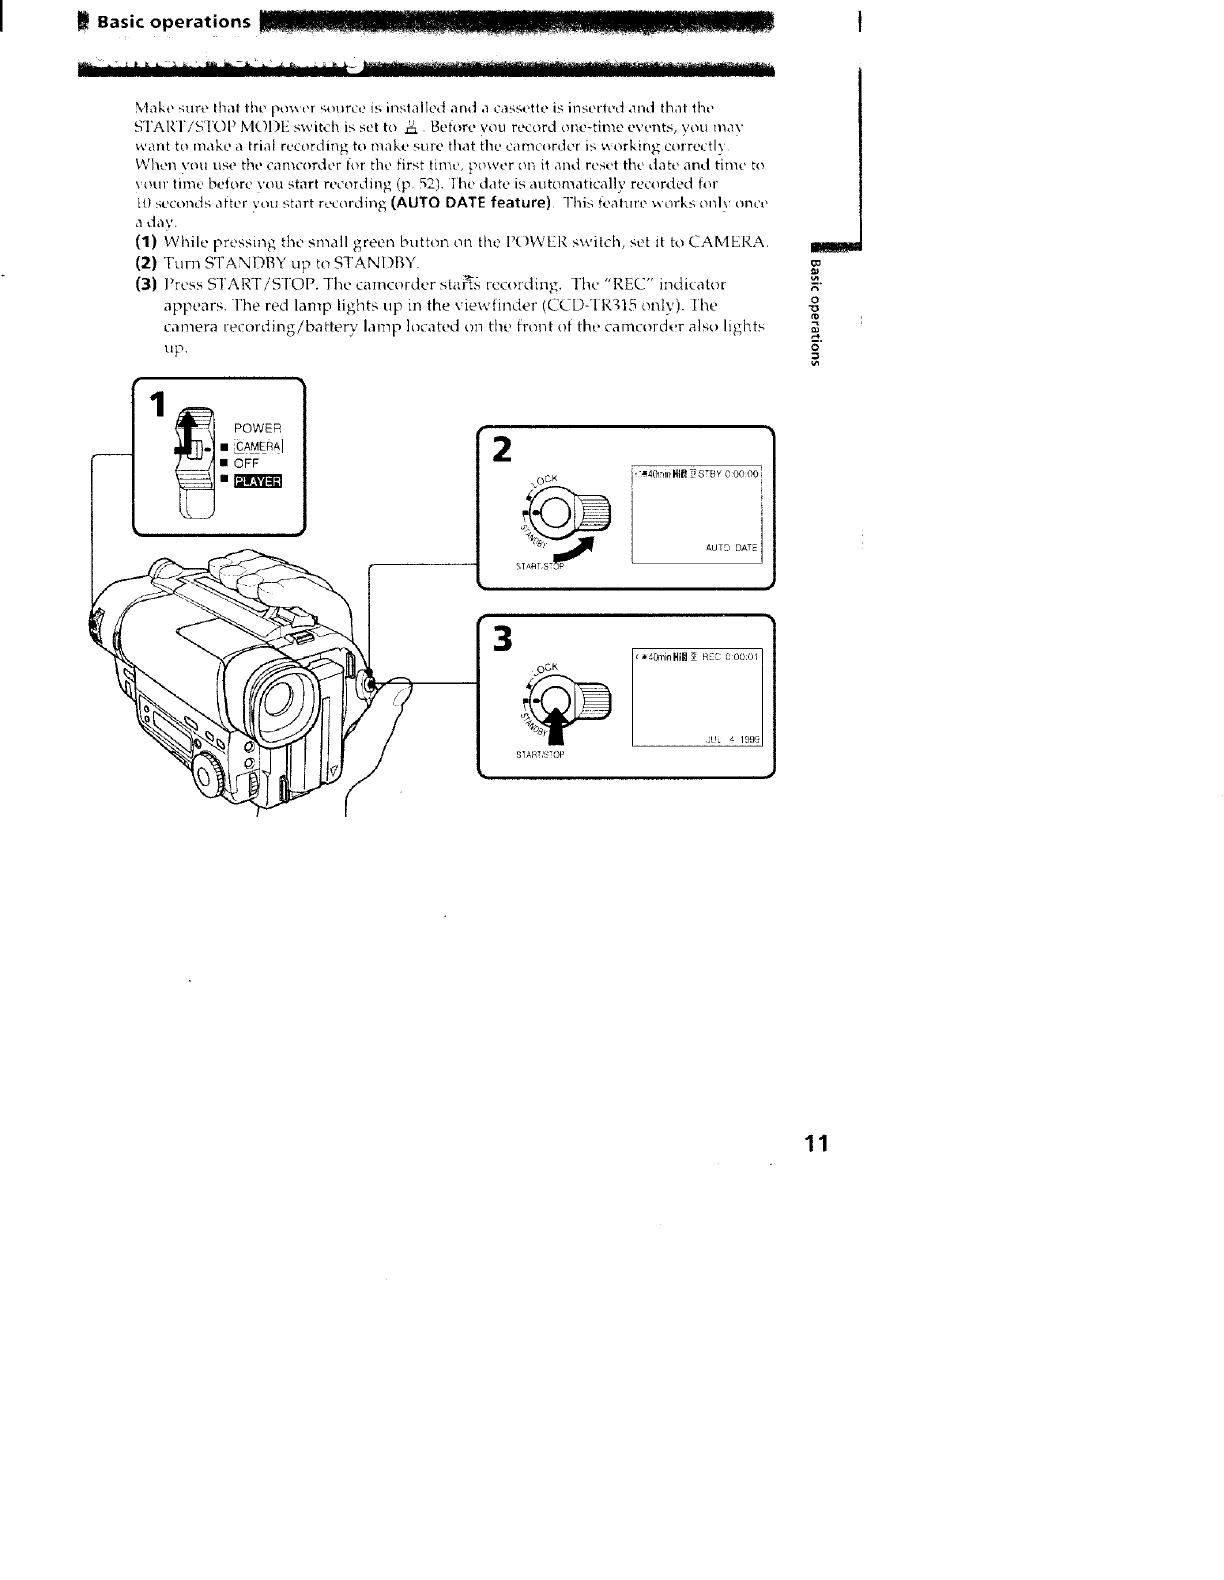
Make _ure Itlat the pm_er s_niice is h_slalled and a cassette is inseri_,d and thai tile
STARI/STOP MOI)E switch is set to u. Betore you record one-time events, you may
want to make a trial recording to make sure that the camcordei is working co_rectl_
When vim use the camcorder for the first time, prover on it and reset the date and time to
your time before you start recording (p 52). Ihe date is automatically recorded for
it) seconds after you start recc_rdlng (AUTO DATE feature) This feahne _ orks onh once
a day.
(1) While pressing the small green button on the POWER switch, set it to CAMERA.
(2) Turn STANDBY tip to STANI)BY
(3) Press START/STOP. The camcorder stm'_s recoMmg. The "REC" indicator
appears. The red lamp lights tip in the viewfinder (CCD-'I I<_,15 only). Ihe
camera recording/battery lamp located on the fn_nt of the camcorder also lights
-- 2
-.<..
HEC 00001
_OGR t! 4 191!9
s 's _
1
AUTO DATE
g
0
o
11
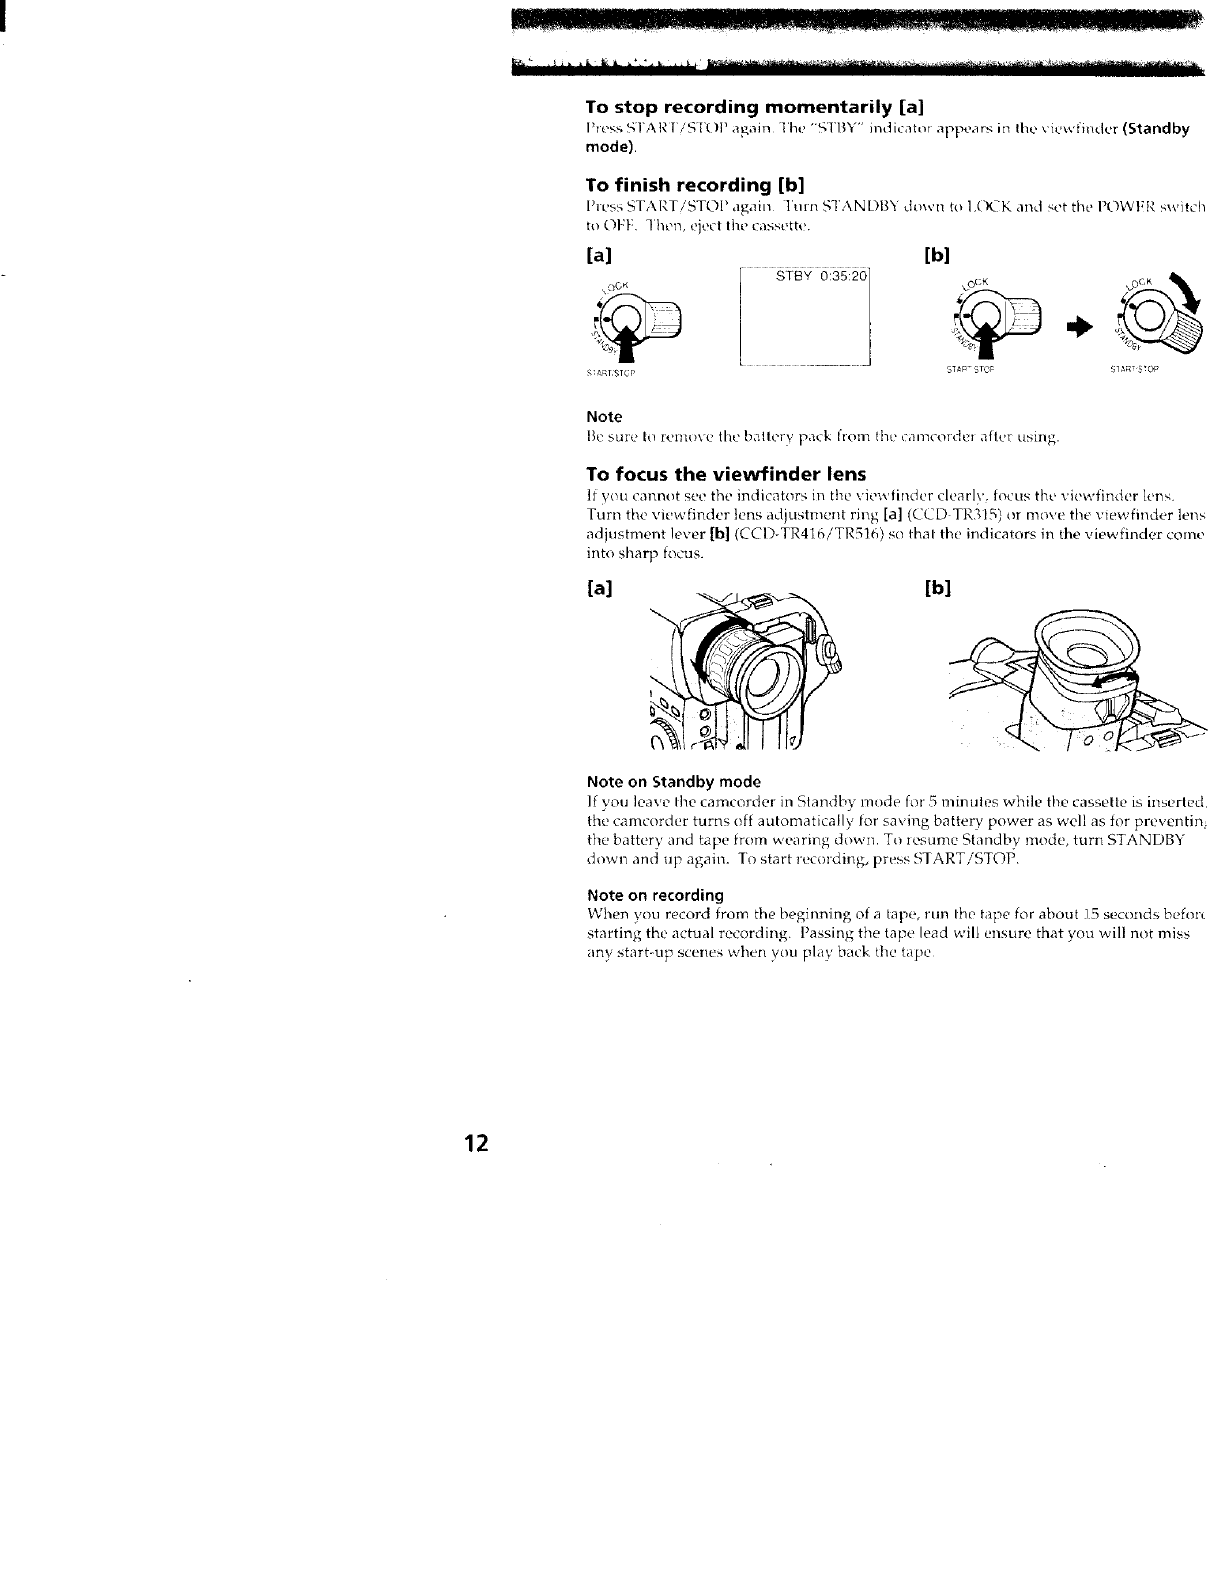
To stop recording momentarily [a]
Press STAR I'/ST()P again The "'STBY" indicah_r appears it_ the \ ie_ finder (Standby
mode).
To finish recording [b]
Press STAI_.T/STOf again l'urn SI'ANDB_ do_n to I.(K-K ai'id st2tthe POWI{R switch
to OFF. lhen, eject the cassette.
[a]
• oC_
S T_,RT,._T (" F
[b]
ST_R _ STOp SIART StOp
Note
F;esuie to remt_vu the battery pack from tb_ cnmeorder alter using.
To focus the viewfinder lens
It you cannot see the imtieators m the viewfinder clearly, focus the viewfinder le;_s.
Turn the viewfinder tens adjustmunt ring [a] (L'CD TI_._IS) or move thevie\vfmder lens
adjustment le_er [hi (CCI)-TR416/TR516) so lbal the indicators in the viewfinder come
into sharp focus.
[a] [b]
Note on Standby mode
If you leave line camcorder in Standby mode for 5 nlintltes whi]e the cassette is inserted
the camcorder turns off automatically for saving battery power as well as for preventin;
the battery and tape from wearing down. To _esume Standby mode, turn STANDBY
down anti up again. To start recording, press STARTiSTOI _
Note on recording
When you record from the beginning of a tape, run the tape for about ] 5 seconds befo;t
starting the actual recording. Passing the tape lead will ensure that you will not miss
any start-up scenes when you play back the tape
12
Notes on the tape counter
•1"he tape counter indicates flx_ recording or playback time. Use it as a _uide There
will be a time lag of se\ crat seconds from the actudI time, 1_./set _l_e COUllter to ze[o,
press CO[ NI'EI_ RESET
• If the tape is recorded m .%[' and [.P modes mixed, the tape counter shows incorrect
re_ording time When _ou intend Io edil lhe Iapu using lhe tape counter as a guide,
record in same (51' or 1 P) mode.
Note on the beep sound
I'i_L,beep s(mnds when you ol_erat(, lhe can_cc_del Several beeps also sound a,_ a
warning ot any unusual" condition of the eamcorder.
No!e that the beep sound is llot recorded on the tape If '_(ill do i2o[ wmt to hear the
beep sound, sele_ 1 "OFF" m the illenu svMem
Note on the AUTO DATE feature
Tile clock is sel at Ihe factolv to Tokyo lime tol th_ m_xtels sold in Japan, and to | tong
Kong, New York or Panama time tor other models You can reset the clock in the menu
system. You can change the AUIO I)A'I F settings by selecting ON or OFF m the melm
system. The AUTO DATE teatt_re shows lhedaW aulomalicalh, once a da)
1Iowever. the date may automatically appear more than once a day' when:
VOtl reset {}le dglte all{.{ tillle
)ou ejeO and hlsert lhe lape again.
- you stop recording within 10 seconds,
- _ou set AUTO DATE to OFF once and set it 1o ON again ill the menu system
I
g
o
g
I
I
13
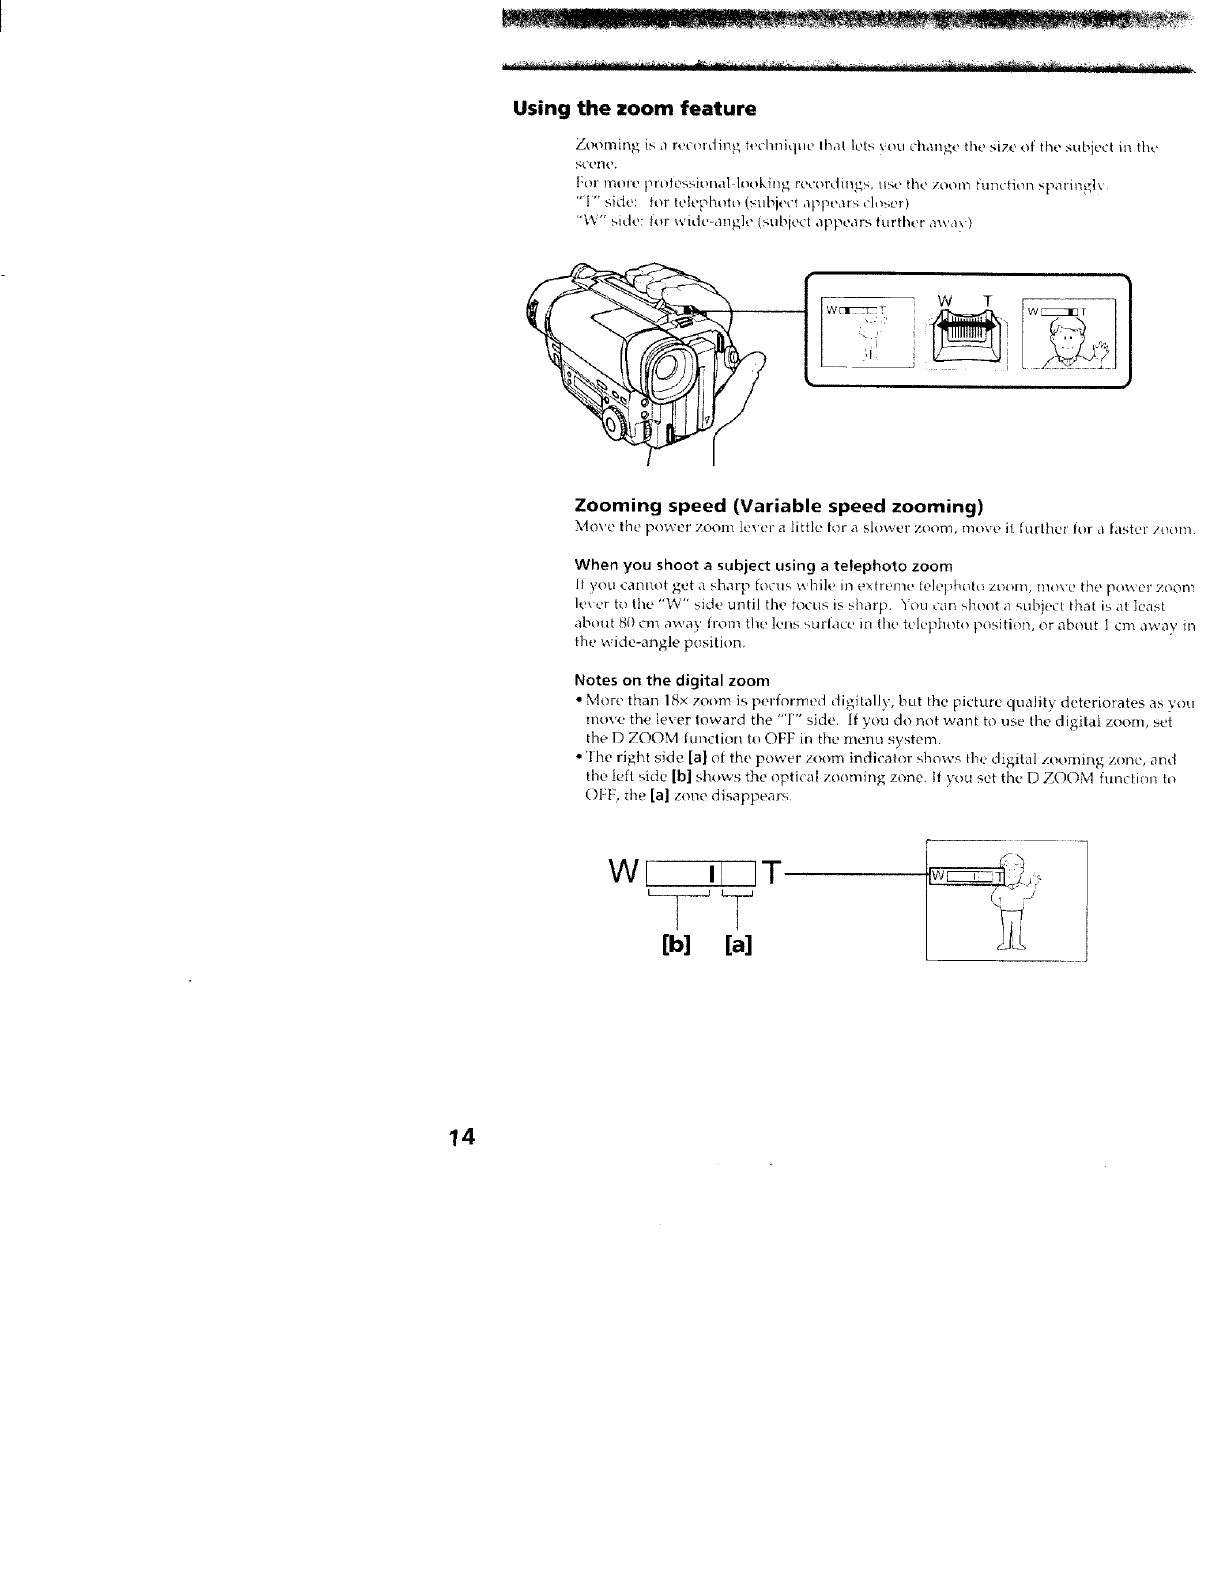
Using the zoom feature
Zt_mir_g is ,1 recolding techniq_e Ihal k, ts _ou change the size of the subiect in the
_cerle.
FoI" morl' pru|e_,_iDnal lookin_ roeordill_,, tint _ the zoom fui3ction _paril'lt_]\
"I" side: for telephoto (_ubiect apF, ears ch_eO
"W" side: Rir wRte-angle {subiect appears turther away)
W_T
2. ,
W T w:::_/
£
Zooming speed (Variable speed zooming)
_40\'e the power ZOOlll levL, l"a little for a s[o_._,er zoom, mov{ • ii fLli-ttie[ for {I _lstel ztl(}ll_
When you shoot a subject using a telephoto zoom
If VOU eanllot _et Q sharp {OCUS while in _xlr{_mo h.']oil}!{itt! zt_DIn> I]love the pov,'el" zoo[I3
lexcr to the "W" side until the £ocus is ._harp. You u21nshoot i_ subject that is at ]uast
,tb{nlt 80 cm away from thu lens Stir[lice ill the telephoto positio]% or ,lbOllt ] cm away in
the wide-angle position,
Notes on the digital zoom
• More than 18× zoom is pel-formed digitall}, but the picture quality deteriorates as you
move the lexer toward the "T" side. If you do not want to use the digital zoom, set
the D ZOOM ttmction t{} OFF m the menu system.
• 'Ihe right side [a] of the power zoom indicator shows the digital zooming zone, and
the left side lb] shows the optical zoomh]g zone. tt you set the D ZOOM function tD
OFt, the [a] zone disappears
W! il IT
[a]
14
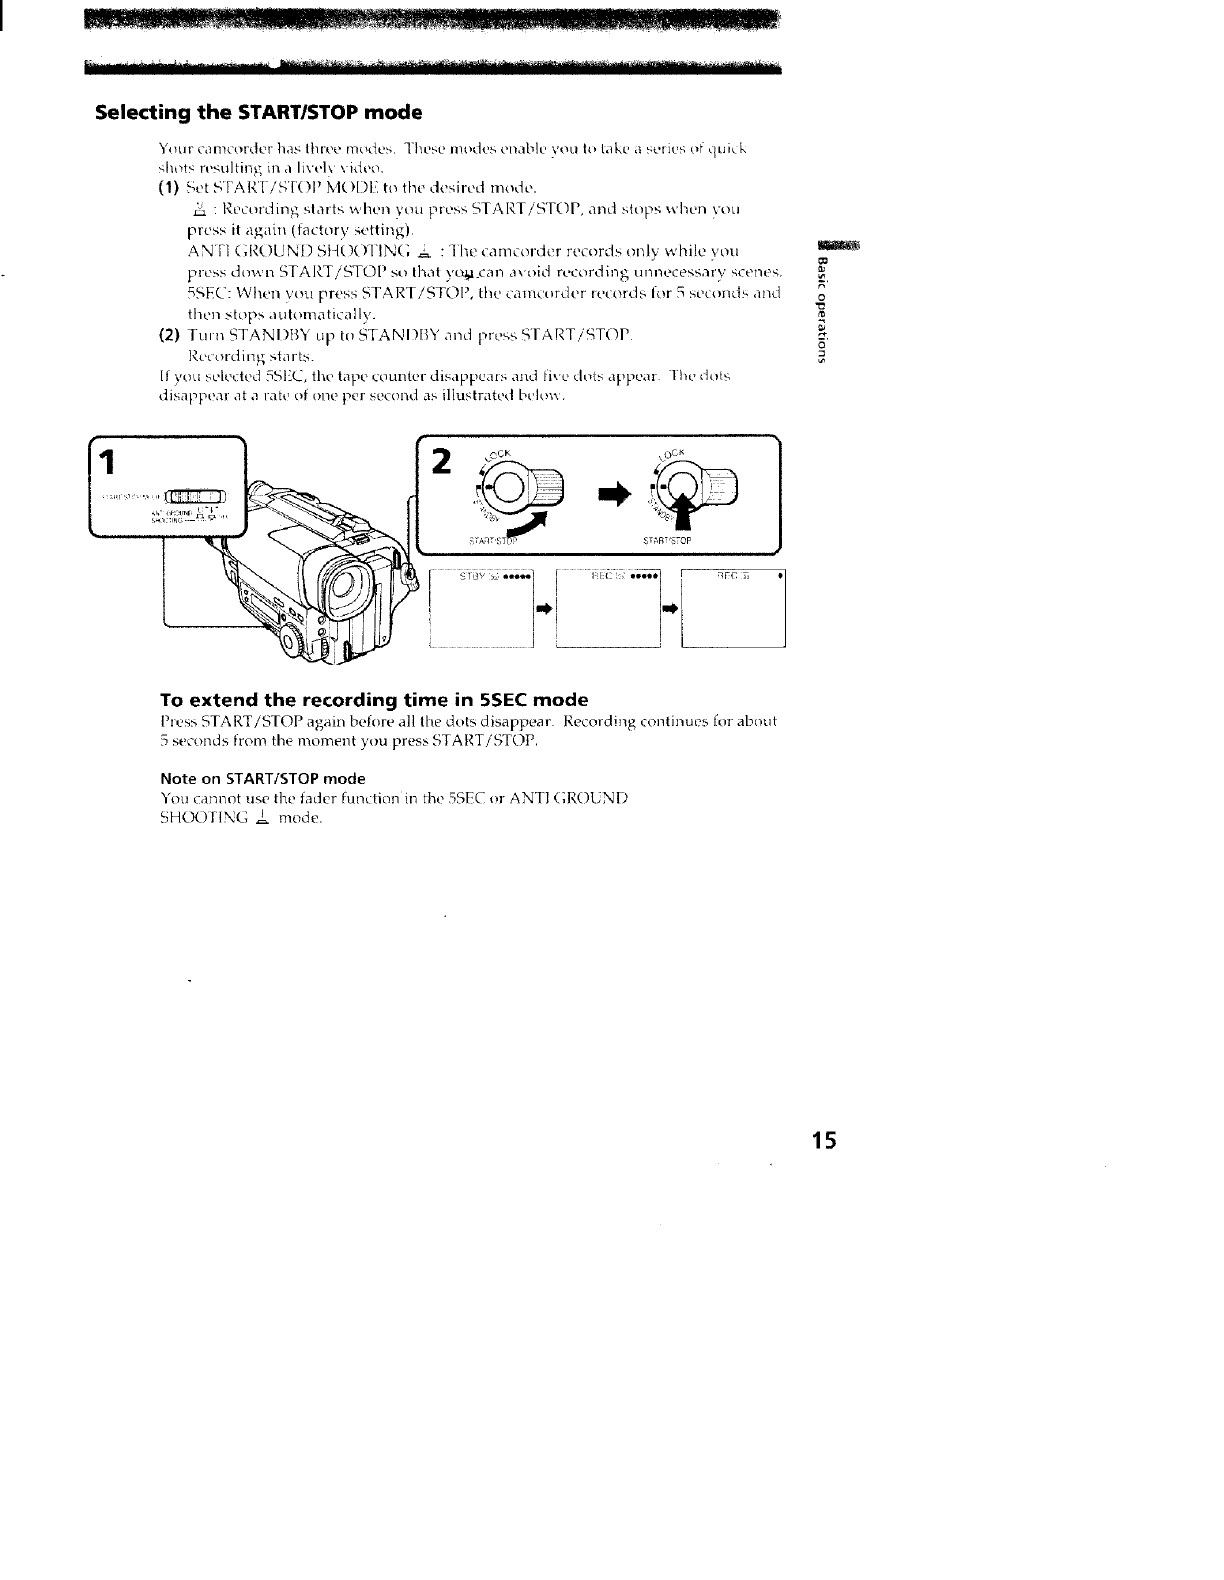
Selecting the START/STOP mode
Yotn- camcorder has three modes These mode_, enable you |o take a serifs oFquick
shots resulting m a livel\ \ ideo.
(1) Set STAR'I/S'IOP M(IDI'I to the desired mode.
: l'_ecording slarts when you press START/STOP, and stops when you
press it again (Iactory setting),
ANTI GROUN/) St IOOTIN(; _ :'/he camcorder records only while vou
press down START/STOP so that y(v_l ('al_ avoid recording unnecessary scenes.
5SEC: When you press START/STOP, the camcorder records for 5 seconds and
then stops aulomaticall}.
(2) Turn STANDBY uip Io STANI)BY and press START/STOP
Recording starts.
1!yoti selected 5SEC, the tape counter disappears and five dt_ts appem Thv dois
disappear at a fate ot one per second as illustrated belov_.
i
i
To extend the recording time in 5SEC mode
Pru'ss START/STOP again before all the dots disappe,w l-',ecording col_linnes for ab(mt
5 seconds from the moment you press START/STOP.
Note on START/STOP mode
You camaot use the fader hmction in the 5SEC or ANTI GROUND
SHOOIING _ mode•
15
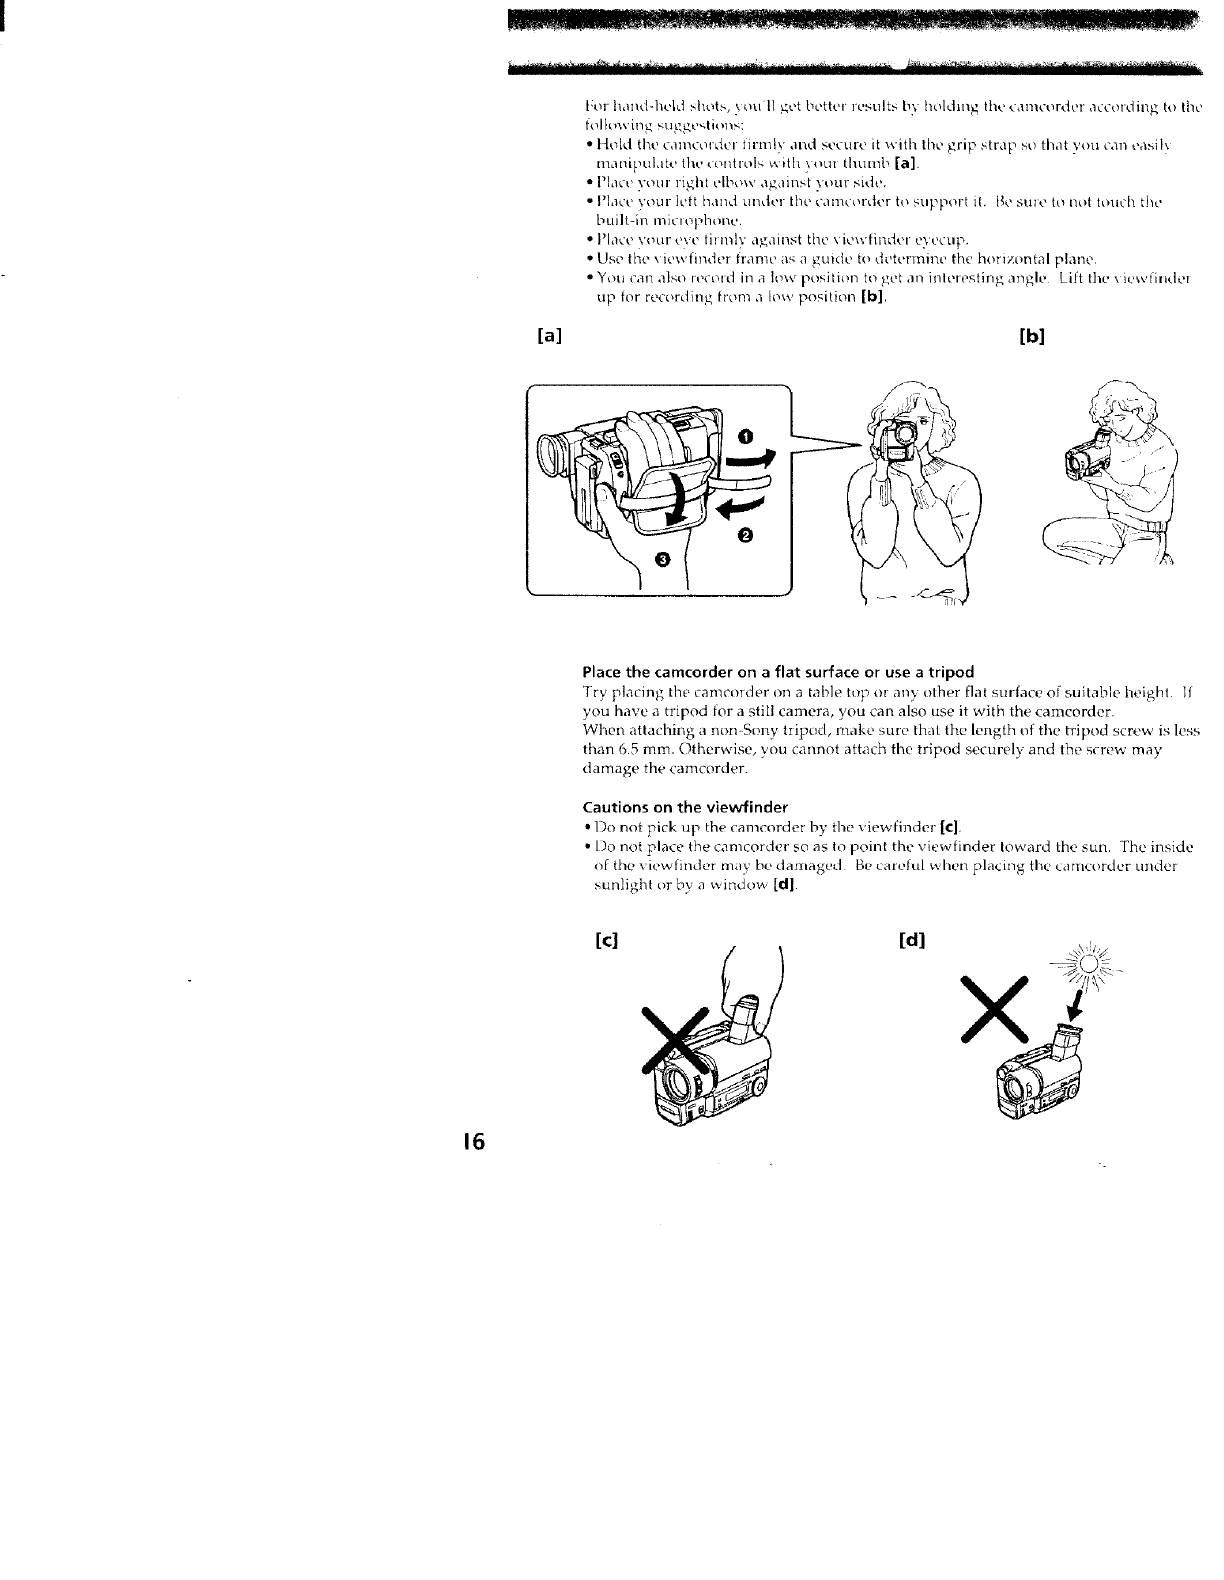
I:nr h<_I_dAit'ld st_ot_,, _,ou l/,_et better i_esults by holding the <amcnrder accordil_g to the
• t4oid the catncorder tirnqv and secure it "_vith the grip strap so that yell can ea,,,il_
i_lanit_ulate the t _i/tiol<; _.;ith ) _tii thLH_b [a]
• Place yOtll" right tql, ow against your sitJe.
• I_l,lct ' voclr left hallc_ under the cal]]tt_rder to snpt_(_rt il. tge Stile to iltlt touch the
• Place VOLIr eve fit mi)' against tile \ iewfil'_der eyecup.
• Use the \ iewfil_dt'r frame ;is a guidt' to deter]nine the horizontal pl;'_ne
"Y(_tl Cal_ als{_ it,ct_ld in alow positic_n to b;et an iI_l_'iesting a_gle Lift tile \ iewlindel
up for recording from a Inw position [b]
[a] [b]
Place the camcorder on a flat surface or use a tripod
Try placing tl_' canlel'_t'der c,n a table top or any other flat s/llfa_?_, of snitaL)le heigl_i II
you have a tripod for a still camera, you can also use it with the car_tcorder.
When attaching a non-Soi_y tzipod, make stile that the length of the tripod screw is less
than 6.5 mi'n. Otherwise, you cannot attach the tripod securely and the screw may
damage the carncorder.
Cautions on the viewlinder
• l)o not pick up the camcordeI" by the view'finder [c],
• [)o not place the camcorder so as to point the viewfinder loward the sun. The inside
(if the "_'iew finder m_ly be dar_laged Be careful _xhe[_ placi_g the camcorder Llnder
sunlight or by a _,_,'ir_dow [d].
16
[c]

Using EDt I'SEARCH, you can review the last recorded scene or check tile rece,rdud
picture in the viev,,fir_der
(1) While pressing the small green button or, the I"OWER switch, set it to
CAMERA.
(2} Turn STANI)BY up to STANDBY.
(3) Press the (1_:1)side of EDITSEARCH momentarily; the last few seconds of the
recorded portion play back (Re¢ Review}.
t told down the - side of I'.I)ITSEAR( H tultil the canlcorder goes back to the
scene you want. The last recorded piartion is played back. To go forward, hold
down the + side (Edit Search).
• _CAMERA
•OFF
i
To stop playback
Release ED[I SEARCH,
To begin re-recording
Press START/STOI". I_.e-recording begins from the pe,int you released EDITSEARCH
Prdvided you do not eject the cassette, the transition between the last scene you
recorded and the next scer_e you record will be smooth
I
O
o
17
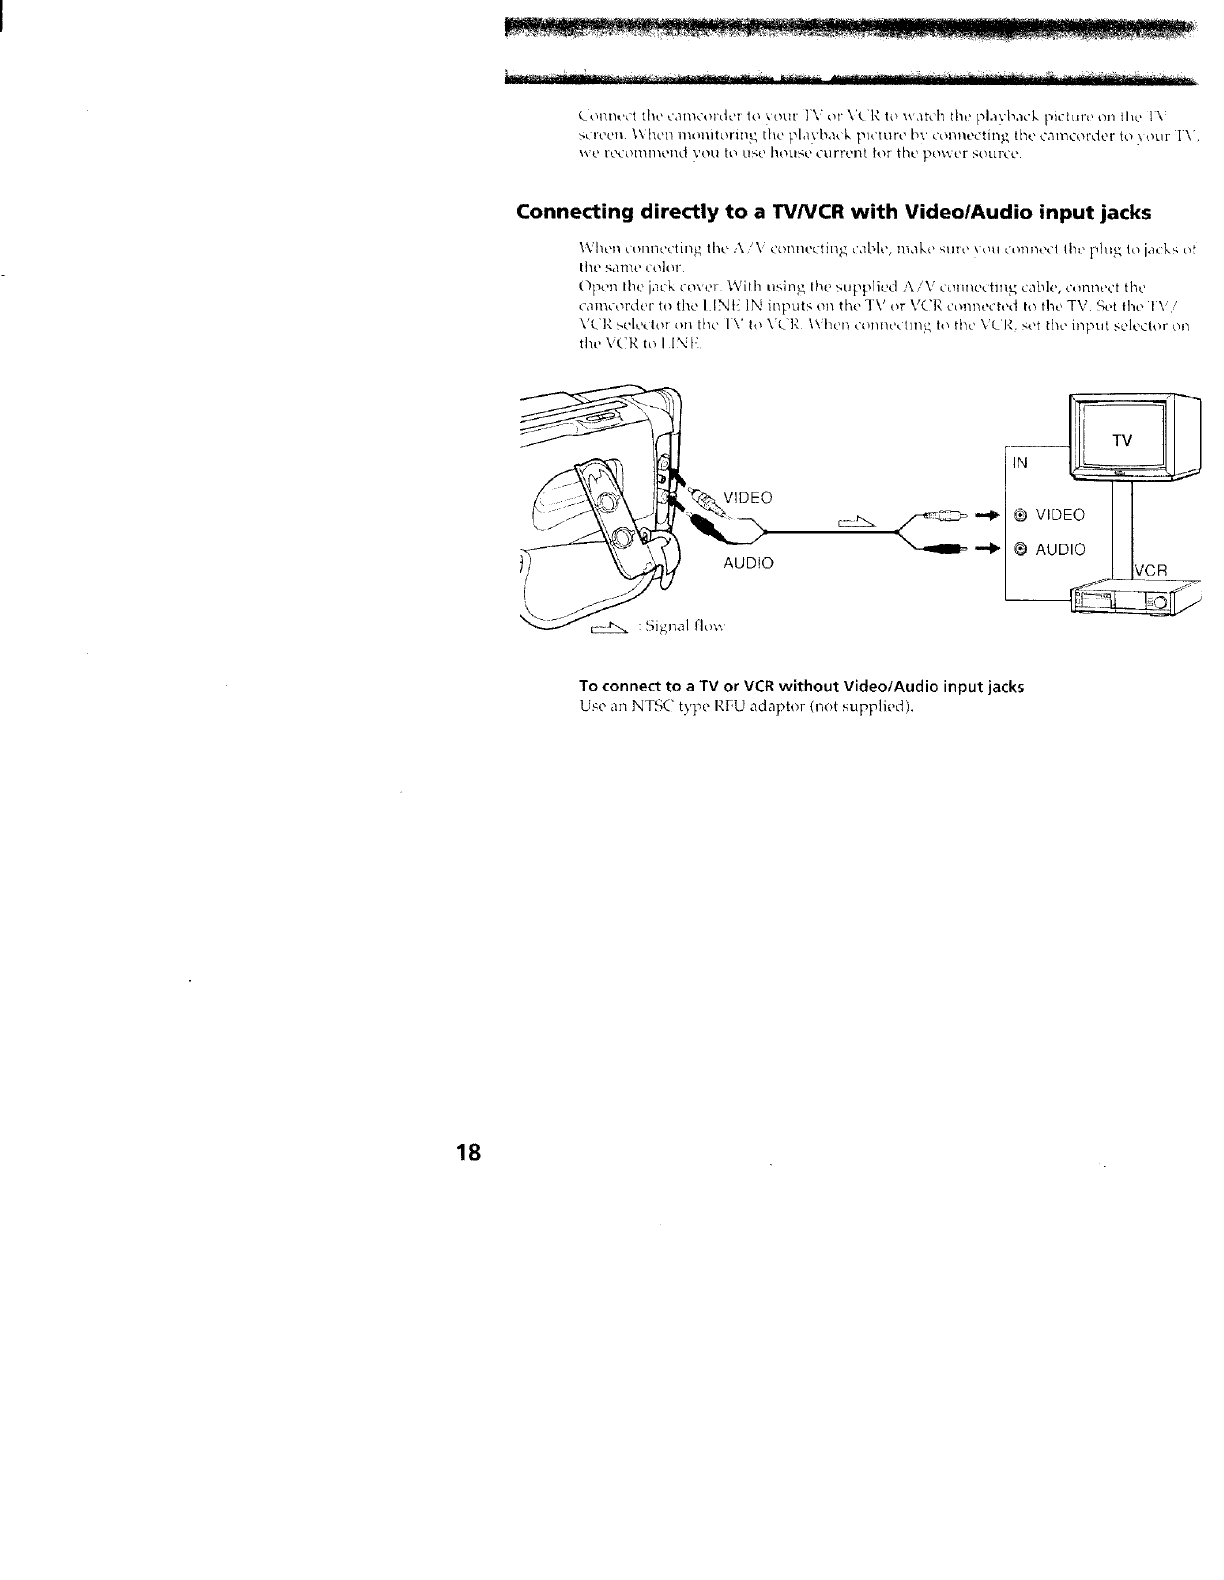
__ _'_¢_ ...... • ............... _<_-_'ii _ .... _ "'_'_<'_='N_"_'" _ _*:_ _¸_ ....
Lolmect the camcorde: Io _ocir l\ o)\'CR io watch the playback piclt,e_)n tlw IV
_cl't_t)tl I.\ ht.[1 ll'iOllltt!r|ll_ tilt' ]Dldv[')(It k plt'il.lrt' bv connectin_ lht" can_cordor to \ Dill [\'
\ve I'_\'011/11_t'1/0 VOtl 10 tlSt' hOtlSt' CklrF(.'llt tot [ht' ]__Owt'I" SOUI't'O.
Connecting directly to a TVNCR with Video/Audio input jacks
!,\qlt')l c'ollnt't'thl4 the A/\ itxti_nttc;th_ _;Jiqt', nlakt, ,_11!o } Oil connecl Ih_, phi_ h) i,,<ks t_f
lilt' S,dlllQ color
Open Ih( >jack ro_r(.'_ _,_rilh IIS111_ [ht >supplic, d S% /_rtOIIl}t'ctlll_ t'a}._l(', t'OIMlt't't tht'
camcorder to the IINE IN inputs on the TV (>r V(717. connected to the TV _(,i ihe 1\ i/
VC]_. $t, lt,c|oi till tht' IV IO \:_- ]'_ \\;ht'li t'Ol/l/t'c 111/_4tO lhc' VLR, set tile input solt, dor oit
tire \iC|,} to liNK
/
!
\
VIDEO
AUDIO
VIDEO t
_l AUDIO I k
To connect to a TV or VCR without VideolAudio input jacks
Use an NTSC type RFU adaptor (not supplied),
18
ti¸
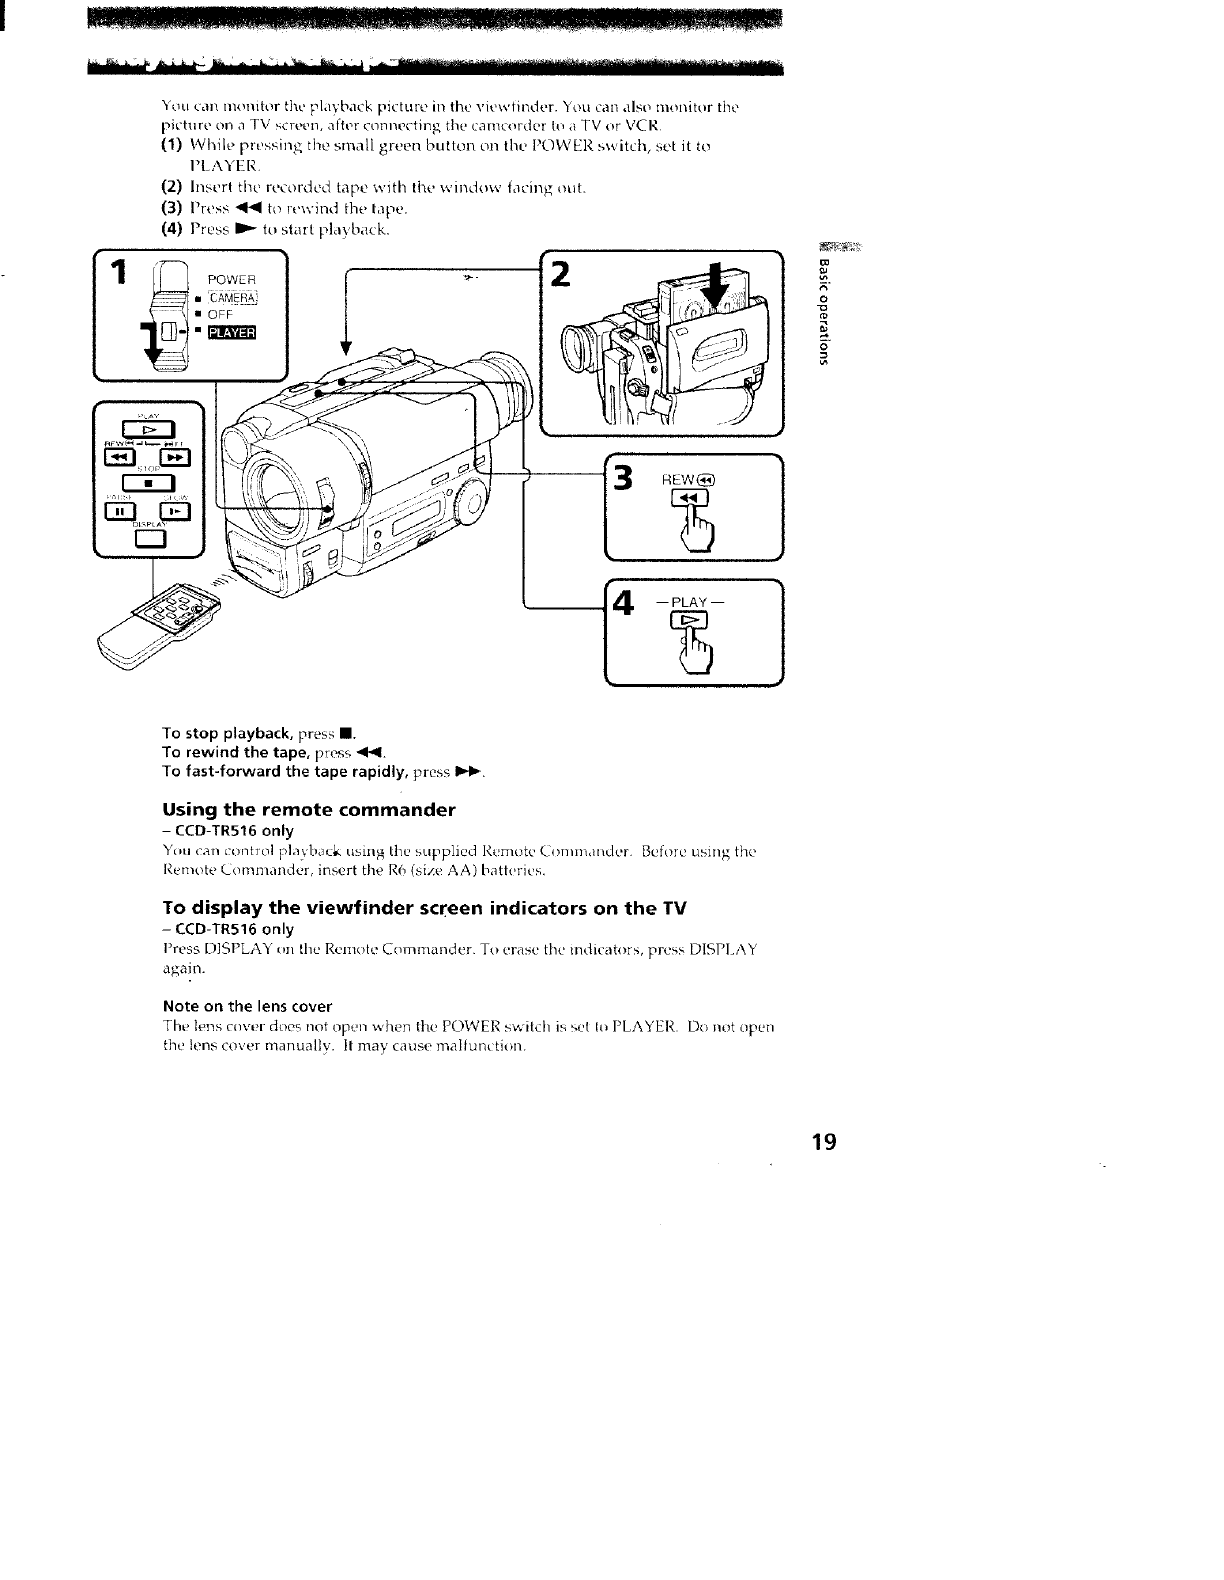
You can momtnr the playback picture in the viewfinder. You can also monitor the
picture on a TV screen, after ¢onnectin_ the camcordvr tu a TV or VCI._
(1) While pressing the small green button on the POWER switch, s_.'t it to
I'LAYER.
(2) Insert the recorded tape with the window facing out.
(3) Press _ to rewind the tape.
(4) Press _ to start playback.
• OFF
o
P_
=o
To stop playback, press I,
To rewind the tape, press 41_I.
To fast-forward the tape rapidly, press lwlW.
Using the remote commander
-CCD-TR516 only
You can conl_o! playb,_ck usin_ the sclpplied Remote Lonlmat_der Bvforc using the
Remote Commander, insert the R6 (size AA) batteries.
To display the viewfinder screen indicators on the TV
-CCD-TR516 only
Press D]SPLAY _n the Remote Commander To erase the indicators, pn'ss DISPLAY
again.
Note on the lens cover
The lens cover does not open wherl the POWER switch is set 1o PLAYER. Do not open
the lens cover manually. It may cause malfunction.
19
__ _i _ ..,i i, ,_i _ ............................... 1_r_................
Various playback modes
To view a still picture (playback pause)
I>rc_ II duiin_ t_la_rbac_, It_l<estlllle pia\ baclx, [_I't_S_U or I_,
To locate a scene (picture search)
Keep pressing _ or D dullng playback. To resume normal playback, release the
button
To monitor the high-speed picture while advancing the tape or
rewinding (skip scan)
Kee l) pressing 411_1while rewinding or 11_ while adv,mcinf; lhe tape. To resume
normal playback, press ll,-
To view the picture at 115 speed (slow playback)
- CCD-TR516 only
Press I i_ on the Rem_ie Commander dtuing playback To re._ume normal playback,
press ll,,-, If slow playback lasts fo_ abel-l| 1 111illtlte, it shifts tO normal speed
auton'taticallv.
Notes on playback
•Noise may appear when you use lhe stilJ/sMw/picture search function to play back
the tape recorded in LP mode.
• Streaks appea_ and Ihe sound is muted in the varicms playback modes
• When plan/back pause m_,de I<_sls far 5minutes, tile cameorder aaloma/icaflly enters
slop mode.
• Horizontal noise appears al the center, or top al_d bottom of the screen when you plax
back a tape m reverse. [his is norrnM
• You call play back the tape_, recorded in the }1i8 video system on tile standard 8 mm
camcorder (CCD-TR315/TR416 onlv),
2O
_ou can choose an; ot the _ol[owhlg power som'ces for y_ m camcorder: batterv pa_k,
house qm'rent at]d I2/24 V car batter'c. L-hoose 01c appropriak, power somce
dt2pcI]Clil/_ o17 _vbt?re }OU '€cant tO LlbC \_lur c,_ll_corder.
Place Power source
Indoors IIotlse currcl'd
Outdoors g,_t tery p,_ck
In the car 12 V or 24 V car battery
Accessory to be used
Sut_Flied AC power ad,_i_tor
Battery pack N P-F330 (supplied), NP-F530,
NP-F550, NP F730, NP F750, Nl'-F930, NP F950
S __v DC adapt _r/ct_, rger IXT-V700 (not
r,
supphed
Notes on power sources
• Discom_ectil_g the power source or removing the battery pack during recording or
playback may damage the inserted tape
• 'lhe DC IN jack has poaer source priority. This means that the battery pack cannot
supply any power if the poe,'er cord is com_ected to the DC IN jack, even when the
power cord is not phJgged into the wail outlet
m
O.
ca
r_
ca
21
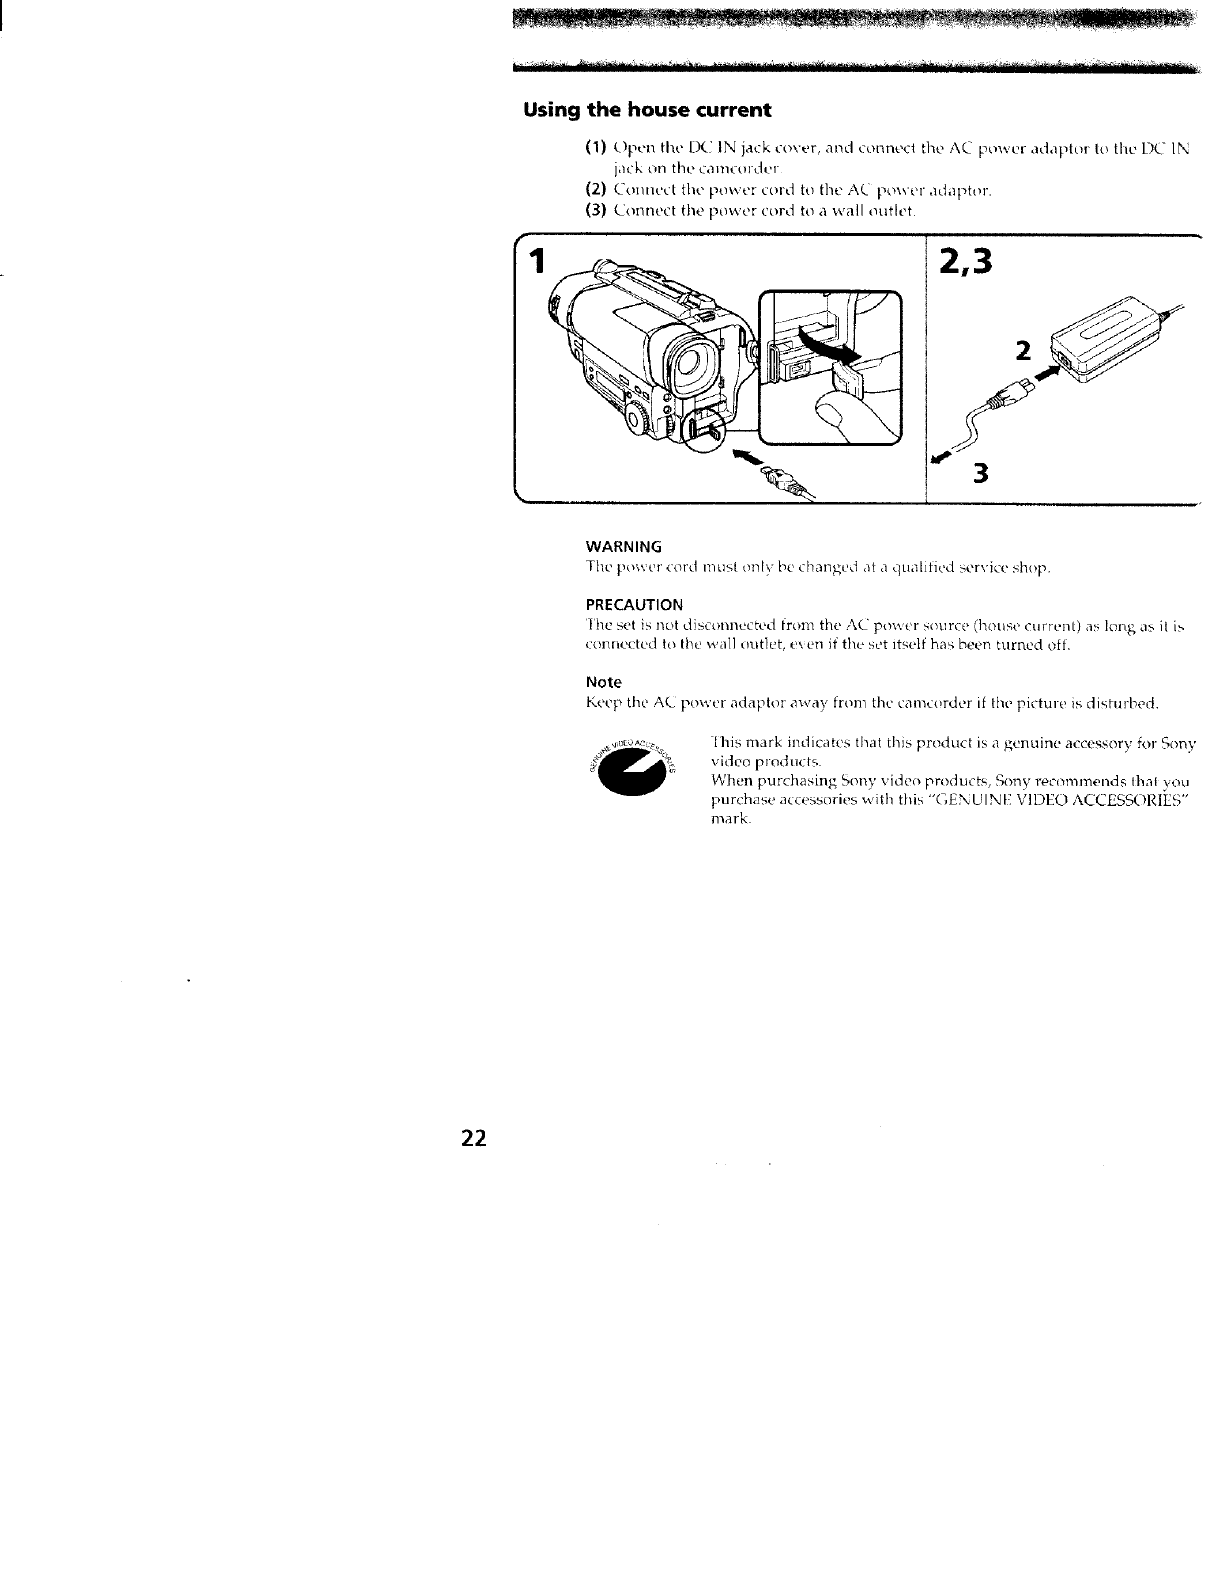
Using the house current
(1) Open the l)( IN jack cover, and conneci the AC power adaptor to tilL' DC IN
jack on tile camcorder
(2) Comwct the power cord to tile AC power adaptor.
(3) Connect the power cord to a wall outlet
r T //
2,3
3
WARNING
The power cord must 0111y be changed at aqualified servk'e shop.
PRECAUTION
lhe set is not disconnected lrom the AC power source (house current) as long as it b,
(oH_ected to the wall outlet, c_en if the set itself has been turned off.
Note
Keep the AC power addptor away from the camcorder if the picture is disturbed,
lhis mark indicates that this product is a genuine accessory {or Sony
video products.
When purchasing Sony xideo products, Sony recommends that you
purchase accessories with this "GENUINE VIDEO ACCESS(.)I_,IES"
mark
22
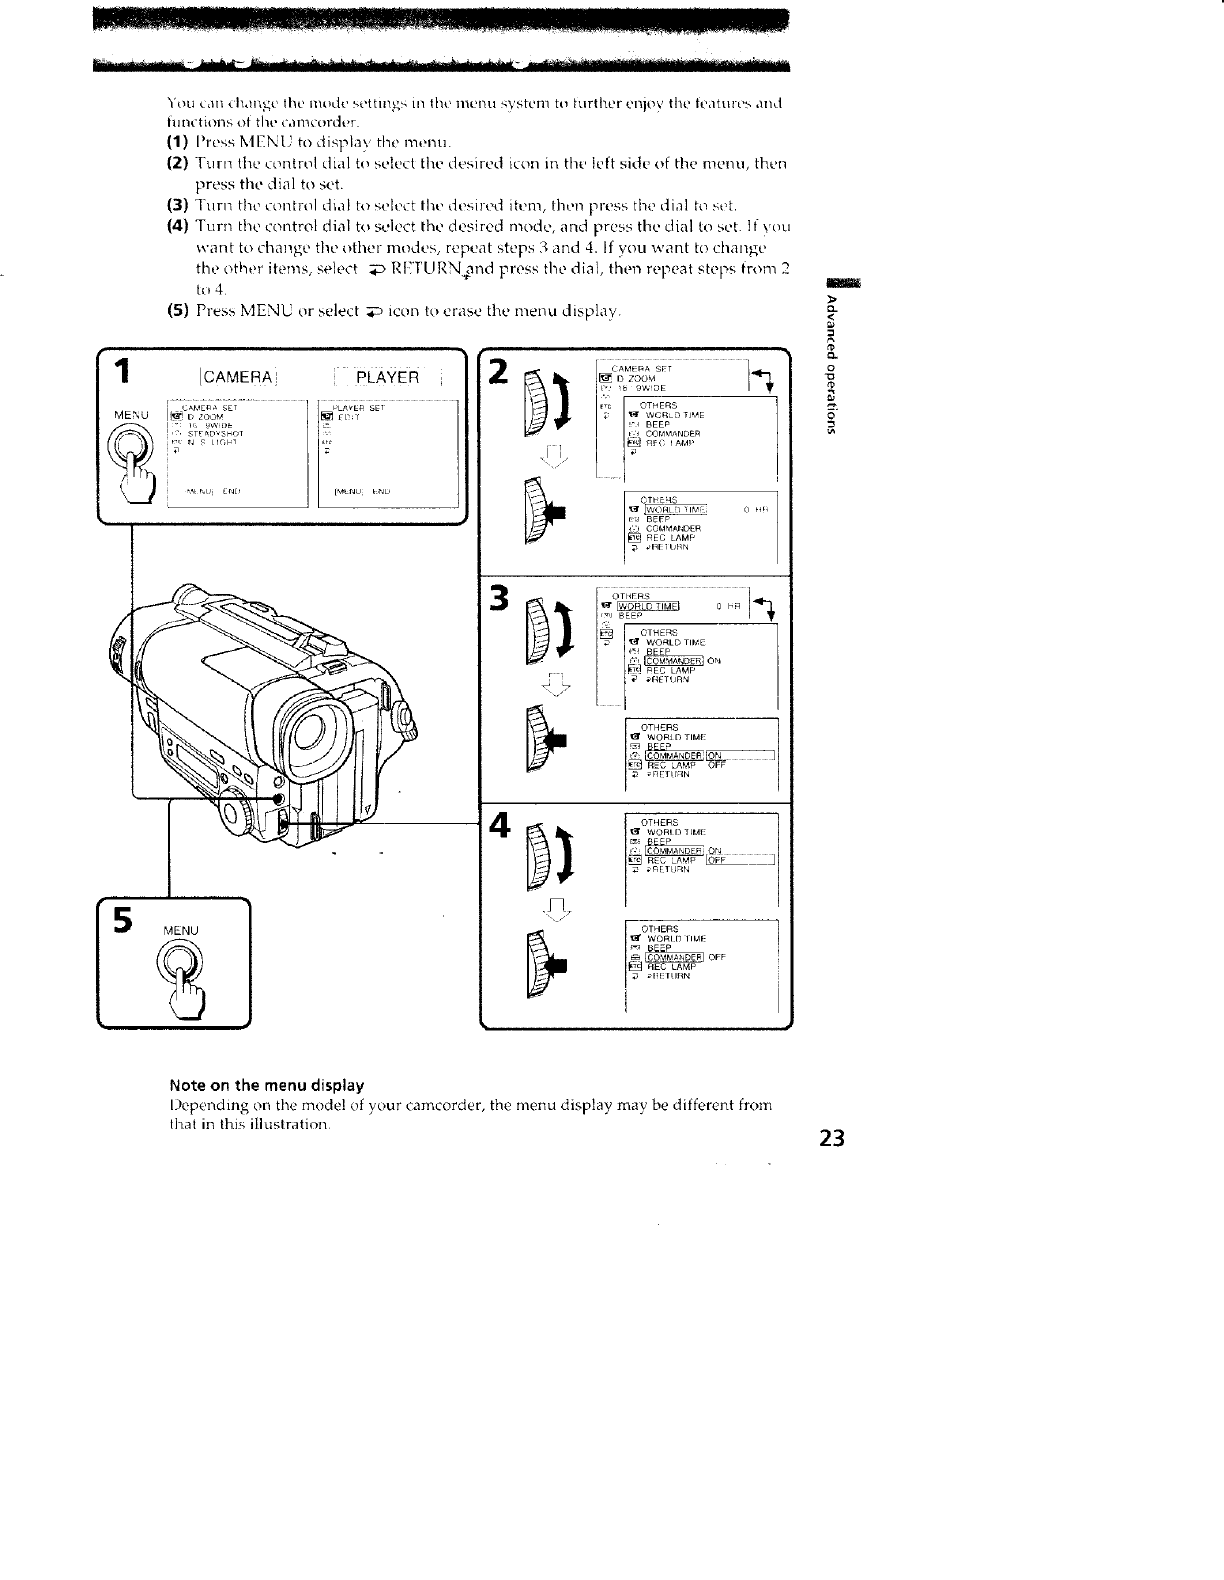
"l'ocl can _.hal,,g,., the modc _.ettmqs in lh_' ll_lertll system to further enioy the.' |eatures and
llll'l'2tiOllS ','st tht? can+ft'ordt_r
(1) I)ross MENU to display tile l'ilt)lltl.
(2) TuN1 the control dial to st'lect the de_;ired icon in the left .Mdt' of the nlel/tl, then
press the dial to set.
(3) Ttlrn the conttol dial to stqect tht! desired item, lllel_ press the dial to set
(41 Turn the control dial t_ st4ect the desired mode, aild press the dial to set. If you
want to change the other modes, repeat steps 3 and 4. If you want to change
the ottler items, select _ RtTI JRNand press the dial, then repeat stops from 2
tc_4
(5) Press MENU or select _ icon to erase the menu display.
1
MENU
ICAMERAI PEAYEFt
MENU
2CAM_A SET /
L'¸¸ _5 9WiOE I T
_c OTHERS
;_ 12_ WOr_LD TIME
r,'l BEEf
LJ COMMANDER
t',3 COMMANDER
REC LAMP
3OTltERS
ry_ BEE r' I T
# WO2p_O TI"E
]
I_ _ORI OTIMIT
i .......
RE.S LAMP _ ]
OTHERS
,1_ WORLD IIM[
OFF
AEC kAMP
i
I
I
#
7,
&
g
Note on the menu display
I)epending on the model of your camcorder, the menu display may be different from
thai in llnis ilhislration 23
Note on changing the mode setting
Mm_u i_ems dilier dependii_ on the settin,_ ol fl_e I_OWEI,_ ._witch to PI AYI-R or
CAMI RA
Selecting the mode setting of each item
Items for both CAMERA and PLAYER modes
_REMAIN* <AUTO/ON>
-Select ALIt) when ;ou want to display the H_,maming tape bar:
{OF about _ _ecol_ds (_llel thi, camcorder tLn'ns oll and calculates the Fonlahldel ill
the tap_'
loY abotlt _ seconds _lfter a cassette is inserted arm tire, {XHI_(ordel" calculates the
remainder of the tap('.
- for the period _)t tape rewi_ding, forwarding or picture search in Pl AYER mode
loraboutSse,-ondsafter_ is pressed inPI,AYIRmode
for about 8 seconds after I)ISPLA_ on Ihe Rem_te Commander is pressed to
display the screen indicat;_r. ((ICD-TI'U_ h_ onl\)
• Select ON 1o al\'vatys display tilt, remaining tapc indicator.
LTR SIZE* <NORMAL/2x>
•Nt_rmalh select NORMAL.
• ScLt'ct 2x to di>play selected meJlu ih,m b_ t_!_ {>six(_, of normal.
ETd BEEP* <ON!OFF>
• Sdect (ON so that beeps sound when you start istop mcmd in};, {qt
• Select ()lq a when ','ou do not want to hear lile I)ec't> sound
{ETC!COMMANDER <ON/OFF> (CCD-TRS16 only)
• Select ON when rising the supplied Remote Commander for the cal'ncorder
• Select OFF _hen not using the Remote Commander.
Items for CAMERA mode only
D ZOOM* <ON/OFF>
• Select ON to activate digital /oonlhlg
• Select OFF to prevent the deterioration ot the picture q.ality. Tt_e camcorder goes
back {o optical zoom
16:9WIDE* <OFF/CINEMA/16:9FU LL>
• Normally select OFF
• Select CINEMA to record in (INEMA too&'.
• Selecl 16:9FULL to record ii/ lm9FLJI.I, mode'.
N.S.LIGHT*<ON/OFF>
• Normally select ON
- Select OFF to not use the NightShot I,ight funclion
24
_j REC MODE* <SP/LP>
• _!lect SI' when reo,rd ing in SP (standard play) mode.
-Select I_1_ _ hel_ recording in l.l' (long play) mode.
When a tape recorded on this eamcorder in I,P mode is played back on other types of
8 mm camcorders or VCRs, the playback quality ma_ not be as good as that on this
cdnlqot'del
Note on the REC mode
- CCD-TR516 only
When you record tapes in LP mode, thepicture is not recorded in the Hi8 sysh,m,
hut in the standard 8 mm system.
._J ORC TO SET*
Select lhis item to automatically adjust the recording condition to get the best possibh!
recordirlg.
It you have already performed this function, "O1_.( ON" is displayed.
ORC slands fol "Optimizii_g the Recording Condition."
I_-gCLOCKSET*
Resetthe date or time.
AUTO DATE* <ON/OFF>
• Select ON to record tl'tedate for Ill seconds altel recording has >taitcd
• Select OFF to not record the date
{_] DEMO MODE* <ON/OFF>
• Select ON to make the demonstratiorl appear
• Select OFF to deacti_ ate the demcmstration mode
Notes on DEMO MODE
• DEMO MODE is set to STB'*' (Standby) at the factory and the demonstration starts
about 1{'; minutes alter you set the POWER switch to CAMERA without inserting a
cassette.
Note that wm cannot select STBY of DEMO MOI)E in the menu system.
* You cannot select DEMO MOI)[ when a cassette is inserted in the camcordei
• If you insert a cassette during the demonstration, the demonstration stops. You can
start recording as cistlaI. I)EMO MODE automatically returns to STBY
• Vvhen NIGHTSHOI is set td ON, "NIGI ITSI K)T" appears in the viewfinder and
the demonstration does not start.
To look at the demonstration at once
lject the cassette, if iilserted. Select ON ol DEMO M()I)E ;rod erase the mcim
display. The demonstration will begin.
When you turn off the camcorde_ o_ce, DEMO MODE automaticall_ leturns to 51 BY.
g
GL
O
25
_'c] WORLD TIME*
5electthisitem Iosetthoclockb_ n timeditterence.
REC LAMP* <ONIOFF>
•Select OFF when you do not w;ti_l the comera l't'cordJill_/b<lt[t, rv lamp <If lhe filmier ol
the unit tt_ light up.
• Normalh: select ON.
Items for PLAYER mode only
EDIT <ON/OFF>
• _eh!ct ()N i_ nlil/imi/_' i>h htr_ , dc'telic_rdti_n _ }_t'll t'ditiug
•Nornh/llv select OIF
lht' El)IT setting *_ t_i k>; only during pin}back
* Ihcsc settings are retained cxen when the battery pack is lemoved, as h_ug _ls the,
lithium bnth:rv is {n lr,lact'
26
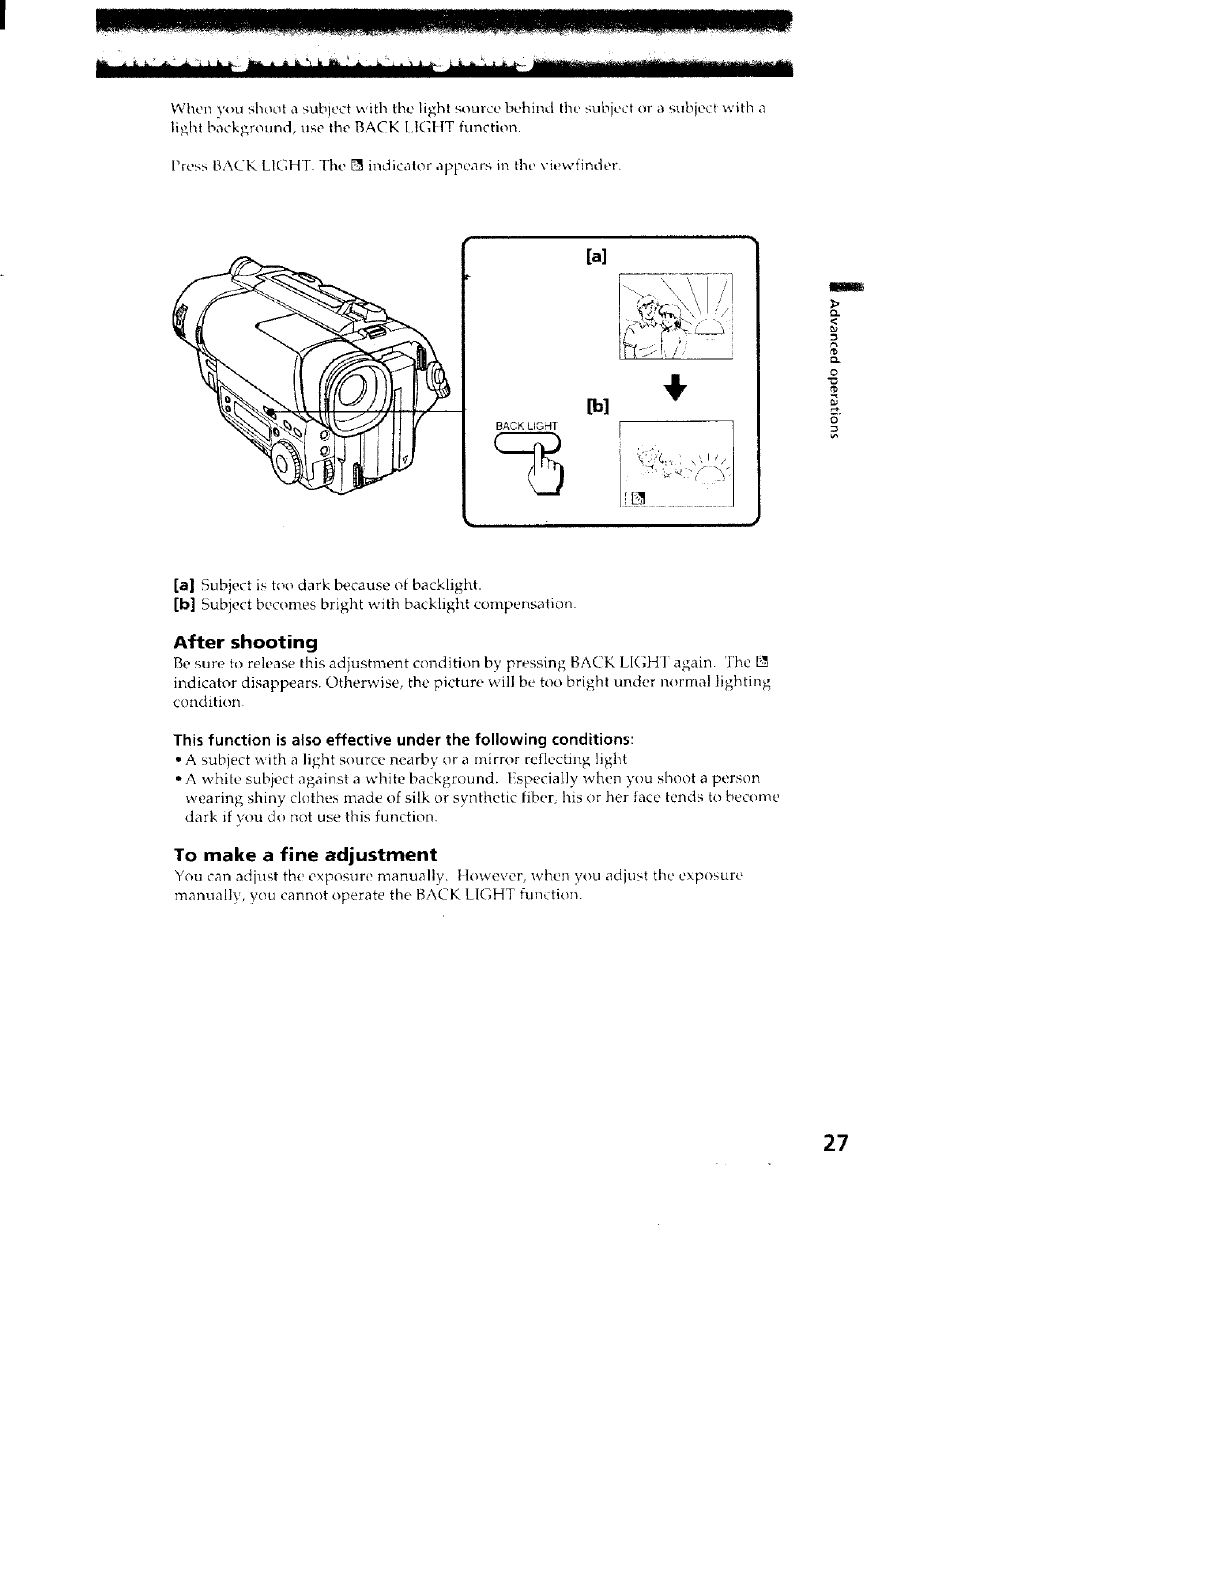
_]hl2n yola slloo[ a subiect with the light source behind the subivcl or a subject _ith a
light background, use the BACK I1GI IT function,
Press BACK LIGHT The I_ indicator appears in the viewfinder.
i _k:2
[a]
[bl
BACK LIGHT [
€
B
Q.
O-
O
t_
O
[a] Subject is too dark because of backlight.
[b] Subject becomes bright with backlight compensation.
After shooting
Be sure to release this adjustment condition by pressing BACK LI(;HI again. The
indicator disappears, Otherwise, the picture will be too bright under normal lighting
condition
This function is also effective under the following conditions:
•Asubject with a light source nearby or a mirror reflecting light
• A white subject against a white background, t specially when you shoot a person
wearing shiny clothes made of silk or synthetic fiber his or her face tends to become
dark if you do not use this function
To make a fine adjustment
You can adiust the exposure manually, 1]nwever, when you adjust the exposure
manuall}, you cannot operate the BACK LIGHT function
27
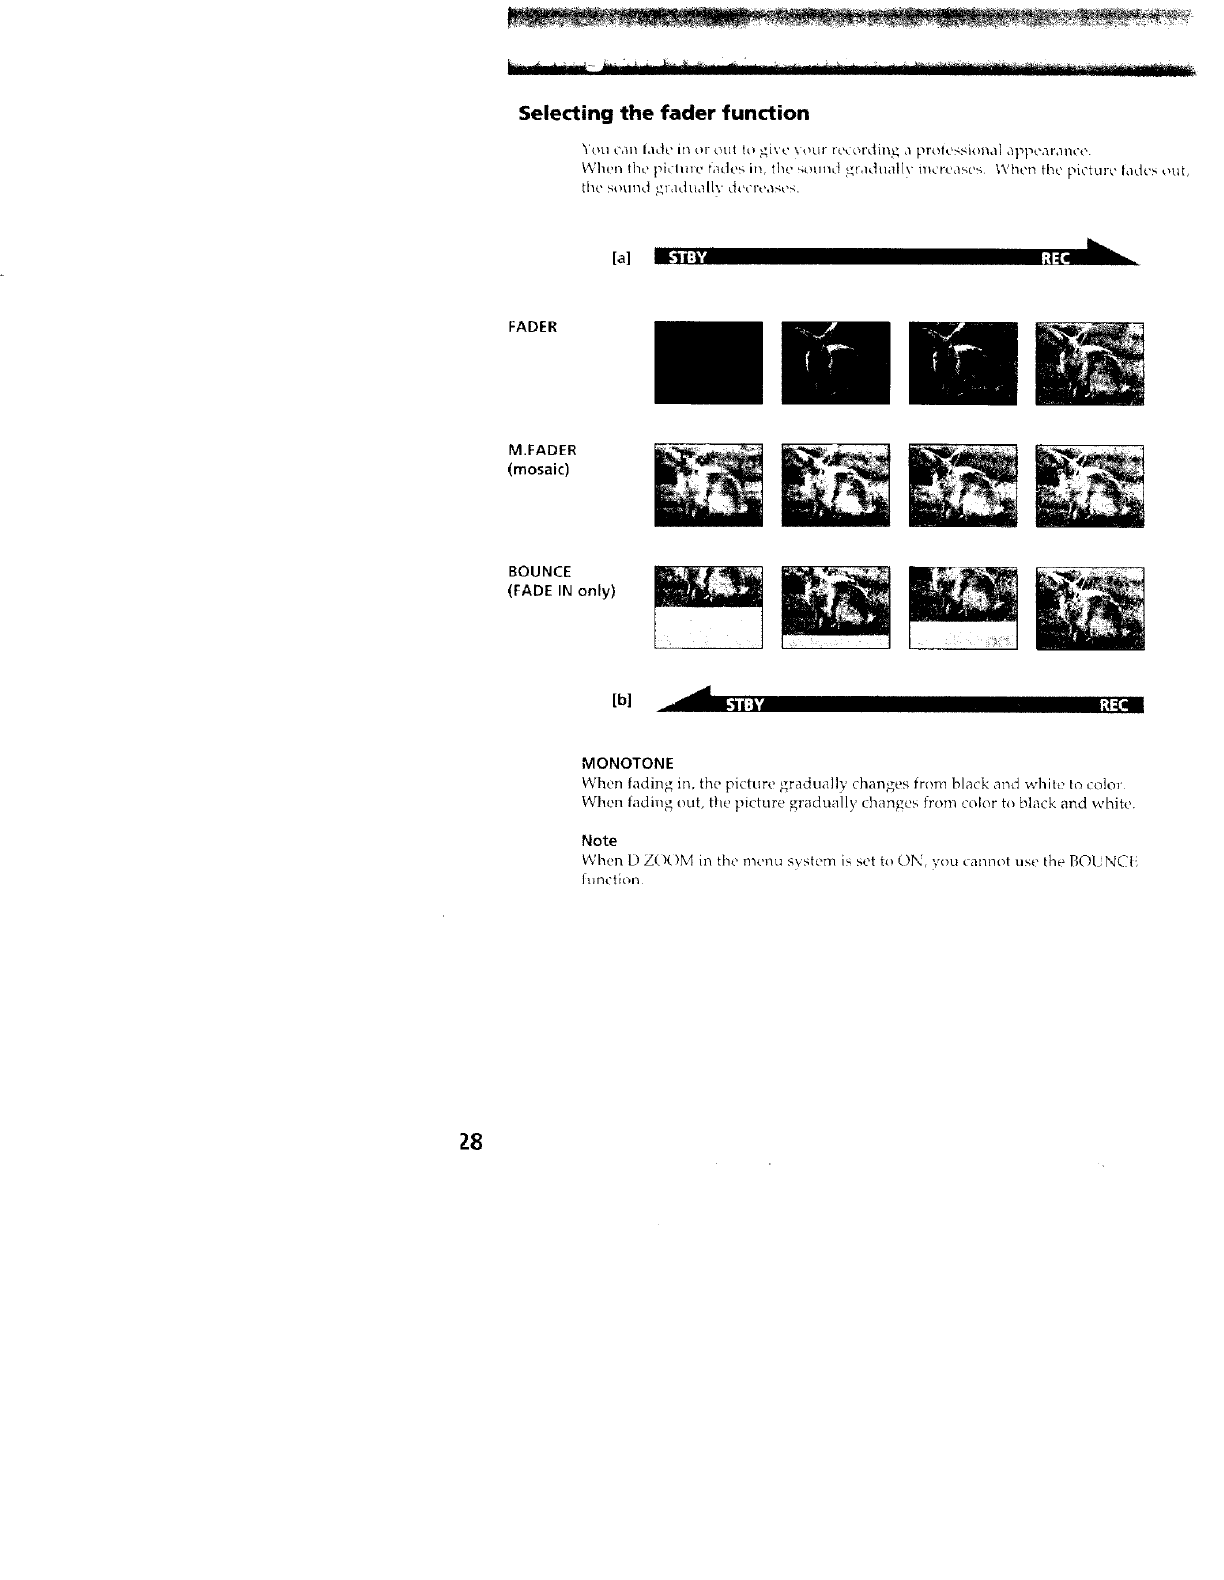
Selecting the fader function
YOLI can [aOe Jl_ or Otll {o gl\'t, \our lt.,_ol'dH_ a prole_sional appe,mmce
_.'ll_'n the l_iChn( ' t,_de_ in. the _ound g_ adt_al/_ m_r_,a_e_ When Hw picture lades otlL
fl_e sound _.IraduaIL'_ dl'cT'enst"<
If.
[a] !:1.Ii:J 1:{.
FADER
M.FADER
(mosaic)
BOUNCE
(FADE IN only)
[bl ii:1" ;!:€
MONOTONE
When fading in, the picture gradually changes from black and white to colol
When fading out, the picture gradually changes from color to black and white.
Note
When D Z(X)M ii-ithe menta system is set to ON, you cannot use [he Bq)[ N(TI',
hmctlon
Z8
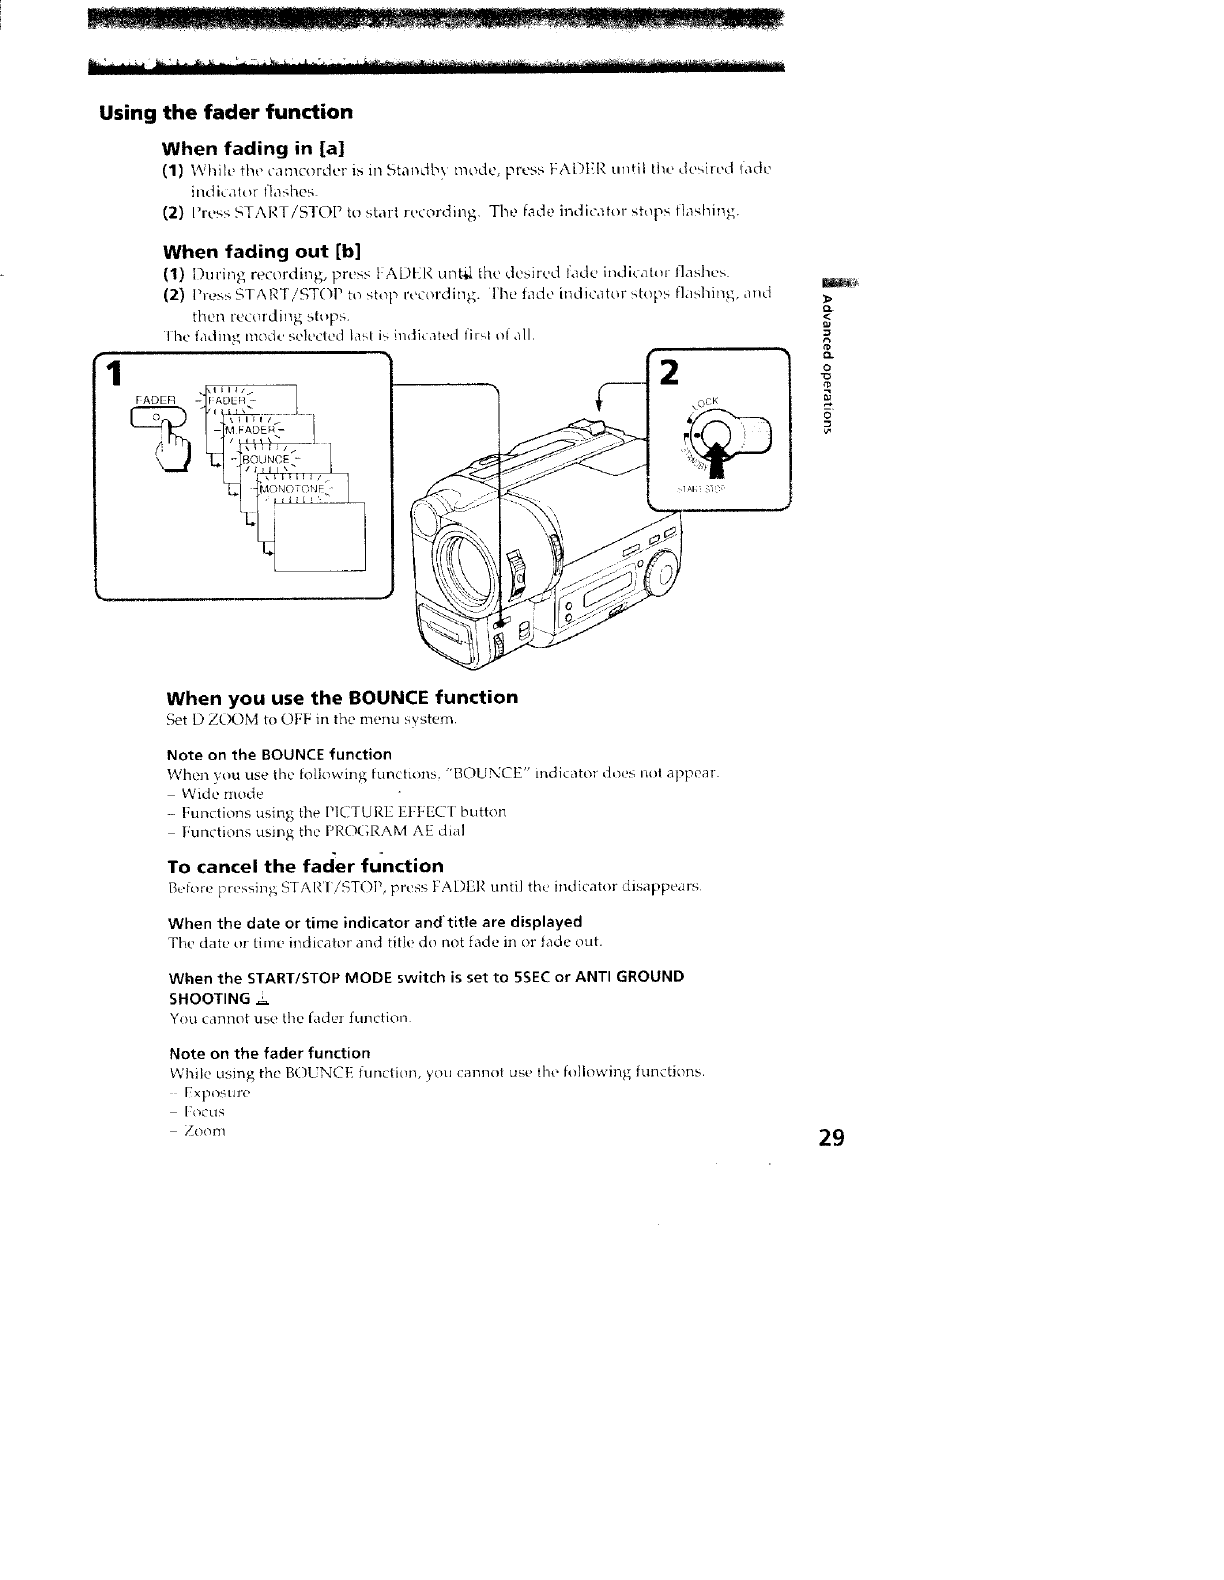
Using
1
the fader function
When fading in [a]
(1) Whih! the camcordt'r N in Standb_ mode, press FADER until the de_hed fade
mdi__ato[ Nashes
(2) Press START/STOP to start recording The fade indica|or stops tlashing.
When fading out [b]
(1) During recl)rding, press t ADEI<: unt_!, the desired fade indicator flashus
(2) PFUS>STAR]iSTOI _ tD sh)p i'e_Drdiilg. l'h<' time ndicator >top.<,fla.Mling, and
ther_ recording M:_p>.
Ihe fading mc_dc selt,cted laM
• III11 z ]
FADER - fADEH-
-- M FADE_-
-BOUNCE
, indicated firq ol all
0
When you use the BOUNCE function
Set D Z(K)M to OFF in the menu system
Note on the BOUNCE function
When you use the fDlkW,'ing tundions, "BOUNCE" indicato: does i:ol appear.
Wide mode
- Functions using the PICTURE EI FECI button
Functions using the PROGRAM AE dial
To cancel the lacier function
Bc.fDre pressing STAI{'I/STOP, press 1 ADt P, until the indicator disappears
When the date or time indicator andtitle are displayed
The date oi time il:dicalor anEI title do not fade in or fade out.
When the START/STOP MODE switch is set to 5SEC or ANTI GROUND
SHOOTING --
"Y'oI.1 canllot L!_L' thu fadul fl.lllC_i(lll
Note on the fader function
While using the BOUNCE functioi1, you callnot use tl-,e following functions.
Exposure
FOCUS
Zoom 29

[he NightShirt lunctk_n enables you to shoot a subiect ill a dark place You can achh
a satisfactory recordil_g of the ec_',]og\ of nocturnal animals for observation with Ihi
tul]cti_m
(1) While thu (amcorder is in Standbx mode, slide NIGI {TSHOT to ON.
(2) Press S[AR1/SIOP to start reccmJing
II_and "NIGI flSI tOT" indicators flash
NightShot
light emitter
To cancel the NightShot function
Slicle NIGHTSHO 1"to OFF
Using the NightShot light
When you set N S l J(;} tl to ON in the menu system, the picture will be more clear
Nightghot I,ight raxs are infrared and are therefore invisible. The D3aXill2Ui]3limit ,_
NightShot light is about 3 m.
Notes on the NightShot
•Do not use the NightShot function in bright places (ex outdoors).
T|ds may catlse yota] camcorder to malfunction.
• lhe following functions are not operabIe when using the NightShot function.
- PRO(;RAM AIr
Exposure
• When you keep setting NIGHTSI I()_ t_ ON in m_rmal recording, picture may be
recorded in iilcotteet/unnatural color.
• If focusing is difficult with the autofocus mode when using the NightShot functio_
use manual focus.
30
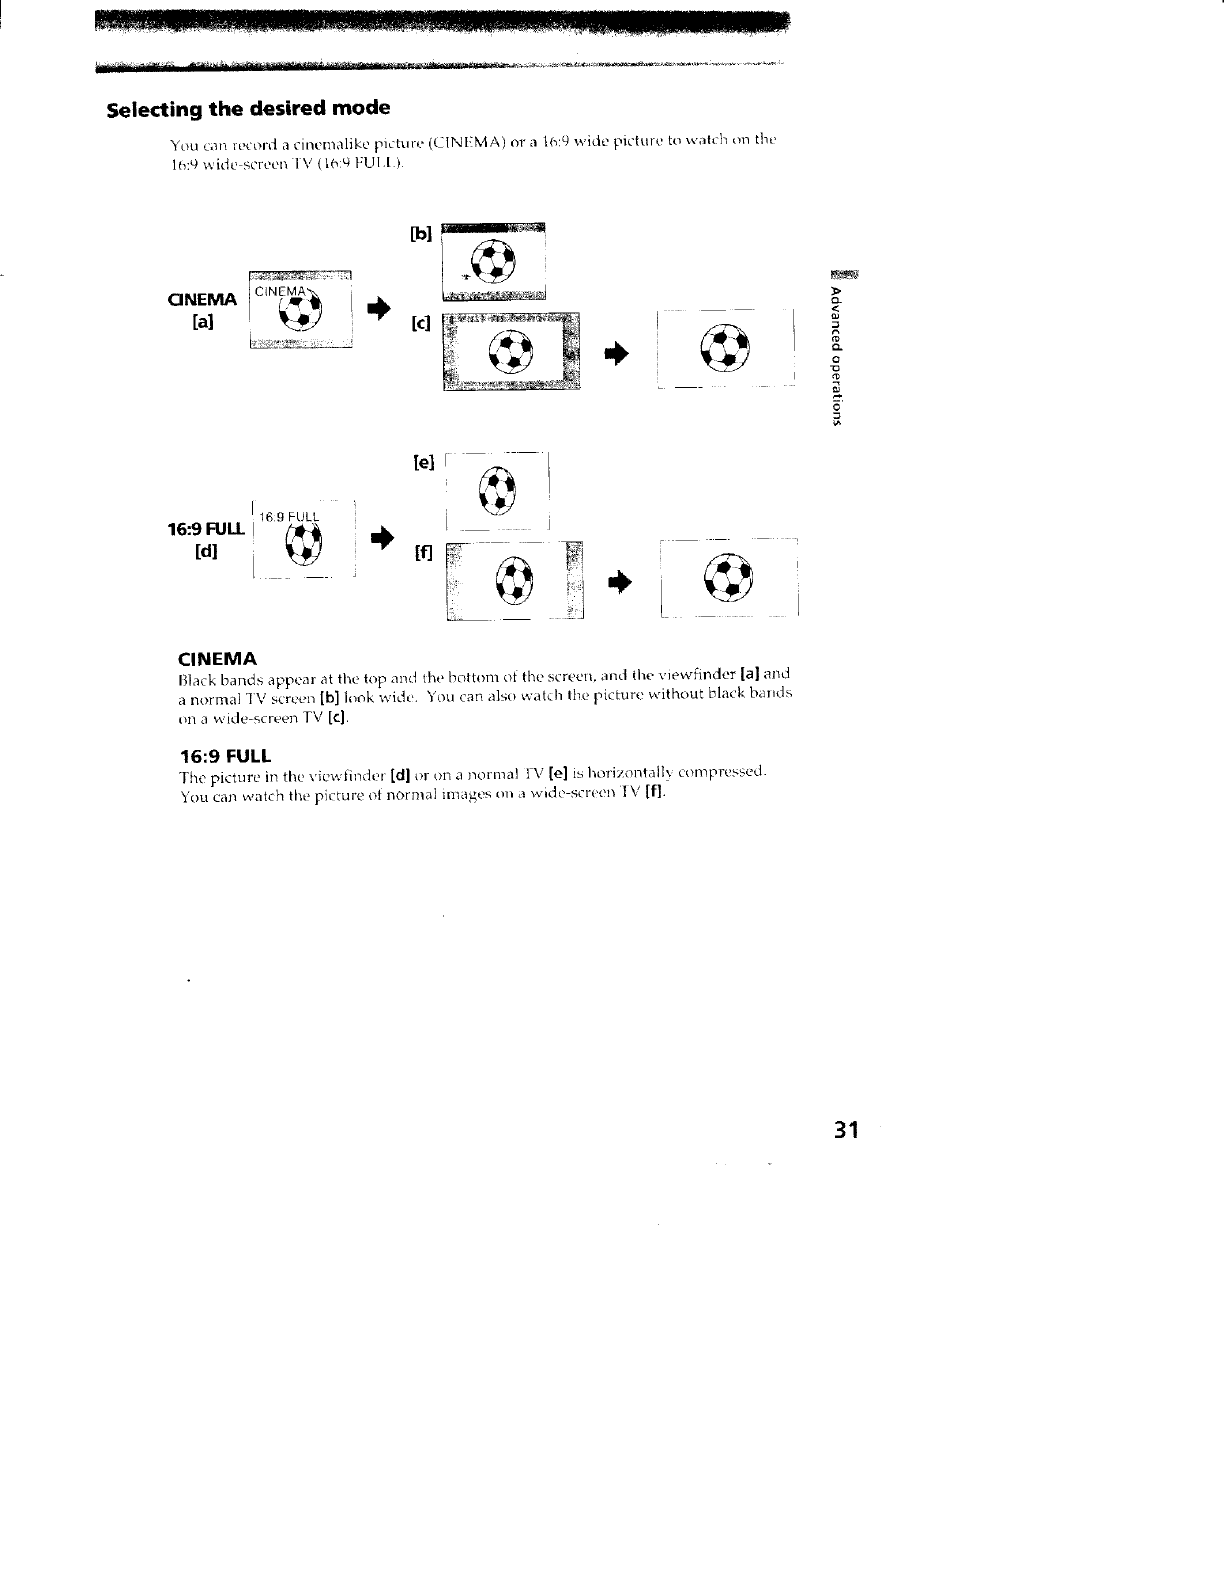
Selecting the desired mode
You can r_'cord a cinemalike picture (CINFMA) or a 16:9 wide picture to vvalch on the
1(_:9wide screer, l V (1(_:_ FUI I)
_]
CINEMA
.
[el
16g FULL "
16:9 FUll
" %w *
CINEMA
Black bands appear at the top ai_d the bottom ot the screen, and the view_inder la] and
a normal 'IV screen [b] look wide. You can also watch lbe picture without black bauds
on a wide-screen TV [¢].
16:9 FULL
The picture in the _.iu',*.l:inder [d] or on a normal IV [e] is horizimtalI', compressed.
"You can watch the picture of normal images on a wide-, reen 1\ [f].
g.
o
g
31
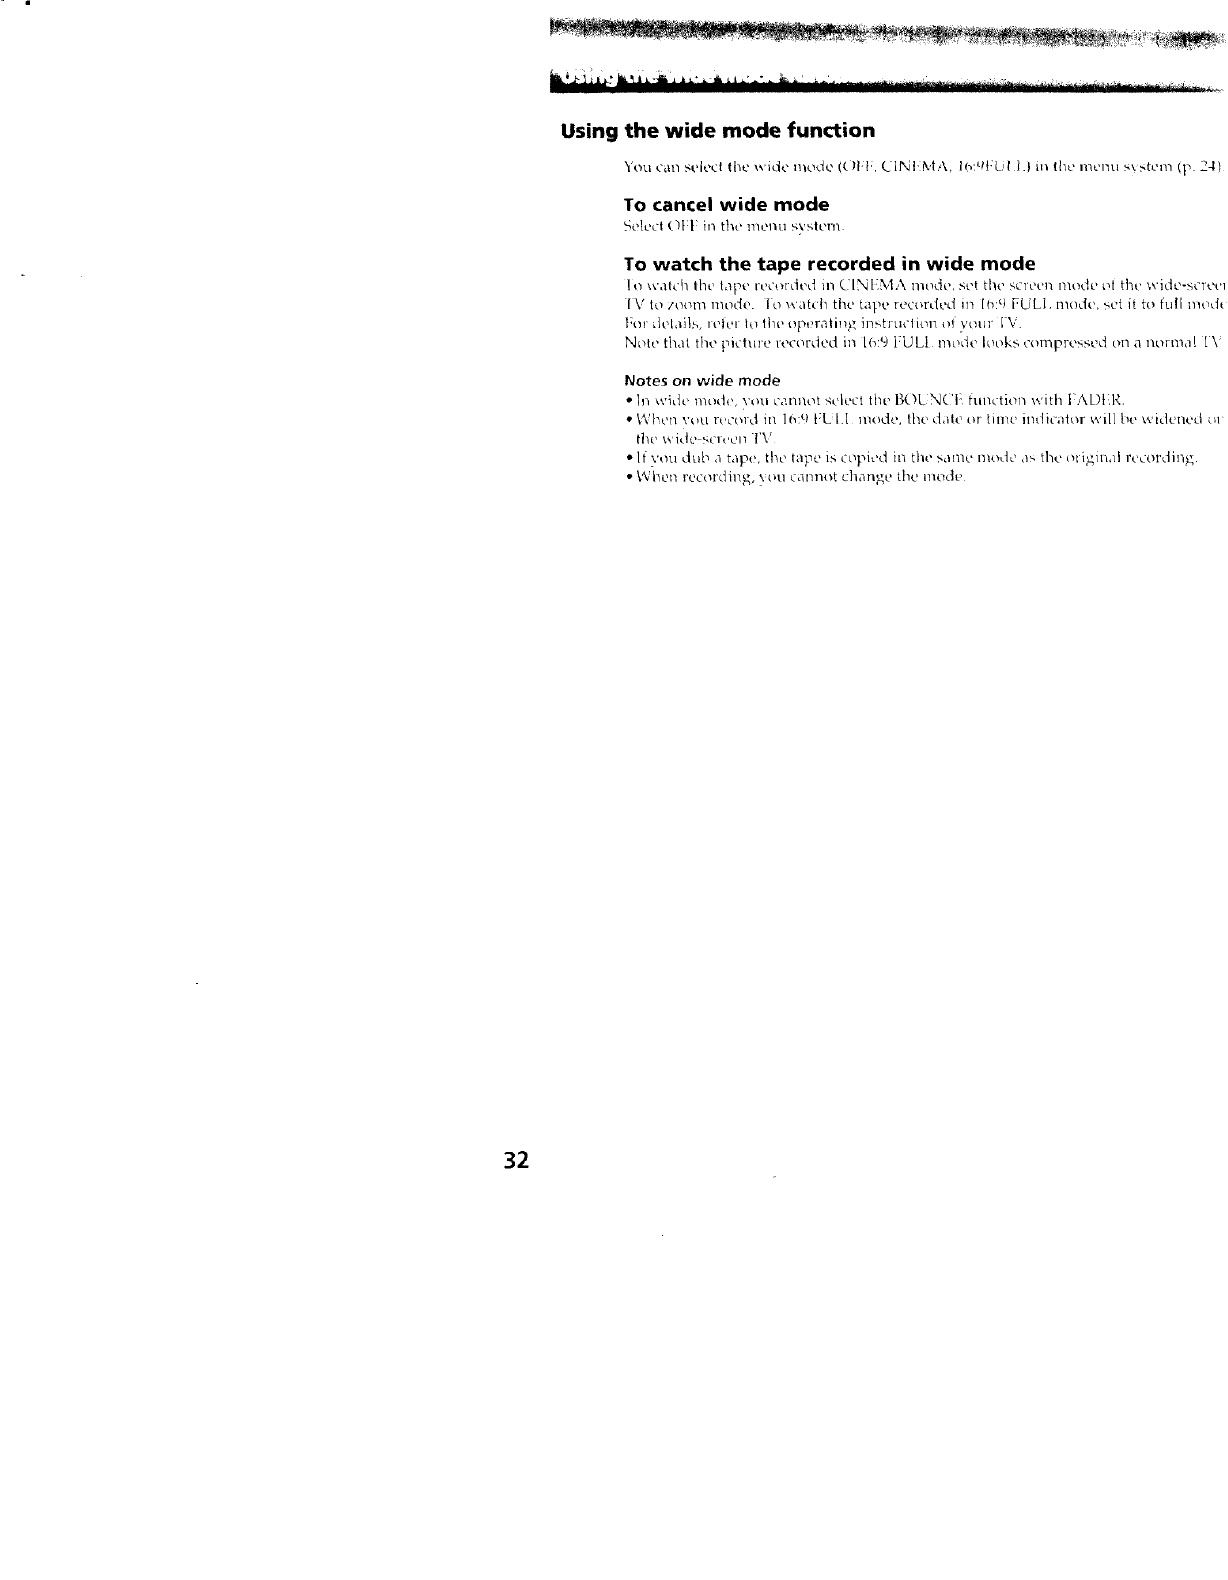
Using the wide mode function
You can select lhe wide mode (()FF, CINI MA, I_:_FLil 1.) in ihe menu s_stem (p 2.4)
TO cancel wide mode
5elc,_ I ('![:| in the menu s\'slcm
To watch the tape recorded in wide mode
1o watch the taD' recorded in (. INEMA mode, set the screen mode ot the wicle-screvl
I V to 7oom mode. Io wak'h the tape recorded in ltxq FULl. mode, sc't it to full illc_ct_
}701 kit'[3]15 It'lt'l ltl lilt' Opi)r*'ll i115_ il)Stl _It'l ioI) 0]: }rt/llF [\';.
Note that the picture recorded in [6:9 FULl me>de looks compressed on a norllla[ i\
Notes on wide mode
• In wide mode, you cnlmot select the BC}LNCI function with 1 AL)t,I,'
• When you lt,cold it_ lo: _}t:l_.l+I I/Iodo, the date or [lille illt]ic0ior will be widened c_l
the x_idc4(It'CI1 {'\s
•If you dub a tape, the tape is copied in the_,amc mode <>.the oligin,_l rt'cerdin#,.
•When recording, >ou calmot change the mode
32
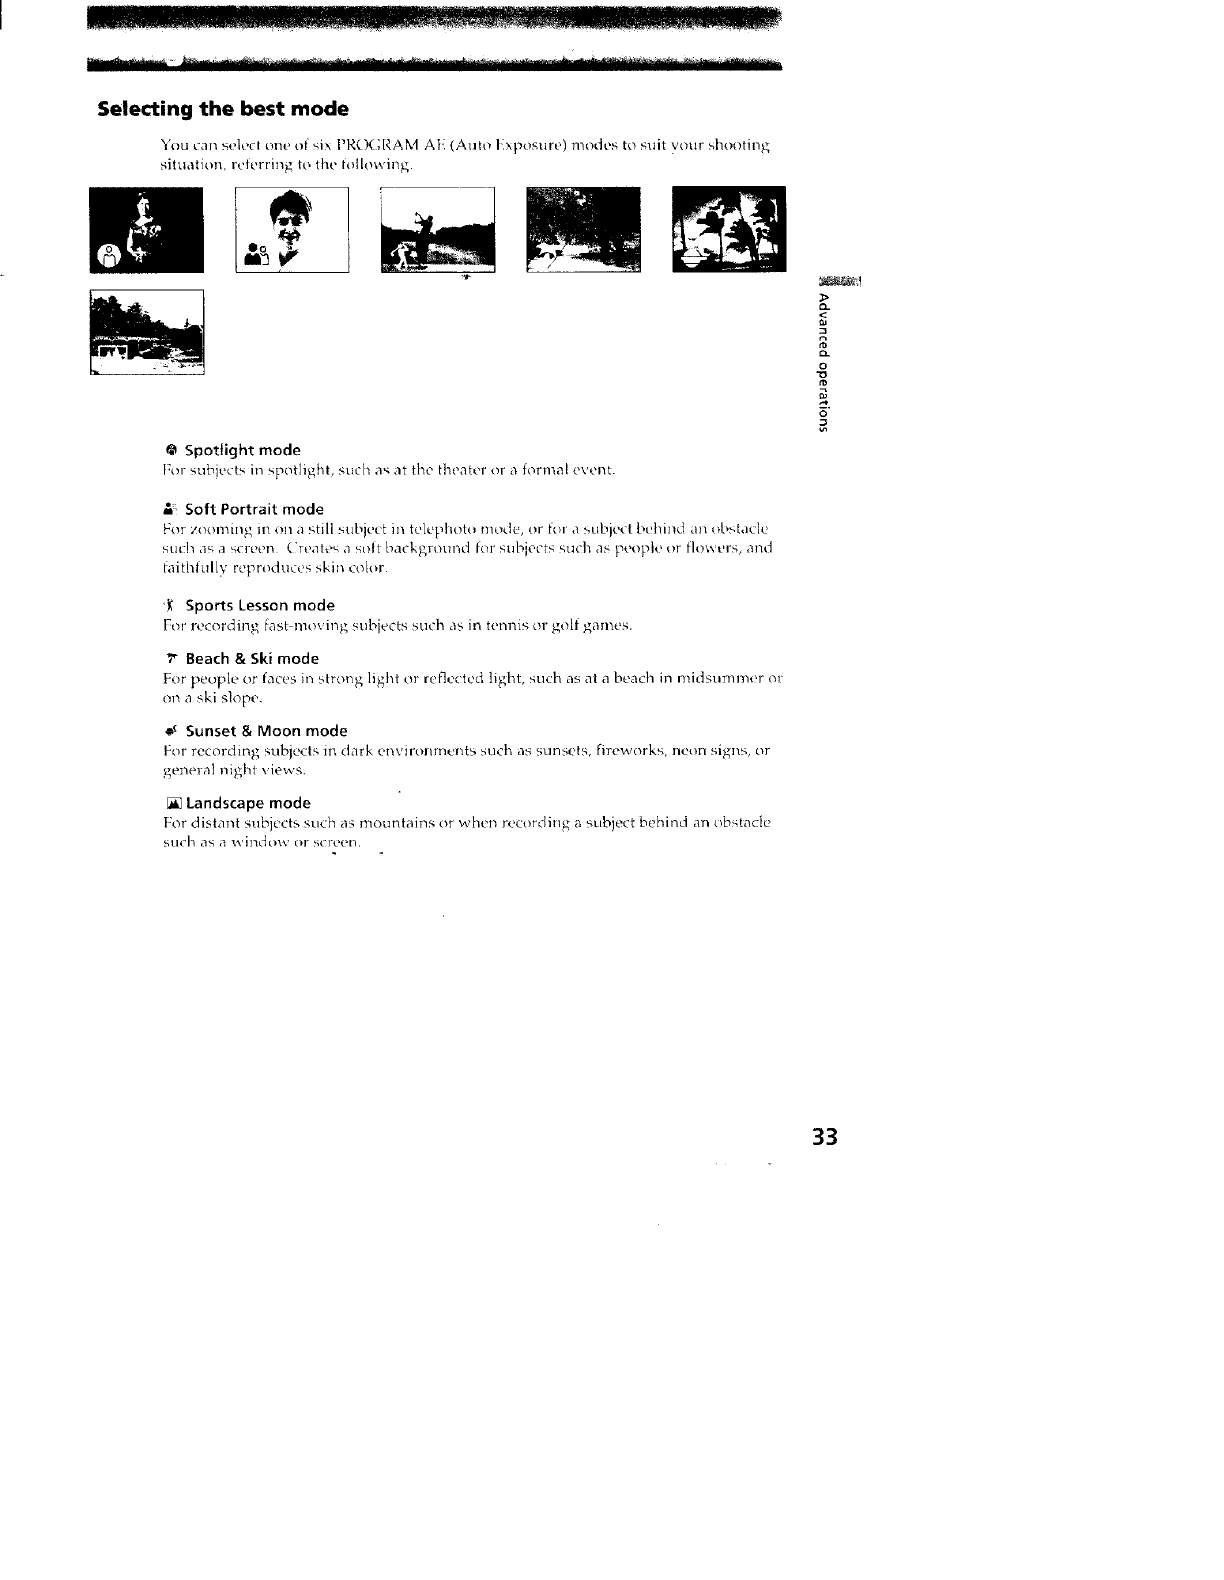
Selecting the best mode
You can select one .f _ix PROGRAM AF (Auto Exposnre) modes to suit ynur shooting
situation, referring to the tollowing.
@ Spotlight mode
For suhiect'_ in spotlight, such a'_at the theater or a fl_rmal event.
-" Soft Portrait mode
For zo,,immg m on a !,tdl subw_t in telephoto mode, or for a ,,ubied btqdnd an t_b_,tacle
sudl as a screen Creates a_olt hackgn_und tor subiects _u(-h as people or flm_ ers, and
taithlul[v reproduces skin color
'_" Sports Lesson mode
For recording fasbmo_ ins subiects such a,, in tenms or sol! games.
_ Beach & Ski mode
For people or faces in stro_/g light or relict ted light, snch as at a beach in midsummer _1
on a ski Mope.
Sunset & Moon mode
For recording snblects in dark envlronmvnt_ >rich a,', _,unsct._, fireworks, neun sigl/s, ul
general night views.
[] Landscape mode
For distant _;ublcctb such as mountains or when reo_rding a subject behind an ob,qade
SIICh as _3 %%'i]1do%_, ' OF Sclet'n.
o
33
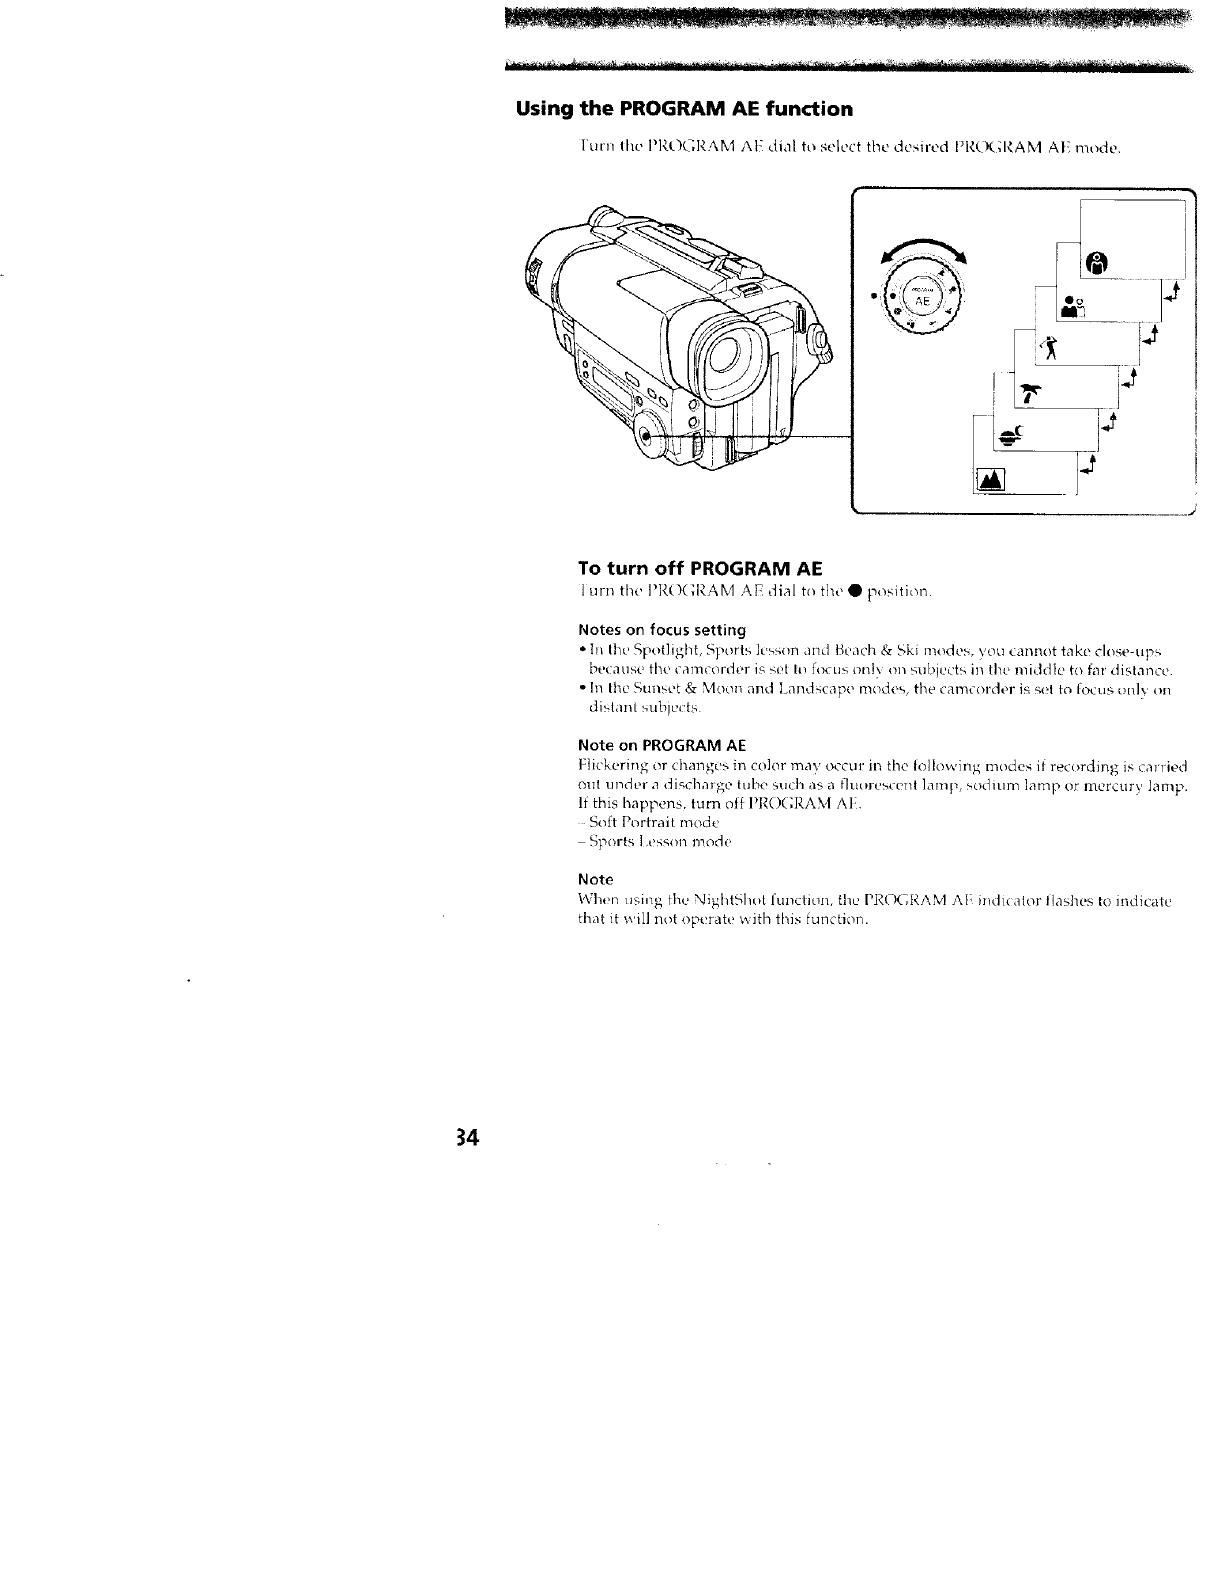
Using the PROGRAM AE function
Furn Ihe PI(OL;I_.AM AE dial to select the desired I'V,(K;I,_AM AE mode
(
To turn off PROGRAM AE
lurn the I'R()(_RAM AE dial to {he • position
Notes on focus setting
°In Ihe Spot]ighL Sports k'sson and Beach & Ski modes, you cannot take close-up_
because the camcorder is set 1o focus on!} on subjects in the middle t(/far distance.
• In the Sunset & Moon and Landscape modes, the canworder is set to focus only on
distant subjects
Note on PROGRAM AE
Flickering or changes in color ma_ occur in the following modes il re_ ording is carried
oltl 1113dt?l"_3digch,u ge lube such as a flUL_l-eSce_lt lamp, soditlrll lamp or mercury lamp.
If this happens, turn off I_RO(;F.AM AI.
Soft Portrait mode
Sports l,esson mode
Note
Whep, using _he NighLqhot function, the PI;tO(;Y, AM At1 mdi(ator tlashes to indicate
that it will not operate with this function.
34
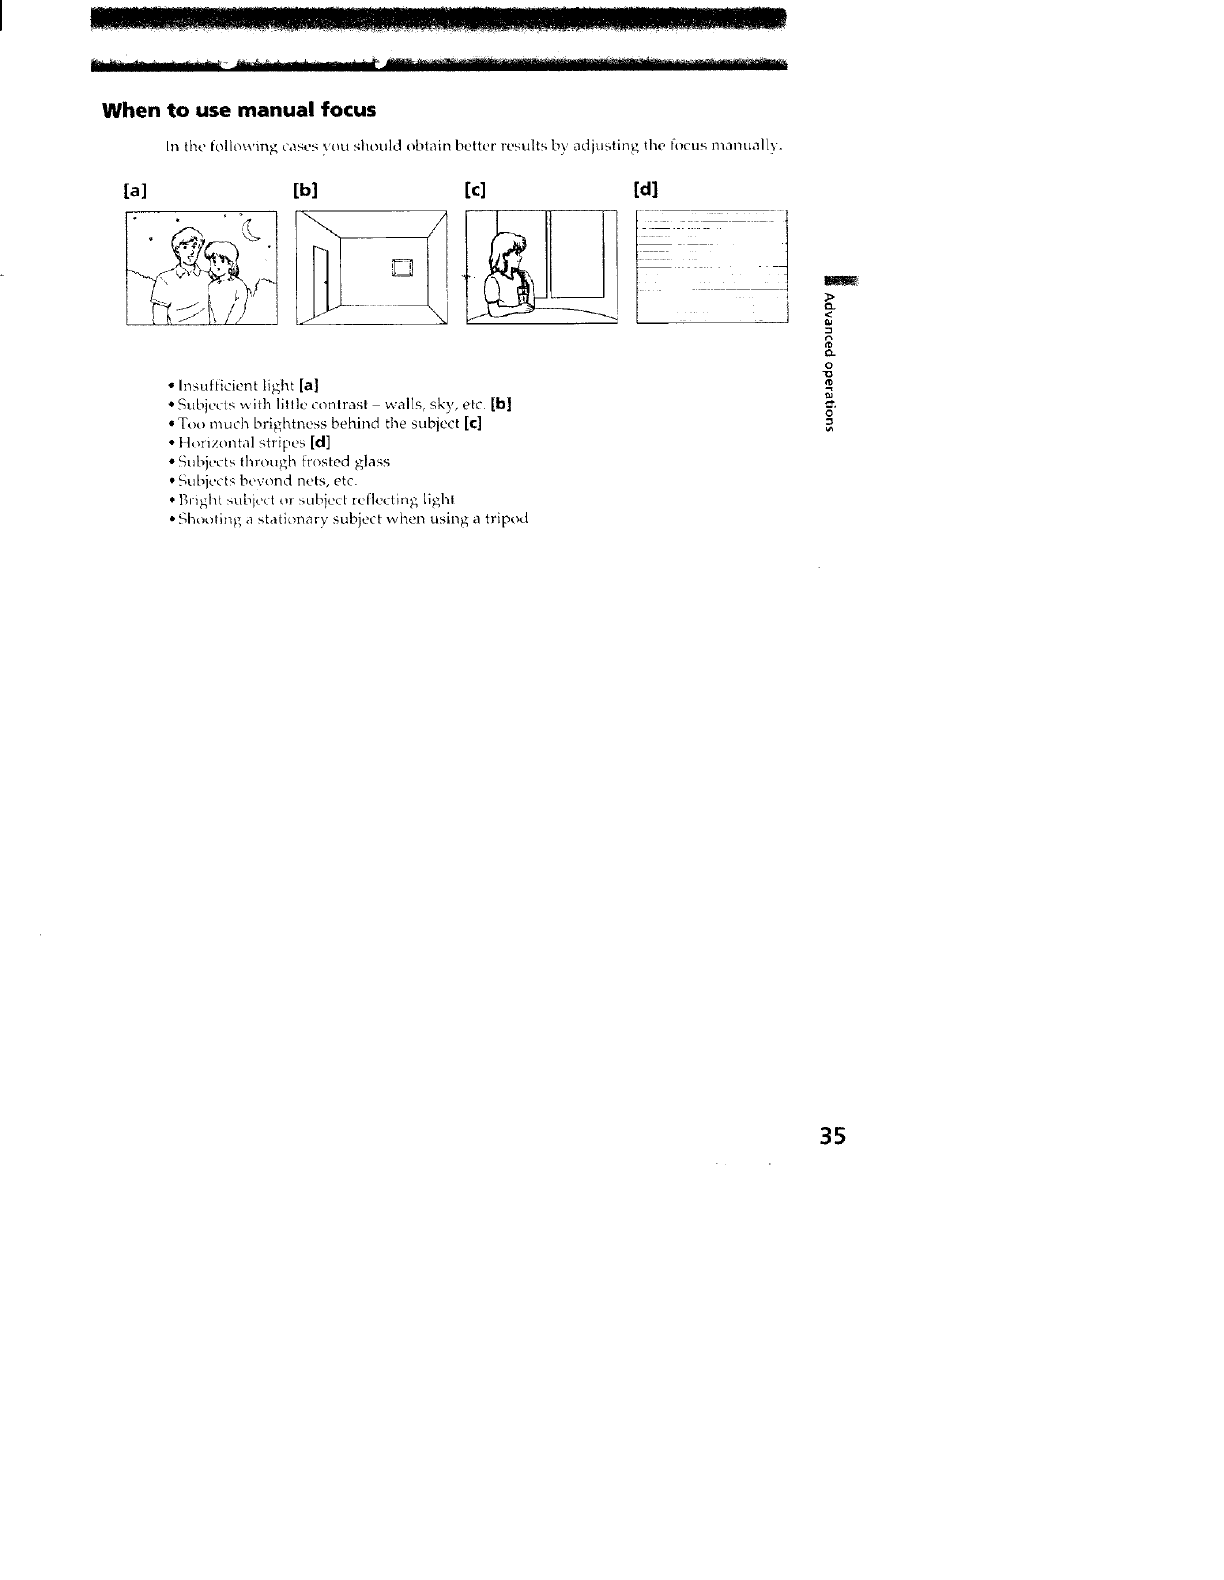
When to use manual focus
In the [ol[owing cases 5ou should obtain better resu|ts by adiusting the focus manual/),
[al [bl [c] [d]
•Insufficient light [a]
• Subjects with little contrast walls, sky, etc [b]
• Too much brightness behind the subject [c]
• H_iizonta] stripes [d]
• Subjects throu,_h frosted glass
• Subjects beyond nets, etc.
* Bright subiect o_ subiect reflecting light
• Shooting a stationary subject when using a tripod
R_
p_
o
Q
35
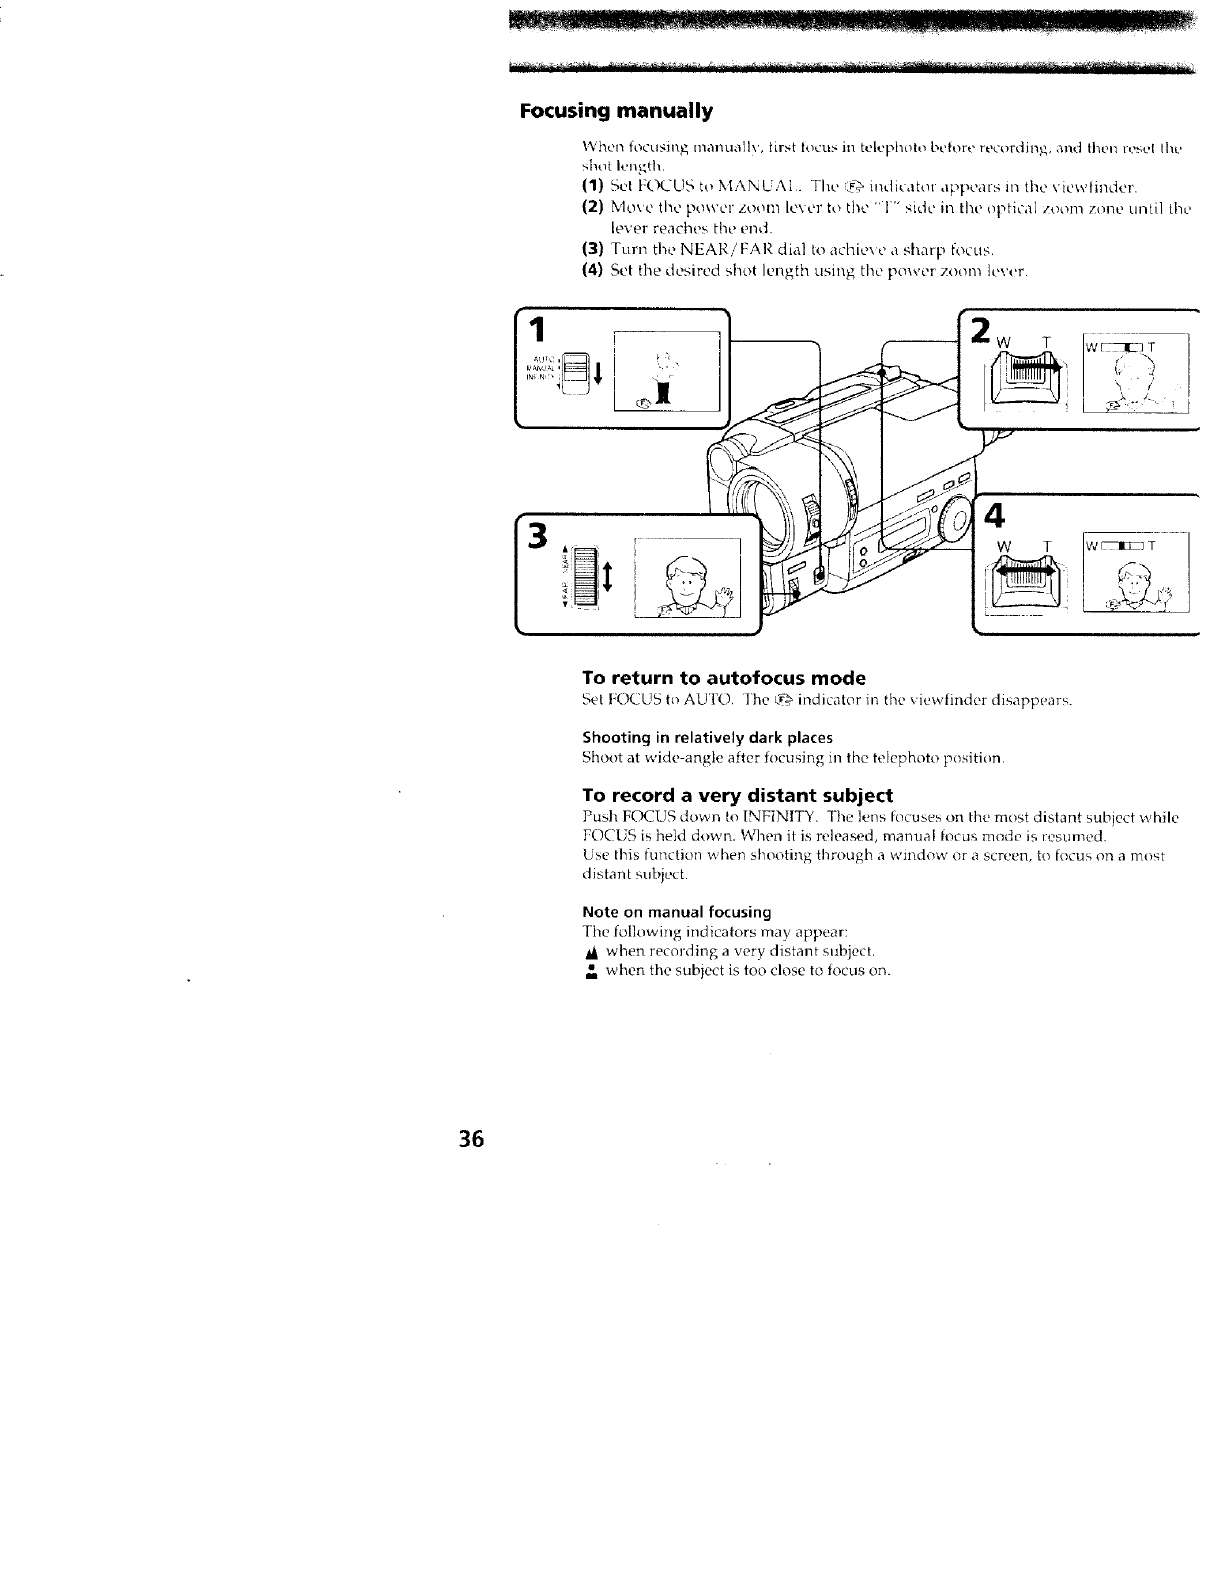
Focusing manually
Whel_ focusing manualh', first locus ill telephoto before recording{, and lhen r_'sel Iho
shot length
(11 Set FOCLIS to MANUAl. Tilt, cfD ii'Micator <lppears il'i the '_'icwlillder.
(2) Mo_e the power zoom le\ er to the " 1" side ill the optical zoom zone ill, ill the
lever reaches the ei'id.
(3) Turn the NEARiFAR dial to achie\ e a sharp focus.
(4) Set the desired shot lengfl_ using the power zoom lever.
To return to autofocus mode
Set FOX'US tc_AUTO, The k_ indicator in the viewfinder disappears.
Shooting in relatively dark places
Shoot at wide-angle alter tocusing in the telephoto position,
To record a very distant subject
Push FOCUS down to INFINITY. The lens focuses on the most distant subject while
FOCUS is held down. When it is released, manual focus mode is resumed.
Use this function _ her_ shouting through a window or a screen, to focus on a most
distant subject
Note on manual focusing
The following indicators may appear:
ii when recording a very distant subjeci.
when the subject is too close to focus on.
36
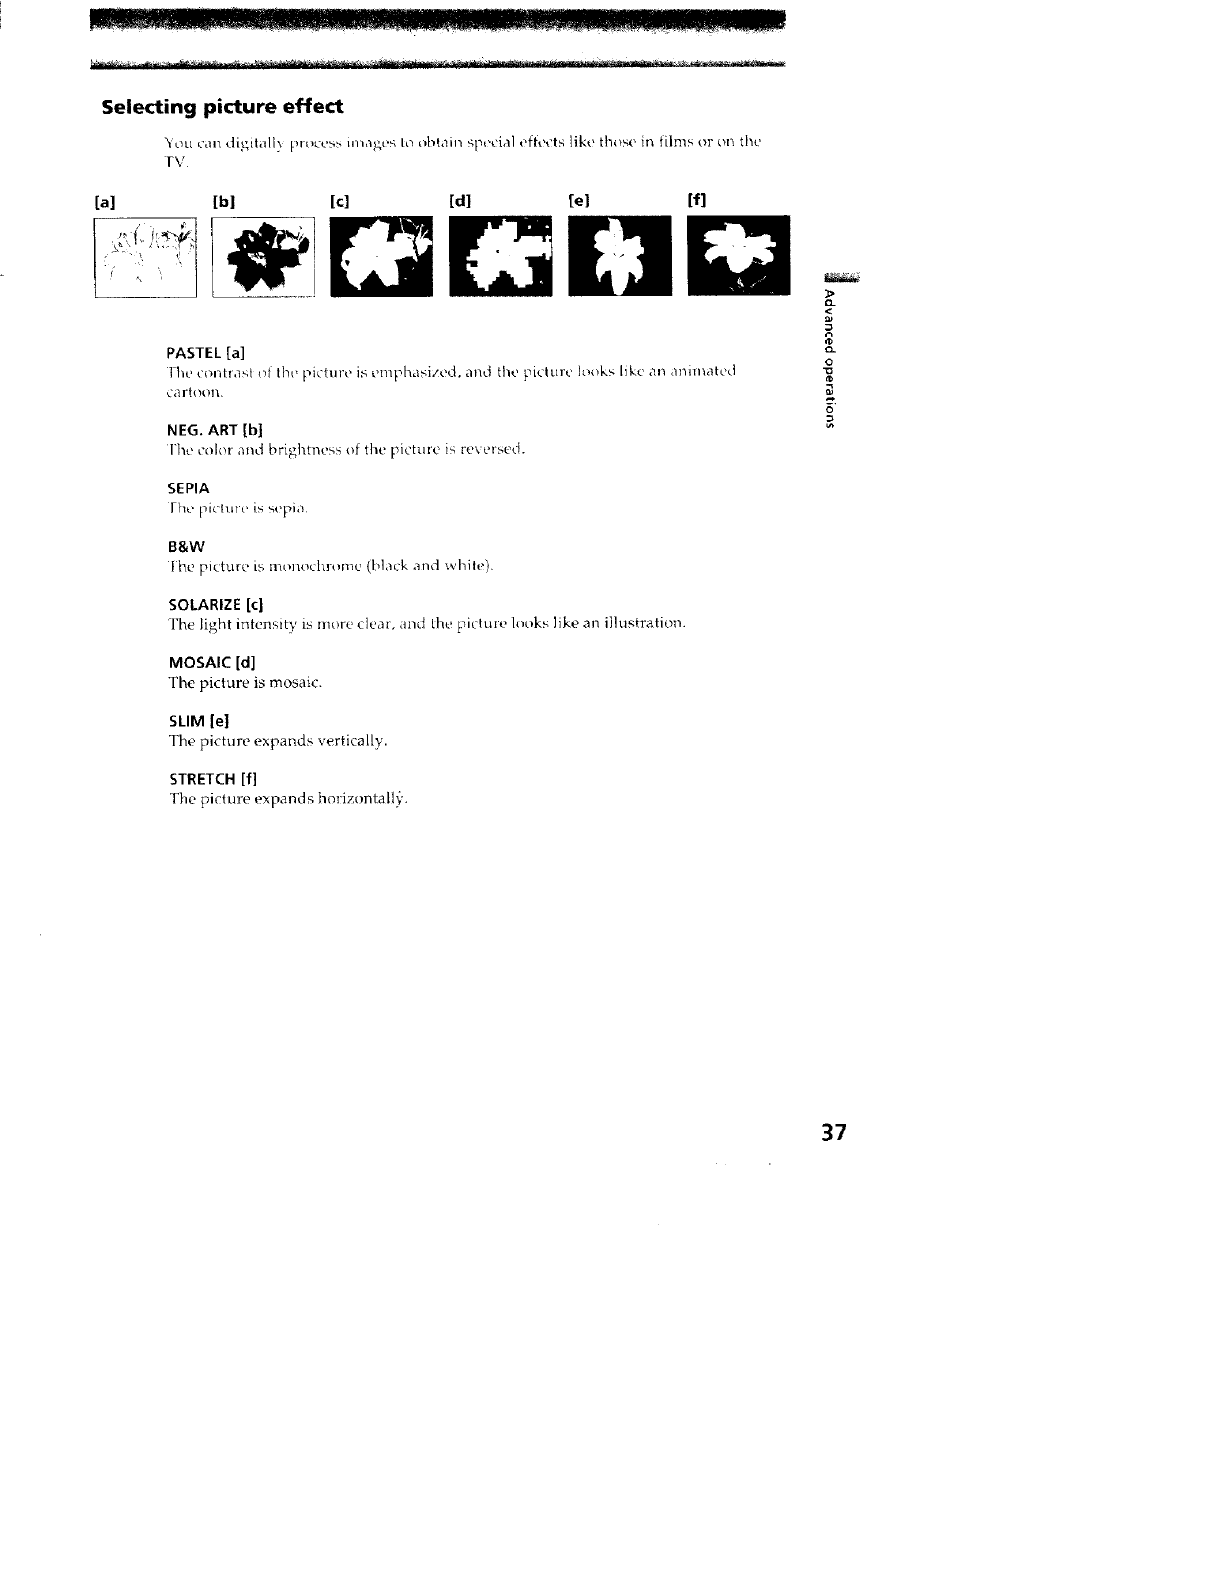
Selecting picture effect
"_ott can digit_ll3 proces_ images tt_ ohtain sp_'cial effects like those in films or on the
rv
[a] [bl [c] [dl [el [f]
I?. <,
Q_
R
PASTEL [a] _-
[he _ (_nirast _t the picture is enapht_sized, and the picture looks like an animated
c_wtooll>
o
NEG. ART [bl
lhe color and brig]_=tI;ess of the picture is re',elscd.
SEPIA
[he pk'lu_e is sepia
B&W
lhe picture is nlo]lochr,,nc (bl ick and white).
SOLARIZE [¢]
The light irltensity is more clcar, and th_._ picttire ll_oks like an illustration.
MOSAIC [d]
The picture is mosaic.
SLIM [el
The picture expands vertically.
STRETCH [f]
The picture expands horizontally'.
37
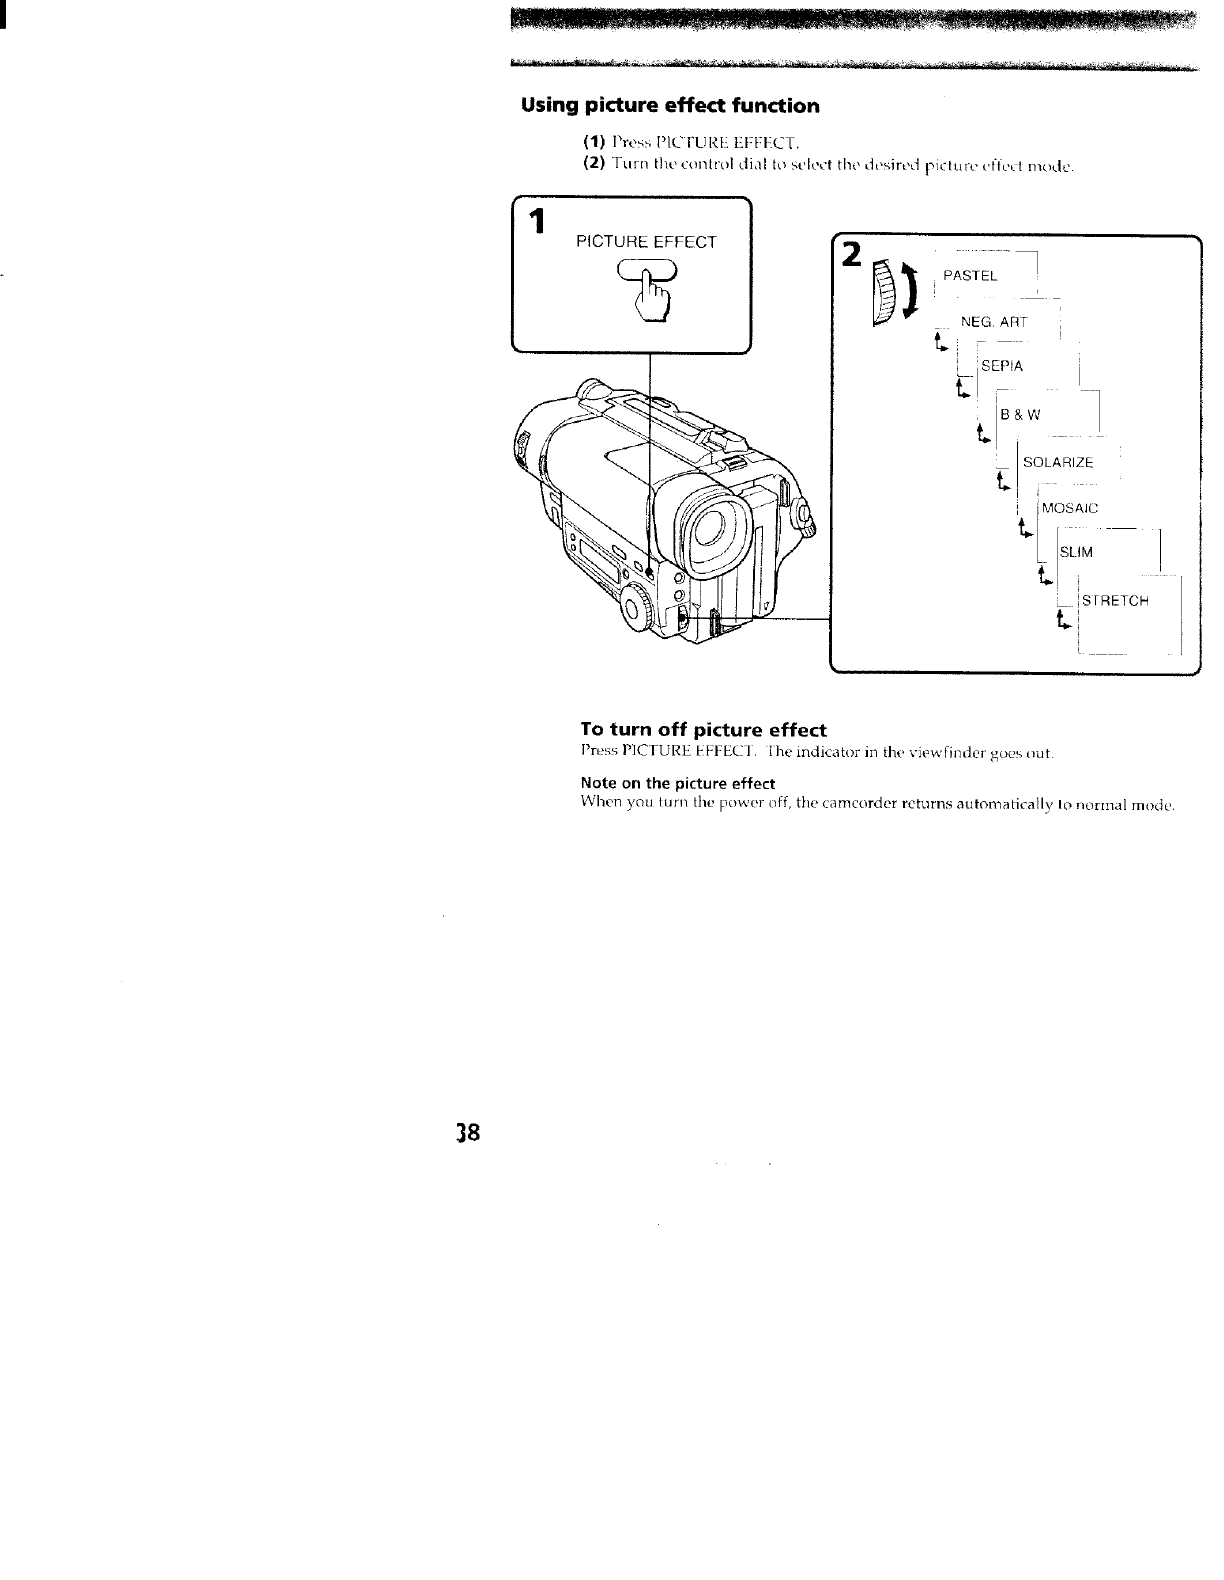
Using picture effect function
(1) Press PICFL RL: EFFt-CT.
(2) Turn the con|rol dial to select the desired picture ettect mode
1PICTURE EFFECT 2PASTEL
NEGART
t.
SEPIA
L
B&W
t_
SOLARIZE
MOSAIC
t_
SLIM
t.
_ SrRETCH
k
To turn off picture effect
Press PICTURE EFFEt'I, lhe indicator in the viewfinder goes out
Note on the pkture effect
When you turin the power off, the camcorder returns automatically Io normal mode
38
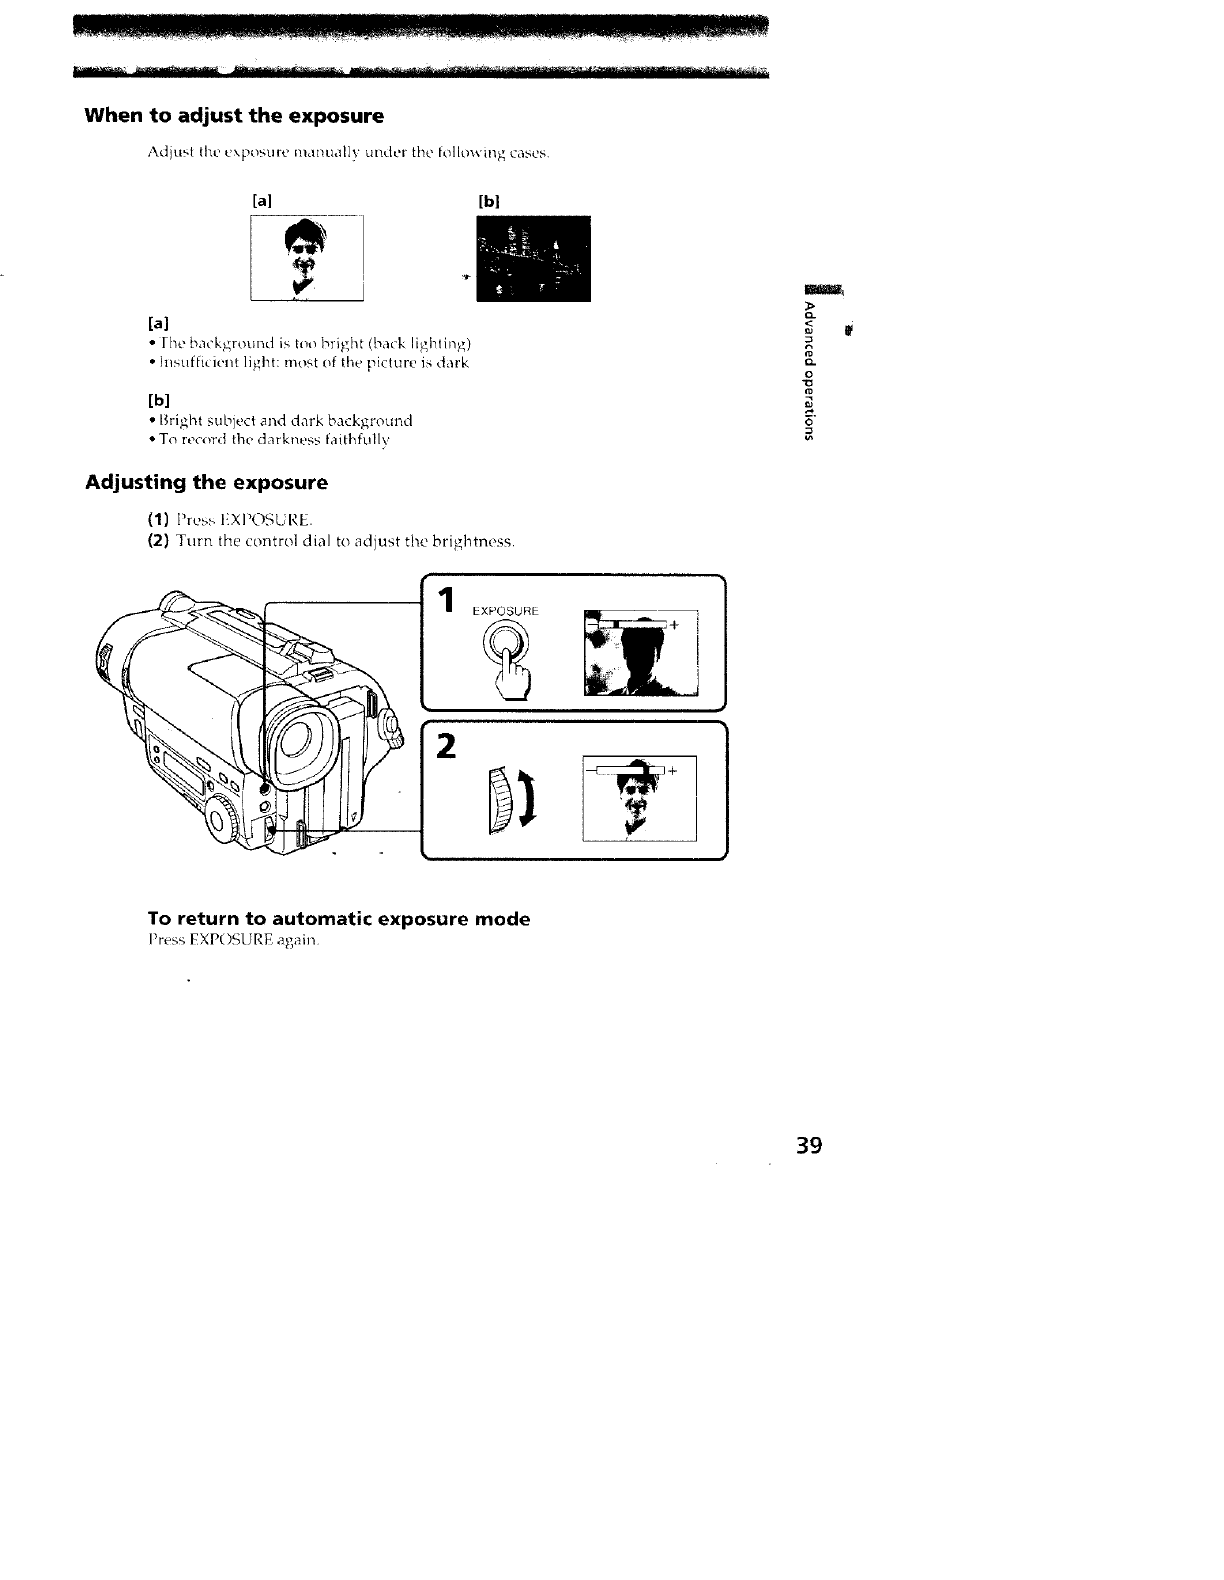
When to adjust the exposure
Adiust tl_e exposure m,mu,llly ut'Mer the [,.qlowmg cases.
[al [bl
[a]
• [he back,qround is too bright (ba_k lighting)
° hlsuffi_ient light: most of the picture is dark
[b]
• Bright subiect and dark background
• To record the darkt_ess faithfully
Adjusting the exposure
(1) Pres,'. EXI_OSUI_,E
(2) Turn the control dial to adjust the brightness.
(EXPOSURE
2
U
Q.
_ W
o
To return to automatic exposure mode
Press EXPOSURE again
39
Shooting with the sun behind your subject
If the, li_hl _ourcc is belmkt xom ' subiect, or in the folto_x in_ situation_, the subit _ t _ill
b,> recorded too daTk
•I he _ubiccl is indo_rs and thele i_ awindow behind lhe _ubiect,
•B_i_:ht light somo-, ,_, inclnded in the scene
• \'Ivht.'l__'l_O_1[iIl_1,1 _ht'l'SOl'I wearin% _hite or shin\ clothe_,illIIOIllot a \\'hitL'
back,_,,roun_i,the:fl_cewillby _ecorded too dark
Shooting in the dark
\\'e recommend you to use the broil-in ]i_ht (CCD 11_51_, onl)) ol n video ligi_t {not
snpp/ied) lo _et the be_,t color, you must main|am asnfficient light level
Note
t xpo_-/II'e _nnl_Ot be adjusted when usnig the NightShot hmc[i_m.
When you adjust the exposure manually
•BACK 1.1(:1] I does mq work
•II )ou chan_e the ._ettin_ oI ]_RO(_I_.AM AI mode, Ihe camcorder automaticalh
r,.)D.lrns [0 atltOmolic exposure modt •
4O
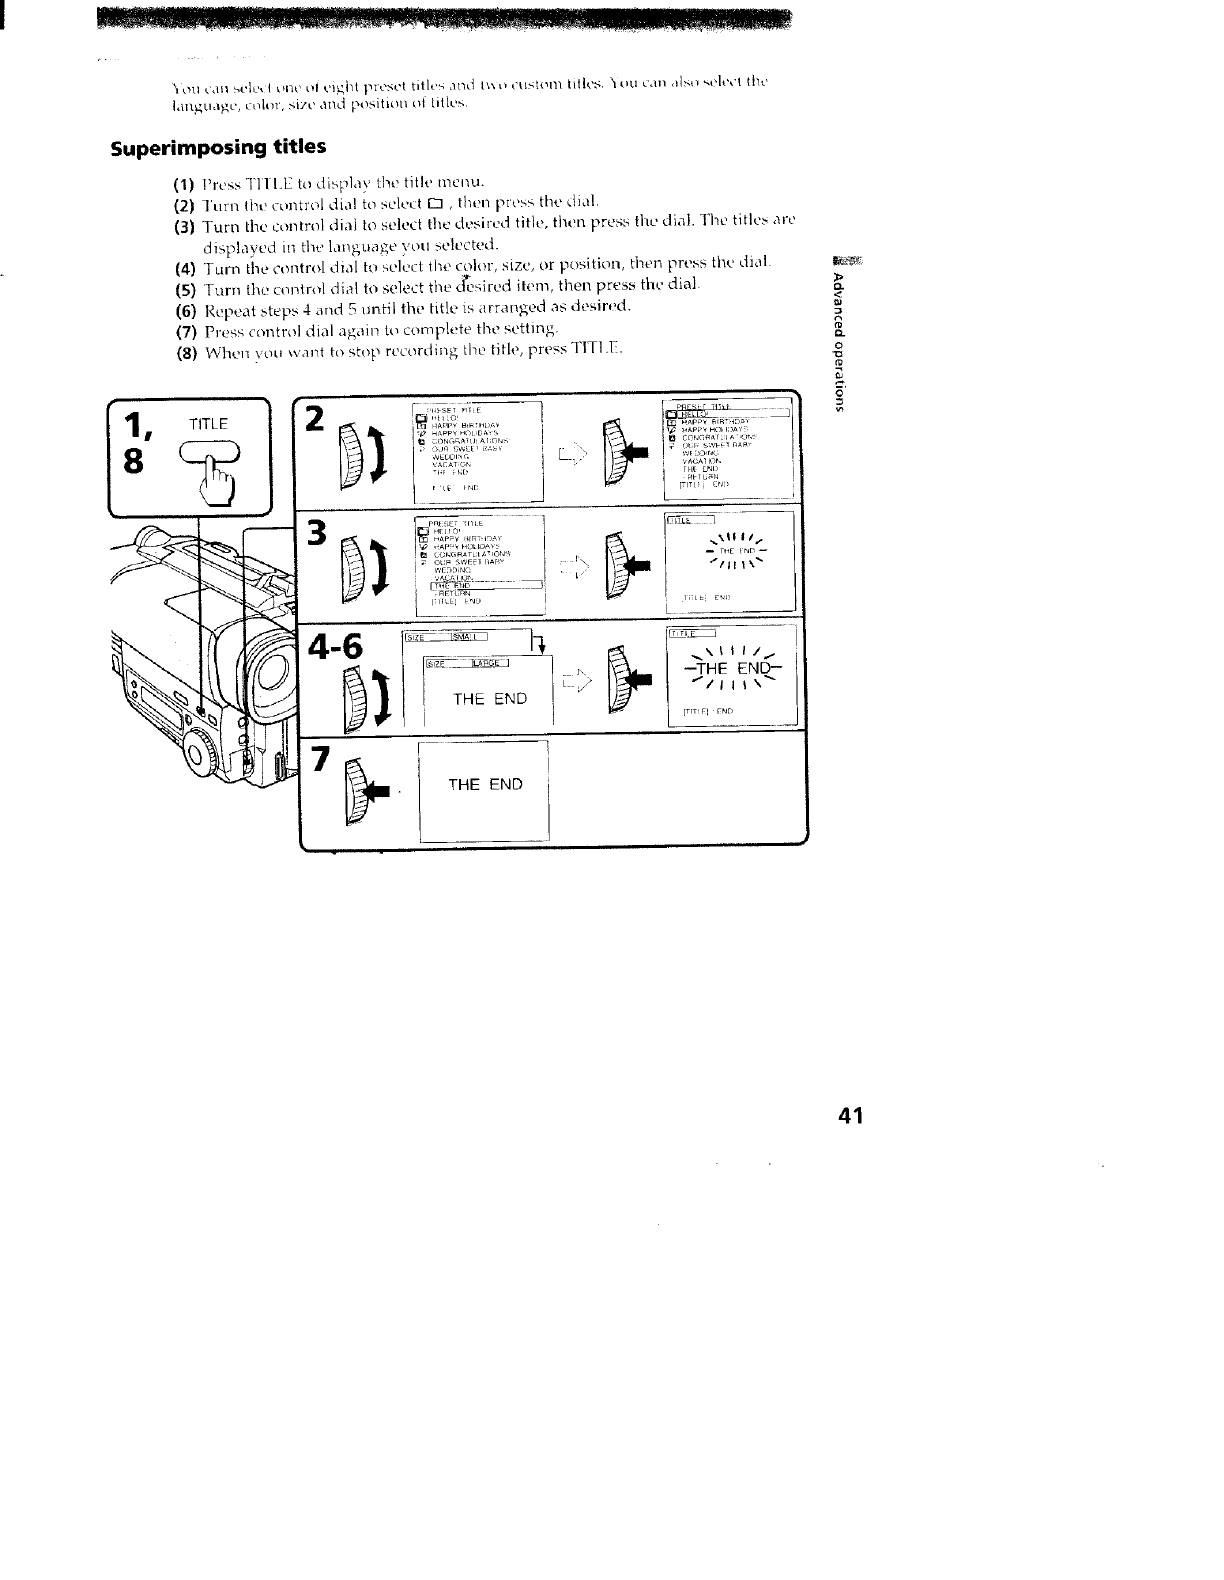
Superimposing titles
(1) Press Tll I.E t{i displa) the title mel'_u.
(2) ]urn Ihe control dial to select E3 , tl_!n press the ¢tial.
(3) Turn the control dial to select the desired title, then press the dial. The titles are
displayed ill the lai_guage you selected.
{4) Tt*l'_ tht_ eolltrol dial to se]ect the color, size, or position, the_ press tt_e di,_l
(5) rTum the coiTti'ol dial to select the _t, sired item. then press the dial
(6) Repeat steps 4_l_d 5 tmti] the title is arra_ged as desir_!d.
(7) Press control dial again t.o complete the setting.
(8) When vou wal_( to stop recordii_g the title, pre_s TIT1.E.
# TITLE
8
I¸-_
rll_ ENI)
:i> ill'"
te t
THE END 2 > "/I I I \"
L XX El E_D
_. THE END
_>
&
o
r#
0
41
To superimpose the title from beginning
Atlet step 7, pre,,,_, S1 AR I iS I O1' to start reeordin'4
To superimpose the title while you are recording
After v,ressmg S1ARI iSIOI _ to start tecordit; M, start trow, '-;tel*, 1. Itl this case, beep is
not heard
To select the language of preset title
Whel; you ',,,'c_l_,tIn s,.'h.'et the la+',gua_c, s,.'le,.'t _ before step 2. lhetl _,e/ecl Lmguage m+d
return to step 2
To use the custom title
When you _*ant to use the c,,.lston'_ title, select IX]i_ step 2
Notes on superimposing atitle
• lf\ouhaxenot_ivenan- custom title." --- . ." appears on the display
• The FADI-R ftm, tion _orks _', hil(, the title is di<piav(,d, however, the title does not
fade
• If you displa'_ the iI/eill.I or title illenkl _,_,'}'lili2superit_posinq a title, the litlt_ is nt)t
recu_ded ;,. bile the menu or title menu is being displayed
Title color changes as follows :
WH1FIi ._,_ "_ELI3.)W ,, * VIOl t+I * * RED *--* CYAN *_, GREIN *_. BI.(t'
Title size changes as follows :
SMALL *-4 LARGE
Title position changes as follows :
WheI'_ you select the title size "SMAI ,I", you can choose 9 p{_silions WheJa you select
the title size "LAFtGE" you c;m choose 8 positions.
Notes on the title
• Dependin.g on size nr position of the title, botl_ of the date and time or either of them
_ot displayed
• If you input 13 characters or more for a lARGE title, II_e title is automatically reduce_
into a proper size after the position is set
42

_ou can make up to lwo titles and More the'ill hi the _alncord_'r. _NL, recoil/tilt, lid to sl'l
the I_OWER switch h_ I_[,AYEI_ or eiect the cassette before you begin
',our title can have up to 20 characters.
(1) Press Ill LE to display the titk" menu.
(2) TtlrI1 the control dial to select t#, then press the dial.
(3) Turn the control dial to select the first line (CUSTOM1) or >econd line
(CUSI OM2), then press the dial.
(4) Turn the control dial to select the column o_ the desired character, then press
the dial.
(5) Turn the control dial to select the desired charitcter, then press the dial
(6) Repeat steps 4 and 5 ul?til you finish the title.
{7) For finishing the titling work, turn the control dial to select SET, then press the
dial.
1 T,T,E 2
7,rte SET
z8 _ AOn;_ 1_
{TIT_EI [_4D
-4-6o ,.....
),\
/
ITITE ND
O ! 11'LE _;e_
_tmnO aE lot, i
I_ LE EN_
t ...........
za, _e,u, :E3
[rITE I EtaD
g
43
_ _a _.i. _.,_,_ ........... _,._ _:_ _ ,__.._. _._L_ _ _ _d _,__,,_,_r _
To edit a title you have stored
In _.iep I, select LL 5 IOM 1 or (.LS I t)M2. dependh;g on which till,., you want io ed i!,
then change die title.
Note
_'Otlc0nnl){t,nh!rt)\t,l21)chala_IL'l'_{lilt'
If you take 5minutes or longer to enter characters while a cassette is in the
camcorder
lhu i:_o_er goes o1| aLitoIY_ati_it]]y (_halacteis VOLt have entered remain. Im'n
SI.\NDIW down once and lhen up a_>tin, then pm_ed trom st_,p I.
To delete atitle
II1 _;tL'p 4, turn the control dial to select {el thLm press the dial 'l'lle la,I _h</_acle_i_
era-_ed I_epeal Ibis _,tep unlil all t ]l,llilCieF$ dru deleted
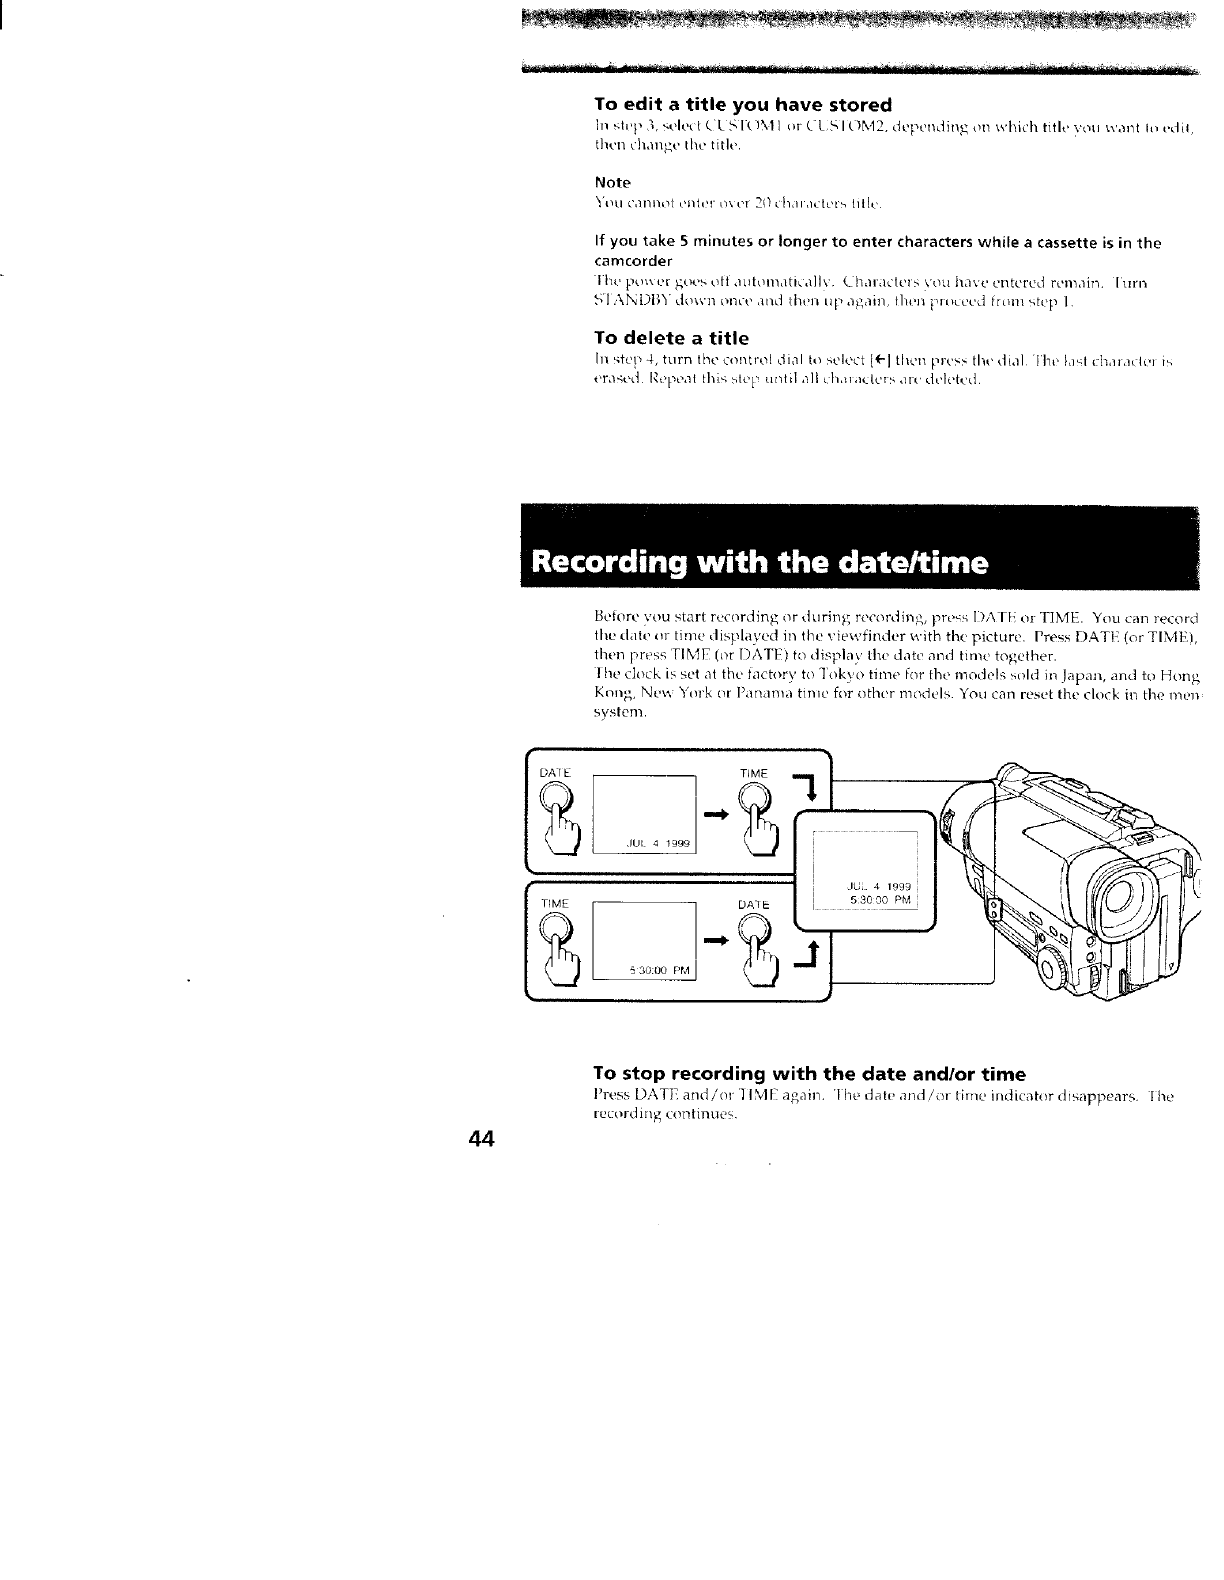
Before you start recording or dtlrh_g recording, press DATt or TIME. You can record
the date or time displayed in the viewfinder with the picture. Press DATE (or TIME),
then press TIME (c)r [)ATE) h_ display flw date and tinle together.
1he clock is set at the factory to '1okyo time for the models sold in Japan, and to Hong
K_mg, Ne_ Vtll-k Ol I)amlnla time for othor nlodeI5. You can reset the clock in the nl_?l]
system.
TIME
,IUI 4 1999
IL{ 4 1999 i
53000 PM
id
'J
44
To stop recording with the date and/or time
Press DATE andi0r]lMI agMn, rlhe dale and/or time mdicah_r disappears. Ihe
ecor( /g C( iltinue _,
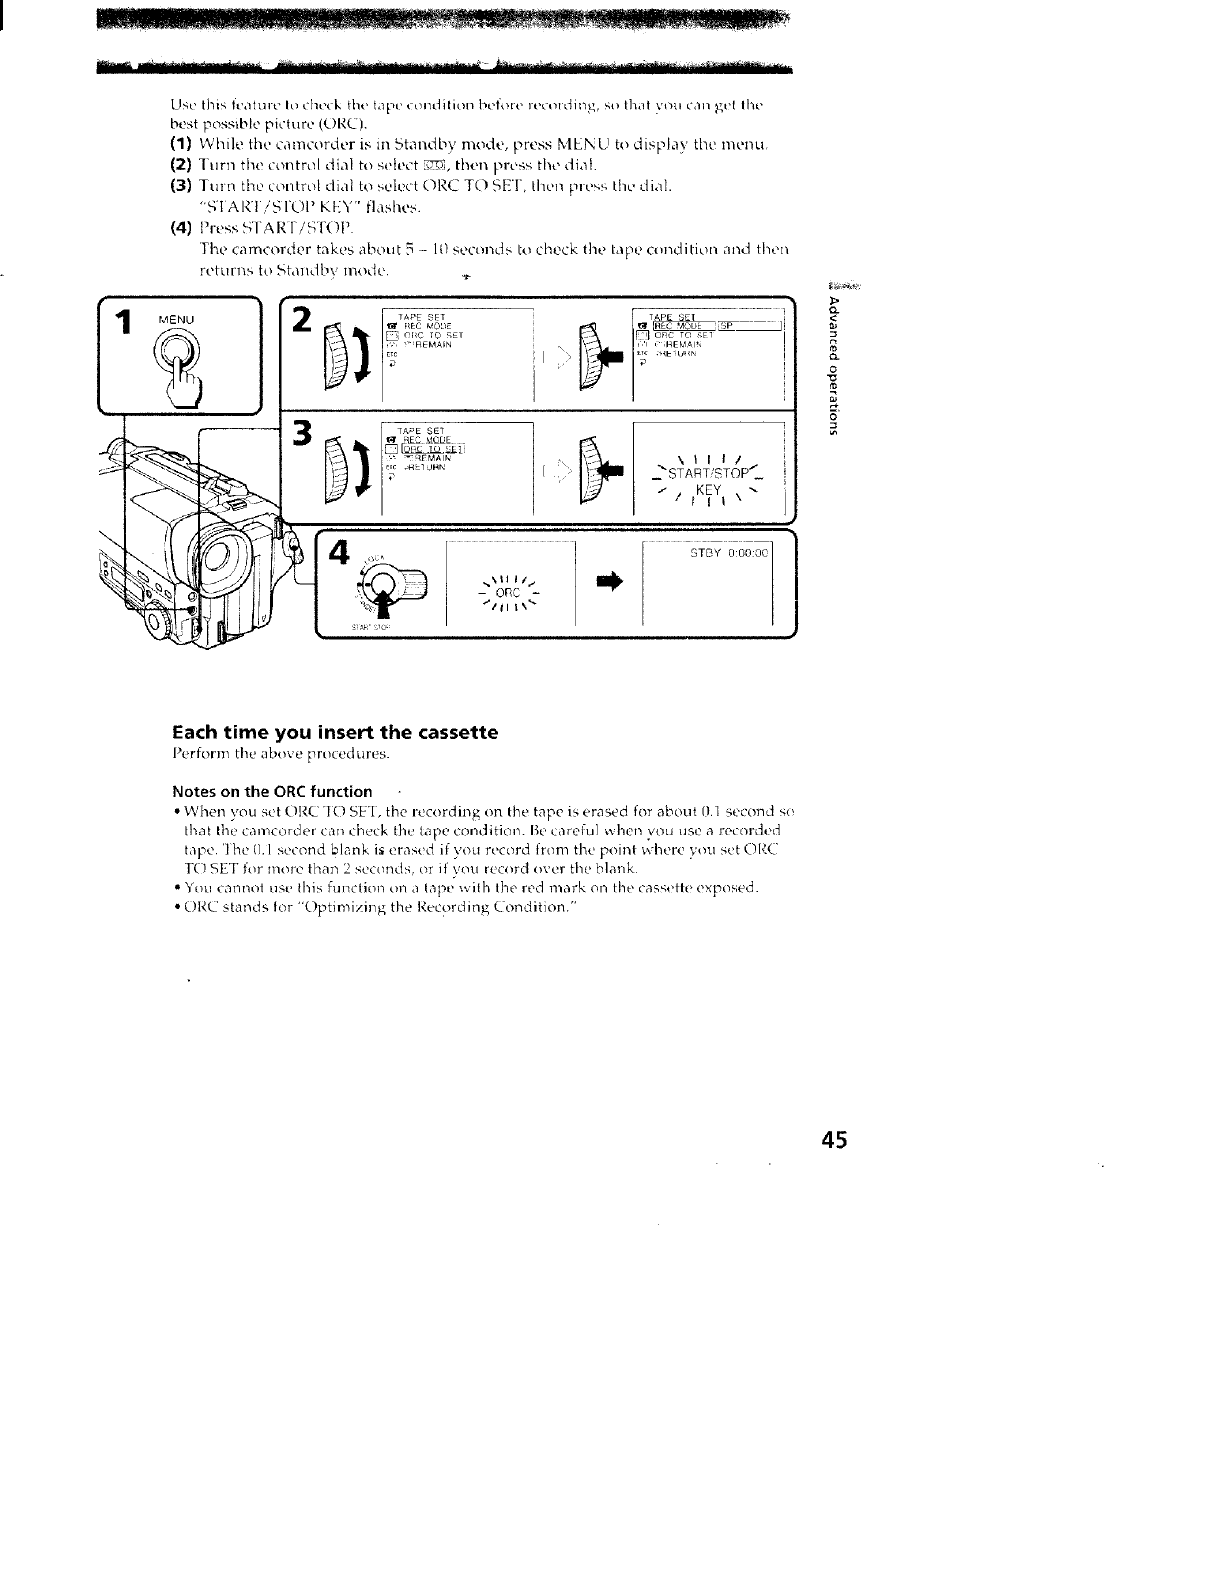
Use this feature Io check the tope o++_ditit+n before recc, t dh_g, so that votl can get the
best possible picture (ORC).
(1) While the camcorder is m Standby mode, press MENU to displa_ the n_,enu,
{2) Turn the contrtH dial to select _, th{H1 pl+ess the dial
{3} Turn the control dial to select ORC TO SET, then pIt"_ the dial.
"'S_l ARt iS IOP KEY" flashes.
(4} Press 51AP.I'/STOP.
The eameorder takes about 5 1{} second._ to check the tape c{}ndition and then
rett)rns to Standby l/lode, ,,_
Each time you insert the cassette
Pc, florin the above pro_edl_ires.
Notes on the ORC function
• When you set OP, C rio SE'I, the recording on the tape is erased for about 0.1 second so
that the camcorder carl check the tape condition. Be careful _ hen you rise a recorded
tape. ']he 0,1 second k_lank i_ erased if you record [tom the point ;x here you set OP,_2
TO SET for more than 2 sec{_nds, or if 5ou record over the blank
• Ynu cannot use lhis function on a tape with the red Fnark oo the {assette exposed.
• OP, C stands for "Optimizing the Recprding Condition."
45
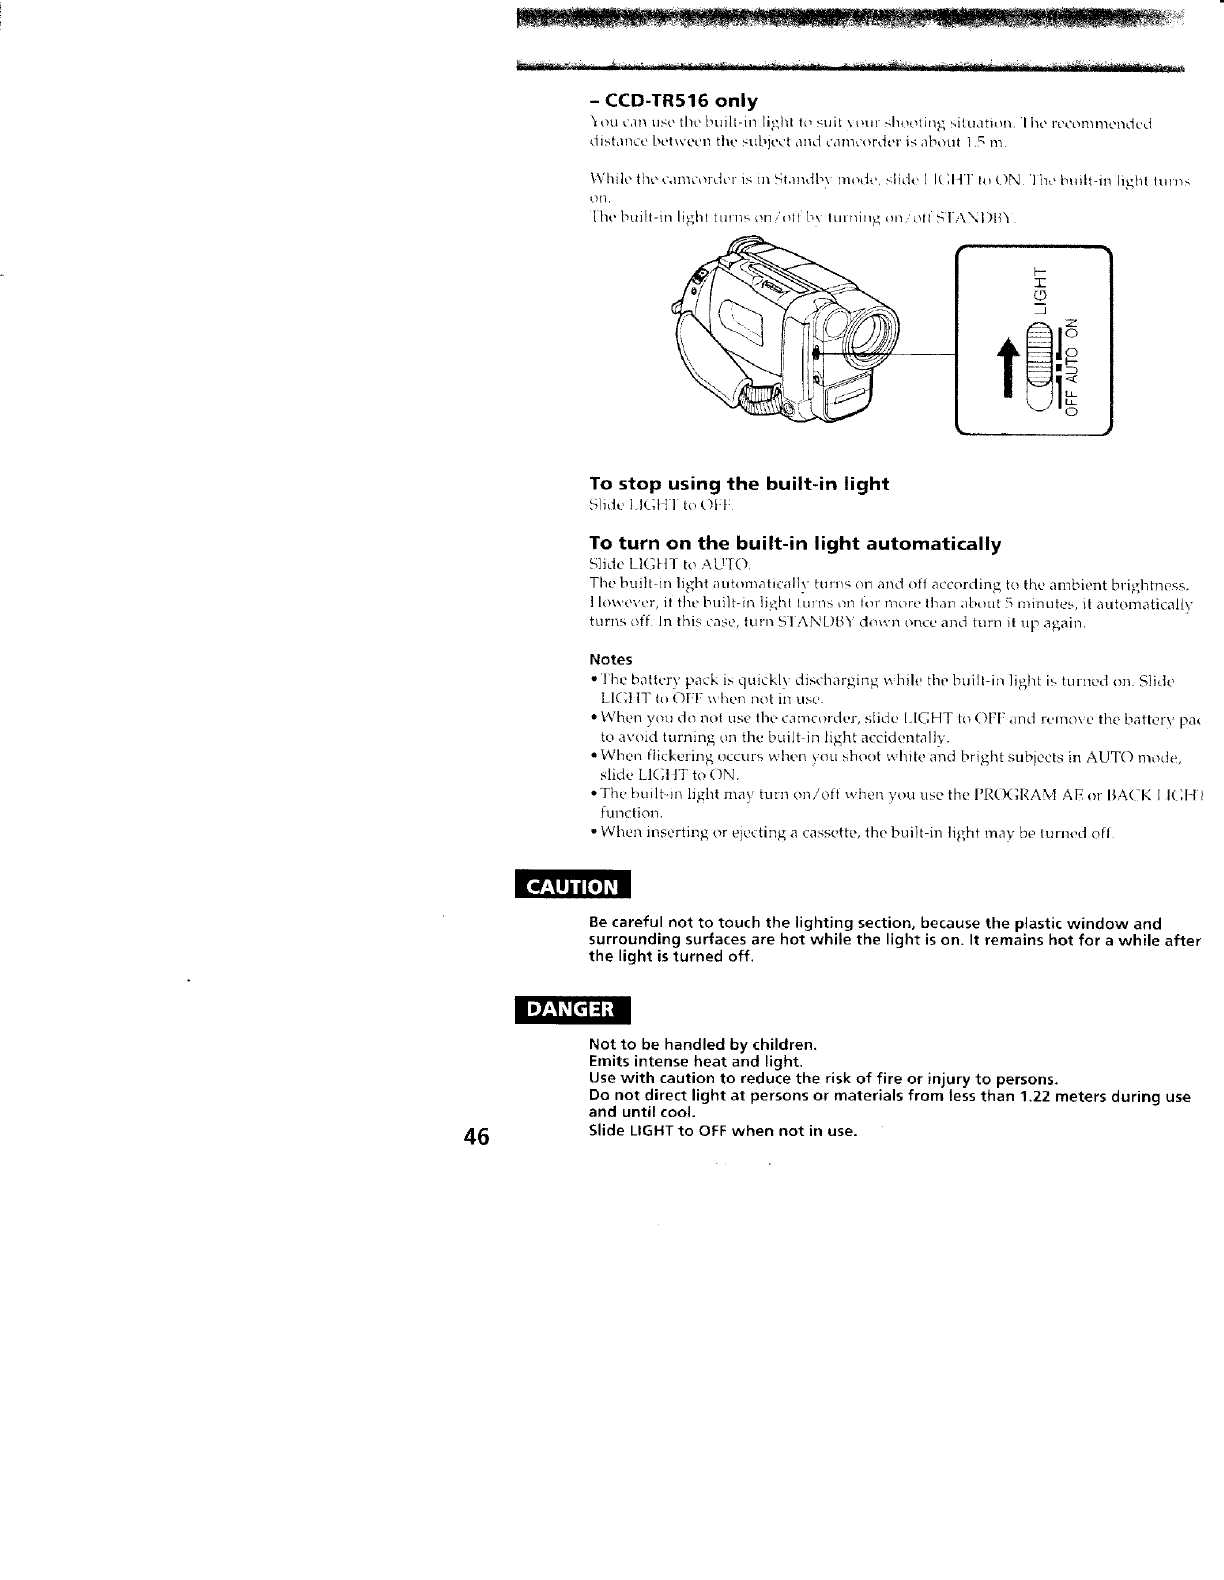
- CCD-TR516 only
ou car, use the l_uilt-in light Io _tdt \ _t+l _,h_othlg sRudtiun Iiw rccommel',dcd
distance betwecn the _-ubject and calncordel is about 1,5 m
While the caiv_curdci is ii1 5tandbx triode, slide I I1;HI lu t)N l iw tmilt-m tight Iron<
lhe I_uiit-m light tu*n_, on t_H bx lm/liIIg (111/Oil _41J\NI)[{'I
"T
©
t li°
To stop using the built-in light
Slid,, I IGt I1 t_>OFF
To turn on the built-in light automatically
Slide LIGtll to AU'IO
The built iT/light automaticall?, turlv_ or_ and oft according to the ambient brightne_,s.
1luwever, it the built-ha lid',hi tulns _tl lot more tlnmn about 5 minutes, it automatically
turns off In this case, turn S lANk)BY down once and turn it up again,
Notes
• The battery pack is quickh discharging whih! the huill-in ]ighl is (tlltlL+doil. Slide
LIG11T t_) O[:F _ hetl not in use
• Whet: you do nul use lbe camcorder, slide lIGHT It) OFF and remove the battery pa_
to avoid turning on the built in light accidentally.
• Whets flickeiing occurs when you shoot shire and bright subjects in AUTO mode,
slide [l(;I IT to ON.
• The built+ill light may turn ou/ott when you use the I'R(XH_.AM AE or BA(K I l(;ll
function.
• When inserting or e}ecting a cassette, the built-in light may be turned oft
Be careful not to touch the lighting section, because the plastic window and
surrounding surfaces are hot while the light is on. It remains hot for a while after
the light is turned off.
46
Not to be handled by children.
Emits intense heat and light.
Use with caution to reduce the risk of fire or injury to persons.
Do not direct light at persons or materials from less than 1.22 meters during use
and until cool.
Slide LIGHT to OFF when not in use.
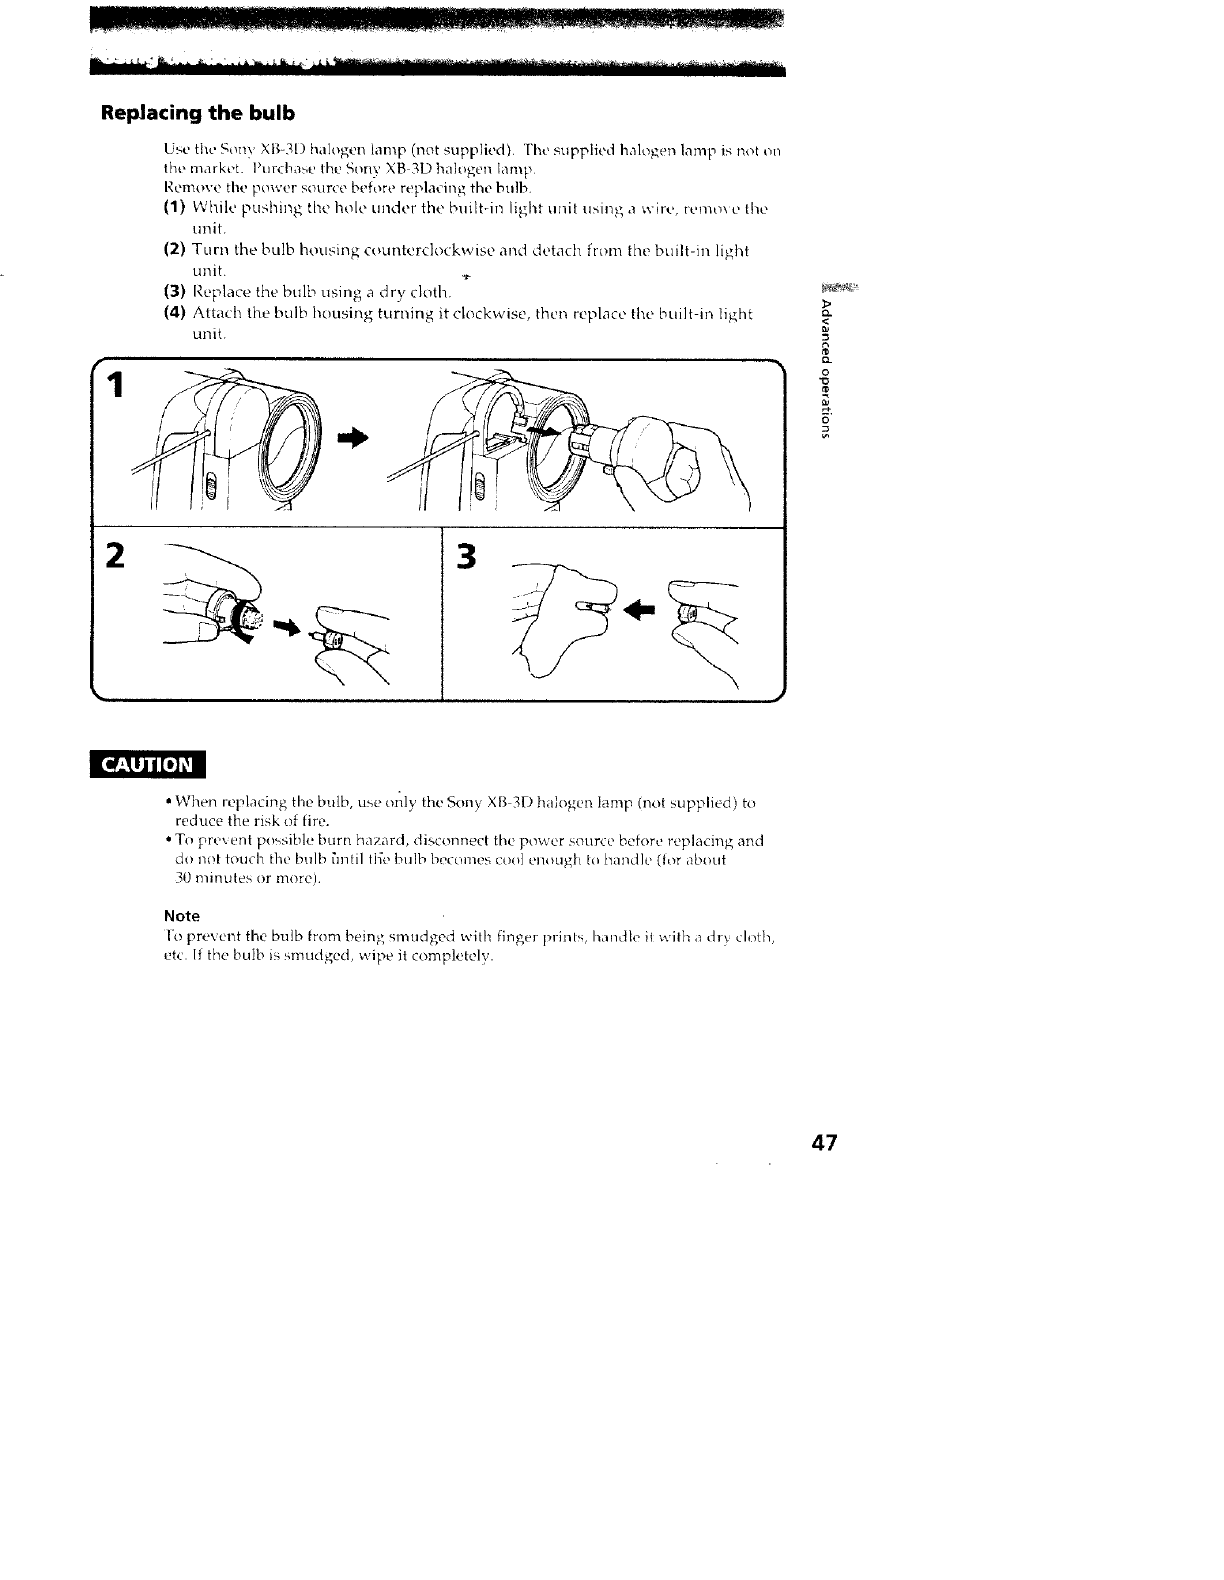
Replacing the bulb
Use the Sony Xt_,-BDhalogen lamp (not supplied). '['he supplied halogml lamp is not on
the market. Purdlasc tilt, Sony XB 3D halogen km_p
Remove tl_e power souree before replacing the bulb.
(1) While pushing the hole under the buiItdn light unit using a wire. remo_ e the
unit.
(2) Turn the bulb housing counterclockwise and detach from [he built-in light
unit. .,_
(3) Replace the bulb using a dry cloth
(4) Attach the bulb housing turning it clockwise, then replace the built-in light
unit.
r
23
<
O
o
[I!'alli_/0]_l
• When replacing the bulb, use o[dy the Sony XB 3D halogen 1amp (not supplied) to
reduce tee risk of tire.
• To pre'_ent possible burn hazard, disconnect the power source before replacing and
do not toucl7 the bulb _mtil fl{e btllb becomes cool ellOLIgt/ [0 handle (Ior about
30 minutes or more).
Note
Io prevertt the bulb _rom being_ smudged with finger prints, handle it v_ilh a dr) cloth,
et(. If the bulb is smudged _ipe it completely.
47
"_o_.I,.an,.ieat,-';our m; n ,.ideoF',_,._g_am b_ u,.iitingv,ithan',oth,.'r[;]g ram, I-Ii[;lIliS.
"I_"mini I)V.Ik"DV. VIIsVIIS._vI_sS-VIIS.VI_',E_VIISC.S_,'IP,[__-VIISC _r Ill
lk'tamax V{. 1_.that has \{&'o/audio inputs.
Before editing
_.'Ol_l_OCt tho Call_COldt'l" 1o tJ'tt. V( l_, LiNil'tg the sul'T, Jied A/V ce, nnecling cable
Set the input selector on the \CI-_ to lANE, il a_ affable.
SetFDIq It_ON in then/,_'I/u s)stem (p 2(_}
Starting
(2)
(3)
(4)
editing
lm-urt a blank tape (or atape you want to rec_d m,er) h_to the VCR, ,rod inse_
VOLII" I'_'_ oldL'd {_I[._L' ill_o tho ('£1111q{_rd_'l
I'la\ back fl_e reeorded tape on the <amcorder until }ou k_cate the point just
I+elt+te ',',here \t',u \san{ k', Mart editin+L tl'_t'o }+l'l.*SS II to qt,t tilt' _'al]_(oldt't ill
pla_.ba_.k pause mode.
Oft the V(I'L hwat,+' the recordh'+g start ,M+int and :<,'_'tfl+e \CR in recordh+_g
[_a/me m 0(]_.'
First pru-s I I on the +_amc_+t&+._,and alt+_+_,++,_,_+e..M+ press II +++tthe VC R t_
start editing
To edit more scenes
I,X,peat sk'ps 2 to 4
To superimpose the title while you are editing
YI)tl C,)I_ _,llpolil_13p()5_ ' th{? tkie "_v]_ileyOU are editing ['_ele_to "Superhnposing atitiu"
(p 41)
To stop editing
lhe_,s • _m both the.,eamcorder and the VCR
Note on the DISPLAY function
-CCD-TR516 only
If you have displayed the _icwfinder screen indicator_ on the IV, erase the indicators
by pres,qng DISPl .AY on the Remote (7ommander so thai _hey will not be
superimposed on the edited tape.
Note on Fine Synchro Edit
If vou c;mnect a video deck that has tint? Fine Svnchro Idit feature to the I,ANC _jack
of the camcorder, using a I.ANC cabh' (not suppliedL the edit will be even more precis
48
Additional information
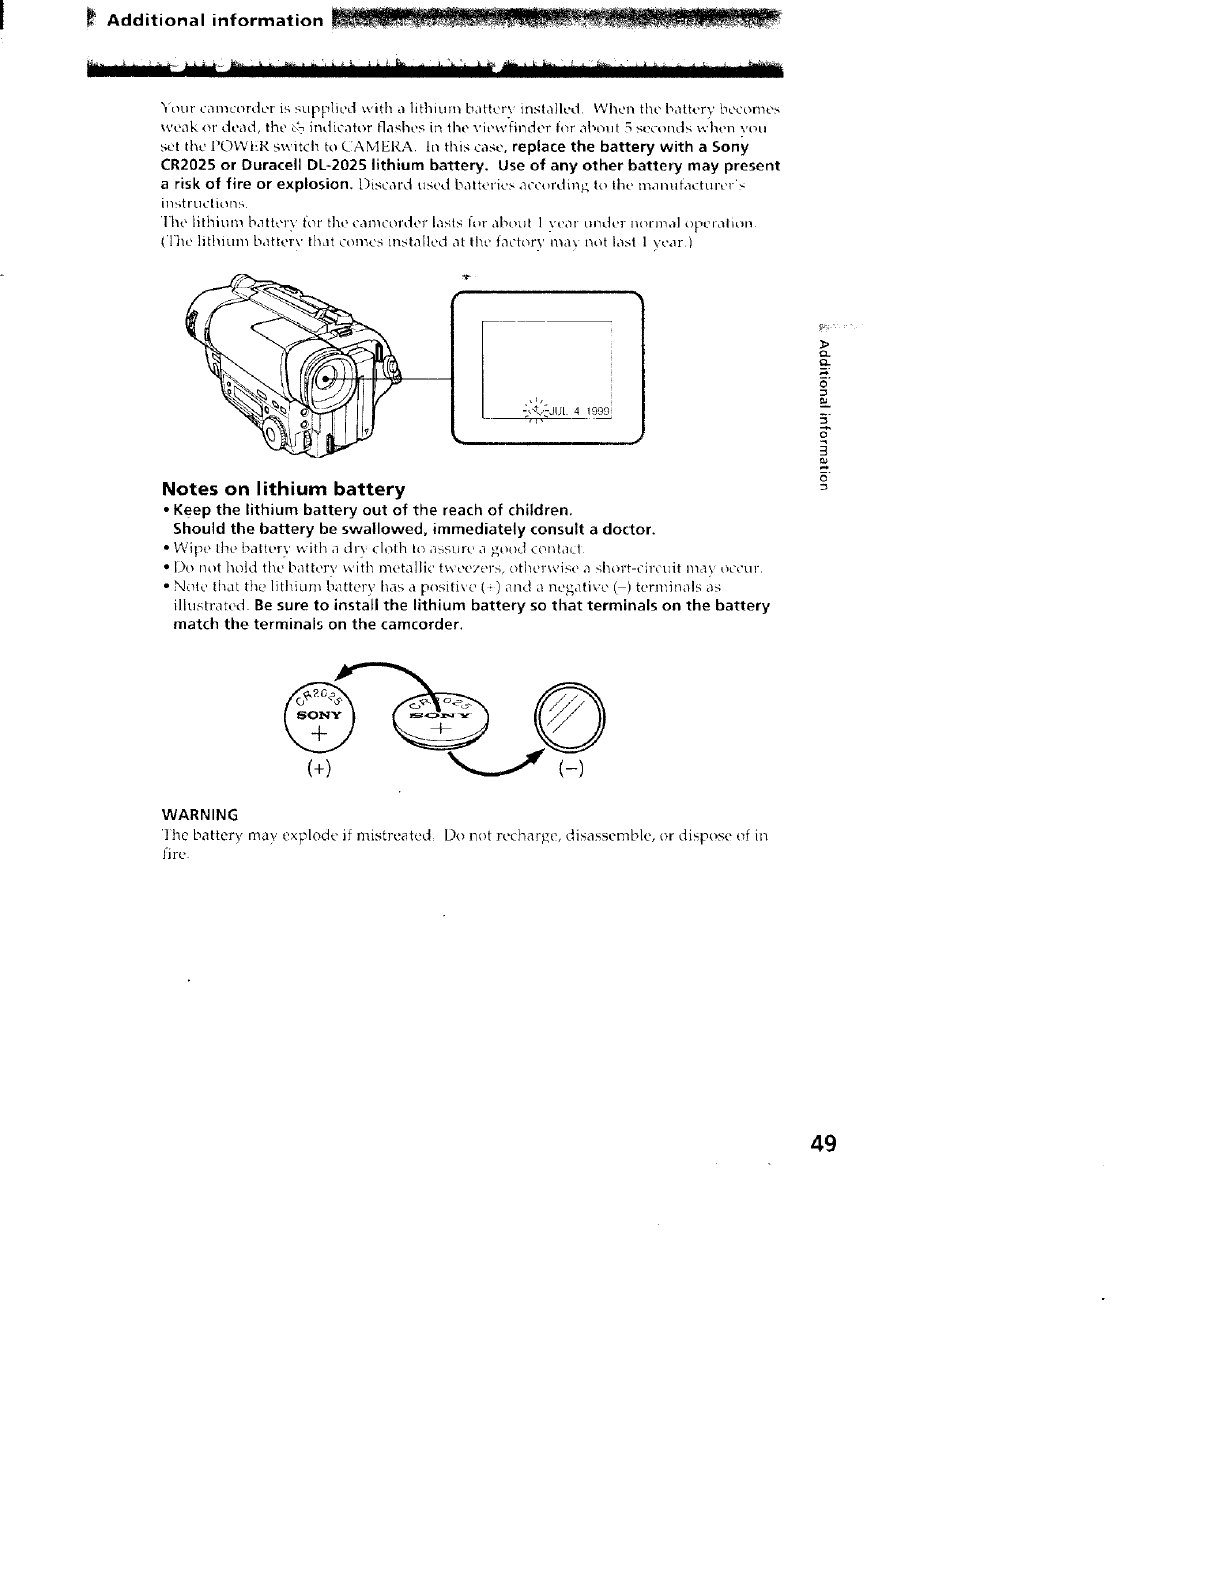
Your camc(.de[ is supplied with a lithium battery installed When the batk, rv becomes
weak or dead, tile _ indicator flashes in the viewfinder fi_r about 5 seconds when :'ou
set the I_OW[:I-{ sv¢itch to CAMERA, In this case, replace the battery with a Sony
CR2025 or Duracell DL-2025 lithium battery. Use of any other battery may present
a risk of fire or explosion, Discard used batteries according to the manufacturer's
illbtl tldiony,
lhe lithiklm battt?rv |or tho calllcorder masts for abotlt ]vttar tll?di'F IlI3rl/?_l] ilt_clat[ol/
( lt_e lithium battery that comes installed at the factory ma_, not last 1 year)
_4 1999
Notes on lithium battery
•Keep the lithium battery out of the reach of children.
Should the battery be swallowed, immediately consult a doctor.
• Wipe the battery with a dr\ ch_ih to it_sllrL' a good contact
• Do not hold the battery with metallic twee)'ers, otherwise a short-oh'cult ma? occur
•N(lte float the lithiun_ battelv has a positi\ e ( ) and a negative ( ) terminals as
illustrated Be sure to install the lithium battery so that terminals on the battery
match the terminals on the camcorder.
(-)
WARNING
lhe battery may explode if mistreated Do not recharge, disassemble, or dispose of in
fire
I,
I3.
o
49
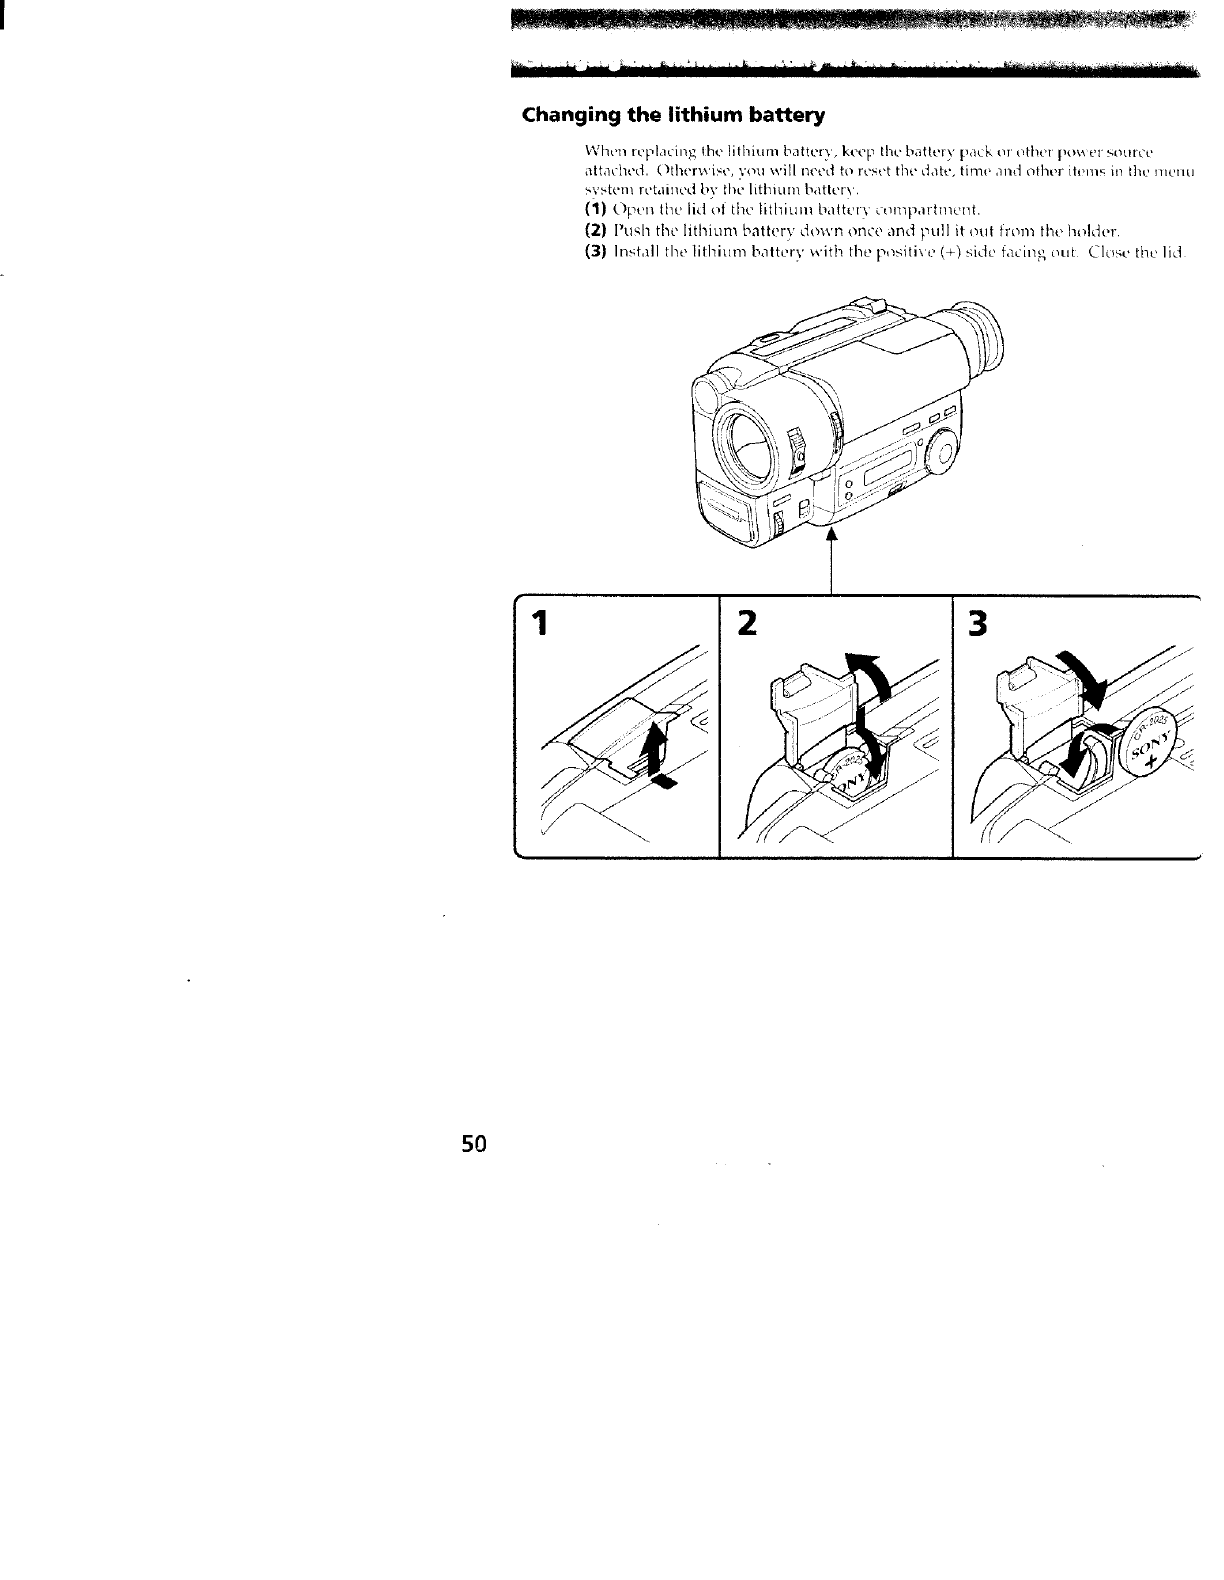
Changing the lithium battery
When ret_l<lcing lhe lithium I_lltel>', keep lhe bailer)' pack _ uthei tx_ ei_st;tll'ce
attacheci. ('ltherwise, >'4_tl will neect to reset the d<_te, time olltJ olher itl?m _,ill the illel/cl
svfteil! retaillect {1), the Iittliun_ battery,
(1) ripen tl_e lid el the lithiun/battt r_, ct/lllp</!'ti!leI/t.
(7) l>ush the [ithiun_ battery down once an_i l,_tll] it _lif trt_nl the l_lder
(3) Inst,_ll the lithitml baltery witl_ the p_slti\ o (÷) side 7<_cing t_tl{ Cltl_.e lhe Iict
1SS 23
SO
_J_N 1 I 1999 _ I
12 0O AM 12 00 AM
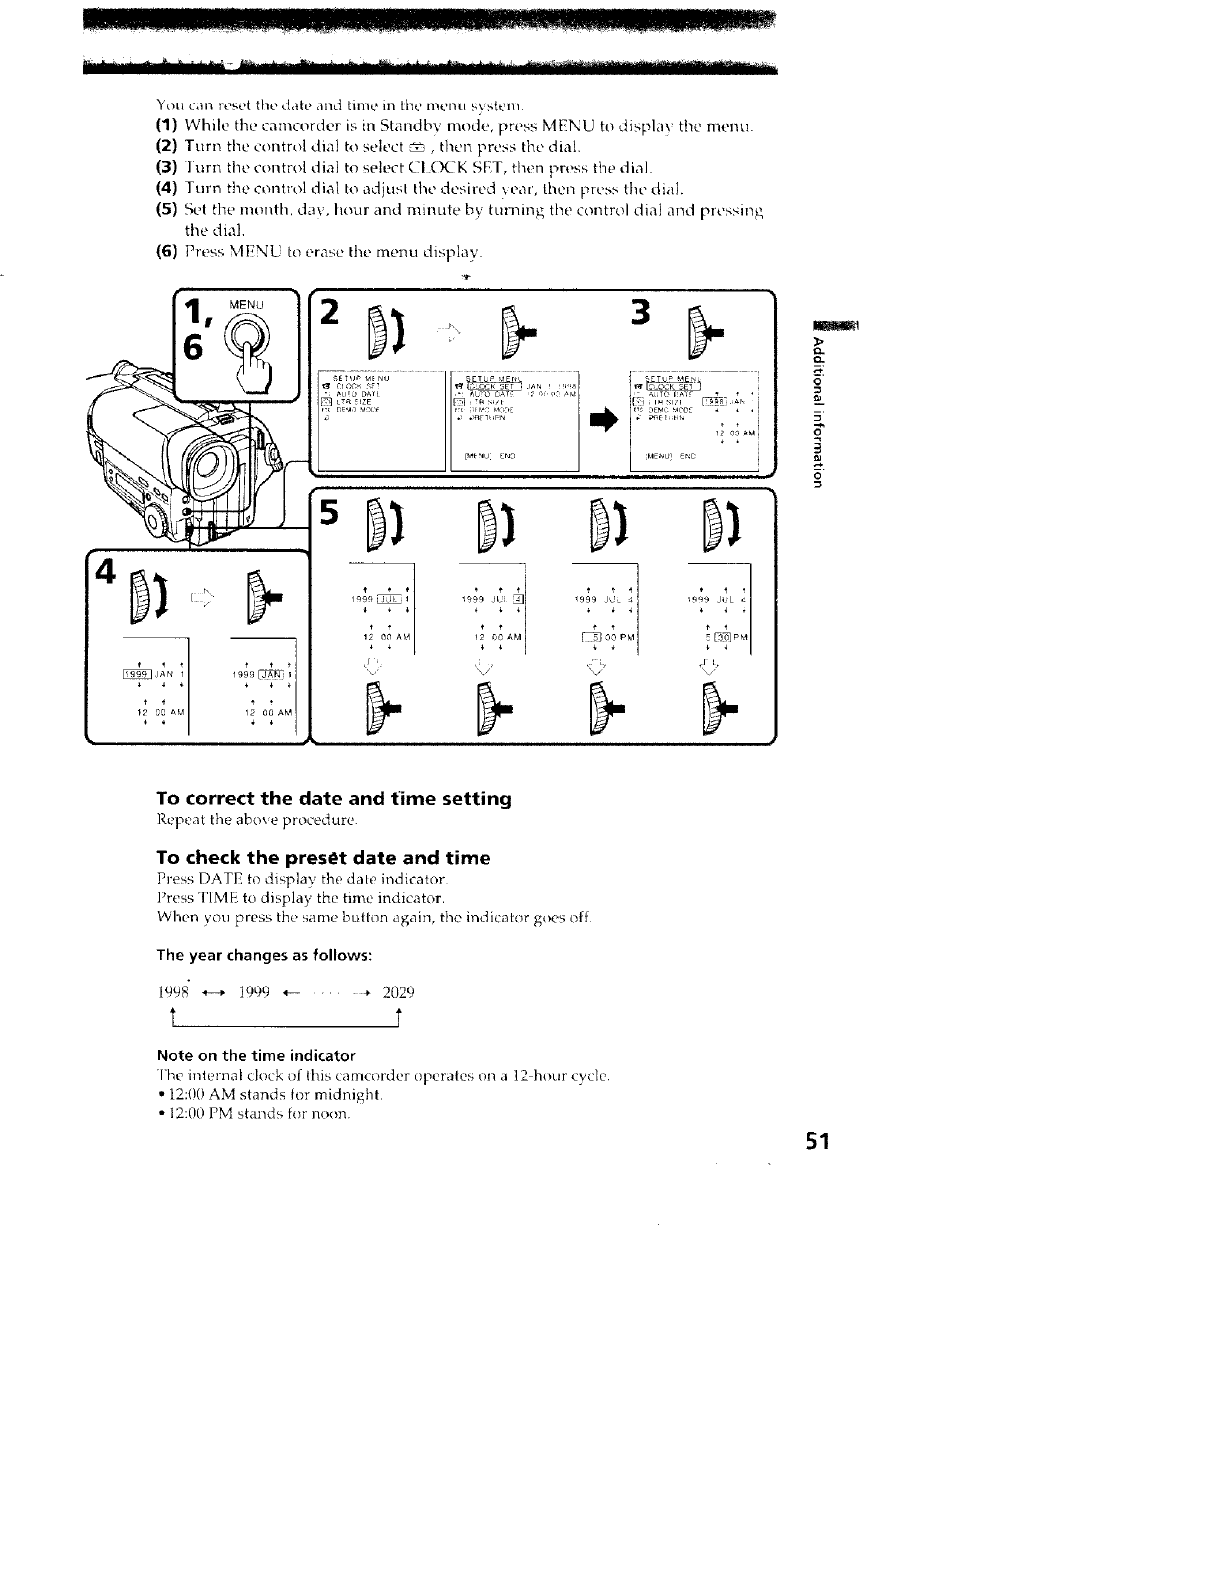
You can reset tile date _|lld time m the n_elltl svstelll
(1) While the camcorder is m Standbv mode, press MENU to displa} the menu.
(2) Turn the control dial to select _ , then press tee dial.
(3) lurn the control dial to select ( I (KTK SET, then press the dial.
(4) Turn the control dial to adiusl the desired }ear, then pre>s the dial
(5) _c_'tthe month, day, hour and minute by turning the control dim and pressmg
the dial.
(6) Press MENU to erase the menu display.
l[
, b. ,,: VEMC *,_ODC • ,,
12 0 _U
[ MENU] SN_
. DI D}
1999_1 1999 JUi _ !999 JUL 19(}9 JUL a
t
%, \/ \/ _,
F F F F
D
0
To correct the date and time setting
Repeatthe aboveprocedure.
To check the preset date and time
Press DATE to display the date indicator
Press TIME to display the tm;e indicator.
When you press the same button again, the indicator goes off
The year changes as follows:
1998" *--* 1999 *_- .... ÷2029
t t
Note on the time indkator
The internal clock of dds camcorder operates on a 12 hour cycle
• 12:00 AM stands for midnight
* 12:00 PM stands for noon
51
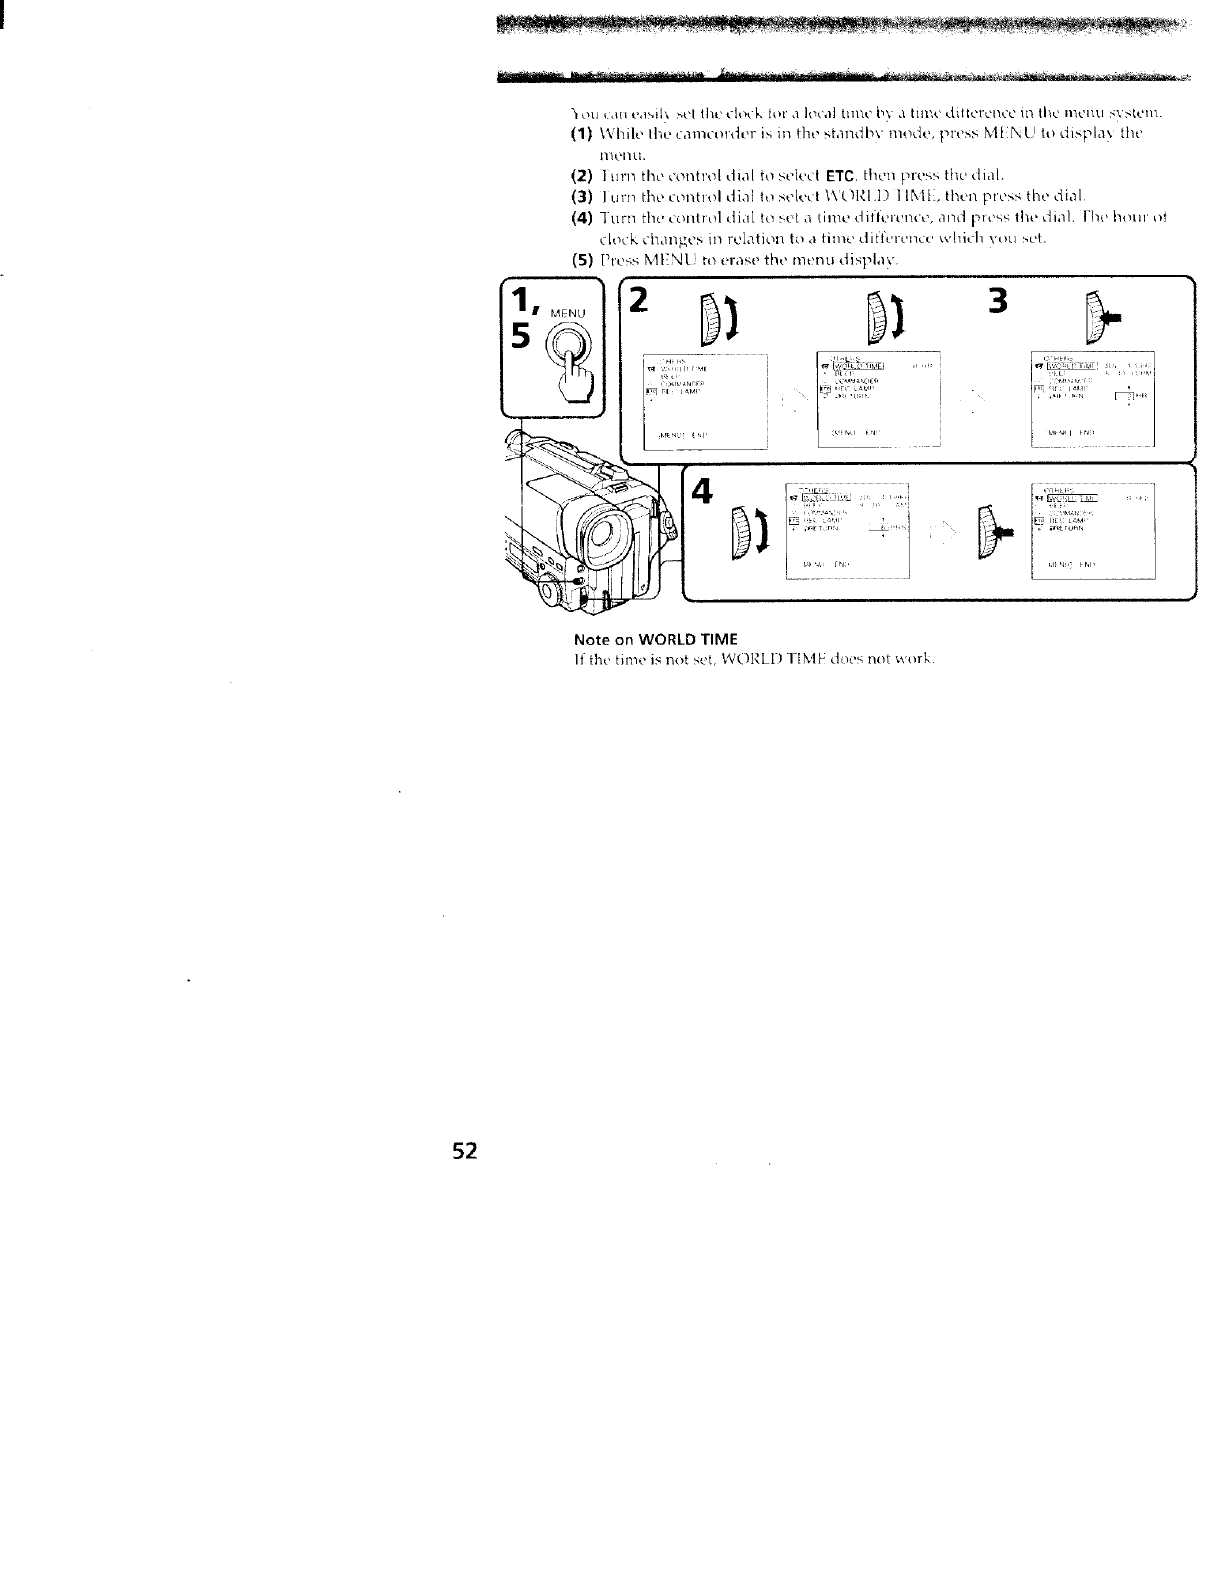
_IOi+l _._IIit_l_,ih _,t}llht) t:lOt'!x fill",1 ]Of,l] t111"ct_ i_\",l tilllt'i.].iiI_'I'L'lli.>_-_ i11 tI1_.' I11t'I1t.lS\ _tt'lll.
(I) While lh_'cam_'_l'd_'rish_ tht"st,mdI_\'m_d_',prt's,_MINLJ i_displa\the'
nil.41Ll,
(2) Im'n the _'ontI'oldialto ,_ek'clETC, tl_c'llpit's_the>dial.
(3) Ium the control dial h_ soi_'_'i _'_t'_l,_l.I) 11klt, thc<n plo_,s the _lial
(4) 7 urll the' colltiol dial t_ sc't ,t tim_, dillt,i't!n_;t_, arEd t_lo4,_lh_' dial. l'h_, h_lu _l
ch_c'k c'iTai/gc's in relatioll to ,l tin,c, clifft'rt'l_c(' whkh \'_u set.
(5) [>te_sN,112NI.J ti_ i!rase th<" n]t)ntl disphy
: i" "
Note on WORLD TIME
11the, tim_" is no{ _>c't,WC)I,]L[) IIME do{'s not work
52
Selecting cassette types
- CCD-TR516 only
realize higher picture quality,
\lOLl Cal] t,lSL' either I ti8 or slatldard 8 11_,11/_. [deo casselie Ior this camera _.'VhcJ/\o/i u_e
a ItiS vide\ cassette, the recording is made in the 1 liS system. IA"ilen \ou use a 'qandard
mm video cassette, the recording is made m the standard _ mm s_ stem Stalldard
b mm video cassette is incapable of wcording mIhe Hi8 s\ stem
y)t !{_d )is _stlldlr_8 _lvdeorec_rder/plavertoplaybackavideotape,
VOLI arc reqtlired to use a standard 7, i_llllg__ideo cassette for recordilig
What is Video 8_
"'XR" is an abbleviation of "Extended I4esohltion." The video 8 Xl.. ca\at _dcl is ne_ _._-
type of 8 mm camcorder with a picture quality superior to the con\ entional xideo N o
camcorder rcspedix el> You can rec<H d and Pla> b,3ck picmles more ,clearly x\'ill_ the
"X 1_,'' calllCOl def,
,& video t:,pe recorded bn the "XI<" camcorder gi_ e_ excellen{ pictule qLlalitx at
maximLlm when it is played bick i_tl th{ _ "XR" camcordel
When a \ideo tape recorded by this "XP," camcorder is played back on a conventional 8 o
cal¢lCOldt'l or \_,'[/_'ll a Vi(|e(/ tape recorded 011 0 _OllX {_[_{iOIILIl _ (_llllCOl(tL_I 15 [llav('l'{ !3_2Ck
on Ibis "XI,U' camc(_rder, the ph_ back t_icttlre llas the normal quality of an S camco_der.
When you play back
Ihe playback re.de (SP/I ,P) and s\ stem (l liS!stancia_d 8 ram) are selected
automatically according to the format m which the tape has been recorded, l he qua[it\
of the recorded picture m LP mode, however, will l]t)l be as gooct is that in SP mode
Foreign 8 mm video
Because fl_e TV color systems differ from country to country, you may not be abk' to
play back foreign pre-recorded tapes. Refer to the list of "Using your canlcorder
abroad" to check tile TV color svs!enl of foreign countries.
53
I hm _,t'_:tion _,hows vou hoxx ,.ou dart _'_et tile most out ot )out b,lth?ly i_ack
Preparing the battery pack
Always carry additional batteries
] |a'_ (.' '_Lltli'.'k'l_l _,lttu'T', tr_dCl__0',*, ('1' to U_O2 tO _ till/e:. ,/:_ mtl_h ro. ordil_,,_ a_- \o(i I't0\ e
planned.
Battery life is shorter in a cold environment
IL_ltt'r,, ufti_'ienc} is decreased, and the batter) _ill be used up n_ort _ quickl), it )otL ate
['(_t.(H'diH_ i_l _) C_)IIJ L*11_. ilL_llJll('11_
To save battery power
I till1 S'I ANI )II'_ do,. _,n whet+ not rocord il_.<_+t_+sa,+ e battt,i _ po,+ +,,_i
.,\>tl_t+_+t}ltr+lllsitionbet_xeell_.c_,llt_,5cailbu tll_Id___.+\'t+t_if r_'_Ol'_H_ i._stopp_xJ ,Ind
+tatted ag,til_ While \ ou ,lt,+' po_,itiotlin_ the _ubject, >;elcctin_ an an_,le, or It+okillg
tl_,rou,.'_h lilt' \+e_',|il_der lt'ns, tht' ien_ mt+_e> ,lutonl,/ticnlh and the, |+niter,, t+ u,<ed Ihe
b_lttL'rV 15 _115(I USe+++ _'+ lien ,l l,)pt' is it_>Cl ttTt| ol l ClllO\ L'd
I}_:stq:e ,!nd ren++l_', e tilt' batter\ p,lq]-, aft¢'r u_,m'4 the C,IlllCtlrdt'l"
When to replace the battery pack
While vou aie us/1]_ }our camcord+,'r, th(' ren/ainil_ battery indi_:ator dt_Treast,s
graduall'_ as batter\ power is used lip. I_,emaining timt' m minutes appea+s.
Whet+ the rt, msillillg battery indicator reaches the lowest point, the ':\ indicator may
appear aria start Plashing in the viev_ fil_der.
When the +\ indicator changes from slow flashing to rapid flashi+_g +_bile you are
recu_di_g, set thu POWKI,_ switch to OFF on the camcorder and re}_lac,_, the battery pacI
I ea',e the tape in the camcorder to obtain a smooth transition bet_ een scenes after the
battery pack has been replaced
54
Notes on the rechargeable battery pack
Caution
"_.'\'tq" I_\'e lilt _botterv pack il_ tl, m_,ratLirL,s _lbove _t)_, Stlch a_ ill a car _ark/,d ill the
sun or under direct sunh_ht.
The battery pack heats up
Durmgchargingorrccordmg the battery pack heats up. lhisiscausedbvenerg_ that
has been generated and a chemical change l_!at has occurrd inside Ihe ballety pack
|his iS I]ot caLISL' for COI_C@FI_ ;:t13d is norlllaL
Be sure to observe the following
•Keep file battery pack av..ay fr_,ll fire
• Keep the batter}' pack dr},.
• Do m_t open nor tr} to disassemble the battery pack,
•I)o not t xp..'.se d_ebatter} pack to am mechanical sh{:ck
The life of the battery pack
If the batter'* indicator flashes rapidly iust after tuH_ing on the camcorder _ith a tulh
charged batte_} pack, the batkery pack should be replaced witl_ a new fulIx charged
olle.
Charging temperature
You should ct_arge baHerie_ at temperal_res from 10°L to NI'C. Lower temperatures
_equire a hmger chargin?, time
Z
O
o
55

Notes on the "InfoLITHIUM" battery pack
What is "InfoLITHIUM"
lhe "lnto1.11 HIUM" is a [ithium ion battery pack which can exchange data with
compalilqe video eqtllpll/ell[ (Ibotl[ its battery C'OllSUlllptiol].
(%.'hen vou tl;4e Ibis bdtterv pack with video ec]lllpnlt?l]l ha\ il_i_ the tl/i.lur_tllsl lllarl_, the
_ideo eqcliplngllt _ill indicate the remaining batter\' time il; mil-iutes _. I towe\tw, if veil
use it with \ideo equipmenl lie[ hax ing thb, mark, the remammg batter'! capacit\ _xill
not be indicated in minutes
"ln fol 1 FHIUM" is a trademark of Sony Corporation.
The itldicatiun mav l?l_t bt! dc-cllrah_ depending on the _tll/ditiili_ ,/.nd e!7virol?l/_elnl
which the equipment is clsed under.
How the battery consumption is displayed
T]le power t tinsunlpli_l/el the camcordur c]laugc,_ depeilding on its use, such as how
the autofucusing is workmg.
While dlt'ckiug the condition ot the call_Col'der, the "lnioLl I ltlL M" battery pack
I]+it_aStlli?$ Ihe balh'i} 7til3Sllllll)litll/alld culodates the rc'inainil_g hatterv power. 1t the
cortclitiol_ changecl drastically, the remainmg battery indication may $tldd/'llly decrc, ase
or [l/CIeilse bv lnore {han 2 IIlillutes,
Even if5 to lO mmutes i_ indicated as the balh,rv relnailnng lime in the viewfmder, the
(\G indicator l/'la}: also flash under some ccmdition.
To obtain more accurate remaining battery indication
Set lhc camcorder to recording standb} mode and point towards a slationary object.Do
not lit(we the CalTicorder for _0 secl)I]d_ or l'fieF{ _.
- If the indication seems meorrect, recharge the baltory p_<ck fulh' (Full char<t_e_).Not{,
that if yotl have IlSe(7]lhe hatiery in a hot el cold envirol!illellt for long time, or you
have repeated charging many times, the battery pack may not be able to show the
correct time even after being fully charged.
• After you have used the "lnfi_I,1T[ tlUM" battery pack with an eqmpment not having
the (i)_.,oL,r._uA,mark, make sure that you use up the battery pack on the equipment
having Ihe {'l)s._Ir.l._ mark and then recharge fully.
Why the remaining battery indication does not match the
continuous recording time in the operating instructions
The recording time is ,affected bv the environmental temperature and conditions, lhe
recordmg time becomes ver_, short in a cold environmenl. The eonlinuous recording
time in the operatmg instructions is measured under the condition of using a fully
charged (or normal charged) battery pack in 25°C As the enviroimlental temperature
and condition are different when you actually use th< _amcorder, the remaining baltery
time is not same as the continuous recording time in the operating instructions.
J Full charge: (_harging until FULl, appears in the display window.
56
Moisture condensation
t{ the camcorder is brought directly trom a cold place to a warm place, moisture may
cnndense inside the eamcorder, o1_ the sllrhce o{ the tape, or on the h?ns In this
condition, the tape may stick to the head drum and be damaged or the ut_it maT_ not
opmale correclh I'o pie\ enl pt_ssible dau_age under these cir( umstances, the
camcorder is furnished with moisture sensors. Please take the following precautions.
Inside the camcorder
If there is n_oisture reside the camcorder, the beep sounds and the [] indicator flashes.
If this happens, none of the functions except cassette ejection will _ork Oper, the
cassette compartmenh turn off the camcorder, and leave it about 1 hour. When
indicatol flaslles al the same time, the cas>ette is inserted i[_ the camcordei Eject the
cassette, turn oil the camcorder, and leave also the cassette about ] hour The canl<?order
can be used again if the [] indicator does not appear when the power is turned on
again
On the lens
If moisture condo, uses on the lens, no indicator appears, but the picture becomes dim.
TLIIII off the power and do not tlse the camcorder for Llboklt ] hour.
How to prevent moisture condensation
When bringing the cameorder from a coht plaee to a warm place, pul the camcorder in a
plastic bag and allow it to adapt to room conditions over a period of time.
(1) Be sure to tightl} seal the plastic bag containing the camcorder
(2) Remow_ the bag when the air temperature inside it has reached the
temperature surrounding it (after about 1 hour)
_k
O..
E<
0
0
57
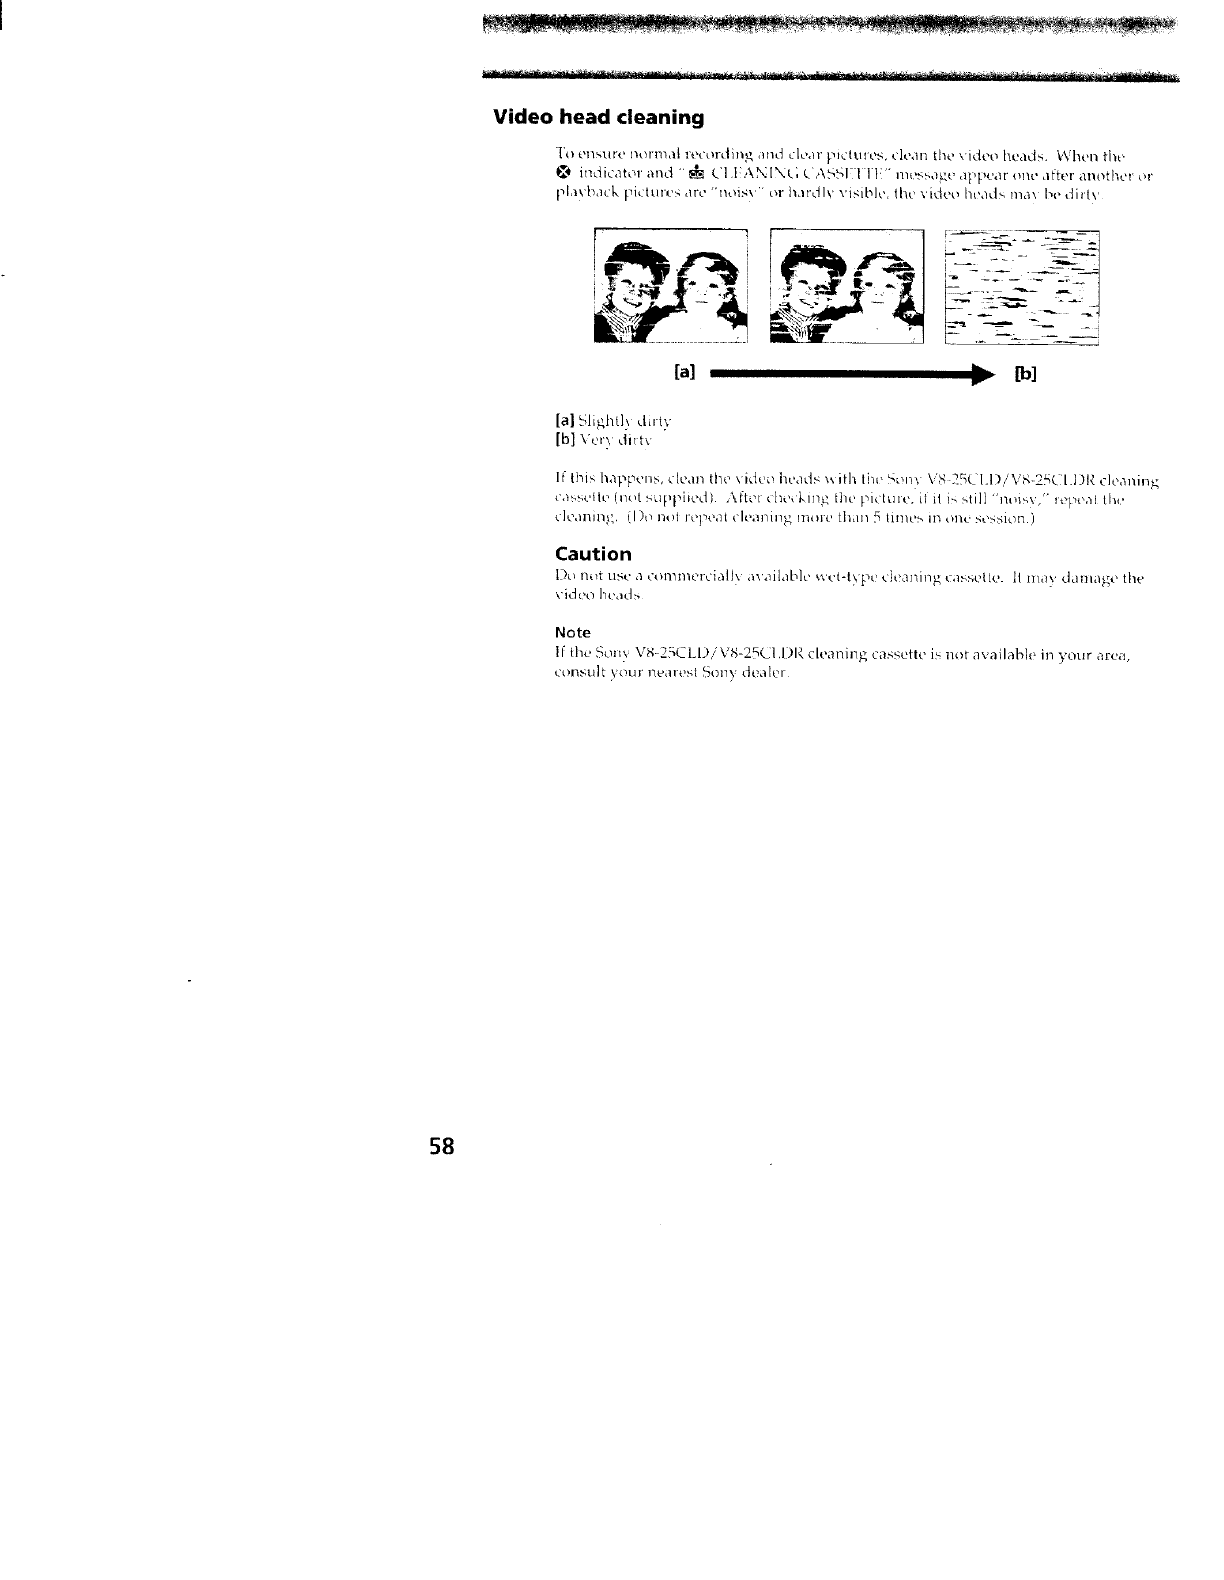
Video head cleaning
To en,,ur,.' normal le<olding and ck',/I pKluies, dean the video heads. \'\hen the
t_ indicator and "'_, L'I I ANINC; C ASSI 1 l| '" message appear one atter another or
F,la',ba_.klq,Aur,.,sare "r_,.qs'," or hardly visible,lhc video heads max be dilt\r
<l
[a] i[b]
[a]Slightl)dirty
[b]\',_,_?di_ _r
Ifthish,'q',pens,clean the ,.idco heads v,ithtierSore, VS 2_L ,'VS-25CI.I)I,_cleaning
<assetle (_lots ippited) .\ftei,.he, king ill,.,picttllc,ifitis:-,till"'nois>,'"*ep_,a[the
dt'd]3il3_, iI)o not repeat <leaning mt re than q time_, 113one St'Ssiotl.)
Caution
|)o Ilot us_' a _on_mciv'iall\ ov,lil,lble wt,t-{_ pc tieal_in_ casseI N.' |l mit} ddll|age the
_ideo brad>
Note
II the Sonx ,,:8 25CLI)iVS-25C1.DI{ cleaning cassette is not availabD in your area,
Ct)I_SLI]_ VOLIF 1_e411"_S1 S013\ dealer
58
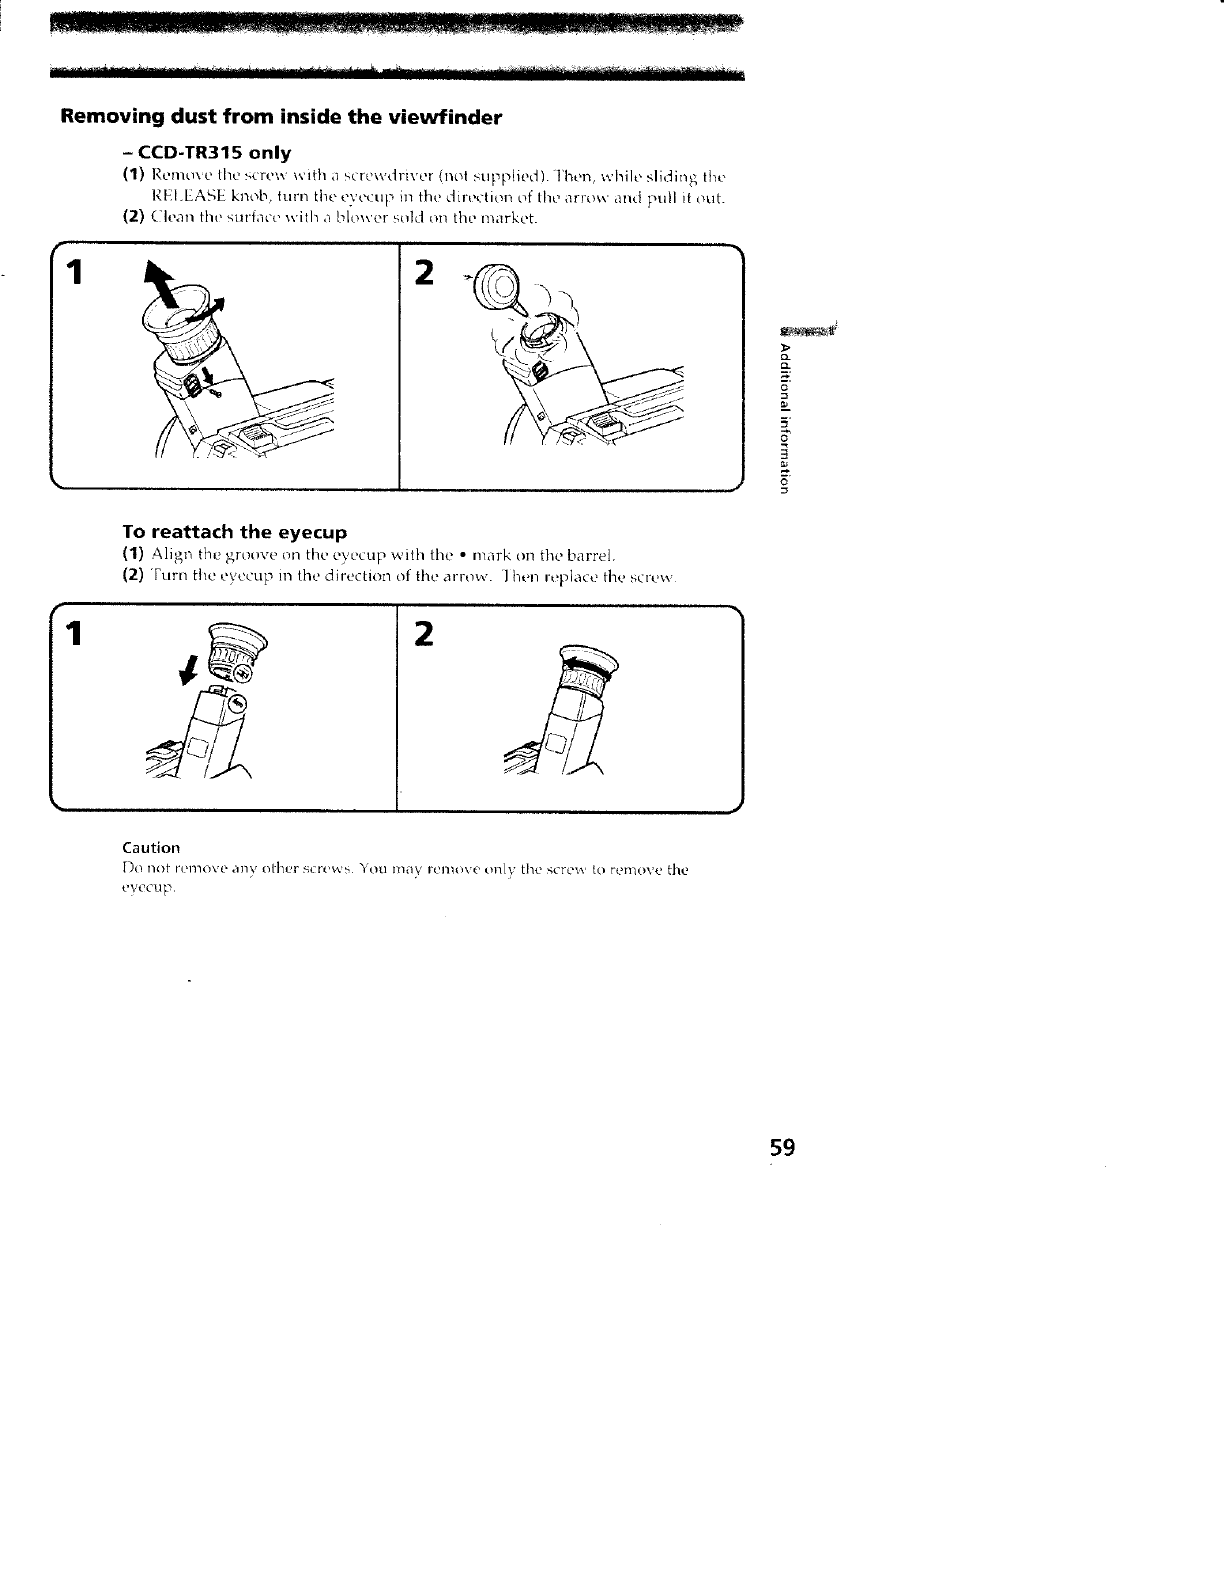
Removing dust from inside the viewfinder
- CCD-TR315 only
(1) Rem_', c the' _,crew with a screwdriver (not supplied). Then, while sliding the
REI;EASE knob, hu'n the eyecup in the direction of the arrow and pull it out.
(2) Clean the stlrface with a blower s_ld on the market.
1
i,i0\+
_ _ __-_i _
2
1
To reattach the eyecup
(1) Align the groove on the eyecup with the • mark on the barrel,
(2) Turn the t'yect.lp i1"1the direction of the arrow. ] hen replace the screw
2
Caution
t'v_'cup.
59
Precautions
Camcorder operation
*,L')p,vrate the ,__amc,.;rder ,.',n 72 \ /batter_ pack_ or 84 V (AC t',ov_er adaptor)
• For [)(" or &(_ L_peration, rise the acce_soiJc_ recommended ill this n/antla[.
• Should an\ :.,.*(tO obiect or liquid _et irv..idc tht, casin_, up.plug thu can'.corder and ha\e
it ,_heckud by a tS,ony dealer before oper,'_tmg it ai;y further.
•A_oid rough handling or mechanical sho_k Be parlicu)arlv eareiul of the lens
• Keep the POWER switch setting to OFF ;vhen not m;ing the ,_am_ordcr.
• I){_ not wrap up the camcorder and operate it since heat may build tip internallx
. Keep the camcorder away [Fl)n*l StTI}Ilg magnetic fieId._ or mechanical vibration
Built-in light
-CCD-TR516 only
•Dt_ not knock or jolt the built-in light wbiic it is turned on as it ma 3 d,_ma_u the bulb
or shorten the life of the l_flh
• I)o not leave the built-in light on while it is resting on or against snmethmg; it may
cause a firu (n d,nna._e the built-ii_ light.
On handling tapes
Do not nl_'lt a:lythiT_ in the _mal) h_]L,s E_!Ithe Ieai o) the cassetb.' I hese bole._ art'
used to sem;e the type at tape, thickness at tape and if the rec_,rding tab is mol out
Camcorder care
• When the camcorder is not to be used fnr a Ion_ time, remove the tape. Periodically
operate the camcorder both in CAM1 RA and PI AYER modes and play back a tape tar
about 3 ininLltes
• Clean the lens with a soft bHish to remox e dust. If there are fingerprints on it, remove
them with a soft cloth.
• Clean the camcorder body v, ith a dry soft cloth, or a sort cloth lightly mlfistened with
a miht detergent solution D_ no_ t_se any type of so)vent which may damage the
fmish
• Do n_,t let sand get into the camcorder. When you use the camcorder on a sand)'
beach or in a dusty place, protect it from the sand or dust with some protector such as
Stony sports pack. Sand or dust may cause the unit to malfunction, and sometimes this
malfunction cannot be repaired
6O
AC power adaptor
•Unplug the unit from the _all outlet when not in use [or a long time. To disconnect
the power cord, pull it out by the plug Never pull the power cord itselt.
• Do not operate the unit with a damaged cord or if the unit has been dropped or
damaged.
• Do not bend the power cord forcibly, or put a heavv object on il This _il] damage the
curd filial ll/av Louse a fire or electrical shock.
• Be sure that nothil_g metallic comes into contact with the metal parts of the cormectmg
plate. If this happens, a short may occur andthe unit may be damaged
•Alv, avs ke_,p the metal contacts clean
• Do not disassemble the unit
•D_ not apply mechanical shock or drop the unit.
• While the unit is m use particularly during charging, keep it away [ram AM receivers
and video equipment because it will disturb AM reception and \idea operation
• The llnlt becornes warnl while i:r/use, r]hiS is norllla].
• Do not place the unit ip, locations that are:
Extremely hot or cold
- Dusty or dirty
--\err humid
Vibrating
Notes on dry batteries
- CCD-TR516 only
rlO axoid possiNe damage hom batlery h.,akage or corrosion, observe the follnwing
• Be sure 1o i_sert the batteries in the correct directiun.
•l)ly batteries are rl_t rechargeable.
• Do not use a combination of new and old batteries
• Do nut use different types of batteries.
• The batteries slowly discharge while not in use.
• Do not use a battery that is leaking.
If battery leakage occurred
• Wipe off the liquid in the Remote Commander carefully before replacing the batteries
• If you touch the liquid, wash it off with water.
• If ihe liquid gel rata your eyes, wash your eyes with a lot of water and then consult a
doctor.
If any difficult)' should arise, unplug the unit and contact yeur nearest Sony dealer,
Q.
a:
O
5
8"
g
61

)d.-il_cltlltt+_+OI <Itt<<ih,lblibO_',t_t'It'_trlt'<IildI\ dolor F.\'s|t'n+1>.[+}qh'+rt.,u_,in__our
,can'_.,:ot'd+,trabroadi <h_x'k lhc I_]lowin_ pt_int-_
Power sources
xl Oil cdl't Ll_,t'VOtlt" c',ItIlt'tWc'[t+l"ii_ ,II_\ t'Otlll|t\ or _ItO_ '+\'i[l'}tl'tt'_tI|_l'+lit'iI,'\(" I_OXX t_t
adn|+lor +_ithin IL)C]V to+2 ill\ .,\L',,qtl,'(_t)H×
Difference in color systems
I hi> cam,._ldt'r i_ ,m _ I.%C :_', :_t,um b,_,ed cnm,.-t_rdur. It vt+u Wahl tc_ ",iu'.', [hu pl_l'_ b_tc k
l+c hit_2 <>il d ]\ ,i{ ttltl_,t bc++In NI _C _\'_-tt_]ll b,l',cc] 1\.
Check the fol],.+v,'irtg li-t
NTSC system
I_;,_hnm,1 IM,md'_, I+tdi,. i,i, C li+<ld<l. ('_'nt+a] >,nlcri_.<l, Chi)u, ( o[ombia, { cuad¢+r, [,m'_ai_,_,
lap,m, Korea, Mexico, l>t'iu,Sulindni, |diW<ll't,tilt'I+hilil+l+m_'s,lhc L;S.A, Vet_.ezuel,l,
PAL system
:\clstr,_li<_,Au_tM,_, l_++,l:_ium,Chin._, ( zc',, h Kcpubii_, l)t+nmm-I,,l:inland,C ;_ re,m\, th-_,at
13+itdiH, 1 hfllzmd, t t,.mg K,._ng, lt,_iy, Kw,_, air, Malaysia, No'+_, Zt'aldnd, Nor_x a 3 ,[>orttt_Ml[,
5ingap,,+rc, Slo:'ak Republic, St',air,, Swe&m, SwitztMand, Thailand, otc
PAL-M system
I'ira×il
PAL-N system
Argentina, P_tr,.tguay, Uruguay
SECAM system
Bulgari<_, France, (;uyana, Hungary, lran, Jraq, Monaco, Poland, Russia, {Jkr,3in_>, _.qc
62
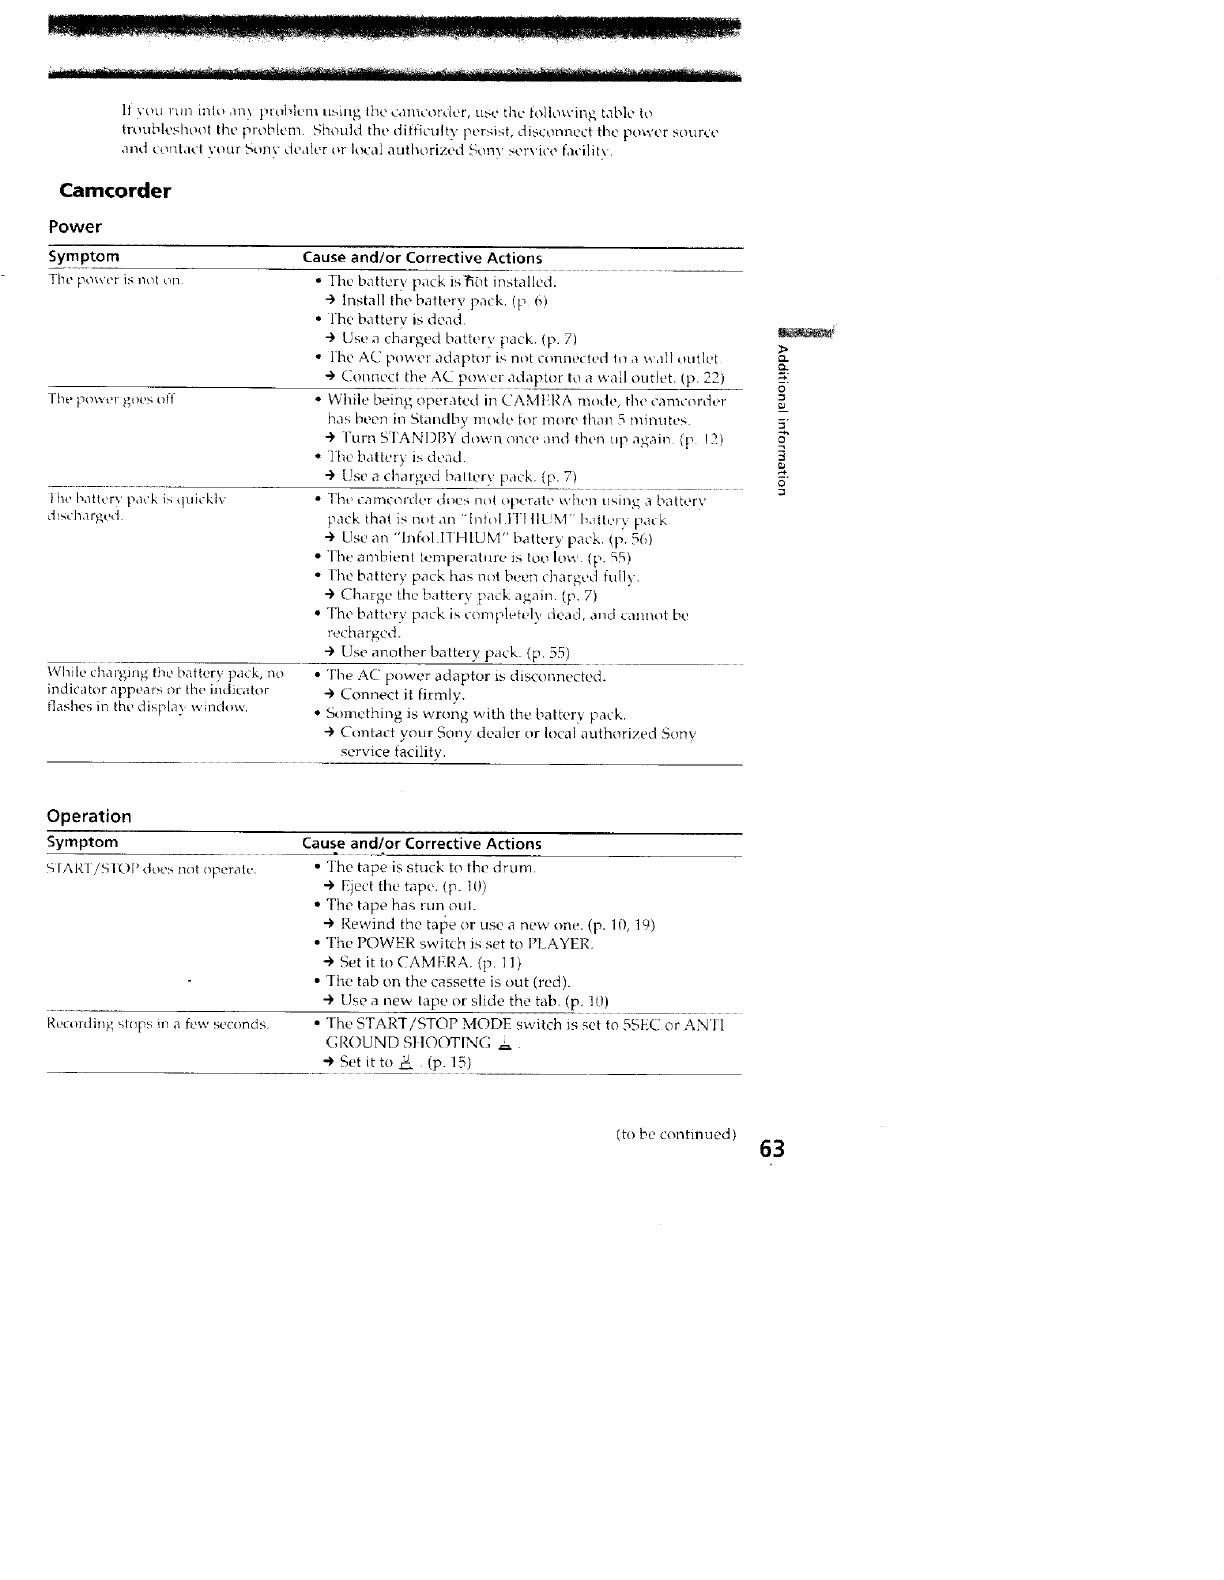
II _nu l'ttll lille ,n_) ploblcn_ tl$11lg the &u/R'ulder, u._e tl_e tullowing table to
troubleshoot tt-Le problem Should the difficult) persist, disconnect the power shut{de
and (oiltact VOtlr _{lnv dr'diet hi local authorized _onv seivice facility
Camcorder
Power
Symptom
The po_._er is ilot oil
Th{, powt?r _{)os off
t hc battery pack i_ quicktx
di',charF, ed
While charging lhe baitery pack, no
indicator appears or thP indicator
l]ashes i17 the displa} /_,'{i]{tli%v,
Operation
Symptom
SI/\I_,I iSIOI _ does not operaR,.
Cause and/or Corrective Actions
•The battery pack is'_ot installed.
÷ Install the baiter), pack (p 6)
• l'he battery is dead
-) Use a charged batter_ pack {p. 7)
• lhe AC power adaptor is nut c{innected tt_ a _aII outlet
-)" Co[meet the AC po;xer adaptor to a ;_ail outlet (p 22)
• While being operated in CAMt RA mode, the cantcorlter
has been in Standby elide for nl{ire tball 5 mintltl_'s
÷Furn SI'ANDBY di};%n unee and then tip a_4ai!7 (p !2)
• ll_e battely is dead.
-) Use a charged batler) pack. {p. 7)
•The [amcordet ch}es not operate when tlMng abatlerv
pack thai is not an "Infol Illllt M" b<dh- U, pa_k
4' Use an "lnfol I I HIUM" battery' pack. (p. 56)
• The ambient t_ mpefaiNre i_>rue In_ {p. "35)
• l'he battery pack t_as not been charged fully
"} Charge the batter) pack a_ain. (p. 7)
• TIre battery pack is c(_mplelely dead, and cannot be
recharged.
--i,Use another battery pack (p. 55)
• The AC p{}wer adaptor is disconnected.
÷ Connect it firmly.
•Something is wrong with the battery pack.
") Contact your Sony dealer or local authorized Sony
service facility.
_2
o
Rt!cOl{tilI;,_ _,l{Ips in a few seconds
Cause and/or Corrective Actions
•']he tape is stuck to tl:e drum
-}' Eject the tape. (p. t{})
• The tape has run ont.
O Rewind the tape or use a new one. (p. 10, 19)
• The POWER switch is set to PLAYER.
÷ Set it to CAMERA. (p. 11)
• Tire tab on the cassette is out (red).
-)' Use a new lape {)r slide the tad (p. 1{})
• The STAR1-/STOP MODE switch is set to 5SEC or AN'II
GROUND SI lOOTING ._.
-tSetitto_ (p. 15)
(to be continued) 63
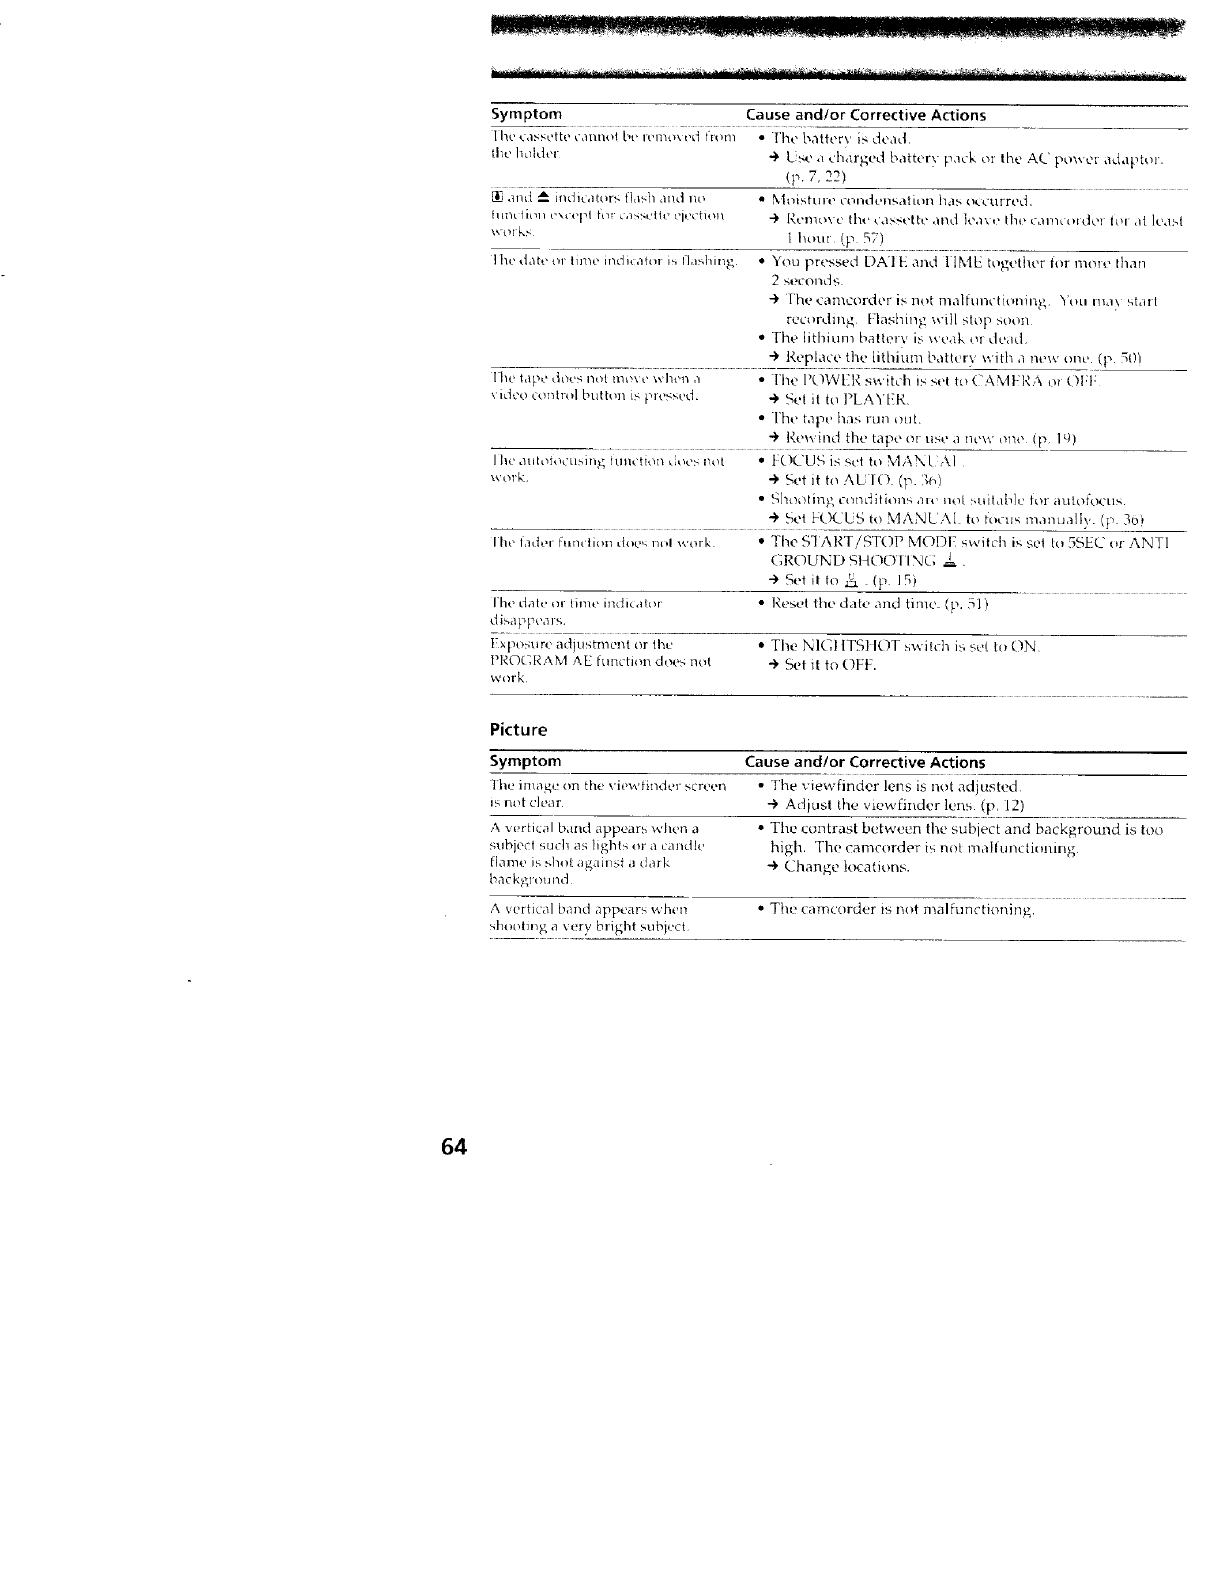
Symptom Cause and!or Corrective Actions
I hc <asselte _',ll*lnol bc it_ll_o\ 0_J ii-oll_ • the batter_ is dead.
tl_c hoktcr + ks,.' a charged batter}- pack or the AC powe_ adaptor.
(p. 7, 22)
and ----.indi_atoi_, flaql and no •Moisturt' condol/satit_ll has o,.curred.
hlz/t tion c\_ epl hit _,lst.u, lI_ _ L_it'CtlOl/ "_ [(fill0\(' th( _ ,Jds_4_3t_t •,111_t Ie,l\ t' [ho c,/111_ t)ldol tOl .tt ]_.xiM
work,, I hou_ (p 57)
] he date ol time mdi_ atot i_ II,lshing • you pressed DArl k. aJ;d I IME togt, thcr (or mole than
25t?Col_d S
÷ l'he _',tnlcorder is not nlaltUl'_Ctionil_g You ma\ strut
recordillg I:lasi_il_g will stop soon
•The lithium ballerv is weak ol dead
")' Replace the lithium battery with a new one ( )5t)i
[he tape does not mo_e when a -I'he I>C_WER switch is set Io(AM|RA _ t)FF
\ideo control button is plessl'd. -)' 5el it to PLAYi{R.
•The tape has run out
"1" b'.ewind the tape or use a ll_'\v OI)t" (p b))
[ 111' dtltOtOCHSil/_, Jtlll([iOIl tOt?b I_ot ** FOCUS is set to MAN[ AI
_ ol-k -)' Set it to ALl O. (p. _,_,/
• 'F,]'_oi)ting o_nditions ate not !;uilablc ff_r _ll_l{o_oe[is.
-)" bet POCU5 to MANUAl to f( cu_ m,mualh;. ( _. 3o;
Ihe lador hm_ lion doe _,nol _ork "']he SI ART!STOP MODI switch is set to 5SEe or ANTI
GROUNDSt4OOIING _.
+Setillo_ (p 15)
rhe dab, or iime indi<ahw -Reset the daL,-' and tinle, p. 51)
disappcalS.
I ×posurc adjustment or the • The NIGI ITS1 lOT swilch is s_'t to ON
PRO(]RAM AE fmlctilm d(_'s not '€' bet it to OFF.
work
Picture
Symptom Cause and/or Corrective Actions
I he image on the vit,wfinder screen •I'he viewfinder lens is not adjusted
is not clear + Adjust the viewfinder lens (p, 12)
A v_,rlical band appears when a "The contrast between the subject and background is too
subjecl such _s ]ighls or a candk, high. The camcorder is noi malfunctioning
flame is shol agains_ a dark -I. Change locations.
background
A _ ertical band appears \*,'h_,n •The camcorder is not malfunctioning.
shooting aw!ry bright subwct
64
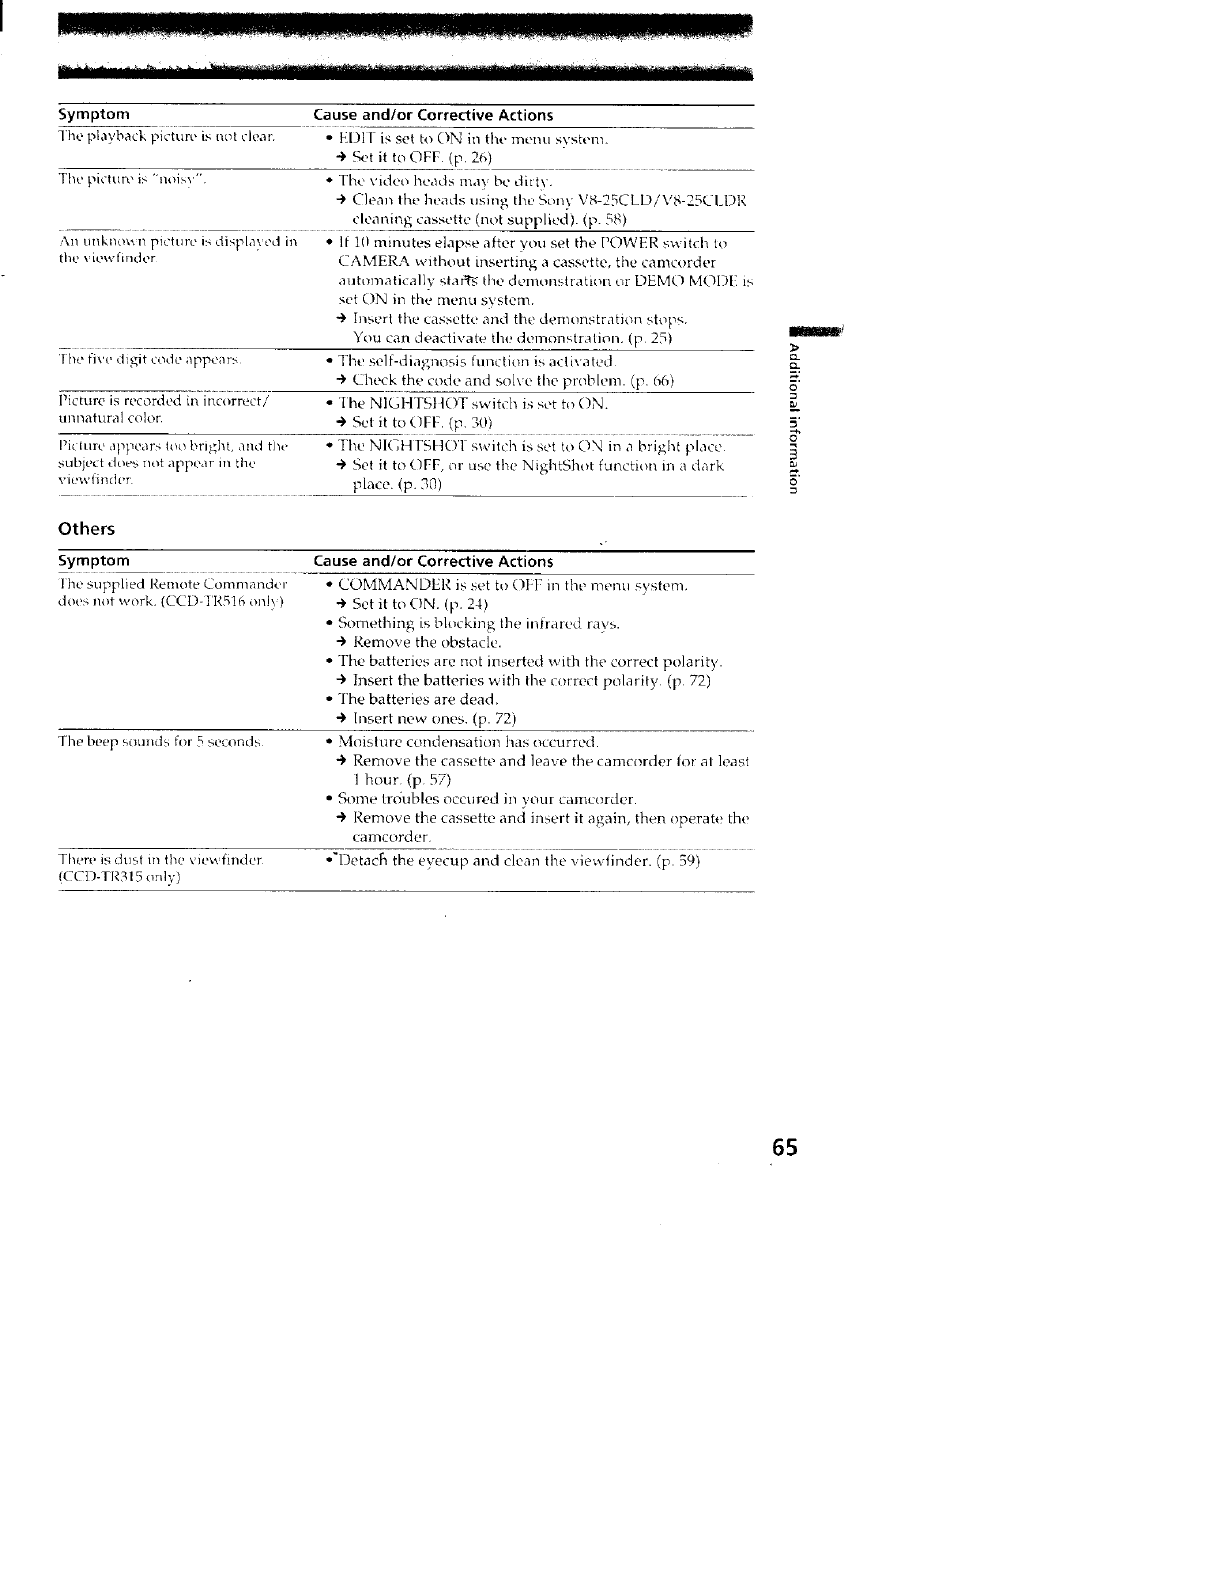
Symptom Cause and/or Corrective Actions
The playback picture is not clear. • kl)II is set to ON in the menu system.
+ _%,tit to OFF (IP.26)
The picture _s"noisy" • The video heads may be diw¢.
•4, Clean lhe heads using the St nv. V8 2qCLDiV8 -_9qCl_l)I'/.
....... clem).ing cassette (not supplied). (p. 58)
An unkno*_ n piciure iv;displa) ed in • If 10 minutes elapse after you set the POWER switch to
the viewfmder CAMERA without inserting a cassette, the camcorder
autnmalically slar% tile demonshathm or DEMO MODI is
set ON in the menu sv;tern.
'+ Insert the cassette and the demonstration stops.
You can deactivate the demonstralion. (p 25}
'lhe five digit c<de appear,. • The self-diagnosis functio_ is act[: ated
4. Check the code and solve the probh?m. (p. 06)
Picture is recorded in incorrect/ • Ihe NIGHTSI lOT switch is set to ON.
unnatural color -) .%t it to ()Ft t, (p. 30)
Pkture appears 1oo bright, and the • The NIC, H 1SHO'I switch is set to ON in a bright place
subNct does not appear m the + Set it to OFF, or use the NightShot function in a dark
viewfinder place. (p. 30)
Others
Symptom
lhe supplied Remote Commander
does not work. (CCD- 1R516 only)
The beep son]Ms flr 5 secollds
ThPrP is dust in the viewfnlder
((TCD-TR315 {]nly)
Cause and/or Corrective Actions
• COMMANDER is set to ()H? m the menu system.
+ Set it to (-IN. p. 24)
• Something is bh}eking the ini:rared rays.
÷ Remove the obstacle.
• The batteries are not inserted with the correct polarity.
•+ Insert the batteries ;',ith the correct polarily (p 72)
• The batteries are dead.
'+ Insert new ones. (p. 72)
• Moisture condel/satioll has occurred.
+Remove the cassette and leave the camcorder for at leas{
1 hour (p 57)
• Some tr6ubles occured in you[ oamcorder.
÷ Remove the cassette and insert it again, then operate the
canlcorder
•"Detac_ the eyecup and clean fine xiewtinder. (p. 59)
8"
g
65
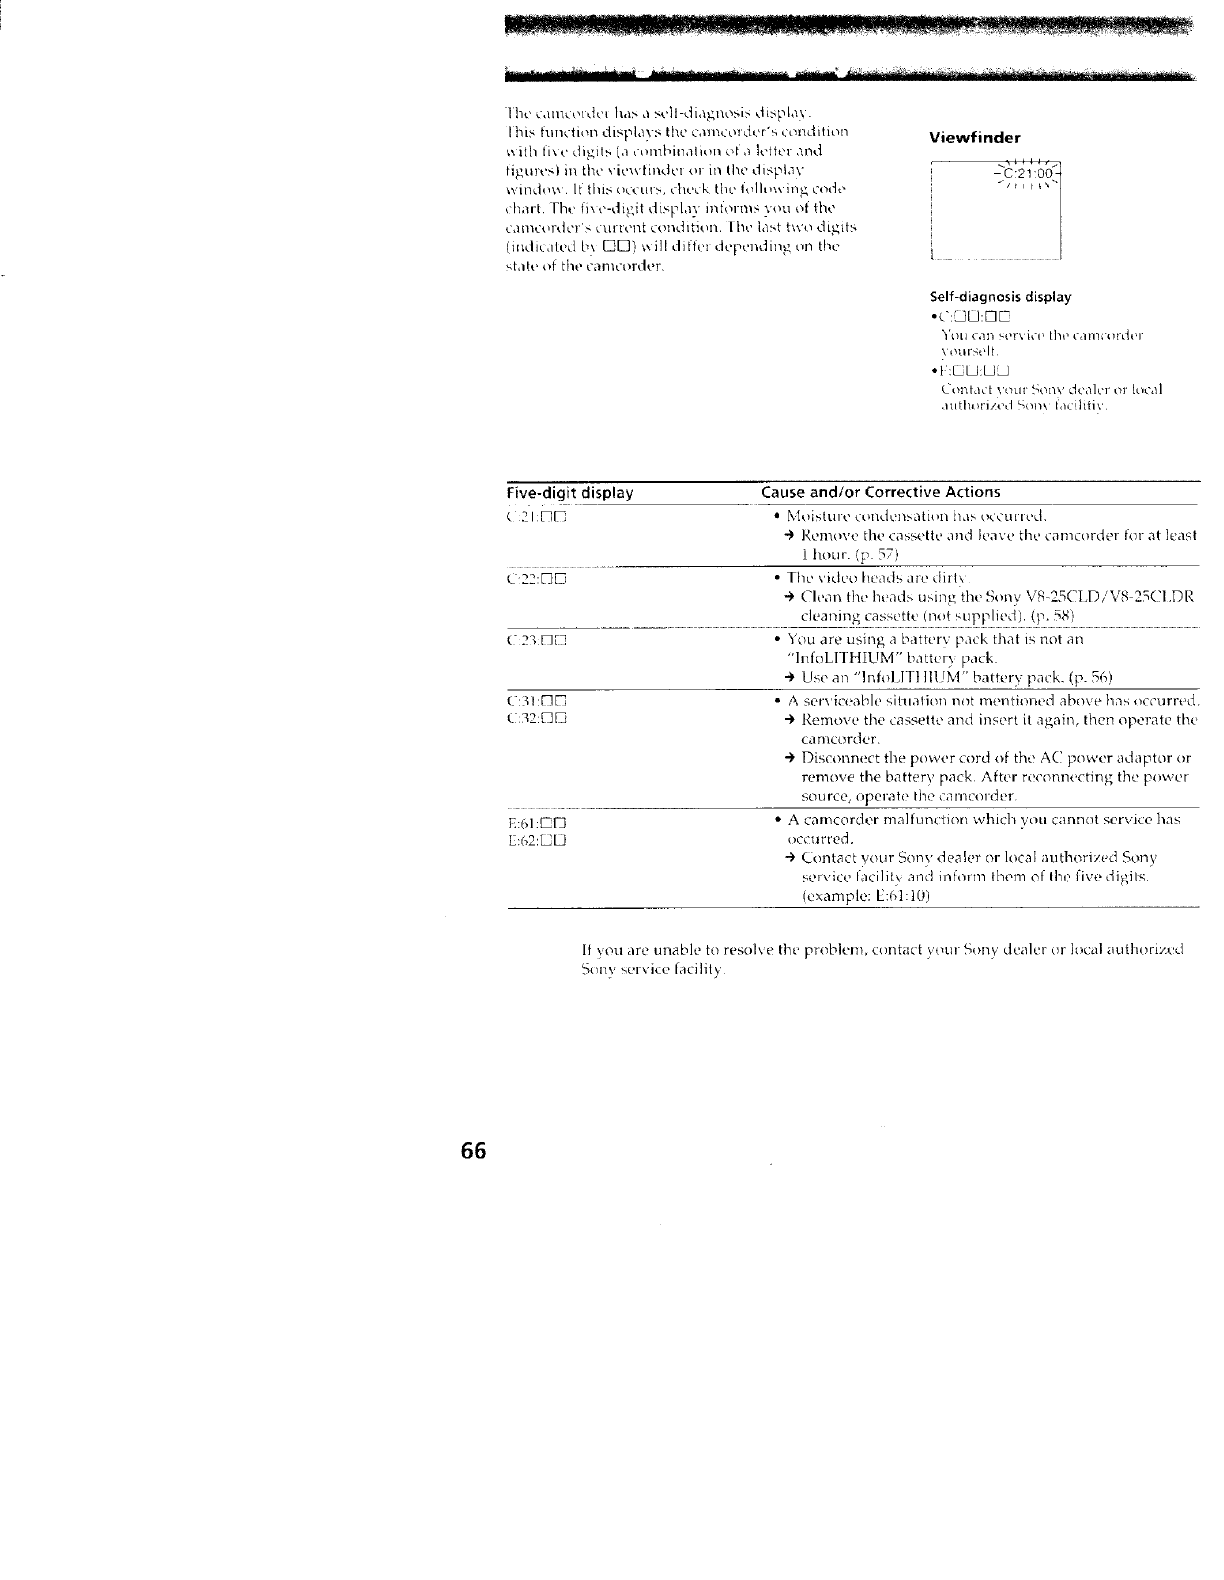
lhe camcoidet has a ,,cll-diagno>b, displa\.
Ihis function displays the camcoldei's coi_dition
_xith ti\e Higits (a combill,tlion of a lt'tter alia
figures) in the viewfmdet or in the disptav
window If tilts o_.otrs, dletk the' (ollt,wing code
chart The fh e-digit display intorms you ot the
camcorder's _ilfl'el][ Colldi_{ol]. lilt' last _\%'o digits
(mdicated b_ EEl) _ ill dillet depending on the
s[a[t' O{ the cameorder
Viewfinder
--clt:°°]
Self-diagnosisdisplay
.C:_Ld:E3_
_rl!tl CdI_ be!'; it't _ [he cami-ordel
\ Olll+Sel{
oF:_tJ:LIU
_'OI_tdC[ VOLIF .i'_OI'lV dealc,r or local
authorized +';on', _acilitiv
Five-digit display Cause andlor Corre(tive Actions
t 21[_ " r_loishu-e condensation has tu._tuted.
-) I_',emovethe cassette and leave the camcorder for at least
1 hour (I- _7)
<:22:E_D •The video heads aie diIt\
-1 Ch'an the heads usinE the Sony VS-25CI+D/V8 )'5('I DR
cleaning cassette (not supplied). (p. 58)
( + D_ • You are using a battery pack that is not an
"hffoLITHIUM" batter} pack
-+ klsl, al_ "lnfol ,IT] ]IUM" battery pack. (p. 56)
(:31:_ • A serviceable situalion not menth)l]ed above has occllrred
_,:_::,q_ -..I.Remove the cassette and resort it again, then operate the
camcorder
÷ Disconnect the power cord of the AC power adaptor or
3r
tern(we the batter} pack After rec¢ nnecting the po',_ er
source, operate the cl]n]col+d{?l"
E:61:DF2 •A camcorder ma]funetion whic]+ _,otl Calirlo[ service has
E:62:_LJ occurred.
÷ Contact your Sony dealer or local authorized Sony
service Iicl]ih and hll:olm t}lem of liGe five dil.,ils
(example: E:6hlO)
If }ou are unable to resolve the problem, contact your ,qony dealer or local authorized
.%m} seivice facility
66
Video camera
recorder
System
Video recording system
2 tot3r\ he&d_
l k, licM s_amm_g FM s_stem
Audio recording system
Rolar_ heads FM _sh!m
Video signal
NISL (olor, tIA _1,11da_d,;
Usable cassette
Ili++ or standard 8
Recording /Playback time (using
120 rain. cassette)
SP mode: 2 hotns
IP modv: 4 h_mi >
Fastforward/rewind time (using
120 rain. cassette)
Xpptox _ lml
Image device
].:4 indl CCI )(L barge Cot+plod
Device)
Approx. 27tl,0t 1t pixels (1 ifedix t,:
appT.X 2'+{),t)()l pixe] ]
Viewfinder
Elect+onto _ iewlmder
CCD-TR315: Monochrome
CCD TR410/TI_.515: Color
Lens
ColnbiI_+d p{iF_t'l zo(llll ]elm
Filter diameter 37 mm
CCD-TR315: I B> (Optical), ]80×
(Digital)
CCD-TR4 l tx 18× (C}ptic d), 22t)x
(Digital)
CCD-] R5!6: 18x (Optical),
330x (Digital)
Focal distance
i]738 mm
When converted to a 35 mm st]l
tan]t2rd
3c}_1 - 71)9 roll]
Color temperature
A/ito
Minimum illumination
04 tux al F 1 4
{) ]ux ( m Night,hot mode) _
Illumination range
0.4 tux to ]0[),0{)l! ILl×
Recommended illumination
More tball IIXt lux
* Object invisible for the dark can
be shot with infrared lighting
Input and output connectors
Video output
Pboilo jack, 1 Vp-p, 7_ ohms,
tm balai_ct,t]
Audio output
Monaural, I+hunc jack,
327 mV (aL titlt_ul iml)i_dan_:{,
47 kilohmsl impedance le_s than
2.2 kilohms
RFU DC OUT
Spcdal minijack, DL 5\'
LANC control jack
Sk'tec+ him m iliiac k (o 25rain)
MI( jack
Miuiim k.l) ;88 m\ im_ il H_edal :c
impedance o4 ki]o]m> (,_35 nlq/)
_llllCltll al Q.pt'
General
Power requirements
7 2 V (bat_ry pack)
84 V (AC po\_ cr adaptor)
Average power consumption
(when using the battery pack)
I)lJ rm b, camera re( ortlitl_
(C/) l R315:25 W
CCI)-TR416/] R51e,: 2.4 W
Operating temperature
0C to 4(YC
Storage temperature
-20C to ÷60°C
Dimensions (Approx.)
t()7_ 107 x193 mm (_/i_Itl)
Mass (Approx.)
CUD I R315:790 g
CCD TR416iTRS16:7_50 g
exdudi_g the batter', pack, lithium
battery, {asselt(! and slloulder
strap
CCI)-TR315:930 g
CCD-TR416iTRS16 920 g
in{ hiding Hie battery pick NP
F330, lithium battery CR2025,
cassette and shoulder strap
Microphone
Vlot+aural Wpe
Supplied accessories
See Dlge 5
AC power adaptor
Power requirements
I!)l! 240 V At .St) !_t) I t1
Power consumption
23 W
Output voltage
IX Oll: 8 1 \r 1:_ \ in _lpt'r,!tll1_t
Operating temperature
0 ( to 40 ("
Storage temperature
20( to _h0 t
Dimensions (Approx.)
125 x 39 x (+2 IIIII (_\ib !ti)
ext ]llkling Imqe< tmq pmt_
Mass (Approx.)
2_0 g
cxC]tlcling pm_cl cold
I)t' d}U/ ,il/d _1,<>< itl_ ,tlion<_ aro
_,tlbj('c I to cbal/<_e/', it]_out +_oti_'t'
67
[]
%
%
[] EDITSEARCH button (p 17)
Built-in ght(CCD-lRq16onlv)
(p 46'}
I31 Lens cover
14] POWER switch (p. 11)
_ FOCUS switch (p. 36)
NEAR/FAR dial (p. _0)
Video control buttons (p. 19)
• STOP (stop)
_1_1 REW (rewind)
I1_ PI,AY (playback)
11' (fastforward)
II PAUSE (pause)
[8_ Power zoom lever (p. 14)
[] NIGHTSHOT switch (p 30)
I_ Display window (p. 74)
_I FADER button (p. 2_)
[] Tripod receptacle (p 16)
Make sure that the length ot the tripod
screw is less than 6.5 ram otherwise, you
cannot attach the tripod securely and
the screw may damage the eamcorder,
[] Lithium battery compartment (p. 50)
68
Q.
O
a-
DATE button (p 44)
TIME button (p. 44
i!_ COUNTER RESET button (p. 13)
1_7]START/STOP MODE switch (p. 15)
PROGRAM AE dial (p. 34)
%! BACK LIGHT button (p. 27)
TITLE button (p. 41)
PICTURE EFFECT button (p. 38)
EXPOSURE button (p 39)
_3 MENU button (p. 23)
[] Control dial (p. 23)
69
@
[]
127]
@
[]
Viewfinder lens adjustment ring
(CCD-TR315 only) (p. 32) /Viewfinder
lens adjustment lever (CCI)-TR4] (_/
TRS] 6only)
(p 12)
Eyecup RELEASE knob (( ( I)-TR315
only) (p. 59)
Viewfinder (p. 12)
Battery mounting surface
DC IN jack (p "7,22)
Hook for shoulder strap (p. 73)
/31! Eyecup
[] BATT RELEASE lever (p. _)
[] START/STOP button (p. ]1)
134]STANDBY switch (p 1])
[3_ Hook for shoulder strap (_,. 73)
7O
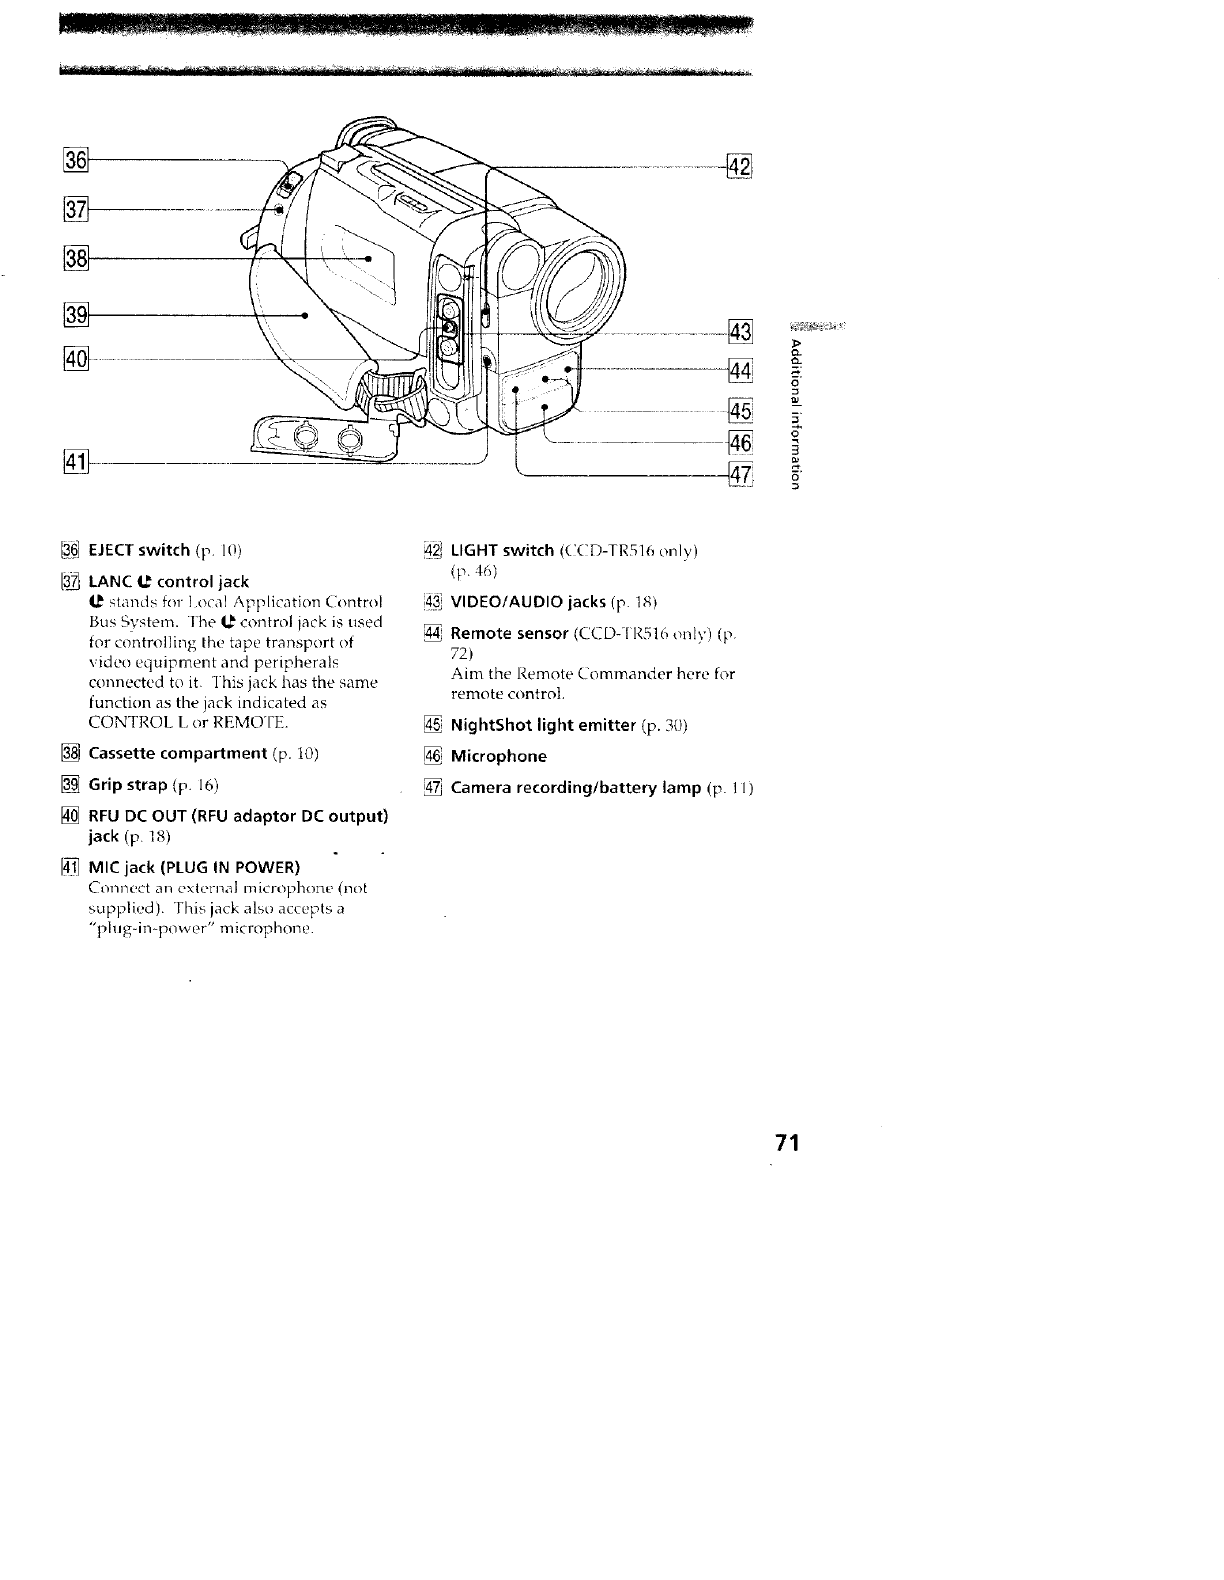
[]
............................. t
CL
o
w
R
3
136]EJECT switch (9- ]0)
[3_ LANC _ control jack
I_' stands for local Application (ontrol
Bus System. Fhe I_ control jack is used
for controlling the tape transport of
video equipment and peripherals
connected to it. I his jack has the same
function as the jack indicated as
CONTROL L or REMOTE.
[] Cassette compartment (p. i0)
[] Grip strap (9. 16)
[] RFU DC OUT (RFU adaptor DC output)
jack (p 18)
[4_ MIC jack (PLUG IN POWER)
Connect an external microphone (not
supplied) This jack also accepts a
"phlg-in-power" microphone
42_ LIGHT switch (C( D-TR516 only)
(p. 46)
40_ VIDEOIAUDIO jacks (p. 18)
Remote sensor (CCD- I 1,L516only) (p
72)
Aim the Remote Commander here for
remote control.
NightShot light emitter (9.30)
Microphone
Camera recordinglbattery lamp (p. ll)
71
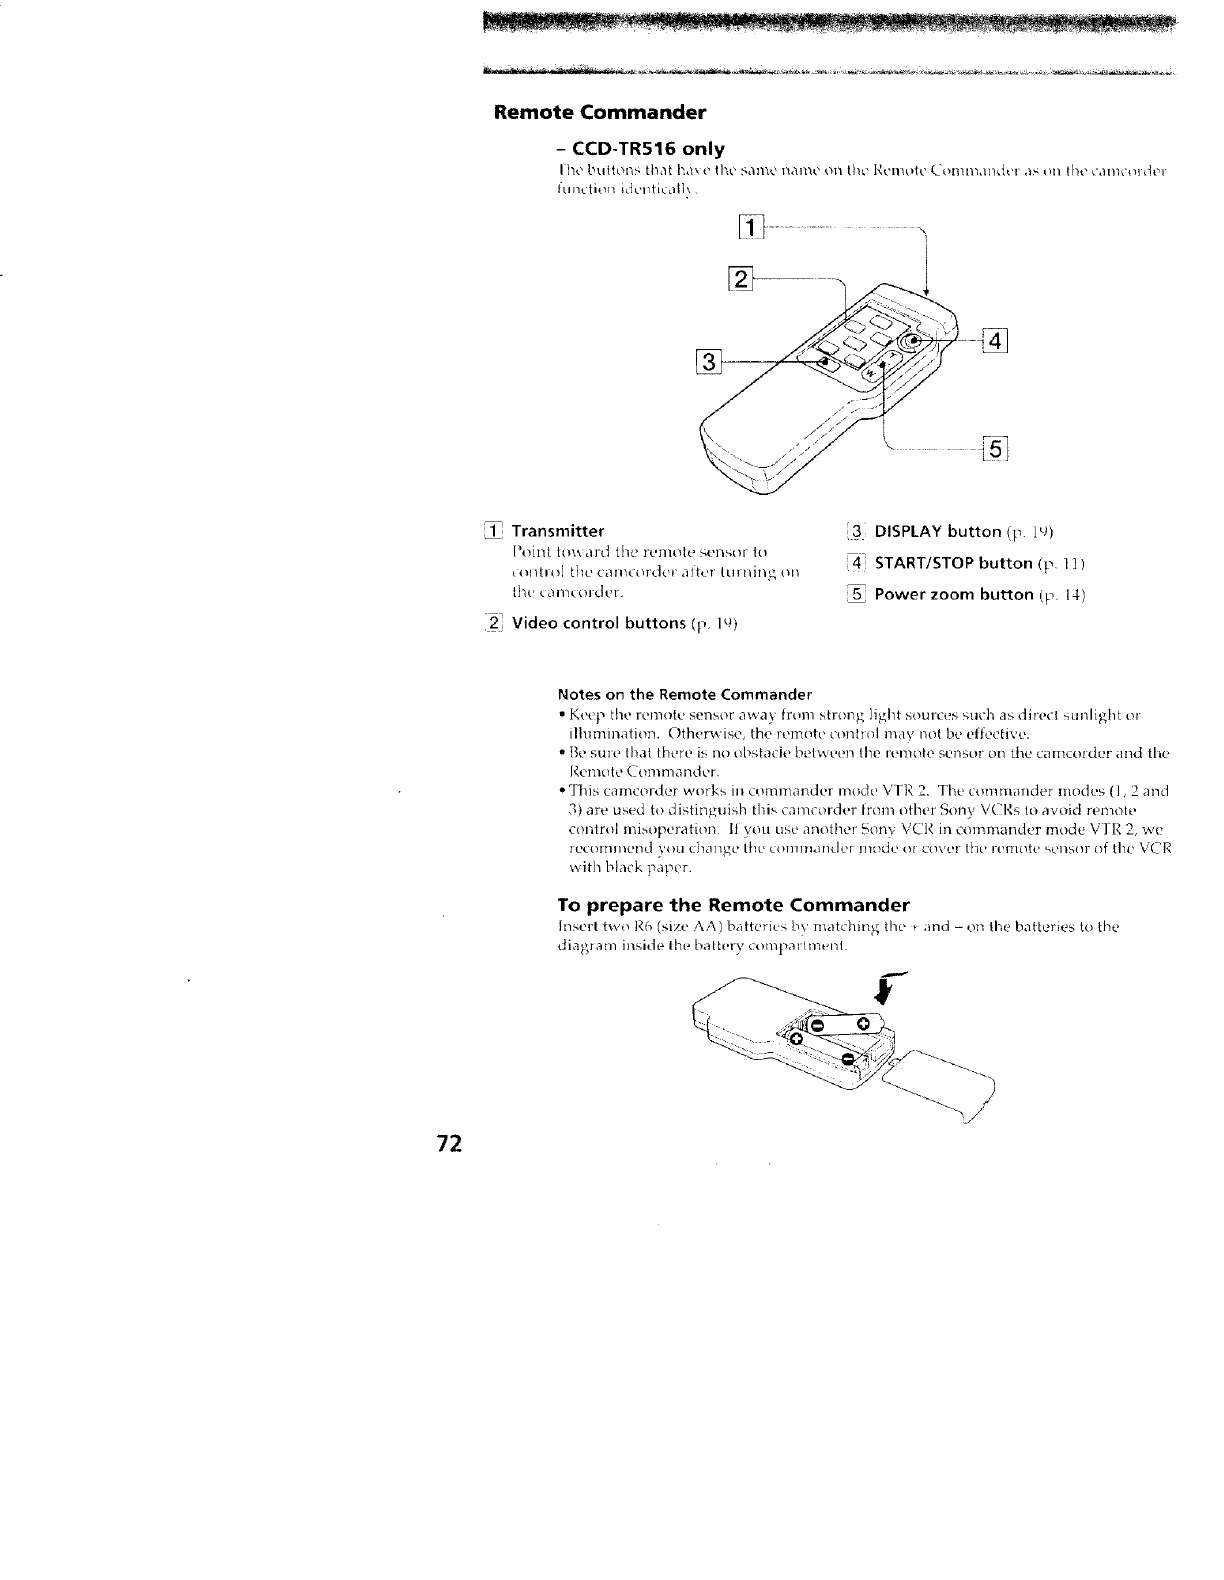
Remote Commander
- CCD-TR516 only
I he buttons that ha_e the same i_ame on the [_emote _'onlm,lndtu ,is on the catll_'ol der
lU +l_ t loT1 iL]l'l/t iL _tl\
Transmitter
Point tm_ ard the remote _ensor to
(olltlO] LIlt+CdIllO_]'(l_'+" a{tt_,r tutilitlg on
{b(' ( a re(el-Oct
2 Video control buttons (p 19)
3DISPLAY button (p. i'_)
4 START/STOP button (p tl)
5_ Power zoom button (p+ 14)
72
Notes on the Remote Commander
•Keep the remote sensor away fro]ll strong ]ight sources such as direct sunlight or
illuminatiorl. Otherwise, the remote control may not be effective.
• t:_esure that there is no obstacie bet'_ een the remote sensor 01_tile c_uncolder and the
I_,emote (7ommander
°This camcorder works m commandm modt! VF]'_ 2. The commandeT modes (], 2 and
3) are used to distinguish this cameorder from other Sony VCRs to aw)id remote
control misoperation If "_,ouuse another Son\ VCI< in commander mode V'IR 2, we
ieCOlTllllel/d }'ou CbDIl_e [}lu COTIIIII_ITIdOr I]IOdL' Ot COVL!]" 111{* I'1%_10{(? S(._l/S(tr (}f the \"(_R
with black paper.
To prepare the Remote Commander
Insert two R() (size .A.,,Mbatteri(,s by matching the t and - on the batteries to the
diagram inside the battery compaltmet_l
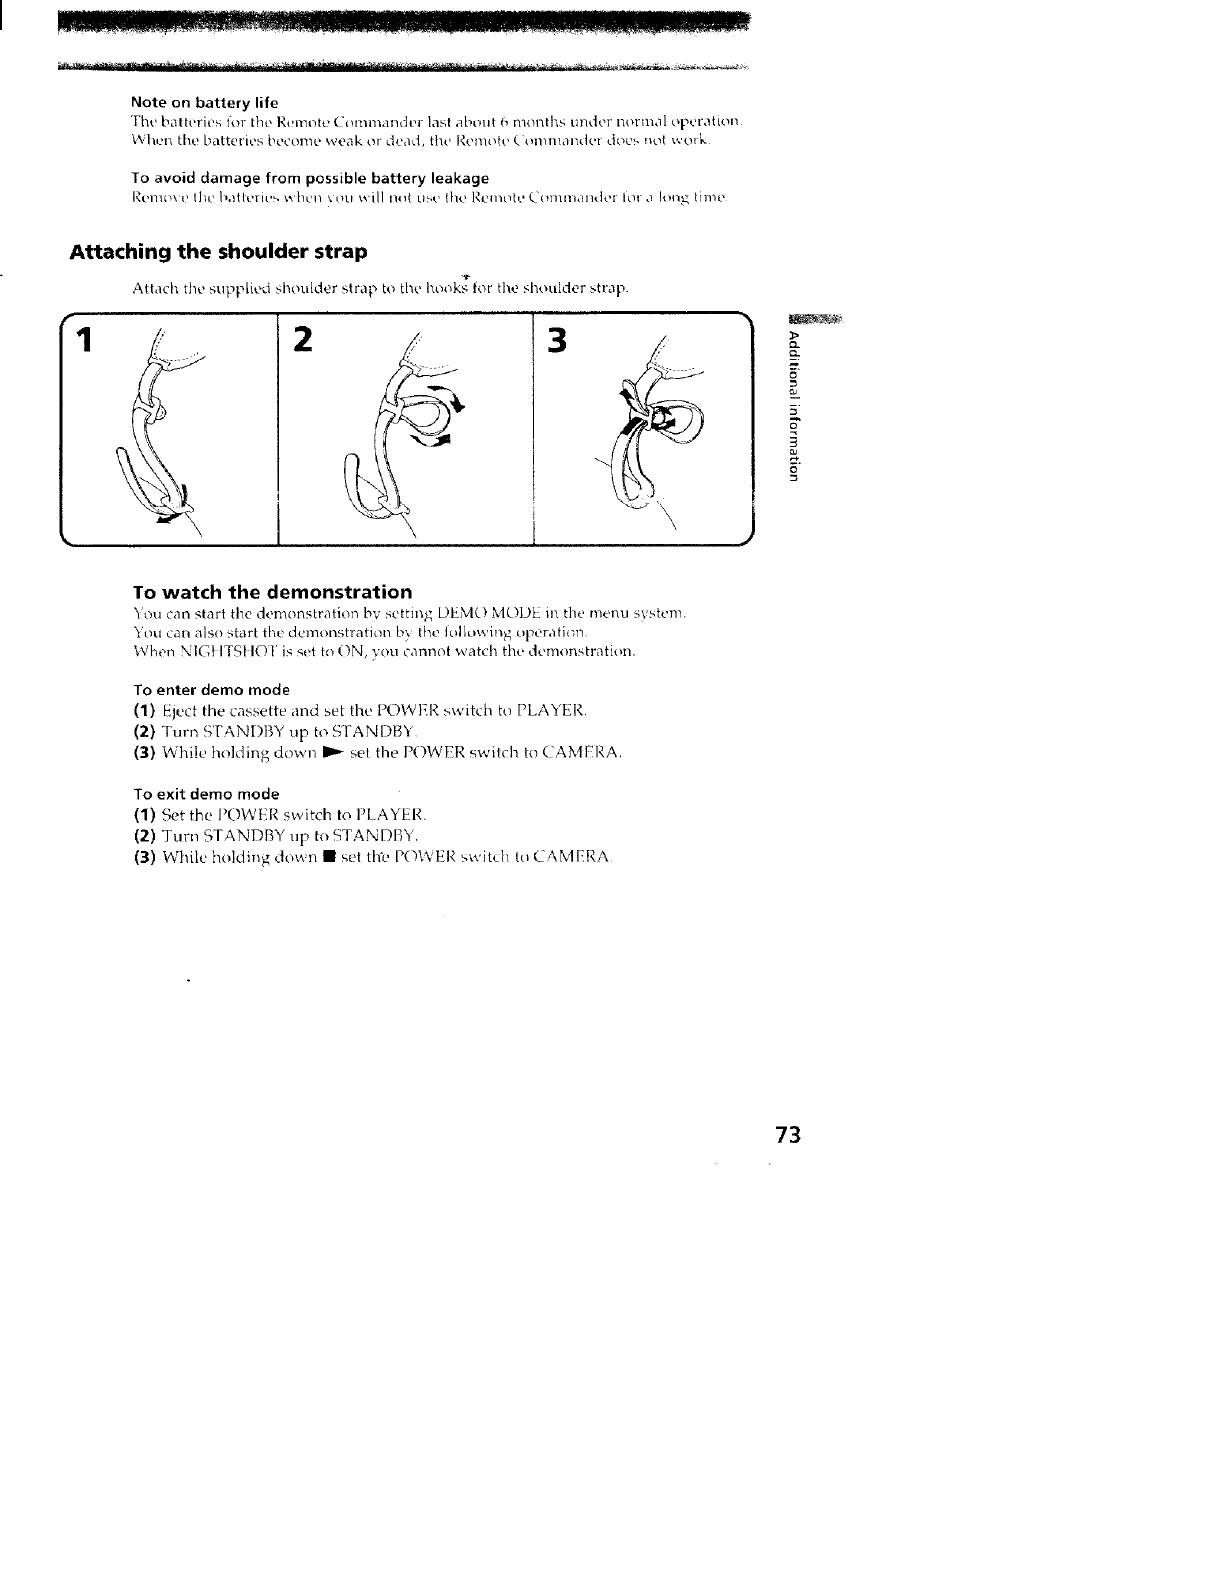
Note on battery life
Tht batteries _:ov the ]_.emot_! ( l_li'.l_ander laM about 6 mol_tht; tlnd0r n,._rm_ll op_.'r_ti,._n
\'\ hL'n the batteries become weak or dead, the l_,inott, (. ommallde_ d_w_ not wol k
To avoid damage from possible battery leakage
Renll_p t]l_' b,lth'l h'_. _ hL'17 \ otl will i_1_ Ll_' _IK, Remote Cl_l]ml,i]ldol Iol .1 !on._ tinlt"
Attaching the shoulder strap
Attach the supplied shoulder str_'_p to the hooks for the shoulder strap.
13
¢3
5
5"
To watch the demonstration
You can start the demonstration bv settin_ DEMO MODE in the menu svstcm.
"_OklCall/_lso start the demonstratioI_ b} the Iolh__wing ol_e_atk_n
When N1G! ITSt lOT is set to ON, you cannot watch the demonstration.
To enter demo mode
(1) Elect the cassette and set the POWFR switch to PLAYER,
(2} Turn STANI)BY up to S'[ ANDBY
(3) While ho]ding down _ set the POWER switch to CAMERA.
To exit demo mode
(1) Set the POWER switch to PLAYER
(2) Turn STANDBY up to STANDBY.
(3) While holding duv, n • set th'e POWER switch tu CAMERA
73
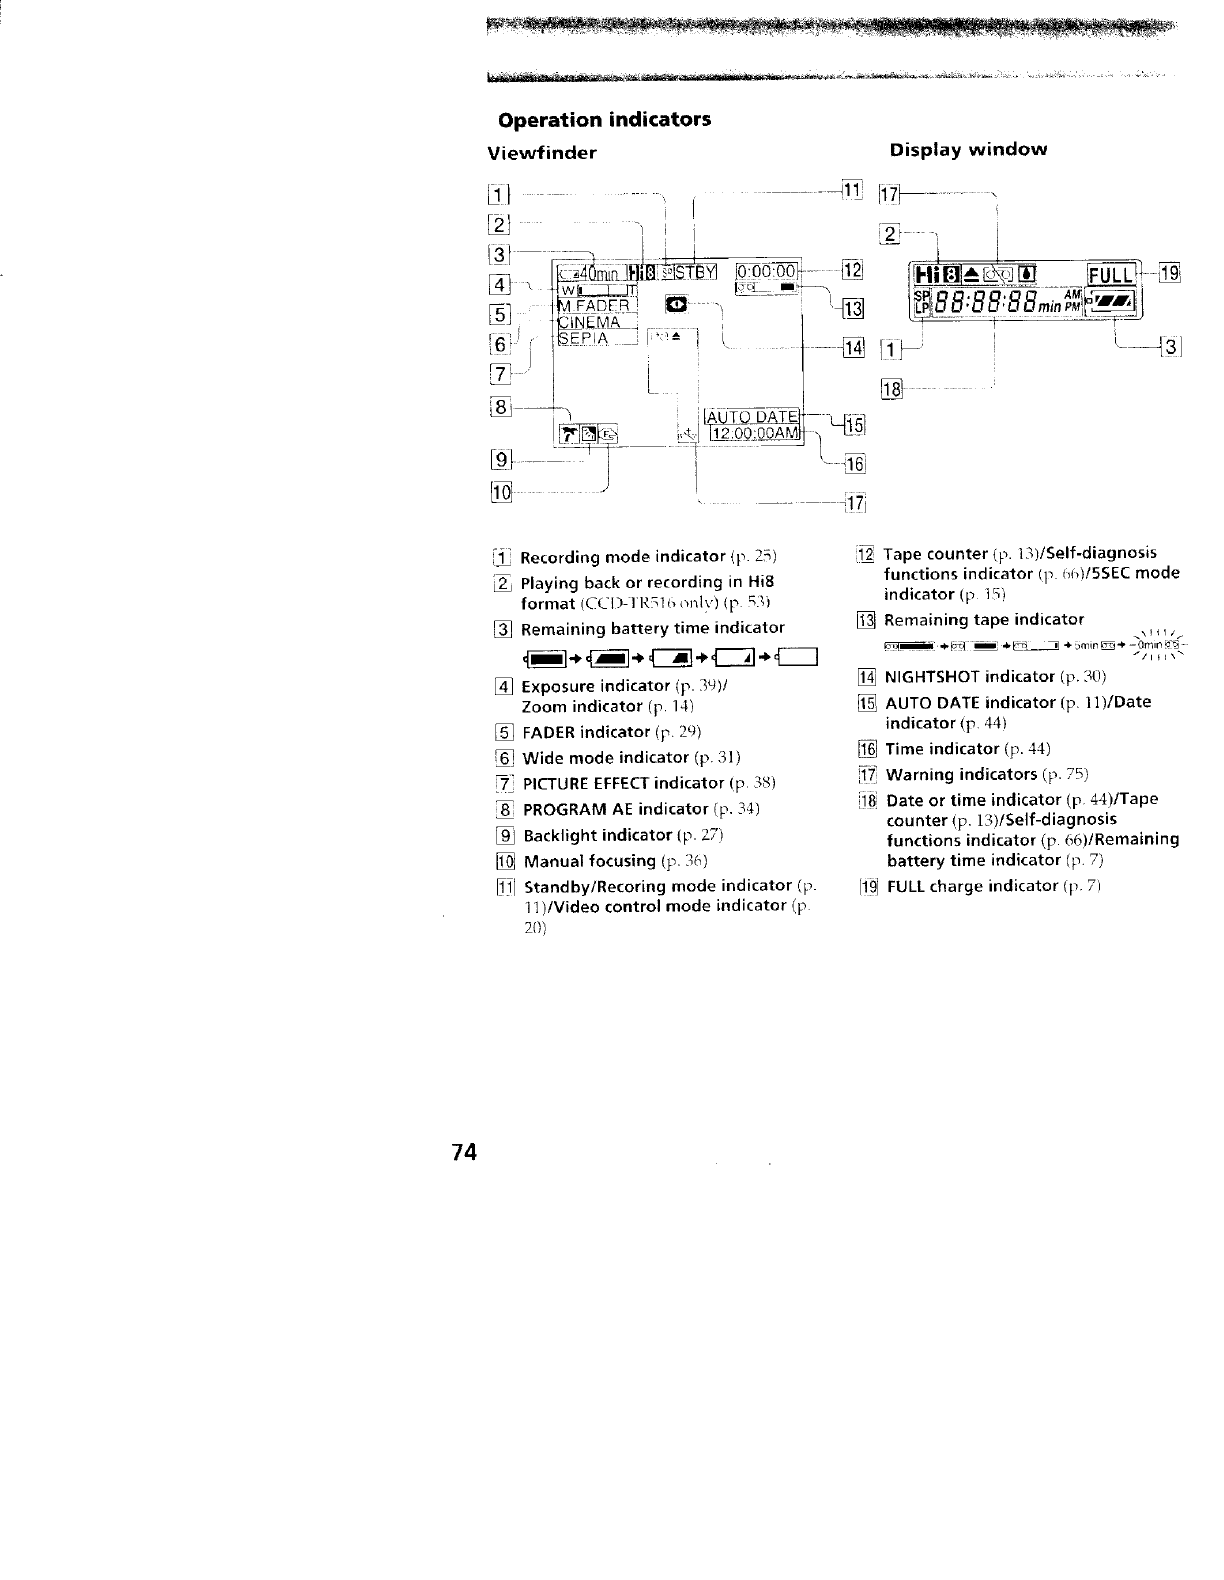
Operation indicators
Viewfinder Display window
li
/31 .... ,
\ _Wll _T
r<_ i_ D ....
L_ irj##yA_,,,
!6[' [SEPIA " -
19t-
--_-I17_ -
D_ im_ .........
T-- I T
I1 }--' t----_ 3 ]
LAUTO DATE
.... .171
"1_ Recording mode indicator (}). 25)
Playing back or recording in Hi8
format (CCI) l R_lt_ only) (p rqb
[] Remaining battery time indicator
[] Exposure indicator (p. 39)/
Zoom indicator (p 14]
[] FADER indicator (p. 29)
Wide mode indicator (p. 3])
PICTURE EFFECT indicator (p 38_
PROGRAM AE indicator ([_. 34)
[] Backlight indicator (p. 2_7)
[] Manual focusing (p. 36)
111.11Standby/Recoring mode indicator (_
11)IVideo control mode indicator (p
20)
[_ Tape counter (p. 13)/Self-diagnosis
functions indicator (p I}_)!5SEC mode
indicator (p 15)
[] Remaining tape indicator
NIGHTSHOT indicator (p. 30)
AUTO DATE indicator (p. ]])/Date
indicator (p, 44)
1_ Time indicator (p. 44)
17_ Warning indicators (p. 75)
i8 Date or time indicator (p. 44)/Tape
counter (p, 13)/Self-diagnosis
functions indicator (p. 66)/Remaining
battery time indicator (p, 7)
[i_I FULL charge ndicator (p 7]
74
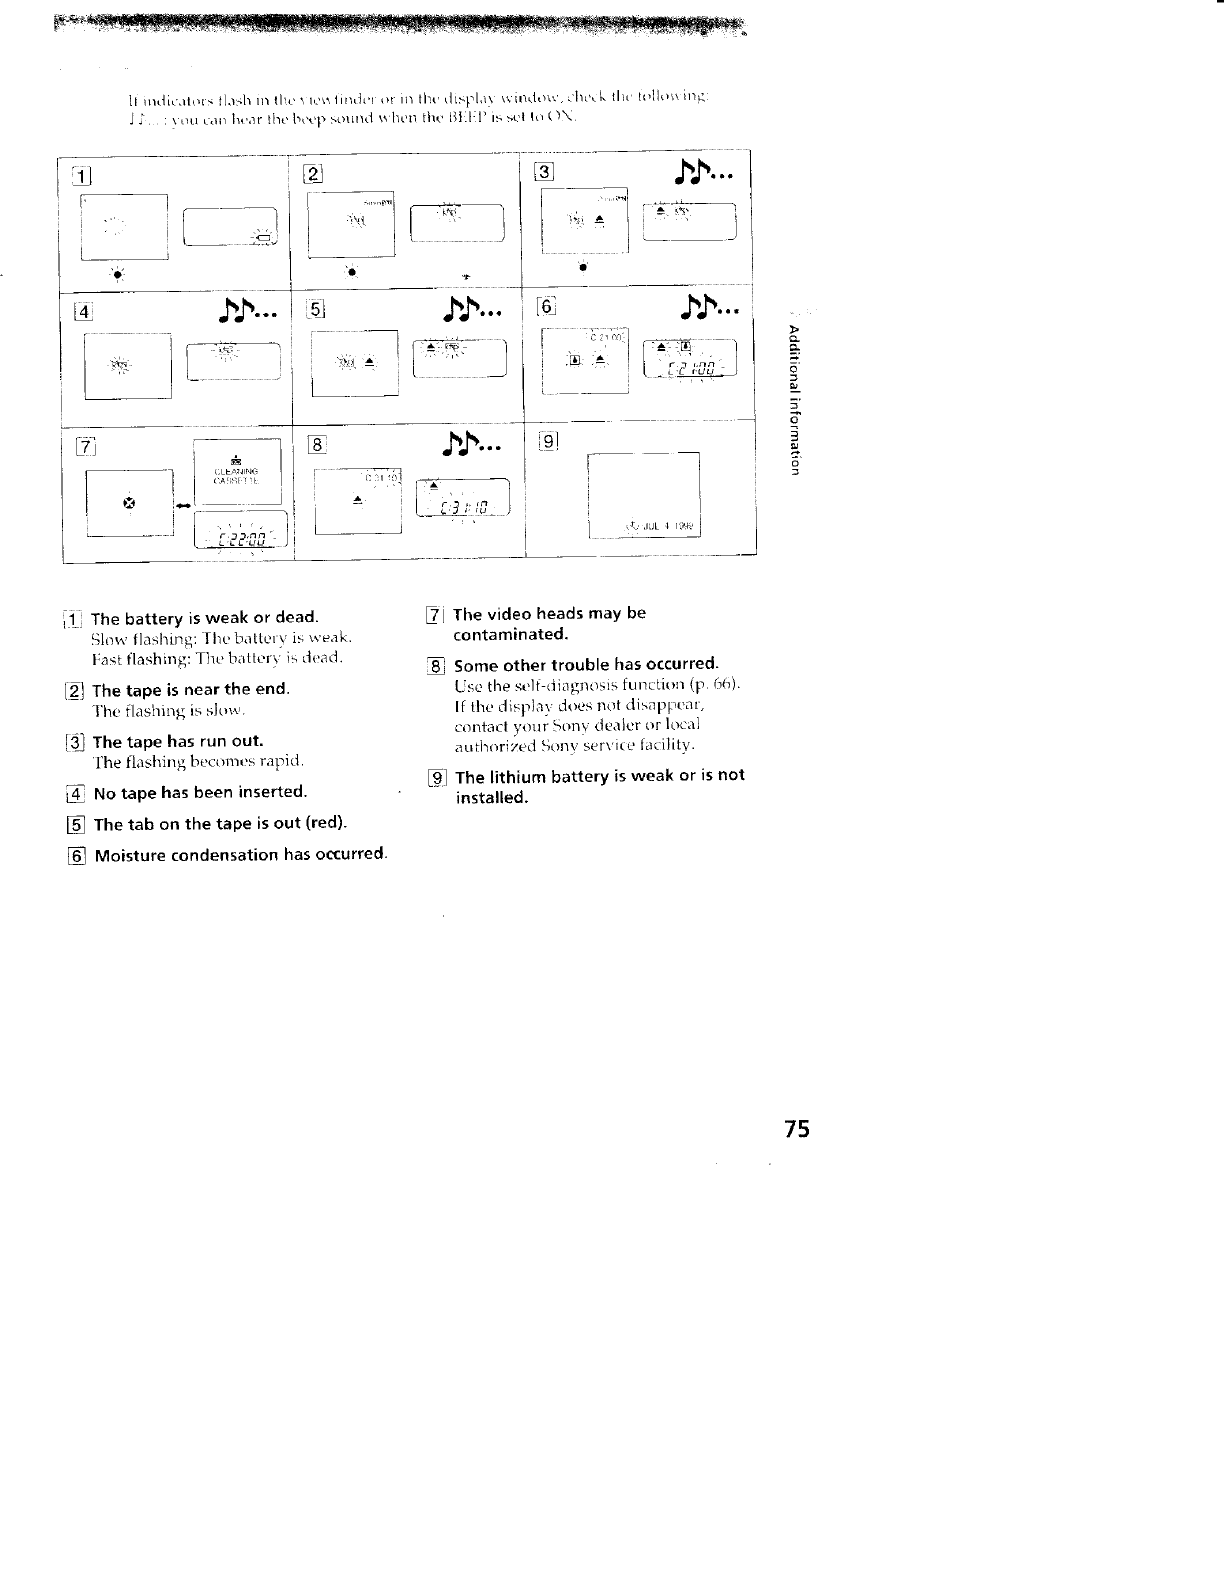
c v- tL,>h in tic _i_'_ l imh,z l_rin the d>pla\ wil_do\x, _llu'_ kllw hql_ in_:
14
i ,
....
S'
The battery is weak or dead.
Slow flashing: H_e l,_attelv is weak,
Fast flashing: The bitter}; is dead.
L21 The tape is near the end.
l'he flashing is slow.
!3_ The tape has run out.
The flashing becomes rapid,
No tape has been inserted.
[] The tab on the tape is out (red).
Moisture condensation has occurred.
_i The video heads may be
contaminated.
8_ Some other trouble has occurred.
Use the self-diagnosis function (p 66)
I{ the display does not disappear,
contact your Son}i dealer or local
attfl_rized Sony service facility.
% The lithium battery is weak or is not
installed.
75
Index
A,B
&diu_ling \im_ findrr...........12
ANTI GROI NI'J SI ItS) IINC
Auto _Ot'LIS ............................... _(_
Backlight ................................ 27
B<',t'p ....................................... 13
C, D
Camera rccordin_ 4 ................. 1 ]
t'ar batt_ r_ ............................. 2I
Ch,trging balter_ ..................... 7
(leanm_ video head> ............ 5_
Ch_ck set ......................51
Connection ................. 18
(-(){JN 111< 17,IS{ I ........... I
I)ATE/TIMI2 44
DIMO ............... 2% 73
I)igital zoom ................. 1,t
I)ISP{ AY ......................... 19
E
ti)11 ............................... 2(_
EditilTg ............................ 4_
I DII<I ,\Rt II .................... 17
[ "vDo',tlrc ................................. 3Q
F, G, H, I, J, K
FADIR .................................... 2q
tqousc cuHent .......................... 22
L
I <:',NC ............................ 71
1,ithium batk,rv ................. 50
M,N
Malltial focu <>................. 36
_,_oll tl s):SlOlT/ ..................... 23
MIC (microphone) jack ...... 71
NIGtlTSt lOT .................... 3!)
O,P,Q
PIC IL;l'tl { FI:L(I ................. _
Pla_ back pause ....................... 211
Po_x t'I Sotlrce_ ......................... 2I
Po\_ er ZOOll/ ............................ l 4
I>I,XK;I,'A M AI ................. 33
l_.tc review ............................ 17
I%c'ord il/g mode ..................... 25
I,_emote control jack (I.ANC)
........................... 7I
I<e_ ind .................................. 19
Self-diagnosis display ........ 66
Shoulder strap ..................... 73
Skip scan ............................... 20
Standby mode ...................... 12
T,U,V
]ape counter .......................... 13
Title .......................................... 41
I rlpod mounting .................... 16
I rouble check ......................... 63
W, X, Y, Z
WIDE modu. ...................... 31
WORLD I-IME ............... 52
Zoom ................................... 14
Sony Corporation Printed n Japan
Son' tline http:/lwww.world.sony,com/
Printed on recycled paper
