Sony CMT GP5 User Manual HI FI COMPONENT SYSTEM Manuals And Guides L0307343
SONY Tabletop Systems Manual L0307343 SONY Tabletop Systems Owner's Manual, SONY Tabletop Systems installation guides
User Manual: Sony CMT-GP5 CMT-GP5 SONY HI FI COMPONENT SYSTEM - Manuals and Guides View the owners manual for your SONY HI FI COMPONENT SYSTEM #CMTGP5. Home:Electronics Parts:Sony Parts:Sony HI FI COMPONENT SYSTEM Manual
Open the PDF directly: View PDF ![]() .
.
Page Count: 26
Micro Hi.Fi
Component
System
Operating Instructions
Owner's Record
The model and serial numbers are located at lhe rcar. Record the serial number in the space
provided belong. Re_r to lhem _henever you cal! upon your Sony dealer regarding this
product.
Model No. ........................... Serial No.. .....................
DEITAL AUD|O
CMT-GP5
@2003 Sony Corporation

To prevent fire or shock hazard, do not
expose the unit to rain or moisture.
TO prevent fire, do not cover tile ventilalion of the
apparatus wfib news papers, table-cloths, curtains, e_c.
And don't place lighted candles on the apparatus.
To prevent fire or shock hazard, do not place objects
filled with liquids, such as vases, on tile apparatus.
Do not install the appliance in a confined space,
such as a bookcase or buifi-in cabinet.
This appliance is
classified as aCLASS 1
LASER product. This
label is located on the
rear exl_rior.
Don't throw away the battery with
general house waste, dispose of it
correctly as chemical waste.
Except for European model
ENERGY STAR _ is a U.S.
registered mark. As an ENERGY
STAR ¸_ipartner, Sony Corporation
has determined that this product
meets the ENERGY STAP( _
guidelines for energy efticiency.
NOTICE FOR THE CUSTOMERS IN
THE U.S.A.
c;_¢_ _m¢uc: THEmx_ EmeTiCmo_
_UIm_S_IL_ r_S WI_
m_ sm_m 1oa_JRm m_lc_ _¢_B-
This symbol is intended to alert tile user to
/_ the presence ofuninsulated"dangerous
voltage" within the product's enclosure that
may be of sufficient ln3gnitude to constitute
a risk of electric shock to persons.
This symbol is intended to alert the user to
Z_ the presence of impo_ant operating and
maintenance (servicing) instructions in the
literature accompanying the appliance.
CAUTION
The use of optical instruments with this product will
increase eye hazard.
WARNING
This equipment has been tested and found to comply
with tile limits for a Class B digital device, pursumlt to
Part 15 of the FCC Rules. These limits are designed to
provide reasonable protection against harmt)!
interference ill a residential installation. This
equipment generales, uses, and can radiale radio
frequency energy and, if hal installed and used ill
accordance with the instructions, may cause harmful
interference to radio communications. However, lhere
is no guarantee that interference will not occur in a
particular inslallation. If this equipment does cause
harmt)l inler ference to radio or television receplion,
which can be delermined by turning Ike equipment off
and on, the user is encouraged to try to correct the
interference by one or more of_he following measures:
Reorient or relocate lhe receiving antenna.
Increase _be separation between the equipment and
receiver.
Connect the eqthpment into an outlet on a circuit
difli:rent from that to which the receiver is
connected.
Consult the dealer or an experienced radioTFV
technician for help.
CAUTION
You are cautioned that any changes or modifications
not expressly approved in this manual could void your
authority to operate this equipment.
Note to CATV system installer:
This reminder is provided to call tke CATV system
ins_aller's a_tention to Article 820-40 of the NEC that
provides guidelines for proper grounding and, in
particular, specifies that the cable ground shall be
connected to the grounding system of the building, as
close to the point of cable entry as practical.
NOTICE FOR THE CUSTOMERS IN
CANADA
CAUTION
TO PREVENT ELECTRIC SHOCK, DO NOT USE
THIS POLARIZED AC PLUG WITH AN
EXTENSION CORD, RECEPTACLE OR OTHER
OUTLET UNLESS THE BLADES CAN BE FULLY
INSERTED TO PREVENT BLADE EXPOSURE.
This manual mainly explains operations using
the remole, but the same operations can also be
performed using the buttons on the system
having the same or similar names.
2GB
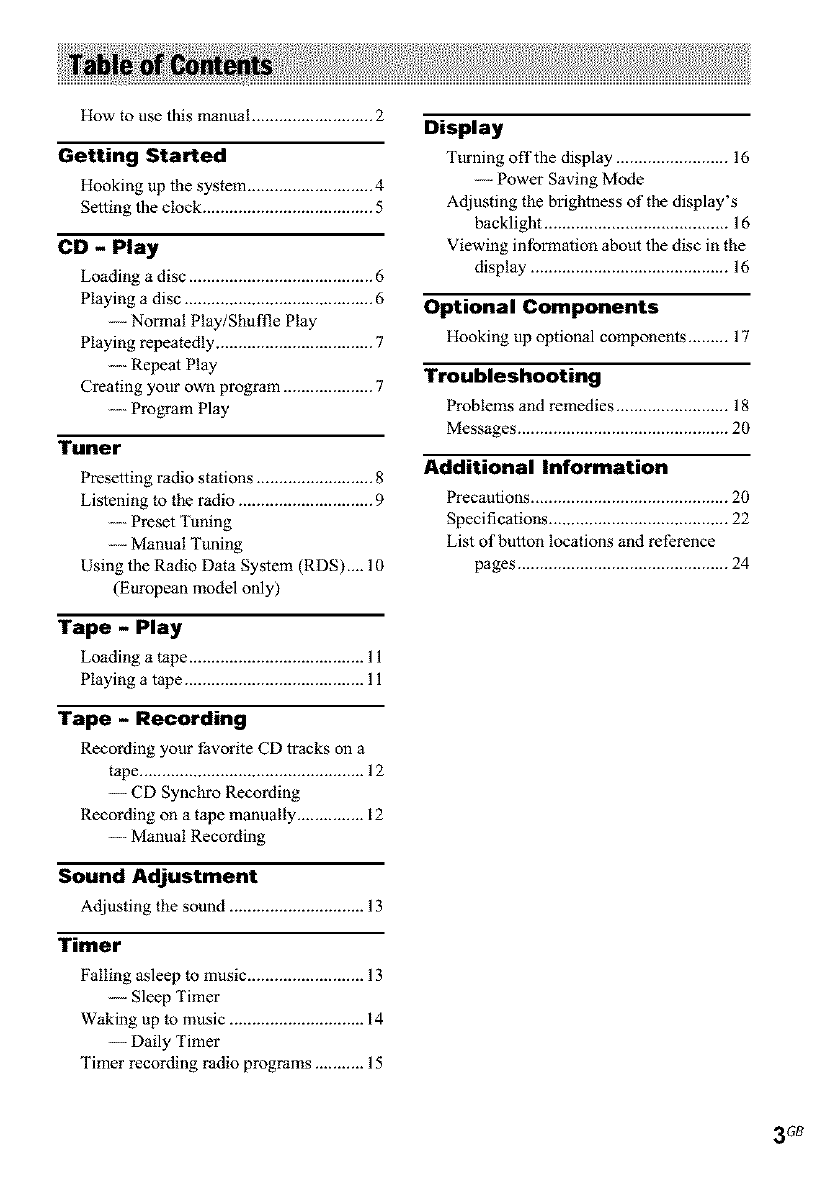
How to use this manual ........................... 2
Getting Started
Hooking up the system ............................ 4
Setting the clock ...................................... 5
CD - Play
Loading a disc ......................................... 6
Playing a disc .......................................... 6
-- Normal Play/Shuffle Play
Playing repeatedly ................................... 7
........Repeat Play
Creating your own program .................... 7
.........Program Play
Tuner
Presetting radio stations .......................... 8
Listening to the radio .............................. 9
........Preset Tuning
.........Manual Tuning
Using the Radio Data System (RDS).... 10
(European model only)
Tape - Play
Loading a tape ....................................... 11
Playing a tape ........................................ 11
Tape - Recording
Recording your favorite CD tracks on a
tape .................................................. 12
--- CD Synchro Recording
Recording on a tape manually ............... 12
.........Manual Recording
Sound Adjustment
Adjusting the sound .............................. 13
Timer
Falling asleep to nmsic .......................... 13
-- Sleep Timer
Waking up to music .............................. 14
--- Daily Timer
Timer recording radio programs ........... 15
Display
Turning off the display ......................... 16
-- Power Saving Mode
Adjusting the brightness of the display's
backlight ......................................... 16
Viewing information about the disc in the
display ............................................ 16
Optional Components
Hooking up optional components ......... 17
Troubleshooting
Problems and remedies ......................... 18
Messages ............................................... 20
Additional Information
Precautions ............................................ 20
Specifications ........................................ 22
List of button locations and reference
pages ............................................... 24
3GB
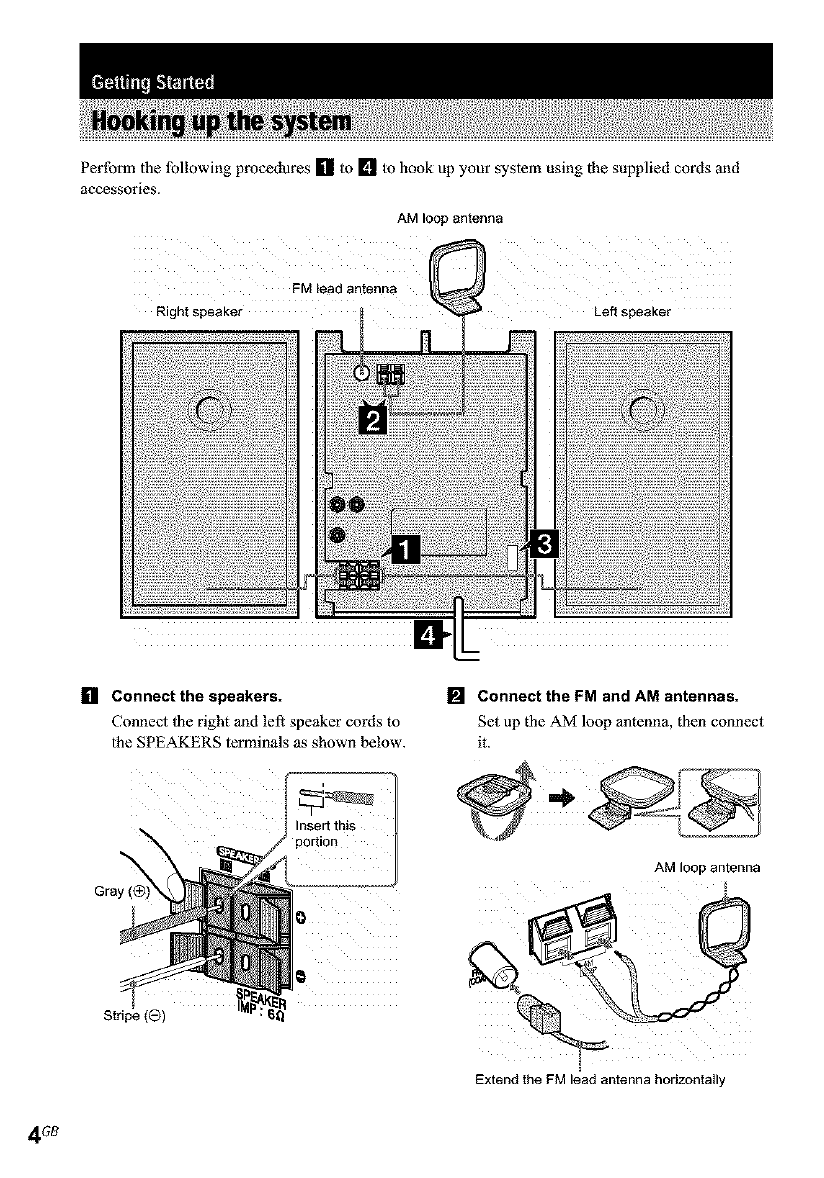
Perform the lbllowing procedures [] to [] to hook up your system using the supplied cords ond
accessories.
AM loop antenna
FM lead antenna
Rightspeaker Left speaker
[] Connect the speakers.
Connect II_eright 3nd left speaker cords to
the SPEAKERS terminals as shown below.
[] Connect the FM and AM antennas.
Set up the AM loop antenna, then connect
it.
Gray
nseri tnts
portion
AM lOOP antenna
[
Extend theFM leadantenna horizontally
4GB
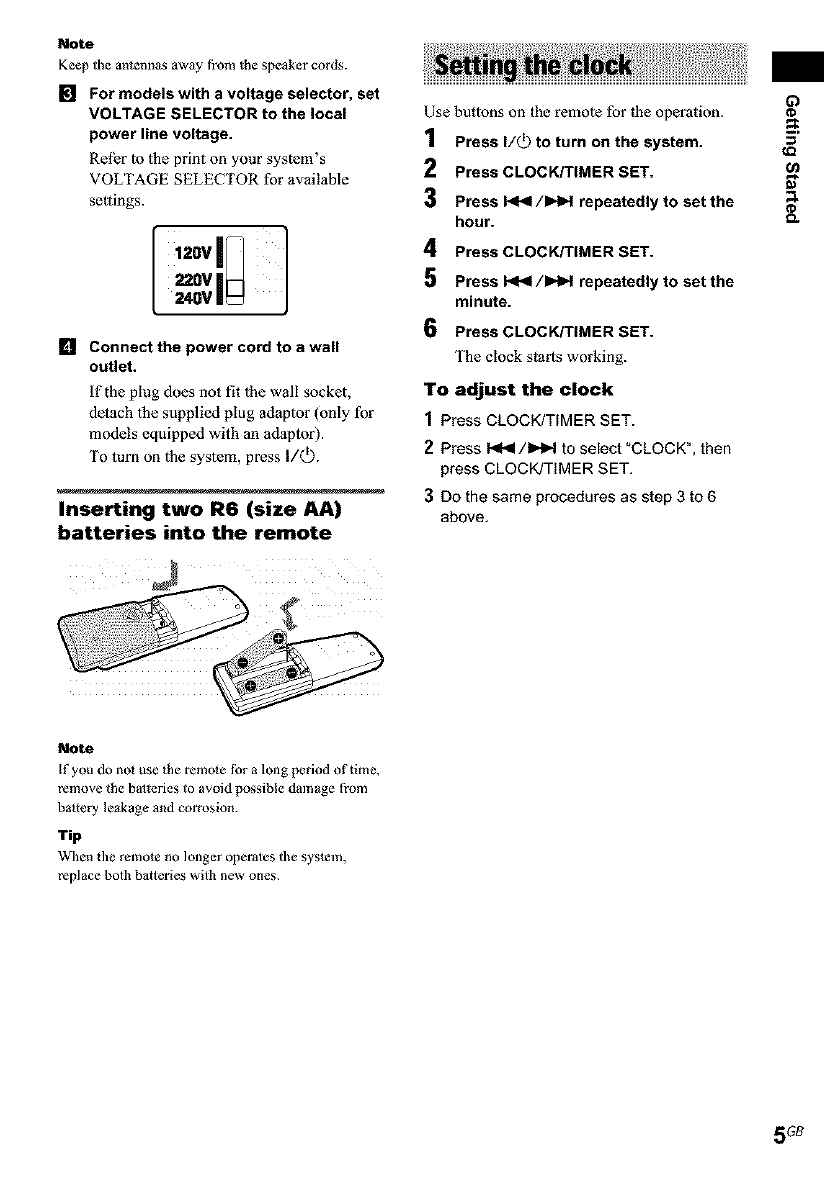
Note
Keep the antennas away from the speaker cords.
mFor models with a voltage selector, set
VOLTAGE SELECTOR to the local
power line voltage.
Rel_r |o |he print on your system's
VOLTAGE SELECTOR for av3ilable
settings.
[,,gv[i
z2ovIH
240V |
Lq Connect the power cord to a wall
outlet.
if the plug does not fit |he wall socket,
detach lhe supplied plug adap|or (only for
models equipped with an adaptor).
To turn on |he system, press I/Q).
Inserting two R6 (size AA)
batteries into the remote
Use but|ons on the remo|e for |he opcration.
1Press I/_ to turn on the system.
2Press CLOCK/TIMER SET.
3 Press _/)HH repeatedly to set the
hour.
4 Press CLOCK/TIMER SET.
5 Press _/)HH repeatedly to set the
minute.
6 Press CLOCK/TIMER SET.
['he clock starts working.
To adjust the clock
1Press CLOCK/TIMER SET.
2 Press I._4/1_=,.I to select "CLOCK", then
press CLOCK/TIMER SET.
3Do the same procedures as step 3 to 6
above.
63
_o
o.
Note
If you do nol use _he remole for a long period of time,
remove the batteries to avoid possible damage from
battery leakage and corrosion.
Tip
When the remote no longer operates the syslem,
replace both balteries with new ones.
5GB
Use buttons on the unit lbr the operation.
1Press -_.
2Place adisc with the label side up on
the disc tray.
When you play
an 8 cm disc,
place it on the
inner circle of
the tray.
3 Press -- again to close the disc tray.
Notes
• Do not use a disc wit]l tape, seals or paste on R as t]ds
may cause malthnction.
• Do not forcibly press the disc tray closed witl/your
finger, as this may cause malfunction.
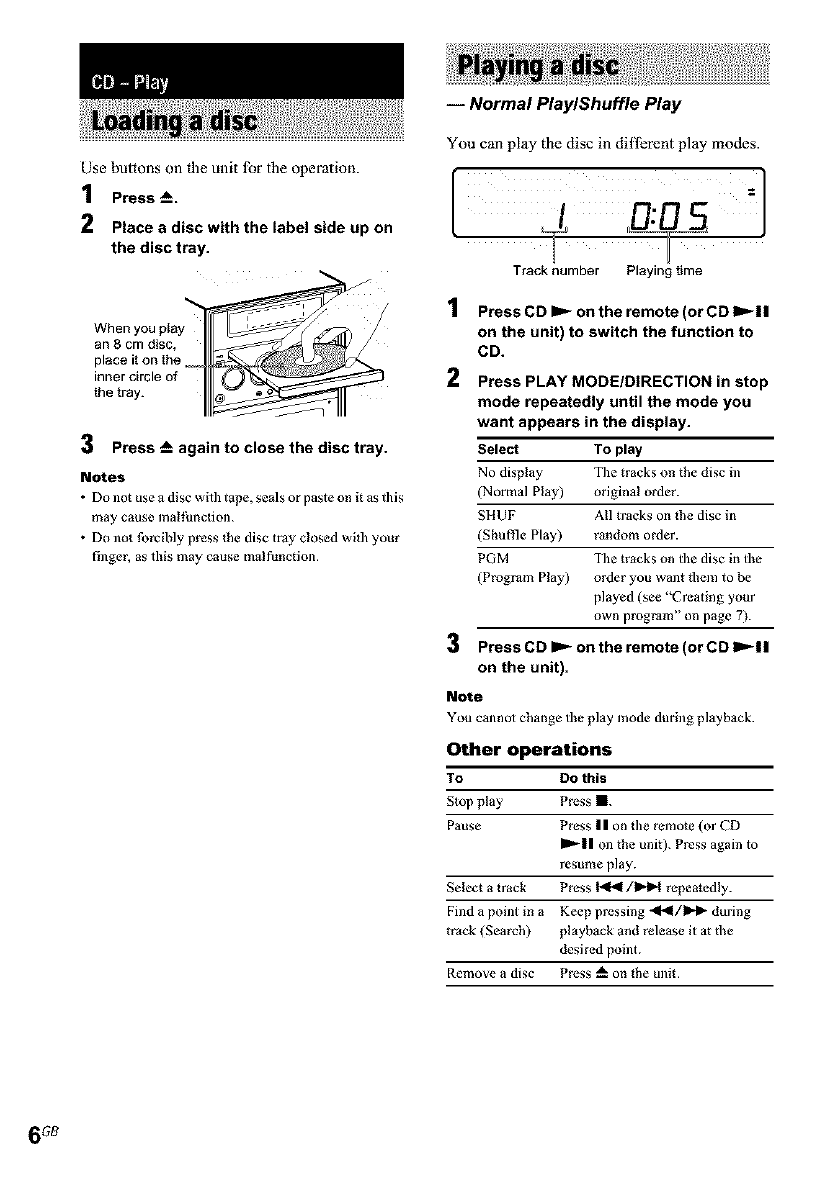
iNormal PlaylShuffle Play
You can play the disc in difl_rent play modes.
ITrack number Playing time
1
2
Press CD _on the remote (or CD ),-II
on the unit) to switch the function to
CD.
Press PLAY MODE/DIRECTION in stop
mode repeatedly until the mode you
want appears in the display.
Select To play
No display The tracks on the disc in
(Normal Play) original order.
SIIUF All tracks on the disc in
(Shuffle Play) random order.
PGM The tracks on the disc in the
(Program Play) order you want fl_em to be
played (see "Creating your
own program" on page 7).
3 Press CD _ on the remote (or CD ID'_II
on the unit).
Note
You cannot change tile play mode during playback.
Other operations
To DO this
Stop play Press I.
Pause Press II on the remote (or CD
_11 on the unit). Press again to
resume play.
Select a track Press _/_ repeatedly.
Find a point in a Keep pressing .ql_l/l_l_ during
track (Search) playback and release it at d_e
desired point.
Remove a disc Press _" on the unit.
6GB
-- Repeat Play
You can play all the tracks or a single crack on a
disc.
Press REPEAT/FM MODE on the remote
during playback until "REPEAT" or
"REPEAT 1" appears.
REPEAT: For all the tracks oll the disc up to five
times.
REPEAT 1: For a single track only.
To cancel Repeat Play
Press REPEAT/FM MODE on the remote
repeatedly until both "REPEAT" and "REPEAT
1" disappear.
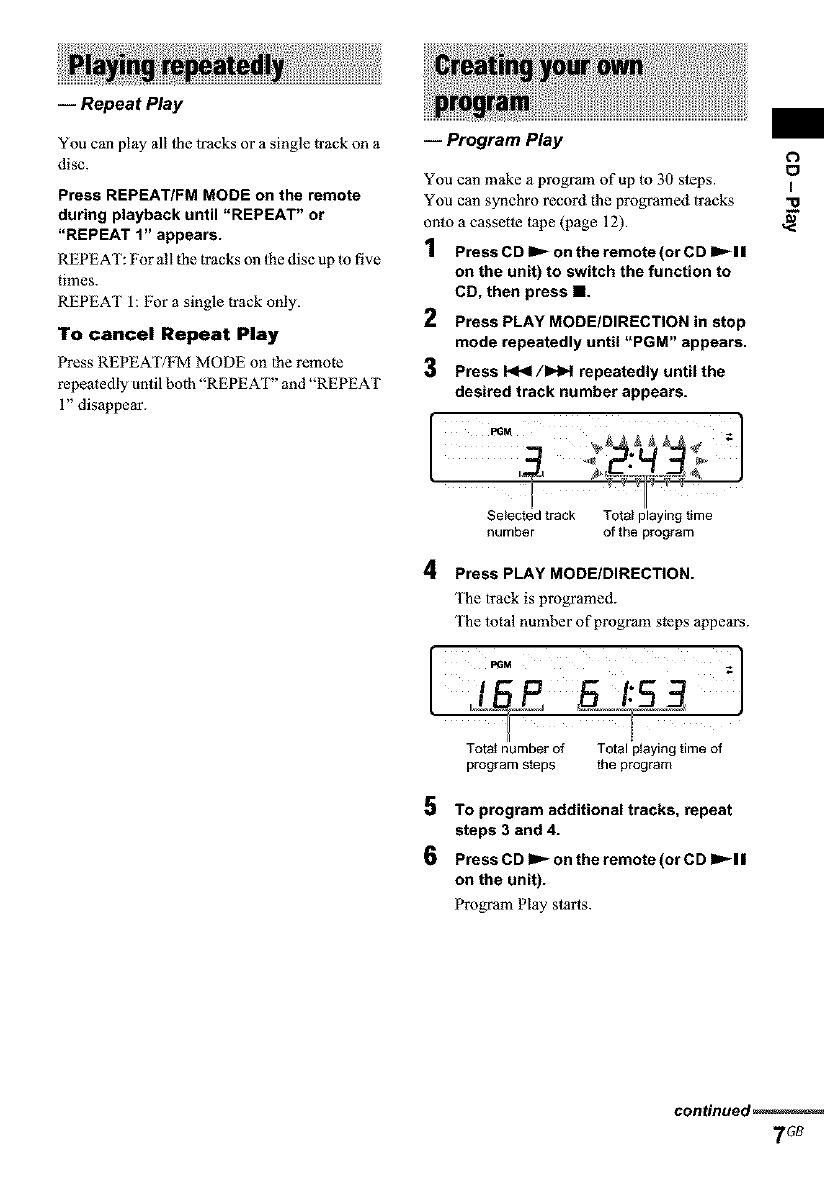
-- Program Play
You can make a program of up to 30 steps.
You can synchro record the programed tracks
onto a cassette tape (page 12).
1Press CD IP_ on the remote (or CD IP_I I
on the unit) to switch the function to
CD, then press I1.
2 Press PLAY MODE/DIRECTION in stop
mode repeatedly until "PGM" appears.
3 Press I<1<1/IHH repeatedly until the
desired track number appears.
Selected track Total playing time
number of the program
4Press PLAY MODE/DIRECTION.
The track is programed.
The total number of program steps appears.
H J
Total number of Total playingtimeof
program steps the program
5 TO program additionaltracks, repeat
steps 3 and 4.
6 Press CD IP_ on the remote (or CD IP_I I
on the unit).
Program Play starts.
o
o
I
-o
continued
7G8
8_
Other operations
TO DO this
Cancel Program Press PLAY MODE/
Play DIRECTION in stop mode
repeatedly until bod_ "PGM" and
"SHUF" disappear.
Add a track to the Perform s_eps I 4 in stop mode.
end of the program
Erase the program Press CLEAR on the remote in
s_op mode. Each time you press
the button, a track is cleared from
the end of the program.
Tip
The program you made remains after Program Play
finishes. To pl_y the same program again, press CD
on the remote (or CD Im'_l I on _he unit). However,
the program is cleared when you open the disc tray.
You can preset up to 32 stations for FM and AM.
You can then tune in any of those stations
simply by selecting the corresponding preset
number.
Use buimns on the unit lbr the operation.
Automatic tuning preset
You can aulomatically tune in all ofihe stations
tbot can be received in your area and then store
the radio fi'equency of the desired stations.
1Press TUNER/BAND repeatedly to
select FM or AM.
2Press PLAY MODE/TUNING MODE
repeatedly until "AUTO" and the
frequency appear in the display.
Press and hold TUNING +/- until the
frequency indication starts to change,
then release it.
Scanning slops automatically when a
station is tuned in. At ihat time, "TUNED"
and "STEREO" (lbr stereo program only)
appear.
If "TUNED" does not appear and the
scanning does not stop
Set the fi'equency of the desired radio
station as described in steps 2 through 5 of
"Manval tuning preset" (page 9).
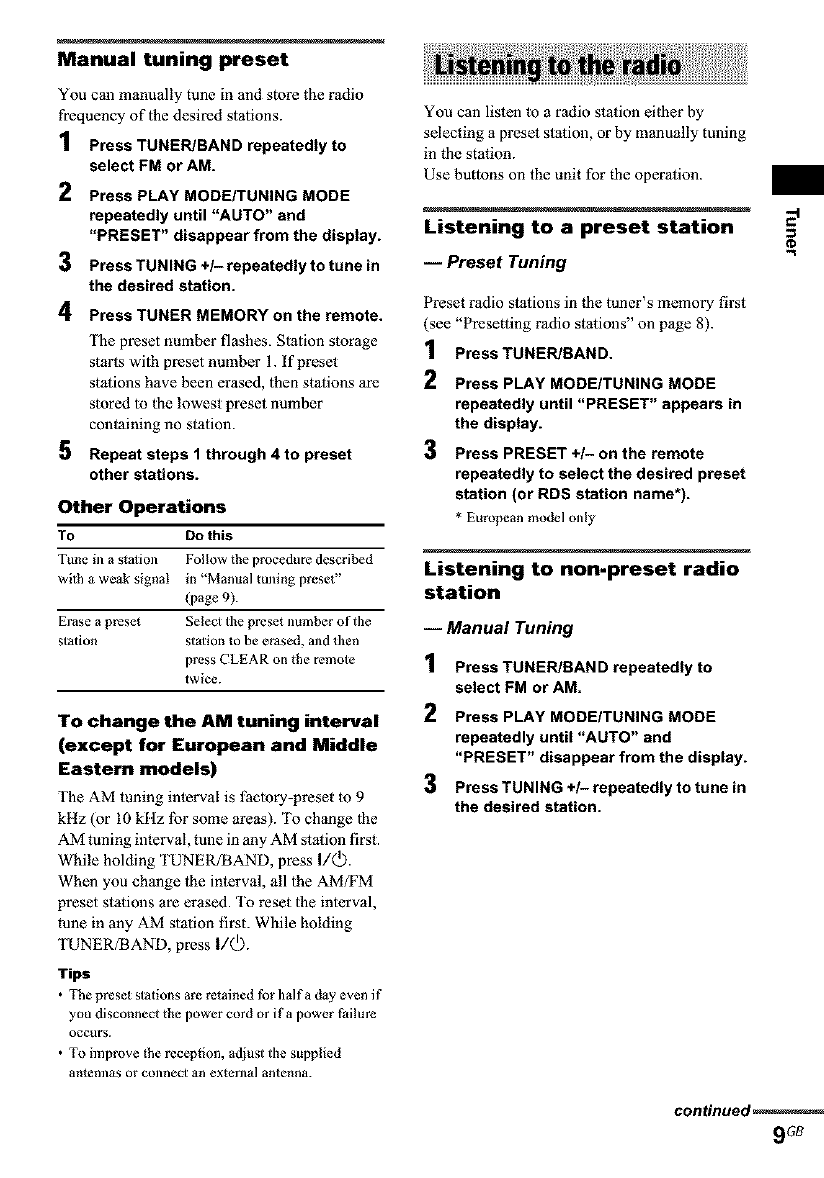
4Press TUNER MEMORY on the remote.
The preset number flashes. Station storage
starts wilh preset number i. If preset
stations have been erased, then stations are
slored lo the lowest preset number
containing no station.
°° ,ia0 -'1
[
H
Preset number Frecluency
Repeat steps 1 through 4 to preset
other stations.
Manual tuning preset
You can manually tune in and store the radio
frequency of the desired stations.
1Press TUNER/BAND repeatedly to
select FM or AM.
2 Press PLAY MODE/TUNING MODE
repeatedly until "AUTO" and
"PRESET" disappear from the display.
3 Press TUNING +/- repeatedly to tune in
the desired station.
4Press TUNER MEMORY on the remote.
The preset number flashes. Station storage
staris with preset number 1. If preset
stations have been erased, then stations are
stored to the lowest preset number
containing no station.
5 Repeat steps 1 through 4 to preset
other stations.
Other Operations
TO Do this
Tune in a s_a_ion Follow the procedure described
wi_ha weak signal in "Manual tuning preset"
(page%
Erase a preset Seleo the preset number of the
station stalion to be erased, and then
press CLEAR on the remote
twice.
To change the AM tuning interval
(except for European and Middle
Eastern models)
The AM tuning interval is faoory-preset to 9
kHz (or 10 kltz lbr some areas). To change 1he
AM tuning interval, tune in any AM station first.
While holding TUNERfBAND, press I/Q).
When you change the interval, all 1he AM;FM
preset stations are erased. To reset the interval,
rune in any AM station first. While holding
TUNER;BAND, press I/Q).
Tips
•The preset stations are retained for halfa day even if
you disconnect the power cord or if a power Pailure
occtlrS.
• TOimprove the reception, adjust the supplied
antellnas or connect an exlerna] antenna.
You can listen to a radio station eifl_er by
selecting a preset station, or by manually tuning
in the station.
Use butlons on the unit for the operation.
Listening to a preset station ::"
iPreset Tuning
Preset radio stations in fl_e taner's memory first
(see "Presetting radio stations" on page 8).
1Press TUNER/BAND.
2Press PLAY MODE/TUNING MODE
repeatedly until "PRESET" appears in
the display.
3 Press PRESET +/- on the remote
repeatedly to select the desired preset
station (or RDS station name*).
* European model only
Listening to non-preset radio
station
iManual Tuning
1PressTUNER/BAND repeatedly to
select FM or AM.
2Press PLAY MODE/TUNING MODE
repeatedly until "AUTO" and
"PRESET" disappear from the display.
3 Press TUNING +/- repeatedly to tune in
the desired station.
continued
9Gt_
Tips
•TO improve broadcast receplion, adjus_ Ike supplied
antennas, or connect a commercially available
externa] antenna.
• When an FM stereo program has s_afic noise, press
REPEAT/FM MODE on the remole until "MONO"
appears. There will be no s_ereo effeO, but the
reception will improve.
• in step 2, press PLAY MODE/TUNING MODE
repeatedly until "AUTO" and the frequency appear
in the display, then press and hold TUNING /until
the frequency indication slarts to change. Straining
stops when the system tunes ill a station (Aulomadc
Tuning).
• TO record the radio programs, use manual recording
(page 12).
• You cml change the display into tile clock display
(for the six seconds) by pressing DISPLAY.
(European model only)
What is the Radio Data
System?
Radio Data System (RDS) is a broadcasting
service that allows radio stations to send
additional infonnaiion along wilh the regulor
program signal. RDS is available only on FM
stations.*
Note
RDS may nol work properly if the station you are tuned
in is nol trmlsmirdng the RDS signal properly or if the
signal is weak.
* Not all FM s_ations provide RDS service, nor do they
provide _lle same types of services. ]f you are not
Pamiliar with the RDS systam, check with your local
radio st_rlons for details on RDS services in your
area.
Receiving RDS broadcasts
Simply select a station from the FM band.
When you rune in a station that provides RDS
services, lhe station name appears in lhe display.
To check the RDS information
Each time you press DISPLAY, the display
changes cyclically as lbllows:
Station name* --_ Frequency _ Clock display
* If the RDS broadcast is not properly received, the
station name may not appear in the display.
10
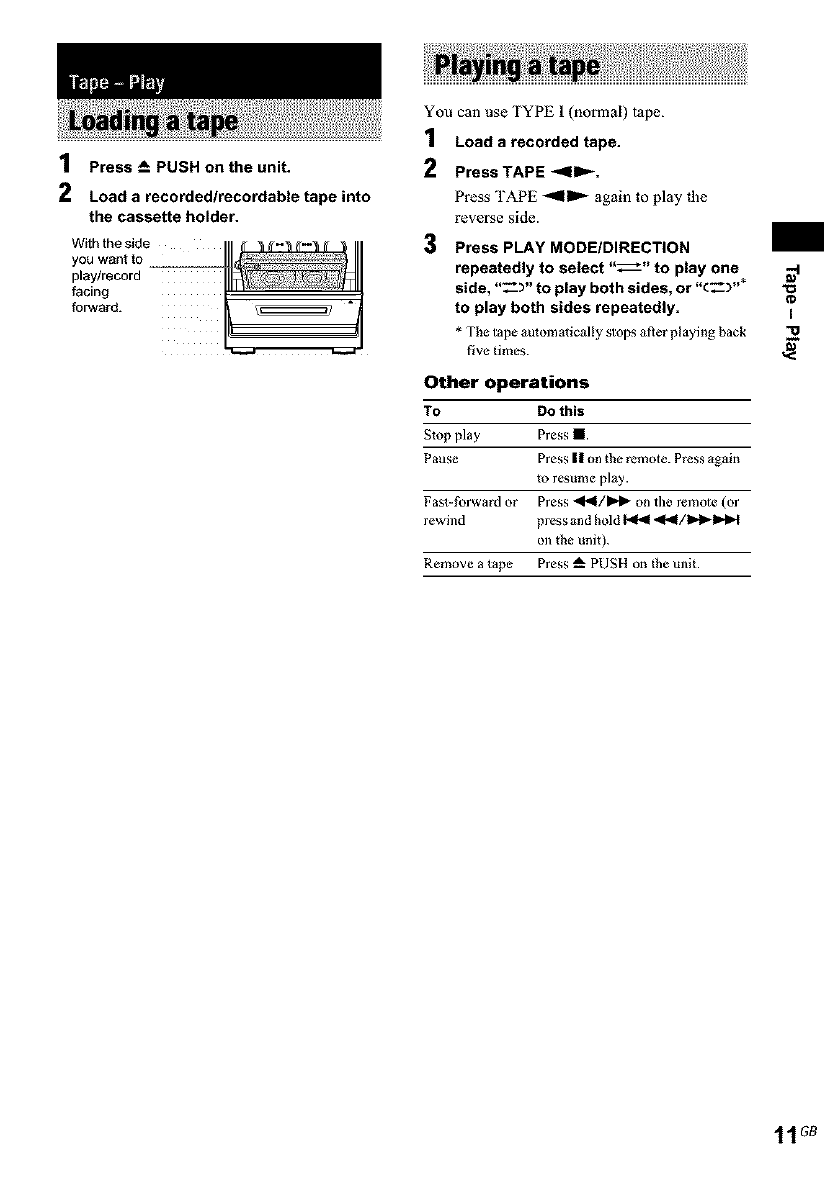
1Press A, PUSH on the unit.
2Load a recorded/recordable tapeinto
the cassette holder.
With the side
you want to
play/record
facing
forward.
You can use TYPE 1 (normal) tape.
1Load a recorded tape.
2PressTAPE <11_.
Press TAPE -'<ll=,'- again to play _he
reverse side.
3 Press PLAY MODE/DIRECTION
repeatedly to select "_" to play one
side, "_- )" to play both sides, or "c___"*
to play both sides repeatedly.
* The tape automatically stops after playthg back
five times.
Other operations
To DO this
Stop play Press II.
Pause Press | | on the remote. Press ogain
to resume play.
Fa_-forward or Press 41_1/ID,I_ on the remote (or
rewind press and hold _ <I_I/I_!_I_H
on the unit).
Remove a tape Press _" PUSH on the unit.
I
11 GB
i
CD Synchro Recording
You can record a whole CD on a tape.
You can use TYPE i (normal) tape.
1Load a recordable tape.
2 Load a CD you want to record.
3 Press CD SYNC on the unit.
The tape deck stands by tbr recording and
lhe CD player pauses for playback.
When you want to record on _he reverse
side, press 'rAPE -qnlD,-
4 Press PLAY MODE/DIRECTION
repeatedly to select "_" to record on
one side or "-_Y' to record on both
sides.
5Press REC PAUSE/START •on the
unit.
Recording starts.
When |he recording is completed, |he CD
player and the tape deck stop automalically.
To stop recording
Press I.
To record only your favorite CD
tracks
You can record only your favorite CD tracks
using Program Play. Between steps 2 and 3,
perform steps 1 to 5 of "Creating your own
program" (page 7).
Note
When you record on both sides, be sure to s_art from
the front side. If you start from the reverse side,
recording stops at the end of the reverse side.
iManual Recording
You can record just 1he portions you like li'om a
CD on a tape. You can also record a radio
program.
You can use TYPE i (normal) tape.
1Load a recordable tape.
2 Select the desired source to record.
•CD: To record from 1his system's CD
player.
• TUNER: To record from this system's
tuner.
• MD: To record from 1he optional
component connected 1o the MD IN
jacks.
3 Press REC PAUSE/START •on the
unit.
The tape deck stands by for recording.
When you want to record on _he reverse
side, press TAPE _,IIID,-
4 Press PLAY MODE/DIRECTION
repeatedly to select "_" to record on
one side or "-_Y' to record on both
sides.
5Press REC PAUSE/START •on the
unit, then start playing the desired
source to record.
Recording starts.
Other operations
To Do this
Stop recording Press I
Pause Press REC PAUSE/START • on the
recording unit.
Tip
For recording from a CD, you can press _/l_l to
select tracks during recording pause mode (after slep 3
and before step 5).
Note
When you record on bod_ sides, be sure to start from
the front side. If you start from the reverse side,
recording s_ops at the end of the reverse side.
12 _
You can adiust the bass and treble lo enjoy more
powerful sound.
Generating a more dynamic
sound (Dynamic Sound
Generator)
Press DSG.
To cancel ll_e DSG, press DSG 3gain.
Adjusting the bass and treble
Press BASS +/- on the remote repeatedly to
adjust the bass, or TREBLE +/- on the
remote repeatedly to adjust the treble.
ISleep Timer
You can set the system 1o turn offafter a certain
time, so thai you can fall asleep to music.
Use butlons on the remole for lhe operation.
Press SLEEP repeatedly.
Each time you press the button, the minule
display (the turn-offtime) changes cyclically as
follows:
AUTO* -_ 90MIN --* 80M1N --* ... --*
10MIN --* OFF
* The syslem aulomalically turns off in 1O0minutes or
al/er the current CD or tupe t]nishes playing.
Other operations
To Press
Check the SLEEP once.
remaining time**
Change the time SLEEP repeatedly to select the
to turn off time you want.
Cancel the Sleep SLEEP repealedly until "OFF"
Timer |hnction appears.
**You cannot cheek tile remaining time if you select
"AUTO".
Note
DO not set to "AUTO" during Synchro Recording on a
tape.
Tip
You can use the Sleep Timer, even if you have no_ set
file clock.
-I
§'
13G8
i
Daily Timer
You can wake up to music at a preset time. Make
sure you have set lhe clock (see "Setting lhe
clock" on page 5).
Use buttons on lhe remote for the operation.
1Prepare the sound source you want to
play.
• CD: Load a disc. To st3rt from a specific
track, make a program (see "Creating
your own program" on page 7).
• TAPE: Load a tape.
• TUNER: Tune in a radio station (see
"Listening to _l_e radio" on page 9).
Press CLOCK/TIMER SET.
2
3
4
5
6
Press _/I_IM repeatedly until
"PLAY" appears, then press CLOCK/
TIMER SET.
"ON TIME" appears m_d lhe hour
indicalion flashes.
Set the time to start playback.
Press I_/IHH repeaiedly m set |he hour,
|hen press CLOCK!TIMER SET.
The minute indication flashes.
Press _/IHH repeatedly to set 1he
minute, then press CLOCK/TIMER SET.
Set the time to stop playback following
the same procedure as step 4.
Press I<_/_ repeatedly depending
on the sound source you want to play.
Each time you press lhe button, lhe display
changes cyclically as follows:
CD -_ TAPE --_ TUNER
7 Adjust the volume.
8 Press CLOCK/TIMER SET.
9Press I/_) to turn off the system.
Other operations
To DO this
Change tile setting Start over from step I.
Activate the timer Press CLOCK/TIMER
SELECT repeatedly unlil
"PLAY" appears, then press
CLOCK/TIMER SET.
Cancel the timer Press CLOCK/TIMER
SELECT repeatedly unlil
"OFF" appears, then press
CLOCK/TIMER SET.
Notes
•If you use the Daily Timer and file Sleep Timer at the
same time, the Sleep Timer has priority.
• Do not opera+e the system from the time the system
turns on until the play stax4s (about 15 seconds before
the preset time).
• If the system is on about 15 seconds before the preset
time, the Daily Timer will not be activaled.
• You cannot use the oplional component connected to
MD IN jacks as sound sources for the Daily Timer.
14 G8
To timer record, you must first preset the radio
station (see "Presetting radio stations" on
page 8) and set the clock (see "Setting the clock"
on page 5).
Use buttons on the remote for the operation.
1Tune in the preset radio station (see
"Listening to a preset station" on
page 9).
2 Press CLOCK/TIMER SET.
3 Press P<<IglHH repeatedly until"REC"
appears, then press CLOCK/TIMER
SET.
"ON TIME" appears and the hour
indication flashes.
4Set the time to start recording.
Press _/IHH repeatedly to set _he hour,
then press CLOCKPl'IMER SET.
The minute indication flashes.
Press _/1_'1 repeatedly to set _he
minute, lhen press CLOCKfI'IMER SET.
5 Set the time to stop recording following
the same procedure as step 4.
The @ REC indicator lighis up.
6Adjust the volume* for listening to the
radio when it is activated by the timer.
* Tltis is not affect the recording volume: it only
adjusts tile volume for when tile radio turns on
at the preset time.
7 Load a recordable tape.
8 Press REC PAUSE/START •on the
unit.
9 Press TAPE _<1_, if you want to
switch the direction.
10 Press PLAY MODE/DIRECTION
repeatedly to select "_" to record on
one side or "_-_" to record on both
sides.
11Press I/_ to turn off the system.
Other operations
TO Do this
Change the setting Start over from step I.
Activate the timer Press CLOCKTflMER
SELECT repealedly until
"REC"_ppears, then press
CLOCK/TIMER SET.
Cancel the timer Press CLOCKFflMER
SELECT repeatedly until
"OFF" appears, then press
CLOCK/TIMER SET.
Notes
•You cannot aciiv_le the Daily Timer and recording
timer at the same time.
• If you use the recording timer and the Sleep Timer at
the same time, the Sleep Timer has priority.
• Do not operate the system from the time the system
turns oll until the recording star_ (about 15 seconds
be_re the preset time).
• If the system is on about 15 seconds before the p_set
time, the timer recording will not be activated.
• The volume is reduced to minimum during
recording.
• If the system is in the recording or _cording pause
mode at the preset time, the timer recording will not
be made.
• If the system is playing back a tape at the p_set time,
the system will switch to the timer, but the timer
recording will not be made.
-I
§'
15 G8
-- Power Saving Mode
The clock display can be turned off to minimize
the amount of power consumed during stm_dby
(Power Saving Mode).
Press DISPLAY.
TO cancel Power Saving Mode
Press DISPLAY.
Tips
•The I/(_) indicator lights up even in the Power
Saving Mode.
• Tile (imer continues to operate in Power Saving
Mode.
You can change the brightness of the display's
backlight.
1Press DISPLAy repeatedly until
"DIMMER X" appears.
2 Press _/_ repeatedly.
Each time you press the button, the
brightness changes cyclically as follows:
DIMMER 0 --* DIMMER 1 --* DIMMER
2
You can check the playing time and remaining
time of the current track or that of the disc.
Checking the remaining time
(CD)
Press DISPLAY repeatedly.
Each time you press the button, flae display
changes cyclically as lbllows:
During playback
Current track number and elapsed playing time
*1
of the track --_ Current track number and
.*2 • .
remaining tlme of he )rack _ Rema n ng
time of (he current disc --_ Clock display (for six
seconds)
• l,, ,, appears when the total playing time of the
program exceeds !00 minutes, when the progrmn
contains 31 tracks or more, or v,,h_n a disc with 3I
tracks or more is played in Shuffle Play mode.
•2,, ,, appears when a track is played whose
number is 31 or over.
In the stop mode
Total playing time _ Clock display (lbr six
seconds)
16 G8
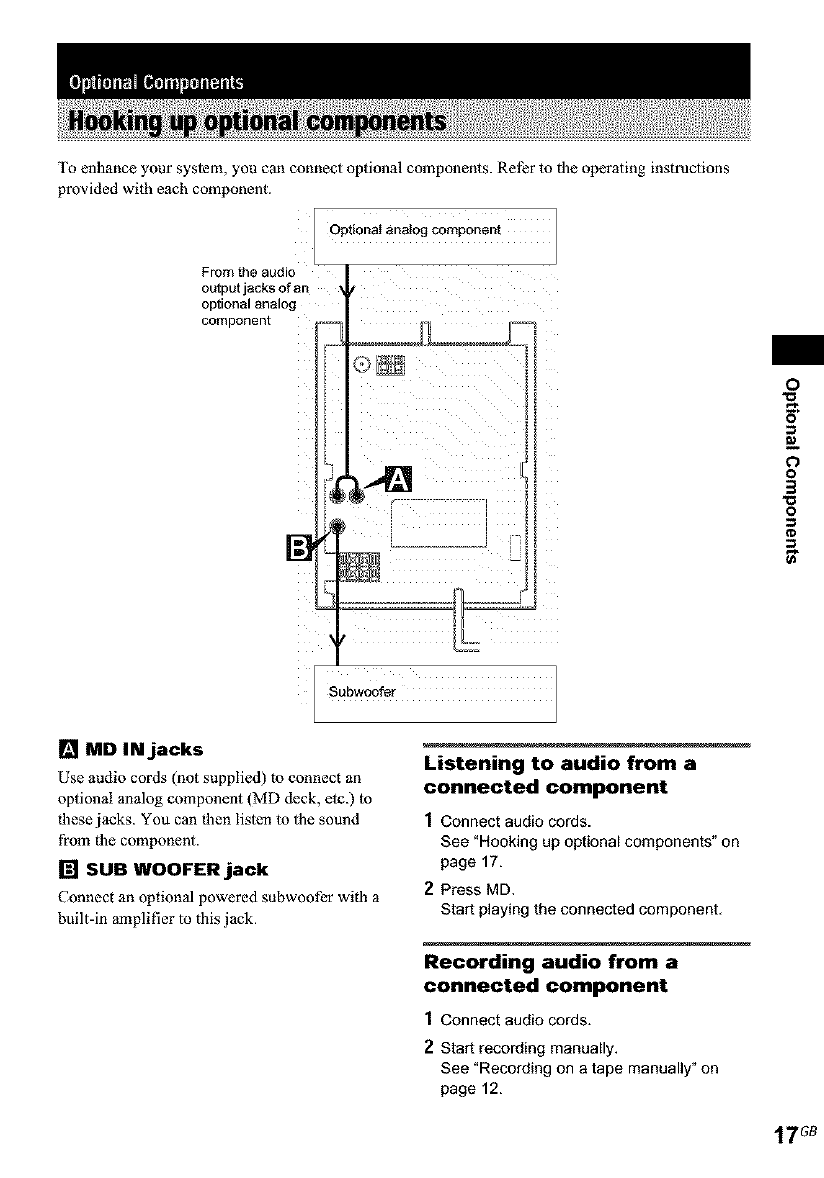
To enhance your system, you can connect optional components. Ret_r to the operating instructions
provided with each component.
Optional analog component
From the audio
output jacks of an
optional analog
component
0
m
0
o
3
o
[] MD IN jacks
Use audio cords (not supplied) to connect an
optional analog component (MD deck, etc.) to
these jacks. You can then listen to the sound
from the component.
[] SUB WOOFER jack
Connect an optional powered subwoofer with a
built-in amplifier to this jack.
Listening to audio from a
connected component
1Connect audio cords.
See "Hooking up optional components" on
page 17.
2Press MD.
Start playing the connected component,
Recording audio from a
connected component
1 Connect audio cords.
2 Start recording manually.
See "Recording on a tape manually" on
page 12.
17G8
Should you encounter a problem with your
system, de the following:
1Make sure the power cord and speaker
cords are correctly and firmly connected.
2Find your problem in the troubleshooting
checklist below and take the indicated
corrective action.
if the problem persists after doing all of the
above, consult your nearest Sony dealer.
When the I/_) indicator flashes
hnmediately unplug the power cord and check
the following items.
• Is the voltage selector set to the correct
voltage?
Check the voltage for your region, then make
sure the voltage selector is set correctly.
• Arethe+and speakercordsshort-circuited?
• Are you using only the prescribed speakers?
• Is anything blocking the ventilation holes on
the rear of the system?
After checking Ihe above items and fixing any
problems, connect the power cord again and turn
on the system. If the indicator still flashes, or if
the cause of the problem cannot be lbund even
after checking all the above items, consult your
nearest Sony dealer.
General
The display or button remains lighted or
flashes even after the system was turned off.
•Press DI SPLAY repeatedly until tile clock display
appears.
The clock indication does not show the
correct time.
• A power interruplion has occurred. Set the clock
(page 5) and timer settings (pages 14 and 15)
again.
The clock setting/radio presetting/timer is
canceled.
• The power cord is disconnected or a power Pailure
occurs longer than halfa day.
Redo the following:
"Setting die clock" (page 5)
"Preseefing radio stalions" (page 8)
If you have set the timer, also redo "Waking up to
music" (page 14) and "Timer recording radio
programs" (page 15).
There is no sound.
• Press VOL _ repeatedly.
•Make sure the headphones are nol connected.
• Insert only the slripped portion of the speaker cord
into the SPEAKERS terminal. Inserting the vinyl
portion of the speaker cord will obstruct the
speaker connections (page 4).
Sound comes from one channel, or
unbalanced left and right volume.
• Check tile speaker connection and speaker
placement.
Sound lacks bass.
• Check that the speaker's _ and lerminals are
connected correctly.
There is severe hum or noise.
• A TV or VCR is placed too close to the stereo
system. Meve the stereo system away from the TV
or VCR.
• Connect the system to a different wall outlet.
• Install a noise filter (commercially available) to
the power line.
The timer cannot tie set.
• Set the clock correctly (page 5).
The timer does not function.
• Set the timer correctly (pages 14 and 15).
• Cancel the Sleep Timer funOion (page 13).
• You cannel activate Ihe timer recording and Daily
Timer at the same time.
The remote does not function.
•Remove the obstacle.
•Move the remo_e closer to tile system.
•Point the remote at the system's sensor.
• Replace the balteries (Rd/size AA).
The color irregularity on a TV screen persists.
•Turn oft'the TV set once, then turn it on after 15
to 30 minu_es. If the color irregularity still
persists, place the speaker_ f_rther away from the
TV set
18 G8
CD player Tuner
The disc tray does not open and "LOCK"
appears in the display.
• Consult your neares_ Sony dealer or local
authorized Sony service Facility.
The disc tray does not close.
• Place the disc correctly ill the center of the tray.
• Always close the tray by pressthg _ on the unR.
Trying to press the tray ClosEd with your fingers
may cause problems with the player.
The disc does not eject.
• Consult your neares_ Sony dealer.
Play does not start,
• Open the disc tray and check whether a disc is
loaded.
• Wipe the disc clean (page 21 ).
• Replace the disc.
• Place the disc that this system can play.
• Place the disc correctly in the center of the tray.
• Place the disc in the tray wtib the label side up.
• Remove tile disc and wipe away the moisture on
the disc, then leave tile system mrnad on fur about
an hour until the moisture evaporates.
• Press CD _ on the remo_e (or CD I1=,-II on the
unit) to start play.
The sound skips.
• Wipe the disc clean (page 21 ).
• Replace the disc.
• Try moving the syslem to a place withoul
vibration (e.g., on top of a stable slmld).
• Try moving the speakers away from the system, or
placing them on separate stands. When you listen
to a track with bass sounds at high volume, the
speaker vibralion may cause the sound to skip.
Play does not start from the first track.
• Press PLAY MODE/DIRECT[ON repeatedly
until both "PGM" and "SltUF" disappear to
return to Normal Play.
Severe hum or noise/stations cannot be
received.
• Set the proper band and frequency (page 9).
• Connect the antenna properly (page 4).
• Find a place and an orientation that provide good
reception, then set up the mltenna again. If you
cannot obtain good recepti_l, we recommend you
connect a comme_ially available external
antenna.
• The supplied FM lead antenna receives signals
along its entire length, so make sure you extend it
fully.
• Locate the mltennas as _r away from the speaker
cords as possible.
• Consult your nearest Sony dealer if the supplied
AM antenna has come offthe plastic stand.
• Try turning off surrounding electrical equipment.
A stereo FM program cannot be received in
stereo.
• Press REPEAT/FM MODE on the remote until
"STEREO" appears in the display.
Tape deck
The tape does not record or play, or there is a
decrease in sound level.
• The heads are dirty. Clean them (page 21).
• The record/playback heads are magnefised.
Demagnetise them (page 22).
The tape does not erase completely.
• The record/playback heads are magnefised.
Demagnetise them (page 22).
There is excessive wow or flutter, or the sound
drops out.
• The capstans ill tile tape deck are dirty. Clean
them using a cleaning cassette (page 21).
Noise increases or the high frequencies are
erased.
• The record/playback heads are magnefised.
Demagnetise them (page 22).
The tape does not record.
• No cassette is loaded. Load a cassette.
• The tab has been removed from the cassetie.
Cover the broken tab with adhesive tape
(page 21 ).
• The tape has wound to the end.
w
m
:::r
o
o
continued
19G8
Optional components
There is no sound.
•Refer to General item "There is no sound."
(page 18) and check the condition of the system.
• Connect the component properly (page 17) while
checking:
- if the cords ate connected properly.
- if the cord plugs are firmly inserted all the way.
• TUlll on the connected component.
• Refer to the operating in_ructions supplied with
the connected component and start playing.
•Press MD (page 17).
The sound is distorted.
• Set the volume of the connected component
lower.
If the system still does not
operate properly after performing
the above measures, reset the
system as follows:
1Turn offthe system.
2 While pressing and holding II, turn on the
system.
The system is reset 1o the factory settings. You
should set the settings you made, such as the
preset stations, clock, and timer.
One of the following messages may appear or
flash in the display during oper3fion.
CD
NO DISC
There is no disc in tile player.
PGM FULL
You tried to program 31 tracks or more.
PROTECT
Consult your nearest Sony dealer.
On operating voltage
Before operating tile system, check that tile operaling
voltage of your system is identical with the voltage of
your local power supply.
On safety
• The unit is not disconnected from the AC power
source (mains) as long as it is connected to the wall
ourleL even if the unit itself has been turned off2
• Unplug the system from the wall outlet (mains) if it
is not to be used for an extended period of time. To
disconnect the power cord (mains lead), pull it out by
the plug. Never pull the cord itsel£
• Should any solid object or liquid Pall into the system,
unplug the system and have it checked by qualified
personnel be|bre operating it any further.
• AC power cord must be changed only al the qualified
service shop.
On placement
• Do not place the system in an inclined position.
• Do not place the system in locations where it is;
Extremely hot or cold
Dusty or dirty
Very humid
Subject m vibrations
Subject to direct sunlight.
• Use caution when placing 01e unit or speakers on
surl_aces thai have been specially treated (wi¢h wax,
oil, polish, etc.) as staining or discolorarion of the
surl_ace may result.
On heat buildup
• Although tile system heats up during operalion, this
is not a mal|_nction.
• Place the system in a location with adequate
ventilation to prevent heal build-up in the system.
• If you continuously use this system at a high volume,
the cannel temperature of the top, side and bottom
rises considerably. To avoid burning yourself, do not
touch the cabinet.
• To prevent a mal|hncfion, do not cover the
ventilation hole.
20

In case color irregularity is observed
on nearby a TV screen
With the magnetlca[ly shielded type of speaker system,
tile speakers can be installed near a TV set. However,
color irregularity may still be observed on the TV
screen depending on the type of your TV sei.
If color irregularity is observed...
Tmza off 1he TV sel once, then turn it on after 15 to 30
minu_es
If color irregularity is observed
again...
Place tile speakers Partiler away from tile TV sel.
On operation
•Iflhe system is brought directly from a cold to a
warm location, or is placed in a very damp morn,
moisture may condense on the lens inside lbe CD
player. Should this occur, the system will nol operale
properly. Remove the disc and leave tile system
turned on for about an hour until the moisture
evaporates.
• When you move the system, take out any disc.
[f you have any questions or problems concerning your
system, please consult your nearest Sony dealer.
Notes on discs
• Be|)ore playing, clean the disc with a cleaning cloth.
Wipe tile disc from tile center out.
•Do noi use solvents such as benzene, tllinner,
commercially available cleaners or anti-slafic spray
intended for vinyl LPs.
• Do not expose the disc to direct sunlight or beat
sources such as hoi air ducts, nor leave it in a car
parked in direct sunlight.
•Do not use discs encircled with a protaction ring.
This may cause a malfunction to tile system.
• When using discs that have glue or similar tacky
subs_mlce on tile label side of the disc or that used a
special ink when the label was printed, tl/ere is a
chance that lbe disc or label may become attached to
parN inside this unit. When this occurs, it may no_ be
possible to remove _he disc, and may also cause ibis
unit to mafthnction. Be sure to check that the label
side of the disc is not sticky before using.
The following types of disc should not be used:
Rental or used discs wilh a_tached seals where the
glue extends beyond tile seal. The perimeier of tile
seal on tile disc is tacky.
Discs that have labels printed using a special ink
that feels tacky Mien touched.
• Discs with non-slandard shapes (e.g., heart, square,
slar) cannot be played on ibis unit. Aliempbng to do
so may damage the unit. Do noi use such discs.
Note on CD-R/CD-RW playback
Discs recorded on CD-R!CD-RW drives may not be
played back because of scratches, dirt, recording
condition or the drive's characteristics. Besides, tile
discs, wldch are not yei finalized _t the end of
recording, cannot be played back.
Music discs encoded with copyright
protection technologies
This product is designed to playback discs _hat
contbrm to the Compact Disc (CD) standard. Recently;
various music discs encoded with copyright protaction
technologies are marketed by some record companies.
Please be aware that among those discs, there are some
tllat do noi contprm to the CD standard and may no_ be
playable by this product.
Cleaning the cabinet
Clean the caNneL panel and controls with a soft cloth
slightly mN stened wilh mild detergent solution. Do not
use any type of abrasive pad, scouring powder or
solvent such as thinner, benzene or alcohol
To save a tape permanently
To prevent a tape from being accidentally recorded _.
over, break offthe cassette tab from side A or B as _.
illustrated,
O
If you la_er want to reuse file tape for recording, cover
the broken tab with adhesive tupe.
Before placing a cassette in the tape
deck
Take up any slack in the tape. Otherwise, the tape may
ge_ entangled ill the parts of the tape deck and become
damaged.
When using a tape longer than 90
minutes
The t_pe is very elastic. Do no_ change _he t_pe
operations such as play, stop, and Past-winding
tYequenfty. The tape may get entangled in the tape
deck.
Cleaning the tape heads
Clean lhe tape heads after every 10 hours of use.
Be sure to clean the tape heads before you start m/
important recording or alter playing an old tape.
Use a separately sold dry-type or wet-type cleaning
cassette. For details, refer to lhe instructions of the
cleaning cassette.
continued
21 G8
DemagneUsing the tape heads
Demagnetise the tape ]leads and lhe metM parts that
have contact with the tape after every 20 to 30 hours of
use with a separately sold dem_gnetising cassette. For
delails, refer to tile instructions of the dem_gnetising
cassette.
Main unit
Amplifier section
AUDIO POWER SPECIFICATIONS:
(U.S.A. model only)
POWER OUTPUT AND TOTAL HARMON]C
DISTORTION:
Wiih 6-ohm loads, both channels driven, from 120 -
I 0,000 Hz; r_led 35 w_lts per channel minimum RMS
power, with no more than 10% total hm_nonic
distortion from 250 milliwatts to rated output.
North Amedcan model:
Continuous RMS power output (reference):
35+35W
(6 ohms at 1 kHz, 10%
THD)
European model:
DIN power output (r_led): 30 + 30 W
(6 ohms al 1 kHz, DIN)
Continuous RMS power output (reference):
30 _ 30 W
(6 ohms at 1 kHz, 10%
THD)
Music power output (reflerence):
60 _- 60 W
Other models:
The tbllowing measured at AC 230 V or AC 120 V, 50/
60 Hz
DIN power output (r_led): 30 + 30 W
(6 ohms al 1 kHz, DIN)
Continuous RMS power oulput (reference):
30 _ 30 W
(6 ohms at 1 k!lz, 10%
THD)
Inputs
MD IN (phono jacks):
Sensitivity 500 mY,
impedance 47 kilohms
Outputs
Pl tONES (s_ereo minijack):
Aecepls headphones with
an impedance of 8 ohms or
illore
SPEAKERS: Accepts impedunce of 6 to
16 ohms.
22G8
CD player section
System
Laser
Frequency response
Compac_ disc and digital
audio system
Semiconductor laser
(_780 nm)
Emission duration:
Continuous
2 ltz 2(1 kHz (:_O.5 dB)
Tape deck section
Recording system
Frequency response
Wow and fluter
4-track 2-chmmel slereo
50 13,000 Hz(:_3 dB),
using Sony TYPE 1
cassettes
:_0.15% W. Peak (IEC)
0.1% W. RMS (NAB)
:_0.2% W. Peak (DIN)
Tuner section
FM stereo, FM/AM superheterodyne tuner
FM tuner section
Tuning range 87.5 108.0 MHz (50-k!lz
s)ep)
Antenna FM lead antenna
Antenna terminals 75 ohms balanced
[ntermediale frequency 10.7 MHz
AM tuner section
Tuning range
Pan-American model: 530 1,710 k!tz
(with file tuning interval
set a_ !0 kHz)
531 1,710 kHz
(with tbe tuning interval
set a_ 9 kltz)
European modeh 531 1,602 k!lz
(with tl_e tuning interval
set al 9 kltz)
Other models: 530 1,710 k!tz
(with tl_e tuning interval
set al !0 kHz)
531 1,602 kHz
(with tbe tuning interval
set al 9 kltz)
Antenna AM loop antenna, external
antenna terminal
Intermediale |¥equency 450 kHz
Speaker
Speaker system
Speaker units
WooPcr:
Tweeler:
Nominal impedance
Dimensions (w/h!d)
Mass
2 way, bass-reflex type
10 cm din., cone type
2 cm din., dome type
6 olnns
Approx. 155 × 25(1 x 200
mm
Approx. 2.1 kg nel per
speaker
General
Power requirements
North American model:
European modeh
Koreml model:
Australian model:
ltong Kong model:
Taiwanese model:
gingaporean model:
O,her models:
Power consulnption
North American model:
European model:
Koreml model:
Other models:
Dimensions (w/h!d)
Mass
Supplied accessories
120 V AC, 60 Hz
230 V AC, 50/60 Hz
220 V AC, 60 Hz
230 - 240 V AC, 50/60 llz
220 240 V AC, 50/60 ltz
110 120 V AC, 50/60 Hz
220 _ 240 V AC, 50/60 Hz
110 120Vor220 240V
AC, 50/60 Hz
Adjustable with voltage
selector
60 watts
60 watts
0.3 wa*ts (in tile standby
mode)
60 watts
60 watts
Approx. 190 × 250 x 270
mm
Approx. 4.6 kg
Remote (1)
R6 (size AA) batteries (2)
AM loop an*enna (1)
FM lead antenna (1)
Design and speeificalions are subject to change
wilhou_ notice.
O
O
23G8
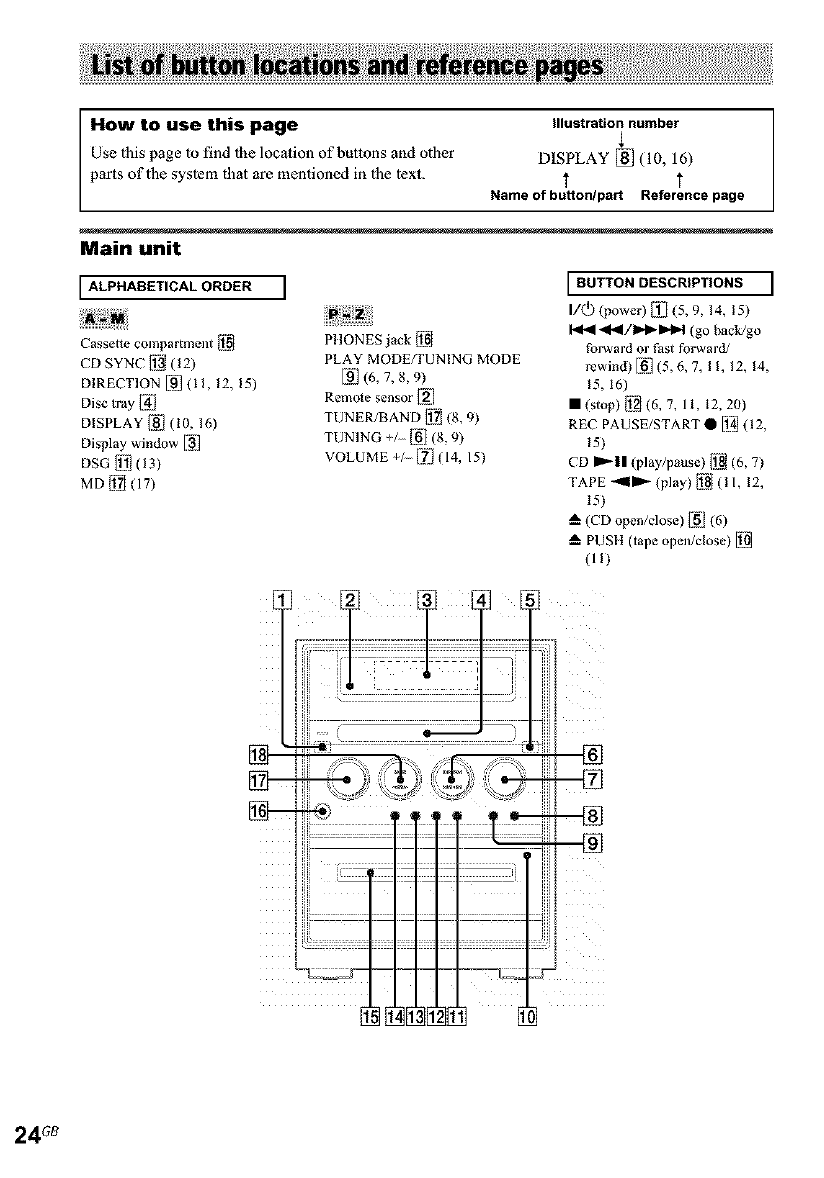
How to use this page Illustration number
Use this page to find 1he location of buttons and other DISPLAY [] (10, 16)
parts oflhe syslem that are mentioned in the 1ext. T
Name of button/part Reference page
Main unit
ALPHABETICAL ORDER ]
Cassette compartment [J_l
CD SYNC []_ (12)
DIRECTION E_'I (11, 12, 15)
Disc tray I_/
DISPLAY Ii_/(10, 16)
Display winduw [_i]
DSG_j (13)
MD [jl]j (17)
PIIONES Jack [_l
PLAY MODE/TUNING MODE
_] (6, 7, 8, 9)
Remo_e sensor [HI
TUNER/BAND I_ (8, 9)
TUNING + [_l (8, 9)
VOLUME + l_ (14, 15)
BUTTON DESCRIPTIONS ]
I/(_) (power) [_._iI(5, 9, 14, ! 5)
I_ 4I_/I_I_I_H (go back/go
fov_vard or Past forward/
rewind) K_I](5, 6, 7, II, 12, 14,
_5, 16)
• (stop) [j_] (6, 7, 11, 12, 20)
REC PAUSE/START • [i_ (12,
_5)
CD ml'-|l (play/pause) I_ (6, 7)
TAPE _mm'_ (play) [_l ( ! I, 12,
15)
(CD open/close) ]i_i/(6)
PUSH (tape open/close) [_
(U)
24G8
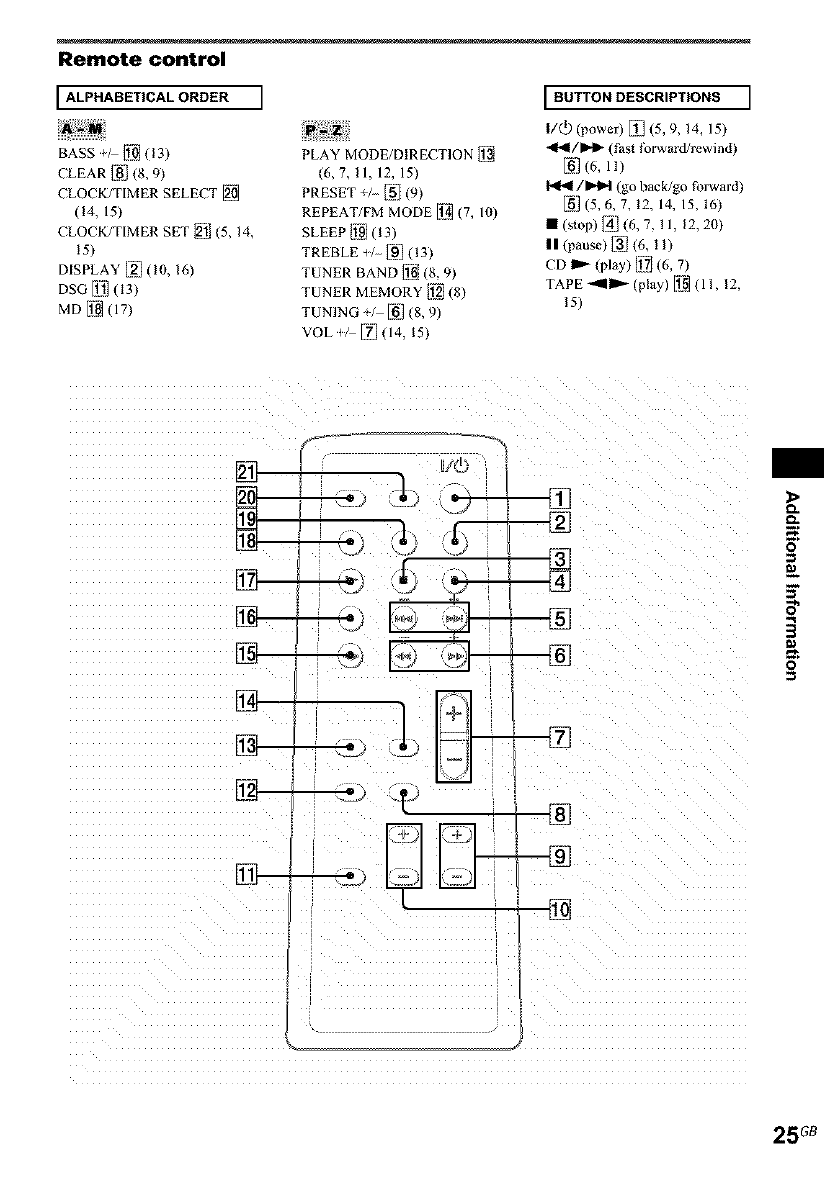
Remote control
I ALPHABETICAL ORDER I
BASS [Ji_ (!3)
CLEAR [_] (8, 9)
CLOCK/TIMER SELECT [_1_
(!4, 15)
CLOCK/TIMER SET [_J/(5, 14,
!5)
DISPLAY [_] (10, 16)
DSG L_Jl(13)
MD [i_(17)
PLAY MODE/DIRECTION []_
(6,7,11,12,15)
PRESET + [_] (9)
REPEAT/FM MODE [i2_(7, 10)
SLEEP IJ_91(13)
TREBLE _/_] (13)
TUNER BAND ]i_ (8, 9)
TUNER MEMORY IJ_I(8)
TUNING +, _] (8, 9)
VOL/-- [IT'](14, 15)
I BUTTON DESCRIPTIONS I
I/(_ (power) _i1 (5, 9, 14, 15)
_1_1 /mD,l_ (t_asl t_rward/rewind)
E_'](6, ll)
I,ql_l/l_l (go back/go forward)
_1 (5, 6, 7, 12, 14, IS, 16)
m (s_op) [_/(6, 7, I1, 12,20)
|| (pause) _] (6, I 1)
TAPE _IP '_ (pl_y) [i2_ (1 I, 12,
15)
i°
O
O
25G8

Sony Corporation Printed in China httpJ_Nw.sony,net]
