Sony DCR DVD408 User Manual DIGITAL CAMCORDER Manuals And Guides L0703085
SONY Digital Camcorder Manual L0703085 SONY Digital Camcorder Owner's Manual, SONY Digital Camcorder installation guides
User Manual: Sony DCR-DVD408 DCR-DVD408 SONY DIGITAL CAMCORDER - Manuals and Guides View the owners manual for your SONY DIGITAL CAMCORDER #DCRDVD408. Home:Electronics Parts:Sony Parts:Sony DIGITAL CAMCORDER Manual
Open the PDF directly: View PDF ![]() .
.
Page Count: 139 [warning: Documents this large are best viewed by clicking the View PDF Link!]
Addiliona] information on lhis product and answers
Io freguenlly asked guestions can be found at our
Customer Support Websile.
http://www.sony.net/
Printed on 70% or more recycled paper
using VOC (Volatile Organic Compound)
-free vegetable oil based ink.
Printed in Japan 2319640110
0
€
!
m
C
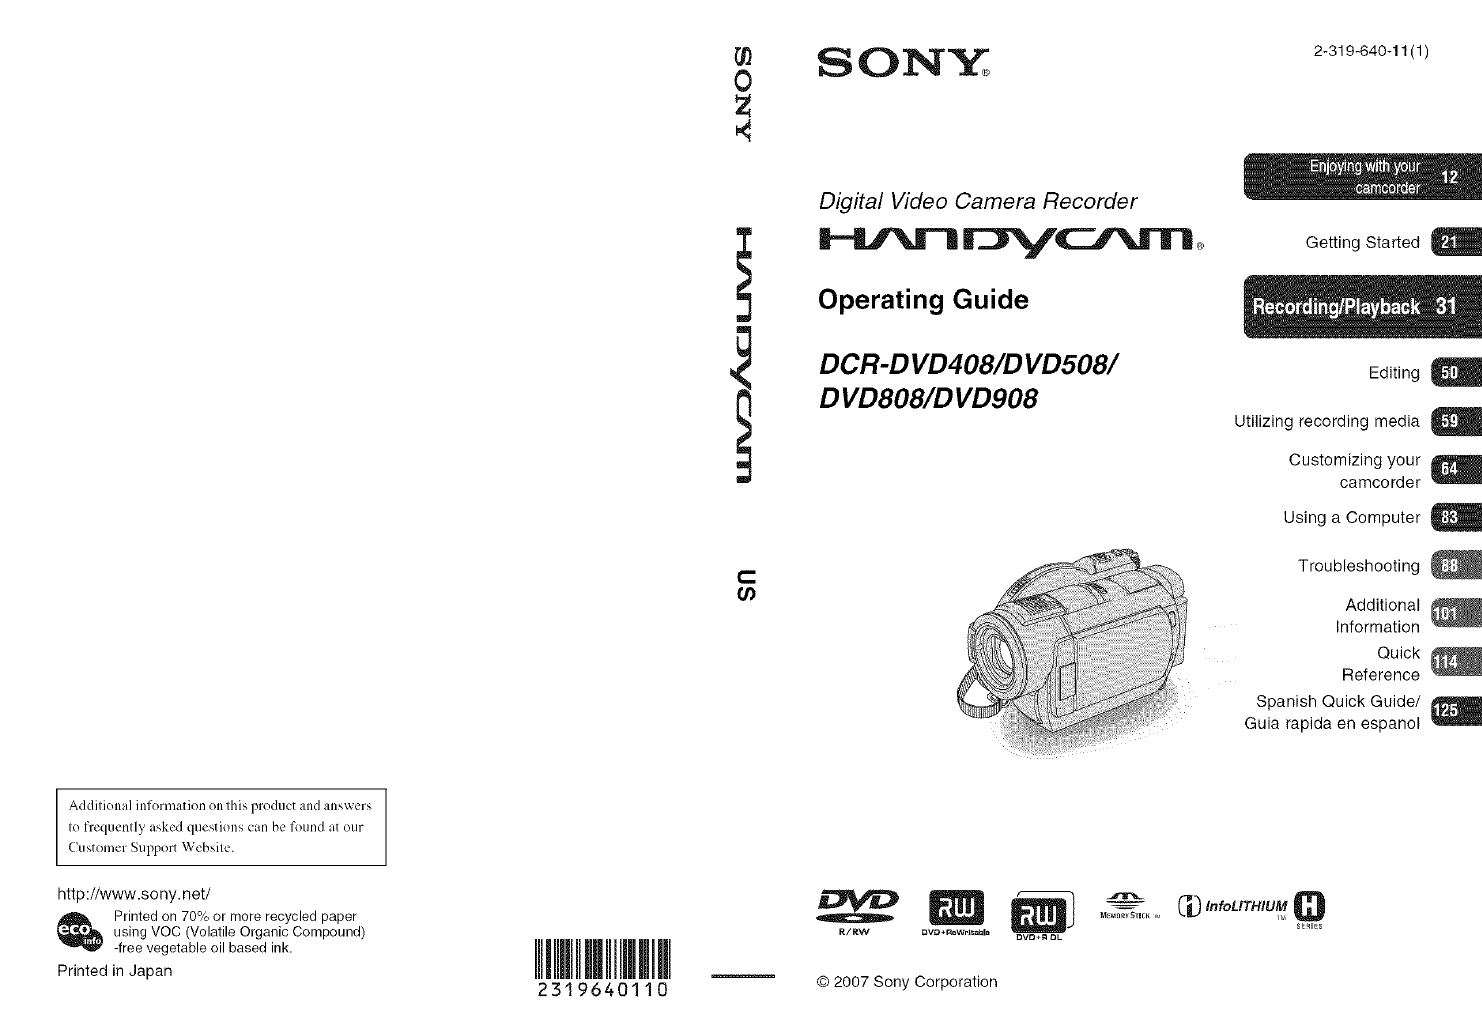
,SON'Y 2-319-640-11 (1)
Digital Video Camera Recorder
Operating Guide
DC R-D VD408/D VD508/
DVD808/D VD908
Getting Started
Editing
Utilizing recording media U
Customizing your U
camcorder
Using a Computer
Troubleshooting
Additional
Information
Quick
Reference
Spanish Quick Guide/
Guia rapida en espanol
_ _L_ InfoL/THIUM Q
M_IORYSTIEK,_,
R/RW DVD *ReWH_a_ie DVD+R DL
© 2007 Sony Corporation
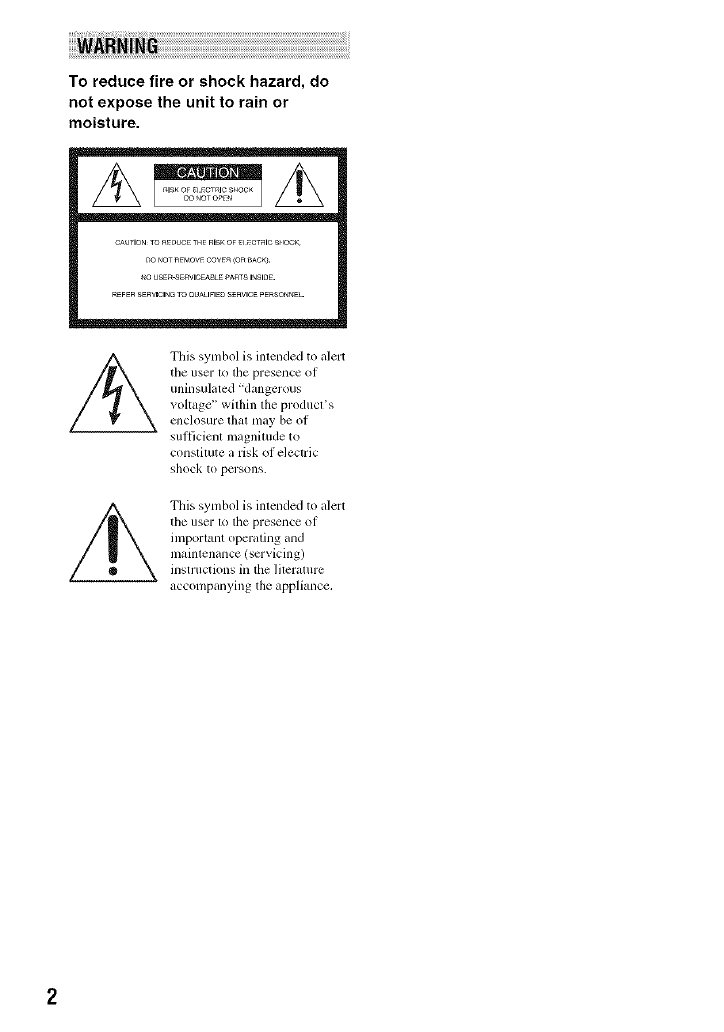
To reduce fire or shock hazard, do
not expose the unit to rain or
moisture.
CAUTIONTOa_UC_ THFRISKOF_ _CTalCS_IOCK
DO _OTR_MOVECOVER(OR_AC_.
_O USER-SERVICEaBLEPAaTSI_SlDE.
R_FERSERWCIN_TO aUA_IFIEDSERVICEPERSOnnEL
/_ This symbol is intended to alert
the user to the presence of
uninsuhlted "dangerous
v(_l_age _' within the produces
ellclosure [hal lllay be of
sufficient magnitude to
constitute a risk of electric
shock to persons.
This symbol is inlended to alert
the user 1_)tile presence: of
important operating and
maintenance (servicing)
insn uctions in the lileramre
accompanying the appliance,
IMPORTANTSAFEGUARDS
For your protection, please read these safety
instructions completely before operating
the appliance, attd keep this manual for
future reference.
Carelidly observe all warnings, precautions
and instructions oil the appliance, or the one
described in the operating instructions :utd
adhere to them.
PowerSources
This set should be operated only fl'om tile type of
power source indicated on the marking label. If
you are not sure of tile type of electrical power
supplied to your home. consuh your dealer or
local power company. For those sets designed to
operate llonl battely power, or other sources, relcr
to the operating instructions.
Polarization
This set may be equipped with a polarized ac
power cord plug (a plug having one blade wider
than tim other).
This plug will fit into the power outlet only one
way. This is a sat_sty Ii:amre. If you are unable to
insert tile plug Ihlly into the outlet, IiT reversing
the plug. If the plug should still tail to fit, contact
your electrician to have a suitable out]et installed.
Do not delt_at the sat_sty purpose of the polarized
plug by b)rcing it in.
Overloading
Do not o_, erload wall onllets, extensioll cords or
corn enience rccept_lcles beyond their Cal)_city_
since this can result in fire or electric shock.
ObjectandLiquidEntry
Ne_er push objects oI any kind into the set
through ol?enings as they may touch dangerous
voltage points or sllort out parts that could rcsull
m a fire or electric shock. Norm- spill liquid of any
kind on the set.
Attachments
Do not use _lttilchlllenls llOt rccolnnlcllded by the
n/_mul_lcturcr. _Ls they Inay cause h_Lzal'dS.
Cleaning
Unplug tile set Irom tile wall outlet betbre
cleaning or polisbmg it. Do not useliquid cleaners
or aerosol cleaners. Use _Lcloth lightly dampened
with water lot cleaning the exterior of tile set.
Water andMoisture
Do not use power-line operated _ts near water
Ibr example, near a bathtub, washbowl, kitchen
sink, or laundry tub, in a wet basemenL or near a
swimming pool, etc.
Power-CordProtection
Route tile power cord so thai it is not likely to be
walked on or pinched by items placed upon or
against thmn, paying particular atrcmion to tile
plugs, receptacles, and the point where the cord
exits I?om tile appliance.
Accessories
Do not placc tile set on an unstable cart, stand,
tripod, bracket, or table. The set may lidl. causing
serious in.iul3' to a child or an aduh, and serious
damage to tile set. Use only a carl, stand, tril?od,
bracket, or table recommended by the
ii/anul_lc[urcr,
Ventilation
Tile slots and openings in the cabinet arc provided
Ibr necessau ventilatkm. To ensure reliable
operation of tile set, and to protect it liom
overheating, these slots and openings must never
be blocked or covered.
Never cover tile slots and openings with a cloth
or other nlalcrials.
Never block the slots and openings by placing
tile set on a bed. sola, rug, or ()tiler similar
sur|ace.
Never place the set in a confined space, such as
a bookcase, or built-in cabinet, unless proper
ventilation is provided.
Do not place tile set near or over a radiator or
heat register, or where it is exposed to direct
sunlight.
Continued._ 3
INPORTANT SAFEGUARDS(go_i_sdl
Lightning
For added protectfim lor this _el during a fighlning
storm, or when it is lelt un_tlended and unused lor
long periods of time. unplug it l_x)m tile wall
outlcl and disconnect lhe antenna or cable system.
This will prevenl damage to the set due to
lighming and power-line surges.
SafetyCheck
Upon completion ol any scP4ce or repairs to tile
sel. ask tile service lechnician 1o perfimn routine
salcty checks (as specified by tile manul_,cturcr)
to determine tllal the set is in safi: operating
condilion.
DamageRequiringService
Unplug tim sel hx)m lhe wall oullel and rclcr
selvicing to qualified _rvice personnel under tile
lbllowing condilions:
When the power cord or plug is damaged or
frayed.
If liquid has be_n spilled or objects have hdlen
into the sel.
If the _t has been exposed to rain or water.
If the set has been subjecl to excessive shock by
being dropped, or lhe cabinet has b_n
damaged.
If lhe set does not opert_te normally when
Iollowing lhe operaling instructions. Adjust
only lhose controls thai are specified in the
operating instructions, hnproper adjuslmenl of
other controls may resuh in damage and will
often require extensive work by a qualified
technician 1_>rt2storc tile set to normal operalion.
Wllen file set exhibits a distincl change in
performance this indicales a need lor service.
Servicing
Do not altelnpl to ser_,ice lhe sel yourself as
opening or rclnoving covers may expose you to
dangerous voltage or olher hazards.
Relcr all servicing to qualified service personnel.
Replacementparts
Whcn replacement paris m'e required, be sure lhe
ser_ ice leclmician has used replacement paris
specilied by tile u/anul_cturer tllat llave tile same
charactcristics as tile original palls.
Unauthorized substitmions may rcsu]l ill fire.
electric sllock, or olher hazards.

Readthis beforeoperatingyourcamcorder
Before operating the unit, please read this
manual thoroughly, and retain it for futttre
reference.
CAUTION
Tile use of optical instrumenls with this producl
will increase eye ha/urd. Use of controls or
adjtlstlncnls or perfimnance of proccdures olher
than those specified herein may 1_3suh in
hazard(illS radiation exposure.
Replace tile baltcry with tile specified type only.
Otherwi_, filv or inju Umay result.
RECYCLINGLITHIUM-IONBATTERIES
LithiunMon balteries are o
recyclable. You can help preserve
our ellVirOlll/lelll by relllrllillg
your used rechargeable batleries
tit the colleclion and recycling
location nearest you.
For more inlormation regarding recycling of
rechargeable batteries, call toll h-ee 1-800-822-
8837_ or visil hllp://www.rbrc.org/
Caution: Do nol handle damaged or leaking
Lithium-Ion batteries.
Owner'sRecord
Tile model and serial numbers are located on the
bollom. Record tile serial number in the space
provided below. Relcr to lhe_ numbers whenever
you call upon your Sony dealer regarding this
product.
Model No. DCR-DVD
Serial No.
Model Nit. AC-
No,
If you have any questions aboul lhis producl, you
may call:
Sony CtlstVllllel"lnlorlnation Center
1-800-222-SONY (7669).
The number bdow is lor the FCC rclated malters
only.
RegulatoryInformation
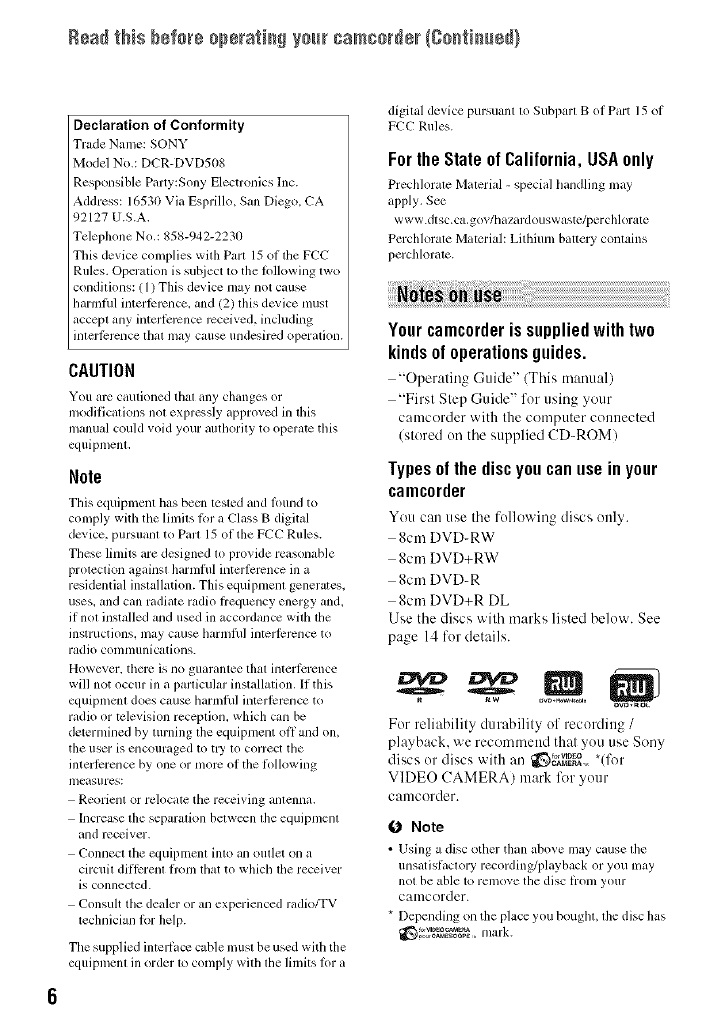
Declaration of Conformity
Trade Name: SONY
Model Nit.: DCR-DVD408
Responsible Party:Sony Electronics Inc.
Addrcss: 16530 VizJ Esprillo, San Diego, CA
92127 U.S.A.
Telephone Nit.: 858-942-2230
This device complies with Part 15 of ll/e PCC
Rules. Operation is subject 1o tile 6_llowing lwo
condilions: / 1) This device may not cau_
harmflfl interfi:rence, and (2) this device must
accept any intedi:rence received, including
interfi:rence lhat may cause undesired operalion,
Continued._ 5
Rsad this b÷fo_÷0p÷rati_N y0_[rcamcord÷r (Sostissed}
Declaration of Conformity
Trade Name: SONY
Model No.: DCR-DVD508
Responsible Party:Sony Electronics hlc.
Address: 16530 Via Esprillo. San Diego. CA
92127 U.S.A.
Telephone No.: 858-942-2230
This device complies with Part 15 of tile FCC
Rules. Operatkm is sul_iect to tile lollowing two
conditions: ( 1) This device nlay not cause
harmlhl interlcrcncc, and 12) this device nmst
accept any interli:rcnce rcceived, including
intm'lErcncc that may cause undesircd operation.
CAUTION
You arc cautioned that any changes or
modifications not exprc_,sly approved in this
inanu_d could void your authority to operate this
equipment.
Note
This equipment has becn tested and lound to
conlply with the linfits lot a Class B digital
device, pursuant to Part 15 of the FCC Rules.
These limits are designed to pro_ ide reasonable
protection against harmfifl interlcrcnce ill a
residential installation. This equipment generates.
uses, and call radiate radii) l?equency energy and,
if not installed and used in accordance with the
instructions, may cause harmlhl interlcrcnce to
radio conltllllnications.
However. tllel_ is no guarantee that interl_:rcnce
will not occur ill a particular installation. If this
equipmcm does cause tlarmlhl interlcrcnce to
radio or television reception, which can be
deternlined by turning the equipnlent off and on,
tile user is encouraged to tl3' to correct tile
interlcrencc by one or nlorc of the lk)llowing
measures:
Reorient or relocatc tile receiving antenna.
Increase the separation betw_n tile equipment
and receiver.
Connect the equipment into an outlet on a
circuit dil]crem from lhat to which dm receiver
is connected.
Consuh the dealer or an experienced mdio/TV
technician lbr help.
Tile supplied interlace cable must be used with tile
equipment ill order to conlply with tile limits lor a
digital device pursuant to Subpall Bof Part 15 of
PCC Rules.
Forthe State of California, USAonly
Prechlorale Material - special handling may
apply. See
www.dtsc.ca.gov/h azardouswastc/per chlorate
Perchlorate Material: Lithiunl battcry contains
perchlorate.
Your camcorder is supplied with two
kinds of operations guides.
"Operating (-hlide" (This tnmmal)
"First Step Guide" for using your
camcorder with the computer connected
(stored un the supplied CD-ROM)
Types of the disc you can use in your
camcorder
You can use the fullowing discs unb .
8cm DVD-RW
8cm DVD+RW
8cm DVD-R
8cm DVD+R DL
Use the discs with marks listed below. See
page 14 for details.
For reliability durahility of recording /
playback, we recommend that you use Sony
discs or discs with an _'_I_, *(lk)r
VIDEO CAMERA) mark lk_r yuur
camcorder.
0 Note
•Using a disc other than abo_e may cause tile
unsatishLctory recording/playback or you nl_,y
not be able to remove the disc lionl your
camcorder.
* Depending on the place you boughl, file disc has
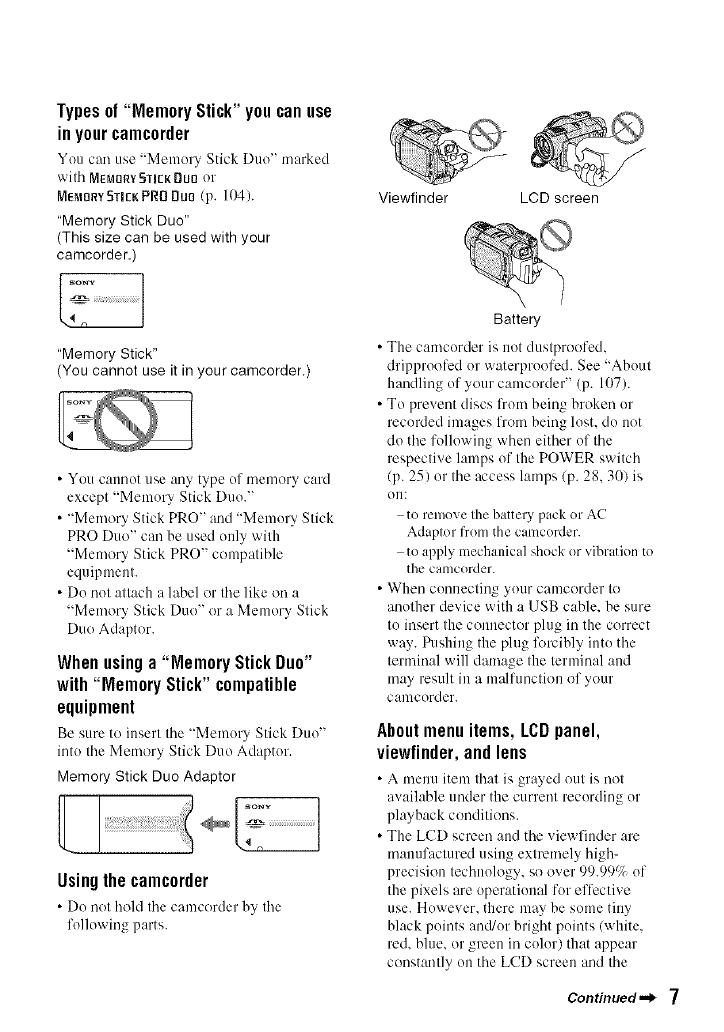
Types of "Memory Stick" you can use
in your camcorder
You can use "Memory Stick Duo' marked
with MEMORY5IIEKDUOor
ME_O_VSIiEKPRBDuo (p. I(g).
"Memory Stick Duo"
(This size can be used with your
camcorder.)
"Memory Stick"
(You cannot use it in your camcorder.)
• You cannot use any type of memory card
except "Memory Stick Duo."
• "Memory Stick PRO" and "Memory Stick
PRO Duo" can be used only with
"Memory Stick PRO" cempatible
equipment.
• Do not attach a label or the like on a
"Memory Stick Duo" or a Memory Stick
Due Adapter.
Whenusinga"MemoryStickDuo"
with"MemoryStick" compatible
equipment
Be sure to insert tile "Menlory Stick Duo"
into tile Memory Stick Duo Adaptor.
Memory Stick Duo Adaptor
Usingthecamcorder
• Do net hohl tile camcerder by tile
following parts.
Viewfinder LCD screen
Battery
• The camcorder is not dustproofed.
dripproofcd or waterproofed. See "About
handling of your camcordef' (p. 107).
• To prevent discs l'ronl being broken or
recorded images from being lost. do not
do the following when either of the
respective lamps of the POWER switch
(p. 25) or tile access lamps/p. 28, 30) is
OI11
to remove the battery pack or AC
Adaptor from the camcorder.
to apply mechanical shock or vibratkm to
the camcorder.
• When connecting your camcorder to
another device with a USB cable, be sure
to insert the connector plug in the correct
way. Pushing the plug forcibly into the
terminal will damage the terminal and
may result in a malfunction of your
caulcorder.
About menu items, LCD panel,
viewfinder,and lens
• A meu/i item that is gra}ed eut is not
available under the current recording or
playback conditions.
• The LCD screen and the viewfinder are
manufactured using extremely high-
precision technology, so over 99.9991 of
the pixels are operational for effective
use. However. there may be some tiny
black points anWor bright points (white.
red. blue. or green ill color) that appear
constantly on the LCD screen and the
Continued._ 7
Rsad this bs[o_s oDs_ati_Nyo_[_camcoNs_ {Sostisse_}
viewfiuder. These points are nurmal
results of tile manufacturing process and
do not affect the recording in any way.
green point
• Exposing the LCD screen, the viewfinder,
or the lens to direct sunlight for long
periods uf time may cause malfimctiuus.
• Do not aim at the sun. Doing so might
cause yuur camcorder to malfunction.
Take images of the sun only in low light
conditions, such as at dusk.
Onrecording
• Before starting to recoM, test the
recording limction to make sure the image
and sound are recorded without any
problems. You cannot delete images once
you recurd them on a DVD-R/DVD+R
DL. Use a DVD-RW/DVD+RW fur trial
recording/p. 14).
• Compensation for the contents of
recordings cam/ot be provided, even if
recurding or playback is not possible due
to a mallimction of the camcorder, storage
media, etc.
• TV color systems differ depending un the
countries/regiuns. To view your
recordings on a TV, you need an NTSC
system-based TV.
• Television programs, fihns, video tapes,
and other materials may be copyrighted.
Unauthorized recording of such materials
may be contrary to the copyright laws.
About language setting
The on-screen displays in e:,ch local
language are used fur illustrating the
operating procedures. Change the screen
language befure using your camcorder if
necessary (p. 26).
Aboutthis manual
• The LCD screens and the viewfiuder
images and indicators shown in this
manual were taken with a digital still
camera, and may louk different from what
you actually see.
• Design and specifications uf recording
media and other accessories are subject to
change without nutice.
• The illustration used in this manual are
based uu the mudel DCR-DVD508/
DVD908.
• Disc in this Operating Guide refers to 8cm
DVD discs.
About the Carl Zeiss lens
Your cmncuMer is equipped with :, Carl
Zeiss lens, which was developed jointly by
Carl Zeiss, in Germany, and Sony
Curporatiun, and produces superior images.
It adopts the MTF measurement system for
video cameras and offers a quality typical
of a Carl Zeiss Lens. Also, the lens for your
camcorder is T*-coated to suppress
unwanted reflectiuns and faithfully
reproduce culors.
MTF= Modulation Transfer Function. The
number value indicates the amount of light
from a subject coming into the lens.
Aboutthemarksusedinthismanual
• The operations available depend uu the
disc used. The fullowing marks are used
to indicate the type of disc yuu can use
for a particular operation.
Table of Contents
Read this before operating your
camcorder .................................... 5
Subject examples and solutions
11
What you can do with your
camcorder .................................. 12
Choosing a disc .......................... 14
Using your camcorder ................ 16
"1_ HOME" and "0_._=OPTION"
- Taking advantage of two types of
menus ........................................ 18
Step 1: Checking supplied items
.................................................... 21
Step 2: Charging the battery pack
.................................................... 22
Step 3: Turning the power on, and
setting the date and time ............ 25
Changing the language setting
....................................................... 26
Step 4: Preparing for recording
.................................................... 27
Step 5: Inserting a disc or a
"Memory Stick Duo" ................... 28
Recording and playing back with
ease (Easy Handycam) .............. 31
Recording ................................... 34
Zooming ........................................ 36
Recording sound with more presence
(5.1ch surround recording) ........... 36
Using the flash .............................. 36
Recording high quality still images
during movie recording (Dual Rec)
....................................................... 37
Recording in dark places (NightShot)
....................................................... 38
Adjusting the exposure for backlit
subjects ......................................... 38
Recording in mirror mode ............. 38
Selecting the aspect ratio (16:9 or 4:3)
38
Recording the fast action in slow-
motion (SMTH SLW REC) .............. 39
Playback ..................................... 41
Using PB zoom ............................. 43
Playing back a series of still images
(Slide show) .................................. 43
Playing the picture on a TV
....................................................44
Making the disc compatible with
playback on other devices or DVD
drives (Finalizing) ....................... 46
NN
I_!(OTHERS) category ............. 50
Deleting images .......................... 50
Dividing the image ...................... 52
Creating the Playlist ................... 53
Dubbing to VCR or DVD/HDD
recorders .................................... 56
Printing recorded images
(PictBridge compliant printer)
.................................................... 57
(MANAGE DISC/MEMORY)
category ...................................... 59
Playing a disc on other devices
.................................................... 59
Finding the right disc (DISC
SELECT GUIDE) ........................ 60
Deleting all scenes on the disc
(Formatting) ................................ 61
Recording additional scenes after
finalizing .................................... 62
Continued._ 9
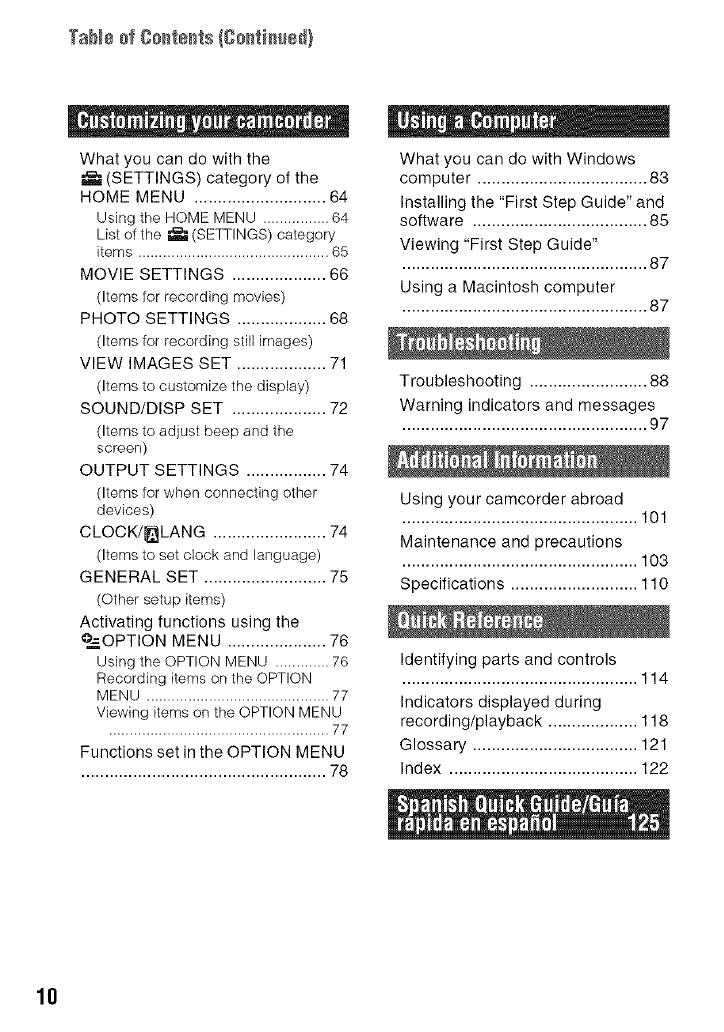
Tab_÷ofCo_te_ts(Co_ti_ed)
What you can do with the
(SETTINGS) category of the
HOME MENU ............................ 64
Using the HOME MENU ................ 64
List of the _ (SETTINGS) category
items .............................................. 65
MOVIE SETTINGS .................... 66
(Items for recording movies)
PHOTO SETTINGS ................... 68
(Items for recording still images)
VIEW IMAGES SET ................... 71
(Items to customize the display)
SOUND/DISP SET .................... 72
(Items to adjust beep and the
screen)
OUTPUT SETTINGS ................. 74
(Items for when connecting other
devices)
CLOCK/_LANG ........................ 74
(Items to set clock and language)
GENERAL SET .......................... 75
(Other setup items)
Activating functions using the
°.-=OPTION MENU ..................... 76
Using the OPTION MENU ............. 76
Recording items on the OPTION
MENU ............................................ 77
Viewing items on the OPTION MENU
..................................................... 77
Functions set in the OPTION MENU
.................................................... 78
What you can do with Windows
computer .................................... 83
Installing the "First Step Guide" and
software ..................................... 85
Viewing "First Step Guide"
.................................................... 87
Using a Macintosh computer
.................................................... 87
Troubleshooting ......................... 88
Warning indicators and messages
.................................................... 97
Using your camcorder abroad
.................................................. 101
Maintenance and precautions
.................................................. 103
Specifications ........................... 110
Identifying parts and controls
.................................................. 114
Indicators displayed during
recording/playback ................... 118
Glossary ................................... 121
Index ........................................ 122
10

Subjectexamplesand solutions
[_'SMTH SLW REC............................. 39
images @d_g
movie recording
I_ Dual Rec......................................... 37
I Fbwers in _laseqp
_. PORTRAIT...................................... 80
_. FOCUS............................................ 78
_.TELE MACRO................................. 78
dag an the bft side
af the s_een
_.FOCUS............................................78
_.SPOTFOCUS..................................78
[ etti_g a gead shat
af a ski sbpe ar
beach
_.BACKLIGHT....................................38
_.BEACH............................................80
_.SNOW.............................................80
A @ild ar_the stage
m_dera spat _ight
_.SPOTLIGHT.....................................80
[ Fi_ewa_kswith aH
its spbedar
I_FIREWORKS....................................79
_'FOCUS............................................78
A sleepi_g @Hd
I_ NightShot ........................................ 38
I_COLOR SLOW SHTR....................... 81
11
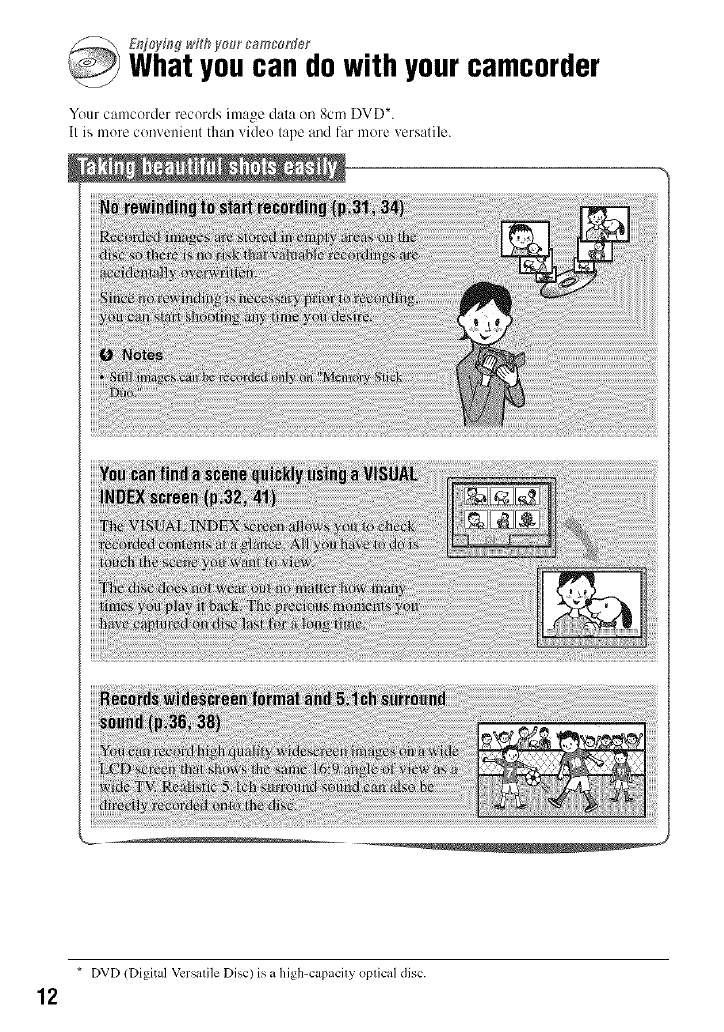
E_Tj_ty[#g_,F;hVo_r c_mcon}er
Whatyoucan dowith yourcamcorder
Your camcorder records ima_ge dala on 8cm DVD*.
II is more convenient than video tape and far more versatile.
*DVD (Digital Vcrsalile Disc) is a high-capacily oplical disc.
12
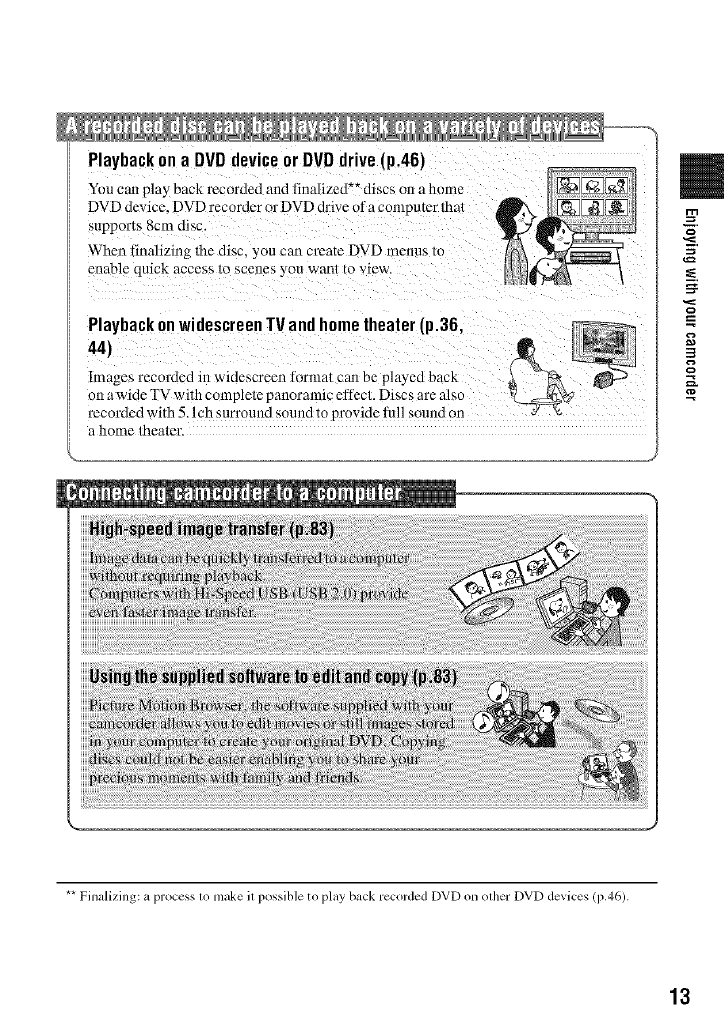
Playback on a DVD device or DVD drive [p.46)
You can play back recorded and finalized *_discs o11a home
DVD device. DVD recorder or DVD drive of acomputer lhal
supports 8cm disc.
When finNizing tile disc, you can create DVD menus m
enable quick access to scenes you wanl 1o view.
PlaybackonwidescreenTVandhometheater(p.36.
44)
Images recorded in widescrecn li,rmat carl be played back
on a wide TV with completc panoramic efl_ct. Discs are also
recoMed with 5.I ch surround sound to provide lull sound on
a home theater.
** Finalizing: a process 1o make il possible to play back recorded DVD on olher DVD devices (p.46).
13
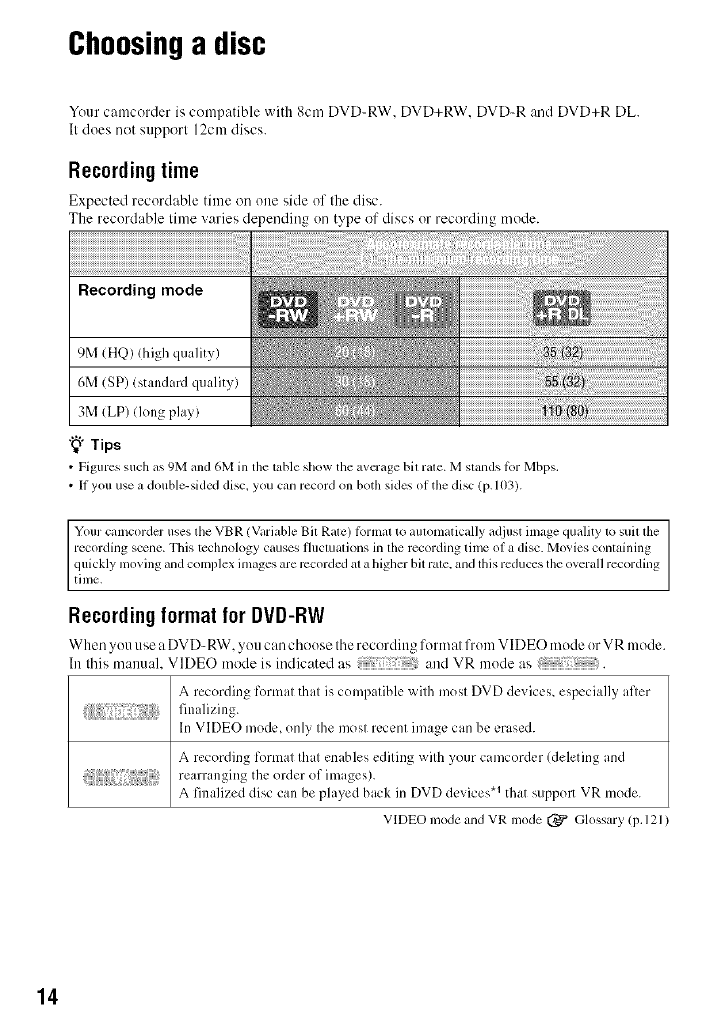
Choosinga disc
Your camcorder is compatible with 8cm DVD-RW. DVD+RW. DVD-R and DVD+R DL.
It does not support 12cm discs.
Recording time
Expected recordable time on one side of the disc.
The recordable time varies depending on type of discs or recording mode.
Recording mode
9M (HQ) (high quality)
6M (SP) (standard quality)
3M (LP) (long play)
"_° Tips
•Figuressuch as 9M m_d6M in the table show the avcrage bit rate. Mstands lbr Mbps.
•II you use a double-sidcd disc, you can recordon both sides of the disc (p. 103).
Your camcorder uses the VBR (Variable Bit Rate) lbrnmt to automatically adjust image quality to suil the
recording scene. This technology causes fluctuations in the recording time of a disc. Movies conlaining
quickly moving and complex inmges are recorded al a higher bit rale. and lhis reduces the overall recording
time.
Recording format for DVD-RW
When you use a DVD-RW. _ou can choose the recording format from VIDE(-) mode or VR mode.
In this manual. VIDEO mode is indicated as and VR mode as .
A recording format that is compatible with most DVD devices, especially afler
In VIDEO mode, only the most recent image can be erased.
A recording format that enables editing with your camcorder (deleting and
rearranging the order of images).
A finalized disc can be played back in DVD devices .1 that supp(m VR mode.
VIDEO mode and VR mode (_ Glossary (p. 121 )
14
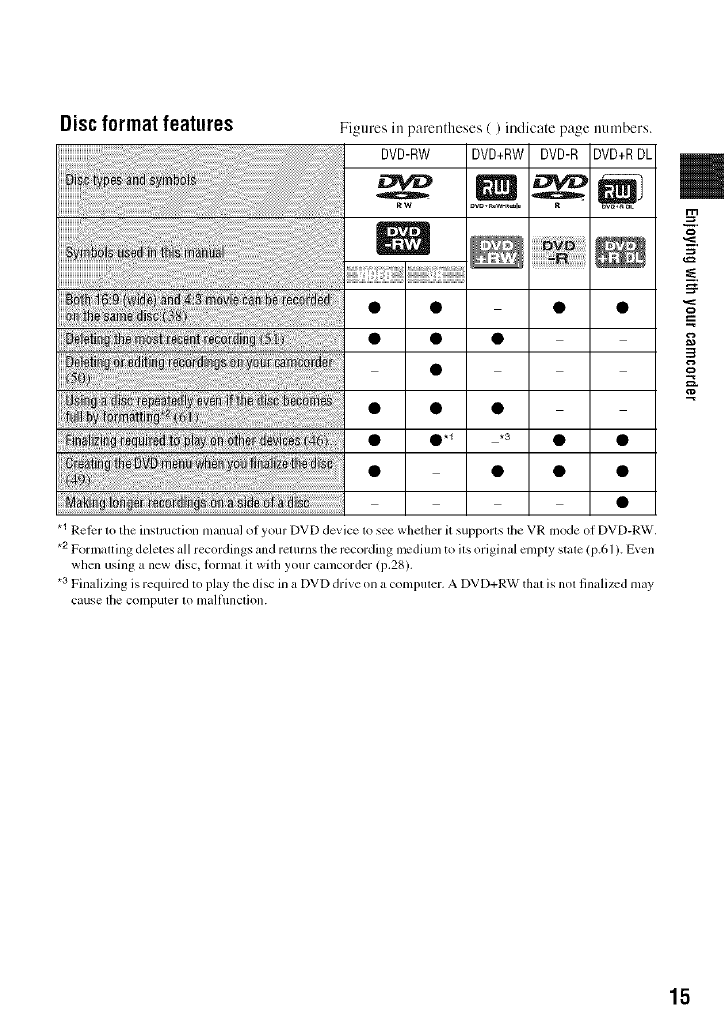
Discformat features Figures in parentheses ( )indicate page numbers.
DVD-RW DVD+RW DVD-R DVD+RDL
o
0.1 *3 • •
.1 Reicr lo the inslmction manual of your DVD device 1o see whether it supporls file VR mode of DVD-RW.
*2 Formalting deletes all recordings and relurns the recording lncdium to ils original cnlply stale (p.61 ). Even
when using a new disc, lormal it wilh your camcorder (i).28).
.3 Finalizing is required to play the disc in a DVD drive on a compuler. A DVD+RW thai is nol finalized may
cause lhe computer IOmall/lnclion.
g,
15
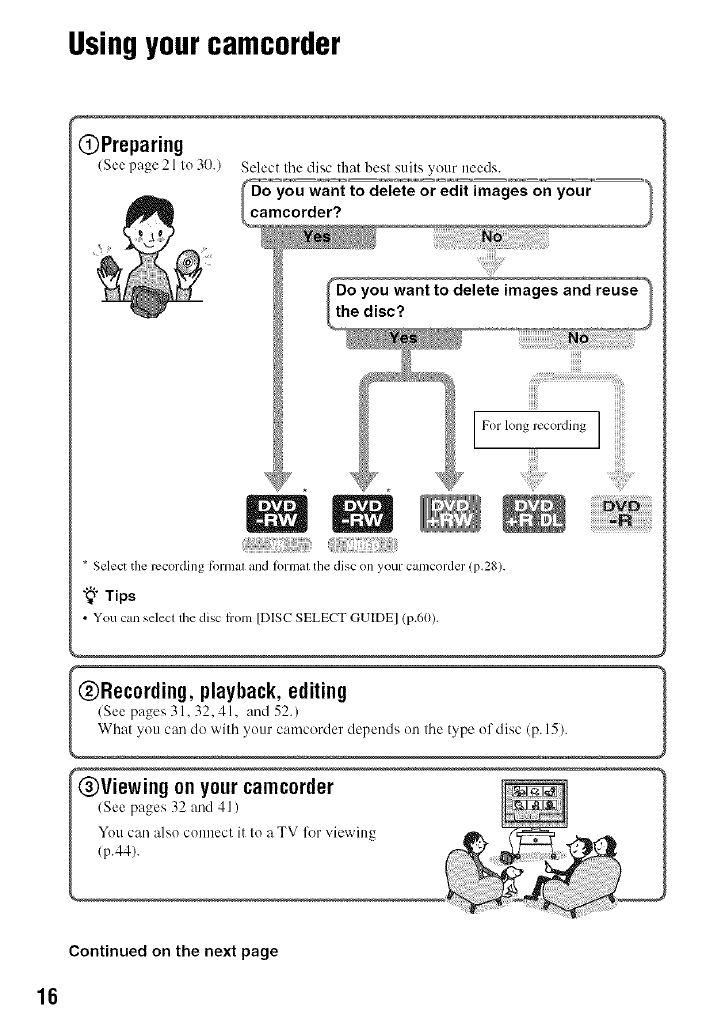
Usingyourcamcorder
OPreparing
(See page 21 to 30.) Select tile disc that best suits your needs.
_mYOU want to delete or edit images on
your
corder?
* Select the rccording tbrmal and formal tile disc on your camcorder (p.28).
"_° Tips
• You can select the disc h'om [DISC SELECT GUIDE] (p.60).
@Recording, playback, editing _1
/See pages 3 l, 32, 4 l, :rod 52.)
What you can do with yotlr camcorder depends on the type of disc (p. 15).
,g on your camc0rder
Continued on the next page
16
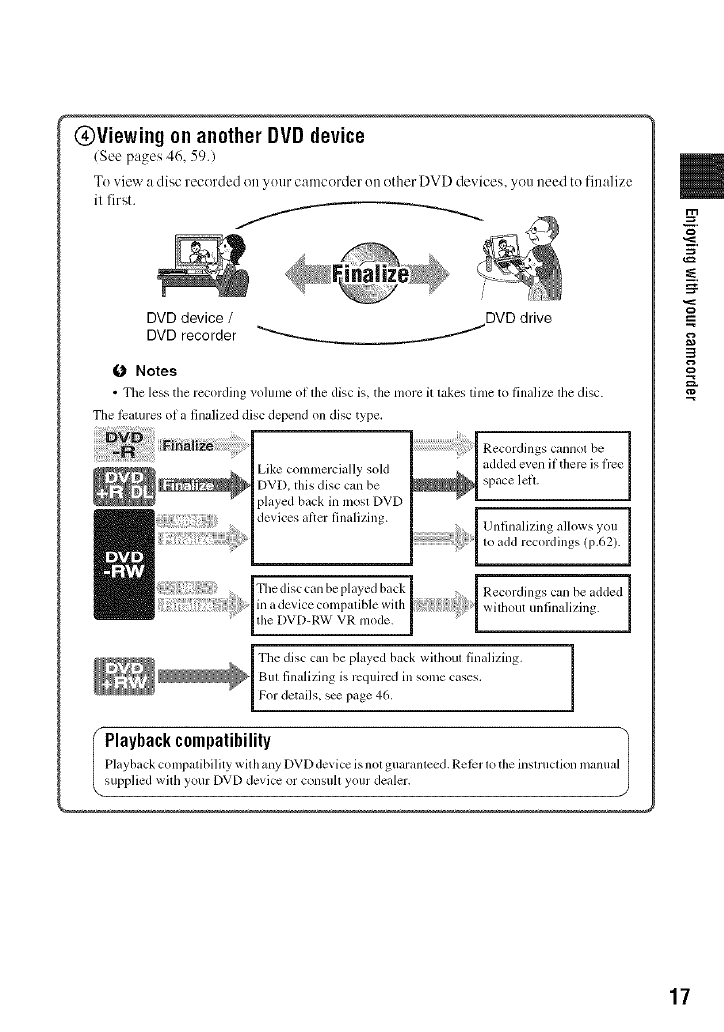
@Viewing on another DVD device
(See pages 46, 59.)
To ,Jew a disc recorded on your camcerder ()it ether DVD devices, you need to finalize
il first.
/
DVD device /DVD drive
DVD recorder "_'----_ /
0 Notes
• The less the recording volume ol the disc is. the more it takes time to finalize the disc.
The l_tures ol a finalized disc depend on disc type,
Like commercially sold
DVD, this disc can be
played back in mosl DVD
devices al_er finalizing.
Recordings cannot be
added even if there is fi'ee
space left.
Unfinalizing allows you
to add recordings (p.62).
Recordings can be added
wilhout unlinalizing.
Fhe disc can be played back
in a device colnl)atible with
the DVD-RW VR mode.
The disc can be played back widmul finalizing.
But finalizing is required in some cases,
For details, s_ page 46.
IPlaybackcompatibility
Playback con/patibility wit h any DVD device isnot guaranteed. Rel_r to the instruction manua
supplied wid/your DVD device or consuh your dealer.
17
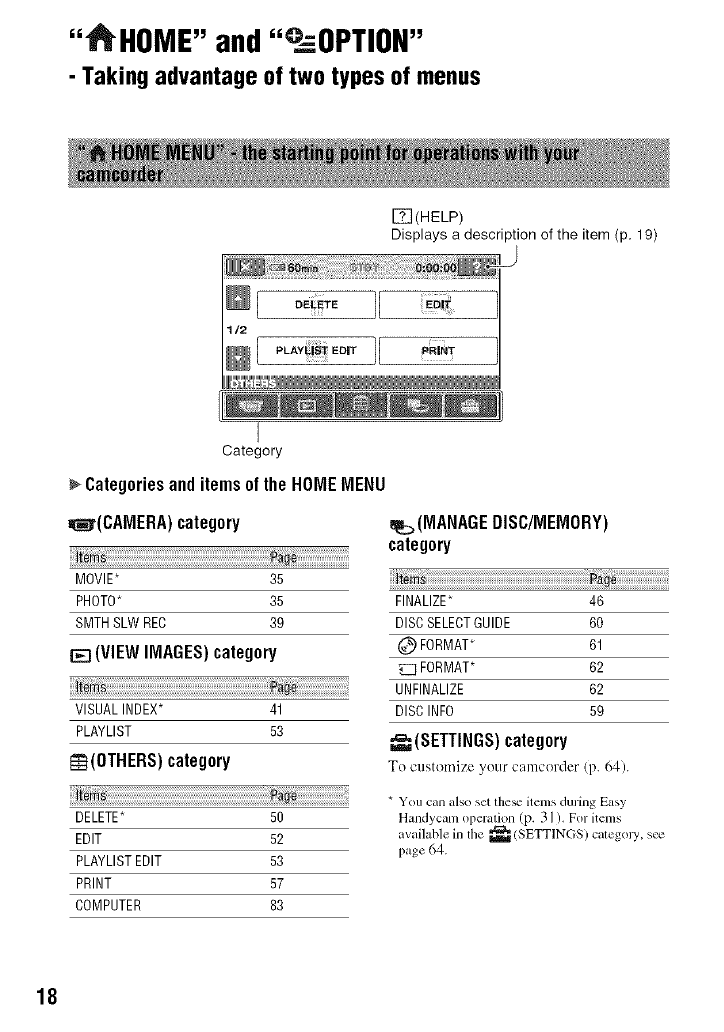
"_HOME" and"°_:=OPTION"
- Taking advantage of two types of menus
[_(HELP)
Displays a description of the item (p. 19)
eE TOII
,LA,_Eo,,II "R'_'
I;_21
I
Category
Categoriesand itemsof the HONEMENU
=I_r(CANERA) category
_m
MOVIE* 35
PHOTO_ 35
SMTH SLW REC 39
[_ (VIEW IMAGES)category
!
VISUAL INDEX_ 41
PLAYLIST 53
re(OTHERS) category
_m
DELETE* 50
EDIT 52
PLAYLIST EDIT 53
PRINT 57
COMPUTER 83
(MANAGEDISC/MEMORY)
category
FINALIZE_ 46
DISCSELECTGUIDE 60
(_ FORMAT_ 61
FORMAT* 62
UNFINALIZE 62
DISC INFO 59
(SETTINGS}category
To customize your camcerder (p. 64).
* You can also set the_ items during Easy
Handycam operation (p. 3 ] ). For items
a'ailable in the _(SETTINGS) categ( J3_ s_
page 64.
18
1Turn the POWER switch to turn
on your camcorder.
4Touch the item you want to use.
Example: [EDITI
2Press "J_ (HOME) [] (or [_).
(HOME) []
5 Continue operation by following
the guidance on the screen.
To hide the HONE MENU screen
Touch [_.
When you want to know something
about the function of each item on the
HONE MENU- HELP
0 Press _ (HOME).
The HOME MENU appe:]rs.
(ItOME) []
3Touch the category you want to
use.
Example: _ (OTHERS) category
@ Touch ITI(HELP).
The bottom of tile [] (HELP) button
turns orange.
Continued._ 19
°°@HOME _ a_d _QsO?T_ON"(8o_ti_ed)
(_) Touch the item you want to know the
content.
When you touch an item, its explanation
appears on the screen.
To apply the option, touch [YES],
utherwise, touch [NO].
To deactivate the HELP
Tuuch [] (HELP) again in step 2.
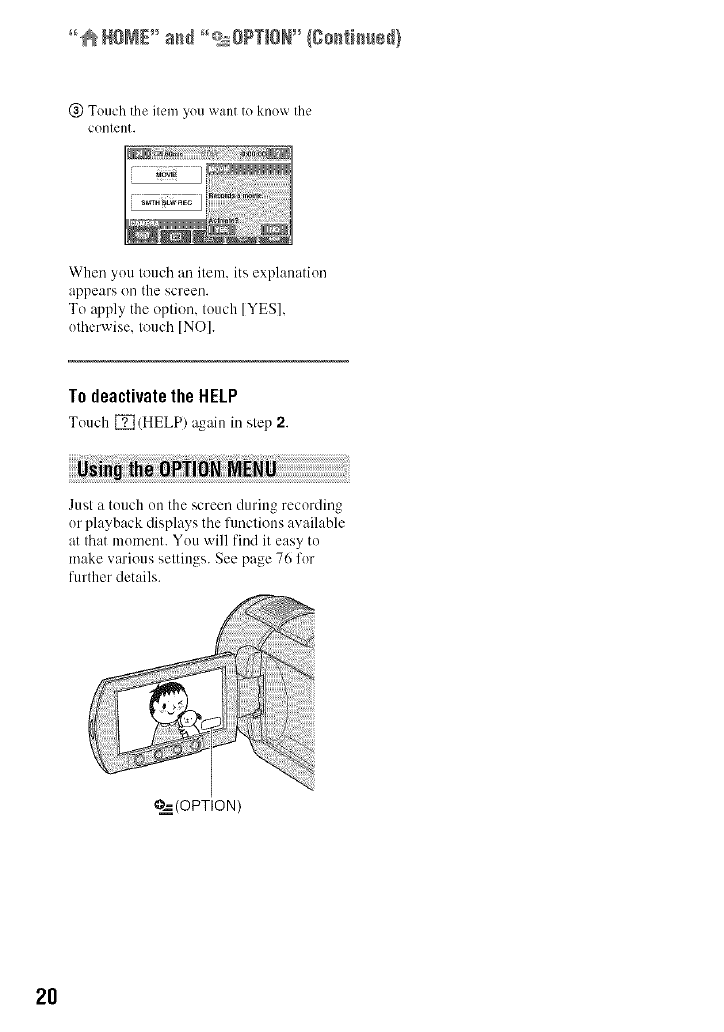
Just a touch uu the screen during recording
ur playback displays the fimctious available
at that mumeut. You will find it easy to
make various settings. See page 76 fur
further details.
?._ (OPTION )
2O

Step1: Checkingsupplieditems
Make sure that you have tile folk)wing
items supplied with yuur camcorder.
The number in the parentheses indicates the
number of that item supplied.
CD-ROM "Handycam Application
Software" (1) (p. 83)
Operating Guide (This manual) (1)
AC Adaptor (1) (p. 22)
Power cord (1) (p. 22)
AN connecting cable (1) (p. 44, 56)
m
USB cable (1) (p. 57)
Wireless Remote Commander (1)
(p. 117)
Abuu(m-type lithium battery is aheady installed,
Rechargeable battery pack NP-FH60 (1)
(p. 22)
21
Step2: Chargingthe battery pack
You can charge the "InfoLITHIUM"
battery pack (H series) (p. 106) after
attaching it to your camcorder.
O Notes
• You can use only "[ntbLITHIUM" battery pack
H series.
4
/ Turn the POWER switch in the
direction of the arrow to OFF
(CHG) (The default setting).
Attach the battery pack by sliding
it in the direction of the arrow
until it clicks.
Lift up the viewfinder and attach
the battery pack by sliding it in
the direction of the arrow until it
4Connect the power cord to the AC
Adaptor and the wall outlet.
Tile CHG (ch:wge) lamp lights up and
charging starts. The CHG (charge) lamp
turns off when the battery is fully
charged.
5 Disconnect the AC Adaptor from
the DC IN jack on your
camcorder.
O Notes
• DiscolmeCt tile AC Adaptor trom lhe DC IN
jack holding both the camcoMer mM the DC
plug.
clicks.
22
3Connect the AC Adaptor to the
DC IN jack of your camcorder.
Open the jack cover, and connect the
DC plug of the AC Adaptor.
Match the •mark on the DC plug with
the • mark on your camcorder.
To remove the battery pack
(!) Turn the POWER s_xitch to OFF (CHG).
@ Raise the viewfinder.
@ Press the BATT (battery) release button
and remove the batte Upack.
BATT (battery)
release button
D
0Notes
•When you remo_ethe battery pack or the AC
Adaptor, makesure that the _ (Movie) lamp/
(Still7lamp (p. 25) is turned oil
When storing the battery pack
Fully discharge the battery before storing it
for an extended period.
To use an outside power source
Make the same couuectious :is }ou do wheu
chargittg the battery pack. The battery pack
will not lose its charge ilt this case.
To checkthe remaining battery
(BatteryInfo)
Set the POWER switch to OFF/CHG), then
)ress DISP/BATT INFO.
After a while, the approximate recordable
time and battery ittformation appear for
about 7 seconds. You can view the battery
iufi_rmatiou for up to 20 seconds by
pressing DISP/BATT INFO again while the
informalion is displayed.
Remaining battery (approx.)
Recording capacity (approx.)
Charging time
Approximate time (rain.) required when
you fully charge a fully discharged baltery
pack.
NP-FH5(7 135
NP-FH60 135
(st+pplied)
NP-FH70 170
NP-FH 100 390
Recording time
Approximate time (rain.) a_:dl:+ble when
you use a fully charged battery pack.
DCR-DVD408/DVD808
NP-FH50 75 35
80 40
80 40
NP-FH60 100 50
(supplied) 105 50
105 5(7
NP-FH70 16(7 80
170 85
170 85
NP-FH 1170 375 185
395 195
395 195
Continued._ 23
m
g
Step2:gha(g)_)thebatte(ypack(go_ti_ed}
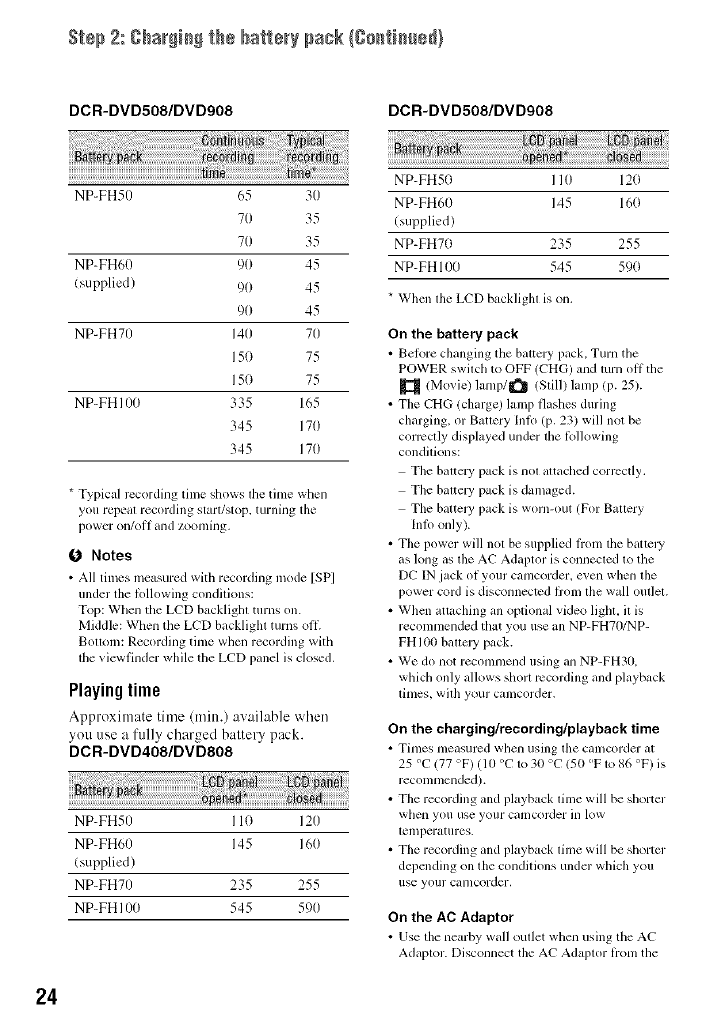
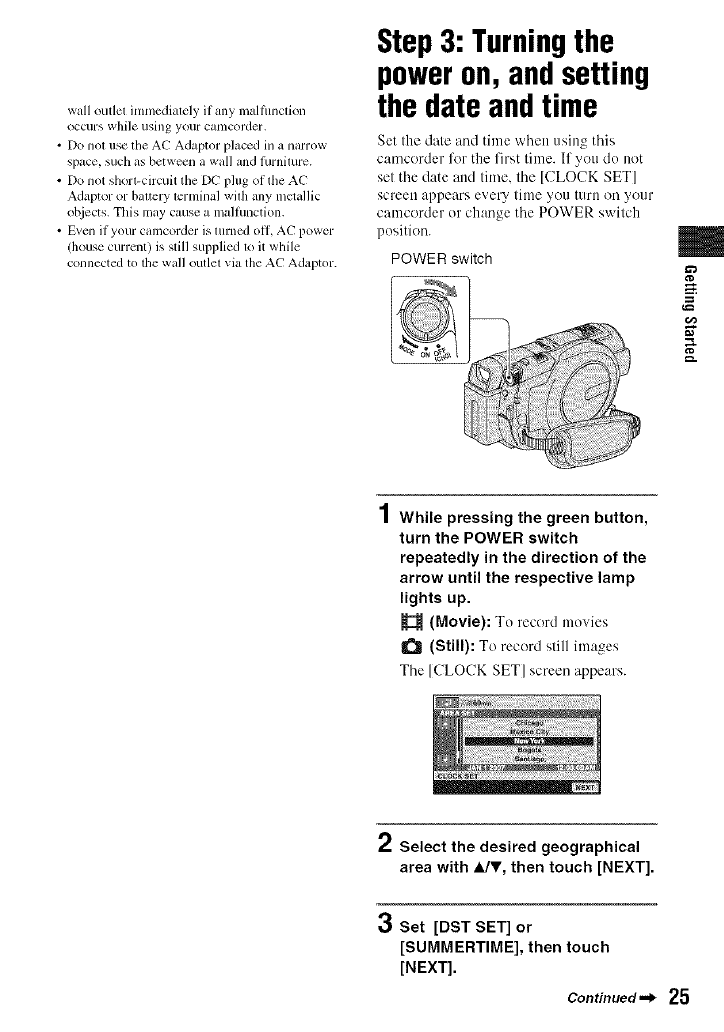
DCR-DVD508/DVD908
NP-FH50 65 30
70 35
70 35
NP-FH60 90 45
(supplied) 90 45
90 45
NP-FH70 140 70
150 75
150 75
NP-FH 100 335 165
345 170
345 170
DCR-DVD508/DVD908
* Typical rccording time shows the time when
you repeal recording start/stop, turning tile
power on/ol] and zoonlillg,
O Notes
• All tinlcs measured with recording mode [SP]
under the lollowing condilions:
Top: When the LCD backlighl turns on.
Middle: When the LCD backlighl turns oil
Bouoln: Recording tinle when recording with
lhe viewfinder while the LCD panel is dosed.
Playingtime
Approximate time (mitt.) av:dlable when
you use a fully charged battery pack.
DCR-DVD408/DVD808
NP-FH50 110 120
NP-FH60 145 160
(supplied)
NP-FH70 235 255
NP-FH 100 545 590
NP-FH50 110 120
NP-FH60 145 160
(supplied)
NP-FH70 235 255
NP-FH 100 545 590
* When the LCD backlight is on.
On the battery pack
• Belore changing tile baltcry pack, Turn the
POWER swilch to OFF (CHG) mid turn oil the
(Movie) lamp/_ /Still) hmlp (p. 25).
• The CT[G (charge) lamp flashes during
charging, or Bauery lnlo (p. 23) will not be
corlvctly displayed under lhe lbllowing
condilkms:
The balicl3, pack is nol altached corrcctly.
Tile baltel 3, pack is damaged.
The battel3' pack is worn-out (For Baltery
Inlo only).
• Tile power will not be supplied Kom the batter
as long as the AC Adaptor is connected to the
DC IN jack of your camcorder, even when the
power cord is disconnected flom the wall oullel.
• When attaching all optional video light, it is
reconmlended that you use all NP-FH70/NP-
FH IO0 bal/el3' pack.
• We do not reconmlend using an NP-FH30,
which only allows sholl lvcording and playback
limes, wilh your calllcorder,
On the charging/recording/playback time
• Times Illeilsurcd whell using lhe Cilll/Col'der _11
25 °C 177 °F) (10 °C to 30 °C 150 °F to 86 °F) is
reconmlended).
• The recording and playback time will be shorter
when you use your camcol_Jer ill low
lemperatures.
• The recording and playback lime will be shorter
depending on the conditions under which you
use your canlcorder.
On the AC Adaptor
• Use the nearby wall oullet when using tile AC
Adaplor. Disconnect tile AC Adaplor lionl the
24
wall outlet imnmdiately if any malflmction
occurs while using your catllcorder,
• Do nol use the AC Adaptor placed in a narrow
space, such as between a wall and lhrnimre.
• Do not shorl-circuit tile DC I?lug of tile AC
Adaptor or baltery lerminal wilh any mclallic
ot_iects. This may cause a malfunction.
• Even if your camcorder is lurned oil AC power
(house current) is still supplied to it wlfile
connected to the wall outlet via the AC Adaptor.
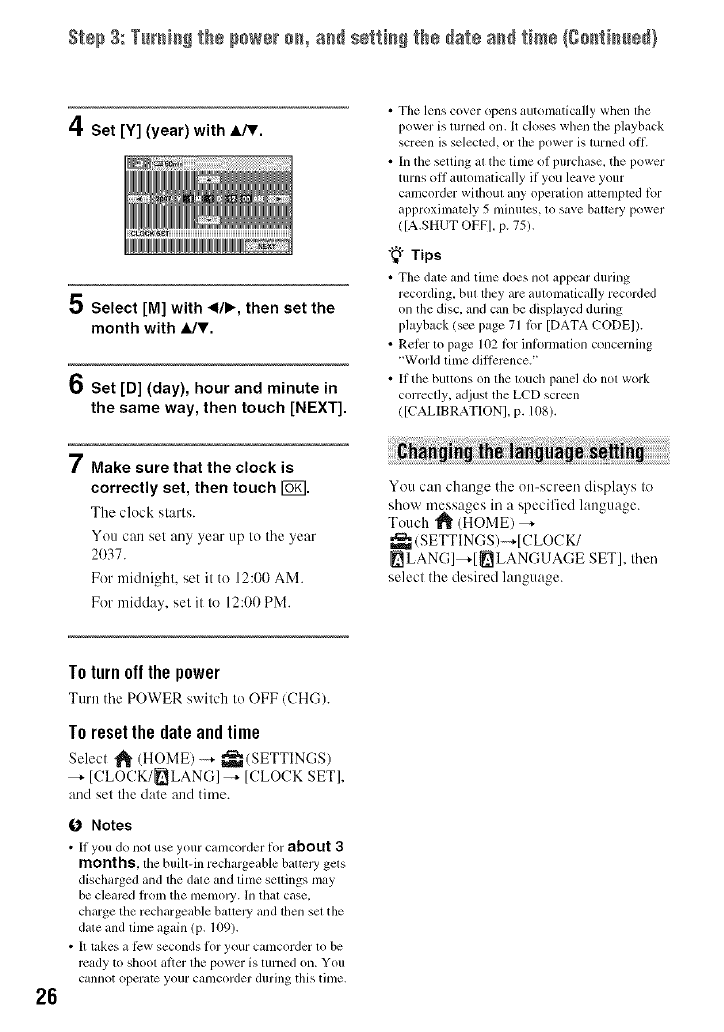
Step3: Turningthe
poweron, andsetting
the dateand time
Set the date and time when using this
camcorder %r the first time. If you do not
set the date attd time, the [CLOCK SET]
screen appears every tittle you tllrll on your
camcorder or change the POWER switch
position.
POWER switch m
a_
g
IWhile pressing the green button,
turn the POWER switch
repeatedly in the direction of the
arrow until the respective lamp
lights up.
(Movie): To record movies
(Still): To record still images
Tile [CLOCK SET] screen appears.
2Select the desired geographical
area with 4Jr, then touch [NEXT].
3Set [DST SET] or
[SUMMERTIME], then touch
[NEXT].
Continued,,_ 25
S_÷p3: TurN_gthepowero_,a_ se_i_gthe_atea_ time(go_i_ed)
4Set [Y] (year) with A/V.
5Select [M] with </b, then set the
month with JJr.
6Set [D] (day), hour and minute in
the same way, then touch [NEXT].
7Make sure that the clock is
correctly set, then touch I_.
The clock stm'ls.
You can set any year up to the year
2037.
For midni_hk set it to 12:00 AM.
For midday, sel it to 12:00 PM.
• The lens cover opens automatically when tile
power is turned on. It doses when file playback
scr_n is selecled, or the power is turned oil
• In the setting al file lime of purchase, the power
turns off automatically if you leave your
camcorder wifl/oul any operation altemptcd lbr
approxinlately 5 minutes, to save battcl T power
([A.SHUT OFFI, p. 75).
"_° Tips
• Tile dale and lime does not appear during
recording bul file,i are auhmlaticallv recorded
on the disc, and can be dispktyed during
playback/see page 71 lor [DATA CODE]).
• Reler lo page 102 lbr inlormalion concerning
"World lime dillerence. '
•It the buttons on lhe louch panel do not work
correctly, adjust tile LCD screen
([CALIBRATION], p. 108).
i
You can chan_e the on-screen displays to
show messages in a specified language.
Touch "_" (HOME) _-
_(SETTINGS)-+[CLOCK/
LANG]_-[ _LANGUAGE SET], dlen
selecl the desired lanouaoe
26
To turn off the power
Turn the POWER switch to OFF (CH(-;).
To resetthe date andtime
Select _ (HOME) -_- _(SETTINGS)
--, [CLOCK/_LANG]-+ [CLOCK SET],
and sel the dale and time.
0Notes
• It you do nol use your camcorder lot about 3
months,the built-in rechargeable battcly gels
discharged and lhe dale and lime sellings [nay
be clearcd |tom the tlletlloly. In that case.
charge the rechargeable ballely and lhen set the
date and lime again (p. 109).
• It takes a li:w seconds lot your camcorder 1o be
rcady to shoot al}er lhe power is turned on. You
cannot operate your camcorder during this time.
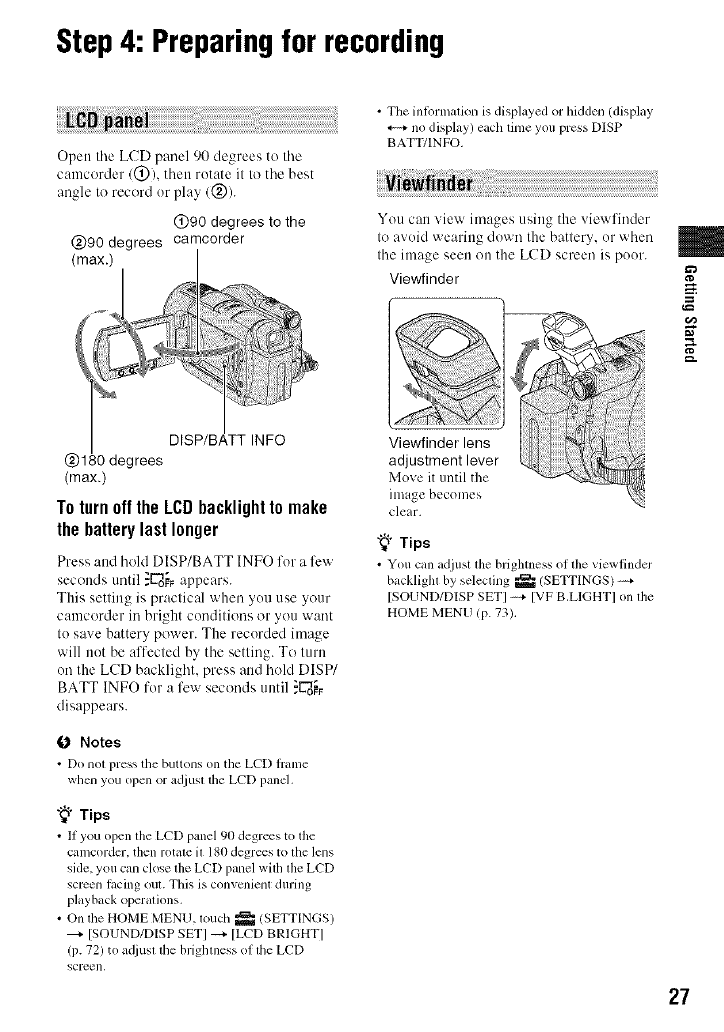
Step4: Preparingfor recording
Open tile LCD panel 90 degrees to tile
oamcerder/@), then rotate it to tile best
angle to record or play (@).
@90 degrees to the
(max.)
To turn off the LCDbacklight to make
the battery last longer
Press and hold DISP/BATT INFO for a few
seconds until }_oo.;_appears.
This setting is practical when you use your
camcorder in bright conditioos or you want
to save battery power. The recorded image
will not be affected by the setting. To turn
on the LCD backlight, press and hold DISP/
BATT INFO for a few seconds until ._oo_
disappears.
ONotes
• Do nol press the buttons on the LCD hanle
when you open or ad.iustthe LCD panel,
"_° Tips
• If you open the LCD panel 90 degrees to the
camcoMer, then rotate it 180 degrees to the lens
side, you can close tile LCD panel wifll the LCD
screen racing out. This is convcnicm during
playback operations.
• On the HOME MENU, touch _ (SETTINGS)
[SOUND/DISP SET] _ [LCD BRIGHT]
(p. 72) to adjusl die brighmess of die LCD
SCl-t2en,
• The intormalion is displayed or hidden (display
no display) each time you press DISP
BATT/INFO.
You can view images using the viewfinder
to avoid wearing down the battery, or when
the image seen on the LCD screen is poor.
Viewfinder
Viewfinder lens
adjustment lever
Move it until the
image becomes
clear.
"_° Tips
• You can adjust the brighmess of the viewtindcr
backligla by selecling _/SETTINGS) -_+
[SOUND/DISP SETI -_+ [VF B.LIGHTI on lhe
HOME MENU (p. 73).
m
g
27
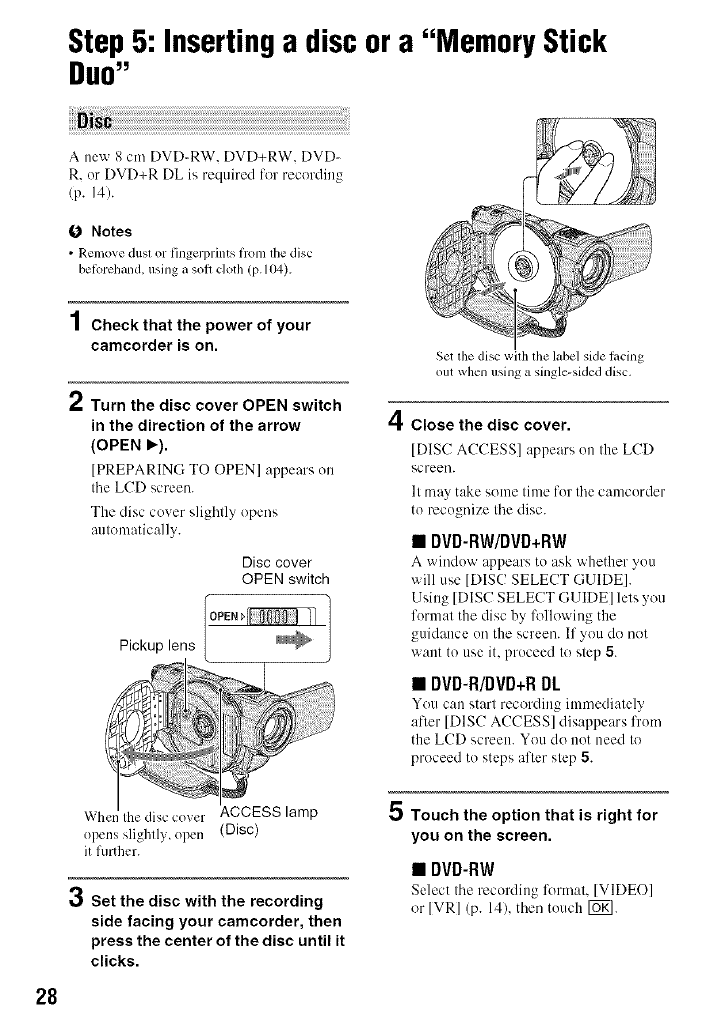
Step5: Insertinga discora "Memory Stick
DUO"
O Notes
• Remove dust or tingerprints trom tile disc
beforehand, using a soil cloth (p. 1{}4),
4
/ Check that the power of your
camcorder is on.
2Turn the disc cover OPEN switch
in the direction of the arrow
(OPEN _.).
[PREPARING TO ()PEN] appears on
tile LCD screen.
The disc cover slighlly opens
aulenaatically.
Disc cover
OPEN switch
Pickup lens
Set lhe disc wilh the label side lacing
ilut when using asingle-skied disc,
4Close the disc cover.
[DISC ACCESS] appears on tile LCD
scFeeo.
It may take some time for the camcorder
to recognize the disc.
• DVD-RW/DVD+RW
A window appears to ask whether you
will use [DISC SELECT GUIDE].
Using [DISC SELECT GUIDE] lets you
format the disc by following the
guidance on the screen. If you do net
want to use it, proceed to step 5.
•DVD-R/DVD+R DL
You c:m start recording immediately
afler [DIS(! ACCESS] disappears from
the LCD screen. You do not need to
proceed to steps after step 5.
When Ihe disc cover ACCESS lamp
opens slightly, open (Disc)
it further.
Pj Set the disc with the recording
side facing your camcorder, then
press the center of the disc until it
clicks.
5Touch the option that is right for
you on the screen.
•DVD-RW
Select tile recording l_era'mt, [VIDEO]
or [VR] (p. 14), tlien touch [6g].
28
• DVD+RW
Select tile aspect ratio of tile movie,
[16:9 WlDEI or [4:31, then louch [_g].
6Touch [YES].
7Touch _when [Completed.] is
displayed.
When tile form:lltin_ is completed, you
can start recording on the disc.
"_° Tips
• When you use a DVD-RW while the Easy
Handycam operation (p. 31) is set, the
recording format is fixed to VIDEO
mode.
Toremovethedisc
@ Perform steps 1and 2to open the disc
cover.
(_) Press the disc holder in the center of the
disc compartment, and remove the disc by
holding the edge.
• If you catch the belt when closing tile disc
cover, it lnay cause your Calllcorder 1o
malflmclion,
• Do not touch the disc with the recording side or
pickup lens (p. 109).
When using a double-sided disc, take care not to
smudge the surlitce with fingerprints.
• If you close the disc cover with the disc sel
incorreclly, it may cause your C_lt/lcorder to
malflmction,
• Do not disconnect the power sources during
l_)rmatting.
• Do not apply shock or vibration to your
camcorder:
while the ACCESS lamp is on
while the ACCESS lamp is flashing
while [DISC ACCESSI or [PREPARING TO
OPENI is displayed on tile LCD screen
• It Inay take some time to remove tile disc
depending on lhe disc condilion or recorded
inaterials.
• It may take up to 10 minutes to remove a disc if
it is damaged or is dirty with fingerprinls, etc. In
that case, the disc mighl be dalnaged.
"_° Tips
• You can relllOVe the disc whell _1 power SOUlCe
is COllll_=cled to your Calllcorder ex,,el/whell youl-
camcorder is turned oil. However, tile disc
recognition process (slep 4) does not slart.
• To delete all ol tile previously recorded ilnages
fronl a DVD-RW/DVD+RW, lhen 1o use il
again to record new ilnages, _e "Deleting all
scenes on the disc/Formatting)" on page 61.
• You can check the righl disc using [DISC
SELECT GUIDEI on the HOME MENU (page
60).
m
g
g.
(J Notes
• Be clu'efill not to obstluct tile operation with
your hand or other ohjects, etc., when opening
or closing tile disc covcr. [Vloxe tile heh to tile
bollonl of tile canlcorder, lhell open or close lhe
disc covcr.
You can use only a "Memory Slick Duo"
marked wilh MEMORYSTICKDUll or
MEMORY5TICK PRO Du0 (p. 104).
"_i° Tips
• Tile numher of rccordahle images xary,
depending on the image quMity or lhe image
size. For delails, _e page 68.
Continued.._ 2g
Step 5: _sertic_ a disc mra °°MemoryStick g_c"/Co,titter}
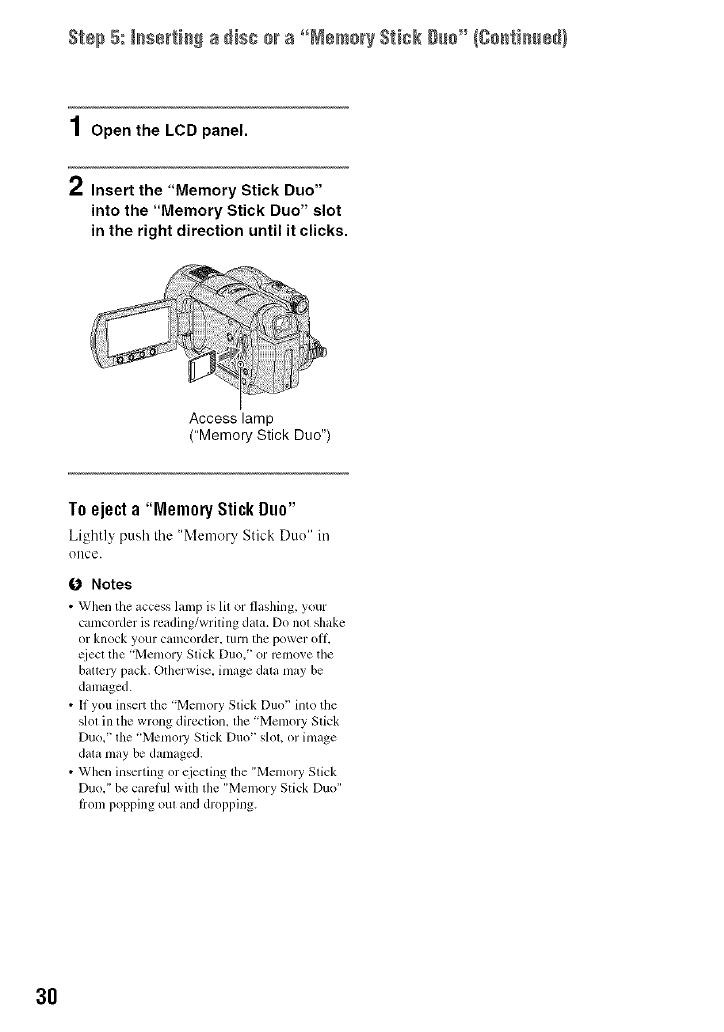
1Open the LCD panel.
2Insert the "Memory Stick Duo"
into the "Memory Stick Duo" slot
in the right direction until it clicks.
Access lamp
("Memory Stick Duo")
To e e "
j cta Memory StickDuo"
Lightly ;:)ush Ihe "Memery Stick Duo" in
()liCe.
Notes
• When the _cccss lamp is lit or flashing, your
camcorder is reading/writing data. Do not shake
or knock yo/ir Call]corder, lurn tile power ott_
qiecl tile "Memory Stick Duo,' or remove the
battcl T pack, Otherwise, image data may be
danlaged.
• If you insert the "Memory Stick Duo' into/tie
slol in (lie wrong direction, lhe "Memory Stick
Duo," the "Memol_ Stick Duo" slot, or image
data may be damaged.
• When inserting or ejecting the "Memory Stick
Duo," be carcfifl with the "Melnory Stick Duo"
trom popping out and dropping.
3O
Re_:ord[n_/Pfayback
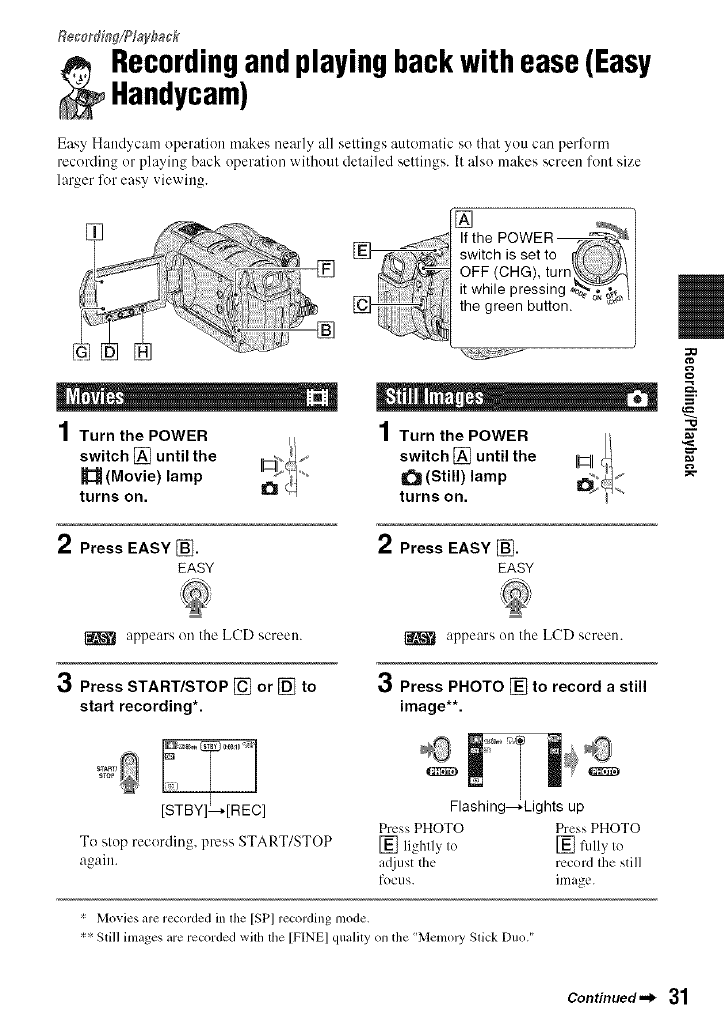
_ecordingandplayingbackwithease(Easy
Handycam)
Easy Handycam operation makes nearly all seltin_s automatic so that you cae perfern;
recerding or playing back operation witbout delailed setlings. It also makes screen lenl size
larger for easy viewing.
If the POWER _J='-,_E
switch is set to [
OFF (CHG), turn\_.\-_JZ.-4/
it while pressing _,_ /|
the green button.
1Turn the POWER
switch [] until the
(Movie) lamp
turns on.
1Turn the POWER
switch [] until the
_ (Still) lamp
turns on.
2Press EASY _].
EASY
2Press EASY _].
EASY
"13
appears on the L(TD screen. appears on Ibe LCD screen.
3Press START/STOP [] or [] to
start recording*.
3Press PHOTO [] to record a still
image**.
..... _]
stop
To slop recording, press START/STOP
again.
Flashing--_Lights up
Press PHOTO Press PHOTO
[] lightly to [] billy to
a(liust the record the still
focus, image.
_: Movies are recorded in lhe [SP] recording mode.
_:_Still images are recorded wiltl the [FINE] quality on the "Memol3' Slick Duo."
Continued._ 31
Rsso_di_Sa_d NaYi_# back wi_h ÷ase (EasyHad@cam} (So_ti_sd}
1Turn the POWER switch [] to turn on your camcorder.
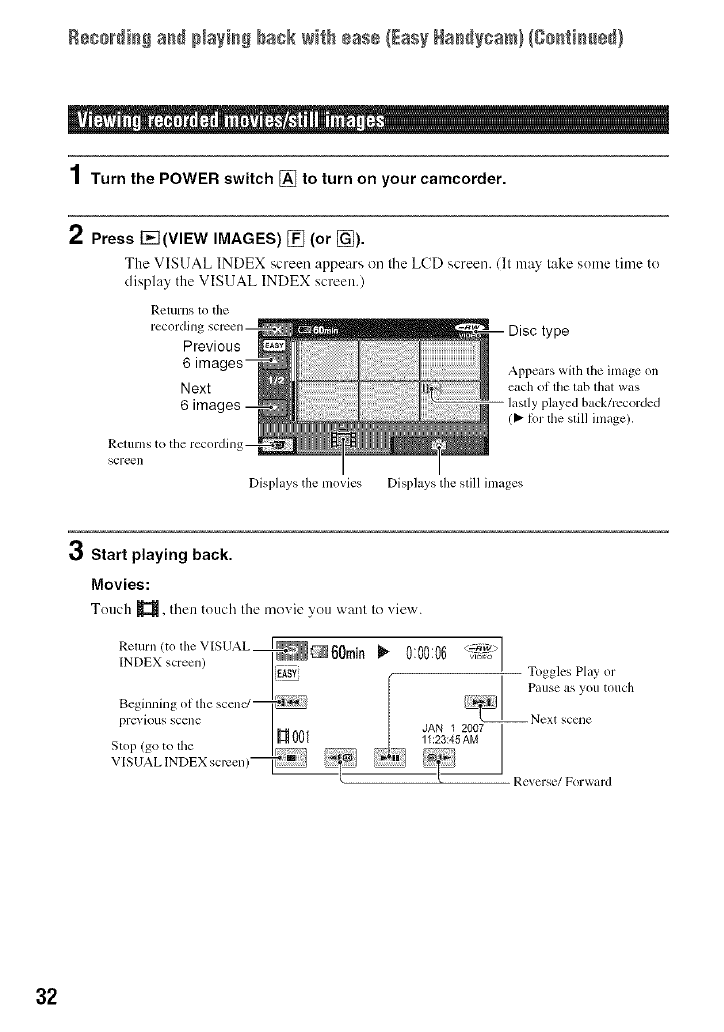
2Press I-_I(VIEW IMAGES) [] (or [_).
The VISUAL INDEX screen appears on file LCD screen. (It may take some time te
display the VISUAL INDEX screen.)
Returns tO the
Previous
Appears with tile inlage on
Next each oI tile tab that was
6lastly played ba,ck/rccorded
(_" h)r the still inlage).
Rcturns to the recordinl
scre_l]
Displays tile movies Displays tile still images
Start playing back.
Movies:
Touch _, then touch the moxie you want to view.
Relr]( _ eV SUAL I_,,_ . _-_iw>l I
INDEX creen I,
I_ -- Toggles Play _r
PaIISC _IS yoII tOllch
Beginnillg Ol tile scenc/_
pl'evious scene 001 JAN_ _ 2007I1 2007
,, , _ Z3:45AM I
11:23:45AM
St( 1 (got( tile I.....
V [SUAL INDEX screen) _
l[ Reverse/Forward
32
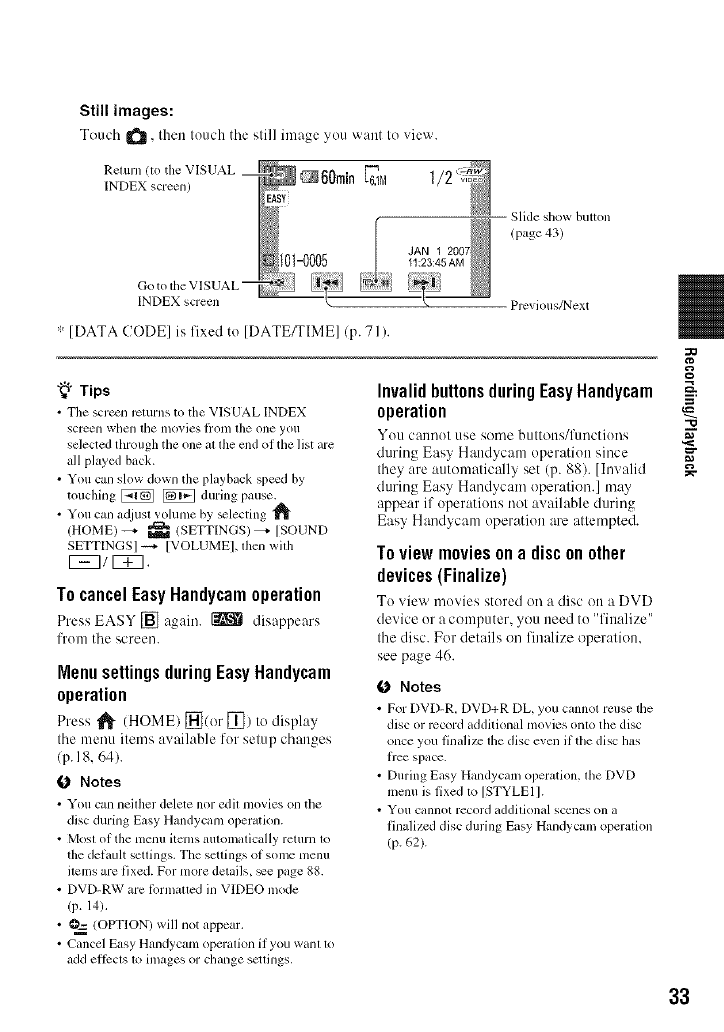
Still images:
Touch ItS, then touchtile slill image you want It)xiew.
Return/to tile VISUAL
INDEX screen)
INDEX screen
* [DATA CODE] is fixed to [DATE/TIME]/p. 71 ).
Slide show button
(page 43)
Previous/Next
"_° Tips
• Tile scr_n rcturns to tile VISUAL INDEX
screen when tile In(ivies li'onl tile one you
selected through the one al lhe mid of the list are
all played back.
• You can slow down the playback spe_d by
touching _ _ during pause.
• You can adjust volume by _lecting
/HOME) -_- _ (SETTINGS) _ [SOUND
SETTINGS] _ [VOLUMEI, then with
EE3/EZ].
To cancelEasyHandycamoperation
Press EASY [] again. _ disappears
['rom the screen.
Menusettingsduring EasyHandycam
operation
Press _ (HOME) _(or _]) to display
the menu items awfilable for setup changes
/p. 18, 64).
ONotes
• You can neilher delete nor edil movies on the
disc during Easy Handycam opermkm.
• Mosl of tile menu itcms automatically return to
tile detault setlings. Tile settings of some menu
ilelns are fixed. For more details, _e page 88.
• DVD-RW are lPrnlulled in VIDEO mode
/P. 14).
• O=_ (OPTION) will not appear.
• Cancel Easy Handycam operation if you want to
add ellccts 1o images or change scuings.
InvalidbuttonsduringEasyHandycam
operation
You cannot use some buttotts/l)lnctions
during Easy Handycanl operation since
they are automatically set (p. 88). [Invalid
during Easy Handycam operation.] may
appear if operations not available during
Easy Handycam operation are attempted.
To view movies on a discon other
devices(Finalize)
To view movies stored on a disc on a DVD
device or a computer, you need to "finalize"
the disc. For details on finalize operation,
see page 46.
0 Notes
• For DVD-R. DVD+R DL, you cannot reuse tile
disc or record additional movies onlo the disc
once you finalize lhe disc even if the disc bs
fice space.
• During Easy Handycam operation, file DVD
menu is fixed to [STYLE1 I.
• You cannot record addilional scenes on a
finalized disc during Easy Handycanl operation
(p. 62).
33
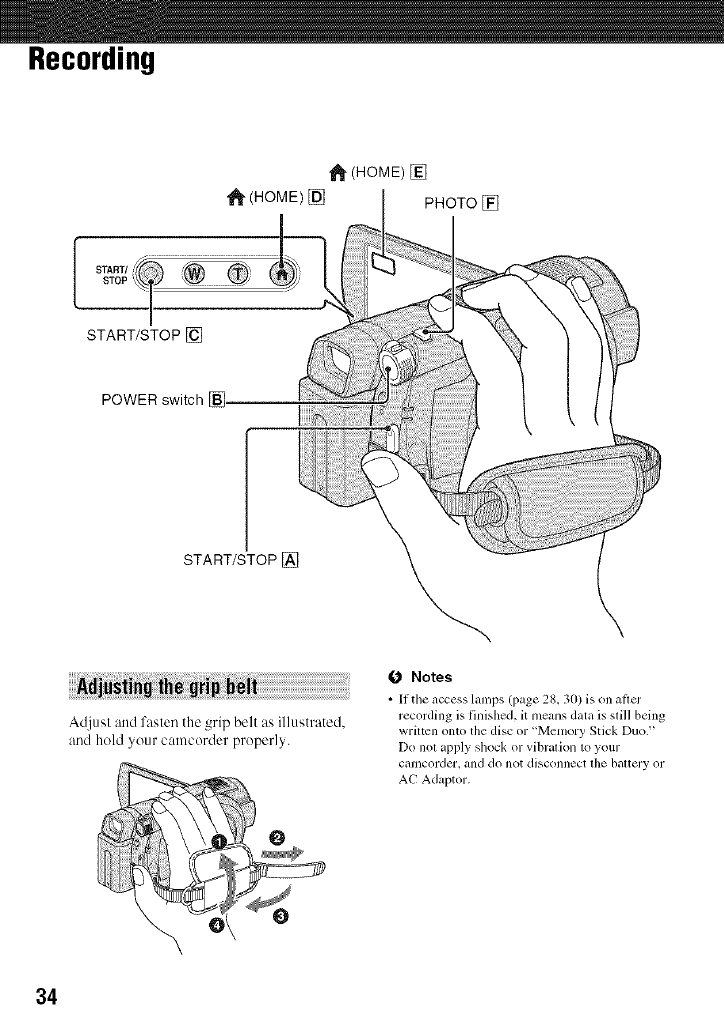
Recording
1_ (HOM E) []
1_ (HOME) [] PHOTO []
START/STOP[]
POWER switch []
START/STOP[_]
Adjusl and fasten the grip belt as illustrated,
and hold your calncorder properly.
0Notes
•lithe _ccess lanlps (page 28, 30) is on aflcr
recording is finished, it means data is still being
wriltcn onto the disc or "Memory Stick Duo."
Do not apply shock or vibration to your
camcorder, and do not disconnect the battery or
AC Adaptor.
34
Movies are recorded on the disc. For
recordable lime, see page 14.
1Turn the POWER
switch [] until
the _(Movie)
lamp turns on.
Still images are recorded on the "Memory
Stick Duo.' For tile number of recordable
still images, see page 68.
1Turn the POWER
switch [] until the
O(Still) lamp
turns on.
2Press START/STOP [] (or [_).
[STBY]-.-*[REC]
To slop recording, press START/STOP
again.
2Press PHOTO [_.
• Lights up Click
Press slighdy Press lkfllto
[O fOCUS rL'C ord
UIM appears next to _ .When mM
disappears, Ihe image has been
recorded.
To switch to the movie recording
modeusingthe _(HOME)button[]
(or [])
Touch _ /CAMERA) of HOME MENll
-+ [MOVIE] or [PHOTO].
Torecordhighresolutionstill images
onthe"MemoryStick Duo"during
movierecording(DualRec)
See page 37 for details.
Continued._ 35
Recordi_# {80_ti_ed)
36
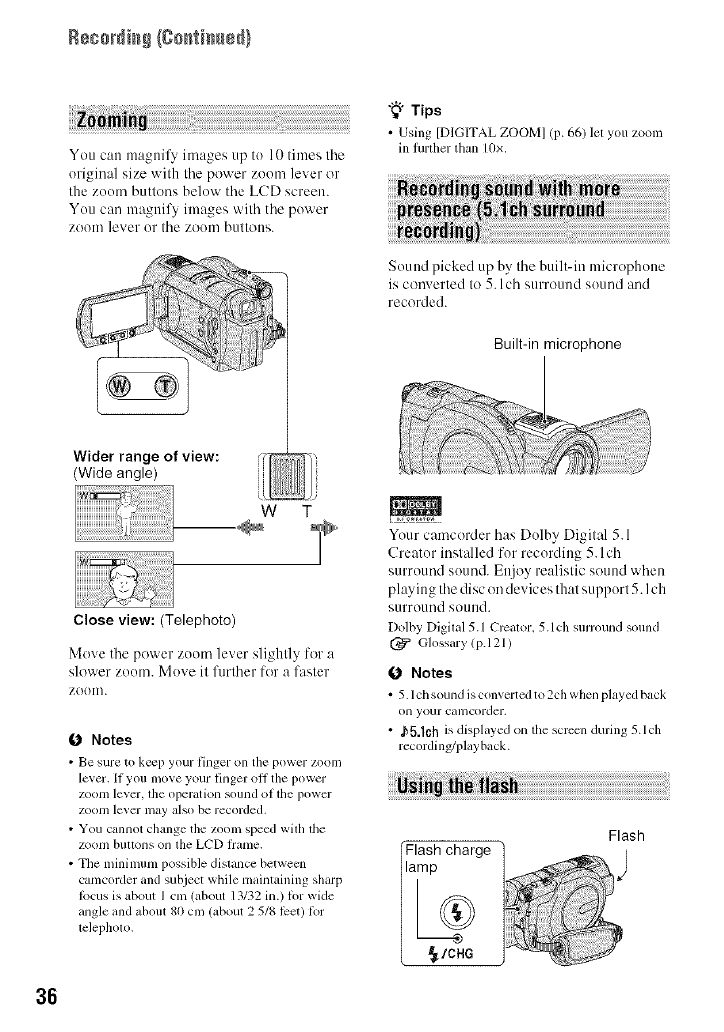
You can magnil3 images up to 10 times tile
original size with tile power zoom lever or
the zomn buttons below tile LCD screen.
You can magnify images with tile power
zoom lever or tile zoom buttons.
Wider range of view:
(Wide angle)
w T
Close view: (Telephoto)
Move tile power zoom lever slightly for a
slower zoom. Move it fllrther for a faster
ZOOIl].
0Notes
• Bt" sure to keep your l]llgt'r on the power ZOOll/
le_er. II you mo_e your finger oll the power
zoonl level', tile operation sound of tile power
ZOOIII level" lll_ly ills() be recorded,
• You cannot change the zomn speed wilh lhe
zoom buttons on tile LCD flame.
• The n/inimmn possible distance betwecn
camcorder and subject while maintaining sharp
locus is about Icm (about 13132 in.) lor wide
angle and about 80 cm (about 2 5/8 lcet) Ibr
telephoto.
"_° Tips
• Using [DIGITAL ZOOM] (p. 66) let you zoon_
in further than 10x.
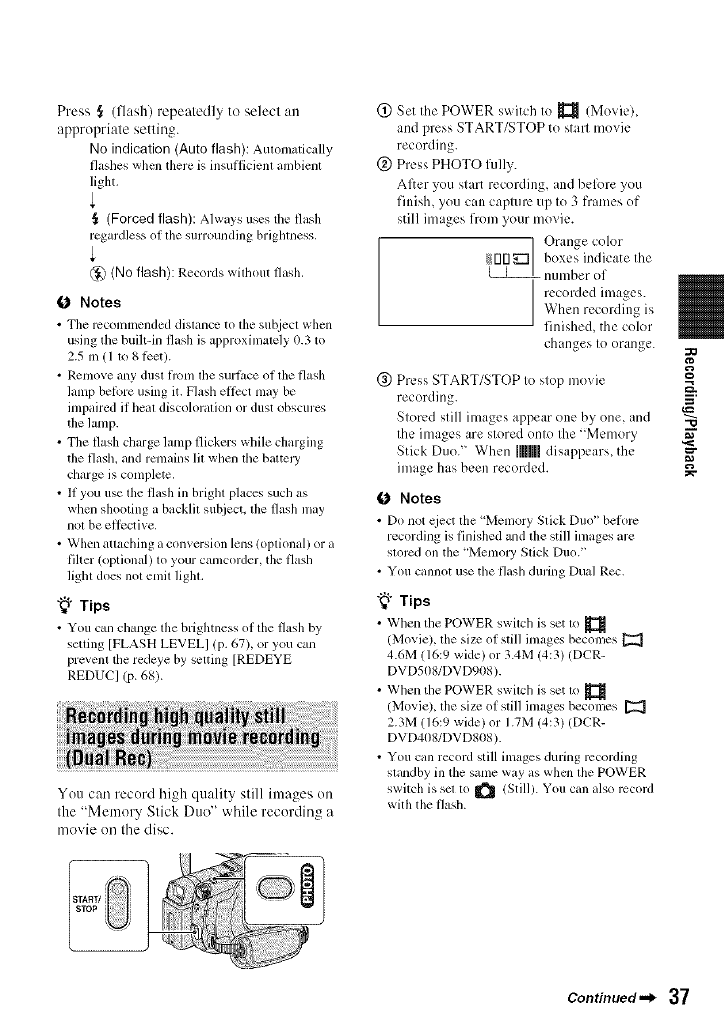
Sound picked up by tile built-in microphone
is converted to 5. l ch surround sound and
recorded.
Built-in microphone
Your camcorder has Dolby Digit_d 5.1
Creator installed for recording 5.lch
surround sound. Enjoy realistic sound when
playing tile disc on devices that support 5. I ch
surround SOOlld.
Dolby Digilal 5.1 Crcalor. 5.1 ch surround sound
Glossary lpA 21)
0Notes
• 5.1 ch sound is converted to 2ch when played back
on your camcorder.
• ,b5.1Ch is displayed on the sclvcn during 5.1ch
recording/playback.
Flash charge
_/CHG
Flash
Press ,_ (flash) repeatedly to select an
appropriate setting.
No indication (Auto flash): Automatically
flashes when there is insul]icienl ambienl
light.
(Forced flash): Always uses tile flash
regardless of lhe surrounding brighmess.
@ (No flash): Records wilhout flash.
(J Notes
• Tile recommended distance to tile sub.iect when
using the buih-in flash is al)l)roximalely 0.3 to
2.5 m 111o 81Pet).
• Remove any dusl fionl lhe surl_mc of lhe flash
lamp belbre using it. Flash efi)ct may be
inlpaired if Ileal discoloralion or dust obscures
the lamp.
• The flash charge lamp flickers while charging
the flash, and rmnains Ill when lhe battel T
charge is complete.
• If you use the flash ill brighl places such as
when shooting a backlil subject, lhe flash nlay
nol be ellcctive.
• When attaching a conversion lens (optional) or a
filter (optional) lo your camcorder, tile flash
light does no1 enlit light,
"_° Tips
• You cml cbnge tile brightness of tile flash by
setting [FLASH LEVEL[ (p. 67), or you can
prevent tile redeye by setting [REDEYE
REDUC] (p. 68).
You can record high quality still images on
the "Memory Stick Duo" while recording a
movie on the disc.
® Set the POWER switch to _ (Movie),
and press START/STOP to start movie
recording.
@ Press PHOTO fully.
After you start recording, and belk)re you
finish, you can capture up to 3 frames of
still images from your movie.
] Orange color
rlrl_:]/ boxes indicate Ihe
number of
I recorded images.
/ When recording is
finished, the color
changes to orange.
®Press START/STOP Io slop movie
recording.
Stored still images appear one by one, and ._
the images are stored onto the "Memory ._
Stick Duo." When IIMIIdisappears_ the
image has been recorded.
(J Notes
• Do not cject the 'Menlory Stick Duo" beiknc
recording is finished and the still images are
slorcd on tile 'Memory Slick Duo."
• You cannot use the flash during Dual Rec,
"_° Tips
• When tile POWER swilch is set 1o
/Movie), the size of still imagcs beconles
4.6M (16:9 wide) or 3.4M (4:3) (DCR-
DVD5OS/DVD908 ).
• When the POWER switch is set to
(Movie), lhe size of slill imagcs becomes [_
2.3M (16:9 wide) or 1.7M (4:3) (DCR-
DVD4OS/DVDS08 ).
• You can record still images during recording
standby ill the same way as when the POWER
switch is sm to _ (Still). You call also record
with the flash.
Continued._ 37
Rec0_di_# {C0_ti_ed)
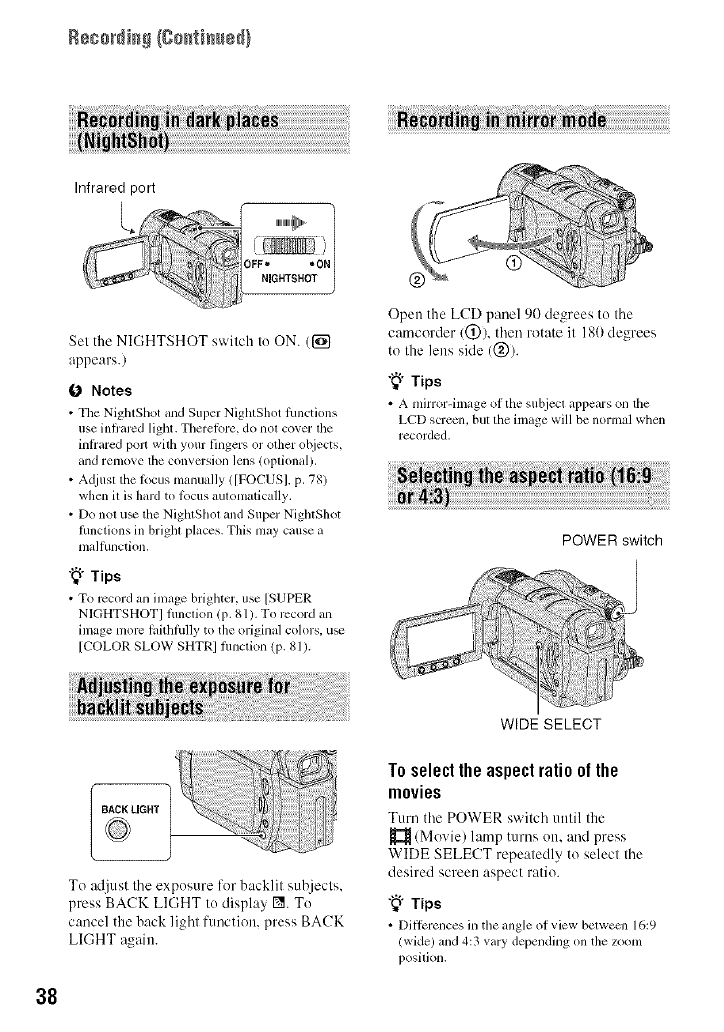
Infrared port
Set the NIGHTSHOT switch to ON. (1_
appears.)
O Notes
• Tile NightShot mM Super NightShot fimctions
use inlrarcd light. Theretbre, do not cover tile
hlffared poJr with your fingers or off,m o[_iects,
and l-emme tim convcrsion lens lopfiomd).
• A@lst tim locus manually ![FOCUS[, p. 781
when it is haM to _bcus mllomafically.
• Do not u_ the NightShol and Super N]ghtShot
hu_ctions in bl'ighl places. This may cruise u
malfunction.
"_° Tips
•To rccoM an image brighter, use [SUPER
NIGHTSHOTI fimcfion (p. 81). To rccord an
image more laithlhlly to the original colors, use
[COLOR SLOW SHTRI lunction (p. 81).
Open the LCD panel 90 degrees to the
camcorder/@/, then rotate it 180 degrees
to the lens side (@).
"_° Tips
• A mirror-linage ol the subject appears on the
LCD screcn, but the image will be normal when
recorded.
POWER switch
BACK LIGHT
To adjust the exposure for backlit subjects.
press BACK LIGHT to display I_. To
cancel the back light function, press BACK
LIGHT again.
WIDE SELECT
Toselecttheaspectratioofthe
movies
Turn the POWER switch until the
(Movie) lamp turns on. and press
WIDE SELECT repeatedly to select the
desired screen aspect ratio.
"{" Tips
• Ditlia-ences in the angle of view betwecn 16:9
(wide) and 4:3 vary depending on the zoom
position.
38
• When you vicw lhe movie on a TV, sm [TV
TYPEI 1o [16:91 or [4:31 according to your TV
(16:9/4:3) (p. 44),
• When viewing 16:9 (wide) pictures wilh [TV
TYPEI set to [4:31, pictures may appear rough
dcpending on subjects.
Toselect the aspectratio of the still
images
(i) Turn thePOWERswitchuntil the
O (Still)lampturnson.
@ PressWIDESELECTrepeatedlyto select
the desiredscreenaspectratio.
O Notes
• Tile siz*:of still images is 112213.0M1 (16:9
wide) or [4.0MI (4:3) at the maximum/DCR-
DVD408/DVD808).
• The size of still images is [[2_4.6MI /16:9
wide) or [6.1MI (4:3) at the maximum/DCR-
DVDSO8/DVD908).
"_° Tips
• See p_ge 69 lor the number ot rccordable still
images.
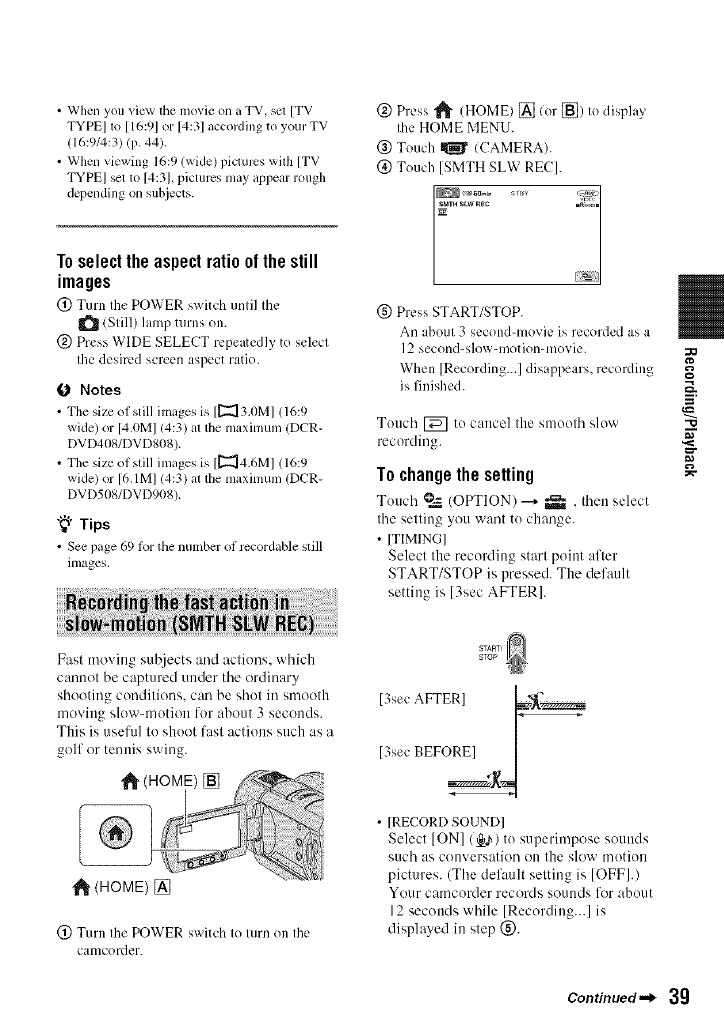
O Press _ (HOME) [] (or [_) to display
the HOME MENU.
(_) Touch _ ICAMERA).
(!) Touch [SMTH SLW REC].
(g) Press START/STOP.
An about 3 second-movie is recorded as a
12 second-slow-motion-movie.
When [Recording...] disappears, rccordill_
is finished.
Touch [_] to cancel the smooth slow "_
recording. ,<_
To change the setting
Touch ?_ (OPTION) --4 _ , then select
the setting you want to change.
• [TIMING]
Select the recording start point after
START/STOP is pressed. The default
setting is [3sec AFTER].
Fast moving sut)jects and actions, which
cannot be captured under the ordinary
shooting conditions, can be shot in smooth
moving slow-motion for about 3 seconds.
This is useful to shoot fast actions such as a
golf or tennis swing.
_1_(HOME) []
(_ Turn the POWER switch to turn on the
calllcordt:r.
I _
13secAFTER] /
[3sec BEFORE] ,/
• IRECORD SOUND]
Select ION] (_a,) to superimpose sounds
such as conversation ou the slow motiou
pictures. (The default setting is [OFF].)
Your camcorder records SO/luds for about
12 seconds while [Recording...] is
displayed in step (_).
Continued._ 39

B88o_i_ (go_ti_sd}
0 Notes
•Sounds arc not recorded during tile about 3
_Colld-t/lOVie shooting.
• Image quality of [S[VITH SLW RE('] is not as
good as thai of normal recording.
4O
Playback
Zoom lever []
_" (HOME) []
I-el(VIEW IMAGES) [] []_(VlEW IMAGES) []
POWER switch []
Turn the POWER switch [] to turn on your camcorder.
Press [_ (VIEW IMAGES) [] (or []).
Tile VISUAL INDEX screen appc:u's on tile LCD screen. (It teay lake some time Ie
display tile VISUAL INDEX screen.)
Renlrns t(>tile
rccordinl
Previous
Next
6 ima(
Returns to tile
rccording
Disc type
Appears with file image on
each of the tab lhat was
lastly played back/rccorded
-- /l_ lk)r the slill inlage).
?,_(OPTION)
Displays die nlovies Displays lhe slill inlages
"_° Tips
• Moxing tile ZOOllllever [] lcl you select whefller to display 6 or 12 inlages on the VISUAL INDEX
screen. To lix this number, touch _ /SETTINGS) in the HOME MENU _ [VIEW IMAGES SETI
--_ [ [] DISPLAYI (p. 711.
Continued-_ 41
Start playing back
M m
Touch _tab and the movie to be played back.
Tile VISUAL INDEX screen reappears when playback fron/the selected movie until tile
last movie is compleled.
Return (to the VISUAL @_ _60m+n
INDEX screen)
j_.+oh
Beginning of the scen_
previous SCCIIC
Stll l) (go to the _001
V [SUAL lNDEX screen)
-- Togglus Play or
Pallse as you tOllch
.............+ °2a,.d
Touch _ tab and the still image to be played back.
Return (to tl_e VISUAL
INDEX screen)
INDEX screen
101-0015 +Slide show button
(page43)
Previous/Next
To switch to the playback mode
using the _" (HOME) button [] (or
Touch [_ (VIEW IMAGES)-+ IVISUAL
INDEX]
To adjust the movie volume
Touch @=_--(OPTION)-'+ [_ tah -...+
[VOLUME], then adjust it with [_/[_.
"_°Tips
•Touch [_/_ during pause to play back
movie slowly.
• One touch makes the rcxcrsc/litst forward
approximately 5 times l_ster, two touches makes
il approximale]y 10 times* li*sler.
* Approximately 8 times laster using a DVD+RW
42
You can magnil_, still images from about
I. 1 to 5 times tile original size.
Magnification can be adjusted with the
power zooin lever or the zooin buttons oil
the LCD frame.
(i) Play back tile still images you want to
magnify.
(_) Magnify the still image with T
(Telephoto).
The screen is lramed.
@ Touch the screen at the point you want
to display in the center of the displayed
frame.
(_) Acliust tile magnification with W (Wide
angle)/T (Telephoto).
To cancel, touch [_].
Touch NS_ on the still image playback
screen.
The slide show begins from the selected
image.
Touch _ to stop the slkle show. To
restart, touch _ again.
0Notes
• You cannol operate playback zoom during slide
show.
"_° Tips
• You can set continuous slide show playback
using [SLIDE SHOW SETI on _ (OPTION)
_ tab. The defauh selling is [ONI
(continuous playback).
"O
43
Playingthe pictureona TV
Cennecl your camcorder to Ihe input jack of TV or VCR usin_ A/V cennecling cable [] or
A/V cenr)ecting cable wilh S VIDEO[_. Connect your camcc'_rder to the "x,rall cmtlel using the
supplied AC Adaptor for tiffs operation (p.22). Refer also to the inslruction manuals supplied
wilh Ihe de_ ices te be connecled.
%
f
Device without
S VIDEO jack
IN
VIDEO
/Red)
Device with
S VIDEO jack
IN S VIDEO
@
V'%E°
/Red)
44
AN OUT jack
, , :Signal flow
[] A/V connecting cable (supplied)
(_'onnect to tile hlput jack OI the other dc_, ice,
[] A/VconnectingcablewithS VIDEO
(optional)
When connecting to another device via the S
VIDEO jack, by using an A/V connecting cuble
witll an S VIDEO cable/optional), higller
quality pictures can be produced than with an
A/V connecting cable. Connect the wllile and
red plug !leltMghl audio) and the S VIDEO
plug/S VIDEO channel) of tile A/V connecting
cable with an S VIDEO cable (optional). The
yellow plug connection is not necessary. S
VIDEO connection only will not output audio.
When your TV is connected to a VCR
Connect your camcoMer to the LINE IN
input on the VCR. Set the input selector on
the VCR to LINE (VIDEO 1.VIDEO 2. etc.),
if the VCR has an input selector.
VCRs or TVs
Toset the aspectratio accordingto the
connectedTV(16:9/4:3)
Change the setting according to the screen
aspect ratio of the TV you will view pictures
OI'1.
(_) Turn the POWER switch to turn on your
camcorder.
@ Touch _!_ (HOME) --_
_ (SETTINGS) ---+ [OUTPUT
SETTINGS] ---+ [TV TYPE] ---+ [I 6:9] or
14:31 ---+ [_]].
ONotes
• '_Vllen you C'Ollnecl your cnmcorder to a TV
compatible with tile ID-I/ID-2 systeln and play
back tile disc, sel [TV TYPE] 1o [16:91. The TV
switches to lhn mode automatically. Refi:r also to
llle insmlclion manuals supplied witll your TV.
• When you set [TV TYPE] to [4:31, the image
qualily may deteriorale. Also, wllen the recorded
picture's w, pect ratio swilches between 16:9
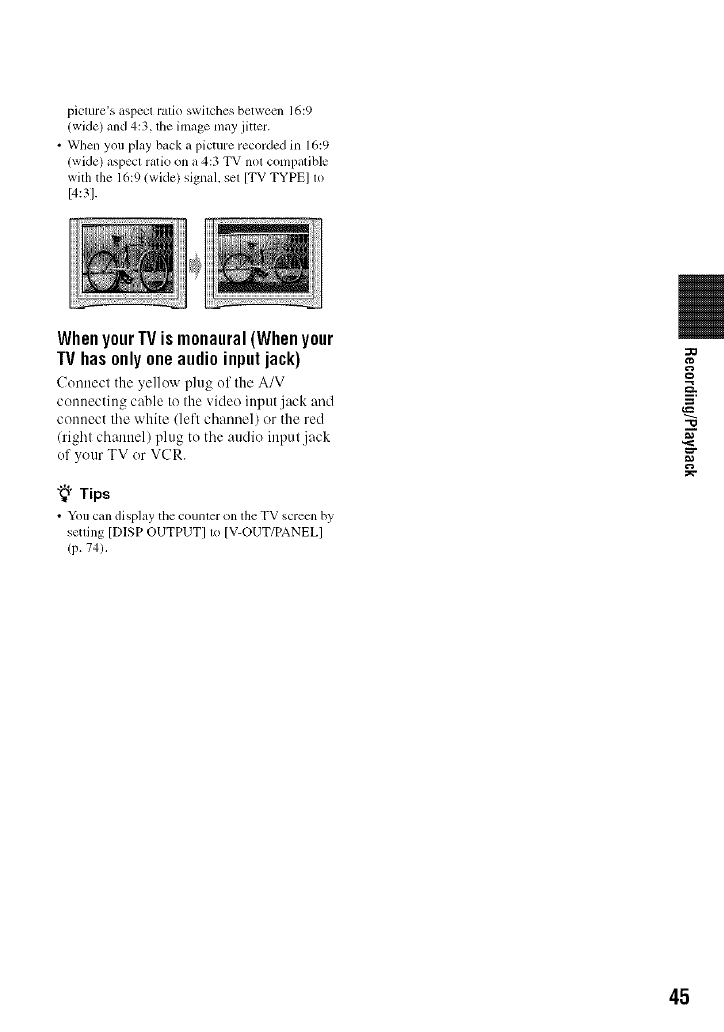
(wide) and 4:3, the image may jiuer.
• When you play back a picture recorded in 16:9
(wide) aspecl ratio on a 4:3 TV not compatible
wilh the 16:9 (wide) signal, sel [TV TYPE] to
[4:3].
WhenyourIV ismonaural(Whenyour
IV hasonly oneaudioinputjack)
Connect the yellow plug of the A/V
connecting cable to the video input jack and
connect the white (left channel) or the red
(right channel) plug to the audio input jack
of your TV or VCR.
"_° Tips
• Yon can displzly the counter on the TV screcn by
setting [DISP OUTPUT] t_ IV-OUT/PANEL]
(p. 74),
-(3
45
Makingthe disccompatiblewith playbackon
otherdevicesor DVDdrives(Finalizing)
Finalizing makes the recorded disc compatible for playback with ()tiler devices and DVD
drives of computers.
Before finalizing, you ca(( select the style of the DVD menu which displays tile image list
(p. 49).
Whether finalizing is required depends on the type of disc.
DVD-RW/DVD-R/DVD+R DL require finalizing.
DVD+RW do not require finalizing except in the following cases:
(_) To create a DVD menu
@ To play back on a computer DVD drive
@ If the disc has a short total recording time (less than 5 rain ill HQ mode, 8 rain in SP mode, or
15 rain ill LP mode)
(J Notes
• Playback conlpatibility with all device is llOt gU_tl'alll_d.
• No DVD menu is created for DVD-RW (VR mode).
_.,_To play backa disc in a DVDdevicefor the firsttime (p.48)
Inca_(_),
®or®.
ItileDVD menu.
46
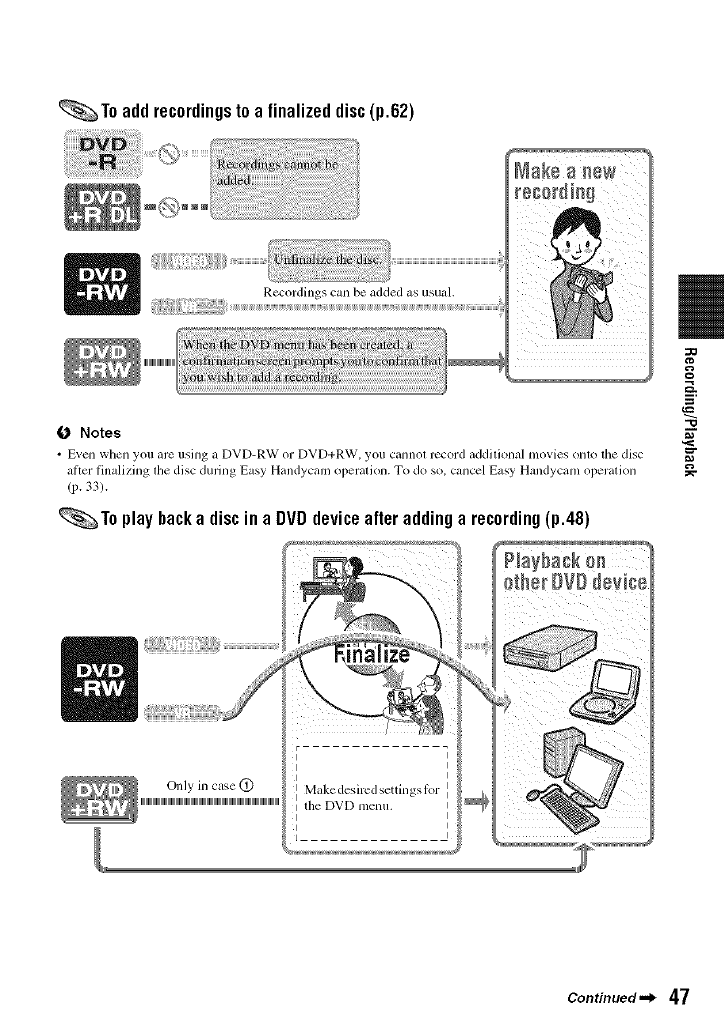
_To add recordingsto a finalized disc(p.62)
Recordings can be added as usual.
-o
O Notes
•Even when you are usillg a DVD-RXN or DVD+R_V, you calmot record additiollal movies ollto the disc m_
_ltter tinalizing d_e disc during Easy Handycam operation. To do so. cancel Easy Handycam operation
(p. 33).
_To play backa discina DVDdeviceafteraddinga recording(p.48)
Continued._ 47
Mak[a@th÷ dis_ co_pa?[N÷ wRhNayback oa o?h÷_devices o_DVDdHv÷s
O Notes
• It takes fl'om a mhmte to a maximum ol _veral
hours to finalize a disc. Tile shorter the amount
of material recorded on the disc, tile longer it
takes lor finalizing.
• Use the AC Adaptor as the power source to
prcvent your calncorder l]'om r/inning ()/it ol
power during finalizing.
• When you finalize a double-sided disc, you
nmst linalizc each side of the disc individually.
Place your camcorder in a stable
position, and connect the AC
Adaptor to the DC IN jack on your
camcorder.
iTurn on the power by turning the
POWER switch.
3Insert the disc that you want to
finalize.
4Touch _[:_(MANAGE DISC/
MEMORY) of the _[HOME)
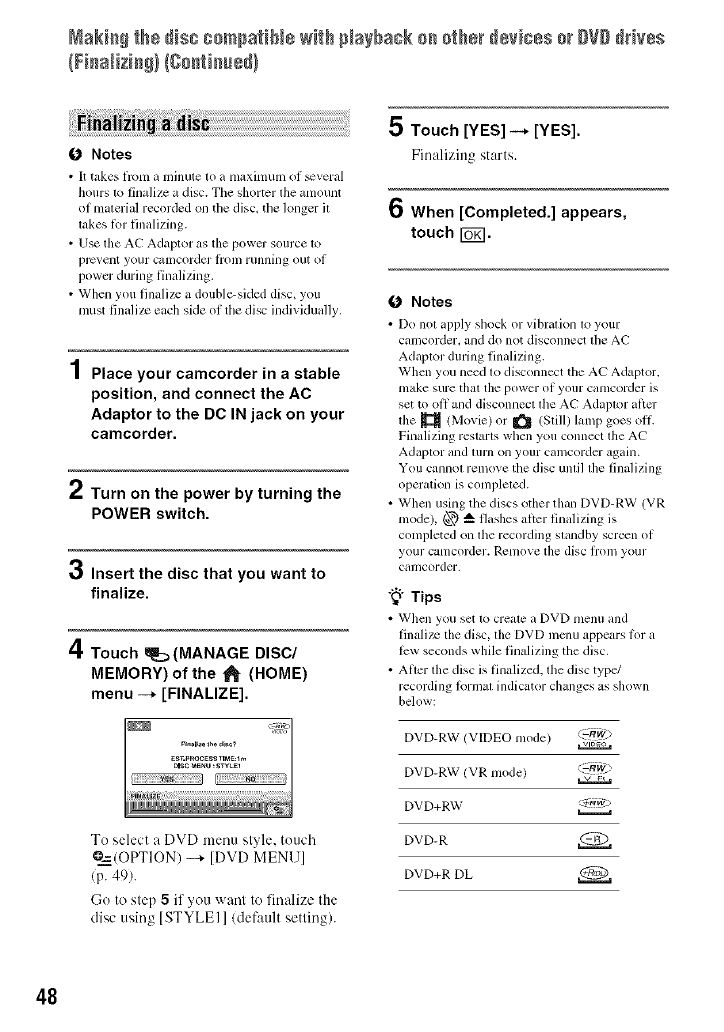
menu -+ [FINALIZE].
To select a DVD menu style, touch
@=2=(OPTION) _ [DVD MENU]
(p. 49).
Go to step 5if you want to fin:dize the
disc using [STYLEI ]/default setting/.
5 Touch [YES] -* [YES].
Finalizing starts.
6When [Completed.] appears,
touch FU_I.
O Notes
• Do not apply shock or vihration to your
camcoMer, mid do not disconnect tile AC
Adaptor during finalizing.
When you need to disconnect tile AE"Adaptor.
nlake sure thai tile power ol your caIllcorder is
set to oil and disconnect file A(-" Adaptor alicr
tile _ (Movie) or _ (Still) lamp goes oil
Finalizing restarts when you connect the AC
Adaptor and 1111"11on your camcorder again.
You cannot remove tile disc until tile finalizing
operation is completed.
• When using the discs other than DVD-RW (VR
mode), @ _ flashes alter finalizing is
completed on the recording standby screen of
your ca[llcorder. Rcnlove the disc lroll/ your
camcorder.
"_° Tips
• _Vhell you set [o crea[e a DVD l/lenu and
linalize tile disc, tile DVD nlenu appears lor a
lew seconds while finalizing the disc.
• After the disc is finalized, the disc type/
recording lormat indicator changes as shown
below:
DVD-RW (VIDEO mode) ,_:--k_)
DVD-RW/VR mode) :-RW2>
DVD+RW <_g,,v
DVD-R
DVD+R DL
48
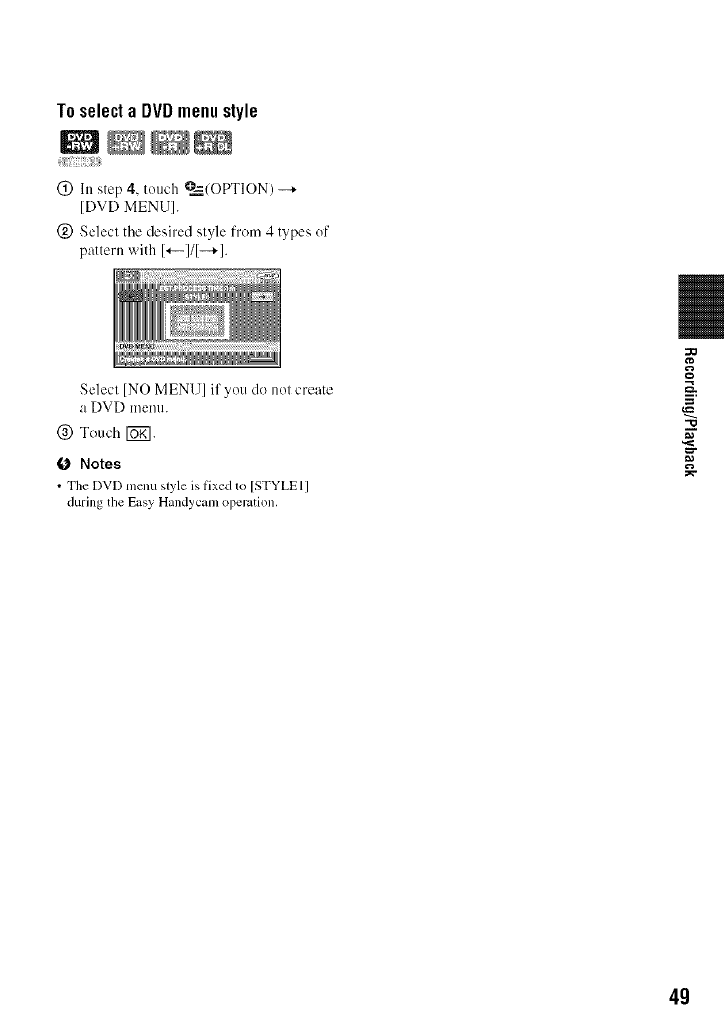
To select a DVD menu style
:iiiji{iiil]ii;TiTi!_iiTJJiit
(_) In step 4, touch @=_,/OPTION) --+
[DVD MENU].
(_) Select the desired style from 4 types of
pattern with I'--I/I-+1.
Select [NO MENU] if you do not create
a DVD menu.
@ Touch [UK].
O Notes
• The DVD mcnu style is l]xed to [STYLE l]
during the Easy Handycam operation.
--=h.
"O
4g
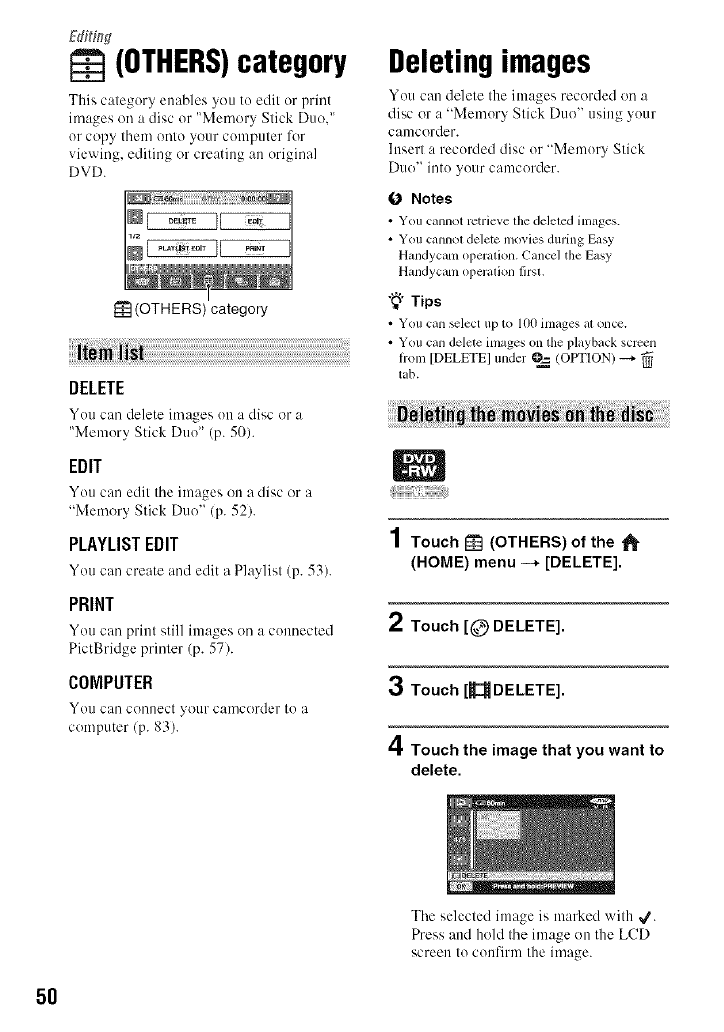
(OTHERS)category
This category enables you to edit or print
images oil a disc or "Memory Stick Duo,"
or copy them onto your computer for
viewing, editing or creating an original
DVD.
(OTHERS) category
DELETE
You can delete images on a disc or a
"Memory Stick Duo" (p. 50).
EDIT
You can edit the images on a disc or a
"Memory Stick Duo" (p. 52).
PLAYLIST EDIT
You can create and edit a Playlist (p. 53).
PRINT
You can print still images on a connected
PictBridge printer (p. 57).
COMPUTER
YOll C:H] conlleCt _O/lr camcorder to a
computer (p. 83).
Deletingimages
You can delete the images recorded on a
disc or a "Memory Stick Duo" using your
canlcorder.
Insert a recorded disc or "Memory Stick
Dtlo" into yotlr camcorder.
0 Notes
• You cannot retrieve lhe deleled inl_ges.
• You cannol delete ino_ ies during Easy
Hmldycam operation. Cancel the Easy
Hmldycam operalion lirsl.
"_° Tips
• You can _lect up to I(IOimages al oncc.
• You c_uldelete images on the playb_tck screen
honl [DELETE] under @=_(OPTION) _.
tab.
1Touch _ (OTHERS) of the _-
(HOME) menu --* [DELETE].
2Touch [@ DELETE].
3Touch[_DELETE].
4Touch the image that you want to
delete.
The selecled image is marked with _.
Press and hold the image on the LCD
screen Io confirnt the image.
5O
Touch 1_7 to relurn Io the pre'dous
SCFeeI].
5 Touch _-+ [YES] -+ Ib_l.
Todelete all moviesonthe discat one
time
ht step 3. touc'h [_DELETE ALL] -_
[YES]--,- [YES]--,- [_].
To delete the most recently recorded
movie
NtNI
ht step 3, touch [_LAST SCENE DELl
-.-* rug] -.-, [YES] -.-* rug].
0 Notes
•Do not rcnlove tile battery pack or the AC
Adaptor fi'om your came'order while editing
images. It may damage the disc.
• If the deleted movie is included in the Playlist
(p. 53), the movie is deleled also from lhe
Playlisl.
• Even if you delete unnecessary images lrom lhe
disc, lhe remaining disc capacity nlay not
increase as much as you can nmke additional
recording.
• To delete all images recorded in the disc and
restore the original capacity of tile disc, t_wmat
the disc !page 61 ).
"_° Tips
• The images recorded by this camcorder and
stored onto a disc are called "original."
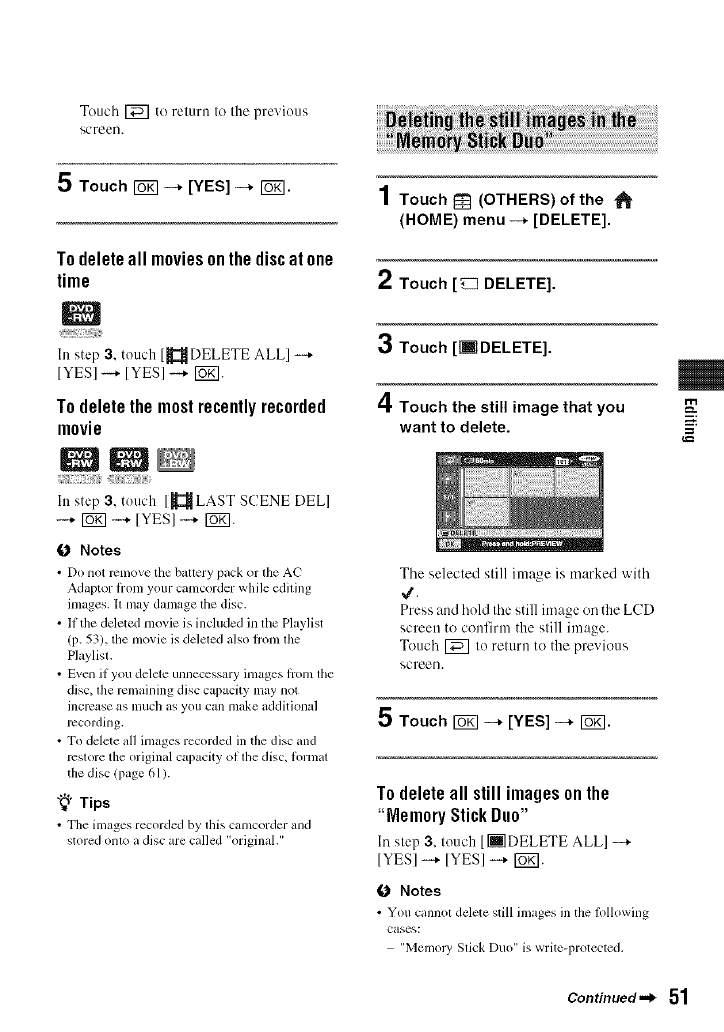
1Touch _] (OTHERS) of the "_
(HOME) menu --+ [DELETE].
2Touch [_ DELETE].
3Touch [liTDELETE].
4Touch the still image that you
want to delete.
The selected still image is marked with
4.
Press attd hold the still image on the LCD
screen to confirm the still image.
Touch [_] to retttrn to the previous
screen.
5 Touch _-+ [YES] -+ r_l.
Todeleteall stillimagesonthe
"MemoryStickDuo"
In step 3, touch [[] DELETE ALLI -+
[YES] -+ [YES] -+ [Ug].
0Notes
• You cannot delete still images in the following
cases:
"Memoly Slick Duo" is write-protected.
m
m,
g
Continued._ 51
write-protection is set to the still images by
the other device.
"_" Tips
• To delete all images recorded on dm 'Memory
Stick Duo," l_wmal tile ' Memoly Slick Duo"
lP. 62).
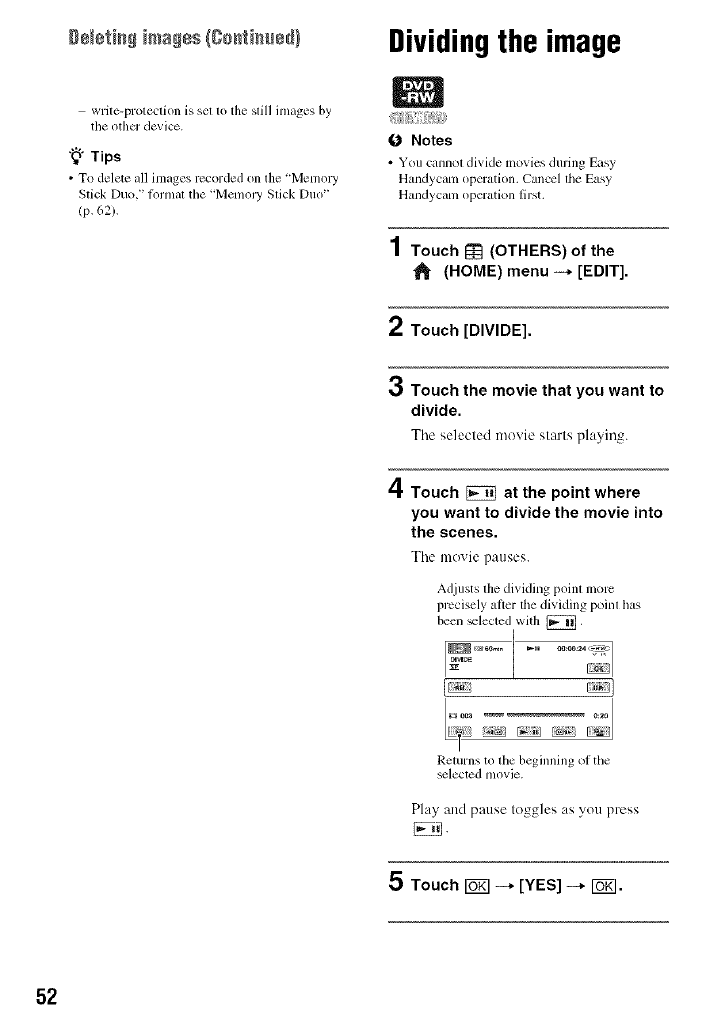
Dividingthe image
ONotes
• You C_lllllO[ divide lnovies during Easy
Handycam operation. Cancel the Easy
Handycam operation first.
1Touch _ (OTHERS) of the
(HOME) menu -* [EDIT].
2Touch [DIVIDE].
3Touch the movie that you want to
divide.
Tile selected moxie starts playing.
4Touch _at the point where
you want to divide the movie into
the scenes.
Tile movie pauses.
Adjusts tiledividing point more
precisely alier thedividing point has
been _lected with [_],
Returns to the beginning ot the
_lected movie.
Play and pause toggles as you press
5 Touch _--+ [YES] --+ I_gl.
52

O Notes
• Mo_ies cannot be reslorcd once flley _uc
divided.
• Do not remove tlae battery pack or ll_e AC
A&apmr ti'om your c_m_corder while editing
images. II may damage ll/e disc,
• Even if the divided movie is included in ll_e
Playlist, the movie is not divided in the Playlist.
• A slight dil]crence m_ty occur irom tile point
where you touch [_ and the actual dividing
point, as your camcorder selects the dividing
point based on about hall;-second incremcnts.
Creatingthe Playlist
_iii{iiiiiii/!ii;!_Siiiiiiiii_,i)iiii/_¸
A Playlist is a list showing thumbnails of
the movies that you have selected. The
uriginal scenes are not changed even
though you edit or delete the scenes in the
Playlist.
Make sure to insert the recorded disc into
your canlcorder.
O Notes
• You cannot add or edit movies during Easy
Handyclun operation. Canccl the Easy
H_mdyclun oper_ttion first.
1Touch I_ (OTHERS) of the
(HOME) menu --* [PLAYLIST
EDIT].
2 Touch[ ADD].
3Touch the scene that you want to
add to the Playlist.
m
m.
g
The selected scene is marked with 4.
Press and hold the image un the LCD
screen to confirm the image.
Touch [_ to return to the previous
screeu.
4Touch rOK] --+ [YES] --+ rOK].
Continued._ 53
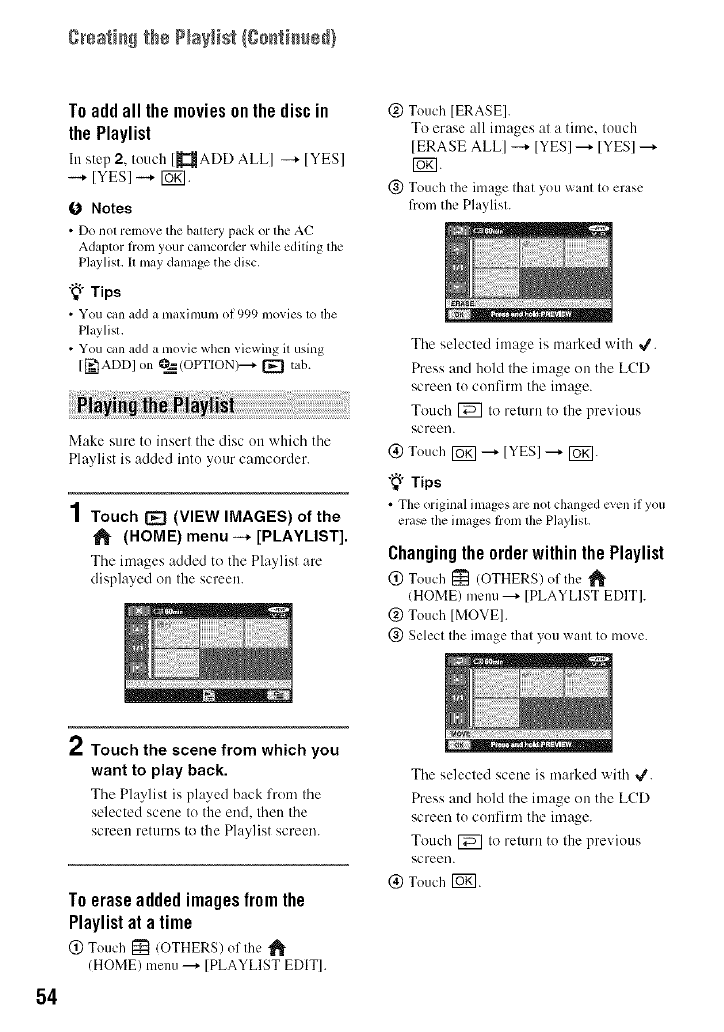
g_sati_ the ?_ayHst(go_ti_t_@}
To add all the movies on the disc in
the Playlist
In step 2, touch [_{ADD ALLI -+ IYES]
--+ [YES] --+ [UKI.
O Notes
•Do not relno_ethe battery pack or the AC
Adaptor h'oln your camcorder while ediling lhe
P]aylisl,I1may damage the disc,
"_°Tips
• You clmadd a maximun/of 999 movies to the
Playlisl.
• You can add a movie when viewing il using
[['_IADD]on @__--=(OPTION)--+[_ tab.
Make sure to insert the disc on which the
Playlist is added into your camcorder.
1Touch [_ (VIEW IMAGES) of the
(HOME) menu -+ [PLAYLIST].
The images added to the Playlist are
displayed on the screen.
@ Touch IERASEI.
To erase all images at a time. touch
[ERASE ALLI -+ IYESI ---+IYESI ---+
giN.
(_) Touch the image that you want to erase
from the Playlist.
The selected image is marked with 4.
Press and hold the image on the LCD
screen to confirm the image.
Touch [_ to return to the previous
screen.
(_) Touch [UK]---+ [YES] ---+ [_.
"_" Tips
• Tileoriginal images are not changed cven ifyou
era_ tile images hom lhe Playlisl.
Changing the order within the Playlist
(_) Touch [_ (OTHERS) of the _'
(HOME) menu ---+[PLAYLIST EDIT].
@ Touch [MOVEI.
@ Select the image that you want to move.
54
," Touch the scene from which you
want to play back.
The Playlist is played back from the
selected scene to the end. then the
screen returns to the Playlist screen.
To erase added images from the
Playlist at a time
@ Touch I_t (OTHERS) of the
(HOME) menu---_IPLAYLIST EDITI.
The selected scene is marked with 4.
Press and hold the image on the LCD
screen to confirm the image.
Touch [_ to return to the previous
screen.
(_) Touch [_.
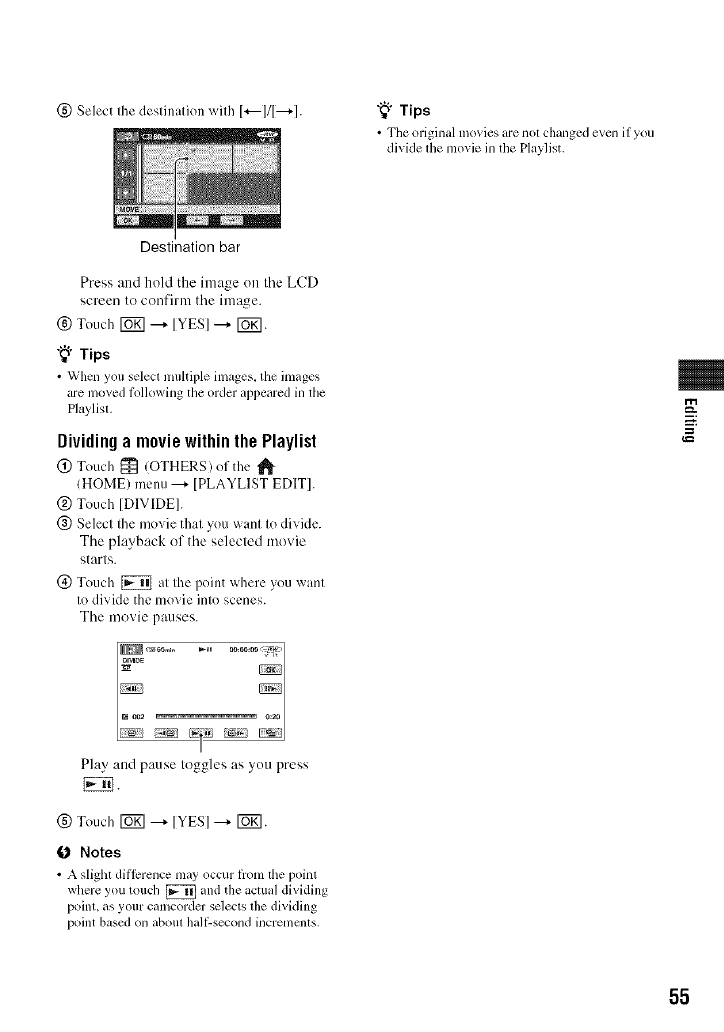
(_) Select the destination with 1+---111---+1.
Destination bar
"_° Tips
• Tim original ramies are not clmnged even if you
divide tile movie in the Playlist.
Press attd hold the image on tile LCD
screen to confirm tile image.
(_) Touch [b_] ---+ [YES] ---+ [Ug].
"_° Tips
• When you select muhiple images, tile images
are moved Mlowing the order appeared in tile
P]uylist,
Dividing a movie within the Playlist
@ Touch _ (OTHERS)of the
(HOME) menu ---+ [PLAYLIST EDIT].
@ Touch ]DIVIDE].
@ Select the movie that you want to divide.
The playback of the selected movie
starts.
(_) Touch [_ at the point where you want
to divide the movie into scenes.
The movie pauses.
m
g
Play attd pause toggles as you press
{EN.
(g) Touch _ ---+IYESI ---+ F6_].
0Notes
• A slight dil]crence may occur from the point
where you touch [_ and file ilCttlitl dividing
point, as your camcorder selects the divkling
point based on about hal/:-second incremcnts.
55
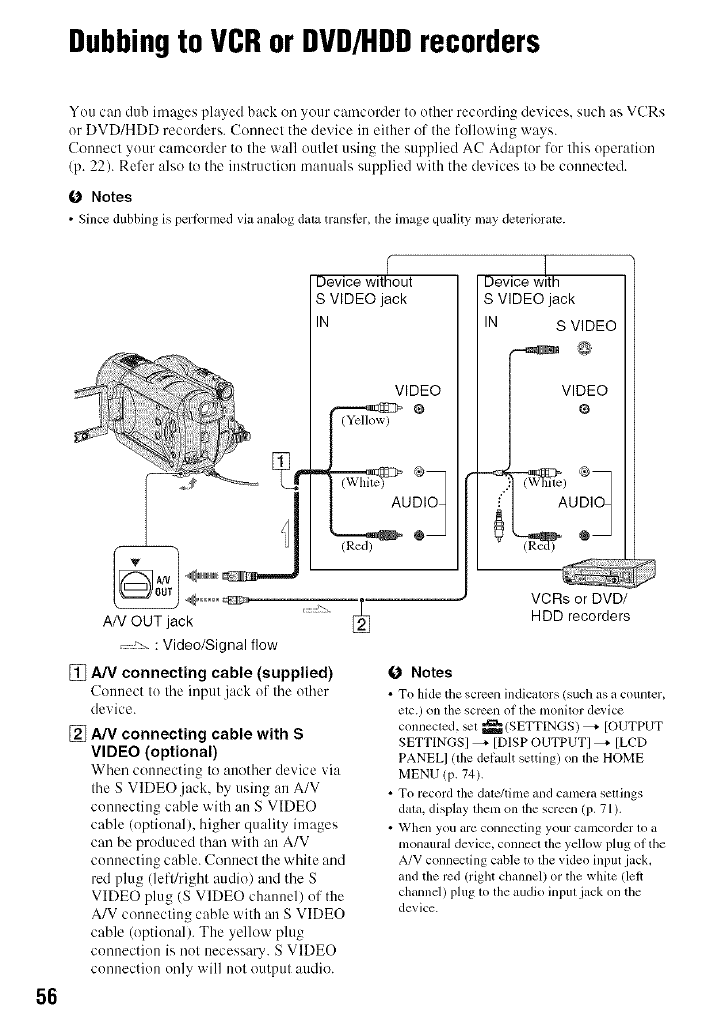
Dubbingto VCRorDVD/HDDrecorders
You can dub images played back oil your camcorder to other recording devices, such as VCRs
or DVD/HDD recorders. Connect the device in either of the following ways.
Conuect your camcorder to the wall outlet using tile supplied AC Adaptor for this operation
(p. 22). Refer also to the instruction manuals supplied with the devices to be connected.
O Notes
•Since dubbing is perlormed via analog (hua translcr, file image quality may deteriorate.
%
Device without
S VIDEO jack
IN
VIDEO
DIO1
@_
Device w!th
S VIDEO jack
IN S VIDEO
VI%EO
I AUDIOq
56
AN OUT jack
: Video/Signal flow
[] A/V connecting cable (supplied)
Connect to tile input jack of tile other
device.
[] A/V connecting cable with S
VIDEO (optional)
When connecting to :mother device via
the SVIDEO.jack, by using an A/V
connecting cable with an S VIDEO
cable (optional), higher quality images
can be produced than with an A/V
connecting cable. Connect the white and
red plug (left/right audio) and the S
VIDEO plug (S VIDEO chatmel) of the
A/V connecting cable with an S VIDEO
cable (optional). The yellow plug
connection is not necessa U. S VIDEO
connection only will not output attdio.
_ VCRs or DVD/
HDD recorders
(J Notes
• To hide tile screen indicators/such as a counter,
elc.) on tile screen of file monitor dc_ icc
connected, _t _ (SETTINGS) _ [OUTPUT
SETTINGSI _ [DISP OUTPUT] _ [LCD
PANELI lille delault setting) on the HOME
MENU (p. 74).
• To record tile date/time and camera seuings
data. display them on the screen (p. 71 ).
• When you arm connecting your camcorder to a
monaural device, connect the yellow plug of tile
A/V connecting cable to the video input jack.
and the rcd (rigtu channel) or the white dell
channel) plug to tile audio input jack on the
device.

.4
/ Insert the recorded disc into your
camcorder.
Turn on your camcorder, and
press [] (VIEW IMAGES).
Set [TV TYPE] according to Ilae display
device/p. 44).
3Insert the recording media in the
recording device.
If your recording device has :m input
selector, set it to the input mode.
4Connect your camcorder to the
recording device (VCR or DVD/
HDD recorder) with the A/V
connecting cable (supplied) [] or
an A/V connecting cable with S
VIDEO (optional) [_.
Connect your camcorder to tile input
jacks of the recording device.
5 Start the playback on your
camcorder, and record it on the
recording device.
P,efcr to the instruction manuals
supplied with your recording device for
details.
Printingrecorded
images(PictBridge
compliant printer)
You can print out still images using a
PictBridge compliant printer, without
connecting the camcorder to a computer.
f_PictBridge
Connect your camcorder to the AC Adaptor
to obtain power from the wall outlet (p. 22).
Insert the "Memory Stick Duo" containing
still images into your camcorder and turn
on the printer.
Turn on your camcorder.
2Connect the _(USB) jack of your
camcorder to the printer using
the USB cable (p. 114).
[USB SELECT] appears on the screen
automatically.
3Touch [_ PRINT].
When connection is complete. []
(PictBridge connecting) appears on
[h(3 SCl-een,
m
==
6When dubbing is finished, stop
the recording device, and then
your camcorder.
One of the still images stored on the
"Memory Stick Duo" will be displayed.
O Notes
• We can guarantee lhe operation ol only models
thal are PictBridge c(mlpalible.
Continued._ 57
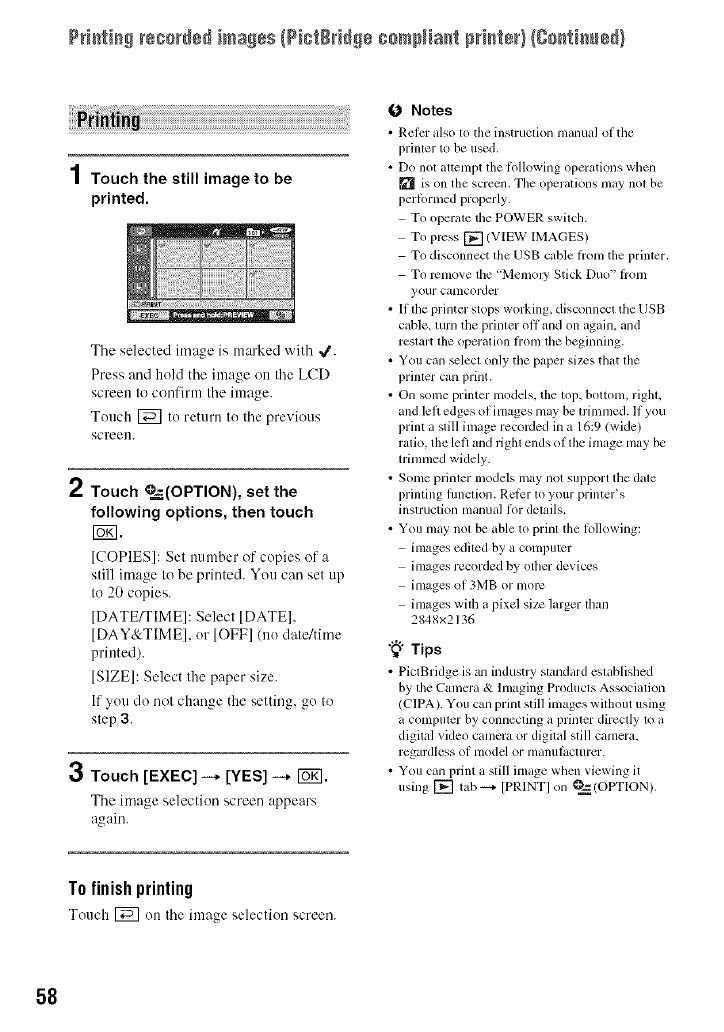
P++++t++g+++++_+d+d+mmg+s{P++t+++++++++mN+a+t p++r+t÷+}Ig++++t++m÷+}
1Touch the still image to be
printed.
3
The selected image is marked with 4.
Press and hold the image on the LCD
screen to confirm the image.
Touch [_] to return to the previous
screen.
Touch _=,_--(OPTION), set the
following options, then touch
r_.
[COPIES]: Set number of copies ol +a
still image to be printed. You can set up
to 20 copies.
[DATE_IME]: Select [DATE],
[DAY&TIME], or [OFF]/no date/time
printed).
[SIZE]: Select the paper size.
If you do not change the setting, go to
step 3.
Touch [EXEC] -* [YES] -* Io_1.
The image selection screen appears
_gain.
ONotes
• Relcr also to the instruction nlmlual oI tim
printer to be used.
• DO not attempt tile Ik)llowing operations Wllt:ll
is on the screen. The operations may not be
perlPrmed properly.
To operate tile POWER switch.
To press []/VIEW IMAGES)
To disconnect the USB cable Iiom the printcr.
To l+cnlove the 'Memoly Stick Duo" Ii'om
your camcorder
• If the printer stops working, disconnect the USB
cable, turn the printer offand on again, and
restart the operation Iiom the beginning.
• You can _lect only the paper sizes that the
printer can print.
• On some printcr models, tile top, bottonl, right,
and left edges of images may be trimmed. If you
print a still image recoMed in a 16:9 (wide)
ratio, tile left and right ends of the image may be
trimmed widely.
• Some printer models may not support the date
printing lunction. Relier to your printer's
instruction manual li>r details.
• You may not be able to print the Iollowing:
images edited by a computer
images recorded by otller devices
images of 3MB or more
images with a pixel size larger than
2848x2136
"_° Tips
• PictBridge is an industry standard established
by the Camcra & Imaging Products Association
/CIPA). You can print still images without using
a computer by connecting a printer directly to it
digital _ideo camera or digital still camera,
regardless ol model or lllanulilCtllrer.
• You can print a still image whcn viewing it
using [] tab +4 [PRINTI on _ (OPTION).
T0finish printing
Touch [_q on the image selection screen.
58
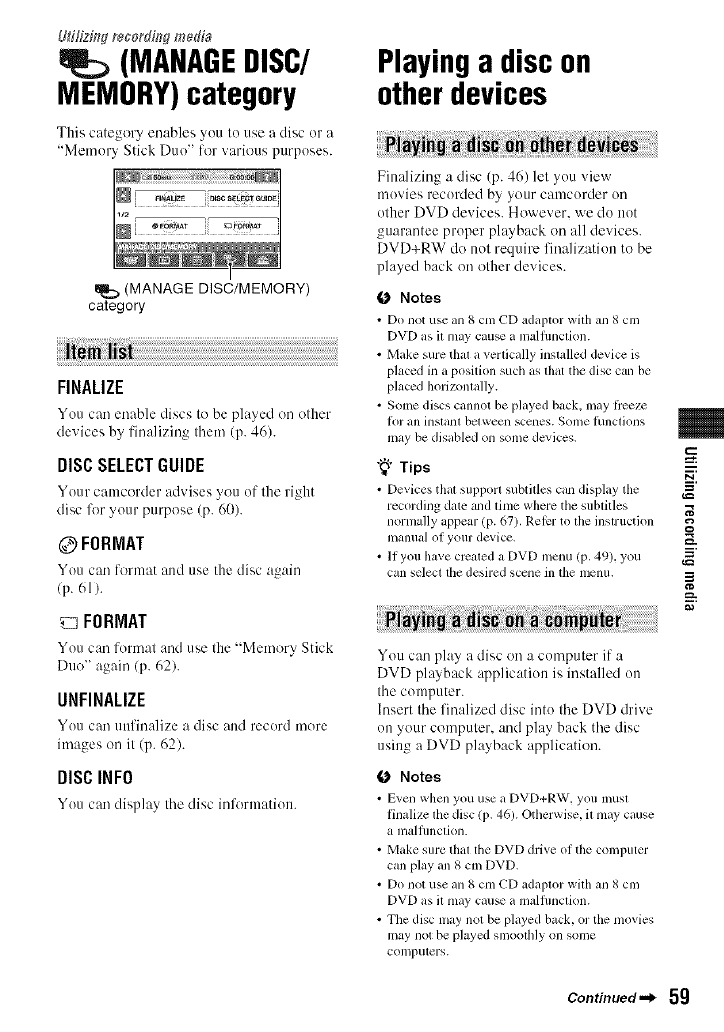
L#i/fzing recordh:_gme&'a
(MANABEBISC/
MEMORY)category
This calegory enables you Io use a disc or a
"Memory Slick Duo" for various purposes.
I
(MANAGE DISC/MEMORY)
category
FINALIZE
You cm/enable discs to be played on other
devices by finalizing them (p. 46).
DISCSELECTGUIDE
Your camcorder advises you of the right
disc lk_ryour purpose (p. 60).
@FORMAT
You can lormat and use the disc again
(p. 61).
FORMAT
You can format :rod use the "Memory Stick
Duo" again (p. 62).
UNFINALIZE
You can unfinalize a disc and record more
images on it (p. 62).
DISCINFO
You can display the disc inl_rmation.
Playinga discon
otherdevices
Finalizing a disc (p. 46) let you view
movies recorded by your camcorder on
other DVD devices. However, we do not
guarantee proper playback on all devices.
DVD+RW do not require finalization to be
played back on other devices.
(J Notes
• Do not use an 8 cm CD adaptor with ml 8 cm
DVD as il may cau_ a nMlunclion.
• Make sure that a vertically instMled device is
placed in a position such as dmt the disc can be
placed horizontally.
• Some discs cannot be played back. nlay liceze
l_)]" all instant between scenes. Some l/incliolls
may be disabled on some dcvices.
"_° Tips
• Devices thal support subtilles can display the
recording date zuld lime where the subtitles
normally appear (p. 67), Rel_r to lhe instruction
manual ol your device.
•II you have created a DVD menu (p, 49), you
can select the desired scene in the menu.
You can play a disc on a computer if a
DVD playback application is installed on
the computer.
Insert the finalized disc into the DVD drive
on your computer, and play back the disc
using a DVD playback application.
(J Notes
• E_en when you use a DVD+RW, you must
finalize lhe disc (p, 46). Otherwise, il may cause
a malfimclion.
• Make sure that file DVD drive of the computer
can play an 8 cm DVD.
• Do not use an 8 cm CD adaplor with an 8 cm
DVD as il may cau_ a malfimclion.
• The disc nlay not be played back, or the movies
may not be played smoolhly on some
computers.
m
g
g
_=h.
Continued._ 5g
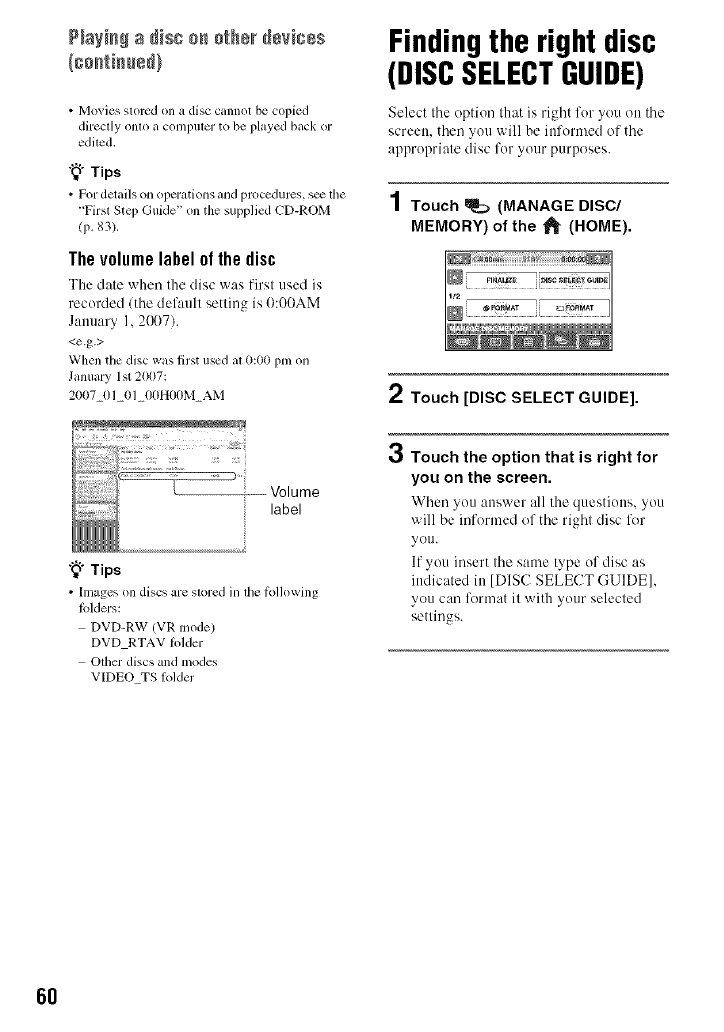
P+a+++++a++s+++ +_h+++8+++8+
• Movies stored on a disc cannot be copied
directly onto a colnputer to be played back or
edited,
"_° Tips
• For details on opermions mid procedures, s_ tile
+'First Step Guide" on the supplied CD-RO1M
(p+83).
The volume label ol the disc
The date when the disc was first used is
recorded/the default setting is !):0!)AM
January 1, 2(X)7).
<e.g.>
When the disc was first used at 0:00 phi on
January 1st 2007:
2007_01 01 00H00M AM
+_°Tips
• Images on discs are stored in the Ibllowing
Ik_lders:
DVD-RW (VR lnode)
DVD RTAV Iolder
Other discs and n;odes
VIDEO TS lolder
Findingthe rightdisc
(DISCSELECTGUIDE)
Select the option that is right for you on the
screen, then yott will be informed of the
appropriate disc for yottr purposes.
1 Touch _(MANAGE DISC/
MEMORY) of the _l_ (HOME).
2Touch [DISC SELECT GUIDE].
OTouch the option that is right for
you on the screen.
When you :mswer all the questions, you
will be informed of the right disc lk_r
you.
If you insert the same type of disc as
indicated in [DISC SELECT GUIDE],
you can format it with your selected
settings.
6O
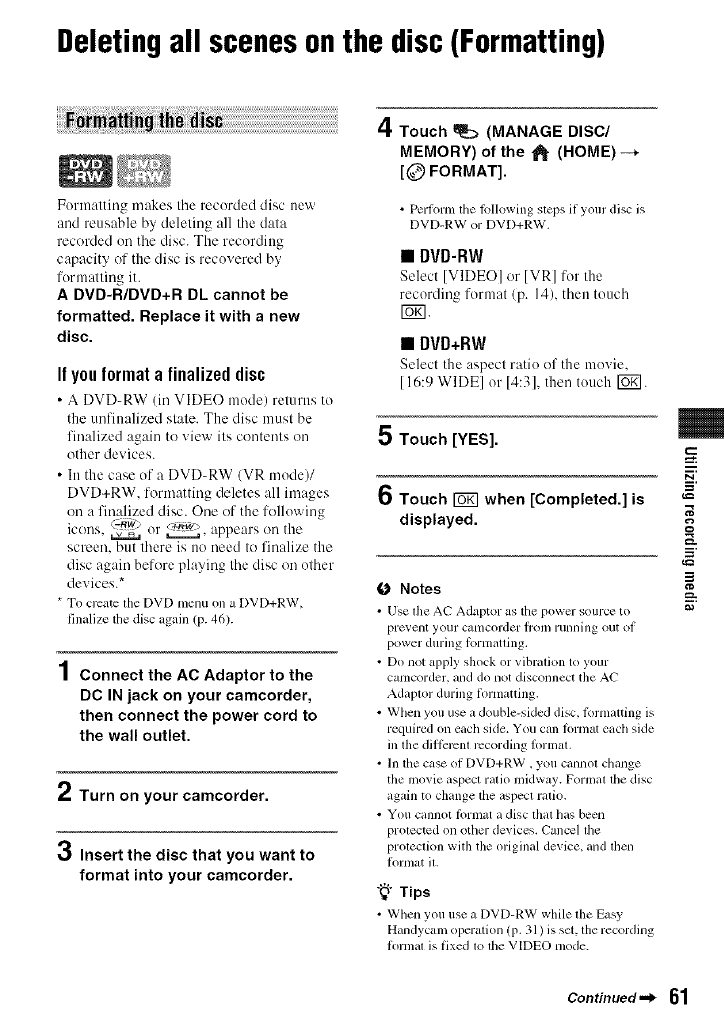
Deletingall scenesonthe disc(Formatting)
Formatting makes tile recorded disc new
and reusable by deleting all tile data
recorded on the disc. The recording
capacity of the disc is recovered by
formalting it.
A DVD-R/DVD+R DL cannot be
formatted. Replace it with a new
disc.
If you format a finalized disc
• A DVD-RW (in VIDEO mode) returns to
the unfinalized stale. The disc must be
finalized again to xiew ilk contenls on
other devices.
• In the case of a DVD-RW/VR mode)/
DVD+RW, formatting deletes all images
on a finalized disc. One of the following
icons. (z.Tiw) _. appears on the
or
screen, but lhere is no need Io finalize the
disc again before playing the disc on olher
' s*device.
* To create the DVDmenu on a DVD+RW,
finalize tiledisc again (p. 46).
4
l Connect the AC Adaptor to the
DC IN jack on your camcorder,
then connect the power cord to
the wall outlet.
Turn on your camcorder.
3Insert the disc that you want to
format into your camcorder.
4Touch _ (MANAGE DISC/
MEMORY) of the "1_ (HOME) --*
[@ FORMAT].
•Pertonn the tkdlowing steps if your disc is
DVD-RW or DVD+RW.
•DVD-RW
Select [VIDEO] or IVR] ror tile
recording format/p. 14), then touch
NN.
•DVD+RW
Select the aspect ratio ill"the movie.
[16:9 WIDEI or 14:31, then touch [_.
5 Touch [YES].
6Touch _when [Completed.] is
displayed.
O Notes
• Use the AC Adaptor as tile power sourceto
pl't=_, elll your catncorder lroln rUllllhlg out ot
power during torinaOing.
• Do not apply shock or vibration to your
camcorder, and do not disconnect the AC
Adaptor during iormatting.
•Wllen you use a double-sided disc, formatting is
required on eactlside. You can tornlat eiicllside
ill filediil_zrcntrecording lormaL
• In tile case of DVD+RW, you cannot ctmnge
the movie aspect ratio midway. Formal the disc
again to change itle aspect ratio.
• You cannot lPrmat a disc lhat has been
protected on other devices. Cancel ltle
protection wflh the original device, and then
lk)rnlat it.
-_i- Tips
• When you use a DVD-RW while the Easy
Handycam operation (p. 31 ) is set, the recording
fornlal is fixed to the VIDEO mode.
m
g
,_=
i
Continued._ 61
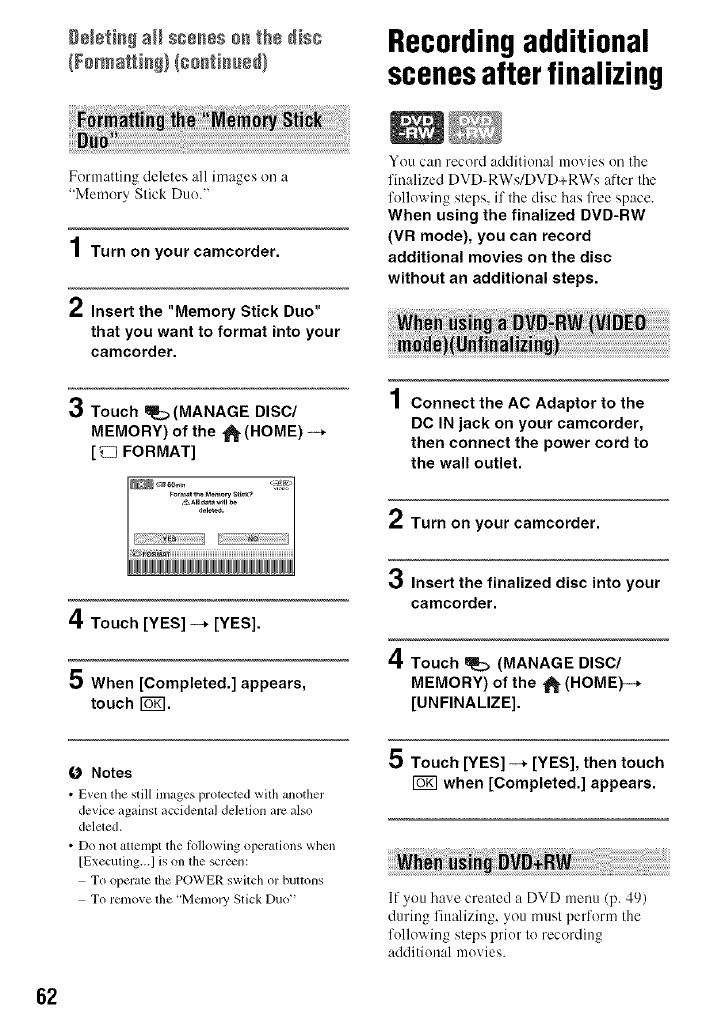
D÷_÷_i_ a_ls_÷nss o__h8 dis_ Recordingadditional
scenesafterfinalizing
Formalling deletes all images on a
"Memory Slick Duo."
Turn on your camcorder.
2Insert the "Memory Stick Duo"
that you want to format into your
camcorder.
3Touch _(MANAGE DISC/
MEMORY) of the _(HOME) -_
[_ FORMAT]
You can record additional movies on the
finalized DVD-RWs/DVD+RWs after the
following steps, if the disc has free space.
When using the finalized DVD-RW
(VR mode), you can record
additional movies on the disc
without an additional steps.
4
| Connect the AC Adaptor to the
DC IN jack on your camcorder,
then connect the power cord to
the wall outlet.
Turn on your camcorder.
3Insert the finalized disc into your
camcorder.
4Touch _(MANAGE DISC/
MEMORY) of the _ (HOME)--*
[UNFINALIZE].
5 Touch [YES] -_ [YES], then touch
when [Completed.] appears.
4Touch [YES] -_ [YES].
5 When [Completed.] appears,
touch I_1.
O Notes
•E_en the still images protected with another
device againsl accidental delelion am also
deleted.
• Do not attempt the lollowing operations when
[Executing...I is on the screen:
To operate the POWER switch or buttons
To remove the 'Mmnoly Stick Duo" If you have created a DVD menu (p. 49)
during finalizing, you must perform the
following steps prior to recording
additional movies.
62
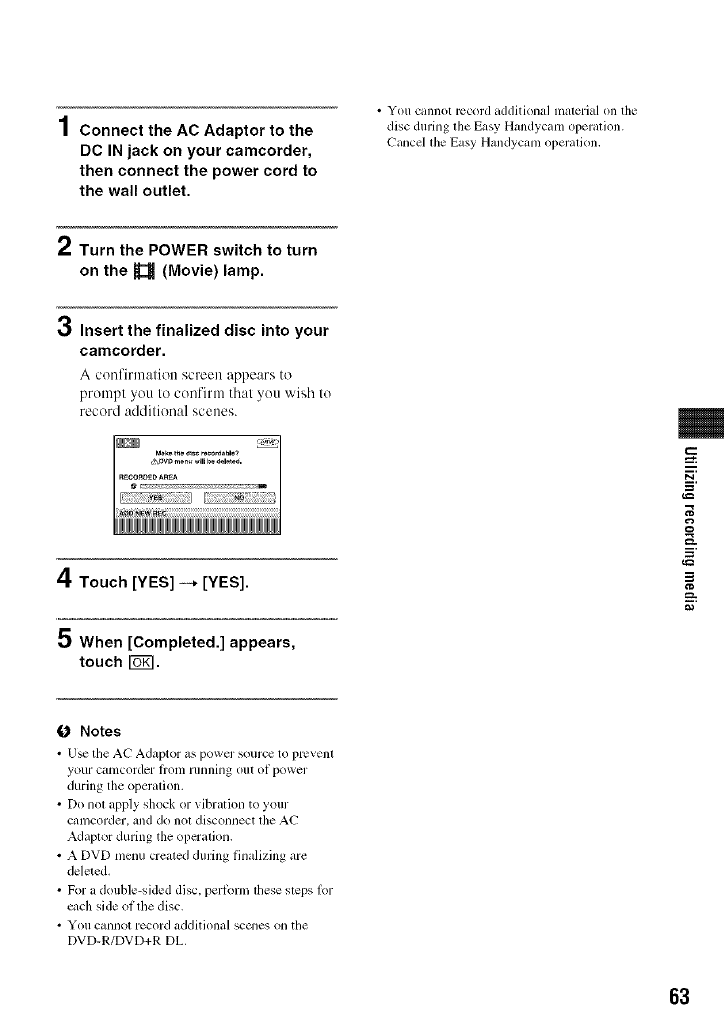
4
| Connect the AC Adaptor to the
DC IN jack on your camcorder,
then connect the power cord to
the wall outlet.
• You cannot record additional malerial on lhe
disc durfilg lhe Easy Handycam operation.
Cancel lhe Easy Handycam operalion.
2Turn the POWER switch to turn
on the U(Movie) lamp.
0Insert the finalized disc into your
camcorder.
A confirmation screen appears to
prompt you to confirm that you wish to
record additional scenes.
4Touch [YES] -+ [YES].
5 When [Completed.] appears,
touch I_.
i
=_
g
==
i
0 Notes
• U_ tile AC Adaptor as powcr source to prcvenl
youl C_ltllcorder lrotll lllllnillg ollt oi power
during the openllion.
• Do not _lpplyshock or _ibr_ltionto your
c_lnlcorder,anddo noldisconnect lhe AC
A&lplor during the opcl"_llion.
• A DVD menu created during Ihlalizing gll'¢
deleted.
• For adouble-sided disc, perlorm lhesesleps lor
ct,ch side of filedisc.
• You ctmnotrecord additional scenes on the
DVD-R/DVD+R DL.
63
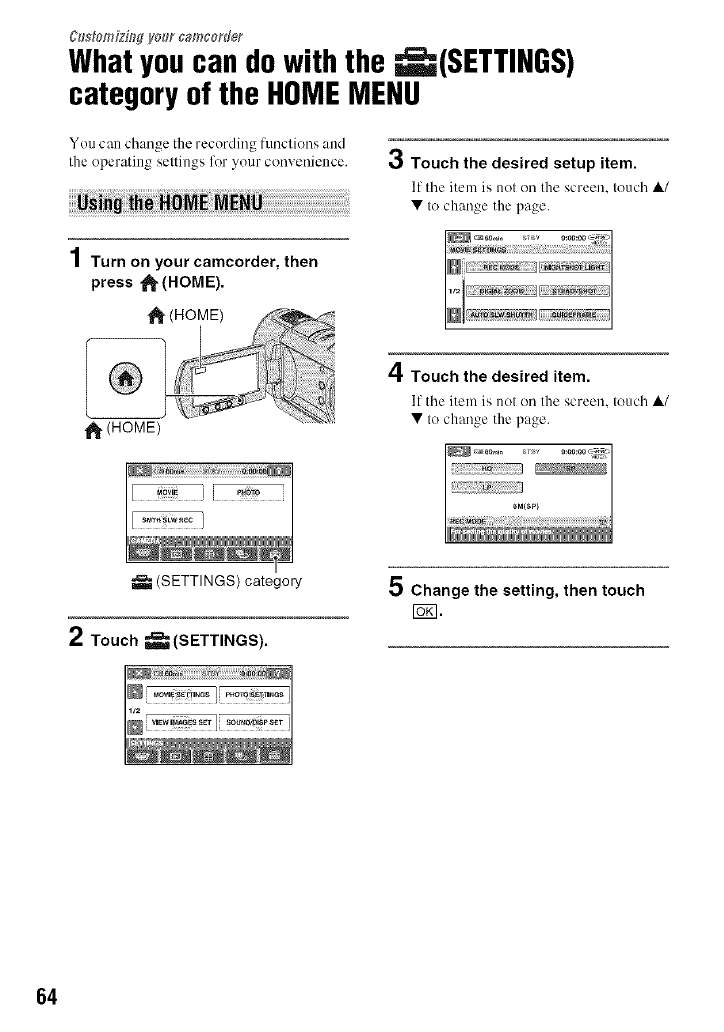
C#s#omiziWVo_r camcorder
Whatyoucan dowith the _(SETTINGS)
categoryof the HOMEMENU
You can change the recording funclions and
the operatillg seltillOS_ for _vour COII_,eIllelICC. €,j Touch the desired setup item.
11tile item is not on the screen, touch ,&/
• to change the page.
1Turn on your camcorder, then
press _ (HOME).
,1_ (HOME)
A
_1, Touch the desired item.
If the item is not on the screen, touch ,&/
• to change the page.
(SETTINGS) category
2Touch _(SETTINGS).
5 Change the setting, then touch
I_1.
64
MOVIESETTINGS(p. 66)
RECMODE 66
NIGHTSHOTLIGHT 66
DIGITALZOOM 66
STEADYSHOT 67
AUTOSLW SHUTTR 67
GUIDEFRANE 67
ZEBRA (77
UREMAINING 67
BUB-T DATE 67
FLASHLEVEL 67
REDEYEREDUC 68
PHOTO SETTINGS (p. 68)
[] IMAGESIZE.2 68
iQUALITY 7o
FILENO. 7o
NIGHTSHOTLIGHT 66
STEADYSHOT*I 67
GUIDEFRANE 67
ZEBRA 67
FLASHLEVEL 67
REDEYEREDUC 68
VIEW IMAGESSET(p. 71J
DATACODE 7/
DISPLAY 71
SOUND/DISPSET*_(p. 72)
VOLUME*_ 72
BEEP*_ 72
LCD BRIGHT 72
LCD BLLEVEL 72
LCDCOLOR 73
VF B.LIGHT 73
OUTPUT SETTINGS (p. 74)
TVTYPE 74
DISP OUTPUT 74
CLOCK/_LANG (p. 74)
CLOCKSET.2 25
AREASET 74
DSTSET/SUMMERTIME 74
[] LANGUAGESET.2 74
GENERAL SET (p. 75)
DEMOMODE 75
CALIBRATION I08
A.SHUTOFF 75
REMOTECTRL 75
*_DCR-DVD50S/DVDg08 only
*2Also available during Easy Handycam
operation
*s Only [SOUND SETTINGS] is available
during Easy Handycam operation.
m
3
o
=_,
8
g
65
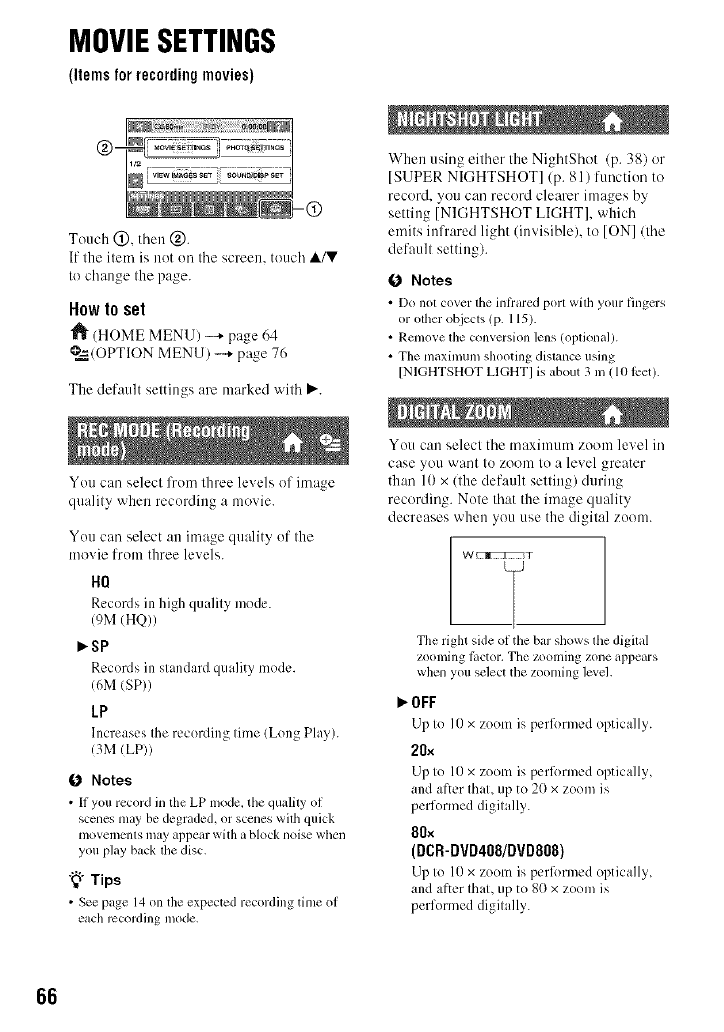
MOVIESETTINGS
(itemsforrecordingmovies)
Touch @, tllen @.
If the item is not oil tile screen, touch A/V
to change the page.
How to set
"_ (HOME MENIJ) -+ page 64
@=_./OPTIONMENU) --+ page 76
The default settings are marked with _'.
You call select l'ronl three levels of image
quality when recording a movie.
You carl select all image quality of the
n/ovie from three levels.
HQ
Records in high quality mode.
(9M (HQ))
_sP
Records in standard quality mode.
/6M (SP))
LP
Increases the recording time (Long Play).
/3M (LP))
0 Notes
• It you record in the LP mode, the qualily of
scenes may be degraded, or sccnes wilh quick
movements may appear with a block noise when
you play back lhe disc,
"_° Tips
• See page 14 on the expected recording time of
each recording mode.
When using either the NightShot (p. 38) or
[SUPER NIGHTSHOT] (p. 81) function to
record, you car/record clearer images by
setting [NIGHTSHOT LIGHT], which
emits infrared light (invisible), to [ON]/the
default setting).
0 Notes
• Do nol cover the inlimed port wilh your lhlgers
or other object', (p. 115).
• Rmnove lhe conversion lens (oplional/.
• The maximum shooting dislance using
[NIGHTSHOT LIGHTI is about 3 in (10 lcet).
You Call select tile maximum zoom level ill
case you want to zoom to a level greater
than 10 x/the default setting) during
recording. Note that the image quality
decreases when you use the digital zoom.
W_T
The right side of the bar shows the digilal
ZOOllling litctor. The zoonling zone appears
when you select the zooming level.
OFF
Lip to I0 x zoom is pcrl_)rmcd optically.
20×
Up to 10 x zoom is perlk)rmed optically,
and after that, up to 20 x zoom is
performed digitally.
80x
(DCR-DVD4OS/DVD808)
Up to 10 x zoom is pcrlk)rmed optically,
and after that, up to 80 x zoom is
performed digitally.
66

You can compensate fur camera shake/the
default setting is [ON]). Set
[STEADYSHOTI to [OFFI ( '@") when
using a tripud (optional). then the image
becomes naturah
When this is set tu [ON] (the default
setting), the shutter speed is automatically
reduced to 1130 second when recording ill
clark conditions.
You can display the lhame and check that
the subject is horizontal ur vertical by
setting [GUIDEFRAMEI to [ON].
The frame is not recorded. Press DISP/
BATT INFO to make the frame disappear.
"_° Tips
• Positioning tile subject at lhe cross point of tile
guide hanle nlakes a balanced composilion.
Diagunal stripes appear ill portiuns of the
screen where brightness is at a preset level.
This is useful as a guide when atliusting the
brightness. When you change the default
setting, [] is displayed. The zebra pattern
is nut recorded.
_OFF
The zebra pattern is not disph,ycd.
7O
The zebra pattern appears at a screen
brightness level of about 70 IRE.
100
The zebra pattern appears at a screen
brightness level of about 100 IRE or
higher.
0Notes
• Portions of the screen where brightness is about
100 IRE or above may appear overexposed.
"_° Tips
• IRE rcprcsenls the scrcen brighlness lcveh
AUTO
Displays the remaining disc indicator for
about 8 seconds in situations such as those
described below.
When your camcorder recognizes the
remaining disc capacity with the POWER
swilch sel to _ (Movie).
When you press DISP/BATT INFO to
switch the indicator from off to on with
the POWER switch set to _ (Movie/.
When you select the movie recording
mode on the HOME MENU.
ON
Always displays Ihe remaining disc
indicalor.
0Notes
• When lhe remaining recor&,bletinle tbr movies
is less than 5 Inillutes, tile indicalor slays on tile
screen.
Select [ON] (the default setting) tu display
the recurding date and time when yuu play
back a disc on a device with a subtitle
display function. Also refer to the
instruction manual of the playback device.
You can set this function when you use the
built-in flash, or an external flash/optional)
that is compatible with your camcorder.
HIGH (_+)
Makes the llash level higher.
_NORNAL(_)
3
2
3
g
Continued._ 67
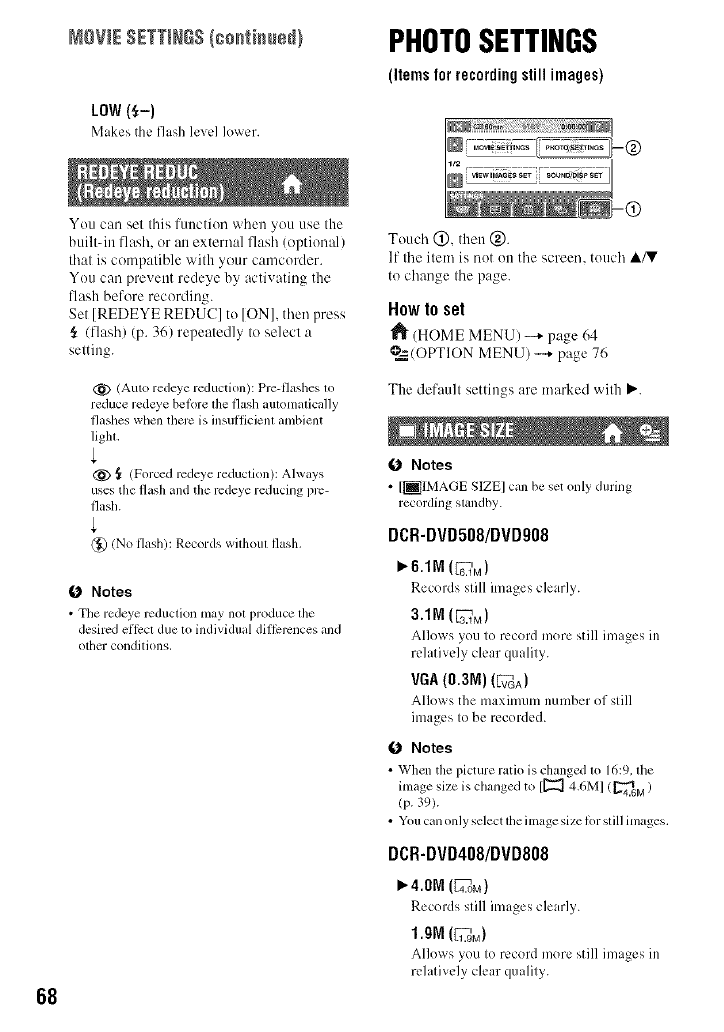
MOWESETTIngS/co. i..e ) PHOTOSETTINGS
LOW (_-)
Makes the llash level lower.
(itemsforrecordingstillimages)
68
You can set this function when you use the
built-in flash, or an external flash (optional)
that is compatible with your camcorder.
You can prevent redeye by activating the
flash before recording.
Set [REDEYE REDUC] to [ON], then press
,_ (flash) (p. 36) repeatedly to select a
setting.
@ (Auto redeye reduction): Pro-flashes to
reduce redeye beiore lhe flash automalically
flashes when therc is insul]icienl ambient
ligla,
(_) i (Forced rcdeye reduction): Always
uses the flash and the rcdeye reducing prc-
flash.
(_ (No flash): Records wilhoul flash,
O Notes
•The redeye reduction may not produce the
desired ellcct due 1o individual dillcrcnces and
other condilions.
Touch @, then @.
If the item is not on the screen, touch ,&/V
to change the page.
How to set
(HOME MENU) --+ page 64
O=_(OPTION MENU) -...+page 76
The default settings are marked with P,'.
fO Notes
•[_IMAGE SIZE] can be set only during
recording slandby.
DCR-DVD508/DVDg08
P"6.1M (6_._M)
Records still images clearly.
Allows you to record more still images in
relatively clear quality.
VGA(0.3N) (vLvLv_GA)
Allows the maximum number of still
images to be recorded.
ONotes
• When the picture ratio is changed lo 16:9.lhe
image size is changed to [[_ 4,6M] (_.4.6M)
(p. 39).
• Youcan onlyselect lheimage size h)rslill images,
DCR-DVD408/DVD808
_. 4.0N (4_.OM)
Records still images clearly.
1.91 (1F_.gM)
Allows you to record more still images in
relatively clear quality.
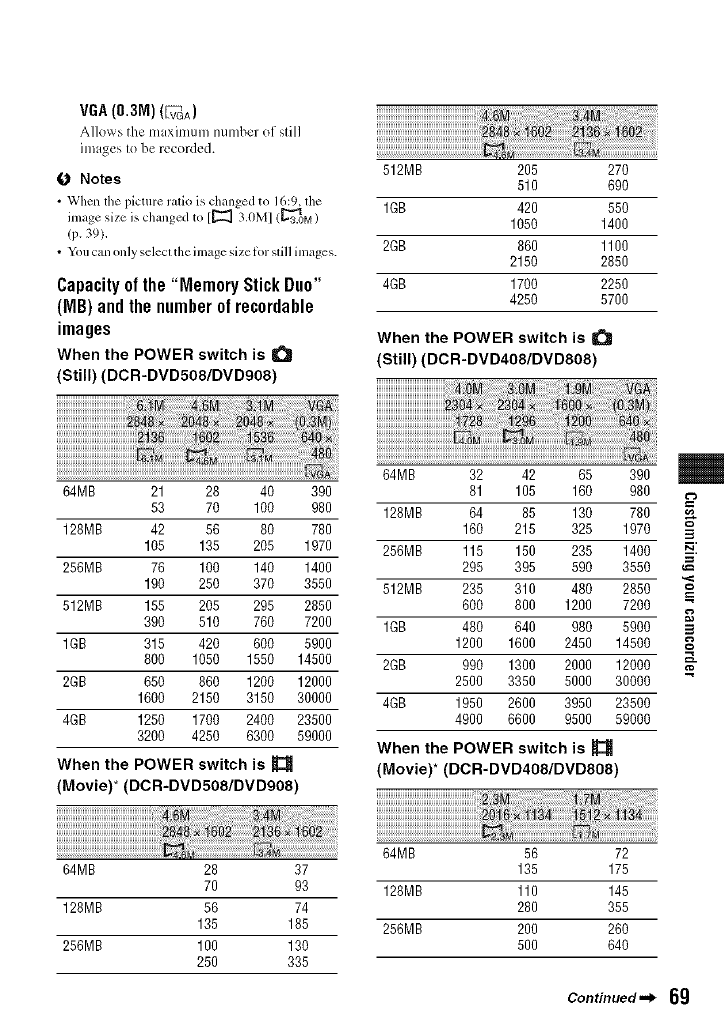
VGA(0.3M)(_A)
Allo_ s the maximum nmnber of still
images to be recorded.
(3 Notes
•When the picture ratio is changed to 16:9, the
image size is changed tll [_22_ 3.0M] (_'3_..OM)
(p. 39).
• You can only selecl the image size liar still images.
Capacityof the "Memory StickDuo"
(MB) and the numberof recordable
images
When the POWER switch is Q
(Still) (DCR-DVD508/DVDg08)
512MB 205 270
510 690
1GB 420 550
1050 1400
2GB 860 1100
2150 2850
4GB 1700 2250
4250 5700
When the POWER switch is
(Still) (DCR-DVD408/DVD808)
64MB 21 28 40 390
53 70 100 980
128MB 42 56 80 780
105 135 205 1970
256MB 76 100 140 1400
190 250 370 3550
512MB 155 205 295 2850
390 510 760 7200
1GB 315 420 600 5900
800 1050 1550 14500
2GB 650 860 1200 12000
1600 2150 3150 30000
4GB 1250 1700 2400 23500
3200 4250 6300 59000
When the POWER switch is_
(Movie)* (DCR-DVD508/DVDg08)
64MB 32 42 65 390
81 105 160 980
128MB 64 85 130 780
160 215 325 1970 3
256MB 115 150 235 1400 _[
295 395 590 3550
512MB 235 310 480 2850 "_
600 800 1200 7200
1GB 480 640 980 5900 3
1200 1600 2450 14500
2GB 990 1300 2000 12000
2500 3350 5000 30000
4GB 1950 2600 3950 23500
4900 6600 9500 59000
When the POWER switch is
(Movie)* (DCR-DVD408/DVD808)
64MB 56 72
64MB 28 37 135 175
70 93 128MB 110 145
128MB 56 74 280 355
135 185 256MB 200 260
256MB 100 130 500 640
250 335
Continued._ 69
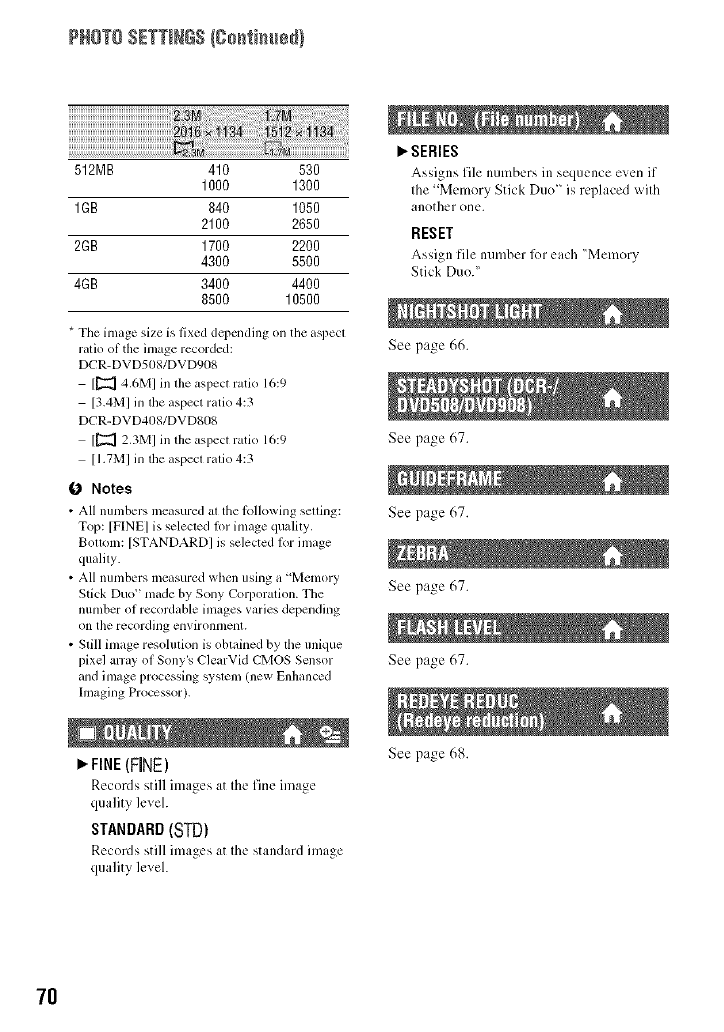
PHOTO SETTINGS(go_tim+÷d)
512MB 410 530
1000 1300
1GB 840 1050
2100 2650
2GB 1700 2200
4300 5500
4GB 3400 4400
8500 10500
*Tile image size is fixed depending on tile aspecl
ralio of the image recorded:
DCR-DVD508/DVDg08
[_] 4.6MI in lhe aspect ratio 16:9
[3.4MI in lhe aspect ratio 4:3
DCR-DVD408/DVD808
[[_ 2.3MI in lhe aspect ratio 16:9
[I.TMI in die aspecl ralio 4:3
0 Notes
• All lmmbers measured al the lbllowing setting:
Top: [FINE] is selected lot image quMib,.
Bollvlm: [STANDARDI is selected lor image
qualily.
• All numbers measured when using a "Memory
Stick Duo" made by Sony Corporation. Tile
number of recordable images wtries depending
on the recording environment.
• Still image resolulion is obtained by the unique
pixel array of Sony's ClearVid CMOS Sensor
and image processing syslem (new Enhanced
hnaging Processor).
l_FINE(FINE)
Records still images at the fine image
quality level.
STANDARD (STD)
Records still images at the standard image
quality level.
I_ SERIES
Assigns file numbers in sequence ew:n it"
the "Memory Stick Duo" is replaced with
another one.
RESET
Assign file number 1i)1each "Memory
Stick Duo."
See page 66.
See page 67.
See page 67.
See page 67.
See page 67.
7O
See page 68.
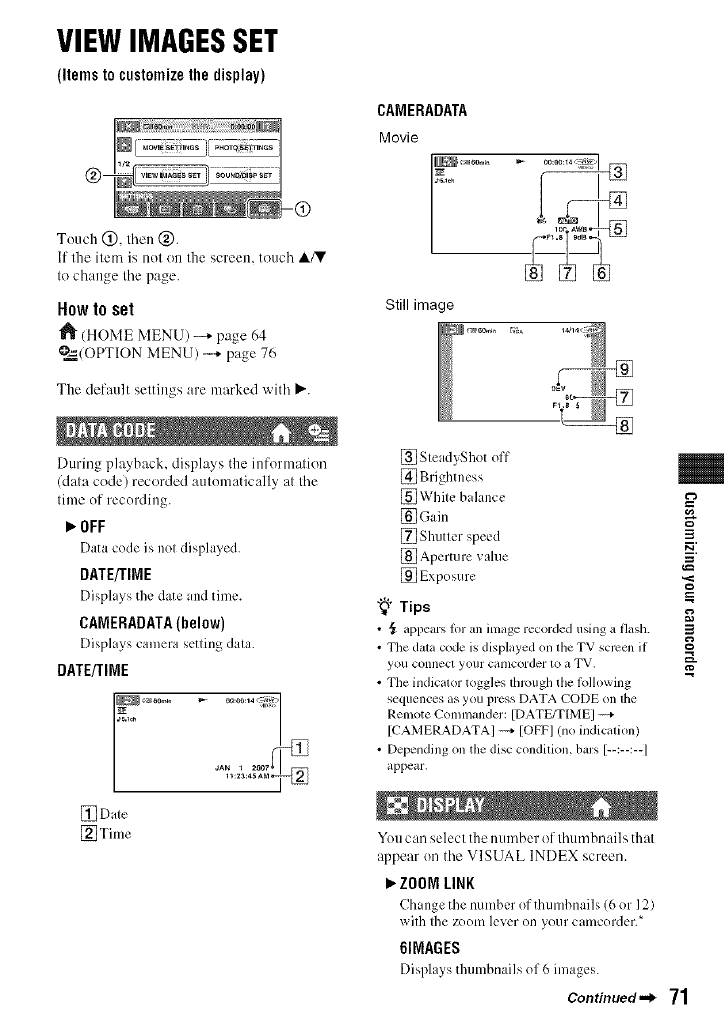
VIEWIMAGESSET
(Itemstocustomizethedisplay)
Touch @, lhen @.
If lhe item is nol on lhe screen, touch ,&/V
Io change file page.
Howto set
"J_ (HOME MENU) --* page 64
O=_/OPTION MENU) -"+ page 76
Tile default seltings are marked with _.
During playback, displays the information
(dala code) recorded aulonlalically al Ihe
lime of recording.
l,,.OFF
Data code ix nol displayed.
DATE/TIME
Displays the date and time.
CAMERADATA (below)
Displays camera sorting dala.
DATE/TIME
J*_N _ 2007_
1 _:2a:46 AM_
[] Dale
[_Time
CAMERADATA
Movie
.....
Still image
[_ SteadyShot off
[] Brightness
[_] White balance
[_Gain
[] Shutter speed
[] Aperture wdue
[] Exposure
"_° Tips
• _ appears lor an image recorded using a flash.
• The d*_lacode is displayed on the TV semen if
you connect your calncorder to a WV.
• The indicalor toggles fllrough the lolh)wing
sequences as you press DATA CODE on the
Renlote Commander: [DATE/TIME] ----+
[CAMERADATAI ----+[OFF]/no indicalion)
• Depending on the disc condilkm, bars [--:--:--]
appeal:.
3
==
8
3
g
You can select the number of thumbnails that
appear on the VISUAL INDEX screen.
ZOON LINK
Change the numhcr of thumhnails (6 or 12)
with the zoom lever on your camcorder.*
61NAGES
Displays thumbnails of 6 images.
Continued._ 71
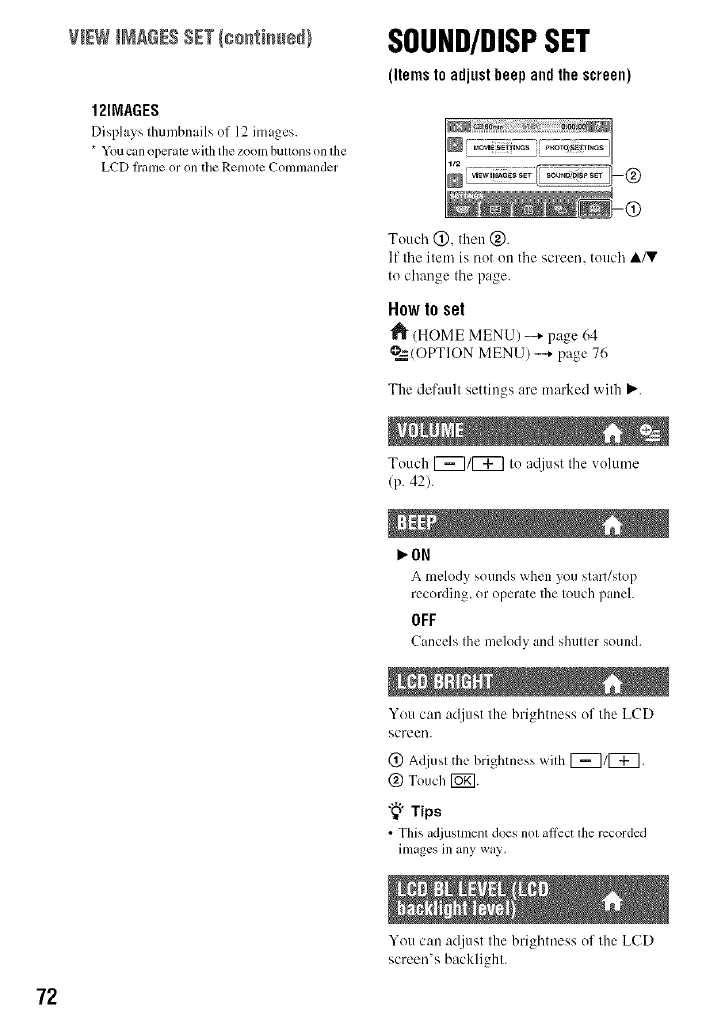
imAGesSETIco. i. edlSOUND/DISPSET
1211YiAGES
Displays thumbnails of 12 images.
* You c_moperate with the zoom buttons on the
LCD hame or on the Remote Cl>mmander
(Itemstoadjustbeepandthescreen)
Touch (_), then @.
If the ilem is 111111111the screen, touch ,&/V
to change the page.
Howto set
(HOME MENU) -+ page 64
@=_(OPTION MENU) -...+ page 76
The default settings are marked with Ii,..
Touch I_/[_ I/1 atljust the volume
(p. 42).
I,,"0N
Alnelody sounds when you slarl/slop
recording, or operate Ihe Iouch panel.
OFF
Cancels Ihe melody and shuller sound.
You can adjust lhe brightness of Ihe LCD
screen.
(_) Adjusl lhe brighlness wilh F_/F_.
@ Touch [_].
"_° Tips
• This adjustlllenl does nllt all_ct tile recorded
images in any way.
72
You can adjust the brightness of the LCD
screen's backlighl.
NORMAL
Standard brighmess.
BRIGHT
Brightens the LeD screen.
0 Notes
• _XJhell yOU COI]IICCt your Calllcorder to outside
power sources, [BRIGHT] is automatically
selected lot the setting.
• When you select [BRIGHT[, baltc] T lilt is
slightly reduced during recording.
• If you open the LCD panel 180 degrees to lace
the scrcen outskle and close the LCD panel to
the camcorder body, lhe sctling becomes
[NORMAL[ automatically.
"_° Tips
• This adjustmenl does nol al]_:cl tile recorded
images in any way.
You can acliust the color of the LCD screen
with 1_7/[_7.
Low intensity High intensity
"_° Tips
• This adjustnlcnl does not ailed the recorded
images in any way.
You can adjust the brightness of the
viewfinder.
"_° Tips
• This a_{iustmenl does not allcct the recorded
images in any way.
3
E:
P_
3
g
NORMAL
Standard brighmess.
BRIGHT
Brightens the viewfinder screen.
0 Notes
• _XJhell yotl COlllleCt your calncorder to otltside
power sources, [BRIGHT] is automatically
selected lbr the setting.
• When you selecl [BRIGHTI, battcl y lilt is
slightly reduced during recording.
73
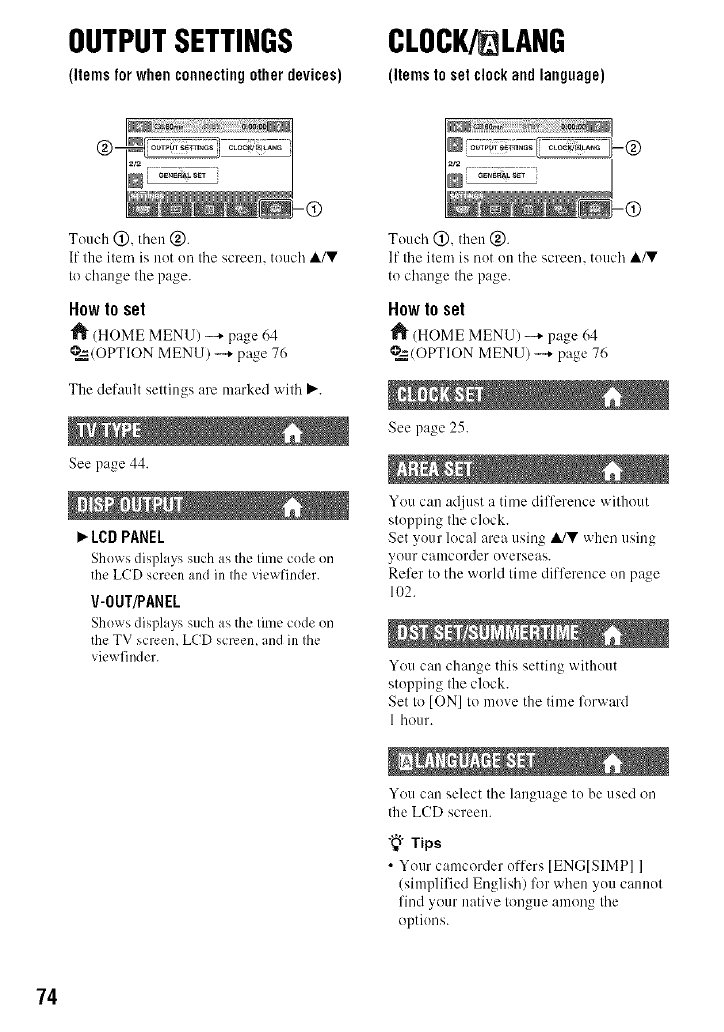
OUTPUTSETTINGS
(itemsforwhenconnectingotherdevices)
CLOCK/ LANG
(items to set clock and language)
Touch (_), then @.
If the ilem is not on the screen, touch A/V
to change the page.
How to set
(HOME MENU) --+ page 64
@=_./OPTIONMENU) -...+page 76
The default seltings are marked wilh ).'.
See page 44.
_"LCD PANEL
Shows displays such as the lime code on
the LCD screen and in Ihe ;,iewfinder.
V-0UT/PANEL
Shows displ lys such as the lime code on
the TV screen, LCD screen, and in Ihe
viewfinder.
Touch @, then @.
If the item is not on the screen, touch A/V
to change the page.
How to set
_1_(HOME MENU) -+ page 64
@=_/OPTION MENU) -...+page 76
See page 25.
You can adjust a time difference without
stopping the clock.
Set your local area using ,&/V when using
your camcorder overseas.
Refer to the world time difference on page
102.
You can change this setting without
stopping the clock.
Set to [ON] to move the time lk_rward
1 hour.
You can select the language to be used on
the LCD screen.
"_° Tips
• Your camcorder offers IENGISIMPII
(simplified English) for when you cannot
find your native tongue among the
options.
74
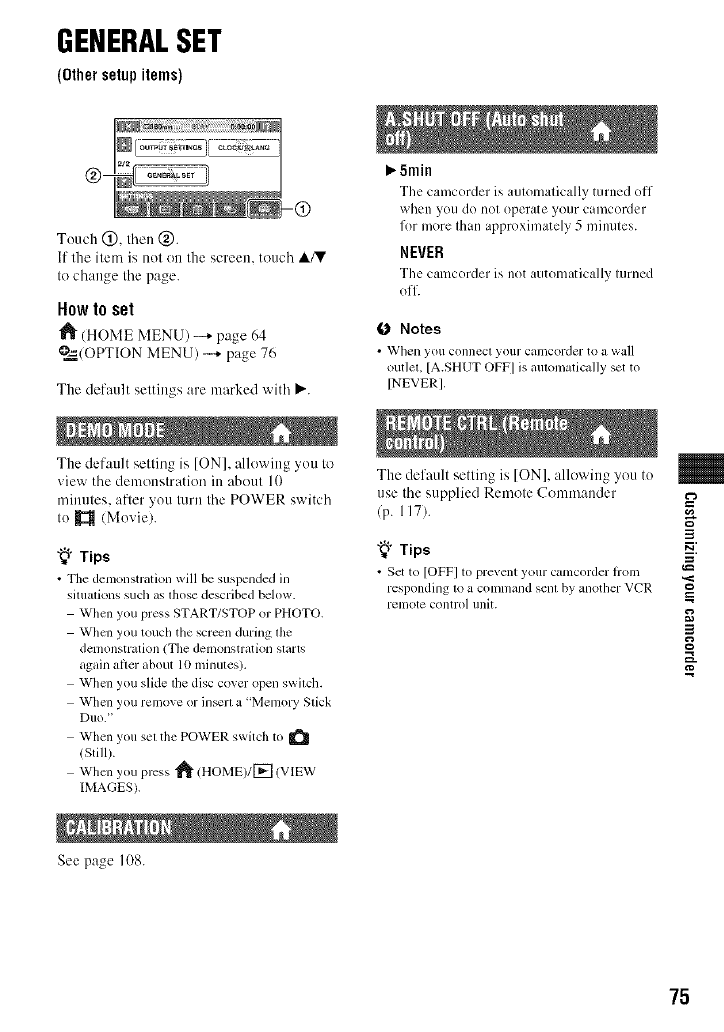
GENERALSET
(Othersetupitems)
Touch (_), lhen (_).
If the item is not on the screen, touch A/V
It) change Ihe page.
How to set
"_ (HOME MENU) --* page 64
@=_(OPTIONMENU) -+ page 76
Tile default settings are marked with P.'.
Tile default selling is [ON], allowing yott to
_iew the demonstration ill aboul 10
minttles, after you turn the POWER switch
Io _ (Moxie).
"_° Tips
• Tile demonstralion will be suspended in
siltlalions such as lhose described below.
When you press START/STOP or PHOTO.
When you touch the screen during lhe
delnonsllation (Tile delnollslratioll slilllS
again after about 10 minutes).
When you slide lhe disc cover open swilch.
When you remove or ]n_rl a "Memory Slick
DIIO."
When you sel the POWER switch to
(Still).
When you press _ (HOME)l[ -_-] (VIEW
IMAGES).
See page 108.
_.5min
The camcorder is automatically turned off
when you do not operate your camcorder
for more than approximately 5 minutes.
NEVER
The camcorder is not automatically turned
off.
ONotes
• _'l/ell you connecl your CillnCOlder to _1 wall
out]eL [A.SHUT OFF] is mnomatica]]y set to
INEVERI,
Tile default selling is [ON]. allowing yotl to
use the supplied Remote Conlmander
(p. 117).
"_° Tips
• Set to [OFF] to prevent your camcorder irom
l'espondillg to a COlI]l/lalld selll by allothel" VCR
l'ell]ote control Ilnit.
3
P_
3
g
75
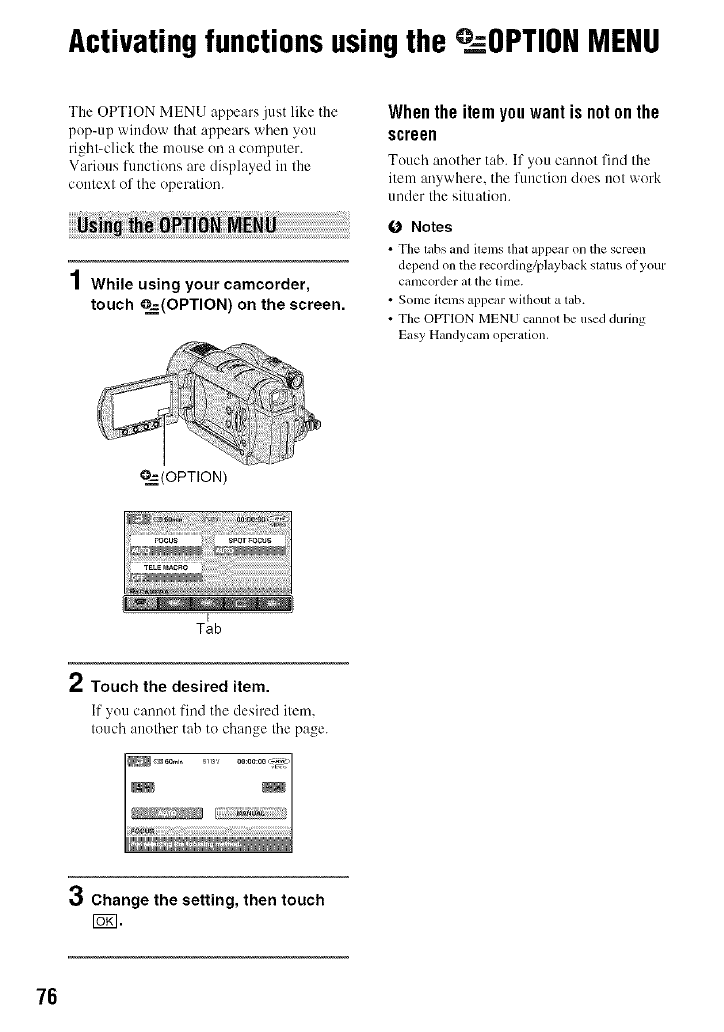
Activatingfunctionsusingthe _.OPTIONMENU
The OPTION MENU appears just like the
pop-up window that appears when you
right-click the mouse oil a conlputer.
Various functions are displayed in the
context of tile operation.
1While using your camcorder,
touch ____-(OPTION)on the screen.
Whenthe item you want is notonthe
screen
Touch another tab. If you cannot find the
item anywhere, tile function does not work
under tile simation.
O Notes
•Thelabsandilemslhatappearon thescreen
dependondmrecording/playbackslatusot your
Catllcorder ill the liln¢.
• Sortie itenls appear without a tab.
• The OPTIONMENU cannolbe usedduring
Easy Hiuid),call/operation.
_(OPTION)
Tab
2Touch the desired item.
If you canno[ find the desired item.
touch another tab to change tile page.
3Change the setting, then touch
15_1.
76
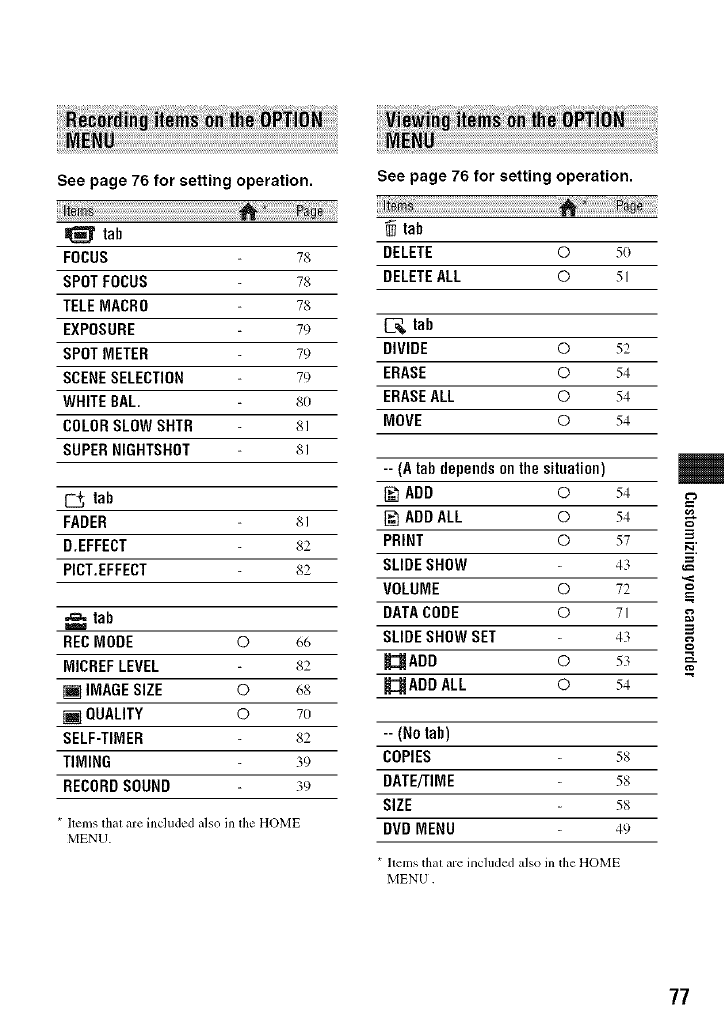
See page 76 for setting operation.
te_
tab
FOCUS
SPOTFOCUS
TELEMACRO
EXPOSURE
SPOTMETER
SCENESELECTION
WHITE BAL
COLORSLOW SHTH
SUPERNIGHTSHOT
78
78
78
79
79
79
8O
81
81
tab
FADER 81
D.EFFECT 82
PICT.EFFECT 82
,,_ tab
REC MODE 0 66
MICREF LEVEL 82
[] IMAGESIZE 0 68
[] QUALITY 0 7O
SELF-TIMER 82
TIMING 39
RECORDSOUND 39
* ltems that are included also in the HOME
MENU.
See page 76 for setting operation.
tab
DELETE O 5o
DELETEALL O 51
tab
DIVIDE O 52
ERASE O 54
ERASEALL O 54
MOVE O 54
-- (A tab dependson the situation)
ADD 054
N] ADDALL 0 54
PRINT 057
SLIDE SHOW 43
VOLUME 0 72
DATACODE 071
SLIDE SHOW SET 43
_ADD © 53
_2_ADD ALL O 54
-- (No tab)
COPIES 58
DATE/TIME 58
SIZE 58
DVD MENU 49
* llems thai are included also in the HOME
MENU.
3
==
3
g
a_
77
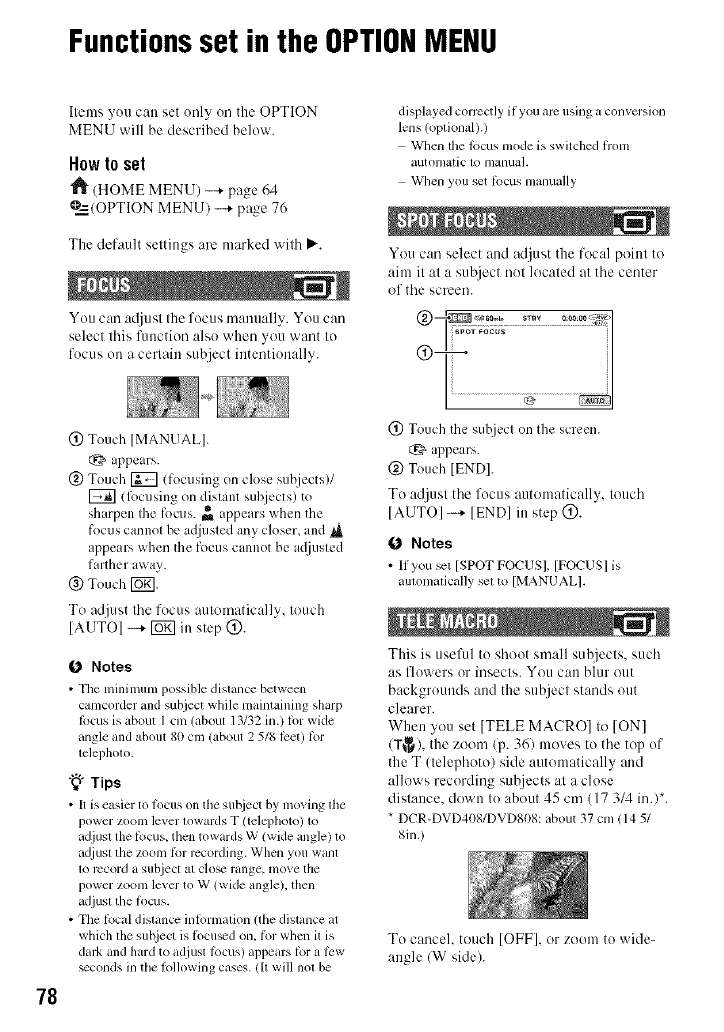
Functionsset in the OPTIONMENU
78
Ilems you can set only on the OPTION
MENU will be described below.
How to set
"l_ (HOME MENU) --+ page 64
@=_--/OPTIONMENU) -+ page 76
The default seltings are marked wilh _'.
You can atljusl Ihe focus manually. You can
selecl lhis function also wheu you 'vvar][IO
fOCUSon a cerlain subject intentionally.
(_) Touch [MANUAL].
t:_ appears.
@ Touch _ (focusing on close subjects)/
llk_cusing on distant suhjects) to
sh irpen Ihe focus. _ appears when the
focus cannot be adjusted any closer, and ,_
appears when the focus cannot be ac{justed
farther away.
(_) Touch [_.
To adjust the focus automatically, touch
[AUTO] -_ _ in step @.
(J Notes
•The nfinimum possible distance betwecn
camcorder and subject while maintaining sharp
locus is about I cm (about 13132 in.) lot wide
angle and about 80 cm (about 2 518 lcet) lbr
telepholo.
"_°Tips
• It is easier to locus on the su_iect by mining the
power zoom lever lowards T (telcphoto) 1o
adjusl the lbcus, then towards W (wide angle) to
ad.iuslthe zoom lbr recording. When you wahl
1orccord asubject at clo_ range, nlove lhe
power zoom levmto W (wkle angle), then
adjust the li_cus.
• The lbcal distance inlormalion (the dislance at
which the sub.iect is l_lCll_don, l_lrwhen it is
dark and hard to adjusl tbcus) appears tbr ;, tow
_conds in the lollowing cases, lit will nol be
displayed corrcctly if you arc using a convcrsion
lens/optional).)
When the locus mode is switched fl'om
autonlatic 1o nlanuah
When you set lbcus nmnually
You can select and adjust the focal point to
aim it at a sut_ject not located at the center
of the screen.
I......... i
(_) Touch the subject on the screen.
E_, appears.
@ Touch IENDI.
To adjust the focus automatically, touch
[AUTOI -_ [ENDI in step @.
0 Notes
• Ilyou s,-t [SPOTFOCUSI, [FOCUS] is
amomatically sel to [MANUALI.
This is usefid to shoot small subjects, such
as flowers or illsects. Vo/i Call blur out
backgrounds and the subject stands out
clearer.
When you set [TELE MACRO] to [ON]
(T_), the zoom/p. 361 moves to the top of
the T (telephoto) side automatically and
allows recording sut!jects at a close
distance, down to about 45 cm (17 3/4 ill.l*.
* DCR-DVD408/DVD808: about 37 cm 1145/
8in.)
To canceh touch [OFF], or zoom to wide-
angle/W side).
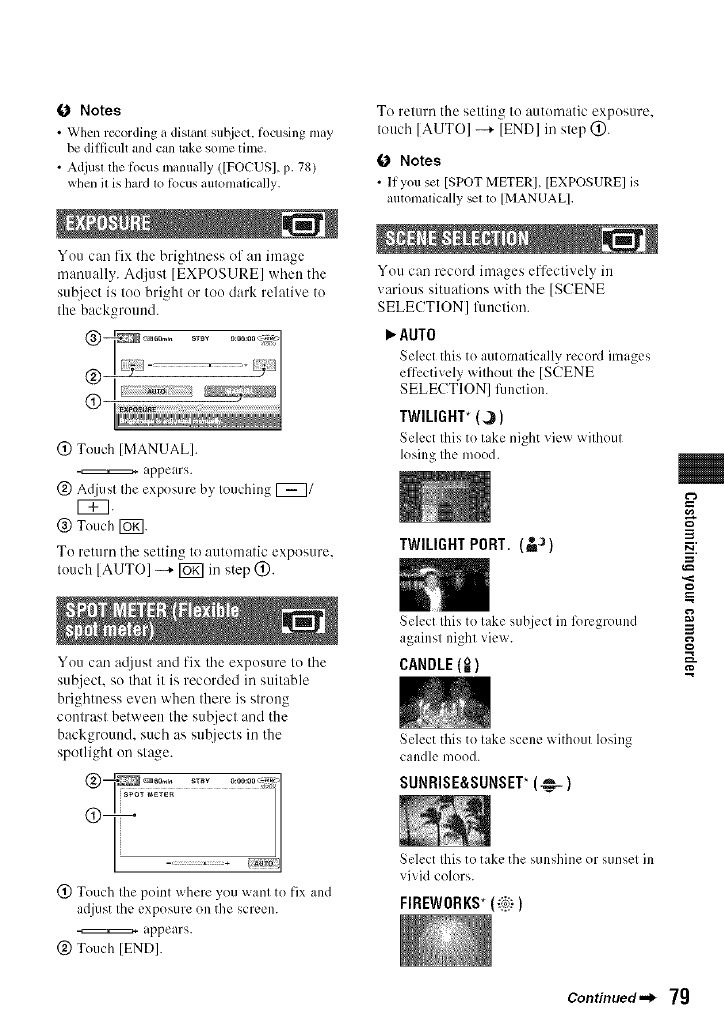
0 Notes
• When recording it distant subject, tbcusing may
be difficult and can lake some time.
• Adjusl the locus manually ([FOCUSI, p. 78)
when 11is hard 1o lbcus aulomalical]y.
You can fix tile brightness of an image
manually. Adjust [EXPOSURE] when the
subject is too bright or too dark relative to
the background.
(_) Touch [MANUAL].
,ppears.
(_) Adjust the exposure by touching _1
VTq.
(_) Touch [_.
To return the setting to automatic exposure.
touch [AUTOI --+ lug] in step (_).
You can at[just and fix the exposure to the
sul2ject, so that it is recorded irasuitable
brightness even when there is strong
contrast between the subject and the
background, such as subjects in the
spotlight on sta_e.
I......... =1
@ Touch the point where you want to fix and
adjust the exposure on the screen.
_ appears.
@ Touch [END[.
To relurn the selting Io automatic exposure.
Iouch [AUTO] -+ [END] in slep (_).
0 Notes
• II you set [SPOT METER], [EXPOSURE] is
automalically _11o [MANUAL].
You can record images effectively in
various situations with the [SCENE
SELECTION] fimction.
AUTO
Select this to automatically record images
effectively without the [SCENE
SELECTION] fimction.
TWILIGHT* (_1
Seh:ct this to take night view without
losing the mood.
TWILIGHT PORT. (_J)
Select Ihis to lake subject in 12)reground
against night view.
CANDLE(=_)
Select this to lake scene without losing
candle mood.
SUNRISE&SUNSET*(_-)
Select Ihis to take the sunshine or sunset in
vivid colors.
FIREWORKS*(_i_i_)
3
==
3
g
Continued._ 79
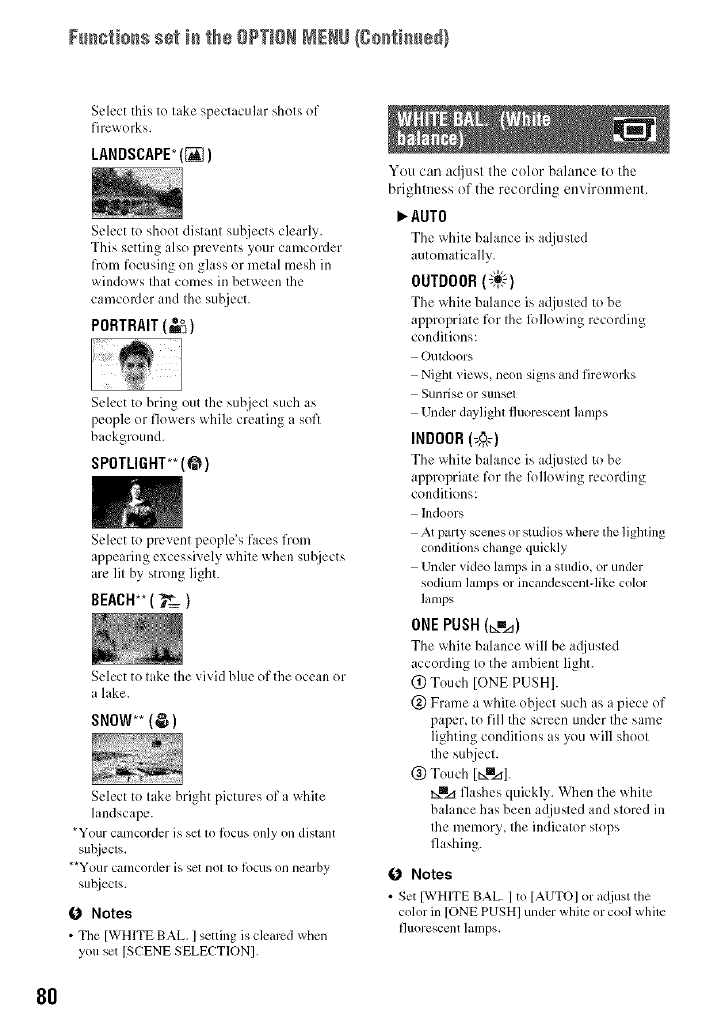
Fu_io_s se_ i_ the OPTIONNENU{go_i_e_}
Select this to lake spectacular shols of
fireworks.
LANDSCAPE_(_)
Select to shoot distant subjects clearly.
This setting also prevents your camcorder
from focusing on glass or metal mesh in
windows that comes in between the
camcorder and the subject.
PORTRAIT (_1
Select to bring out the subject such as
people or flowers while creating a soft
background.
SPOTLIGHT** (@)
Select to prevent people's faces from
appearing excessively white when suhjects
are lit by strong light.
BEACH**( _'& )
Select to lake Ihe vivid blue of the ocean or
a lake.
SNOW** (@1
Select to take bright pictures of a white
landscape.
*Your camcorder is set to lbcus only on distant
su_iecls,
**Your canlcorder is set not to locus on nearby
subjects.
Notes
•Tile [WHITE BAL ] setting is cleared when
you set ]SCENE SELECTIONI.
You can at[just the color balance to the
brightness of the recording environment.
AUTO
The x_llite bahmce is adjusted
automatically.
OUTDOOR(_)
The x_llite balance is adjusted to be
appropriate for the R)llowing recording
conditions:
Outdoors
Night views, neon signs and fireworks
Sunrise or stlnsel
Under daylight fluorescent lamps
INDOOR 1,_1
The _xllite balance is adjusted to be
appropriate for the R)llowing recording
conditions:
hldoors
At party scenes or studios where the lighting
conditions change quickly
Under video lamps in a studio, or under
sodium lamps or incandescent-like color
lamps
ONEPUSH(t_=_)
The white balance will be adjusted
according to the ambient light.
@ Touch [ONE PUSH].
@ Frame a white object such as a piece of
paper, to fill the screen under the same
lighting conditions as you will shoot
the subject.
@ Touch [Nmz_].
txBIzlflashes quickly. When the white
balance has been a(liusted and stored in
the memory, the indicator stops
flashing.
0Notes
• Set [WHITE BAL. ] to ]AUTO] or adjust the
color in [ONE PUSHI under white or cool white
J]uorescent lamps,
80
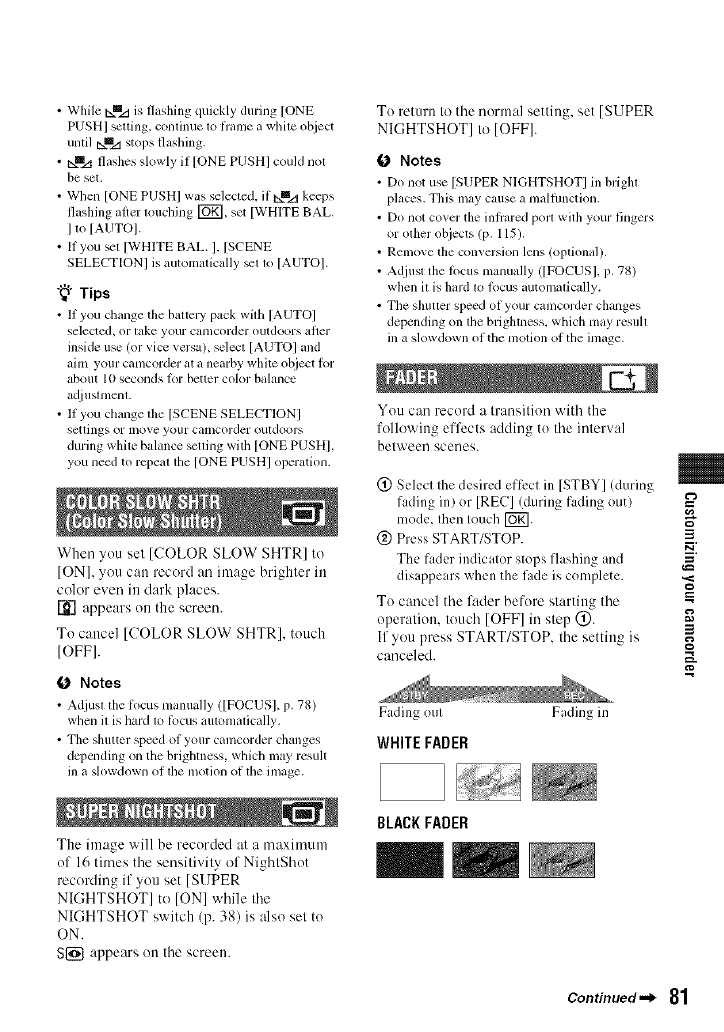
• While _mzl is flashing quickly during [ONE
PUSH[ setting, continue to flame a while ohject
unlil _mzi stops fla',hing.
• t:xmz+flashes slowly if [ONE PUSHI could nol
be set.
• When [ONE PUSHI was selected, if ib,.mz_keeps
flashing aller touching [_, set [WHITE BAL.
I m [AUTOI.
• If you _1 [WHITE BAL. I, [SCENE
SELECTIONI is automalically _11o [AUTOI.
"_° Tips
• II you change tile baltery pack wifll [AUTO]
selected, or lake your Calllcorder ouldoors alter
inside use lot vice versa), select [AUTOI and
aim yotlr camcorder at a nearby white object lor
abollt 10 secollds Ior better color balallce
a_[iustmenl.
• II you change the ]SCENE SELECTIONI
setlings or lnove your calncorder outdoors
during white balance setting with [ONE PUSHI,
you need to repeat the [ONE PUSHI operatfim.
When you set [COLOR SLOW SHTR] to
[ON], you can record at] image brighter in
color even in clark places.
_'] appears on the screen.
To cancel [COLOR SLOW SHTR], touch
[OFF].
Notes
• Adjust tile li>cus manually ([FOCUS], p. 78)
when il is hard 1o lbcus automalically.
• Tile shutter spe_d of your camcorder changes
dcpcnding on the brighlness, which may result
in a slowdown of lfie motion of the image.
The image will be recorded at a maximum
of 16 times the sensitivity of NightShot
recording if you set [SUPER
NIGHTSHOT] to [ON] while the
NIGHTSHOT switch (p. 38) is also set to
ON.
S{_ appears on the screen.
To return Io the normal setting, set [SUPER
NIGHTSHOT] to [OFF].
0Notes
• Do not use [SUPER NIGHTSHOT] in brigla
places. This may cause a malfimcflon.
• Do not cover the inlrared porl wilh your fingers
or olher objects (p. 115).
• Renlove the conversion lens (Ol?tional 1.
• Adjust the locus manually ([FOCUSI, p. 78)
when il is hard 1o locus automalically.
• The shutter speed of your camcorder changes
depending on lfie brighmess, which may resufi
in a slowdown of the motfi)n of the image.
You can record a Iransilion with the
following effects adding to Ihe inlerval
belween scenes.
(!) Selecl Ihe desired effecl in [STBY] (during
fading in) or [REC]!during fading out)
mode, Ihen Iouch []_].
@ Press START/STOP. 3
The fader indicalor stops flashing md ,=
disappe us when the fade is complete. ,._
To cancel the fader before sl,'-trling the
operalion, touch [OFF]in step @. __,
If you press START/STOP. Ihe settin_ is g
canceled.
Fading oul
WHITE FADER
BLACK FADER
Fading in
Continued-_ 81
Functions set i_ the OPTIONMENU{go_ti_e_}
When [OLD MOVIE] is selected.
appears on the screen and you call record
with all old movie-type atmosphere to your
movies.
To cancel [D.EFFECT], touch [OFF].
You can add special elTects to an image
during recording or playback. _ appears.
I_.OFF
Does not use [PICT.EFFECT] setting.
SEPIA
lnmges appear ill sepia.
B&W
hnages appear in black and white.
PASTEL
The self-timer records a still image about
10 seconds after being set.
Press PHOTO to record still images when
]SELF-TIMER] is set to [ON] and
appears.
To cancel the count down. touch ]RESET].
To cancel the self-timer, select [OFF].
"_"Tips
• You can also operate bypressing PHOTOon
tileRemote Commander (p. 117).
hnages appear as a pale pastel drawing.
You can select the microphone level for
recording sound.
Select [LOW] when you want to record
exciting and powerful sound ill a concert
hall. etc.
_"NORMAL
Records vaI'iOLIS surround sounds_
converting them into the certain ]cvch
LOW 115)
Records surround sound faithfully. This
setting is not suitable for recording
conversations.
82
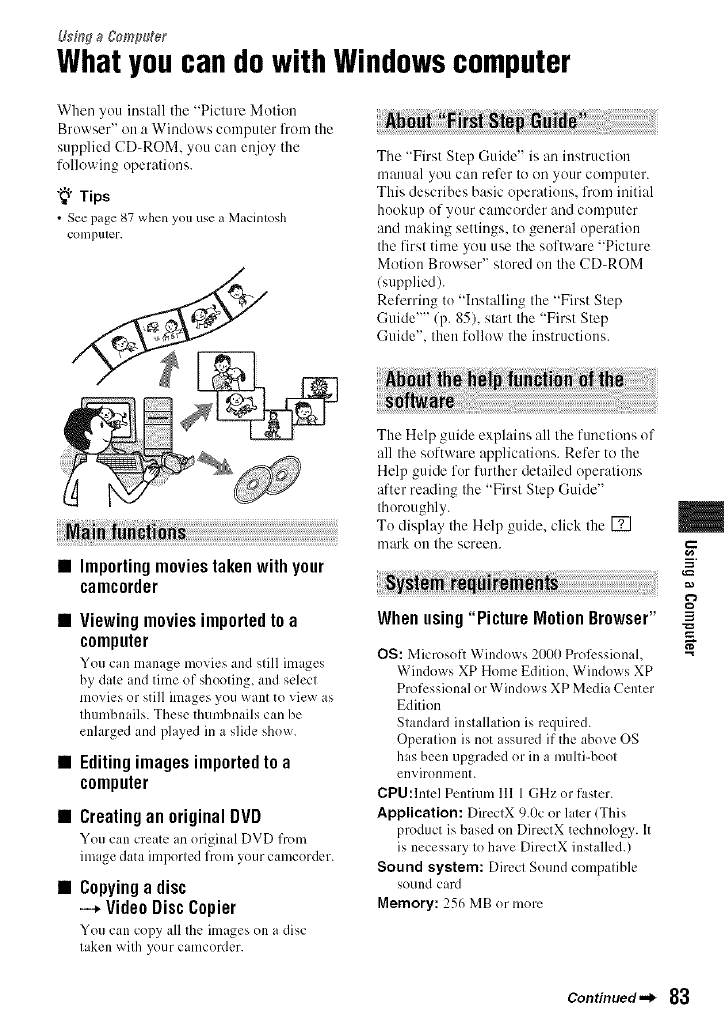
Usi,'_ga gomp_eg
Whatyoucandowith Windowscomputer
When you install the "Picture Motion
Browser" on a Windows computer l'ron/the
supplied CD-ROM, you can enjoy the
following operations.
"_" Tips
•See page 87 when you use a Macintosh
COlllpu[_r.
Tile "First Step Guide" is an instruction
manual you can refer to on your computer.
This describes basic operations, from initial
hookup of your camcorder and computer
and making settings, to general operation
the first time you use the software "Picture
Motion Browser" stored on the CD-ROM
(supplied).
Referring to "Installing the "First Step
Guide'"'/p. 85), start the "First Step
Guide", then follow the instructions.
The Help guide explains all the functions of
all tile software applications. Refer to the
Help guide for lilrther detailed operations
_ffter reading tile "First Step Guide"
thoroughly.
To disphly tile Help guide, click tile []
......... IIl_lrk OU lhe screen.
•Importing movies taken with your
camcorder_ i
•Viewing movies imported to a
computer
You can manage movies and still images
by date and time of shooting, and select
movies or still images you want to view as
thumbnails. These thumbnails can be
enlarged and played in a slide show.
•Editingimagesimportedto a
computer
•CreatinganoriginalDVD
You can crem: an original DVD from
image data imporled from your camcorder.
•Copying a disc
--* Video Disc Copier
You can copy all the images on a disc
taken with your camcorder.
When using"Picture MotionBrowser"
OS: Microsoft Windows 2000 Prol%,ssional,
Windows XP Home Editiom Windows XP
Professional or Windows XP Media Center
Edition
Standard installation is required.
Operation is not issured if the above OS
his been upgraded or in a multi-boot
environment.
CPU:lntel Pentium 111 1 GHz or faster.
Application: DirectX 9.0c or l,ter (This
product is based on DirectX technology. It
is necessary to have DircctX installed.)
Sound system: Direct Sound compatible
sound card
Memory: 256 MB or more
m
.=
3
Continued._ 83
What y+_+cam do with Wia_+ws ++mN+_er(C+._iau+d}
Hard disk:
Disc volume required for instalhaion:
Approximately 600 MB (5 GB or more
m,y be necessary when creating DVD
videos.)
Display: DirectX 7 or later-compatible video
card, Minimum 1024 × 768 dots, High
Color ( 16 bit cok)r)
Others: _,_USB port (this must be provided
as standard), Hi-Speed USB (USB 2.0
compatible) is recommended, Disc drive
that can burn DVDs (CD-ROM drive
required lbr soflware installation)
Whenplayingstill imagesrecorded
ona "MemoryStick Duo"ona
computer
OS: Microsoft Windows 2000 Professional,
Windows XP Home Edition, Windows XP
Professional or Windows XP Media Center
Edition
Standard installation is required.
Operation is not ,ssured if the above OS
has been upgraded.
CPU: MMX Pentium 200 MHz or faster
Others: _ USB port (this must be provided
as standard)
0Note
• E_,ell ill it colnpulcr envirollnlent where the
operations arc guaranteed, lranlcs may be
dropped l_om ramies, resuhing in uneven
playback. Howe_ er, inlported inlages and
images on discs created subsequendy will not be
all_:cted.
• Operations arc not guaranleed, even Oll
computers lnlfilling the above system
rcquiremclllS.
• Picture Motion Brow_r does not support 5.1ch
surround soulld rt_produclion. The sound is
reproduced in 2ch sound.
• Some conlputers do not support 8 cnl discs
(such as DVD+R DL(double-layercd)).
• If you use a Notebook PC, connect it to tile AC
Adaptor as tile power source. Olherwise. tile
software will not work properly due to tim
power saving fllnction of the PC.
"_° Tips
• It your computer llas aMenlory Slick sloL insert
die 'Memory Stick Duo" on which still images
arc recorded into the Menlory Slick Duo
Adaptor (opfional), then insert it into die
Memoly Slick slot on your conlputer to copy
still images to tile con_puter.
• Wllcn using a "Menlol T Stick PRO Duo" mid
your compuler is not compatible with it, connecl
your canlcorder wilh the USB cable instead of
using lhe Memory Stick slot on the compuler.
84
Installingthe "First StepGuide"andsoftware
You need to install the "First Step Guide"
and software to your Windows computer
before connecting your camcorder
to the computer. The installation is
required only for the first time.
Contents to be installed and procedures
may differ depending on your OS.
"_° Tips
•See page 87 whenyou use _ M_cintosh
COlllputer.
4Click [FirstStepGuide].
5 Select the desired language and
the model name of your
camcorder from the pull-down
menu.
1Confirm that your camcorder is
not connected to the computer.
e_
," Turn on the computer.
fO Notes
• Logon as Adlninislr_llorslor inst_dl_,tion.
• Close all _,pplicationsrunning on tile
computer belorc installingtile software.
3Place the supplied CD-ROM in the
disc drive of your computer.
The instalh'ttion screen appears.
6Click [FirstStepGuide(HTML)].
Installation starts.
When [Save is complete] appears, click
[OK] to finish the installation.
To installthe "First Step Guide" in
PDF
In step 6, click [FirstStepGuidc/PDF)].
To installthe software"Adobe
Reader"to displaythe PDFfile
In step 6, click [Adobe(R) Reader(R)].
3
If the screen does not appear
(_)Click [Stan], then click [My
Computer]. (For Windows 2000,
double-click [My Computer].)
@ Double-click [SONYPICTUTIL (E:)]
(CD-ROM) (disc drivel.*
* Drive names (such as (E:)) may vary
depending on the compuler.
1Perform steps 1 to 3 in "Installing
the "First Step Guide"" (p. 85).
2Click [Install].
3Select the language for the
application to be installed, then
click [Next].
Continued,,_ 85
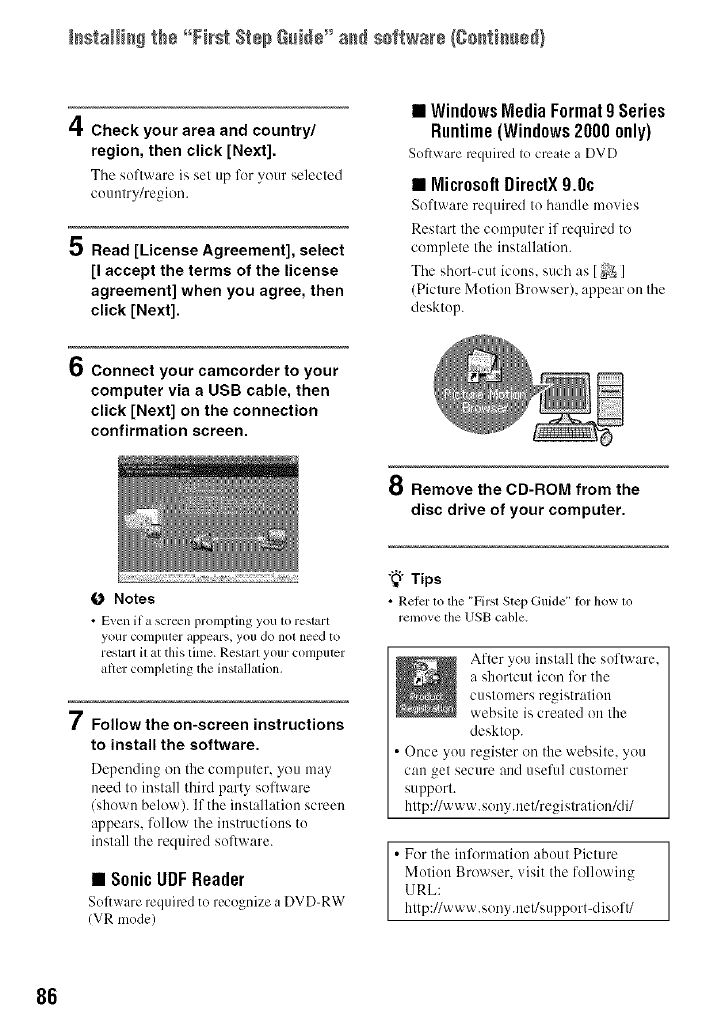
[_staH[_$ the °°First S_÷pGui_÷" a_ sof_war÷/Coati,u@)
4Check your area and country/
region, then click [Next].
The software is settip for your se]ected
comttry/region.
5 Read [License Agreement], select
[I accept the terms of the license
agreement] when you agree, then
click [Next].
•Windows Media Format 0Series
Runtime (Windows20000nly)
Softy, are r,-'quilcd to create a DVD
• MicrosoftDirectX9.0c
Softw:u'e required to h:mdle movies
Restart the computer if required to
complete the installation.
The short-cut icons, such as [_ ]
(Picture Motion Browser), appear on the
desktop.
OConnect your camcorder to your
computer via a USB cable, then
click [Next] on the connection
confirmation screen.
8 Remove the CD-ROM from the
disc drive of your computer.
ONotes
•E_en ira screen prompting youto restart
your cOtllpUl_l" i_ppeal'S, you do not need to
restart it at this time. Reshtrl your conlputer
afire:completing the installation.
7Follow the on-screen instructions
to install the software.
Depending on the cotuputer, you tuay
need to install third party software
/shown below). If the installation screen
appears, follow the instructions to
install the required software.
•SonicUDFReader
Software required to recognize a DVD-RW
(VR mode)
"_" Tips
• Refer to the "First Step Guide" lot how to
remove the USB cable.
After you install the software.
a shortcut icon for the
customers registration
website is created on the
desktop.
•Once you register on the websile, you
can _el secure and tlseftl] customer
support.
http://www.sony.net/registratiunMi/
• For the information aboul Picture
Molion Browser. visit the following
URL:
lattp://www.sony.net/support-disofl/
86
Viewing"First Step
Guide"
"_° Tips
• See page 87 when you use u Macinlosh
COIllpll[_r.
To view "First Step Guide" on your
computer. Microsoft Intemet Explorer
Vet.6.0 or later is recommended.
Double-click the shortcut of "First Step
Guide" on the desktop.
"_° Tips
• You can also start this program by selecting
[Smlll _ [Programsl ([AII Programsl tot
Windows XP) _ [Sony Picture Utilityl
[First Step Guidel --+ folder wilh model name
of your camcorder _ HTML version ot "First
Step Guide."
• To view "Firsl Step Guide" ill HTML withoul
inslalling, copy the desired language fokler from
the [FirstStepGuidel fokler on ltle CD-ROM.
alld lhen double-click [lndex.htnfll.
•RelEr 1o the PDF version ol "First Slep Guide"
ill tile following cases:
When prinlhlg lhe desired lopics ot "Fhsl
Step Guide"
When "Firsl Step Guide" is not displayed
correctly due to the browser setting even ill
recolllli]ellded ellv]rol311lelll.
When the HTML version ot "First Slep
Guide" cannot be installed.
Usinga Macintosh
computer
You can copy the still im,ges from the
"Memory Stick Duo" to the Macintosh.
Install "First Step Gukle" in the supplied
CD-ROM.
0 Notes
• Tile supplied sotiwm-e "Picture Motion
Browser" does not operate on Mac ON.
•Retcr to "Firsl Step Guide" ior the delails on
conllecling your calncorder to tile computer and
copying the still images.
To copy still images from a"Memory
Stick Duo"
OS: Mac OS % 119.2or Mac OS X (riO. l/
v 10.2/v10.3/v10.4).
Others: _ USB port (this must be provided
as standard)
iiiiiiiiiiiiiiiiiiiiiiiiiiiii¸¸¸
The "First Step Guide" is an instruction
manual you can refer to on your computer.
This describes basic operations, from initial
hookup of your camcorder and computer
and making setting.
Referring to "Installing the "First Step
Guide,'"' start the "First Step Guide," then
follow the instructions.
Copy "FirslSlepGuide(PDF)," stored in the
desired language in the [FirslStepGuide]
folder, to your computer.
Double-click "FirslStepGukle/PDF/."
If no software for viewing PDF files is
installed on your computer, you can
download Adobe Reader from the
following website:
http://www.adobe.com/
87
Tro_bfes_toe#W
Troubleshooting
If you run into any problems using your
camcorder, use the following table to
troubleshoot the problem. If the problem
persists, disconnect the power source and
contact your Sony dealer.
•Ovm'all operations/Easy Handycam operation/
telnote Colllll/ander _
• Balteries/Power sources ................................ 89
LCD screen/viewfinder ................................ 90
Discs/"Memory Stick Duo" .......................... 90
Recording ..................................................... 91
Playing back on your camcorder .................. 93
Playing back a disc on otller devices ............ 94
Editing movies on the disc ........................... 94
Dubbing/Editing/Connecling to olher devices
....................................................................... 95
• Connecling 1oa compuler ............................. 95
• Functions that cannot be used simultaneously
....................................................................... 96
The power does not turn on.
• Attach a charged hattery pack to Ihe
camcorder (p. 22).
• Connect the plug of the AC Adaptor to Ihe
wall outlet (p. 22).
The camcorder does not operate
even when the power is set to on.
• It takes a few seconds for your camcordcr to
be ready to shoot after the power is turned
on. This is not a mallimction.
• Disconnect the AC Adaptor from the wall
outlet or remove the battery pack, then
reconnect it after about I minute. If the
limctions still do not work, press the RESET
button (p. 116) using a sharp-pointed object.
llf you press the RESET button, all settings,
including the clock setting, are reset.)
• The temperature of your camcorder is
extremely high. Turn off your camcorder
and leave it for a while in a cool place.
Buttons do not work.
• During Easy Handycam operation, the
following buttons/fimctions are not
available.
BACK LIGHT button (p.38)
Playback zoom (p.43)
Turning the LCD backlight on and off
(pressing and holding the DISP BATT/
INFO button lk)r a li:w seconds) (p.27)
The _ (OPTION) button is not
displayed.
• The OPTION MENU cannot he usedduring
Easy Handycam operation.
The menu settings have been
changed.
• Most menu items automatically return to
their default settings during Easy Handycam
operation.
• The h)llowing menu items are fixed during
Easy Handycam operation:
Movie recording mode: [SP]
[ [] QUALITY] R)r still images: ]FINE]
]DATA CODE]: [DATE/TIME]
Recording hmnat for DVD-RW: [VIDEO]
• The h)llowing menu items return to their
default settings if the POWER switch is set
to OFF (CHG) for more than 12 hours:
[FOCUS]
]SPOT FOCUSI
]EXPOSURE]
]SPOT METER]
[SCENE SELECTION]
]WHITE BAL. ]
[MICREF LEVEL]
88
Even if you press EASY, menu
settings do not switch to their
defaults automatically.
•Following menu settings remain as they
were set even during Easy Handycam
operation.
[FILE NO. ]
[VOLUME]
[TV TYPE]
[ {_ DISPLAY]
[BEEP]
ISUB-T DATE]
[CLOCK SET]
[AREA SET]
[DST SETI/ISUMMERTIME]
[DEMO MODEl
[ _ LANGUAGE SET]
Your camcorder vibrates.
• Vibration occurs depending on the condition
of the disc. This is not a malfunction.
A vibration is felt in your hand or a
faint sound is heard during
operation.
•This is not a malfunction.
A motor sound is heard in the
camcorder when the disc cover is
closed without a disc.
• Your camcorder is trying to recognize the
disc. This is not a malfunction.
Your camcorder gets warm.
• This is hecause the power has been turned on
for a long time. This is not a malfimction.
Turn off your camcorder and leave itfor a
while in a cool place.
The supplied Remote Commander
does not function.
• Set [REMOTE CTRL] to IONI (p. 75).
• Insert a battery into the battery holder with
the +/ polarities correctly matching the +_
marks (p. 117).
• Remove any obstructions between the
Remote ('onllllander and the remote sensor.
• Point the remote sensor away from strong
light sources such as direct sunlight or
overhead lighting. Otherwise, the Remote
Commander may not function properly.
Another DVD device malfunctions
when you use the supplied Remote
Commander.
• Sek'ct a commander mode other than DVD 2
for your DVD device, or cover the sensor of
your DVD device with black paper.
The power abruptly turns off.
• When approxilnalely 5 minulcs have elapsed
while you do not operale your camcorder,
Ihe camcorder is aulom dically lurned off -.I
(A.SHUT OFF). Chan_e the setlin_ of _-
[A.SHUT OFF] (p. 75), or lurn on Ihe power
agfin, or use the AC Adaptor.
• Charge the battery pack (p. 22).
The CHG (charge) lamp does not
light while the battery pack is being
charged.
• Tunl the POWER switch to OFF (CHG)
(p. 22).
• Attach the battery pack to the camcorder
correctly (p. 22).
• Connect the power cord to the wall outlet
properly.
• The battery charge is completed (p. 22).
Continued._ 8g
TrssNsshsstiss/Ssstisssd}
The CHG (charge) lamp flashes while
the battery pack is being charged.
• Attach the battery pack to the camcordcr
correctly (p. 22). If the problem persists_
disconnect Ihe AC Adaptor from the wall
outlet and contact your Sony dealer. The
battery pack may be damaged.
The remaining battery time indicator
does not indicate the correct time.
•The temperature of the environment is too
high or too low. This is not a m dfunction.
• The batter}, pack has not been charged
enough. Fully charge the battery again. If the
problem persists, replace the battery pack
with a new one lp. 22).
• The indicated time may not be correct
depending on the environment of use.
The battery pack is quickly
discharged.
• The temperature of the environment is too
high or low. This is not, malfunction.
• The batter}, pack has not been charged
enough. Fully charge the battery again. If the
problem persists, replace the battery pack
with a new one (p. 22).
The buttons do not appear on the
touch panel.
• Touch the LCD screen lightly.
• Press DISP/BATT INFO on your camcorder
(or DISPLAY on the Remote Commander)
(p. 27).
The buttons on the touch panel do
not work correctly or do not work at
all.
• A(liust the touch panel ([CALIBRATION])
(p. I08).
Menu items are grayed out.
• You cannot select grayed items in the current
recording/playback status.
• Some functions cannot be used
simultaneously (p. 96).
The image in the viewfinder is not
clear.
• Move the viewfinder lens adjustment lever
until the image appears clearly (p. 27).
The image in the viewfinder has
disappeared.
• Close the LCD panch No image is displ ,yed
in the viewfinder when the LCD pmel is
()pen (p. 27).
The disc cannot be removed.
• Make sure the power source (battery pack or
AC Adaptor) is connected correctly (p. 22).
• The disc is damaged or is dirty with
fingerprints, etc. In this case, it may take up
to IO minutes to remove the disc.
• The temperature of your camcorder is
extremely high. Turn off your camcorder
and leave it for a while in a cool place.
•Finalizing is interrupted by turning off your
camcorder. Turn on your camcorder and
remove the disc after finalizing is completed
(p. 48).
Images cannot be deleted.
• The maximum number of images that you
can delete on the index screen at one time is
100.
• Images cannot be deleted depending on the
type and recording R)rmat of a disc (p. 15,
5O).
gO
Remaining disc space indicator is
not displayed.
•Set 1_ REMAINING] Io IONI to ahvays
display the remaining disc space indicator
(p. 67).
The indicators of the disc type and
the recording format on the LCD
screen are grayed out.
• The disc may haw' been created other Ihan
your camcorder. You can play back with
your e;uncorder, but you cannot record
additional scenes.
You cannot operate functions using
the "Memory Stick Duo."
• If you use ;i "Memory Stick Duo" lbnnatted
on a computer, format it again on your
camcorder (p. 62).
You cannot delete or format the
"Memory Stick Duo."
• The maximum number of images that you
can delete on the index screen at one time is
100.
• You cannot delete still images that have
write-protection set by another device.
Data file name is incorrect or
flashing
• The fih: may be corrupted.
• The file lbrmat may not be supported by
your camcorder. Use the supported file
format (p. 104).
Refer also to "Discs/"Memory Stick Duo ....
(p. 90).
Pressing START/STOP does not
record movies on the disc.
• Tile playback screen is disph,ycd. Set your
camcorder to recording standby (p. 35).
• Your camcorder is recording the scene you
have just shot on the disc.
• The disc has run out of space. Use a new disc
or fonnat the disc (DVD-RW/DVD+RW
only, p. 611.Or delete the unnecessary
images (p. 50).
• When you arc using one of the lbllowing
discs after finalizing it, make the disc to be
able to record additional scenes (p.62). Or
use a new disc.
DVD-RW (VIDEO mode)
DVD+RW
• The temper aure of your camcorder is
extremely high. Turn off your camcorder
and leave it for a while in a cool place.
• Moisture condensation has occurred with the
disc. Turn off your camcorder and leave it
for about 1 hour ill a cool place (p. 108).
You cannot record a still image.
• Tile playback serL.L.nis displayed. Set your
camcorder to recording standby (p. 35).
• The "Memory Stick Duo" has run out of
space. Use a new "Memory Stick Duo" or
format the "Memory Stick Duo" (p. 62). Or
delete the unnecessary images (p. 51).
• You cannot record a still image together
with:
ISMTH SLW REC]
[FADER]
[D.EFFECT]
[PICT.EFFECT]
• You cannot record a still image on a disc on
your can/corder.
Ii
Continued-_ gl
TrssNsshsstiss/Ssstisssd}
The ACCESS lamp lights up even
when you stop recording.
•Your camcordcr is recording the scene you
have just shot on the disc.
The recording angle looks different.
• The recording angle may look different
depending on the mode of your camcorder.
This is not a mallimction.
The flash does not work.
• You cannot record with the flash with:
Capturing still images while shooting a
movie
The conversion lens (optional) attached
• Even if auto flash or _) (Auto redeye
reduction) is selected, you cannot use the
flash with:
NightShot
[SUPER NIGHTSHOT]
[TWILIGHT[, [CANDLE],
[SUNRISE&SUNSET], [FIREWORKS ],
[LANDSCAPE], [SPOTLIGHT],
[BEACH] or [SNOW] in [SCENE
SELECTION]
[MANUAL] in [EXPOSURE]
[SPOT METER]
The actual recording time for movie
is less than the expected
approximate recording time of a
disc.
•Depending on an objecL such as a fast
moving object, the time available lk)r
recording may shorten (p. 14).
The recording stops.
• The temperature of your cumcorder is
extremely high. Turn off your camcorder
and leave it for a while in a cool place.
• Moisture condensation his occurred with the
disc. Turn off your camcorder and leave it
about 1hour in a cool place (p. 108).
There is a time difference between
the point where you press START/
STOP and the point that the
recorded movie starts/stops.
• On your camcordcr, there may hc a slight
time difference between the point where you
press START/STOP and the actual point that
recording movie starts/stops. This is not a
maltimction.
The movie aspect ratio (16:9/4:3)
cannot be changed.
•You cannot change the movie aspect ratio if
your disc is DVD+RW.
The auto focus does not function.
• Set IFOCUS] to [AUTO] (p. 78).
• The recording conditions are not suitable for
auto focus. A@lst the focus manually
/p. 78).
[STEADYSHOT] does not function.
• Set [STEADYSHOT] to ION] (p. 67).
• [STEADYSHOT] may not be able to
conlpensate for excessivevibrations.
The BACK LIGHT function does not
function.
•The BACK LIGHT function cannot bc used
during Easy Handycam operation.
The subjects passing by the frame
very fast appear crooked.
•This is called the lk_calphmc phenomenon.
This is not a malfunction. Because of the
way Ihe image device (CMOS sensor) reads
out image signals, the subjects passing by
the frame rapidly might appear crooked
depending on the recording conditions.
g2
Tiny spots in white, red, blue, or
green appear on the screen.
• The spots ,ppear when you are recording
with [SUPER NIGHTSHOT] or [COLOR
SLOW SHTR]. This is not a malfimction.
The color of the image is not
correctly displayed.
• Set the NIGHTSHOT switch to OFF (p. 38).
The screen image is bright, and the
subject does not appear on the
screen.
• Set the NIGHTSHOT switch to OFF (p. 38).
The screen image is dark, and the
subject does not appear on the
screen.
• Press and hokl DISP/BATT INFO lbr a few
seconds to turn on the backlight (p. 27).
Horizontal stripes appear on the
image.
• This occurs when recording images under a
fluorescent lamp, sodium lamp, or mercury
lamp. This is not malfimction.
Black bands appear when you
record a TV screen or computer
screen.
• Set [STEADYSHOT] to [OFF] (p. 67)
(DCR- DVD408/DVD8/)8).
[SUPER NIGHTSHOT] cannot be
operated.
• Set the NIGHTSHOT switch to ON.
You cannot adjust [LCD BL LEVEL].
• You cannot a(!just [LCD BL LEVEL] when:
The LCD panel is closed on your
camcorder with the LCD screen facing out.
The power is supplied from the AC
Adaptor.
You cannot play back a disc.
• Turn the POWER switch to turn on your
camcorder and press [] (VIEW IMAGES).
• On the HOME MENU, touch [_ (VIEW
IMAGESL then [VISUAL INDEX].
• Check out the disc compatibilily (p. 14).
• Insert a disc with the recording side facing
your camcorder (p.28).
• The disc that was recorded, l_)rmatted, of
finalized on other devices may not be played
back on your camcorder.
The playback image is distorted.
• Clean the disc using a soft cloth (p. 104).
Still images stored on a "Memory
Stick Duo" cannot be played back.
• Still images cannot be played hack if you
have modified files or lblders, or have edited
the data on a computer, lThe file name
flashes in that case.) This is not a
malfunction (p. 105).
• Still images recorded on other devices may
not be played back. This is not a malfunction
/p. 105).
"-4
=r
[COLOR SLOW SHTR] does not
operate correctly.
•[COLOR SLOW SHTR] may not operate
correctly in total darkness. Use Super
NightShot or [SUPER NIGHTSHOT].
"IT]" is indicated on an image in the
VISUAL INDEX screen.
• Loading of the data mLv haw: faih:d. It rely
be indicated correctly when you turn off the
power md then turn it on again, or repeat
removing and inserting the "Memory Stick
Duo" acouple of times.
• This may appear on still images recorded on
other devices, edited on a computer, etc.
Continued._ 93
Trssb_sshsstisS/Ssstisssd}
No sound or only a quiet sound is
heard when playing back a disc.
• Turn up tile volunlc (p. 42).
• Sound is not output when the LCD screen is
closed. Open the LCD screen.
• When you record sound with [MICREF
LEVEL] (p. 82) set to [LOW], the recorded
sound may be difficult to hear.
• In case of [SMTH SLW REC], you cannot
record sounds during shooting (about 3
seconds).
You cannot play back the disc, or the
disc is not recognized.
• Clean the disc using a soft cloth (p. 104).
• Finalize the disc (p. 46).
• A disc recorded in VR mode cannot be
played hack on a device that does not
suppoll VR mode. Check the compatibility
ill the instruction mamlal of the playback
device.
The playback image is distorted.
•Cleanthe disc usinga soft cloth (p. 104).
"[_j" is indicated on an image in the
DVD menu.
•Loading of the data may have faih:d when
the disc wls finalized. For the following
discs, make the disc capable of additkmal
recording (p. 62), then remake the DVD
menu by finalizing the disc again (p. 49).
The DVD menu may be displayed correctly.
DVD-RW IVIDEO mode)
DVD+RW
Playback freezes for an instant
between the scenes.
• The image may freeze 1_)1an instant bctx_ecn
scenes depending on the device being used.
This is not a malfimction.
• In case ofa DVD+R DL, the image may
freeze for an instant when the recording
layer changes. This ixnot a malfimction.
Playback does not move to the
previous scene when you press
I<1<.
• If playback crosses 2 titles made
automatically by your camcorder when
ix pressed, playback may not move to the
previous scene. Select the desired scene
from the menu screen. Refer to the
instructkm manual of the playback device
for further inlbrmation.
Unable to edit.
•Your disc may not hc configured for editing
data.
• There are no images recorded on the disc.
• Unable to edit because of the condition of
the image.
• You cannot edit an image protected on
another device.
• You cannot copy or move the images
between a disc and a "Memory Stick Duo."
Scenes cannot be added in the
Playlist.
• The disc ix full, or tile added scenes exceed
999. Delete unnecessary scenes (p. 54).
• You cannot add still images in the Playlist.
A movie cannot be divided.
• A movie that is too short cannot bc divided.
• A movie protected on another device cannot
be divided.
g4
A scene cannot be deleted.
• Your disc may not bc configured for deleting
data (p. 15).
• You cannot delete movie during the Easy
Handycam operation.
•A scene protected on another device cannot
be deleted.
Unable to copy the images from a
disc to a "Memory Stick Duo."
•You cannot copy a movie from a disc to a
"Memory Stick Duo" as a still image during
playback on your camcorder.
Unable to finalize.
• Battery is running out during finalizing. Use
the AC Adaptor.
• The disc has already been finalized. In the
case of lbllowing discs, l\)llow the required
procedure to record additional material
(p. 62):
DVD-RW (VIDEO mode)
DVD+RW
Unable to [UNFINALIZE].
• [UNFINALIZE] is not available for the
following types of disc:
DVD-RW (VR mode)
DVD+RW
DVD-R
DVD+R DL
You cannot edit or record additional
material on a disc using other
devices.
• You may not be ible to edit a disc recorded
on your camcorder using other devices.
You cannot hear the sound.
• When you arc using the S VIDEO plug,
make sure the red and white plugs of the A/V
connecting cable arc connected (p. 44).
The aspect ratio of the playback is
not correct when connecting your
camcorder to the TV.
• Set [TV TYPE] depending on yo/ir TV
(p. 44).
You cannot dub correctly.
• The A/V connecting cable is not connected
properly, klake sure that the A/V connecting
cable is connected to the proper jack, i.e. to
the input jack of another de_icc for dubbing
a image from your camcorder (p. 56).
When using the movies on a disc, a
computer does not recognize your
camcorder.
• Install Picture Motion Browser (p. 85).
• Disconnect the USB device other than the
keyboard, the mouse, and the cam(order
from the computer.
• Disconnect the cahle from the computer and
canlcorder, rcstaE the computer, then
connect them again correctly.
Cannot use the supplied software,
Picture Motion Browser, on the
Macintosh computer.
• You cannot use Picture Motion Browser on a
Macintosh.
=-
Continued._ g5
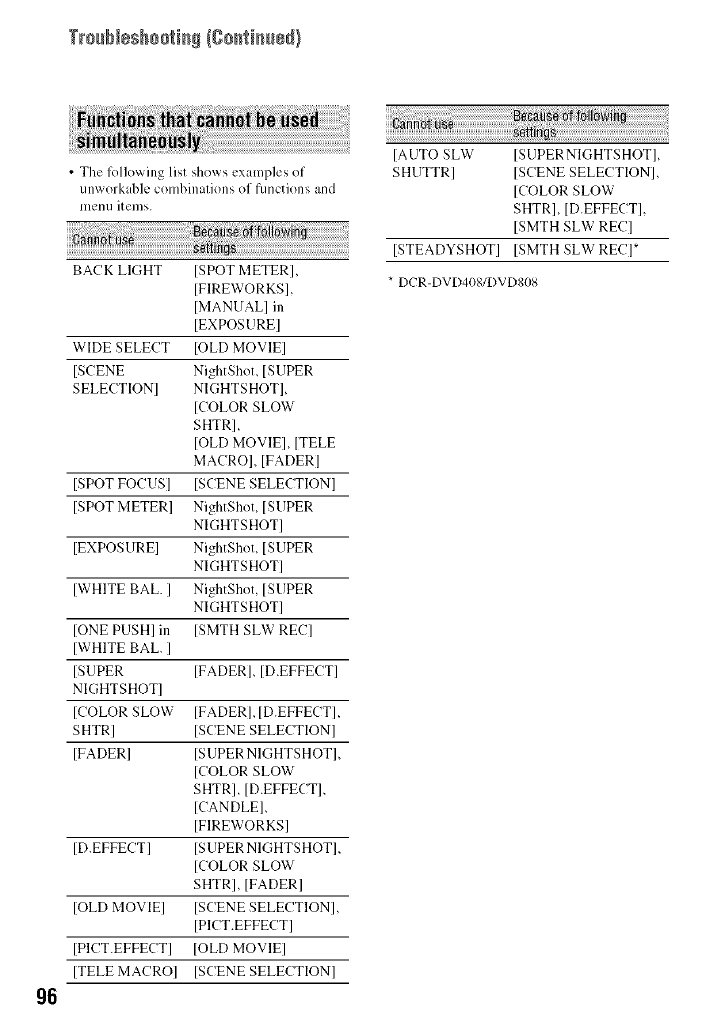
TrouN_sboo_i_g{go_i_ss_)
• Tile lk)llowing list shows examples of
unworkable combinations of fimctions and
mentl items.
BACK LlGHT ISPOT METERI,
IFIREWORKSI,
IMANUAL] in
[EXPOSURE[
WIDE SELECT IOLD MOVIEI
ISCENE NightShot, ISUPER
SELECTION] NIGHTSHOT[,
[COLOR SLOW
SHTR],
[OLD MOVIE], [TELE
MACRO[, [FADER[
[SPOT FOCUS[ [SCENE SELECTION]
[SPOT METER[ NightShot, [SUPER
NIGHTSHOT1
[EXPOSURE] NightShot, [SUPER
NIGHTSHOT]
[WHITE BAL. [ NightShot, [SUPER
NIGHTSHOT]
[ONE PUSH[ in [SMTH SLW REC]
[WHITE BAL. ]
[SUPER [FADER], [D.EFFECT]
NIGHTSHOT]
[COLOR SLOW [FADER],[D.EFFECT],
SHTRI [SCENE SELECTION]
[FADERI [SUPER NIGHTSHOTI,
[COLOR SLOW
SHTR[, [D.EFFECT1,
[CANDLE],
[FIREWORRSI
[D.EFFECTJ [SUPERNIGHTSHOTL
[COLOR SLOW
SHTR], [FADER[
[OLD MOVIE] [SCENE SELECTION I,
[PICT.EFFECT]
[PICT.EFFECT] [OLD MOVIE[
[TELE MACRO[ [SCENE SELECTION]
[AUTO SLW [SUPERNIGHTSHOT],
SHUTTR] [SCENE SELECTION],
[COLOR SLOW
SHTRI, [D.EFFECTI,
[SMTH SLW REC]
[STEADYSHOT] [SMTH SLW REC]*
* DCR-DVD4OS/DVDS08
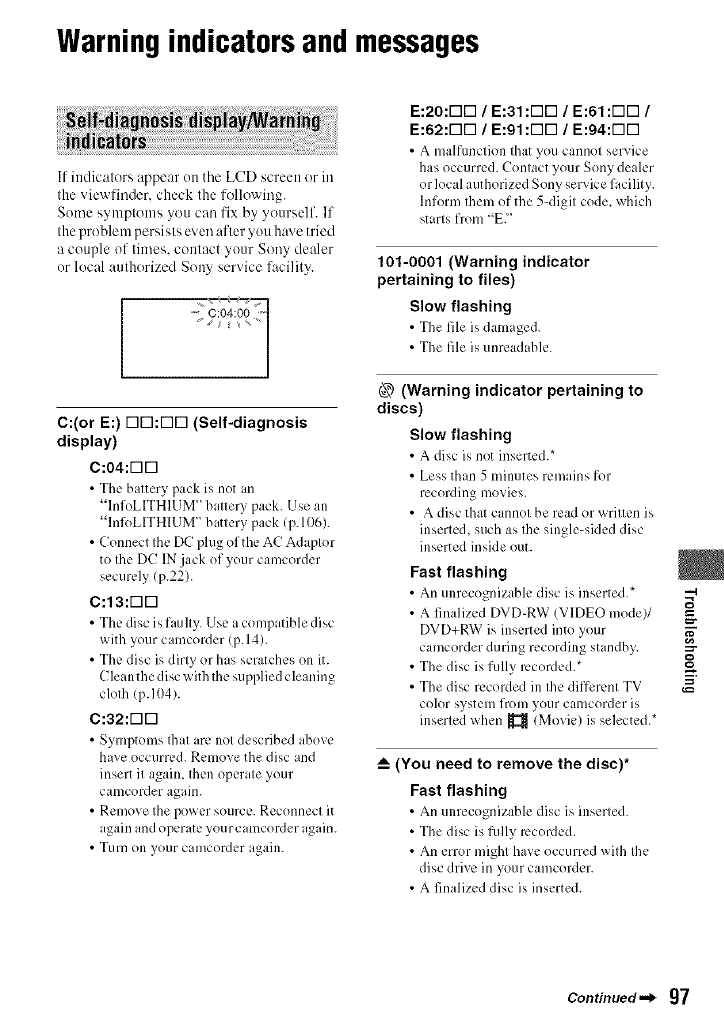
Warningindicatorsandmessages
If indicators appear on tile LCD screen or in
the viewfinder, check the following.
Some symptoms you can fix by yourself. If
the problem persists even after you h:we tried
a couple of times, contact your Sony dealer
or local authorized Sony service facility.
C:(or E:) r-lri:r-lri (Self-diagnosis
display)
C :04:r-lr-I
• Tfic battery pack is not an
"InfoLITHIUM" batte Upack. Use an
"Infi)LITHIUM" battery pack (p.106).
• Connect the DC plug of the AC Adaptor
to the DC IN.jack of your camcorder
securely (p.22).
C:13:F-IF-I
• The disc is faulty. Use a compatible disc
with your camcorder (p.14).
• The disc is dirty or has scratches on it.
Clean the disc with the supplied cleaning
cloth (p.104).
C:32:r-lr-I
• Symptoms Ihat arcnot described above
have occurred. Remove the disc and
insert it again, then operate your
camcorder again.
• Remove the power source. Reconnect it
again and operate your camcorder again.
• Turn on your camcorder again.
E:20:r-lri /E:31 :rift] /E:61 :rift] /
E:62:riri /E:91 :rift] /E:94:riri
• A malfimction that you cannot service
has occurred. Contact your Sony dealer
or local authorized Sony service facility.
Inform them of the 5-digit code. which
starts from "EY
101-0001 (Warning indicator
pertaining to files)
Slow flashing
• The file is damaged.
• The file is unreadable.
(Warning indicator pertaining to
discs)
Slow flashing
• A disc is not inserted.*
• Less than 5 minutes remains for
recording movies.
• A disc that cannot be read or written is
inserted, such as the single-sided disc
inserted inside out.
Fast flashing
• An unrecognizable disc is inserted.*
• A finalized DVD-RW (VIDEO mode)/
DVD+RW is inserted into your
camcorder during recording standby.
• The disc is fidly recorded.*
• The disc recorded in the different TV
color system fron] your calllcorder is
inserted when _ (Movie) is selected.*
_--(You need to remove the disc)*
Fast flashing
• An unrecognizable disc is inserted.
• The disc is fully recorded.
• An error might have occurred with the
disc drive in your camcorder.
• A finalized disc is inserted.
=-
Continued._ 97
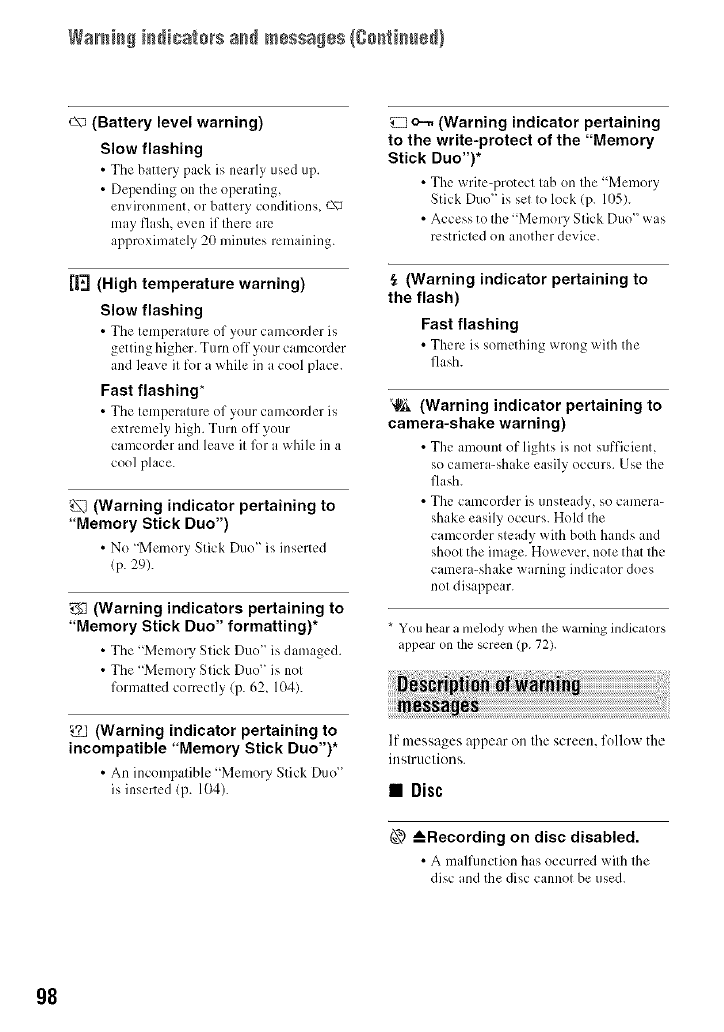
Waraia# iadicatars a_d messa#es {ga[Riaued}
(Battery level warning)
Slow flashing
•The battery pack is nearly used up.
• Depending on the operating,
environment, or battery conditions, _-\_
may flash, even if there am
approximately 20 minutes remaining.
(High temperature warning)
Slow flashing
• The temperature of your camcorder is
getting higher. Turn off your camcorder
and leave it for a while in a cool place.
Fast flashing*
• The temperature of your camcorder is
extremely high. Ttlrn off your
camcorder and leave it R)r a while in a
cool place.
(Warning indicator pertaining to
"Memory Stick Duo")
• No "Memory Stick Duo" is inserted
(p. 29).
_ (Warning indicators pertaining to
"Memory Stick Duo" formatting)*
• The "Memory Stick Duo" is damaged.
• The "Memory Stick Duo" is not
formatted correctly (p. 62, 104).
(Warning indicator pertaining to
incompatible "Memory Stick Duo")*
• An incompatible "Memory Stick Duo"
is inserted (p. 104).
o--. (Warning indicator pertaining
to the write-protect of the "Memory
Stick Duo")*
• The writc-,:_rotecttab on the "Memory
Stick Duo" is set to lock lp. 11)5).
• Access to the "Memory Stick Duo" was
restricted on another device.
(Warning indicator pertaining to
the flash)
Fast flashing
• There is something wrong with the
flash.
_ (Warning indicator pertaining to
camera-shake warning)
• The amount of lights is not sufficient,
so camera-shake easily occurs. Use the
flash.
• The camcorder is unsteady, so camera-
shake easily occurs. Hold the
camcorder steady with both hands and
shoot the image. However, note that the
camera-shake warning indicator does
not disappear.
* You hear a mdody when lhe warning indicators
appear on the screcn (p. 72).
If messages appear on the screen, follow the
instructions.
• Disc
6__ _--Recording on disc disabled.
• A malfunction has occurred with the
disc and the disc cannot be used.
g8
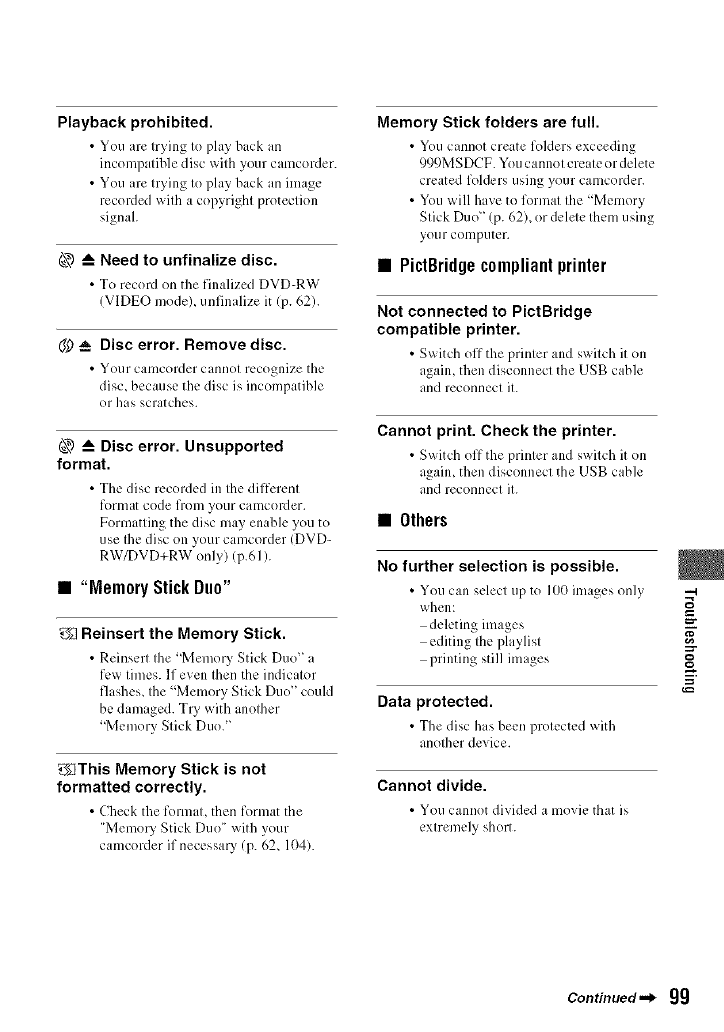
Playback prohibited.
• You are trying to play back an
incompatible disc with your camcorder.
• You are trying to play back an image
recorded with a copyright protection
signal.
_) _-- Need to unfinalize disc.
• To record on the finalized DVD-RW
(VIDEO model unfinalize it (p. 62).
(_ _= Disc error. Remove disc.
• Your calIlCOlder cannot rL, cognize tilL'
disc, because the disc is incompatible
or has scratches.
@ _-- Disc error. Unsupported
format.
• Tile disc recorded in the different
forlllat code fronl your camcorder.
Formatting the disc may enable you to
use Ihe disc on your camcorder IDVD-
RW/DVD+RW only) (p.61).
• "Memory Stick Duo"
_Reinsert the Memory Stick.
• Reinscrt the "Memory Stick Duo" a
few times. If even then the indicator
flashes, the "Memory Stick Duo" could
be damaged. Try with another
"Memory Stick Duo."
_This Memory Stick is not
formatted correctly.
•Check tile format, then format tile
"MemoUStick Duo" with your
camcorder if necessa U(p. 62, 104).
Memory Stick folders are full.
• Youcannot create foklers exceeding
999MSDCF. You cannot create or delete
created folders using your camcorder.
•You will have to format the "Memory
Stick Duo" (p. 62), or delete them using
your conlputer.
• PictBridgecompliantprinter
Not connected to PictBridge
compatible printer.
• S_itch off tile printer and s_itch it on
again, then disconnect the USB cable
and reconnect it.
Cannot print. Check the printer.
• S_itch off tile printer and s_itch it on
again, then disconnect the USB cable
and reconnect it.
•Others
No further selection is possible.
• You can select up to 100 images only --_
when: __
deleting images ="
editing Ihe playlisl
printing still images
Data protected.
• The disc has been protected with
another device.
Cannot divide.
• You cannot divided a movie that is
extremely short.
Continued._ 99
Waraia# iadicatars a_d messa#es {ga[Ria_ed}
Recovering data z_ Avoid any
vibration.
• YOL]F CaH'lcordL*r triL*s to lL*cover Oat3
automatically if the data writing was
not performed properly.
Cannot recover data on disc.
• Writing data to the disc has failed.
Attempts were made to recover the
data, but they were unsuccessfilh
Please wait.
• This is displayed it"the disc removal
process takes time. Turn on the
camcorder and leave it R)r about 10
minutes, preventing vibration.
100
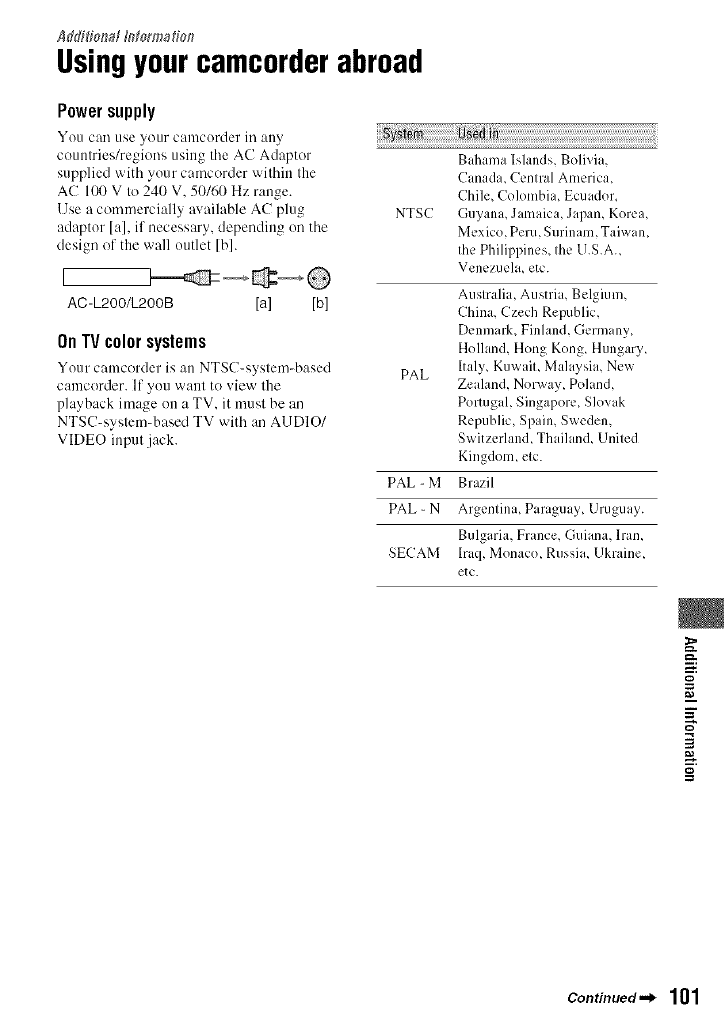
Ad_;#_iot_af_ntom_atio,'_
Usingyourcamcorderabroad
Powersupply
You can useyour camcorder in any
countries/regions using tile AC Adaptor
supplied with your camcorder within the
AC 100 V to 240 V, 50/60 Hz range.
llse a commerci:dly available AC plug
adaptor [a], if necessary, depending on the
design of the wall outlet [b].
[
AC-L200/L200B [a] [b]
On TV color systems
Your camcorder is :m NTSC-system4_ased
camcorder. If you want to view the
playback image on a TV. it must be an
NTSC-system-based TV with an AUDIO/
VIDEO input jack.
NTSC
PAL
PAL - M
PAL - N
SECAM
Bahama Islands, Bolivia,
Canad i, Central America,
Chile, Colombia, Ecuador,
Guyana, Jamaica, Japan, Korea,
Mexico, Peru, Surinam, Taiwam
the Philippines, the U.S.A.
Venezuela, etc.
Australia, Austri i, Belgium,
China, Czech Republic,
Denmark, Finland, Germany,
Holhmd, Hong Kong, Hungary,
Italy, KuwaiL Malaysia, New
Zealand, Norway, Poland,
Portugal, Singapore, Slovak
Republic, Spain, Sweden,
Switzerlan& Thaihm& United
Kingdom, etc.
Brazil
Argentina, Paraguay, Uruguay.
Bulgaria, France, Guiana, Dan,
lraq, Monaco, Russia, Ukraine,
etc.
g
m
=Z
o
3
g
Continued._ 101
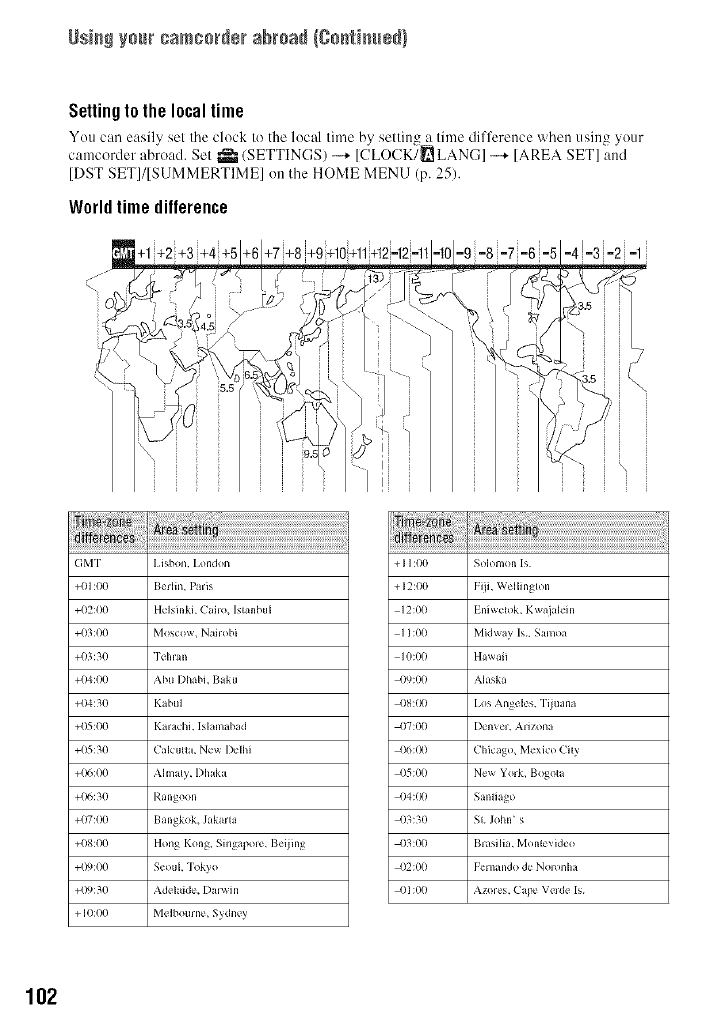
Usi_ your cam¢o_d÷rabroa_ {go_ti_sd}
Settingto the local time
You can easi|v set the clock to the local time by settin_ a time difference when usin_ your
camcorder abroad. Set _ (SETTINGS) -...+ ICLOCK!_] LAN(-;] -"+ [AREA SET] ]md
[DST SET]/[SUMMERTIME] on the HOME MENU (p. 25).
Worldtimedifference
1
1
1
-_0-9 -8 -r-6
Rm m
._ \ _]/
i
i
3.5
¸-¸-3.5 i
/........... i
i i i , i
GMT I,isbon. I,ondon
+01:00 Berlin, Pads
+02:00 HelsinkL Carlo. Islanbul
+03:00 Moscow. Nail obi
+03:30 "l'chlan
+(_:00 Abu I)habi. Baku
+04:30 Kabul
+05:00 Kmachi. Isiamabad
+05:30 Calcutta, New I)elhi
+(X,:O0 Ahnaly, I) h lka
+(}<_:30 Rangoon
+07:00 Bangkok. Jakarta
+08:00 Hong Kong, Singapole, Beiimg
+(_):00 Seouk Tokyo
+(D:30 Adehlide. I)mwin
+ 10:00 Melbounle, Sydney
+ I 1:00 Solomon Is
+12:00 Fiii, Wel[inglon
12:00 Iniwek_k, Kwaialein
11:00 Midway Is, Samoa
10:00 Hawaii
4)9:00 Alaska
4)8:(X) I,os Angeles, Tijuana
4)7:00 I)envel. Arizona
4)6:(X) Chicago, Mexico Cily
4)5:00 New York, Bogota
04:(X) Santiago
03:30 SI John' s
4)3:00 Brasilia, Monlevideo
4)2:00 t'cnlando de Nomnha
4) I :00 Azoles. Cape Velde Is
102
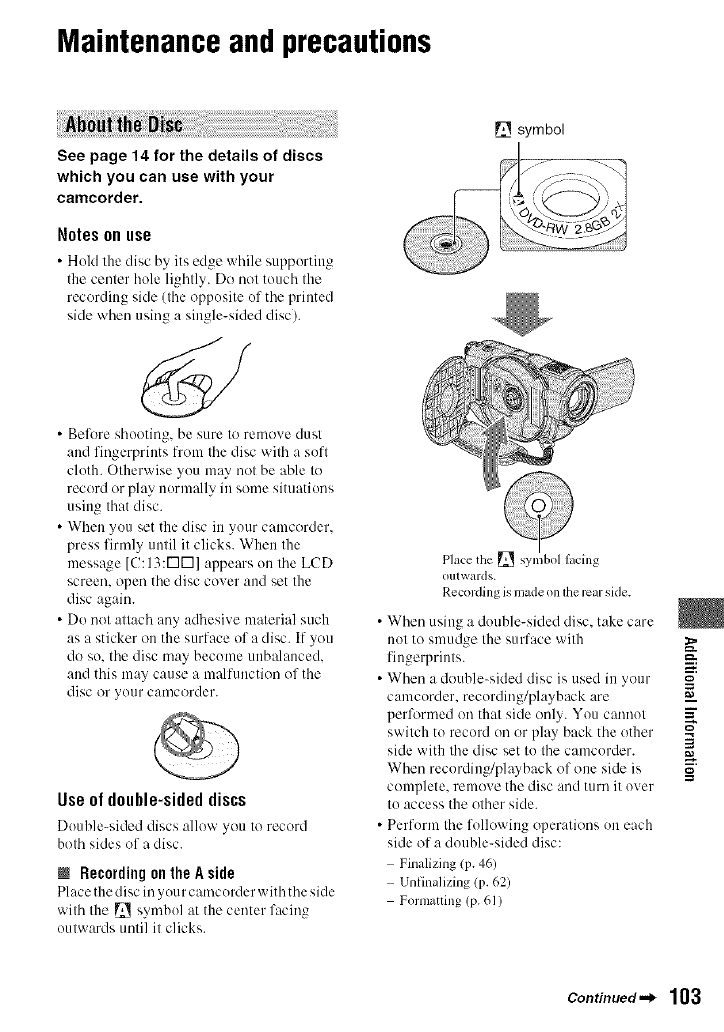
Maintenanceand precautions
See page 14 for the details of discs
which you can use with your
camcorder.
Notes onuse
• Hold the disc by its edge while supporting
the center hole lightly. Do not touch the
recording side (the opposite of the printed
side when using a single-sided disc).
• Before shooting, be sure to remove dust
and fingerpriuts from the disc with a soft
cloth. Otherwise you may not be able to
record or play normally in some situations
using that disc.
• When you set the disc in your camcorder.
press firmly until it clicks. When the
message [(!:13:r-Ivl] appears on the LCD
screen, open the disc cover and set the
disc again.
• Do not attach any adhesive material such
as a sticker on the surface of a disc. If you
do so. the disc may become unbalanced.
and this may cause a malfunction of the
disc or your camcorder.
Useof double-sideddiscs
Douhle-sided discs :dlow you Io record
both sides of a disc.
NRecordingon the A side
Place tile disc in you rcamcorder with the side
wilh tile [] symbol at tile center facing
oulwards unli] il clicks.
__ symbol
Place the [] symbol lacing
o111 wards.
Recording is nlade on lhe rear side.
W s (r• hen uiu_, a double-sided disc. ake care
not to smudge tile surface with _.
fiugerprinls, m:.
• When a double-sided disc is used in your =o
camcorder, recording/playback are =_
performed on thai side only. You cat'li'u)l _"
switch tO record on or play back the other _-,
side with the disc set to the camcorder. 3
When recordiug/playback of one side is
complete, remove tile disc and turn it over
Io access the olher side.
• Perform the followiug operalions on each
side of a double-sided disc:
Finalizing lP. 461
Unfinalizing (p. 62)
Formauing (p. 61)
Continued._ 103
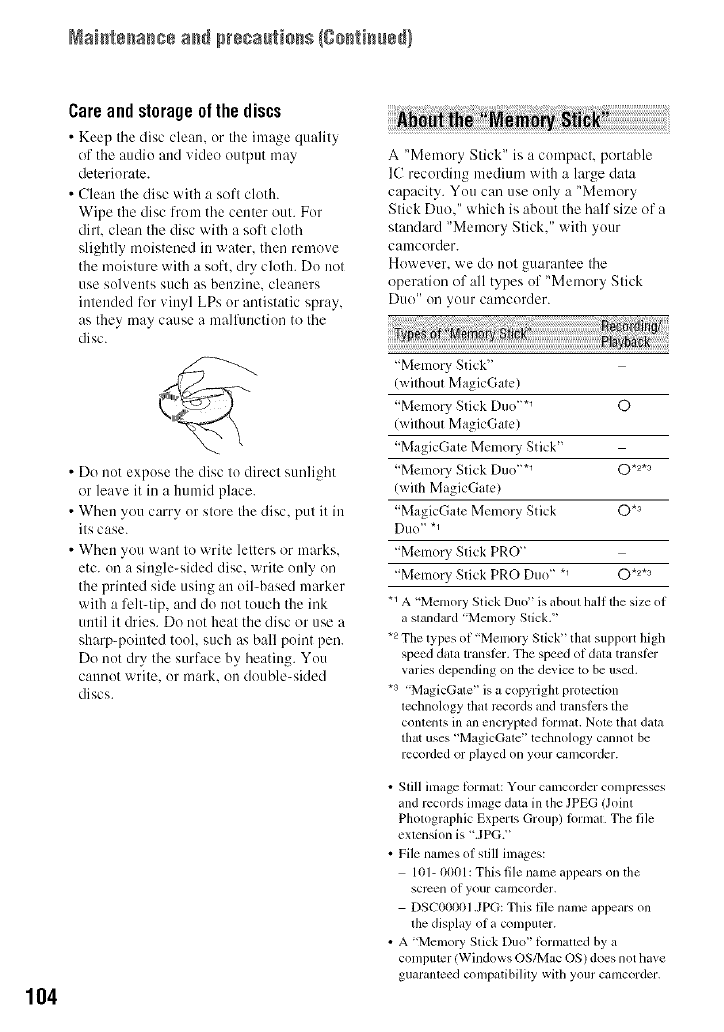
Naistssasss ass pr÷sa_[tisss {gsstisssd!
104
Care and storage of the discs
• Keep tile disc clean, or tile inmge quality
of the audio and video output may
deteriorate.
• Clean the disc with a soft cloth.
Wipe the disc from the center out. For
dirt. clean the disc with a soft cloth
slightly moistened in water, then remove
the moisture with a soft. dry cloth. Do not
use solvents such as benzine, cleaners
intended for vinyl LPs or antistatic spray,
as they may cause a malfimction to the
disc.
• Do not expose the disc to direct sunlight
or leave it in a humid place.
• When you carry or store the disc. put it in
its case.
• When you want to write letters or marks.
etc. on a single-sided disc. write only on
the printed side using an oil-based marker
with a felt-tip, and do not touch the ink
until it dries. Do not heat the disc or use a
sharp-pointed tool. such as ball point pen.
Do not dry the surface by heating. You
cannot write, or mark. on double-skied
discs.
A "Memory Stick" is a compact, portable
IC recording medium with a large data
capacity. You can use only a "Memory
Stick Duo." which is about the half size of a
standard "Memory Stick." with your
camcorder.
However. we do uot guarantee the
operation of all types of "Memory Stick
Duo" on your camcorder.
"Memory Stick"
(without MagicGate)
"Memory Stick Duo "*_ O
Iwithout MagicGate)
"MagicGate Memo W Stick"
"Memo UStick Duo "*_ O*2*a
(with MagicGate)
"MagicGate Memory Stick 0 *3
Duo _ "1
"Memo UStick PRO"
"Memo W Stick PRO Duo" *_ O *2*a
.1 A "Memory Stick Duo" is aboul half lhe size of
a slandard "Memory Stick."
.2 The types of "Menlory Stick" that support high
speed dala translcr. The speed of dala transti_r
varies depending on the device to be used.
.3 "MagicGate" is a copyrigla prolection
lechnology thai records and lranslcrs the
conlcnts ill all encl3_ptcd lormat, Nole thai dala
that uses "MagicGale" technology cannot be
recorded or played on your can/corder.
• Still image lbrmat: Your camcorder compresses
and records image data in the JPEG (Joinl
Photographic Experts Group) h)rmal. The file
exlension is ".JPG."
•File names of still images:
101- 0001: This file nanle appears on the
scrcen of your camcorder.
DSC00001 JPG: This file name appears on
lhe display of a compuler.
• A 'Memory Stick Duo" lbrmaued by a
computer (Windows OS/Mac OS) does not have
guaranleed compatibilily with your camcorder.
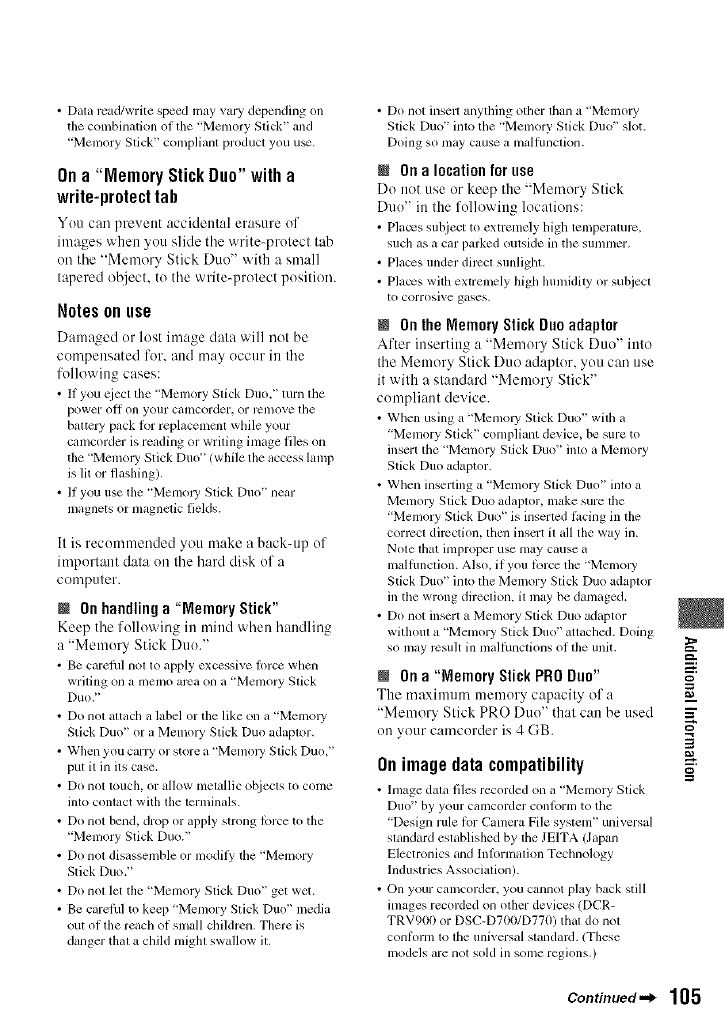
• Data read/write speed may vary depending on
the combination of die 'Memory Stick" and
'Memory Stick" compliant product you u_.
On a"Memory Stick Duo" with a
write-protect tah
You can pre_ ettt accidental erasure of
images when you slide the write-protect tab
on the "Mmnory Stick Duo" with a small
tapered object, to the write-protect position.
Notes onuse
Damaged or lost image data will not be
compensated for. and may occtlr ill tile
following cases:
• If you qiect tile "Memory Slick Duo," turn lhe
power oH on your camcorder, or rClllOVetile
battery pack for replaccmcnt wllile your
camcorder is reading or writing image files on
tile 'Memoly Stick Duo"/while tile access lamp
is lit or flashing).
•If yOU use tile "Memoly Stick Duo" near
magnets or magnclic fields.
It is recommeoded you tnake a back-up of
important data on tile hard disk of a
compHter.
NOn handling a "Memory Stick"
Keep tile followitlg in tnind when handlitlg
a "Memory Stick Duo."
• Be carelhl nol to apply excessive force when
wriling on a memo arca on a "Memory Stick
Duo."
• Do nol altach a label or the like on a "Memo U
Stick Duo" or a Memo W Stick Duo adaptor.
• When you can T or store a "MmnolT Slick Duo,"
put it in its case.
• Do not louch, or allow metallic objecls to come
inlo conlact with the terminals.
• Do not bend, drop or apply strong force to the
"Memory Stick Duo."
•Do not disassemble or modit3; tile "Memory
Stick Duo."
• Do not let the 'Memoly Stick Duo" get wet.
• Be carelhl to kecp 'Memory Stick Duo" media
out of the reach of small children. There is
danger thai a child migla swallow it.
• Do not inselr anytlling otller ltlan a "Memoly
Stick Duo" into the "Memory Stick Du(f' slot.
Doing so may cause a malfimction.
@ On alocation for use
Do not use or keep the "Metnory Stick
Duo" in the following locations:
• Placvs subject to extremely lfigh temperature,
such as a car parked outside in the summer.
• Places under dirccl sunligllt.
• Places with extremely high humidity or subjecl
to corrosive gases.
N On the MemoryStick Duoadaptor
After inserting a "Memory Stick Duo" into
tile Memory Stick Duo adaptor, you can use
it with a standard "Memory Stick"
compliant device.
• When using a "Memo UStick Duo" with a
"Memory Stick" compliant device, be sure to
insert tile "Memo W Slick Duo" inlo a Memory
Stick Duo adaptor.
• When inserting a "Memory Slick Duo" into a
Memol3' Slick Duo adaptor, make sure the
"Memory Slick Duo" is inserted ti_cing in lhe
corrcct direction, tllml insert it all the way in.
Note ttlat improper use may cause a
malflmction. Also, if you force the "Memoly
Stick Duo" imo the Memory Stick Duo adaptor
in tile wrong direction, it may be damaged.
• Do not insert a Memory Stick Duo adaptor
without a 'Memory Stick Du(f' attaclled. Doing
so may rcsuh in malthnctions of tile unit.
NOn a"Memory Stick PRODuo"
The maximum memory capacity of a
"Memory Stick PRO Dtm' that can be used
on your camcorder is 4 GB.
Onimagedatacompatibility
• Image dala tiles recorded on a "Memory Stick
DIIO '_ by yotlr calncorder cont,)ill] to the
'Design Haletor C+mmra File syslem" univers+d
standard established by tile JEITA (Japan
Electronics and Information Tcclmology
Industries Association).
• On your camcorder, you cannot play back still
images recorded on other devices (DCR-
TRV900 or DSC-D700/D770) thai do nol
conform to lhe universal slandard. (These
models are not sold in some regions.)
_=:,
g
=Z
3
g
Continued._ 105

Naistssasss ass pr÷sa_[tisss {gsstisss_!
106
•If you cannot use a "Memo13, Stick Duo" that
has been used with another device, _rmat it
with your camcorder (p. 62). Note that
l'ornlatfing erases all inft)rmation on the
"MemoJ T Stick Duo."
• You may not be able to play back images witll
your canlcorder:
When playing back image data modified on
your conlputer.
- Wllen playing back image data recorded with
other devices.
Your camcorder operates only with an
"InfoLITHIUM" battery pack (H series).
"hffoLITHIUM" H series battery packs
have the Cd,,,,o_,_.qQ,,mark.
What is an "InfoLITHIUIVI" battery
pack?
An "htfoLITHIUM ' battery pack is a
lithiumqon battery pack that has functions
for communicating information related to
operating conditions between your
camcorder and an optional AC Adaptor/
charger.
The "htfoLITHIUM" b:dtery pack
calculates the power consumption
according to the operating conditions of
your camcorder, and displays the remaining
battery time in minutes.
With an AC Adaptoffcharger. the remaining
battery time and charging time appear.
Tochargethe battery pack
• Bc sure tit clmrge tile battel 3, pack belorc you
starl using your Cillllcorder.
• We recommend charging the baltelT pack ill all
ambienl temperature of belween 10 °C tit 30 °C
150 °P tit 86 °F) until the CHG (charge) lamp
turns off. If you charge the battery pack outside
of Ibis temperature rmlge, you may not be able
to dlarge it el_icienlly.
• After charging is complete, disconnect lhe c;,ble
hom the DC IN jack on your camcorder or
remove the battery pack.
Touse the batterypackeffectively
• Battery pack pert_nnmnce decrea_s when tile
surrounding tenlperlmlre is lO °C 150 °F) or
below, and the length of time you can use the
battery pack becomes shorter. In that case, do
one of tile lollowing to use lhe baltely pack lor a
longer time.
Pul the batle W pack ill a pocket lit warm it 1113,
and insert it in your camcorder riglll before
you starl taking sllots.
Use a large capacity baltel3' pack: NP-FH70/
NP-PHIO0 (optional).
• Frequent use of tile LCD screen or a ftcquenl
ph_yback, lasl litrward or rewind operation
w-ears (till lhe baltel T pack laster.
We recommend using a large capacity battery
pack: NP-PH70/NP-PHIO0.
• Be sure to set the POWER switcll to OFF
/CHG) when not recording or playing back on
your camcorder. The battery pack is also
consultled when your calncorder is ill recordillg
standby or playback pause.
• Have spare battely packs ready bar two or tllree
tittles lhe expected recording time. and make
trial recordings using a DVD-RW/DVD+RW
belore making the actual recording.
• Do nol expose tile bauery pack to waler. Tile
battery pack is not water rcsistalnl.
Aboutthe remaining battery time
indicator
• When tile power goes off even though tim
remaining battel T tittle indicator indicates that
tile battery pack bs enough power to operate,
charge the bauery pack fiflly again. Remaining
battery tittle will be indicaled concctly. Note,
however, that lhe baltcry indication will not be
restored if it is used in lligh temperatures lot a
long time, or if left in a fully charged state, or
wllen tile battery pack is ftequently used. Use
the remaining barrel T time indication as a rough
guide only.
• The ':-\J mark that indicates low battery flashes
even if tftere are still 5 to 10 minutes of battery
little renlaining, depending on the operating
condJlions or atnbient lenlperaturc.
Aboutstorageof the battery pack
• It tile battery pack is not used lbr itlong time,
fully clmrge tile battcl 3, pack and use it up on
your canlcorder once a year to nlainlaill proper
flmcfion. To slore tile battery pack, remove il
li'onl your cmncorder and put il ill a dlT, cool
place.
• To discharge the baucl T pack on your
calncorder colnpletely, toucll _/SETTINGS)
----+ [GENERAL SETI ----+ [A.SHUT OFF] ----+
[NEVER] on the HOME MENU and leave your
calncorder in recording standby until the powcr
goes off (p. 75).
Aboutbatterylife
• Bauery capacity decrcases mer time and
through repeated use. II decreased usage time
betw_n charges beconles significant, il is
probably time to replace it with a new one.
• Each battcw's lilt is governed by storage,
operating and environmental conditions.
Onuseandcare
• Do not use or store tile canlcorder and
accessories in lhe lollowing locations:
Anywhere extremely hot or cold. Never leave
lllenl expo_d to tenlperalures above 60 °C
/ 140 °F), such as under direct sunligla, near
healers or in a ear parked in the sun. They
may mallhnction or become delormcd.
Near strong magnetic fields or mechanical
vibration. The camcorder nmy mallhnction.
Near strong radii) waves or radiation. The
cmncorder may nol be able to record properly.
Near AM receivers and video equipmenL
Noise may occur.
On a sandy beach or ally whelv dusty. If sand
or dust gets ill your camcorder, it may
nmllhnction. Solnclin/es this malflmction
cannot be rcpaired.
Near windows or outdoors, where tile LCD
screen, the viewfinder, or tile lens may be
exposed to direct sunlight. This damages the
inside of the viewfinder or tile LCD screen.
Anywhere vcJy lmlnid.
• Operate your camcoMer on DC 6.8 V/7.2 V
(battery pack) or DC 8.4 V/AC Adaptor).
• For DC or AC operation, use the accessories
rcconmlcnded in these operating instructions.
• Do not let your camcorder get wet, lot example,
l]'onl rain or sea water. If your camcorder gets
wet. it may mallhnction. Sometimes this
malflmcfion cgmnot be repaircd.
• If any solid ot_iect or liquid gets inside ttle
casing, unplug your eamcorder and llave it
cllecked by a Sony dealer belore operating it
any lhrdler.
• Avoid rough handling, disassembling,
lnodil}Ang, physical shock, or impacl sucll as
hammering, dropping or stepping on the
producL Be particularly carelhl of lhe lens.
• Keep the POWER switch stating lo OFF/CHG)
when you are not using your camcorder,
• Do not wrap your catllcorder with a lowel, tPr
example, and opel'ale it. Doing so inigllt cause
heat to build up inside.
• When disconnecting the power cord, pull it by
the plug and not tile cord.
• Do not damage the power cord such as by
phJcing anything heavy on it.
Keep metal contacts clean.
• Keep the Remote Commander and button-type
battery out of children's reach. If tile battery is
accidentally swallowed, consuh a doctor
immediately,
• If tile battery electrolytic liquid has leaked:
consuh your local authorized Sony _lwice
lacilfiy.
wash oflany liquid thal may have conlacled
your skin.
if any liquid gets in your eyes, wash wilh
plenty of water and consult a doclvlr.
NWhennotusingyourcamcorderfora _=:.
longtime =
o
•Periodically turn it on and let it run such as by
playing back discs or recording lor aboul 3 _.
millUleS, i_
• Remove a disc liom your calncorder. 3
• Use up tile bauery pack completely before
storing it.
Moisturecondensation
If your camcorder is brought directly from a
cold place to a warm place, moisture may
condense inside your camcorder, on the
surface of the disc. or on the pickup lens.
This may cause a malfimction to your
camcorder.
Continued._ 107
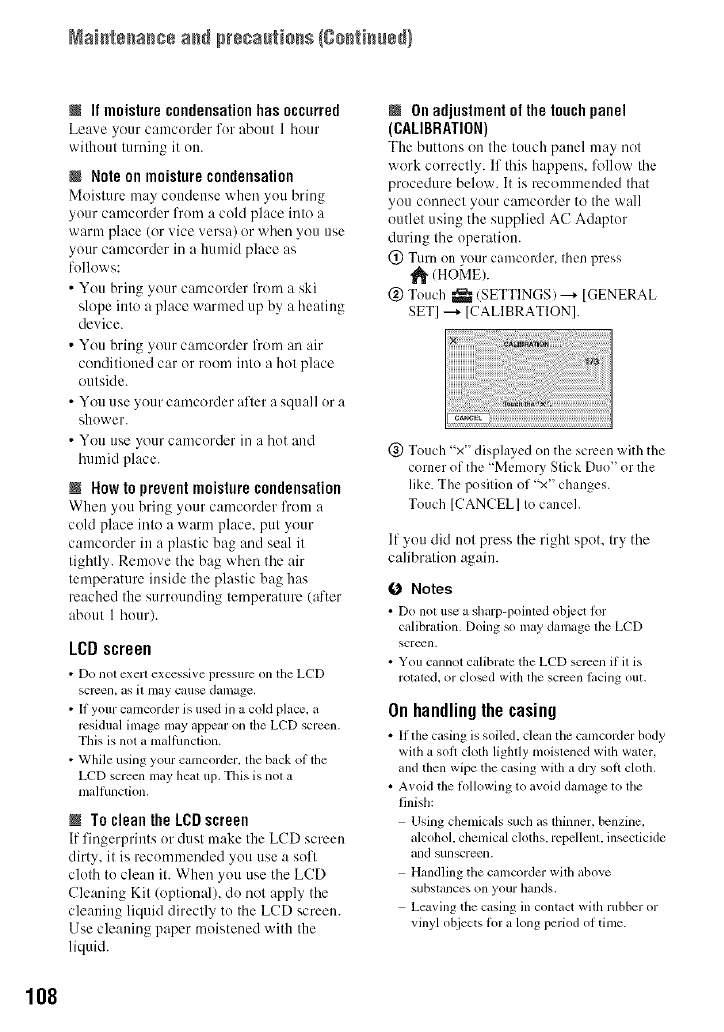
Naistssas+s ass pr÷+a++ti+ss {g+stisss_}
NIf moisture condensation has occurred
Leave your camcorder for abottt 1 hottr
wilhottt turning it on.
NNote on moisturecondensation
Moisture may condense when you bring
your camcorder from a cold place into a
warm place (or vice versa) or when you use
your camcorder in a humid place as
follows:
• You bring your camcorder from a ski
slope into a place warmed up by a heating
device.
• You bring your camcorder from an air
conditioned car or room into a hot place
outside.
• You use your camcorder after a squall or a
shower.
• You use your camcorder ill a hot and
humid place.
NNow to preventmoisture condensation
When you bring your camcorder from a
cold place into a warm place, put your
camcurder in a plastic bag and seal it
tightly. Remove the bag when the air
temperatttre inside the plastic bag has
reached the surrounding temperature (after
about 1 hour).
LCDscreen
• Do not exert exccssive pressure on the LCD
screen, as il lllay cause damage,
• If your camcorder is used in a cokl place, a
residual image may appear on the LCD screml.
This is not a mallhnclion.
• While using your camcorder, the back of the
LCD screen may heal i11).This is nol a
malfunction.
NTo clean the LCDscreen
If fingerprints or dust make the LCD screen
dirty, it is recommended you use a soft
cloth to clean it. When yott use the LCD
Cleaning Kit (optional), do not apply the
cleaning liquid directly to the LCD screen.
Use cleaning paper moistened with the
liquid.
NOnadjustment of the touchpanel
(CALIBRATION)
The buttons oil the touch pallel may not
work correctly. If this happens, follow the
procedure below. It is recommended that
you connect your camcorder tu the wall
outlet using the supplied AC Adaptor
during the operation.
(!) Turn on your camcorder+ then press
(HOME).
@ Touch _ (SETTINGS) ---+[GENERAL
SET] ---+ [CALIBRATION].
(_) Touch "x" displayed on the screen with the
corner of the "Memory Stick Duo" or the
like. The position of "x" changes.
Touch [CANCEL] to cancel.
If you did not press the right spot, try the
calibration again.
0Notes
• Do not use a sharp-poinled ohject ior
calibration. Doing so may damage lhe LCD
screen,
• You cannot calibrate the LCD screen if it is
rotated, or cloud with the screen lacing out.
On handling the casing
• It tile casing is soiled, clean tile camcorder hody
with a soft cloth liglaly moistened with water,
and then wipe the casing with a dry soft cloth.
• Avoid the lollowing to avoid damage to tile
finish:
Using chemicals such as thinner, benzine,
alcohol, chemical cloths,repellent, insecticide
and sunscreen.
Hzmdlingthe camcorder with above
subslances on your bands.
Leaving the casing in contact with rubber or
vinyl ohjects lot a long period of time.
108
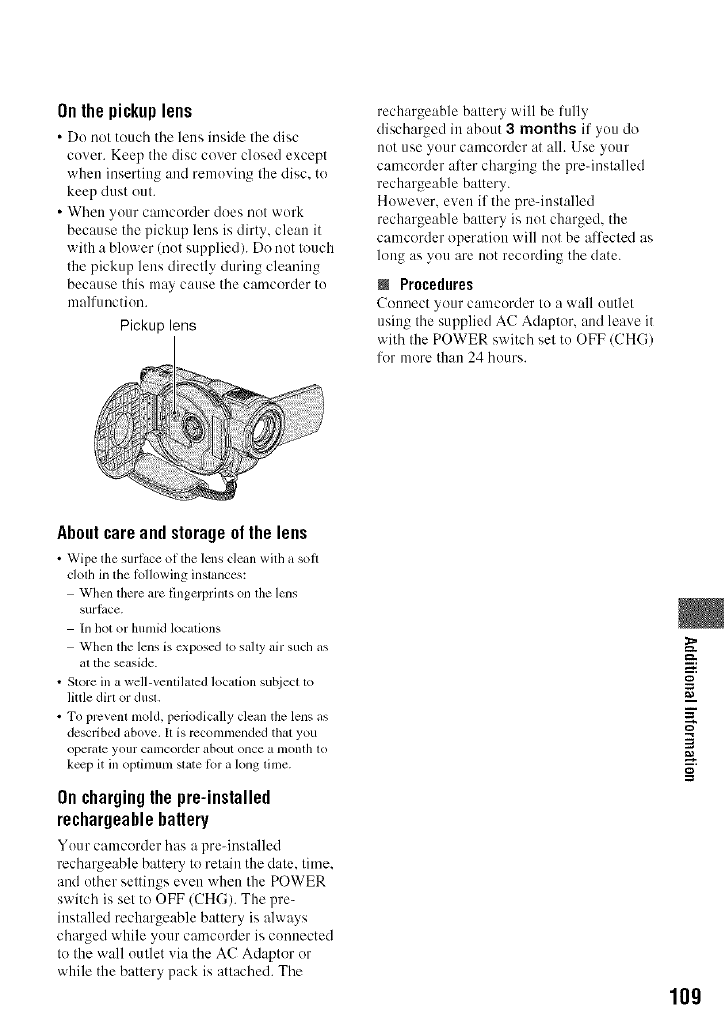
On the pickup lens
• Do not touch tile letts iuside the disc
cover. Keep the disc cever closed except
when insertittg and removing the disc. to
keep dust out.
• Wheu your camcorder does not work
because the pickup lens is dirty, cleatt it
with a blower (not supplied). Do not touch
the pickup lens directly durittg cleanittg
because this may cause tile catncerder to
malfuuction.
Pickup lens
rechargeable battery will be fully
discharged in about 3months if you do
not use your camcorder at all. Use your
camcorder after charging the pre-installed
rechargeable battery.
However. even if the pre-iustalled
rechargeable battery is not charged, the
camcorder operation will not be affected as
long as you are net recording the date.
NProcedures
Connect your camcorder to a w:dl outlet
using the supplied AC Adaptor. and leave it
with the POWER switch set to OFF (CHG)
for more than 24 hours.
About care and storage of the lens
• Wipe the surface of the lens clelm with a soil
clolh in the tallowing inslances:
Whcn lhere are fingerprinls on lhe lens
surlace.
In hot or humkl locations
When the lens is exposed lo sahy air such as
atthe seaside.
• Store ill a well-venlilated localion sut_iecl lo
little dirl or dusl.
• To prcvenl mold, periodically dean the lens as
described above. I1is recommended that you
operale your calncorder about once a nlonth 1o
k_p it ill optinmm slate tk_ra long lime.
On charging the pre-installed
rechargeable battery
Your camcoMer has a pre-installed
rech:_rgeable battery to retain the date, time,
and other settings even when the POWER
switch is set to OFF (CHG). The pre-
installed rechargeable battery is always
charged while your camcorder is connected
to the wall outlet via the AC Adaptor or
while the battery pack is attached. The
g
m
=Z
3
g
lOg

Specifications
110
System
Video conlpression fornlat
MPEG2/JPEG (Still images)
Audio compression l_,rmat
Dolby Digital 2/5. Ich
Dolby Digital 5.1 Creator
Video signal
NTSC color. EIA standards
Usable discs
8 cm DVD-RW/DVD+RW/DVD-R/
DVD+R DL
Recording format
Movie
DVD-RW: DVD-VIDEO (VIDEO
model, DVD-Video Recording (VR
mode)
DVD+RW: DVD+RW Video
DVD-R/DVD+R DL: DVD-VIDEO
Still image
Exif Ver.2.T 1
Recording time
DVD-RW/DVD+RW/DVD-R
9M (HQ): Approx. 20 min
6M (SP): Approx. 30 min
3M (LP): Approx. 60 rain
DVD+R DL:
9M (HQ): Approx. 35 min
6M (SP): Approx. 55 min
3M (LP): Approx. l l0 min
View finder
Electric viewfinder (color)
hnage device (ClearVid CMOS Sensor)
DCR-DVD508/DVD908
CMOS: 6.3 mm (1/2.9 type)
Recording pixels (still, 4:3):
Max. 6.1 mega 12 848 x 2 136) pixels .2
Gross: Approx. 3 2(X1000 pixels
Effective (movie, 16:9):
2 280 000 pixels
Effective (movie, 4:3):
I 710 000 pixels
Effective (still, 16:9):
2 280 000 pixels
Effective (still, 4:3):
3 040 000 pixels
DCR-DVD408/DVD808
CMOS: 5.9 mm (1/3 type)
Recording pixels (still, 4:3):
Max. 4.0 mega 12304 x 1 728) pixels .2
Gross: Approx. 2 100 000 pixels
Efli:ctive (movie. 16:9):
I 430 000 pixels
Effective (movie, 4:3):
I 080 000 pixels
Effective (still, 16:9):
I 490 (10Itpixels
Eflective (still, 4:3):
1 990 (lit0 pixels
Lens
Carl Zeiss Vario-Sonnar T*
10 x (Optical), 20 x. 80 x*a(Digital)
Filter diameter: 37 mm (I 112in.)
Focal length
DCR-DVDS08/DVD908
Fl.8 - 2.9
1=5.4 -54 Into (7/32 - 2 1/4 in.)
When converted to a 35 mm still
canlera
For movies:
40 -400 mm (l 5/8 - 15 3N in.) 116:9)
49 - 490 mm( 1 15/16 - 19 3/8 in.) 14:3)
For still images:
37 - 370 mm (l 1/2 - 145/8 in.) 14:3)
40 -400 mm (l 5/8 - 15 3/4 in.) 116:9)
DCR-DVD408/DVDS08
FI.8 - 2.9
f=5.1 - 51 mm (7/32 - 21/8 in.)
When converted to a 35 mm still
canlera
For movies -4 •
41.3 -485 mm (1 11116 - 19 1/8 in.)
(16:9)
50.5 -594 mm (2 -23 I12 in.) (4:3)
For still images:
37 - 370 mm (1 1/2 - 14 518 in.) 14:3i
40.4 -404 Into (1 5/8 - 16 in.)/I 6:9)
Color temperature
[AUTO], [ONE PUSH],
[INDOOR] (3 2(XI K),
[OUTDOOR] 15 800 K)
Mininmm illumination
1.5 lx (lux) (AUTO SLW SHUTTR
ON, Shutter speed 1/3(I second)
0 lx (lux) (during NightShot function)
*l-Exil _ is a file fommt for still images,
established by the JEITA (Japan
Electronics and Inlk)rmation Technology
Industries Association). Files in this
format can have additional information
such as your camcordeVs setting
infi)rmation at the time of recording.
*2The unique pixel array of Sony's
ClearVid CMOS Sensor and image
processing system (new Enhanced
hnaging Processor) allows still image
resolution equivalent to file sizes
described.
*aDCR-DVD408/DVD808
*4The focal length figures are ictual
figures resulting from wide angle pixel
readout.
•Manutdcmrcd under license from Dolby
Laboratories.
Input/Output connectors
Audio/Video output
10-pin connector
Vide() signal: 1 Vp-p, 75 f2 (ohms)
Luminance signal: l Vp-p, 75 f2(ohms)
Chrominance signal: 0.286 Vp-p, 75 f)
(ohms)
Audio signal: 327 mV (at load
impedance 47 kf)/kilohms)), Output
impedance with less than 2.2 k_2
/kilohms)
USB jack
mini-B
REMOTE jack
Stereo mini-minijack (0 2.5 ram)
LCDscreen
hnage
6.9 cm (2.7 type, aspect ratio 16:9)
Total dot nmnber
211 200 (960 x 220)
General
Power requirenlents
DC 6.8 V/7.2 V (battery pack)
DC 8.4 V (AC Adaptor)
Average power eonsulnption
DCR-DVDS08/DVD908
During camera recording using the
viewfinder with normal brightness:
4.5 W
During camera recording using the
LCD with normal brightness:
4.7W
DCR-DVD408/DVD808
During camera recording using the
viewfinder with normal brightness:
4.0 W
During camera recording using the
LCD with normal brightness:
4.2W
Operating temperature
0'C to +40 'C 132 'Fto 104 'F)
Storage temperature
-20 'C to +60 'C 1-4 'F to +140 'F)
Dimensions (approx.)
70x87x 142mm
(2 7/8 x 3 I/2 x 5 5/8 in.)/w/h/d)
including the projecting parts
70x87x 145mm
(2 7/8 x 3 I/2 x 5 5/8 in.) (w/hM)
including the projecting parts, the NP-
FH60 rechargeable battery pack
attached
g
m
=Z
3
g
Continued.._ 111
112
Mass (approx.)
DCR-DVDS08/DVD908
5 l0 g (1 lb 1 oz) main unit only
590 g (1 lb 4 oz) including tile NP-
FH60 rechargeable battery pack and a
disc
DCR-DVD408/DVD808
490 g (1 lb 1 oz) main unit only
570 g (l lb 4 oz) including tile NP-
FH60 rechargeable battery pack and a
disc
Supplied accessories
See page 21.
AC Adaptor AC-L200/L200B
Power requirements
AC 100 - 240 V. 50/60 Hz
Current consumption
I).35 - 0.18 A
Power consumption
18W
Output wdtage
DC 8.4 V*
Operating temperature
I) 'C to +40 'C (32 °F to 104 'F)
Storage temperature
-20 'C to +60 'C (-4 'F to +140 'F)
Dimensions (approx.)
48x29x81mm(l 15/16x 1 3/16x
3 1/4 ill.) (w/h/d) excluding the
prqjecting parts
Mass (approx.)
170 g (6 oz) excluding the power cord
* See the label on the AC Adaptor lor other
specifications,
Rechargeable battery pack NP-FH60
Maximum output voltage
DC 8.4 V
Output voltage
DC 7.2 V
Capacity
7.2 Wh ( I 0(X) mAh)
Dimensions (approx.)
31.8 x 33.3 x 45.0 mm
(1 5/16 x I 5/16 x l 13/16 in.)(w/h/d)
Mass (approx.)
80 g (2.9 oz)
Operating temperature
0 >C to +40 'C (32 >F to 104 >F)
Type
Lithium ion
Design and specifications are subjecl to change
without notice.
Ontrademarks
• "Handycam" and
registered tradcnmrk'_ of Sony Corporation.
•"Menlory Stick," "_ _," '*Memory Stick
Duo," 'MEMORYSTIEKDUO." "Memory Stick
PRO Duo," 'MEMORY5TIEKPRO [Iua,"
"MagicGal e." "M*2_G ICGkTE ,"
"MagicGate Memory Stick" and "MagicGale
Memory Stick Duo" arc trademarks of Sony
Corporation.
• "InloLITHIUM" is a trademark of Sony
Corporation.
• DVD-RW, DVD+RW. DVD-R. and DVD+R
DL logo arc trademarks.
• Dolby and the double-[) symbol arc tradenlarks
of Dolby Laboratories.
• Dolby Digital 5.1 Crealor is a trademark of
Dolby Laboralories.
• Microsoft, Windows, and Windows Media are
@her regislmcd trademarks or trademarks of
Microsoft Corporalion in llle Uniled States and/
or ()tiler countries.
• Macintosh and Mac OS arc registered
trademarks of Apple Computer, Inc in file U.S.
_lnd olhcr COUlllries.
• Pentium is a trademark or registered trademark
of lntel Corporation.
• Adobe, the Adobe log(), and Adobe Acrobat arc
dtl/er registered trademarks or tradenmrks of
Adobe Systems Incorporated in the United
States and/or otller COUlllries,
All other product names mentioned herein may be
the trademarks or registered trademarks of their
respective companies. Furthcrn_ore, rxl and "_)"
arc not menliolled ill each case ill Ibis manual.
Notes onthe License
ANY USE OF THIS PRODUCT OTHER THAN
CONSUMER PERSONAL USE IN ANY
MANNER THAT COMPLIES WITH THE
MPEG-2 STANDARD FOR ENCODING
VIDEO INFORMATION FOR PACKAGED
MEDlA IS EXPRESSLY PROHIBITED
WITHOUT A LICENSE UNDER APPLICABLE
PATENTS IN THE MPEG-2 PATENT
PORTFOLIO, WHICH LICENSE IS
AVAILABLE FROM MPEG LA, L.L.C., 250
STEELE STREET. SUITE 300. DENVER,
COLORADO 80206.
"C Libral3,," "Expat," "zlib," and "libjpeg"
sollwarc arc provided ill your camcorder. We
provide this sollwarc based on license agrcements
with their owners of copyright. Based on requests
by the owners of copyright of these soltwarc
applications, we have an obligation to inlorm you
of the lollowing. Plew, e read the lbllowing
sections.
Read 'license 1.pdF' ill the 'Licen_" li)lder on the
CD-ROM. You will lind licenses (in English) of
"C LibralT," "Expat," "zlibi' and "libjpeg"
sollwarc,
OnGNUGPL/LGPLappliedsoftware
The soltwar, _ that is eligible lbr the lollowing
GNU General Public License (hereinal}er rel_rred
to as "GPL") or GNU Lesser General Public
License (hereinafler referred lo as "LGPL") are
inchlded ill the camcorder, _"
_=:.
This inlbrms you thal you llave a right to have --_.
access to. modil\_, and redistribute source code lbr
these software i)rogran_s under lhe condilions of
tile supl?lied GPL/LGPL. _"
o
Source code is provided on the web. To
download, go to tile k)llowing website alld select m
HDR-UX 1/HDR-SR 1.
llttp://www.sony .net/ProductffLinux/
We would prclcr you do no[ contact us about tile
contents of source code.
Read "license2.pdF' in the 'Licen_" li)lder on the
CD-ROM. You will find licenses (in English) of
"GPL," and "LGPL" sol}ware.
To view the PDF. Adobe Reader is needed. If it is
not installed on your computer, you can downkmd
il ti'om tile Adobe Systems web page:
lilt p://ww w.ad obe.con_/
113
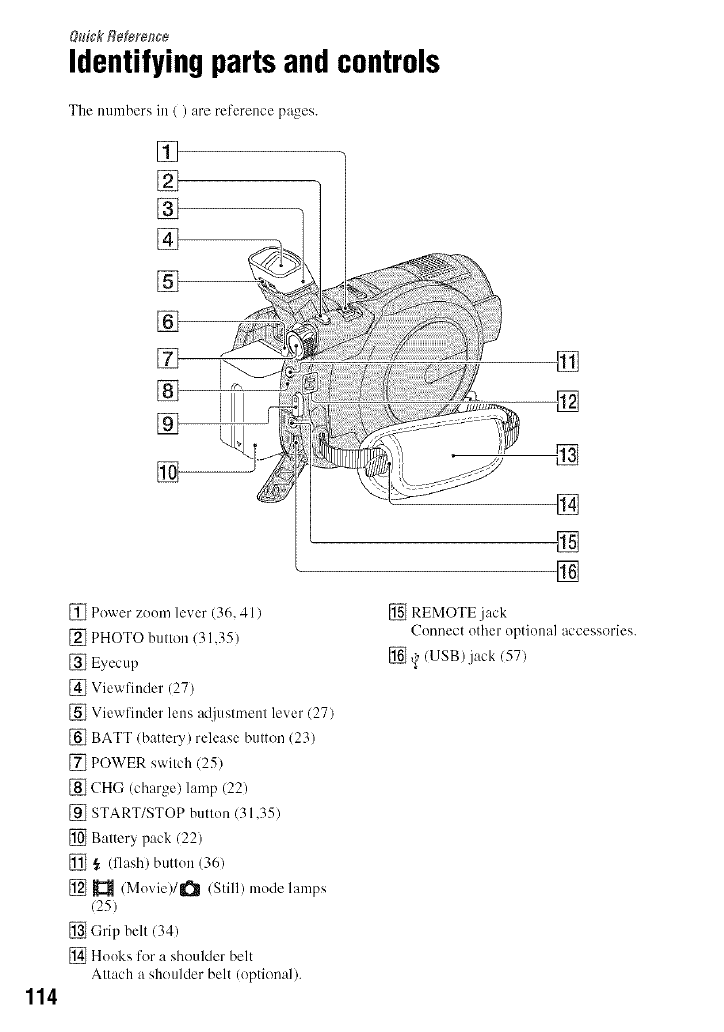
114
&_ick R_r_ce
Identifyingpartsandcontrols
The nllmbers in / ) are reference pages.
[]
[]
[]
[]
%--
[]
[]
[]
[] III
[]--
[] Power zoom lever (36, 41 /
[] PHOTO button 131,35)
[] Eyecup
[] Viewfinder (27)
[] Viewfinder lens aljustment lever (27)
[] BATT (battery) release button (23)
[] POWER switch (25)
[] CHG (charge) lamp (22)
[] START/STOP button 131,35)
[] Battery pack (22)
[] _ (flash) button (36)
[] _ /Movie)/l_ (Still) mode lamps
(25)
[] Grip belt (34)
[] Hooks for a shoulder belt
Attach a shoulder belt (optional).
[]
[]
[]
[]
[]
[] REMOTE jack
Connect other optional accessories.
[] _/USB) jack (57)
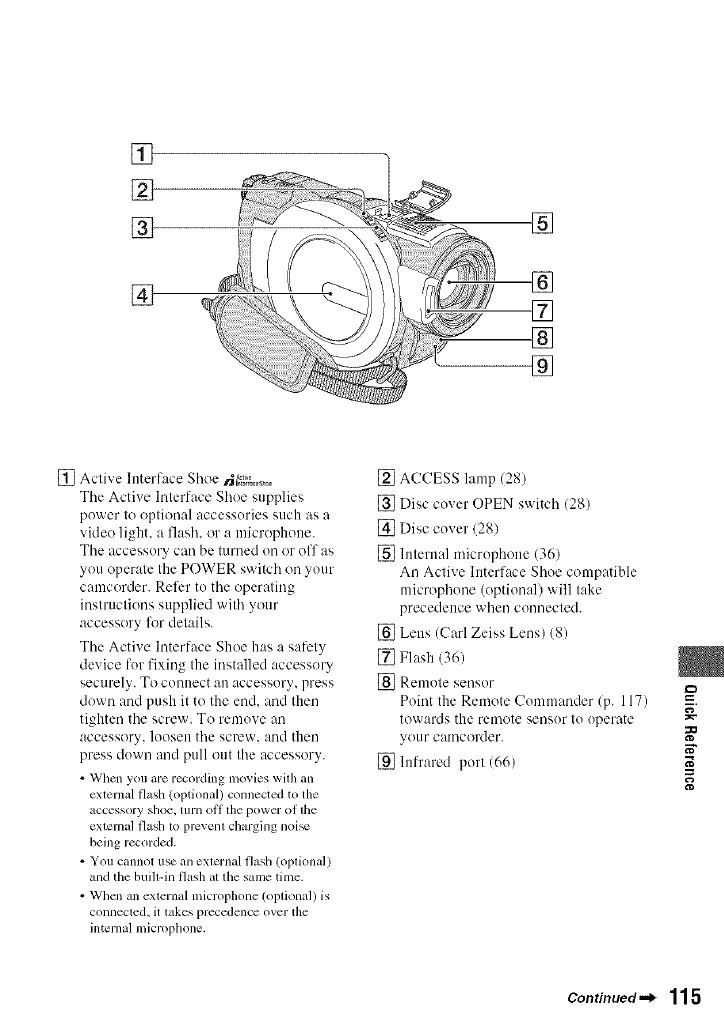
[]
[]
[]
[]
[]
[]
[]
®
[]
[] Active Interface Shoe _I_,,_,0
Tile Active Interface Shoe supplies
power to optional accessories such as a
video light, a flash, or a microphone.
Tile accessory can be turned oil or off as
you operate the POWER switch oil your
camcorder. Refer to tile operating
instructions supplied with your
accessory lk_rdetails.
Tile Active Interface Shoe has a safety
device for fixing the installed accessory
securely. To connect an accessory, press
down and push it to the end. and then
tighten tile screw. To remove an
accessory, looseu tile screw, and then
press down and pull out the accessory.
• When you are recording movies with an
external flash (optional) connected to the
accessory shoe. turn ol] tilepower of tile
external flash lo prcvenl cbrging noi_
being recorded.
•You cannot use an exlernal flash (opliona])
and the buih-in flash at the same time.
• When an exlernal microphone (oplional) is
connected, it takes precedence over the
internal microphone.
[] ACCESS lamp (28)
[] Disc cover OPEN switch (28)
[] Disc cover 128)
[] Internal microphone (36)
An Active Interface Shoe compatible
microphone (optional) will take
precedence when connected.
[] Lens (Carl Zeiss Lens) 18)
[] Flash (36)
[] Remote sensor
Point the Remote Commander/p. 117)
towards the remote sensor to operate
your camcorder.
[] hffrared port (66)
=_
i,
N"
Continued._ 115
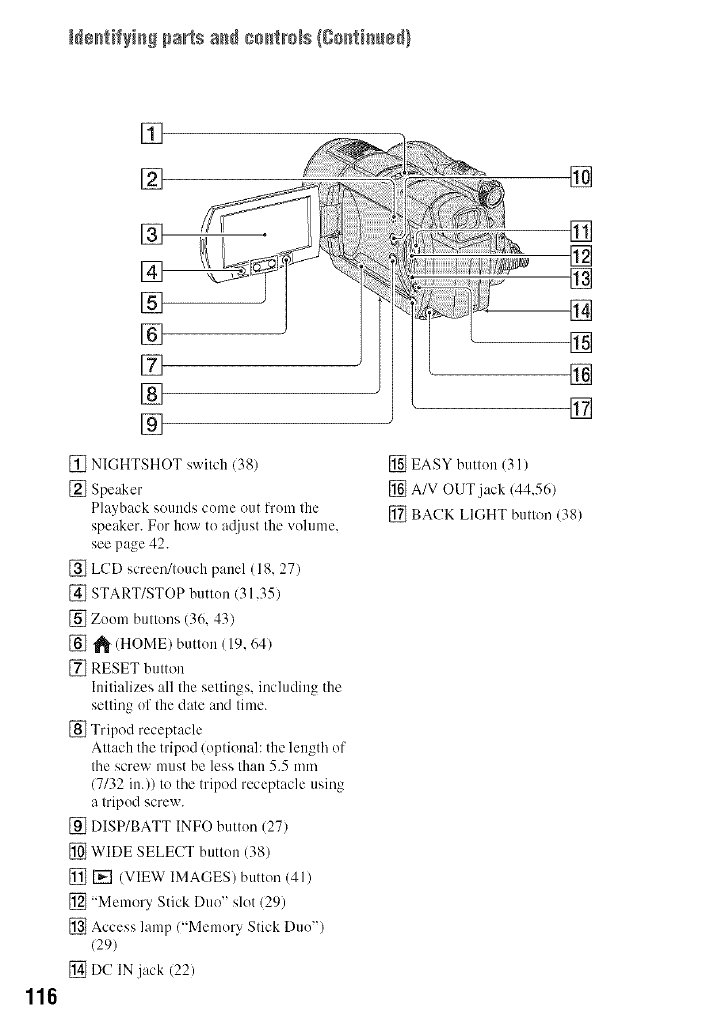
N÷_tifyiaS parts a_ co_trNs (Co[_tia_ed)
116
[]
[]
[]
[]
[]
[]
[]
[]
[] NI(IHTSHOT switch (38)
[] Speaker
Playback sounds come out t?x)m the
speaker. For how to a@lst the vohnne.
see page 42.
[] LCD screen!touch panel (18, 27)
[] START/STOP button (31,35)
[] Zoom buttons (36, 43)
[] _" (HOME) button (19, 64)
[] RESET button
Initializes all the settings, including the
setting of the dale and time.
[] Tripod receptacle
Attach the tripod (optional: the length of
the screw must be less than 5.5 mm
(7/32 in.)) to the tripod receptacle using
a tripod screw.
[] DISP/BATT INFO button (27)
[] WIDE SELECT button (38)
[] [] (VIEW IMAGES) button (41)
[] "Memory Stick Duo" slot (29)
[] Access lamp ("Memory Stick Duo"
(29)
[] DC IN jack (22)
[]
[]
[]
[]
[]
[]
[]
[]
[] EASY button (31 )
[] A/V OUT.jack (44,56)
[] BACK LIGHT button (38)
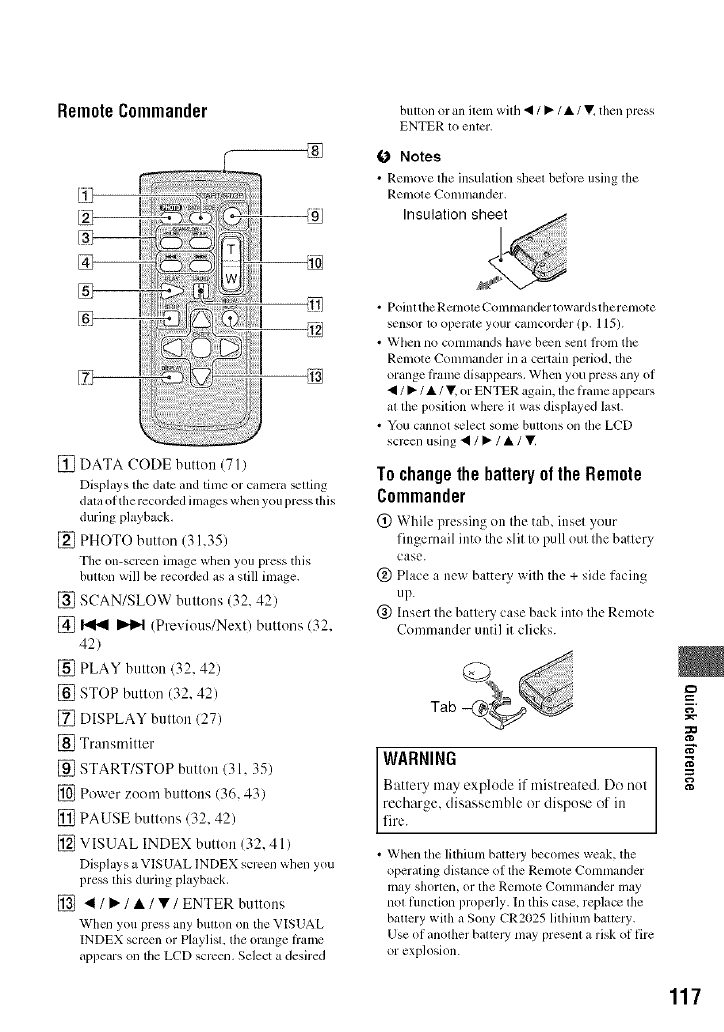
RemoteCommander
®
[] DATA CODE button (71)
Displays the date and time or camera _lling
dala office recorded images when you press this
during playback,
[] PHOTO button (31,35)
The on-scr_n inmge when you press this
buoon will be recorded as a still image.
[] SCAN/SLOW buttons (32, 42)
[] _ I)'1),4 (Previous/Next) buttons (32,
42)
[] PLAY button (32, 42)
[] STOP button (32, 42)
[] DISPLAY button (27)
[] Transmitter
[] START/STOP button (31, 35)
[] Power zoom buttons (36, 43)
[] PAUSE buttons (32, 42)
[] VISUAL INDEX button (32, 41)
Displays a VlSUAL lNDEX screen when you
press lhis during playback,
[] 41 /_. /•/•/ENTER buttons
When you press any bulton on tim VISUAL
INDEX screen or Playlisl, tile orange liamc
appears on lhe LCD screen, Select a desired
button or an item with • /•/•/llv_then press
ENTER to entcr.
O Notes
• Remove the insulation sheel helorc using the
Renlole {_'Olnlllander,
• Poinl the Rclnote Conlnlander towards lherenlote
sensor 1o operale your camcorder (p. 115).
• When no colnnlands have b_n sent |roln lhe
Remote Commander in a certain period, the
orange li'ame disappears. When you press any of
•/•/•/• or ENTER again, the fiame appears
al lhe position where il was displayed lasl.
• You cannot select solne bul_ons Oll lhe LCD
scrcen using • /•/•/lit
To changethe battery of the Remote
Commander
(!) While pressing on the tab, inscl your
fingernail into the slit to pull out the battery
case.
@ Place a new batte Uwith the + side facing
up.
@ Insert the batte Ucase back into the Remote
Commander until it clicks.
Tab
WARNING
Battery may explode if mistreated. Do not
recharge, disassemble or dispose of in
fire.
• When lhe lithium bauely becomes weak, lhe
operating distance of the Remole Commander
may shorten, or the tetllOle Conlmander may
nol flmclion properly. In this case, replacc the
battery with a Sony CR2025 lithium baltcry.
Use of anolher baltel T may presem a risk of fire
or explosion.
=o
N"
117
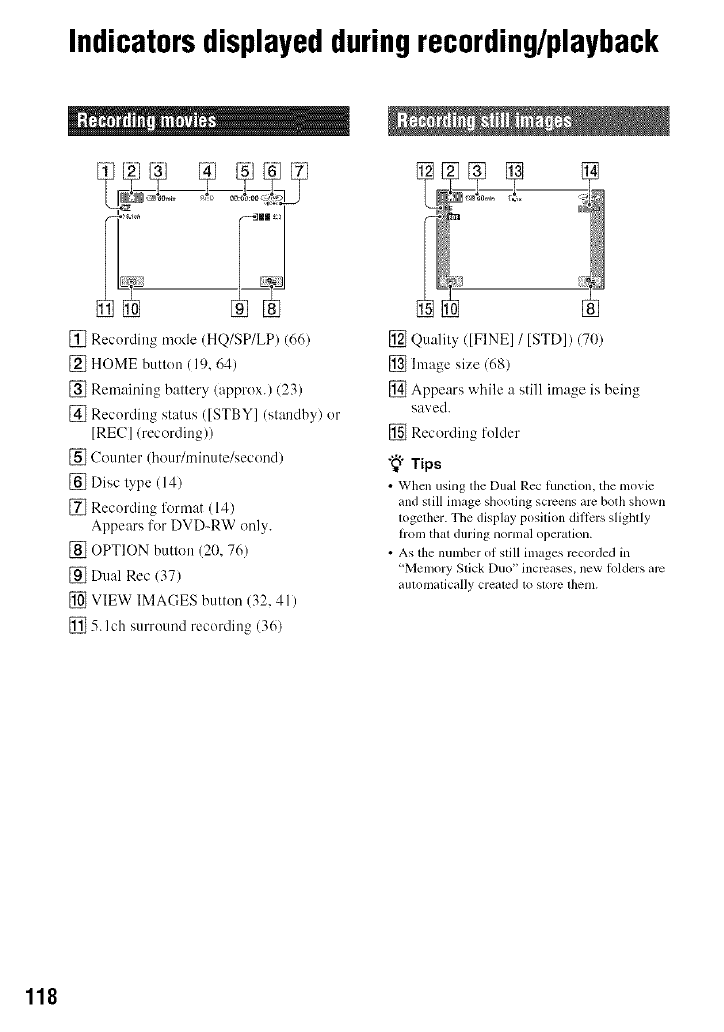
Indicatorsdisplayedduringrecording/playback
[] Recording mode (HQ/SP/LP) (66)
[] HOME button (19, 64)
[] Remaining battery/approx.) (23)
[] Recording status ([STBY] (standby) or
[REC]/recording))
[] Counter (hour/minute/second)
[] Disc type (14)
[] Recording li_rmat (14)
Appears for DVD-RW only.
[] OPTION button (20, 76)
[] Dual Rec (37)
[] VIEW IMAGES button (32, 41)
[] 5. Ich surround recording (36)
[] Quality ([FINE] /[STD]) 170)
[] hnage size 168)
[] Appears while a still image is being
saved.
[] Recording folder
"_° Tips
• When using lhe Dual Rec function, the movie
and still image shooling screens arc both shown
logether. The display position dillcrs slightly
hom thai during normal operation.
• As the number of slill images rccorded in
'Memory Slick Duo" incr,_ases, new h)lders arc
automatically crealed to s[orc them.
118
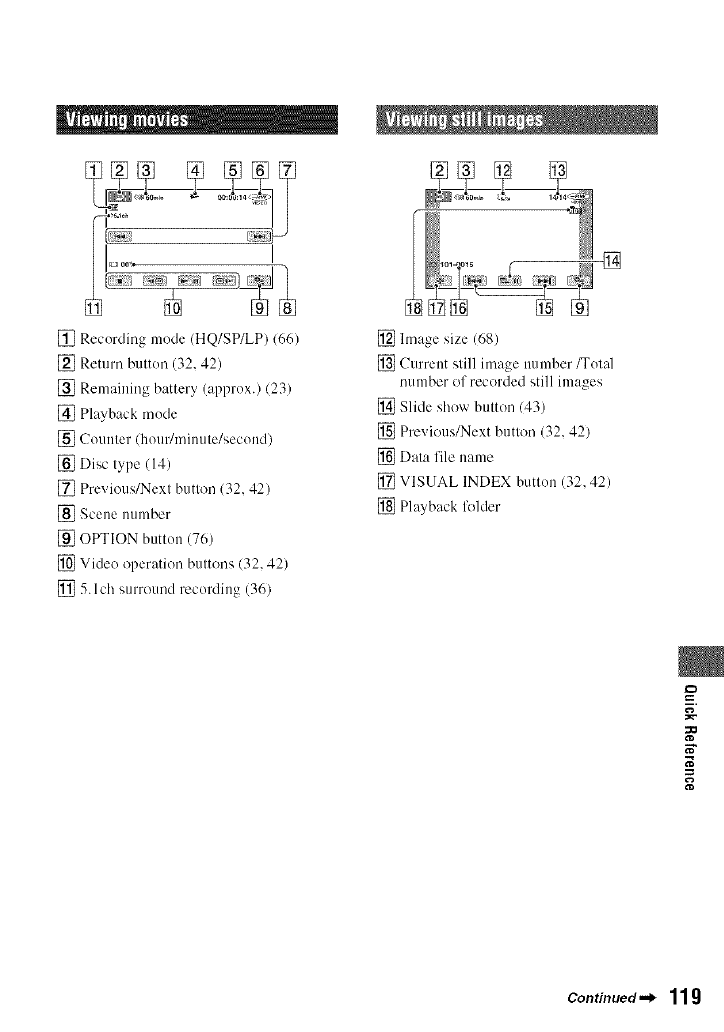
[]
[] Recording mode (HQ/SP/LP) (66)
[] Return button (32, 42)
[] Remaining battery (approx.) (23)
[] Playback mode
[] Counter (hour/minute/second)
[] Disc type (14)
[] Previous/Next button (32, 42)
[_ Scene nllnlber
[] OPTION button (76)
[] Video operation buttons (32, 42)
[] 5. l ch surround recording (36)
[] hnage size (68)
[] Current still image number _ot_fl
number of recorded still images
[] Slide show button (43)
[] Previous/Next button (32, 42)
[] Data file name
[] VISUAL INDEX button (32, 42)
[] Playback fl_lder
=_
N"
Continued._ 11g
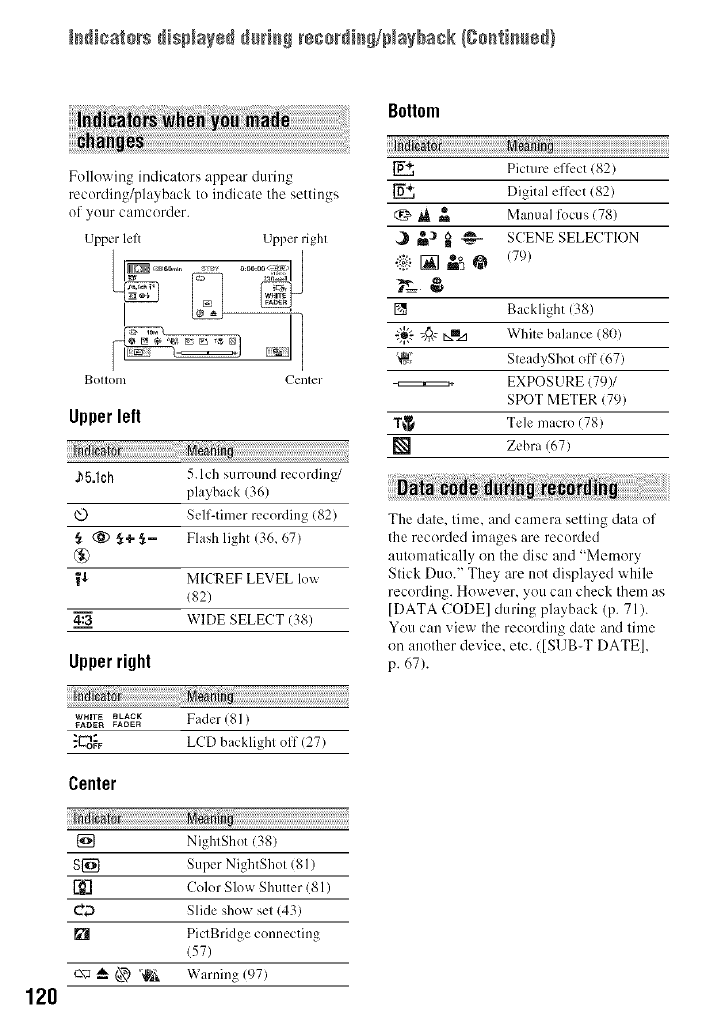
I_dicators displayed @_'i_ rsco_'Nn_/Na_ba¢k (go_ti_sd)
120
Following indicators appear during
recording/playback to indicate the settings
of your camcorder.
Upper lelt Upper righl
Bottom {_'enter
Upper left
_5.1ch 5.1ch surround recordhlg/
playback (36)
Self-timer recording 182)
,_ (i_ _,+ It- Flash light (36, 67)
®
_'_ MICREF LEVEL low
182)
4:3 WIDE SELECT (38)
Upper right
W_lrE _LACK Fader 181 )
FADE_ FADER
,"E_o_ LCD backlighl olf (27)
Center
{_ NighlShot (38)
S{_ Super NightShol (81)
['_] Color Slow Shutter (81)
_ Slide show se_(43)
PiclBridge connecting
(57)
c\_ _ @ "_iik Warning (97)
Bottom
Picture ellk.ct(82)
Digital effect 182)
t:_ _ _ Manual focus/78)
,._ _,_ _ _A SCENE SELECTION
!!i) [] rose°@(79)
[] Backlight (38)
"_ @,_tx_z_ White balance (80)
'q_,}' SteadyShot off (67)
EXPOSURE (79)/
SPOT METER (79)
T_ Tele macro (78)
[] Zebra (67)
The date, time, and camera setting dala of
the recorded images are recorded
automatically on the disc and "Memory
Stick Duo." They are not displayed while
recording. However, you can check them as
]DATA CODE] during playback (p. 71).
You can view the recording date and time
on another device, etc. ([SUB-T DATE],
p. 67).
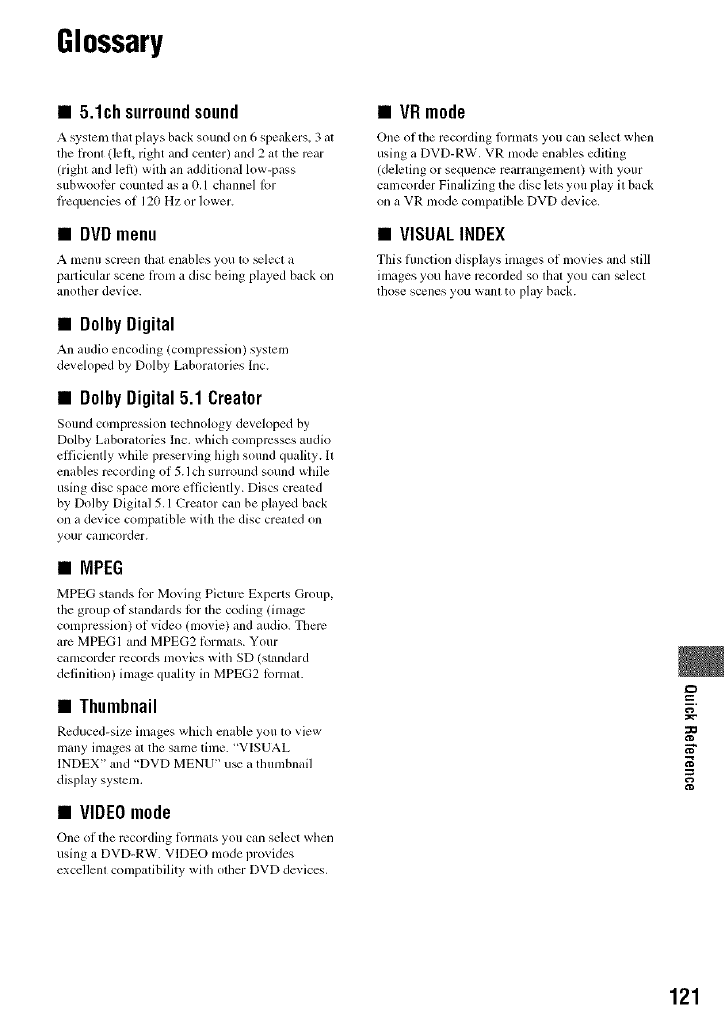
Glossary
•5.1chsurroundsound
A system that plays back sound on 6 speakers, 3 al
tile lronl (lell, right and center) and 2 at tile rcar
(righl and left) with an additional low-pass
subwoolcr counled as a 0.1 channel Ior
flequencies of 120 Hz or lower.
•DVDmenu
A lllellll scrcell thai enables you 1o _lecl a
particular scene liom a disc being played back on
another device.
•DolbyDigital
An m/dio encoding (compression) syslem
developed by Dolby Laboratories Inc.
•DolbyDigital5.1 Creator
Sound compression teclmology developed by
Dolby Laboralories Inc. which compresses audio
elftcienlly while prc_rving higll sound quality. It
rambles recording of 5.1 ch surround sound wllile
using disc space more elliciently. Discs crcated
by Dolby DigitM 5.1 Creator can be played back
on a device compatible with tile disc created on
your calllcorder.
•MPEG
MPEG stands lbr Moving Picture Experts Group,
the group of standards lor the coding (image
compression) of video (movie) and audio. There
arc MPEGI and MPEG2 ft_rmals. Your
camcorder records movies with SD (standard
definilion) image qualily in MPEG2 lormal.
•Thumbnail
Reduced-si/c images which omble you 1o view
many images at the same time. "VISUAL
INDEX" and "DVD MENU" u_ a tlmmbnail
display system.
•VIDEOmode
One of tile recording lknmats you can select wllen
using a DVD-RW. VIDEO mode provides
excellenl compatibility with other DVD devices.
•VRmode
One of tile recording lormats you can select when
using a DVD-RW. VR mode enables editing
(deleting or sequence rearrangement) with your
camcorder Finalizing tile disc lets you play il back
on a VR mode compatible DVD device.
•VISUALINDEX
This ftmction displays images of movies and still
images you have recorded so lhal you can _lecl
those scenes you wahl to play back.
=_
N"
121
Index
Numeric
5.1 ch surround recording,,,., 36
8cm DVD ............................. 12
A
AC Adaplor .......................... 22
Active interlace shoe .......... 115
Addilional recording ............. 62
AREA SET ........................... 74
Aspect raito ........................... 38
AUTO SLaV SHUTTR (Auto
slow slmlter) ................... 67.96
A.SHUT OFF/Amo shut off)
.............................................. 75
A/V connecting cable.....44_ 56
B
BACK LIGHT ................ 38.92
BatteJy .......................... 22. 117
Battery inlo ........................... 23
BEACH ................................ 80
BLACK FADER .................. 81
Button-type lithium battery
............................................ 117
B&W .................................... 82
C
CALIBRATION ................. 1(18
CAMERA DATA ................. 71
CANDLE .............................. 79
CD-ROM .............................. 83
Charging lime ....................... 23
CLOCK SET ........................ 25
CLOCK/LANG .................... 74
COLOR SLOW SHTR (Color
Slow Shutter) .................. 81.96
Compuler .............................. 83
Copyrighl ........................ 8. 113
D
DATA CODE ............... 71. 120
DATE/TIME .......... 26, 71, 120
DC IN jack ........................... 22
DC plug ................................ 22
DELETE
Disc ............................... 50
"Memory Stick Duo" .... 51
DEMO MODE ..................... 75
DIGITAL ZOOM ................ 66
Disc .............................. 28, 103
Disc cover OPEN switch ..... 28
DISC INFO .......................... 59
Disc remaining ..................... 67
DISC SELECT GUIDE ....... 60
[lISP OUTPUT .................... 74
DISPLAY ............................. 71
Display indicalors .............. 118
DIVff/E
Original ......................... 52
Playlist .......................... 55
Dolby Digital 5.1 Creator
..................................... 36, 121
Double-sided disc .............. 103
DST SET .............................. 74
DST SET/SUMMERTIME.. 74
Dual Rec .............................. 37
Dubbing ............................... 56
DVD drive ............................ 59
DVD menu ........................... 49
DVD-R ................................. 15
DVD-RW ............................. 15
DVD+R DL .......................... 15
DVD+RW ............................ 15
D.EFFECT (Digital el]cot)
....................................... 82,96
E
Easy Handycam ................... 31
EDIT .................................... 50
EXPOSURE ................... 79, 96
F
FAILER ........................... 81.96
FILE NO. (File number)....... 70
Finalize ................................. 46
FIREWORKS ....................... 79
Firsl Slep Guide .............. 83_ 87
Flasll ..................................... 36
FLASH LEVEL .................... 67
FOCUS ........................... 78.92
FORMAT
Disc ............................... 61
"Memory Slick DulL' .... 62
G
GENERAL SET ................... 75
Glossary .............................. 121
Grip belt ................................ 34
n
HOME MENU ............... 18.64
CLOCK/LANG ............. 74
GENERAL SET ............ 75
MOVIE SE_INGS...... 66
OUTPUT SETTINGS,.. 74
PHOTO SETTlNGS .....68
SOUND/DISP SET....... 72
VIEW IMAGES SET.... 71
HQ ........................................ 66
I
Icon,,,,,,, See Display indicalors
IMAGE SIZE ....................... 68
Indicalors ............................ 120
INDOOR .............................. 80
InlbLITHIUM .................... 106
Install .................................... 85
Insulalion slleet ................... 117
J
JPEG ................................... 104
122
L
LANDSCAPE ....................... 80
LANGUAGE SET ................ 74
LCD backlighl ...................... 27
LCD BL LEVEL (LCD
backlighl level) ............... 72, 93
LCD BRIGHT ...................... 72
LCD COLOR ........................ 73
LCD panel ............................. 27
LP .......................................... 66
IVi
Macintosh ............................. 87
Mainlcnance ........................ 103
MANAGE DISC/MEMORY
ca[egol3_ ................................. 59
Memol 7 Stick ............... 36, 104
"Memory Stick Duo'.,.,29, 104
Memory Stick Duo adaptor
............................................ 105
MICREF LEVEL .................. 82
Mirror mode .......................... 38
Moisture condensation ........ 107
MOVIE SETTINGS ............. 66
MPEG ................................. 121
N
NightShol .............................. 38
NIGHTSHOT LIGHT .......... 66
NTSC .................................. 101
0
ONE PUSH ........................... 80
OPTION MENU ................... 76
Original
DELETE ........................ 50
DIVIDE ......................... 52
OTHERS category ................ 50
OUTDOOR ........................... 80
OUTPUT SETTINGS ........... 74
P
PAL .................................... 1O1
PASTEL ............................... 82
PHOTO SETTINGS ............ 68
Pickup lens ......................... 109
PiclBridge ............................. 57
Picture Molion Browser ,.,.... 83
PICT.EFFECT (Picture el]oct)
........................................ 82. 96
Playback ......................... 31.41
Playback zoom ..................... 43
Playing time ......................... 24
Playlist
Creating ......................... 53
Playback .................. 32. 54
PORTRAIT .......................... 80
Power cord ........................... 22
Pre-installed rechargeable
batIely ................................. 109
Preparation ........................... 21
Print ...................................... 57
R
REC MODE (Recording mode)
.............................................. 66
Recordin 8 ....................... 31, 34
Recording lorn;al ................. 14
Recording lime ............... 14, 23
REDEYE REDUC ............... 68
REMAINING ....................... 67
Remaining baltery
.................................... 118,119
Remote Comnlander .......... 117
REMOTE CTRL .................. 75
RESET butlon .................... 116
S
SCENE SELECTION
........................................ 79. 96
SellLdiagnosis display .......... 97
SELF-TIMER ....................... 82
SEPIA ................................... 82
SETTINGS category ............ 64
Slide show ............................ 43
SMTH SLW REC ................. 39
SNOW .................................. 8(I
Soflwarc ................................ 85
SOUND/DISP SET .............. 72
SP .......................................... 66
Specifications ..................... 110
SPOT FOCUS ................ 78, 96
SPOT METER/Flexible spot
meier) .............................. 79, 96
SPOTLIGHT ........................ 80
STEADYSHOT .................... 67
Still Images ..................... 31, 35
SUB-T DATE ....................... 67
SUMMERTIME ................... 74
SUNRISE&SUNSET ........... 79
SUPER NIGHTSHOT .......... 81
Supplied items ...................... 21
System rcquircmcnts ............ 83
T
TELE MACRO ............... 78, 96
Tclepllolo .............................. 36
Thumbnail ........................... 121
Tripod ................................. 116
TV ................................... 44, 74
TV color syslem ................. 101
TV TYPE ........................ 44, 74
TWILIGHT ........................... 79
TWILIGHT PORT ............... 79
U
UNFINALIZE ................ 62, 95
USB 2.0 ................................ 84
Usin 8 abroad ....................... 101
V
VBR ...................................... 14
VCR or DVD/HDD recorder
.............................................. 57
Continued ._
==
123
VF B.LIGHT (Viewfinder
brighlness) ............................ 73
VIDEO mode ................ 14. 121
VIEW IMAGES SET ........... 71
Viewfinder. ........................... 27
Viewing ................................ 32
VISUAL INDEX,...32, 41. 121
VOLUME ....................... 42, 72
Volume label ........................ 60
VR mode ....................... 14_ 121
W
Wall oullel ............................ 22
Warning indicalors ............... 97
Warning messages ................ 98
WHITE BAL. (White balance)
........................................ 80. 96
WHITE FADER ................... 81
Wide angle ............................ 36
Windows ......................... 83.95
World time dilli_rence ........ 102
Write-prolect tab ................. 105
z
ZEBRA ................................. 67
Zoom .................................... 36
124
Spanish Qdck &#de/&da r_pida _n espa#d
Paso1: Comprobaci6nde loscomponentes
suministrados
Asegfirese de que dispone de los siguientes
cemponentes s/inlinislrades con g[l
videocfimara.
E1 nfimero entre pardntesis indica el nfimcro
de componentes sunlinistrades.
CD-ROM "Handycam Application
Software" (1)
Guia de operaciones (este manual) (1)
Adaptador de alimentaci6n de ca (1)
Cable de alimentaci6n (1)
Cable de conexi6n de AN (1)
Cable USB (1)
Control remoto inalglmbrico (1)
g
g
g
m
m
La pila de litio tipo botdn ya viene instalada.
Bateria recargable NP-FH60 (1)
125
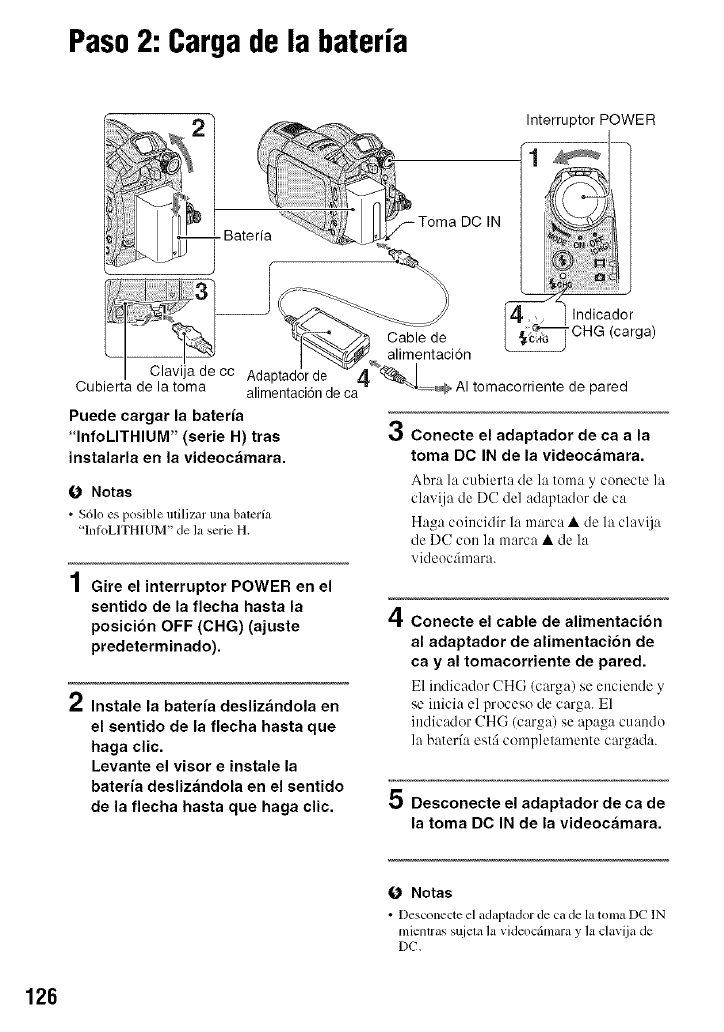
Paso2: Cargade la bateria
Interruptor POWER
Puede cargar la bateria
"InfoLITHIUM" (serie H) tras
instalarla en la videocamara.
O Notas
•Sdlo es posible utili/nr una batel'fa
'In_k)LITHIUM" de la serie H.
Gire el interruptor POWER en el
sentido de la flecha hasta la
posici6n OFF (CHG) (ajuste
predeterminado).
Instale la bateria deslizandola en
el sentido de la flecha hasta que
haga clic.
Levante el visor e instale la
bateria deslizandola en el sentido
de la flecha hasta que haga clic.
3Conecte el adaptador de ca a la
toma DC IN de la videocamara.
Abra la cubierta de la toma y conecte la
clavija de DC del adaptador de ca
Haga coincidir la marca • de la clavija
de DC con la marca • de la
videoc:imara.
4Conecte el cable de alimentaci6n
al adaptador de alimentaci6n de
ca yal tomacorriente de pared.
El indicador CHG (carga) se enciende y
se inicia el proceso de carga. E1
indicador CHG (carga) se apaga cuando
la baterfa estfi completamente cargada.
5 Desconecte el adaptador de ca de
la toma DC IN de la videocamara.
O Notas
•Desconecte el adaptador de ca de la tonla DC IN
mientras s_iem la videocfimara y la clavija de
DC.
126
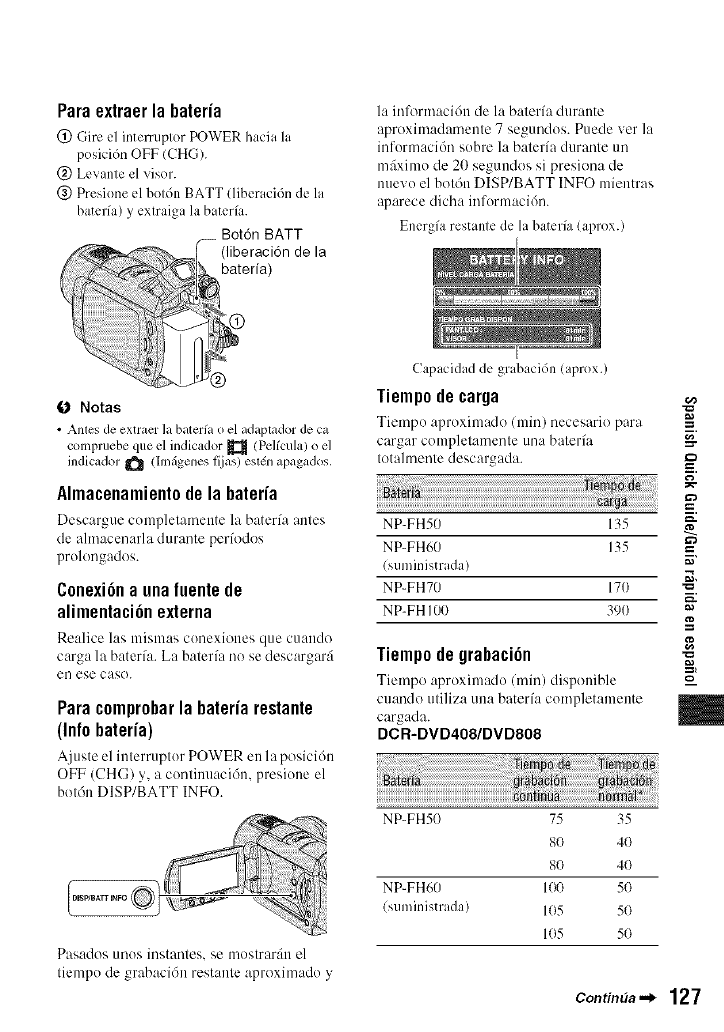
Paraextraerla bateria
(!) Girt cl intemlptor POWER hacia la
posici6n OFF (CHG).
@ Levante el visor.
(_) Presione el botdn BATT (liberaci6n de la
baterfa) y extraiga labaterfa.
Bot6n BATT
(liberaci6n de la
bateria)
Notas
•Anles de extract ]abatel'h_o el adaplador de ca
colnpruebe que el indicador _ (Pclicula)o el
indicador _ (hnfigenes fijas) estdn apagados.
Almacenamientodela bateria
Descar_ue complelamente la baterfa antes
de almacellarla dill'ante perfodos
prolongados.
Conexi6na unafuentede
alimentaci6nexterna
Re:,lice l:,s mism:,s conexiones que on:redo
carga la bater[a. La bater[a no se descargar:i
el/ese caso.
Para comprobarla bateria restante
(Inlo bateria)
Ajusteel interruptor POWERen la posicidn
OFF (CHG) y, a contilmaci6n, presione el
bot6n DISP/BATT INFO.
Pasados unos instanles, se moslrar:in el
yliempo de _rabacJon restanle aproximado y
la inlk_rmacidn de la baterfa durante
aproximadamente 7 segundos. Puede ver la
informaci6n sobre la baterfa durante un
mfiximo de 20 segundos si presiona de
nuevo el botdn DISP/BATT INFO mientras
aparece dicha informaci6n.
Energfa restante de la baterfa (aprox.)
Capacidad de grabacidn (aprox.)
liempo de carga
Tiempo :,proxilnado (rain) necesario para
cargar completamente una bateria
totahnente descargada.
NP-FHS0 135
NP-FH60 135
(suministrada)
NP-FH70 170
NP-FH 100 390
g
g
liempo de grabaci6n -_
==,
Tiempo aproxilnado (rain) disponible
cuando uliliza una baterfa completamente
cargada.
DCR-DVD408/DVD808
NP-FH50 75 35
8(} 4(}
8(} 4(}
NP-FH60 100 5(}
(suministrada) 1(}5 5(}
1(}5 5(}
Contin_a--_ 127
Pas+ 2:Carla+÷ +aba_+++++Ic+++_+++ac+++++)
NP-FH70 160 80
170 85
170 85
NP-FH100 375 185
395 195
395 195
DCR-DVD508/DVD908
NP-FH50 65 3(}
70 35
70 35
NP-FH60 90 45
(suministmda) 90 45
90 45
NP- FH 70 14(} 7(}
150 75
150 75
NP-FH100 335 165
345 170
345 17(}
* E1 tiempo de grabaci6n nomml indica el tien;po
de grabaci6n al rcpetir las operaciones de inicio!
parada, conexi6n!desconexi6n de la
alimentaci6n y utilizaci6n del zoom.
O Notas
•Todos los tiempos _ han calculado con el modo
de grabaci6n [SPI en las siguientes condiciones:
Indicaci6n superior: con la luz de hmdo de la
pantalla LCD encendida,
Indicaci6n central: con la luz de tbndo de la
pantalla LCD apagada.
Indicaci6n inlcrior: timnpo de grabaci6n al
grabar con el visor y con el panel LCD cerrado,
Tiemp0 de repr0ducci6n
Tiempo aproxim:,do (rain) disponible
cuando utiliza una baterfa completamente
cargada.
DCR-DVD408/DVD808
NP-FH50 110 12(}
NP-FH60 145 16(}
(suministrada)
NP-FH70 235 255
NP-FH 100 545 59(}
DCR-DVD508/DVD908
NP-FH50 110 120
NP-FH60 145 16(}
(suministrada)
NP-FH70 235 255
NP-FH 100 545 590
* Con la luz de hmdo de la pantalla LCD
encendida.
Acerca de la baterfa
• Antes de r_=emplaz+u+la baterfa+ gire el
h_terruptor POWER hasta la posicidn OFF
(<+'H(;) y apague el indic+ldor _ (Pclfcula) o
([mfigenes fijas).
• El indicador CHG (curga) parpadearfi durante la
carga o Ii]_o baterfa no se mostrarfi
correctalncnle en las siguienl_s situaciones:
ga baterfa no eslfi conectada correctamenle.
La baterfa estfi dafiada.
La batcrfa estfi completammlte gastada (s61o
para la intbrn;aci6n sobrc la bater/a).
• Cuando el adaptador de alilnentaci6n de ca est(
conectado a la toma DC IN de la videoc&nara+
la baterfa no suministrarfi alimentaci6n, aunque
el cuble de alimentaci6n est+5desconectado del
tomacorriente de pared.
• Cuando conecte una luz de vfdeo opcional, se
recomienda utilizar una baterfa NP-FH70/NP-
FH 100.
128
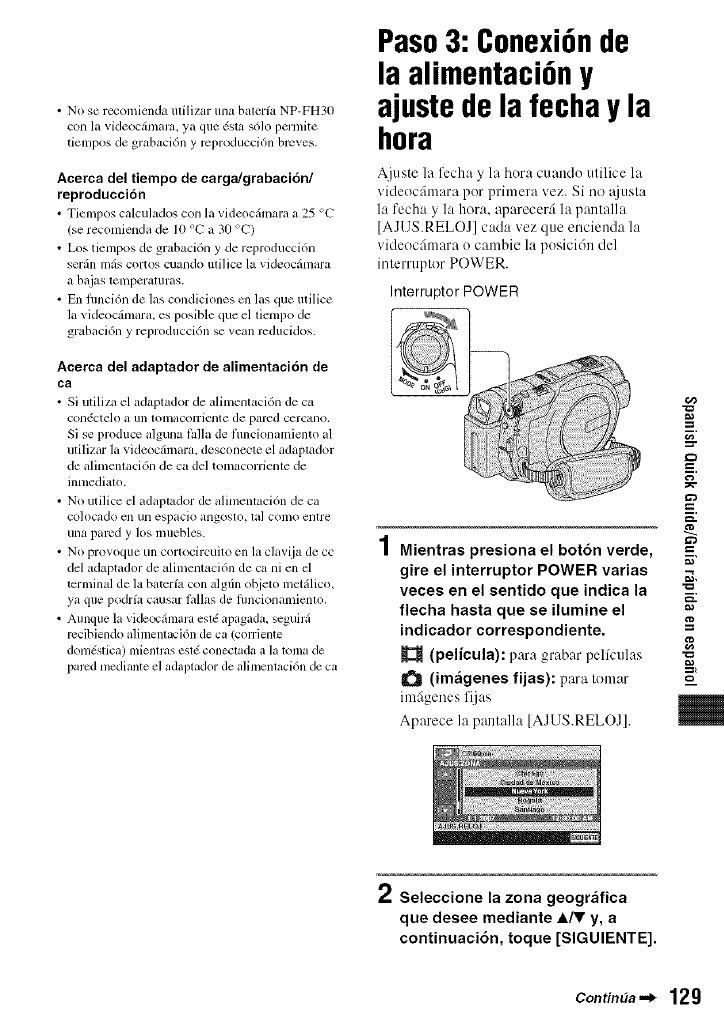
• No se recomienda milizar una baterfa NP-FH30
con la videoc&nara, ya que 6sta s61o permite
tiempos de grabacidn y reproducci6n breves.
Acerca del tiempo de carga/grabacion/
reproducci6n
•Tiempos calculados con l_avideocfimzm_ a 25 %"
(se recomien&t de 10 o1_,a 30 o1_,)
• Los tiempos de grabacidn y de reproducci6n
serfin mils cortos cuando milice la videocfimara
a baias tmnperaturas.
• En fimci6n de las condiciones cn las que milice
la videocfimara, es posible que el tiempo de
grabacidn y reproduccidn se vean rcducidos.
Acerca del adaptador de alimentacidn de
ca
• Si/Itili/n el adaptador de alimentacidn de cz_
con6ctelo a iln lOlllaCOlTiellle de pared cercallo.
Si se produce alguna IMIa de fimcionamiento al
utilizar la videoc&nara, desconecte el adaptador
de alimcnmcidn de ca del tomacorriente de
inmediato.
• NO utilice el adaptador de alimentaci6n de ca
co]ocado cn un espacio angosto, la] como entre
una pared y los muebles.
• NO provoque un cortocircuito en la cl_wija de cc
del adapmdor de alimentaci6n de ca ni en el
terminal de la batcrfa con algfin objeto metfilico,
ya que podrfa causal: tallas de flmcionamicnlo.
• Aunque la vidcoc&nara esld apagada, scguirfi
rccibiendo alinlenla_i6n de ca (corriente
dom_slica) mientras estg coneclada a la tonla de
pared mediante el adaptador de alimentaci6n de ca
Paso3: Conexi6nde
la alimentaci6ny
ajustede la fecha y la
hora
Ajuste la fccha y la hora cuando utilice la
videocfimara pot primera vez. Si no @,sta
la fecha y la hora, aparecer5 la pantalla
[AJUS.RELOJ] cada vez que encienda la
videocfimara o cambie la posicidn del
interruptor POWER.
Interruptor POWER
g
Mientras presiona el bot6n verde,
gire el interruptor POWER varias
veces en el sentido que indica la
flecha hasta que se ilumine el
indicador correspondiente. =_
(pelicula): para grabar pelk'ulas ==,
I1_ (im_igenes fijas): para Iomar ,:a
imfigenes fijas
Aparece la pantalla [AJUS.RELOJ].
2Seleccione la zona geogr_ifica
que desee mediante A/T y, a
continuaci6n, toque [SIGUIENTE].
ContimJa._ 129
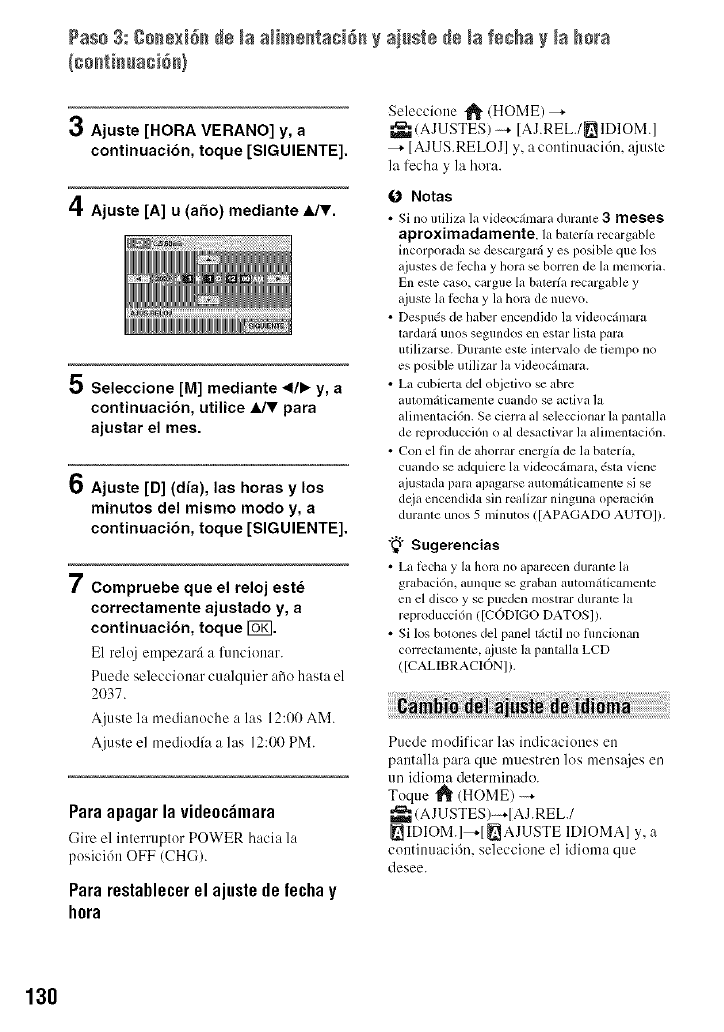
Pas+ 3: g++)ex+++de +aa++me+_a++6++ ai+st÷ +÷ +af++ha + +aho+'a
3Ajuste [HORA VERANO] y, a
continuaci6n, toque [SIGUIENTE].
4Ajuste [A] u (afio) mediante _lJV.
5
7
Seleccione [M] mediante 41/_ y, a
continuaci6n, utilice _para
ajustar el mes.
Ajuste [D] (dia), las horas y los
minutos del mismo modo y, a
continuaci6n, toque [SIGUIENTE].
Compruebe que el reloj est6
correctamente ajustado y, a
continuaci6n, toque Ira.
El reloj empezurfi a funcion:w+
Puede seleccionar cualquier atSohasta el
21)37.
A]uste la medianoche alas 12:00 AM.
Ajuste el mediodfa alas 12:00 PM.
Paraapagarlavide0c_mara
(-]ire el interruptor POWER hacia la
posici6n OFF (CHG).
Pararestablecerel ajustedelechay
h0ra
Seleccione "1_ (HOME) _-
_(AJUSTES) _ [AJREL./_IDIOM]
[AJUS.RELOJ] y, acontinuaci6n, _juste
la ti_cha y la hora.
O Notas
• Si no utiliza la videocfimaradunmte 3 meses
aproximadamente, la baterfarecargable
incorporadase descargarfiyes posible que los
aju_tes de _i:chay hora sc horror',de l_mcmoria.
En este caso, cargue la baterfarccargab]e y
+ljustela l_:chay la hora de nuevo.
• Desptu:s de haber enccndido la videocfimara
lardarfiunos seg/lndosen eslm+lista para
utili/nrse. Durgmte este inlelvalo de tielalpo no
es posible utilizar la videocfimara.
• La cubierta del objetivo se abre
autonlfiticalnente cuando se acliYa ]a
alin'*ent acidn. Se cierra al seleccionar la pantalla
de rcproducci6n o al desactJvar la alimcntaci6n.
• Con el fin de ahorrar energfa de la baterfa.
cualldo se adqulere la vide(lcfimara, dsta viene
+tjustadapara apagarse automfiticamente si se
deja encendida sinrealizar ninguna operuci6n
durante unos 5 minutos ([APAGADO AUTOI).
"_° Sugerencias
• L+tt_ch+ty lahora no apm'ecendurante l+t
grabaci6n, aunqnese gntban automfiticamente
ell el disco y se p/leden mOStl+itr dul+ante ]a
reproducci6n ([CODIGO DATOS]).
• Si losbotones del panel tfictilno flmcionan
correctamcnte, +{iuste la pantalla LCD
([CALIBRACION]).
Puede modificar las indicaciones en
pantalla para que muestren los mens:ties en
un idioma determinado.
Toque _ (HOME)
_a- (AJU STES)---+[AJ.REL./
_IDIOM.]--,-[ _AJUSTE IDIOMA] y, a
continuacidn, seleccione el idioma que
desee.
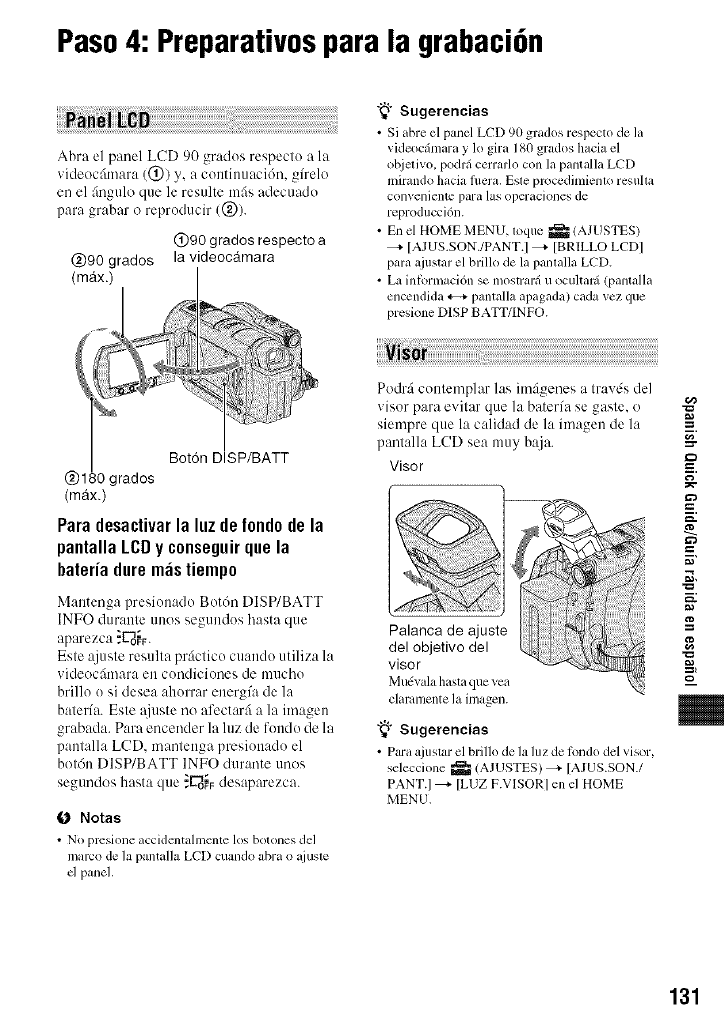
Paso4: Preparativospara la grabaci6n
Abra el panel LCD 90 grados respecto a la
videocfimara (@) y, a continuaci6n, g/relo
en el ;ingulo que le resulte mils adecuado
para grabar o reproducir (@).
@90 grados respecto a
@90 grados la videocgtmara
"_° Sugerencias
• Si abre el panel LCD 90 grados respecto de la
videocfimara y 1o gira 180 grados hacia el
ot_ietivo, podrfi cerrarlo con la pantalla LCD
mirando hacia flmra. Esle proccdimienlo resuha
conveniente para las operaciones de
reproducci6n.
• En el HOME MENU, loqtle _ (AJUSTES)
--,- [AJUS.SON./PANT.I --_- [BRILLO LCDI
para ajustar el brillo de la panlalla LCD.
•La inlbrmaci6n se mostrarfi u ocuhar5 (pantalla
encendida *--_ pamalla apagada) cada vez que
preskme D1SP BATT/INFO.
Bot6n DISP/BATT
@1 _0 grados
(max.)
Para desactivarla luz de fondode la
pantalla LCDy conseguirque la
bateria dure m_istiempo
Mantenga presionado Botdn DISP/BATT
INFO durante unos segundos hasta que
aparezca ,"L"_ob.
Este ajuste resulta prfictico cuando utiliza llt
videocfimara en condiciones de mucho
brillo o hi desea ahorrar energ/a de la
bater/a. Este i\iuste no afectarfi a llt imagen
grabada. Para encender llt luz de rondo de la
pantalla LCD, mantenga presionado el
botdn DISP/BATT INFO durante unos
segundos hasta que "E-dofFdesaparezca.
0 Notas
• NO prcsione accidentahncnte los botones del
marco de la pantalla LCD cumldo abra o @Isle
cl panel.
Podrfi contemplar las imfigenes a travds del
visor para evitar que la baterfa se gaste, o
siempre que la calidad de la imagen de la
pantalla LCD sea muy baja.
Visor
Palanca de ajuste
del objetivo del
visor
Mu(vala hastaque yea
clammente laimagen.
"_° Sugerencias
• Par+ta.iustar el brillo de la luz de t(lndo del visor,
seleccione _ (A.IUSTES) _ [AJUS.SON./
PANT.I --_- [LUZ F.VISORI en el HOME
MENU.
g
g
g
m
131
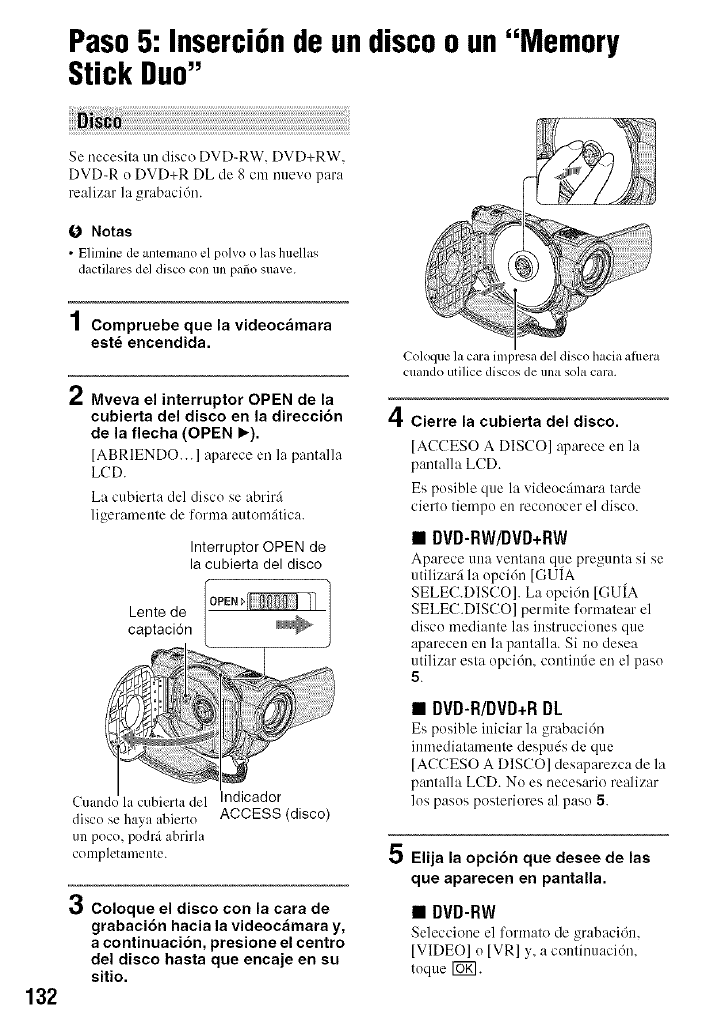
Paso5: InserciGnde undiscoo un"Memory
Stick Duo"
Se necesila tm disco DVD_RW, DVD+RW,
DVD_R o DVD+R DL de 8 cm nuevo para
realizar la _rabacidn.
0 Notas
•Elimine de an(emano el polvo o las huellas
dactilares del disco con un patio suave,
132
1Compruebe que la videocamara
est_ encendida.
2Mveva el interruptor OPEN de la
cubierta del disco en la direcci6n
de la flecha (OPEN I_).
[ABRIENDO... ] atmrece en l:l pantalla
LCD.
La cubierta del disco se abrir:i
ligeramente de forma automfitica.
Interruptor OPEN de
la cubierta del disco
Lente de
captaci6n
Cuando la cubierta del Indicador
disc() se haya abierto ACCESS (disco)
un poco, podrfi abrirla
conlpletamente.
_j
OColoque el disco con la cara de
grabaci6n hacia la videocamara y,
a continuaci6n, presione el centro
del disco hasta que encaje en su
sitio.
Coloque la cma impresa del disco hacia afimra
ctlando utilice discos de IIn_l SO]_I cara.
4Cierre la cubierta del disco.
[ACCESO A DISCO] @arece en la
pantalla LCD.
Es posible que la videocfimara tarde
cierto tiempo en reconocer el disco.
•DVD-RW/DVD+RW
Aparece nna vent:ma q/_epregnnta si se
utilizarfi la opcidn [GUIA
SELEC.DISCO]. La opcidn [GUIA
SELEC.DISCO] pcrmite formatear el
disco mediante las instrucciones que
aparecen en la pantalla. Si i1o desea
utilizar esta opcidn, contintie en el paso
5.
•DVD-R/DVD+R DL
Es posible inicim" la grabacidn
inmediatamente despuds de que
[ACCESO A DISCO] desaparezca de la
pantalla LCD. No es necesario realizar
los pasos posteriores al paso 5.
5Elija la opci6n que desee de las
que aparecen en pantalla.
•DVD-RW
Seleccionc el form:m)de grab:<'idn,
IVIDEO] o IVR] y, a continuacidn,
toque I_g].
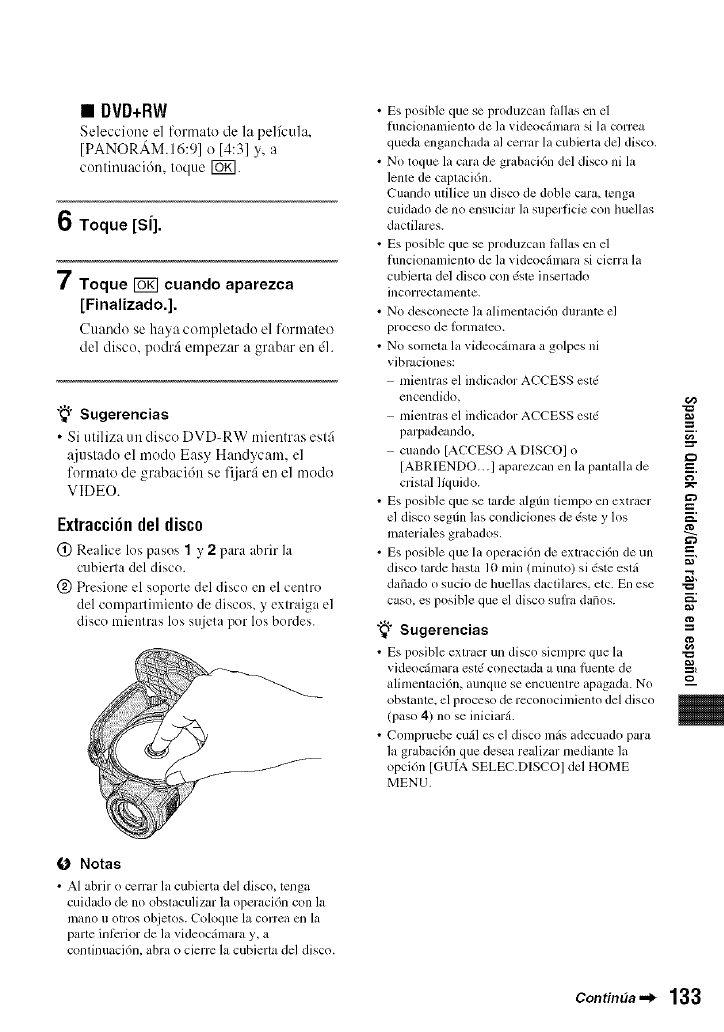
•DVD+RW
Seleccione el form:m)de la pelA:ul:J,
[PANORAM.16:91o [4:31y, a
comimtacidn, toque [_.
6Toque [SI].
7Toque _cuando aparezca
[Finalizado.].
Cttando se haya completado el fornmteo
del disco, podr:i etnpezar a grabar en dl.
"_° Sugerencias
•Si utiliza un disco DVD-RW mientras estfi
ajustado el modo Easy Handycam. el
formato de grabaci6n se fijar:i en el modo
VIDEO.
Extracci6n del disco
(_) Realice los pasos 1y2para abrir I;,
cubierla del disc().
@ Presione el soporte del disco en el centro
del compartimiento de discos, y extraig i el
disc() mientras los sujeta por los bordes.
• Es posible que se produzcan lqllas en el
fimcionamienm de la videocfimara si la correa
queda cnganchada al cerrar la cubiella del disco,
• NO toque la cara de grabacidn del disco ni la
leme de caplacidn.
Cuando ufilice un disco de doble cura, lenga
cuidado de no ensuciar la superficie con huellas
dactihues.
• Es posible que se produzcan lqllas en el
fimcionamienm de la videocfimara si cierra la
cubierta del disco con dste in_llado
incorreclalrlcnte,
• No desconecte la alimenlaci6n durante el
proceso de ]ornlal_o.
• No somela la videocfimara a golpes ni
vibraciones:
mientras el indicador ACCESS esl(
ellcendido,
mientras el indicador ACCESS esl(
parpadcundo.
cuando [ACCESO A DISCOI o
[ABRIENDO...I aparezcan en la pantzdla de
cristal lfquido.
• Es posible que se tarde algfin tiempo en extraer
el disco segtin las condickmes de dste y los
maleriales grabados.
• Es posible que la operaci6n de extracci6n de un
disco larde bsta l0 rain (minulo) si 6ste eslfi
dafmdo o sucio de huellas dactilares, etc. En ese
caso. es posible que el disco sulfa daflos.
"_" Sugerencias
• Es posible exlraer un disco siempre que la
videoc_mara esl_ coneclada a una filente de
alimentaci6n, aunque se encuentre apagada. N0
obstame, el proceso de reconocimiento del disco
(paso 4) no se iniciard.
• Compruebe cufil es el disco mils adecuado para
la grabaci6n que desea realizar medianle la
opci6n [GUtA SELEC.DISCOI del HOME
MENU.
g
m.
g
g
==,
m
m
0 Notas
• AI abrir o cerrar la cubierta del disco, lenga
cuidado de no obslaculizar la opert_ci6n con la
mano ii olros objetos. (-'oloque la correa ell la
parte inl_:rior de la videoc_hnara y. a
confinuaci6n, abra o cierrc la cubierta del disco.
Continaa "_ 133
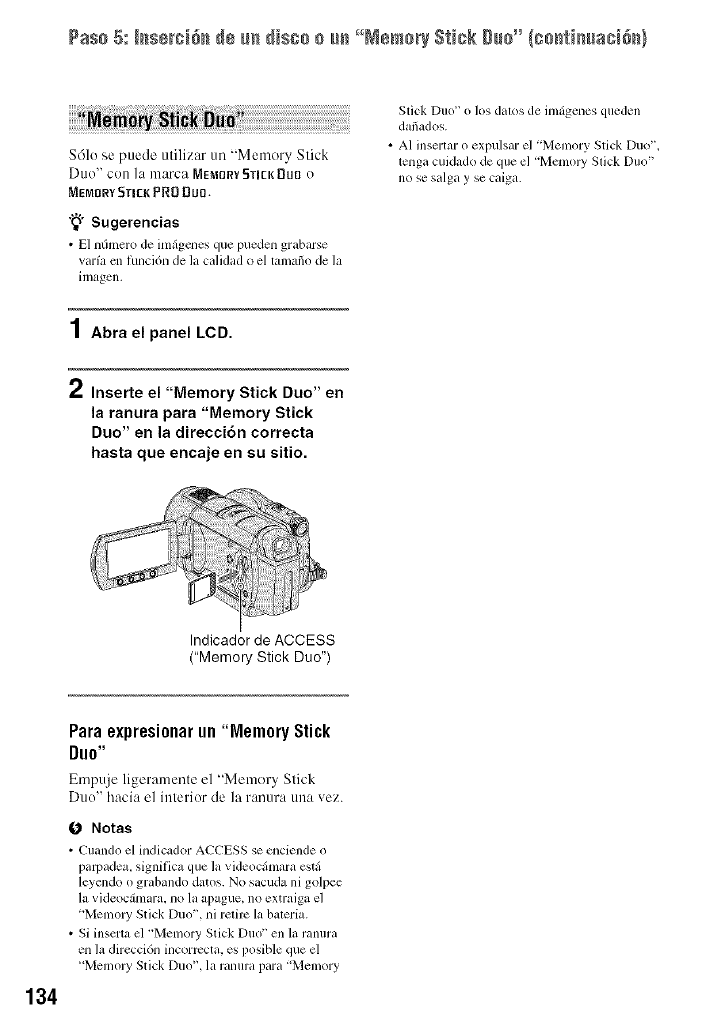
Pas+ 5: +++++'+i++_d+ ++ dis++ + ++ "N+m+++$t++k ++++"{+++t++++ae+d++}
$61o se puede utilizar un "Memory Stick
D/to" con ]a marca MfiM[IR7 fiTICK Dill] o
MEMnRY 5TmEK PRD DU0.
"_° Sugerencias
• E1 nfimero de imfigcnes que pueden grabarse
varia cn funci6n de la calidad o el tamafio de la
imagen.
1Abra el panel LCD.
Stick Duo" o los dat<>s de imfigenes queden
dafiados.
• A1 insertar o expulsar el 'Memory Stick Duo".
tenga cuidado de que el 'Mcmoly Stick Duo"
no se salga y se caiga.
Inserte el "Memory Stick Duo" en
la ranura para "Memory Stick
Duo" en la direccidn correcta
hasta que encaje en su sitio.
Indicador de ACCESS
("Memory Stick Duo")
134
Paraexpresi0narun"MemoryStick
Duo"
Empuje ligeramente el "Memory Stick
Duo" hacia el interior de la ranura tma vez.
O Notas
• Puando el indicador ACPESS se enciendc o
p+ut)adea, signitica que la videocfimara estfi
leyendo o grabando datos. No sacuda ni golpee
la videocfimara, no la apague, no extraiga el
'MemolT Stick Duo", ni retire la bateria.
• Si inscrta el +'Memory Stick Duo" en la ranura
en la direcci6n incorrccta, es posible que el
+'Memoly Stick Duo", la ranura para 'Memory
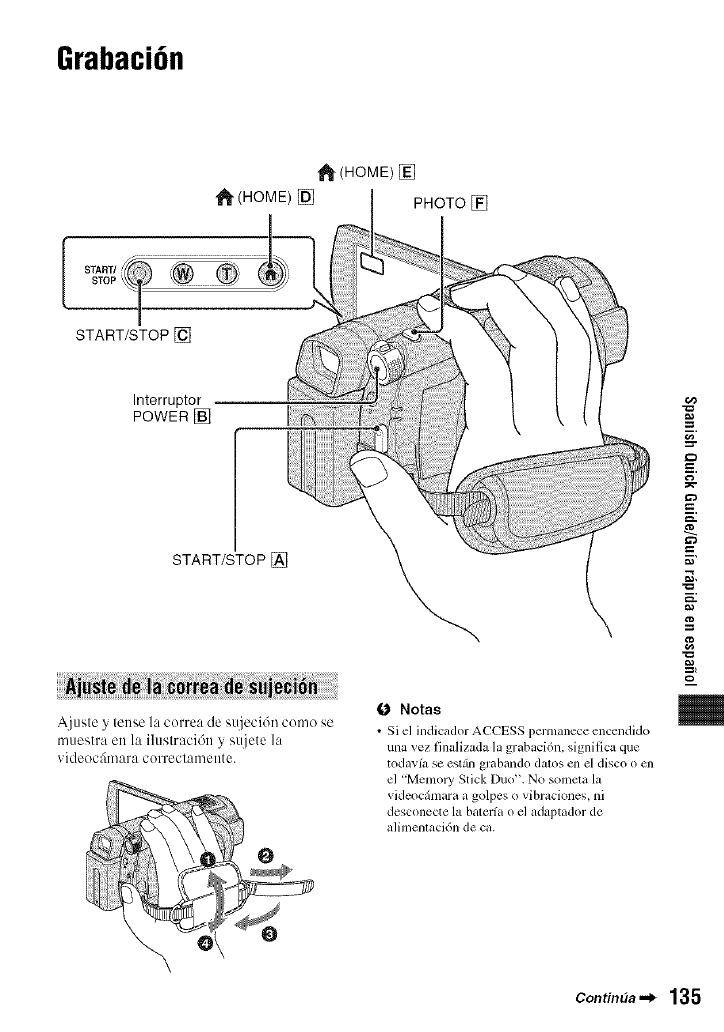
Grabaci6n
1_ (HOME) []
"_ (HOME) [] PHOTO []
START/STOP []
Interruptor
POWER []
START/STOP []
Ajusle y lense la correa de sujeci6n como se
muestra en la iluslraci6n y suje/e ]a
_.ideoc:_mara correclamente.
O Notas
•Si e] indicador ACCESS permanece encendido
una xez finalizada la grabaci6n, signilica que
todav(a se estzln grabando dalos en el disco o cn
el "Memo W Stick Duo". No somcta la
videoc_hnara a golpes o vibraciones, ni
desconecte la bateria o el adaptador de
alimenlaci6n de ca.
g
m.
g
g
m
m
Contin_a ._ 135
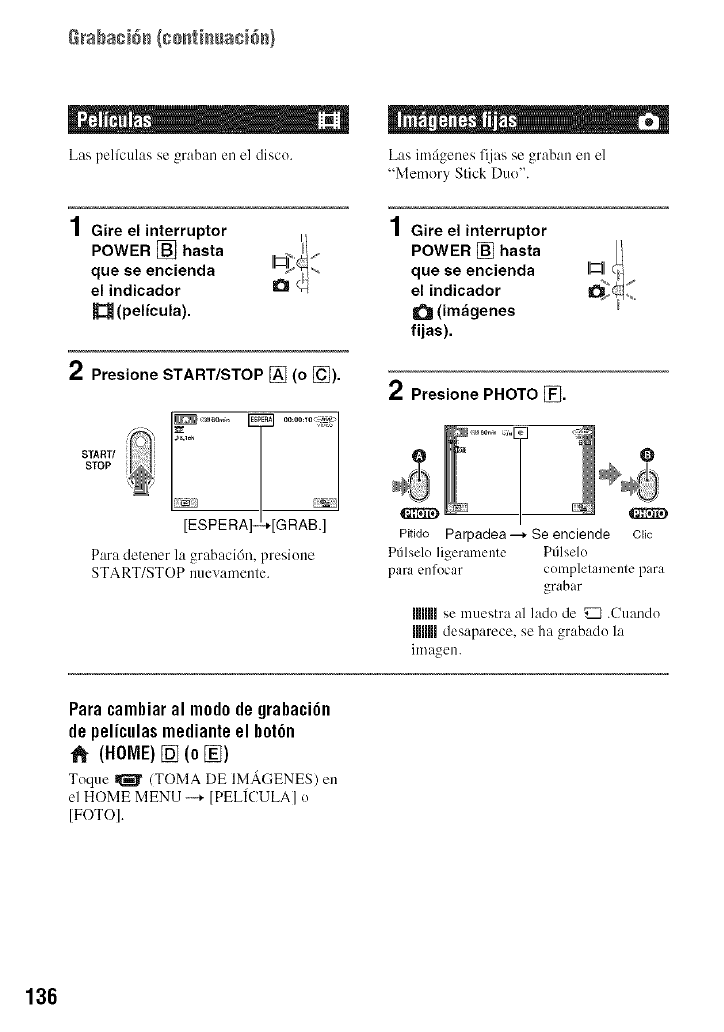
Rraba¢i6_ (go_t}_uac}6_}
m _ j _mE
Las pelfculas se graban en el disc().
1Gire el interruptor
POWER [] hasta
que se encienda
el indicador
(pel/cula).
2Presione START/STOP [] (o [_).
START/
STOP |
[ESPERA]--+[GRAB.]
Para detener la grabaci6n, presione
START/STOP nuevamenle.
Las imfigenes fijas se graban en el
"Memory Slick Duo".
1Gire el interruptor
POWER [] hasta
que se encienda
el indicador
Q(imageries
fijas).
2Presione PHOTO _].
I
Pitido Parpadea--_ Se enciende
P61seloligeramente Ptilselo
para enfocar
Q
Clic
completamente para
grabar
miiUise muestra al lado de _ .Cuando
mm desaparece, se ha grabado la
ili/aoen
Paracambiaramm0d0degrabaci6n
de peliculas mediante el b0t6n
(HOME)[] (0 [])
Toque _ (TOMA DE IMACENES) en
el HOME MENU --+ [PEL[CULA] o
[FOTO].
136
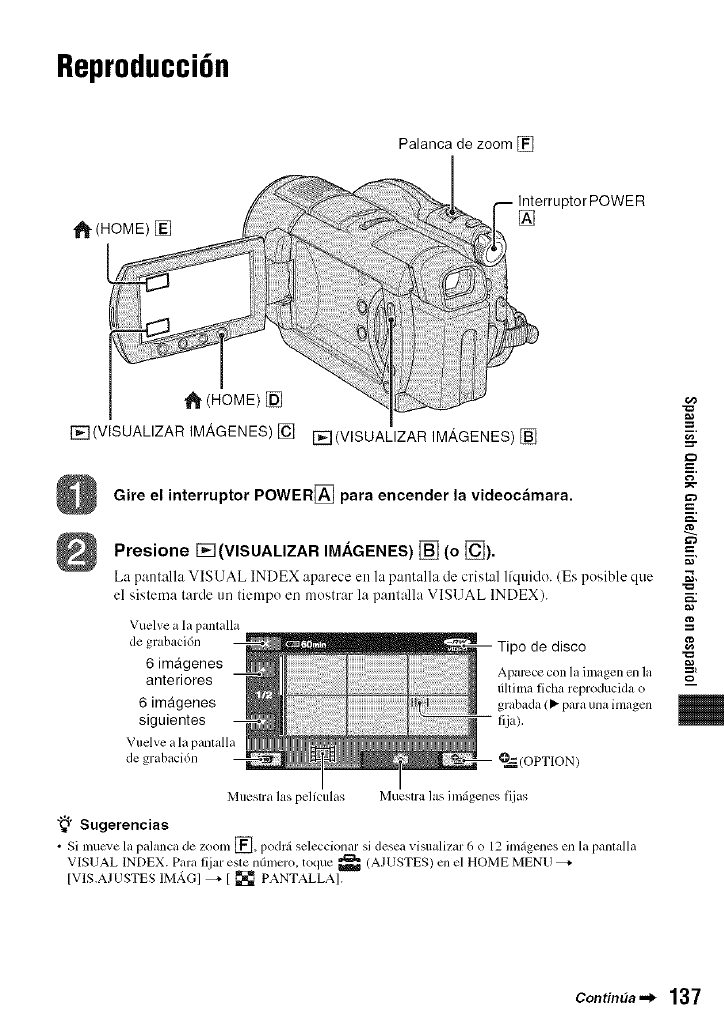
Reproducci6n
Palanca de zoom []
[]
(HOME) []
r_q(VISUALIZAR IMP,GENES) [] r_q(VISUALIZAR IMAGENES) []
Gire el interruptor POWER[_ para encender la videocamara.
Presione I%-I(VISUALIZAR IM.&GENES) [] (o [_).
La pamalla VISUAL INDEX aparecc en la pantalla tic crislal lfquido. (Es posible que
el sislema larde tm liempo en mostrar la panlalla VISUAL INDEX).
g
m.
Vuelve a la pantalla
de grabaci6n Tipo de disco
6 imagenes =%
anteriores Aparece con la imagen en la o
dhima licha reproducida o
6 imagenes grabada(_ paraunahnagen
siguientes I]ja).
Vuelve a la pamalla
de grabaci6n O=_(OPTION)
Muestra las pelfculas Muestra las imfigenes fijas
"_° Sugerencias
• Si mucve la palanca de zoom [_], podrfi seleccionar si desea visualizar 6 o 12 im_genes en la panlalla
VISUAL INDEX. Para lijar este nOmero, toque _ (AJUSTES) en el HOME MENU
[VIS.AJUSTES IM_G] _ [ _ PANTALLAI.
Contin_a._ 137
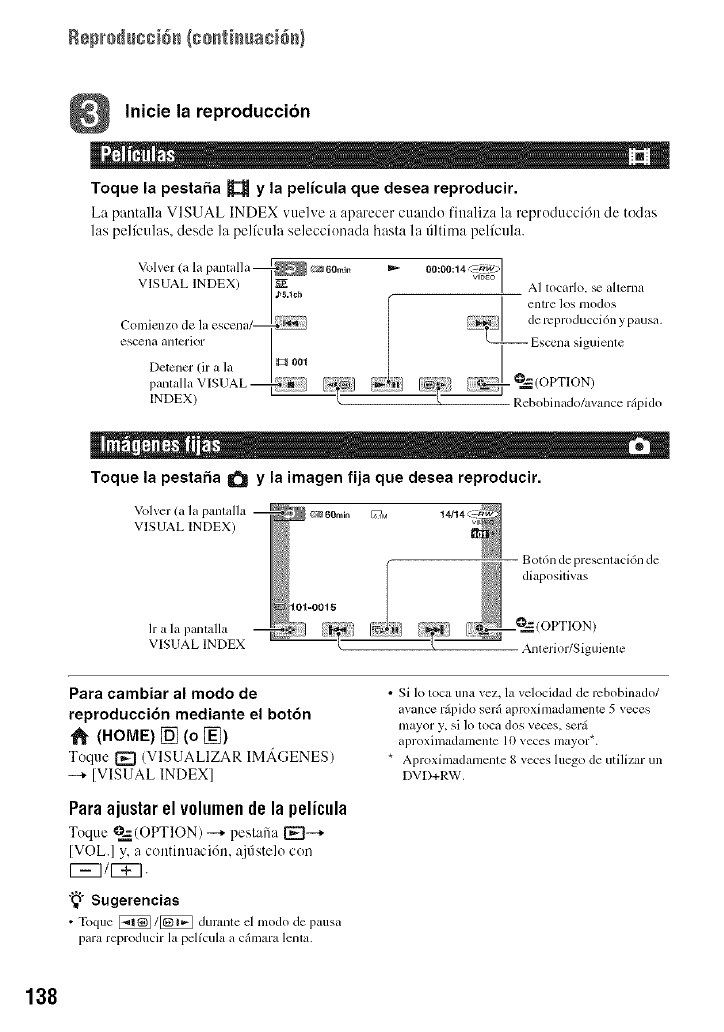
Rep_+_u++i+_(c+_ti_ua+i&+}
Inicie la reproduccion
Toque la pestafia _y la pelicula que desea reproducir.
Ca pantalla VISUAL INDEX vue]_ e a aparecer cuando finaliza la reproduccidn de todas
las pelfculas, desde ]a pelfcula seleccionada hasta la filtima pelicula.
Volver (a la pamalla @_ _60min
VIsuAL INDEX) g_
Comienzo de la escena/_ _-_';
escena alllerior
[)¢3tc311cr(it a la _ _ 001
p , VSUAL_ I_;._1
INDEX) _ ........
00:00:14_>1] AI tocarlo, _ aherna
entl'e los nlodos
_j] dereproducci6n ypausa.
E_,cenasiguiente
- _ (OPTION)
Rebobinado/avance r@ido
Toque la pestafia _y la imagen fija que desea reproducir.
Volver (a la pamalla
VISUAL INDEX)
h"a la panmlla
VISUAL INDEX
101=O015
Bot6n de presentaci6n de
diapositivas
Anterior/Siguiente
Para cambiar al modo de
reproducci6n mediante el bot6n
1_ (HOME) [] (o _)
Toque t-_ (VISUALIZAR IMAGENES)
--+ [VISUAL INDEX]
Paraajustarel v01umendela pelicula
Toque @_.(OPTION) --* pest:ffia [_--+
[VOL.] y, a continuaci6n, a.jfistelo con
CE3/_.
"_° Sugerencias
• Toque _ 1[_] durame el modo de pausa
para reproducir la pelfcula a cfimara lenta.
•Si 1o toca una vez, la velocidad de rcbobinado/
avance r@ido serfi aproximadamente 5 veces
mayor y, si lo toca dos veces, serfi
aproxinladalllenle 10 veces nlayor*.
* Aproximadamente 8 veces luego de utilizar un
DVD+RW.
138

