Sony DCR TRV11 User Manual CAMCORDER Manuals And Guides L0604087
SONY Digital Camcorder Manual L0604087 SONY Digital Camcorder Owner's Manual, SONY Digital Camcorder installation guides
User Manual: Sony DCR-TRV11 DCR-TRV11 SONY CAMCORDER - Manuals and Guides View the owners manual for your SONY CAMCORDER #DCRTRV11. Home:Electronics Parts:Sony Parts:Sony CAMCORDER Manual
Open the PDF directly: View PDF ![]() .
.
Page Count: 152 [warning: Documents this large are best viewed by clicking the View PDF Link!]
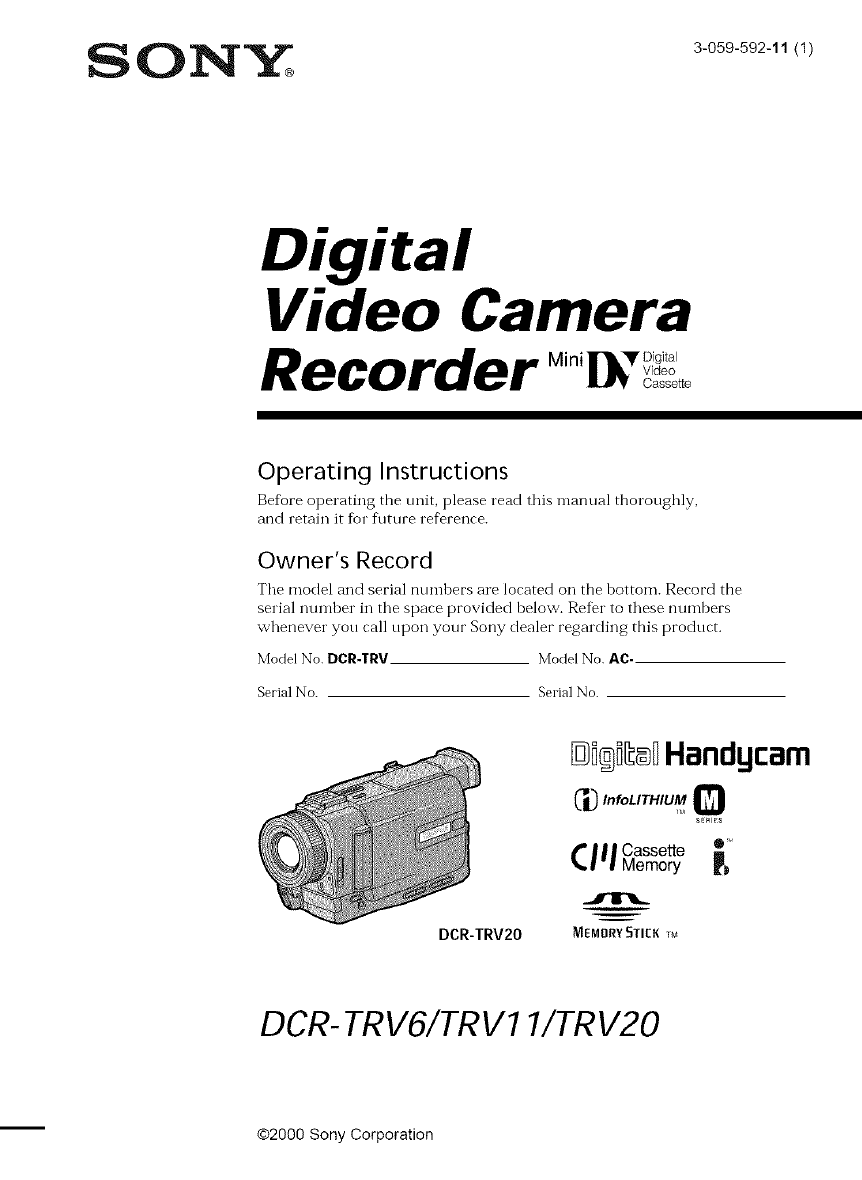
0 NY 3_o_9_92_11tlt
Digital
Video Camera
Recorder
Operating Instructions
Before operating the unit, please read this manual thoroughly,
and retain it for fllture reference.
Owner's Record
Tile model and serial numbers are located on the bottom. Record the
serial number in the space provided helow. Refer to these numbers
whenever you call upon your Sony dealer regarding this product.
Model No. DCR:I'RV. Model No. AC.
Serial No. Serial No.
DCR-TRV20
Di®i[_DHandgcam
C',_,o,o,,T.,..Q
sE_l_s
C| | | Cassette e_
I'1 Memory
MEMORY STIER 1M
DCR- TRV6/TRV11/TRV20
@2000 Sony Corporation
2
Welcome!
Congratulations on your purchase of this Sony Digital Handyranl camrorder. With your Digital
Handycam, you can capture life's precious monlents with superior picture and sound quality, Your Digital
Handycam is loaded with advanced features, but at the same time it is very easy to use. You will soon be
producing home video that you can enjoy for years to come,
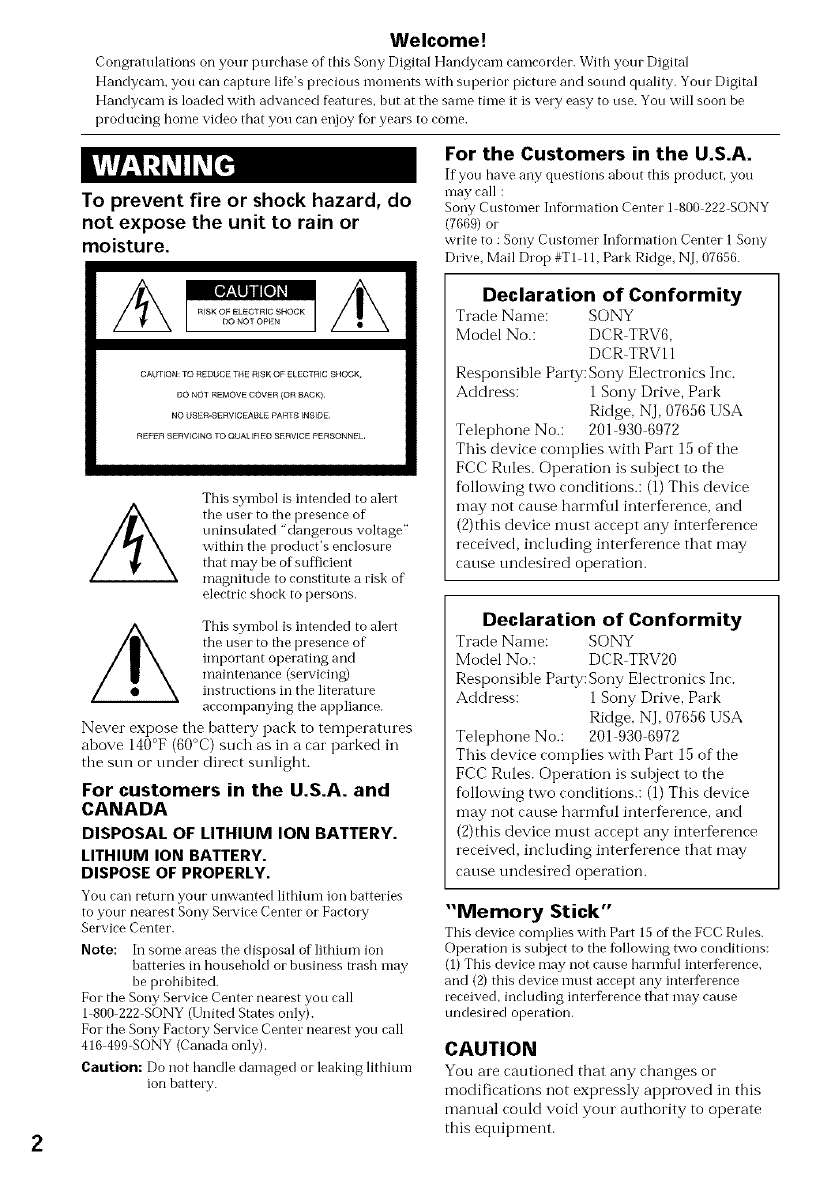
To prevent fire or shock hazard, do
not expose the unit to rain or
moisture.
CAUTION: TO F{EDUCE THE RISK OF ELECTRIC SHOCK,
DO NOT REMOVE COVER IOn BACK)
NO {JSER-SE_tVlCEAt3LE pA_tT8 INSIDE¸
REFER SERVICING TO QUAI IFIEO SERVICE PERSONNEL¸
This symbol is intended to alert
the user to the presence of
uninsulated 'dangerous voltage"
within tile product's enclosure
that may be of suflicient
magnitude to constitute a risk of
electric shock to persons.
/_ This symbol is intended to alelt
the usel to the plesence of
impoltant opel ating and
maintenance (selvicing)
instructions ill tile literature
accompanying tile appliance.
Never expose the battery pack to temperatures
above 140°F (60°C) such as in a car parked in
tbe sun or under direct sunligbt.
For customers in the U.S.A. and
CANADA
DISPOSAL OF LITHIUM ION BATTERY.
LITHIUM ION BATTERY.
DISPOSE OF PROPERLY.
You ran return your unwantecl lithiuIn ion batteries
to your nearest Sony Sel_'ice Center or Factory
Service Center.
Note: In some areas the disposal of lithium ion
batteries in househoM or business trash rnay
be prohibited.
For the Sony Service Center nearest you call
1 800 222 SONY (United States only).
For the Sony Factory Service Center nearest you call
416 499 SONY (Canada only).
Caution: Do not handle damaged or leaking lithium
ion batteEy.
For the Customers in the U.S.A.
If you have any questions ahout this product, yot/
rnay call :
Sony Customer Infimnation Center l 800 222 SONY
(7660) or
write to : Sony Custorner Information Center 1 Sony
Drive, Mail Drop #TI lh Park Ridge, NJ, 07656.
Declaration of Conformity
Trade Name: SONY
Model No.: DCR TRV6,
DCR TRVll
Responsible Party: Sony Electronics Inc.
Address: 1 Sony Drive, Park
Ridge, NJ, 07656 USA
Telephone No.: 201 930 6972
This device complies with Part 15 of the
FCC Rtfles. Operation is subject to the
f_ollowing two conditions.: (1) This device
may not cause harmf\fl interference, and
(2)this device nmst accept any interference
received, including interference that may
cause undesired operation.
Declaration of Conformity
Trade Name: SONY
Model No.: DCR TRV20
Responsible Party: Sony Electronics Inc.
Address: 1 Sony Drive, Park
Ridge, NJ, 07656 USA
Telephone No.: 201 930 6972
This device complies with Part 15 of the
FCC Rtfles. Operation is suloject to the
following two conditions.: (1) This device
may not cause harmful interfbrence, and
(2)this device nmst accept any interference
received, including interference that may
cause tmdesired operation.
"Memory Stick"
This device complies with Part 15 of tile FCC Rules.
Operation is subject to tile fMlowing two conditions:
(1)This device may not cause harmfifl interference
and (2) this device nmst accept any interDrence
received, including interference that may cause
undesired operation.
CAUTION
You are rautioned that any rhanges or
modifications not expressly approved in this
manual cotfld void your authority to operate
this equipment.
Note:
This equipment has been tested and fbtmd to
comply with tile limits for a Class B digital
device, pursuant to Part 15 of the FCC Rules.
These limits are designed to provide
reasonable protection against harmflll
inter%rence in a residential installation. This
equipment generates, uses, and can radiate
radio fi'equency energy and, if not installed
and used in accordance with tile instructions,
may cause harmflll inter%rence to radio
coIllIlltlnications. Hovvever, there is no
guarantee that interDrence will not occur in a
particular installation. If this equipment does
cause harmful inter%rence to radio or
television reception, which can be determined
by turning the equipment off and on, the user
is encouraged to try to correct tile inter%rence
by one or more of tile fbllowing measures:
Reorient or relocate the receiving antenna.
Increase tile separation between tile
equipment and receiver.
Connect the equipment into an outlet on a
circuit dif%rent fi'om that to which the
receiver is connected.
Consult the dealer or an experienced radio/
TV technician fbr help.
For customers in CANADA
CAUTION
TO PREVENT ELECTRIC SHOCK, MATCH WIDE
BLADE OF PLUG TO WIDE SLOT, FULLY INSERT.
This Class B digital ai)paratus complies with
Canadian ICES 003.
Table of contents
4
Checking supplied accessories .................... 5
Quick Start Guide .............................G
Getting started
Using this manual ................................... 8
Step 1 Preparing tile power supply .......... 10
Installing the battery pack ............. 10
Charging the battery pack ............. 11
Connecting to a wall outlet ........... 14
Step 2 Inserting a cassette ................... 15
Recording - Basics
Recording a picture ............................... 16
Shooting backlit subjects (BACK
LIGHT) ........................................ 21
Shooting in the clark
(NightShot/Super NightSho0 ... 22
Selfitimer recording ....................... 23
Checking the recording END
SEARCH/EDITSEARCH/Rec
Review ......................................... 24
Playback -Basics
Playing back a tape ............................... 25
Viewing the recording oil TV .............. 28
Advanced Recording Operations
Recording a still image on a tape
Tape Photo recording ................. 30
Adjusting tile white balance manually ...33
Using the wide mode ........................... 34
Using the fader f\mction ...................... 35
Using special effects Picture effect ... 37
Using special effects Digital effect ... 38
Using the PROGRAM AE f\mction .... 41
Acljusting the exposure manually ...... 43
Focusing manually ................................ 44
Advanced Playback Operations
Playing back a tape with picture efferts ... 45
Playing back a tape with digital effects ...46
Enlarging ilnages recorded on tapes
PB ZOOM ..................................... 47
Quickly locating a scene using the zero
set memory 11ruction ...................... 48
Searching the boundaries of recorded
tape by title Title search ............. 49
Searching a recording by date
Date search ................................... 50
Searching fiora photo Photo search/
Photo scan ....................................... 52
Editing
Dubbing a tape ...................................... 54
Dubbing only desired scenes
Digital program editing .............. 56
Using with analog video unit and PC
Signal convert fimction ............... 66
Recording video or TV programs ....... 67
Inserting a scene fi'om a VCR
Insert editing ................................ 71
Audio dubbing ...................................... 73
Superimposing a title ........................... 77
Making your own titles ........................ 81
Labeling a cassette ................................ 83
Customizing Your Camcorder
Changing the menu settings ................ 85
Resetting the date and time ................. 92
"Memory Stick" Operations
(DCR-TRV 11/TRV20 only)
Using a "Memory Stick"
introduction .................................. 93
Recording still images on "Memo1T Stick"s
Memory photo recording ............. 100
Superimposing a still picture in a
"Memory Stick" on a moving
picture MEMORY MIX ............. 105
Recording an image from a mini DV
tape as a still image ...................... 108
Copying still images from a mini DV
tape Photo save .......................... 111
Viewing a still picture Memory photo
playback ......................................... 113
Copying the image recorded on "Memory
Stick"s to mini DV tapes ................ 116
Enlarging still images recorded on
"Memory Stick"s
Memory PB ZOOM ................... 118
Playing back images in a continuous
loop
SLIDE SHOW ............................. 119
Preventing accidental erasure
hnage protection ........................ 120
Deleting images ................................... 121
Writing a print mark PRINT MARK ... 123
Additional Information
Usable cassettes ................................... 124
About i.LINK ....................................... 126
Troubleshooting .................................. 128
Selfidiagnosis display ......................... 134
Warning indicators and messages.... 135
Using your camcorder abroad .......... 137
Maintenance infi)rmation and
precautions .................................... 138
Specifications ....................................... 142
Quick Reference
Identif3dng the parts and controls .... 144
Quick Function Guide ........................ 151
Index ........................................ Back cover
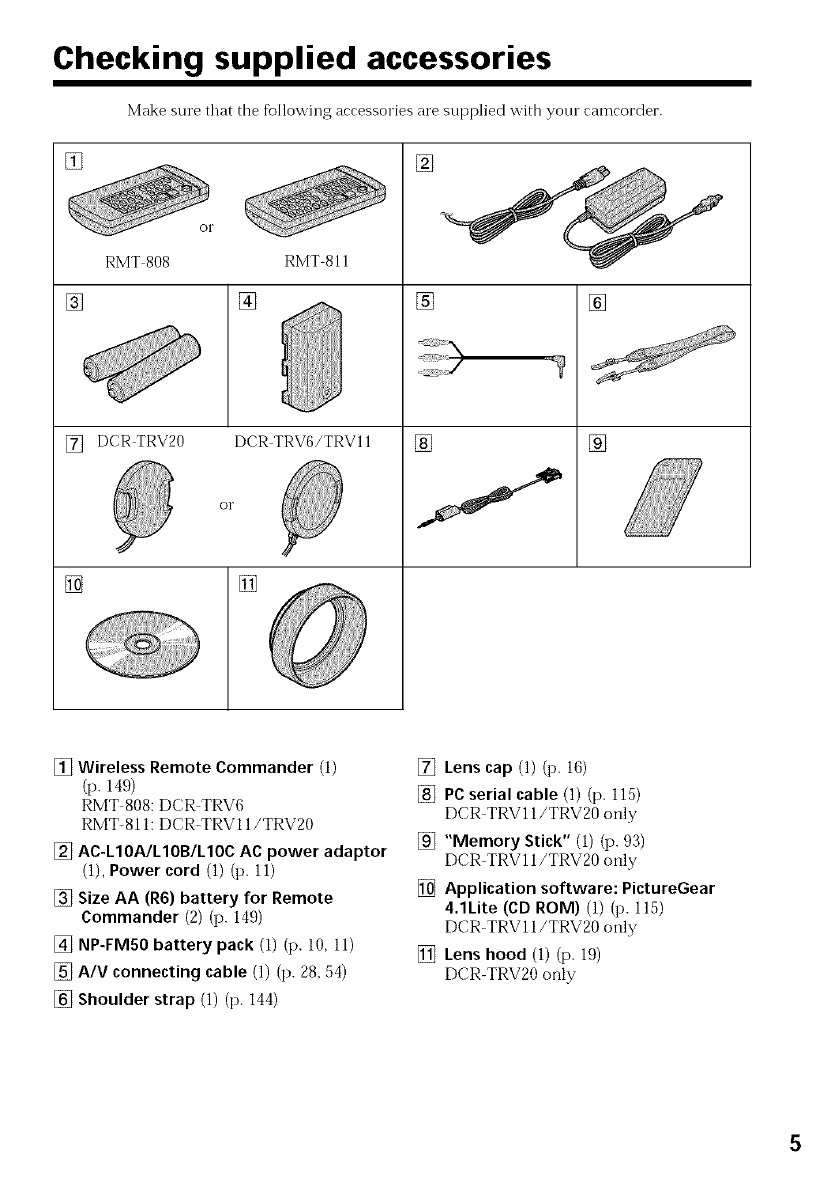
Checking supplied accessories
Make sure that the following accessories are supplied with yore camcorder.
[] []
RMT 808
[]
[] DCRTRY20
[]
RMT 811
[]
DCR TRV6/TRV11
O1"
[]
[] []
[] []
J
[] Wireless Remote Commander (1)
(p. 149)
RMT 808: DCR TRV6
RMT-81 I: DCR-TRV11/TRV20
[] AC-L10A/L10B/L10C ac power adaptor
(1), Power cord (1) (p. 11)
[] Size AA (R6) battery for Remote
Commander (2) (p. 149)
[] NP-FMS0 battery pack (1) (p. 10, 11)
[] A/V connecting cable (1) (p. 28, 54)
[] Shoulder strap (1) (p. 144)
[] Lens cap (1) (p. 16)
[] PC serial cable (1) (p. 115)
DCR TRVll/TRV20 only
[] "Memory Stick" (1) (p. 93)
DCR-TRV 11/TRV20 only
[] Application software: PictureGear
4.1Lite (CD ROM) (1) (p. 115)
DCR-TRV 11/TRV20 only
[] Lens hood (1) (p. 19)
DCR-TRV20 only
Quick Start Guide
This chapter introdoces you to the basic features of your
camcorder. See the page in parentheses "( )" for more
infom-lation.
Use the battery pack when using your camcorder outdoors (p. 10).
Open tile DC IN
jack cover.
-- Connect the plug with its •
mark facing lens side.
0 Slide OPEN/EJECT in
the direction of the
arrow and open the
lid.
AC power adaptor (supplied)
0 Push the middle
portion of the back of
the cassette to insert.
O Close the cassette
compartment by
pressing the (_usH]
mark on the cassette
compartnlent.
O Afler the cassette
compartment going
down completely,
close the lid until it
clicks.
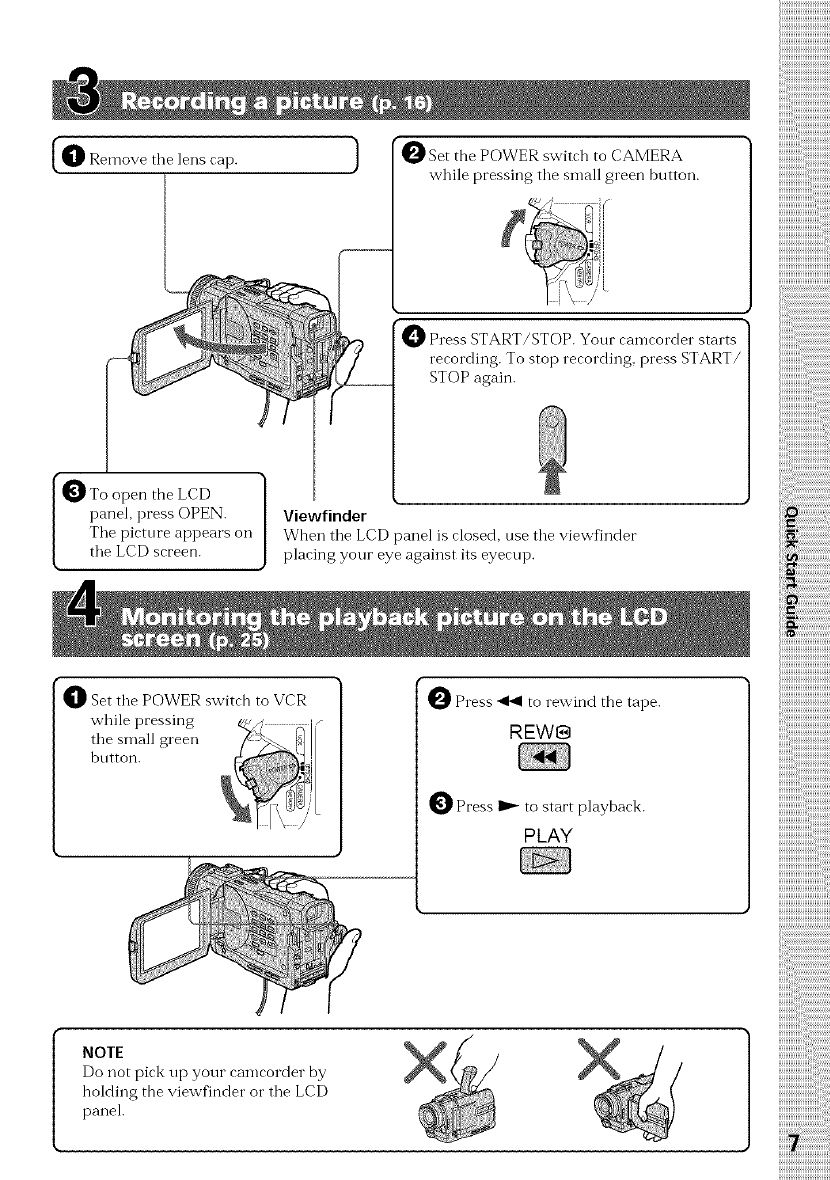
{_1_ Remove tile lens cap.
PPress START/STOP. Your camcorder starts
recording. To stop recording, press START/
STOP again.
the LCD
panel, press OPEN.
Tile picture appears on
tile LCD screen.
Viewfinder
When file LCD panel is closed, use file viewfinder
placing your eye against its eyecup.
_]_ Set tile POWER switch to VCR
while pressing
tile small green
bntton.
0 Press _ to rewind the tape.
REW@
0 Press _ to start playback.
PLAY
iiiiiiiiiiiiiiiiiiiiiiiiiiiiiiiill
i{{i !ii!ii!ii!ii!ii!ii!ii!ii!ii!ii!ii!ii!ii!ii!i!i!ii!ii
liii_%;i;i;i;i;i;i;i;i;i;i;i;!
i_i{!i_i_iiiiiiiiiiiiiiiiiiiiiiiiiiiiiiiiiiiiiiiiiiiiiiiiii;ii
ii{{iii :ii:ii:ii:ii:ii:ii:ii:ii:ii:ii:ii:ii:ii:ii:ii:ii:ii:ii:
iiiiiiiiiiiiiiiiiiiiiiiiiiiiii,,
NOTE
Do not pick up your camcorder by
holding the viewfinder or the LCD
panel.

-- Getting started --
Using this manual
The instructions in this manual are for tile three models listed in the table below. Before
you start reading this manual and operating your camcorder, check the model number
by looking at the bottom of your camcorder. The DCR TRV20 is tile model used tbr
illustration purposes. Otherwise, tile model name is indicated in the illustrations. Any
differences in operation are clearly indicated in tile text, for example, "DCR TRV20
only".
As you read through this manual, buttons and settings on your camcorder are shown in
capital letters.
e.g. Set tile POWER switch to CAMERA.
When you carry out an operation, you can hear a beep sound to indicate that the
operation is being carried out.
Types of differences
DCR TRV6 TRV11 TRV20
MEMORY mark*
(on tile POWER • •
switch)
• Provided
Not provided
* Tile model with MEMORY marked on the POWER switch is provided with memo[y flmctions.
See page 93 fbr details.
Your camcorder is based on the DV format. You can only use mini DV cassettes with
your camcorder. We recommend that you use a tape with cassette memory (IR
The flmctions which require different operations depending on whether the tape has
the cassette ITleIllory OF [lot are_
• End search (p. 24, 27)
• Searching a recording by date date search (p. 50)
• Photo search (i7.52).
The flmctions you can operate only with tile cassette memory are:
• Searching tile boundaries of recorded tape by title title search (i7. 49)
• Superimposing a title (i7. 77)
• Making your own titles (p. 81)
• Labeling a cassette (i7. 83).
For details, see page 124.
You see this mark in tile introduction of the features that are operated only with
cassette iTle iTlo1"y.
Tapes with cassette memory are marked by (Iq (Cassette Memory).
8

Using this manual
TV color systems differ from country to country. To view your recordings on a TV, you
need an NTSC system based TV. _
Television programs, fihns, video tapes, and other materials may be copyrighted. _
Unauthorized recording of such materials may be contrary to tile provision of the
copyright laws. _"
•The LCD screen and the viewfinder are manufactured using high-precision
technology. However, there may be some tiny black points and/or bright points
(red, blue, green, or white) that constantly appear on the LCD screen and in the
viewfinder. These points occur normally in the manufacturing process and do
not affect the recorded picture in any way. Effective ratio of pixels and/or screen
are 99.99% or more.
•Do not let your ramrorder get wet. Keep your ramrorder away fi'om rain and sea
water. Letting your camcorder get wet may cause your eamcorder to malfnnction.
Sometimes this malflmction cannot be repaired [a].
• Never leave your camcorder exposed to temperatmes above 140°F (60°C), such as in a
car parked in the sun or under direct sunlight [b].
• Do not place your eamcorder so as to point the viewfinder o1"the LCD screen toward
the sun. The inside of the viewfinder or LCD screen may be damaged [¢].
[a] [b] [c]
Contents of the recording cannot be con-lpensated if recording or playback is not made doe to a
n-lalflmction of the camcorder, video tape, etc.
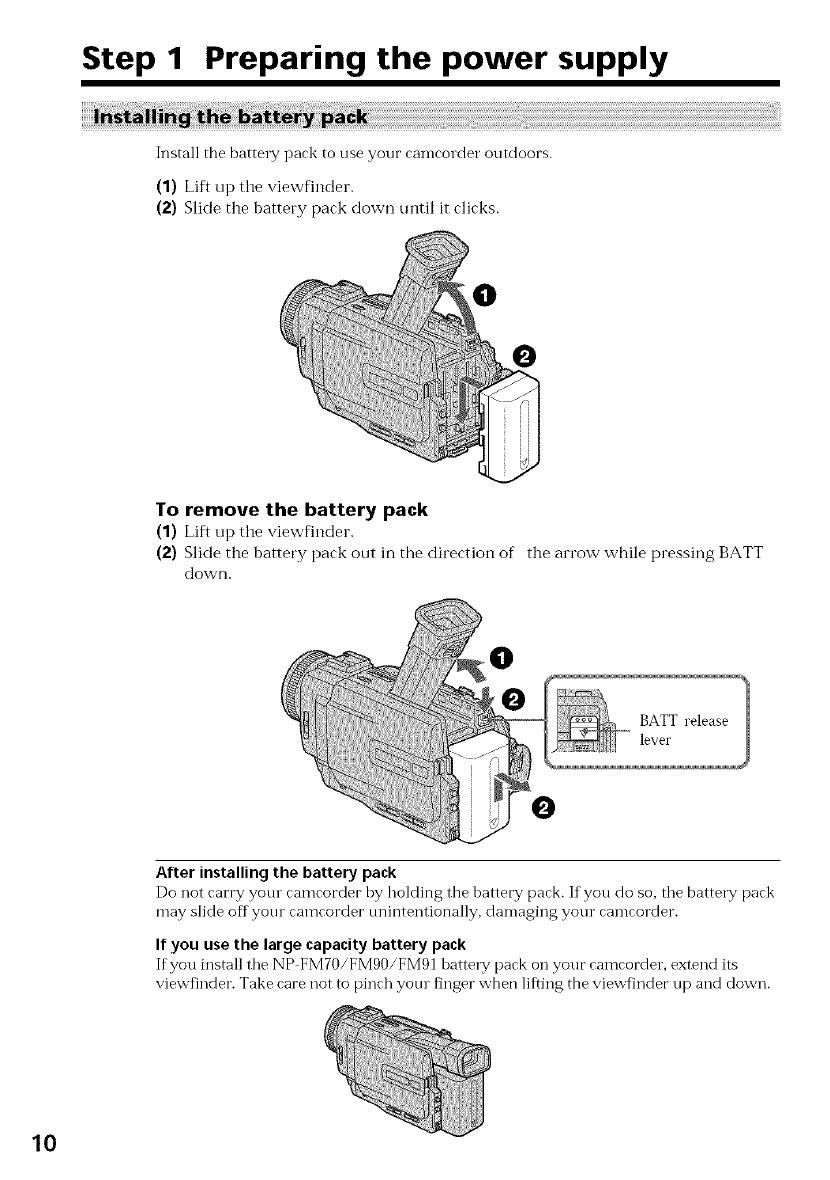
Step 1 Preparing the power supply
Install the battery pack to use your camcorder outdoors.
(1) Lift up tile viewfinder.
(2) Slide the battery pack down until it clicks.
To remove the battery pack
(1) Lift up the viewfinder.
(2) Slide the battery pack out in the direction of the arrow while pressing BATT
down.
BATT release
lever
After installing the battery pack
Do not carry yore camcorder by holding the battery pack. If you do so, tile battery pack
may slide off youl camcorder tmintentionally, damaging your camcorder.
If you use the large capacity battery pack
If you install tile NP FM70/FMgO/FM91 battery pack on your camcorder, extend its
viewfinder. Take care not to pinch yotu finger when lifting the viewfinder up and down.
10
Step 1 Preparing the power supply
!!i!!i!iii!i i i ii iiiiiill i! i i i i i i i i i i i ii!! ! i i i i iiiiiiiiiiiiiiiii i iiii iii ! i iiiii!i!iiiiiiiiiiiiiiiiiiiiiiiiiiiiiiii)i !!! !ii! i i i iiiiiiiiiiiiiiiiiiiiiiiiiiiiiiiiiiiiiiiiiiiiiiiiiiiiiiiiiiiiiiiiiiiiiiiiiiiiiiiiiiiiiiiiiiiiiiiiiiiiiiiiiiiiiiiiiiiiiiiiiiiiiiiiiiiiiiiiiiiiiiiiiiiiiiiiiiiiiiiiiiiiiiiiiiiiiiiiiiiiiiiiiiiiiiiiiiiiiiiiiiiiiiiiiiiiiiiiiiiiiiiiiiiiiiiiiiiiiiiiiiiiiiiiiiiiiiiiiiiiiiiiiiiiiiiiiiiiiiiiiiiiiiiiiiiiiiiiiiiiiiiiiiiiiiiiiii !J!JiJ
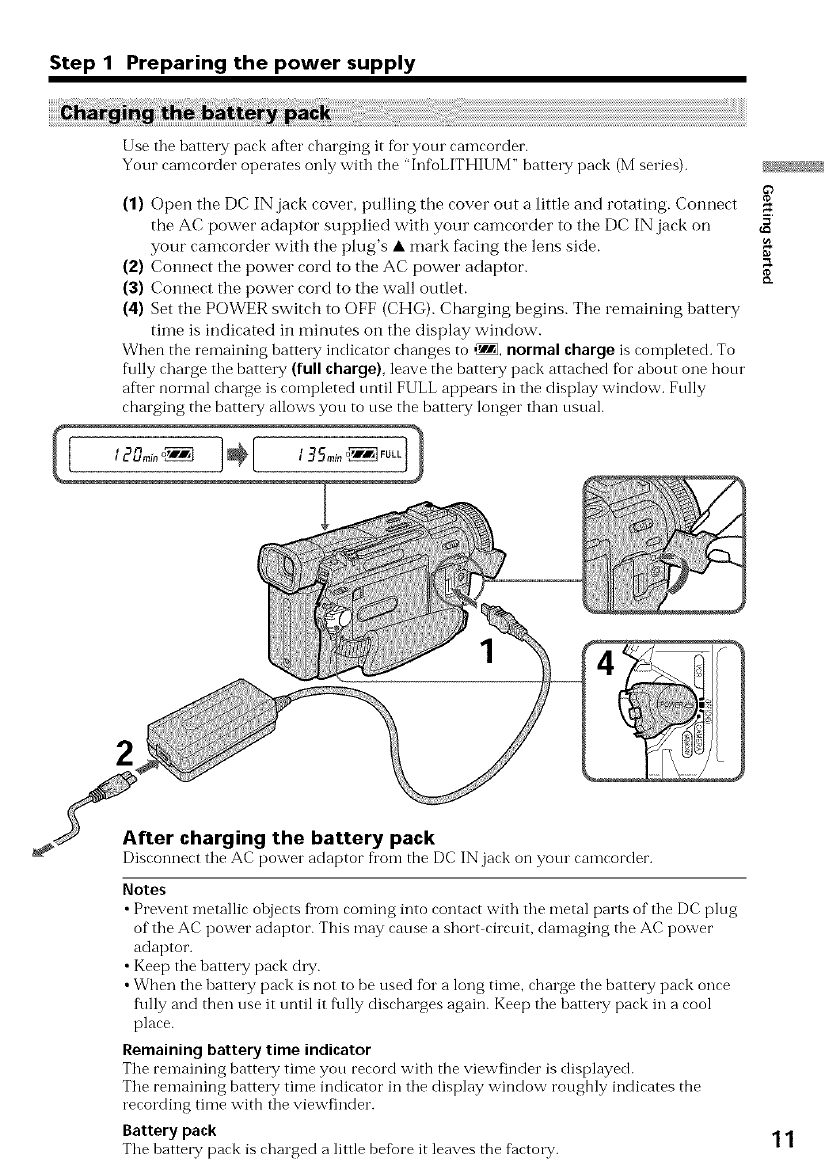
Use the battelTy"pack after charging it fbr yore camcorder.
Your camcorder operates only with the "InfoLITHIUM" batte W pack (Mseries).
(1) Open the DC IN jack cover, pulling tbe cover out a little and rotating. Connect
the AC power adaptor supplied witb your camcorder to the DC IN jack on
your camcorder with the plug's • mark facing tbe lens side.
(2) Connect the power cord to the AC power adaptor.
(3) Connect the power cord to the wall outlet.
(4) Set the POWER switch to OFF (CHG). Charging begins. The remaining battery
time is indicated in minutes on the display window.
When the remaining batte_T indicator changes to ,_, normal charge is completed. To
f\flly charge the batte W (full charge), leave the batte W pack attached for ahout one hour
af'.er normal charge is completed tmtil FULL appears in the display window. Frilly
charging the battery allows you to use the battery longer than usual.
2
After charging the battery pack
Disconnect the AC power adaptor fi'om the DC IN jack on yore camcorder.
Notes
•Prevent metallic objects fi'om coming into contact with the metal parts of the DC plug
of the AC power adaptor. This may cause a short circuit, damaging the AC power
adaptor.
• Keep the battery pack dW.
•When the batte W pack is not to be used for a long time, charge the battery pack once
f\flly and then use it tmtil it f\flly discharges again. Keep the battelTy"pack in a cool
place.
Remaining battery time indicator
The remaining battery time you record with the viewfinder is displayed.
The remaining barrelT time indicator in the display window roughly indicates the
recording time with the viewfinder.
Battery pack
The battery pack is charged a little befbre it leaves the f_ctory. 11
Step 1 Preparing the power supply
12
Until your camcorder calculates the actual remaining battery time
rain" appears in tile display window.
While charging the battery pack, no indicator appears or the indicator flashes in
the display window in the following cases:
Tile battery pack is not installed correctly.
Tile AC power adaptor is disconnected.
Something is wrong with the battery pack.
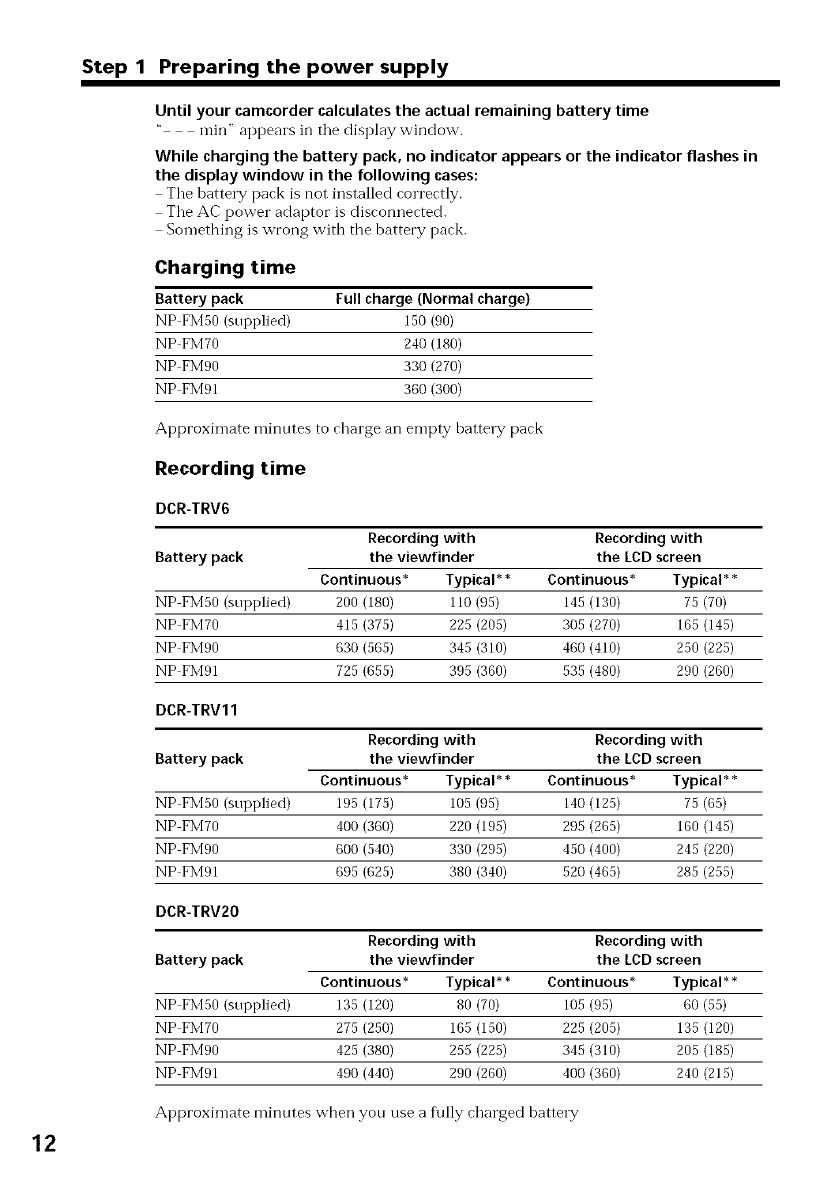
Charging time
Battery pack Full charge (Normal charge)
NP FMS0 (supplied) 150 (90)
NP FM70 240 (180)
NP FM90 330 (270)
NP FM91 360 (300)
Approximate minutes to charge an empty battery pack
Recording time
DCR-TRV6
Recording with Recording with
Battery pack the viewfinder the LCD screen
Continuous* Typical** Continuous* Typical**
NP FM50 (supplied) 200 (180) 110 (95) 145 (130) 75 (70)
NP FMT0 415 (375) 225 (205) 305 (270) 165 (145)
NP FM90 630 (565) 345 (310) 460 (410) 250 (225)
NP FM91 725 (655) 395 (360) 535 (480) 290 (260)
DCR-TRV11
Recording with Recording with
Battery pack the viewfinder the LCD screen
Continuous* Typical** Continuous* Typical**
NP FMS0 (supplied) 195 (175) 105 (95) 140 (125) 75 (65)
NP FM70 400 (360) 220 (195) 295 (265) 160 (145)
NP FM90 600 (540) 330 (295) 450 (400) 245 (220)
NP FM91 695 (625) 380 (340) 520 (465) 285 (255)
DCR-TRV2O
Recording with Recording with
Battery pack the viewfinder the LCD screen
Continuous* Typical** Continuous* Typical**
NP FM50 (supplied) 135 (120) 80 (70) 105 (95) 60 (55)
NP FM70 275 (250) 165 (150) 225 (205) 135 (120)
NP FM90 425 (380) 255 (225) 345 (310) 205 (185)
NP FM91 490 (440) 290 (260) 400 (360) 240 (215)
Approximate minutes wben you use a f\flly charged battery
Step 1 Preparing the power supply
Numbers in parentheses "( )" indicate the time using a normally charged battery.
* Approximate continuous recording time at 77°F (25°C). Tile battery life will be
shorter if you use your camcorder in a cold environment.
**Approximate number of minutes when recording while you repeat recording start/
stop, zooming and turning tbe power on/off. The actual battery life may be shorter.
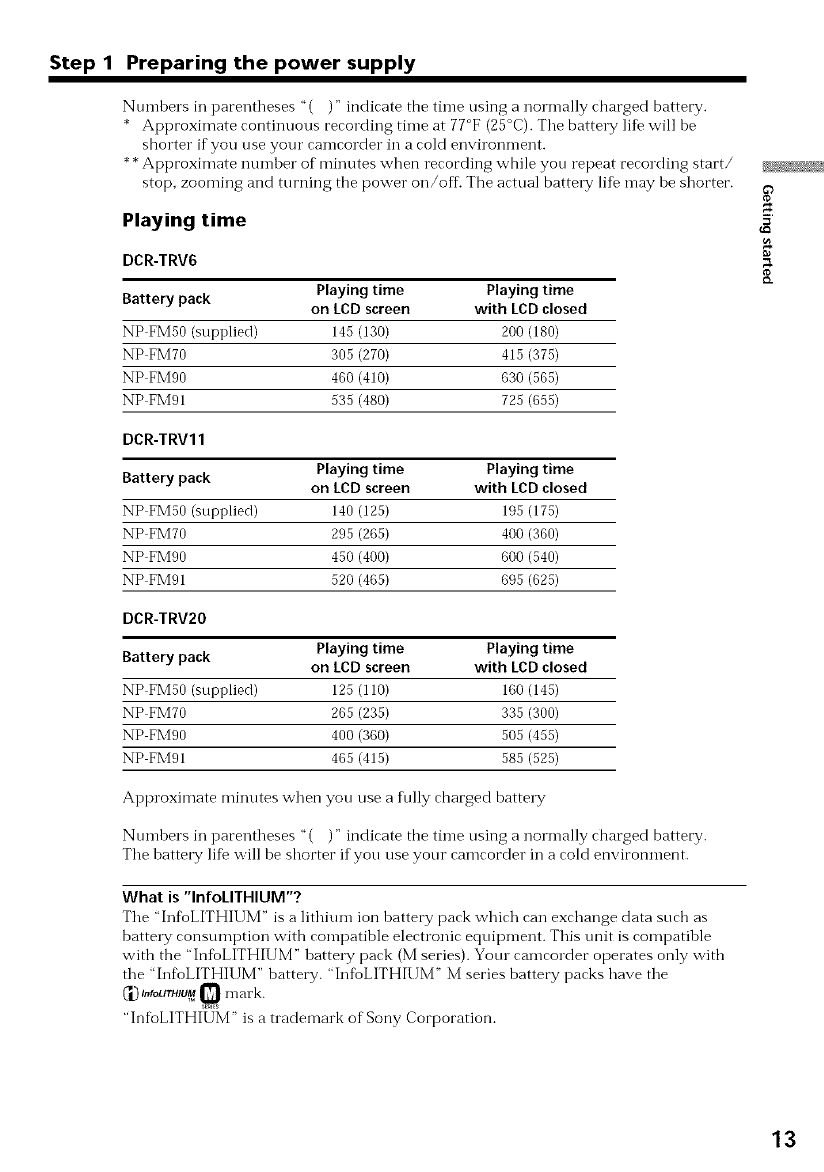
Playing time
DCR-TRV6
Battery pack Playing time Playing time
on LCD screen with LCD closed
NP FMS0 (supplied) 145 (130) 200 (180)
NP FM70 305 (270) 415 (375)
NP FM90 460 (410) 630 (565)
NP FM91 535 (480) 725 (655)
DCR-TRV11
Battery pack Playing time Playing time
on LCD screen with LCD closed
NP FM50 (supplied) 140 (125) 195 (175)
NP FM70 295 (265) 400 (360)
NP FM90 450 (400) 600 (540)
NP FM91 520 (465) 695 (625)
DCR-TRV2O
Battery pack Playing time Playing time
on LCD screen with LCD closed
NP FM50 (supplied) 125 (110) 160 (145)
NP FM70 265 (235) 335 (300)
NP FMg0 400 (360) 505 (455)
NP FM91 465 (415) 585 (525)
Approximate minutes when you use a fully charged battery
Numbers in parentheses "( )" indicate tbe time using a normally charged battery.
The battery life will be shorter if you use your camcorder in a cold environment.
What is "InfoLITHIUM"?
The "Inf_oLITHIUM" is a lithium ion battery pack which can exchange data sucb as
battery consumption with compatible electronic equipment. This unit is compatible
with the "InfbLITHIUM" battery pack (M series). Your camcorder operates only witb
the 'hff_)LITHIUM" battery. "InfioLITHIUM" M series battery packs have the
_'1.)I,,IoUTHIUM0 n-lark
"InfoLITHIUM" is a trademark of Sony Corporation.
if}
13
Step 1 Preparing the power supply
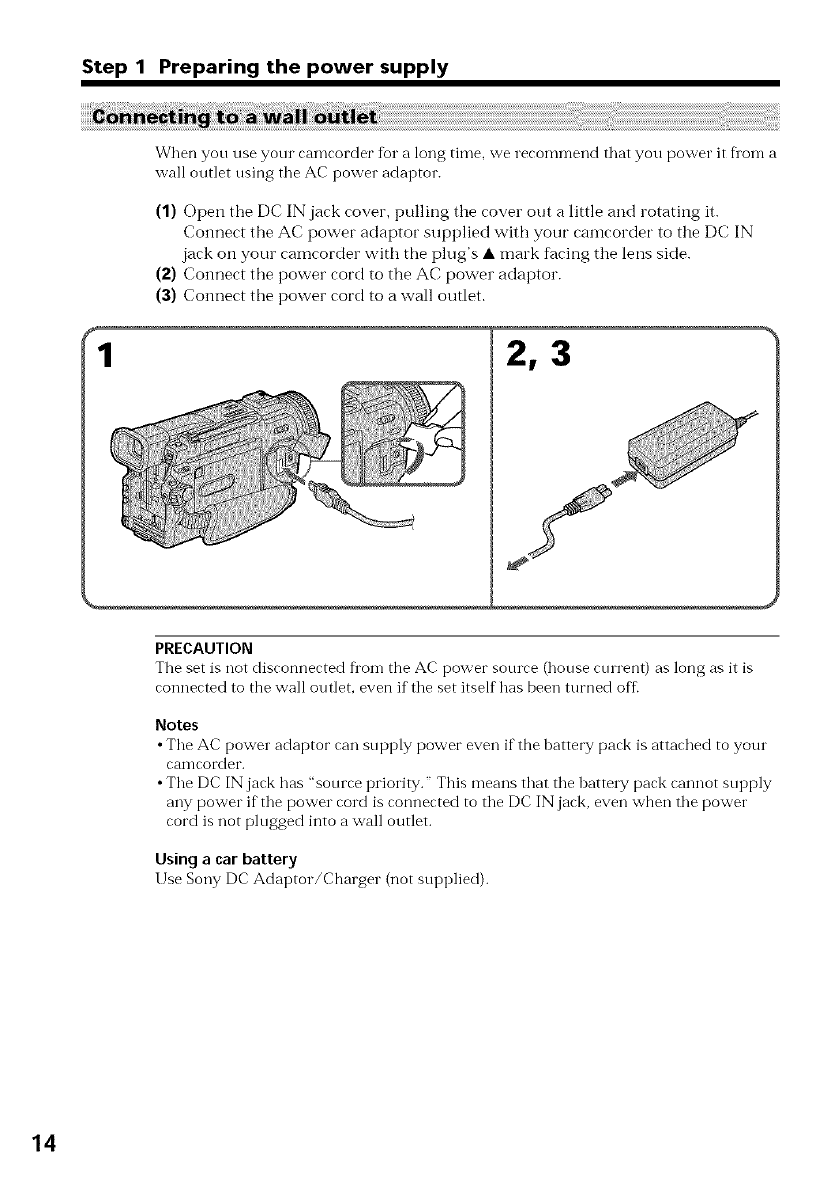
When you use your camcorder fbr a long time, we recommend that you power it Dora a
wall outlet using tile AC power adaptor.
(1) Open the DC IN jack cover, pulling the cover out a little and rotating it.
Connect the AC power adaptor supplied with your camcorder to the DC IN
jack on your camcorder with the plug's • mark f_acingthe lens side.
(2) Connect the power cord to the AC power adaptor.
(3) Com_ect the power cord to a wall outlet.
2, 3
PRECAUTION
The set is not disconnected fl'om the AC power source (house current) as long as it is
connected to the wall outlet, even if tile set itself has been turned off-
Notes
• Tile AC power adaptor can supply power even if the battery pack is attached to your
camcorder.
• Tile DC IN jack has "source priority." This means that tile batte W pack cannot supply
any power if the power cord is connected to tile DC IN jack, even when tile power
cord is not plugged into a wall outlet.
Using a car battery
Use Sony DC Adaptor/Charger (not supplied).
14

Step 2 Inserting a cassette
(1) Install the power source.
(2) Slide OPEN/EJECT in the direction of the arrow and open the lid. The cassette
compartment automatically lifts up and opens.
(3) Push the iniddle portion of the back of the cassette to insert.
Insert the cassette in a straight line deeply into the cassette comparmmnt with
the window facing out.
(4) Close the cassette compartment by pressing the '_1 mark on the cassette
coinpartinent. The cassette compartment automatically goes down.
(S) After the cassette comparmmnt going down completely, close the lid until it _.
clicks.
OPEN/EJECT 3, 4 5
To eject a cassette
Follow the procedure above, and take out the cassette in step 3.
Notes
• Do not press the cassette comparmlent down. Doing so may cause mall\ruction.
• The cassette compamnent may not be closed when you press any part of the lid other
than the PUSH_mark.
When you use mini DV cassette with cassette memory
Read the instruction about cassette memory to use this function properly (p. 124).
To prevent accidental erasure
Slide the write protect tab on the cassette to expose the red malk.
15
-- Recording -Basics --
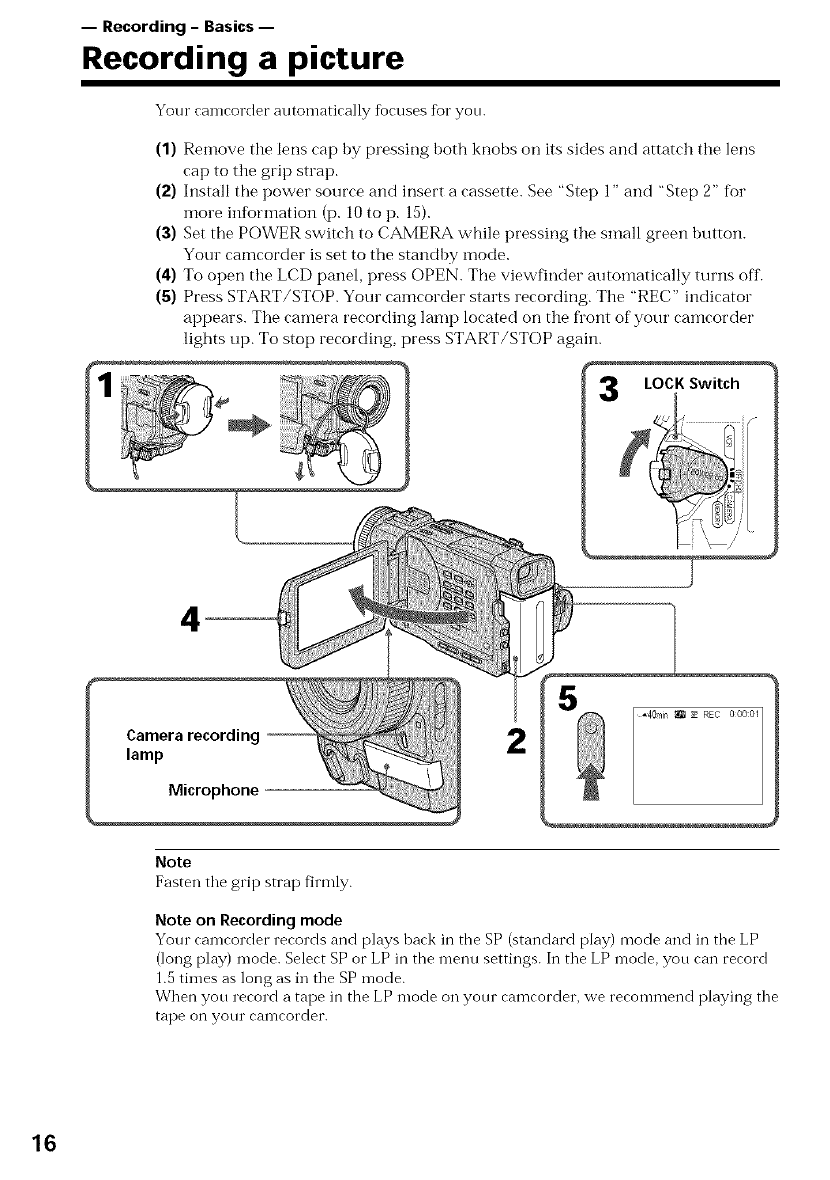
Recording a picture
Your camcorder atltomatically %cuses for yon.
(1) Remove the lens cap by pressing both knobs on its sides and attatch the lens
cap to the grip strap.
(2) Install the power source and insert a cassette. See "Step 1" and "Step 2" fbr
more ii_fbrmation (p. 10 to p. 15).
(3) Set the POWER switch to CAMERA while pressing the small green button.
Your camcorder is set to the standby mode.
(4) To open the LCD panel, press ()PEN. The viewfinder autoinatically turns off.
(5) Press START/STOP. Your camcorder starts recording. The "REC" indicator
appears. The camera recording lamp located on the fl'ont of your camcorder
lights up. To stop recording, )tess START/STOP again.
LOCK Switch
4
2
5
Note
Fasten tile grip strap firmly.
Note on Recording mode
Your camcorder records and plays back in the SP (standard play) mode and in tile LP
(long play) mode. Select SP or LP in the nleilu settings. In tile LP mode, you can record
1.5 times as long as in tile SP mode.
When you record a tape in the LP mode on your camcorder, we recommend playing tile
tape on your camcorder.
16
Recording a picture
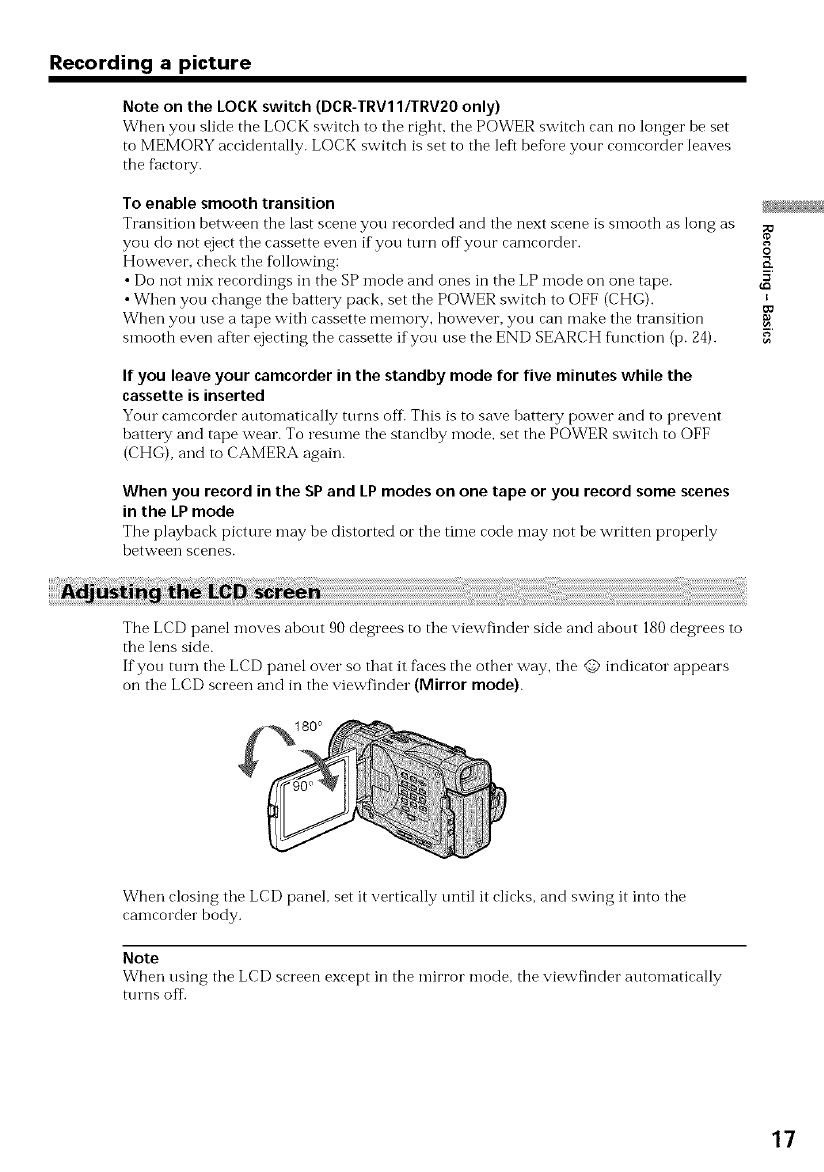
Note on the LOCK switch (DCR-TRV11/TRV20 only)
When you slide the LOCK switch to tile right, the POWER switch can no longer be set
to MEMORY accidentally. LOCK switch is set to tile left before your comcorder leaves
the fhctol T.
To enable smooth transition _
Transition between the last scene you recorded and the next scene is smooth as long as _u
you do not eject the cassette even if you tnrn off your camcorder.
However, check tile %llowing: K
• Do not mix recordings in tbe SP mode and ones in the LP mode on one tape. _aS'
•When you change tile batte W pack, set tile POWER switch to OFF (CHG). m
When yon use a tape with cassette memo1 T, however, yon can make tile transition g
smooth even after ejecting the cassette if you use the END SEARCH hmction (p. 24). 5'
If you leave your camcorder in the standby mode for five minutes while the
cassette is inserted
Yore cameorder auton-latically turns off. This is to save battery power and to prevent
batte W and tape wear. To resume the standby mode, set the POWER switch to OFF
(CHG), and to CAMERA again.
When you record in the SP and LP modes on one tape or you record some scenes
in the LP mode
Tbe playback picture may be distorted or the time code may not be written properly
between scenes.
The LCD panel moves about 90degrees to tile viewfinder side and about 180 degrees to
the lens side.
If you turn tbe LCD panel over so that it faces tbe other way, tile @ indicator appears
on tile LCD screen and in the viewfinder (Mirror mode).
When closing tile LCD panel, set it vertically tmtil it clicks, and swing it into tile
camcorder body.
Note
When using tile LCD screen except in the nlirror nlode, the viewfinder autonlatieally
turns off.
17
Recording a picture
When you use the LCD screen outdoors in direct sunlight
The LCD screen may be difficult to see. If this happens, we recommend that you use the
viewfinder.
Picture in the mirror mode
The picture on the LCD screen is a rein'or image. However, tile picture will toe normal
when recorded.
During recording in the mirror mode
ZERO SET MEMORY on the Remote Commander does not work.
Indicators in the mirror mode
The STBY indicator appears as 110 and REC as O. Some of the other indicators appear
mirror reversed and others are not displayed.
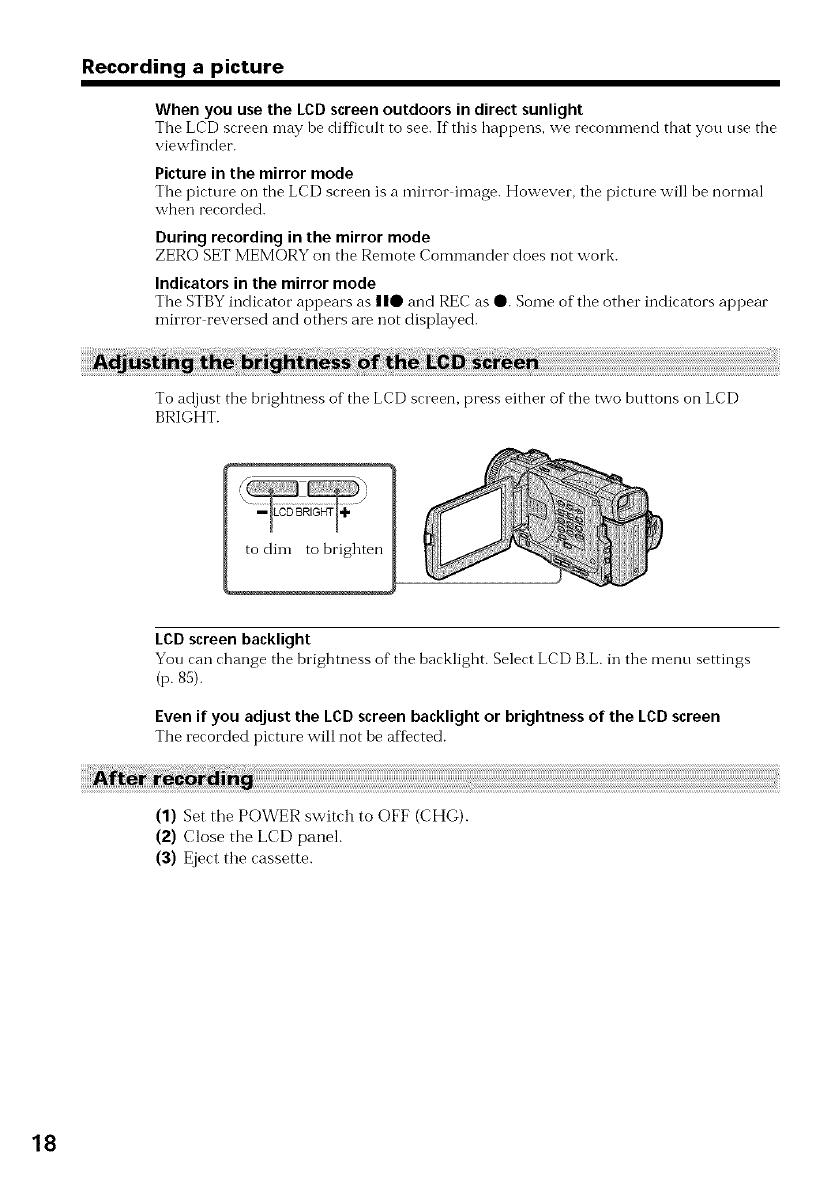
To adjust the brightness of the LCD screen, press either of the two buttons on LCD
BRIGHT.
to dim to brighten
LCD screen backlight
You ran change the brightness of the barklight. Select LCD B.L. in the menu settings
(p.85).
Even if you adjust the LCD screen backlight or brightness of the LCD screen
The lecorded picture will not be affected.
(1) Set the POWER switch to OFF (CHG).
(2) Close the LCD panel.
(3) Eject the cassette.
18
Recording a picture
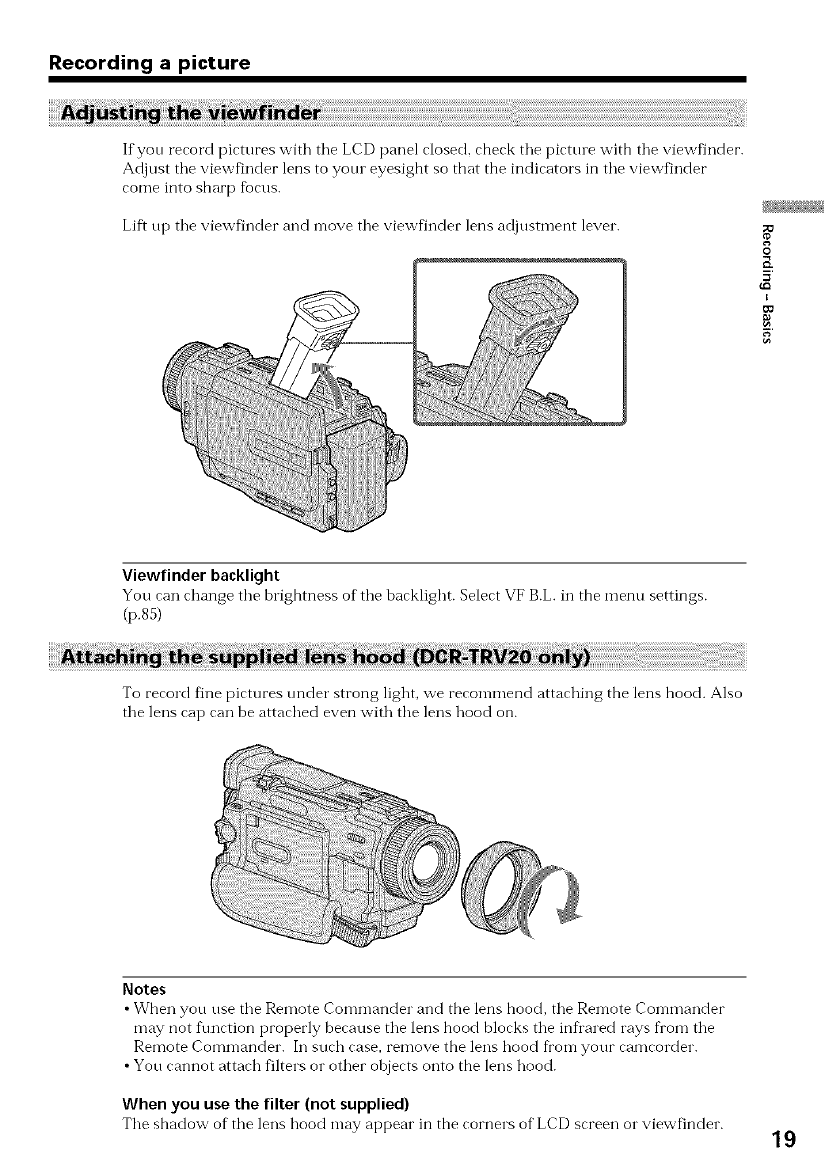
If yon record pictures with tile LCD panel closed, check tile picttue with tile viewfinder.
Adjust tile viewfinder lens to yore eyesight so that the indicators in tile viewf_nder
come into sharp fiocus.
Lift np the viewfinder and n-love the viewfinder lens adjustment lever.
O
E
5
Viewfinder backlight
You can change the brightness of"the backlight. Select VF B.L. in the menu settings.
(p.85)
To record fine pictures under strong light, we recommend attaching the lens hood. Also
the lens cap can be attached even with the lens hood on.
Notes
• When you use the Remote Commander and the lens hood, the Remote Con-ln'JaI'<ter
may not function properly because the lens hood blocks the infl'ared rays from the
Remote Commander. In such case, remove the lens hood from your camcorder.
•You cannot attach filters or other objects onto the lens hood.
When you use the filter (not supplied)
The shadow of the lens hood may appear in the corners of"LCD screen or viewfinder. 19
Recording a picture
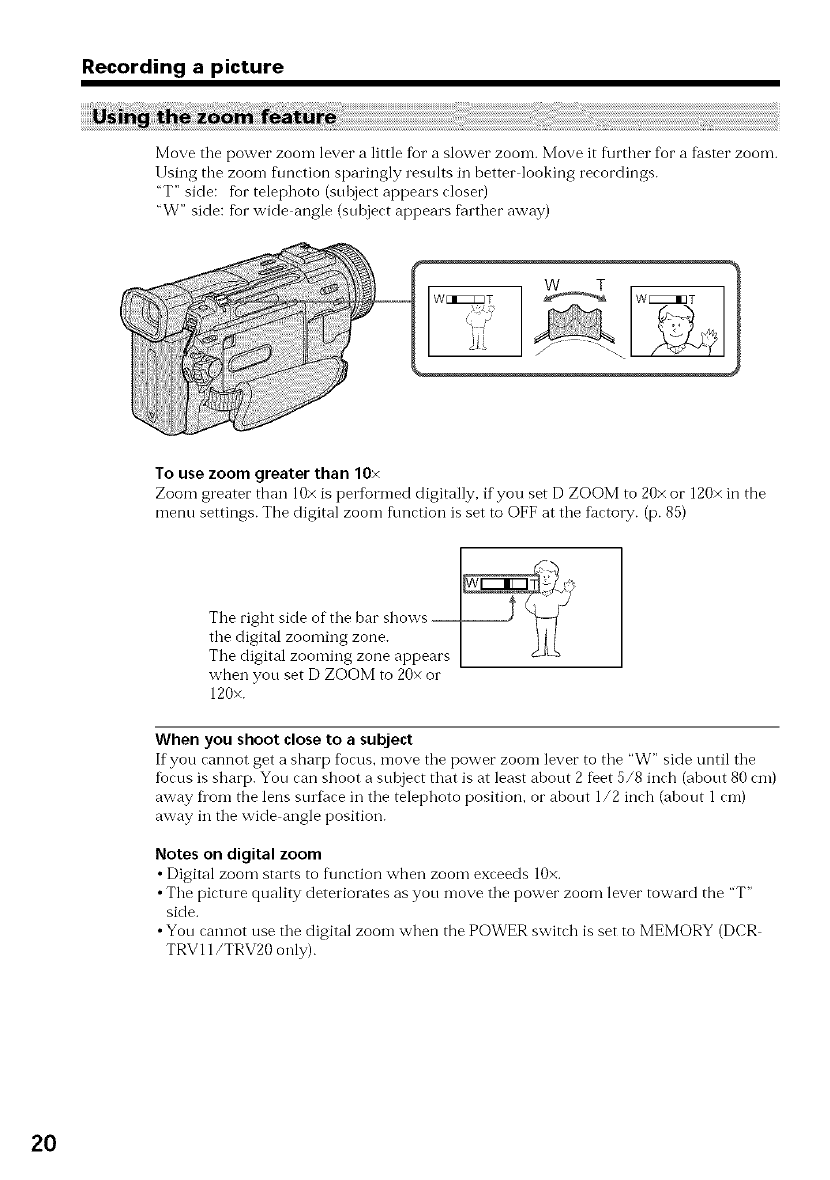
Move tile power zoom lever a little for a slower zoom. Move it f\lrther for a f_ster zoom.
Using the zoom function sparingly results in better looking recordings.
"T" side: for telephoto (subject appears closet)
"W" side: fbr wide angle (subject appears fiirther away)
WT
W E]I_ZT _ [ WE_I3T
To use zoom greater than 10×
Zoom greater than 10x is performed digitally, if you set D ZOOM to 20× or 120× in the
menu settings. The digital zoom flmction is set to OFF at the f_ctot T. (p. 85)
The right side of the bar shows --
the digital zooming zone.
The digital zooming zone appears
when you set D ZOOM to 20× or
120x.
When you shoot close to asubject
If you cannot get a sharp fl)cus, move the power zoom lever to the "W" side until the
focus is sharp. You can shoot a subject that is at least about 2 Det 5/8 inch (about 80 cm)
away flora the lens stn f_mein the telephoto position, or about 1/2 inch (about 1 cm)
away in the wide angle position.
Notes on digital zoom
•Digital zoom starts to flmction when zoom exceeds 10×.
•The picture quality deteriorates as you move the power zoom lever toward the "T"
side.
•You cannot use the digital zoom when the POWER switch is set to MEMORY (DCR
TRV11/TRV20 only).
20
Recording a picture
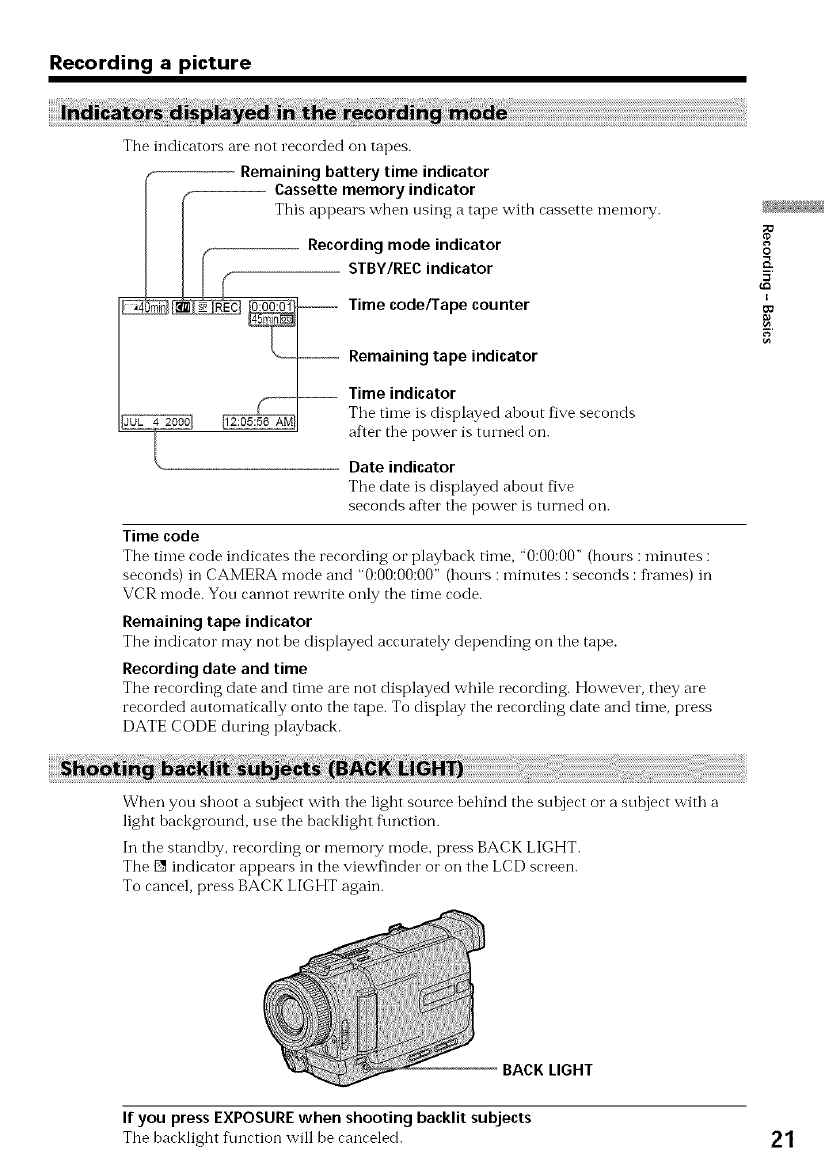
The indicators are not recorded on tapes.
Remaining battery time indicator
FCassette memory indicator
This appears when using a tape with cassette memory.
_ -- Recording mode indicator
_ _ -- STBY/RECindicator
_ _ _ Time code/Tape counter
/ \_ Remaining tape indicator
|F_ Time indicator ,
The time is displayed ahout fix e seronds
r --_l after the power is turned on.
Date indicator
Tile date is displayed about five
seconds after the power is turned oil.
Time code
The time cocle indicates the recording or playhack time, "0:00:00" (hours : minutes :
seconds) in CAMERA mode and "0:00:00:00" (hours : minutes : seconds : fl'ames) in
VCR mode. You cannot rewrite only the time code.
Remaining tape indicator
The indicator may not be displayed aerurately depending on the tape.
Recording date and time
The recording date and time are not displayed while recording. However, they are
recorded automatically onto the tape. To display the recording date and time, press
DATE CODE during playback.
O
5'
I
5
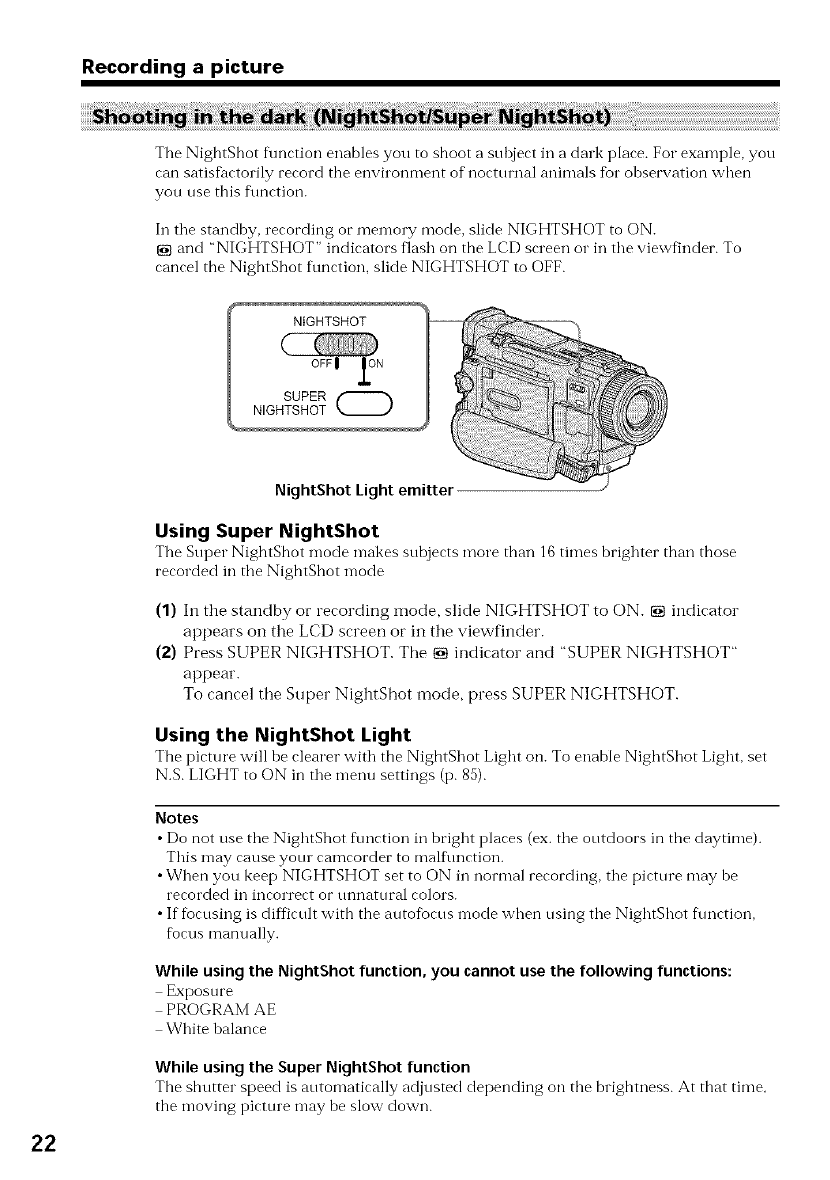
When you shoot a subject with the light source behind the suhject or a subject with a
light background, use the backlight f\mction.
In the standby, recording or memory mode, press BACK LIGHT.
The [] indicator appears in the viewfinder or on the LCD screen.
To cancel, press BACK LIGHT again.
BACK LIGHT
If you press EXPOSURE when shooting backlit subjects
The baeklight f\mrtion will be eanreled. 21
Recording a picture
The NightShot flmction enables you to shoot a subject in a dark place. For example, you
can satisfactorily record the envilonment of nocturnal animals fur observation when
you use this f\mction.
In tile standby, recording or memo W mode, slide NIGHTSHOT to ON.
[] and "NIGHTSHOT" indicators flash on the LCD screen or ill tile viewfinder. To
cancel the NightShot function, slide NIGHTSHOT to OFF.
22
Night:Shot Light emitter
Using Super NightShot
The Super NightShot mode makes subjerts more than 16 times brighter than those
recorded in the NightShot mode
(1) In tlle standby or recording mode, slide NIGHTSHOT to ON. [] indicator
appears on the LCD screen or ii1the viewfinder.
(2) Press SUPER NIGHTSHOT. The [] indicator and "SUPER NIGHTSHOT"
appear.
To cancel the Super NightShot mode, press SUPER NIGHTSHOT.
Using the NightShot Light
The pirmre will be rlearer with the NightShot Light on. To enable NightShot Light, set
N.S. LIGHT to ON in tile menu settings (p. 85).
Notes
•Do not use the NightShot ftmrtion ill bright plares (ex. the outdoors in the daytime).
This may cause your camcorder to malflmction.
•When you keep NIGHTSHOT set to ON ill normal recording, tile picture may be
recorded ill incorrect or tmnatural colors.
• If fbcusing is diffictflt with the autofbcus mode when using the NightShot flmction,
focus manually.
While using the Night:shot function, you cannot usethe following functions:
Exposure
PROGRAM AE
White balance
While using the :super Night:Shot function
The shutter speed is automatically adjusted depending on the brightness. At that time,
the moving picture may be slow down.
Recording a picture
While usingthe Super NightShot function, you cannot usethe following
functions:
Exposure
PROGRAM AE
Fader
Digital effect
Memo1T mode (DCR TRV11/TRV20 only)
NightShot Light
NightShot Light rays are infrared and so are invisible. Tile maximum shooting distance
using the NightShot Light is about 10 Det (3 m).
O
R
I
[o
5
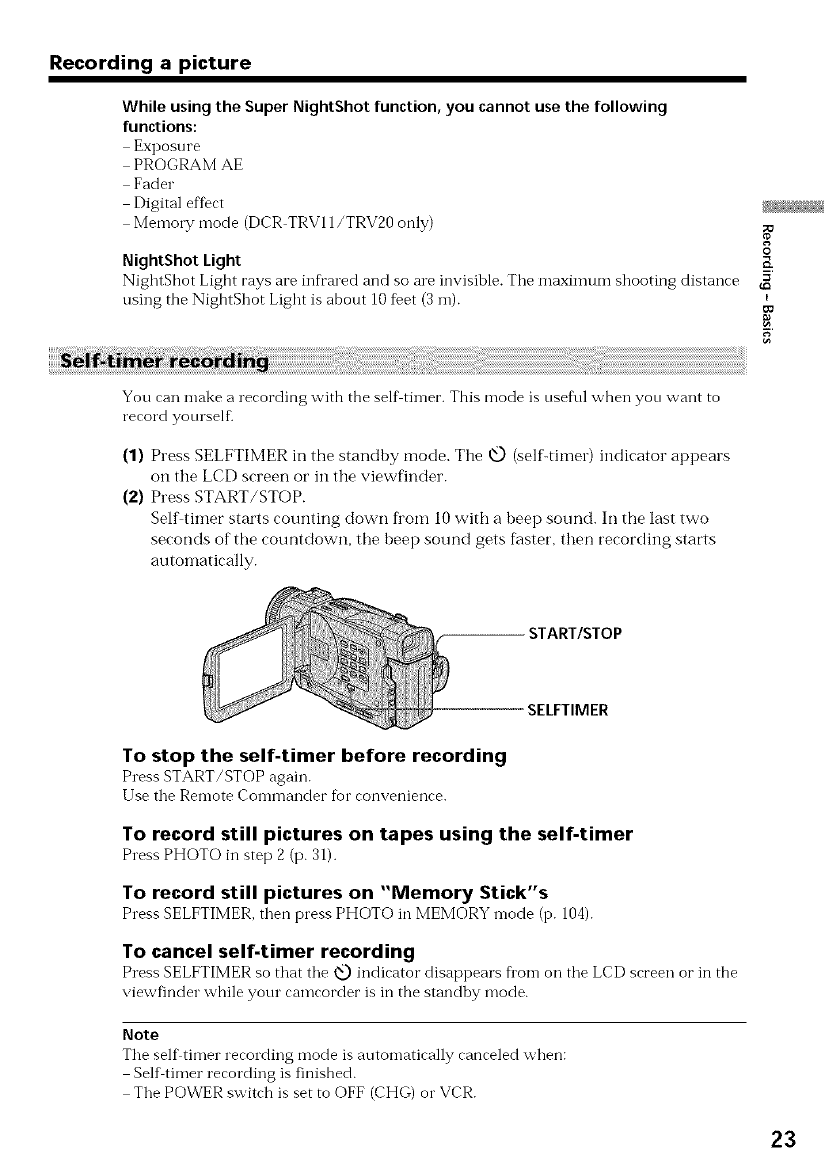
You can make a recording with the self timer. This mode is useful when you want to
record yourself2
(1) Press SELFTIMER in the standby mode. The 0 (selfLtimer) indicator appears
on the LCD screen or in the viewfinder.
(2) Press START/STOP.
Self timer starts counting down fi'om 10 with a beep sound. In the last two
seconds of the countdown, the beep sound gets faster, then recording starts
automatically.
START/STOP
SELFTIMER
To stop the self-timer before recording
Press START/STOP again.
Use the Remote Commander for convenience.
To record still pictures on tapes using the self-timer
Press PHOTO in step 2 (p. 31).
To record still pictures on "Memory Stick"s
Press SELFTIMER, then press PHOTO in MEMORY mode (p. 104).
To cancel self-timer recording
Press SELFTIMER so that the _ indicator disappears flora on the LCD screen oi"in the
viewfinder while your camcorder is in the standby mode.
Note
The self timer recording mode is automatically canceled when:
Self timer recording is finished.
The POWER switch is set to OFF (CHG) o1"VCR.
23
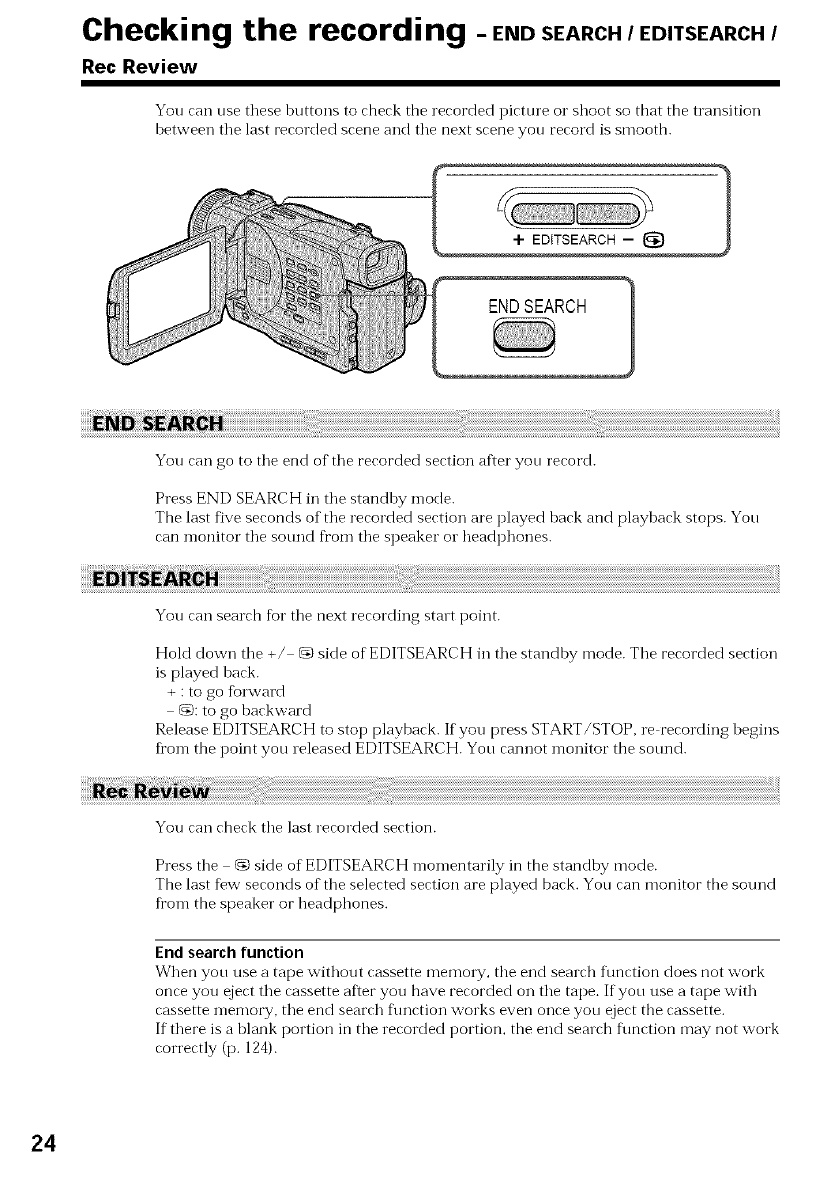
Checking the recording - END SEARCH /EDITSEARCH /
Rec Review
You can use these huttons to check the recorded picture o1"shoot so that the transition
between the last recorded scene and the next scene you record is smooth.
You can go to the end of the recorded section after you record.
Press END SEARCH in the standby mode.
The last five seconds of the recorded section are played hack and playback stops. You
can monitor tile sotmd fl'om the speaker ol headphones.
You can search for the next recording start point.
Hold down the +/ @ side of EDITSEARCH in the standl)y mode. The recorded section
is played hack.
+ : to go fbrward
@: to go backward
Release EDITSEARCH to stop playback. If you press START/STOP, re recording begins
ficomthe point you leleased EDITSEARCH. You cannot monitor the sotmd.
You can check the last recorded section.
Press the __,side of EDITSEARCH momentarily in the standby mode.
The last few seconds of the selected section are played back. You can monitor the sound
from the speaker or headphones.
End search function
When you use a tape without cassette memo W, the end search ftmction does not work
once you eject the cassette after you have recorded on the tape. If you use a tape with
cassette memory, the end search flmction works even once you eject the cassette.
If there is a blank portion in the recorded portion, the end search function may not work
correctly (p. 124).
24
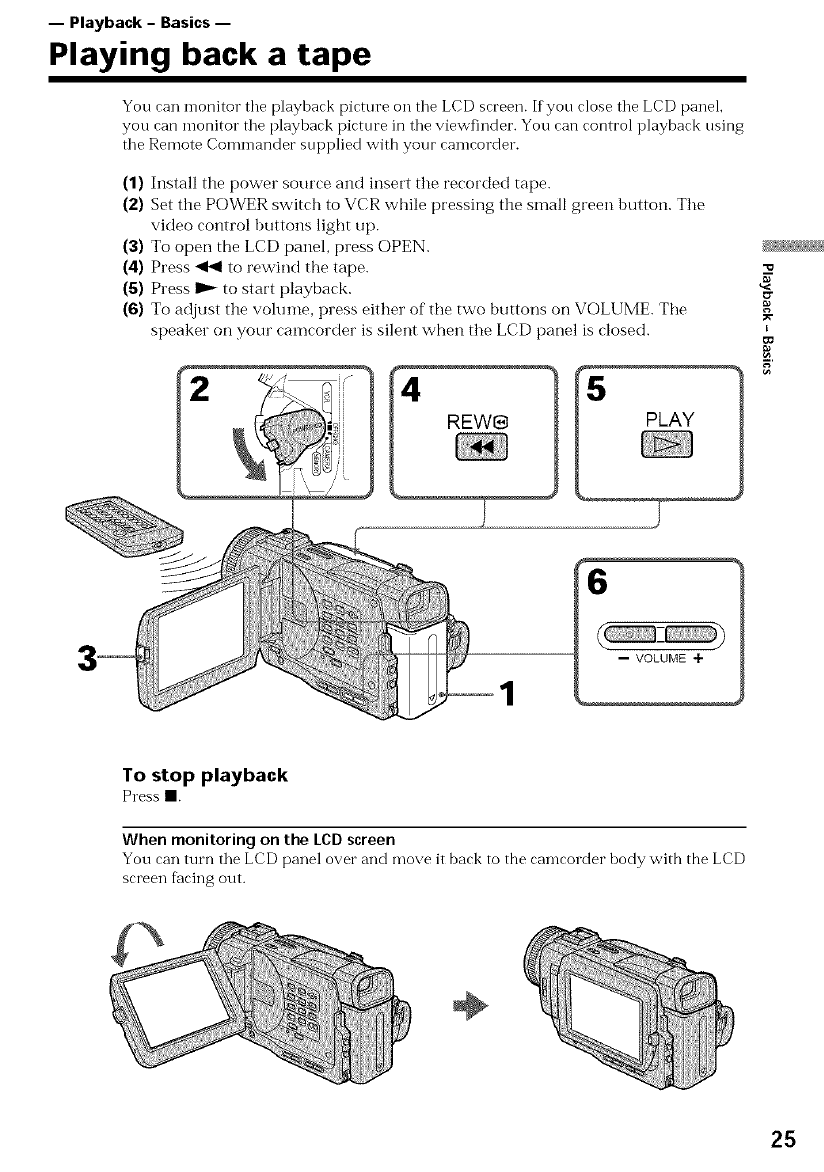
-- Playback - Basics --
Playing back a tape
You can monitor tile playback picture on tile LCD screen. If yon close tile LCD panel,
you can monitor tile playback picture in tile viewfinder. You can control playback using
tile Remote Comn-lander snpplied with your camcorder.
(1) Install the power source and insert the recorded tape.
(2) Set the POWER switch to VCR while pressing the small green button. The
video control buttons light up.
(3) To open the LCD panel, press OPEN.
(4) Press _ to rewind the tape.
(5) Press I_ to start playback.
(6) To adjust the volume, press either of the two buttons on VOLUME. The
speaker on your camcorder is silent "when the LCD panel is closed.
4
REW8
I
6
-- VOLUME ÷
To stop playback
Press II.
When monitoring on the LCD screen
You can mrn the LCD panel over and move it back to the camcorder body with the LCD
screen f_cing out.
÷
25

Playing back a tape
Press DISPLAY on your camcorder or the Remote Commander supplied with your
calllcoFder.
The indicators appear oil tile LCD screen.
To make the indicators disappear, press DISPLAY again.
DATA CODE
Using the data code function
Your can-leorder auton-latieally records not only inlages oil the tape but also the
recording data (date/time o1"various settings when recorded) (Data code).
Press DATA CODE on your camcorder o1"the Remote Commander in the playback
mode.
The display changes as follows:
date/time -+ various settings (SteadyShot, white balance, gain, shutter speed, aperture
value, expostne mode) -+ no indicator
Date/time
UL 4 2OOO
12055_ A_4
Not to display various settings
Various settings
(--SteadyShot OFF indicator
/(Exposure mode indicator
I_Au'rof....... White balance indicator
Gain indicator
Shutter speed indicator
Aperture value
Set DATA CODE to DATE in the menu settings (p. 85).
The display changes as follows:
date/time _+ no indicator
Recording data
Recording data is your camcorder's information when you have recorded. In the
recording mode, the recording data will not be displayed.
When you use the data code function, bars (...... ) appear if:
•A blank portion of the tape is being played back.
•The tape is unreadable due to tape damage or noise.
•The tape was recorded by a camcorder without the date and time set.
Data code
The data code is displayed on the TV screen ifyou connect your camcorder to the TV
(p. 28).
26

Playing back a tape
To operate video control buttons, set tile POWER switch to VCR.
To view a still picture (playback pause)
Press n during playback. To resume norn-lal playback, press I_- or II.
To advance the tape
Press _ in tile stop n-lode. To restm-le normal playback, press I_-.
To rewind the tape
Press 4t_ in tile stop mode. To resume normal playback, press I_ _.
To change the playback direction
Press _< on the Remote Con-ln'JaI'<terduring playback to reverse the playback direction.
To resume normal playback, press I_ _.
To locate a scene monitoring the picture (picture search)
Keep pressing _ or _ during playback. To resume normal playback, release tbe button.
To monitor the high-speed picture while advancing or
rewinding the tape (skip scan)
Keep pressing _ while rewinding or I_- while advancing the tape. To resume
rewinding or advancing, release the button.
To view the picture at slow speed (slow playback)
Press I'- on the Remote Conm-lai'<ler during playback. For slow playback in the reverse
direction, press <<, then press I.- on the Remote Commander. To resume normal
playback, press I_ _.
To view the picture at double speed
Press x2 on the Remote Commander during playback. Foe"double speed playback in the
reverse direction, press _<, then press ×2 on the Remote Commander. To resume
normal playback, press I_-.
To view the picture frame-by-frame
Press II1_on the Remote Colnn'JaI'<ler in the playback pause mode. For flame by fl'ame
playback in the reverse direction, press _11. To resume normal playback, press I_ _.
To search the last scene recorded (END SEARCH)
Press END SEARCH in the stop mode. The last five seconds of the recorded portion
plays back and stops.
End Search
When you use a tape without cassette memory, the end search fnnction does not work
once you eject the cassette after you have recorded on the tape.
When you use a tape with cassette memory, the end search flmction works even once
you eject the cassette.
In the various playback modes
•Sotmd is muted.
• The previous picture may remain as a mosaic image during playback.
When the playback pause mode lasts for five minutes
Your camcorder automatically enters tbe stop mode. To resume playback, press IP--.
Slow playback
The slow playback can toe per%rmed smoothly on your can-lcordee': however, this
flmction does not work %r an output signal through the _,DV IN/OUT jack.
When you play back atape in reverse
Horizontal noise may appear at tbe center, or the top and bottom of the screen. This is
not a malflmction.
"o
g
I
¢o
27
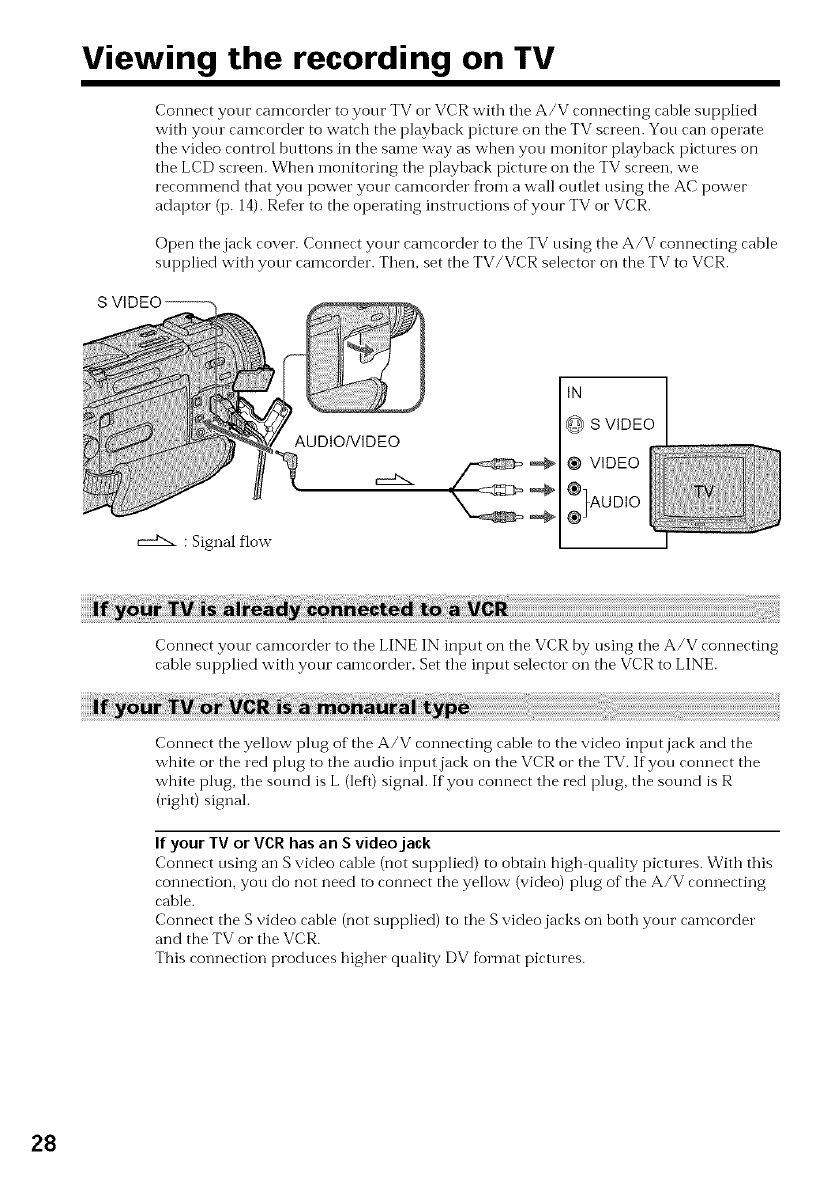
Viewing the recording on TV
Connect your camcorder to your TV or VCR with tile A/V connecting cable supplied
with your camcorder to watch the playback picture on the TV screen. You can operate
the video control buttons in the same way as when you monitor playback pictures on
the LCD screen. When monitoring tile playback picture on tile TV screen, we
recommend that you power your camcorder fi'om a wall outlet using the AC power
adaptor (p. 14). ReDr to the operating instructions of your TV or VCR.
Open the jack cover. Connect your camcorder to the TV using the A/V connecting cable
supplied with your camcorder. Then, set the TV/VCR selector"on the TV to VCR.
,._a,,.. : Signal flow
AUDIO/VIDEO
IN
@ S VIDEO
® VIDEO
)UDIO
Connect your camcorder to the LINE IN input on the VCR by using the A/V connecting
cable supplied with your camcorder. Set the input selecto_ on the VCR to LINE.
Connect the yellow plug of the A/V connecting cahle to the video input jack and the
white or the red plug to the audio input jack on the VCR or the TV. If you connect the
white plug, the sotmd is L (left) signal. If you connect the red plug, the sound is R
(right) signal.
If your TV or VCR has an S video jack
Connect using an S video cahle (not supplied) to obtain high quality pictures. With this
connection, you do not need to connect tbe yellow (video) plug of the A/V connecting
cable.
Connect the S video cable (not supplied) to the S video jacks on hoth your camcorder
and the TV or the VCR.
This connection produces higher quality DV format pictures.
28
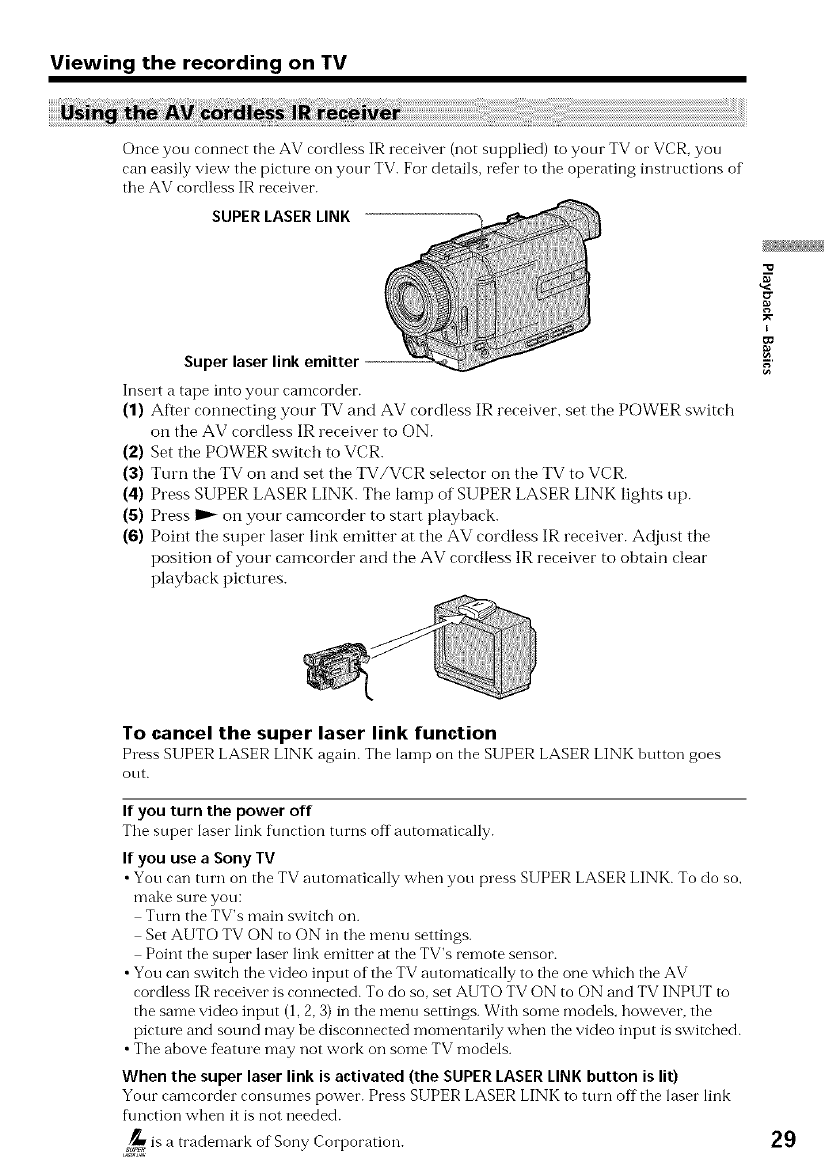
Viewing the recording on TV
Once yon connect tbe AV cordless IR receiver (not supplied) to yonr TV or VCR, you
can easily view the picture on your TV. For details, refer to tile operating instructions of
tile AV cordless IR receiver.
SUPER LASER LINK
Super laser link emitter --
Insert atape into yore camcorder.
(1) After connecting your TV and AV cordless IR receiver, set tile POWER switch
oi1 the AV cordless IR receiver to ON.
(2) Set the POWER switch to VCR.
(3) Turn the TV oi1 and set the TV/VCR selector oi1 the TV to VCR.
(4) Press SUPER LASER LINK. The lamp of SUPER LASER LINK lights up.
(5) Press _ on your camcorder to start playback.
(6) Point the super laser link emitter at the AV cordless IR receiver. Adjust the
position of your camcorder and the AV cordless IR receiver to obtain cleat"
playback pictures.
-u
g
I
To cancel the super laser link function
Press SUPER LASER LINK again. Tbe lamp on tile SUPER LASER LINK button goes
ont.
If you turn the power off
Tile snper laser link ftmction tnrns off atttomatically.
If you use a Sony TV
•Yon can tnrn on the TV atttomatically wben yon press SUPER LASER LINK. To do so,
make sure yon:
Tnrn the TV's main switch on.
Set AUTO TV ON to ON in tile menu settings.
Point tbe snper laser link emitter at tile TV's remote sensor.
• You can switch the video input of the TV atttomatically to tile one which the AV
cordless IR receiver is connected. To do so, set AUTO TV ON to ON and TV INPUT to
the same video input (1, 2, 3) in tile menn settings. With some models, however, tile
picture and sound may be disconnected momentarily when tile video input is switched.
• Tile above %ature may *lot work on some TV models.
When the super laser link is activated (the SUPER LASER LINK button is lit)
Your camcorder consnmes power. Press SUPER LASER LINK to ttnn off tile laser link
f\mction when it is not needed.
,_ is a trademark of Sony Corporation. 29
-- Advanced Recording Operations --
Recording a still image on a tape -TapePhoto recording
You can record a still picture, %1"example, a photograph or drawing. This mode is
useflfl when you want to print a picture using a video printer (not supplied).
You can record about 510 pictures in the SP mode and ahout 765 pictmes in the LP
mode on a 60 minute tape.
Besides the operation described here, your camcorder can record still pictures on
"Memory Stick" s (p. 100) (DCR TRV11/TRV20 only).
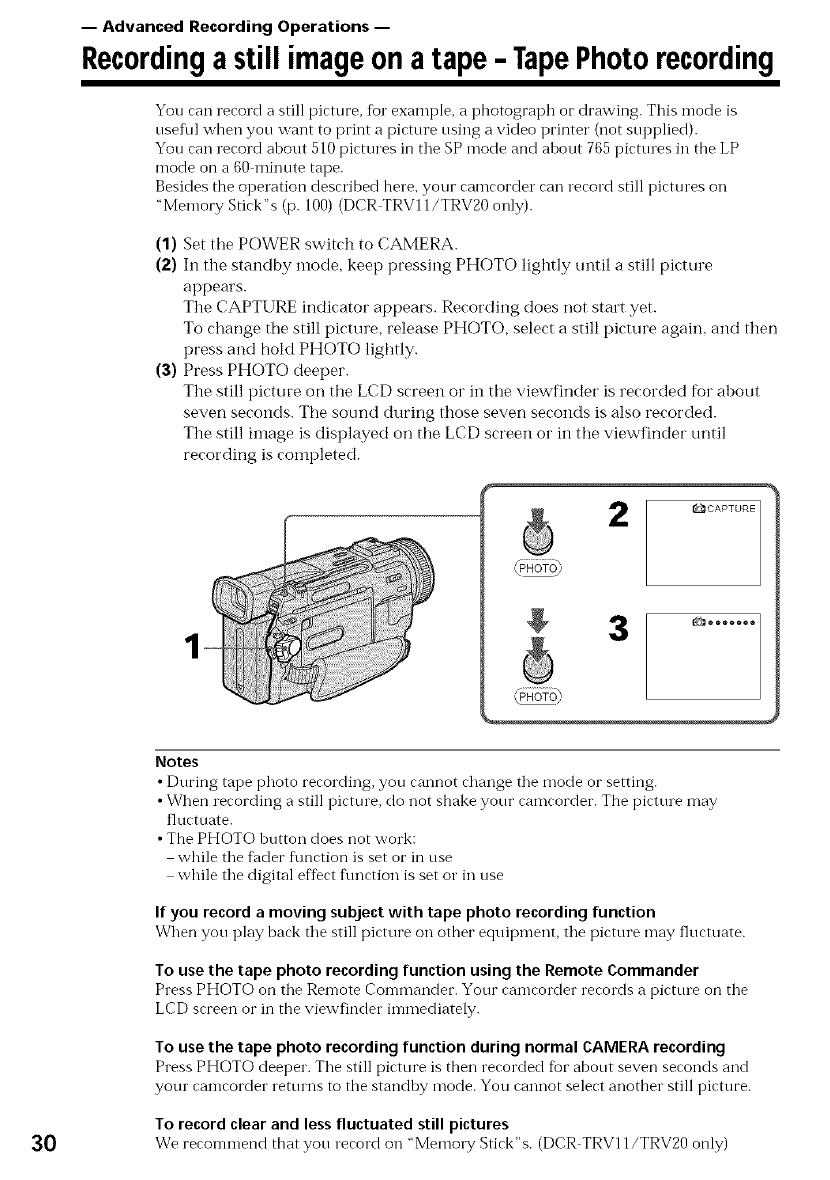
(1) Set the POWER switch to CAMERA.
(2) In the standby mode, keep pressing PHOTO lightly tmtil a still picture
appears.
The CAPTURE indicator appears. Recording does not start yet.
To change the still picture, release PHOTO, select a still picture again, and then
press and hold PHOTO lightly.
(3) Press PHOTO deeper.
The still picture on the LCD screen or in the viewfinder is recorded for about
seven seconds. The sound during those seven seconds is also recorded.
The still image is displayed on the LCD screen or in the viewfinder until
recording is completed.
_CAPTURE
g3_°°°°°°°
Notes
• During tape photo recording, you cannot change the mode or setting.
• When recording a still picture, do not shake your camcorder. The picture may
fluctuate.
• The PHOTO button does not work:
while the flader f\mction is set or in use
while the digital effect fnnction is set o1"in use
If you record a moving subject with tape photo recording function
When you play bark the still pirture on other equipment, the pirture may flurtuate.
To use the tape photo recording function using the Remote Commander
Press PHOTO on the Relnote Con-ln'_aI'_der. Your ramrorder rerords a pirttne on the
LCD screen or in the viewfinder immediately.
To use the tape photo recording function during normal CAMERA recording
Press PHOTO deeper. The still pirture is then rerorded fbr about seven seronds and
your camcorder returns to the standby mode. You cannot select another still picture.
To record clear and lessfluctuated still pictures
30 We reron-lmend that you rerord on "Memory Stirk"s. (DCR TRVI l/TRV20 only)

Recording a still image on a tape - Tape Photo recording
You can make a tape photo recording with tile self timer. This mode is usef\ll when you
want to record yourself.
(1) Set the POWER switch to CAMERA.
(2) Press SELFTIMER. The 0 (self timer) indicator appears oi1 the LCD screen or
in the viewfinder.
(3) Press PHOTO deeper.
Self timer starts counting down fi'om 10with a beep sound. In the last two
seconds of the countdown, the beep sound gets faster, then recording starts
automatically.
3
1
g
ID.
O
5'
©
To cancel self-timer tape photo recording
Press SELFTIMER so that the O indicator disappears fronl the LCD screen or in the
viewfinder while your camcorder is in the standby mode. You cannot cancel the self
timer tape photo recording using the Remote Commander.
Note
The self timer tape photo recording n-lode is automatically canceled when:
• Self timer tape photo recording is finished.
•Tile POWER switch is set to OFF or VCR.
31
Recording a still image on a tape - Tape Photo recording
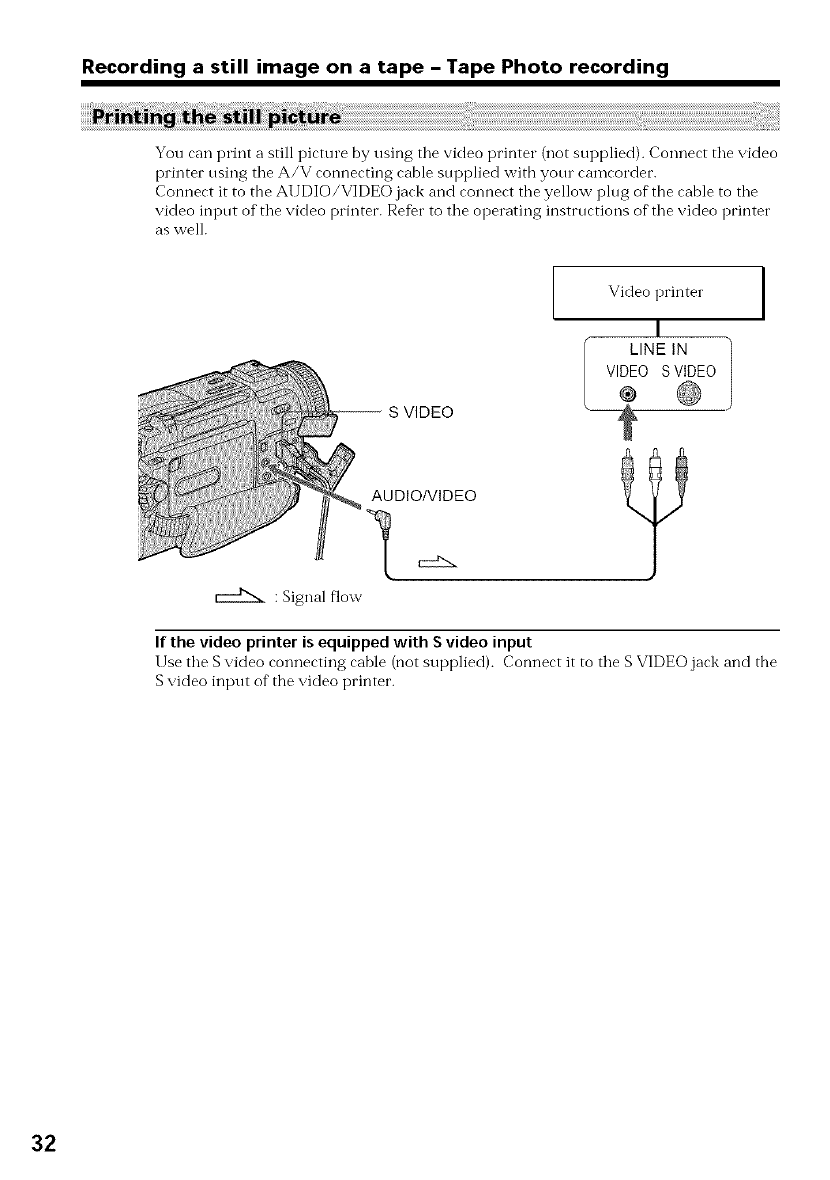
You can print a still picture by using tile video printer (not supplied). Connect tile video
printer using tile A/V connecting cable sui)plied witb your camcordec.
Connect it to the At JDIO/VIDEO jack and connect tile yellow plug of the cable to tile
video input of tile video printer. Refer to tile operating instructions of tile video printer
as well.
:Signal flow
-- S VIDEO
AUDIO/VIDEO
Video printer
I
LINE IN
VIDEO S VIDEO
®
?
If the video printer is equipped with S video input
Use the S video connecting cable (not supplied). Connect it to the S VIDEO jack and the
S video input of" the video printer.
32
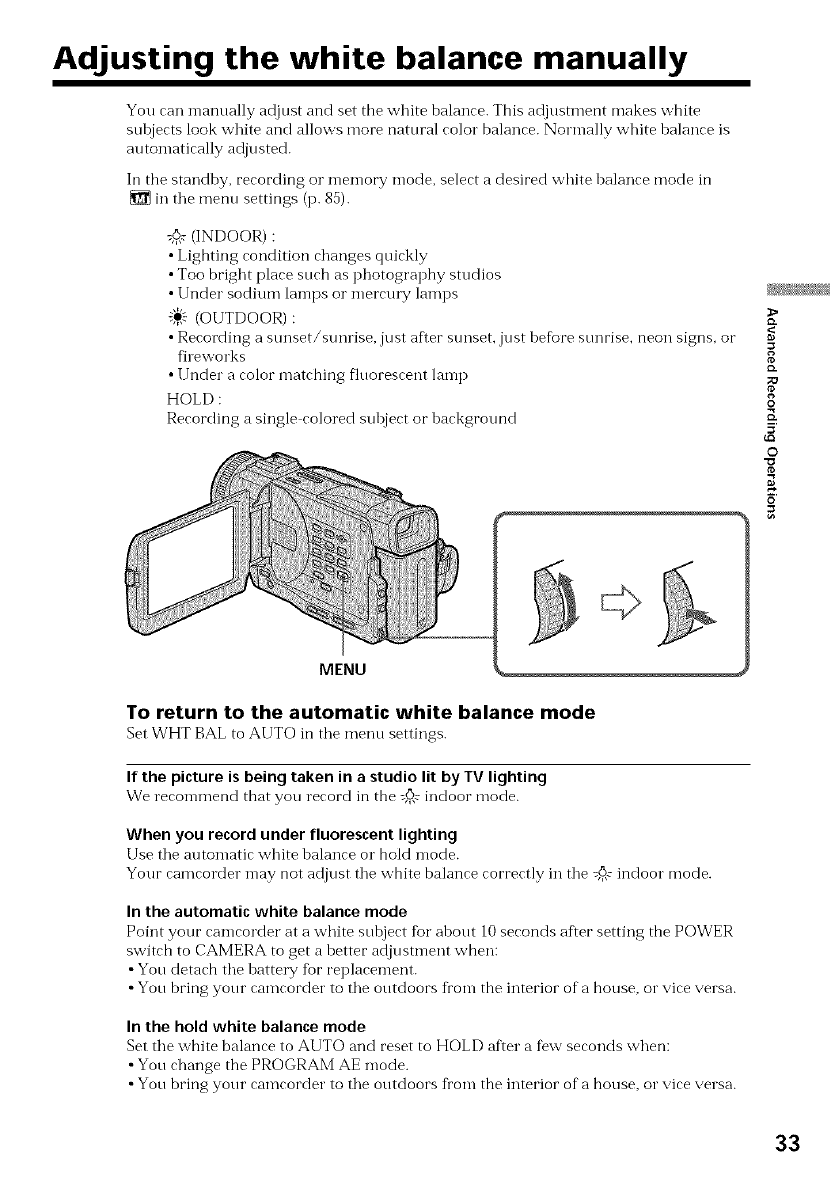
Adjusting the white balance manually
You can manually adjust and set the white balance. This adjusmlent makes white
sulojects look white and allows more natural color balance. Normally white balance is
atltomatically adjusted.
Ii1 the standby, recording o1"men-lory mode, select a desired white balance mode in
in the mentl settings (p. 85).
:_ (INDOOR) :
•Lighting condition changes quickly
• Too bright place such as photography studios
• Under sodium lamps o1"mercm T lamps
"_} (OUTDOOR):
• Recording a sunset/sunrise, just after sunset, just before sunrise, neon signs, oi"
fileworks
• Under a color matching fluorescent lamp
HOLD :
Recording a single colored subject or background
MENU
To return to the automatic white balance mode
Set WHT BAL to AUTO in the menu settings.
If the picture is being taken in a studio lit by TV lighting
We recommend that you record in the _@ indoor mode.
When you record under fluorescent lighting
Use the automatic white balance o1"hold mode.
Your camcorder may not adjust the white balance correctly in the @# indoor mode.
In the automatic white balance mode
Point your camcorder at a white subject tot about 10 seconds after setting the POWER
switch to CAMERA to get a better adjustment when:
•You detach the battel T fbr replacement.
•You bring your camcorder to the outdoors from the interior of a house, o1"vice versa.
In the hold white balance mode
Set the white balance to AUTO and reset to HOLD after a few seconds when:
• You change the PROGRAM AE mode.
• You bring your camcorder to the outdoors from the interior of a house, o1"vice versa.
8
19.
O
K
5
©
33
Using the wide mode
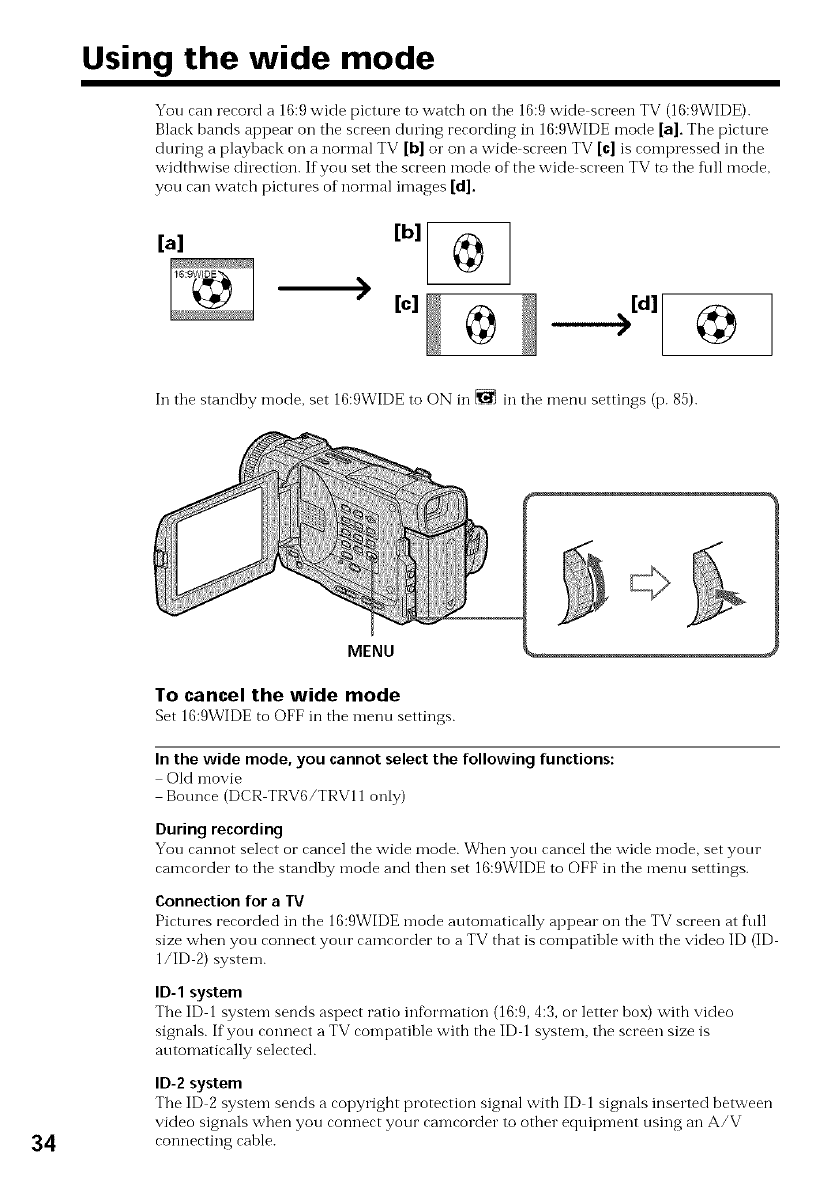
You can record a 16:9 wide picture to watch on tile 16:9 wide screen TV (16:9WIDE).
Black bands appear on tile screen during recording in 16:9WIDE mode [a]. The picture
during a playback on a normal TV [b] o1"on a wide screen TV [c] is compressed in the
widthwise direction. If you set tile screen mode of the wide screen TV to tile fhll mode,
you can watch pictures of normal images [d].
[a]
)[b]
[c]
In the standby n-lode, set 16:9WIDE to ON in _ in the menu settings (p. 85).
34
MENU
To cancel the wide mode
Set 16:9WIDE to OFF in the menu settings.
In the wide mode, you cannot selectthe following functions:
Old n-lovie
Bounce (DCR TRV6/TRV11 only)
Duringrecording
You cannot select or cancel the wide mode. When you cancel the wide mode, set your
camcorder to the standby mode and then set 16:9WIDE to OFF in the menu settings.
Connection for a TV
Pictures recorded in the 16:9WIDE mode automatically appear on the TV screen at fl/ll
size when you connect your camcorder to a TV that is compatible with the video ID (ID
1/ID 2) system.
ID-1 system
The ID 1system sends aspect ratio information (16:9, 4:3, or letter box) with video
signals. If you connect a TV compatible with the ID 1 system, the screen size is
automatically selected.
ID-2 system
The ID 2system sends a copyright protection signal with ID 1 signals inserted between
video signals when you connect your camcorder to other equipment using an A/V
connecting cable.
Using the fader function
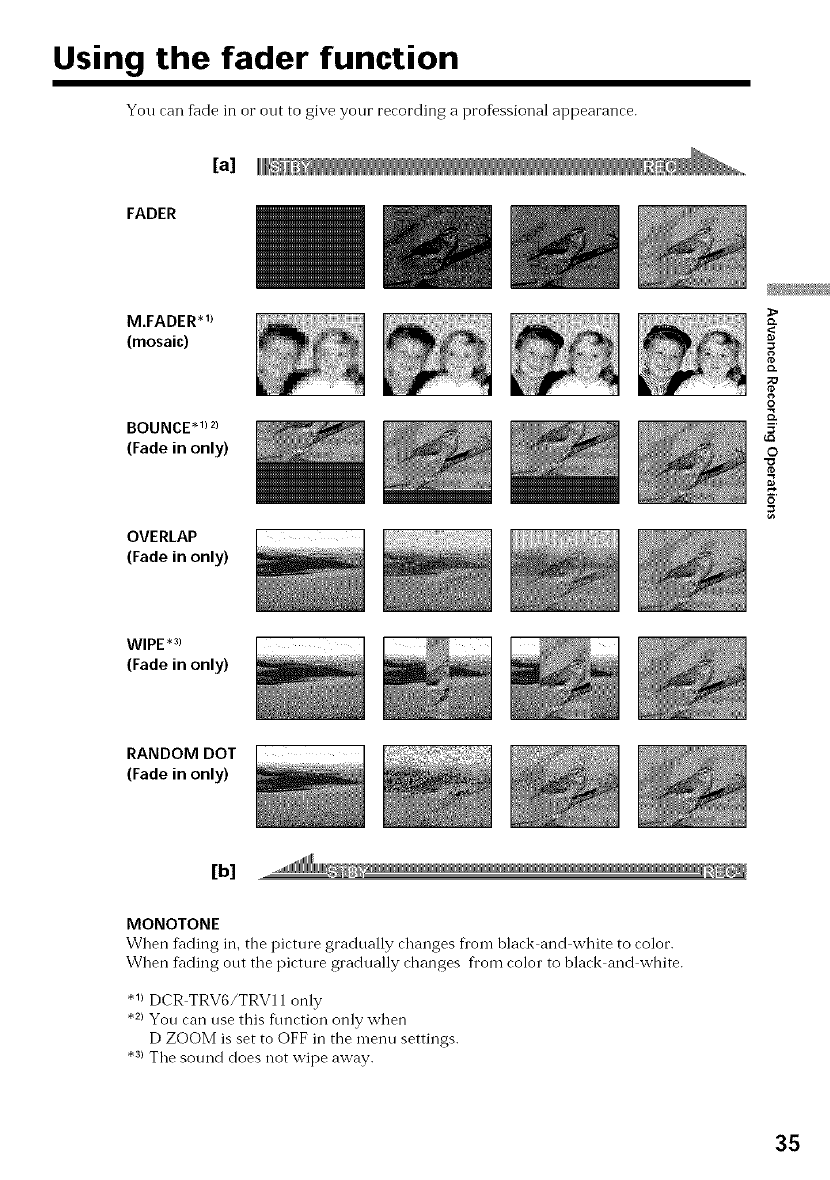
You can fade in or out to give your recording a professional appearance.
[a]
FADER
M.FADER .1)
(mosaic)
BOUNCE*l) 2)
(Fade in only)
OVERLAP
(Fade in only)
_>
o.
O
5'
©
WIPE .3)
(Fade in only)
RANDOM DOT
(Fade in only)
[b]
MONOTONE
When f_lding in, the picture gradually changes fi'om black and white to color.
When f_ding out the picture gradually changes fi'om color to black and white.
• 1) DCR TRV6/TRV11 only
•2) You can use this flmction only when
D ZOOM is set to OFF in the menu settings.
• 3) The sound does not wipe away.
35
Using the fader function
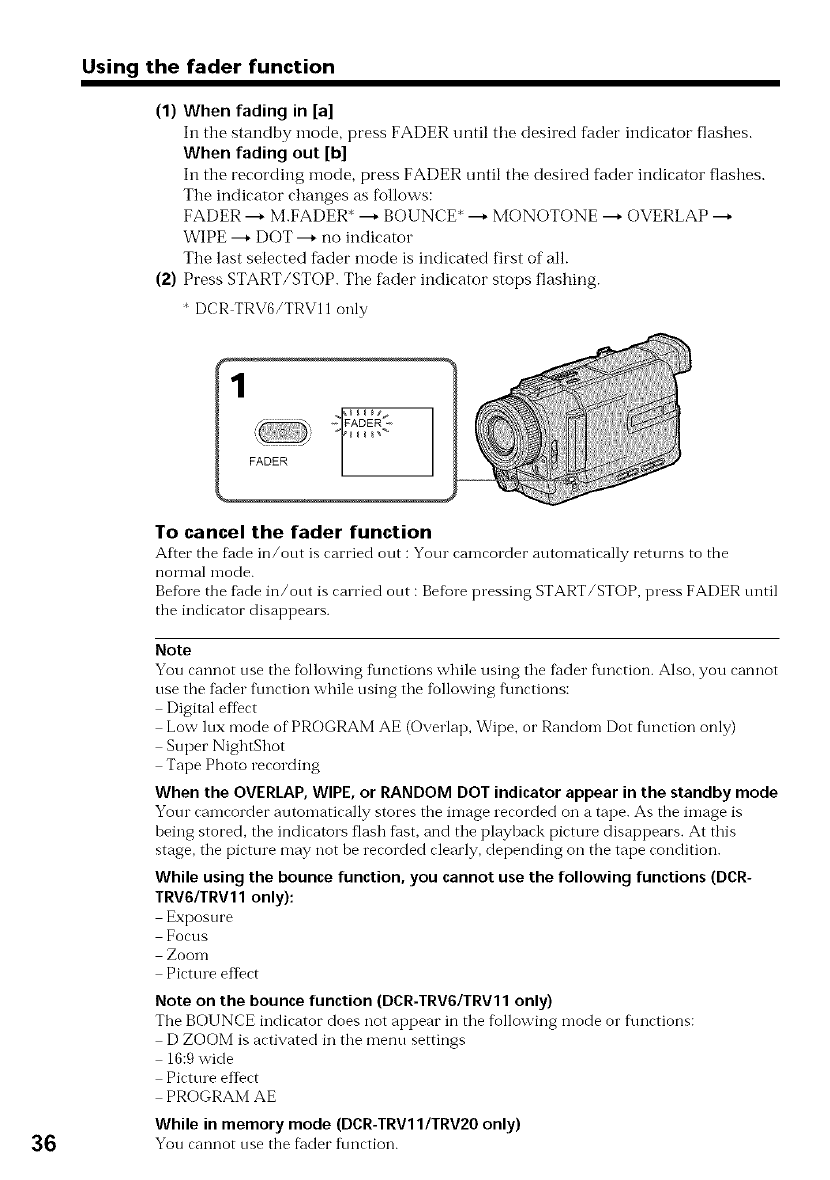
(1) When fading in [a]
In the standby mode, press FADER until tile desired fader indicator flashes.
When fading out [b]
In the recording inode, press FADER until the desired fader indicator flashes.
The indicator changes as follows:
FADER --_ M.FADER* --_ BOUNCE* --_ MONOTONE --_ OVERLAP --_
WIPE --* DOT --* no indicator
The last selected finder mode is indicated first of all.
(2) Press START/STOP. The fader indicator stops flashing.
* DCR TRV6/TRVll only
_ _ FADER
FADER
To cancel the fader function
Afier the f_ade in/out is carried out : Your can-leorder automatically returns to the
nomlal mode.
Be%re the tilde in/out is carried out : Be%re pressing START/STOP, press FADER until
the indicator disappears.
Note
You callllO[ use tile following ft/nctions while using tile fader ftlnction. Also, you caollot
use the f_der f\mction while using tile following f\mctions:
Digital effect
Low lux mode of PROGRAM AE (Overlap, Wipe, or Random Dot flmction only)
Super NightShot
Tape Photo recording
When the OVERLAP, WIPE, or RANDOM DOT indicator appear in the standby mode
Your cameorder automatically stores the in-lage :eeorded on a tape. As the image is
being stored, tile indicators flash thst, and tile playback picture disappears. At this
stage, tile picture may :lot be recorded clearly, depending on the tape condition.
While using the bounce function, you cannot use the following functions (DCR-
TRV6/TRVll only):
Exposure
Focus
ZooIl'l
Pictm e effect
Note on the bounce function (DCR-TRV6/TRV11 only)
Tile BOUNCE indicator does :lot appear in tile following mode or f\mctions:
D ZOOM is activated in tile menu settings
16:9 wide
Picture eftect
PROGRAM AE
While inmemory mode (DCR-TRV1 IlTRV20 only)
36 You cannot use the riveter ftmction.
Using special effects -Picture effect
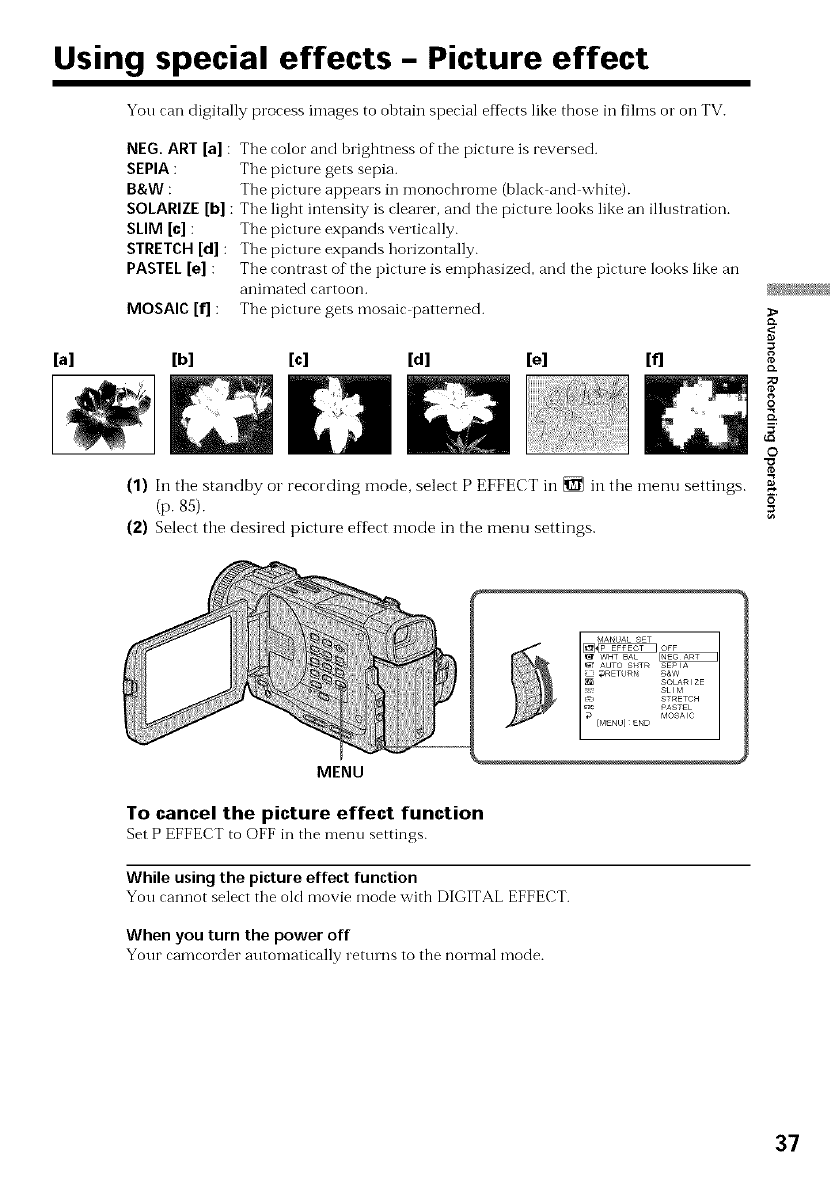
Yon call digitally process images to obtain special effects like those in films o1"on TV.
NEG. ART [a]
SEPIA :
B&W :
SOLARIZE [b]
SLIM [c] :
STRETCH [d] :
PASTEL [e] :
MOSAIC [f] :
The color and brightness of the picture is reversed.
Tile picture gets sepia.
The picture appears ill monochlome (black and white).
Tile light intensity is clearer, and tile picture looks like an illustration.
The picture expands vertically.
The picture expands horizontally.
The contrast of the picture is emphasized, and the picture looks like an
aniI_lated cartoon.
The picture gets mosaic patterned.
[a] [b] [c] [d] [e] [f]
(1) In the standby or recording mode, select P EFFECT in _ in the menu settings.
(p. 85).
(2) Select the desired picture efDct mode in the menu settings.
>
g
{D.
;O
O
5'
©
MENU
To cancel the picture effect function
Set P EFFECT to (-OFFill the menu settings.
While using the picture effect function
You cannot select the old movie mode with DIGITAL EFFECT.
When you turn the power off
Your camcorder automatically rettuns to tile norn-lal mode.
37
Using special effects- Digital effect
You can add special effects to recorded _ictures using the various digital functions. The
sound is recorded normally.
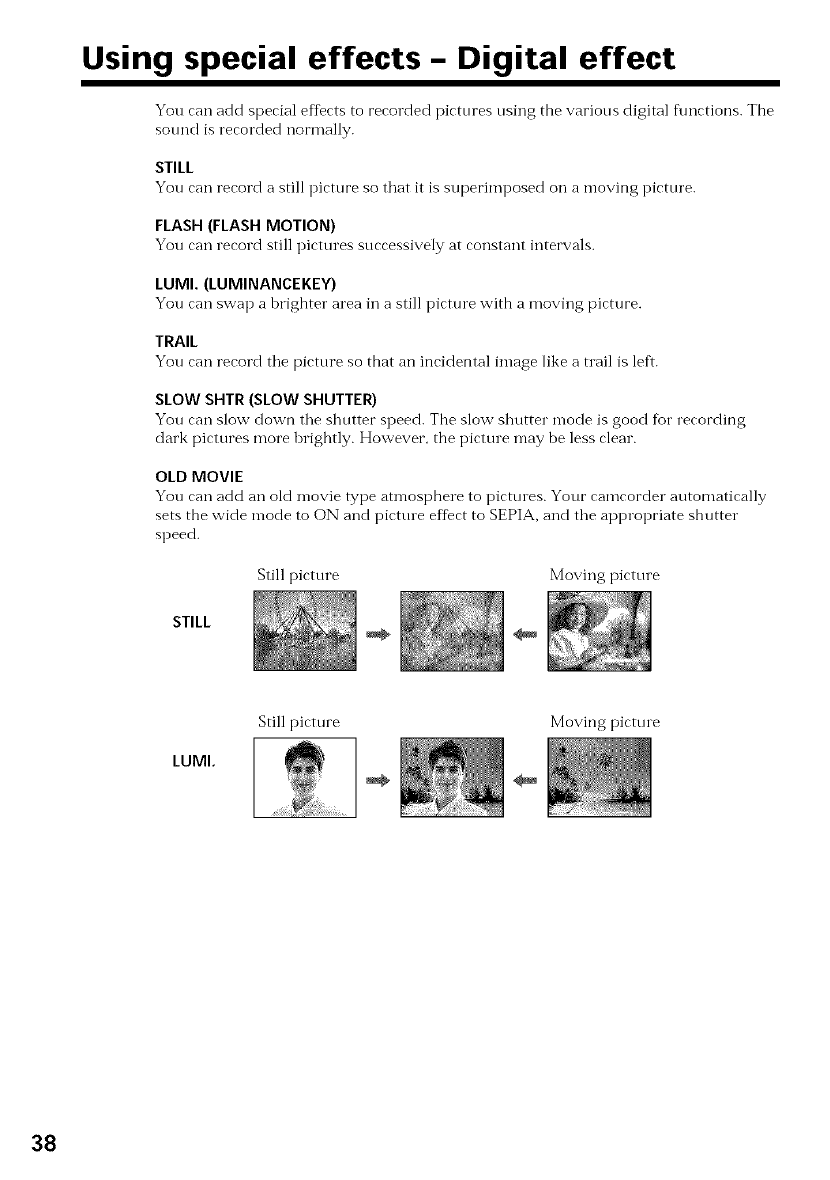
STILL
You can record a still picture so that it Is superimposect on a moving picture.
FLASH (FLASH MOTION)
You can record still pictures successively at constant intervals.
LUMI. (LUMINANCEKEY)
You can swap a brighter area in a still picture with a moving picture.
TRAIL
You can record the picture so that an incidental image like a tlail is left.
SLOW SHTR (SLOW SHUTTER)
You can slow down the shutter speed. The slow shutter n-lode is good fur recording
clark pictures more brightly. However, the picture may be less clear.
OLD MOVIE
You can add an old Inovie type atmosphere to pictures. Your eamcorder a_utomatically
sets the wide mode to ON and picttne effect to SEPIA, and the appropriate shutter
speed.
Still picture Moving picture
STILL
LUMI.
Still picture Moving pictm e
38

Using special effects - Digital effect
(1) In the standby or recording mode, press DIGITAL EFFECT. The digital effbct
indicator appears.
(2) Turn the SEL/PUSH EXEC dial to select the desired digital effect mode.
The indicator changes as follows:
STILL *--+FLASH *--+LUMI. *--+TRAIL *--+SLOW SHTR *--+OLD MOVIE
(3) Press tile SEL/PUSH EXEC diah The indicator lights up and the bars appear.
In the STILL and LUMI. modes, the still picture is stored in memory.
(4) Turn the SEL/PUSH EXEC dial to adjust the effect.
Itemsto be adjusted
STILL The rate of tile still picture you want to superhnpose on the moving
picttue =
g
FLASH The interval of flash motion _-
LUMI. Tile color"scheme of tile area in tile still picture which is to be swapped o
with a moving picture _.
TRAIL The time tmtil the incidental image vanishes _'
O
SLOW SHTR Shutter speed. Tile larger"tile shutter speed number, the slower the
shutter speed. _
OLD MOVIE No adjusmlent necessa W _'
Tile more bars there are on the screen, the stronger the digital effect. The bars appear in
tile following modes: STILL, FLASH, LUMh and TRAIL.
3LUML
To cancel the digital effect function
Press DIGITAL EFFECT again.
39

Using special effects - Digital effect
Notes
•The following f\mctions do not work during digital effect:
Pader
Low lux mode of PROGRAM AE
Tape photo recording
Super NightShot
• The following function does not work in the slow shutter mode:
PROGRAM AE
• The fk_llowing ftmctions do not work in the old movie mode:
Wide mode
Picture effect
PROGRAM AE
When you turn the power off
The digital effect will be automatically canceled.
When recording in the slow shutter mode
Auto focus may not be effective. Focus manually using a tripod.
Shutter speed
Shutter speed mm_ber Shutter speed
SLOW SHTR 1 1/30
SLOW SHTR 2 1/15
SLOW SHTR 3 1/8
SLOW SHTR 4 1/4
40
Using the PROGRAM AE function
Yon can select PROGRAM AE (Auto Exposure) mode to suit your specific shooting
requil ements.
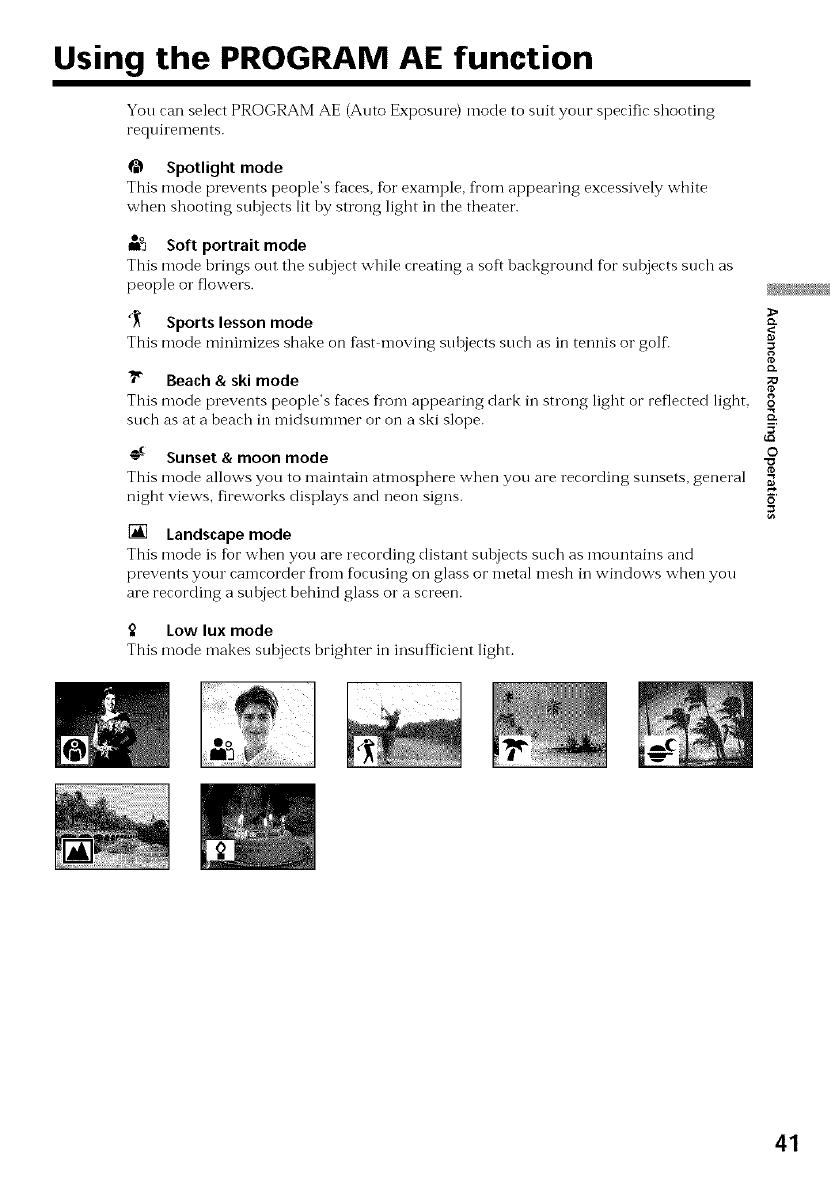
Spotlight mode
This mode prevents people's faces, %1" example, from appearing excessively white
when shooting subjects lit hy strong light in the theater.
Oo
mn Soft portrait mode
This mode hrings ont the snbject while creating a soft hackground for subjects such as
people o1"flowers.
_ Sports lesson mode
This mode minimizes shake on fast moving snhjects such as in tennis o1"golf.
_" Beach & ski mode
This mode prevents people's faces fl'om appearing dark in snong light or reflected light,
snch as at a beach in midsnmmer or on a ski slope.
o_ Sunset & moon mode
This mode allows you to maintain atmosphere when you are recording sunsets, general
night views, fireworks displays and neon signs.
[] Landscape mode
This mode is for when you are recording distant suhjects such as mountains and
prevents your camcorder from focusing oi] glass or metal mesh in windows when you
are recording a suhject behind glass or a screen.
Low lux mode
This mode makes subjects brighter in insnfficient light.
_>
g
ID.
;O
8
5'
_Q
©
41

Using the PROGRAM AE function
(1) In the standby or memory inode, press PROGRAM AE. The PROGRAM AE
indicator appears.
(2) Turn the SEL/PUSH EXEC dial to select the desired PROGRAM AE mode.
The indicator changes as follows:
42
To cancel the PROGRAM AE function
Press PROGRAM AE again.
Notes
• In the si3otlight, sports lesson and beach & ski modes, you cannot take close ups. This
is because your camcorder is set to fiocus only on subjects in the middle to far distance.
• In the sunset & moon and landscape modes, your camcorder is set to focus only on
distant sulojects.
• The following f\mctions do not work in the PROGRAM AE mode:
Slow shutter
Old movie
Bounce (DCR TRV6/TRV11 only)
• The following f\mctions do not work in the low lnx mode:
Digital effect
Overlap
Wipe
Random clot
• While setting the NIGHTSHOT to ON. the PROGRAM AE f\mction does not work.
(The indicator flashes.)
• While shooting in memory mode. the low lux and sports lesson modes do not work.
(The indicator flashes.)
While WHT BAL is set to AUTO in the menu settings
The white balance is adjusted even if the PROGRAM AE function is selected.
Even if the PROGRAM AE function is selected
You can adjust the exposure.
If you are recording under adischarge tube such as a fluorescent lamp, sodium
lamp or mercury lamp
Flickering or changes in color may occur in the fbllowing modes. If this happens, ttun
the PROGRAM AE fnnction off.
Soft portrait mode
Sports lesson mode
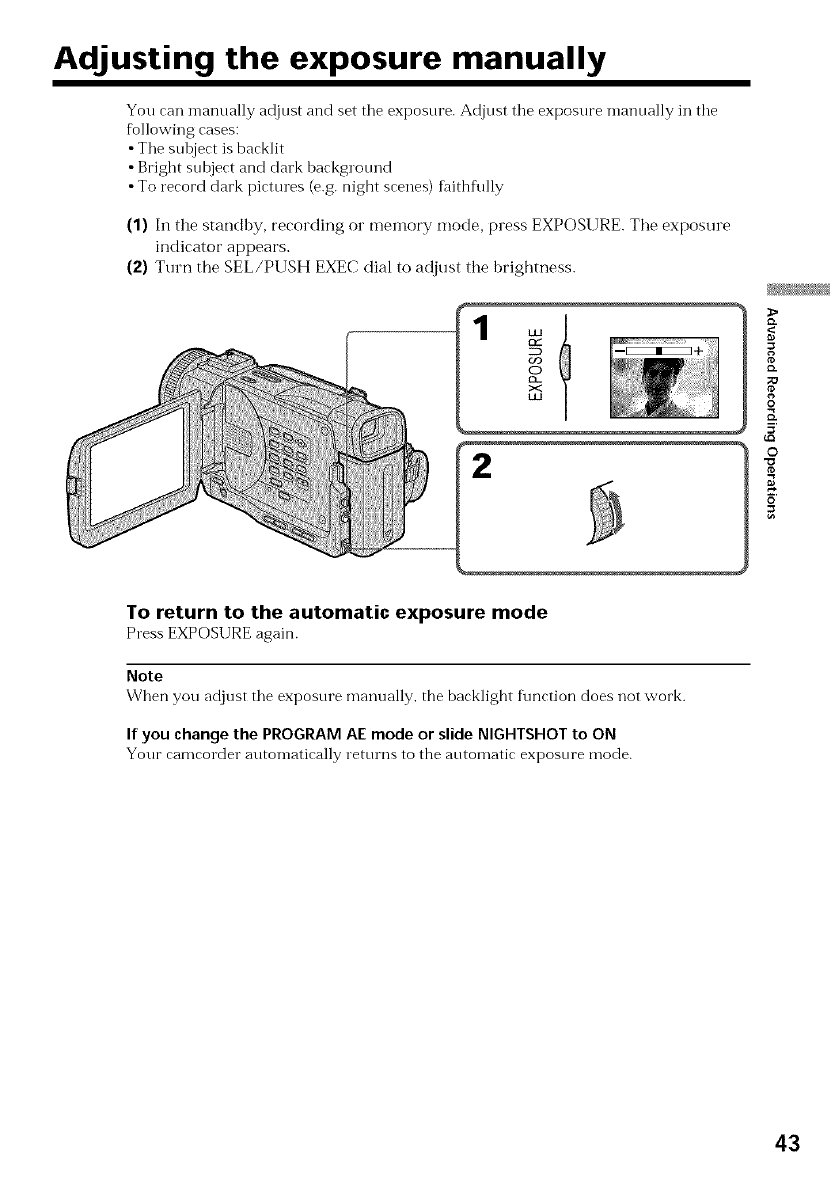
Adjusting the exposure manually
You can manually adjust and set tile exposure. Adjust tile exposure manually in tile
following cases:
•Tile sul0ject is backlit
• Bright subject and clark hackground
•To record dark pictures (e.g. night scenes) fidthfu]ly
(1) In the standby, recording o1"memory mode, press EXPOSURE. Tile exposure
indicator appears.
(2) Turn the SEL/PUSH EXEC dial to adjust the brightness.
2
8
0
5'
o
To return to the automatic exposure mode
Press EXPOSURE again.
Note
When you adjust tile exposnre manually, the backlight f\mction does not work.
If you change the PROGRAM AE mode or slide NIGHTSHOT to ON
Your eameorder automatically returns to the automatic exposure mode.
43

Focusing manually
You can gain better results by manually adjnsting the focus in the fbllowing cases:
•The autofocus mode is not effective when shooting
subjects through glass coated with water choplets
horizontal stripes
subjects with little contrast with backgrounds such as walls and sky
•When you want to change tile focus from a subject in the fbregrotmd to a subject in the
background
• Shooting a stationm y subject when using a tripod
(1) In the standby, recording or memory mode, set FOCUS to MAN. The _
indicator appears.
(2) Turn the focus ring to sharpen focus.
To return to the autofocus mode
Set FOCUS to AUTO.
To record distant subjects
When you press FOCIIS down to INFINITY, tile lens fbeuses on and _ indicator
appears. When you release FOCUS, your camcorder returns to the manual fbcus mode.
Use this mode when your camcorder fbcuses on near objects even though you are
trying to shoot a distant object.
To focus precisely
It is easier to focus on the subject if you adjust the zoom to shoot at the "W" (wide
angle) after focusing at the "T" (telephoto) position.
When you shoot close to the subject
Focus at tile end of tile "W" (wide angle) position.
_'_ changes as follows:
when recording a distant subject.
when the stlbject is too close to focus on.
44

-- Advanced Playback Operations --
Playing back a tape with picture effects
Dnring playback, you can process a scene nsing the picture effect functions: NEG. ART,
SEPIA, B&W and SOLARIZE.
In the playback or playback pause mode, select the desired picttue effect n-lode in _ in
tlle menu settings (p. 85).
For"details of each picture effect flmction, see page 37.
MENU
To cancel the picture effect function
Set P EFFECT to OFF in the menu settings.
Notes
•Yon cannot process tile picture that is input fl'om other equipment using tile picture
ef_bctf\mction.
•To record pictures that yon have processed using the picture eftect flmction, record
tile pictures on the VCR, using your camcorder as a player'.
Picturesprocessedby the picture effect function
Picttues processed by tile picture eftect function are not output throngh tile _,DV IN/
OUT jack.
When you set the POWER switch to OFF (CHG) or stop playing back
Tile picture ef'fect f\mctinn is automatically canceled.
g
O"
O
45
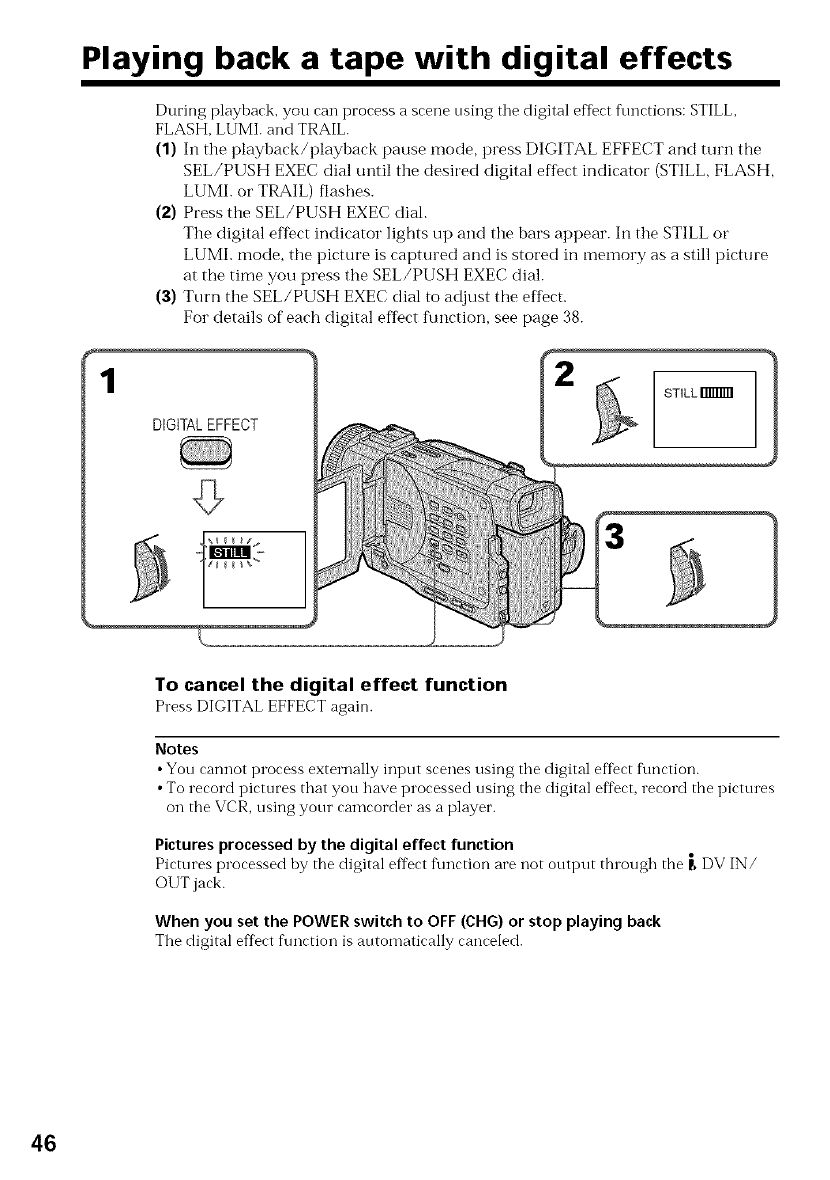
Playing back a tape with digital effects
1
During playhack, you can process a scene using tile digital effect functions: STILL,
FLASH, LUMI. and TRAIL.
(1) Ill the playback/playback pause mode, press DIGITAL EFFECT and turn the
SEL/PUSH EXEC dial tmtil the desired digital effect indicator (STILL, FLASH,
LUMI. or TRAIL) flashes.
(2) Press the SEL/PUSH EXEC dial.
The digital efDct indicator lights up and the bars appear. In the STILL or
LUMI. mode, the picture is captured and is stored in memory as a still picture
at the time you press the SEL/PUSH EXEC dial.
(3) Turn the SEL/PUSH EXEC dial to adjust the effect.
For details of each digital eflect Ikmction, see page 38.
DIGITALEFFECT
STILL Imlml
To cancel the digital effect function
Press DIGITAL EFFECT again.
Notes
•You cannot process externally input scenes using the digital effect f\mction.
• To record pictures that you have processed using the digital eft)ct, record the pictures
on the VCR, using your camcorder as a player.
Pictures processed by the digital effect function
Pictures processed by the digital effect f\mction are not output thlough the P, DV IN/
OI IT jack.
When you set the POWER switch to OFF (CHG) or stop playing back
The digital effect ftlllCtioi1 is automatically canceled.
46

Enlarging images recorded on tapes
- PB ZOOM
You can enlarge still and n-loving playback picttues. You can also dub the enlarged
picttues to tapes o1"copy to "Memo1 T Stick"s.
(1) In the playback oi"playback pause mode, press PB ZOOM on your camcorder.
The image is enlarged, and T ,_*-- ---*appears on the LCD screen or in tile
viewfinder.
(2) Turn SEL/PUSH EXEC dial to move the enlarged image, then press the dial.
: The image moves downward
,L: The image moves upward
(3) Turn SEL/PUSH EXEC dial to move the enlarged image, then press the dial.
---*: The image moves leftward (Turn the dial to upward.)
*-- : The image moves rightward (Turn the dial to downward.)
ZO0_
[]
g
©
To cancel the PB ZOOM function
Press PB ZOOM again.
Note
You cannot process externally input scenes using the PB ZOOM f\u'<tion vv'itl'_your
can]corder.
The following functions do not work in the PB ZOOM function:
Digital ef'fect
While displaying the menu settings or title
The PB ZOOM ftmction does not work.
The PB ZOOM function is automatically canceled when you operate the following
functions:
Set the POWER switch to OFF (CHG)
Stop playback
Display the menu settings
Display the title
Pictures in the PB ZOOM
Picttues in the PBZOOM mode are not output through the _ DV IN/OUT jack.
47
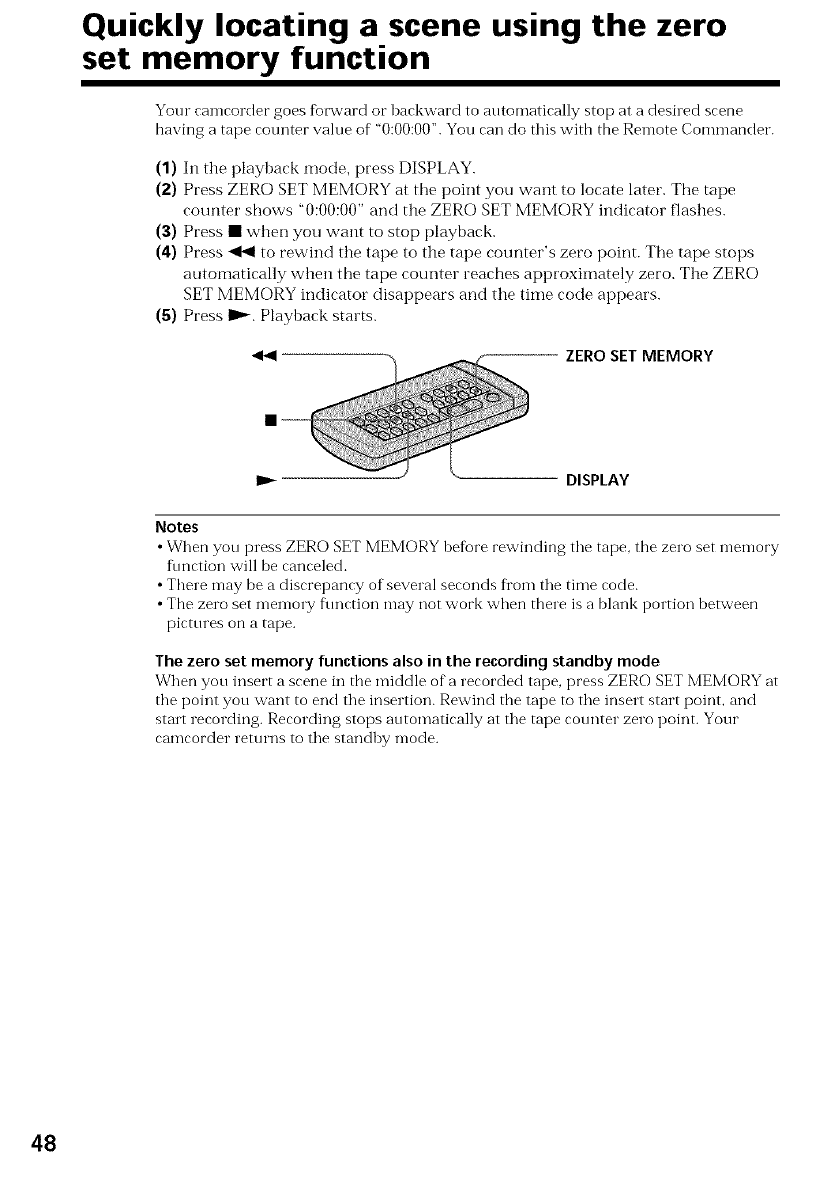
Quickly locating a scene using the zero
set memory function
Your camcorder goes forward or backward to automatically stop at a desired scene
having a tape counter value of ' 0:00:00". You can do this with the Remote Commander.
(1) In the playback mode, press DISPLAY.
(2) Press ZERO SET MEMORY at tile point you want to locate later. Tile tape
counter shows "0:00:00" and the ZERO SET MEMORY indicator flashes.
(3) Press • wherl you want to stop playback.
(4) Press <1<1 to rewind the tape to the tape counter's zero point. The tape stops
automatically when the tape counter reaches approximately zero. The ZERO
SET MEMORY indicator disappears and the time code appears.
(5) Press I_. Playback starts.
_--- ZERO SET MEMORY
IP_DISPLAY
Notes
•When you press ZERO SET MEMORY before rewinding tile tape, the zero set memory
fimction will be canceled.
• There may be a discrepancy of several seconds fl'om tile time code.
• The zero set memo1T f\mction may not work when there is a blank portion between
pictures on a tape.
The zero set memory functions also in the recording standby mode
When you insert a scene in tile middle of"a recorded tape, press ZERO SET MEMORY at
the point you want to end tile insertion. Rewind the tape to tile insert start point, and
strut recording. Recording stops automatically at tile tape cotmter zero point. Your
camcorder returns to tile standby mode.
48

Searching the boundaries of recorded
tape by title -Title search
If you use a tape with cassette memory, you can search for the boundaries of
recorded tape hy title (Title search). Use the Remote Commander for this
operation.
(1) Set the POWER switch to VCR.
(2) Set CM SEARCH in _ to ON in the menu settings (p. 85). Factory setting is
ON.
(3) Press SEARCH MODE on the Remote Commander repeatedly, until tile TITLE
SEARCH indicator appears.
The indicator changes as IMlows:
TITLE SEARCH ---+ DATE SEARCH ---+ PHOTO SEARCH ---+ PHOTO SCAN
--+ no indicator
(4) Press _ or _ on the Remote Commander to select the title fbr playback.
Your camcorder automatically starts playback of the scene having the title that
you selected.
TITLE SEARCH
SEARCH _ HELLO!
CONGRATULATIONS!
MODE s HAPPY NEW YEAR!
4 PRESENT
GOOD MORNING
WED©ING
$
i®1 i
8
_r
©
5'
To stop searching
Pressm.
If you use atape without cassette memory
You cannot superimpose or search a title.
In the _ / mark
•The bar in the _ mark indicates the present point on the tape.
• The _ mark in the [_ ............................I indicates the actual point you are hying to search.
If a tape has a blank portion between recorded portions
The title search function may not work correctly.
To superimpose a title
See page 77.
49
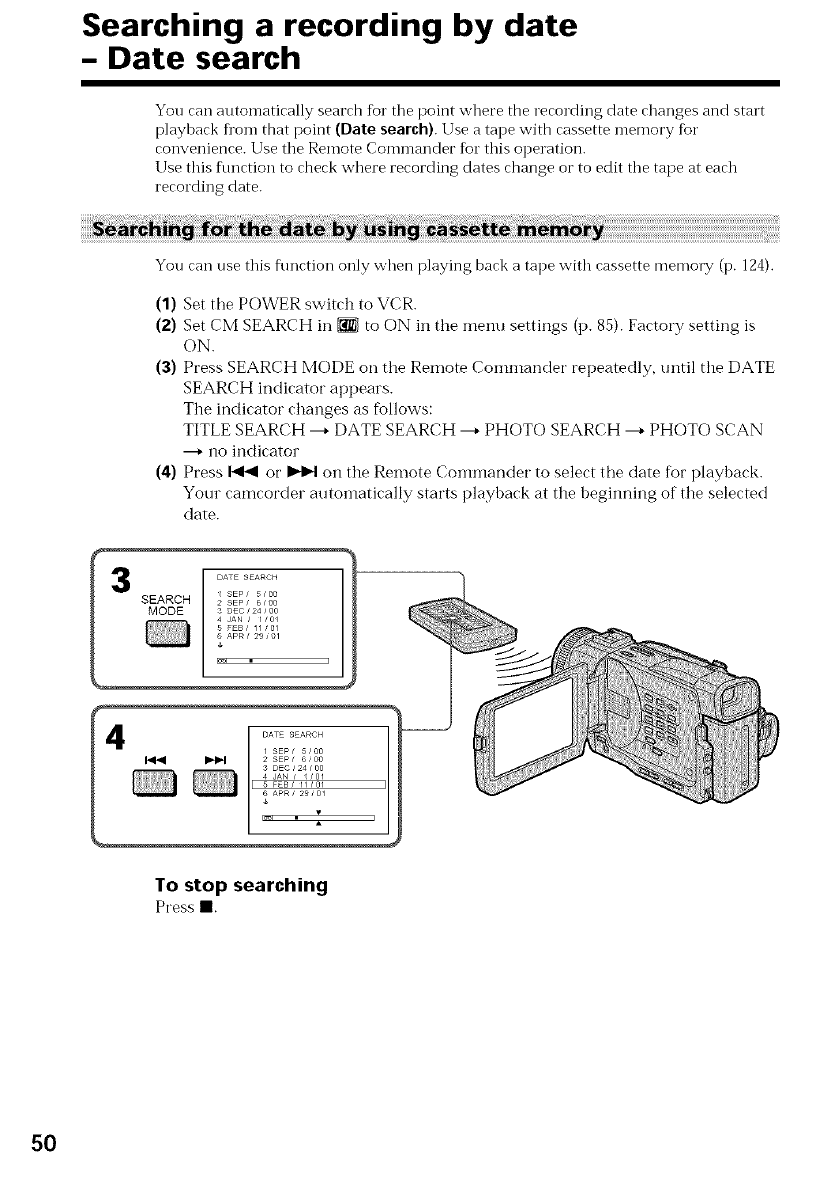
Searching a recording by date
- Date search
You can automatically search for tile point where the recording date changes and start
playback fl'om that point (Date search).Use a tape with cassette memory fbr
convenience. Use tile Remote Commander for this operation.
Use this function to check where recording dates change or to edit tile tape at each
recording date.
You can use this f\mction only when playing back a tape with cassette memory (p. 124).
(1) Set the POWER switch to VCR.
(2) Set CM SEARCH in _ to ON in the menu settings (p. 85). Factory setting is
ON.
(3) Press SEARCH MODE on the Remote Commander repeatedly, until the DATE
SEARCH indicator appears.
The indicator changes as fiAlows:
TITLE SEARCH ---* DATE SEARCH ---* PHOTO SEARCH ---* PHOTO SCAN
---+ no indicator
(4) Press I-<1<1or b,-IH on the Remote Colnmander to select the date fior playback.
Your camcorder autolnatically starts playback at the beginning of the selected
date.
DATE SEARCH
21 SEp/ 5/00SEARCH sEp/ 6too
MODE 3 DEC/24 / oo
4 JAN / /0/
FEB/ II101
ApR/ 29/01
I®l I
To stopsearching
Pressl
50
Searching a recording by date - Date search
Note
Ifone day's rerording is less than two minutes, your ramrorder may not arrorately find
tile point where the recording date changes.
In the _ mark
• Tile bar in the [_iiiiiiiiiiiiiiiiiiiiiiiii]mark indicates the present point on the tape.
• The l mark in the _ ) indicates the actual point you are trying to search.
If a tape has ablank portion between recorded portions
The date searrh f\mrtion may not work rorrertly.
Cassette memory
The tape cassette memory can hold six recording date data. If you search the date
among seven or more data, see "Searching for the date without using cassette memoly"
below.
i
(1) Set the POWER switch to VCR.
(2) Set CM SEARCH in _ to OFF in the menu settings (p. 85).
(3) Press SEARCH MODE on the Remote Commander repeatedly, until the DATE
SEARCH indicator appears.
The indicator changes as fMlows:
DATE SEARCH ---+PHOTO SEARCH ---+PHOTO SCAN ---+no indicator
(4) Press _ on the Remote Commander to search for the previous date or press
on the Remote Commander to search fi_r the next date. Your camcorder
automatically starts playback at the point where the date changes. Each time
you press _ or I_pt, your camcorder searches for the previous or next date.
To stop searching
Press m.
8
©
0
_=
51

Searching for a photo -Photo search/
Photo scan
You can search for a still picture you have recorded on a mini DV tape (photo search).
You can also search fin" still pictures one after another and display each picttne for five
seconds automatically regardless of cassette memo W (photo scan). Use the Remote
Commander for these operations.
Use this flmction to check or edit still pictures.
You can use this flmction only when playing back a tape v_'ith cassette memory (p. 124).
(1) Set the POWER switch to VCR.
(2) Set CM SEARCH in _ to ON in tile menu settings (p. 85). Factory setting is
ON.
(3) Press SEARCH MODE on the Remote Conlnlander repeatedly, until the
PHOTO SEARCH indicator appears.
Tile indicator changes as fbllows:
TITLE SEARCH ---+DATE SEARCH ---+PHOTO SEARCH ---+PHOTO SCAN
---+no indicator
(4) Press _ or _ on tile Remote Commander to select the date for playback.
Your camcorder autolnatically starts playback of tile photo having tile date
that you selected.
52
To stop searching
Press I.
In the _ mark
•The bar in the _ mark indicates the present point on the tape.
• The _ mark in the [_[iiiiiiiiiiiiiiiiiiiiiiiiii]indicates the actual point you are trying to search.
If atape has a blank portion between recorded portions
The photo search flmction may not work correctly.
The available number of photos that can be searchedusing the cassettememory
The available nnmber is up to 12photos. However, yon can search 13 photos oi"more
using the scanning photo function.
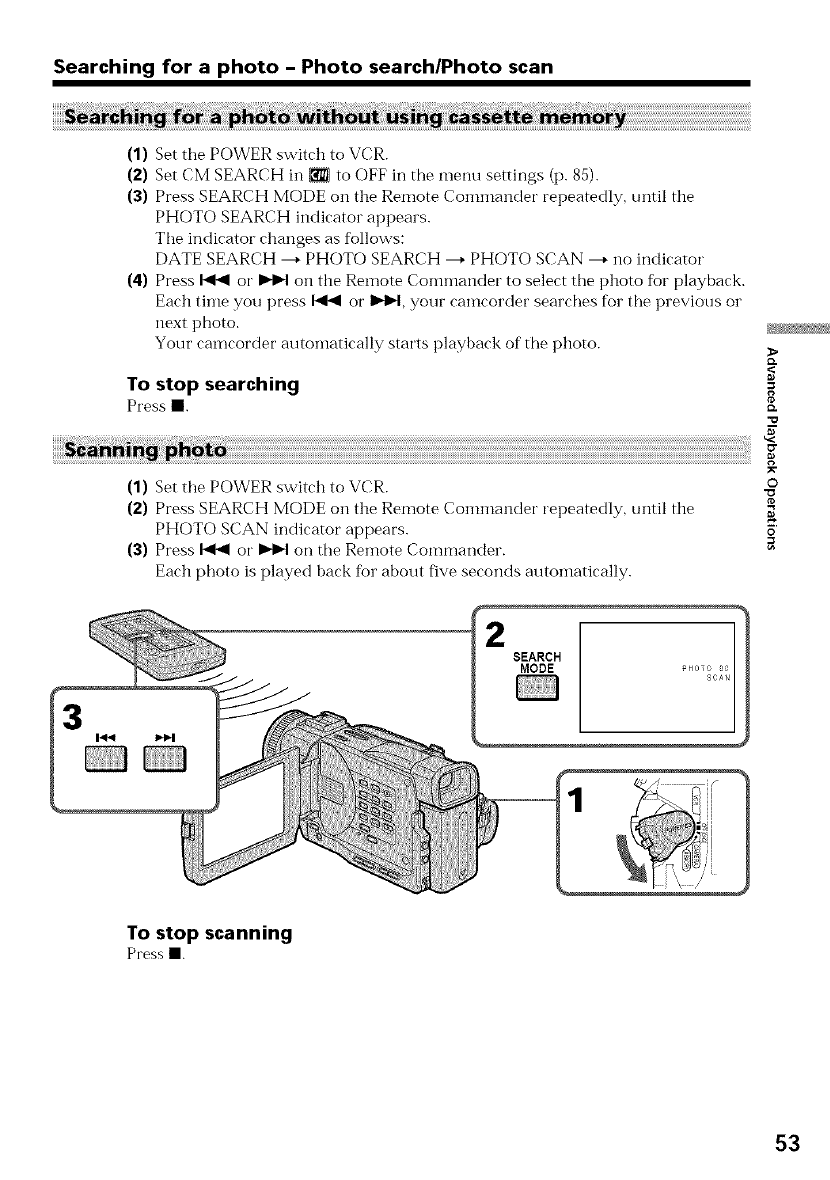
Searching for a photo -Photo search/Photo scan
(1) Set the POWER switch to VCR.
(2) Set CM SEARCH in _to OFF in the menu settings (p. 85).
(3) Press SEARCH MODE on tile Remote Conlillander repeatedly, until tile
PHOTO SEARCH indicator appears.
The indicator changes as follows:
DATE SEARCH ---+PHOTO SEARCH ---+PHOTO SCAN ---+no indicator
(4) Press _ or _ on the Remote Commander to select the photo for playback.
Each tilne you press _ or _, your camcorder searches for the previous or
next photo.
Your camcorder autoinatically starts playback of the photo.
To stop searching
Press m.
(1) Set the POWER switch to VCR.
(2) Press SEARCH MODE oil tile Remote Commander repeatedly, until tile
PHOTO SCAN indicator appears.
(3) Press _ or _ on the Remote Commander.
Each photo is played back for about five seconds autoinatically.
ID.
g
©
O
SEARCH
MODE
To stop scanning
Pressm.
53

-- Editing --
Dubbing a tape
Using the AJV connecting cable
Connect your eameorder to tile VCR using tile A/V connecting cable supplied with
your Call-lcorder.
Set the input selector on the VCR to LINE, if available.
(1) Insert a blank tape (or a tape you want to record over) into the VCR, and insert
the recorded tape into your camcorder.
(2) Prepare the VCR fur recording, then set the input selector to LINE.
Refer to the operating instructions of the VCR.
(3) Set the POWER switch to VCR.
(4) Play back the recorded tape on your camcorder.
(5) Start recording on the VCR. ReDr to the operating instructions of your VCR.
AUDIO/VIDEO
IN
S VIDEO
_ @ VIDEO
®TAUalO
®_ VCR
: Signal flow
When yo,, have finished d,,bbing a tape
Press • on both your cameorder and the VCR.
Before a dubbing
Set DISPLAY to LCD in the menu settings. (Default setting is LCD.)
Be sure to clear the indicators from the screen
If they are displayed, press tbe fbllowing buttons not to record the indicators on the
dubbed tape:
•Tbe DISPLAY button
• The DATA CODE button
• The SEARCH MODE button on the Remote Commander
You can edit on VCRsthat support the following systems
[] 8 ram, Hig Hi8, [VgSVHS, SlVgS,S VHS, Vtl_51_VHSC, S/VItSI_S VHSC,
rfl Betamax, _ ED Betamax, _"1_" mini DV, 1}_"DV, |) Digital8
If your VCR is amonaural type
Connect tbe yellow plug of the A/V connecting cable to tbe video inputjack and the
wbite or tbe red plug to the audio input jack on the VCR or the TV. When tbe white
plug is connected, the left channel audio is output, and the red plug is connected, the
right channel audio is output.
54
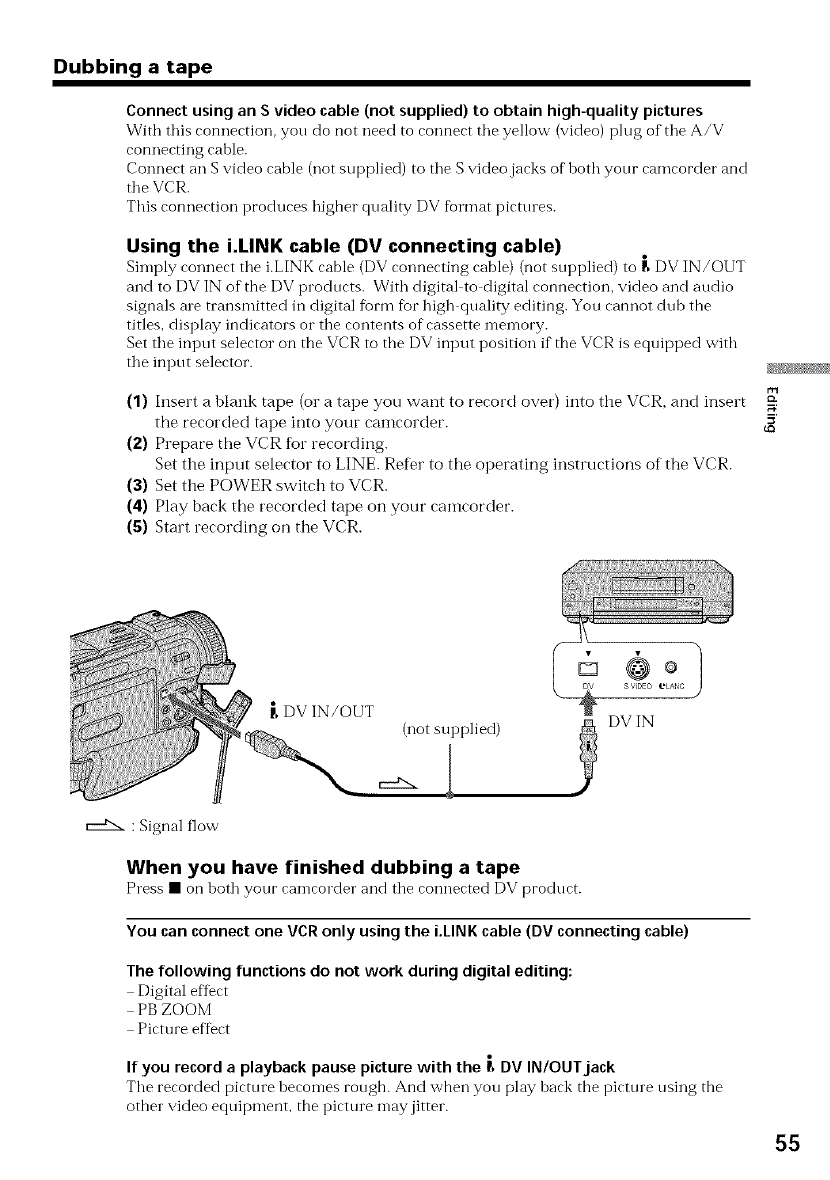
Dubbing a tape
Connect using an S video cable (not supplied) to obtain high-quality pictures
With this conneeticm, you do not need to ecmnect tile yellow (video) plug of tile A/V
connecting cable.
Connect an S video cable (not supplied) to the S video jacks of" both your camcorder and
the VCR.
This connection produces higher quality DV fbrmat pictures.
Using the i.LINK cable (DV connecting cable)
Simply connect the i.LINK cable (DV connecting cable) (not supplied) to _ DV IN/OUT
and to DV IN of the DV products. With digital to digital connection, video and audio
signals ale transmitted in digital form fur high quality editing. You cannot dub the
titles, display indicators or the contents of cassette memory.
Set the input selector on the VCR to tbe DV input position if the VCR is equipped witb
the input selector.
(1) Insert a blank tape (or a tape you want to record over) into the VCR, and insert
the recorded tape into your camcorder.
(2) Prepare the VCR Ibr recording.
Set the input selector to LINE. Refer to the operating instructions of the VCR.
(3) Set the POWER switch to VCR.
(4) Play back the recorded tape on your camcorder.
(5) Start recording on the VCR.
,--"'-:Signalflow
5'
DV IN/OUT
(not supplied)
When you have finished dubbing a tape
Press• onboth your eameorderand the connected DV product.
You can connect one VCR only using the i.LINK cable (DV connecting cable)
The following functions do not work during digital editing:
Digital effect
PB ZOOM
Picture effect
If you record a playback pause picture with the _, DV IN/OUT jack
The recorded picture becomes rongb. And wben you play back tbe picture using tbe
other video equipment, the picture may jitter.
55
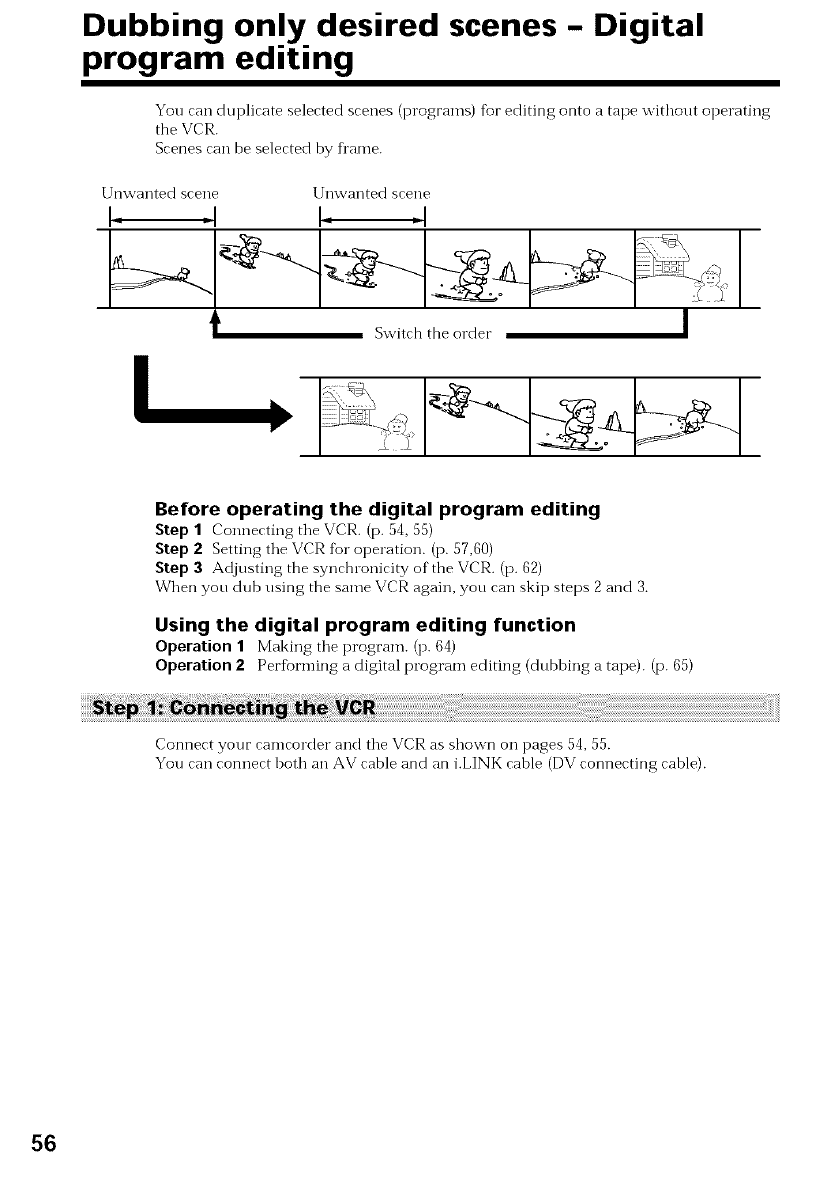
Dubbing only desired scenes -Digital
program editing
You can duplicate selected scenes (programs) for editing onto a tape without operating
the VCR.
Scenes can be selected by fl'ame.
Before operating the digital program editing
Step 1Connecting tile VCR. (p. 54, 55)
Step 2 Setting the VCR fur operation. (p. 57,60)
Step 3Adjusting the synchronicity of the VCR. (p. 62)
When you dub using the same VCR again, you can skip steps 2and 3.
Using the digital program editing function
Operation 1 Making the program. (p. 64)
Operation 2Perfi)rming a digital program editing (dubbing a tape). (p. 65)
Connect your camcorder and the VCR as shown on pages 54, 55.
You can connect both an AV cable and an i.LINK cable (DV connecting cable).
56
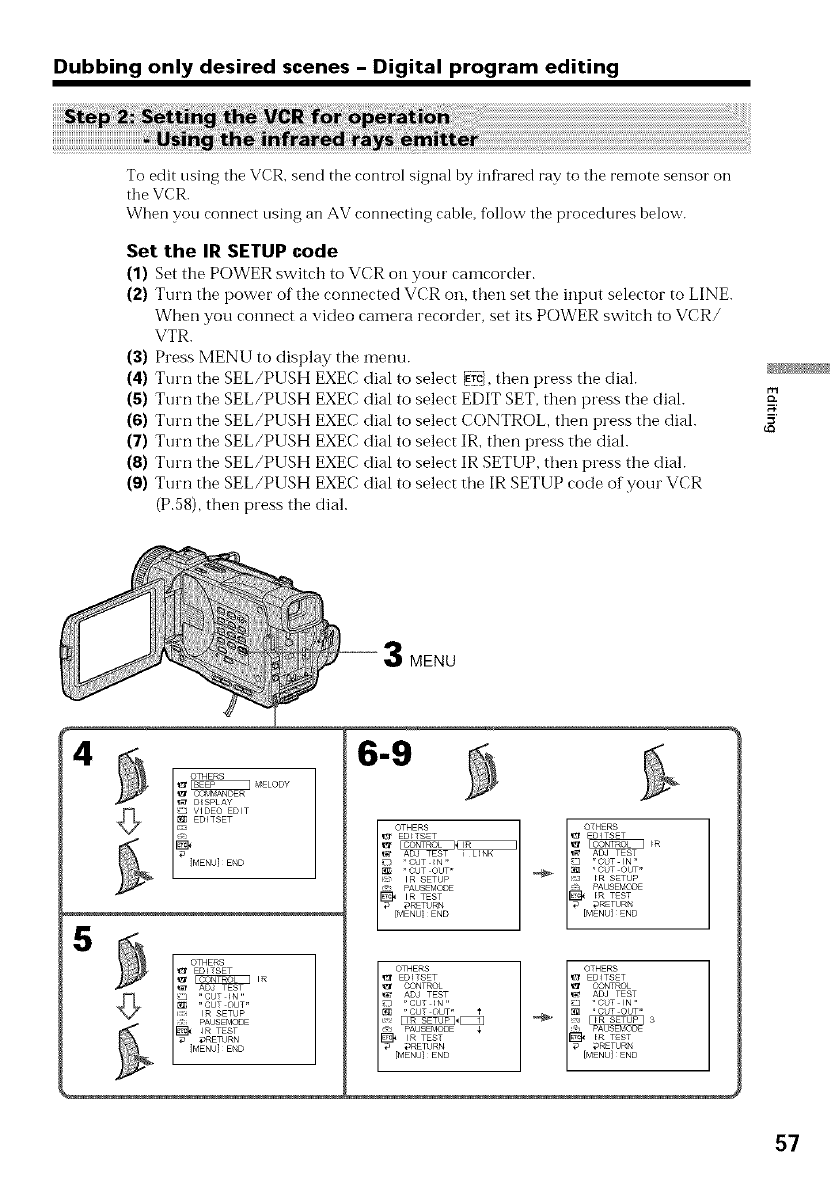
Dubbing only desired scenes -Digital program editing
To edit using the VCR, send the control signal by infrared ray to the remote sensor oil
the VCR.
When you connect nsing an AV connecting cable, follow tile procedures below.
Set the IR SETUP code
(1) Set the POWER switch to VCR on your camcorder.
(2) Turn tile power of tile cormected VCR oil, then set tile input selector to LINE.
When you connect a video camera recorder, set its POWER switch to VCR/
VTR.
(3) Press MENU to display the menu.
(4) Turn the SEL/PUSH EXEC dial to select _, then press tile dial.
(5) Turn the SEL/PUSH EXEC dial to select EDIT SET, then press the dial.
(6) Turn the SEL/PUSH EXEC dial to select CONTROL then press the dial.
(7) Turn the SEL/PUSH EXEC dial to select IR, then press the dial.
(8) Turn tile SEL/PUSH EXEC dial to select IR SETUP, then press tile dial.
(9) Turn tile SEL/PUSH EXEC dial to select tile IR SETUP code of your VCR
(P.58), then press tile dial.
MENU
_t D_SPLAY
VIDEO EDIT
EDiTSET
IMENU]END
5
l OTHERS
EDITSET
_t AD TEST
} "CUT _N"
"CUT OUT"
i: IR SETUP
t PAUSEMODE
_RETURN
[MENU] END
6-9
OTHERS
EDITSET
_ ADJ TEST
r*OUT IN"
r_ _ "CUT OUT"
_s_ _ R SETUP
@J PAUSEN_D8
I_ _RETURN
[MENU] END
OTHERS
EDITSET
CONTROL
ADJ TEST
[R TEST
"CUT IN,,
i_ PAUSEN_DE 3
_ _RETURN
[MENU] END
57

Dubbing only desired scenes -Digital program editing
About the IR SETUP code
The IR SETUP code is stored in the memory of your camcorder. Be sure to set tile
correct code, depending on your VCR. Code number 1 is preset at the factory.
Brand Remote control mode Brand Remote control mode
Sony h 2, 3, 4, 5, 6 Multitech 23, 80, 32
Admiral (M. Wards) 89 NEC 21, 33, 35
Aiwa 80 Olympic 77, 78
Audio Dynamic 21, 35 Panasonic 16, 17, 78, 77, 96
Bell&Howell (M. Wards) Pentax 42, 08
36 Philco 78, 77
Brocsonic 70, 82 Philips 83, 78, 77
Canon 77, 78, 97 Pioneer 78
Citizen 47 Quasar 78, 77, 16, 17
Craig 73, 47 RCA/PROSCAN 08, 42, 16, 77, 83, 07, 40, 41, 78*
Curtis Mathis 08, 80, 77 Realistic 77, 36
Daewoo 26, 40, 77 Sansui 21
DBX 21, 33, 35 Singer 73
Dimensia 08 Samsung 94, 41, 32, 32*, 94*, 24*
Emerson 26, 82, 59, 48, 70, 81 Sanyo 36, 37
Fisher 36, 45, 37, 44 Scott 40, 41, 32, 37, 28, 22, 23, 24
Funai 80 Sharp 89, 88
General Electric 87, 08, 77, 32", 94* Shintom 73
Goldstar 47 Signature 2000 (M. Wards)
Hitachi 78, 08, 42 80, 89
Instant Repley 77, 78 Sylvania 83, 78, 77, 80
JC Penny 77, 42, 08, 36, 21, 33, 35 Symphonic 80
JVC 21, 12, 13, 14, 33, 35 Tashiro 47
Kenwood 21, 33, 47, 35 Tatung 21, 33, 35
LXI (Sears) 80, 47, 42, 44, 45, 36, 37 Teac 21, 33, 80, 35
Magnavox 83, 78, 77 Technics 77, 78
Marantz 21, 33, 35 Toshiba 40, 07
Marta 47 Wards 89, 88, 37, 95, 47
Memorex 77, 37 Yamaha 36, 2 h 33, 35
Minolta 42, 08 Zenith 95
Mitsubishi/MGA 28, 22, 23, 24
* TV/VCR component
Note on remote control mode
You cannot do the assemble editing with some VCRs (%1"recording) if the remote
control mode does not correspond to this VCR (fUrplaying).
58
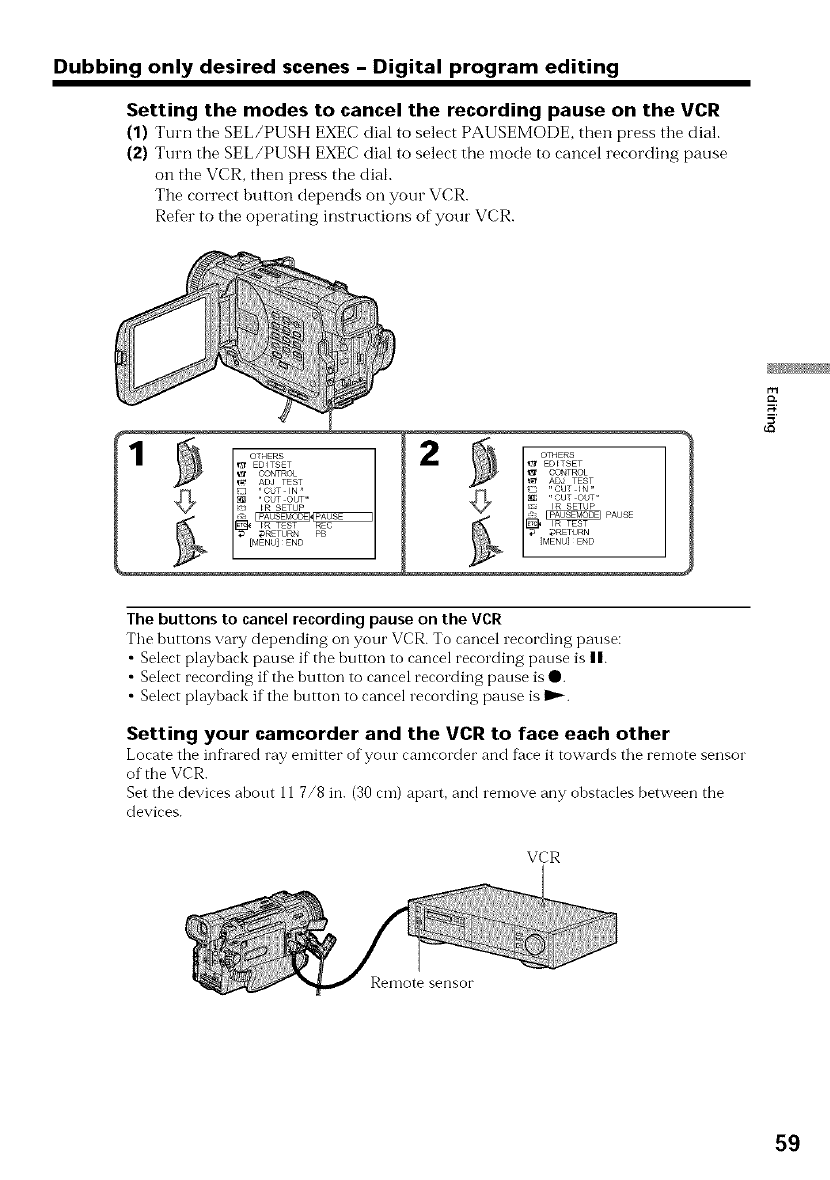
Dubbing only desired scenes -Digital program editing
Setting the modes to cancel the recording pause on the VCR
(1) Turn the SEL/PUSH EXEC dial to select PAUSEMODE, then press the dial.
(2) Turn the SEL/PUSH EXEC dial to select the mode to cancel recording pause
on the VCR, then press the dial.
The correct button depends on your VCR.
Refer to the operating instructions of your VCR.
_ EDFTSET
CONTROL
'_t ADJ TEST
"CUT IN"
"CUT OUT"
IR SETUP FAUSE
IR TEST
_ _RETURN
[MENU] END
5'
The buttons to cancel recording pause on the VCR
The buttons vary depending on your VCR. To cancel recording pause:
•Select playback pause if" file button to cancel recording pause is II.
•Select recording if the button to cancel recording pause is O.
• Select playback if the button to cancel recording pause is I_.
Setting your camcorder and the VCR to face each other
Locate tile infl'ared ray emitter ofyotu cameorder and face it towards tile ren-lote sensor
of the VCR.
Set tile devices about 11 7/8 in. (30 cm) apart, and remove any obstacles between the
devices.
VCR
Remote sensor
59

Dubbing only desired scenes -Digital program editing
Confirming the VCR operation
(1) Insert a recordable tape into tile VCR, then set to recording pause.
(2) Turn the SEL/PUSH EXEC dial to select IR TEST, then press the dial.
(3) Turn the SEL/PUSH EXEC dial to select EXECUTE, then press the dial.
If the VCR starts recording, the setting is correct.
The EXECUTING indicator flashes on the LCD screen or in the viewfinder.
When finished, the indicator changes to COMPLETE.
When the VCRdoes not operate correctly
• Afier checking the code in "Ahout the IR SETUP code", set the "IR SETUP" or the
"PAUSEMODE" again.
• Place your camcorder at least 11 7/8 in. (30 cm) away flora the VCR.
6O
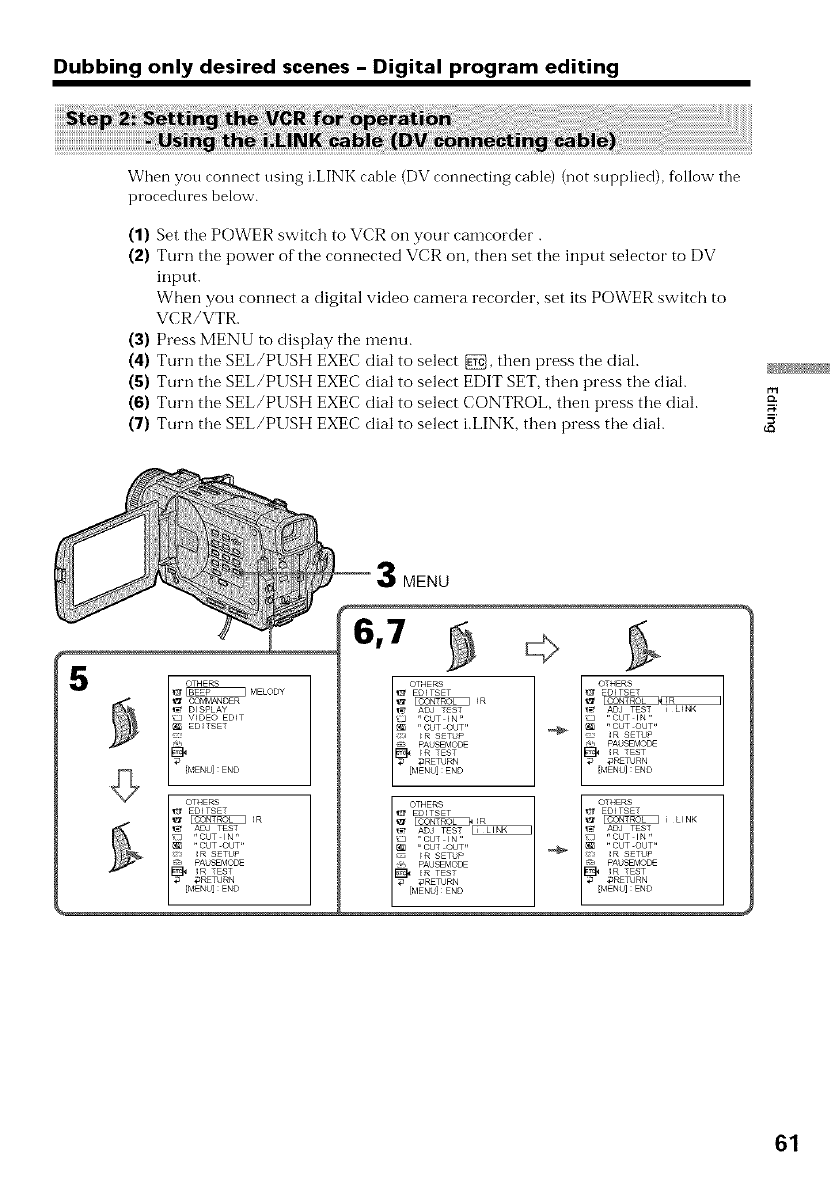
Dubbing only desired scenes -Digital program editing
When you connect using i.LINK cable (DV connecting cable) (not supplied), follow the
procedures below.
(1) Set the POWER switch to VCR on your camcorder.
(2) Turn the power of the connected VCR on, then set the input selector to DV
input.
When you COlmect a digital video camera recorder, set its POWER switch to
VCR/VTR.
(3) Press MENU to display the menu.
(4) Turn the SEL/PUSH EXEC dial to select _, then press the dial.
(5) Turn the SEL/PUSH EXEC dial to select EDIT SET, then press the dial.
(6) Turn the SEL/PUSH EXEC dial to select CONTROL, then press the dial.
(7) Turn the SEL/PUSH EXEC dial to select i.LINK, then press the dial. 5'
MENU
' li.....
_ MELODY
_ CO_,@,4ANDER
_ DISPLAY
'_ V_DEO EDT
ED_TSET
%,
OTHERS
_;f EDI TSET
_R
_ ADJ TEST
"CUT IN"
"CUT OUT"
R SETUP
J PAUSEMODE
_3RETURN
OTHERS
EDITSET
,r_ ADJ TEST
3'r CUT I N "
" CUT OUT"
IR SETUP
PAUSEMODE
_R TEST
_ _RETURN
[MENU] : END
OTHERS
EDI TSET
27.....
_ ADJ TEST
" CUT I N "
"CUT OUT"
'_ IR SETUP
_ PAUSEMO_
l_ _RETURN
[MENU] :END
61

Dubbing only desired scenes -Digital program editing
You can adjust tile synchronicity of your camcorder and the VCR.
Have a pen and paper ready for notes.
(1) Set the POWER swtich to VCR on your camcorder.
(2) Insert a blank tape (or a tape you want to record over) into the VCR, then set
to recording pause.
When you select i.LINK in CONTROL, the above procedure is not necessary.
(3) Turn the SEL/PUSH EXEC dial to select ADJ TEST, then press tile dial.
(4) Turn the SEL/PUSH EXEC dial to select EXECUTE, then press the dial.
IN and OUT are recorded on an image for five times each to calculate the
numerical values for adjusting the synchronicity.
The EXECUTING indicator flashes on the LCD screen or in the viewfinder.
When finished, the indicator changes to COMPLETE.
(5) Rewind the tape in the VCR, then start slow playback.
Take a note of the opening numerical value of each IN and the closing
numerical value of each OUT.
(6) Calculate the average of all the opening nunmrical values of each IN, and the
average of all the closing numerical values of' each OUT.
(7) Turn the SEL/PUSH EXEC dial to select "CUT-IN', then press the dial.
(8) Turn the SEL/PUSH EXEC dial to select the average numerical value of IN,
then press the dial.
The calculated start position fbr recording is set.
(9) Turn the SEL/PUSH EXEC dial to select "CUT-OUT", then press the dial.
(10) Turn the SEL/PUSH EXEC dial to select the average numerical value of OUT
then press the dial.
The calculated stop position for recording is set.
(11) Turn the SEL/PUSH EXEC dial to select RETURN, then press the diah
62

Dubbing only desired scenes -Digital program editing
0
9
0r_
5'
_3
Notes
• If you start recording fl'Olll the very beginning of tile tape, tile thst few seconds of the
tape may not record properly. Be sure to allow about 10 seconds' lead bef_ore starting
tile recording.
• You cannot dub tile titles, display indicators, o1"tile contents of cassette memory.
• When you connect with an i.LINK cable (DV connecting cable), you may not be able to
operate tile dubbing f\mction correctly, depending on the VCR.
Set CONTROL to IR in tile menu settings of your camcorder.
• When editing digital video, tile operation signals cannot be sent with DIGITAL I/O/
(LANC).
If you connect using an i,LINK cable (DV connecting cable)
With digital to digital connection, video and audio signals are transmitted in digital
form for bigh quality editing.
When the operations of the VCR do not work with an i.LINK cable (DV connecting
cable)
Keep the i.LINK connection, and select IR.
63
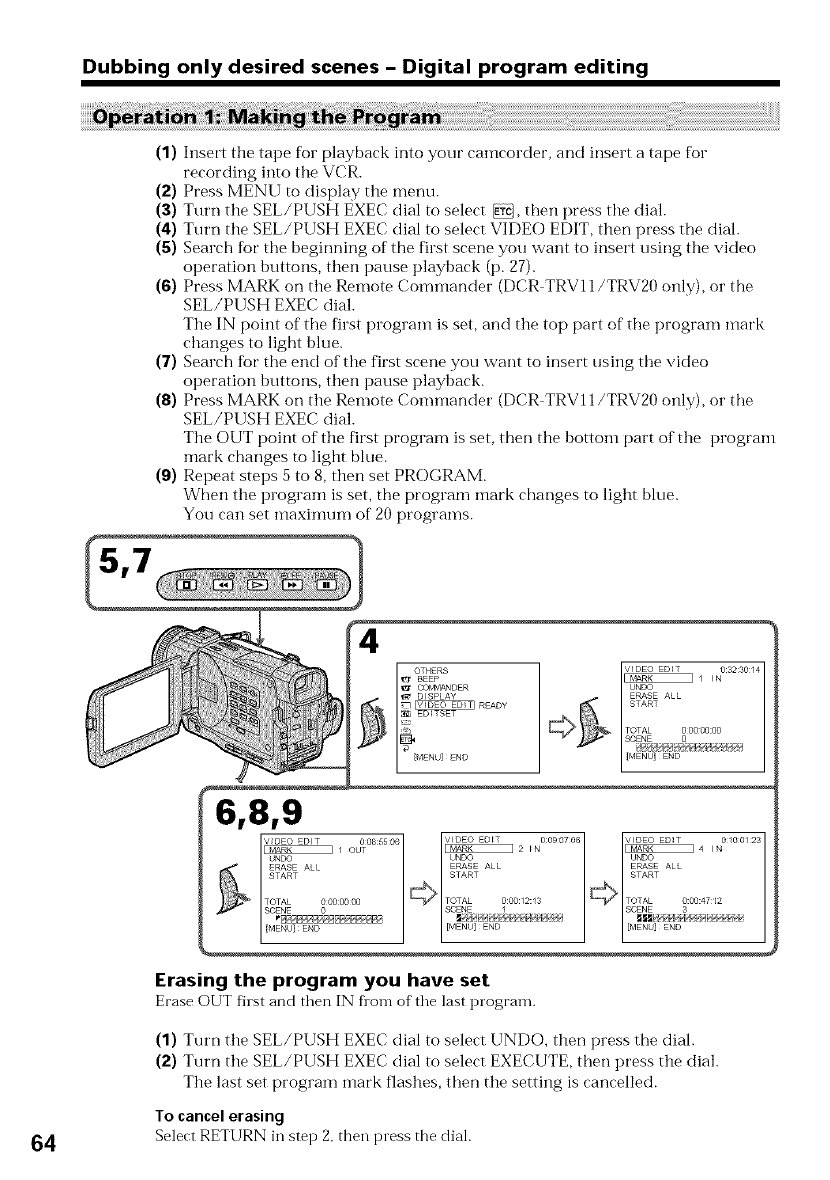
Dubbing only desired scenes -Digital program editing
(1) Insert the tape for playback into your camcorder, and insert a tape for
recording into the VCR.
(2) Press MENU to display the menu.
(3) Turn the SEL/PUSH EXEC dial to select _, then press the dial.
(4) Turn the SEL/PUSH EXEC dial to select VIDEO EDIT, then press the dial.
(5) Search for the beginning of the first scene you want to insert using the video
operation huttons, then pause playback (p. 27).
(6) Press MARK on the Remote Commander (DCR TRV11/TRV20 only), or the
SEL/PUSH EXEC dial.
The IN point of the first program is set, and the top part of the program mark
changes to light hlue.
(7) Search Ik_r the end of the first scene you want to insert using the video
operation huttons, then pause playback.
(8) Press MARK on the Remote Commander (DCR TRV11/TRV20 only), or the
SEL/PUSH EXEC dial.
The OUT point of the first program is set, then the bottom part of the program
mark changes to light blue.
(9) Repeat steps 5 to 8, then set PROGRAM.
When the program is set, the program mark changes to light blue.
You can set n_aximum of 20 programs.
_1 IN 0:3230/4
UNDO
ERASE ALL
TOTAL 0 00 00:00
SCENE 0
Bp_aBp/,q£_HB_4/yP_f_4
IMENOi END ................
V_DEO EDIT 008:55O6
_/ OUT
ERASE ALL
START
TOTAL 0000000
SCENE 0
[MENU} END
Erasing the program you have set
Erase OUT fhst and then IN flora of"the last program.
(1) Turn the SEL/PUSH EXEC dial to select UNDO, then press the dial.
(2) Turn the SEL/PUSH EXEC dial to select EXECUTE, then press the dial.
The last set program mark flashes, then the setting is cancelled.
To cancel erasing
64 Select RETURN in step 2, then press the dial.

Dubbing only desired scenes -Digital program editing
Erasing all programs
(1) Select VIDE() EDIT in the menu settings. Turn the SEL/PUSH EXEC dial to
select ERASE ALL, then press the dial.
(2) Turn tile SEL/PUSH EXEC dial to select EXECUTE, then press tile dial.
All the program marks flash, then the settings are cancelled.
To cancel erasing all programs
Select RETURN in step 2, then press the dial.
To cancel a program you have set
Press MENU.
Tile program is stored in memory until the tape is ejected.
On a blank portion of the tape
You cannot set IN o1"Ol JT on a blank portion of the tape.
If there is a blank portion between IN and OUT on the tape
The total time code may not be displayed correctly.
Make sure your camcorder and VCR are connected, and that the VCR is set to recording
pause. When you use an i.LINK cable (DVconnecting cahle) the following procedure is
not necessary.
Wizen you use a digital video camera recorder, set its POWER switch to VCR.
(1) Select VIDEO EDIT. Turn the SEL/PUSH EXEC dial to select START, then
press tile dial.
(2) Turn the SEL/PUSH EXEC dial to select EXECUTE, then press the dial.
Search for the beginning of the first program, then start dubbing.
The program mark flashes.
The SEARCH indicator appears during search, and tile EDIT indicator appears
during edit on the LCD screen or in the viewfinder.
The PROGRAM indicator changes to light blue after dubbing is complete.
Wizen the dubbing ends, your camcorder and the VCR automatically stop.
To stop dubbing
Press • using the video operation huttons.
To end the program editing function
Your eanzeorder stops when the dubhing is complete. Then the display returns to
VIDEO EDIT in the menu settings.
Press MENU to end the program editing fimction.
You cannot recordon the VCRwhen:
•The cassette is not inserted.
•The tape has run out.
•The write protect tah is set to expose the red mark.
•The IR SETUP code is not correct. (Wizen IR is selected.)
•The button to cancel recording pause is not correct. (When IR is selected.) (see page 59)
NOT READYappears on the LCDscreenwhen:
•The program to operate the digital program editing has not made.
• i.LINK is selected but an i.LINK cable (DV connecting cable) is not connected.
•The power of the connected VCR is not turned on. (when you set i.LINK). 65
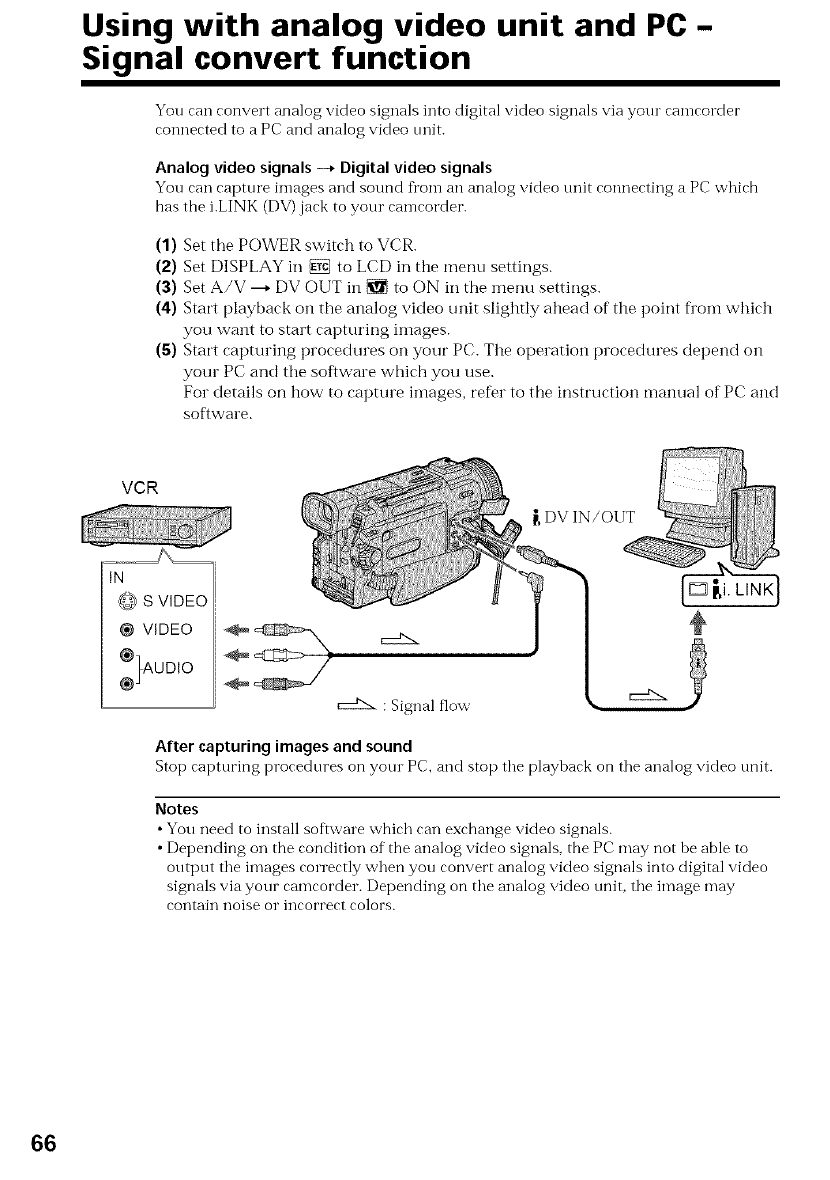
Using with analog video unit and PC -
Signal convert function
You can convert analog video signals into digital video signals via your camcorder
connected to a PC and analog video trait.
Analog video signals -+ Digital video signals
You can capture images and sound fl'om an analog video trait connecting a PC which
has the i.LINK (DV) jack to your camcorder.
(1) Set the POWER switch to VCR.
(2) Set DISPLAY in _ to LCD in the menu settings.
(3) Set A/V ---+DV OUT in _ to ON in the menu settings.
(4) Start playback on the analog video unit slightly ahead of the point fl'Oln which
you want to start capturing images.
(5) Start capturing procedures on your PC. The operation procedures depend on
your PC and tile software which you use.
For details on how to capture ilnages, refer to the instruction manual of PC and
software.
VCR
@ S VIDEO
® VIDEO
.%OD,O
: Signal flow
[, DV IN/OUT
After capturing images and sound
Stop capturing procedures on yotu PC, and stop tile playback on tile analog video unit.
Notes
•You need to install software which can exchange video signals.
• Depending on the condition of the analog video signals, the PC may not be able to
outi)ut tile images correctly when you convert analog video signals into digital video
signals via your camcorder. Depending on tile analog video unit, tile image may
contain noise o1"incorrect colors.
66
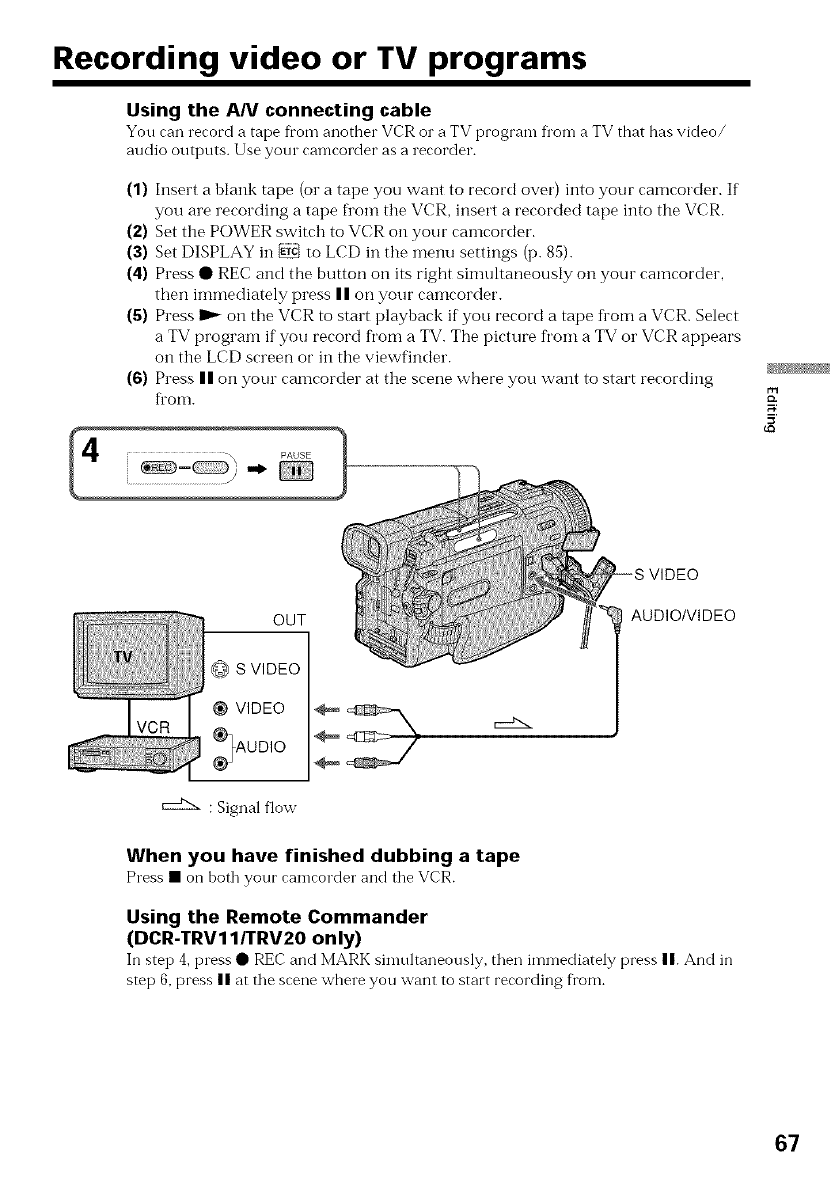
Recording video or TV programs
Using the AN connecting cable
You can record a tape fl'om another VCR o1"a TV progranl fl"on-ia TV that has video/
audio outputs. Use yore camcorder as a recorder.
(1) Insert a blank tape (or a tape you want to record over) into your camcorder. If
you are recording a tape fl'om the VCR, insert a recorded tape into the VCR.
(2) Set the POWER switch to VCR on your camcorder.
(3) Set DISPLAY in _ to LCD in the menu settings (p. 85).
(4) Press • REC and the button on its right simultaneously on your camcorder,
then immediately press I I on your camcorder.
(S) Press I_- on the VCR to start playback if you record a tape fl'om a VCR. Select
a TV program if you record from a TV. The picture from a TV or VCR appears
on the LCD screen or in the viewfinder.
(6) Press II on your camcorder at the scene where you want to start recording
fl'om. r-,
5'
OUT
@ S VIDEO
VIDEO
.%UD,O
: Signal flow
AUDIO/VIDEO
When you have finished dubbing a tape
Press •on both your camcorder and the VCR.
Using the Remote Commander
(DCR-TRV11/TRV20 only)
In step 4, press •REC and MARK sinmltaneously, then immediately press n. And in
step 6, press || at the scene where you want to start recording fl'om.
67
Recording video or TV programs
Note
When tile pictt/l e fi'onl the VCR o1"TV does not appear on the LCD screen o1"in tile
viewfindec, check if tile A/V connecting cable is connected to tile output jack for
playback.
If your VCR is a monaural type
Connect the yellow plug of the A/V connecting cahle to the video output jack and the
white or the red plug to tile audio output jack on the VCR or the TV. When tile white
plug is connected, tile left channel audio is output, and the red plug is connected, the
right channel audio is output.
Connect using an Svideo cable (not supplied) to obtain high-quality pictures
With this connection, you do not need to connect the yellow (video) i_lug of"the A/V
connecting cable.
Connect an S video cable (not supplied) to the S (S1) video jacks of both your camcorder
and the VCR.
This connection produces higher quality DV fbrmat pictures.
68
Recording video or TV programs
Using the i.LINK cable (DV connecting cable)
Simply connect tile i.LINK cable (DV connecting cable) (not supplied) to _ DV IN/OUT
and to DV IN/OUT of the DV products. With digital to digital connection, video and
audio signals are transmitted in digital form for high quality editing.
(1) Insert a blank tape (or a tape you want to record over) into your camcorder,
and insert tile recorded tape into the VCR.
(2) Set tile POWER switch to VCR on your" comcorder.
(3) Set DISPLAY ill _ to LCD ill the menu settings (p. 76).
(4) Press • REC and the button oil its right simultaneously on your camcorder,
then immediately press II on your camcorder.
(5) Press I_ on the VCR to start playback. Tile picture to be recorded appears oil
the LCD sct'een or ill the viewfinder.
(6) Press II on your camcorder at the scene where you want to start recording
fl'om.
...........................................\ PAUSE 1
_ = C:::::D)-.
. DV IN/OUT
r----N.: Signal flow
When you have finished dubbing a tape
Press • on both your camcorder and the VCR.
Using the Remote Commander
(DCR-TRV11/TRV20 only)
In step 4, press •REC and MARK simultaneously, then immediately press n. And in
step 6, press n at the scene where you want to start recording fi'om.
69
Recording video or TV programs
You can connect one VCR only using the i.LINK cable (DV connecting cable)
When you dub apicture in digital form
The color of tile display may be uneven. However this does not affect the dubbed
picture.
If you record playback pause picture with the F, DV IN/OUT jack
The recorded picture becomes rough. And when you play back tile picture using your
camcorder, tile picture may jitter.
Before recording
Make sure if the DV IN indicator appears on tile LCD screen or in the viewfinder. Tile
DV IN indicator may appear on both equipment.
70
Inserting a scene from a VCR -Insert editing
You can insert a new scene fl'om a VCR onto your originally recorded tape by
specif}?ing the insert stalt and end points. Use tile Remote Commander for this
operation. Connections are the same as on page 67 or 69.
Insert a cassette containing the desiled scene to insert into the VCR.
[a]
[A]
[B]
[C]
I I
[b] [c]
[A]: A tape that contains the scene to be snperimposed
[B]: A tape befi0re editing
[C]: A tape after editing
(1)
(2)
(3)
(4)
(s)
(6)
Set the POWER switch to VCR on your comcorder.
On tile connected VCR, locate just before the insert start point [a], then press
| | to set the VCR to the playback pause mode.
On your camcorder, locate the insert end point [¢] by pressing _ or ll,_.
Then press | | to set it to the playback pause mode.
Press ZERO SET MEMORY on the Remote Conlmander. Tile ZERO SET
MEMORY indicator flashes and the end point of the insert is stored ii1
memory. The tape counter shows "0:00:00."
On your camcorder, locate the insert start point [b] by pressing <<, then press
• REC and tile button on its tight simultaneously.
First press | | on tile VCR, and after a few seconds press | | on your camcorder
to start inserting the new scene.
Inserting automatically stops near the zero point on the ta/e counter. Your
camcorder automatically returns to tile recording pause mode.
r-,
400o001
MEMORY _ MEMORY ,,IC
71
Inserting a scene from a VCR -Insert editing
To change the insert end point
Press ZERO SET MEMORY again af'.er step 5 to erase the ZERO SET MEMORY
indicator and begin fl'om step 3.
Using the Remote Commander
(DCR-TRV1 I/TRV20 only)
In step 5, press @REC and MARK simultaneously, then immediately press n. And in
step 6, press II at the scene where you want to start recording from.
Note
The picture alld sound recorded Oil tile portion betvveen the insert start and end points
will be erased when you insert tile new scene.
If you insert scenes on the tape recorded with other camcorder (including other
DCR-TRV6/TRV11/TRV20)
Tim picture and sound n-lay be distorted. We reeonnnend tbat you insert scenes on a
tape recorded with your camcorder.
When the inserted picture is played back
The picture and sound may be distorted at the end of the inserted portion. This is not a
malfunction.
The picture and sound at the start point and tile end point may be distorted in tile LP
mode.
To insert ascene without setting the insert end point
Skip steps 3 and 4. Press • when you want to stop inserting.
72
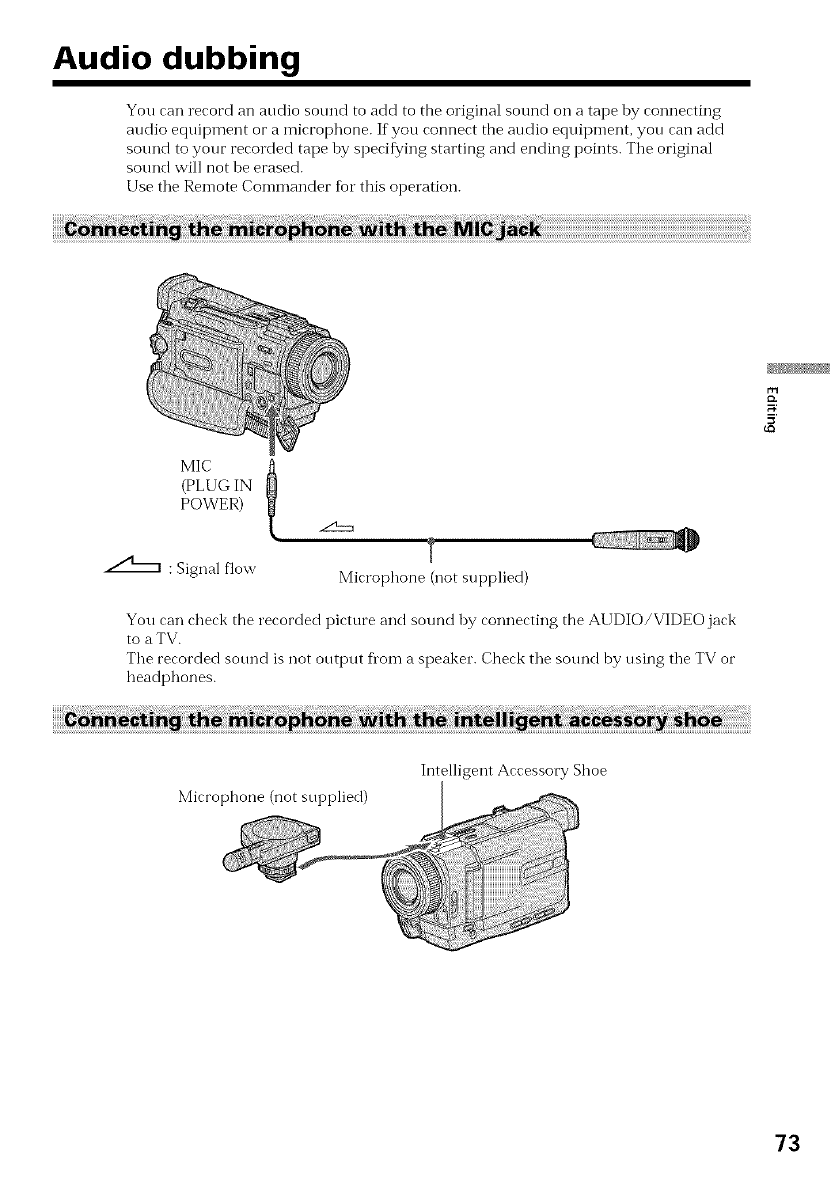
Audio dubbing
You can record an audio sound to add to the original sound on a tape hy connecting
audio equipment or a microphone. If you connect the audio eqnipment, you can add
sound to your recorded tape by specifying starting and ending points. Tile original
sound will not be erased.
Use tile Remote Commander for this operation.
l
(PLUG IN
POWER)
T
_ : Signal flow Microphone (not supplied)
You can check the recorded picture and sound by connecting the AI JDIO/VIDEO jack
to a TV.
The recorded sotmd is not output flora a speaker. Check the sotmd by using the TV or
headphones.
Microphone (not supplied)
Intelligent Accessory Shoe
73
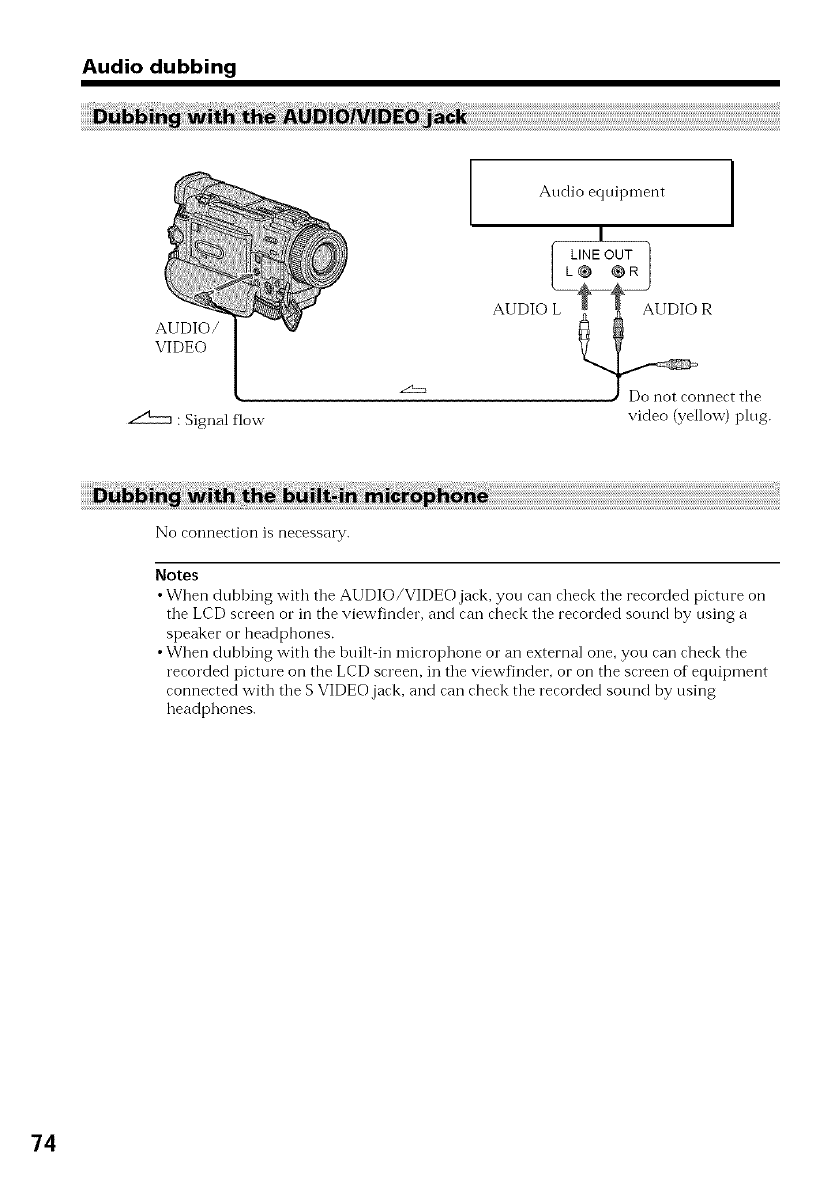
Audio dubbing
AUDIO/
VIDEO
: Signal flow
Audio equipment
I
[ LINE OUT ]
IL_ CR I
AUDIO L R
J Do not connect the
video (yellow) plug.
No connectiol] is necessary.
Notes
•When dubbing with tile AUDIO/VIDEO jack, you can check tile recorded picture on
tile LCD screen or in the viewfinder, and can check tile recorded sound by using a
speaker or headphones.
•When dubbing with tile built in microphone or an external one, you can check the
recorded picture on the LCD screen, in tile viewfinder, or on the screen of equipment
connected wkh tile S VIDEO.jack, and can check tile recorded sound by using
headphones.
74
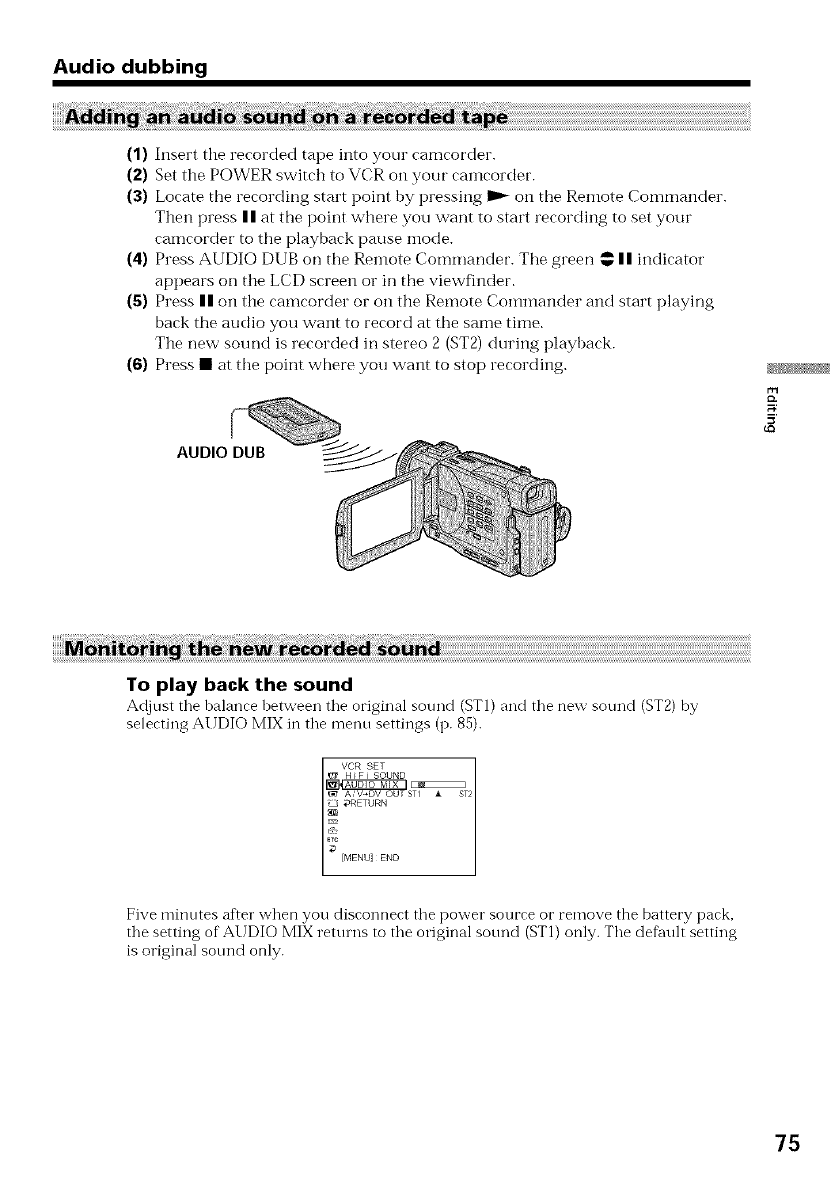
Audio dubbing
(1) Insert the recorded tape into your camcorder.
(2) Set the POWER switch to VCR on your can:corder.
(3) Locate the recording start point by pressing I1_ on the Remote Commander.
Then press I I at the point where you want to start recording to set your
camcorder to the playback pause :::ode.
(4) Press AUDIO DUB on the Remote Commander. The green _ I I indicator
appears on the LCD screen or in the viewfinder.
(5) Press II on the camcorder or on the Remote Commander and start playing
back the audio you want to record at the same time.
The new sound is recorded in stereo 2 (ST2) during playback.
(6) Press • at the point where you want to stop recording.
AUDIO DUB
To play back the sound
Adjust the balance between the original sound (ST1) and the new sound (ST2) by
selecting AUDIO MIX in the men:, settings (p. 85).
VCR SET
RETURN
MENU] END
Five minutes after when you disconnect the power source or remove the battery pack,
the setting of AUDIO MIX rettuns to the original sotu'<] (ST1) only. Tile default setting
is original sound only.
75

Audio dubbing
Notes
•New sound cannot be recorded on a tape already recorded in the 16 bit mode (32 kHz,
44.1 kHz or 48kHz) (p. 89).
• New sound cannot be recoMed on a tape already recorded in the LP mode.
• You cannot add audio with the _,DV IN/OUT jack.
Ifyou make all the connections
The audio input to be recorded will take precedence over others in tile fbllowing order.
• MIC (PLUG IN POWER) jack
• Intelligent accesso W shoe
• AUDIO/VIDEO jack
• Built in microphone
If an i.LINK cable (DV connecting cable) (not supplied) is connected to your
camcorder
You cannot add a sound to a recorded tape.
To add new sound more precisely
Press ZERO SET MEMORY on the Remote Commander at the point where you want to
stop recording later in the playback mode.
Can T out steps 3to 5.Recording automatically stops at the point where ZERO SET
MEMORY was pressed.
We recommend that you add new sound on a tape recorded with your camcorder
If'you add new sound on a tape recorded with another camcorder (including
DCR TRV6/TRV11/TRV20), the sound quality may become worse.
If you set the write-protect tab of the tape to lock
You cannot record on a tape. Slide the write protect tab to release the write protection.
On blank portions
You cannot add an audio.
76
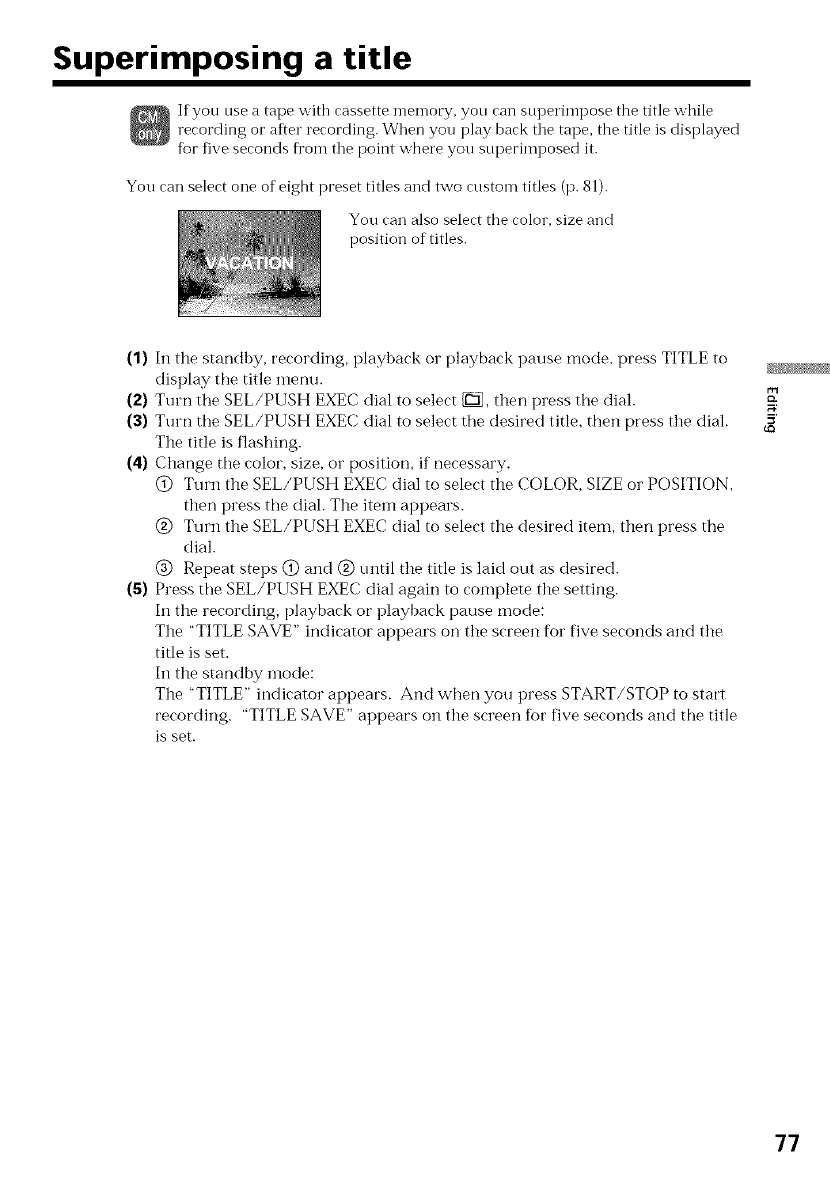
Superimposing a title
If you use a tape witb cassette men-lory, you can stu)erimpose the title while
recording or after recording. When you play back tile tape, the title is displayed
for five seconds fl'om tile point wbere you superimposed it.
You can select one of eight preset titles and two custom titles (p. 81).
You can also select tbe color, size and
position of titles.
(1) In the standby, recording, playback or playback pause mode, press TITLE to
display the title menu.
(2) Turn the SEL/PUSH EXEC dial to select _, then press the dial.
(3) Turn the SEL/PUSH EXEC dial to select the desired title, then press the dial.
The title is flashing.
(4) Change the color, size, or position, if necessary.
@ Turn the SEL/PUSH EXEC dial to select the COLOR, SIZE or POSITION,
then press the dial. The item appears.
@ Turn the SEL/PUSH EXEC dial to select the desired item, then press the
dial.
@ Repeat steps @ and @ until the title is laid out as desired.
(S) Press the SEL/PUSH EXEC dial again to complete the setting.
In the recording, playback or playback pause mode:
The "TITLE SAVE" indicator appears on the screen for five seconds and the
title is set.
In the standby inode:
The "TITLE" indicator appears. And wtmn you press START/STOP to start
recording, "TITLE SAVE" appears on the screen for five seconds and the title
is set.
5'
77
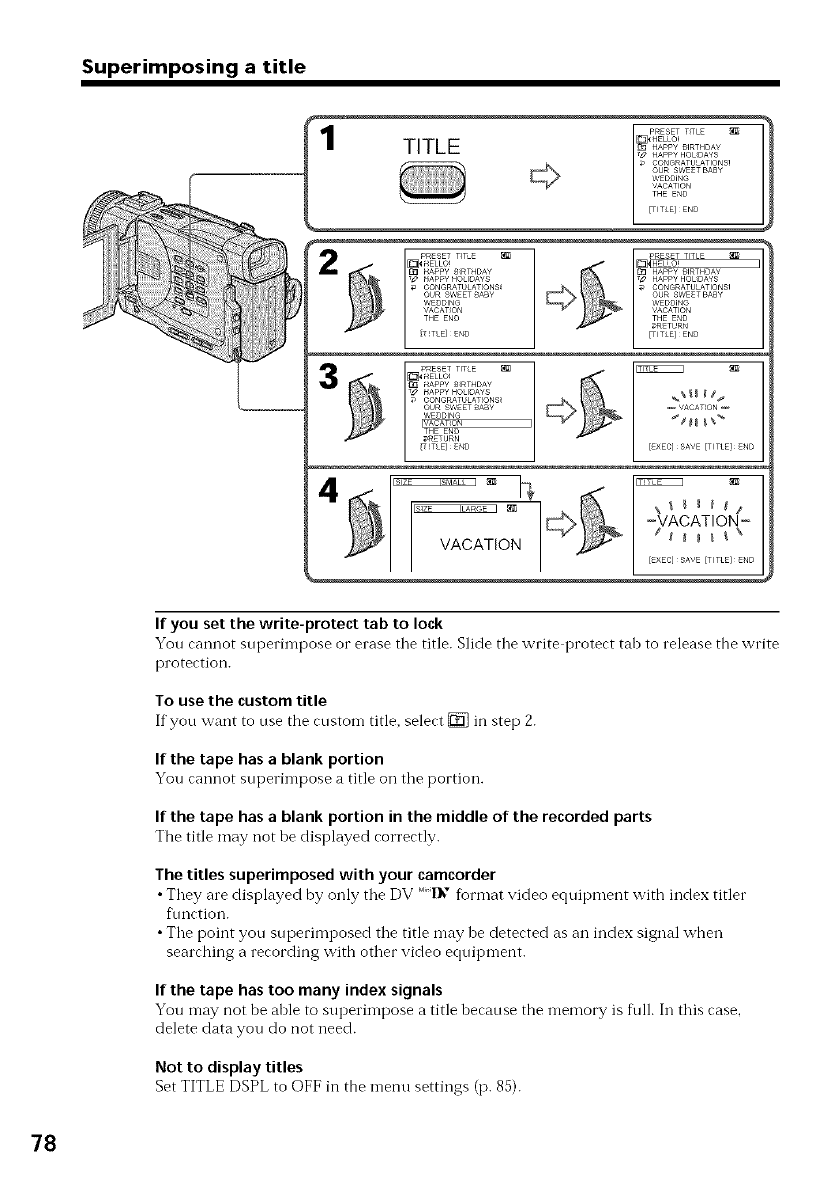
Superimposing a title
L [EXEC] SAVE [T_TLEL END
I[you set the write-protect tab to lock
You cannot superimpose or erase tile title. Slide tile write protect tab to release the write
protection.
To use the custom title
If you want to use the custom title, select _ in step 2.
If the tape has ablank portion
You cannot superimpose a title on the portion.
If the tape has ablank portion in the middle of the recorded parts
The title may not be displayed correctly.
The titles superimposed with your camcorder
•They are displayed by only the DV Mi3'_format video equipment with index titler
t\mction.
•The point you superimposed the title may be detected as an index signal when
searching a recording with other video equipment.
Ifthe tape has too many index signals
You may not be able to superimpose a title because the memory is frill. In this case.
delete data you do not need.
Not to display titles
Set TITLE DSPL to OFF in the menu settings (p. 85).
78
Superimposing a title
Title setting
•Tile title color changes as t_ollows:
WHITE _-+ YELLOW _-+ VIOLET _-+ RED _-+ CYAN _-+ GREEN _-+ BLUE
•Tile title size changes as ti011ows:
SMALL _-+ LARGE
You cannot input more than 13 characters or more t_ora LARGE size.
• If you select the title size "SMALL," you have nine choices for tile title position.
If you select the title size "LARGE," you have eight choices fbr tile title position.
One cassette can have up to about 20 titles, if one title consists of five characters
However, if the cassette memory is 1i111with date, photo and cassette label data, one
cassette can have only up to about 11 titles with five characters each.
Cassette memory capacity is as fi_llows:
• 6 date data (maximum)
• 12 photo data (maximum)
• 1 cassette label (maximum)
If the "_ FULL" mark appears
The cassette memory is t\_ll.If you erase the title in the cassette, you can label it.
r-,
5'
79

Superimposing a title
(1) Set the POWER switch to VCR.
(2) Press MENU to display the menu.
(3) Turn the SEL/PUSH EXEC dial to select _, then press the dial.
(4) Turn the SEL/PUSH EXEC dial to select TITLEERASE, then press the dial.
Title erase display appears.
(5) Turn the SEL/PUSH EXEC dial to select the title you want to erase, then press
the dial.
"ERASE OK ?" indicator appears.
(6) Make sure the title is the one you want to erase, and turn the SEL/PUSH EXEC
dial to select ERASE, then press the dial.
MENU
CM SET
CM SEARCH
TITLEERASE
_TITLE DSPL
TAPE TITLE
ERASE ALL
L [MENU] END
5,6
CM SET
_' CM SEARCH
_tlT_TLEERASEIIm
TITLE DSPL
TAPE T_TLE
_ERASE ALL
/ RET"RNo
L [MENU]END
MENU
/ HELLO!
2 CONGRATULATIONS!
3 HAPPY NEW YEAR!
4 PRESENT
5 GOOD MORNING
6 WEDDING
[MENU]END
TITLE ERASE
4 PRESENT
ERASE OK9 ERASE
[MENU]END
To cancel erasing a title
Select RETURN in step 6.
8O
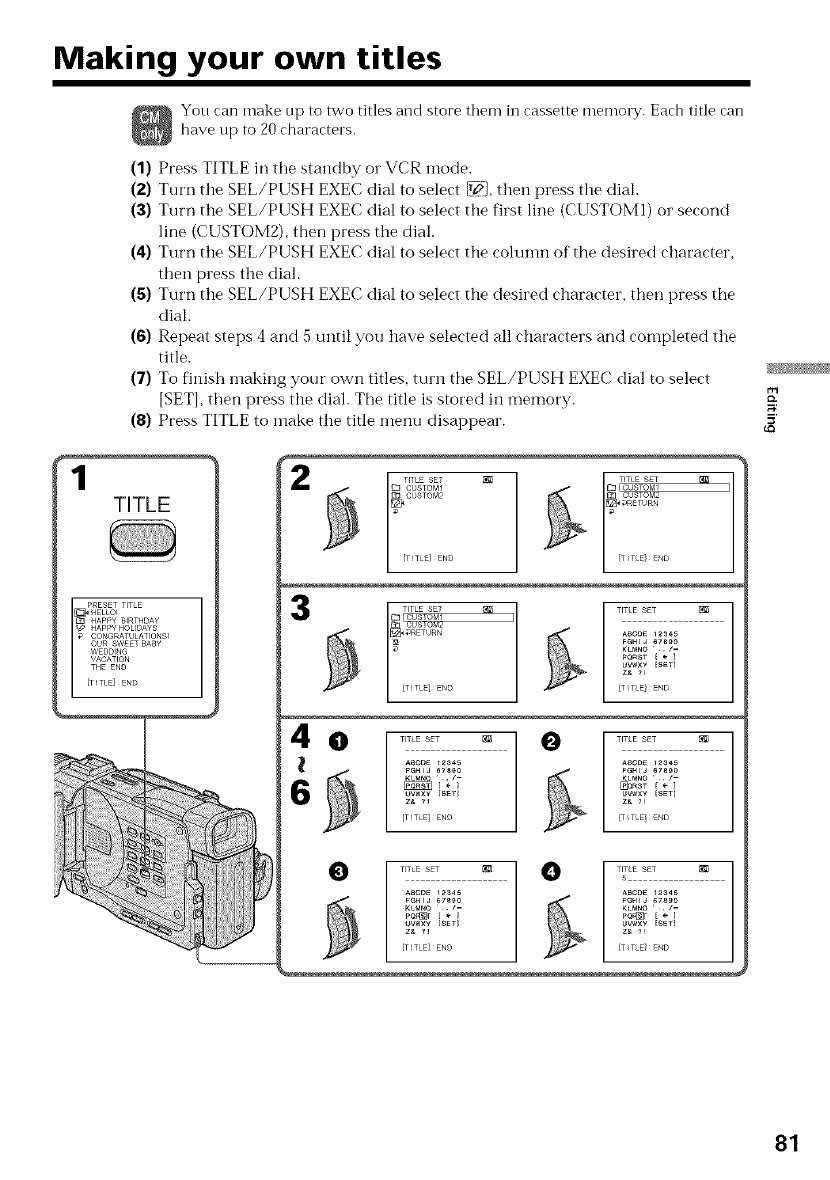
Making your own titles
You can make tip to two titles and store them in cassette memory. Each title can
have tip to 20 characters.
(1) Press TITLE in the standby or VCR mode.
(2) Turn the SEL/PUSH EXEC dial to select _, then press the dial.
(3) Turn the SEL/PUSH EXEC dial to select the first line (CUSTOMI) or second
line (CUSTOM2), then press the dial.
(4) Turn the SEL/PUSH EXEC dial to select the colunm of the desired character,
then press the dial.
(5) Turn the SEL/PUSH EXEC dial to select the desired character, then press the
dial.
(6) Repeat steps 4 and 5 tmtil you have selected all characters and completed the
title.
(7) To finish making your own titles, turn the SEL/PUSH EXEC dial to select
[SETI, then press the dial. The title is stored in memory.
(8) Press TITLE to make the title menu disappear.
1TITLE 2
3
O TITLE SET _ _ TITLE SET _B
A
V s
ABC_E _ ABODE _3_
FGHIJ _7_0 F_HIJ _7_9_
UWXY [SET_ UV_×Y [_T]
[TITLE]ENO [T_TLE/END
¢Q
81
Making your own titles
To change a title you have stored
In step 3, select CUSTOM1 or CUSTOM2, depending on which title you want to change,
then press the SEL/PUSH EXEC dial. Ttnn the SEL/PUSH EXEC dial to select I÷1,then
press the dial to delete the tide. The last character is erased. Enter the new title as
desired.
If you take five minutes or longer to enter characters in the standby mode while a
cassette is in your camcorder
The power automatically goes off The characters you have entered remain stored in
memory. Set the POWER switch to OFF (CHG) once and then to CAMERA again, then
proceed from step 1.
We recommend setting the POWER switch to VCR o1"removing the cassette so that
your camcorder does not automatically turn off while you are entering title characters.
To delete the title
SelectI<'1.The last character is erased.
To enter a space
Select IZ& ?!I, then select the blank part.
82
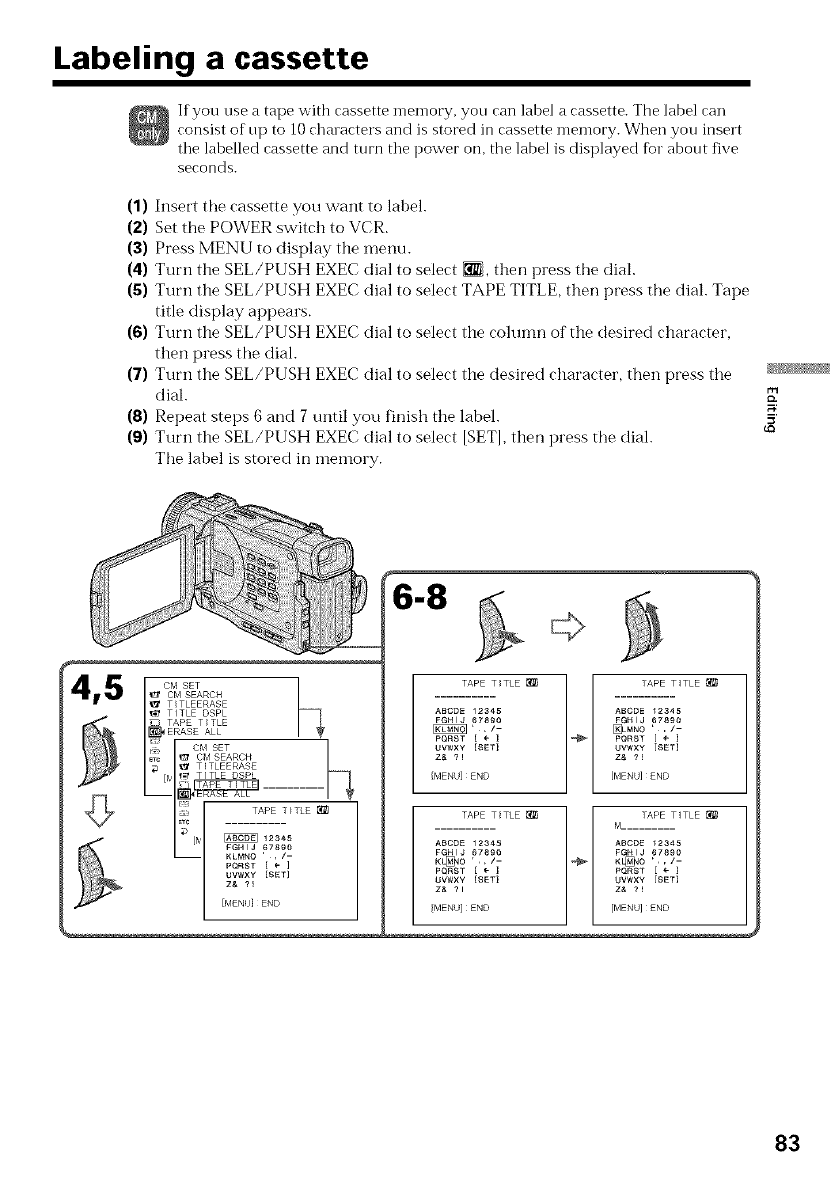
Labeling a cassette
If you use a tape witb cassette memory, you can label a cassette. The label can
consist of up to 10 chalacters and is stored in cassette memory. When you insert
tile labelled cassette and turn tile power on, the label is displayed for about five
seconds.
(1) Insert the cassette you want to label.
(2) Set the POWER switch to VCR.
(3) Press MENU to display the menu.
(4) Turn the SEL/PUSH EXEC dial to select _, then press the dial.
(5) Turn the SEL/PUSH EXEC dial to select TAPE TITLE, then press the dial. Tape
title display appears.
(6) Turn the SEL/PUSH EXEC dial to select the cohmm of the desired character,
then press the dial.
(7) Turn the SEL/PUSH EXEC dial to select the desired character, then press the
dial.
(8) Repeat steps 6 and 7 until you finish the label.
(9) Turn the SEL/PUSH EXEC dial to select [SETI, then press the dial.
The label is stored in memory.
6-8
4,5 cMsEt
t_ CM SEARCH
,1_ TITLEERASE
TITLE DSPL
ERASE AU
i_rc I_' Cbl SEARCH
_;t TITLEERASE
_TC TAPE T _TLE_
L_I :.........
KLMN O ' , /-
PQRST [ ÷ ]
[MENU] END
TAPETITLE_ r_ TAPIT[TLE_
ABCDE 12345 ABCDE 12345
FGHIJ 6789O FGHIJ 67890
[RiN_' ;/[ _.No' -PQRST [ PQRST [
UVWXY {SET} UVWXY [SET)
z& _1 z& ?t
[MENU] END [MENU] END
TAPET_TLE_ "_ TAPII[TLE_
M..........
ABODE 12345 ABODE 12345
FGHIJ 67890 FGHIJ 67890
K_O' ;/[ K_O' -
PQRST [ PQRST [
UVWXY {SETI UVWXY [SET]
z& ?1 z& ?_
{MENU]END [MENU]END
5'
83
Labeling a cassette
To erase a character
In step 6 turn the SEL/PUSH EXEC dial to select I÷1,then press the dial. The last
character is erased.
To change the label you have made
Insert the cassette to change the label, and operate in the saIl-le vv'ay to make a new label.
If you set the write-protect tab of the tape to lock
You cannot label the tape. Slide the write protect tab to release the write protection.
If the _ mark appears in step 5
The cassette memory is f\fll. If you erase tile title iI1 the cassette, you can label it.
If you have superimposed titles in the cassette
When the label is displayed, up to fbur titles also appear.
When the "-----" indicator has fewer than 10 spaces
The cassette memory is frill.
The .... indicates tbe numl)er of cbaracters you can select fbr the label.
To enter a space
Select IZ& ? ! l, then select the blank part.
84
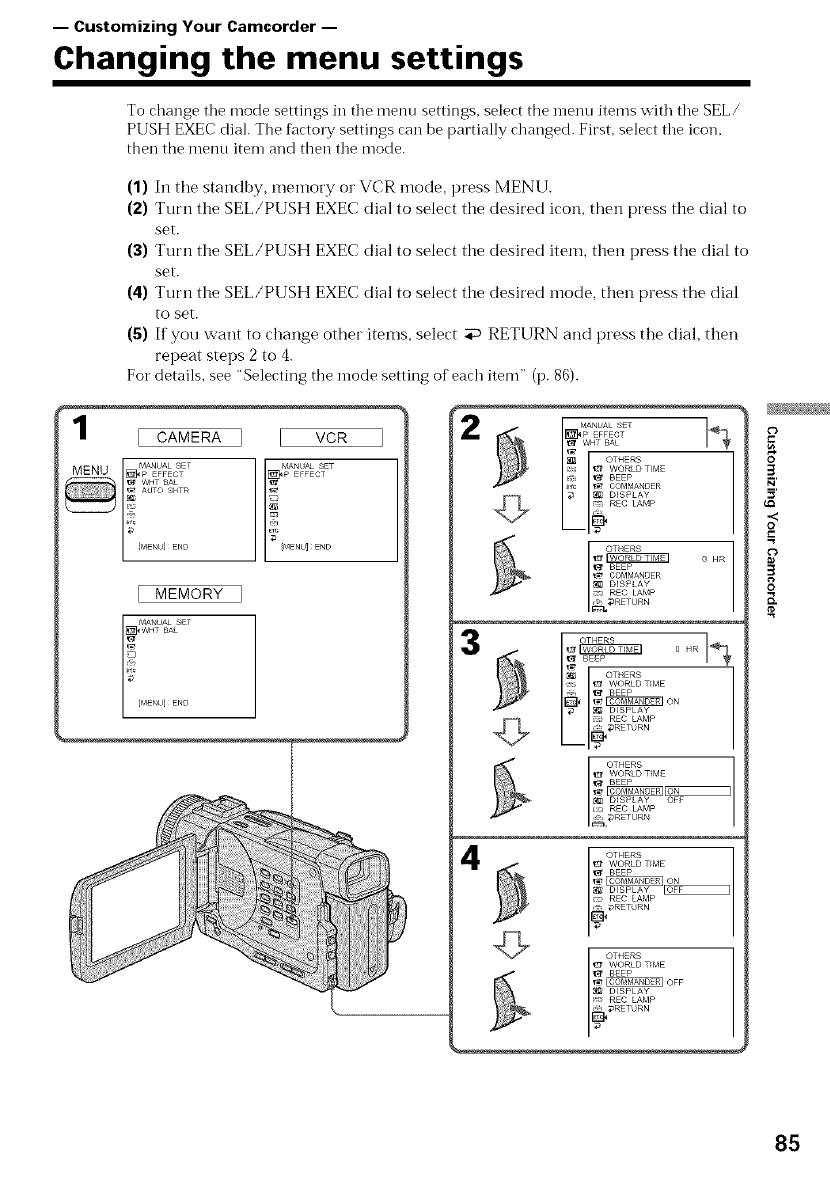
-- Customizing Your Camcorder --
Changing the menu settings
To change tile mode settings in tile menu settings, select the menu items with tile SEL/
PUSH EXEC dial. The factory settings can be partially changed. First, select tile icon.
then the menu item and then tile mode.
1
(1) In the standby, memory or VCR mode, press MENU.
(2) Turn the SEL/PUSH EXEC dial to select the desired icon, then press the dial to
set.
(3) Turn the SEL/PUSH EXEC dial to select the desired item, then press the dial to
set.
(4) Turn the SEL/PUSH EXEC dial to select the desired inode, then press the dial
to set.
(5) If you want to change other items, select _ RETURN and press the dial, then
repeat steps 2 to 4.
For details, see "Selecting the mode setting of each item" (p. 86).
WHT BAL
OTHERS
WORLD TIME
C7 I_ BEEP
_rc _ COMMANDER
7 _ _ {i_ DISPLAY
REC LAMP
o HR
3BEEP
{:_ OTHERS
WORLD TIME
J _ BEEP
_ DISPLAY
REC LAMP
DRETURN
I CAMERA VCR
MANUAL SET
7Z,
I MEMORY
MANUAL SET
WHT BAE
_[MENU]END
4
G
¢')
8'
3
.<
O
3
8
85
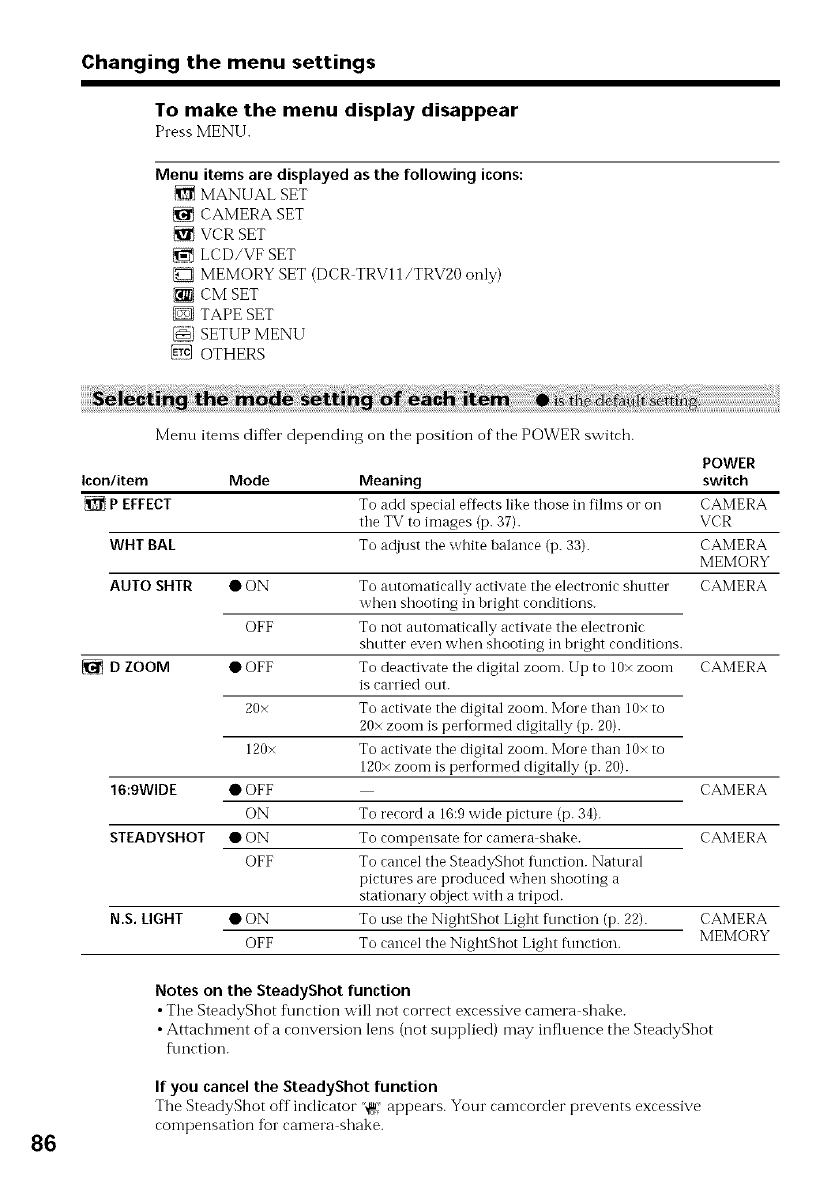
Changing the menu settings
To make the menu display disappear
Press MENU.
Menu items are displayed as the following icons:
MANUAL SET
CAMERA SET
VCRSET
LCD/VF SET
MEMORY SET (DCR TRV11/TRV20 only)
{_ CM SET
D TAPE SET
SETUP MENU
@ OTHERS
86
Menu items diffbr depending on the position of the POWER switch.
POWER
Icon/item Mode Meaning switch
{_ PEFFECT To add special effects like those in fihns o1"oil CAMERA
the TV to images (p. 37). VCR
WHT BAL To adjust the white balance (p. 33). CAMERA
MEMORY
AUTO SHTR • ON To antomatically activate the electronic shntter CAMERA
when shooting in bright conditions.
OFF To not automatically activate the electronic
shutter even when shooting in bright conditions.
• OFF To deactivate the digital zoom. Up to 10x zoonl CAMERA
is carried out.
20x To activate tile digital zoom. More than 10x to
20x zoom is performed digitally (p. 20).
120x To activate tile digital zoom. More than 10x to
120x zoom is performed digitally (p. 20).
• OFF CAMERA
ON To record a 16:9 wide picture (p. 34).
• ON To compensate for camera shake. CAMERA
OFF To cancel tile SteadyShot flmction. Natural
pictures are produced when shooting a
stationary object with a tripod.
N.S. LIGHT • ON To use tile NightShot Light fnnction (p. 22). CAMERA
OFF To cancel the NightShot Light fnnction. MEMORY
DZOOM
16:9WIDE
STEADYSHOT
Notes on the SteadyShot function
• Tile SteadyShot flmction will not correct excessive camera shake.
•Attachment of a conversion lens (not supplied) may influence tile SteadyShot
f\mction.
If you cancel the SteadyShot function
The SteadyShot off indicator "@' appears. Your camcorder prevents excessive
compensation fur camera shake.

Changing the menu settings
POWER
Icon/item Mode Meaning switch
HiFi SOUND • STEREO To play back a stereo tape or dual sound track VCR
tape with main and sub sound (p. 125).
1 To play back a stereo tape with the left sound o1"
a dual sound tape with main sound.
2 To play back a stereo tape with the right sound
or a dual sound track tape with suh sound.
To adjust the balance hetween the stereo 1 and VCR
stereo 2 (p. 75).
L! ]
STI Alk ST2
AUDIO MIX
A/V-+DV OUT • OFF
ON
LeD B.L. • BRT NORMAL
To output digital images and sound in analog
format using your camcorder.
To output analog images and sotmd in digital
format using your camcorder.
To set the hrightness on the LCD screen normal.
BRIGHT To hrighten the LCD screen.
LeD COLOR
VCR
VF B.L.
VCR
CAMERA
MEMORY
To adjust the color on the LCD screen, turn and VCR
press the SEL/PUSH EXEC dial. CAMERA
To get low _ To get high MEMORY
,A intensity
intensity
• BRT NORMAL To set the hrightness on the viewfinder screen to VCR
normal. CAMERA
BRIGHT To hrighten the viex_finder screen. MEMORY
Notes on LCDB.L
•Wizen you select "BRIGHT". battel T life is reduced by about 10 percent during
recording.
•When you use power sources other than the batte_T pack, "BRIGHT" is automatically
selected.
Notes on VF B.L
When you select "BRIGHT", battery life is reduced by about 10percent during
recording.
3
.<
O
.=
3
8
E
87
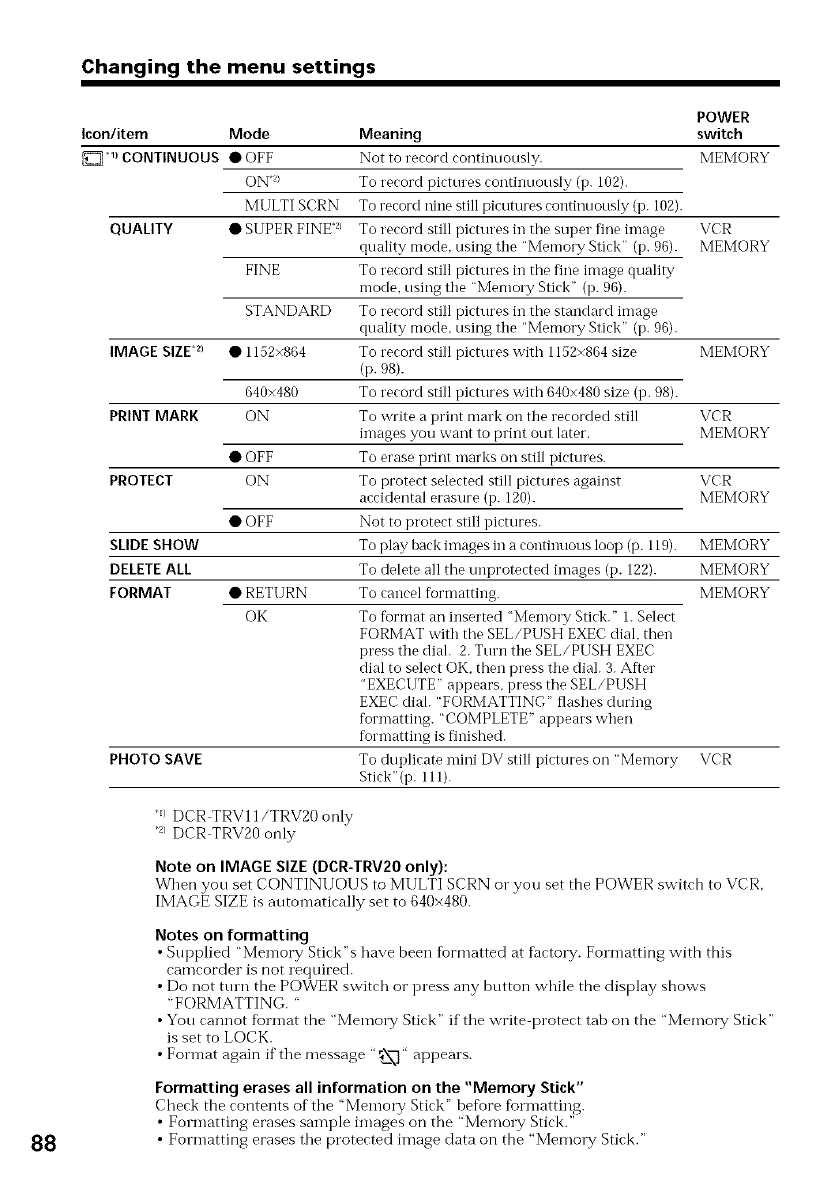
Changing the menu settings
POWER
Icon/item Mode Meaning switch
1) CONTINUOUS •OFF Not to record continuously. MEMORY
ON *_} To record pictures continuously (p. 102).
MULTI SCRN To record nine still picutures continuously (p. 102).
QUALITY • SUPER FINE _) To record still pictures in the super fine image VCR
quality mode. using the "Memory Stick" (p. 96). MEMORY
FINE To record still pictures in the fine image quality
mode. using the "Memory Stick" (p. 96).
STANDARD To record still pictures in the standard image
quality mode. using the "Memory Stick" (i7. 96).
IMAGE SIZE*z) • 1152×864 To record still pictures with 1152×864 size MEMORY
(p.98).
640×480 To record still pictures with 640×480 size (i7. 98).
PRINT MARK ON To write a print mark oi7 the recorded still VCR
images you want to print out later. MEMORY
• OFF To erase print marks oi7 still pictures.
PROTECT ON To protect selected still pictures against VCR
accidental erasure (i7. 120). MEMORY
• OFF Not to protect still pictures.
SLIDESHOW To play back images in a continuous loop (p. 119). MEMORY
DELETEALL To delete all the unprotected images (i7. 122). MEMORY
FORMAT • RETURN To cancel formatting. MEMORY
OK To format an inserted "Memory Stick." 1. Select
FORMAT with the SEL/PUSH EXEC dial. then
press the dial. 2. Turn the SEL/PUSH EXEC
dial to select OK. then press the dial. 3. After
"EXECUTE" appears, press the SEL/PUSH
EXEC dial. "FORMATTING" flashes during
forlnatting. "COMPLETE" appears when
forlnatting is finished.
PHOTO SAVE To duplicate mini DV still pictures oi7 "Memory VCR
Stick" (p. 111).
88
q/ DCR TRV11/TRV20 only
•2/DCR TRV20 only
Note on IMAGE SIZE (DCR-TRV20 only):
When you set CONTINUOUS to MULTI SCRN o1"you set the POWER switch to VCR,
IMAGE SIZE is automatically set to 640x480.
Notes on formatting
• Supplied "Memory Stick"s have been formatted at factory. Formatting with this
camcocder is not zequiced.
• Do not tmn the POWER switch or press any button while the display shows
"FORMATTING. "
•You cannot format the "Memo1T Stick" if the write protect tab on the "Memo1T Stick"
is set to LOCK.
• Format again if the message "_',_" appears.
Formatting erasesall information on the "Memory Stick"
Check the contents of the "Memory Stick" before formatting.
• Formatting erases sample images on the "Memo W Stick."
• Formatting erases the protected image data on the "Memo1T Stick."
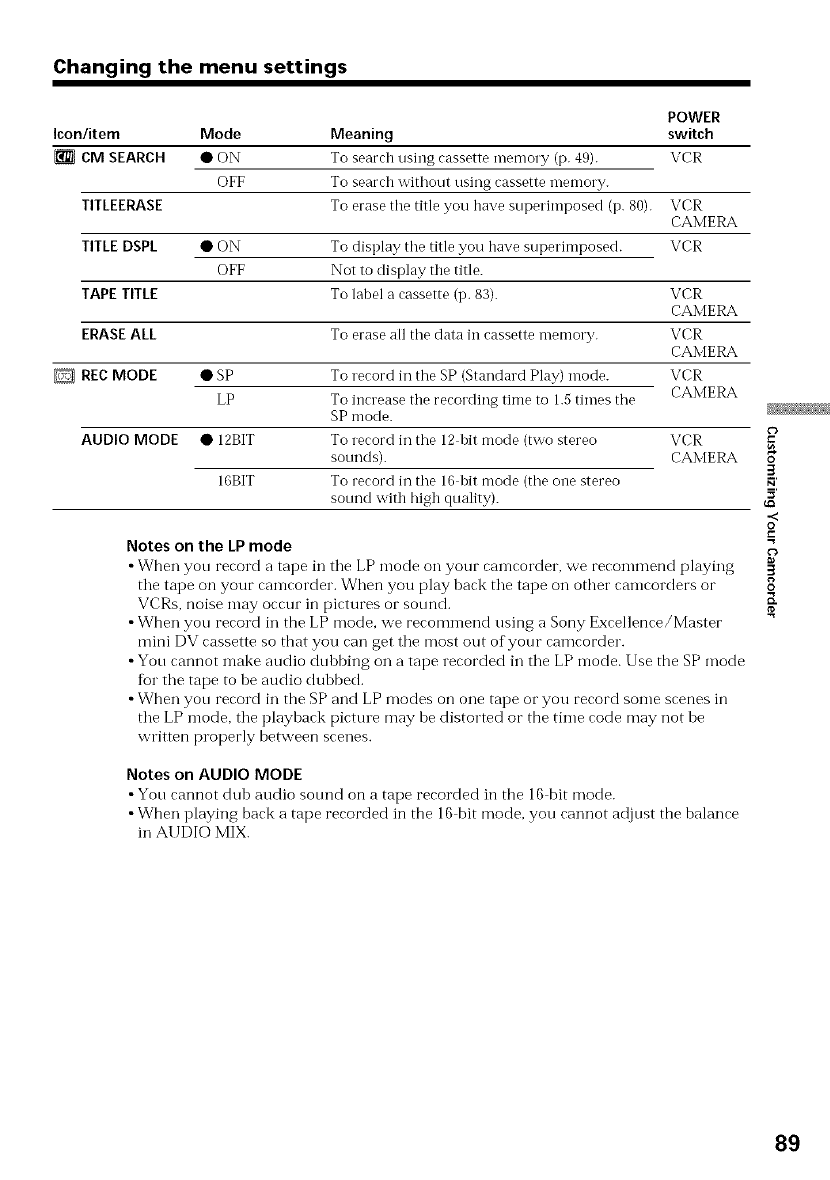
Changing the menu settings
POWER
Icon/item Mode Meaning switch
CM SEARCH • ON To search using cassette memory (p. 49). VCR
OFF To search without using cassette Tnemory.
TITLEERASE To erase the title you have superimposed (p. 80).
TITLE DSPL
TAPE TITLE
ERASE ALL
D REC MODE
•ON
OFF
To display tile title you have superimposed.
Not to display the title.
To label a cassette (p. 83).
To erase all tile data in cassette memory.
VCR
CAMERA
VCR
VCR
CAMERA
VCR
CAMERA
VCR
CAMERA
• SP To record in the SP (Standard Play) mode.
LP To increase the recording time to 1.5 times the
SP mode.
AUDIO MODE • 12BIT To record in the 12 bit mode (two stereo VCR
sonnds). CAMERA
16BIT To record in the 16 bit mode (the one stereo
sound with high quality).
Notes on the LP mode
• When yon record a tape in tile LP mode on your camcorder, we recommend playing
tile tape on your camcorder. When you play back tile tape on other camcorders or
VCRs, noise may occur in pictures or sotmd.
• When yon record in the LP mode, we recommend using a Sony Excellence/Master
mini DV cassette so that you can get tile most out of your camcorder.
• Yon cannot make audio dubbing on a tape recorded in tile LP mode. Use the SP mode
for tile tape to be audio dubbed.
• When yon record in the SP and LP modes on one tape or you record some scenes in
tile LP mode, tile playback picture may he distorted or the time code may not be
written properly between scenes.
Notes on AUDIO MODE
• Yon cannot dub audio sotmd on a tape cecorded in the 16 bit mode.
• When playing back a tape recorded in the 16 bit mode, you cannot adjust the balance
in AUDIO MIX.
3
.<
O
.=
3
8
K
89
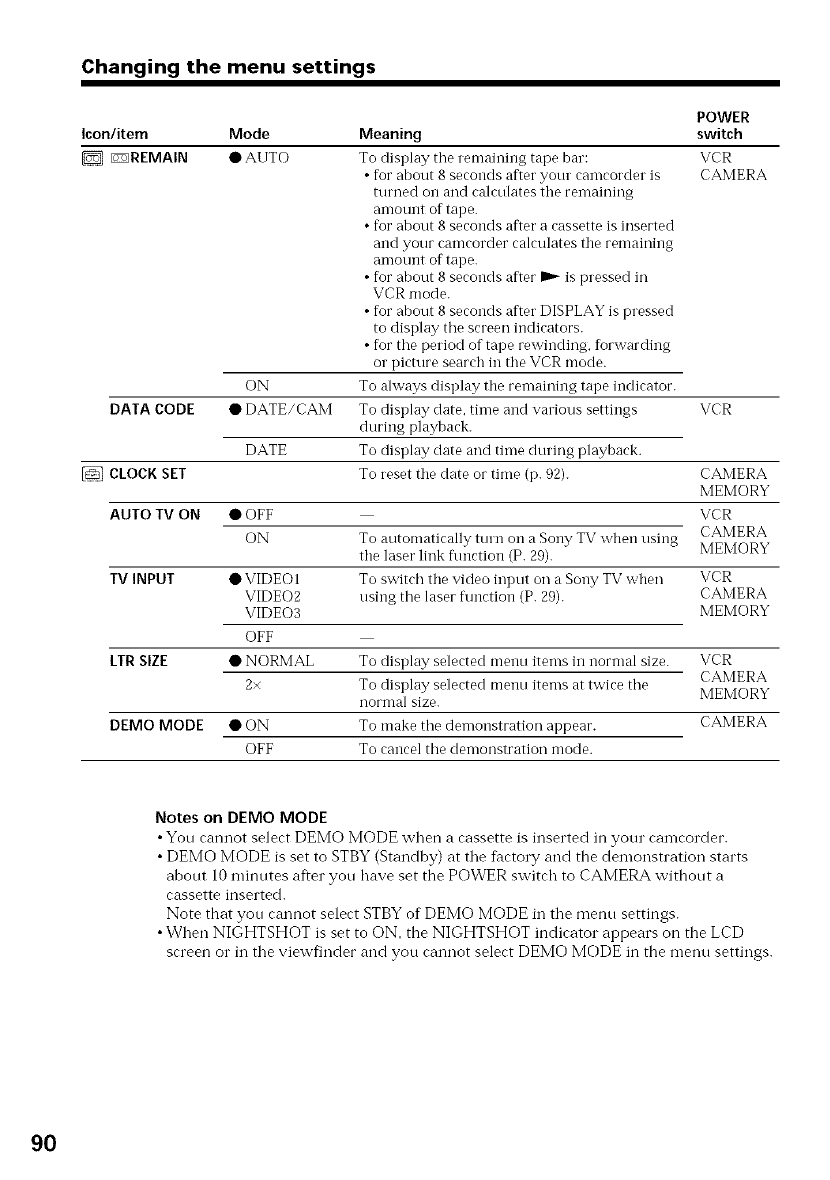
Changing the menu settings
POWER
Icon/item Mode Meaning switch
DE3REMAIN • AUTO To display tile remaining tape bar: VCR
• for about 8 seconds after your camcorder is CAMERA
turned o11 and calculates the remaining
amount of tape.
• for about 8 seconds after a cassette is inserted
and your camcorder calculates the remaining
amount of tape.
• for about 8 seconds after D_ is pressed in
VCR mode.
• for about 8 seconds after DISPLAY is pressed
to display the screen indicators.
• for the period of tape rewinding, forwarding
or picture search in the VCR mode.
ON To ahvays display the remaining tape indicator.
• DATE/CAM To display date. time and various settings VCR
during playback.
To display date and time during playback.
To reset the date or time (p. 92).
DATA CODE
DATE
CLOCK SET
AUTO TV ON • OFF
ON
IV INPUT • VIDEOI
VIDEO2
VIDEO3
OFF
LTRSIZE • NORMAL
2×
DEMO MODE • ON
OFF
To autonmtically turn on a Sony TV when using
the laser link flmction (P. 29).
To switch the video input oi1 a Sony TV when
using the laser flmction (P. 29).
CAMERA
MEMORY
VCR
CAMERA
MEMORY
VCR
CAMERA
MEMORY
To display selected menu items in normal size. VCR
To display selected meno items at twice the CAMERA
MEMORY
nornlal size.
To make the demonstration appear. CAMERA
To cancel the demonstration mode.
Notes on DEMO MODE
• You cannot select DEMO MODE when a cassette is inserted in your camcorder.
• DEMO MODE is set to STBY (Standby) at the factory and the demonstration starts
about 10 minutes after you have set the POWER switch to CAMERA without a
cassette inserted.
Note that you cannot select STBY of DEMO MODE in the menu settings.
• When NIGHTSHOT is set to ON, the NIGHTSHOT indicator appears on the LCD
screen or in the viewfinder and you cannot select DEMO MODE in the menu settings.
9O
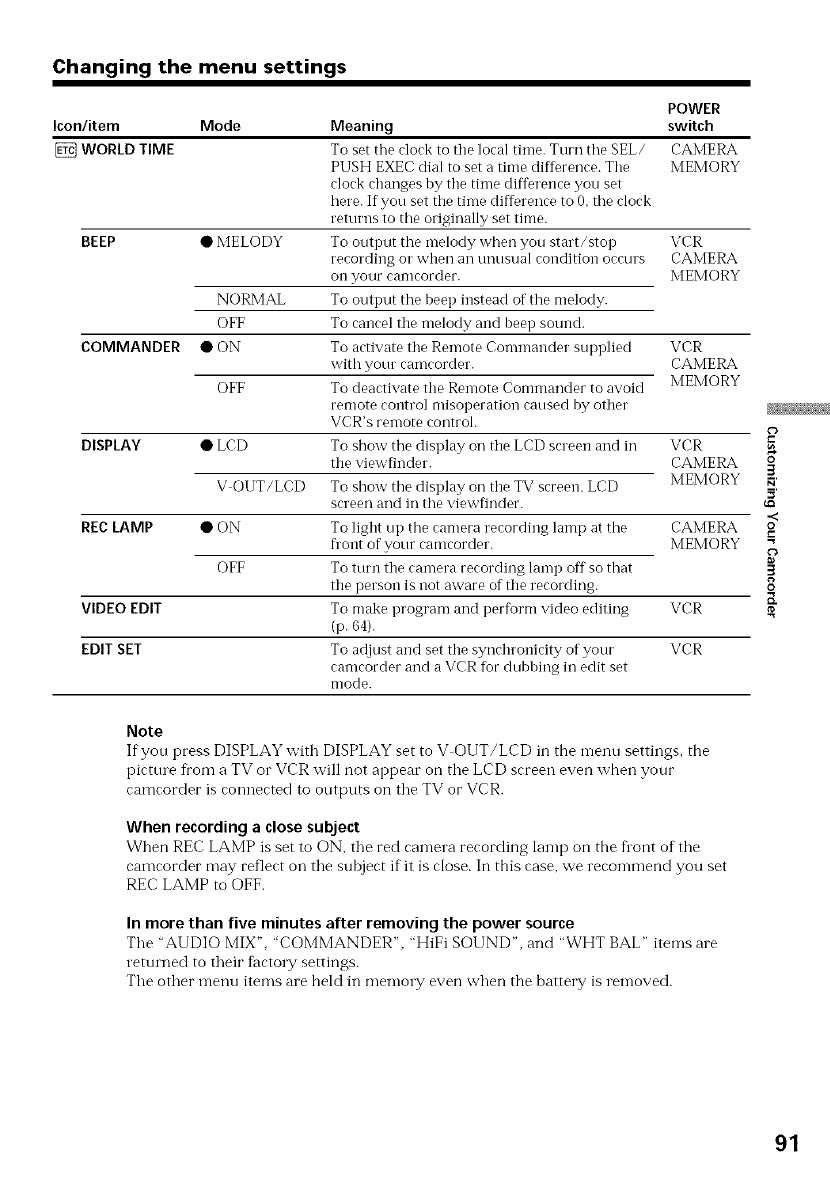
Changing the menu settings
POWER
Icon/item Mode Meaning switch
WORLD TIME To set the clock to the local time. Turn the SEL/ CAMERA
PUSH EXEC dial to set a time difference. The MEMORY
clock changes by the time difference you set
here. If you set the time difference to 0. tile clock
returns to the originally set time.
BEEP • MELODY To output the melody when you start/stop VCR
recording o1"when all t/nt/stlal condition occurs CAMERA
on your camcorder. MEMORY
NORMAL To output the beep instead of the melody.
OFF To cancel tile melody and beep sound.
COMMANDER • ON To activate tile Remote Commander supplied VCR
with your camcorder. CAMERA
OFF To deactivate tile Remote Commander to avoid MEMORY
remote control misoperation caused by other
VCR's remote control.
DISPLAY • LCD To show the display on tile LCD screen and in VCR
tile viewfinder. CAMERA
V OUT/LCD To show tile display on tile TV screen, LCD MEMORY
screen and in tile viewfinder.
REC LAMP • ON To light up the camera recording lamp at the CAMERA
h'ont of your camcorder. MEMORY
OFF To turn tile camera recording lamp off so that
tile person is not aware of tile recording.
VIDEO EDIT To make program and perform video editing VCR
(p. 64).
EDIT SET TO adjust and set tile synchronicity of your VCR
camcorder and a VCR fur dubhing ill edit set
mode.
5
8_
3
.<
O
=o
3
8
K
Note
If you press DISPLAY with DISPLAY set to V OUT/LCD in the Tnentlsettings, the
picttu e from a TV o1"VCR will not appear on tile LCD screen even when your
camcorder is connected to outputs on tile TV or VCR.
When recording aclose subject
When REC LAMP is set to ON, tile red camera recording lamp on the Dont of tile
camcorder may reflect on tile subject if it is close. In this case, we recommend you set
REC LAMP to OFF.
In more than five minutes after removing the power source
Tile "AUDIO MIX", 'COMMANDER", "HiFi SOUND", and "WHT BAL" items are
returned to their factoW settings.
The other menu items are held in memo1T even when the battery is removed.
91

Resetting the date and time
The clock is set at tile f_tctory to East Coast Standard time for the models sold in tile
United States, and to Japan, Hong Kong, New York or Panama time for other models.
If you do not use your camcorder for about six montbs, the date and time settings may
be released (bars may appear) because the vanadium lithium battel T installed in yore
camcorder will have been discharged (p. 139).
First, set the year, then the month, the day, the hotu and then the minute.
(1) In the standby mode, press MENU to display the menu.
(2) Turn the SEL/PUSH EXEC dial m select {_, then press the dial.
(3) Turn the SEL/PUSH EXEC dial to select CLOCK SET, then press the dial.
(4) Turn the SEL/PUSH EXEC dial to adjust the desired year, then press the dial.
(5) Set the month, day and hour by turning the SEL/PUSH EXEC dial and
pressing the dial.
(6) Set the minute by turning the SEL/PUSH EXEC dial and pressing the dial by
the time signal. The clock starts to move.
(7) Press MENU to make the inenu settings disappear.
IW MENU
[MENU/ENO
3
92
6
_JAN / 2000 @ I
12 O0 AM/ 2 00 A_,,/
The year changes as follows:
1995 *-+ 2000 *-- .... --* 2079
t T
If you do not set the date and time
" : : " is recorded on the data code of the tape and tbe "Memo1T Stick" (DCR
TRV11/TRV20 only).
Note on the time indicator
The internal clock of your camcorder operates on a 12 hour cycle.
•12:00 AM stands for midnight.
• 12:00 PM stands fbr noon.

-- "Memory Stick" Operations --
Using a "Memory Stick" - introduction
- DCR-TRV11/TRV20 only
You can record and play back still images on a "Memory Stick" supplied with your
camcorder. You can easily play back, record or delete still images. You can exchange
image data witb other equipment such as a personal computer etc., using the PC serial
cable for "Memory Stick" supplied with your camcorder o1"PC card adaptor for
"Memory Stick" (not supi)lied ).
On file format (JPEG)
Your camcorder compresses image data in JPEG fbrmat (extension .jpg).
Typical image data file name
100 0001:Tbis file name appears on the LCD screen o1"in the viewfinder of your
caI_'IcoFdoF.
DSCOOOOI.jpg: This file name appears on the display of your personal computer.
Using a "Memory Stick"
Terminal
Labeling position
•You cannot record or erase still images when the write protect tab on the "Memory
Stick" is set to LOCK.
•We recommend backing up important data.
• hnage data may be damaged in the following cases:
If you remove the "Memo1T Stick" o1"turn the power off while reading or writing.
If you use "Memot T Stick % near magnets or magnet fields.
• Prevent metallic objects or yore finger fi'om coming into contact with the metal parts
of the connecting section.
• Stick its label on the labeling position.
• Do not bend, drop or apply stlong shock to "Memory Stick"s.
• Do not disassemble or modif}? "Memo1T Stick"s.
• Do not let "Memo W Stick"s get wet.
• Do not use or keep "Memory Stick"s in locations that are:
Extremely hot such as in a car parked in the sun or under tbe scorching sun.
l Jnder direct sunlight.
VeW humid o1"subject to corrosive gases.
•When you carry or store a "Memory Stick," put it in its case.
3
o
g
©
o
93
Using a "Memory Stick" - introduction
Formatting the supplied "Memory Stick"
Formatting with this can-lcorder is not requiled. Tile "Men-lory Stick" has been
formatted in tile FAT format at fhctol T.
"Memory Stick" supplied with your camcorder
•Sample images are recorded in the "Memory Stick" (p. 107). Note that these images
will be deleted if you fbrmat the "Memory Stick."
• Stick the supplied lahel on the labeling position to prevent the accidental erasure. As
for the labeling position, see the illustration on the previous page.
"Memory Stick's formatted by a computer
"Memory Stick's fl)rmatted by Windows OS or Macintosh computers do not have a
guaranteed compatibility with this camcorder.
Notes on image data compatibility
•Image data files recorded on "Memory Stick"s by your camcorder conform with the
Design Rules for Camera File Systems tmiversal standard established by the JEIDA
(Japan Electronic Indust W Development Association). You cannot play back on yore
camcorder still images recorded on other equipment (DCR TRV890E/TRV900/
TRV900E or DSC D700/D770) that does not confiorm with this tmiversal standard.
(These models are not sold in some areas.)
•If you cannot use the "Memory Stick" that is used with other equipment, fbrmat it
with this camcorder (p. 88). However, formatting erases all infiormation on the
"Memory Stick."
"Memory Stick" and _, are trademarks of Sony Corporation.
• Windows is a registered trademark licensed to Microsoft Corporation, registered in
the U.S.A. and other cotmtries.
• All other product names mentioned herein may be the trademarks or registered
trademarks of thei_ respective companies.
Furthermore, "*"" and "(_)"are not mentioned in each case in this manuah
94

Using a "Memory Stick" - introduction
(1) Slide MEMORY OPEN in the direction of the arrow. The "Memory Stick"
coinpartment opens.
(2) Insert a "Memory Stick" in as far as it can go with its rounded corner fhcing
up.
Then, close tile "Memory Stick" compartment.
O 0
Access lamp MEMORY OPEN
"Memory Stick" compartment
Open the "Memory Stick" compartment in step 1, press MEMORY RELEASE. The
"Memory Stick" comes out.
3
o
g
o
O
MEMORY RELEASE
When the access lamp is lit or flashing
Never shake or strike yotu camcorder. Do not ttun the power off, eject a "Memory
Stick" or remove the battery pack. Otherwise, the image data breakdown may occtu.
95
Using a "Memory Stick" - introduction
You can select image quality n-lode in still pictme recording. Image quality is set to
SUPER FINE mode at the thctory.
(1) Set the POWER switch to MEMORY or VCR. Make sure that the LOCK switch
is set to the left (unlock) position.
(2) Press MENU to display the menu.
(3) Turn the SEL/PUSH EXEC dial m select {_Z, then press the dial.
(4) Turn the SEL/PUSH EXEC dial to select QUALITY, then press the dial.
(5) Turn the SEL/PUSH EXEC dial to select the desired image quality, then press
the dial.
4
5
Note
In some cases, changing the image quality mode may not affect the image quality,
depending on the types of images you are shooting.
96

Using a "Memory Stick" - introduction
Image quality settings
Setting Meaning
St IPER FINE (SFN) This is the highest image quality in your camrorder.
(DCR TRV20 only) The number of still images you can record is less than
in FINE mode. The image is compressed to about 1/3.
SFN appears oil the screen.
FINE (FINE) Use this mode when you want to record high quality
images. The image is compressed to about 1/6. FINE
appears on the screen.
STANDARD (STD) This is the standard image quality. The image is
compressed to about 1/10. STD appears on the screen.
Differences in image quality mode
Recorded images are compressed in JPEG %rmat he%re being stored in memory. The
memory capacity allotted to each image varies depending on the selected image quality
mode and image size. Details are shown in the table below. (You can select 1152×864 o1"
640×480 image size in tbe menu settings.)
1152 ×864 image size (DCR TRV20 only)
Image quality mode Memory capacity
SUPER FINE About 600 KB
FINE About 300 KB
STANDARD Ahout 200 KB
640 x 480 image size
Image quality mode Memory capacity
SUPER FINE About 190 KB
(DCR TRV20 only)
FINE About 100 KB
STANDARD About 60 KB
Image quality mode indicator
The image quality mode indicator is not displayed during playback.
3
o
g
©
o
97
Using a "Memory Stick" - introduction
- DCR-TRV20 only
You can select either one of two image sizes: 1152×864 or 640×480. (In VCR mode, yon
can select only 640x480.)
(1) Set the POWER switch to MEMORY. Make sure that the LOCK switch is set to
the left (unlock) position.
(2) Press MENU to display the menu.
(3) Turn the SEL/PUSH EXEC dial to select {_D, then press tile diah
(4) Turn the SEL/PUSH EXEC dial to select IMAGE SIZE, then press the dial.
(5) Turn the SEL/PUSH EXEC dial to select the desired image size, then press the
dial.
The indicator changes as fbllows:
1_152 _-_ _640
3
4
98
Image size settings
Setting Meaning
5
1152 x 864 Records 1152 × 864 still images.
Indicator
Recording Playback
E752SFN _52
640 x 480 Records 640 x 480 still images. E'g640SFN _40
Note
When images recorded on a camcorder in 1152x864 size are played back on a unit that does
not sul)l)ort that size, tile fkrl] image may not appear.
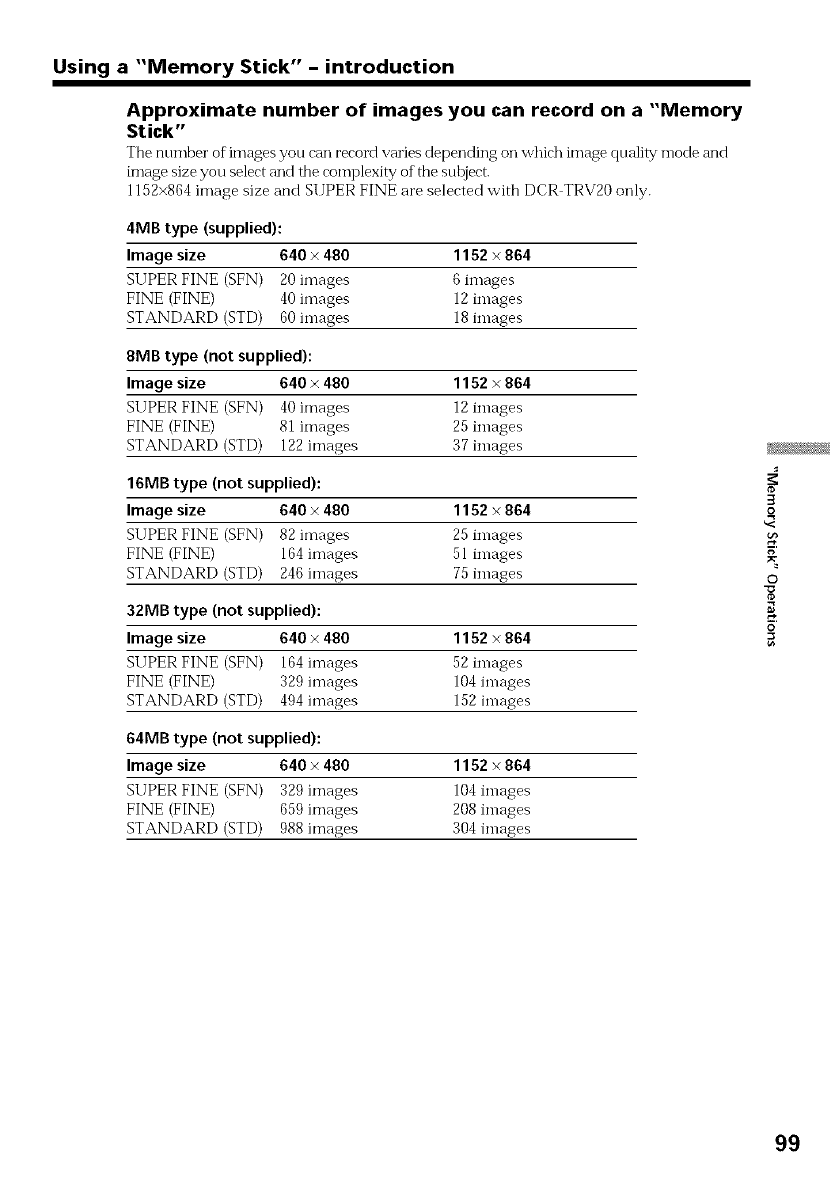
Using a "Memory Stick" - introduction
Approximate number of images you can record on a "Memory
Stick"
The number ofimages you can record varies depending on which image quality n-lodeanct
image size you select and the complexity of the sul0ject.
1152x864image size and SUPER FINE are selected with DCR TRV20 only.
4MB type (supplied):
Image size 640 ×480 1152 x864
SUPER FINE (SFN) 20 images 6 images
FINE (FINE) 40 images 12 images
STANDARD (STD) 60images 18images
8MB type (not supplied):
Image size 640 ×480 1152 × 864
SUPER FINE (SFN) 40 images 12 images
FINE (FINE) 81 images 25 images
STANDARD (STD) 122 images 37 images
16MB type (not supplied):
Image size 640 ×480 1152 ×864
SUPER FINE (SFN) 82 images 25 images
FINE (FINE) 164 images 51 images
STANDARD (STD) 246 images 75images
32MB type (not supplied):
Image size 640 ×480 1152 ×864
SUPER FINE (SFN) 164 images 52 images
FINE (FINE) 329 images 104 images
STANDARD (STD) 494 images 152 images
64MB type (not supplied):
Image size 640 ×480 1152 × 864
SUPER FINE (SFN) 329 images 104 images
FINE (FINE) 659 images 208 images
STANDARD (STD) 988 images 304 images
3
g
©
o
99

Recording still images on "Memory
Stick"s -Memory photo recording
- DCR-TRV11/TRV20 only
You can record still pictures oil "Memory Stiek"s.
Before operation
Insert a "Memo_ T Stick" into your camcorder.
(1) Set the POWER switch to MEMORY. Make sure that the LOCK switch is set to
the left (unlock) position.
(2) Keep pressing PHOTO lightly until the desired still picture appears. The green
• mark stops flashing, then lights up. The brightness of tile picture and fi)cus
are adjusted, being targeted for the middle of the picture and are fixed.
Recording does not start yet.
(3) Press PHOTO deeper. The image displayed on tile screen will be recorded on a
"Memory Stick." Recording is complete when the bar scroll indicator
disappears.
2Number of images can be recorded
on the "Memory Stick"
Number of recorded images
$IIIIIII1_
100
Recording still images on "Memory Stick"s - Memory photo
recording
When the POWERswitch is set to MEMORY
The following flmctions do not work:
Wide TV mode
Digital zoom
SteadyShot flmction
SUPER NIGHTSHOT
Fader
Picture effect
Digital effect
Title
Low lux mode (The indicator flashes.)
Sports lesson mode (The indicator flashes.)
While you are recording a still image
You can neither turn off the power nor press PHOTO.
When you press PHOTO on the Remote Commander
Your camcorder immediately records the image that is on the screen when you press
the button.
Note
When recording still images at step 2with the PHOTO button pressed lightly, the in-lage
momentarily flickers. This is not a malflmction.
When recording in memory mode
The angle of view is a little increased than one in CAMERA mode.
3
o
g
©
o
101

Recording still images on "Memory Stick"s - Memory photo
recording
You can record still pictures continuously. Select one of the two modes described below
before recording.
Continuous mode [a] (DCR-TRV20 only)
When the image size is set to 1152 × 864, you can record up to four pictures
continuously.
When the image size is set to 640 × 480, you can record up to 16 pictures continuously.
The number of recorded photos in coi'_tii'mous mode depends on the capacity of the
"Memory Stick."
Multi screen mode (Recording image size is 640 ×480) [b]
You can record nine still pictures continuously on a single page.
[al lt)]
While pressing down PHOTO, your camcorder continuously record maxinmm number
of still pictures depending on the image size.
When you stop pressing, the recording stops.
(1) Set the POWER switch to MEMORY. Make sure that the LOCK switch is set to
the left (unlock) position.
(2) Press MENU to display the menu.
(3) Turn the SEL/PUSH EXEC dial to select _, then press the dial.
(4) Turn the SEL/PUSH EXEC dial to select CONTINUOUS, then press the dial.
(5) Turn the SEL/PUSH EXEC dial to select the desired setting, then press the dial.
102

Recording still images on "Memory Stick's - Memory photo
recording
MENU 3
4
5
If the capacity of the "Memory Stick" becomes full
"_"_ FULL" appems on the LCD screen o1"in tile viewfinder, and you cannot record still
pictmes oil this "Memory Stick."
Continuous shooting settings
Setting Meaning (indicator on the screen)
OFF Your can-lcorder shoots one image at a time. (no indicator)
ON Your camcorder shoots up to 16 still images at about 0.5 sec intervals.
(DCR TRV20 (1_)
only)
MULTI SCRN Your camcorder shoots nine still images at about 0.5 sec intervals and
displays the images on a single page divided into nine boxes. Still
images are recorded in 640 × 480 size. ( _ )
The number of images in continuous shooting
The number of in-lages you can shoot continuously ,,,aries depending on the image size
and the capacity of the "Memory Stick."
Image size The number of images
640 x 480 tip to 16 in-lages
l 152 x 864 up to 4 in-lages
3
o
g
©
o
103
Recording still images on "Memory Stick"s - Memory photo
recording
Note on using the video flash light (not supplied)
The video flash light does not work in the rontinuous or nmlti srreen mode if you
install it to the intelligent accessory shoe.
You can make a memory photo recording with tile self timer. This mode is useful when
you want to record yourselfi
(1) Set the POWER switch to MEMORY. Make sure that the LOCK switch is set to
the left (unlock) position.
(2) Press SELFTIMER in the standby mode. The _ (self-timer) indicator appears
on the LCD screen or in the viewfinder.
(3) Press PHOTO.
Self timer starts counting down from l0 with a beep sound. In the last two
seconds of the countdown, the beep sound gets fhster, then recording starts
automatically.
PHOTO
SELFTIMER
To cancel self-timer recording
Press SELFTIMER so that the _ (self'timer) indirator disappears from on the LCD
screen or in the viewfinder. You cannot cancel the self timer recording using the
Remote Commander.
Note
The self timer recording mode is automatically canceled when:
Self timer recording is finished.
The POWER switch is set to OFF (CHG) or VCR.
To check the picture to be recorded
You can check the picture with pressing the PHOTO button lightly, then press it deeper
to capture.
104

Superimposing a still picture in a "Memory
Stick" on a moving picture -MEMORY MIX
-DCR-TRV11/TRV20 only
You can superin-li)ose a still picttue you have recorded on a "Memory Stick" on the top
of the moving picture you are recording.
M. CHROM (Memory chromakey)
You can swap a blue area of a still pictm e such as an illustration or a fi'ame with a
moving picture.
M. LUMI (Memo W luminancekey)
You can swap a brighter area of a still picttue such as a handwritten illustration or title
with a moving picture. Record a title on a "Memory Stick" before a trip or event for
COIlVelliOIK'O.
C, CHROM (Camera chromakey)
You can superimpose a moving picttu e on the top of a still picttu e such as a picture can
be used as background. Shoot the stfloject against a blue backgrotmd. The blue area of
the moving picture will be swapped with a still picture.
M. OVERLAP (Memory overlap)
You can make a moving image fade in on top of a still image.
M. CHROM
Still picture
Blue
Moving picture
÷
M. LUMI
Still picture
N_
Moving picture
+ ÷
Still picture Moving picture
C. CHROM ÷
Blue
÷
3
R
g
©
o
Still picture
M, OVERLAP ÷
Moving picture
÷
105
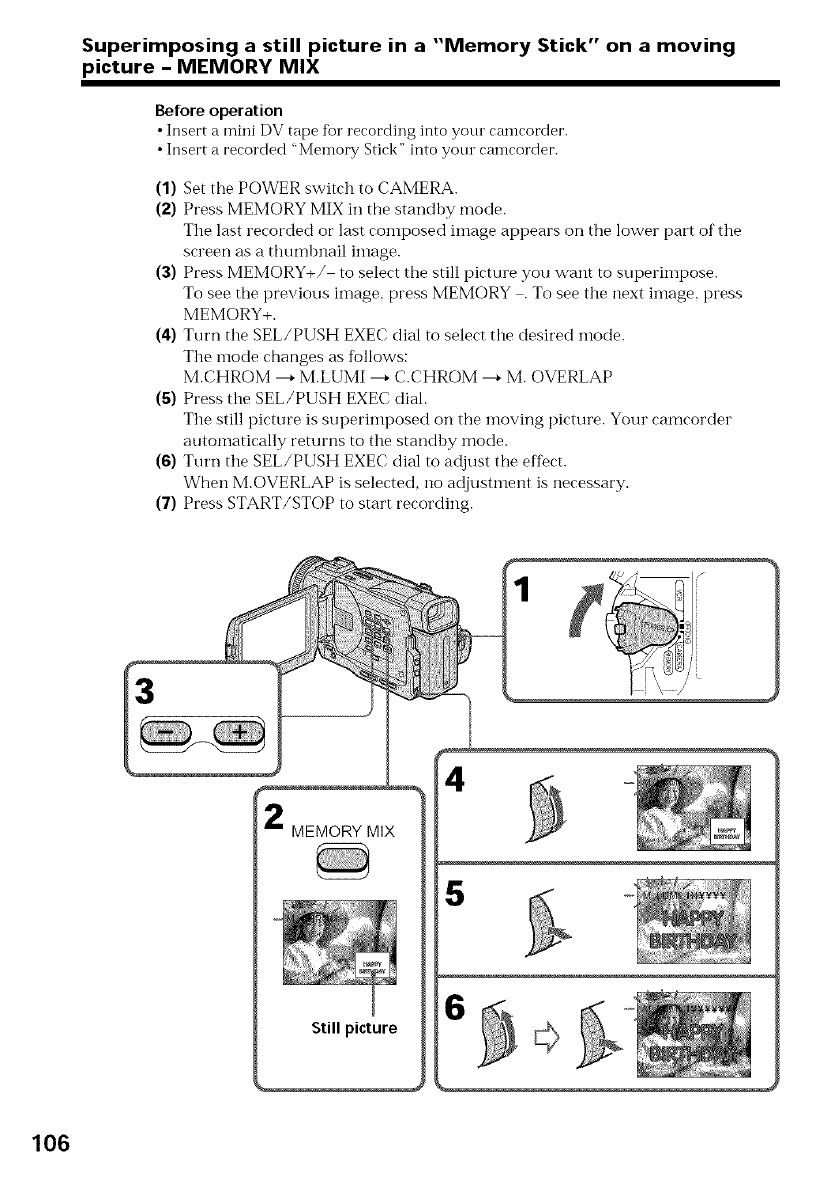
Superimposing a still picture in a "Memory Stick" on a moving
picture -MEMORY MIX
Before operation
•Insert a mini DV tape for recording into your camcorder.
•Insert a recorded "Memory Stick" into your camcorder.
(1) Set the POWER switch to CAMERA.
(2) Press MEMORY MIX in the standhy mode.
The last recorded or last composed image appears on the lower part of the
screen as a thumbnail image.
(3) Press MEMORY+/ to select the still picture you want to superimpose.
To see tile previous image, press MEMORY .To see the next ilnage, press
MEMORY+.
(4) Turn the SEL/PUSH EXEC dial to select the desired mode.
Tlle mode changes as follows:
M.CHROM ---+M.LUMI ---+C.CHROM ---+M. OVERLAP
(5) Press the SEL/PUSH EXEC dial.
Tile still picture is superimposed on the moving picture. Your camcorder
automatically returns to ttle standhy mode.
(6) Turn the SEL/PUSH EXEC dial to adjust the effect.
When M.OVERLAP is selected, no adjustment is necessary.
(7) Press START/STOP to start recording.
MEMORY MIX
Still picture
4
5
106
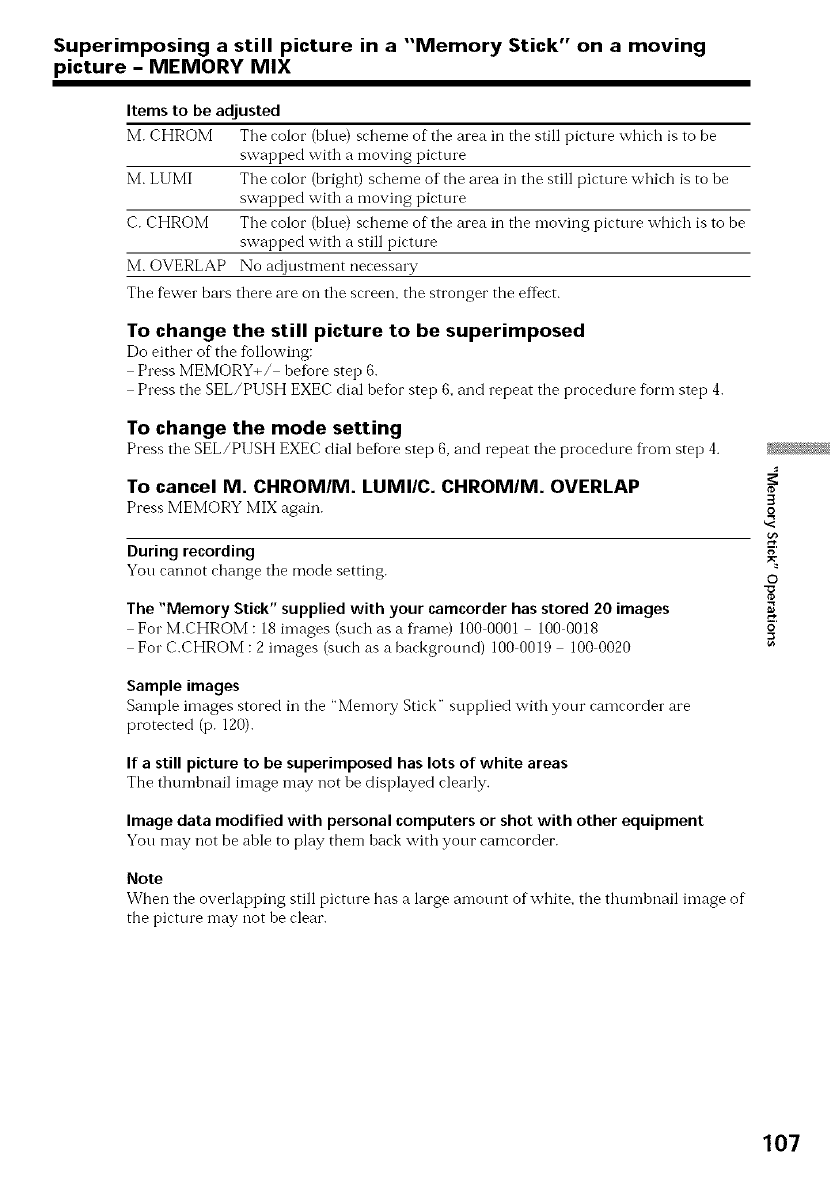
Superimposing a still picture in a "Memory Stick" on a moving
picture -MEMORY MIX
Items to be adjusted
M. CHROM Tile color (blue) scheme of tile area in the still picture which is to be
swapped with a moving picture
M. LUMI The color (bright) scheme of the area in the still picture which is to be
swapped with a moving picture
C. CHROM Tile color (bhm) scheme of"tile area in the moving picture which is to be
swapped with a still picture
M. OVERLAP No adjustment necessa W
The fewer bars there are on the screen, the stronger the effect.
To change the still picture to be superimposed
Do either of"the fbllowing:
Press MEMORY+/ befiore step 6.
Press the SEL/PUSH EXEC dial befor step 6, and repeat the procedure form step 4.
To change the mode setting
Press the SEL/PUSH EXEC dial before step 6, and repeat the proredure flora step 4.
To cancel M. CHROM/M. LUMI/C. CHROMIM. OVERLAP
Press MEMORY MIX again.
During recording
You cannot change the mode setting.
The "Memory Stick" supplied with your camcorder has stored 20 images
For M.CHROM : 18 images (surh as a fi'ame) 100 0001 - 100 0018
For C.CHROM : 2 images (such as a background) 100 0019 - 100 0020
Sample images
Sample images stored in the "Memory Stick" supplied with yotlr camcorder are
protected (p. 120).
Ifastill picture to be superimposed haslots of white areas
Tbe thumbnail image may not be displayed rlearly.
Image data modified with personal computers or shot with other equipment
You n-lay not be able to play tben-l bark with your ramrorder.
Note
When the overlapping still pirtore has a large amotmt of white, the thumbnail image of
the picture may not be clear.
3
o
g
©
o
107
Recording an image from a mini DV tape
as a still image
- DCR-TRV11/TRV20 only
Your can-leorder can read moving picture data recorded on a mini DV tape and record it
as a still image on a "Memory Stick".
Before operation
•Insert a recorded mini DV tape into your camcorder.
• Insert a "Memory Stick" into your camcorder.
(1) Set the POWER switch to VCR.
(2) Press _. The picture recorded on the mini DV tape is played back.
(3) Keep pressing PHOTO lightly until the picture fi'Oln the mini DV tape fi'eezes.
"CAPTURE" appears on the LCD screen or in the viewfinder. Recording does
not start yet.
(4) Press PHOTO deeper. The image displayed on the screen will be recorded on a
"Memory Stick." Recording is complete when the bar scroll indicator
disappears.
p CAPTURE
Image size of still pictures
Image size is automatically set to 640 × 480.
When the access lamp is lit or flashing
Never shake or strike the trait. As well do not turn the power off, eject a "Memory
Stick" or ren-love tile battery pack. Otherwise, tile image data breakdown may occur.
If "_" appears on the LCD screen or in the viewfinder
The inserted "Memory Stick" is incompatible with your eameorder because its format
does not conform with yotu camcorder. Check the format of the "Memory Stick."
If you press PHOTO lightly in the playback mode
Your camcorder stops momentarily.
108
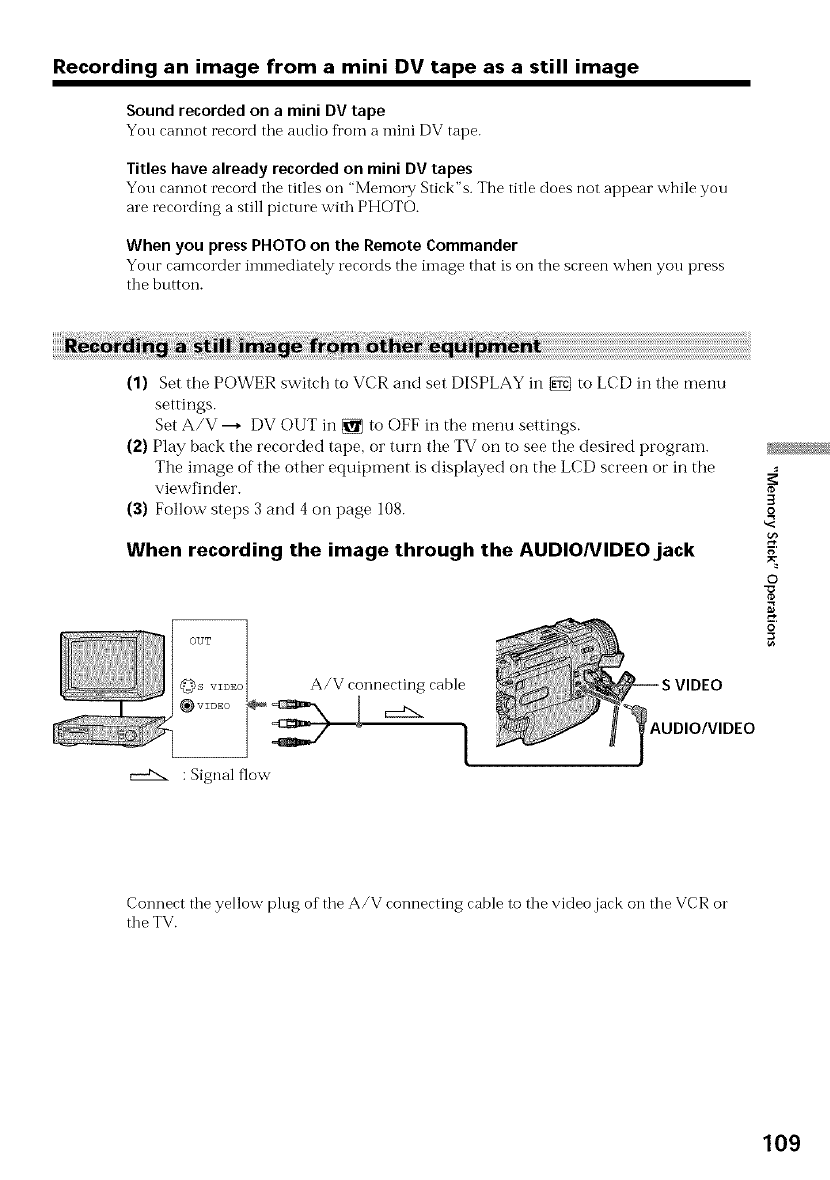
Recording an image from a mini DV tape as a still image
Soundrecordedon a mini DVtape
You rannot record the audio from a mini DV tape.
Titles have already recordedon mini DVtapes
You rannot record tile titles on "Memory Stirk"s. The title does not appear while you
are recording a still picture with PHOTO.
When you press PHOTO on the Remote Commander
Your camcorder immediately records the image that is on the screen when you press
the button.
(1) Set the POWER switch to VCR and set DISPLAY in _ to LCD in tile menu
settings.
Set A/V ---+ DV OUT in _ to OFF in the menu settings.
(2) Play back the recorded tape, or turn the TV on to see the desired program.
The ilnage of tile other equipment is displayed on tile LCD screen or in the
viewfinder.
(3) Follow steps 3 and 4 on page 108.
When recording the image through the AUDIONIDEOjack
:Signal flow
A/V connecting cable
I}AUDIO/VIDEO
3
o
g
©
o
Connect the yellow plug of the A/V connecting cable to the video jack on the VCR o1"
the TV.
109

Recording an image from a mini DV tape as a still image
When recording the image through the |, DV INIOUTjack
c::£:x
_,i.LINK cable (DV connecting cable)
: Signal flow
Connect using an S video cable (not supplied) to obtain high-quality pictures
With this connection, you do not need to connect the yellow (video) plug of"tile A/V
connecting cable.
Connect an S video cable (not supplied) to tile Svideo jacks of both your camcorder and
tile VCR.
This connection produces higher quality DV format pictures.
110
Copying still images from a mini DV tape
- Photo save
-DCR-TRV11/TRV20 only
Using the search fimction, you can autonlatically take in only still images flora mini DV
tapes and record them oil a "Memory Stick" in sequence.
Before operation
• Insert a recorded mini DV tape into your camcorder and rewind the tape.
• Insert a 'Memory Stick" into yore camcorder.
(1) Set the POWER switch to VCR.
(2) Press MENU to display the menu.
(3) Turn the SEL/PUSH EXEC dial to select _, then press the dial.
(4) Turn the SEL/PUSH EXEC dial to select PHOTO SAVE, then press the dial.
"PHOTO BUTTON" appears on the LCD screen or in the viewfinder.
(S) Press PHOTO deeper. The still image fl'om the mini DV tape is recorded on a
"Memory Stick." The mm]ber of still images copied is displayed. "END" is
displayed when copying is completed.
3
MENU
PHOTO_ENuSAVJNGSAVEEND_,C_OOOOOOO4/15_J'_ PHOTO[_ENU]ENDSAVENB O°30 8/15_]°°°°
3
o
©
o
_I_I_RETuRNPROTECT ..... _ PHOTO BUTTON
PHOTO] START [MENU END
111

Copying still images from a mini DV tape - Photo save
To stop or end copying
Press MENU.
When the memory of the "Memory Stick" is full
"MEMORY FULL" appears on tile LCD screen or in the viewfinder, and tile copying
stops. Insert another "Memo_T Stick" and repeat tile procedure Dora step 2.
Image size of still pictures
Image size is automatically set to 640 × 480.
When the access lamp is lit or flashing
Never sbake or strike your camcorder. As well do not turn tile power off, eject a
"Memory Stick" or remove the battery pack. Otherwise, the image data breakdown may
OCCL/F.
To record all the images recorded on the mini DV tape
Rewind tbe tape all tile way back and start copying.
If the write-protect tab on the "Memory Stick" is set to LOCK
"NOT READY" appears when you select the item in tile menu settings.
When you change "Memory Stick"s in the middle of copying
Your camcorder resumes copying flora tile last linage recorded on the previous
"Memory Stick."
112
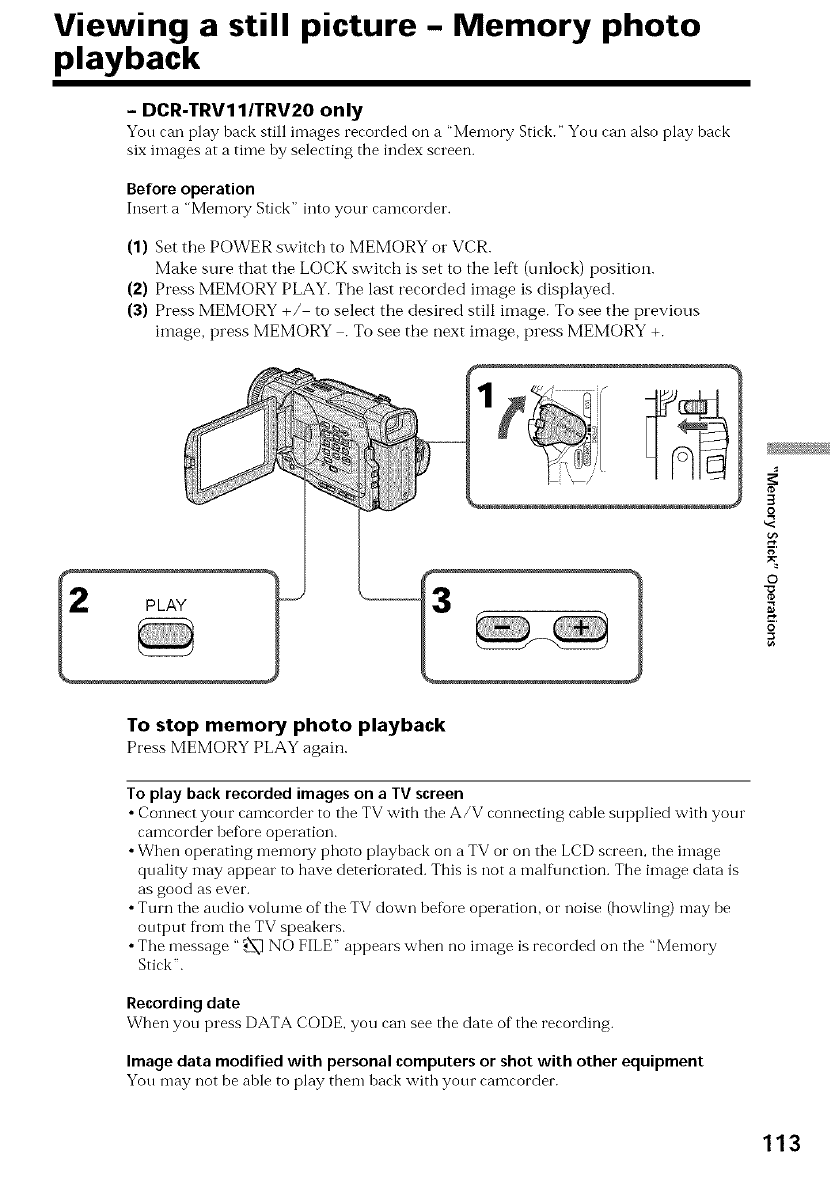
Viewing a still picture -Memory photo
playback
-DCR-TRV11/TRV20 only
You can play back still images recorded on a "Memory Stick." You can also play back
six images at a time by selecting the index screen.
Before operation
Insert a "Memo1 T Stick" into your camcorder.
(1) Set the POWER switch to MEMORY or VCR.
Make sure that the LOCK switch is set to the left (unlock) position.
(2) Press MEMORY PLAY. The last recorded image is displayed.
(3) Press MEMORY +/ to select the desired still image. To see the previous
image, press MEMORY . To see the next image, press MEMORY +.
PLAY
3
R
g
©
o
To stop memory photo playback
Press MEMORY PLAYagain.
To play back recorded images on a TVscreen
•Connect your camcorder to the TV with the A/V connecting cable supplied witb your
camcorder bet_0reoperation.
•When operating memory photo playback on a TV or on the LCD screen, the image
quality may appear to have deteriorated. This is not a malt\ruction. The image data is
as good as ever.
•Turn the audio volume of the TV down betore operation, or noise (bowling) may be
output fl'om the TV speakers.
•The message "._._ NO FILE" appears when no image is recorded on the "Memory
Stick".
Recording date
When you press DATA CODE, you can see the date of the recording.
Image data modified with personal computers or shot with other equipment
You may not be able to play tbem back with your camcorder.
113
Viewing a still picture - Memory photo playback
_ Image size
f--
L
hnage number/
Total nnmber of recorded images
Print mark
Protect indicator
"-- Data Directory Number, File Number
114
You can play back six recorded images at a time. This flmction is especially nseful when
searching for a palticnlar image.
(1) Set the POWER switch to MEMORY or VCR. Make sure that the LOCK switch
is set to the left (unlock) position.
(2) Press MEMORY INDEX to display the index screen.
INDEX 1
A red l_ mark appears above tile image that is displayed be%re changing to tile index
screen nlode.
MEMORY : to display the previous six images
MEMORY + : to display the following six images
123
100-0006 6 /100_
-- l_ mark
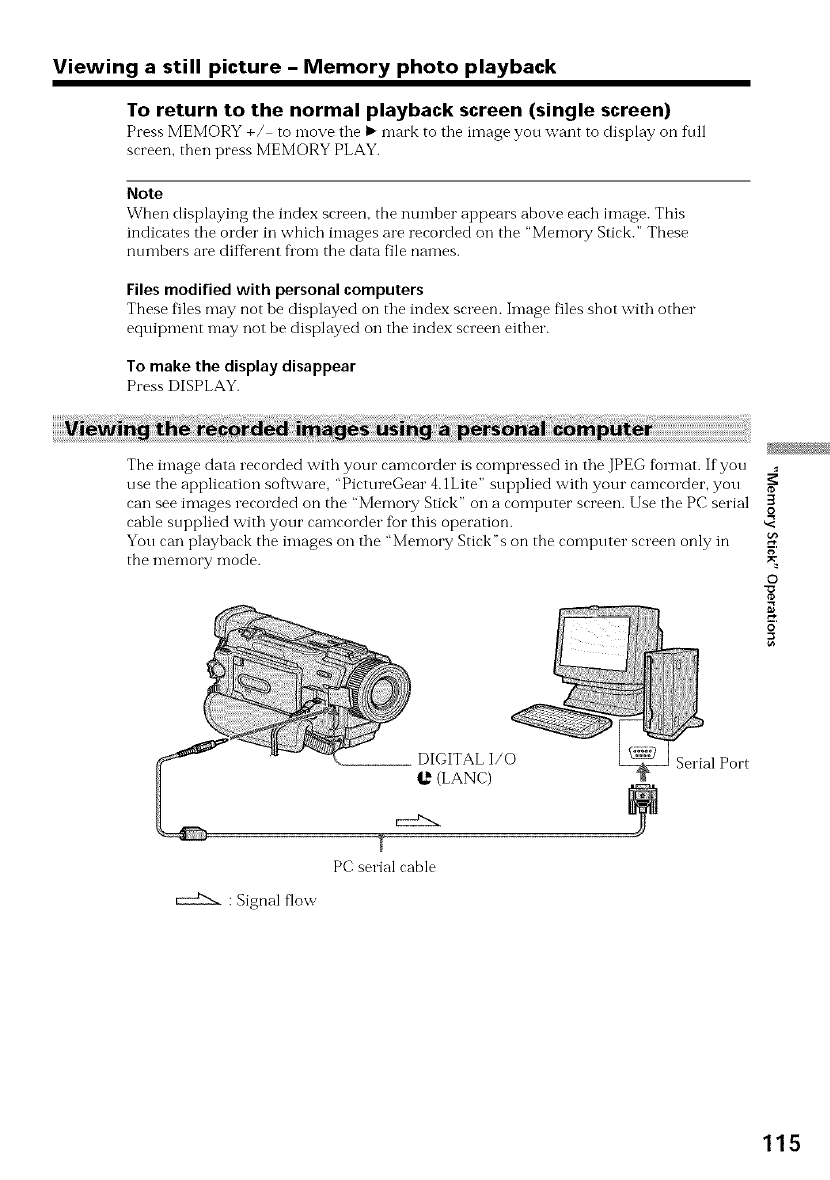
Viewing a still picture - Memory photo playback
To return to the normal playback screen (single screen)
Press MEMORY +/ to nlove the _ mark to the image you want to display on fidl
screen, then press MEMORY PLAY.
Note
When displaying the index screen, the number appears above each image. This
indicates the order in which images are recorded on the "Memory Stick." These
numbers are difDrent flora the data file names.
Files modified with personal computers
These files may not be displayed on the index screen. Image files shot with other
equii)ment may not be displayed on the index screen either.
To make the display disappear
Press DISPLAY.
The image data recorded with your camcorder is compressed in the JPEG format. If you
use the application software, "PictureGear 4.1Lite" sui)plied with your camcorder, you
can see images recorded on the "Memo W Stick" on a computer screen. Use the PC serial
cable supplied with your camcorder fbr this operation.
You can playback the images on the "Memory Stick"s on the computer screen only in
the memory mode.
L DIGITAL I/0
_' (LANC)
g
PC serial cable
:Signal flow
Port
3
R
g
©
o
115
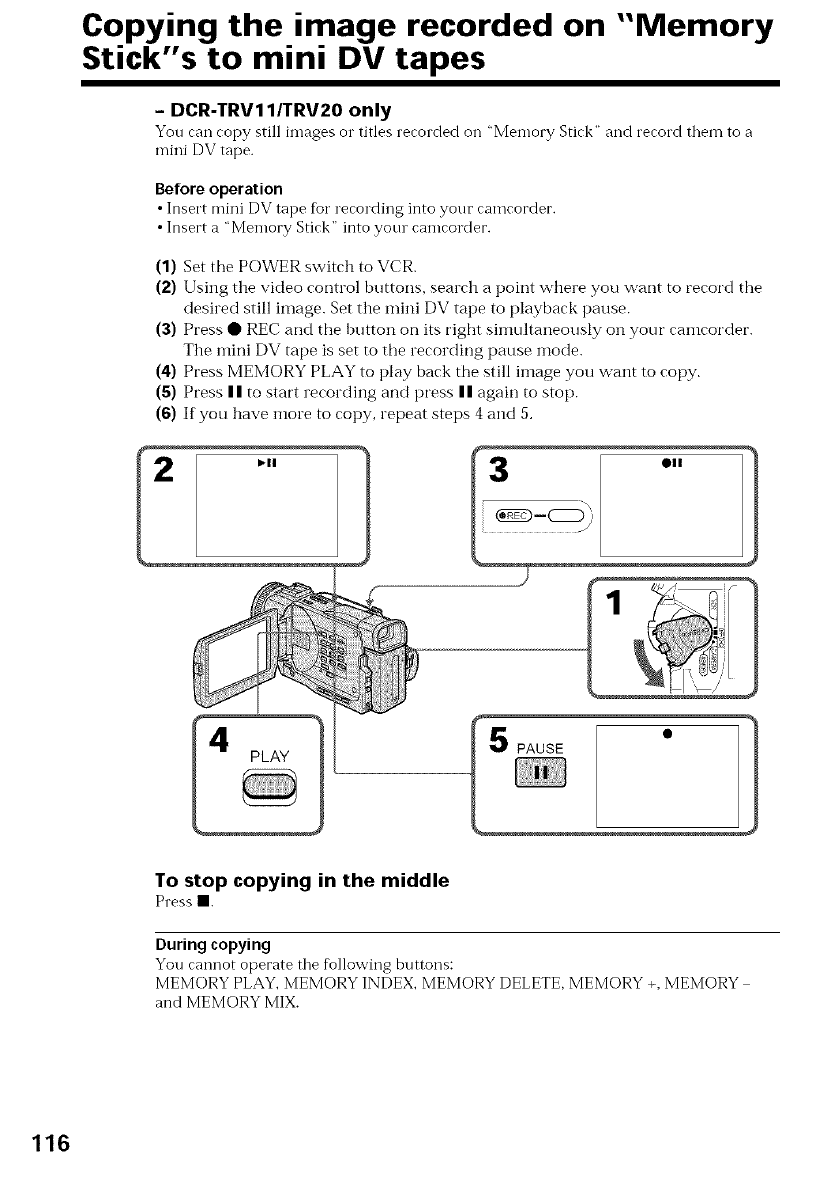
Copying the image recorded on "Memory
Stick's to mini DV tapes
- DCR-TRV11/TRV20 only
You can copy still images o1"titles recorded oil "Memory Stick" and record them to a
mini DV tape.
Before operation
•Insert mini DV tape tor recording into yonr camcorder.
• Insert a 'Memory Stick" into yore camcorder.
(1) Set the POWER switch to VCR.
(2) Using tile video control buttons, search a point where you want to record the
desired still image. Set the mini DV tape to playback pause.
(3) Press • REC and the button on its right simultaneously oil your caincorder.
The mini DV tape is set to the recording pause mode.
(4) Press MEMORY PLAY to play back the still image you want to copy.
(5) Press II to start recording and press II again to stop.
(6) If you have more to copy, repeat steps 4 and 5.
To stop copying in the middle
Press II.
During copying
You cannot operate the fbllowing buttons:
MEMORY PLAY, MEMORY INDEX MEMORY DELETE, MEMORY +, MEMORY
and MEMORY MIX.
116
Copying the image recorded on "Memory Stick"s to mini DV tapes
Note on the index screen
You cannot record tile index screen.
If you press EDITSEARCH during pause mode
Memory playback stops.
image data modified with personal computers or shot with other equipment
You may not be able to copy them with your camcorder.
If you press DISPLAY in the standby or recording mode
You can see inen-lot'y playback and tile file name indicators in addition to tbe indicators
pertinent to mini DV tapes, such as tbe time code indicator.
3
o
g
©
o
117
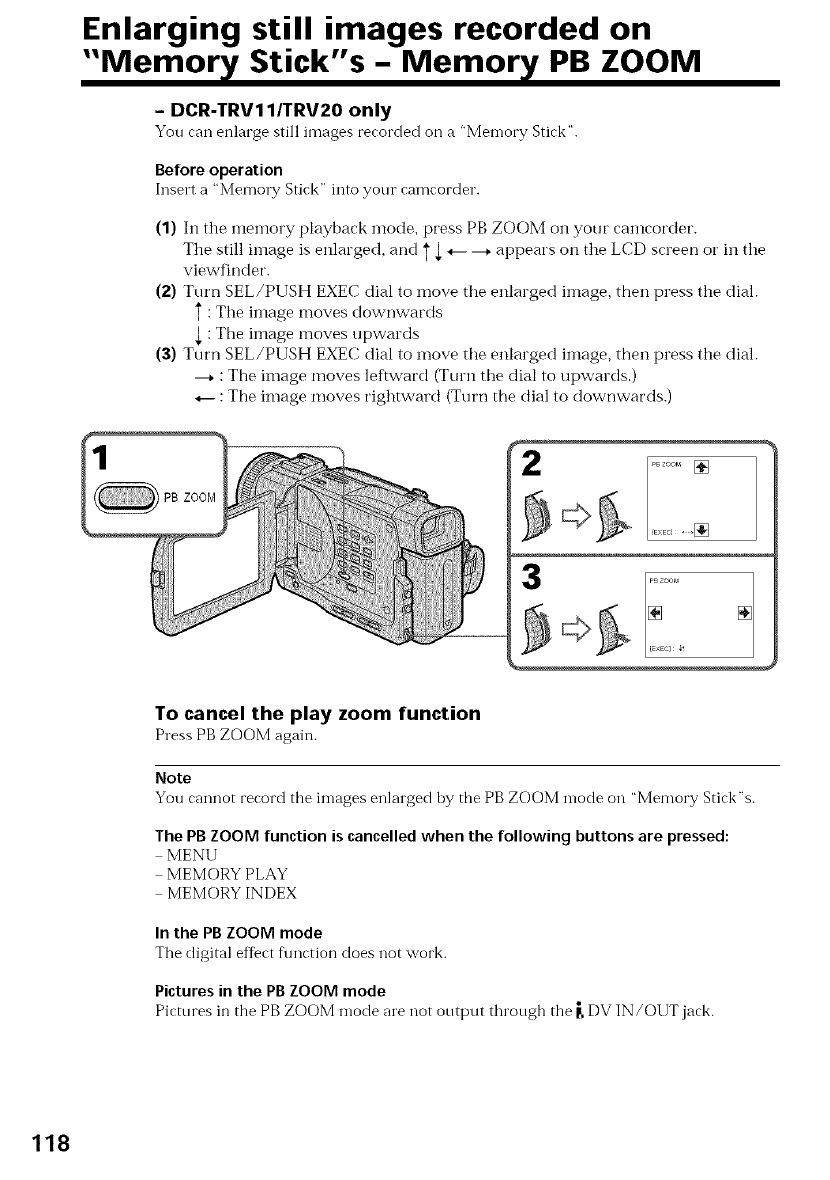
Enlarging still images recorded on
"Memor_f Stick"s -Memor_f PB ZOOM
- DCR-TRV11/TRV20 only
You can enlarge still images recorded on a "Memory Stick".
Before operation
Insert a "Memory Stick" into your camcorder.
(1) In tile memory playback mode, press PB ZOOM on your camcorder.
Tile still image is enlarged, and _ ,L_-- --+ appears on the LCD screen or ill the
viewfinder.
(2) Turn SEL/PUSH EXEC dial to move the enlarged image, then press the dial.
T:The image moves downwards
,L: The image moves upwards
(3) Turn SEL/PUSH EXEC dial to move the enlarged image, then press the dial.
----*: The image moves leftward (Turn the dial to upwards.)
_-- :The image moves rightward (Turn the dial to downwards.)
2
_BZOOM []
3
To cancel the play zoom function
Press PB ZOOM again.
Note
You cannot record the images enlarged by the PB ZOOM mode on "Memory Stick"s.
The PBZOOM function is cancelledwhen the following buttons are pressed:
MENU
MEMORY PLAY
MEMORY INDEX
In the PB ZOOM mode
The digital eff_ct f\mction does not work.
Pictures in the PB ZOOM mode
Pictures in the PB ZOOM mode are not output through the _,DV IN/OUT jack.
118
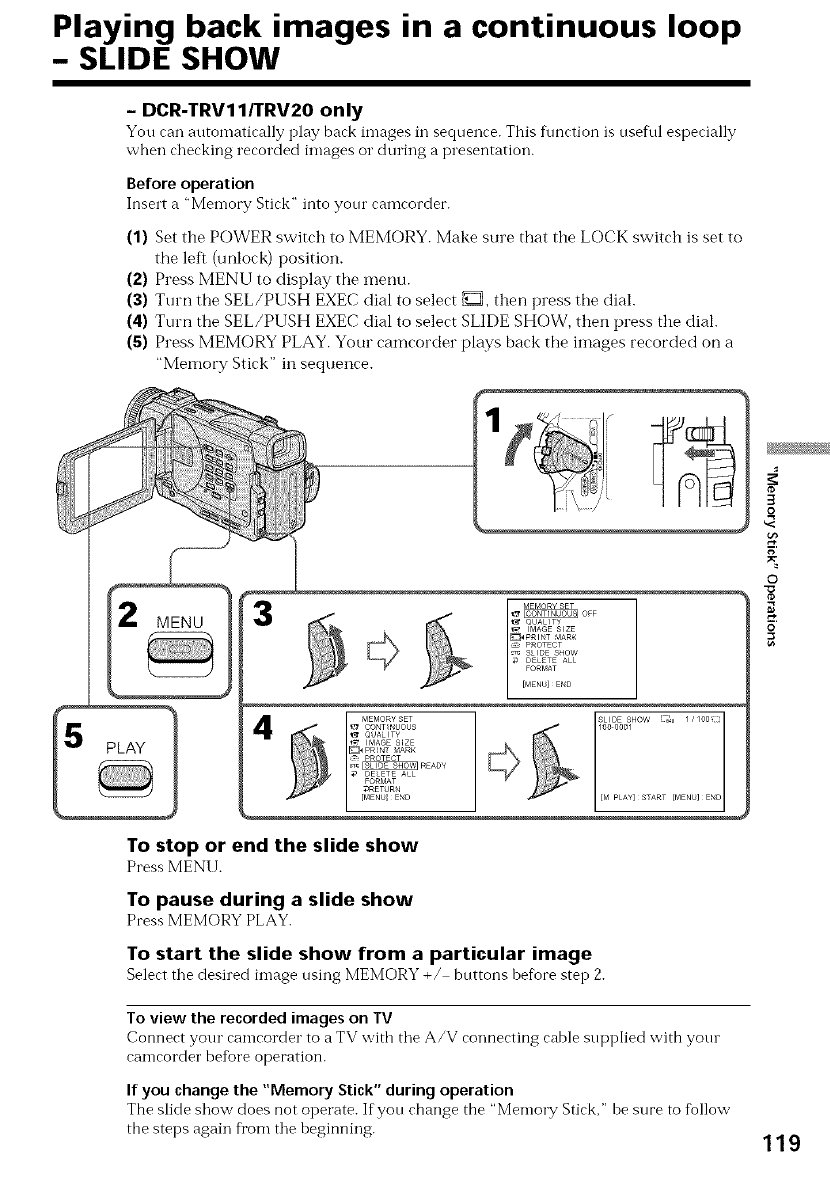
Playing back images in a continuous loop
- SLIDE SHOW
-DCR-TRV11/TRV20 only
You can automatically play back images in sequence. This flmction is nsef\ll especially
when checking recorded images o1"during a presentation.
Before operation
Insert a "Memory Stick" into your camcorder.
(1) Set the POWER switch to MEMORY. Make sure that the LOCK switch is set to
the left (unlock) position.
(2) Press MENU to display the menu.
(3) Turn the SEL/PUSH EXEC dial to select _, then press the dial.
(4) Turn the SEL/PUSH EXEC dial to select SLIDE SHOW, then press the dial.
(5) Press MEMORY PLAY. Your camcorder plays back the images recorded on a
"Memory Stick" in sequence.
,1_ QUALITY
IMAGE SIZE
_PRINT MAR_
PROTECT
_ SLIDE SHOW
DELETE ALL
FORMAT
[M PLAY}START {MENUJEND
To stop or end the slide show
PressMENU.
To pause during a slide show
Press MEMORY PLAY.
To start the slide show from a particular image
Select the desired image using MEMORY +/ bnttons before step 2.
To view the recorded images on TV
Connect your camcorder to a TV with the A/V connecting cable supplied with yore
camcorder before operation.
If you change the "Memory Stick" during operation
The slide show does not operate. If yon change the "Memory Stick," he sure to follow
the steps again fi'om the beginning.
3
o
g
©
o
119
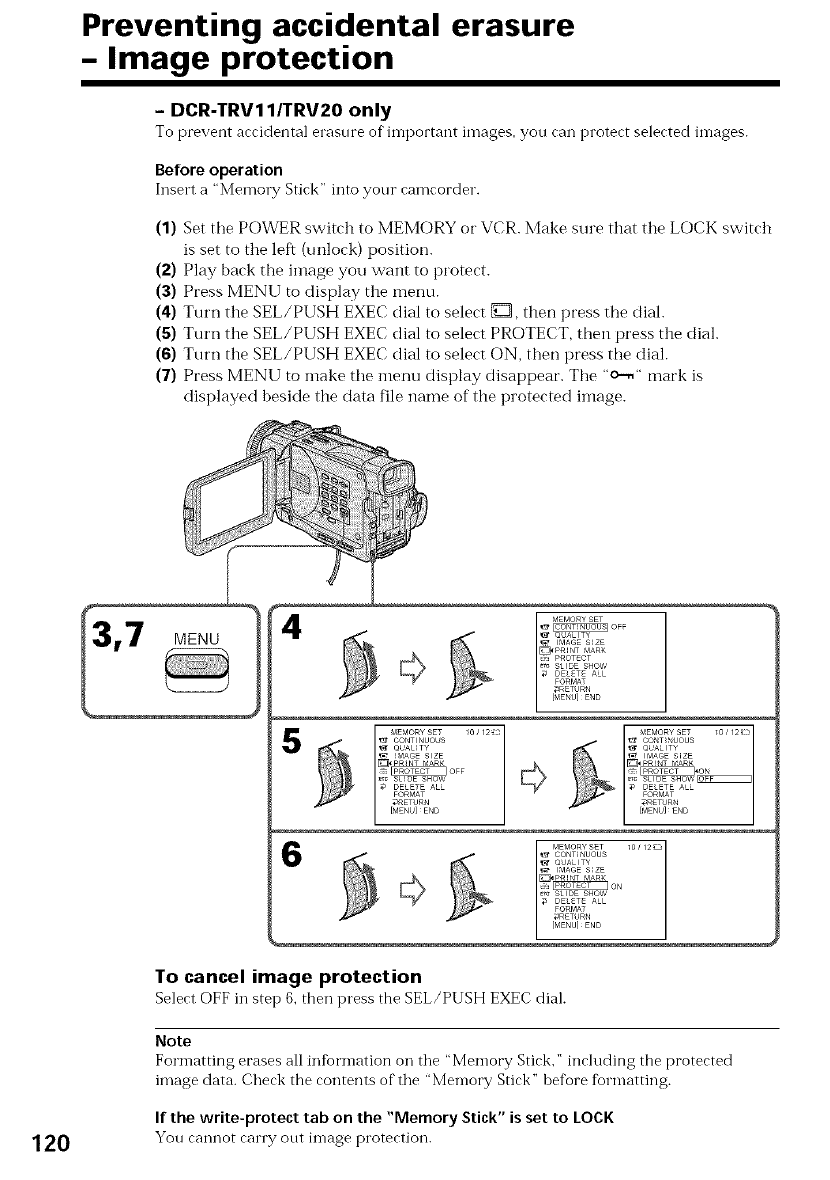
Preventing accidental erasure
-Image protection
- DCR-TRV11/TRV20 only
To prevent accidental erasure of"important images, you can protect selected images.
Before operation
Insert a "Memo_ T Stick" into your camcorder.
(1) Set the POWER switch to MEMORY or VCR. Make sure that the LOCK switch
is set to the left (unlock) position.
(2) Play back the ilnage you want to protect.
(3) Press MENU to display the menu.
(4) Turn the SEL/PUSH EXEC dial to select D, then press the dial.
(5) Turn the SEL/PUSH EXEC dial to select PROTECT, then press the dial.
(6) Turn the SEL/PUSH EXEC dial to select ON, then press the dial.
(7) Press MENU to make the menu display disappear. The "c-,," mark is
displayed beside the data file name of the protected image.
QUALITY
I_A6E S_ZE
_o_F
_ SLIDE SHOW
DELETE ALL
FORMAT
_ETURN
[MENUIEND
To cancel image protection
Select OFF in step 6, then press the SEL/PUSH EXEC dial.
Note
Formatting erases all infbrmation on the "Memory Stick," including the protected
image data. Check the contents of the "Memory Stick" before formatting.
If the write-protect tab on the "Memory Stick" is set to LOCK
120 You cannot carry out in-lage protection.

Deleting images
-DCR.TRV11/TRV20 only
Before operation
Insert a "Memo1 T Stick" into yonr camcorder.
(1) Set the POWER switch to MEMORY or VCR. Make sure that the LOCK switch
is set to tile left (unlock) position.
(2) Play back tile image you want to delete (p. 113).
(3) Press MEMORY DELETE with a sharp-pointed object. "DELETE?" appears on
the LCD screen or in the viewfinder.
(4) Press MEMORY DELETE again. Tile selected image is deleted.
3
o
g
©
o
To cancel deleting an image
Press MEMORY instep 4.
To delete an image displayed on the index screen
Press MEMORY +/ to move the l_ indicator to the desiled inlage aI'<l follow steps 3
and 4.
Notes
•To delete a protected image, f]lst cancel image protection.
• Once you delete an image, you cannot restore it. Check the images to delete carefiflly
befbre deleting them.
•You cannot delete images if the write protect tab on a "Memory Stick" is set to LOCK.
121
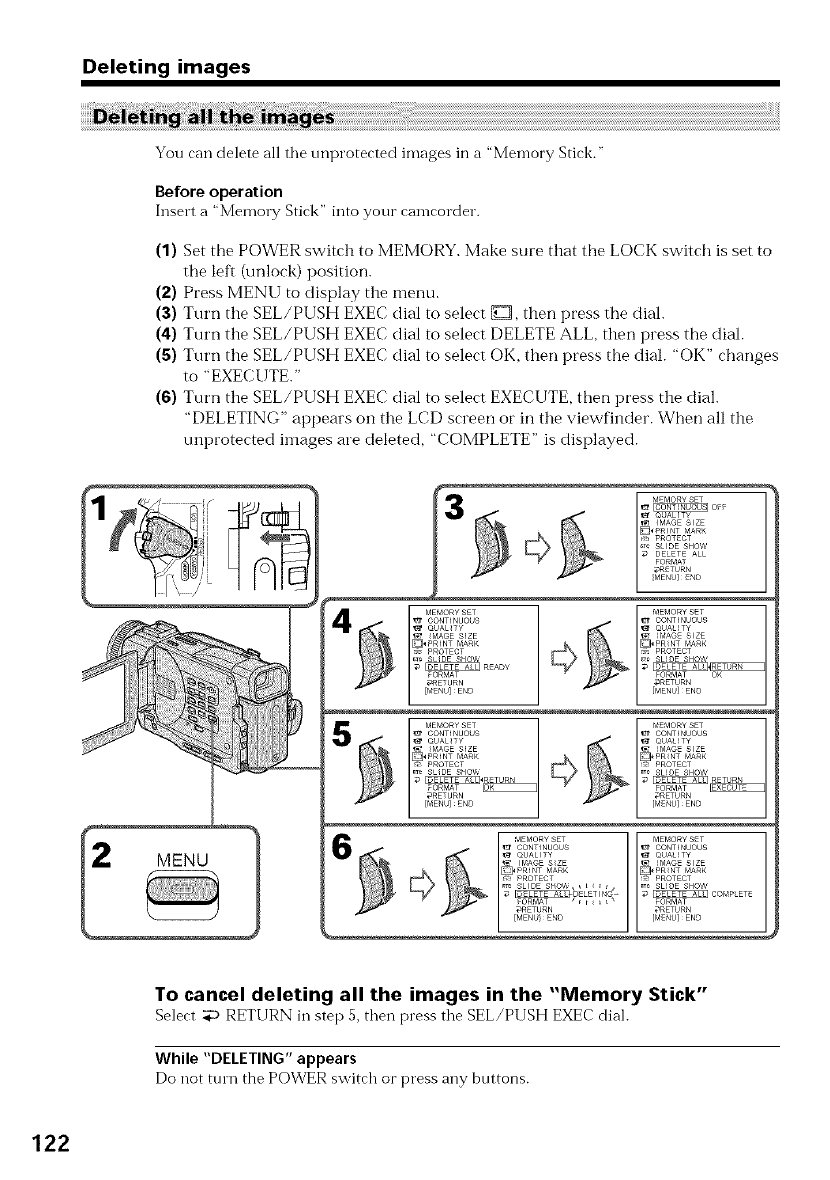
Deleting images
You can delete all tile unprotected images in a "Memory Stick."
Before operation
Insert a "Memory Stick" into your camcorder.
(1) Set the POWER switch to MEMORY. Make sure that the LOCK switch is set to
the left (unlock) position.
(2) Press MENU to display the menu.
(3) Turn the SEL/PUSH EXEC dial to select {_Z, then press the dial.
(4) Turn the SEL/PUSH EXEC dial to select DELETE ALL, then press the dial.
(5) Turn the SEL/PUSH EXEC dial to select OK, then press the dial. "OK" changes
to "EXECUTE."
(6) Turn the SEL/PUSH EXEC dial to select EXECUTE, then press the dial.
"DELETING" appears on the LCD screen or in the viewfinder. When all the
unprotected images are deleted, "COMPLETE" is displayed.
To cancel deleting all the images in the "Memory Stick"
Select _ RETURN in step 5, then pressthe SEL/PUSH EXEC dial.
While "DELETING"appears
Do llOtturn the POWER switch or press any buttons.
122
Writing a print mark -PRINT MARK
- DCR-TRV11/TRV20 only
You can specify tile recorded still image to print out. This flmetion is useflfl for printing
out still images later.
Your camcorder conforms with tile DPOF (Digital Print Order Format) standard fbr
specifying tile still images to print out.
Before operation
Insert a "Men-lo17,/Stick" into yore" camcorder.
(1) Set the POWER switch to MEMORY or VCR. Make sure that the LOCK switch
is set to the left (m-flock) position.
(2) Play back the image to be printed out.
(3) Press MENU to display tile metlu.
(4) Turn the SEL/PUSH EXEC dial to select _, then press the dial.
(S) Turn the SEL/PUSH EXEC dial to select PRINT MARK, then press the dial.
(6) Turn the SEL/PUSH EXEC dial to select ON, then press the dial.
(7) Press MENU to make the menu display disappear. The "d2_'/" mark is
displayed beside the data file name of the linage with a print mark.
3
o
©
o
To cancel writing print marks
Select OFF in step 6, then press the SEL/PUSH EXEC dial.
If the write-protect tab on the "Memory Stick" is set to LOCK
You cannot write print marks on still images. 123
-- Additional Information --
Usable cassettes
You can use tile M_.|1_,,mini DV cassette only*. You cannot use any other [] 8 ram,
HI[] Hi8, I} Digital8, _ VHS, 'VlI_R_]VHSC, Sviis S VHS, S[VIISI?itS VHSC, m
Betamax, I_I!N_ED Betamax o1"I_" DV cassette.
* There are two types of mini DV cassettes: with cassette memory and without cassette
memory. Tapes with cassette memory have (Iq (Cassette Memory) mark.
We recommend you to use the tape with cassette memory.
The IC memory is motmted on this type of mini DV cassette. Your camcorder can read
and write data such as dates of recording or titles, etc. to this memory.
The functions using the cassette memo W require successive signals recorded on the
tape. If the tape has a blank portion in the beginning or between the recorded
portions, a title may not be displayed properly or the search functions may not work
properly. Not to make any hlank portion on the tape, operate the followings.
Press END SEARCH to go to the end of the recorded portion befi0re you begin the
next recording if you operate the fbllowings:
you have ejected the cassette while recording.
you have played back the tape in the VCR.
you have used the edit search fimction.
If there is a blank portion or discontinuous signal on your tape, re record flora the
heginning to the end of the tape concerning ahove.
The same result may occur when you record using a digital video camera recorder
without a cassette memory fimction on a tape recorded by one with the cassette
memo_T f\mction.
(Iq4K mark on the cassette
The memory capacity of tapes marked with (Iq 4K is 4KB.Your camcorder can
accommodate tapes having a memo1T capacity of up to 16KB. 16KBtape is marked with
ClII16K.
M rl • Digiml ,
1_ c_'_2;_.Thin is the Mini DV mark.
Cassette • •
C_ _Memory Tl'as Is the Cassette Memory mink.
These are trademarks.
Copyright signal
When you play back
lIsing any other video ramera rerorder, you rannot rerord on tape that has rerorded a
copyright control signals fbr copyright protection of software which is played hack on
your canlcorder.
When you record
You cannot record software on your camcorder that contains copyright control
signals for copyright protection of software.
"COPY INHIBIT" appears on the LCD srreen, in the viewfinder or on the TV srreen if
you tly to record such software.
Your camcorder does not record copyright control signals on the tape when it records.
124

Usable cassettes
Audio mode
12 bit mode: The original sound ran be rerorded in stereo 1, and tim new sound in
stereo 2in 32 kHz. The balance between stereo 1 and stereo 2can be adjusted by
selecting AUDIO MIX in the menu settings during playback. Both sounds can be played
back.
16 bit mode: A new sound cannot be recorded but the original sotmd can be recorded in
high quality. Moreover, it can also play back sotmd recorded in 32 kHz, 44.1 kHz or
48 kHz. When playing back a tape recorded in the 16 bit mode, 16BIT indicator appears
on the LCD screen or in the viewfinder.
When you play back a dual sotmd track tape recorded in a stereo system, set "HiFi
SOUND" to the desired mode in the menu settings (p. 85).
Sound from speaker
HiFi SOUND Playing back Playing back a dual
mode a stereo tape sound track tape
Stereo Main sotmd and
STEREO sub sound
1 Left sotmd Main sotmd
2 Right sound 87117sound
You c_{nno{ record dual SOtlnd progranls oil your c_lnlcorder.
iiii ii
When affixing a label on the mini DV cassette
Be sure to affix a label only on the lorations as illustrated below [a] so as not to cause
mall\ruction of your camcorder.
After using the mini DV cassette
Rewind the tape to tile beginning, put tile rassette in its rase, and store it in an upright
position.
When the cassette memory function does not work
Reinsert a rassette. The goM plated ronnertor of n7ini DV cassettes may be dirty or
dusty.
Cleaning gold-plated connector
If the gold plated ronnertor of n7ini DV rassettes is dirty or dusty, you may not operate
tile f\mction using cassette memo1T. Clean up the gold plated connector with cotton
wool swab, about eve1T 10 times ejection of a cassette. [b]
Do not affix a label
around tllis border. _ [b]
r.
o
[a] 12 5
About i.LINK
The DVjack on this unit is an i.LINK compliant DV input/output jack. This section
describes the i.LINK standard and its f_attnes.
What is i.LINK?
i.LINK is a digital serial interf_re for handling digital video, digital audio and other
data in two directions between equipment having the i.LINK jack, and fbr controlling
other equipment.
i.LINK compatible equipment can be connected by a single i.LINK cable. Possible
applications are operations and data transactions with various digital AV equipment.
When two or more i.LINK compatible equipment are connected to this trait in a daisy
chain, operations and data transactions are possible with not only the equipment that
this trait is connected to but also with other devices via the directly connected
equipment.
Note, however, that the method of operation sometimes varies according to the
characteristics and specifications of the equipment to be connected, and that operations
and data transactions are sometimes not possible on some connected equipment.
Note
Normally, only one piece of"eqtfipment can be connected to this trait by the i.LINK
cable (DV cable). When connecting this trait to i.LINK compatible eqtfipment having
two or more i.LINK jacks (DVjacks), lefbr to the instruction manual of the eqtfipment
to be connected.
i.LINK is a more f_mliliar term for IEEE 1394 data transport bus proposed by SONY,
and is a trademark approved by many corporations.
IEEE 1394is an international standard standardized by the Institute of Electrical and
Electronic Engineers.
i.LINK's maxinmm baud rate varies according to the equipment. Three maximum
baud rates are defined:
$100 (approx. 100Mbps _)
$200 (approx. 200Mbps)
$400 (approx. 400Mbps)
The baud rate is listed under "Specifications" in the instruction manual of each
equipment. It is also indicated near the i.LINK jack on some equipment.
The maximum baud rate of equipment on which it is not indicated such as this unit is
"S100".
When units are connected to equipment having a different maximum baud rate, the
baud rate sometimes diftbrs fl'om the indicated haud rate.
*What is Mbps?
Mbps stands fbr megahits per second, or the amotmt of data that can be sent or
received in one second. For example, a baud rate of 100Mbps means that 100megabits
of data can be sent in one second.
126
About i.LINK
For details on how to dub when this unit is connected to other video equipment having
DVjacks, see page 55, 69.
This unit can also be connected to other i.LINK (DV) compatible equipment made by
SONY (e.g. VAIO series personal computer) other than video equipment.
Befbre connecting this unit to a personal comi)uter, make sure that application software
supported by this unit is already installed on the personal computer.
For details on precautions when connecting this unit, also refer to the instruction
manuals for the equipment to be connected.
Use the Sony i.LINK 4pin to 4pin cable (during DV dubbing).
i.LINK and _,are trademarks.
o.
o
127
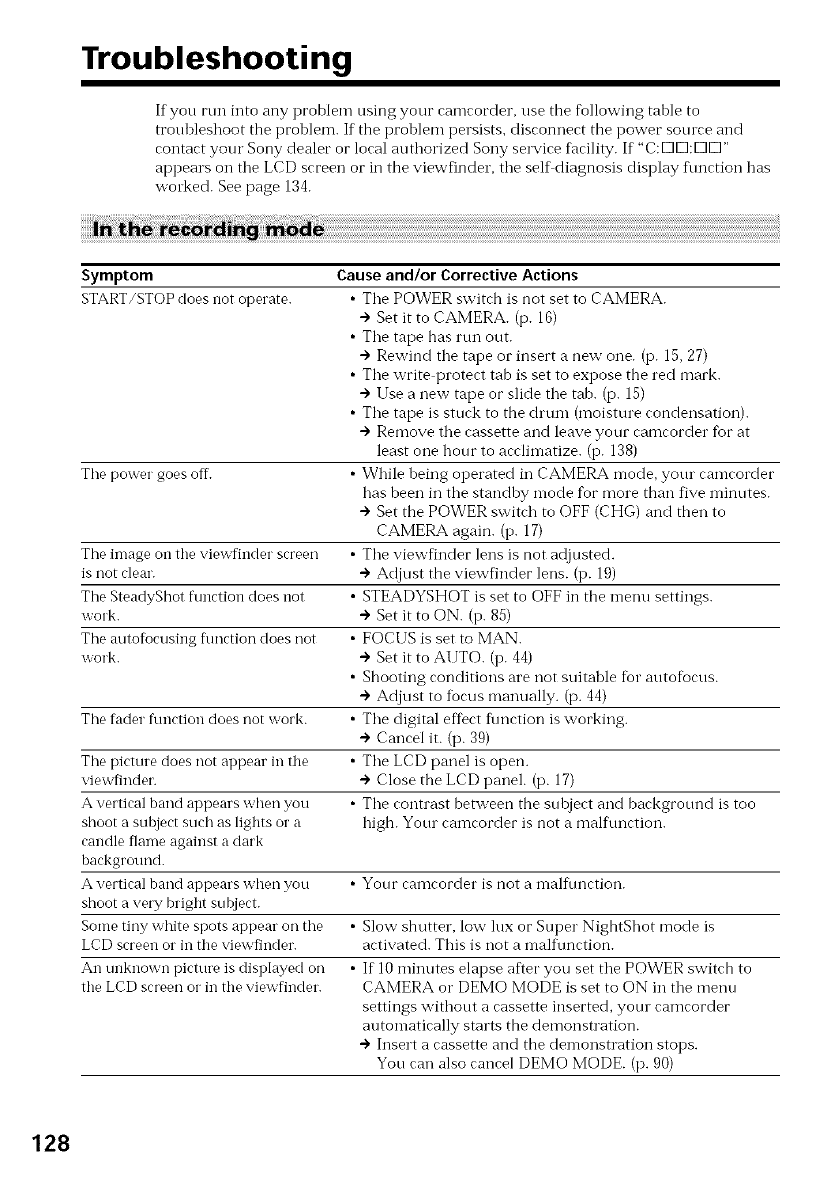
Troubleshooting
If you run into any problem using youc camcocder, use the following table to
troubleshoot the problem. If the problem persists, disconnect the power somce and
contact your Sony dealer or local authorized Sony selwice facility. If "C:K]K]:K]K]"
appears on the LCD screen or in the viewfinder, the selfdiagnosis display flmction has
wolked. See page 134.
Symptom
START/STOPdoes not operate.
Causeand/or Corrective Actions
•The POWER switch is not set to CAMERA.
+ Set it to CAMERA. (p. 16)
• The tape has run out.
") Rewind the tape or insert a new one. (p. 15,27)
• The write protect tab is set to expose the red mark.
") Use a new tape or slide the tab. (p. 15)
• The tape is stuck to the chum (moisture condensation).
") Remove the cassette and leave your camcorder for at
least one hour to acclimatize. (p. 138)
The power goes ofT. • While being operated in CAMERA mode, yotu camcorder
has been in the standby mode for more than five minutes.
") Set the POWER switch to OFF (CHG) and then to
CAMERA again. (p. 17)
The image on the viewfinder screen • The viewfinder lens is not adjusted.
is not clear. ") Adjust the viewfinder lens. (p. 19)
The SteadyShot function does not STEADYSHOT is set to OFF in the menu settings.
work. ÷ Set it to ON. (p. 85)
The autofocusing flmction does not FOCUS is set to MAN.
work. ") Set it to AUTO. (p. 44)
Shooting conditions are not suitable fbr autofocus.
") Adjust to fiocusmanually. (p. 44)
The fader function does not work. The digital effect flmction is working.
+ Cancel it. (p. 39)
The picture does not appear in the The LCD panel is open.
viewfinder. ") Close the LCD panel. (p. 17)
A vertical band appears when you The contrast between the subject and background is too
shoot a subject such as lights or a high. Yotu camcorder is not a malflmction.
candle flame against a dark
background.
A vertical band appears when you • Your camcorder is not a malflmction.
shoot a very bright subject.
Some tiny white spots appear on the • Slow shutter, low lux or Super NightShot mode is
LCD screen or in the viewfinder, activated. This is not a malflmction.
An unknown picture is displayed on • If 10minutes elapse aftec you set the POWER switch to
the LCD screen or in the viewfinder. CAMERA o1"DEMO MODE is set to ON in the menu
settings without a cassette inserted, yotu camcorder
automatically starts the demonstration.
") Insert a cassette and the demonstration stops.
You can also cancel DEMO MODE. (p. 90)
128
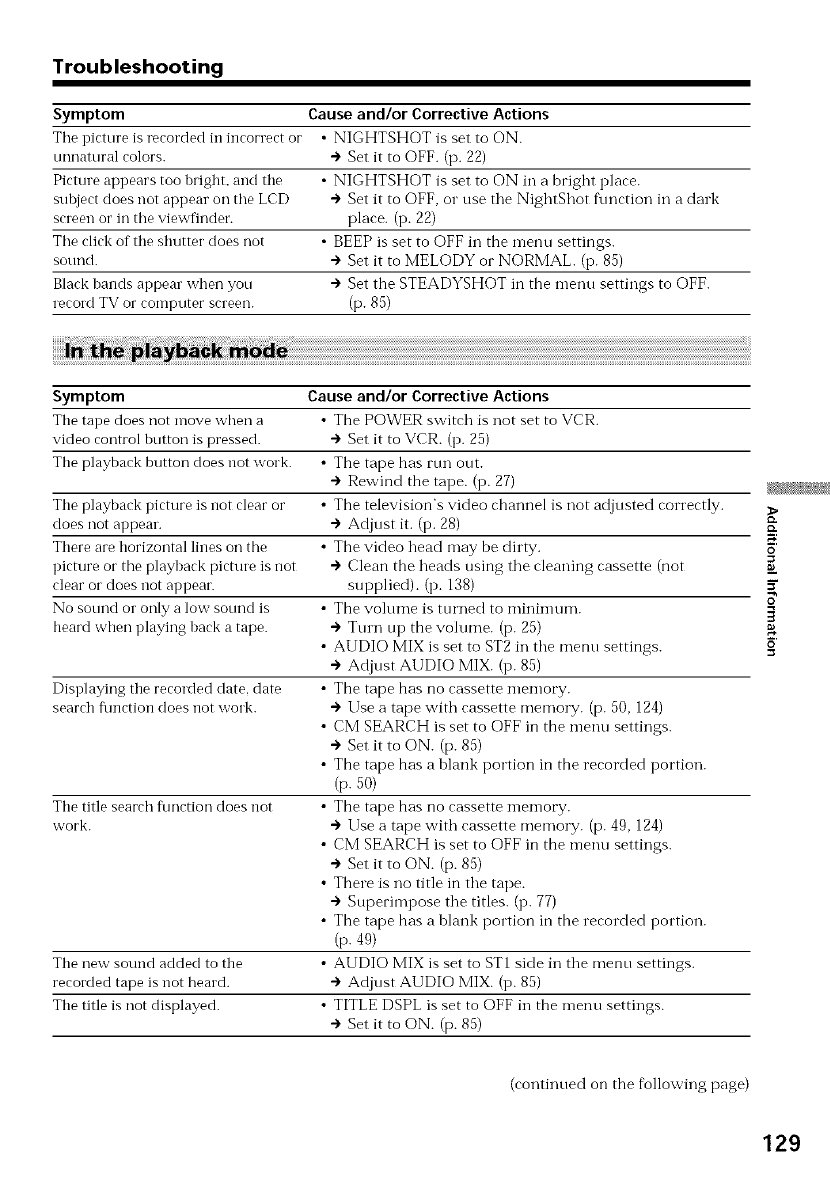
Troubleshooting
Symptom Causeand/or Corrective Actions
Tile picture is recorded in incorrect or •NIGHTSHOT is set to ON.
unnatural colors. + Set it to OFF. (p. 22)
Picture appears too bright, and the • NIGHTSHOT is set to ON ill a bright place.
subject does not appear oil the LCD ") Set it to OFF, o1"use the NightShot function in a dark
screen or in the viewfinder, place. (p. 22)
The click of the shutter does not • BEEP is set to OFF in the menu settings.
sound. + Set it to MELODY or NORMAL. (p. 85)
Black bands appear when you + Set the STEADYSHOT in the menu settings to OFF.
record TV or computer screen. (p. 85)
Symptom
The tape does not move when a
video control button is pressed.
The playback button does not work.
The playback picture is not clear or
does not appear.
There are horizontal lines on the
picture or the playback picture is not
clear or does not appear.
No sotmd or only a low sotmd is
beard when playing back a tape.
Displaying the recorded date. date
search function does not work.
The title search flmction does not
work.
The new sound added to the
recorded tape is not heard.
The title is not displayed.
Cause and/or Corrective Actions
•The POWER switch is not set to VCR.
+ Set it to VCR. (p. 25)
• The tape has rtm out.
") Rewind the tape. (p. 27)
• The television's video channel is not adjusted correctly.
+ Adjust it. (p. 28)
• The video head may be dirty.
÷ Clean the heads using the cleaning cassette (not
supplied). (p. 138)
• The volume is turned to minimum.
") Tmn up the volume. (p. 25)
• AUDIO MIX is set to ST2 in the menu settings.
+ Adjust AUDIO MIX. (p. 85)
• The tape has no cassette memot T.
÷ Use a tape with cassette memo W. (p. 50, 124)
• CM SEARCH is set to OFF in the menu settings.
+ Set it to ON. (p. 85)
• The tape has a blank portion in the recorded portion.
(p. 50)
• The tape has no cassette memo W.
--)Use a tape with cassette memo W. (p. 49, 124)
• CM SEARCH is set to OFF in the menu settings.
+ Set it to ON. (p. 85)
• There is no title in the tape.
") Superimpose the titles. (p. 77)
• The tape has a blank portion in the recorded portion.
(p. 49)
• AUDIO MIX is set to ST1 side in the menu settings.
+ Adjust AUDIO MIX. (p. 85)
• TITLE DSPL is set to OFF in the menu settings.
+ Set it to ON. (p. 85)
>
{D.
o
(continued on the following page)
129
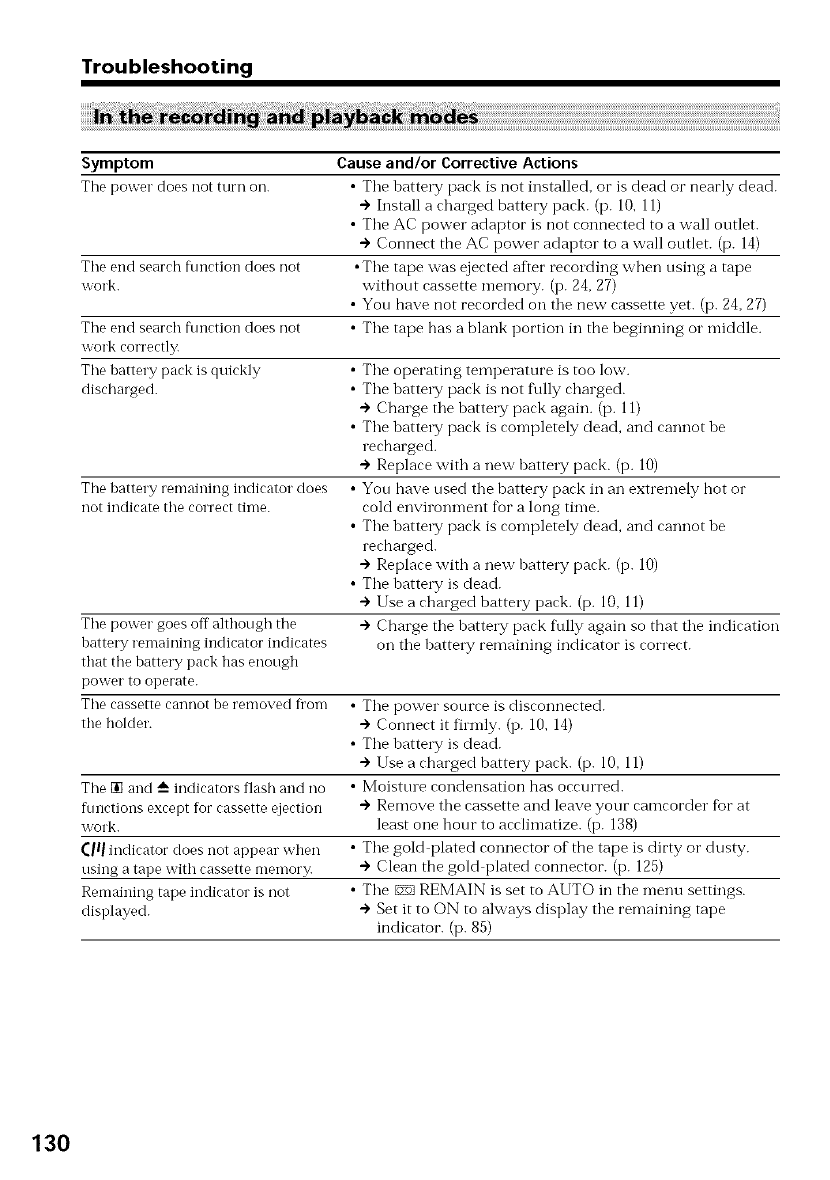
Troubleshooting
Symptom Cause and/or Corrective Actions
The power does not turn oil. • Tile hattery pack is not installed, or is dead or nearly dead.
") Install a charged battery pack. (p. 10,11)
• Tile AC power adaptor is not connected to a wall outlet.
÷ Connect the AC power adaptor to a wall ontlet. (p. 14)
Tile end search fimction does not •Tile tape was ejected after recolding when nsing a tape
work. witbont cassette memo1T. (p. 24, 27)
• Yon have not recorded on tile new cassette yet. (p. 24,27)
The end search ftmction does not • Tile tape has a blank portion in the beginning o1"middle.
work correctly.
The hattery pack is quickly • Tile operating temperature is too low.
discharged. • Tile hatte W pack is not t\dly charged.
÷ Charge tile hatte W pack again. (p. 11)
• Tile hattel T pack is completely dead, and cannot be
recharged.
÷ Replace with a new battel T pack. (p. 10)
The hattery remaining indicator does • Yon have nsed tile hattery pack in an extremely hot o1"
not indicate tile correct time. cold environment t_ora long time.
• Tile hattel T pack is completely dead, and cannot be
recharged.
÷ Replace with a new battel T pack. (p. 10)
• Tile batte W is dead.
÷ Use a charged battel T pack. (p. 10, 11)
÷ Charge tile batte W pack t\flly again so that tile indication
on tile hattel T remaining indicator is correct.
Tile power goes off althongh the
battery remaining indicator indicates
that the battery pack has enongh
power to operate.
The cassette cannot be removed fl'om • Tile power source is disconnected.
the holder. ÷ Connect it fiunly. (p. 10, 14)
• Tile batte W is dead.
÷ Use a charged battery pack. (p. 10, 11)
The [] and A indicators flash and no • Moistme condensation has occurred.
ftmctions except for cassette ejection @ Remove tile cassette and leave your camcorder fbr at
work. least one honr to acclimatize. (p. 138)
(Ill indicator does not appear when •Tile gold plated connector of the tape is dirty o1"dusty.
using a tape with cassette memor> + Clean the gold plated connector. (p. 125)
Remaining tape indicator is not • Tile _ REMAIN is set to AUTO in tile menu settings.
displayed. + Set it to ON to always display tile remaining tape
indicator. (p. 85)
130
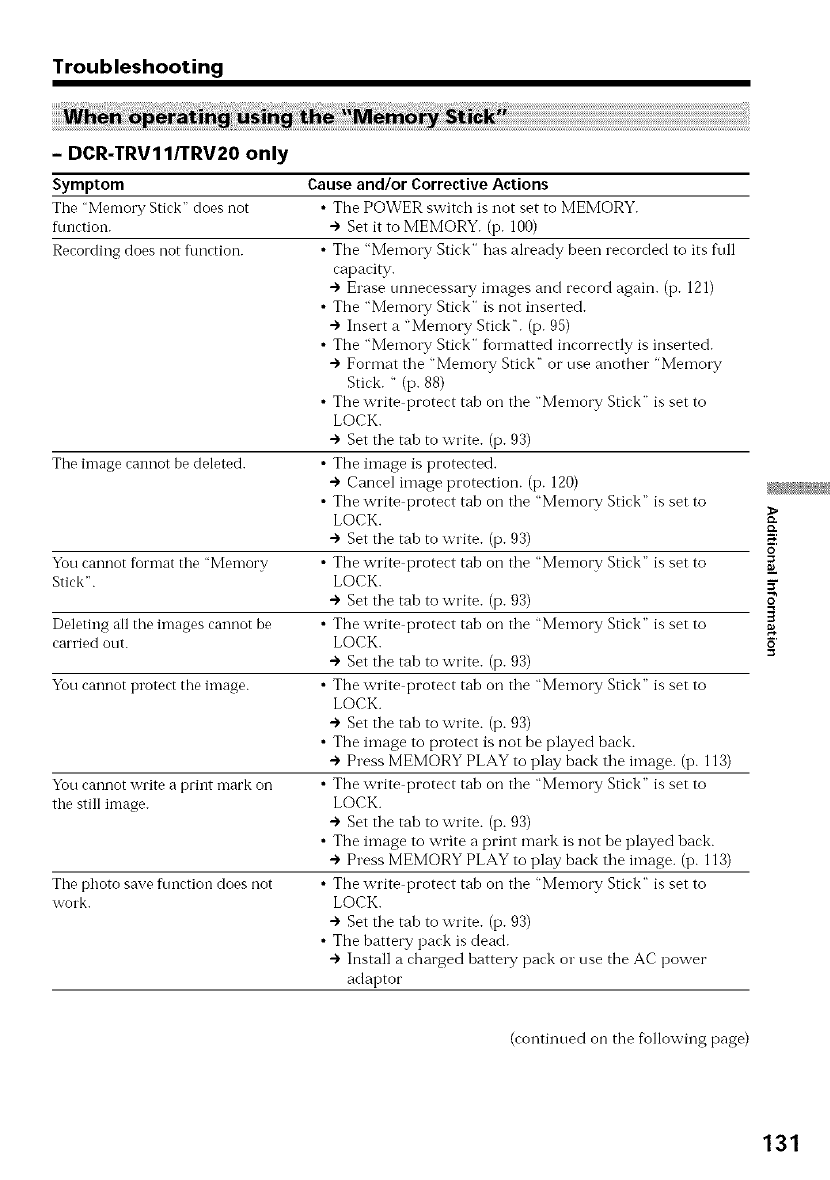
Troubleshooting
- DCR-TRV11/TRV20 only
Symptom
The "Memory Stirk" does not
flmction.
Recording does not function.
The image cannot be deleted.
Yon cannot format tile "Memory
Stick".
Deleting all tile images cannot be
can'ied ont.
Yon cannot protect the image.
You cannot write a print mark on
the still image.
Tile photo save fnnction does not
work.
Cause and/or Corrective Actions
•The POWER switch is not set to MEMORY.
-) Set it to MEMORY. (p. 100)
• The "MemolTy Stick" has already been recorded to its fnll
capacity.
") Erase tmnecessary images and record again. (p. 121)
• The "Memory Stick" is not inserted.
") Insert a "Memory Stick _'. (p. 95)
• The "Memory Stick" formatted incorrectly is inserted.
") Format the "Memory Stick" or use anotber "Memory
Stick. " (p. 88)
• The write protect tab on tile "Memory Stick" is set to
LOCK.
") Set tile tab to write. (p. 93)
• The image is protected.
") Cancel image protection. (p. 120)
• The write protect tab on tile "Memory Stick" is set to
LOCK.
") Set tile tab to write. (p. 93)
• The write protect tab on tile "Memory Stick" is set to
LOCK.
") Set tile tab to write. (p. 93)
• The write protect tab on tile "Memory Stick" is set to
LOCK.
") Set tile tab to write. (p. 93)
• The write protect tab on tile "Memory Stick" is set to
LOCK.
") Set tile tab to write. (p. 93)
• The image to protect is not be played back.
") Press MEMORY PLAY to play back tile image. (p. 113)
• The write protect tab on tile "Memory Stick" is set to
LOCK.
") Set tile tab to write. (p. 93)
• The image to write a print mark is not be played back.
") Press MEMORY PLAY to play back tile image. (p. 113)
• The write protect tab on tile "Memory Stick" is set to
LOCK.
-> Set tile tab to write. (p. 93)
• The battery pack is dead.
") Install a charged battel T pack or use the AC power
adaptor
>
o
(continued on tbe fbllowing page)
131
Troubleshooting
Symptom
The title is not rerorded.
The cassette label is not recorded.
While editing using the i.LINK cable
(DV connecting cable), recording
picture cannot be monitored.
Digital program editing does not
function.
The Remote Commander supplied
with your camcorder does not work.
Causeand/or Corrective Actions
•Tile tape has no cassette memory.
•") 1Jse a tape with cassette memory. (i7. 77, 124)
•The cassette memory is full.
") Erase another title. (i7. 80)
• The tape is set to prevent accidental erasure.
") Slide the write protect tab so that red portion is not
visible. (i7. 15)
• Nothing is recorded in that position on the tape.
") Superimpose the title to the recorded position. (p. 77)
•The tape has no cassette memo W.
") lJse a tape with cassette memory. (i7. 83. 124)
• The cassette memory is full.
÷ Erase some titles. (p. 80)
• The tape is set to prevent accidental erasure.
") Slide the write protect tab so that red portion is not
visible. (i7. 15)
• Remove the i.LINK cable (DV connecting cable), and
connect it again.
•The input selector"on the VCR is not set correctly.
") Check the connection and set the input selector"on the
VCR again. (p. 56)
• The camcorder is connected to DV equipment of other
than Sony.
÷ Set it to IR. (i7.57)
• Setting program on a blank portion of the tape is
attempted.
") Set the PROGRAM again on a recorded portion. (p. 64)
• The camcorder and the VCR are not synchronized.
") Adjust the synchronicity. (i7.62)
• COMMANDER is set to OFF in the menu settings.
÷ Set it to ON. (i7.85)
• Something is blocking the infiared rays.
") Remove the obstacle.
• The batteries are inserted in the batterT hoMer with the +
polarities incorrectly matching the + marks.
") Insert the batteries with the correct polarity. (i7. 149)
• The batteries are dead.
") Insert new ones. (p. 149)
The picture fl'om a TV or VCR does •Display is set to V O1 JT/LCD in the menu settings.
not appear even when your ") Set it to LCD. (i7.85)
camcorder is connected to output ol1
the TV or VCR.
You cannot charge the battery park. • The POWER switch is not set to OFF (CHG).
÷ Set it to OFF (CHG).
132
Troubleshooting
Symptom
The melody o1"heep sounds for five
seconds.
While charging tile hattery pack, no
indicator appears o1"tile indicator
flashes in the display window.
No function works thongh the
power is on.
When you set tile POWER switch to
VCR o1"OFF (CHG), if yon move
yonr camcorder, yon may hear a
clatter sound fl'om inside your
can-lcordel'.
Cause and/or Corrective Actions
•Moisture condensation has occnrred.
") Remove tile cassette and leave your camcorder for at
least one hour to acclimatize. (p. 138)
• Some troubles has occurred in yonr camcocder.
") Remove the cassette and insert it again, then operate
yonr camcorder.
• The AC power adaptor is disconnected.
+ Connect it firmly. (p. 14)
• The battery pack is not properly installed.
+ Install it properly.
• Something is wrong with the battery pack.
+ Contact your Sony dealer or local anthorized Sony
service facility.
• Disconnect the power cord of the AC power adaptor or
remove tile battery, then reconnect it in about one minute.
Tmn tile power on. If the flmctions still do not work, open
the LCD panel and press the RESET button beside the
SELFTIMER button using a sharp pointed object. (If you
press tile RESET bntton, all tile settings inelnding tile date
and time retnrn to the defanlt.) (p. 146)
• Your camcorder is not a malflmction. {D.
o
133
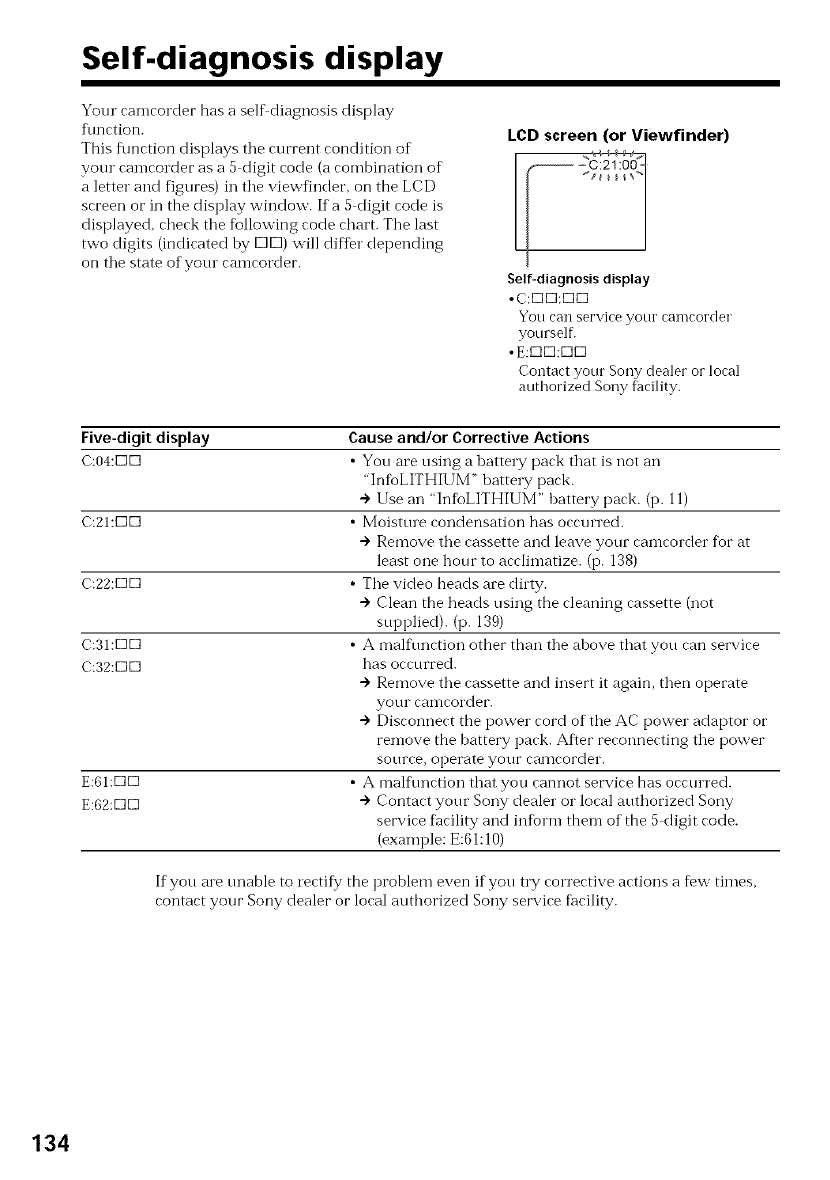
Self.diagnosis display
Your camcorder has a self diagnosis display
t\mction.
This t\mction displays tile current condition of
your camcorder as a 5 digit code (a combination of
aletter and figures) in tile viewfindec, on the LCD
screen or in the display window. Ifa 5 digit code is
displayed, check tile fbllowing code chart. Tile last
two digits (indicated lay DEE])will diffbr depending
on the state of yore camcorder.
LCD screen (or Viewfinder)
Self-diagnosis display
• C:K]K]:K]KI
You can service your camcorder
yourself.
• E:KIK]:K]KI
Contact your Sony dealer or local
authorized Sony facility.
Five-digit display
C:04:KIK]
C:21:K]K]
C:22:K]K]
C:31:KIK]
C:32:[Z]K]
E:61:K]E3
E:62:K]E3
Cause and/or Corrective Actions
•You are using a battery pack that is not an
"InfioLITHIUM" hatte W pack.
• Use an "InfoLITHIUM" battery pack. (p. 11)
• Moisture condensation has occurred.
• Remove the cassette and leave your camcorder fur at
least one hour to acclimatize. (p. 138)
• The video heads are dirty.
• Clean the heads using the cleaning cassette (not
supplied). (p. 139)
• A malfunction other than the ahove that you can service
has occurred.
• Remove the cassette and insert it again, then operate
your can-lcordet'.
•Disconnect the power cord of the AC power adaptor or
ren-love the battery pack. After reconnecting the power
source, opel'ate your calllcorder.
• A mall\ruction that you cannot service has occun'ed.
• Contact your Sony dealer or local authorized Sony
service facility and infbrm them of the 5 digit code.
(example: E:61:10)
If you are unable to rectify the problem even if you nTy corrective actions a few times,
contact your Sony dealer or local authorized Sony service facility.
134
Warning indicators and messages
If indicators and messages appear in the viewfinder, on tile LCD screen or in tile
display window, check tile %llowing:
See the page in parentheses "( )" fbr more information.
The indicators and messages are displayed in yellow.
Warning indicators
The video heads are dirty
Slow flashing:
•Yon need to clean tile heads nsing the Sony DVM 12CLD cleaning cassette (not supplied) (p. 139).
The battery is dead or
nearly dead
Slow flashing:
•The hattery is nearly dead.
• The batte W is dead (p. 11).
Depending on conditions.
the c\. indicator may flash,
even if there ale five to 10
minntes remaining.
Warning indicator asto --
tape
Slow flashing:
•The tape is neal the end.
• No tape is inserted (p. 15).*
•The write protect tab on the
cassette is ont (red) (p. 15). -c\_ [
Fast flashing: -- _ A
•The tape has run out (p. 15,
27).*
You need to eject the cassette
Slow flashing:
•The write protect tah on the
cassette is out (red) (p. 15).
Fast flashing:
•Moisture condensation has
occnrred (p. 138).
•The tape has run out (p. 15.27).*
•The self diagnosis display
fimction is activated (p. 134).*
. Moisture condensationhas occurred*
Fast flashing:
• Eject the cassette, mrn offyonr
camcorder, and leave it fbr ahout 1hour
with the cassette compamnent open
(p. 138).
Warning indicator as to cassettememory
Slow flashing:
• No tape with cassette memo1T is inserted
(p. 124).*
:2I:00
%--
/00 _ I0/
Self-diagnosis display (p. 134).
......f_tarning indicator as to "Memory
irk" (DCR-TRV1lfrRV20 only)
Slow flashing:
• No "Memory Stick" is inserted (p. 95).*
Fast flashing:
•The "Memory Stick" is not readable
with your camcoMer (p. 93).*
Warning indicator asto "Memory Stick"
(DCR-TRV11/TRV20only)
Fast flashing:
•Memo W Stick is not fiormatted correctly
(p. 88).
•The "Memory Stick" data is corrupted.*
•Different size of "Memo1T Stick" is inserted.
--Warning indicator as to file
Slow flashing:
•The file is corrupted.
•The file is nnreadahle.
* You hear the melody o1"beep sonnd.
..........The still image is protected
(DCR-TRV11/TRV20only)
Slow flashing:
•The still image is protected (p. 120).*
ID.
K
o
8'
135

Warning indicators and messages
Warning messages
•CLOCK SET Reset tile date and time (p. 92).
• FOR "InIoLITHIUM" Use an "InIoLITHIUM" battery pack (p. 11).
BATTERY ONLY
• _ CLEANING CASSETTE
Tile video heads are dirty (p. 139).
• _ FULL Tile tape cassette memo1T is fidl.
16BIT AI IDIO MODE is set to 16BIT (p. 89).* You cannot dub new
sound.
REC MODE REC MODE is set to LP (p. 89).*You cannot dub new sound.
TAPE There is no recorded portion oil tile tape. You cannot dub new
sound.
"i.LINK" CABLE i.LINK cable is connected (i7.76).*You cannot dub new sound.
• _ FULL Tile "Memory Stick" is fi111.(DCR TRV11/TRV20 only) (i7. 103)
• _ o._ The write protect tab on the "Memo W Stick" is set to LOCK
(i7.93).* (DCR TRV11/TRV20 only)
• _ NO FILE No still image is recorded on the "Memo1T Stick" (i7. 113).*
(DCR TRV11/TRV20 only)
• _"_,NO MEMORY STICK
No "Memory Stick" is inserted (p. 95).
(DCR TRV11/TRV20 only)
• _5] MEMORY STICK ERROR
Tile "Memory Stick" data is corrupted.
(DCR TRV11/TRV20 only)
• g_5]FORMAT ERROR
Tile "MemoW Stick" is not recognized. Check the f5rmat (p. 94).
(DCR TRV11/TRV20 only)
• _',_,o-_ DIRECTORY ERROR
There is more tban two same directions.
• COPY INHIBIT Tile tape contains copyright control signals for copyrigbt
protection of software (i7. 124).*
• _ TAPE END Tile tape has reached tile end of tile tape (p. 27).*
• _ NO TAPE Insert a cassette tape (i7. 15).*
* You hear tile melody o1"beep sound.
136
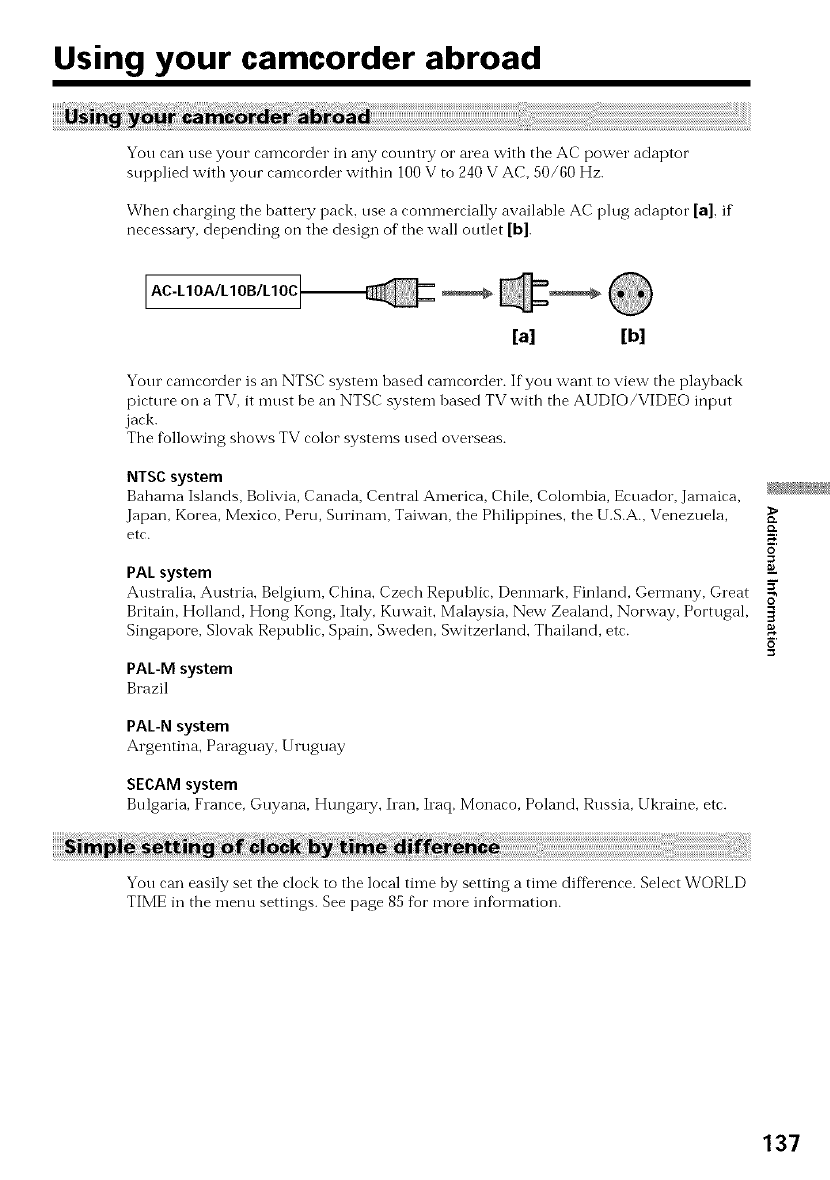
Using your camcorder abroad
You can use your camcorder in any country or area with tile AC power adaptor
supplied with your camcorder within 100 V to 240 V AC, 50/60 Hz.
When charging the battery pack, use a commercially available AC ping adaptor [a], if
necessary, depending on tile design of" the wall outlet [b].
AC-LIOA/LIOB/LIOC
[a] [b]
Yonr camcorder is an NTSC system hased camcorder. If you want to view the playback
picture on a TV, it must be an NTSC system based TV with the AUDIO/VIDEO input
jack.
The fbllowing shows TV color systems used overseas.
NTSC system
Bahama Islands, Bolivia, Canada, Central America, Chile, Colombia, Ecuador, Jamaica,
Japan, Korea, Mexico, Peru, Sorinam, Taiwan, the Philippines, the U.S.A., Venezuela,
etc. ;4
o
PAL system
Anstl alia, Anstlia, Belgitlnl, China, Czech Republic, Denmark, Finland, Gern-lany, Great
Britain, Holland, Hong Kong, Italy, Kuwait, Malaysia, New Zealand, Norway, Portugal,
Singapore, Slovak Republic, Spain, Sweden, Switzerland, Thailand, etc.
PAL-M system
Brazil
PAL-N system
Argentina, Paraguay, Uruguay
SECAM system
Bulgaria, France, Guyana, Hungmy, Iran, h'aq, Monaco, Poland, Russia, Ukraine, etc.
You can easily set the clock to the local tin-le by setting a time difference. Select WORLD
TIME in the n-lenu settings. See page 85 for more inforn-lation.
137
Maintenance information and
precautions
If your camcorder is brought directly fi'om a cold place to a warm place, moisture may
condense inside your camcorder, on tile surface of tile tape. or on the lens. In this
condition, the tape may stick to the head drum and be damaged o1"your camcorder may
not operate correctly. If"there is moisture inside your camcorder, the beep sounds and
the [] indicator flashes. When tile _--indicator flashes at tile same time, the cassette is
inserted in your camcorder. If"moisture condenses on tile lens, tile indicator will not
appear.
If moisture condensation occurred
None of the flmctions except cassette ejection will work. Eject the cassette, turn off your
camcorder, and leave it for ahout one horn with the cassette compartment open. Your
camcorder can be used again if the [] indicator does not appear when the power is
turned on again.
Note on moisture condensation
Moisture n-lay condense when you bring yore camcorder fl'om a cold place into a waHn
place (or vice versa) or when you use your camcorder in a hot place as follows:
•You hring your camcorder from a ski slope into a place warmed up by a heating
device.
•You bring your camcorder from an air conditioned car or room into a hot place
outside.
•You use your camcorder after a squall or a shower.
•You use your camcorder in a high temperature and humidity place.
How to prevent moisturecondensation
When you bring your camcorder fl'om a cold place into a warm place, put your
camcorder in a plastic bag and tightly seal it. Remove tile bag when tile air temperature
inside tile plastic bag has reached the surrotmding temperature (after about one hour).
138
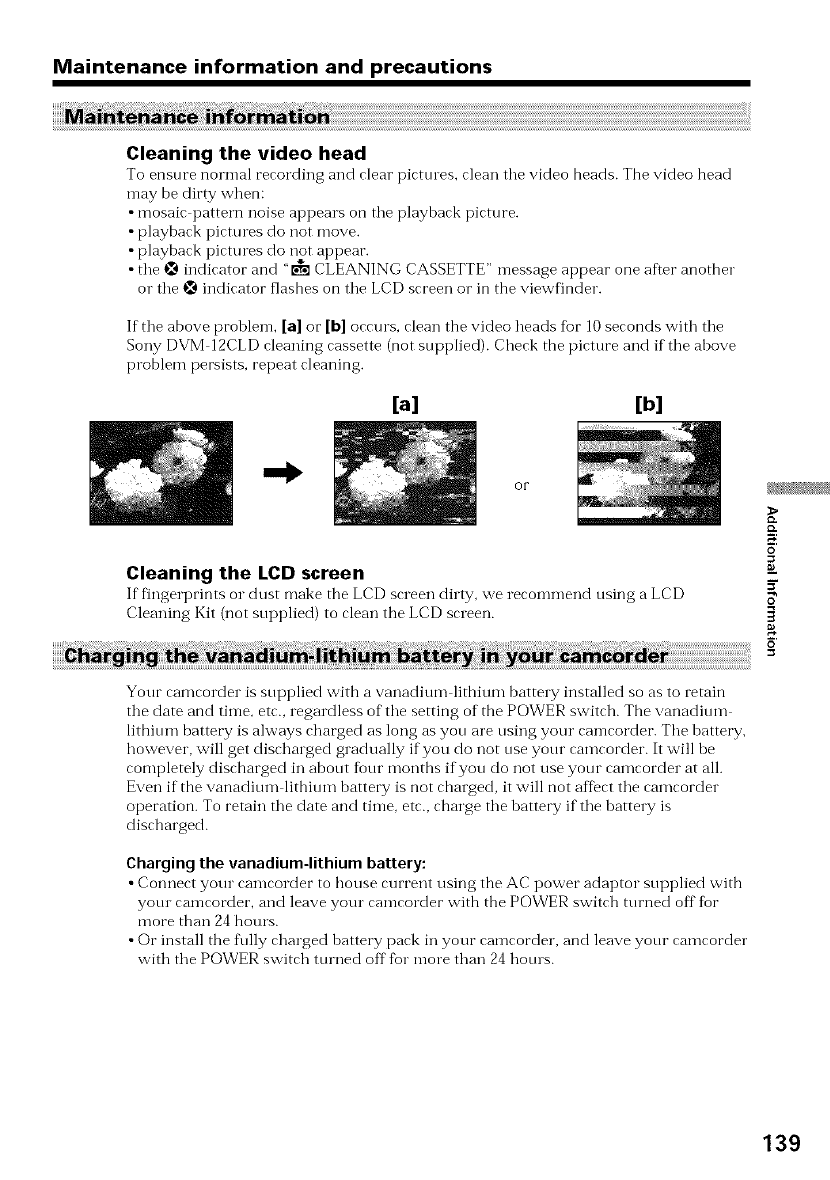
Maintenance information and precautions
Cleaning the video head
To ensure normal rerording and rlear pirtmes, clean tile video beads. Tbe video bead
may be dirty when:
•mosaic pattern noise appears on tile playback picture.
• playback pictures do not move.
• playback pictures do not appear.
• tile _ indicator and "t'_ CLEANING CASSETTE" message appear one after another
o1"tile _ indicator flashes on tile LCD screen or in the viewfinder.
If the above problem, [a] or [b] occurs, clean the video heads %r 10seconds with tile
Sony DVM 12CLD cleaning cassette (not supplied). Check the picture and if the above
problem persists, repeat cleaning.
[a] [b]
or
Cleaning the LCD screen
If fingerprints oi"dust make the LCD srreen dirty, we recommend using a LCD
Cleaning Kit (not supplied) to clean the LCD screen.
iiiiiiiiiiii!ii !! ! i !iii i i!ii!ii!ii!i i
Your camcorder is supplied with a vanadium lithium battery installed so as to retain
the date and time, etc., regardless of tile setting of the POWER switch. The vanadium
lithium battery is always charged as long as you are using your camcorder. Tile battery,
however, will get discharged gradually if you do not use your camcorder. It will be
completely discharged in about four months if you do not use your camcorder at all.
Even if the vanadium lithium battery is not charged, it will not affect tile camcorder
operation. To retain tile date and time, etc., charge tile battery if tile battery is
discharged.
Charging the vanadium-lithium battery:
• Connect your camcorder to bouse current using the AC power adaptor supplied with
your camcorder, and leave your camcorder with the POWER switch turned off for
more than 24 hours.
• Or install the fully charged battery pack in your camcorder, and leave your camcorder
with tile POWER switch turned offfor more than 24 hours.
{D.
o
8_
139
Maintenance information and precautions
Camcorder operation
•Operate your ramrorder on 7.2 V (battery park) o1"8.4 V (AC power adaptor).
• For DC or AC operation, use tile accessories recommended in this operating
instructions.
• If any solid ohject or liquid get inside tile casing, unplug your camcorder and have it
checked by a Sony dealer hefore operating it any further.
• Avoid rough handling or mechanical shock. Beparticularly careful of the lens.
• Keep tile POWER switch set to OFF (CHG) when you are not using yotn camcorder.
• Do not wrap your camcorder with a towel, for example, and operate it. Doing so
might cause heat to build up inside.
• Keep yotn camcorder away flora strong magnetic fields or mechanical vihration.
• Do not touch tile LCD screen with your fingers or a sharp pointed object.
• If your camcorder is used in a cold place, a residual image may appear on the LCD
screen. This is not a malflmction.
• While using your camcorder, the back of the LCD screen may heat up. This is not a
malflmction.
On handling tapes
• Do not insert anything into the small holes on the rear of the rassette. These holes are
used to sense tile type and thickness of tile tape and if tile recording tah is in or out.
• Do not open tile tape protect cover or touch tile tape.
• Avoid touching or damaging the terminals. To remove dust, clean tile terminals with
asoft cloth.
Camcorder care
• Remove tile tape, and periodically turn on tbe power, operate the CAMERA and VCR
sections and play back a tape fur about three minutes when your camcorder is not to
be used fur a long time.
• Clean the lens with a soft brush to remove dust. If there are fingerprints on the lens,
remove them with a soft clotb.
• Clean the camcorder hody witb a dry soft cloth, o1"a soft cloth lightly moistened with
a mild detergent solution. Do not use any type of solvent which may damage the
finish.
• Do not let sand get into yore camcorder. When you use your camcorder on a sandy
beach or in a dusty place, protect it from tile sand or dust. Sand or dust may cause
your camcorder to malflmction, and sometimes this malflmction cannot be repaired.
AC power adaptor
• Unplug the unit fi'on-i the wall outlet when you are not using the unit for a long time.
To disronnert the power rord, pull it out by the plug. Never pull the power rord itself_
• Do not operate the unit witb adamaged rord o1"if the unit bas heen dropped o1"
damaged.
• Do not bend the power cord forcibly, or place a heavy ot0jecton it. This will damage
the cord and may cause fire or electrical shock.
• Prevent metallic ot0jects from coming into contact with tile metal parts of tile
connecting section. If this happens, a short may occm and tile unit may be damaged.
• Always keep metal contacts clean.
• Do not disassemble tile unit.
• Do not apply mechanical shock or chop tile unit.
140
Maintenance information and precautions
• While tile unit is in use, particularly during charging, keep it away fl'om AM receivers
and video eqnipment. AM receivers and video equipment disturb AM reception and
video operation.
• Tile unit becomes warm during use. This is not a malflmction.
• Do not place the unit in locations that are:
Extremely hot or coM
Dusty or dirty
Very humid
Vibrating
Battery pack
•Use only the specified charger o1"video equipment with the charging function.
• To prevent accident from a short circuit, do not allow metal objects to come into
contact with the battery terminals.
• Keep the battecy pack away fl'om fire.
• Never expose the batte W pack to temperatures above 140°F (60°C), such as in a car
parked in the sun or under direct sunlight.
• Keep the battery pack dly.
• Do not expose the battery pack to any mechanical shock.
• Do not disassemble nor modify the battecy pack.
•Attach the battery pack to the video equipment securely.
• The battery pack is not resistant to water. Do not wet the battecy pack.
• Unless you use the battery pack for a long period, store the battery pack after you
charge it f\llly and use it completely once a year.
• Store the battery pack in a cool, &y place.
Notes on dry batteries
To avoid possible dan-lage from battery leakage or corrosion, observe the fbllowing:
• Besure to insert the batteries with the + polarities matched to the + marks.
• DW batteries are not rechargeahle.
• Do not use a combination of new and old batteries.
• Do not use diffbrent types of batteries.
•Current flows from batteries when you are not using them for a long time.
• Do not use leaking batteries.
If batteries are leaking
• Wipe off the liquid in the battery compartment carefully before replacing the batteries.
• If you touch the liquid, wash it offwith water.
• If"the liquid get into your eyes, wash your eyes with a lot of water and then consult a
doctor.
If any problem occurs, unplug your camcorder and contact your nearest Sony dealer.
ID.
o
141
Specifications
Video recording system
2 rotary beads
Helical scanning system
Audio recording system
Rotary heads, PCM system
Qnantization: 12 bits (Fs 32
kHz, stereo 1. stereo 2), 16 bits
(Fs 48 kHz. stereo)
Video signal
NTSC color, EIA standards
Usable cassette
Mini DV cassette with tile M°_[]k"
mark printed
Tape speed
SE: Approx. 18.81 mm/s
LP: Approx. 12.56 mm/s
Recording/playback time
(using cassette DVM60)
SP: 1 honr
LP: 1.5 hours
Fastforward/rewind time
(using cassette DVM60)
Approx. 2 rain. and 30 seconds
Viewfinder
Electric viewfinder (color)
Image device
1/4 type CCD (Charge Coupled
Device)
DCR TRV6/TRVI 1:
Approx. 680,000 pixels
(Effective: Approx. 340,000
pixels)
DCR TRV20:
Approx. 1.070,000 pixels
(Effective (still): 1.000,000
pixe[s)
(Effective(moving): 690.000
pixels)
Lens
Carl Zeiss
Combined power zoom lens
Filter diameter
DCR TRV6/TRVI 1:1 3/16 in.
(30 ram)
DCR TRV20:1 1/2 in. (37 ram)
10× (Optical). 120× (Digital)
Focal length
DCR TRV6/TRVI 1:
5/32 15/16in.(3.3 33ram)
DCR TRV20:
3/16 1 ll/16in. (4.2 42ram)
When converted to a 35 mm
142 still camera
DCR TRV6/TRVI 1:
Camera/Memory mode:
1 11/16 165/8in.(42 420
thin)
DCR TRV20:
Can-lera mode:
1 15/16 19 in. (48 480 ram)
Memory mode:
1 5/8 153/4in. (40 400ram)
Color temperature
Auto, HOLD (HoM), @,_Indoor
(3200K), _,Ontdoor (5800K)
Minimum illumination
DCR TRV6/TRVI 1:5 lux (F 1.7)
DCR TRV20:7 lux (F 1.8)
0 lux (in tile NightShot mode)*
Objects tmable to be seen due
to the clark can be shot with
infl'ared lighting.
S video input/output
4 pin n-fini DIN
Lun-finanee signal: 1 Vp p. 75
ohms. unbalanced
Chrominance signal: 0.286 Vp p,
75 ohms, unbalanced
AudiolVideo inputloutput
AV MINI JACK, 1Vp p. 75
ohms, tmbalanced, sync
negative
327 mV, (at output impedance
more than 47 kilohms)
Output impedance with less
than 2.2 kilohms/Stereo
mini jack
(o 3.5ram)
Input impedance more than
47 kilohms
_,DV input/output
4 pin connector
Headphonejack
Stereo minijack (o 3.5 ram)
_' (LANC)jack (DCR-TRV6)
DIGITAL I/O/_._ (LANC) jack
(DCR-TRV11/TRV20)
Mini minijack (o 2.5 ram)
MlCjack
Minijack, 0.388 mV low
in-lpedance with 2.5 to 3.0 V DC,
output impedance 6.8 kilohms
(o 3.5 mm)
Stereo type
Picture
DCR TRV6:
2.5 inches measured diagonally
2 × 1 1/2 in. (50.3 × 37.4 ram)
DCR TRVI 1/TRV20:
3.5 inches measured diagonally
2 7/8 × 2 in. (72.4 × 50.4 ram)
Total dot number
DCR TRV6:200,640 (880 x 228)
DCR TRVI 1:184,800 (840 × 220)
DCR TRV20:246,400 (1120 ×
220)
Power rec Jirements
7.2 V (battery pack)
8.4 V (AC power adaptor)
Average power consumption
(when using the battery pack)
During camera recording using
LCD
DCR TRV6:3.4 W
DCR TRVI 1:3.5 W
DCR TRV20:4.5 W
Viewfinder
DCR TRV6:2.5 W
DCR TRVI 1: 2.6W
DCR TRV20:3.7 W
Operating temperature
32 "F to 104 °F (0 "C to 40 "C)
Storage temperature
4 "F to +140 "F
( 20 "C to +60 °C)
Dimensions (Approx.)
DCR TRV6/TRVI 1:
27/8×3 3/4 ×61/2in.
(71 × 93 × 163 ram) (w/h/d)
DCR TRV20:
27/8x3 3/4 ×6 3/4 in.
(71 × 93 × 170 ram) (w/h/d)
Mass (approx.)
DCR TRV6:1 lb 4 oz (580 g)
DCR TRVI 1:1 lb 5 oz (620 g)
DCR TRV20:1 lb 7 oz (680 g)
main nnit only
DCR TRV6:1 lb 7 oz (680 g)
DCR TRVI 1:1 lb 9 oz (720 g)
DCR TRV20:1 lb 11 oz (780 g)
including the battery pack,
NP FM50,cassette DVM60, lens
call and shotflder strap
Supplied accessories
See page 5.

Specifications
Power requirements
100 240 V AC, 50/60 Hz
Power consumption
23 W
Output voltage
DC OUT: 8.4 V, 1.5 A in the
operating mode
Operating temperature
32 "F to 104 "F (0 °C to 40 "C)
Storage temperature
4 "F to +140 "F ( 20 °C to +60
"C)
Dimensions (approx.)
5 × 1 9/16 × 2 1/2 in.
(125 × 39 × 82 ram) (w/h/d)
exclnding projecting parts
Mass (approx.)
9.8 oz (280 g)
exclnding mains lead
Cord length (approx.)
Power cord: 6.6 feet (2 in)
Connecting cord: 5.2 %et (1.6
in)
Output voltage
DC 7.2V
Capacity
8.5 Wh (1,180 mA)
Dimensions (approx,)
1 9/16 × 13/16 × 2 1/4 in.
(38.2 × 20.5 × 55.6 mm)
(w/h/d)
Mass (approx,)
2.7 oz (76 g)
Type
Lithium ion
Memory
Flash memory
4MB: MSA 4A
Operating voltage
2.7 3.6V
Power consumption
Approx. 45mA in the operating
mode
Approx. 1301.1A in the standby
mode
Dimensions (approx,)
2 × 1/8 ×7/8in.
(50 × 2.8 × 21.5 ram) (w/h/d)
Mass (approx,)
0.14 oz (4 g)
Design and specifications are
subject to change without
notice.
o
5"
143
--Quick Reference--
Identifying the parts and controls
[]
[]
[]
[]
[]
[] []
[] Viewfinder lens adjustment lever
(p. 19)
[] Display window (p. 150)
[] OPEN button (p. 16)
[] PROGRAM AE button (p. 41)
[] EXPOSURE button (p. 43)
[] SEL/PUSH EXEC dial (p. 33, 85)
[] Hooks for shoulder strap
This mark indicates that this product is a genuine accessory for Sony
video products.
When purchasing Sony video products, Sony recommends that you
purchase accessories with this "GEN[ lINE VIDEO ACCESSORIES"
mark.
Attaching the shoulder strap
Attach the shoulder strap supplied with your camcorder to tile hooks for the shoulder
strap.
144
Identifying the parts and controls
[]
[]
[]
[]
[]
[] EDITSEARCH buttons (p. 24)
[] Intelligent accessory shoe (p. 73)
[] Focus ring (p. 44)
[] FOCUS switch (p, 44)
[] Camera recording lamp (p. 16)
[] Microphone
[] Infrared rays emitter (p. 22, 29, 59)
[] Remote sensor
[] SUPER LASER LINK button (p. 29)
[] Viewfinder (p. 19)
[] FADER button (p. 35)
[] VOLUME buttons (p. 25)
[] LCD BRIGHT +/- buttons (p. ]8)
[] BACK LIGHT button (p. 21)
[]
[]
[]
[]
[]
[]
_,_1Intelligent
AccessoryShoe
Notes on the intelligent accessory shoe
•Tile intelligent arressory shoe supplies power to optional arressories surh as a video
light or microphone.
•Tile inte]ligent accessory shoe is linked to the POWER switch, allowing you to turn the
power supplied lay tile shoe on and off. Refer to the operating instructions of the
accessory for ftnther inftormation.
• The intelligent accessory shoe has a saDty device fbr fixing the installed accessory
securely. To connect an accesso_ T, press down and push it to the end. and then tighten
the screw.
• To remove an accessory, loosen the screw, and then press down and pull out the
accessory.
145
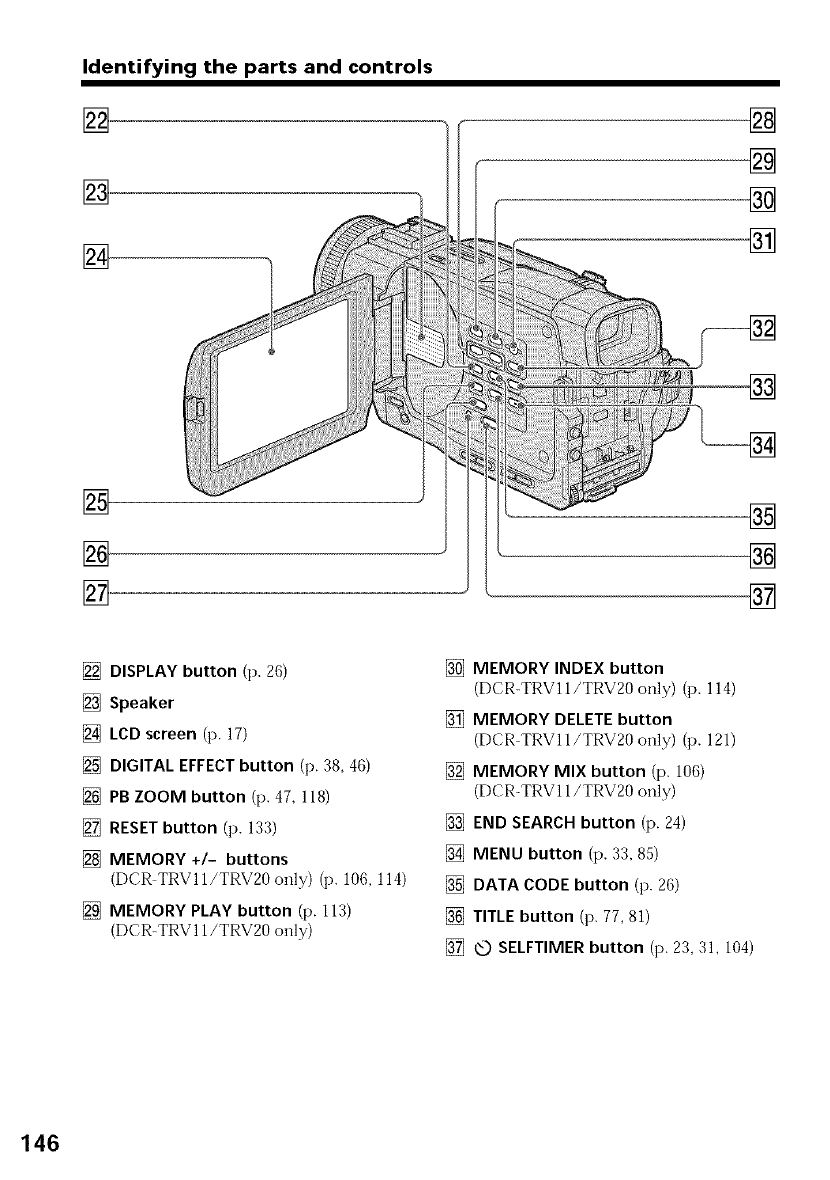
Identifying the parts and controls
[],
[]
[]
[]
[]
l--
[]
[]
[]
[]
[]
[]
[]
[]
[]
[] DISPLAY button (p. 20)
[] Speaker
[] LCD screen (p. 17)
[] DIGITAL EFFECT button (p. 38, 46)
[] PB ZOOM button (p. 47, 118)
[] RESET button (p. 133)
[] MEMORY +/- buttons
(DCR TRV 11/TRV20 only) (p. 106, 114)
[] MEMORY PLAY button (p. 113)
(DCR-TRV 11/TRV20 only)
[] MEMORY INDEX button
(DCR-TRV 11/TRV20 only) (p. 114)
[] MEMORY DELETEbutton
(DCR TRVI1/TRV20 only) (p. 121)
[] MEMORY MIX button (p. 106)
(DCR-TRV 11/TRV20 only)
[] END SEARCH button (p. 24)
[] MENU button (p. 33, 85)
[] DATA CODE button (p. 26)
[] TITLEbutton (p. 77, 81)
[] @ SELFTIMER button (p. 23, 31, 104)
146
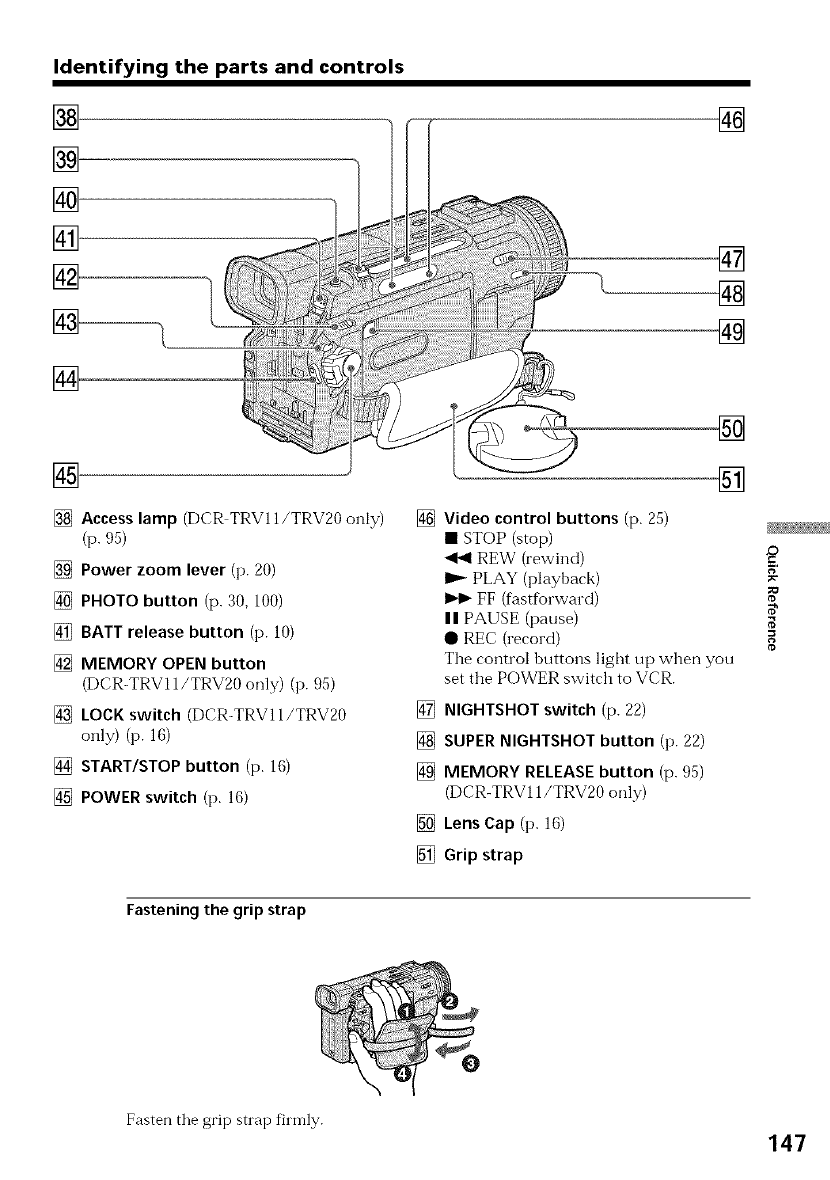
Identifying the parts and controls
[]
[]
[]
[]
[]
[]
[]
[]
[]
[]
[]
[]
[] Access lamp (DCR TRV11/TRV20 only)
(p. 95)
[] Power zoom lever (p. 20)
[] PHOTO button (p. 30, 100)
[] BATT release button (p. 10)
[] MEMORY OPEN button
(DCR-TRV11/TRV20 only) (p. 95)
[] LOCK switch (DCR-TRV11/TRV20
only) (p. 16)
[] START/STOP button (p. 16)
[] POWER switch (p. 16)
[]
[]
Video control buttons (p. 25)
• STOP (stop)
<1<1REW (rewind) £_
I_ PLAY (playback)
FF (fastfbrward)
II PAUSE (pause) _'
• REC (record)
The control buttons light up when you
set the POWER switch to VCR.
[] NIGHTSHOT switch (p. 22)
[] SUPER NIGHTSHOT button (p. 22)
[] MEMORY RELEASE button (p. 95)
(DCR-TRV11/TRV20 only)
[] Lens Cap (p. 16)
[] Grip strap
Fastening the grip strap
%
Fasten tile grip strap finYlly. 147
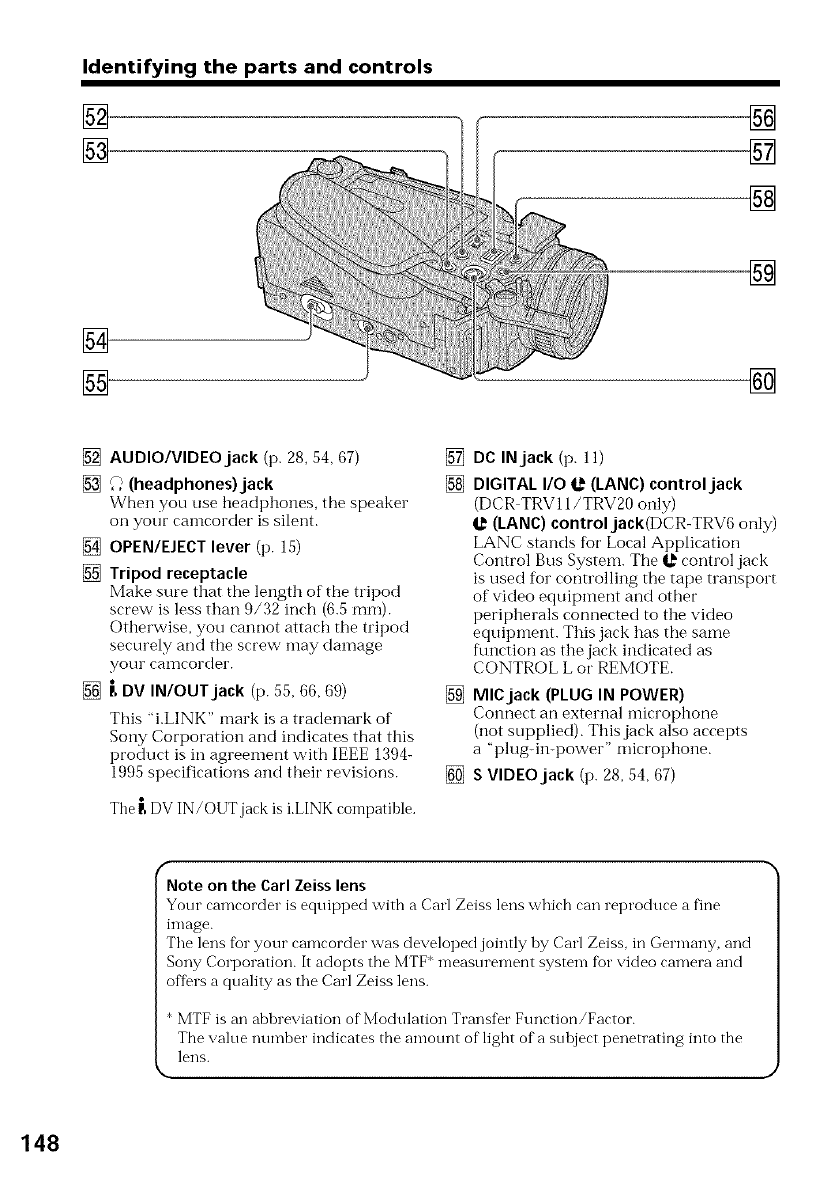
Identifying the parts and controls
[_
[]
[]
[]
[]
[]
[]
[] AUDIO/VIDEO jack (p. 28, 54, 67)
[] _) (headphones)jack
When you use headphones, the speaker
on your camcorder is silent.
[] OPEN/EJECT lever (p. 15)
[] Tripod receptacle
Make sure that the length of the tripod
screw is less than 9/32 inch (6.5 ram).
Otherwise, you cannot attach the tripod
securely and the screw nmy danmge
yOtlF can]coFdeF.
[] r, DV IN/OUT jack (p. 55, 66, 69)
This "i.LINK" mark is a tradenmrk of
Sony Corporation and indicates that this
product is in agreement with IEEE 1394-
1995 specifications and their revisions.
The _ DV IN/OUTjack is i.LINK compatible.
[]
[]
DC IN jack (p. 11)
DIGITAL I/O _(LANC) control jack
(DCR TRVll/TRV20 only)
I,_ (LANC) controljack(DCR-TRV6 only)
LANC stands for Local Application
Control Bus System. The _ control jack
is used for controlling the tape transport
of video equipment and other
peripherals connected to the video
equipnmnt. This jack has the same
function as the jack indicated as
CONTROL L or REMOTE.
[] MlCjack (PLUG IN POWER)
Connect an external ndcrophone
(not supplied). This jack also accepts
a "plug-in-power" microphone.
[] S VIDEO jack (p. 28, 54, 67)
fNote on the Carl Zeiss lens
Your camcorder is equipped with a Carl Zeiss lens which can reproduce a fine
image.
The lens for your camcorder was developed jointly hy Carl Zeiss. in Germany, and
Sony Corporation. It adopts the MTF measurement system fen"video camera and
offers a quality as the Carl Zeiss lens.
*MTF is an abhreviation of Modulation Transfer Function/Factor.
The value number indicates the amotmt of light of a suhject penetrating into the
lens.
k
148

Identifying the parts and controls
[]
[]
[]
[]
The buttons that have the same nan-le on the Remote Con-lmander as on your can-lcorder
ftmction identically to the buttons on yore camcorder.
RMT-808 RMT-811
® [] ®
[]
[]
[] [] []
[] PHOTO button (p. 30, 100)
[] DISPLAY button (p. 26)
[] Memory control buttons (p. 106)
PLAY/INDEX/+/ button
[] SEARCH MODE button (p. 49, 50, 52)
[] Video control buttons (p. 25)
[] RECbutton (p. 67, 69, 71)
[] MARK button (DCR-TRV11/TRV20
only) (p. 64, 67, 69, 71)
[] AUDIO DUB button (p. 75)
[] ZEROSET MEMORY button (p. 48)
[] DATA CODE button (p. 26)
[] Transmitter
Point toward the remote sensor to _"
=o
control yotlr camcorder after turning on
your camcorder.
[] START/STOP button (p. 16) ¢
[] Power zoom button (p. 20)
[] _/I_H buttons (p. 49, 50, 52)
To prepare the Remote Commander
Insert two size AA (R6) batteries by matrhing the + and polarities on the batteries to
the + marks inside the battery compaltment.
Notes on the Remote Commander
•Point the remote sensor away from strong light sources such as direct sunlight o1"
overhead lighting. Otherwise, the Remote Commander may not f\mction properly.
• Your camcorder works in the commander mode VTR 2. Commander modes 1, 2and 3
are used to distinguish your camcorder flora other Sony VCRs to avoid remote control
misoperation. If you use another Sony VCR in the commander mode VTR 2, we
recommend changing the commander mode o1"covering the sensor of the VCR with
black paper. 149
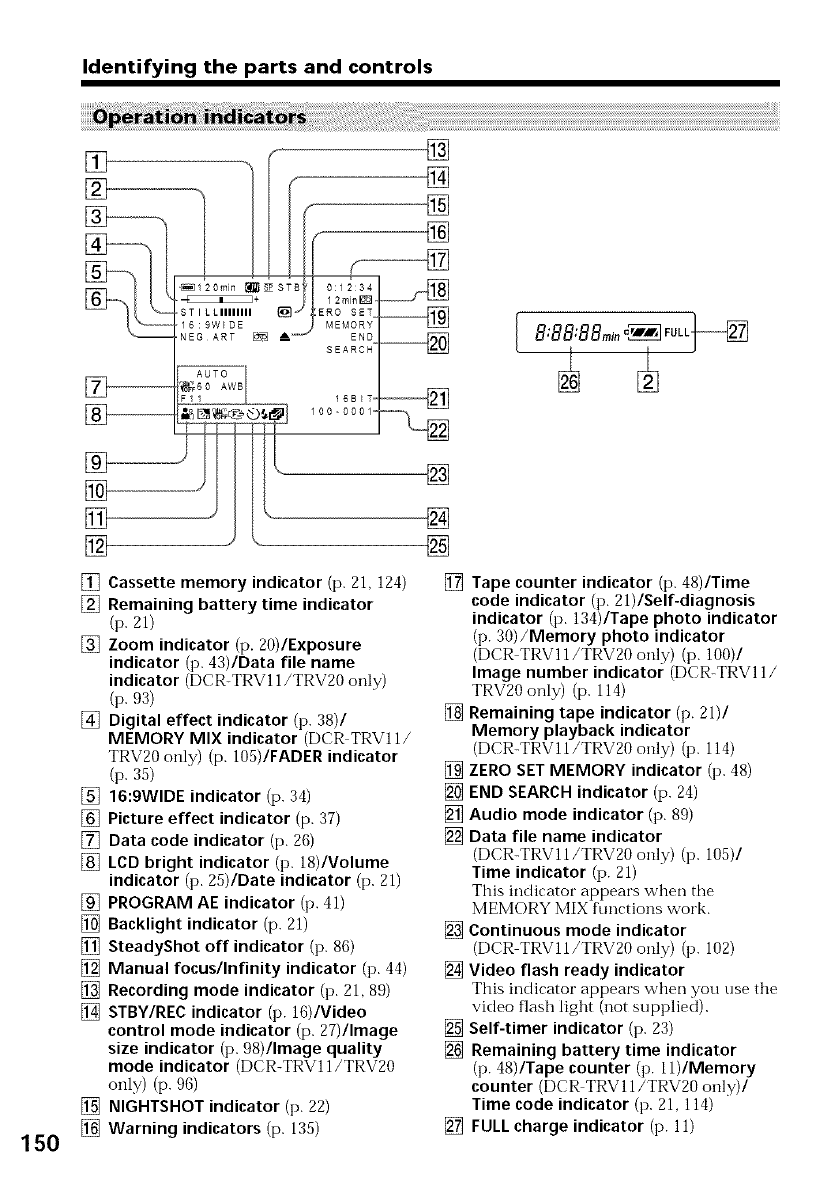
Identifying the parts and controls
_120rain _rm sp STB
_+
,ST I L LIIIIIIII
16:gWIDE
,NEG ART L'_ m
[]
[]
@_ FRo SE_ ._
.j "E"°Z
SEARCH" "_
150
[]
[] Cassette memory indicator (p. 21, 124)
[] Remaining battery time indicator
(p. 21)
[] Zoom indicator (p. 20)/Exposure
indicator (p. 43)/Data file name
indicator (DCR-TRV11/TRV20 only)
(p. ,93)
[] Digital effect indicator (p. 38)/
MEMORY MIX indicator (DCR TRV11/
TRV20 only) (p. 105)/FADER indicator
(p. 35)
[] 16:9WIDE indicator (p. 34)
[] Picture effect indicator (p. 37)
[] Data code indicator (p. 26)
[] LOB bright indicator (p. 18)/Volume
indicator (p. 25)/Date indicator (p. 21)
[] PROGRAM AE indicator (p. 41)
[] Backlight indicator (p. 21)
[] SteadyShot off indicator (p. 86)
[] Manual focus/Infinity indicator (p. 44)
[] Recording mode indicator (p. 21, 89)
[] STBY/REC indicator (p. 16)/Video
control mode indicator (p. 27)/Image
size indicator (p. 98)/Image quality
mode indicator (DCR-TRV11/TRV20
only) (p. 96)
[] NIGHTSHOT indicator (p. 22)
[] Warning indicators (p. 135)
[]
[] Tape counter indicator (p. 48)/Time
code indicator (p. 21)/Self-diagnosis
indicator (p. 134)/Tape photo indicator
(p. 30)/Memory photo indicator
(DCR TRV 11/TRV20 only) (p. 100)/
Image number indicator (DCR-TRVI 1/
TRV20 only) (p. 114)
[] Remaining tape indicator (p. 21)/
Memory playback indicator
(DCR-TRV11/TRV20 only) (p. 114)
[] ZERO SET MEMORY indicator (p. 48)
[] END SEARCH indicator (p. 24)
[] Audio mode indicator (p. 89)
[] Data file name indicator
(DCR-TRVll/TRV20 only) (p. 105)/
Time indicator (p. 21)
This indicator appears when the
MEMORY MIX functions work.
[] Continuous mode indicator
(DCR TRVll/TRV20 only) (p. 102)
[] Video flash ready indicator
This indicator appears when you use the
video flash light (not supplied).
[] Self-timer indicator (p. 23)
[] Remaining battery time indicator
(p. 48)/Tape counter (p. ll)/Memory
counter (DCR TRVll/TRV20 only)/
Time code indicator (p. 21, 114)
[] FULL charge indicator (p. 11)
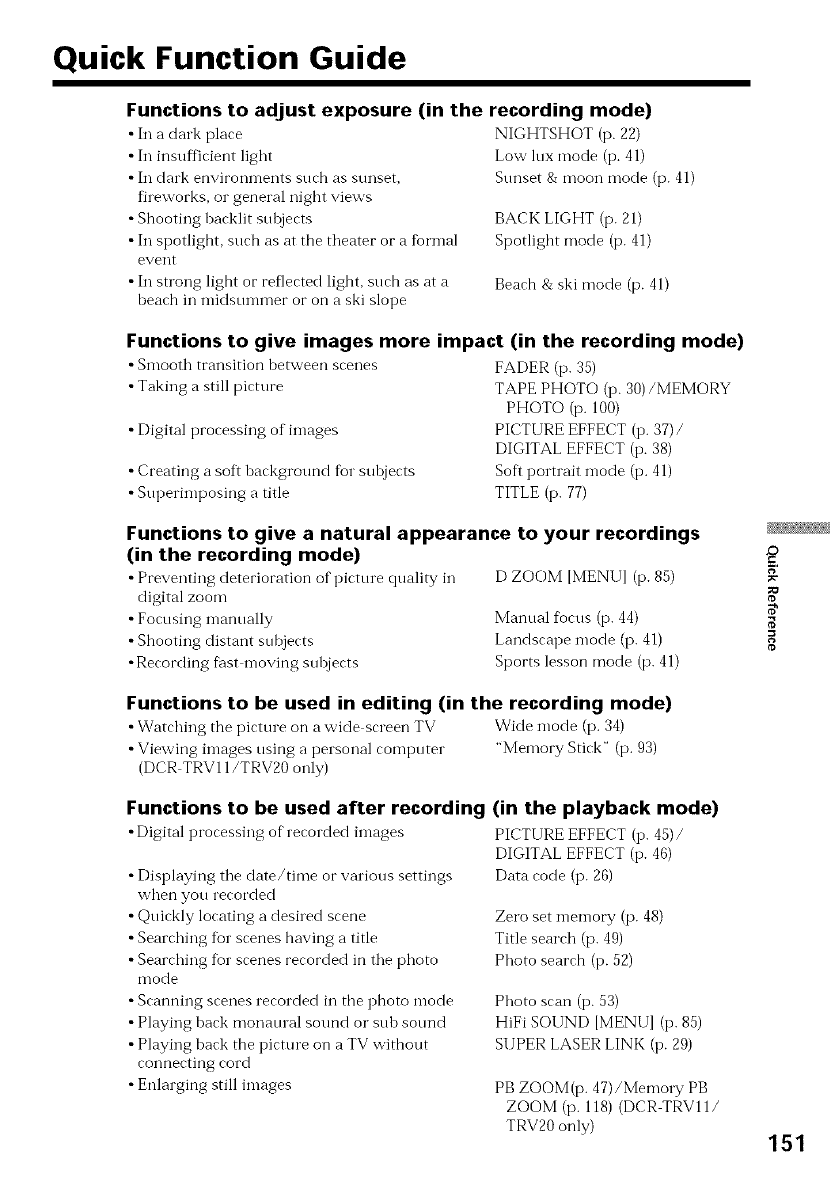
Quick Function Guide
Functions to adjust exposure (in the recording mode)
•In a dark place
• In insufficient light
• In dark environments such as sunset,
fireworks, o1"general night views
• Shooting backlit suhjects
• In spotlight, such as at the theater or a fbrmal
event
• In strong light or reflected light, such as at a
beach in midsummer or on a ski slope
NIGHTSHOT (p. 22)
Low lux mode (i3.41)
Sunset & moon mode (p. 41)
BACK LIGHT (p. 21)
Spotlight mode (p. 41)
Beach & ski mode (p. 41)
Functions to give images more impact (in the recording mode)
• Smooth transition between scenes
• Taking a still picture
• Digital processing of images
• Creating a soft background for subjects
• Superimposing a title
FADER (p. 35)
TAPE PHOTO (p. 30)/MEMORY
PHOTO (p. 100)
PICTURE EFFECT (i3. 37)/
DIGITAL EFFECT (i3.38)
Soft portrait *node (i3. 41)
TITLE (p. 77)
Functions to give a natural appearance to your recordings
(in the recording mode)
• Preventing deterioration of picture quality in D ZOOM [MENUI (p. 85)
digital zoom
• Focusing manually Manual flocus (p. 44)
•Shooting distant subjects Landscape mode (p. 41)
•Recording fiist moving subjects Sports lesson mode (p. 41)
JD
¢D
R
¢D
Functions to be used in editing (in the recording mode)
•Watching the picture on a wide screen TV Wide mode (p. 34)
• Viewing images using a personal computer "Memory Stick" (p. 93)
(DCR TRV11/TRV20 only)
Functions to be used after recording
•Digital processing of recorded images
•Displaying the date/time or various settings
when you recorded
• Quickly locating a desired scene
• Searching fur scenes having a title
• Searching fur scenes recorded in the photo
mode
• Scanning scenes recorded in the photo mode
• Playing back monaural sound or sub sotmd
• Playing back the picture on a TV without
connecting cord
• Enlarging still images
(in the playback mode)
PICTURE EFFECT (I3. 45)/
DIGITAL EFFECT (I3. 46)
Data code (p. 26)
Zero set memory (p. 48)
Title search (p. 49)
Photo search (i3. 52)
Photo scan (i3. 53)
HiFi SOUND IMENU] (i3. 85)
SUPER LASER LINK (i3. 29)
PB ZOOM(p. 47)/Memo1T PB
ZOOM (i3. 118) (DCR TRVll/
TRV20 only) 151
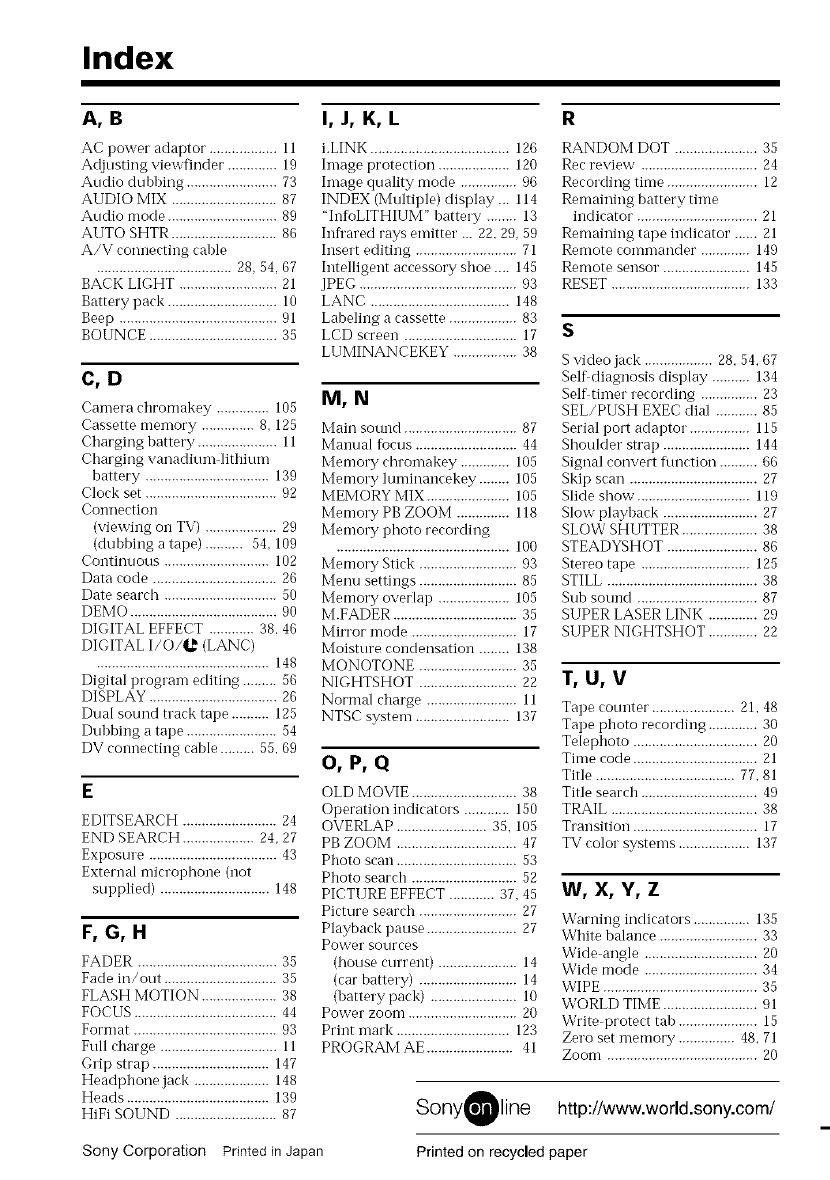
Index
A,B
AC power adaptor .................. II
Adjusting viewfinder ............. 19
Audio dubbing ........................ 73
AUDIO MIX ............................ 87
Audio mode ............................. 89
AUTO SHTR ............................ 86
A/V connecting cable
.................................... 28, 54, 67
BACK LIGHT .......................... 21
Battery pack ............................. 10
Beep .......................................... 91
BOUNCE .................................. 35
C,D
Camera chromakey .............. 105
Cassette memory .............. 8, 125
Charging battery ..................... 11
Charging vanadium lithiunl
battery ................................. 139
Clock set ................................... 92
Coilnection
(viewing oll TV) ................... 29
(dubbing a tape) .......... 54, 109
Continuous ............................ 102
Data code ................................. 26
Date search .............................. 50
DEMO ....................................... 90
DIGITAL EFFECT ............ 38, 46
DIGITAL I/O/l._ (LANC)
.............................................. 148
Digital program editing ......... 56
DISPLAY .................................. 26
Dual sound track tape .......... 125
Dubbing a tape ........................ 54
DV connecting cable ......... 55, 69
E
EDITSEARCH ......................... 24
END SEARCH ................... 24, 27
Expostn'e .................................. 43
External microphone (not
supplied) ............................. 148
F,G,H
FADER ..................................... 35
Fade in/out .............................. 35
FLASH MOTION .................... 38
FOCUS ...................................... 44
Format ...................................... 93
Full charge ............................... 11
Grip strap ............................... 147
Headphone jack .................... 148
Heads ...................................... 139
HiFi SOUND ........................... 87
I, J, K, L
i.LINK ..................................... 126
hnage protection ................... 120
hnage quality mode ............... 96
INDEX (Multiple) display ... 114
"InfoLITHIUM" battery ........ 13
Infrared rays emitter ... 22.29, 59
Insert editing ........................... 71
Intelligent accessory shoe .... 145
JPEG .......................................... 93
LANC ..................................... 148
Labeling a cassette .................. 83
LCD screen .............................. 17
LUMINANCEKEY ................. 38
M,N
Main sound .............................. 87
Manual focus ........................... 44
Memory chromakey ............. 105
Memory luminancekey ........ 105
MEMORY MIX ...................... 105
Memory PB ZOOM .............. 118
Memory photo recording
.............................................. 100
Memory Stick .......................... 93
Menu settings .......................... 85
Memory overlap ................... 105
M.FADER ................................. 35
Mirror mode ............................ 17
Moisture condensation ........ 138
MONOTONE .......................... 35
NIGHTSHOT .......................... 22
Normal charge ........................ 11
NTSC system ......................... 137
O,P,Q
OLD MOVIE ............................ 38
Operation indicators ............ 150
OVERLAP ........................ 35. 105
PB ZOOM ................................ 47
Photo scan ................................ 53
Photo search ............................ 52
PICTURE EFFECT ............ 37.45
Picture search .......................... 27
Playback pause ........................ 27
Power SOUrces
(house current) ..................... 14
(car battery) .......................... 14
(battery pack) ....................... 10
Power zoom ............................. 20
Print mark .............................. 123
PROGRAM AE ....................... 41
R
RANDOM DOT ...................... 35
Rec review ............................... 24
Recording time ........................ 12
Remaining battery time
indicator ................................ 21
Remaining tape indicator ...... 21
Remote commander ............. 149
Remote sensor. ...................... 145
RESET ..................................... 133
S
S video jack .................. 28.54.67
Self diagnosis display .......... 134
Self timer recording ............... 23
SEL/PUSH EXEC dial ........... 85
Serial port adalltor. ............... 115
Shoulder strap ....................... 144
Signal convert flmetion .......... 66
Skip scan .................................. 27
Slide show. ............................. 119
Slow playback ......................... 27
SLOW SHUTTER .................... 38
STEADYSHOT ........................ 86
Stereo tape ............................. 125
STILL ........................................ 38
Sub SOtllld ................................ 87
SUPER LASER LINK ............. 29
SUPER NIGHTSHOT ............. 22
T,U,V
Tape counter ...................... 21.48
Tape photo recording ............. 30
Telephoto ................................. 20
Time code ................................. 21
Title ..................................... 77.81
Title search ............................... 49
TRAIL ....................................... 38
Transition ................................. 17
TV color" systems ................... 137
W, X, Y, Z
Warning indicators ............... 135
White balance .......................... 33
Wide angle .............................. 20
Wide mode .............................. 34
WIPE ......................................... 35
WORLD TIME ......................... 91
Write protect tab ..................... 15
Zero set memory ............... 48.71
Zoom ........................................ 20
SonyOline http://www.world.sony.com/
Printed on recycled paperSony Corporation Printed in Japan
