Sony DCR TRV460 User Manual CAMCORDER Manuals And Guides L0402294
SONY Digital Camcorder Manual L0402294 SONY Digital Camcorder Owner's Manual, SONY Digital Camcorder installation guides
User Manual: Sony DCR-TRV460 DCR-TRV460 SONY CAMCORDER - Manuals and Guides View the owners manual for your SONY CAMCORDER #DCRTRV460. Home:Electronics Parts:Sony Parts:Sony CAMCORDER Manual
Open the PDF directly: View PDF ![]() .
.
Page Count: 136 [warning: Documents this large are best viewed by clicking the View PDF Link!]
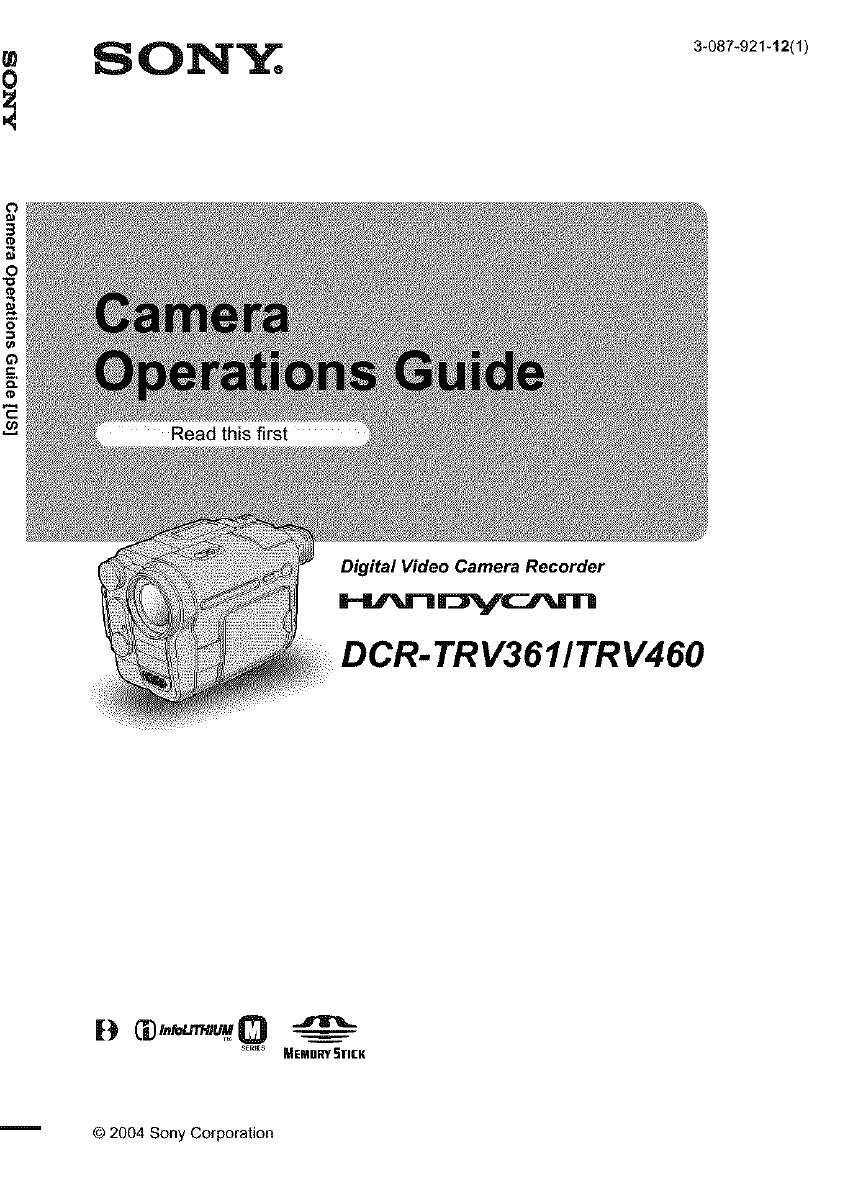
0SON_ 3-087-921-12(1)
Digital Video Camera Recorder
DCR- TRV3611TRV460
SEr_es _EMDRY _TICK
© 2004 Sony Corporation
Read this first
Before operating the unit, please read this
manual thoroughly, and retain it for l_ture
reference.
WARNING
TO prevent fire or shock hazard, do not
expose the unit to rain or moisture.
CAUTK_: TO REDUCETHE RI_ C_ B_G_JC _,1_
DO NO'rREIIOVI_ _ (OR B,_lq.
NO U6EP_BB_C_LE pART6 _61D_
This symbol is intended to alert the
user to the presence of uninsul_led
"dangerous voltage" within the
product's enclosure that may be of
sul_cient magnitude to consti_te a
risk of electric shock to persons.
This symbol is intended to alert the
user to the presence of important
operating and maintenance
(servicing) instructions in the
li_eralure accompanying the
appliance.
fJ Notice
•If St_lic e]eetrduty or electromagnetic inlerference
causes data transfer to discontinue midway (f_il),
restart the application or disconnect and connect the
USB c_ble _gain.
For customers in the U.S.A. and
CANADA
CAUTION
TO PREVENT ELECTRIC SHOCK, MATCH WIDE
BLADE OF PLUG TO WIDE SLOT, FULLY
INSERT.
RECYCLINGLITHIUM-ION BMTERIES
Lithium-ion batteries are recgelable. ._
You can help preserve our
environment by returning your
used rechargeable batteries to lhe
collection and recycling location
nearest you. For more inform_lion
regarding recycling of rechargeable batteries, call roll
free 1-800-822-8837, or visit htlp://www.rbrc.org/
Caution: Do not handle damaged or leaking Lithium-
Ion batteries.
2
For customers in the U.S.A.
If you ]/ave any quesrions about this product, you may
call:
Sony Customer futbrmation Cemcr 1-800-222-SONY
(7669)
The number below is for FCC rdaled matters only.
Regulatory [rdbrmation
Declaration of Conformity
Trade Name: SONY
Model No.: DCR-TRV4b0
Responsible Party: Sony Electronics hm.
Address: 680 Kinderkamaek Road, Oradell, NJ
07649 U.S.A.
Telephone No.: 20!-930-6972
This device complies with Part 15 of the FCC Rules.
Operation is subjecl to the following two cmrdifions:
( 1) This device may not cause harmfi_! interference,
and (2) this device must accept any interference
received, including futer ference thai may cause
undesired operation.
Owner'sRecord
The model and serial numbers are located on the
bottom. Record the serial number in the space
provided below. Refer to these numbers whenever you
call upon your Sony dealer regarding this product.
Model No. DCR-TRV
Serial No.
Model No. AC-
Serial No.
CAUTION
You are cautioned that any changes or modifications
not expressly approved fu this manual could void your
authorily to operate this equipment.
O Note:
This equipment has been tested and found to comply
with the limits fur a Class B digital device, pursuant to
Part 15 of the FCC Rules.
These funits are designed to provide reasonable
protection against harmful interference in a residential
installarion. This equipment generates, uses, and can
radiate radio tYequency energy and, if not fus_alled and
used in accordance with the instructions, may cause
harm tld interference to radio communications.
1towever, there is no guarantee that interference wil!
not occur fu a particular installarion. If this equipment
does cause harmful interference m radio or television
receprion, which can be determined by turning the
equipment offand on, the user is encouraged to try to
correct the inler ference by one or more of the
tbllowing measures:
Reorim/t or relocate the receiving antenna.
Increase the separation between the equipment and
r_ceiver.
- Commct the equipment _ an outlet oll a circuit
different from that to which the _ceiver is
connected.
- Consult a Sony dealer or an experienced radio/TV
technician for help.
The intert_ace cable supplied must be used with the
equipment in order to comply with the funRs tbr a
digital device pursuant to Subpart B of Part 15 of FCC
Rules.
Notes on use
Note on a Cassette tape
You can record on standard 8 mm [] and Ifig I'||m,
Digital8 [2 video cassettes in Digital8 [2 system only
on your camcorder. See page 115 for details.
Notes on recording
•Before slarlfug to record, test the recordfug function
to make su_ the picture and sound ate recorded
without any problems.
• Compen safion for the contents of _cordings cannot
be provided, even if _cording or playback is n_
possible due to a malfunction of the camcorder,
storage media, etc.
• TV color systems differ depending on the country/
regions. To view your _cordings on a TV, you need
an NTSC system-based TV.
• Television pmgrmns, films, video tapes, and other
materials may be copyrighted. Unauthorized
recording of such materials may be contrary to the
copyright laws.
Notes on the LCD panel, viewfinder, and
lens
• The LCD screen and the viewfinder are
manufactured using extremely high-precision
technology, so over 99.99% of the pixels are
eperafional for effective use.
However, there may be some tiny black points and/
or bright points (white, red, blue, or green in color)
thai appear constantly Ol/the LCD screen and fue
viewfinder.
These points are normal results of the manufacturing
process and do not affect the recording in any way.
,,,_conffnued
3
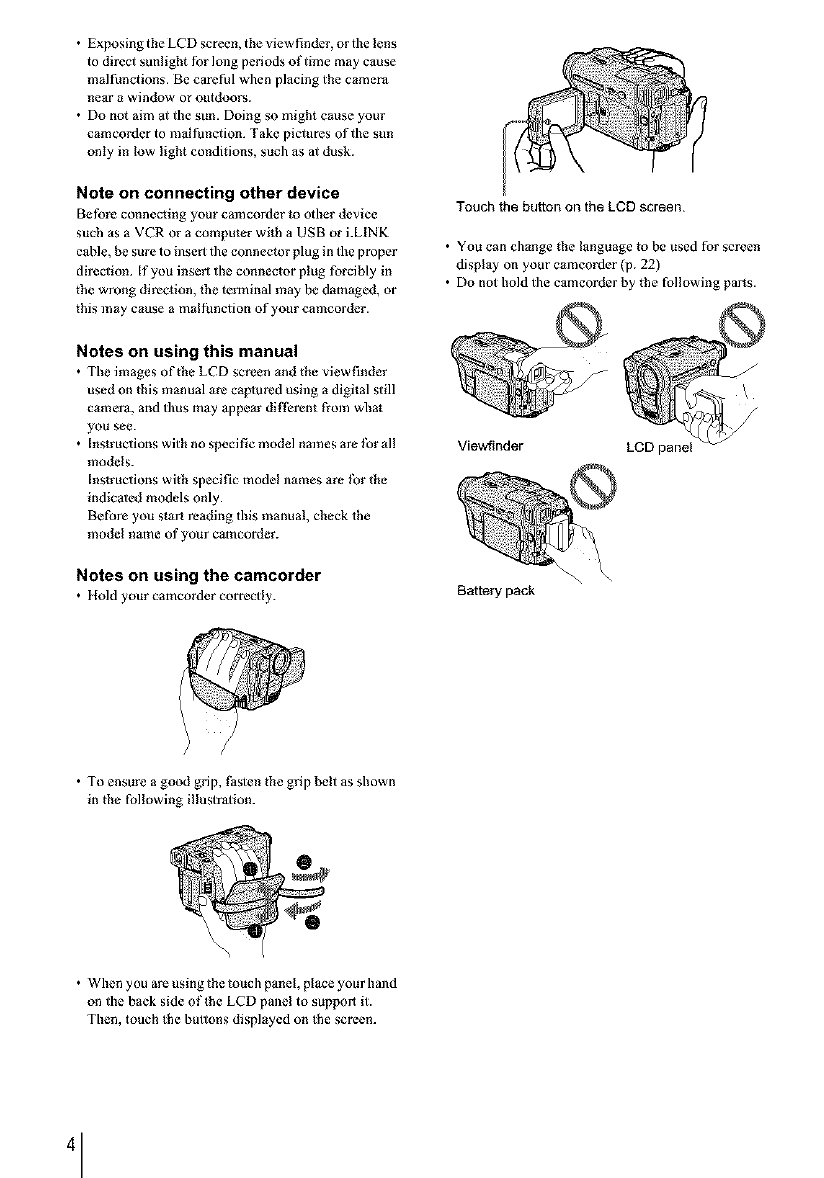
• Exposing the LCD screen, the view finder, or the lens
to di_ct sunlight _r long pedods of time may cause
malfunctions. Be capful when placing the camera
near a window or outdoors.
• Do not aim at the sun. Doing so might cause your
camcorder to mal function. Take pictures of the sun
only in low light conditions, such as at dusk.
Note on connecting other device
Before connecting your cam€order to other device
such as a VE'R or a computer with a USB or i.LINK
cs[)]e, be sure to fuser t the connector plug in the proper
direction. If you insert the connector plug forcibly in
the wrong direction, the terminal may be damaged, or
this may cause a malfunction of your camcorder.
Notes on using this manual
• The images of the LCD screen and the viewfinder
used on this manual are caplured usfug a digital still
camera, and thus may appear different from wbat
you see.
• Instructions with no specific model names are tbr all
models.
Instructions with specific model names are tbr the
fudicaled models only.
Before you start reading this manual, check the
model name of your camcorder.
Notes on using the camcorder
• Hold your camcorder correctly.
Touch the button on the LCD screen.
• You can change the language to be used for screen
display on your cameorder (p. 22)
• Do not hold the camcorder by the following parts.
\
Viewfinder LCD panel
Battery pack
• To ensure a good grip, Pasten the grip belt as shown
in the following illustration.
• When you are using the touch panel, place your hand
on the back side oflhe LCD panel to support it.
Then, touch the buttons displayed on the screen.
4
Table of Contents z.:, 'oato,esavai,ablefor only.
_] : Features available for "Memory Stick"
only.
Read this first ............................................................................................. 2
Quick Start Guide
Recording movies ...................................................................................... 8
Recording still images .............................................................................. 10
Recording/Playing back with ease ........................................................... 12
Getting started
Step 1: Checking supplied items .............................................................. 13
Step 2: Charging the battery pack ............................................................ 14
Using an outside power source ................................................................................. 17
Step 3: Turning the power on ................................................................... 17
Step 4: Adjusting the LCD panel and viewfinder ...................................... 18
Adjusting the LCD panel ........................................................................................... 18
Adjusting the viewfinder ............................................................................................ 18
Step 5: Setting the date and time ............................................................. 19
Step 6: Inserting the recording media ...................................................... 20
Inserting a cassette tape ........................................................................................... 20
Inserting a "Memory Stick" ........................................................................................ 21
Step 7: Setting the screen language ........................................................ 22
Recording
Recording movies .................................................................................... 24
Recording for a longer time ....................................................................................... 26
Using zoom ............................................................................................................... 26
Using the built-in light ................................................................................................ 27
Recording in mirror mode ......................................................................................... 28
Using the self-timer ................................................................................................... 28
Recording still images _ - Memory photo recording ............................. 29
Selecting image quality ............................................................................................. 31
Using the self-timer ................................................................................................... 31
Recording a still image on a "Memory Stick" while recot_Jing movies on a tape ....... 32
Recording with ease - Easy Handycam .................................................. 33
Recording a movie _ .............................................................................................. 33
Recording a still image _ ........................................................................................ 34
Making full use of Easy Handycam operation ........................................................... 34
.,,_centinued
5
Adjusting the exposure ............................................................................. 35
Adjusting the exposurefor backlit subjects ...............................................................35
Fixing the exposure for the selected subject- Flexible spot meter ...........................35
Adjusting the exposure manually ............................................................................... 36
Recording in dark places - NightShot plus, etc ....................................... 37
Adjusting the focus ................................................................................... 38
Adjusting the focus for anoff-center subject - SPOT FOCUS .................................. 38
Adjusting the focus manually .....................................................................................39
Recording a picture using various effects ................................................ 40
Fading in and out of a scene [] - FADER ..............................................................40
Using special effects [] - Digital effect ...................................................................41
Overlaying still imageson movies on a tape - MEMORY MIX ..................................42
Searching for the starting point [] .......................................................... 44
Searching for the last scene of the most recent recording
- END SEARCH ..................................................................................................44
Searching manually- EDIT SEARCH .......................................................................45
Reviewing the most recently recorded scenes - Rec review ....................................45
Playback
Viewing movies recorded on a tape [] ................................................... 46
Playing back in various modes ..................................................................................47
Viewing recordings with added effects - Digital effect ..............................................48
Viewing recordings on a "Memory Stick" _ ........................................... 49
Playing back in various modes from a "Memory Stick", .............................................50
Playing back with ease - Easy Handycam .............................................. 51
Making full use dEasy Handycam operation ...........................................................52
Various playback functions ...................................................................... 53
Magnifying pictures - Tape playback zoom/Memory playback zoom .......................53
Displaying the screen indicators ................................................................................54
Displaying the date/time and camera settings data - Data code .............................. 54
Playing the picture on a TV ...................................................................... 56
Locating a scene on a tape for playback [] ........................................... 57
Searching quickly for a desired scene -Zero set memory ........................................57
Searching for a scene by date of recording- Date search ....................................... 57
6

Advanced operations
Using the Menu
Selecting menu items ......................... 59
Using the _ (CAMERA SET) menu
- PROGRAM AE/16:9 WIDE,
etc ................................................ 61
Using the _ (MEMORY SET) menu
- QUALITY/IMAGE SIZE/ALL
ERASE/NEW FOLDER, etc ......... 65
Using the _ (PICT. APPLI.) menu
- PICT. EFFECT/SLIDE SHOW/
FRAME REC/INTERVAL REC,
etc ................................................ 68
Using the _@ (EDIT/PLAY) menu
- END SEARCH/TITLE, etc ......... 73
Using the/_ (STANDARD SET) menu
- REC MODE/MULTI-SOUND/
AUDIO MIX/USB-CAMERA,
etc ................................................ 76
Using the _@ (TIME/LANGU.) menu
-CLOCK SET/WORLD TIME,
etc ................................................ 82
Customizing Personal Menu .............. 83
Dubbing/Editing
Connecting to a VCR or TV ............... 86
Dubbing to another tape [] ............... 87
Recording pictures from a VCR or
mv ................................................. 88
Dubbing pictures from a tape to a
"Memory Stick". ............................ 89
Dubbing still images from a "Memory
Stick" to a tape ............................. 90
Dubbing selected scenes from a tape
- Digital program editing .............. 91
Deleting recorded pictures _ ............ 98
Marking recorded images with specific
information _] -Image protection/
Print mark ..................................... 99
Printing recorded images (PictBridge
compliant printer) _ .................. 101
Troubleshooting
Troubleshooting ............................... 103
Warning indicators and messages ...110
Additional Information
Using your camcorder abroad .......... 114
Usable cassette tapes ...................... 115
About the "Memory Stick". ................ 116
About the "InfoLITHIUM" battery
pack ............................................ 118
About i.LINK ..................................... 119
Maintenance and precautions .......... 120
Specification ..................................... 123
Quick Reference
Identifying parts and controls ........... 126
Index ................................................ 132
Refer also to other operating instructions
supplied wi_l_your camcorder:
")Computer Applications Guide
•Editing images with your computer
7
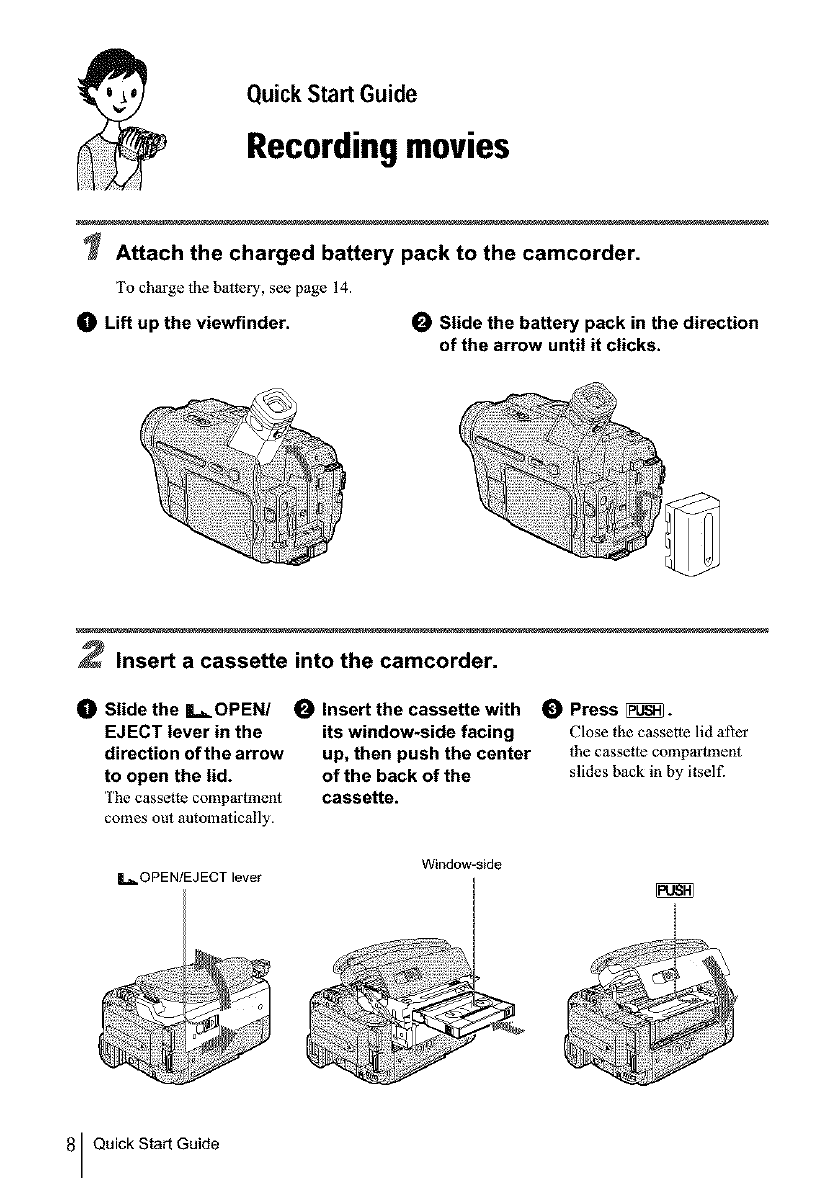
Quick Start Guide
Recordingmovies
Attach the charged battery pack to the camcorder.
To charge the battery, see page 14.
OLift up the viewfinder. OSlide the battery pack in the direction
of the arrow until it clicks.
2Insert a cassette into the camcorder.
Slide the IL_ OPEN/
EJECT lever in the
direction of the arrow
to open the lid.
'['hecassette compartment
comes out automatically.
Insert the cassette with
its window*side facing
up, then push the center
of the back of the
cassette.
Press _.
Close the cassette lid after
the cassette compartment
slides back in by itself.
1= OPEN/EJECT lever Window-side
8 Quick Start Guide
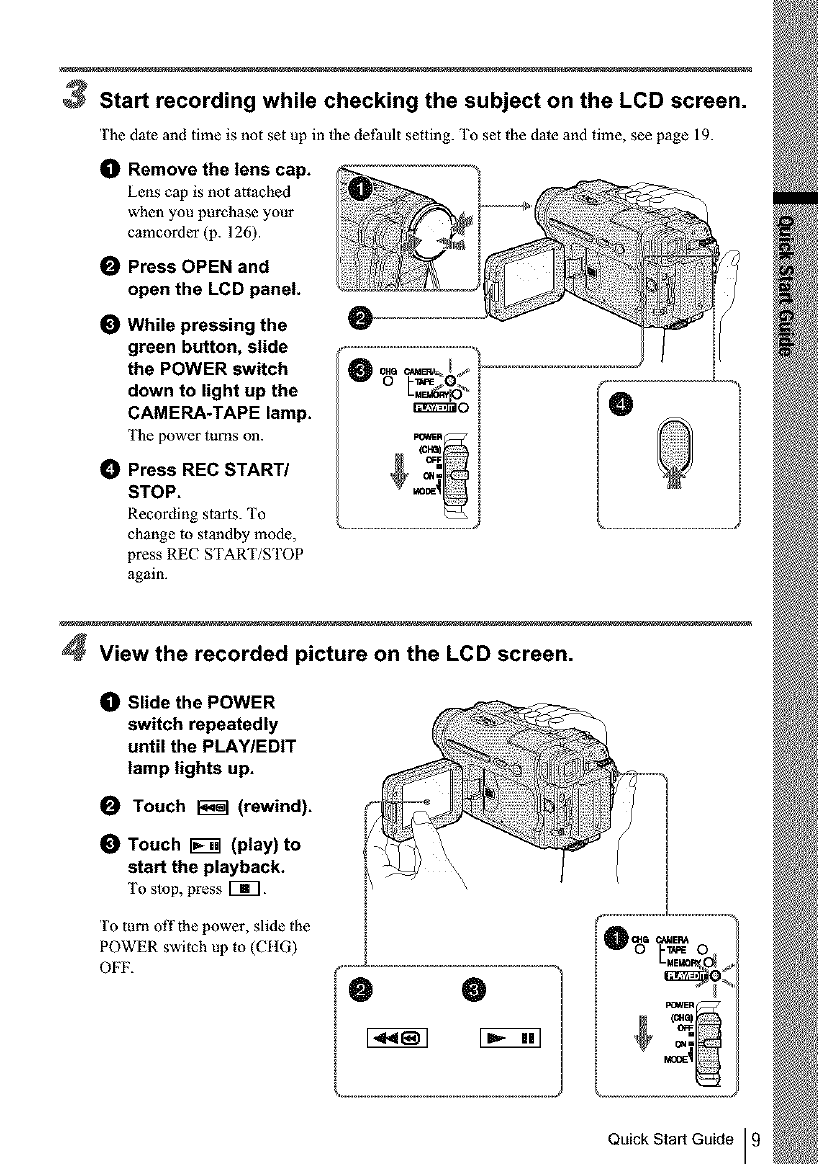
Start recording while checking the subject on the LCD screen.
The date and time is not set up in lhe delYult setting. To set the date and time, see page 19.
(]D Remove the lens cap.
Lens cap is not attached
when you purchase your
camcorder (p. 126).
OPress OPEN and
open the LCD panel.
While pressing the
green button, slide
the POWER switch
down to light up the
CAMERA.TAPE lamp.
['he power lurns on.
_) Press REC START/
STOP.
Recording star|s. To
change to standby mode,
press REC START/STOP
again.
4View the recorded picture on the LCD screen.
_]_ Slide the POWER
switch repeatedly
until the PLAY/EDIT
lamp lights up.
Touch _1 (rewind).
Touch _(play) to
start the playback.
To stop, press [_.
To turn offthe power, slide the
POWER switch up to (CIIG)
OFF.
\,
IO
I
I
Ir Nq
I
I
i
71
Quick Start Guide I 9
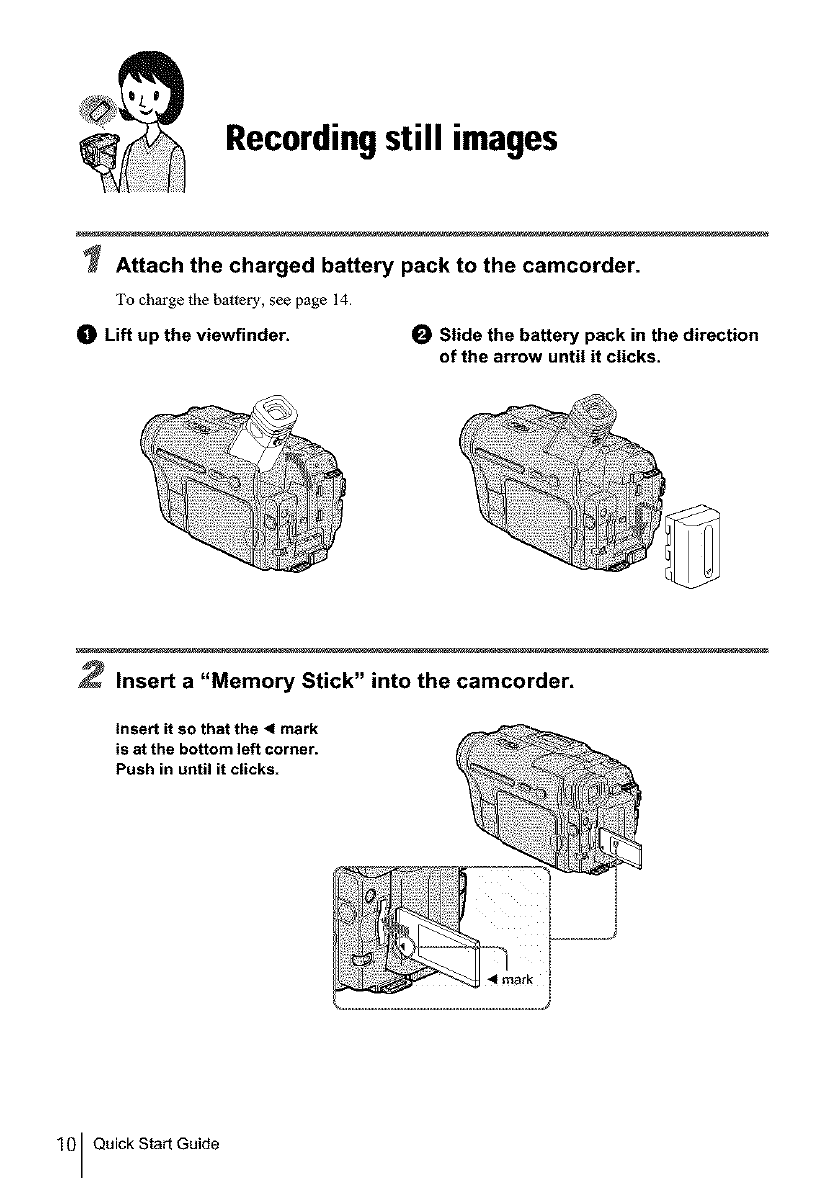
Recordingstill images
Attach the charged battery pack to the camcorder.
To charge the battery, see page 14.
0Lift up the viewfinder. 0Slide the battery pack in the direction
of the arrow until it clicks.
2Insert a "Memory Stick" into the camcorder.
insert it so that the <mark
is at the bottom left corner.
Push in until it clicks.
10 Quick Start Guide
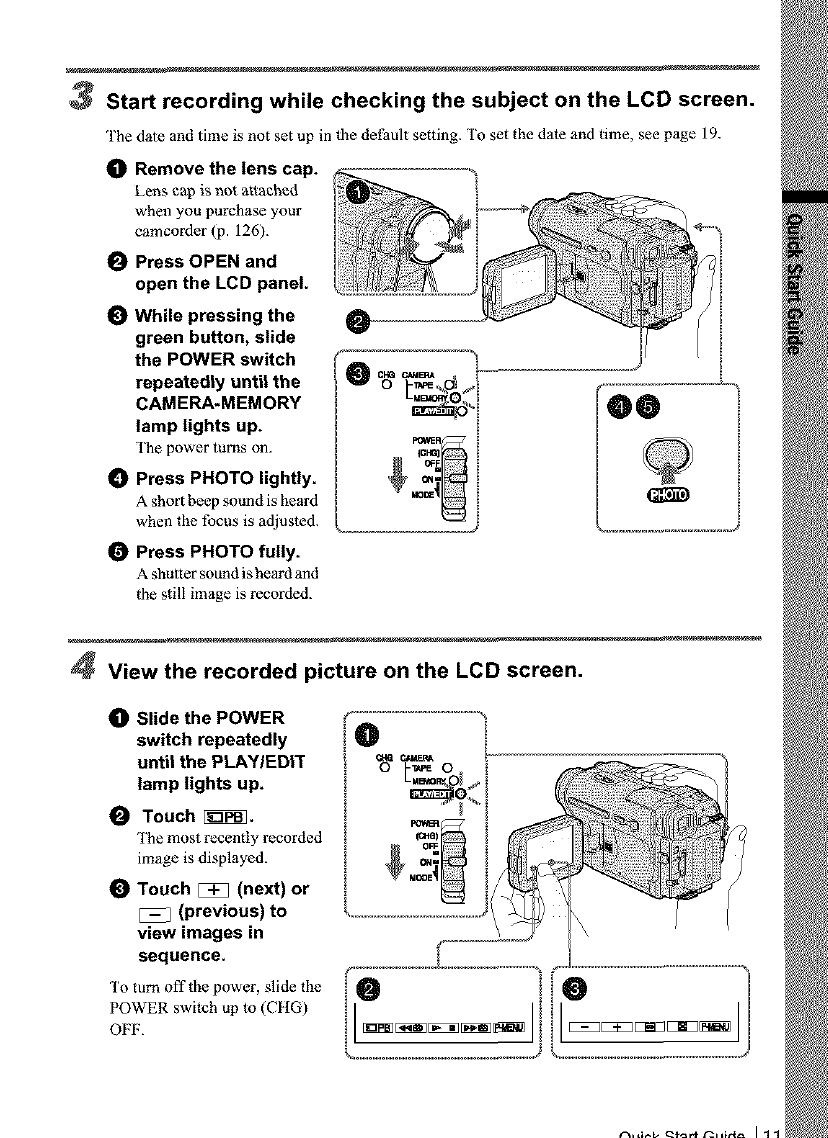
3Start recording while checking the subject on the LCD screen.
'1'he date and time is not set up in fl_e del_ault setting. To set the date and time, see page 19.
_) Remove the lens cap.
Lens c_p is not attached
when you purchase your
camcorder (p. 126).
0Press OPEN and
open the LCD panel.
While pressing the
green button, slide
the POWER switch
repeatedly until the
CAMERA-MEMORY
lamp lights up.
The power turns on.
_) Press PHOTO lightly.
A short beep sound is heard
when the focus is adjusted.
Press PHOTO fully.
A shutter sound is heard and
CHe CJ,M_ _.....
|he still image is recorded.
4View the recorded picture on the LCD screen.
_) Slide the POWER
switch repeatedly
until the PLAY/EDIT
lamp lights up.
Touch i_.
The most recently recorded
image is displayed.
Touch [3_ (next) or
[_ (previous) to
view images in
sequence.
To turn oft'the power, slide the
POWER switch up to (CHG)
OFF.
O I
o
e ie H
n
k..........................................J k..........................................d
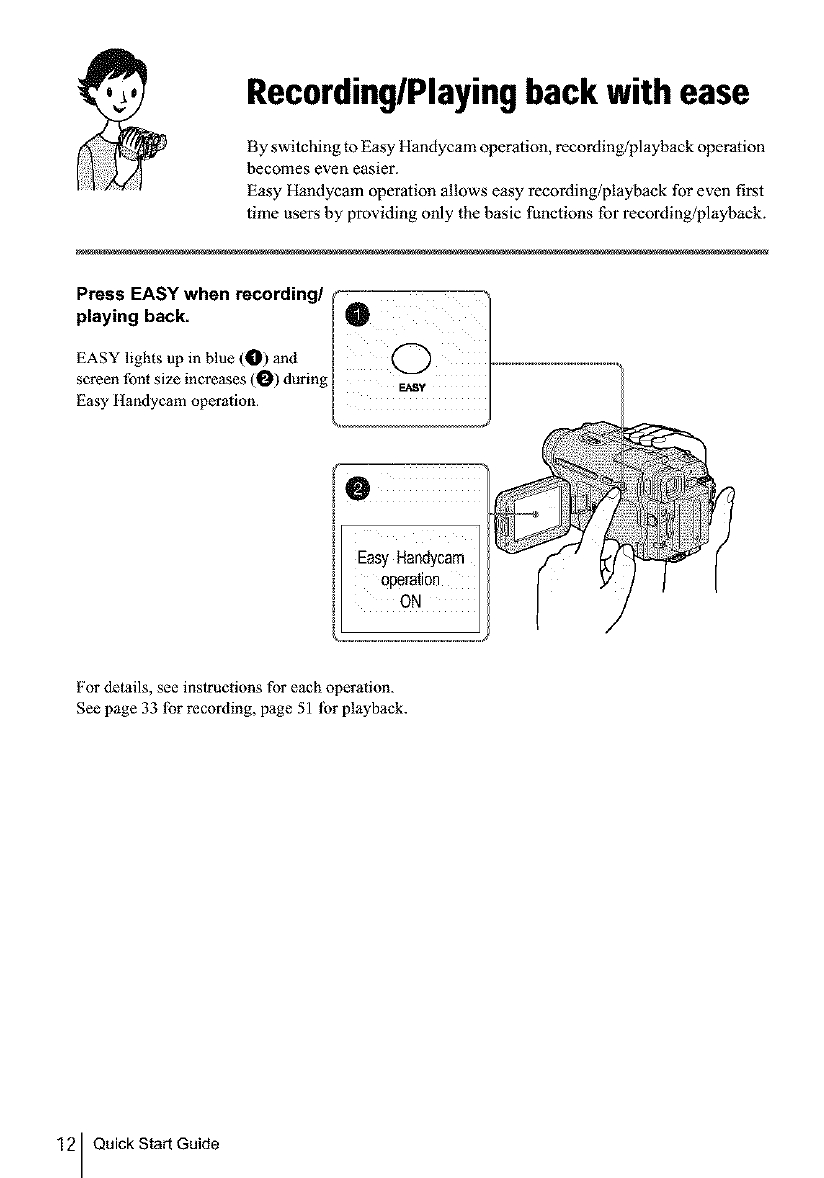
Recording/Playingback with ease
By switching to Easy Handycam operation, recording/playback operation
becomes even easier.
Easy Handycam operation allows easy recording/playback for even first
time users by providing only the basic functions for recording/playback.
Press EASY when recording/
playing back.
EASY lights up in blue (0) and
screen font size increases (0) during E_y
Easy Itandycam operation.
For details, see instructions for each operation.
See page 33 lbr recording, page 51 lbr playback.
12 Quick Start Guide
Gettingstarted
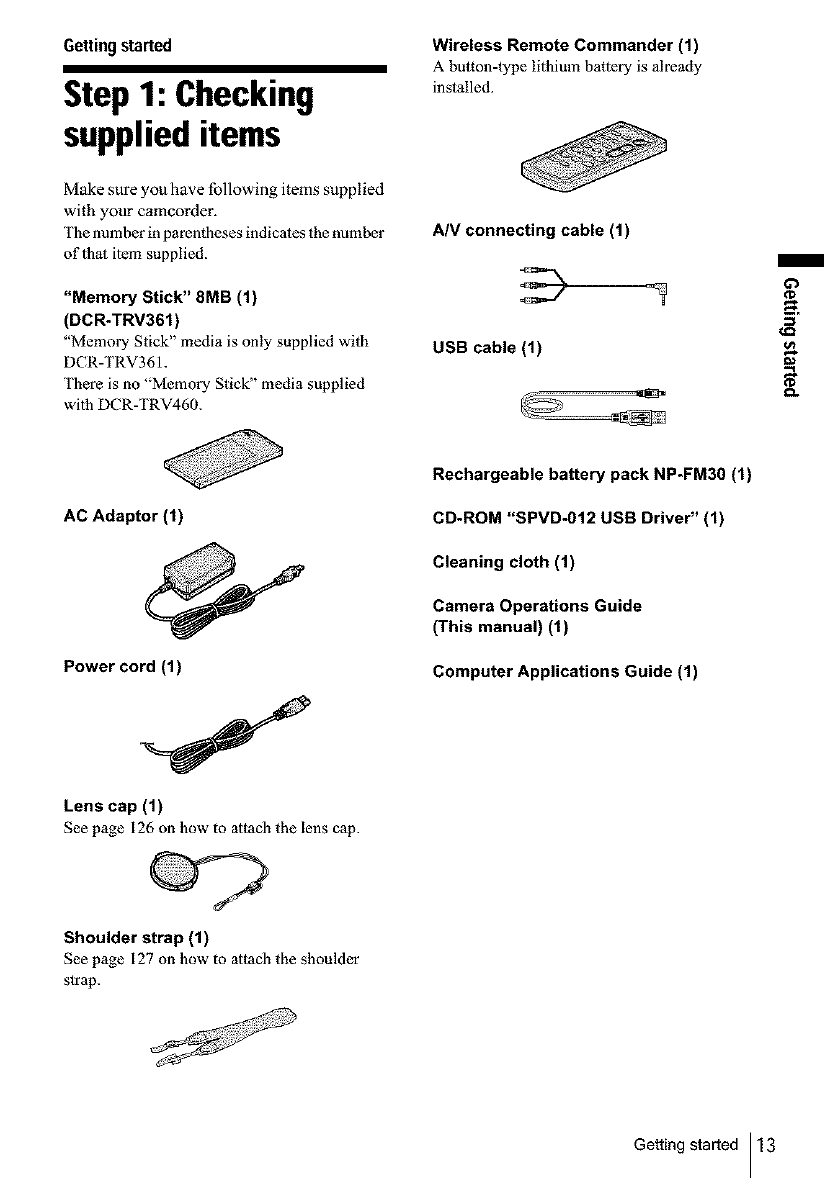
Step1: Checking
supplieditems
Make sure you have following items supplied
with your camcorder.
The number in parentheses indicates the number
of 1hat item supplied.
"Memory Stick" 8MB (1)
(DCR-TRV361)
"Memory Stick" media is only supplied with
DCR-TRV361.
There is no "Memory Stick" media supplied
wi|h DCR-TRV460.
Wireless Remote Commander (1)
A button-type lithium battery is already
installed.
A/V connecting cable (1)
USB cable (1)
_0
AC Adaptor (t)
Power cord (1)
Lens cap (1)
See page 126 on how to attach the lens cap.
Rechargeable battery pack NP-FM30 (1)
CD-ROM "SPVD-012 USB Driver" (1)
Cleaning cloth (1)
Camera Operations Guide
(This manual) (t)
Computer Applications Guide (1)
Shoulder strap (1)
See page 127 on how to attach the shoulder
s|rap.
Getting started 13

Step 2: Chargingthe
battery pack
You can charge the battery by attaching the
"InfoLITHIUM" battery pack (M series)
to your camcorder.
I_ Notes
•You canl_o_ use b_tterles o_her than the
"lnfoLITl tlUM" battery pack (M s_ries) (p. 118).
•Do not shOlt-circuit the DC plug of the AC Adaptor
or boltery terminals with any melallic ol_jeets. This
may cause a m_l function.
• Use a nearby wall outlet when using the AC
Adaptor. Disconnect lhe AC Adaptor from the wall
oullet immediately if any malfunction occurs.
Lift up the viewfinder.
Attach the battery pack by sliding it in
the direction of the arrow until it
clicks.
Bakery pack
DC tN jack
Power col'd
3"0 the wall outlet
AC Adaptor
3 With the • mark on the DC plug
facing up, connect the AC Adaptor to
the DC IN jack on your camcorder.
•mark ---,'_/
4Connect the power cord to the AC
Adaptor.
Connect the power cord to the wall
outlet.
14 Gettingstarted
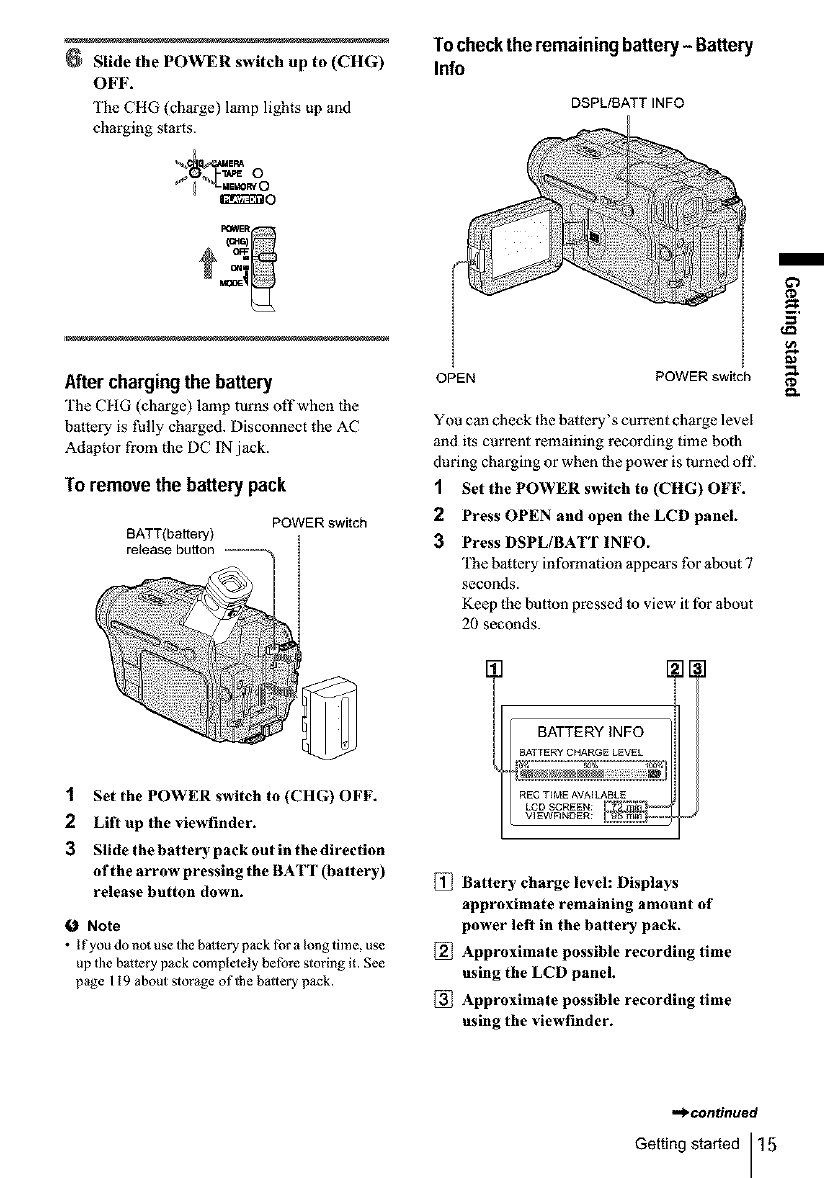
Slide the POWER switch up to (CHG)
OFF.
The CHG (charge) lamp lights up and
charging starts.
_o
Afterchargingthe battery
The CItG (charge) lamp turns off when lhe
battery is thlly charged. Disconnect the AC
Adaptor from the DC IN jack.
To removethe batterypack
POWER switch
BATT(battery)
release button .......... --_ t
t
t
t
t
1 Set the POWER switch to (CHG) OFF.
2Lift up the viewfinder.
3 Slide thebattery pack out in the direction
of the arrow pressing the BATT (battery)
release button down.
ONote
•Ifyou do not use the ba_lery pack for a long time, use
up the battery pack complelely before storing it. See
page 119 about storage of the baltery pack.
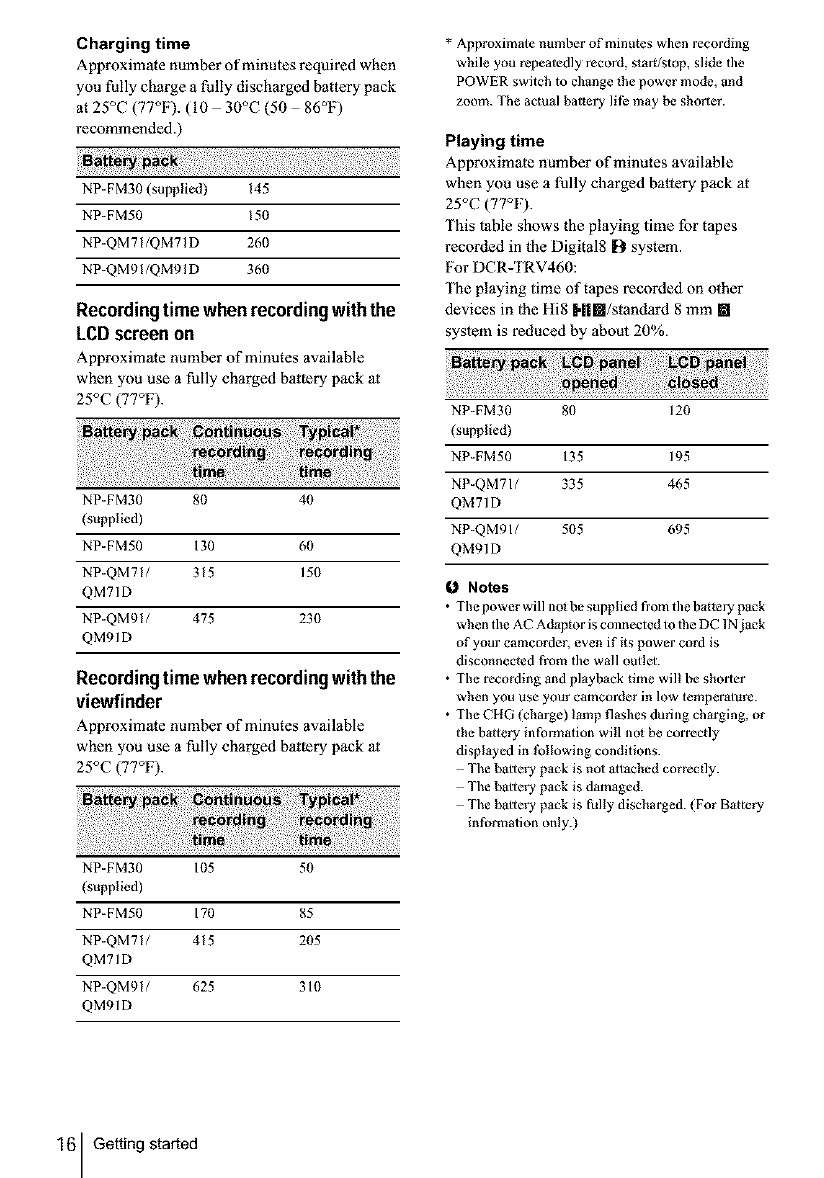
Tochecktheremainingbattery- Battery
Info
DSPL/BATT INFO
OPEN POWER switch
You can check the battery's current charge level
and its current remaining recording time both
during charging or when the power is turned ot'£
1Set the POWER switch to (CHG) OFF.
2 Press OPEN and open the LCD panel.
3 Press DSPL/BATT INFO.
The battery information appears {br about 7
seconds.
Keep the button pressed to view it for about
20 seconds.
BATTERY INFO ]_._I
BATTERY CHARGE LEVEL
REC T_ME AVAILABLE
LCD SCREEN: _VI EWFINDEI:I:
Battery charge level: Displays
approximate remaining amount of
power left in the battery pack.
Approximate possible recording time
using the LCD panel.
Approximate possible recording time
using the viewfinder.
,_continued
Getting started 15
Charging time
Approximate number of minutas required when
you fully charge a fully discharged battery pack
at 25°C (77°F). (I0 30°C (50 86°F)
recommended.)
NP-FM30 (supplied) 145
NP-FM50 15(1
NP-QM71/QM71D 26(1
NP-QM91/QM91D 36(1
Recording time whenrecordingwiththe
LCDscreenon
Approximate number of minutes available
when you use a fully charged baltery pack al
25°C (77°F).
NP-FM30 8(1 40
(supplied)
NP-FM50 130 60
NP-QM71/ 315 15(1
QM71D
NP-QM91/ 475 23(1
QM91D
Recordingtime whenrecordingwiththe
viewfinder
Approximate number of minutes available
when you use a fully charged baltery pack al
25°C (77°F).
NP-FM30 105 50
(supplied)
NP-FM50 170 85
NP-QM71/ 415 205
QM71D
NP-QM91/ 625 310
QM91D
* Approximate number of minutes when recording
while you repeatedly record, st arg/stop, slide tile
POWER switch to change the power mode, and
zoom. The actual batlery lilb may be shorter.
Playing time
Approximate number of minutes available
when you use a fully charged battery pack at
25°C (77°F).
This table shows the playing time for tapes
recorded in the Digital8 D system.
For DCR-TRV460:
The playing time of t3pes recorded on other
devices in lhe Hi8 Hi[]/standard 8 mm []
syslem is reduced by about 20%.
NP-FM30 8(1 120
(supplied)
NP-FM50 135 195
NP-QM71/ 335 465
QM71D
NP-QMgl/ 5(15 695
QM91D
Notes
•The power will no_ be supplied from tile battery pack
when the AC Adaptor is connected to 1he DC 1Njack
of your camcorder, even if its power cord is
disconnected from tile wall outlet.
• The recording and playback time will be shorter
when you use your camcorder in low temperature.
• The CHG (charge) I_mp flashes during charging, or
the b_ttery information will nol be correctly
displayed in tbllowing conditions.
The b_ltery pack is no1 _ltached correctly.
The b_ltery pack is damaged.
The b_ltery pack is fully discharged. (For B_ttery
information only.)
16 Gettingstarted
You can use the AC Adaptor as the power
source when you do not want the battery to
run out. While you are using the AC Adaptor,
the battery pack will not lose its charge even
when it is attached to your camcorder.
PRECAUTION
Even if your camcorder is tamed olt; AC power
(house current) is still supplied to it while
connected to the wall outlel via the AC Adaplor.
Connect your camcorder as shown in
"Charging the battery pack" (p. 14).
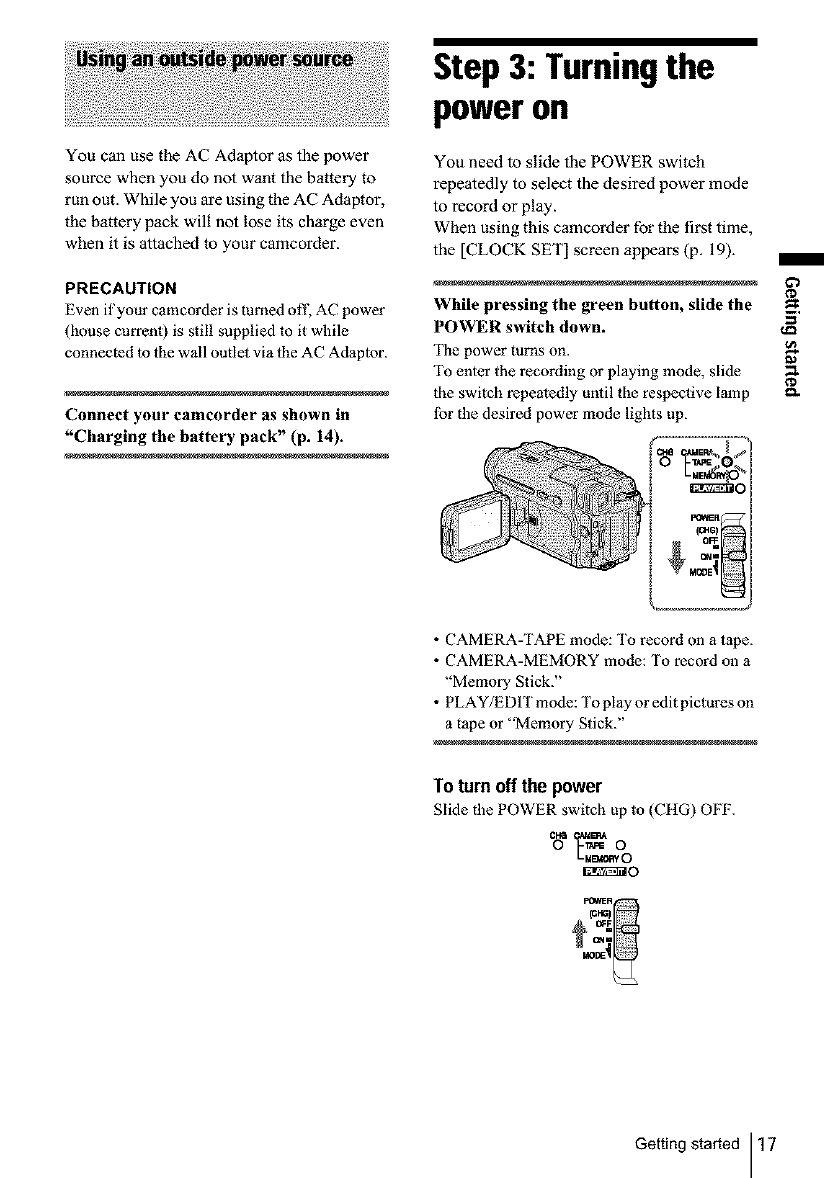
Step3: Turningthe
poweron
You need to slide the POWER switch
repeatedly to select the desired power mode
to record or play.
When using this camcorder for the first time,
the [CLOCK SET] screen appears (p. 19).
While pressing the green button, slide the _.
POWER switch down.
The power turns on.
To enter the recording or playing mode, slide
the switch repeatedly until the respective lamp _-
lbr the desired power mode lights up.
•CAMERA-TAPE mode: To record on a tape.
• CAMERA-MEMORY mode: To record oll a
"Memory Stick."
• PLAY/EDIT mode: To play or edit pictures on
a tape or "Memory Stick."
Toturn off the power
Slide the POWER switch up to (CItG) OFF.
O r_ O
_O
Getting started 17
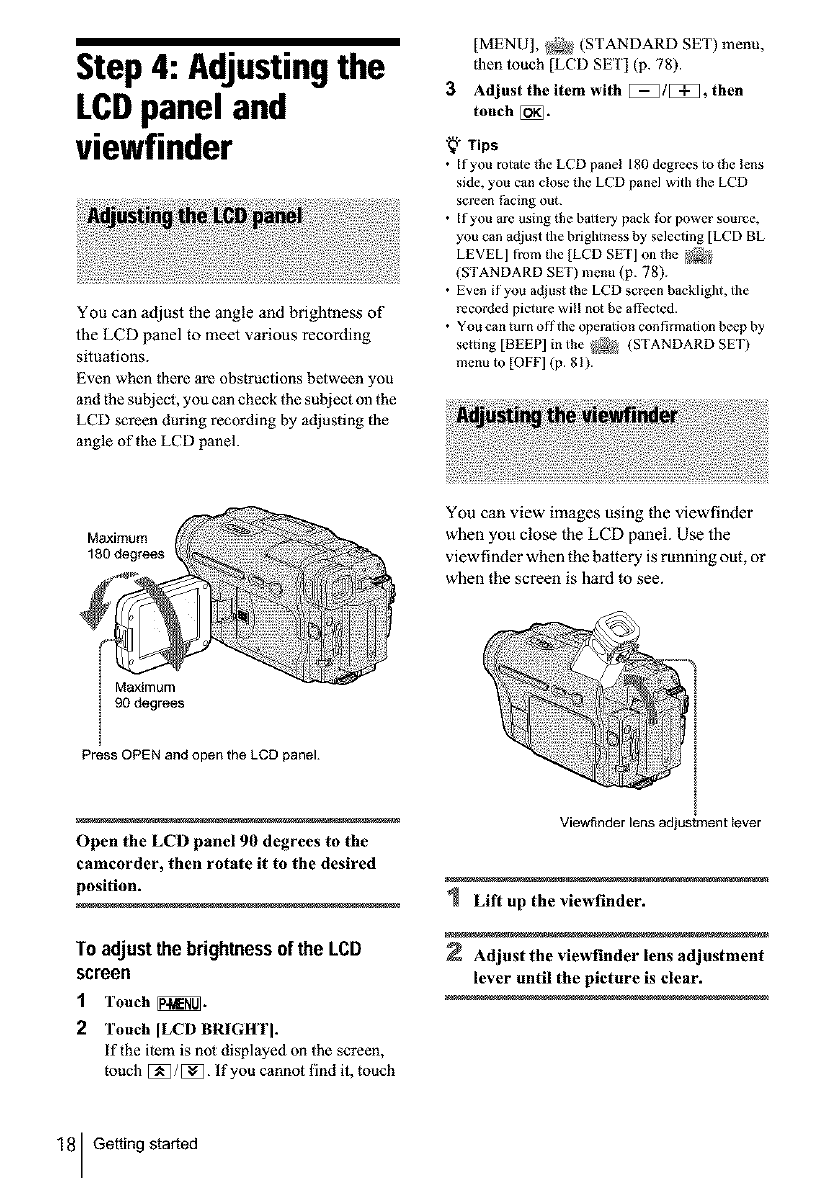
Step4: Adjustingthe
LCDpanel and
viewfinder
You can adjust the angle and brightness of
the LCD panel to meet various recording
situations.
Even when there are obstructions between you
and the subject, you can check the subject oll the
LCD screen during recording by adjusting the
angle of the LCD panel.
[MENU], _ (STANDARD SEt) menu,
then touch [LCD SET] (p. 78).
3 Adjust the item with [[[_]1[[[_], then
touch[_.
"_" Tips
•If you mtale the LCD panel 180 degrees to the lens
side, you can close the LCD panel with lhe LCD
screen Pacing out.
• If you are using the baltery pack |br power source,
you can adjust the brightness by selecling [LCD BL
LEVEL] from lhe [LCD SET] oll the _
(STANDARD SET) menu (p. 78).
• Even if you adjust the LCD screen backlight, the
recorded picture will not be affected.
• You can turn offthe operation confirmation beep by
setting [BEEP] in the _ (STANDARD SET)
menu to [OFF] (p. 81).
Maximum
180 degrees
You can view images using the viewfinder
when you close the LCD panel. Use the
viewfinder when the battery is running out, or
when the screen is hard to see.
Maximum
90 degrees
Press OPEN and open the LCD panel.
Open the LCD panel 90 degrees to the
camcorder, then rotate it to the desired
position.
To adjust the brightnessof the LCD
screen
1Touch _.
2 Touch [LCD BRIGHT].
if the flem is not displayed on the screen,
touch [_/[_. If you cannot find it, touch
Viewfinder lens adjustment tever
Lift up the viewfinder.
Adjust the viewfinder lens adj astment
lever until the picture is clear.
18 Getting started

To usethe viewfinderduringoperation
When you are recording on a tape or a "Memory
Stick", you can adiust the exposure (p. 35) and
fader (p. 40) while checking the image on the
viewfinder. Have lhe LCD panel rotated 180
degrees and closed wilh the screen facing out.
1 Set the power mode to CAMERAJI'APE
or CAMERA-MEMORY (p. 17).
2 Close the LCD panel with the screen
facing ont.
appears on the screen.
3Touch _.
[get LCD off?] appears on the screen.
4Touch [YES].
The LCD screen is turned off.
5 Touch the LCD screen while checking
the display in the viewfinder.
[EXPOSURE[, etc. are displayed.
6 Touch the button you want to set.
•[EXPOSURE]: Adjust wi|h [i=1/[_
and touch [_].
• [FADER]: Touch it repeatedly to select a
desired el'l_ct (only in the CAMERA-
TAPE mode).
• [_ : The LCD screen lights up.
To hide lhe buttons on lhe LCD screen,
touch [_].
To usethe large-capacitybatterypack
When you use the large-capacity battery pack
(NP-QM71/QM7 ID/QM91/QM91D) on your
camcorder, extend the viewfinder and pull it up
to the optimal angle for viewing.
Step5: Setting the
date andtime
Set the date and time when using this
camcorder for the first time. If you do not set
the date and time, the [CLOCK SET] screen
appears every time you turn on your
camcorder.
ONote
• If you do nol use your camcorder fbr about 3
months, the built-in rechargeable button-type
battery gets discharged mid the date and time
seitings may be cleared from the memory. In thai
case, charge the rechargeable button-type battery
(p. 123) and then set the date and time again.
OPEN _ POWER switch
Torn on your eamcorder (p. 17).
Press OPEN and open the LCD panel.
Proceed to step 7 when you set the clock for
the first time.
3Touch _.
,->continued
Getting started 19
G'}
4Touch [MENU]. Step6: Insertingthe
recordingmedia
Select _@ (TIME/LANGU.) with
[_]/[_], then touch [_].
Select [CLOCK SET[ with [_/[_,
then touch [i_.
7 Set[Yl(year)with[_l[:_,thentoueh
NN.
k_J kx
You can set any year up to the year 2079.
Set [MI(month), [DI(day), hour and
minute in the same way as was done in
step 7, then touch [_].
For midnight, set it to 12:0OAM.
For midday, set it to 12:00PM.
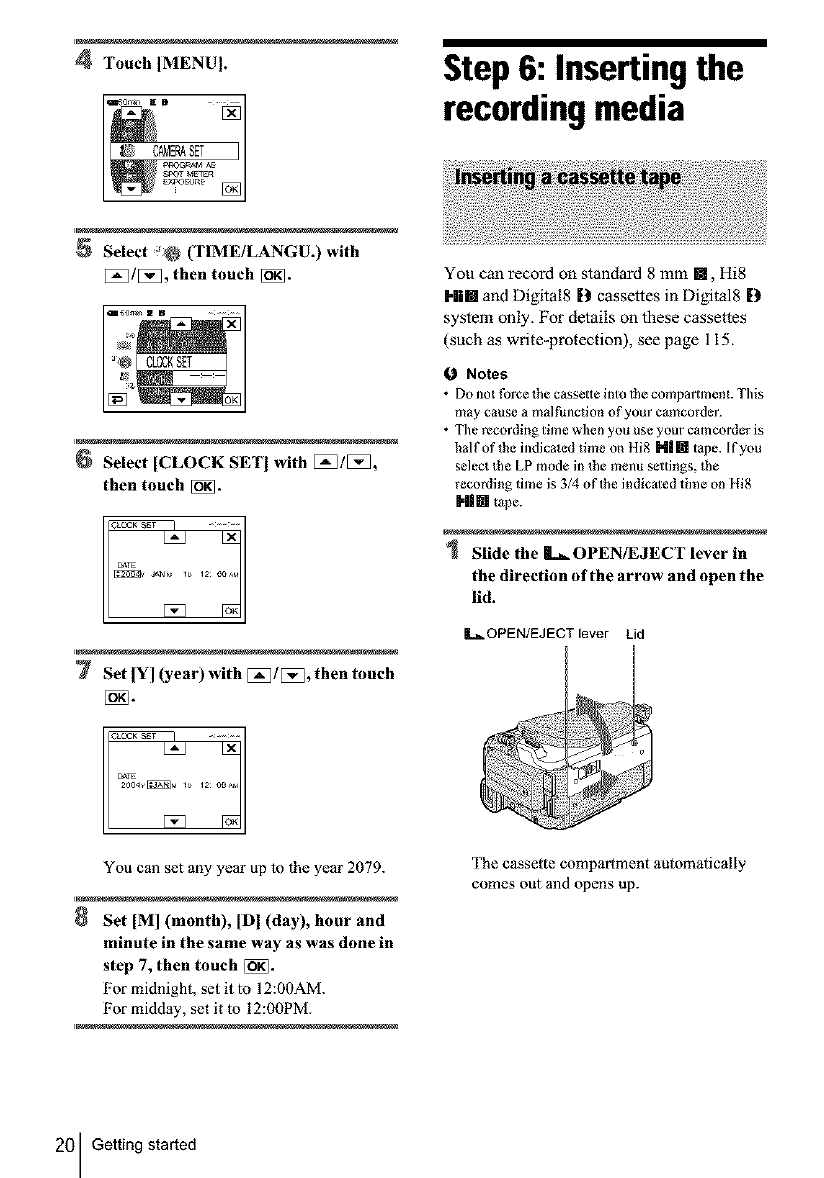
You can record on standard 8 mm m, Hi8
Hi[] and Digital8 [_ cassettes in Digital8 [_
system only. For details on these cassettes
(such as write-protection), see page 115.
0 Notes
• Do not force _he cassette into 1he comparhnent. This
may cause a malfunction of your ¢amcorder.
• The recording time when you use your camcorder is
half of the indicaled time on Hi8 N|[] tape. If you
select lhe LP mode in _he menu settings, the
recording time is 3/4 of the indic_led time on Hi8
|t1 [] _pe.
Slide the L- OPEN/EJECT lever in
the direction of the arrow and open the
lid.
I_OPENIEJECT lever Lid
]'he cassette compartment automatically
comes out and opens up.
20 Getting started
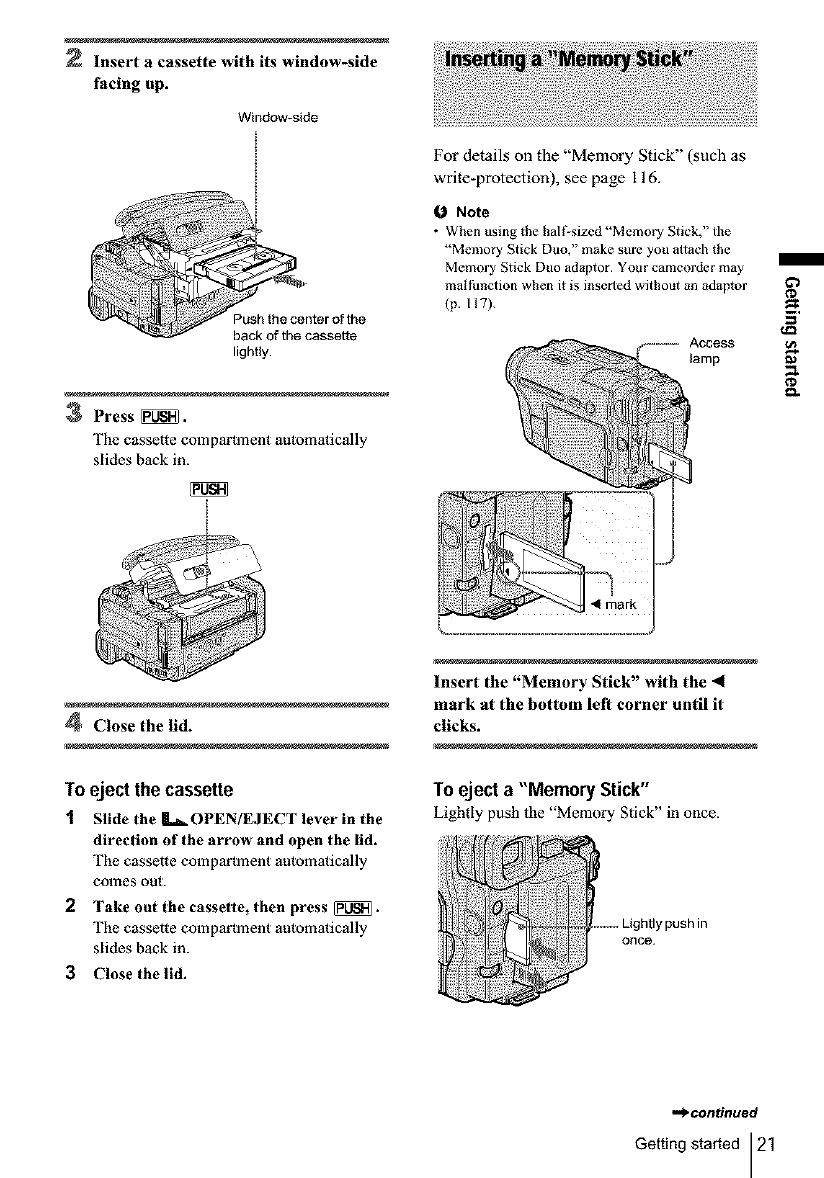
Insert a cassette with its window-side
facing up.
Window-side
Push the center of the
back of the cassette
lighUy.
3Press _.
The cassette comparh_ent automatically
slides back in.
For details on the "Memory Stick" (such as
write-protection), see page I 16.
ONote
•When using the ball'sized "Memory Stick," the
"Memory Stick Duo," make sure you attach lhe
Memory Stick Duo adaptor. Your camcorder may
malfunclion when it is inserted without an _daptor
(p. HT).
Access
lamp
¢D
f_
4Close the lid.
Toeject the cassette
1 Slide the L_OPEN/EJECT leverin the
direction of the arrow and open the lid.
The cassette comparh_ent automatically
conles out.
2Take out the cassette, then press _.
The cassette comparh_ent automatically
slides back in.
3Close the lid.
Insert the "Memory Stick" with the 4
mark at the bottom left corner until it
clicks.
To eject a "Memory Stick"
Lightly push lhe "Memory Stick" in once.
..... Lightly push in
once.
,=>continued
Getting started 21
Notes
• If you force the "Memory Stick" into the "Memory
Stick" slo_ in the wrong direction, the "Memory
Stick" slot m_y be damaged.
• Do not insert anything other than a "Memory Stick"
into the "Memory Stick" slot. Doing so may cause a
malfunction of your camcorder.
• When the access lamp is lit or flashing, your
camcorder is reading/writing dola from/_o the
"Memory Stick." Do not shake or knock your
camcorder, turn tile power off2 eject the "Memory
Stick." or remove tile boltery pack. Otherwise,
image data may be dumaged.
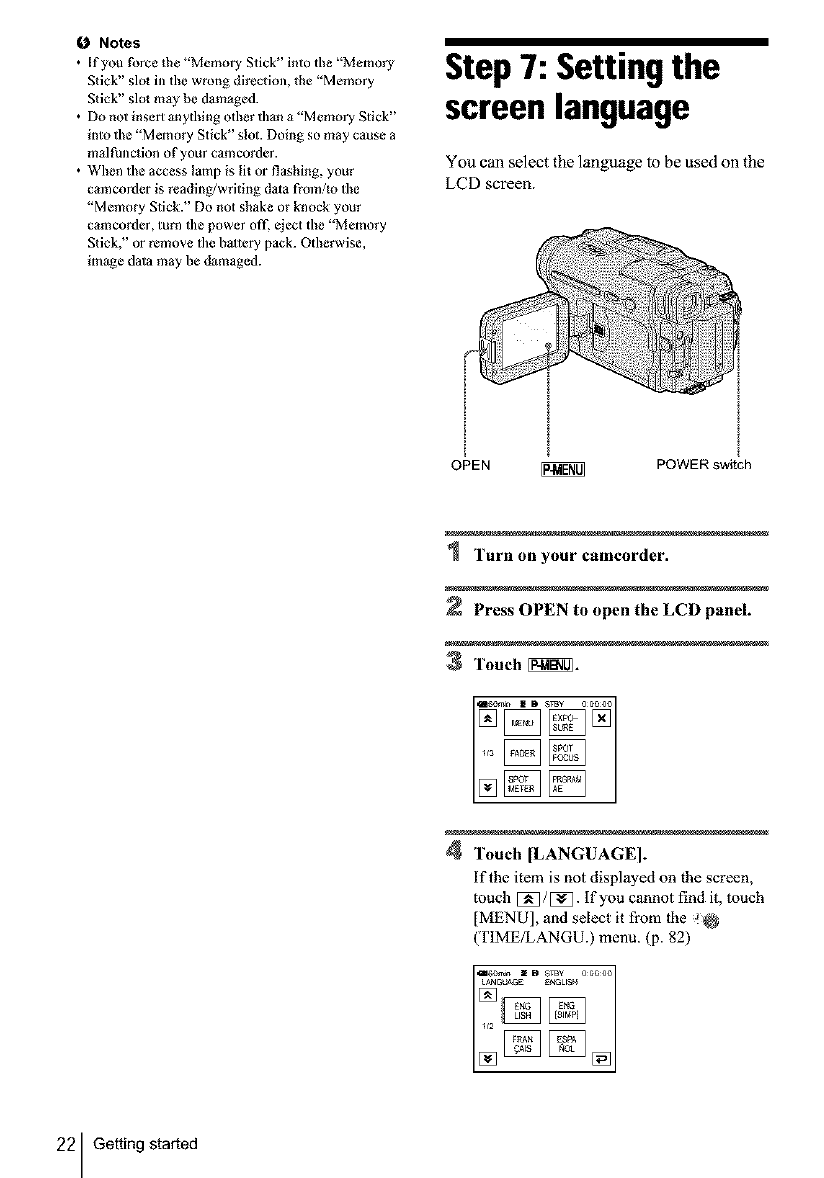
Step7: Setting the
screen language
You can select the language to be used on the
LCD screen.
OPEN
I
I
I
!
POWER switch
Turn on your camcorder.
Press OPEN to open the LCD panel.
3Touch [_1_.
4Touch [LANGUAGE].
if the item is not displayed on the screen,
much [_/[_. If you cannot find it, touch
[MENU], and select it from the _
(TIME/LANGU.) menu. (p. 82)
22 Getting started
Select the desired language with [_/
[_, then touch [_.
"_" yi 0
•Your camcorder of&:rs [ENG[SIMP]](simp[ified
English) for when you cannot find your nalive
tongue among the options.
¢D
Getting started 23
Recording
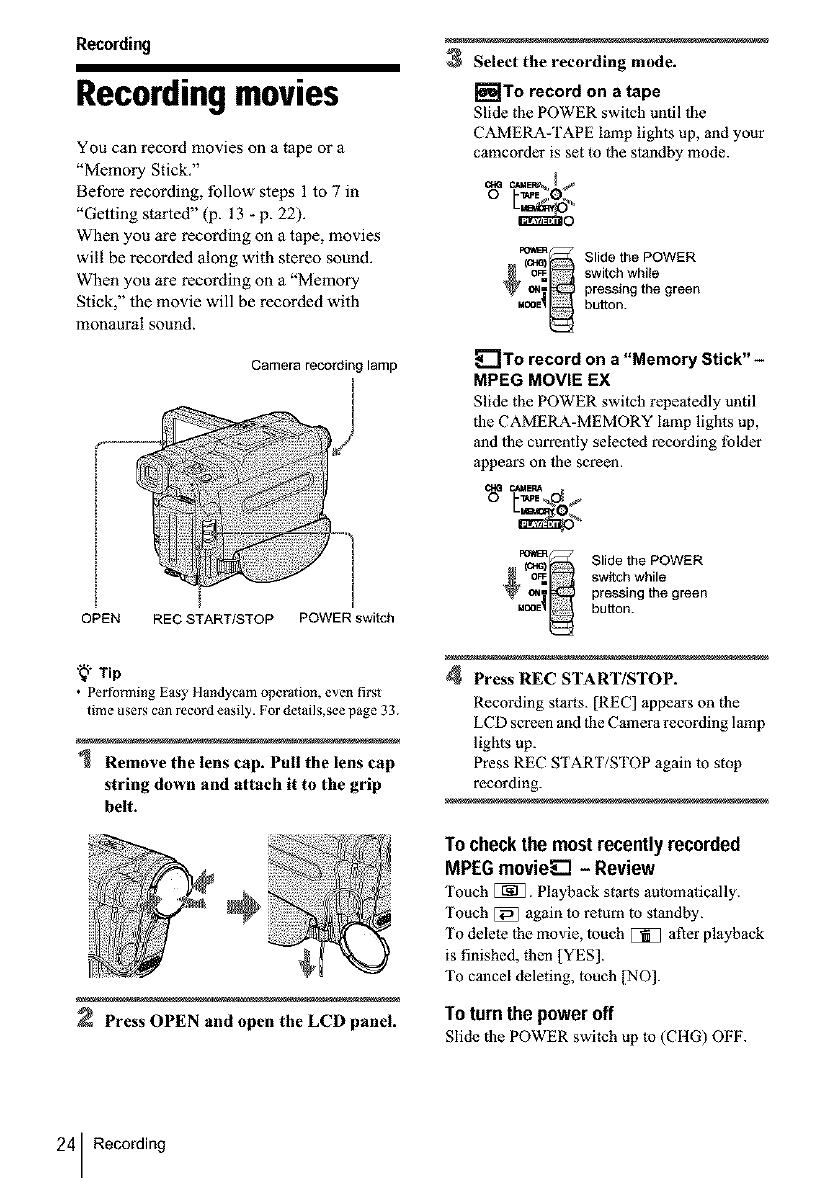
Recordingmovies
You can record movies on a tape or a
"Memory Stick."
Before recording, follow steps 1 to 7 in
"Getting started" (p. 13 - p. 22).
When you are recording on a tape, movies
will be recorded along with stereo sound.
When you are recording on a "Memory
Stick," the movie will be recorded with
monaural sound.
Camera recording lamp
OPEN REC START/STOP POWER switch
'_;" Tip
•Perfo_z,ning Easy Handycam operation, even first
time users can record easily. For details,see page 33.
Remove the lens cap. Pull the lens cap
string down and attach it to the grip
belt.
Press OPEN and open the LCD panel.
3Select the recording mode.
[_To record on atape
Slide the POWER switch until the
CAMERA-TAPE lamp lighls up, and your
camcorder is set to lhe stm_dby mode.
m_._ Slide the POWER
(o_ switch while
pressing the green
button.
_]To record on a "Memory Stick" -
MPEG MOVIE EX
Slide the POWER switch repeatedly until
the CAMERA-MEMORY lamp lights up,
and lhe currently selected recording tblder
appears on the screen.
_ Slide the POWER
ol_ switch while
pressing the green
button.
4Press REC START/STOP.
Recording starts. [REC] appears on the
LCD screen and the Camera recording lamp
lights up.
Press REC START/STOP again to stop
recording.
To check the most recently recorded
MPEG movie_E] - Review
Touch [_]. Playback starts automatically.
Touch [_ again to return to standby.
To delete lhe movie, loach _ after playback
is finished, then [YES].
To cancel deleting, loach [NO].
Toturn the poweroff
Slide the POWER switch up to (CItG) OFF.
24 Recording
0 Note
• While recording movies on a "Memory Stick," the
only menu items available will be those with short
cuts on the Personal Menu. In order to use other
menu items, add them to the Personal Menu.
"_" Tip
•If you do no_ use your cameorder for a long time,
remove the cassette and store it.
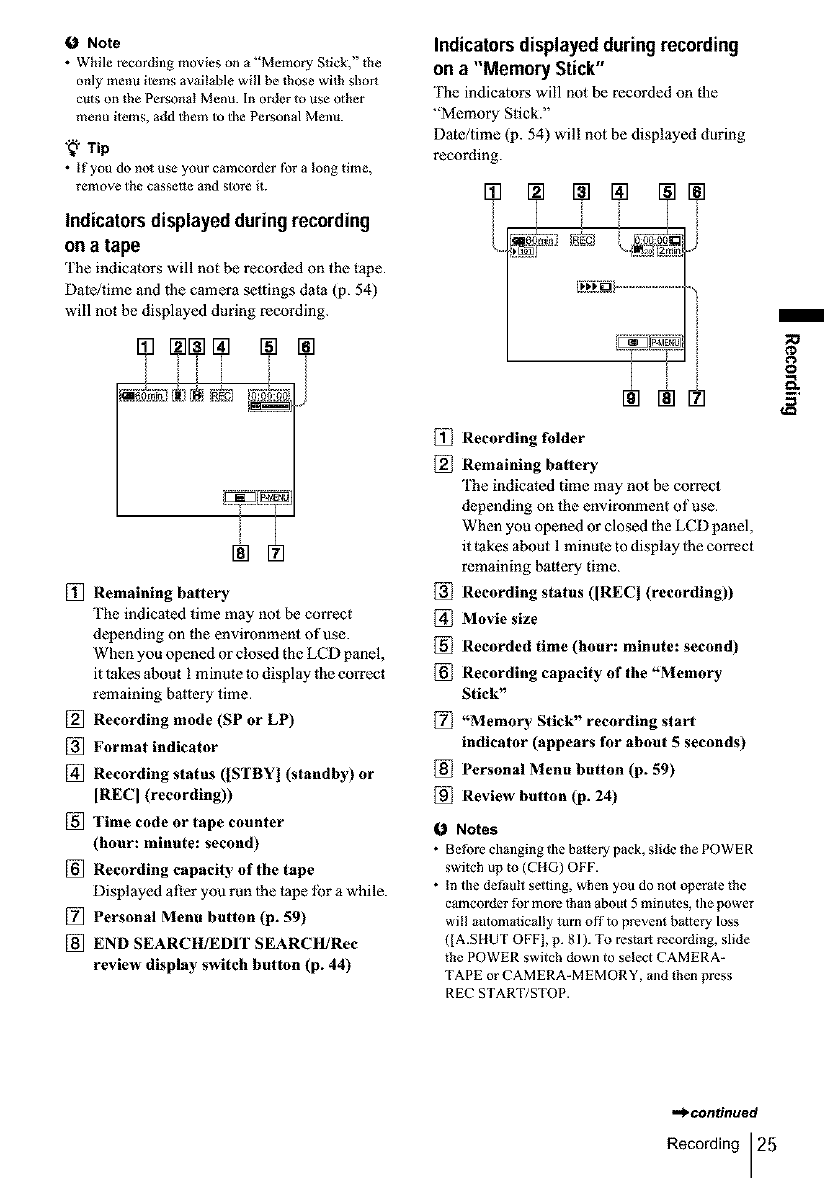
Indicators displayedduringrecording
on a tape
The indicators will not be recorded on the tape.
Date/time and the camera settings data (p. 54)
will not be displayed during recording.
i i i
[] Remaining battery
The indicated time may not be correct
depending on file environmen_ of use.
When you opened or closed the LCD panel,
it takes about I minule to display the correct
remaining baltery time.
[] Recording mode (SP or LP)
[_ Format indicator
[] Recording status (ISTBYI (standby) or
IRECI (recording))
[] Time code or tape counter
(hour: minute: second)
[] Recording capacity of the tape
Displayed after you run lhe tape lbr a while.
[] Personal Menu button (p. 59)
[] END SEARCIt/EDIT SEARCItIRec
review display switch button (p. 44)
Indicators displayed during recording
on a "Memory Stick"
The indicalors will not be recorded on the
"Memory Stick."
Date/time (p. 54) will not be displayed during
recording.
[] Recording folder
[] Remaining battery
The indicated time may not be correct
depending on the environment of use.
When you opened or closed lhe LCD panel,
it takes about I minute to display lhe correct
remaining batlery time.
Recording status (IRECI (recording))
[] Movie size
[] Recorded time (hour: minute: second)
[] Recording capacity of the "Memory
Stick"
[] "Memory Stick" recording start
indicator (appears for about 5 seconds)
[] Personal Menu button (p. 59)
Review button (p. 24)
I_ Notes
•Before chm_ging the battery pack, slide _he POWER
switch up to (CHG) OFF.
• In the default setting, when you do not operate the
camcorder for more lhan _bout 5 minutes, the power
will automatically turn offto prevent battery loss
([A.SIIUT OFF], p. gl ). To restart recording, slide
the POWER switch down to select CAMERA-
TAPE or CAMERA-MEMORY, and then press
REC START/STOP.
/
_o
t'D
8
,,._continued
Recording 25
'_;" Tips
•TO ensure smooth trans0ion on a tape from the last
recorded scene 1o the next, note tile following.
Do not remov_ the cassette. (The picture will he
recorded continuously without a break even when
you turn the power oft).
Do not record pictures in SP mode and LP mode on
the same tape.
Avoid stopping then recording a movie in the LP
mode.
• See "To record for a longer time ml a "Memory
Stick'' (p. 26) for the approximate length of time it
is possible to record on a "Memory Stick" of
different capacities.
• The recording time, date. and the camera se.ings data
(for t_pe only) are recorded automalically on file
recording media wilhout being displayed on die screen.
YOU c_n view this informalion during playback by
selecning [DATA CODE] in lhe menu seoing (p. 54).
image size and time (hour: minute: second)
8MB* 00:01:20 (10:05:20
16M B 00:02:40 00:1 (1:40
32MB 00:05:20 00:21:20
64MB 00:10:40 (10:42:40
128MB 00:21:20 (11:25:20
256MB 00:42:40 (12:5(1:40
(MSX-256)
512MB 01:25:20 (15:41:20
(MSX-512)
1GB 02:50:40 11:22:40
(MSX-1G)
* Supplied with DCR TRV361 only.
To recordfora longertime on a tape
in the _ (STANDARD SET) menu, select
[[NI REC MODE], lhen [LP] (p. 76).
in the LP mode, you can record 1.5 times longer
than you can when recording in the SP mode.
A tape recorded in the LP mode should be
played back only on this camcorder.
To record for alongertime on a
"Memory Stick"
in |he _ (MEMORY SET) menu, select
]MOVIE SET], [[1_ IMAGE SIZE], then [160 x
112] (p. 65).
The lenglh of time you can record on a
"Memory Stick" varies depending on lhe image
size and the recording environment.
Refer to the fbllowing list lbr approximate
length of time you can record movies on a
"Memory Stick" formatted on your camcorder.
When the CAMERA-TAPE mode is
selected, you can choose zoom to
magnification levels greater than 20 times,
and from that point activate the digital zoom
([DIGITAL ZOOM], p. 63).
Occasional use of the zoom is effective, but
use it sparingly for best results.
¢
iiiiiiiiil
iiiiiiiiiiiiii ii ii ii
I1cm (approx. 80 cm (approx.
i!/2inch) 2 5/8 feet)*
* Tile minimum distance required between your
camcorder and the subject to get a sharp focus in
thal position of the lever.
26 Recording
Move the power zoom lever slightly for a
slower zoom. Move it further for a faster
zoom.
To record wider range of view
Move the power zoom lever towards W.
The subject appears farther away (Wide
angle).
To record closer view
Move the power zoom lever towards T.
The subject appears closer (Telephoto).
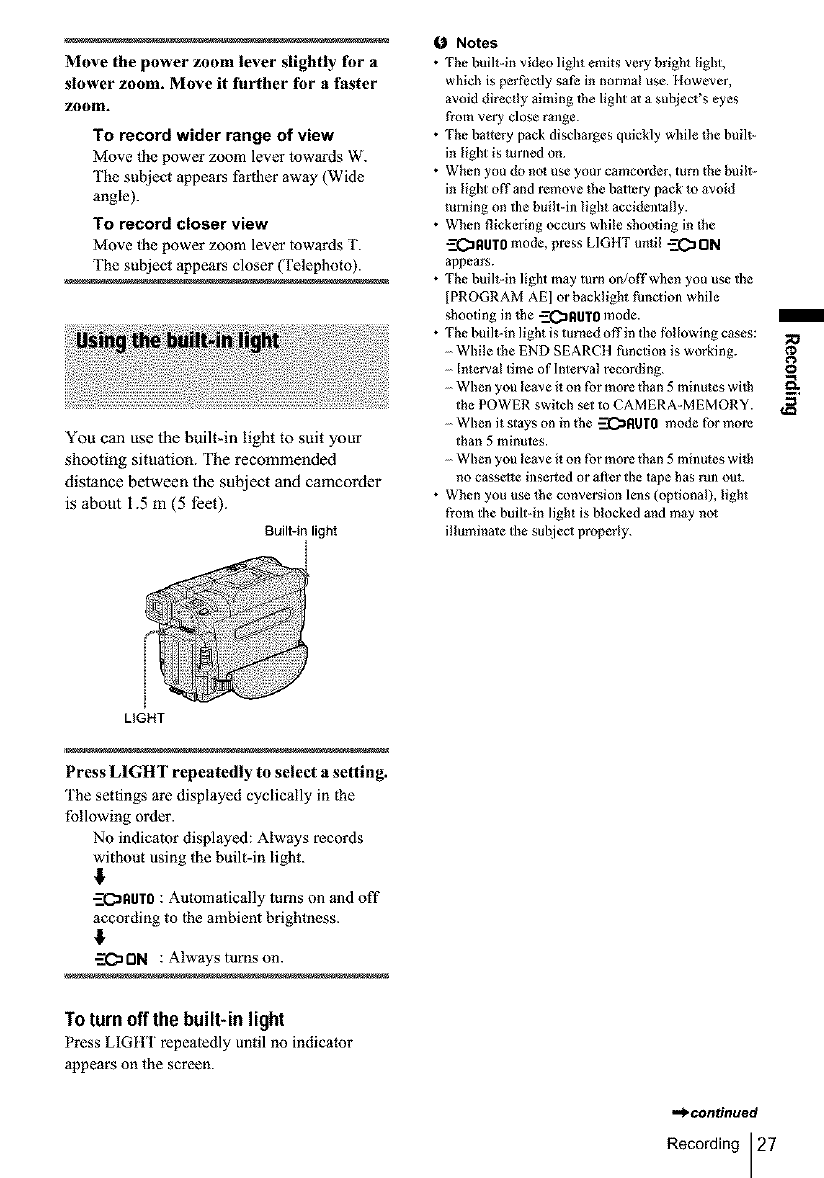
You can use the built-in light to suit your
shooting situation. The recommended
distance between the subject and camcorder
is about 1.5 m (5 feet).
Built-in light
i
Notes
• The built-in video light emits very bright [ighg
which is perfectly safe in nomlal use. However,
avoid directly aiming 1he light al a subject's eyes
from very close range.
• The baltery pack discharges quickly while the built-
in light is turned on.
• When you do nol use your camcorder, turn the built-
in light off and remove the battery pack 1o avoid
mining on the built-in light accidentally.
• When flickering occurs while shooting in the
-ZCaRUTO mode, press LIGHT until _ ON
appears.
• The built-in light may turn on/offwhen you use the
[PROGRAM AE] or backlight function while
shooting in the -Z(_RUTg mode.
• The built-in light is turned off in the fPllowing cases:
While the END SEARCH function is working.
Interval time of Interval recording.
When you leave it on for more than 5 minutes with
the POWER switch set to CAMERA-MEMORY.
When it stays on in the -_RUr0 mode for more
than 5 minutes.
When you leave it on for more than 5mintttes wi_h
no cassette inserted or after the tape has run out.
• When you use _he conversion lens (optional), light
from the built-in light is blocked and may no_
illuminate the sut!iect properly.
/
¢D
8
LIGHT
Press LIGHT repeatedly to select asetting.
The settings are displayed cyclically in the
following order.
No indicator displayed: Always records
without using the built-in light.
#
-ZC_AUT0 : Automatically turns on and off
according to lhe ambient brightness.
-ZCzDN : Alwaystumson.
Toturn off the built-in light
Press LIGItT repealedly until no indicator
appears on the screen.
.,,_'eOntinued
Recording 27
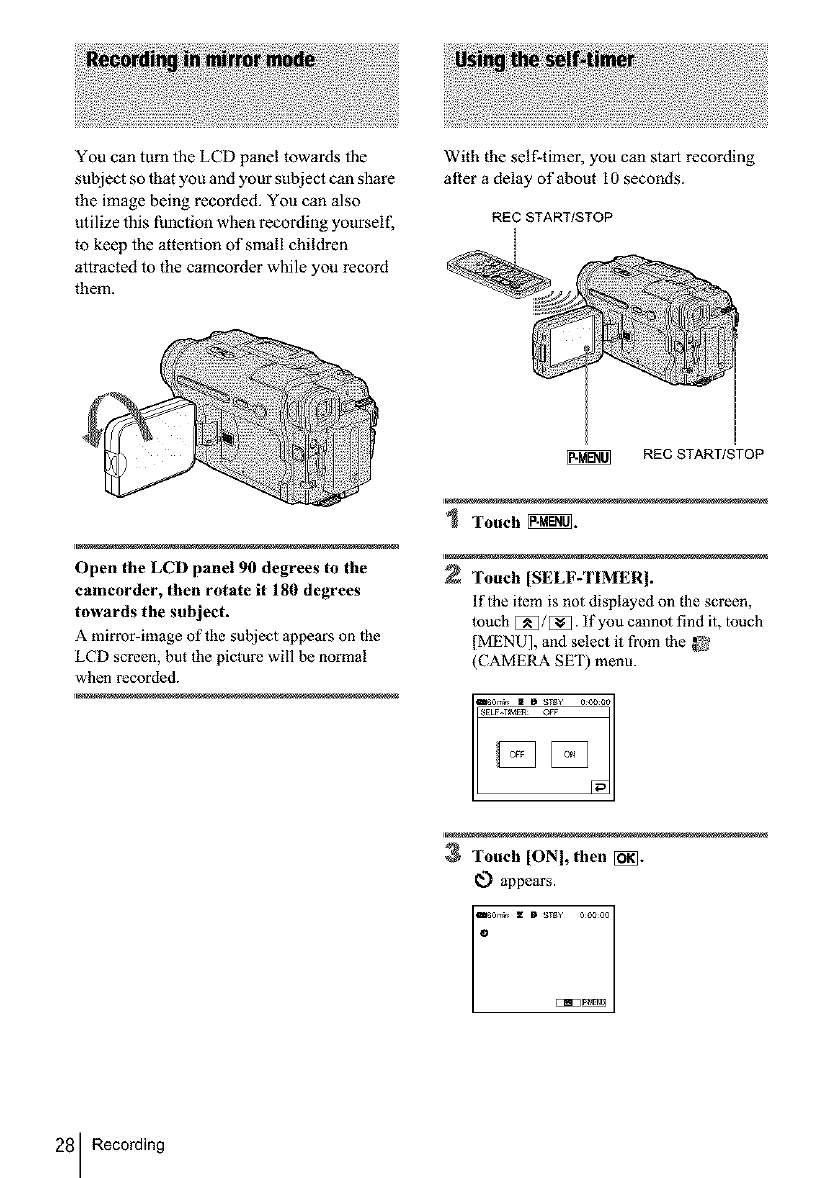
You can turn the LCD panel towards the
subject so that you and your subject can share
the image being recorded. You can also
utilize this function when recording yourself,
to keep the attention of small children
attracted to the camcorder while you record
them.
With the self-timer, you can start recording
after a delay of about IO seconds.
REC START/STOP
I
I
REC START/STOP
Open the LCD panel 90 degrees to the
camcorder, then rotate it 180 degrees
towards the subject.
A mirror-image ofihe subject appears on lhe
LCD screen, but the picture will be normal
when recorded.
Touch _.
Touch [SELF-TIMER I.
lfihe item is not displayed on the screen,
touch E_]/[_]. if you cannot find it, |ouch
[MENU], and select it from lhe _
(CAMERA SET) menu.
3Touch [ONI,then [_.
_.) appears.
D sTs¥ ooooo
28 Recording
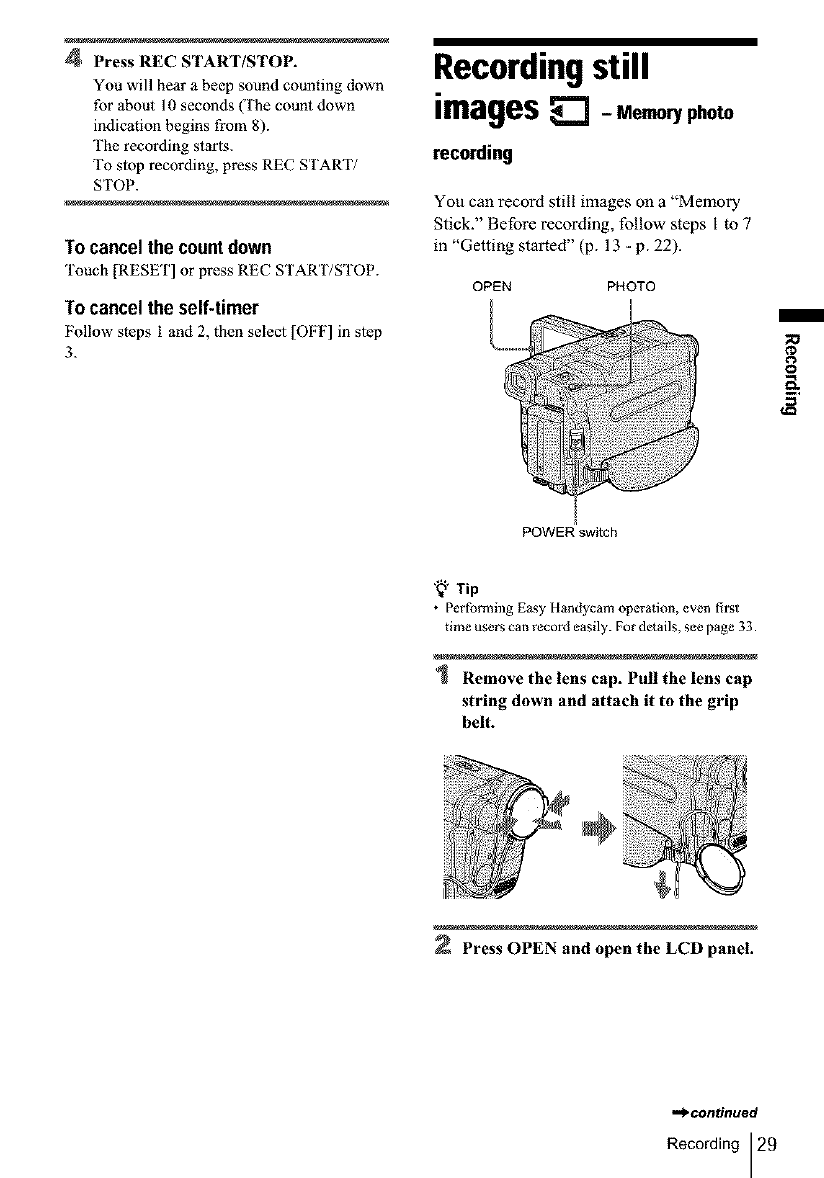
4Press REC START/STOP.
You will hear a beep sound counting down
for about 10 seconds (The count down
indication begins from 8).
The recording starls.
To slop recording, press REC START/
STOP.
Tocancelthe countdown
'['ouch [RESET] or press REC START/STOP.
To cancel the self-timer
Follow steps 1 and 2, then select [OFF] in step
3.
Recordingstill
images -Memoryphoto
recording
You can record still images on a "Memory
Stick." Before recording, follow steps I to 7
in "Getting started" (p. 13 -p. 22).
OPEN PHOTO
¢D
8
POWER switch
'8" Tip
•Performing Easy llandycam operation, even first
time users can record easily. For details, see page 33.
Remove the lens cap. Pull the lens cap
string down and attach it to the grip
belt.
Press OPEN and open the LCD panel.
,.,_.continued
Recording 29
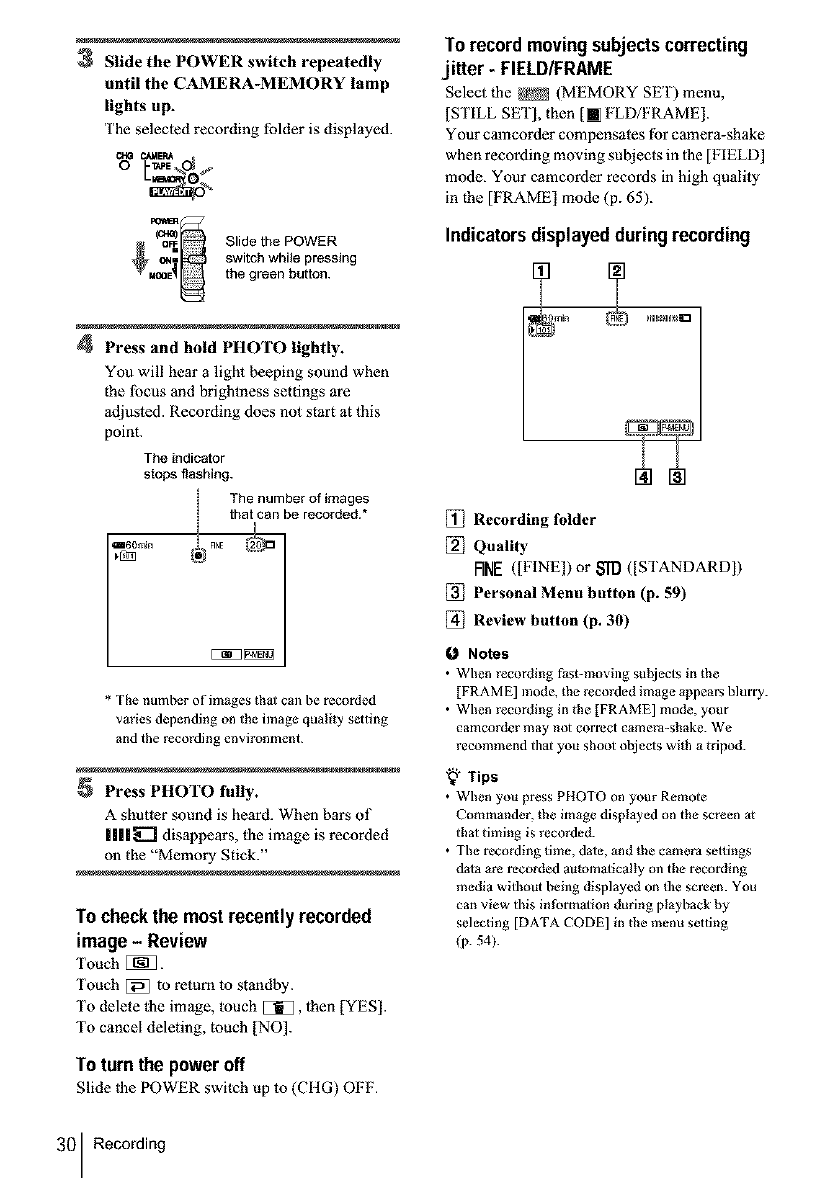
3Slide the POWER switch repeatedly
until the CAMERA-MEMORY lamp
lights up.
The selected recording folder is displayed.
S,idetho OWER
_Mco_e switch while pressing
the green button.
4Press and hold PHOTO lightly.
You will hear a light beeping sound when
the lbcus and brightness settings are
adiusted. Recording does not start at this
point.
The indicator
stops flashing.
The number of images
that can be recorded.*
I
* The number of images that Call be recorded
varies depending on the bnage quality setting
and the recording environment.
Press PHOTO fully.
A shutter sound is heard. When bars of
|lll=_"] disappears, the image is recorded
oll the "Memory Stick."
To checkthe most recentlyrecorded
image-Review
Touch [J_].
Touch [_ to return to standby.
To delete the image, touch [51_, 1hen [YES].
To cancel deleting, touch [NO].
To turn the poweroff
Slide |he POWER switch up to (CItG) OFF.
Torecordmoving subjectscorrecting
jitter - FIELD/FRAME
Select |he _ (MEMORY SET) menu,
]STILL SET], then [[] FLDfFRAME].
Your camcorder compensates for camera-shake
when recording moving subjects in 1he [FIELD]
mode. Your camcorder records in high quality
in the [FRAME] mode (p. 65).
Indicatorsdisplayedduringrecording
[_ Recording folder
[_ Quality
RNE([FINE]) or S'_ ([STANDARD])
[_ Personal Menu button (p. 59)
[_ Review button (p. 30)
1_ Notes
•When recording l_ast-moving sul_iects in the
[FRAME] mode, the recorded image appears blurry.
• When recording in the [FRAME] mode, your
camcorder may not correct camera-shake. We
recommend thai you shoot objects wgh a tripod.
"Q" Tips
• When you press PHOTO on your Remote
Commander, the image displayed on the screen _t
that timing is recorded.
• The recording time, date, and the camera settings
data are recorded aulom_lically m/the recording
media without beb/g displayed on the screen. You
can view this in form_lion during playback by
selecting [DATA CODE] in the menu setting
(p. 54).
30 Recording
Select the _ (MEMORY SET) menu,
[STILL SET[, then [ii QUALITY[ (p. 65).
The number of pictures you can record on a
"Memory Stick" varies depending on the
quality of the image and the recording
environment.
Refer to the following list for the approximate
number of pictures that can be recorded on a
"Memory Stick" lbrmatted on your camcorder.
Image quality and number of images
The image size of [FINE[ is about 150 kB, that
of[STANDARD] is about 60 kB.
8MB* 5(1 12(1
16MB 96 24(1
32MB 190 485
64MB 390 98(1
128MB 780 1970
256MB 1400 3550
(MSX-256)
512MB 2850 7200
(MSX-512)
IGB (MSX-1G) 5900 14500
* Supplied with DCR-TRV361 only.
"_ Tip
• The still image size is 640 x 480 dots only.
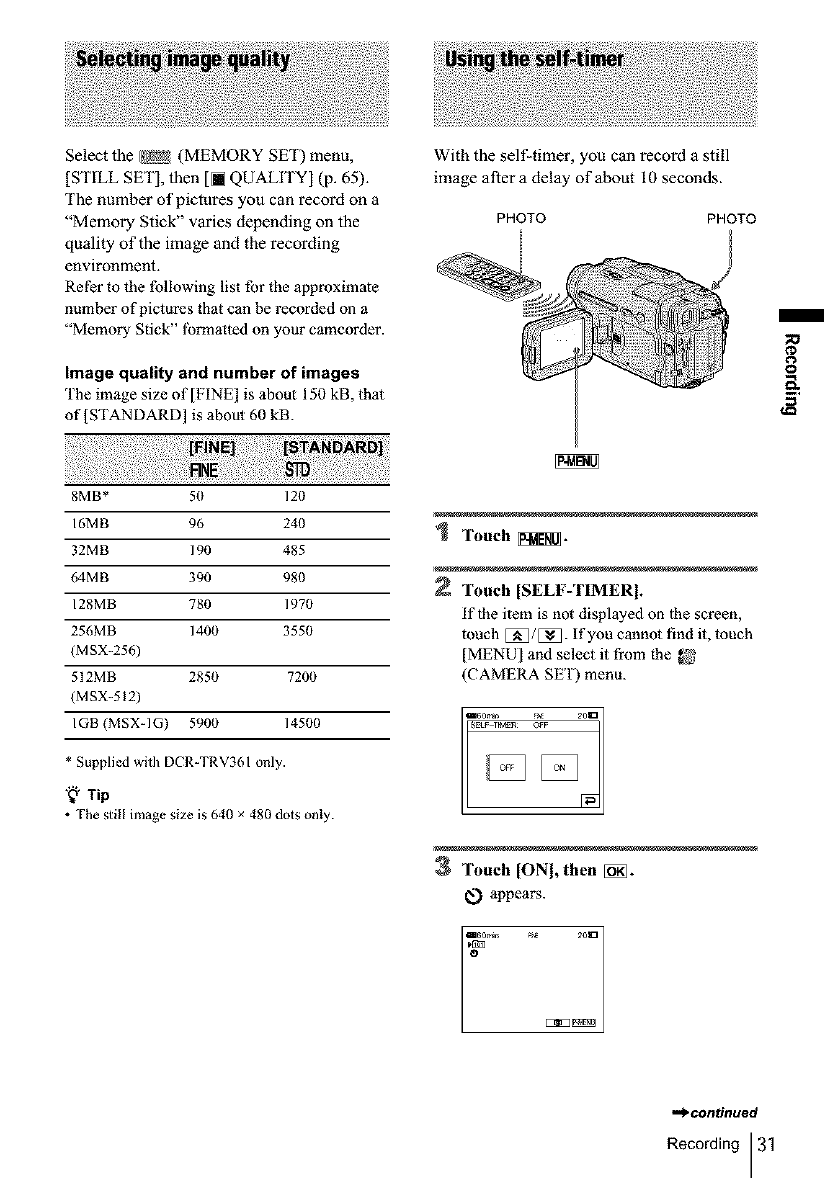
With the self-timer, you can record a still
image after a delay of about 10 seconds.
PHOTO PHOTO
Touch _.
Toech [SELF-TIMER I.
if lhe item is not displayed on lhe screen,
touch [[_]/[[_. If you cannot find it, touch
[MENU[ and select it from the
(CAMERA SE'I) menu.
3 Touch [ONI, thee [i_i]-
_.} appears.
t_
{'D
8
,,,_continued
Recording 31
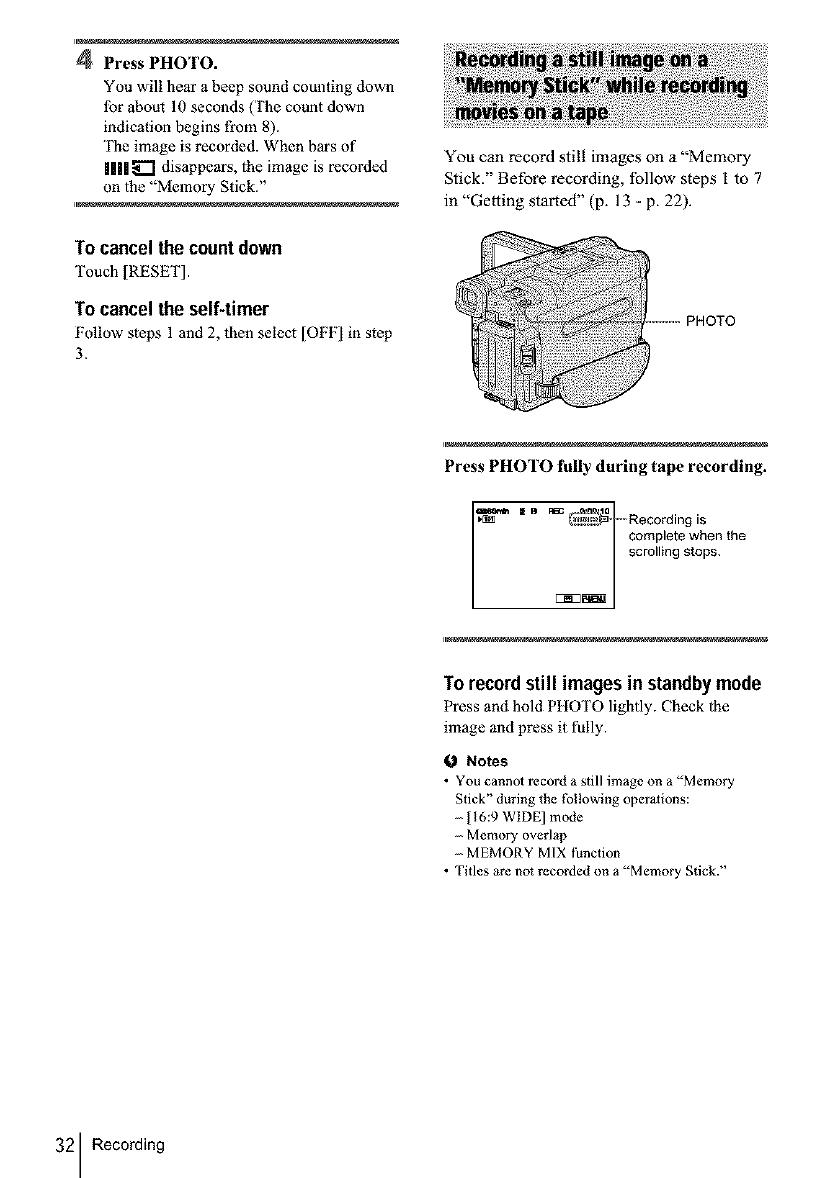
4Press PHOTO.
You will hear a beep sound counting down
lbr about 10 seconds (The count down
indication begins from 8).
The image is recorded. When bars of
ill| _ disappears, lhe image is recorded
on lhe "Memory Stick."
To cancelthe countdown
Touch [RESET].
To cancelthe self-timer
Follow steps 1 and 2, then select [OFF] in step
3.
You can record still images on a "Memory
Stick. Before record ng, follow steps I to 7
in "Getting started" (p. 13 - p. 22).
PHOTO
Press PHOTO fully during tape recording.
complete when the
scrolling stops.
To recordstill imagesin standbymode
Press and hold PHOTO lightly. Check lhe
image and press it fully.
f,_ Notes
• You cannol record a still image on a "Memory
Stick" during the tbllowing oper_lions:
- [16:9 WIDE] mode
Memory overlap
-MEMORY MIX function
• Titles are no_ recorded on a "Memory Stick."
32 Recording
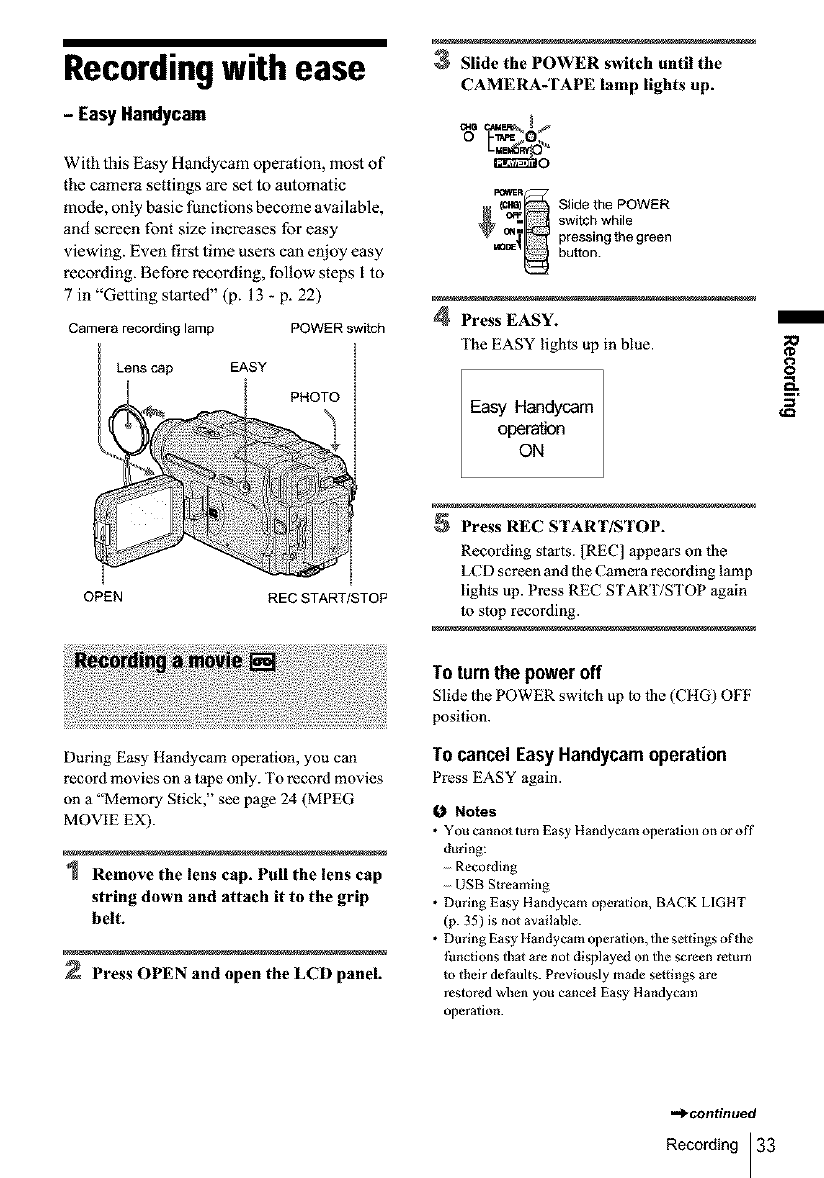
Recordingwith ease
- EasyHandycam
With this Easy Handycam operation, most of
the camera settings are set to automatic
mode, only basic functions become available,
and screen font size increases for easy
viewing. Even first time users can enjoy easy
recording. Before recording, follow steps I to
7 in "Getting started" (p. 13 - p. 22)
Camera recording lamp POWER switch
Lenscap EASY
i PHOTO
3Slide the POWER switch until the
CAMERA-TAPE lamp lights up.
(cm0 Slide the POWER
_ switch while
m_'_ pressingthe green
button.
4Press EASY.
The EASY lighls up in blue.
Easy Handy_m
o_m_n
ON
o
8
OPEN REC START/STOP
Press REC START/STOP.
Recording starts. [REC] appears on tbe
LCD screen and the Camera recording lamp
lights up. Press REC START/STOP again
to stop recording.
During Easy Handycam operation, you can
record movies on a tape only. To record movies
on a "Memory Stick," see page 24 (MPEG
MOVIE EX).
Remove the lens cap. Pull the lens cap
string down and attach it to the grip
belt.
Press OPEN and open the LCD panel.
Toturnthe poweroff
Slide the POWER switch up to tbe (CIIG) OFF
position.
Tocancel EasyHandycamoperation
Press EASY again.
0Notes
•You cannot turn Easy IFtandycam operation on or off"
during:
- Recording
- USB Streaming
• During Easy Handycam operation, BACK LIGIIT
(p. 35) is not available.
• During Easy Handycam operation, tlae settings of the
thncgons that are not displayed on the screen return
to their defaults. Previously made setlings are
restored when you cancel Easy 1]andycam
operation.
-d_continued
Recording 33
Remove the lens cap. Pull the lens cap
string down and attach it to the grip
belt.
Press OPEN and open the LCD panel.
3Slide the POWER switch repeatedly
until the CAMERA-MEMORY lamp
lights up.
(caE Slidethe POWER
switchwhile
pressingthe green
button.
4Press EASY.
The EASY lights up in blue.
Press and hold PHOTO lightly to
adjust focus, then press fully.
Ashutter sound is heard. When bars of
||l| _ disappear, the image is recorded on
the "Memory Stick."
To turn the power off
Slide the POWER switch up to the (CHG) OFF
position.
To cancel Easy Handycam operation
Press EASY again.
0Notes
•You cannot turn Easy [[andyc_m operagon on or off
during recording.
• During Easy Handycam operation, BACK LIGHT
(p. 35) is not available.
• During Easy 1]andycam operation, the sattings o f the
functions that ate not displayed on the screen teturn
lo their de_u]ts. Previous]y made settings ate
restored wben you cancel the Easy Handycam
operation.
Touch [MENU[.
The available menu items are displayed on
lhe screen.
Example: _nthe CAMERA-MEMORY mode
Touch the desired item.
Select the desired setting.
For [CLOCK SET]
1 Set [Y] (year) wilh E_/E_, then touch
[i_N-
2 Set [M 1 (month), [D] (day), hour and
mimttes in 1he same way as [Y] (year),
lhen much [_].
For [LANGUAGE]
Select lhe desired language with E_/E_,
then touch [_].
For [DEEP]
See page 81.
For [SELF-TIMER] (In the CAMERA-
MEMORY mode only)
"[kmch [ON], then [_]. Press PHOTO fully.
You will hear a beeT?sound counting down
for about I0 seconds. When the bars of
Ill| _ disappear, lhe image is recorded on
lhe "Memory Stick."
34 Recording
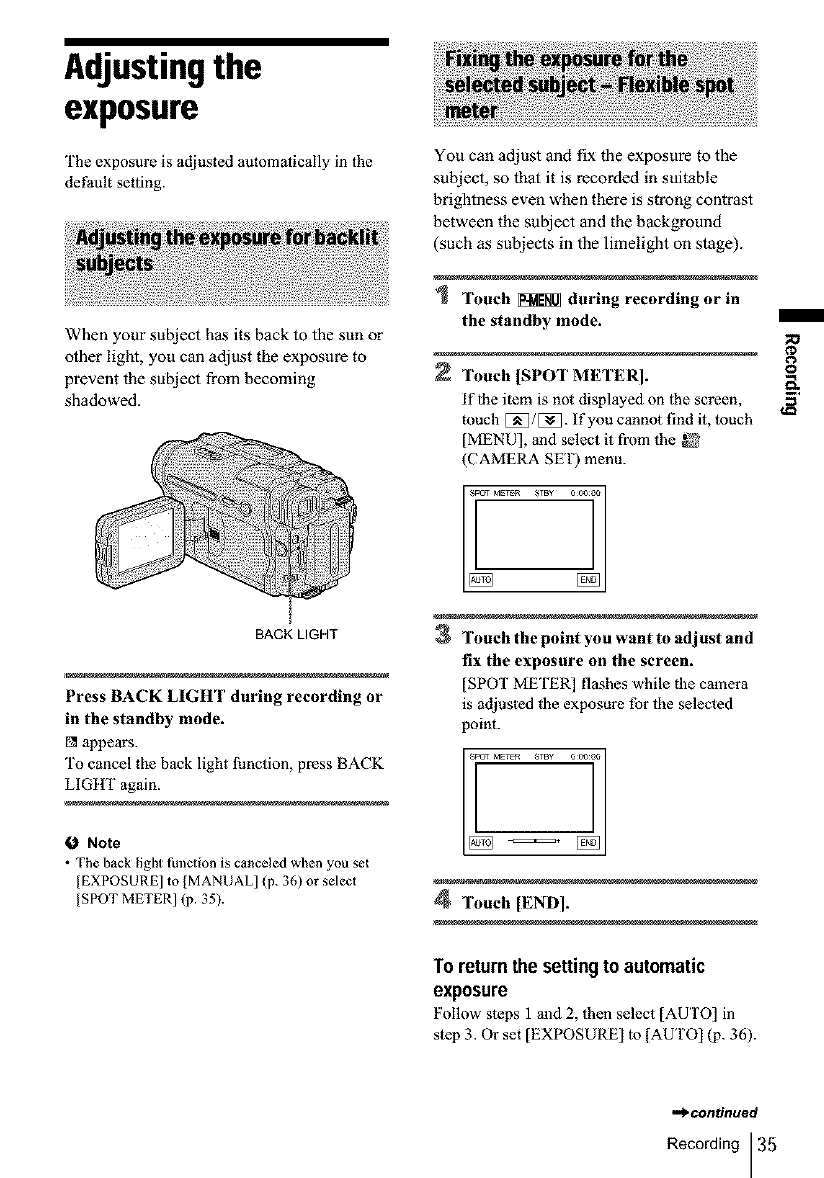
Adjustingthe
exposure
The exposure is adjusted automatically in the
default setting.
When your subject has its back to the sun or
other light, you can adjust the exposure to
prevent the subject from becoming
shadowed.
BACK LIGHT
Press BACK LIGHT during recording or
in the standby mode.
[] appears.
To cancel the back light lhnction, press BACK
LIGHT again.
ONote
• The back light function is canceled when you set
[EXPOSURE] to [MANUAL] (p. 36) or select
[SPOT METER] (p. 35).
You can adjust and fix the exposure to the
subject, so that it is recorded in suitable
brightness even when there is strong contrast
between the subject and the background
(such as subjects in the limelight on stage).
Touch _during recording or in
the standby mode. /
Touch [SPOT METER]. i,
if lhe item is not displayed on lhe screen, €,_
Rmch E_/E_. If you cannot find it, touch
[MENU], and select it from the
(CAMERA SET) menu.
3Touch the point you want to adjust and
fix the exposure on the screen.
[SPOT METER] flashes while the camera
is adjusted _l_eexposure for the selected
point.
4Touch [END].
To returnthe settingto automatic
exposure
Follow steps 1 and 2, then select [AUTO] in
step 3. Or set [EXPOSURE) 1o [AUTO) (p. 36).
,,_ntinued
Recording 35
Notes
•You canno_ use lhe Flexible spo_ meter together
with:
Color Slow Shutter function
....NightShol plus funclion
• If you sel [PROGRAM AE], [SPOT METER] is
automalically set to [AUTO].
"_" Tip
• If you set [SPOT METER], [EXPOSURE] is
automatically se_ to [MANUAL].
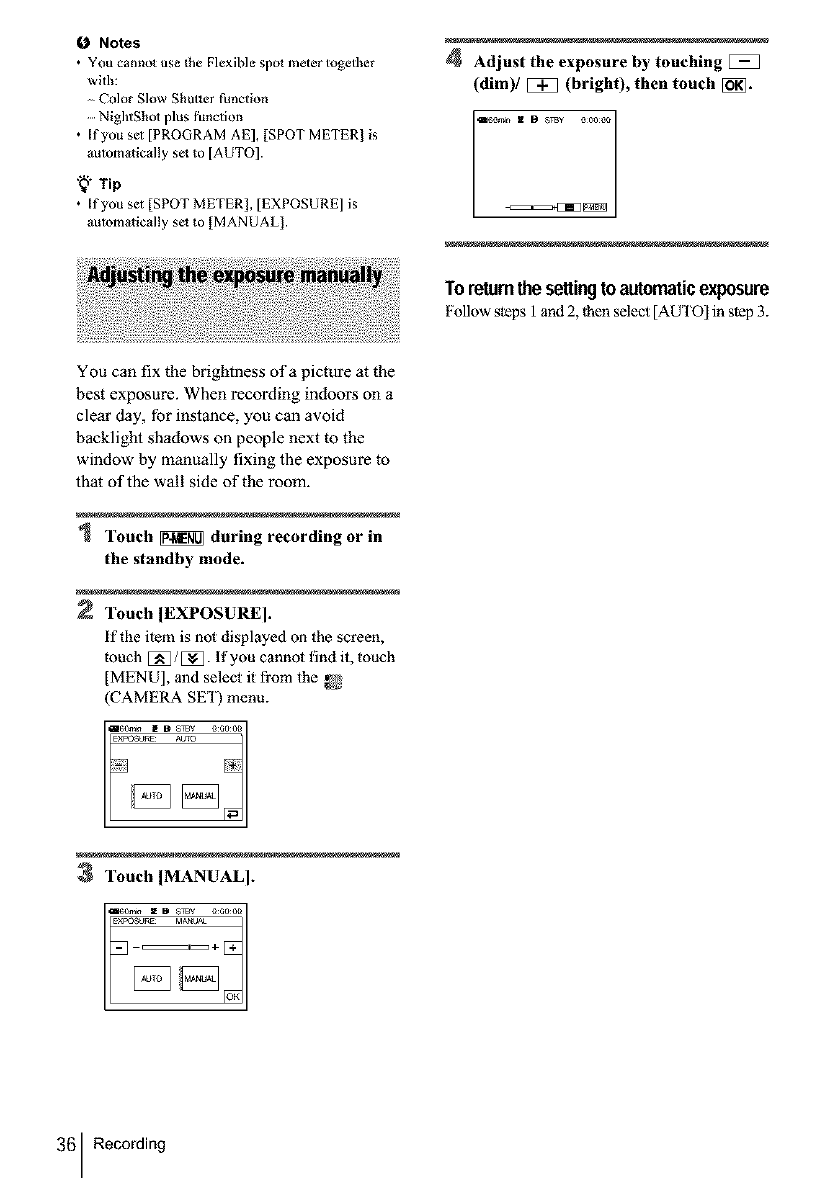
4Adjust the exposure by touching
(dim)/_ (bright), then touch [_.
Toreturnthesettingtoautomaticexposure
Follow steps I and 2, |hen select [AU i'O[in step 3.
You can fix the brightness of a picture at the
best exposure. When recording indoors on a
clear day, for instance, you can avoid
backlight shadows on people next to the
window by manually fixing the exposure to
that of the wall side of the room.
Touch _during recording or in
the standby mode.
Touch [EXPOSURE].
if the ilem is not displayed on the screen,
touch [_]/E_]. If you cannol find it, touch
[MENU], and select it from the
(CAMERA SET) menu.
3Touch [MANUAL I.
_o_, z @ stay oeooo
EXP0SORE MA_
--_l_÷
36 Recording
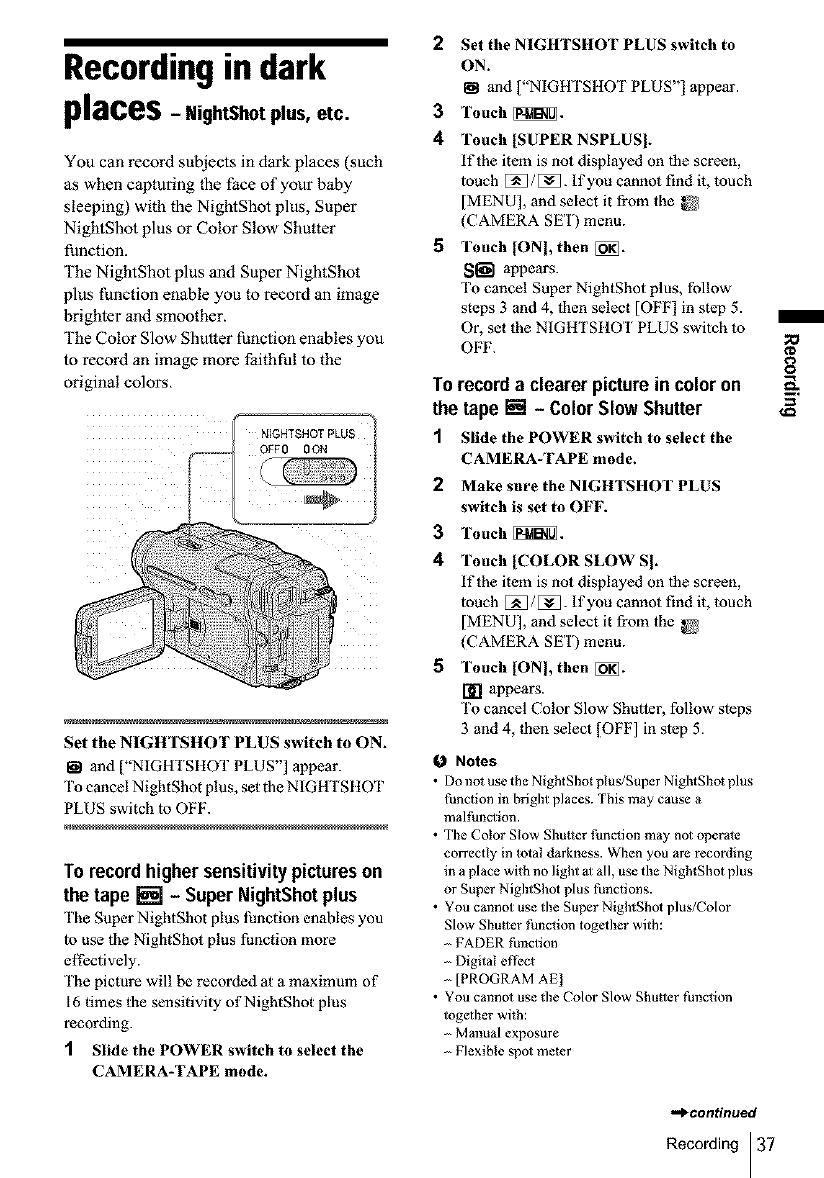
Recordingin dark
places -NightShot plus, etc.
You can record subjects in dark places (such
as when capturing the face of your baby
sleeping) with the NightShot plus, Super
NightShot plus or Color Slow Shutter
function.
The NightShot plus and Super NightShot
plus function enable you to record an image
brighter and smoother.
The Color Slow Shutter function enables you
to record an image more faithful to the
original colors.
Set the NIGHTSHOT PLUS switch to ON.
161 and ["NIGHI SttOT PLUS"] appear.
To cancel NightShot plus, set the NIGHI SttOT
PLUS switch m OFF.
To recordhighersensitivitypictureson
the tape [] -Super NightShot plus
The Super NightShot plus function enables you
|o use the N]ghtShot plus function more
effectively.
The picture will be recorded at a maximum of
16 times the sensitivity of NightShot plus
recording.
1Slide the POWER switch to select the
CAMERA-TAPE mode.
2Set the NIGHTSHOT PLUS switch to
ON.
I_1 and ["NIGHTSHOT PLUS"] appear.
3Touch _.
4 Touch ]SUPER NSPLUS].
If the item is not displayed on lhe screen,
louch [_/[_3. If you cannot find it, touch
[MENU], and select it from the _'
(CAMERA SET) menu.
5 Touch IONI, then [_.
Sl_-I appears.
To cancel Super N]ghtShot plus, follow
steps 3 and 4, then select [OH:] in step 5.
Or, set the NIGHTSHO'I PLUS switch to
OFF.
Torecorda clearer pictureincolor on
the tape [] - Color SlowShutter
1 Slide the POWER switch to select the
CAMERA-TAPE mode.
2 Make sure the NIGHTSHOT PLUS
switch is set to OFF.
3Touch _.
4 Touch ]COLOR SLOW SI.
If the item is not displayed on |he screen,
|ouch [_/[_3. If you cannot find it, touch
]MENU], and select it from the _[
(CAMERA SE'I) menu.
5 Touch IONI, then [_.
[] appears.
To cancel Color Slow Shutter, follow sleps
3 and 4, lhen select [OFF] in slep 5.
0Notes
•Do not use the Night Shot plus/Super Night Shot plus
function in bright places. This may cause a
malthnction.
• The Color Slow Shutter fhnction may not operate
correctly in Iotal darkness. When you are recording
in a place with no light al all, use the NightShot plus
or Super NightShot plus functions.
• You cmmot use the Super NighlShol plus/Color
Slow Shutter function togelher with:
FADER tlmction
Digital effi:ct
[PROGRAM AE[
• You cannol use dze Color Slow Shutter function
togelher with:
Manual exposure
Flexible spot me_er
.,._continued
Recording 37
/
;o
¢D
• When using the Super NightShot plus or Color Slow
Shutter function, the shutter speed of your
camcorder changes depending on the brightness.
The motion of the picture may slow down al this
time.
• Adjust lhe focus manually when it is hard to focus
automatically.
• Do not cover the infrared port with your fingers or
other objects. Remove the conversion lens (optional)
if it is altached.
• Depending on tile shooting conditions or
circumstances, colors may not be reproduced
properly.
"_" Tip
• If you record subjects in complete darkness, setting
[NS LIGHT] to [ON] on the menu is recommended.
The maximum shooting distance using lhe
NightShoi Light is about 3 m (10 |_et).
(The del:a ult selling is [ON])
If you record subjects in d_rk places (such as night
scene or in moonlight), set [NS LIGIIT] to [OFF l on
the menu. You can make image color deeper (p. 62).
38 Recording
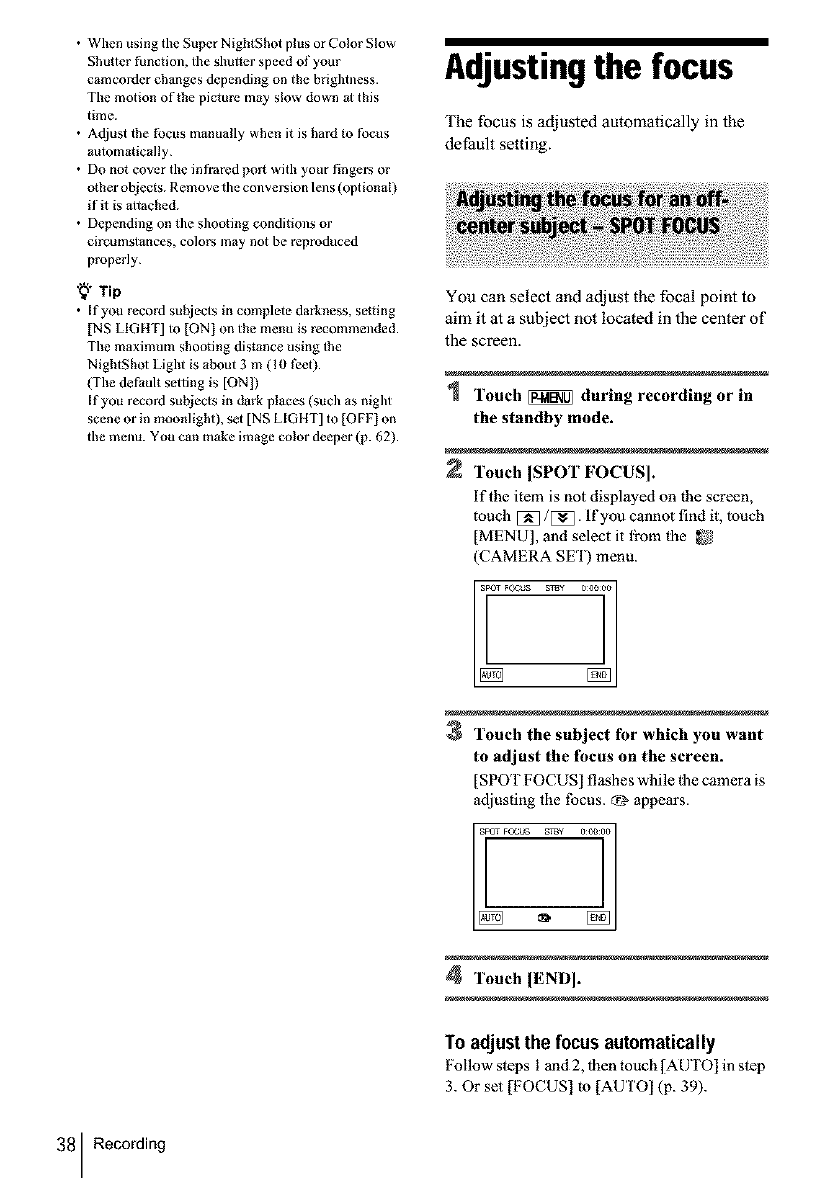
Adjustingthe focus
The focus is adjusted automatically in the
detSult setting.
You can select and adjust the focal point to
aim it at a subject not located in the center of
the screen.
Touch _ during recording or in
the standby mode.
Touch [SPOT FOCUS].
if the item is not displayed on the screen,
touch [_/[_]. If you cannot find it, touch
[MENU], and select it from fl_e _2
(CAMERA SE'I) menu.
3Touch the subject for which you want
to adjust the focus on the screen.
[SPOT FOCUS] flashes while |he camera is
adjusting the tbcus. _? appears.
4Touch lEND].
To adjustthe focusautomatically
Follow steps 1 and 2, ]hen touch [AUTO] in step
3. Or set [FOCUS] to [AUTO] (p. 39).
0 Note
• You cannot use the SPOT FOCUS thnction together
with [PROGRAM AE[.
"_" Tip
• If you set [SPOT FOCUS!, [FOCUS] is
automalical[y set to [MANUAL].
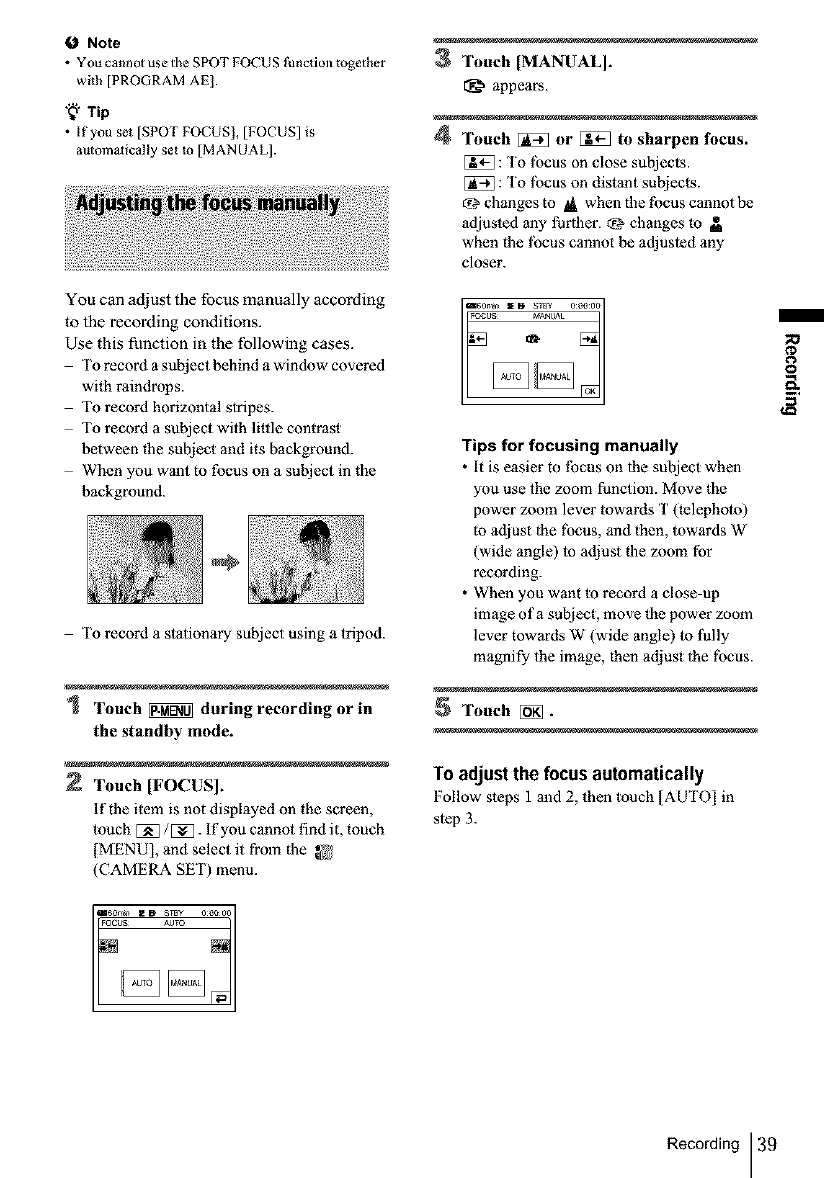
You can adjust the focus manually according
to the recording conditions.
Use this function in the following cases.
To record a subject behind a window covered
with raindrops.
To record horizontal stripes.
To record a subject with little contrast
between the subject and its background.
When you want to focus on a subject in the
background.
To record a stationary subject using a tripod.
1 Touch _ during recording or in
the standby mode.
2 Touch [FOCUS].
If the item is not displayed on the screen,
touch [_/[_. If you cannot find it, touch
[MENU], and select it from the
(CAMERA SET) menu.
3Touch [MANUAL].
appears.
4Touch [_ or [i_ to sharpen focus.
: To lbcus on close subjects.
: To lbcus on distant subjects.
_? changes to lit when the focus cannot be
adjusted any lhrther. _ changes to
when the locus cannot be adjusled any
closer.
Tips for focusing manually
•it is easier m focus on lhe subject when
you use the zoom function. Move the
power zoom lever towards T(telephoto)
to adjust lhe tbcus, and then, towards W
(wide angle) to adjust file zoom for
recording.
• When you want to record a close-up
image of a subject, move the power zoom
lever towards W [wide angle) to fully
magnify the image, then adjust 1he tbcus.
Touch [_.
To adjustthe focusautomatically
Follow steps 1 and 2, then touch [AUTO] in
step 3.
¢D
8
,B
Recording 39
Recordinga picture
usingvariouseffects
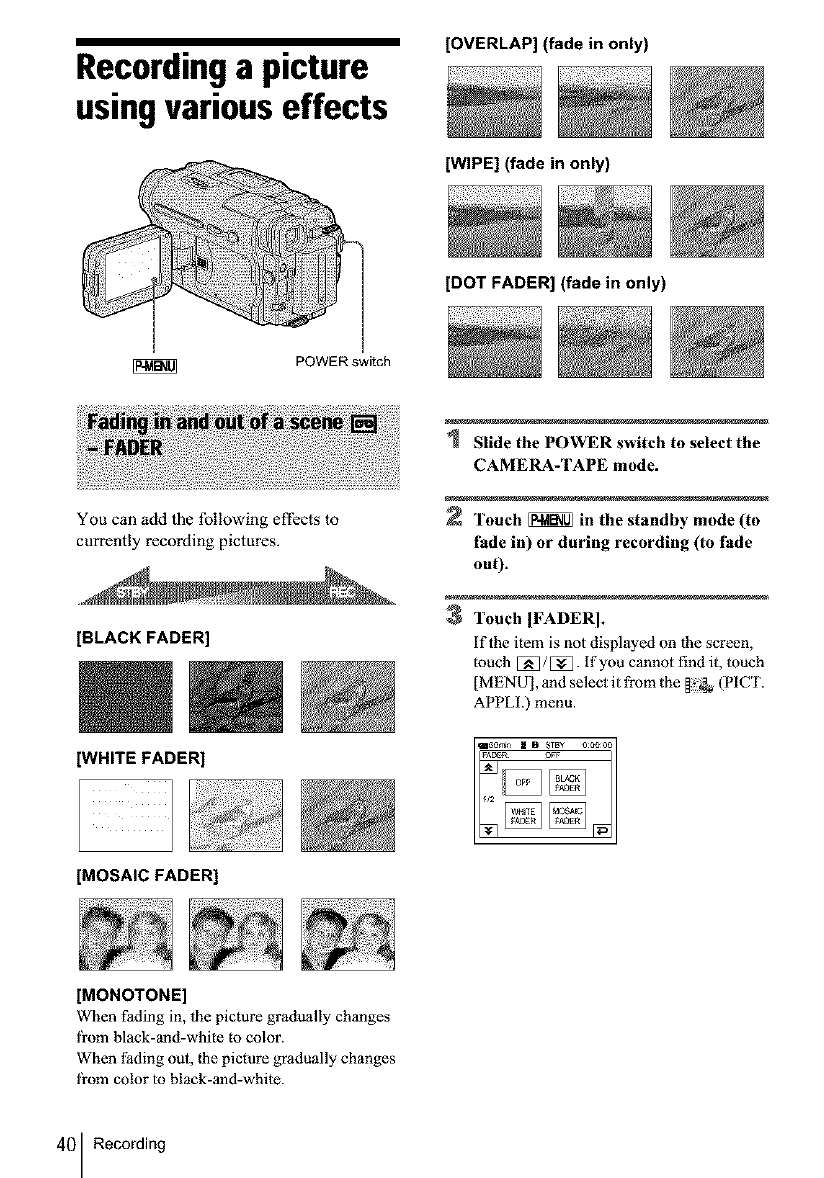
[OVERLAP] (fade in only)
[WIPE] (fade in only)
[DOT FADER] (fade in only)
POWER switch
You can add the following effects to
currently recording pictures.
[BLACK FADER]
Slide the POWER switch to select the
CAMERA-TAPE mode.
Touch _ in the standby mode (to
fade in) or during recording (to fade
out).
3Touch [FADER].
if the item is not displayed on the screen,
touch [_]/[_]. If you cannot find it, much
[MENU], and select it from the _ _ (PICT.
APPLI.) menu.
WHITE FADER]
@
[MOSAIC FADER]
[MONOTONE]
When fading in, the picture gradually changes
fi'om black-and-white m color.
When fading out, |he picture gradually changes
fi'om color m black-and-white.
40 Recording
4 Touch the desired effect, then touch
When you touch (OVERLAP], (WIPE] and
(DOT FADER], 1he image on |he tape in
your camcorder is slored as a still image.
(While storing the image, 1he screen turns 1o
blue.)
1 6°w_ 1
D s_¥ ooo00
Press REC START/STOP.
The fader indicator stops flashing and
disappears when the l_tde is complete.
Tocancelthe operation
Follow steps 2 and 3, |hen touch [OFF] in step 4.
O Notes
• For DCR-TRV460:
The OVERLAP, WIPE and DOT FADER funoions
do not work with t_pes recorded on other devices in
the Hi8 [o||li/st_nd_rd 8 mm [] system.
• The title does not lade in or fade out. Erase it before
operating the FADER function if it is not needed.
• You cannot use the FADER ftlnction together wit]l:
Super NightShot plus function
Color Slow Shutter function
Digital effect
-(INTERVAL REC] (Interval recording)
-(FRAME REC( (Frame recording)
Serf-timer
Fading infrom still imageonthe
"Memory Stick"- Memory overlap
You can fade in from the still image on the
"Memory Stick" to the movie currently being
recorded on the tape.
Still image Movie
2Slide the POWER switch to select the
CAMERA-TAPE mode.
3Touch _.
4 Touch [MENUI.
5 Select _(PICT. APPLI.), then
(_:] OVERLAP] by touching [:_]/E_]
and touch [_.
The recorded image appears on die
thumbnail screen.
6Touch _ (previous)/[:i] (next) to
select the still image to be superimposed.
7 Touch (ON], then [_.
8Touch E_.
9 Press REC STAR'IYSTOP to start
recording.
[M. OVRLAP] stops flashing, and
disappears when lhding is finished.
You can add digital ell?cts to the recordings.
(STILL]
You can record a movie while superimposing it
on a previously recorded still image.
(FLASH] (flash motion)
You can record a movie with a serial-still-image
effect (slrobe effect).
[LUMI. KEY] (luminance key)
You can replace a brighter area in a previously
recorded still image, such as lhe background of
a person or a title written on white paper, with a
movie.
8
Check that you have a"Memory Stick"
with the still image to be superimposed
and a tape in your camcorder.
.._continued
Recording 41
(TRAIL]
You can record a picture so that an incidental
image like a trail is left.
(SLOW SHUTTR] (slow shutter]
You can slow down the shutter speed. This
mode is suitable for shooting a subject more
clearly in a dark place.
(OLD MOVIE]
You can add an old movie-type atmosphere to
piclures. Your camcorder automatically records
pictures in the letlerbox mode tbr all screen size,
sepia in color, and at a slower shutter speed.
Slide the POWER switch to select the
CAMERA-TAPE mode.
Touch _.
3Touch ID.EFFECTb
if the ilem is not displayed on the screen,
touch [_/E_[_- If you cannot find it, touch
[MENU], and select it from lhe _ (PICT.
APPLh) menu.
4Touch the desired effect, then adjust
the effect by touching _(decrease) /
(increase) and touch [_}_.
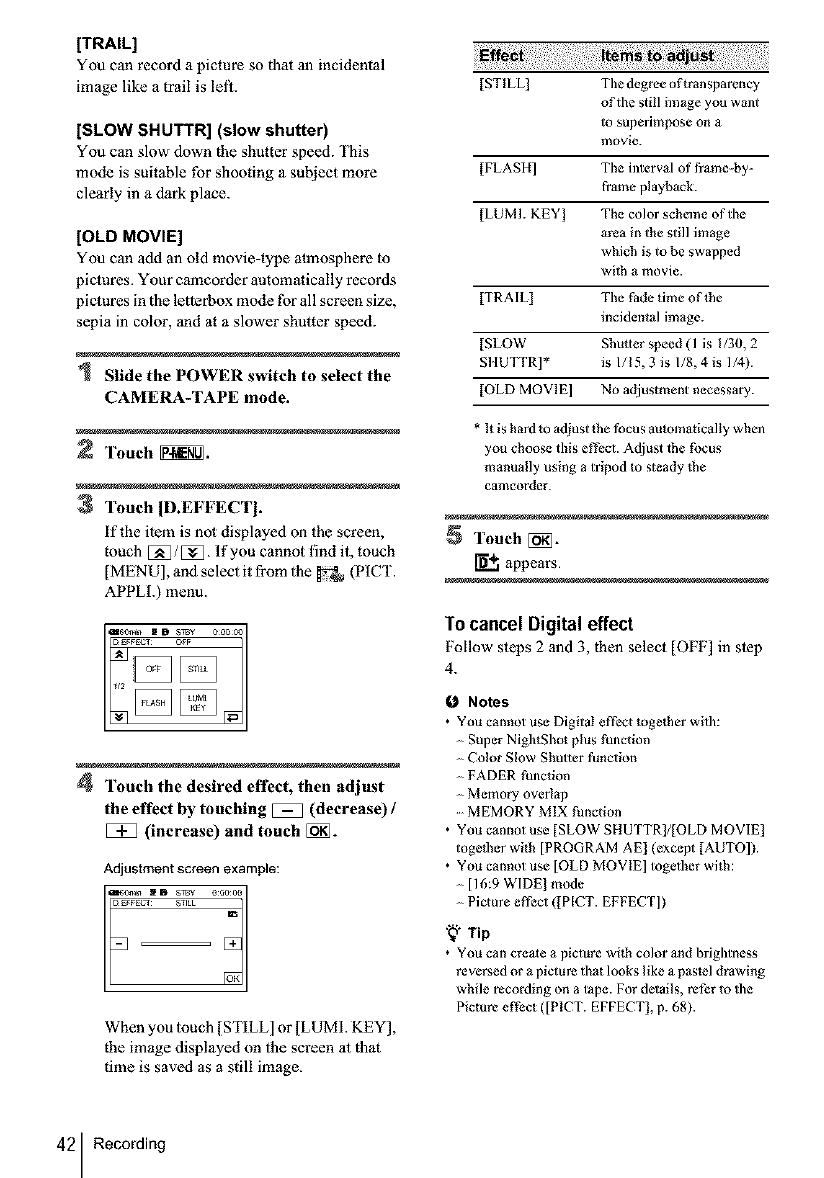
Adjustment screen example:
When you touch [STILL] or [LUMI. KEY],
the image displayed on the screen at that
time is saved as a still image.
[STILL] The degree oft ran sparency
of the still image you want
to superimpose on a
movie.
[FLASH] The interval of t?ame-by-
frame playback.
[LUMI. KEY[ The color scheme of the
area in the still image
which is to be swapped
wilh a movie.
[TRA[L] The Fade time of the
incidental image.
[SLOW Shutter speed (1 is 1/30, 2
S1tUTTR]* is I/I 5, 3 is I/8, 4 is 1/4).
[OLD MOVIE] No adjustment necessary.
* It is hard to adjust _he focus automatically when
you choose this effect. Adjust lhe focus
manually using a tripod to s_eady the
camcorder.
Touch [_}_].
_+. appears.
Tocancel Digital effect
Follow steps 2 and 3, then select [OF'F] in step
4.
0Notes
•You cannot use Digital effect together with:
Super Nightghot plus function
Color Slow Shutter function
FADER function
Memory overlap
MEMORY MIX function
• You cannot use [SLOW SHUTTR[/[OLD MOVIE]
togetber wich [PROGRAM AE[ (except [AUTO]).
•You cannot use [OLD MOVIE] together with:
- [16:9 WIDE) mode
- Picture eft-eel ([PICT. EFFECT])
,'_i. Tip
• You can creale a picture with color and brightness
reversed or a picture that looks like a pastel drawing
while recording on a tape. For details, refer to the
Picture effect ([PICT. EFFECT], p. 68).
42 Recording
You can superimpose a still image you have
recorded on a "Memory Stick" over the
movie you are currently recording on a tape.
You can then record the superimposed
pictures on a tape or a"Memory Stick." (You
cannot superimpose a still image on a tape
which you have already finished recording.)
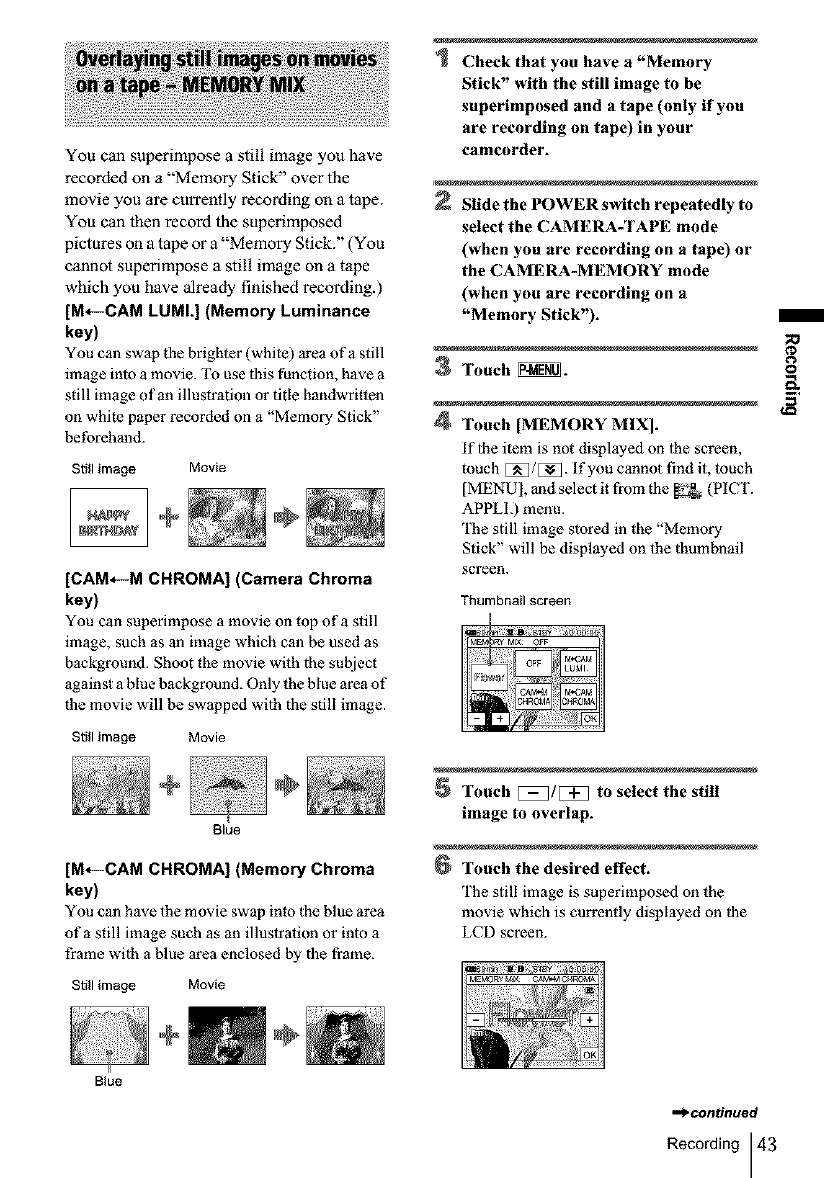
[M*--CAM LUML] (Memory Luminance
key)
You can swap the brighter (white) area of a still
image into a movie. To use this function, have a
still image of an illustration or title handwritten
on white paper recorded on a "Memory Stick"
beforehand.
Still image Movie
[CAM,--M CHROMA] (Camera Chroma
key)
You can superimpose a movie on top of a still
image, such as an image which can be used as
background. Shoot the movie with the subject
against a blue background. Only the blue area of
the movie will be swapped wilh the still image.
Still image Movie
Blue
[M*--CAM CHROMA] (Memory Chroma
key)
You can have the movie swap into the blue area
of a still image such as an illuslration or into a
frame with a blue area enclosed by the flame.
Still image Movie
Check that you have a "Memory
Stick" with the still image to be
superimposed and a tape (only if you
are recording on tape) in your
camcorder.
Slide the POWER switch repeatedly to
select the CAMERA-TAPE mode
(when you are recording on a tape) or
the CAMERA-MEMORY mode
(when you are recording on a
"Memory Stick").
3Touch _.
4Touch [MEMORY MIX].
if lhe item is not displayed on 1he screen,
touch E_/E_- If you cannot llnd it, touch
[MENU], and select it from the _ (P1CT.
APPLI.) menu.
The still image stored in the "Memory
Stick" will be displayed on the thumbnail
screen.
Thumbnail screen
Touch [_]/[:_] to select the still
image to overlap.
Touch the desired effect.
The still image is superimposed on the
movie which is currently displayed on file
LCD screen.
Blue
,.,)'centinued
Recording 43
7Touch _(decrease)/Eq_ (increase)
to adjust the following.
For [M*--CAM LUML]
The color scheme of file bright area in the
still image which is to be swapped into a
movie. When you want lo record only the
still image stored on the "Memory Stick" to
a tape, touch _ on lhe screen in
[M4--CAM LUM[.] until the bar indicalor
is extended fully to the right side.
For [CAM*--M CHROMA]
The color scheme of|he blue area in |he
movie.
For [M-_-CAM CHROMA]
The color scheme of the blue area in 1he still
image which is to be sw3pped inlo a movie.
8Touch [_ twice.
appears.
Start recording.
When you are recording on a tape
Press REC START/STOP.
When you are recording on a
"Memory Stick"
Press PHOTO fully.
To cancel MEMORY MIX
Follow steps 1to 4, then touch [OFF] in step 5.
0Notes
•When tile overlapping still image has a large amount
of white, the image in the thumbnail screen may no_
be clear.
• When you use the MEMORY MIX function in the
mirror mode (p. 28), the picture on the LCD screen
appears normally, without being mirror-reversed.
• You m_y not be able to play back pictures modified
on your computer or recorded with other eamcorders
on your camcorder.
"_" Tip
• The supplied SPVD-012 USB Driver CD-ROM
contains sample images for use in MEMORY MIX
operations. Refer to the supplied "Computer
Applications Guide" |br delails.
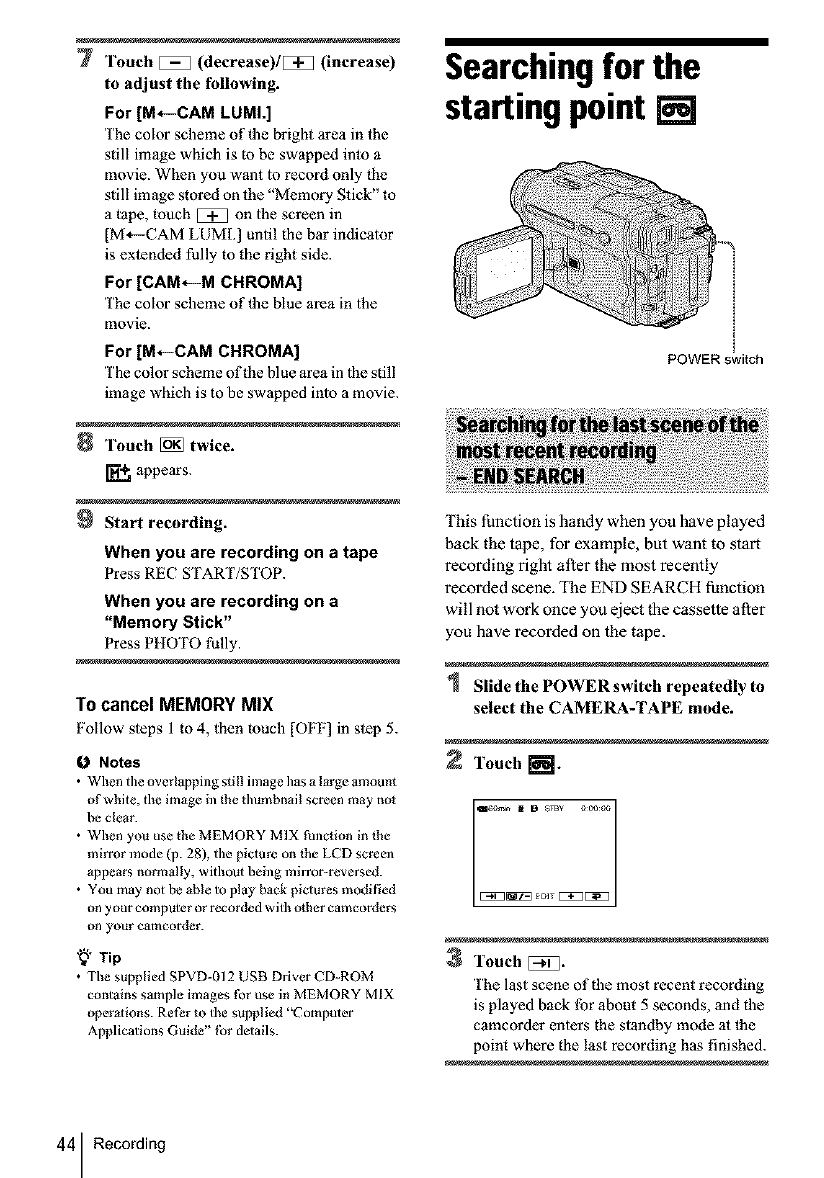
Searchingfor the
starting point []
[
[
POWER switch
This function is handy when you have played
back the tape, for example, but want to stal_
recording right after the most recently
recorded scene. The END SEARCH function
will not work once you eject the cassette after
you have recorded on the tape.
Slide the POWER switch repeatedly to
select the CAMERA-TAPE mode.
Touch r-'@m.
Touch [_D.
The last scene of the most recent recording
is played back for about 5 seconds, and the
camcorder enters the standby mode at the
point where the last recording has finished.
44 Recording

Tocancelthe operation
Touch [CANCEL].
0 Notes
• The END SEARCH function will not work correctly
when there is a blank section between recorded
sections on the tape.
• For DCR-TRV460:
The END SEARCH function does not work for the
tapes recorded on other devices in the Hi8 H|m/
standard 8 mm [] system.
"_" Tip
• You can do this operation also by selecting [END
SEARCH] in the menu setting. When PLAY/EDIT
mode is selected, you can do this operation by
selecting [END SEARCIt I short-cut on _.
(p. 59)
You can search for the start point while
viewing the pictures on the screen. The sound
is not played back during the search.
Slide the POWER switch to select the
CAMERA-TAPE mode.
2 Touch I_.
You can view a few seconds of the scene
recorded just before you stopped the tape.
Slide the POWER switch repeatedly to
select the CAMERA-TAPE mode.
Touch _.
3Touch _once.
The last f_w seconds of the most recently
recorded scene are played back. Then, your
camcorder is set to 1be standby mode.
1_ Note
• For DCR-TRV460:
The Rec review function does not work for the tapes
recorded on other devices in the Iti8 H|[]/slandard
8 mm [] system.
8
Keep touching _ (to go
backward)/[_] (to go forward) and
release it at the point where you want
the recording to start.
O Note
•For DCR-TRV460:
The EDIT SEARCH function does not work for the
tapes recorded on other devices in the Hi8 I,II[]/
standard 8 mm [] system.
Recording 45
Playback
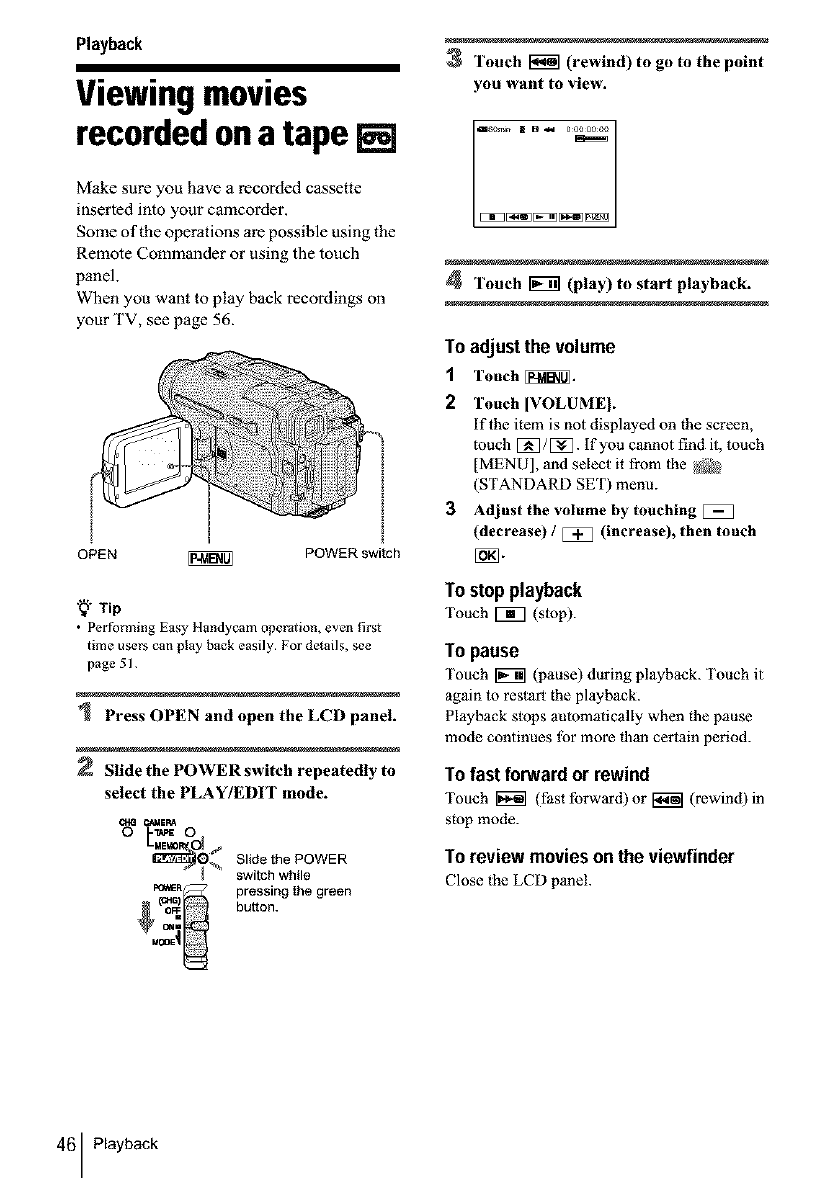
Viewingmovies
recordedonatape[]
Make sure you have a recorded cassette
inserted into your camcorder.
Some of the operations are possible using the
Remote Commander or using the touch
panel.
When you want to p'tay back recordings on
your TV, see page 56.
I
OPEN _ POWER switch
_Tip
• Performing EasyHandycamoperadon, even first
time users ean play back easily. For details, see
page 51.
Press OPEN and open the LCD panel.
Slide the POWER switch repeatedly to
select the PLAY/EDIT mode.
Slide the POWER
switch while
(_ pressing the green
= buttoN.
C¢41
3Touch [_ (rewind) to go to the point
you want to view.
4Touch _(play) to start playback.
Te adjustthe volume
1Touch _.
2Touch [VOLUMEI.
if the item is not displayed on the screen,
touch _/_. If you carmot find it, touch
[MENU], and select it from the _
(STANDARD SET) menu.
3Adjust the volume by touching [_
(decrease) /[_ (increase), then touch
Te step playback
Touch _ (stop).
To pause
Touch _ (pause) during playback. Touch it
again 1o restart the playback.
Playback stops automatically when the pause
mode continues tbr more flaan certain period.
Te fast forward er rewind
Touch 1_7 (fast forward) or _ (rewind) in
stop mode.
Te review movies en the viewfinder
Close the LCD panel.
46 Playback
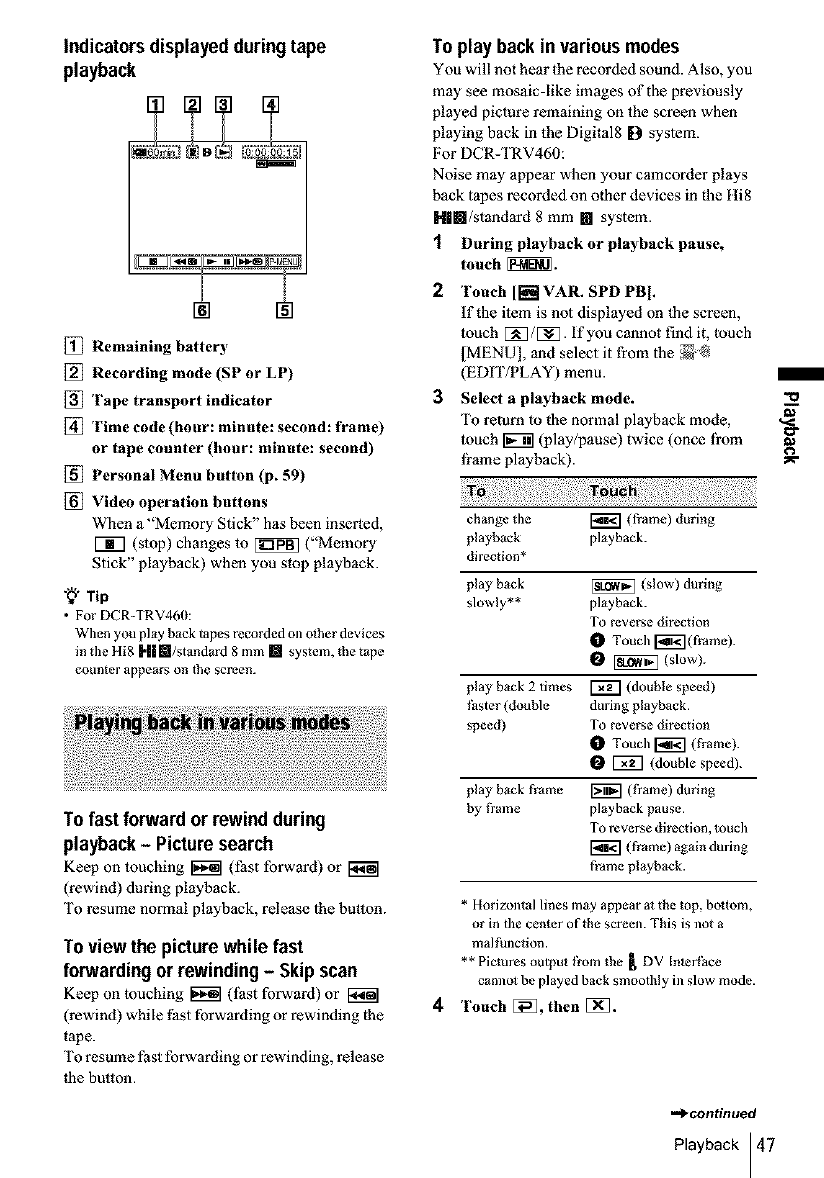
Indicatorsdisplayedduringtape
playback
[] Remaining battery
[] Recording mode (SP or LP)
[] Tape transport indicator
[] Time code (hour: minute: second: frame)
or tape counter (hour: minute: second)
[] Personal Menu button (p. 59)
[] Video operation buttons
When a _'Memory Stick" has been inserted,
V_] (stop) changes m _ ("Memory
Stick" playback) when you stop playback.
Tip
• For DCR-TRV46(h
When you play back tapes recorded onother devices
in tile Hi8 ["||Ira/standard 8 mm [] system, the t_pe
counter appears on 1hescreen.
To fast forward or rewindduring
playback- Picturesearch
Keep on touching _ (fast forward) or
(rewind) during playback.
To resume normal playback, release the button.
Toview the picturewhile fast
forwarding orrewinding- Skipscan
Keep on touching _ (lhst forward) or [_
(rewind) while last forwarding or rewinding the
tape.
To resume fast forwarding or rewinding, release
lhe button.
Toplay back invariousmodes
You will not hear the recorded sound. Also, you
may see mosaic-like images of the previously
played picture remaining on the screen when
playing back in the Digital8 [9 syslem.
For DCR-TRV460:
Noise may appear when your ca•corder plays
back tapes recorded on olher devices in the tti8
Hlm/stas_dard 8 mm [] system.
1 During playbackor playback pause,
touch _.
2 Touch [[i_! VAR. SPD PB I.
iftbe item is not displayed on lhe screen,
touch [:N]/[:_. If you cannot find it, touch
[MENU], and select it from lhe _-@
(EDIT/PLAY) menu.
3Select a playback mode.
To return to the normal playback mode,
touch _ (play/pause) twice (once fi'om
li'ame playback).
change the _ (frame) during
playback playback.
direction*
play back [_ (slow) during
slowly** playback.
To reverse direction
OTouch I_i_](frame).
O_ (slow).
play back 2 times I_ (double speed)
faster (double during playback.
speed) To reverse direction
I_ Touch I_ (frame).
I_ I_ (double speed).
play back frame _ (tYalne) during
by tYame playback pause.
To reverse direction, touch
(frame) again during
frame playback.
* Horizontal lines may appear at the top, bottom,
or in the center of the screen. This is ]lot a
malfunction.
** Pictures output from the [ DV [nlerPace
cannol be played back smoothly ill slow mode.
4Touch []_, then [:N].
=d_continued
Playback 47
/
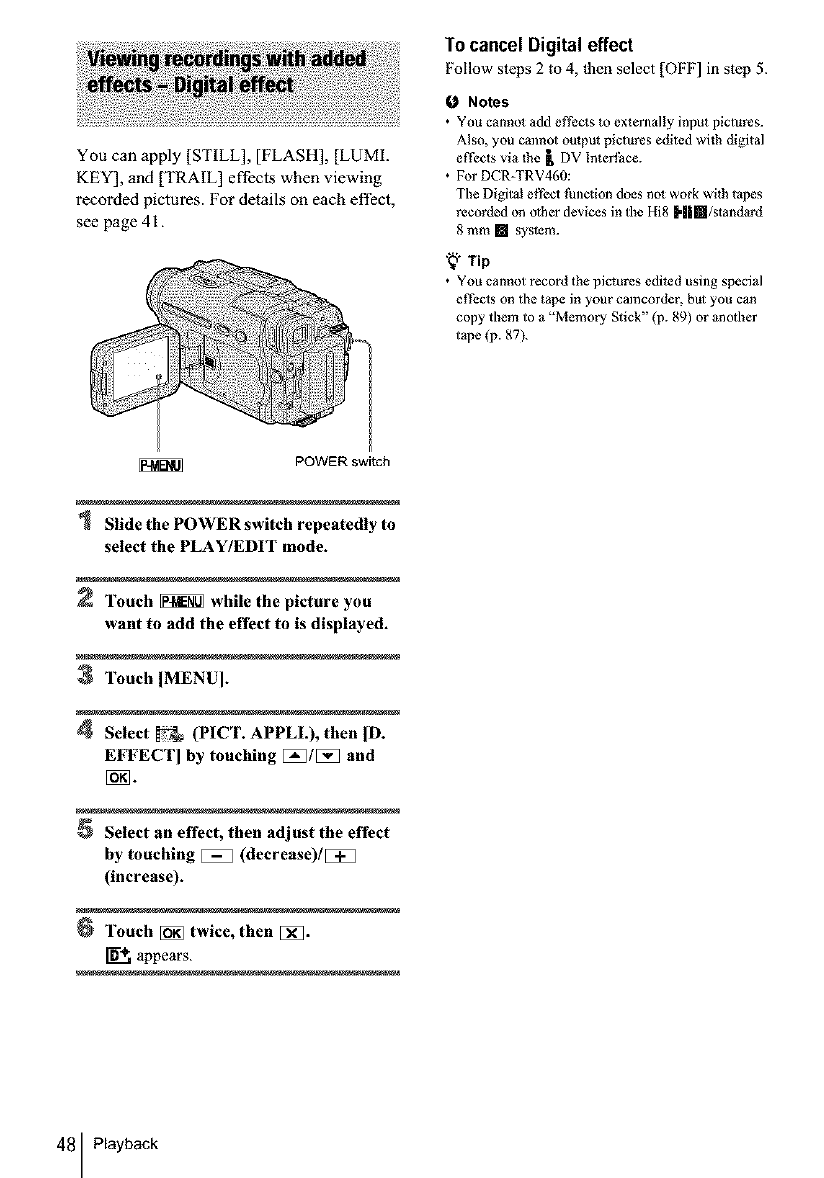
You can apply [STILL], [FLASH], [LUMI.
KEY], and [TRAIL] effects when viewing
recorded pictures. For details on each effect,
see page 4 I.
Tocancel Digital effect
Follow steps 2 to 4, |hen select [OFF] in step 5.
0 Notes
•You canno_ add ef_ects to externally input pictures.
Also, you cannot output pictures edited wilh digital
effects via lhe _, DV InterPaee.
• For DCR-TRV460:
The Digital etPcc_ thnction does no_ work wilh tapes
recorded on olher devices in the I[i8 H|m/standad
8 mm [] system.
"_" Tip
• YOU cannot record the pictures edited using special
effecls on the tape in your camcorder, but you can
copy them to a "Memory Stick" (p. 89) or another
t_pe (p. 87).
POWER switch
Slide the POWER switch repeatedly to
select the PLAY/EDIT mode.
Touch _ while the picture you
want to add the effect to is displayed.
3Touch IMENU].
Select _(PICT. APPLI.), then ID.
EFFECI'] by touching [_]/[5_] and
Select an effect, then adjust the effect
by touching _(decrease)/[_]
(increase).
Touch [_ twice, then []_].
appears.
48 Playback
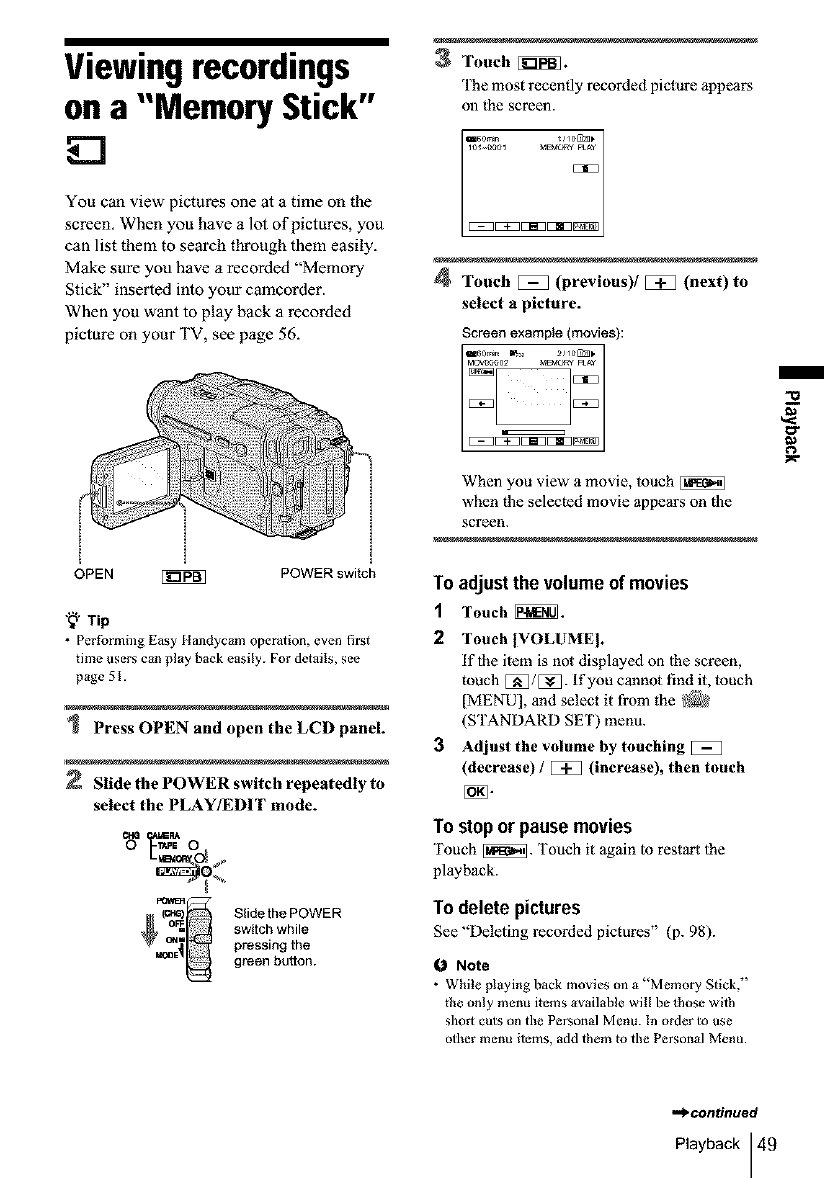
Viewingrecordings
ona "'MemoryStick"
You can view pictures one at a time on the
screen. When you have a lot of pictures, you
can list them to search through them easily.
Make sure you have a recorded "Memory
Stick" inserted into your camcorder.
When you want to play back a recorded
picture on your TV, see page 56.
OPEN [i_NN
I
I
POWER switch
"_ Tip
•Performing Easy I[tandycam operation, even first
time users can play back easily. For details, see
page 5 I.
Press OPEN and open the LCD panel.
Slide the POWER switch repeatedly to
select the PLAY/EDIT mode.
(o_ Slidethe POWER
switch while
pressing the
green button.
3Touch [_.
'fhe most recently recorded picture appears
on the screen.
160rrm _/IO&Np
[:E:] _[51[315113 _
4Touch E_] (previous)/E_] (next) to
select u picture.
Screen example (movies):
_60rr_ _ 211rt[_]_
MOVOO602 _MOT_ pLAy
[:E:] _[511:][5113 _
When you view a movie, touch
when the selected movie appears on the
screen.
To adjust the volume of movies
1Touch _.
2 Touch |VOLUME I.
if lhe item is not displayed on 1he screen,
touch [:_]/[:_]. If you cannot find it, touch
[MENU], and select it from the _2
(STANDARD SET) menu.
3Adjust the volume by touching
(decrease) /_(increase), then touch
To stopor pausemovies
Touch [_. Touch it again to restart 1he
playback.
To delete pictures
See "Deleting recorded pictures" (p. 98).
ONote
•While pl_ying back movies on a "Memory Stick,"
the only menu items available will be _hose with
short cuts on the Personal Menu. In order to use
other menu items, add them to the Personal Menu.
,,._continued
Playback 49
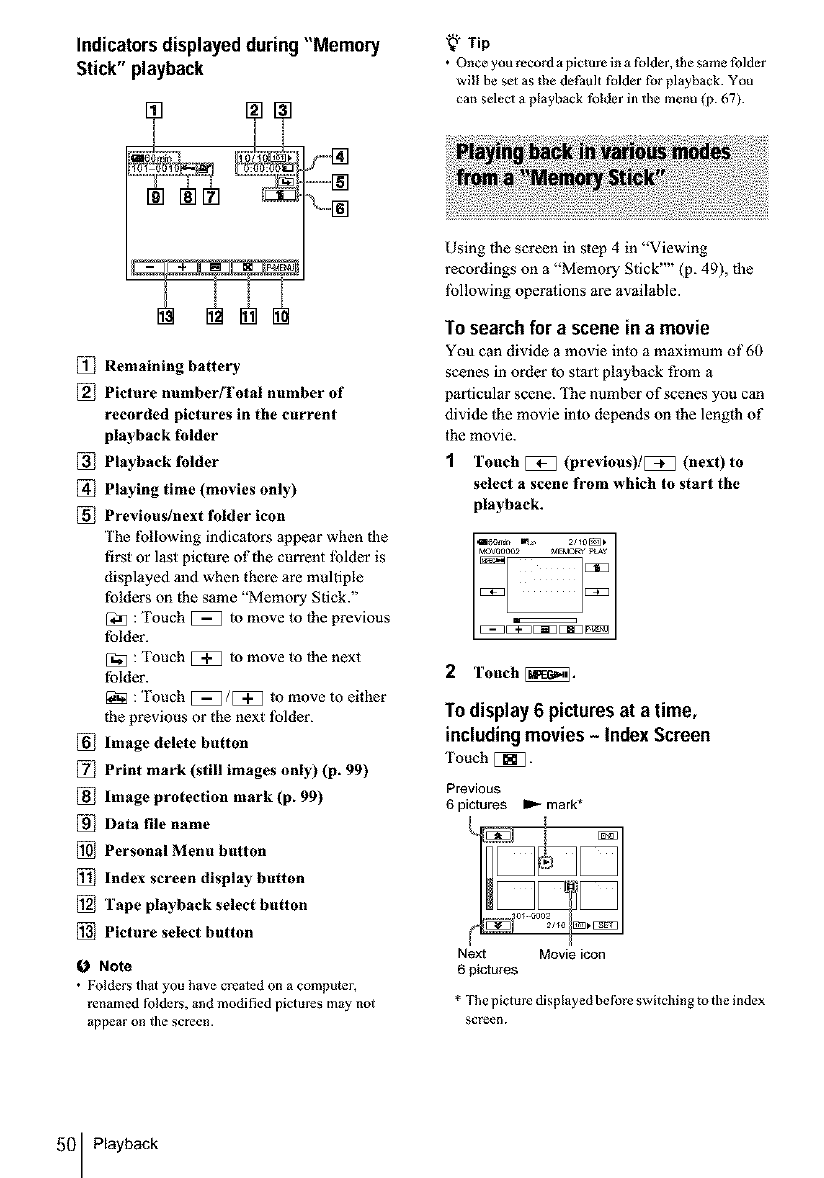
Indicatorsdisplayedduring"Memory
Stick"playback
÷
[_ Remaining battery
[_ Picture numberfFotal number of
recorded pictures in the current
playback folder
[_ Playback folder
[_] Playing time (movies only)
[_ Previous/next folder icon
The following indicators appear when the
first or last picture of the current lblder is
displayed and when there are multiple
folders on the same "Memory Stick."
[3_ : Touch _ to move to lhe previous
folder.
[_ : Touch _ to move to lhe next
folder.
:Touch [5_/[:i_ to move to either
the previous or the next lblder.
[_ Image delete button
[_ Print mark (still images only) (p. 99)
[_ Image protection mark (p. 99)
[_ Data file name
[_ Personal Menu button
[_ Index screen display button
[_ Tape playback select button
[_ Picture select button
Note
• Folders thai you have created on a computer,
renamed folders, and modified pictures may not
_ppear on tile screen.
"_'* Tip
• Once you record a picture in a folder, the same folder
will be set as the default folder for playback. You
can select a playback folder ta the menu (p. 67).
Using the screen in step 4 in "Viewing
recordings on a "Memory Stick'"' (p. 49), the
lbllowing operations are available.
To search for a scene in a movie
You can divide a movie into a maximum of 60
scenes in order to start playback from a
particular scene. The number of scenes you can
divide the movie into depends on the length of
the movie.
1Touch [_ (previous)/[_l (next) to
select a scene from which to start the
playback.
i#on_n I_, 2/ 10[_1b
_o0o2 _IEMOFer pL_
[:3E3
[::?K3[::1_ [=1_3 [:3[:3E[!_
2Touch _.
To display 6 pictures at a time,
including movies -Index Screen
Touch [_.
Previous
6 pictures _ mark*
H
Next Movie icon
6 pictures
*The picture displayed before switching to the index
screell.
50 Playback
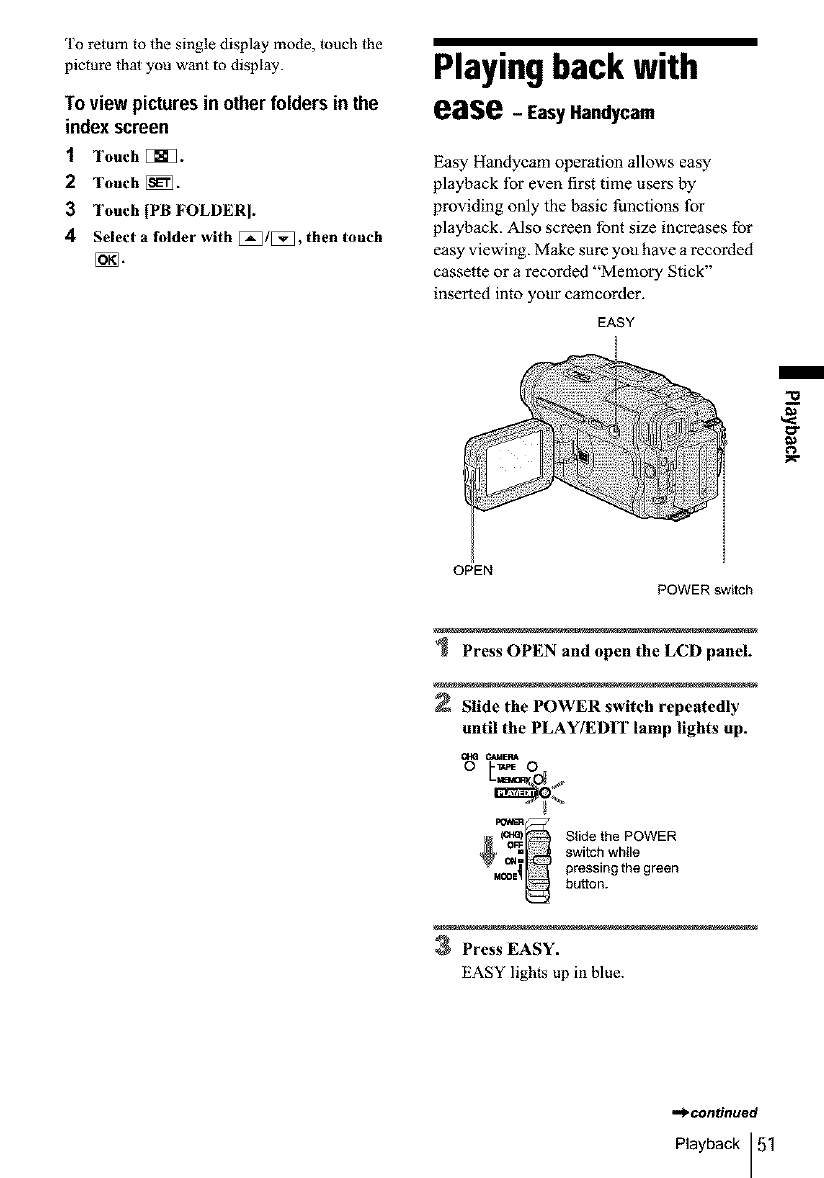
To return to the single display mode, couch the
picture thal you want to display.
Toview picturesin other folders in the
index screen
1Touch [_].
2Touch [_.
3 Touch [PB FOLDER].
4 Select a folder with E_/E_3, then touch
Playingback with
ease - EasyHandycam
Easy Handycam operation allows easy
playback for even first time users by
providing only the basic functions for
playback. Also screen font size increases for
easy viewing. Make sure you have a recorded
cassette or a recorded "Memory Stick"
inserted into your camcorder.
EASY
OPEN
POWER switch
Press OPEN and open the LCD panel.
Slide the POWER switch repeatedly
until the PLAY/EDIT lamp lights up.
OtG O*qdERA
(o_ Slide the POWER
switch while
pressingthe green
button.
3Press EASY.
EASY lights up in blue.
,.._.continued
Playback 51
4Play back a picture.
When playing back on a tape
The following buttons can be operated.
I_N (play/pause)/_l (l_tst forward)/
V_] (stop)/[_u_q (rewind)
You can operate these operations and
SLOW [iVq on the Remote Commander.
When playing back on a "Memory
Stick"
Touch [_.
The following buttons can be operated.
You con control playback with the Remote
Commander.
To cancelEasyHandycamoperation
Press EASY again.
0Note
• You cannot tunl Easy Handycam operation on or off
during communication with anod/er device via USB
cable.
2Set [M] (month), [D] (day), hour and
minutes in the same way as [Y] (year),
then touch [_.
For [LANGUAGE]
Select the desired language with [_]/[_],
then touch [_].
For [BEEP]
See page 81.
For [VOLUME]
Adiust the volume by touching
(decrease)/[!_ (increase), then touch [_].
For [DATA CODE]
You can display the date/time during
playback.
Touch [DATE/TIME], then touch [ON.
For [_ ALL ERASE]
You can delete all the images on the
"Memory Stick."
Touch [YES].
"_" Tip
• During Easy Handycam operation, you call also do
the fb!lowing:
"Playing the picture on a TV" (p. 56)
"Dubbing to another tape" (p. 87)
Touch IMENU].
The available menu items are displayed oll
the screen.
Touch the desired item.
3Select the desired setting.
For [CLOCK SET]
1Set [Y] (year) with [_/[_, then touch
[ON.
52 Playback
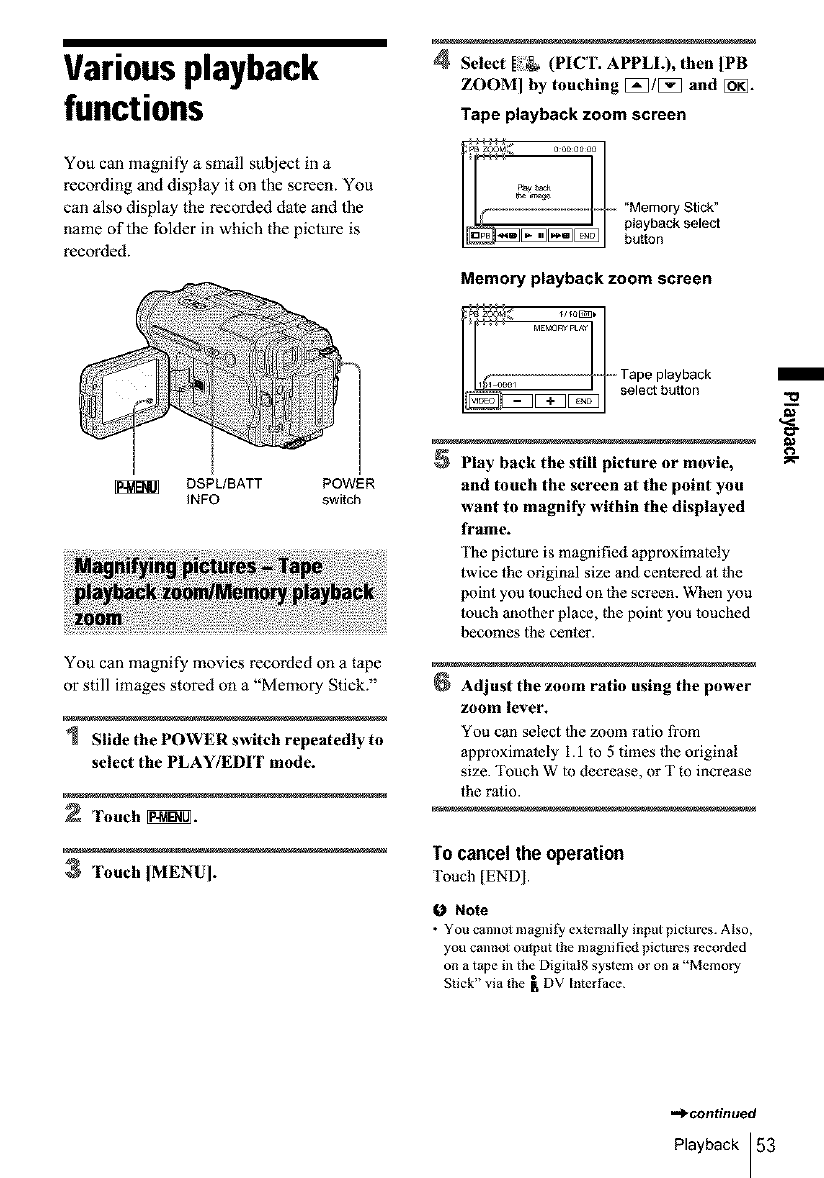
Variousplayback
functions
You can magnify a small subject in a
recording and display it on the screen. You
can also display the recorded date and the
name of the folder in which the picture is
recorded.
t
l
DSPL/BATT POWER
INFO switch
You can magnify movies recorded on a tape
or still images stored on a "Memory Stick."
Slide the POWER switch repeatedly to
select the PLAY/EDIT mode.
2Touch _.
3 Touch IMENUI.
4Select [_ (PICT. APPLL), then [PB
ZOOM] by touching _/_ and [_.
Tape playback zoom screen
_B • M_ o_oo_or_oo
t ,"Mer oryStic "
playback select
button
Memory playback zoom screen
_]_ ME_ v P_A¥
........ Tape playback
ir E3 / selectbutton
Play back the still picture or movie, _=
and touch the screen at the point you
want to magnify within the displayed
frame.
The picture is magnified approximalely
twice the original size and centered at the
point you touched on 1he screen. When you
touch anolher place, _be point you touched
becomes _he center.
Adjust the zoom ratio using the power
zoom lever.
You can select the zoom ratio fi'om
approximately I. 1 to 5 times _be original
size. Touch W lo decrease, or T to increase
the ratio.
Tocancel the operation
Touch [END].
ONote
•You canno_ magnit_ externally input pictures. Also,
you canno_ output the nlBgni lied pidures recorded
on a tape in the Digital8 system or on a "Memory
Stick" via the [ DV [mcrPace.
-d_continued
Playback 53
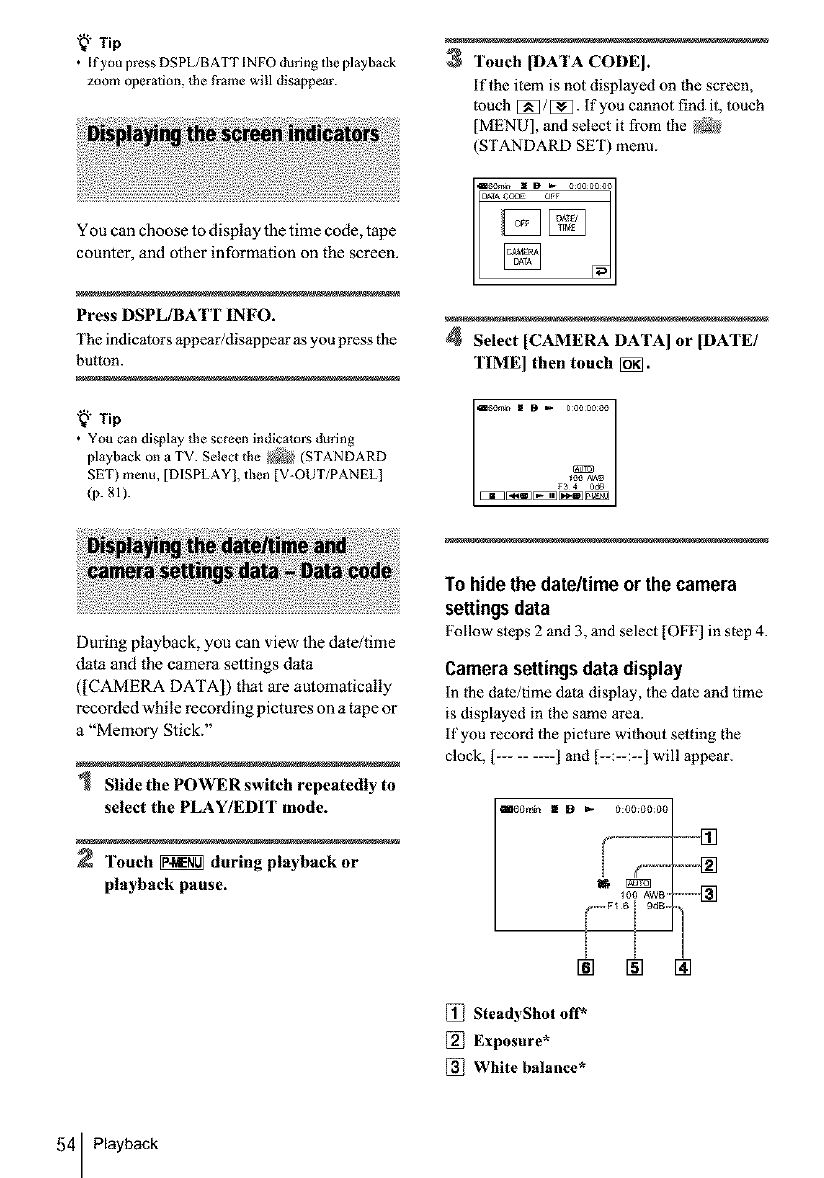
'8" Tip
• If you press DSPL/BATT INFO during the playback
zoom operation, the frame will disappear.
3Touch [DATA CODE I.
if the item is not displayed on the screen,
much [_/[_. If you cannot find it, touch
[MENU], and select it from the _
(STANDARD SET) menu.
You can choose to display the time code, tape
counter, and other information on the screen.
Press DSPL/BATT INFO.
The indicators appear/disappear as you press the
button.
"_" Tip
• You can display the screen indicators during
playback on a TV. Select the _/'_ (STANDARD
SET) menu, [DISPLAY], then [V-OUT/PANEL]
(p. 81[.
During playback, you can view the date/time
data and the camera settings data
([CAMERA DATA]) that are automatically
recorded while recording pictures on a tape or
a "Memory Stick."
Slide the POWER switch repeatedly to
select the PLAY/EDIT mode.
Touch _ daring playback or
playback pause.
4 Select [CAMERA DATA] or [DATE/
TIME] then touch [_.
To hide the date/time or the camera
settingsdata
Follow steps 2 and 3, and select [OFF] in step 4.
Camerasettingsdata display
in the date/time data displ3y, the date and time
is displayed in the same area.
if you record the picture without setting the
clock, [......... ] and [--:--:--] will appear.
_60m[_ E D t_ 0:00:00:00
[_ SteadyShot off*
Exposure*
White balance*
54 Playback
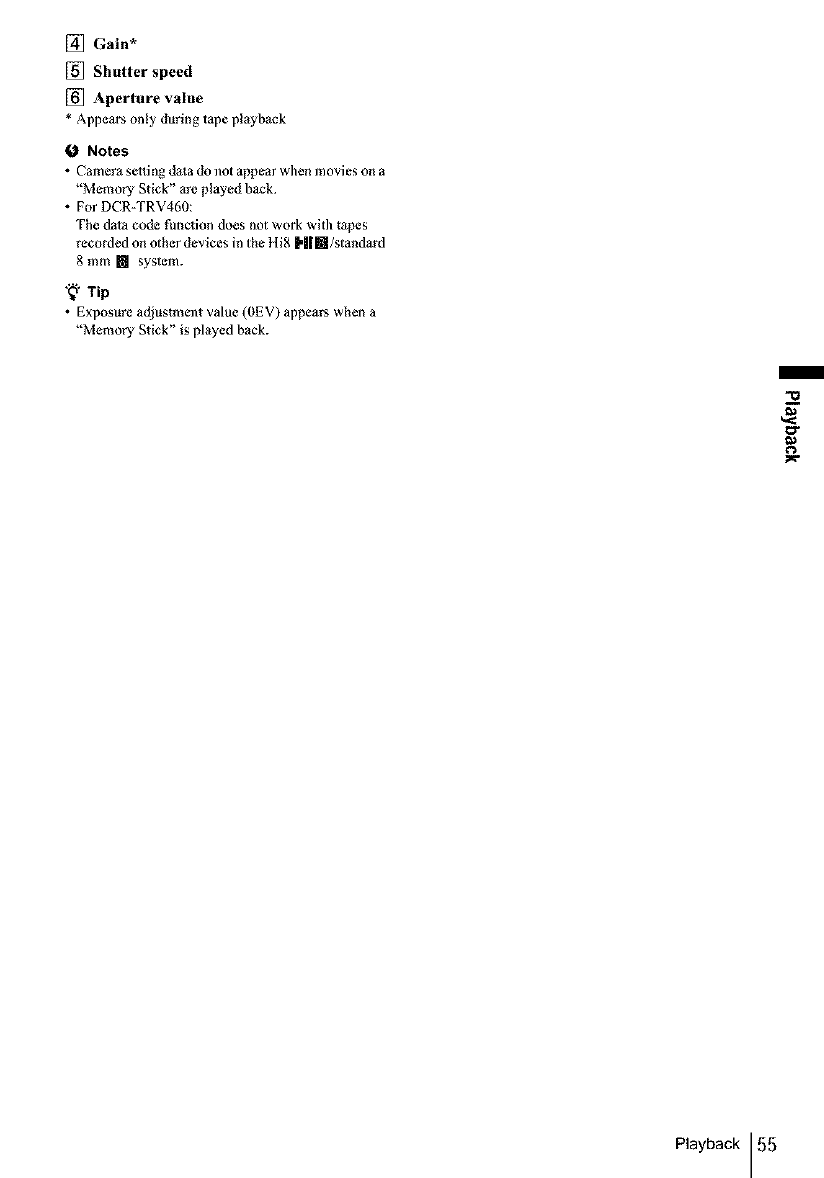
[] Gain*
[] Shutter speed
[] Aperture value
* Appears only during t_pe playback
0Notes
• Camera setting dsta do not appear when movies on a
"Memory Stick" are played back.
• For DCR-TRV460:
The data code function does not work with tapes
recorded on other devices in the Hi8 H|m/standard
8 mm [] system.
"_ Tip
• Exposure adjustment value (OEV) appears _vben a
"Memory Stick" is played back.
Playback 55
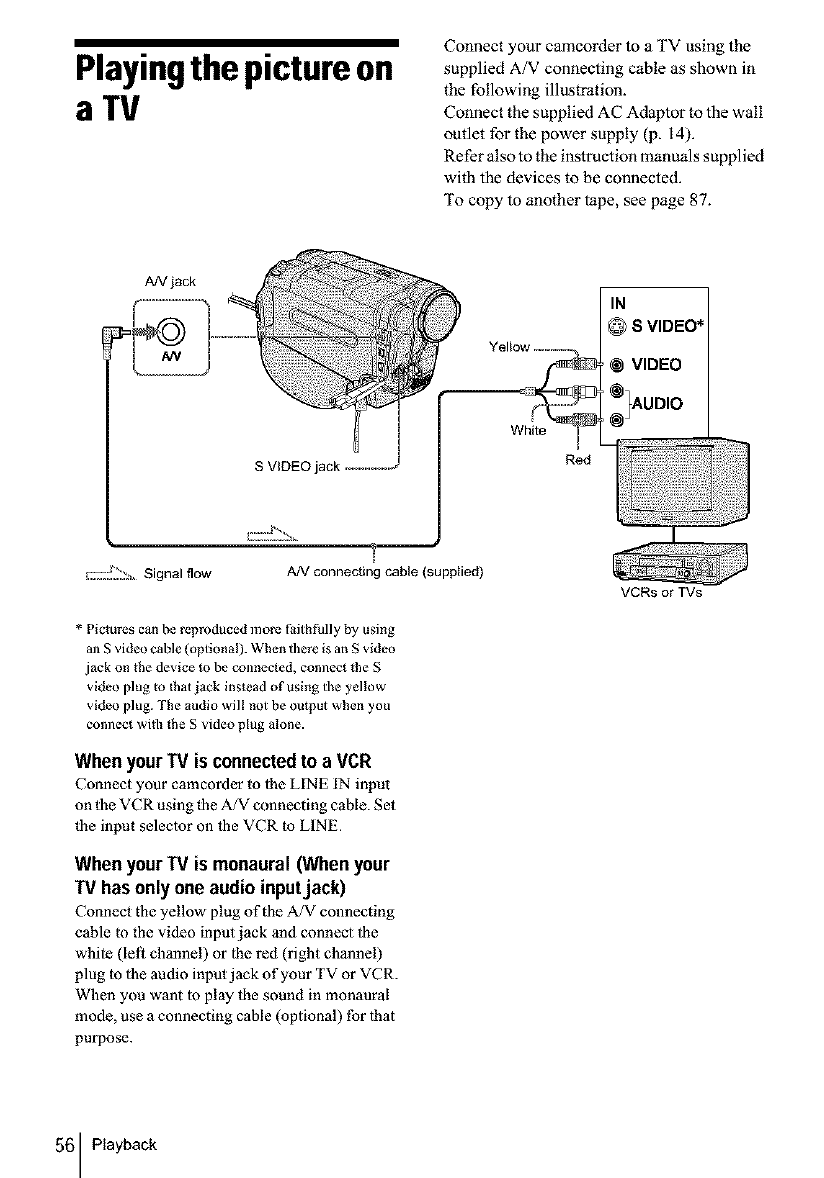
Playingthepictureon
aTV
Connect your camcorder to a TV using the
supplied A/V connecting cable as shown in
the following illustration.
Connect the supplied AC Adaptor to the wall
outlet for the power supply (p. 14).
Refer also to the instruction manuals supplied
with the devices to be connected.
To copy to another tape, see page 87.
A/V jack
White
IN
@SVIDEO*
VIDEO
_UDIO
Red
I:::!._'_!:_ Signal flow A/V connecting cable (supplied)
* Pictures can be reproduced more Paith fully by using
an S video cable (optional). When there is an S video
jack on the device to be connected, connect the S
video plug m (hat jack instead of using the yellow
video plug. The audio will not be output when you
connect wilh the S video plug alone.
When yourTV is connectedto a VCR
Connect your camcorder to lhe LINE IN input
on the VCR using (he A/V connecting cable. Set
(he input seleclor on 1he VCR to LINE.
When yourTV is monaural (Whenyour
TV has only oneaudio inputjack)
Connect the yellow plug of the A/V connecting
cable m the video inpmjack and connect 1he
while (lel/channel) or lhe red (right channel)
plug to 1he audio input jack of your TV or VCR.
When you want 1o play 1he sound in monaural
mode, use a connecting cable (optional) for lhat
purpose.
VCRs or TVs
56 Playback
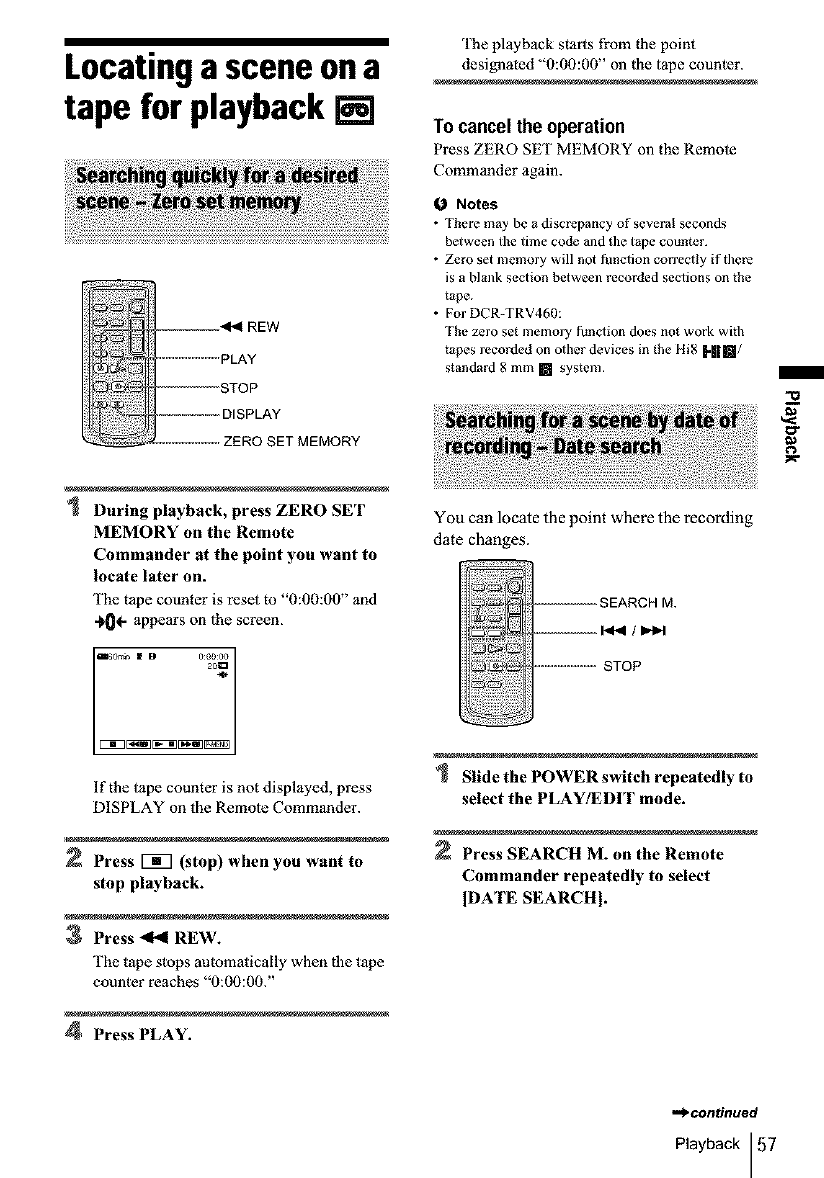
Locatingasceneona
tape forplayback[]
_:_ ................ PLAY
................. DISPLAY
ZERO SET MEMORY
During playback, press ZERO SET
MEMORY on the Remote
Commander at the point you want to
locate later on.
The tape counter is rest1 to "0:00:00" and
-_OI- appears on lhe screen.
20_
If the tape counter is not displayed, press
DISPLAY on the Remote Commander.
Press [_7 (stop) when you want to
stop playback.
3Press _REW.
The tape stops automatically when the tape
counter reaches "0:00:00."
4Press PLAY.
The playback starts from |he point
designated "0:00:00" oll fl_e tape counter.
Tocancel the operation
Press ZERO SE[" MEMORY oll the Remote
Commander again.
Notes
•There may be a discrepancy of several seconds
between the time code and the tape counter.
•Zero set memory will not funclion correctly if there
is a blank section between recorded seclions on the
tape.
• For DCR-TRV460:
The zero set memory t)ndion does not work with
tapes recorded on olher devices in lhe 11i8 [-I[[]/
standard 8 mm [] system.
You can locate the point where the recording
date changes.
,----------SEARCH M.
.............. STOP
Slide the POWER switch repeatedly to
select the PLAYIEDIT mode.
Press SEARCH M. on the Remote
Commander repeatedly to select
IDATE SEARCHI.
g
,._continued
Playback 57
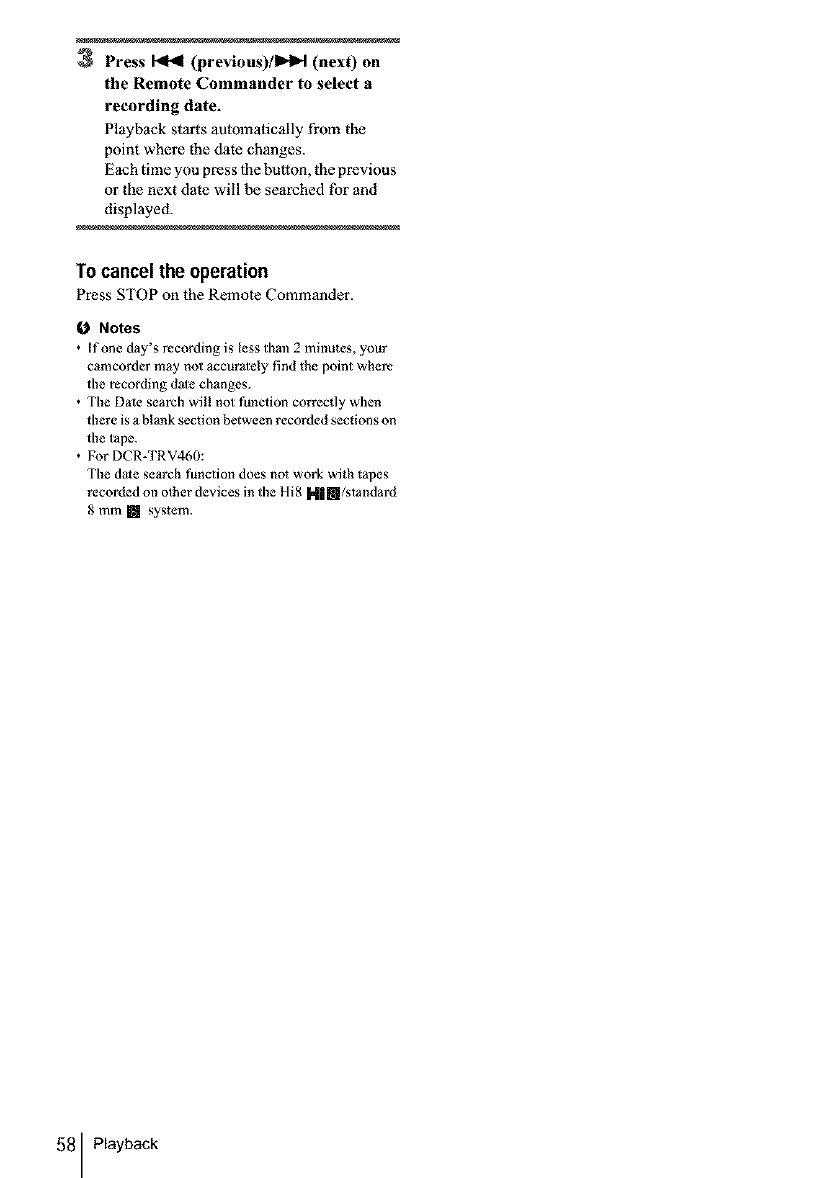
3Press _(previous)/l_lH (next) on
the Remote Commander to select a
recording date.
Playback starts automatically from the
point where the date changes.
Each time you press 1he button, the previous
or the next date will be searched tbr and
displayed.
To cancelthe operation
Press STOP on the Remote Commander.
0 Notes
• If one day's recording is less thml 2 minutes, your
camcorder may not accurately find the point where
the recording dale changes.
• The Dale search will not function correcdy when
there is a blank section between recorded sections on
the tape.
• For DCR-TRV460:
The dale search function does not work with tapes
recorded on olher devices in the Hi8 M|m/standard
8 mm [] system.
58 Playback

Usingthe Menu
Selecting menu items
You can change v3rious settings or make
detailed adjustments using the menu items
displayed on the screen.
I
I
POWERswitch
Turn on the power (p. 17).
2Touch _i_.
The Personal Menu appears. Item that ore
used often are displayed as short-cuts.
Example: PLAY/EDIT mode's Personal Menu
3 Touch [MENU] to display the menu
index screen.
CAMERA SET (p. 61)
_ MEMORY SET (.p.65)
[_ PICT. APPLh (p. 68)
_,{_ EDIWPLAY (p. 73)
(_g STANDARD SET (p. 76)
TIME/LANGU. (p. 82)
"°7;i............
Select the desired item with [_/[_,
then touch [_.
You can also touch the item directly to
select it.
You can scroll and see all items. The
available items vary depending on the
power mode of your camcorder.
Unavailable items will be grayed out.
Select the desired setting.
[_ changes to [g_. if you decide not to
change the setting, touch [_] to return to
fl_e previous screen.
¢D
Select the icon of the desired menu
with [_/[5_, then touch [_.
,,_continued
Using the Menu 59

7Touch [_, then [_] to hide the menu
screen.
You can also touch _ (return) to go back
a screen each time you touch the button.
To use the short-cutsof the Personal
Menu
The available items vary depending on the
power mode of your camcorder. Unavailable
items will be grayed out. You can customize the
short-cuts (p. 83).
1Touch _.
2 Touch the desired item.
3 Select the desired setting, then touch [_.
"_" Tips
•When the PLAY/EDIT mode is selected, touch [_
on the screen displayed after step 2 (p. 59) _odisplay
the video operation screen. Touch _ to return to
the previous screen.
•[t is convenient if the items you often use appear as
short-cuts on the Personal Menu. To customize the
Personal Menu, see page 83.
60 Using the Menu
Usingthe
(CAMERASET)menu
- PROGRAMAE/16:9WIDE, etc.
You can select items listed below on _lle
CAMERA SET menu. To select items, see
"Selecting menu items" (.p. 59).
The default settings are marked with D. The
indicalors in parentheses appear when the
setting is selected. The settings you can adiust
vary depending on _l_epower mode of your
camcorder. The screen shows 1he items you can
currently operate. Unavailable items will be
grayed out.
You can record pictures easily in a situation thal requires various lechniques by
selecting the following settings.
I:> AUTO Select tilts when not using PROGRAM AE.
SPOTLIGHT* Soled to prevent people's laces from appearing
(spotlight) ( _t_ ) excessively white when suNects are lit by strong
light, such as in a theater or at a wedding.
PORTRAIT (soft Seled to bring out the suNect such as people or
portrait) ( _i_ ) flowers while creating a soil background.
SPORTS* (sports SeleO to minimize shake when shooting gist-
lesson) ( d_ ) moving subjects such as in tennis or golf.
BEACH&SKI* Soled to prevent people's laces from appearing
(beach & ski) ( "_ ) durk in strong light or refleeled light, such as al a
beach in midsummer or on a ski slope.
SUNSET&MOON Sele¢l to maintain the atmosphere of situations
** (sunset & moon) such as sunsets, general night views, fireworks,
( _: ) and neon signs.
LANDSCAPE** SeleO when shooting distant subjects such as
(landscape) ( li_l ) mountains. This setting also prevents your
eamcorder from focusing on glass or melal mesh
in windows that comes in between the cameorder
and the subjech
$
* Your cameorder is adjusted to tbcus only on sut_iect s in the middle to fnr distance.
,_continued
Using the Menu 61
**Your camcorder is adiusted to focus only on distant subjects.
See page 35 for details.
See page 36 for details.
[:>ON Select to automatically activate tile eleOronic shueer to adjust the
shutter speed when recording in bright conditions.
OFF Select when recording without using the electronic slmtter.
See page 38 tbr details.
See page 39 for details.
See page 37 fbr details.
When using the NightShot plus lhnction to record, you can record clearer pictures
by using 1he NightShot Light to emit infrared rays (invisible).
DON Select to use the NightShot Light (p. 37).
OFF Select to disable the NightShot Light (p. 37).
See page 37 for details.
62 Using the Menu
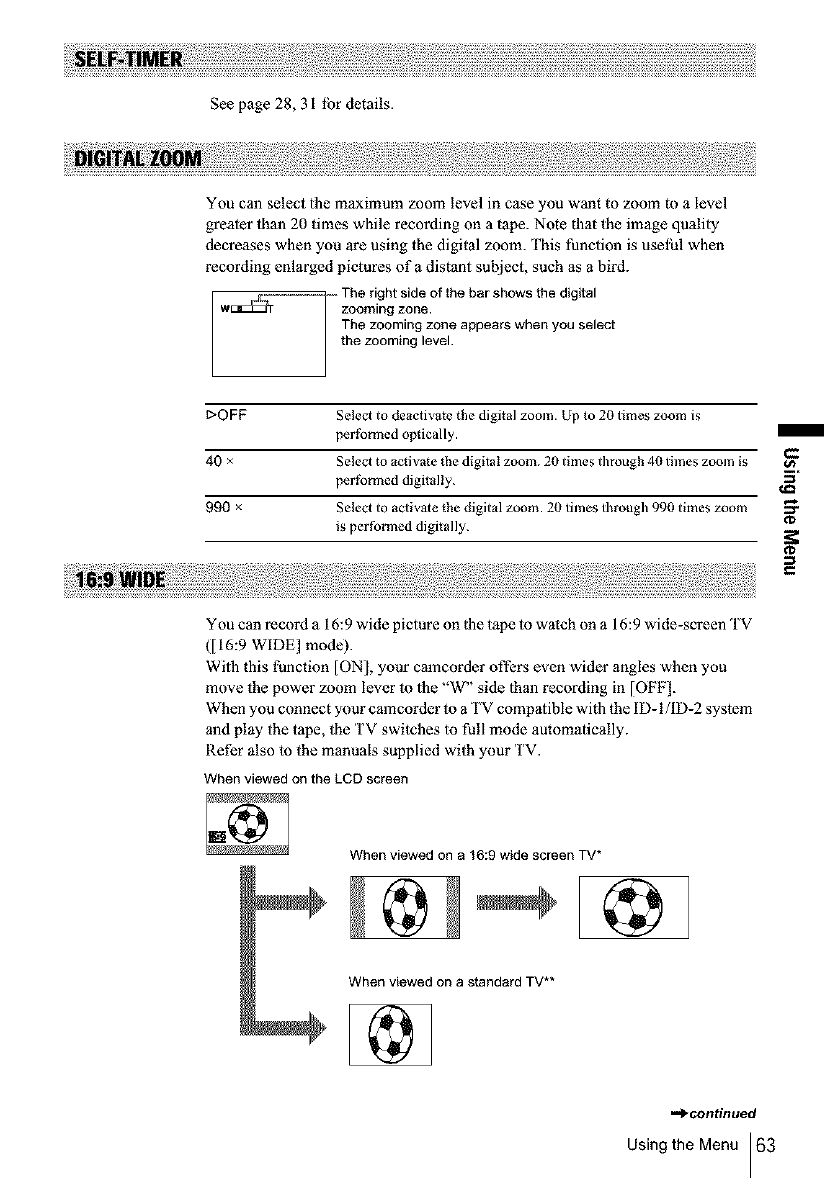
See page 28, 31 lbr details.
You can select the maximum zoom level in case you want to zoom to a level
greater than 20 times while recording on a tape. Note that the image quality
decreases when you are using the digital zoom. This function is useful when
recording enlarged pictures of a distant subiect, such as a bird.
, The right side of the bar shows the digital
w_ zooming zone.
Ihe zooming zone appears when you select
the zooming level.
t>OFF
40 x
990 ×
Select to deactivate the digital zoom. Up to 20 times zoom is
pertblxned optically.
Selecl to activate _he digital zoom. 20 times through 4g times zoom is
pertblxned digitally.
SeleO to actiwle the digital zoom. 20 tPnes through 990 times zoom
is per folxned digitally.
€-
o_
3'
¢D
€
You can record a 16:9 wide picture on |he tape to watch on a 16:9 wide-screen TV
([16:9 WIDE] mode).
Wgh this thnction [ON], your camcorder offers even wider angles when you
move the power zoom lever m 1he "W" side than recording in [OFF].
When you connect your camcorder to a TV compatible with the ID- I/ID-2 system
and play the tape, the TV switches 1ofull mode automatically.
Refer also to the manuals supplied with your TV.
When viewed on the LCD screen
When viewed on a 16:9 wide screen TV*
When viewed on a standard TV**
-_continued
Using the Menu 63
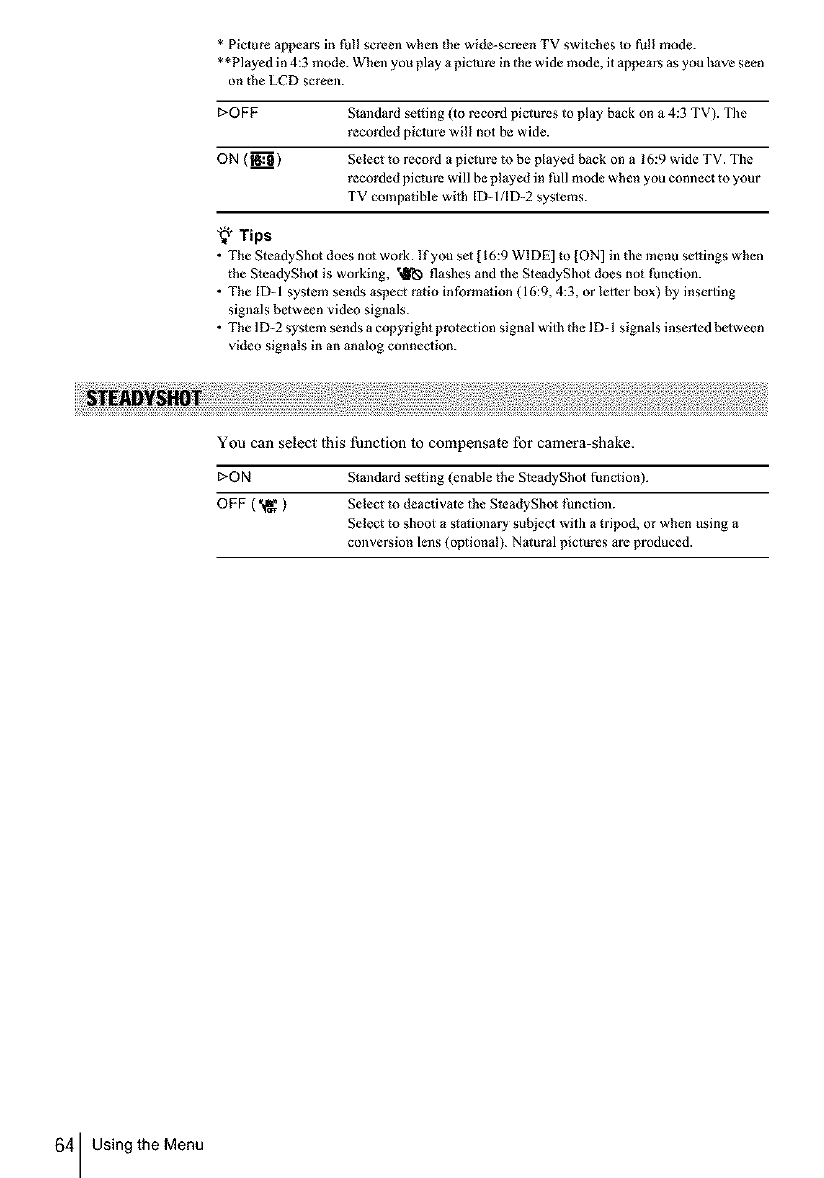
* Picture appears in full screen when _he wide-screen TV switches io full mode.
* *Played in 4:3 mode. When you play a picture in the wide mode, it appears as you have seen
on the LCD screen.
E>OFF Standard se_ting (to record piclures to play back on a 4:3 TV). Tile
recorded piciure will not he wide.
ON {_'_ ) Select to record a picture to be played back on a 16:9 wide TV. The
recorded picture will be played in full mode when you connect to your
TV compatible with ID-I/ID-2 systems.
'_" Tips
• The Ste_dyShot does not work. If you sei[ 16:9 WIDE] Io [ON] in the menu settings when
the S_eadyShoi is working, "_ flashes and the SteadyShot does not |hnc_ion.
• The ID-1 system sends aspect ratio information (16:9, 4:3, or lelier box) by inserting
signals between video signals.
• The 1D-2 system sends a copyright protection signal with the 1D-1 signals inserted beiween
video signals in an analog connection.
You can select lhis function lo compensale for camera-shake.
E>ON Standard se_ting (enable the SteadyShot function).
OFF ( _ ) Select m deactivate the SteadyShol |_nctiml.
Select to shoot a sla_ionary subject with a tripod, or when using a
conversion lens (optional). Nalural pictures are produced.
64 Using the Menu
Usingthe
(MEMORYSET)menu
- QUALITY/IMAGE SIZE/ALL ERASE/NEW
FOLDER, etc.
You can select ilems listed below on lhe
MEMORY SET menu. To select items, see
"Selecting menu items" (13.59).
The default settings are marked with t>. The
indicators in parentheses appear when the
setting is selected. The settings you can adiust
vary depending on lhe power mode of your
camcorder. The screen shows lhe items you can
currently oper3te. Unavailable ilems will be
grayed out.
2o_:1
[] QUALITY
I:>FINE(FINE) Seled to record still images with the fine image quality (compressed
to about 1/4).
STANDARD (_) Seled to record still images with the standard image quality
(compressed to about 1/10).
[] FED/FRAME
_>FIELD To record moving subjects co_Tecting jitter (p. 30).
FRAME ( [_ )To record stationary subjects in ]dgb quality.
I_I] IMAGE SIZE
I:>320 x240 Seled to record movies for playing on a large screen, or to record
(_0) clearer pictures.
160 x 112 (_60) Seled to record for longer time.
I_]REMAINING
1:>AUTO SeleO to display the remaining capacity of the 'qVlemory Stick" in tile
following cases:
•r
After inserting a "Memory Stick" with the POWER switch in the
CAMERA-MEMORY mode (for about 5 seconds).
When the remabling capacity of the 'Memory Stick" is less than 2
minutes afler the CAMERA-MEMORY mode is selected.
•r
At the starting or ending point of the movie (for approximately 5
seconds).
3'
¢D
,.*_.continued
Using the Menu 65
ON Select to always display the remaining capacity of the "Memory
Stick."
You can delete all the pictures on a "Memory Stick" that are not write-protected.
To delete pictures one by one, see page 98.
1Select [ALL FILESI or [CURRNT FOLDER].
ALL FILES Select to delete all the images on the "Memory Stick."
CURRNT FOLDER Select to delete all the images in the selected playback folder.
2 Touch IYES] twice.
To cancel deletion of all pictures, select [NO].
3Touch []_].
Notes
•The folder will not be deleted even wken you delele all the pictures in tbe folder.
• Do not move the POWER switch or press any buttons while [_ Erasing all data...] is
displayed on the screen.
The supplied* or newly purchased "Memory Stick" has been formatted at the
lhciory, and does not require formatting.
For details on the "Memory Stick," see page 116.
* Memory Stick media is mdy supplied with DCR-TRV361.
1Touch [YES] twice.
To cancel formatting, select [NO].
2 Touch [_.
ONotes
• Do not do any of the following while [_ Formalting...] is displayed:
Move the POWER switch to select other power modes.
Operate any buttons.
Eject 0ae "Memory Stick."
• Formatting erases everything m_ the "Memory Stick" including protected image data and
newly crealed folders.
1>SERIES Selecl to assign file numbers in sequence even if the "Memory Stick"
is replaced with another one. The file number is reset when a new
folder is crealed or the recording folder is replaced with another.
RESET Select to resel the file number to (1001 each time the "Memory Stick"
is changed.
66 Using the Menu
You can creale a new folder (I02MSDCF m 999MSDCF) on a "Memory Stick."
When a fblder is full (a maximum of 9999 images are stored) a new folder is
automatically crealed.
1Touch [YES].
A newly created folder will be numbered in sequence alter |he last lblder
number.
To cancel creation, select [NO].
2Touch [_.
Notes
• You cannot delete tile created folder_ using your camcorder. You will have to formal tile
"Memory Stick" (p. 66), or delete them using your computer.
• The number of pictures the1 can be recorded on a "Memory Stick" decreases as the number
of folders increases on d_e "Memory Stick."
As tbe delhult setting, pictures are saved in the 101MSDCF folder. You can select un
a folder to save your pictures. Create new folders fi'om the [NEW FOLDER] ",_
menu, then select the folder to be used for recording with [[_/[5_ and touch [_].
When you have a lot of pictures, you can search for the desired picture easily when
you sort them in lblders. =_"
Select flae playback folder with E_/[[_, then touch [_].
Using the Menu 67
Usingthe (PICT.
APPLI.)menu-PITT.
EFFECT/SLIDESHOW/FRAMEREC/
INTERVALREC,etc.
You can select items listed below on lhe PICT.
APPL1. menu. To select items, see "Selecting
menu items" (p. 59).
The delhult settings are marked with I>. The
indicators in parentheses appear when the
setting is selected. The settings you can adjust
vary depending on the power mode of your
camcorder. The screen shows the items you can
currently operate. Unavailable items will he
grayed out.
See page 40 lbr details.
See page 41 lbr details.
See page 41, 48 for details.
You can add special effects (such as lilms) to a picture belbre or after recording
on a tape. _ appears when 1he effect is selected.
I:>OF F Selecl wben no1 using the Picture effect selting.
NEG.ART Selecl m record/play the picture wich the color
and brighlness of the picture reversed.
SEPIA
B&W
SOLARIZE
PASTEL Select to record lhe picture looking like a pale
pastel drawing. (This effect is nol available
during playback.)
€€
Selecl to record/play the picture _ppem_ingin sepia.
Selecl to record/play the picture _ppearing in monochrome (black-
and-white).
Select to record/play the picture looking like an
illuslrafion with strong contrast.
68 Using the Menu
MOSAIC Soled to record picture appearing mosaic-
patterned. (This effect is not available during
playback.)
Notes
• YOU cannot add effects to externally input pictures. Also, you cannot outpu_ pictures edited
with Picture effects via tile _ DV [n_erPace.
• For DCR-TRV460:
Picture effects do no_ work with t_pes recorded on od/er devices in lhe Hi8 HI []/s_andard
8 mm [] system.
'_" Tip
• You can copy piciures edited using picture effects m a "Memory Stick" (p. 89) or to
another tape (p. 87).
See page 43 for details.
See page 53 for details.
/
¢D
You can play back the images stored in a"Memory Stick" (or a selecied playback
lblder) in sequence (slide show).
1Touch _.
2Touch [PB FOLDER[.
3 Select [ALL FILES] or [CURRNT FOLDER], then touch _.
I> ALL FILES ([_]) Select to execute a slide skow by playing back all tile images on
the "Memory Stick."
CURRNT Selecl to execute a slide show by playing back all the images in
FOLDER ([_ ) the current playback folder.
4Touch [REPEAT].
5Touch ION I or IOFFI, then [_.
DON (_'_) Select to repeat tile slide show.
OFF Select to execute the slide show only once.
6Touch lEND I.
7Touch [START].
Your camcorder plays back the images recorded on the "Memory Stick" in
sequence.
To cancel lhe slide show, touch [END]. To pause, touch [PAUSE].
"_" Tips
•You can select the first picture t_r the slide show by touching [_]/[_] before touching
[START].
• [f movies are played in the slide show, you can adjust the volume by Iouching [_
(decrcase)/[_ (increase).
You can record piclures with a stop-motion animated effect by allernately li'ame
recording and lhen moving the subject a little. Oper3te your camcorder using the
Remote Commander to prevent camera shake.
_>OFF
ON(_)
Select to record in tile standard recording mode.
Select to record pictures using tile FRAME REC function.
1 Select [ONI, then touch [_].
2Touch []_.
3 Press REC START/STOP.
A picture (approximately 6 fi'ames) is recorded, and your
camcorder enters the standby mode.
4Move the subject and repeat step 3.
O Notes
• When you use frame recording continuously, the remaining tape time wil! not be indicated
correclly.
• The last scene will be longer than o_her scenes.
You can achieve excellent recordings of flowers blooming, etc., with this
function. Connect your camcorder to |he wall outlet using |he supplied AC
Adaptor during |he operation.
[al [al
a: [REC TIME]
b: [INTERVAL]
1Touch [_.
2Touch [INTERVAL I.
3 Select a desired interval time, then touch [_].
You can select fi'om 30 seconds, 1, 5 or 10 minuies for |he interval.
4 Touch [REC TIME].
5 Select a desired recording time, then touch [_}_.
You can select from 0.5, 1, 1.5 or 2 seconds for the recording time.
6 Touch IENDI.
7 Touch [ONI, then [_}_.
70 Using the Menu
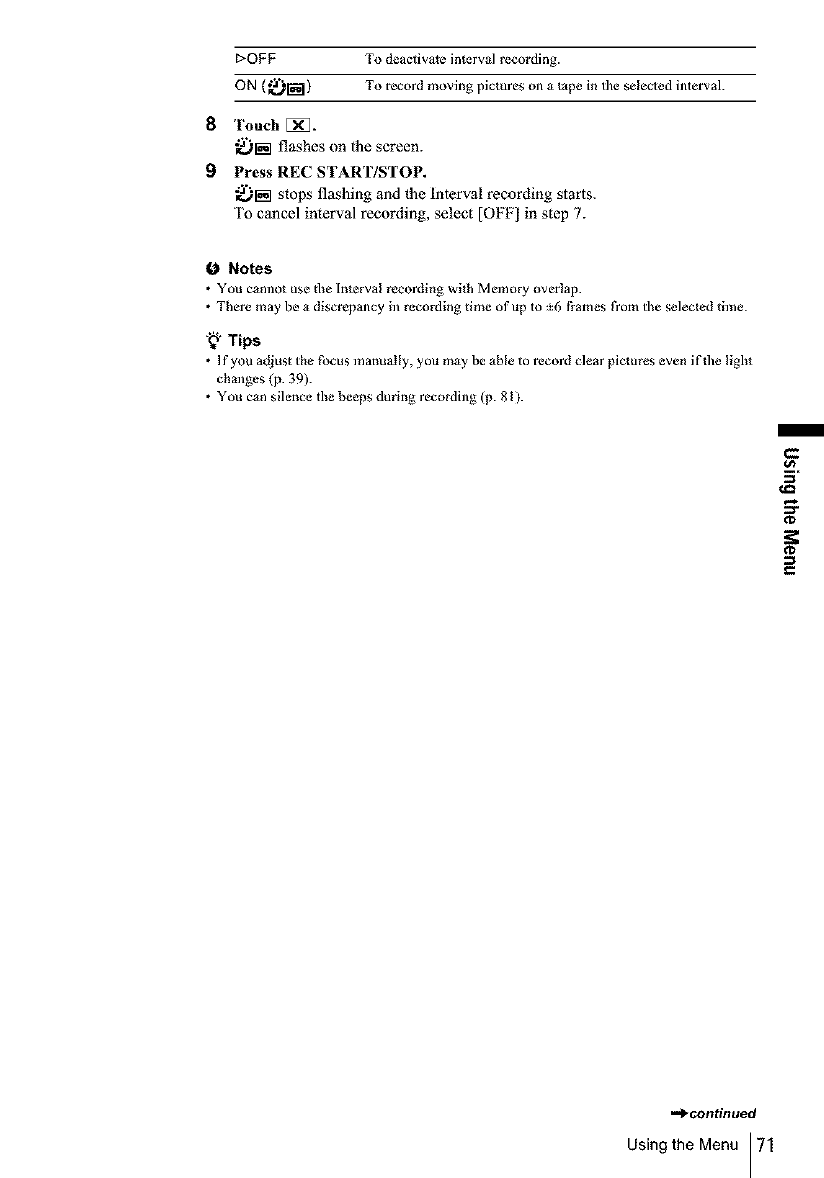
E>OFF To deactivate interval recording.
ON (_r_l) To record moving pictures on a tape in tile seleoed interval.
8 Touch [_.
_r_ flashes on the screen.
9Press REC START/STOP.
_r_q stops floshing and the Interval recording starts.
To cancel interval recording, select [OFF] in step 7.
0 Notes
• You cannot use tbe Interval recording wi_h Memory overlap.
• There may be a discrepancy in recording time of up to :_6 f_ames |Yore the selected 6me.
"_"Tips
• If you adjust the focus manually, you may be able to record clear pictures even if file light
changes (p. 39).
• You can silence the beeps during recording (p. 81).
I
e-
3"
¢J=
¢D
¢D
€
-apcontinued
Using the Menu 71

This l'uncflon is useful to observe the movement of clouds or the changes of
daylight. Your camcorder will shoot a still image at a selected interval and record
it on a "Memory Stick."
1
2
3
4
5
a: Shooting time
b: Interval
Touch [_.
Select adesired interval time (1, 5 or 10 minutes), then touch [i_.
Touch [ON], then touch [_.
DOFF To deactivate interval recording.
ON (_llm ) To record still images on a "Memory Stick" in the selecled interval.
Touch [_].
_£)i flashes.
Press PHOTO fully.
_m stops flashing and lhe Interval photo recording starts.
To cancel interval pholo recording, select [OFF] in step 3.
When you remove a cassette and"Memory Stick" from your camcorder, and select
the CAMERA-TAPE mode, you can view lhe demonstration in about 10 minules.
_>ON Select to see an overview oflhe thnclions available such as when you
arc using this comcorder |br the first time.
OFF Select when you do not intend to use tile DEMO MODE.
0Note
•You c_nnot view the demonstration only when the NIGHTSHOT PLUS switch is set to ON.
"_" Tips
• The demonstration will be suspended in situations such as those described below.
When you touch the screen during the demonstration. (The demonstration sta_s again in
about 10 minutes.)
When a cassette or "Memory Stick" is inserted.
....When a mode other than CAMERA-TAPE is selected.
• [f [A.SHUT OFF] is set to [5 min] when the camcorder is used on the battery pack, fl_e
power will be turned off al/er approximately 5 minutes (p. 81).
See page I01 for details.
72 Using the Menu
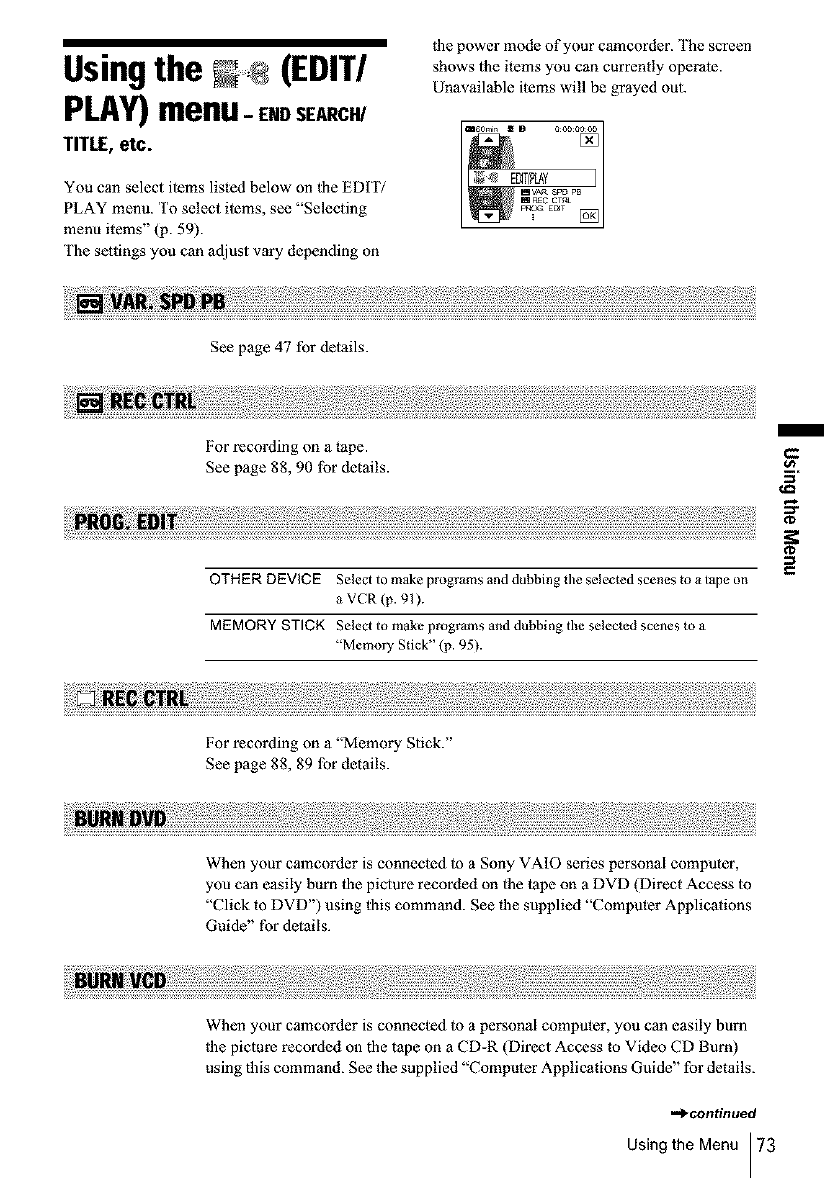
Usingthe (EDIT/
PLAY)menu-ENDSEARCH/
TITLE,etc.
You can select items listed below on (he EDrI7
PLAY menu. To select items, see "Selecting
menu items" (p. 59).
The se)tings you can adjust vary depending on
lhe power mode of your camcorder. The screen
shows the items you can currently operate.
Unavailable items will be grayed out.
See page 47 for details.
For recording on a tape.
See page 88, 90 lbr details.
OTHER DEVICE Select to make programs and dubbing tile selec)cd scenes to a tape on
a VCR (p. 91 ).
MEMORY STICK Selecl to make programs and dubbing the selected scenes to a
"Memory Stick" (p. 95).
€-
o_
3'
For recording on a "Memory Stick."
See page 88, 89 lbr details.
When your camcorder is connected 1o a Sony VAIO series personal computer,
you can easily burn )he piclure recorded on lhe tape on a DVD Direct Access m
"Click to DVD") using this command. See |he supplied "Computer Applications
Guide" for details.
When your camcorder is connected to a personal computer, you can easily burn
(he picture recorded on the tape on a CD-R (Direct Access to Video CD Burn)
using this command. See the supplied "Computer Applications Guide" for details.
-_continued
Using the Menu 73
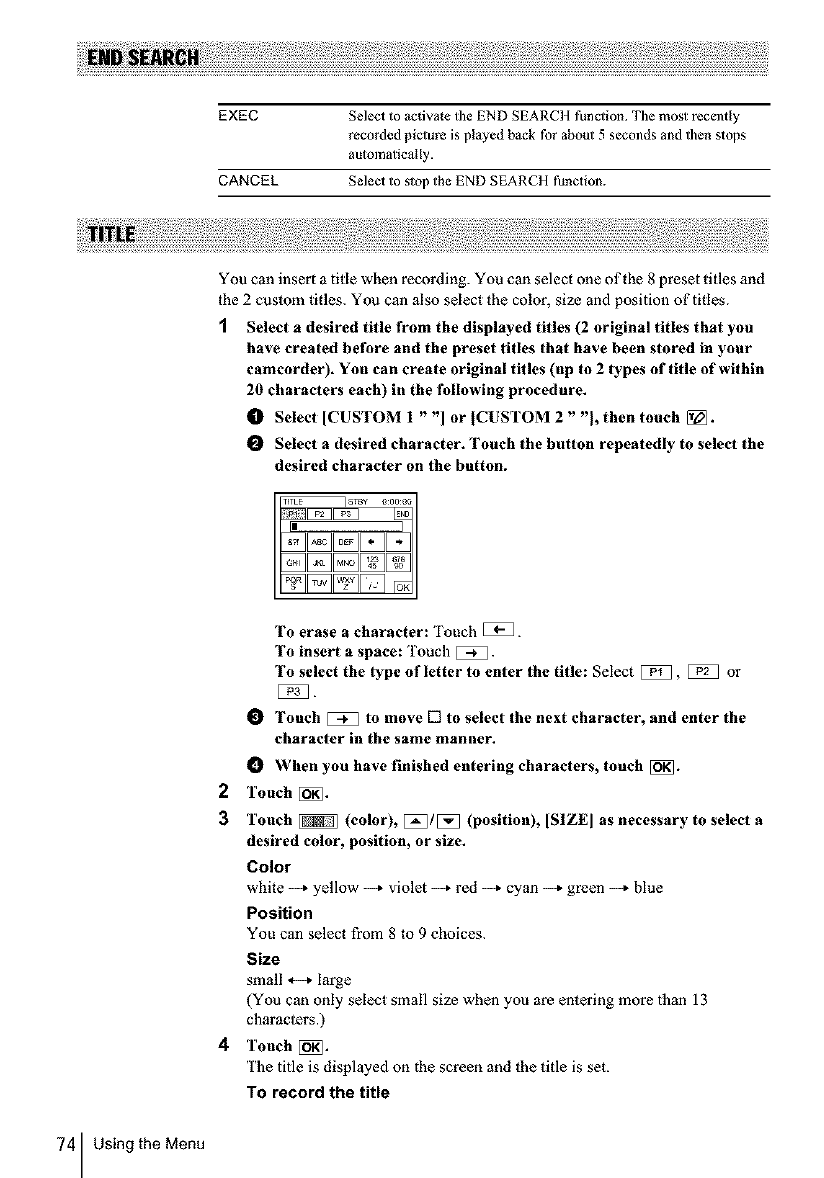
EXEC Select to activale tile END SEARCH funclion. Tile most recently
recorded picture is played back fur about 5 seconds and then stops
automatically.
CANCEL Select to stop the END SEARCH function.
You can insert a title when recording. You can select one of the 8 preset titles and
the 2 cuslom titles. You can also select the color, size and position of titles.
1Select adesired title from the displayed titles (2 original titles that you
have created before and the preset titles that have been stored in your
camcorder). You can create original titles (up to 2 lypes of title of within
20 characters each) in the following procedure.
O Select [CUSTOM 1 ""] or [CUSTOM 2 ""[, then touch [].
O Select a desired character. Touch the button repeatedly to select the
desired character on 1he button.
To erase acharacter: Touch _.
To insert a space: Touch [_.
To select the lype of letter to enter 1he title: Select [:_B, _ or
OTouch _to move [] to select the next character, and enter the
character in the same manner.
When you have finished entering characters, touch [_.
2 Touch [_.
3Touch _(color), [:_3/_ (position), [SIZE[ as necessary to select a
desired color, position, or size.
Color
white --_ yellow _ violet _ red --_ cyan --_ green _ blue
Position
You can select from 8 to 9 choices.
Size
small *--* large
(You can only select small size when you are entering more than 13
characters.)
4Touch [_.
The title is displayed on the screen and the title is set.
TO record the title
74 Using the Menu
Press REC START/STOP during recording standby.
To erase the title display
Touch _].
0 Notes
• When you are using your camcorder on the battery pack and do not operate it for 5 minutes,
the power automatically goes offas the default setting. If you may take 5minutes or longer
to enter characters, set [A.SHUT OFF] on lhe _ (STANDARD SET) menu to
[NEVER] (p. 81 ). The power will not be turned of LEven though file power goes off, the
characters you have entered remain stored in memory. Turn the power back on, [hell star_
again from step 1 to continue superimposing the title.
• When you superimpose a title while you are recording, the beep does not sound.
'8" Tip
• To change a created title, select the title in step I, then touch [_. Then, reseIeo the
characters _gain.
m
¢D
Using the Menu 75
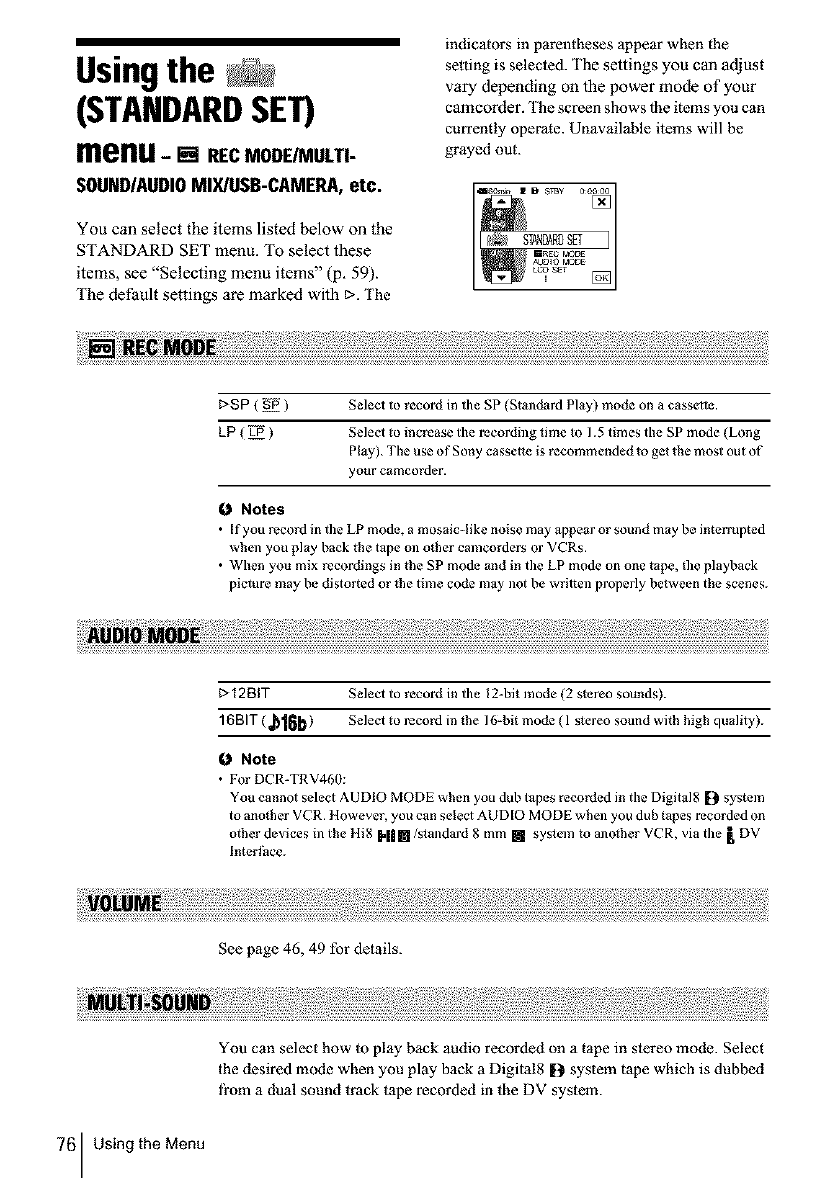
Usingthe
(STANDARDSET)
menu-[] RECMODE/MULTI-
SOUND/AUDIOMIX/USB-CAMERA,etc.
You can select the items listed below on the
STANDARD SET menu. To select these
items, see "Selecting menu items" (p. 59).
The default settings are marked with t>.The
indicators in parentheses appear when the
setting is selected. The settings you can adjust
vary depending on the power mode of your
czmcorder. The screen shows lbe items you can
currently operate. Unavailable items will be
grayed out.
I:>SP ( gi5 ) Seleci to record in tile SP (St_ndurd Play) mode on a cassette.
kP ( Li5 ) Select to increase the recording time to 1.5 times the SP mode (Long
Play). The use of Sony cassette is recommended to get the most out of
your camcorder.
Notes
• If you record in tile LP mode, a mosaic-like noise may appear or sound may be interrupted
when you play back the tape m] o_her camcorders or VCRs.
• When you mix recordings in the SP mode and in the LP mode on one t_pe, file playback
picture may be distorted or lhe time code illay not be written properly between the scenes.
I:>12BIT Select to record in tile 12-bit mode (2 slereo sounds).
16BIT ( _'16b ) Select to record in lhe 16-bit mode ( 1 slereo sound with high quality).
Note
• For DCR-TRV460:
You cannot select AUDIO MODE when you dub tapes recorded in the Digital8 [2 system
to another VCR. However, you can select AUD[O MODE when you dub tapes recorded on
oiher devices in the Hi8 I'|l []/s_andard 8 mm [] system m another VCR, via the _, DV
lnterthce.
See page 46, 49 for details.
You can select how to play back audio recorded on a tape in stereo mode. Select
the desired mode when you play back a Digital8 D system tape which is dubbed
fi'om a dual sound track tape recorded in the DV system.
76 Using the Menu
For DCR-TRV460:
Select the desired mode when you play back a Hi8 I'lim/standard 8 mm [] system
tape recorded on other devices in a dual sound track of the AFM ttiFi stereo
system.
I>STEREO Select to play back a stereo tape with stereo sound or dual sound track
tape with main and sub sound.
1 Digital8 [} system: Select to play back a stereo tape with tile lett
channel sound or a dual sound track tape with main sound.
For DCR-TRV460:
Hi8 H| []/standard 8 mm [] system: Select to play back a stereo tape
with monaural sound or a dual sound track tape with main sound.
2 Digital8 [} system: Select to play back a stereo tape with the right
channel sound or a dual sound track tape with sub sound.
For DCR-TRV460:
Hi8 N II[]/standard 8 mm [] system: Selecl to play back a stereo tape
with unnmurai sound or a dual sound track tape with sub sound.
0Notes
• YOU can playback a dual sound track cassette on your camcorder. However, you cannot
record a dual sound track on your camcorder.
• The se_ting returns to [STEREO] when you disconnecl 1he power source from your
camcorder for more than 5 minutes.
For DCR-TRV460:
I:>ON SeleO to correct jiller (horizontal picture shake during playback).
OFF SeleO to not compensale picture distortion when playing back a tape
on which you have dubbed repeatedly or recorded TV game signals.
0Note
•The TBC function works only with tapes recorded on other devices in tile Ill8 H|[]/
standard 8 mm [] system.
i
3"
¢D
For DCR-TRV460:
I>ON Select to eliminate color noise in the picture.
OFF SeleO to minimize picture artifacts in a picture containing lots of
movement.
0Note
•The DNR function works only with tapes recorded on other devices in the tli8 _,|| []/
standard 8 mm [] system.
,,._contintted
Using the Menu 77
You can adjust the audio balance between the main sound (ST I) and lhe sub sound
(ST2) on |he tape.
Notes
• YOU cannot adjust sound recorded in lg bit audio mode.
• Only the originally recorded sound will be heard when you disconnect file power source
from your camcorder for more than 5 minutes.
• For DCR-TRV460:
You cannot adjus_ file balance for tapes recorded on other devices in tile lli8 M|m/
standard 8 mm [] system.
The recorded picture will not be all'ec|ed by this setting.
LCD BRIGHT
See page 18 lbr details.
LCD BLLEVEL
You can adjust lhe brightness of lhe LCD screen's backligbt.
I:>NORMAL Standard brightness.
BRIGHT Seleci to brighten the LCD screen.
0Notes
• When you connect your camcorder to outside power sources, [BRIGIIT] is automatically
selected for the setting.
• When you select [BRIGItT], battery life is reduced by about I0 percent during recording.
LCD COLOR
Touch _/[3_ to adjust the color on the LCD screen.
Low intensity ,_ High intensity
78 Using the Menu
You can connect a digital device and an analog device to your ca•corder and
convert the signal transmitted from lhe connected devices to lhe appropriate signal
on your ca•corder.
_OFF Seleo when not using the Digital convert tlmction.
ON ( m ) To output analog images and sound in digital tbrmat using your
ca•corder.
The analog signal input to the A/V jack of your ca•corder will be
converted and output from the DV Interti_ce of your ca•corder.
For details, refer to the "Computer Applications Guide."
For DCR-TRV460:
_AUTO Seleo to automatically detect tile system (Hi8 H|m/standard 8 mm
[] or Digital8 !2) that was used to recorded on the tape, and play
back the tape. During switching of systems, the screen turns blue, and I_
tile following displays appear on tile screen. Ahissing noise also _,
sometimes can be heard. 1_
[9 --* H|li/l_l : During switching from Digital8 I[_ to 1Ii8 Him /,_'
standard 8 mm [].
I"1111/Ij --* [2: During switching from Hi8 Nil§l/standard 8 mm _*
[] to Digital8 [2.
Nllltl/m Seleo to play back a tape that was recorded on other devices in the lli8
1,41111/standard 8 mm [] system when your co•corder does not
automatically detect the recording system.
0 Note
• The selfing returns to [AUTO] when you disconnect the power source from your ca•corder
or slide the power switch.
You can connect a USB cable (supplied) to your camcorder, and view lhe picture
displayed on the screen of your ca•corder on your computer (USB Slreaming).
For details, refer to |he "Computer Applications Guide."
I>OFF Selecl to deactivate tile USB Streaming function.
USB STREAM Selecl to activate the USB Streaming function.
,,_ntinued
Using the Menu 79
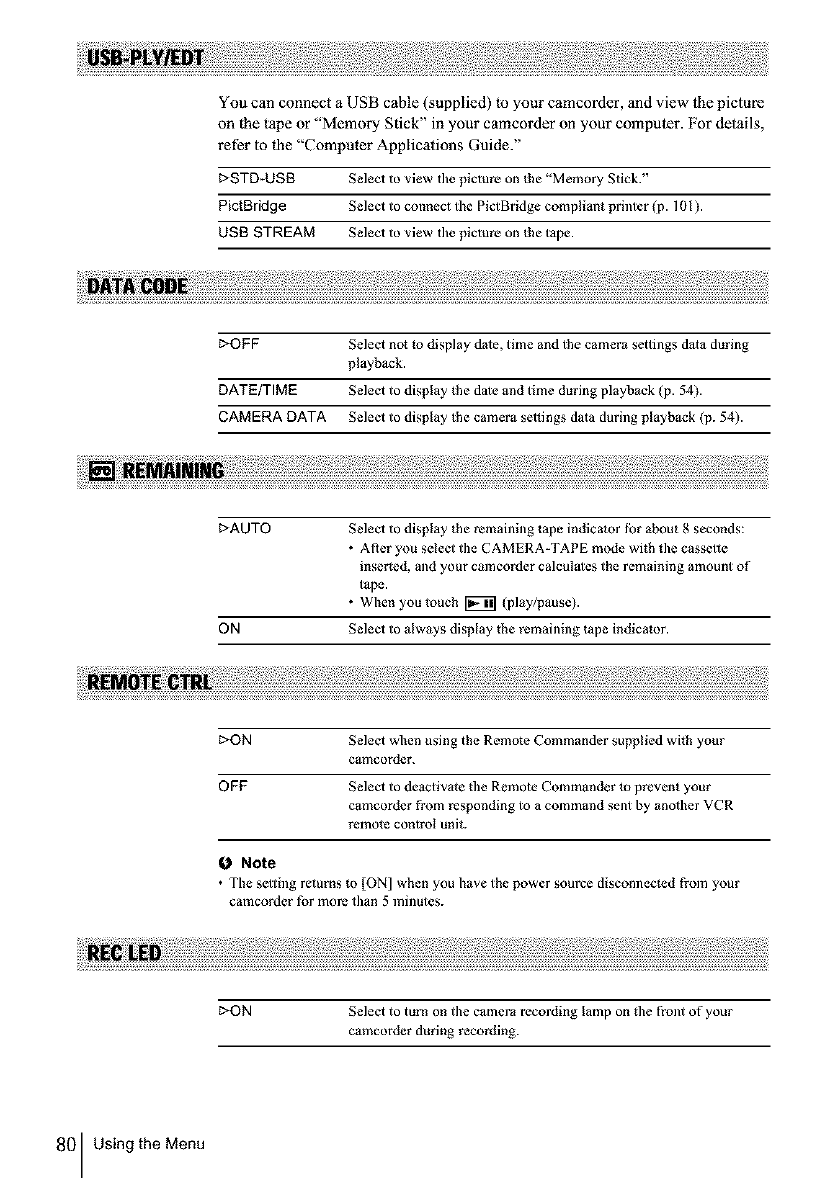
You can connect a USB cable (supplied) to your camcorder, and view lhe picture
on the tape or "Memory Stick" in your camcorder on your computer. For details,
refer to _he "Compumr Applicaiions Guide."
I>STD-US8 Selecl to view the picture on the "Memory Stick."
PictBridge Select to connect the Pict Bridge compliant printer (p. 101 ).
US[3 STREAM Selecl to view tile picture on the tape.
1>OFF Select not io display date, time and the camera settings dala during
playback.
DATE/TIME Select to display the date and time during playback (p. 54).
CAMERA DATA Select to display the camera settings data during playback (p. 54).
I>AUTO Select to display _he remaining tape indicator tbr about g seconds:
• After you select the CAMERA-TAPE mode with the cassette
inserted, and your camcorder calcul_les the remaining amount of
t_pe.
• When you touch _ (play/pause).
ON Select to always display the remaining tape indicator.
1>ON Select wben using the Remote Commander supplied with your
camcorder.
OFF Select to deactivate the Remote Commander _oprevent your
camcorder from responding to a command sent by anolher VCR
remote control unit.
Note
• The setting rclurns to [ON] when you have the power source disconnected from your
eamcorder for more than 5 minutes.
I>ON Select to turn on tile camera recording lamp on the front of your
camcorder during recording.
80 Using the Menu
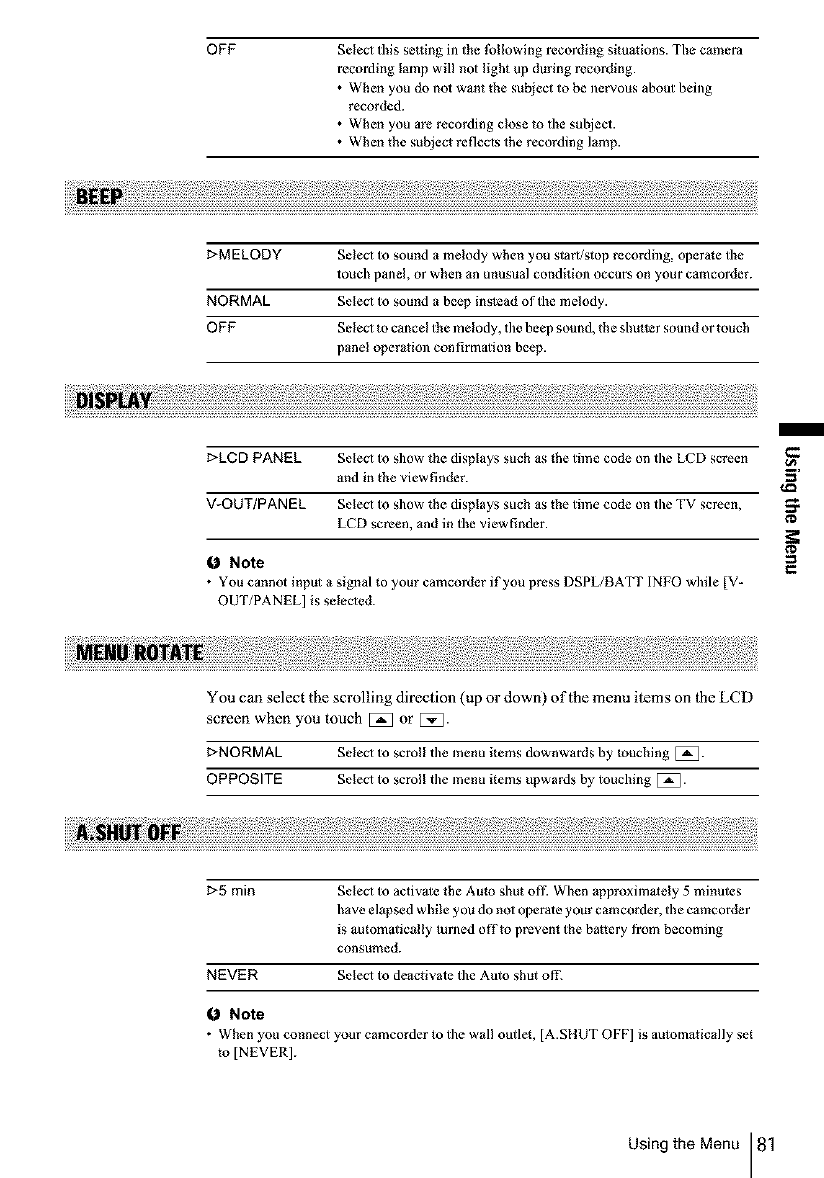
OFF SeleO this se¢ling in the |bllowing recording situations. The camera
recording lamp will not light up during recording.
• When you do not want the subject to be nervous about being
recorded.
• When you are recording close to the subject.
• When the subject reflecis the recording lamp.
I>MELODY SeleO to sound a melody when you start/stop recording, operale the
touch panel, or when an unusual condition occur5 on your camcorder.
NORMAL Seleo to sound a beep instead of the melody.
OFF SeleO to cancel the melody, tile beep sound, the shutler sound or touch
panel operation confirmalion beep.
I>LCD PANEL SeleO to show the displays such as the time code on the LCD screen
and in the viewfinder.
V-OUT/PANEL Seleo to show the displays such as the time code on tile TV screen,
LCD screen, and in the viewfinder.
Note
• You cannot input a signal to your camcorder if you press DSPL/BATT INFO while [V-
OUT/PANEL] is seleoed.
I
3'
¢D
You can select the scrolling direction (up or down) oflhe menu items on the LCD
screen when you touch [_ or [5_.
r-NORMAL Select to scroll tile menu items downwards by touching [_.
OPPOSITE Seleo to scroll tile menu items upwards by touching [_.
t>5 rain Seleo to activale the Aulo shut off. When approximalely 5 minutes
have elapsed while you do noi operate your camcorder, the camcorder
is automalically turned offto prevent the battery from becoming
consuIlled.
NEVER Seleo to deactivate the Auto shut off.
Note
• When you connect your camcorder to tile wall outlet, [A.SItUT OFF] is automatically set
to [NEVER].
Using the Menu 81

Usingthe (TIME/
LANGU.)menu-CLOCKSET/
WORLDTIME etc.
You can select items listed below on the TIME/
LANGU. menu. To selecl items, see "Selecting
menu items" (p. 59).
The settings you can adjust vary depending
on the power mode of your camcorder. The
screen shows the items you can currently
operate. Unavailable items will be grayed out.
You can set the date and time (p. 19).
You can adjust the time difference when using your camcorder abroad. Set the
time difference by touching [_/[_1, the clock will be adjusted in accordance
with lhe time difference, if you set 1he time difference to 0, the clock returns lo
the originally sel time.
You can select or change the language used for the on-screen display (p. 22). You
can select from English, Simplilied English, Canadian-French, Latin American
Spanish, Brazilian-Portuguese, Traditional-Chinese, or Korean.
82 Using the Menu
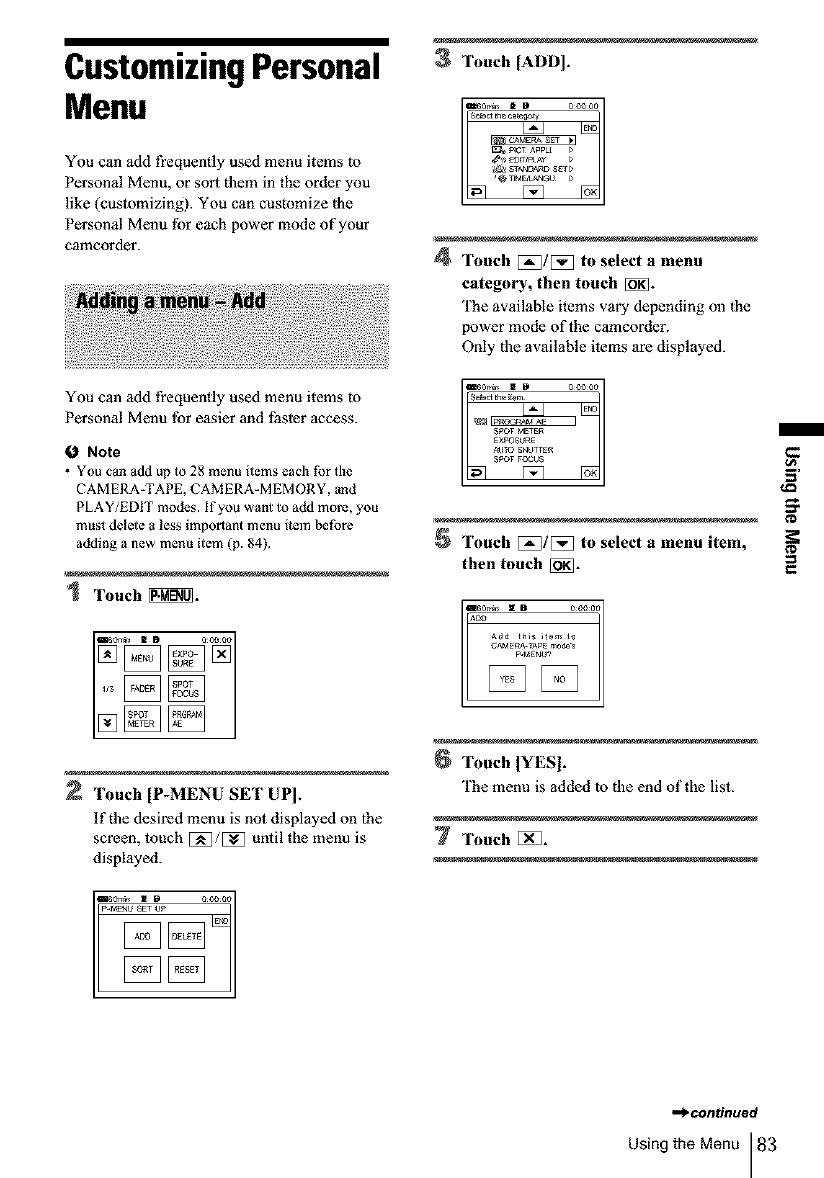
CustomizingPersonal
Menu
3Touch [ADD].
You can add frequently used menu items to
Personal Menu, or sort them in the order you
like (cuslomizing). You can customize the
Personal Menu for each power mode of your
camcorder. 4Touch E_/[_ to select a menu
category, then tooch [_.
The available items vary depending oll the
power mode of the camcorder,
Only the available ilems are displayed.
You can add frequently used menu items to
Personal Menu ibr easier and l_tster access.
ONote
• You can add up to 28 menu items each for the
CAMERA-TAPE, CAMERA-MEMORY, and
PLAY/EDIT modes. If you want to add more, you
must delete a less important menu item before
adding a new menu item (p. 84).
1 Touch_@L
2 Touch [P-MENU SET UP].
If the desired menu is not displayed on lhe
screen, touch E_/E_ until the menu is
displayed.
Touch [_]/[_ to select a menu item,
then touch [_].
Touch IYES].
'fhe menu is added to the end of the list.
7Touch []_].
,.,_.continuecl
Using the Menu 83
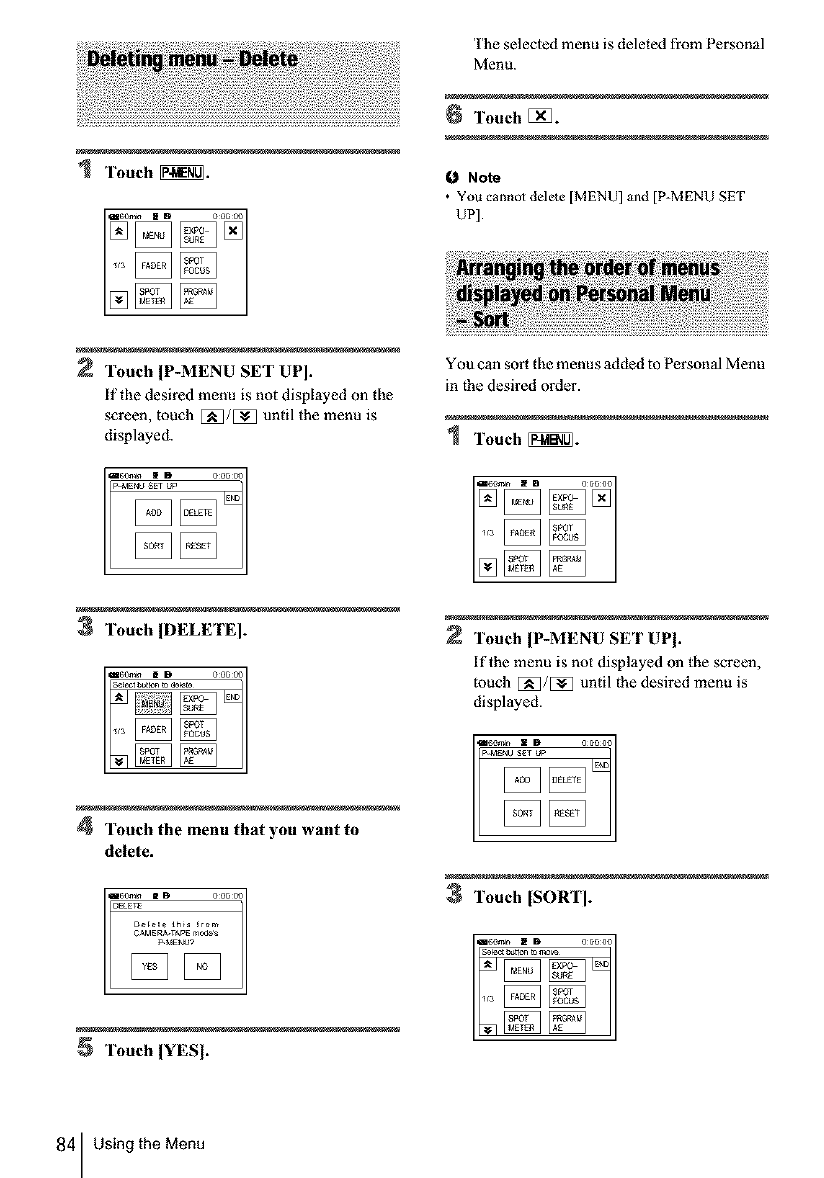
Touch _.
Touch IP-MENU SET UP].
if the desired menu is not displayed on the
screen, touch E_/E_ until the menu is
displayed.
3Touch IDELETE].
The selected menu is deleted from Personal
Menu.
6Touch [_.
I_ Note
• You cannot delete [MENU] and {P-MENU SET
UP].
You can sort the menus added to Personal Menu
in the desired order.
Touch [_!_ -
Touch {P-MENU SET UPJ.
if the menu is not displayed oll the screen,
touch EN_/[_] until the desired menu is
displayed.
4Touch the menu that you want to
delete.
Touch [SORT].
Touch IYESI.
84 Using the Menu
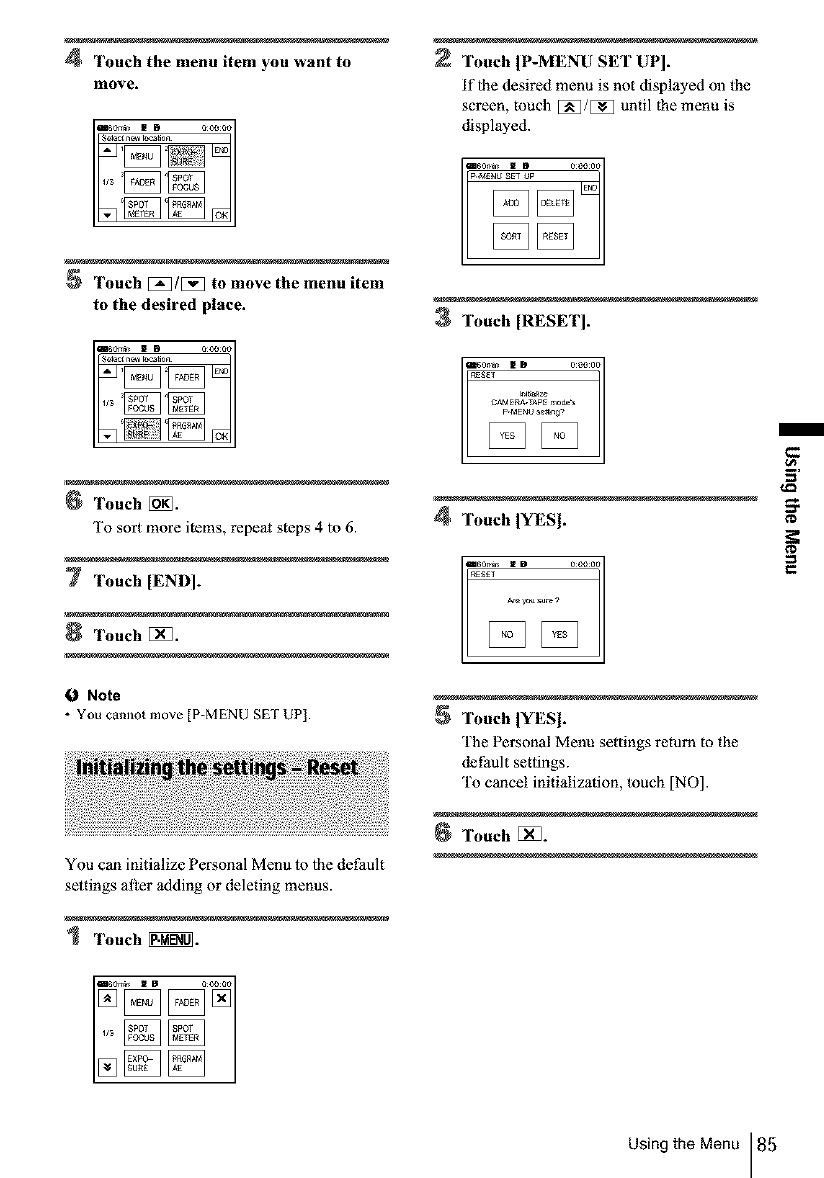
4 Touch the menu item you want to
move.
Touch [P-MENU SET UP].
if lhe desired menu is not displayed oll the
screen, touch [_/E_ until the menu is
displayed.
Touch [_/[_ to move the menu item
to the desired place.
Touch [_.
To sort more items, repeat steps 4 to 6
7 Touch [END].
Touch [_].
fO Note
• You camlot move [P-MENU SET UP!.
You con initialize Personal Menu to lhe dePault
settings alter adding or deleting menus.
1 TouehN_.
3Touch [RESET].
CAMERA.TJ,pE moce'_
p.MENU set_ng?
4Touch [YES].
Touch IYES].
'['he Personal Menu settings return to the
dePault settings.
To cancel initialization, touch [NO].
Touch []_.
Using the Menu 85
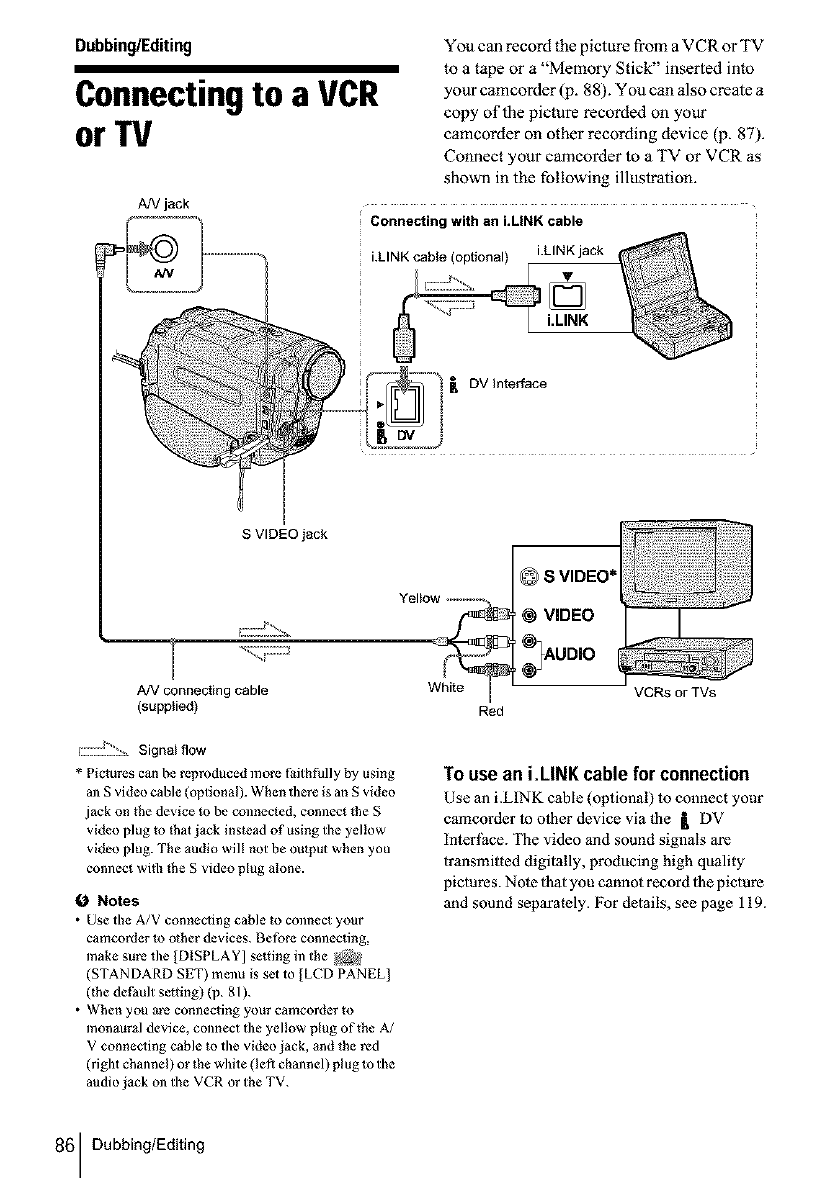
Dubbing/Editing
Connectingto a VCR
or TV
You can record the picture from a VCR or TV
to a tape or a "Memory Stick" inserted into
your camcorder (p. 88). You can also create a
copy of the picture recorded on your
camcorder on other recording device (p. 87).
Connect your camcorder to a TV or VCR as
shown in the following illustration.
AN jack
Connecting with an i.LINK cable
S VIDEO jack
AN connecting cable
(supplied)
L222:_!_1.12__Signal flow
* Pictures can be reproduced more Paith fully by using
an g video cable (optional). When there is an S video
jack on the device to he connected, connect the g
video plug to that jack instead of using the yellow
video plug. The audio will not be output when you
connect with the S video plug alone.
ONotes
• Use the A/V connecting cable to connect your
camcorder 1o other devices. Before connecting,
make sure the [DISPLAY] se_ting in the _2_
(STANDARD SET) menu is set to [LCD PANEL]
0he det:ault setting) (p. 81).
• When you are connecting your camcorder to
monaural device, connect the yellow plug oflhe A/
V connecting cable to the video jack, and the red
(right channel) or the white (loll channel) plug to the
audio jack on the VCR or the TV.
SVIDEO*
Yelto_ _ VIDEO
White I '
Red
VCRs or TVs
To use an i.LINK cable for connection
Use an i.LINK cable (optional) lo connect your
camcorder to oiher device via the [ DV
interlace. The video and sound signals are
transmiited digitally, producing high quality
pictures. Nolo lhat you cannot record lhe picture
and sound separalely. For details, see page 119.
86 Dubbing/Editing
Dubbingto another
tape []
You can copy and edit the picture played
back on your camcorder to other recording
devices (such as VCRs).
Connect your VCR to your camcorder
as a recording device (p. 86).
Prepare your VCR for recording.
•insert a cassette tbr recording.
• if your VCR has an input selector, set it to
the input mode.
3Prepare your camcorder for playback.
• insert the recorded cassette.
• Slide the POWER switch to select file
PLAY/EDIT mode.
4Start the playback on your camcorder,
and record it on the VCR.
Rel_r to the operating instructions supplied
with your VCR for details.
When the dabbing is finished, stop
your camcorder and the VCR.
ONotes
• When your camcorder is connecqed to the VCR via
the _ DV l]/terface, you cannot record the title,
indicators and words entered on the index screen of
the "Memory Stick."
• When dubbing using the A/V connecflng cable,
press DSPL/BATT INFO to hide indicators such as
time code (p. 54). Otherwise, they will be recorded
on the tape.
• To record the da_e/_ime and cmnera se_tings da_a,
have them displayed on screen (p. 54).
• Picl ures edited with Picture efl-ect ([PICT. EFFECT]
p. 68), Digital effect (p. 41, 48), or Playback zoom
(p. 53) cannot be oulput via the [ DV Interface.
• When connected using the i.LINK c_b[e, the
recorded pioure becomes rough when a picture is
paused on your eamcorder while recording to a
VCR.
• For DCR-TRV460:
When you dub the tape recorded on other devices in
the [ti8 H|lll/standard 8 mm [] system via 1he [
DV I nter|:ace, the picture may fluctuate. This is not a
real funclion. Digital signals are oulput as image
signals t¥om the [, DV Interface during playback.
Dubbing/Editing 87
Recordingpictures
froma VCRor IV
You can record and edit pictures or TV
programs from a VCR or TV on a tape or a
"Memory Stick" inserted in your camcorder.
You can also record a scene as a still image
on a "Memory Stick."
Insert a cassette or a "Memory Stick" for
rec_di_g in yam" camcorder.
Connect your TV or VCR to your
camcorder (p. 86).
i
If you are recording from a VCR,
insert a cassette.
1
3Slide the POWER switch to select the
PLAY/EDIT mode.
1
4Operate your camcorder to record
movies.
When recording on a tape
1Touch _[[_.
2Touch [[_1 REC CTRL] with an []
icon.
lflhe item is not displayed on the screen,
touch [_]/[_. if you cannot find it,
touch [MENU], and select it li'om the
_@ (EDFITPLAY) menu (p. 73).
3 Touch [REC PAUSE].
When recording on a "Memory
Stick"
1Touch _.
2Touch [MENU].
3Select the _ (EDIT/PLAY) menu,
lhen [[_] REC CTRL] with an [_ icon.
i
Start playing the cassette on your
VCR, or select a'IV program.
The picture played on 1he connected device
appears on the LCD screen of your
eamcorder.
i
Touch [REC STAlrrl at the point you
want to start recording,
1
7Stop recording.
When recording on a tape
[_uch [B7 (stop) or [REC PAUSE].
When recording on a "Memory
Stick"
"[%uch [REC STOP[.
i
Touch[_,then[]_.
i
'_" Tips
•The DVIN indicator appears M_en you connect your
camcorder and other devices via an i.LINK cable.
(This indicator may also appear on your TV.)
• When recording movies on a "Memory Stick," you
can skip s_ep4 and press REC START/STOP in
s_ep 6.
• For DCR-TRV460:
TOenable smooth trmlsition, wo recommend thai
you do hal mix pictures recorded in the Hi8 Hi[]/
standard 8 mm [] system on other devices with the
Digital8 [_ system on a tape.
88 Dubbing/Editing
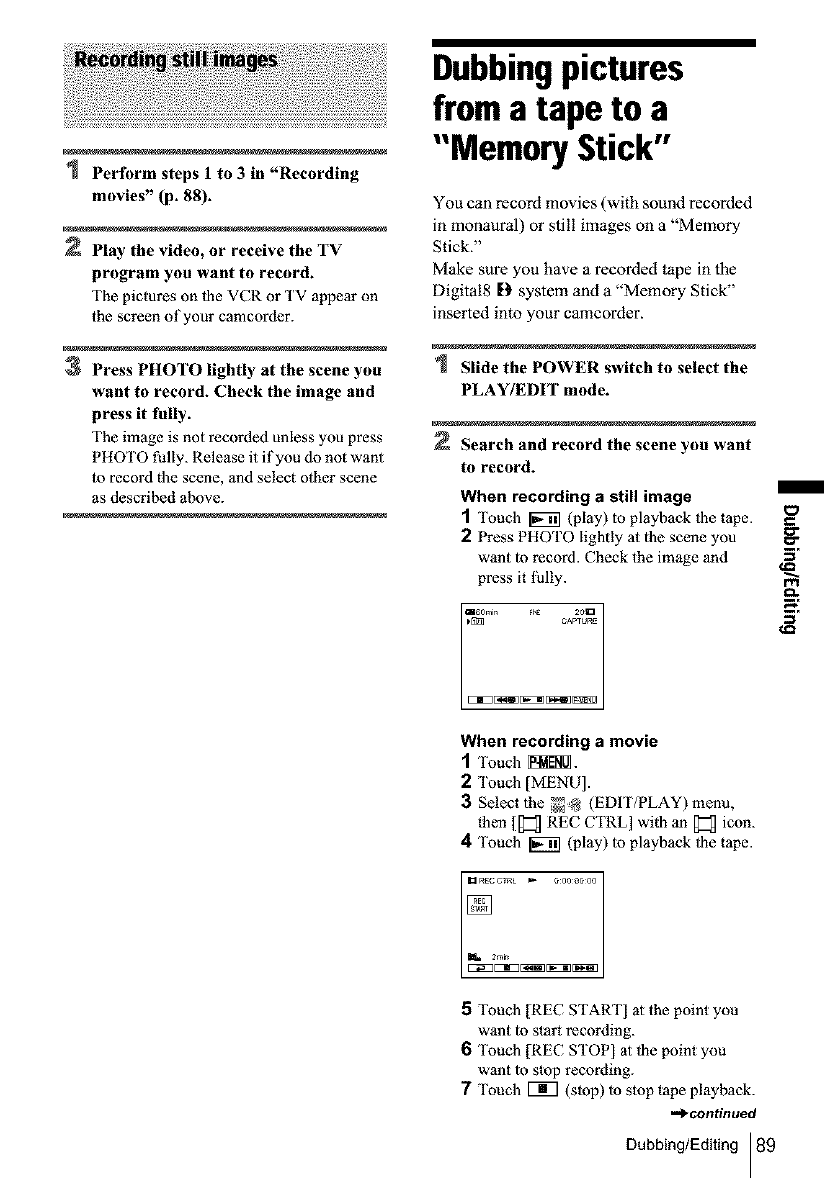
Perform steps 1 to 3 in "Recording
movies" (p. 88).
Play the video, or receive the TV
program you want to record.
The pictures on d_e VCR or '['V appear on
the screen of your camcorder.
3Press PHOTO lightly at the scene you
want to record. Check the image and
press it fully.
The image is not recorded unless you press
PHOTO fully. Release it if you do not want
1orecord the scene, and select olher scene
as described above.
Dubbingpictures
froma tape to a
"Memory Stick"
You can record movies (with sound recorded
in monaural) or still images on a "Memory
Stick."
Make sure you have a recorded tape in the
Digital8 D system and a "Memory Stick"
inserted into your camcorder.
Slide the POWER switch to select the
PLAY/EDIT mode.
Search and record the scene you want
to record.
When recording a still image
1"[kmch _ (play) lo playback ll_e tape.
2Press PHOTO lightly 31 the scene you
want to record. Check the image and
press it fully.
_omin _ 20U
_ CAPT_P_
m
When recording a movie
1[k_uch_.
2Touch [MENU].
3Select the _@ (EDIT/PLAY) menu,
then [[_ REC CTRL] with an _ icon.
4Touch _ (play) 1oplayback d_e tape.
5"[kmch [REC START] at the point you
want to start recording.
6[kmch [REC STOP] at 1he point you
want to stop recording.
7 Touch Vi7 (stop) 1ostop tape playback.
-_continued
Dubbing/Editing 89
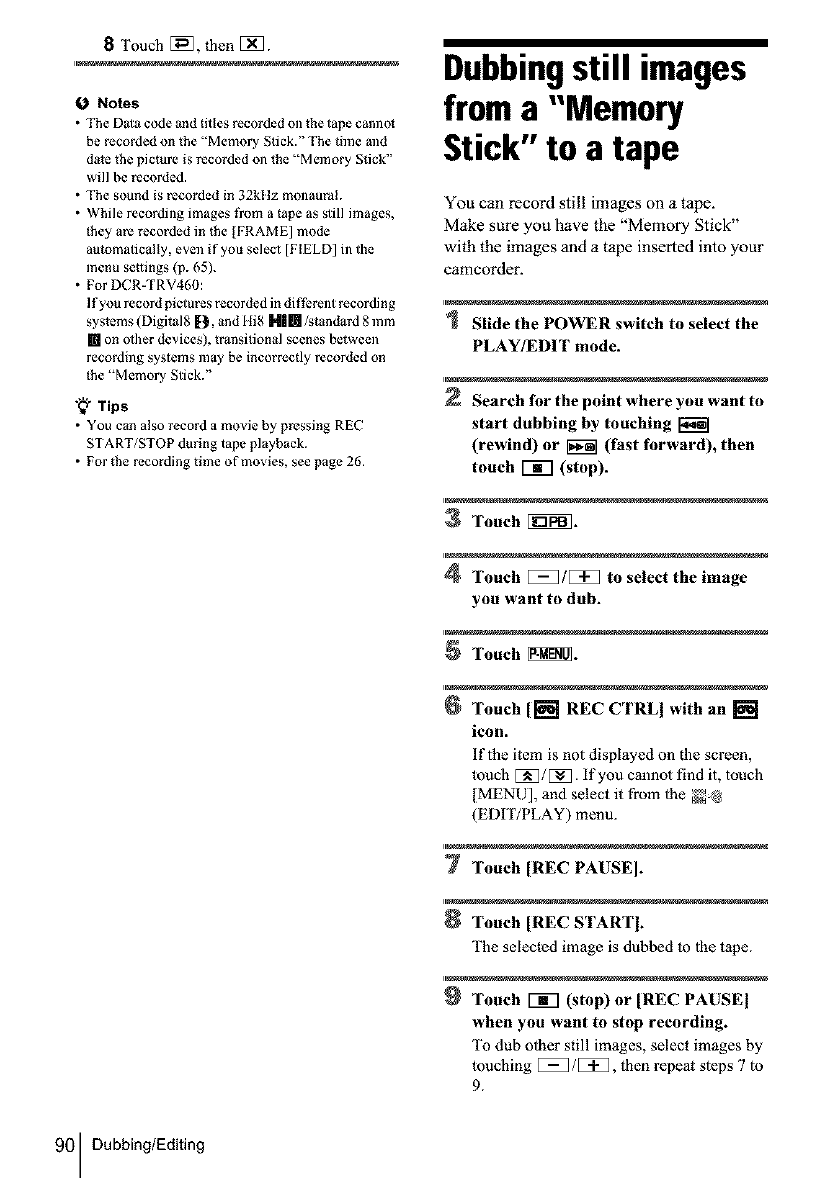
8Touch [_, |hen [_.
ONotes
• The D_la code _nd titles recorded oll the tape canno_
be recorded on the "Memory Stick." The time and
date the picture is recorded ol/the "Memory Stick"
will be recorded.
• The sound is recorded in 32kltz monaural.
• While recording images t¥om a tape as still images,
they are recorded in lhe ]FRAME] mode
automatically, even if you select [FIELD] in the
menu settings (p. 65).
• For DCR-TRV460:
If you record pictures recorded in different recording
systems (Digital8 IlL and HiS N| []/standard 8 mm
[] on olher devices), transitional scenes between
recording systems may be incorrectly recorded on
the "Memory Stick."
"_ Tips
• You c_n also record a movie by pressing REC
START/STOP during tape playback.
• For the recording time of movies, see page 26.
Dubbingstill images
froma "Memory
Stick"to a tape
You can record still images on a tape.
Make sure you have the "Memory Stick"
with the images and a tape inserted into your
camcorder.
Slide the POWER switch to select the
PLAY/EDIT mode.
Search for the point where you want to
start dubbing by touching
(rewind) or _ (fast forward), then
touch Vffl (stop).
3Touch [i_.
4Touch [_]1[i_] to select the image
you want to dub.
Touch _.
Touch [[_ REC CTRLI with an []
icon.
lflhe item is not displayed on the screen,
touch EN_/[_. if you cannot find it, touch
[MENU], and select it from 1he _
(EDIT/PLAY) menu.
Touch [REC PAUSE].
Touch [REC STARTb
The selected image is dubbed to lhe tape.
Touch [_q (stop) or [REC PAUSE I
when you want to stop recording.
"1% dub olher still images, select images by
touching [_1/[3_, fl_en repeal sleps 7 to
9.
90 Dubbing/Editing
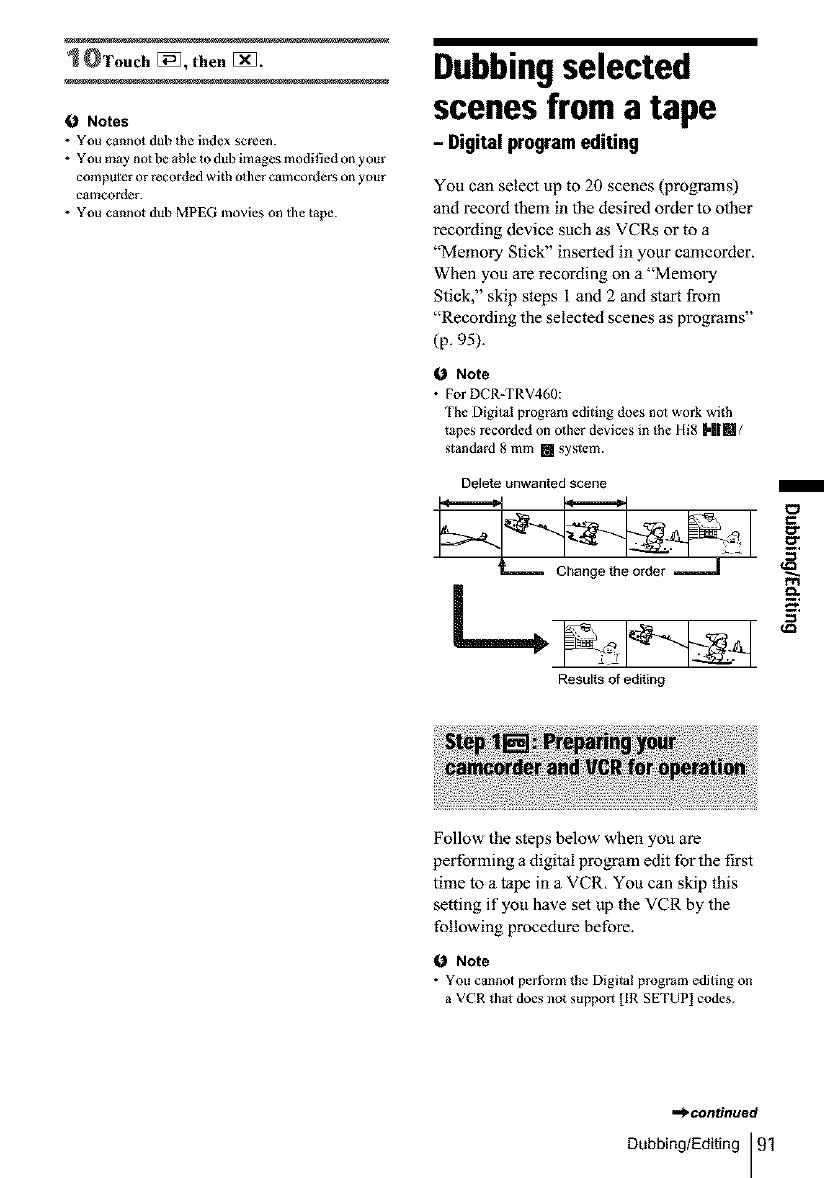
OTouch [_, then []_].
0 Notes
• You cannot dub the index screen.
•You may not be able to dub images modified on your
computer or recorded with olher camcorders on your
camcord_r.
• You cannot dub MPEG movies on the tape.
Dubbingselected
scenes froma tape
- Digital programediting
You can select up to 20 scenes (programs)
and record them in the desired order to other
recording device such as VCRs or to a
"Memory Stick" inserted in your czmcorder.
When you are recording on a "Memory
Stick," skip steps 1and 2 _nd start from
"Recording the selected scenes as programs"
(p. 95).
ONote
• For DCR-TRV460:
The Digital program editing does no1 work wi_h
t_pes recorded on olher devices in the 11i8 NI[]/
standard 8 mm [] system.
Delete unwanted scene
L_
Results of editing
Follow the steps below when you are
performing a digital program edit for the first
time to a lape in a VCR, You can skip this
setting if you have set up the VCR by the
following procedure before.
Note
• YOU cannot perform the Digital program editing on
a VCR that does not support [IR gETUP] codes.
,,_continued
Dubbing/Editing 91
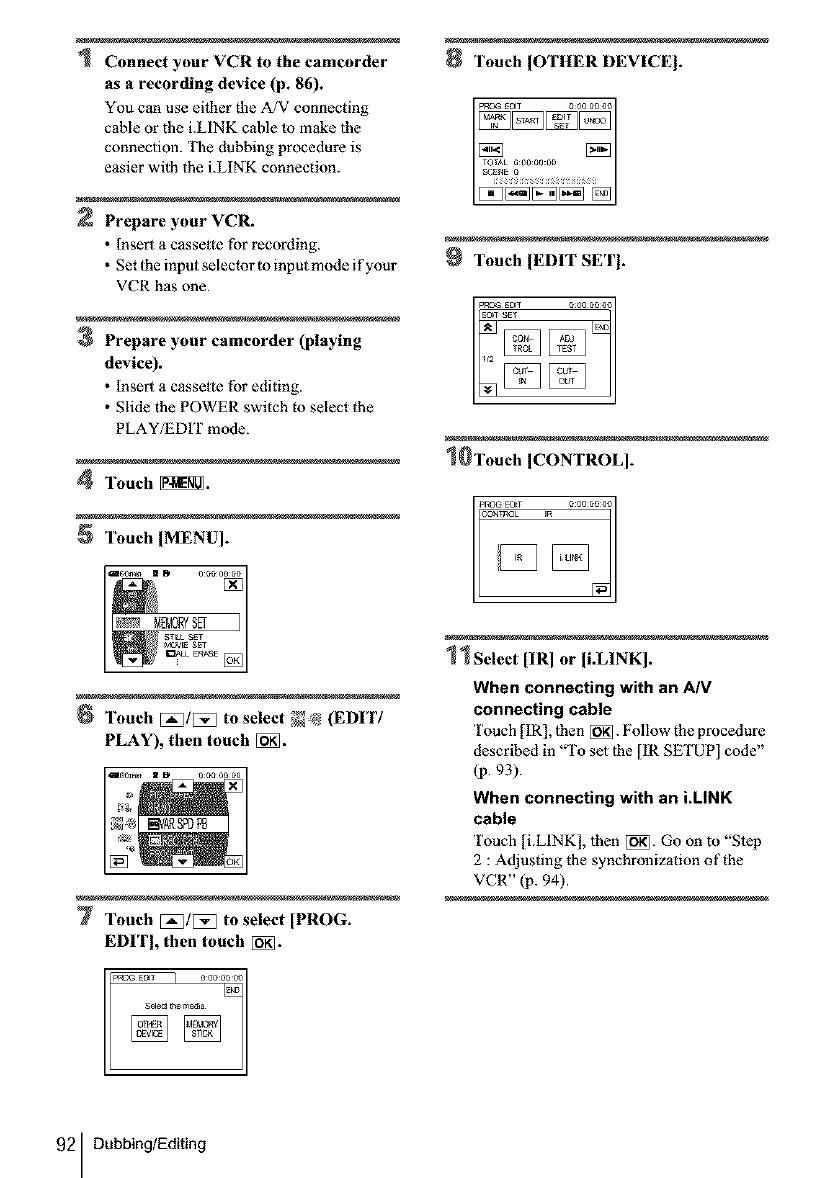
Connect your VCR to the camcorder
as a recording device (p. 86).
You can use eilher the A/V connecting
cable or the i.LINK cable to make lhe
connection. The dubbing procedure is
easier with the i.LINK connection.
Prepare your VCR.
• Insert a cassette for recording.
• Set the input selector to input mode if your
VCR has one.
3Prepare your camcorder (playing
device).
•Insert a cassette for editing.
• Slide the POWER switch to select the
PLAY/EDIT mode.
4Touch _.
Touch [MENU].
8Touch ]OTHER DEVICE I.
Touch ]EDIT SETI.
0Touch ]CONTROL].
Touch [:_/[_ to select _N (EDIT/
PLAY), then touch [_.
160_[:_i_ D 0 0e00 00
Touch [:_/[_ to select [PROG.
EDI'I], then touch [_}_].
1Select [IR] or [i.LINK].
When connecting with an A/V
connecting cable
Touch [IR], 1hen [i_. Follow the procedure
described in "To set lhe [IR SETUP] code"
(p. 93).
When connecting with an i.LINK
cable
'I'ouci_ [i.LINK], lhen [_}_]. Go on to "SIep
2 : Adjusting the synchronizalion of the
VCR" (p. 94).
92 Dubbing/Editing
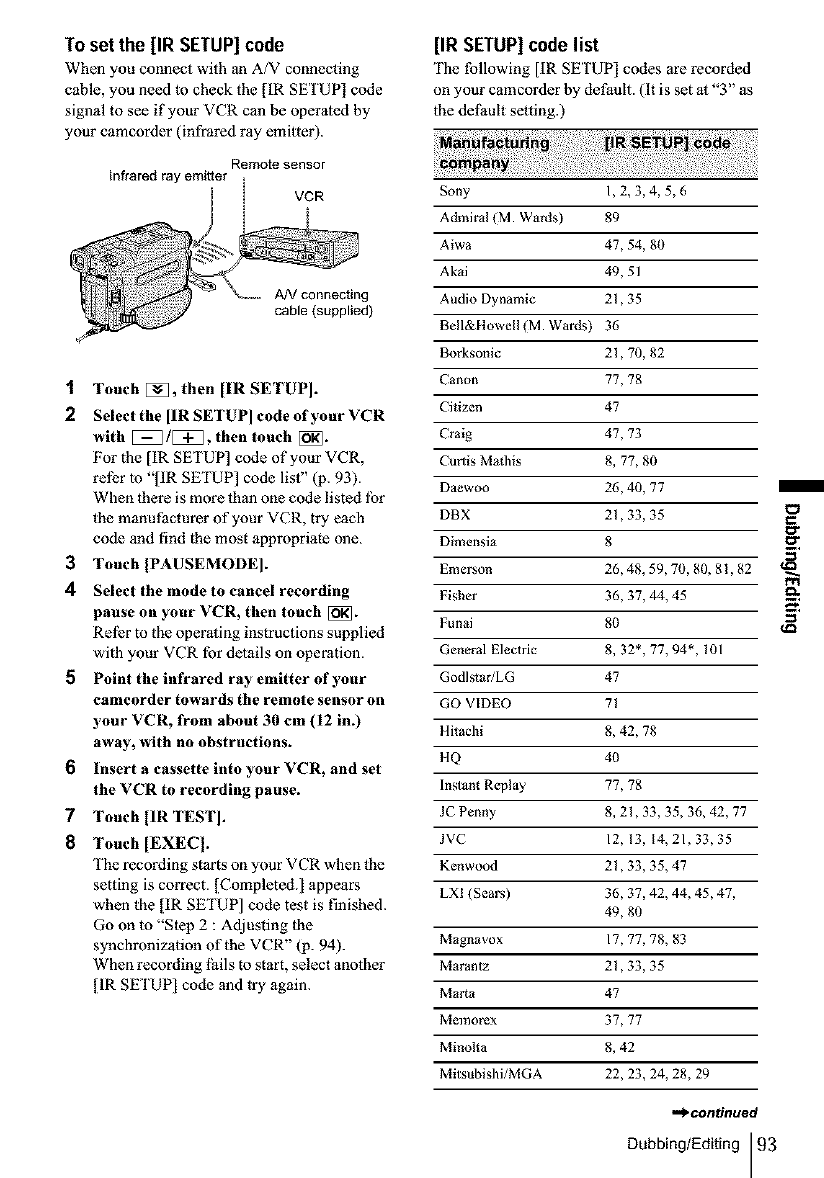
To set the [IR SETUP]code
When you connect with an A/V connecting
cable, you need to check the [IR SETUP] code
signal to see if your VCR can be operaled by
your camcorder (infrared ray emilter).
AN connecting
cable (supplied)
1 Touch [_], then [IR SETUP].
2Select the [IR SETUP] code of your VCR
with [_]/[3_, then touch [i_].
For the [IR SETUP] code of your VCR,
rel_r 1o "[IR SETUP] code list" (p. 93).
When there is more than one code listed lbr
the manufacturer of your VCR, try each
code and find the most appropriate one.
3Touch IPAUSEMODE].
4Select the mode to cancel recording
pause on your VCR, then touch [_].
Rel_r to the operating instructions supplied
with your VCR for details on operation.
5Point the infrared ray emitter of your
camcorder towards the remote sensor on
your VCR, from about 30 cm (12 in.)
away, with no obstructions.
6 Insert a cassette into your VCR, and set
the VCR to recording pause.
7Touch [IR TEST I.
8 Touch [EXEq.
The recording starts on your VCR when the
setting is correct. [Completed.] appears
when the [IR SETUP] code test is finished.
Go on to "Step 2 : Adjusting the
synchronization of the VCR" (p. 94).
When recording l_ils to start, select another
[IR SETUP] code and try again.
[IR SETUP] code list
The following [IR SETUP] codes are recorded
on your camcorder by default. (It is set at "3" as
the detlmlt setting.)
Sony 1,2,3,4,5,6
Admiral (M. Wards) 89
Aiwa 47, 54, 80
Akai 49, 51
Audio Dynamic 21,35
Bell&Howell (M. Wards) 36
Borksonic 21,70, 82
Canon 77, 78
Citizen 47
Craig 47, 73
C_artis Mad/is 8, 77, 80
Daewoo 26, 40, 77
DHX 21,33, 35
Dimensia 8
Emerson 26, 48, 59, 70, 80, 81,82
Fisher 36, 37, 44, 45
Funai 80
General Electric 8, 32", 77, 94", 101
Godlstar/LG 47
GO VIDEO 71
Hitachi 8, 42, 78
HQ 40
Instant Replay 77, 78
JC Penny 8, 21,33, 35, 36, 42, 77
JVC 12, 13, 14,21,33,35
Kenwood 21,33, 35, 47
LXI (Sears) 36, 37, 42, 44, 45, 47,
49, 80
Magnavox 17, 77, 78, 83
Marantz 21,33, 35
Marta 47
Memorex 37, 77
Minolta 8, 42
Mitsubishi/MGA 22, 23, 24, 28, 29
mi_nffnued
Dubbing/Editing 93
/
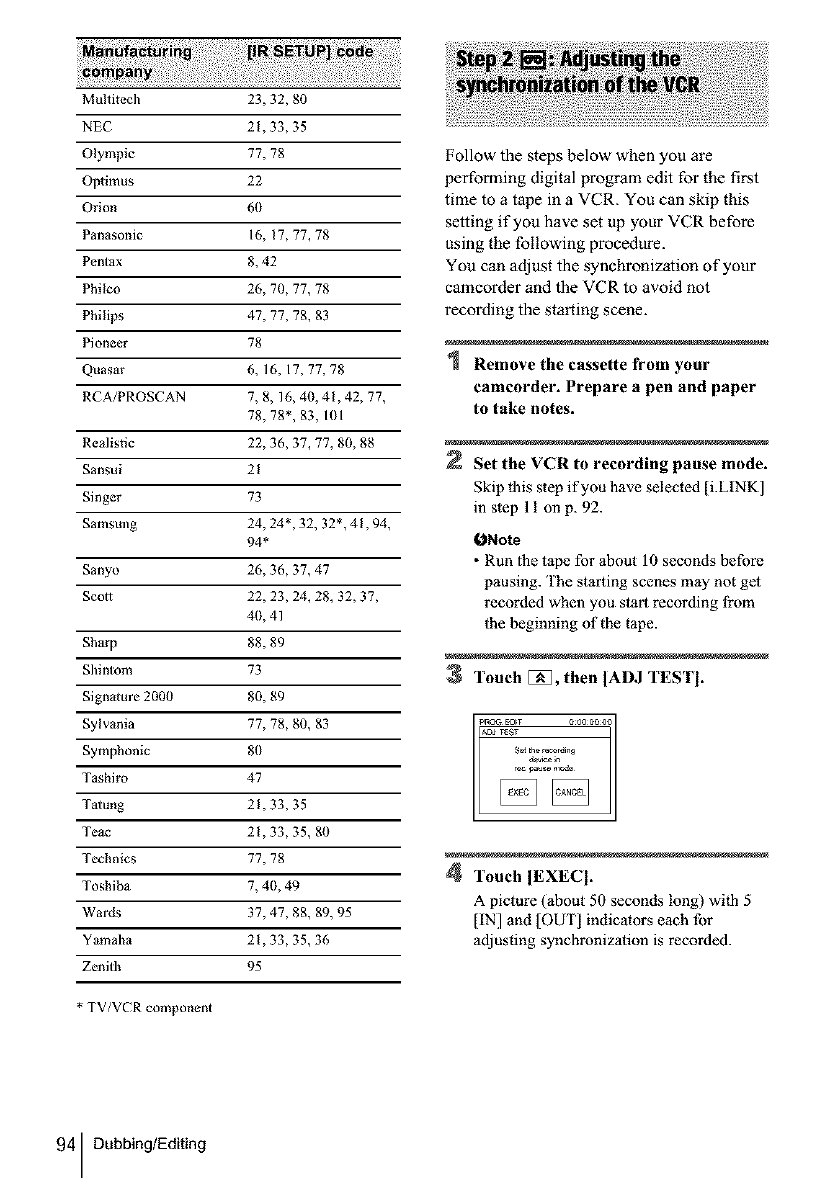
MuRitech 23, 32, 80
NEC 21,33, 35
Olympic 77, 78
Op0mus 22
Orion 6(1
Panasonic 16, 17, 77, 78
Pentax 8, 42
Philco 26, 70, 77, 78
Philips 47, 77, 78, 83
Pioneer 78
Quasar 6, 16, 17,77,78
RCA/PROSCAN 7, 8, 16, 40, 41,42, 77,
78, 78", 83, 101
Realistic 22, 36, 37, 77, 80, 88
Sansui 21
Singer 73
Samsung 24, 24*, 32, 32*, 41,94,
94*
Sanyo 26, 36, 37, 47
Scot1 22, 23, 24, 28, 32, 37,
40, 41
Sharp 88, 89
Shintom 73
Signature 2000 80, 89
Sylvania 77, 78, 80, 83
Symphonic 80
Tashiro 47
Talung 21,33, 35
Teac 21,33, 35, 80
Technics 77, 78
Toshiba 7, 4(1, 49
Wards 37, 47, 88, 89, 95
Y_maha 21,33, 35, 36
Zenith 95
* TV/VCR component
Follow the steps below when you are
performing digital program edit for the first
time to a tape in a VCR. You can skip this
setting if you have set vp your VCR before
using the following procedure.
You can adjust the synchronization of your
camcorder and the VCR to avoid not
recording the starting scene.
Remove the cassette from your
eameorder. Prepare a pen and paper
to take notes.
Set the VCR to recording pause mode.
Skip this step if you have selected [i.LINK]
in step 11 on p. 92.
ONote
• Run lhe tape for about 10 seconds before
pausing. The starting scenes may not get
recorded when you start recording from
the beginning of the tape.
3Touch [_, then IADJ TESTI.
4Touch IEXECI.
A picture (about 50 seconds long) wi|h 5
[IN] and [OUT] indicators each for
adjusting synchronization is recorded.
94 Dubbing/Editing
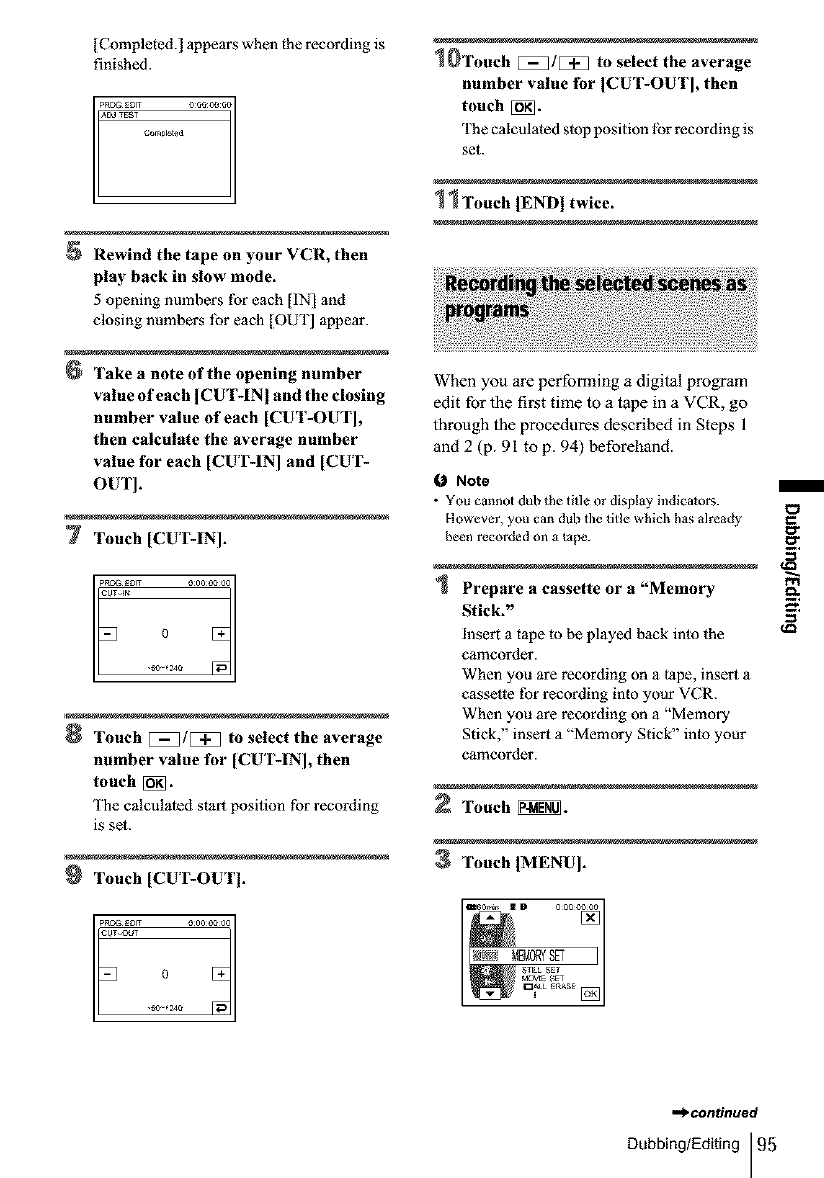
[Completed.] appears when the recording is
finished.
pRo_ EOIT
ACOTEST
Rewind the tape on your VCR, then
play back in slow mode.
5 opening numbers for each [IN[ and
closing numbers lbr each [OUT] appear.
'rake a note of the opening number
value of each [CUT-IN[ and the closing
number value of each [CUT-OUT[,
then calculate the average number
value for each [CUT-IN[ and [CUT-
OUT].
7 Touch [CUT-INI.
Touch _/_ to select the average
number value for [CUT-IN[, then
touch [_.
The calculaled start position for recording
is se£
Touch [CUT-OUrl.
1@Touch [:_]1[:_] to select the average
number value for [CUT-OUT[, then
touch [_.
The calculated slop position lbr recording is
set.
11 Touch [END] twice.
When you are performing a digital program
edit for the first time to a tape in a VCR, go
through the procedures described in Steps 1
and 2 (p. 91 to p. 94) beforehand.
0Note
•YOUcannot dub the title or display indicators.
However, you can dub tile title which has already
been recorded on a tape.
Prepare a cassette or a"Memory _.
Stick." "*
=
insert a tape to be played back into the ,a_
camcorder.
When you are recording on a tape, insert a
cassette tbr recording into your VCR.
When you are recording on a "Memory
Stick," insert a "Memory Stick" into your
camcorder.
Touch _.
Touch IMENUI.
_.continued
Dubbing/Editing 95

4Touch [:_/[[_ to select _ @ (EDIT/
PLAY), then touch [_.
Touch [:_/[[_3 to select [PROG.
EDIT], then touch [_.
7Search for the beginning of the first
scene that you want to dub on your
camcorder, then pause playback.
You can adjust the position with _ /
(fi'ame).
8Touch [MARK IN].
The starting point of the first program is sel,
and the upper part of the program mark
changes to light blue.
[tMAGESIZE} appearswhen recording
on a _MemoryStick."
Touch the desired item.
When you are recording on atape in
the VCR
'['ouch [OTHER DEVICE[.
Search for the end of the first scene
that you want to record on your
camcorder, then pause playback.
You can adjust the position with _ /
(fi'ame).
1@Touch IMARK OUT I.
The ending point of the first program is set,
and the lower part of the program mark
changes to light blue.
When you are recording on a
"Memory Stick"
1Touch [MEMORY STICK].
2 Touch [IMAGE SIZE] repeatedly to
select the desired image size.
11 Repeat steps 7 to 10 and create
programs.
l_set your VCR to recording pause.
Skip this step if your camcorder is
connected via an i,LINK cable or recording
oll a "Memory Stick."
96 Dubbing/Editing
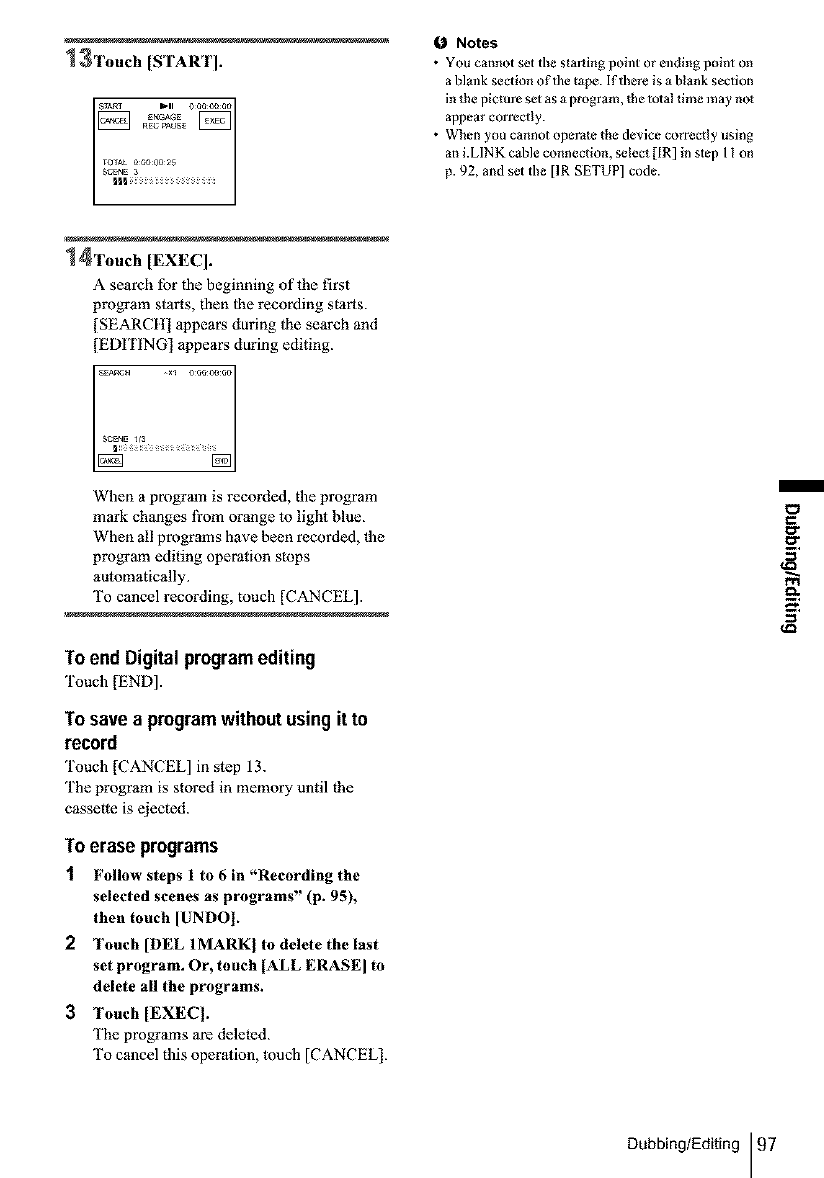
13Touch [START].
I
r
14Touch [EXECl.
Asearch for the beginning of the first
program starts, then lhe recording starts.
[SEARCH] appears during the search and
[EDITING] appears during editing.
SEa,qCH _xl 0 O000 O0
When a program is recorded, the program
mark changes fi'om orange 1o light blue.
When all programs have been recorded, lhe
program editing operation stops
automatically,
To cancel recording, touch [CANCEL[.
Toend Digital programediting
Touch [END].
To savea programwithoutusingit to
record
Touch [CANCEL] in step 13.
The program is stored in memory until the
casset*e is ejected.
Toerase programs
1FoUow steps 1 to 6 in "Recording the
selected scenes as programs" (p. 95),
then touch ]UNDO[.
2 Touch [DEL 1MARK[ to delete the last
set program. Or, touch [ALL ERASE] to
delete all the programs.
3Touch [EXEq.
The programs are deleted.
To cancel this operation, touch [CANCEL].
Notes
• YOU cannot set the starting point or ending point on
a blmlk seoion of the tape. If there is a blank section
in the picture set as a program, the total time may nol
appear correctly.
• When you cannot operate the device correctly using
an i.LINK came connection, select [IR] in step I I on
p. 92, and set the [IR SETUP] code.
rvl
Dubbing/Editing 97
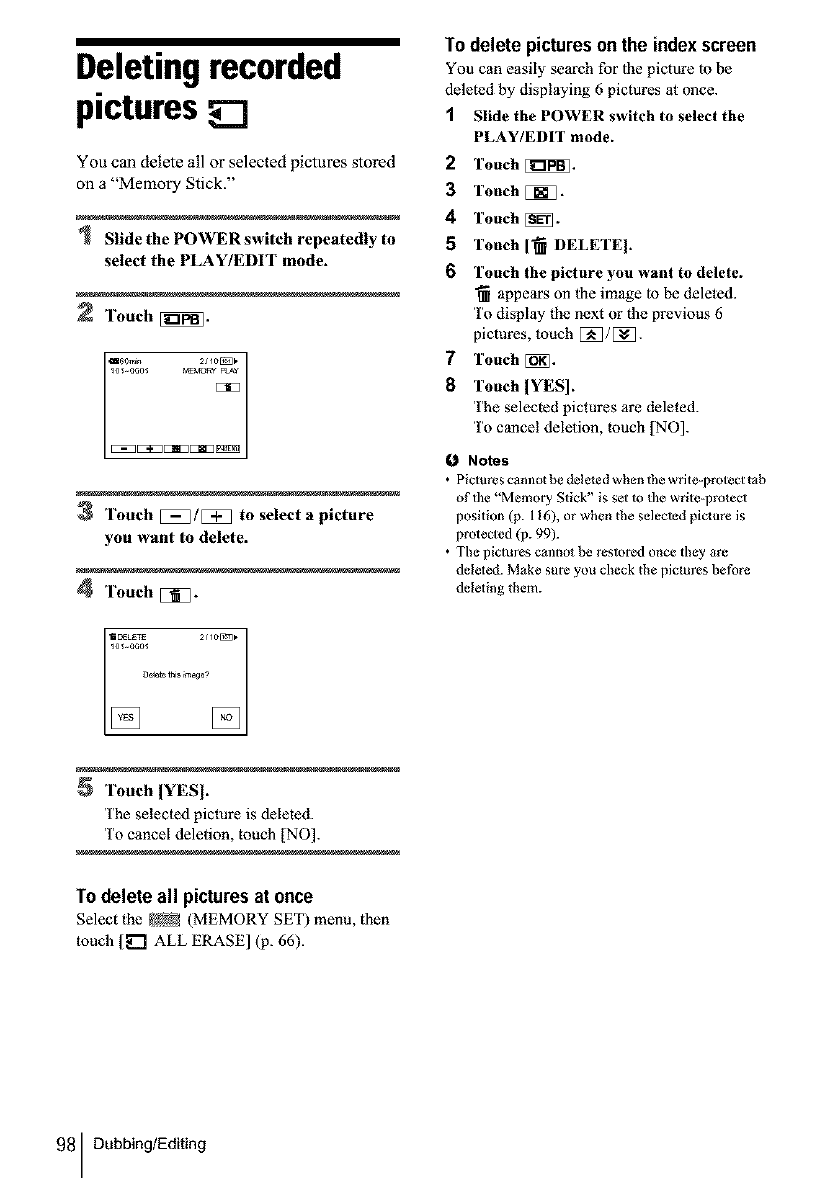
Deleting recorded
pictures
You can delete all or selected pictures stored
on a "Memory Stick."
Slide the POWER switch repeatedly to
select the PLAY/EDIT mode.
Touch [i_.
160_ 2Jl0[_
[:EZ _[:1[3 E:ISDC_:!_
3Touch [_]/E_] to select a picture
you want to delete.
4Touch [_1"
I_[ETE 2t10_
[] ..............[]
Touch IYESI.
The selected picture is deleted
To cancel deletion, touch [NO].
To delete all picturesat once
Select the [_ (MEMORY SET) menu, then
touch [_ ALL ERASE] (p. 66).
Todelete picturesonthe indexscreen
You can easily search for lhe picture lo be
deleted by displaying 6 pictures at once.
1Slide the POWER switch to select the
PLAY/EDIT mode.
2Touch _.
3Touch [_.
4Touch [_.
5 Touch ['_ DELETE].
6 Touch the picture you want to delete.
"_ appears on the image to be deleted.
To display the next or the previous 6
pictures, 1ouch [_]/E_.
7 Touch [_.
8Touch [YES].
The selected pictures are deleted.
To cancel delelion, touch [NO].
ONotes
•Pictures cannot b_ d_le_d when 1he wdte=protecl t_b
of the "M_mory Stick" is set to the write-prote¢l
position (p. 116), or when the selected picture is
protecled (p. 99).
• The pictures c_]lno_ be restored once they are
deleted. Make sure you check the pictures before
deleting them.
98 Dubbing/Editing
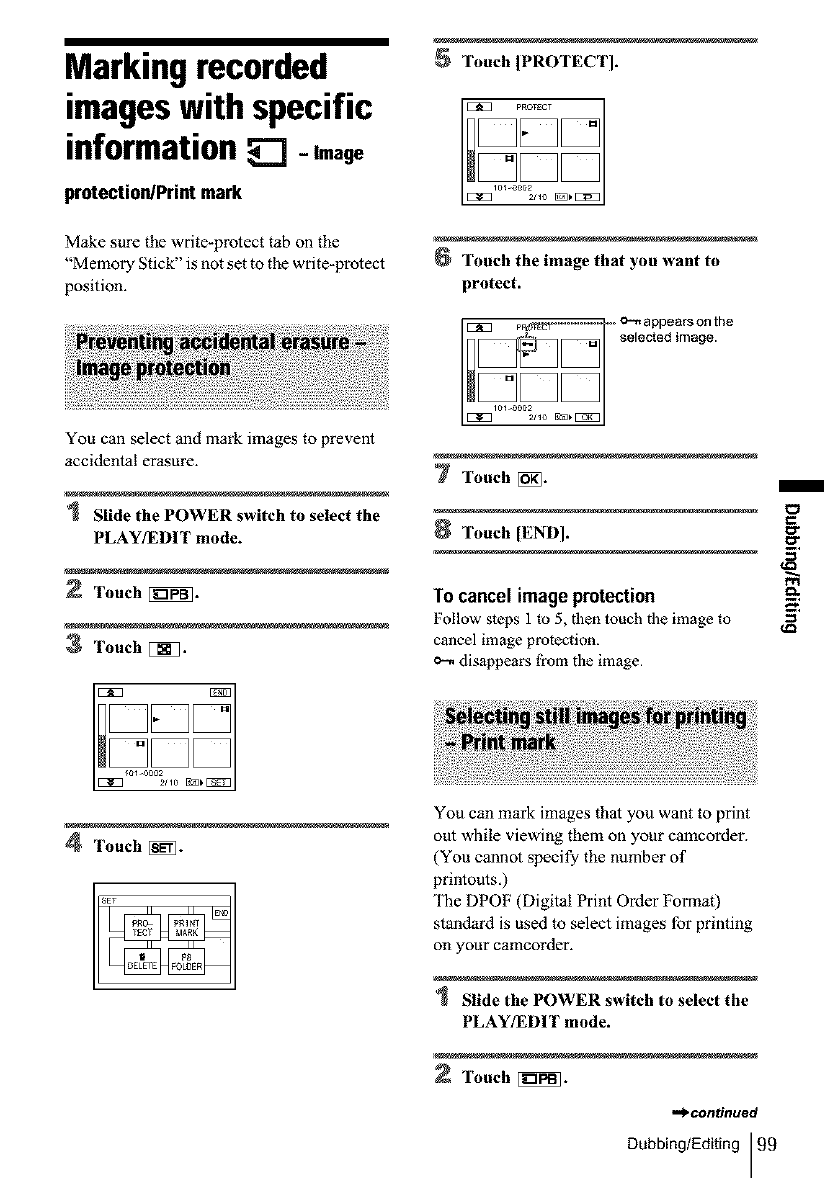
Marking recorded
imageswith specific
informationE_]-Image
protection/Printmark
Make sure the write*protect tab on the
"Memory Stick" is not set to the write*protect
position,
You can select and mark images to prevent
accidental erasure.
Slide the POWER switch to select the
PLAYIEDIT mode.
2 Touch _.
3 Touch E_].
Touch IPROTECT].
Touch the image that you want to
protect.
7Touch [_.
Touch [END].
Tocancel image protection
Follow steps 1 co 5, then touch the image to
cancel image protection.
o_ disappears from the image.
4 Touch _.
_ET
You can mark images that you want to print
out while viewing them on your camcorder.
(You cannot specify the number of
printouts,)
The DPOF (Digital Print Order Format)
standard is used to select images for printing
on your camcorder.
Slide the POWER switch to select the
PLAYIEDIT mode.
Touch [_].
,_continued
Dubbing/Editing 99
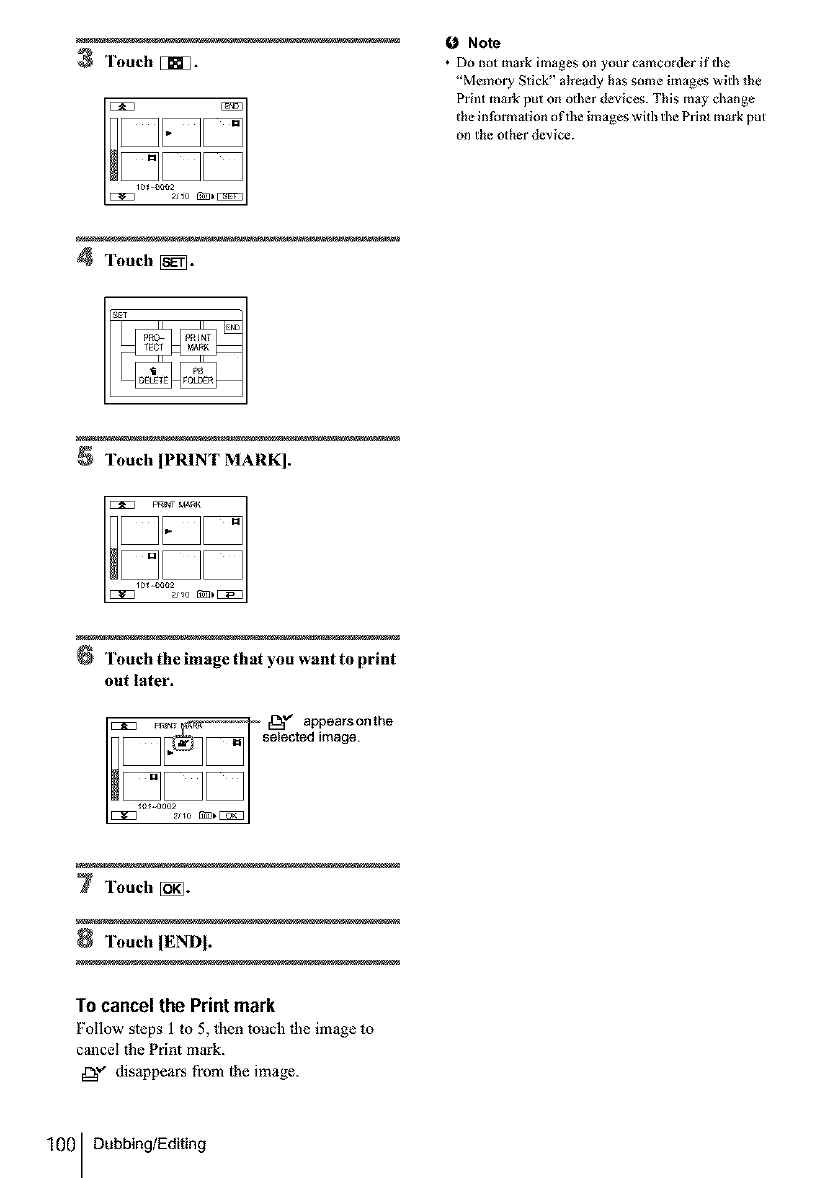
3Touch []_.
0 Note
•Do not mark images on your camcorder if the
"Memory Stick" alread_ has some images with the
Print mark put on other devices. This may change
the in_nn_ion of the images with the Print mark put
on the other device.
4Touch [_.
Touch [PRINT MARK].
Touch the image that you want to print
out later.
_m_ "Eb'_"appearsonthe
selected image.
7Touch [_.
Touch IEND].
To cancel the Print mark
Follow sleps 1to 5, then touch |he image 1o
cancel the Print mark.
_?" disappears from lhe image.
100 Dubbing/Editing
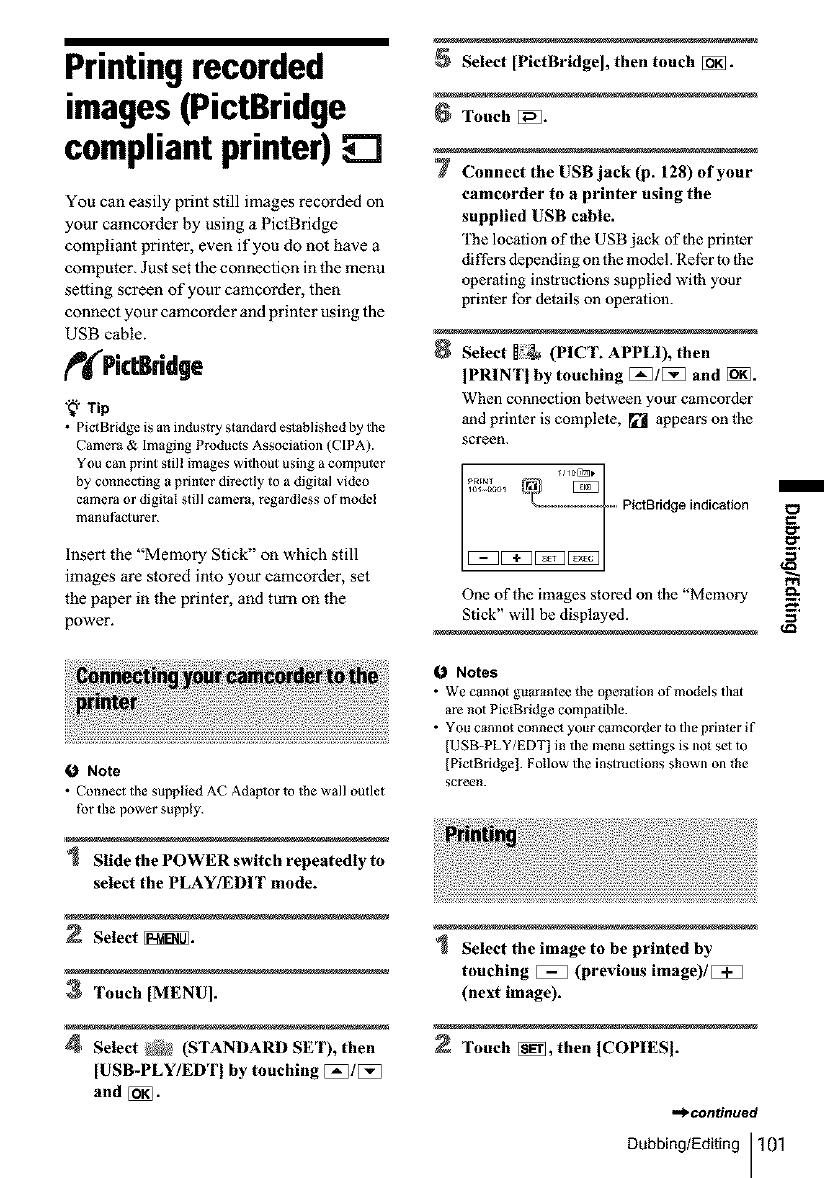
Printing recorded
images(PictBridge
compliantprinter)
You can easily print still images recorded on
your camcorder by using a PictBridge
compliant winter, even if you do not have a
computer. Just set the connection in the menu
setting screen of your camcorder, then
connect your camcorder and printer using the
USB cable.
PictBridge
"_" Tip
• Pict Bridge is an industry standard established by tile
Camera & Imaging Products Association (CIPA).
You Call print still images without using a computer
by connecting a printer direoly to a digital video
camera or digital still camera, regardless of model
manufitcturer.
Insert the "Memory Stick" on which still
images are stored into your camcorder, set
the paper in the printer, and turn on the
power.
0Note
• Connect tile supplied At-' Adaptor to the wall outlet
for the power supply.
Slide the POWER switch repeatedly to
select the PLAY/EDIT mode.
Select _.
3 Touch [MENUI.
4 Select _} (STANDARD SET), then
[USB-PLY/EDTI by touching [:_/[:_
and [_].
Select [PietBridge], then touch [_.
Touch [[_.
7 Connect the USB jack (p. 128) of your
camcorder to aprinter using the
supplied USB cable.
The location of 1he USB jack of |he printer
differs depending on the model. Rel_r m the
operating instructions supplied wi|h your
printer lbr details on operation.
Select (PICT. APPLI), then
IPRINTI by touching [_]/[_] and [_.
When connection between your camcorder
and printer is complete, _ appears on the
screen.
PictBridge indication
One of the images stored on the "Memory
Stick" will be displayed.
0Notes
•We cannot guarantee the operation of models tl/_l
are no1 Pit,Bridge compalible.
You cannot connect your camcorder to the primer if
[USB-PLY/EDT l in the menu setlings is not sel to
[PictBfidge]. Follow the instructions shown on the
screen.
Select the image to be printed by
touching _ (previous image)/
(next image).
Touch [i_, then ICOPIESI.
_.continuecl
Dubbing/Editing 101
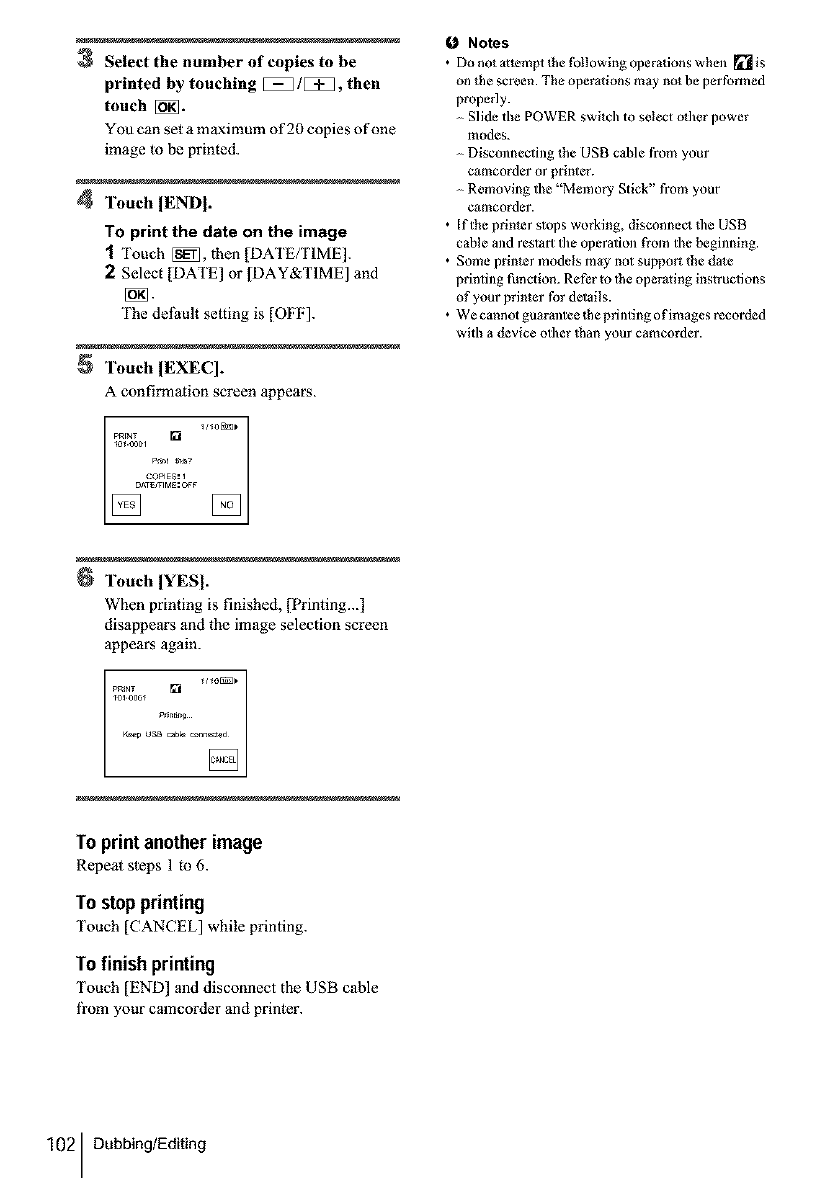
3Select the number of copies to be
printed by touching _/[_B, then
touch [_.
You can set amaximum of 20 copies of one
image to be printed.
4Touch IEND].
To print the date on the image
1Touch [_, then ]DATE/TIME].
2Select [DATE] or ]DAY&TIME] and
The defftult seCting is [OFF].
Touch IEXEC].
A confirmation screen appears.
PRFNT [] I/_0[K_P
_0_.0001
P_t MS?
Touch [YESI.
When printing is finished, [Printing...]
disappears and the image selection screen
appears again.
_olooo¢
K_O OSB_b_nn_
To print anotherimage
Repeat steps 1 to 6.
To stopprinting
Touch [CANCEL] while printing.
To finishprinting
Touch [END] and disconnect the USB cable
fi'om your camcorder and printer.
0Notes
• Donotattemptlhet_)llowingoperationswhen _is
on the screen. The operations m_y not be performed
properly.
Slide the POWER switch to select oilier power
modes.
Disconnecting _he USB c_ble from your
eamcorder or printer.
Removing the "Memory Stick" from yotw
camcorder.
•If the printer stops working, disconnect the USB
cable and restart the operation from the beginning.
• Some printer models m_y not support the da_e
printing funoion. Refer to _he operating instructions
of your printer for details.
• We cannot gtlarm_tee the printing of images recorded
with a device other than your cameorder.
102 Dubbing/Editing
Troubleshooting
Troubleshooting
If you run into any problem using your
camcorder, use the following table to
troubleshoot the problem, if the problem
persists, remove the power source and
contact your Sony dealer.
If"C:V1VI:V1VI" is displayed on the LCD
screen or the viewfinder, the self-diagnosis
display function is activated. See page 110
for details.
The power does not turn on. • Tile baltery pack is discharged, running low, or nol allached _o tile
camcorder.
-) Aliach a charged battery pack to the camcorder. (p. !4)
-)Use lhe AC Adaptor to connect to lhe wall outlei. (p. 17)
The camcorder does not operale even -)Disconnect the AC Adaptor from a wall outlet or remove the baltery
when _he power is set to on. pack, lhen reconnect it after about I minute. If the functions sdl! do not
work, press the RESET breton using a sharp-pointed object. (If you press
the RESET bul_on, all se¢lings including the clock setting (except the
Personal Menu ilems) are reset.)
The supplied Remote Commander ") get [REMOTE CTRL 1 on the _ (STANDARD SET) menu to [ON].
does not function. (p. 80)
-) Insert a battery inlo the baltery holder with the + polarities correctly
matching the + marks. If this slill does not solve the problem, insert a
new ballery since the battery is dead. (p. 129)
")Remove any obstructions between the Remote Commander and the
renlole sensor.
,.*_.continued
Troubleshooting 103
The CHG (charge) lamp does not -)Allach the baltery pack to fl_e camcorder correctly. If the lamp still does
light while the baltery pack is being not light up, then it indieales that no power is supplied from the wall
charged, outlet.
• The baltery charge is comple*ed. (p. 14)
The CHG (charge) lamp flashes wbile -) Allach the barrel 7 pack to the camcorder correctly. If the problem
the baltery pack is being charged, persists, disconnect the AC Adaptor from lhe wall outlel and contact
your Sony dealer. The battery pack may be damaged. (p. 14)
The baltery pack is quickly • The tempera*ure of tl_e environment is too low, or the baltery pack has
discharged, not been charged enough. This is not a mal funcflon.
-)Fully charge the battery again, lf_he problem persists, replace the
baltery pack with a new one. It may be damaged. (p. 14, 118)
The remaining baltery time indiealor • The temperature of the environment is too high or too low, or the baltery
does not indicale the correct time. pack has not been charged enough. This is not a malfunction.
-)Fully charge the battery again, lf_he problem persists, replace the
baltery pack with a new one. It may be damaged. (p. 14, 118)
The power turns off frequently • A problem has occurred in the remaining balte_ 7 time indica*or, or the
although the remaining baltery battery pack has not been charged enough.
indicalor indicales thai lhe batlery -)Fully charge the battery again to correct the indication. (p. 14)
)ack has enough power to operate.
The power abruptly turns off. • [A.SI tUT OFF] in the _) (STANDARD SET) menu is set to [5 rain].
(p. 81)
-)When approximately 5 minutes have elapsed while you do not operate
your cmncorder, the cmncorder is automatically tun_ed off2
Slide the POWER swilch down 1o turn tbe power on again. (p. 17) Or
use the AC Adaptor.
A problem occurs when the -) Turn off the power, and disconnect the AC Aduplor from the wall outlet.
eamcorder is connected to the AC Then, connect it again.
Adaptor.
Cassette cannot be ejected from the -) Make sure the power source (battery pack or AC Adaptor) is connected
compartment, correctly. (p. 14)
-) Remove the battery pack from the camcorder, then attach it again. (p. 14)
-)Allach a charged battery pack to the camcorder. (p. 14)
Cassette is not ejected even wben the • Moisture condensation is starling in your camcorder. (p. 121 )
cassette lid is open.
104 Troubleshooting
The remaining tape indicator is not @Set [[_ii REMAINING] to [ON] on the _ (STANDARD SET) menu
displayed, to always display the remaining tape indicator. (p. 80)
An unknown language appear5 on the _ See page 22.
:creen.
An unknown picture appears on the • The camcorder is in [DEMO MODE]. (The [DEMO MODE] is
:creen. automatically displayed when you leave the camcorder for I0 illinutes
aRer selecting CAMERA-TAPE witl/out inserting a cassette and
"Memory Stick.") Touch on the LCD screen or insert a cassette or
"Memory Stick" to cancel [DEMO MODE]. You can also set [DEMO
MODE] to [OFF] on the menu. (p. 72)
An unknown indicator appears on the -)Refer to the indicator lisl. (p. 131 )
:creen.
The letters on the screen are larger -)Press the EASY button to cancel Easy Handycom operalion (p. 33, 51 ].
than usual, or the menu settings
(_ (CAMERA SET) etc.) are not
displayed.
The buttons do not appear on the -)Touch the LCD panel lightly.
touch panel. -)Press DSPL/BAT-F INFO (or DISPLAY on lhe Remote Commander}.
(p. 54)
The buttons on the touch panel do not _ Adjust the screen ([CALIBRATION]). (p. 122)
work correctly or do not work al all.
The picture in the viewfinder is not _ Use the viewfinder lens adjuslment lever to adjust the lens. (p. I 8)
clear.
The picture in the viewfinder has -)Close the LCD panel. The piciure is not displayed in the viewfinder
disappeared, when lhe LCD panel is open. (p. 18)
,._contintted
Troubleshooting 105
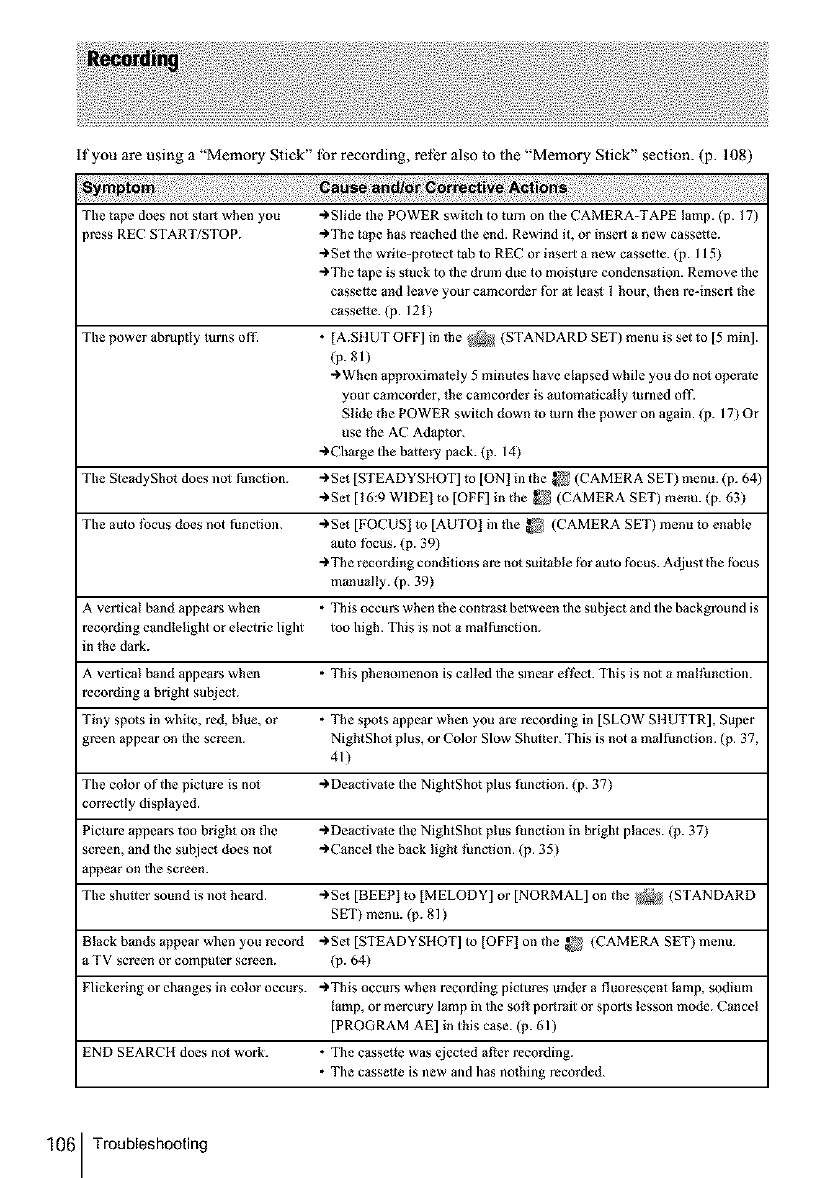
if you are using a "Memory Stick" lbr recording, ret_r also to lhe "Memory Stick" section. (p. 108)
Tile tape does no) start when you ")Slide tile POWER switch to turn on tile CAMERA TAPE lamp. (p. 17)
)ress REC START/STOP. ")The tape has reached the end. Rewind it, or insert a new cassette.
,Set tile write-protect tab to REC or insert a new cassette. (p. 115)
,The tape is sluck to the drmn due to moisture condensalion. Remove file
cassette and leave your camcorder tbr at leas) I hour, then re-insert (he
cassette. (p. 121)
The power abruptly turns off. • [A.SI JUT OFF] in lhe _ (STANDARD SET) menu is set to [5 min].
(p. 81)
")When approximately 5 minutes have elapsed while you do no) operate
your cmncorder, the cmneorder is automatically tunled ott2
Slide the POWER swilch down to turn lbe power on again. (p. 17) Or
use the AC Adaptor.
")Charge the battery pack. (p. 14)
The SteadyShot does no) function. ")Set [STEADYSHOT] to [ON] ill the _ (CAMERA SET) menu. (p. 64)
")Set [16:9 WIDE] to [OFF] in the _ (CAMERA SET) menu. (p. 63)
The auto |bcus does not function. ")Set [FOCUS] to [AUTO] in tbe _ (CAMERA SET) menu to enable
auto tbcus. (p. 39)
"The recording conditions are not suitable for auto focus. Adjust the focus
manually. (p. 39)
A vertical band appears when • This occurs when lhe contrast between the subject and the background is
recording candlelight or electric light too high. This is not a malfunction.
in the dark.
A vertical braid appears when • This phenomenon is called the smear e|]_o. This is not a mal|_ncfion.
recording a bright subject.
Tiny spots in white, red, blue, or • The spots appear when you arc recording in [SLOW S1tUTTR], Super
green appear on the screen. NightSho) plus, or Color Slow Shutter. This is not a malfunction. (p. 37,
41)
The color of the picture is no) "Deactiva)e the NightShot plus function. (p. 37)
correcfly displayed.
Picture appears too bright on the , Deactivate the NightShot plus function in bright places. (p. 37)
screen, and the subject does not ")Cancel the back light ti_nction. (p. 35)
appear on the screen.
The shulier sound is not heard. ")Set [BEEP] to [MELODY] or [NORMAL] on the _ (STANDARD
SET) menu. (p. 81 )
Black bands appear when you record ,Sel [STEADYSHOT] to [OFF] on the _! (CAMERA SET) menu.
a TV screen or computer screen. (p. 64)
Flickering or changes in color occurs. ")This occurs when recording pictures under a fluorescent lamp, sodium
lamp, or mercury lamp in the soft portrait or sports lesson mode. Cancel
[PROGRAM AE] in this case. (p. 61)
END SEARCH does no) work. • The cassette was ejected at}er recording.
• The cassette is new and has nothing recorded.
106 Troubleshooting
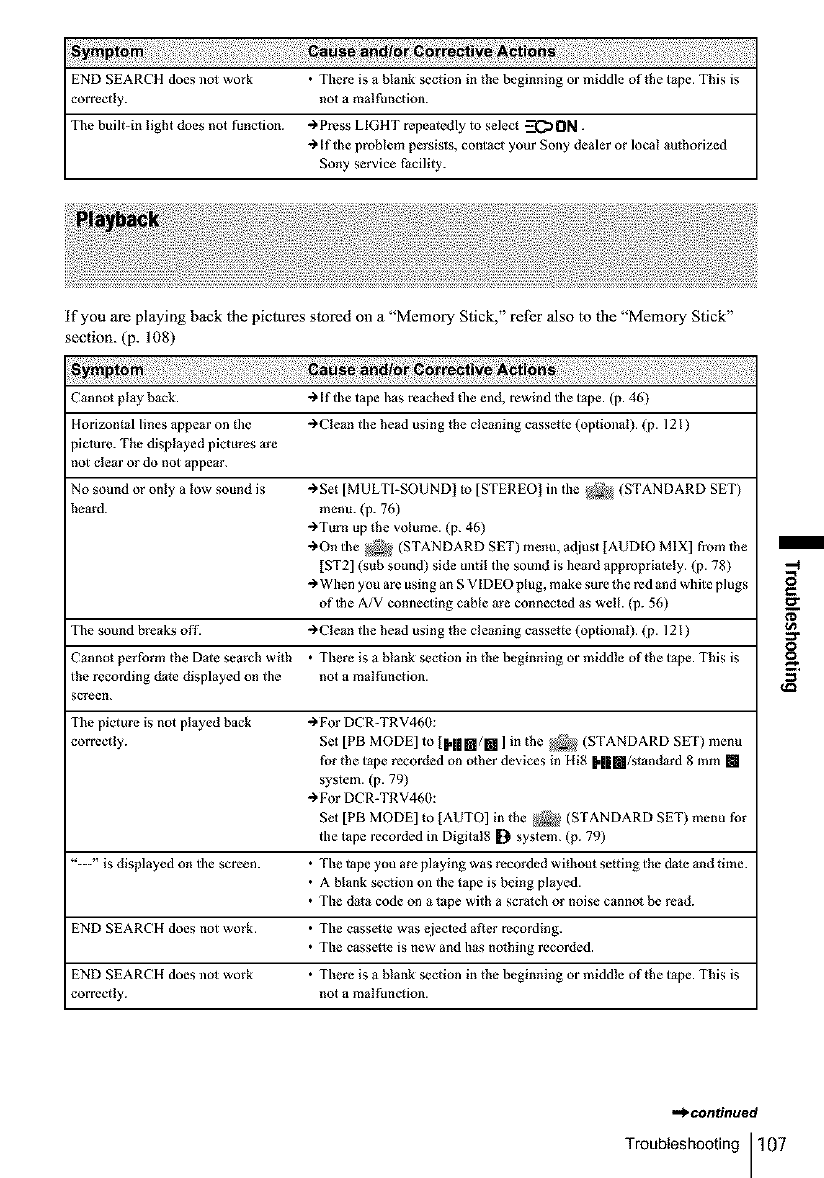
END SEARCH does not work • There is a blank section in the beginning or middle of the tape. This is
correctly, not a malfunction.
Tile built-in light does not function. -_ Press LIGHT repeatedly to select _ ON.
-_ If the problem persists, contact your Sony dealer or local authorized
Sony service Facility.
if you are playing back lhe pictures stored on a "Memory Stick," rel_r also |o tbe "Memory Stick"
section. (p. 108)
Cannot play back. "_ If the tape has reached file end, rewind tile tape. (p. 46)
Horizontal lines appear on lhe -_ Clean the head using the cleaning cassette (optional). (p. 121)
_icmre. The displayed pictures are
mt clear or do not appear.
No sound or only a low sound is "_Set [MULTI-SOUND ! to [STEREO] in the _ (STANDARD SET)
heard, menu. (p. 76)
"_Tm_ up lhe volume. (p. 46)
->On the _ (STANDARD SET) menu, adiust [AUDIO MIX] from lhe
[ST2] (sub sound) side until the sound is beard appropriately. (p. 78)
-_ When you are using an S VIDEO plug, make sure the red and white plugs
of the A/V connecting cable are connected as well. (p. 56)
The sound breaks off. -_ Clean the head using the cleaning cassette (optional). (p. 121)
Cannot perform the Dale search with • There is a blank section in the beginning or middle of the tape. This is
the recording date displayed on the not a malfunction.
icreen.
The picture is not played back ")For DCR-TRV460:
correctly. Set [PB MODE] to {H|m/[] ] in the _ (STANDARD SET) menu
for the tape recorded on other devices in Hi8 [.||[l/standard 8 mm []
system. (p. 79)
")For DCR-TRV460:
Set [PB MODE] to ]AUTO] in the _4 (STANDARD SET) menu for
the tape recorded in Digital8 [} system. (p. 79)
"---" is displayed on the screen. • The tape you are playing was recorded without se_ting the da_e and time.
• A blank section on the tape is being played.
• The data code on a tape with a scralch or noise cannot be read.
END SEARCH does not work. • The cassel_e was ejected afIer recording.
• The casse¢_e is new and has nothing recorded.
END SEARCH does nol work • There is a blank section in the beginning or middle of the tape. This is
correctly, not a malfunction.
.._continued
Troubleshooting 107
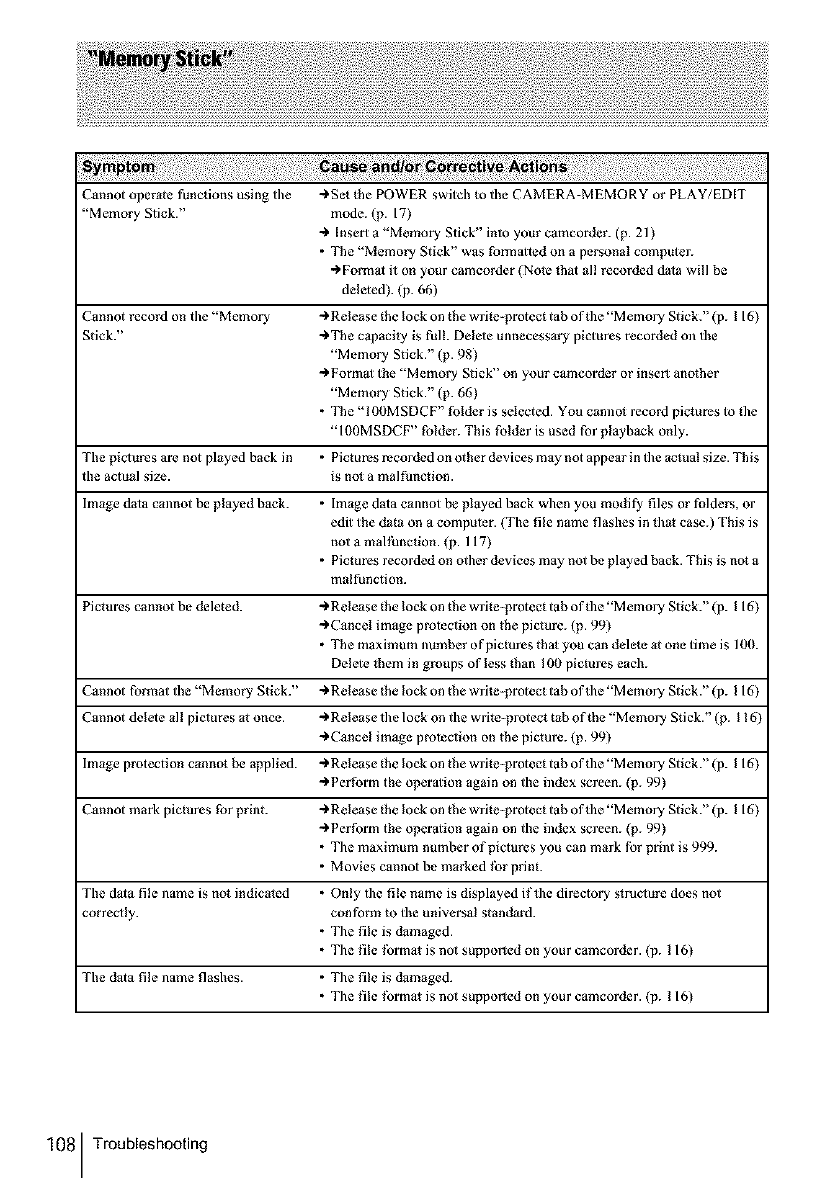
Cannot operate functions using tile _Set the POWER switch to the CAMERA-MEMORY or PLAY/EDIT
"Memory Stick." mode. (p. 17)
Insert a "Memory Stick" into your camcorder. (p. 21 )
•The "Memory Stick" was formailed on a personal computer.
-_ Fornlal it on your camcorder (Note lhat all recorded data will be
deleted). (p. 66)
Cannot record on the "Memory _ Release _he lock on the wrile protect tab of lhe "Memory Stick." (p. I 16)
Stick." _The capacily is full. Delele unnecessary pictures recorded on the
"Memory Stick." (p. 98)
_Formal the "Memory Stick" on your camcorder or insert another
"Memory Stick." (p. 66)
• The "100MSDCF" folder is selected. You cannol record pictures to the
"1 fi0MSDCF' folder. This folder is used for playback only.
The pictures are not played back in • Pictures recorded on other devices may not appear in the aclual size. This
the actual size. is no_ a malfunction.
Image data cannot be played back. • Image dala cannot be played back when you modify files or folders, or
edit the dora on a computer. (The file name flashes in that case.) This is
not a mal|_nction. (p. 117)
• Pictures recorded on other devices may not be played back. This is not a
malfunction.
Pictures cannot be deleted. _ Release _he lock on the wrile protect tab of lhe "Memory Stick." (p. I 16)
_ Cancel image protection on the picture. (p. 99)
• The maximum number of pictures tha_ you can delete at one time is 10(h
Delete lhem in groups of less than 100 piclures each.
Cannot format the "Memory Stick." _Release _he lock on the wrile protect tab of the "Memory Stick." (p. I 16)
Cannot delete all pictures at once. _Release the lock on the write-protect tab of the "Memory Sfick." (p. 116)
_ Cancel image protection on the picture. (p. 99)
Image protection cannot be applied. _Release _he lock on the wrile-pmtect tab of_he "Memory Stick." (p. 116)
_ Perform the operalion again on the index screen. (p. 99)
Cannot mark pictures for print. _ Release _he lock on the wrile-pmtect tab of the "Memory Stick." (p. I 16)
_Perform the operalion again on the index screen. (p. 99)
• The maximum number of pictures you can mark for print is 999.
• Movies cannot be marked |br print.
The dala file name is not indicated • Only the file name is displayed if the directory slruc_ure does not
correctly, con fo_zmto the universal standard.
• The file is damaged.
• The file |brmaI is not supported on your camcorder. (p. 116)
The dala file name flashes. • The file is damaged.
• The file |brmaI is not supported on your camcorder. (p. 116)
108 Troubleshooting

_il;!ii!!iii!_i_:iiii::;i_i¸iii!i_i¸iii¸;!_i:il¸II¸;i_ii_ii:i_ii:ili:il;_i!¸I!I¸_:i:;iil;_!i_:i:;iil;_!i_:i:;iil;_!ii_!!i_ii_ii_;!_i_i_i¸_:_I¸:_IIII¸iiii:i¸i:i¸;_i!;!!i¸_:_:;ii_;!!_:_:;ii_;!!_:_:;ii_;!!_:_:;ii_;!!_:_:;ii_;!!_:_:;ii_;!!_:_:;ii_;!!_:_:;ii_;!!_:_:_¸iiii_i
Piclures from connected devices are "_Set [DISPLAY] to [LCD PANEL] in file _ (STANDARD SET)
not displayed on the LCD screen or menu. (p. 81 )
the viewfinder.
Still pictures cannol be dubbed from a •You canno_ record or a dislorted picture may be recorded if the tape has
tape to a "Memory Stick." been used repealedly for recording.
M ovies canno_ be dubbed t¥om a tape •You cannot record or a dis_orted picture may be recorded in the
to a "Memory Stick." following:
- The tape has a blank section.
- The tape has been used repealedly for recording.
- Input signal has been interrupted or cut.
Digital program editing on the tape "_Set the input selector on the VCR correctly, _hen check the connection
does not function, between your camcorder and the VCR. (p. 86)
")When your camcorder is connected to a DV device _hat is not a Sony
produd via an i.LINK cable, seled [IR] in stepl 1 of"Step I: Preparing
your camcorder and VCR for operation" (p. 91 ).
")Adjust the synchronization of the VCR. (p. 94)
")Enter a correct [IR SETUP] code. (p. 93)
"_Select the mode used to cancel recording pause again. (p. 93)
"_Set your camcorder and the VCR more than 30 cm ( 12 in.) apa_. (p. 93 )
")Set [PB MODE] to ]AUTO] in the _ (STANDARD SET) menu.
(p. 79)
•The program may not be set to a blank section on the tape.
• While connecting via an i.LINK cable, select [IR] in step I 1 of "S_ep 1:
Preparing your camcorder and VCR for operation" (p. 91 ).
The VCR is not responding properly
during Digital program editing when
it is connected via an i.L1NK cable.
Digital program editing on the • The program may not be set to a blank secdon on the tape.
"Memory Stick" does not function • You canno_ record or a dislorted piclure may be recorded if the tape has
correctly, been used repe_ledly for recording.
Troubleshooting 109
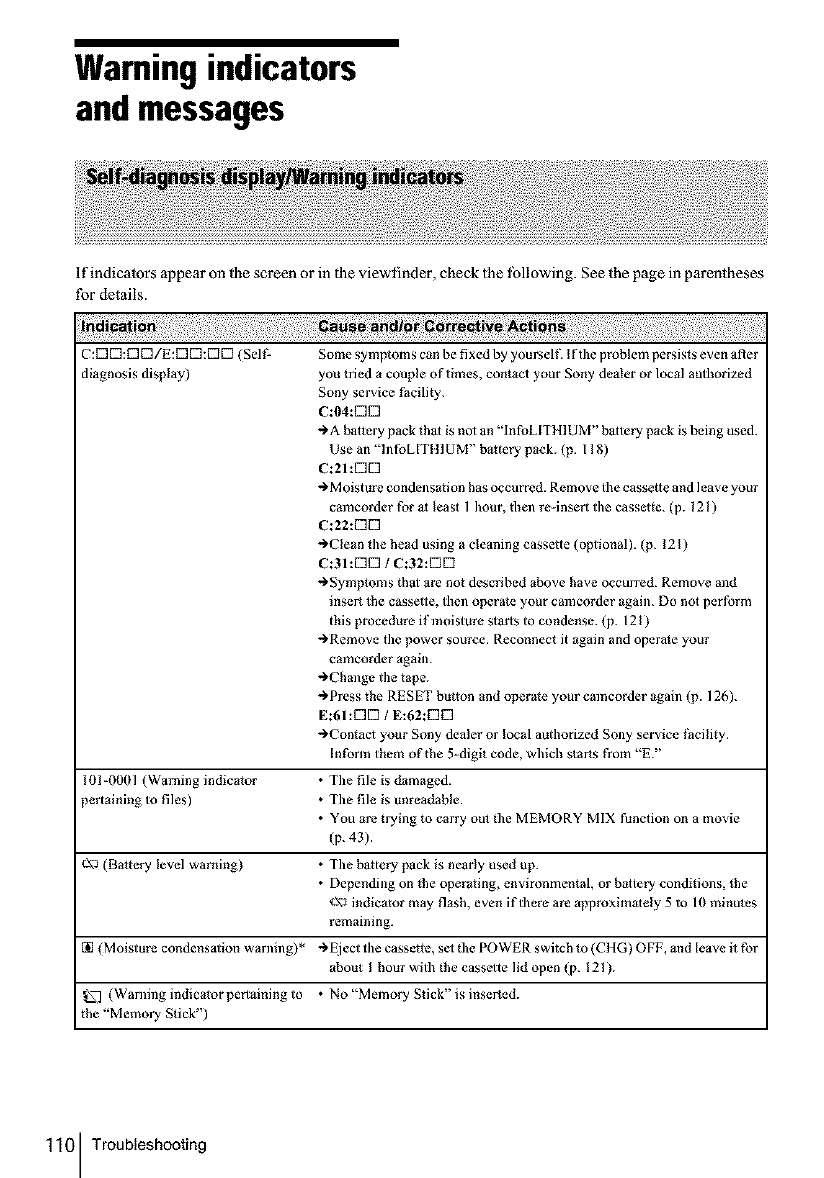
Warning indicators
and messages
If indicators appear on lhe screen or in the viewfinder, check lhe lbllowing. See the page in parentheses
for details.
C:ff]ff]:DD/E:ff]ff]:DD (Selt: Some symptoms can be fixed by yourselt: If the problem persists even aRer
diagnosis display) you tried a couple of times, contact your Sony dealer or local authorized
I01-0001 (Warning indicator
pertaining to files)
c'_ (Battery level warning)
[] (Moisture condensaflon warning)*
(Warning indicator pertaining to
the "Memory Stick")
Sony service Facility.
C:04:K]K]
"_A battery pack thai is no1 an "InfoLlTH] UM" baltery pack is being used.
Use an "lnfoL[TIIlUM" battery pack. (p. I 18)
C:21:DD
"_M oisture condensation has occurred. Remove the cassette and leave your
cmncorder for al least 1 hour, tfien re-insert tile cassette. (p. 121)
C:22:DD
-)Clean the head using a cleaning cassette (optional). (p. 121)
C:31:DD /C:32:DE]
"_Symp_oms thai are not described _bove have occurred. Remove and
insert the cassette, then opera*e your camcorder again. Do not perform
this procedure if mNsture starts to condense. (p. 121)
"_Remove the power source. Reconnect it again and operale your
cmncorder again.
÷Change the tape.
"_Press the RESET button and operale your camcorder again (p. 126).
E:61:DE] /E:62:E]E]
")Contact your Sony dealer or local authorized Sony service Facility.
Inform them of the 5-digit code, wldch starts from "E."
•The file is dumaged.
• The file is unreadable.
• You are trying to carry oul Ike MEMORY MIX function on a movie
(p. 43).
• The battery pack is nearly used up.
• Depending on the operating, envimnmentai, or baltery conditions, the
¢_\_indicator may flash, even if there are approximalely 5 to 10 minule
remaining.
"_fiject the cassette, sel lke POWER switch to (CHG) OFF, and leave it for
about I hour with the cassette lid open (p. 121 ).
• No "Memory Stick" is inserted.
110 Troubleshooting
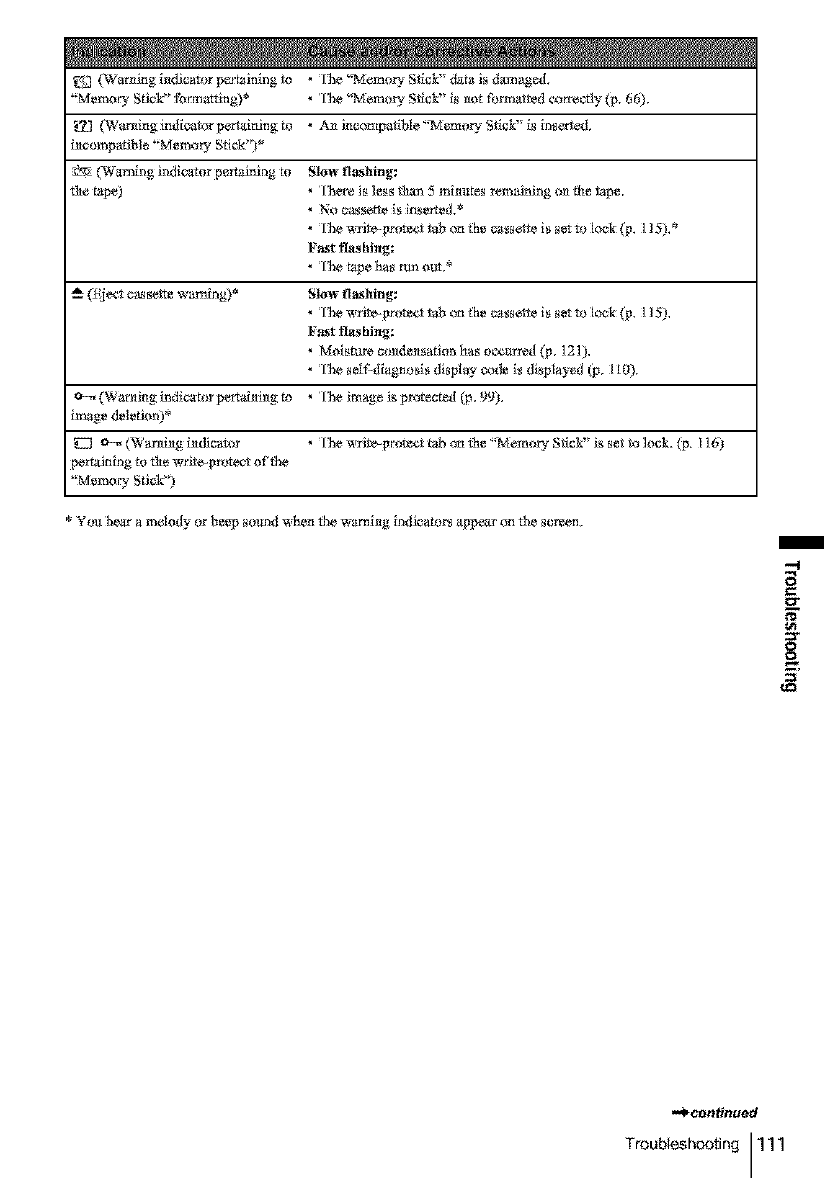
_ (Warni_Ig i_dJc_r_)r p_i_ing to * I'he '_Mem_)u¢ 8_¢k" data i_ damaged.
"Memory StJ_k _' _marrlng)* • ¸[The '!Mem_ S_ick" i_ _ot _rm_tted correctly (p. 6_,
(War_fitIg indicator per'_xlrfi_g _ • AJa i_compat_ble _?¢lem_¢ S_ic_' i_ in_e_ed,
i_comp_tJbl_ '_Memory St_k_ *
(War_r_g ir_dica_r p_rt_nlng _ Slo_ ftashing_
_he t_p_ • There i_ les_ tha_ 5 mimtte_ remaining t_n the tape,
• ¸]¸Thewrit_e_ _ab o_ _h_ _erte is _ m lock (p. 115),*
Fast t_tshi_g:
• The tape ha_ am our. _
_ect e_e_v-e w_rn_ng)* Slo_ ftaslting_
• ¸]¸Thewrit_e_ _ab o_ _h_ _e_te is _t m lock (p. 115),
Fast tlashi_g:
• Moisture _t_de_ts_tJo_ ha_ o_¢urred (_, J2J),
• The _el_diagn_s di_pI_ _o_ i_ di_pI_d _, II_).
(Warrtir_g indicator perva_m_g to • The _m_ is prot_ted _, 9_),
i_ge deletion) _
e-_ (W_r_i_g i_dlc_r_r * ]he wri_e_r_ect _ab o_I th_ '_*¢lem t_U¢S_ick" i_ _et to ]oek, (p. I ] 6)
pertai_Iing m the wri_c_Fr_tec_ o_'rhe
'_Memor 3, Sti6k' 3
• *t'ou hear a melody t_r beep _otmd whe_I the w_rni_g ir_dJcamrs appear o_I the _creen,
m
--!
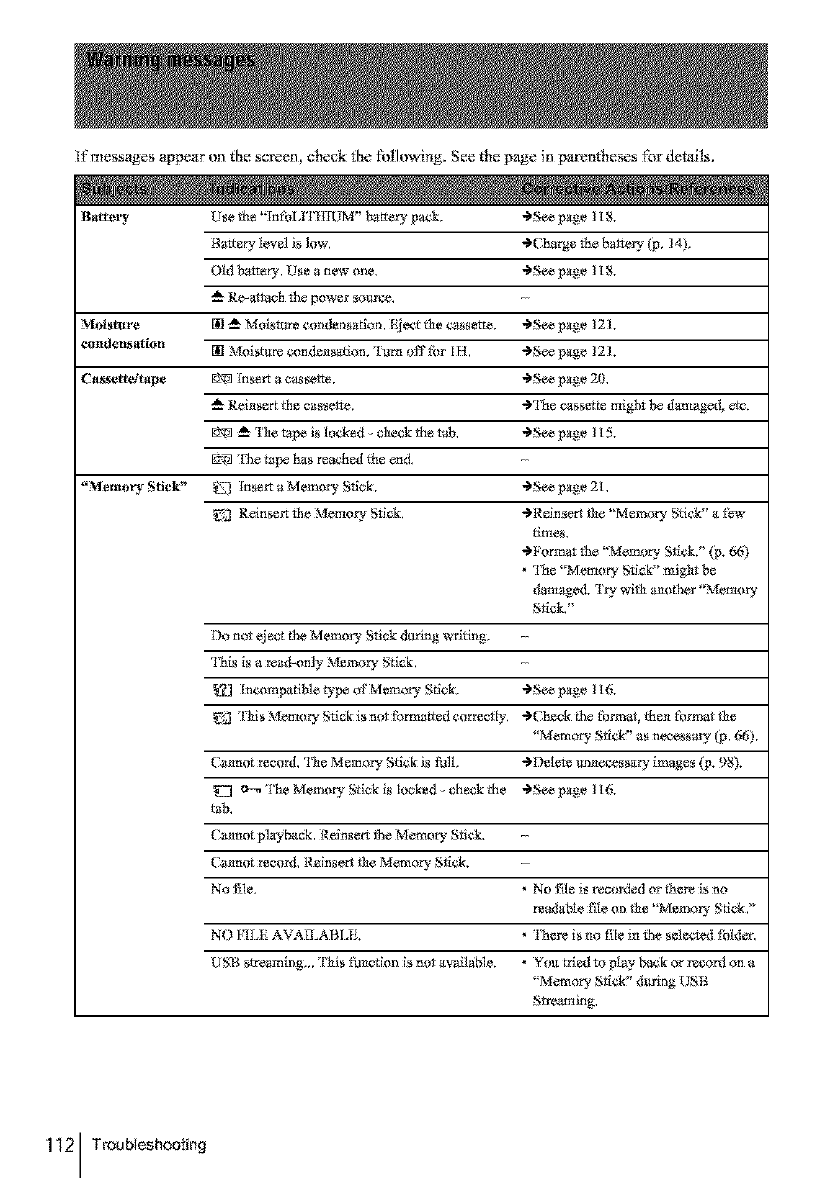
l_'messages appear on {he s_reen, et_eck {hefollowing, See t|_epage in parer*thesesfor de_dls.
112 Tmubleshoo_irlg
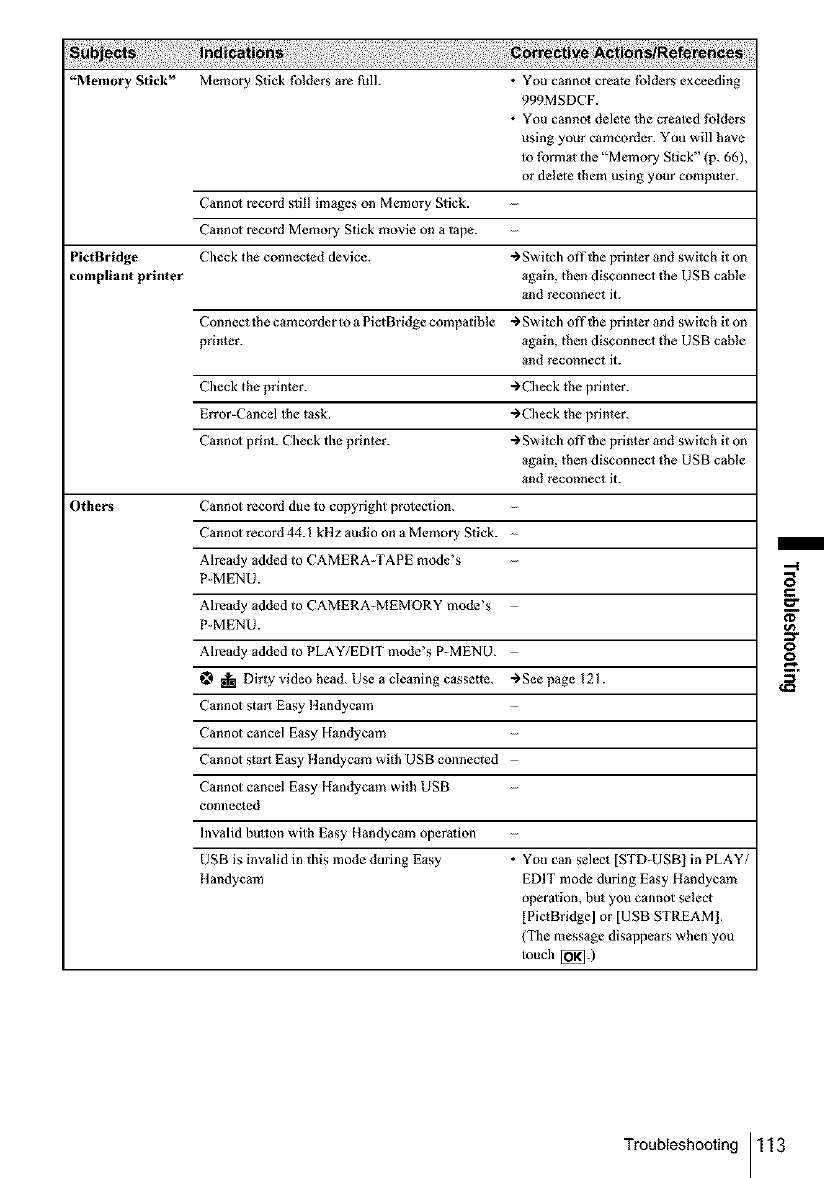
ii!ii:iil;i ;i: i:ii:::iii::i:
"Memory Stick" Memory Stick folders are full. • You cannol create |biders exceeding
999MSDCF.
• You cannol delete lhe created folders
using your camcorder. You will have
to format the "Memory Stick" (p. 66),
or delete them using your computer.
Cannol record still images on Memory Stick.
Cannol record Memory Stick movie on a tape.
PietBridge Check the connected device. ÷Switch off-the printer and switch it on
compliant printer again, then disconnect the USB cable
and reconnect it.
Connect the camcorder to a PictBridge compatible ÷Switch offlhe printer and switch it on
printer, again, then disconnect the USB cable
and reconnect it.
Check the printer. "_Check the printer.
Error-Cancel the t_sk. -_CJmck the printer.
Cannol print. Check the pdnter. "_Switch offlhe printer and switch it on
again, then disconnect the USB cable
and reconnect it.
Others Cannot record due to copyright protection.
Cannol record 44.1 kHz audio on a Memory Stick.
Already added to CAMERA TAPE mode's
P-MENU.
Already added to CAMERA-MEMORY mode's
P-MENU.
Already added to PLAY/EDIT mode's P-MENU.
i Dirty video head. Use a cleaning cassette. ÷See page 121.
Cannot start Easy llandycam
Cannot cancel Easy Handycam
Cannot start Easy 1tandycam with USB connected
Cannot cancel Easy Handycam with USB
connected
Invalid bulton with Easy Handycam operarion
USB is invalid in this mode during Easy • You can select [STD-USB] in PLAY/
ltandycam EDIT mode during Easy Handycam
operalion, bu_ you cannot select
[PictBridge] or [USB STREAM 1.
(The message disappears when you
touch [_] .)
Troubleshooting 113
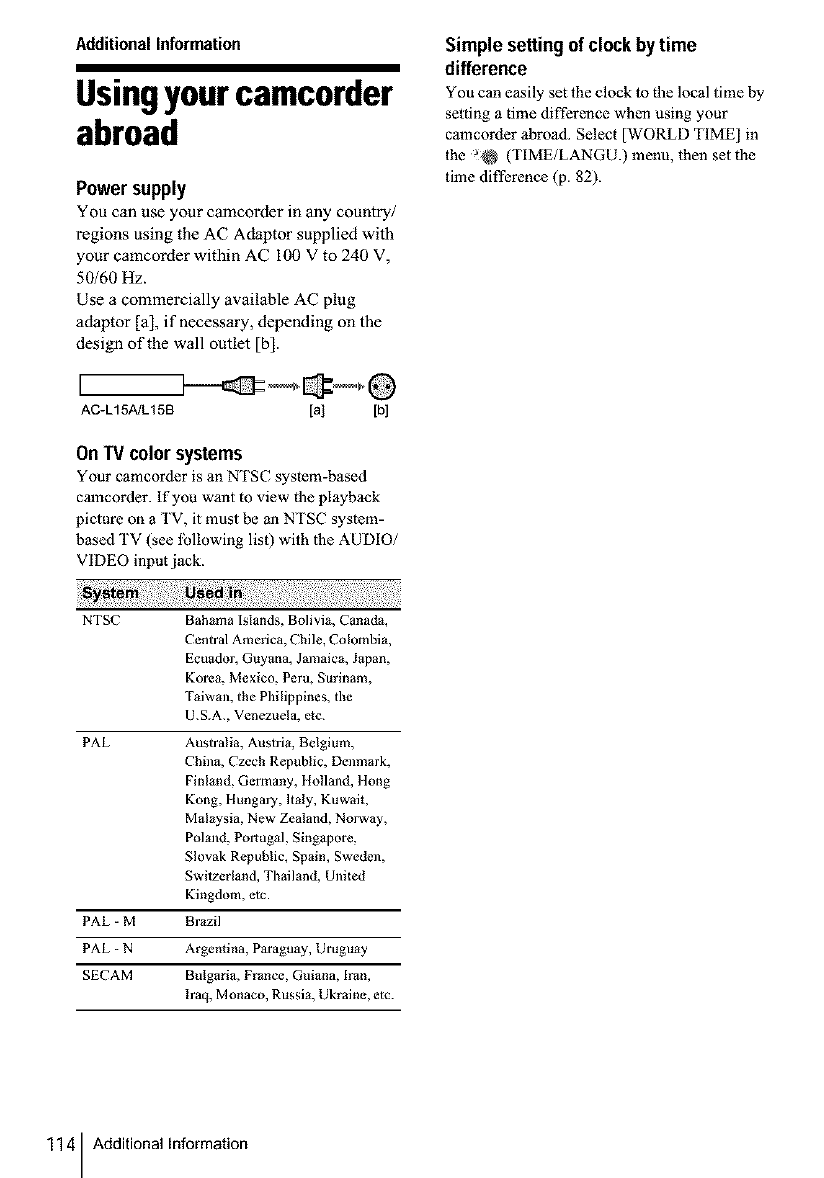
Additional information
Usingyourcamcorder
abroad
Powersupply
You can use your camcorder in any country/
regions using the AC Adaptor supplied with
your eamcorder within AC I00 V to 240 V,
50/60 Hz.
Use a commercially available AC plug
adaptor [a], if necessary, depending on the
design of the wall outlet [b].
I
AC-L15A/LI 5B [a] [b]
On TV color systems
Your camcorder is an NTSC system-based
camcorder. If you want to view the playback
picture on a TV, it must be an NTSC system-
based TV (see lbllowing list) with the AUDIO/
VIDEO input jack.
Simple setting of clockby time
difference
You can easily set the clock to the local time by
setting atime difference when using your
camcorder abroad. Select [WORLD TIME] in
the _ (TIME/LANGU.) menu, then set the
time difference (p. 82).
NTSC Bahama Islands, Bolivia, Canada,
Central America, Chile, Colombia,
Ecuador, Guyana, Jmnaica, Japan,
Korea, Mexico, Peru, Surinam,
Taiwan, the Philippines, the
U.S.A., Venezuela, etc.
PAL Australia, Austria, Belgium,
China, Czech Republic, Denmark,
Finland, Germany, I lolland, Hung
Kong, Hungary, Italy, Kuwait,
Malaysia, New Zealand, Norway,
Poland, Portugal, Singapore,
Slovak Republic, Spain, Sweden,
Swilzerland, Thailand, United
Kingdom, etc.
PAL - M Brazil
PAL =N Argentina, Paraguay, Uruguay
SECAM Bulgaria, France, Guiana, [ran,
Iraq, Monaco, Russia, Ukraine, etc.
114 AdditionalInformation
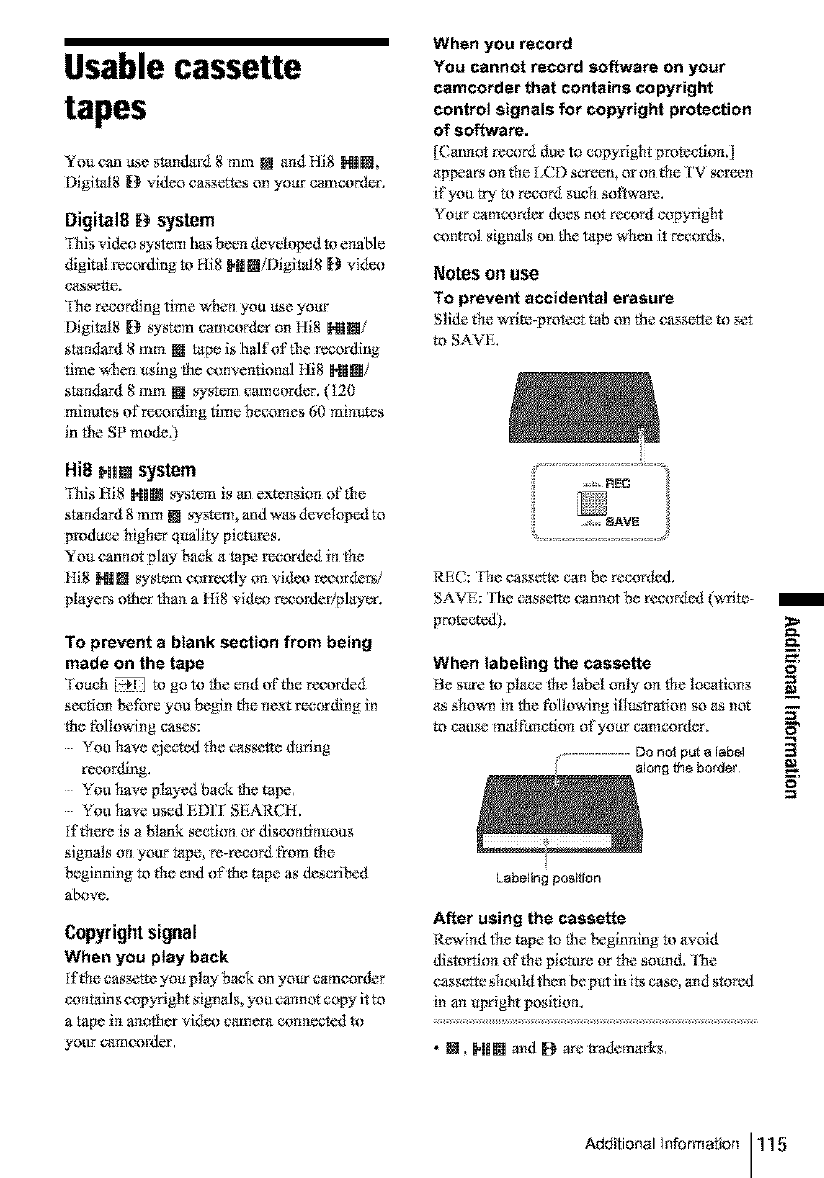
Usablecassette
tapes
Yo_ c_m use stan&rd 8 mm NI arid tli8 IN|[],
Dighal8 D video cassettes on yotlr c_mcorder,
Digitel8 Dsystem
'rhis video system has been developed to ermble
digital recordiwg to Hi8 H|_/Digital8 [_ vid_x_
c4_seto%
'Ihe recording time wherl yea use your
Digital8 [_ system cameorder on Hi8 NilN/
st_mdard 8 mm [] tape is half of re recording
time when _ing the conventional Hi8 []|[]/
standard 8 mm [] system camcorder. (120
minutes of recording time becomes 60 minutes
in Ne SP mode.)
Hi8 PRl[]system
This :qi8 NJ[] system is an exten_ior= or'the
staridard 8 mm [] system, and was devek_pexl t_
pmdace higher q*_ality pic_es.
You canrmt play back a tape recorded iri the
Hi8 N|• system correctly on video r*'cor_er_/
players other than a Hi8 vidc<_ rt_'ordelqplayer.
To prevent a blank section from being
made on the tape
'roach _ to go to the er=d or'the recorded
section t_fore you begin the riext r_'cording in
the tbllowing cases:
Yea have eje,_ed the cassette daring
recordJr_g.
You have played back the tape.
You have used EDIT SEARCH.
If there is a rank section or discontirl_ous
signals ori yo0r tape, re-reeor_ from the
beginning to the end o£ th* tape as deseriI_d
above.
Copyrightsignal
When you play back
lfth_ cassette you play back on yo_r camcorder
corit_dns c_pyright signals, you carmut copy it tx_
a tape iri another vid_x_ c_mera con nec_ted to
yo0r camcorder.
When you record
You cannot record software on your
camcorder that contains copyright
control signals for copyright protection
of software.
[(armor record due to c_pyright protecti_r=.]
appears on the [CD screeta or on th_ TV screen
if yea try to reco_ such software.
Yoar camcor_ter does not record copyright
control signals on the tape when it rec_rds.
Notes oll use
To prevent accidental erasure
Slide th_ _i_- _teta tab _n the cassette _ _t
m SAVE.
REC: 'Ihe cassette can be recorded.
SAVE: 'Ihe cassett_ cannot be receded (writa-
pr_lteeted).
When labeling the cassette
Be sIlre to ph_ce the labe! onl_ on the locatians
as _hown in the following ill_stration so as not
m cause mNthnctiorl of your camcorder.
DOn_ p_ a label
along t_e border
Labeling poNl_on
After using the cassette
Rewind the tape to the t_ginning to avoid
distortion or'the pictt_ or the sound. l'he
cassette _houldthen be p_t it_ its case, and stored
in an _pright position.
• _, H_[]and_ are tradem_u'ks.
m
o
Additional Informatior_ 115
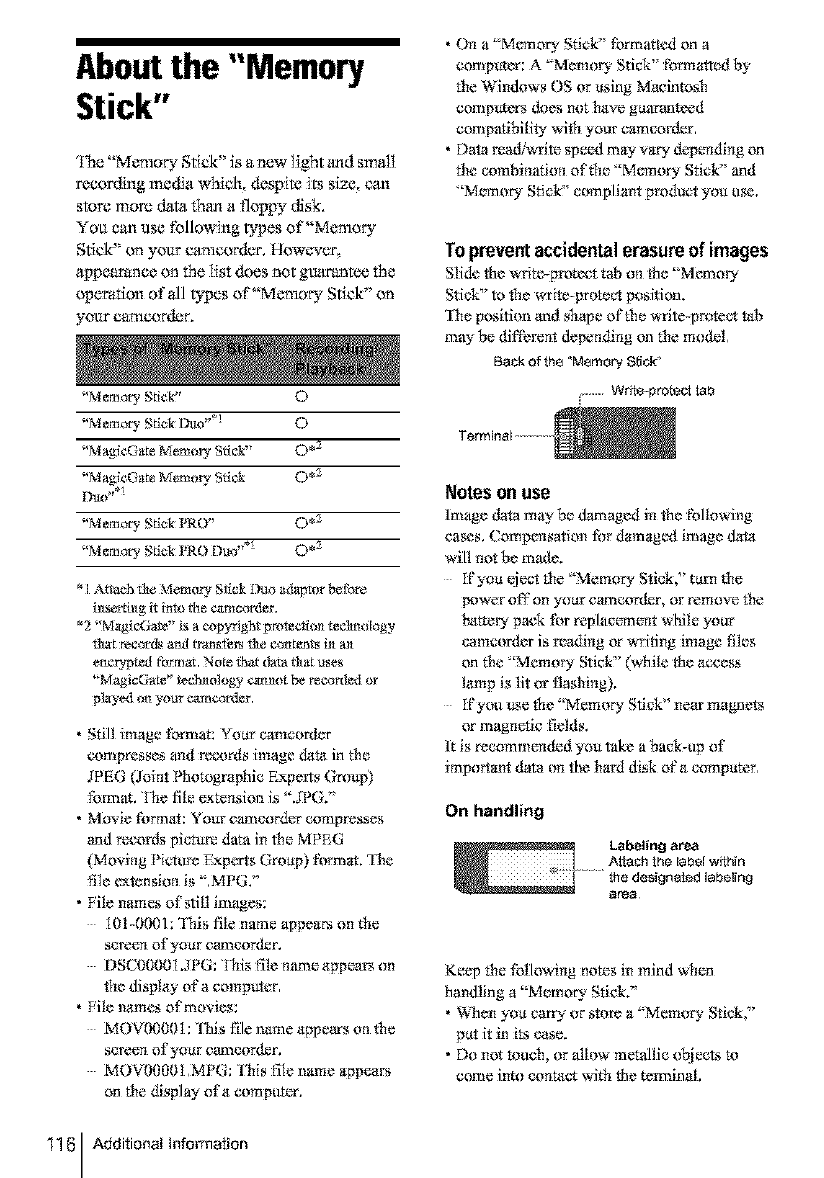
Aboutthe "Memory
Stick"
'I_e "Memary Stick '_is a new l_ght and small
recording media which, dcsplm its size, c_
store more data than a fl_ppy disk,
Yau can use following typos of"Memory
Stick" on yo_ came*ardor, However,
appearance on the list _s not _antee the
operation of all types of"Memory Stick" on
yo_ came*ardor.
"M_mory Stk'k" O
"M_mory Sdck Duo "°! O
"Magie(}a_ Memo UBrick" 0 *2
_'Magi¢C..}a_ M_m{}_ Brick 0 *2
"M_mory St_ PRO" 0 *2
"M_mory St_ PRO Duo ".I 0 *2
*1 Attach Ne Memory Stick ITmo a_lalrcor be Fore
i_ser ti_tg it into the _amcorder,
*2 _!MagicGate" is a _pyright _rom_ti{}_ techn_[ogy
_t ¸records am{ transits _e c_ntea_ts i_ m_
e_tc_yted f_rm_, N_t_ _t data &at uses
'_Magla@ate" technology ¢_a be r_c_r*led or
¸played {m your _m_rd_r.
•Still image format: Yottr tam,order
compresses arid records image &ata in t!ie
JPEG 0oin* Photographic Expe!ls Ore_p)
fore,at. 'I]ae file e_tonsio_ is "..IPG/'
• Movie tbrmat: Your ¢a_cor_r compresses
and rtx'oNs pic_ data in Ne MPEG
(Movirig Pictt/_ FLxperts Grottp) format, 'lhe
file _tensi_ri is ",MPG2'
• File names of still irr_ages:
101-0{K?I: 'Ibis file name appears on Ne
screer_ ofyoar camcorder.
DSC00001.JPG: 'Ibis file name apvoa!=_ on
Ne display of a computer.
•File names ofrr!o¥ies:
MOV00001 :lhis file name appears on Ne
sereer_ of your camcorder.
MOV00001 .MPG: This file name appears
on Ne display ofa comvotor.
116 Additional Information
• On a "Memory Stick" formatted on a
compvter: A "Mem*_Lv SO@" formatted by
the Windows OS or using Macintosh
corrlptlt_rs does not have guaranteed
corr_patibility win your camcorder.
• Da_ mad&_rite spe_u,tmay v_" devoridirig on
t!ie combim_tiori of ffro'Memory Stick" and
'Memory Stick" compliant product y{m abe.
Topreventaccidentalerasureof images
Slide the writt>protect tab o_ the "Memory
Stick?' to Ne write-proto_t position.
'file posifim_ and shape of the write-protect tab
may be dit'_bm_t depending on the m_}dal.
Back of the "Memory, Stick°
WbIe-pro_ecItab
Notes on use
Image data may be _mged in the fNk}wing
cases. ( omvorisation fi_r damagc'd irmlge daha
will riot be mada.
ffyoa eject the "Memory Stick," turn the
vower off on yotlr camcor_r, or remove the
N_tteiy pack tbr replacemerit wNle yotF
camcordar is reading or writing image files
on Ne "Memory Stick?' (while the a_cess
lamp is lit or flashing).
ffyou _e the "Memory Stick" near magnets
or magnetic fields.
It is recommended you take a back-up of
important data on the hard d&k of'a compater.
On handling
Labeling area
Atlach the label within
...... the designated labeling
area
Keep the followirig notes in mind when
handling a "Memory Stick."
• _2qen yoa carry" or _tore a "Mercury Stick,"
pat it in its case.
• Do not touch, or allow metallic Objects to
come into c_ntad: with the tem_inal.
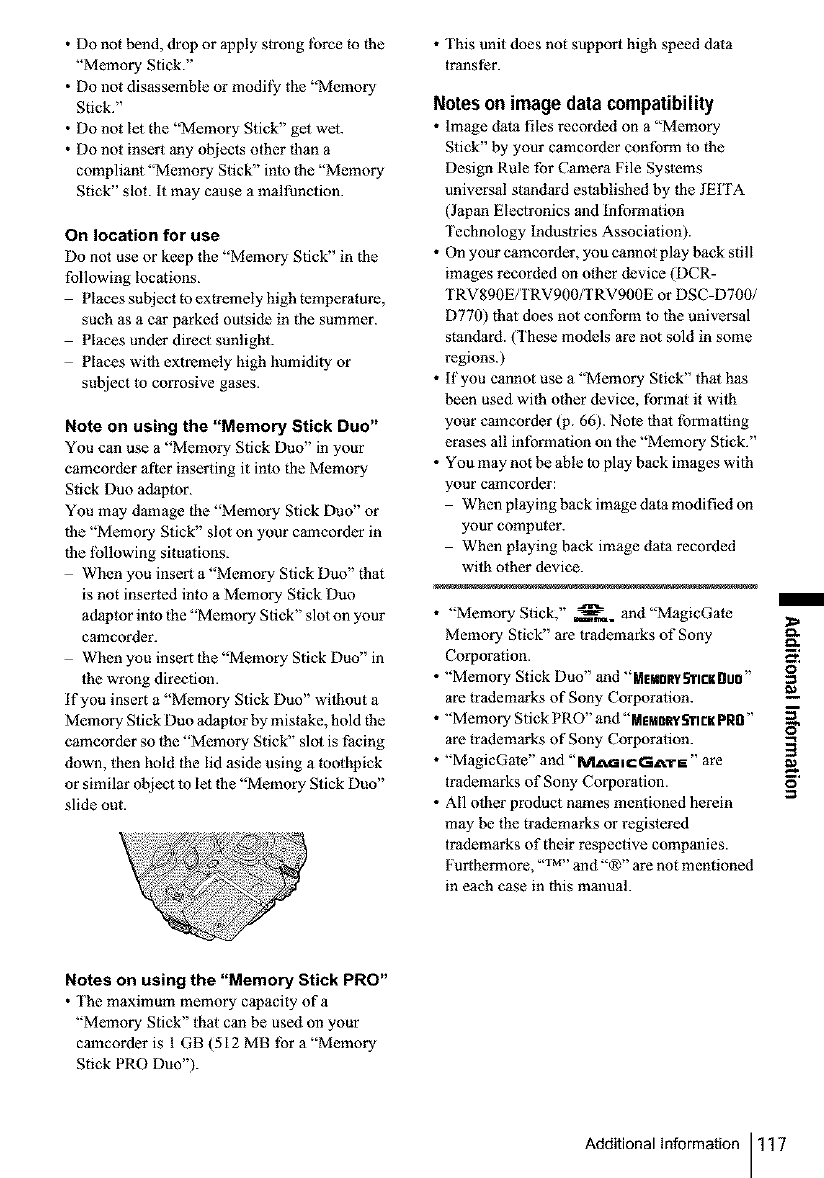
•Donotbend,droporapplystronglbrcemthe
"MemoryStick."
•Donotdisassembleormodil}€the"Memory
Stick."
•Donotletthe"MemoryStick"gelwet.
•Donotinsertanyobjectsotherlhana
compliant"MemoryStick"intothe"Memory
Stick"slot.Itmaycauseamalfunction.
On location for use
Do not use or keep the "Memory Stick" in the
following locations.
Places subject to extremely high temperature,
such as a car parked outside in the summer.
Places under direct sunlight.
Places wilh extremely high humidity or
subject to corrosive gases.
Note on using the "Memory Stick Duo"
You can use a "Memory Stick Duo" in your
camcorder after inserting it into the Memory
Stick Duo adaptor.
You may damage the "Memory Stick Duo" or
tlae "Memory Stick" slot on your camcorder in
tlae lbllowing situations.
When you insert a "Memory Stick Duo" that
is not inserted into a Memory Stick Duo
adaptor into the "Memory Stick" slot on your
camcorder.
When you insert the "Memory Stick Duo" in
the wrong direction.
if you insert a "Memory Stick Duo" without a
Memory Stick Duo adaptor by mistake, hold the
camcorder so 1he "Memory Stick" slot is facing
down, then hold the lid aside using a toothpick
or similar object to let the "Memory Stick Duo"
slide out.
• This unit does not support high speed data
transfer.
Notes on imagedata compatibility
• image data files recorded on a "Memory
Stick" by your camcorder conform to tile
Design Rule for Camera File Systems
universal standard established by |he JEITA
(Japan Electronics and Information
Technology Industries Association).
• On your camcorder, you cannot play back still
images recorded on other device (DCR-
TRV890E/TRV900/TRV900E or DSC-D700/
D770) that does not conform to lhe universal
standard. (These models are not sold in some
regions.)
• If you cannot use a "Memory Stick" that has
been used with other device, format it with
your camcorder (p. 66). Note lhat formatting
erases all information on the "Memory Stick."
• You may not be able to play back images wilh
your camcorder:
When playing back image data modified on
your computer.
When playing back image data recorded
with other device.
• "Memory Stick," _. and "MagicGate
Memory Stick" are trademarks of Sony
Corporation.
• "Memory Stick Duo" and "ME¥fl_RncKBufl"
are trademarks of Sony Corporation.
• "Memory Stick PRO" and "MEMt_RVS"ntKPRB"
are trademarks of Sony Corporation.
• "MagicGate" and "ML_:I,C GA'r E" are
trademarks of Sony Corporation.
• All other product names mentioned herein
may be the trademarks or registered
trademarks of their respective companies.
Furthermore, -'r_a- and"®" are not mentioned
in each case in this manual.
/
o
Notes on using the "Memory Stick PRO"
• The maximum memory capacity of a
"Memory Stick" that can be used on your
camcorder is I GB (512 MB tbr a"Memory
Stick PRO Duo").
AdditionalInformation 117

Aboutthe
"InfoLITHIUM"
battery pack
'Ibis _mit is compatible with t1"m
"trifoI ITH]UM" batter), pack _M sedes), Your
camcorder operates only- with the
"]rlfoI,YfH]UM?' battery pack.
"tnfot ITH]UM?' M series batteD" p_wks have
the _'_)_ Q mark.
What is the "InIoLITHIUM" battery
pack?.
'The "InfoI IHIfIJM" battery- pgck is a lithium-
ion N_ttery pack that has functions _br
c_mm_nicating intbrmatkm related to opemtiag
conditi_l_s beD¢¢_ n yoar camcorder and an
optiorml AC Adaptor/charger.
'I1"m"lnfoH KHrUM" batter)" pa_k calculates
the power const/mption according to f[m
opemtirig conditkms ofyoar camcorder, and
displays the remalr6ng batteu time in minutes,
Witl_l an A( Adaptor/charger (optional), the
remaining batter), time a_d charging time
a_pear.
Tochargethe batterypack
•F3e sam to charge the balter), pa_k be_hre you
start using your camcorder.
•We recommend charging the battery pack in
an ambient temperature of betweeri 10°( to
30'*(: (50<'F to 86°F) _ntil the CHG (charge)
lamp tonas off. If you charge the bar.r), pack
outside o_'thi s temperatam hinge, yot_may-not
be able to charge it efficiently.
•After charging is complete, either disc_mnect
the cable from the DC IN :iack on your
¢amcorder or remove the balamry pack,
Touse the batterypack effectively
•BatteD" pack pe_fbrrr_ance &:creases when the
sarrounding temperature is 10<'C (50°F) or
bdow, and the length of time you can use the
battery pack becomes shorter, tn that case, do
_IIe of the fo Ilov.dng to use the batte_" ptwk for
a kruger time.
Put the battery pack in a pocket to warm it
_, and insert it in yoor camcorder fight
_fbre you start taking _hots.
Use a large capacity battery pack: NP-
_ M50/QM71/QM71DiQM91/QMg l D
(optiorm!),
•Frequent _e o_'the _,(13 screerl Or a t'req_erit
playback, Nst _brward or rewind operation
wears oat the battery pack faster. We
recommend t_sing a large capacity N_ttery
pack: NP-FM50/QM71/QM71D/QM9 H
QM91D (optional),
•Be sore to set the PO_VBR switc?l to (CHG)
OFF' when not recording or playing back on
your camco_t:r. 'I]ae baltery pack is also
constwne_t wher_ yo0r camcorder is in
recording standby or playback pa_e.
• Have spare N_ttery packs ma@ fbr two or
Nree times Ne expected recording time, and
make ttial recordings before making tile acttml
rec_rdirlg,
•Do not expose the batter), pack m water, The
battery- pack is not water resistant,
Aboutremainingbatterytime indicator
• Wlaen the power goes off'even though the
remaining baiter), time indicator indicates that
Ne battery-pack has enough power to ol_rate,
charge the N_tto Upack thlly again. _lhe
indication on the remaining battery time will
be indicated correctly, Note, N_weve_; Nat the
battery indication will not be restored if it is
used in high temperatures [br a long time, _lrif
le_ in a _hlly charged state, or when the
battery- pack is frequently _c_1,
/.Ise the rerunning battery time indication as a
guide to the a_pmximate ghooting time.
•_lhe,_:x-mark Nat indicates low batteD" flashes
even ifNem are still 5 to 10 minutes o _'bat_ry
time remaining, deperlding on Ne operating
conditions or ambient tempemttwe and
environment.
118 Additional Information
Aboutstorageof the batterypack
•If_he battory pack is not t_sed for a long time,
fully charge the batlely- p*_ckand use it on yot_r
camcorder once a year to maintaff_ the proper
f_nctiom
1'o store the bat tecy pack, remove it from yo_r
camcorder and pm it in adry, cool place.
•To discharge the batteui pack on yotlr
camcorder completely, set [A. SHUT OEF] to
_NEVER] on the _ (STANDARD SET)
meriu and leave your ca_lcorder in tape
recordirig stm_dby ur_til the power g_es off
(p, 81).
Aboutbatterylife
•Ybe batlery life is limittxL BatteLv capacity
drops little by' little _ you use it more and
more, and as time passes. Whorl tbe available
battery time is shortened c_nsiderably, a
probable cause is that the battery pack has
reached Ne er_d of'its life. Nease buy a new
battery, pack,
•Ybe battaty lif_ varies depenffmg on how it is
stored and the operating conditions and
environment for eavahbattery, pack,
' InfoI rrHIUM' is a tr*ulema/k of Sony
( orporation.
About i.LINK
1he DV Interface or,this unit is an i.LINK-
compliarlt DV Intarface, This stx,'tion deserit_s
the i.UINK standard m_d it_ features.
What is i,LINK?
LL_NK is a _igital serial intarfac_ tbr
transferring digital video, digital at_dio, and
other dat_ to other i,LINK-compatible device.
You can also eontrN oth_r device ltsing the
i.LIN K,
i._ilNK-compatible device can be connected
asing an i.IIINK cable. Possible applicatkms am
operations and data trans_uations with various
digital AV davices.
When two or more i.LINK-compatible device
are connoted to this I_lil in a dais), cbairl,
operations and data tmns*wtions are possible
win rmt only the device t[mt Nis trait is
connected to but also with other devices via the
directly connected device.
Note, however, that the method of operation
sometimes varies aceordthg to the
cltaracteristics and sptx'ifications of the device
to be co,mooted. Also, operations and data
transactions may rmt be possible tm so_r_e
con r_t:eted device.
Note
• Normatty, only one device can be connected to this
mait win tire ilLINK cable. When co_n_¢_ing this
mait to i.l ANK-eompattble device bevi_g t_,o or
more DV tnto@aee_, retkr to the operating
th_r_¢lions _f the device to be connected.
Tips
• LLfNK is a morn thmi[iar _erm fhr _heIEEE 1394-
data {rate,pot t bus proposed l-q Sony, and is a
trademark ztpproved _ ¸many e_rp_t_ts,
• [b_E ¸1394is an talerrtatJoJ_d _tanda_ _tandatdlzed
by the _stttote _ Ele¢_ica_ and Eieetr_mlc_
P_Sr_e_rs.
m
€2a,
,,.,,t
-_con#nued
Additional Informaton 119
About i,LINK Baud rate
i.LINK's maximum baud rate varies according
to the device. There are three types.
S100 (approx. 100Mbps*)
$200 (approx. 200Mbps)
$400 (approx. 400Mbps)
The baud rate is listed under "Specifications" in
the operating instructions of each piece of
device. It is also indicated near the i.LINK
interface on some device.
The maximum baud rate for device that does not
have any indication (such as |his unit) is
"SI00."
The baud rate may differ from the indicated
value when lhe unit is connected to device with
a different maximum baud rate.
* Whal is Mbps?
Mbps stands for "megabits per second," or tile
amount of data tha_ can be sent or received in one
second. For example, a baud rate of 100 Mbps means
tha1100 megabits of data can be sent in one second.
To use i,LINK functions on this unit
For details on how to dub when 1his unit is
connected to other video device having a DV
interface, see page 86, 87.
This unit can also be connecled 1o other i.LINK
(DV interli_ce) compatible device made by
Sony (e.g. a VAIO series personal computer) as
well as to video device.
Before connecting this unit to your computer,
make sure that application software supported
by this unit is already installed oll your
computer.
Some i.LINK compatible video device such as
Digital Televisions, DVD recorders/players,
and MICROMV recorders/players are not
compatible with DV device. Betbre connecting
to other device, be sure to confirm whether the
device is compatible with DV device or not.
For details on precautions and compatible
application software, refer also to the operating
instructions for the device to be connected.
Aboutthe requiredi.LINK cable
Use the Sony i.LINK 4-pin-to-4-pin cable
(during DV dubbing).
i.LINK and _ are trademarks of Sony
Corporation.
Maintenance and
precautions
On use andcare
• Do not use or store the camcorder and
accessories in the lbllowing locations.
Anywhere extremely hot or cold. Never
leave them exposed to temperatures above
60°C (140°F), such as under direct sunlight,
near heaters or in a car parked in the sun.
They may malfunction or become
deformed.
Near strong magnetic fields or mechanical
vibration. The camcorder may malfunction.
Near strong radio waves or radiation. The
camcorder may not be able to record
properly.
Near AM receivers and video equipment.
Noise may occur.
Sandy beach or anywhere dusty, if sand or
dust gets in your camcorder, it may
malfunction. Sometimes this malfunction
cannot be repaired.
Near windows or outdoors, where the LCD
screen, the viewllnder, or the lens may be
exposed to direct sunlight. This damages
the inside of the viewfinder or the LCD
screen.
Anywhere very humid.
• Operate your camcorder on DC 7.2 V (battery
pack) or DC 8.4 V (AC Adaptor).
• For DC or AC operation, use the accessories
recommended in these operating instructions.
• Do not let your camcorder get wet, for
example, from rain or sea water. If your
camcorder gets wet, it may malfunction.
Sometimes this malfunction cannot be
repaired.
• If any solid object or liquid get inside the
casing, unplug your camcorder and have it
checked by a Sony dealer before operating it
any further.
•Avoid rough handling disassembling,
modifying or mechanical shock. Be
particularly caret_l of the lens.
• Keep the POWER switch setting to (CHG)
OFF when you are not using your camcorder.
120 Additional Information
• Do not wrap your camcorder with a towel, tbr
example, and operate it. Doing so might cause
heat m build up inside.
• When disconnecting 1he power cord, pull by
the plug and not the cord.
• Do not damage the power cord such as by
placing anything heavy on it.
• Keep metal contacts clean.
• Keep the Remote Commander and button-
type battery out of children's reach. If the
battery is accidentally swallowed, consult a
doctor immediately.
• If the battery electrolytic liquid has leaked
consult your local authorized Sony service
facility.
wash offany liquid that may have contacted
your skin.
if any liquid gets in your eyes, wash with
plenty of water and consult a doctor.
When not using your camcorder for a
long time
Occasionally turn it on and let it run such as by
playing back tapes lbr about 3 minutes.
Otberwise, unplug it from die wall outlet.
Moisturecondensation
if your camcorder is brought directly from a
cold place to a warm place, moisture may
condense inside your camcorder, on the surlhce
of the tape, or on the lens. In this state, the tape
may stick to the head drum and be damaged or
your camcorder may not operate correctly. If
there is moisture inside your camcorder,
[[] --_ Moisture condensation. Eject the
cassette] or [@ Moisture condensation. Turn off
for llt.] appears. The indicator will not appear
when the moisture condenses on the lens.
if moisture condensation has occurred
None of the functions except cassette ejection
will work. Eject the cassette, turn offyour
camcorder, and leave it lbr about one hour with
the cassette lid open. Your camcorder can be
used again if the [] or _ does not appear when
the power is turned on again.
if moisture starts to condense, your camcorder
sometimes cannot detect condensation. If this
happens, the cassette is sometimes not ejected
for 10 seconds after the cassette lid is opened.
This is not a malfunction. Do not close the
cassette lid until the cassette is ejected.
Note on moisture condensation
Moisture may condense when you bring your
camcorder from a cold place into a warm place
(or vice versa) or when you use your camcorder
in a humid place as shown below.
• When you bring your camcorder fi'om a ski
slope into a place warmed up by a heating
device.
• When you bring your camcorder from an air-
conditioned car or room into a hot place
outside.
• When you use your camcorder after a squall or
a shower.
• When you use your camcorder in a hot and
humid place.
How to prevent moisture condensation
When you bring your camcorder li'om a cold
place into a warm place, put your camcorder in
a plastic bag and seal it tightly. Remove the bag
when the air temperature inside the plastic bag
has reached the surrounding temperature (after
about one hour).
Video head
• When the video head becomes dirty, you 1==
cannot record pictures normally, or distorted _.
picture or sound is played back. --_i
o
• The video head suffers from wear alter long
use. If you cannot obtain a clear image even m
after using a cleaning cassette, it might be
because the video head is worn. Please contact
your Sony dealer or local authorized Sony
service facility to have the video head _'
replaced.
• If the following problem occurs, clean the
video heads lbr I0 seconds with the Sony
V8-25CLD cleaning cassette (optional).
When you play back in die Digital8 I[) system
Mosaic-pattern noise appears on the
playback picture or the screen is displayed
in blue.
Playback pictures do not move.
,=>continued
Additional information 121
Playback pictures do not appear or the
sound breaks off.
[_ i Dirly video head. Use a cleaning
cassette.] appears on the screen during
recording.
For DCR-TRV460:
When you play back in lhe lti8 Nil[I/standard
8 mm [] system
[_ i Dirly video head. Use a cleaning
cassette.] appears on the screen during
recording.
Playback pictures contain noise.
Playback pictures are hardly visible.
Playback pictures do not appear.
LCD screen
•Do not add excessive pressure on _he LCD
screen, as it may cause damage.
• if your camcorder is used in a cold place, a
residual image may appear on 1he LCD screen.
This is not a malfunction.
• While using your camcorder, the back ofihe
LCD screen may heat up. This is not a
malt_nction.
To clean the LCD screen
•if fingerprints or dust make the LCD screen
dirly, it is recommended you use |he cleaning
cloth (supplied) to clean it. When you use the
LCD Cleaning Kit (optional), do not apply the
cleaning liquid directly to 1he LCD screen.
Use cleaning paper moistened wilh the liquid.
On adjustment of the LCD screen
(CALIBRATION)
The buttons on |he touch panel may not work
correctly, if this happens, follow the procedure
below, it is recommended you connect your
camcorder to the wall outlet using |he supplied
AC Adaptor during the operation.
1 Slide the POWER switch up to (CHG)
OFF.
2 Eject the cassette and "Memory Stick"
from your camcorder, then disconnect
any connecting cables except the AC
Adaptor from your camcorder.
3Slide the POWER switch repeatedly to
select the PLAY/EDIT mode while
pressing DSPL/BATT INFO on your
camcorder, then press and hold DSPL/
BATT INFO for about 5 seconds.
4Touch the"x" displayed on the screen
with an object such as the corner of a
"Memory Stick."
The position of the "×" changes.
If you did not press the right spot, starl l?om
step 4 again.
O Note
• YOU cannot calibrate tile LCD screen it'you have
rotaled the LCD panel and set it with the LCD screen
Pacing out.
On handlingthe casing
• If the casing is soiled, clean 1he camcorder
body with a sofi cloth lightly moistened with
water, and then wipe lhe casing with a dry soft
cloth.
• Avoid the following to avoid damage to the
finish.
Using chemicals such as thinner, benzine,
alcohol, chemical cloths, repellent and
insecticide.
Handling with above substances on your
hands.
Leaving lhe casing in contact with rabber or
vinyl objects lbr a long period of time.
Aboutcare and storageof the lens
• Wipe the surface ofihe lens clean with a soft
cloth in the following instances:
When there are fingerprints on |he lens
surface.
In hot or humid locations
When 1he lens is exposed to salty air such as
at the seaside.
• Store in a well-ventilaied location subject to
little dirt or dust.
• To prevent molds periodically clean the lens
as described above.
122 AdditionalInformation
it is recommended you operate your camcorder
about once a month to keep it in an optimum
state tbr a long time.
Tochargethe pre-installed button-type
battery
Your camcorder has a pre-installed button-type
battery to retain the date, time, and other
settings even when the POWER switch is set to
(CHG) OFF. The pre-installed button-type
battery is always charged while you are using
your camcorder but it will get discharged
gradually if you do not use your camcorder. The
button-type battery will be fully discharged in
about 3 months if you do not use your
camcorder at all. ttowever, even if the pre-
installed button-type battery is not charged, the
camcorder operation will not be affected as long
as you are not recording the date.
Procedures
Connect your camcorder to a wall outlet using
the supplied AC Adaptor, and leave it with the
POWER switch set to (CHG) OFF for more
than 24 hours.
Specification
System
Video recording system
2 rotary beads, Helical scanning system
Still image recording system
Exif Ver. 2.2 * 1
,1 "ExiP' is a file format for still images,
established by the JE[TA (Japan
Electronics and hlformation Technology
Industries Association), Files in this formm
can have additional information such as
your camcorder's setting information at lhe
time of recording.
Audio recording system
Rotary beads, PCM system
Quantization: 12 bits (Fs 32 kHz, stereo 1,
slereo 2), 16 bits (Fs 48 kHz, stereo)
Video signal
NTSC color, EIA standards
Usable cassette
8 mm video format cassette
Tape speed
SP: Approx. 28.67 mm/s
LP: Approx. 19.11 mm/s
Recording/playback time (using 120 rain. 1ti81
Digital8 video cassette)
SP: 60 rain
LP: 90 min
Fast forward/rewind time (using [20 rain. Hi8/
Digit al8 video cassette)
Approx. 5 rain
Viewfinder
Electric viewfinder (monochrome)
Image device
3.0 mm (I/6 type) CCD (Charge Coupled
Device)
Gross: Approx. 460 000 pixels
Effective (still): Approx. 290 000 pixels
Effective (movie): Approx. 290 000 pixels
Lens
Combined power zoom lens
Filler diameter: 37 mm (1 7116 in.)
20 x (Optical), 990 × (Digital)
F 1.6 ~ 2.4
,=>continued
Additional information 123
/
o
o
Focal length
2.5 - 50 mm (1/8 - 2 in0
When converted to a 35 mm still camera
In CAMERA-TAPE:
42 - 840 mm (1 11/16 - 33 1/8 in.)
In CAMERA-MEMORY:
42 - 840 mm (1 11/16 - 33 1/8 in.)
Color temperature
Auto
Minimum illumination
4 Ix 0ux) (F 1.6)
0 Ix (lux) (during the NightShot plus
function) .2
,2 Objects unable to be seen due to tile dark call
be shot with infrared lighting.
Input/0utput connectors
S video input!output
Luminance signal: 1 Vp-p, 75 _(ohms),
unbalanced
Chrominance signah 0.286 Vp-p, 75 £2
{ohms), unbalanced
4-pin mini DIN
Audio]Video input/output
AV MINI JACK
Video signal: 1 Vp-p, 75 £2(ohms),
unbalanced, sync negative
Audio signah 327 mV (at output impedance
more than 47 kf_ (kilohms)), Input impedance
more thm_ 47 k_(kilohms), Output impedance
with less than 2.2 kf2(kilohms)
Stereo mini jack (03.5ram)
DV input/output
4-pin connector
USB jack
mini-B
LCD screen
Picture
6.2 eln (2.5 _ype)
Total dot number
123 200 (560 × 220)
General
Power requirements
DC 7.2 V (battery pack)
DC 8.4 V (AC Adaptor)
Average power consumption (when using the
hattery pack)
During camera recording using the viewfinder
2.9 W
During camera recording using the LCD
3.8 W
Operating temperature
0 ° C to 40 ° C (32 ° F to 104 ° F)
Storage temperature
-20 ° C to + 60 ° C (-4 ° F to + 140 ° F)
Dimensions (approx.)
gsxQgx 151mm(33/Sx37/8×6in.)
(w/h/d)
Mass (Approx.)
g00 g (1 lb 12 oz) main unit only
940 g (2 lb 1 oz) including the NP-FM30
rechargeable battery pack, HiS/Digital8
cassette, lens cap, and shoulder strap.
Supplied accessories
See page 13.
ACAdaptorAC-L15A/L15B
Power requirements
AC 100 -240 V, 50/60 Hz
Current consumption
0.35 - 0.18 A
Power consumption
lgW
Output voltage
DC 8.4 V, 1.5 A
Operating temperature
0°C to 40 ° C (32 ° F to 104 °F)
Storage temperature
-20 ° C to + 60 ° C (-4 ° F to + 140 ° F)
Dimensions (approx.)
56 × 31 × 100mm(2 1/4 x 1 1/4 × 4in.) (w/If
d) excluding the proiecting parts
Mass (approx.)
190 g (6.7 oz) excluding the power cord
124 Additional Information
Rechargeablebatterypack (NP-FM30)
Maximum output voltage
DC 8.4 V
Output voltage
DC 7.2 V
Capacity
5.0 Wh (700 mAh)
Dimensions (approx.)
38.2 × 20.5 x 55.6 mm
(1 9/16 x 13/16 x 2 1/4 in.) (w/h/d)
Mass (approx.)
65 g (2.3 oz)
Operating temperature
0°C to 40°C (32°F to 104°F)
Type
Lilhium ion
Model
DCR- TRV361 TRV460
Available
recording Digital8 Digital8
system
Available
playback Digital8 Hi8/8/Digital8
system
Design and specifications are subject to change
wi|hout notice.
/
o
3
o
Additional information 125
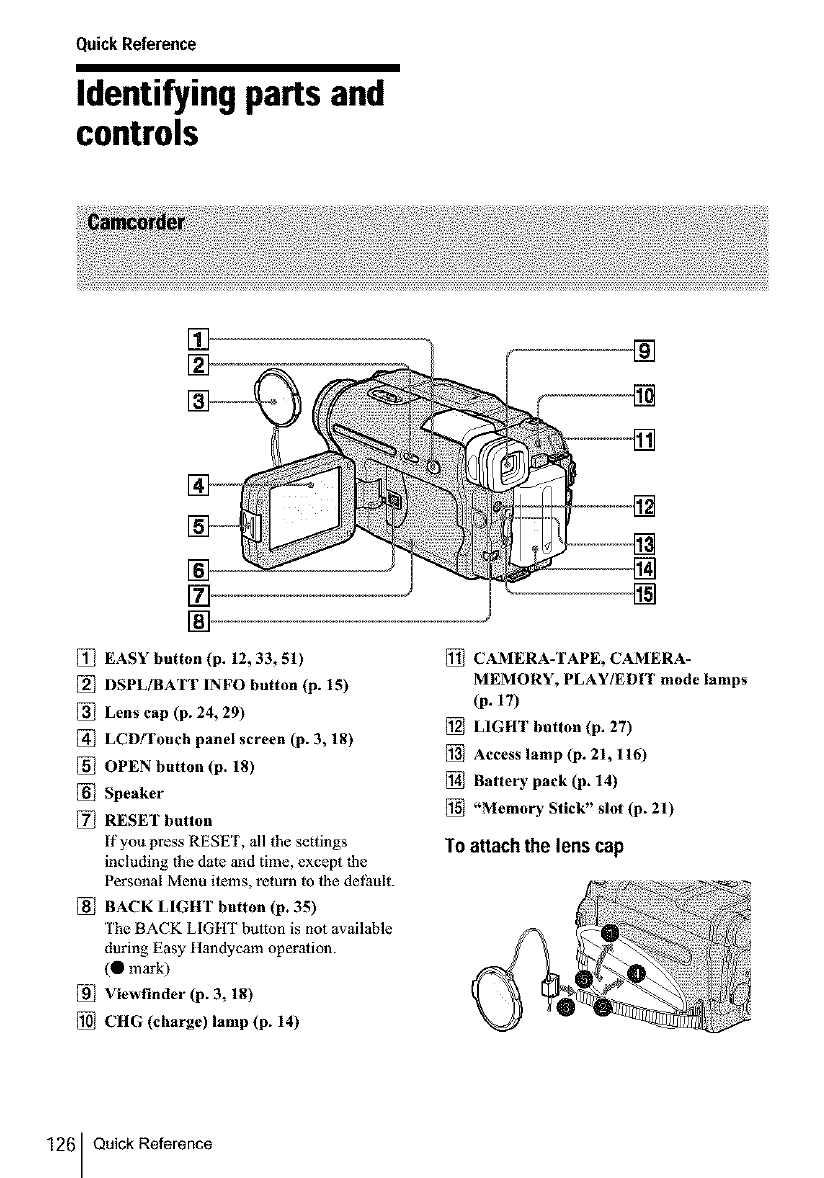
Quick Reference
Identifying parts and
controls
iii!iiii
] ................................................
_] EASY button (p. 12, 33, 51)
_] DSPL/BATT INFO button (p. 15)
_] Lens cap (p. 24, 29)
_] LCD/Touch panel screen (p. 3, 18)
_] OPEN button (p. 18)
_] Speaker
[_] RESET button
If you press RESET, all the settings
including the date and time, except _he
Personal Menu items, return to lhe default.
_] BACK LIGHT button (p. 35)
The BACK LIGHT button is not available
during Easy Itandycam operation.
(0 mark)
_] Viewfinder (p. 3, 18)
CHG (charge) lamp (p. 14)
CAMERA-TAPE, CAMERA-
MEMORY, PLAY/EDIT mode lamps
(p. 17)
LIGHT button (p. 27)
Access lamp (p. 21,116)
Battery pack (p. 14)
"Memory Stick" slot (p. 21)
Toattach the lens cap
126 QuickReference
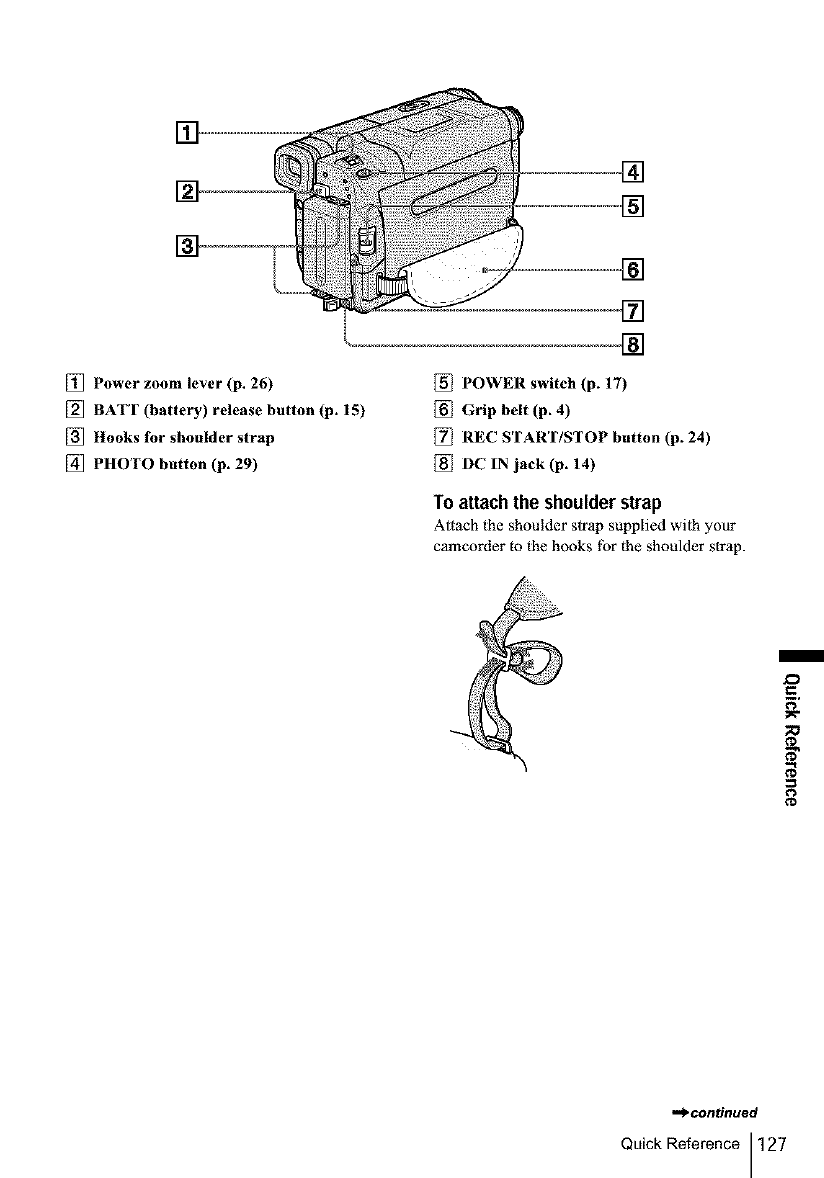
t
[] Power zoom lever (p. 26)
[] BATT (battery) release button (p. 15)
_] Hooks for shoulder strap
[] PHOTO button (p. 29)
_] POWER switch (p. 17)
_] Grip belt (p. 4)
[_ REC START/STOP button (p. 24)
_] DC IN jack (p. 14)
To attachthe shoulderstrap
Attach the shoulder strap supplied wi|h your
camcorder to the hooks tbr the shoulder strap.
,,_continued
Quick Reference 127
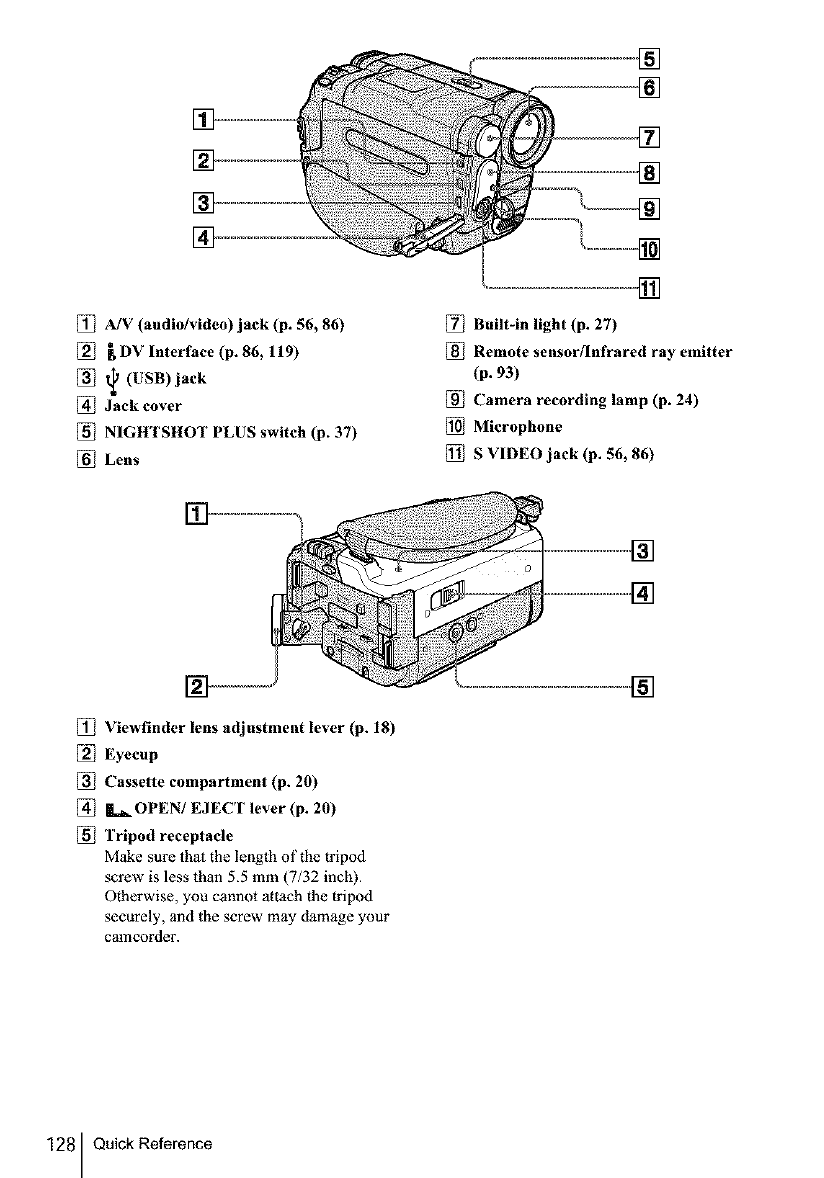
[_ A/V (audio/video) jack (p. 56, 86)
[_ _DV Interface (p. 86, 119)
[_ t_ (USB)jack
[_ Jack cover
_] NIGHTSHOT PLUS switch (p. 37)
Lens
[_ Built-in light (p. 27)
[_ Remote sensor[Infrared ray emitter
(p. 93)
Camera recording lamp (p. 24)
Microphone
S VIDEO jack (p. 56, 86)
[_ Viewfinder lens adjustment lever (p. 18)
[_ Eyecup
[_ Cassette compartment (p. 20)
[_ i._OPEN/EJECT lever (p. 20)
[_ Tripod receptacle
Make sure that the length of the tripod
screw is less than 5.5 mm (7/32 inch).
Otherwise, you cannot attach the tripod
securely, and the screw may damage your
camcorder.
128 Quick Reference
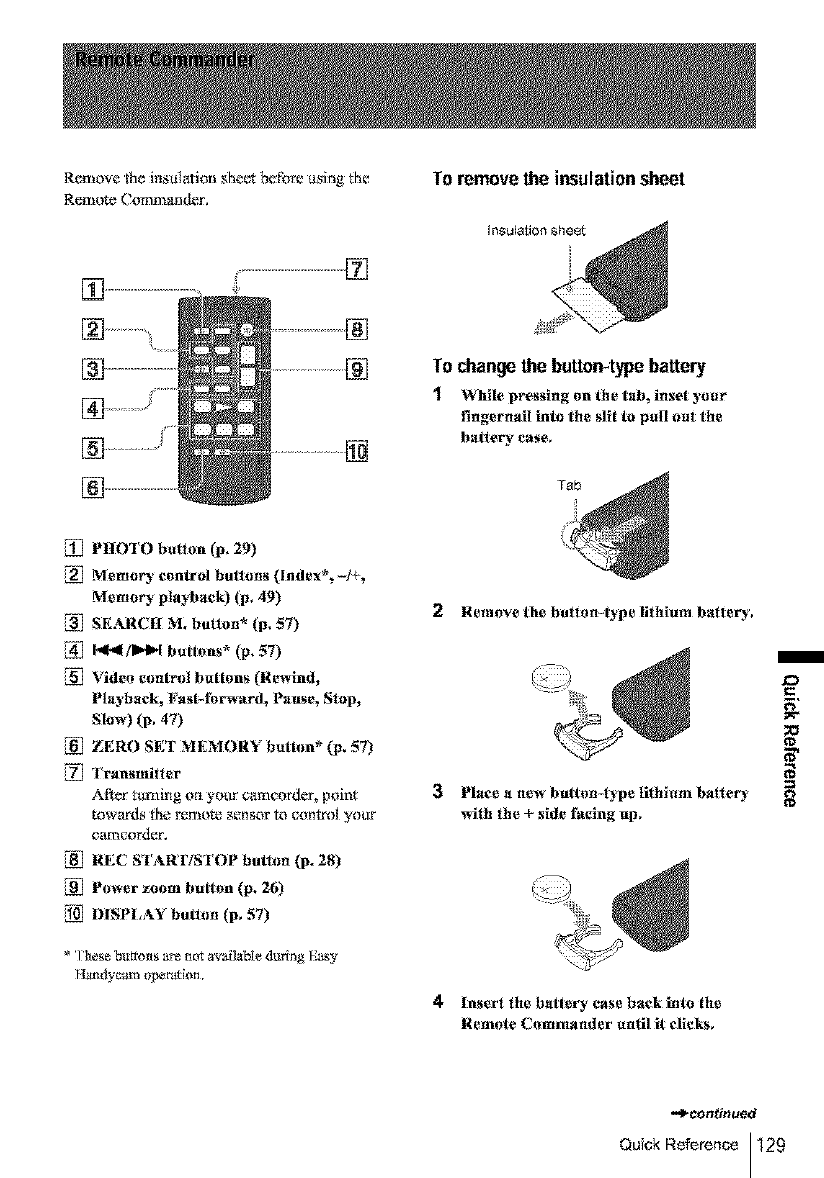
Removethe irisulationsheetbefore asi**g{he
RemoteCommander. Toremovethe insulationsheet
P]]OI O bulton (p. 29)
Memory control buttons (Index_-/+_
Memory playback) (p, 49)
_] SEARC[[ M_ button* (p. 57)
I_I[/ml_'l but:ions* (p, 57)
Video control buttons (Rewind,
Playback, Fasbforward_ Pause_ Stop,
Slow) (p. 47)
ZERO SET MEMORY I)_tl()n _ _. 57)
Transmill er
.Afar _ming ori yot/r camcorder, point
towards the mmom sensor to contr_l yotw
carnco_ler.
REC STARTISI OP button (p. 28)
Power **ore billion (p,26)
DISPLAY button (p. 57)
* 1laeseb_rto_s ar_ nor available during Easy
Hamlycam operallon.
To change the button-type battery
1While pressing on the tab_inset your
t_ngernail into the slit to pall oat the
batter)' case,
2 Remove the butttm-type lithium battery.,
Place a new bution-lype tithiam balte_
wilh the + side facing up,
4Insert the batter), ease back into the
Remote Commander until it clicks,
.0
g
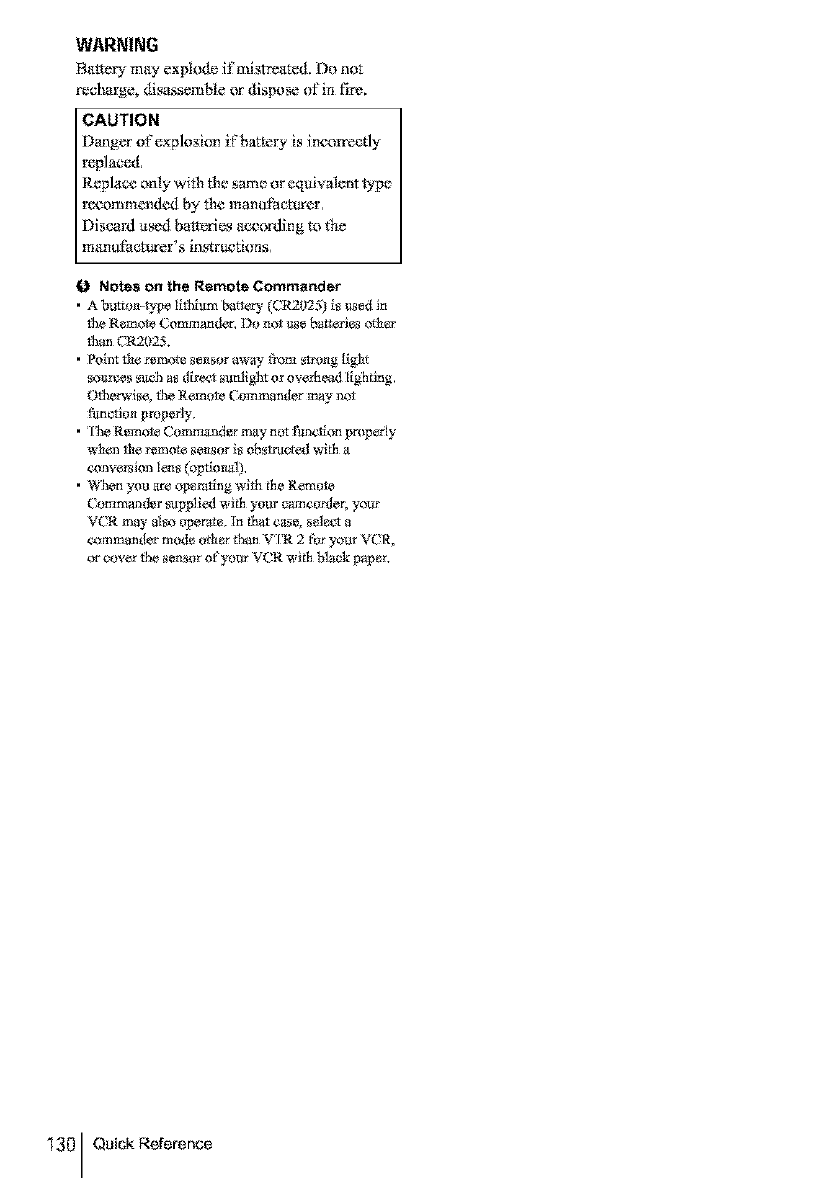
WARNING
Ba_- m_ expl_ if mist_,_te&Do not
reSUrge, _sassembleor _s_ of in fire.
CAUTION
[)anger o_'explo_km K'batteLvis hworreetly
mpla_L
R_pla_e onD with tile same or equivale_*ttype
recommended by the mantlfac_er,
Discard used balteries _v:eordingto {he
mantlfacturer's instructions,
0 Notes on the Remote Commander
•Ah_=_'pe [i_um ba_ ((.'t{2025) is tts_d in
the R_moR_ Command_. Do no_ _ b_fi_s oe_
than CR2025.
• Point _ _mo_ s_or aw_ from _g 11_
sotmz_s s_eh as dir_ s_rdight or ow_ead [igh _g.
_i"wis_ _ R_mo_ C_m_l_{_r may ¸riot
fim_o_ properly.
• The R_mot_ Commamd_ _y _ot ftmctlo_ p_e_[y
_h_n _e r_mo_ _ser is obstructed wi_h a
• When you ar_ op_ratlng with _h_ Remo_e
Commuter s_pp]ied wi_h your cam_t_, yo_
_'_mman_r mod_ otl_ _ban V_[R 2 fbr your VCR,
or eowr the s_t_s_ o£yot_ VCR wi_h _ a_k p_p_
130 Quick Reference
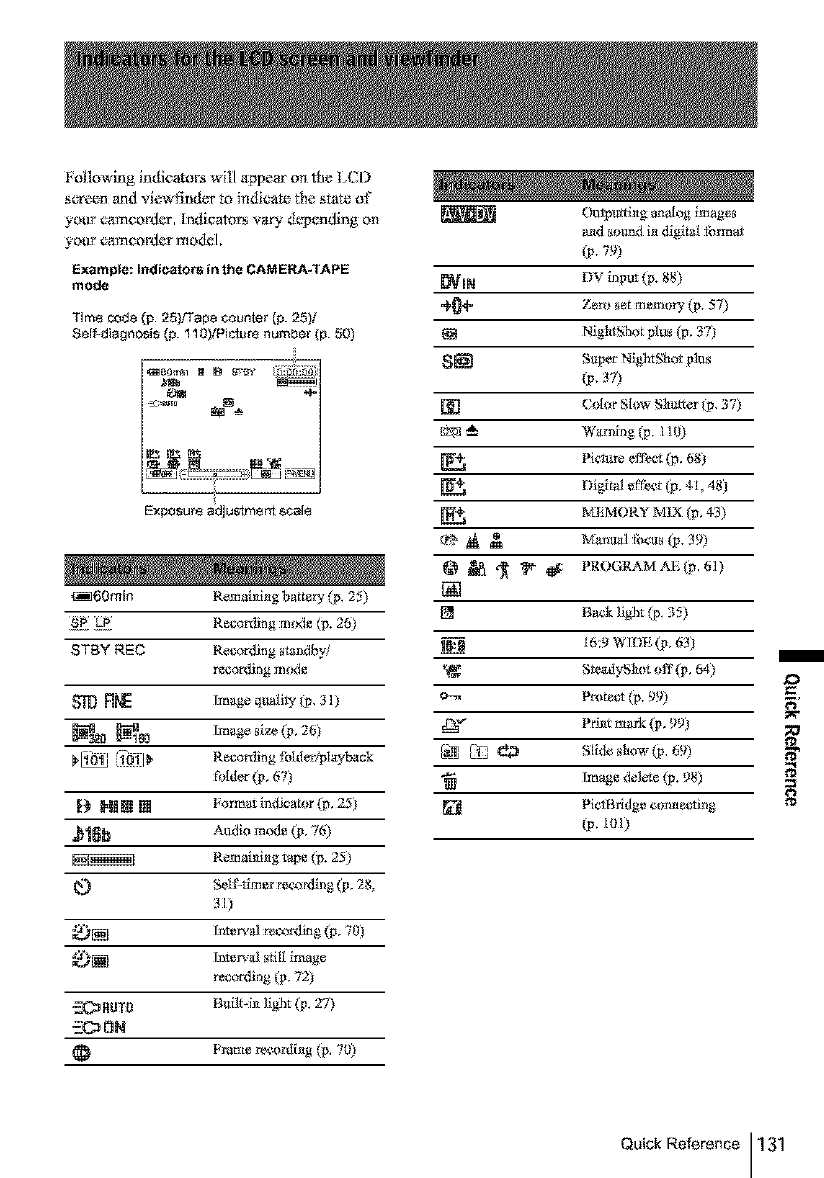
Following indk'ato!_ will appear ori the L(D
screen and viewfir_dvr t_* indicate the state of
your camcordcr, Indicators vary dgpendir_g on
your camcordcr model.
Example: Indicators in the CAMERA.TAPE
mode
Tim8 code (p 25)Fape counter {p. 25}t
Self-diagnosis (p. 110)!Pi_r_ number (p. 50)
Exposur8 a_u_mgrR ge,al_
_60min Remaining batter 3, (p. 25)
SP LiP Recording m_le (p. 26)
STBY REC Recording s_mdby/
resoling ¸mode
FJ[k_ Image q_i_7 (p 31)
_a_ _ Image size (p, 26)
1._ _1011_ Reeorfliag &dde_;playbadk
a_lder (p, 67)
l{_ _*_|_ [] FotmatindJcator(p, 25)
_ Audio mode (p, 7(*)
Remaining tape (p. 25)
Seti'-fim er rel:o rdlng (p 28
31)
_)[_ Inmrval mcordklg (p, 70)
*_5_[.[].] Irl_p.'al s61I inlage
recording (p, 721t
_RUTO Built-iJa llghr (p. 27)
.-.-CC_0N
Frame re¢_rdi_g (p 7))
Outputti_g amt[og images
a_d sound in dlgibA tb_mat
(p,7'_)
_IN DV input (p. 88)
@_I" Zgro set memory (p. 57)
1_! NightShut plus (p, 371}
S_ SI,tp_r NightStIot plI_
(p 373
[_l C 1 rSI wSlaI_tter(p 37)
_%fl --_-- W_ming (p I ] 0)
Pictare ef'f_ct (p, 6811
Distal e f_;.t (p, 41, 48:t
_I_-:MORY MIX (p, 43)
@ _ ._ _ _ PROGRAM AE (p, 61)
[]
[_ Back light (p, 35)
_:____9 I6:9 WIDE (p, 631}
_" gteadyS_aot off(p, 64)
o-_ Protect (p. 99)
Z_¢ Pd_at mark (p, 9911
Ll_ L_ _*_ giideslttw(# 69)
Image delet_ (# 98)
[] PietBridge correct:ring
(p, I01)
Quick Reference 131
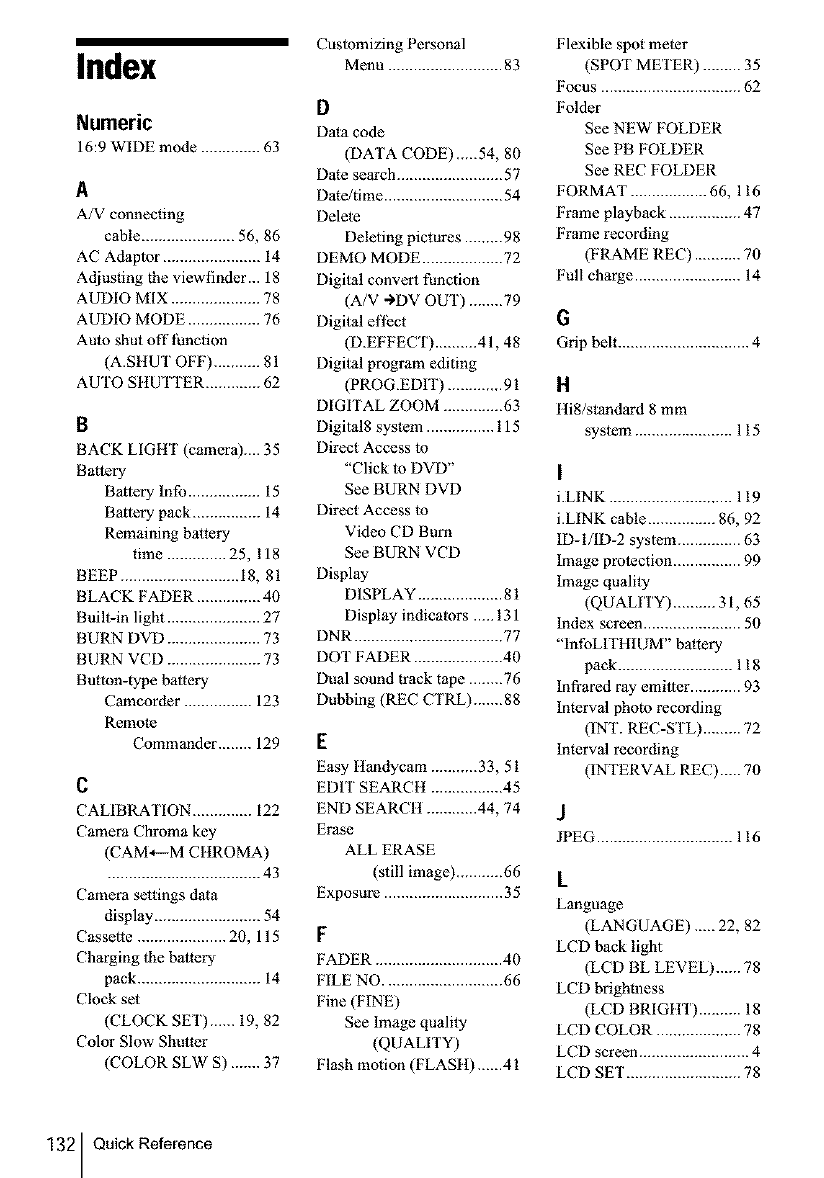
Index
Numeric
16:9 WIDE mode .............. 63
A
A/V connecting
cable ...................... 56, 86
AC Adaptor ....................... 14
Adjusting the viewfinder... 18
AUDIO MIX ..................... 78
AUDIO MODE ................. 76
Auto shut off l'uncfion
(A.SHUT OFF) ........... 81
AUTO SHUTTER ............. 62
B
BACK LIGHT (camera).... 35
Baltery
Battery lnfo ................. 15
Battery pack ................ 14
Remaining battery
time .............. 25, 118
BEEP ............................ 18, 81
BLACK FADER ............... 40
Built-in light ...................... 27
BURN DVD ...................... 73
BURN VCD ...................... 73
Button-type battery
Camcorder ................ 123
Remom
Commander ........ 129
C
CALIBRATION .............. 122
Camera Chroma key
(CAM*---M CttROMA)
.................................... 43
Camera settings data
display ......................... 54
Cassette ..................... 20, 115
Charging the battery
pack ............................. 14
Clock set
(CLOCK SET)...... 19, 82
Color Slow Shutter
(COLOR SLW S) ....... 37
Cuslomizing Personal
Menu ........................... 83
D
Dala code
(DATA CODE)__.54, 80
Date search ......................... 57
Date/time ............................ 54
Delete
Deleting pictures ......... 98
DEMO MODE ................... 72
Digital convert function
(A/V ->DV OUT) ........ 79
Digital el'l_ct
(D.EFFECT) .......... 41,48
Digital program editing
(PROG.EDIT) ............. 91
DIGITAL ZOOM .............. 63
Digital8 system ................ 115
Direct Access to
"Click to DVD"
See BURN DVD
Direct Access to
Video CD Burn
See BURN VCD
Display
DISPLAY .................... 81
Display indicators ..... 131
DNR ................................... 77
DOT FADER ..................... 40
Dual sound track tape ........ 76
Dubbing (REC CTRL).......88
E
Easy ttondycam ........... 33, 51
EDIT SEARCH ................. 45
END SEARCH ............ 44, 74
Erase
ALL ERASE
(still image) ........... 66
Exposure ............................ 35
F
FADER .............................. 40
FILE NO ............................ 66
Fine (FINE)
See Image quality
(QUALITY)
Flash motion (FLASH)......41
Flexible spot meter
(SPOT METER) ......... 35
Focus ................................. 62
Folder
See NEW FOLDER
See PB FOLDER
See REC FOLDER
FORMAT .................. 66, 116
Frame playback ................. 47
Frame recording
(FRAME REC) ........... 70
Full charge ......................... 14
G
Grip belt ............................... 4
H
Hi8/standard 8 mm
system ....................... 115
I
i.LINK ............................. 119
i.LINK cable ................ 86, 92
ID- I/ID-2 system ............... 63
Image protection ................ 99
Image quality
(QUALITY) .......... 3 I, 65
Index screen ....................... 50
"hffoLITItlUM" battery
pack ........................... 118
Infrared ray emitter ............ 93
Interval photo recording
(INT. REC-STL) ......... 72
Interval recording
(INTERVAL REC)..... 70
J
JPEG ................................ 116
L
Langu3ge
(LANGUAGE) ..... 22, 82
LCD back light
(LCD BL LEVEL)......78
LCD brightoess
(LCD BRIGt tT) .......... 18
LCD COLOR .................... 78
LCD screen .......................... 4
LCD SET ........................... 78
132 QuickReference
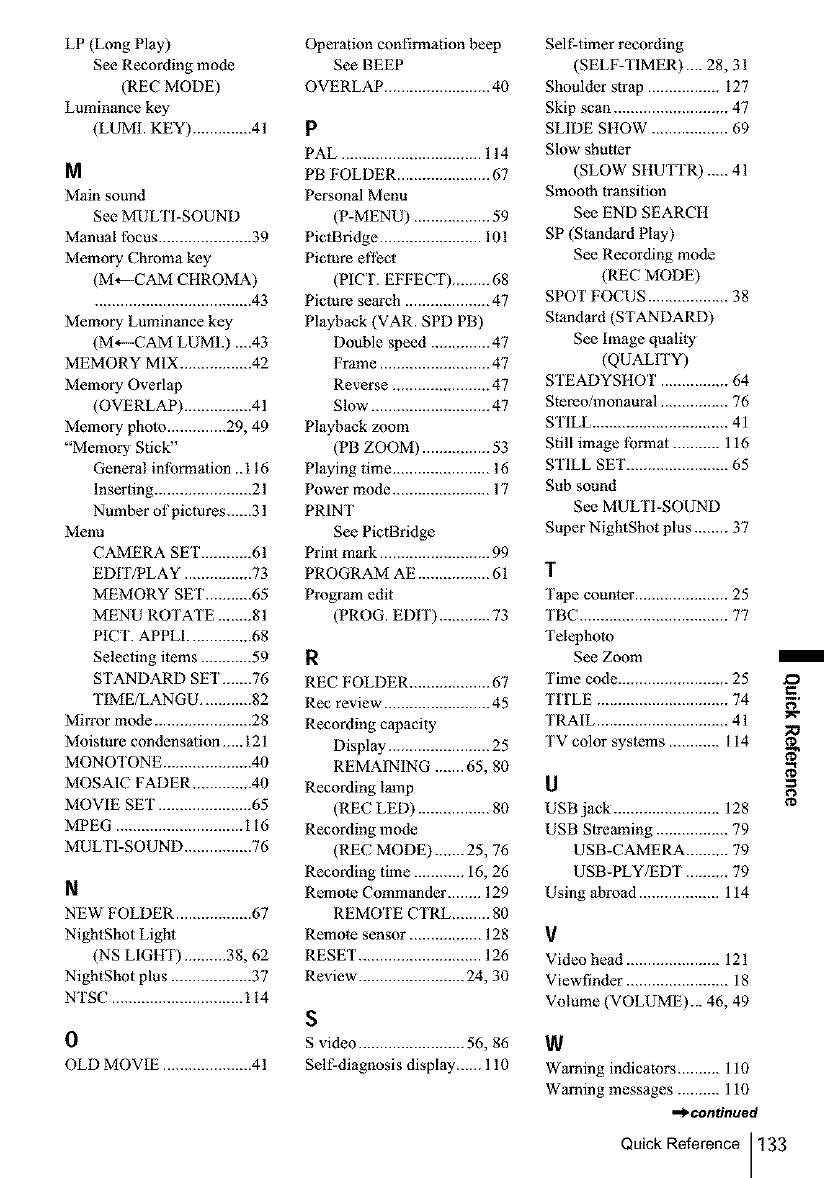
LP (Long Play)
See Recording mode
(REC MODE)
Luminance key
(LUMI. KEY) .............. 41
M
Main sound
See MULTI-SOUND
Manual focus ...................... 39
Memory Chroma key
(M,--CAM CHROMA)
..................................... 43
Memory Luminance key
(M_--CAM LUMI.) ....43
MEMORY MIX ................. 42
Memory Overlap
(OVERLAP) ................ 41
Memory pholo .............. 29, 49
"Memory Stick"
General inlbrmation ..116
Inserting ....................... 21
Number of pictures......31
Menu
CAMERA SET ............ 61
EDIT/PLAY ................ 73
MEMORY SET ........... 65
MENU ROTATE ........ 81
PICT. APPLI ............... 68
Selecting items ............ 59
STANDARD SET .......76
TIMEfLANGU ............ 82
Mirror mode ....................... 28
Moisture condensation...., 121
MONOTONE ..................... 40
MOSAIC FADER .............. 40
MOVIE SET ...................... 65
MPEG .............................. 116
MULTI-SOUND ................ 76
N
NEW FOLDER .................. 67
NightShot Light
(NS LIGHT) .......... 38, 62
NightShot plus ................... 37
NTSC ............................... 114
0
OLD MOVIE ..................... 41
Operation confirmation beep
See BEEP
OVERLAP ......................... 40
p
PAL ................................. 114
PB FOLDER ...................... 67
Personal Menu
(P-MENU) .................. 59
PictBridge ........................ 101
Picture effect
(PICT. EFFECT) ......... 68
Picture search .................... 47
Playback (VAR. SPD PB)
Double speed .............. 47
Frame .......................... 47
Reverse ....................... 47
Slow ............................ 47
Playback zoom
(PB ZOOM) ................ 53
Playing time ....................... 16
Power mode ....................... 17
PRINT
See PictBridge
Print mark .......................... 99
PROGRAM AE ................. 61
Program edit
(PROG. EDIT) ............ 73
R
REC FOLDER ................... 67
Rec review ......................... 45
Recording capacity
Display ........................ 25
REMAINING ....... 65, 80
Recording lamp
(REC LED) ................. 80
Recording mode
(REC MODE)....... 25, 76
Recording time ............ 16, 26
Remote Commander ........ 129
REMOTE CTRL ......... 80
Remote sensor ................. 128
RESET ............................. 126
Review ......................... 24, 30
S
S video ......................... 56, 86
Self-diagnosis display...... 110
Self-timer recording
(SELF-TIMER).... 28, 31
Shoulder strap ................. 127
Skip scan ........................... 47
SLIDE SttOW .................. 69
Slow shutter
(SLOW StlUTrR) ..... 41
Smooth transition
See END SEARCtt
SP (Standard Play)
See Recording mode
(REC MODE)
SPOT FOCUS ................... 38
Standard (STANDARD)
See image quality
(QUALITY)
STEADYSHOT ................ 64
Stereo/monaural ................ 76
STILL ................................ 41
Still image lbrmat ........... 116
STILL SET ........................ 65
Sub sound
See MULTI-SOUND
Super NightShot plus ........ 37
1
Tape counter ...................... 25
TBC ................................... 77
Telephoto
See Zoom
Time code .......................... 25
TITLE ............................... 74
TRAIL ............................... 41
TV color systems ............ 114
U
USB jack ......................... 128
USB Streaming ................. 79
USB-CAMERA .......... 79
USB-PLY/EDT .......... 79
Using abroad ................... 114
V
Video head ...................... 121
Viewfinder ........................ 18
Volume (VOLUME)... 46, 49
W
Warning indicators .......... 110
Warning messages .......... 110
,_continued
Quick Reference 133
m
F;
;o
g
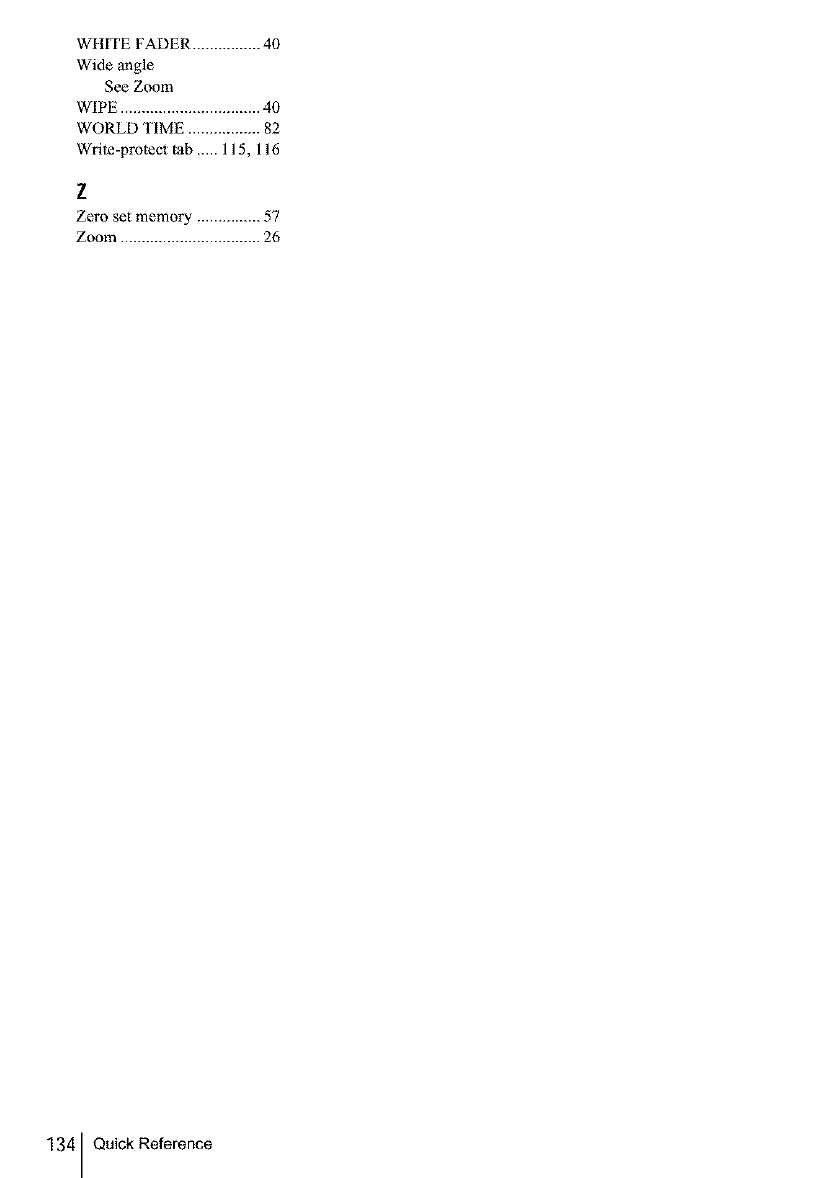
WttITE FADER ................ 40
Wide angle
See Zoom
WIPE ................................. 40
WORLD TIME ................. 82
Wrile-protect tab ..... 115, 116
Z
Zero set memory ............... 57
Zoom ................................. 26
134 Quick Reference


hffp://www.son£ne_
Printed on 100% recycled paper using
VOC (VolatileOrganic Compaund)-free
vegetable oil based ink.
Printed in Japan H IIIIIIHHI
3087921120
