Sony DGA-4002 Bluetooth notifier User Manual 08 user guide
Sony Mobile Communications Inc Bluetooth notifier 08 user guide
Sony >
08 user guide

LiveView™ touch
Startup guide
Sony Ericsson Mobile Communications AB
SE-221 88 Lund, Sweden
www.sonyericsson.com
Getting started
Turning on and off
To turn on LiveView™ touch
•Press and hold down the power key until the
icon is displayed.
To turn off LiveView™ touch
•When the display is active, press and hold down
the power key .
Setting up
To set up your LiveView™ touch device, you need
to:
•install on your phone the LiveWare™ manager
application from Android Market™, if the
application is not already installed. Before
downloading applications from Android
Market™, make sure you have an Internet
connection and a Google™ account. You may
also need to have a memory card inserted in
your phone.
•pair the LiveView™ touch device with your
phone using a Bluetooth™ connection.
•install the LiveView™ touch application on your
phone.
•install on your phone applications which are
tailor made for LiveView™ touch, such as
Messaging, Calendar, Find phone, Facebook
and Twitter. These applications help you run
specific functions on your LiveView™ touch
device.
Installing LiveWare™
manager
Your phone may already have LiveWare™
manager installed. If so, make sure you have the
latest version.
To install LiveWare™ manager
1Open your phone's main application screen.
2Find and tap Market.
3Tap to open the search field and then type
LiveWare.
4Tap to start searching.
5Select LiveWare™ manager in the result list,
and then install the application on your phone.
You can also download the LiveWare™
manager application by scanning the 2D
barcode shown below. This barcode can be
read by optical scanner software in your
phone, such as Barcode Scanner or
NeoReader™. Before using the scanner
function, make sure your phone has an
Internet connection.
Pairing LiveView™ touch
You need to pair the LiveView™ touch device with
your phone. LiveView™ touch can only be paired
with one phone at a time.
To pair LiveView™ touch with your phone
1Turn on the Bluetooth™ function in your phone.
2Turn off the LiveView™ touch device if it is not
already turned off.
3Press and hold down the power key to restart
the LiveView™ touch. The device automatically
enters pairing mode.
4Place your phone close to the LiveView™ touch
device.
5Go to the Bluetooth™ devices list in the
Bluetooth settings of your phone. Tap
LiveView™ touch.
6Follow the instructions in the phone. For
non-Sony Ericsson phones, enter '0000' if you
are asked to enter a passcode.
7Tap on your LiveView™ touch, then tap Pair
on your phone.
If pairing fails, the LiveView™ touch device
switches off and you need to restart and enter
pairing mode again.
Installing the LiveView™
touch application
The LiveView™ touch application handles the
connection between the LiveView™ touch device
and your phone. Use this application to change
settings for LiveView™ touch, and to download
applications from Android Market™.
To install the LiveView™ touch
application
1Pair your phone with the LiveView™ touch
device. Once paired successfully, a popup
window in your phone asks if you want to install
the required application for your LiveView™
touch accessory.
2Tap Continue. The Android Market™
application opens.
3When details of the LiveView™ touch application
appear, tap Install. After the LiveView™ touch
application is installed on your phone, the phone
should automatically connect to the LiveView™
touch device within a few seconds.
Even when connected, LiveView™ touch
status is displayed as Paired but not
connected under Bluetooth settings in your
phone.
Installing other applications
Once you set up LiveView™ touch to work with
your phone, you are ready to go to Android
Market™ and start downloading tailor-made
applications for LiveView™ touch. For example,
you can download applications that allow you to
use Twitter™, Facebook™, messaging, music
player and other features from your LiveView™
touch.
To search for LiveView™ touch
applications
1From your phone's main application screen, find
and tap LiveWare™ manager > LiveView™
touch > LiveView™ touch application. A list of
recommended and pre-configured applications
for LiveView™ touch appears.
2Tap an application name to go to Android
Market™, or tap Search for applications for a
full list of available applications in Android
Market™.
To install Android Market™ applications
•In Android Market™, select an application you
want to download, then follow the instructions
that appear to download and install it on your
phone.
Using LiveView™ touch
Turning on the display
The display on your LiveView™ touch device turns
off after a short period of time if you don't use it.
This saves power and protects your personal
information.
To turn on the display
1Make sure your LiveView™ touch device is
turned on.
2Press the power key briefly.
Navigating
There are two main views on your LiveView™
touch device: the Widget screen and the
Application screen. The Widget screen appears
after you turn on the device when it's paired. You
can then switch between the Widget screen and
the Application screen.
11:48
+861234556
:)
6 mins ago
11:48
Widget screen Application screen
Widget screen
Widgets are small applications that you can use
directly on the Widget screen of your LiveView™
touch device.
Application screen
Applications you install on the LiveView™ touch
device are displayed as application icons on the
Application screen. Just tap an icon to open the
associated application.
To go to the Widget screen
1Turn on the LiveView™ touch device.
2When the clock appears, tap the screen.
To switch between the Widget screen and
the Application screen
•Flick up or down.
8
:
)
6 mins a
6 mins a
ns
a
g
g
g
s
ag
ag
g
g
g
o
o
o
o
o
o
o
o
o
o
1:48
1
1
1
1
1
1
48
8
1
1
To navigate the Widget screen
•To view widgets located in extensions of the
Widget screen, flick left or right.
6
6
6
455
455
6
6
4
4
23
11:4
8
23
6
6
6
1
2
23
Ju
Jul 16
+
+86
86
1
1
6
6
1
+8
8
J
861
61
+8
To navigate the Application screen
•To view applications located in extensions of the
Application screen, flick left or right.
To open notifications
1Find and tap a widget or an application you want
to open.
2Flick left or right to scroll through notifications.
3Flick up or down to read a notification.
To go back to the previous screen
•Tap the screen with two fingers at the same
time.
25
+861234556...
:)
6 mins ago
2
6
6...
6...
6
6
6
6
)
Handling applications
You can decide which applications you want to
display on your LiveView™ touch device.
To select which widgets to display
1Connect the LiveView™ touch device with your
phone.
2From your phone's main application screen, find
and tap LiveWare™ manager > LiveView™
touch > LiveView™ touch application.
3Tap the application you want to enable.
4Mark the checkbox beside the application name.
5Mark the Display as widget checkbox.
To select which applications to display
1Connect the LiveView™ touch device with your
phone.
2From your phone's main application screen, find
and tap LiveWare™ manager > LiveView™
touch > LiveView™ touch application.
3Tap the application you want to enable.
4Mark the checkbox beside the application name.
Sorting widgets and
applications
You can sort the order in which widgets and
applications appear on your LiveView™ touch
display.
To sort widgets and applications
1Connect the LiveView™ touch device with your
phone.
2From your phone's main application screen, find
and tap LiveWare™ manager > LiveView™
touch > LiveView™ touch application.
3Tap the menu key on your phone.
4Tap Sort widgets or Sort applications.
5Drag and drop the icon beside the application
name to sort the order in which widgets or
applications appear on your LiveView™ touch
display.
Introduction
LiveView™ touch is an Android™-powered
smartwatch that shows you what's going on in
your phone. So you can keep your phone in your
pocket and still stay up to date.
On your LiveView™ touch screen you can view
notifications such as text and multimedia
messages, incoming calls, calendar event
reminders, Facebook™ updates, tweets and
more. From LiveView™ touch, you can also
control the music player in your phone, or handle
incoming calls.
This Startup guide focuses on using
LiveView™ touch with a Sony Ericsson
Android™ mobile phone. LiveView™ touch is
compatible with most Android™ phones.
Compatibility information and a User guide for
your accessory are available at
www.sonyericsson.com/support.
Overview
1
2
1 Clip – attaches LiveView™ touch device to
wrist band, belt or clothing
2 Power key – turns device on and off, activates
pairing mode and the screen
Charging
1
2
Before using the LiveView™ touch device for the
first time, you should charge it for approximately
two hours.
November 4, 2011 11:21:00
LiveView™ touch__Booklet_EN_1250-7783.1.pdf 1 of 2
1250-7783.1
Vibrating alerts
Your LiveView™ touch device vibrates when a new
notification arrives. If desired, you can turn off the
vibrating alert function.
To turn on and turn off vibrating alerts
1Connect the LiveView™ touch device with your
phone.
2From your phone's main application screen, find
and tap LiveWare™ manager > LiveView™
touch > LiveView™ touch application.
3Tap the application for which you want to adjust
the vibrating alert.
4Mark or unmark the Vibrate checkbox.
Calls
When your phone rings, LiveView™ touch displays
the name or number of the caller. You can mute,
reject, or answer the call. You can also use
LiveView™ touch to open your missed call log
remotely.
To mute an incoming call using
LiveView™ touch
•Tap .
To reject an incoming call using
LiveView™ touch
•Tap .
To accept an incoming call using
LiveView™ touch
•Tap . You can now answer the call from your
phone or from a Bluetooth™ headset.
To view the missed call log on your
LiveView™ touch
•Open the Missed call widget or application on
your LiveView™ touch device.
Rejected calls and muted calls both appear as
missed calls in the missed call log.
Text messages
When your phone receives a text message, you
can check the sender's information and the
content of the message on your LiveView™ touch
device. You can also use LiveView™ touch to start
a call to the sender, to send back a predefined
message, or to remotely open the received
message in your phone.
To read text messages on LiveView™
touch
1Find and tap the Messages widget.
2Flick left or right to find the message you want to
read.
To view a text message in your phone
using LiveView™ touch
1Open a text message in LiveView™ touch.
3View the notification on the phone.
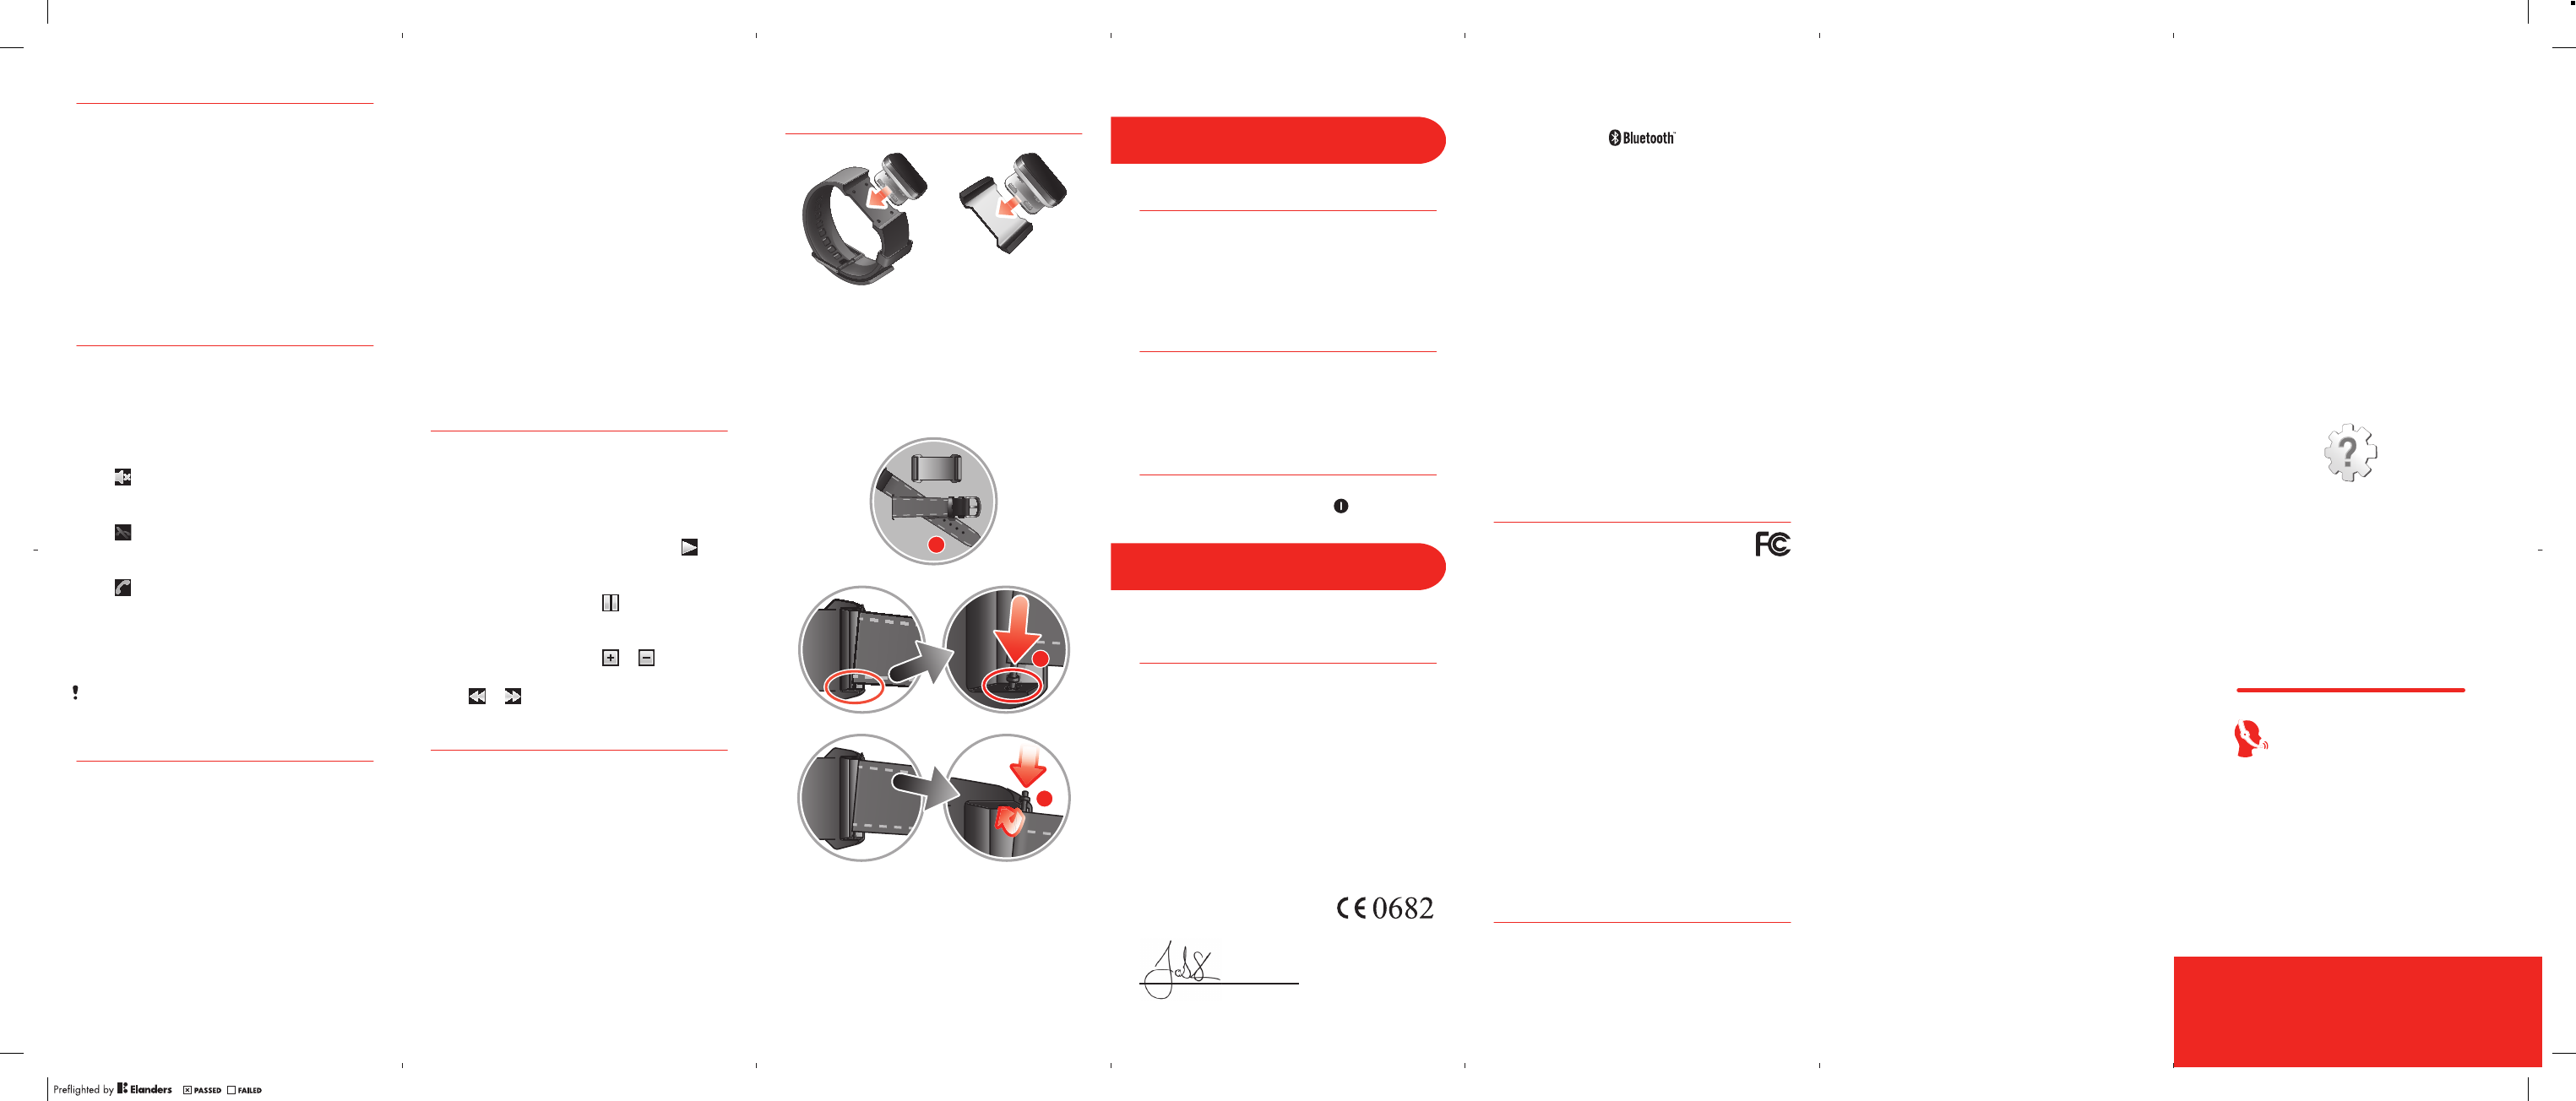
Wearing solutions
You can wear LiveView™ touch in different ways.
For example, you can clip the device to the
provided wristband, or you can attach it to the
provided wristband adaptor and use your own
wristband.
To attach the wristband adaptor to your
own wristband
1
2
3
1Insert a spring bar through the sleeve located on
the end of the wristband.
2Insert one end of the spring bar into one of the
retaining holes in the lugs of the wristband
adaptor.
3Use a spring bar tool or a nail to push down on
the spring bar on the opposite end and slip it
into the opposite retaining hole.
4Repeat the process on the other side of the
wristband adaptor.
Troubleshooting
No applications are found
For some phone types, and for some countries or
regions, there might not be any applications
available in Android Market™ for the LiveView™
touch application.
LiveView™ touch shuts
down unprompted
•The battery level is too low. Charge your
LiveView™ touch device.
•Pairing has failed. You need to restart the device
and reenter pairing mode.
Unexpected behaviour
Reset your LiveView™ touch device by pressing
and holding down the power key for 15
seconds.
Legal information
Declaration of Conformity
for MN2
We, Sony Ericsson Mobile Communications AB
of
Nya Vattentornet
SE-221 88 Lund, Sweden
declare under our sole responsibility that our
product
Sony Ericsson type DGA-0004002
and in combination with our accessories, to which
this declaration relates is in conformity with the
appropriate standards EN 300 328:V1.7.1, EN
301 489-17:V2.1.1 and EN 60 950-1:2006
+A11:2009+A1:2010 following the provisions of,
Radio Equipment and Telecommunication Terminal
Equipment directive 1999/5/EC.
Lund, October 2011
Jacob Sten,
Head of Product Business Unit Accessories
We fulfil the requirements of the R&TTE Directive (1999/5/EC).
Sony Ericsson MN2
Prior to use, please read the Important information leaflet
separately provided.
This User guide is published by Sony Ericsson Mobile
Communications AB or its local affiliated company, without any
warranty. Improvements and changes to this User guide
necessitated by typographical errors, inaccuracies of current
information, or improvements to programs and/or equipment, may
be made by Sony Ericsson Mobile Communications AB at any time
and without notice. Such changes will, however, be incorporated
into new editions of this User guide.
All rights reserved.
©Sony Ericsson Mobile Communications AB, 2011
Publication number: 1250-7783.1
Interoperability and compatibility among Bluetooth™ devices varies.
Device generally supports products utilizing Bluetooth spec. 1.2 or
higher, and Headset or Handsfree profile.
All product and company names mentioned herein are the
trademarks or registered trademarks of their respective owners. Any
rights not expressly granted herein are reserved. All other
trademarks are property of their respective owners.
Visit
www.sonyericsson.com/cws/corporate/common/legal/disclaimer
for more information.
All illustrations are for illustration only and may not accurately depict
the actual accessory.
FCC Statement
This device complies with Part 15 of the FCC rules.
Operation is subject to the following two conditions: (1)
This device may not cause harmful interference, and (2)
This device must accept any interference received, including
interference that may cause undesired operation.
Any change or modification not expressly approved by Sony
Ericsson may void the user's authority to operate the equipment.
This equipment has been tested and found to comply with the limits
for a Class B digital device, pursuant to Part 15 of the FCC Rules.
These limits are designed to provide reasonable protection against
harmful interference in a residential installation. This equipment
generates, uses and can radiate radio frequency energy and, if not
installed and used in accordance with the instructions, may cause
harmful interference to radio communications. However, there is no
guarantee that interference will not occur in a particular installation.
If this equipment does cause harmful interference to radio or
television reception, which can be determined by turning the
equipment off and on, the user is encouraged to try to correct the
interference by one or more of the following measures:
•Reorient or relocate the receiving antenna.
•Increase the separation between the equipment
and receiver.
•Connect the equipment into an outlet on a
circuit different from that to which the receiver is
connected.
•Consult the dealer or an experienced radio/TV
technician for help.
Industry Canada Statement
This device complies with RSS-210 of Industry Canada.
Operation is subject to the following two conditions: (1) this device
may not cause interference, and (2) this device must accept any
interference, including interference that may cause undesired
operation of the device.
This Class B digital apparatus complies with Canadian ICES-003.
Cet appareil numérique de la classe B est conforme à la norme
NMB-003 du Canada. Explore more and get
support
User guide
A User guide is available to read online or for
download at www.sonyericsson.com/support.
To download the LiveView™ touch User
guide
1From an Internet browser, go to
www.sonyericsson.com/support.
2Click the Extra tab near the top of the page.
3Select your accessory by searching for it by
name or by selecting an image.
4Click User guide, then click Download.
Support on the web
Visit www.sonyericsson.com/support to get the
most from your accessory, including support,
compatibility information and directions on how to
upgrade the software for your LiveView™ touch
device.
You can read the QR code on the cover page with
optical scanner software in your phone, such as
Barcode Scanner or NeoReader™. Before using
the scanner, make sure you have an Internet
connection. After scanning, you are directed to the
www.sonyericsson.com/support web page.
Customer support
Customer support – if all else fails. Access the
relevant support number on the Sony Ericsson
website by clicking the Contact us link at the
bottom of the page.
www.sonyericsson.com/support
2Tap and hold the screen, then tap View in
phone.
3View the text message on your phone.
To call a message sender using
LiveView™ touch
1Open a text message.
2Tap and hold the screen, then tap Call sender.
3Continue the call using your phone.
To edit a predefined text message
1From your phone's main application screen, find
and tap LiveWare™ manager > LiveView™
touch > LiveView™ touch application.
2Tap Messaging > Messaging settings >
Predefined SMS.
3Edit the text, then tap Phone detected.
To send a predefined text message using
LiveView™ touch
1Open a text message.
2Tap and hold the screen, then tap Reply:.
Music player
You can use LiveView™ touch to control the music
player in your phone.
To play a track in your phone using
LiveView™ touch
1Open the music player widget or application on
your LiveView™ touch device.
2Find the track you want to play, then tap .
To pause the music player in your phone
using LiveView™ touch
•When music is playing, tap .
To adjust the music player volume using
LiveView™ touch
•When music is playing, tap or .
To move between tracks
•Tap or .
Social networking
You can get live notifications from Facebook™ and
Twitter™ on your LiveView™ touch. You can also
change your social networking service settings to
determine which notifications you receive.
To view social networking notifications on
LiveView™ touch
1Find and tap a social networking service widget
or application, for example, the Facebook™
application.
2Flick left or right to navigate through notifications.
To view a social networking notification in
the phone using LiveView™ touch
1Open a social networking notification on your
LiveView™ touch device.
2Tap and hold the screen, then tap View in
phone.
November 4, 2011 11:21:02
LiveView™ touch__Booklet_EN_1250-7783.1.pdf 2 of 2