Sony DSC P92 User Manual CAMERA Manuals And Guides L0406520
SONY Cameras, All Manual L0406520 SONY Cameras, All Owner's Manual, SONY Cameras, All installation guides
User Manual: Sony DSC-P92 DSC-P92 SONY CAMERA - Manuals and Guides View the owners manual for your SONY CAMERA #DSCP92. Home:Electronics Parts:Sony Parts:Sony CAMERA Manual
Open the PDF directly: View PDF ![]() .
.
Page Count: 114 [warning: Documents this large are best viewed by clicking the View PDF Link!]
3-082-719-11(1)
Getting started
Shooting still images
Viewing still images
Deleting still images
Before advanced operations
A dva nced still image sh ooti ng
Advanced still image viewing
Still image editing
Enjoying movies
Enjoying images on your computer_
Troubleshooting
Additional information
Index ×
To prevent fire or shock hazard, do
not expose the unit to rain or
moisture,
CAUTI_ TO_EDUCETF_ERI_KOFEL,eThiCS_K.
nE_E_SERVICINGTOQUALnED_E_VlC__EnSONNL_
This symbol is intended to
Mat the user to the presence
of lminsulated "dangaous
voltage" within the product's
enclosme thai may be of
sufficient magnitude to
constitute a risk of electric
shock to persons
This symbol is intended to
alert the use_ to the presence
of important operating and
maintenance (servicing)
insnuctions in the literatme
accompanying the appliance.
If you have any questions about this pro&_ct,
you may call:
Sony Customer Infom_ation Services Center
1-800-222-SONY (7669)
The nmnber below is for the FCC related
matters only.
Regulatory Information
Declaration of Conformity
T:ade Name: SONY
Model No.: DSC-P92
Responsible Pmty: Sony Electronics Inc
Address: 680 Kinderkamack
Road, Oradell, NJ
07649 USA
Telephone No: 201-930-6972
This device complies with Part 15 of the
FCC Rules Operation is subject to fl_e
following two conditions: (1) This device
may not cause tmnnfifl interference, and (2)
this device must accept any interference
received, including interfelence that may
cause _mdesired operation.
CAUTION
You are cautioned that any changes or
modifications not expressly approved in this
n:anual could void your authority to operate
this equipment
Note:
This equipment has been tested and found to
comply with the limits for a Class B digital
device, pursuant to Pa:t 15 of the FCC Rules
These limits are designed to provide
reasonable protection against harmfifl
inteffe:ence in a residential installation This
eqmpment generates, uses, and can radiate
radio frequency energy and, if not installed
and used in accordance with the instructions,
may cause harmfifl inte:_rence to radio
commtmications. Howeve:, there is no
guarantee that inter:erence will not occur in a
pa:ticular installation If this equipment does
cause hannfid interference to radio or
television reception, which ca:: be determined
by turning the equipment off and on, the use:
is encouraged to t:> to correct the interfe:ence
by one or more of the following measures:
_eorient or relocate the receiving antenna.
_ncrease the separation between the
equipment and receiver.
Connect the equipme::t into an outlet on a
circuit different fion: that to which the
receive: is connected.
Consult the dealer or an experienced
radioiTV technician for help.
The supplied intert:ace cable nmst be used
with the equipment in order to comply with
the limits for a digital device pmsuant to
S::bpart B of Part 15 of FCC Rules

RECYCLING NICKEL METAL
HYDRIDE BATTERIES
Nickel Metal Hydride batteries .,_
are iecyclable.
"_bu can help preseive ore
environment by ietmmng yore
used iechargeable batteries to
the collection and recycling location nearest
you.
For more infomlation regarding recycling of
rechargeable batteries, call toll free
1-800-822-8837, or
visit htlp: '/www.rbrc orgi
Caution: Do not handle damaged o_ leaking
Nickel Metal Hydride batteries
CAUTION
TO PREVENT ELECTRIC SHOCK, DO
NOT USE THIS POLARIZED AC PLUG
WITH AN EXTENSION CORD,
RECEPTACLE OR OTHER OUTLET
UNLESS THE BLADES CAN BE FULLY
INSERTED TO PREVENT BLADE
EXPOSURE.
A moulded plug complying with BS 1363 is
fitted to this equipment tbr your safety and
convenience
Should the fi_se in the plug supplied need to be
replaced, a 5 AMP filse approved by ASTA or
BSI m BS 1362, (i.e., marked with @ or
mark) must be used
If the phlg supplied with this equiplnent has a
detachable fi_se cover, be sure to attach the
filse cover after you change the fuse. Never
use the plug without the fuse cover. If you
should lose the filse cover, please contact your
nearest Sony smvice station
This product has been tested and tbtmd
compliant with the limits sets out in the EMC
Directive for using connection cables sho_ter
than 3 meters (9.8 feet).
Attention
The electromagnetic fields at the specific
frequencies may influence the pic_ue and
sound of this digital camera.
Notice
If static electrici_, m electromagnetism canses
data tlansf_r to discontimm midway (fail),
restart the application or disconnect and
connect the USB cable again
Cmtain countries may regulate disposal of the
battm T used to power this product Please
consult with your local amhority.
For the Customers in the U.S.A.
and Canada
THIS ('LASS B DIGITAL DEVICE
COMPLIES WITH PART 15 OF THE FCC
RULES AND THE CANADL_N ICES-003
OPERATION IS SUBJECT TO THE
FOLLOWING TWO CONDITIONS:
(1) THIS DEVICE MAY NOT CAUSE
HARMFUL INTERFERENCE, AND (2)
THIS DEVICE MUST ACCEPT ANY
INTERFERENCE RECEIVED,
INCLUDING INTERFERENCE THAT NL_Y
CAUSE UNDESIRED OPEt_a_TION.
using your camera
Trial recording
Before you :ecord one-time events, you may
want to make a trial recording to make sure
that the camera is working conectly.
No compensation for contents of the
recording
Contents of the :ecording cannot be
compensated for if recording or playback is
not possible due to a malfimction of your
camera or recording inedillnl, etc.
Back up recommendation
To avoid the potemial risk of data loss ahvays
copy (back up) data to a disk
Notes on image data compatibility
•This camera confolms with the Design role
tbr Camera File system universal standard
established by the JEITA (Japan Electronics
and Intbrmation Technology Industries
Association).
•Playback of images recorded with your
camera on other equipment and playback of
images recorded or edited with other
equipment on yollr camera are not
guaranteed.
Precaution on copyright
Television p:og:ams, films, video tapes and
other malerials may be copyrighted.
Unanthorized recording of such materials may
be cmmary to the p:ovision of the copyrigN
laws
Do not shake or strike the camera
In addition to malfunctions and inability to
record images, this may render the "Memory
Stick" unusable or image data breakdown,
damage or loss may occllr.
LCD screen, LeD finder (only models
with a LCD finder) and lens
•The LCD screen and _e LCD finder are
manufiac_ued using exnemely high-
precision teclmology so over 99.99% of the
pixels are operational tbr effective use.
However, thae may be some tiny black
points and/or bright poims (wNte, red, bh:e
or green in color) that constantly appear on
the LCD screen and the LCD finder. These
points are normal in the manufacturing
process and do not affect the recording in
any wa}:
• Be carefifl when placing the camera near a
window or outdoors. Exposing the LCD
screen, the finder or the lens to direct
sunlight tbr long periods may cause
malfimcfions.
• Do not press the LCD screen hardly The
screen may be uneven aild that nlay cause a
malfimcfion
• hnages may be tailed on the LCD screen in
a cold location. This is not a malfimcfion.
The power zoom lens
This came:a is equipped with power zoom
lens. Be carefifl not to bump the lens, and be
carefid not to apply tb:ce to it
Remove dirt from the surface of the
flash
If the di:_ changes colo: o: sticks to the
surface of the flash due to the heat of the flash,
sufficient light may not be emitted.
Do not get the camera wet
When taking pictures outdoo:s in the rain or
:rode: similar conditions, be carefid not to get
the camera wet If moisture condensation
occurs, see page 104 and follow the
instrucfions on how to relnove it before using
the camera.
Do not expose the camera to sand or
dust
Using the camera in sandy o: dusty locations
may cause a malfimction.
Do not aim the camera at the sun or
other bright light
This may cause inecoverable damage to your
eyes or the malfimction of your camera.
Notes on locations where you can
use the camera
• Do not use the camera near a location that
generates strong radio waves or emits
radiation. The camera may not be able to
record or play back properly.
• Do not use the camera near a T\; radio, or
nmer This may cm:se noise to iNert)re the
camera.
The pictures used in this manual
Tile photographs used as examples of pictures
in this manual me repro&_ced images, and are
not actual images shot using this camera
Trademarks
•"Memo_ W Stick" _, _, and "MagicGate
Memm W Stick" me trademalks of Sony
Co!potation.
•"Memo_ W Stick Duo" and
MEMORY5TICK DUO are trademmks of Sony
Colporation.
•"Memo_ W Stick PRO" and
MEMIIRY5TIgK PRO ale tradelnarks of Sony
Colporation.
•"MagicGate" and MZ_G|CGZ_TE are
trademarks of Sony Co_oration.
• Microsoft and Windows are registaed
trademarks of the U S. Microsoft
Colpomtion in the United States and other
cotllltlies.
• Macintosh, Mac OS, QuickTime, iBook, and
Power Mac are tladelnarks or registered
trademarks of Apple Computer, Inc.
•"Pentimn" is a trademark or a registered
trademark of Intel Corporation
• In addition, system and product names used
in ins manual are, in general, t_ademarks or
registered trademarks of their respective
developers or nlanu_lCtlll-ers. However, tile
•Mor 'K marks are not used in all cases in this
tllantlal.

Table of contents
Before using your camera ......................... 4
Identifying the parts .................................. 8
Preparing batteries .................................. 10
Charging the batteries ............................. 10
Inserting the batteries .............................. 12
Using an external power source .............. 15
Using your camera abroad ...................... 15
Ttmfing your camera o_off .................... 16
How to use the control button ................. 16
Setting the date and time ......................... 17
Inserting and removing a "Memo W Stick"
........................................................ 19
Setting the still image size ...................... 20
Image size and quality ............................ 21
Basic still image shooting
using auto mode ........................... 22
Checking the last image shot
Quick Review. ............................. 24
Using the zoom featme ....................... 25
Shooting close-ups Macro ............... 26
Using the self-timer ............................ 27
Selecting a flash mode ........................ 28
Shooting with the finder ..................... 30
Inserting the date and time on a still
image .............................................. 31
Viewing images on the LCD screen of your
camera ............................................ 32
Viewing images on a TV screen ............. 34
Deleting images ...................................... 36
Formatting a "Memo W Stick". ............... 40
How to setup and operate your camera .. 41
Changing menu settings ..................... 41
Changing items in the SET UP screen
........................................................ 41
Deciding the still image quality .............. 42
Creating or selecting a folder ................. 42
Creating a new folder ......................... 43
Selecting the recording i\)lder ............ 43
Choosing a focus method ....................... 44
Setting the distance to the subject
Focus preset ................................ 45
Adjusting the exposure
EV adiustlnent ............................. 46
Selecting a metering mode ..................... 47
Actiusting color tones "_\q_ite Balance...48
Actiusting the flash level Flash Level...49
Shooting multiple frames
Clip Motion ................................. 49
Shooting in Multi Burst mode
Multi Bttrst ................................... 51
Shooting three images in succession
Burst 3 ......................................... 51
Shooting still images for e-mail
E-Mail .......................................... 52
Shooting still images with audio files
Voice ............................................ 53
Shooting according to scene conditions
........................................................ 54
Adding special effects
Picture Effect ............................... 56
Selecting the folder and playing back
images Folder .............................. 57
Enlarging a portion of a still image ......... 58
Enlarging an image
Playback zoom ............................. 58
Recording an enlarged image
Trimming ..................................... 59
Playing back successive images
Slide show. .................................. 59
Rotating still images Rotate ................. 60
PlayingbackimagesshotinMultiBurst
mode...............................................61
Playingbackcontinuously..................61
Playingbackframebyframe
Jogplayback................................61
Protecting images Protect ..................... 63
On the single screen ............................ 63
On the Index (nine-image) screen ....... 63
On the Index (n-iple-ilnage) screen..... 64
Changing image size Resize ................. 65
Choosing images to print
Print (DPOF) mark ...................... 66
On the single screen ............................ 66
On the Index (nine-image) screen ....... 66
On the Index (n-iple-ilnage) screen ..... 67
Shooting movies ...................................... 68
Viewing movies on the LCD screen ....... 69
Deleting movies ...................................... 70
On the single screen ............................ 70
On the Index (nine-image) screen ....... 70
On the Index (n-iple-image) screen..... 71
Editing movies ........................................ 72
Cutting movies .................................... 72
Deleting unnecessa W portions of movies
........................................................ 73
Copying images to yore- COlnputer
For Windows users ...................... 74
Installing the USB driver .................... 75
Installing "hnage Transfer". ............... 76
Installing "hnageMixer". .................... 77
Colmecting the camera to your computer
........................................................ 7_
Copying images using "Image Transfer"
........................................................ 79
Changing "hnage Transfer" settings .. 80
Copying images withom using "Image
Transfer". ....................................... 80
Viewing the images on yottr computer
........................................................ Sl
Image file storage destinations and file
names .............................................. 82
Copying images to your COlnputer
For Macintosh users .................... 84
Creating a Video CD .............................. 86
Troubleshooting ...................................... 87
Warnings and messages .......................... 94
Self-diagnosis display Ifa code starting
with an alphabet letter appears ....... 96
The number of images that can be saved/
shooting time ................................... 97
Menu items .............................................. 98
SET UP items ........................................ 102
Precautions ............................................ 104
The "Memoly Stick". ............................ 105
The nickel-lnetal hydride batteries ........ 106
The battely charger ................................ 107
Specifications ........................................ 107
The LCD screen .................................... 109
Index ...................................................... 112
the parts
[]
[]
[]
[]
[]
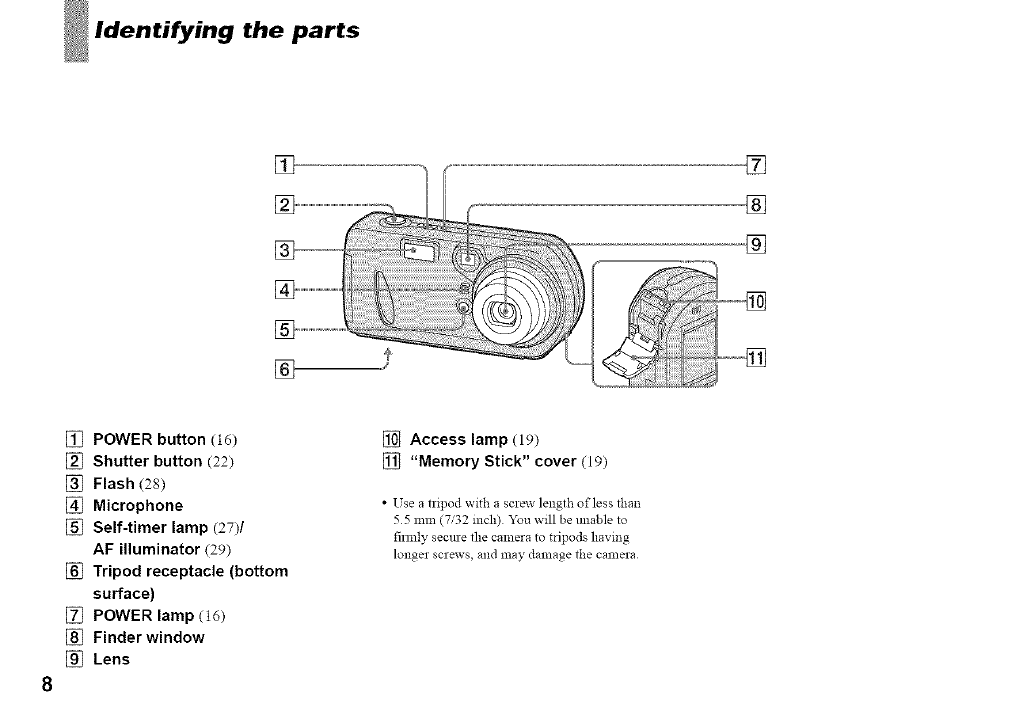
[] POWER button (16)
[] Shutter button (22)
[] Flash (28)
[] Microphone
[] Self-timer lamp (27)/
AF illuminator (29)
[] Tripod receptacle (bottom
surface)
[] POWER lamp (16)
[] Finder window
[] Lens
[] Access lamp (19)
[] "Memory Stick" cover (19)
•Use a tripod with a screw length of less than
55111111(7/32 inch) You will be unable to
firmly secure the camera to tripods having
longer screws, and may damage the camera
.o
[]
[]
[]
[]
[]
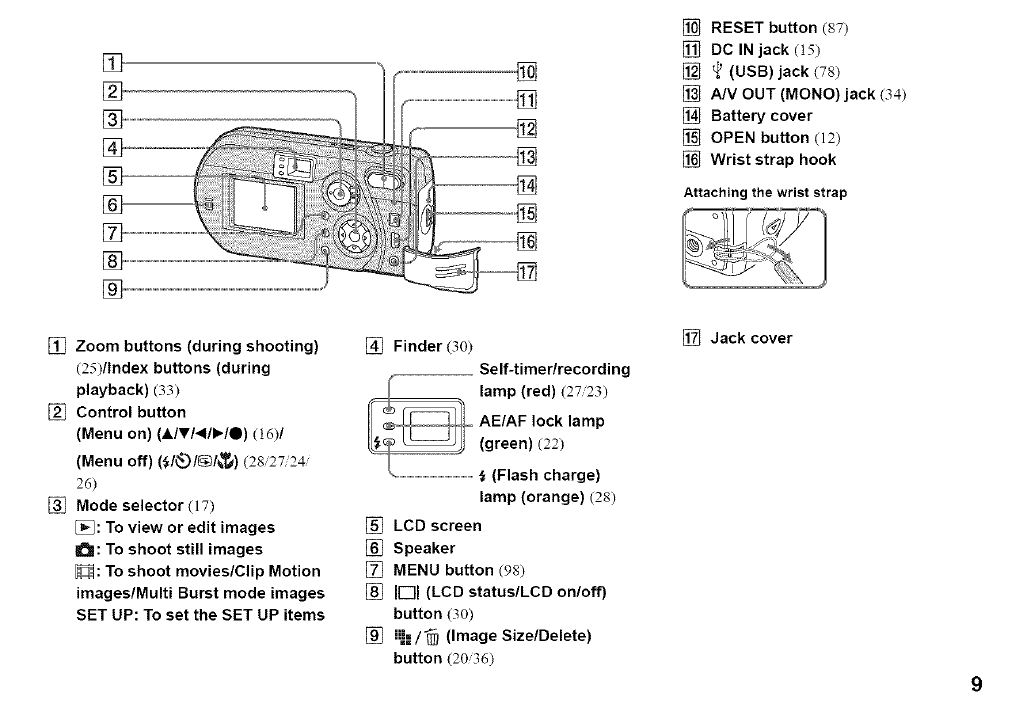
[] RESET button (87)
[] DC IN jack (15)
[] _ (USB) jack (78)
[] A/V OUT (MONO) jack (34)
[] Battery cover
[] OPEN button (12)
[] Wrist strap hook
Attaching the wrist strap
[] Zoom buttons (during shooting)
(25)/Index buttons (during
playback) (33)
[] Control button
(Menu on) (,A.IVl41P,'IO) (16)1
(Menu off) (_1_._1_1_._)(28 27 2_
26)
[] Mode selector (17)
[_: To view or edit images
a'_: To shoot still images
H: To shoot movies/Clip Motion
images/Multi Burst mode images
SET UP: To set the SET UP items
[] Finder (30)
Self-timer/recording
lamp (red) (27/23)
AE/AF lock lamp
(green) (22)
(Flash charge)
lamp (orange) (28)
[] LCD screen
[] Speaker
[] MENU button (98)
[] IE]l (LCD status/LCD on/off)
button (30)
[] i.=/_ (Image Size/Delete)
button (2036)
[] Jack cover
9
10
batteries
Use the ±\_llowing batteries in this camera.
Acceptable batteries
HR 15/51 :HR6 (size AA) Nickel-Metal
Hydride batteries (2)
- NH-.%_-DA(2)(supplied)
- NH-.%_-2DAtwin-pack (not supplied)
R6 (size AA) alkaline batteries (2)
Batteries that cannot be used
Manganese batteries lithium batteries_ ni-
cad batteries
If you use the batteries described above, we
cannot guarantee full per±'onnance of the
camera by property of the batteries, such as
brownout of the batteries.
The batte W remaining indicator does not
display the correct information.
•When alkaline bakeries are used. take note of
the following information.
- There is a big difference in the performance
of batteries of different types and of batieries
lnade by different manufacntrers This is
especially trite in low temperatures, where
some batteries are noticeably weaker
You may not be able to shoot in temperatures
below 5°C (41 °F)
- The battery remaining indicator may not
display the correct information
Charging the batteries
CHARGE lamp toawa outet
(wa!t socket)
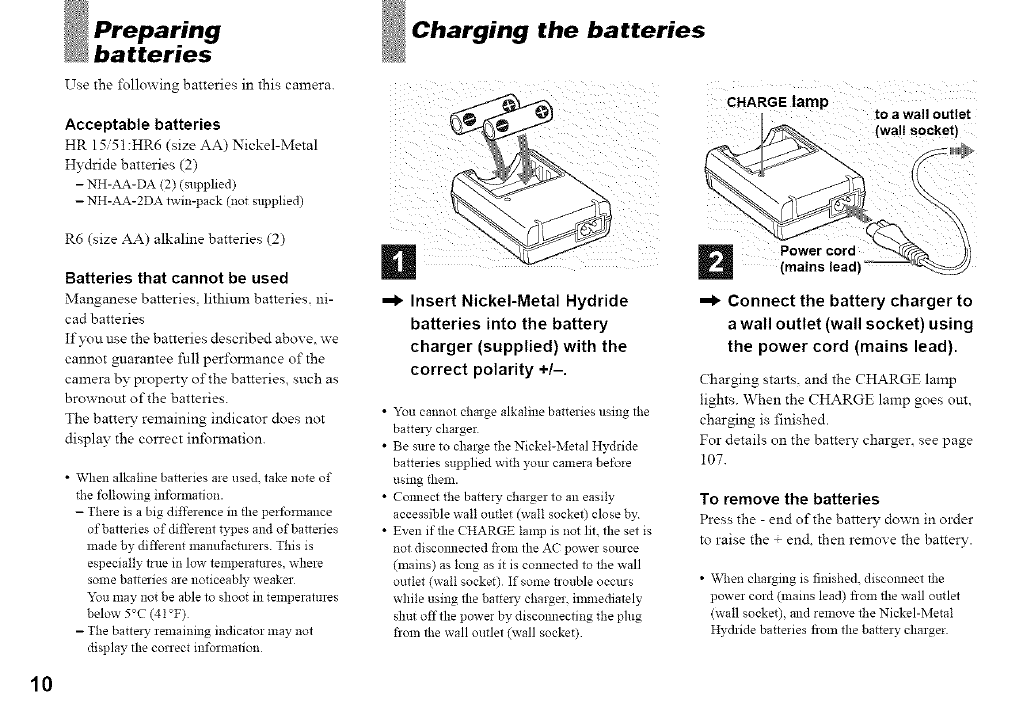
=1_Insert Nickel-Metal Hydride
batteries into the battery
charger (supplied) with the
correct polarity +/-
•You cannot charge alkaline batteries using the
battel 5, charger
• Be sure to charge the Nickel-Metal Hydride
batteries supplied with your calnera before
using theln.
• Comlect the battery charger to an easily
accessible wall outlet (wall socket) close by
• Even if the CHARGE lamp is not lit. the set is
not discomlected from the A( power source
(mains) as long as it is connected to the wall
outlet (wall socket) If some trouble occurs
while using the barrel 3, charger, ilmnediately
shut off the power by discomlecting the plug
from the wall outlet (wall socket)
(mains lead)
_1_ Connect the battery charger to
a wall outlet (wall socket) using
the power cord (mains lead)
Charging struts, and the CHARGE lamp
lights. When the CHARGE lamp goes out,
charging is finished.
For details on the battery charger, see page
107.
To remove the batteries
Press the - end of the barteD' down in order
to raise the + en& then remove the batter.,,'.
• \_,q_en charging is finished, discomlect the
power cord (lnains lead) from the wall outlet
(wall socket), and remove the Nickel-Metal
Hydride batteries from the battery charger
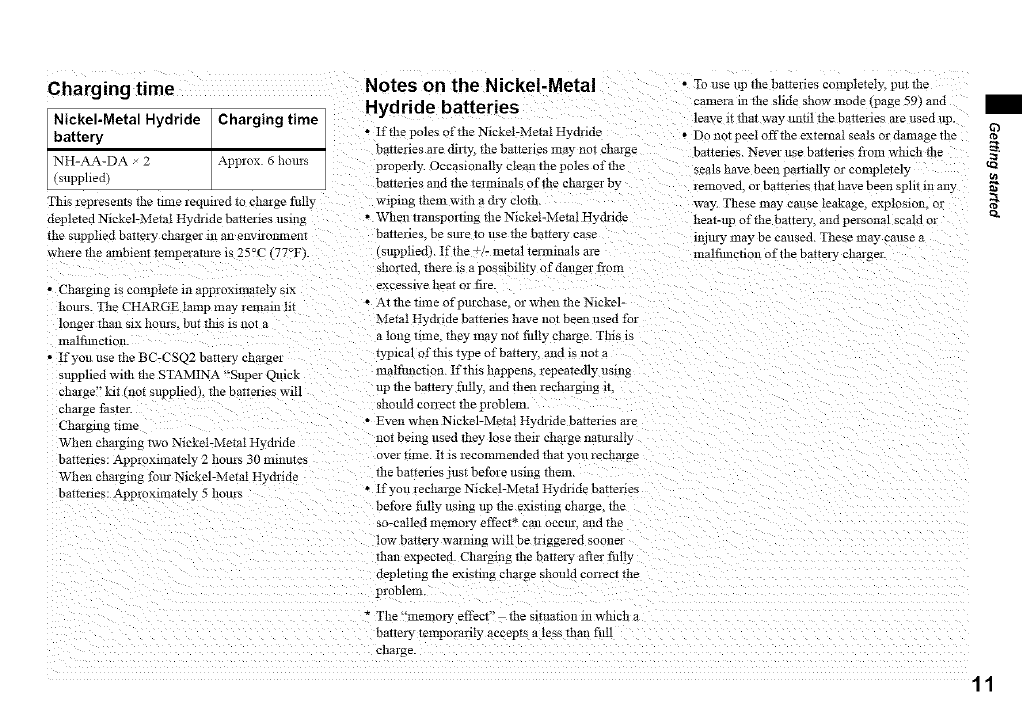
Charging time
Nickel-Metal Hydride Charging time
battery
NH-AA-DA _ 2Approx 6 hours
(supplied)
Th:s represents the tmae reqinred to charge fully
deple:ed N:ckel-Metal Hydnde batteries usn:g
the supphed ba*tery- charger 111an e11vn-onmen:
where *he alnb:ent*emperatm-e is 25°C (77°]- ,.
•Charging is complete in approxima*ely six
horns. The CHARGE lamp :nay lemam ht
longer thin: six horns but tiffs is not a
malfimcti )11.
• If you use *lie BC-CSQ2 baUery chargeJ
supplied with *he STAMINA "Super Quick
charge" Pat (:tot supphedl fire ba:renes will
charge }aster.
Charging rime
When chsrgmng two N:ckeI-Metal Hydride
batteries: Approximately 2 horns 30 minutes
When chargmn8 fore Nickel-Metal Hydride
batteries: Approx:mately 5 hours
Notes on the Nickel-Metal
Hydride batteries
• If*he poles of fire Nickel-Metal Hydride
batterws are rhlly, the battelles :nay not c_a_:-ge
properly. Occas:onally cleat1 the poles of the
batteries and _he terminals of the charger by
wiping them w:th a dry cloth
• When :rallspoHm_ *he N:ckal-Metal Hv&-lde
batteries, be sm-e to use *he battery case
_,lpplied). If the +/- metal termmals are
,ho:_ed. *here is a possibility of danger rio:l:
excessive heat or fire.
* At*he *ime of prochase, or when the Nickel-
Metal Hydr:de banenes have not bee:: used for
a long time, they :nay not fillly charge. This is
typical of*his type of battery, and is not a
malfimc*inn. If*his happens, repeatedly using
up the battery fuUy a11dthen recharging iT
shouM correct the problem
• Even whenNlckel-Metal Hydride bar:cues are
not being used lhey lose *herr charge rialtoall)
over ::me. It is recommellded *hN you recharge
the batter:es just before using them.
.If you recharge N:ckel-Metal Hyrh':de bavenes
before fillly using up *he existing c_:urge, the
so-called memory effect* can occm, and the
low battel_y•warning will be mggered soot:el
than expected. Charging the battel?z after fifil)
depleting the existtllg charge should corIect the
problem
The "memory effect" the SltUatlO11ill winch a
• To use tip the batter:es completely, pm the
camera m the slide show mode [page 59) and
leave It *hat way ,mill the baneries are used up
• Do not peel off the external seals or damage the
batteries. Never use batteries froln which the _.
_eals have been pamally or completel 3 t_
o_
lemoved or banenes that have been split m any
way. These may cause leakage, exploslo11, or .4,_.
heat-up of*he battery, and personal scald ol
mJm2¢may be caused. These may cause a
malfimctio11 of the battery charger
:_a,:ery _emporanly accepts a less than fuU
charge
11
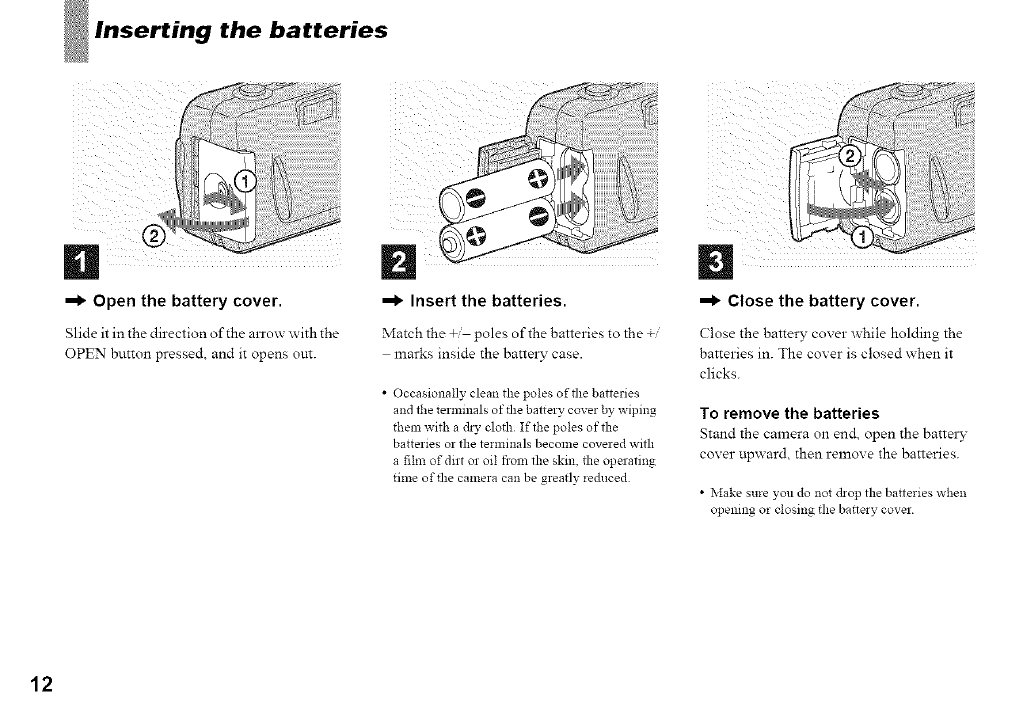
Inserting the batteries
_1_ Open the battery cover.
Slide it in the direction of the alxo_ with the
OPEN button pressed, and it opens out.
_1_ Insert the batteries.
Match the + poles of the batteries to the +
marks inside the battely case.
•Occasionally clean the poles of the batteries
and the terminals of the battery cover by wiping
them with a dry cloth Iftbe poles of the
batteries or the terminals become covered with
a film of dirt or oil from the skin, the operating
time of the camera can be greatly re&iced
iiii
_1_ Close the battery cover.
Close the battery cover while holding the
batteries in. The cover is closed when it
clicks.
To remove the batteries
Stand the camera on end open the battel 3"
coxer upx_ ard, then remove the batteries.
•Make sure you do not (bop the batteries when
opening or closing the bakery cover
12
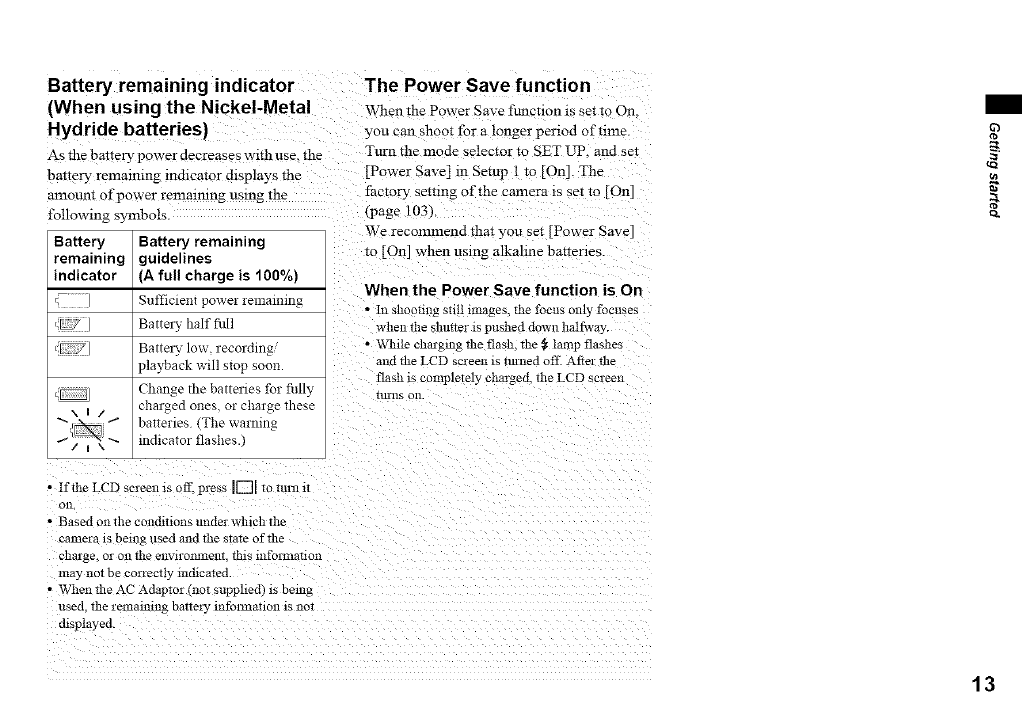
Battery remaining indicator The Power Save function
(When using the Nickel-Metal WhenthePowerSavef_non :__e::o On.
Hydride batteries) you can shoot for a longer period of time.
As the battery- power decreases w:th use. the Turn the mode selector to SET Lnp. and set
batte_ remaimng lnd:cator &splays the [Power Save] in Setup I to [On]. The
amount of power remmmng using the factory semng of the camera :s set 1o [On]
following symbols. *page 103)
Battery Battery remaining
remaining guidelines
indicator (A full charge is 100%)
( ] Sufficient power remaining
_L7 ] Battery half fllll
L;F7 Battery low, recording °
playback will stop soon.
_ Change the battelies for fiflly
charged ones. or charge these
batteries (The warning
indicator flashes.)
We recommend that you se: [Power Save]
to [On] when using alkalme bat_er:es
When the Power Save function is On
• In shooting still images, the focus only focuses
when the shutter is pushed down halg,vay
• While chargm_ *he flash, the _ lamp flashes
and the LCD screen is turned off. Af*el the
flash is completely charged, the LCD screen
nUllS on.
cn
• If the LCD screen is off. press I[[]1 *o iI11_1_iJ
on
• Based on the conditions under which the
camer_ is being used and the sTa_eof *l:e
charge or o1: the ellVlrO1311lenl,this infol-131a_ion
may not be correctly mchca*ed
• When *he AC Adap*or (nol supphed) :s being
used. the remaining battery infolrmation is :1oi
d:splayed.
13
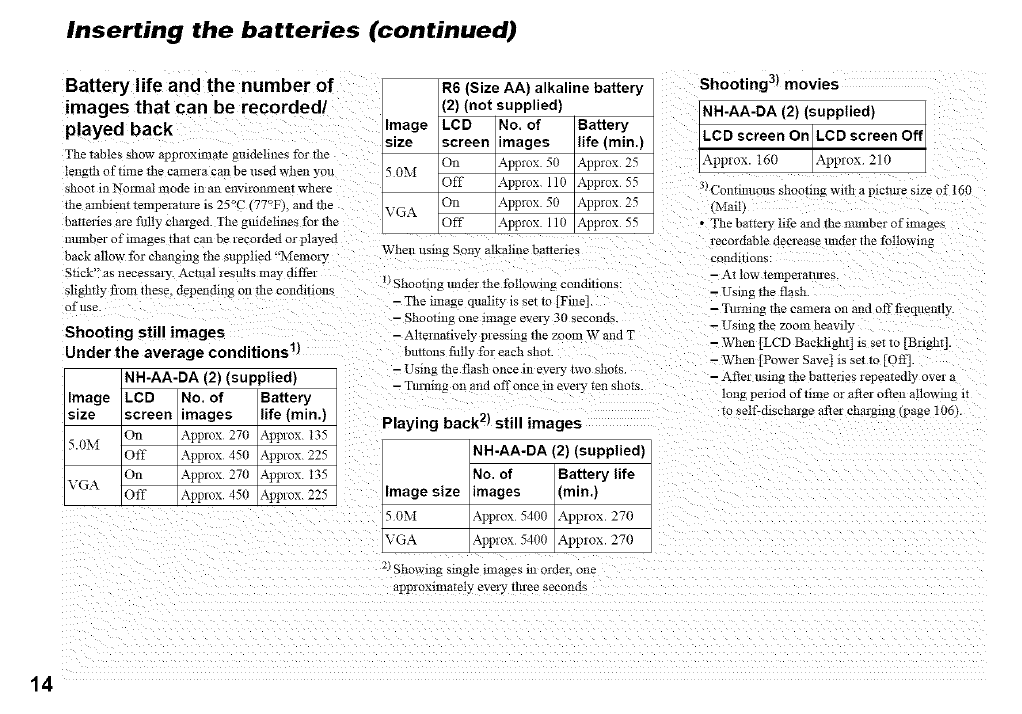
Inserting the batteries (continued)
Battery life and the number of
images that can be recorded/
played back
The tables show approxmlaTe guidelines for the
length of time the camera can be used when you
shoot ill NolIrtal If!ode 11/an envlroI!lllent whele
the ambient *emperatm-e is 25°C 77°F1. and file
batteries are fully charged. The gindelines for the
mtmber of images that can be recorded ol played
back allow for changing the supplied "Memory
Stick" as necessary. Actual results may differ
slightly from these, depenrhng on tile conditions
of use.
Shooting still images
Under the average conditions 1)
NH-AA-DA (2) (supplied)
Image LCD No. of Battery
size screen =mages life (min.)
On Approx 270 Approx. 135
5.0M Off Approx 450 Approx. 225
On Approx 270 Approx. t35
VGA Off Approx 450 Approx. 225
R6 (Size AA) alkaline battery
(2) (not supplied)
Image LCD No. of Battery
size screen =mages life (min.)
On AppIox 50 Appmx 25
50M Off Approx 110 Approx 55
On Appmx 50 Approx 25
VGA Off Approx 110 Approx 55
When usmg Sony alkahne baUenes
•JShooting lmder the following conrhtIons:
- The image quslity is set to [Fine].
- Shooting one image every 30 seconds.
- Alternanvely pressing the zoom W and T
buttons tiflly for each shot.
- Using the flash once in every cwo shots.
- Tinrang on and off once in every len shots.
Playing back 2) still images
NH-AA-DA (2) (supplied)
No. of Battery life
Image size images (min.)
50M Approx 5400 App!ox. 270
VGA Approx 5400 Approx. 270
2Showing single images in order, one
appIoxmmtely every tluee seconds
Shooting 3) movies
NH-AA-DA {2) (supplied)
_. screen On ILCD screen Oft
Approx 160 _pp_ox 210
3)Continuous shooting with a picm*e size of 160
(MmB
• The battely life and the nmnber of images
recmdable decrease under the following
condlllOnS.
- At low temperanu'es.
- Using the flash
- Tmmng the camera on and off t}equemly.
- Using the zoom heawb
- \Vhen [LCD Bacldight] is set to [Bright].
- %Vhen [Power Save] is set m [Off]
- After using the batteries lepeatedl_ over a
tong peliod of time or after often allowing lr
to self-discharge after charging (page 106).
14
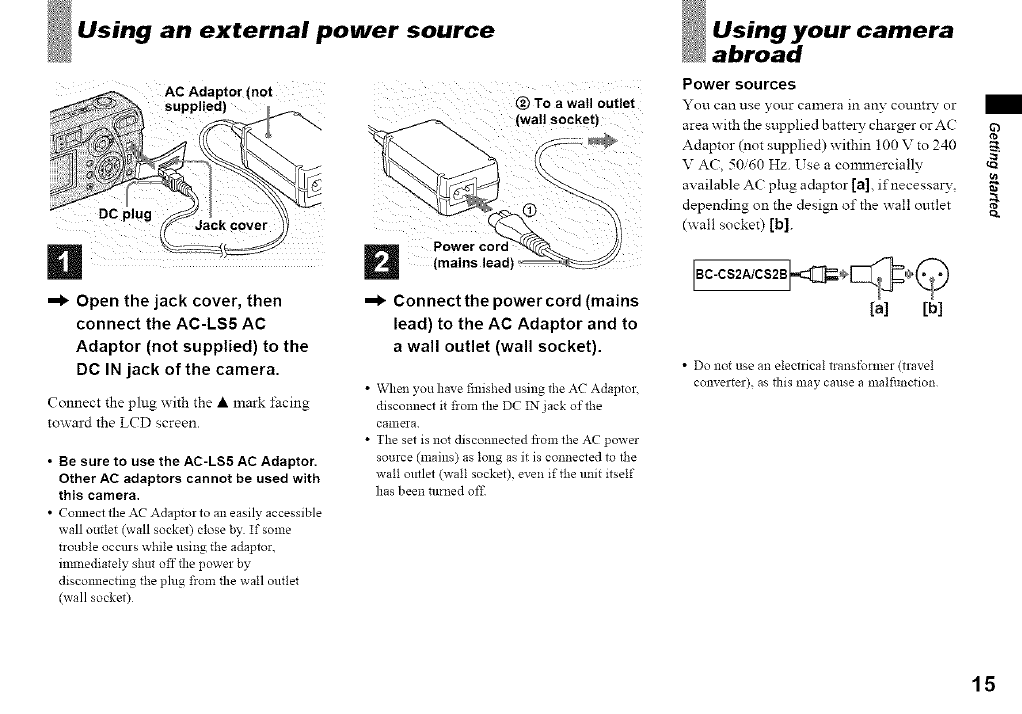
Using an external power source
@To a wail outlet
n
--I_ Open the jack cover, then
connect the AC-LS5 AC
Adaptor (not supplied) to the
DC IN jack of the camera.
Connect the plug with the • mark i;acing
toward the LCD screen
• Be sure to use the AC-LS5 AC Adaptor,
Other AC adaptors cannot be used with
this camera,
• Comlect the AC Adaptor to an easily accessible
wall outlet (wall socket) close by If some
trouble occurs while using the adaptor,
imlnediately shut off the power by
discomlecting the plug fiom the wall outlet
(wall socket)
=1_ Connectthe powercord (mains
lead) to the AC Adaptor and to
a wall outlet (wall socket).
•When you have finished using tbe AC Adaptor.
disconnect it fiOln the DC IN jack oftbe
canlera
• The set is not disconnected from the AC power
source (mains) as long as it is connected to the
wall outlet (wall socket), even if the unit itself
has been turned off
Using your camera
abroad
Power sources
You can use your camera in an?" country or
area _ith the supplied batteLv charger or AC
Adaptor (not supplied) within 100 V to 240
V AC, 50,60 Hz. Use a cmmnercially
available AC plug adaptor [a]. ifnecessm3", _"
depending on the design of the _all outlet _.
(wall socket) [b]
0ccs, c,,0 =o 0#
[a] [bl
• Do not use an electrical transformer (travel
converter), as fllis may cause a malfimction
15
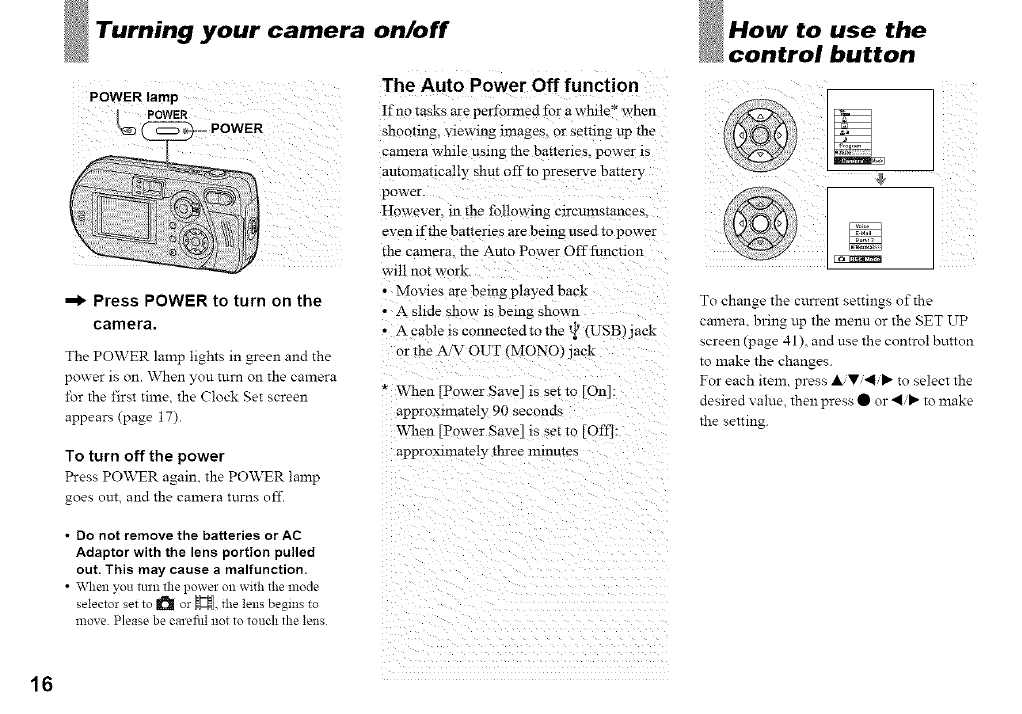
your camera on/off
POWER lamp
--I) Press POWER to turn on the
camera,
The POWER lamp lights in green and the
power is on. When you turn on the camera
for the first time, the Clock get screen
appears (page 17).
To turn off the power
The Auto Power Off function
If no tasks are performed for a while* when
shootmg, viewing images, or semng up the
camera while using the ba_terles, power is
aummancally shut off to preserve battery
power
However. m the following mrcumstances.
even if the batteries are being used to power
the camera, the Auto Power Off function
w111no_ work
• Movies are being played back
• A slide show is being shown
• A cable is connected to the t_ (USB)jack
or the A/V OUT (MONO) jack
* When [Power Sac'e] is setto [On]:
approxmlately 90 seconds
When [Power Save] is set to [Off]:
approximately three minutes
Press POWER again, the POWER lamp
goes out, and the camera turns off.
•Do not remove the batteries or AC
Adaptor with the lens portion pulled
out. This may cause a malfunction,
• _\rhen you turn the power Ollwith the mode
selector set to _ or _, the lens begins to
move Please be ealefitl not to touch the lens
How to use the
control button
To change the current settings of the
camera, bring up the menu or the SET UP
screen (page 41), and use the control button
to make the changes.
For each item, press &iV/41iI_ to select the
desired value, then press • or 41/I_ to make
the setting.
16
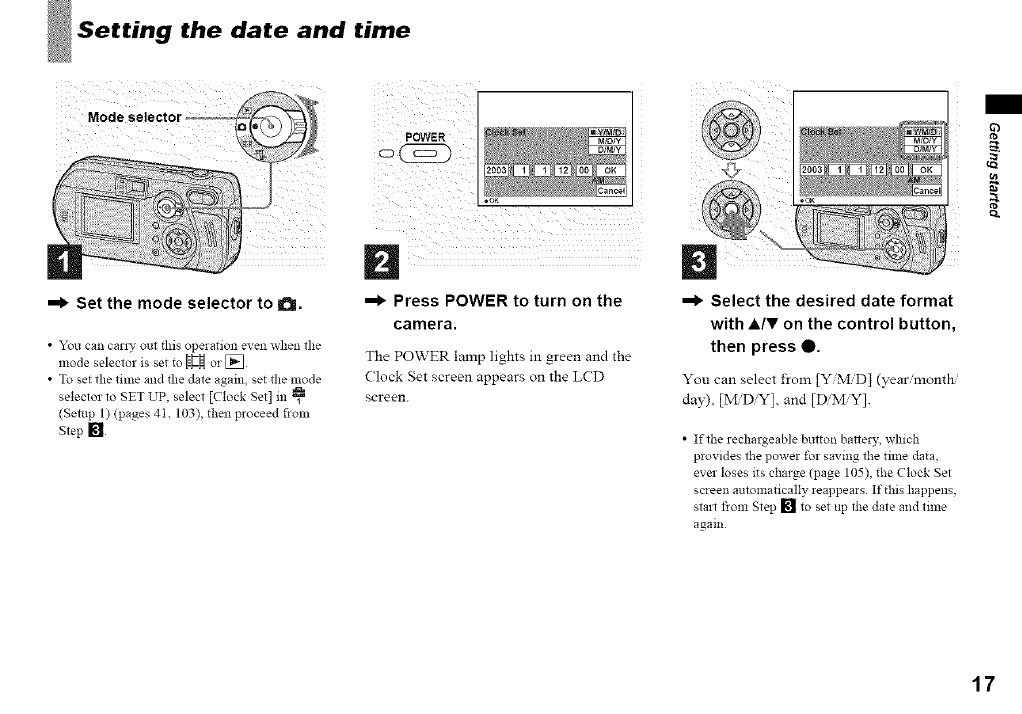
Setting the date and time
=1_ Set the mode selector to a.
•You can can T out this operation even when the
mode selector is set to _ or []
• To set the time and the date again, set the mode
selector to SET UP, select [Clock Set] in
(Setup 1) (pages 4I, 103), then proceed froln
Step []
=1_ Press POWER to turn on the
camera.
The POWER lamp lights in green and the
Clock Set screen appears on the LCD
screen.
D
=1_ Select the desired date format
with A/V on the control button,
then press 0.
You can select from [YMD] (year, month,
day). [M D Y], and [D M,Y].
•If the rechargeable button bariery, which
provides the power for saving the time data.
ever loses its charge (page 105), the Clock Set
screen automatically reappears. If this happens,
stall flora Step [] to set up the date and time
again
g-
a
17
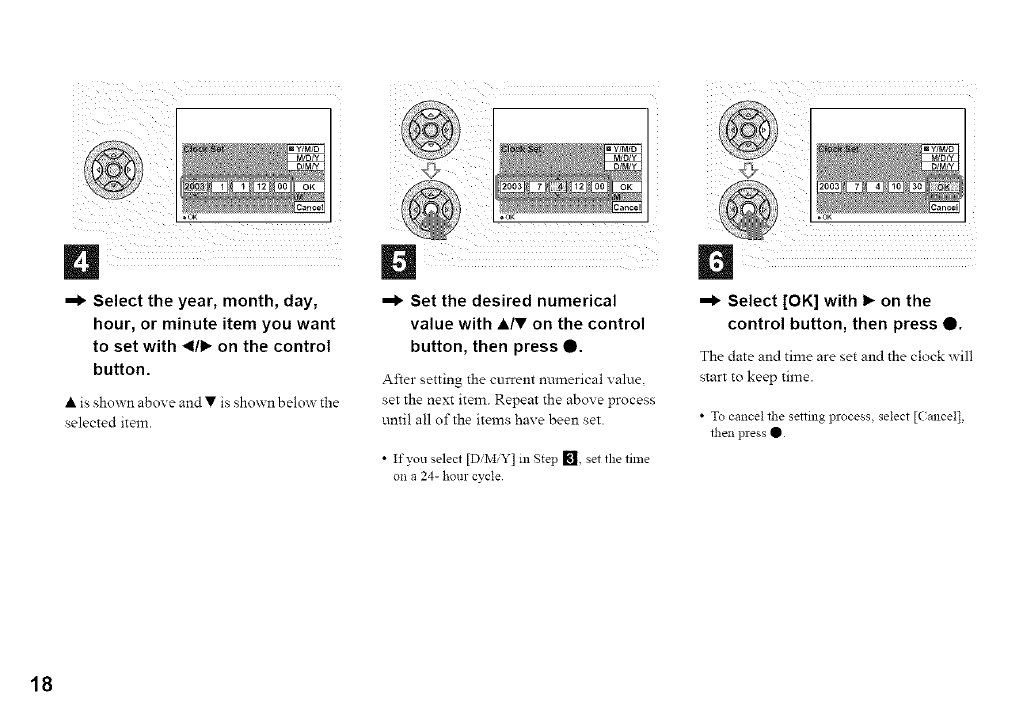
=1_ Select the year, month, day,
hour, or minute item you want
to set with _1/1_on the control
button.
• is shown above and • is sho_ n belox_ the
selected item.
=1_ Set the desired numerical
value with •IV on the control
button, then press 0.
After setting the current numerical value
set the next item. Repeat the above process
until all of the items have been set.
• If you select [D,M,Y] m Step [], set the time
on a 24- hour cycle
=1_ Select [OK] with I_ on the
control button, then press 0.
The date and time are set and the clock x_ill
start to keep time.
• To cancel the setting process, select [(ancel],
then press •
18
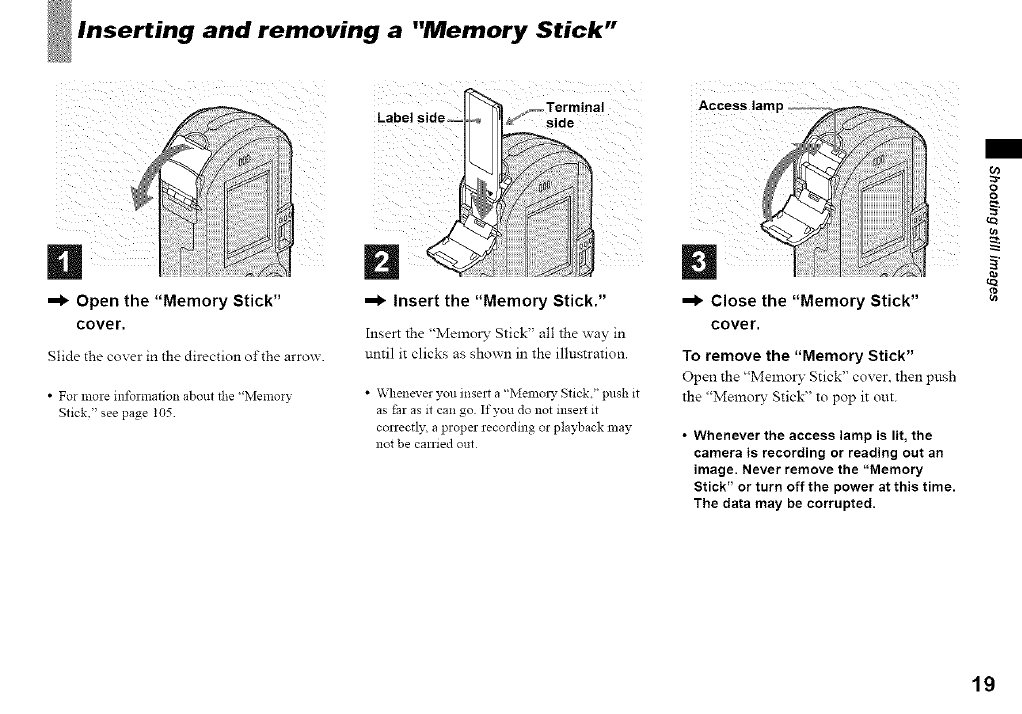
Inserting and removing a "Memory Stick"
--I_ Open the "Memory Stick"
cover.
Slide the coxer in the direction of the arro_.
•For more information about the "Memory
Stick," see page t05
--I_ Insert the "Memory Stick."
Insert the "Memory Stick" all the way in
until it clicks as sho_n in the illustration.
•Whenever you insert a "Memols_ Stick," push it
as far as it can go If you do not insen it
correctly, a proper recording or playback may
not be carried out
--I_ Close the "Memory Stick"
cover.
To remove the "Memory Stick"
Open the "Memol 5" Stick" cover, then push
the "Memo W Stick" to pop it out.
• Whenever the access lamp is lit, the
camera is recording or reading out an
image. Never remove the "Memory
Stick" or turn off the power at this time.
The data may be corrupted.
o)
o
o
cn
19
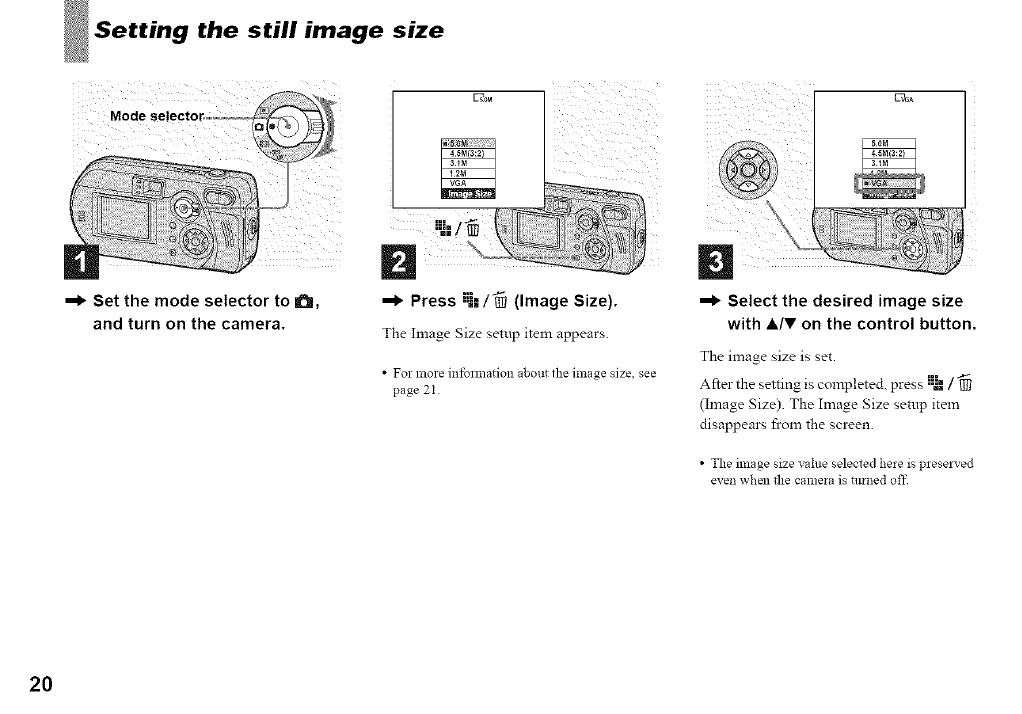
Setting the still image size
!!iii!i?¸....
ii_iiiiii_i i ii_
--I, Set the mode selector to I_,
and turn on the camera.
ii);iii_ii!s!;)
i iJ
Press :_-=/_ (image Size).
The hnage Size setup item appears.
•Formore info*mation aboutthe image size, see
page 2I.
--I, Select the desired image size
with &IV on the control button.
The image size is set.
After the setting is completed, press :_l /
(hnage Size). The Image Size setup item
disappears from the screen.
•The image size value selected here is p_ese_ved
even when file camera is turned off
2O
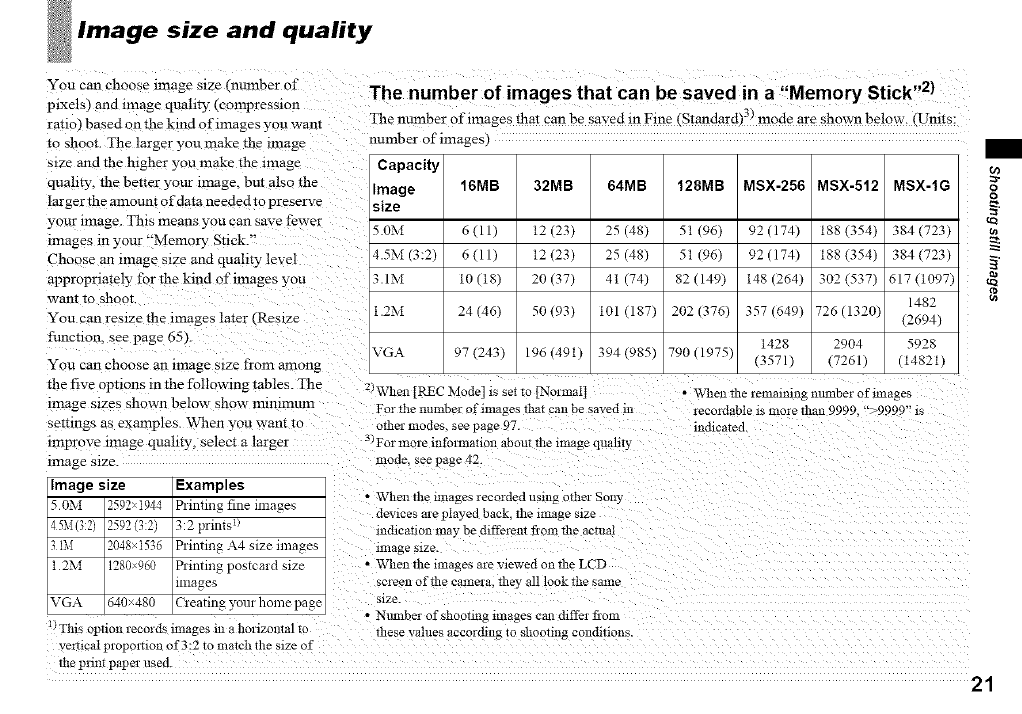
Image size and quality
You can choose image size (number of
plxels) and m:age quahty (compression
rat:o) based on the kind of images you want
•o shoot. The larger you make the re:age
s:ze and the higher you make the m:age
quahty, the better your :mage. but also the
larger the amo:mt o f data needed :o preserve
your re:age. This means you can save fewer
:mages m your °'Memory St:ok "
Choose an m:age s:ze and quality level
appropriately for the kind of images you
want to shoot.
You can res:ze the :mages later _Res:ze
f:mction, see page 65).
You can choose an :mage size from among
the five options in the following tables. The
:mage s:zes shown below show mmnnum
settings as examples. When you wan: :o
:reprove :mage quahty, select a larger
image size.
linage size Examples
50M 2592>i944 Printing fineimages
45M(3:2) 2592(3:2) 3:2prints:)
IM 2048xi536 Printing A4 site images
1 2M 1280_960 Printing postcard size
lnlages
VGA 640x480 Creating your home page
_¢Tins optmn recmds Kaages m a horizontal 1o
The number of images that can be saved in a "Memory Stick ''2)
The nmnber of images that can be saved In Free _Standard_ 3) mode are shown below. _Umts:
number of images
Capacity
Image 16MB 32MB 64MB 128MB MSX-256 MSX-512 MSX-IG
size
5.0M 6 (11) 12 (23) 25 (48) 51 (96) 92 (174) 188 (354)
4.5M (3:2) 6 (11) 12 (23) 25 (48) 51 (96) 92 (174) 188 (354)
3.1M 10 (18) 20 (37) 41 (74) 82 (149) 148 (264) 302 (537)
1.2M 24 (46) 50 (93) 101 (187) 202 (376) 357 (649) 726 (1320)
1428 2904
VGA 97 (243) 196 (491) 394 (985) 790 (1975) (3571) (7261)
2/VV'hen _R_C Mode] is set to [Normal
For the lmmber of images lha* can be saved in
other modes, see page 97.
3/For more information about tl:e image qTtaluy
mode, see page 42.
384 (723)
384 (723)
617 (1097)
1482
(2694)
5928
(14821)
•When the remamin_ mtmber of images
recordable :s more than 9999. "_9999" :s
m_hca_d
•VC'henthe images recorded using other Son3,
dewces are played back. the image s:ze
lndleahon may be dffl'e:ent fiom the actual
linage size.
• When the images are wewed on*he LCD
screen of *l:e camera, *hey all look*he same
s:ze.
• Number of shooting images can differ from
tl:ese values accorrhng To shootln_ COlVhllons.
veilIcaI propomon of 3:2 to malch the size of
the prlfir paper used
21
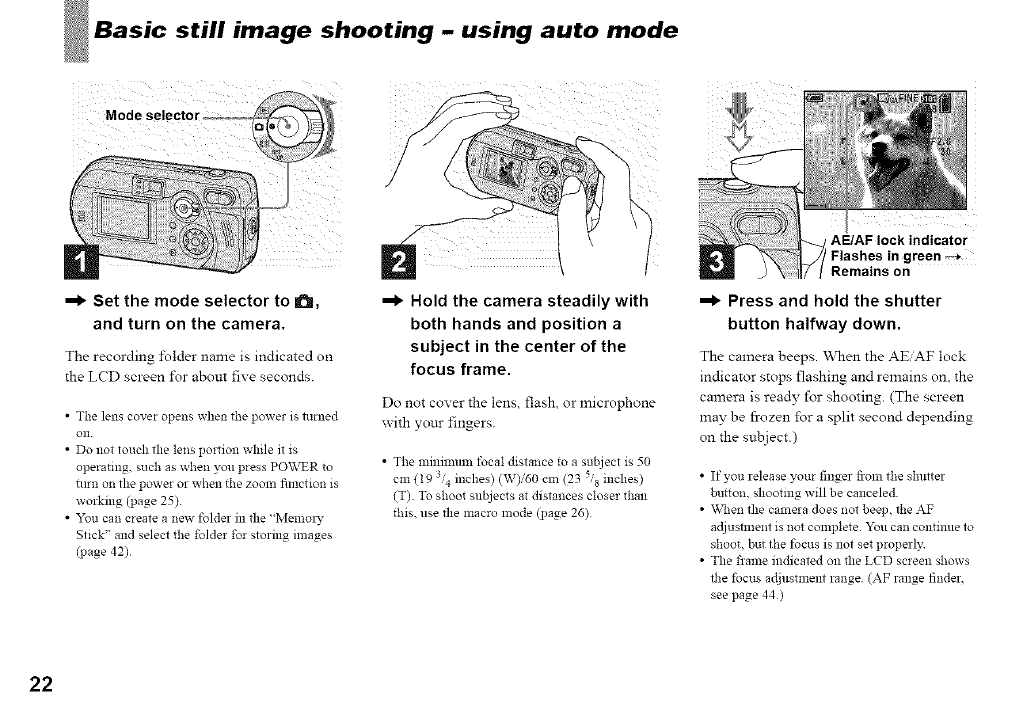
still image shooting -using auto mode
)
=1_ Set the mode selector to a,
and turn on the camera.
The recording i\dder name is indicated on
the LCD screen I\_r abom five seconds.
•The lens cover opens when the power is turned
on
• Do not touch the lens portion while it is
operating, such as when you press POWER to
turn on the power or when the zoom fimction is
working (page 25).
• You can create a new folder in the "Memol 3,
Stick" and select the folder for storing images
(page 42)
=1_ Hold the camera steadily with
both hands and position a
subject in the center of the
focus frame.
Do not cover the lens, flash, or microphone
with your fingers.
• The minmmln focal distance to a subject is 50
cm (19 3,4 inches) (W)/60 Cln (23 5/8 inches)
(T) To shoot subjects at distances closer than
this. use the macro mode (page 26)
AE/AF lock indicator
IFlashes in green
Remains on
=1_ Press and hold the shutter
button halfway down.
The camera beeps When the AEiAF lock
indicator stops flashing and remains on. the
camera is ready for shooting (The screen
may be fi-ozen for a split second depending
on the subject.)
•If you release your finger fronl the shutter
button, shooting will be canceled
• \_,q_enthe camera does not beep, the AF
adjustment is not complete 2_u can continue to
shoot, but the focus is not set properly
• The frame indicated on the LCD screen shows
the focus adjustment range (AF range finder,
see page 44)
22
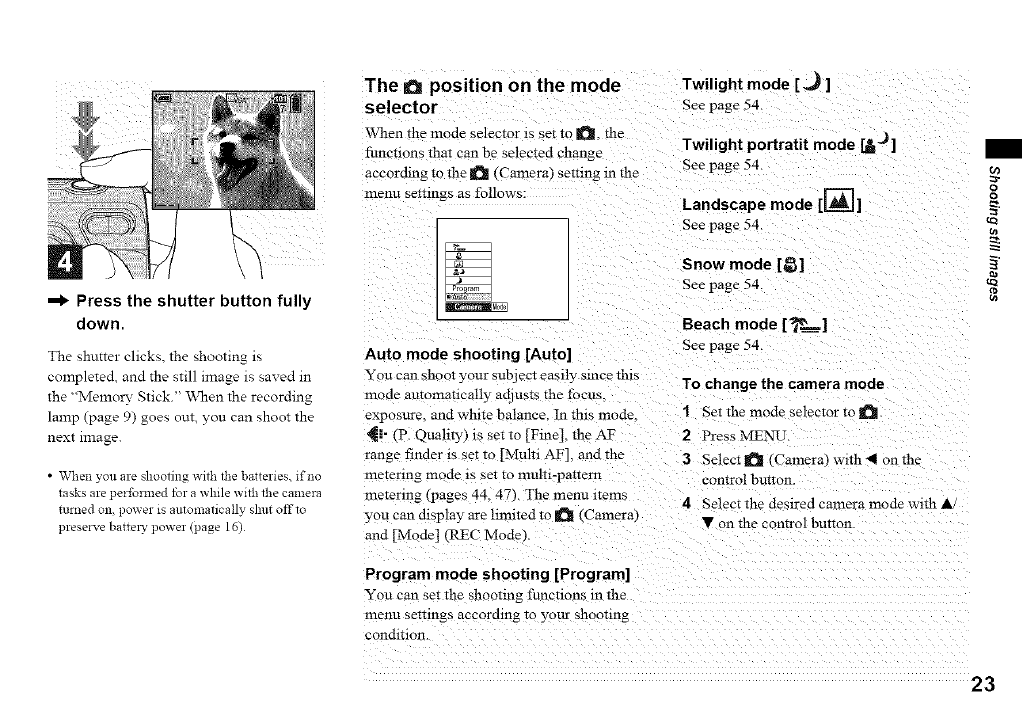
=1_ Press the shutter button fully
down.
The shutter clicks, the shooting is
completed, and the still image is saved in
the "Memo_" Stick." When the recording
lamp (page 9) goes out, you can shoot the
next image.
• When you are shooting with the batteries, if no
tasks are performed tbr a while with the camera
turned on, power is automaticMly slmt offto
preserve battels' power (page 16)
The aposition on the mode Twilightmode [_,_ ]
selector See page 54.
When the mode selector is set to a, the Twilight portratit mode _J ]
functions that can be selected change
accordmg to the _ (Camera) setting m the See page 54.
menu semngs as follows: Landscape mode [[=_1__
See page 54.
Auto mode shooting [Auto]
You can shoot your subject easily smce this
mode automatically adjusts the focus
exposure, and white balance. In this mode
_i- (P. Quality) is set to [Fine]. the AF
range finder is set to [Multi AF], and the
me_enng mode zs set to multz-pattern
metering _pages 44. 47). The menu items
Snow mode [_l
See page 54.
Beach mode [_=_=1
See page 54.
To change the camera mode
1Set the mode selector to
2Press MENU.
3Select_ (Cameral with_< onthe
control bu_ton.
4Select the deslred camera mode with A/
you can dlsplay are lmllted to _ (Camera! • on the control button
and [Mode] (RRC Mode L
Program mode shooting [Program]
You can set the _hooting functions m the
menu semngs according to your shooting
condition.
u)
o
o
tQ
23
Basic still image shooting -
using auto mode (continued)
About Auto Focus
When you _y :o shoot a subject that is hard
to focus on. the AE/AT lock md:cator w:ll
change to flashing slowly
The Auto Focus fimction may be dffficuh to
use w::h m the following subjec:s. In such
cases, release the shutter button, then try :o
recompose the shot and focus again.
•The subject is distaut flora the came:a and da:k
• The contrast bei_veen the sub}ect and its
baekg:o:md :s poor
• The subject is seen tl_ough glass, such as a
window
•A fast-moving subjecl
• The subject has a reflection, such as that rio::: a
mllTOL or there is a llllmllotls body _ild a
lustrous subjec:
• A flasNng subjec:.
• A backht sublec:
There are _wo methods for Auto Focus
fi.mction: Mulnpomt A_ and Center AF
tpage 44). When _ (Camera) is set to
[Auto] m the men:: settings, the Muir:point
A1_ :s automat:cally selected.
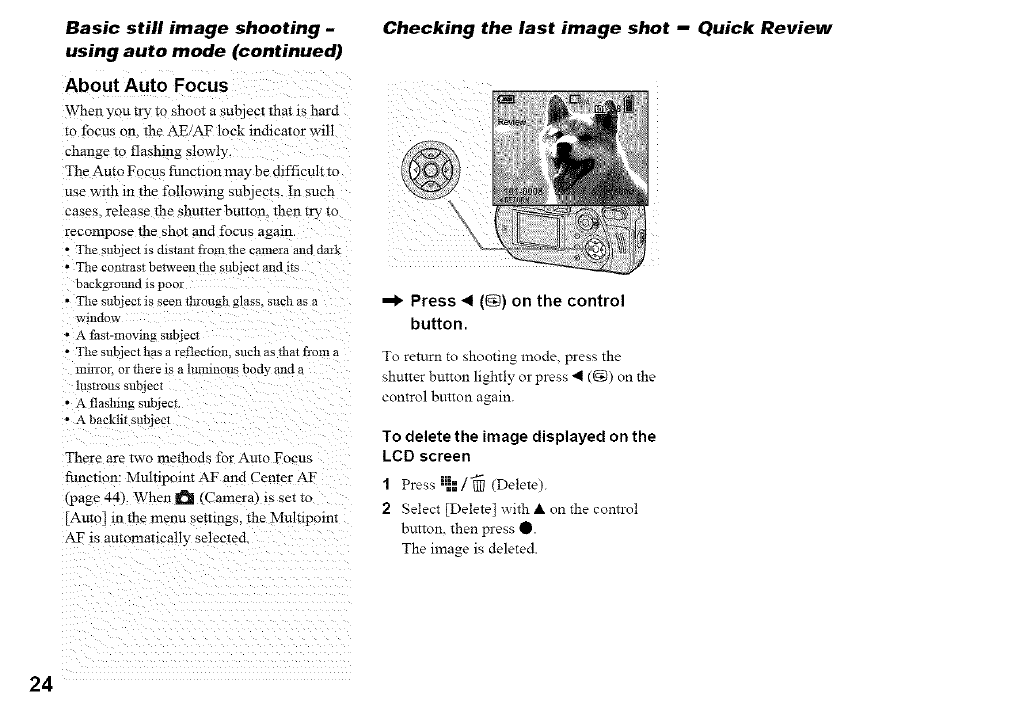
Checking the last image shot -Quick Review
--I* Press _1 ((_) on the control
button.
To return to shooting mode, press the
shutter breton lightly or press 41 ((_) on the
control button again.
To delete the image displayed on the
LCD screen
1Press :_==/'_ (Delete).
2 Select [Delete] with • on the control
button, then press 0.
The image is deleted.
24
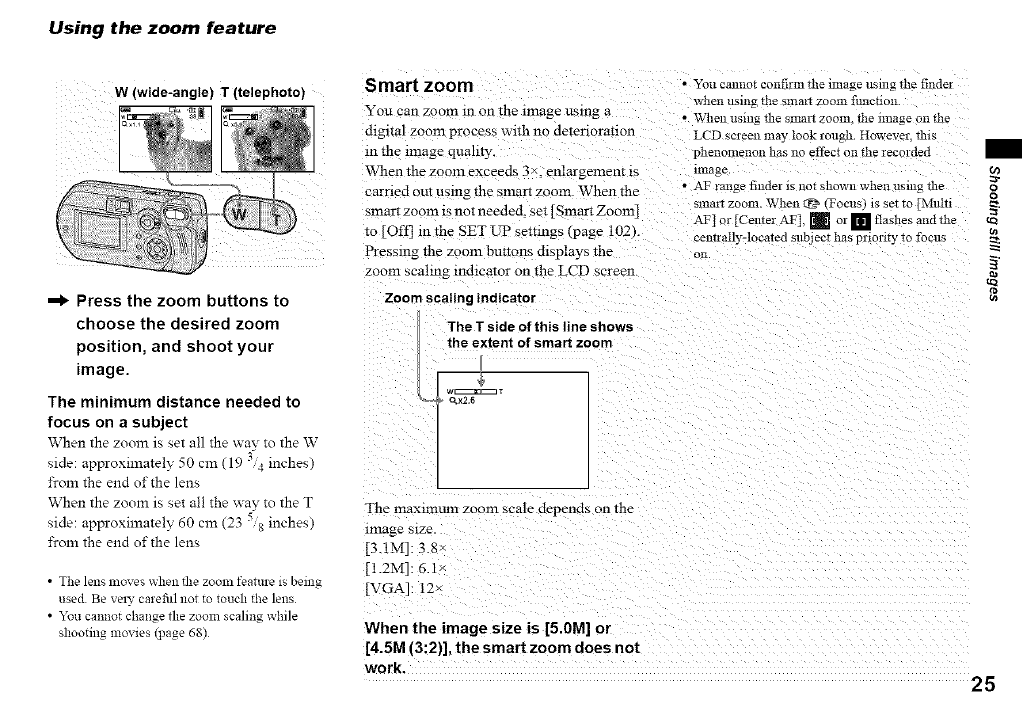
Using the zoom feature
W (wide-angle) T (telephoto)
--I_ Press the zoom buttons to
choose the desired zoom
position, and shoot your
image.
The minimum distance needed to
focus on a subject
When the zoom is set all the way to the W
side: approxilnately 50 cm (19 _'/4inches)
from the end of the lens
When the zoom is set all the way to the T
side: approxilnately 60 Cln (23 5/8 inches)
from the end of the lens
•The lens moves when the zoonl feature is being
used Be velT carefitl not to touch the lens
• "*%ucannot change the zoom sealing while
shooting movies (page 68)
Smart zoom
You can zoom m on the image using a
&gltal zoom process with no detenoranon
In the mlage quallW.
When the zoom exceeds 3 ×. enlargement is
carried out using the smart zoom. When the
smart zoom is not needed, set [Smart Zoom]
to [Off] in the SET L'P settings (page 102k
Pressing the zoom buttotLs displays the
zoom scalmg indicator on the LCD screen.
Zoom scaling indicator
The T side of this line shows
the extent of smart zoom
• You cannot confirm the image using the finder
when using file Slllat_ zoom flmetion.
• When using the smal7 zoom. the nnage on the
LCD screen may look rough. However. this
phenomenon has no effect on the recorded
image
• A! _ range finder is not shown when using the
slnait zoom. When _g_ (Focus} is set*o [Multi
AF] or [Center AT], _ or [] flashes and*he
_-enTrally-located subjeeI has priority *o focus
on
l [_ID_IT
O_X2,5
The inaxnnum zoom scale depends on the
Image size
[3.1M]: 3 8
[ [ .2M]: 6.1
[VGA]: 12x
When the image size is [5.0M] or
[4.5M (3:2)], the smart zoom does not
work. 25
cJ
o
tQ
cn
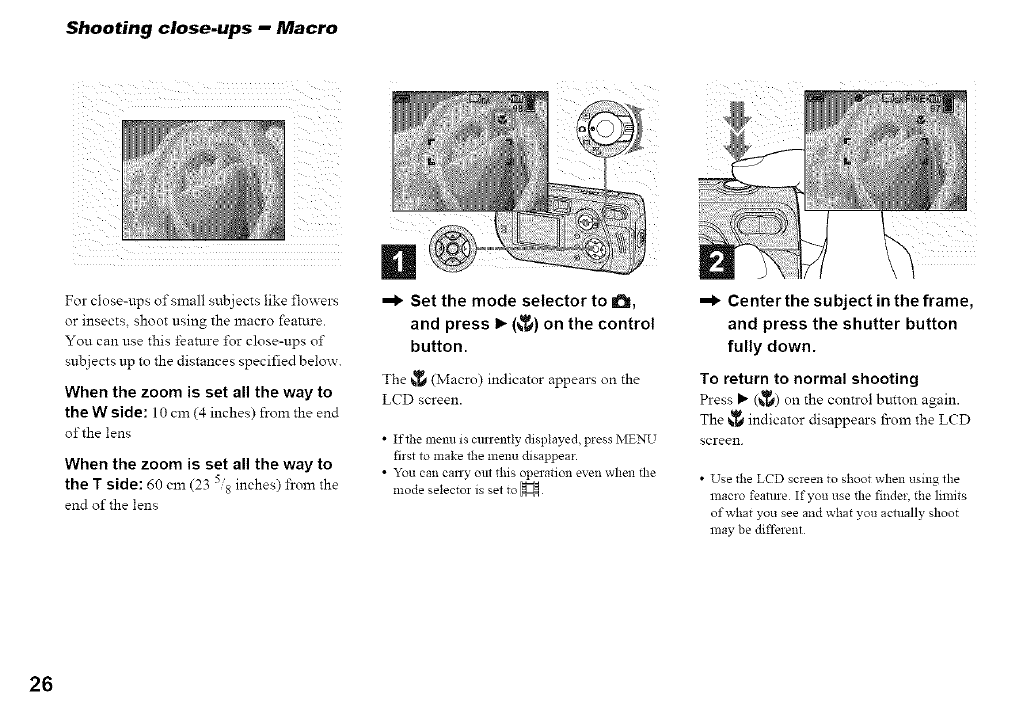
Shooting close.ups -Macro
For close-ups of small subjects like flowers
or insects, shoot using the macro feature.
You can use this feature i\)r close-ups of
subjects up to the distances specified below.
When the zoom is set all the way to
the W side: 10 cm (4 inches) from the end
of the lens
When the zoom is set all the way to
the T side: 60 cm (23 inches) froln the
end of the lens
=1_ Set the mode selector to a,
and press I_ (_) on the control
button.
The v_ (Macro) indicator appears on the
LCD screen.
•If the menu is curremly displayed, press MENU
first to make the menu disappear.
• You can cany out this operation even when the
mode selector is set to H
=1_ Center the subject in the frame,
and press the shutter button
fully down.
To return to normal shooting
Press _" (_) on the control button again.
The _ indicator disappears from the LCD
screen.
• Use the LCD screen to shoot when using the
macro feature If you use the finder, the limits
of what you see and what you actually shoot
nlay be different
26
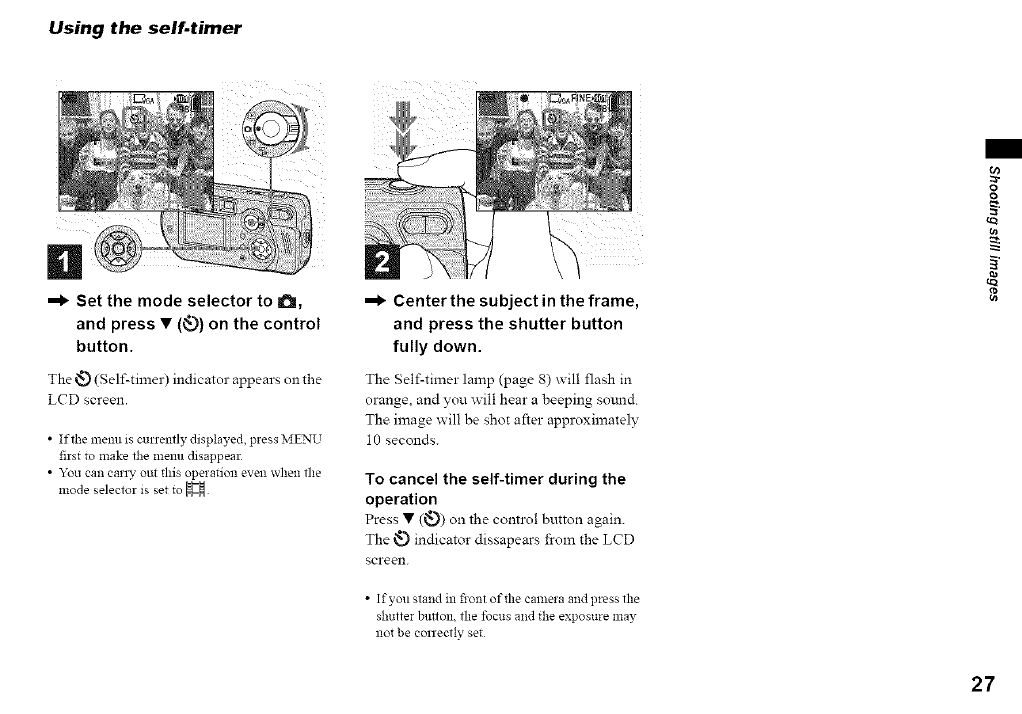
Using the self.timer
Set the mode selector to _,
and press • (<_.))on the control
button.
The _) (Self-timer) indicator appears on the
LCD screen.
•If the menu is curremly displayed, press MENU
first to make the menu disappear
• Y_u cat_ canV ou_ this _pe_ation e_'en wh_1_th_
mode selector is set to
-!_ Center the subject in the frame,
and press the shutter button
fully down.
The Self-timer lamp (page 8) will flash in
orange, and you will hear a beeping som_d.
_he image will be shot after approximately
10 seconds.
To cancel the self-timer during the
operation
Press • (_:_) on the comrol button again
The _ indicator dissapears from the LCD
screen.
• If you stand ill fiont of tlle camera and press the
shutter butloll, the focus and the expos re nay
not be correctly set
_r
tva
t_
27
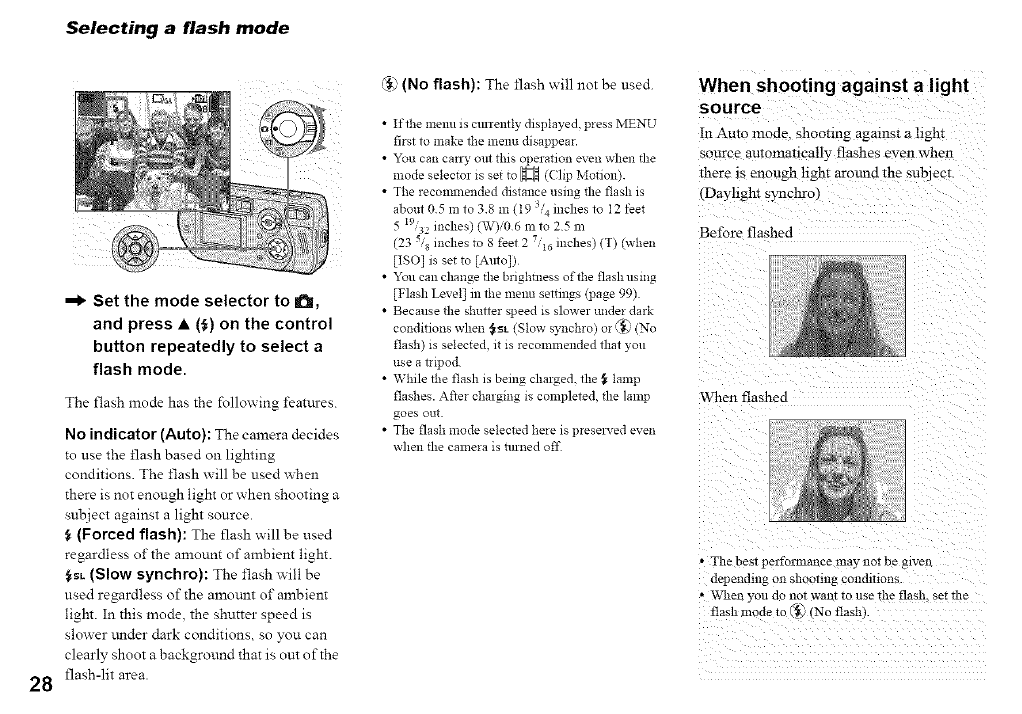
Selecting a flash mode
28
--I_ Set the mode selector to a,
and press • (_) on the control
button repeatedly to select a
flash mode.
The flash mode has the %llowing feattaes.
No indicator (Auto): The camera decides
to use the flash based on lighting
conditions. The flash will be used _hen
there is not enough light or when shooting a
subject against a light source.
(Forced flash): The flash will be used
regardless of the amount of ambient light.
t_L (Slow synchro): The flash _ill be
used regardless of the amotalt of ambient
light. In this mode the shutter speed is
slower under dark conditions, so you can
clearly shoot a background that is out of the
flash-lit area.
@ (No flash): The flash will not be used.
•If the menu is cttrremly displayed, press MENU
first to make the menu disappear.
• You can cany out this operation even when tlle
mode selector is set to _ ((lip Motion).
• The recommended distance using the flash is
about 05 ill to 38111 (t934 inches to I2 feet
5 I9/3: inches) (W)i06 nl to 25 ill
(23 S/s inches to 8 feet 27/16 inches) (T) (when
[ISO] is set to [Auto])
• You can clmnge the brighmess of the flash using
[Flash Level] in the menu settings (page 99)
• Because the shutter speed is slower under dark
xx
condmons when {_L (Slow synchro) or ',_! (N °
flash) is selected, it is recommended that you
use a tripod
• While the flash is being charged, the ,_ lamp
flashes. After charging is completed, tlle lamp
goes out
• The flash mode selected here is presel_-ed even
when tlle camera is mined off
When shooting against a light
source
In Auto mode. shooting against a hght
source automancally flashes even when
there is enough hght around the subject.
(Dayhght synchro
Before flashed
When flashed
• The best pefi'ormanee may not be given
depending on shooting condmons
• When you rio not want To use ihe flash, set the
flash mode to _, rNo flashk
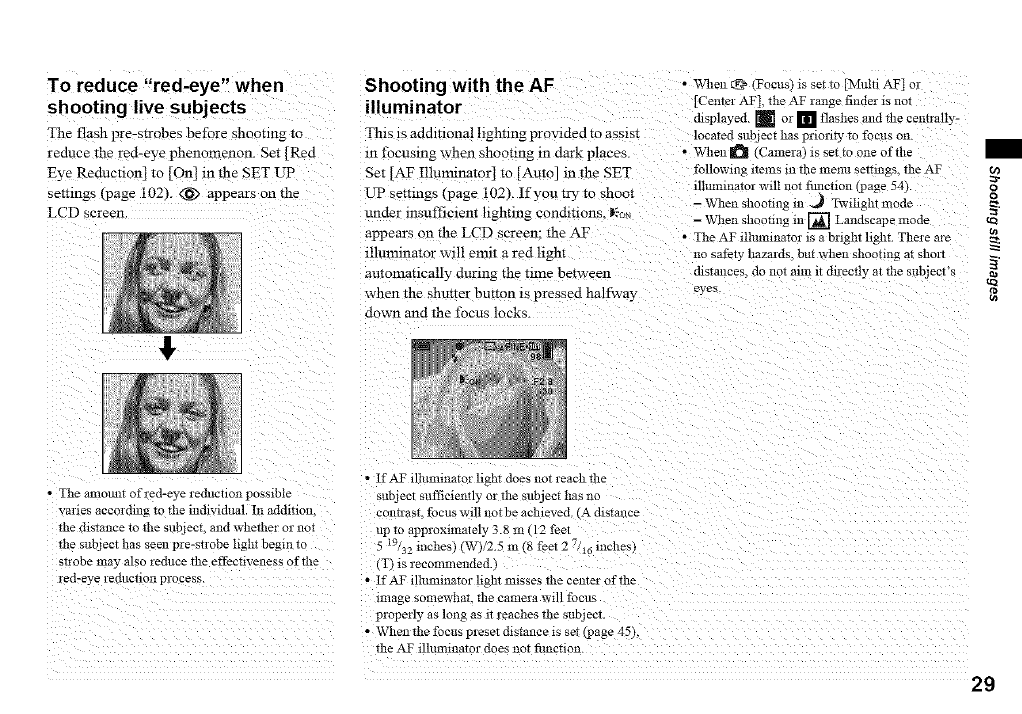
To reduce "red-eye" when
shooting live subjects
The flash pre-strobes before shooting to
reduce the red-eye phenomenon. Set [Red
Eye Reduction] to [On] in the SET UP
senmgs Eoage 102). <_ appears on the
LCD screen
Shooting with the AF • _u,e11® Foc,,_ixsetto_,mi AT]or
iIIUminatorCenterAT],theAFrangefinderisnot
displayed. [] o: [] flashes and the cent:ally-
This :s addmonal hghtmg provided to ass:st located subject has priority tc focus on
in focusing when shooting m dark pIaces ........ ¢Cameral :s set to one of the
Set AF Illunnnator] to [Auto] m the SET
L'P settmgs (page 102). If you try to shoo_
under itLsufficient lighting condmons. Dso_
appears on the LCD screen: the AF
illuminator will emit a red hght
auton:at:cally during the tnne between
when the shutter button :s pressed halfway
down and the focus locks.
followin_ ltell!S 111the menu se:rmgs the AF O)
vzr
fllmnma_or will not time(ion (page 54). oo
- When shooting in .=_ Twilight :::ode _.
- When shooung :11 [] Landscape :::ode
• The AF llhumnator is a bright light. There are
no safety hazards, but when shooting a: short _.
distances, do 11or alll! it dn-ectly at the subject's tel
eyes
" The amomn of red-eye reduction possible
vanes according w the mdzvzd,ml. In addmon.
*he distance to the sub lee:. and whether or llot
the subject has seen pre-strobe hght begin :o
strobe may also reduce the effectiveness of the
red-eye reduction process.
• If AT ilbmlinator ligh* does not reach the
subject sufficiently or the subject has no
conu'asr, focus will not be achieved. CA_hsTai:ce
up :o approximately 3.8 m _12 feet
5 19/32 lnchesl (Wt/2.5 in (8 feet 2 "7/16inches_
]'l is recommended..
• IfAF illuminator light misses the center of the
image somewha*, the camera will focus
properly as long as it reaches the subJecT
• When the focus preset &stance is se[ (page 451 ....
the AT ilhm:illat or does not 5me(ion.
29
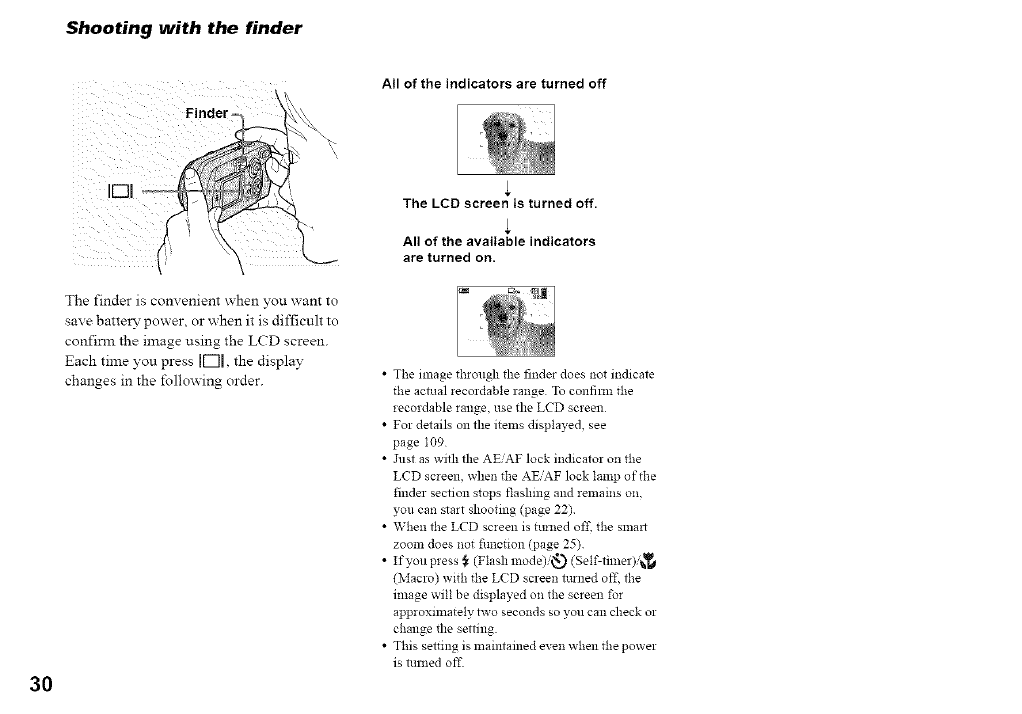
Shooting with the finder
30
Finde_
The finder is convenient when you want to
save batter>' power, or when it is difficult to
confirm the image using the LCD screen.
Each time you press 11-"1[,the display
changes in the follm_ing order.
Atl of the indicators are turned off
The LCD screen is turned off.
All of the available indicators
are turned on,
• The image through the finder does *lot indicate
the actual reeordable range To confilm the
recordable range, use the LCD screen
• For details on the items displayed, see
page I09
• Just as with the AE, AF lock indicator on the
LCD screen, when the AEAF lock lamp of the
finder section stops flashing and remains on,
you can start shooting (page 22)
• When the LCD screen is tinned off, the snla!_
zoom does *lot fimction (page 25)
• If you press } (Flash mode)/__) (Self-timer),'_
(Macro) with the L(D screen turned off, the
image will be displayed on the screen for
approxilnately two seconds so you can check or
change the setting.
• This setting is maintained even when the power
is mrned oft"
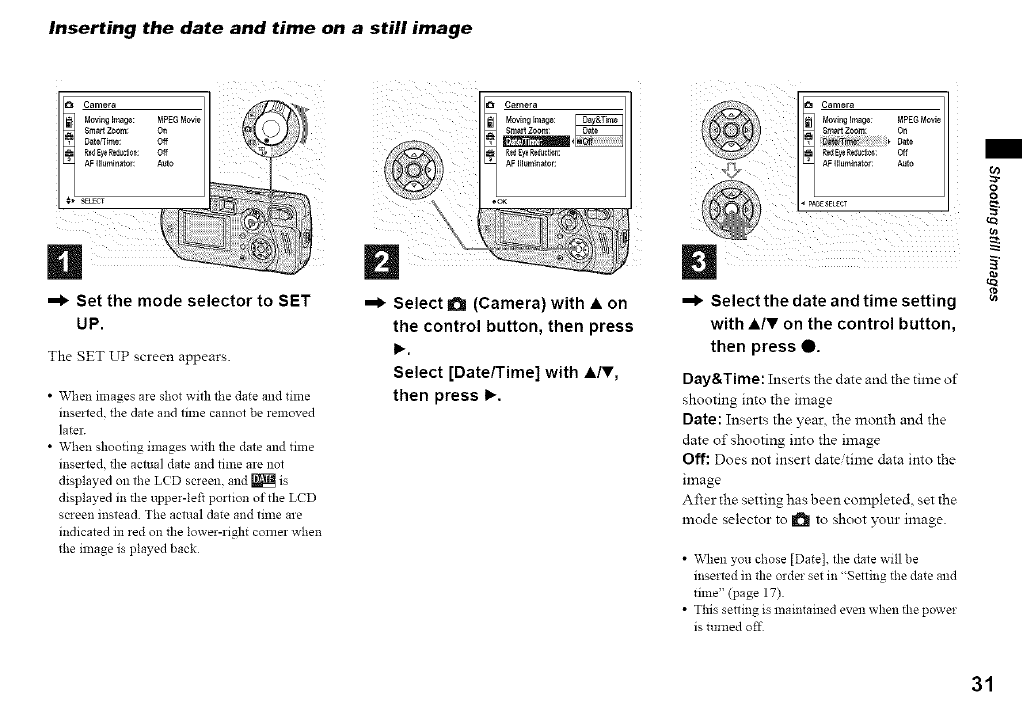
Inserting the date and time on a still image
Camera
NovEngimage:
SmartZoom:
OatefTin_:
R_ Ey_Red_di0_:
AF Illuminator:
_ SELECT
n
=1_ Set the mode selector to SET
UP
The gET UP screen appears.
•When images are shot with the date and time
inserted, the date and time cannot be removed
later.
• When shooting images with the date and tm_e
inserted, the actual date and time are not
displayed on the LCD screen, and _ is
displayed in the upper-left portion of the LCD
screen instead. The actual date and time are
indicated in red on the lower-right corner when
the image is played back
¸¸¸¸2\
D
=1_ Select !_ (Camera) with • on
the control button, then press
I_
Select [Date/Time] with •IV,
then press I_
hi_ i_ i i>>>
i iiii_ iiiiiiiiii
=1_ Select the date and time setting
with •IV on the control button,
then press •
Day&Time: Inserts the date and the time of
shooting into the image
Date: Inserts the year. the month and the
date of shooting into the image
Off: Does not insert date/time data into the
image
After the setting has been completed, set the
mode selector to II_ to shoot )xmr image.
•_\qlen you chose [Date], the date will be
inserted in the order set in 'Setting the date and
tilne" (page 17)
• This setiing is maintained even when tlle power
is turned off
o
o
iga
31
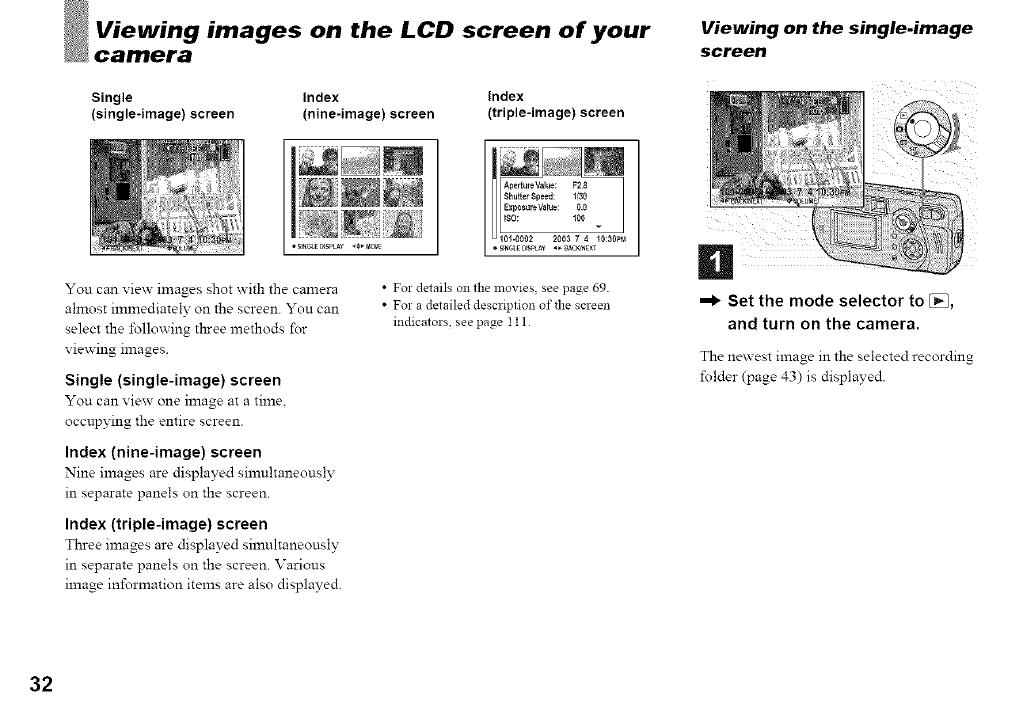
images on the LCD screen of your Viewing on the single.image
screen
Single Index Index
(single-image) screen (nine-image) screen (triple-image) screen
You can view images shot with the camera
almost immediately on the screen. You can
select the following three methods for
viewing images.
Single (single-image) screen
You can view one image at a time.
occupying the entire screen.
Index (nine-image) screen
Nine images are displayed simultaneously
in separate panels on the screen.
Index (triple-image) screen
Three images are displayed simultaneously
in separate panels on the screen. Various
image information items are also displayed.
•For details on the movies, see page 69.
•For a detailed description of the screen
indicators, see page I 11
=1_ Set the mode selector to [_,
and turn on the camera.
The nex_ est image in the selected recording
folder (page 43) is displayed.
32
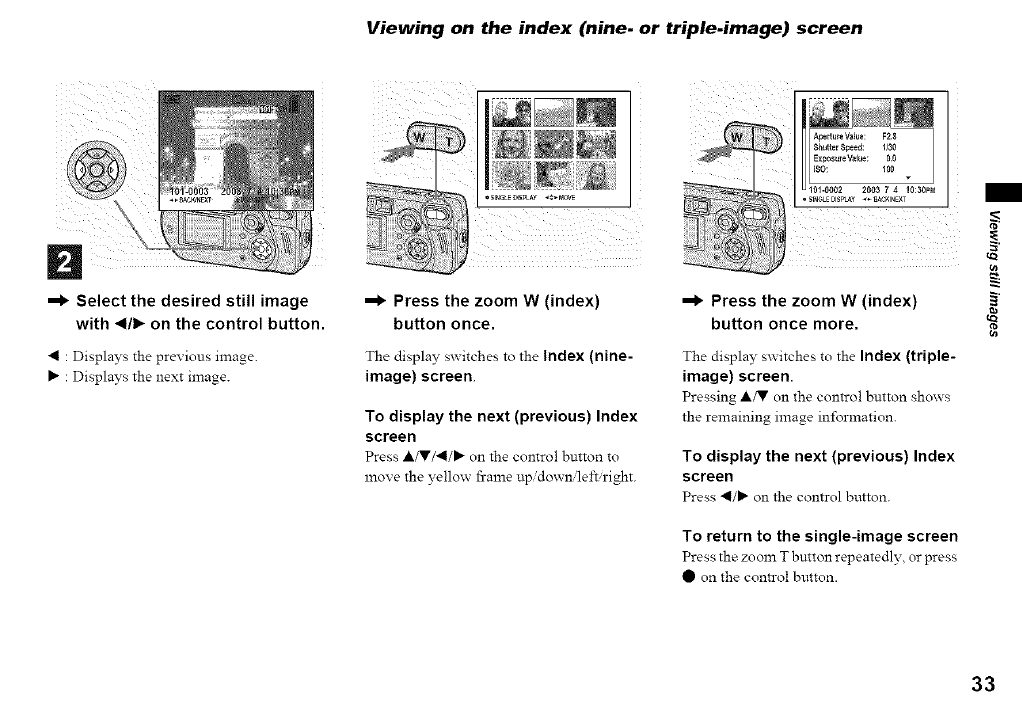
Viewing on the index (nine. or triple.image) screen
--I_ Select the desired still image
with _1/1_on the control button.
• : Displays the previous image.
: Displays the next image.
* SI_LE0_SPLA¥,_*.MOVE
--I_ Press the zoom W (index)
button once.
The display switches to the index (nine-
image) screen.
To display the next (previous) Index
screen
Press A/V/•/I_ on the control button to
znove the yello_ fi-azneup, do_nleft right.
--I_ Press the zoom W (index)
button once more.
The display switches to the Index (triple-
image) screen.
Pressing A/V on the control button shows
the remaining image information.
To display the next (previous) Index
screen
Press •/_ on the control button.
To return to the single-image screen
Press the zoom T button repeatedly or press
• on the conn-ol button.
tara
Oi
ira
33
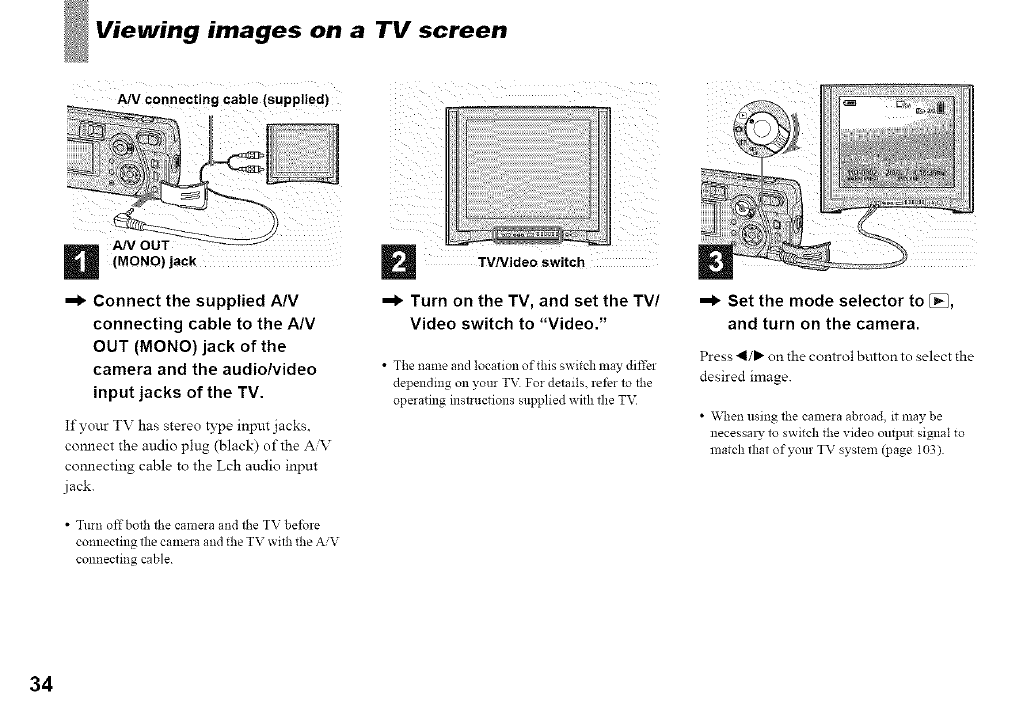
images on a TV screen
A/V Connecting Cable (supplied)
(MONO) jack
=1) Connect the supplied AIM
connecting cable to the A/V
OUT (MONO) jack of the
camera and the audio/video
input jacks of the TV.
If your TV has stereo B'pe input jacks.
comlect the audio plug (black) of the A'V
connecting cable to the Lch audio input
jack.
•Turn offboth the camera and the TV before
connecting the camera and the TV with the AiV
connecting cable
TVNideo switch
=1) Turn on the TV, and set the TV/
Video switch to "Video."
• The name and location of this switch may differ
depending o11your TV For details, refer to the
operating instructions supplied with the T_
=1) Set the mode selector to [_,
and turn on the camera.
Press 41/_ on the control button to select the
desired image.
•\_q_en using the camera abroad, it may be
necessal T to switch the video output signal to
match that of your TV system (page I03)
34
Watching images on a TV screen SECAM system
If you want to view nnages on a TV, you Bulgarm, France. Gmana. Hungary-, Iran,
need a TV having a video input jack and the Iraq, Monaco. PoIand. Russia. Ukraine. em
A/V connecting cable (supphed).
The color system of the TV must match as
that of your &gltal snll camera Check the
following hst:
NTSC system
Bahama Islands_ Bohvla_ Canada. Central
America. Chile. Colombia. Ecuador.
Jamaica. Japan, Korea, Mexlco. Peru.
Surinam. Talwan_ the Pbahppmes_ the
U.S.A.. Venezuela_ e_c.
t_
cn
t_
PAL system
Austraha. Ausma_ Beiglm_. Cbana. Czech
Repubhc. Denmark. Fmlan& Germany-.
Holland. Hong Kong, Italy, Kuwait.
Malavsla. New Zealand. Norway, Portugal,
Singapore. Slovak Repubhc, Spain.
Sweden. Switzerland. Thmland Umted
Kingdom. e_c.
PAL-M system
Brazil
PAL-N system
Argentina, Paraguay, Uruguay
35
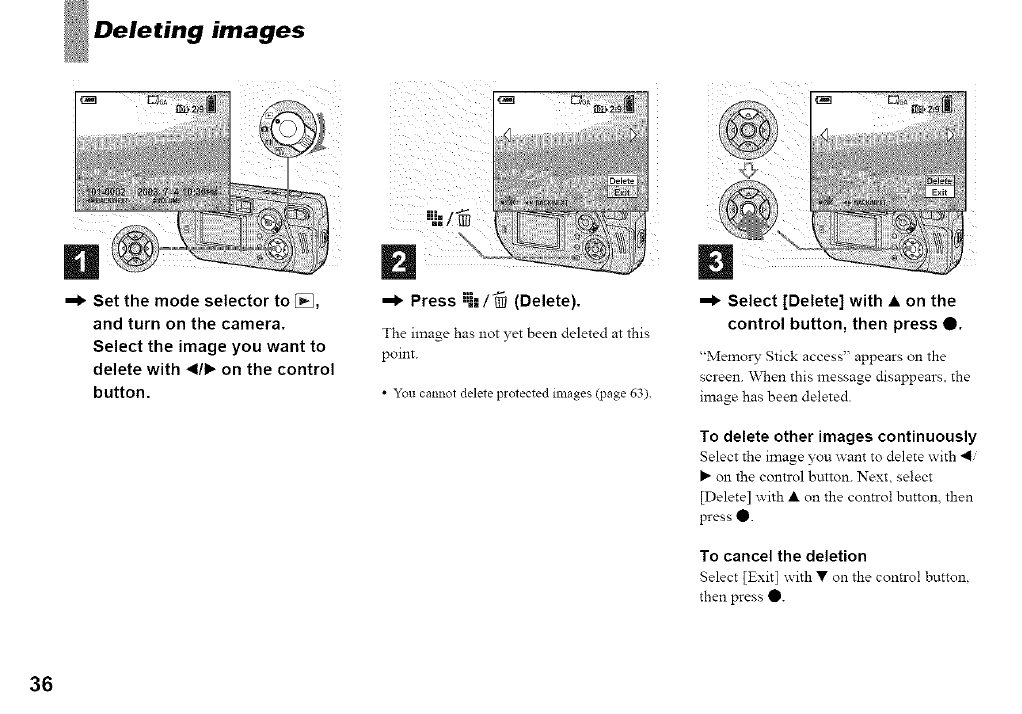
Deleting images
--I_ Set the mode selector to [_,
and turn on the camera.
Select the image you want to
delete with _1/1_on the control
button.
--I_ Press "U-"/_ (Delete).
The image has not yet been deleted at this
point.
•Y_u cannot delete protected images (page 63)
--I_ Select [Delete] with • on the
control button, then press 0.
"Memory Stick access' appears on the
screen. "_\_en this message disappears, the
image has been deleted.
To delete other images continuously
Select the image you want to delete with 4/
_" on the control button. Next, select
[Delete] with • on the control button, then
press 0.
To cancel the deletion
Select [Exit] with • on the control button
then press O.
36
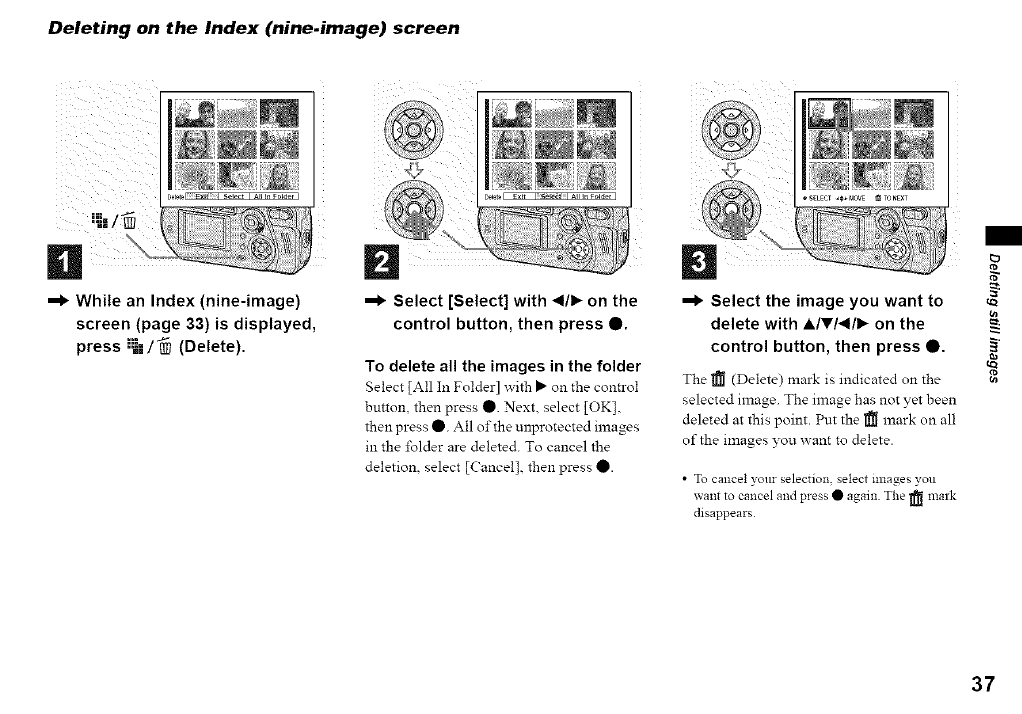
Deleting on the Index (nine.image) screen
n
--I_ While an Index (nine-image)
screen (page 33) is displayed,
press ;_==/_ (Delete).
D
--I_ Select [Select] with _1/1_ on the
control button, then press Q.
To delete all the images in the folder
Select [All In Folder] with _ on the control
button then press O. Next select [OK]
then press O. All of the unprotected images
in the folder are deleted. To cancel the
deletion, select [Cancel], then press 0.
Dt_
--I_ Select the image you want to cn
delete with ,&IVI_III_ on the
control button, then press 0. §
_a
t_
The _ (Delete) mark is indicated on the
selected image. The image has not yet been
deleted at this point. Put the _[_ mark on all
of the images you x_ant to delete.
•To cancel your selection, select images you
want to cancel and press • again The _ mark
disappears
37
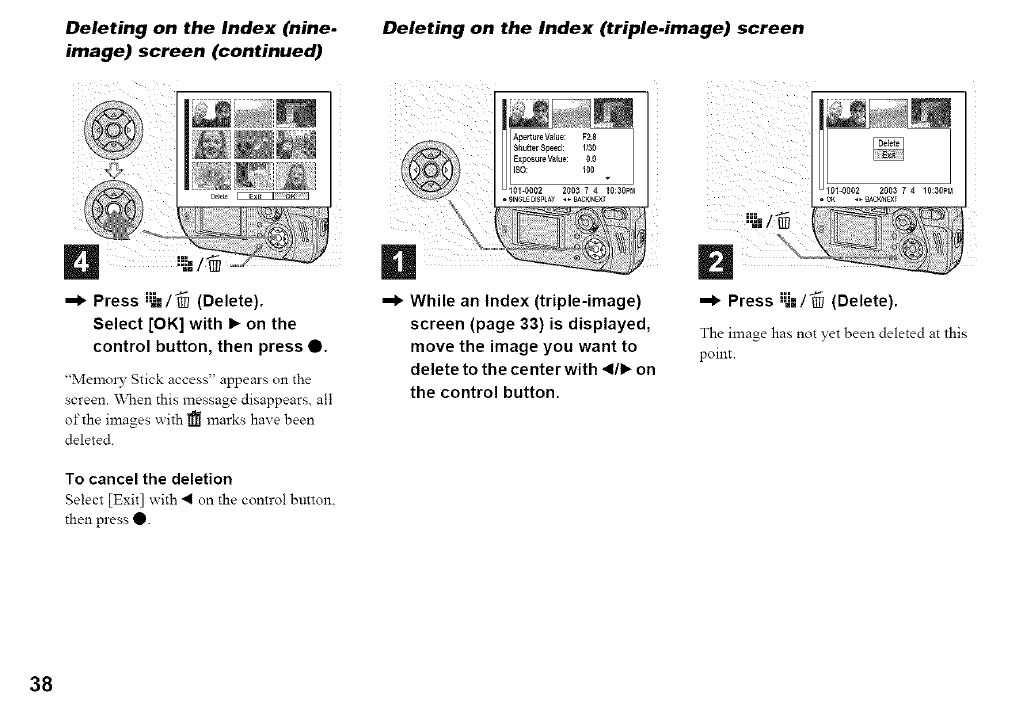
Deleting on the Index (nine.
image) screen (continued)
-I_ Press iU--/-_ (Delete).
Select [OK] with I_ on the
control button, then press O.
"Memo13* Stick access" appears on the
screen. "_\rhen this message disappears, all
of the images _ith _ marks haze been
deleted.
To cancel the deletion
Select [Exit] _ith "4 on the control button.
then press O.
Deleting on the Index (triple.image) screen
1
--I_ While an Index (triple-image)
screen (page 33) is displayed,
move the image you want to
delete to the center with _1/1_on
the control button.
--I_ Press "-"-"/'_ (Delete).
The image has not yet been deleted at this
point.
38
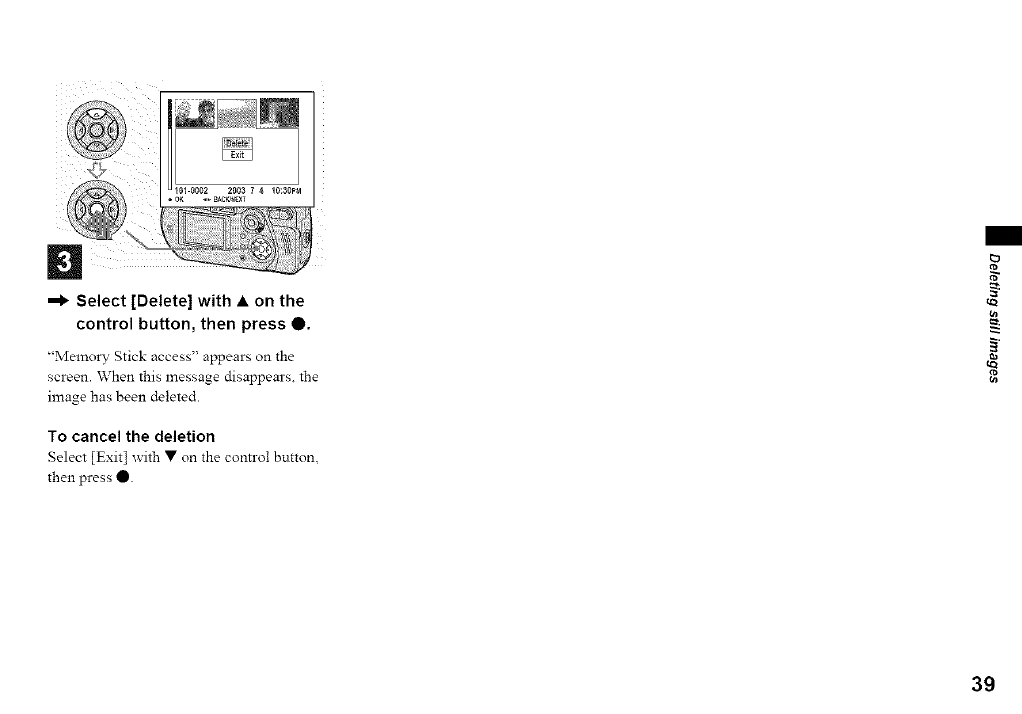
D
=1_ Select [Delete] with • on the
control button, then press 0.
"Memory Stick access' appears on the
screen. When this message disappears, the
image has been deleted.
To cancel the deletion
Select [Exit] with • on the control buttom
then press 0.
t_
tQ
tel
39
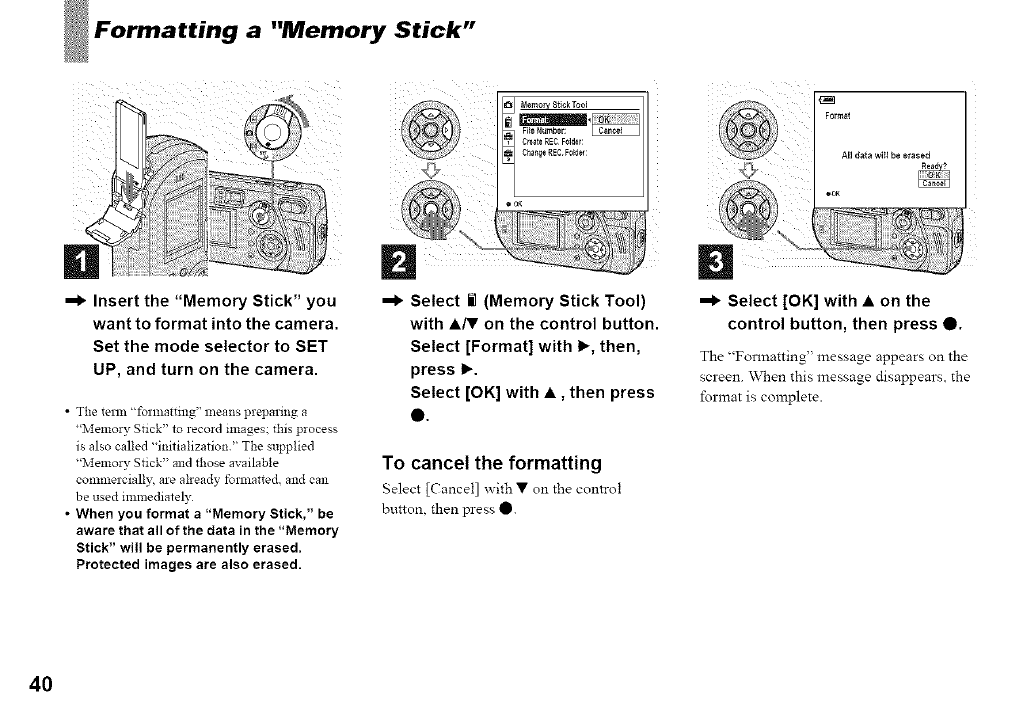
a"Memory Stick"
--I_ Insert the "Memory Stick" you
want to format into the camera.
Set the mode selector to SET
UP, and turn on the camera.
•The terln "forlnatting" means preparing a
"Memory Stick" to record images; this process
is also called "initialization." The supplied
"Memory Stick" and those available
commercially, are already forlnatted, and can
be used inm_ediately
• When you format a "Memory Stick," be
aware that all of the data in the "Memory
Stick" will be permanently erased.
Protected images are also erased.
--I_ Select li (Memory Stick Tool)
with A/V on the control button.
Select [Format] with I_, then,
press 1_.
Select [OK] with •, then press
e.
To cancel the formatting
Select [Cancel] _ith • on the control
button, then press O.
All data witl be erased
--I_ Select [OK] with • on the
control button, then press 0.
The "Formatting' message appears on the
screen. "_\_en this message disappears, the
format is complete.
4O
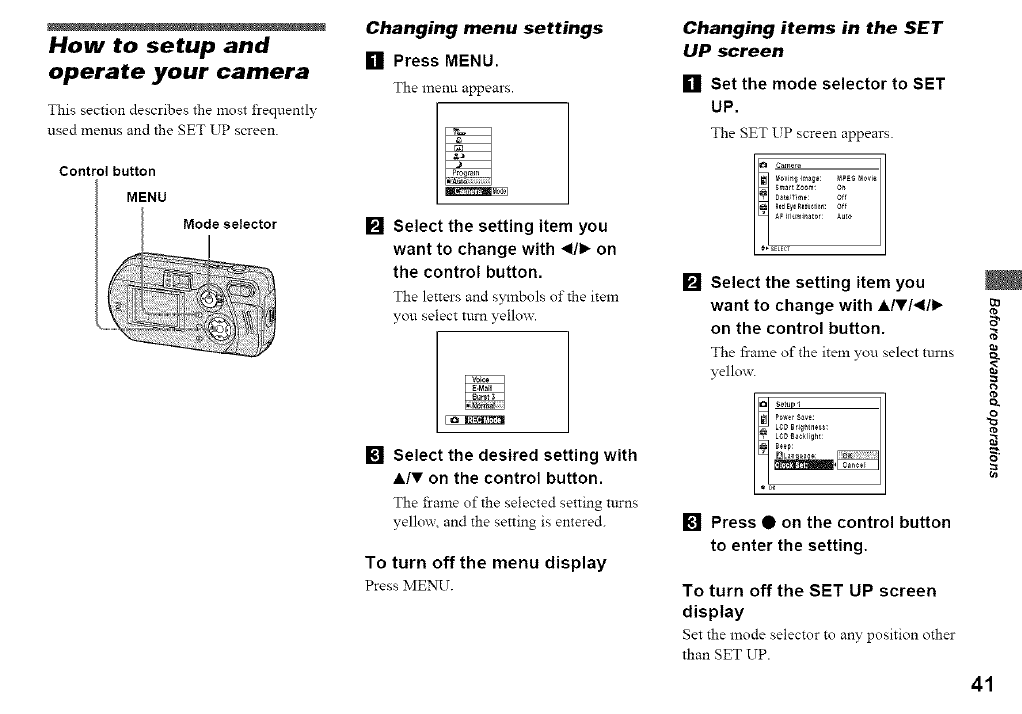
How to setup and
operate your camera
This section describes the most frequently
used menus and the SET UP screen.
Control button
MENU
Changing menu settings
[] Press MENU.
The menu appears.
[] Select the setting item you
want to change with _1/1_on
the control button.
The letters and s_lnbols of the item
you select turn yellow.
[] Select the desired setting with
A/V on the control button.
The frame of the selected setting tttrns
vello_ and the setting is entered.
To turn off the menu display
Press MENU.
Changing items in the SET
UP screen
[] Set the mode selector to SET
UP.
The SET UP screen appears.
Career a
_fovm_Img÷: MPEG_ovi_
Smart Z_*m: On
AF I[l_mlnat 0r: o
[ €, _ELErT
[] Select the setting item you
want to change with ,&IVI_III_
on the control button.
The frame of the item you select ttmas
yellmv
semp_
P_w_rsaw:
LED Brightness:
LeD Backlig_t:
Be÷p:
[] Press • on the control button
to enter the setting,
To turn off the SET UP screen
display
Set the mode selector to any position other
than SET UP.
o
t_
o
cn
41
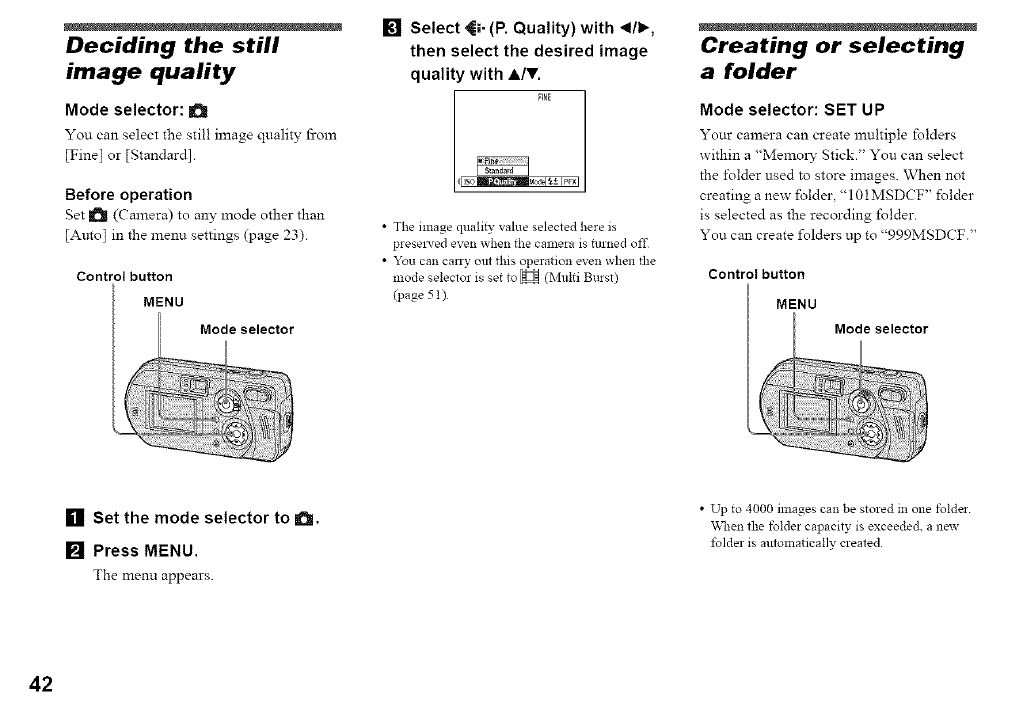
Deciding the still
image quality
Mode selector: a
You can select the still image quality from
[Fine] or [Standard].
Before operation
Set _ (Camera) to any mode other than
[Auto] in the menu settings (page 23).
Control button
MENU
[] Select _;. (P. Quality) with _1/1_,
then select the desired image
quality with A/V,
FINE
•The image quali b, value selected here is
presel_'ed even when the camera is turned offi
• You can ¢any out this operation even when the
mode selector is set to H (Multi Burst)
(page 51 )
Creating or selecting
a folder
Mode selector: SET UP
Your camera can create muhiple folders
within a "Memol_- Stick." You can select
the ±\_lder used to store images. When not
creating a new folder," 101MSDCF' folder
is selected as the recording folder.
You can create folders up to "999MSDCF."
Control button
MENU
[] Set the mode selector to 1Oil.
[] Press MENU.
The menu appears.
•Up to 4000 images can be stored in one folder
_l'_en the folder capacity is exceeded, anew
folder is mttomatieally created
42
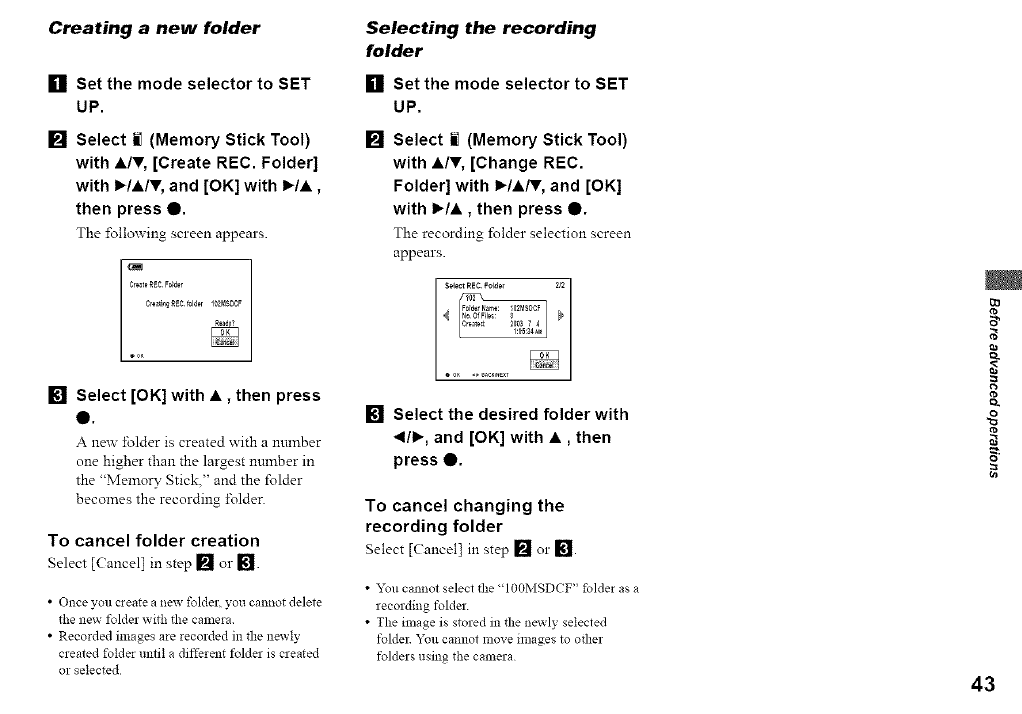
Creating a new folder
[] Set the mode selector to SET
UP.
[] Select i] (Memory Stick Tool)
with •IV, [Create REC. Folder]
with I_IAIV, and [OK] with I_/•,
then press 0.
The following screen appears.
CrewingREC fol_r I02MS_CF
ooK
[] Select [OK] with •, then press
e.
A ne_ folder is created with a number
one higher than the largest nmnber in
the "Memory Stick," and the folder
becomes the recording ±\_lder.
To cancel folder creation
Select [Cancel I in step [] Ol-[].
•Once you create a new folden you cannot delete
the new folder with the camera.
• Recorded images are recorded in the newly
created folder until a different folder is created
or selected
Selecting the recording
folder
[] Set the mode selector to SET
UP,
[] Select iil (Memory Stick Tool)
with •IV, [Change REC.
Folder] with I_/•/I', and [OK]
with I_/•, then press 0.
The recording folder selection screen
appears.
[] Select the desired folder with
_1/1_, and [OK] with •, then
press Q.
To cancel changing the
recording folder
Select [CancelJ in step [] or [].
• "_u cannot select the "I00MSDCF" folder as a
recording folder
•The image is stored in the newly selected
folder You cannot move images to other
folders using the camera
Q
t_
43
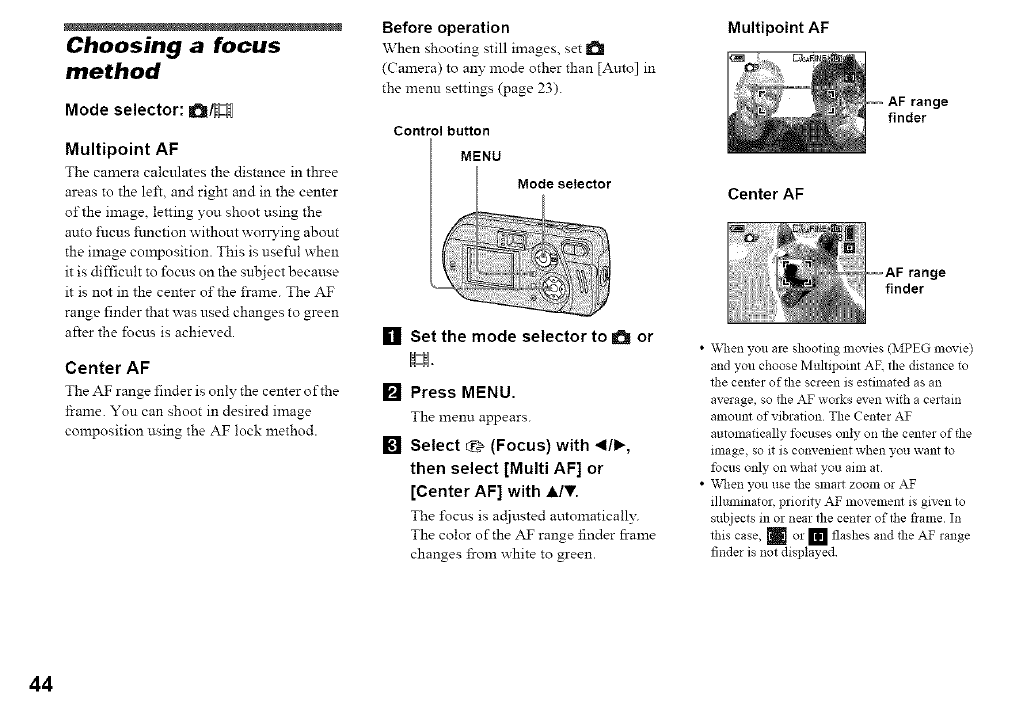
Multipoint AF
Choosing a focus
method
Mode selector: a/H
Multipoint AF
The camera calculates the distance in three
areas to the left, and right and in the center
of the in:age, letting you shoot using the
auto fucus function without wonTing about
the in:age con:position. This is useful when
it is difficult to focus on the subject because
it is not in the center of the frame. The AF
range finder that :_ as used changes to green
after the focus is achieved.
Center AF
The AF range finder is only the center of the
frame. You can shoot in desired image
composition using the AF lock method.
Before operation
When shooting still images, set It_
(Camera) to any mode other than [Amo] in
the menu settings (page 23).
Control button
MENU
[]
[]
[]
Set the mode selector to a or
H.
Press MENU.
The menu appears.
Select _, (Focus) with _1/1_.
then select [Multi AF] or
[Center AF] with A/,.
The ±\_cus is actiusted automaticall?:
The color of the AF range finder frame
changes from white to green.
finder
Center AF
range
finder
•\_le:iyou are shooting movies (MPEG movie)
and you choose Multipoim AF. the distance to
the center of the screen is estimated as an
average, so the AF works even with a certain
amollnt of vibration The Center AF
autolnatically focuses only on the center of the
image, so it is convenient when you want to
focus only on what you aim at
• Vv'hen you use the smart zoom or AF
illmninator, priority AF movement is given to
subjects in or near the center of the flame In
this case, _ or [] flashes and the AF range
finder is not displayed
44
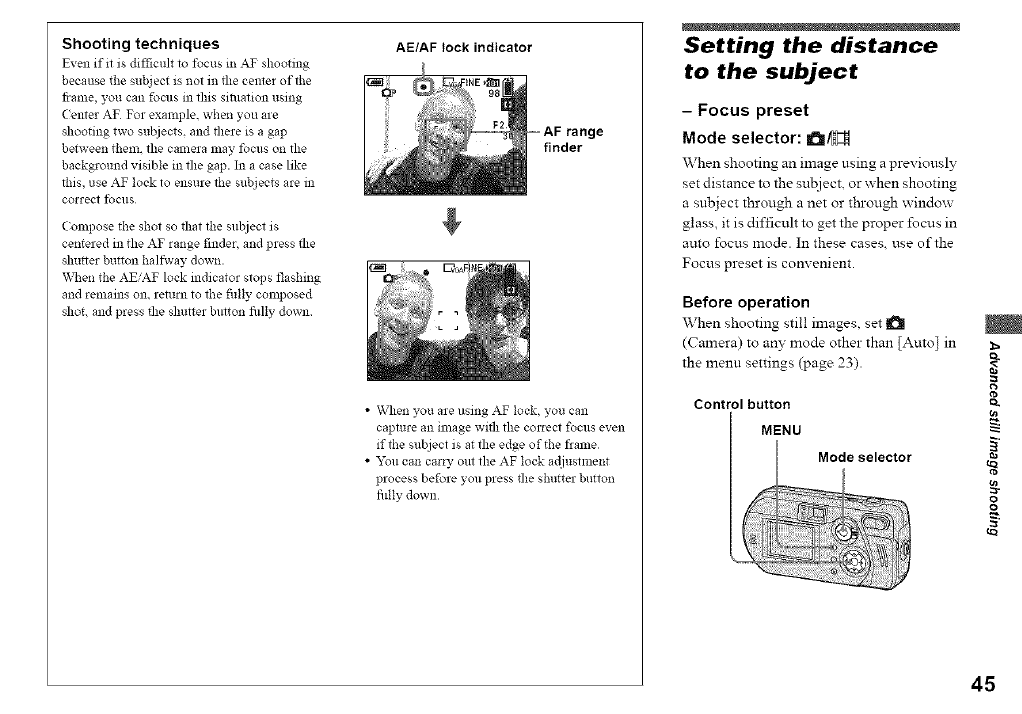
Shooting techniques
Even if it is difficult to focus in AT shooting
because the subject is not in the cemer ofll_e
flame, you can focus in this sivuation using
Cemer AF For example, when you are
shooting two subjects, and there is a gap
between them. the camera may focus on the
background visible in llle gap. In a case like
tiffs, use AF lock to ensure ll_e subjects are in
correct foclls
(ompose the shol so thal lt_e subject is
centered in the AF range finder, and press the
slmt_er button halfway down.
_lq_en the AEiAF lock indicator slops flashing
and remains on. return to ll_e fiflly composed
shot, and press the shutter button fidly down
AE/AF lock indicator
range
finder
• When you are using AF lock, you can
capture an image with the COllecl focus even
iffl_e subject is at the edge of the flame
• "_u can carry out the AF lock a@lsllnent
process before you press the shutter button
fiflly down
Setting the distance
to the subject
- Focus preset
Mode selector: a/H
\Vhen shooting an image using a previously
set distance to the sul_iect, or when shooting
a subject through a net or through window
glass, it is difficult to get the proper focus in
auto focus mode. In these cases, use of the
Focus preset is convenient.
Before operation
When shooting still images, set !_
(Camera) to an?" mode other than [Auto] in
the menu settings (page 23).
Control button
MENU
Mode selector
cn
g
o
o
u_
45
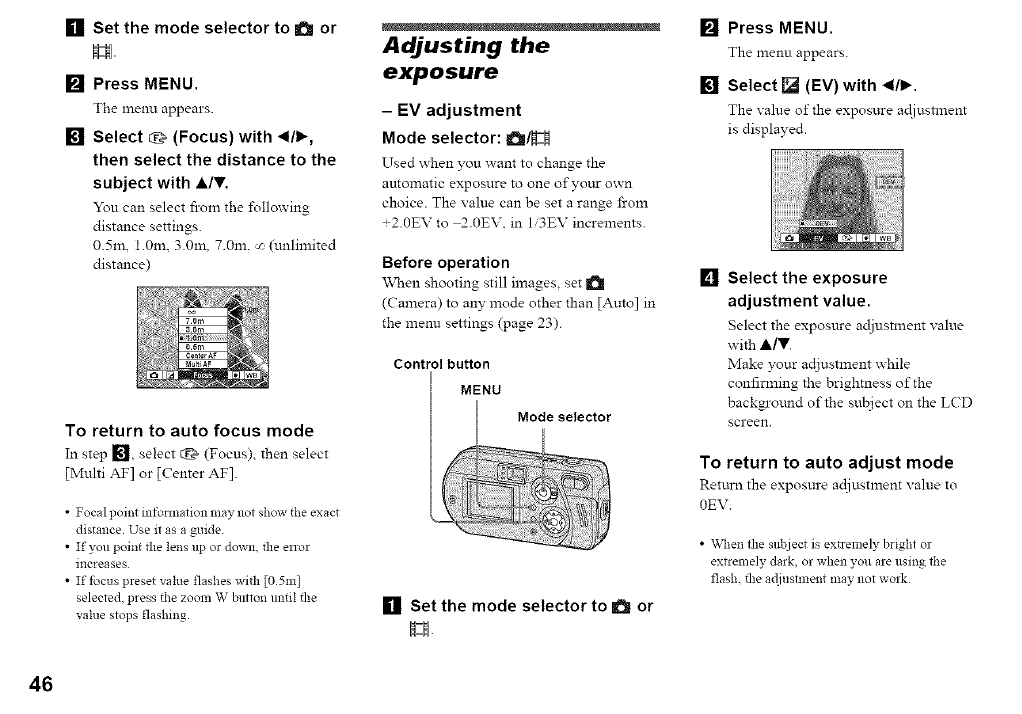
[] Set the mode selector to a or
El
[] Press MENU.
The menu appears.
[] Select EE_(Focus) with *1/_,
then select the distance to the
subject with A/,.
You can select fl-om the %llowing
distance settings.
0.5m, 1.0m. 3.0m, 7.0m, _ (unlimited
distance)
To return to auto focus mode
In step I_], select q_ (Focus), then select
[Multi AF] or [Center AF].
• Focal point information may not show the exact
distance. Use it as a guide.
• If you point the lens up or down. the enor
increases
• If tbcus preset value flashes with [05m]
selected, press the zoom W button until the
value stops flashing.
Adjusting the
exposure
- EV adjustment
Mode selector: a/H
Used when you want to change the
amomatic exposure to one ofyottr own
choice. The value can be set a range from
+2.0EV to 2.0EV. in Ii31EV increments.
Before operation
"_\_en shooting still images, set I_i
(Camera) to any mode other than [Amo] in
the menu settings (page 23).
Control button
MENU
[] Set the mode selector to I_ or
H
[] Press MENU.
The menu appears.
[] Select [] (EV) with *l/l_.
The value of the exposure ac!iusUnent
is displayed.
[] Select the exposure
adjustment value.
Select the exposure adjustment value
with ,A/V.
Make your adjustxnent _hile
confirming the brightness of the
background of the sul_iect on the LCD
screen.
To return to auto adjust mode
Retttrn the exposure adiustment value to
0EV.
• \Kq_en the subject is extrelnely bright or
extremely dark, or when you are using the
flash, the a@lstment may not work
46
Shooting techniques
In nol_nal shooting, the camera makes
automatic exposure adjustments Check the
image to be shoL if it looks like the image
below, you should nlake lnanuM adjustnlents
If you are shooting a back-lit person or a
snow3' scene, nlake your adjusmlents in the +
phls direction; if you are shooting a dark
subject that fills the screen, making your
adjllstments in file direction should give tlle
best results
Underexposured
-_, Adjust in the + direction
Appropriate exposure
Overexposed -_, Adjust in
the - direction
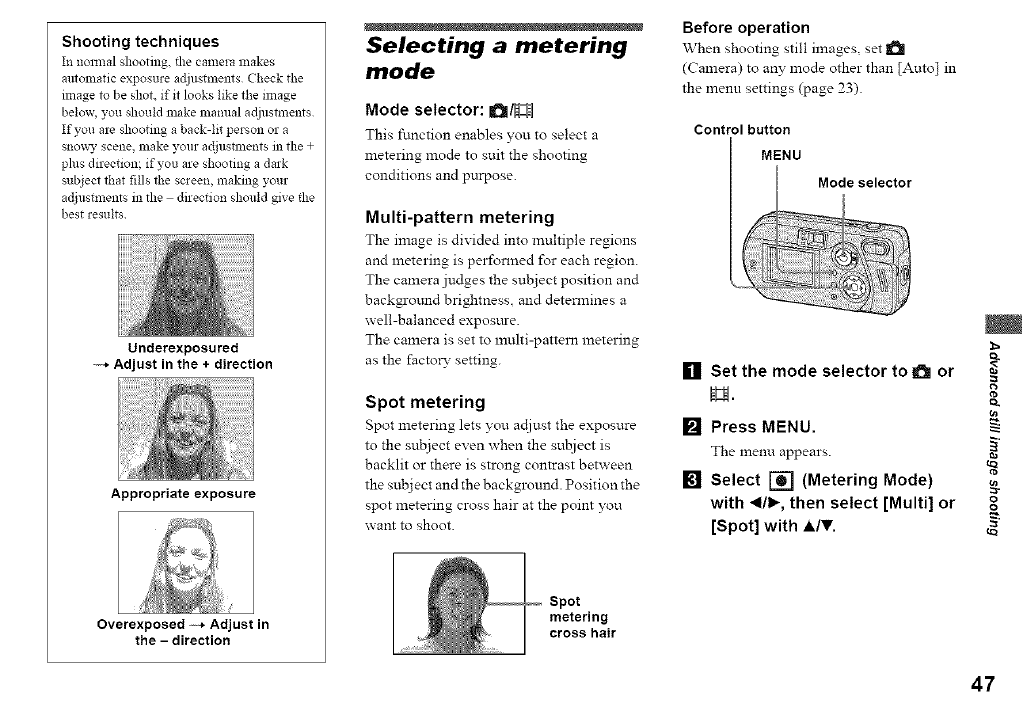
Selecting a metering
mode
Mode selector: a/H
This ftmction enables you to select a
metering mode to suit the shooting
conditions and purpose.
Multi-pattern metering
The image is divided into muhiple regions
and metering is performed for each region.
The camera judges the subject position and
backgrotmd brightness, and determines a
well-balanced expostu-e.
The camera is set to multi-pattern metering
as the factoD" setting.
Spot metering
Spot metering lets you ac[iust the exposure
to the subject even when the sul!iect is
backlit or there is strong contrast between
the subj ect and the background. Position the
spot metering cross hair at the point you
want to shoot.
Spot
metering
cross hair
Before operation
When shooting still images, set !_
(Camera) to an}" mode other than [Auto] in
the menu settings (page 23).
Control button
MENU
[] Set the mode selector to !_! or
[] Press MENU.
The menu appears. _"
[] Select [] (Metering Mode) g
with _1/1_,then select [Multi] or o°
[Spot] with A/T,
47
48
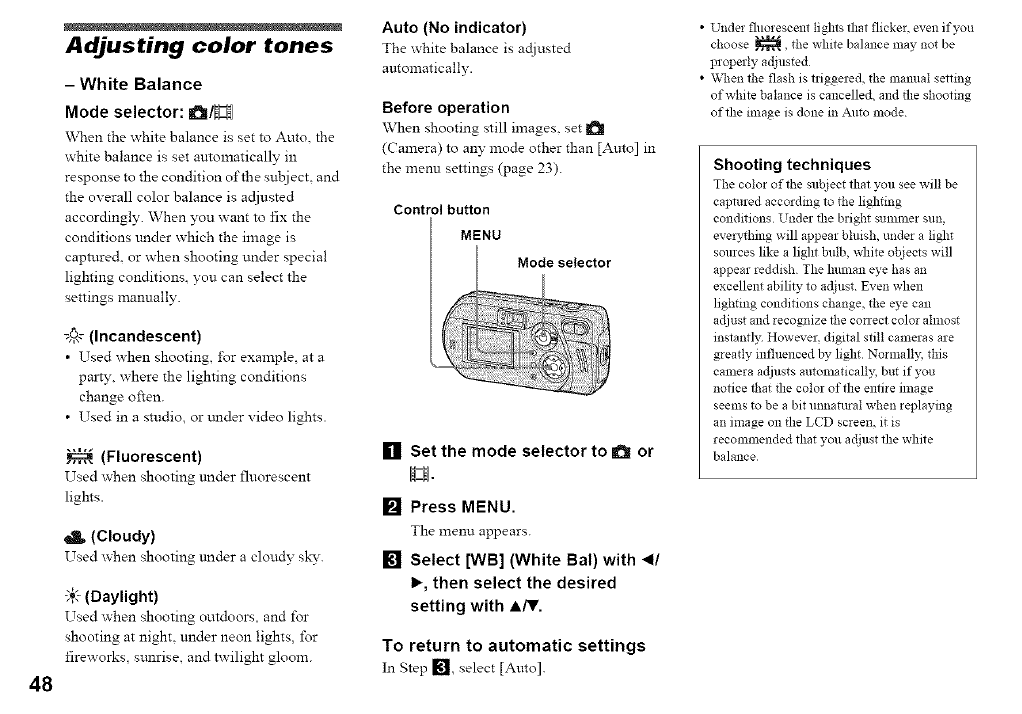
Adjusting color tones
-White Balance
Mode selector: a/H
\\then the white balance is set to Auto. the
white balance is set autoxnatically in
response to the condition of the sul_iect, and
the overall color balance is adjusted
accordingly. When you want to fix the
conditions under which the image is
capture& or when shooting under special
lighting conditions, you can select the
settings manually.
@,_ (Incandescent)
•Used when shooting i\_r example at a
paxty, where the lighting conditions
change often.
• Used in a studio, or trader video lights.
(Fluorescent)
Used when shooting under fluorescent
lights.
(Cloudy)
Used _hen shooting trader a cloudy sky.
"_.'-(Daylight)
Used when shooting outdoors and for
shooting at night, under neon lights, for
fireworks, stmrise, and twilight gloom.
Auto (No indicator)
The white balance is actjusted
automatically.
Before operation
When shooting still images, set I_1
(Camera) to an?- mode other than [Amo] in
the menu settings (page 23).
Control button
MENU
[] Set the mode selector to 101 or
H.
[] Press MENU.
The menu appears.
[] Select [WB] (White Bal) with _11
I_, then select the desired
setting with A/V,
To return to automatic settings
In Step 1_, select [Auto].
•Under fluorescent lights that flicker, even if you
choose _, the white balance may not be
properly adjusted
• Vv_en the flash is triggered, the mmmal setting
of white balance is cancelled, and the shooting
of the image is done in Auto mode
Shooting techniques
The colin of the subject that you see will be
captured according to the lighting
conditions Under the bright summer sun,
everything will appear blmsh, under a light
sources like a light bulb, white objects will
appear reddish The hmnan eye has an
excellent ability to adjust Even when
lighting conditions change, the eye can
adjust and recognize the conect color ahnost
instantly. However. digital still cameras are
greatly influenced by light Normally, this
calnera adjusts autolnatically, but if you
notice that the color of the entire ilnage
seems to be a bit mmatmal when replaying
an image on the LCD screen, it is
recommended that you adjust the white
balance
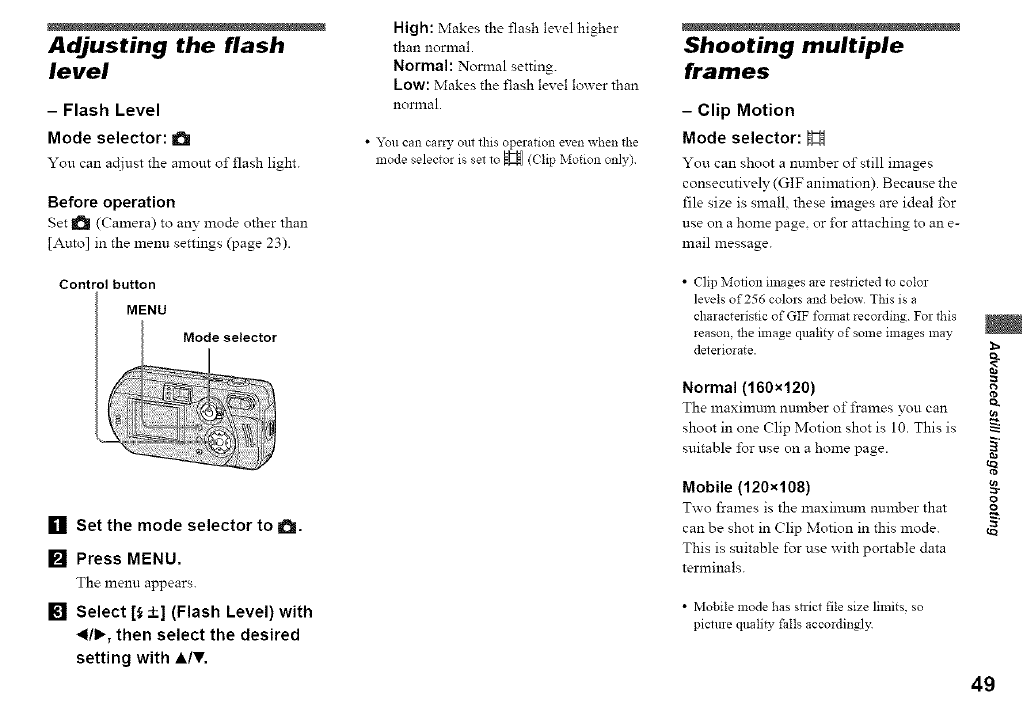
Adjusting the flash
level
- Flash Level
Mode selector: a
You can ac[iust the amour of flash light.
Before operation
Set l_! (Camera) to any mode other than
[Auto] in the menu settings (page 23).
Control button
MENU
[] Set the mode selector to a.
[] Press MENU.
The menu appears.
[] Select [_ +] (Flash Level) with
_1/1_,then select the desired
setting with A/V.
High: Makes the flash level higher
than normal.
Normal: Normal setting.
Low: Makes the flash level lower than
nonnal.
•_u can carry out this operation even when the
mode selector is set to H ((lip Motion only)
Shooting multiple
frames
-Clip Motion
Mode selector: H
You can shoot a number of still images
consecutively (GIF animation). Because the
file size is small, these images are ideal for
use on a home page, or i\)r attaching to an e-
mail message.
• Clip Motion images are restricted to color
levels of 256 colors and below This is a
characteristic of GIF format recording For tbis
reason, tbe image quality of some images may
deteriorate.
Normal (160x120)
The maximum number of frames you can
shoot in one (:lip Motion shot is 10. This is
suitable for use on a home page.
Mobile (120x108)
Two frames is the maximum number that
can be shot in Clip Motion in this mode.
This is suitable for use with portable data
terminals.
• Mobile mode has sn-ict file size limits, so
picture qttali_ tails accordingly
cn
g
o
o
49
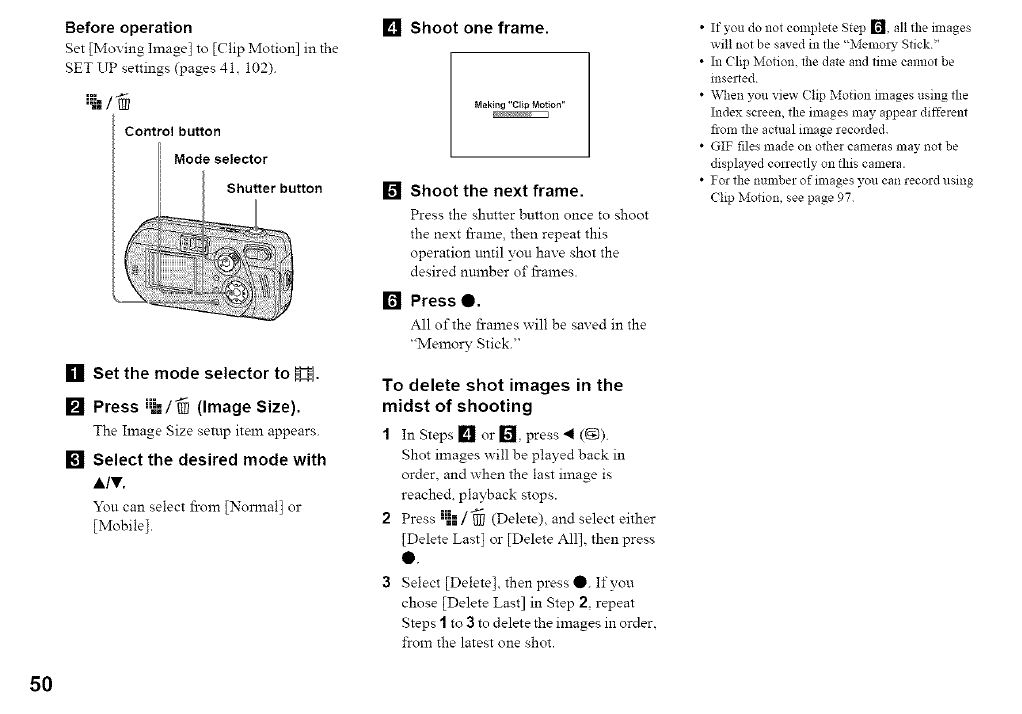
50
Before operation
Set [Moving Imagel to [Clip Motion] in the
SET UP settings (pages 41, 102).
Control button
Mode selector
Shutter button
[] Set the mode selector to H,
[] Press i_=/_ (Image Size).
The Image Size setup item appears.
[] Select the desired mode with
A/V.
You can select fl-oln [Nonnal] or
[Mobile].
[] Shoot one frame.
Mak{ng "Clip Motion"
[] Shoot the next frame.
Press the shutter button once to shoot
the next frame, then repeat this
operation until you have shot the
desired number of fi-ames.
[] Press 0.
All of the frames will be saved in the
"Memory Stick."
To delete shot images in the
midst of shooting
1In Steps [] or [] press 4 (1_).
Shot images will be played back in
order, and when the last image is
reached, playback stops.
2 Press l_l/-_ (Delete), andselect either
[Delete Last I or [Delete All1,then press
Q.
3Select [Delete], then press O. If you
chose [Delete Last] in Step 2, repeat
Steps Ito 3to delete the images in order,
from the latest one shot.
• If you do not complete Step r_, all the images
will not be saved in the "MemolT Stick"
• In (lip Motiom the date and time cannot be
mserted
• \x,q_enyou view (lip Motion mlages using the
Index screen, the images may appear different
from the actual image recorded.
• GIF files made on other cameras may not be
displayed correctly on this camera.
• For the number ofilnages you can record using
Chp Motion, see page 97

Shooting in Multi
Burst mode
- Multi Burst
Mode selector: !:H
Pressing the shutter button once records 16
frames in a row. This is convenient for
checking your i\)nn in sports, for example
Before operation
Set [Moving hnage I to [Multi Burst I in the
SET UP settings (pages 41, 102)
Control button
MENU
Mode selector
Shutter button
[] Set the mode selector to N:H.
[] Press MENU.
The menu appears
[] Select-=-=_ (Interval) with 41/1,_,
then select the desired
between-frame interval with A/
,.
You can choose the frame interval
from the menu settings (page 100)
[] Shoot your image,
16 frames will be recorded as one
image (image size: 12M).
•When you play back images recorded in Multi
Burst mode on file camera, see page 61
• For the lmmber of images that can be recorded.
see page 97
•The flash cannot be used
• In Multi Burst, the date and time cannot be
inserted
Shooting three
images in succession
- Burst 3
Mode selector: a
You can shoot three images in succession
x_hile pressing the shutter button only once.
Control button
MENU
Mode selector
[] Set the mode selector to !_!.
[] Press MENU.
The lnenl.l appears.
I
i
g
o
o
51
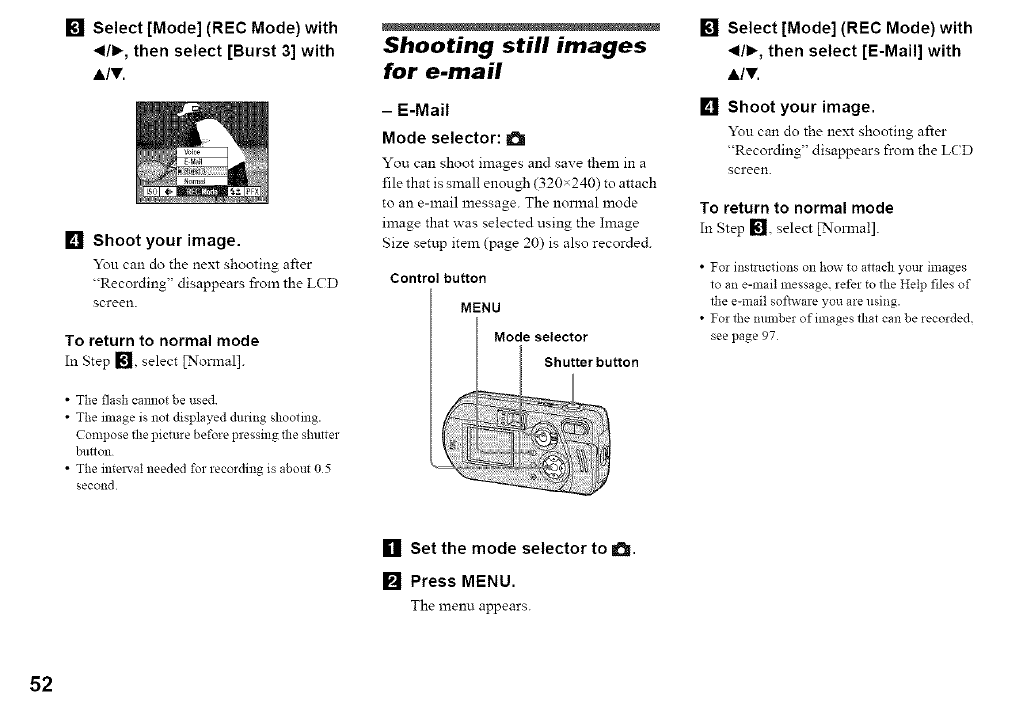
[] Select [Mode] (REC Mode) with
_1/1_,then select [Burst 3] with
A/T.
[] Shoot your image.
You can do the next shooting after
"Recording" disappears from the LCD
screen.
To return to normal mode
In Step [], select [Nonnal].
• The flash camlot be used
• The image is not displayed during shooting.
Compose file picture before pressing the shutter
Ninon
• The intel'_'al needed for recording is about 05
second
Shooting still images
for e-mail
- E-Mail
Mode selector: a
You can shoot images and save them in a
file that is small enough (320×240) to attach
to an e-mail message. The normal mode
image that was selected using the Image
Size setup item (page 20) is also recorded.
Control button
MENU
Mode selector
[] Select [Mode] (REC Mode) with
_1/1_,then select [E-Mail] with
&IV.
[] Shoot your image.
You can do the next shooting after
"Recording" disappears from the LCD
screen.
To return to normal mode
In Step [], select [Normal].
• For instructions on how to attach your images
to an e-mail message, refer to the Help tiles of
the e-mail software you are using.
• For the mnnber of images flint can be recorded.
see page 97
[] Set the mode selector to its.
[] Press MENU.
The menu appears.
52
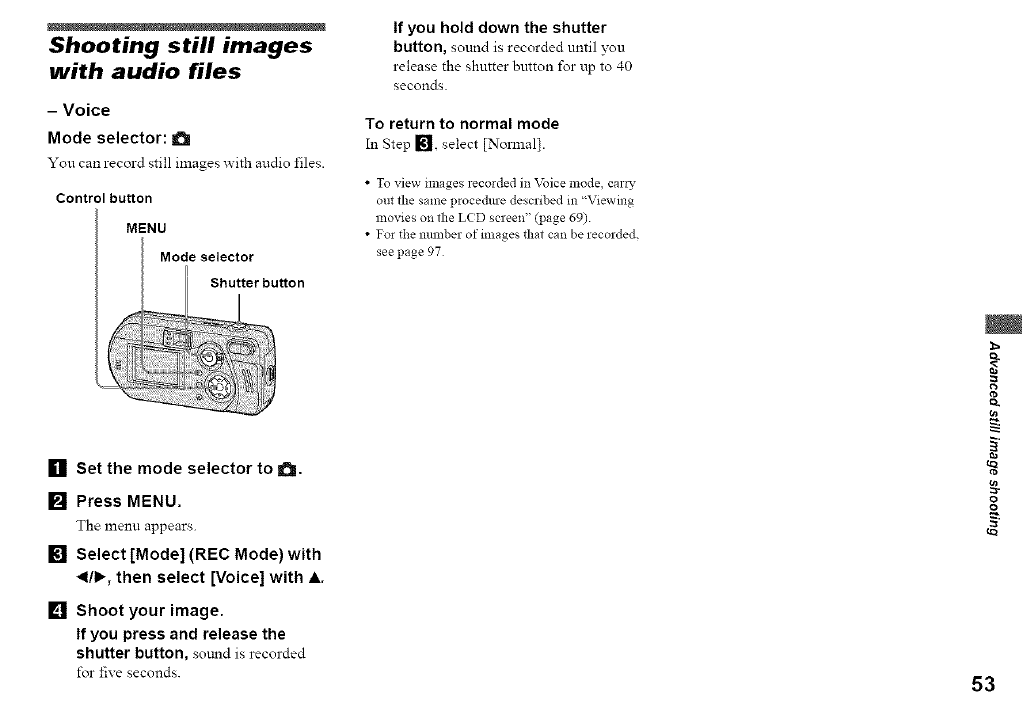
Shooting still images
with audio files
- Voice
Mode selector: a
You can record still images _ith audio files.
Control button
MENU
Mode selector
Shutter button
If you hold down the shutter
button, sound is recorded until you
release the shutter button for up to 40
seconds
To return to normal mode
In Step [], select [Normal].
•To view images recorded in Voice mode, caro_
out the same procedme described in "Viewing
movies on the L(D screen" (page 69)
• For the mnnber of images that can be recorded.
see page 97
[] Set the mode selector to a.
[] Press MENU.
The menu appears.
[] Select [Mode] (REC Mode) with
_1/1_,then select [Voice] with A.
[] Shoot your image.
If you press and release the
shutter button, soLmd is recorded
for five seconds. 53
o)
g
o
o
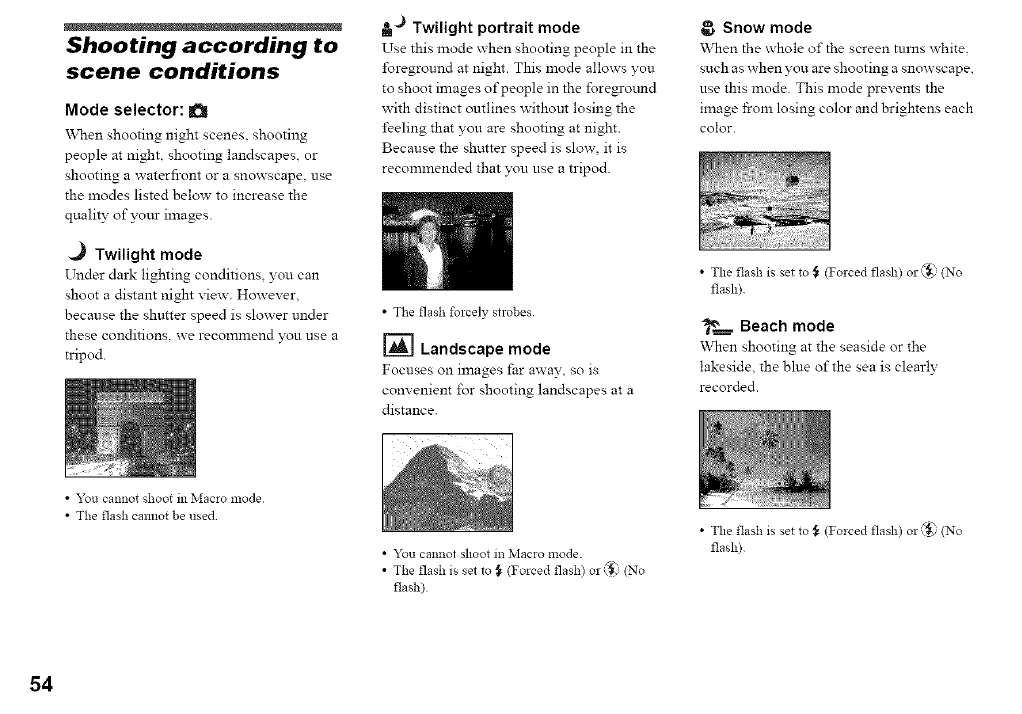
Shooting according to
scene conditions
Mode selector: a
\\q_en shooting night scenes, shooting
people at night, shooting landscapes or
shooting a waterfront or a snowscape, use
the modes listed below to increase the
quality of yore- images.
._ Twilight mode
Under dark lighting conditions, you can
shoot a distant night xiew. However,
because the shutter speed is slower under
these conditions, x_erecommend you use a
tripod.
at``) Twilight portrait mode
Use this mode x_hen shooting people m the
foreground at night. This mode allows you
to shoot images of people in the foreground
with distinct outlines without losing the
feeling that you are shooting at night.
Because the shutter speed is slow, it is
recommended that you use a tripod.
•The flash forcely strobes
_=] Landscape mode
Focuses on images far away so is
convenient for shooting landscapes at a
distance.
Snow mode
When the whole of the screen turns white.
such as when you are shooting a snowscape,
use this mode. This mode prevents the
image from losing color and brightens each
color.
•The flash is set to _ (Forced flash) or _._' (No
flash)
_'_.=_= Beach mode
When shooting at the seaside or the
lakeside, the blue of the sea is clearly
recorded.
•You cannot shoot in Macro mode
•The flash cannot be used
•You cannot shoot m Macro mode.
•The flash is set to _ (Forced flash) O1"_ I (NO
flash/
•The flash is set to _ (Forced flash) or (_ (No
flash)
54
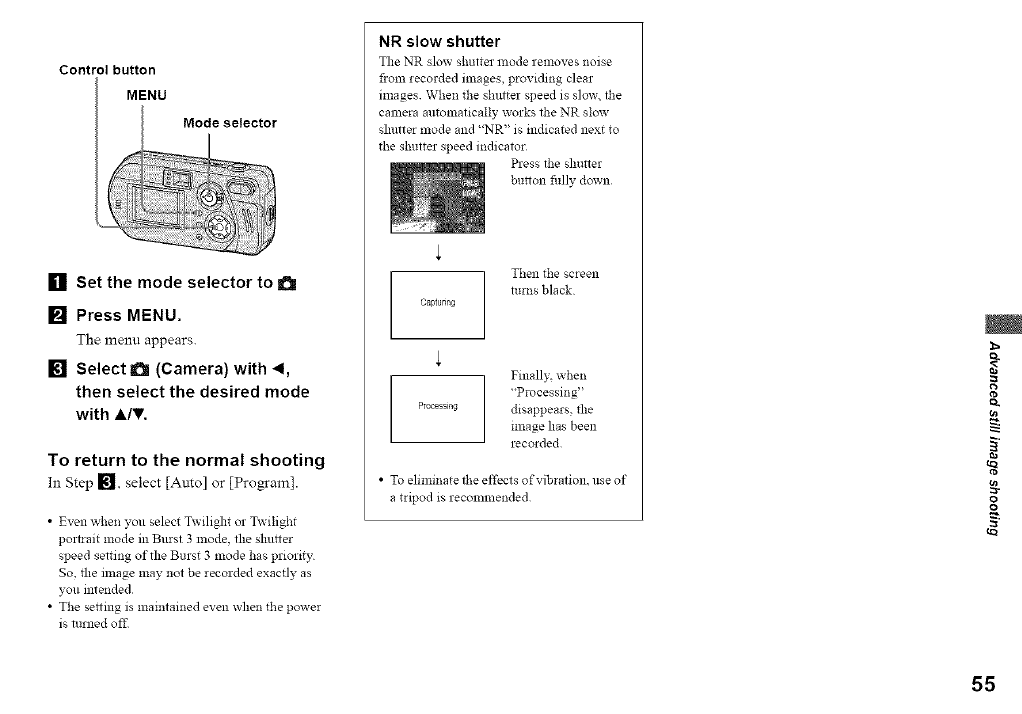
Control button
MENU
[] Set the mode selector to a
[] Press MENU.
The menu appears.
[] Select a (Camera) with 4,
then select the desired mode
with A/T.
To return to the normal shooting
Ill Step 1_. select [Auto] or [Pro_am].
•Even when you select Twilight o1"Twilight
portlait mode in Burst 3 nlode, the shutter
speed setting of the Burst 3 mode has priority
So, the image may not be recorded exactly as
you intended
• The se_ing is maintained even when the power
is turned offi
NR slow shutter
The NR slow shutter lllode removes noise
from recorded images, providing clear
images. When the shutter speed is slow. tbe
camera automatically works tbe NR slmv
shutter mode and "NR" is indicated next to
the shutter speed indicator
Press tbe shutter
burion filly down
Then the screen
turns black
captunn_
Finally. when
"Processing"
Processing disappears, the
image has been
recorded
•To eliminate the effects of vibration, use of
a tripod is recommended
m
g
o_
g
g
55
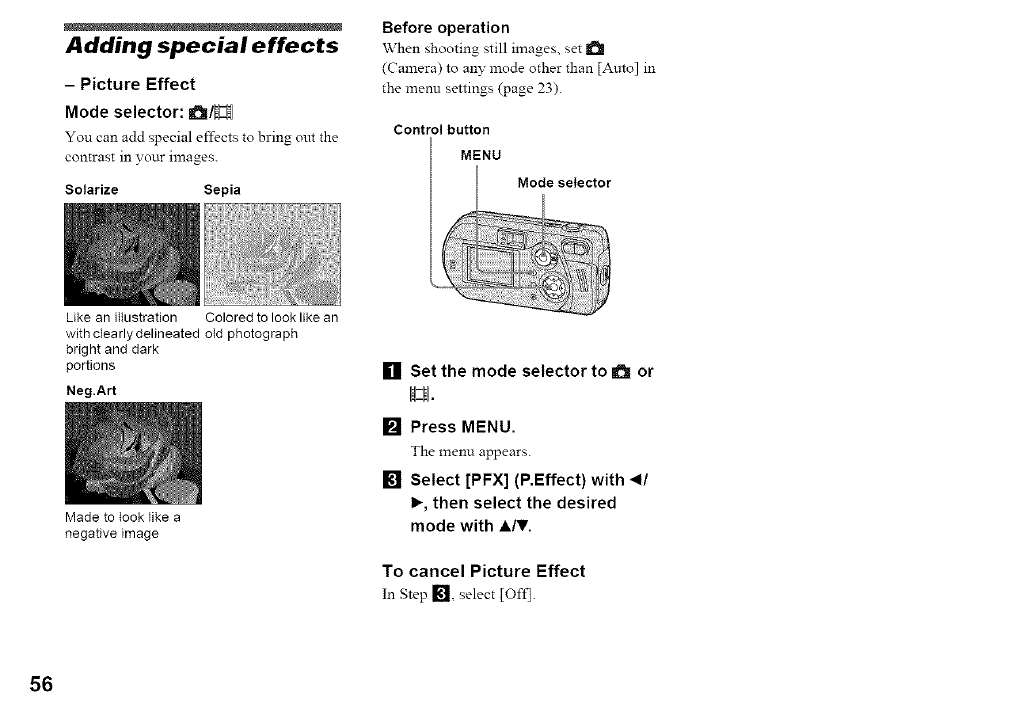
Adding special effects
- Picture Effect
Mode selector: a/H
You can add special effects to bring out the
contrast in your images.
Solarize Sepia
Before operation
When shooting still images, set
(Camera) to any mode other than [Amo] in
the menu settings (page 23).
Control button
MENU
Mode selector
Like an illustration Colored to look like an
with clearly delineated oId photograph
bright and dark
portions
Neg.Art
Made to took like a
negative image
[] Set the mode selector to aor
H.
[] Press MENU.
The menu appears.
[] Select [PFX] (P.Effect) with 4/
I_, then select the desired
mode with A/,.
To cancel Picture Effect
In Step [], select [Oft'].
56
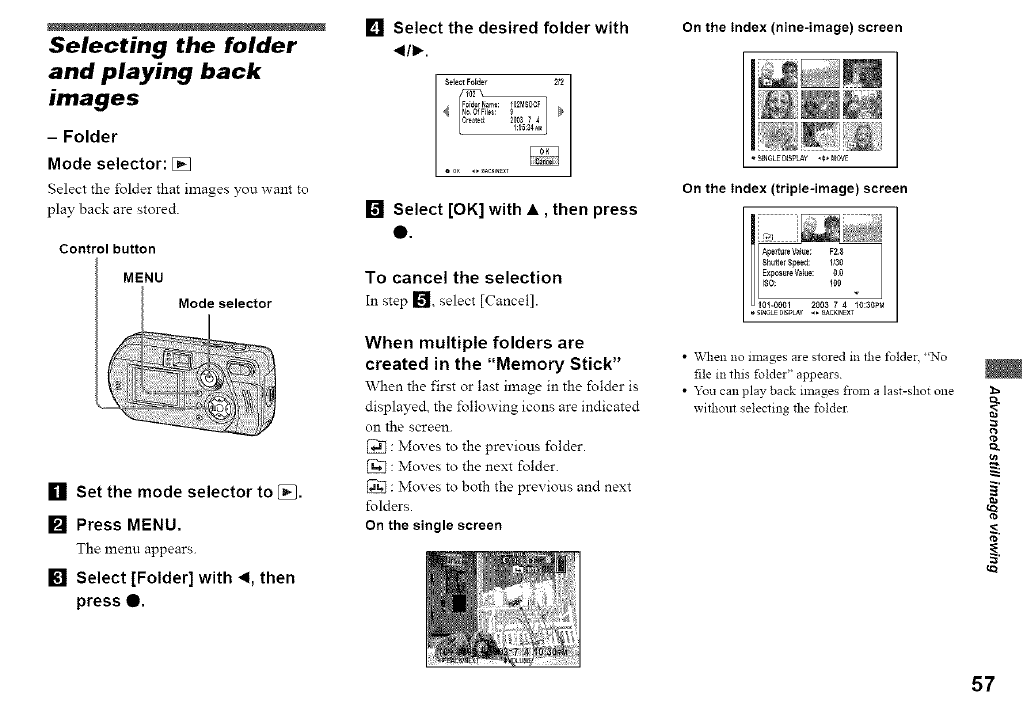
Selecting the folder
and playing back
images
- Folder
Mode selector: []
Select the folder that images you want to
play back are stored.
Control button
MENU
Mode selector
[] Set the mode selector to [_.
[] Press MENU.
The menu appears.
[] Select [Folder] with _1, then
press 0.
[] Select the desired folder with
_1/1_,
[] Select [OK] with •, then press
e.
To cancel the selection
In step [_J, select [Cancel].
When multiple folders are
created in the "Memory Stick"
When the first or last image in the folder is
displayed, the following icons are indicated
on the screen.
[_ : Moves to the previous folder
D_ : Moves to the next folder.
[_ : Moves to both the previous and next
folders
On the single screen
On the Index (nine-image) screen
_ SINGLEDIS_LAY,€, MOVE
On the Index (triple-image) screen
Ape_ureValue: F28
Shu_erSteed: 1130
_ii!i: ii3i LExposureValue: O0
I0_-0001 2003 74 I0:30%1
•SINGLE DISP_Y _ _ _K_NEXT
•When no images are stored in the folder, "No
file in this folder" appears
• Y_u can play back images froln a last-shot one
without selecting the folder
eo
57
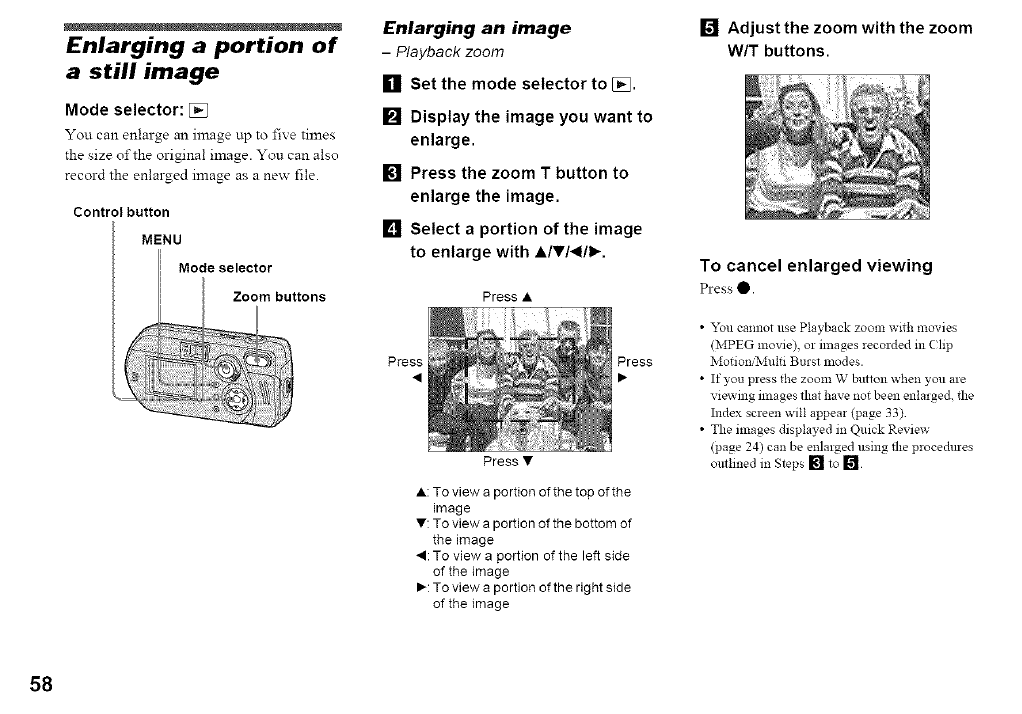
Enlarging a portion of
a still image
Mode selector: [2_
You can enlaTge an image up to five times
the size of the original image. You can also
record the enlarged image as a new file.
Control button
MENU
Mode selector
Enlarging an image
-Playback zoom
[] Set the mode selector to [J_.
[] Display the image you want to
enlarge.
[] Press the zoom T button to
enlarge the image.
[] Select a portion of the image
to enlarge with ,&l,14111_.
Press •
Press
Press •
Press
• : To view a portion of the top of the
image
• : To view a portion of the bottom of
the image
• : To view a portion of the left side
of the image
• : To view a portion of the right side
of the image
[] Adjust the zoom with the zoom
WIT buttons.
To cancel enlarged viewing
Press O.
•&_u cannot use Playback zoom with movies
(MPEG movie), or images recorded in (;lip
MotionfN[ulti Burst modes.
•If you press the zoom W button when you ale
viewing images that have not been enlarged, the
Index screen will appear (page 33)
• The images displayed m Quick Review
(page 24) can be enlarged using the procedures
outlined in Steps [] to []
58

Recording an enlarged
image -Trimming
[] After you have viewed an
image using playback zoom,
press MENU.
The menu appears.
[] Select [Trimming] with I_, then
press 0.
[] Select the image size with A/V,
then press 0.
The image is recorded and the screen
image returns to the size it was before
enlargement.
• The trilmned image is recorded in the recording
folder as the newest file, and the original image
is retained
• The nimnled image may suffer some
deterioration in image quality.
• You cannot trim to 3:2-sized image
Playing back
successive images
- Slide show
Mode selector: []
You can play back recorded images in
succession, one after another. This is useful
for checking your images, or for giving a
presentation.
Control button
MENU
[] Set the mode selector to [].
[] Press MENU.
The menu appears.
[]
[]
Select [Slide] with _1/1_, then
press e.
Set the following items with A V 41 _"
Interval settings
3 sec5 secil0 seci30 secil lnin
Image
Folder:Plays back all the images in the
selected folder.
All:Plays back all the images in the
"Memol_- Stick."
Repeat
On:Plays the images back repeatedl_:
Off:Plays through the images one time
and then stops.
Select [Start] with T/I_, then
press 0.
The slide show begins.
To cancel the slide show setting
In Step _, select [Cancel].
To stop slide show playback
Press • select [Exit] with IP'.then press •.
1=
ta.
o)
eo
59
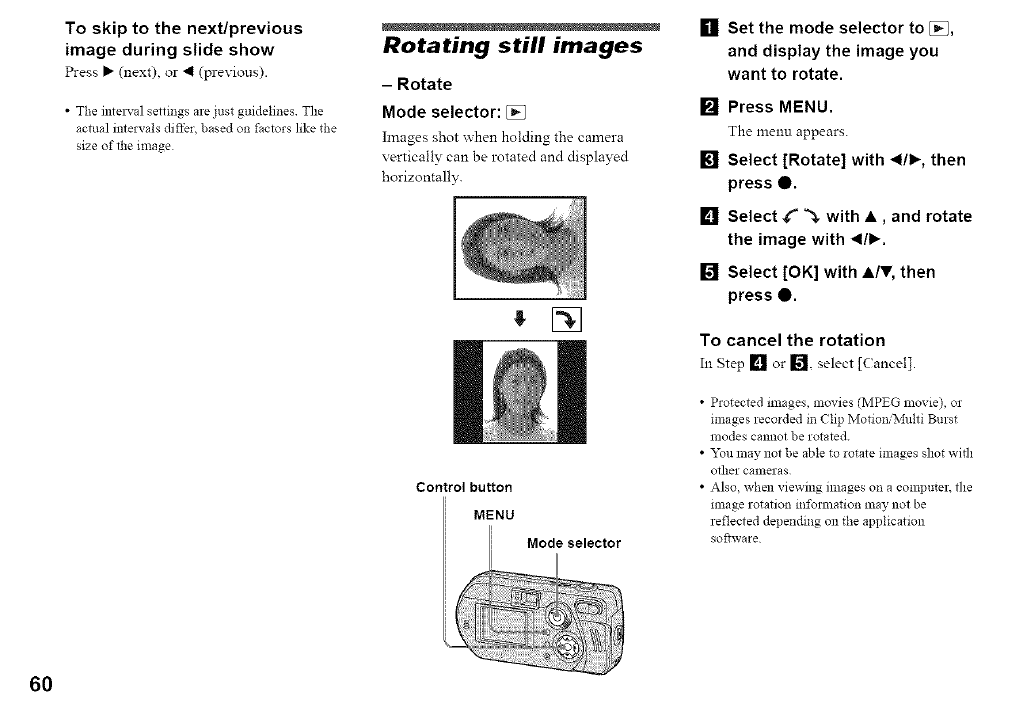
To skip to the next/previous
image during slide show
Press _" (next) or 4 (previous).
• The inlel_-al settings are just guidelines The
actual intervals differ, based on factors like the
size of the image
Rotating still images
- Rotate
Mode selector: []
Images shot when holding the camera
vertically can be rotated and displayed
horizontally.
! []
Control button
MENU
[] Set the mode selector to [],
and display the image you
want to rotate
[] Press MENU.
The menu appears.
[] Select [Rotate] with _1/1_,then
press 0.
[] Select C _- with •, and rotate
the image with _1/1_.
[] Select [OK] with •IV, then
press •
To cancel the rotation
In Step [] or [] select [Cancel].
•Protected images, movies (MPEG movie), or
nnages recorded in Clip Motion/Multi Burst
modes cannot be rotated.
• _u may not be able to rotate images shot widl
oilier cameras
•Also, when viewing images on a conllmter, the
mmge rotation inforlnation may not be
reflected depending on the application
software
60
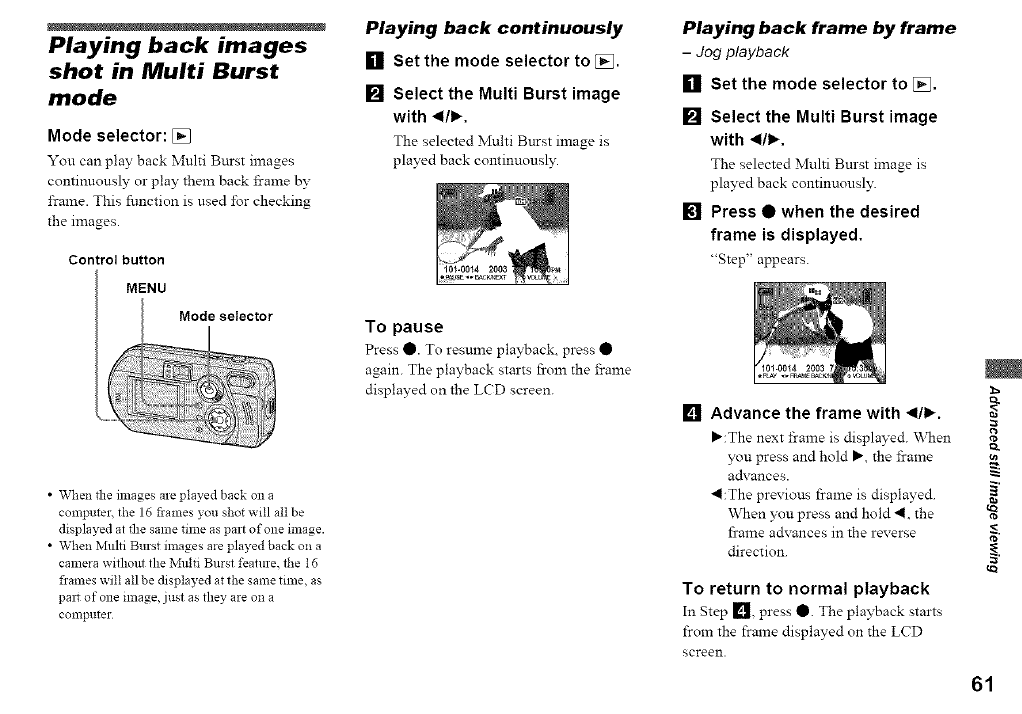
Playing back images
shot in Multi Burst
mode
Mode selector: []
You can play back Multi Burst images
continuously or play them back frame by
frame. This function is used for checking
the images.
Control button
MENU
Mode selector
•When the images are played back on a
computer, the 16 frames you shot will all be
displayed at the salne time as part of one image.
• When Multi Burst images are played back on a
camera without the Multi Burst feature, the 16
flames will all be displayed at the same time, as
pail of one linage, just as they are on a
conlputer
Playing back continuously
[] Set the mode selector to [].
[] Select the Multi Burst image
with _1/1_,
The selected Multi Burst image is
played back continuously.
To pause
Press O. To resume playback press
again. The playback starts from the frame
displayed on the LCD screen.
Playing back frame by frame
-Jogpiayback
Set the mode selector to [].[]
[]
[]
Select the Multi Burst image
with _1/1_,
The selected Multi Burst image is
played back continuousl3:
Press • when the desired
frame is displayed.
"Step' appears.
[] Advance the frame with _1/1_.
_:The next frame is displayed. When
you press and hold _, the frame
advances.
4l:The previous frame is displayed.
When ?xmpress and hold 41. the
flame advances in the reverse
direction.
To return to normal playback
In Step [] press Q. The playback starts
from the frame displayed on the LCD
screen.
(ga
61
To delete shot images
\\then using this mode you cannot delete
only certain frames. When you delete
images, all 16 of the frames are deleted at
the same time.
1 Display the Multi Burst image you want
to delete.
2 Press "_I /IN (Delete).
3 Select [Delete], then press O.
All of the frames are deleted.
62
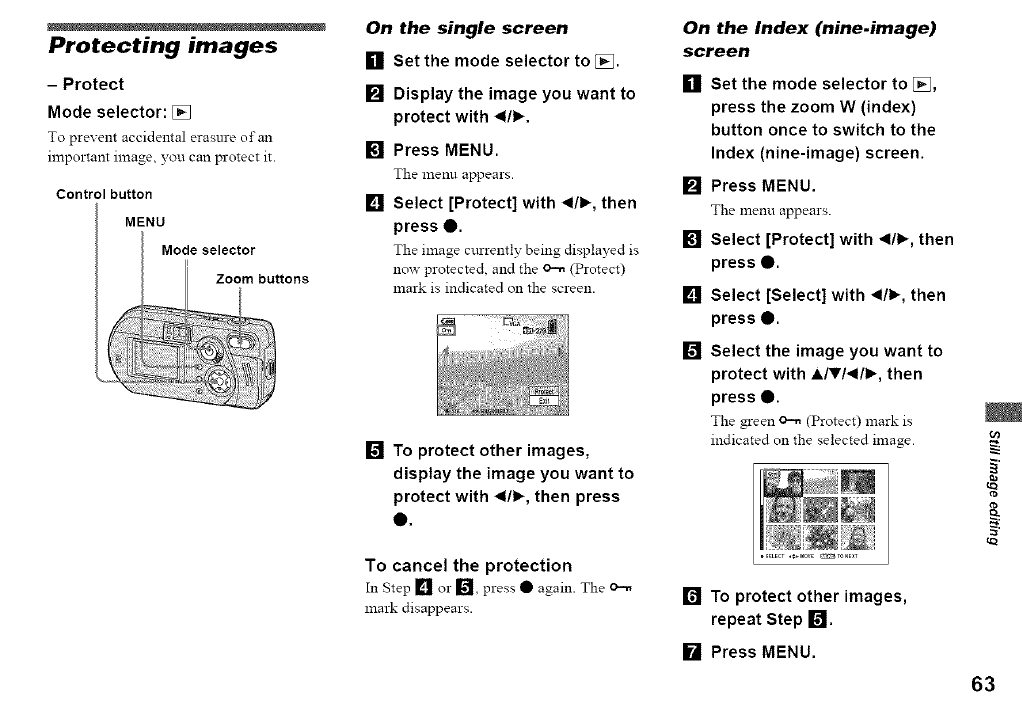
Protecting images
- Protect
Mode selector: []
To prevent accidental erasure of an
important image, you can protect it.
Control button
MENU
Mode selector
Zoom buttons
On the single screen
[] Set the mode selector to [_.
[]
[]
[]
Display the image you want to
protect with _1/1_,
Press MENU.
The menu appears.
Select [Protect] with _1/1_,then
press 0.
The image cttrrently being displayed is
now protected, and the _ (Protect)
xnark is indicated on the screen.
[] To protect other images,
display the image you want to
protect with _1/1_,then press
e.
To cancel the protection
In Step [] or I_]l, press • again. The o_
mark disappears.
On the Index (nine.image)
screen
[] Set the mode selector to [],
press the zoom W (index)
button once to switch to the
Index (nine-image) screen.
[] Press MENU.
The xnenu appears.
[] Select [Protect] with _/_, then
press e.
[] Select [Select] with _ll._, then
press e.
[] Select the image you want to
protect with ,i,1,1_111_, then
press 0.
The green _ (Protect) mark is
indicated on the selected image.
[] To protect other images,
repeat Step !_!.
[] Press MENU.
o)
_a
63

[] Select [OK] with I_, then press
Q.
The o-n mark turns white and the
selected image is protected.
To cancel the protection
In Step I_ll, select [Cancel], or in Step [],
select [Exitl.
To release protection
In Step [] select an image for which you
want to release protection with A,Ti4i_
and wess O. The _ mark turns gray and
repeat this operation for all the images for
which you want to release protection. Then,
press MENU. select [OK], and press O.
To protect all the images in
folder
In Step I_11select [All In Folder], then press
O. Next, select [On], then press O.
To release protection of all the
images in the folder
In Step _], select [All In Folder] and press
O. Then select [Off], and press O.
On the Index (triple.image)
screen
[]
[]
[]
[]
Set the mode selector to [j_,
press the zoom W (index)
button twice to switch to the
Index (triple-image) screen.
Move the image you want to
protect to the center with _1/1_.
Press MENU.
The menu appears.
Select [Protect] with A/V, then
press 0.
The center image is protected and the
(Protect) mark is indicated on that
image.
[] To protect other images, move
the image you want to protect
to the center with _1/1_, and
repeat Step L_I.
To release protection
In Step [] select the image from which
you want to release protection, and press O.
To release protection from all of your
images, repeat this process i\)r each of them.
64
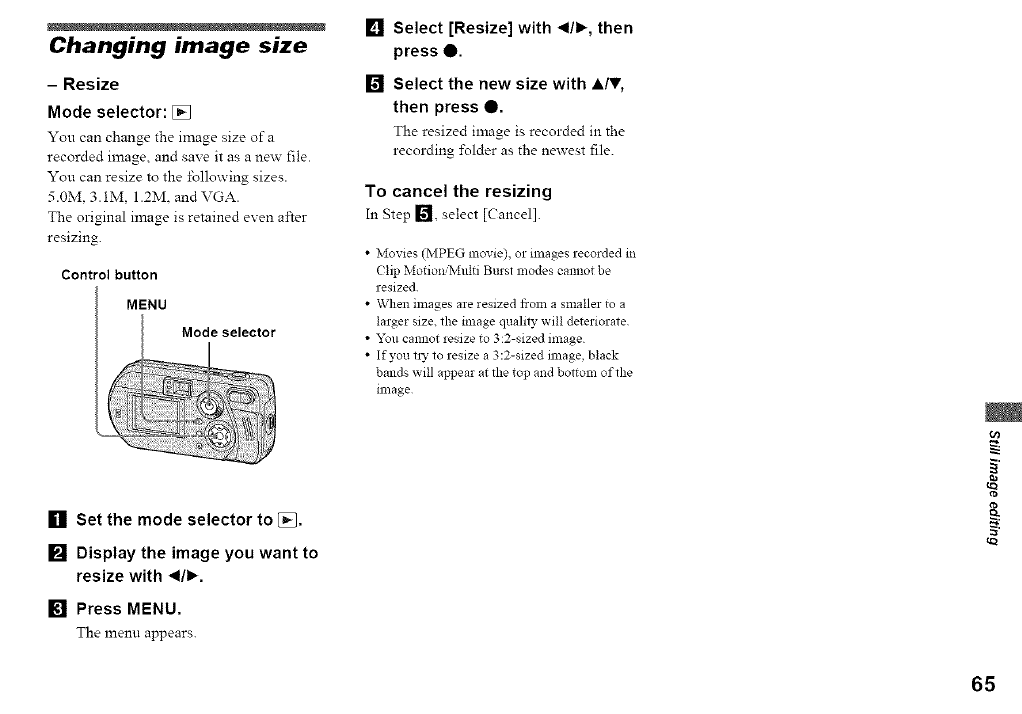
Changing image size
- Resize
Mode selector: []
You can change the image size of a
recorded image, and save it as a new file.
You can resize to the following sizes.
5.0M. 3.1M, 1.2M. and VGA.
The original image is retained even after
resizing.
Control button
MENU
Mode selector
[] Set the mode selector to [_.
[] Display the image you want to
resize with _1/1_.
[] Press MENU.
The menu appears.
[] Select [Resize] with _1/1_,then
press •
[] Select the new size with A/,,
then press O.
The resized image is recorded m the
recording i\_lder as the newest file.
To cancel the resizing
In Step 1_1, select [Cancel].
•Movies (MPEG movie), or images recorded in
(lip MotionfiVfulti Burst modes cannot be
resized.
• When images are resized flora a smaller to a
larger size. the image quality will deteriorate
• "x%u cannot resize to 3:2-sized image
• If you t15 to resize a 3:2-sized linage, black
bands will appear at tlle top and bottom of the
lnlage
(11
igl
65
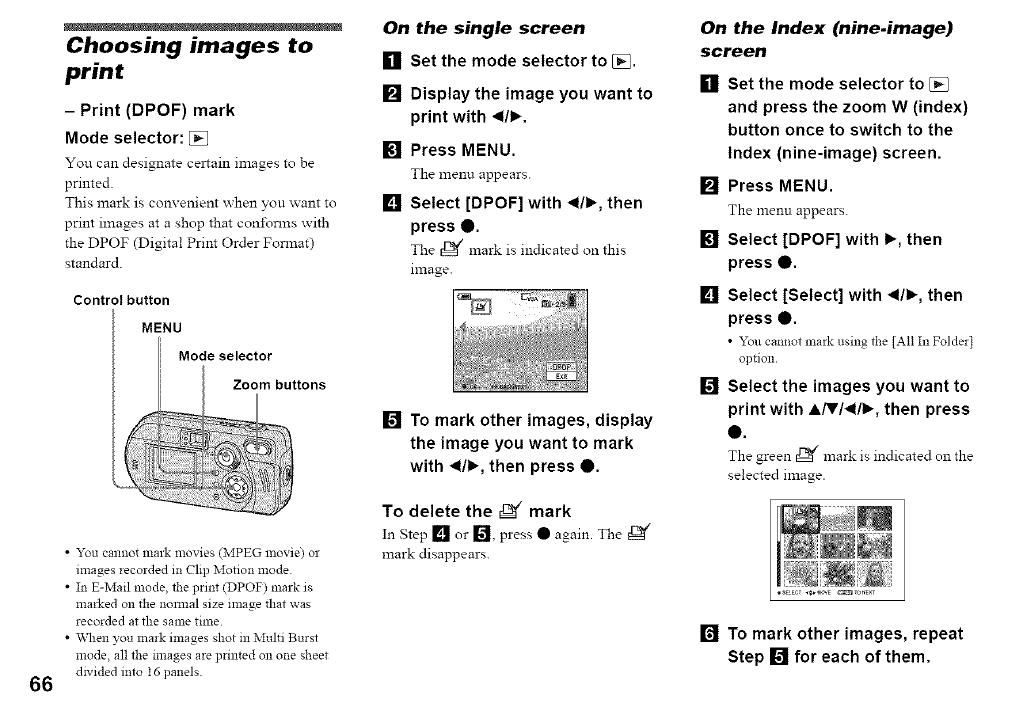
66
Choosing images to
print
-Print (DPOF) mark
Mode selector: []
You can designate celtain images to be
printed.
This mark is convenient when you want to
print images at a shop that con±\_rlns with
the DPOF (Digital Print Order Format)
standard.
Control button
MENU
Mode selector
•You cannot malk movies (MPEG movie) or
images recorded in Clip Motion mode
• In E-Mail mode, the print (DPOF) mark is
marked on the nomlal size image that was
recorded at the same time
• _tqlen you mark images shot in Multi Burst
mode, all the mlages are printed on one sheet
dwided into 16 panels
On the single screen
[] Set the mode selector to [_.
[]
[]
[]
Display the image you want to
print with _1/1_.
Press MENU.
The menu appears.
Select [DPOF] with _1/1_,then
press O,
The _'/mark is indicated on this
image.
[] To mark other images, display
the image you want to mark
with _1/1_,then press Q.
To delete the _" mark
In Step [] or [] press •again. The _/
mark disappears.
On the Index (nine.image)
screen
[] Set the mode selector to []
and press the zoom W (index)
button once to switch to the
Index (nine-image) screen.
[] Press MENU.
The menu appears.
[] Select [DPOF] with I_, then
press O.
[] Select [Select] with _1/1_,then
press O.
• _u cannot ma_k using the [All InFolde*]
option
[] Select the images you want to
print with A/V/_I/I_, then press
@.
The green _ mark is indicated on the
selected image.
[] To mark other images, repeat
Step [] for each of them.
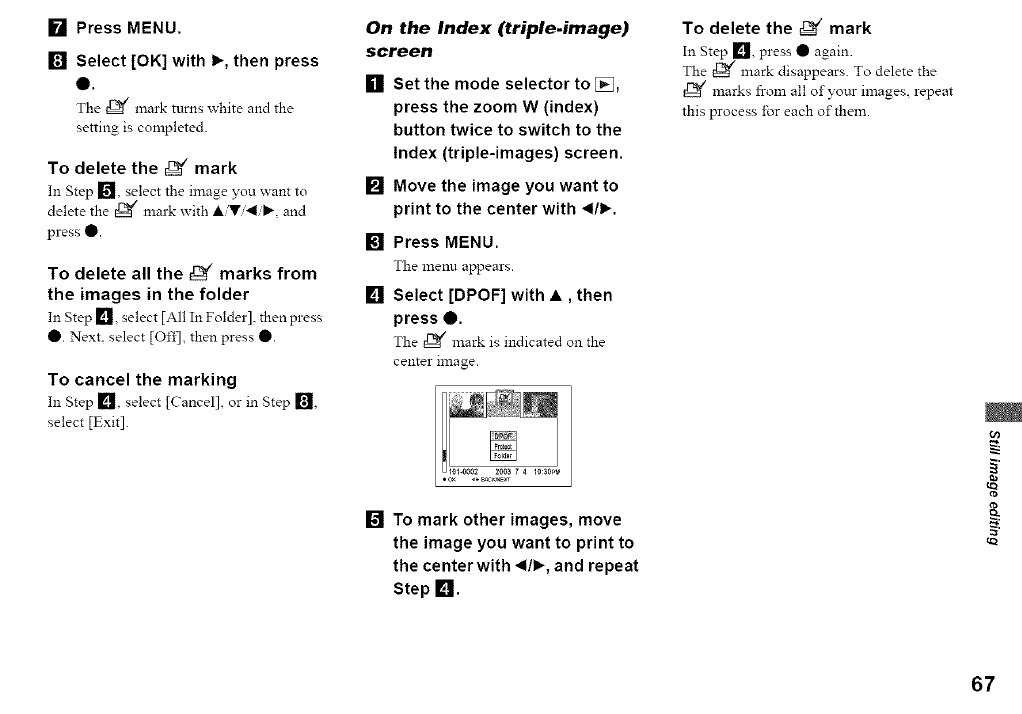
[] Press MENU.
[] Select [OK] with I_, then press
0.
The t_ mark turns white and the
setting is completed.
To delete the _ mark
In Step [] select the image you want to
delete the E_/mark with •iVi<ib', and
press •.
To delete all the _marks from
the images in the folder
In Step [] select [All In Folder] then press
• . Next. select [Of±I, then press •.
To cancel the marking
In Step In select [Cancel], or in Step [],
select [Exit].
On the Index (triple.image)
screen
[]
[]
[]
[]
Set the mode selector to [_L],
press the zoom W (index)
button twice to switch to the
Index (triple-images) screen.
Move the image you want to
print to the center with _1/1_.
Press MENU.
The menu appears.
Select [DPOF] with •, then
press 0.
The _¢ mark is indicated on the
center image.
[] To mark other images, move
the image you want to print to
the center with _1/1_,and repeat
Step L_I.
To delete the _ mark
In Step [] press • again.
The _ mark disappears. To delete the
marks from all ofyotu- images, repeat
this process for each of them.
±
u)
iga
67
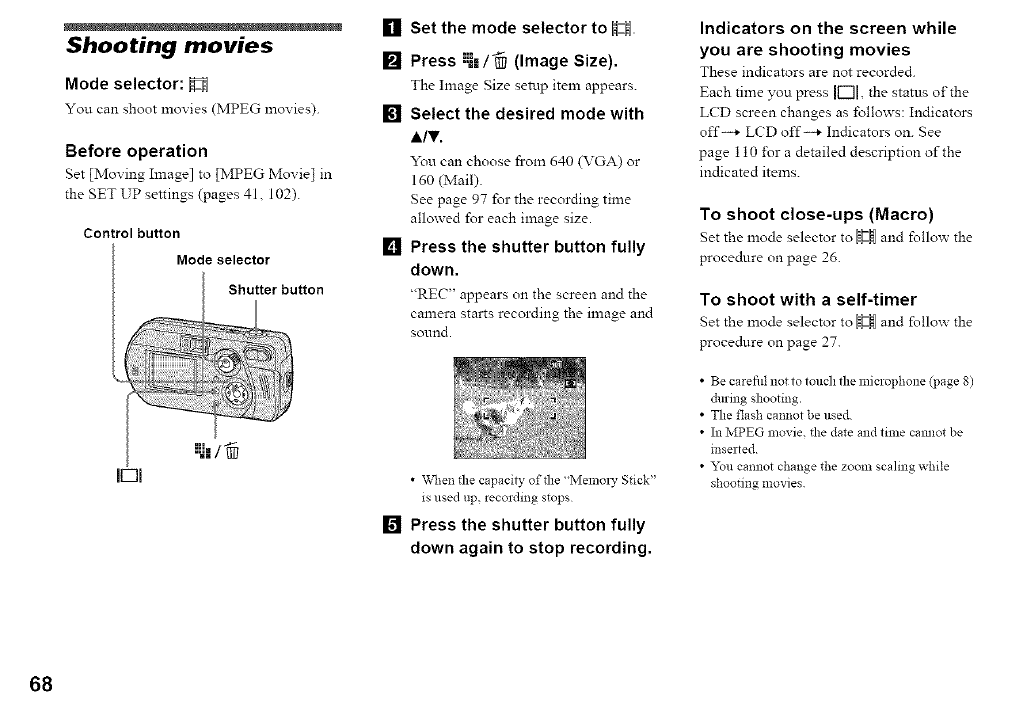
Shooting movies
Mode selector: H
You can shoot movies (MPEG lnovies).
Before operation
Set [Moving Image] to [MPEG Movie] in
the SET UP settings (pages 41,102).
Control button
Mode selector
Shutter button
[] Set the mode selector to H
:::m
[] Press "I,/_I/ (Image Size).
The hnage Size setup item appears.
[] Select the desired mode with
A/,.
You can choose from 640 (VGA) or
160 (Mail).
gee page 97 for the recording time
allowed for each image size.
[] Press the shutter button fully
down.
"RE('" appears on the screen and the
camera starts recording the image and
sol_lrld.
•Vvl_enthe capacity of the "Melnol 7 Stick"
is used up, recording stops
[] Press the shutter button fully
down again to stop recording.
Indicators on the screen while
you are shooting movies
These indicators are not recorded.
Each time you press F-11, the status of the
L(D screen changes as follows: Indicators
off--+ LCD off-+ Indicators on. See
page 110 i\)r a detailed description of the
indicated items.
To shoot close-ups (Macro)
Set the ,node selector to _ and follow the
procedure on page 26.
To shoot with a self-timer
Set the mode selector to _ and follow the
procedure on page 27.
• Be carefid not to touch the microphone (page 8)
du_mg _hootmg.
• The flash cannot be used
• In MPEG movie, the date and time cammt be
mserted
•"x'mlcamaot change _he zoom scaling while
shootillg movies
68
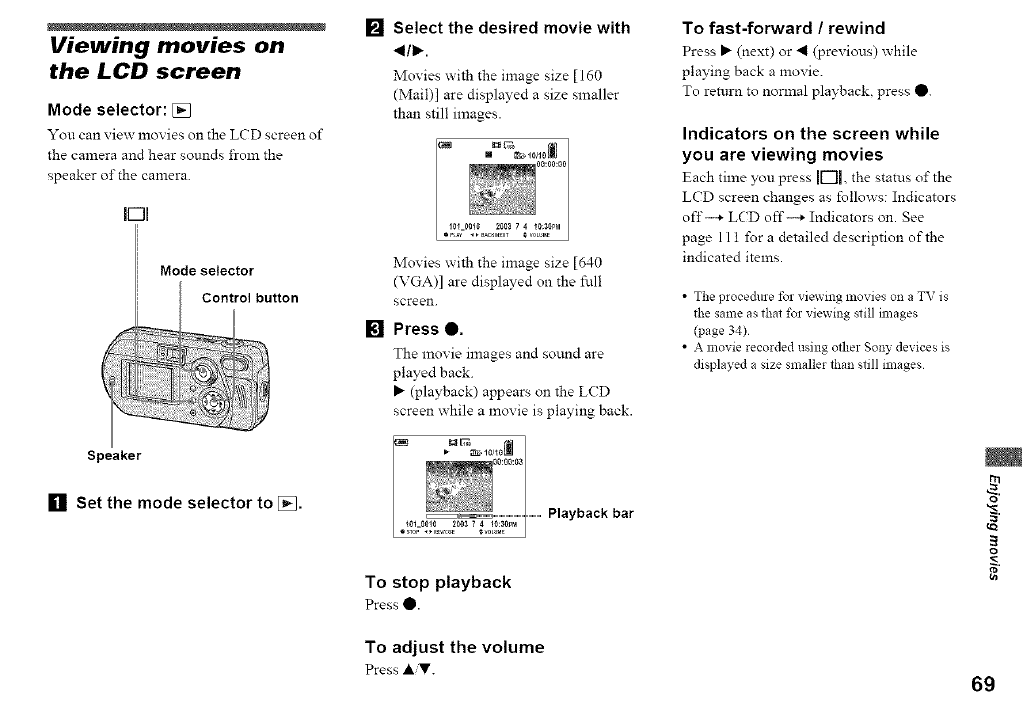
Viewing movies on
the LCD screen
Mode selector: []
You can view movies oll the LCD screen of
the camera and hear sounds from the
speaker of the camera.
IOI
Mode selector
Speaker
[] Set the mode selector to [],
[] Select the desired movie with
_1/1_.
Movies with the image size [160
(Mail)l are displayed a size smaller
than still images.
Movies _ith the image size [640
(VGA)] are displayed on the full
screen.
[] Press e.
The movie Rages and sound are
played back.
@ayback) appears on the LCD
screen while a movie is playing back.
Playback bar
To stop playback
PressO.
To fast-forward /rewind
Press _ (next) or 411(previous) while
playing back a movie.
To return to normal playback, press O.
Indicators on the screen while
you are viewing movies
Each time you press F'll the status of the
LCD screen changes as follows: Indicators
off--+ LCD off--+ Indicators on. See
page 11 t for a detailed description of the
indicated items.
•The procedure %r viewing movies on a TV is
the same as that %r viewing still images
(page 34)
• A movie recorded using other Sony devices is
displayed a size smaller than still images
o
To adjust the volume
Press A,T. 69
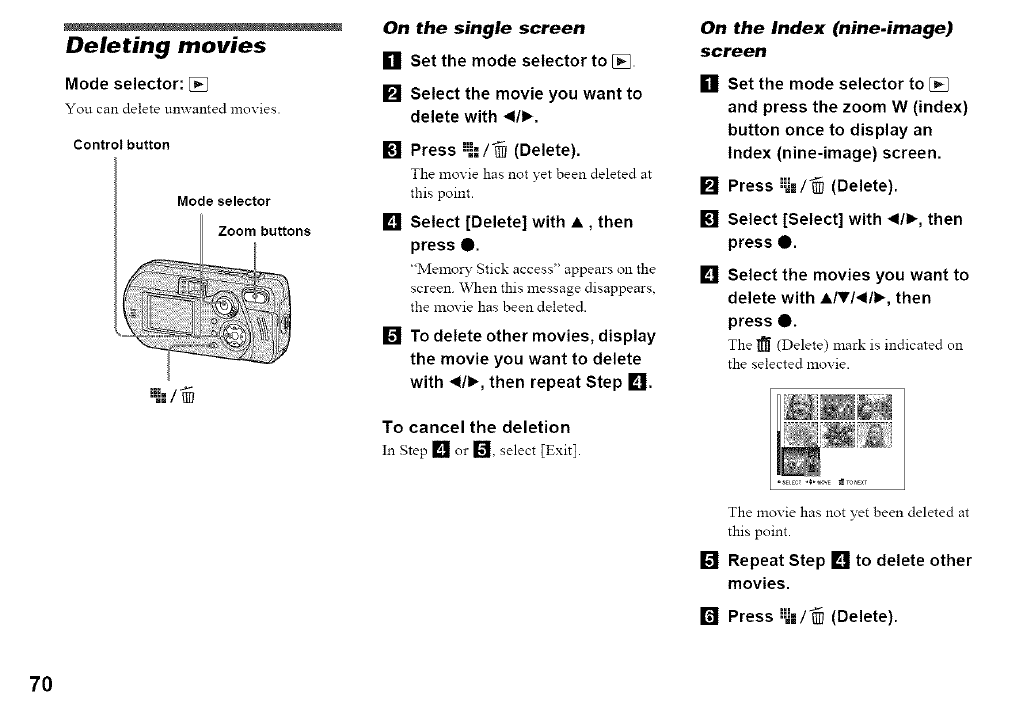
Deleting movies
Mode selector: [j_
You can delete unwanted mox ies.
Control button
Mode selector
".:/
On the single screen
[] Set the mode selector to [_.
[] Select the movie you want to
delete with _1/1_.
[] Press :_-=/_ (Delete).
The movie has not yet been deleted at
this point.
[] Select [Delete] with •, then
press e.
"Memory Stick access' appears oll the
screen. \Vhen this message disappears,
the movie has been deleted.
[] To delete other movies, display
the movie you want to delete
with _1/1_,then repeat Step [_lJI.
To cancel the deletion
On the Index (nine.image)
screen
[]
[]
[]
[]
Set the mode selector to [_
and press the zoom W (index)
button once to display an
Index (nine-image) screen.
Press :_-'/_ (Delete).
Select [Select] with _1/1_,then
press e.
Select the movies you want to
delete with •/,/_1/1_, then
press O.
The 1_ (Delete) mark is indicated on
the selected movie.
The movie has not yet been deleted at
this point.
[] Repeat Step [] to delete other
movies.
====i=
[] Press .._=/@ (Delete).
70
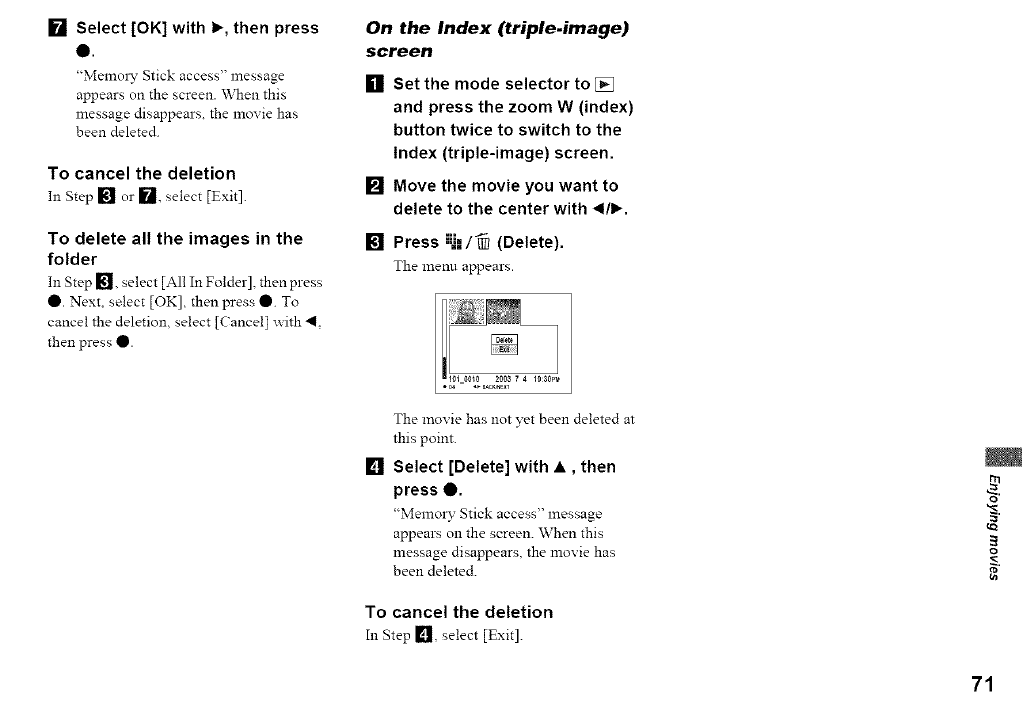
[] Select [OK] with I_, then press
Q.
"Memoly Stick access" message
appears on the screen. When this
message disappears, the movie has
been deleted.
To cancel the deletion
In Step [] or [], select [Exit].
To delete all the images in the
folder
In Step [], select [All In Folder], then press
O. Next, select [OK], then press O. To
cancel the deletion, select [Cancel I _ith 4,
then press O.
On the Index (triple.image)
screen
[] Set the mode selector to [_
and press the zoom W (index)
button twice to switch to the
Index (triple-image) screen.
[] Move the movie you want to
delete to the center with _1/1_.
[] Press "-."./_ (Delete).
The menu appears.
[]
The movie has not yet been deleted at
this point.
Select [Delete] with •, then
press 0.
"Memoly Stick access" message
appears on the screen. When this
message disappears, the movie has
been deleted.
To cancel the deletion
In Step 1_], select [Exit].
o
71
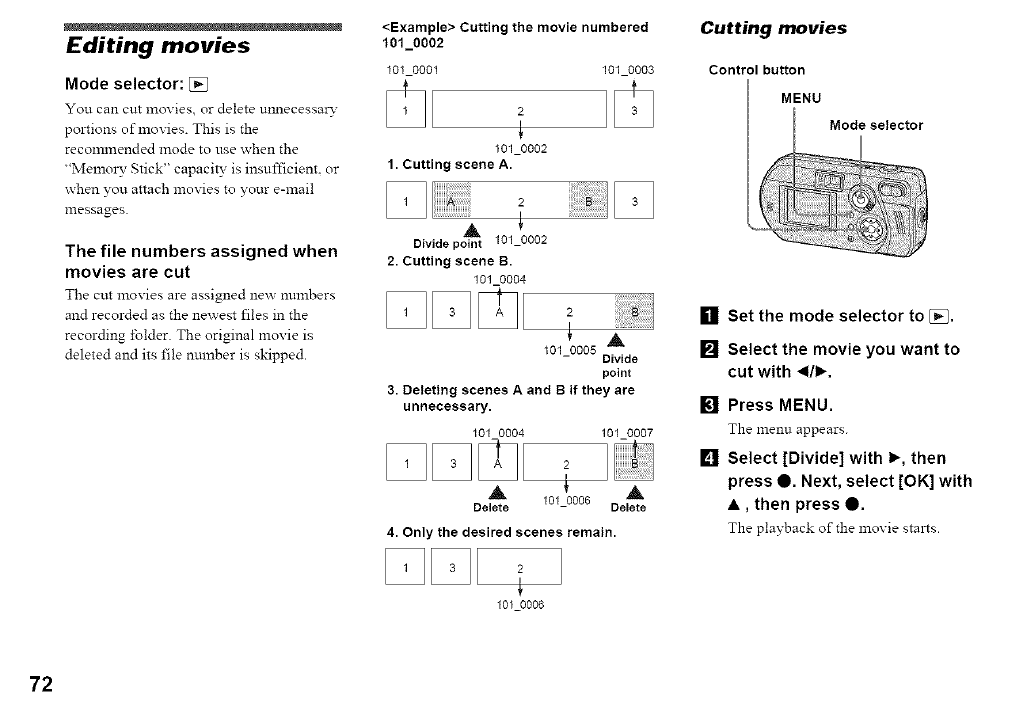
Editing movies
Mode selector: [j_
You can cut movies or delete unnecessa_-
portions of movies. This is the
recon_nended mode to use when the
"Memoly Stick" capacity is insufficienL or
when you attach movies to your e-mail
messages.
The file numbers assigned when
movies are cut
The cut movies are assigned new numbers
and recorded as the newest files in the
recording folder. The original movie is
deleted and its file number is skipped.
<Example> Cutting the movie numbered
101_0002
101 0001
2
101_0002
1. Cutting scene A.
2
A
Divide point 101_0002
2. Cutting scene B.
101 0004
101_0003
2
A
101_0005 Divide
point
3. Deleting scenes Aand B if they are
unnecessary.
101 0004 101_0007
2
A f A
Delete 101_0006 Delete
4. Only the desired scenes remain.
2
f
101_0006
Cutting movies
Control button
MENU
Mode selector
[] Set the mode selector to [_,
[] Select the movie you want to
cut with _1/1_,
[] Press MENU.
The menu appears.
[] Select [Divide] with I_, then
press 0. Next, select [OK] with
•, then press 0.
The playback of the movie stalts.
72
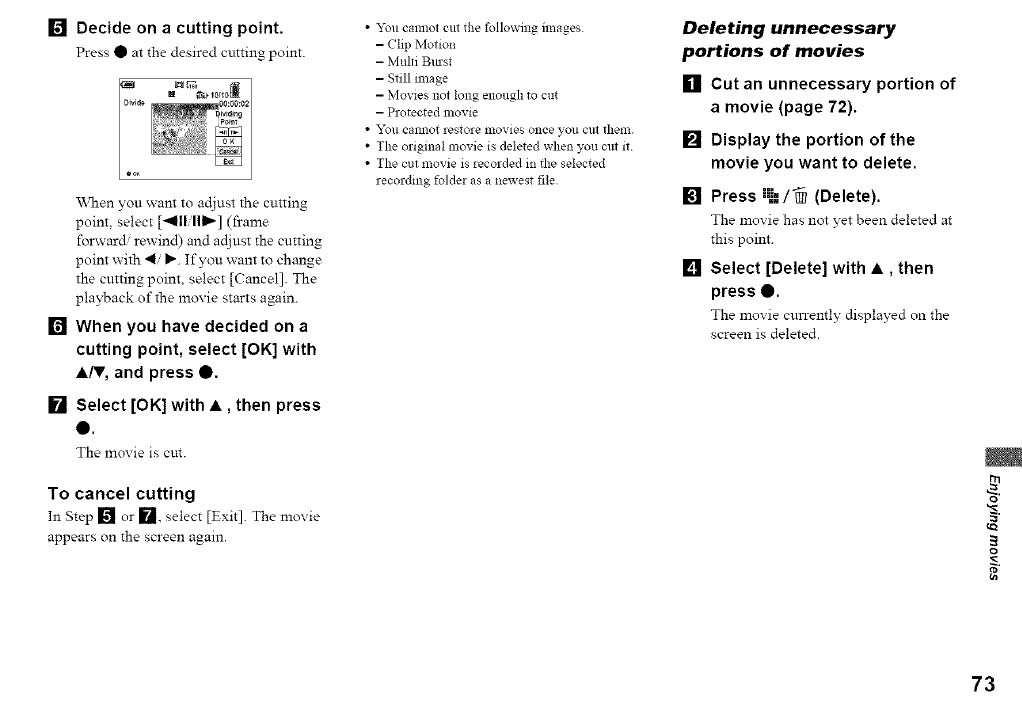
[] Decide on acutting point.
Press O at the desired cutting point.
When you want to adjust the cutting
point, select [_111/111_] (frame
folzvar_ rewind) and adjust the cutting
point with 4/I_. If you want to change
the cutting point, select [Cancel]. The
playback of the movie starts again.
[] When you have decided on a
cutting point, select [OK] with
A/V, and press Q.
[] Select [OK] with •, then press
Q.
The movie is cut.
To cancel cutting
In Step [] or 1_, select [Exit]. The movie
appears on the screen again.
• "_%ucalmot cut the following images
-Clip Motion
- Multi Bmst
- Still image
- Movies not long enough to cut
- Protected movie
• _l"L)/I callllOt restore nlovie$ once you citt thenl.
• The originM movie is deleted when you cut it
• The cut movie is recorded in the selected
recording folder as a newest file
Deleting unnecessary
portions of movies
[] Cut an unnecessary portion of
a movie (page 72).
[] Display the portion of the
movie you want to delete.
[] Press ;_-=/-_ (Delete).
The movie has not yet been deleted at
this point.
[] Select [Delete] with •, then
press O.
The movie cun-ently displayed on the
screen is deleted.
o
73
74
Copying images to
your computer
-For Windows users
Recommended computer
environment
OS: Microsoft Windows 98 Windows
98SE, Windows 2000 Professional,
Windows Millelmimn Edition, Windows
XP Home Edition, or Windows XP
Professional
The above OS must be installed at the
I'actory. Operation is not assured in an
enviromnent upgraded to the operating
systems described above or in a muhi-boot
environment.
CPU: MMX Pentimn 200 MHz or faster
USB connector: Provided as standard
Display: 800 × 600 dots or more
High Color (16-bit color. 65 000 colors) or
more
•If you connect two or more USB equipment to
a single computer at the same time, some
equipment, including your camera, may not
operate depending on the type of USB
equipment.
• Operations are not guaranteed when using a
USB hub
• Operations are not guaranteed for all the
recommended computer environnlents
mentioned above
USB mode
There are two modes for a USB connection
[Normal] and [PTP]* modes. The l_actow
setting is the [Nom_al] mode.
* Compatible only with Windows XP. V_qlen
connected to a computer, only the data in the
folder selected by the camera is copied to the
computer To select the folder, follow tlle
procedure on page 57
Communication with your
computer
\\then your computer resmnes from the
suspend or sleep mode. comlmmication
between your camera and your computer
may not recover at the same time.
When a USB connector is not
provided on your computer
_\rhen neither a USB connector nor a
"Memo W Stick" slot is provided, you can
copy images using an additional device. See
the Sony Website for details.
http :/www. sony. net/
Contents of the CD-ROM
•USB Driver
This driver is needed in order to cormect the
camera to a computer.
"_\rhenusing Windows XP you need not
install the USB driver.
• Image Transfer
This application is used to easily transfer
images from the camera to a computer.
•ImageMixer
This application is used to display and edit
images that are stored in a computer.
• This section describes the procedures
using Windows Me as an example. The
required operations may differ depending
on yo_tr OS.
•Close down all applications
running on the computer before
installing the USB driver and
application.
• "_\rhenusing Windows XP or Windows
2000, log on as Administrators.
• The display settings should be 800 x 600
dots or more and High Color (16-bit
color, 65 000 colors) or more. "_\rhen set
to less than 800 × 600 dots or 256 colors
or less. the install title screen does not
appear.
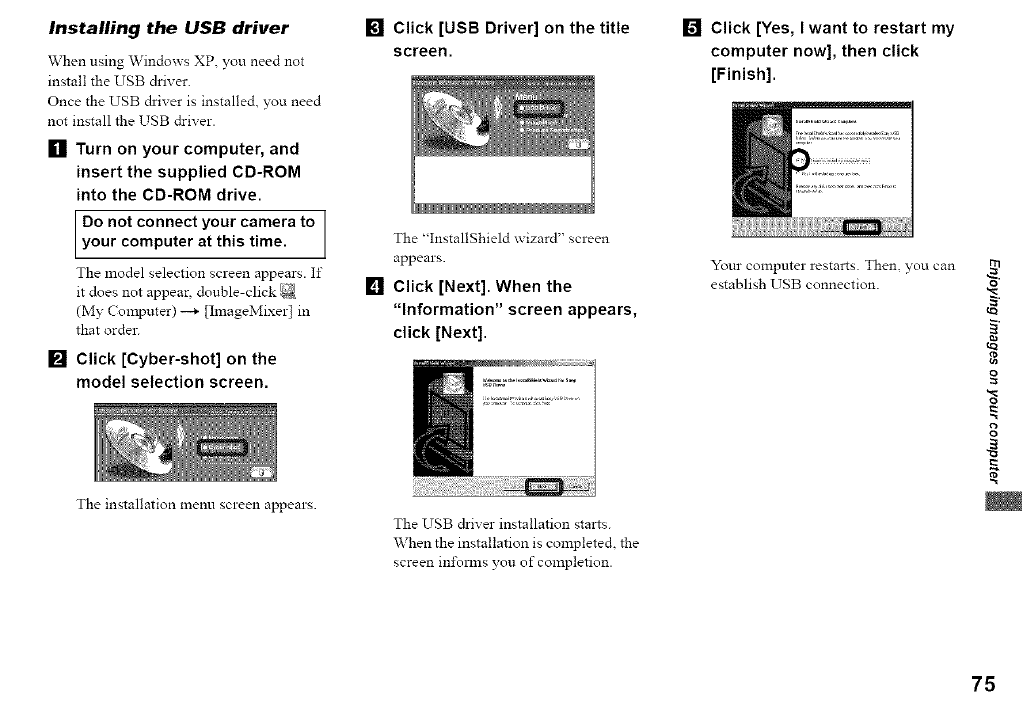
Installing the USB driver
When using Windows XP. you need not
install the USB &iver.
Once the USB &iver is installe& you need
not install the USB driver.
[] Turn on your computer, and
insert the supplied CD-ROM
into the CD-ROM drive.
Do not connect to 1
your camera
your computer at this time. I
The model selection screen appears. If
it does not appear, double-click
(My Computer) --_ [ImageMixer] in
that order.
[] Click [Cyber-shot] on the
model selection screen.
The installation menu screen appears.
[] Click [USB Driver] on the title
screen.
The "InstallShield wizard" screen
appears.
[] Click [Next]. When the
"Information" screen appears,
click [Next].
The USB driver installation starts.
When the installation is complete& the
screen in±\_nns you of completion.
[] Click [Yes, I want to restart my
computer now], then click
[Finish].
Your computer restarts. Then, you can
establish USB connection.
tva
o
o
P,
75
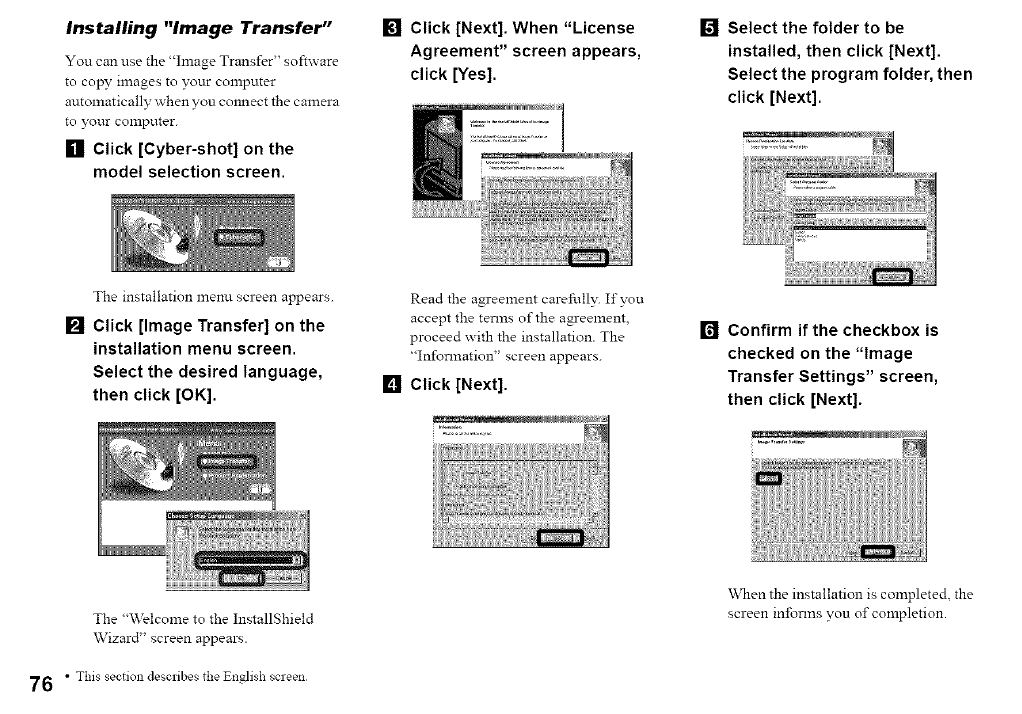
Installing "Image Transfer"
You can use the "hnage Trans_r" so,ware
to co_ images to your computer
automatically when you colmect the camera
to your COlnp_.lter.
[] Click [Cyber-shot] on the
model selection screen.
[] Click [Next]. When "License
Agreement" screen appears,
click [Yes].
[] Select the folder to be
installed, then click [Next].
Select the program folder, then
click [Next].
The installation menu screen appears.
[] Click [Image Transfer] on the
installation menu screen.
Select the desired language,
then click [OK].
Read the agreement carefully5 If you
accept the terms of the agreement,
proceed with the installation. The
"Information" screen appears.
[] Click [Next].
[] Confirm if the checkbox is
checked on the "Image
Transfer Settings" screen,
then click [Next].
The "Welcome to the InstallShield
Wizard" screen appears.
When the installation is completed, the
screen informs you of completion.
76 • This section describes the English screen
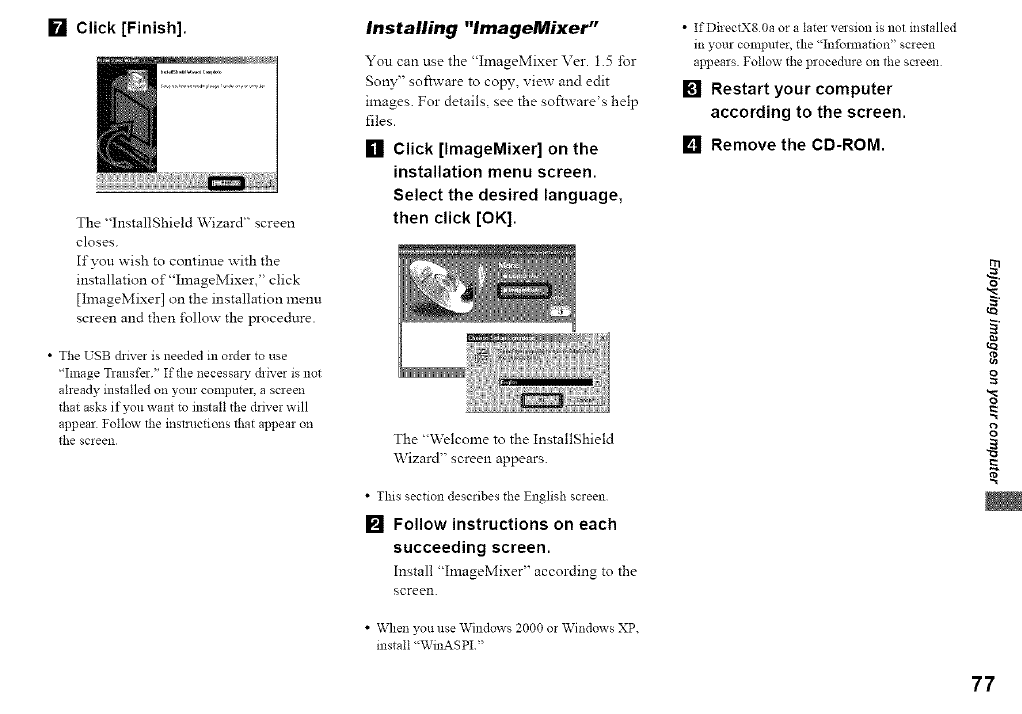
[] Click [Finish].
The "InstallShield \Vizard" screen
closes.
If you wish to continue with the
installation of"ImageMixer," click
[ImageMixer] on the installation menu
screen and then l\_llow the procedure.
• The USB ch-lver is needed in order to use
qmage Transfer." If the necessary driver is not
already installed oil your comlmter, a screen
that asks if you want to install the driver will
appear Follow the instructions that appear oil
the screen
Installing "lmageMixer"
You can use the "hnageMixer Ver. 1.5 for
Sony" software to copy, view and edit
images. For details, see the software's help
files.
[] Click [ImageMixer] on the
installation menu screen.
Select the desired language,
then click [OK].
The "Welcome to the InstallShield
\Vizard" screen appears.
•This section describes the English screen
[] Follow instructions on each
succeeding screen.
Install "ImageMixer" according to the
screen.
•When you use Windows 2000 or Windows XP.
install "WinASPI"
•IfDirectX80a or a later version is not installed
in your computer, the "Infol_nation" screen
appears Follow the procedure on the screen
[] Restart your computer
according to the screen.
[] Remove the CD-ROM.
Lc_
t_
o
o
g
77
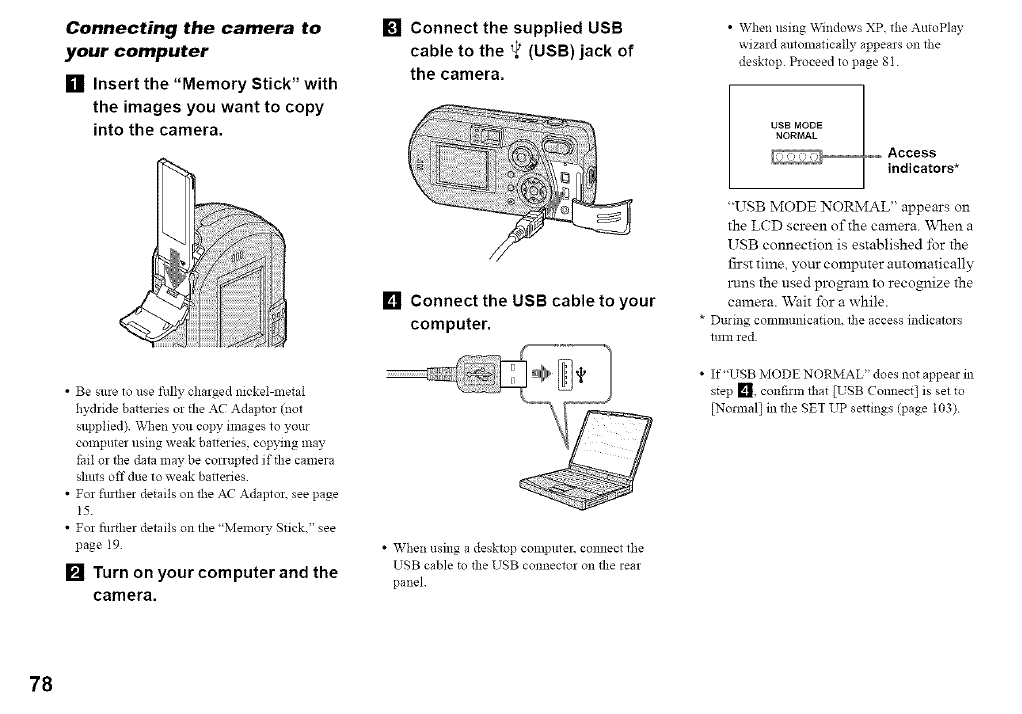
Connecting the camera to
your computer
[] Insert the "Memory Stick" with
the images you want to copy
into the camera.
• Be sure to use fully charged nickel-metal
hydride batteries or the AC Adaptor (not
slipplied) Vvq_enyou copy nnages to your
computer using weak batteries, copying may
tail or the data may be corrupted if tlle camera
shuts off due to weak barieries
• For fin_her details on the AC Adaptor. see page
15
• For fltrther details on llle "Memory Stick." see
page I9
[] Turn on your computer and the
camera.
I_1 Connect the supplied USB
cable to the _}' (USB) jack of
the camera.
[] Connectthe USB cable to your
computer.
• When using a desktop computer, comlect the
USB cable to tlle USB connector on tlle rear
panel
• When using Windows XP. the AutoPlay
wizard mttomatically appears oll the
desktop Proceed to page 81
UBB MODE
NORMAL
_Access
................... indicators*
"USB MODE NORMAL" appears on
the LCD screen of the camera. When a
USB connection is established for the
first time, your computer amomatically
in.ins the used program to recognize the
camera. Wait for a whi_e.
* During commullication, the access indicators
turn red
•If "USB MODE NOR?vIAL" does not appear ill
step Lq, confirm that [USB Comlect] is set to
[Normal] in llle SET UP settings (page I03)
78
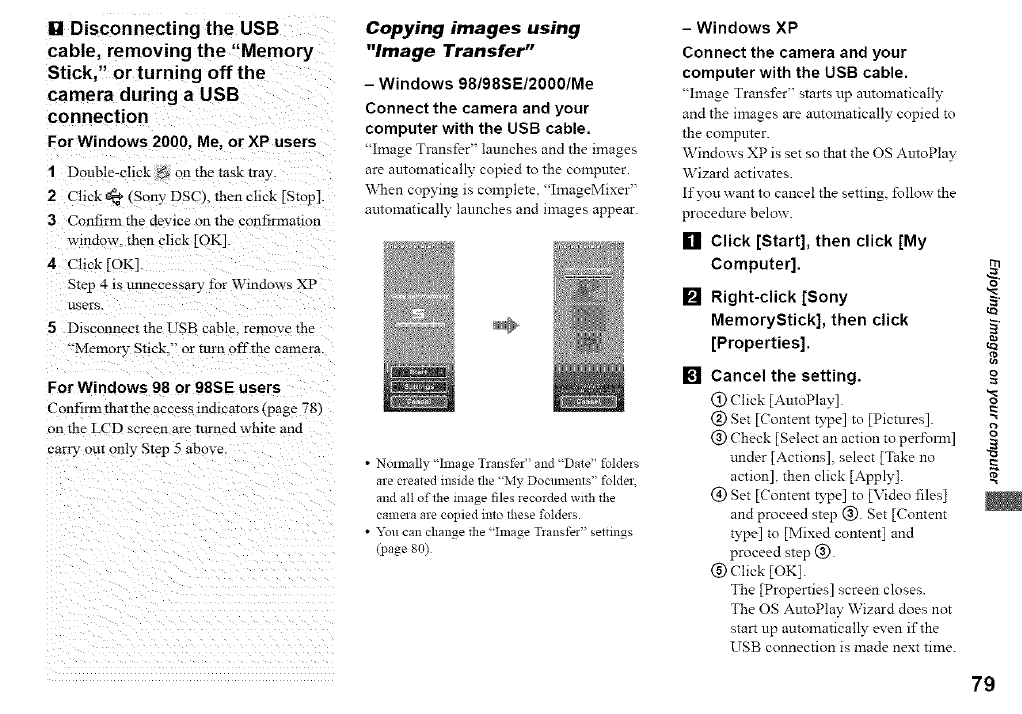
IglDisconnecting the USB
cable, removing the "Memory
Stick," or turning off the
camera during a USB
connection
ForWindows 2000, Me, or XP users
1Double-chck _ on the task tray.
2 Chck _a* (Sony DSCk then chck [Stop[
3Confirm the devine on the confirmanon
window, then click [OK].
4Chck [OK]
Step 4 is unnecessary for Windows XP
users.
5 Disconnect the USB cable, remove the
'Memory Stick," or turn off the camera
For Windows 98 or 98SE users
Confirm that the access indicators (page "vS)
on the LCD screen are turned white and
carry- out only Step 5 above
Copying images using
"Image Transfer"
-Windows 98/98SE/2000/Me
Connect the camera and your
computer with the USB cable.
"Image Transfer" launches and the images
are automatically copied to the computer.
When copying is complete, "ImageMixer"
automatically launches and images appear.
•Normally "Image Transfer" and "Date" folders
are created inside the "My Docmnents" folder.
and all of the image files recorded wlvh the
calnela are copied into these folders.
• "_u can change the "Image T_ansfer" settings
(page 80)
- Windows XP
Connect the camera and your
computer with the USB cable.
"hnage Transfer" starts up automatically
and the images are automatically copied to
the computer.
Windows XP is set so that the OS AmoPlay
Wizard activates.
If you want to cancel the setting, follm_ the
procedure below.
[] Click [Start], then click [My
Computer].
[] Right-click [Sony
MemoryStick], then click
[Properties].
[] Cancel the setting.
@ ('lick [AutoPlay].
@ Set [(ontent type] to [Pictures].
@ Check [Select an action to per±\n]n]
trader [Actions], select [Take no
action], then click [Apply].
(_) get [(ontent B'pe] to [Video files]
and proceed step @. Set [Content
type] to [Mixed content] and
proceed step @.
(_) Click [OK].
The [Properties] screen closes.
The OS AmoPlay Wizard does not
start up automatically even if the
USB connection is made next time.
=m
ira
o
o
g
79
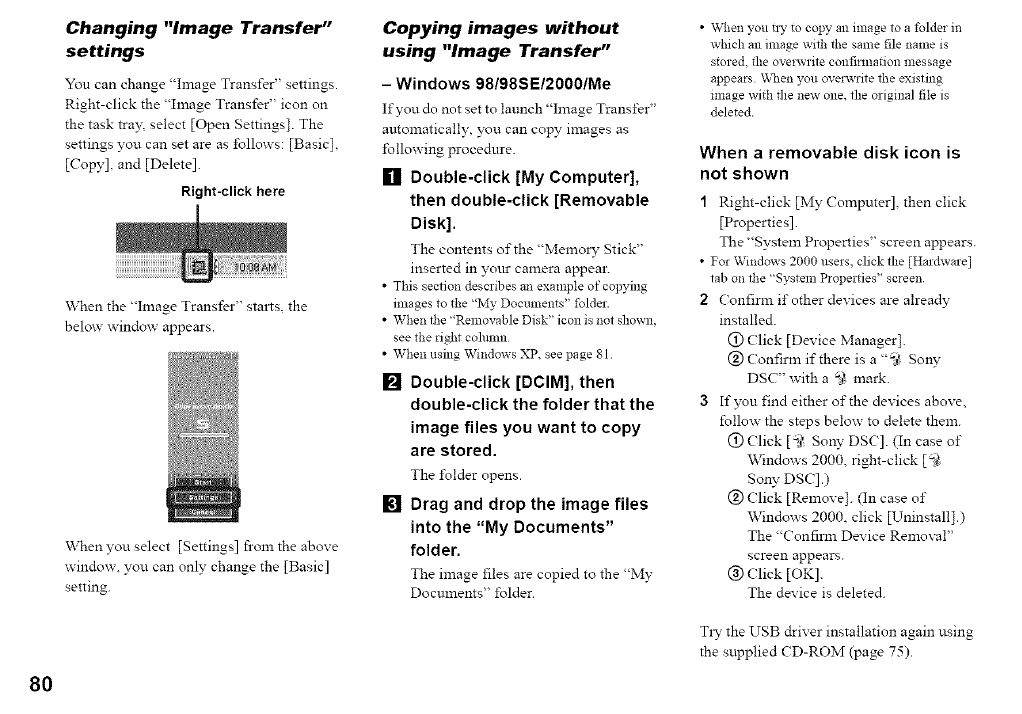
Changing "Image Transfer"
settings
You can change "hnage Transfer' settings.
Right-click the "hnage Transfer" icon on
the task tra)\ select [Open Settings]. The
settings you can set are as follows: [Basic],
[Copy], and [Delete].
Right-click here
"_\rhenthe "hnage Transfer" stalts, the
below window appears.
\\then you select [Settings] from the above
window, you can only change the [Basic]
setting.
Copying images without
using "Image Transfer"
- Windows 98/98SE/2000/Me
If you do not set to launch "hnage Transfer'
automatically, you can copy images as
following procedure.
[] Double-click [My Computer],
then double-click [Removable
Disk].
The contents of the "_Ielllory Stick"
inserted in yottr camera appear.
• This section describes an example of copying
images to the "My Documents" folder.
• When the "Removable Disk" icon is not shown,
see the right cohmm
• When using Windows XP. see page 81
[] Double-click [DCIM], then
double-click the folder that the
image files you want to copy
are stored.
The ±\_lder opens.
[] Drag and drop the image files
into the "My Documents"
folder.
The image files are copied to the "My
Documents" folder.
• \Kqien you t13,to copy an image to a folder in
which an ilnage with the same file name is
stored the overwrite confirmation message
appears _lq_en you overwrite the existing
mlage with the new one. the original file is
deleted
When a removable disk icon is
not shown
1Right-click [My Computer] then click
[Properties].
The "System Properties" screen appears.
• For Windows 2000 users, click the [Hardware]
tab on the "System Properties" screen
2Confirm if other devices are alrea@
installed.
(!) (?lick [Device Manager].
@ Confirm if there is a "_ So W
DSC" x_ith a _i* mark.
3If you find either of the devices above,
follow the steps below to delete them.
(_) (?lick [5' Son?" DSC]. (In case of
Windows 2000, right-click [ _
Son?' DSC].)
(_) (?lick [Remove]. (In case of
\Vindows 2000. click [Uninstall].)
The "Confim_ Device Removal"
screen appears.
@ (?lick [OK].
The device is deleted.
TLw the USB driver installation again using
the supplied (D-ROM (page 75).
80
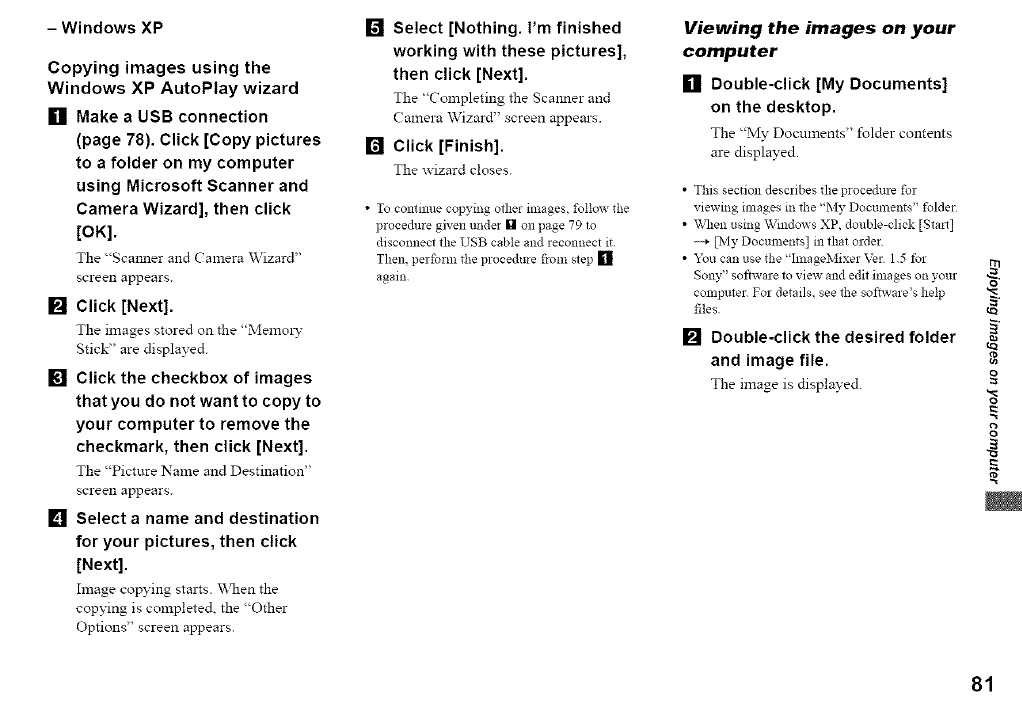
- Windows XP
Copying images using the
Windows XP AutoPlay wizard
[] Make a USB connection
(page 78). Click [Copy pictures
to a folder on my computer
using Microsoft Scanner and
Camera Wizard], then click
[OK].
The "Scanner and Camera \Vizard"
screen appears.
[] Click [Next].
The images stored on the "Memol_-
Stick" are displayed.
[] Click the checkbox of images
that you do not want to copy to
your computer to remove the
checkmark, then click [Next].
The "Picture Name and Destination"
screen appears.
[] Select a name and destination
for your pictures, then click
[Next].
Image copying starts. When the
copying is completed, the "Other
Options" screen appears.
[] Select [Nothing. I'm finished
working with these pictures],
then click [Next].
The "Completing the Sca:mer and
Camera Wizard" screen appears.
[] Click [Finish].
The wizard closes.
• To commue copying other images, follow the
procedure given under [] on page 79 to
disconnect the USB cable and reconnect it
Then, perform the procedure fxom step []
again
Viewing the images on your
computer
[] Double-click [My Documents]
on the desktop.
The "My Documents" folder contents
are displayed.
•This section describes the procedure for
viewing images in the "My Documents" folder
• _v\qlenusing Windows XP, double-click [Sta_]
----+_,iy Documents] in that order
• Yc,u can use the "ImageMixer Ver 15 for
Sony" software to view and edit images on your
computer For details, see tbe software's help
files
[] Double-click the desired folder
and image file.
The image is displayed.
=m
ira
o
o
P,
81
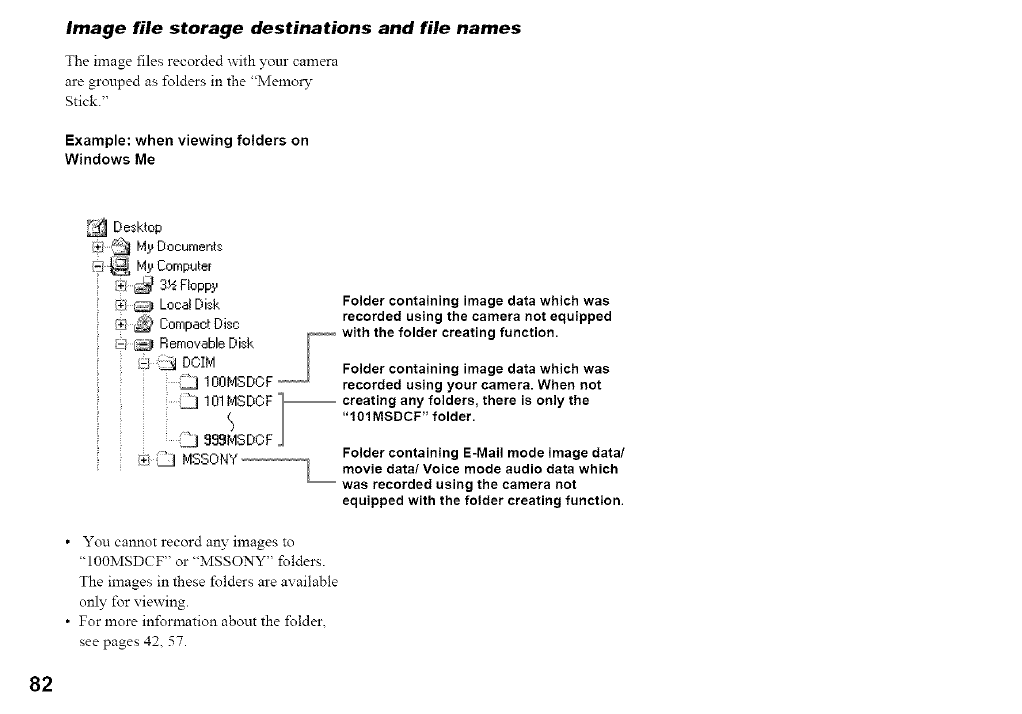
Image file storage destinations and file names
The image files recorded with your camera
are grouped as folders in the "Memo_
Stick."
Example: when viewing folders on
Windows Me
Desktop
/_i .{_ My Documents
[_;_ My Computer
[4:1_ _ 3½ Floppy
Local Disk
[_)_ Compact Disc
Removable Disk
N]:J DOIM
__l 100t,4SDOF
:.._J 101MSDOF I_
S
< 2sS.SDCF
_! _ MSoOIW
Folder containing image data which was
recorded using the camera not equipped
with the folder creating function.
Folder containing image data which was
recorded using your camera. When not
-- creating any folders, there is only the
"101MSDCF" folder.
Folder containing E-Mail mode image data/
movie data/Voice mode audio data which
was recorded using the camera not
equipped with the folder creating function.
• You cannot record an3"images to
"IOOMSDC:F" or "MSSONY" folders.
The images in these folders are available
only for viewing.
• For more information about the folder.
see pages 4Z 57.
82
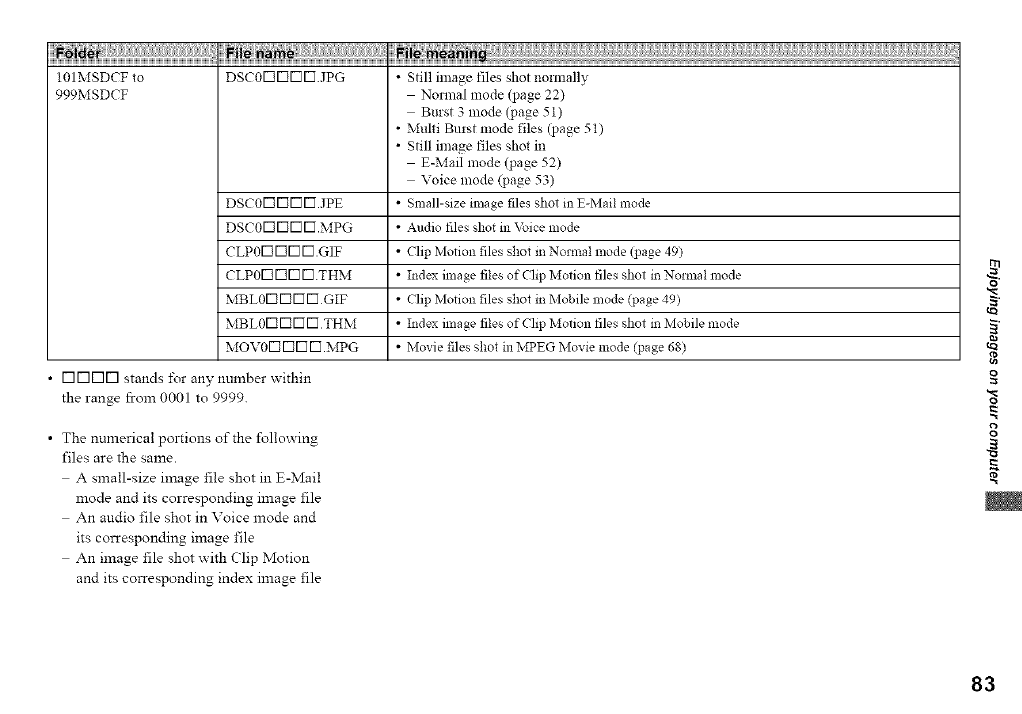
101MSDCF to DscoFIFIF]F] JpG • Still image files shot normally
999MSDCF Normal mode (page 22)
Burst 3 mode (page 51)
•Multi Bmst mode files (page 51)
• Still image files shot in
E-Mail mode (page 52)
Voice mode (page 53)
DscoFIFIF]F].JpE • Small-size image files shot in E-Mail mode
DscoF1F1V]V].MPG • Audio files shot in Voice mode
CLpoFIFIF]F].GIF • Clip Mofion files shot in Normal mode (i)age 49)
CLPOFIFIF]F] THM • Index linage files of Clip Mofion files shot in Nolmal mode
MBLOF1F1F]F] GIF • Clip Mofion files shot in Mobile mode (page 49)
MBLOFIFIF]F] THM • Index linage files of Clip Mofion files shot in Mobile mode
MovoF1F1V]V].MPG • Movie files shot in MPEG Movie mode (page 68)
• [3[3[3[3stands i\)r any number _ithin
the range from 0001 to 9999.
• The numerical portions of the following
files are the same.
A small-size image file shot in E-Mail
mode and its corresponding image file
An audio file shot in Voice mode and
its corresponding image file
An image file shot with Clip Motion
and its corresponding index image file
o
o
P,
83
84
Copying images to
your computer
-For Macintosh users
Recommended computer
environment
OS: Mac OS 8.5.1.8.6 9.0 9.1.9.2 or
Mac OS X (v 10.0iv 10. lv 10.2)
The above OS must be installed at the
I'actory. For the following models, update
your OS to Mac OS 9.0 or 9.1.
iMac with Mac OS 8.6 installed at the
factory, and a slot loading type CD-ROM
&ire
iBook or Power Mac G4 with the Mac OS
8.6 installed at the ±;acto W
USB connector: Provided as standard
Display: 800 × 600 dots or more
32 000-color mode or more
• If you connect two or more USB equipment to
a single computer at the same time, some
equipmem, including your camera, may not
operate depending on the type of USB
equipment.
• Operations are not guaranteed when using a
USB hub
• Operations are not guaranteed for all the
recommended co111p/tler environnlents
mentioned above
USB mode
There are two modes for a USB connection
[Normal] and [PTP]* modes. The factory,
setting is the [Nom_al] mode.
* Compatible only with Mac OS X When
connected to a computer, only the data ill the
folder selected by the camera is copied to the
computer To select the folder, follow file
procedure on page 57
Communication with your
computer
\\then your computer resumes from the
suspend or sleep mode. comlmmication
between your camera and your computer
may not recover at the same time.
When a USB connector is not
provided on your computer
"When neither a USB connector nor a
"Memo W Stick" slot is provided, you can
copy images using an additional device. See
the Sony Website for details.
http :/www. son3", net/
Steps your OS requires
Follow the steps below, according to your
OS.
OS Steps
Mac OS 85.1,'86/90 Steps [] to []
Mac OS 9 l/9.2/Mac OS X Steps [] _o[]
(v 100iv 10.1ivl02)
[] Installing the USB driver
1Tulll on _<_ttrcomputer and set the
supplied ( D-ROM into the CD-ROM
drive.
The model selection screen appears.
2Click [Cyber-shot] on the model
selection screen.
The installation menu appears.
3Click {_ [USB Diner].
The "USB Driver" screen appears.
4Double-click the icon of the hard disk
containing the OS to open the screen.
5 Drag and drop the following two files
fi-omthe screen opened in step 3 into the
System Folder icon in the screen opened
in step 4.
• SoW USB Driver
• SoWUSB Shim
6When the message for confim_ation is
shown, click "OK."
7 Restart the computer and remove the
CD-ROM from the CD-ROM drive.
[] Connecting your camera to
your computer
For details see page 78.
Disconnecting the USB cable,
removing the "Memory Stick," or
turning off the camera during a USB
connection
Drag and drop the drive icon or the icon of
the "Memory Stick" to the "Trash" icon.
then remove the USB cable, remove the
"Memory Stick," or ttlrn off the camera
• If you are using Mac OS X vt00. remove the
USB cable etc, after you have turned your
computer off
[] Copying images
1Double-click the newly recognized icon
on the desktop.
The contents of the "Memory Stick"
inserted in your camera appear.
2 Double-click "DCIM."
3 Double-click the folder that the images
you want to copy are stored.
4 Drag and drop the image files to the hard
disk icon.
The image files are copied to your hard
disk.
For details on the storage location of the
images and file names, see page 82.
[] Viewing the images on your
computer
1Double-click the hard disk icon.
2 Double-click the desired image file in
the folder containing the copied files.
The image file opens.
•Close down all applications running on
the computer before installing the USB
driver and application,
•"x_u can use the "hnageMixe_ _'el 15 for
Sony" software to copy images to your
computer and to view images on your
computer. For details on installing, see
operafing instructions supplied with the CD-
ROM For details on operation, see the
software's help files.
• "hnageMixer Ver 15 for Sony" cannot be used
with Mac OS X
• "hnage T_ansfer" cannot be used with
Macintosh
For Mac OS X users
When you click an E-MAIL mode image
file. "There is no application available to
open the document .Dscor-Iv3r-lr-I JpE,,."
may be shown. In this case, can3" om the
follwing setup. The screen may differ
depending on your OS version.
1 Click [Choose Application...] on the
screen "There is no application available
to open the document
"DSC0r-IN r-Iv3 JpE. "
2 Change [Recowanended Applications]
to JAil Applications].
3 Select [QuickTime Player] fi-om the
application list, then click [Openl.
tQ
o
o
P,
85
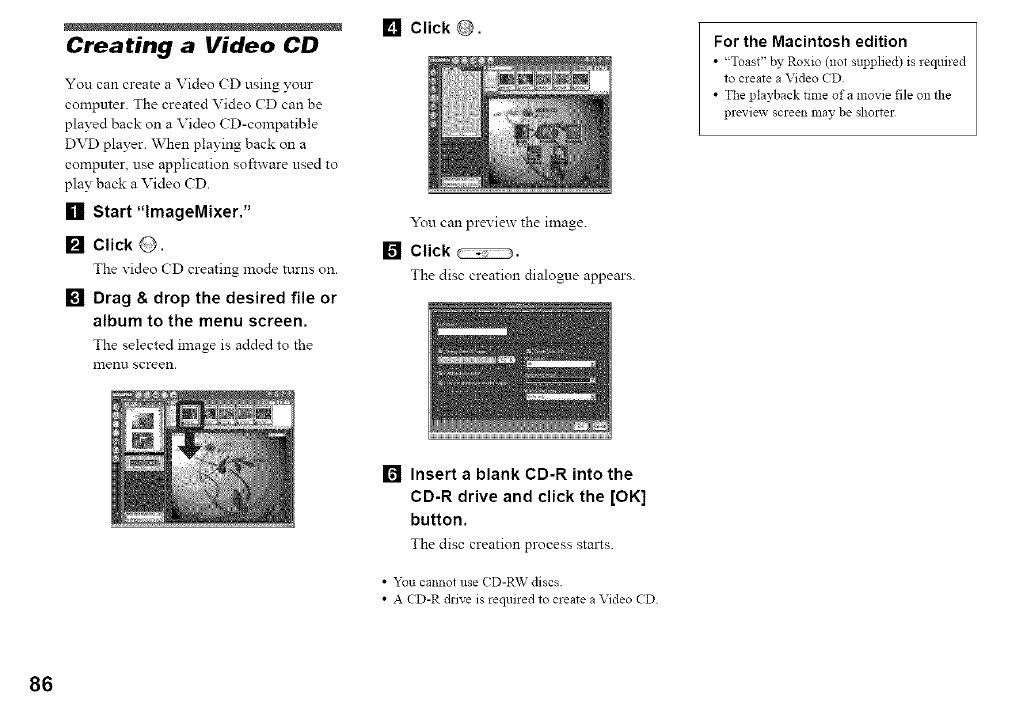
Creating a Video CD
You can create a Video CD using yom
compmer. The created Video CD can be
played back on a Video CD-compatible
DVD player. When playing back on a
compmer, use application software used to
play back a Video CD.
[] Start "lmageMixer."
[] ClickO.
The video CD creating mode turns on.
[] Drag & drop the desired file or
album to the menu screen.
The selected image is added to the
mentl screen.
[] Click @.
You can preview the image.
[] Click _.
The disc creation dialogue appears.
For the Macintosh edition
•'Toast" by Roxio (not supplied) is _equired
to create a Video CD
• The playback time of a movie file on die
preview screeIl may be shorter
[] Insert a blank CD-R into the
CD-R drive and click the [OK]
button.
The disc creation process stalts.
• You cannot use (D-R\V discs
• A CD-R drive is required to create a Video CD
86
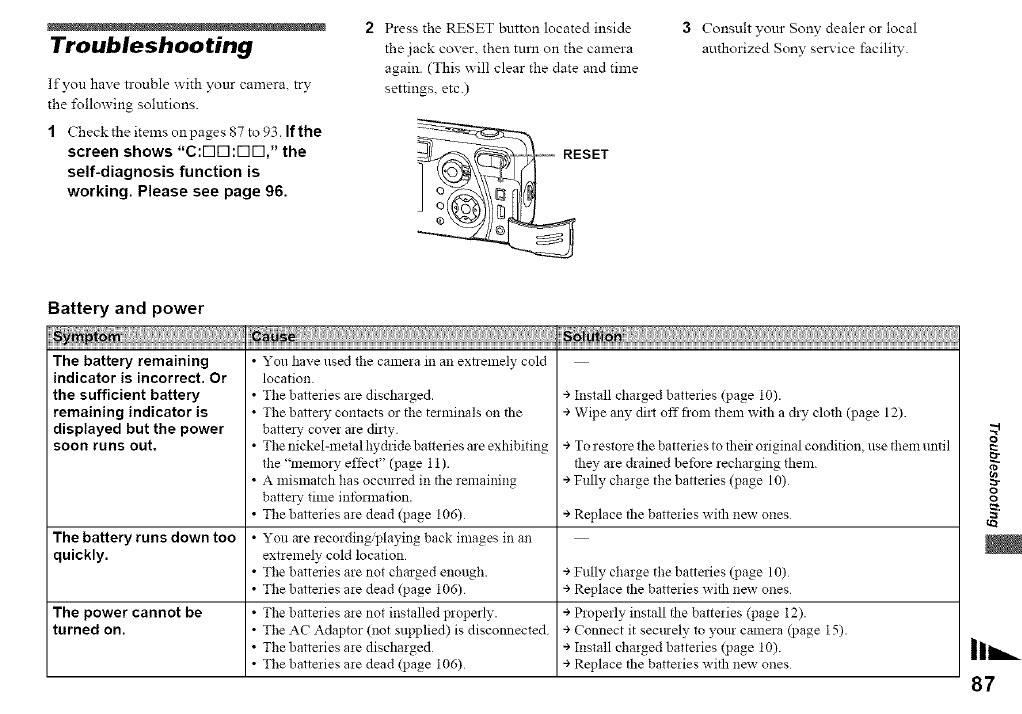
Troubleshooting
If you have trouble with your camera, try
the %llowing solmions.
{Check the items on pages 87 to 93. Ifthe
screen shows "C:[313:[313," the
self-diagnosis function is
working, Please see page 96.
2Press the RESET button located inside
the jack cover, then turn on the camera
again. (This s_ill clear the date and time
settings, etc.)
-- RESET
3Consult your Sony' dealer or local
authorized Sony' service facilil3-.
Battery and power
The battery remaining
indicator is incorrect. Or
the sufficient battery
remaining indicator is
displayed but the power
soon runs out,
+ Install charged batteries (page 10).
+ Wipe any dilt off flonl than with a dry cloth (page 12).
•You have used the camera m an extzenmly cold
location.
• The batteries are discharged.
• The battm T contacts or the tmminals on the
batta T cover are dirty
• The nickel-metal hychide batteries are exhibiting
the "memo; T effbct" (page 11).
• A mismatch has occurred in tile remaining
battm T time infommtion.
•The batteries are dead (page 106)
• You are recording'playing back images in an
extremely cold location
•The batteries are not charged enough.
•The batteries are dead (page 106)
• The batteries are not installed properly.
• The AC Adaptor (not supplied) is disconnected
• The batteries are discharged
•The batteries are dead (page 106)
+ To restore tile batteries to their original condition, use them until
they are chained betbre recharging them.
+ Fully charge the batteries (page 10)
+ Replace the batteries with new ones
The battery runs down too
quickly.
+ Fully charge the battmies (page 10)
+ Replace the batteries witl_ new ones
The power cannot be ÷ Properly install the batteries (page 12).
turned on. + Connect it secmely to your camera (page 15).
+ Install charged batteries qJage 10).
+ Replace the batteries with new ones
o
ra-
Il h,..
87

Shooting still images /movies
ym; tom u....
The LCD screen is not • The power was tinned offwith the LCD screen ÷ Turn on the LCD screen (page 30)
turned on even when the turned off tl:e last time you used the camera
_ower is turned on.
The subject is not visible • Tile mode selectm is not set to _ 0: _!_. ÷ Set the mode selecto: to _ 0: _ (pages 22 68)
on the LCD screen.
The image is out of focus. • Tile subject is too close. ÷ Set the mac:o recording mode Make sme to place the lens
t:arther away from the subject than the shortest shooting distance
when shooting (page 26).
• While shooting still images, _ (Camera) is ÷ Cancel the mode (page 54).
set to [] o2 ,.).
• You set the focus preset distance ÷ Set to the amo tbcus mode (page 45).
Unable to zoom. • You cannot zoom while shooting a movie
(MPEG movie).
Smart zoom does not • You cannot use smart 7oom while shooting a
function, movie (MPEG movie).
• The LCD screen is im::ed off. ÷ Turn oi1 the LCD screen (page 30).
•The image size is set to [5.0M] or [45M (3:2)] ÷ Set image size to other settings except [5.0M] and [4.5M (3:2)]
(page 25).
• [Smart Zoom] is set to [Off] in tile SET UP + Set [Smart Zoom] to [On] (page 102)
settings
The image is too dark. • You a:e shooting a subject with a light somce + Adjust the exposme (page 46)
behind the subject.
• The brightness of the LCD screen is too low. + Adjust the brightness of the LCD screen (page 103)
88
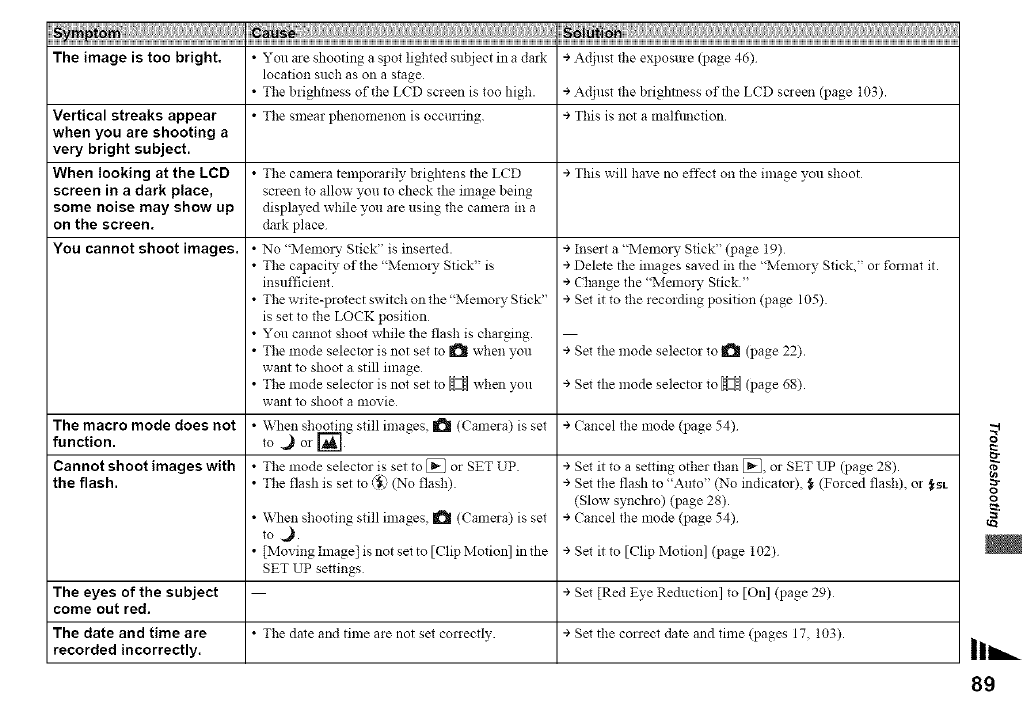
iiii i ii i! i iiiiiiiiiiiiiiiiiiiiiiiiiiiiiiiiiiiiiiiiiiiiiiiiiiii! i' N ii iii i iiiiiiiiiiiiiiiiiiiiiiiiiiiiiiiiiiiiiiiiiiiiiiiiiiiiiiiiiiiiiiiiiiiiiiiiiiiiiiiiiiiiiiiiiiiiiiiiiiiiiiiiiiiiiiiiiiiiiiiiiiiiiiiiiiiiiiii ' ii ! ! i ill iiiiiiiiiiiiiiiiiiiiiiiiiiiiiiiiiiiiiiiiiiiiiiiiiiiiiiiiiiiiiiiiiiiiiiiiiiiiiiiiiiiiiiiiiiiiiiiiiiiiiiiiiiiiiiiiiiiiiiiiiiiiiiiiiiiiiiiiiiiiiiiiiiiiiiiiiiiiiiiiiiiiiiiiiiiiiii
The image is too bright. • You are shooting a spot lighted subject in a dark ÷ Adjust the exposure (page 46)
÷ Adjust the brightness of the LCD sczeen (page 103).
Vertical streaks appear ÷ This is not a malfimction.
when you are shooting a
very bright subject.
When looking at the LCD ÷This will have no effect on the image you shoot
screen in a dark place,
some noise may show up
on the screen.
You cannot shoot images. ÷ Insert a "Memo O, Stick" (page 19)
÷ Delete the images saved in the "Memory Stick," or format it.
÷ Change the "Memo O, Stick."
÷ Set it to the recording position (page 105)
location such as on a stage
•The brightness of the LCD screen is too high.
•The smear phenomenon is occurring.
•The camera temporarily brigNens the LCD
screen to allow you to check the image being
displayed while you are using the camera in a
dark place
• No "IMemoz?- Stick" is inse_ted.
•The capaci_, of the "Memo O, Stick" is
insufficient.
• The write-protect switch on the "Memory Stick"
is set to the LOCK position
• You cannot shoot while the flash is charging.
•The mode selector is not set to _ when you
want to shoot a still image
•The mode selector is not set to _ when you
want to shoot a movie
• When shooting still images. _ (Camera) is set
to.) o I -I
• The mode selector is set to [] or SET UP
•The flash is set to @ (No flash).
• When shooting still images, I_ (Camera) is set
to ,_.
• [Moving hnage[ is not set to [Clip Motion] in the
SET UP settings
• The date and time are not set conectly.
+ Set the mode selector to _11 (page 22).
+ Set the mode selector to _ (page 68).
The macro mode does not ÷ Cancel the mode (page 54)
function.
Cannot shoot images with ÷Set it to a setting other than [], or SET UP (page 28).
the flash. + Set the flash to "Auto" (No indicator), _ (Forced flash), or _NL
(Slow synchlo) (page 28).
+ Cancel the mode (page 54)
+ Set it to [Clip Motion] (page 102)
The eyes of the subject + Set [Red Eye Re&_ction] to [On] (page 29)
come out red.
The date and time are ÷Set the correct date and time (pages 17 103).
recorded incorrectly.
g
89
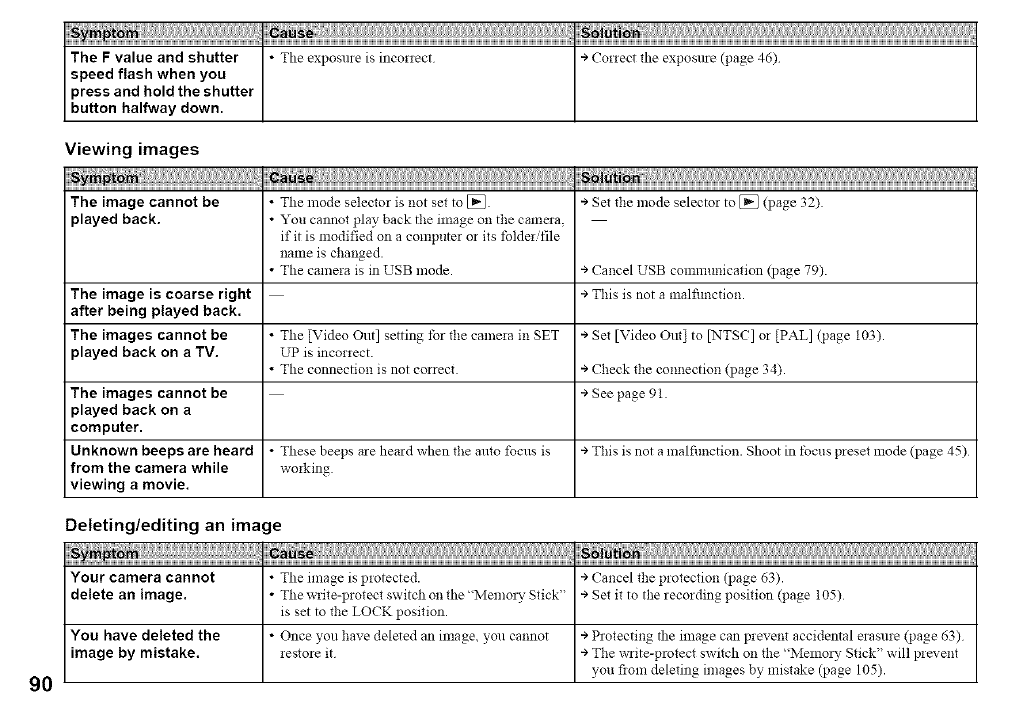
Viewing images
Sym_! _aus, _)1_!_ ....
The image cannot be •The lnode selector is not set to [_. ÷ Set the mode selector to [_ (page 32)
played back. •You cannot play back the image on the camera,
if it is modified on a computer or its tblderifile
name is changed.
•The camera is in USB mode. ÷ Cancel USB communication (page 79).
The image is coarse right ÷ This is not a malfimction.
after being played back.
The images cannot be •The [Video Out] setting tbr the camela in SET + Set [Video Out] to [NTSC] 02 [PAL] (page 103).
played back on a TV. UP is incorrect.
•The connection is not cozreet ÷ Check the connection (page 34).
The images cannot be ÷See page 91
played back on a
computer.
U nknown beeps are heard • These beeps me herod when the anto focus is ÷ This is not a malfunction. Shoot in tbcus p_eset mode (page 45)
from the camera while working.
viewing amovie.
Deleting/editing an image
;....
Your camera cannot • The image is protected. ÷ Cancel the protection (page 63).
delete an image. •The write-protect switch on the"Memory Stick" ÷ Set it to the recording position (page 105)
is set to the LOCK position.
You have deleted the • Once you have deleted an image, you cannot ÷ Protecting the image can prevent accidental erasure QJage 63)
image by mistake, restore it ÷ The write-protect switch on the "Memozy Stick" will prevent
you flora deleting images by mistake (page 105).
90

i ! ii! i! i! i! i! i! i! i! i! i! i ! i ! i L`` N ; ;i iiii iiiiiii iiiiiii iiiiiii iiiiiii iiiiiii iiiiiii iiiiiii iiiiiii iiiiiii iiiiiii iiiiiii iiiiiii iiiiiii iiiiiii iiiiiii iiiii```'``` ! i `i iiiiiiiiiiiiiiiiiiiiiiiiiiiiiiiiiiiiiiiiiiiiiiiiiiiiiiiiiiiiiiiiiiiiiiiiiiiiiiiiiiiiiiiiiiiiiiiiiiiiiiiiiiiiiiiiiiiiiiiiiiiiiiiiiiiiiiiiiiiiiiiiiiiiiiiiiiiiiiiiiiiiiiiiiiiiiiiiii
The resizing function •Movie (MPEG movie)/Clip MotioniMulfi Burst
does not work. files cannot be resized
You cannot attach a print • Print(DPOF) markscannotbeattachedtomovie
(DPOF) mark. (MPEG movie)/Clip Motion files.
You cannot cut a movie. •The movie is not long enough to cut.
•Protected movie (MPEG movie), Clip Motion,
Multi Burst files and still images cannot be cut.
Computers
,,, soi ,,
You do not know whether
or not your OS can be
used with the camera.
You cannot install the
USB driver.
Your computer does not
recognize your camera.
+ Check "Recommended computez environment" (pages 74, 84).
• The camera is tinned oft'.
• The batte O, level is too low.
• You are not using the supplied USB cable.
• The USB cable is not connected securely
• [USB Connect] is set to [PTP] in the SET UP
settings.
• The USB connectors on yore computer are
connected to other equipment besides the
keyboard, the mouse.
• The camera is not directly connected to your
conlpllter.
•The USB &iver is not installed.
• Your computer does not properly recognize the
device because you connected the camera and
your COlnlJuter with the USB cable bet)ze you
installed the '<USB Driver" from the supplied
CD-ROM
÷ In Windows 2000, log on as Adminislator (authorized
Adminislators).
÷ Turn on the camera (page 16).
÷ Use the AC Adaptor (not supplied) (page 15)
÷ Use the supplied USB cable (page 78).
÷ Disconnect the USB cable, and securely connect it again Make
sm-e that "USB MODE" is displayed on the LCD screen
(page 78).
÷ Set it to [Normal] (page 103)
÷ Disconnect the USB cables except for those connected to the
keyboard and the 1house.
÷ Directly connect the camera and your computer without using a
USB hub
÷ Install the USB driver (page 75)
÷ Delete the erroneously recognized device fiom your computer,
then install the USB drivez (pages 75, 80)
I
rzr
II==._
91
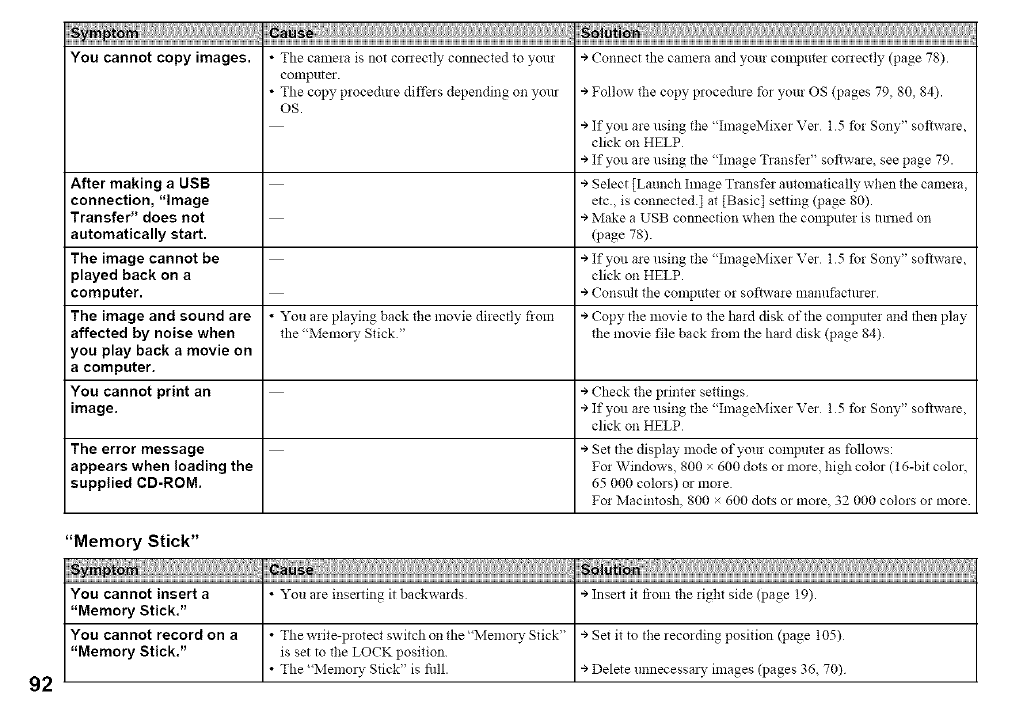
....
You cannot copy images. • The camera is not conectly connected to your ÷ Connect the camera and your computer conectly (page 78).
computer.
• The copy procedme differs depending on yore ÷ Follow the copy pwce&ne fo_ your OS (pages 79 80 84).
OS.
÷ If you are using the "ImageMixer Ver 1 5 for Sony" software,
click on HELP
÷ If you are using the '<Image Transfer" software, see page 79.
After making a USB ÷ Select [Launch hnage Transfer automatically when the camera,
connection, "image etc., is connected.] at [Basic] setting (page 80).
Transfer" does not ÷ Make a USB connection when tile computer is mined on
automatically start. (page 78).
The image cannot be ÷ If you are using the "ImageMixer Ver 15 for Sony" software,
played back on a click on HELP.
computer, ÷Consult the compute! or softwme mamlfactuler
The image and sound are • You me playing back tlle movie directly flora ÷ Copy the movie to the had disk of the compile! and then play
affected by noise when the "Memo O' Stick" the movie file back fiom the had disk (page 84)
you play back a movie on
acomputer.
You cannot print an ÷Check the plinter settings
image. ÷ If you are using the "ImageMixer Vet 15 for Sony" software,
click on HELP
The error message ÷Set the display mode of your computer as follows:
appears when loading the For Windows, 800 x 600 dots or more, high color (t 6-bit color,
supplied CD-ROM. 65 000 colors) or more
For Macintosh, 800 x 600 dots or more, 32 000 colors or more.
92
"Memory Stick"
You cannot insert a • You are inse_ting it backwards ÷ Inse_t it flora the right side (page 19).
"Memory Stick."
You cannot record on a • The w_ite-p!otect switch on the"IVlemozy Stick" ÷ Set it to the zecozding position (page 105)
"Memory Stick." is set to the LOCK position.
• The "Melnozy Stick" is fill. + Delete unnecessm), images (pages 36, 70)
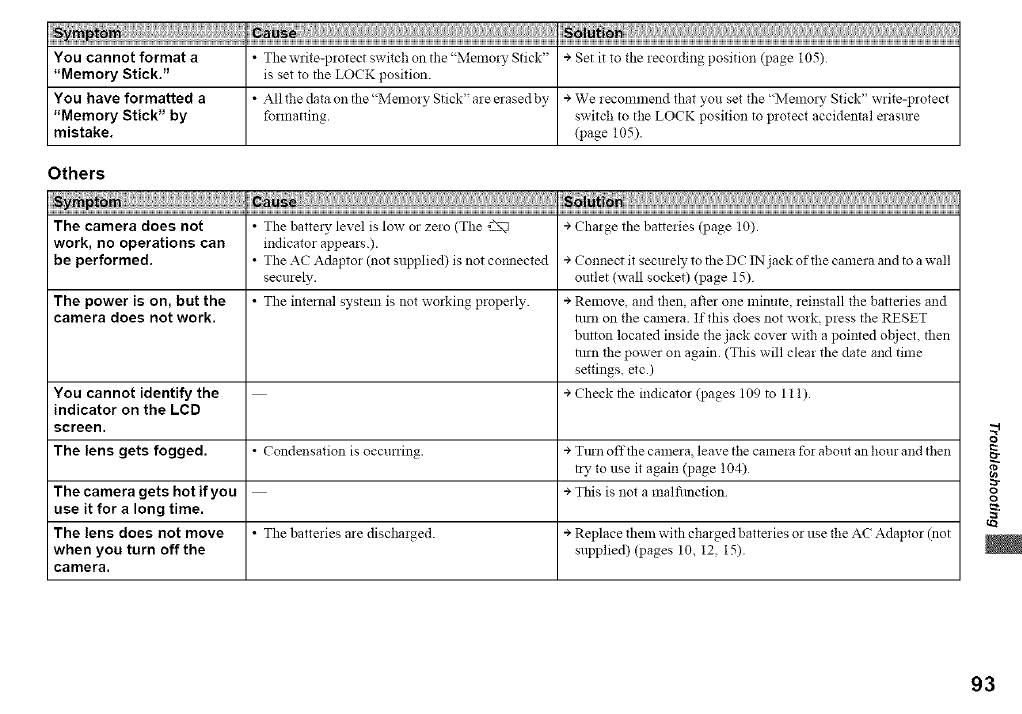
i ! ii! i i i i i i i i i i i i iiiii ``` N ; ;i iiii iiiiiii iiiiiii iiiiiii iiiiiii iiiiiii iiiiiii iiiiiii iiiiiii iiiiiii iiiiiii iiiiiii iiiiiii iiiiiii iiiiiii iiiiiii iiiii```'``` ! i i iiiiiiiiiiiiiiiiiiiiiiiiiiiiiiiiiiiiiiiiiiiiiiiiiiiiiiiiiiiiiiiiiiiiiiiiiiiiiiiiiiiiiiiiiiiiiiiiiiiiiiiiiiiiiiiiiiiiiiiiiiiiiiiiiiiiiiiiiiiiiiiiiiiiiiiiiiiiiiiiiiiiiiiiiiiiiiiiii
You cannot format a • The write-protect switch on the"Memo O, Stick" ÷ Set it to the recording position (page 105)
"Memory Stick." is set to the LOCK position.
You have formatted a • All the data on the "Memory Stick" are erased by ÷ We recommend that you set the '<Memo:? Stick" write-protect
"Memory Stick" by formatting, switch to the LOCK position to protect accidental erasme
mistake. (page 105).
Others
The camera does not • The batte O, level is low or zero (The =2_'%, ÷ Charge the batteries (page 10).
work, no operations can indicator appears.).
be performed. • The AC Adaptor (not supplied) is not co:mected ÷ Connect it secmely to the DC IN jack of the camera and to a wall
securely, outlet (wall socket) (page 15)
The power is on, but the • The internal system is not working properly. + Remove, and lwn, after one lninute, reinstall the batte:ies and
camera does not work. lm: on the camera. If this does not work, press the RESET
button located inside the jack cover with a poi::ted object, then
ixu-nthe power on again. (This will clear the date and time
settings, etc.)
You cannot identify the ÷ Check the indicator (pages 109 to 111).
indicator on the LCD
screen.
The lens gets fogged. • Condensation is occurring. ÷ Tmn off the camera, leave the came:a fo: about an hour and then
ly to use it again (page 104)
The camera gets hot if you ÷Tiffs is not a malfimction
use it for along time.
The lens does not move •The batte:ies a:e dischmged. ÷ Replace them with chmged batte:ies or use the AC Adaptor (not
when you turn off the supplied) (pages 10, 12, 15).
camera.
I
13-
93
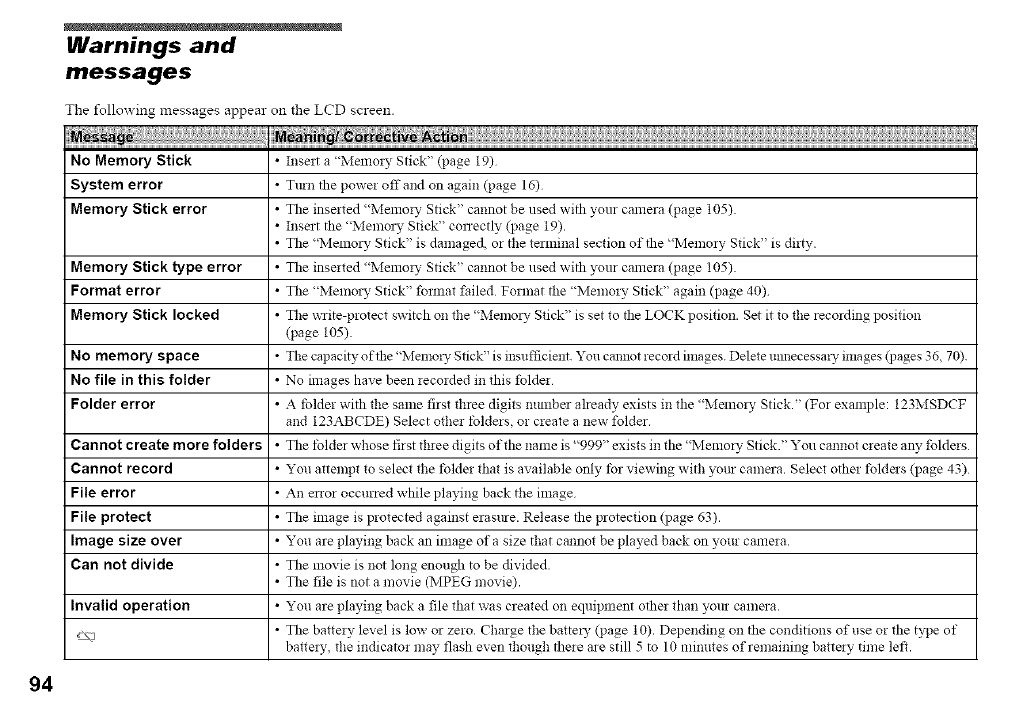
94
Warnings and
messages
The %llowing messages appear on the LCD screen.
No Memory Stick •Inse_t a "Memo!), Stick" (page 19)
System error •T:u:: the power offand on again (page 16)
Memory Stick error •The inserted "Memory Stick" cannot be used with your camera (page 105).
•Insert the "Memm), Stick" conectly (page 19).
• The "IMemoz), Stick" is damaged, or the terminal section of the "Memory Stick" is dirty.
Memory Stick type error •The inserted "Memory Stick" cannot be used with _ur camera (page 105).
Format error •The "Memo_), Stick" fmmat failed Format the "Memory Stick" again (page 40)
Memory Stick locked • The write-protect switch on the "Memory Stick" is set to the LOCK position. Set it to the recording position
(page 105).
No memory space • The capacity of the 'MemoL_- Stick" is insufficient. You cannot record inmges. Delete unnecessmy inmges (pages 36, 70).
No file in this folder • No images have been recorded in this folder
Folder error • A tblder with the same first three digits ntmlber already exists in the "Melno!)' Stick." (For example: 123MSDCF
and 123ABCDE) Select other foldezs, or create a new folder.
Cannot create more folders •The tblde_ whose first three digits of the name is "999" exists in the "Niemory Stick." You cannot create any folders
Cannot record • You attempt to select the tblder that is available only tbr viewing with _m camera. Select other tblders (page 43)
File error •An enor occurred while playing back the image
File protect •The image is protected against erasme. Release the protection (page 63).
Image size over • You are playing back an image of a size that cannot be played back on your camera.
Can not divide •The movie is not long enough to be divided.
• The file is not a movie (MPEG movie).
Invalid operation •You me playing back a file that was created on equipment other than your camera.
_\j •The battery level is low or zero. Charge the battery qJage 10). Depending on the conditions of use or the t_]Je of
battely, the indicator may flash even though there are still 5 to 10 minutes of remaining battely time left.
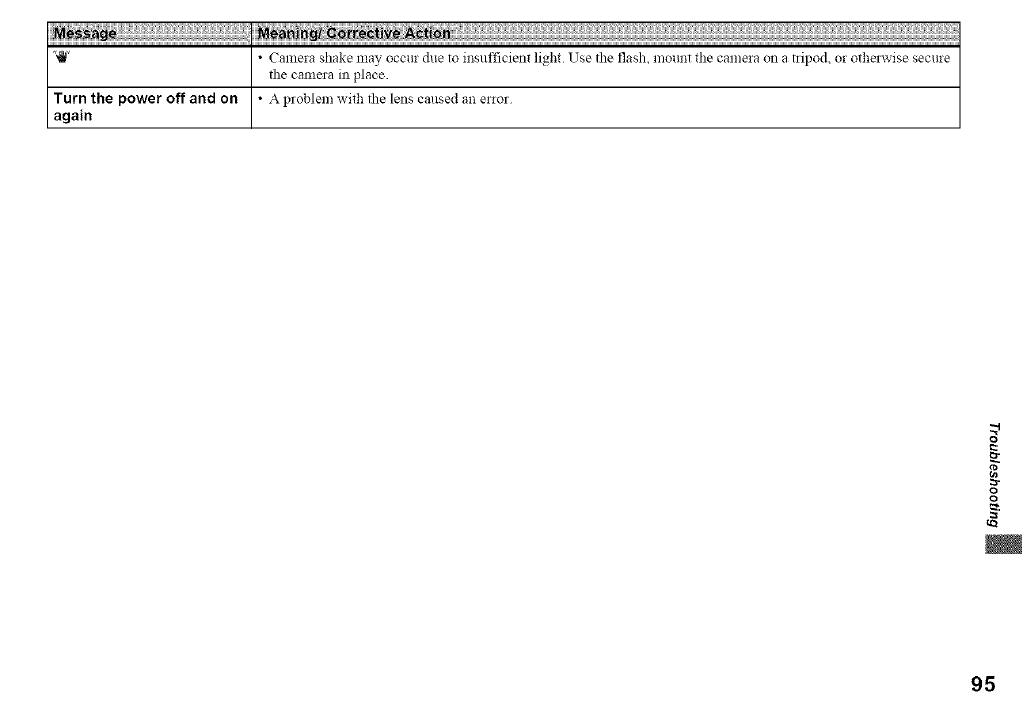
'_" •CalnerashakemayoccurduetoinsufficientlightUsetheflash,mounttt_ecameraonalipod,orothe_-isesecure
thecamerainplace.
Turnthepoweroffandon •Aproblemwit_thelenscausedanenor
again
o
r_
::3"
o
o
95
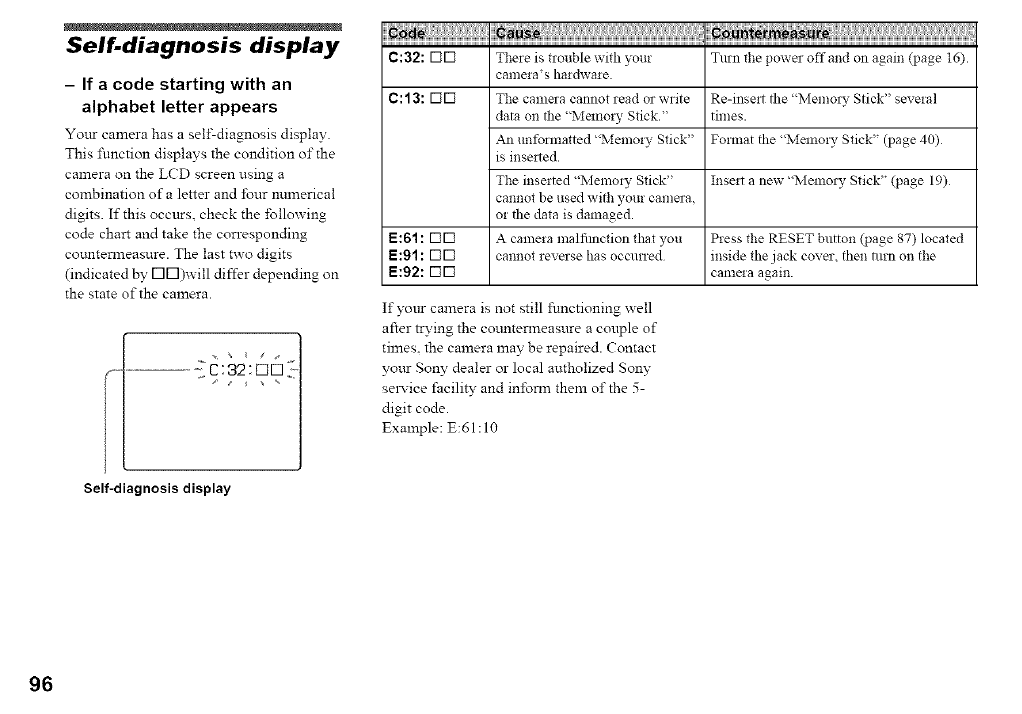
Self-diagnosis display
- If a code starting with an
alphabet letter appears
Yo_tr camera has a self-diagnosis display.
This function displays the condition of the
camera on the LCD screen using a
combination of a letter and four nmnerical
digits. If this occurs, check the following
code chart and take the corresponding
cotmtenneasure. The last two digits
(indicated by r-IN)will differ depending on
the state of the camera.
Self=diagnosis display
¸!!!I ....
C:32: rid There is trouble with )_ur Turn the power off and on again (page 16).
canlera's hardware.
C: 13: rill The camera cannot read or write Re-inse_t the "Memory Stick" several
data on the "Memo!), Stick." times.
_1 unlblmatted "Memory Stick" Format the "Memo!), Stick" (page 40)
is insetted.
The inserted "Memory Stick" Insert a new "Memol), Stick" (page 19)
cannot be used with your camera,
or the data is damaged.
E:61 : rill A camera malfilnction that you Press the RESET button QJage 87) located
E:91 : rill cannot reverse has occurred inside the jack cover, then nlrn on the
E:92: riri camela again.
If yotLr camera is not still functioning well
after trying the cotmtenneasure a couple of
times, the camera may be repaired. Contact
yottr Sony dealer or local autholized Sony
sela:ice facility and inform them of the 5-
digit code.
Example: E:61:10
96
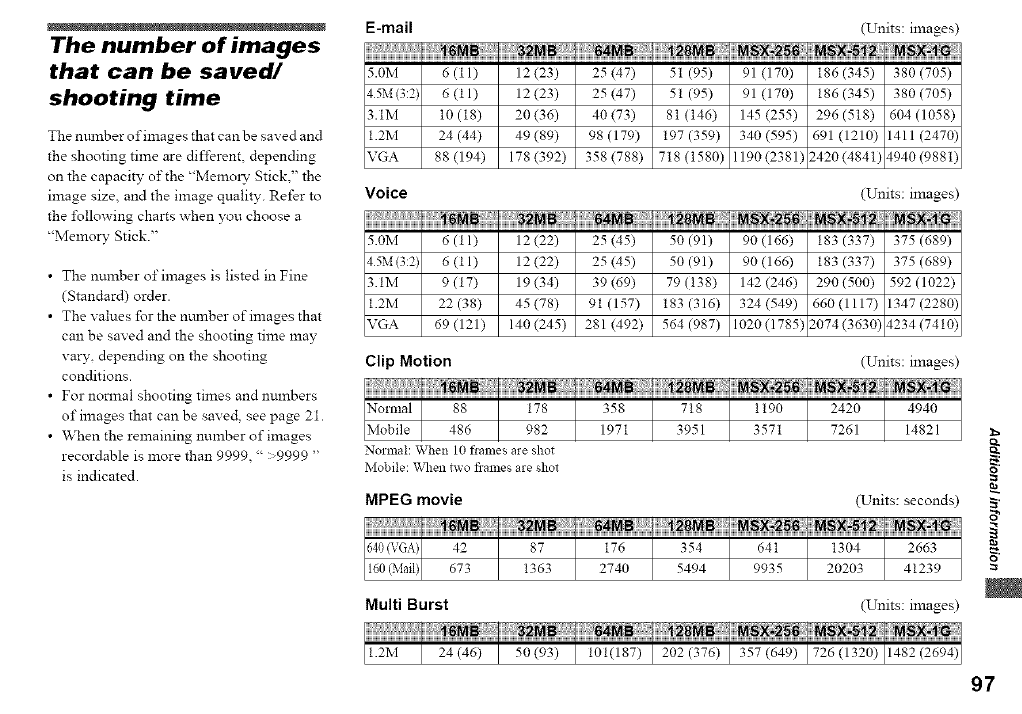
E-mail
The number of images
that can be saved/
shooting time
The nmnber of images that can be saved and
the shooting time are different, depending
on the capacity of the "Memoxw Stick2' the
image size, and the image quality. Refer to
the i\_llowing charts when you choose a
"Memory Stick."
•The number of images is listed in Fine
(Standard) order.
• The values for the nmnber of images that
can be saved and the shooting time may
vary, depending on the shooting
conditions.
• For normal shooting times and numbers
of images that can be saved, see page 21.
• When the remaining number of images
recordable is more than 9999, " :,9999 "
is indicated.
(Units: images)
5.0M 6(tl) 12(23) 25(47) 51(95) 91(170) 186(345) 380(705)
15M (3:2) 6(11) 12(23) 25(47) 51(95) 91(170) 186(345) 380(705)
3.1M 10 (t8) 20 (36) 40 (73) 8t (t46) 145 (255) 296 (5t8) 604 (1058)
1.2M 24 (44) 49 (89) 98 (179) 197 (359) 340 (595) 691 (1210) 1411 (2470)
VGA 88 (194) 178 (392) 358 (788) 718 (t580) 1190(2381) 2420(4841; 4940(988t)
Voice (Units: images)
5.0M 6 (t 1) 12 (22) 25 (45) 50 (91) 90 (166) 183 (337) 375 (689)
15M(3:2) 6 (11) 12 (22) 25 (45) 50 (91) 90 (166) 183 (337) 375 (689)
3.1M 9(t7) 19(34) 39(69) 79(138) 142(246) 290(500) 592(1022)
1.2M 22(38) 45(78) 91(157) 183(316) 324(549) 660(1117) 1347(2280)
VGA 69 (121) 140 (245) 281 (492) 564 (987) 1020 (1785) 2074 (3630; 4234 (7410)
Clip Motion (Units: images)
Normal: When 10 flallles are shot
Mobile: When two frames are shot
MPEG movie
Multi Burst
o
(Units: seconds) _,
(Units: images)
97
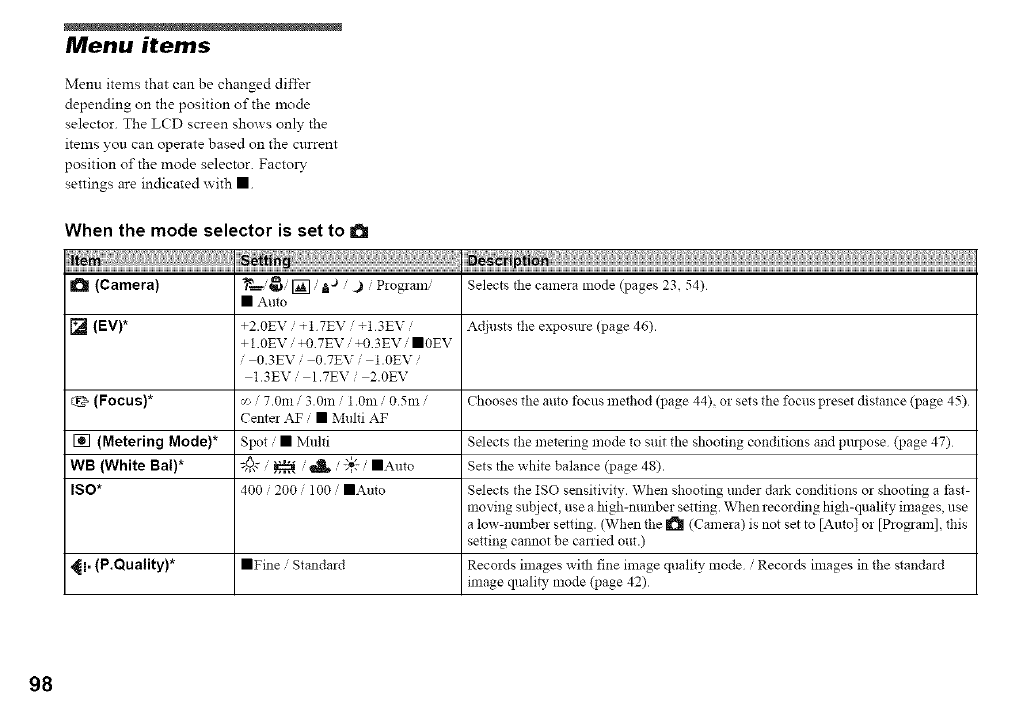
Menu items
Menu items that can be changed differ
depending on the position of the mode
selector. The LCD screen shows only the
items you can operate based on the current
position of the mode selector. FactoD'
settings are indicated _ ith m
When the mode selector is set to a
d_ (Camera) m ,j
_._, I_], _ j Piogram, Selects the camera mode (pages 23 54)
• Auto
[] (EV)* +2.0EV /+1 7EV /+1 3EV /Adjusts the exposure (page 46).
+ 1.0EV /+0 7EV /+0 3EV /•0EV
,0.3EVi 0.7EVi 1.0EV/
13EVi 1.7EVi 2.0EV
(Focus)* v- / 7.0m /3.0m /1.0m /0.5m /Chooses the auto tbcus method (page 44), or sets the focus preset distance (page 45)
Cente] AF /• Multi AF
[] (Metering Mode)* Spot /• Multi Selects the metering mode to suit the shooting conditions and puqJose (page 47)
WB (White Bal)* _c /_/_/"_ /•Auto Sets the white balance (page 48).
ISO* 400 /200 /100 /•Auto Selects the ISO sensitivity. When shooting under dmk conditions or shooting a thst-
moving subject, use a high-number setting. When recording high-quality images, use
a low-number setting. (When the _ (Camera) is not set to [Auto] or [Program], this
setting cannot be canied out.)
_i. (P.Quality)* •Fine /Standard Records images with fine image quality mode /Recor& images in the standard
mlage quali b, mode (page 42)
98
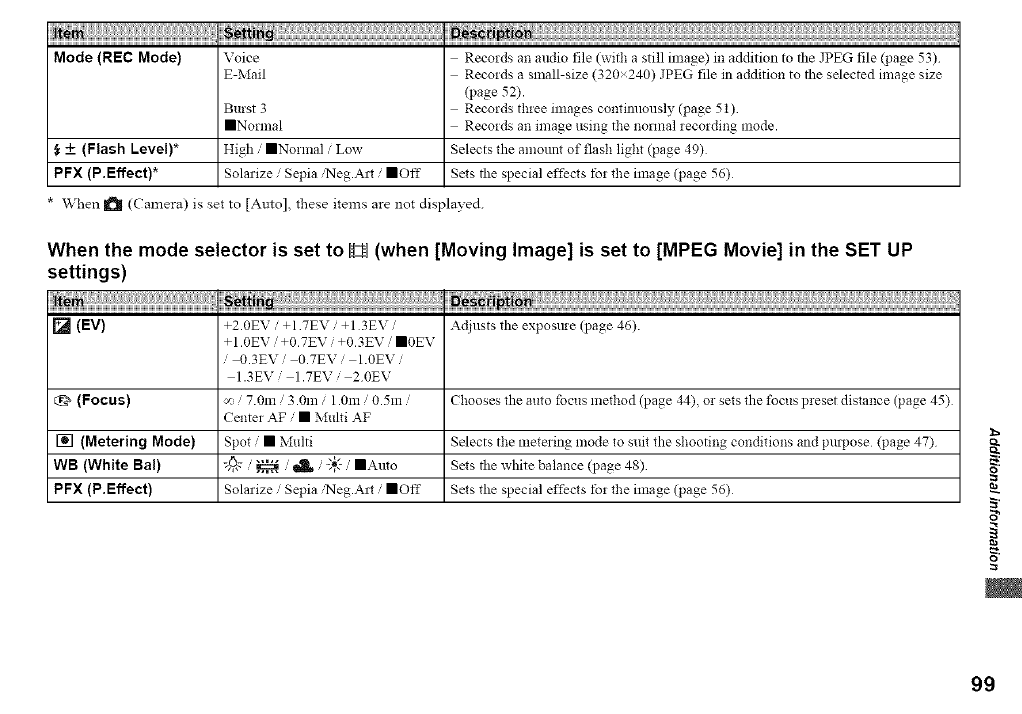
Mode (REC Mode) Voice Records an audio file (with a still image) in addition to the JPEG file qgage 53)
E-Mail Recozds a small-size (320x240) JPEG file in addition to fl_e selected image size
(page 52).
Burst 3 Records three images continuously (page 51)
• Normal Reeozds an image using the normal _eeording mode.
_, _+ (Flash Level)* High ,' •NoHnal /Low Selects the amount of flash light (page 49)
PFX (P.Effect)* Solarize /Sepia ,'Neg.A_t / ==Off Sets fl_e special effects tb_ the image (page 56)
When I_ (Camera) is set to [Auto], these items are not displayed.
When the mode selector is set to _ (when [Moving Image] is set to [MPEG Movie] in the SET UP
settings)
on
[] (EV) +2.0EV/+1 7EV +1 3EV/ Adjusts the exposme (page 46).
+1.0EV ,'+0.7EV ,' +0.3EV ,'•0EV
0.3EV' 0.7EV' 1.0EV'
1.3EV,' 1.7EV,' 20EV
t_ (Focus) x, 7.0m /3.0m /1.0m /0.5m Chooses the auto focus method (page 44) or sets the focus p_eset distance (page 45)
Center AF ,' • Multi AF
[] (Metering Mode) Spot /• Multi Selects the metering mode to suit the shooting conditions and pml_ose (page 47)
WB (White Bal) J5¢,,,,_.,,,. __'_IK ,'-'6"-,,,,, •Auto Sets the white balance (page 48)
PFX (P.Effect) Solarize ,' Sepia ,'Neg.A_t ,' •Off Sets the special effects fo_ the image (page 56)
i
i
o
99
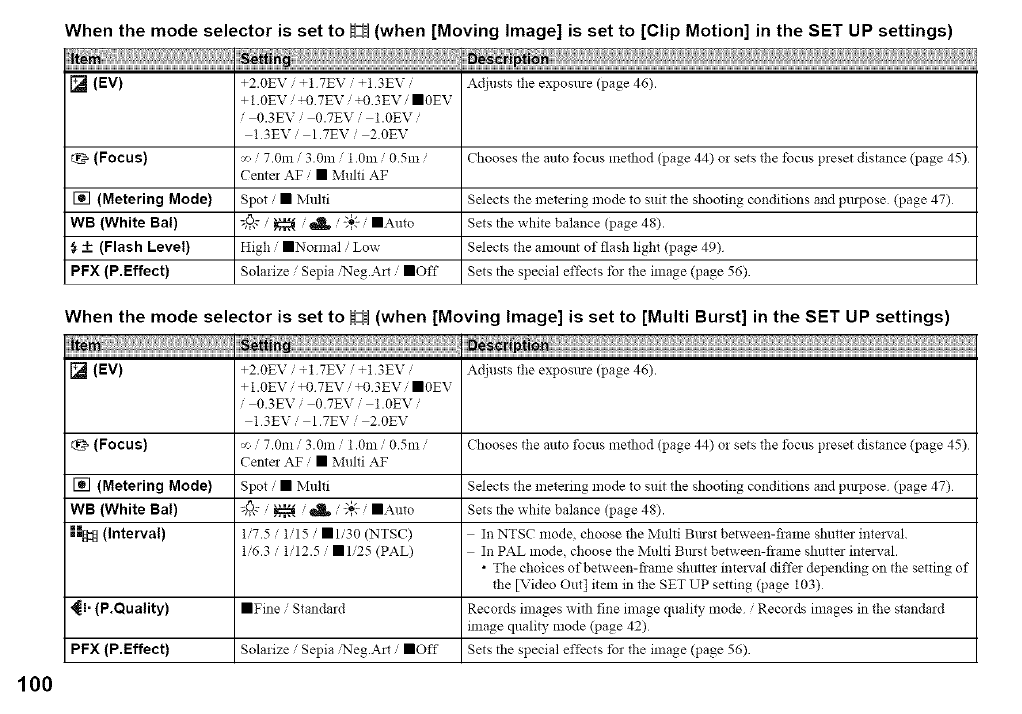
When the mode selector is set to !z! (when [Moving Image] is set to [Clip Motion] in the SET UP settings)
[] (EV) +2.0EV +1 7EV +1 3EV Adjusts the exposure (page 46).
+ 1.0EV /+0 7EV /+0 3EV /•0EV
,0.3EVi 0.7EVi 1.0EV/
13EVi 1.7EVi 2.0EV
(Focus) _/7.0m /3.0m /1.0m /0.5m /Chooses the amo focus method (page 44) or sets the tbcus preset distance (page 45)
Cente: AF /• Multi AF
[] (Metering Mode) Spot /• Multi Selects the metering mode to suit the shooting conditions and pu:lJose (page 47)
WB (White Bal) :_: /_/_/;6" /•Auto Sets the white balance (page 48).
_+ (Flash Level) High /•Normal /Low Selects the an:ount of flash light (page 49)
PFX (P.Effect) Solarize /Sepia/Neg.A:t /•Off Sets the special effects tbr the in:age (page 56).
When the mode selector is set to H(when [Moving Image] is set to [Multi Burst] in the SET UP settings)
[] (EV)
(Focus)
[] (Metering Mode)
WB (White Bal)
-===_(Interval)
_i- (P.Quality)
PFX (P,Effect)
+2.0EV /+1 7EV /+1 3EV /
+ 1.0EV /+0 7EV /+0 3EV /•0EV
,0.3EVi 0.7EVi 1.0EV/
13EVi 1.7EVi 2.0EV
v- / 7.0::: /3.0m /1.0m /0.5n: /
Cente: AF /• Multi AF
Spot /• Multi
:_; /_/d, /",_,'-/•auto
1/7.5 /1/15 /•1/30 (NTSC)
1/6.3/1/12.5/•1/25 (PAL)
• Fine 'Standard
Sola:ize ,' Sepia ,'Neg.A:t ,' •Off
Adjusts the exposure (page 46).
Chooses the auto focus method (page 44) o: sets the tbcus preset distance (page 45)
Selects the mete:ing mode to suit the shooting conditions and pu:lJose (page 47)
Sets the white balance (page 48).
In NTSC :::ode, choose the Multi Bmst between-frame shutter inte:5,ah
In PAL mode, choose the Multi Bmst between-fiame shutter inte:5,ah
•The choices ofbetween-fiame shutte: inte:5,al cliffs: depending on the setting of
the [Video Out[ item in the SET UP setting (page 103)
Records images with fine image quality mode /Records in:ages in the standard
::::age qualiD, mode (page 42)
Sets the special effects tbr the in:age (page 56).
100
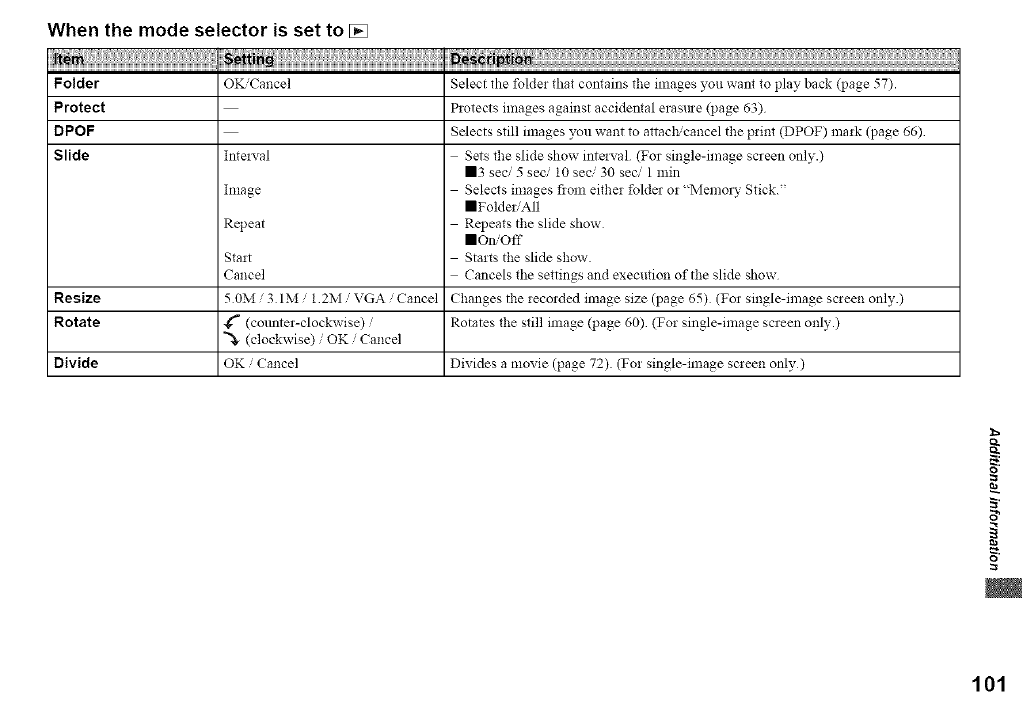
When the mode selector is set to []
OK'Cancel Select the foldei that contains the images you want to play back (page 57).
Folder
Protect
DPOF
Slide Inte!_,,al
Image
Repeat
Start
Cancel
50M/3 IMi 1 2M /VGA /Cancel
4_" (colmter-clockwise) /
"_ (clockwise) /OK /Cancel
OK /Cancel
Resize
Rotate
Divide
Protects images against accidental erasme (page 63)
Selects still images you want to attach'cancel the print (DPOF) mark (page 66)
Sets file slide show mtelval (For single-image screen only.)
113 seci 5 seci 10 seci 30 seci 1 min
Selects images flora either folde_ or "Memory Stick."
mFolder,,All
Repeats the slide show
_On/Off
Starts the slide show
Cancels the settings and execution of the slide show
Changes the recorded image size (page 65) (For single-image screen only.)
Rotates the still image (page 60) (For single-image screen only.)
Divides a movie (page 72). (For single-image screen only)
o
o
101
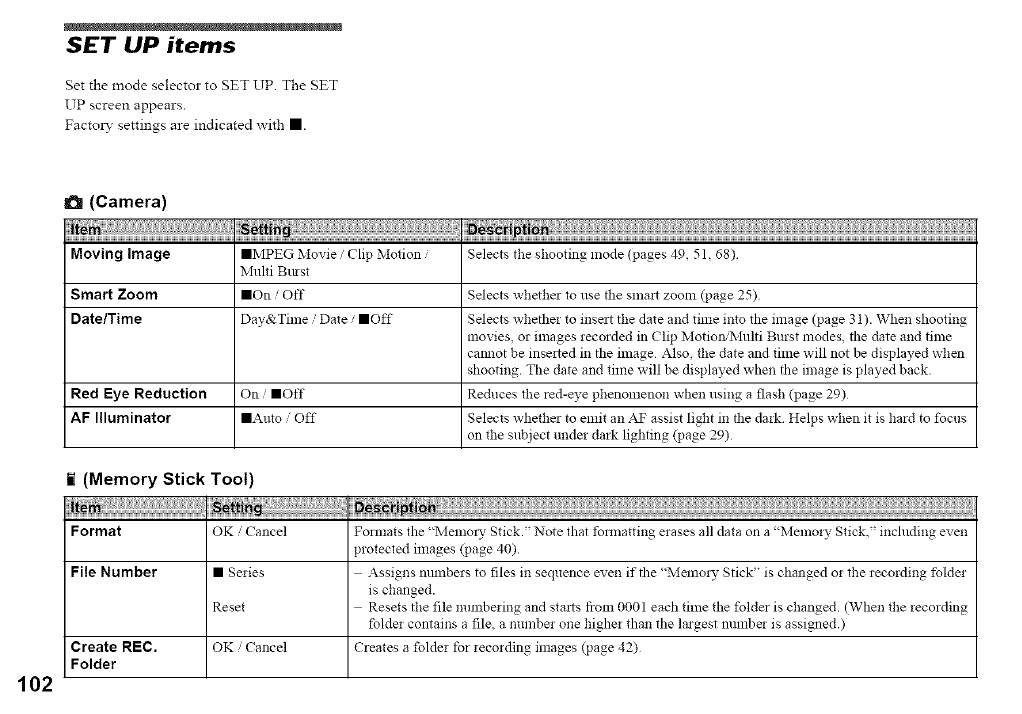
SET UP items
get the mode selector to SET UP. The gET
UP screen appears.
Factory settings are indicated with II.
(Camera)
Moving Image Selects tile shooting mode (pages 49 51 68)
Smart Zoom
Date/Time
Red Eye Reduction
AF Illuminator
• MPEG Movie /Clip Motion /
Multi Btust
liOn /Off
Day&Time /Date /==Off
On /==Off
• Auto /Off
Selects whether to use tile smart zoom (page 25)
Selects whetiler to insert tile daIe and time into the image (page 31 ). When shooting
movies, or images recorded in Clip Motio/_'Multi Burst modes, tile date and time
caimot be inse_ted in tile image Also, the date and time will not be displayed when
shooting. The date anti time will be displayed when tile image is played back.
Reduces the red-eye phenomenon when using a flash (page 29)
Selects whether to emit an a_c assist light in tile dark Helps when it is hard to focus
on the subject under dark lighting (page 29)
t(Memory Stick Tool)
Format OK Cancel Folmats the '_2vtenlol_, Stick.' Note that fomlatting elases all data oil a "Memoly Stick' including even
protected images (page 40).
File Number • Series Assigns mnnbers to files in sequence even if tile "Melno!), Stick" is changed or the recording fblder
is changed.
Reset Resets tile file mmlbering and starts fiom 0001 each time the foltier is changed. (When the recording
folder contains a file, a number one higher than the largest mnnba is assigned.)
OK /Cancel Creates a folder for recording images (page 42)
Create REC.
Folder
102
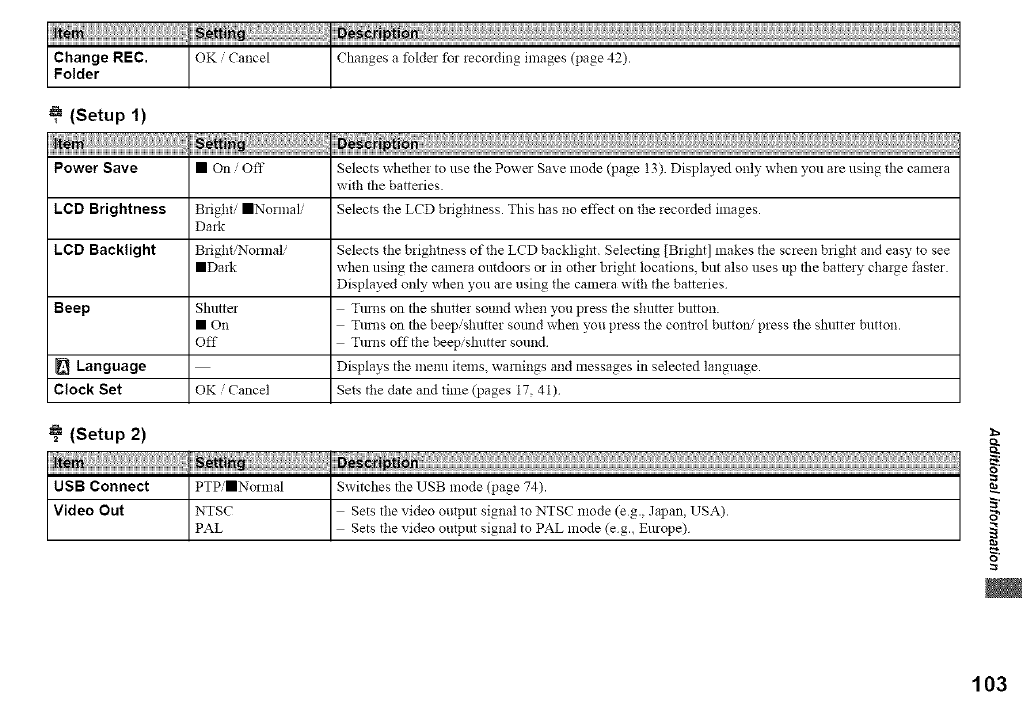
(Setup 1)
Power Save • On Oft" Selects whethe! to use the Power Save mode (page 13). Displayed only when you a_e using the camaa
with tile batteries
LCD Brightness Bright/•Normal/ Selects the LCD brightness. This has no effect on the recorded images.
Dark
LCD Backlight Bfight/Nom_ali Selects the brightness of the LCD backlight. Selecting [Bright] makes the screen bright and easy to see
• Dark when using the camera outdoors or in other bright locations, but also uses up the battay charge faster
Displayed only when you are using the camaa with the batteries
Beep Shutta Tm_ls on the shutter sound when you press the shutter button.
• On Turns on the beepishutter sotmd when you press the control buttot_' press the slmttez button.
Off Turns off the beepisNltter sound
Language Displays the metal items, warnings and messages in selected langlmge.
Clock Set OK /Cancel Sets the date and time (pages 17, 41)
(Setup 2)
USB Connect PTPi•Nomml Switches the USB mode (page 74).
Video Out NTSC Sets the video output signal to NTSC mode (eg., Japan, USA).
PAL Sets the video output signal to PAL mode (eg., Europe)
t_
o
103

Precautions
Do not leave the camera in the
following places
•In extremely hot place, such as in a car
parked in the sun. The camera bo@ may
become deformed or this may cause a
malfi.mction.
• Under direct stmlight or near a heater.
The camera bo@ may become deformed
or this may cause a malfi.mction.
• On rocking vibration
• Near strong magnetic place
• On sandy or in dus_' place
Do not let sand get into the camera. Sand
or dust may cause the camera to
malfanction and sometimes this
malfi.mction cannot be repaired.
Cleaning
Cleaning the LCD screen
Clean the screen surface with an LCD
cleaning kit (not supplied) to remove
fingerprints, dust. etc.
Cleaning the lens
Wipe the lens with a soft cloth to remove
fingerprints, dust. etc.
Cleaning the camera surface
Clean the camera sm-±'ace x_ith a soft cloth
slightly moistened with water, then wipe the
sturface with a dry cloth. Do not use the
following as this may damage the finish or
the casing.
Thilmer
Benzine
Alcohol
Diposable cloth
Volatile insecticide
( ontact with robber or vinyl for a long
time
Note on operating temperature
The camera is designed for use within a
temperature range of 0'C to 40_C (32'T to
104°F). Shooting in extremely cold or hot
locations that exceed this range is not
recommended.
On moisture condensation
If the camera is brought directly from a cold
to a wam_ location, or is placed in a vez_-
damp room, moisture may condense inside
or outside the camera. This moisture
condensation may cause a malfi.mction of
the camera.
Moisture condensation occurs easily
when:
•The camera is brought from a cold
location such as a ski slope into a wm_ly
heated room.
• The camera is taken from an air-
conditioned room or car interior to the hot
outdoors, etc.
To prevent moisture condensation
\Vhen bringing the camera from a cold
place to a warm place, seal the camera in a
plastic bag and leave it in the new location
for about an hour. Remove the plastic bag
when the camera has adapted to the new
temperature.
If moisture condensation occurs
Turn oft" the camera and wait about an hour
for the moistture to evaporate. Note that if
you attempt to shoot with moisture
remaining inside the lens, you will be
unable to record clear images.
104

The internal rechargeable button
battery
This camera has an internal rechargeable
button batte W for maintaining the date and
time and other settings regardless of
whether the power is on or off.
This rechargeable breton battery is
continually charged as long as you are using
the camera. However, if you use the camera
for only short periods it discharges
gradually, and if you do not use the camera
at all for about one month it becomes
completely discharged. In this case, be sure
to charge this rechargeable button batte W
before using the camera.
Note that even if this rechargeable button
batte W is not charged, you can still use the
camera as long as you do not record the date
and time.
How to charge
Comlect the camera to a wall outlet (wall
socket) using the AC Adaptor (not
supplied), or install charged batteries, and
leave the camera for 24 hours or more with
the power turned off.
The "Memory Stick"
"Memo W Stick" is a new compact, poltable
and versatile IC recording lnedium with a
data capacity that exceeds the capacity of a
floppy disk.
You can use the "Memo W Stick" as an
external recording media that can be
attached or removed as well as exchanging
data between the units.
There are two types of"Memory Stick": an
ordina W "Memo W Stick" and a
"MagicGate Memory Stick" that are
equipped with the MagicGate copyright
protection technology. You can use both
types of"Memo W Stick" with your camera.
However. because your calnera does not
support the MagicGate standards, data
recorded with your camera is not subject to
MagicGate* copyright protection.
You can also use the "Memory Stick Duo"
and "Memory Stick PRO" with the camera.
* MagicGate is copyright protection technology
that uses enclTption technology,.
•The "Memory Stick" formatted with a computer
is not guaranteed to operate with this camera
"Memory Stick" Recording/
Playback
Memmy Stick (Memory Stick Duo) O
MagicGate Memmy Stick ©**
(MagicGate Memory Stick Duo)
Memm T Stick PRO (D**
** The camera cannot record or play back the
data needed by, the MagieGate fimction.
We cannot ensure all of the fimetions of each
"Memo W Stick"
Notes on use of the "Memory Stick"
(supplied)
• "_u cannot record, edit, or delete images when
the write-protect switch is set to LOCK. The
position or the shape of the write-protect switch
may differ depending on the ' Memol T Stick"
yoii/ise
Terminal
Labeling position
•Data may be dalnaged m the following cases:
- Removing the "Memory Stick" or tinning oft"
the camera while reading or writing data
- Using the calnera m a location subject to the
effects of static eleen'iclD_ or noise
• We recolmnend you back up any nnportant
data
• Do not attach any other material than the
supplied label on the labeling posi*ion
• When you attach the supplied label, be sure to
attach it to the labeling position Be carefid that
the label does not stick out
• When you carry or store the ' Memol T Stick."
put it in the ease supplied with it.
• Do not touch the terminals ofa "Memoly
Stick" with your hand or a metal ol!iect
o
S'
o
105
• Do not strike, bend or drop a "Memo_ 3, Stick"
• Do not disassemble or modi_ a "Memory
Stick"
• Do not expose the "Memo W Stick" to water.
• Avoid using or storing the "Memol 3, Stick" in
the following places:
- In a car parked in the sum or at a high
temperature
- Under direct sunlight.
- In a lmmid place or near corrosive material
Notes on use of the "Memory Stick
Duo" (not supplied)
•Be sine to inse11 the "I_,iemo13_Stick Duo" into
the "Memory Stick Duo" Adaptor when using
the "Memory Stick Duo" wl_b the camera
• Veri_, that you are inserting the "Memol) _Stick
Duo" in the proper direction when inserting it
into the "Memory Stick Duo" Adaptor.
• Veri_, that you are inserting the "MelnOl)_Stick
Duo" Adaptor in the proper direction when
inserting it into the camera. Insel_ing it in the
wrong direction may cause a malfimction
• Do not insert a "Memory Stick Duo" that is not
inserted into a "MelnOl) _Stick Duo" Adaptor
into a "Memol3_ Sfick"-COlnpatible unit This
may cause a malfunction of the unit
Note on use of the "Memory Stick
PRO" (not supplied)
'h,lel]lOl) _Stick PRO" wl_h a capacity of up to
1 GB is verified %1 this camera
The nickel-metal
hydride batteries
Effective use of the battery
• Battex_- performance decreases in low-
temperature surroundings, and the batter?,
life is shoxtened under such
circumstances. To use the batte D' longer,
we recommend you keep the battex3-
stored in the supplied barrel3- case, in a
pocket close to your bo@ to warm it. and
insext it in your camera just before you
strut shooting.
•If you shoot a lot using the zoom and
flash, the battex 3' power will be used up
faster.
• We recolranend having spare batteries
handy i\)r two or three times the expected
shooting time, and tx_- test shooting
before the actually using the camera.
• Do not expose the batte&' to water. The
batter?, is not water-resistant.
Battery life
• The battery lif_ is limited. Battex_"
capacity decreases little by little as you
use it more and more, and as time passes.
When the battex 7 operating time seems to
have been considerably shortened, a
probable cause is that the battex 7 has
reached the end of its life.
• The batter?, life varies depending on
storage, operating conditions, and
environment, and is different for each
batte_'.
106
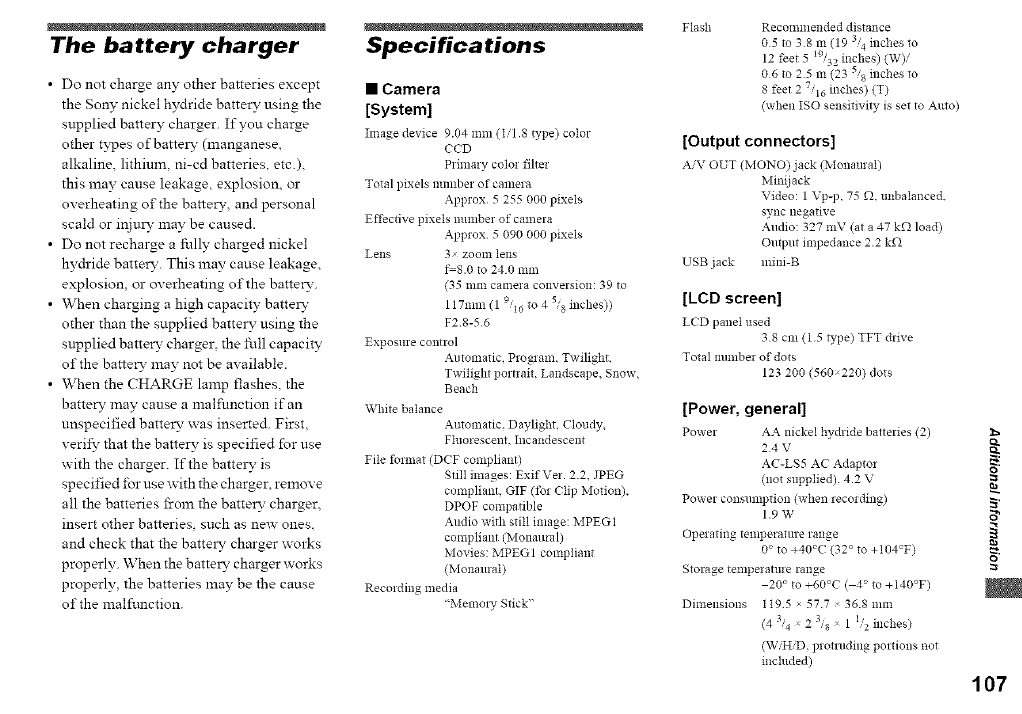
The battery charger
• Do not charge any other batteries except
the Son?" nickel hydride battery using the
supplied battery charger. If you charge
other t?-pes ofbattel W (manganese,
alkaline, lithium, ni-cd batteries, etc.),
this may cause leakage, explosion, or
overheating of the battery, and personal
scald or injuD, may be caused.
• Do not recharge a fully charged nickel
hydride battery. This may cause leakage,
explosion, or overheating of the batter?-.
• When charging a high capacity battelw
other than the supplied battely using the
supplied batte R" charger, the 15.lllcapacity
of the batte R" may not be available.
• When the CHARGE lamp flashes, the
batter?, may cause a malfunction if an
unspecified batter?, was inserted. First,
verify that the batter?, is specified for use
with the charger. If the battely is
specified for use with the charger, remove
all the batteries from the batter?, charger,
insert other batteries, such as ne_ ones.
and check that the battely charger works
properly. When the battelw charger works
properly, the batteries may be the cause
of the malftmction.
Flash
Specifications
•Camera
[System]
Image device 9.04 mm (I/1 8 type) color
CCD
Primary color filter
Total pixels number of camera
Approx 5 255 000 pixels
Effective pixels number of camera
Approx 5 090 000 pixels
Lens 3 zoonl lens
fS.0 to 240111111
(35111111 camera conversion: 39 to
117nnn (19/16 to 4 si8 inches))
F2 8-56
Exposure control
Amoma*ic. Program, Twilight,
Twilight portrait. Landscape, Snow.
Beach
White balance
Automatic. Daylight, Cloudy,
Fluorescent. Incandescent
File ft_rmat (DCF compliant /
Still images: Exif Vet. 2.2, JPEG
compliant, GIF (ibr (;lip Motion),
DPOF compatible
Audio with still image: MPEG1
compliant (Monmtral)
Movies: MPEGI compliant
(Monmlral)
Recording media
' Memoly Stick"
Recommended distance
05 to 38 m (19 3'4inches to
12 feet 5 I9/32 inches) (W)i
06 to, 25 m (23 5/8 inches to
8 feet 2 7/i6 inches) (T)
(when ISO sensitivity is set to Auto)
[Output connectors]
A/V OUT (MONO)jack (Monaulal)
Mini jack
Video: 1 Vp-p, 75 f.). unbalanced.
sync negative
Audio: 327 mV (at a 47 kf)- load)
Output impedance 2.2 kf-)
USB jack mini-B
[LCD screen]
LCD panel used
38 cm (1 5 type/TFT drive
Total number of dots
123 200 (560220) dots
[Power, general]
Power AA nickel hydlide batteries (2)
24 V
AC-LS5 AC Adaptor
(not supplied), 4.2 V
Power consumption (when recording)
19 W
Operating tempera*ure range
0_ to +40_C (32 ° to +104_F)
Storage temperature range
20 °to ÷60_C ( 4_ to +140°F)
Dimensions 1 I95 x 577 36.8 nnn
(4 3/4 x 23/8 _ 1 1/2 mcbes/
(W/HiD, protnlding portions not
included)
o
o
107
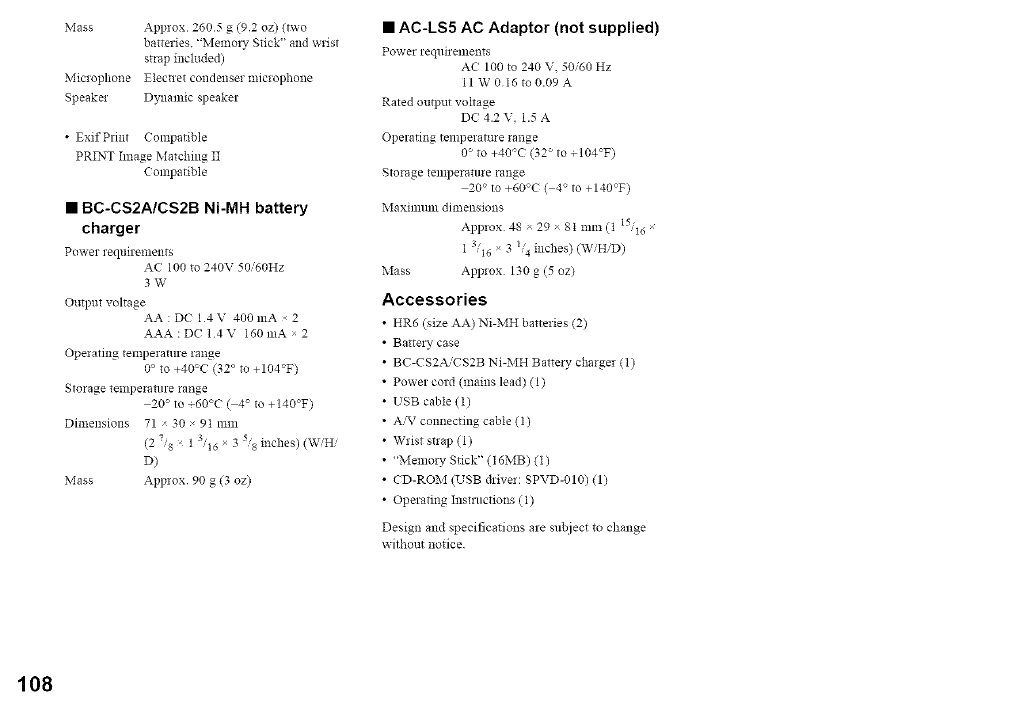
Mass Approx 2605 g (92 oz) (two
batteries. "Memory Stick" and wrist
strap included)
Microphone Electlet condenser microphone
Speaker Dynamic speaker
• Exif Print (;ompatible
PRINT Image Matching II
(;ompatible
•BC-CS2A/CS2B Ni-MH battery
charger
Power requiretllents
A( 100 to 240V 50 60Hz
3W
Output voltage
AA : DC 14 V 400 mA 2
AAA : DC 14V I60mA × 2
Operating temperature range
0° to +40C (32 ° to +104rF)
Storage temperature range
20 ° to +60"C ( 4" to +140"F)
Dimensions 71 30 91 mm
(2 7,'8 _ 1 "16 x 3 _'s nches) (W'H'
D)
Mass Approx 90 g (3 oz)
•AC-LS5 AC Adaptor (not supplied)
Power le qltilelllent s
AC 100 t_ 240 V. 50"60 Hz
11 W0 16to0.09A
Rated output voltage
DC 4.2 V, 1.5 A
Operating temperature range
0 ° to +40°C (32 ° to ÷104"F)
Storage temperature range
20" to +60°C ( 4" to +140rF)
Maximum dimensions
Applox 48 x 29 x 8t mm (t 'I6
1 3,16 x 3 l, 4inches) (W,'HiD)
Mass Approx 130 g (5 oz)
Accessories
HR6 (size AA) Ni-MH batteries (2)
Ba£tery case
BC-CS2AiCS2B Ni-MH Battery charger (1)
Power cord (mains lead) (1)
USB cable (1)
A,'_ connecting cable (1)
Wrist strap (1)
_Memory Stick" (16MB) (I)
CD-ROM (USB driver: SPVD-010) (1)
Operating Instructions (1)
Design and specifications are subject to change
without notice
108
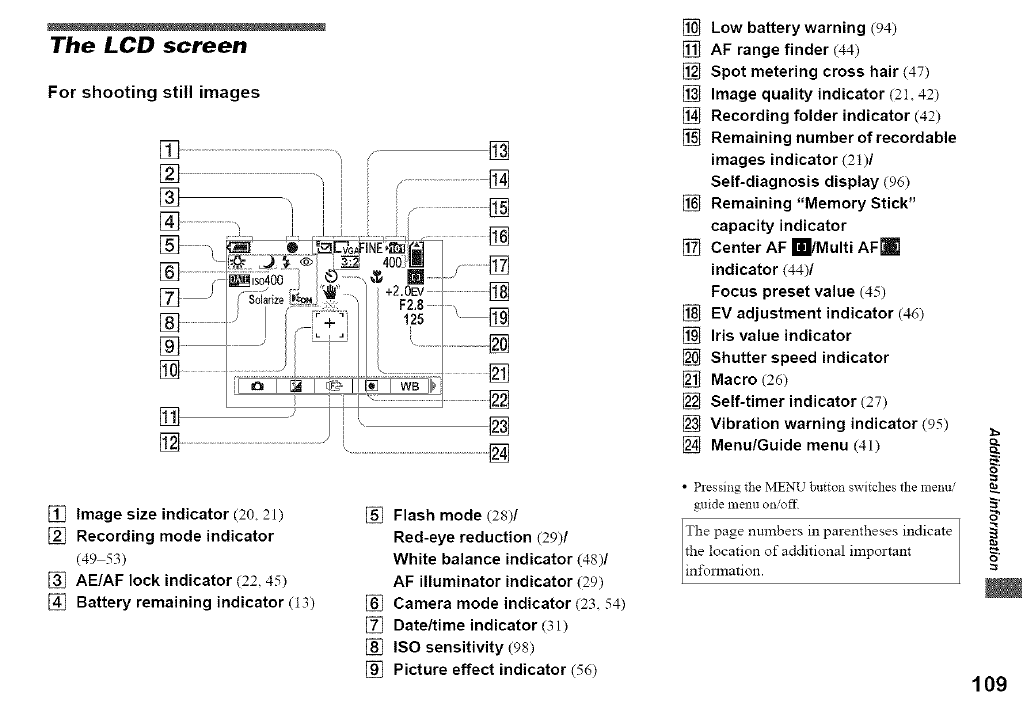
The LCD screen
For shooting still images
[]
] .........................
] ....
[]
[] Image size indicator (20, 21)
[] Recording mode indicator
(49 53)
[] AE/AF lock indicator (22 45)
[] Battery remaining indicator (13)
[] Flash mode (28)/
Red-eye reduction (29)/
White balance indicator (48)/
AF illuminator indicator (29)
[] Camera mode indicator (23 54)
[] Date/time indicator (31)
[] ISO sensitivity (98)
[] Picture effect indicator (56)
[] Low battery warning (94)
[] AF range finder (44)
[] Spot metering cross hair (47)
[] Image quality indicator (21 42)
[] Recording folder indicator (42)
[] Remaining number of recordable
images indicator (21)/
Self-diagnosis display (96)
[] Remaining "Memory Stick"
capacity indicator
[] Center AF _/Multi AFrl
indicator (44)/
Focus preset value (45)
[] EV adjustment indicator (46)
[] Iris value indicator
[] Shutter speed indicator
[] Macro (26)
[] Self-timer indicator (27)
[] Vibration warning indicator (95)
[] Menu/Guide menu (41)
T
•Pressing the MENU button switches the1]lellui
guide nlenu oil/off
The page numbers in parentheses indicate
the location of additional important
in±\_nnation.
o
109
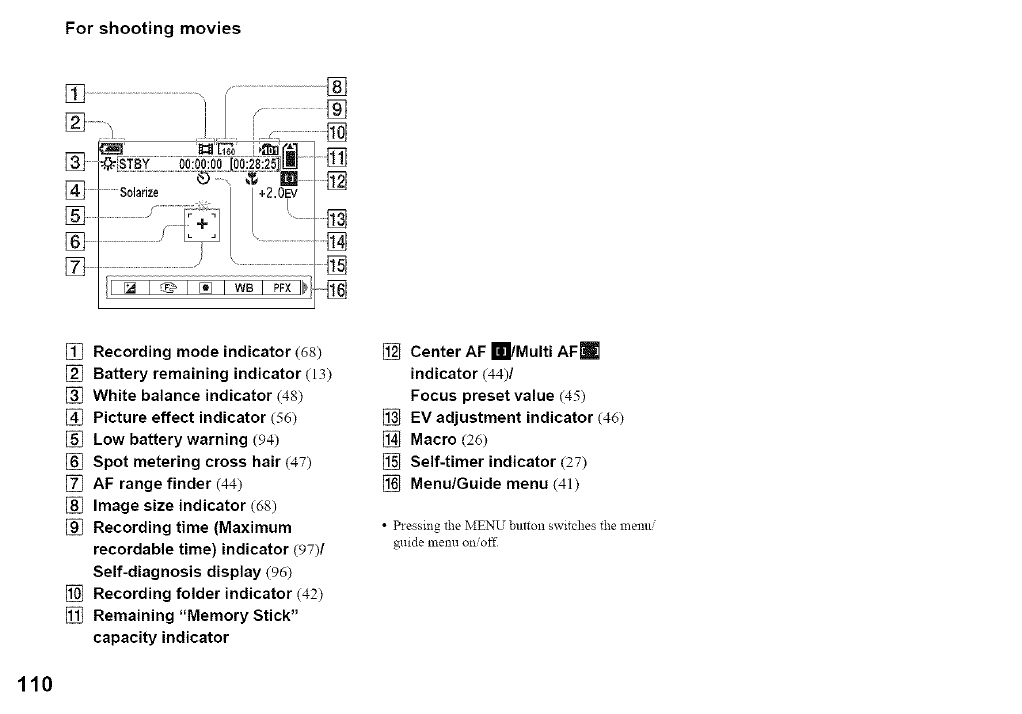
[] Recording mode indicator (68)
[] Battery remaining indicator (13)
[] White balance indicator (48)
[] Picture effect indicator (56)
[] Low battery warning (94)
[] Spot metering cross hair (47)
[] AF range finder (44)
[] Image size indicator (68)
[] Recording time (Maximum
recordable time) indicator (97)/
Self-diagnosis display (96)
[] Recording folder indicator (42)
[] Remaining "Memory Stick"
capacity indicator
[] Center AF _/Multi AFro
indicator (44)/
Focus preset value (45)
[] EV adjustment indicator (46)
[] Macro (26)
[] Self-timer indicator (27)
[] Menu/Guide menu (41)
• Pressing the MENU button switches the lnemti
guide menu on/oft2
110
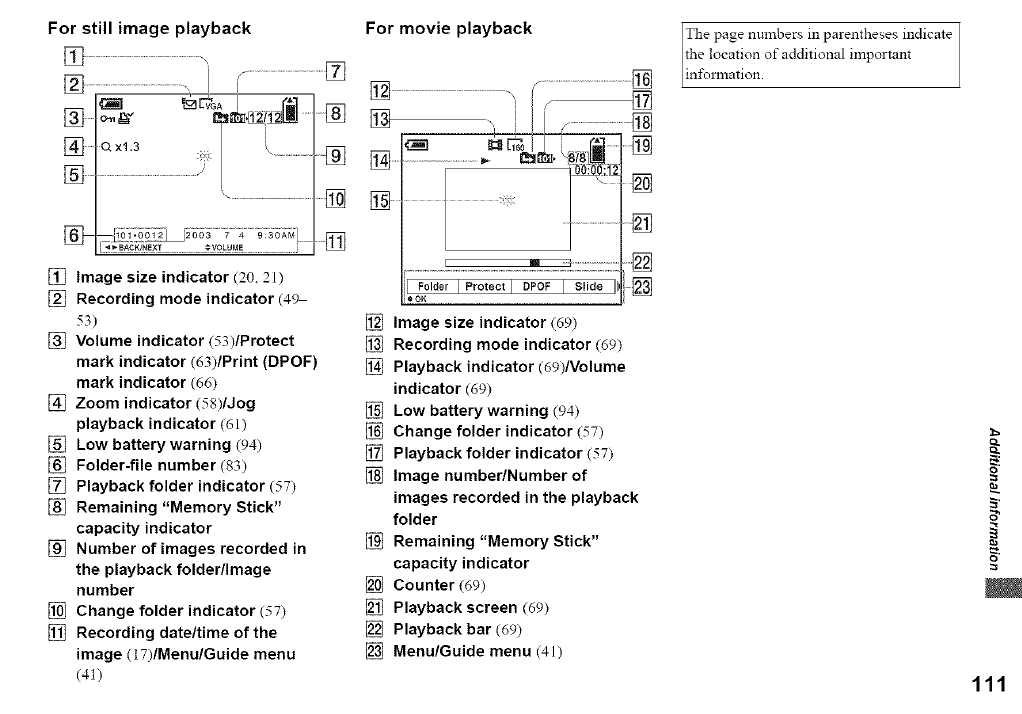
For still image playback
[] Image size indicator (20, 21)
[] Recording mode indicator (49
53)
[] Volume indicator (53)/Protect
mark indicator (63)/Print (DPOF)
mark indicator (66)
[] Zoom indicator (58)/Jog
playback indicator (61)
[] Low battery warning (94)
[] Folder-file number (83)
[] Playback folder indicator (57)
[] Remaining "Memory Stick"
capacity indicator
[] Number of images recorded in
the playback folder/Image
number
[] Change folder indicator (57)
[] Recording date/time of the
image (17)/Menu/Guide menu
(41)
For movie playback
I FolderIProteotl DPOFI Slide III []
eOK
[] Image size indicator (69)
[] Recording mode indicator (69)
[] Playback indicator (69)/Volume
indicator (69)
[] Low battery warning (94)
[] Change folder indicator (57)
[] Playback folder indicator (57)
[] Image number/Number of
images recorded in the playback
folder
[] Remaining "Memory Stick"
capacity indicator
[] Counter (69)
[] Playback screen (69)
[] Playback bar (69)
[] Menu/Guide menu (41)
The page numbers in parentheses indicate
the location of additional important
in±\_nnation.
13
13
111
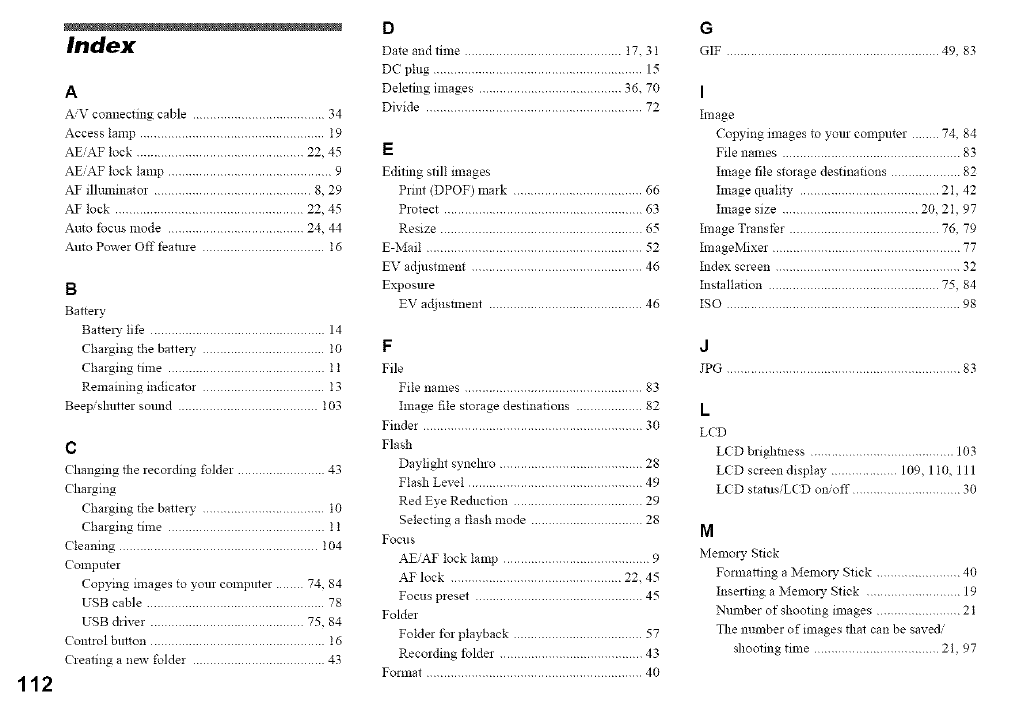
112
Index
A
A_V connecting cable ...................................... 34
Access lamp ..................................................... 19
AEiAF lock ................................................ 22, 45
AE,AF lock lamp ............................................... 9
AF illuminator ............................................. 8, 29
AF lock ...................................................... 22, 45
Auto focus mode ....................................... 24, 44
Auto Power Off feature ................................... t6
B
Battery
BattelT life .................................................. 14
Charging the battery ................................... 10
Charging time ............................................. t t
Remaining indicator ................................... I3
Beepislmtter sound ........................................ t03
c
Changing the recording folder ......................... 43
( harging
Charging the battery ................................... t0
Charging time ............................................. t t
Cleaning ......................................................... 104
Computer
Copying mlages to your computer ........ 74, 84
USB cable ................................................... 78
USB driver ............................................ 75, 84
Control button .................................................. t6
Creating a new folder ...................................... 43
D
Date and time ............................................. 17.3I
DC plug ............................................................ 15
Deleting images ......................................... 36. 70
Divide .............................................................. 72
E
Editing still nnages
Prim (DPOF) mark ..................................... 66
Protect ......................................................... 63
Resize .......................................................... 65
E-Mail .............................................................. 52
EV adjustnlent ................................................. 46
Exposure
EV adjustlnem ............................................ 46
F
File
File names ................................................... 83
hnage file storage destinations ................... 82
Finder ............................................................... 30
Flash
Daylight synehro ......................................... 28
Flash Level .................................................. 49
Red Eye Reduction ..................................... 29
Selecting a flash mode ................................ 28
Focus
AE,AF lock lamp .......................................... 9
AF lock ................................................. 22. 45
Focus preset ................................................ 45
Folder
Folder for playback ..................................... 57
Recording folder ......................................... 43
Format .............................................................. 40
G
GIF ............................................................. 49, 83
I
hnage
Copying images to your computer ........ 74, 84
File names ................................................... 83
hnage file storage destinations .................... 82
hnage quah b ........................................ 2I, 42
hnage size ....................................... 20, 2I, 97
hnage Transfer ........................................... 76, 79
hnageMixer ...................................................... 77
Ndex screen ..................................................... 32
Nsmllation ................................................. 75, 84
ISO ................................................................... 98
J
JPG ................................................................... 83
L
LCD
LED brightness ......................................... 103
LED screen display ................... 109, 1 I0, 111
LED status/LE D on/off ............................... 30
M
Memory Stick
Formatting a Melnm T Stick ........................ 40
Inserting a Memol T Stick ........................... 19
Number of shooting images ........................ 21
The number of images that can be saved/
shooting time .................................... 21, 97
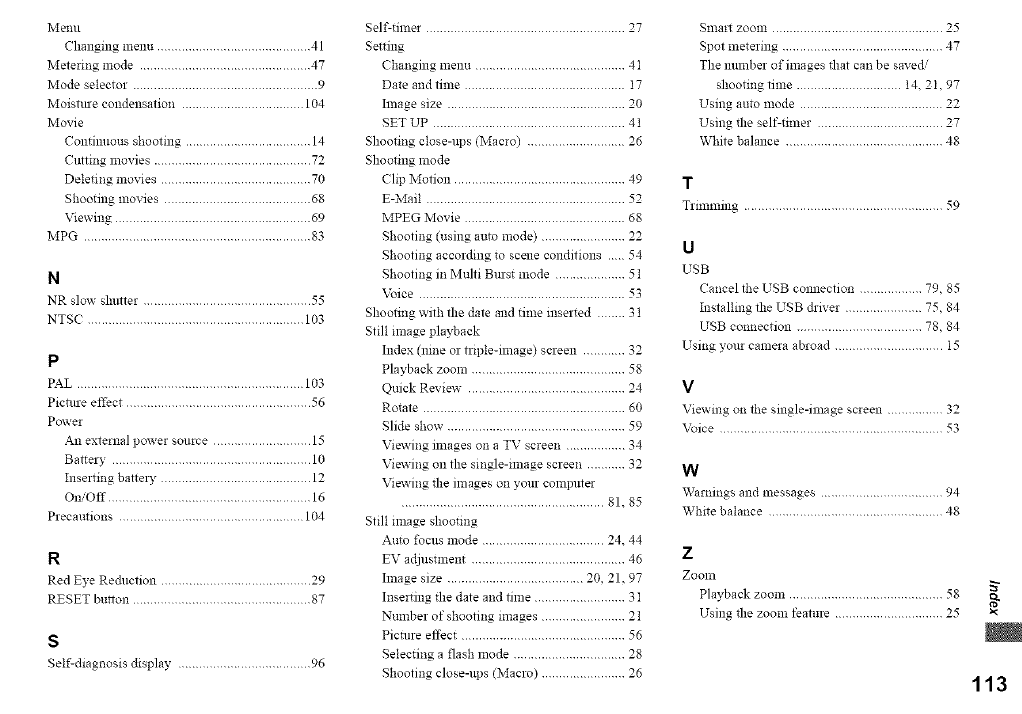
Men/i
Changingmenu............................................41
Meteringmode.................................................47
Modeselector.....................................................9
Moisturecondensation...................................104
Movie
Continuousshooting....................................14
Cuttingmovies.............................................72
Deletingmovies...........................................70
Shootingmovies..........................................68
Viewing........................................................69
MPG.................................................................83
N
NR slow" shutter ................................................ 55
NTS( .............................................................. 103
P
PAL ................................................................. 103
Picture effect ..................................................... 56
Power
An external power source ............................ 15
Battery ......................................................... 10
Inserting battel T ........................................... 12
On/Off .......................................................... 16
Precautions ..................................................... 104
R
Red Eye Reduction ........................................... 29
RESET button ................................................... 87
s
Self-diagnosis display ...................................... 96
Self-timer ......................................................... 27
Setting
(hanging menu ........................................... 4 I
Date and time .............................................. I7
Ilnage size ................................................... 20
SET UP ....................................................... 41
Shooting close-ups (Macro) ............................ 26
Shooting mode
(hp Motion ................................................. 49
E-Mail ......................................................... 52
MPEG Movie .............................................. 68
Shooting (using auto mode) ........................ 22
Shooting according to scene conditions 54
Shooting in Multi Burst mode .................... 51
Voice ........................................................... 53
Shooting with lhe date and time inserted ........ 31
Still image playback
Index (nine or triple-linage) screen ............ 32
Playback zoonl ............................................ 58
Quick Review ............................................ 24
Rotate .......................................................... 60
Slide show ................................................... 59
Viewing images on a TV screen ................. 34
Viewing on the single-ilnage screen ........... 32
Viewing the images on your eOlnlmter
.......................................................... 81.85
Still image shooting
Auto focus mode ................................... 24. 44
EV adjustment ............................................ 46
Ilnage size ....................................... 20, 21, 97
Inserting the date and time .......................... 3 I
Number of shooting mmges ........................ 21
Picture effect ............................................... 56
Selecting a flash mode ................................ 28
Shooting close-ups (Macro) ........................ 26
Smart zoom ................................................. 25
Spot metering .............................................. 47
The number of images _at can be save_
shooting time .............................. 14_ 2 I, 97
Using auto mode ......................................... 22
Using _e self-tinier .................................... 27
White balance ............................................. 48
T
Trimming ......................................................... 59
u
USB
Cancel the USB cmmection .................. 79, 85
Installing the USB chiver ...................... 75, 84
USB connection .................................... 78, 84
Using your camera abroad ............................... 15
v
Viewing on the single-linage screen ................ 32
Voice ................................................................ 53
w
Warnings and messages ................................... 94
White balance .................................................. 48
z
Zoonl
Playback zoom ............................................ 58
Using tlle zoom feature ............................... 25
113
m
m
m
m
m
co_
mm_
m
"4_m
m
m
_m m
m
m
m
_m
m
m
_m m
m
m
m
m
Printed on 100% recycled paper
using VOC (Volatile Organic
Compound)-free vegetable ail
based ink.
http://www.sony.net/
Sony Corporation Printed in Japan
Additional information on this product and answers to frequent /
]
asked questions can be found at our Customer Support Website. J
