Sony DSC S730 User Manual DIGITAL CAMERA Manuals And Guides L0802254
SONY Cameras, All Manual L0802254 SONY Cameras, All Owner's Manual, SONY Cameras, All installation guides
User Manual: Sony DSC-S730 DSC-S730 SONY DIGITAL CAMERA - Manuals and Guides View the owners manual for your SONY DIGITAL CAMERA #DSCS730. Home:Electronics Parts:Sony Parts:Sony DIGITAL CAMERA Manual
Open the PDF directly: View PDF ![]() .
.
Page Count: 31
SON3t:
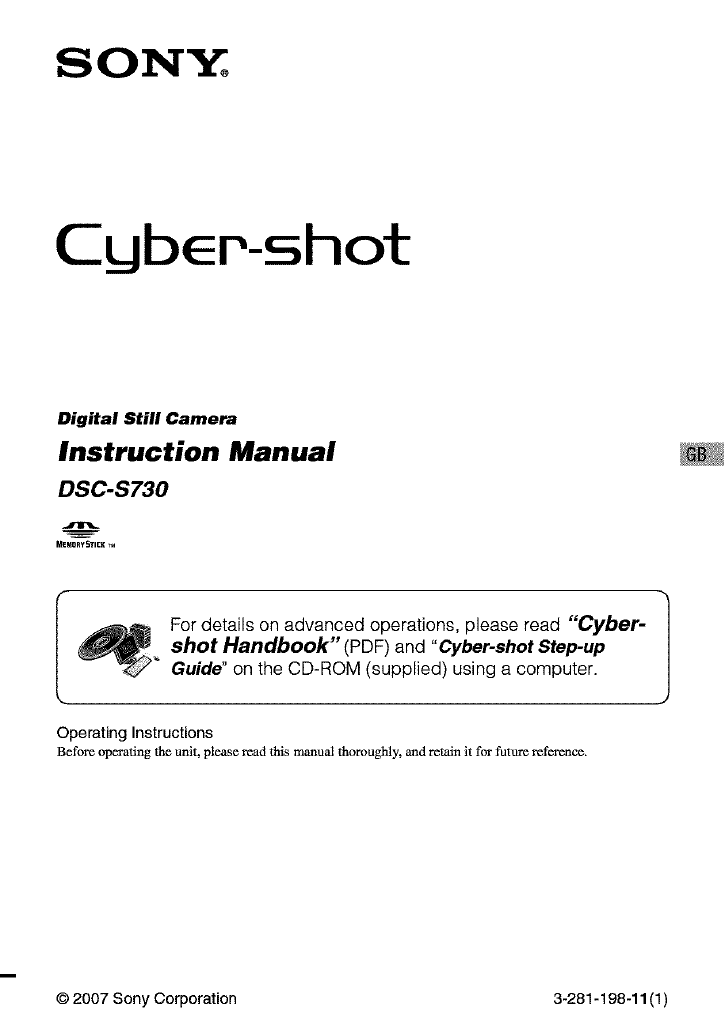
Cuber-shot
Digital Still Camera
Instruction Manual
DSC-S730
MeMeRY5TItK
For details on advanced operations, please read "Cyber-
,. shot Handbook" (PDF) and "Cyber-shot Step-up
Guide" on the CD-ROM (supplied) using a computer.
Operating Instructions
Before operatingthe unit, please read this manual thoroughly, midretain it forfuture reference.
© 2007 Sony Corporation 3-281-198-11 (1)
Owner's Record
Tile model and serial numbers are lock,ted on file
bottom. Record tile serial nunlbcr in the space
provided bdow. RetPr to these numbers whencvcr
you cull upon your Sony dealer regarding this
product.
Model No. DSC-S730
Serial No.
i D
To reduce fire or shock hazard, do
not expose the unit to rain or
moisture.
This symbol is imended to
alerl lhe user 1o the prcsence
of uninsulated "dangerous
voltage '' witllin tile
producl's enck)sul_ that may
be of suIlicient magnitude
to constitute a ri_k of
electric sllock to persons.
This symbol is imended to
alert the user to the presence
of important operating and
maintenance (servicing)
instructions in the literature
accompanying the
appliance.
IMPORTANT
SAFEGUARDS
For your protection, please read these safety
instructions completely belk_reoperating
the appliance, attd keep this manttal for
future reference.
Carefully observe all wantings, precautions
and instructions on the appliance, or the one
described in the operating instructions and
adhere to them.
IPower Sources
This set shouhl be opcrated only irom the type oi
powcr source indic_tted on lhe marking labeh If
you armnot sure of lhe lype of electrical power
supplied to your home, consult your dealer or
local power company. For those sets designed to
operale honl battcry power, or olher sources, relcr
to the operating instructions.
IPolarization
This set may be equipped with a pohu'ized _,c
power cord plug (a plug having one blade wider
than tile other).
This plug will fit into the power outlet only one
way. This is a sal_:ty Icaturc. If you are unable to
insert the plug fldly into the outlet, try reversing
the plug. If the plug should still lidl to lit, contact
your electrician to have a suitable outlet installed.
Do not delcat the sM;xly purpo_ of the polarized
plug by Iorcing it in.
IOverloading
DO nol oYerload wall Ollllels, eXlellsh)n cords or
convenience receptacles beyond their capacity,
since lhis can resuh ill fire or electric shock.
IObject and Liquid Entry
Never push objects ot any kind into tile set
dnough openings as they lnay touch dmlgerous
voltage points or short out paris that could result
ill a lire or electric shock. Never spill lktuid ol ally
kind on tim set.
IAttachments
DO not IISe _lltachlnenls llOt recollll/lellded by tile
l/lanlliaCtllrer, as they inay cause hazards.
Cleaning
Unplug tile set IYom tile wall outlet betknv
clemling or polishing it. Do not use liquid clemlers
or aerosol cleaners. U_ a clofll lightly dampened
with water lor cleaning file cxterior of tile sol.
Water and Moisture
Do nol/ise power-line operaled sels llear wal_r
lbr cxmnple, near a bathtub, washbowl, kitchen
sink, or laundry tub, in a wet basenlent, or near a
swimnling pool, etc.
Power-Cord Protection
Route file power cord so tlmt it is not likely to be
walked on or pinched by items placed upon or
against them, paying particular attentkm to tile
plugs, receptacles, and the point where the coM
exits lrom tile appliance.
Accessories
Do llOt place tile set Oll illl/instable C_ll't,stand.
tripod, bracket, or table. Tile _t may ball. causing
serious injury to a child or an adult, and serious
damage to tile set. Use only a cart. stand, tripod.
bracket, or table rcconnnended by file
inanll filc[ urer,
Ventilation
Tile slots and openings in tile cabinet are provided
lbr necessary ventilation. To ensure reliable
operalion of the set, and lit protect it fiOll/
overheating, these slots and openings must never
be blocked or covered.
Never cover file slots and openings will1 a cloth
or olher nlaterials.
Never block lhe slols and opcnings by placing
tile set on a bed, sofil, iilg, or (tiller sinlifiu
silri_lce,
Never place tile sol in a confined space, such as a
bookcase, or buih-in cabinel, unless proper
ventilation is provided.
Do not place tile sel lle_lror over a radiator or
heal register, or where it is exposed to direct
sunlighl.
Lightning
For added pl'otcctkm lor this set during a lightning
storm, or when it is lell unattcnded and unused lor
long periods of time. unplug it from tile wall
oullel and disconnect file antenna or cable sysleln.
This will prevent damage to tile sel due to
fighming and power-line surges.
Damage Requiring Service
Unplug tile _t lrom tile wall outlet and rclcr
servicing m qmditied service personnel under file
lbllowing conditions:
When the power cord or plug is damaged or
Irayed.
If liquid has been spilled or objects have fidlen
into tile set.
If tile set has been exposed tit rain or water.
If the set has be_n subject to excessive shock by
being dropped, or the cabinet has beml damaged.
If file set does not operate normally when
lollowing file operating instructions. Adjusl only
fllose controls that arc specified in the operating
instructions. Improper adjustment of other
controls may result in damage and will often
require extcnsive work by a qualified technician
to rcstore tile sm to norn/al operation.
When the sol exhibits a distinct change ill
per%rmance this indicates a need lbr service.
Servicing
Do not attclnpt to service tile set yourself as
opellillg or rcnlo_, illg covers Inay expose yo/i to
dangerous voltage or other lmzaMs.
Relcr all servicing to qualified _rvice personncl.
Replacement parts
When replacemcnt parts are rcquircd, be sure tile
service technician has used rcplacelnent parts
specified by tile nlanulzlcltlrcr that have tile salne
characteristics as file original paris.
Unautfiorized substitutions may result ill fire.
electric shock, or other hazaMs.
Safety Check
Upon conlpletion of any selMcc or repairs to tile
set. ask tile selvice technician to perloln_ routine
saiPty checks (_Jsspecified by tile manuh_cmrer)
to determine that file set is ill sale operating
conditkm.

Readthis first
Do not expose tile batteries to excessive heat such
as sunshine, lirc or tile like.
This device complies v¢ith Part 15 of the FCC
Rules. Operation is subject to the lbllowing two
conditions: (1) This devicc may not cause harmful
intericrencc, and (2) this device must accept any
interlcrence received, including inlerlcrcnce thal
may cause undesired operation.
CAUTION
_u are cautioned thal ally changes or
modilica6ons not expressly approved in this
manual could void your aulhority to operale this
equipmenl.
Note:
Tills equipment llas becn tested and iound to
comply witll tile limits lot a Class B digilal
device, pursuanl to Parl 15 of the FCC Rules.
These limits are designed to provide rcasonable
protcc6on against harmlhl interlcrcnce in a
residential inslallation. This equipmenl generates,
uses. and can radiate radio liequency energy and,
if nol installed and used in accordance with lhe
instructions, may c_mse harmihl interlcrcnce to
radio COllllllllnicatiollS. Ho;vc,, m', there is no
guarantee that interl_:rence will not occur in a
particular inslallation. If this equipment does
cause harmfifl interi_:rence to radio or telcvision
reception, wllich call be determined by turning lhe
equipmcnl oil and on. the user is encouraged to
try to correct tile inlertcrencc by one or ii/orc of
tile h)llowing measures:
Reorient or relocate the rccciving antenna.
Increase lhe separation belween lhe
equipment and rcceivm.
Connect lhe equiplnenl into an oullct on a
circuit dil]crcnt liom that lo which tile
receiver is collnected.
Consuh file dealer or an experienced radio/TV
technician lbr help.
Tile supplied interl_ce cable musl be used with lhe
equipmenl in order to comply with tile limils lor a
digital dc_,ice pursuanl 1o Subparl B of Part 15 of
PCC Rules.
Perchlorale Malerial - special llandling may apply.
See
www.dt so.ca, gov/h azardouswasle/perchlor ale
Perchlorate Malerial : Lithium baltcry conlains
perchlorale.

SJ"Jl "
This product has been tested and lound compliant
with the limits set out in the EMC Directive lbr
using connection cables shorter than 3 meters (9.8
lla_t).
Attention
The electromagnetic liekls m tile specific
liequencies may influence the picture and sound
of this unit.
Notice
It static electricity or electromagnetism causes
data translcr to discontinue midway (lail), restart
the applicg_tion or disconnect and connect tile
colnmunication cg_ble (USB, etc.) again.
Disposal of Old Electrical &
Electronic Equipment (Applicable
in the European Union and other
European countries with separate
collection systems)
This symbol on tile product or on its packaging
indicates ttlat this product slmll not be treatcd as
household waste. Instead it shall be banded over
to file applicable collection point lor the recycling
of electrical and electronic equipmcnt. By
m]suring this product is disposed of correctly, you
will help prcvcnt potential negative con_quences
Ibr file environment and human heahh, which
could otherwise be caused by inappropriate waste
handling of this product. The recycling of
materials will help to conscp.'e natural resources.
For more detailed inlormation about recycling of
this product, please contact your local Civic
Oltice, your household waste disposal _lxicc or
the shop where you purcha_d the product.
Disposal of waste batteries
(applicable in the European
Union and other European
countries with separate
collection systems)
This sylnbol on the battery or on tim packaging
indicates thai the battery provided with this
product shall not be treated as household waste.
By ensuring these batteries are disposed of
corlvctly, you will help plvvent potentially
negalive consequellces l_lr tile envirollnlelll and
lmman llealth which could otherwise be caused by
inappropriate waste handling of the battery. The
recycling of the materials will help to conserve
natural rcsources.
In ca_ of producls tlmt Ibr sat_:ty, perlbrmance or
data inlegrily reasons require a perlnanent
connection wilh an incorporated battery, this
batlery should be replaced by qualified service
stall only.
To ensure that the batte W will be trcaled properly,
hand over lhe producl al end-ol-lili: to the
applicable colleclion point for the recycling of
electrical and electronic equipmenl.
For all other batteries, plea_ view the section on
how to remove tile balte W hom the product sati:ly.
Hand lhe baltel3' over to file applicable collection
point Ibr lhe recycling of waste balteries.
For more detailed informalion about recycling of
tills product or battery, please contact your local
Civic Oltice, your household waste disposal
service or tile shop where you purchased tile
product.
Notice for the customers in the
countries applying EU Directives
Tile nlmmlacturcr of tills product is Sony
Corporation. 1-7-1 Konml Minato-ku Tokyo, 108-
0075 Japan. Tile Aulhorized Represenlati_e Ior
EMC and product satPty is Sony Deutschland
GmbH. Hedelfinger Strasse 61,70327 Stuttgart,
Gernlany. For any service or guzlranlee matters
plea_ rclcr to the addrcsses given in sq)arate
service or guaranl_ docllnlenls.
Notes on usingyourcamera
Internal memory and "Memory
Stick Duo" back up
Do not ttlrn oil the camera, relnove the batteries,
or remove the "Memory Stick Duo" while file
access lamp is lit. Otllerwi_, the internal mcmoly
data or "Memoly Stick Duo" may be damaged, Be
sure to muke a buckup copy to protect your data,
Notes on recording/playback
• Bel_n'c you start recording, nlake a trial
rccoMing to m_Jkesurc tllat tile clmlera is
working correctly.
• The camera is neither dust-prooL nor splash-
prool, nor water-proof, Read "Precautions"
(page 29) belore operating the camera,
• Avoid exposing the camera to water. If water
enters inside tile camera, a mallhnction may
occur. In some cases, tile camera cannot be
repaired.
• Do not ainl tile c_mlcra at tile sun or other bright
light. It may cause the mallhnction of the
cglnlera.
• Do not u_ the camera near a location that
generates strong radio waves or emits radiation.
Otherwise, the camera nlay not properly record
or play back images.
• Using the camera in sandy or dusty locations
nlay callse lnalflmctions.
• If inoislllrc condensation occurs, remove it
belbre using the camera (page 29).
• Do not shake or strike file camera. It may cause
a malfimction and you may not be able to record
images. Furthernlolv, tile recording media may
become unusable or image data may be
damaged.
• Clean the flash surlacc belPre use. The heat of
flash emission may cause dirt on the flash
surli,ce to become discolored or to stick to tile
flash surlnce, rc_,uhing in insull_cient light
emission.
Notes on the LCD screen and
lens
• Tile LCD screen is manuluctured using
extremely high-precision technology, so over
99.99% of the pixels are operational lot
ell_:ctive use. However, some tiny black and/or
bright dots (white, red, blue or green) may
appeal on the LCD screen. These dots arc a
normal rcsuh of the manuli_cmring process, and
do not allcct the recording.
• When file batte W level becomes low, the lens
might stop moving, lnsmt new batteries or
charged Nickel-Metal Hydride batteries and turn
on the camera again.
On image data compatibility
• The camera conlorms with DCF/Design nile
Ior Camera File system) universal standard
established by JEITA (Japan Electronics and
Inlormation Tcclmology Industries
Associalion).
• Sony does not guarantee that the camm;a will
play back images recorded or edited with other
equipmenL or that other equipment will play
back images recorded with the canlera.
_Warning on copyright
Television progranls, lihns, videotapes, and oilier
materials may be copyrighted. Unauthorized
recording of such materials may be contral T to tile
i?rovisions of the copyright laws.
No compensation for damaged
content or recording failure
golly CanllOt conlpensiltc lor lililure to record or
loss or damage of rccorded content due to a
mall_mction of tile camera or recording media,
etc.

Table of contents
IMPORTANT SAFEGUARDS ..................................................................... 2
Read this first ............................................................................................ 4
Notes on using your camera .................................................................... 6
Getting started ................................................................................. 8
Checking the accessories supplied ......................................................... 8
1 Inserting the batteries/a "Memory Stick Duo" (not supplied) ................ 9
2 Turning the camera on/setting the clock ............................................. 11
Shooting images easily ................................................................. 12
Mode dial/Zoom/Flash/Macro/Self-timer/Display/Image size ................. 13
Viewing/deleting images ............................................................... 15
Indicators on the screen ............................................................... 17
Changing the settings - Menu/Setup .......................................... 19
Menu items ............................................................................................. 20
Setup items ............................................................................................. 21
Enjoying your computer ............................................................... 22
Supported Operating Systems for IdSB connection and application
software (supplied) ................................................................................. 22
Viewing "Cybepshot Handbook" ........................................................... 23
Battery life and memory capacity ................................................ 24
Battery life and number of images you carl record/view ........................ 24
Number of still images and recording time of movies ............................ 25
Troubleshooting ............................................................................. 27
Batteries and power ............................................................................... 27
Shooting still images/movies .................................................................. 28
Viewing images ...................................................................................... 28
Precautions .................................................................................... 29
Specifications ................................................................................ 30
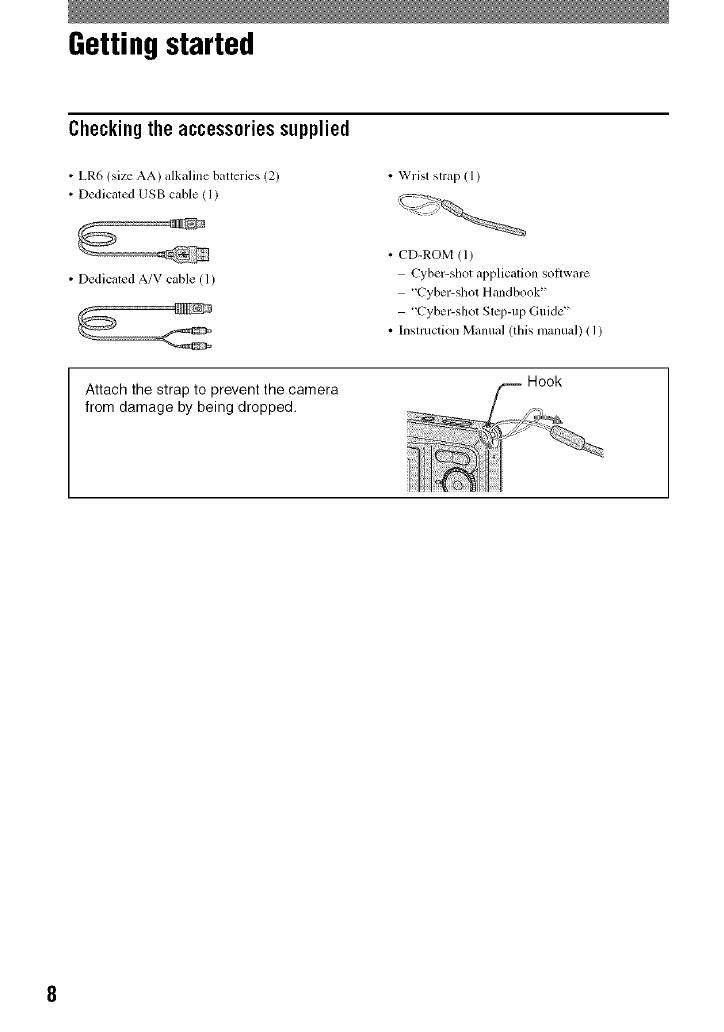
Getting started
Checkingthe accessoriessupplied
• LR6 (siz__ AA) alkaline batteries (2)
• Dedicaled USB cable (1)
• Wrist strap ( 1)
• Dedicated A/V cable ([)
• CD-ROM (1)
Cyber-shot applicalion soflwarc
"Cyber-shot Handbook"
'Cyber-shot Slq)-up Guide _'
• Inslmction Manual (this manual) (1)
Attach the strap to prevent the camera
from damage by being dropped.

1 Inserting the batteries/a "Memory Stick Duo" (not supplied)
OOpen the battery/"Memory Stick Duo" cover.
OInsert the "Memory Stick Duo" (not supplied) all the way in until it clicks.
Match +/- and insert.
Close the battery/"Memory Stick Duo" cover.
When there is no "Memory Stick Duo" inserted
The camera records/plays back ima._es usin_ tile internal menlory (approx. 22 MB).
Batteries you can and cannot use with 'our camera
LR6/size AA) alkaline balteries O O
HR 15151:HR6 (size AA) Nickel-Metal Hydride O O
balteries
ZR6 (size AA) Ox} Nickel Primary Ballery C)
Manganese balleries '_
Lilhium batteries*
Ni-Cd batleries =
Operating periormance cannot be ensured if vohage drops or other problems are catlsed by tile nature oi
the baltery.
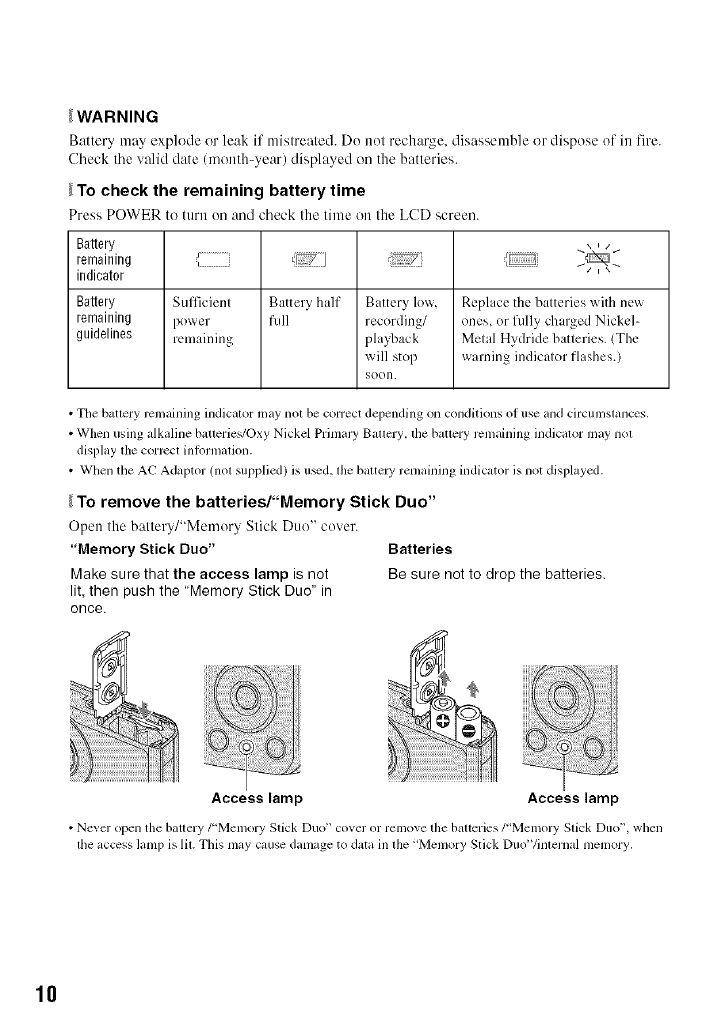
_WARNING
Battery may explode or leak if mistreated. Do not recharge, disassemble or dispose of in fire.
Cbeck tbe ",','diddate (month-year) displayed on the batteries.
_To check the remaining battery time
Press POWER to turn on and cbeek the time on the LCD screen.
Battery
remaining ,_ _ ] J_...............
indicator
Battery Sull]cienl Battery half Battery low, Repl ice the balteries with new
remaining power full recording/ ones or fully charged Nickel-
guidelines remaining pl uback Melal Hydride batleries. (The
will stop warning indicalor flashes.)
goon.
• The battery remaining indicator may not be correct depending on conditions of use and circumstances.
• When using alkaline batterie_+/Oxy Nickel Primal3' Ballery. the batlery rcmaining indicator may nol
display the correct inlormation.
• When the AC Adaptor (nol supplied) is u_d, lhe baltely remaining indicator is not displayed.
_To remove the batteries/"Memory Stick Duo"
Open the battery/"Memory Stick Duo" cover.
"Memory Stick Duo" Batteries
Make sure that the access lamp is not Be sure not to drop the batteries,
lit, then push the "Memory Stick Duo" in
once.
Access lamp Access lamp
• Never open the battery/"Memory Stick Duo" cover or remove the batteries/'Memory Stick Duo", when
the access lamp is lit. This may cause damage to data in the 'Menlory Stick Duo'Vinternal memory,
10
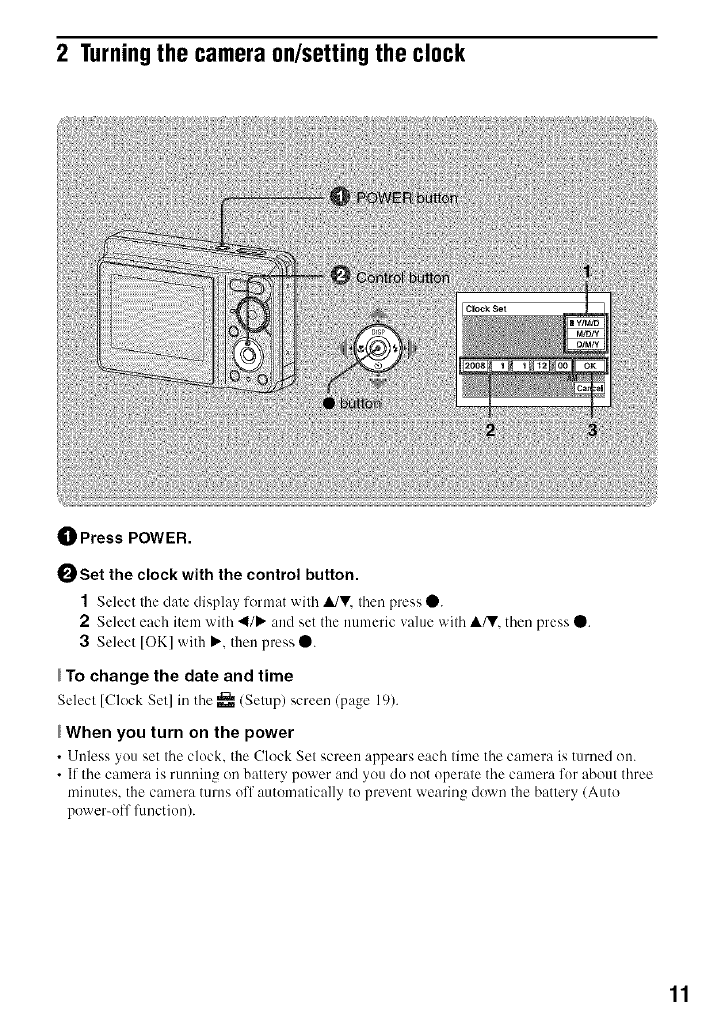
2 Turningthe camera on/setting the clock
_]_ Press POWER.
0Set the clock with the control button.
1Select the date display lorumt with ,it/V. then press 0.
2 Select each item with 4/P" and set the numeric value with A/V. then press 0.
3Select [OK] with P.'. then press 0.
To change the date and time
Select [Clock Set] in tile _ (Setup) screen (page 19).
When you turn on the power
• Unless you set tile clock, the Clock Set screen appears each time the camera is turned on.
• If the camera is running on battery power and you do not operate the camera for about three
minutes, the camera turns off automatically to prevent wearing down the battery/Auto
power-off flmctiou).
11
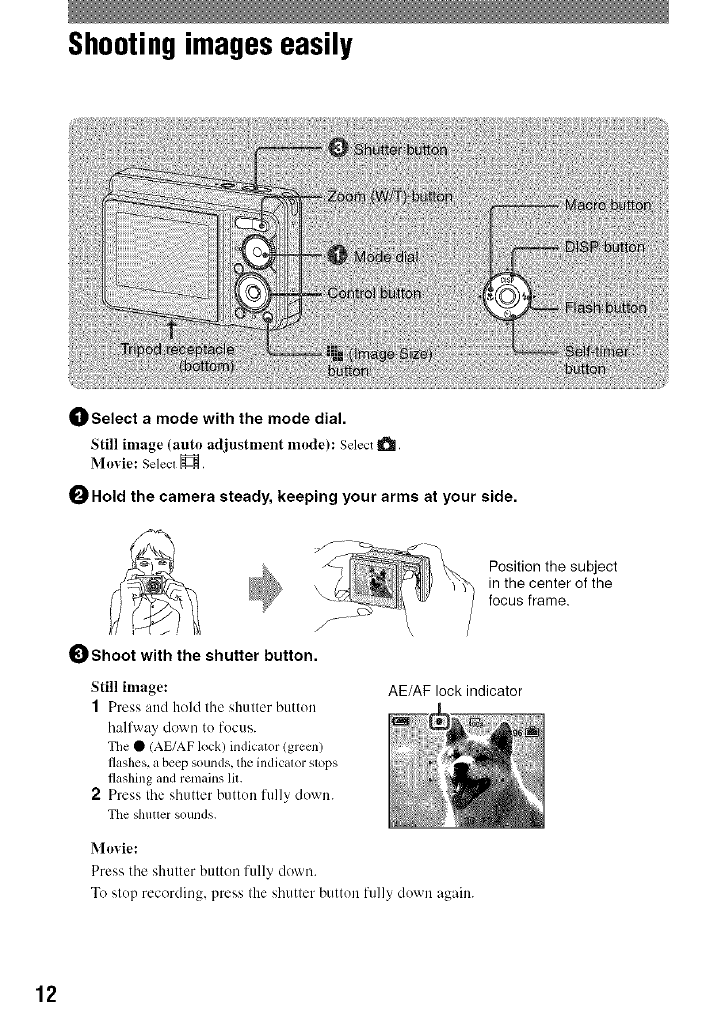
Shootingimageseasily
OSelect a mode with the mode dial.
Still image (auto adjustnlent nlode): Select _.
Movie: Select H.
0Hold the camera steady, keeping your arms at your side.
J
Shoot with the shutter button.
Still image:
1Press attd hold tile shutter buttun
hallM'ay down to focus.
The • (AE/AF lock) indicator (green)
flashes,a beepsounds, theindicator sl_lps
flashing and remains lit.
2 Press the shutter buttuu fully down.
The shuuer sounds.
Position the subject
in the center of the
focus frame.
AE/AF lock indicator
Movie:
Press the shutter button fully down.
To slup recording, press Ihe shutler buttun fully duwn again.
12
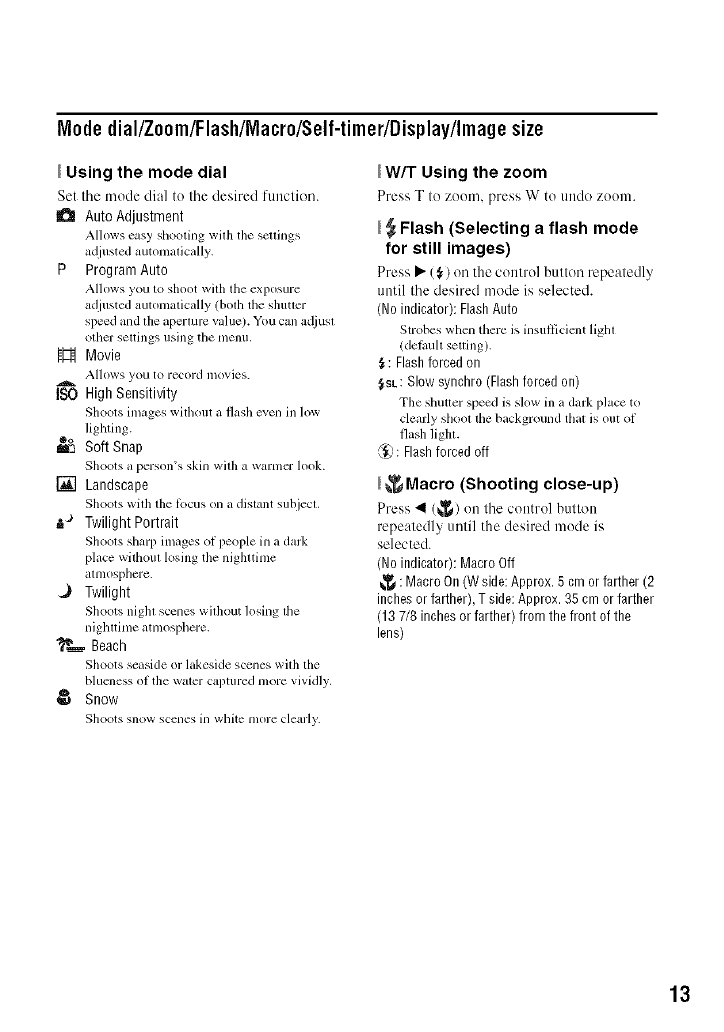
M0de dial/Zoom/FlashlMacro/Self-timer/Display/Imagesize
Using the mode dial
Set the nlode dial to the desired ftutction.
a Auto Adjustment
Allows easy shooting willl tile scllings
a@lsted automatic_dly.
P Program Auto
Allows you to shoot with tile exposure
adjusted automatically (bolh the shutler
speed and the aperture value). You can Miusl
other sellings using tile [/lenlL
H Movie
Allows yo/I to record inovies.
ISO High Sensitivity
Shoots images wifl/out a flash even in low
lighting.
do
m'_ Soft Snap
Shoots a person's skin with a warmer h)ok.
[] Landscape
Shoots with the lbcus on a distant subjecl.
..a Twilight Portrait
Shoots sharp images of people in a dal&
place withoul losing tile nighttime
atmosphere.
Twilight
Shoots night scenes without losing the
nighttime atmosphere.
_.._- Beach
Shoots seaside or lakeside scenes with tile
blueness of the water captured more vividly.
@ Snow
Shoots snow scelles ill white more clearly.
_W/T Using the zoom
Press T to zoom, press W to tlndo zoon].
_Flash (Selecting a flash mode
for still images)
Press • (_) on tile control btltton repeatedly
until tile desired mode is selected.
(No indicator): Flash Auto
Strobes when there is insullicient light
/delhuh setting).
_: Flash forced on
_SL: Slow synchro (Flash forced on)
Tile shutter speed is slow ill a dark place to
clearly shool tile background that is ()tit of
flash light.
@: Flash forced off
_Macro (Shooting close-up)
Press 411(_) on tile control button
repeatedly until the desired mode is
selected.
(No indicator): Macro Off
_: Macro On (W side: Approx. 5 cm or farther (2
inches or farther), T side: Approx. 35 cm or farther
(13 7/8 inches or farther) from the front of the
lens)
13
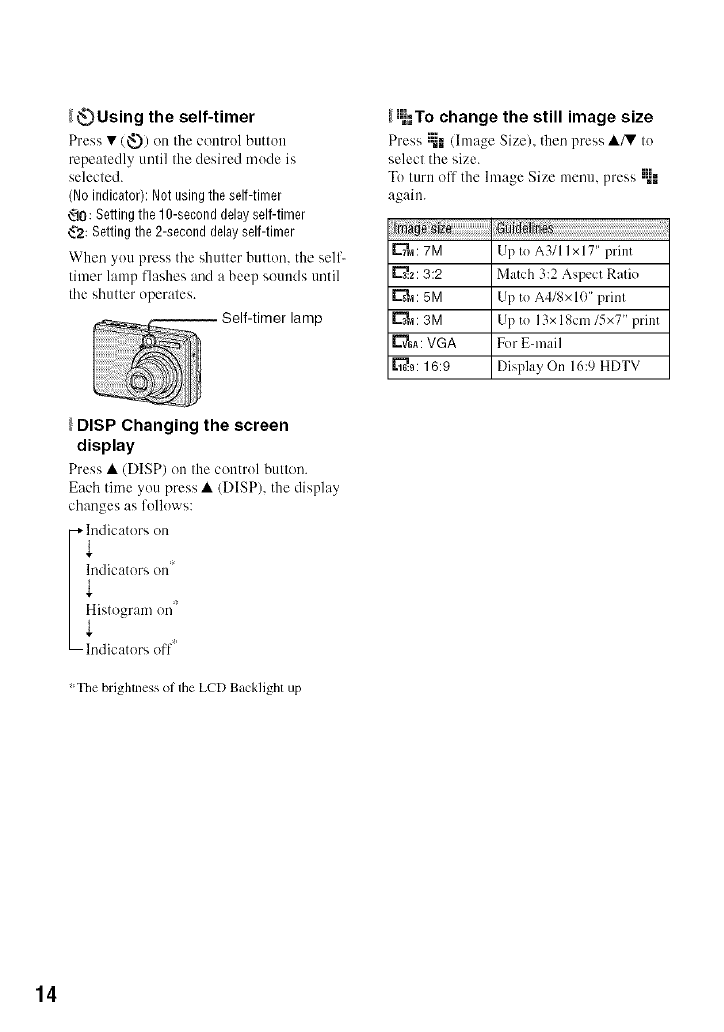
_Using the self-timer
Press • (_.)) on the control button
repeatedly until the desired mode is
selected.
(Noindicator):Notusingtireself-timer
_0: Settingthe10-seconddelayself-timer
_.'2:Settingthe 2-seconddelayself-timer
When you press tile shutter button, the self-
timer lamp flashes and a beep sounds until
the shutter operates.
lamp
_I_=,Tochange the still image size
Press ;_-.(Image Size), then press •/3? to
select the size.
Toturn off the hnage Size menu, press ;_-"
again.
_a : 7M Up to A3/I I x 17" print
_..2:3:2 Match 3:2 Aspect Ratio
L"_: 5M Up to A4/gx10" print
_'_,a: 3M Up to 13x 18cm/5xT' print
E'_GA:VGA For E-mail
[_.9:16:9 Display On 16:9 HDTV
DISP Changing the screen
display
Press • (DISP) on tile control button.
Each time you press • (DISP), the display
changes as follows:
i indicators on
ndicators on
!227/
The brightness of the LCD Backlighl up
14
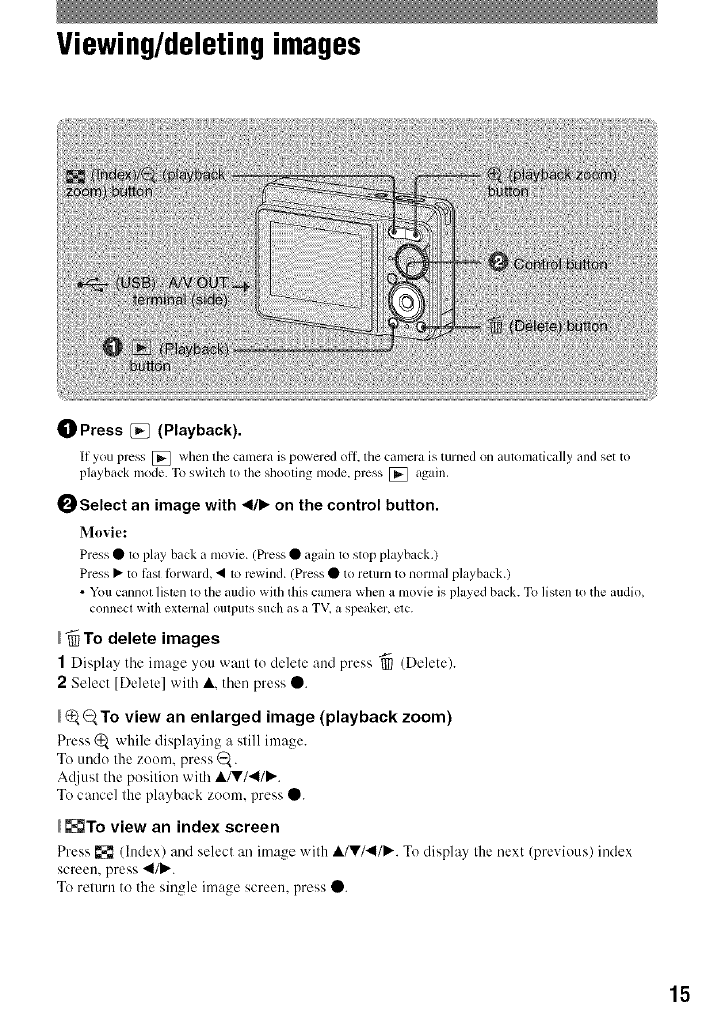
Viewing/deletingimages
OPress [_ (Playback).
If you press [] when the camera is powered off, the cumera is turned on automatically und set to
playb+tckmode.To switch to the sllooting mode, press [] again.
OSelect an image with 41111,,on the control button.
Movie:
Press •to pl+ty back a movie. (Press • +tgain to stop playback.)
Press • to t_,sttbrward, • to rewind. (Press • to return to normal playback.)
• Youcunnot listen to the audio witl/this camera when a movie is played Ntck. To listen m the mldio,
connect with extermdoutputs such+tsa TV,a spe+tker,clc.
_To delete images
1Display the image you want to delete and press "_ (Delete).
2Select [Delete] with A, then press O.
_To view an enlarged image (playback zoom)
Press (_ while displaying a still image.
To undo the zoom. press _.
Ac{iust the position with A/V/4I/P,..
To cancel the playback zoom, press O.
_To view an index screen
Press [{{_(Index) and select an image with A/V/.,II/P,..Todisplay thenext (previous) index
screen, press 4Ill,,..
Toreturn to the single image screen, press O.
15
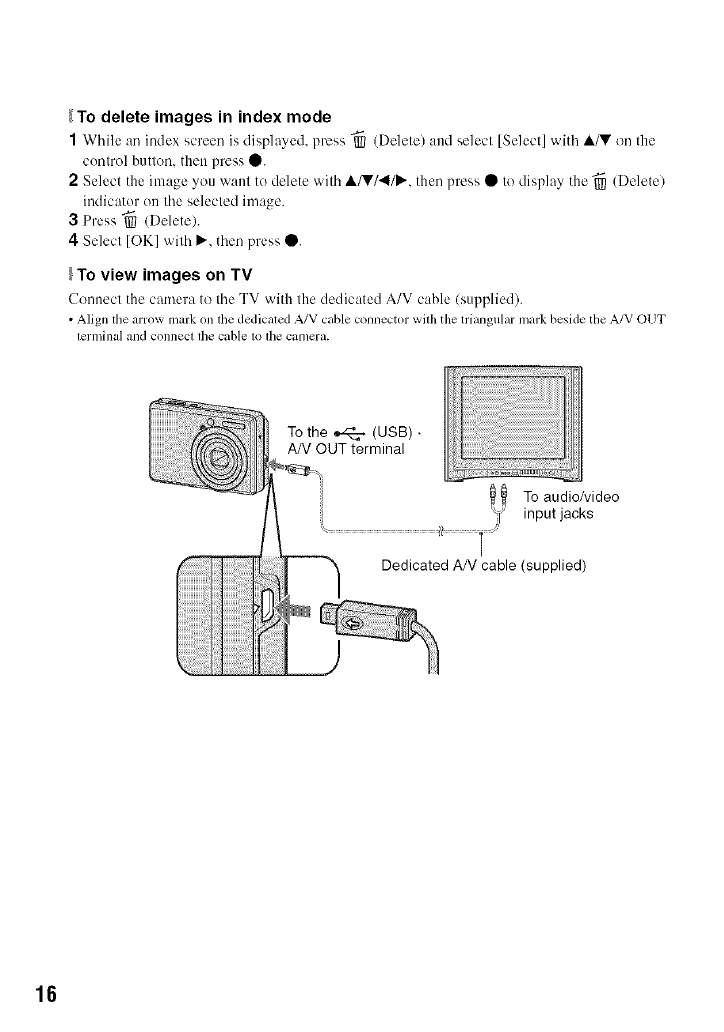
_To delete images in index mode
1While an index screen is displayed, press "_ (Delete) and select [Select] with A/V on the
control butten, then press •.
2Select the image you want to delete with A/V/4/P,'. then press • to display the "_ (Delete)
indicator on the selected image.
3 Press _ (Delete).
4 Select [OK] with P,'. then press •.
To view images on TV
Uennect the camera to the TV with the dedicated A/V cable (supplied).
•Align tile arrow mark ontile dedicaled A/V cable connector wilh the triangular mark beside tile A/V OUT
lerminal and connect lhe cable1o lhe camera.
To the _ (USB) •
AN OUT terminal
To audio/video
input jacks
Dedicated AN cable (supplied)
16
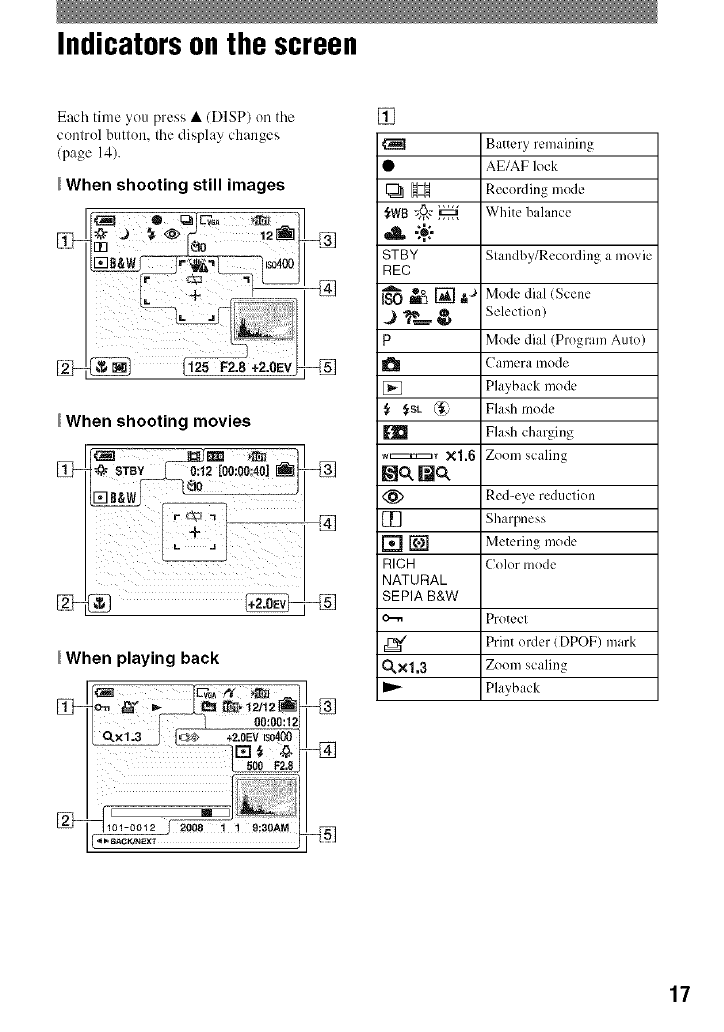
Indicators on the screen
Each time you press • (DISP) on tile
conlrol butlon, tile display changes
(page 14).
_When shooting still images
When shooting movies
_When playing back
[]-_
_BAC_NEXT
[]
_H
,A -:+:-
STBY
REC
P
{, f,SL (_
EID
_.:_:z_ r xl.6
Nc_ Nc_
m
rnN
RICH
NATURAL
SEPIA B&W
0.xl,3
Battery remaining
AE/AF lock
Recording mode
White balance
Standby/Recording a movie
Mode dial (Scene
Selection)
Mode dial (Program Auto)
Camera [ilode
Playback mode
Flash mode
Flash charging
Zoom scaling
Red-eye reduction
Sharpness
Metering mode
Color mode
Protect
Print order (DPOF) mark
Zoom scaling
Playback
17
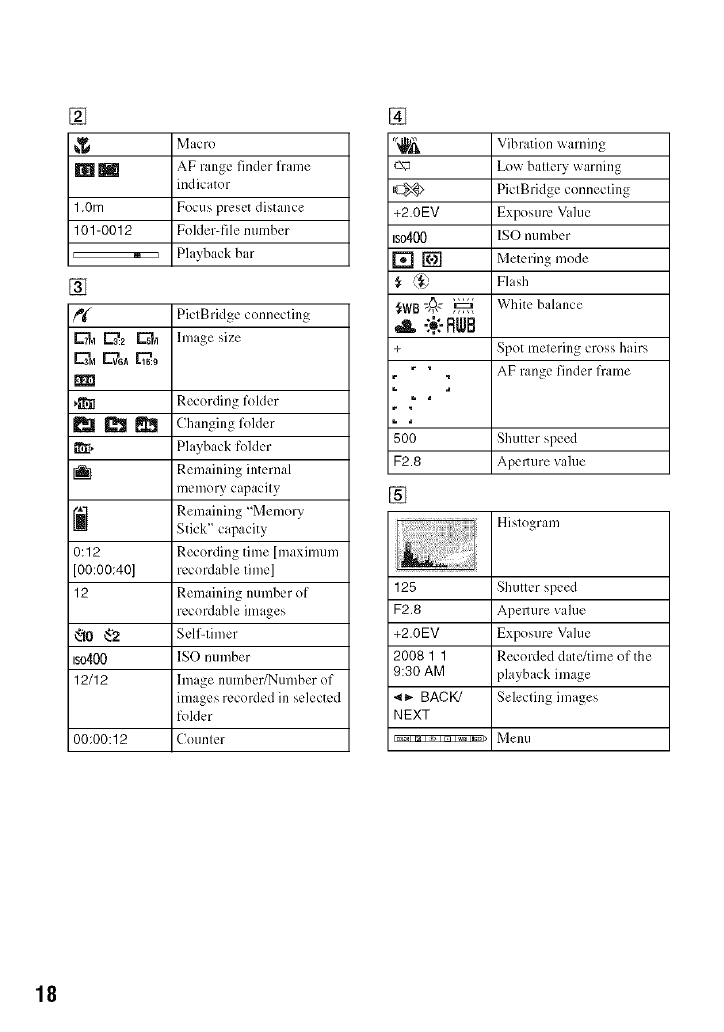
[]
Macro
_ AF range finder frame
indicator
1,0rn Focus preset distance
101-0012 Folder-file number
,E::::::::::::::::_:Z ,Playback bar
[]
_ PictBrklge connecting
_.'z _ hnage size
_il Recording folder
_ _ Changing folder
_[, Playback folder
I_1 Remaining internal
memory capacity
_] Remaining "Memory
Stick" capacity
0:12 Recording time [maximum
[00:00:40] recordable time]
12 Remaining number of
recordable images
_10 _'2 Self-timer
IS0400 ISO number
12/12 linage number/Number of
images recorded in selected
folder
00:00:12 Counter
[]
_-N_
+2.0EV
Bo400
,A -:._:-RWB
+
500
F2.8
[]
Vibration warning
Low battery warning
PictBridge connecting
Exposure Vahle
ISO number
Metering mode
Flash
White balance
Spot metering cross hairs
AF range finder frame
Shutter speed
Apemlre value
Histogram
128 Shutter speed
F2,8 Apemlre value
+2.0EV Exposure Vahle
2008 1 1 Recorded d itc/time of the
9:30 AM playback image
_1_- BACK/ Selecting images
NEXT
Im_I _, m wa Iso>l _ell/I
18
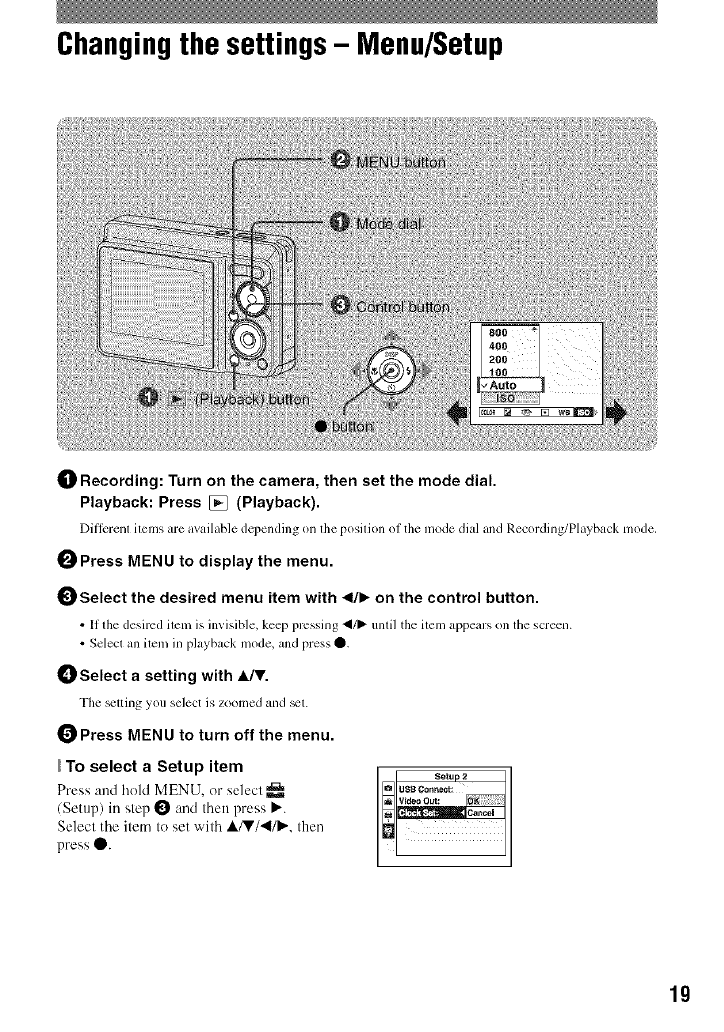
Changingthe settings- Menu/Setup
_]_ Recording: Turn on the camera, then set the mode dial.
Playback: Press [] (Playback).
Different items are available depending on the position ol the mode dial and Recording/Playback mode,
0Press MENU to display the menu.
Select the desired menu item with 41/1_on the control button.
•[1 fl_e desired iteln i'_ inviqble, keep pressing _/1_ until the iteln appears on the screen.
• Select an iteln in playback mode, and press O.
_) Select a setting with A/T.
The _tting you select is zoomed and _t.
Press MENU to turn off the menu.
To select a Setup item
Press and hold MENU, or select
/Setup) in step 0 and then press P".
Select the item to set with A/V/'4/P,'. then
press O.
Setup 2
USB C_n_ect:
19
Fordetailsonthe operation _page lg
Menu items
The available menu items vary depending on the n]ode setting (shoeting/vie',_ ing), and the
mode dial pesitien in the shooting mede. Only the available items are displayed on the screen.
Shooting menu
COLOR (Color Mode) Changes the vividness of the image or adds special effects.
[] EV Adjusts Exposure.
(Focus) Changes the focus method.
[] (Metering Mode) Selects the metering mode.
WB (White Bal) Adjusts the color tones.
ISO Selects a luminous sensitivity.
Mode (REC Mode) Selects the continuous shooting method.
5± (Flash Level) Adjusts the amount of flash light.
[[_ (Sharpness) Adjusts the sharpness of the image.
(Setup) Changes Setup items.
Viewingmenu
ill (Folder) Selects the folder for viewing images.
o-,, (Protect) Prevents accidental erasure.
DPOF Adds a Print order mark.
rl_ (Print) Prints images using a PictBridge compliant printer.
(Slide) Plays back a series of images.
-------------------E_(Resize) Changes the image size of a recorded image.
rl_ (Rotate) Rotates a still image.
(Setup) Changes Setup items.
Trimming Records an enlarged image (Available only for playback zoom).
2O
Fordetai/sonthe operation _page lg
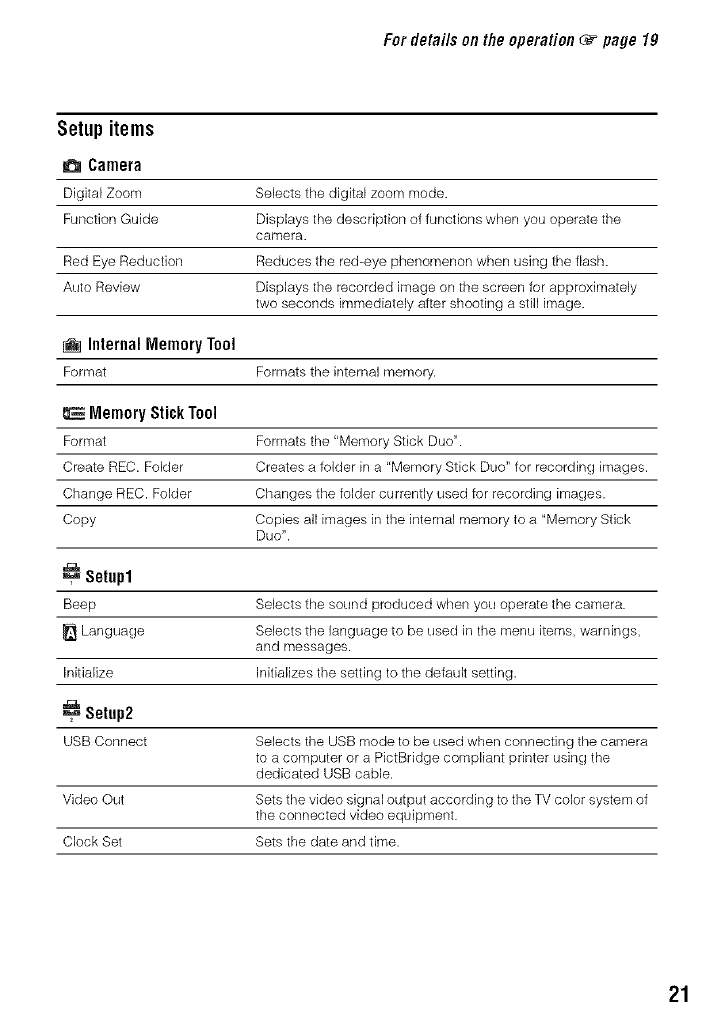
Setup items
Camera
Digital Zoom Selects the digital zoom mode.
Function Guide Displays the description of functions when you operate the
camera.
Red Eye Reduction Reduces the red-eye phenomenon when using the flash.
Auto Review Displays the recorded image on the screen for approximately
two seconds immediately after shooting a still image.
InternalMemoryTool
Format Formats the internal memory.
EMemoryStickTool
Format Formats the "Memory Stick Duo".
Create REC. Folder Creates a folder in a "Memory Stick Duo" for recording images.
Change REC. Folder Changes the folder currently used for recording images.
Copy Copies all images inthe internal memory to a "Memory Stick
Duo".
_=_Setup1
Beep Selects the sound produced when you operate the camera.
Language Selects the language to be used in the menu items, warnings,
and messages.
Initialize Initializes the setting to the default setting.
Setup2
USB Connect Selects the USB mode to be used when connecting the camera
to a computer or a PictBridge compliant printer using the
dedicated USB cable.
Video Out Sets the video signal output according to the TV color system of
the connected video equipment.
Clock Set Sets the date and time.
21
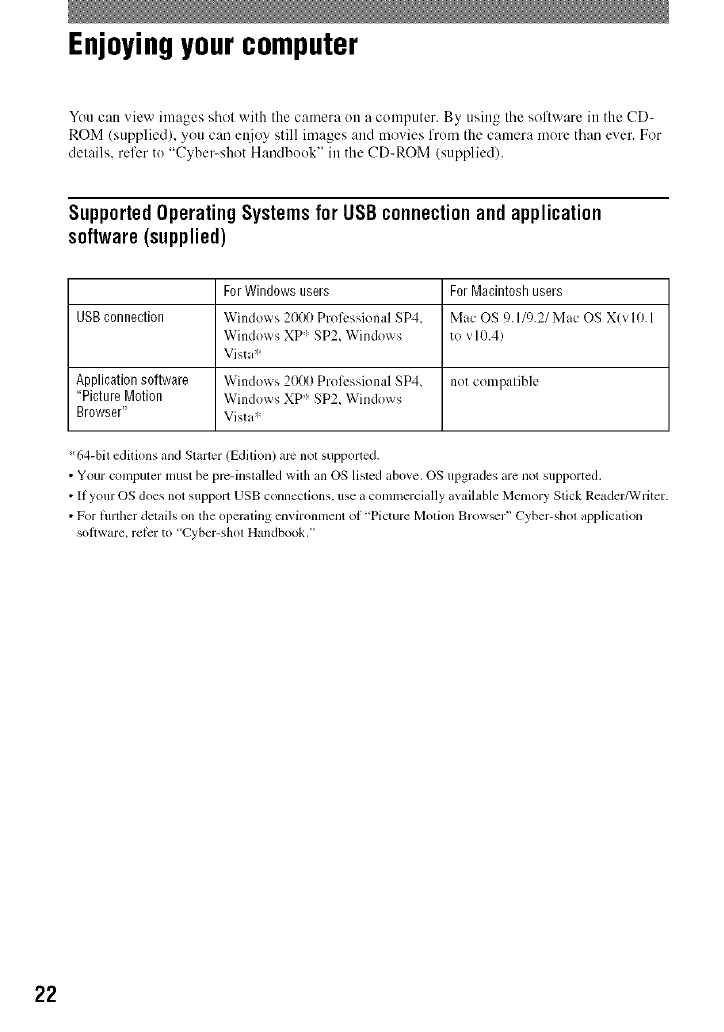
Enjoyingyour computer
You can view images shol with the camera on a computer. By using the software in the CD-
ROM/supplied), you can et\ioy still images and movies from the camera more than exer. For
delails, refer to "Cyber-shot Handbook" in the CD-ROM (supplied).
SupportedOperating SystemsforUSBconnectionand application
software(supplied)
ForWindowsusers ForMacintoshusers
USBconnection Windows 2000 Proli:ssional SP4, Mac OS 9.11c).21Mac OS X(vl0.1
Windows XP ' SP2, Windows to v10.4)
Vista :'_
Applicationsoftware Windows2000 Prol_:ssionalSP4, not compatible
"Picture Motion Windows XP" SP2, Windows
Browser" Vista"
%4-bil editions and Starlet (Edilion) arc not supporled.
•Your compuler must be pm-inslalled with an OS lisled above. OS upgrades armnot supported.
• If your OS does not support USB connectkms, use a commercially available Memory Stick Readm'_Vriter.
• For flnther details on the operaling environment of "Picture Motion Brow_r" Cyber-shol application
soltware, relcr to "Cyber-shol Handbook."
22
Viewing"Cyber-shotHandbook"
"Cyber-shot Hattdbook" in the CD-ROM
(supplied) explains how tu use tile camera
in detail. Adobe Reader is required to view
it.
For Windows users
1Turn on your computer, and insert the CD-
ROM (supplied) into the CD-ROM drive.
The screen belowappears.
For Macintosh users
1Turn on your computer, and inscrl the CD-
ROM (supplied) into the CD-ROM drive.
2Select the [Handbook] fulder and copy
"Handbook.pdf" stored in the [GB] fulder
to your computer.
3After copying is complete, double-click
"Handbook.pdf'.
Whcn you click tile [Cyber-shot Handbook]
button, tile scrcen lot copying 'Cyber-shot
Handbook" appears.
2Follow the on-screen instructions to copy.
• When you install "Cyber-shot Handbook,"
the "Cyber-shol Stq>up Guide" will be
installed aulomaticzdly.
3After the installation is complete, double-
click the shortcut created on the desktop.
23
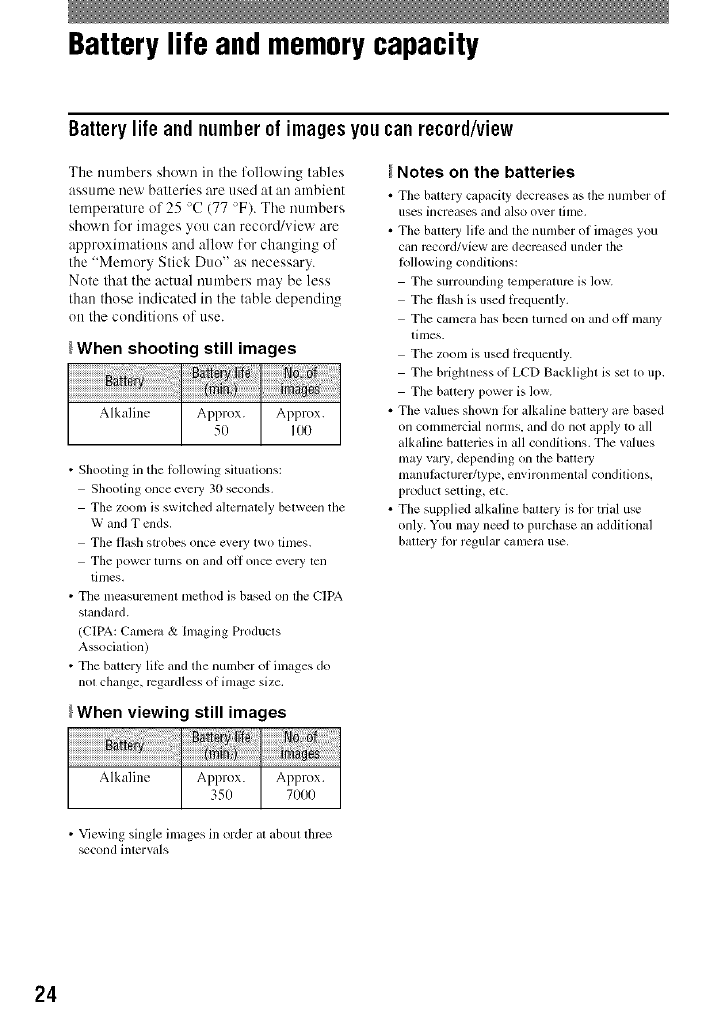
Battery life and memory capacity
Batterylife andnumberof imagesyoucan record/view
The mHnbers shown in the following tables
assume new batteries are used at an ambient
temperature of 25 >C(77 >F). Tile numbers
shown l\_r images you can record/view are
approximations and allow for changing of
the "Memory Stick Duo" as necessary.
Note that the actual numbers may be less
than those indicated in the table depending
on tile conditions of use.
_When shooting still images
Alkaline Approx. Approx.
50 IO0
• Shooting in tile lollowing situations:
Shooting once evel3' 30 seconds.
The zoom is switched ahernalely belw_n the
W and T raids.
The flash strobes once cxeW two tinles.
The power [urns on and oil once every ten
tinles,
• The measurement nlethod is based on the CIPA
standard.
(CIPA: Cunleru & hnaging Products
Association)
• The bauery lilk: and the number of inlages do
not change, rcgardlcss of inlage size.
_When viewing still images
Alkaline Approx. Approx.
350 71)00
Notes on the batteries
• Tile battery capacity decrew, es as tile numbcr of
uses hlcreases [llld also over tilne,
• Tile battery lilc and the nunlber of images you
can record/view alx_ decreased under the
Iollowing conditions:
The surrounding tenlperamrc is low.
The flash is used liequently.
Tile canlcra has b_ll lurned on all(] oil nlany
times.
The zoom is used liequently.
The brighmess of LCD Backliglu is set m 1113.
Tile battel3' i?owcr is low.
• The values shown lbr alkaline battery arc based
on commm'cial norms, and do not apply to all
alkaline baoeries in all conditions. The values
nlay vary, del?ending on the batte W
nlanulacturefftype, environmental conditions,
i?roduct setting, etc.
• The supplied alkaline batmry is lor trial use
only. You may n_d to I?urchase an additional
bauery Ior regular cumera u_.
• Viewing single images ill order at about three
+cond intervals
24
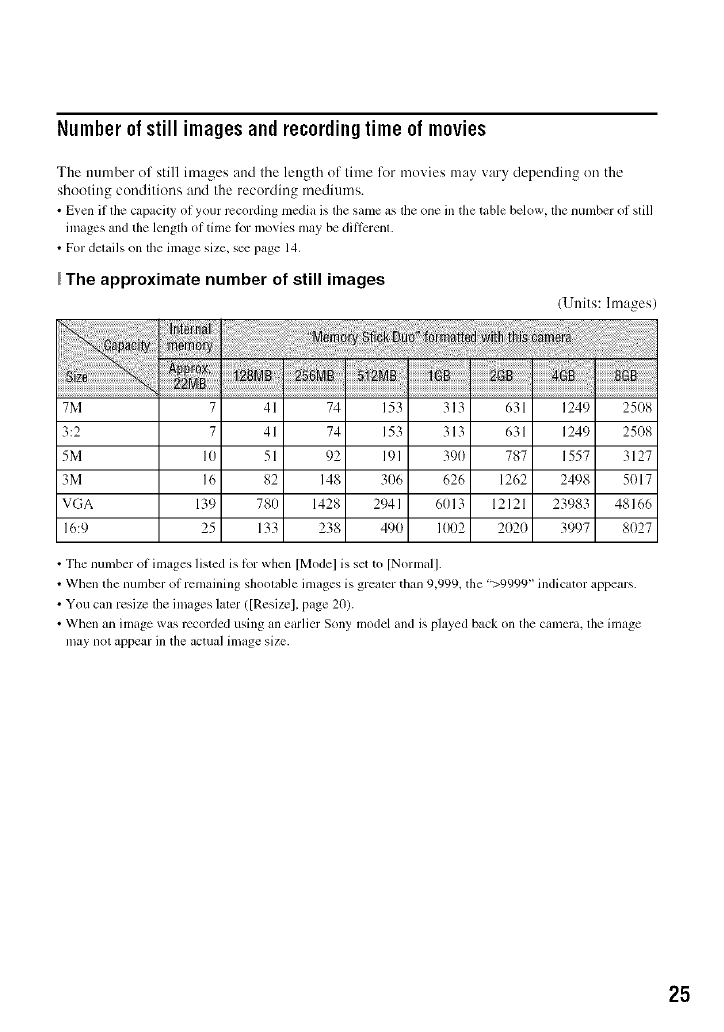
Number of still imagesandrecordingtime of movies
The number of still images attd tile length of time for movies may wtry depending on the
shooting conditions and the recording mediun/s.
•Even if die capacity of your r_cording media is dm same as dm one in the table below, dm number of still
images and tile length of time tbr movies may be ditl_:renl.
• For details on tile image size, s_ page 14.
The approximate number of still images
(Units: hnages/
7M 7 41 74 153 313 631 1249 25(t8
3:2 7 41 74 153 313 631 1249 25(18
5M 10 51 92 191 390 787 1557 3127
3M 16 82 148 306 626 1262 2498 5(t17
VGA 139 780 1428 2941 6013 12121 23983 48166
16:9 25 133 238 490 1002 2(t2(t 3997 8(t27
• The number of images listed is tbr when [Model is set to [Normal].
• Wllen tile number of remaining shootable images is greater titan 9,999_ the ">9999" indicator appears.
• You can resizc tile images later/[Resizel, page 20).
• Wllen an image was recorded using an earlier Sony model and is played back on the camera, the image
may not appear in the actual image size.
25
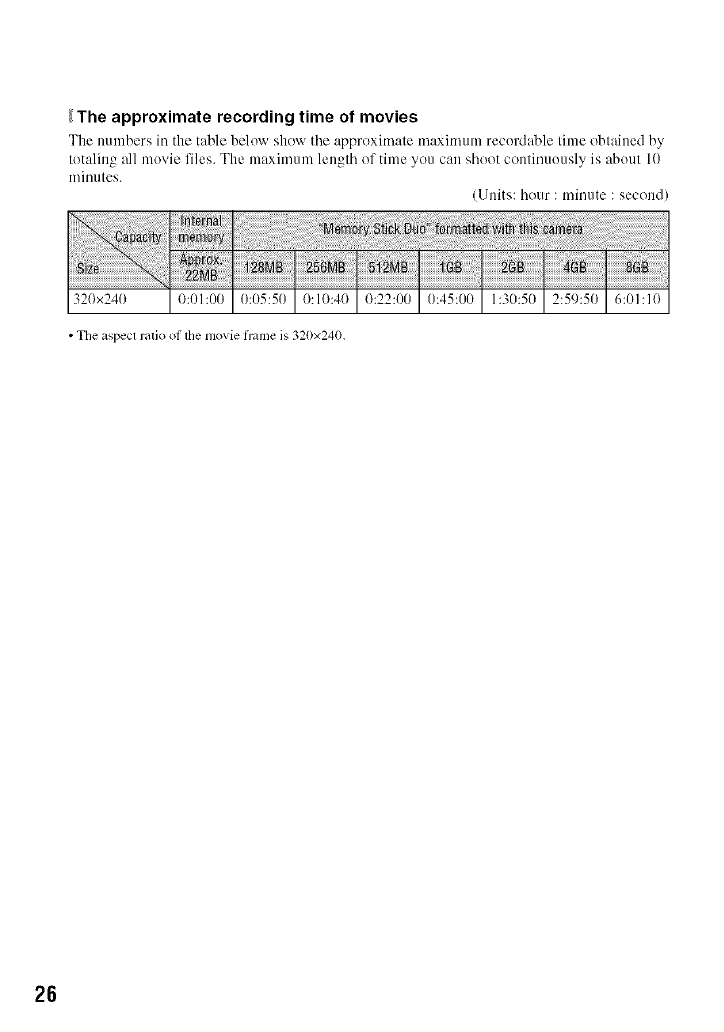
_The approximate recording time of movies
The numbers in the table below sho_ rtile approximate maximum recordable time obtained by
totaling all movie files. The maximum length of time you can shoot continuously is about 10
minutes.
(Units: hour : minute : second)
320x240 _:_k50 6:01:10
• Tile aspect ratio ol the nlovie h'ame is 320x240.
26
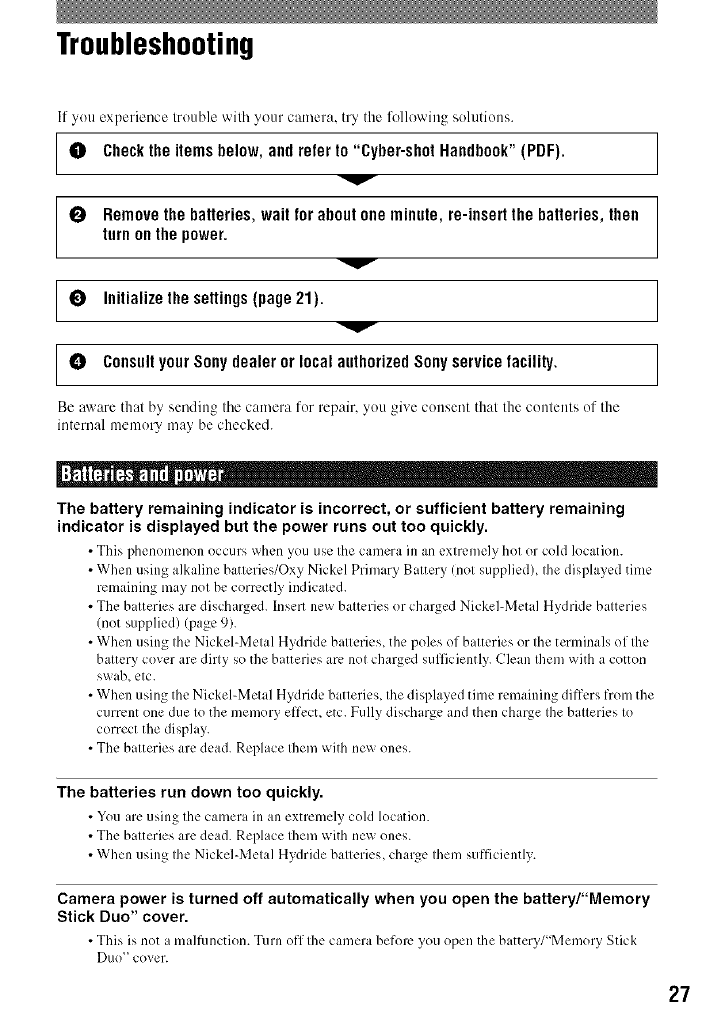
Troubleshooting
If you experience lrouble wilh ycmr camera, try the following solutions.
[ 0 Check the items below, and refer to "Cyber-shot Handbook" (PDF). ]
0Remove the batteries, wait for about one minute, re-insert the batteries, then
turn on the power.
I° 1
[° ]
Be aware thai by sending tile camera for repair, you gixe consent that the contents of the
internal memory may be checked.
V
Initialize the settings (page 21).
Consult your Sony dealer or local authorized Sony service facility.
The battery remaining indicator is incorrect, or sufficient battery remaining
indicator is displayed but the power runs out too quickly.
•This phenomenon occurs _hen you use the camera in an extremely hot or cold location.
• When using alkaline batteries/Oxy Nickel Primary Battery (not supplied), the displayed time
remaining may not be correctly indicated.
• The batteries are discharged, hlsert new batteries or charged Nickel-Metal Hydride batteries
/not supplied) (page 9).
• When using the Nickel-Metal Hydride batteries, the poles of batteries or the terminals of the
battery cover are dirty so the batteries are not charged sufficiently. Clean Ihem with a cotton
swab, etc.
• When using the Nickel-Metal Hydride batteries, the displayed time remaining differs from the
current one due to the memory effccL etc. Fully discharge and then charge the batteries to
correct the display.
• The batteries are dead. Replace Ihem with new ones.
The batteries run down too quickly.
• You are using the camera in an extremely cold location.
• The batteries are dead. Replace Ihem with new ones.
• When using the Nickel-Metal Hydride batteries, charge them sufficiently.
Camera power is turned off automatically when you open the battery/"Memory
Stick Duo" cover.
• This is not a malfunction. Turn off the camera before you open the battery/"Memory Stick
Duo" cover.
27
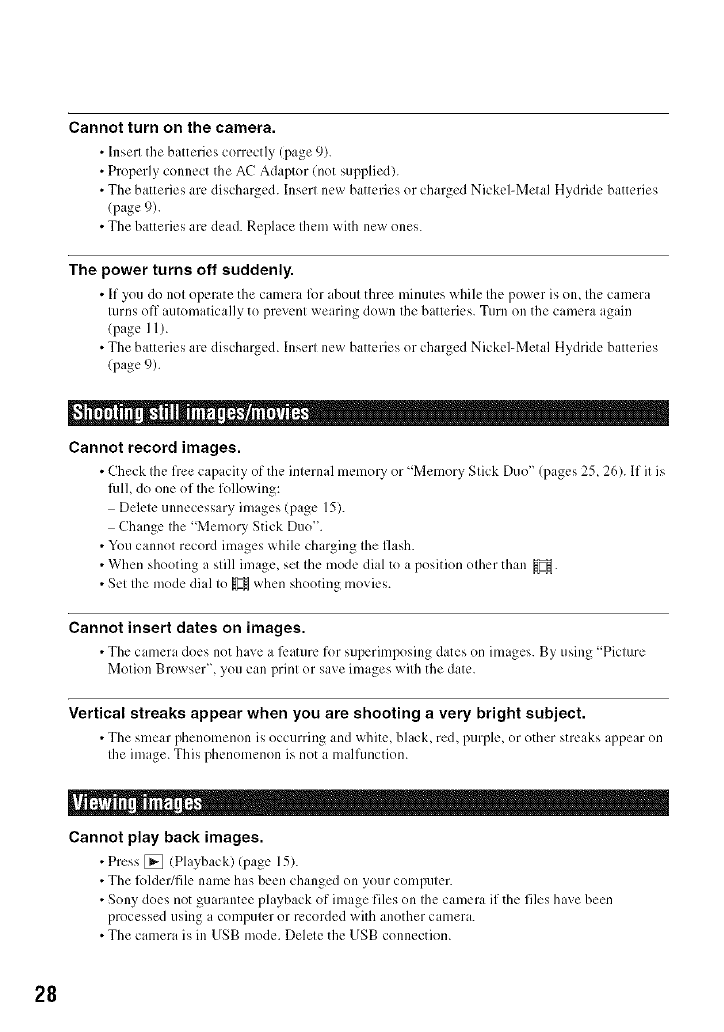
Cannot turn on the camera.
• Insert the batteries correctly (page 9).
• Properly connect the AC Adaptor (not supplied).
• The batteries are discharged, lnserl new batteries or charged Nickel-Metal Hydride batteries
(page 9).
• The batteries arc dead. Replace them with new ones.
The power turns off suddenly.
• If you do not oper itethe camera for d_out three minutes whih: the power is oil the camera
turns off automatically to prevent wearing down the batteries. Turn on the camera again
(page 11).
• The batteries are discharged. Insert new batteries or charged Nickel-Metal Hydride batteries
(page 9).
Cannot record images.
• Check the free capacity of the internal memory or "Memory Stick Duo" (pages 25, 26). If it is
fidh do one of Ihe following:
Delete unnecessary images (page 15).
Change the "Memory Stick Duo".
• Youcannot record images while charging the flash.
• When shooting a still image, set the mode dial to a position other than _.
• Set the mode dial to _ when shooting movies.
Cannot insert dates on images.
• The camera do,:s not have a l_mturefor superimposing dates on images. By using "Picture
Motion Browser", you can print or save images with the date.
Vertical streaks appear when you are shooting a very bright subject.
• The smear phenomenon is occurring and white, black, red, purple, or other streaks appear on
the image. This phenomenon is not a malfunction.
Cannot play back images.
•Press [] (Playback)(page 15).
• The l_)lder/file name has been changed on your computer.
• Sony does not guaramee playback of image files on the camera if the files have been
processed using a computer or recorded with another camera.
• The camera is in USB mode. Delete the USB connection.
28
Precautions
Do not use/store the camera in
the following places
• In ml extremely hot, cold or lmlnid place
In placcs such as in a car parked in tile sun, tile
camera body may become deh)rmed and this
nlay cause a malflmction.
• Under direct sunlight or near a healer
The camera body nlay beconle discolored or
deti)rmcd, and this may cau_ a malthnction.
• In a location subject to rocking vibration
• Near strong magnetic place
• In sandy or dusty places
Be careihl not to let sand or dust get into the
calncra. This may cause the camera to
malthnction, and in some cases tills malflmction
cannot be repaired,
On carrying
Do not sit down in a chair or oilier place with the
camera ill the back pocket of your trousep, or
skirt, as this may cause malthnction or damage tile
camera.
On cleaning
Cleaning the LCD screen
Wipe tim screen surthcc with an LCD cleaning kit
(nol supplied) to rcmo_ e fingerprints, dust, etc.
Cleaning the lens
Wipe tile lens with a sot_ cloth to rcnlove
Iingerplinls, dust, etc.
Cleaning the camera surface
Clean tile canlera surl_ce with a sol1 cloth sliglltly
moistened with water, then wipe tile SUlqi_ce with
a dry clotil. To prevent danlage to tile linisil or
c_sing:
• Do not expose tile canlcra 1o chemicld products
such as flfinner, benzine, alcohol, disposable
cloflls, insect rcpellcnL sunscrcen or in_cticide.
• Do not touch file camera with ally of tile above
oll your hand.
• Do not leave the calnera ill contact with rubbcr
or vinyl lOT a long time.
On operating temperatures
Your camcra is designed b.n u_ under tile
tenlperamres between 0°C and 40°C (32°F and
104°F). Shooling ill extremely cold or hot places
that exceed this range is not reconlmended.
On moisture condensation
11 tile camera is brought directly li'om it cold to a
warm lociltion,/noisturc nlny COlldellse inside or
outside tile cmnel'a. This moisturc condensation
Inay ctlllSe tl nltlIl/Inctioll of the catlleril.
If moisture condensation occurs
Turn oil tile camera and wait aboul an hour lbr tile
moisture to e_ apol'atc. Notc that il you shoot with
moisture remaining inside tile lens, im_,ges will
not be clear.
On the internal rechargeable
backup battery
This cmncl'a tins an internal recharge_d_le battcry
for mainlaining tile dale and lime and other
settings regardless of whether the power is on or
This rechalgeable battery is continually chalged
as long as you are using the camera. Howc;'er, if
you use the CUlnma Ior only short periods, it
discharges gradually, and if you do not use the
camera at all b.)r about one lllonth il beconles
completely discharged. In this case, be surc to
chalge this rcchargeable battcry beti)rc using the
calnera.
However, even if tills rcchargeable baaery is not
cllalged, you can still use tile camera, but tile dale
and time will not be indicated.
Charging method of the internal
rechargeable backup battery
hlsert batteries with cnough power rtqnaining in
tile Calllera, and leilvc tile canlera l_)r 24 hours or
II]ore with the power oil,
29
Specifications
3O
Camera
[System]
Image de_ ice: 7.20 nlnl ( 1/2,5 type) color CC[Z
Primary color tilter
Total pixel number of camera:
Approx. 7 410 000 pixels
Effective pixel number of camera:
Approx. 7 201 000 pixels
Lens: 3x zoom lens f = 5.8 17.4 toni 135-
I05 mm when convertcd to a 35 mm still
camera) F2.8 (W) 4.8 (T)
Expogllre control_ A/itolnatic cxposllre, Scene
Seleclion (7 modes)
While balance: Automatic, Daylight, Cloudy,
Fluorescent. Incandescenl, Flash
File tormal (DCF compliant):
Slill images: Exif Vcr. 2.21 JPEG complianl.
DPOF compatible
Movies: AVI (Motion JPEG)
Recording media: Internal Memory (approx.
22 MB), "Memo UStick Duo"
Flash: Flash range (ISO sensitivity
(Recomnlended Exposure Index) set to Auto):
approx. 0.5 to 3.5 nl ( 1 tcct 7 3/4 inches to 11
test 5 7/g inches) (W)/approx. 0.5 to 2.0 nl ( 1
test 7 3/4 inches to 6 test 6 3/4 inches) (T)
[inputandOutputconnectors]
(USB)*A/V OUT terminal:
Video. Audio (Monaural). USB
COllllnllnicillion
USB communication:
Hi-Spe_d USB (USB 2.0 compliant)
[LCDscreen]
LCD panel: 6d) cm (2.4 type) TFT drive
Total mmlber of dots: 112 320 (480×234) dots
[Power, general]
Power: LR6 (size AA) Alkaline hatteries (2), 3 V
HR 15/51 :HR6 (size AA) Nickel-Metal
Hydride batteries 12) (not supplied). 2.4 V
ZR6 (size AA) Oxy Nickel Primaly Battery
(2) (not supplied), 3 V
AC-LS5K AC Adaptor (not supplied), 4.2 V
Power consumption (during shooting): 1.2 W
Operating tenlperature: 0 to 4t)°C (32 to I04°F)
Storage temperamrc: 20 to +6t)°C (_, to +I4tI°F)
Dimensions: 91.4×61.(1×29.1 toni (3 5/8×2 112×
I 3116 inches) (W/H/D, excluding
protrusions)
Mass: Approx. 189 g (6.7 oz) (including two
batteries and strap, etc.)
Microphone: Monaural
Buzzer
Exif Dint: Compatible
PRINT Image Malching ttI: Conlpatible
PictBridge: Compalible
Design and specifications arc subject to change
without notice.
Trademarks
•C.WbED..sh,_: ',5"yher-shot" arc mtdemarks
of Sony Corporation.
• "Memory Stick", ,7_. , "Memou Stick PRO",
MEMORY STICK PRD, "Menlou Stick Duo",
_EMORY 5TJEK _U[l, "Menlory Stick PRO
Duo", MEMORY STICK PRODUO,"Memo]y
Stick PRO-HG Duo",
MEIVlORY5TI_KPR0-H5[Iu0."MemoryStick
Micro", "MagicGate', and ru_l_.G IC GILX.TE
arc trademarks of Sony Corporation.
• Microsolt. Windows, DirectX and Windows
Vista are eilher rcgistered trademarks or
lrademarks of Microsoft Corporalion ill the
United States and/or other countries.
• Macintosh, Mac OS, iMac, iBook, PowerBook,
Power Mac and eMac arc tradenlarks or
registered tradenlarks of Apple Inc.
• Intd, MMX, and Pentium are tradenlarks or
regislered tradenlarks of Intel Corporalion.
• Google is a registered tradenlark of Google, Inc.
• Adobe and Reader arc trademarks or trademarks
of Adobe Systems Incorporated ill lhe Uniled
States and/or olhcr countries.
• In addition, systenl and product nanles used in
lhis manual are, in general, lrademarks or
regislered tradenlarks of their respective
developers or illallut_lourers, Sowcx er, tile rM or
_) marks arc not u_d ill all cases in lhis nlanual.

Additional information on this product and answe_
to frequently asked questions can be found at our
Customer Support Website.
http://www.sony.net/
Printed on 70% or more recycled paper using VOC
(Volatile Organic Compound)-free vegetable oil based
ink.
Printed in China
