Sony DSC T100 User Manual DIGITAL CAMERA Manuals And Guides L0703317
SONY Cameras, All Manual L0703317 SONY Cameras, All Owner's Manual, SONY Cameras, All installation guides
User Manual: Sony DSC-T100 DSC-T100 SONY DIGITAL CAMERA - Manuals and Guides View the owners manual for your SONY DIGITAL CAMERA #DSCT100. Home:Electronics Parts:Sony Parts:Sony DIGITAL CAMERA Manual
Open the PDF directly: View PDF ![]() .
.
Page Count: 31
SON3t:
Cuber-shot
Digital Still Camera
Instruction Manual
DSC-TIO0
0
UTHlUMION
MeMoRY5TI[K _
For details on the advanced operations, please access
"Cyber-shot Handbook"and "Cyber-shot Step-
up Guide"contained on the supplied CD-ROM via a
computer.
Operating Instructions
Before operating the unit, please read this manual thoroughly, and retain it for future reference.
© 2007 Sony Corporation 2-319-290-12(1 )

Owner's Record
The model and serial nmnbers are located
on tile bottom. Record tile serial ntunber in
the space provided below. ReFer to these
numbers whenever you call upon your Sony
dealer regarding this product.
Model No. DSC-T 100
Serial No.
D
To reduce fire or shock hazard, do
not expose the unit to rain or
moisture.
CaUtION TO _DUCE rH_ RISKO_ ELeCTriC SHOCK
DO NOTRFMOWCOW_ (OR _ACK).
_O USEn-SE_VlCEABLEPARTSI_SlDE.
F_E_ SErVICInG_O QUALIFmDSErViCE_E_SO_L,
This symbol is intended to
alert the user to tile presence
of uninsulated "dangerous
vohage '' within file
producl's enclosure that may
be of sullicient nmgnitude
tw constitute a ri',k of
electric shock to persons.
This symbol is intended to
idert the user to the presence
of important operating and
nlaintenancc (servicing)
instructions in tile literature
accompanying tile
appliance.
IMPORTANT
SAFEGUARDS
For your protection, please read these safety
instructions completely belk_re operating
the appliance, attd keep this manual for
future reference.
Carefully observe all warnings, precautions
and instructions on the appliance, or the one
described in the operating instructions and
adhere to them.
Power Sources
This s_=tshouhl be opcrated only lrom tile type ol
powcr source indicated on the marking label. If
you are not sure of file type of electrical power
supplied to your home, consult your dealer or
local power company. For fllose sets designed to
operate honl battcry power, or oilier sources, relcr
to tile operating instructions.
Polarization
This set may be equipped with _,pohu'ized ac
power cord plug (a plug bavmg one blade wider
than tile other),
This plug will fit into the power outlet only one
way. This is a sal_:ty lcaturc. If you are unable to
insert the plug flflly into the outlet, try reversing
file plug. If the plug should still lidl to lit, contact
your electrician to have a suitable outlet installed.
Do not delcat tile s_,lPty purpo_ of tile polarized
plug by b_wcing it in.
Overloading
DO not o_'erload wall outlets, extellsion cords or
convenience receptacles beyond their capacity,
since this can resuh ill I]re or electric shock.
_Object and Liquid Entry
Never push ot!iects ot any kind into tim set
through openings as they lnay tlluch dgulgerous
voltage points or short out paris that could restl]t
in a fire or electric shock. Never spill liquid ol any
kind on the set.
Attachments
DO not IISe _ltt_tchlnents llOt recollll/lellded by the
l/lanlllaCttlrer, as tile}, in_ty cause hazards.
Cleaning
Unplug tile set IYom tile wall outlet betknv
clemling or polishing it. Do not use liquid clemlers
or aerosol cleaners. U_ a clofll lightly dampened
with water lor cleaning file cxterior of tile sol.
Water and Moisture
Do nol/ise power-line operaled sels llear wal_r
lbr cxmnple, near a bathtub, washbowl, kitchen
sink, or laundry tub, in a wet basenlent, or near a
swimnling pool, etc.
Power-Cord Protection
Route file power cord so tlmt it is not likely to be
walked on or pinched by items placed upon or
against them, paying particular attentkm to tile
plugs, receptacles, and the point where the coM
exits lrom tile appliance.
Accessories
Do llOt place tile set Oll illl/instable C_ll't,stand.
tripod, bracket, or table. Tile _t may ball. causing
serious injury to a child or an adult, and serious
damage to tile set. Use only a cart. stand, tripod.
bracket, or table rcconnnended by file
inanll filc[ urer,
Ventilation
Tile slots and openings in tile cabinet are provided
lbr necessary ventilation. To ensure reliable
operalion of the set, and lit protect it fiOll/
overheating, these slots and openings must never
be blocked or covered.
Never cover file slots and openings will1 a cloth
or olher nlaterials.
Never block lhe slols and opcnings by placing
tile set on a bed, sofil, iilg, or (tiller sinlifiu
silri_lce,
Never place tile sol in a confined space, such as a
bookcase, or buih-in cabinel, unless proper
ventilation is provided.
Do not place tile sel lle_lror over a radiator or
heal register, or where it is exposed to direct
sunlighl.
Lightning
For added pl'otcctkm lor this set during a lightning
storm, or when it is lell unattcnded and unused lor
long periods of time. unplug it from tile wall
oullel and disconnect file antenna or cable sysleln.
This will prevent damage to tile sel due to
fighming and power-line surges.
Damage Requiring Service
Unplug tile _t lrom tile wall outlet and rclcr
servicing m qmditied service personnel under file
lbllowing conditions:
When the power cord or plug is damaged or
Irayed.
If liquid has been spilled or objects have fidlen
into tile set.
If tile set has been exposed tit rain or water.
If the set has be_n subject to excessive shock by
being dropped, or the cabinet has beml damaged.
If file set does not operate normally when
lollowing file operating instructions. Adjusl only
fllose controls that arc specified in the operating
instructions. Improper adjustment of other
controls may result in damage and will often
require extcnsive work by a qualified technician
to rcstore tile sm to norn/al operation.
When the sol exhibits a distinct change ill
per%rmance this indicates a need lbr service.
Servicing
Do not attclnpt to service tile set yourself as
opellillg or rcnlo_, illg covers Inay expose yo/i to
dangerous voltage or other lmzaMs.
Relcr all servicing to qualified _rvice personncl.
Replacement parts
When replacemcnt parts are rcquircd, be sure tile
service technician has used rcplacelnent parts
specified by tile nlanulzlcltlrcr that have tile salne
characteristics as file original paris.
Unautfiorized substitutions may result ill fire.
electric shock, or other hazaMs.
Safety Check
Upon conlpletion of any selMcc or repairs to tile
set. ask tile selvice technician to perloln_ routine
saiPty checks (_Jsspecified by tile manuh_cmrer)
to determine that file set is ill sale operating
conditkm.
Readthis first
*|
Replace the baltery with tile specified type
only. Otherwise, fire or injury may resttlt.
RECYCLING LITHIUM-ION
BATTERIES
Lithium-Ion balteries are
recyclahle.
YoU Call help preserve our
ellvirollnlellt by leturllillg your
used rechargeable balteries m
the collection and recycling
location nearest you,
For nlorc inli)rmation regarding recycling of
rechargeable batteries, call toll fi'ce
1-8110-822-8837, or visit hup://www.rbrc,org/
Caution: Do not handle danlaged or leaking
Lilhium-lon balteries.
This power unit is intended to be correctly
orientaled ill a vertical or floor nlounl posilion.
i i "*•1
if you have ally questions aboul this product, you
may call:
Sony Custonler Inlormalion Cenler
1-800-222-SONY (7669)
The number below is lbr the FCC relaled matlers
only,
Regulatory Information
Declaration of Conformity
Trade Name: SONY
Model No.: DSC-Tlt)0
Responsible Party: Sony Electronics hlc,
Address: 16530 Via Esprillo.
San Diego, CA 92127 U.S,A,
Tclephone No,: 858-942-2230
This device conlplies with Part 15 of tile FCC
Rules. Operalion is suhject to lhe lbllowing
two conditions: (1) This dcx ice may nol cause
harmlhl intedi:rence, and (2) lhis device musl
accept any intedi:rence rcceived, including
interlcrcnce thai nlay cause undesircd
operation.
CAUTION
You m'e cautioned thal any changes or
modilications not expressly appl'o_ed in this
nlanual could xoid your authority to operate this
equipnlent.
Note:
This equipmcnl has heen tesled and timnd to
conlply with tile limils tor a Class B digital
dcvice, pursuanl to Part 15 of tile FCC Rules.
These limils armdesigned to provide reasonable
protection agzfinst harmlhl interlcrence in a
rcsidenlial inslallalion. This equipnlent generates,
uses, and can radiate radio ffcquency energy and.
if not inslalled and used in accordance wilh the
instructions, may cause harmful interference 1o
radio colnnlunic;l[ions. However, there is no
guaranlee that inlerli:rence will not occur in a
parlicular inslallation. If this equipment does
cau_ harnlflfl inlerl_:rcncc to radio or lelm ision
rcccption, which can be delermined by turning the
equipment o1_ and on. the user is cncouragcd lo
113_ IO correcl tile inlerlcrence by one or nlorc of
lhe lollowing measures:
Reorienl or rclocale the receiving antenna.
Increase the separalion betweml lhe
equipment and rcceiver.
Connect tile equipment into an outlet on a
circuit dill?rent holn that to which tile
receiver is connected.
Consuh the dealer or an expericnced radio/TV
technician lor help.
Tile supplied intel_iJce cable must be u_d with tile
equipment in ordcr tit comply with tile limits lbr a
digital device pursuant to Subpart B of Part 15 of
F,5"CRules.
Pcrchlorate Material - special handling may apply.
See
www.dt sc.ca.gov/h azar douswaste/perchlorate
Pcrchloratc Matcrial : Lithium battery contains
perchlorate.
J _ " Jl "
This product has becn tested and %und compliant
with the limits set out in the EMC Directive lbr
using connection cables shorter than 3 meters (9.8
l_t).
Attention
Tile electromagnclic lields at tile specilic
liequencies may influence the picture and sound
of this unit.
Notice
II static electricity or electromagnetism causes
data translcr to discontinue midway (Jail), restart
the application or disconnect and connect the
communication cable/USB, etc.) again.
Disposal of Old Electrical &
Electronic Equipment (Applicable
in the European Union and other
European countries with separate
collection systems)
This symbol on the product or on its packaging
indicates thai this product shall not be treatcd as
household waste, lnstead it shall be handed over
to tile applicable collection point litr file recycling
of electrical and electronic equipment. By
ensuring this product is disposed of correctly, you
will help prcxcnt potential negative consequences
lbr tile environment and truman tleahh, which
could otherwise be caused by inappropriate waste
handling of this product. The recycling of
materials will help tit con_rve natural resources.
For more detailed inb_)rmation about recycling of
this product, please contact your local Civic
Ollice, your household waste disposal selvicc or
the shop where you purchased tile product.
A moulded plug colnplying with BS 1363 is fitted
to this equipment tin your salcty and con,, enience.
Should the filse in tile plug supplied need to be
replaced, a flJse of tile same rating as tile supplied
one and approved by ASTA or BSI to BS 1362,
(i.e,, marked with an @ or _ mark) must be
use(].
If tile plug supplied with this equipment has a
detachable fll_ cover, be sure to attach the luse
cover al_er you change the fuse. Nevcr use tile
plug without the lhse cover. If you should lose the
lhse cover, plea_ conlact your nearesl Sony
service stalioll.
Notes on usingyourcamera
Internal memory and "Memory
Stick Duo" back up
Do not triM Ot] file calncra or renlove file batt_ly
pack or 'MelnoJy Stick Duo" while tile access
lamp is lighted+ as the internal memory data or
"Memory Stick Duo" data nlay be destroyed,
Always protect your data by nlaking a back up
copy.
Notes on recording/playback
• Belinc you record, make a trial recording to
nlake sum that the camera is working corrcctly.
• Tiffs camera is neither dust-proof, nor splasll-
proof, nor water-proof, Read "Prccautions"
(page 29) belore operating file cmnera.
• Be careflll not to gel the clunera wet. Watm+
entering file inside of the calnera may cau_
malfunctions which ill some cases may not be
rcpairable.
• Do not aim the c_mlcla at tile sun or ()tiler bright
light. It inay cau_ tile malflmction of yotlr
cglnlera+
• Do not u_ the camera near a ]ocaflon that
generates slrong radio waves or emits radiation,
The camera may not be able to rccord or play
back properly.
• Using file canlera in sandy or dusly locations
nlay cause lnallunclions+
• If inoislllrc condensation occurs, remove il
belbre using the calnera (page 29).
• Do not shake or strike file camera. Ill addition to
malfunctions and an inability to record images.
this may render file recording mediuln unusable,
or cau_ inlage data brcakdow-n, danlage or loss.
• Clean tile flash surlacc belPre use. The heat of
flasll emission may cause dirt on the flash
surli,ce to become discolored or to stick to the
flash surlace, rcsuhing ill insull_cient light
emission.
Notes on the LCD screen
• Tile LCD screen is manulacmred using
extremely lligll-precision teclmology so over
99.99% of tile pixels are operational lin+
ell_zctive use. However, tllm+emay be some tiny
black points and/or bright points (white, red,
blue or green in color) that constantly appear on
file LCD screen. These points arc normal in file
manulilct uring process and do not allccl tile
recording m any way.
On image data compatibility
• This canlcra conliwms with DCF/Design lule
Ior Camera File system) universal standard
established by JEITA (Japan Electronics and
Inlbrmation Technology Industries
Association).
• Playback of images recorded with your canlera
on ofller equiplncnt and playback of inlages
recorded or edited with otller equipnlent on your
camera arc not guaranteed.
_Warning on copyright
Television progranls, lihns, videotapes, mid <)filer
materials may be copyrighted. Unauthorized
recording of such materials may be contral3' to tile
provisions of the copyright laws.
No compensation for contents of
the recording
Tile contents of tile recording cannot be
compensated lor if recording or playback is not
possible due to a malfimction of your canlma or
recording media, etc.
Table of contents
IMPORTANT SAFEGUARDS ..................................................................... 2
Read this first ............................................................................................ 4
Notes on using your camera .................................................................... 6
Getting started ................................................................................. 8
Checking the accessories supplied ......................................................... 8
1 Preparing the battery pack .................................................................... 9
2 Inserting the battery pack/a "Memory Stick Duo" (not supplied) ........ 10
3 Turning the camera on/setting the clock ............................................. 12
Shooting images easily (Auto adjustment mode) ...................... 13
Zoom/Flash/Macro/Seif-tiraer/Dispiay .................................................... 14
Viewing/deleting images ............................................................... 15
Learning the various functions - HOME/Menu ........................... 17
Using the HOME screen ......................................................................... 17
HOME screen items ............................................................................... 18
Using menu items ................................................................................... 19
Menu items ............................................................................................. 20
Enjoying your computer ............................................................... 21
Supported Operating Systems for IdSB connection and application
software (supplied) ................................................................................. 21
Viewing "Cyber-shot Handbook" or "Cyber-shot Step-up Guide". ......... 22
Indicators on the screen ............................................................... 23
Battery life and memory capacity ................................................ 25
Battery life and nuraber of iraages that can be recorded/viewed .......... 25
Number of still images and recording time of movies ............................ 26
Troubleshooting ............................................................................. 27
Battery pack and power ......................................................................... 27
Shooting still images/movies .................................................................. 28
Viewing images ...................................................................................... 28
Precautions .................................................................................... 29
Specifications ................................................................................ 30
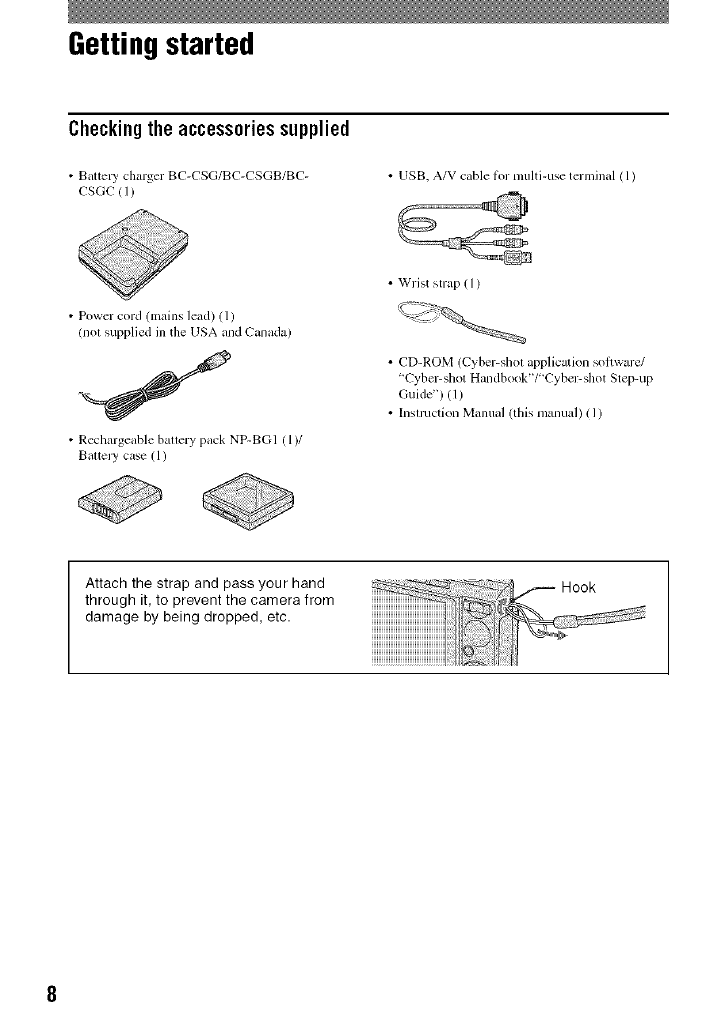
Getting started
Checkingthe accessoriessupplied
• Battely charger BC-CSG/BC-CSGB/BC-
CSGC (1)
• USB, A/V cable for multi-use terminal ( 1)
• Power cord (mains lead) (1)
(nol supplied in the USA and Canada)
• Rechargeable battery pack NP-BG1 (1)/
BatteJy case (1)
• Wrist strap ( 1)
• CD-ROM (Cyber-shot applicaion soflwarc/
'Cyber-shot Handbook'V"Cyber-shot Step-up
Guide") (1)
• Insmlction Manual (this manual) (1)
Attach the strap and pass your hand
through it, to prevent the camera from
damage by being dropped, etc.
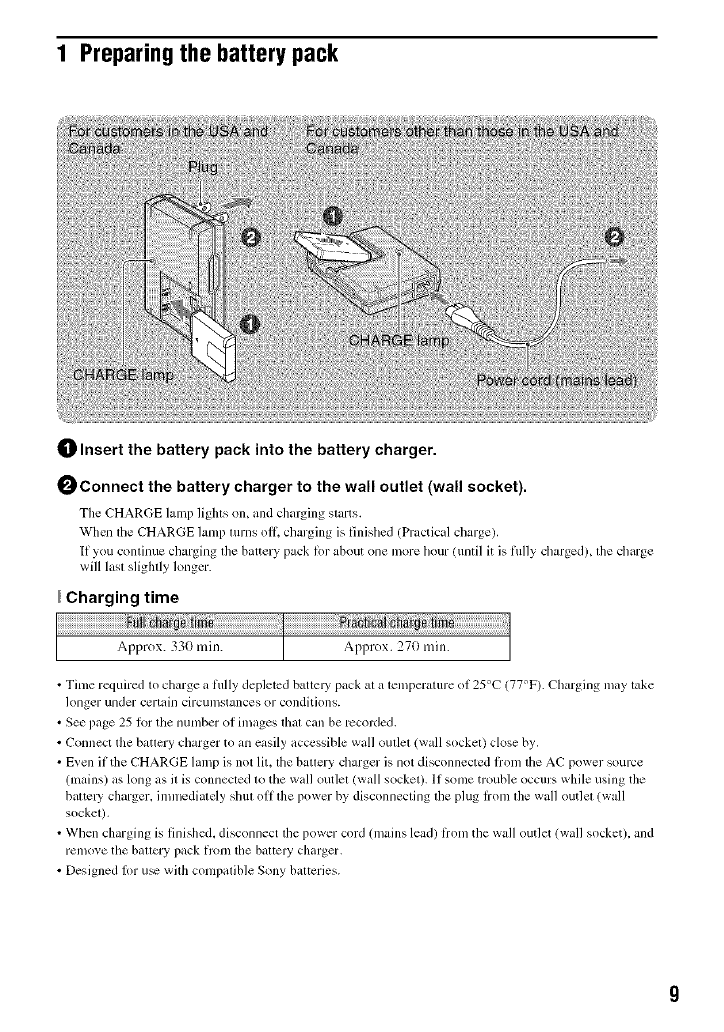
1 Preparing the battery pack
_) Insert the battery pack into the battery charger.
0Connect the battery charger to the wall outlet (wall socket).
The CHARGE lamp lights on, and charging starts.
When file CHARGE hm_p turns oll_ charging is finished (Practical charge).
If you continue charging the battery pack lor about one more hour/until it is flllly charged), the charge
will lasl slighlly longer.
Charging time
• Time required to charge a flllly depleted batte Upack al a temperature of 25°C (77°F). Charging may take
longer under certain circumstances or conditions.
• See page 25 lor the number of images lhal call be Jvcorded.
• Connect the batlery charger to an easily acccssible wall oullel (wall socke0 close by.
• Even if the CHARGE lamp is not lit. lhe batlery charger is not disconnected liom the AC power source
(lnains) as long as it is connected to the wall outlel (wall socket). If some trouble occurs while using the
baltc Ucharger, ilnnledialely shul oil lhe power by disconnecting lhe plug from lhe wall out]el (wall
sockel),
• When charging is finished, disconnect lhe power cord (mains lead/li-om the wall outlet (wall socket), and
remove the ballery pack flom the batte W charger.
• Designed lot u_ wilh compalible Sony balteries.
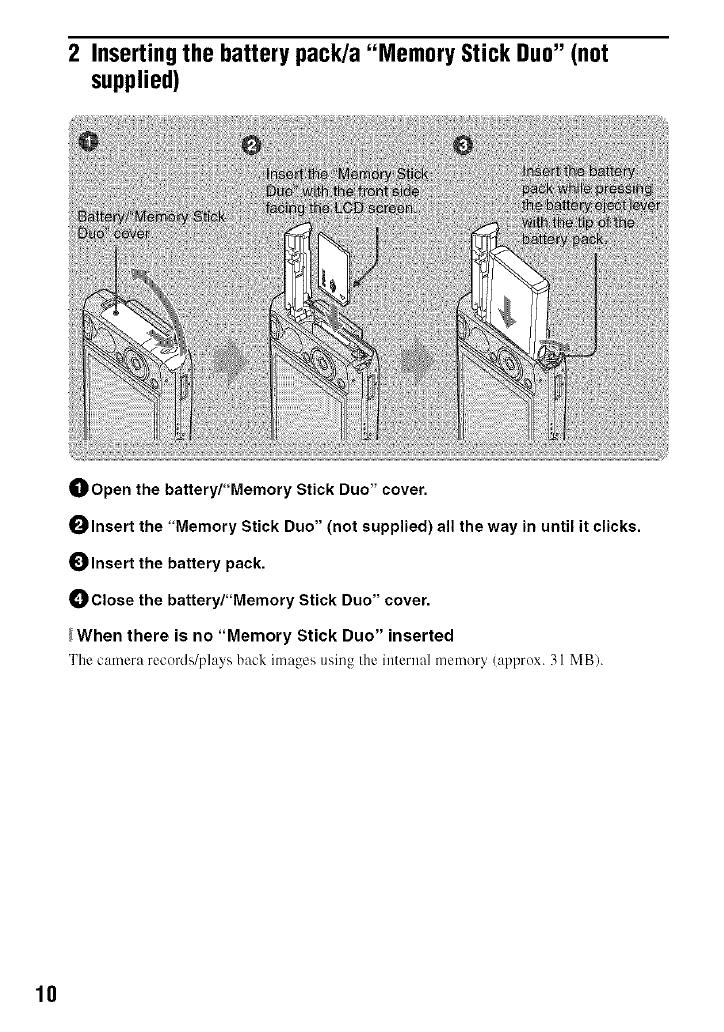
2 Inserting the battery pack/a "Memory Stick Duo" (not
supplied)
_) Open the battery/"Memory Stick Duo" cover.
Olnsert the "Memory Stick Duo" (not supplied) all the way in until it clicks.
Insert the battery pack.
Close the battery/"Memory Stick Duo" cover.
_When there is no "Memory Stick Duo" inserted
The camera recoM_/pl:Jys back images using the internal memor 5(:Jpprox. 31 MB).
10
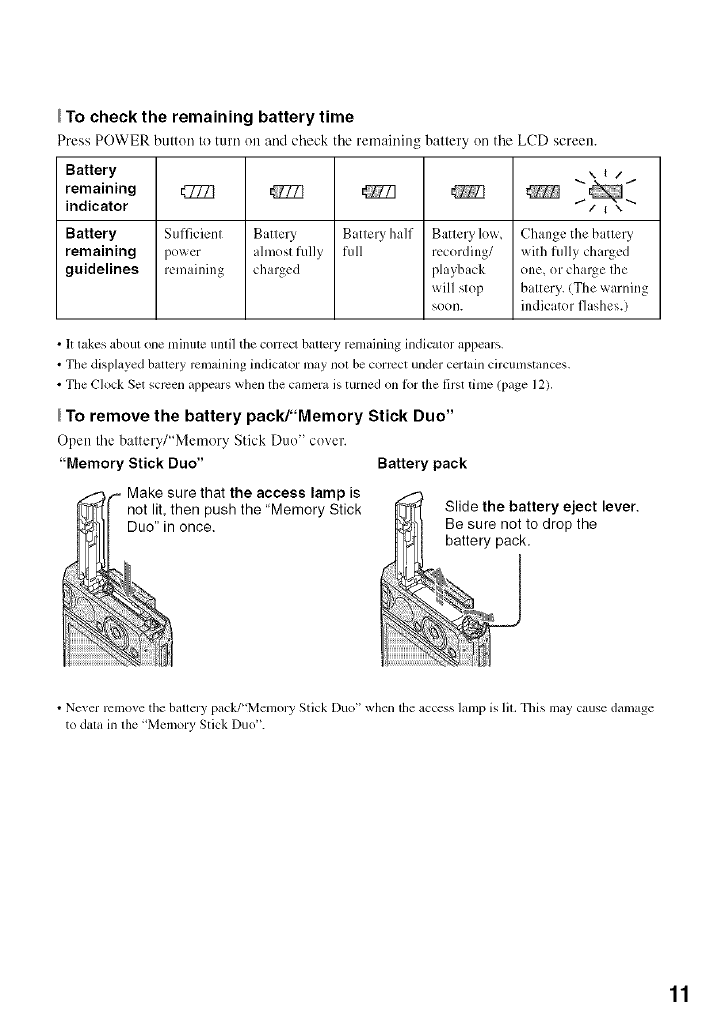
To check the remaining battery time
Press POWER button to turn on and check tile remaining battery on tile LCD screen.
Battery ,, t/
remaining _ _ _ _ _ "_"
indicator i-/_\ -..
Battery Sufficient Battery Battery half Battery lo'_,'_ Change the battery
remaining power ahnost fiflly full recording/ with flflly charged
guidelines remaining charged playback one, or charge Ihe
will stop battery. (The warning
soon. indicator flashes.)
• It takes about one nlinule unlil the correct batlery renlaining indicator appears.
• The displayed battery mnmining indicator may nol be correct under ccrlain circumstances,
• The Clock Set screen appears when the camera is turned on b_r the first tinle (page 12).
To remove the battery pack/"Memory Stick Duo"
Open tile battery/"Memory Stk'k Dtlo" cover.
"Memory Stick Duo" Battery pack
pis
not lit, then push the "Memory Stick
Duo" in once.
• Never remove tim battery pack/"Memory Stick Duo" when tile acccss lanlp is lit, Tllis may cause damage
to data in tile "Memory Stick Duo".
11
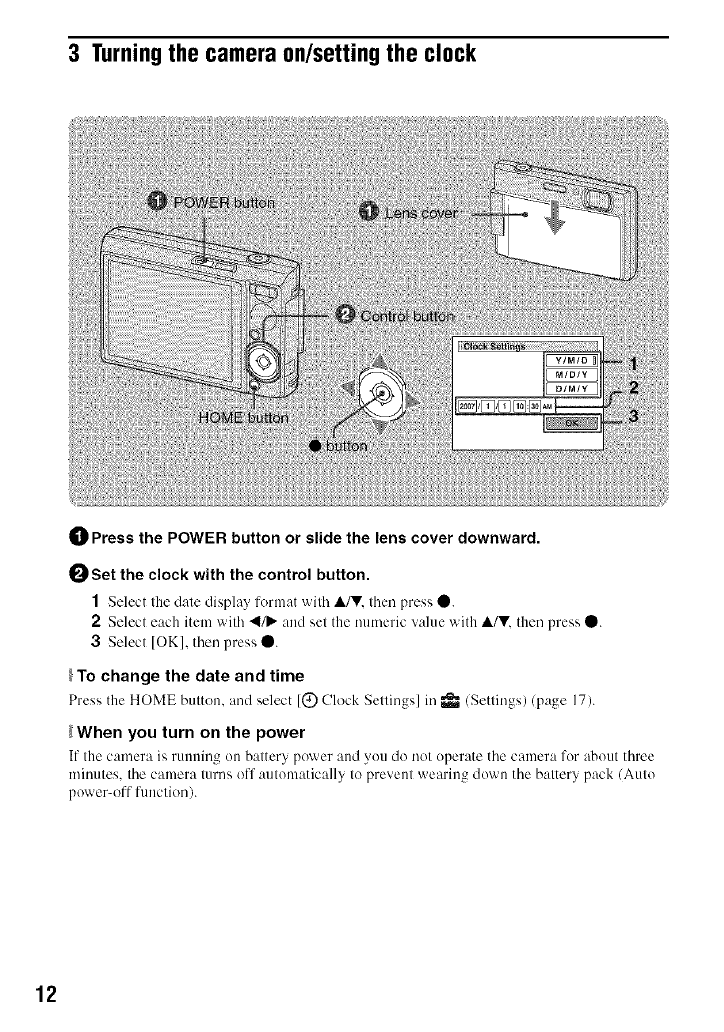
3 Turningthe camera on/setting the clock
0Press the POWER button or slide the lens cover downward.
0Set the clock with the control button.
1Select the date display lormat with A/V. then press O.
2Select each item with 4/_ and set the numeric value with A/V, then press 0.
3Select [OK], then press Q.
}To change the date and time
Press the HOME button, and select [Q Clock Settings] in _/Setlings)/page 17).
_When you turn on the power
If the camera is running on battery power and you do not operate the cmnera for about three
minutes, the camera turns off automatically to prevent wearing down the battery pack (Auto
power-offfunction).
12
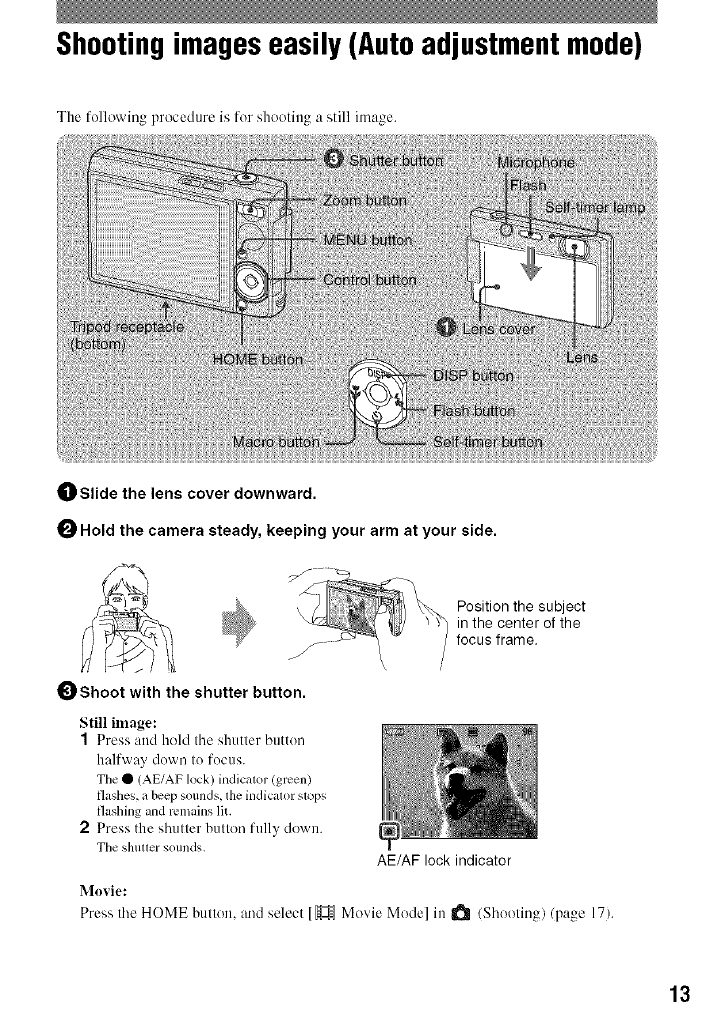
Shootingimageseasily(Autoadjustmentmode)
The following procedure is for shooting a still image.
0 Slide the lens cover downward.
OHold the camera steady, keeping your arm at your side.
Position the subject
in the center of the
focus frame.
Shoot with the shutter button.
Still image:
1Press and hold tile shutter button
halfway down to focus.
Tile • (AE/AF lock) indicator (green)
flashes, abeep sounds,lhe indicator sl_lps
flashing and remains lit.
2Press the sbutter button fully down.
Tile shuttersounds. AE/AF lock indicator
Movie:
Press tile HOME button, and select [_ Movie Mode] in I_ /Sboeling)/page 17).
13
Z00m/Flash/Macr0/Self-timer/Display
_Using the zoom
Press_ to zoom, press (_ to undo zoom.
_Flash (Selecting a flash mode
for still images)
Press • ($) on the control button repeatedly
until tile desired mode is selected.
_TO: FlashAuto
Strobes when there is insullicient light or
backlight (defimh setling)
_: Flashforced on
$SL:Slowsynchro(Flashforcedon)
The shulter speed is slow ina dark place to
clearly shoot the background thai is out of
flash light.
(_: Flashforcedoff
_Macro/Close Focus (Shooting
close-up)
Press • (_) oil the control button
repeatedly until the desired mode is
selected.
_OFF: Macrooff
_: MacroOn(W side:Approx.8 cmor farther
(3 1/4inchesorfarther),T side:Approx.80 cmor
farther(311/2 inchesor farther))
_O.:Closefocusenabled(Lockedto theW side:
Approx.1 to 20cm (13/32to 7 7/8 inches))
_Using the self-timer
Press •/_) on tile control button
repeatedly until the desired mode is
selected.
_FF: Notusingtheself-timer
t_1o: Settingthe1g-seconddelayself-timer
_,.)2: Settingthe 2-seconddelayself-timer
Press the shutter button, tile selFtimer lamp
flashes, and a beep SO/lnds until the shutter
operates.
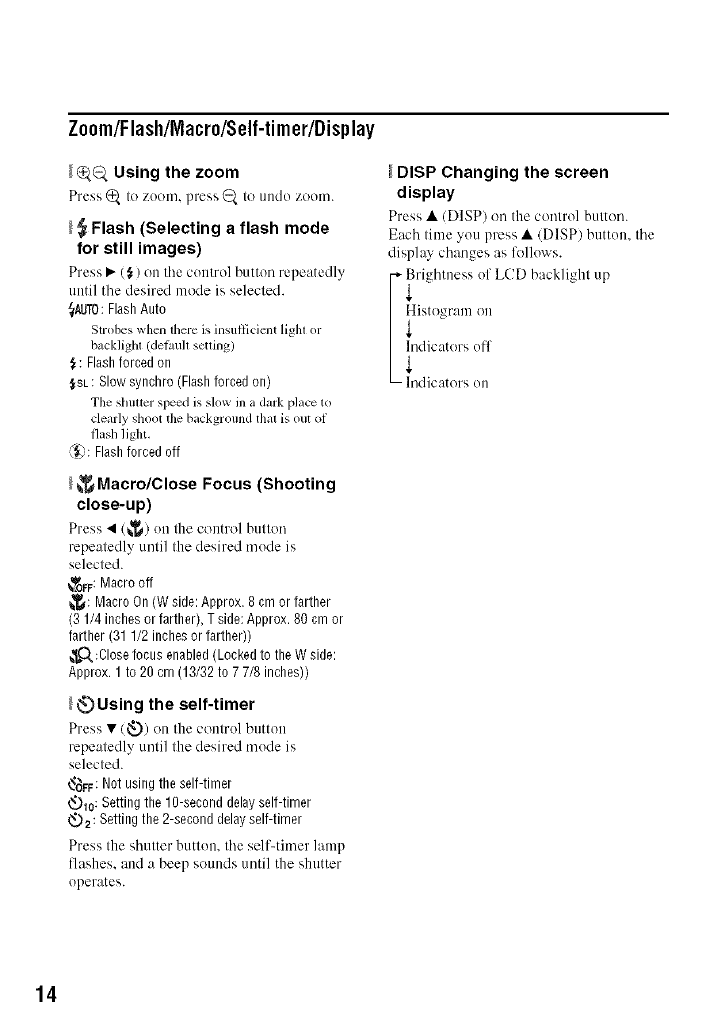
DISP Changing the screen
display
Press • (DISP) on tile control button.
Each time you press • (DISP) button, tile
display changes as lk_llows.
_righlness of LCD backlighl up
I _istogram on
] hldicalors off
L-- _l/dic'/lors on
14
Viewing/deletingimages
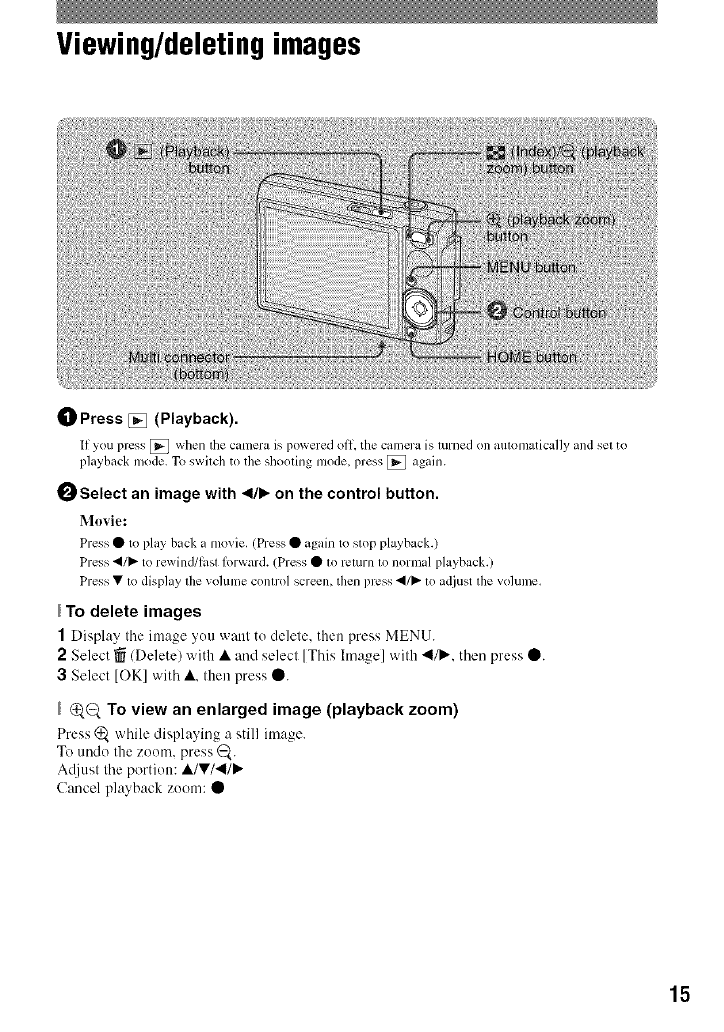
0Press [] (Playback).
If you press [_ when tile camera is powered off, the c_tmera is turned on mltomatically _md set to
playback mode. To switch to the shooting mode, press [] ag_dn.
I_ Select an image with 4111),,on the control button.
Movie:
Press •to pl_y back a movie. (Press • _lDdnto slop playback.)
Press ,/_ to rewind/last lorward. (Press • m return m normal playback.)
Press•to display the volume control screen, then press ,/_ to adjust the volume.
To delete images
1Display the image you want to delete, then press MENU.
2Select _ (Delete) with •and select [This hnage] with 411/))..then press O.
3 Select [OK] with •. then press O.
Q,_ To view an enlarged image (playback zoom)
Press (_ while displa) ing a still image.
To undo the zoom. press _.
A_/iust the portion: •/V/'4/)."
Cancel playback zoom: •
15
_Viewing an index screen
Press _ to display tile index screen wbile a still image is displayed.
Then. select an image with •/V/4IP".
To return to the single image screen, press 0.
•You can also access tile indexscreen by selecting [_m.Index Display] on tile HOME screen.
• Each time yotl press _the number of pictures on lhe index screen changes.
_To delete images in index mode
1Press MENU wbile the index screen is disph,yed.
2Select [Delete] witb • and select [Multiple Images] witb 4111,..then press 0.
3Select the image you want to delete witb •/V/'_I/P.'. then press 0.
The _ mark is checked inthe checkbox of the image.
To cancel a selection, select an image you have selected for deletion, lhen press• again.
4Press MENU and select [OK] with •. tben press 0.
• To delete all the images in a h)lder, select [All In This Folder], tllen press • in step 2.
_To play back a series of images (Slide Show)
Select 1_ Slide Show] in D (View Images) on the HOME screen, and then select [OK] with
•,tben press 0.
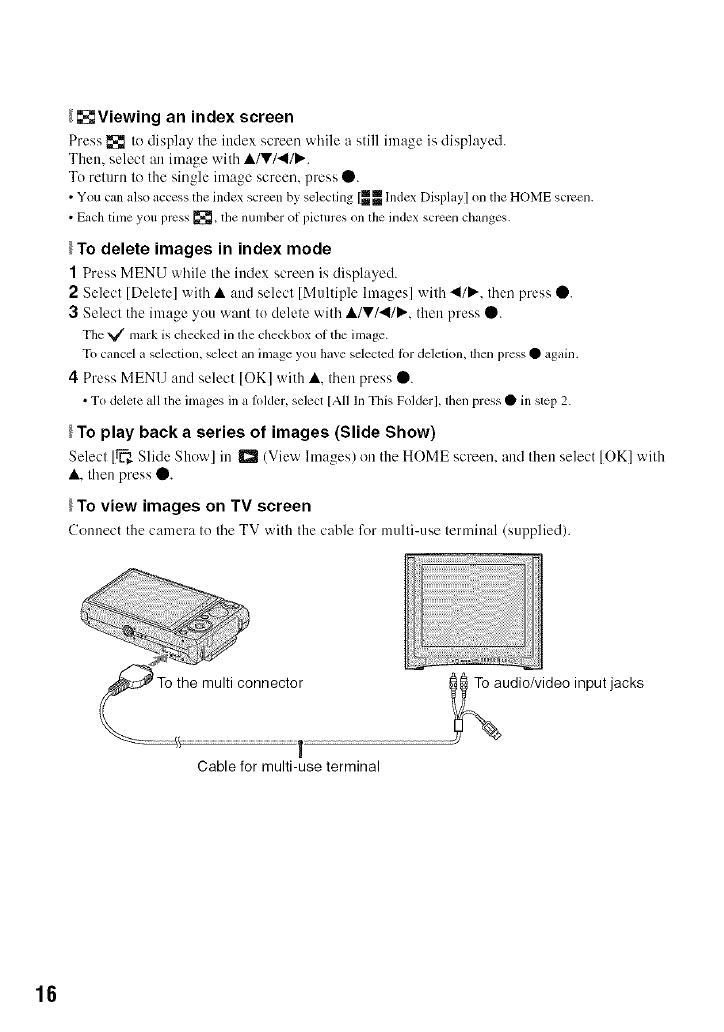
To view images on TV screen
Connect the camera to tbe TV with the cable for nmlti-use terminal (supplied).
T
Cable for multi-use terminal
udio/video input jacks
16
Learningthe variousfunctions- HOME/Menu
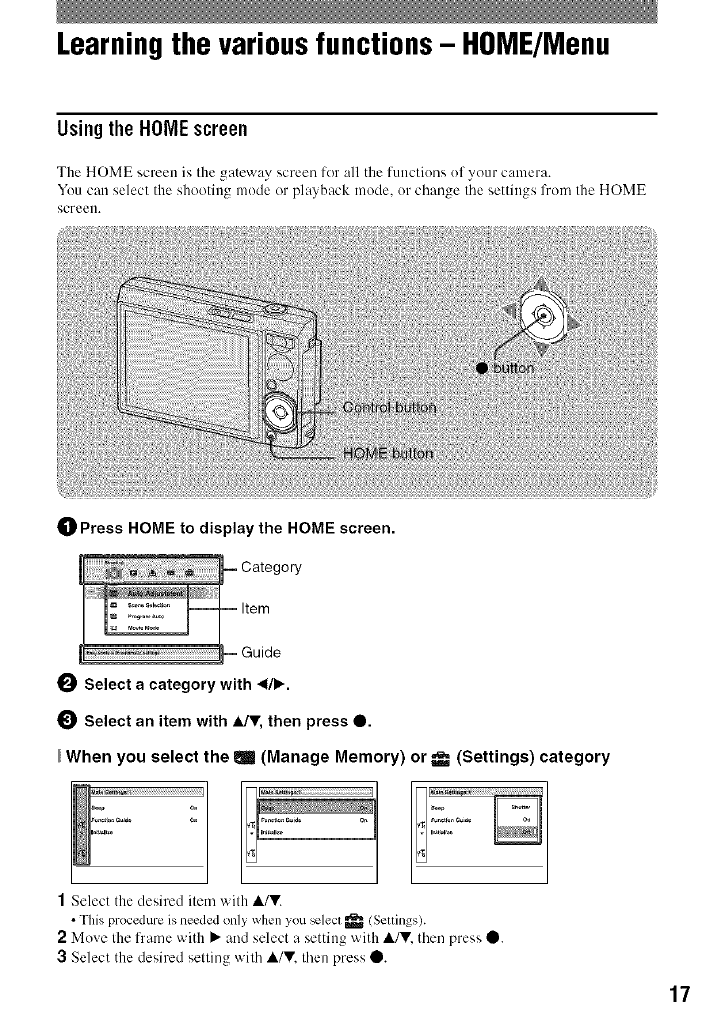
Usingthe HOMEscreen
The HOME screen is the gateway screen lor all the functions of your camera.
You can select the shooting mode or playback mode, or change the settings from the HOME
screen.
0Press HOME to display the HOME screen.
0Select a category with 41•.
_) Select an item with A/v, then press O.
When you select the elm (Manage Memory) or _- (Settings) category
1Select the desired item with A/V.
• This procedure is needed only whenyou _lecl _ (Seoings).
2Move the frame with • and select a setting with A/Y. then press 0.
3Select the desired setting with A/Y. then press 0.
17

Fordetailsonthe operation _ page 17
HOMEscreen items
The following categories and items are displayed when you press the HOME button.
A description of tile selected category or item is displayed on tile screen by tile guide.
6Shooting AutoAqiusmlem
Scene Selection
Program Auto
Movie Mode
QView Images Singlehnage
Index Display
Slide Show
,t, Printing,Other Prinl
Music Tool
Download Music Format Music
Manage Memory lk/emory Tool
Memory Stick Tool
Format Create REC.Folder
Change REC.Folder Copy
Internal Memory Tool
Forfllat
Settings MainSellings
Main Settings I
Beep Function Guide
lniti dize
Main Settings 2
USB Connect COMPONENT
Vide() Out
Shooting Settings
Shooting Settings 1
AF Illuminator Grid Line
AF Mode Digital Zoon/
Shooting Settings 2
Auto Orientation Auto Review
Clock Settings
Language Setting
18
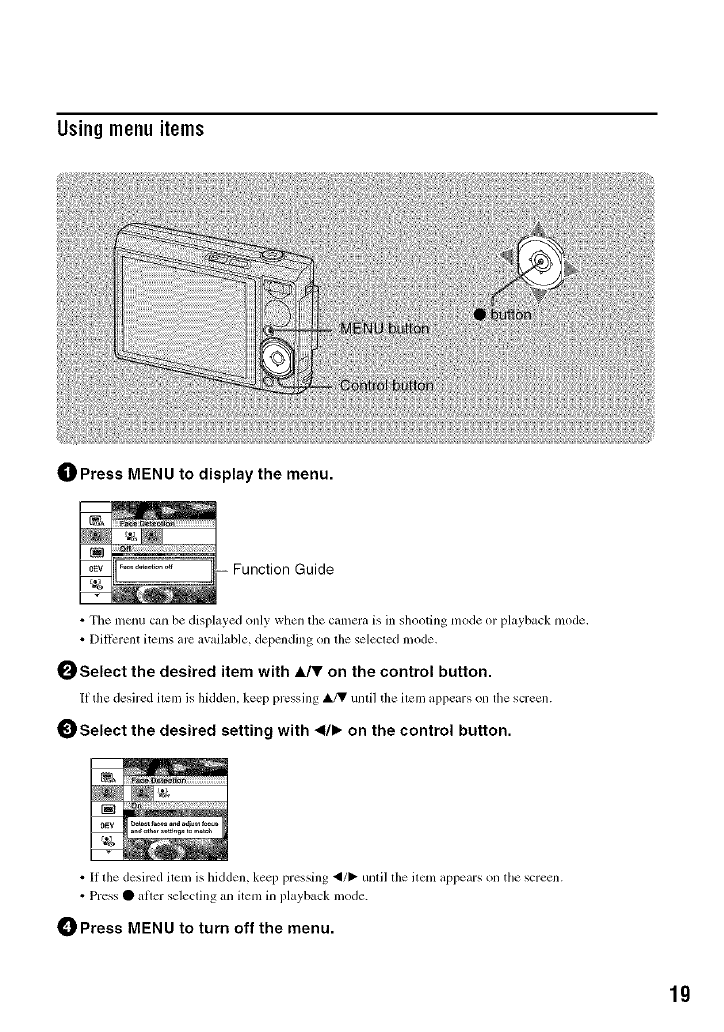
Using menuitems
_]_ Press MENU to display the menu.
-- Function Guide
• The menu can be displayed only when tile calnela is in shooting mode or playback mode,
•DiffErent items are available, depending on the selected mode,
0Select the desired item with A./V on the control button.
It the desired item is hidden, keep pressing A/V until the item appears on file screen.
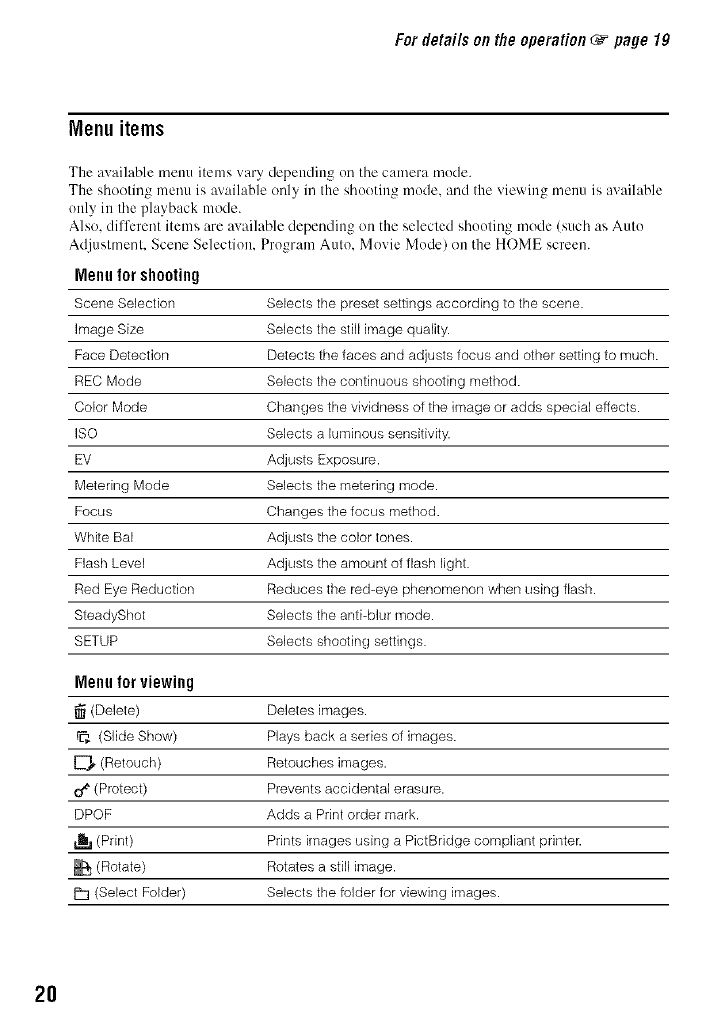
_) Select the desired setting with <l/b on the control button.
• I1 the desired item is hidden, keep pressing _/_ until the iteln appears on tile screen.
•Press • after selecting an item in playback mode.
_) Press MENU to turn off the menu.
lg
Fordetailsonthe operation _page lg
Menu items
The available menu items vary depending oil tile camera mode.
The shooting menu is axailable only in the shooting mode. and the viewing menu is available
only in the playback mode.
Also. different items are available depending on the selected shooting mode (such as Auto
Adjustnmnt. Scene Selection. Program Auto. Movie Mode) on the HOME screen.
Menufor shooting
Scene Selection Selects the preset settings according to the scene.
image Size Selects the still image quality.
Face Detection Detects the faces and adjusts focus and other setting to much.
REC Mode Selects the continuous shooting method.
Color Mode Changes the vividness of the image or adds special effects.
ISO Selects a luminous sensitivity.
EV Adjusts Exposure.
Metering Mode Selects the metering mode.
Focus Changes the focus method.
White Bal Adjusts the color tones.
Flash Level Adjusts the amount of flash light.
Red Eye Reduction Reduces the red-eye phenomenon when using flash.
SteadyShot Selects the anti-blur mode.
SETUP Selects shooting settings.
Menufor viewing
(Delete) Deletes images.
rp_ (Slide Show) Plays back a series of images.
E?_, (Retouch) Retouches images.
O_ (Protect) Prevents accidental erasure.
DPOF Adds a Print order mark.
(Print) Prints images using a PictBridge compliant printer.
(Rotate) Rotates a still image.
P-I (Select Folder) Selects the folder for viewing images.
2O
Enjoyingyour computer
You can display images shot wilh the camera on Ilae computer. Also, you can use still images
and movies from the camera tnore than ever by, taking advantage of the £oldware. For details.
refer to "Cyber-shot Handbook."
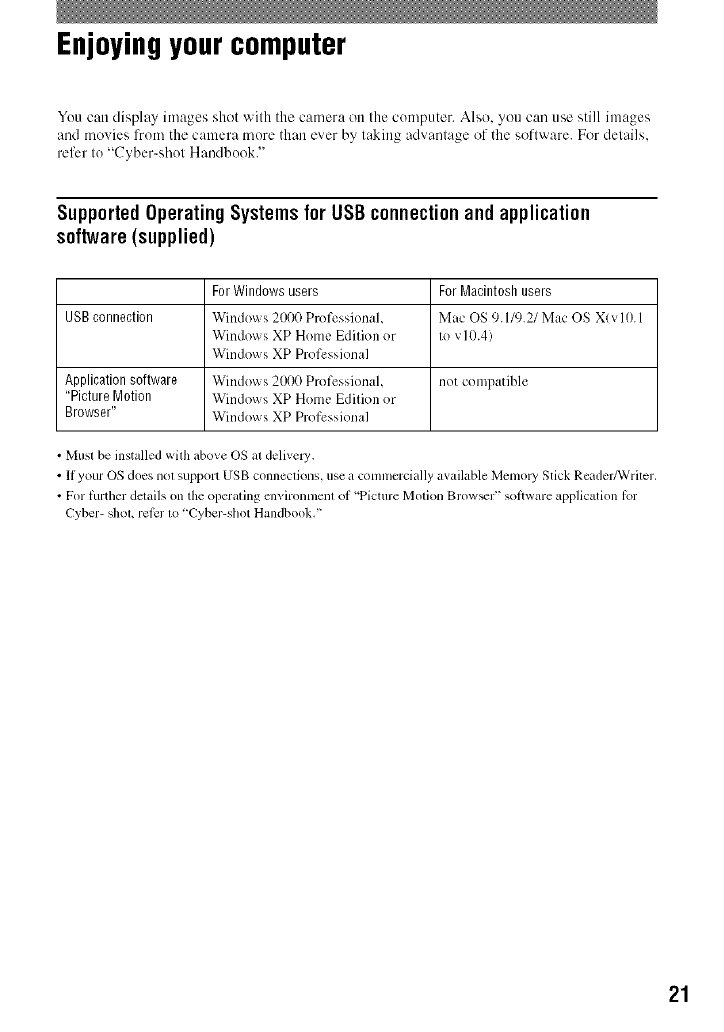
SupportedOperating Systemsfor USBconnectionand application
software(supplied)
For Windows users For Macintosh users
USB connection Windows 2000 Professional. Mac OS 9.1/9.21 Mac OS Xlvl0.1
Windows XP Home Edition or to v10.4)
Windows XP Professional
Application software Windows 2000 Professional. not compatible
"Picture Motion Windows XP Home Edition or
Browser" Windows XP Professional
• Musl be installed with above OS al delivel3,.
• If your OS does nol support USB conneclions, use a comnlcrcially awdlable Memo W Stick Reader/Writer.
•For thrther delails on the operating cnvironmenl of 'Picture Molion Brow_r" sot}ware application lot
Cyber- shoL ret_:r 1o 'Cyber-shot Handbook,"
21
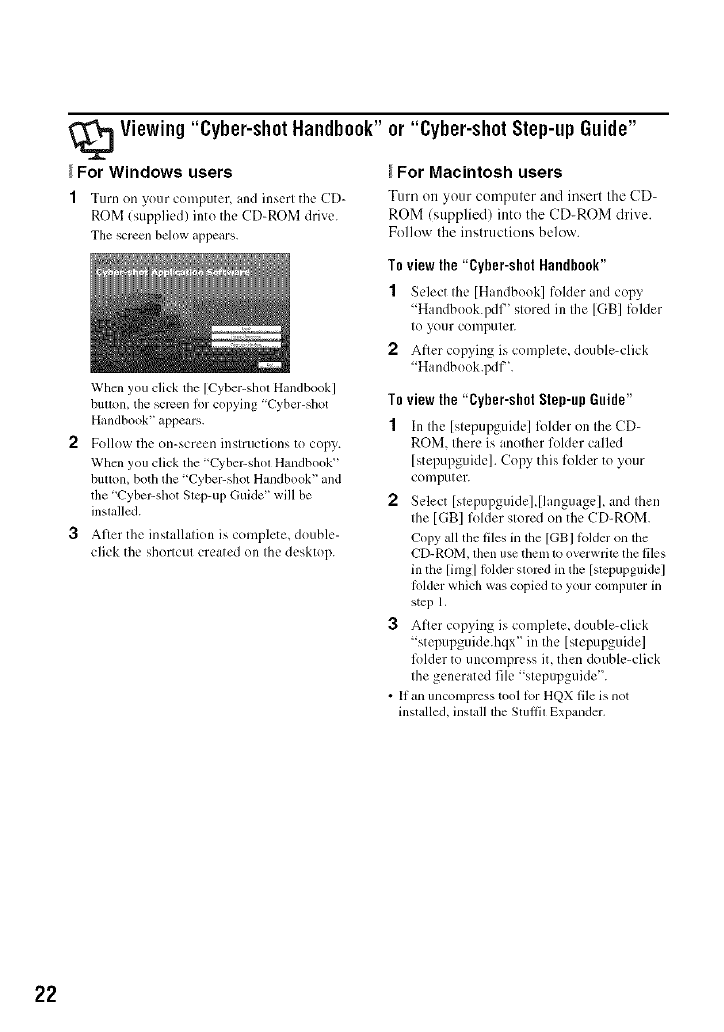
_Viewing"Cyber-shot Handbook"
For Windows users
1Turn on your computer, and insert the CD-
ROM (supplied) into the CD-ROM drive.
The screen below appears,
When you click tile [Cyber-shot Handbook]
butt_m, the screen lor copying "Cyber-shot
Handbook" appears.
2Follow the on-screen instructions to copy.
When you click the "Cyber-shot Handbook"
button, both the "Cyber-shot Handbook" and
the 'Cyber-shot Step-ul? Guide" will be
installed.
3After the installation is complete, double-
click the shortcut created on the desktop.
or "Cyber-shot Step-upGuide"
For Macintosh users
Turn on your computer and insert the CD-
ROM (supplied) into the CD-ROM drive.
Follow the instructions below.
Toviewthe "Cyber-shot Handbook"
1Select the [Handbook] folder and copy
"Handbook.pdf' stored in the [GB] folder
to your computeE
2After copying is complete, double-click
"Handbook.pdf'.
To view the "Cyber-shot Step-up Guide"
1In the [stcpupguidc] lk)lder on the CD-
ROM. there is another folder called
[stepupguide]. Copy this folder to your
computer.
2Select [stepupguide],[language], and then
the [GB] folder stored on the CD-ROM.
Copy all the films in the [GBI lblder on the
CD-ROM, then use them to overwrite the files
in the [imgl lolder stored in tl_e [stcpupguidel
Iolder which was copied to your computer in
step 1.
3After copying is complete, double-click
"stepupguide.hqx" in the [stepupguide]
lk_lder to uncomprcss it, then double-click
the generated file "stepupguide'.
• If an uncompress tool lor HQX film is not
installed, install the Stullil Expander.
22
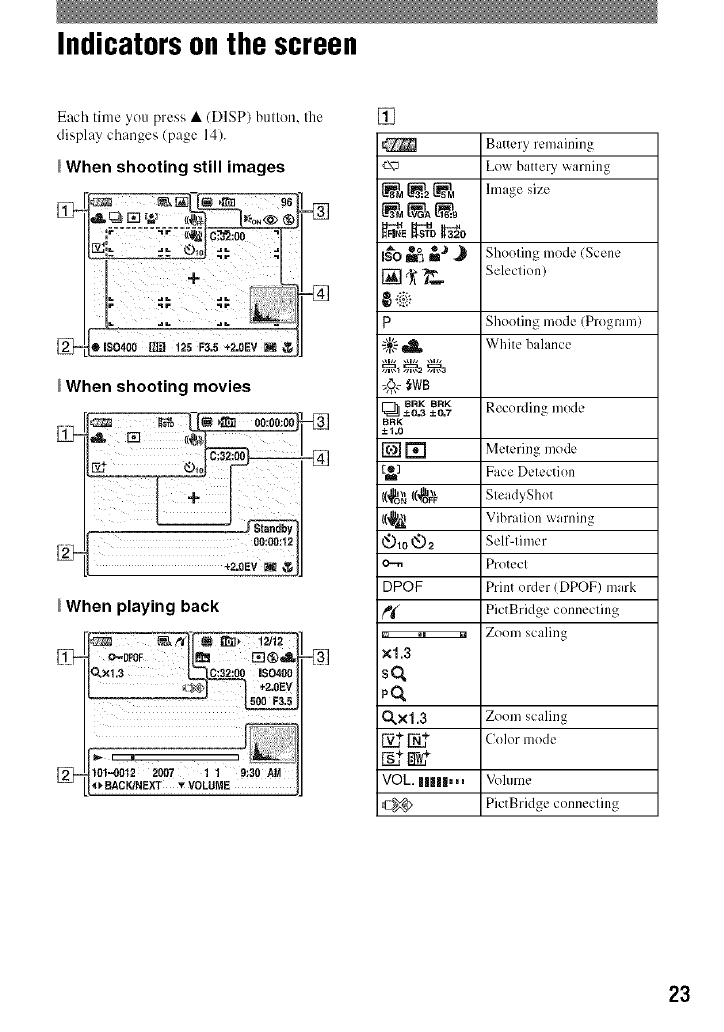
Indicators on the screen
Each time you press • (DISP) bullon, Ihe
display changes (page 14).
_When shooting still images
•IS0400 _125 F3.5 +2.0EV _
When shooting movies
00:00:1
*_.0Ev_¢
_When playing back
o-0poF lira _®,A
3L×1,3 _iS0400
101-0012 2007 1 19:30 AM
_BACK/NEXT _VOLUME
=_
[]
P
8RK BRK
[_ ±0,3 ±C_7
BRK
-+%0
,c_a
O,0®=
DPOF
rg
i_ iZoom scaling
x1.3
sq
po,
CLX1.3 Zoom scaling
V_ N_ Color mode
s_w +
VOL. IIIII,,,
Battery remaining
Low battery warning
Image size
Shooting mode (Scene
Selection)
Shooting mode (Program)
White balance
Recording mode
Metering mode
Face Detection
SteadyShot
Vibration warning
Self-timer
Protect
Print order (DPOF) mark
PictBridge connecting
Vohlme
PictBridge connecting
23
24
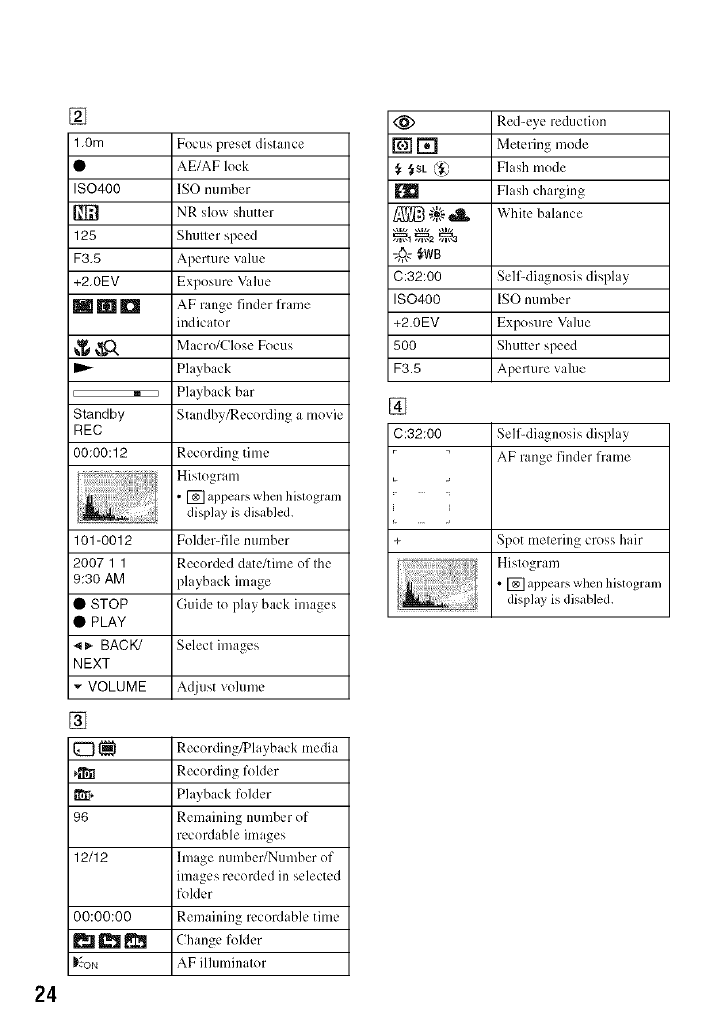
[]
1.0m
ISO400
#]R
125
F3.5
+2.0EV
MmD
Focus preset distance
AE/AF lock
ISO number
NR slow shutter
Shutter speed
Aperture value
Exposure Value
AE range finder flame
indicator
__O., Macro/Close Focus
Playback
i E::::::::::::::::_ I Playback bar
Standby Standby_ecording a movie
REC
00:00:12 Recording time
Histogram
• [] appears whcn hislogram
display is disabled.
101-0012 Folder-file number
2007 1 1 Recorded date/time of the
9:30 AM )layback image
• STOP Guide to play back images
• PLAY
_!_- BACK/ Select images
NEXT
- VOLUME Adjust volume
[]
[_ 1_1 Recording_layback media
_ll Recording folder
_[, Playback folder
96 Remaining number of
recordable images
12112 linage number/Number of
mmges recorded in selected
folder
00:00:00 Remaining mcordable time
_ I_ Change folder
D_oN AF ilhmdnator
<_ Red-eye reduction
[] [] Metering mode
,_ ,_Sk @ Flash mode
Flash charging
";_{_"I1_ White balance
C:32:00 Self-diagnosis display
IS0400 ISO number
+2.0EV Exposure Vahle
500 Shutter speed
F3.5 Apelltlre vahle
[]
C:32:00 Self-diagnosis display
AF range finder frame
+ Spot metering cross hair
......................... Hislogram
• [] appears when histogram
display is disabled.
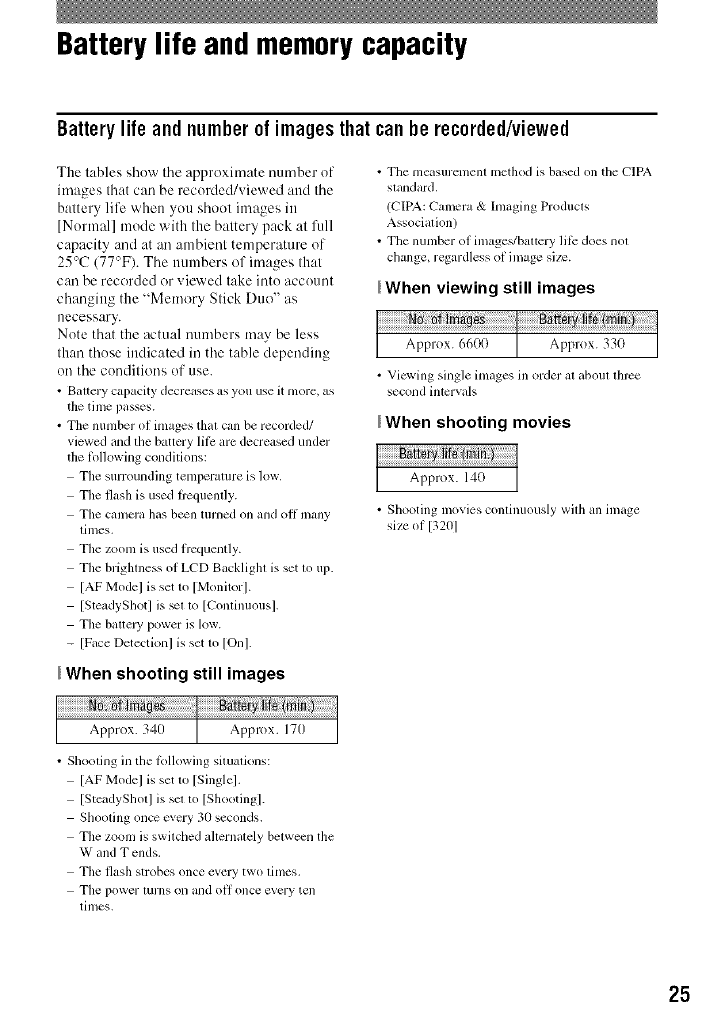
Battery life and memory capacity
Batterylife andnumberof imagesthat can be rec0rded/viewed
The tables show tile approximate number of
images that can be recorded/viewed attd the
battery life when you shoot images in
[Normal] mode with the battery pack at full
capacity and at an ambient temperature of
25°C (77°F). The numbers of itnages that
carl be recorded or viewed take into account
chatlging the "Memory Stick Duo" as
necessary.
Note that the actual numbers tnay be less
than those indicated in the table depending
on the conditions of use.
• Baltery capacity decreases as you use it nlore, as
the time passes.
• The number of images thai can be recorded/
viewed and the battery lil_: are decreased under
the lk_llowing conditions:
The surrounding tenlperature is low.
The flash is used flcquenlly.
Tile camera has b_n turned on and oil many
lill/es.
The zoonl is used fl'cquently.
The briglaness of LCD Backlighl is set 1o up.
[AF Model is set 1o [Monitor].
[SteadySllot] is _1 to [Conlinuous].
The baltel T power is low.
- [Face Detectionl is set 1o [Onl.
• Tile measuremenl metbod is based on tile CIPA
slandard.
(CIPA: Camera & hnaging Producls
Associalion)
• The nunlber of image'_/baltery lil_: does nol
change, regardless of image size.
_When viewing still images
• Vicwing single inlages ill order al aboul lhrce
second intcrvals
_When shooting movies
• Sllooting movies conlinuously wilh all image
size of 13201
_When shooting still images
• Sllooling in tile b_llowing situalions:
[AF Model is set 1o [Single].
[SteadySllotl is sm to [Shooting].
Shooling once every 30 seconds.
The zoom is swilched ahernalely belween the
W and T ends.
The flash strobes once every two limes,
Tile power turns on and oil once cvery tell
times.
25

Number of still images andrecordingtime of movies
The nutnber of still images and the length of titne awdlable lkw recording movies may wiry,
depending on the shooting conditions and/or the recording media used.
• You can select the image size to be used when shooting honl the menu (page 19, 20).
_The approximate number of still images
(Units: Images)
8M 10 40 72 148 3(}2 62(} 1225 2457
3:2 10 40 72 148 302 620 1225 2457
5M 13 51 92 188 384 789 1559 3127
3M 21 82 148 302 617 1266 2501 5017
VGA 202 790 1428 29(}4 5928 12154 24014 48166
16:9 33 133 238 484 988 2(}25 4002 8(}27
• The number of images listed is li_r when [REC Model is sm to [Nornml].
• When the number of remaining shoolable images is greater lllan 9,999_ the ">9999" indicator appears.
_The approximate recording time of movies
(Units: hour : minute : second)
6401Fine) 0:02:50 0:06:00 0:12:20 0:25:10 0:50:00 1:40:20
640(Standard) 0:01:30 0:05:50 0:10:40 0:21:40 0:44:20 1:31:(t(t 3:00:00 6:01:10
32(1 0:06:00 (t:23:4(t 0:42:50 1:27:00 2:57:5(t 6:(_:30 12:00:20 24:04:50
• Movies with the size sel 1o [640(Fine)] can only be recorded on a "Mmnory Slick PRO Duo ''.
• The size of a movie file is limiled 1o approx. 2 GB.
During recording, movie ivcording slops aulvmmlically when the file size of the movie reaches approx.
2 GB.
• This canlma does nol support HD ivcordings or playbacks li_wmovies.
• When images recorded using earlier Sony models are played back on this camera, lhe display may dillcr
flom lhe actual image size.
26

Troubleshooting
If you experience trouble with your camera, try the fl_llowing solutions.
tl) Checktheitemsbelow,andreferto "Cyber-shotHandbook(PDF)".
If ;i code such as "C/E:r-IN:r-IN" appears on the screen, refer to "Cyber-shot
Handbook".
ORemovethebatterypack,andinsertthebattery packagain afteraboutone
minute,andturnonthe power.
V
OInitializethe settings(page18). ]
[ _ Censnlt your Sony dealer or local authorized Sony service facility. ]
Please understand thai you give your consent lhat the contents of lhe internal memory, Music
files may be checked when you send your camera lo be repaired.
m
The battery pack cannot be installed.
•Install the baltcry pack correctly using Ihc tip of the battery pack to push Ihe batlery cjccl lever
(page I0).
Cannot turn on the camera.
• After installing the battery lxJck into the camcra_ it may take CJlittle while to get Ibc camera
powered.
• Install the battery pack correctly (plge 10).
• The battery pack is discharged. Install charged battery pack (page 9).
• The battery pack is dead. Replace it with i new one.
• Use a recommended battery pack (page 8).
The power turns off suddenly.
•If you do not operate the camera for Mx)ut three minutes x_bile the lX)wcr is ()n_ Ibe cCm/cl¢J
turns off automatically to prevent wearing down the battery pack. Turn on the camera again
(page 12).
• The battery pack is dead. Replace it with a new one.
27
The battery remaining indicator is incorrect.
• This phenomenon occurs _hcn you use the camera in an extremely hot or cold location.
• The displayed battery remaining differs from the current one. Fully discharge and then charge
fl_ebattery pack to correct the displa3_
• The battery pack is discharged. Install the charged battery pack (page 9).
• The battery pack is dead. Replace it with a new one.
Cannot charge the battery pack
• Youcannot charge the battery pack using the AC Adapt,:r (not supplied).
i
Your camera cannot record images.
• Check the free capacity of the internal memory or "Memory Stick Duo" (page 26). If it is lhll,
do one of the R)llowing:
Delete unnecessary images (page 15).
Change the "Memory Stick Duo".
• You are using the "Memory Stick Duo" with the write-protect switch, and the switch is set to
the LOCK position. Set the switch to the recording position.
• You cannot record images while charging the flash.
• Select a shooting mode other than the [_ Movie Mode] using the HOME screen when
shooting still images.
• Select [_ Movie Mode] using the HOME screen when shooting movies.
• The image size is set to [640(Fine)] when recording movies. Do one of the lbllowing:
Set the image size to other than [640(Fine)].
Insert a "Memory Stick PRO Duo".
Cannot insert dates on images.
• This camera does not have al'caturc for superimposing dates on images. You can print or save
images with the date inserted using "Picture Motion Browser".
Vertical streaks appear when you are shooting a very bright subject.
• The smear phenomenon is occurring and white, black, red, or purple streaks ap?ear on the
image. This phenomenon is not a malfimction.
28
Your camera cannot play back images.
• Press _ (Playback) (page 15).
• The lblder/file name has been changed on your computer.
• When an image file has been processed by a computer or when the image file was recorded
using a model other than that of your camera, playback on your camera is not guaranteed.
• The camera is in USB mode. Delete the USB connection.
Precautions
Do not use/store the camera in
the following places
• In ml extremely hot, cold or hulnid plao:
In ph,ces such as in acar pm'ked in tile sun, tile
camera body may beconle delornled andtiffs
Hilly cause a ln3]l/lnc[iOll.
• Under direct sunlight or near a healer
The camera body nlay beconle discolored or
delornled, and this may cau_ a nlaltunction.
• In a location subject to rocking vibration
• Near strong magnetic place
• In sandy or dusty places
Be carehll not to let sand or dust gel into tile
camera. This may cause tile camera to
nlalhmction, and in sonle cases this nlalflmction
cannot be repaired.
On carrying
Do not sit down in achair or other place with tile
CiUllera ill the bilck pocket of your trousel>, or
skirt, _lSthis nl_lycause malhmction or danl_lge the
catnera.
On cleaning
Cleaning the LCD screen
Wipe the screen surface with an LCD cleaning kil
(not supplied) to rcnlove fingerprints, dust. etc.
Cleaning the lens
Wipe tile lens with il solt ch)th to rcnlox e
fingerprints, dust, etc.
Cleaning the camera surface
Clean tile camera surt_lce with asoil cloth slightly
u/oistened with wider, then wipe tile sllrtace with
a dry cloth. Do not use the lollowing as they nlay
danlage the finish or the casing.
• Chenlical products such as thinner, benzine,
alcohol, disposable cloths, insect repellent,
sunscrcen or insecticide, etc.
• Do not [ouch tile camera with tile above on your
hand.
• Do nol leave the camera ill contact with rubber
or vinyl lot a long tinle.
On operating temperatures
Your camera is designed _>r u_ under tile
tenlperatures between 0°C and 40°C (32°F and
104°F). Shooting ill extrenlely cold or hot places
that exceed this range is not reconln/ended.
On moisture condensation
If the camera is brought directly ti'onl it cold to a
warm h)c_ltion, tnoJslure Illay condense inside or
outside tile Cillnera, This Inoisture C'olldensatiOll
lll_ly ctluse a nltllJ/inctiOll o1 tile C_ltller_l.
If moisture condensation occurs
Turn off the calncra and wait about an hour for the
moisture to e_,aporate. Note that it you attempt to
shoot with nloisture rcnlaining inside the lens, you
will be unable to record deal inlages.
On the internal rechargeable
backup battery
This cmnera has an internal rechargeable battery
lor maintaining tile date and time and other
settings regardless ol whether tile power is oil or
OI|.
This rechargegdqe battery is continually charged
as lollg tls yo/I are/ishlg tile CtllnertL Howe,, er, if
you usetile camera l_l" only short periods, it
discharges gradually, and if you do not use tile
Calllel'a at till [or abo/it Olle lllOnth it beconles
completely dischmged, hi this case, be sure to
charge this rcchargeable battery belorc using the
calnera.
However, even if this rcchargeable battery is not
charged, you can still use the camera as long as
you do not record the date and tithe.
Charging method of the internal
rechargeable backup battery
hlsert charged battery pack in tile camera, and
then lea'_'e lhe calnel'a [or 24 hours or II/ore with
tile power off,
29
Specifications
3O
Camera
[System]
Image de_ ice: 7,18 mm ( 1/2,5 lype) color CC[X
Primary color filter
Total pixel number of camera:
Appwx. 8 286 000 pixels
Effective pixel number of camera:
Appwx. 8 1183(11111pixels
Lens: Carl Zeiss Vario-Tcssar 5x/oom lens f =
5.8 29,0 mm 05 175 mm when converted
to a 35 mm still camera) F3.5 4.4
Exposure control: A/itolnalic exposure, Scene
Seleclion (9 modes)
While balance: Aulomatic, Daylight. Cloudy,
Fluorescent 1, Fluorescent 2. Fluorcscenl 3,
lncandesccm. Flash
File lormat (DCF compliant):
Slill ftnages: Exif Vcr. 2.21 JPEG complianl,
DPOF compalible
Movies: MPEG1 compliant (Monaural)
Recording media: Internal Memory (approx.
31 MB), "Memo W Slick Duo"
Flash: Fl_,sh range (ISO (Recommended Exposurc
Index) set to Auto): approx. 0.1 to 3.7 m
(4 inches to 12 lcet 1 3/4 inches) (W)/
approx. 11.8to 2.9 m (2 lcet 7 I/2 inches to
9 1Pet 6 1/4 inches) (T)
[InputandOutputconnectors]
Mufti connector:
Vkleo output
Audio output (mono)
USB communication
USB communication:
Hi-Speed USB (USB 2.0 compliant)
[LCDscreen]
LCD p_ulel: 7.5 cnl (3.0 type) TFT drive
Total number of dots: 230 41111(960×240) dols
[Power,general]
Power:
Rechargeahle baucry pack NP-BGI. 3.6 V
AC-LS5K AC Adaptor (nol supplied), 4.2 V
Power consumption (during shooting): 1.1 W
Operating temperature: 0 to 40°C (32 to 104°F)
Slorage lemperalurc: 20 to +60°C 1_0,1o + 140°F)
Dimensions: 91.8x59.2×22.3 mm
(3 518x2 3/8x29132 inches)
(W/H/D, excluding protrusions)
Mass: Approx. 172 g 16.1 oz) (including NP-BGI
batlery pack and wrist strap, etc.)
Microphone: Monaural
Speaker: Monaural
Exif Dint: Compatible
PRINT Image Malching Ilk Compatible
PictBridge: Compalible
BC-CSG/BC-CSGB/BC-CSGC
battery charger
Power requirements: AC 100 to 240 V, 5(1/60 Hz.
2 W (BC-CSG/BC-CSGC)/2.6 W (BC-
CSGB)
Oulput vohage: DC 4.2 V, 0.25 A
Operating temperalurc: 0 1o 40°C (32 to 104°F)
Storage lmnperature: -20 to +60°C ( 4 1o
+140°F)
Dimensions: Approx. 62x24×91 mm( 2 I/2x
31/32×3 5/8 inches) (W/H/D)
Mass: Approx. 75 g 12.7 oz)
Rechargeable battery pack NP-
BG1
Used hattery: Lithium-ion battery
M_ximunl _ollage: DC 4.2 V
Nominal vollage: DC 3.6 V
Ct_paeily: 3.4 Wh (960 mAh)
Design and specificalions arc suhject to change
wilhout notice.
Trademarks
• CybEp-sh_l: is _Ltradem_u'k o1 Sony
Corl_oralion.
• 'Memory Stick", _._, "Memol T Stick PRO",
MEMORY5TIEK PR[I. "Memo UStick Duo",
MEMnRY 5TIEK _tlO, "Memory Stick PRO
Duo", MEMORYSTICKPRII DUO, "Memoly
Stick Micro". "MagicGate'. and
rfflZ_G|CCIZ_TE are trademarks of Sony
('orporalioll.
• Microsoft, Windows and DircctX arc eilher
registered trademarks or trademarks of
Microsoft Corporalion in lhe Unhed Slates and/
or ()tiler counlries.
• Macintosh. Mac OS, iMac, iBook, PowerBook,
Power Mac and eMac arc lradenlarks or
regislered trademarks of Apple Compmer, Inc.
• Intd, MMX. and Pentium are trademarks or
regislered trademarks of Intel Corporalion.
• Google is a registered lrademark of Google lnc.
• In addition, system and product names used in
lhis manual are. in general, lrademarks or
regislered trademarks of their respective
developers or inallul_lclurcrs. Sowcx er. the rMor
q_)marks arc nol u_d ill all cases in this manual.