Sony DSC W210 User Manual DIGITAL CAMERA Manuals And Guides L0902566
SONY Cameras, All Manual L0902566 SONY Cameras, All Owner's Manual, SONY Cameras, All installation guides
User Manual: Sony DSC-W210 DSC-W210 SONY DIGITAL CAMERA - Manuals and Guides View the owners manual for your SONY DIGITAL CAMERA #DSCW210. Home:Electronics Parts:Sony Parts:Sony DIGITAL CAMERA Manual
Open the PDF directly: View PDF ![]() .
.
Page Count: 38
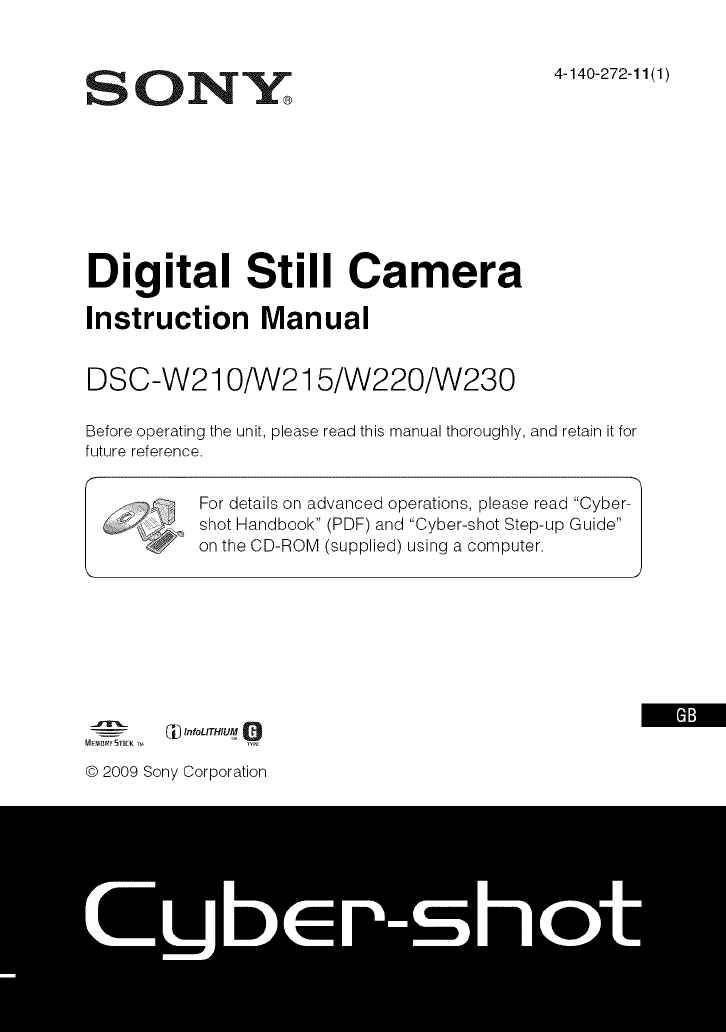
ON.,_r _ 4-140-272-1111/
Digital Still Camera
Instruction Manual
DSC-W210/W215/W220/W230
Before operating the unit, please read this manual thoroughly, and retain it for
future reference.
For details on advanced operations, please read "Cyber-|
shot Handbook" (PDF) and "Cyber-shot Step-up Guide" J
on the CD-ROM (supplied) using a computer.
C_"'°L'TH'UMQ
© 2009 Sony Corporation
Owner's Record
The ruodel and serial nurubers are located
on the bottoru. Record the serial number ill
the space provided below, Refer to these
nurubers whenever you call upon your Sony
dealer regarding this product,
Model No. DSC-W210/W215/W220/W230
Serial No.
To reduce fire or shock hazard, do
not expose the unit to rain or
moisture.
-SAVETHESE
iNSTRUCTiONS
DANGER
TOREDUCETHERiSKOF
FiREORELECTRIC
SHOCK,CAREFULLY
FOLLOWTHESE
iNSTRUCTiONS
lithe shape ollhe plug does nol lit the power
outlet, use an allachmem plug adaptor of the
proper conliguration lk_r lhe power outlet.
Battery pack
lfthe batter2r pack is mishandled, the b_lttery p_c'k
can burst, cause a fire or even chemical burns.
Observe the following cautious.
• Do not disassemble.
• Do not crush and do not expose the battery pack
to any shock or li_rce such as hammering,
dropping or stepping on it.
• Do not short circuit and do not allow metal
objects to come into contact with the battery
terminals.
• Do not expose to high temperature above 60°C
(140°F) such as in direct sunlight or in a car
parked in the sun.
• Do not incinerate or dispose of in fire.
• Do not handle damaged or leaking lithium ion
batteries.
• Be sure to charge the battery pack using a
genuine Sony battery charger or a device that
can charge the battery pack.
• Keep the battery pack out of the reach of small
children.
• Keep the battery pack dry.
• Replace only with the same or equivalent type
recommended by Sony.
• Dispose of used battery packs promptly as
described in the instructions.
Battery charger
Even it" the CHARGE lamp is not lit, the batter2r
charger is not disconnected from the AC power
source (mains) as long as it is connected to the
wall outlet (wall socket). If some trouble occurs
while using the battery charger, immediately shut
off the power by disconnecting the plug from the
wall outlet (wall socket).
RECYCLING LITHIUM-ION
BATTERIES
Lithium-Ion b;itteries are
recyclable.
You can help preserve our
environment by returning your
used rechargeable batteries to
the collection and recycling
location nearest you.
For more inff_rmatiou regarding recycling of
rechargeable batteries, call toll free
1-800-822-8837, or visit http://www.rbrc.org/
Caution: Do not handle damaged or leaking
Lithium-Ion batteries.
Battery pack
This device complies with Pm't 15 of the FCC
Rules. Operation is subject to the following two
conditions: (1) This device may not cause harmful
inteHizreuce, and (2) this device must accept any
interlizreuce received, including interlizreuce that
may cause undesired operation.
This Class B digital apparatus complies with
Canadian 1CES4t03.
Ifyouhaveanyquestionsaboutthisproduct,you
)naycall:
SonyCustomerlu[k>rmationCenter
1-800-222-SONY(7669)
ThenumberbelowisfortileFCCrelatedmatters
only.
Regulatory Information
Declaration of Conformity
Trade Name: SONY
Model No.: DSC-W230
Responsible Party: Sony Electronics Inc.
Address: 16530 Via Esprillo,
San Diego, CA 92127U.S.A.
Telephone No.: 858-942-2230
This device complies with Part 15 of the FCC
Rules. Operation is subject to tile following
two conditions: (1) This device may not cause
harnlfnl interference, and (2) this device must
accept any interli_reuce received, including
interli_reuce that may cause undesired
operation.
Declaration of Conformity
Trade Name: SONY
Model No.: DSC-W220
Responsible Party: Sony Electronics Inc.
Address: 16530 Via Esprillo,
San Diego, CA 92127U.S.A.
Telephone No.: 858-942-2230
This device complies with Part 15 of the FCC
Rules. Operation is subject to tile following
two conditions: (1) This device may not cause
harnlfnl interference, and (2) this device must
accept any interli_reuce received, including
interli_reuce that may cause undesired
operation.
Declaration of Conformity
Trade Name: SONY
Model No.: DSC-W210, DSC-W215
Responsible Party: Sony Electronics Inc.
Address: 16530 Via Esprillo,
San Diego, CA 92127U.S.A.
Telephone No.: 858-942-2230
This device complies with Part 15 of the FCC
Rules. Operation is subject to the following
two conditions: (1) This device may not cause
harmful interference, and (2) this device must
accept any iuterli_rence received, including
interli_reuce that may cause undesired
operation.
CAUTION
You are cautioned theft _ln_ chmlges or
modifications not expressly approved in this
manual could void your authority to operate this
equipment.

Note:
This equipment has been tested and found to
comply with the limits for a Class B digital
device, pursuant to Part 15 of the FCC Rules.
These limits are designed to provide reasonable
protection against harmful interference in a
residential installation. This equipment generates,
uses, and can radiate radio fl'equency energy and,
it"not installed and used in accordance with the
instructions, may cause harmflfl interli_reuce to
radio communications. However, there is no
guarantee that interfizreuce will not occur in a
particular installation. If this equipment does
cause harmful interfizreuce to radio or television
reception, which can be determined by turning the
equipment off and on, tile user is encouraged to
try to correct the interference by one or more of
the following measures:
Reorient or relocate tile receiving antenna.
Increase the separation between the
equipment and receiver.
Connect the equipment into an outlet on a
circuit diffizreut fi'om that to which the
receiver is connected.
Consult the dealer or an experienced radio/TV
technician for help.
The supplied iuterlace cable must be used with the
equipment in order to comply with the limits lot a
digital device pursuant to Subpart Bof Part 15 of
FCC Rules.
I" IH" IoL"
Notice for the customers in the
countries applying EU Directives
The mauulacmrer of this product is Sony
Corporation. 1=7=1 Kouan Minato=ku Tokyo, 108=
0075 Japan. The Authorized Representative for
EMC and product safety is Sony Deutschland
GmbH. Hedell'inger Strasse 61,70327 Stuttgart,
Germany. For any service or guarantee matters
please rellzr to the addresses given in separate
service or guarantee documents.
This product has been tested and found compliant
with tile limits set out in the EMC Directive for
using connection cables shorter than 3 meters
(9.8 llzet).
Attention
The electromagnetic fields at tile specific
fi'equencies ,nay influence the picture and sound
of this unit.
Notice
It"static electricity or electromagnetism causes
data trausllzr to discontinue midway (fail), restart
tile application or disconnect and connect the
comnmnicatiou cable (USB, etc.) again.
Disposal of Old Electrical &
Electronic Equipment (Applicable
in the European Union and other
European countries with separate
collection systems)
This symbol on the product or on its packaging
indicates that this product shall not be treated as
household waste. Instead it sball be handed over
to the applicable collection point tk>rtile recycling
of electrical and electronic equipment. By
ensuring this product is disposed of correctly, you
will help prevent potential negative consequences
lor tile environment and human health, which
could otherwise be caused by inappropriate waste
handling of this product. The recycling of
materials will help to conserve natural resources.
For more detailed iulormation about recycling of
this product, please contact your local Civic
Office, your household waste disposal service or
tile shop where you purchased the product.
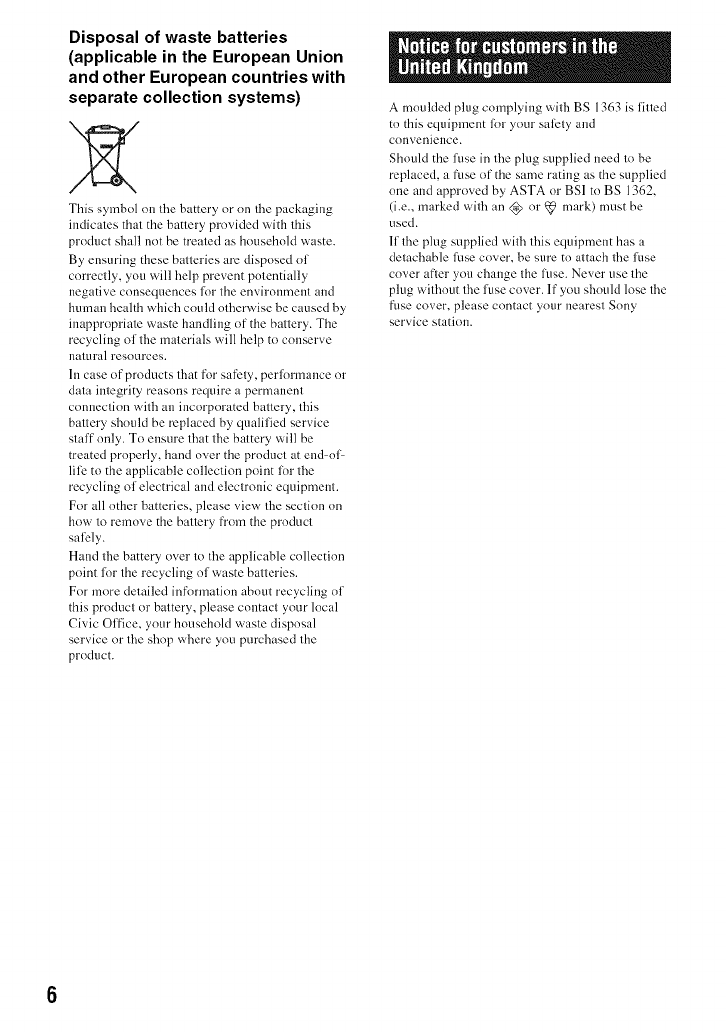
Disposal of waste batteries
(applicable in the European Union
and other European countries with
separate collection systems)
This symbol on the battery or on the packaging
indicates that the battery prnvided with this
product shall not be treated as household waste.
By ensuring these batteries are disposed of
correctly, you will help prevent potentially
negative consequences lot the environment and
human health which could otherwise be caused hy
inappropriate waste handling of the battery. The
recycling of tile materials will help to conserve
natural resources.
1n case of products that for safety, perlormance or
data integrity reasons require a permanent
connection with an incorporated battery, this
battery should be replaced by qualified service
staff only. To ensure that the battery will be
treated properly, hand over the product at end-nl_
lile to the applicable collection point lot tile
recycling of electrical and electronic eqtfipment.
For all other batteries, please view the section on
how to remove the battery fi'om the product
saMy.
Hand the battery over to the applicable collection
point lor the recycling of waste batteries.
For more detailed infnrmation about recycling of
this product or battery, please contact your local
Civic Office, your household waste disposal
service or the shop where you purchased the
product.
A moulded plug complying with BS 1363 is fitted
to this equipment lot your salety and
convenience.
Should the fuse in the plug supplied need to be
replaced, a fuse of the same rating as the supplied
one and approved by ASTA or BSI to BS 1362,
(i.e., marked with an @ or _ mark) must be
used.
lfthe plug supplied with this equipment has a
detachable lhse cover, he sure to attach tile lhse
cover after you change the fuse. Never use the
plug without tile fuse cover. If you should lose tile
fl/se cover, please contact your nearest Sony
service station.
Table of contents
Notes on using the camera ...................................................................... 8
Getting started ................................................................................. 9
Checking the accessories supplied ......................................................... 9
1 Preparing the battery pack .................................................................. 10
2 Inserting the battery pack/a "Memory Stick Duo" media
(sold separately) ..................................................................................... 11
3 Turning the camera on/setting the clock ............................................. 13
Shooting images easily ................................................................. 14
Mode dial/Zoom/Flash/Macro/Self-timer/Display ................................... 15
Detecting smiles and shooting automatically (Smile Shutter) ................ 17
Detecting the shooting conditions (Scene Recognition) ........................ 18
Viewing/deleting images ............................................................... 19
Learning the various functions - HOME/Menu ........................... 22
Using the HOME screen ......................................................................... 22
HOME items ............................................................................................ 23
Using menu items ................................................................................... 24
Menu items .............................................................................................. 25
Enjoying your computer ............................................................... 27
Supported Operating Systems for USB connection and application
software (supplied) ................................................................................. 27
Viewing "Cyber-shot Handbook". ........................................................... 27
Indicators on the screen ............................................................... 28
Battery life and memory capacity ................................................ 30
Battery life and number of images you can record/view ........................ 30
Number of still images and recordable time of movies .......................... 31
Troubleshooting ............................................................................ 32
Battery pack and power ......................................................................... 32
Shooting still images/movies .................................................................. 33
Viewing images ...................................................................................... 34
Precautions .................................................................................... 35
Specifications ................................................................................ 36
Notes on usingthe camera
Internal memory and "Memory
Stick Duo" media back up
Do not turn off the camera, remove the batter_
pack, or remove the "Memory Stick Duo" media
while the access lamp is lit. Otherwise, the
internal memory data or "Memory Stick Duo"
media may be damaged. Be sure to make a backup
copy to protect your data.
Notes on recording/playback
• Before you start recording, make a trial
recording to make sure that tile camera is
working correctly.
• The camera is neither dust-pronE nor splash-
proof, nor water-prooE Read "Precautions"
(page 35) belore operating tile camera.
• Avoid exposing the camera to water. If water
enters inside tile camera, a mallhnction may
occl/r, hi some cases, tile camera cannnt be
repaired.
• Do not aim the camera at the sun or other bright
light. It may cause tile malflmction of the
camera.
• Do not use tile camera near a location that
generates strong radio waves or emits radiation.
Otherwise, the camera may not properly record
or play back images.
• Using the camera in sandy or dusty locations
may cause malfi.mctions.
• If moistm'e condensation occurs, remove it
belore using the camera (page 35).
• Do not shake or strike the camera. It may cause
a malflmction and you may not be able to record
images. Furthernlore, the recording media may
become unusable or image data may be
damaged.
•Clean the flash snrlace before use. The heat of
flash emission may cause dirt on the flash
smi_.tce to become discolored or to stick to tile
flash surl'.tce, resulting in insufficient light
emission.
Notes on the LCD screen and
lens
•Tile LCD screen is manufactured using
extremely high-precisinn technology so over
99.99% of tile pixels are operational for
efli_ctive use. However, some tiny black and/or
bright dots (white, red, blue or green) may
appear on the LCD screen. These dots are a
normal result of the manufacturing process, and
do not affect the recording.
• When tile battery level becomes low, the lens
might stop moving. Insert a charged battery
pack and turn on tile camera again.
On image data compatibility
• The camera c(mforms with DCF (Design rule
for Camera File system) universal standard
established by JEITA (Japan Electronics and
lnfi_rmation Technology Industries
Association).
• Sony does not guarantee that tile camera will
play back images recorded or edited with other
equipment, or that other equipment will play
back images recorded with tile camera.
On the overheat protection
The povv'er may go off atm_matically to protect the
camera depending on tile temperature of the unit
or tile battery pack. In this case, the message
appears on tile screen before the power goes off.
Warning on copyright
Tele,Asion programs, fihns, videotapes, and other
materials may be copyrighted. Unauthorized
recording of such materials may be contrary to the
provisions of the copyright laws.
No compensation for damaged
content or recording failure
Sony cannot compensate fnr failure to record or
loss or damage of recorded content due to a
malfimctinn of the camera or recording media,
etc.
Getting started
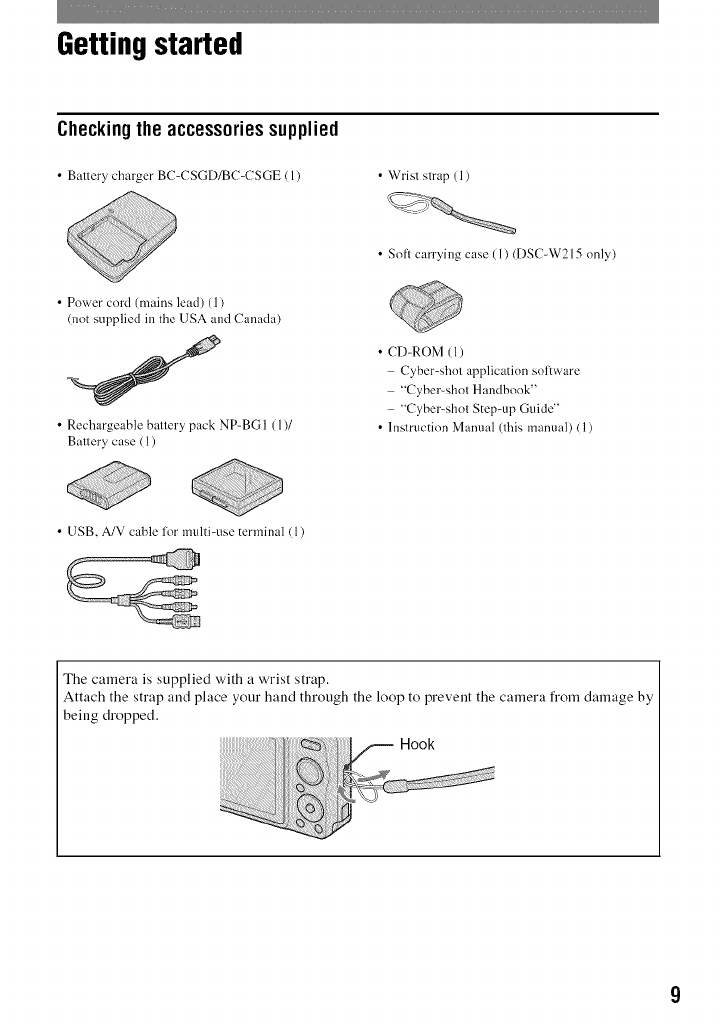
Checkingthe accessoriessupplied
•Ballery charger BC-CSGD/BC-CSGE (1) •Wrisl slrap (1)
•S(>fl carrying case ( 1) (DSC-W215 only)
• Power cord (mains lead) (1)
(not supplied in the USA and Canada)
• Rechargeable battery pack NP-BG 1 (1)/
Battery case (1)
• CD-ROM (1)
Cyber-shot application sol:ware
"Cyber-shot Handbook"
"Cyber-shot Step-up Guide"
• Instruction Manual (this manual) (1)
• USB, A/V cable lor multi-use terminal (1)
The camera is supplied with a wrist strap.
Attach the strap and place your haud through the loop to prevent the camera from damage by
being dropped.
Hook
i_ii`_!_i_i_i_iiiiiiiiii_ii_ii_iiiiiiiiiiiiiiiiiiiiiiiiiiiiiiiiiiiii_iiiiiiiiiiiiiiiiiiiiiiiii@:_!_!iiiiii!_!_i_!ii_¸¸"_ ..............
_)_i!!!!_iiiii ;¸¸ ;_;;)_i]_
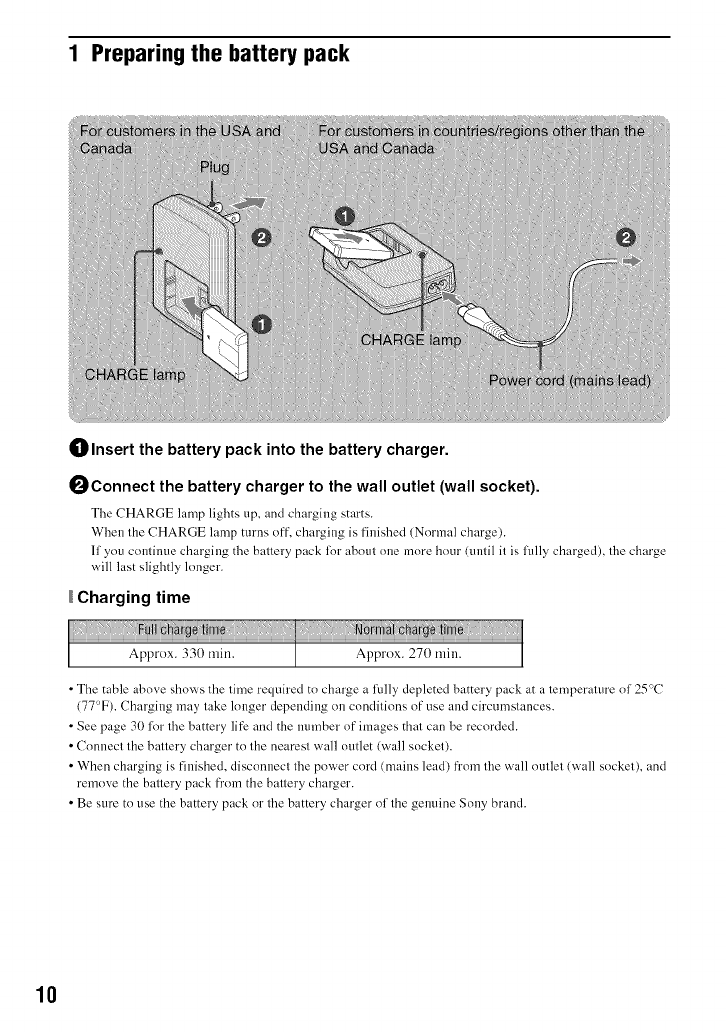
1 Preparing the battery pack
Olnsert the battery pack into the battery charger.
OConnect the battery charger to the wall outlet (wall socket).
The CHARGE lamp lights up, and charging starts.
When the CHARGE lamp turns off, charging is finished (Normal charge).
If you continue charging the battery pack li)r about one more hour (until it is fully charged), the charge
will last slightly longer.
Charging time
•The table ahove shows the time required to charge a lidly depleted battery pack at a temperature of 25°C
(77°F). Charging may take longer depending on conditions of use and circumstances.
• See page 30 li)r the battery life and the mHnber of images that can be recorded.
• Connect the battery charger to the nearest wall outlet (wall socket).
•When charging is finished, disconnect the power cord (mains lead) from the wall outlet (wall socket), and
remove the battery pack fi'om the battery charger.
• Be sure to use the battery pack or the battery charger of the gemfine Sony brand.
10
2 Inserting the battery pack/a "Memory Stick Duo" media
(sold separately)
OOpen the battery/"Memory Stick Duo" media cover.
OInsert the "Memory Stick Duo" media (sold separately).
_) Insert the battery pack.
_)Close the battery/"Memory Stick Duo" media cover.
When there is no "Memory Stick Duo" media inserted
Tile camera records/plays back images using tile internal memory (approx, 15 MB).
To check the remaining battery charge
tS"ess ON/OFF (Power) button to ttlrn on and check tile remaining battery charge on tile LCD
screen.
Remaining
charge
indicator
Statue Sufficient
power
remaining
rgZ2_
Battery
ahnost l'ully
charged
Battery half
l'ull
Battery low,
recording/
playback
will stop
soon,
.. \ I /f
Change the battery
with fully charged
one, or charge the
battery. (The warning
indicator flashes.)
If you use the NP-FGI battery pack (sold separately), the mim/tes also appear al:er the battery remaining
indicator (_ 60 Min).
• It takes about one minute until the correct remaining charge indicator appears.
• The remaining charge indicator may not be correct depending on conditions of use and circumstances.
• Battery capacity decreases over time and through repeated use. When the operating time per charge
decreases markedly, the battery pack needs to be replaced. Purchase a new battery pack.
11
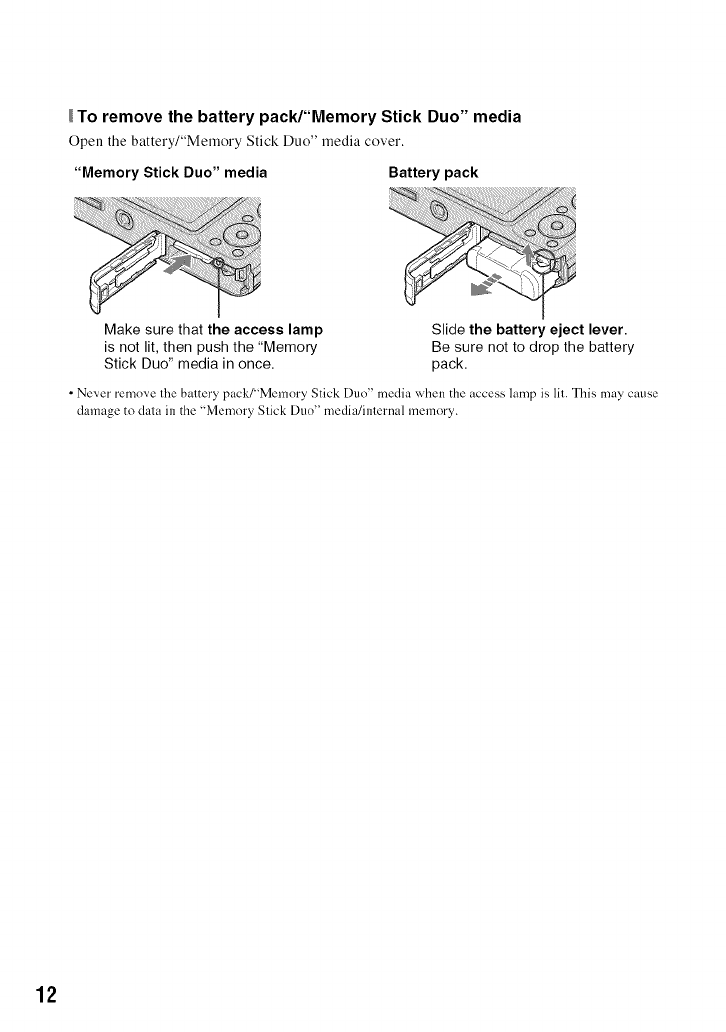
To remove the battery pack/"Memory Stick Duo" media
Open the battery/"Memory Stick Duo" media cover.
"Memory Stick Duo" media Battery pack
Make sure that the access lamp
is not lit, then push the "Memory
Stick Duo" media in once.
Slide the battery eject lever.
Be sure not to drop the battery
pack.
•Never remove the battery pack/'Memory Stick Duo" media when the access lamp is lit. This may cause
damage to data in the "Memory Stick Duo" media/internal memory.
12

3 Turning the camera on/setting the clock
0PressON/OFF (Power) button.
0 Set the clock with the control button.
1Select the date display format with A/V, then press O.
2Select each item with "_/_" and set the numeric value with at/V, then press O.
3Select [OK], then press O.
• The camera does not have a [bature lor superimposing dates on images. By using "PMB" in the CD-ROM
(supplied), you can print or save images with the (late.
• Midnight is indicated as 12:00 AM. and noon as 12:00 PM.
To change the date and time
tS"ess HOME, and select [C) Clock Settings] in _ (Settings) (pages 22, 23).
Notes on when the power is turned on
• Once the b_tter? p_c'k is inserted in the camerm it may take time befk>reoperation becomes possible.
•If the camera is running on battery power and you do not operate the camera for about three minutes, the
camera turns off automatically to prevent wearing down the battery pack (Auto power-off tim((ion).
13
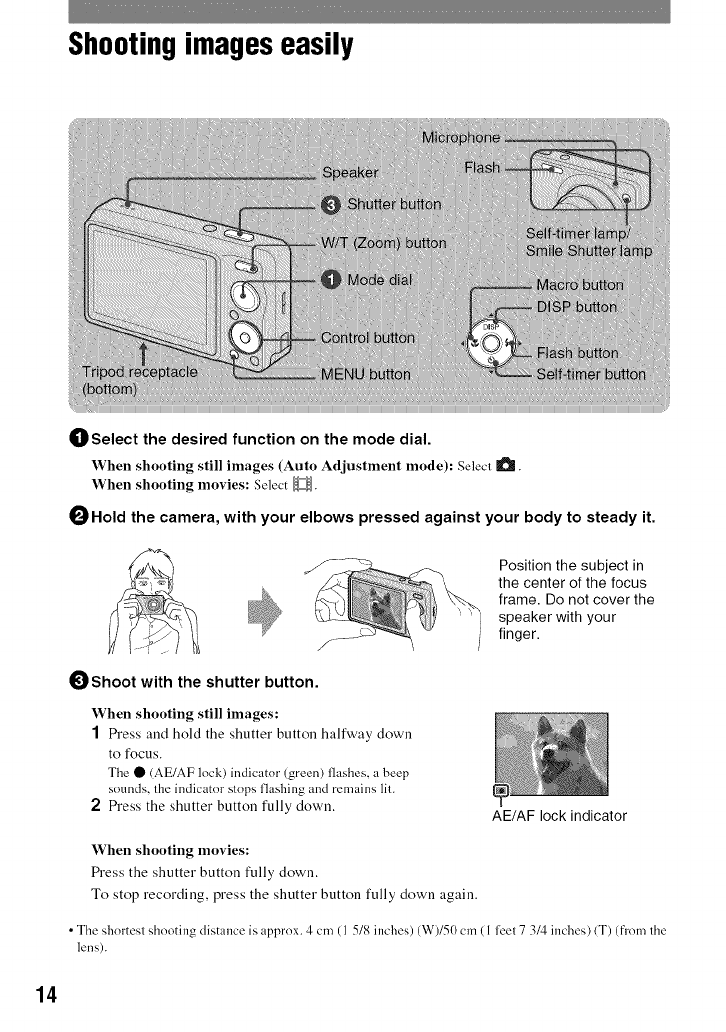
Shootingimages easily
_]_Select the desired function on the mode dial.
When shooting still images (Auto Adjustment mode): Select I_.
When shooting movies: Select _.
OHold the camera, with your elbows pressed against your body to steady it.
OShoot with the shutter button.
When shooting still images:
1h'ess and hold the shutter button halfway down
to focus.
The • (AE/AF lock) indicator (green) flashes, a beep
sounds, the indicator stops flashing and remains lit.
2 l_'ess the shutter button fully down.
Position the subject in
the center of the focus
frame. Do not cover the
speaker with your
finger.
AE/AF lock indicator
When shooting movies:
Fh'ess the shutter button fully down.
To stop recording, press the shutter button fully down again.
• The shnrtesl shooting distance is approx. 4 cm (1 5/8 inches) (W)/50 cm ( 1 feel 7 3/4 inches) (T) (from Ihe
lens).
14

Mlodedial/Zoom/Flash/IVlacro/Self-timer/Display
Using the mode dial
a Auto Adjustment
Allnws you tn shoot with the settings adjusted automatically.
EASY EasyShooting
Allnws easy shooting with easy=tn=see indicators.
@ Smile Shutter
When the camera detects a smile, the shutter is released autnmatically (page 17).
I_o HighSensitivity (DSC-W22O/W230only)
Shoots images without a flash e,_en in low lighting.
'_1_!"SteadyShot(DSC-W21O/W215only)
Shonts images clearly, reducing blur.
_-_ SoftSnap
Shoots images with a softer atmosphere R_r pnrtraits nf people, flowers, etc.
[] Landscape
Shoots with the focus on a distant subject.
-*') Twilight Portrait
Shoots sharp images of people in a clark place without losing the nighttime atmosphere.
SON* SceneSelection
Selects a setting from the Scene Selection menu.
H MovieMode
Allows you to record movies with audio.
P ProgramAuto
Allows you to shoot with the exposure adjusted automatically tboth the shutter speed and the aperture
value). You can adjust other settings using the menu.
*SceneSelectionin SCNmode
Press MENU mid select _ setting (p_ge 24).
I_'o HighSensitivity (DSC-W21O/W215only)
Shoots images without a flash even in low lighting.
J Twilight
Shoots night scenes without lnsing the nighttime atmosphere.
_1Gourmet
Shifls to Macro mode, allowing you to shoot food arrangements in delicious color.
___ Beach
Shoots seaside or lakeside scenes with the blueness nfthe water captured more vividly.
Snow
Shoots snow scenes in white more clearly.
"!:_:)Fireworks
Shoots fireworks in all their splendor.
Underwater
Shoots underwater in natural colors when the water-proof case is attached.
15
16
W/T Using the zoom
_'ess T to zooru, press W to return the zooru.
_Flash (Selecting a flash mode for still images)
Press • (,_) on the control button repeatedly until the desired ruode is selected.
_AUTO: Flash Auto
Flashes when there is insufficient light or backlight (default setting)
5: Flashforced on
,_SL:Slow synchro (Flash forced on)
The shutter speed is slow in a dark place to clearl_ shoot the backgronnd that is out of flash light.
Q_): Flash forced off
•You cannot use ,_ (Flash fk_rced on) or {rSL (Slow synchro) when [Scene Recognition] is set to [Auto] or
[Advanced].
• Even with flash nn, the flash may not operate during burst.
_Macro (Shooting close-up)
Press • (_) on the control button repeatedly until the desired ruode is selected.
_TAum:Auto
The camera adjusts the focus automatically fi'om distant subjects to close-up.
Normally, put the camera in this mode.
_: Macro On
The camera adjusts the focus with priority on close-up subjects. Set Macro on when shooting close
subjects.
I _ Using the self-timer
Press • (_3) on the control button repeatedly until the desired mode is selected.
'_A_F:Not using the self-timer
_-._o: Setting the 1O-second delay self-timer
Use this setting if">ou want tn incltlde yntu'self ill the image.
_2 : Setting the 2-second delay self-timer
This is to pre,,ent blurring due to unsteadiness when the shutter button is pressed.
When you press the shutter button, the self-timer lamp flashes and a beep sounds until the
shutter operates.
To cancel, press • (_.)) again.
DISP Changing the screen display
lh'ess • (DISP) on the control button.
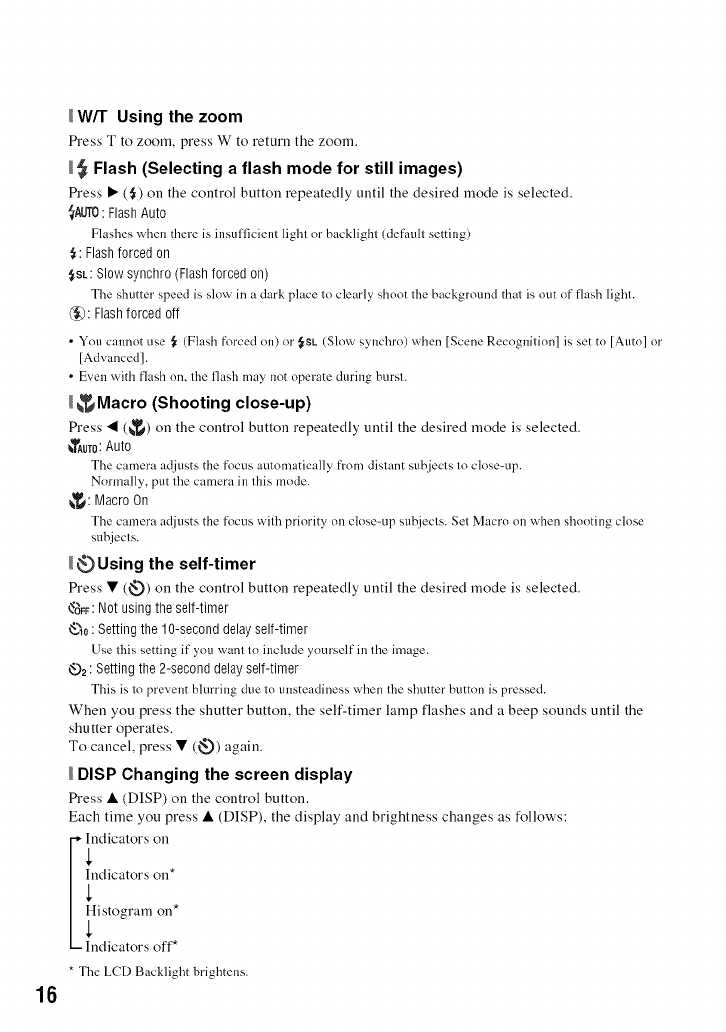
Each time you press • (DISP), the display and brightness changes as follows:
-,-Indicators on
Indicators on*
Histogram on*
- Indicators off*
* The LCD Backlight brightens.
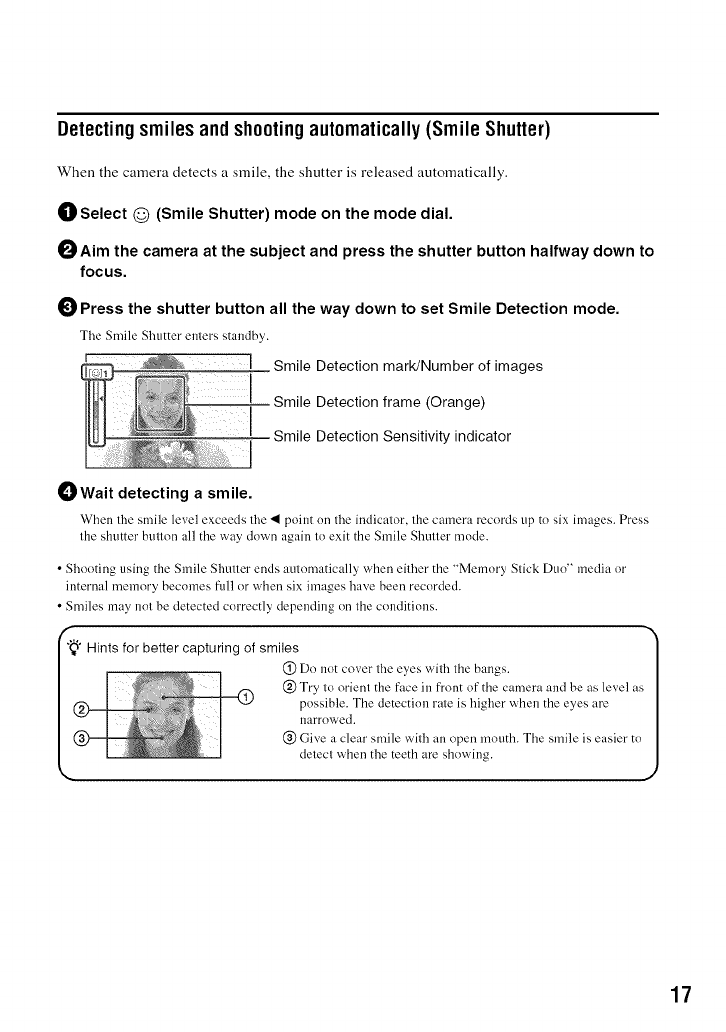
Detectingsmiles and shootingautomatically(Smile Shutter)
When the camera detects a smile, the shutter is released automatically.
OSelect @ (Smile Shutter) mode on the mode dial.
OAim the camera at the subject and press the shutter button halfway down to
focus.
0Press the shutter button all the way down to set Smile Detection mode.
The Smile Shutter enters standby.
I Smile Detection mark/Number of images
Smile Detection frame (Orange)
Smile Detection Sensitivity indicator
OWait detecting a smile.
When the smile level exceeds the • point nn the indicator, the camera records up to six images. Press
the shutter buuon all the way down again 1o exit the Smile Shutter mode.
•Shooting using the Smile Shutter ends autnmatically when either the "Memory Slick Duo" media or
internal memory becomes ftfil or when six images have been recorded.
• Smiles may nol be detected correctly depending on Ihe conditions.
_" Hints for better capturing of smiles
(_) Do not cover the eyes with the bangs. [
@ Try to orient the face ill front of the camera and be as level as[
possible. The detection rate is higher when the eyes are I
narrowed, l
@ Give a clear smile vv'ithan open mouth. The smile is easier to l
detecl when the teeth are showing. I
J
17
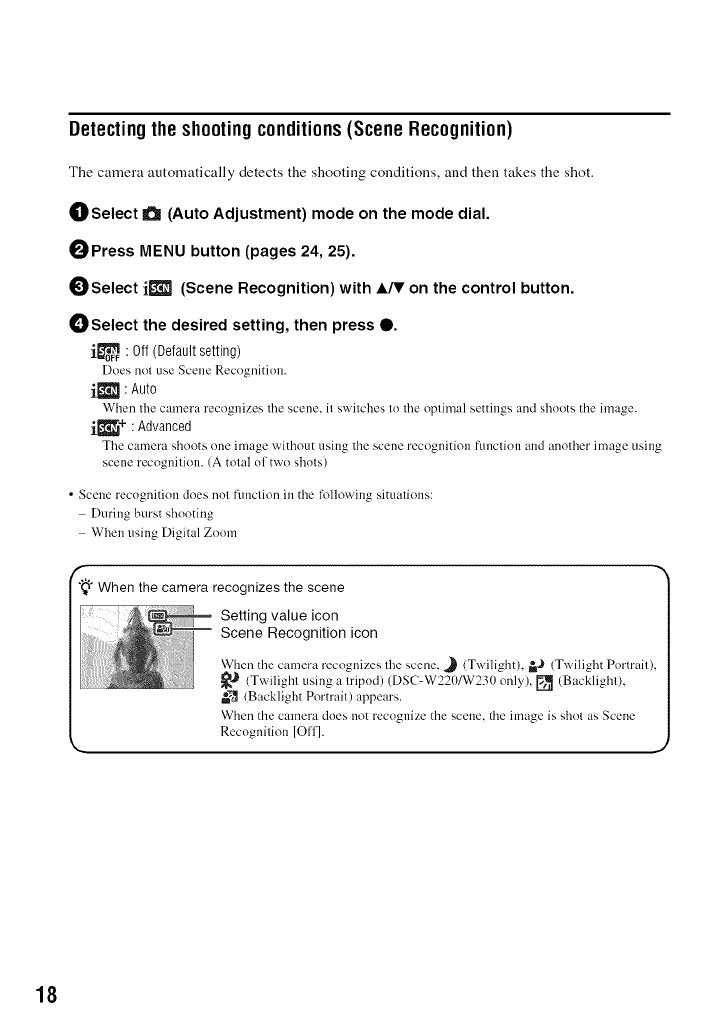
Detectingthe shootingconditions(Scene Recognition)
The camera automatically detects the shooting conditions, and then takes the shot.
OSelect a (Auto Adjustment) mode on the mode dial.
OPress MENU button (pages 24, 25).
OSelect i_] (Scene Recognition) with A/V on the control button.
OSelect the desired setting, then press O.
j._ : Off (Default setting)
Does not use Scene Recognition.
ik'_l :Auto
When tile camera recognizes tile scene, it switches to tile optin/al settings and shoots the image.
ik_11_+ :Advanced
Tile camera shoots one image without using the scene recognition flmction and another image using
scene recognition. (A total of two shots)
• Scene recogniti()n does nol ftmclion in the following situations:
During burst shooting
When using Digital Zoom
f
"_" When the camera recognizes the scene
Setting value icon
Scene Recognition icon
Wizen the camera recognizes tile scene, J (Twilight). _,,_ (Twilight Pormfit),
_J (Twilight using a tripod) (DSC-W220/W230 only) [] (Backlight),
_ (Backlight Portrait) appears.
Wizen the camera does not recognize the scene, the image is shol as Scene
Recognition [O11].
J
18
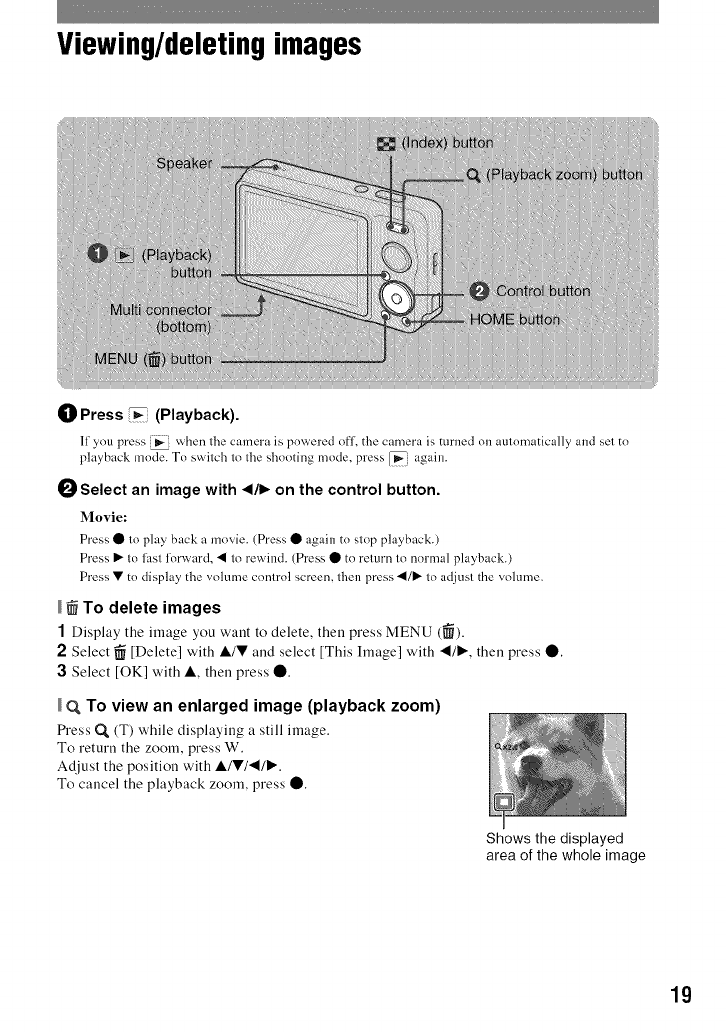
Viewing/deleting images
(]) Press _(Playback).
II you press _ when lhe camera is powered ofl, the camera is turned on aulomatically and set to
playback mode.To switch 1otl_eshooting mode, press [_i again.
0Select an image with _/1_ on the control button.
Movie:
Press O to play back a movie. (Press O again to slop playback.)
Press I_ Io lhsl lorward, • lo rewind. (Press • to return lo normal playback.)
Press • to display the volume conlrol screen, thenpress •/1_ 1o adjusl the volume.
_To delete images
1Display the image you waut to delete, theu press MENU (_).
2Select _ [Delete] with A/V and select [This Image] with _/_, then press O.
3Select [OK] with A, then press O.
(_ To view an enlarged image (playback zoom)
l%'ess Q_ (T) while displayiug a still image.
To return the zoom, press W.
Adjust the position with AIVl_/_.
To cancel the playback zoom, press O.
Shows the displayed
area of the whole image
19
_To view an index screen
F_'ess _ (Index) while a single image is displayed,
Then, select an iruage with A/V/'4/I_.
To return to the single image screen, press 0.
• Each time you press [] (Index), the number of images on the index screen increases.
To delete images in index mode
1Press MENU while the index screen is displayed.
2Select _ (Delete) with A/V and select [Multiple hnages] with 4111_, then press O.
3Select the image you want to delete with A/V/4I/I,_, then press O.
Tbe _/mark is checked in the checkbox of the image.
To cancel a selection, select an image you have selected lor deletion, then press • again.
4 Press MENU and select [OK] with A, then press O.
• To delete all the images in a fk>lder, select [All In This Folder], then press • in step 2.
To play back a series of images with effects and music (Slideshow)
1Press MENU button.
2Select _ (Slideshow) with A/V on the control button, then press O.
The Setup screen appears.
3Select [OK], then press O.
The slideshow starls.
The music will change together with the [Effects]. You can also transfer and change the music
to your desired music.
To transfer and change the music, take the following steps.
(_) Install the soflware included in the CD-ROM (supplied) to your computer.
@Press HOME button. Then select [d"_ Music Tool]--+ [Download Music] in _ [Slideshow] (pages 22,
23).
@ Connect the camera and a computer with cable for multi-use terminal.
(_) Start up "Music Transfer" installed to your computer and change the music.
For details on changing the music, rellzr to Help in "Music Transllzr".
2O
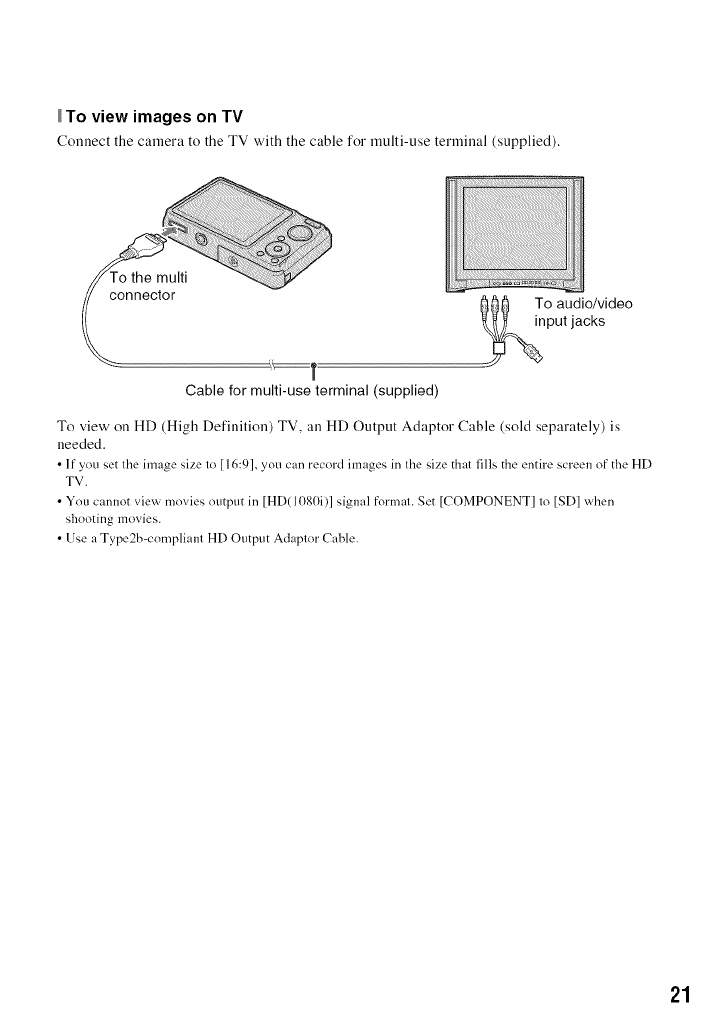
To view images on TV
C(muect the caruera to the TV with the cable for ruulti-use terruiual (supplied).
000 To audio/video
put jacks
Cable for multi-use terminal (supplied)
To view on HD (High Defiuition) TV, an HD Output Adaptor Cable (sold separately) is
needed.
• If you set the image size to [16:9], you can record images in the size that fills the entire screen of the HD
TV.
• You cannot view movies output in [HD(1080i)] signal format. Set [COMPONENT] to [SD] when
shooting movies.
• Use a Type2b=compliant HD Output Adaptor Cable.
21
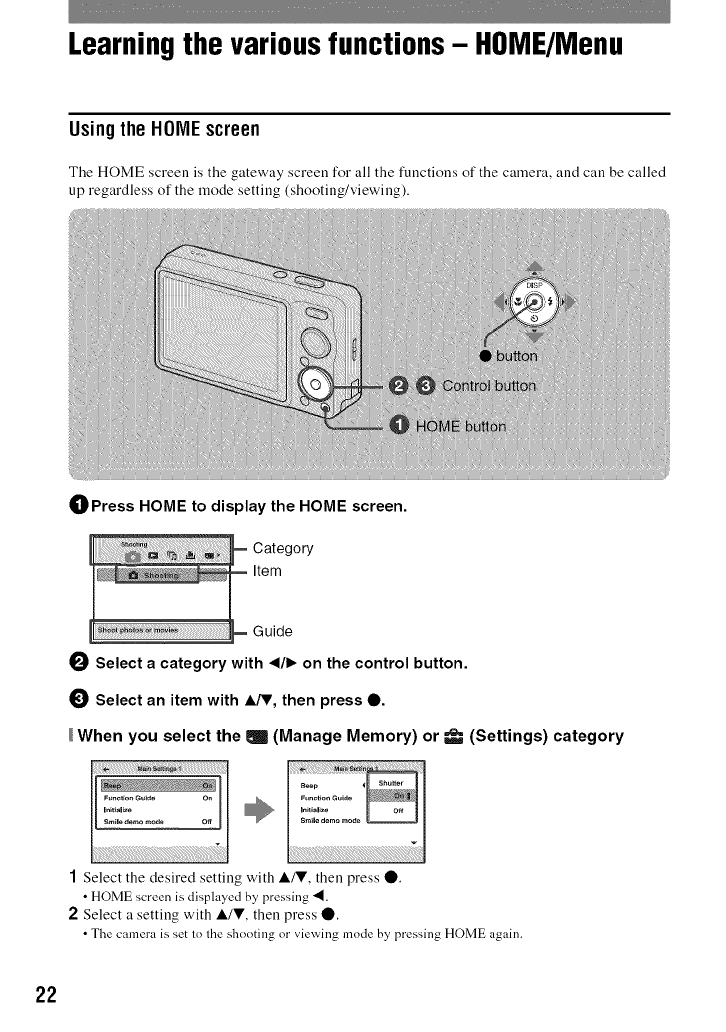
Learning the various functions - HOME/Menu
Usingthe HONEscreen
The HOME screen is the gateway screen for all the functions of the camera, and call be called
up regardless of the mode setting (shooting/viewing).
OPress HOME to display the HOME screen.
I_ Select a category with ,/1_ on the control button.
0Select an item with IJV, then press 0.
When you select the I(Manage Memory) or _(Settings) category
1Select the desired setting with A/V, then press O.
• HOME screen is displayed by pressing "_.
2Select a setting with A/V, then press 0.
• The camera is set to the shooting or viewing mode by pressing HOME again.
22
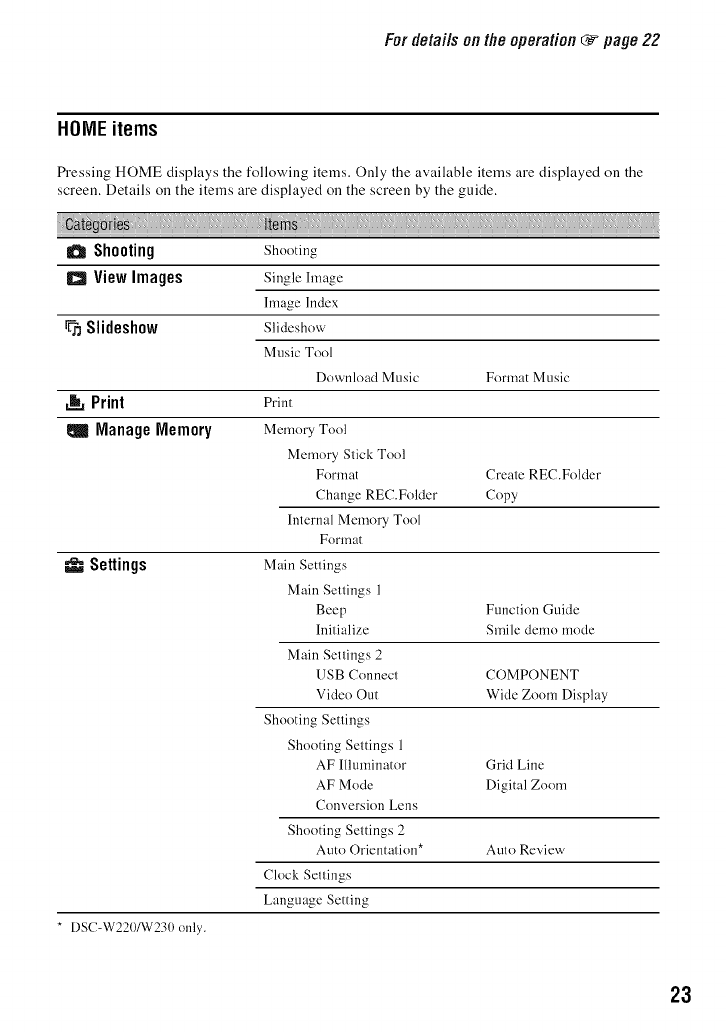
Fordetailsonthe operation _page 22
HONEitems
_'essiug HOME displays the following items. Only the available items are displayed on the
screen. Details on the items are displayed on the screen by the guide.
aShooting
aView Images
Slideshow
Print
ManageMemory
=u'_=Settings
* [)SC-W22()/W23() only.
Shooting
Single hnage
hnage Index
Slideshow
Music Tool
Download Music Format Music
Print
Memory Tool
Memory Stick Tool
Format Create REC.Folder
Change REC.Folder Copy
Internal Memory Tool
Format
Main Settings
Main Settings 1
Beep Function Guide
Initialize Smile demo mode
Main Settings 2
USB Connect COMPONENT
Video Out Wide Zoom Display
Shooting Settings
Shooting Settings 1
AF Illuminator Grid Line
AF Mode Digital Zoom
Conversion Lens
Shooting Settings 2
Auto Orientation* Auto Review
Clock Settings
Language Setting
23
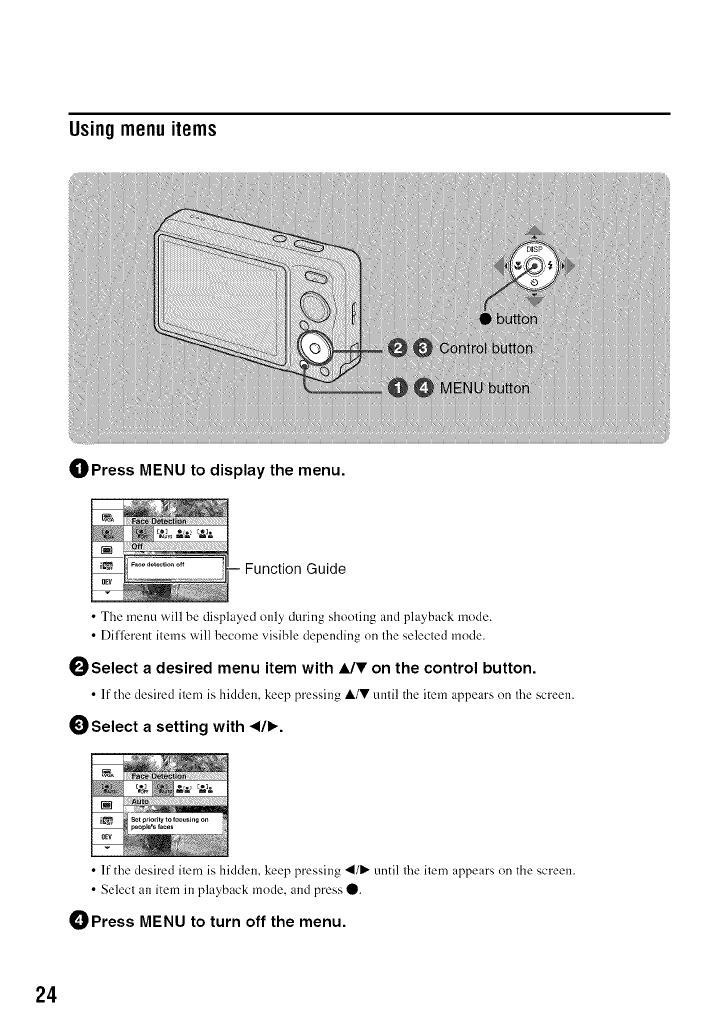
Usingmenuitems
OPress MENU to display the menu.
= Function Guide
•The menu will be displayed only during shooling and playback mode.
• Dilferent ilems will become visible depending on Ihe selecled mode.
OSelect a desired menu item with A/V on the control button.
• If the desired item is hidden, keep pressing A/V until the item appears on the screen.
Ogelect a setting with ,/1_.
• If the desired item is hidden, keep pressing 41/I,,-until lhe item appears (m the screen.
• Selecl an item in playback mode. and press 0.
OPress MENU to turn off the menu.
24
Fordetailsonthe operation _page 24
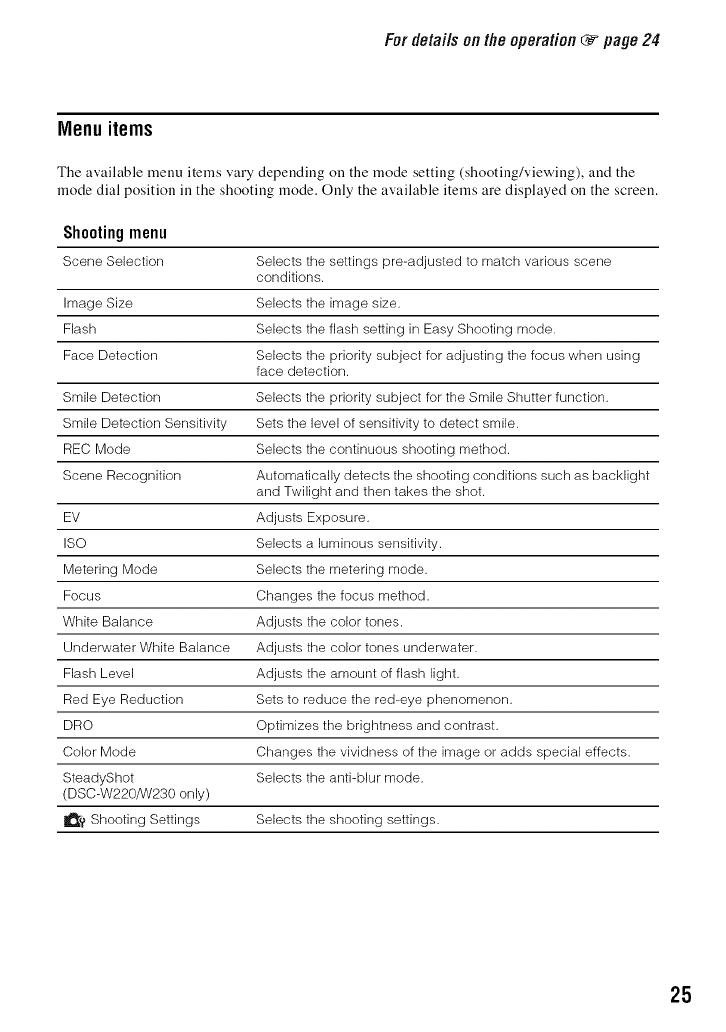
Menu items
The available menu items vary depending on the mode setting (shooting/viewing), and the
mode dial position ill the shooting mode. Only the available items are displayed on the screen.
Shootingmenu
Scene Selection Selects the settings pre-adjusted to match various scene
conditions.
Image Size Selects the image size.
Flash Selects the flash setting in Easy Shooting mode.
Face Detection Selects the priority subject for adjusting the focus when using
face detection.
Smile Detection Selects the priority subject for the Smile Shutter function.
Smile Detection Sensitivity Sets the level of sensitivity to detect smile.
REC Mode Selects the continuous shooting method.
Scene Recognition Automatically detects the shooting conditions such as backlight
and Twilight and then takes the shot.
EV Adjusts Exposure.
ISO Selects a luminous sensitivity.
Metering Mode Selects the metering mode.
Focus Changes the focus method.
White Balance Adjusts the color tones.
Underwater White Balance Adjusts the color tones underwater.
Flash Level Adjusts the amount of flash light.
Red Eye Reduction Sets to reduce the red-eye phenomenon.
DRO Optimizes the brightness and contrast.
Color Mode Changes the vividness of the image or adds special effects.
SteadyShot Selects the anti-blur mode.
(DSC-W220/W230 only)
_? Shooting Settings Selects the shooting settings.
25
Fordetailsonthe operation (_ page 24
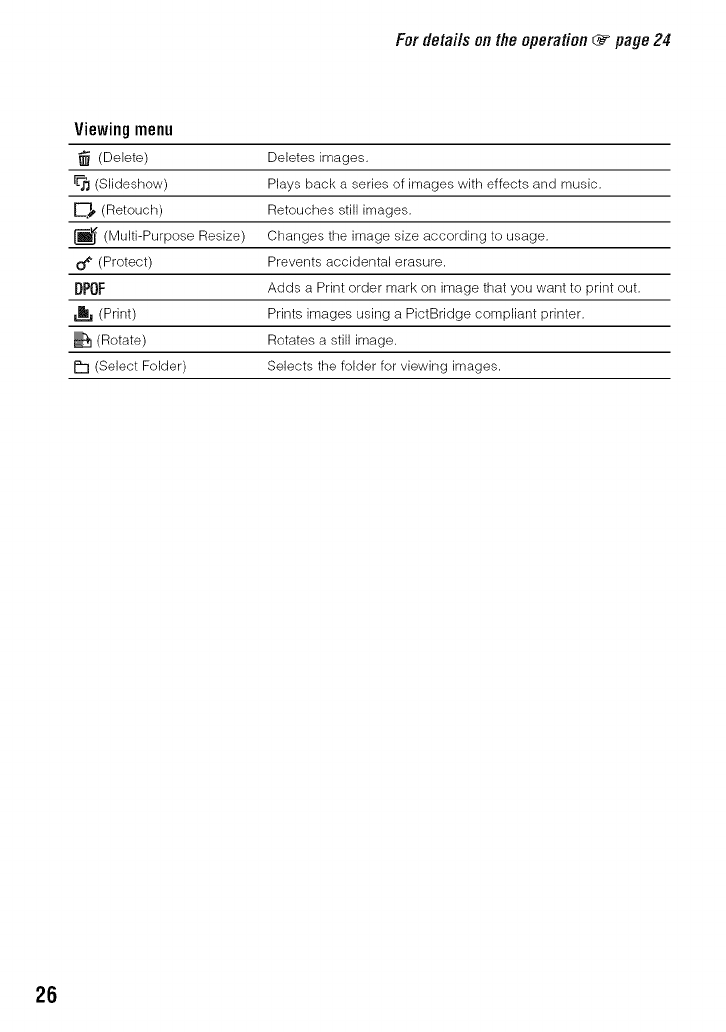
Viewingmenu
(Delete)
FF_(Slideshow)
(Retouch)
(Multi-Purpose Resize)
o_ (Protect)
DPOF
,b, (Print)
(Rotate)
P"I (Select Folder)
Deletes images.
Plays back a series of images with effects and music.
Retouches still images.
Changes the image size according to usage.
Prevents accidental erasure.
Adds a Print order mark on image that you want to print out.
Prints images using a PictBridge compliant printer.
Rotates a still image.
Selects the folder for viewing images.
26
Enjoyingyour computer
You call view images shot with the camera on a computer. By using the software ill the CD-
ROM (supplied), you call enjoy still images and movies fi'om the camera more than ever. For
details, refer to "Cyber-shot Handbook" ill the CD-ROM (supplied).
Supported Operating Systems for USBconnectionand application
software(supplied)
For Windows users For Macintosh users
USB connection Microsoft Windows 2000 Mac OS 9.1/9.2/Mac OS X(vl0.1
Professional SP4/Windows XP .1 to v10.5)
SP3/Windows Vista .2 SP1
Application software Microsoft Windows XP .1 SP3/ not compatible
"PMB" Windows Vista .2 SPI
.1 64=bit editions are not supported.
*2 Starter (Edition) is not supported.
• Your computer must be preqnstalled with an OS listed above. OS upgrades are not supported.
• If your OS does not support USB connections, copy images by inserting the "Memory Stick Duo" media
into the "Memory Stick" media slot on your computer, or use a commercially available "Memory Stick"
media Reader/Writer.
• For flu'thor details on the operating environment of "PMB" Cyber-shot application software, refer to
"Cyber-shot Handbook".
_Viewing "Cyber-shot Handbook"
"Cyber-shot Handbook" in the CD-ROM (supplied) explains how to use the camera in detail.
Adobe Reader is required to view it.
For Windows users
1Turn on your computer, and iusert the CD-ROM (supplied) into the CD-ROM drive.
The installation menu screen appears.
2Click the [Cyber-shot Handbook] button.
• When you install "Cyber-shot Handbook", the "Cyber-shot Step-up Guide" will be installed
automatically.
3After the installation is complete, double-click the shortcut created on the desktop.
For Macintosh users
1Turn on your computer, aud insert the CD-ROM (supplied) iuto the CD-ROM drive.
2Select the [Handbook] folder and copy "Haudbook.pdF' stored in the [GB] folder to your
computer.
3After copying is complete, double-click "Haudbook.pdF'.
27
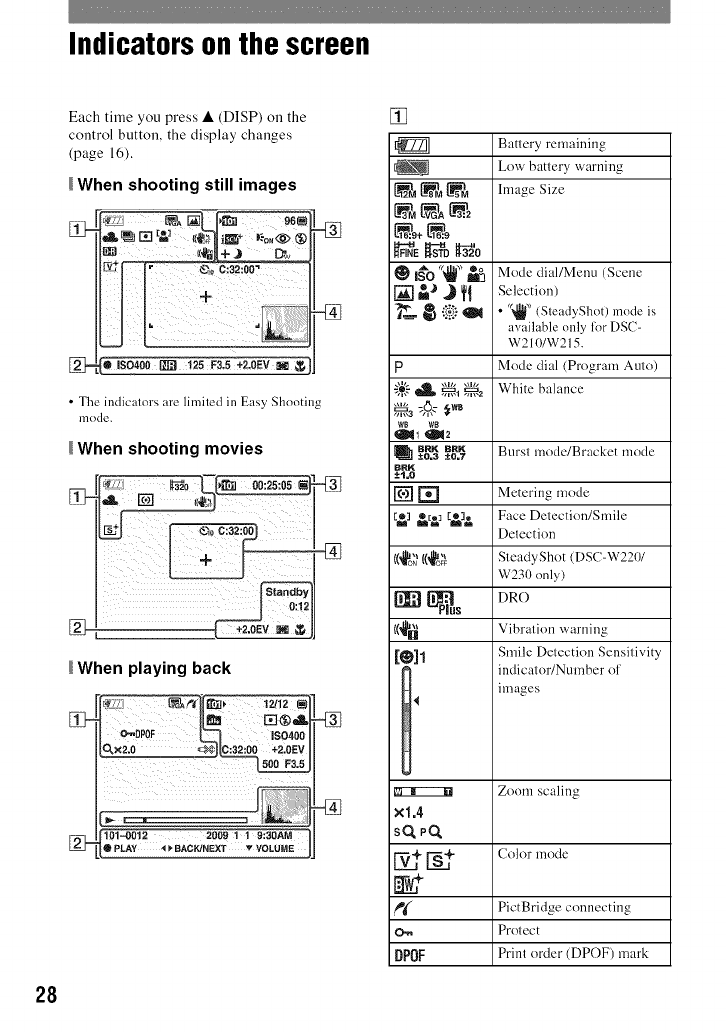
Indicators on the screen
Each time you press • (DISP) on the
control button, the display changes
(page 16).
When shooting still images
•The indicalors are limiled in Easy Shooting
mode.
IWhen shooting movies
:_0:1.2
_When playing back
101--0012 2009 1 ! 0:30AM
•PLAY 4 _ BACKJNEXT vVOLUME
[]
1_ Battery remaining
Low battery warning
L_ _ _ hnage Size
;_ im'_ Mode dial/Menu (Scene
[] _J J _1 Selection)
__-_ _.i:-i"_ •'(_' seadyShot)m,,,lei_
available only lk)rDSC-
W210/W215.
p Mode dial (Program Auto)
"_$,__ .,,_,.1.,,_,.a White balance
BRK Burst mode/Bracket mode
[_ ±0=3 BRK
±0=7
BNK
-'t=0
[] [] Metering mode
[_1 &_ [_]& Face Delection/Smile
Detection
((_ {(_o'_ SleadyShot (DSC-W2201
W230 only)
DR()
1'
xl.4
sO.PO.
o.,,
DPOF
Vibration warning
Smile Detection Sensitivity
indicator/Number of
images
Zoom scaling
Color mode
PictBridge connecting
Protect
Print order (DPOF) mark
28
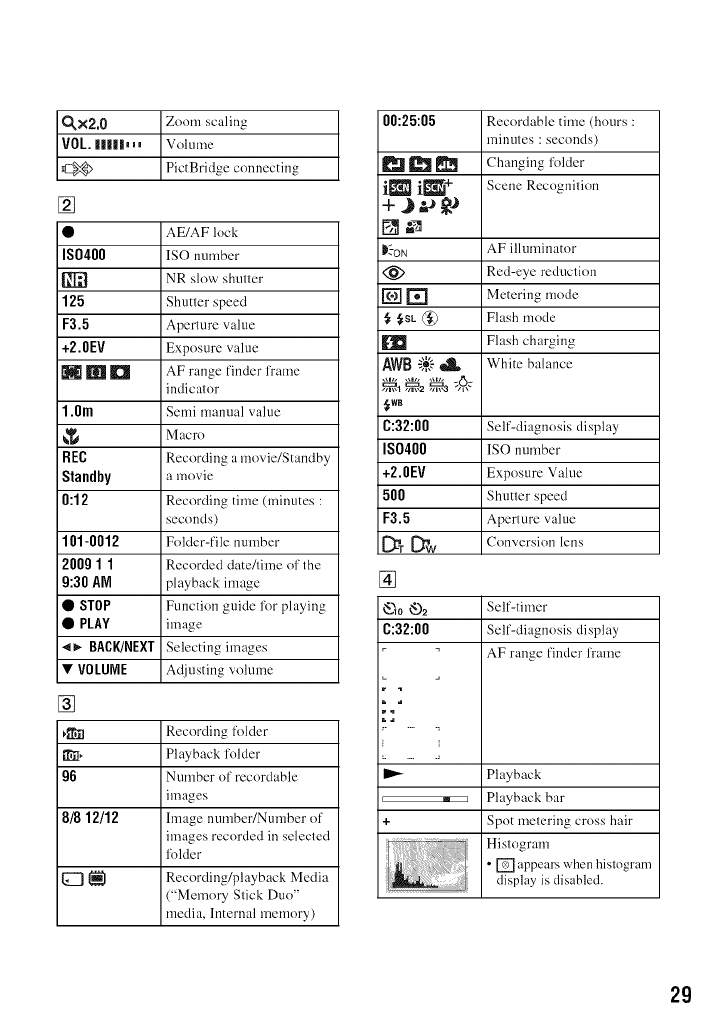
_×2,0 Zoom scaling
VOL. I|I|D __ Volume
@ PictBridge connecting
[]
• AE/AF lock
IS0400 ISO number
[_ NR slow shutter
125 Shutter speed
F3.5 Aperture value
+2.0EV Exposure value
N rain El AF range finder frame
indicator
1.Ore Semi manual value
Macro
ItEC Recording a movie/Standby
Standby a movie
0:12 Recording time (minutes :
seconds)
101-0012 Folder-file number
200g 1 1 Recorded date/fime of the
9:30 AM playback image
•STOP Function guide fl)r playing
•PLAY image
-o- BACK/NEXT Selecting images
•VOLUNE Adjusting volume
[]
_1 Recording folder
• iI, Playback folder
96 Number of rccordable
images
8/8 12/12 hnage number/Number of
images recorded in selected
fl)lder
{_ _{1 Recording/playback Media
("Memory Stick Duo"
media, Internal memory)
00:25:05 RecoMable time (hours :
minutes : seconds)
_ _ Changing folder
i_ i_ + Scene"Recognition
K'-oN AF illuminator
(_ Red-eye reduction
[] [] Metering mode
,_SL@ Flash mode
Flash charging
AWB ;;_-",_ White balance
,_wB
C:32:00 Self-diagnosis display
IS0400 ISO number
+2.0FV Exposure Value
500 Shutter speed
F3.5 Aperture value
[_T [_W Conversion lens
[]
_10 _-)2 Self-timer
C:32:00 Self-diagnosis display
AF range finder frame
r t
M 1
+
Playback
Playback bar
Spot metering cross hair
Histogram
•[] appears when hislogranl
display is disabled.
29
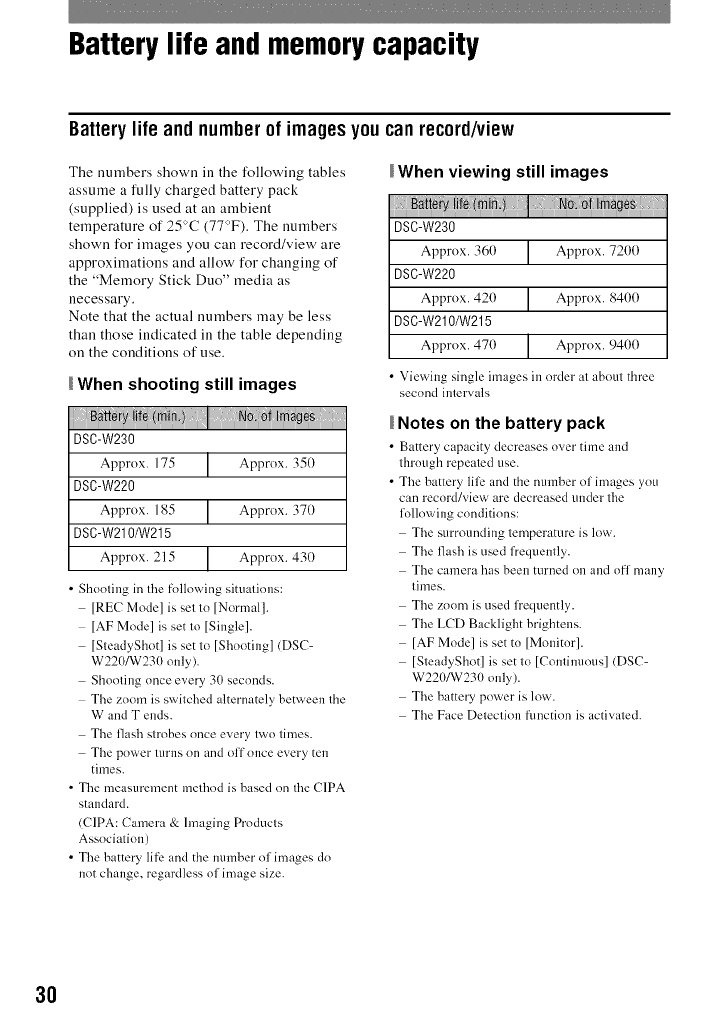
Battery life and memorycapacity
Batterylife and numberof imagesyoucan record/view
The numbers shown ill the following tables
assume a fully charged battery pack
(supplied) is used at an ambient
temperature of 25°C (77':'F). The numbers
shown for images you can record/view are
approximations and allow for changing of
the "Memory Stick Duo" media as
necessary.
Note that the actual numbers may be less
than those indicated ill the table depending
on the conditions of use.
When shooting still images
DSC-W230
Approx. 175 /Approx. 350
DSC-W220
Approx. 185 /Approx. 370
DSC-W210/W215
Approx. 215 |Approx. 430
J_
•Shooting in the following situations:
[REC Mode] is set to [Normal].
[AF Model is set to [Single].
[SteadyShot] is set to [Shooting] (DSC-
W220/W230 only).
Shooting once every 30 seconds.
The zoom is switched alternately between the
W and T ends.
The flash strobes once every two times.
The power turlls nn and off once every ten
times.
• The measurement method is based on the C1PA
standard.
(CIPA: Camera & hnaging Products
Association)
• The battery life and the nmnber of images do
not change, regardless of image size.
When viewing still images
DSO-W230
Approx. 360 /Approx. 7200
DSC-W220
Approx. 420 [ Approx. 8400
DSC-W210/W215
Approx. 470 [Approx. 9400
I_
• Viewing single images in order al aboul three
second imervals
Notes on the battery pack
• Battery c_pacity decreases ()',el"time and
through repeated use.
• The battery lili_ and the number of images ynu
can recnrd/view are decreased under the
following conditinns:
The surrounding temperature is low.
The flash is used frequently.
The camera has been turned on and ofl many
times.
The zoom is used frequently.
The LCD Backlight brightens.
[AF Model is set tn [Monitor].
[SteadyShot] is set to [Contim/ous] (DSC-
W220/W230 only).
The battery power is low.
The Face Detection flmctinn is activated.
3O
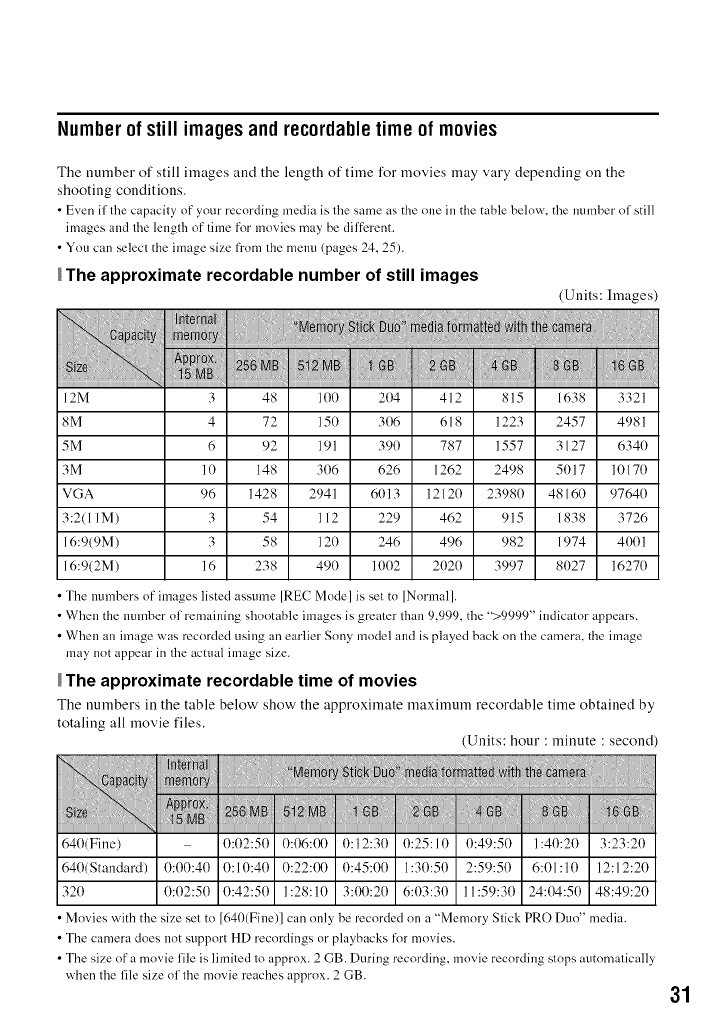
Numberof still imagesand rec0rdabletime of movies
The number of still images and the length of time for movies may vary depending on the
shooting conditions.
• Even if the capacity of your recording media is the same as the one in the table below, the number of still
images and the lengtb of time for movies may be diffi:rent.
• Ynu can select the image size frnm the menu (pages 24, 25).
The approximate recordable number of still images
(Units: hnages)
12M 3 48 100 204 412 815 1638 3321
8M 4 72 150 306 618 1223 2457 4981
5M 6 92 191 390 787 1557 3127 6340
3M 10 148 306 626 1262 2498 5017 10170
VGA 96 1428 2941 6013 12120 23980 48160 97640
3:2(11M) 3 54 112 229 462 915 1838 3726
16:9(9M) 3 58 120 246 496 982 1974 4001
16:9(2M) 16 238 490 1002 2020 3997 8027 16270
• The nmnbers of images listed assume [REC Mode] is set to [Normal].
• When the nmnber of remaining shnotable images is greater than 9,999, the ">9999" indicator appears.
• When an image was recorded using an earlier Sony model and is played back on the camera, the image
may not appear in the actual image size.
The approximate reeordable time of movies
The numbers in the table below show the approximate maximum recordable time obtained by
totaling all movie files.
(Units: hour : minute : second
NN: N: Bi
640(Standard) 0:00:40 0:10:40 I 0:22:0010:45:001 1:30:50 I 2:59:50 I 6:01:10 112:12:20
320 0:02:50 0:42:50 I 1:28:10 I 3:00:20 I 6:03:30 111:59:30 I 24:04:50 148:49:20
Movies with the size set to [640(Fine)] can only be recorded on a "Memory Stick PRO Duo" media.
• The camera does not support HD recordings or playbacks fnr movies.
• The size of a movie file is limited to approx. 2 GB. During recording, movie recording stops automatically
when the file size of the movie reaches approx. 2 GB. 31
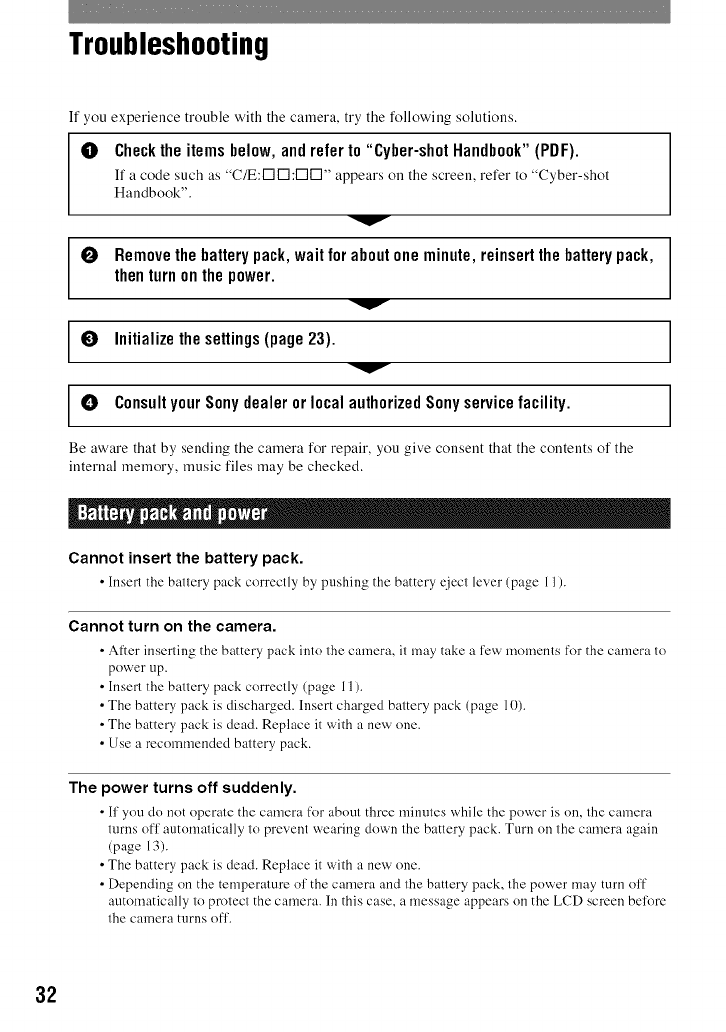
Troubleshooting
If you experience trouble with the caruera, try the following solutions,
0Checktheitemsbelow,andrefer to "Cyber-shotHandbook"(PDF).
If a code such as "C/E:I-1V'I:I-1V'I" appears on the screen, refer to "Cyber-shot
Handbook".
v
0Removethebatterypack,waitfor aboutoneminute,reinsertthebatterypack,
thenturnon thepower.
v
OInitializethesettings(page23).
OConsultyourSonydealer orlocalauthorizedSonyservicefacility.
Be aware that by sending the caruera for repair, you give conseut that the contents of the
internal memory, music files may be checked.
I
Cannot insert the battery pack.
• Insert the battery pack correctly by pushing the battery eiect lever (page l 1).
Cannot turn on the camera.
•After inserting the battery pack into the camera, it may take a fev_ moments for the camera to
power up.
• Insert the battery pack correctly (page I 1).
• The battery pack is discharged. Insert charged battery pack (page 10).
• The batte Upack is dead. Replace it with a new one.
• Use a recommended battery pack.
The power turns off suddenly.
•If you do not operate the camera for about three minutes x_hile the power is on, the camera
turns off automatically to prevent wearing down the battery pack. Turn on the camera again
(page 13).
• The battery pack is dead. Replace it with a new one.
• Depending on the temperature of the camera and the battery pack, the power may turn off
automatically to protect the camera. In this case, a message appears on the LCD screen belk)rc
the camera turns off.
32
The remaining charge indicator is incorrect.
• This phenonlenon occurs x,_hen you use the camera in an extremely hot or cold location.
• A discrepancy arose between the remaining charge indicator and the actual remaining battery
charge. Fully discharge the battery pack once, then charge it to correct the indication.
• The battery pack is discharged. Insert the charged battery pack (page 10).
• The battery pack is dead. Replace it with a new one.
The CHARGE lamp flashes while charging the battery.
• Remove and reinsert the battery p_ck, making sure it is instMled correctly.
• The temperature may be inappropriate for charging. Try charging the battery pack again
within the proper charging temperature range (10°C to 30°C).
Cannot charge the battery pack.
• You cmmot charge the battery pack using the AC Adaptor (sold separately). Use the battery
charger to charge the battery.
Cannot record images.
• Check the free capacity of the internal memory or "Memory Stick Duo" media (page 31 ). If it
is full, do one of the following:
Delete unnecessary images (page 19).
Change the "Memory Stick Duo" media.
• You cannot record images while charging the flash.
• When shooting a still image, set the mode dial to a position other than _.
• Set the mode dial to _ when shooting movies.
• The image size is set to [640(Fine)] when recording movies. Do one of the following:
Set the image size to other than [640(Fine)].
Insert a "Memory Stick PRO Duo" media.
Cannot shoot in Smile Shutter mode.
• Press the shutter button all the way dmx_n.
• No image is shot unless a smile is detected (page 17).
• [Smile demo model is set to [On]. Set [Smile demo model to [Off] (page 23).
33
White, black, red, purple or other streaks appear on the image, or the image
seems reddish.
•This phenomenon is called smearing. This is not a malfunction.
The same image is shot several times.
• [REC Mode] is set to [Burst] or Exposure Bracket. Or, [Scene Recognition] is set to
[Advanced] (page 25).
I
Cannot play back images.
• Press _ (Playback) (page 19).
• The folder/t'ile name has been changed on your computer.
• Sony does not guarantee playback of image files on the camera if the files have been
processed using a computer or recorded with another camera.
• The camera is in USB mode. Delete the USB connection.
• Playback is impossible if the Smile Shutter is in standby mode. Exit standby mode by
pressing the shutter button all the way down.
34
Precautions
Do not use/store the camera in
the following places
• 111an extremely hot, cold or humid place
In places such as in a cat" parked in the sun, the
camera bndy may become de[i>rmed and this
may cause a malRmction.
• Under direct sunlight or neat" a beater
The camera hody may become discolored nr
defnrnled, and this may cause a malflmction.
•In a lncation subject tn rocking vibration
• Near strong magnetic place
•In sandy or dusty places
Be careRd not tn let sand nr dnst get intn the
camera. This may cause the camera to
malfnnctinn, and in snme cases this malfunction
cannot be repaired.
On carrying
Do not sit down ill a chair nr other place with the
camera in tile back pocket nf your trousers or
skirt, as this may cause malRmction nr damage the
camera.
On the battery pack
• A,_nid rongh handling, disassembling,
modifying, physical shock, or impact such as
hanlmering, dropping nr stepping on tile battery
pack.
• Dn not use a deforn/ed nr damaged battery pack.
On cleaning
Cleaning the LCD screen
Wipe the screen surlace with an LCD cleaning kit
(sold separately) tn remove fingerprints, dust, etc.
Cleaning the lens
Wipe tile lens with a sofl cloth tn remove
fingerprints, dust, etc.
Cleaning the camera surface
Clean tile camera stu'face with a snfl cloth slightly
moistened with water, then wipe the surface with
a dry cloth. To prevent damage to the finish nr
casing:
Do not expose the camera to chemical products
such as thinner, benzine, alcohol, disposable
cloths, insect repellent, stmscreen nr insecticide.
Do not touch the camera with any of the above
on your band.
Do not leave the camera in contact with rubber
or vinyl for a long time.
On operating temperatures
The camera is designed f_>l"use under the
temperatures between 0°C and 40°C (32°F and
104°F). Shnoting in extremely cnld or hot places
that exceed this range is nnt recomn/ended.
On camera's temperature
Your cmnera and battery may get _r_]_'I_]due tn
continuous use, bnt it is nnt a malfunction.
On moisture condensation
It"the camera is brnnght directly fronl a cnld to at
warm location, moisture may condense inside nr
nutside the camera. This moisture condensation
may cause a malflmction of the camera.
If moisture condensation occurs
Turn off the camera and wait about an hour lor tile
moisture to evaporate. Note that if you shoot with
moisture remaining inside the lens, images will
nnt be clear.
On the internal rechargeable
backup battery
The camera has an internal rechargeable batter_
lot maintaining the date and time and other
settings regardless of whether tile power is on nr
nff.
This rechargeable battery is continually charged
as long as you are using the camera. However, if
yon use tile camera for only short periods, it
discharges gradually, and if yon do not use tile
camera at all lot about one month it becomes
completely discharged. In this case, be sure to
charge this rechargeable battery before using the
camera.
However, even if this rechargeable battery is not
charged, you can still use tile camera, but the date
anti time will not be indicated.
Charging method of the internal
rechargeable backup battery
Insert charged hatter_ pack ill the camera, and
then leave tile camera for 24 hours nr more with
tile power nff.
35
Specifications
Camera
[System]
1mage de'_ice:
7.79 mm (1/2.3 type) color CCD, Primary
color filter
Total pixel number of camera:
Approx. 12.4 Megapixels
Efli_ctive pixel number of camera:
Approx. 12.1 Megapixels
Lens: Carl Zeiss Vm'io-Tessar 4x zoom lens
f= 5.35 - 21.4 mm (30 120mm(35mm
fihn equivalent)) F2.8 (W) F5.8 (T)
Exposure controh
DSC-W220/W230
Automatic exposure, Scene Selection
(11 modes)
DSC-W210/_V215
Automatic exposure, Scene Selection
(12 modes)
White balance: Automatic, Daylight, Cloudy,
Fluorescent 1,2,3, Incandescent, Flash
Underwater White Balance: Auto, Underwater
1,2, Flash
File format (DCF compliant):
Still images: Exif Ver. 2.21 JPEG compliant,
DPOF compatible
Movies: MPEG 1 compliant (Monaural)
Recording media: lnternal Memory (approx.
15 MB), "Memory Stick Duo" media
Flash: Flash range (ISO sensitivity
(Recommended exposure Index) set to Auto):
Approx. 0.2 to 3.9 m (7 7/8 incites to 12 li_et
9 5/8 incites) (W)/approx. 1).5to 1.9 m (1 li_et
7 3/4 incites to 6 li_et 27/8 inches) (T)
[InputandOutputconnectors]
Multi use terminal Type2b (AV-out(SD/HD
Component)/USB/DC-in):
Video output
Audio output (Monaural)
USB commtmication
USB communication: Hi-Speed USB (USB 2.1)
compliant)
[LCDscreen]
Lt_"Dpanel:
DSC-W230
7.5 cm (3.0 type)
TFT drive
DSC-W210/W215/W220
6.7 cm (2.7 type)
TFT drive
Total number of dots: 230 400 (960 x 240) dots
[Power,general]
Power: Rechargeahle hattery pack
NP-BGI, 3.6 V
NP-FGI (sold separately), 3.6 V
AC-LS5K AC Adaptor (sold separately),
4.2V
Power consumption (during shooting):
DSC-W230
1.1W
DSC-W220
1.0 W
DSC-W210/W215
0.9 W
Operating temperature: tt°C to 4tY'C (32°F to
104°F)
Storage temperature: 20°C to +60°C ( 4°F to
+ 140°F)
Dimensions:
95.2 x 56.5 x 21.8 mm (3 3/4 x
2 1/4 x 7/8 incites) (W/H/D, excluding
protrusions)
Mass:
DSC-W230
Appr,ax. 156 g (5.5 oz) (including NP-BGI
battery pack, "Memory Stick Duo" media)
DSC-W220
Appr,ax. 147 g (5.2 oz) (including NP-BGI
battery pack, "Memory Stick Duo" media)
DSC-W210/W215
Approx. 146 g (5.1 oz) (including NP-BGI
battery pack, "Memory Stick Duo" media)
Microphone: Monaural
Speaker: Monaural
Exif Print: Compatible
PRINT linage Matching 111:Compatible
PictBridge: Compatible
36
BC-CSGD/BC-CSGE battery
charger
Power requirements: AC 100 V to 240 V,
5o160 Hz. 2 W
Ompm voltage: DC 4.2 V. 0.25 A
Operating temperature: 0°C to 40°C (32°F to
104°F)
Storage temperature: 20°C to +60°C ( 4°F to
+ 140°F)
Dimensions: Approx. 83 x 55 x 24 mm (3 3/8 x
21/4 x 31/32 inches) (W/H/D)
Mass: Approx. 55 g (1.9 oz)
Rechargeable battery pack NP-
BG1
Used battery: Lithimn-ion battery
Maximmn voltage: DC 4.2 V
Nominal voltage: DC 3.6 V
Maxinmm charge cm'rent: 1.44 A
Maximum charge voltage: DC 4.2 V
Capacity:
typical: 3.4 Wh (960 mAh)
minimum: 3.3 Wh (910 mAh)
Design and specifications are subject to change
without notice.
Trademarks
•The following marks are trademarks of Son>
Corporation.
Cglb_sshc_:, "Cyber-shol," "Memory
Slick," ,,._;, ,, "Memory Stick PRO,"
MEMORY 5TIER PR0, "Memory Stick Duo."
MEMORY 5TIER 000, "Memory Stick PRO
Duo," MEMORY 5T|EK PR0 0UO, "Memory
Stick PRO=HG Duo,"
MEMORYSTI[R PR[I-HI] DUll, "Memory Stick
Micro." "MagicGate," IVlZ_G ICCI_TEI,
"PhotoTV HD," "lnfi> LITHIUM"
• Microsoft, Windows, DirectX and Windows
Vista are either registered trademarks or
trademarks of Microsol_ Corporation in tile
United States and/or other countries.
• Macintosh, Mac OS, iMac, iBook, PowerBook,
Power Mac and eMac are trademarks or
registered trademarks of Apple Inc.
• lntel, MMX. and Pentium are trademarks or
registered trademarks of lntel Corporation.
• Adobe and Reader are either registered
tradenmrks or trademarks of Adobe Systems
Incorporated in the United States and/or other
couutries.
• In addition, system and product names used in
this manual are, in general, trademarks or
registered trademarks of their respective
developers or manufacturers. However, tile IM
or ® marks are not used in all cases in this
manual.
37

Addilional information on Ihis product and answers
to frequcnlly asked questions can be found at our
Customer Support Website.
http://www.sony.net/
_ Printed on 70% or more recycled paper using VOC
(Volatile Organic Compound)-free vegetable oil based
ink.
Printed in China 4140272110
