Sony FB031012 Licensed transmitter User Manual P810 User s manual R1A
Sony Mobile Communications Inc Licensed transmitter P810 User s manual R1A
Sony >
Exhibit 8 User Manual

Preliminary Layla850 P1B
P910a
User Guide
Preliminary Layla850 P1B
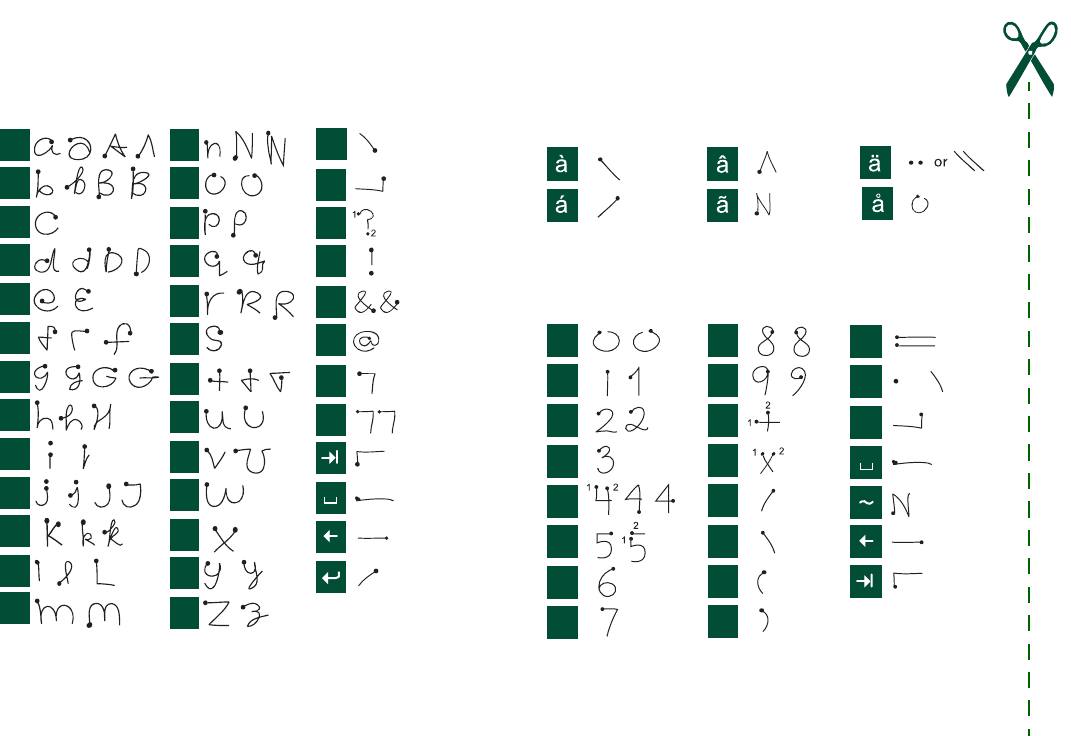
Letters
Lowercase letters are written below the arrow and uppercase
letters in line with the arrow.
Note Start each stroke at the dotted end.
Accented letters
Write the character as described above, then write the accent
above the arrow. Other such characters, for example, ö and ü,
follow the same principle.
Note Start each stroke at the dotted end.
Numbers
Numbers are written above the arrow.
Note Start each stroke at the dotted end.
a
b
c
d
e
f
g
h
k
l
m
n
o
p
q
r
s
t
u
v
y
z
w
x12
i
j
1
1
1
1
1
1
2
1
2
2
2
22
2
,
.
?
!
&
@
"
'
0
1
2
3
4
5
6
7
8
9
,
.
*
or
+
*
/
\
(
)
=

3
Preliminary Layla850 P1B
Contents
OVERVIEW
Introduction ................................................................. 9
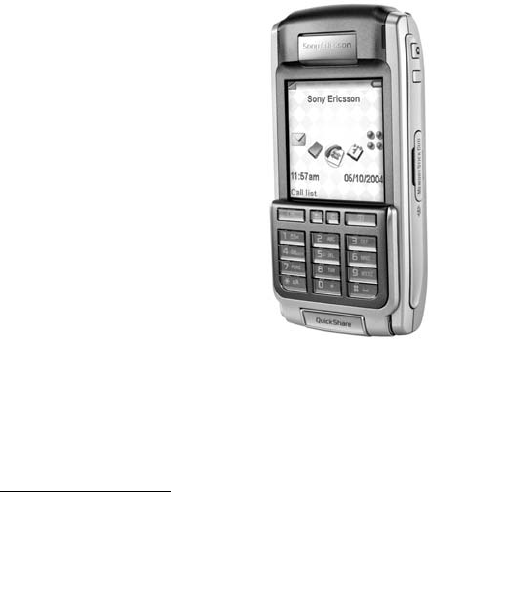
Getting to know your P910a..................................... 10
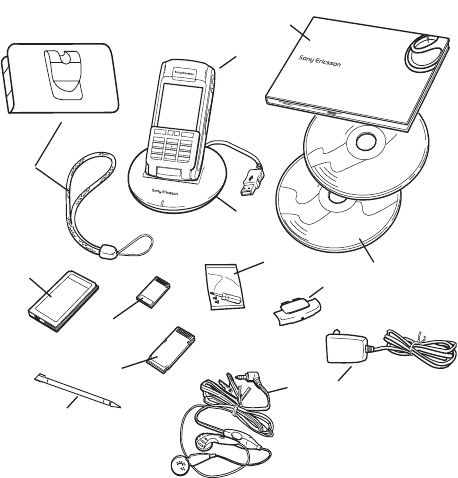
P910a package .................................................................. 10
P910a overview ................................................................ 11
SIM card ........................................................................... 12
Battery .............................................................................. 12
Care instructions ............................................................... 13
First time start-up.............................................................. 14
Turning your P910a on and off......................................... 14
Importing phone book entries........................................... 14
Flip closed mode............................................................... 15
Flip open mode ................................................................. 16
Flip removed..................................................................... 17
Screen areas ...................................................................... 18
Jog Dial ............................................................................ 19
Keypad functions ............................................................. 20
Indicators and status bar icons.......................................... 20
Memory Stick ................................................................... 21
Connecting the accessories............................................... 24
Services............................................................................. 24
Applications - overview.................................................... 25
Updating the software....................................................... 27
General functions.............................................................. 27
Entering text with the flip closed..................................... 31
Entering text with the flip open ....................................... 33
P910a locks ...................................................................... 36
Phone.......................................................................... 40
Call handling with the flip closed .................................... 40
Call handling with the flip open ...................................... 43
Handling two or more calls.............................................. 45
Call list and call log ......................................................... 47
Hints and smart functions ................................................ 47
Preferences....................................................................... 52
MEDIA
CommuniCorder....................................................... 58
Recording video clips ...................................................... 58
Taking pictures ................................................................ 60
Camera settings................................................................ 61
Pictures and Image editor ........................................ 63
Pictures ............................................................................ 63
Image editor ..................................................................... 65
Video .......................................................................... 67
Video clips ....................................................................... 67
Streaming ......................................................................... 69
Preferences....................................................................... 70
4
Preliminary Layla850 P1B
Music player............................................................... 71
Playing sound files............................................................ 71
Managing sound files........................................................ 72
Internet....................................................................... 75
Using the browser view .................................................... 76
Using the bookmark view................................................. 79
Preferences........................................................................ 80
Games ......................................................................... 83
Chess................................................................................. 83
Solitaire............................................................................. 83
BUSINESS
Messages..................................................................... 85
Folders in Messages.......................................................... 86
The accounts in Messages ................................................ 87
Handling text messages .................................................... 87
Handling multimedia messages ........................................ 88
Handling email.................................................................. 92
More about messaging...................................................... 96
Contacts...................................................................... 99
Using Contacts with the flip closed .................................. 99
Using Contacts with the flip open .................................. 101
Creating and editing contacts.......................................... 102
Managing contacts .......................................................... 104
Making an owner card .................................................... 105
Preferences...................................................................... 105
Calendar .................................................................. 106
Creating calendar entries................................................ 106
Managing calendar entries ............................................. 107
Sending and receiving calendar entries.......................... 108
Preferences ..................................................................... 108
Tasks ........................................................................ 109
Creating task entries....................................................... 109
Managing task entries .................................................... 110
Moving task entries........................................................ 110
Sending and receiving task entries................................. 111
Preferences ..................................................................... 111
Jotter ........................................................................ 112
Creating and editing notes ............................................. 112
Drawing pictures ............................................................ 113
Managing notes .............................................................. 113
Sending and receiving notes .......................................... 113
TOOLS
Sound recorder........................................................ 114
Making sound recordings............................................... 114
Using sound recordings as ring signals.......................... 114
Sending sound recordings .............................................. 115
Calculator ................................................................ 116
Time.......................................................................... 117
Setting time and date...................................................... 117
Specifying workdays...................................................... 118

5
Preliminary Layla850 P1B
Setting locations ............................................................. 118
Setting number formats .................................................. 119
Setting alarms ................................................................. 119
Viewers and editors – Quickoffice ......................... 122
Common viewer and editor functions ............................ 122
Quickword ...................................................................... 122
Quicksheet ..................................................................... 123
Pdf+ .............................................................................. 123
File manager ............................................................ 125
Online services......................................................... 127
ADVANCED FUNCTIONS
PC Suite and multimedia for P910a ...................... 128
Sony Ericsson PC Suite .................................................. 128
Multimedia for P910a..................................................... 128
Installing applications............................................. 130
Installing applications on your P910a ............................ 130
Removing applications from your P910a ....................... 132
Sony Ericsson Update Service........................................ 132
Connecting to other devices.................................... 133
Connection via SyncStation............................................ 133
Connection via Infrared port........................................... 134
Connection via Bluetooth wireless technology .............. 134
Synchronization and backup.................................. 138
Local synchronization..................................................... 138
Remote synchronization ................................................ 139
Backing up data ............................................................. 140
Restoring data ................................................................ 141
SETTINGS
Personalizing your P910a....................................... 142
Themes........................................................................... 142
Changing your application shortcuts ............................. 142
Setting a background picture ......................................... 142
Setting the light intensity ............................................... 142
Setting a screen saver..................................................... 143
Adding images to your Contacts.................................... 143
Ring signals.................................................................... 143
Alarm tones and sound notification ............................... 144
Control panel........................................................... 145
The Device tab
Application shortcuts ..................................................... 145
Display ........................................................................... 145
Flight mode .................................................................... 147
International ................................................................... 147
Locks.............................................................................. 147
Sounds and alerts ........................................................... 147
Text input ....................................................................... 149
Themes........................................................................... 149
Time & date ................................................................... 150
User greeting.................................................................. 151
6
Preliminary Layla850 P1B
The Connections tab
Bluetooth......................................................................... 151
Cable ............................................................................... 152
GSM Networks ............................................................... 152
Infrared ........................................................................... 153
Internet accounts............................................................. 153
Messaging accounts ........................................................ 158
WAP accounts ................................................................ 163
The Other tab
Certificate manager......................................................... 164
Flip settings..................................................................... 165
Format disk ..................................................................... 165
IP Security manager........................................................ 166
Language selection ......................................................... 166
Master reset..................................................................... 166
Secure tokens .................................................................. 167
Storage manager ............................................................. 167
WIM PIN settings ........................................................... 168
Getting started with Internet and Messages ......... 170
Introduction..................................................................... 170
Automatically set up service provider and messaging ... 171
Manually set up service provider.................................... 171
Manually set up messaging............................................. 172
Setting up WAP accounts ............................................... 173
Using your P910a as a modem ....................................... 173
GPRS - connection information...................................... 175
REFERENCE
Troubleshooting ...................................................... 177
Guidelines for Safe and Efficient Use ................... 183
Limited warranty............................................................ 185
FCC Statement ............................................................... 187
Environmental information............................................ 187
Declaration of Conformity ............................................. 187
Terms and definitions............................................. 188
Technical data ......................................................... 196
Index......................................................................... 200

7
Preliminary Layla850 P1B
Sony Ericsson P910a
User Guide
First edition (July 2004)
This User Guide is published by Sony Ericsson Mobile Communications AB,
without any warranty. Improvements and changes to this User Guide necessitated
by typographical errors, inaccuracies of current information, or improvements to
programs and/or equipment, may be made by Sony Ericsson Mobile
Communications AB at any time and without notice. Such changes will, however,
be incorporated into new editions of this User Guide.
Sony Ericsson Mobile Communications AB, 2004. All rights reserved.
Publication number: EN/LZT 162 35 P1B
The Bluetooth word mark and logos are owned by the Bluetooth SIG, Inc. and
any use of such marks by Sony Ericsson is under license.
Symbian and all Symbian-based marks and logos are trademarks of Symbian
Limited.
Memory Stick, Memory Stick Duo and Memory Stick PRO Duo are
trademarks of Sony, its parent and/or its affiliates.
Beatnik is a trademark of Beatnik, Inc.
T9™ Text Input is a trademark or a registered trademark of Tegic Communications
T9™ Text Input is licensed under one or more of the following: U.S. Pat. Nos.
5,818,437, 5,953,541, 5,187,480, 5,945,928, and 6,011,554; Canadian Pat. No.
1,331,057, United Kingdom Pat. No. 2238414B, Hong Kong Standard Pat. No.
HK0940329; Republic of Singapore Pat. No. 51383; Euro. Pat. No. 0 842 463
(96927260.8) DE/DK, FI, FR, IT, NL, PT, ES, SE, GB; and additional patents are
pending worldwide.
Quicksheet, Quickoffice and Quickword are either trademarks or registered
trademarks of Cutting Edge Software, Inc.
Adobe and Acroba are either trademarks or registered trademarks of Adobe
Systems Incorporated in the United States and/or other countries.
Microsoft Outlook, Visual Basic, Windows and PowerPoint are either registered
trademarks or trademarks of Microsoft Corporation in the Unites States and/or
other countries
Apple is a trademark of Apple Corporation, Inc.
AppForge is a trademark of AppForge, Inc
Lotus Notes and Lotus Organizer are trademarks of International Business
Machines Corporation in the United States, other countries, or both.
This product contains software copyright Beatnik, Inc.
1996-2002.
Java and all Java-based trademarks and logos are trademarks or registered
trademarks of Sun Microsystems, Inc. in the U.S. and other countries.End-user
license agreement for Sun Java J2ME:
1. Restrictions: Software is confidential copyrighted information of Sun and title to
all copies is retained by Sun and/or its licensors. Customer shall not modify,
decompile, disassemble, decrypt, extract, or otherwise reverse engineer Software.
Software may not be leased, assigned, or sublicensed, in whole or in part.
2. Export Regulations: Software, including technical data, is subject to U.S. export
control laws, including the U.S. Export Administration Act and its associated
regulations, and may be subject to export or import regulations in other countries.
The Customer agrees to comply strictly with all such regulations and
acknowledges that it has the responsibility to obtain licenses to export, re-export,
or import Software. Software may not be downloaded, or otherwise exported or
re-exported (i) into, or to a national or resident of, Cuba, Iraq, Iran, North Korea,
Libya, Sudan, Syria (as such listing may be revised from time to time) or any
country to which the U.S. has embargoed goods; or (ii) to anyone on the U.S.
Treasury Department's list of Specially Designated Nations or the U.S. Commerce
Department's Table of Denial Orders.
3. Restricted Rights: Use, duplication or disclosure by the United States
government is subject to the restrictions as set forth in the Rights in Technical Data
and Computer Software Clauses in DFARS 252.227-7013(c) (1) (ii) and FAR
52.227-19(c) (2) as applicable.
Copyright SyncML initiative Ltd. (1999-2002). All rights reserved.
Portions of software © PacketVideo Corporation (USA) 1999, 2002. PacketVideo,
pvPlayer and the PacketVideo logo are trademarks of PacketVideo Corporation.
All rights reserved.
Other product and company names mentioned herein may be the trademarks of
their respective owners.
Any rights not expressly granted herein are reserved.
Note Some of the services in this User Guide are not supported by all networks.
This also applies to the GSM International Emergency Number 112. Please contact
your network operator or service provider if you are in doubt whether you can use
a particular service or not.
8
Preliminary Layla850 P1B
Important
Your mobile phone has the capability to load, store and forward additional content,
e.g. ring tone melodies. The use of such content may be restricted or prohibited by
rights of third parties, including but not limited to restriction under applicable
copyright laws. You, and not Sony Ericsson, are entirely responsible for additional
content that you download to or forward from your mobile phone. Prior to your use
of any additional content, please verify that your intended use is properly licensed
or is otherwise authorized. Sony Ericsson does not guarantee the accuracy,
integrity or quality of any additional content or any other third-party content.
Under no circumstances will Sony Ericsson be liable in any way for your improper
use of additional content or other third party content.
Introduction 9
Preliminary Layla850 P1B
OVERVIEW
Introduction
For ease of reference the Getting to know your P910a chapter
gives a quick overview of the main functions of the phone,
shortcuts and general information.
Your P910a combines advanced business and entertainment
features in one intuitive device.
Its camera lets you take pictures and record video wherever you
are and use them in a wide range of applications. The pictures
can be used in the Picture Phone Book, where they can be used
to identify callers.
MMS (Multimedia Messaging Service) allows you to send and
receive messages that include pictures, sound, text and voice
notes.
The P910a features advanced entertainment functionality that
offers high quality MP3 music and widescreen format video
clips and 3D games. New content can be downloaded quickly
and easily from Internet sites or transferred to the phone via
Bluetooth Wireless Technology, an infrared port or a cable.
Extra memory is available through a Memory Stick , which
also serves as a convenient way to exchange content and
applications such as Java games.
The P910a can be used as a corporate phone with Ericsson
MD110 and Business Phone exchanges.
The P910a also contains an organizer,
which includes contacts, a calendar,
notes and email, all of which can be
quickly and efficiently synchronized
with a PC. The email application
supports attachments. Viewers let you
read and edit documents in various
formats such as Microsoft® Word
and Excel®.
With Sony Ericsson Update Service
you can keep your phone updated
with the latest P910a software.
The complete P910a documentation
consists of the following parts:
• Quick Guide
•User Guide
• Instruction for removing the flip
• Help texts in the P910a
• Complementary information on the Internet, refer to
www.SonyEricsson.com
10 Getting to know your P910a
Preliminary Layla850 P1B
Getting to know your P910a
P910a package
Note The design of the charger will differ depending on the
market.
Note If your package does not include all the listed items above,
please contact your retailer.
Note Before you can use your P910a you need to insert the SIM
card, and insert and charge the battery. Always detach the
charger before you insert or remove the SIM card.
B
C
A
E
F
K
H
J
N
P910i
M
G
D
L
AP910a with stylus
BBattery
CTravel charger
DSyncStation
EStereo headset
FProtective bag and strap
GExtra stylus
HMemory Stick
JMemory Stick adapter
KFlip replacement cover
LFlip replacement tool set
MUser documentation package
N 2 CDs, Sony Ericsson PC Suite and Multimedia for P910a
Getting to know your P910a 11
Preliminary Layla850 P1B
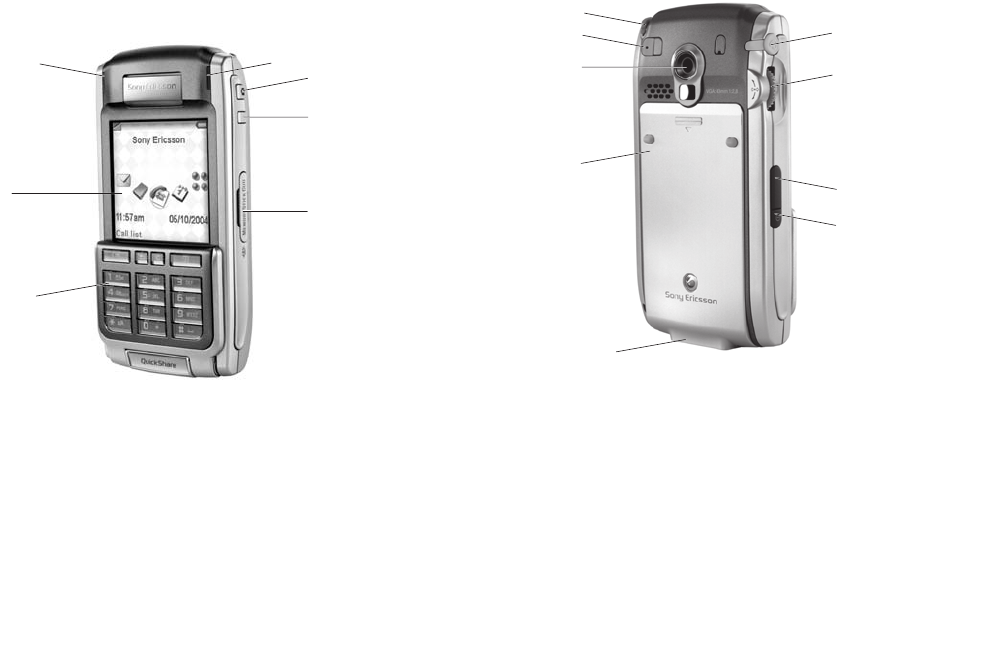
P910a overview
AIndicator light for Bluetooth wireless technology (blue)
BScreen
CFlip with keypad and keyboard
DIndicator light for network and battery (green/red)
ECommuniCorder activation and shutter release
FInternet button for activation of the browser
GSlot for Memory Stick
A
B
C
D
F
G
E
AStylus
BExternal antenna connector
CCommuniCorder
DBattery compartment
EConnector for accessories and charger
FConnector for stereo headset
GJog Dial
HInfrared port
IOn/Off button
A
B
C
D
E
F
G
H
I
12 Getting to know your P910a
Preliminary Layla850 P1B
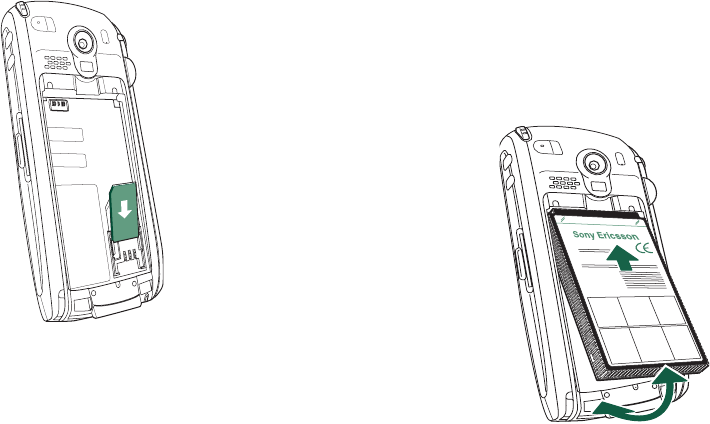
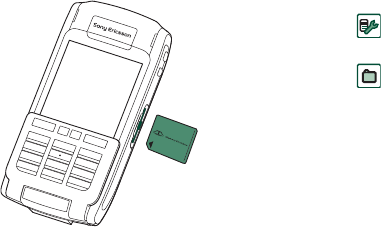
SIM card
When you register as a subscriber with
a network operator, you receive a SIM
(Subscriber Identity Module) card.
The SIM card contains a computer
chip that keeps track of your phone
number, the services included in your
subscription and your phone book
information, among other things.
A PIN (Personal Identity Number)
code is supplied with the SIM card
from your operator and must be
entered when switching on the P910a.
Open the battery cover by pressing
sligthly on its upper part and slide it
down the P910a. Insert the SIM card as shown in the picture.
Some subscriptions are limited to call only predefined numbers,
so-called Fixed Dialling Numbers (FDN). To avoid problems
when travelling abroad, these predefined numbers should be
defined as international numbers starting with +, for example
+4613244500. In order to speed up calling while at home, the
same numbers can also be added in the national number format,
for example 013244500.
For more information. see ‘Copying contacts to and from the
SIM card’ on page 104.
Battery
Before you use your P910a for the first time, charge the battery
provided for at least 4 hours. Use the supplied charger. See
‘Charging the battery’ on page 13.
Insertion and removal
To insert the battery
1. Ensure that the flip is closed.
2. Remove the battery cover by
sliding it downwards.
3. Place the battery in the
battery compartment and
close the cover.
To remove the battery
1. Ensure that your P910a is
turned off.
Note It is important that you always turn off your P910a before
removing the battery. Failure to do so can result in loss of
information.
2. Remove the battery cover by sliding it downwards.
3. Use your fingernail at the lower left-hand edge of the battery
to gently lift the lower edge of the battery outwards.
4. Take out the battery.
Getting to know your P910a 13
Preliminary Layla850 P1B
Charging the battery
• When the battery needs to be charged, a beep is heard. The
indicator light (on the top of your P910a) flashes red and a
battery low message appears on the screen.
• The battery can be charged whenever you want. The P910a
performance is not affected. However, using your P910a
while charging increases the charging time.
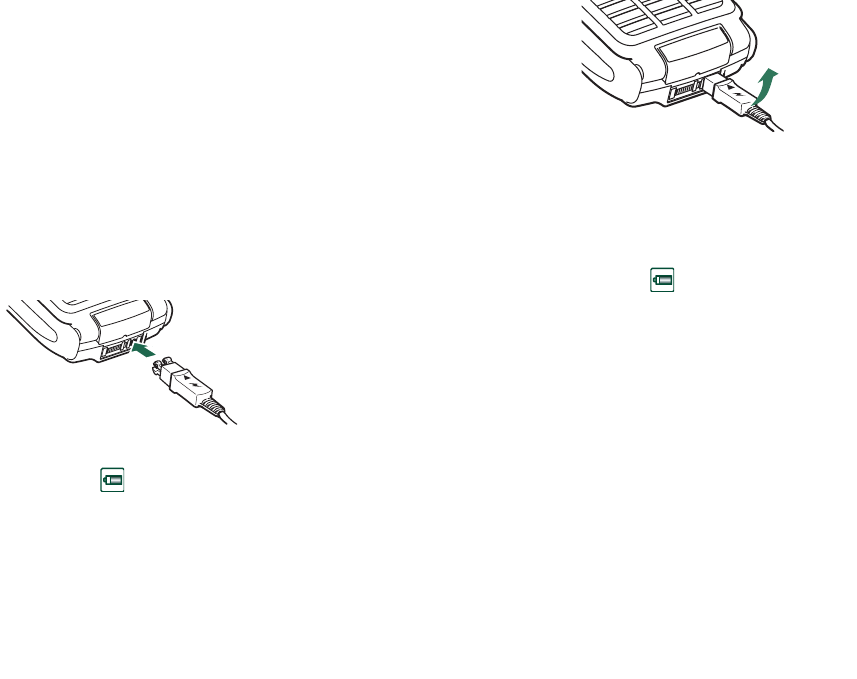
To charge the battery
The P910a can be charged either when it is switched on or off.
1. Make sure the battery is inserted in your P910a and the cover
is closed.
2. Connect the charger to
the P910a at the base of
the phone by the flash
symbol. The charger
plug flash symbol must
face upwards.
3. Connect the charger to the mains.
Charging is indicated by the battery icon on the screen
pulsing continuously, and the indicator at the top of the
P910a showing a steady red light (or green, if the P910a is
switched on).
See also ‘Battery Use and Care’ on page 184.
4. Wait approximately 4 hours or
until the battery meter on the
screen is full and the indicator
on the top of the P910a shows
a steady green light.
5. Remove the charger by tilting
the plug upwards.
Tip You can also use other battery chargers that have been
supplied with other Sony Ericsson mobile phones using the same
connector plug, for example, T300 or P900.
Note When the battery is completely discharged, or new, it may
take up to 30 minutes before the battery icon appears on the
screen.
Care instructions
Your P910a is a highly sophisticated electronic device. To get
the most out of it, please make sure that you follow this advice:
• Keep the P910a in its protective bag when not using it.
• Use a commercial glass screen cleaner sprayed on a cloth,
when you clean the screen.
• Use only the stylus provided to tap the screen.
14 Getting to know your P910a
Preliminary Layla850 P1B
First time start-up
Please read ‘Guidelines for Safe and Efficient Use’ on page 183
before you start using your P910a.
When you start your P910a for the first time
1. Press the
On
/
Off
button to turn on your P910a, keeping the
flip closed. The language selection dialog opens.
2. Select one of the languages from the list. Read more about
selecting a language in ‘Language selection’ on page 166.
3. Open the flip. Press the
On
/
Off
button again. The
Setup Wizard
starts and guides you through the essential settings.
4. The
Power menu
opens. Select
Phone on.
5. Enter your PIN when the dialog box appears and press
. Press to delete a digit.
Turning your P910a on and off
By default the
Power menu
prompts you to choose normal
operation or
Flight mode
each time you press the
On
/
Off
button.
These settings can be turned off. See ‘To use the Power menu’
on page 49.
In
Flight mode
the phone and Bluetooth functions are switched
off, but you can still use the other functions. Set your P910a in
Flight mode
where the use of mobile phones is not allowed, or if
you want to use the other functions but do not want incoming
calls.
Importing phone book entries
You may want to import existing contact information from
another mobile phone to your P910a. You can do this in several
ways:
• Beam the phone book entries from the other phone by
infrared or Bluetooth wireless technology and save the set to
Contacts
. See ‘Creating and editing contacts’ on
page 102.
• Synchronize the SIM and the internal memory on the other
phone with one of the PC PIM (Personal Information
Management, for example, Calendar, Contacts) applications
supported by your P910a. Then you can synchronize this
information with
Contacts
.
Note When you synchronize
Contacts
with your PC PIM
application, the SIM information will not be synchronized. You
might get two versions of the same contact. See
‘Synchronization and backup’ on page 138.
• Phone book entries stored on your SIM card are accessible
through
Contacts
. Select
SIM
in the folders menu to the
right in the menu bar to see the list of entries in your SIM
phone book. These entries can be imported to
Contacts
.
See ‘Copying contacts to and from the SIM card’ on
page 104.
Getting to know your P910a 15
Preliminary Layla850 P1B
Flip closed mode
Touch the Jog Dial to see the shortcut icons
With the keypad flip closed, the P910a can be used as a
conventional mobile phone using the keypad to dial and the Jog
Dial to navigate. For more information please see ‘Jog Dial’ on
page 19 and ‘Keypad functions’ on page 20.
You can open the flip at any time to continue working. Many
more functions are available when the flip is open.
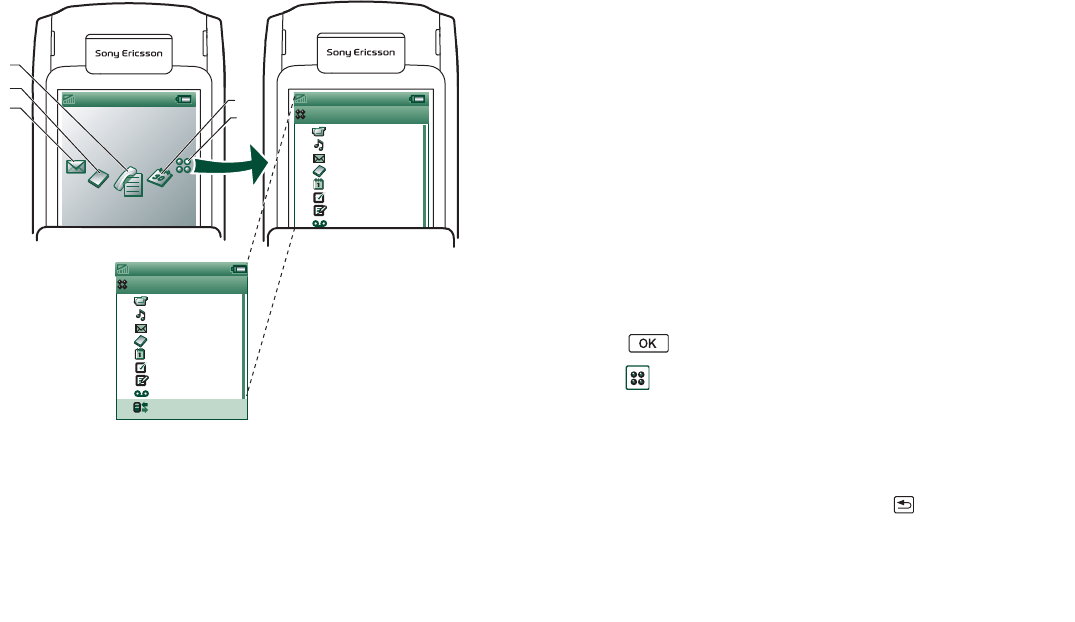
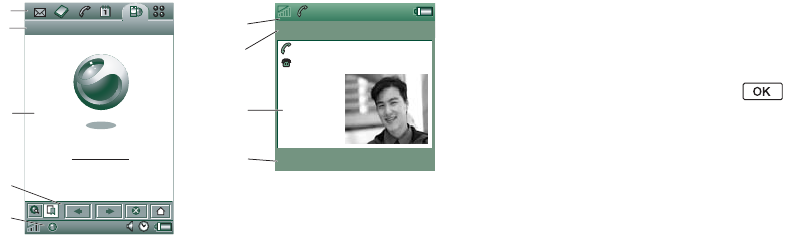
Standby view
The standby view shows shortcuts to the most commonly used
applications. Choose which shortcuts you want to use in
standby. See ‘Personalizing your P910a’ on page 142.
Selecting and starting applications
Rotate the Jog Dial to select an application. Press the Jog Dial
inwards or to start the application.
Tip When view is selected, it is also possible to start an
application by pressing its specific number.
Closing applications
The current application automatically closes and the data is
saved when you return to the standby view or switch to another
application. To return to standby, press and hold or press the
Jog Dial backwards.
AShortcut to the Messages application
BShortcut to the Contacts application
CShortcut to the Call list application
Sony Ericsson
Sony Ericsson
Call list
Call list
11:20am 21/06/2004
11:20am 21/06/2004
C
D
E
B
A
CommuniCorder
Music player
Messages
Contacts
Calendar
Tasks
Jotter
1
2
3
4
5
6
7
8
Sound recorder
9Connections
Applications
CommuniCorder
Music player
Messages
Contacts
Calendar
Tasks
Jotter
1
2
3
4
5
6
7
8
Sound recorder
Applications
DShortcut to the Calendar application
EShows all applications available in flip closed mode
16 Getting to know your P910a
Preliminary Layla850 P1B
Options menu
Press
or press the Jog Dial forwards to open the standby
options menu to get access to keylock, battery status, accepted
callers and more.
Flip open mode
When the flip is opened, the large touch-screen is revealed. You
use the stylus to tap the screen to navigate and enter data. There
is also a handwriting recognition feature, so that you can use the
stylus to write on the screen.
AShortcut to the Messages application
BShortcut to the Contacts application
CShortcut to the Phone application
DShortcut to the Calendar application
EShortcut to the Internet application
FShows all applications available in flip open mode
CommuniCorder
Pictures
Video
Music player
Internet
Messages
Contacts
Phone
Calendar
Tasks
Quicksheet
Sound recorder
Pdf+
Time
Storage wizard
Remote Sync
Online services
Quickword
Demo
GPRS data log
Chess
Solitaire
CommuniCorder
Pictures
Video
Music player
Internet
Messages
Contacts
Phone
Calendar
Tasks
Applications Edit All
A
B
CDE
F
File manager
i
PDF
Jotter
Calculator
Control panel
Jotter
Controlpanel
Calculator
Getting to know your P910a 17
Preliminary Layla850 P1B
The Jog Dial provides further navigation and selection
capability. Closing the flip generally ends an activity and saves
the data. Multimedia phone calls and data sessions will,
however, continue.
When the flip is opened, the large touch-screen is revealed. You
use the stylus to tap the screen to navigate and enter data. There
is also a handwriting recognition feature, so that you can use the
stylus to write on the screen.
The Jog Dial provides further navigation and selection
capability. Closing the flip generally ends an activity and saves
the data. Multimedia phone calls and data sessions will,
however, continue.
You can change the shortcuts A-E. See ‘Changing your
application shortcuts’ on page 142.
Navigation
When the flip is open, the application shortcut icons shown in
the flip closed mode move to the top row in the flip open screen.
You navigate by using the stylus and tapping selected items and
by using the Jog Dial, see ‘Jog Dial’ on page 19.
Flip removed
The flip can also be removed, which makes the organizer
applications easier to access. When the flip is removed, the
P910a works in flip open mode.
Note Turn off the P910a before you remove the flip to avoid to
damage your phone.
To remove and attach the flip, refer to the separate instructions.
Note Please note that Sony Ericsson does not accept any
liability for lost parts or product defects resulting from any
disassembly or modification of the product.
Virtual flip
You can use a virtual flip when the real flip is removed. Tap the
Enable virtual flip
checkbox in
Control Panel > Other > Flip
settings
and select the check box to activate it. When the virtual
flip is enabled, is shown on the status bar when the virtual
flip is open. Select to ‘close’ the virtual flip.
When the virtual flip is closed, the virtual flip keypad is shown.
Select to ‘open’ the virtual flip.
AShortcut to the Messages application
BShortcut to the Contacts application
CShortcut to the Phone application
DShortcut to the Calendar application
EShortcut to the Internet application
FShows all applications available in flip open mode
18 Getting to know your P910a
Preliminary Layla850 P1B
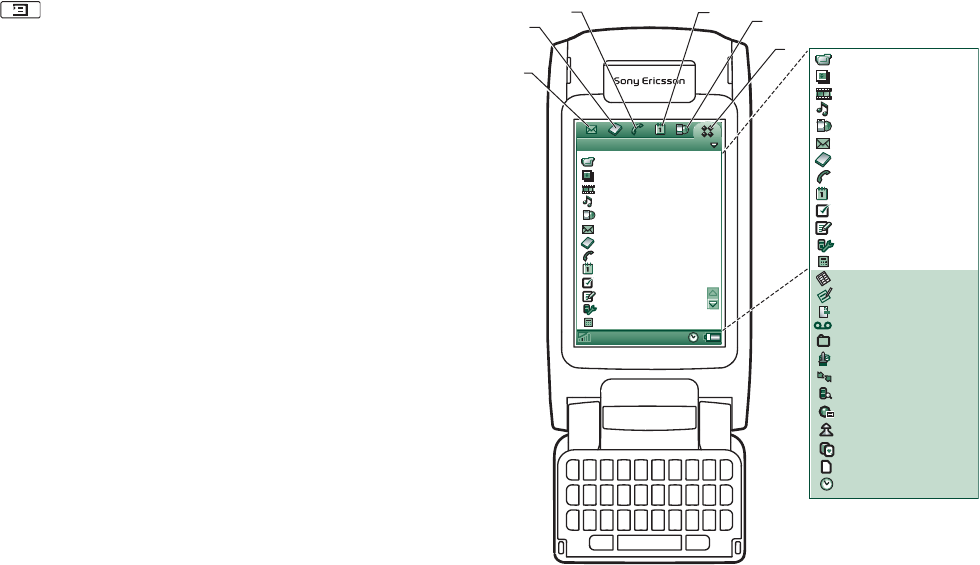
Screen areas
When the flip is closed, you use the keyboard and the Jog Dial.
When the flip is open the screen is touch-sensitive. The screen is
divided into a number of areas: see the figure and table below.
Item Description
A Application
picker
Displays six icons for quick and easy access to the
most common applications. These can be customized.
Chat Edit
Internet Edit
A
B
C
D
E
Sony Ericsson
E
F
C
B
John Smith
+4613244500 (h)
11:03
End call
B Menu bar Usually contains two menus on the left, and a folder
menu on the right. The two left-hand menus contain:
•the application menu, whose name is always the
same as the application. It contains the system
services used by most applications, such as
Find
,
Send as
, and
Delete
.
•the edit menus contain editing items such as
Cut
,
Copy
,
Paste
,
Zoom
,
Preferences
and
Help.
With the flip closed, the menu bar often shows the
function of the key.
C Application
area
Applications use this central area of the screen to
display the essential information.
Many of the applications are based on two standard
view layouts: a list view and a detail view.
D Button bar An application view displays a button bar that
contains useful controls and shortcuts. Not all
application views require a button bar.
E Status bar Displays device status information such as: signal
strength, battery and device information, settings for
sounds and time, on-screen keyboard, as well as
temporary indicators such as missed calls and unread
messages.
F Title bar Displays the name of the active application.
Getting to know your P910a 19
Preliminary Layla850 P1B
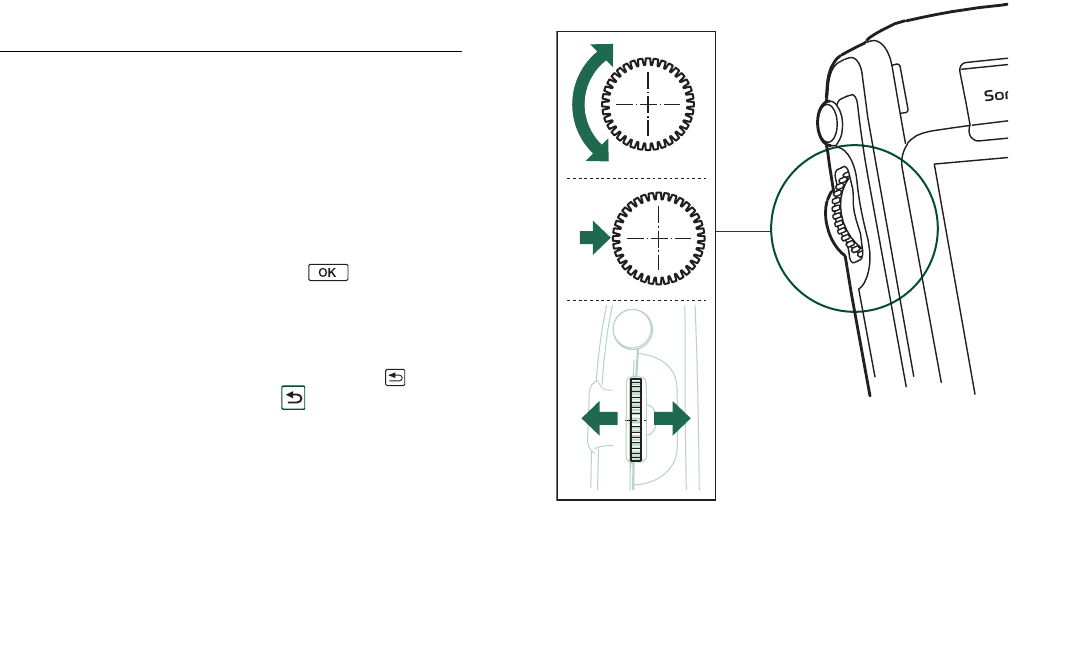
Jog Dial
Action Function
Rotate the Jog Dial up Scrolls items in a list up/to the left,
increases volume during a call, moves
back a page when playing a
multimedia message.
Rotate the Jog Dial down Scrolls items in a list down/to the
right, decreases volume during a call,
moves forward a page when playing a
multimedia message.
Press the Jog Dial inwards Selects a highlighted item, dials
selected phone numbers. Generally the
same action as in flip closed.
Press the Jog Dial backwards Goes back to the previous screen,
dismisses dialogs, and sends a busy
signal to the calling party when you
receive a call. It will not end a call.
Always the same action as in flip
closed and in flip open.
Press the Jog Dial forwards Flip closed: Brings up the Options
menu. Press and hold takes you to the
Applications list.
Flip open: Toggles the Application,
Edit and Category menus. Press and
hold takes you to the Application
launcher.
Up
Down
Inwards
Backwards Forwards
20 Getting to know your P910a
Preliminary Layla850 P1B
Keypad functions
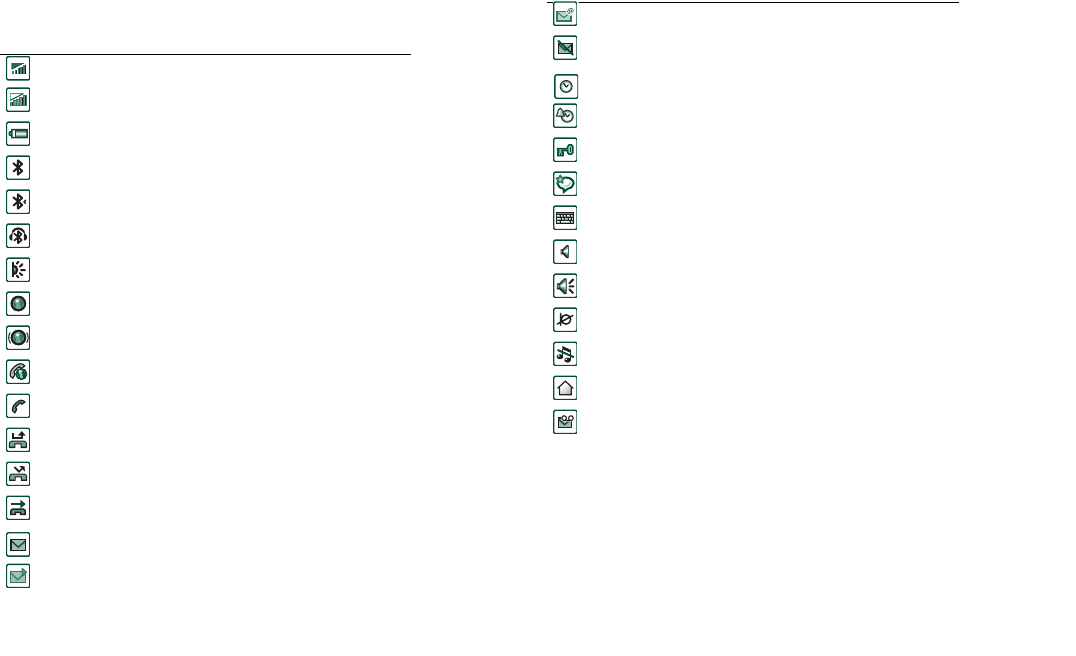
Indicators and status bar icons
These icons appear in the flip closed standby screen or in the
status bar when the flip is open. When the flip is open, you can
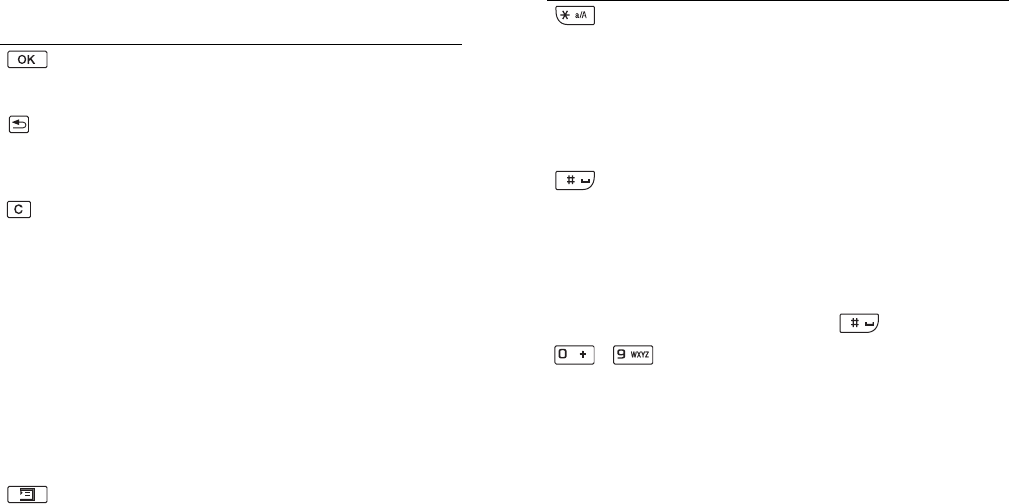
Key Function
OK
• Enter selected function, indicated on the display
above the key.
BACK
• Return to previous menu.
• Reject an incoming call.
• Press and hold to return to Standby.
CLEAR
• Delete entered characters/digits from the screen
one by one.
• Press and hold to delete an entire row of entered
characters/digits.
• Delete an entry from Contacts, Calendar, Tasks,
Sound Recorder, and Messages.
• Press and hold to disconnect the microphone
(mute function) when a call is in progress.
• Mute the ring signal during an incoming call.
• Pause/play the melody when the Music player is
open.
• Press and hold to put the P910a into silent mode,
when in the standby view.
OPTIONS
• Open the menu with different options for
different applications.
• Press and hold to open Applications.
STAR
• Enter the character
*
.
• Press and hold to enter a
p
(pause) character.
• Press to switch between different input modes
(Abc, 123 ... ). This is useful when writing SMS
or similar texts.
• Press and hold to change between T9 and
multitap.
HASH
• Enter the character #.
• Press and hold to see a list with special
characters.
• Terminate the input of PIN and security codes.
• Retrieve a phone number from the SIM card
phone book. Enter the number of the memory
position and then press .
- NUMERIC KEYS
• Enter the digits 0 to 9.
• Enter associated characters or perform associated
functions. See ‘Shortcuts’ on page 42.
• Press and hold digits 1 to 9 to open Contacts.
Key Function
Getting to know your P910a 21
Preliminary Layla850 P1B
often tap the icons to get more detailed information or start an
application.
Memory Stick
Memory Sticks provide a convenient way of increasing the
storage space in your P910a. You can use both Memory Stick®
Duo and Memory Stick® PRO Duo. You can save pictures,
Icon Function
Signal strength, GPRS avialable
Signal strength, GPRS not avialable
Battery strength
Bluetooth on
Bluetooth discoverable
Bluetooth headset connected
Infrared on
GPRS active
GPRS data transfer in progress
Ongoing data call
Ongoing call
Missed call
Divert all calls notification
Calls screened
SMS notification
MMS notification
Email notification
SMS overflow
Time
Time, alarm set
Keylock
Magic word
Keyboard
Multimedia volume
Speakerphone
Muted microphone
Silent mode
Home network
Voicemail notification
Icon Function
22 Getting to know your P910a
Preliminary Layla850 P1B
video clips, music, and voice recordings as well as computer
data and applications on a Memory Stick and use it to store or
transfer the contents for many different purposes. These include:
• Storing backup copies of important files.
• Storing media for personalizing your P910a.
• Storing media for use when composing MMS messages.
• Storing installation files for new applications.
• Transferring data between the P910a and a PC or Mac.
• Providing storage for third-party applications.
To insert the Memory Stick
1. Open the cover for the
Memory Stick slot.
2. Insert the Memory Stick in the
slot, with the connector side
towards the back (see picture).
Make sure it is securely
inserted. A click should be
heard.
Note Insert the Memory Stick
correctly to avoid damage to your P910a or the Memory Stick.
The Memory Stick supplied with the P910a may or may not be a
version that contains the lock function. Remember, you can
overwrite existing files without the lock function.
To remove the Memory Stick
Press the edge of the Memory Stick using your fingernail or the
stylus to release it. You hear a click as it jumps out of the slot.
Note Be careful not to drop the Memory Stick when removing it.
Renaming a Memory Stick
You can rename a Memory Stick to give it a name that is
meaningful to you. The name you set will be shown in the
divider between internal and external storage in the folder menu.
See ‘Folders’ on page 27. There are two ways to rename a
Memory Stick:
• Select
Control Panel > Other > Format disk
and tap
Rename
.
See ‘Format disk’ on page 165.
• Select
File manager > File > Format disk
and tap
Rename
.
Renaming will not erase any data.
Copying and moving data
For information on how to copy and move data to and from the
Memory Stick, refer to ‘Folders’ on page 27.
Formatting a Memory Stick
New Memory Sticks are normally automaticaly formated first
time they are inserted in a phone. The phone stops working
during the formatting and it can take some time.

Getting to know your P910a 23
Preliminary Layla850 P1B
Note Do not remove a Memory Stick during the formatting.
If you need to reformat a Memory Stick, select
Control Panel
> Other > Format disk
and tap
Format
, or select
File manager >
File > Format disk
and tap
Format
. When you format a Memory
Stick, you delete all the information on it, including any
applications that you may have installed.
Sharing data with other devices
Your P910a uses the shorter Memory Stick variants, Memory
Stick Duo and Memory Stick PRO Duo.
Memory Stick adapter
Use the Memory Stick adapter when using your Memory Stick
in a device equipped with a regular sized Memory Stick, for
example a personal computer. Insert your Memory Stick
according to the picture on the adapter.
Warning! Do not insert a Memory Stick adapter without a
Memory Stick into a Memory Stick slot. This may damage the
product. Always insert the adapter in the slot with the connector
end (marked with a triangle) first.
Compatibility
The P910a defines its own folder structure on a Memory Stick.
Each application has its own set of folders. A folder created in
one application is not visible in another.
Other devices must access the same folder structure to interact
with the P910a files. If you are using a PC, this is easily done by
browsing to the required folder on the Memory Stick.
Memory Stick enabled devices which do not allow you to
browse and manage a folder structure may not be able to share
data directly with the applications in your P910a (for example,
Memory Stick enabled digital cameras). However, the File
Manager can access these files and move them into the correct
folders for use by the applications. When your P910a is
connected to your PC, you also have access to the P910a folder
structure as well as other Memory Stick content in
My P910a
.
Personal computer support
Both PCs and Apple computers may be enabled for Memory
Stick use via built-in Memory Stick slots, floppy disk adapters,
PC card adapters, and Memory Stick enabled mouses. (Memory
Stick adapter required.)
For more information about Sony Memory Stick, visit
www.memorystick.com.
24 Getting to know your P910a
Preliminary Layla850 P1B
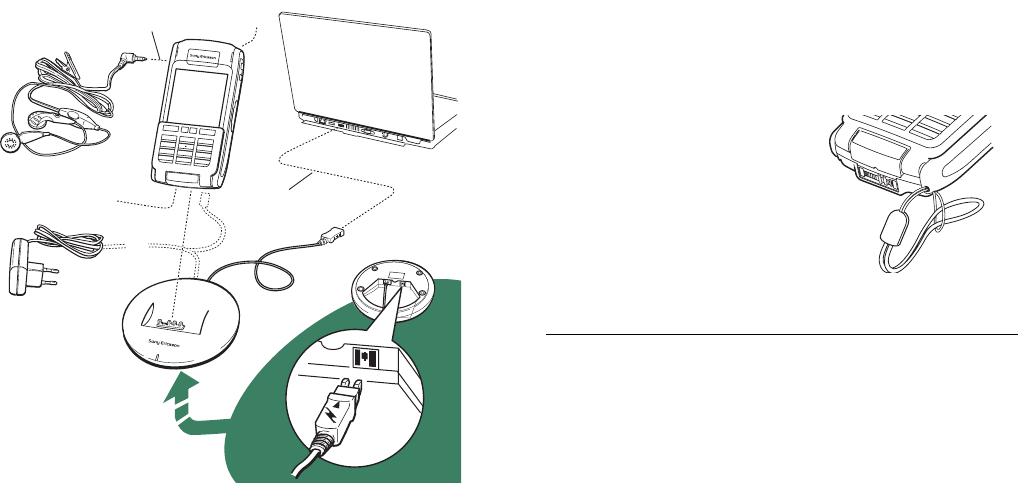
Connecting the accessories
The wrist strap is threaded through
the holes next to the connector at
the bottom of the P910a.
Services
You need the following services to
use the P910a functions:
Please consult your network operator and Internet service
provider about the services that are available to you.
AThe travel charger is connected to the desk stand or to the P910a.
Note The design of the charger will differ depending on the
market.
BThe USB connector from the desk stand is connected to a PC.
A
B
D
CE
CThe headset is connected to the P910a.
DOther accessories can be connected to the connector at the base of
the P910a.
EA car holder can be connected to the antenna connector at the rear.
Note Remove the plastic plug before connecting the P910a to the
car holder.
To use... You need...
phone services GSM subscription
text messaging (SMS) GSM subscription
multimedia messaging (MMS) MMS account, GSM data subscription
email email account, GSM data subscription
Internet Internet account, WAP account (only
for WAP 1.x services), GSM data
subscription
data communication GSM data subscription
Getting to know your P910a 25
Preliminary Layla850 P1B
Applications - overview
You can start applications in different ways. Select icons in the
standby view (flip closed) and in the application picker (flip
open) to start the most important ones. Select to list all
applications.
Demo application (Not in all phone versions)
The Demo application shows some of the most common
functions in your P910a. You can release this application to
remove memory.
You can uninstall the demo application and also reinstall it from
the
Multimedia for P910a
CD. See ‘Removing applications from
your P910a’ on page 132 for how to uninstall the demo
application and ‘Installing applications on your P910a’ on
page 130 for how to reinstall it.
To start the demo
1. Select the Applications icon .
2. Select the Demo icon and the demo starts.
To stop the demo
Tap the screen or rotate the Jog Dial to stop the demo.
The demo also stops when any other dialog is opened.
Note When the flip is open, an incoming text or MMS message
will not stop the demo.
The Demo application can be launched also when the P910a is
started without a SIM card inserted. When the P910a asks you to
insert the SIM card, just press OK. If the flip is closed, open it.
Phone
This is the mobile phone application. When the flip is opened,
select to start it.
Call list
The call list displays the most recent calls, either outgoing,
incoming or missed. In flip closed, press the Jog Dial or
to call the selected entry. To view the call list when the flip is
open, open
Phone
and
tap the
call list icon.
CommuniCorder
For taking video clips and still pictures. In CommuniCorder
view, the screen becomes a viewfinder. Press the
CommuniCorder button or the Jog Dial to start recording or take
a photo. Alternatively tap the red button at the bottom of the
screen.
Pictures (flip open only)
Manages your pictures. You can take pictures with
CommuniCorder, or receive them via email, Bluetooth wireless
technology and infrared communication. Download via the
Internet browser, or transfer them from your PC. With the image
editor you can also edit your pictures.
26 Getting to know your P910a
Preliminary Layla850 P1B
Video (flip open only)
Plays video clips. You can record video with CommuniCorder,
download them from Internet or transfer them from your PC.
You can stream video and audio from the Internet.
Music player
Plays music tracks and other audio files. You can download
these from the Internet or transfer them from your PC. The
player supports the most common sound formats. You can save
music tracks on the Memory Stick.
Internet (flip open only)
The Internet browser can access both Web and WAP pages. It
can also download images, video clips, audio files, and Java
applications.
Messages
You can read, create, send and delete text (SMS), multimedia
(MMS) and email messages in this view.
Contacts
Displays a list of your contacts. Select a contact to view
associated contact data.
Calendar
The Calendar view displays entries for the current day. Use the
Jog Dial to get more information about a selected entry or to
change days.
Tasks
Keeps track of your tasks. Set due date, alarm, priority, and so
on, for all your tasks and let your P910a remind you in time.
Quicksheet, Quickword, Pdf+ (flip open
only)
Use it to view and edit various types of documents. Pdf-
documents can not be edited.
Jotter
Displays a list of stored entries. In detailed view, the complete
entry is displayed.
Control panel (flip open only)
Contains all settings that are system-wide and affect more than
one application. This is the main view to use when initially
setting up your P910a.
Note Settings for Flight mode and P910a locks are located
under
Control panel > Device
Calculator (flip open only)
A standard 10-digit calculator. You can add, subtract, multiply,
divide, calculate square roots and percentages.
Sound recorder
You can use your P910a as a sound recorder.
PDF
Getting to know your P910a 27
Preliminary Layla850 P1B
Time (flip open only)
Shows time and date. You can set your current location and
another. You can also set different alarms.
File manager (flip open only)
You can handle the content and organization of media, both in
the P910a and on the Memory Stick.
Storage Wizard (flip open only)
Helps you to release memory. The icon appears in the status
bar when the memory is running short. Tap it to start the Storage
Wizard.
Remote Sync (flip open only)
Performs synchronization over the air. Using GPRS, the P910a
can be continuously connected to the remote synchronization
server. Remote Sync works equally well over CSD or HSCSD.
Online services
Your service provider may offer different services, for example,
weather forecasts, financial information or newsletters. Contact
your service provider for more information.
GPRS data log (flip open only)
A list of GPRS Internet accounts. Open an account to view your
logged GPRS traffic, including your costs. The P910a creates a
new data log when a connection to an account is created.
Connections (flip closed only)
Set the way you communicate with your PC or other devices.
Select between infrared, Bluetooth wireless technology and
cable. In the cable menu, you can also select whether the P910a
synchronizes with a PC or acts as a wireless modem.
Updating the software
With Sony Ericsson Update Service you can keep your phone
updated with the latest P910a software. See “Sony Ericsson
Update Service” on page 132 how to download the software
from the Internet.
General functions
Application launcher views
In flip open, the P910a can present the applications in two ways:
• List view (small icons appear in one column)
• Icon view (large icons appear in two columns)
Folders
Folders are used to organize information, for example contacts,
jotter entries, or task lists. You might want to organize your
contacts in business and personal folders.
i

28 Getting to know your P910a
Preliminary Layla850 P1B
Folders are also used when managing files of different types on
your P910a and Memory Stick. You might want to move or copy
sound files into a sound track folder to store on a Memory Stick.
As you may notice, if you connect your P910a to a PC and view
the contents of your P910a in
My P910a
, it is easier to get an
overview of a folder and file structure on a large screen than on
a handheld device. If you make it a habit to set up specific
folders to suit your needs and use them to categorize all your
information, working with it becomes easy.
Each application has its own set of folders. A folder created in
one application is not visible in another.
For each application there is a default
Unfiled
folder. Since there
is no way of seeing on your P910a, whether a file in an
Unfiled
folder is located on your P910a or on a Memory Stick, we
recommend that you move files to your own folders as soon as
possible.
Every item created in an application is always assigned to a
single folder, by default the folder as displayed in the list view.
In list view, the folder menu is used to organize your entries. In
detail view, the folder menu allows you to change the folder of
the current item.
Using the folder menu
In the applications that use folders you can see the folder menu
to the right in the menu bar.
When a Memory Stick is available in the P910a, the folders on it
are shown in the folder menu under the divider. If you rename
the disk (see ‘Renaming a Memory Stick’ on page 22) the
divider will show the new name.
In list view, there is a super-folder called
All,
which, when
selected, displays items from all folders (in
Contacts
, the
All
folder does not display the entries in the SIM phone book).
All
is
the default value in list views and when an application is first
launched.
Use the
Edit Folders
menu item to:
• Rename a folder, or move a folder to or from the Memory
Stick. Select the folder you want to move or rename, tap
Edit
,
type the name of the new folder, and choose a
Location
from
the list. Tap
Done
.
•To
add
a new folder. Tap
Add
, enter a folder
Name
and choose
a
Location
from the list
.
Tap
Done
.
•To
delete
a folder. Select the folder you want to delete and tap
Delete
. A folder can only be deleted if it is empty. Not all
folders can be deleted.
To copy all the files in a folder to another folder
1. From within an application such as
Pictures
or
Video
, select a
folder from the folder menu. From the
application menu, first
select
Select all
and then
Copy
.
2. Select the destination
Folder
from the list and select
Copy.

Getting to know your P910a 29
Preliminary Layla850 P1B
To move a file from one folder to another
Open the file in detail view. In the folder menu, select the
destination folder.
To copy a file to another folder
1. Open the file in detail view. In the folder menu, select the
destination folder. Select
Copy to
in the
main application
menu; for example
Music
or
Pictures
.
2. Select the destination
Folder
from the list and tap
Copy.
Tip To delete multiple files in an application you can use
Storage manager. See ‘Deleting or copying general files’ on
page 168.
Managing your files
Using the File Manager, you can handle the content and
organization of media, both in the P910a and on the Memory
Stick. See ‘File manager’ on page 125.
You can also use the Storage manager in the Control Panel. See
‘Storage manager’ on page 167.
Zooming
You can change the size of the screen fonts. Choose between
Small, Medium or Large. From the menu bar, tap
Edit > Zoom.
Automatic saving
When you work in an application and leave it, your work is
automatically saved.
Find
The Find function searches through all the items stored in an
application. The standard
Find
dialog contains a single text edit
box with two buttons,
Find
and
Cancel
. Selecting
Find
starts the
search, while
Cancel
closes the
Find
dialog.
In some applications, for example Messages, Find may be more
advanced:
• The size of each message is so large that you may want to
restrict the search to the current message only.
• Folders are potentially more significant, so you may want to
restrict the search to the current folder only.
Sorting your files
You can sort the files you have stored in your P910a. By sorting
your files, you choose in which order you want the files to be
displayed on the screen. You can choose between sorting by, for
example type, size, date, or name.
Note Sort is not included in all applications.

30 Getting to know your P910a
Preliminary Layla850 P1B
Sending and receiving items
From many applications it is possible to exchange items like
appointments, contacts and images.
To send an item using Send as
1. Enter the
Send as
menu in the specific application.
2. Depending on the application and item, you can choose
between the following transfer methods:
•
Text message
(using SMS): P910a will create a new text
message. Add the mobile number of the recipient and tap
Send
.
•
Email
: the P910a will create a new message with the item
included as an attachment. Complete with address and
subject, and tap
Send
.
•
Multimedia message
(using MMS): the P910a will create a new
message with the item included as an attachment. Complete
the message and tap
Send
.
•
Infrared
: align the infrared port of the P910a with the infrared
port of the other device. Select
Send
.
Messages on screen will
tell you when the information has been transferred.
•
Bluetooth wireless technology
: the P910a will search the local
area for Bluetooth devices that are set to be visible. These
will be presented in a list. Select a device to which the item is
to be sent and select
Send
. Progress messages will tell you
when the information has been transferred.
Tip The other devices must have Bluetooth wireless technology
enabled. You can select
Refresh
to perform a new search if, for
example, a destination device was not enabled at first.
To handle items received in email and multimedia messages
1. Tap the notification icon , or
open
Messages
and select MMS or an email inbox.
2. Open the message.
3. Select the attachments tab.
4. Select the required attachment. The attachment or a summary
of the attachment will be displayed.
5. Select
Save
to save the item. You may optionally display the
received item within the related application.
See ‘Messages’ on page 85 for more information.
To receive beamed items
1. Ensure that infrared or Bluetooth wireless technology is
activated and, for infrared, that the infrared ports are aligned.
2. The received item will be notified by a dialog box listing the
item(s) received. When using Bluetooth you will also be
asked to accept or reject the connection.
3. Select
View
to view and save the item to the related
application. Select
Done
and any unsaved items will be
automatically saved for you in the
Beamed
inbox in
Messages.
Getting to know your P910a 31
Preliminary Layla850 P1B
Methods for storing data
Your P910a can store data in different ways:
• Internal memory. Used for storing pictures, messages, music,
applications, and so on.
• Memory Stick (expansion memory).
• SIM card, for phone numbers and associated names. See
‘Copying contacts to and from the SIM card’ on page 104.
• Several other expansion-memory alternatives on the market.
• Pictures on Sony Image Station on the Web:
– For Europe: http://www.sonystyle-imaging.com
– For Japan: http://www.imagestation.jp
– For USA: http://www.imagestation.com
Getting help and setting zoom
From the menu bar tap
Edit > Help
to get to the P910a help system
or set the zoom level. The help system uses two views:
• The Topics view shows all available topics, for example both
specific application topics and general topics.
• The Detail view presents the title and text of a single topic.
The Topics view allows you to select a topic, which opens the
detail view and displays the selected topic.
In many dialog boxes you can select the Help icon in the
upper right corner.
Settings
For settings that are application-specific, tap
Edit > Preferences
in
the application menu bar. For generic settings, use
Control panel
.
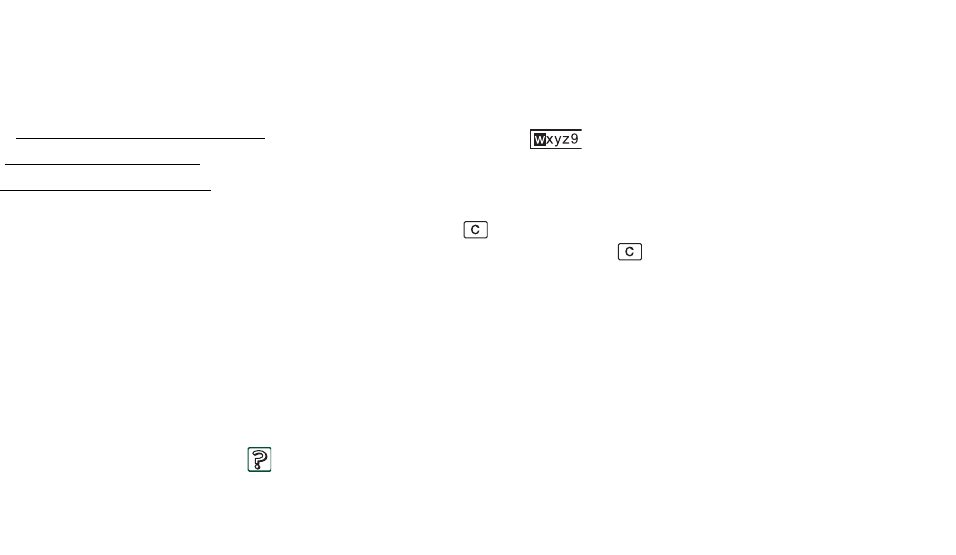
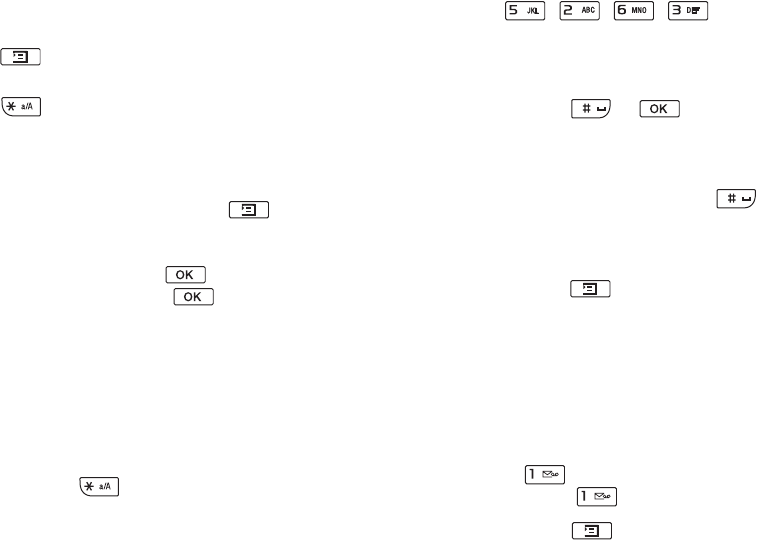
Entering text with the flip
closed
With the flip closed, you use the keypad keys to enter text, for
example, when writing a text message. When you press a key, a
pre-edit box with the different characters on that key is shown in
the title area:
If the same key is pressed again, the next character in the pre-
edit box will be selected.
The key deletes the character to the left of the cursor. If
continuously pressed, the key deletes several characters
and then whole words.
Types of text input
There are four text input types:
• Abc – initial uppercase letter, the rest lowercase. Default for
each new text edit field.
• 123 – numeric entry only
• ABC – uppercase entry
32 Getting to know your P910a
Preliminary Layla850 P1B
• abc – lowercase entry
When you are editing text you can:
• Press and select
Text options > Input type
to select text
input type.
• Press to switch between the input types in text edit
mode.
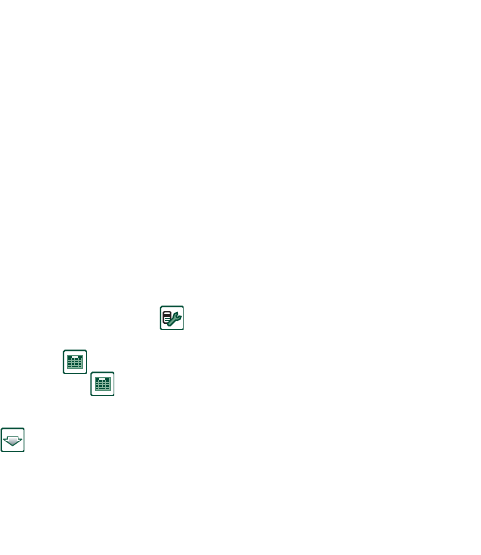
Inserting symbols
When you are editing text you can press and, depending
on the application, choose
Add symbol
or
Text options > Add symbol
to select an item from the symbol selector table. Use the Jog
Dial to select the row and press . Then scroll within the
row to select a symbol and press .
T9® text input
You can use T9 Text Input when writing, for example text
messages and email. The T9 Text Input method uses a built-in
dictionary to recognise the most commonly used word for each
sequence of key presses. This way, you press each key only
once, even when the letter you want is not the first letter on the
key. Press and hold to change input method.
The following example shows how to start writing a text.
To enter letters using T9 Text Input
1. Select, for example,
Messages > Create SMS
.
2. For example, if you want to write the word ‘Jane’, press
.
During text entry, a suggestion list with word candidates are
presented. The most frequently used word is highlighted.
3. If the word is the word you want:
– Press or to accept and add a space.
If the word is not the one you want:
– Scroll with the Jog Dial up or down to view alternative
words (candidates). Press to accept the word and
add a space.
If you do not find the word you want:
– Press to go to a list of options.
– Select
Text options > Spell word
.
– Edit the word using multitap text input and press
Yes
.The
word is added to the user dictionary. The next time you
enter the word, it will appear as one of the alternative
words.
4. Continue writing your message.
Press to enter a full stop. To enter other punctuation
marks, press and use the Jog Dial.
If you press and select
Text options
when writing, you get
a list of options:
•
Spell word
, to edit the entered word.
Getting to know your P910a 33
Preliminary Layla850 P1B
•
My words
, to view the user dictionary.
•
Language
, to change language.
•
Show suggestion list
/
Hide suggestion list
, to switch the
candidates window on and off.
•
Use T9
/
Use multitap
, to switch between T9 Text Input and
multitap text input
•
Add symbol
, adds symbols and punctuation marks.
•
Input type
, changes the text input type between
Abc
,
abc
,
ABC
and
123
.
•
Copy all
/
Paste
, to copy all text to the clipboard, and for
pasting the copied text to the place of the text cursor.
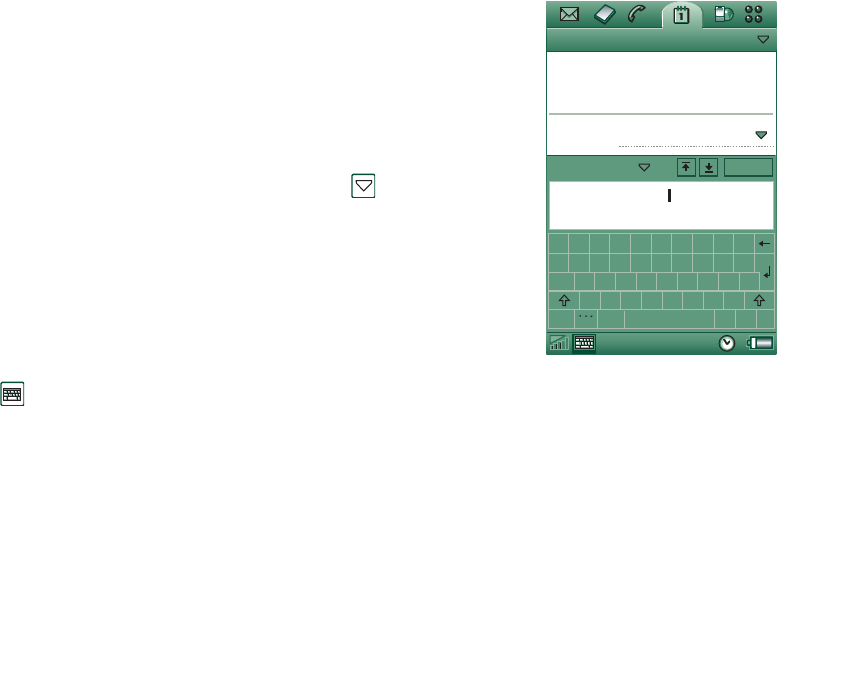
Entering text with the flip open
There are three ways of entering text with the flip open:
• Use the on-screen keyboard located at the bottom of the
screen.
• Write directly on the screen using the stylus.
• Use the keyboard on the inside of the flip.
On-screen
keyboard
When you need to edit text,
tap the keyboard icon in the
status bar and then select
characters. Tap
Done
when
ready.
Tap
> Setup
to change
language for the keyboard.
At the bottom left of the
keyboard you can choose
between three keyboard
layouts with different
character sets.
abc
- standard characters
àëó
- international characters
123
- numeric characters and currencies
The current input field is shown to the left in the top bar of the
keyboard. Tap the arrows or rotate the Jog Dial to change the
input field. The keyboard top bar also contains a drop-down
menu with
Cut
,
Copy
and
Paste.
When copying or cutting, the text
must be selected first.
Chat Edit
Calendar Edit Unfiled
Weekly meeting
Type Appointment
The agenda for...
1234567890
qwe r t yu i op
a
cap
abc 123aeo
sdfghjkl
zxcvbnm.
,?@
Done
Description
Weekly meeting
34 Getting to know your P910a
Preliminary Layla850 P1B
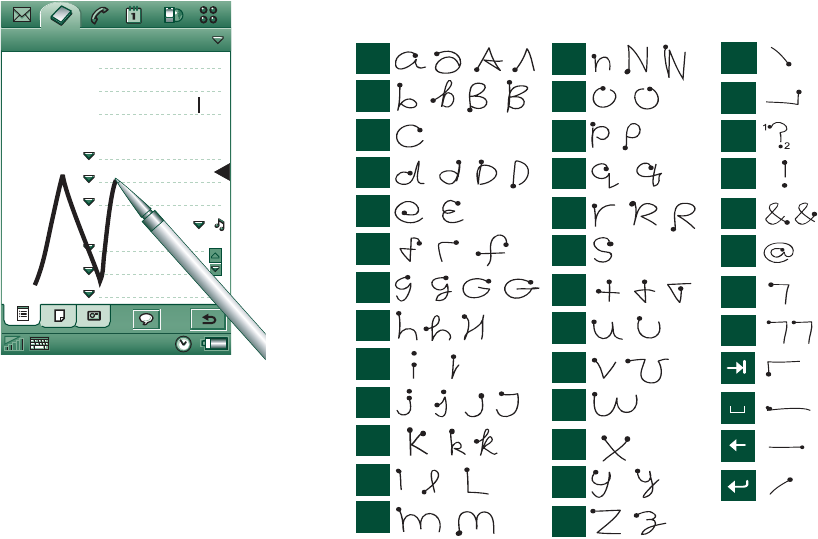
Handwriting recognition
Handwriting recognition
translates stylus gestures
into letters, numbers or
other characters, and
displays these characters
as text. Handwriting
recognition is only active
in places where text can
be input.
The text mode screen is
split into an upper and a
lower part, by an arrow
in the middle of the right
edge. Write lowercase
letters below the arrow
and uppercase letters in
line with it. Write
numbers above the
arrow.
Mark text by putting the stylus on the text, wait a moment, and
drag the stylus over the text.
Note Most letters can be written using different stroke styles.
See the tables below. The style does not determine case. The
position on the screen decides case.
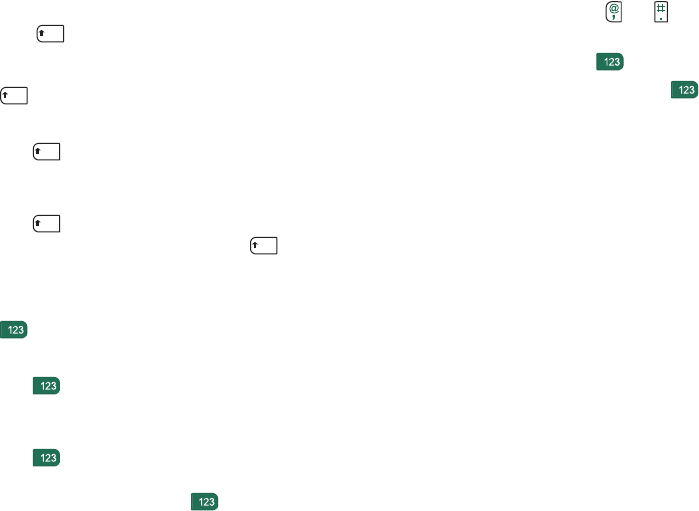
Letters
Lowercase letters are written below the arrow and uppercase
letters in line with the arrow.
Note Start each stroke at the dotted end.
Chat Edit
Contacts Edit Unfiled
First name
Last name
Job title
Phone (w)
Phone (h)
Mobile (w)
Ring tone Default Rin...
Email (w)
Fax (w)
Web
Jane
Jones
Graphic Desig
a
b
c
d
e
f
g
h
k
l
m
n
o
p
q
r
s
t
u
v
y
z
w
x
12
i
j
1
1
1
1
1
1
2
1
2
2
2
22
2
,
.
?
!
&
@
"
'
Getting to know your P910a 35
Preliminary Layla850 P1B
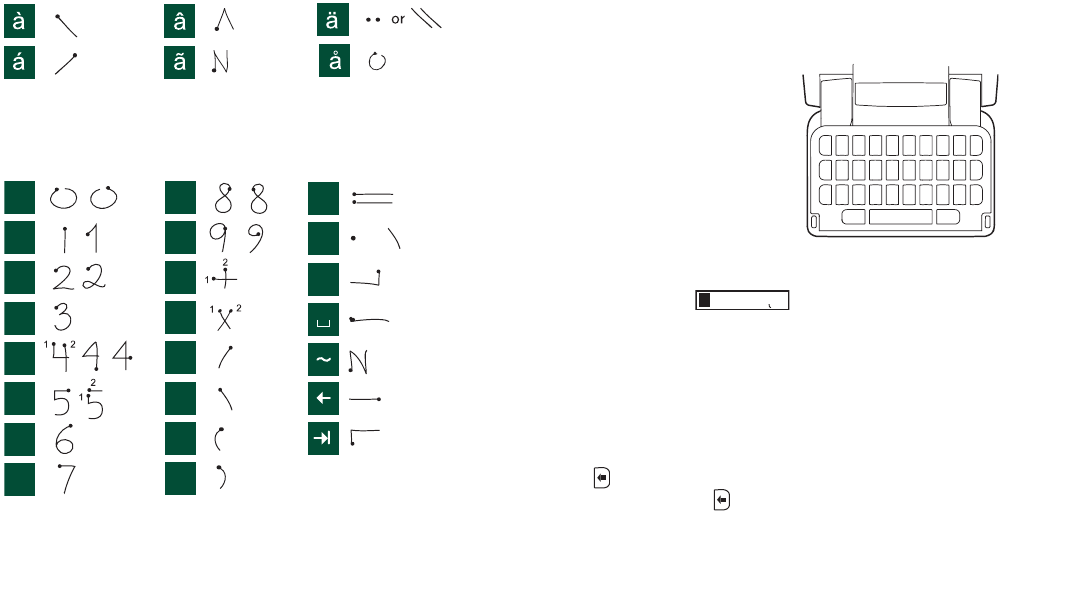
Accented letters
Write the character as described above, then write the accent
above the arrow. Other such characters, for example, ö and ü,
follow the same principle.
Note Start each stroke at the dotted end.
Numbers
Numbers are written above the arrow.
Note Start each stroke at the dotted end.
Extended characters
To write symbols and characters that are not shown in these
tables, please consult the Extended characters section of the
Handwriting recognition help topic in your phone.
Flip keyboard
Located on the inside of the flip,
the keyboard is similar in design
to that of a standard computer
keyboard.
With the flip open you use the
keyboard keys to enter text, for
example, when writing a text
message. When you press a key,
if there are additional characters
associated with that key, then these will be shown in a pre-edit
box in the title area:
If the same key is pressed again, the next character in the pre-
edit box will be selected. You can also use the Jog Dial to run
through and select characters in the pre-edit box. (The pre-edit
box will be displayed on screen for as long as you have the key
depressed.) When the key is released, the highlighted character
will be selected after approximately 1 second.
Press to delete the character or spaces to the left of the
cursor. Press and hold to delete several characters and then
whole words.
0
1
2
3
4
5
6
7
8
9
,
.
*
or
+
*
/
\
(
)
=
e 'e ee é è e ê
36 Getting to know your P910a
Preliminary Layla850 P1B
Press the space key to enter a character space to the right of the
cursor. Press and hold the space key to move the cursor forward
by inserting 6 space characters at a time.
Note When typing, press the keys one after another. Not, for
example, and
E
simultaneously.
Using the CAPS key
The key is used to capitalize or 'caps-lock' characters on
the keyboard.
•Press once followed by, for example, 'E' to write a
capital letter. Any additional keys pressed will be displayed
in lowercase.
•Press twice for caps-lock. Any additional keys pressed
will be displayed in uppercase until is pressed again to
remove caps-lock.
Using the 123 key
The key is used to access the coloured characters and
numbers on the keyboard keys.
•Press once followed by, for example,
E
to type the
number
3
. Any additional keys pressed will display the
standard characters on the keys.
•Press twice to lock the coloured characters and
numbers. Any additional keys pressed will type the coloured
characters or numbers until is pressed again.
Inserting symbols
There are a number of ways to insert symbols with the P910a
keyboard.
• Press the or keys to show additional symbols in the
pre-edit box in the title area.
• Use the to access the coloured symbols on the keys.
• Holding down the key for a short time will generate the
symbol selector table. To select a symbol use the Jog Dial by
first scrolling through the rows, and select the row by
pressing the Jog Dial inwards. Then use the Jog Dial to scroll
within the row, and selecting the symbol by pressing the Jog
Dial inwards.
See “Flip settings” on page 165 how to specify which keyboard
your P910a has.
P910a locks
Use the SIM card lock and the device lock to protect your SIM
card and your P910a from unauthorized use. Use the keylock to
prevent the keys from being accidentally pressed.
Note You can usually make an emergency call without
unlocking the P910a.
CAPS
CAPS
CAPS
CAPS
CAPS

Getting to know your P910a 37
Preliminary Layla850 P1B
SIM card lock
The SIM card lock protects your SIM card, not the P910a,
against unauthorized use. It is unlocked by the PIN and PUK
codes which you receive from your service provider.
You can choose to have to unlock the SIM card every time you
turn the P910a on, or to have the SIM card unlocked.
Your PIN (Personal Identification Number) code consists of four
to eight digits. If you activate the SIM card lock, the P910a will
ask for the PIN code every time you turn it on. You unlock the
SIM card by entering the PIN code.
To activate the SIM card lock
1. Select
Control panel
> Device > Locks.
2. Select a lock option.
3. Select
Done
.
An error message informs you if a wrong PIN code has been
entered. Usually, the SIM card will be blocked after three wrong
attempts (the number of attempts is SIM-card dependent), and
you need to enter the PUK code to unblock it.
The PUK code consists of eight digits. When you have entered
the right PUK code you must enter a new PIN code. You have
ten attempts to enter the PUK code. If all ten attempts fail, the
SIM card will be disabled and you need to contact your network
operator.
You cannot change the PUK code.
PIN2
Some functions on the SIM card can be protected by a
secondary code feature. Some SIM cards do not have a PIN2
lock.
The PIN2 lock cannot be deactivated. The code can be changed
by a user who knows the old code.
Device lock
The device lock protects your P910a and the data in it against
unauthorized use.
If the device lock is set to
When SIM changed
, it means that the
P910a is not normally locked. However, if the SIM has been
changed, the P910a asks you to enter the code to unlock the
P910a before you can use it. This means that if someone steals
your P910a and puts another SIM card into it, they will not be
able to use it.
Note Your operator can block your SIM, if you report that your
phone has been stolen.
The device lock is not on when you buy your P910a. You can
change the device lock code to any four to eight digit personal
code.
The default device lock code is 0000.
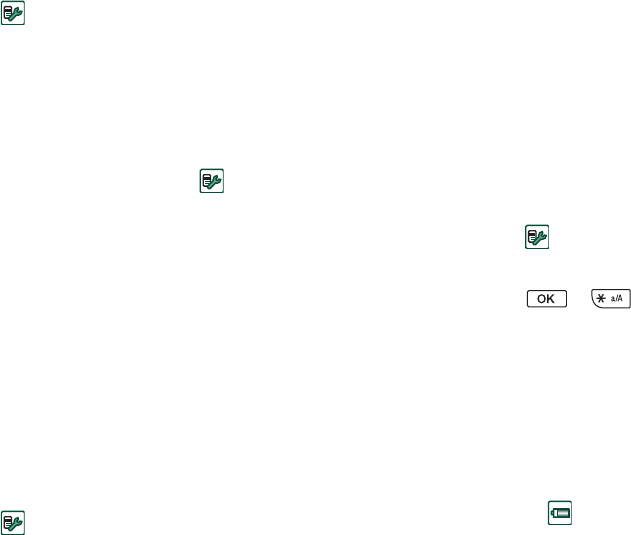
38 Getting to know your P910a
Preliminary Layla850 P1B
To activate the device lock
1. Select
Control panel
> Device > Locks.
2. Select a lock option.
3. Select
Done
.
You can choose to have the P910a locked every time you turn it
on, locked when the SIM card has been changed, or unlocked.
It is also possible to use the device lock in combination with the
screen saver. Just mark the checkbox
Control panel > Device >
Display > Screen > Screen saver device lock
to have the device lock
activated when the screen saver goes on.
Note When using the screen saving device lock, make sure you
have set the device lock to activate at Power on. Otherwise your
P910a will be unprotected after Power on, until the screen saver
goes on.
Note You will not be able to browse the contents of your P910a
from a PC, or synchronize items using the SyncStation, when the
P910a device lock is enabled and active.
Change code
To change a code
1. Select
Control panel
> Device > Locks.
2. Select Change Codes.
3. Select the code you want to change.
4. First enter the old code, then the new one. (To ensure that
you have typed the new code correctly you have to enter it
twice.)
Automatic keylock
This option locks the keys on your P910a when the flip is
closed. This is to protect the device if the keys are accidentally
pressed. When this setting is active, the keypad will become
automatically locked after a period of inactivity.
To activate or change the keylock
Select
Control panel
> Device > Locks.
To unlock the keys
Select
> .
Screen lock
This option locks the screen of your P910a. This is to protect the
device if the screen is accidentally pressed in flip open mode or
with the flip removed. When this setting is active, the screen
will automatically become locked after a period of inactivity.
To activate or change the screen lock
1. Select
> Settings > Screen > Automatic input lock
.
2. Select a lock time or
Off
.

Getting to know your P910a 39
Preliminary Layla850 P1B
To lock the screen
Select
> Lock screen
.
To unlock the screen
Push the Jog Dial
Forwards > Inwards
or
Backwards > Inwards
.

40 Phone
Preliminary Layla850 P1B
Phone
The Phone application is easy for the beginner, yet powerful for
the advanced user. It can be used together with the other
functions of the P910a, including applications from developers
outside Sony Ericsson.
The phone includes useful features such as:
• Personalized ring types.
• Picture phone book.
• Quick access back to the entries in Contacts, making it easy
to try an alternative number or send a message if the contact
is unavailable or busy.
• Voice-dialling – make a call by saying the contact’s name.
• Voice answer – an incoming call may be answered or sent a
busy signal, using the words recorded for ‘answer’ and
‘busy’.
• Incoming call acceptance limit – specify those who should be
able to reach you.
• Access to other applications while talking on the phone.
• Office handsfree (speakerphone) which starts when you open
the flip, making it easy to access applications such as
Calendar and Jotter while talking.
• Flight mode which enables the P910a to be used as a PDA in
situations where radio transmitters may not be used. The
GSM and Bluetooth transmitters (and receivers) are switched
off.
With the flip closed you can access most of the functions using
the Jog Dial and the keypad. More advanced tasks such as
handling a conference calls or using other applications during a
call are best handled with the flip open.
Some options may be hidden or not available depending on your
subscription.
Call handling with the flip
closed
With the flip closed, you can use either the keypad or the Jog
Dial to handle calls.
Outgoing calls
To make a call
Enter the phone number on the keypad and press the Jog Dial or
press .
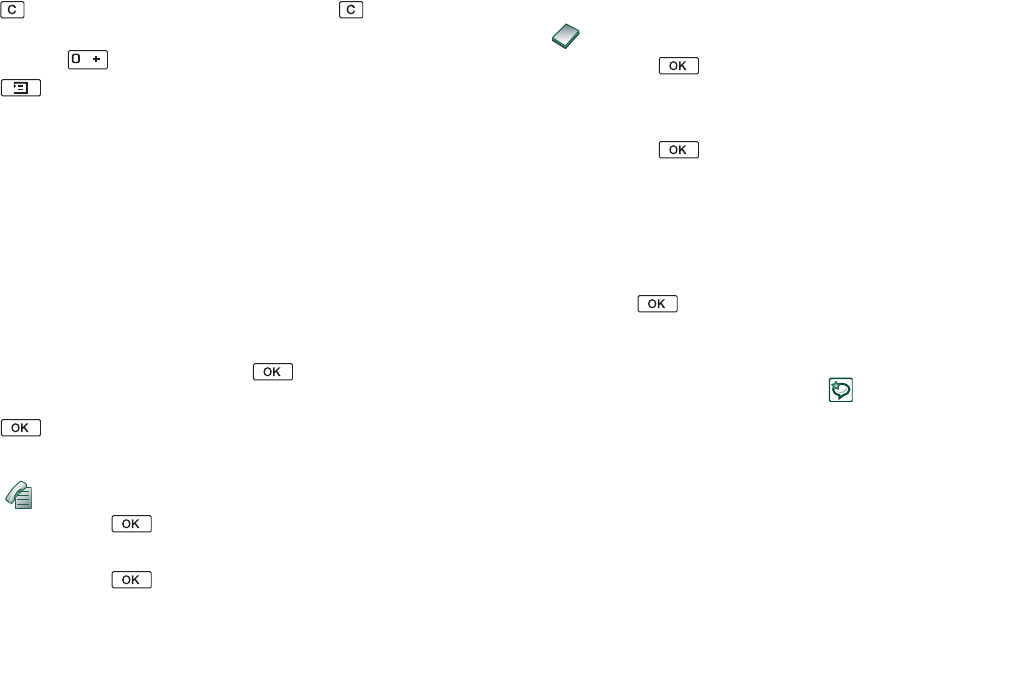
Phone 41
Preliminary Layla850 P1B
• Press to delete a typed character. Press and hold to
delete all characters
.
• Press and hold to insert the international call prefix
+
.
• Press and select
Hide my number
when you have
entered the phone number, if you do not want to show your
phone number to the party you are calling. Select
Show my
number
, if you want to show it.
If the called party is busy, a dialog box appears from which you
can set your P910a to automatically retry to connect.
To make a call using Speed dial
Speed dial is a fast way to call one of your special numbers. See
‘Set up speed dial numbers’ on page 48.
1. Press the key corresponding to the number of the speed dial
contact.
The speed dial name is shown above the key. If a
picture is attached to the speed dial, the picture is also shown.
2. Press .
To make a call using the Call list
1. Select on the standby screen.
2. Press the Jog Dial or .
3. Scroll the list by rotating the Jog Dial and select an entry.
4. Press the Jog Dial or .
To make a call using Contacts
1. Select on the standby screen.
2. Press the Jog Dial or .
3. Scroll the list by rotating the Jog Dial and select a contact.
4. Scroll by rotating the Jog Dial and select the desired number.
5. Press the Jog Dial or .
For more information, see ‘Contacts’ on page 99.
To make a call using voice control
1. There are various ways to make a call using voice control.
– Press and hold the Jog Dial.
– Press and hold .
– Say the ‘Magic word’.
– Press the call button on the headset.
When the Magic word function is active, the icon
appears in the status bar.
2. When you hear a short tone, say the voice command linked to
the number you want to call. The P910a will connect you
with the matching contact.
You can use voice control when the P910a is handheld, used
with a handsfree set (car or portable), or with a Bluetooth
wireless technology headset. Magic word cannot be used
together with a Bluetooth wireless technology headset.
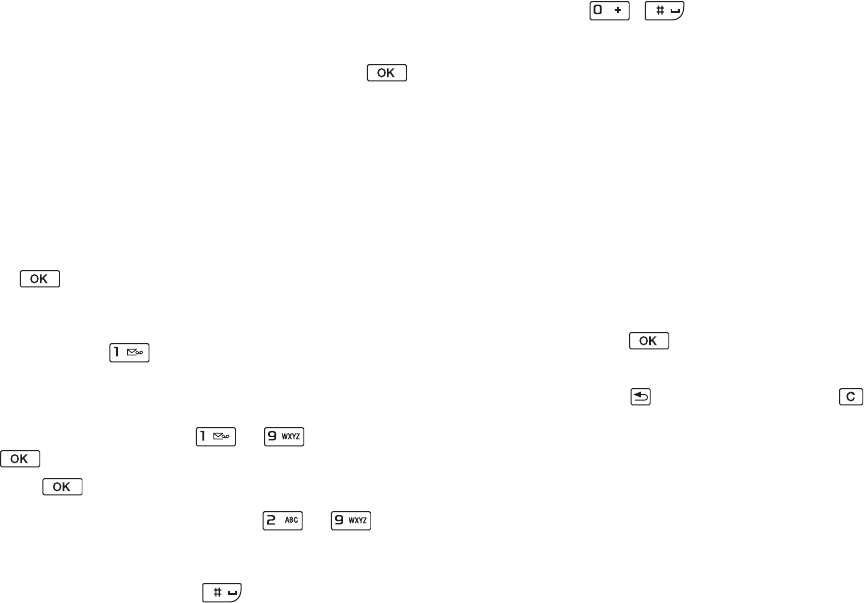
42 Phone
Preliminary Layla850 P1B
Read more about this in ‘Voice control’ on page 52.
To make an emergency call
Enter the emergency number on the keypad and press or
the Jog Dial.
Usually, but not always, no SIM card or PIN code is required for
emergency calls and you will be able to make the call as long as
you have coverage from a GSM network. Check with your local
provider to find out if emergency calls are possible without a
SIM card, and which emergency call numbers are supported.
To end a c a l l
Press , or press the Jog Dial.
Shortcuts
• Press and hold to dial your voicemail. With the flip
open, select
Phone > Call voice mail
.
See ‘Voicemail’ on page 55 on how to set up voicemail.
• Press any of the keys from to followed by
to call a speed dial number.
• Press twice to call the last dialled number.
• Press and hold any of the keys from to to open
your Contact list. Press again to reach the next letter.
Additional key presses will add letters to your search.
• Press any digit followed by to reach a phone number
in the SIM phone book.
• Press for the last dialled number.
Incoming calls
When you receive a call, the name of the caller will be displayed
if the calling party is in Contacts and the caller’s number is
received from the network. If there is an associated picture it
will also be shown in a small or large version. See ‘Incoming
call picture’ on page 52.
You can select whether an ongoing program will remain active
when you get an incoming call or if the Phone program shall
interrupt it. For settings see “Incoming call behaviour” on page
56.
To handle an incoming call
You can press to answer the call or answer by voice
control, see ‘Voice control’ on page 52.
You can press to reject a call and press to silence the
ring signal.
An incoming call will bring up the following options:
•
1 Answer
– Answer the call.
•
2 Send Busy
– Reject the call. The calling party will hear a
busy tone and the call will be logged as a rejected call.
•
3 Mute
– Silence the ring signal. The calling party will not
notice that you have silenced the call. The call will be logged
as a missed call.
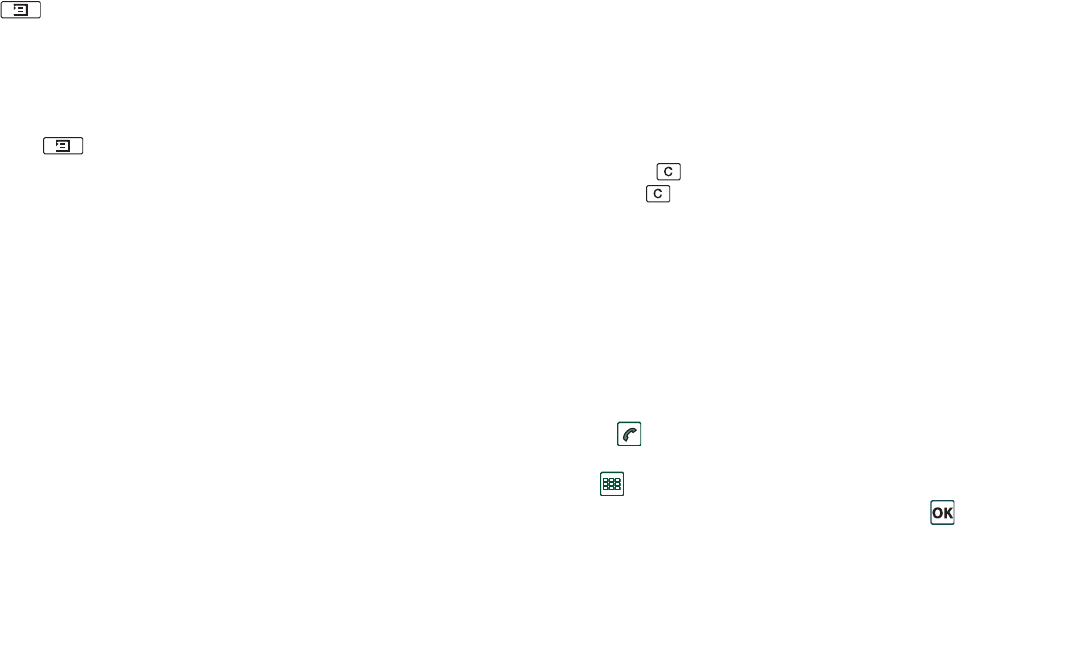
Phone 43
Preliminary Layla850 P1B
If a large picture of the caller fills the screen, you can press
or use the Jog Dial to access the menu with the options
above.
Options during or directly after a call
Use the Jog Dial to change the phone volume during a call.
Press to get a list of call handling options. The list will
vary depending on the situation. Options that concern two or
more active calls are described in ‘Handling two or more calls’
on page 45.
•
End call
– End the active call.
•
New call/Hold call/Retrieve call
– Put the active call on hold /
retrieve the held call. This is useful if you want to make a
new call during a call.
•
Add to contacts
– Create a new Contacts entry if the phone
number of the active call is known, and not already stored in
Contacts.
•
Show contact
– Display the entry in Contacts, if any, that
corresponds to the phone number of the active call.
•
Transfer sound
– Transfer the call to a Bluetooth wireless
technology headset.
•
Turn On/Off tones
– You can send DTMF tones with the
keypad, ‘Controlling tone-based services’ on page 49.
•
Microphone mute On/Off
– Turn the microphone on or off.
•
Copy number
– Copy a phone number to the clipboard.
•
Paste number
– Paste a copied number to be used for the next
call.
•
Speakerphone On/Off
– You can use the P910a as a
speakerphone. See ‘Speakerphone’ on page 47.
•
Applications
– Open another application, and, for example,
paste a copied phone number into a Jotter entry.
Press and hold to mute the microphone during a call.
Shortly press again to reactivate the microphone.
Call handling with the flip open
You use the stylus and the virtual keypad to handle calls with the
flip open.
Outgoing calls
To make a call
1. Select in the application picker. The Speed dial view is
opened.
2. Tap on the button bar.
3. Enter the numbers with the virtual keypad and tap on the
keypad, or press the Jog Dial inwards.
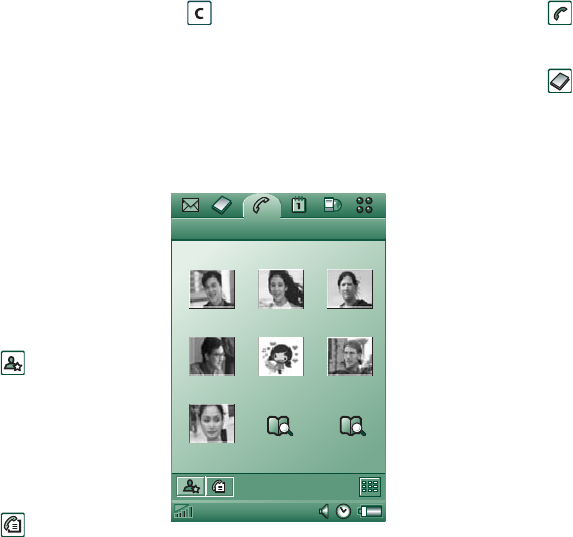
44 Phone
Preliminary Layla850 P1B
To delete a typed character - tap . If you do not want to
show your phone number to the party you are calling, select
Phone > Hide my number
after you have entered the digits.
Select
Show my number
, if you want to show it.
If a call is not successfully connected, the P910a can be set to
automatically retry to connect the call. When a retry is
successful, the P910a alerts you with a single ring signal.
To make a call using Speed
dial
Speed dial is a fast way to call
one of your special numbers.
See ‘Set up speed dial
numbers’ on page 48. This is
the default phone view.
1. Select on the button
bar.
2. Use the Jog Dial or tap with
the stylus to select an entry.
To make a call using the Call
list
1. Select from the button
bar.
2. Select an entry by rotating the Jog Dial and pressing it
inwards. You can also tap the entry using the stylus.
3. Select .
To make a call using the Contact list
1. Select in the application picker.
2. Select an entry by rotating the Jog Dial and pressing it
inwards.
3. Select a phone number by rotating the Jog Dial.
4. Press the Jog Dial inwards.
You can also tap the contact and/or number using the stylus.
To make a call using voice control
You use the voice control in the same way as with the flip
closed. See“To make a call using voice control” on page 41.
To end a call
Select
End call
, or press the Jog Dial.
Incoming calls
When you receive a call, if the calling party is found in
Contacts, the name of the caller will be displayed. If there is a
picture, it will also be shown in a small or large version. See
‘Incoming call picture’ on page 52.
To handle an incoming call
Use the screen buttons to select what to do.
•
Answer
– Answer the call.
Chat Edit
Phone Edit
Sony Ericsson
Sony Ericsson
8 9
John Sandra Susan(w)
Mike Julia(h) Robert
Elizabeth Empty Empty
1 2 3
4 5 6
7

Phone 45
Preliminary Layla850 P1B
•
Send Busy
– Reject the call. The calling party will hear a busy
tone and the call will be logged as a rejected call.
•
Mute
– Silence the ring signal. The calling party will not
notice that you have silenced the call. The call will be logged
as a missed call.
You can also answer by voice control, see ‘Voice control’ on
page 52.
Options during or after a call
There are several options available, depending on the situation.
You can access some of them using the screen buttons, by
tapping the field with the calling party details, or on the menus.
Options that concern two or more active calls are described in
‘Handling two or more calls’ on page 45.
•
End call
– End the active call.
•
New call/Hold call/Retrieve call
– Put the active call on hold/
retrieve the held call.
•
Add to contacts
– Create a new Contacts entry. This option
appears automatically after a call if the phone number of the
call is known, and not already stored in Contacts. See ‘Add to
contacts’ on page 53.
•
Show contact
– Display the entry in Contacts, if any, that
corresponds to the phone number of the active call.
•
Copy number
– Copy a phone number to the clipboard.
•
Paste number
– Paste a copied number into a field
Tap to make the following adjustments:
•
Call volume
– Adjust the volume in the phone. This is easier to
do with the Jog Dial.
•
Vibrating alert
– Set when the vibrating alert should be active.
•
Silent mode
– All sounds, for example ring signals, will be
turned off.
•
Speakerphone
– Activate the P910a as a speakerphone.
•
Mute microphone
– Turn the microphone on or off.
Handling two or more calls
During a call, you can make a second call, or answer an
incoming call. The ongoing call is put on hold and the new call
becomes active. The held call is shown with a grey background.
If someone calls when a call is on hold, you will be asked if you
want to release the held call and answer the incoming call.
When an active call is finished, you are asked to retrieve the
held call. If you do not respond within a few seconds, the held
call will also be finished.
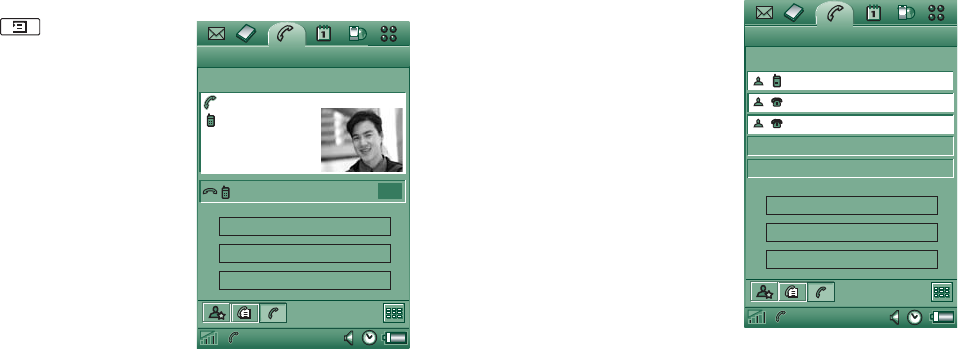
46 Phone
Preliminary Layla850 P1B
To make and handle a new call during a call
Press to get a list of call
handling options with the flip
closed.
–
End active call
– End the
active call, the held call
becomes active.
–
Switch calls
– Switch
between the active and
held call.
–
Start conference call / Add to
conference call
– Join the
two calls for a conference
call.
–
Transfer calls
– Connect
the held call to the active
call and disconnect yourself from the call.
–
Release all
– End both calls.
–
Show contact
– Display the entry in Contacts, if any, that
corresponds to the phone number of the active call.
With the flip open, choose options by tapping the screen
buttons, by tapping the field with the other party’s details, or
selecting from the menus.
Conference calls
A conference call can be started
when you have an active call
and a held call.
The conference call view is
automatically displayed
whenever a party has been
added to the conference.
If an incoming call is answered
during a conference call, the
conference call will be put on
hold.
Note Conference calls are only
available if they are supported
by your subscription.
To start a conference call
With one active call and one held call, tap the
Start conference call
button, or select
Phone > Start conference call
from the menu.
To add a new conference party
1. During a conference call, tap
New call
and make a new call.
2. Select
Add to conference
.
To manage a conference call
Use the screen buttons:
Chat Edit
Phone Edit
John Smith
11
:
03
End active call
Switch calls
Start conference call
Anne Jones (w)
0123456789012(h)
0123456789012(h)
Chat Edit
Phone Edit
John Smith
Tom Clark
11:03
Ann Jones
(w)
1
(w)
(h)
End conference
New call
Hide parties
2
3
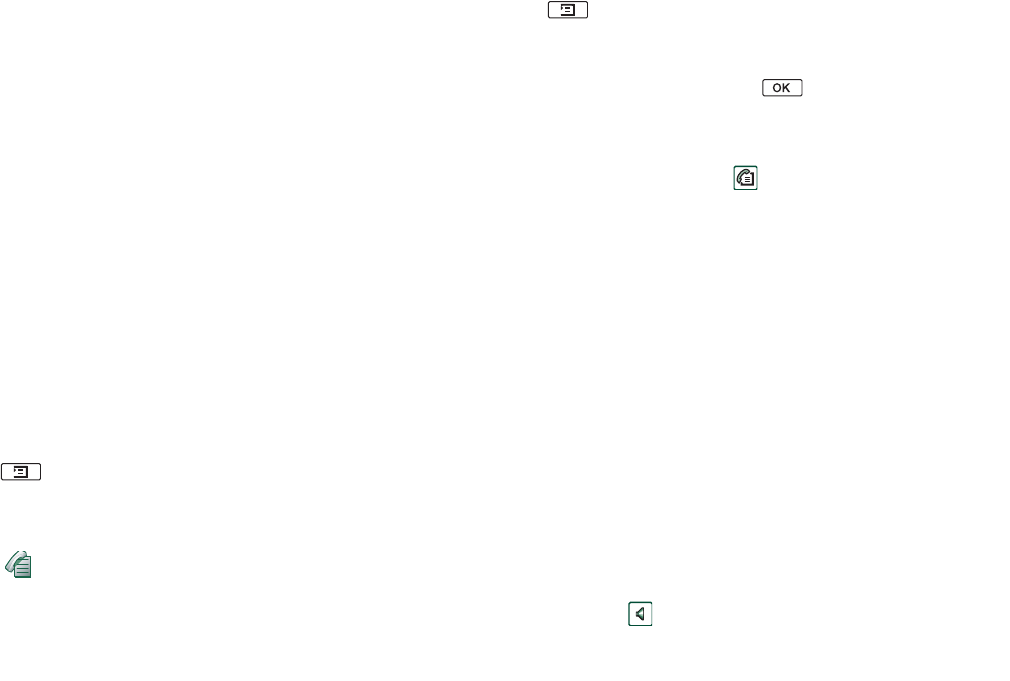
Phone 47
Preliminary Layla850 P1B
•
End conference
– End the conference for all parties.
•
Show / Hide parties
– Switch between the standard call control
view and conference call view.
To speak privately to a specific conference party
Tap a party in the list to get the following options:
•
Extract party
– Make the selected party the active call, the rest
of the parties will be put on hold.
•
Release party
– End the conference call for the selected party.
Call list and call log
The Call list available with the flip closed shows calls made,
received, rejected, or missed. with the last dialled call at top.
The Call log available with the flip opened keeps track of date,
time, length, and cost information (if available) for each call. It
shows all calls in order with the most recent call at the top.
To view the Call list with the flip closed:
1. Press .
2. Select
Call list
.
or
1. Select on the standby screen to open the Call list.
2. Press and select which calls in the list you want to
display. The currently selected view is not shown as an
option.
Tip With the flip closed you can press once to view the
call list. Press twice to call the last number used in the P910a.
To view the Call log with the flip open:
1. In the Phone application, select from the button bar.
2. Select a listed call to see more detailed information about it.
To delete calls from the Call list
• To delete all calls, select
Phone > Delete all calls.
• To delete old calls, select
Phone > Delete entries older than >
Enter a date
> Done
• To delete one call, open the detailed view on the call
> Phone
> Delete this entry.
Hints and smart functions
Speakerphone
If you open the flip during a call, the speakerphone function is
activated and the volume will increase. This lets you continue
the conversation while using other functions of the P910a.
Close the flip or tap to switch off the speakerphone.
48 Phone
Preliminary Layla850 P1B
Note The speakerphone does not work while the phone is in
silent mode.
Warning! The volume may be uncomfortably loud at the
higher volume levels if the phone is close to your ear. Exposure
to excessive volume may damage hearing.
Silent mode
In silent mode all audible ring and alarm signals are turned off.
When the flip is closed, press and select
Turn on silent
to
put the phone in silent mode. Press and select
Turn off
silent
to turn off silent mode. When the flip is open, tap the
sounds icon in the status bar to open a dialog where you can
switch silent mode on or off.
The vibrating alert still works in silent mode if not deactivated.
Set up speed dial numbers
Speed dial is a fast way to call one of nine selected phone
numbers. The view contains nine speed dial positions. Each
speed dial entry consists of a picture or an icon, and a name or a
number. The names, numbers and pictures shown in the Speed
dial view are derived from the Contacts application, see
‘Contacts’ on page 99. If the contact has a picture stored then
this picture is used. A default icon is used if the contact does not
have a stored picture.
To set a Speed dial number
1. Select from the button bar.
2. Select an empty position.
3. Select the desired contact.
4. Edit the name tag if desired.
5. Select
Done
.
To edit or delete a Speed dial number
1. Select on the button bar.
2. Select
Edit > Edit speed dial
.
3. Select the contact to edit or delete.
4. To change the name, enter the new name.
To delete a contact, tap
Delete.
5. Select
Done
.
Flight mode
Note The phone and other communication functions must never
be used in an aircraft unless otherwise instructed by the aircraft
personnel. If the use of equipment without a radio transmitter is
permitted, you can turn on the flight mode on the product. Doing
so turns off the radio function.
In flight mode the radio function is turned off so that it does not
disturb sensitive equipment, for instance in an aeroplane or in a
Phone 49
Preliminary Layla850 P1B
hospital. You cannot make and receive calls, but most of the
other functions in the P910a are available.
A Power menu asks you if you want to start the P910a in normal
mode or flight mode each time you turn on the P910a. See
‘Flight mode’ on page 147 on how to activate and deactivate
this Power menu.
Note You must set the Power menu before the flight.
To use the Power menu
The Power menu has the following options:
•
Phone on
– Start the P910a in the normal way.
•
Flight mode
– Start the P910a in flight mode.
•
Power off
– Turn the P910a off.
To set flight mode on and off when Power menu is selected
1. Press the On/Off button.
2. On the Power menu, select the option you want.
3. Press the Jog Dial, , or tap
Done
.
To set flight mode on or off
1. Select
Control panel > Device > Flight mode.
2. Select
Flight mode now / Phone on now
.
3. Tap
Done
.
Controlling tone-based services
You can use your P910a to control phone banking services or
other tone-based services that use DTMF (Dual Tone Multi
Frequency).
The P910a provides different ways of sending tones during a
call:
• Pressing keypad keys during an active call.
• Including a tone sequence in the call setup. Enter the phone
number, then press and hold to insert a pause,
represented by the character
p
. Continue to enter your
numbers for the tone-based code. Finally make the call by
pressing .
Hyperlinks in Messaging and Jotter
When you write text in Messaging and Jotter, your P910a
interprets a number as a phone number. If you select that
number, you have the possibility to, for example, call the
number or send an SMS to it.
Your P910a also recognises email addresses and URLs. If you
select an email address you have almost the same possibilities as
for the phone number. If you select an URL, your have the
possibility to start the Internet browser which opens the
corresponding Internet page.
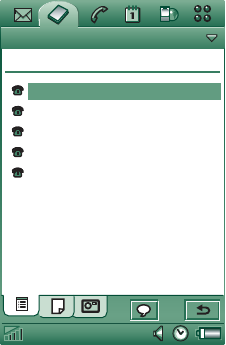
50 Phone
Preliminary Layla850 P1B
• Write digit sequences into
a Contact entry for the
service. Each digit
sequence to be sent as
tones must begin with
p
. A
space will end the tone
sequence and you can add
a comment after the space.
Once your call to the
service has been
established and you want
to send one of your pre-
programmed digit
sequences, choose
Show
contact
on the Phone menu
to get back to the Contact
card with the tone
sequences.
Note You should not store any personal codes in your P910a, in
case your phone is stolen or lost.
Support for TTY
Teletype (TTY) accessory, text phone, is an aid for people with
speech impairments.
To use the TTY device together with the P910a
1. Connect the TTY device to the accessories connector at the
base of the P910a.
2. In Phone, go to
Edit > Preferences > TTY Accessory
and select
the check box to set the P910a into TTY mode.
Refer to the TTY device user manual to find out how to use the
device. It may be necessary to use an adapter between the TTY
device and the P910a.
You can still make normal calls with the P910a in TTY mode
but other accessories such as handsfree will not work properly.
Do not open the flip during a TTY call. It will impair the quality
of the connection.
Note Support for voice carry over (VCO) and hearing carry
over (HCO) is handled through the TTY device and not through
the phone.
Support for ALS
Alternate line service (ALS) allows you to have two lines, and
two phone numbers, in one subscription. If you are not
subscribed to ALS, these dialogs and settings are hidden.
Using ALS, you can select which line to use for outgoing calls.
You can use the first line for any function, while the second line
can be used for speech only.
Chat Edit
Contacts Edit Unfiled
Bank
+4613244500 p1#1234567890
p10#0#34#56789 balance (w)
p30#1234#56 account 1 (w)
p10#1#5678901 account 2 (w)
p20#123456789 (w)
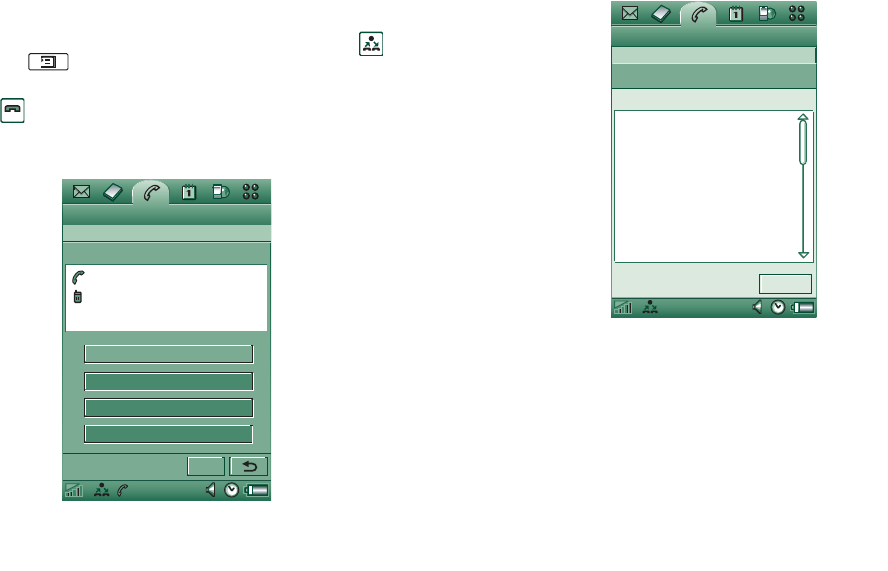
Phone 51
Preliminary Layla850 P1B
Incoming calls can be received at both lines at any time. The
name of the line is shown and the ring signal defined for the line
is used.
To select a line for outgoing calls
The preset line is shown by the icon in the status bar. If you want
to use the other line:
• With the flip closed, press and select
Switch to line 1
or
Switch to line 2
depending on the previously preset line.
• With the flip open, tap and select
Switch to line 1
or
Switch
to line 2
depending on the previously preset line.
Corporate phone
services in P910a
The P910a can be used in a
corporate environment like
centrex, mobile centrex and
corporate switchboards (PABX)
equipped with a mobile
extension facility (like Ericsson
MD110 or Ericsson
BusinessPhone).
Programmable feature
buttons
Used in a corporate
environment, the P910a
provides programmable feature buttons for easier use of
corporate phone services. When, for example, you call someone
who does not answer, you can press the button
Call Back
to have
the corporate system call you back as soon as he is free.
To report that you are busy, click
(in standby mode) the PBX icon
> Command
to send a
command to the PBX, such as In
meeting until..., Course, or
Business trip. The switchboard
operator can then answer
incoming callers that you are
busy and when you will be back.
All those commands that you
used to dial to the corporate
switch can now be replaced by a
command button with clear text.
Using corporate phone
service
To place an internal call, dial an internal (short) number or an
external (long) number. The phone sets up the call through the
corporate switch, so that during the call you can utilize all
corporate features like call back, interrogation, conference and
switchboard operator services. When dialling an external
number, you do not need to dial the external line prefix; it is
added automatically.
2
Chat Edit
Phone Edit
John Smith
+442745551409 (w)
02:00
New call
Call back
Intrude
End call
Corporate call ?
M
o
r
e
Chat Edit
Phone Edit
Commands
Select command
Meeting
Business trip
Sick leave
Corporate voicemail
Lunch
Gone for the day
Vacation
Course
Cancel

52 Phone
Preliminary Layla850 P1B
Note When travelling abroad, use your phone as a normal GSM
phone, entering
Phone > Edit > Preferences> Calling Cards
and set
the calling card to
Call directly
.
When storing numbers in Contacts you should use the
international number format, starting with
+
. This allows you to
use Contacts when you are outside the corporate telephony
environment, when you are abroad, and when you are sending
SMS or MMS messages.
Incoming calls via the PBX may be routed to the P910a as well
as to your desk phone, and you can answer in either telephone.
When talking on the P910a, you may hand over the call to the
desk phone by calling that phone, answering it and hanging up
the P910a. You can also hand over a call from the desk phone to
your P910a.
Configuring corporate phone service
Your corporate phone administrator can program feature
buttons, call routing, and commands in your phone via a
settings file. Contact him to receive a user guide valid for the
company and the configuration file, either via email or down
load from the intranet.
See “Corporate phone services” on page 56 on how to install
corporate phone service.
For more information on corporate telephony go to
www.sonyericsson.com/professionalsolutions
Preferences
In this menu you can change the settings for the phone options.
(Settings on your P910a that are system-wide and affect more
than one application are made from the Control panel, see
‘Control panel’ on page 145).
To set the phone preferences
1. In the
Phone
program select
Edit > Preferences.
2. Select the item to set up.
Incoming call picture
If an incoming caller has a picture stored in Contacts it will be
shown on the screen. Select the checkbox to show a large
version of the picture over the whole screen.
Voice control
The voice control option lets you manage calls using your voice.
With Voice answer you can use words recorded for ‘answer’ and
‘busy’ to answer or send a busy signal to an incoming call. With
Voice dialling, you can make a call by saying the contact’s
name.
A magic word ensures that the P910a will not call somebody
whose name has just been mentioned by chance.
Say the ‘magic word’ and then the name of the person you want
to call, and the P910a will try to call the person. Instead of the

Phone 53
Preliminary Layla850 P1B
magic word you can also press and hold the Jog Dial or press the
handsfree set call button.
Note Magic word is not supported with the Bluetooth headset/
car kit in the P910a. Instead of magic word, push the button on
the Bluetooth headset. After a confirmation tone, you should say
the name.
•
Voice dialling
– Select or unselect the checkbox.
•
Magic word
– Select the cases where you want to use the
magic word when you use voice dialling. You must,
however, record a magic word before you can select to use it.
Using Magic word will increase battery drain.
•
Voice answer
– Select or unselect the checkbox. Tap
On
if you
want to answer or reject incoming calls by voice commands.
You must first record voice commands for Answer and Busy.
•
Play caller name
– If you have recorded a name for a person in
Contacts, the P910a will tell you the person’s name when he
or she calls you. This is useful when using your P910a
together with a handsfree.
•
Voice commands
– A list of the voice commands. A balloon
means that a voice command is recorded for the command.
To record a voice command
1. Select one of the options,
Magic word
,
Answer
, or
Busy
and tap
Record
.
2. Say the magic word, the answer command or the busy
command after the tone.
If you are recording a magic word, make sure that you
choose a long unusual word, which can easily be
distinguished from ordinary background speech.
3. Select
Play
to check the quality of your recording.
4. Select
Done
to exit.
You are advised to record voice commands in a quiet
environment to maximize recognition.You also have to select
the voice commands carefully, so it does not activate by mistake
from environment sounds.
To record voice commands for individual contacts, see
‘Creating and editing contacts’ on page 102.
Add to contacts
This is a function for adding called and calling parties to
Contacts
. After a call has ended, if the phone number is not
already stored in the
Contacts
, you are asked if you would like to
add it.
Set the function
On
or
Off
.
Handsfree
Specify how to manage calls when the P910a is used with a
handsfree kit connected.

54 Phone
Preliminary Layla850 P1B
•
Answering mode
– Select the option you want.
–
Normal
– Answer calls as normal.
–
Any key
– Press any key (except ) on the keypad to
answer.
–
After 5 seconds
– P910a answers automatically after five
seconds.
You can also select to use a Bluetooth headset as the preferred
sound device. See ‘Pairing’ on page 135 for information on how
to establish connection with the headset.
•
Bluetooth: Preferred Handsfree
– Select the option you want.
–
Phone
– Use the keypad to manage incoming and outgoing
calls.
–
Headset
– Use the headset or the keypad to manage
incoming and outgoing calls.
Divert calls
You can divert incoming calls to another number if for any
reason you are unable to answer them.
To divert calls
1. Select the type of call you want to divert.
2. Specify the phone number you want to divert to.
3. Select
Done
.
The settings are stored in the network. Tap
Refresh
to receive the
current settings.
Tip Normally the data/fax options should not be changed.
Accept calls
You can specify who should be able to call you. All other callers
will be rejected. Your options are:
–
All callers
– Everybody can phone you.
–
Listed callers only
– Only people on the
Accept callers
list
can phone you.
–
Contacts
– Only people in your
Contacts
address book can
phone you.
–
Speed dial list
– Only people in your
Speed dial
list can
phone you.
–
No one
– No one can phone you. You can still receive
messages such as SMS, MMS and email.
To add a contact to the Accepted list
1. Select
Add new.
2. Select
Lookup
and choose a contact, or write the name and
number of the contact.
3. Select
Done
.
Tap a contact on the list to remove it.

Phone 55
Preliminary Layla850 P1B
Call waiting
Use these settings to control how P910a handles incoming calls
during an ongoing call.
•
On
– You will be alerted by incoming calls.
•
Off
– The P910a sends a busy tone to the calling party.
Restrict calls
You can set restrictions for calls made from or to your P910a.
You can, for example, protect it from being used for long-
distance calls.
To restrict incoming calls
1. Select the
Incoming
tab.
2. Set restrictions for:
– All incoming calls.
– Incoming calls when roaming. Use this to avoid costs for
incoming calls when travelling abroad.
To restrict outgoing calls
1. Select the
Outgoing
tab.
2. Set restrictions for:
– All outgoing calls.
– Outgoing international calls.
– Outgoing international calls except to your home country.
Voicemail
For easy voicemail access, enter the number of your voicemail
box.
With the flip closed, press and hold to call this number.
With the flip open, select
Phone > Call voice mail
.
Note It is possible to include DTMF tones in the number. Insert
a
p
before the tones.
Calling cards
Calling cards are used together with some phone services, which
means that calls are set up via a calling card server. These
settings specify how P910a handles calling cards. Most Calling
card settings are protected by the Device lock, see ‘Device lock’
on page 37.
–
Calling card mode
– Select how to use the selected calling
card.
–
Calling cards
– A list of your calling cards.
–
Selected card
– Select which of your calling cards you
want to use.
Please consult your calling card supplier for more details.
To create a new calling card
Select
New
and enter the account information.
56 Phone
Preliminary Layla850 P1B
•
Access
tab:
–
Name
– Enter a name for the calling card account.
–
Access number
– Enter the phone number of the calling
card server.
–
Verification code
– Enter the verification code.
–
International prefix
– Enter the international prefix used by
the server.
•
Set up
tab:
–
Sending order
–
Number then code
means that the P910a,
after you have connected to the server, first sends the
phone number you have entered, and then sends the
verification number.
Code then number
means the opposite
order.
–
Delay for number/code
– Set a time delay between the
moment the calling card answers the call and the P910a
starts sending tones.
Some international calling card services instruct their users to
select a language by pressing a digit. When using the P910a
calling card feature, you can insert such a digit in one of these
places:
• Immediately after the access number, but preceded by a
pause sign,
p
.
• In the verification code.
• In the phone number that you dial.
Corporate phone services
You set up corporate phone services by importing a .pbx type
settings file from your corporate IT-manager. This file can be
received via email, stored on the Memory Stick or downloaded
from Internet.
Note Make sure the file is authentic before you import it.
To set up corporate phone services
1. Place the file in the
Document > Unfiled
folder of the P910a or
the Memory Stick.
2. Select
Edit > Preferences > Calling cards
and enter your device
lock code.
3. Tap
Import
.
4. Select the settings pbx file and tap
Import
.
5. Select the card among the imported cards in the
Selected card
control.
6. Activate the card by setting the Calling Card Mode to either
Always use calling card
or
Prompt before call
.
Incoming call behaviour
When you answer a call when the flip is open the default
behaviour is for the P910a to switch to the phone program.
Select the check box if you prefer to stay in the ongoing
program when you answer a call with the flip open.

Phone 57
Preliminary Layla850 P1B
GPRS Alert
If you make a new telephone call you can interrupt an ongoing
GPRS session, for example, an incoming email. Select the check
box to get a warning in such a case.
TTY Accessory
Select the check box when you want to use the P910a together
with a TTY accessory. Teletype (TTY) accessory, text phone, is
an aid for deaf and speech-impaired people.
AoC - Call meter settings
Advice of Charge allows you to keep track of the cost of calls
and to stop the P910a from making chargeable calls when a
certain credit limit has been exceeded. The Advice of Charge
option only appears in the list if it is supported by your current
subscription.
If the credit is limited, a
Low credit
warning is displayed, when
there is approximately thirty seconds of credit left. When the
credit runs out,
Credit expired
is displayed and ongoing,
chargeable calls are stopped.
Please refer to the Help system for detailed information about
the Call meter settings.
Note PIN2 is required from your network operator for storing
any changes you make to the Call meter settings.
Not all networks provide charging information to the phone
during a call. If your network provides this service and your
subscription is for Advice of Charge Charging, you cannot make
or receive any chargeable calls if you are roaming in a network
that does not provide charging information.
ALS settings (subscription dependent)
Use Alternate Line Service to make calls on two lines with
separate phone numbers. Some of the phone settings are used on
a per line basis. In most cases, the settings displayed apply to the
selected line. This is then indicated in the dialog title bar. In
other cases, the lines correspond to separate settings or tabs in
the dialogs.
To set the line tags
1. Select the
ALS settings
dialog.
2. Edit the names for line 1 and 2.
3. Tap
Done
.
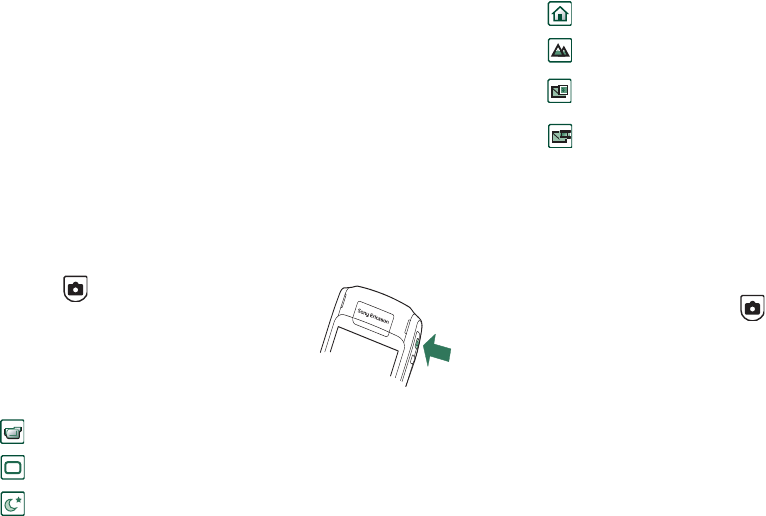
58 CommuniCorder
Preliminary Layla850 P1B
MEDIA
CommuniCorder
With the built-in CommuniCorder camera you can record video
clips and take pictures, view them on your phone screen and
send them directly to friends or colleagues via multimedia
messaging. You can also send the video clips and pictures you
have saved in your P910a via messaging, infrared
communication or Bluetooth wireless technology to, for
example, a PC. It is also possible to exchange video clips and
pictures between the P910a and the Web.
The pictures in your P910a can be set as background, wallpaper,
or they can be added to the contacts in your phone book. See
‘Personalizing your P910a’ on page 142 to find out more about
using pictures.
A button on the camera activates the
CommuniCorder application and acts as the
shutter release when taking pictures.
The Jog Dial is used to set the
CommuniCorder working mode:
Recording video clips
You can record a video clip with the flip open as well as closed.
To record a video clip
1. Press the camera button to activate the CommuniCorder
application.
2. Rotate, if required, the Jog Dial to the Video mode or
Message video if the video clip is to be sent in an MMS.
3. Press again to start recording. The status indicator flashes red
during the recording.
4. Press the Jog Dial to stop recording. The video clip is
automatically saved in
Video
.
Video camera Video Automatic setting
Still camera Auto Automatic setting
Still camera Night Set for dark environment
Still camera Indoor Set for indoor light
Still camera Outdoor Set for outdoor light
Still camera Message
picture
Set for picture size 160x120
pixels
Video camera Message
video
Set for video clips to be
appended to messages
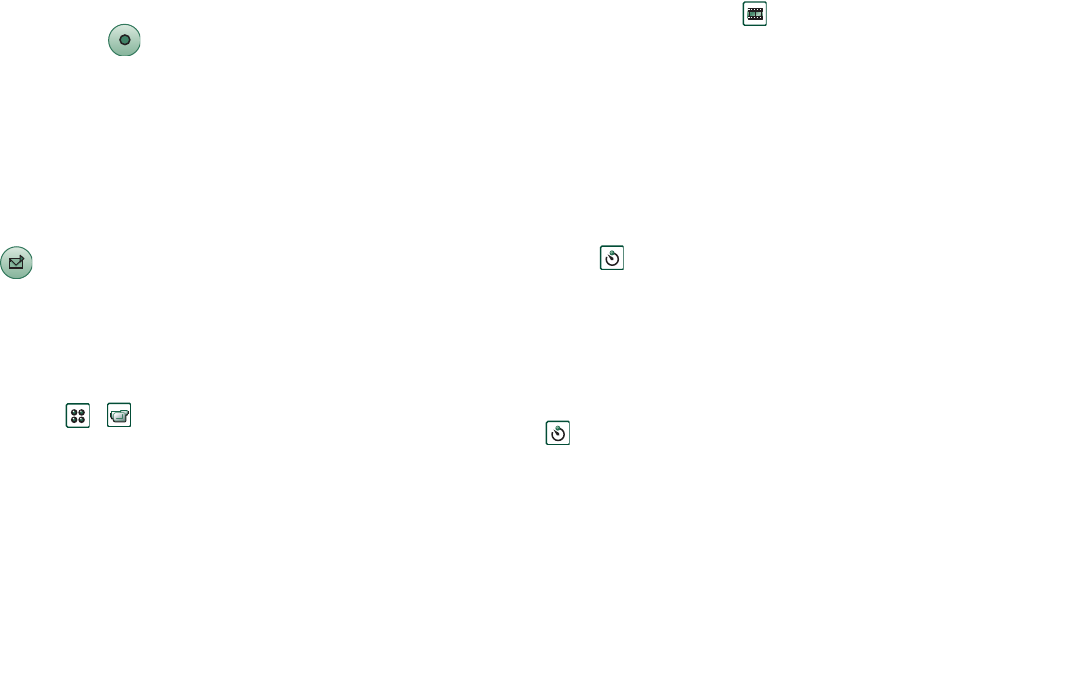
CommuniCorder 59
Preliminary Layla850 P1B
You can also press the Jog Dial, or, when the flip is open, tap the
capture button at the bottom of the screen to record a
video clip.
By default the video clips you record are stored internally in the
Unfiled
folder. Tap the folder menu to the right in the menu bar to
change the storage location to another location, for example, on
a Memory Stick. See ‘Folders’ on page 27 for more information
on using folders.
To send a video clip you have just recorded in flip closed, select
Send as MMS
from the flip closed context menu. In flip open, tap
.
Note Most operators only accept video clips of 10 seconds
length or 95 KB size.Use the Message video mode, or the Video
limit setting in Video mode to limit the file size.
Open the flip to access the full range of CommuniCorder
settings. With the flip open, the CommuniCorder is activated by
selecting
>
.
To delete the last video clip
1. Select
CommuniCorder > Delete clip
.
2. Confirm the delete operation.
To delete a video clip you have just recorded in flip closed,
select
Delete clip
from the flip closed context menu.
To manage video clips, tap to go directly to
Video
. See
‘Video’ on page 67 for more information.
Delay timer
CommuniCorder has a delay timer with a delay of 1-25 seconds.
The delay time is the time between the moment you activate the
shutter release and the moment when the recording starts.
To set the delay time
1. Tap
CommuniCorder > Preferences.
2. Tap and set the desired delay time
To record video with delay timer
1. Tap
CommuniCorder > Delay timer.
2. Press the camera button. The timer beeps for the set time and
a timer icon is shown before the recording is started.
When the delay timer is set, you will see the timer status icon
.
3. Tap
CommuniCorder > Delay timer
to deactivate the timer.
Video status
Above the viewfinder, you will find the video status. Icons show
whether the CommuniCorder is ready or busy, video quality, and
audio quality. A number indicates how much time you have left.
The calculation is based on the current settings plus available
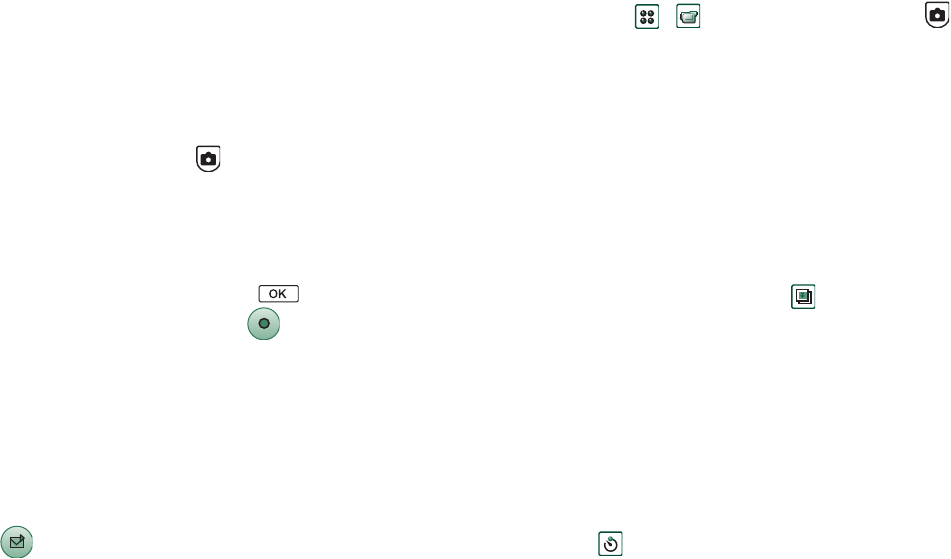
60 CommuniCorder
Preliminary Layla850 P1B
space on the storage location you have selected (internal or the
Memory Stick).
Taking pictures
You can take a picture with the flip open as well as closed.
To take a picture
1. Press the camera button to activate the CommuniCorder
application.
2. Rotate, if required, the Jog Dial to the desired mode.
3. Press again to capture the image on the screen. The picture is
automatically saved in
Pictures
.
You can also press the Jog Dial, the button, or when the
flip is open, tap the capture button at the bottom of the
screen to take a picture.
By default the pictures you take are stored internally in the
Unfiled
folder. Tap the folder menu to the right in the menu bar to
change the storage location to another location, for example, on
a Memory Stick. See ‘Folders’ on page 27 for more information
on using folders.
To send a picture you have just taken in flip closed, select
Send
as MMS
from the flip closed context menu. In flip open, tap
.
Open the flip to access the full range of CommuniCorder
settings. With the flip open, you activate the CommuniCorder
by selecting
>
or pressing the camera button .
To view the last picture
1. Select
CommuniCorder > View picture
.
2. Select
Done
to return.
To delete the last picture
1. Select
CommuniCorder > Delete picture
.
2. Select
Delete
to delete the picture.
To delete a picture you have just taken in flip closed, select
Delete picture
from the flip closed context menu.
To manage or edit the picture, tap to go directly to
Pictures
.
See also ‘Pictures and Image editor’ on page 63.
Delay timer
CommuniCorder has a delay timer with a delay of 1-25 seconds.
The delay time is the time between the moment you activate the
shutter release and the moment when the picture is taken.
To set the delay time and the picture freeze time
1. Tap
CommuniCorder > Preferences.
2. Tap and set the desired delay time.
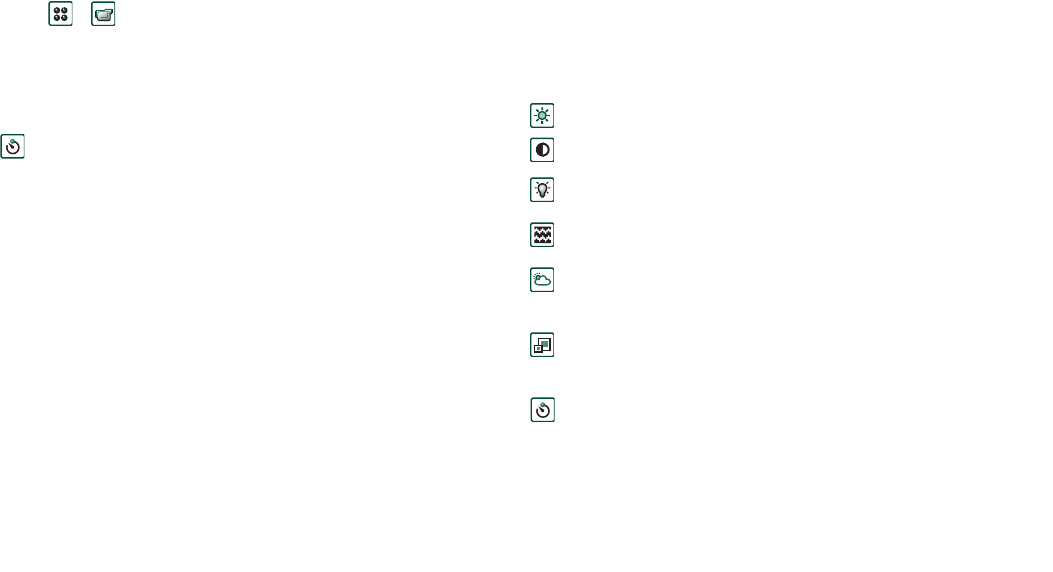
CommuniCorder 61
Preliminary Layla850 P1B
In this dialog box you can also set the picture freeze time. This
specifies the time the picture stays unchanged in the screen after
you have taken it.
To take a picture with delay timer
1. Select
>
.
2. Tap
CommuniCorder > Delay timer.
3. Press the camera button. The timer beeps for the set time and
a timer icon is shown before the picture is taken.
When the delay timer is set, you will see the timer status icon
.
4. Tap
CommuniCorder > Delay timer
to deactivate the timer.
Image status
Above the viewfinder, you will find the image status. Icons
show whether the CommuniCorder is ready or busy, delay timer
status, picture size and picture quality. A number indicates how
many pictures you have left. The calculation is based on the
current settings plus available space on the storage location you
have selected (internal or the Memory Stick).
Camera settings
You may want to change some of these settings if, for example
you are taking a picture in daylight or in dark surroundings. You
can also choose what resolution, size and quality, you want for
the pictures you take.
Note Depending on which mode you are using, some settings
may be fixed (and not user adjustable).
To change preferences for the camera
1. Tap
CommuniCorder
> Preferences
.
2. Select the setting you want to change:
The icons in the upper right corner of the main view reflect the
quality and size settings of the pictures and video clips and also
the sound quality of video clips.
Move the slider to change the brightness of the picture.
Move the slider to change the contrast.
Turn the backlight On when the light behind the subject is
brighter than the light in front of the subject.
Turn the flicker free function On to reduce the effects of
flicker from, for example, fluorescent light.
Choose white balance according to the lighting conditions
you are in when taking the picture.
For pictures, choose quality and size. The picture sizes,
640x480, 320x240 and 160x120, are displayed in pixels.
For video, choose quality for video and audio.
Larger size and higher quality use more memory.
Choose delay time and freeze time for the still camera, and
delay time and Video limit for video.
62 CommuniCorder
Preliminary Layla850 P1B
To restore default CommuniCorder preferences
1. Tap
CommuniCorder
>
Preferences
.
2. Tap
Default
.
3. Tap
Yes
.
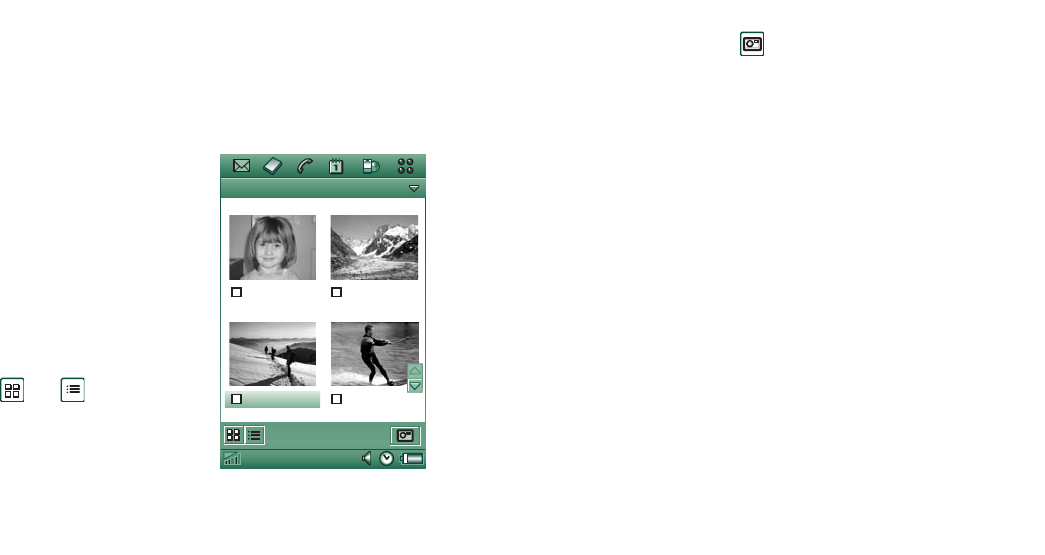
Pictures and Image editor 63
Preliminary Layla850 P1B
Pictures and Image editor
In Pictures you can manage all pictures saved in your P910a.
The pictures can be taken using the CommuniCorder or received
via Messages, Bluetooth wireless technology or infrared
communication. They can also be downloaded via the browser
or transferred from your PC via a cable. Your P910a supports
JPEG, GIF, MBM, PNG, WBMP and BMP picture formats. In
the Image editor you can perform basic editing of JPEG
pictures.
Pictures
You can send the pictures to
others, add them to the contacts
in your phone book, or use one as
a background image (wallpaper)
or screensaver.
Thumbnail and list
views
Tap and to change
between the thumbnail view and
the list view.
The thumbnail view gives an overview of all the pictures in your
P910a while the list view shows a more compact list. At the
bottom of the screen you can see how many pictures you have
saved in the current folder.
Tip To take a new picture, tap to go to the
CommuniCorder
.
Move among the pictures with the arrow buttons or Jog Dial.
You can search for specific pictures and sort your pictures by
name, date, size or type. Tap
Edit
to choose how to sort the
pictures.
Detail view
Tap a picture or select it with the Jog Dial to open it. Specify in
Edit > Preferences
if pictures should open in detail view or full
screen view.
In the detail view, you can rename your pictures and sort them
into folders. This makes it easier for you to keep track of your
pictures. Read more about organizing files in ‘Folders’ on
page 27.
Chat Edit
Pictures Edit All
Brioney Mer de gla...
Mont Blanc Wakeboard
12 pictures (890Kb)
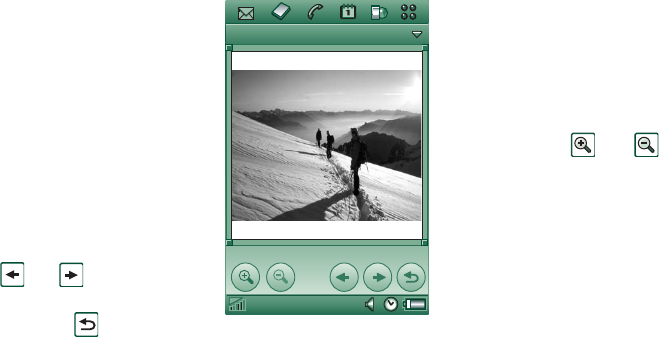
64 Pictures and Image editor
Preliminary Layla850 P1B
To rename a picture
1. Select
Pictures
>
Rename picture
.
2. Enter a picture name
>
Done
.
Note Two or more pictures
cannot have the same name.
At the bottom of the screen you
can see the picture information,
for example, the size of the
picture and the date the picture
was taken.
Use and or the Jog Dial to
move between the pictures in the
current folder. takes you back
to the thumbnail or list view.
Sending and receiving pictures
Select
Pictures > Send as
to send pictures to other phones or to a
PC via multimedia messaging, IR or Bluetooth. See ‘Sending
and receiving items’ on page 30. You can also save pictures that
you have received via email and multimedia messages. See
‘Incoming multimedia messages’ on page 89 and ‘Receiving
attachments’ on page 94.
Pictures in JPEG can also be imported/exported from/to a
memory card.
Note Pictures with Forward lock cannot be sent further.
Zooming pictures, widescreen and full
screen
From the detail view of the picture you can:
• Tap and to zoom in and out.
• Tap and drag the zoomed picture to view specific details in
the picture.
• Tap a picture to display it over the whole screen. Tap it again
to zoom in or zoom out. Press the Jog Dial backwards to
return to the detail view.
• Rotate the Jog Dial to browse the pictures in widescreen
view.
Moving, copying and deleting
From the detail view of the picture you can:
• Select a folder from the folders menu to move the picture to
that folder (internal or on a Memory Stick). See ‘Folders’ on
page 27 for more information.
• Select
Pictures
> Copy to
to copy the picture to another folder
(internal or on a Memory Stick).
• Select
Pictures > Delete picture
to delete it.
• Select
Pictures
> Copy picture
to copy the picture to a clipboard
so that you can paste it into an item in another application.
Chat Edit
Pictures Edit Photos
JPG-0002 10:15am,21/06/04
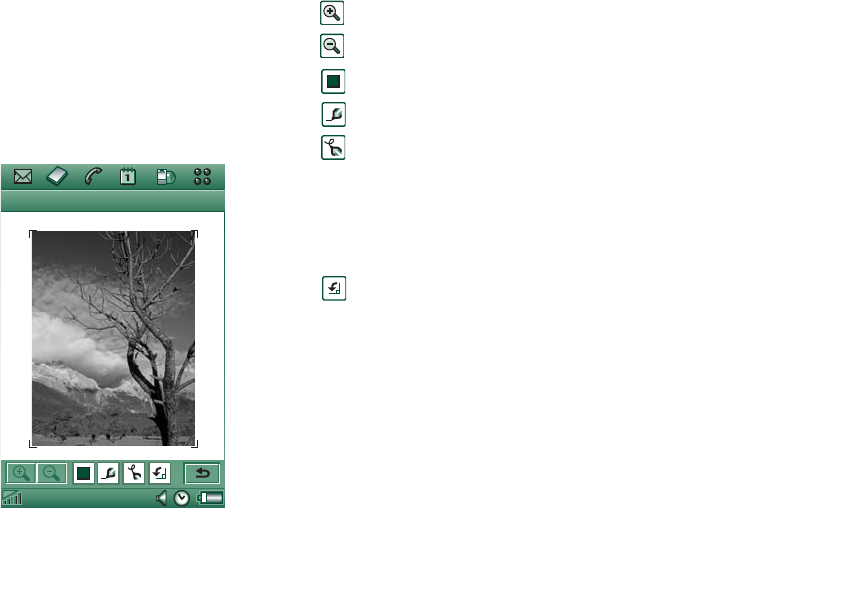
Pictures and Image editor 65
Preliminary Layla850 P1B
To copy, delete or move multiple pictures
• In the thumbnail and list views, select the check boxes beside
the picture names. Then select
Pictures >
the command you
want.
• To copy and delete pictures you can also use the Storage
Manager found in the Control panel. For more information,
refer to ‘Folders’ on page 27.
Image editor
Using the Image editor, you
can edit JPEG images.
You can
• crop and resize the pictures
• rotate them by 90° at a
time
• write and draw on them,
using different colours
To start the Image editor
From a picture opened in
Pictures
, select
Edit > Edit
picture
.
Editing pictures
Editing is controlled from the toolbar below the picture. Tapping
the tool icons will bring up a palette with choices:
You can save the edited image by selecting
Image editor > Done
.
Copy and paste by selecting
Edit > Copy
and
Edit > Paste
. You can
only copy and paste whole pictures.
If you make an error when editing the picture, you can undo the
last change by
Edit > Undo
. You can also undo all actions since
the picture was saved, by selecting
Edit > Undo all
.
To zoom in and out
This is not available in all formats.
Image editor Edit
Zoom in
Zoom out
Select colour Select one of the 16 colours
Select pen Select one of the 4 pen sizes
Select
drawing tool
Select one of the tools:
- Pen for freehand drawing
- Undo last action
- Undo all actions
- Add text
- Crop picture
- Resize picture
Select rotation Select rotation – clockwise or anti-clockwise
66 Pictures and Image editor
Preliminary Layla850 P1B
• Tap to zoom in.
• Tap and drag the zoomed picture to view specific details in
the picture.
• Tap to zoom out.
•Select
Edit > Zoom
, and select between
Fit to screen
and
Full
size
.
To draw on a picture
1. If desired, tap and select the desired colour.
2. If desired, tap and select the desired pen size.
3. Tap and select the pen tool .
4. Draw with the stylus on the picture.
To add text to a picture
1. Tap and select the text tool .
2. Tap the place where the text should be put on the picture.
3. Enter the text in the text field.
4. If required, change the text properties, using the choices on
the text, style and colours tabs.
5. Tap
Done
to place the text on the picture.
• You can move the text on the picture by tapping and dragging
on the text.
• You can return to the text editor by tapping on the text item.
Note As soon as you tap outside the text item, the text is merged
with the picture and cannot be edited or moved.
To crop a picture
1. Tap and select the cropping tool .
A frame with 8 handles is placed around the picture.
2. Tap and drag one of the handles to define how the picture
should be cropped.
3. Tap anywhere, except on the handles, to crop the picture.
To resize a picture
1. Tap and select the resizing tool .
A frame with 4 handles is placed around the picture.
2. Tap and drag one of the handles to define the new size of the
picture.
When you lift the stylus, the picture will be resized.
Sony Image Station
You can exchange pictures between your P910a and Sony Image
Station on the Web. Use the browser in your P910a to go to the
relevant Internet site and sign up:
• For Europe: http://www.sonystyle-imaging.com
• For Japan: http://www.imagestation.jp
• For USA: http://www.imagestation.com
Video 67
Preliminary Layla850 P1B
Video
You can play video content that is recorded with the
CommuniCorder, stored in your P910a or streamed. You can
also play audio-only material which is encapsulated within an
MPEG file or streamed. You can download video clips from an
Internet site or transfer from a PC via a cable, or from a Memory
Stick. You can also exchange video clips with other phones or
PCs via infrared communication, Bluetooth wireless technology
or multimedia messaging.
You do not have to download a complete video clip to be able to
view it. You can use the streaming function and view the video
clip from the Web site where it is located. The video clip is
played with only a short time delay.
The video player supports files in the MPEG-4 file format, for
example name.mp4.
You can store video clips both internally and externally. You can
also copy them between the internal memory and the Memory
Stick. See ‘Folders’ on page 27.
To adjust the volume
Rotate the Jog Dial up to increase the volume, and down to
decrease the volume.
Video clips
A video clip is a short video sequence.
Playing video clips
The Video player opens in the list view. In this view, you get an
overview of all the MPEG-4 video clips in your P910a. You can
search for specific video clips, zoom the video clip names and
sort them by name, date, or size. At the bottom of the screen you
can see how many video clips you have saved in your P910a.
To view a video clip
1. Select
>
Video
.
2. Select a video clip in the list.
Warning! The volume may be uncomfortably loud at the
higher volume levels if the phone is close to your ear, or if you
are using the stereo headset. Exposure to excessive volume
levels may damage hearing.
While a video clip plays, tap the screen to display the video clip
in widescreen. Tap the screen again to go back. Specify the
screen orientation in
Edit > Preferences > Display
.
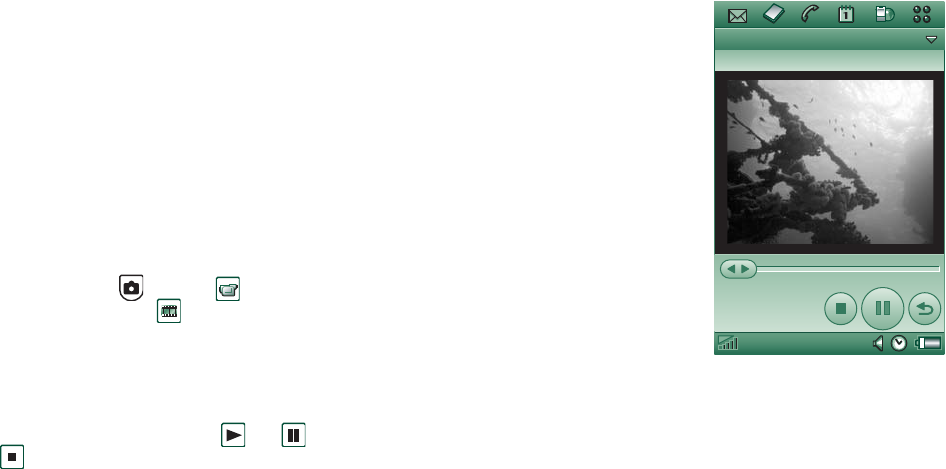
68 Video
Preliminary Layla850 P1B
To copy, delete or move multiple video clips
• In the list view, select the video clips you want to delete,
move or copy, by selecting the check boxes beside the picture
names. Then select
Video >
the command you want.
• To delete you can also use the Storage manager found in the
Control panel. For more information, refer to ‘Folders’ on
page 27.
To sort the video clips
Select
Edit
and choose how you want to sort the video clips in
the current folder.
To record a clip using the CommuniCorder
Press the camera button or select to activate the
CommuniCorder application. takes you back to the list
view.
Managing video clips
The detail view is intended for managing one clip at a time. You
can play and pause the clip by tapping and , and stop by
tapping .
The slider under the video area shows the current play position
within the clip. Tap and drag the slider to move to another
position.
In this view you can send,
rename, delete or move your
video clips. Only the video
clips saved in your P910a or
on the Memory Stick (that is
not streamed) can be
handled in the detail view.
To rename a video clip
1. Select
Video
>
Rename
clip
.
2. Enter a video clip name
>
Done
.
Two or more video clips
cannot have the same
name.
Tip Use the
Folder
function
to organize all your video clips.
To copy the current video clip to another folder, select
Video >
Copy to
, then
select a folder from the list.
To view the video clip information
Select
Video > Info
.
To delete a video clip
1. Select the video clip you want to delete.
Chat Edit
Video Edit Sports
Playing
0:09
Diving in the ocean

Video 69
Preliminary Layla850 P1B
2. Select
Video > Delete clips
.
Saving video clips
When you play video clips that you have received via email or
multimedia messaging, or that you have downloaded to your
P910a from the Web, the viewer detail view is automatically
launched. From the viewer detail view you can then save the
video clip to your P910a.
To save a video clip from another application
1. Select the video clip you want to save.
2. Select
Video > Save clip
.
3. Select the folder you want to save the video clip in
> Save
.
Sending and receiving video clips
You can send and receive video clips using
Video > Send as
. See
‘Sending and receiving items’ on page 30.
Streaming
Streaming is a data transfer method making multimedia
available in real-time. You can, for example, listen to audio and
watch video almost at the same time as it is sent.
The data in the file is divided into small packets that are sent in a
continuous flow, a stream.You can then begin viewing the file
from the beginning as the rest of the packets are sent. The short
delay at the start is to enable a small amount of data to be
buffered.
Your P910a can receive streaming multimedia.
Applications
Streaming applications can be classified into on-demand and
live applications.
Examples of on-demand applications are:
• Streaming of music.
• Streaming of news (video and audio).
• Streaming of movie trailers.
• Streaming and download of video.
• Live streaming of music or video (broadcast).
How to connect to a streaming service
• If you know the URL of the streaming service:
1. Select
Video > Open location
.
2. Enter the URL of the streaming service, or select a service
from the drop-down list.
3. Tap
Done
.
• If you do not know the URL of the streaming service:
70 Video
Preliminary Layla850 P1B
1. Open Internet and browse to the site where the service is.
2. Select the item you want to play, for example a video.
The site server will download part of the video to the P910a
buffer memory. This will take a short while. When the buffer
memory is filled, the Video player will open the detail view,
described above, and play the video seamlessly.
Preferences
When you view a video clip in full screen mode, you can select
the orientation of the picture
To change the orientation of the picture in full screen mode
1. Select
Edit > Preferences
.
2. Select the
Display
tab.
3. Tap
Left-handed
or
Right-handed
orientation
> Done
.
When you view a video clip from a Web site, using the
streaming function, a media buffer is used to provide a steady
flow of data. Increasing the size of the media buffer may
improve the play-back of the video clip.
To change the media buffer size
1. Select
Edit > Preferences
.
2. Select the
Buffering
tab.
3. Select
Custom setting
and move the slider left or right
> Done
.
When you download a video clip to your P910a, it is saved in
the download cache memory. When this memory is full, you
have to empty it to be able to download new video clips to your
P910a.
To clear the download cache
1. Select
Edit > Preferences
.
2. Select the
Buffering
tab.
3. Select
Clear Cache > Done
.
When you view a video clip from a Web site, you may have to
set the proxy settings.
To change the proxy settings
1. Select
Edit > Preferences
.
2. Select the
Proxy
tab.
• If the proxy settings set in the control panel are to be used,
tap
Automatic configuration
.
• If the manual settings are to be used, enter the relevant
information.
Music player 71
Preliminary Layla850 P1B
Music player
Your P910a has mobile music in the form of a stereo music
player. With the music player you can listen to single music
tracks or entire folders with tracks. You can download tracks to
your P910a from a PC, the Internet or Memory Stick, and create
different folders with tracks. Your P910a supports a number of
different sound files, including the popular MP3 format. See
‘Technical data’ on page 196 for more information on supported
file types.
You can store sound files both internally and on the Memory
Stick. You can also copy them between the internal memory and
the Memory Stick. See ‘Folders’ on page 27.
When you receive a phone call while listening, the playback will
be paused. When you end the call, you must navigate back to the
Music application to restart playing.
Tip To listen to more music you can store music on several
Memory Sticks and carry them with you.
Playing sound files
You can play MP3 music both in flip closed and in flip open. In
flip closed, with the Jog Dial, select , select
Music player
, and
select the track you want to play. Press to find other
commands.
If you navigate to the standby screen while you play music, you
can press to pause. Press it again to play.
Press to go back to the standby screen and launch another
application. The music will still play. If this application requires
dedicated audio, the playback will be paused.
If you use the Music player a lot, it can be useful to create flip
closed and flip open shortcuts to it. This way you can quickly
access the Music player when you for example want to adjust
the volume or change track folder. Refer to ‘Application
shortcuts’ on page 145 for more information.
Jog Dial control
Rotate the Jog Dial to select a sound track. Press it inwards to
play. Press it again to stop.
To adjust the volume
Rotate the Jog Dial up to increase the volume, and down to
decrease the volume.
Warning! The volume may be uncomfortably loud at the
higher volume levels if the phone is close to your ear, or if you
are using the stereo headset. Exposure to excessive volume
levels may damage hearing.

72 Music player
Preliminary Layla850 P1B
Track-folder view
This view is intended for
playing entire folders with
MP3 files. In the track-folder
view you can
Play,
Pause,
and
Stop
the
playback of the current folder,
and see the duration of the
track. Selecting a track and
tapping will play the
selected track and all the
following tracks in the folder.
Use the slider to move
forwards and backwards in
the track. Select
Music >
Manage tracks
to move to the
file list view.
Loop and random
With the loop function you can decide if you want to listen to
the tracks in the current folder only once, or if you want to loop
them until you manually stop the play-back. Select the random
function to play the tracks randomly.
To loop a list
Select
Music > Loop
.
To play a list randomly
Select
Music > Random
.
Managing sound files
File list view
In the file list view you can
see how many tracks you
have in the current folder.
Tapping a file name will open
the detail view, and allow you
to play and manage that file.
To copy, delete or move
multiple files, select the files
you want to delete, move or
copy, by selecting the check
boxes beside the file names.
Then select
Music >
the
command you want.
To delete you can also use the
Storage manager found in the
Control panel. For more information, refer to ‘Folders’ on
page 27.
Tap to move directly to the track-folder view.
Music Edit All
Sony Ericsson
0:00/3:35
Aeroplane
Beautiful Night
Rooster
Song for you
Sony Ericsson theme
Standing Still
Music Edit All
Aeroplane
Beautiful Night
Rooster
Song for you
Sony Ericsson theme
Standing Still
Stuck with You...
Walk on
8 tracks (6806 KB)
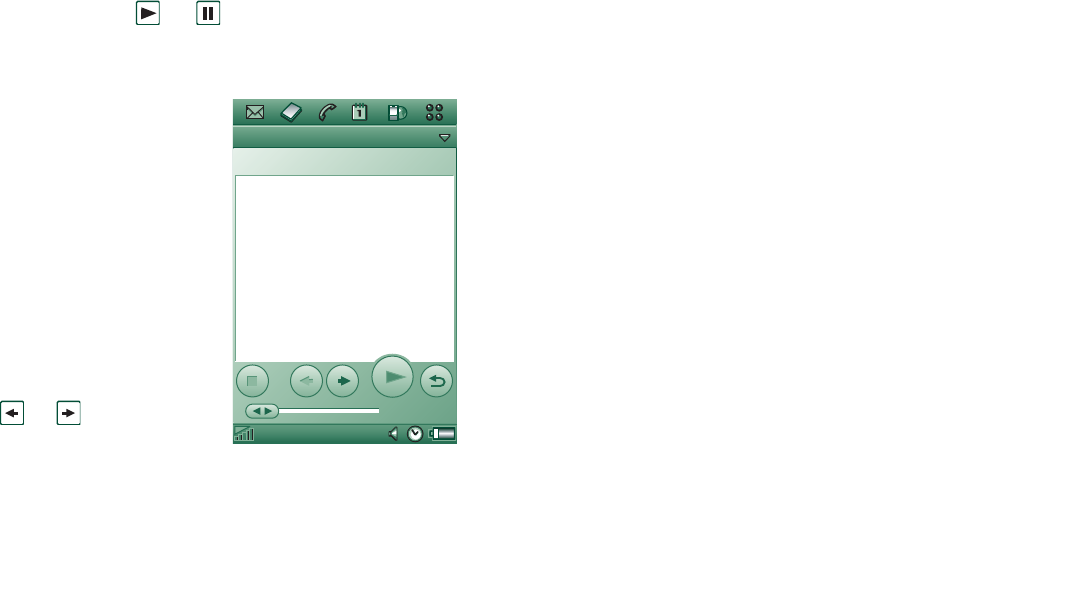
Music player 73
Preliminary Layla850 P1B
Detail view
The detail view is intended for managing one file at a time. Tap
a file name to open the detail view. You can also play and pause
the file by tapping and .
In the detail view you can move tracks between your different
folders using the folder function, or rename or delete them.
The detail view displays the
name of the track, the artist’s
name, the album title, the
track number, the copyright
year, the sound file type and
the duration of the track.
Note The amount of
information displayed
depends on how much
information is available on
the sound file.
Move between the tracks in
the current folder using the
and buttons.
To rename a track
1. Select
Music > Rename track
.
2. Enter a track name and tap
Done
.
Two or more tracks cannot have the same name.
To delete a track from the P910a
1. Select
Music > Delete track
.
2. Select
Yes
.
Viewer
If you play sound tracks remotely, for example music on an
Internet site, a view similar to the detail view displays. The
commands you find in this view are similar to those in the Detail
view.
Managing track folders
In the track-folder view, the Music player plays the MP3 files of
the selected folder. (With one exception, the
All
folder. If you
select this folder, all MP3 files in all music folders will be
played.) Using the folder function you can create new folders
for sound tracks. You can create folders on the Memory Stick.
You can also use several Memory Sticks for your music, for
example.
In any Music player view, you can create a new folder using the
Edit Folders
command in the folder menu. Then you move or
copy your sound files to the new folder. You can add more
folders with sounds as long as there is memory available. You
can also sort the files using commands in the
Edit
menu.
Music Edit Unfiled
Artist:
Album:
Filename:
Date and Size:
Duration:
0:00
Aeroplane
Aeroplane
6:02pm, 21/06/04 2107KB
3:35
74 Music player
Preliminary Layla850 P1B
Preferences
You can choose if you want all types of sound files to be
displayed in the file list view, or if you want to display only a
certain type of sound file.
To select sound file types
1. Select
Edit > Preferences
from the file list view.
2. Check the boxes next to the sound files you want to include
in the track folders and tap
Done
.
Saving sound files
When you receive sound files in other applications, such as
email and multimedia messages, you activate the viewer in your
P910a. From the viewer you can then save the sound file
to your P910a.
To save a track from another application
1. Tap the save (floppy disk) icon or select
Music
and tap
Save
.
2. Select the folder you want to save the track in and tap
Save
.
Sending and receiving sound files
You can send and receive sound files using
Send as
. See
‘Sending and receiving items’ on page 30.
Note You can send WAV and AMR sound files in multimedia
messages, and MP3 and AU sound files as attachments to
multimedia messages.
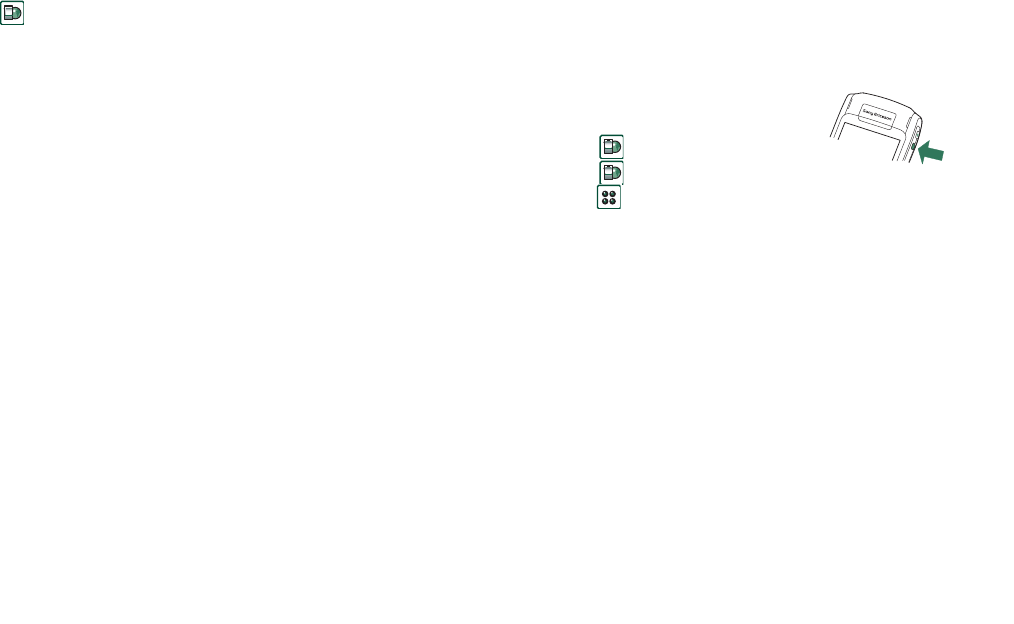
Internet 75
Preliminary Layla850 P1B
Internet
You use
Internet
, the P910a browser, to:
• Connect to the Internet to view and access Web and WAP
pages.
• Receive and view Push messages from your WAP service
provider.
• Download Java applications, images and audio.
The browser can open Web pages that use Java script or frames,
but functions that use Java script in the Web page will not work
properly.
You can save bookmarks to viewed pages, to be able to access
them easily. You can also save pages in the P910a for off-line
viewing.
The browser uses folders for categorising information. The
folders used are bookmarks, saved pages, signed documents,
and Push messages.
Push messages is a service that gives you notifications about, for
example, weather forecasts, sport results, and stock quotes. The
notification is sent to you as a message that contains a WAP link
to the site with the information you subscribe to.
Before you can use Internet, you need to set up an Internet
account in the
Control panel
. If you intend to use certain WAP
services it might be necessary to set up a WAP account in the
Control panel
as well. See ‘Getting started with Internet and
Messages’ on page 170.
To start the browser Start the browser by:
– pressing the Internet button.
– selecting in the application picker.
– selecting in the application
launcher .
– selecting a URL in another application.
Note If required, you have to enter your username and
password to log in to your Internet account.
While opening a page, the P910a might not receive incoming
calls. However, when the page is properly opened you can
receive a call and the page will still be open.
The application has two views:
Browser view The base view of the application, where you can
view Web and WAP pages.
Bookmarks
view
A list view where you can save shortcuts:
• to Web and WAP sites on the Internet
• to locally stored pages
• to documents digitally signed by you.
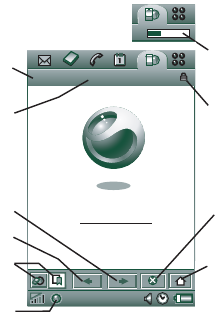
76 Internet
Preliminary Layla850 P1B
Using the browser view
The P910a can display the
Internet page in normal view
or full screen view. Use the
Internet button to change
between the views. In full
screen view, press the Jog Dial
forwards to display a menu
with the most frequently used
commands.
Browser view options
• Internet menu
–
Open page
– Enter the URL, or select from the drop-down
list.
–
Add to bookmarks
– Enter the name of the bookmark and
select the folder to save it in.
–
Save page
– Enter the name of the page and select the
folder to save it in.
–
Send as
– Send the current URL via text or multimedia
message, email, Infrared, or Bluetooth wireless
technology.
–
Find
– Enter text and search for the text in the page.
–
Find next
– Search for the next occurrence of the search
text.
–
Scan text
– Go to the area with the greatest amount of text.
–
Back
– Move bact to the previously viewed page.
–
Reload page
– Reload the page.
–
Load all images
– Load all images of the page.
–
Page information
– Show the page information.
–
Bookmarks
– Open the bookmark view.
•Edit menu
–
Cut
– Cut out the marked information from an input field.
–
Copy
– Copy the marked information.
–
Copy all
– Copy all information on the page.
–
Paste
– Paste the copied text into the selected field.
–
Full screen
– Expand the browser view.
–
Narrow layout
– Adjust web page to screen witdh.
AInternet menu.
BEdit menu.
CGo to the next page.
DGo to the previous page.
EShift between the browser view and the bookmarks view.
FDisconnect or get information about the connection.
GGo to the home page.
HStop loading the page.
JA secure connection is established.
KProgress bar, shows the loading progress.
0:03
Chat Edit
Internet Edit
A
H
J
G
B
C
D
E
F
K
Sony Ericsson

Internet 77
Preliminary Layla850 P1B
–
Zoom
– Select zoom level: Small, Medium or Large.
–
Preferences
– Set the preferences of the browser.
–
Help
– View help on Internet.
• Internet button
–
Full screen
– When you have opened an Internet page,
press the Internet button to display the page in full screen.
–
Normal browser view
– Press the Internet button again to go
back.
•
Handles on the screen
– Use the handles on the screen to scroll:
–
Scroll up and down
– Tap the handle to the right of the
screen and drag it up or down.
–
Scroll left and right
– Tap the handle at the bottom of the
screen and drag it to the left or to the right.
•Jog Dial
–
One hand navigation
– In an open page, rotate the Jog Dial
slowly to go to next link. Press the Jog Dial inwards to
select the link.
–
Scroll up and down
– In an open page, rotate the Jog Dial
fast to scroll up and down.
–
Scan text function
– Press the Jog Dial inwards (when no
link is selected) to scan the page for text. The screen will
navigate to the area with the greatest amount of text.
Repeat the operation to find the next greatest area of text
–
Short forwards
– In Normal view, change between the
Internet and the Edit menus. In full screen view, show a
menu with the most frequently used commands.
Context-sensitive menus
The context-sensitive menu is opened when you keep the stylus
pressed on a link or a picture.
• Text link and picture link
–
Open link
– Open the active link.
–
Link information
– Show information on the link.
–
Add to bookmarks
– Add the active link URL to the
bookmark list.
• Loaded picture (with or without link)
–
Save image
– Save the picture in the P910a.
–
Copy image
– Copy the picture to the clipboard.
–
View image
– View the picture adapted to the screen
(enlarged or reduced).
–
Send image as
– Send the picture as text or multimedia
message, email, infrared, or Bluetooth wireless
technology.
• Not loaded picture (with or without link)
–
Load image
– Load the picture.
• Voice call link
–
Call
– Place a call according to the link.
–
New SMS
– Send an SMS message according to the link.
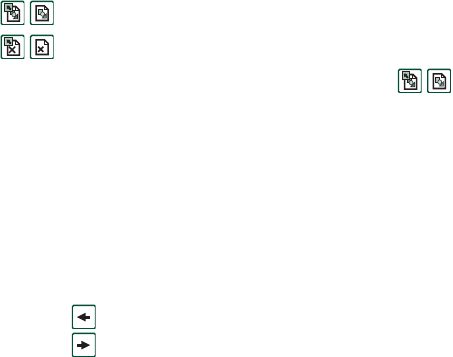
78 Internet
Preliminary Layla850 P1B
–
New MMS
– Send an MMS message according to the link.
–
New contact
– Create a contact with the link information.
• Mail to link
–
New email
– Send an email according to the link.
–
New MMS
– Send an MMS message according to the link.
–
New contact
– Create a contact with the link information.
Icons within a page
Picture not loaded (can be loaded manually).
Damaged picture (not possible to load).
Note If images are not loaded, select the picture icons
or select
Internet > Load all images.
To open a specific Web page
1. Select
Internet > Open page.
2. Enter the page URL or select a previously viewed page from
the drop-down list.
3. Select
Open.
To navigate through recently opened pages
1. Select to move back to previously viewed pages.
2. Select to move forwards again.
To save a page for off-line browsing
1. Select
Internet > Save page
.
2. Change the page name, if required, and select a folder to save
it in.
3. Select
Done.
To create a bookmark to the open page
1. Select
Internet > Add to bookmarks.
2. Change the bookmark name, if required, and select a folder
to save it in.
3. Select
Done.
To download and upload files, for example, applications
• When you select a link to a downloadable file, for example,
applications, images and so on, information on the file is
displayed.
Select
Yes
to start the download.
• When you select a link for uploading a file, a form for
submitting the file is displayed.
Select the file and select
Yes
to start the upload.
To view information on the open page
1. Select
Internet > Page information
.
2. Select the
Content
tab to view the page information.
3. Select the
Connection
tab to view information on the
connection.
4. Select the Certificates button to view the information on:
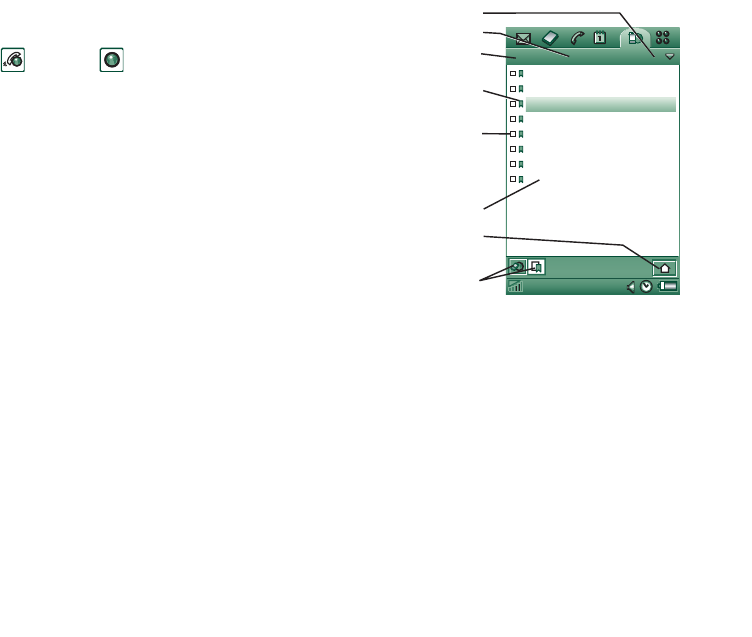
Internet 79
Preliminary Layla850 P1B
– Server
–User
To disconnect from the Internet
1. Select the connection icon (HSCSD/CSD or GPRS )
in the status bar.
2. Select
Disconnect
from the pop-up menu
3. The dialog
Do you want to disconnect, Yes/No
appears.
4. Select
Yes
.
WIM Access
When the browser requires access to the WIM card, for
example, when establishing a secure connection, you have to
enter the correct PIN. For more information, please contact your
service provider or IT department.
Signing documents
You have to enter the signing PIN each time a signing operation
is going to be performed.
User authentication request
Whenever a user authentication is requested, you have the
possibility to either select a certificate and confirm the user
authentication, to select to continue anonymously or to cancel
the connection.
If
Connect anonymously
has been set, the browser will instead
automatically try to connect anonymously.
Using the bookmark view
Bookmark view options
• Internet menu
–
Open page
– Enter the URL, or select from the drop-down
list.
–
New bookmark
– Enter the URL, the name of the bookmark
and select the folder to save it in.
–
Delete
– Delete the selected bookmark.
•Edit menu
–
Edit
– Edit the selected bookmark.
AFolder menu.
BEdit menu.
CInternet menu.
DSelect an icon to view
information on the bookmark.
EChecked bookmarks can be
deleted from the Internet
menu.
FSelect the bookmark text to
open the page.
GSelect to go to the home page.
HShift between browser and
bookmarks views.
Chat Edit
Internet Edit All
Search Internet
My home page
News
Webmail
Project home
711 time table
CSS fonts
C
B
D
E
F
H
A
G
SonyEricsson

80 Internet
Preliminary Layla850 P1B
–
Sort by date / name
– Sort the entries. (Available for Push
messages and Signed documents only.)
–
Zoom
– Select zoom level: Small, Medium or Large.
–
Preferences
– Set the preferences of the browser.
–
Help
– Open the help for Internet.
• Folders menu
–
All
– Show all contacts in the list.
–
Bookmarks
– Show all bookmarks.
–
Saved pages
– Show all saved pages.
–
Unfiled
– Show the bookmarks that are not in a folder.
–
Edit folders
– Categorise your contacts in folders (business,
personal and so on).
The contents in the Folders menu can change depending on the
pages and bookmarks stored in the P910a.
Icons
Bookmark
Saved page
Push message from the WAP service provider
Signed document
To open a bookmark
1. Select the bookmark text.
2. The bookmarked item is opened.
To view bookmark information
1. Select the check box of the preferred bookmark.
2. Select
Edit > Edit
.
Information on the bookmark is shown. From the
information screen you can:
– Edit the bookmark.
– Delete the bookmark.
– Send the bookmark as an email, SMS message, Bluetooth
wireless technology, infrared, or MMS message.
To delete several bookmarks
1. Select the check box of the bookmarks to delete.
2. Select
Internet > Delete.
3. Select
Yes
to confirm.
Preferences
The browser is initially set up to work, but you have to set up
your own account. A simple way of setting up an Internet
account is to use the Web phone setup-message generator on
www.SonyEricsson.com. See also ‘Internet accounts’ on
page 153 for more information.
The easiest way to set up Internet and WAP accounts is to ask
your Internet service provider to send you an auto setup message

Internet 81
Preliminary Layla850 P1B
containing the required setup information. The accounts will
then be set up automatically on your P910a. To guarantee the
integrity of the settings, a PIN may be used.
For security reasons, some WAP pages and services, for
example on-line banking, can only be accessed from a particular
WAP account. See ‘WAP accounts’ on page 163 for more
information.
Note Proxy settings for MMS messages, and for a WAP gateway
should be set in the WAP accounts. Other proxy settings should
be set in the Internet accounts.
To set up the browser
1. Select
Edit > Preferences
.
2. Perform the setup according to the following:
Basic settings
– Enter the URL for the page to be shown when the browser
is started from the Internet button; either a page stored in
the P910a or a page on the Internet.
– Select the WAP account to be used when the home page is
loaded. The accounts are set up in the control panel.
– Select if a new page should be displayed over the whole
screen.
– Select if you want to use a vertical scroll bar to scroll the
pages up and down. Otherwise you can use the Jog Dial.
– Select if images should be loaded. If images are not
loaded, the page will be loaded faster. Non-loaded images
can be loaded manually when viewing the page.
– Select if sounds should be played when the page is
opened.
– Select if animations should be played when the page is
opened.
Security settings
– Select if you want to save signed documents.
– Select if you want to connect without giving away your
identity.
– Select if you want to connect using the WIM card.
– Select if you want to allow cookies.
Advanced settings
– Select if you want to be able to receive messages from
your WAP service provider.
– Select if you want to automatically open the URL in WAP
Push messages.
– Select if you want to remove out-of-date messages
automatically.
– Select a sound that notifies you when a Push message
arrives.
82 Internet
Preliminary Layla850 P1B
– Set the size of the cache memory. The cache is the part of
the memory where viewed pages are stored. Stored pages
will load faster when you visit them again.
–Select
Clear history
to empty the list of pages visited and
cookies stored.
–Select
Clear cache
to empty the cache memory.

Games 83
Preliminary Layla850 P1B
Games
There are two pre-installed games in your P910a. Traditional
Chess and the card game Solitaire.
More games are available on the
Multimedia for P910a
CD in your
original P910a box. You can also install games from other
developers, see ‘Installing applications’ on page 130.
Chess
You can play Chess against the P910a, or against another P910a
user via SMS.
Please read the help texts for detailed information on how to set
up and play Chess.
To start a new game
1. Select
Chess > New game
to initiate a game.
2. Enter details as desired in the
New game
dialog. You can
return to these details later.
–
Name
– Give the game a name so you can return to it later
if you have to interrupt it.
–
Notes
– Write a note about the game.
–
You play
– Choose to play white or black.
–
Against
– Select the level of your opponent.
–
Played
– Select if you want to play locally against your
P910a or against another P910a user.
3. Tap
Play
to start the game.
To play Chess
1. Select the piece you want to move.
The square where it is standing will now be marked with a
triangle.
2. Select the square to which you want to move the piece and
the piece will move to it.
Closing the flip closes the game temporarily and saves the
session status. Your opponent will be sent an end-of-game text
message.
Solitaire
Solitaire is a card game played with a standard deck of 52 cards
and up to 4 Jokers.
The purpose of Solitaire is to remove all the cards from the piles
to the layout card while scoring as many points as possible.
84 Games
Preliminary Layla850 P1B
Points are awarded for playing pile cards and bonus points are
awarded for unbroken, ascending or descending runs of four or
more rank cards.
When you cannot play any more cards and cards still remain in
the piles, the game is over. If all the pile cards are removed,
bonus points are awarded and the hand is won. You are then
challenged to play a Higher/Lower game to acquire more bonus
points. After the challenge, the game continues and a new hand
is dealt with one less Joker.
Rules
When the game starts, 35 cards are dealt from the deck into
7 piles of 5 cards. A further card is then dealt face up from the
layout card.
• Cards can only be played from the bottom of the piles.
• To play a pile card it must have a face value of one more or
one less than the layout card.
• Aces are low and may not be played onto kings. Jokers can
be played onto any card and any card can be played onto a
joker.
Play Solitaire
Solitaire is only available with the flip open.
1. Select the icon for Solitaire.
The game will either start with a new game or with the layout
for an earlier, interrupted game. (the game data is saved on
return to desktop, when the flip is closed or when the battery
is low).
2. Select the card you want to move and it will be higlighted.
3. Select the card to which you would like to move the
higlighted card.
To restart the game during a game
Select Solitaire > New game.
To undo/redo a move
Select Edit > Undo move / Redo move.
Messages 85
Preliminary Layla850 P1B
BUSINESS
Messages
With
Messages
you can create, send, and receive different
types of messages:
You also use
Messages
to receive:
• Area Information messages.These are text messages
broadcast to all subscribers in a network area, for example
local road reports or local taxi phone numbers. (Area
Information services are not available from all operators).
• BIO (Bearer Independent Object) messages. There are
different types of messages:
– Setup (email, Internet, WAP accounts).
– Email notifications.
– Files for exchanging electronic business cards (vCard)
and calendar information (vCal).
• Auto setup files for OTA (Over The Air) configuration.
• Beamed messages. These are files received via infrared or
Bluetooth wireless technology.
The different types of messages are handled by separate
messaging accounts. Select
Control panel > Connections >
Messaging accounts
to see the details of the messaging accounts
on your P910a.
You can have any number of email accounts - a typical
configuration will be one business and one personal account.
When you set up a synchronization with your PC, an account for
synchronized email is automatically created on your P910a.
With the flip closed, text and multimedia messages can be sent
and received using the Jog Dial and the keypad. More advanced
tasks are, however, best handled with the flip open.
Before using Messages
Before you can send and receive any messages (except for SMS)
you need to set up the necessary accounts.
SMS (Short Message Service) messages are text
messages sent and received via the network operator's
message centre. When a text message has pictures,
sounds, melodies and animations inserted, it becomes
an EMS (Enhanced Message Service).
MMS (Multimedia Message Service) messages.
A multimedia message can contain text, graphics,
animations, photographic images, audio clips and ring
melodies.
Email messages. Your P910a mail client supports POP3
and IMAP4 mail servers, MIME attachments and
SMTP for sending mail.

86 Messages
Preliminary Layla850 P1B
A simple way of setting up an Internet, email, or MMS account
is to ask your service provider to send you a message that
contains the required information to create an account
automatically on your P910a. You can also use the Web phone
setup-message generator on www.SonyEricsson.com. Received
auto-setup messages are stored in the
Auto setup
inbox.
See ‘Getting started with Internet and Messages’ on page 170.
Folders in Messages
Messaging accounts can have the following folders:
Inbox
,
Outbox
,
Draft
,
Sent
, and folders you can create yourself, local
folders. You can also subscribe to folders based on a server
(remote folders), if you have selected
IMAP
for your email
account.
Inbox
Inbox contains received messages. You can reply to, forward,
and delete messages, but not edit them.
Outbox
Outbox contains messages that are ready to be sent. If you are
creating several messages, and not using GPRS, you can reduce
connection time by saving them to
Outbox
and then connect and
send them all at the same time.
To save an email message to Outbox
1. After composing your message, select
Send.
2. Select
Save to outbox.
Messages that you send from an email synchronization account
are always saved to
Outbox
and sent from your PC after your
next synchronization.
Draft
Draft
contains messages that are not ready to be sent.
To store a new message in Draft
Create the message and exit without selecting
Send
.
To move a message from Outbox to Draft
Open the
Outbox
message list, select the message, and select
Message > Move to draft
.
Sent
Sent contains messages you have sent from your P910a.
Tip Regularly delete old messages from your
Sent
folder,
especially those with attachments, to clear storage space.

Messages 87
Preliminary Layla850 P1B
Local folders
To create a new folder
1. From the folder menu, select
Edit folders
.
2. Tap
Add
.
3. Name the folder.
4. Tap
Done
.
Remote folders
If you have selected connection type
IMAP
for your email
account, you can subscribe to remote folders on your email
server. (To select connection type, see “Email account basic tab
settings” on page 159.) By default you subscribe to an
Inbox
folder.
Note If you change connection type, your
Inbox
will be emptied.
Use the
Get&send
command to download your messages again.
See “Get and send” on page 96.
To subscribe to a new remote folder
1. From the folder menu, select
Subscribe
.
2. Select the check box for the folders you wish to subscribe to.
3. Tap
Done
.
The new folders are shown in the folder list. Your subscribed
folders will be shown in a flat structure, that is, subfolders will
be shown on the same level as main folders. Use the
Get&send
command to download messages from the folders you have
subscribed to.
The accounts in Messages
When you open Messages, a list of your accounts appears.
The top items in the list,
Create SMS,
and
Create MMS,
are
shortcuts for directly creating new messages.
An asterisk next to an account indicates that a message has
arrived since you last opened the accounts inbox.
Handling text messages
A text message is sent via SMS (Short Message Service). It can
contain up to 160 characters (70 characters if you use non-Latin
characters). If you create a longer message it will be sent as two
(or more) separate messages (concatenated), but will usually be
received as one message. If you add pictures, sounds and other
items to your message it becomes an EMS message.
Text messages can be sent to one or more people (not more than
thirty, we recommend), and you can request a delivery report
when your text messages have been delivered to the recipients.
The delivery report arrives on your P910a as a text message.
88 Messages
Preliminary Layla850 P1B
If you leave the message before sending it, it will automatically
be stored in the
Draft
folder (unless you edit a message which
was already located in Outbox).
Tip To enter several addresses manually (without using
Contacts) in a text message, multimedia message or in an email:
enter a comma between each address.
To write and send a text message
1. In
Messages
select
Create SMS
.
(You can also select
SMS >
tap
Message > New
.)
2. Enter the recipient’s number or select
To
and select recipient
or recipients from your contact list and select
Done.
3. Write your message.
4. Go to the address tab and specify whether you want a
delivery report or not.
5. Tap
Send.
To add an EMS item to your text message
Use the icons at the bottom of the screen to select the type of
item you wish to add.
• Tap to insert one of the smilies that appear.
• Tap to insert a picture or an animation. The pictures and
animations last used appear.
–Tap
More
to get more pictures and animations to use.
–Tap
New
to draw a picture of your own.
• Tap to insert a sound. The sounds last used appear.
–Tap
More
to get more sounds to use.
• Tap to write bold text.
• Tap to change the size of the text you write.
To format the text in the message using EMS features
1. Highlight the text you want to format.
2. Tap
Edit > Format text.
3. Tap
General
tab to change the
Alignment
and
Font
.
4. Tap
Style
tab to check the character style check boxes: bold,
italic, underline, or strike through.
5. Select
Done
.
You can also use the icons and described above.
To save a received EMS item
1. Tap the item.
2. Select
Edit > Save object
.
Handling multimedia messages
MMS (Multimedia Messaging Service) messages can include
pictures, animations and sound, organized like a slide
presentation with time-based control of the playback.
Composing a multimedia message is like building a small slide
a
a
a
a

Messages 89
Preliminary Layla850 P1B
presentation. A typical page will consist of a picture, some text
and sound. Refer to Technical data, section ‘MMS’ on page 198
for supported file types that you can add.
You can take a picture with the CommuniCorder and send it as a
multimedia message using the
Send as
command from Pictures.
Multimedia messages can be sent to a mobile phone or an email
account.
How a recipient receives an MMS you send depends on your
MMS service and how the receiving phone complies to MMS
specifications. Phones can, for example, only receieve pictures
of a maximum size, video and sound.
Your P910a can help you to create messages which conform to
standard and therefore are more likely to reach recipients. Set
the
Content alert
to warn or restrict you. See “MMS Advanced
settings tabs” on page 162.
Tip To enter several addresses manually (without using
Contacts) in a text message, multimedia message or in an email:
enter a comma between each address.
Incoming multimedia messages
To play a received multimedia message
• Open the MMS inbox and select the new message.
The first time a multimedia message is opened it plays
automatically. The next time you open the message you can
play it by pressing the Play Button (flip open) or by choosing
Play
from the menu (flip closed).
To forward an MMS
1. Open the message.
2. From the
Message
menu, select
Forward
.
3. On the address tab, select
To
and enter the recipient’s
mobile number or email address.
4. Select
Send
.
To store a received MMS item, for example a picture
1. Open the message.
2. Select the picture you want to save.
3. Select
Save picture
or select
Edit > Save picture
.
4. Select the storage location.
5. Select
Save
.
You can store items both internally and externally. You can also
copy them between the internal memory and the Memory Stick.
See ‘Folders’ on page 27.
Creating and sending multimedia messages
You can create multimedia messages in the P910a but you can
also use the MMS editor on the Multimedia for P910a CD.
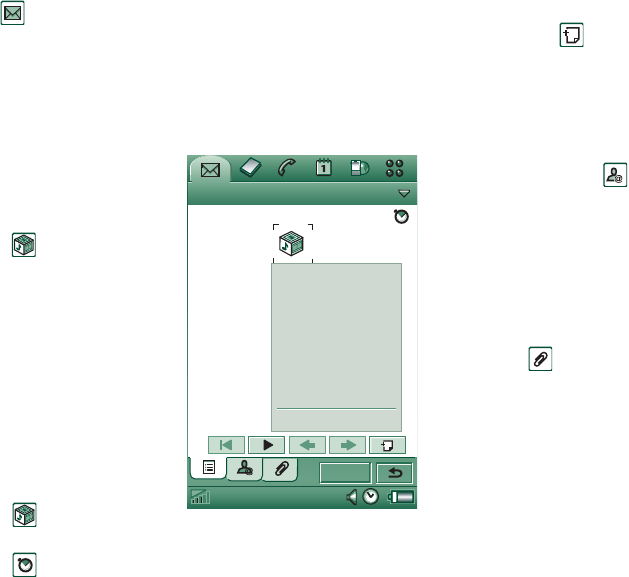
90 Messages
Preliminary Layla850 P1B
To create a new multimedia message
1. In
Messages
select
Create MMS
.
(You can also select
MMS >
Message > New
. or open an existing message and select
Message > New
).
2. From the
Select template
dialog, tap the name of the template
you want and tap
Select
. The
Blank
template will open a blank
message.
3. The first page of the new
message is now displayed.
Select an item from the
menu that appears.
Tap to open the menu
if it does not open
automatically
.
If you
select
Add scribble
the
Image editor presents a
white background onto
which manual graphics
can be added. The Image
Editor includes controls
for pen, crop, colour,
scale, rotate and pen
width.
4. Tap again to add text,
audio or voice to the page. Tap the page to return to it.
5. Tap if you want to change the time this page should be
shown. Default time is 5 seconds.
6. Select
Edit > Background colour
to give the message a
background colour.
7. Tap to add a new page to the multimedia message in
which you can insert items.
8. Select
Edit > Page order
to change the page order in the
message.
To enter the recipient’s phone number
1. Select the address tab.
2. Select
To
and select the recipient from Contacts.
or:
Select the line beside
To
and enter the recipient’s mobile
number or email address.
To insert an attachment
1. While creating your multimedia message, select the
attachment tab, select
Add
.
2. Select the type of attachment you want to add.
3. Select the attachment.
To send the multimedia message
Tap
Send
.
Preferences to a multimedia message
Select
Edit > Preferences
to set the preferences to a multimedia
message. The following settings are available:
Chat Edit
Message Edit Draft
1/1
Send
2
Add picture
Add video
CommuniCorder
Add scribble
Add text
Add sound
Add recording
Paste
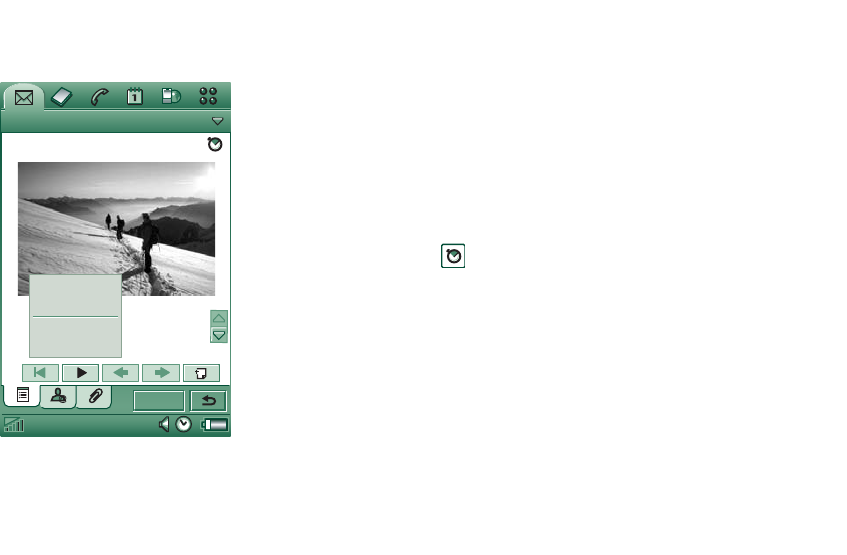
Messages 91
Preliminary Layla850 P1B
•
Hide number
– Prevent your phone number from being
displayed in the recipient’s phone. (Subscription dependent).
•
Read report
– Request a receipt when the recipient has opened
your message.
•
Delivery report
– Request a receipt when the message has been
delivered to the recipient’s phone.
Editing multimedia messages
Here you can see the first
page with an inserted
picture.
To delete, replace or edit an
inserted item
Select the inserted item and
choose an action.
While editing an image you
can add scribble, resize, crop
or rotate your image or add
text. To undo your changes,
select
Edit > Undo
all.
Note If you have accepted
changes by selecting Done,
you will not be able to undo
them.
To edit item time
For each item in a page, it is possible to set the time when the
item appears and for how long it is displayed or played.
1. Select the item so it is highlighted
2. Select
Edit time
3. Set the
Start
, which is the number of seconds before the item
appears after the start of the page. The default is 0, meaning
show or play immediately.
4. The default
Duration
is for the item to continue for the
remaining duration of the page. To change this, un-check
Page time
and change the duration to the required value in
seconds. Start time + duration cannot exceed total page time.
If you have added video or sound and the page time is longer
than the video or sound play time, the video or sound will
only play once (it will not be repeated in leftover page time).
You can also tap , or select
Edit > Page time
to see the time
settings for all items in a page. Tap the time bar to adjust the
time settings for each item.
To add or delete a template
• To make a template from a message, select
Save as template,
give the template a name, and tap
Done
.
• To delete a template, tap the name of the template you want
in the
Select template
dialog and tap
Delete
.
Chat Edit
Message Edit Draft
1/1
Send
5
Edit picture
Edit time
Delete
Copy
10kb

92 Messages
Preliminary Layla850 P1B
To set the download method for receiving multimedia
messages, manual or automatic
•In
Control panel,
select
Connections > Messaging accounts >
MMS > Automatic.
–
Off
means that only headers will be downloaded and can
be viewed.
–
Home only
means the same as for
On
below, but is only
valid in your home country.
–
On
means that the multimedia message is downloaded and
can be read like any other message. There is no
intermediate step.
Handling email
Writing email
To write a new email
Select an email account and select
Message > New
.
If you leave the message before sending it, it will automatically
be stored in the
Draft
folder (unless you edit a message which
was already located in Outbox).
To mark an email as urgent
On the address tab, select
High
in the
Priority
list.
To enter addresses from Contacts when writing an email
1. Select
To:
2. In the
Select contact
dialog select the check box for each entry
you want to send the email to.
3. Select
Done
.
Tip To enter several addresses manually (without using
Contacts) in a text message, multimedia message or in an email:
enter a comma between each address.
Sending email
To send an email message
Select
Send > Send
immediately
.
If your P910a is connected to the Internet when you send an
email, it will be sent immediately and your P910a will remain
connected to the Internet. If not, your P910a will connect to the
Internet and then send the email.
Tip If you are creating several messages, and not using GPRS,
you can reduce connection time by saving them to
Outbox
and
then connect and send them all at the same time.
To save an email message and send it later
Select
Send >
Save to outbox
.
Messages 93
Preliminary Layla850 P1B
To move an email message from Outbox to Draft
In your list of
Outbox
messages, tap to the left of the email (a tick
appears), and select
Message > Move to draft
.
If you leave the message before sending it, it will automatically
be stored in the
Draft
folder (unless it was created from Outbox).
Setting email preferences
Select
Edit > Preferences
to open the preferences dialogue.
–
Email account
– The email account you are currently using.
–
Always attach your card
– The entry in Contacts specified as
My card
will be attached to your email messages.
–
Always reply with history
– The contents of the email you
replay to is included in your new email.
–
Signature
– The signature you write here ends your email
messages.
Adding attachments
To attach an entry to an email message
1. On the attachment tab, select
Add.
2. Select the type of attachment you want to add, and select the
item.
‘Send as’ email
You can send the entry you are viewing as an attachment to a
new email from the following applications:
Music player,
Video, Viewer, Internet, Calendar, Contacts,
Tasks, Jotter, Sound recorder,
and
Pictures.
To attach a Calendar entry to an email message
1. Open the entry in Calendar and select
Calendar > Send As.
2. Select
Email > Done.
3. Complete the email message and select
Send
.
To attach a Contact to an email message
1. Open the contact details for the contact you wish to send and
select
Contacts > Send as.
2. Select
Email > Done.
3. Complete the email message and select
Send
.
Receiving email
Email must be fetched from the email server on the Internet or at
your office. This can be done manually using the
Get & send
function or automatically by requesting the P910a to check for
new email at certain times.
When you forward an email, you can choose whether or not to
forward the attachment. Large attachments increase the size of
an email and consequently the connection time needed to send
it.
94 Messages
Preliminary Layla850 P1B
Receiving attachments
Any attachments to an email message are displayed on the
tab. The icon next to an attachment in the list identifies the
type of attachment.
To view an attachment you need a viewer for that type of
file.Your P910a comes with pre-installed viewers for Microsoft
Word, Excel, and Adobe Acrobat (PDF) files.
To save an attachment, for example a picture
1. Open the email message and select the tab.
2. Tap the attachment, which opens the Pictures application.
3. Select
Pictures > Save
.
4. Select the location where you want to store the message.
5. Select
Save
.
You can store items both internally and externally. You can also
copy them between the internal memory and the Memory Stick.
See ‘Folders’ on page 27.
Downloading
You can choose not to download large messages and receive just
a header instead. A header contains the subject line, sender’s
details, and date, but not the full message.
To specify a size limit for email, above which you only receive
a header
1. Select
Control panel > Connections > Messaging accounts >
Email (select the email account) > Edit.
2. Select
Inbox.
3. Select an option from the
Download
list.
In your list of messages, headers are denoted by .
To download the full message
1. In your list of messages, select the header.
2. The dialog
Download, Yes/No
appears.
3. Select
Yes
.
To download a series of messages
1. In your list of messages, select the check box to the left of
each entry (a tick appears).
2. Select
Get & Send
.
Deleting messages
You can delete messages both locally and in your email server.
To delete a message locally
1. In your list of messages, select the check box to the left of the
message header.
2. Select
Message > Local delete.

Messages 95
Preliminary Layla850 P1B
3. Select
Yes
.
The message body and attachments are deleted but the heading
remains. You can download the message again later.
To delete a message both locally and in your email server
1. In your list of messages, select the check box to the left of the
message header.
2. Select
Message > Delete message.
3. Select
Yes
.
The message is deleted in your P910a and in your email server
and will no longer be visible in your message list.
Downloading email automatically
You can schedule your email messages to be downloaded
automatically at certain times.
To download your email automatically
1. In Control Panel, select
Connections >
Messaging accounts >
Email.
2. Select the required email account and select
Edit.
3. Select
Inbox > Schedule.
4. Set time or interval for scheduled download and select
Done
.
Disconnecting and connecting
If your P910a is already connected to the Internet when you
send an email, it will remain connected after sending it. If your
P910a is not connected before sending an email, it will connect
and send the message, and then disconnect.
Note You can send text messages while connected to the
Internet. If your connection is CSD or HSCSD it must be
disconnected before you can make or receive a phone call.
If your connection is GPRS, it may be suspended to enable a
phone call to be made or received. You may need to repeat the
data activity (Web page fetch, get email) after the call has
ended.
If your P910a cannot connect to the email account, automatic
download will fail, and will be displayed next to the email
account.
A scheduled download will fail if your P910a is engaged in a
voice call. It may fail if it is connected to another ISP, that is,
through a different Internet account than specified for the email
account.
If email messages are not downloaded because a scheduled
download fails, they will be downloaded during the next
successful connection.

96 Messages
Preliminary Layla850 P1B
More about messaging
Finding messages
In both the list of accounts and list of messages,
Find
searches
through the subject lines, senders’ details, the text of the
message, and dates.
In an open message, Find searches through the text of the
message and highlights the text it finds.
You can only search through email messages that have been
fully downloaded.
Get and send
To get and send messages for one specific account
1. Select
Messages
.
2. Select the desired account (MMS or email for example).
3. Select
Get&send.
To get and send messages for all your accounts
1. Select
Messages
.
2. Select
Message > Get&send.
Any unsent messages in your
Outbox
will now be sent and new messages not yet
downloaded will be downloaded to your P910a.
Note If the email account is set up to access the mail server
through a Secure access connection (see ‘Secure tokens’ on
page 167) you must have the flip open when you use
Get&send
.
If the flip is closed you will see an error message.
Mark read and unread
Use commands on the
Edit
menu to mark your received
messages read or unread. You can also make P910a show just
unread messages. If you have selected connection type
IMAP
for
your email account, the read or unread status will be updated for
the messages on the server the next time you use the
Get&send
command.
If you have changed the read or unread status for the messages
on the server, for example from your PC, the read and unread
status will change accordingly on your P910a.
To select connection type, see “Email account basic tab
settings” on page 159.
Note If you change connection type, your
Inbox
will be emptied.
Use the
Get&send
command to download your messages again.
Full screen view
Use the command
Edit > Full screen
to view your email messages
and MMS in full screen. You can also edit email in full screen.
Set your P910a to open email messages in full screen view by
default, see “Email account Inbox tab settings” on page 159,
Messages 97
Preliminary Layla850 P1B
and to play received MMS in full screen by default, see “MMS
Advanced settings tabs” on page 162.
Saving contact details
When you receive a message, you can save the contact details of
the person who sent you the message.
To save the sender’s details
On the message’s address tab, select
From
.
Note If you save an address from an email message
synchronized from your company PC, the corporate version of
the address, rather than the full Internet email address, will be
saved to Contacts. If the corporate version of the address is not
an Internet address (an X.400 address, or just the sender's
name, for example), you can use it to send email from your
synchronized account, but you cannot use it in email that you
send directly from your P910a.
Connecting and disconnecting from the
Internet
To disconnect from the Internet
1. Select the connection icon (HSCSD/CSD or GPRS )
in the status bar.
2. Select
Disconnect
from the pop-up menu
3. The dialog
Do you want to disconnect from Internet?, Yes/No
appears.
4. Select
Yes
.
If your service provider or network is
unavailable
Sometimes a message cannot be sent because your P910a cannot
connect to a network. Please check that the Messaging Account
and Internet Account information in the Control Panel is correct.
If you have both GPRS and Dial-Up Internet accounts, try
sending the email message using an account of the other type.
GPRS Internet accounts use the GPRS network and Dial-Up
Internet accounts use the GSM network.
Synchronized email
When you set up a synchronization with your PC, an account for
synchronized email messages is automatically created on your
P910a and indicated by . You can have more than one
account for synchronized email, but only one per PC. If you
send an email as PC mail, the mail will be sent via the PC when
you have synchronized your P910a with the PC.
If you set up a POP or IMAP account which accesses the same
mail server, the two accounts will contain the same messages.
Note that there is no connection between the accounts; the
copies in each account are separate.
98 Messages
Preliminary Layla850 P1B
Area information
Area information messages are text messages that are sent to all
subscribers in a certain network area, for example, a local traffic
report. When you receive an area information message, the
message automatically appears on the screen. When you dismiss
the information, it will be stored in the
Area info
Inbox until it is
replaced by a new message received on the same channel.
Please consult your service provider for more information about
the availability of area information services and area
information channel numbering. See ‘‘Area tab’ on page 162 for
more information.

Contacts 99
Preliminary Layla850 P1B
Contacts
Contacts is like an address book, in which you can store names,
phone numbers, email addresses and other useful information,
including photos.
The information stored in the SIM is also accessible. SIM
entries can be copied to Contacts and Contacts entries can be
copied to the SIM. Some SIM cards have Information numbers
and Service numbers stored on the SIM card by the operator.
These numbers are useful for service and information, and are
accessible from the SIM within Contacts.
You can synchronize the contents in Contacts with one of the
PIM applications in your PC supported by the P910a. See
‘Synchronization and backup’ on page 138.
Using Contacts with the flip
closed
With the flip closed, you can make calls and send text or
multimedia messages.
Contacts has two views when the flip is closed:
Menus
In both list view and detail view, you can use to access
some of the P910a’s contact functions. The options will vary
depending on the situation.
Menu options in list view
•
SIM
– Display the contacts of the SIM card.
•
Send my card
– Send your owner card (See ‘Making an owner
card’ on page 105) via infrared or Bluetooth wireless
technology.
•
Find
– Search for a specific contact.
•
Undo delete
– Restore the last deleted contact. Will appear
only if there is something to undo.
•
# Applications
– Access the application list view.
Menu options in detail view
Menu options in detail view: (availability depends on the type of
contact detail, for example mobile number, that is highlighted.)
•
Send SMS
– Send a multimedia message to the active contact
•
Send MMS
– Send a text message to the active contact.
•
Call
– Call the active contact.
List view An alphabetical list of contacts. The list view is the
starting point for finding a contact.
Detail view The details for a contact.
100 Contacts
Preliminary Layla850 P1B
•
Send as
– Send the active contact using infrared or Bluetooth
wireless technology.
•
Delete contact
– Delete the active contact.
•
# Applications
– Will access the application list view.
Menu options in SIM
•
View all
– Switch to Contacts list.
•
Service numbers
– Display the service numbers on the SIM
card. This option is only displayed if there are service
numbers stored on the SIM card.
•
Information numbers
– As for service numbers above.
•
Find
– Search for a specific contact.
•
# Applications
– Will access the application list view.
Selecting a contact with the flip closed
To select a contact
1. Select .
2. Then either:
– Scroll down to the desired contact.
– Press a number key. The first contact corresponding to the
first letter of the key appears. To search further, continue
to enter the letters with the keys.
–Select
Find
from the menu and search for the contact.
3. Select a contact and press the Jog Dial or press to open
the detail view for a contact.
To return to the list view, press .
Note To make a call to a contact in the SIM, select
SIM
from the
options menu. If there are service numbers or information
numbers stored on the SIM card, you can also access them.
To make a call
1. Select a phone number.
2. Press the Jog Dial or press .
or
1. Select a phone number.
2. Select
Call
from the
options menu.
To send a text message
1. Select a phone number.
2. Select
Send SMS
from the
options menu.
To send a multimedia message
1. Select a phone number.
2. Select
Send MMS
from the
options menu.
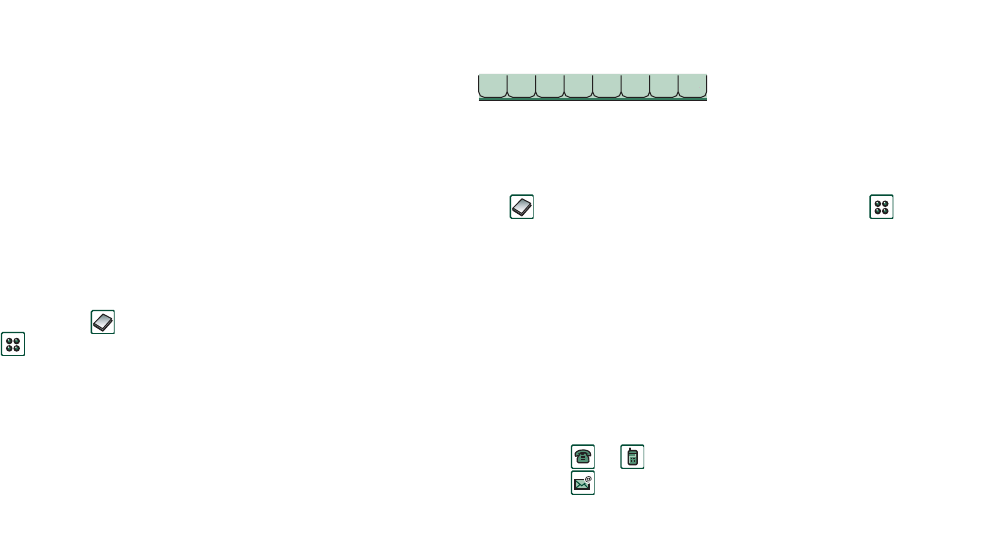
Contacts 101
Preliminary Layla850 P1B
To add a contact
You can create a new contact using information from a recently
received voice call or message. See also ‘Add to contacts’ on
page 53.
1. Select
Yes
when asked to add to contacts.
2. Enter contact name and edit the number, if required.
To delete a contact
1. Select the contact.
2. Select
Delete contact
from the
options menu.
• To restore a deleted contact, select
Undo delete
from the
options menu.
Using Contacts with the flip
open
Open the flip and tap or select
Contacts
in the Application
launcher to open Contacts.
Contacts has three views when the flip is open:
Tabs at the bottom of the list view provide a fast way to locate
information. To highlight the first entry that begins with the first
letter on a tab, select the tab once. To highlight the first entry
that begins with the next letter on the tab, select the tab again,
and again for the third letter on the tab.
Making a call with the flip open
To open Contacts
Tap or select
Contacts
in the Application launcher .
To make a call
1. If required, change folder from the
Folders
menu.
2. Scroll down to the desired contact.
If the contact list is long, first select a tab at the bottom of the
view.
3. Select the contact to display the contact details.
4. Depending on what you want to do, make one of the
following choices:
– Select or or the phone number to make a call.
– Select or the email address to send an email.
List view An alphabetical list of contacts. The list view is the
starting point for finding a contact.
Detail view The details for a contact.
Edit view Contact details, displayed in a way that allows you
to add and change the information.
abc def ghi jkl mno pqr stu v-z
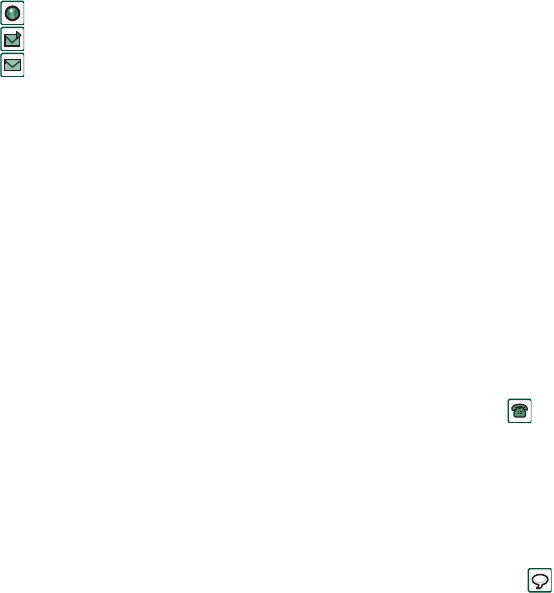
102 Contacts
Preliminary Layla850 P1B
– Select or the URL to open a Web page.
– Select to send a multimedia message.
– Select to send a text message.
Using service and information numbers
To call an Information number or Service number on the SIM
card
1. Select
SIM
in the folders menu.
2. Select
Contacts > Information numbers / Service numbers
and
select a phone number or select a sub-category and then a
phone number.
3. Select
Call
.
Creating and editing contacts
You can sort the contacts according to first name, last name or
company. The contact entries can also be filtered by folder, such
as
Business
or
Personal
.
To create a new contact
1. Select
Contacts > New
.
2. Enter the desired information. When applicable, select from
the drop-down menus.
To add a field to a contact
1. Select the contact.
2. Select
Edit > Edit contact.
3. Select
Edit > Add field.
4. Select the field to be added from the drop-down list.
5. Select
Add.
To add a DTMF tone sequence
1. Select a field and set it to
Phone (h)
.
Add a new field if necessary.
2. Enter a
p
and then the tone digits. Enter a
p
to insert a pause.
It is necessary to start the tone sequence with a p so the
phone recognises it as a tone sequence.
To send a DTMF tone sequence during a call
1. During a call, open the contact’s detail view.
2. Tap at the tone sequence.
Read more about DTMF tones in ‘Controlling tone-based
services’ on page 49.
To add a voice dialling command
Contacts with a voice dialling command are shown in
Voice
commands
in the folders menu.
1. Select at the bottom of the screen.
2. Select a number.
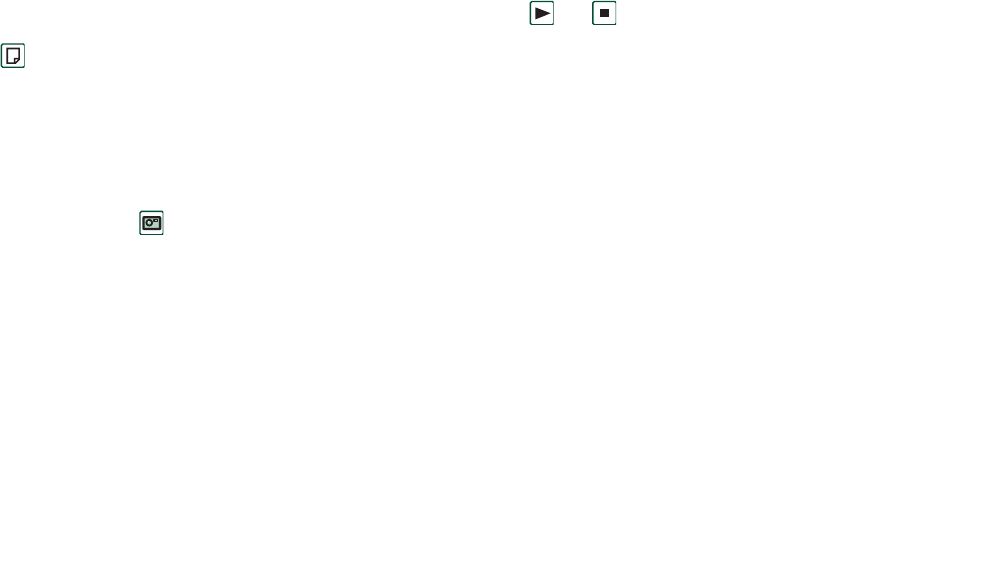
Contacts 103
Preliminary Layla850 P1B
3. Tap the
Record
button and record a voice command after the
tone.
4. Tap
Play
to check the quality of the recording.
• To remove a voice command, select the
Del
button.
To add a note to a contact
1. Select .
2. Enter the text.
3. If you do not want the note to be included when you send,
beam, or synchronize the contact, select the
Private
check
box.
To add a photo or other picture to a contact
1. Select the photo view tab .
2. Tap the picture space.
3. If required, change folder.
4. Select the picture to use.
5. Tap the
Select
button.
• To change a picture, select the picture and select
Replace
image.
• To remove a picture, select the picture and select
Delete image.
To personalize the ring melody for a contact
Contacts with a personalized ring melody are shown in
Personal
ring type
in the folders menu.
1. Against
Ring Tone
, select
Find sound
from the drop-down
menu.
2. If required, change folder.
3. Select the required sound.
4. Tap and to preview the sound.
5. Tap
Select
to set this sound for the contact.
Note The selected ring melody will only be played if the
network provides a CLI (Calling Line Identity) to enable the
contact to be identified, otherwise the Default Melody will be
played.
Note If the ring melody selected for this contact is later deleted
or moved, the Default Melody will be played.
To change the details of a contact
1. Select a contact.
2. Select
Edit > Edit contact
, or tap the tab.
3. Change the desired information. When applicable, select
from the drop-down menus.
To delete a contact
1. Select the contact.
2. Select
Contacts > Delete
contact.
To create or edit a contact on the SIM card
1. Select
SIM
from the
Folders
menu.
104 Contacts
Preliminary Layla850 P1B
2. Create or edit the contact as described above.
All options are, however, not available for the SIM card
contacts.
Managing contacts
You can use
Contacts manager
to move contacts between the
folders, send contacts as a Vcard to another device, or to delete
them. You can also send or delete contacts on the SIM card with
the
Contacts manager
.
See ‘Sending and receiving items’ on page 30 for information
about how to receive contacts from another device.
To move, send or delete a contact
1. Select
Contacts > Contacts manager
.
2. Select the contacts you want to manage.
(If required, change folder from the
Folders
menu. Selecting
All
will show all the contacts from all the folders except the
SIM. Clicking the
Select all
check box will select all the
contacts in the current folder.)
3. Select
Send / Move / Delete
.
4. Follow the instructions, for example, select a folder or a
sending method.
5. Tap
Done
or
Yes
to confirm the action.
To search for an entry containing specific text
1. Select
Contacts > Find.
2. Enter the text string you wish to search for.
3. Select either
In all fields
or
In Names & Company
and tap
Find.
4. When the search is complete, all results will be displayed.
Note Searching is not case sensitive and you do not have to
enter an entire word to locate a matching entry.
Copying contacts to and from the SIM card
You can also copy information between the contacts list and the
SIM card.
To copy contacts from the SIM card
1. Select
SIM
in the folders menu to the right in the menu bar.
2. Select
Edit > Copy all to Contacts
for copying all SIM entries
or
Tap a SIM entry to open it and select
Edit > Copy to Contacts
to
copy the selected SIM entry.
To copy contacts to the SIM card
1. Select a contact.
2. Select
Edit > Copy to SIM card
.
3. If the contact has multiple phone numbers, select the number
to copy.

Contacts 105
Preliminary Layla850 P1B
4. Select
Done
.
Making an owner card
You can create an electronic business card, containing your
contact details, including notes and a photo. You can then send
this card to another device.
To create your owner card
1. Select
Contacts > New
and enter your details.
2. Select
Contacts > Set as my card
.
Tip You can also create an owner card by viewing the detail
view of a contact and selecting the menu option
Set as my card
.
To send your owner card
1. Open the list view, and then select
Contacts > Send my card
.
2. Send the card using
Send as
.
Read more about sending items in ‘Sending and receiving items’
on page 30.
To view or edit your owner card
•Select
Contacts > View my card
.
Preferences
Contacts tab
To sort the contact list and show the preferred phone number
1. Select
Edit > Preferences
.
2. Select the desired sorting option (first name, last name or
company) and tap
Done.
3. If you want a phone number to be shown next to the name in
list view, select
Show preferred phone number
.
If no preferred number has been set up for the contact, the
first phone number will be used.
4. Select
Done.
To change the preferred phone number
1. Select a contact.
2. Select
Edit > Edit contact
.
3. Select
Edit > Show in list.
4. Select the number to be shown from the list.
5. Tap
Done.
Note If no number appears, ensure that
Show preferred phone
number
is checked in preferences.
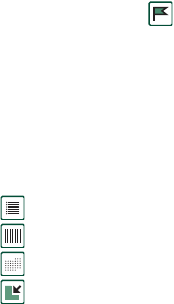
106 Calendar
Preliminary Layla850 P1B
Calendar
The Calendar function helps you to keep track of appointments
and events, and you can also set reminder alarms for the entries.
A reminder is denoted by a .
Different views
You can see your Calendar entries in three views with the flip
open: Day, Week and Month. With the flip closed you will see
the Day view.
To change view in flip open
• Tap to display the Day view.
• Tap to display the Week view.
• Tap to display the Month view.
• Tap to navigate to the present day in the displayed view.
If you tap an entry in week view, the subject and time for that
entry are shown.
To navigate backwards or forwards in the current view
Tap the left and right arrows in the button bar at the bottom of
the screen. You can also rotate the Jog Dial.
To navigate to a specific date in the current view
Tap the day, week or month heading at the top of the display to
show a calendar pop-up in which you can select a specific date.
Creating calendar entries
To create a new calendar entry
1. Select
Calendar > New
and enter a short description of the
entry. This is the description you see in the calendar.
2. Tap
Unfiled
(the folder menu) in the menu bar and select a
folder to store the entry in.
3. Continue to enter information for the items on the detail
page.
–
Type
- Specify if the entry is an appointment, reminder or
all day event.
–
Date
- Select the date to get a calendar where you can set a
date for the entry.
–
Time
- Set start and end time for the entry.
–
Location
- Specify a location or select a location you have
used before.
–
Alarm
- Select the check box if you want your P910a to
alert you about the entry with a sound. Select the time and
date that appears for your settings.
–
Repeat
- Specify if you want to repeat the entry or not.
Read more about this below.

Calendar 107
Preliminary Layla850 P1B
–
Private
- Select the check box to prevent the item from
being viewed by others than yourself if you synchronize
your calendar with, for example, your PC.
4. Select the note page tab to write a note for this entry.
5. Select to save and close the entry.
You should delete old entries regularly to release memory.
To create re-occurring entries
1. When the entry is open, select
Repeat
.
– Set repeating to
Daily
,
Weekly
,
Monthly by date
,
Monthly by
day
,
Yearly by date
or
Yearly by day
.
–
Interval
- Specify how often the event will happen, for
example, by selecting
Weekly
and
Interval 2
means that the
event will go off every two weeks on the specified day.
–
Forever/Until
- Set the time limit for the alarm or select
forever.
2.
Select days
- Weekly repeated events can be set to occur twice
or more in a week. For example, eating lunch with a friend
Tuesday and Friday every week.
Note You cannot repeat All Day Events
To edit an entry
1. Open the entry by tapping it in the calendar.
2. Make the changes in accordance with the instructions above.
Managing calendar entries
To find a certain entry
1. Select
Calendar > Find
.
2. Enter a search word in the menu that appears.
3. Select where to search (
Everywhere, Future, Past
).
4. Select
Find
. A result list is then displayed.
5. Select an entry on the result list to open it.
To delete an entry
Open the entry and select
Calendar > Delete entry
.
A deleted entry may be restored with
Edit > Undo delete
.
To delete all entries in a period of time
1. Select
Calendar > Remove entries
.
2. Select the time period and select
Done
. All entries from that
time period are deleted from the Calendar.
Note Repeated entries will not be deleted.
To copy, cut or paste an entry
1. Open the entry.
2. Select
Edit > Copy entry/ Cut entry.
3. Go to the day where you want to place the entry.
4. Select
Paste entry.

108 Calendar
Preliminary Layla850 P1B
To move a Calendar item to Tasks
1. Open the entry and select
Calendar > Move to Tasks
.
2. The entry is moved, not copied.
If you move an entry with an alarm, the alarm will also sound in
Tasks.
To cut or copy Calendar entries to the Tasks application
1. Open the entry and select
Edit > Cut entry
or
Copy entry.
2. Open Tasks.
3. Select
Edit > Paste entry.
Sending and receiving calendar
entries
You can send and receive calendar entries using
Send as
. See
‘Sending and receiving items’ on page 30.
Preferences
You can customize the calendar views and alarm settings to suit
your own needs.
To customize the calendar view, General tab
1. Select
Edit
> Preferences.
2. Select the
General
tab, and fill in the required details.
To customize the alarm settings
1. Select
Edit > Preferences.
2. Select the
Alarm
tab.
Now, you can change the
Alarm precedes event by
setting - the
length of time before an entry that the alarm goes off.
To assign colours to your entries using the folders
1. In Calendar, select the folders menu to the right in the menu
bar and select
Edit folders.
2. Select a folder and select
Edit
or create a new folder by
selecting
Add
.
3. Select the colour box and select colour for that folder and
select
Done
.
Entries in a folder with a specific colour appear in that colour in
Day and Week views (but not in Month view) so that you can
see the pattern of events in your diary. Reminders appear as
whatever the folder colour.
Saving changes
If you leave Calendar while editing an entry, your changes will
be saved automatically.

Tasks 109
Preliminary Layla850 P1B
Tasks
With the Tasks function you can make a list of things you need
to do. The folders help you to separate different types of
activities.
You can move entries between Tasks and the Calendar, which is
useful when you come to schedule a Tasks entry. You can also
send an entry via text message, infrared, Bluetooth wireless
technology, multimedia message or email.
Creating task entries
The Tasks list shows a short description of the task. Select a task
to see its full information.
A task entry consists of two pages. One detail page where you
set the properties for the task, and one page where you can add
notes.
To create a new task entry
1. Select
Tasks > New
and enter a short description of the task.
This is the description you see in the task list.
2. Select
Unfiled
(the folder menu) in the menu bar and select a
folder to store the task in.
3. Continue to enter information for the items on the detail
page.
–
Completed
– Select the check box when the task is
done.This can also be done directly in the Tasks list.
–
Priority
– Set a priority for the task. You can sort the tasks
by priority.
–
Due date
– Select the check box to set a deadline for the
task. Select the date that appears to get a calendar where
you can set a due date.
–
Alarm
– Select the check box if you want your P910a to
alert you about the task. Select the time and date that
appears for your settings.
–
Private
– Select the check box to prevent the task from
being visible by others, when synchronized with shared
calendars or tasks in other devices, for example your PC.
4. Select the note page tab to write a note for this entry.
5. Select to save and close the task.
Note Delete will delete the whole task entry.
To edit an entry
1. Open the entry by tapping it in the Tasks list.
2. Make the changes according to the instructions above.
110 Tasks
Preliminary Layla850 P1B
Managing task entries
To open an existing entry
Select the entry in the Tasks list.
To mark an entry as completed
Select the check box to the left of the entry in the Tasks list.
To sort the entries
Select
Edit > Sort on priority
or
Sort on date
.
To find a certain entry
1. Select
Tasks > Find
.
2. Enter a search word.
3. Select in which folder to search or use the default value
All folders
.
4. Select
Find
. A result list is then displayed.
5. Select an entry on the result list to open it.
To make a copy of an entry or paste an entry
1. Open a task and select
Edit > Copy entry.
2. In list view, select
Edit > Paste entry.
To delete an entry
Open the entry in the task list and then select
Delete
.
To restore a deleted entry
Select
Edit > Undo delete.
To delete all completed entries
In your Tasks list, select
Tasks > Delete completed
.
Note When you delete All Completed Entries, they are deleted
permanently and cannot be restored.
Moving task entries
To move an entry to the Calendar
Open the entry and select
Tasks > Move to Calendar.
The entry is
moved, not copied.
To copy a task entry to Calendar
1. Open the entry and select
Edit > Copy entry
.
2. Open Calendar.
3. Enter the day you wish the task to appear.
4. Select
Edit > Paste entry
in Calendar.
Note If you move or copy an entry to the Calendar, it will lose
the priority it was assigned in Tasks.
If you do not set a due date for the task entry, the current date
will be used for the new Calendar entry. If you move or copy an

Tasks 111
Preliminary Layla850 P1B
entry with an alarm, the alarm will also be moved to the
Calendar.
Sending and receiving task
entries
You can send and receive task entries using
Send as
. See
‘Sending and receiving items’ on page 30.
Preferences
Select
Edit > Preferences
to change the settings. The following
settings are available.
–
Display due dates
– Select whether or not to display them in
the Tasks list.
–
Display completed
– Select whether or not to display them
in the Tasks list. This will not delete the completed tasks.

112 Jotter
Preliminary Layla850 P1B
Jotter
The Jotter works as a notebook where you can write notes and
draw pictures. The folders help you to separate different types of
notes.
A Jotter entry consists of two pages. One text page and one
drawing page. With the flip closed, you can read and edit your
notes, but you cannot view or edit pictures.
When opening Jotter you will see a list of entered notes, with the
first words of each text note. Select a note to see its full
information or edit it.
Creating and editing notes
To create a new note
1. Open Jotter and select Jotter >New.
The new note will automatically start as a text note. Select
to get bold text and to create a bullet list.
2. Select
Unfiled
(the folder menu) in the menu bar and select a
folder to store the jotter in.
3. Select the drawing page tab to draw a sketch for this note.
4. Select to save and close the note.
To edit a note while working with it
• For text, select
Edit > Revert.
The text returns to its original state. All changes are lost.
• For sketches, select
Edit > Undo.
This choice removes your last pen stroke. If you change your
mind, select
Edit > Redo
.
To create a new note from text or sketches copied from another
application
Open the list of notes and select
Edit > Paste
.
Note If you paste a sketch over an existing sketch, the existing
sketch will be deleted.
Create a note with the flip closed (text only)
1. Select Applications >Jotter with the flip closed.
2. If you have previous notes stored, these will now be listed.
Use the Jog Dial to select a previous note in order to open it.
3. Press if you want to create a new note. Select
New
.
Insert your text by using the keypad.
Edit a note with the flip closed
1. Select Applications >Jotter with the flip closed.
2. Use the Jog Dial to select a previous note in order to open it.
A
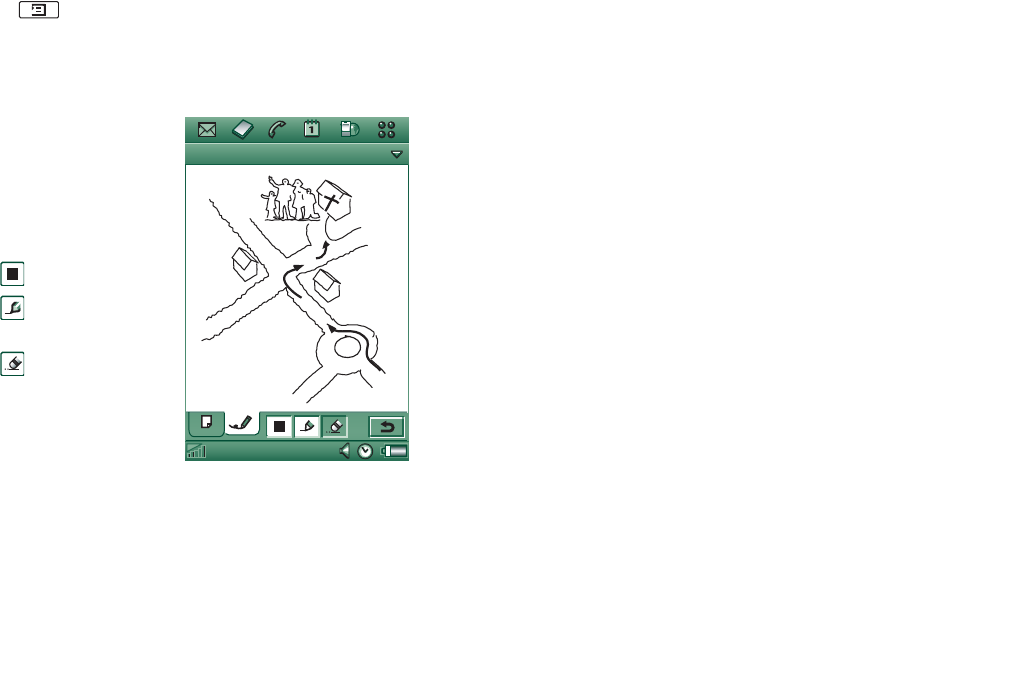
Jotter 113
Preliminary Layla850 P1B
3. Press . Select
Edit
. Insert your text using the keypad.
Drawing pictures
You can draw with different
nib widths and colours. The
main window is the ‘paper’
where you can draw with
your stylus in the same way
as you draw with an ordinary
pen.
Select to change colour.
Select to change the
virtual nib.
Select to activate the
eraser. Tap the eraser again to
re-activate the pen.
All jotter files (both text and
drawings) are automatically
stored in the P910a. The list
view will be presented to you as soon as you start the Jotter
application.
Managing notes
To delete a note
1. Select the note in the notes list.
The note opens.
2. Select
Jotter > Delete note
.
Sending and receiving notes
You can send and receive notes using
Send as
. See ‘Sending and
receiving items’ on page 30.
Note Selecting Send as SMS will send the text only.
Jotter Edit Unfiled
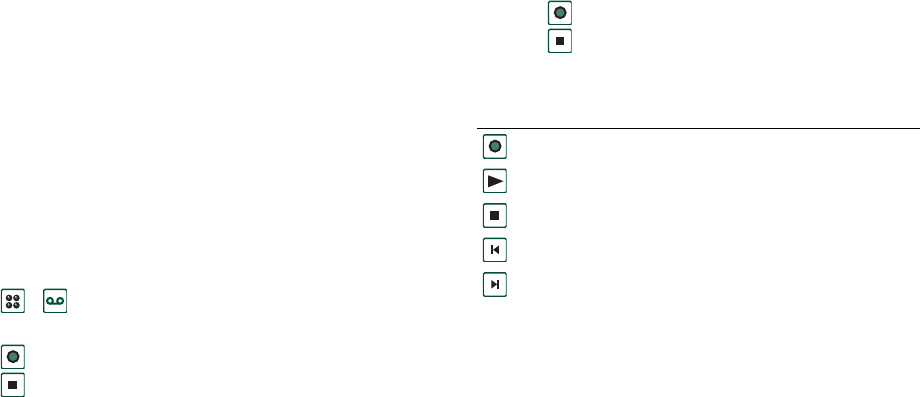
114 Sound recorder
Preliminary Layla850 P1B
TOOLS
Sound recorder
In Sound recorder you can record and listen to your own sound
recordings. You can also send your recordings to other devices
via Bluetooth wireless technology, infrared communication,
email or multimedia message, and use a sound recording as a
ring signal.
Each memo is identified by the date and time it was recorded
and by its position in the list of sound recordings.
Making sound recordings
To record and save a sound recording
1. Select
>
> New
.
A new sound recording is created.
2. Select
and start recording after the beep.
3. Select to finish the recording.
The new sound recording is automatically saved in the list of
sound recordings with the current date and time.
To append to the end of a previous sound recording
1. Select the required recording.
2. Select
and start recording after the beep.
3. Select to finish the recording.
Key functions
To delete a sound recording
1. Select a sound recording you want to delete.
2. Select
Delete >
Yes
.
Using sound recordings as ring
signals
You can set a sound recording as a ring signal.Your sound
recordings will appear in the list of sounds that can be selected
Select... To...
start recording a sound.
listen to the current sound recording.
stop the current sound recording.
go to the previous sound recording in the list.
go to the next sound recording in the list.

Sound recorder 115
Preliminary Layla850 P1B
as ring signals. They will take the form
voicenote
and a number,
for example
voicenote1470
.
To set a sound recording as a ring signal see ‘Sounds and alerts’
on page 147.
Sending sound recordings
You can send Sound recorder recordings via Bluetooth wireless
technology, infrared communication, email or as a multimedia
message.
To send a sound recording
1. Select
Sound recorder > Send as
.
2. Select how you want to send the sound recording. See ‘To
send an item using Send as’ on page 30 for more
information.
Note All other sound media on your P910a is handled via the
Music player
application. You can send sound items from
Music player
and all received sound items are played using
Music
player
.
116 Calculator
Preliminary Layla850 P1B
Calculator
The Calculator is a standard 12-digit calculator. You can add,
subtract, multiply, divide, calculate square roots and
percentages. It also has a memory function.
To use the calculator
1. Select
>
.
2. Enter the calculations by tapping the digits.
All calculations, except percentage calculations, are performed
in the order they are entered, for example: 5+5x5=50, not 30.
Percentage calculations are performed backwards. To calculate,
for example, 10% of 50, enter 50x10%. The result is displayed
when you tap the %-key.
Key functions
You can copy and paste values to and from other applications by
selecting
Calculator
>
Copy
or
Paste
.
Values stored in the memory are retained while using other
applications.
mr
Tap once to retrieve a value from the memory and enter it
into the screen.
Tap twice to clear the memory.
m+
Tap once to store an entered value in the memory.
If you have already entered a value in the memory, tap once
to add the value on the screen to the value in the memory.
m-
Tap once to subtract the entered value from the value in the
memory. The memory is adjusted but not displayed.
Tap once to delete the last digit you entered.
C
Tap once to reset the screen to 0.
Time 117
Preliminary Layla850 P1B
Time
The time and date are always displayed on the flip closed
standby screen. You can customize the display of times and
dates throughout your P910a. You can set your current location
and another location of your choice. It is also possible to set
three different alarms.
Setting time and date
To set the current time and date
1. Select
>
.
2. Tap the clock, or select
Time > Set time & date
, to view the
current time and date settings.
3. Tap the Date box, then use the arrows to set the current year
and month. Then select the current day.
4. Tap
Summertime
, then select the check box next to the zone
that currently has summer time and tap
Done
. This is only
required if you are currently in a country/region with summer
time.
5. Tap the time box, then tap the upper half of the hour or
minute box to increase the number displayed, or the lower
half to decrease the number.
Use the
am
/
pm
box to switch between am and pm. (This is
only possible if you use the 12-hour time format.) Confirm
by tapping outside the time picker.
6. Set
Update time
. This is useful when you travel between time
zones.
–
Prompt
– The phone asks you if you want to update the
clock according to the new time zone.
–
Auto
– The phone automatically updates the clock
according to the new time zone.
–
Off
– The clock will not be updated.
7. Select
Done
.
Format
You can specify how you want the time and date to be displayed
on the screen, and if you want to use the 12- or 24-hour time
format.
To set the time and date display format
1. Select
>
.
2. Tap the clock, or select
Time > Set time & date
, to view the
current time and date settings.
3. Select
Format
.

118 Time
Preliminary Layla850 P1B
4. Tap the Date Format box and choose a format.
5. Tap the Date Separator box and choose a separator.
6. Select a
Time format
.
7. Tap the Time separator box and choose a separator.
8. Select
Done
.
Specifying workdays
You can specify what days you work, if, for example, you want
to set an alarm that sounds only on workdays. You can also
specify the first day of your week to customize the display of
both Week and Month views in Calendar.
To specify your workdays
1. Select
>
.
2. Tap the clock, or select
Time > Set time & date
, to view the
current time and date settings.
3. Select
Workdays
.
4. Select the check boxes next to the days you normally work.
5. Select
First day of week
and choose a day.
6. Tap
Done
.
Setting locations
Specify the country/region and city you are currently in. The
city you select will be displayed next to the clock in Time.
If you are away from home, for example travelling in another
country/region, it can be useful to know what the time is in your
home country/region as well as the country/region you are in.
The city you select as Other City will be displayed below the
clock in Time.
To set the locations
1. Select
> .
2. Tap
Time > Set location
.
3. Tap the Current Country/Region box and select the country/
region you are in at that moment.
4. Tap the Current City box and select the city you are in at that
moment. If the city you are in is not listed, select the city
closest to you.
5. Tap the Other Country/Region box and choose a country/
region.
6. Tap the Other City box and choose a city.
7. Tap
Done
.
Time 119
Preliminary Layla850 P1B
Setting number formats
You can choose how you want the measurements and numbers
in your P910a to be displayed in all your applications. Distances
can be displayed using the imperial or the metric system and
different punctuation marks can be used as separators.
To set the number details
1. Select
> .
2. Select
Time > Set location
.
3. Select
Numbers
.
4. Choose separators and symbol positions from the drop-down
lists. You can tap the keyboard icon to find currency
symbols.
5. Tap
Done
.
Setting alarms
You can set up to three different alarms in your P910a. You can
choose to activate one of the preset alarms, or set a new alarm
with your own definitions.
You can choose to set a silent alarm, where only a message is
displayed when it goes off, or you can set a sound alert.
Alarms requires that the P910a is turned on. If you want to get
alarms in an environment where radio transmitters are not
allowed, you can set the P910a to flight mode, see ‘Flight mode’
on page 48.
Note If you have connected a stereo headset to the P910a, the
alarm will only be heard in the headset.
To activate an existing alarm
• Select the check box in the alarm slot. is displayed on the
status bar on the screen.
To set a new alarm
1. Select
>
.
2. Select one of the alarm slots.
3. Select
Time
and choose at what time you want the alarm to go
off. Confirm by tapping outside the time picker.
4. Select
When
and choose how often you want the alarm to go
off:
–
Once
The alarm will go off once only, at a time more than
24 hours from now but within the next eight days.
–
Next 24 hours
Within the next 24 hours.
–
Daily
Every day at the specified time.
–
Workdays
Every workday at the specified time.
–
Weekly
Every week at the specified time.
5. Select
Alarm sound
and choose a sound.
6. Select
Message
and choose a preset message or write a new
one.
120 Time
Preliminary Layla850 P1B
7. Tap
Done
.
8. Make sure the check box next to the alarm is selected.
When the alarm goes off, select
Snooze
to postpone the alarm for
five minutes or
Silence
to turn off the alarm sound. To turn off
the alarm completely, tap
Done
.

Time 121
Preliminary Layla850 P1B

122 Viewers and editors – Quickoffice
Preliminary Layla850 P1B
Viewers and editors – Quickoffice
With Quickword and Quicksheet you can view and edit
Microsoft Word and Excel documents. With Pdf+ you can view
Adobe Acrobat (PDF) documents.
When the flip is open there are two views:
The applications are also started automatically when selecting
and opening attachments to messages.
To save documents to another location (internal or on the
Memory Stick) you use folders, see ‘Folders’ on page 27.
The functions available differ depending on the document type.
Common functions are similar between the applications and are
described first.
Common viewer and editor
functions
To open a document from an email or Internet page
Select the document link. The document viewer opens the
document in the detail view.
To open a document from the list view
1. Select the Application launcher icon .
2. Select, for example, the Quickword icon .
3. If required, change folder.
4. Scroll to the desired file and select the file name.
5. The document is shown in the detail view.
Quickword
To save and copy the document to a special folder
1. In the list view, select
Quickword > Copy to
.
2. Select where to save the document, and select
Copy
.
List view An alphabetical list of files, for selecting a file to
view.
Detail view The contents of a file, for viewing and editing the
file.
Viewers and editors – Quickoffice 123
Preliminary Layla850 P1B
To edit a document
In the detail view, from the toolbar at the bottom of the screen,
select the edit icon .
The first time you edit a document (in native Microsoft Word
format) transferred to your P910a, you have to rename it. When
you select
OK
, your P910a copies the document with the new
name.
In the toolbar you find icons for performing the most common
word-processing functions.
When you have finished editing and leave the document, your
P910a saves it automatically.
Quicksheet
To save and copy the document to a special folder
1. In the list view, select
Quicksheet > Copy to
.
2. Select where to save the document, and select
Copy
.
To edit a document
The first time you edit a document (in native Microsoft Excel
format) transferred to your P910a, you have to rename it. When
you select
OK
, your P910a copies the document with the new
name.
At the bottom of the screen you find the spreadsheet character
input field, and icons for performing the most common
spreadsheet functions.
When you have edited the document and leave it, your P910a
saves it automatically.
Pdf+
To save and copy a received document
1. In the detail view, from the toolbar at the bottom of the
screen, select the save icon .
2. Name the document, select where to save it, and select
Save
.
To move a document
In the detail view, from the folder menu, select a new folder.
To view a document
Control the viewing from the toolbar at the bottom of the screen:
Bookmarks view. Select a heading to go to the corresponding
page. You can also use the Jog Dial to select a bookmark, and
then use the icon below to go to the corresponding page.
Takes you to the selected page.
Returns you to the page view.
Previous page.

124 Viewers and editors – Quickoffice
Preliminary Layla850 P1B
Next page.
Full screen.
To return to the normal view, select the icon and de-select
Full screen.
Wraps the document, that is the text is displayed in a format
which fits the screen. Images and line drawings are not visible
in this view.
Unwraps the document.
Search.
Search for links.

File manager 125
Preliminary Layla850 P1B
File manager
With the
File manager
you can view, rename, copy, move, and
delete files and folders on the P910a. You can also add folders,
send files and rename and format the Memory Stick.
Initially, the root view is shown, with the sub folders:
•
Audio
, where all audio files are stored.
•
Document
, where different document files are stored.
•
Image
, where all images, pictures as well as drawings, are
stored.
•
Other
, where all files not applicable for the other folders are
stored.
•
Video
, where all video clips are stored.
Using the folder menu, you can select between the internal
storage and the external storage, that is, the Memory Stick. The
path to the selected folder is shown at the top of the window.
Note There is an important distinction between
External media
and
External other
.
External other
lets you view folders that have
been placed on the Memory Stick by other equipment, such as
digital cameras. This is the only place where these folders can
be viewed.
From the file manager it is possible to reach the Control Panel
storage manager, see ‘Storage manager’ on page 167. You can
also format the Memory Stick, see ‘Formatting a Memory Stick’
on page 22.
To move within the folder structure
• To move up in the hierarchy - tap the top folder.
• To view the contents of a folder or a file - tap the top folder.
Folders are opened in the file manager while other files are
opened in the applicable application.
To add a folder
1. Select
File > New folder
.
2. Type a folder name and tap
Done
.
To copy or move one or more folders or files
1. Select the folders or files to handle.
2. Select the required activity from the
File
menu.
3. Select the destination and tap
Done
.
To delete one or more folders or files
Note Only empty folders can be deleted.
1. Select the folders or files to delete.
2. Select
File > Delete
.
126 File manager
Preliminary Layla850 P1B
3. Tap
Delete
.
To change properties for one or more folders or files
1. Select the folders or files to change.
2. Select
File > Properties
.
3. Change the properties, as required.
4. Tap
Done
.

Online services 127
Preliminary Layla850 P1B
Online services
Online services is a customized service offered by a network
operator. This function is network- or subscription-dependent.
Online services provides a mechanism that allows applications
that exist on the SIM to interact and operate with the P910a. It
may provide services ranging from weather forecasts to the
latest information from the stock market.
Online service are placed on your SIM card by your operator.
Note Contact your operator to find out which services are
available for your account.
Note If this service is available on your SIM, the Online
services application will appear in the application list under a
name defined by the SIM provider. However, the icon used to
represent the Online services application will not change.
i
i

128 PC Suite and multimedia for P910a
Preliminary Layla850 P1B
ADVANCED FUNCTIONS
PC Suite and multimedia for P910a
Sony Ericsson PC Suite
The
Sony Ericsson PC Suite
CD delivered with your P910a
contains a set of useful applications:
•
Synchronization
– Synchronization of Calendar, Notes,
Contacts and Tasks against Microsoft Outlook, Lotus Notes
and Lotus Organizer.
•
Backup and Restore
– Make safety copies of your data via
SyncStation.
•
File Manager
– Transfer files (images, documents, music) via
Windows® Explorer between your P910a and PC.
•
Install software
– Install applications in the P910a.
•
Download Language
– Change the language in the P910a.
Additional languages are downloaded from
www.sonyericsson.com/support
•
Dial-Up Networking Wizard
– Wizard for GPRS and HSCSD
settings for using your P910a as a modem.
•
Drivers
– Drivers for modem and the USB cable connected
SyncStation.
Refer to the online help for each specific application.
Installation of the Sony Ericsson PC Suite
The
Sony Ericsson PC Suite
programs can be used with Windows
ME, 98, 2000 and XP.
When inserting the CD in the PC, a start menu is automatically
shown. Select language and then start the
Sony Ericsson PC Suite
Setup
. Follow the instructions in the installation wizard.
If the start menu is not automatically shown, use the
Run
command in the Windows
Start
menu to start
Start.exe
from your
CD drive.
By default the
Sony Ericsson PC Suite
is accessed from
Start menu
> Programs > Sony Ericsson > P910a.
The
Setup
application also can be used later to add or delete
components.
You can download the latest PC Suite software from
www.sonyericsson.com/support
Multimedia for P910a
The
Multimedia for P910a
CD contains a number of applications
and files to be installed in, or downloaded to, your P910a and
used together with its applications.

PC Suite and multimedia for P910a 129
Preliminary Layla850 P1B
• Games.
• Audio files.
• Pictures.
• Video clips.
• MMS templates.
• MMS editor
• Image editor
• Themes editor.
Opening the Multimedia CD for P910a
When you insert the CD in the PC, a start menu opens
automatically. Select an item from the menu and follow the
instructions on the PC screen.
If the start menu is not automatically shown, use the
Run
command in the Windows
Start
menu to start
CDBrowser.exe
from
your CD drive.
130 Installing applications
Preliminary Layla850 P1B
Installing applications
It is possible to install new applications in your P910a. These
applications can be obtained in several ways, for example:
• from the Internet.
•from a CD.
• from a Memory Stick.
• as an email attachment.
• from other devices.
There are two types of installation files for applications:
• SIS (Symbian Standard Installation) made for P910a or other
Sony Ericsson devices.
• MIDP JAR (Mobile Information Device Profile Java
Archive).
Note SIS and JAR files are installation packages containing one
or more files.
Programs made for the Sony Ericsson P800 and P900 series can
also be used in the P910a.
This chapter also applies to other types of software to install, for
example, system components and add-ons.
Applications from developers outside Sony Ericsson, so-called
third-party developers, might be possible to install in the P910a.
Applications which are not approved by Sony Ericsson are not
guaranteed to work correctly or securely, and users install them
at their own risk. Product failures caused by applications not
approved or made for Sony Ericsson will not be covered by your
warranty.
Installing applications on your
P910a
Installation file security
Installation files in SIS format are typically used for installation
of Epoc or PersonalJava™ applications or other content into the
P910a file system.The vendor who prepared the SIS file decides
where in the file system the various content of the SIS file will
be installed. This means that you need to decide if you trust that
the SIS file does not contain harmful content. If you are certain
of the origin of the SIS file you can take an installation decision
based on what you know about that vendor. Your P910a
supports cryptographic verification of vendor identity.
During installation the P910a verifies a digital signature and
certificate in the SIS file against a root certificate in the phone.
Successful verification means that you can trust the origin of the

Installing applications 131
Preliminary Layla850 P1B
SIS file and that the content has not been modified after it was
created. If the SIS file does not contain a digital signature you
will be given a warning about the problem but you can still
decide to proceed with the installation at your own risk. In
general, it is recommended that you install only from SIS files
where the vendor identity and file integrity can be verified.
Note Installation of uncertified applications may cause your
system to crash and all your data will then be lost.
MIDP applications run in a protected environment with no
access to sensitive information so no signatures are required for
MIDP JAR files.
From a PC
Sony Ericsson PC Suite
must be installed in your PC and the P910a
must be connected to the PC via SyncStation, infrared, or
Bluetooth wireless technology in order to install applications
from your PC.
Installing applications from your PC
1. Connect your P910a to the PC via SyncStation, infrared or
Bluetooth wireless technology. When connected, an icon is
shown in the status area to the right in the taskbar on the PC.
2. Start the PC software
Install Software
and select the
application (.sis file) to install. You can also open a .sis file
directly in your PC.
3. Confirm to install the application in the P910a.
4. Select target drive (phone memory or Memory Stick).
Download to the P910a begins.
5. Installation starts when the download is complete.
From the P910a
Program packages, for example, games, can also be downloaded
to your P910a from the Internet or from a Memory Stick. When
downloading a file from the Internet, the installation will start
automatically when the file is completely downloaded to your
P910a. The procedure below describes installation of
application packages transferred to the P910a but not yet
installed.
See ‘To download and upload files, for example, applications’
on page 78 for information about how to download files from
the Internet.
Installing applications in the P910a
1. Select .
2. From the menu, select
Applications > Install
.
3. Select the software from the list.
4. Select
Install.
If the software is certified, an information
dialog will be shown with the name of the software, version
and supplier. Select
Install
again.

132 Installing applications
Preliminary Layla850 P1B
5. Now, depending on the software, you may be prompted to
replace a previous installation, select language, memory
location and select other installation options.
6. Installation is complete. Select
Done
.
Removing applications from
your P910a
It is sometimes necessary to remove installed applications and
user data to free up memory.
Removing applications in the P910a
1. Select .
2. From the menu, select
Applications > Uninstall
.
3. Select the application to be uninstalled.
4. Select
Uninstall
.
5. Tap
Yes
to confirm.
6. Select
Done
.
Tip See also ‘Master reset’ on page 166 and ‘Storage manager’
on page 167 in
Control Panel
for more options regarding removal
of applications and user data.
Some removed applications can be reinstalled from the PC Suite
for the P910a and the multimedia CD.
Sony Ericsson Update Service
With Sony Ericsson Update Service you can keep your phone
updated with the latest P910a software. When a new software
version is available, you can download and install it using the
deskstand and an Internet-connected PC (preferably via
broadband).
To update the P910a software
1. Connect the desk stand to your PC and place your P910a into
it.
2. Visit Sony Ericsson P910a support site on
www.SonyEricsson.com/support
3. Select Sony Ericsson Update Service and follow the
instructions on how to proceed with the update sequence.
Answer
Yes
when you are asked if you want to install the Sony
Ericsson Update Service PC program.
Note User data can be lost when the software is updated.
Always back up the phone before updating.

Connecting to other devices 133
Preliminary Layla850 P1B
Connecting to other devices
Your P910a can be connected to other devices with similar
interfaces such as PCs, other P910as and handheld computers.
The connection can be made via:
• Bluetooth wireless technology (not together with
Windows 98)
•Cable
• Infrared (IrDA)
Note Bluetooth wireless technology and infrared transmitting
are rather power consuming. Do not have them on more than
necessary.
Depending on the type of connection you have chosen, you can
use your P910a to perform various tasks, for example:
• Sending and receiving files via infrared or Bluetooth wireless
technology – ‘beaming’.
• Making Backup/Restore and Synchronization of your data
and file transfer (cable, infrared and Bluetooth wireless
technology).
You can even use your P910a as a modem for Dial-Up
Networking using cable, infrared and Bluetooth wireless
technology. With Bluetooth wireless technology, you can for
example, connect a cordless headset.
PC connectivity software
Your P910a is delivered with a CD,
Sony Ericsson PC Suite
. This
software must be installed in the PC you want to connect to. See
‘Installing applications’ on page 130 for more information. You
do not need to install the
Sony Ericsson PC Suite
if you only want
to perform beaming with the PC or use a cordless headset.
Connection via SyncStation
Connect the SyncStation to your PC with the USB cable. A
wizard helps you to install the USB cable the first time. The
Sony Ericsson PC Suite
CD contains the necessary software.
Put your P910a in the SyncStation. A new wizard starts which
helps you to connect your P910a if this is the first time.
appears in the status area to the right on the taskbar when
the P910a is connected.
When connecting via cable, the P910a can be set in PC Connect
mode or Modem mode. The setting is made in
Control panel >
Connections > Cable
, see ‘Cable’ on page 152.
Set the P910a in
PC connect
mode for
• Synchronization.
• Installation of software.

134 Connecting to other devices
Preliminary Layla850 P1B
• Backup and restore.
Set the P910a in
Modem
mode when using
• P910a as a modem.
• Dial-up network wizard.
You should disable the USB cable connection in these two
cases. In your PC select
Start > Settings > Control Panel > Phone
Monitor Options > COM Ports
and disable the COM port to
which the cable is connected.
Connection via Infrared port
When connecting via the infrared port, make sure that both
devices are placed within one metre from each other and that the
infrared ports have a free line of sight between them.
Both your P910a and the device you connect to must have their
infrared ports activated before communication can begin.
To activate the infrared port on the P910a
1. Go to
Control panel > Connections > Infrared
.
2. Set the P910a to
PC connect
or
Modem
as required.
3. Set the port state to
On
or
On for 10 minutes.
You can also change the infrared port state with the flip closed,
in the
Connections
application.
To activate the infrared port on the PC
1. Right click in the status area to the right on the taskbar.
2. Select
Properties
3. Select the Infrared check box
4. Click
Close
.
Note Clear the Infrared check box when ready.
Send and receive
You can send items via the infrared port, beam, in any
application if there is a
Send as
command. To send, select
Infrared
. If you receive a beamed item, a dialog box appears with
three options:
Delete
,
View
or
Done
.
Delete
deletes the item;
View
opens the associated application which shows the item;
Done
saves it in the
Beamed
folder in
Messages
.
Connection via Bluetooth
wireless technology
You can connect your P910a to other products equipped with
Bluetooth wireless technology, for example PCs, car handsfree
devices, or other mobile phones, and exchange data. Since
Bluetooth wireless technology is radio-based, there does not
have to be a free line of sight between transmitting and receiving
devices. This means that your P910a can stay in your pocket

Connecting to other devices 135
Preliminary Layla850 P1B
while communicating. However, items between transmitting and
receiving devices might weaken the signal.
Connection to another device can be made within a range of up
to 10 metres. Obstructions between the transmitting devices will
have an effect on the performance. For all tasks, except
beaming, it is necessary that you first set up a permanent and
trusted relationship between your P910a and the other device.
This process is called pairing (other documentation may refer to
it as bonding). The paired devices are remembered by your
P910a even after you have turned it off so you do not need to
repeat the process for every connection with those devices. The
reason for pairing is to simplify future connections and to make
them secure – only paired devices can connect to your P910a.
Activating Bluetooth wireless technology
Activate Bluetooth wireless technology on your P910a in
Control
panel > Connections > Bluetooth > Settings
.
Set
Bluetooth
to
On
, and
set if your P910a should be
Visible by other devices
or not. See
‘Bluetooth’ on page 151 for more information on Bluetooth
wireless technology settings.
The Bluetooth wireless technology operation mode can also be
changed with the flip closed, through the
Connections
application. When the Bluetooth wireless technology is
activated, appears on the screen and the left indicator light
on top of your P910a flashes blue.
Pairing
To let your P910a initiate pairing with another device, such as
a headset
1. In
Control panel > Connections> Bluetooth > Settings
, set
Bluetooth
to
On
. Make sure
Visible to other devices
is selected.
2. Set the other device to be on or discoverable.
3. In the
Devices
tab, tap
Add
. Your P910a searches for all
devices in the vicinity and lists them.
– All enabled devices that are visible to others within range,
are shown with their name and icon. You can use
Show:
to
restrict the list to one category (only PC, for example).
– Paired devices that are within range are shown with
regular text.
– Non-paired devices that are within range are shown with
their names in italics.
– Devices that are within range but unknown are shown
with a preset name.
4. Select the device you want your P910a to pair with, and enter
a passcode when asked for it. When the passcode is accepted,
the pairing process is complete, see ‘Passcodes’ on page 136.
5. If in the future you want to allow a paired device to connect
to your P910a without you explicitly approving each
connection, you should select
Control panel > Connections >
Bluetooth > Devices,
then select a device and the check box
Allow to connect without confirmation
.
136 Connecting to other devices
Preliminary Layla850 P1B
To let another device initiate pairing with your P910a
1. In
Control panel > Connections > Bluetooth > Settings
, set
Bluetooth
to
On
.
2. Follow the other device’s manual to initiate pairing.
3. When asked for a passcode, enter the same on both devices.
4. If in the future you want to allow a paired device to connect
to your P910a without you explicitly approving each
connection you should select
Control panel > Connections >
Bluetooth > Devices,
select a device and the check box
Allow to
connect without confirmation
.
Tip You can change the name of a paired device. When you pair
with other Bluetooth wireless technology enabled phones, it is
very useful to include the user's name as part of the device
name. This will make it very easy to beam information to the
desired recipients.
To let a headphone initiate pairing with your P910a
1. Check that the device you want to pair with your P910a:
– Is on and within range.
– Has its Bluetooth function activated and that it is in
visible mode.
2. In
Control panel > Connections > Bluetooth > Settings
, set
Bluetooth
to
On
.
3. Follow the headphone’s manual to initiate pairing on the
headphone.
4. In the
Devices
tab tap
Add
. Your P910a searches for all
devices in the vicinity and lists them.
5. When asked for a passcode, enter the headphone’s passcode
on your P910a.
6. If in the future you want to allow the headphone to connect to
your P910a without you explicitly approving each
connection, you should select
Control panel > Connections >
Bluetooth > Devices
, select the headphone and the check box
Allow to connect without confirmation
.
To remove a paired device from your P910a
Select a device in the list and select
Remove
.
Passcodes
Passcodes ensure that the device you pair with really is the
device you think it is. A passcode is a set of numbers and/or
letters (at least four characters) that you agree to exchange with
the owner of the other device. Simply agree a passcode with the
other user and each enter the same code into both devices when
asked for it. The actual code is up to you; the important thing is
that you both enter the same code. Accessories like headsets
often have a default passcode, usually ‘0000’, see the specific
user guide.

Connecting to other devices 137
Preliminary Layla850 P1B
Send and receive
You can send items via Bluetooth wireless technology in any
application if there is a
Send as
command. To send, select
Bluetooth
. If you receive an item via Bluetooth wireless
technology, a dialog box appears with three options:
Delete
,
View
or
Done
.
Delete
deletes the item;
View
opens the associated
application which shows the item;
Done
saves it in the
Beamed
folder in
Messages
.
Bluetooth share
You can make it possible for other users to transfer items from
your P910a. To make an item accessible, select
Send as >
Bluetooth Shared
. The item is then copied to the
Shared
folder,
accessible by other users. When a user requests to access your
Shared
folder, a request dialog is shown, where you can
Accept
or
Reject
the transfer.

138 Synchronization and backup
Preliminary Layla850 P1B
Synchronization and backup
With
Sony Ericsson PC Suite
installed in your PC, your P910a can
synchronize with the following PC applications, also called
Personal Information Managers (PIMs):
• Lotus® Organizer® 5 & 6, 6.5
• Lotus Notes® 5.0, 6
• Microsoft Outlook 98, 2000, 2002, 2003
• Microsoft Windows Address Book
Synchronization is divided into local and remote. Local
synchronization is performed directly to a connected PC while
remote synchronization is done over the air with a remote server
in, for example, a corporate network.
The manual describes the easiest way to perform the tasks but
you can also carry out most of them by selecting
Start > Programs
> Sony Ericsson > P910a
in the PC and then select the desired
command.
Refer to the online help find in
Help
in the menu bar in the PC
software to get more information about synchronization and
backup.
Note If you have imported SIM phone book entries into
Contacts
in your P910a, these entries will not be synchronized with the
corresponding entries in your PC when synchronizing your
P910a and PC. You will instead get duplicates in your P910a.
Local synchronization
Local synchronization is done with either cable, infrared or
Bluetooth wireless technology. The functionality is the same.
Email, Contacts, Calendar, Tasks, and Jotter notes (only text)
can be synchronized locally.
Local synchronization settings
Local synchronization is initiated from the PC and all settings
are made in the P910a PC software (included on the
Sony
Ericsson PC Suite
CD).
Bluetooth
Cable
Irda
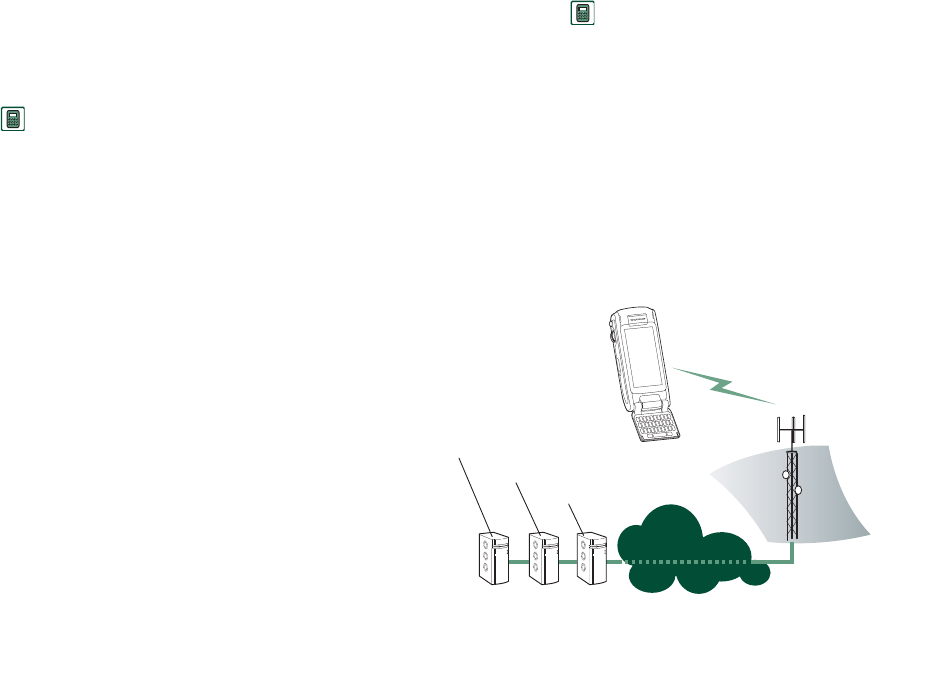
Synchronization and backup 139
Preliminary Layla850 P1B
The easiest way to synchronize is to set the Synchronization to
automatically make a synchronization every time your P910a is
connected.
To make the synchronization settings
In the PC, click on in the status area to the right in the
taskbar on the PC and select
Sync Station Settings
.
A dialog appears where you can make the synchronization
settings. Click
Help
in the dialog to get more information about
the settings.
Making a local synchronization
To make an automatic synchronization
1. Connect your P910a via SyncStation, infrared or Bluetooth
wireless technology. For more information, see ‘Connecting
to other devices’ on page 133.
2. Synchronization starts automatically.
3. After a short time, the PC application you want to
synchronize with might ask you to allow the P910a access to
it. Answer
Yes
and the synchronization continues.
To make a manual synchronization
1. Connect your P910a via cable, infrared or Bluetooth wireless
technology. For more information, see ‘Connecting to other
devices’ on page 133.
2. In the PC, click on on the PC taskbar and select
Synchronise
.
The synchronization starts.
3. After a short time, the PC application you want to
synchronize with might ask you to allow the P910a access to
it. Answer
Yes
and the synchronization continues.
Remote synchronization
Remote synchronization takes place over the air and is the ideal
way to keep the P910a up-to-date while on the move. Using
GPRS, the P910a can be continuously connected to the remote
synchronization server.
Internet/Intranet
PIM Application
Sync Server
Firewall
GPRS, HSCSD
or CSD

140 Synchronization and backup
Preliminary Layla850 P1B
Synchronization services may be offered by mobile operators,
third-party service providers and as added capability to
corporate PIM applications.
Contacts, Calendar, and Tasks can be synchronized remotely.
Remote synchronization settings
To configure the remote synchronization server
In
Applications,
select
Remote Sync > Edit > Preferences
and fill
in the following parameters:
– Server address
–Username
– Password
You might also need to fill in whether to use transport login
under the Protocol tab. Contact your corporate information
services help desk or your service provider for information on
these parameters.
You also need to have at least one configured Internet account
that remote sync can use to connect, see ‘Internet accounts’ on
page 153.
To select items to synchronize
1. In Remote Sync, select one item in the list you want to be
synchronized.
2. Select the
Enable task
check box.
3. Fill in the
Task name
or leave default.
4. Fill in the
Server database
(contact your corporate
information services help desk or your service provider).
5. The item you selected to be synchronized is now above the
divider in the list. (Disabled items are below the divider.)
6. Repeat for other items.
Making a remote synchronization
Open
Applications > Remote Sync
and tap the
Sync
button.
When ready, the
Task status
column shows today's date for all
successfully synchronized items.
Backing up data
You can use the
P910a Backup and Restore
PC software to back up
the contents stored in your P910a to your computer. Keeping
backups of your P910a contents on your computer means that
you have a separate copy of the contents of the P910a, which
can be restored into the P910a. Backups should be made on a
regular basis. See the online help for
P910a Backup and Restore
for
more information on how to use the application.
Note All user data will be deleted when the P910a software is
upgraded by a Service Partner. Always back up your data before
handing over the P910a for upgrading, so that you can restore it
afterwards

Synchronization and backup 141
Preliminary Layla850 P1B
Preconditions
The
Sony Ericsson PC Suite
must be installed in the PC and the
P910a must be connected to the PC via cable.
Note Backup and restore does not work via infrared or
Bluetooth wireless technology.
Performing a backup
To make a backup
1. Turn on your P910a and connect it to the PC via cable.
2. In the PC, click on on the PC taskbar and select
Back up
and restore
.
3. Select your P910a in the menu that appears. Several P910as
can be backed up to the same PC.
4. Select
Backup
and choose what to back up: P910a and/or
Memory Stick.
5. Click
Yes
and follow the instructions in the PC and in the
P910a.
6. The backup is complete.
Restoring data
Lost data or accidentally deleted information in your P910a can
be restored from an earlier backup. A backup from the phone
can only be restored to the phone, and a backup from a Memory
Stick can only be restored to a Memory Stick.
To restore a backup
1. Turn on your P910a and connect it to the PC via cable.
2. In the PC, click on on the PC taskbar and select
Back up
and restore
.
3. Select your P910a in the menu that appears. Several P910as
can be backed up to the same PC.
4. Select one of the backups in the list of previously saved
backups and click
Restore
.
5. Click
Yes
and follow the instructions in the PC and in the
P910a.
6. The restore is complete.
Note Everything in your P910a will be overwritten by the
chosen backup. Once you have clicked Yes to start the restore,
you cannot cancel the procedure.
Note If you have used your Secure Tokens (Secure Access files)
since you made your backup, you must reconfigure these. If you
restore another P910a, you must reconfigure your Secure
Tokens. For more information see ‘Secure tokens’ on page 167.
142 Personalizing your P910a
Preliminary Layla850 P1B
SETTINGS
Personalizing your P910a
There are a number of ways you can give your P910a a personal
touch and change its settings to suit your requirements.
Themes
Themes control the colour of screen and text, the icons, and the
background picture, the wallpaper. Sound themes control the
notification alerts. Four themes are pre-loaded in the P910a.
Extra themes can be found on the Multimedia for P910a CD
where you also can use the themes editor to modify the themes
or create new.
To change the theme, select
Control panel > Device > Themes
,
see ‘Themes’ on page 149
.
Changing your application
shortcuts
You can change and rearrange the five shortcuts to applications,
shown in the standby screen when the flip is closed, and the five
first shortcuts in the Application picker area in flip open (not the
Application launcher ). The flip closed shortcuts can even
be hidden, if you wish.
Setting a background picture
You can change the background image (wallpaper) for the
standby screen in
Control panel > Device > Display.
You can use
any image stored internally or on a Memory Stick.
Tip More background images can be found on the Multimedia
P910a CD, delivered with your P910a.
You can obtain suitable background picture files by
downloading, MMS, beaming using Bluetooth or infrared, or
transferring them using a cable from your PC.
Background picture images are 208 x 144 pixels and the picture
can be seen in the standby screen. (Any chosen picture will be
scaled to fit the screen). The images can be JPEG, GIF, BMP,
WBMP, MBM or PNG format.
Setting the light intensity
You can set the maximum and minimum display light intensity.
This is useful to save the battery or protect your night sight
when driving a car. See “Power tab” on page 146.
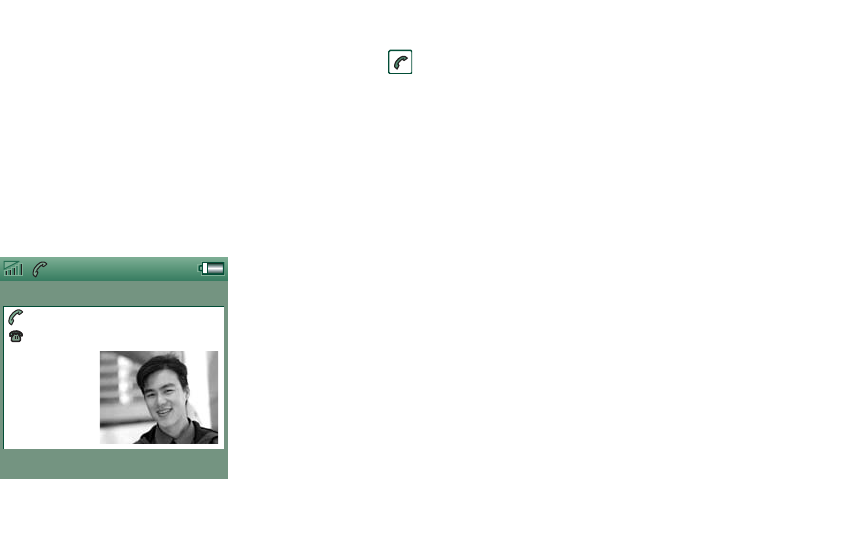
Personalizing your P910a 143
Preliminary Layla850 P1B
Setting a screen saver
You can set a screen saver picture to be displayed after a period
of inactivity. See ‘Display’ on page 145. Keylock and device
lock may be used in combination with the screen saver. When
you press a key or touch the screen, you will be prompted to
activate keys and/or enter the device lock code.
The images can be JPEG, GIF (including animated), BMP,
WBMP, MBM or PNG format. Image format for the screen
saver is 208 x 320 pixels.
Note Using animated GIF uses more power.
Adding images to your
Contacts
You can store a picture with
each entry in Contacts. See
‘Creating and editing
contacts’ on page 102.
Pictures are easily taken
using the CommuniCorder
(see ‘CommuniCorder’ on
page 58) though of course
other images can be used.
If your network operator provides a CLI (Calling Line Identity)
service, your P910a can display the contact’s picture together
with the other information when an incoming call is received
with a CLI matching that contact (not all numbers can be
displayed). The contact’s picture is also displayed when you
make a call to that person.
To choose the contact’s picture size
1. Select
Phone > Edit >Preferences > Incoming call picture
.
2. Select the
Show large pop-up picture for incoming calls
check
box.
3. Tap
Done
.
Ring signals
Your P910a can play both iMelody format and polyphonic ring
signals in WAV, AU, AMR, MIDI, RMF, and MP3 sound file
formats. When you choose a ring signal, your P910a will scan
the internal and Memory Stick storage and present you with a
list of ring signals that are in these formats. Recordings you
have made using Sound Recorder can also be selected.
Ring signals can be added by downloading from the Internet,
beaming using infrared or Bluetooth wireless technology file
transfer from a PC and by using a Memory Stick. Extra ring
signals can be found on the Multimedia for P910a CD-ROM.
J
ohn
S
m
i
t
h
+
4613244500
(
h
)
11
:
03
E
nd
ca
ll
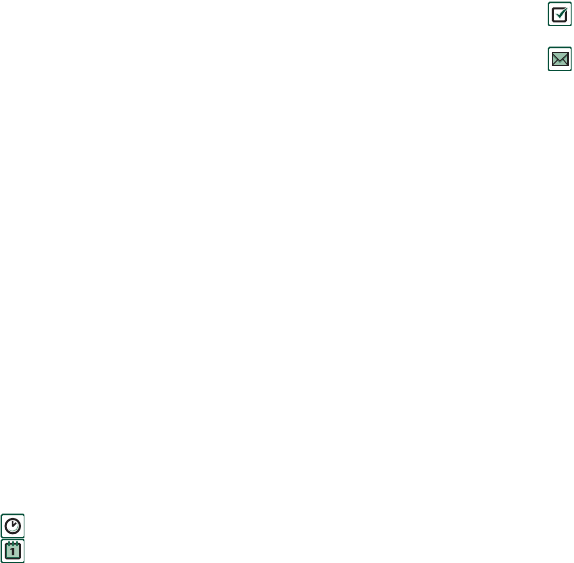
144 Personalizing your P910a
Preliminary Layla850 P1B
You can add as many ring signals as desired, subject only to
available storage space.
Tip Sound Recorder recordings are listed as voicenote and a
number, for example voicenote1470.
A ring signal may be selected for an entry in Contacts, so that
the caller can be identified by the ring signal that is played. See
‘To personalize the ring melody for a contact’ on page 103.
Note The mobile network must provide the CLI (Calling Line
Identity) of the caller to enable the contact to be identified.
You may change the default ring signal that is played in all other
cases. To do this, see ‘Sounds and alerts’ on page 147.
Note If your P910a finds that you have renamed, moved or
deleted a ring signal, it will play the default instead.
Alarm tones and sound
notification
You can choose different sounds for alarms and notifications in
these applications:
Note If you use an audio file as alarm or notification signal, it
will be played using the Multimedia volume setting. The ring
volume setting will not effect the sound volume.
Time
See ‘Setting alarms’ on page 119.
Calendar
Set a sound for reminder alerts, see ‘Preferences’
on page 108).
Tasks
Set a sound for reminder alarms. See ‘Preferences’
on page 111.
Messages
Set a different sound for each type of message as
notification of a new message:
See ‘Sounds and alerts’ on page 147.

Control panel 145
Preliminary Layla850 P1B
Control panel
The Control Panel is the location for all the main settings on
your P910a that are system-wide and affect more than one
application. This is the main place to go to initially set up your
P910a, and to change settings at any point thereafter. To access
it, select
Applications > Control panel
.
Tip You can find settings that apply to a single application in
the
Preferences
menu of the application, for example:
Phone > Edit
> Preferences, CommuniCorder > CommuniCorder > Preferences,
Internet > Edit > Preferences.
The sections below describe the settings available for each of
the default items in the
Control panel.
The Device tab
The device tab contains settings related to the behaviour of your
P910a device itself.
Application shortcuts
Use this dialog to configure the application shortcuts shown in
the flip closed standby view, and the Application picker
shortcuts in the flip open mode. See ‘Standby view’ on page 15
and ‘Navigation’ on page 17. You can change the five shortcuts
shown. If you feel that the flip closed shortcuts obscure your
background, you can choose to have them hidden when you do
not need them.
To change an application shortcut
1. In the
Application shortcuts
dialog, select the
Flip open
or
Flip
closed
tab depending on the shortcuts you intend to change.
2. Select the icon you wish to change. The name of the
application is shown in the
Set application
pick list.
3. Choose the application you want to replace it with from the
list.
To hide the flip closed application shortcuts when your P910a
is inactive
Clear the
Shortcuts always displayed
check box.
Display
Use the
Display
settings to control the screen and power
functions of your P910a.
146 Control panel
Preliminary Layla850 P1B
Wallpaper tab
You can set a picture to be the background, wallpaper, for the
standby screen.
1. Select if the flip closed or flip open wallpaper should be
changed.
2. Tap the image showing the current picture.
3. Browse to see picture files available on your P910a.
4. Select a picture and tap
Select
.
Read more about background in ‘Personalizing your P910a’ on
page 142.
Screen tab
You can set a picture to be the screen saver.
1. Select a picture for the screen saver.
2. Set the activation time for the screen saver.
If you select the
Screen saver device lock
check box the device
lock will activate when the delay runs out. Read more about the
device lock in ‘Device lock’ on page 37.
If you set a time for the
Automatic Input Lock
, the keyboard lock
will activate when the time runs out. Read more about the
automatic keylock in ‘Automatic keylock’ on page 38.
Occasionally you may find that you tap one item (for example a
button or menu option) but another is activated. Calibrating the
screen ensures that the correct item is activated. Tap
Calibrate
screen
and follow the instructions.
Power tab
You can set if the power save should switch off the screen, blank
the screen or show a clock on the screen. You can also set the
power save time between 1 and 30 minutes.
If you set times for both screen saver and power saver, the
power saver time will commence after the screen saver is
displayed.
You can set the screen light settings for handheld use and car
use.
Select
Adjust brightness
to set to set the normal (max) and
dimmed (min) light intensity for handheld use and car use. The
Brightness
box works as a slider.
Auto
Light switches on when you tap the screen, press a key, or
receive an incoming call
On
Light is always on
Off
Light is always off

Control panel 147
Preliminary Layla850 P1B
Flight mode
In flight mode the radio function is turned off. You cannot make
and receive calls but most of the other functions in the P910a are
available.
Use these settings to turn the flight mode on or off and also to
activate the
Power menu. When activated, the Power menu will
ask you if you want to start the P910a in normal mode or flight
mode each time you turn on the P910a. Also, when you press the
On/Off button when your P910a is on, the Power menu will ask
you if you want to turn off the P910a, or switch to another mode.
To activate the Power menu
Select the
Prompt me...
check box and tap
Done
.
To cancel the selection of Power menu
Clear the
Prompt me...
check box and tap
Done
.
International
Use these settings to set the locations shown in
Time,
as well
as the units for distances, numerical separators, and how
currency values should be shown.There are two tabs:
Location
and
Numbers.
On the Location tab
•Set
Current country/region
and
Current city, state
to your current
location.
•Set
Other country/region
and
Other city, state
to an alternative
location (for example your home location if you are abroad).
If the city you want is not listed, select another city in the
desired time zone.
On the Numbers tab
Set the decimal separator and thousands separator you desire.
Locks
Locks contains options for activating the locks on the device,
the SIM card and the keys on the keypad, and for changing the
lock codes, see ‘P910a locks’ on page 36.
Sounds and alerts
Use these settings to control sounds and alerts of your P910a.
•
Calls
tab – Sets ring tones and volume.
•
Messages
tab – Sets notification alerts for messages.
•
Other
tab – Sets button and screen clicks, reminders, alarms,
and other notifications.
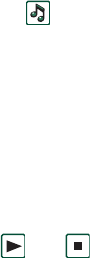
148 Control panel
Preliminary Layla850 P1B
You can choose to use any sound recording or audio file. You can
select ring signals that are stored on your local storage or on a
Memory Stick. If the selected file is later deleted or moved, the
Default Melody will be played instead.
Note If you use an audio file as a ring tone, alarm or
notification signal, it will be played using the Multimedia
volume setting. The ring volume setting will not affect the sound
volume.
To listen to the selected ringtone or alert
1. Tap the icon to listen to the signal.
2. Tap again to stop playback.
To change the default ring tone or alert
1. Tap the drop-down menu.
2. Select
Default Melody
for the P910a default or
Find sound
to
select a new one.
3. If required, change folder.
4. Select the required sound
5. Tap and to preview the sound.
6. Tap
Select
to set this sound.
Warning! The volume may be uncomfortably loud at the
higher volume levels if the phone is close to your ear. Exposure
to excessive volume may damage hearing.
Note To set vibrating alert, silent mode, speakerphone or mute
the microphone, tap the volume icon on the status bar.
Calls tab
These settings set incoming call alerts. For more information see
‘Ring signals’ on page 143.
You may personalize the ring melodies further for individual
contacts, see ‘To change the details of a contact’ on page 103.
•
Ring (voice)
– Select a ring signal for incoming voice calls.
•
Ring (voice) line 2
– Select a ring signal for incoming voice
calls.
•
Ring (data)
– Select a ring signal for incoming data calls.
•
Ring volume
– Set the preferred sound level for handheld,
handsfree and car use.
•
Increasing ring
– Select the checkbox to use increasing ring
signals. This disables the other volume settings.
Messages tab
These settings set messaging alerts.
•
Display notification message
– Select the check box to receive
notification of a received message.
•
SMS
– Select an alert for received SMS messages.
•
Email
– Select an alert for received Email messages.

Control panel 149
Preliminary Layla850 P1B
•
MMS
– Select an alert for received MMS messages.
•
Area info
– Select an alert for received area information
messages.
•
Auto setup
– Select an alert for auto setup messages.
Other tab
These settings set button and screen clicks, reminders, alarms,
and other notifications.
•
Button click
– Select the sound used when you press a key on
the keypad.
•
Screen tap
– Select the sound used when you tap the screen.
•
Key press
– Select the sound used when you press a key on
the keyboard on the flips inside.
•
Reminder
– Select an alert to be played for reminders.
•
Voice messages
– Select an alert to be played for voice
messages.
•
Default alarm
– Select the default alarm sound.
Text input
There are several standard ways of entering text in your P910a.
See ‘Entering text with the flip closed’ on page 31 and ‘Entering
text with the flip open’ on page 33.
Use the settings on the
Primary
,
Alternative
and
Flip Closed
tabs to
set methods for entering text in your P910a.
If you load other text input software, select it and adjust its
settings here.
Themes
You can set the look of the user interface by changing the theme.
• To change the theme, select a theme from the list. The picture
shows the flip closed standby background. Tap
Select
.
• To listen to a theme sound, select the event from the drop-
down list. Tap the icon to play. Tap again to stop playback.
• To send a theme, select the theme and tap
Send as
.
• To delete a theme, select the theme and tap
Delete
.
Primary
The method that you select here is activated
automatically when you need to enter text into your
P910a.
Alternative
The method that you select here is activated if you
tap at the bottom of the screen.
Flip closed
The method that you select here is activated when you
need to enter text with the flip closed.

150 Control panel
Preliminary Layla850 P1B
Time & date
Adjusting the time and date here sets these throughout your
P910a.
The dialog has three tabs. You can set:
Note These settings are also available in the
Time
application.
Time & date tab
To set the current date
1. On the
Time & date
tab, select the date. A calendar view opens.
Tap the arrows to set the current year and month.
2. Select the current date.
To set the current time
1. On the
Time & date
tab, select the time. Select the upper half of
the hour or minute box to increase the number displayed, or
the lower half to decrease the number.
2. Select the
am
/
pm
box.
This is only possible if you use the 12-hour time format.
3. Set
Update time
. This is useful when you travel between time
zones.
–
Prompt
– The phone asks you if you want to update the
clock according to the new time zone.
–
Auto
– The phone automatically updates the clock
according to the new time zone.
–
Off
– The clock will not be updated.
4. Confirm by tapping outside the time picker.
If the locations you have set under
Control panel >
International
are in a country/region that currently has
summertime (daylight saving time), you can adjust the time and
date.
To turn daylight saving time on
1. On the
Time &date
tab, select
Summertime,
select the check
boxes for the zones that currently have daylight saving time.
2. Select
Done
.
Format tab
You can specify how you want the time and date to be displayed
on the screen, and if you want to use the 12-hour (am/pm) or 24-
hour time format.
Time & date
The current time and date. Here you can also turn
Summertime (daylight saving time) on or off for your
location.
Format
Specify how you want the time and date to be displayed
on the screen.
Workdays
Specify the days in your working week.

Control panel 151
Preliminary Layla850 P1B
To set the time and date display format
1. Select
Date format
and choose a format.
2. Select
Date separator
and choose a separator.
3. Select a
Time format
.
4. Select
Time separator
choose a separator.
5. Select
Done
.
Workdays tab
You can specify what days you work, if, for example, you want
to set an alarm that sounds only on workdays. You can also
specify the first day of your week to customize the display of
both Week and Month views in Calendar.
User greeting
Your P910a can show a user greeting on the standby screen
when you turn it on. Use this dialog to turn this function on or
off. You can define your own user greeting text (up to 32
characters).
The Connections tab
The connections tab contains settings related to how your P910a
communicates with other devices.
Bluetooth
Bluetooth wireless technology uses radio waves to enable
wireless connections between your P910a and other Bluetooth-
enabled devices. This method of linking works well at a range of
up to 10 metres. Obstructions between the transmitting devices
will have an effect on the performance. Read more about
connecting to other devices using Bluetooth wireless technology
in ‘Connection via Bluetooth wireless technology’ on page 134.
Bluetooth
settings are shown on two tabs:
Settings
• A device name for your P910a.
• Bluetooth on or off.
• If it should be visible to other Bluetooth equipped
devices.
Devices
A list of all the Bluetooth-enabled devices that your
P910a is paired (bonded) with.
• To change the name of a device, and to allow for
connection without confirmation, select the name in
the list.
• To remove a device from the list, select the name and
select
Remove
.
• To locate other devices in the vicinity, and add them to
the list, tap
Add
.

152 Control panel
Preliminary Layla850 P1B
Tip You will probably find that the preset name of your P910a,
and of devices you pair it with, are not very meaningful or easily
recognisable. It is a good idea to change these names to
something more useful. The name you choose for your P910a
appears on any devices you pair it with.
See ‘Pairing’ on page 135 for instructions on how to connect to
another device using Bluetooth wireless technology.
Security
On the
Settings
tab you can set the Bluetooth security related
settings of your P910a.
Cable
Use
Cable
to set the cable connection mode and the connection
parameters used when communicating through your P910a's
cable port.
• Set the cable connection mode. Please note that you must set
the mode to
Modem
when using the P910a as a modem and
when using the DUN (Dial-up Networking) Wizard.
• Set the baud rate, parity, number of stop bits, character length
and type of flow control required for the connection. When
connecting your P910a via the desk stand to a USB port on
your PC, use the following (default) settings:
Tip You can set the cable connection mode when the flip is
closed by selecting
Applications >
Connections
>
Cable.
GSM Networks
This option lets you choose what network to use when you are
outside your operator’s area. Choose if you want to search for a
Bluetooth on
All Bluetooth wireless technology functionality from
your P910a works. Visibility according to the
Visible
to other devices
setting.
Set Bluetooth to
Off
if you do not use Bluetooth, it
will decrease battery drain. Bluetooth will
automatically switch on if you use
Send as >
Bluetooth
from the applications
Visible to
other devices
Selected: All Bluetooth wireless technology
functionality from your P910a works.
Cleared: All Bluetooth wireless technology
functionality from your P910a works but you cannot
receive beamed items, and other devices cannot
initiate pairing with your P910a.
Baud rate
115200
Parity
None
Stop bits
1
Character length
8
Flow control
CTS/RTS

Control panel 153
Preliminary Layla850 P1B
new network or use a preferred one. You can also make a list of
preferred networks.
•
Search mode
– Select between automatic or manual search for
a network.
•
Select network
– Tap the button to get a list of available
networks.
•
New search
– Tap the button to search for available networks.
•
Preferred list
– Show the networks that your P910a will search
for when you are outside your home network.
Note Your operator may not allow you to access all available
networks.
To add a network to the preferred list
1. Tap
Add network
.
2. Select a network from the displayed list.
3. Select a position in the Preferred list and tap
Done
.
Infrared
Use this setting to control the state of the infrared port of your
P910a.
Set the infrared status to
PC connect
or
Modem
, as required.
You can set it
Off
,
On
or
On for 10 minutes.
Read more about
connecting to other devices using infrared in ‘Connection via
Infrared port’ on page 134.
Internet accounts
You access the Internet using an Internet Service Provider (ISP),
who supplies you with account details including: a username, a
password, and the phone number or Web site address that your
P910a automatically uses to access the Internet. You need to set
up an Internet account before you can:
• Access Web pages and download multimedia messages.
• Set up an email account to send and receive email messages.
Tip A simple way of setting up an Internet account is to ask
your service provider to send you a message that contains the
required information to create an account automatically on your
P910a.
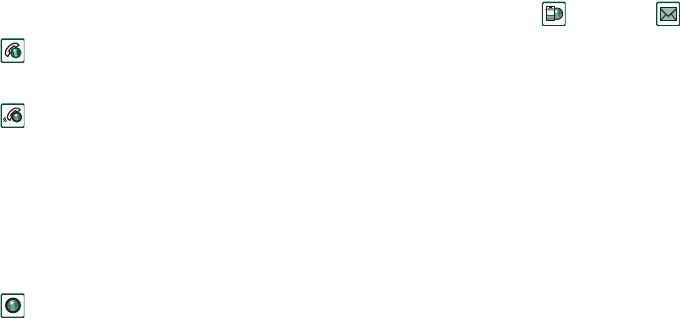
154 Control panel
Preliminary Layla850 P1B
There are three types of Internet account:
The dialog has two tabs:
Accounts
and
Other.
Accounts tab
The Internet accounts dialog lists all the Internet accounts that
have been set up on your P910a.
You can add a
New
account to the list and
Edit
or
Delete
an
existing account.
If you want to select an Internet account every time you connect
to the Internet, select the
Show connection
dialog
check box. This
may be useful if you use different Internet accounts for
Internet
and
Messages
.
Whenever you connect to the Internet, your
Preferred
account is
the account that your P910a prompts you to use.
To create a new Internet account
1. On the
Accounts
tab, select
New
.
2. Give the account a name. This will be the name shown in
your list of accounts. (In dialogs that appear while a
connection is being established the text
-GPRS
is
automatically added to names of GPRS accounts.)
3. Choose the
Connection type
for the type of account that you
want to create, GPRS or Dial-Up.
4. Continue entering settings as required. These will differ
depending on the type of account: GPRS, Dial-Up or High-
Speed Dial-Up:
Dial-Up
: For Dial-Up (CSD, Circuit Switched Data)
connections, you are charged for the length of
time that you are connected to the Internet.
High-Speed Dial-Up
: For High-Speed Dial-Up (HSCSD, High Speed
Circuit Switched Data) connections you are
charged for the length of time you are
connected but you can increase the connection
speed so that information is transferred faster.
The service must be included in your
subscription and billing rates from your
network operator may increase as you increase
the connection speed.
GPRS
: For a GPRS connection you are charged for the
amount of information you view, download, or
send.

Control panel 155
Preliminary Layla850 P1B
New GPRS account
For some accounts you may need to make advanced settings,
provided by your ISP. Select
Advanced
and enter settings on the
tabs as described below
GPRS Advanced tabs
Server User name and password
Normally, you do not have to enter a username and
password when you connect to a GPRS account.
However, some service providers may require you to
enter these details.
If you select the
Username and password required
check box, but do not enter a username and
password, you will be prompted to enter these when
the P910a connects.
Address
Enter the Internet address of your access point. The
address is supplied by your service provider.
Log in
The settings on this tab deal with IP and DNS
addresses.
The DNS address uniquely identifies your Internet
Service Provider (ISP)'s computers, which your
P910a uses to connect to the Internet. Your P910a can
normally fetch these addresses automatically from
most ISPs.
If, after setting up an Internet account, you cannot
connect to the Internet and you suspect these
addresses are incorrect, ask your ISP for their
primary and secondary DNS addresses.
An IP address consists of four 3-digit boxes and valid
input is between 000 and 255 in each box.
Proxy
A proxy server is a computer connected between
your P910a and the computer you communicate with.
This arrangement can be used for connections to
Remote Sync servers, or within a company network.
If this setting is needed, your company's Information
Services department or Remote Sync provider must
give you instructions.
Other
If your ISP supports Point to Point Protocol (PPP)
extensions, you can select the
Enable PPP extensions
check box. PPP extensions allow your P910a to
provide features such as encryption, which increases
the security of your Internet connection.
GPRS Advanced tabs

156 Control panel
Preliminary Layla850 P1B
New Dial-Up or High-Speed Dial-Up account
Your Internet Service Provider (ISP) supplies you with your
User
name
, your
Password
, and their
Phone number
, which your P910a
dials to connect to the Internet. If you have a High-Speed Dial-
Up account with your network operator you can increase the
speed of your connection by making settings on the
Speed
tab
under
Advanced
.
Tip To avoid having to change the phone number when you
travel abroad: enter the international dialling prefix (for
example '+') and the appropriate country code for your ISP.
For some accounts you may also need to make advanced
settings.
Select
Advanced
and enter settings on the tabs as described
below
Authentication
is used by some network operators to
identify the mobile phone connecting to their GPRS
network. There are different methods, or protocols,
for doing this.
Normal
: PAP (Password Authentication Protocol).
The user's username and password are transmitted
over the network in an unencrypted form.
Secure
: CHAP (Challenge Handshake
Authentication Protocol). The user's username and
password are never transmitted over the network.
None
: No authentication is required by the network
operator.
QoS
Check with your network operator before changing
any of the QoS (Quality of Service) settings.
The settings
Precedence
,
Delay
,
Peak rate
, and
Mean
rate
are all by default set to
Subscribed
, which means
that your operators default QoS (Quality of Service)
values will apply.
Reliability
is set as
Class 3
by
default.
GPRS Advanced tabs
Dial-Up and High-Speed Dial-Up Advanced tabs
Log in
The settings on this tab deal with IP and DNS addresses.
For an explanation of these settings, see
Log in
in the
‘GPRS Advanced tabs’ on page 155.
Script
As an alternative to entering your username and password
to access the Internet you may need to use a login script
stored on your P910a. Although uncommon, scripts may
be required by your Internet Service Provider (ISP).
Select the
Use login script
check box and enter the script
text in the
Script editor
.
If you select the check box
Plain text authentication
(required by some ISPs), the security of your connection
will decrease during the connection process. Once you
are connected, the security of your connection will be
restored.

Control panel 157
Preliminary Layla850 P1B
To edit an Internet account
1. On the
Accounts
tab, select the account in the list.
2. Select
Edit
.
3. Change your settings as desired.
4. Select
Done
.
Note If you change the
Connection type,
all account data for that
account will be deleted.
To delete an Internet account
1. On the
Accounts
tab, select the account in the list.
2. Select
Delete
.
3. Select
Done
.
Other tab
You can use the
Dial-up timeout
and
GPRS timeout
settings to set up
your P910a to disconnect automatically from the Internet, if you
are not using it. The connection is broken after the period you
specify has lapsed.
Preferred mode (bearer preference)
Please note that your P910a can be used for either voice (or
GSM data) calls or transferring GPRS data, but not both at the
same time. It may, however, still be connected to GPRS. As an
example, during GPRS data transfer (Icon: ) your P910a
Select the check box
Post connect terminal
if:
• The login script of the account that you are setting up
requires that you input certain information or you will
need to respond to prompts from the Internet accounts.
You are connecting to a Dial-Up account that uses Secure
Access generated by a separate smart card or password
generator.
Proxy
For an explanation of these settings, see
Proxy
in the
‘GPRS Advanced tabs’ on page 155.
Speed
You can only increase the speed of your connection if you
have a High-Speed Dial-Up account with your network
operator.
Secure
To enable secure access for this Internet account you
must link it to a vendor-associated Secure Token in this
dialog:
1. Select the
Enable secure access
check box.
To create or delete Secure Tokens on your P910a, select
Control panel > Other >Secure tokens
.
2. Select the vendor and token names of the Secure Token
that you want to link to this account from the drop-down
lists.
Other
If your Internet Service Provider (ISP) supports Point to
Point Protocol (PPP) extensions, you can select the
Enable PPP extensions
check box. PPP extensions allow
your P910a to provide features such as encryption, which
increases the security of your Internet connection.
Dial-Up and High-Speed Dial-Up Advanced tabs

158 Control panel
Preliminary Layla850 P1B
may not receive incoming calls. As soon as the transfer stops
(Icon: ) incoming calls will be accepted.
Setting the
Preferred mode
lets you choose how you want to use
your P910a:
•Select
GPRS only
if you do not want to be disturbed by
incoming phone calls while browsing the Web. All incoming
voice (and GSM data) calls are rejected. If you disconnect
from the Internet, incoming calls can be received. Outgoing
calls are possible, except during data transfer. This mode is
useful if you are using sensitive Internet services, such as
banking.
• If you select
GSM only
, your P910a will not be connected to
the GPRS network. If you choose to download email or
browse the Web, your P910a will connect to GPRS only as
long as is needed for the data connection.
• If you select
Automatic
, your P910a will let you answer
incoming GSM calls while having normal GPRS
functionality. A GPRS data connection will be temporarily
interrupted by a voice call.
Messaging accounts
The
Messages
application can handle many different types
of messages, but you must first set up accounts and make
settings as described below.
The Messaging accounts dialog has four tabs, one for each type
of messaging account:
Tip A simple way of setting up an email or multimedia message
account is to ask your service provider to send you a message
that contains the required information to create an account
automatically on your P910a.
Read more about the different types of messages in ‘Messages’
on page 85.
Email
You can have any number of email accounts. To receive
and send email, you must first set up an Internet account
(if one is not already set up). See ‘Internet accounts’ on
page 153.
SMS
You can only have one SMS (Short Message Service)
account.The settings on this tab also apply to EMS
(Extended Message Service) messages.
MMS
You can only have one MMS (Multimedia Messaging
Service) account. To receive MMS messages you must
first set up Internet and WAP accounts (if not already set
up). See‘Internet accounts’ on page 153.
Area
You can only have one
Area info
account. The number of
Area Information channels that you can subscribe to is
limited by the space on your SIM.

Control panel 159
Preliminary Layla850 P1B
Email tab
The
Email
tab shows a list of the email accounts on your
P910a.You can add a
New
account to the list and
Edit
or
Delete
an
existing account.
You can choose one of your email accounts as
Preferred.
This
will be the email account that your P910a uses when you use
Send as
to send an entry as email directly from one of your
P910a applications
To create a new email account
1. On the
Email
tab, select
New.
2. Enter the following settings on the tabs:
Email account basic tab settings
Account name
This is the name you give to your email account.
Your name
This name appears on your outgoing email
messages.
Email address
Your Internet Service Provider (ISP) supplies you
with your email address.
Connection type
Select POP3 or IMAP. POP3 is most common.
IMAP makes it possible to subscribe to server
based folders.
Internet account
Select the Internet account to access your email
messages.
Email account Inbox tab settings
Username
Password
Incoming server
address
Your Internet Service Provider (ISP) supplies you
with your username, your password, and its
incoming server address, which identifies the
computer where your incoming email messages
are stored.
Open in full
screen
Select to open messages in full screen portrait
view.
Download
If you want to limit the data traffic, you can choose
to receive just
Just headers
(the sender, subject,
and date only) or set a size limit (if a message is
larger than the
Smaller than
limit, only the headers
are downloaded). You can download the complete
message later. You can also set a limit to the total
number of messages held in your email account at
any one time.
Schedule
Select
Schedule
to schedule an automatic
download of your incoming email messages.
Messages that are waiting in your
Outbox
will not
be sent at the same time.

160 Control panel
Preliminary Layla850 P1B
To edit an email account
1. On the
Email
tab, select the account in the list.
2. Select
Edit
.
3. Change your settings as desired.
4. Select
Done
.
To delete an email account
1. On the
Email
tab, select the account in the list.
2. Select
Delete
.
3. Select
Yes
.
Email account Outbox tab settings
Outgoing server
address
Your Internet Service Provider (ISP) supplies you
with its Outgoing server address, which identifies
the computer through which your outgoing email
messages are sent.
Use SMTP
authentication
Some SMTP servers might also require
authentication when sending email. In that case,
select the check box
Use SMTP authentication
and
enter your
User name
and
Password
.
Use Inbox login
details
If the SMTP server accepts using your Inbox login
information for authentication, select the check
box
Use Inbox login details
.
Email account Advanced tab settings
Secure
connection
Your Internet Service Provider (ISP) will tell you
whether you can use either a
Secure connection
or
Secure password authentication
.
Outgoing mail
port
Normally 25. Do not change unless your ISP
instructs you to.
Use MIME
encoding
MIME encoding is a standard that allows non-
textual information (for example graphics) and
accented characters to be sent in email messages.
If you should not wish to
Use MIME encoding
,
clear the check box.
Incoming mail
port
Normally 110. Do not change unless your ISP
instructs you to.
Secure
password
authentication
A secure connection means that all information
(including your username, password, and all
messages) is encrypted to maximize security while
you are connected to the Internet. In contrast,
secure password authentication means that only
your password is encrypted.
Email account Advanced tab settings

Control panel 161
Preliminary Layla850 P1B
SMS tab
Use these settings to set up text messaging and EMS
messaging:
Tip If you send and receive text messages in several countries,
you can avoid having to change the service centre address when
you travel abroad by entering the international dialling prefix
(for example '+') and the appropriate country code for your
network operator.
MMS tab
Use these settings to set up multimedia messaging:
Messaging accounts SMS tab settings
SMS Service
centre address
The SMS Service centre address is the phone
number where your text messages are stored. It is
normally imported from the SIM card but if that
fails, your network operator can provide you with
the service centre address.
Character Set
Your network operator may also specify the
Character set
.
Messages stored
for
You can set a time limit after which text messages
are deleted from the network by choosing a value
in the
Messages stored for
list.
Connection type
Specify if you prefer to use GPRS or GSM
connection as directed by your network operator.
Messaging accounts MMS tab settings
Service centre
address
The MMS Service centre address is the URL to the
server on which your multimedia messages are
stored. Your MMS service provider or your network
operator can provide you with the service centre
address.
WAP account
Specify which of your configured WAP accounts
you wish to use.
•WAP accounts are created in
Control panel >
Connections > WAP accounts
Automatic
Select between:
•
Off
- automatic download is off, you will receive
notifications of incoming messages and have to
download them manually.
•
Home only
- messages are downloaded
automatically when you are connected to your
home network.
•
On
- messages are also downloaded automatically
when you are roaming outside your home network.
Download size
and
Smaller than
Set whether or not to have a size limit for incoming
messages:
•
No restrictions
- the size of the incoming messages
does not matter, all messages will be received.
•
Smaller than
- messages smaller than the limit will
be received, bigger messages will be deflected.

162 Control panel
Preliminary Layla850 P1B
Advanced settings
Select
Advanced
to make settings about how your P910a will
send and receive multimedia messages.
Area tab
On the Area tab you make settings related to Cell Broadcast
Services. These include both Area Information and Cell
Information services. The availability of Cell and Area
Information Services is operator-dependent.
Your network may broadcast the area code as cell information.
Your P910a can display it below the network name in the flip
closed standby view.
MMS Advanced settings tabs
Send
The values you give these settings will be default for all
multimedia messages that you send. You can of course
choose other values for an individual message in Messages.
You can set the
Validity period
for your messages, that is,
how long they should be available to the receiver.
Maximum
is the default.
You can give your messages a
Priority
of
Low
,
Normal
(default) or
High
.
You can set
Content alert
for the multimedia messages you
create to help you check content.
If you select
Warning
, a warning message is displayed
whenever you add a non-conformant item to a multimedia
message. You have the option to send anyway. If you select
Restricted
, the message will not be sent in the situation
described above.
Free
means no restrictions.
Select the check boxes to provide the function you want:
Hide number
prevents the sent message from showing your
number.
Read report
requests a read notification from receivers of
your messages.
Delivery report
requests a delivery notification from
receivers of your messages.
Reply with history
includes the original with your reply.
Receive
These settings apply to multimedia messages that you
receive.
Select the
Play full screen
checkbox, when you want to
play MMS messages in full screen.
Select the check boxes to send a notification message to the
sender when a message is:
• Delivered to you:
Allow delivery notification
• Read by you:
Allow read notification
You can filter reception of incoming messages by message
type (
Advertisements
,
Information
) or from senders not
listed in Contacts (
Anonymous senders
). Selecting a check
box will filter out messages of that category.
To receive multimedia messages only from senders listed
in your Contacts, select all other check boxes and clear the
check box for
Anonymous senders
.
MMS Advanced settings tabs

Control panel 163
Preliminary Layla850 P1B
Area Information is a type of text message that is sent to all
subscribers in a certain network area, for example a local traffic
report.
To enable Cell Information
Select the
Cell information
check box
To turn Area Information on
1. Check the
Area information
check box. Received messages
will be automatically stored, and displayed in the list when
dismissed.
2. The list shows all the channels that you have defined on your
P910a. The check box for each channel shows if it is on
(selected, ready to receive messages) or off (cleared, not
active):
To add a new channel
1. Select
New
.
2. Enter the number of the new channel in the New Channel
dialog. Channel numbers can be from 0 to 999. If there are
too many channels defined,
New
will be disabled and you will
see a message:
Maximum channels on SIM
.
Channel numbering is operator-dependent. Please consult
your network operator for information.
To turn a channel on or off
Select the channel in the list and select the check box. To turn it
off, clear the check box.
To delete a channel
Select
Delete
. Since deleting a channel cannot be undone, you
will be asked to confirm the delete. Deleting the channel will
also delete any stored Area Information messages for that
channel in your Area Info Inbox.
WAP accounts
Use these settings to set up and manage WAP accounts on your
P910a.
WAP accounts are intended for multimedia messages and for
accessing the Internet through a WAP gateway. (Such gateways
make use of proxy port 9200-9203.) All other proxy settings
should be included in your Internet accounts.
For security reasons, some WAP pages and services, for
example online banking, can only be accessed from a particular
WAP account.
The dialog has two tabs:
Basic
and
Preferred.
Basic tab
The dialog shows a list of all the WAP accounts on your P910a.
You can add a
New
account to the list and
Edit
or
Delete
an
existing account.

164 Control panel
Preliminary Layla850 P1B
Note You access WAP pages through an Internet Service
Provider (ISP) so, when you create a WAP account, you must
choose one of your existing Internet accounts or first create a
new one.
To create a new WAP account
1. Enter the name of the WAP account.
2. Select the Internet account you want to use.
Preferred
indicates the account set as preferred in the Internet setup.
3. If you are going to use a WAP gateway or a proxy, select the
Use Proxy
check box.
4. Enter the
Address
of the gateway or proxy.
5. Enter the
Port
of the gateway or proxy.
For a WAP gateway use:
– 9201 for a normal connection.
– 9203 for an encrypted secure connection.
6. If the gateway/proxy requires
Username
and
Password
, which
is very unusual, fill in the last two fields in the dialog.
Preferred tab
Select the check box to set a preferred WAP account. It will be
used when you use the
Open page
command in the
Internet
application and when a page is opened from another P910a
application. If you do not set a preferred WAP account, the
preferred Internet account will be used when connecting to the
Internet.
The Other tab
The other tab contains all settings that are not related to the
device or connections. This is also where settings from system
components and add-ons, developed by third-party developers,
will be found.
Certificate manager
Digital certificates ensure that the Web or WAP pages you visit,
or any software you install, really are created by the person you
expect.
Certificates may be present on the pages that you view or the
software that you download. Your P910a compares these
certificates with a set of certificates that are stored in
Certificate
manager
to ensure the authenticity of the page or software. If the
certificates do not match, your P910a informs you, and gives
you the following choices:
• Prevent the page being loaded or the software being installed.
• Continue at your own risk.
The certificates on your P910a have been created and issued by
an independent organization that ensures their authenticity.

Control panel 165
Preliminary Layla850 P1B
Security information
Security information is displayed when
Certificate manager
cannot be sure of the origin of the page or software. For
example, security information will be displayed if:
• The certificate on a page has expired.
• The identity of a software manufacturer cannot be verified.
Security information is also displayed when a certificate on your
P910a has:
• Expired.
• Been revoked by the independent organization that issued it.
Adding and deleting certificates
Your P910a handles certificates automatically so, most of the
time, you can browse the Internet securely without using
Certificate manager
. If you do need to add or delete a certificate,
you will usually be informed by your network operator or
system administrator. You should delete a certificate from
Certificate manager
if you are informed, or suspect, that:
• The certificate does not belong to the person who supplied it.
• The certificate was issued incorrectly by the independent
organization that created it.
Type of certificate
The type can be either
User
or
Certificate Authority
.
•
User
certificates contain your identity. This type of certificate
is used when the server asks for client authentication. The
client application requests you to identify yourself by
choosing a user certificate.
•
Certificate Authority
certificates contain server details. This
type of certificate is handled by your P910a when the server
only requires server authentication. This means that your
identity remains anonymous.
Flip settings
Flip keyboard
- Specify the keyboard your P910a has on the
inside of the flip.
Enable virtual flip
- Select the check box to use of the Virtual flip
when the flip of your P910a has been removed.
Format disk
This dialog primarily lets you rename and format any Memory
Stick that you install in your P910a. Your P910a comes with one
Memory Stick.

166 Control panel
Preliminary Layla850 P1B
When you format a disk, you delete all the information on it,
including any applications that you may have installed. You also
delete all information placed on it by other devices (these
folders are hidden except in File Manager).
IP Security manager
The IP security manager displays stored policies and only one
policy can be activated at a time.This is used for secure
connections over the Internet, typically to a corporate intranet. If
needed, your company information services department will
supply the necessary information.
There are two types of passwords needed:
•IP security password: is to be set when activating the very
first policy, that is, this password is only set once, but it is
possible to change it later at any time by tapping the
Password button.
•Activation password: is needed when a policy is activated
for the first time and the supplier of the policy gives this.
Language selection
Use this list of all languages stored on your P910a to change
language. The highlighted entry is the language presently in use.
You can delete all languages except English.
To conserve storage space only a limited set of languages is
loaded on your P910a at delivery. When you select one of the
languages from the list the unused languages in the set are
deleted from the memory of your P910a. You can, at any time,
download additional languages from www.sonyericsson.com/
support
Master reset
Use
Master reset
to reset your P910a.
Note All user data, as well as pre-installed media files and
application data files (including, for example, backgrounds,
ring signals and pictures), will be deleted and settings will be set
to the state they were, after you selected the language. The
selected local language will be restored.
If you have backed up your user data, you can restore it from the
backup, see ‘Restoring data’ on page 141.
You can restore media files and application data files from the
Multimedia for P910a CD, or from the Web.
If you want to keep installed applications, clear the
Delete user
installed applications
check box.
Control panel 167
Preliminary Layla850 P1B
Secure tokens
If you need access to a network that requires secure access
(often known as ‘strong authentication’), for example a
corporate intranet, you can set up the Internet account you use to
log in to that network to use secure access and generate the
required one-time password when you make the connection.
Your P910a supports the following secure access systems:
• SecureID from RSA
• SafeWord from Secure Computing
It is also possible to add other access systems through third-
party software.
If you have a separate device or application that requires one-
time passwords according to one of these systems, you do not
need a separate hardware token generator (Hard Token). Your
P910a can generate passwords that are not associated with an
Internet account.
You manage secure access in your P910a using Secure Tokens.
Each token is associated with one vendor/system and may be
associated with one or more Internet accounts (or none, when
you use your P910a as a Hard Token). You can configure as
many tokens as needed.
Tip Dialog details when using secure access are vendor, system
and network-specific. You should contact the administrator of
the network you wish to access to get the correct information.
Storage manager
The list shows the applications on your P910a and the space
they occupy. Tapping the
Files
button lets you manage general
files stored internally on the P910a or on a Memory Stick.
Deleting information from applications
To delete information from an application: select an application
in the list. This application is then displayed. Delete the old or
unwanted entries or information.
Here are some housekeeping tips for different applications:
• Delete any unwanted recordings as even short ones occupy a
lot of space.
•In
Messages
, delete any old messages from your Inbox or
Sent folders.
•In
Calendar
, delete all entries in a specified time period by
selecting
Calendar > Remove entries
in your list of entries.
•In
Tasks
, delete all completed entries by selecting
Tasks > Delete completed
in your list of entries.
• Throughout your P910a, use folders as you create and
receive information to speed up housekeeping later.
168 Control panel
Preliminary Layla850 P1B
Deleting or copying general files
Tap
Files
to see lists of all stored general file types on your
P910a and the Memory Stick. You can copy files to a specified
folder, delete unwanted files, and launch the appropriate
application to view or play a file in the list.
To delete files or copy files between folders
1. Select
Files.
2. Select the
Type
of file to move or delete.
3. Select the
Location
folder.
4. Tap one or more check boxes to select the files to copy or
delete.
5. To copy files, tap
Copy
and select the destination folder.
To delete files, tap
Delete.
You will be asked to confirm.
Uninstalling applications
If you uninstall an application, you can always reinstall it if you
want to use it later.
To uninstall applications
1. Select
Uninstall.
A list of applications that can be uninstalled is shown.
2. Select the application to uninstall.
3. Select
Uninstall.
Note You cannot uninstall the standard applications that come
with your P910a.
WIM PIN settings
WIM (WAP Identity Module) is used for performing security
functions, especially to store and process information needed for
user identification and authentication. It is a tamper-resistant
store for private keys, certificates and other items that may
require a PIN for access or modification.
The
WIM management
dialog consists of a PIN choice list and a
WIM items list.
You can select a PIN from the PIN choice list. The WIM items
list changes content dynamically, displaying only the keys that
are protected by the selected PIN and also have an associated
certificate. Other keys that are protected by the selected PIN but
do not have an associated certificate are not shown in the WIM
item list. This is the case when WIM PIN (PIN-G) is selected.
Note The PIN-G applies to the whole WIM and any items that
do not have a different PIN. This means that no specific items on
the WIM are linked to PIN-G.
You can change status of a PIN:
•Enable PIN A PIN code that is enabled is requested for
authorisation of an operation. To proceed with the operation
you must enter the PIN code.

Control panel 169
Preliminary Layla850 P1B
•Disable PIN A PIN code that is disabled is not requested to
authorize an operation to proceed.
To change the PIN code
1. Select the PIN you want to change from the choice list.
2. Select
Change PIN
.
If a PIN code has been blocked, you must unblock it before it
can be used again. Select the PIN and select
Change PIN
.
170 Getting started with Internet and Messages
Preliminary Layla850 P1B
Getting started with Internet and Messages
Introduction
Before you can use
Internet
and
Messages
to access the
Internet and send or receive messages, you will need to make
some user-specific settings in the
Control Panel
.
Service provider
You will need a service provider to connect your P910a to the
network.The service provider could be:
• An Internet Service Provider (ISP) which connects you to the
Internet.
• An access point provided by your network operator.
• A private service provider such as your company or your
bank.
You will need to enter specific service provider details into your
P910a to set up an Internet account. It can hold the details of
multiple service providers, for example, you may have separate
Internet and corporate accounts.
Your network operator or retailer may have pre-installed
services, check with them.
Connection type
When your P910a connects to a service provider, it will use a
GSM or GPRS network provided by a network operator. Many
network operators offer both GPRS and GSM services.
The connection type defines which network your account uses
to connect to the Internet. GPRS Internet accounts use the GPRS
network, and Dial-Up Internet accounts use the GSM network.
GPRS
If your network operator supports GPRS, a GPRS Internet
account allows you to:
• Remain permanently connected to the Internet without being
charged for connection time. With a GPRS account, you are
charged for the amount of information you view, download
or send when your are connected to the Internet. Check your
operator for details of your subscription.
• Avoid having to reconnect to the Internet if the connection is
broken.
Dial-Up
For both Dial-Up and High-Speed Dial-Up accounts, you are
charged for the length of time you are connected. If your
network operator supports them, you can increase your
connection speed (at a cost) by setting up a high-speed account.
Getting started with Internet and Messages 171
Preliminary Layla850 P1B
Automatically set up service
provider and messaging
The easiest way to set up your P910a is automatically, through
your service provider.
For
Messages
settings your P910a supports automatic setup
of:
• email accounts
• MMS message (Multimedia Messaging Service) settings.
Check your service provider's Web site for information or
contact their support desk and ask about automatic remote
phone set-up of ISP (Internet Service Provider) settings, email
and MMS message settings.
If remote phone set-up is possible, they will send you the phone
set-up messages required by SMS message.
Settings valid for your network operator and one or more of
these services may also be available through the phone setup-
message generator at www.SonyEricsson.com/support
To check that your SMS messaging settings are correct
1. Select
Control panel > Connections > Messaging accounts >
SMS.
2. Check the information, for example the address of the service
centre.
Accepting new Internet or Messages
settings
New phone set-up messages will appear in the
Auto setup
account
inbox of
Messages.
(Phone set-up messages for
email accounts will, however, be found in your
SMS message
inbox.)
When an phone set-up message appears, select it.
A dialog with a brief text and operator message appears on the
screen. You can accept the new settings or leave the message in
the inbox
.
If the name of the new account is the same as that of an existing
account you can choose to create a new account with the same
name or replace the existing account.
Note Never accept remote phone set-up messages if you are not
expecting them or are unsure where they have come from.
Manually set up service
provider
As an alternative to setting up an Internet account automatically,
you can enter the settings manually from
Control panel >
Connections > Internet accounts.

172 Getting started with Internet and Messages
Preliminary Layla850 P1B
First collect all the information you will need. You can obtain
this information from your ISP (Internet Service Provider), or if
you are connecting to a corporate network, your information
services department.
All settings are described in ‘Internet accounts’ on page 153.
To set up a new account follow the steps under ‘To create a new
Internet account’ on page 154.
Manually set up messaging
As an alternative to setting up
Messages
automatically, you can
enter the settings for the messaging services you want to use
yourself from
Control panel > Connections > Messaging
accounts
.
First collect all the information you will need. You can obtain
this information from the following sources:
• If your network operator offers an email service you can get
the necessary details from them.
• Your Internet service provider.
• Your information services manager in the case of connecting
to the corporate network to access your work email account.
• Your network operator in the case of SMS message and Cell
Broadcast Services.
The dialog has four tabs, one for each type of messaging
service:
email
The provider of your email service, or for a corporate
account, your information services manager can provide
you with the necessary details.
All settings are described in ‘Email tab’ on page 159.
To set up a new account follow the steps under ‘To create a
new email account’ on page 159.
SMS
message
Short Message Service
The necessary settings are usually provided on your SIM
card.
All settings are described in ‘SMS tab’ on page 161.
MMS
message
Multimedia Messaging Service
Your MMS messaging provider will be able to provide you
with the necessary information.
Before you set up MMS messaging you need to set up an
Internet account in
Control panel > Connections > Internet
accounts
and a WAP account in
Control panel >
Connections > WAP accounts
All settings are described in ‘MMS tab’ on page 161.
Area
Cell Broadcast Service: Area and Cell information
Your network operator will be able to inform you if these
services are available.
All settings are described in ‘Area tab’ on page 162.

Getting started with Internet and Messages 173
Preliminary Layla850 P1B
Setting up WAP accounts
A WAP account (sometimes called a WAP profile) defines a
service provider and gateway that should be used when making
a connection to WAP services. You also need a WAP account
when you use MMS message (Multimedia Messaging Service).
The WAP gateway sits between your P910a and the WAP site
coding and decoding information. You can set up details of more
than one gateway if necessary, for example one for your MMS
messaging, one to access corporate data over WAP, and another
to access your bank's WAP service.
The easiest way to set up a WAP account on your P910a is
automatically, through your service provider. Check your
service provider's Web site for information or contact their
support desk and ask about automatic setup. You can also find
more information, and settings for many operators on:
http://www.SonyEricsson.com/support.
Note You access WAP pages through an Internet Service
Provider (ISP) so, when you create a WAP account, you must
choose one of your existing Internet accounts or first create a
new one.
Manually set up a WAP account
Instead of setting up a WAP account automatically, you can
enter the settings manually from
Control panel > Connections >
WAP accounts
.
First collect all the information you will need. You can obtain
this information from the WAP service provider, or if you are
connecting to a corporate network, your information services
manager.
All settings are described in ‘WAP accounts’ on page 163.
To set up a new account follow the steps under ‘To create a new
WAP account’ on page 164.
Using your P910a as a modem
Your P910a contains a complete GSM/GPRS modem, so you
can use it to connect your PC to the Internet or corporate
intranet.Your P910a appears to the laptop like a normal modem.
You link the laptop to your P910a using Bluetooth wireless
technology, infrared, or cable (USB or serial).The connection
over the air can be by any of the bearers that your P910a
supports:
•GPRS
• HSCSD (High-speed Circuit Switched Data)
• CSD (Circuit Switched Data).
A Windows modem driver file and a PC utility, the
Dial-Up
Networking Wizard,
is provided on your
Sony Ericsson PC Suite
CD.
The wizard will help you configure DUN (Dial-Up Networking)
entries on your PC for GPRS and HSCSD connections.
174 Getting started with Internet and Messages
Preliminary Layla850 P1B
Once paired with a Bluetooth-enabled laptop, your P910a is
ready to make a connection to the Internet or corporate network.
Since Bluetooth is wire-free and requires no line-of-sight
alignment, you can place the laptop in a comfortable position
and let your P910a remain in your pocket, briefcase, or even be
placed up to 10 metres away.
If you wish to use an infrared link, the range is typically up to
one metre. The two infrared ports must be kept in line of sight,
at an angle of no more than approximately 30 degrees.
The Dial-Up Networking Wizard
The wizard simplifies creating GPRS DUN connections by
setting the proper values in the PC DUN entry and linking the
entry to one of the GPRS configurations in your P910a. You can
also view and modify the GPRS settings in the P910a.
For HSCSD DUN entries, the wizard updates the modem
settings such that the specified data rate and type of bearer
(ISDN / Analogue) will be used when you make a DUN
connection.
You can view or change the DUN entries created with the
wizard using the standard Windows DUN user interface.
The Dial-Up Networking Wizard software included in the
Sony
Ericsson PC Suite
must be installed in your PC and your P910a
must be connected to the PC via cable, infrared or Bluetooth
wireless technology. See ‘Connecting to other devices’ on
page 133.
Make sure that you have any information concerning, for
example, phone numbers, names of servers or domains, that the
server that you want to connect to may require.
To set up a GPRS or HSCSD (High-Speed Circuit Switched
Data) connection using the Dial-Up Networking Wizard
1. Start the
Dial-Up Networking Wizard
from the Sony Ericsson
folder of the Start menu on your PC.
2. Choose Create a new Dial-Up connection.
3. Follow the instructions in the wizard.
To edit a previously created DUN entry
1. Start the
Dial-Up Networking Wizard
from the Sony Ericsson
folder of the Start menu on your PC.
2. Modify a Dial-Up connection.
3. Select the desired connection from the list.
4. Follow the instructions in the wizard.
To define P910a as a modem
To set up a CSD (GSM Data) or HSCSD connection you will
need to install your P910a as a modem manually.
Getting started with Internet and Messages 175
Preliminary Layla850 P1B
To set up a Dial-Up entry for CSD or HSCSD
1. On the PC, open the Control Panel.
2. Choose to install a new modem.
3. Choose your P910a as the modem.
4. Select the port where the P910a is connected.
5. Confirm the selection. A new DUN connection has been
created.
Connecting
To connect using a DUN entry created by the wizard
1. If you are connecting by cable, set your P910a to
Modem
cable connection mode, see ‘Cable’ on page 152.
2. Use any conventional method to make a connection:
– Click the Desktop shortcut created by the wizard.
– Select the entry from within the system DUN folder.
– Run an application that has built-in support for using
DUN entries (for example a browser or email client).
GPRS - connection information
Icons on the status bar let you overview the information on data
connection calls.
A combined signal strength and GPRS signal icon provides
information on the GPRS service status. The GPRS connection
status appears above the signal strength icon. There are three
states for the icon, unavailable , available and
attached .
The HSCSD/CSD and GPRS icons are displayed during
a data connection. Where GPRS is suspended, for example, the
GPRS suspended state is indicated by a combined icon .
There are three states for the GPRS icon: Active ,
active transferring data (alternates between and )
and suspended . Any data transfer either received or sent
activates the GPRS active icon for 5 seconds.
Connection information
When you select the data connection icon, during an active data
connection, a menu appears with the choices
Information
and
Disconnect
.
• Select
Information
to view information on the connection.
• Select
Disconnect
to end the connection.
GPRS status information
When the signal strength icon is selected, network, GPRS status
information and, if applicable, GPRS error text appear.

176 Getting started with Internet and Messages
Preliminary Layla850 P1B
GPRS data log
A new GPRS data log entry is created when a GPRS account
establishes a connection for the first time. It does not wait for
transfer data. If there is an existing data log associated with the
current GPRS connection, this is updated.
The GPRS data log shows a list of GPRS Internet accounts.
Where one account is active or suspended, the relevant status
icon is displayed to the left of the account.
To view information on an account
1. Select an account in the list.
2. Information on the account is shown. The data log is updated
dynamically.
Buttons allow you to delete or reset the current data. These
buttons are disabled during an active or suspended
connection.
To delete the log for an account
1. Select an account in the list.
2. Select
GPRS data log > Delete
.
To reset the log of an account
1. Select an account in the list.
2. Select
GPRS data log > Reset
.
To delete or reset the log of several accounts
1. Select the check boxes of the accounts in the list to be deleted
or reset.
2. Select
GPRS data log > Reset
or
GPRS data log > Delete
.
Session data
When the connection is deactivated, for example when the
current Internet account is disconnected, the total data sent and
received in the last session is displayed.
The information is displayed for a couple of seconds. To dismiss
the information when the flip is closed, press .

Troubleshooting 177
Preliminary Layla850 P1B
REFERENCE
Troubleshooting
This chapter consists of a selection of suggestions for solving
possible problems with your P910a. If this does not help, please
try the Knowledge base on the global support site,
www.sonyericsson.com/support. There you also find other
information that can be helpful.
Your P910a also contains help files with additional information.
Access help with the menu option
Edit > Help
or, in many dialog
boxes, with the help icon .
To improve performance, you can update the software of your
P910a. See “Sony Ericsson Update Service” on page 132.
If you need to hand in your P910a for repair, please note that
you may lose information and content that you have saved in
your P910a. You are advised to make a copy of such information
(make a backup) before handing your P910a in for repair.
Start-up problems
P910a will not
start
• Handheld phone: recharge or replace the battery.
• Make sure the contacts on the battery and
charger are clean and avoid charging the battery
in extreme temperatures.
• Vehicle Handsfree: check that the P910a is
properly inserted into the holder and check the
fuse in the fuse holder (connected to the battery
cable).
Lock problems
Insert card • Make sure a SIM card is activated and inserted
into your P910a. See ‘SIM card’ on page 12.
Blocked SIM
card
If your PIN is entered incorrectly three times in a
row, the SIM card will be blocked. You can
unblock it by using your PUK. See ‘SIM card lock’
on page 37.

178 Troubleshooting
Preliminary Layla850 P1B
Device lock Phone locked is displayed followed by the prompt
Enter lock code
.
Your P910a is locked to prevent unauthorized use.
To unlock the P910a:
• Enter your device lock code, 0000 by default,
then press or .
Key symbol The keypad is locked to prevent unintentional key
action.
Press followed by to unlock the
keys.
Indicator light
Flashes red This indicates that the battery is running low and
soon needs recharging or replacing with a spare.
• With Vehicle Handsfree (VHF) equipment, make
sure that the following are inserted or connected:
Your P910a and its holder, the fuse in the fuse
holder, and/or the external antenna.
Does not flash If the indicator light at the top of your P910a does
not flash and no network is displayed there is no
network within range. See ‘Telephone does not
work’ on page 178.
Communication problems
Telephone does
not work
• The received signal can be too weak, possibly
because you are being shielded from the signal.
Check your display signal strength indicator.
Move outdoors or up from the ground to obtain a
sufficiently strong signal.
• Make sure the P910a is not set in Flight mode.
• Your P910a might be busy sending or receiving
data or email.
• Check the settings for diverting or restricting
calls. See ‘Divert calls’ on page 54, ‘Accept
calls’ on page 54 and ‘Restrict calls’ on page 55.
•If
Emergency calls only
is displayed on the
screen, you are not allowed to use the network
within range. You can, however, usually make an
emergency call using the emergency number.
•If
No network
is displayed on the screen, you are
in an area that is not covered by a network or the
received signal is too weak.
Cannot hear
incoming call
• Increase the ring signal volume.
• Your P910a is set in silent mode.
• Your P910a is set in Flight mode.

Troubleshooting 179
Preliminary Layla850 P1B
The person I
am talking to
has a problem
hearing what I
am saying
• Make sure you do not cover the microphone
when you talk. You find the microphone at the
bottom of the phone, next to the connector.
• You could be almost out of network range. The
sound improves with a better network
connection.
Cannot use
WA P
• Your subscription does not include WAP. Check
with your service provider.
• The settings are not correct. Enter new settings.
Contact you service provider or visit
www.sonyericsson.com/support and use the
WAP phone setup-message generator.
Cannot send
nor receive
SMS or MMS
• Your subscription does not include SMS or
MMS. Check with your service provider.
• Check with you service provider that you have
entered the correct Service Centre phone
number.
• Check the settings in the Control panel. Contact
you service provider or visit
www.sonyericsson.com/support and use the
MMS phone setup-message generator.
• Make sure that Flight mode is deactivated.
• Phone memory might be full. Delete some
pictures or music, for example.
Cannot use
e-mail
• Check with your service provider that your
subscription includes email.
• The settings might not be correct. Enter new
settings. Use the phone setup-message generator
for email on www.sonyericsson.com/support
to send you an auto setup message, or contact
your service provider. See also “Email tab” on
page 159.
Fax calls • Your P910a does not support fax transmission.
Even if your operator subscription supports fax
transmission, fax calls will be rejected. However,
they can be diverted to another number such as
the office fax number, see ‘Divert calls’ on
page 54 for more information.
• Make sure potential fax callers do not try to send
a fax to your P910a as they can experience a
number of retries before the fax transmission is
stopped.

180 Troubleshooting
Preliminary Layla850 P1B
Problems to connect to a PC or another device
Not possible to
establish
connection
using cable
• Make sure that the Sync Station and cable is
correctly connected to the PC.
• Make sure that the correct COM port on the PC
is enabled. Right-click the P910a link symbol in
the PC taskbar, and select Properties. Select the
USB COM port.
• Make sure the device lock is not active.
•Uninstall
Sony Ericsson PC Suite
. Connect the
Sync Station with the P910a to the PC. Reinstall
Sony Ericsson PC Suite
, following the
installation procedure carefully.
• Check for
Sony Ericsson PC Suite
updates on
www.sonyericsson.com/support. If you find a
new version of the program, download it and
install this instead of the old one.
Cannot transfer
pictures
Place the P910a in the Sync Station. In the PC,
open My P910a and browse through the P910a file
system to find the picture.
Cannot transfer
items with
Bluetooth
wireless
technology
• Make sure that Bluetooth wireless technology is
activated.
• Make sure that the devices are in range with each
other. Maximum range is 10 metres.
Cannot
establish
connection with
a Bluetooth
wireless
technology
handset or
handsfree
• Make sure that the devices are correctly paired.
See ‘Connection via Bluetooth wireless
technology’ on page 134.
• Make sure that the handset or handsfree is
charged.
• Make sure that the devices are in range with each
other.
Cannot find PC
software for
downloading
• You can find PC software on
www.sonyericsson.co/support and also on
local sites.
Cannot use my
P910a as a
modem
• First ask your service provider to enable your
data connection.
• Then connect your P910a to your PC with cable,
Bluetooth technology, or infrared. See “Using
your P910a as a modem” on page 173,
“Connecting to other devices” on page 133, and
Knowledge base on www.sonyericsson.com/
support

Troubleshooting 181
Preliminary Layla850 P1B
Cannot
synchronize
with my PC
• Connect to your PC with cable, Bluetooth
technology, or infrared. See “Connecting to
other devices” on page 133.
• Then install
Sony Ericsson PC Suite
, and make
necessary settings. See “Synchronization and
backup” on page 138 and the help files in
Sony
Ericsson PC Suite
. See also Knowledge base on
www.sonyericsson.com/support
Memory full
When your P910a has no more space available to
save or store information, the icon is shown in
the status bar. You must then free up memory to
ensure the proper functioning of the P910a.
• Make sure regular backups are made with
Communications Suite to reduce the risk of lost
or corrupted information.
Storage Wizard • Tap the icon in the status bar to start the
Storage Wizard, or start it in the application
launcher. Then use the storage wizard to move
items from the P910a internal memory to a
Memory Stick, or remove items from the P910a
memory.
Storage
Manager
You can also use the storage manager to free up
memory.
•Select
Applications > Control
panel > Device > Storage manager.
• A list of all applications and their memory
requirements is shown.
•See ‘Deleting or copying general files’ on
page 168 and ‘Deleting information from
applications’ on page 167.
Information in
applications
Use the applications to remove unused or old items
from the P910a internal memory:
WAP history or bookmarks.
•Messages.
•Contacts.
• Call logs.
• Calendar tasks or appointments.
• Jotter notes.
Miscellaneous
Cannot save on
Memory Stick
• You might have a Memory Stick with a lock
switch. Move the switch in the other direction.
• The Memory Stick might be full. Delete some
files on it.

182 Troubleshooting
Preliminary Layla850 P1B
Tap on display
does not work
Occasionally you may find that you tap one
item (for example a button or menu option)
but another is activated. Calibrating the
screen ensures that the correct item is
activated. Tap
Control panel > Device tab >
Display > Screen tab > Calibrate screen
and
follow the instructions.
Cannot change
language
• The first time you start the P910a you select a
language. All other languages are then deleted, in
order to free memory. You can find all languages
on the
Sony Ericsson PC Suite
CD. From the
CD, you can install the language you want. You
can find more languages on
www.sonyericsson.com/support
• When you have installed a new language, you
have to turn your P910a off and then on again for
the change to take effect.
Incorrect
character
appears when
keyboard key is
pressed
• The wrong keyboard type can be specified in the
control panel. Make sure the correct settings are
defined in
Control panel > Device tab > Flip
settings > Flip keyboard
.
Applications
stop responding
• Close the flip and open it again.
• Turn off the P910a and turn it on again.
• Remove the battery, wait about 10 seconds, and
insert it again.
• Phone memory might be full. Delete some
pictures or music, for example.
• If the problem continues, do a master reset. See
‘Master reset’ on page 166. All data will be lost.
System failure In the case of a system failure, your P910a will
flash an animated warning. To recover, please
restart the P910a like this:
• Press and hold the On/Off button for at least 10
seconds to turn the P910a off.
• Restart as normal: Press the On/Off button to
turn on your P910a.

Guidelines for Safe and Efficient Use 183
Preliminary Layla850 P1B
Guidelines for Safe and Efficient Use
Please read this information before using your mobile phone.
Recommendations
• Always treat your product with care and keep it in a clean and dust-free place.
• Do not expose your product to liquid or moisture or humidity.
• Do not expose your product to extreme high or low temperatures.
• Do not expose your product to open flames or lit tobacco products.
• Do not drop, throw or try to bend your product.
• Do not paint your product.
• Do not use your product near medical equipment without requesting permission.
• Do not use your product when in, or around aircraft, or areas posted "turn off
two-way radio".
• Do not use your product in an area where a potentially explosive atmosphere
exists.
• Do not place your product or install wireless equipment in the area above your
car's air bag.
• Do not attempt to disassemble your product. Only Sony Ericsson authorised
personnel should perform service.
Antenna
Only use an antenna that has been specifically designed by Sony Ericsson for your
mobile phone. Use of unauthorised or modified antennas could damage your
mobile phone and may violate regulations, causing loss of performance and SAR
levels above the recommended limits (see below).
Efficient use
Hold your mobile phone as you would any other phone. Do not cover the top of the
phone when in use, as this affects call quality and may cause the phone to operate
at a higher power level than needed, thus shortening talk and standby times.
Radio Frequency (RF) Exposure and SAR
Your mobile phone is a low-power radio transmitter and receiver. When it is turned
on, it emits low levels of radio frequency energy (also known as radio waves or
radio frequency fields).
Governments around the world have adopted comprehensive international safety
guidelines, developed by scientific organizations, e.g. ICNIRP (International
Commission on Non-Ionizing Radiation Protection) and IEEE (The Institute of
Electrical and Electronics Engineers Inc.), through periodic and thorough
evaluation of scientific studies. These guidelines establish permitted levels of radio
wave exposure for the general population. The levels include a safety margin
designed to assure the safety of all persons, regardless of age and health, and to
account for any variations in measurements.
Specific Absorption Rate (SAR) is the unit of measurement for the amount of radio
frequency energy absorbed by the body when using a mobile phone. The SAR
value is determined at the highest certified power level in laboratory conditions,
but the actual SAR level of the mobile phone while operating can be well below
this value. This is because the mobile phone is designed to use the minimum power
required to reach the network.
Variations in SAR below the radio frequency exposure guidelines do not mean that
there are variations in safety. While there may be differences in SAR levels among
mobile phones, all Sony Ericsson mobile phone models are designed to meet radio
frequency exposure guidelines.
Before a phone model is available for sale to the public, it must be tested and
certified to the FCC that it does not exceed the limit established by the
government-adopted requirement for safe exposure. The tests are performed in
positions and locations (that is, at the ear and worn on the body) as required by the
FCC for each model. For body worn operation, this phone has been tested and
meets FCC RF exposure guidelines when the handset is positioned a minimum of
15 mm from the body without any metal parts in the vicinity of the phone or when
used with the original Sony Ericsson body worn accessory intended for this phone.
Use of other accessories may not ensure compliance with FCC RF exposure
guidelines.
A separate leaflet with SAR information for this mobile phone model is included
with the material that comes with this mobile phone. This information can also be
184 Guidelines for Safe and Efficient Use
found, together with more information on radio frequency exposure and SAR, on:
www.sonyericsson.com.
Driving
Please check if local laws and regulations restrict the use of mobile phones while
driving or require drivers to use handsfree solutions. We recommend that you use
only Ericsson or Sony Ericsson handsfree solutions intended for use with your
product. Please note that because of possible interference to electronic equipment,
some vehicle manufacturers forbid the use of mobile phones in their vehicles
unless a handsfree kit with an external antenna supports the installation.
Always give full attention to driving and pull off the road and park before making
or answering a call if driving conditions so require.
Personal Medical Devices
Mobile phones may affect the operation of cardiac pacemakers and other
implanted equipment. Please avoid placing the mobile phone over the pacemaker,
e.g. in your breast pocket. When using the mobile phone, place it at the ear
opposite the pacemaker. If a minimum distance of 15 cm (6 inches) is kept
between the mobile phone and the pacemaker, the risk of interference is limited. If
you have any reason to suspect that interference is taking place, immediately turn
off your mobile phone. Contact your cardiologist for more information.
For other medical devices, please consult the manufacturer of the device.
Children
DO NOT ALLOW CHILDREN TO PLAY WITH YOUR MOBILE PHONE OR
ITS ACCESSORIES. THEY COULD HURT THEMSELVES OR OTHERS, OR
COULD ACCIDENTALLY DAMAGE THE MOBILE PHONE OR
ACCESSORY. YOUR MOBILE PHONE OR ITS ACCESSORY MAY
CONTAIN SMALL PARTS THAT COULD BE DETACHED AND CREATE A
CHOKING HAZARD.
Disposing of the Product
Your mobile phone should not be placed in municipal waste. Please check local
regulations for disposal of electronic products.
Power Supply
Connect the AC power adapter only to designated power sources as marked on the
product. Make sure the cord is positioned so that it will not be subjected to damage
or stress. To reduce risk of electric shock, unplug the unit from any power source
before attempting to clean it. The AC power adapter must not be used outdoors or
in damp areas. Never alter the cord or plug. If the plug will not fit into the outlet,
have a proper outlet installed by a qualified electrician.
Emergency Calls
Mobile phones operate using radio signals, which cannot guarantee connection
under all conditions. Therefore you should never rely solely upon any mobile
phone for essential communications (e.g. medical emergencies).
Emergency calls may not be possible on all cellular networks or when certain
network services and/or mobile phone features are in use. Check with your local
service provider.
Battery Use and Care
We recommend that you fully charge the battery before you use your mobile phone
for the first time. The battery should only be charged in temperatures between
+5°C (+41°F) and +45°C (+113°F).
A new battery or one that has not been used for a long time could have reduced
capacity the first few times it is used.
The talk and standby times depend on the actual transmission conditions when
using the mobile phone. If the mobile phone is used near a base station, less power
is required and talk and standby times are prolonged.
•Warning! May explode if disposed of in fire.
• Use only Ericsson or Sony Ericsson branded original batteries and
chargers intended for use with your mobile phone. Other
chargers may not charge sufficiently or may produce excessive
heat. Using other batteries and chargers could be dangerous.
• Do not expose the battery to liquid.
• Do not let the metal contacts on the battery touch another metal
object. This could short-circuit and damage the battery.
• Do not disassemble or modify the battery.
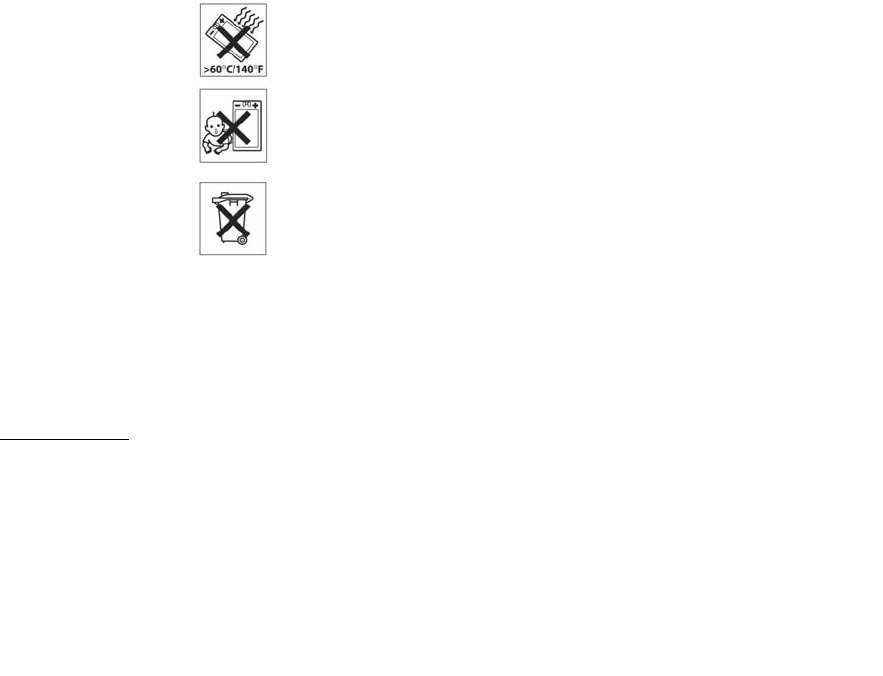
Guidelines for Safe and Efficient Use 185
Preliminary Layla850 P1B
• Do not expose the battery to extreme temperatures, never above
+60°C (+140°F). For maximum battery capacity, use the battery
in room temperature.
• Turn off your mobile phone before removing the battery.
• Keep out of children's reach.
• Use the battery for the intended purpose only.
• Do not allow the battery to be put into the mouth. Battery
electrolytes may be toxic if swallowed.
Disposing of the battery
Please check local regulations for disposal of batteries or call your
local Sony Ericsson Customer Care Center for information.
The battery should never be placed in municipal waste. Use a
battery disposal facility if available.
Limited warranty
Sony Ericsson Mobile Communications AB, S-221 88 Lund, Sweden, (Sony
Ericsson), provides this Limited Warranty for your mobile phone and original
accessory delivered with your mobile phone (hereinafter referred to as "Product").
Should your Product need warranty service, please return it to the dealer from
whom it was purchased, or contact your local Sony Ericsson Customer Care Center
(national rates may apply) or visit www.sonyericsson.com to obtain further
information.
Our warranty
Subject to the conditions of this Limited Warranty, Sony Ericsson warrants this
Product to be free from defects in design, material and workmanship at the time of
its original purchase by a consumer, and for a subsequent period of one (1) year.
What we will do
If, during the warranty period, this Product fails to operate under normal use and
service, due to defects in design, materials or workmanship, Sony Ericsson
authorized distributors or service partners, in the country/region* where you
purchased the Product, will, at their option, either repair or replace the Product in
accordance with the terms and conditions stipulated herein.
Sony Ericsson and its service partners reserve the right to charge a handling fee if a
returned Product is found not to be under warranty according to the conditions
below.
Please note that your personal settings/downloads might be lost when the Product
is repaired or replaced.
Conditions
1. The warranty is valid only if the original proof of purchase issued to the original
purchaser by a dealer authorized by Sony Ericsson for this Product, specifying
the date of purchase and serial number**, is presented with the Product to be
repaired or replaced. Sony Ericsson reserves the right to refuse warranty
service if this information has been removed or changed after the original
purchase of the Product from the dealer.
2. If Sony Ericsson repairs or replaces the Product, the repaired or replaced
Product shall be warranted for the remaining time of the original warranty
period or for ninety (90) days from the date of repair, whichever is longer.
Repair or replacement may involve the use of functionally equivalent
reconditioned units. Replaced parts or components will become the property of
Sony Ericsson.
3. This warranty does not cover any failure of the Product due to normal wear and
tear, or due to misuse, including but not limited to use in other than the normal
and customary manner, in accordance with the Sony Ericsson instructions for
use and maintenance of the Product. Nor does this warranty cover any failure
of the Product due to accident, software or hardware modification or
adjustment, acts of God or damage resulting from liquid.
4. Since the cellular system on which the Product is to operate is provided by a
carrier independent from Sony Ericsson, Sony Ericsson will not be responsible
for the operation, availability, coverage, services or range of that system.
186 Guidelines for Safe and Efficient Use
5. This warranty does not cover Product failures caused by installations,
modifications, or repair or opening of the Product performed by a non-Sony
Ericsson authorized person.
6. The warranty does not cover Product failures which have been caused by use of
accessories or other peripheral devices which are not Ericsson or Sony
Ericsson branded original accessories intended for use with the Product.
7. Tampering with any of the seals on the Product will void the warranty.
8. THERE ARE NO EXPRESS WARRANTIES, WHETHER WRITTEN OR
ORAL, OTHER THAN THIS PRINTED LIMITED WARRANTY. ALL
IMPLIED WARRANTIES, INCLUDING WITHOUT LIMITATION THE
IMPLIED WARRANTIES OF MERCHANTABILITY OR FITNESS FOR A
PARTICULAR PURPOSE, ARE LIMITED TO THE DURATION OF THIS
LIMITED WARRANTY. IN NO EVENT SHALL SONY ERICSSON OR ITS
LICENSORS BE LIABLE FOR INCIDENTAL OR CONSEQUENTIAL
DAMAGES OF ANY NATURE WHATSOEVER, INCLUDING BUT NOT
LIMITED TO LOST PROFITS OR COMMERCIAL LOSS, TO THE FULL
EXTENT THOSE DAMAGES CAN BE DISCLAIMED BY LAW.
Some countries/states do not allow the exclusion or limitation of incidental or
consequential damages, or limitation of the duration of implied warranties, so the
preceding limitations or exclusions may not apply to you.
The warranty provided does not affect the consumer's statutory rights under
applicable legislation in force, nor the consumer's rights against the dealer arising
from their sales/purchase contract.
* European Union (EU)
If you have purchased your Product in an EU country you can have your Product
serviced, under the conditions set out above, within the warranty period in any EU
country where an identical Product is sold by an authorized Sony Ericsson
distributor. To find out if your Product is sold in the EU country you are in, please
call the local Sony Ericsson Customer Care Center. Please observe that certain
services may not be possible anywhere other than in the country of original
purchase, for example due to the fact that your Product may have an interior or
exterior which is different from equivalent models sold in other EU countries. It
may not be possible to repair SIM-locked Products.
** In some countries/regions additional information is requested. If so, this is
clearly shown on the valid proof of purchase.

Guidelines for Safe and Efficient Use 187
Preliminary Layla850 P1B
FCC Statement
This device complies with Part 15 of the FCC rules. Operation is
subject to the following two conditions:
(1) This device may not cause harmful interference, and
(2) This device must accept any interference received, including interference that
may cause undesired operation.
Environmental information
•Halogenated flame retardants are not used in cabinets or the
printed wiring board of the phone.
• Power consumption of charger during standby < 0.3W.
For more environmental information, look at the Environmental Declaration for
P910a at www.sonyericsson.com
Declaration of Conformity
We, Sony Ericsson Mobile Communications AB of
Nya Vattentornet
S-221 88 Lund, Sweden
declare under our sole responsibility that our product
Sony Ericsson type FAB-1031012-BV and FAB-1031012-CN
and in combination with our accessories, to which this declaration relates is in
conformity with the appropriate standards 3GPP TS 51.010-1, EN 301489-7,
EN 300328, EN 301489-17 and EN 60950, following the provisions of, Radio
Equipment and Telecommunication Terminal Equipment directive 99/5/EC with
requirements covering EMC directive 89/336/EEC, and Low Voltage directive 73/
23/EEC.
We fulfill the requirements of the R&TTE Directive (99/5/EC).
Kista, July 2004
Place & date of issue
0682
188 Terms and definitions
Preliminary Layla850 P1B
Terms and definitions
AU
Format for audio data files .AU files have the suffix .au
Bearer
Path over which data flows. Specifically in CSD and HSCSD,
the type of phone link from the GSM network to the server –
PSTN or ISDN.
Bluetooth
Bluetooth wireless technology is a secure, fast radio connection
technology. It is a computing and telecommunications industry
specification that describes how mobile phones, computers, and
personal digital assistants (PDAs) can easily interconnect with
each other and with home and business phones and computers
using a short-range wireless connection.
BMP
Microsoft Windows Bitmap. A graphics format defined by
Microsoft supporting 1, 4, 8 or 24 bit colour depth. No
compression, so files can be large.
Bookmark
A URL and header/title stored in the phone, enabling the user to
go directly to a Web or WAP page.
bps
Bits per second – rate of data flow.
cHTML
A version of HTML optimised for small devices.
CLI
Calling Line Identity. Shows the number of the person calling
you in your mobile phone display. Your P910a will also display
the name and photograph of the caller if they are in Contacts.
You can then make an informed choice as to whether or not to
take the call. Bear in mind that not all numbers can be displayed.
To use this service, it must be supported by your network.
COM Port
Defines a serial/RS-232 port within the Windows environment.
CS
Circuit Switched. Connection from A to B which has a fixed
bandwidth and is maintained over a period of time, for example
a voice phone call.
CSD
Circuit Switched Data. CSD is a GSM service providing a CS
data connection at a rate of 9.6 or 14.4kbps.

Terms and definitions 189
Preliminary Layla850 P1B
CSS
Cascading Style Sheet. A feature of browsers.
DTMF
Dual Tone Multi Frequency. A method of coding digits as a
combination of two audible tones.
DUN
Dial-Up Networking. The dial-up networking capability in
Windows.
EMS
Enhanced Messaging Service. An extension of SMS enabling
pictures, animations, sound and text formatting to be added to
text messages.
FCC
Federal Communications Commission. US government agency
which regulates radio communications.
GIF
Graphics Interchange Format. Format for storing images which
also supports animated images. Highly compressed by limiting
the colour palette to 16 or 256 colours. It is one of the two most
common file formats for graphic images on the World Wide
Web. The other is JPEG.
GPRS
General Packet Radio Services. A radio technology for GSM
networks that adds packet-switching protocols, shorter setup
time for ISP connections, and offers the possibility of charging
by the amount of data sent rather than by connection time.
GPRS promises to support flexible data transmission rates
typically up to 20 or 30 kbps (with a theoretical maximum of
171.2 kbps), as well as continuous connection to the network.
GSM
Global System for Mobile Communications. GSM is the world's
most widely-used digital mobile phone system, now operating
in over 160 countries around the world.
GSM 850
The GSM system family includes GSM 850, GSM 900, GSM
1800 and GSM 1900. GSM 850 refers to GSM working on a
frequency of 850 MHz.
GSM 1800
Also known as DCS 1800 or PCN, this is a GSM digital network
working on a frequency of 1800 MHz. It is used in Europe and
Asia-Pacific.
GSM 1900
Also known as PCS. Refers to a GSM system running in the
1900 MHz band. Used in the USA and Canada, for instance.
190 Terms and definitions
Preliminary Layla850 P1B
HSCSD
High-Speed Circuit-Switched Data (HSCSD) is circuit-switched
wireless data transmission for mobile users at data rates of up to
64 kbps.
HTML
Hypertext Markup Language is the set of markup symbols or
codes inserted in a file intended for display on a World Wide
Web browser page. The markup tells the Web browser how to
display a Web page's words and images.
HTTP
HyperText Transfer Protocol. The communications protocol
used to connect to servers on the World Wide Web. Its primary
function is to establish a connection with a Web server and
transmit HTML pages to the client browser.
IMAP4
Internet Message Access Protocol (the latest version is IMAP4)
is a standard client/server protocol for accessing email from
your local server. The email is received and held for you by your
IMAP server. You (or your client email receiver) can view just
the heading and the sender of the letter and then decide whether
to download the mail.
IrDA
The Infrared Data Association is dedicated to developing
standards for wireless, infrared transmission systems between
devices. With IrDA ports, a device such as your P910a can
exchange data with other devices without a cable connection.
IrDA requires line-of-sight transmission.
ISDN
Integrated Services Digital Network. Communication protocol
offered by phone companies that permits phone networks to
carry data, voice, and other source traffic. Selecting ISDN for
CSD/HSCSD connections provides quicker call setup.
ISP
Internet Service Provider. An organization that provides access
to the Internet.
JFIF
JPEG File Interchange Format.
JPEG
Joint Photographic Experts Group, best known for the .JPG
format for still image compression.
MBM
Multiple Bit Map. Symbian OS bitmap format.
MeT
Mobile Electronic Transactions. An initiative founded by
Ericsson, Nokia and Motorola to establish a secure and
consistent framework for mobile transactions.

Terms and definitions 191
Preliminary Layla850 P1B
MIDI
MIDI (Musical Instrument Digital Interface) is a protocol
designed for recording and playing back music on digital
synthesizers that is supported by many makes of personal
computer sound cards.
MIME
Multipurpose Internet Mail Extensions. A protocol defining
how messages are sent on the Internet. For example, MIME is
used to describe how attachments are encoded and what type of
data they contain.
MMS
Multimedia Messaging Service. Logical extension of SMS and
EMS. MMS defines a service enabling sound, images and video
to be combined into multimedia messages. It supports photo
quality pictures, and sounds in WAV, MIDI, AMR, or Melodies
format.
MP3
MPEG-1 Audio Layer-3 is a standard technology and format for
compression a sound sequence into a very small file (about one-
twelfth the size of the original file) while almost preserving the
original level of sound quality when it is played.
MPEG-4
The Moving Picture Experts Group, develops standards for
digital video and digital audio compression. It operates under
the auspices of the International Organization for
Standardization (ISO). MPEG-4 goes far beyond compression
methods. Instead of treating the data as continuous streams,
MPEG-4 deals with audio/video items that can be manipulated
independently, allowing for interaction with the coded data and
providing flexibility in editing. MPEG-4 supports a wide range
of audio and video modes and transmission speeds.
OS
Operating System, such as Symbian OS, Linux, Microsoft
Windows.
OTA
Over The Air. A technology for transmission and reception of
application related configuration information in a wireless
communications system.
PC
Personal Computer.
PCS
Personal Communications Services, often used to describe GSM
1900 networks.
PDA
Personal Digital Assistant. A handheld computer having
functions such as address book, calendar, and so on.
192 Terms and definitions
Preliminary Layla850 P1B
PDF
Portable Document Format. A format created by Adobe for
storing and distributing documents.
Phone book
A memory in the SIM card where phone numbers can be stored
and accessed by name or position.
PIM
Personal Information Management. Generic term for
applications such as Contacts, Calendar, Tasks, and so on.
PIN
A PIN is a personal identification number.
PNG
Portable Network Graphics. Format for storing images on file
with data compression but without lowering of quality (loss of
information).
POP3
Post Office Protocol 3 is a standard client/server protocol for
receiving email. The email is received and held for you by your
POP server. Periodically, the P910a Messages application can
check your mail-box on the server and download any mail.
Protocol
In information technology, a protocol is the special set of rules
that end points in a telecommunication connection use when
they communicate. Protocols exist at several levels in a
telecommunication connection.
QQVGA
Quarter Quarter VGA, 160 x 120 pixels.
QVGA
Quarter VGA size, typically refers to a portrait oriented screen
240 pixels wide x 320 pixels high.
RS232
A standard for serial transmission between computers and
peripheral devices
SC
Service Centre (for SMS).
Service Provider
A company that provides services and subscriptions to mobile
phone users.
SGML
A generic markup language for representing documents.
SIM
A SIM (Subscriber Identity Module) card is a ‘smart card’,
inserted into GSM phones, that contains your phone account
information. SIM cards can also be programmed to display

Terms and definitions 193
Preliminary Layla850 P1B
custom menus for personalized services, for instance to assist
operators in providing mobile commerce applications.
SMIL
Synchronized Multimedia Integration Language. Used by MMS
to describe how media items are to be played.
SMS
Short Message Service. Allows messages of up to 160
characters to be sent and received via the network operator's
message centre to a mobile phone.
SMTP
Simple Mail Transfer Protocol. Protocol used to send email
from an email client via an SMTP server.
SWIM
A SWIM card is a SIM card containing a WIM.
SyncML
SyncML is a universal protocol for data synchronization,
developed by the SyncML Initiative Ltd.
TCP/IP
Transmission Control Protocol/Internet Protocol. TCP/IP is the
basic communication language or protocol of the Internet. It can
also be used as a communications protocol in a private network
(either an intranet or an extranet).
TLS
Transport Layer Security. Used by Web browsers, for example.
URL
Uniform Resource Locator. Points to a service or information on
the Internet, for example: http://www.SonyEricsson.com
USB
Universal Serial Bus. A plug-and-play interface between a
computer and add-on devices (such as audio players, joysticks,
keyboards, phones, scanners, and printers). With USB, a new
device can be added to your computer without having to add an
adapter card or even having to turn the computer off.
USSD
Unstructured Supplementary Services Data. Narrow-band GSM
data service. For example entering *79*1234# might return the
stock price for stock 1234.
vCal; vCalendar
vCalendar defines a transport and platform-independent format
for exchanging calendar and scheduling information for use in
PIMs/PDAs and group schedulers. vCalendar is specified by
IETF.
vCard
vCard automates the exchange of personal information typically
found on a traditional business card, for use in applications such
as Internet mail, voice mail, Web browsers, phone applications,
194 Terms and definitions
Preliminary Layla850 P1B
call centres, video conferencing, PIMs /PDAs, pagers, fax,
office equipment, and smart cards. vCard is specified by IETF.
VGA
Video Graphics Array. Graphics standard introduced by IBM,
having a resolution of 640 x 480 pixels.
VPN
Virtual Private Network. A private network that is configured
within a public network. A VPN appear as private national or
international network to the customer, but physically shares a
backbone trunk with other customers. VPNs enjoy the security
of a private network via access control and encryption, while
taking advantage of the economies of scale and built-in
management facilities of large public networks. Today, there is
tremendous interest in VPNs over the Internet, especially due to
the constant threat of hacker attacks.
WAP
Wireless Application Protocol is a specification for a set of
communication protocols to standardise the way that wireless
devices, such as cellular phones and radio transceivers, can be
used for Internet access, including email, the World Wide Web,
and newsgroups.
WAV
A Wave file is an audio file format, created by Microsoft, that
has become a standard PC audio file format for everything from
system and game sounds to CD-quality audio. A Wave file is
identified by a file name extension of WAV (.wav).
WBXML
Wireless Binary Extensible Markup Language.
WIM
The Wireless Identity Module is a data module for electronic
identity certificates. It can contain both trusted and client
certificates, private keys and algorithms needed for WTLS
handshaking, encryption, decryption, and signature generation.
The WIM module can be placed on a SIM card, called a SWIM
card.
WML
Wireless Markup Language. A markup language used for
authoring services, fulfilling the same purpose as HyperText
Markup Language (HTML) does on the World Wide Web
(WWW). In contrast to HTML, WML is designed to fit small
handheld devices.
WTLS
Wireless Transport Layer Security. Part of WAP, WTLS
provides privacy, data integrity and authentication on transport
layer level between two applications.
W3C
The main standards body for the WWW.

Terms and definitions 195
Preliminary Layla850 P1B
xHTML
Extensible Hypertext Markup Language. A reformulation of
HTML 4.01 in XML. Being XML, means that XHTML can be
viewed, edited, and validated with standard XML tools. At the
same time, it operates as well as or better than HTML 4 in
existing HTML 4 conforming user agents.
XML
Extensible Markup Language. An initiative from the W3C
defining an ‘extremely simple’ dialect of SGML suitable for use
on the WWW.
196 Technical data
Preliminary Layla850 P1B
Technical data
General Screen
Third Party Application Support
Bluetooth wireless technology
Product P910a standard version, Latin character set
Size 115 x 58 x 26 mm
Weight 155 grams with battery and flip.
System and power class GSM 850 Class 4
GSM 1800 Class 1
GSM 1900 Class 1
Antenna Built in
Speech Coding HR, FR, EFR supported where available,
for high speech quality.
SIM Card Small plug-in card, 3V or 5V type
Operating System Symbian OS v7.0 with UIQ user interface
and applications environment
Processor ARM 9
Internal User storage For settings, user data (for example images,
contacts, messages) and third-party
applications: up to 64 MB
Additional storage Memory Stick Duo, up to 128 MB
supported. Memory Stick PRO Duo, up to
1 GB supported. 32 MB Memory Stick
Duo supplied, plus adapter.
Operating temperature –15° to +55° C
Screen type TFT
Screen size Flip closed: 208 x 208 pixels, 40 x 40 mm
Flip open: 208 x 320 pixels, 40 x 61 mm
Pixel size 0.192 x 0.192 mm, or 132 ppi (Pixels Per Inch)
Colour resolution 18-bit (262 144 colours)
Screen surface Touch-sensitive
Illumination Variable intensity back-light
SDKs C++, PersonalJava , J2ME CLDC/MIDP 2.0,
AppForge Microsoft Visual Basic 6 and .NET
Load formats C++, Java or VB applications in Symbian SIS
format.
MIDP installation (JAR/JAD) from Browser or
connected PC.
Security Support for signed applications.
Bluetooth compatibility
statement
This product is manufactured to comply
with the Bluetooth specification 1.1.
Coverage area Up to 10 metres (33 feet)

Technical data 197
Preliminary Layla850 P1B
Infrared transceiver
GPRS Maximum Data Rates (kbps)
Speed achieved depends on the Coding Scheme supported by
the GSM Network.
HSCSD Maximum Data Rates (kbps)
Phone
Integrated CommuniCorder
Pictures (Image viewer)
Data transmission rate Max speed between phone and IrDA
device (that is a PC or another phone)
SIR: up to 115,200 bps
CS-1
9.05 kbps
CS-2
13.4 kbps
CS-3
15.6 kbps
CS-4
21.4 kbps
4 + 1 Rx 36.2 53.6 62.4 85.6
Tx 9.05 13.4 15.6 21.4
9.6 kbps per time slot 14.4 kbps per time slot
2 + 1 Rx 19.2 28.8
Tx 9.6 14.4
Personal ring
tones -
supported
formats
Sound clips as personal ring tones and default ring
tone:
MP3, AMR, AU, iMelody, MIDI, RMF (Beatnik)
a n d WAV.
Image size 640 x 480 pixels (VGA)
320 x 240 pixels (QVGA)
160 x 120 pixels (QQVGA)
176 x 144 pixels (QCIF) (video)
Colour depth 24 bit (16 million colours)
Storage format Still pictures: JPEG/JFIF, 3 quality (compression)
levels, user-selectable.
Video: 3GPP/MPEG4 video with AMR sound.
Formats BMP, GIF (including animated), JPEG, MBM, PNG,
WBMP
Sharing via Infrared, Bluetooth wireless technology, MMS
message, e-mail, PC file transfer, Memory Stick
198 Technical data
Preliminary Layla850 P1B
Video player
Music player
Integrated browser
SMS
MMS
EMS
File Format MP4 (MPEG4), 3GP (3GPP PSS)
Streaming
transport
RTSP according to 3GPP
File Format MP3, MP4, M4A,WAV, AAC, AU, AMR and
G-MIDI level 1 with 24 voices polyphony, RMF,
iMelody
Markup languages HTML 3.2 (excluding features not relevant to a
small screen device)
WML 1.3
WBXML
xHTML Basic
xHTML Mobile Profile
cHTML
WAP version 2.0
Scripting Compiled WML scripts
Style sheets WCSS
Images BMP, WBMP, GIF (including animated), JPEG,
PNG
Security WTLS Class 1, 2, 3
WTLS Cipher RC5 with key length 128
TLS/SSL
TLS Cipher RC4 with key length 128
SignText
WIM WIM interface including SIM-WIM (SWIM)
Cache 15 - 120kbyte user-configurable; 30kbyte default.
Content download OMA Download OTA ver 1.0
Bearer GSM and GPRS
Concatenated Up to 255 messages
Image formats BMP, GIF (including animated), JPG, WBMP,
PNG
Audio formats 3GPP, AMR, AU, iMelody, MIDI, MP3, RMF,
WAV
Video formats 3GP (3GPP PSS), MP4 (receive only), Packet
video, SDP
Supported items Sounds, Melodies, Pictures, Animations

Technical data 199
Preliminary Layla850 P1B
Email
Document viewer and editor
Note The installed viewer for Microsoft Word documents
cannot be used to view files in Rich Text format (.RTF)
Incoming mail server support POP3, IMAP4
Outgoing mail server support SMTP
Content coding MIME compliant
Security SMTP authentication, SSL encrypted
IMAP4 and SMTP
Attachments Receiving and sending
Microsoft® Word
Microsoft® Excel
Adobe® Acrobat® (PDF)
200 Index
Preliminary Layla850 P1B
Index
A
Accented letters
- handwriting 2, 35
Accepted callers 54
Accessories 24
Add to contacts 53
Alarm tones 144
Alarms 119
ALS
- settings 57
- support 50
Antenna 183
AoC - Call meter settings 57
Application shortcuts 142
Applications
- flip closed 15
- installing 130
- overview 25
- removing 132, 168
Area information 162
Attachments 93
B
Backgrounds 142, 146
Backing up data 140
Battery
- charging 13
- information 184
- inserting 12
- removing 12
Bluetooth wireless technolo-
gy 134, 151
- bluetooth share 137
- headphone 136
- pairing 135
- passcodes 136
Bookmarks 79
Browser view 76
Browsing the internet 75
C
Cable 152
Calculator 116
Calendar 106
- creating entries 106
- managing entries 107
- preferences 108
- sending and receiving
entries 108
Calibrate 146
Call costs 57
Call list 47
Call waiting 55
Calling cards 55
Calls
- answering 42, 44
- conference 46
- diverting 54
- emergency 42
- flip closed 40
- flip open 43
- incoming 44
- international 41
- making 40, 43
- options 43, 45
- preferences 52
- rejecting 42, 45
- restricting 55
- retrying automatically
44
- speed dialling 44
- two or more 45
- voice control 52
Camera
- settings 61
Care instructions 183
Cell information 162
Certificate manager 164
Chat settings 152
Chess 83
CommuniCorder
- settings 61
- taking pictures 60
Communicorder
- recording video clips 58
Conference calls 46
Connecting
- via Bluetooth wireless
technology 134
- via infrared port 134
- via SyncStation 133
Connection type 170
Connectivity software 133
Contacts 99
- adding images 143
- creating and managing
contacts 102
- to add a contact 101
- to delete a contact 101
Control panel 145
Corporate phone services 51
- set up 56

Index 201
Preliminary Layla850 P1B
D
Data backup 140
Data restore 141
Data storage 31
Date settings 117
Demo application 25
Device lock 37, 178
Dial-Up Networking Wizard
174
Disk formatting 164
Display 145
Disposing of the battery 185
Diverting calls 54
Drawing pictures 113
Driving 184
DTMF 49
- turning on 43
E
Editing
- spreadsheets 123
- Word documents 122
Efficient use 183
E-mail 85, 92, 159
Emergency calls 42
EMS 87
Entering text
- flip closed 31
- flip keyboard 35
- flip open 33
- handwriting 34
- keyboard on the screen
33
Extended characters
- handwriting 35
F
File manager 125
Find 29
First time start-up 14
Flight mode 48
Flip
- virtual 17
Flip closed 15
Flip open 16
Folders 27
Folders in Messages 86
Formatting disks 164
G
Games 83
General functions 27
Getting help 31
GPRS 170, 175
H
Handsfree 53
Handwriting recognition 34
- accented letters 2, 35
- extended characters 35
- letters 2, 34
- numbers 2, 35
Help texts 31
I
Icons 20
Image editor 65
Image status 61
Importing phone book en-
tries 14
Incoming call picture 52
Incoming calls 44
Increasing ring 148
Indicator light 178
Indicators 20
Infrared 134, 153
Inserting symbols 32
Installing applications 130
International calls 41
International settings 147
Internet 75
- accounts 153
- bookmarks 79
- browser view 76
- browsing 75
- signing documents 79
- user authentication re-
quest 79
Introduction to P910a 9
IP security manager 164
J
Jog Dial 19
Jotter 112
- creating and editing
notes 112
- drawing pictures 113
- managing notes 113
- sending and receiving
notes 113
K
Key functions 116
Key lock 38
Keyboard
- flip keyboard 35
- on screen 33
Keypad functions 20
L
Languages 166
Letters
- handwriting 2, 34
Light intensity 142
202 Index
Preliminary Layla850 P1B
Local synchronization 138
Locations 118
Lock problems 177
Locks 36
- device 37
- key lock 38
- SIM card 37
M
Making a call 100
Media buffer 70
Medical Devices 184
Memory Stick Duo 21
- adapter 23
- formatting 164
Messages
- accounts 87, 158
- attachments 93
- e-mail 92
- MMS 88
- multimedia messages
88
- SMS 87
- text messages 87
Messaging
- accounts 87, 158
MMS 85, 161
Mobile music 71
Modem 173
Multimedia for P910a 128
Multimedia messages 85, 88
Music player 71
N
Navigation 17
Networks 152
Notes 112
- creating and editing 112
- managing 113
- sending and receiving
113
Numbers
- formats 119
- handwriting 2, 35
O
Off 14
On 14
Online services 127
Options menu 16
Owner card 105
P
P910a Locks 36
P910a overview 11
P910a package 10
PC connectivity software
133
PC Suite for P910a 128
Pdf documents
- viewing 122
Personalizing your P910a
142
Phone book
- importing entries 14
Pictures 63
- drawing 113
- sending and receiving
64
- taking 60
- viewing 63
PIN 37
PIN2 37
PUK 37
R
Radio Frequency 183
Recording sounds 114
Remote synchronization 139
Removing applications 132
Restoring data 141
Restricting calls 55
Retry to call 44
Ring signals 143
Ring volume 148
S
SAR 183
Screen areas 18
Screen saver 143
Secure tokens 167
Security information 165
Self timer - picture 60
Self timer - video 59
Send as 30
Sending notes 113
Service provider 170
Services 24
Settings 31
Setup Wizard 14
Shortcuts 168
Silent mode 48
SIM card 12
SIM card lock 37
SMS 85, 87, 161
Solitaire 83
Sony Ericsson Update Serv-
ice 132
Sony Image Station 66
Sound files
- loop 72
- managing 72
- playing 71
Sound notification 144

Index 203
Preliminary Layla850 P1B
Sound recorder 114
Sound recordings 114
- sending and receiving
115
- using as ring signals
114
Sounds and alerts 147
Speakerphone 47
Speed dial
- making a call 44
- set-up 48
Spreadsheets
- editing 123
- viewing 122
Standby view 15
Start-up 14
Storage Manager 181
Storage manager 167
Storage Wizard 181
Storing data 31
Streaming 69
Symbols 32
Synchronization
- local 138
- remote 139
T
T9® text input 32
Tasks 109
Technical data 196
Text input 31, 147
Text messages 87
Themes 142
Time 117
- alarms 119
- locations 118
- number formats 119
- settings 117
- workdays 118
Time & date settings 164
Tone based services 49
Touchscreen lock 38
Transfer items with Send As
30
Troubleshooting 177
TTY settings 57
TTY support 50
Turning on and off 14
U
Uninstalling applications
132, 168
Updating the software 132
User greeting 150
V
Vibrating alert 45
Video 58
Video clips
- downloading 70
- managing 68
- playing 67
- saving 69
- sending and receiving
69
Video status 59
Viewing
- pdf documents 122
- spreadsheets 122
- word documents 122
Virtual flip 17
Voice control 52
- making a call 41
Voice mail 55
Volume
- changing 43
W
Wallpaper 142, 146
WAP accounts 163
Warranty 185
WIM management 168
Word documents
- editing 122
- viewing 122
Z
Zoom the screen 31
Zooming 29