Sony HDR HC3 User Manual DIGITAL CAMCORDER Manuals And Guides L0607152
SONY Digital Camcorder Manual L0607152 SONY Digital Camcorder Owner's Manual, SONY Digital Camcorder installation guides
User Manual: Sony HDR-HC3 HDR-HC3 SONY DIGITAL CAMCORDER - Manuals and Guides View the owners manual for your SONY DIGITAL CAMCORDER #HDRHC3. Home:Electronics Parts:Sony Parts:Sony DIGITAL CAMCORDER Manual
Open the PDF directly: View PDF ![]() .
.
Page Count: 133 [warning: Documents this large are best viewed by clicking the View PDF Link!]
SONY 2-66t-366. 2(tl
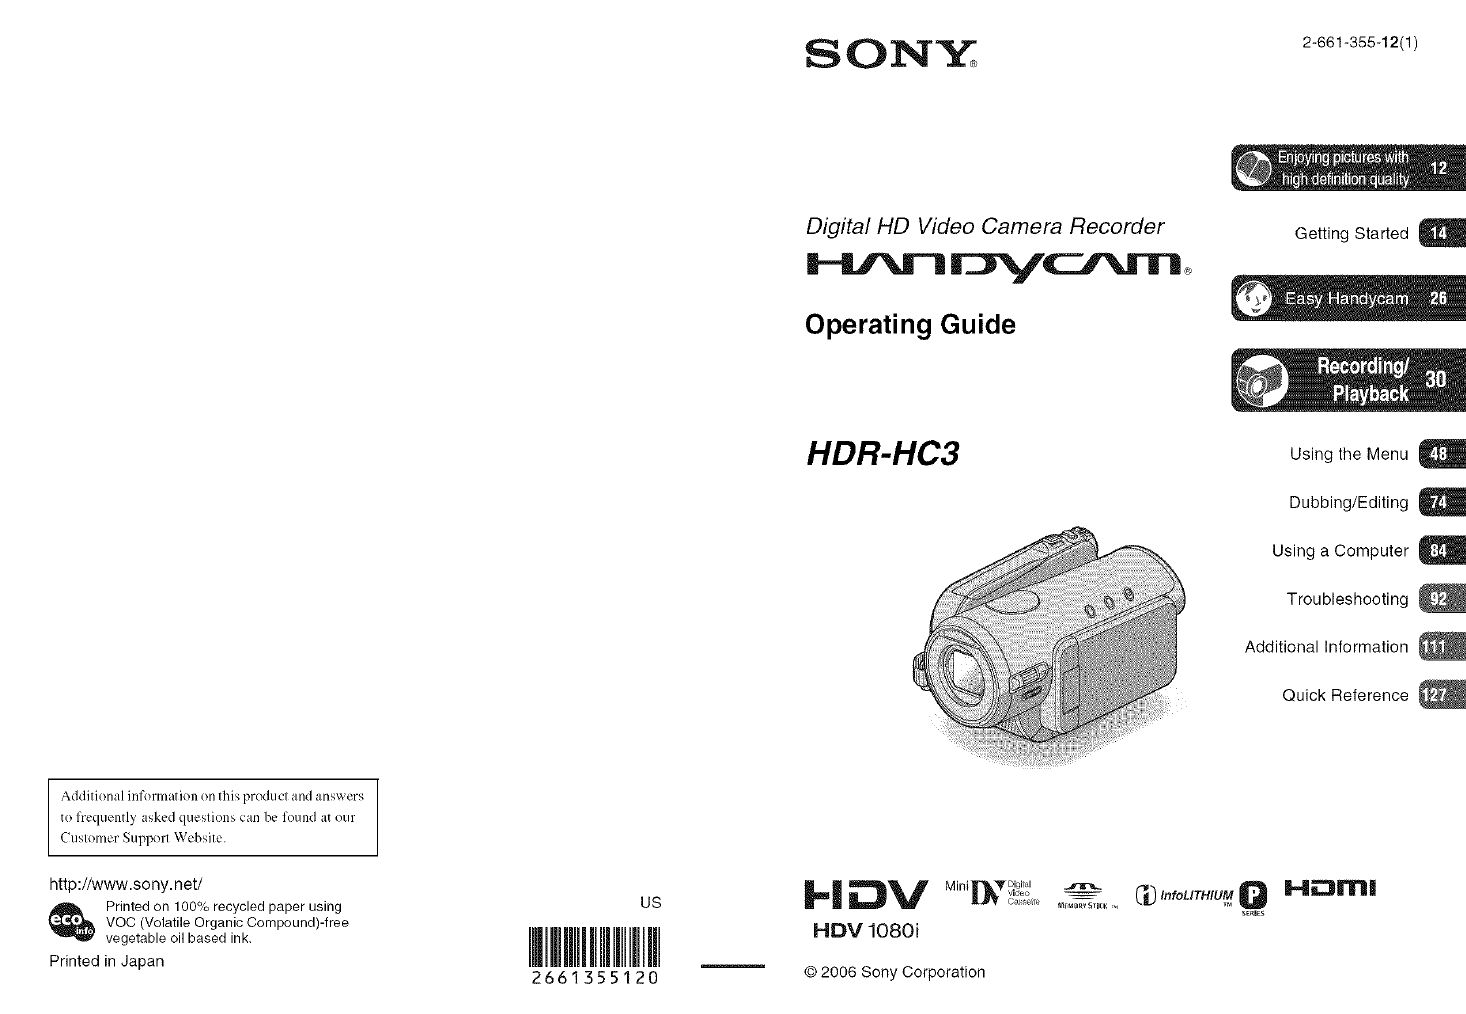
Digital HD Video Camera Recorder
Operating Guide
Addifion:d inforJ}l;itJon on this pr(_hlct and answers
te frequentl,¢ asked ques _s can be found at our
CusloJ_ler Support Websi[e.
http://www.sony, net/
Printedon 100% recycled paper using
VOC (VolatJJeOrganic Compound)-free
vegetable oil based ink,
Printed in Japan
US
2661355120
HDR-HC3
_l_V MiRi _r_l_r bigital
HDV 1080i
© 2006 Sony Corporation
m_oRv 5Tle_ ,_,
GettJng Started U
Using the Menu U
Dubbing/Editing g
Using a Computer U
Troubleshooting
Additional Information
Quick Reference
C#"foUTntU__ HEJEIrH
series
To reduce fire or shock hazard, do
not expose the unit to rain or
moisture.
This symbol is intended to alert
tile user 1<1tile presence of
uninsulated "d_mgerous
vollage _within the producffs
enclosure lhal tlmy be of
sul_icienl milgnittlde to
constitute a risk (if electric
s]lock to persons.
This symbol is intended to alert
tile user 1o lhe presence of
important operating and
maintenance (servicing)
inslructions in tile literature
accompanying the appliance.
IMPORTANTSAFEGUARDS
For your protection, please reM these sa/i:ty
iustructions completely before operating
the appliance, and keep this manttal for
future reference.
Carefully observe all warnings, precautions
and instrttctious on the appliance, or the one
described in the operating instructions and
adhere to them.
PowerSources
Tiffs set sllould be operaled only h'onl llle type of
Ipower source indicated on tile marking label. If
you arc not sure of tile type of electrical power
supplied to your honle, consult your dealer or
local power company. For those sets designed to
operate floln battery power, or oilier Sotlrces, retcr
to tile operating instr/ictions.
Polarization
Tiffs set nlay be equipped with a polarized ac
power cord plug (a plug having one blade wider
lhan lhe other).
This phlg will fit into the power outlet only one
way. This is a salkty lkature. If you arc unable to
insert tile plug flllly into tile outlet, try reversing
tile plug. If the plug should still lkdl to fit. contact
your electrician to have a suitable outlet installed.
Do not delcat file sali:ty purpose of file polarized
plug by lorcing il ill,
Overloading
Do not overload "_ill] oulJets_ eXtellsion cords or
convenience receptacles beyond tlleir capacity.
since this can resull in tire or electric shock.
ObjectandLiquid Entry
Never pusll objects oI any kind into tile set
lbrough openings as tile}' may louch dangerous
voltage [)<)Jilts or slloll O/II paris that coldd result
in a fire or electric sllock. Never spill lkluid of ally
kind on the sel,
Attachments
Do nol II_ ilttacJltnelllS not reconllnended by file
nlanulacturer, as lhey may catlse b21zards.
Cleaning
Unplug tile set h'onl tile wall outlet befl)re
cleaning or polishing it. Do not use liquid cleaners
or aerosol cleaners. Use a cloth lightly dampened
with water lot cleaning tile exterior of tile set.
WaterandMoisture
Do llOl use power-line operated sels llear waler
lot exanlple, nero a batllmb, wasllbowl, kitchen
Sillk, or laulldry Itlb, ill iJ wet baselnenI, or near it
swimming pool. etc,
Power-CordProtection
Ro/lle tile power cord so lhal it is not likely to be
walked on or pinched by itenls placed upon or
against lllenl, paying particular auenlion to file
plugs, receptacles, and the point where tile cord
exits flonl tile appliance,
Accessories
DO not place tile _1 on an illlSI;ible cart, SI, IIK].
tripod, brackel, or table. Tile set may l,dl, causing
svrious injury to a child or an adult, and serious
damage to file set. Use only a cart. sland, tripod.
bracket, or table rccon/mended by tile
nlanufltcturer,
Ventilation
Tile slots and openings ill tile cabinet are provided
lot necessary _entilation. To ensure reliable
operation of tile set, alld to protect it fl'onl
overheating, these slols and openings must never
be blocked or covered.
Never cover tile slols and openings wilh a clotll
or other nlalerials.
Never block tile slots and openings by placing
tile set on a bed. sol_l, rug. or oilier similar
silrfilce.
Never place tile set in a confined space, such as
a bookcase, or built-in cabinel, unless proper
venlilation is provided.
Do not place the set near or over a radiator or
Ileal register, or wllerc il is exposed Iv)direct
SIlnligbl,
Continued-_ 3
ff_?ORTaNTSAF[GUgRD$/Csstisssd}
Lightning
For added protection for this _t during aligbming
storm, or when it is lefi unattended and unused loz"
long periods ol tinle, unplug it fi'onl the wall
o/itlet and disconnect the antellna or cable system.
This will prc_ ent damage to the set due to
lightning and power-line surges.
Safety Check
Upon completion ol any selMce or l_:pairs to tile
set, ask the _r_, ice technician to perlorm routine
saLcty checks (as specified by the manuhLcturer)
to detcrnline thai tile set is in salP operating
condition.
DamageRequiringService
Unplug tile set b'om tile wall outlet and rellrr
set, icing to qualified _rxice personnel under tile
Lollowing conditions:
When tile power cord or plug is damaged or
h'ayed.
11 liquid has been spilled or objects have fidlen
inlo lhe _t.
It the set has been exposed to rain or water.
It the set has been subject to excessive shock by
being dropped, or the cabinet has been
damaged.
If the set does not operate normally when
Rdlowing tile operating instructions. Adjust
only those controls tllat are specified in the
operating insmlctions, hnproper adjustment of
other controls may result in danlage and will
often rcquirc extensive work by it qualified
techniciiul to l_2SIore I]le SeI to llornltd operation.
When the set exlfibits adistinct change in
perlormance tills indicates aneed lor selwice.
Servicing
Do nol attelnpt to serxice tile set yourself as
opening or rcnloving covers nlay expose you lo
dangerous voltage or ol]ler hazards.
Reler all selxicing to qualified service personnel.
Replacementparts
When replacement paris are required, be surc tile
service tccbnician bag used replacenlent parts
specified by tile inanul;_ctumr that have tile sanle
characteristics as the original parts.
Unauthorized substitutions may result in fire,
electric sbock, or other hazards,

Readthisfirst
Before operating tile unit, please read this
manual thoroughly, :utd retain it for future
reference.
Replace the battery with the
specified type only. Otherwise, fire
or injury may result.
RECYCLINGLITHIUM-ION BATTERIES
Lithium-[on baueries are O
recyclable. You can help preserve
ollr en'_'irOnlllenl by returnhlg
your used rechargeable baueries
to the collection and recycling
location nearest yoll.
For more information regarding recycling of
rechargeable batteries, call toll hce 1-800-822-
8837, or visil hup://www.rbrc.org/
Caution: Do not handle damaged or leaking
Lithium-Ion batteries.
Batterypack
This device colnplies with Pm'l 15 ()lille FCC
Rules. Operation is subject lo tile lollowing two
conditions:
(1) This device may not cause harmlul
interlcmncc, and (2) this device must accept any
interlercnce received, including inlerlcrence lhal
may cause undesired operation.
This Class B digital apparatus complies with
Canadian ICES-/I03.
Owner'sRecord
The model and serial nunlhers are localed on lhe
bottom. Record tile _erial number in the space
pro_ ided below. Relcr to the_ numbers whenever
you call upon your Sony de_der regarding this
product.
Model NO, HDR-HC3
Serial NO.
Model NO, AC-
No.
If you have any questions about this
product, you may call:
Sony Customer Information Center 1-800-
222-SONY 17669).
The number below is for the FCC related
matters only.
RegulatoryInformation
Declaration of Conformity
Trade Name: SONY
Model NO.: HDR-HC3
Responsible Party: Sony Electronics lnc.
Address: 16530 Via Esprillo, San Diego, CA
92127 U.S.A.
Telephone Number: 858-942-2230
This device complies with Part 15 of the FCC
Rules.
Operation is subject to tile lo]lowing lwo
conditions:
(1) This device may not cruise harnlfld
interlemnce, and (2) this device nmst accept any
interlemnce received, including interterence
thai may cruise undesired operalion.
CAUTION
You are cautioned thai any changes or
modifications not expressly appro_ ed in this
manu+d could _oid your muhority to operate this
equipmenl.
Note
This equipment has been tested and lound to
comply wilh lhe lindts for a Class B digital
device, pursuant to Part 15 of the FCC Rules.
These limits are designed to provide reasonable
proteclion against harmlul interlPrence in a
residential installatkm. This equipment generates,
uses, and can radiate radio hcquency energy and.
if niu installed and used in accordance with tile
instruclions, may cause harnll/l] hlterlerellce 1o
radio co/lllll/lllicaI iOllS.
However, there is no guarantee thai interlcrence
will not occur in a particular installation. If this
equipment does cause harmlul interlPrence to
radio or television reception, which can be
determined by turning the equipment oil and on,
Continued-_ 5
Rea# this first {Oo_tim_e#}
tile user is encouraged to tlT lo correct the
interlbmnce by one or more of the lollowing
II/ei/sures_
Reorienl or relocate lhe receiving antenna.
Increase the sel)aradon between the equil)menl
and receiver.
Connecl the equipment into all outlel on a
cilvuit dil]erenl I)'oln thai 1o which the receiver
is connected.
Consull ll_edealer or an experienced radio/TV
technician lor help.
Tile supplied interlace cable tllustbe used with the
equipmem inorder 1ocomply withthe limits lot a
digital device pursuant to Subpart B ol Part 15 of
FCC Rules.
Typesof cassetteyoucan use in your
camcorder
You cau/lse mini DV cassettes marked
with M*._*. Mini DV cassettes with
Cassette Memory are incompatible (p. 112).
Types of "Memory Stick" you can use
in your camcorder
There are two sizes of "Metuory Stick."
You cau use "Memory Stick Duo" marked
with MEmorYSTicKDuBor
MEMORYfTIEKPRD BUD (p. 114).
"Memory Stick Duo"
(This size can be used with your
camcorder )
"Memory Stick"
(You cannot use it in your camcorder.)
• You cannot use any type of memory card
except "Memory Stick Duo."
• "Memory Stick PRO" and "Memory Stick
PRO Duo" can be used only with
"Memory Stick PRO" compatible
equipment.
Whenusinga "Memory StickDuo"
with "Memory Stick" compatible
equipment
Be sure to insert the "Metuory Stick Duo"
into the Memory Stick Duo Adaptor.
Memory Stick Duo Adaptor
sony
Usingthe camcorder
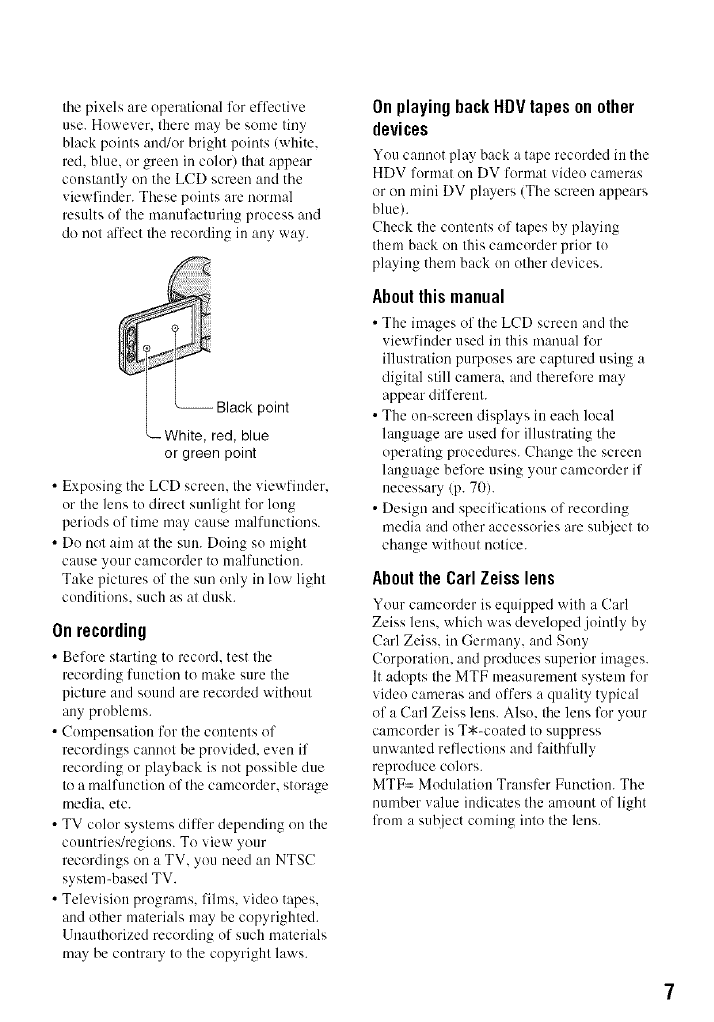
• Do net hold tile camcorder by tile
following part.
LCD panel
•Tile camcerder is not dustpreof, drippreof
or waterproof.
See "Maintenance and precautions"
(p. 118).
• Before connecting your camcorder to
another device with an HDMI cable.
component video cable. USB or i.LINK
cable, be sure to insert the connector plug
the correct way, attd not lk_rcibly to avoid
damaging the terminal, or cause a
nlalftu/ctien of your canlcerder.
About menu items, LCD panel,
viewfinder,and lens
•A menu itetu that is gra_ed out is uot
available under the current recording or
playback conditions.
• The LCD screen aud the viewfinder are
manufactured using extremely high-
precision technology, so ever 99.99_/¢ of
tilepixelsareoperationallk_reffective
use.However.theremaybesometiny
blackpointsand/orbrightpoints(white.
red.blue.orgreenincolor)thatappear
constantlyontheLCD screen and the
viewfinder. These points are normal
results of the manufacturing process and
do not affect the recording in any way.
or green point
•Exposing the LCD screen, the viewfiuder.
or the lens to direct sunlight for long
periods of tinm may cause malfunctions.
• Do not aim at the sun. Doing so might
cause your camcorder to malfunctiou.
Take pictures of the sun only in low light
conditions, such as at dusk.
Onrecording
• Before starting to record, test the
recording function to make sure the
picture aud souud are recorded without
any problems.
• Compensation for the contents of
recordings cannot be provided, even if
recording or playback is not possible due
to a malfunction of the camcorder, storage
media, etc.
• TV color systems differ depending on the
countries/regions. To view your
recordings on a TV, you need an NTSC
system-based TV.
• Television programs, films, video tapes,
and other materials may be copyrighted.
Unauthorized recording of such materials
may be contrary to the copyright laws.
On playing back HDV tapes on other
devices
You c:mnot play back a tape recorded in the
HDV format on DV format video cameras
or on mini DV players (The screen appears
blue/.
(?heck the contents of tapes by playing
them back on this c:uncorder prior to
playing them back on other devices.
Aboutthismanual
• The images of the LCD screen and the
viewfiuder used in this manual l\_r
illustration purposes are captured using a
digital still camera, and therelT_re may
appear different.
• The on-screen displays in each local
language are used for illustrating the
operating procedures. Change the screen
language belT_reusing your camcorder if
necessary (p. 70).
• Design and specifications of recording
media and other accessories are subject to
change without notice.
AbouttheCarlZeisslens
Your camcorder is equipped with a Carl
Zeiss lens. which was developed jointly by
Carl Zeiss. in Germany, and Sony
Corporation. and produces superior images.
It adopts the MTF measurmnent system for
video cameras and offers a quality typical
of a Carl Zeiss lens. Also. the lens lk_ryour
camcorder is T*-coated to suppress
unwanted reflections and faithfully
reproduce colors.
MTF= Modulation Transfer Function. The
number value indicates the amount of light
lhom a subject coming into the lens.
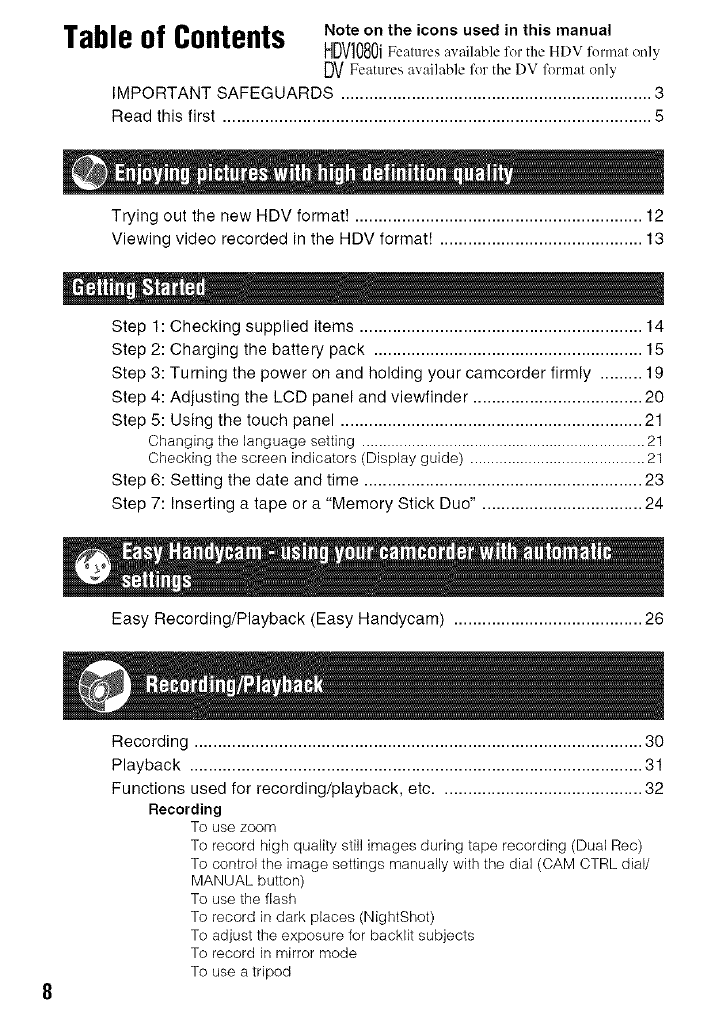
Table of Contents Note on the icons used in this manual
HDVI080iF_...._ .,,_il.bl_t'orth_HDVt'or,n.tonb'
DVFeatures available for the DV format only
iMPORTANT SAFEGUARDS .................................................................. 3
Read this first ........................................................................................... 5
Trying out the new HDV format! ............................................................. 12
Viewing video recorded in the HDV format! ........................................... 13
m
Step 1: Checking supplied items ............................................................ 14
Step 2: Charging the battery pack ......................................................... 1,5
Step 3: Turning the power on and holding your camcorder firmly ......... 19
Step 4: Adjusting the LCD panel and viewfinder .................................... 20
Step 5: Using the touch panel ................................................................ 21
Changing the language setting .................................................................... 21
Checking the screen indicators (Display guide) .......................................... 21
Step 6: Setting the date and time ........................................................... 23
Step 7: Inserting a tape or a "Memory Stick Duo". ................................. 24
Easy Recording/Playback (Easy Handycam) ........................................ 26
Recording ............................................................................................... 30
Playback ................................................................................................ 31
Functions used for recording/playback, etc ........................................... 32
Recording
To use zoom
To record high quality still images during tape recording (Dual Rec)
To control the image settings manually with the dial (CAM CTRL dial/
MANUAL button)
To use the flash
To record in dark places (NightShot)
To adjust the exposure for backlit subjects
To record in mirror mode
To use a tripod
To use a Shoulder belt
Playback
To use PB zoom
Recording/playback
To check the remaining battery (Battery Info)
To turn off the operation confirmation beep (BEEP)
To initialize the settings (RESET)
Other part names and functions
Indicators displayed during recording/playback ..................................... 36
Searching for the starting point .............................................................. 39
Searching for the last scene of the most recent recording
(END SEARCH) .................................................................................. 39
Reviewing the most recently recorded scenes (Rec review) ....................... 39
Remote Commander .............................................................................. 40
Searching quickly for a desired scene (Zero set memory) .......................... 40
Searching for a scene by date of recording (Date search) ......................... 41
Playing the picture on a TV .................................................................... 42
High definition TV ......................................................................................... 42
16:9 (wide) or 4:3 TV .................................................................................... 42
Connecting to a high definition TV ............................................................... 43
Connecting to a 16:9 (wide) or 4:3 TV ......................................................... 44
Using the menu items ........................................................... 48
Menu items ............................................................................................. 50
CAMERA SET menu ........................................................................ 52
Settings to adjust your camcorder to the recording conditions (EXPOSURE/
WHITE BAL./STEADYSHOT, etc.)
MEMORY SET menu ....................................................................... 58
Settings for the "Memory Stick Duo" (QUALITY/IMAGE SIZE/ALL ERASE/
NEW FOLDER, etc.)
_, PICT.APPLI. menu .......................................................................... 61
Special effects on pictures or additional functions on recording/playback
(SLIDE SHOW/PICT.EFFECT/SMTH SLW REC, etc.)
_%8 EDIT/PLAY menu ........................................................................... 64
Settings for editing or playing back in various modes (VAR.SPD PB/
END SEARCH, etc.)
_ STANDARD SET menu .................................................................. 65
Settings while recording on a tape or other basic settings (REC MODE/
MULTI-SOUND/LCD/VF SET/DISP OUTPUT/QU ICK REC, etc.)
TIME/LANGU. menu ....................................................................... 70
(CLOCK SET/WORLD TIME/LANGUAGE)
Customizing Personal Menu .................................................................. 71
Using the CAM CTRL dial ...................................................................... 72
Continued _g
Dubbing to VCR/DVD device, etc .......................................................... 74
Recording pictures from a VCR ............................................................ 77
Dubbing pictures from a tape to a "Memory Stick Duo" ......................... 79
Deleting recorded pictures from the "Memory Stick Duo" ...................... 80
Marking images on the "Memory Stick Duo" with specific information
(Print mark/Image protection) ....................................................... 80
Printing recorded images (PictBridge compliant printer) ........................ 81
Jacks to connect external devices ......................................................... 83
Connecting to a computer ...................................................................... 84
Copying still images to a computer ........................................................ 84
Copying movies on a tape to the computer ........................................... 87
Creating a DVD (Direct Access to "Click to DVD") ................................ 89
Troubleshooting ..................................................................................... 92
Warning indicators and messages ....................................................... 107
Using your camcorder abroad .............................................................. 111
Usable cassette tapes .......................................................................... 112
About the "Memory Stick" .................................................................... 114
About the "InfoLITHIUM" battery pack ................................................. 116
About i.LINK ......................................................................................... 117
Maintenance and precautions .............................................................. 118
Specifications ....................................................................................... 123
Identifying parts and controls ............................................................... 127
Index .................................................................................................... 130
18

11

Et_oy_9_gph;t _reswi¢##fg# _tefim'¢io_q_Mity
Tryingout the newHDVformat!
High image quality
The HDV format has about 2 times tile horizontal resolution of a standard TV resulting in
about 4 times the amount of pixels providing high quality images.
Being HDV format compliant, your camcorder is ready to shoot custal clear, high-definition
images.
12

Viewingvideorecordedin the HDVformat!
=
13
Getting S_agted
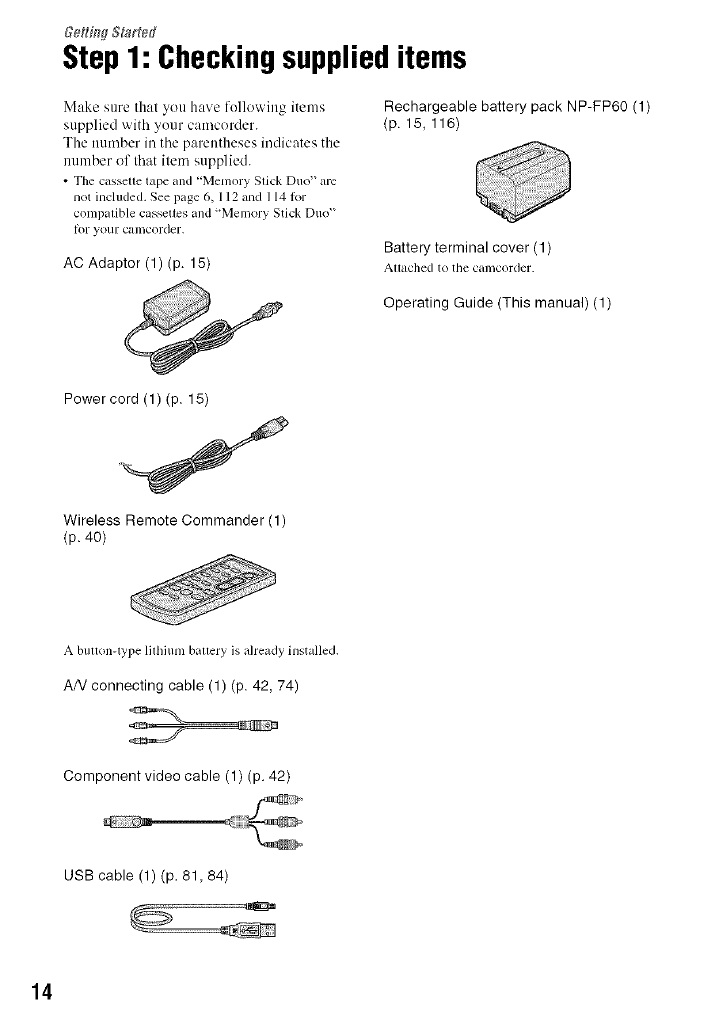
Step1: Checkingsupplieditems
Make sure that you have following items
supplied with your camcorder.
The number in the parentheses indicates the
number of that item supplied.
• The cassette tape and "Memory Stick Duo" am
not included. See page 6, 112 and 1141or
COml)alible cassettes and "Meu/ory Stick Duo"
Ior your camcorder.
AC Adaptor (1) (p. 15)
Rechargeable battery pack NP-FP6O (1)
(p. 15, 116)
Battery terminal cover (1)
Attached to tile camcorder.
Operating Guide (This manual) (1)
Power cord (1) (p. 15)
Wireless Remote Commander (1)
(p. 40)
A button-type lithium battery is already installed.
AN connecting cable (1) (p. 42, 74)
Component video cable (1) (p. 42)
USB cable (1) (p. 81,84)
14
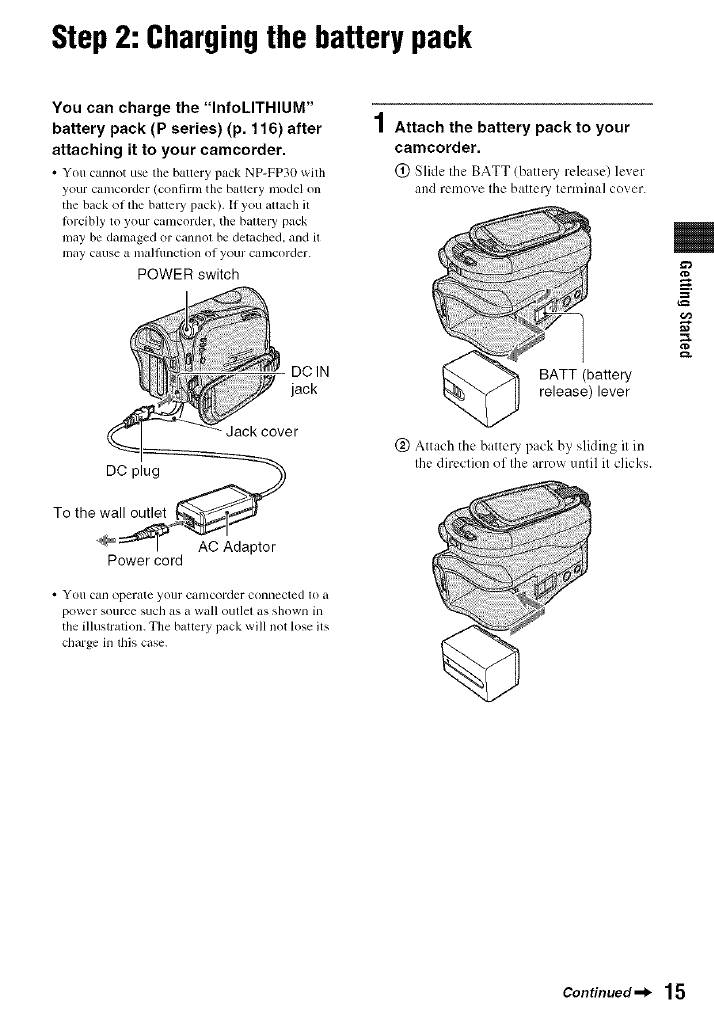
Step2: Chargingthe battery pack
You can charge the "InfoLITHIUM"
battery pack (P series) (p. 116) after
attaching it to your camcorder.
•You cannot use tile battery pack NP-FP30 with
your camcorder (confirm the battery model on
the back (iffile batteW pack). If you attach 11
/orcibly toyour camcorder, the batteW pack
may be damaged or cannot be detached, and it
may cause a illa]ltlnction of your cali/corder.
POWER switch
DCIN
jack
•YOII can operate yollr canlcorder connected to a
power sollrce such as a wall outlet as shown in
tile illustration. The battery pack will not lose its
charge in this case.
1Attach the battery pack to your
camcorder.
(_) Slide the BATT (battelT release) lever
and remove Ihe baltel3t lenninal cover.
BATT (battery
release) lever
(_ Attach the battel T pack by slkling il in
Ihe direclkm oflhe arrow until it clicks.
¢D
=
g.
Continued _l_ 15
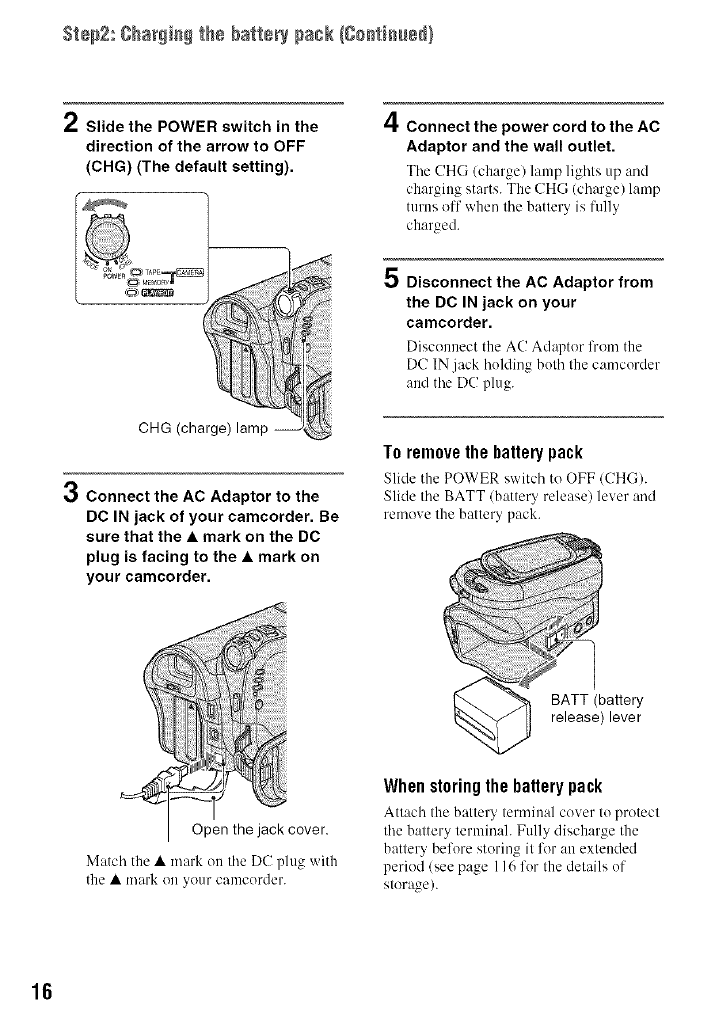
Step2: ghar_i_ the battery pack {ge_ti_ue_}
/Slide the POWER switch in the
direction of the arrow to OFF
(CHG) (The default setting).
CHG (charge) lamp
Connect the AC Adaptor to the
DC IN jack of your camcorder. Be
sure that the •mark on the DC
plug is facing to the •mark on
your camcorder.
4
5
Connect the power cord to the AC
Adaptor and the wall outlet.
Tile CH(; (ch:,rge/lamp lights up :rod
charging starts. The CHG (charge) lamp
turns off when the battery is fully
charged.
Disconnect the AC Adaptor from
the DC IN jack on your
camcorder.
Disconnect the AC Adapter lhem the
DC IN jack holding both the camcorder
and the DC plug.
To remove the battery pack
Slide the POWER switch to OFF (CHC).
Slide the BATT (battery release) lever and
remove the battery pack.
BATT (battery
release) lever
Match the • mark on the DC plug with
the • mark on your camcorder.
When storing the battery pack
Attach the battery terminal cover to protect
the battery terminal. Fully discharge the
battery before storing it lk)ran extended
period (see page 116 for the details of
storage/.
16
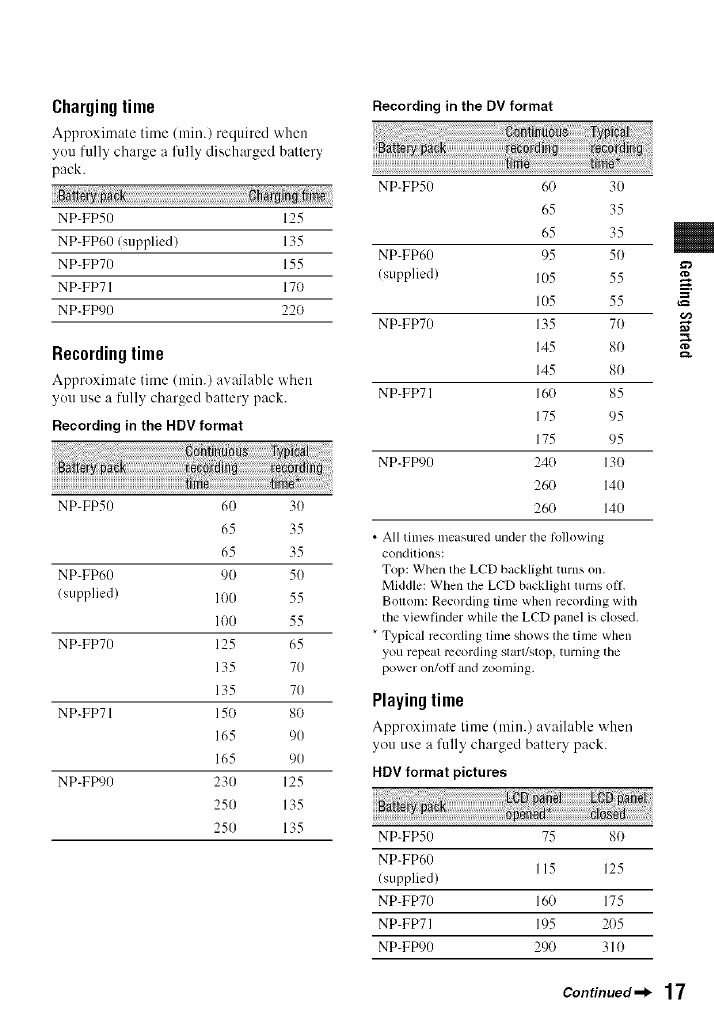
Chargingtime
Approximate time/min.) required "Mien
you fully charge a l)llly discharged battery
pack.
NP-FP50 125
NP-FP60 Isupplied) 135
NP-FP70 155
NP-FP71 170
NP-FD)0 22O
Recordingtime
Approximate time (rain.) avaihdqe when
you use a fully charged battery pack.
Recording in the HDV format
NP-FP50 60 30
65 35
65 35
NP-FP60 90 50
(supplied) 1O0 55
100 55
NP-FP70 125 65
135 70
135 70
NP-FP71 150 80
165 90
165 90
NP-FP90 230 125
250 135
250 135
Recording in the DV format
NP-FP50 60 30
65 35
65 35
NP-FP60 95 50
(supplied) 105 55
105 55
NP-FP70 135 70
145 80
145 80
NP-FP71 16(1 85
175 95
175 95
NP-FP90 240 130
260 140
26(} 140
• All times measured under the lollowing
conditions:
Top: When the LCD backlight turns on.
Middle: When the LCD backlight turns off.
Bouom: Recording time when recording with
tile viewfinder while the LCD panel is closed.
* Typical rccoMing time shows the time when
you repeat lvcordhlg start!',top, turning tile
power on/oil and zoomillg.
Playingtime
Approximate time (rain.) available "Mien
you use a fiflly charged battery pack.
HDV format pictures
NP-FP50 75 80
NP-FP60 115 125
(supplied)
NP-FP70 160 175
NP-FP71 195 2()5
NP-FP90 290 310
ro
=
€/1
g.
Continued _l_ 17

St÷p2: ¢har_ie_ the battery pack {¢+etieu+_}
18
DV format pictures
NP-FP50 85 95
NP-FP60 135 145
/supplicd)
NP+FP70 185 200
NP+FP71 220 235
NP+FfX)0 335 355
*When the LCD backlight turns on.
On the battery pack
• Bel_)re changing tile battery pack. slMe tile
POWER switch to OFF/CHG).
• The CHG (charge) lamp flashes during
charging, or Battc UInlk) (p. 34) will not be
correctly displayed under the lollowing
conditions.
Tile battcl T pack is not attached corrcctly.
Tile battc Upack is damaged.
Tile baaery pack is worn-out (For Battery
Inlk) only).
• The power will not be supplied liom the battery
as long as the AC Adaptor is connected to the
DC IN jack of your camcorder, even when the
power cord is disconnected fiom the wall outlet.
• When aaacbing an optional video light, it is
recommended thai you use a NP-FP60. NP-
FP70. NP-FP71 or NP-FIX)O battery pack.
On the charging/recording/playback time
• Times measured with the camcorder at 25 %"
(77 OF)(10 to 30 %" (50 OF to 86 OF) is
mconnnended).
• The recording and playback lime will be shorter
when yell use your camcorder in low
tenlperalures.
• The recording and playback lhllc will be shorter
depending on file conddions under which you
use yollr camcorder.
On the AC Adaptor
• U_ tile nearby wall outlet when using the AC
Adaptor. Disconnect tile AC Adaptor h'om the
wall outlet immedialcly if any mallunction
Occurs while using your calllcorder.
• Do not use tile AC Adaptor placed ill a nan-ow
space, such as between a wall and flmliturc.
• Do not short-circuit tile DC plug of tile AC
Adaptor or battery terminal with any metallic
objects, This may cause a malflmction.
PRECAUTION
• Even if your camcorder is turned oil. AC power
/house current) is still supplied to it while
connected to the wall out]el via the AC Adaptor.
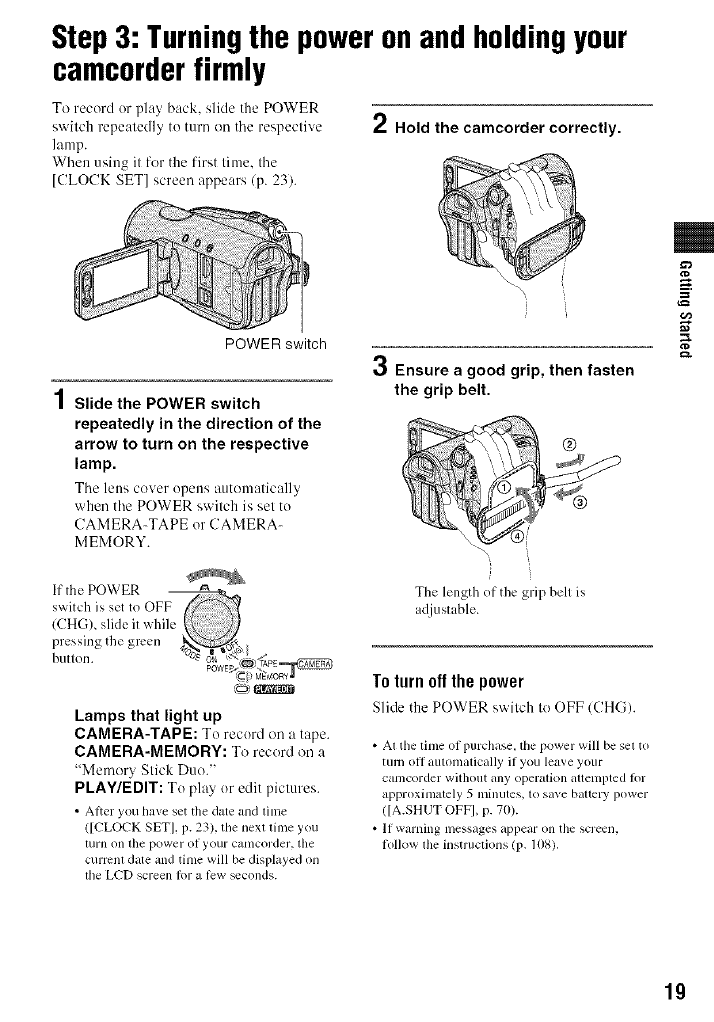
Step3: Turningthe poweronandholdingyour
camcorderfirmly
To record or play back, slide the POWER
switch repeatedly to turn on tile respective
lamp.
When using it for the first time. tile
[CLOCK SET] screen appears (p. 23).
2Hold the camcorder correctly.
')
POWER switch
4
/ Slide the POWER switch
repeatedly in the direction of the
arrow to turn on the respective
lamp.
Tile leos cover opeus automatically
when tile POWER swilch is sel to
CAMERA-TAPE or CAMERA-
MEMORY.
3Ensure a good grip, then fasten
the grip belt.
The length of the grip bell is
adjustable.
=
g.
co)
Lamps that light up
CAMERA-TAPE: To record on a tape.
CAMERA-MEMORY: To record on a
"Memor_ Stick Duo."
PLAY/EDIT: To play or edit pictures.
• Alter you have set tile date and lime
([CLOCK SET], p. 23), the next time you
turn on tile power of your catllcorder, tile
curmnl date and time will be displayed on
the LCD screen lot a low _conds.
To torn offthe power
Slide the POWER switch to OFF/CHG).
•At the lime of purchase, the power will be set to
turn oll autonlatically if you leave your
calncorder without ally operalion attenlpted lk)r
approximately 5 minutes, to save bauery power
([A.SHUT OFF], p. 70).
• If warning nlessages appear on the screen.
lollow lhe instruclions (17. 108).
19
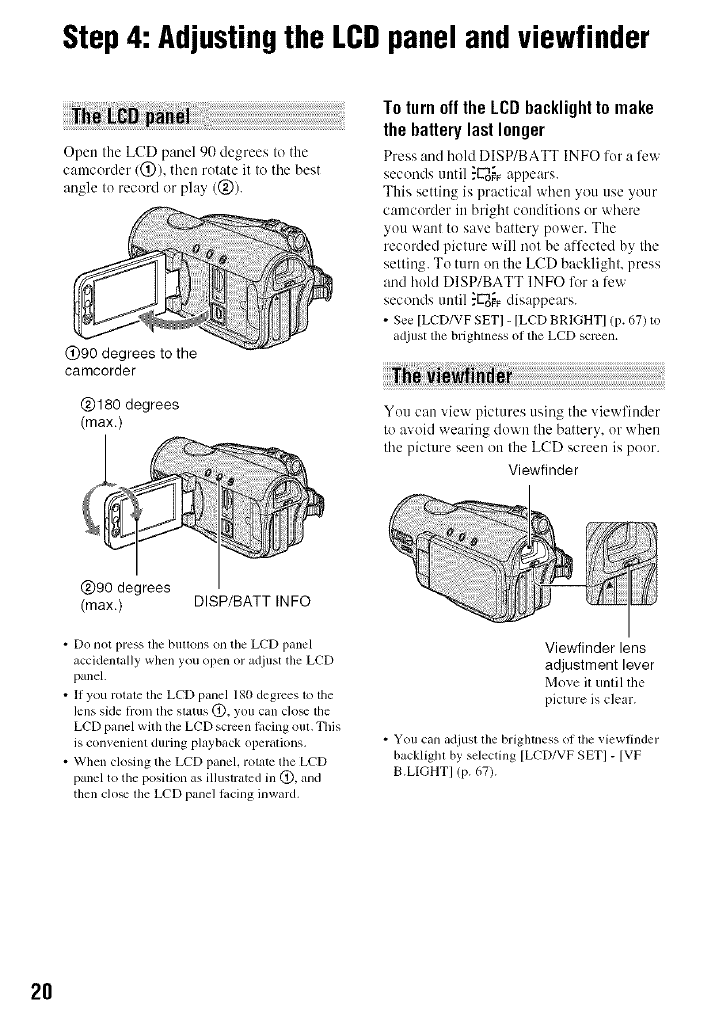
Step4: Adjustingthe LCDpanelandviewfinder
Open the LCD panel 90 degrees to the
camcorder 1@), then rotate it to tile best
angle to record or play (@).
@90 degrees to the
camcorder
@180 degrees
(max.)
To turn offthe LCDbacklightto make
the battery last longer
Press and hohl DISP/BATT INFO for a few
seconds until ."U_o_ appears.
This setting is practical when you use your
camcorder in bright conditions or where
you want to save battery power. The
recorded picture will not be affected by the
setting. To turn on the LCD backlight, press
and hold DISP/BATT INFO lk_r a few
seconds tmtil ."ggo_Fdisappears.
• See [LCD/VF SETI - [LCD BRIGHTI (p. 67) to
adjust lbe brighmess ol lbe LCD scrcen,
You can view pictures using the viewfinder
to avoid wearing down the battery, or when
the picture seen on the LCD screen is poor.
Viewfinder
@90 degrees
(max.) DISP/BATT INFO
• Do not press lbe buttons on the LCD panel
accidentally when you open or adjust tim LCD
panel.
• If you rotale lhe LCD panel 180 degrees lo the
lens side hom the status @, you can clo_ the
LCD panel with the LCD screen lacing oul, This
is convenient during playback operations.
• When closing the LCD panel, rotate the LCD
panel to the posilion as illustrated in @, and
then clo_ lhe LCD panel lacing inward.
Viewfinder lens
adjustment lever
Move it until the
picture is clear.
• You can adjust tim brighmess of tile viewfinder
backlight by selecting [LCD/VF SET] - [VF
B.LIGHT] (p. 67).
2O

Step5: Usingthe touchpanel
You can play back recorded pictures
(p. 31 ). or change file sellings (p. 48) using
the touch panel.
Place your hand on the rear side of
the LCD panel to support it. Then,
touch the buttons displayed on the
screen.
DISP/BATT INFO
Touch the bulton on
the LCD screen.
• Perlorm lhe same aclions as explained above
when you press the bullv)ns on lhe LCD panel.
• Be carelul not 1o press butlv)ns on the LCD
panel accidenlally while using the touch panel.
• If tile buttons on tile touch panel do noI work
correctly, adjust the LCD screen
(CALIBRATION) (p. 120).
Tohide the screen indicators
Press DISP/BATT INFO to toggle the
screen indicators (such as time code) on or
off.
You can change the on-screen displays to
show messages in a specified language.
Select the screen language in
[LANGUAGE] on the ;_ (TIME/
LANGU.) menu (p. 70).
You can easily check the lneaning of eacl'l
indicaB)r thal appears on the LCD screen
(p. 38).
1 Touch Ig:ff_].
Touch [MENU] during Easy Handycam
operation (p. 26).
2Touch [DISP GUIDE].
The indicators vary depending on lhe
settings.
=
,,x
g.
Continued_l_ 21

Step 5: Usingthe tou_h pa_e_{go_ti_e_)
3Touch the area including the
indicator that you want to check.
The meanings of the indicators in the
area are listed on the screen. If you
cannot find the indicator you want to
check, touch [_]/f_] to toggle.
When you touch [_, the screen returns
to the area selecting display.
To finishthe operation
Touch [END].
22
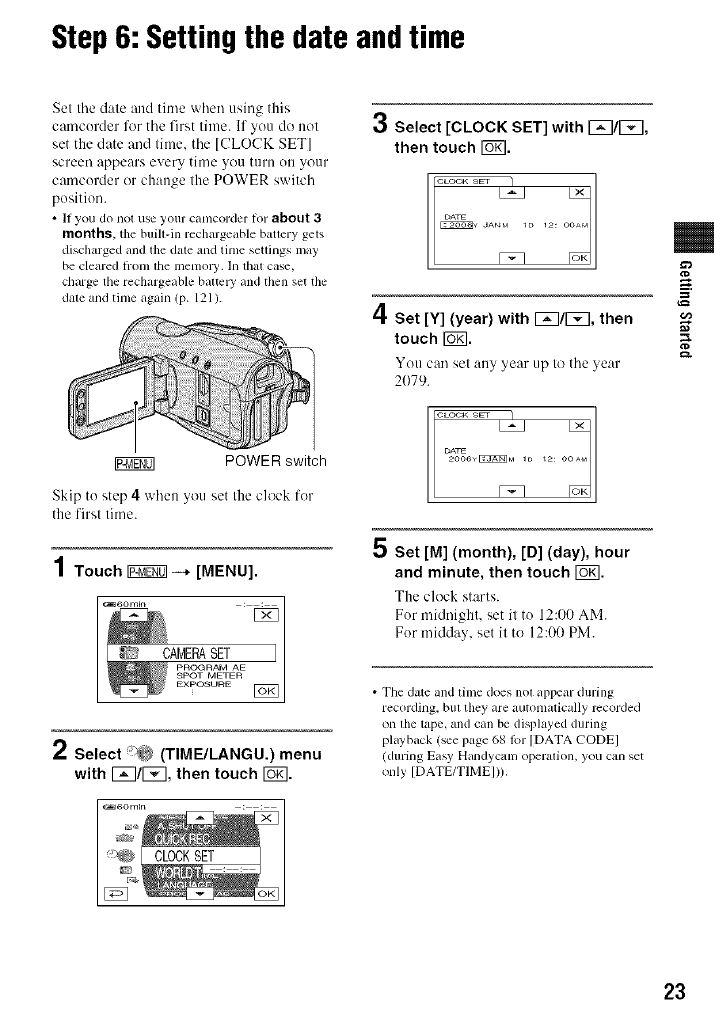
Step6: Settingthe date andtime
Set tile date and time when using this
camcorder %r tile first time. If you do not
set the date and time. the [CLOCK SET]
screen appears every time you turn ou your
camcorder or change the POWER switch
position.
• II you do not use your canlcorder for about 3
months,tile buill-in rechargeable bauery gets
discharged andthe date and tinle settings may
be cleared honl the menlory. In that case,
charge the rechargeable battcW and then set the
dale and tinle again (p. 121).
r_TF0] POWER switch
Skip to step 4 when you set the clock lor
the firsl lime.
1 Touch _--* [MENU].
I CAF 2SETAE
2Select '_ (TIME/LANGU.) menu
with I_q/_, then touch [6_].
3Select [CLOCK SET] with I_q/F_l,
then touch Io71.
o 12: o
/I
='1"Set [Y] (year) with [_3/[5[], then
touch I_K].
You can set any year up to tile year
2079.
DATE
Set [M] (month), [D] (day), hour
and minute, then touch F6_I.
The clock starts.
For midnight, set it to 12:00 AM.
For midday, set it to 12:00 PM.
• Tile date and time does not appear during
recording, bill they are autonlatically recorded
on file tape, and can be displayed during
playback (see pt_ge 68 tbr [DATA CODEI
(during Easy Handycanl operation, you can set
only [DATE/TIMEI)).
=
€=/3
&
23
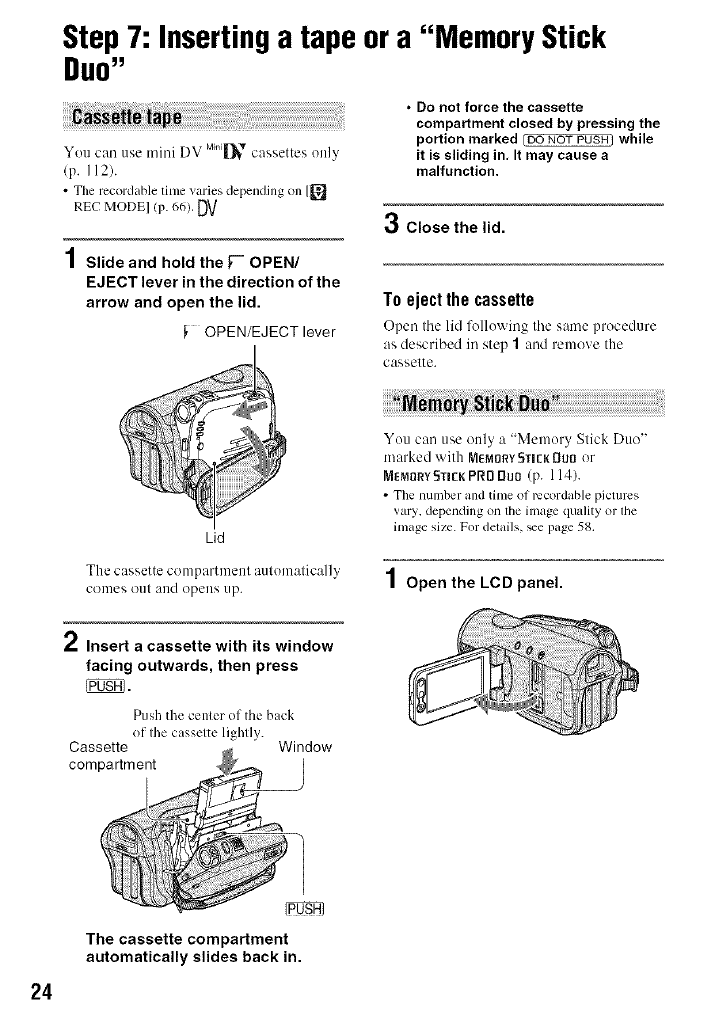
Step7: Insertinga tape ora "Memory Stick
DUO"
You call use mini DV MilliJ_ cassettes Ole]y
(p. 112).
• The mcordable lime varies depending on [_
REC MODEl (p. 66). DV
1Slide and hold the _-" OPEN/
EJECT lever in the direction of the
arrow and open the lid.
OPEN/EJECT lever
Lid
•Do not force the cassette
compartment closed by pressing the
portion marked _ NOT PUSH] while
it is sliding in, It may cause a
malfunction.
3Close the lid.
To eject the cassette
Open tile lid following tile same procedure
as described in step 1and remeve the
cassette.
You can use only a "Memory Stick Duo"
marked with MEMORY_TI[KDUI3er
MEMORYSTI[KPRI] Duo (p. 114).
• The number and time of mcordable pictures
vary, depending on the image quality or lhe
image size. Fordelails, _e page 58.
The cassette cenlpartmenl automatically
cenles (lee[ ale(l opeles lip. 1 Open the LCD panel.
*" Insert acassette with its window
facing outwards, then press
Push the ccnlcr of the back
of Ihe casselee lighlly.
Cassette Window
compartment
24
The cassette compartment
automatically slides back in.
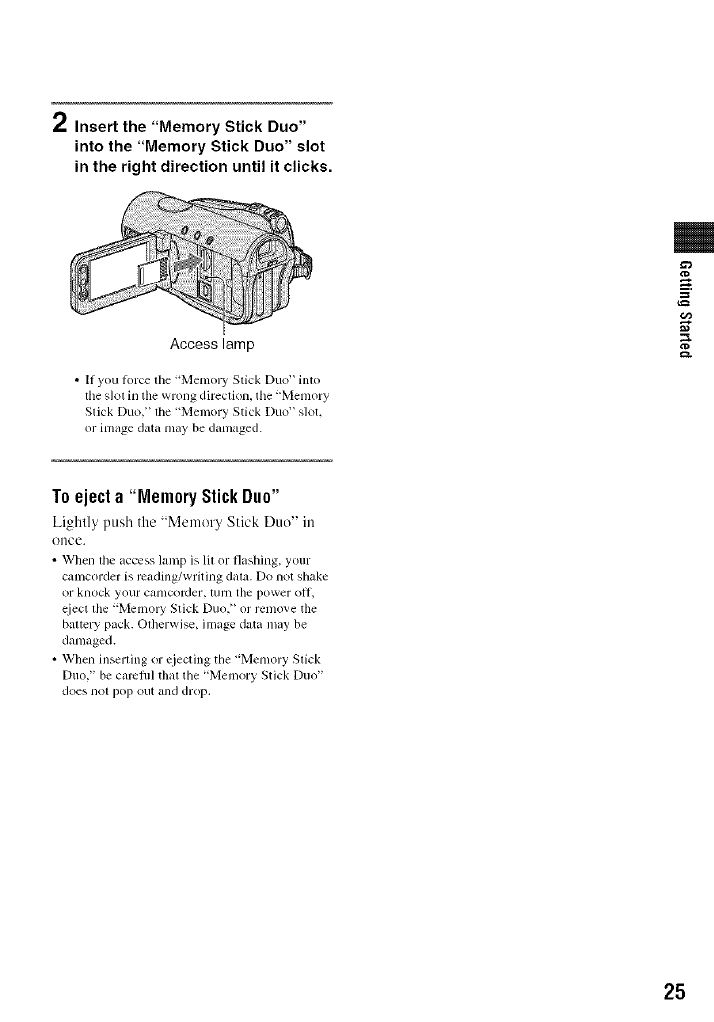
2Insert the "Memory Stick Duo"
into the "Memory Stick Duo" slot
in the right direction until it clicks.
Access lamp
• If you torte lhe "Memory Stick Duo" into
the slot in the wrong direction, tile "Memory
Slick Duo," the "Memory Stick Duo" slot.
or image data may be danmged.
¢D
=
g.
Toeject a "Memory StickDuo"
Lightly push the "Memer_ Stick Duo" in
once.
• When lhe access lamp is lil or flashing, your
canlcorder is rcading/writing data. Do not shake
or knock your canlcorder, [/1111the power o11,
eiect lhe "Memo W Slick Duo," or remove the
baltery pack. Olherwise, image data may be
damaged.
• When inserling or cjecting the "Memory Slick
Duo," be camfifl that the "Memory Stick Duo"
does nol pop out all(] drop.
25

Easy Hafldycam __sin# ya_" _a_r_co_ter wq_fi a_tomat_¢ sett[#gs
EasyRecording/Playback(EasyHandycam)
With this E_lsy Hnnd_c_un oper_ltion, most of the c_unera settings _lre _mtom_ticMly optimMl_
adjusted, which frees you from detailed adjustments. The screen font size increz_ses l%r easy
viewing.
_f the POWER s_itch is
d
1Slide the POWER switch [] to turn on the CAMERA-TAPE lamp.
If the POWER swilch i; et I_ OFF (CHC),
slide il while pressing Ihe green_ bullon.
k" ON "_'
P WE_,_) rAP_
o_1_ _o_
2Press EASY [_.
appears on the screen [_].
3Press START/STOP [] or [] to start recording.
[STBY] ---+ [REC]
To slop recording, press [] or [] again.
26

1Slide the POWER switch [] to turn on the CAMERA-MEMORY lamp.
If the POWER swilch is set Io OFF ICHG), _
slide il while pressing Ihe green bullon.
L_MOR va
2Press EASY [_.
appears on Ihe screen [].
3Press PHOTO [] to record.*
O O
Flashing _ Lil
Press and hold lighlly Press flflly Io record.
to a(liusl Ihe focus.
When |11|| disappears. Ihe image has been recorded.
* Still inlages are recorded in [F[NE] qualfly on a "Memol T Slick Duo?'
Torecordhighqualitystill imagesduringtaperecording(DualRe€)
Slide the POWER switch [] to turn on the UAMERA-TAPE lamp, then press PHOTO []
fillly during tape recording.
For each separate time tape recording, up to 3 still images can be recorded. After tape
recording, stored still images are stored onto the "Memol 3, Stick Duo" (p. 32).
• Do not eject "MemoW Stick Duo" belore tape recording is finished and tile still images are stored on tile
"Memory Stick Duo."
:7t2
=_
3
g
=_
3
Continued-_ 27
Easy Reg0_dia_/Play_agk{EasyHaa_ygam}(Caa{iaa÷d}
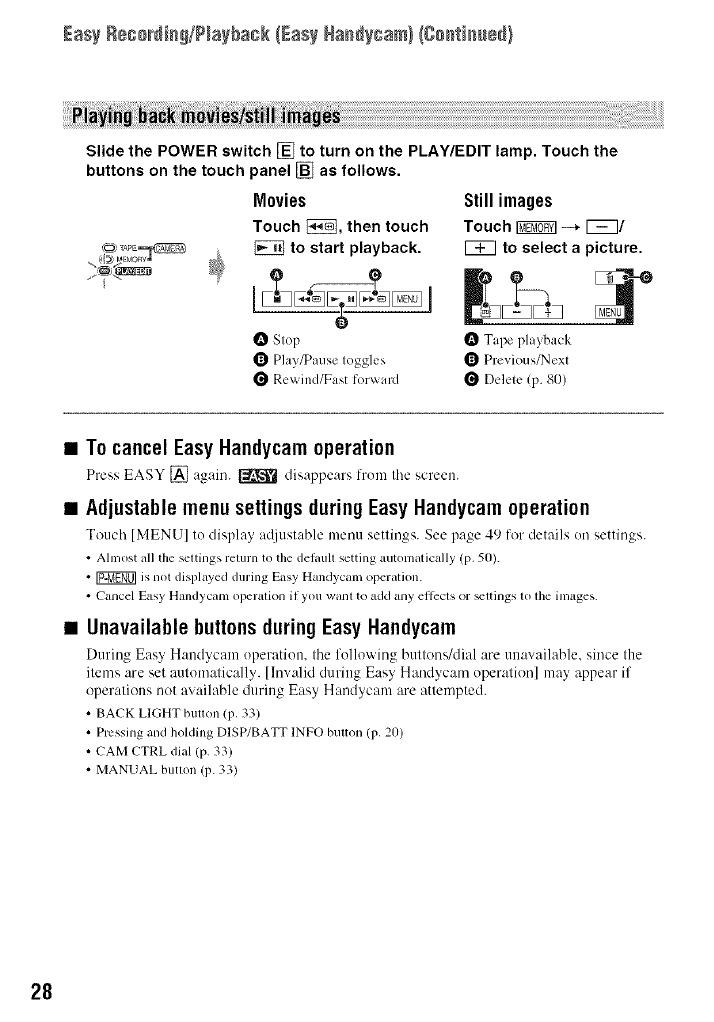
Slide the POWER switch [] to turn on the PLAY/EDIT lamp. Touch the
buttons on the touch panel [] as follows.
Movies
Touch _, then touch
to start playback.
O Stop
Q Play/Pause toggles
Re_ ind/Fast forward
Still images
Touch _-_ _/
[_ to select a picture.
O Tape playback
_ Previous/Next
_ Delete (p. 80)
•To cancel Easy Haudycam operation
Press EASY [] again. _ disappears from the screen.
•Adjustable menu settings during Easy Haudycam operation
TouchIMENUIto display at[iustable menu settings. See page 4 _)lor details on settings.
• Almost all the settings return to the del,mltsetting automatically (p. 50).
• r_ is not displayed during Easy Handycaln operation.
• Cancel Easy Handycam opergllion if you want to add any ellccls or _ltings to the iln_lges.
•Unavailable buttonsduring Easy Handycam
During Eas_ H:mdycam operation, the follo'_ ing buttons/dial are unaw_ib_ble, since the
items are set automatically. [Invalid during Easy Handycam operation] may appear if
operations not available during Easy Handycam are attempted.
• BACK LIGHT butlon (p, 33)
• Pressing and holding DISP/BATT INFO bulton (p, 20)
• CAMCTRL dial (p. 33)
• MANUAL butlon (p. 33)
28

3
3
2g
START/STOP []
Reget_HW/?layback
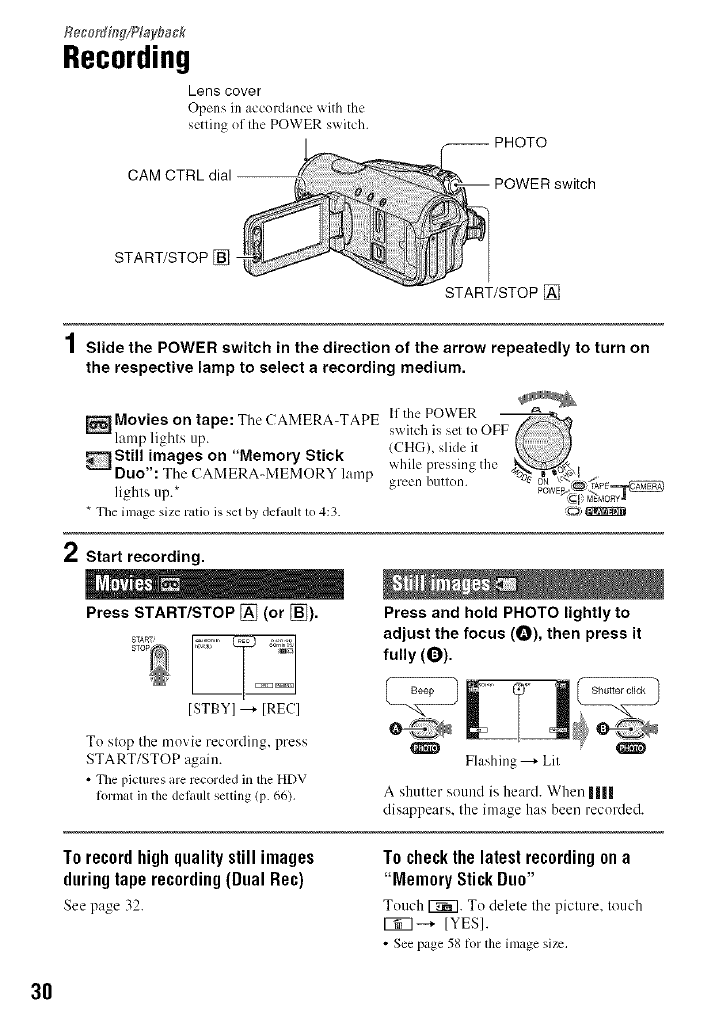
Recording
Lens cover
Opens in accordance with the
setting of the POWER switch.
PHOTO
CAM CTRL dial POWER switch
START/STOP []
2
Slide the POWER switch in the direction of the arrow repeatedly to turn on
the respective lamp to select a recording medium.
Movies on tape: Tile CAMERA-TAPE switchlfthe POWERissel Io O
lamp lights up. (CHG), slide it
Still images on "Memory Stick while pressing the
DUO": Tile CAMERA-MEMORY lamp green burton. "%?_"_'/f_PE_
lights up.* PowE_<__-_o_
*The inlage size ratio is sel by de/ault 1o4:3. _o)
Start recording.
Press START/STOP [] (or [_).
To step tile movie recording, press
START/STOP again.
• The pictures are rccorded in tile HDV
/ormat in tile delault setting (p. 66),
Press and hold PHOTO lightly to
adjust the focus (O), then press it
fully (0).
Flashing ---+Lil
A shutter sound is heard. When ||||
disappears. Ihe image has been recorded.
To recordhighquality still images
duringtape recording(Dual Rec)
See page 32.
T0 check the latest recording on a
"Memory Stick Duo"
Touch 1_7. To delete tile picture, touch
1_7 --_ IYESI.
• See page 58/or lhe image size.
3O
Playback
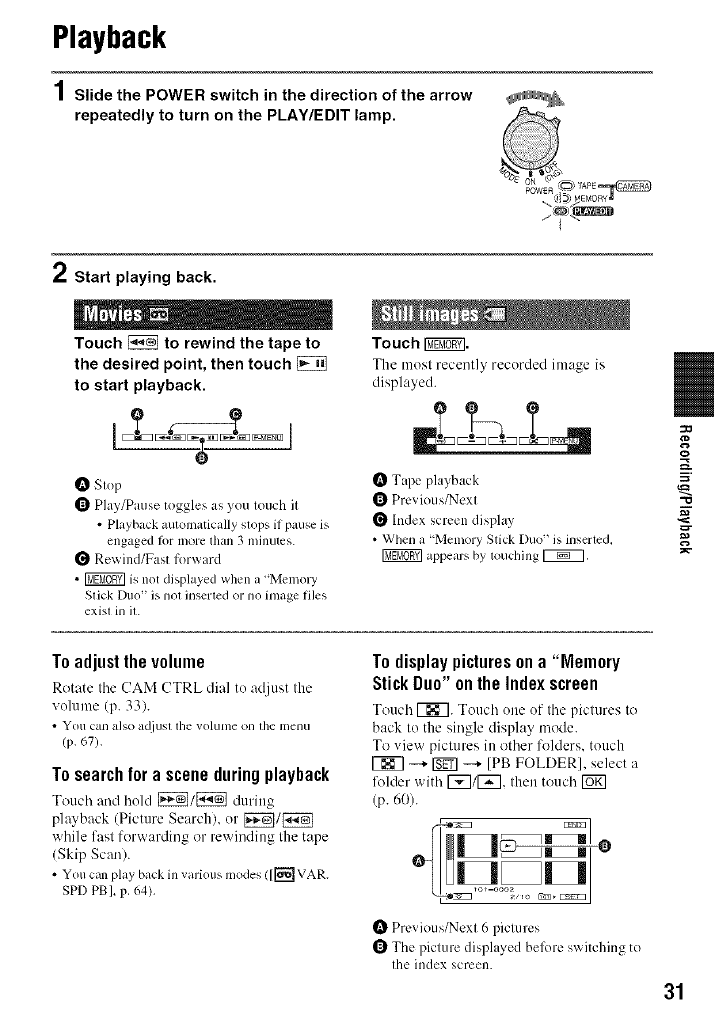
1Slide the POWER switch in the direction of the arrow
repeatedly to turn on the PLAY/EDIT lamp.
2Start playing back.
Touch _to rewind the tape to
the desired point, then touch
to start playback.
O Slop
OPlay/Pause toggles as you Iouch il
• Playback automatically slops if pause is
engaged lor more than 3 minutes.
Rewind/Fast forward
•_ is not displayed when a "Memol 3'
Stick Dtlo is llOt inserted or no inmge files
exist ill it.
Touch I_.
The luest recently recorded image is
displayed.
O Tape playback
OPrevious/Next
Index screen disphJy
• When a "Menlory Stick Duo _is inserted,
appears by touching _,
130
¢D
-O
Toadjustthe volume
Rotate the CAM CTRL dial to :Jdjust the
volume (p. 33).
• _rOll Call also a_/j/ISl the vollltlle oil the I])elIH
(p. 671.
To search for a scene duringplayback
Touch and hold [_]/_ during
playback (Picture Search), or _/_
while fzlst forw_Jrding or rewinding the tape
(Skip Scml).
• You can play back in various modes ([['_ VAR.
SPD PBI, p, 64),
To display pictureson a "Memory
Stick Duo" onthe Index screen
Touch [_7. Touch one of the pictures tu
back to the single display mode.
To view pictures in uther lk_lders, touch
[_ _ _ _ [PB FOLDER], select a
lk_lder with [_]/[_], then touch [_
(p. 60).
4R H
Previous/Nexl 6 pictures
OThe picture displayed belk)re switching to
Ihe index screen.
31
Functionsusedfor recording/playback,etc.
32
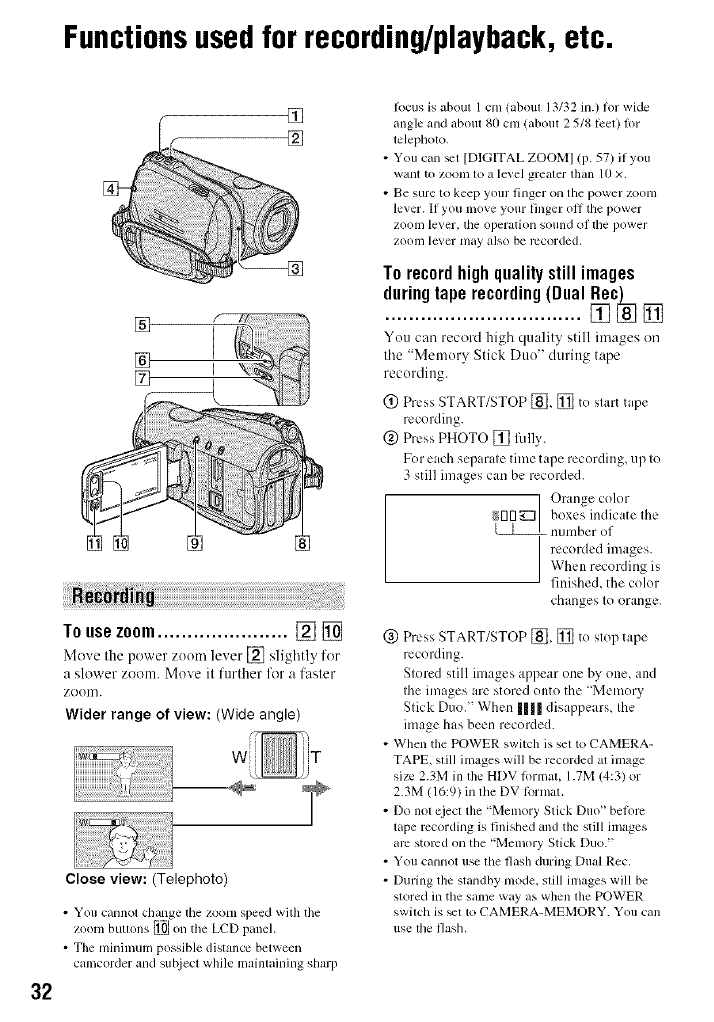
[]
TOusezoom...................... [] []
Move the power zoonl lever [] slightly for
a slower zoom. ]Move it further for a faster
zoom.
Wider range of view: (Wide angle)
Close view: (Telephoto)
•You cannol change tile zoom speed with tile
zoom bullons _ on the LCD panel.
• The minimum possible distance between
canlcorder and sut!iect while mainlaining shmp
R)cus is aboul 1 cm/abom 13/32 in.) lor wide
angle and aboul 80 ctn (about 2 5/8 lcel) lt)r
telephoto.
• You can _t [DIGITAL ZOOMI (p. 571 if you
want to ZOOlll1oa level greater than lO ×.
• Be sure to keep your finger on tile power zoonl
lever. If you move your linger oil tile power
zoom lever, tile operation sound of lhe power
ZOOlI/lever nlay also be recorded.
Torecordhighqualitystillimages
duringtaperecording(Dual_c_ []
You can recoM high qu:dity still images on
the "Memory Stick Duo" during tape
recording.
(_) Press START/STOP [_, [] to start tape
recording.
@ Press PHOTO [] fiflly.
For each separate time tape recording, up to
3 still images can be recorded.
Orange color
_rlrl_] boxes indicate Ihe
number ol
recorded images.
When recording is
finished, the color
changes to orange.
@ Press START/STOP [_, [] to stop tape
recording.
Stored still images appear one by one, and
the images arc stored onto the 'Memory
Stick Duo." When I1|1 disappears, the
image has been recorded.
• When the POWER switch is set to CAMERA-
TAPE, still images will be recorded al image
size 2.3M in lhe HDV lormal, 1.7M (4:3) or
2.3M 116:9) in tile DV R>rmat.
• Do not eject tile "Memory Stick Duo" betorc
tape recording is finished and the still images
arc stored on the "Memory Stick Duo."
• You cannot use file flash during Dual Rec,
• During the standby mode, still inlages will be
stored in the same way as when tim POWER
switdl is _1 to CAMERA-MEMORY. You call
use lhe flash,
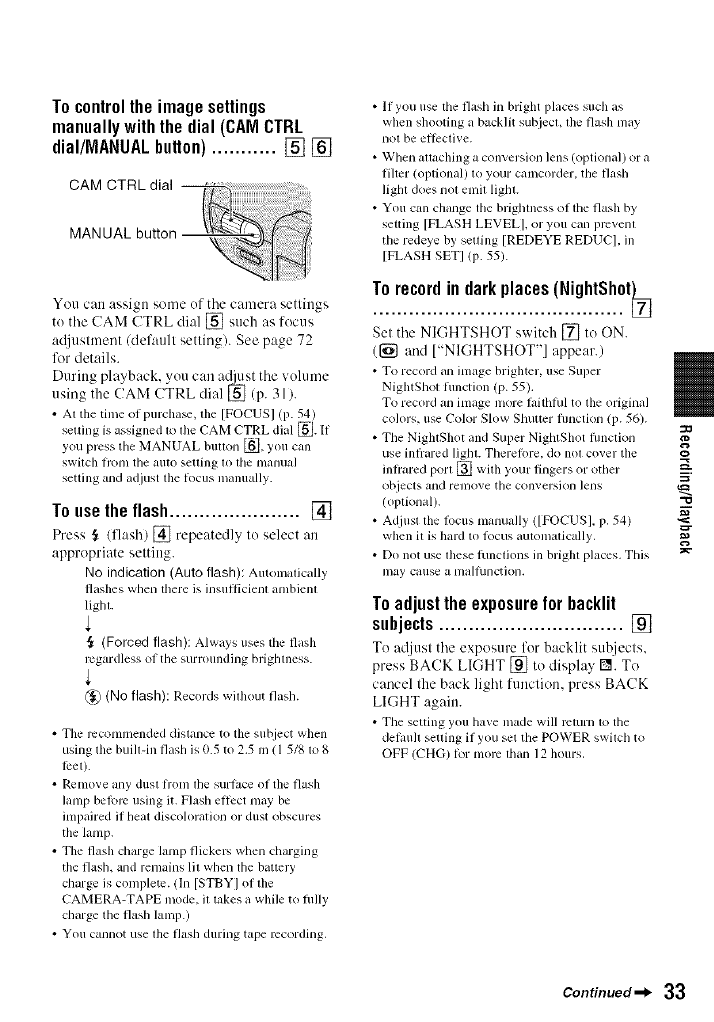
Tocontrolthe imagesettings
manuallywiththe dial(CAMCTRL
dial/MANUALbutton)........... [] []
You can assign some ef tile camera settings
te tile CAM CTRL dial [] such as focus
a@tstment/defattlt setting[. See page 72
for details.
During playback, yeu can adjust tile velmne
using the CAM CTRL dial [] (p. 31).
• At the time of purcha_, the [FOCUSI (p. 54)
setting is assigned to the CAM CTRL dial _. If
you press tile MANUAL button _, you can
switch fi'onl the auto setting 1o file manual
setting and adjust tile locus manually.
l0 use the llash ...................... []
Press ,_ /flash) [] repeatedly to select an
appropriate setting.
No indication (Auto flash): Automatically
flashes when lhere is insul_icienl anlbienl
light.
6_ (Forced flash): Always uses the flash
regardless of the surrounding brightness.
_@ (No flash): Records without flash.
• Tile recommended distance to tile sut_iect when
using the built-in flash is 0.5 to 2.5 I1/( 15/8 to 8
leer).
• Rcnlove any dust fi+onltile surtacc of tile flash
lamp beR>re using it. Flash ellcct may be
inlpaired if heat discoh)ralion or dust obscures
tile lamp.
• The flash charge lamp flickem when charging
tile flash, and remains Ill when lhe battery
charge is complelc. (In [STBYI of the
CAMERA-TAPE mode, il takes a while to fiflly
charge the flash lanlp.)
• You cannot use lhe flash during tape recording,
• If you use the flash in bright places such as
when shooting a backlit subjecl, lhe flash may
not be ellcctive.
• When allaching a conversion lens (optional) or a
filter (oplional) to your camcorder, the flzJsh
lighl does not emil lighl.
• You cun change the brightness of the flash by
setting [FLASH LEVELI, or you can prevent
the redeye by setting [REDEYE REDUCI. in
[FLASH SETI lP- 55).
Set the NIGHTSHOT switch [] to ON.
([_ and ["NIGHTSHOT"] appear.)
• To record _lnimage brighter, use Super
NightShot fimction (p. 55).
To record an image nlore fifithhd to tile original
colors, use Color Slow Shuttcr fimction (p. 56).
• The NightShot _md Super NightShot fimction
use infi'ared liglu. Therefi)re. do not cover the
inlrared porl _ with your fingers or other
objects and renlove the conversion ]ellS
(optionM).
• Adjust the filcus nlanually ([FOCUSI. p. 54)
when il is hard to locus aulolnulically,
• Do not use these lunclions ill brigla places. This
may cause a nlalhlnction.
Toadjusttheexposureforbacklit
subjects ............................... []
Te re[just the exposure for backlit subjects.
press BACK LIGHT [] to display r_l. To
cancel the back light function, press BACK
LIGHT again.
• Tile setting you have made will return to the
delault selling if you set tile POWER switch to
OFF (CHG) lor nlorc lhan 12 hours.
"O
Continued-_ 33
Functionsusedfo_reco_di_g/NaybacLetc.Igo_ti_ed)
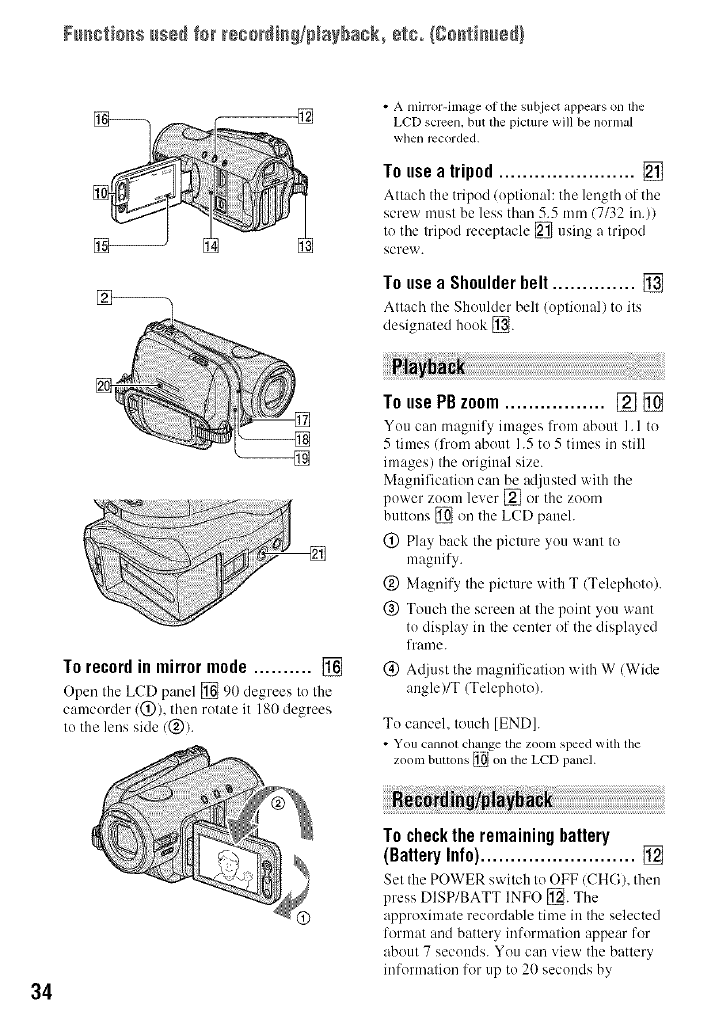
• A mirror-image of the subject appears on lhe
LCD semen, but file piclure will be normal
when recorded.
Touseatripod....................... []
Attach the tripod (optional: the length of the
screw must be less than 5.5 mm (7/32 in.))
to the tripod receptacle [] using a tripod
screw.
TouseaShoulderbelt.............. []
Attach the Shoulder belt (option:d) to its
designated hook [_.
34
To record in mirror mode .......... []
Open the LCD p:mel [] 90 degrees to the
camcorder (®), then rotate it 180 degrees
to the lens side/®/.
To usePBzoom................. [] []
You can magnify images lhom about I. l to
5 times/lhom about 1.5 to 5 times in still
images) the original size.
Magnification can be adjusted with the
power zoom lever [] or the ZOOln
buttons [] on the LCD paneh
® Play back the picture you want to
magnify.
® Magnify the picture with T (Telephoto).
@ Touch the screen at the point you want
to display in the center of the displayed
frame.
®At/iust the magnification with W (Wide
angle)/T (Telephoto).
To cancel, touch [END].
• You cannol change the zoom speed with the
zoom buttons _ on the LCD panel.
To check the remaining battery
(BatteryInfo).......................... []
Set the POWER s'a itch to OFF (CHG), then
press DISP/BATT INFO [_. The
approximate recordable time in the selected
format and battery information appear for
about 7 seconds. You can view the battery
information for tip to 20 seconds by
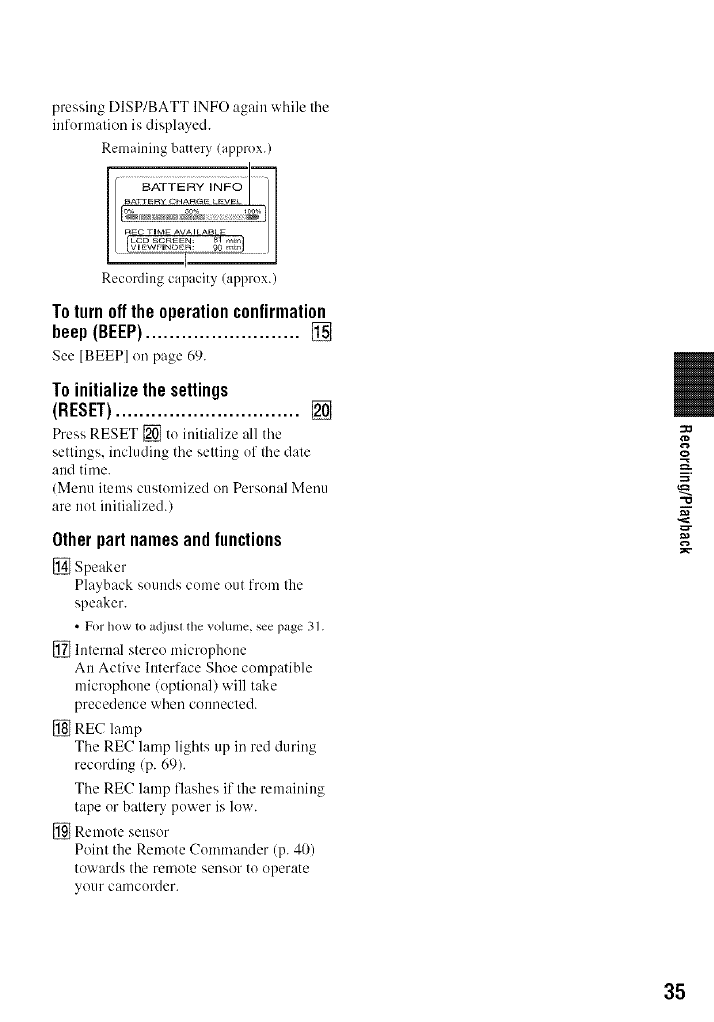
presslgDISP/BATTINFOagainwhilethe
informalionisdisplayed.
Remainingbatter)(approx.)
Recordingcapacity(approx.)
To turn off the operation confirmation
beep (BEEP) .......................... []
See [BEEP] on page 69.
To initialize the settings
(RESET) ............................... []
Press RESET _ to initialize all tile
settings, including tile setting of tile date
attd time.
(Menu items customized on Personal Menu
are not initialized.)
Otherpartnamesandlunctions
[] Speaker
Playback sounds come out from the
speaker.
• For how to adjtlsl tile volume, see page 31.
_} Internal stereo microphone
An Active Interface Shoe compatible
microphone/optional) will t_Jke
precedence when connected.
[] REC lamp
The RE(! lamp lights up in red during
recording/p. 69).
The RE(7 lamp flashes if the remaining
lape or ba/tery power is low.
[]Remote Sellsor
Point the Remote Comnlander (p. 40)
towards tile remote sensor to operate
your camcorder.
:o
-Ip
35
Indicatorsdisplayedduringrecording/playback
36
[] [] []
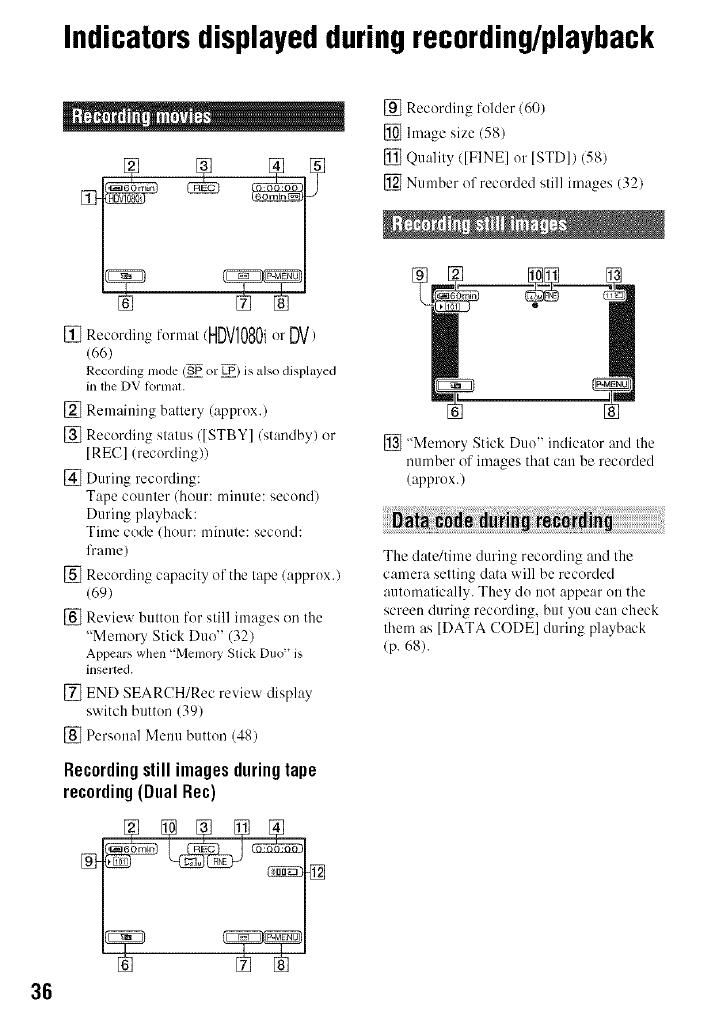
[] Recording fornmt/HDVl080i orDV)
(66)
Recording mode (_ or _) is also displayed
in the DV klrnlal.
[] Remaining battery (approx.)
[] Recording status/[STBY]/standby) or
[REC] (recording))
[] During recording:
Tape counter/hour: minute: second)
During playback:
Time code/hour: minute: second:
lYame/
[] Recording capacity of the tape/approx.)
(69)
[] Review button for still images on the
"Memory Stick Duo" (32)
Appears when "Memory Slick Duo" is
inserted.
[] END SEARCH/Rec review display
switch button (391
[] Personal Menu button (48)
Recordingstill imagesduringtape
recording(DualRec)
[] Recording folder (60)
[] hnage size (58)
[] Quality/[FINEI or [STDI)(58)
[] Number of recorded still images (32)
[] "Memory Stick Duo" indicator and the
number of images thai can be recorded
(approx.)
The date/time during recording and the
camera setting data will be recorded
automatically. They do not appear on the
screen during recording, but you call check
them as ]DATA CODE] during playback
(p. 68).
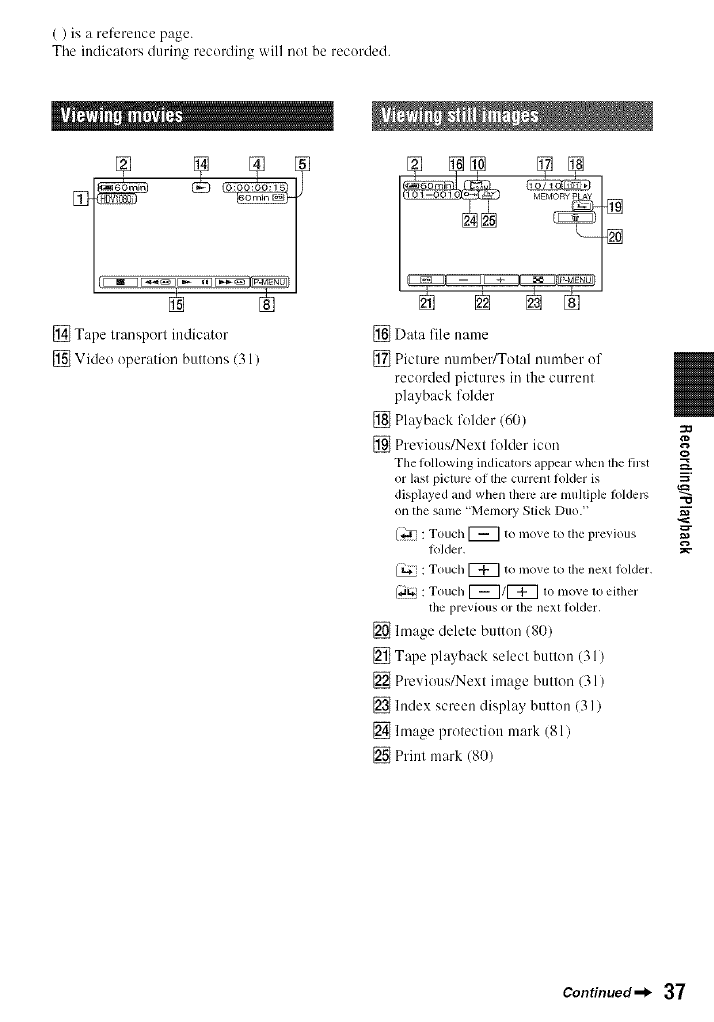
()isareferencepage.
Theindicalursduringrecerdiugwillnolberecurded.
[] Tape lransporl indicator
[] Video operation bultons 131 /
[] Data file name
[] Picture numbeffTotal uumber of
recurded pictures in the current
playback folder
[] Playback lk_lder 160)
[] Previous/Next lk_lder icon
The lollowing indicutors appear when lhe first
or last picture of the currenl tolder is
displayed and when therc are multiple lblders
on the same "Memory Slick Duo. _
(_ : Touch [_ to move to tile previous
tolder.
: Touch [_ to move to the nexl lolder,
f,itg_: Touch [_/[_ to move to either
the previous or lhe nexl folder,
[] hnage delete button (80)
[] Tape playback select button (31)
[] Previous/Next image button (31)
[] Index screen display button 131 )
[] hnage protection mark (81)
[] Print mark (8{))
o
m.
-O
Continued_l_ 37
rs_o_di_/Nayback {go_i_u÷_)
Center
( ) is a reference page.
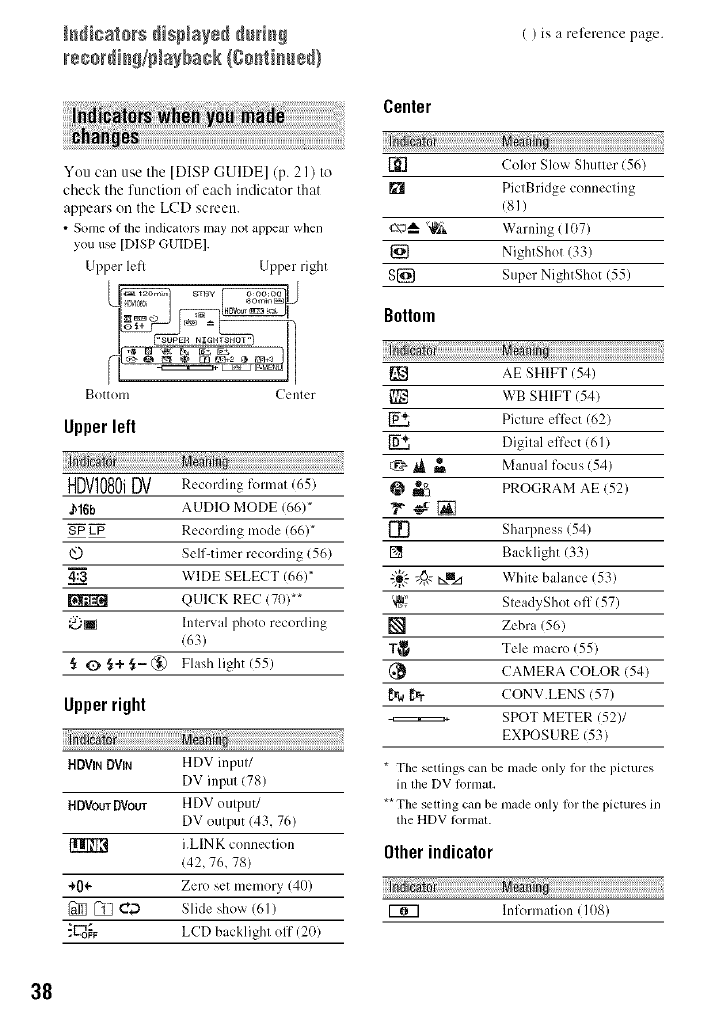
You can u_,cthe [DISPGUIDEI (p. 21) to
check tile function of each indicator that
:_ppears on the LCD screen.
• Some of lhe indicators may not appeal: whell
yon u_ [D|SP GUIDE].
Upper left Upper right
Bottom Center
Upperleft
HDVIO80iDV R_.co,dingformal(65)
J_16b AUDIO },lODE (66)*
SP LP Recording mode (66)*
@ Self-timer recording (56)
WIDE SELECT (66)*
QUICK REC (70) _*
@i Interval photo recording
(63)
§O§÷ ._- (_) Flash ligh_ (55)
Upperright
HDV_ DV_ HDV inptlt/
DV input (78)
HOVoLrrDVoUT HDX" ()t]tpul]
DV output (43, 76)
i.LIN K conneclion
(42, 76, 78)
÷0÷ Zero set memory (40)
_C_ Slide show (6/)
_L_o_F LCD backlight off (20)
[_'] Color Slow Shutter (56)
PictBridgc connecting
(8])
c\_ "_'_ Warning (107)
_} Nigh_gho_ 133)
S[_ Super NightShot (55)
Bottom
AE SHIFT (54)
WB SHIFT (54)
Picture ell_:ct (62)
_, Digital effect (61)
I_ _ Mant focus '54)
@_ PROGRAM AE 52)
[!] Sharpness (54)
[] Backlight (33)
"i_,.'-"4@ _mz_ White bahmce (53)
'_" SteadyShot off (57)
[] Zebra (56)
T_ Tele macro (55)
(_ CAMERA COLOR (54)
_,a _r CONV.LENS (57)
-======_ SPOT METER (52)1
EXPOSURE (53)
*T{_e..cttit_gs cat_ be made only lot file pictures
in the DV lk)rtllal.
** The seltil_g can be made olfly Rwthe pictures in
the HDV/ormal.
Other indicator
lnft_rma/ion (lOg)
38

Searchingfor the startingpoint
Make sure that the CAMERA-TAPE
lamp lights up (p. 30).
END SEARCH will not work once you
eject the cassette after you have recorded tm
the tape.
Touch J'_ --* I_.
Touch here Io cancel Ihe operalion.
The last scene of the most recent
recording is played back for about 5
secottds, and the camcorder enters the
standby mode at the point where the last
recording has finished.
You can view about 2 seconds of flae scene
recorded .just before you slopped the tape.
Touch [_ --* _.
HDV]080i
E_ E_
The last 2 seconds (approx.) of the most
recently recorded scene are played back.
Then, your camcorder is set to the
standby.
"10
• END SEARCH will not work correclly when
them is a blank section between recorded
sections on lhe tape.
• You can also seleo [END SEARCHI lrom lhe
menu. When the PLAY/EDIT lamp lights up,
select the [END SEARCHI shorl-cul in Personal
Menu (p. 48).
39
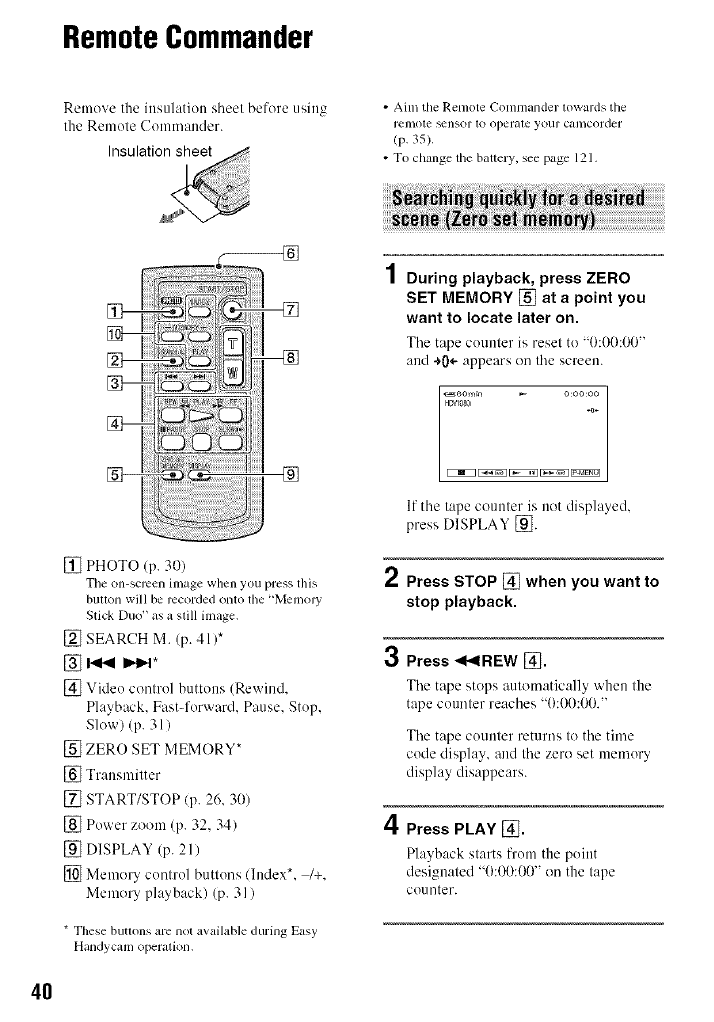
RemoteCommander
Remove the insulation sheel before using
Ihe Remote Commander.
• Ailn the Remote Comnmnder towards the
remote _nsor to operale your camcorder
(p. 35).
• To change the battery, see page 121.
[]
[] PHOTO (p. 30)
Tile on-screen image when you press tiffs
buoon will be recorded onto file"MemolT
Stick Duo" as a slill image.
[] SEARCH M. (p. 41)*
%I.,q_I,,._*
[] Video control buttons (Rewind.
Playback. Fast-forward. Pause. Stop,
Slow) (p. 31 )
[] ZERO SET MEMORY*
[] Transmitter
[] START/STOP (p. 26, 30)
[] Power zoom (p. 32, 34)
[] DISPLAY (p. 21)
[] Memory control buttons (lndex*. /+.
Memory playback) (p. 31)
* These buttons are not available during Easy
Handycam operation.
4
/ During playback, press ZERO
SET MEMORY [] at a point you
want to locate later on.
The tape counter is resel to "0:00:00"
and *0÷ appears on the screen.
l_6omin _ O:OO:OO
H_tDg3i _0÷
EZiiZ3 _ [3iEZ_ _ _
If the tape counter is not displayed,
press DISPLAY [_].
2Press STOP [] when you want to
stop playback.
3Press _I_IREW [].
The tape stops automatically when the
tape counler reaches "0:00:00."
The tape counter returns to the time
code display, and the zero set memory
display disappears.
4Press PLAY [].
Playback slarts fi'om the point
designated "0:00:00" on the tape
COLinter.
4O
Tocancelthe operation
PressZERO SET MEMORY [] again
before rewinding.
• There may be a discrepancy of several seconds
between lhe linle code and lhe tape counter.
• Zero set memory will not flmction correctly il
them is a blank section between recorded
sections on tile tape.
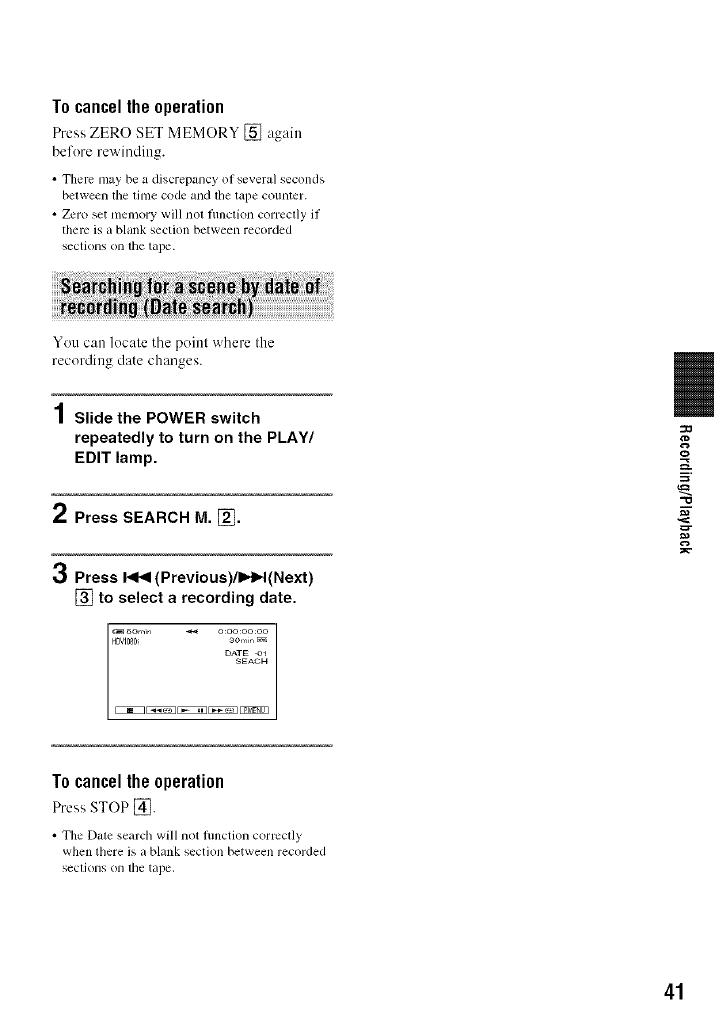
You can locale tile poinl where Ihe
recording dale changes.
1Slide the POWER switch
repeatedly to turn on the PLAY/
EDIT lamp.
2Press SEARCH M. [].
3Press I<1<1(Previous)/l_l_l(Next)
[] to select a recording date.
HDV1080 aOmin La_
DATE O_
SEACH
O
Tocancelthe operation
Press STOP [_.
• The [)ate search will not fimction cormclly
when there is a blank section between recorded
sections on lhe tape,
41
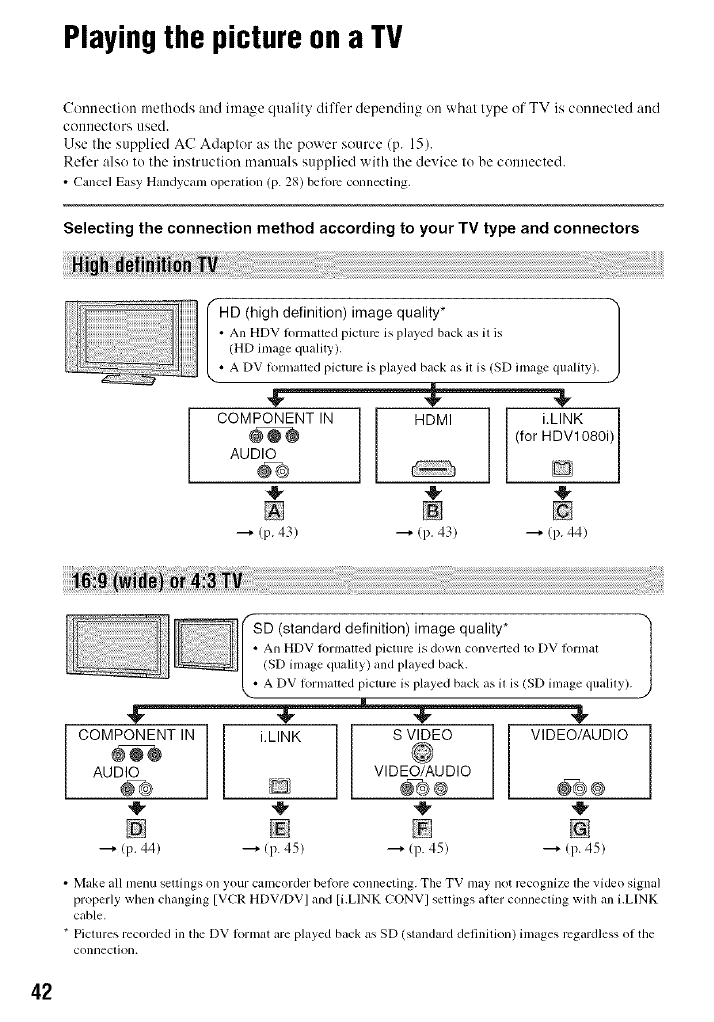
Playingthe picture ona TV
Connection methods and image quality differ depending on what type of TV is comtected and
COllllectors used.
Use the supplied AC Adaptor as the power source (p. 15).
Refer also to tile instruction manuals supplied with tile device to be connected.
• Cancel Easy Handycam ol)eralk)n (p. 28) beft)m connecting.
Selecting the connection method according to your TV type and connectors
'-HD (high definition) image quality* 1
•All HDV lormatted picture is played back as il is
(HD image qualily).
• A DV lorn/alted picture is played back as il is (SD linage quality).
COMPONENT IN I HDMI i.LINK
I (for HDV1080i)
AUDIO
_®
41- 4!, 41,
[] [] []
---_ (p. 43) ---_ (p. 43) ---_ (p. 44)
standard definition) image quality* J
•An HDV lormalted picture is down converted to DV Iormal
(SD image quality) and played back.
• A DV lormalted piclure is played back as il is (SD inlage qualily).
COMPONENT IN
@@@
AUDIO
[]
--_ (p. 44)
i.LINK
D
[]
---+/p. 45)
S VIDEO
VIDEO/AUDIO
@®
,@
(p. 45)
VIDEO/AUDIO
@®
[]
---+ Ip. 45)
•Make all menu settings on your camcorder belore connecting. Tile TV may not recognize tile video signal
properly wllen changing [VCR HDV/DV I and [i.LINK CONV I settings after connecting wilh all i.LINK
cable.
* Pictures recorded ill the DV ft_rmat are played back as SD (standard definitkm) images regardless of the
connection.
42
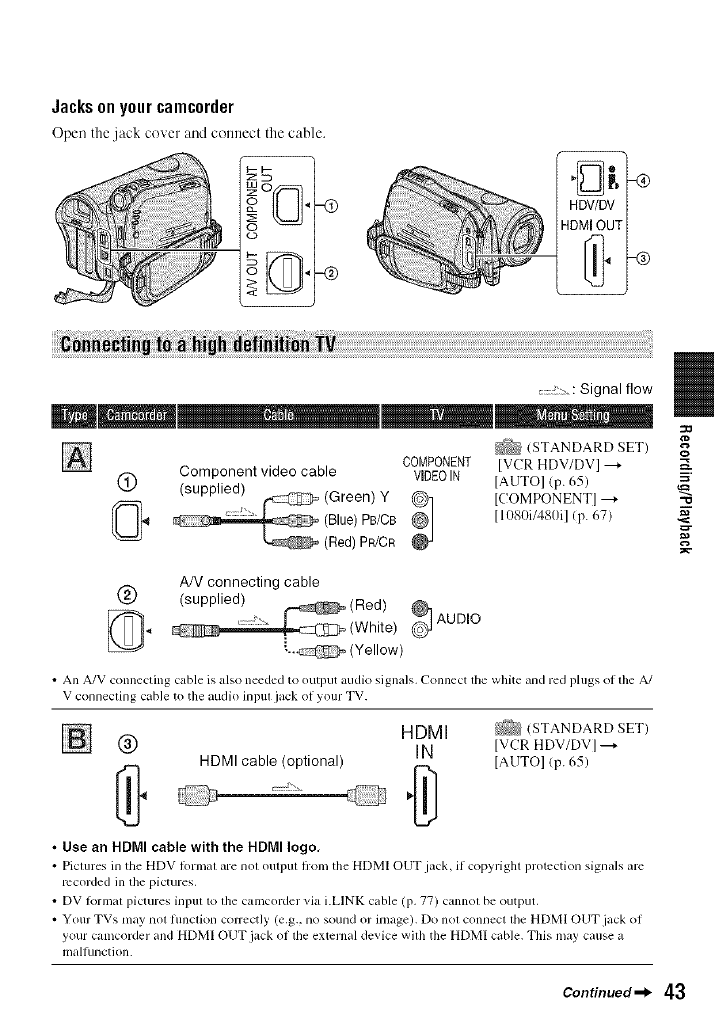
Jacksonyourcamcorder
Open the .jack cover and connect the cable.
........ : Signal flow
_ (STANDARD SET) o
COMPONENT IVCR HDV/DVI ---_ _.
Component video cable VIDEOIN IAUTOI (p. 65) ="
(_) (supplied) _ (Green) Y @ ICOMPONENTI---_
...... (Blue)PB/CB'' g] 11080i/480i1 (p. 67)
(Red) PR/CR _,_
AN connecting cable
@ (supplied)
_._ _ AUDIO
"-,,_ (Yellow)
• An A/V connecting cable is also needed to output audio signals, Connect tile white and red plugs ol the A/
V connecting cable to the audio inpul ¸jack of your TV.
HDMI k2%(STANDARDSET)
[] (_) IN IVCRHDV/DVI---_
HDMI cable (optional) IAUTOI (p. 65)
•Use an HDMI cable with the HDMI logo,
• Piclures in the HDV lormal are nol outpul fi:om the HDMI OUT jack, if copyrighl protection signals arc
recorded in the pictures.
• DV lk)rmal pictures input to lbe camcorder via i.LINK cable (p. 77) cannol be output.
• Your TVs may nol funclion COlTectly (e.g., no sound or image). Do nol connect lhe HDMI OUT jack of
your Calncorder and HDMI OUT jack of lhe external device wilh the HDMI cable. This may cause a
malhlnction.
Continued_l_ 43
P+a+++++th+ p++t+r+ +_+a TV {g++t+++++}
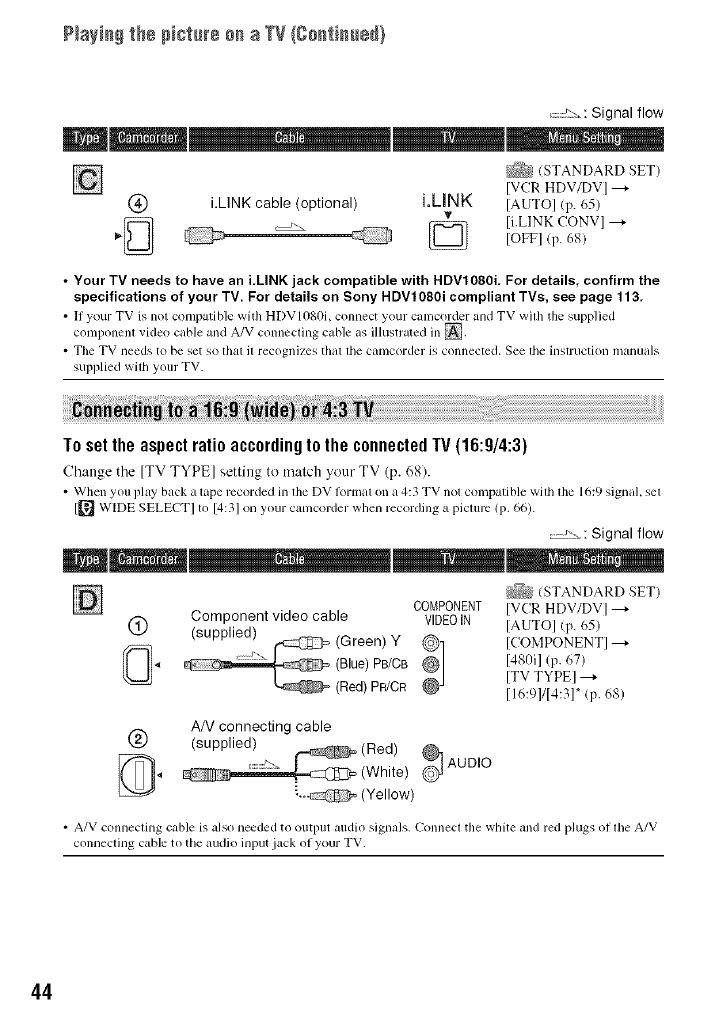
.......!:-_,: Signal flow
/STANDARD SET)
[VCR HDV/DV] ---+
(_) i.LINK cable (optional) i.LINK ]AUTO] (p. 65)
_ li.LINK CONVI --+
[OFF] (p. 68)
•Your TV needs to have an i,LINK jack compatible with HDV1080i, For details, confirm the
specifications of your TV. For details on Sony HDVl080i compliant TVs, see page 113.
• lI your TV is not compatible with HDVI0g0i, connect your calncorder and TV with the supplied
component vide(} cable and A/V connecting cable as illustrated in [].
• Tile TV needs to be set so IhaI it recognizes thai tile camcorder is connected. See tile instruction manuals
supplied with your TV.
To set the aspectratio accordingto the connectedTV (16:9/4:3)
Cb:mge tile [TV TYPE] setting to match yo/lr TV (p. 68).
• When you play back a tape recorded in file DV lormat on a 4:3 TV not compatible with the 16:9 signal, set
[[_ WIDE SELECTI to [4:31 on your camcorder when recording a picture (p. 66).
>_: Signal flow
_:_N (STANDARD SET)
COMPONENT IVCR HDV/DV] ---+
Component video cable VIDEOIN ]AUTO[ (p. 65)
(_) (supplied) (Green) Y ICOMPONENTI--_
.4 (Blue) PB/CB @@] 1480il Cp.67)ITV TYPEI --_
(Red) PR/CR [ 16:91114:31" (p. 68)
AN connecting cable
(_) (supplied)
(Red) _ AUDIO
{_,, (White)
• A/V connecting cable is also needed to output audio signals. Connect the white and red plugs oI tile A/V
connecting cable to the audio input .lack of your TV.
44

.......::::, : Signal flow
_ (STANDARD SET)
IVC:R HDV/DV I ---_
IAUTOI _p. 65)
(_) i.LINK cable (optional) i.LINK li.LINK CONVI ---_
vION (HDV --_ DV)I
•The TV lleeds to be set so tbal Jl recognizes tbal the call]corder is COlHlected. gee the instruction u]anuals
supplied with your TV.
AN connecting cable with S VIDEO
v
S VIDEO (optional) :_,
_(Red)
AUDIO
Whte
L._ (Yellow) @ VIDEO
_ (STANDARD SET)
IVCR HDV/DV] --_
IAUTOI (p. 65)
ITV TYPEI --_
I16:91/14:31" (p. 68)
• When connecting only an S VIDEO plug (S VIDEO channel), audio signals am not oulput. To output
audio signals, connect lhe white and red plugs of lhe A/V connecting cable with an S VIDEO cable 1o the
audio input jack of your TV.
• This conneclion produces higher resolulion pictures compared wilh lhe A/V connecling cable (Type _).
AN connecting cable .......
/_4_ STANDARD SET)
v_,_J (supplied) IVCR HDV/DVI --_
(Red) _
_,4 (White) AUDIO IAUTOI (p. 65)
ITVTYPEI---+
(Yellow) @ VIDEO [16:91114:31" (p. 68)
*Change tim seltings according 1o lbe TV connected.
• If you connect your camcorder to your TV using more than one type of cable to output images flon/a jack
other than the LLINK jack, the order of priority of tile output signals is as l_)llows:
HDMI ----+component vide() ----+S VIDEO ----+audio/video.
• See page 117 lot lbe details of i.LINK.
=O
Continued_l_ 45
P+a+i++++_h+p++_+r++_+a TV (g++_+++++}
AboutHDMI(HighDefinitionMultimediaInterface)
HDMI OUT jack is :m interface to send both video/audio signuls. Connecting HDMI OUT
jack and external device supplies high quality images aud digital audio to you.
Whenconnectingto yourTVviaa VCR
Select the connecting method on page 74 depending on the input j:_ck of the VCR. Connect
your camcorder to the LINE IN input on the VCR using the A/V connecting cable. Set the
input selector on the VCR to LINE (VIDEO I. VIDEO 2. etc.).
WhenyourIV is monaural(WhenyourIV hasonlyoneaudioinputjack)
Connect the _ellow plug of the A/V connecting cable to the video input jack :rod connect the
white Cleft channel) or the red (right channel) plug to the audio input jack of your TV or VCR.
When you want to play the sound in monaural mode. use a connecting cable for that purpose.
46

:33
=.
"0
47
Us_ _e MemJ
Usingthe menuitems
Follow the instructions below to use each of the menu items listed after this page.
48
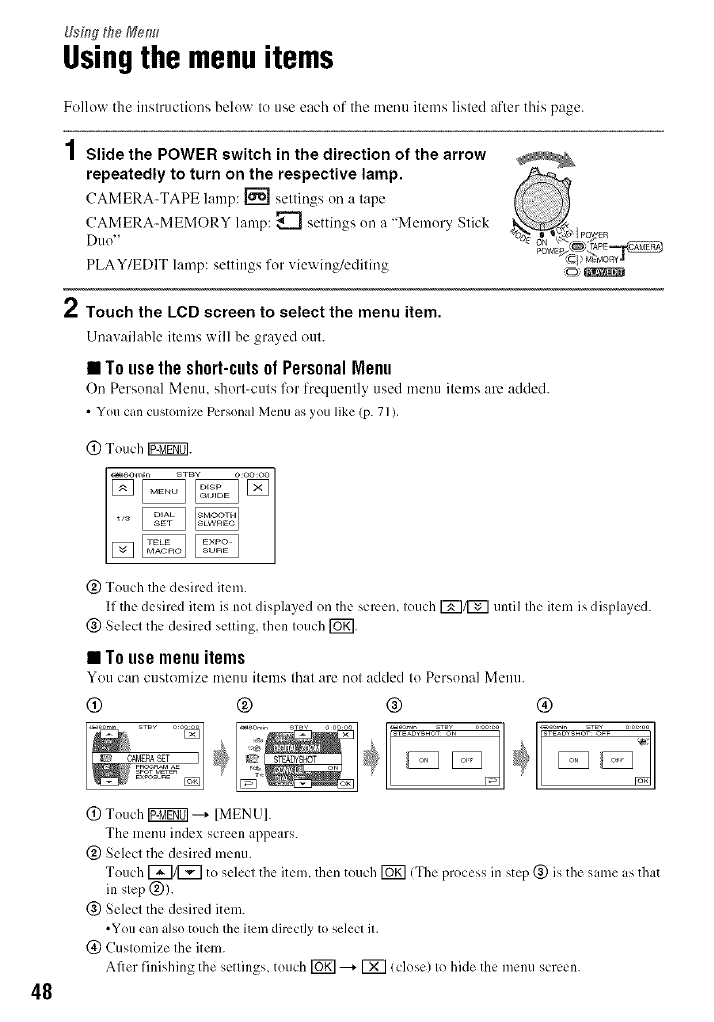
2
Slide the POWER switch in the direction of the arrow
repeatedly to turn on the respective lamp. ,_°
CAMERA-TAPE lmnp: _ settings-, on a lape
PLAY/EDIT lamp: settings for viewing/editing ,_o_g_3_
Touch the LCD screen to select the menu item.
Urmwdlable items will be grayed out.
•Tousethesh0rt-cuts0I PersonalMenu
On Personal Menu. short-cuts for frequently used menu items are added.
•You call custonlize Personal Menu as you like (p. 71 ),
0 Touch IV:_].
@ Touch the desired item.
|f the desired item is not displayed on the scmem touch [_1/[_] until file item is displayed.
@ Select the desired setting, then touch [_.
•Tousemenuitems
You can customize mere] items that are not added to Persona] Metal
0 ® ® ®
0 Touch _ ---_ IMENUI.
The menu index screen appears.
@ Select the desired menu.
Touch [_/[_7 to select the item, then touch fO_] (The process in step @ is the same as that
in step @).
@ Select the desired item.
•You call also touch tile item directly to selecl it,
(_) Customize the item.
After finishing the settings, touch _ ---+ IX] lclose) to hide the menu screen.

Ifyoudecidenottochangethesetting,touch[_ toreturntothepreviousscrc*:n.
• Touse menu itemsduringEasyHandycamoperation
Ig_gff01 is not displayed during Eas_ Hand, cam operation (p. 28).
@ Touch IMENUI.
Available menu items appear on the screen.
@ Select the desired menu.
@ Change your item setting.
After finishing the settings, touch ]OK].
If you decide not to change the setting, touch [_ to return to the previous scrc*:n.
• Cancel Easy Handycam operation to use menu items normally (p. 28).
• See page 72 lor tile settings ot CAM CTRL dial.
_=
4g
50
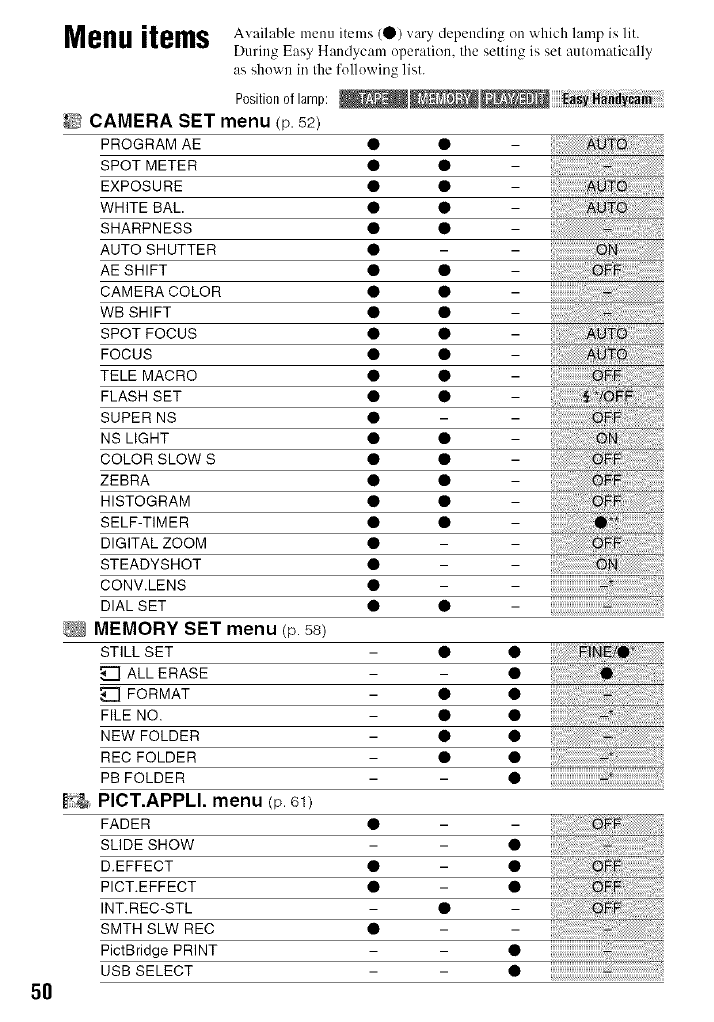
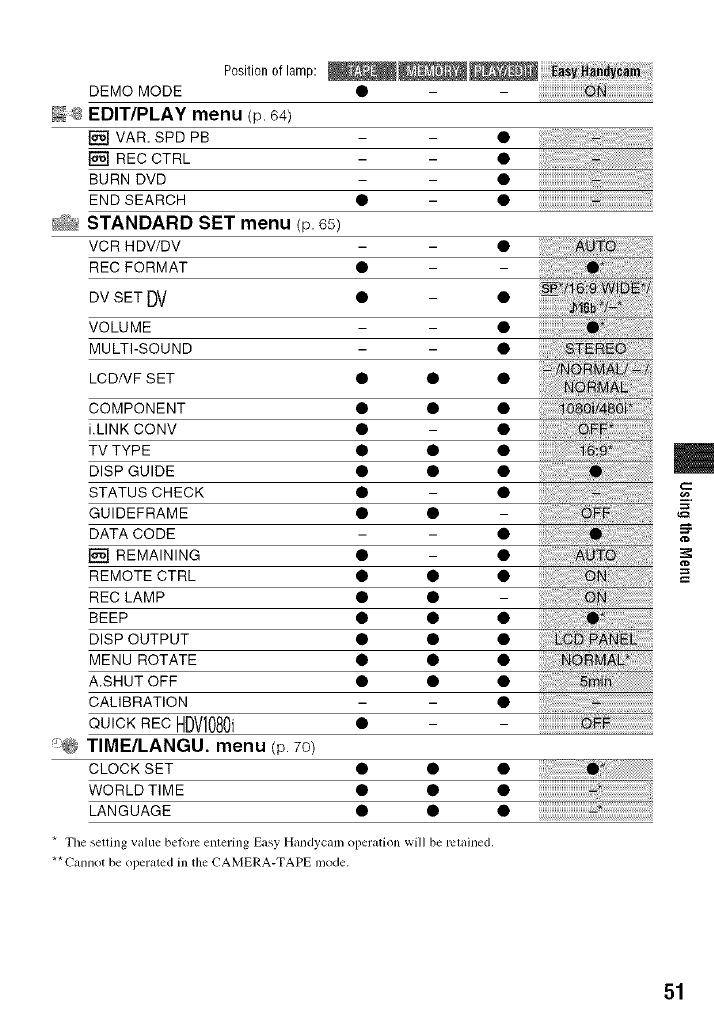
Menuitems Available menu items (0) vary depending on which lamp is lit.
During Easy Handycam operation, tile setting is set :mtom:_tic:dly
as shown in the following list.
Positiondlamp:
_2 CAMERA SET menu (p.,52)
PROGRAM AE • •
SPOT METER • •
EXPOSURE • •
WHITE BAL • •
SHARPNESS • •
AUTO SHUTTER • -
AE SHIFT • •
CAMERA COLOR • •
WB SHIFT • •
SPOT FOCUS • •
FOCUS • •
TELE MACRO • •
FLASH SET • •
SUPER NS • -
NS LIGHT • •
COLOR SLOW S • •
ZEBRA • •
HISTOGRAM • •
SELF-TIMER • •
DIGITAL ZOOM • -
STEADYSHOT • -
CONV.LENS • -
DIAL SET • • -
MEMORY SET menu (p. 58)
STILL SET • •
_[] ALL ERASE - •
FORMAT • •
FILE NO. • •
NEW FOLDER • •
REC FOLDER • •
PB FOLDER - •
PICT.APPLI. menu (p. 61)
FADER • -
SLIDE SHOW - •
D.EFFECT • - •
PICT.EFFECT • - •
INT.REC-STL •
SMTH SLW REC • -
PictBridge PRINT - •
USB SELECT - •
Positiono amp: - iiiiiiiiiiiiiiiiiiiiiiiiiiiiiiiiiiiiiiiiiiiiiiiiiiii;:_i_i_i_i_i_i_i_i_i_i_i_i_i_i_i_i_i_i_i_i_i_i_i_i_i_i_iJ_
DEMO MODE •
8EDIT/PLAY menu (p. 64)
[] MAR. SPD PB
[] REC CTRL
BURN DVD
END SEARCH •
_ STANDARD SET menu (p. 65)
VCR HDV/DV
REC FORMAT •
DV SET DV •
VOLUME
MULTI-SOUND
LCDNF SET • • •
COMPONENT • • •
i.LINK CONV • •
TV TYPE • • •
DISP GUIDE • • •
STATUS CHECK • •
GUIDEFRAME • • -
DATA CODE - •
[] REMAINING • •
REMOTE CTRL • • •
REC LAMP • • -
BEEP • • •
DISP OUTPUT • • •
MENU ROTATE • • •
A.SHUT OFF • • •
CALIBRATION - •
QUICKREDHDV1080i • -
_:@ TIME/LANGU. menu (p. 70)
CLOCK SET • •
WORLD TIME • •
LANGUAGE • •
*The setting value belorc entering Easy Handycam operation will be rclained.
**Cannot be operated in the CAMERA-TAPE mode.
==
51
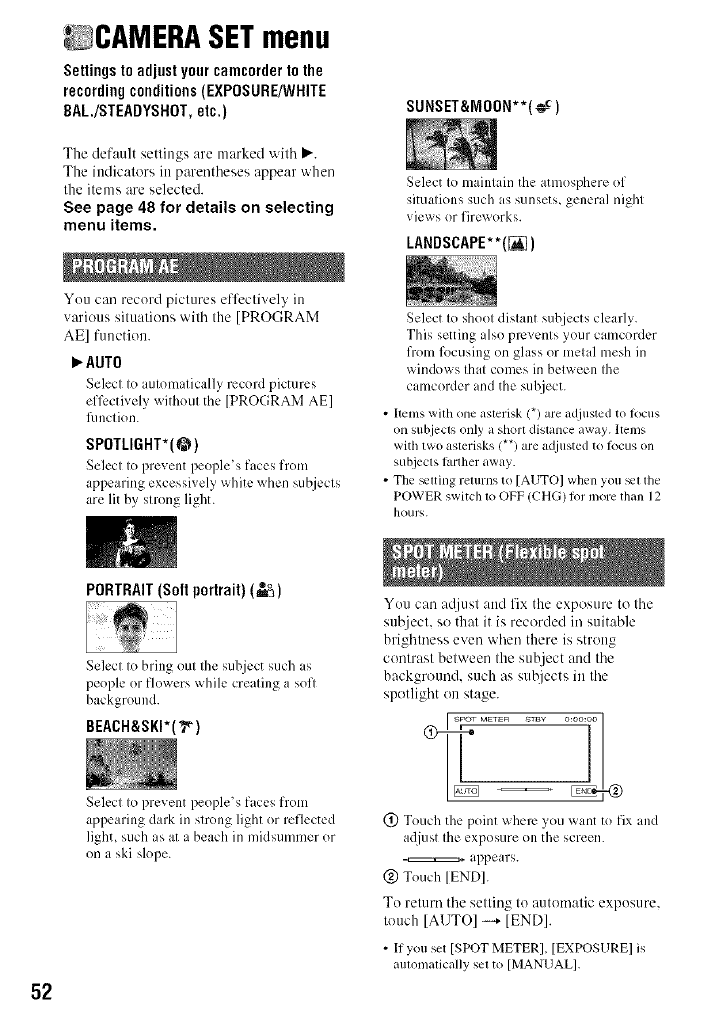
CAMERA SETmenu
Settingstoadjustyourcamcordertothe
recordingconditions(EXPOSURE/WHITE
BAL./STEADYSHOT,etc.)
The default settings are marked with _'.
The indicators in parentheses appear when
the items are selected.
See page 48 for details on selecting
menu items.
Yuu can recurd pictures effectively in
various situations with the [PROGRAM
AE] function.
_"AUTO
Select to mtomatically record pictures
ell_:ctively without the [PROGRAM AE]
fimction.
SPOTLIGHT*(@)
Seh:ct to prevent people's faces from
appearing excessively x_hire _hen subjects
are lit by strong light.
SUNSET&NOON**(_)
Select Io maintain the atmosphere of
situations such as sunsets, general night
views or fireworks.
LANDSCAPE**([_)
Select to shoot distant subjects clearly.
This setting also prevents your camcorder
from lbcusing on glass or metal mesh in
windows that comes in between the
camcorder and the subject.
• Items with one aslerisk (*) are adjusted to locus
on subjects only a shorl dislance away. Items
with two aslerisks/**) are a_[iusted to iocus on
subjects larther away.
• The _lfing returns to [AUTO] when you _1 tile
POWER switch 1o OFF (CHG)/or more than 12
hour',.
52
PORTRAIT(Soft portrait) (_)
Select to bring out the suhject such ,s
people or flowers while creating a soft
background.
BEACH&SKI*(_)
Select to prevent people's faces from
appearing dark in strong light or reflected
lighL such as at a beach in midsummer or
on a ski slope.
You can atljust and fix the exposure to the
sulziect, so that it is recorded in suitable
brightness even when there is strong
contrast between the subject and the
background, such as subjects in the
spotlight on stage.
SPOT METER STBY ]
o:oo:oo
=2
(!) Touch the point where you want to fix and
adjust the exposure on the screen.
appears.
(_) Touch IENDI.
To return the setting to automatic exposure,
touch [AUTO] --+ [END].
• [tyou set [SPOT METER], [EXPOSURE] is
automatically sel to [MANUAL].
• The setting returns 1o [AUTO] when you sel lhe
POWER swilch 1o OFF (CHG) fi)r more than 12
hours,
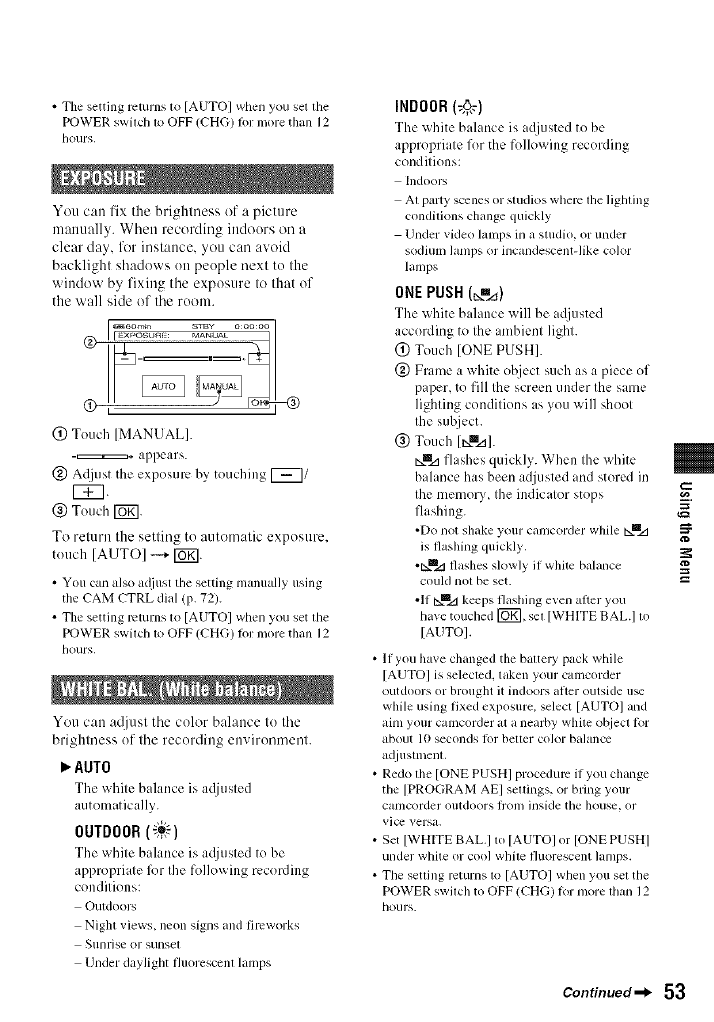
You can fix the brightness of a picture
manually. When recording indoors oil a
clear day, lk_rinstance, you can avoid
backlight shadows on people next to the
window by fixing tile exposure to that of
the wall side of tile room.
® s+zs,,,,
@ Touch [MANUAL].
-=+ appears.
@ Acljust the exposure by, touching [_/
@ Touch IOK1.
To return the setting to automatic exposure.
touch [AUTO] --+ [BT].
• You tun also a(liust tile setting manually using
the CAM CTRL dial (p. 72).
• The setting returns 1o [AUTO[ when you set lhe
POWER swilcll 1o OFF (CHG) fi)r more titan 12
hours.
You can aljust the color balance to the
brightness of the recording environment.
AUTO
The white bahmce is acljusted
automatically.
OUTDOOR(-_i_)
The white bahmce is acliusted to be
appropriate R)r the following recording
conditions:
OuldooIN
Nigla views, neon signs and fireworks
Silnrise or sunsel
Under daylighl fluorescenl lamps
INDOOR (@,_)
The white buhmcc is a¢[]ustcd to bc
appropriate %r the follm_ing recording
conditions:
hldoor_,
AI party scenes or studios where llle ligbling
conditions clmnge quickly
Under vkleo lamps in a studio, or under
sodiulI/ ]anlps or incandescent-like color
lamps
ONEPUSH(_=_)
The white bahmce will bc a(ljustcd
according to the ambient light.
@ Touch [ONE PUSH].
@ Frame a white ol_ject such as a piece of
paper, to fill the screen under the same
lighting conditions as you will shoot
the subject.
@ Touch [_m_].
Nlll.d flashes quickly. When the white
bahmce has been adjusted and stored in
the memor.M the indicator stops
flashing.
•Do not slmke your camcorder while txmz_
is flashing quickly.
•N=ll.dflashes slowly if white balance
could not be set.
•lf NUzl keeps flashing even afier you
have touched [_, set [WHlTE BALI to
[AUTO].
If you have changed tim batte]y pack while
[AUTO] is selected, token your camcorder
outdoors or brought it indoors aller outside u_
while using fixed exposure, select [AUTOI and
aim your camcorder at a nearby white o[_iecl lot
about lO seconds fi)r belier color balance
adiustmenl,
Redo lhe [ONE PUSHI procedure if you clmnge
the [PROGRAM AEI seoings, or bring your
calncorder Olltdoors ]/'oII/ inskle tile ]louse, or
vicv versa.
Set [WHITE BAL.I to [AUTOI or [ONE PUSHI
under white or cool while fluorescent lamps.
The setling returns to [AUTO] when you sel the
POWER swilc]l to OFF (CHG) R_rmore lhan 12
hours.
Continued_ 53
g
_ICANERA SETmenu (go_i_ed)
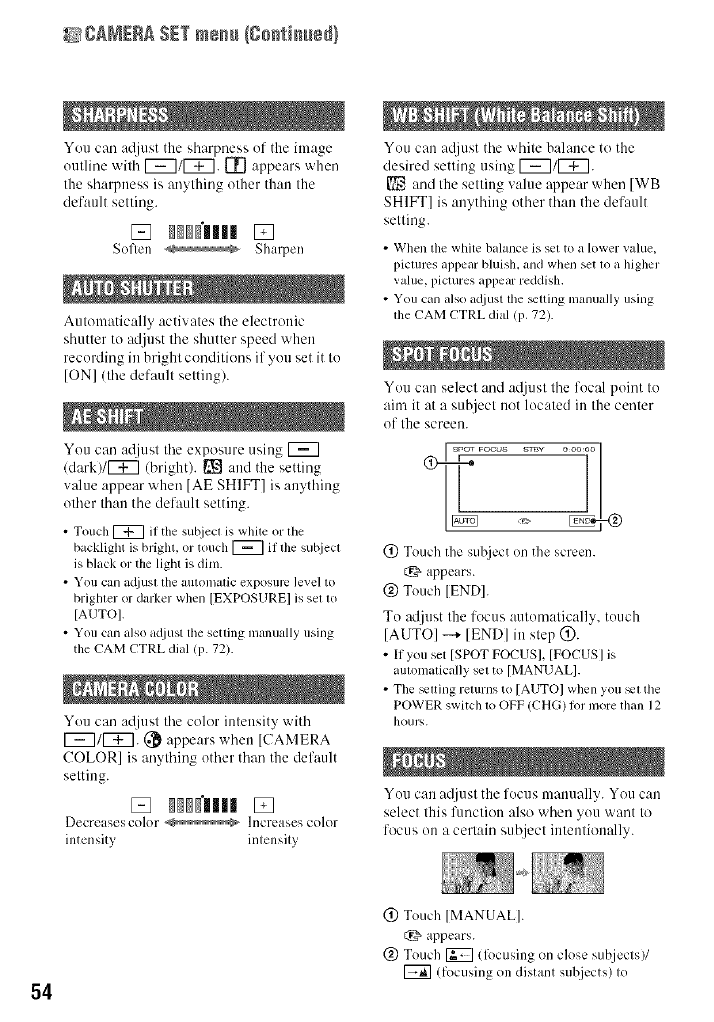
You can atliust the sharpness of the image
outline with [_7/[_. 1_ appears when
the sharpness is anything other than the
default setting.
[] _'lllI []
Soften _ Sharpen
Automatically activates the electronic
shutter to adjust the shutter speed when
recording in bright conditions if you set it to
IONI (the default setting).
You can at[jusl Ihe exposure using [_7
/dark)/[_7 (bright). [_ and the setting
value appear when [AE SHIFT] is anything
other than the default setting.
• Touch _ if tile subject is white or tile
backlight is bright, or touch [_7 il tile sut!iecl
is black or the light is dim.
• You can ac[iusl the automatic exposure level to
brighter or darker when [EXPOSURE] is set to
[AUTO].
• You can also a(liust the setting manually using
the CAM CTRL dial lP- 72).
You can a@tst the color intensity with
1_711_7. (_ appears when ]CAMERA
COLOR] is anything other than the default
setting.
[] ll_gllll []
Decreasescolor _ Increases cohu
intensity intensity
You can adjust the white balance to the
desired sening using _/[_7.
[] and the setting value appear when IWB
SHIFT] is anything other than the default
setting.
• When tile white balance is set to a lower value,
piclums appear bluish, and when set lo a higher
value, pictures appear reddislL
• You can also a(liust lhe _lting manually using
file CAM CTRL dial (p. 72).
You can select and atliust the focal point to
aim it at a subject not located in the center
of the screen.
SPOT FOCUS S_¥ 7 1
@_ __ ooooo
(!) Touch the sul!jcct on the screen.
t:_ appears.
@ Touch IENDI.
To adjust the focus automatically, touch
[AUTO] --+ lEND] in step @.
• If you set [SPOT FOCUSI, [FOCUSIis
aulonlatically sel to [MANUAL].
• The _euing returns to [AUTO[when you _1 the
POWER switch to OFF (CHG)lot more than 12
houl%.
You can a{ljust the focus manually. You can
select lhis funcliou also when you want Io
locus on a cerlain subject inlenlionally.
54
(!) Touch IMANUAL].
appears.
@ Touch _ (lbcusing on close subjects)/
(focusing on distant subjects) to
sharpentheff)cus._ appearswhenIhe
focuscannotbeacljustedanycloser,and
appearswhenthefocuscannotbeacljusted
farfllera_ay.
(_)TouchI_g].
To atljust the lk_cus automatically, touch
[AUTO] -+ C0_] in step (_).
• It is easier to l_)cus on tile stlbjecl by moving tile
power zoonl lever towards T (telephoto) to
adjtlsl the lbcus, then towards W (wide angle) to
at0ust the/ooln lor recording. When you want
to record a su[zject at close range, move the
power zoonl lever to W (wide angle), then
adjust tile locus.
• Tile nlinimum possible distance between
cguncorder and subject while maintaining sharp
locus is about 1 cm {about 13/32 in.) lot wide
angle grad about 80 cln (abolu 2 518 lceI) lk]r
telephoto.
• The setting returns to [AUTO] when you set the
POWER switch to OFF (CHG) lk>lmore than 12
hours.
• You can also adjust file locus manually using
the CAM CTRL dial (p. 72).
This is useful to shoot small su'c_jects, such
as flowers or insects. You can blur out
backgrounds and the sub.ject stands out
clearer.
When you set [TELE MACRO] to [ON]
(T_), the zoom (p. 32) moves to the top of
the T (Telephoto) side mttomatically and
allows for recording subjects at a close
distance, down to about 37 cm (14 5/8 in.).
To cancel, touch [OFF], or zoom to wide-
angle (W side).
• When recording a distain su[_ject, locusing nlay
be difficult and cgmtake some time,
• Adjust the locus manually ([FOCUSI, p. 54)
when il is hard 1o locus automatically.
You can set this l_tnction when you use the
builtdn flash or an external flash (optional)
that is compatible with your camcorder.
MFLASHLEVEL
HIGH(_+)
Makes the flash level higher.
>.NOHMAL(_ )
LOW(_-)
Makes the flash lexel lo_xer.
MREDEYEREDUC
Volt Call prevent rede_e by activating the
flash before recording.
Set [REDEYE REDUC] to tONI, then press
(flash) (p. 33) repeatedly to select a
setting.
Q (Auto redeye lvduction): Pre-flashes to
reduce mdeye belbm the flash autonlatically
flashes when there is msuflicient ambient
light.
{
Q _ (Forced mdeye reduction): Always uses
the flash and the rcdeye rcducing pro-flash.
{
(_) (No flash): Records without flash.
• Tile redeye reduction nlay not produce the
desired eflk_ct due to individual difR:rences and
other conditions.
The picture will be recorded at a nmximum
of 16 times the sensitivity of NightShot
recording if you set [SUPER NS] to [ON]
while the NIGHTSHOT switch (p. 33) is
also set to ON.
S[_ and ["SUPER NIGHTSHOT'] appear
on the screen.
To return to the normal setting, set [SUPER
NS] to [OFF], or set tile NIGHTSHOT
swilch to OFF.
Continued-_ 55
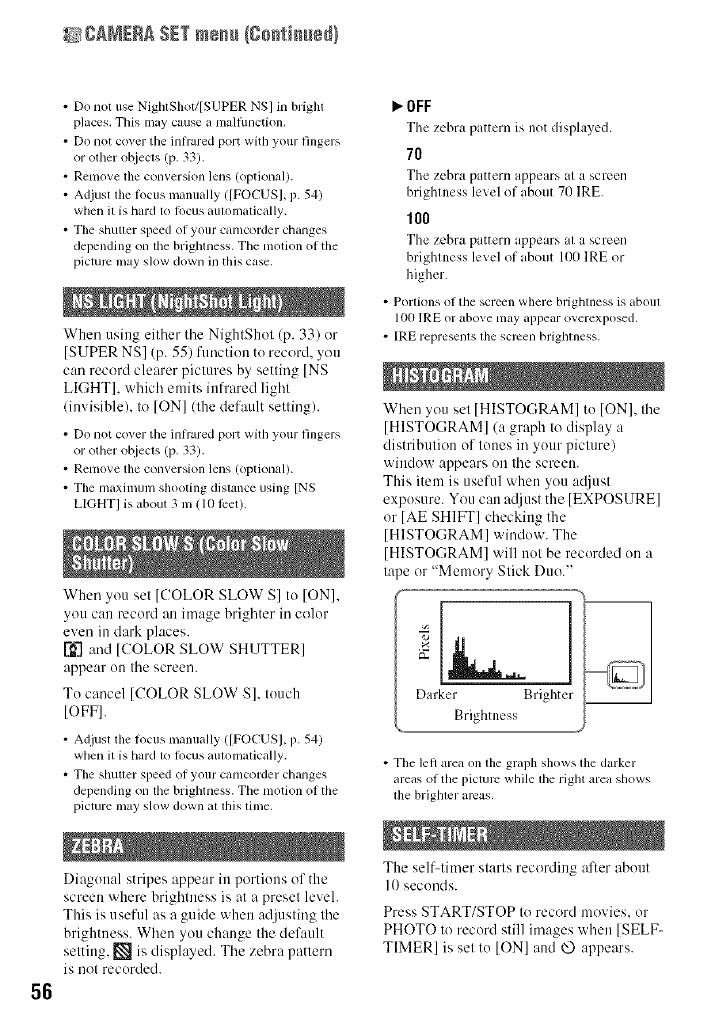
_ICA_ERA SETmenu (go_ti_edl
56
•Do nol use NightShot/[SUPER NS] in brighl
places. This may cause a malfimction.
• Do not cover the inh'ared port with your fingers
or other objects (p. 33).
• Remove the converskm lens (optional).
• Adjust tim locus manually ([FOCUS], p. 54)
when it is hard to locus aummalically.
• The shutler speed of your camcorder changes
depending on lhe brighmess. The motion of the
pictmc may slow down in this case.
When using either the NightShot (p. 33) or
[SUPER NS] (p. 55) function tu record, you
can record clearer pictures by setting [NS
LIGHT[, which emits infrared light
(invisible), to [ON] (the default setting).
• Donot cover the inh'ared port with your fingers
or other objects (p. 33).
• Removethe converskm lens (optional).
• The maximum shooting distance using [NS
LIGHTI is about 3 Ill(10 lPet).
When you set [COLOR SLOW S] to ION],
you can record an image brighter in color
even in dark places.
and [COLOR SLOW SHUTTER]
appear ou the screen.
Tu cancel [COLOR SLOW S], tuuch
[OFF].
• Adjust the focus lnalmally([FO(-_S], p. 54)
whenit is hard to locus automatically.
• The shutler speed of your camcorder changes
depending on lhe brighmess. The motion of the
piclure u/ayslow down at lhis lime,
Diaguual stripes appear in portiuus of the
screen where brightness is at a preset level.
This is useful as a guide when adjusting the
brightness. When you change the def:mlt
setting. _ is displayed. The zebra patlern
is not recurded.
P,.OFF
The zchra pattern is not displayed.
70
The zebra pattern appears at a screen
brightness level of about 70 IRE.
100
The zebra pattern appears at a screen
brightness level of about 100 IRE or
higher.
• Portions of the screen where brighmess is about
100 IRE or above may appear overexposed.
• IRE represems lhe screen brighmess.
When you set [HISTOGRAM] tu [ON], the
[HISTOGRAM[ (a graph to display a
distribution of tunes irayuur picture)
window appears on the screen.
This item is useful when you acUust
expusure. You can a{liust the [EXPOSURE]
or [AE SHIFT] checking the
[HISTOGRAM[ window. The
[HISTOGRAM[ will not be recorded un a
tape or "Memory Stick Duo."
L
Darker Brighter
Brightness
• The left area on tile graph shows tile darker
areas of the picture while lhe righl area shows
tile brighler areas,
The self-timer starts recording after abuut
I0 seconds.
PressSTART/STOP to record movies, or
PHOTO to record still images when [SELF-
TIMER[ is set tu [ON] and _ appears.
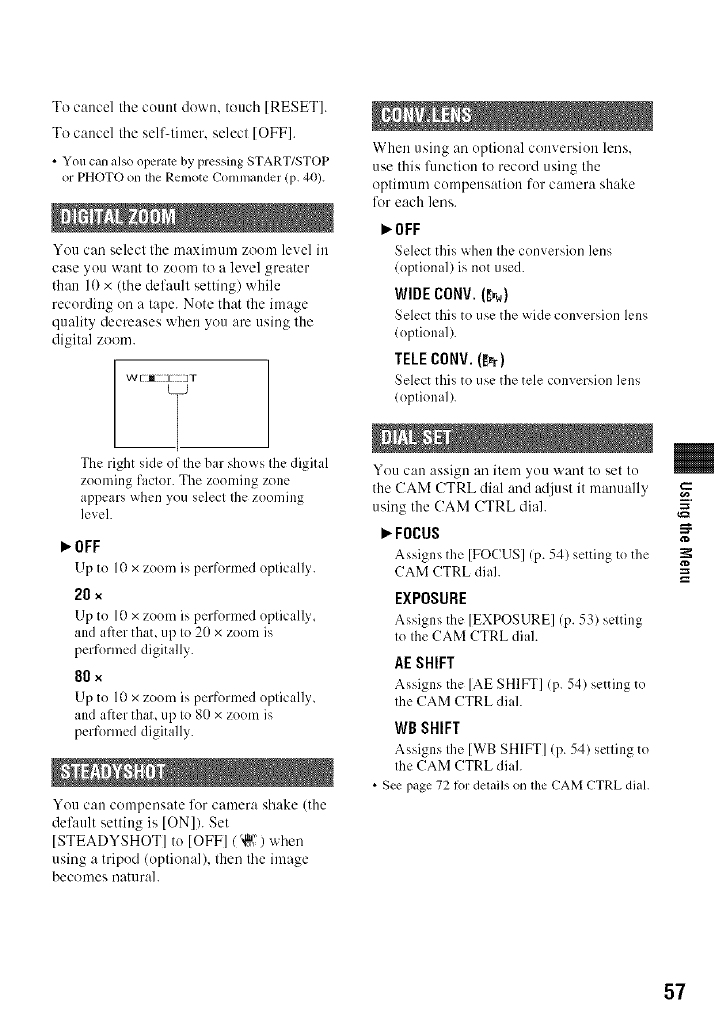
To cancel tile count down. touch [RESET].
To cancel the self-timer, select [OFF].
• Youcan also operatc by pressing START/STOP
or PHOTO on tile Remote Commander (p. 40).
You can select the nlaximum zoom level ill
case you Wallt to ZOOmto a level greater
than 10 x (the default setting) while
recording on a tape. Note that the image
quality decreases when you are using the
digital zoom.
W[M • 3T
The right side of the bar shows the digital
zooming factor. The zooming zone
appears when you select the zooming
level.
I_OFF
LIpto l0 x zoom is performed optically.
20 ×
Up to 10x zoom is performed optically.
and after that, up to 20 x zoom is
performed digitally.
80 ×
Up to 10x zoom is performed optically,
and after that, up to 80 x zoom is
performed digitally.
You can compensate lk_rcamera shake (the
def:mlt setting is [ON]). Set
[STEADYSHOT] to [OFF]/'_o" ) when
using a tripod (optional), then the image
becomes naturah
When using an optional conversion lens.
use this lhnction to record using the
optimum compensation for camera shake
lk_reach lens.
P,'OFF
Select this _@en the conversion h:ns
(optional) is not used.
WIDE CONV.(D_)
Select this to use the wide con'_ersion lens
(optional).
TELECONV. (_r)
Select this to use the tele conversion lens
(optional).
You c:ul assign ai'litem _ou _aant to set to
the CAM CTRL dial :rod adjust it manually
using the CAM CTRL diah
_'FOCUS
Assigns the [FOCUS] (p. 54) setting to the
CAM CTRL diah
EXPOSURE
Assigns the [EXPOSURE[ (p. 53) setting
to the CAM CTRL dial.
AE SHIFT
Assigns the [AE SHIFT] (p. 54) setting to
the CAM CTRL diah
WB SHIFT
Assigns the [WB SHIFT] (p. 54) setting to
the CAM CTRL diah
• See page 72lot delails on lhe CAM CTRL dial.
57
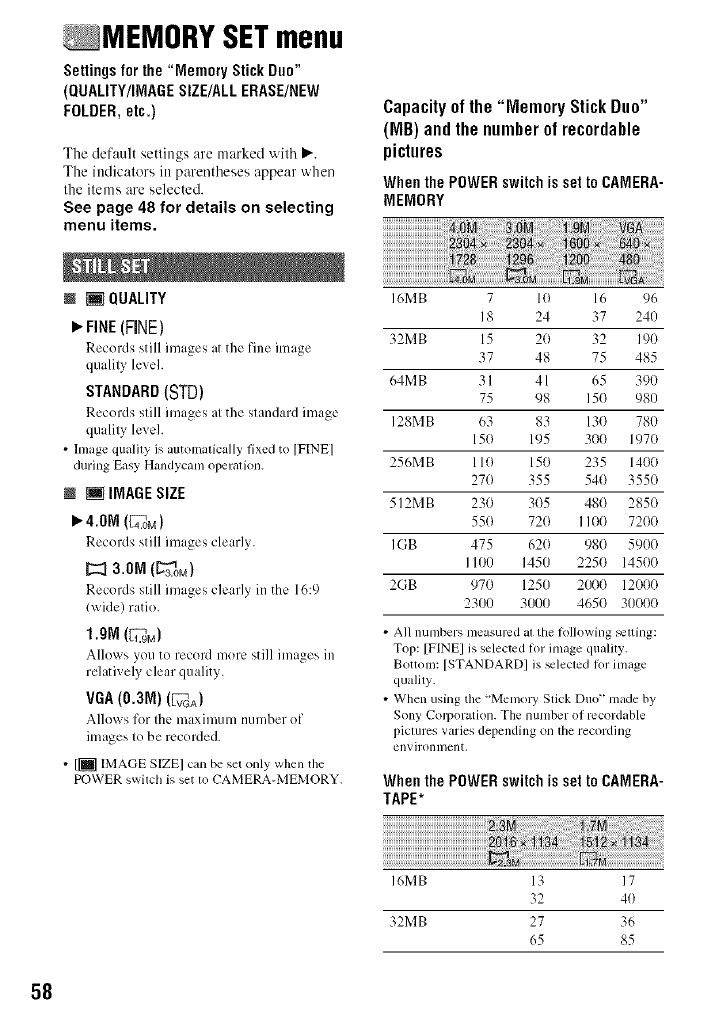
MEMORY SETmenu
Settings for the "Memory Stick Duo"
(QUALITY/IMAGESIZE/ALL ERASE/NEW
FOLDER, etc.)
The default settings are marked with _.
The indicators in parentheses appear when
the items are selected.
See page 48 for details on selecting
menu items.
N [] QUALITY
FINE(FINE)
Records still images at the fine image
quality level.
STANDARD(STD)
Records still images at the standard image
quality level.
• hnage qualfly is automalically fixed to [FINE]
during Easy Handycam operalion.
@ [] IMAGESIZE
4.ON (4E_oM)
Records still images clearly.
3.ON (L'_3ON)
Records still images clearly in the 16:9
lwide) ratio.
1.9N (1L_.gM)
Allows you to record more still images in
relatively clear quality.
VGA (0.3M) (VFVGA)
Allows for the maximum number of
images to be recorded.
• [[] IMAGE SIZEI tun be set only when the
POWER swilch is set 1oCAMERA-MEMORY,
Capacityof the "Memory StickDuo"
(MB) andthe number of recordable
pictures
WhenthePOWERswitchissettoCAMERA-
MEMORY
I6MB 7 10 16 96
18 24 37 240
32MB 15 20 32 190
37 48 75 485
64MB 31 41 65 390
75 98 15(1 980
128MB 63 83 13(} 780
15(} 195 300 1970
256MB 110 150 235 1400
27(} 355 54(} 355(}
512MB 230 3(}5 48(} 285(}
550 720 1100 7200
IGB 475 62(} 980 5900
1100 1450 2250 14500
2GB 970 1250 2000 12000
2300 3000 4650 311000
•All nunlbers nleasured at the lollowing _tling:
Top: [FINEI is seleclcd tot image quality.
Bottom: [STANDARDI is _lected fi)r inmge
quality.
• When using the "Memo W Stick Duo" made by
Sony Corporatkm. The number of mcordable
piclures varies depending on lhe recording
environment,
WhenthePOWERswitchissettoCAMERA-
TAPE*
I6MB 13 17
32 40
32MB 27 36
65 85
58
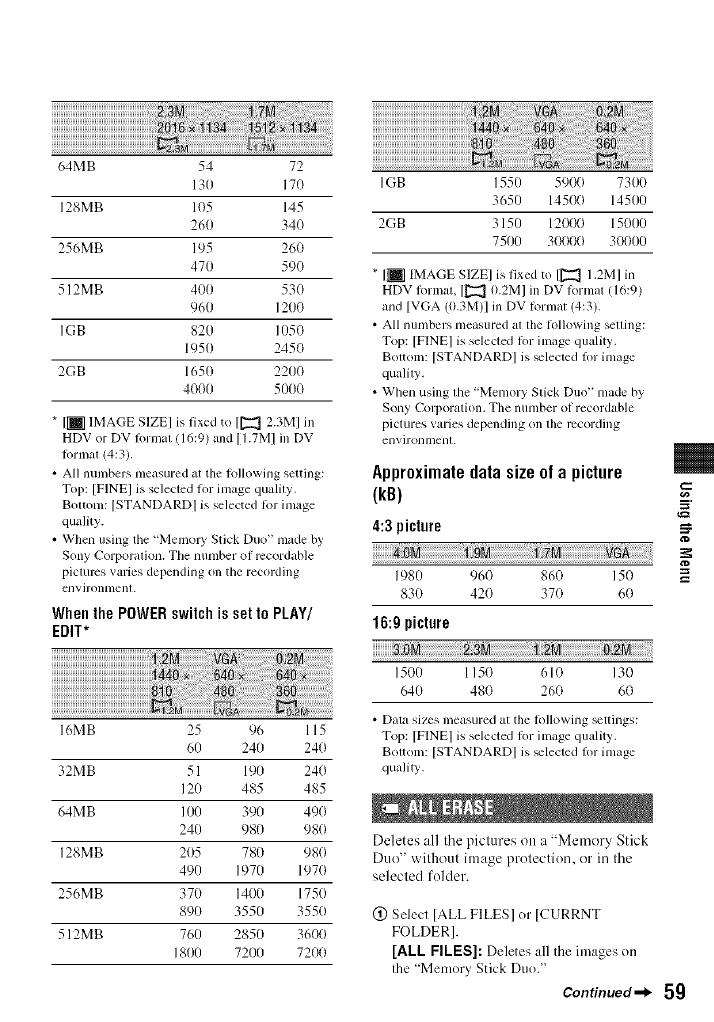
64MB 54 72
130 17(1
128MB 105 145
260 34(1
256MB 195 260
470 59(1
512MB 400 530
960 1200
IGB 820 105()
1950 245(I
2GB 1650 2200
4000 5000
* [1i7 IMAGE SIZE] is fixed to [[_ 2.3M1 in
HDV or DV lormat (16:9) and [I.7M] in DV
Iormal (4:3).
• All numbers measured at the R_llowing setting:
Top: [FINEI is selected for image quality.
Bottom: [STANDARDI is selected R_r image
quMity.
• When using the "Memo W Stick Duo" made by
Sony Corporation. The number of mcordable
pictures varies depending on the recording
envJrontllenl.
WhenthePOWERswitchissettoPLAY/
EDIT*
;i×
M
16MB 25 96 115
60 240 24(1
32MB 51 190 24(1
120 485 485
64MB 100 390 49(1
240 980 98(1
128MB 205 780 980
490 1970 1970
256MB 370 1400 1750
890 3550 3550
512MB 760 2850 3600
1800 7201) 7200
IGB 1550 590(t 7300
3650 14500 14500
2GB 3150 12000 15000
7500 30000 30000
* [_] IMAGE SIZE] is fixed to [[_ 1.2M] in
HDV lormat, [[_l 0.2M] in DV lormat (16:9)
and [VGA (0.3M)I m DV Iormat (4:3).
• All numbers measured at the hlUowing selling:
Top: [FINEI is selected lor image quality.
Bottom: [STANDARDI is _lected lot image
quality.
• When using tile "Memory Stick Duo" made by
Sony (-k)rporation. The number of recordable
tfictures varies depending on the recording
environment.
Approximatedata size of a picture
(kB)
4:3 picture
1980 960 860 150
830 420 370 60
16:9 picture
640 480 260 60
• Data sizes measured at the lollowing _ttings:
Top: [FINEI is selected lor image quality.
Bottom: [STANDARDI is _lected lot image
quality.
Deletes all the piclures on a "Memory Stick
Duo" without image prolection, orin the
selected folder.
(!) Select [ALL FILES] or [CURRNT
FOLDER].
[ALL FILES]: Deletes all the images on
the "Memory Stick Duo."
Continued_l_ 5g
a_
MEMORYSETmem_(go_tim_ed}
[CURRNT FOLDER]: Ddetes all the
images in the selected folder.
(_) Touch IYESI mice--_ r_7.
• Cancel image protection on the "Memory Stick
Duo" belorchand when using the "Memory
Stick Duo" with tile write-protect tab (p. 114).
• The lolder will nol be deleted even when you
delete all the pictures in the lolder,
• Do not do any of the lollowing while [_
Erasing all datz_,..I is displayed:
Operate lhe POWER switdl/operation
billions.
l_iecl lhe "Memory Stick Duo?'
The "Memory Stick Duo" has been
formatted at the factory, and does not
require formatting.
To execute fl_rmatting, touch [YES] twice
-...+ [_].
Formatting is completed, and all the images
will be deleted.
• Do not do any of the lo]lowing while [_
Pormalting...I is displayed:
Operate lhe POWER switchA)peration
bllttolls.
l_iect the "Menlory Stick Duo."
•Pormalting erases everything on the "Memory
Stick Duo" including prolected inlage dala and
newly creg_ted lolders.
P,'SERIES
Assigns file numbers in sequence c_en it"
the "Memory Stick Duo" is replaced with
another one. The file number is reset when
a ne_ lkdder is created or the recording
folder is replaced with another.
RESET
Resets the file number to 0001 each time
Ihe "Memory Stick Duo" is changed.
You can create a new folder ( 102MSDCF
to 999MSDCF) on a "Memory Stick Duo."
When a folder is fitll/a maximum of 9,999
images are stored) a new folder is
automatically created.
Tottch [YES] -"+ IX].
• You cannot delete the created lolders using your
camcorder. You will have to lbrmat the
"Memory Stick Duo" (p. 60), or delele them
using your COlllpuler,
• The number of recordable piclums on a
"Memory Stick Duo" may decrease as file
nunlber of Iolders incrca_s.
Select the folder to be used lk_r recording
with [_/[_, then tottch IOK].
• As the del,mll _tting, pictures are saved ill the
1(t1MSDCF lolder.
• Once you mcoM a picture in a lolder, the same
R)lder will be set as the dehmll lolder lot
I?layback,
Select the playback folder with 1_71[_],
then touch [Wg].
6O
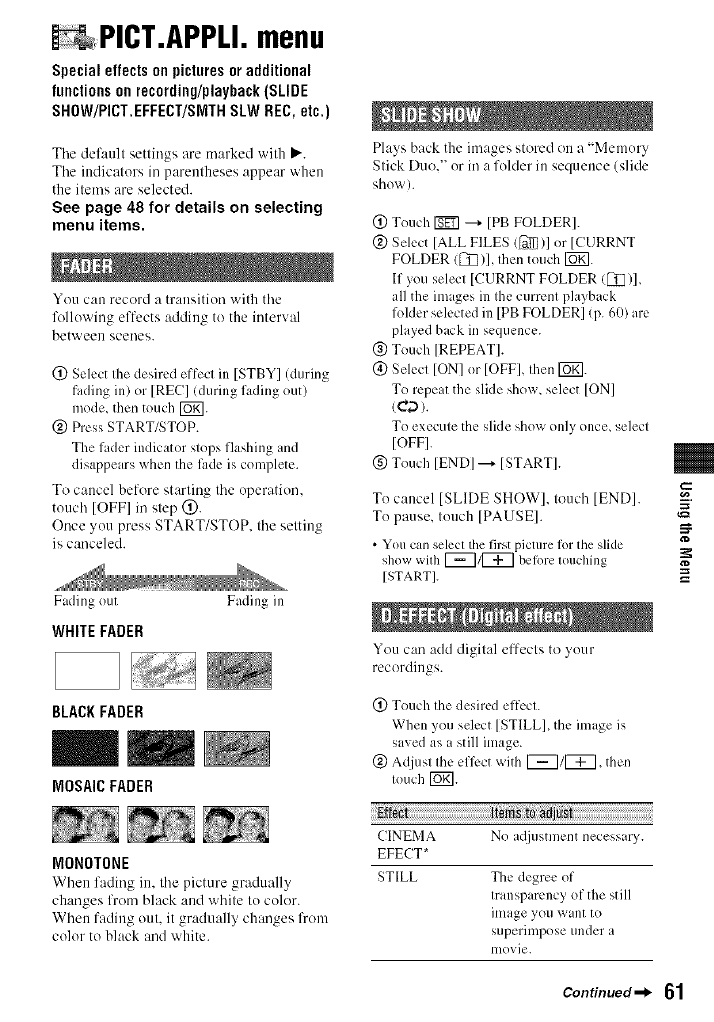
PICT.APPLI.menu
Special effects on picturesor additional
functionson recording/playback(SLIDE
SHOW/PICT.EFFECT/SlYlTHSLW REC, etc.)
Tile default settings are marked with _'.
Tile indicators in parentheses appear when
the items are selected.
See page 48 for details on selecting
menu items.
You can record It transitiorJ with the
following elTects adding to the interval
between scenes.
(2) Select the desired effect in [STBY] (during
fading in) or [REC] (during fading out)
mode, then touch [_.
@ Press START/STOP.
The fader indicator stops flashing and
disappears when the time is complete.
To cancel before starting the operation.
touch [OFFI in step (_).
Once you press START/STOP. the setting
is canceled.
Fading out
WHITE FADER
BLACKFADER
Fading in
MOSAIC FADER
MONOTONE
When fading in, the picture gradually
changes from black and white to color.
When fading out, it gradually changes from
color to black and white.
Plays back the images stored on a "Memory
Stick Duo," or in a folder in sequence (slide
shov,').
(_)Touch [gF] ---+[PB FOLDER].
@ Select [ALL FILES (_)1 or [CURRNT
FOLDER ([7_)], then touch [UK].
If you select [CURRNT FOLDER ([7_)],
all the im iges in the current playback
folder selected in [PB FOLDER] (p. 60)are
played back in sequence.
@ Touch ]REPEAT].
(_) Select [ON] or [OFFI, then I_g].
To repeat the slide show, select [ON]
tea).
To execute the slide show only once, select
[OFF].
(_)Touch [END] --_ [START].
To cancel [SLIDE SHOW], touch [END].
To pause, touch [PAUSE].
• You can select the first picture lot the slide
show with [_1[_ belore touchhlg
[START].
You can add digilal effects to your
recoMings.
(_) Touch the desired effect.
When you select [STILL], the image is
saved as a still image.
@ Adjust the efli:ct x_ith [_1[_, then
touch [_.
CINEMA No a({justment necessary.
EFECT*
STILL The degree of
transp irency of the still
image you want to
superimpose under a
nlovie.
_=
Continued=_ 61

+ P++T+APPH+m++J I+o++R+++t_++}
62
++++E+++t +[t+++_++++++_++j ++++++++++++++++++++++++++++++
FLASH The interval of flame-by-
flame playback+
TRAIL The tilde time of the
incidental image.
SLOW Shutter speed lI is 1/30, 2
SHUTTR* is I/I 5, 3 is 1/8, 4 ix I/4).
OLD MOVIE* No acljt+stment necessary.
* Available during tape recording only.
@ Touch [_]+
appears.
To cancel [D.EFFECT], tuuch [OFF]in
step 0.
I_OFF
Does not use [D.EFFECT] setting.
CINEMA EFECT (Cinematiceffect)
You can add a cinematic atmosphere to
?icturcs by a(liusting the image quality.
STILL
Records t movie while supcrim?osing it
on a previously recorded still image.
FLASH(flashmotion)
Records a movie _ith a serial-still-image
effect (strobe effect).
TRAIL
Records a picture so that an incidental
image like a trail is left.
SLOW SHUTTR (slow shutter)
The shutter speed is slox_ed dov+n. Suitable
I_)r shooting a subject more clearly in a
dark place.
• Adjust the locus manually using a tripod
(optional) since adjusting tile R)CUS
automaticaUy is hard wllen [SLOW
SHUTTRI is selected./[FOCUSI, p. 54)
OLDMOVIE
Adds an old movie effect _xith a sepia hue
to pictures.
• You cannot change to another digital ellect
while recording pictures on a tape with
[CINEMA EFECTI selected.
• You cannot record playback pictures edited
using special effects on the tape in your
camcorder.
• You cannot add effects to externaUy input
pictures. Also, you cannot output playback
pictures edited with digital eflPcts via the _,
HDV/DV Interlace (i.LINK).
• You can save pictures edited using special
efllrcts on a "Memory Stick Duo" (p. 79) or
record them on another VCR/DVD device, etc.
(p. 74)+
• While using [D.EFFECTI, you cannot use the
review button lor still inlages on file "Memory
Stick Duo" _,
Yuu can add special effects to a picture
during recording ur playback. _ appears.
OFF
Does not use [PlCT.EFFECT] setting.
SKINTONE*
Makes skin texture look more smoother
and more appealing.
MEG.ART
The color and brightness are reversed.
SEPIA
Pictures appear in sepia.
B&W
Pictures appear in black and white.
SOLARIZE
Pictures appear as an illustration with
strong contrast.
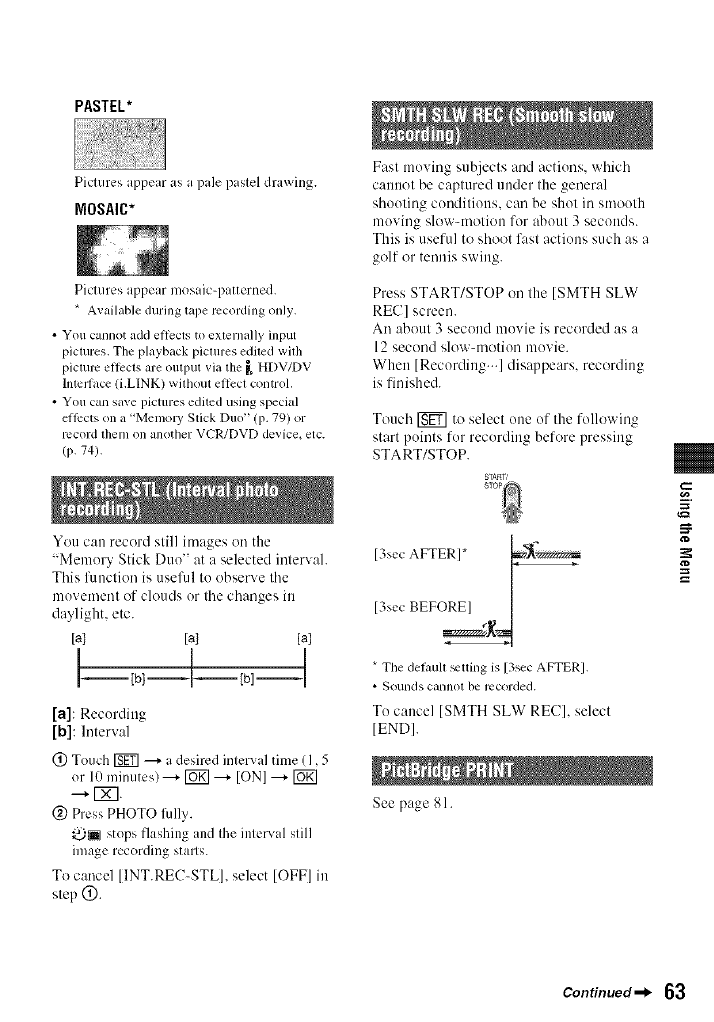
PASTEL*
Piclures appear as a pale paslel drawing.
MOSAIC*
Pictures appear mosaic-patterned.
* Available during tape recording only.
• You cannot add ellecls to externally input
pictures. The playback pictures edited with
picture ellects are output via the _ HDV/DV
hucdace (i.LINK) wilbout ellcct control.
• You can save pictures edited using special
ellPcts on a "Memo W Stick Duo" (p. 79) or
record them on another VCR/DVD device+ etc.
/P- 74).
You can record still images on the
"Memory Stick Duo" at a selected intervah
This fimctiou is usefid to observe the
movement of clouds or the changes in
daylight, etc.
[a] [a] [a]
t 1 I
I I<--I--Ihl--I
[a]: Recording
[b]: Interval
(_) Touch rg_ --+ a desired interval time (1,5
or 10 minutes) ---+_ ---+ [ON] ---+rUKI
--+ IXT.
(g) Press PHOTO fidly.
_ stops flashing and the interval still
image recording stalls.
To cancel [INT.REC-STL], select [OFF] in
step (_).
Fast moving subjects and actiuns, which
cannot be captured under the general
shouting conditions, can be shot in smouth
moving slow-motion for about 3 seconds.
This is useful to shoot fast actions such as a
golf or tennis swing.
Press START/STOP on the [SMTH SLW
REC] screen.
An about 3 second muvie is recorded as a
12 second slow-motion movie.
When [Recording...] disappears, recording
is finished.
Touch _ to select one of the following
start points fur recording before pressing
START/STOP.
soP_
[3sec AFTER]*
[3see BEFOREI [
The defimlt _tting is [3sec AFTERI.
• Soullds callnot be recorded.
To cancel [SMTH SLW REC], select
[END].
See page 81.
_=
=:r
Continued-l_ 63
+ P(+T+APPU+m+NJ I+o++R+++t_++}
You can connect the camcorder to a
personal computer with a USB cable attd
view pictures on the computer. You can
also cotmect the camcorder to a PictBridge
compatible printer/p. 81) using this
fuuction.
_.BrmMemoryStick
Seh:ct this to _ i_.+_pictures on a "Memory
Stick Duo" on the computer or to import
them to the computer.
PictBridgePRINT
Select this when you connect tile
camcorder to a PictBridge comp ttible
printer to print out directly (p. 81).
The default setting is ION], allowing you to
view the demonstration in about 10
minutes, after you have removed both a
cassette and a "Memory Stick Duo" from
your camcorder, and slide the POWER
switch to turn on the CAMERA-TAPE
lamp.
•The demonstratkm will be suspended in
situations such as fllose described below.
When you touch file screen during the
denlonstratkln (The demonstration starts
again ariel about 10 nlinules).
When a cussette or a "Memory Stick Duo" is
inserted.
When the POWER swilcll is set to other lhan
CAMERA-TAPE.
N EDIT/PLAY menu
Settings for editing or playing back in
various modes (VAR.SPDPB/END
SEARCH,etc.)
The def:mlt settings are marked with P,'.
The ittdicators itt parentheses appear when
the itmns are selected.
See page 48 for details on selecting
menu items.
You can play back in various modes while
viewing movies.
(_) Touch the lk)llowing buttons during
playback.
change the
phtyback [2_ (frame)
direction*
play back IgiBDT2]
slowly** To reverse direction:
(frame) --+
play back frame _ (frame) during
by frame playback pause.
To reverse directkm:
(frame) during
frame playback.
*Horizontal lines may appear at tile top,
bouom, or in tile cemer of file screen, This
is not a maltunctkm.
**Pictures output flom the _, HDV/DV
Imerluce (i.LINK) cannot be played back
smoothly ill slow mode.
@ Touch [_ --+ [_.
To return to the normal playback mode,
touch {_ (Play/P:mse) twice/once from
frame playback).
• You will not hear tile recorded sound. You inay
see mosaic-like images of the previously played
picture.
• Pictures in the HDV lk)rlna[ are not output lronl
the _ HDV/DV lnterli_ce (i.LINK) when they
64
are paused or played back in any mode other
than normal playback mode.
• Pictures in the HDV Ibrnmt may appear
distorted during:
Picture search
Reverse playback
• Playing back slowly to the reverse direction and
playing back l?ame by ftame to the reverse
direction arc not available in HDVI080i IbrmaL
See page 78.
When your camcorder is COUllected to a
Sony VAIO series personal computer, you
can easily bum the picture recurded on tile
tape on a DVD (Direct Access to "(?lick to
DVD")/p. 89).
• Tim quality ol tile picture to be copied to DVDs
is SD (standard definilkm),
EXEC
Tile most recently recorded picnlre is
played back for about 5 seconds and then
stops automatically.
CANCEL
Stops [END SEARCH].
• [END SEARCH] will not work once you eject
the casqUe after yoll have recorded Oll lhe tape,
STANDARDSET
menu
Settingswhilerecordingonatapeor other
basicsettings(RECNODE/MULTI-SOUND/
LCD/VFSET/DISPOUTPUT/QUICKREC,
etc.)
The default settings are marked with It,,.
Tile indicators in parentheses appear when
the items are selected.
See page 48 for details on selecting
menu items.
Select the playback signal. Normally select
IAUTOI.
When your cmncurder is connected to
:muther device using an i.LINK cable,
select tile signal to input/output from the _,
HDV/DV Interface/i.LINK). The selected
signal is recorded or played back.
_"AUTO
S_itches tile signals bct_ccn HDV and
DV furmat automatically when playing
back a tape.
During i.LINK conncctkm, switches the
signals between HDV and DV %rmats
automatically, and inputs/uutputs from the
_, HDV/DV Interface (i.LINK).
N0V
Plays back only the portkms recorded in
HDV format.
During i.LINK connection, inputs/outputs
only HDV lbrmatted signals from the _,
HDV/DV Interface (i.LINK), and records/
plays back. You can also select this when
connecting Ihe cau/coKler to a computer_
etc.
DV
Plays back only the portions recorded in
DV furmat.
During i.LINK connection, inputs/outputs
only DV lkmnatted signals from the _,
HDV/DV Interface (i.LINK), and records/
plays back. You can dso select this when
connecting the camcorder to a compllter_
etc.
Continued_l_ 65
:::r
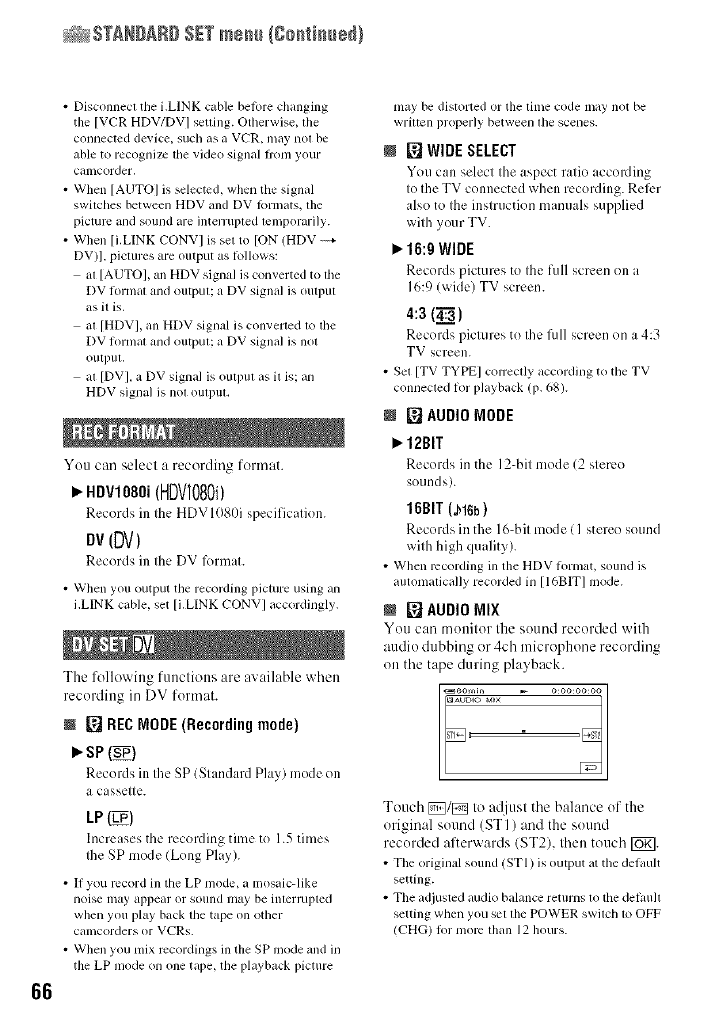
_A STM_DARgSIT menu/Co_ti_ueg}
66
• Disconnect the i.LINK cable belore changing
the [VCR HDV/DV I setdng. Otherwise, the
connected device, such as a VCR, may not be
able to recognize the video signal flom your
camcorder.
• When [AUTOI is selected, when the signal
switches between HDV and DV lbrmats, the
picture and sound are interrupted temporarily.
• When El.LINK CONVI is sel to [ON (HDV
DV)I. pictures are output as lollows:
al [AUTO], all HDV signal is converted to lhe
DV tornlat and output; a DV signal is (11111)111
as it is.
at [HDV], all HDV signal is converted to the
DV lormat and output; a DV signal is not
output,
at [DVI. a DV signal is output as it is: an
HDV signal is not (111113111.
You can select a recording format.
ROY108ai(HDVI080i)
Records in the HDVI080i specification.
BY(DV)
Records in the DV l_)rmat.
• When you output tile recording picture using an
i.LINK cable, set El.LINK CONVI accordingly.
The l\_llowing functions are available when
recording in DV format.
@ [] REC NODE (Recording mode)
_.Se(_)
Records in the SP (Standard Play) mode on
a cassette.
LP(_)
Increases the recording time to 1.5 times
Ihe SP mode (Long Play).
• II you record ill the LP mode, a mosaic-like
noise may appear or sound may be interlupted
when you play back the tape on other
calllcorders or VCts.
• When you mix recordings in the SP mode and in
the LP mode on one tape, the playback picture
may be distorted or tile time code may not be
written properly between lhe scenes.
@ [] WIDESELECT
You can select the aspect ratio accoaling
to the TV connected when recording. Reli:r
also to the instruction manuals supplied
with your TV.
I,_16:0 WIDE
Records pictures to the full screen on a
16:9/_ide) TV screen.
4:3 (4:._)
Records pictures to the filll screen on a 4:3
TV screen.
• Set [TV TYPE] conectly according to tile TV
connected lor playback/P. 68).
@ []AUDI0 NODE
_12BIT
Records in the 12-bit mode 12 stereo
sounds).
16BIT (J_16b)
Records in the 16-bit mode ( I stereo sound
with high quality).
• When recording ill the HDV lormat, sound is
automatically recorded in [16BITI mode.
@ [] AUDIO MIX
You can tnonitor the sound recorded with
audio dubbing or 4ch microphone recording
on the tape during playback.
Touch _/E_ to atliust the balance of the
original sound (ST I ) and the sound
recorded afterwards/ST2), then touch I_gl.
• The original sound (STI) is output at the delault
setting.
• The adjusted audio balance returns to tile delmllt
setting when you set the POWER switch to OFF
/CHG) lot more than 12 hours.
Touch[_7/[_7 Io a@tsl file vohnne
]p. 31).
• You can also a({iust the siting using the CAM
CTRL dial (p. 72).
You can selecl v,'hether to play back audio
recorded using other devices wilh dual
SOtllld or stere() SOuI]d.
P,"STEREO
Plays back with main and sub sound/or
stereo sound).
1
Plays back with main sound ((51the lefl
channel sound/.
2
Plays back with sub sound ((51 the right
channel sound/.
• You cam play back, but cannot record a dual
sound track casstte on your canlcorder.
• The siting returns to [STEREO] when you sel
the POWER switch to OFF (CHG) tot more
than 12 hours.
Tile recorded picture will not be affected by
this operation.
NLCDBRIGHT
You can a@lst tile brightness of tile LCD
screen.
(!) Adjust the brightness with [_71[_7.
@ Touch [_].
• Youcan also turn off the LCD backlight (p. 20).
NLCDBL LEVEL
You can a_ust tile brightness of tile LCD
screen's backlight.
P,"NORMAL
Standard brightness.
BRIGHT
Brightens tile LCD screen.
• When yoll connect yollr camcorder to outside
power sources, [BRlGHT] is automatically
selected tot tile siting.
• When you select [BRIGHTI, battel T lilP is
sligblly reduced during recording.
NLCD COLOR
You can a@tst tile color on tile LCD screen
with 1_71[_7.
Low intensity High intensity
NVF B.LIGHT
You can adjust tile brightness of tile
viewfinder.
P,"NORMAL
Standard brightness.
BRIGHT
Brightens the _ ie_ finder screen.
• When you connect your camcorder to outside
power sources, [BRIGHT] is amomatically
selected lot tile siting.
• When you select [BRIGHTI, battel T lilP is
sliglaly reduced during recording.
Select [COMPONENT] when connecting
your camcorder to a TV with the
component input jack.
480i
Select _hen connecting your camcorder to
a TV with the component input jack.
I_.lOBOi/4BOi
Select _hen connecting your camcorder to
a TV that has the component input jack
and is capable of displaying the 1080i
signah
_=
=:r
Continued_l_ 67
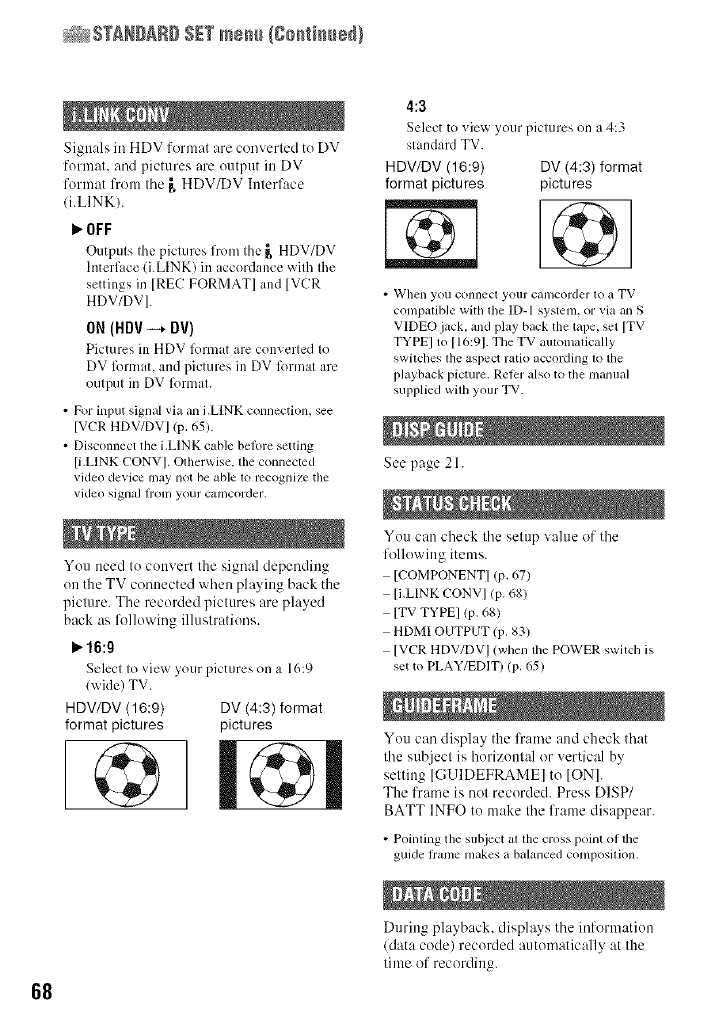
_A $Tg_DAR# SETmenu/Co_ti_ueg}
68
Signals in HDV format are converted tu DV
format, and pictures are output in DV
format from tile [, HDV/DV htterface
/i.LINK).
P,"OFF
Outputs the pictures lron_ the _, HDV/DV
Interface (i.LINK) in accordance with the
settings in [REC FORMAT[ and [VCR
HDV/DV].
ON (HDV --* DV)
Picuues ill HDV lbrmat are con'_ ertcd to
DV lbrmat, and pictures in DV lbrmat are
output in DV lbrmat.
• For input signal via an bLINK connection, see
[VCR HDV/DV] (p, 65).
• Disconnect the i.LINK cable belore setting
[i.LINK CONV]. Otherwise, the connected
video device may not be able to recognize tile
video siglla] II'Olll your camcorder,
Yuu need to cunvert the signal depending
()it the TV connected when playing back the
picture. The recorded pictures are played
back as lklllowiug illustratiuus.
_.16:9
Seh:ct to vie_ your pictures on a 16:9
lwide) TV.
HDV/DV (16:9)
format pictures
@DV (4:3) format
pictures
4:3
Select to vie_ your pictures on a 4:3
standard TV.
HDV/DV (16:9) DV (4:3) format
format pictures pictures
• When you connect yollr camcorder to a TV
compatible with the ID-I system, or via an S
VIDEO jack, and play back the tape, set [TV
TYPEI to [16:91. The TV automatically
switches the aspect ratio according to tile
playback picture. Reler also to tile manual
supplied wilh your TV.
See page 21.
You can check the setup value of the
following items.
[COMPONENT] (p. 67)
[i.LINK CONV] (p. 68)
[TV TYPE] (p. 68)
HDMI OUTPUT (p. 83)
[VCR HDV/DV I (when the POWER switch is
set to PLAY/EDIT) (p. 65)
Yuu can display the frame and check that
the subject is horizuntal or vertical by
setting [GUIDEFRAME] to tONI.
The frame is not recorded. Press DISP/
BATT INFO tu make the frame disappear.
• Pointing tile subject at the cross point of the
guide fiame makes a balanced composition.
During playback, displays the informatiun
]data code) recorded automatically at the
time of recording.
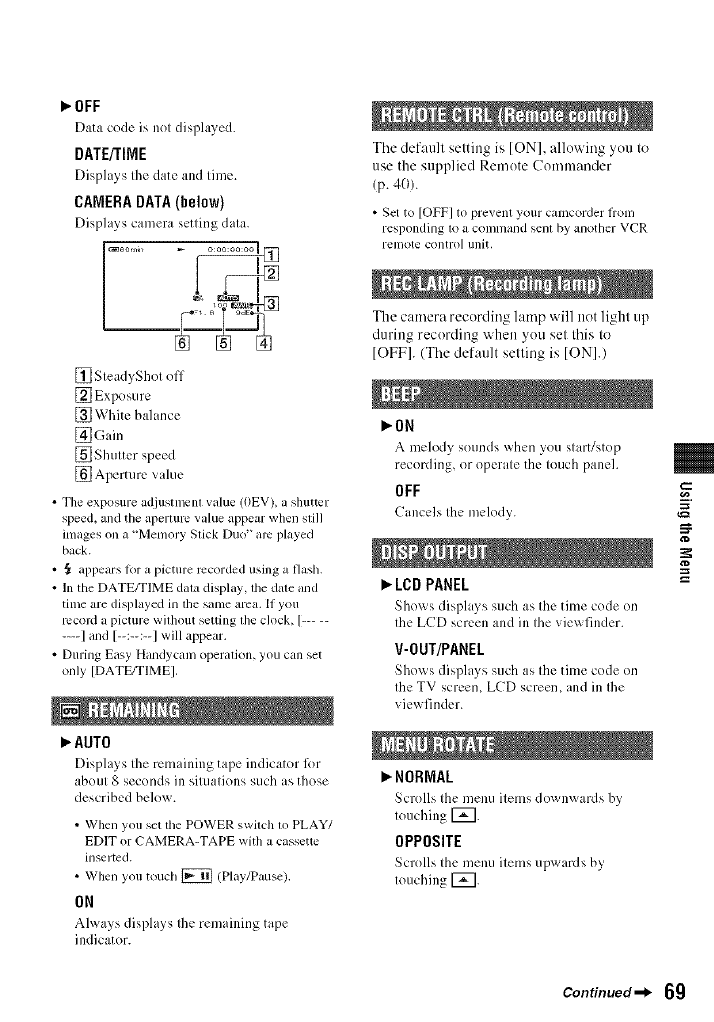
_OFF
Data code is not displayed.
DATE/TIME
Displa) s the date and time.
CAMERA DATA (below)
Dis_:flays camera setting data.
[] SteadyShot off
[] Exposure
[] White balance
_]Gain
[] Shutter speed
[] Aperture value
•The exposure adjustmcnl value (0EV), a shutter
speed, and the aperture value appear when still
images on a "Memory Stick Duo" arc played
back.
• ,_ appears for a picture recorded using a flash.
• In the DATE/TIME dala display, lhe date and
time are displayed in lhe same area. If you
mcoMa picture wilhout setting lhe clock, [.....
.... ] and [--:--:--1 will appear.
• During Easy Handycgun operalion, you can set
only [DATE/TIMEI.
AUTO
[)is_:flays tile remaining tape indicator fi)r
about 8 seconds ill situations such as those
described below.
• When you set the POWER switch 1o PLAY/
EDIT or CAMERA-TAPE with a cassette
inserted.
• When you touch [_ (Play/Pause).
ON
Always displays Ibe remaining tape
indicator.
The defatflt setting is [ON], allowing you to
use the supplied Remote Commander
(p. 40).
• Set to [OFF] to prevent your camcorder fi'onl
responding to a command senl by another VCR
remote control unit.
The camera recording lamp will not light up
during recording when you set this to
[OFF]. (The defattlt setting is [ON].)
l,,0N
A melody sounds when you start/stop
recording, or operate the touch panel.
OFF
Cancels the melody.
LCDPANEL
Sho_ s displ lys such as the time code on
the LCD screen and ill the viewfinder.
V-OUT/PANEL
Sho_ s displays such as the time code on
the TV scrc*:n, LCD screen, and ill Ibe
viewfinder.
NORMAL
Scrolls the menu items downwards by
touching [_.
OPPOSITE
Scrolls the menu items u_:_wards b)
touching [_.
Continued=_ 69
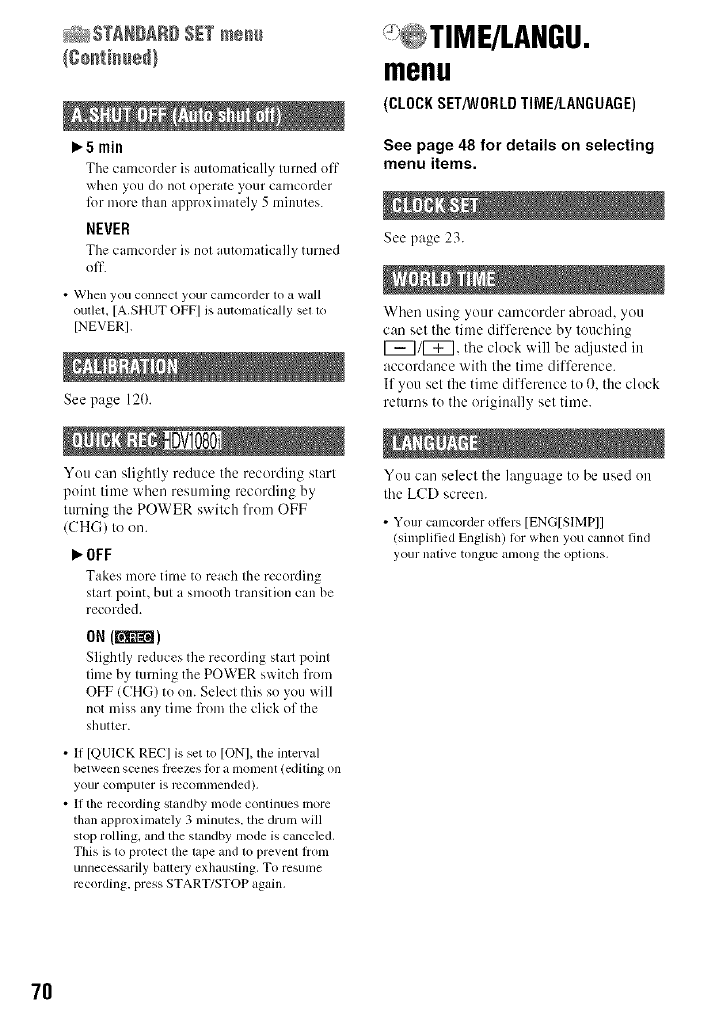
_STANBA88 SET m_u
5 rain
The cmnCol-dcris automatically turned off
when you do not operate your camcorder
lbr more than approximately 5 minutes.
NEVER
The cmncordcr is not automatically turned
off.
• W]len yoLI connect yoLIr cal/lcorder to a wall
oullet, [A.SHUT OFF] is automalically sel 1o
[NEVER].
See page 12{).
You can slightly reduce the recording start
point time when resuming recording by
turning the POWER switch from OFF
(CHG) to on.
_OFF
Takes more time to reach the recording
start point, but a smooth transition can be
recorded.
ON(_1
Slightly reduces the recording start point
time by turning the POWER switch from
OFF (CHG) to on. Select this so you will
not miss any time l)om the click of the
shutter.
• If [QUICK REC] is set to [ON], the interval
between scenes ficezcs lor a lllOlllent (ediling on
your computer is r¢conlli/ended),
• 11the recording slandby mode continues more
than approximately 3 minutes, the drum will
stop rolling, and the standby mode is canceled.
This is to protect the lape and to prevent l]onl
unnecessarily ballery exhausling, To resunle
recording, press START/STOP again.
menu
(CLOCKSET/WORLDTIME/LANGUAGE)
See page 48 for details on selecting
menu items.
See page 23.
When using your camcorder abroad, you
can set the time difference by touching
_/_, the clock will be adjusted in
accordance with the time difference.
If you set the time difference to 0. the clock
returns to the originally set time.
You can selecl the language to be used on
tim LCD screen.
•Your canlcorder oll_rs [ENG[SIMPI]
(silnplilied English) for when you cannot lind
your native tongue al/long tile options.
7O
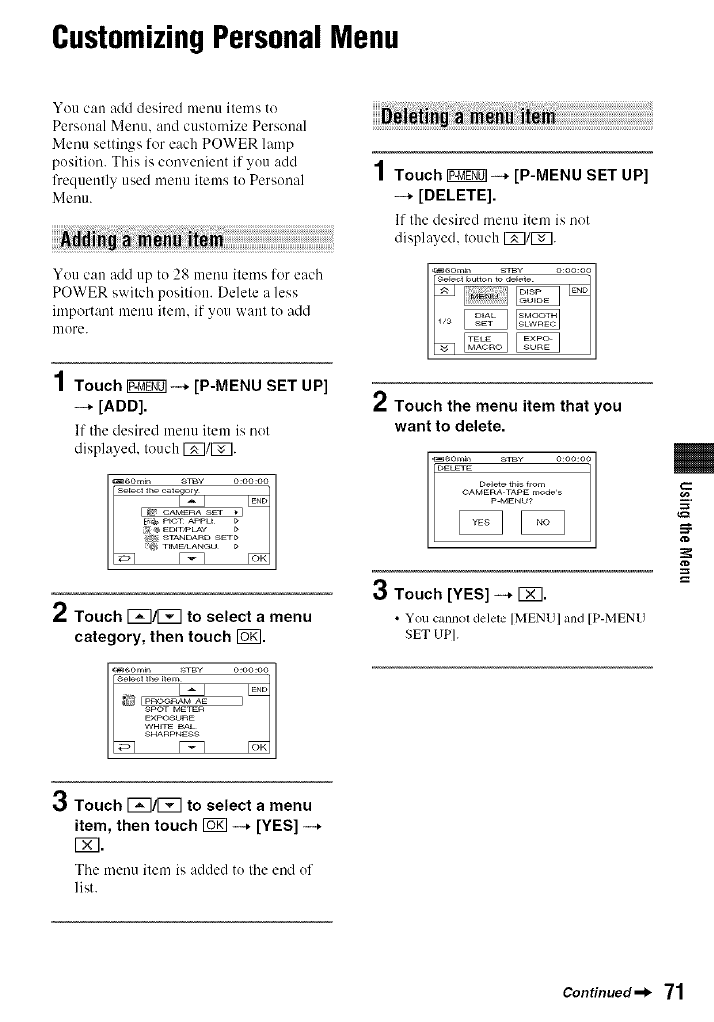
CustomizingPersonalMenu
You can add desired menu items to
Personal Menu. and customize Personal
Menu settings for each POWER lamp
position. This is convenient if you add
frequently used menu items to Personal
Menu.
You can add up to 28 menu items for each
POWER swilch position. Delele a less
important menu item. if you want to add
uqore.
4
/ Touch IF_--* [P-MENU SET UP]
-_ [DELETE].
If the desired menu item is not
displayed, touch r_7/1_7.
1Touch 17_07-+ [P-MENU SET UP]
--* [ADD].
If the desired menu item is not
displayed, touch r_7/r_7.
_6om_n 8JBy O:OO:OO
I_ CAMERASEt _Ti _
E_ PkC_ _Pkk _
2Touch [_E]/_ to select a menu
category, then touch 1o7].
3Touch I_/[_ to select a menu
item, then touch _ -_ [YES] -_
r_l.
The menu item is added to Ille end of
list.
/Touch the menu item that you
want to delete.
_6om_n s_Y o:oo:oo
OELETE
Delete th_s _rom
_ _OAMERApMENu?TAPEmodes
3Touch [YES] -_ r_7.
•You cannol delele [MENU] and [P-MENU
SET UP].
Continued =b 71
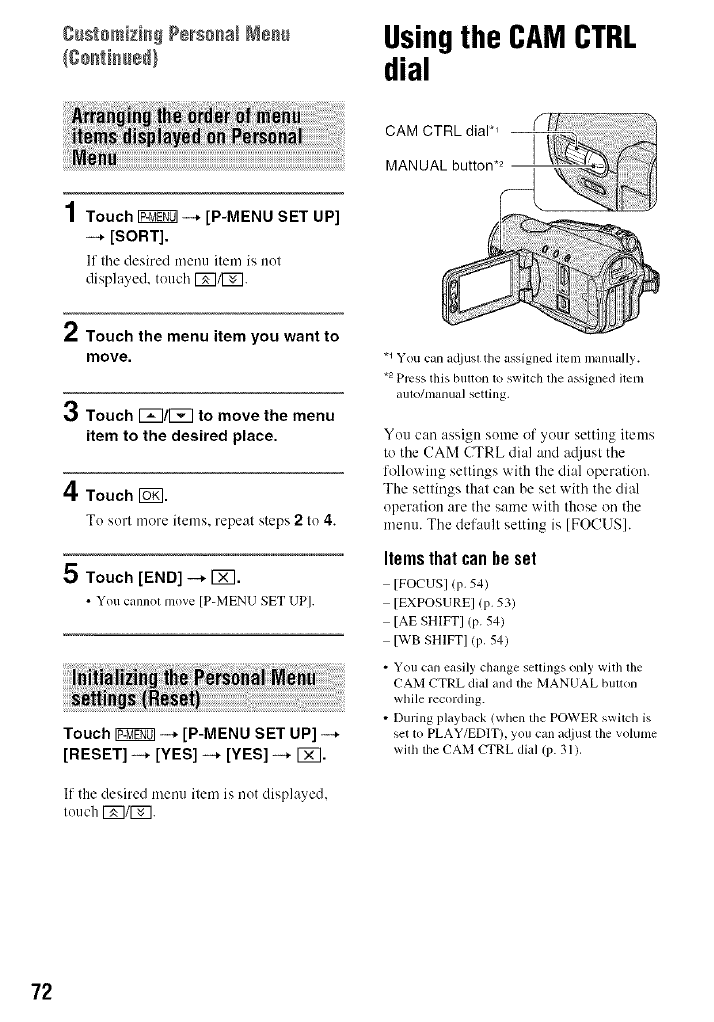
8_stemizi_ Personal Ne_ Usingthe CAMCTRL
dial
1Touch _--* [P-MENU SET UP]
-+ [SORT].
If tile desired menu item is nut
displayed, touch E_/I_.
2Touch the menu item you want to
move.
3Touch E_/E_ to move the menu
item to the desired place.
4 Touch
Tu surl more items, repeal steps 2 lu 4.
5 Touch [END] --* r_].
•Youcannol move [P-MENU SET UPI.
Touch _--+ [P-MENU SET UP] --+
[RESET] -+ [YES] -+ [YES] -+ FXI.
If the desired menu item is nut displayed,
luuch E_/F_].
CAM CTRL dial*_ --
MANUAL button .2 ]
.1You can ac[iuslthe assigned item manually.
*2 Press Ibis btlltOll to switch the assiglled item
alllO/lllallua] seuhlg.
Yuu can assign sume of your setting items
to the (!AM CTRL dial and a([iust the
following settings with the dial operation.
The settings that can be set with the dial
operation are the same with those on the
menu. The default setting is IFOCUSI.
Items that can he set
IFOCUSl lp. 54)
[EXPOSUREI lP. 531
[AE SHIFT] (p. 54)
[WB SHIFT] lP. 54)
• You can easily change settings only with the
CAM CTRL dial and the MANUAL bullon
while recording.
• During playback (when the POWER switch is
set to PLAY/EDIT), you can a(liusllhe volume
wilh tile CAM CTRL dial (p. 31).
72
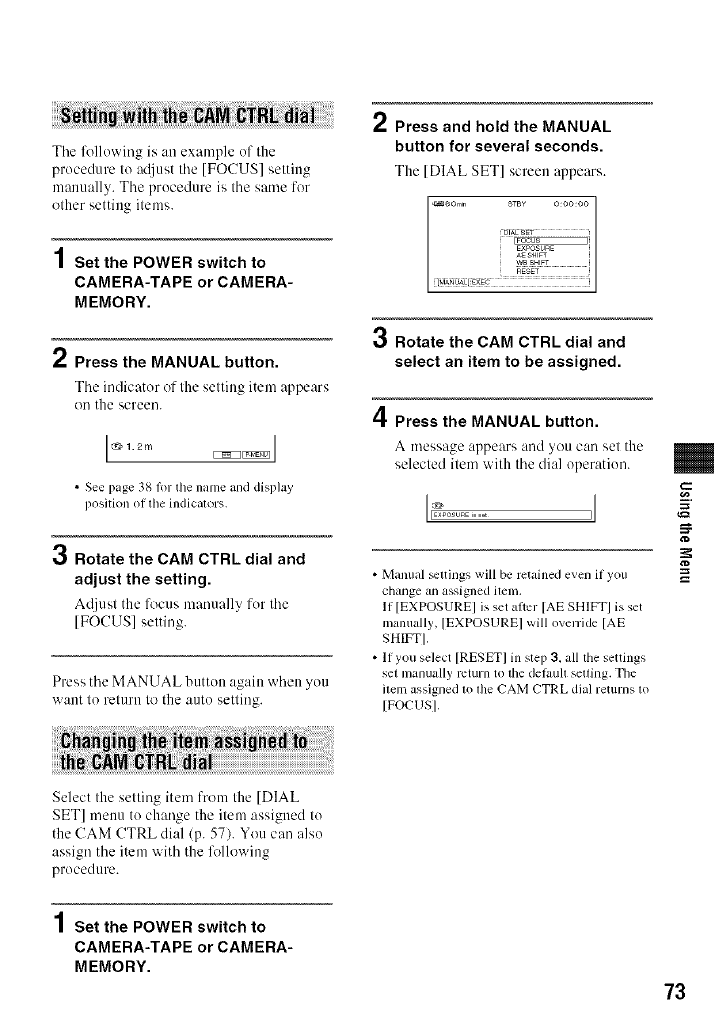
Tile %llowing is an example of the
procedure to ac{just tile [FOCUS] setting
manually. The procedure is the same for
other setting items.
4
| Set the POWER switch to
CAMERA-TAPE or CAMERA-
MEMORY.
Press the MANUAL button.
The indicator of the setting item appears
on the screen.
• See page 38 fortile nalne alld display
position ol tile indicators.
3Rotate the CAM CTRL dial and
adjust the setting.
At[just the focus manually for the
[FOCUS] selling.
Press the MANUAL button again when you
want lo t'elurn lo the auto setling.
Press and hold the MANUAL
button for several seconds.
The IDIAL SET] screen appears.
3Rotate the CAM CTRL dial and
select an item to be assigned.
4Press the MANUAL button.
A message appears :rod you can set the
selecled ilem with the dial operation.
• Manual _ttings will be retained even if you
change an assigned ilem.
If [EXPOSUREI is set al?cr [AE SHIFT] is set
manually, [EXPOSUREI will override [AE
SHIFTI.
• If you select [RESET] in step :3, all the settings
set nlzlnually return to tile detault selling. Tile
ilem assigned m lhe CAM CTRL dial returns m
[FOCUSI.
,_=
Select the setting item from the [DIAL
SET] menu to change the item assigned to
the CAM CTRL dial (p. 57). You can also
assign the item with the lk)llowing
procedttre.
4
|Set the POWER switch to
CAMERA-TAPE or CAMERA-
MEMORY.
73
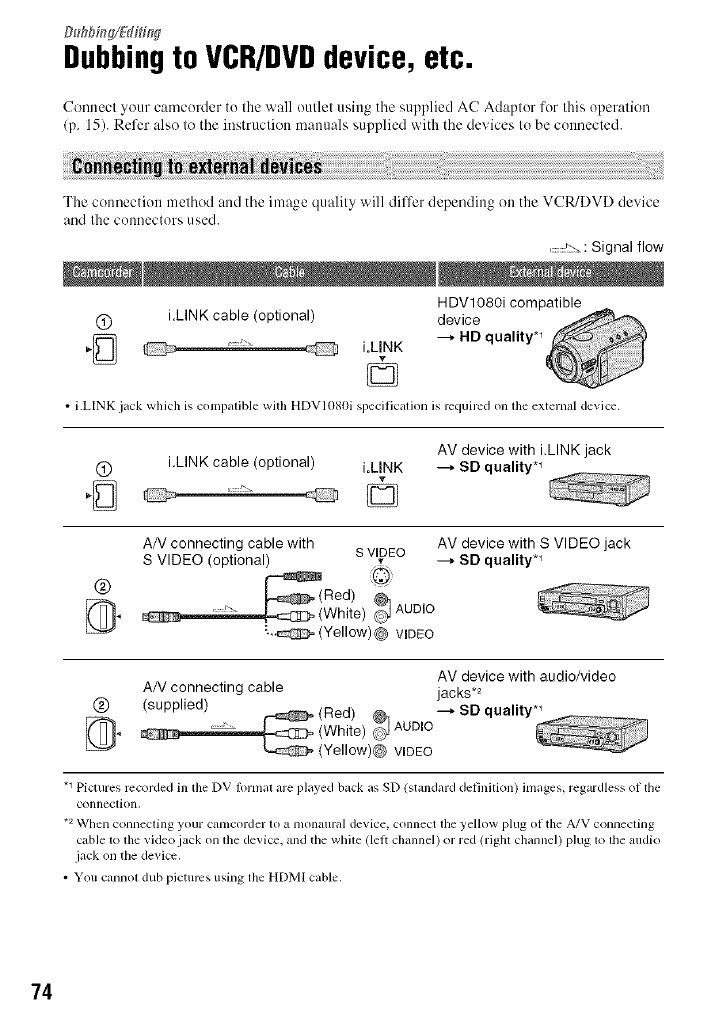
Dubbingto VCR/DVDdevice, etc.
Cennecl your camcuMer tu the wall oullel using tile supplied AC Adaplur fur lifts uperalien
(p. 15). Refer also lo tile instruclieu manuals supplied with tile devices lu be cuunected.
The connection melhed and tile image qualby will differ depending en tbe VCR/DVD device
_lud Ihe cuuuecturs u sed.
..............Signal flow
HDVt 080i compatible
(_) iLINK cable (optional) device
=-_ @ @ i.LINK ---_ HD quality *_
L_J ©
• i.LINK jack which is compalible with HDVI080i specificalion is required on ll_e external device,
AV device with i.LINK jack
(_ i.LINK cable (optional) i.LINK --_ SD quality *_
AN connecting cable with s VIDEO AV device with S VIDEO jack
S VIDEO (optional) _ --_ SD quality *_
(g) ,_Red)
_ _ (White) _'_JAUDIO
'.-@ (Yellow)@ WDEO
AV device with audio/video
AN connecting cable jacks,2
0 (supplied) (Red)
_}_ (White) _ AUDIO
(Yellow)@ VIDEO
.1 Pidures recorded in tim DV fi)rmal are played back as SD (standard definilion) images, regardless of file
conneclion.
*2 When connecling your camcorder to a monaural device, connect lhe yellow plug of the A/V connecling
cable 1o lhe video jack on lhe device, and the while (lelt channel) or red (rigbl channel) plug 1olhe audio
jack on the device.
• You cannol dub pictures using the HDMI cable.
74
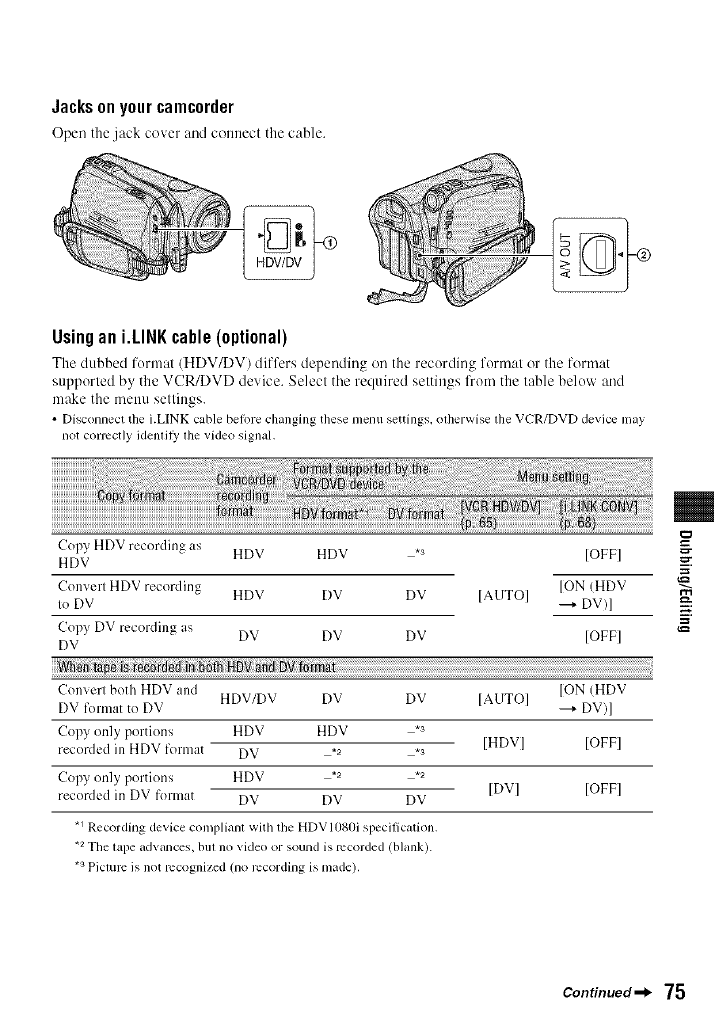
Jacksonyourcamcorder
Open the jack cover and connect the cable.
Usingan i.LINKcable(optional)
The dubbed formal (HDV/DV) differs depending on the recording format or the lormat
supported by the VCR/DVD device. Select tile required settings from the table below and
make the menu settings.
• Disconnect the LLINK cable belore changing these metal settings, olherwise lhe VCR/DVD device may
not correctly idenlil}' lhe video signal.
Copy HDV recording as
HDV HDV HDV ,3 [OFF]
Converl HDV recording HDV DV DV [AUTO] [ON (HDV
Io DV --4 DV)]
Copy DV recording {Is
DV DV DV DV [OFF]
i _:_ _ ! r
Converl both HDV and [ON (HDV
HDV/DV DV DV [AUTO]
DV format to DV ---+ DV)]
Copy on]y portions HDV HDV .3 [HDV] [OFF]
recorded ill HDV format DV ,2 ,3
Copy only portions HDV .2 .2 [DVI [OFF]
recorded in DV format DV DV DV
,1 Recording device compliant with the HDVI{}8{}i specilication.
,2 The lape advallces, bill no video or sound is recorded (blank).
*s Piclure is not recognized (no recordhlg is made).
==
,_=
Continued-_ 75
Dubbie_ to VCR/_VDdevice, etc./¢0e_ieue_}
76
• When [VCR HDV/DV I is sel to [AUTOI, and
the signal switches between HDV and DV
hlrlnats, tile piclurc and sound are interrupted
temporarily.
• When lhe recorder is HDR-HC3, st [VCR
HDV/DV] to [AUTO] on lhe recorder and the
player (p. 65).
• When the player and the recorder am both
HDV1080i compatible devices such as HDR-
HC3 and connected with the i.L[NK cable, alter
pausing or stopping and then resuming the
recording, the images will be a bil choppy or
rough at that point. A
• Set [DISP OUTPUTI to [LCD PANELI (delaull /'_
setting) when connecting with an A/V
connecting cable (p. 69).
When connecting with the A/V
connecting cable with SVIDEO
(optional)
Uonnect with S VlDE().jack instead of the
video plug (yellow). This connection
produces pictures tnore faithfully. This
cotmectiott produces higher quality DV
format pictures. The audio will not be
output when you connect with the S
VIDEO cable alotte.
4
/ Prepare your camcorder for
playback.
Insert the recorded cassette.
Slide the POWER switch to turn on the
PLAY/EDIT lamp.
Set [TV TYPE] according to the
playback device/TV, etc.) (p. 68).
2Prepare your VCR/DVD device for
recording.
When dubbing to the VCR, insert a
cassette for recording.
Whett dubbing to the DVD recorder,
insert a DVD for recording.
5
If your recording device has an ittput
selector, set it to the appropriate input
/such as vide() iuputl and video input2).
Connect your VCR/DVD device to
your camcorder as a recording
device.
See page 74. for connection details.
Start playback on the camcorder,
and recording on the VCR/DVD
device.
Refer to the operatittg instructions
supplied with your recording device for
details.
When dubbing is complete, stop
your camcorder and the VCR/DVD
device.
• To record the datc/time and camera settings data
when connected by the A/V connecting cable,
display them on the screen (p. 6g).
• The lollowing cannot be output via lhe _, HDV/
DV interlace (i.LINK):
Indicators
Pictures edited with [PICT.EFFECT] (p. 62)
or [D.EFFECTI (P. 61)
Titles thai are recorded on olher camcorder
• Pictures recorded in lbe HDV l_rmal are not
outpul hom lhe _ HDV/DV Interlace/i.LINK)
jack during playback pause or in any playback
mode other than normal playback.
• Nole the lollowing wllen connecling wilh an
i.LINK cable:
The recorded picture becomes rough when a
picture is paused on your camcorder while
recording to a VCPJDVD device.
[)g_lacodes (dine/time/camera setlings data)
may not be displayed or recorded depending
on file device or applicalion.
You cannot record the picl/irc and sound
separalely.
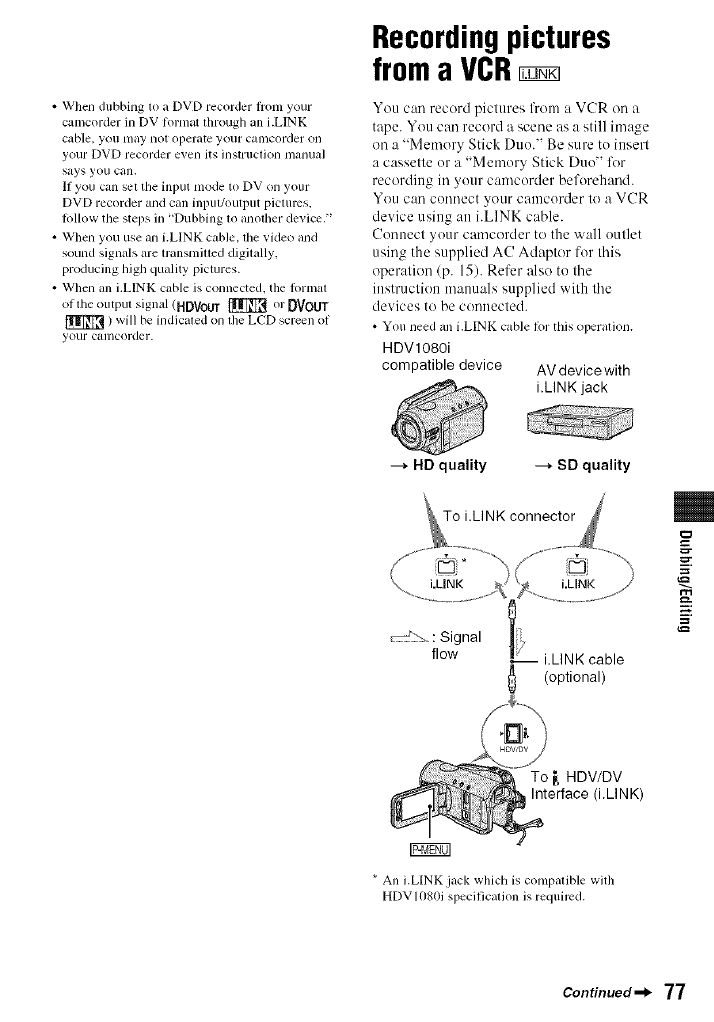
•Whendubbing1oaDVDrecorderliomyour
camcorderinDVlormatthroughani.LINK
cable,youmaynotoperateyourcalncorderon
yourDVDrecorderevenitsinstructionmanual
saysyoucall.
IfyoucansettileinputmodetoDVonyour
DVDrecorderandcallinput/oulputpictures.
lolIowthestepsin"Dubbing1oanodlerdevice."
•Whenyouuseani.LINKcable,dievideoand
soundsignalsaren'ansmiueddigitally,
producinghighqualitypictures.
•Whenalli.LINKcableisconnected,thelormat
oftheoutputsignal(HDVouT_ orOVouT
) will be indicated on tim LCD screen of
your cglmcorder.
Recordingpictures
froma VCR
You call record pictures from a VCR on a
tape. You call record a scene as a still image
on a "Memory Stick Duo." Be sure to insert
a cassette or a "Memory Stick Duo" l\w
recording in your camcorder beforehand.
You Call connect your camcorder to a VCR
device using an i.LINK cable.
Connect your camcorder to the wall outlet
using the supplied AC Adaptor for this
operation/p. 15). Refer also to tile
instruction manuals supplied with tile
devices to be connected.
• You need all i.LINK cable lot this operalion.
HDVl080i
compatible device AV devicewith
i.LINK jack
---_ HD quality ---_ SD quality
=_
==-
(optional)
To _, HDV/DV
Interface (i.LINK)
* All i.LINK jack wlfich is compatible with
HDVIOSt)i specilicalion is required.
Continued_l_ 77
Rece[di_# pictures from a VgB _ {ge_ti_ued}
4
/ Slide the POWER switch to turn
on the PLAY/EDIT lamp.
2Set the input signal of your
camcorder.
Sel IVCR HDV/DVI Io IAUTOI when
recording from an HDV formal
compalible device.
3
Sel IVCR HDV/DVI Io IDVI or
[AUTO] when recording from a DV
format compatible device (p. 65).
Connect your VCR as a player to
your camcorder.
When an i.LINK cable is connected, the
lklrmat of the input signal (HDVIN
or DVlN _) will be
indicated on the LCD screen of your
camcorder (This indicator may appear
on the screen of the playback device.
however, it will not be recorded).
/i
HI, Insert a cassette into the VCR.
50perateyourcamcorder to record
movies.
Touch Igggff01-+ I_ RE(: CTRLI -+
IRE(: PAUSEI.
If Ihe desired item is not displayed on
the screen, leuch F_]/r_] until the item
is displayed.
6Start playing the cassette on your
VCR.
The picture played on Ihe connecled
device appears on Ihe LCD screen of
yO/IF carl/corder.
7Touch [REC START] at the point
you want to start recording.
8 Stop recording.
Touch _/SIop) or IRE(? PAUSE].
9Touch [_ --* 171.
•Yoll cannol record TV programs fionl the
HDV/DV lnlerlace (i.LINK).
• You can record pictures t_onl DV devices only
in the DV lbnnal.
• Nole tile following when connecting wilb all
i.LINK cable:
Tile recorded picture becomes rough when a
picture is paused on your camcorder while
recording 1o a VCR.
Votl cannot record tile pitt/ire alld SOUlld
separalely.
If you pau_ or slop lhe recording and restart
it, tile picture may not be recorded smoothly.
• When a 4::; vide() signal is inplll, il appears with
black bands on lbe Fight and left sides on lbe
screen of yollr canlcorder.
78
1Perform steps 1 to 4 in
"Recording movies."
2Start playing the cassette.
The pictures on the VCR appear on the
screen of your camcerder.
3Press PHOTO lightly at the scene
you want to record. Check the
image and press it fully.
Dubbingpicturesfrom
a tape to a "Memory
Stick Duo"
You can record still images on a "Memory
Stick Duo." Make sure you have a recorded
tape attd a "Memory Stick DLtO" inserted
into your camcorder.
1Slide the POWER switch to turn
on the PLAY/EDIT lamp.
/ Search and record the scene you
want to record.
Touch _ (PIa>) to play back the
tape, then press PHOTO lightly at the
scene you want to record. Check the
image and press it fully.
• The dale and lime the picture is recorded on tile
tape and stored on tile "Memory Stick Duo" are
recorded. On your CalllCOlder, tile date and tillle
tile picture is recorded on tile tape are displayed.
Camera _lting data recorded on tile lape cannot __.
be slomd on file "Menlo W Stick Duo."
• Still inlages will be lixed to image size [[_] _.
1.2M] when playing back ill lhe HDV lollllat, --,
Still inlages will be fixed to image size [[_
tt.2MI (16:9) or [VGA !0.3M)I (4:3) wllen
playing back in the DV l_)rlnal (p. 59).
• You cannot record still images while using PB
zoom.
79

Deletingrecorded
picturesfromthe
"Memory Stick Duo"
1Slide the POWER switch to turn
on the PLAY/EDIT lamp.
2Touch _.
_6om_n _;M I /Io[_!3,
i_[_11aoool MEMORY pL,<
3Select a picture you want to
delete with [_7/[_.
•To delete all pictures at once, select [_
ALL ERASE] (p. 59).
4Touch r_q --, [YES].
•The pictures callnol be restored OllCe they
are deleted.
• You can delete pictures on the index screen
(p. 31 ). You can easily search lor tile picture to
be deleted by displaying 6 pictures at once.
Touch [_ -4- [-_ DELETE] _ the picture
you want m delete _ [_ -_- [YES].
• Pictures cannot be deleted when a "Memo W
Stick Duo" with tile write-protect lab is set m
the write-protect position (p. 114), or when the
selected picture is protected (p. 81).
Markingimageson
the "Memory Stick
Duo"with specific
information(Print mark/
Image protection)
When you are using a "Memory Stick Duo"
with the write-protect tab. make sure the
write-protect tab on the "Memory Stick
Duo" is not set to the write-protect position
(p. 114).
The DPOF (Digital Print Order Format)
standard is used to select images for
printing on your camcorder.
By marking images that you want to print
out. you do not need to reselect them when
you print them out (You cam/ot specify the
number of printouts).
1Slide the POWER switch to turn
on the PLAY/EDIT lamp.
2Touch _ --+ _ --+ _ --+
[PRINT MARK].
3Touch the image that you want to
print out later.
PRINT MARK [,j_v-
appears.
4Touch rh_ -+ [END].
8O
• To cancel Print mark, touch tile image again to
cancel Prinl mark in step 3.
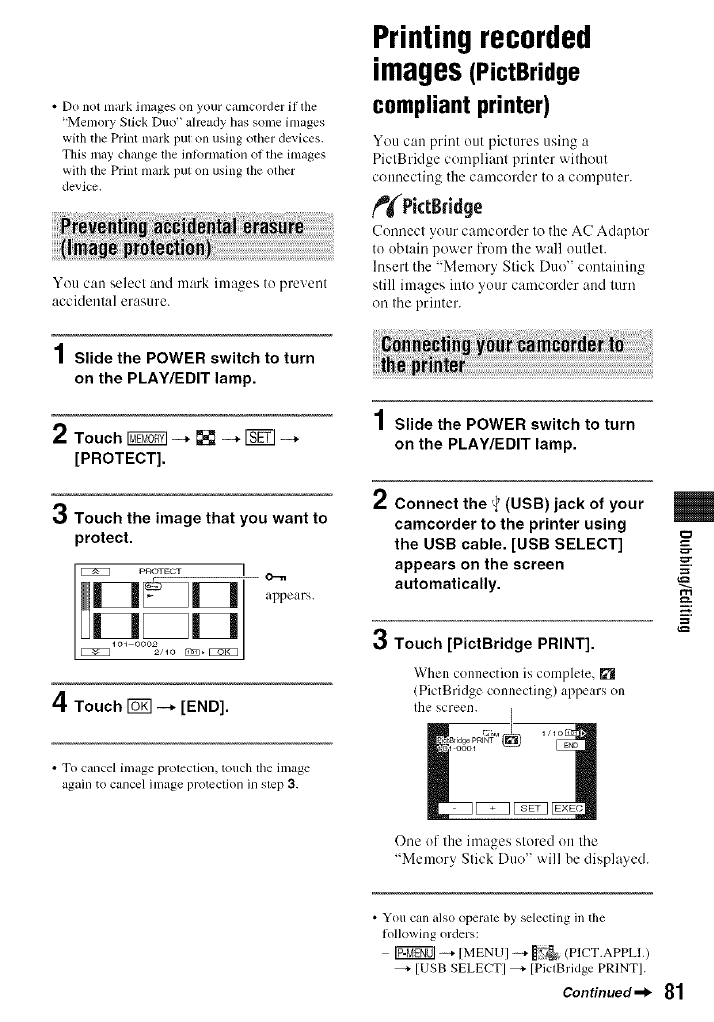
• Do not mark images on your ctuncorder if tile
"Memory Stick Duo" already has some images
with the Print mark put on using other devices.
This may change the inkwmation of tile images
with the Print mark put on using the other
device.
You can selecl and mark images to prevent
accidenla] erasure.
1Slide the POWER switch to turn
on the PLAY/EDIT lamp.
2Touch _--* [] --* _--*
[PROTECT].
3Touch the image that you want to
protect.
P_TECT I O--e
__ appears.
4Touch _-_ [END].
Printingrecorded
images(PictBridge
compliant printer)
You can print out pictures using a
PictBridge compliant printer without
COilnecting the camcorder to a computer.
_PictBridge
Connect your camcorder to the AC Adaptor
to obtain power from the wall outlet.
Insert the "Memory Stick Duo" containing
still images into your camcorder attd turn
on the printer.
1Slide the POWER switch to turn
on the PLAY/EDIT lamp.
2Connect the '_"(USB) jack of your
camcorder to the printer using
the USB cable. [USB SELECT] €=-
appears on the screen -=.
automatically.
3Touch [PictBridge PRINT].
When connection is complele, _1
(PictBridge connecling) appears on
Ihe screen.
g
• To cancel image protection, touch the image
again to cancel image protection in step 3.
One of the images stored on the
"Memory Slick Duo" ',.','illbe displayed.
• You can also operale by selecting in tile
lollowing orders:
[07_gOl -+ [MENUI-+ _, (PICT.APPLI.)
_,- [USB SELECTI _,- [PictBridge PRINTI.
Continued-_ 81
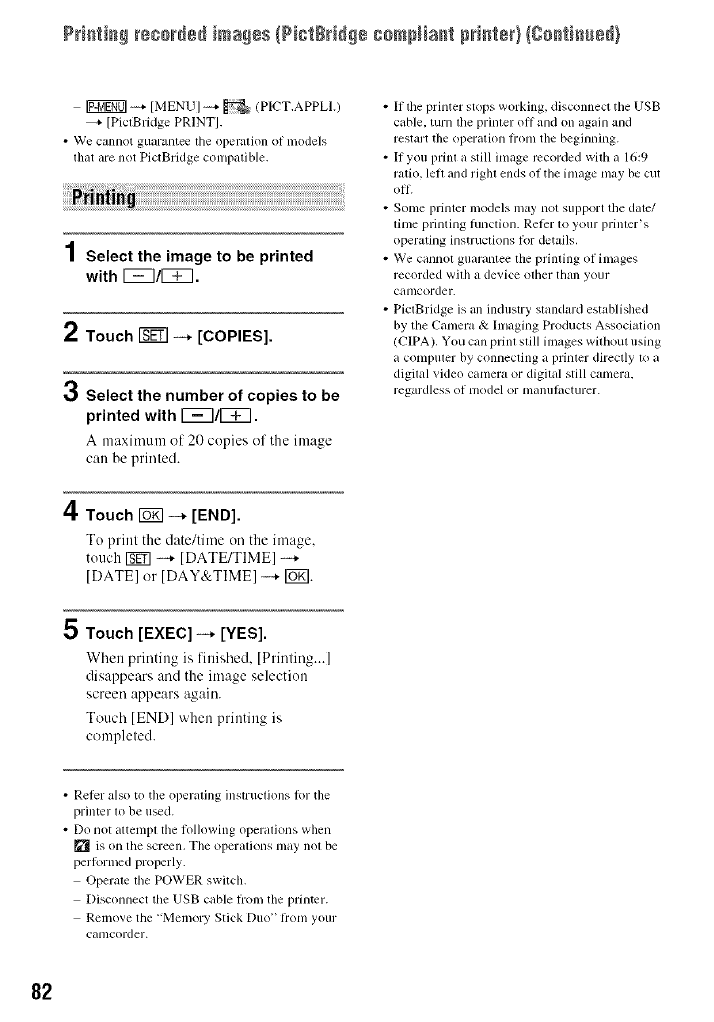
PH+t++++++++++++++++a++sIN+tee++++ ++raN+met +++++t++}{g++th++++}
Ig_gg0] -_ [MENUI _ _ (PICT,APPLI.)
[PictBridge PRINTS.
• We cminot guiu'antee the operation of n'_odels
tlmt +ire not PictBridge comp+ltible.
1 Select the image to be printed
with r_7/r_7.
2Touch _-+ [COPIES].
3Select the number of copies to be
printed with 1_7/1_7.
A maxinmnl oI 20 copies of the image
can be printed.
4Touch ro_ -_ [END].
To print the date/time on the image,
touch _ _ [DATE/TIME]
IDATE] or IDAY&TIME] -+ FUR].
5 Touch [EXEC] -_ [YES].
When printing is finished, [Printing...]
disappears :rod the image selection
screen appears again.
Touch [END] when printing is
completed.
• If the printer stops working, disconnect tile USB
cable, turn the printer oil and on again and
restart the operation hom the beginning.
• If you print a still image recorded with a 16:9
ratio, left and right ends of tile image may be cut
off.
• Some printer models may not support the date/
lime printing hmction. Relcr to your printer's
operuting instructions R>rdetails,
• We cannot guarantee the printing of images
recorded with a device oilier than your
canlcorder.
• PictBridge is an industry standard established
by the Camera & hnaging Products Association
/CIPA). You can print still images without using
a conlpuler by connecting a printer directly to a
digital video camera or digital still camera,
regardless of lnodel or nlanulhcturer.
• Rel)r also to tile operating instructions lor tile
printer to be used.
• Do not attenlpt the following operations when
[_ is on the screen, The operations may not be
performed properly.
Operate tile POWER switch,
Disconnect tile USB cable from the printer.
Remove tile +'Memory Stick Du(f +_om your
canlcorder+
82
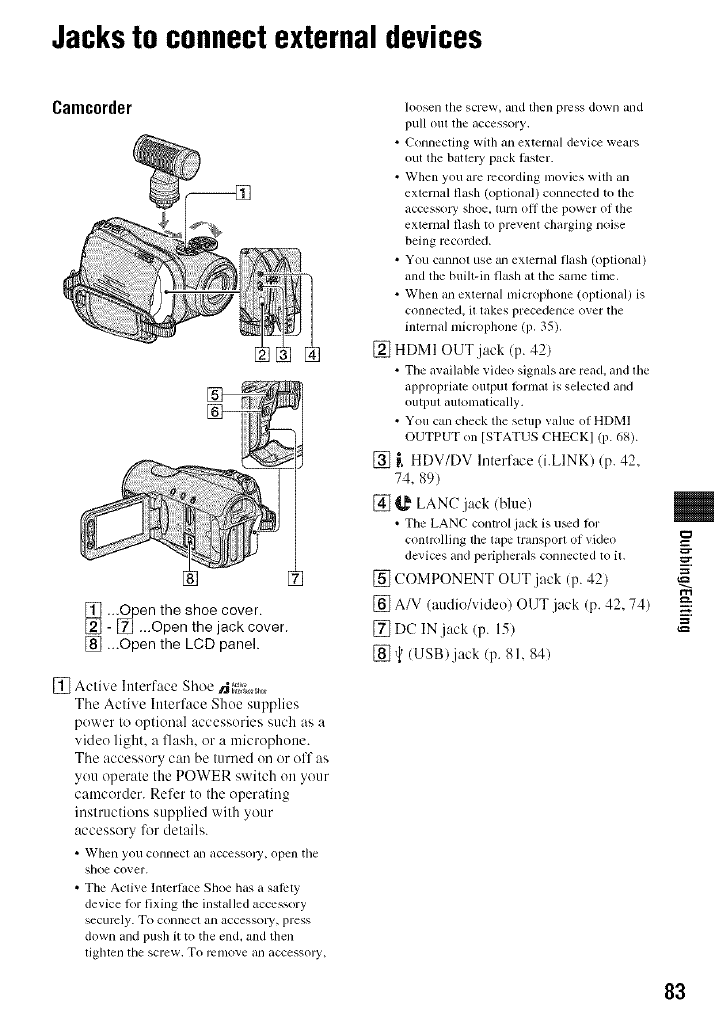
Jacksto connectexternal devices
Camcorder
[] ...Open the shoe cover.
[] - [] ...Open the jack cover.
[] ...Open the LCD panel.
[] Active htterface Shoe N_,;_0_,0
The Active Ittterface Shoe supplies
power to optional accessories such as a
video light, a flash, or a microphotte.
Tile accessory car/be turned on or off as
you operate the POWER switch on your
camcorder. Refer to tile operating
instructions supplied with your
accessory lk_r details.
• When you connecl an accessory, open tile
shoe cover.
•The Active Interlace Shoe has a sal_ty
device lot fixing lfie installed accessory
securely. To connect an accessolT, press
down and push it to the end, and then
lighten tile screw. To r_2nlove an accessoly,
loosen tile screw, and l]len press down and
pull oul the accessory.
• Connecting with an external device wears
out the batlel_' pack lastcr.
• When you are recording nlovies with an
external flash (optional) connectcd to the
accessoly shoe, mrn off tile power of the
external flash to prevent charging noise
being mcoMed.
• You cannol use an exlernal flash (optional)
and tile built-in flash at tile same Iinlc.
• When an external ndcropbone (optional) is
connected, it takes precedence over the
inlernal microphone (p. 35).
[] HDMI OUT jack (p. 42)
• The available video signals are read, and file
appropriate outpul format is selected and
ouIpul aulolnalically.
• You can check the setup value of HDMI
OUTPUT on [STATUS CHECKI (p. 68).
[] _, HDV/DV Interface/i.LINK)/p. 42.
74. 89)
[] _,_ LANC jack (blue)
• Tile LANC control jack is u_d fi)r
conlrolling tile tape transporl of video
devices and peripherals connected to il.
[] COMPONENT OUT.jack (p. 42)
[] A/V (audie/video) OUT jack (p. 42, 74)
[]DC IN jack (p. 15)
[]_ (lJSB)jack (p. 81,841
=_
83
Using a gompu#eg
Connectingto a
computer
When connecting your camcorder to the
computer, tile following operatiens are
available:
Copying tile still images on a "Memory
Stick Duo" to the computer
--+p. 84
Copying the movie on a tape in the HDV
format to the computer
--+p. 87
Copying the movie on a tape in tile DV
format to the computer
--+[7. 87
There are 2 ways to collllect your
camcorder to a computer:
USB cable
When copying pictures on a "Memory Stick
Duo"
i.LIN K cable
When copying pictures on a tape
Notes on connectingto a computer
•When you m'e using a USB cable or ml i.LINK
cable to connect your canlcorder to _1colnputer,
in_lke sure you ill.Z1 tile connector ill tile correct
direction. If you insert tile connector lorcibly, it
may be damaged, and cruise a malflmctkm ol
your Calllcorder.
• You cannot do tile lollowing:
Copying pictures on a tape to a computer witll
_tUSB cable.
Copying pictures on a "Memo UStick Duo"
to a compuler wilh an bLINK cable.
•Remove the USB cable according to the correct
procedure when disconnecting il honl lhe
compuler (p. g6).
Copyingstill images
to a computer
iiiiiiU ii!i ii !i i i i ii ili!iii! i ii i ii!ii!ii!ii!ii!ii!ii!ii!ii!ii!ii!ii!ii!ii!ii!ii!ii!ii!ii!ii!ii!ii!ii!ii!ii!ii!ii!ii!ii!ii!ii!ii!ii!ii!ii!ii!ii!ii!ii!ii!ii!ii!ii!ii!ii!ii!ii!ii!ii!ii!ii!ii!ii!ii!
ForWindowsusers
• OS: Windows 2000 Prolcssional/Windows
Millenniunl Edition/Windows XP Honle
Edition/Windows XP Prolessiomd
Standard install+_tionis lvquircd. Operation is
not assured il the above OS Ires been upgraded.
•CPU: MMX Pentimn 200MHz or l_ster
• Others: USB port (This must be provided as
standard.)
ForMacintoshusers
•ON: Mac ON 9.1/9.2 or Mac OS X (v lO.1/x 10.21
v 10.3/v 10.4)
• Olhers: USB port (This nmst be provided as
standard.)
• You can do this operation with tile standard
driver of yollr conlplllcr. Voll do not need to
instidl any soltware.
• If your computer has a Memory Stick slot, insert
file "Memo UStick Duo" on which pictures am
recorded into the Memory Stick Duo adaptor
(optional), lhen insert il inlo lbe Memory Stick
slot on your computer to copy still inlages to tile
conlputer,
• When using a "Memo W Stick PRO Duo" and
your COlllptller is not compatible wilh il, connect
your camcorder with the USB cable inslead of
using tile Melnory Stick slot on tile computer.
84
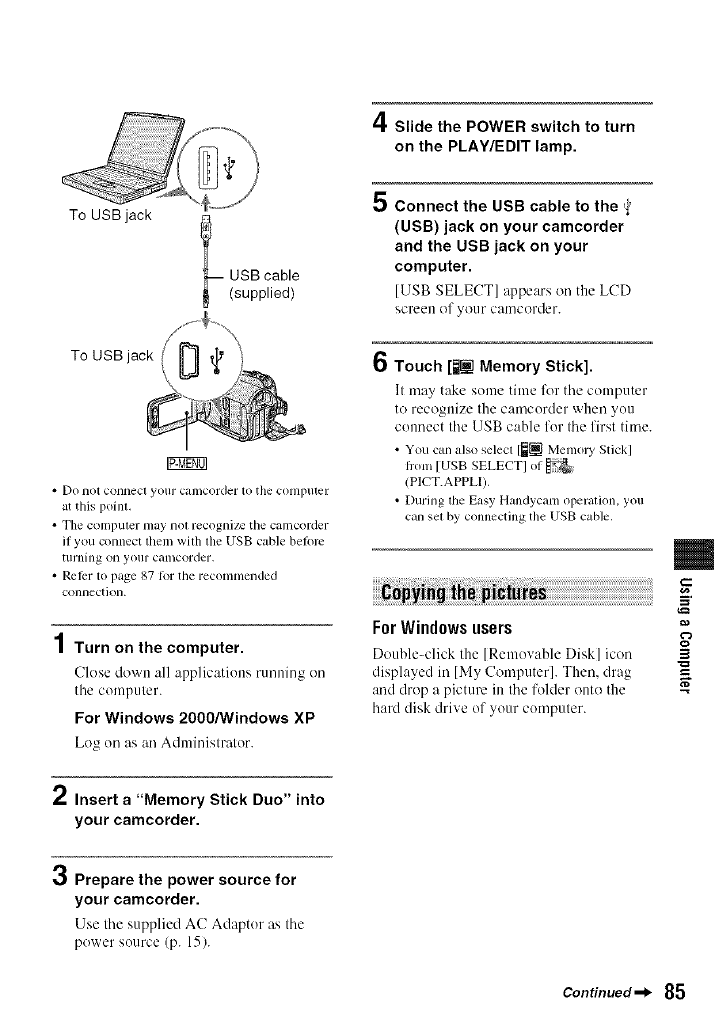
To USB jack
-- USB cable
(supplied)
To USB jack
• Do notconnecl yotlFcamcorder to the computer
at this poinl,
• Tile compuler may 11ol recognize lhe camcorder
if you connect them with the USB cable belom
turning on your camcorder.
• Rcllrr to page 87 R_r tile recomnlended
connection.
4
/Turn on the computer.
Close down all applications running on
tile computer.
For Windows 2000/Windows XP
Log on as an Adnlinistrator.
2Insert a "Memory Stick Duo" into
your camcorder.
3Prepare the power source for
your camcorder.
Use tile supplied AC Adaptor as tile
power source (p. 15).
4Slide the POWER switch to turn
on the PLAY/EDIT lamp.
5 Connect the USB cable to the _'
(USB) jack on your camcorder
and the USB jack on your
computer.
[USB SELECT] appears on the LCD
screen of your camcerder.
Touch [lltil Memory Stick].
It may take some tittle for tile computer
to recognize the camcorder when you
connect the USB cable for the first time.
• You can also select [_it MemolT Stick]
I]onl [USB SELECTI of
(PICT.APPLI).
• During the Easy Handycanl operation, you
can sel by connecting the USB cable.
ForWindowsusers
Double-click the [Removable Disk] icon
displayed in [My Computer]. Then, drag
and drop a picture in the folder onto the
hard disk drive of your computer.
3
-g
Continued-_ 85
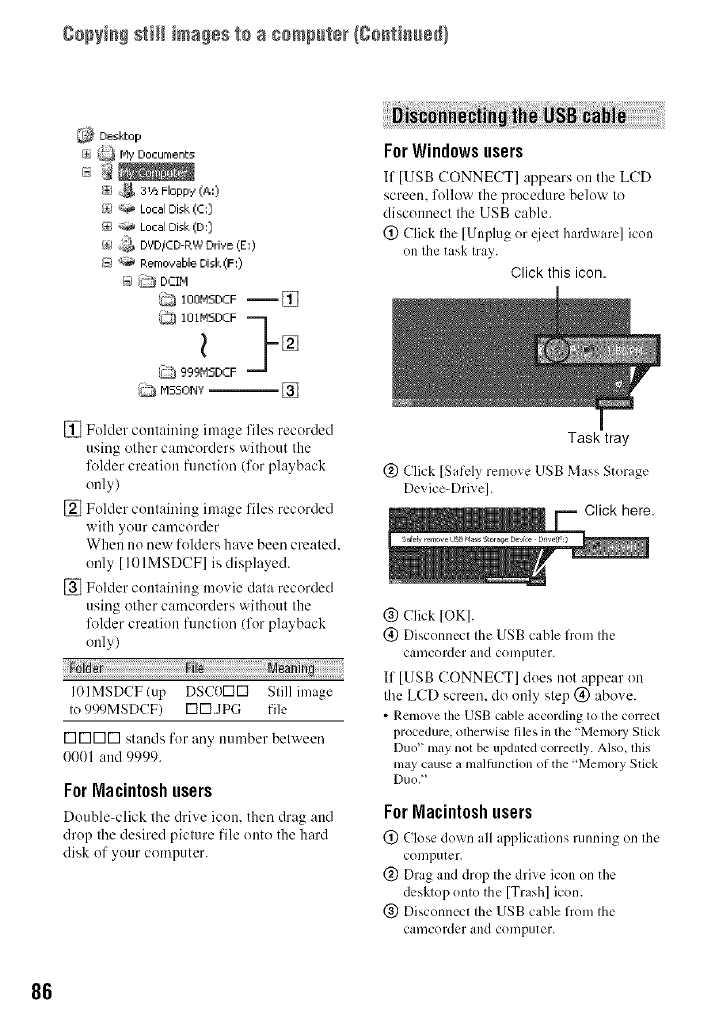
gop_i_ still ima_ss b a 8empub_ (So_tbu÷d/
i_ Hy DocumenL5
I±i 3 t._Floppy (A,,)
{_ "_ Local Disk (C;)
_ ";_ Local Disk (D:)
/_i ,,;_ DVD/CD-RW Drive (E:)
F_ _;_ Eernovable Disk(F:)
-_ i_ DCIM
tOOMSDCF-- []
iOIMSDEF}
l []
999NSDCF
ij Mssor_'-- []
[] Fulder cuutainiug image files recorded
using other camcorders without the
fl_lder creation function (for playback
only)
[] Folder containing image files recorded
with your camcorder
When no new folders have been created,
only [ 101MSDCF] is displayed.
[] Folder containing movie data recorded
using other camcorders without the
fl_lder creatiun function (fur playback
only)
101MSDCF(up DSCOKIKI Still image
to 999MSDCF) U1U1.JpG file
K]K]K]m stands fur any number between
0001 and 9999.
ForMacintoshusers
Double-click tile drive icon, then drag attd
drup the desired picture file onto the hard
disk uf yuur computer.
ForWindowsusers
If [USB CONNECT] :,ppears uu tile LCD
screen, follow the procedure below to
disconnect the USB cable.
(_) Click the [Unplug or Kiecthardware] icon
on the task tray.
Click this icon,
(_) Click [OK].
(_) Disconnect the USB cable from the
camcorder and computer.
If [USB CONNECT] dues not appear on
the LCD screen, do uuly step (_) above.
•Remove the USB cable according to the correct
procedure, otherwi_ files in the"Memo W Stick
Duo" may nol be upduled correctly. Also, lhis
may cause a malfimcfion of the "Memory Stick
Duo, _
ForMacintoshusers
(_) Close dos_u all applications running on the
computer.
(_) Drag and drop the drive icon on the
desMop onto the [Trash] icon.
(_) Disconnect the USB cable from the
camcorder and computer.
86
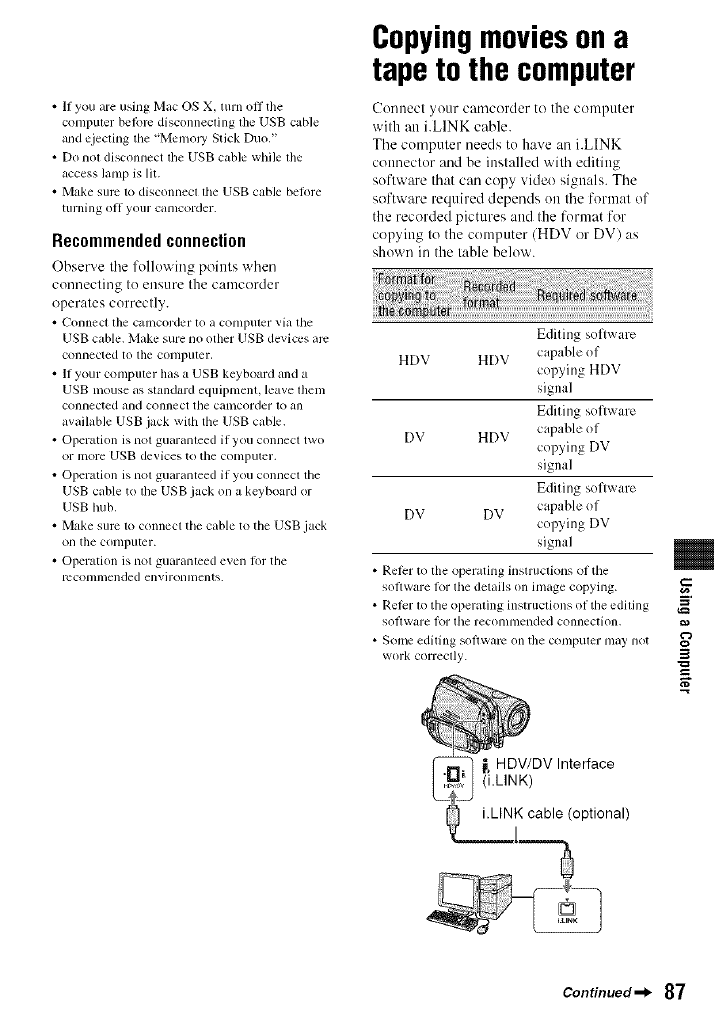
• If you are using Mac OS X. turn off tile
computer belbrc disconnecting tile USB cable
and ejecting tile "MemoJ y Stick Duo."
• Do not disconnect lhe USB cable while lhe
access ]amp is Ill.
• Make sure to disconnecl lhe USB cable belkne
tllrning oil yollr cunlcorder.
Recommendedconnection
Observe tile follo_ log points when
connecting to ellsure the camcorder
operates correctly.
• Connect the calncorder tO a co[llplller via tile
USB cable. Make sure no other USB devices arc
corlllected to the conlpl[ter,
• II your conlputer has a USB keyboard and a
USB lllOuse as standiwd equipnlenI, leave l]lenl
connected and connect the camcorder 1o all
available USB jack with the USB cable.
• Operation is not guaranleed if you connecl two
or in(ire UNB devices to tile conlputer.
•Operalion is nol guaranteed il' you conllecl tile
USB cable to lhe USB jack on a keyboard or
USB hub,
• Make slim to connect the cable to the USB.jack
on the ¢onlplltcr.
• Operation is not guaranteed even lot the
mconnllended environlllents.
Copyingmoviesona
tape to the computer
Connect )our caalcorder to the conlptlter
with an i.LINK cable.
The computer needs to have an i.LINK
connector and be installed with editing
soflware that can copy video signals. The
software required depends on the format of
the recorded pictures attd the format for
copying Io the compnler (HDV or DV) as
shown in the table below.
Editing software
HDV HDV capable of
copying HDV
signal
Editing soflware
DV HDV capable of
copying DV
signal
Editing software
DV DV capable of
cop) ing DV
signal
• Refer to tile operating instructions of tile
sol'_valv lor the details on image copying.
• Refer lo tile operating instruclions of the ediling
software lor tile recolnnlended connection.
• Sonlt2 editing software on tile conlputel- may not
work correclly.
m
3
,g
_, HDWDV Interface
(i,LINK)
K cable (optional)
Continued_l_ 87
gopyi_ movies o_ a tape to ths compute_ {Co_ti_usd}
Notes on connectingto the computer
•Connect tile i.LINK cane to tile computer tirsL
then to your camcorder. Connecting ill the
()[)[)()silt order may cause slalic electricity to
build up, resulling in a inalfllnclion of your
camcorder.
•The conlputer inay IrceTc or may not recognize
tile signal flom your camcorder in tile fl)llowing
situatkms.
Connecting your Calllcorder to a colnp/ller
lhat does not support tile video signal [ornlatg
appearing on lbe LCD screen of your
camcorder display (HDV or DV).
Changing the [VCR HDV/DV I and [i.LINK
CONVI settings on the (STANDARD
SET) menu while connecled wilh all i.LINK
cable.
Changing the [REC FORMATI selling on the
(STANDARD SET) menu while
connecled with an i.LINK cable wilh lhe
POWER switch set lo CAMERA-TAPE.
Changing tile POWER switch posilion while
connecled wilh an i.LINK cable.
• The format (HDV or DV) of inpul/output signal
appears on the LCD screen of your camcorder
while connected with an i.LINK cable,
Whensettingupyourcamcorder
The menu settings required depend on the
format of the recorded pictures and the
format for copying.
* See page 65 for [VCR HDV/DV] and 68 lbr
[i.LINK CONV].
• A lape recorded ill tile DV R)rmal cannot be
copied in lhe HDV Iormat lo a compuler.
• You can creale DVDs hom a tape by connecling
your camcorder to a Sony VAIO _ries
computer lhat has "Click to DVD Ver.2.3"or
laler installed (p. 89). The quality of file picturc
1o be copied lo DVDs is SD (slandard
definilkm).
Whencopying the moviein the HDV
format from the computer to your
camcorder
Set IVCRHDV/DVI to IHDVI and li.LINK
CONVI to IOFFI on the _}_
(STANDARD SET) tnenu(p. 65, 68).
Whencopying the moviein the DV
format from the computer to your
camcorder
Set IVCR HDV/DVI to IDVI on the _TZ_
(STANDARD SET) metal (p. 65).
[VCRHDV/DV]
HDV --+ [HDV] HDV
[i.LINK CONV]
---+IOFFI
[VCR HDV/DV]
---+ [HDV]
DV [i.LINK CONV] HDV
---+ [ON (HDV
--_ DV)I
IVCR HDV/DVI
DV --_ IDVl DV
li.LINK CONVI
--_ IOFFI
88

Creatinga DVD(DirectAccessto "Click to
DVD")
Yuu can create a DVD from a tape with a
Sony VAIO series computer* preinstalled
with "Click to DVD." via an i.LINK cable.
Tile picture is automatically copied and
writlen lu aDVD. To i.LINK connector _ Lg
Tile following pwcedures describe how le
create aDVD from a recorded tape. Fur
details of compatible cumpulers, uperaling
environment. "Click lu DVD." and '_
upgrading lu "Click lu DVD Ver.2.3" or
later, visit the following URL:
i.LINK
cable
(optional)
Europe
http://www.vaio-link.com/
USA
http://ciscdb.sehsuny.com/perl/select-p-
n.pl
Asia Pacific Regional
http://www.css.ap.sony.com/
Korea
http://scs.suny.cu.kr/
Taiwan
http://vaio<mline.so W.com/tw/vaiu/
China
http://www.sonystyle.cum.cn/vaiu/
Thailand
http://www.suuy.co.th/vaicdindex.html
Latin America
http://www.sonydatin.cum/vaiu/info/
iudexjsp
* Note thai you need a computcr with a DVD
drive that can be used to write DVDs, and
"Clickto DVD Ver.2.3++/Sonyoriginal
soltwarc) or later installed.
To _, HDV/DV
Interface (i,LINK)
ro_g0q
_oF,_+:Signal flow
• Images recorded in HDV lormat are
down<unverted to SD (standard
definition) quality when copying to DVDs
/They are not copied in the HD (high
definition) quality).
• You can only use an i.LINK cable fur this
operation. You cannot use a USB cable.
Using the Direct Access to "Click to
DVD" function for the first time
Tile Direct Access to "(!lick to DVD"
fimction enables you to copy pictures
recorded on a tape to a DVD easily if your
camcorder is connected tu a computer.
Bel\we operating the Direct Access to
"(!lick to DVD" function, l\_llow the steps
below to start "(;lick to DVD Automatic
Mode Launcher."
(!) Turn on the computer.
@ Click the start menu, then select [All
Programsl.
(_) Select [Click to DVD] from the programs
displayed, then click [Click to DVD
Automatic Mode Launcher].
[Click to DVD Automatic Mode Launcher]
starts up.
3
,g
Continued_l_ 8g
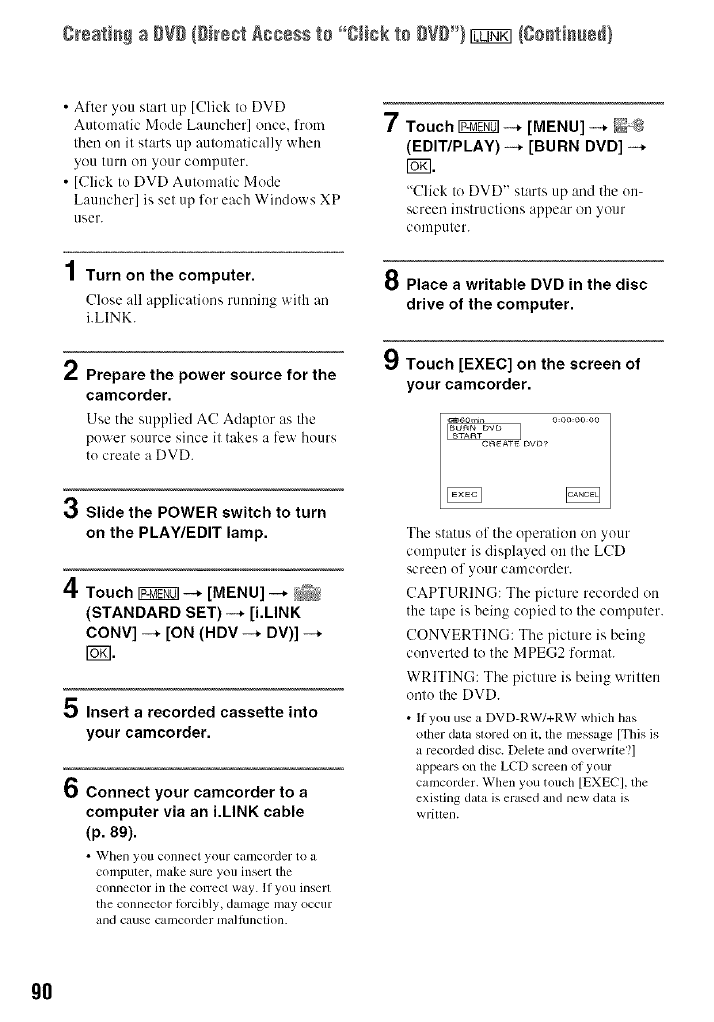
greatia# a #Vg (girect Access te '°gHck te #V#') _/ge_tia#ed}
• After you start up [Click to DVD
Automatic Mode Launcher] once. from
then on it starts up automatically when
yOU turll ou your computer.
• [Click to DVD Automatic Mode
Launcher] is set up for each Windows XP
user.
4
/ Turn on the computer.
Close all applications running with an
i.LINK.
2Prepare the power source for the
camcorder.
Use the supplied AC Adaptor as the
power source since it takes a few hours
to create a DVD.
3Slide the POWER switch to turn
on the PLAY/EDIT lamp.
4Touch IF:_fiOq-4, [MENU] -+
[STANDARD SET) --* [i.LINK
CONV] -4, [ON (RDV -4, DV)] -4,
rs_l.
;_ Insert a recorded cassette into
your camcorder.
6Connect your camcorder to a
computer via an i.LINK cable
(p. 89).
• When you connec[ yollr CalllOorder 1o a
C()ll'llr)uIer _ lllake sure yoll illser[ [he
connector ill the COITeCl wily. 11 you inserl
the connector ]Ol'Ci_L)ly_ dalllage ii_ay occllr
_lnd cause Call/corder l/la]Junclion.
7Touch _ --* [MENU] --* _-:_
(EDIT/PLAY] -+ [BURN DVD] -+
r_.
"Click to DVD" starts up :rod the Oil-
screen instructions appear on your
computer.
8 Place a writable DVD in the disc
drive of the computer.
9Touch [EXEC] on the screen of
your camcorder.
_6om4n o:oo:oo DO
The status of the operation on your
computer is displayed on the LCD
screen of your calncorder.
CAPTURING: The picture recorded on
the tape is being copied to the computer.
CONVERTING: The picture is being
converted to the M PEG2 format.
WRITING: The piclure is being wrillen
onlo the DVD.
•If you use a DVD-RW/+RW which has
olher data slored on it, the mcssage [This is
a recorded disc. Delete and overwrile?l
appears on the LCD screen of your
camcorder. When you touch [EXECI, the
existing dala is erased and new dala is
wriuen.
gO
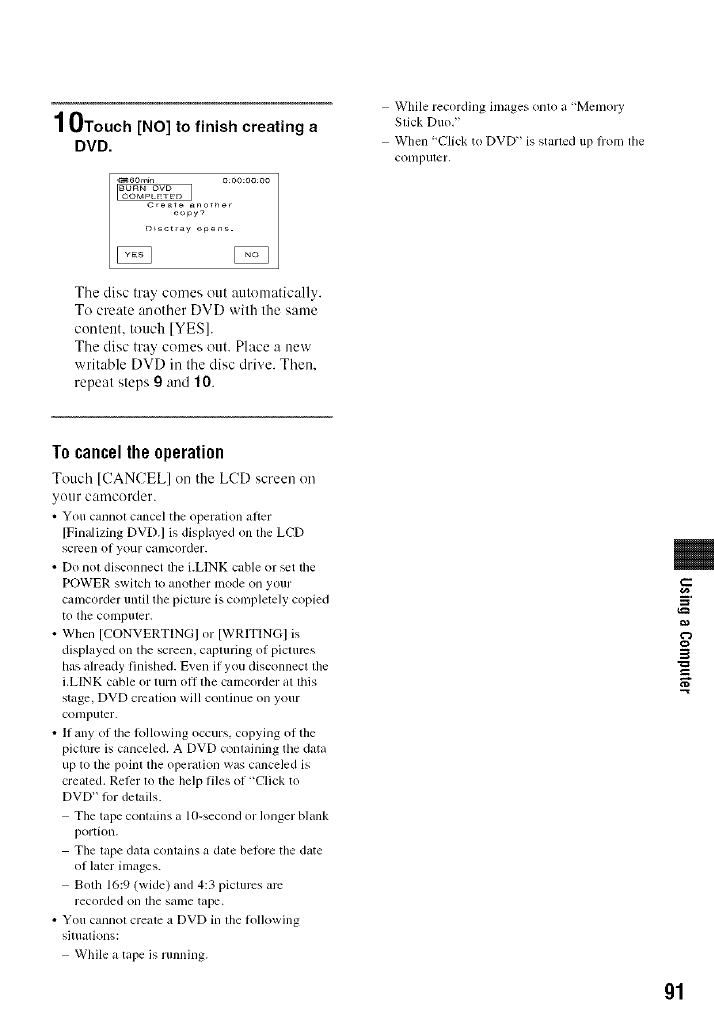
10Touch[NO] to finish creating a
DVD.
C,_a_ another
copy?
DLs¢_ay o_ens.
Tile disc tray comes out automatically.
To create another DVD with the same
content, touch [YES].
The disc tray comes out. Place a new
writable DVD in the disc drive. Then.
repeat steps g and 10.
While recording images on(o a "Memo] T
Slick Duo,"
When "Click to DVD" is starled up froln file
conlputer,
Tocancelthe operation
Touch [CANCELI on the LCD screen on
your camcorder.
• You cannol cancel the operation al)er
[Finalizing DVD.I is displayed on (he LCD
screen of your camcorder.
• Do no( disconnect die i.LINK cable or _t (he
POWER switch to another mode on your
canlcorder until the picture is complelely copied
to file colnpuler.
• When [CONVERTINGI or [WRITINGI is
displayed on the screen, capturing of pictures
has already finished. Even if you disconnect file
i.LINK cable or turn oll lhe camcorder at lhis
stage, DVD creation will continue on your
conlpuler.
• 11any of lhe lolh)wing occurs, copying of the
picture is canceled. A DVD conlaining the data
up to the point the operalion was canceled is
crealed. Relcr to the help files of"Click to
DVD" lot delails.
The tape conlains a 10-second or longer blank
portion.
The lape dala conlains a date beR)re the date
of later images.
Both 16:9 (wide) and 4:3 pictures arc
recorded on lhe same tape.
• You cannot creale a DVD in lhe h)llowing
situations:
While a tape is I unning.
3
gl
7ro_bfes_wo_h_g
Troubleshooting
If you run into any problems using your camcorder, use tile ff)llowiug table to troubleshoot the
problem. If lhe problem persists, disconnect the power source and contact your Sony dealer.
The power does not turn on.
• Attach a charged battery pack to the camcordcr (p. 15).
• Use the AC Adaptor to connect to a wall outlet (p. 15).
The camcorder does not operate even when the power is set to on.
• Disconnect the AC Adaptor from the _all outlet or remove the battery pack_ then reconnect it
after about 1 minute.
• Press the RESET button (p. 35) using a sharp-pointed object (If you press the RESET button,
all settings are reset, except Personal Menu items).
Buttons do not work.
• During Easy Handycam operation, not all buttons arc functional (p. 28).
You cannot turn Easy Handyeam operation on or off.
• During recording or communicating _ith another device via USB cable, )ou cannot turn
Easy Handycam operation on or off.
Settings change during Easy Handycam operation.
• During Eas) Handycam opcration_ the settings of the lilnctions that are not displa) ed on the
screen return to their defaults (p. 26, 5(t).
[DEMO MODE] does not start.
• Eject the cassette and 'Memory Stick Duo" from your camcordcr (p. 24, 25).
The cameorder gets warm.
• The camcorder may get warmer while you use it. This is not a mallhnction.
The power abruptly turns off.
• When approximately 5 minutes haxe elapsed x@ilc you do not operate your camcorder, the
camcorder is automatically turned off IA.SHUT OFF). Change the setting of [A.SHUT OFF]
(p. 70), or turn on the power again (p. 19), or use the AC Adaptor.
• Charge the batter}., pack (p. 15).
92
The CHG (charge) lamp does not light while the battery pack is being charged.
•Slide the POWER sx_itch to OFF (CHG) (p. 15).
• Attach the battery pack to Ibe camcorder correctly (p. 15).
•Connect Ibe power cord to the wall outlet properly.
• The batte Ucharge is completed lp. 15).
The CHG (charge) lamp flashes while the battery pack is being charged.
• Attach the battmT .:_ack to the camcorder correctly (p. 15). If the problem .:_ersists,disconnect
the AC Adaptor fiom the _all outlet and contact your Sony dealer. The battery pack may be
damaged.
The power turns off frequently although the remaining battery time indicator
indicates that the battery pack has enough power to operate.
• A problem has occurred in the remaining butte13'time indicator, or the battery pack has not
been charged enough. Fully charge the batte Uagain to correct the indication (p. 15).
The remaining battery time indicator does not indicate the correct time.
• Ambient temperature is too high or too Iox_ or the battelT pack has not been charged enough.
This is not a malfunction.
• Fully charge the battery again. If the problem persists, the battery may be x_orn-out. Replace
it with a new one (p. 15, 116).
• The indicated time may not be correct in certain circumstances. For example, when you open
or close Ihe LCD panel it takes about I minute to disphLvthe correct remaining batte Utime.
The battery pack discharges too quickly.
•Ambient temperature is too high or lox_,or the battery pack has not been charged enough. -4
This is not a malfunction. _-
=-
• Fully charge the batte Uagain. If the problem persists, the battery may be _orn-out. Replace
it with a new one (p. 15, 116).
A problem occurs when the camcorder is connected to the AC Adaptor.
•Turn off the power, and disconnect the AC Adaptor from the _all outlet. Then, connect it
again.
An unknown picture appears on the LCD screen or viewfinder.
• The camcorder is in [DEMO MODE] (p. 64). Touch the LCD screen or insert a cassette or a
"Memory Stick Duo" to cancel [DEMO MODE].
An unknown indicator appears on the screen.
•A _ arning indicator or message appears on the screen (p. 107).
Continued_l_ g3
TrssNeshsstisS/gsstisssS}
The picture remains on the LCD screen.
• This occurs if you disconnect the DC plug or remove the hatter) pack without turning off the
pox_er first. This is not a malfunction.
You cannot turn the LCD backlight off.
• During Ep;y Handycam operation, you cannot turn the LCD hacklight on/off by pressing and
holding DISP/BATT INFO (p. 28).
You cannot turn off the indicators.
• You cannol turn olf 1_7. Touch [_ to check Ihc warning messages (p. 108).
The buttons do not appear on the touch panel.
• Touch the LCD screen lightl 5.
• Press DISP/BATT INFO on your camcorder (or DISPLAY on the Remote Commander)
(p. 21 ).
The buttons on the touch panel do not work correctly or do not work at all.
• A@lst the screen (ICALIBRATIONI) (p. 120).
The picture in the viewfinder is not clear.
• Move the view finder lens acljustment lcxer until the picture appears clcarl 5 (p. 20).
The picture in the viewfinder has disappeared.
• Close the LCD paneh The picture is not displayed in the x iewfinder when the LCD panel is
open (p. 20).
g4
The cassette cannot be ejected from the compartment.
• Make sure the po_ er source (hattery pack or AC Adaptor) is connected com:ctl) (p. 15).
• Remove the battery pack from the camcorder, then attach it again (p. 16).
• Attach a charged battery pack to the camcorder (p. 15).
• Moisture condensatkm has occurred inside the camcorder (p. 119).
The Cassette Memory indicator or title display does not appear while using a
cassette with Cassette Memory.
• This camcordcr does not support Cassette Memory, so the indicator does not appear.
The remaining tape indicator is not displayed.
• Set 1[_-I REMAINING] to ION] to alx_a} s display the remaining tape indicator (p. 69).
The cassette is noisier during rewinding or fast-forwarding.
•When using the AC Adaptor, le_ ind/l_p_tfol_ ald speed inclcases (comp ued with batteU
operation) and therefore incre ,ses noise. This is not a malfimction.
You cannot operate functions using the "Memory Stick Duo."
• Slide tile POWER sxvitch to turn on the CAMERA-MEMORY or PLAY/EDIT lamp (p. 19).
• Insert a "Memory Stick Duo" into your camcorder (p. 24).
• If you use a "Memory Stick Duo" formatted on a computer, format it again on your
camcorder (p. 6(t).
Pictures cannot be deleted.
• Release Ihe lock on the _rite-protcct tab of Ihe 'Memory Stick Duo" if there is ore: (p. 114).
• Cancel image protection on the picture (p. 81).
• The maximum number of pictures that you can delete on the index screen at one time is I0(t.
You cannot delete all pictures at once.
• Rele ise Ihc lock on Ihc wr]lt:-prolcct tab of Ihe Memory Stick Duo" if Ihereis ore: (p. 114).
•Cancel image protection on Ihe pictures (p. 81 ).
You cannot format the "Memory Stick Duo."
• Release Ihc lock on Ihc wr]ll:-proll:ct tab of Ihe ' ]_{elIlOly Stick Duo" if Ihere is one (p. 114).
Image protection cannot be applied.
• Release Ihc lock on Ihc wril,:-prolcct td_ of Ihe Memory Stick Duo" if Ihereis one (p. I ]4).
• Perform Ihe operation again on Ihe index screen (p. 81).
You cannot mark pictures for print.
• Release the lock on the _rit,:-protcct tah of tile Memory Stick Duo" if there is ore: (p. 114).
• Ped\)rm the operation again on the index screen (p. 80).
• The maximum mlmber of pictures you call mark for print is 999.
The data file name is not indicated correctly.
• Onl._ the file name is displa._cd if the directol3' structure do,:s not conl_)lm to the universal
standard.
• The file is damaged.
• The file R)rmat is not supported on your camcorder (p. 114).
--4
m
Continued_l_ g5
TrssNsshsstisS/gsstisssS}
The data file name flashes.
•The file is damaged.
• The file format is not supported on your camcorder (p. 114).
Refer also to "Adjusting the image during recording"/p. 97) and "Memory Stick Duo" section
(p. 95).
The tape does not start when you press START/STOP.
• Slide the POWER s_itch to turn on the CAMERA-TAPE lamp (p. 311).
• The tape has reached the end. Rewind it, or insert anew cassette.
• Set the write-protect tab to REC or insert a new cassette (p. 112).
• The tape is stuck to the drum due to moisture condensation. Remove the cassette and leave
your camcorder R)r at least I hour, then re-insert the cassette (p. I 19).
You cannot record on the "Memory Stick Duo."
•Rch:ascthe lock on the write-protect tab of the Memory Stick Duo" if there is one (p. 114).
• The "Memory Stick Duo" is fillh Delete unnecessa Upictures recorded on the "Memory Stick
Duo" (p. 80).
• Format the "Memory Stick Duo" on your camcorder or insert another "Memory Stick Duo"
(p. 60).
• You cannot record movies with this unit on the _Memory Stick Duo."
• When the POWER switch is set to CAMERA-TAPE, you cannot record still images on the
'Memory Stick Duo" with:
[PICT.EFFECT]
[D.EFFECT]
While executing [FADER]
[SMTH SLW REC]
The recording angle differs depending on the POWER switch setting position.
• The recording angle x_hen the POWER sx_itch is set to CAMERA-MEMORY is _xider than
when it is set to CAMERA-TAPE.
You cannot record asmooth transition on atape from the last recorded scene
to the next.
• Perlkmn END SEARCH (p. 39).
• Do not remove the cassette (The picture will be recorded continuously _ithout a break even
when you turn the power off).
• Do not record pictures in the HDV and DV formats on the same tape.
• Do not record pictures in SP mode and LP mode on the same tape. DV
• Avoid stopping then recording a movie in the LP mode. DV
• When [QUICK REC] is set to ION], you cannot record a smooth transition (p. 711).HDV1080{
g6
The shutter sound is not heard when you record a still image.
•Set [BEEP] to IONI(p. 6q).
The flash does not work.
• You cannot use the flash during tape recording.
• When attaching a conversion lens (optional) or a filter (optional) to your camcorder_ it may
block the flash of your camcorder. In this case, the flash light does not emit light.
• Even if auto flash or (i) (Auto redcye reduction) is selecte& you cannot use the internal flash
wifla:
[SPOTLIGHT], [SUNSET&MOON], and [LANDSCAPE] of [PROGRAM AE]
[SPOT METER]
• The power of the external flash (optional) is not turned on, or the flash is not attached
correctly.
[END SEARCH] does not work.
• Do not _._jcctthe cassette after recording (p. 39).
• There ix nothing recorded on the cassette.
[END SEARCH] does not work correctly.
• There is a blank section hetween recorded sections of the tape. This is not a malfunction.
Refer also to "Menu" (p. 101).
The auto focus does not function.
• Set [FOCUS] to [AUTO] (p. 54).
• The recording conditions are not suitable for auto focus. Adjust the lbcus manually (p. 54). m
[STEADYSHOT] does not function.
• Set [STEADYSHOT] to ION] (p. 57).
• While using [SMTH SLW REC], [STEADYSHOT] does not work.
The BACK LIGHT function does not function.
• In the lbllox_ing scttings, the BACK LIGHT fimction is canceled.
[MANUAL] of [EXPOSURE]
[SPOT METER]
• The BACK LIGHT function does not work during Easy Handycam operation (p. 28).
The [FLASH LEVEL] cannot be changed.
• ]FLASH LEVEL] (p. 55) cannot be changed during Easy Handycam operation.
Continued_l_ 97
TrssNsshsstisS/SsstisssS}
[DIGITAL ZOOM] does not function.
•[DIGITAL ZOOM] does not fimction x_hen you set [TELE MACRO] to ION].
Tiny spots in white, red, blue, or green appear on the screen.
• The spots appear when you are recording in [SLOW SHUTTRL [SUPER NS], or [COLOR
SLOW S]. This is not a malfunction.
The subjects passing by the frame might appear crooked.
• This is called the focal plane phenomenon. This is not a malffmction. Because of the way the
image device (CMOS sensor) reads out image signals_ the suhjccts passing by the flame
rapidly might appear crooked depending on the recording conditions.
The color of the picture is not correctly displayed.
• Deactivate the NightShot fimction (p. 33).
The screen picture is bright, and the subject does not appear on the screen.
• Cancel the BACK LIGHT fimction (p. 33).
• Set Ihe NIGHTSHOT switch (p. 33) to OFF.
The screen picture is dark, and the subject does not appear on the screen.
• Press and hokl DISP/BATT INFO lbr a l)w seconds to turn (711the backlight (p. 20).
The picture appears too bright, or flickering or changes in color occurs.
• This occurs when recording pictures under a fluorescent lamp_ sodium lamp_ or mercury
lamp. Cancel [PROGRAM AE] to minimize this phenomena (p. 52).
Black bands appear when you record aTV screen or computer screen.
• Set [STEADYSHOT] to [OFF] (p. 57).
g8
If you are playing back pictures stored on a "Memory Stick Duo," refer also to the "Memory
Stick Duo" section (p. 95).
You cannot play back tape.
• Slide the POWER s_itch to turn on the PLAY/EDIT lamp.
• Rescind the tape (p. 31).
You cannot play back in reverse direction.
• Reverse playback is not possible _ith the tape recorded in the HDV format.

The pictures stored on a "Memory Stick Duo" are not played back in their
correct size or aspect ratio.
• Pictures recoMcd on other devices may not appcur in their actuu] size. This is not a
malfunction.
Image data stored on a "Memory Stick Duo" cannot be played back.
• You cannot see movies recorded x_ithother camcorders on the 'Memory Stick Duo?'
• lmlge data cannot be played back if you have modified file names or folders, or have edited
the data on acomputer/ln this case, the file name flashes). This is not a malfunction (p. I15).
• Pictures recorded on other devices may not be played back. This is not a nmllhnction
(p. 115).
Horizontal lines appear on the picture. The displayed pictures are not clear or
do not appear.
• Clean the head using the cleaning cassette (optional) (p. 119).
You cannot hear the sound recorded with 4CH MIC REC on another camcorder.
DV
• Adjust 1_ AUDIO MIX] (p. 66).
Fine patterns flicker, diagonal lines look jagged.
• A@lst [SHARPNESS] to the [_7 (soflcn/side (p. 541.
No sound or only a low sound is heard.
• Set IMULTI-SOUND] to ISTEREO] (p. 67).
• Turn up the vohune (p. 31).
• Adjust [[_ AUDIO MIX] from Ibe [ST2] (a&litional sound) side until the sound is heard
appropriately (p. 66).
• If you are using an S VIDEO plug or component video plug, make sure the red and x_hite
plugs of the A/V connecting cable arc also connected (p. 42).
• Pictures recorded using [SMTH SLW REC] do not have sounds.
The picture or sound breaks off.
• The tupc "_xasrecorded ill both of the HDV and DV l()lmltts. This is not a malflu_ction.
The movies freeze for a while, or the sound breaks off.
• This occurs if the tape or video head is dirty (p. 119).
• Use the Sony mini DV cassette.
-'4
m
Continued-_ gg
TrssNsshsstisS/gsstisssS}
"---" is displayed on the screen.
• The tape you are playing _as recorded _vithout setting the date and time.
• A blank section on the tape is being played.
• The data code on a tape with a scratch or noise cannot be read.
Noises appear and _ or _[_ is displayed on the screen.
• The tape was recorded in a TV color system other than that of your camcorder (NTSC). This
is not a malflmction (p. I I 1).
Date Search does not work correctly.
• Bc sure to record more than 2 minutes aflcr the date changed. It"one day' s recording is too
short, your camcorder may not iccurately find the point where the recording <late changes.
• There is a bhmk section between recorded sections of the tape. This is not a malfimction.
No picture appears during [END SEARCH] or Rec Review.
• The tape _as recorded in both HDV and DV formats. This is not a malfunction.
You cannot view the picture on the TV connected with the i.LINK cable.
• You cannot vicv_ the picture in the HD (high definition) qualit 3 on the TV _hich is not
compatible with the HDVI080i specification (p. 42). Reli:r to the instruction manuals
supplied with your TV.
• Down convert the pictures recorded in HDV format and play back in DV format (SD image
quality) (p. 68).
• Play back pictures using another connecting cable (p. 42).
You cannot view the picture or hear the sound on the TV connected with the
component video cable.
• Set [COMPONENT] on the _ (STANDARD SET) menu according to Ibe requirements of
the connected device (p. 67).
• When you arc using the component video cable, make sure the red and white plugs of the
A/V connecting cable are connected (p. 42).
You cannot view the picture or hear the sound on the TV connected with the
HDMI cable.
• Pictures in the HDV format are not output from the HDMI OUT.jack, if copyright protection
signals are recorded in the pictures.
• DV format pictures input to the camcoNer via i.LINK cable (p. 77) cannot be output.
• This occurs if you record on a tape in both HDV and DV formats. Disconnect and connect the
HDMI cable, or slide the POWER switch to turn on your camcorder again.
100
The picture appears distorted on the 4:3 TV.
• This happens when viewing a picture recorded in the 16:9 (wide) mode on a 4:3 TV. Set [TV
TYPE] on the _ (STANDARD SET) menu (p. 68) and play back the picture.
J_4ch=12bappears on the LCD screen.
• This appears _@en you pkJy bCJck a tape recorded on other recording &:vices using CJ4ch
microphone (4CH MIC REC). This camcorder does nol comply with the 4ch microphone
recording st mdard.
The supplied Remote Commander does not function.
• Set [REMOTE CTRL] to ION] (p. 69).
• Remove any obstructions between the Remote Commander and the remote sensor.
• Keep strong light soumes, such as sunlight or overhead lighting, away from the remote
sensor, otherwise the Remote Commander may not fimction properly.
• Insert a fresh b ,ttel_ in the compartment with its +_ terminals matching those of the
compartment (p. 121).
• Remove the conversion lens 1optional) as the remote sensor in_l_ be obstructed by it.
Another VCR malfunctions when you use the supplied Remote Commander.
• Selecl a commander mode other than VTR 212)r yotu VCR.
• Cover the sensor of your VCR wilh black paper.
Menu items are grayed out. __
• You cannot select grayed items in the current recording/playback situation. ="
is not displayed.
• During Easy Handycam operation, not all menu items arc lklnctionah Cancel Easy Handycam
operation (p. 28).
You cannot use [PROGRAM AE].
•You cannot use [PROGRAM AE] togclher with:
NightShot
[OLD MOVIE] or ]CINEMA EFECT] of [D.EFFECT]
[COLOR SLOW S]
[TELE MACRO]
Continued_l_ 101

TrssNsshsstisS/gsstisssS}
102
You cannot use [SPOT METER].
You cannot use ]SPOT METER] together with:
NightShot
]CINEMA EFFECT] of [D.EFFECT]
[COLOR SLOW S]
If you set [PROGRAM AE]_ [SPOT METER] is auton/atically set to [AUTO].
You cannot use [EXPOSURE].
You cannot use [EXPOSURE] together _ith:
NightShot
[COLOR SLOW S]
[CINEMA EFECT] of [D.EFFECT]
If you set [PROGRAM AE], [EXPOSURE] is automatically set to [AUTO].
You cannot adjust [WHITE BAL d.
You cannot adjust [WHITE BAL.] xqlcn }ou use NightShot.
You cannot adjust [SHARPNESS].
You cannot a@lst [SHARPNESS] with [CINEMA EFECTI of [D.EFFECT].
[AE SHIFT] cannot be operated.
You cannot use [AE SHIFT] together x_ith:
[CINEMA EFECT] of [D.EFFECT]
[MANUAL] of [EXPOSURE]
You cannot use [SPOT FOCUS].
•You cannot use [SPOT FOCUS] together _qth [PROGRAM AE].
You cannot use [TELE MACRO].
• You cannot use ITELE MACRO] together with:
[PROGRAM AE]
Tape recording
[COLOR SLOW S] does not operate correctly.
•[COLORSLOW S] may not operate correctly in total darkness. Use NightShot or [SUPER
NSI.
• You cannot use [COLOR SLOW S] together Tiff1:
[FADERI
[D.EFFECT]
[PROGRAM AEI
[MAN UAL] of [EXPOSURE[
[SPOT METER[
NightShot
[HISTOGRAM] is not displayed.
•[HISTOGRAM] is not displayed while displaying the date and time.
•Q) indicator appears and [HISTOGRAM] is not displayed in the lk)llowing.
While using [DIGITAL ZOOM]
While using [D.EFFECT]
You cannot use [FADER].
• You cannot use [FADER] together _ilh:
[SELF-TIMER]
[SUPER NS]
[COLOR SLOW S]
[D.EFFECT]
You cannot use [D.EFFECT].
• You cannot use [D.EFFECT] together with:
[SUPER NS]
[COLOR SLOW S]
[FADER]
• You cannot use [OLD MOVIE] together with:
[PICT.EFFECT]
[PROGRAM AEI
When [[] WIDE SELECT] of [DV SET] is sol to [4:3]
• You cannot use [CINEMA EFECT] together with:
[EXPOSURE] set to [MANUAL]
Other than 0 in [AE SHIFT]
[PICT.EFFECT]
When [['_ WIDE SELECT] of [DV SET] is so to [4:3]
[PROGRAM AEI
[SPOT METER]
You cannot use [PICT.EFFECT].
• You cannot use [PICT.EFFECT] together with [OLD MOVIE] or [CINEMA EFECT] of
[D.EFFECT].
[SMTH SLW REC] does not function.
•You cannot use [SMTH SLW REC] together with:
[SUPER NS]
[COLOR SLOW S]
[D.EFFECT]
[PICT.EFFECT]
• You cannot use [SMTH SLW REC] while performing END SEARCH.
m
Continued_l_ 103
TrssblsshsstisS {Csstisssd)
Pictures from connected devices cannot be zoomed.
•You cannot zoom pictures from connected devices on your camcordcr (p. 34).
Time code and other information appear on the display of the connected
device.
• Set [DISP OUTPUT] to [LCD PANEL] x_hile connected x_ithan A/V connecting cable
(p. 69).
You cannot dub correctly using the A/V connecting cable.
• You cannot input externally from a device connected _ith the A/V connecting cable.
• The A/V connecting cable is not connected properly.
Make sure that the A/V connecting cable is connected to the input jack of the other device for
dubbing a picture from your camcorder.
When connected using an i.LINK cable, no picture appears on the monitor
screen during dubbing.
• Set [VCR HDV/DV] on the }_)_ (STANDARD SET menu according to the requirements of
the connected device (p. 65).
You cannot add sound to the recorded tape.
• You cannotaddsoundto the recordedtape on this unit.
You cannot dub correctly using the HDMI cable.
• You cannot dub pictures using the HDMI cable.
New sound added to a recorded tape on another camcorder is not heard. DV
• At[just 1_{_AUDIO MIX] from the [STI] (original sound) side until the sound is heard
appropriately (p. 66).
Still pictures cannot be dubbed from a tape to a "Memory Stick Duo."
• You cannot record or a distorted picture may bc recorded if the tape has been used repeatedly
for recording.
104
The computer does not recognize your camcorder. [_
•Disconnect the cable from tile computer and camcordcr, then connect it again securely.
• Disconnect USB devices other than the keyboard_ the mouse_ and the camcorder lron/file
(USB) jack on the computer.
• Disconnect the cable from the computer and camcorder_ restml the computer_ then connect
them again correctly.
You cannot monitor video that the camcorder is capturing.
• Disconnect the cable from the computer, turn on the camcordcr_ then connect it again.
You cannot view the video recorded on a tape on the computer.
• Disconnect the cable from the computer, then connect it again.
• Connect file i.LINK cable because you cannot copy pictures wifll the USB cabh:.
You cannot view still images recorded on a "Memory Stick Duo" on the
computer screen. [_
•Insert a"Memory Stick Duo" in the correct direction, then push it all tile_ay in.
• You cannot use an i.LINK cable. Connect tile camcorder and the computer using the USB
cable.
• Slide the POWER switch to turn on the PLAY/EDIT lamp on your camcorder and set [USB
SELECT] to [_1 Memo UStick] (p. 64).
• The computer does not recognize the "Memory Stick Duo" during camcorder operatkms such
as tape playback or editing. Finish any camcorder operations and Ihen connect the camcorder
to the computer again.
Your computer freezes.
• Set [VCR HDV/DV] of _ (STANDARD SET) correctly according to the connected
device.
• During the Easy Handycam operation, set the menu afler canceling the Easy Handycam
operation (p. 28).
• Disconnect the cable from your computer and camcorder. Reboot your computer, and
comlect your computer and camcorder follm_ing Ihe steps in the correct order (p. 86).
It
m
[Removable Disk] does not appear on the computer screen. [_
• Slide the POWER switch to turn on the PLAY/EDIT lamp, then set [USB SELECT] to [_lml
Memory Stick] (p. 64).
• Insert a "Memory Stick Duo" into your camcorder.
• Disconnect the USB device other than the kc?board, the mouse, and the camcorder fiom the
{s(USB)jack on the computer.
• The computer does not recognize the "Memory Stick Duo" during camcorder operatkms such
as tape playback or editing. Finish camcorder operations and then connect the camcorder to
the computer again.
Continued_l_ 105

TrssNsshsstisS/SsstisssS}
You cannot copy images to the Windows computer.
• DisphJ} pictures recorded on a "Memo1), Stick Duo _ith the t'ollo_ing procedures.
1Double-click [My Computer].
2 Double-click the icon lk)r the newly recognized drive [Removable Disk]. It may take some
time until Ihe drive is recognized.
3Double-click the desired image file.
106
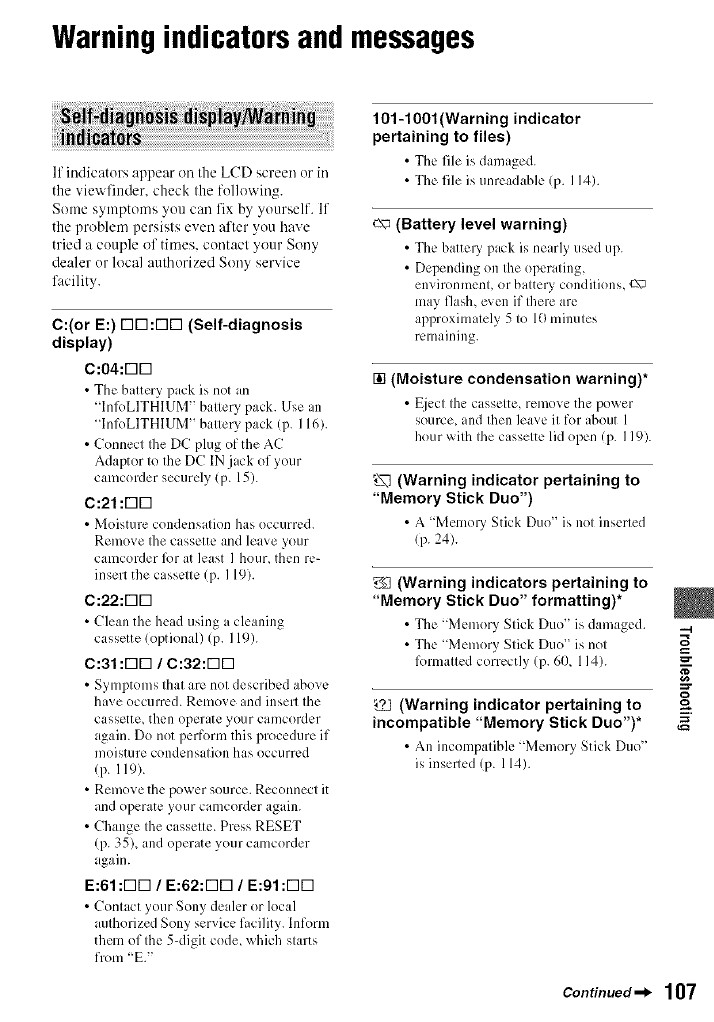
Warningindicatorsand messages
If indicators appear oil the LCD screen or in
the viewfinder, check the following.
Some symptoms you can fix by yourself. If
the problem persists even after you have
tried a couple of times, contact your Sony
dealer or h)cal authorized So W service
facility.
C:(or E:) r-IN:r-IN (Self-diagnosis
display)
C:04:r-wI
•The battery pack is not an
"InlbLITHIUM" batter)' pack. Use an
"InlbLITHIUM" batter)' pack (p. 116).
• Connect Ihe DC plug of the AC
Adaptor to the DC IN jack of your
camcorder securely lp. 15).
C:21 :r-ID
• Moisture condensation has occurred.
Remove Ihe cassette and leave your
camcorder lbr at least I hour, then re-
insert the cassette (p. 119).
C:22:r-IN
• Clean the head using a ch:aning
cassette loptional) (p. 119).
C:31 :r-IN /c:a2:rTr7
• Symptoms that arc not described above
have occurred. Remove and insert the
cassette, then operate your camcorder
again. Do not perfurm this procedure if
moisture condensation has occurred
(p. 119).
• Remove the power source. Reconnect it
and operate your camcorder again.
• Change the cassette. Press RESET
(p. 35), and operate your camcorder
again.
E:61 :r-IN /E:62:F-WI /E:gl :r-IN
• Contact }our Sony dealer or local
authorized Sony service facility, hffurm
them of the 5-digit code, which starts
from "E."
101-1001 (Warning indicator
pertaining to files)
• The file is damaged.
• The file is unreadable (p. 114).
c\_ (Battery level warning)
• The battcly' pack is nearl} used up.
• Depending on the operating,
environment, or battery conditions, c\_
may flash, even if there are
approximately 5 to 10 minutes
remaining.
[] (Moisture condensation warning)*
• t_jcct the cassette, remove the pox_er
source, and Ihen leave it fur about 1
hour with the cassette lid ()pen (p. I 19).
_7, (Warning indicator pertaining to
"Memory Stick Duo")
• A "Memory Stick Duo" is not inserted
(p. 24).
g_] (Warning indicators pertaining to
"Memory Stick Duo" formatting)*
• The "Memory Stick Duo" is damaged.
•The _Memory Stick Duo" is not
R)rmattcd correctly (p. 60, 114).
(Warning indicator pertaining to
incompatible "Memory Stick Duo")*
• An incompatibh: "Mcmor) Stick Duo"
is inserled (p. 114).
m
g
g
2
Continued_l, 107
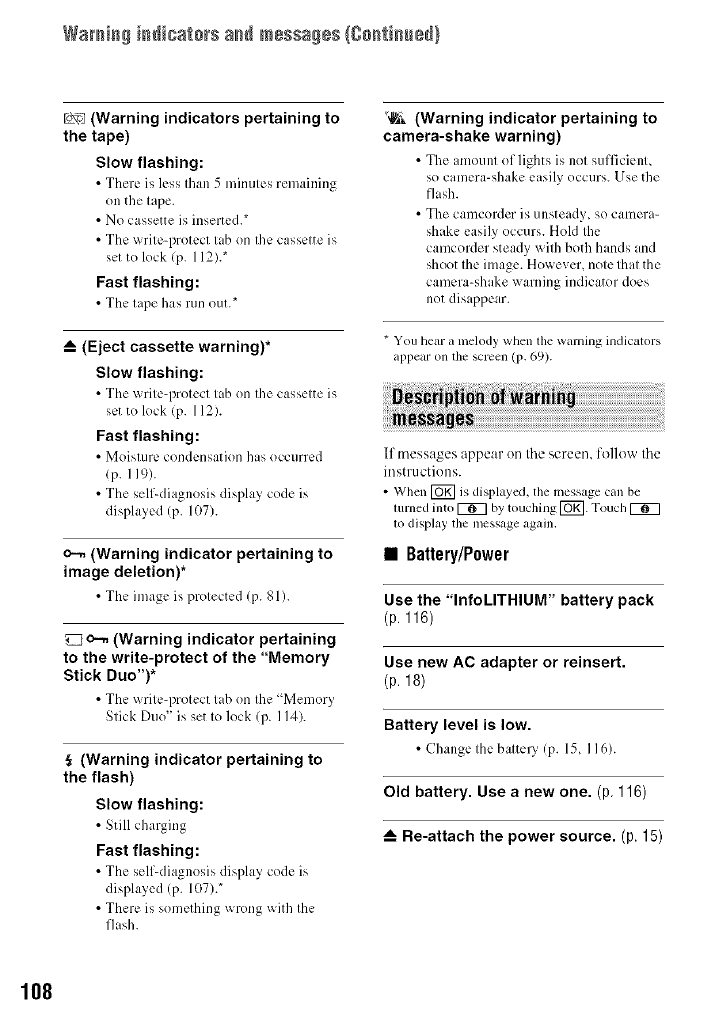
Wamia_ iadicato_s a_d messages{8o_tia_e_}
Lo_:_j(Warning indicators pertaining to
the tape)
Slow flashing:
•There is h:ss than 5 minutes remaining
on the tape.
• No cassette is inserted.*
• The write-protect tab on the cassette is
set to lock (p. 112).*
Fast flashing:
• The tape has run out.*
_-- (Eject cassette warning)*
Slow flashing:
•The _ rite-protect tab on the cassette is
set to lock (p. 112).
Fast flashing:
• Moist=m: condensation has occurred
lp. 119).
•The self-diagnosis display code is
displayed !P. 107).
o--. (Warning indicator pertaining to
image deletion)*
•The image is protected (p. 81).
o--. (Warning indicator pertaining
to the write-protect of the "Memory
Stick Duo")*
• The _ritc-protcct tah on the Memor)
Stick Duo" is set to lock (p. 114).
(Warning indicator pertaining to
the flash)
Slow flashing:
•Still charging
Fast flashing:
• The self-diagnosis display co(h: is
displayed !P. 107).*
• There is something wrong with the
flash.
"_ (Warning indicator pertaining to
camera-shake warning)
• The amount of lights is not sufficient,
so camera-shake easily occurs. Use the
flash.
• The camcorder is unsteady, so camera-
shake easily occurs. Hold the
camcorder steady with both hands md
shoot the image. However, note thatthe
camera-shake warning indicator does
not disappear.
* You hear a melody when tile warning indicators
appear on the screen (p. 69).
If tnessages appear on the screen, follow the
instructions.
• When [_ is displayed, tile message can be
turned into _ by touching [_. Touch K_7
lo display the message again,
•Battery/P0wer
Use the "InfoLITHIUM" battery pack
(p. 116)
Use new AC adapter or reinsert.
(p. 18)
Battery level is low.
•Change the battcl3 !P. 15, I16).
Old battery. Use a new one. (p. 116)
_-- Re-attach the power source. (p. 15)
108
• Moisture condensation
r__ Moisture condensation. Eject
the cassette (p 119)
[] Moisture condensation. Turn off
for 1H. (p 119)
• Cassette/Tape
Lo_ Insert a cassette. (p. 24)
_-- Reinsert the cassette. (p. 24)
•Check if the ca_;scttc is damaged.
Lo_ The tape is locked - check the
tab. (p 112)
Lo_ The tape has reached the end.
(p. 24, 31)
• Rescind or change the tape.
• "MemoryStickDuo"
Insert a Memory Stick. (p. 24)
_l Reinsert the Memory Stick.
(p. 24, 114)
• Reinsert the "Men]ol3' Stick Duo" a
few times. If even then the indicator
flashes, the 'Memory Stick Duo" might
be dan]aged. Try with another
"Memory Stick Duo."
This is a read-only Memory Stick.
•Insert a _ritable 'Memory Stick Duo."
_This Memory Stick is not
formatted correctly.
• Check the format, then l_mnat the
"Memory Stick Duo" as necessary
(p. 6(1,114).
Cannot record. The Memory Stick is
full.
• Dch:te unneccssal 3, images (p. 80).
o--. The Memory Stick is locked.
Check the tab. (p. 114)
Cannot playback. Reinsert the
Memory Stick. (p 24)
Cannot record. Reinsert the Memory
Stick. (p. 24)
No file.
• No file ix recorded or there ix no
readable file on the "Memory Stick
Duo."
Memory Stick folders are full.
•You cannol create foMcrs exceeding --4
999MSDCF. You cannot delele created _-
lk)lders using yoLIr camcorder.
• You, will have to format the "Memor)
Stick Duo" (p. 60), or delete them using
your computer.
Cannot record still images on
Memory Stick. (p 114)
•Dual Rec
Incompatible type of Memory
Stick.
• A type of "Memory Stick Duo"
incompatible with your camcorder is
inserted (p. 114).
No more still pictures during movie
recording.
• You pressed PHOTO after taking the
maximum storable still images (up to 3
images car] be stored) (p. 32).
Continued_ 109

War_ia_ iadicata_s and messages{8o_tia_e_}
Cannot save still picture.
•Do not _:icct Memory Stick Duo '_
whih: still images are being stored onto
it (p. 32).
• PictBridge compliant printer
Check the connected device.
• Sx_itch off the printer and sxvitchit on
again, then disconnect the USB cable
and reconnect it.
Connect the camcorder to a
PictBridge compatible printer.
• S_itch off the printer and s_itch it on
agdn, then disconnect the USB cable
and reconnect it.
Error. Cancel the task.
• Check the printer.
Cannot print. Check the printer.
• Sx_itch off the printer and sxvitchit on
again, then disconnect the USB cable
and reconnect it.
•Flash
Charging... Cannot record still
images.
• You are trying to record a still image
while charging the flash (optional).
Lens accessory attached. Cannot
use flash. (p. 33)
•Lenscover
Lens cover not fully open. Turn
power off then on. (p 19)
Lens cover is not closed. Turn the
power off once. (p. 19)
• Others
Cannot record due to copyright
protection. (p. 112)
Change to correct tape format.
•The pictures cannot he played back
because of an incompatible format.
No output image in "VCR HDV/DV".
Change format.
•Stopplayback or signal inpuL or
change the [VCR HDV/DV] setting
!P. 65).
_r_ Dirty video head. Use a
cleaning cassette. (p. 119)
Cannot start Easy Handycam. (p 92)
Cannot cancel Easy Handycam.
(p. 92)
For audio, connect red and white
plug on AV cable. (p 42)
110
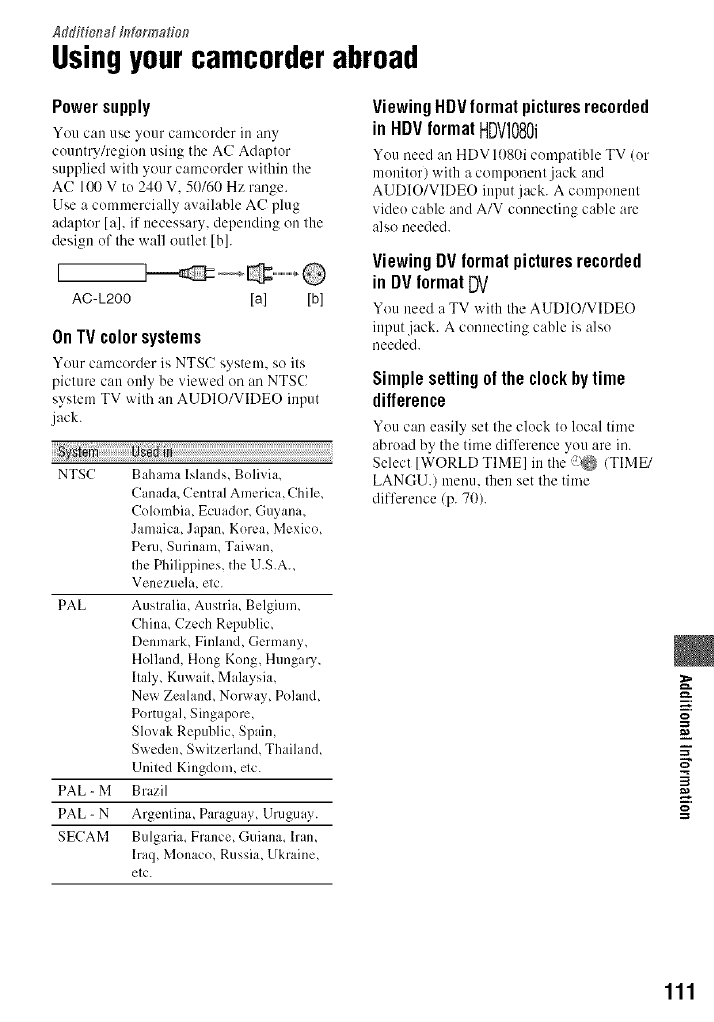
AJditk_a[ I_to_malio_?
Usingyourcamcorderabroad
Power supply
You can/P,e _o/lr camcorder ill 3ny
country/regioo using tile AC Adaptor
supplied with your camcorder within tile
AC 1{_)V to 240 V, 50/60 Hz range.
Use a commercially available AC plug
adaptor [a], if necessary, depending on the
design of the wall outlet [b].
AC-L200 [a] [b]
OnTVcolorsystems
Your camcorder is NTSC system, so its
picture can only be viewed on an NTSC
system TV with an AUDIO/VIDEO input
jack.
_ys_ in
NTSC Bahama Islands, Bolivia,
Canada, Cenmtl America, Chile,
Colombia, Ecuador Guvana,
Jamaica, Japan, Korea, Mexico,
Peru, Surinaln, Taiwan,
Ihe Philippines, the U.S.A.,
V elleZile] it, etc.
PAL Australia, Austria, Belgium,
China, Czech Republic,
Denmark, Finhmd, Germany,
Holland, Hong Kong, Hungalw
Ilalv Kuw ill, Mala,,'sia,
New Zealand Norway Pohmd,
Portugal, Singapore,
Slo_ ak Republic, Spain,
Sweden, Swilzerhmd, Thailand,
United Kingdom, etc.
PAL - M Brazil
PAL-N Argenlina Paraguay Uruguay.
SECAM Bulgaria, Frauce, Guiaua, ll'aU,
lraq, Monaco, Russia, Ukraine,
elc.
Viewing HDV format pictures recorded
in HDV format HDV1080i
You need :m HDV 1080i compatible TV (or
monitor) with a component jack and
AUDIO/VIDEO input jack. A component
vide() cable and A/V connecting cable are
als,o needed.
Viewing DVformat picturesrecorded
in DV formatDV
You need a TV with tile AUDIO/VIDEO
inputjack. A connecting cable is also
needed.
Simple setting of the clock by time
difference
You can easily set the clock to local time
abroad by the time difference you are in.
Select ]WORLD TIME] in tile ?_ (TIME/
LANGU.) menu. then set the time
difference (p. 70).
m.
]
g
111
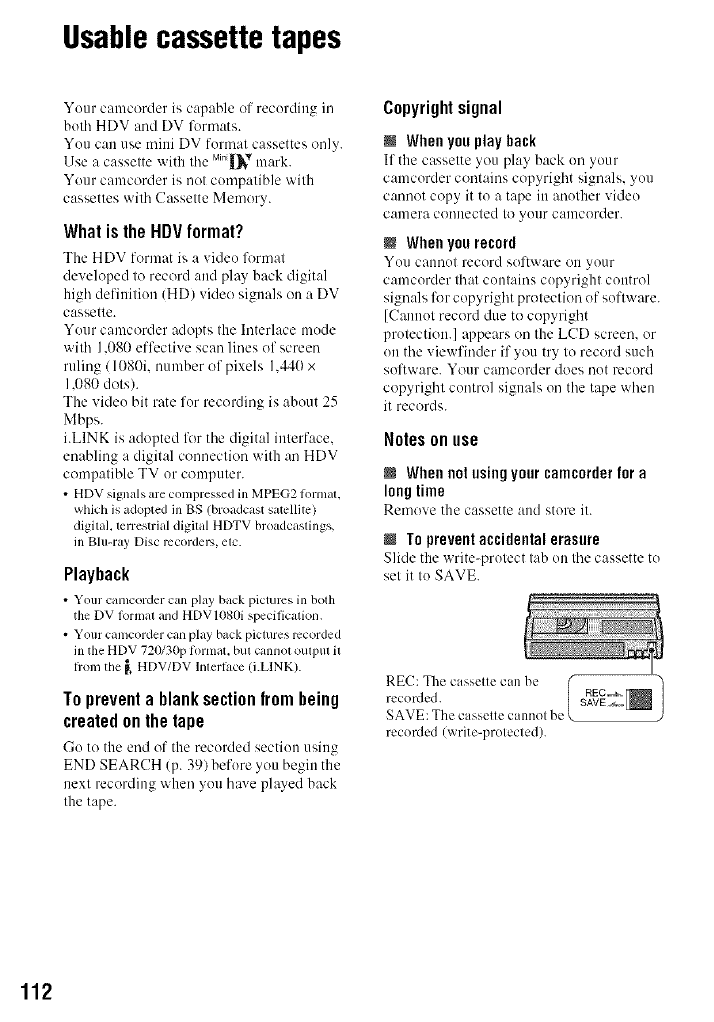
Usablecassettetapes
Your camcorder is capable of recording in
both HDV and DV %rmats.
You can use mini DV format cassettes only.
Use a casselte with Ihe Mi.|_'V mark.
Your camcorder is not compatible with
cassettes with Cassette Memory.
What is the HDV format?
The HDV format is a vide() format
developed to record and play back digital
high definition (HD) video signals on a DV
cassette.
Your camcorder adopts the Interlace mode
with 1.080 effective scan lines of screen
ruling /1080i. number of pixels 1.440 x
1.080 dots).
The video bit rate for recording is about 25
Mbps.
i.LINK is adopted lk_rthe digital interface.
enabling a digital connection with an HDV
compatible TV or computer.
• HDV signals are compressed in MPEG2 tormal,
which is adopted in BS (broadcast satellite)
digital, terrestrial digital HDTV broadcastings,
in Blu-ray Disc recorder',, etc.
Playback
• Your camcorder can play back picturcs in both
the DV l_>rmaland HDVIO80i specification,
• Your camcorder can play backpictures recorded
inthe HDV 720130ptormat, but cannol oulput il
fiom tbe _ HDV/DV lmerlace (LLINK).
To prevent a blank section from being
created on the tape
Go to the end of the recorded section using
END SEARCH (p. 39) before you begin the
next recording when you have played back
the tape.
Copyrightsignal
NWhenyou play back
If the cassette >ou play back on your
camcorder contains copyright signals, you
cannot copy it to a tape in another video
caulura couuected to your caulcorder.
NWhen you record
You cannot record sol't_ are on your
camcorder that contains copyright control
signals lklr copyright protection of software.
[Cannot record due to copyright
protection.] @pears on the LCD screen, or
(lit the viewfinder if you try to record such
software. Your camcorder does not record
copyright control signals on the tape when
it records.
Notes on use
NWhennotusingyourcamcorderfora
longtime
Remove the cassette aud store it.
NTo preventaccidental erasure
Slide the write-protect tab on the cassette to
set it to SAVE.
REC: The cassette can be
recorded.
SAVE: The cassette cannot be
recorded/write-protected).
112
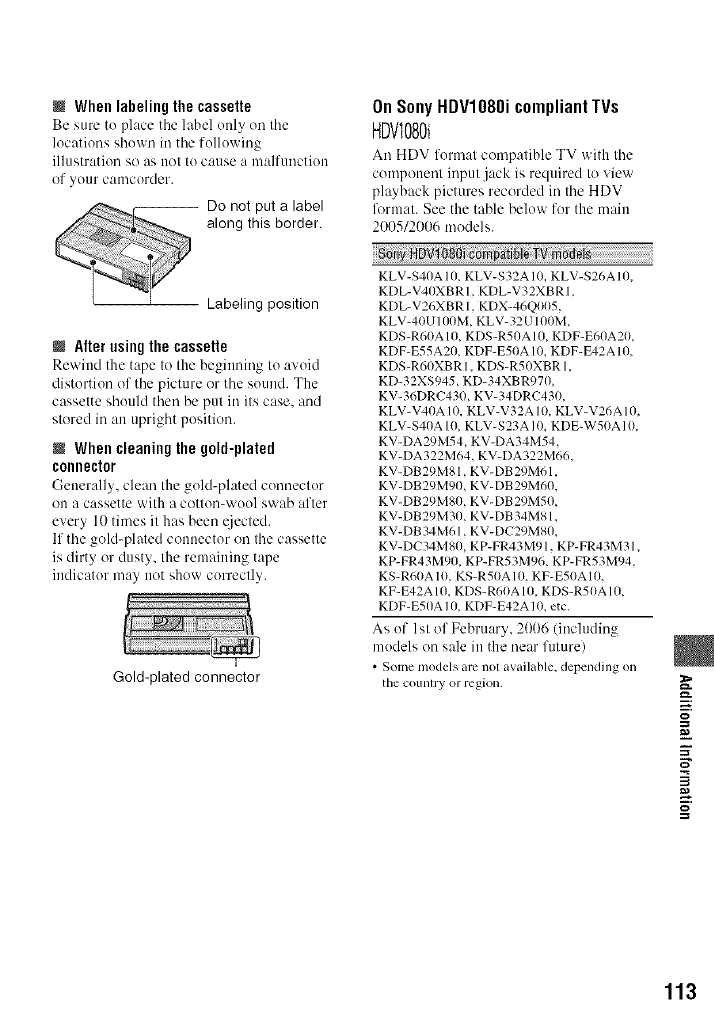
When labeling the cassette
Be sure to place tile label ottly oil tile
locations sbowu in tile folluwing
illustration so us trot tu cause a m:dfuuction
of yuur camcorder.
-- Do not put a label
along this border.
Labeling position
NAlter using the cassette
Rewittd the tape to the beginning to avoid
distortion of the picture or tbe sound. The
cassette sbuuld tben be put in its case. aud
stored in an uprigbt position.
MWhen cleaning the gold-plated
connector
Gener:dly, clean the guld-ph_ted cunnectur
on a cassette with a cotton-wuol swab after
every 10 times it has been _4jected.
If the gold-plated cotmector on the cassette
is dirty or dusty, the remaining tape
indicatur may not show correctly.
Gold-plated connector
OnSonyHDVI080icompliantTVs
HDVI080i
An HDV furm:.t compatible TV with tbe
component input jack is required to view
playback pictures recorded in tbe HDV
li)rtnat. See the table beluw for the main
200512006 tnodels.
KLV-S40A t O, KLV-S32A 10, KLV-S26AIO,
KDL-V4OXBRI, KDL-V32XBRt,
KDL-V26XBR 1, KDX-46Q005,
KLV-40U t tRIM, KLV-32 Ul OOM,
KDS-R60A 10, KDS-R50A 10, KD F-E60A20,
KDF-E55A20, KDF-E50A 10, KDF-FA2AIO,
KDS-R60XBR 1, KDS-RSOXBR 1,
KD-32XS945, KD-34XBR970,
KV-36DRC430, KV-34DRC430,
KLV-V40A l 0, KLV-V32A I0, KLV-V26A 10
KLV-S40A I O, KLV-S23A I0, KDE-W50A 10
KV-DA29M54, KV-DA34M54,
KV-DA322M64, KV-DA322M66,
KV-DB29M81, KV-DB 29M61,
KV-DB29M90, KV-DB29M60,
KV-DB29MSO, KV-DB29M50,
KV-DB29M30, KV-DB34MSl,
KV-DB 34M61, KV- DC29MSO,
KV-DC34MSO, KP-FR43M91, KP-FR43M31
KP-FR43M90, KP-FR53M96, KP-FR53M94
KS-R60A 10, KS-R50A lO, KF-E50A 10.
KF-E42A 10, KDS-R60A 10, KDS-R50A 10,
KDF-E50A 1O, KDF-E42A 10. etc.
As of 1st of February, 2006 (including
models on sale in the near future)
•Some models am not available, depending on
tile COIllllry or region.
i.
g
113

Aboutthe "Memory Stick"
A "Memory Stick" is a compact, portable
IC recording mediun/with a data capacity
that exceeds the capacity of a floppy disk.
You can use only a "Memory Stick Duo."
which is about the half size uf a standard
"Memory Stick" in your camcurder.
However. appearance oil the list beluw does
not guarantee the operation of all types of
"Memory Stick Duo" in your camcorder.
"Memory Stick"
lwithout MagicGate)
"Memo UStick Duo "*_ ©
lwithout MagicGate)
"MagicGate Memory Stick"
"Memo UStick Duo "*_ ©*2*a
(with MagicGate)
"M tgicGate Memo UStick ©*a
Duo" *1
"Memo UStick PRO"
"Memo UStick PRO Duo" *_ ©*2*s
,1 A "Men_ol T Stick Duo" is about half the size of
a standard "Melno W Stick."
,2 The types of "Memol T Stick" thai support high
speed data translPr. The speed of data translPr
varies depending on lhe device lo be used.
*a "MagicGale" is a copyrighl protection
technology that records and translPm tile
contents in an encrypted k)rtllaI. Note that data
lhal uses "MagicGalc" teclmoh)gy cannot be
recorded or played on your camcorder,
• Still image lonnat: Your canlcorder compresses
and records image data in the JPEG (Joint
Photographic Expelts Group) lormaL The file
extension is ".JPG."
•File names of still images:
101- 0001: This file name appears on the
screen of your calncorder,
DSC00001 JPG: This file name appears on
tile display of a compuler.
• A "Menlol T Stick Duo" lomlalted by a
conlputer (Windows OS/Mac OS) does not have
guaranleed compatibilily wilh your camcorder.
• Data mad/write speed may vary depending on
lhe combination of the "Memory Stick" and
"Memory Stick" complianl product you use.
On a"Memory Stick Duo" with a
write-protect tab
You cm/prevent accidental erasure uf
images when you slide the write-protect tab
on tile "Memury Stick Duo" with a small
tapered object, to the write-protect position.
Notes onuse
Damaged or lost image data will not be
compensated for. and may uccur in the
following cases:
• If you ejecl tile "Memory Stick Duo," turn the
power oil on your canlcorder, or mnlove the
battery pack lor replacement while your
camcorder is reading or writing image files on
the "Memo W Stick Duo" (while tile access lamp
is lit or flashing).
• If you use the "Memory Stick Du<f' near
nlagnets or inagnetic fields.
It is recommended you make a back-up uf
important data on the hard disk of a
computer.
NOn handlinga "MemoryStick"
Keep the li_llo_ ittg in miud _hen handling
a "Memor_ Stick Duo."
• Be carefifl not to apply excessive lbrce when
writing on a memo area on a "memory Slick
Duo,"
• Do nol allach a label or tile like on a "Memol T
Slick Duo" or a Memory Stick Duo adaptor.
• When you carl 3' or store a "Menloly Slick Duo,"
put it in its case.
• Do not touch, or alh)w metallic objects to come
into contact with the terminals.
• Do nol bend, drop or apply strong lorce to tile
"Memory Stick Duo."
• Do not disas_mble or nlodil}' tile "Memol T
Stick Duo,"
• Do nol let the "Menlory Stick Duo" get wet.
• Be carelhl to keep "Memory Stick Duo" medkt
out of the reach of small children. There is
danger lhal a child might swanow it.
114
•Do not insert anything other than a "Memory
Stick Duo" into the "Memory Stick Duo" slot.
Doing so may cause a malhmction.
@ Ona locationforuse
Do not use or keep the "Memory Stick
Duo" in tile following locations.
• Places subject to extrenlcly high temperature.
such as a car parked outside ill the sunmler,
• Places under direct sunlight.
• Places with extremely high bunlidity or su[_iecl
to corrosive gases.
@ OntheMemoryStickDuoadaptor
Alter inserting a "Memory Stick Duo" into
the Memory Stick Duo adaptor, you can use
it with a standard "Memory Stick"
compliant device.
• When using a "Memory Stick Duo" with a
"Memory Stick" compliant device, be sure to
insert tile "Memo W Stick Duo" into a Memoly
Stick Duo adaplor.
• When inserting a "Memoly Stick Duo" into a
Memory Stick Duo adaptor, make sure the
"Memory Stick Duo" is inserted lacing in the
correct direclion, then inserl it all the way ill,
Note that ilnprol?er use may cause a
malhmction. Also. if you lorce tile "Menlory
Stick Duo" into the Memory Stick Duo adaptor
ill file wrong dircclkm, it may be damaged.
• Do not in_rl a Menlo W Stick Duo ndaptor
without a "Memo UStick Duo" attached. Doing
so may result in malflmclions of the unit.
@Ona"MemoryStickPRODuo"
• Tile nlaximum nlemo D' capacity of a "Memory
Stick PRO Duo" that can be used on your
camcorder is 2 GB,
On image data compatibility
• Image data files recorded on a ' Nlemory Stick
DIIO _ by your Calllcorder conlorln to the
"Design rule for Cmnera File system' universal
standard established by tile JEITA (Japan
Electronics and lntbrnlation Technology
Industries Association).
• On your camcorder, you cannot play back still
images recorded on other devices (DCR-
TRV9(t(t or DSC-D71IO/D77(t) thai do not
conlorm to the universal standard./Tbese
models are not sold in some regions.)
• If you cannot use a "Menlory Slick Duo '_ thai
has been used with another device, lbrmal it
with your camcorder (p. 60). Note that
lormatting era_s all inkwmation on tile
"Memory Stick Duo."
• You nlay not be able to play back images with
yollr Calllcorder:
When playing back image data nlodified on
your colnputer.
When playing back image data recorded with
other devices.
m.
g
115

Aboutthe "InfoLITHIUM" battery pack
This unit is compatible with an
'%foLITHIUM" battery pack (P series).
Your camcorder operates only with an
'%foLITHIUM" battery pack.
'%foLITHIUM" P series battery packs
have the (1),,,,o.T,_o_Q mark.
What is an "InfoLITHIUIVI" battery
pack?
An "InfoLITHIUM" battery pack is a
lithiumqou battery pack that has ftmctious
for comnmnicating information related to
operating conditions between your
camcorder and an optional AC Adaptor/
charger.
The "InfoLITHIUM" baltery pack
calculates the power consumption
according to the operating conditions of
your camcorder, and displays the remaining
battery time in minutes.
With an AC Adaptoffcharger. the remaining
battery time and charging time appear.
To chargethe battery pack
•Be sure to charge tile battery pack betore you
Slglr[ /isillg yo/lr C_llDCorder.
• We recommend charging tile battery pack in an
ambient temperature of between 10 °C 1o 30 °C
(50 °F 1o 86 °F) until the CHG (charge) lamp
turns olE If you charge tile baue W pack oulsMe
of this lemperature range, you lnay not be able
to charge it efficiently.
• After charging is complete, disconnect the cable
hom the DC IN jack on your camcorder or
remove the bauery pack.
To use the batterypack effectively
• Battery pack pertormance declvases when tile
surrounding tenlperamre is l0 °C 150 °F) or
below, and tile length of time you call use tile
battery pack becmnes shorter. In fllat case, do
one of the %llowing to u_ tile battery pack lor a
longer tinle.
Pul tile bauery pack ill glpocket to w_lrlll it up,
and inert it in your camcorder right belore
you start taking sbols.
Use a large capacily baltel T pack: NP-PP71/
PP90 (optional).
•Frcquenl use of the LCD screen or a fl'cquent
playback, l,Jst lorward or rewind operation
wears out the balte W pack laster.
We mconnnend using a large capacity bauel T
pack: NP-FP7 I/FP90.
• Be sure to set the POWER swilch 1o OFF
(CHG) when not recording or playing back on
your camcorder. The baltery pack is also
consumed when your cginlcorder is ill recordillg
standby or playback pause.
• Have spare battely packs ready k_r two or three
times the expeclcd recording time, and make
trial recordings belbre making file actual
recording.
• Do not expose tile bauery pack to water. Tile
bauery pack is no[ water rcsistanl.
Aboutthe remainingbattery time
indicator
• When tile power goes oil e_en though tile
relllilhlillg biluely linle illdicalor indicates that
the battery pack has enough power to operate.
charge the battery pack flflly again. Renlaining
battery time will be indicated correctly. Note.
however, that the bauery indicalion will not be
restored if it is used ill high temperatures R>ra
long time. or if lelt in a hilly charged stale, or
when the battely pack is lrequently used. Use
file remaining battery time indication as a rough
guide only.
• Tile C\3 mark thal indicales low baltery flashes
even if there are still 5 to 10 minutes of battery
tinle remaining, depending on the operating
condilions or anlbient temperature.
Aboutstorageof the batterypack
• If the battery pack is not used lor a long tinle,
hilly charge tile battel T pack and use it up on
your camcorder ()liCe a ye_lr to [nainlahl proper
hlllction. To store tile battery pack, l'ell/O_, eit
li'oln your camcorder and put it in a dry, cool
phJce.
• To discharge the battery pack on your
camcorder completely, _t [A.SHUT OFFI to
[NEVERI on the (STANDARD SET)
menu and leave your camcorder in tape
recording standby until tile power goes oll
(p. 70).
116
Abouti.LINK
About battery life
•B_lttery capacity decl_ases o_er time and
through repeated use. If decreased usage time
belween charges becomes significanL it is
probably time to replace it willl a new one.
• Eachbaltcly's lilt is governed by storage_
operaling and envirollnlenta] conditions.
The HDV/DV Interface on this unit is an
i.LINK-compliant Interface. This section
describes the i.LINK standard and its
features.
What is i.LINK?
i.LINK is a digital serial interface for
transferring digital video, digital audio, and
other data to other i.LlNK-compatible
devices. You can also control other devices
using the i.LINK.
i.LINK-compatible devices can be
connected using an i.LINK cable. Possible
applications are operations and data
transactions with various digital AV
devices.
When two or more i.LINK-compatible
devices are daisy-chained with the unit.
operation becomes possible from any
device in the chain. Note that operation
method may vary, or data transactions may
not be possible, depending on specifications
and characteristics of the connected
devices.
• Normally, only one device can be connecled to
this unit with an i.LINK cable. When
connecting this unit to an HDV/DV compatible
device having two or more _ HDV/DV
lnlerlaces, mlcr lo the operating instructions of
tbe device to be connected.
• i.LINK is a morn lhmiliar term lot the [EEE
1394 dala transport bus proposed by Sony, and
is a trademark approved by many corporations.
• IEEE 1394 is an international slandard
slandardized by the lnslitule of Electrical and
Electronics Engineers.
About the i.LINK Baud rate
i.LINK's maximum baud rate varies
according to the device. There are 3 types.
SI00 (approx. 100Mbps*)
$200 (approx. 200Mbps)
$400 (approx. 400Mbps)
The baud rate is listed under
"Specifications" in the operating
instructions of each piece of equipment. It
g
Continued _l_ 117
118
absst i.HNR/Ssstisssd}
is also indicated near the i.LINK interface
on some devices.
The baud rate may differ from the indicated
wdue when the unit is connected to adevice
with a different maximum baud rate.
*Whatis Mhps?
Mbps stands for "megahits per second." or
the amount of data that can be sent or
received in one second. For example, a
baud rate of 100 Mbps means that 100
megabits of data can be sent in one second.
To usei.LINK functionson this unit
For details on how to dub when this unit is
connected to other video devices having an
i.LINK Interface. see page 74.
This unit can also be connected to other
i.LlNK-compalible devices made by Sony
(e.g. a VAIO series personal computer) as
well as to video devices.
Some i.LINK compatible video devices.
such as Digital Televisions. DVD.
MICROMV or HDV recorders/players are
not compatible with this unit. Before
connecting to other devices, be sure to
confirm whether the device is compatible
with an HDV/DV device or not. For details
on precautkms and compatible application
software, refer also to the operating
instructions for the device to be connected.
About the required i.LINK cable
Use the Sony i.LINK 4-pin4o-4-pin cane
(during HDV/DV dubbing).
Maintenanceand
precautions
Onuseandcare
• Do not use or store tile C;llllcorder _llld
accessories in the tollowing locations.
Anywhere extremely hot or cold. Never lea_e
flmln e×po_d to temperatures abo_e 60 °G
(140 OF),such as under direct sunlighL nero
heaters or in a cm parked in the sun. They
may maltunction or become detormed,
Near strong mngnetic fields or mechlulical
vibration. Tile camcorder may maltunction.
Near strong radio waves or radiation. The
cmncorder may not be able to record properly.
Near AM receBers mid video equipment.
Noise may oc,,'ur.
On a sandy beach or anywhere dusty. It sand
or dust gets in your camcorder, it may
nmltunction. Sometimes this malfimction
cannot be repaired.
Nenr windows or ouMoors, wherethe LCD
screen, the viewt]nder, or the lens may be
exposed to direcl sunlight. This da]n_ges the
inside of tile viewfinder or the LCD screen.
Anywhere ve Utmmid.
• Operate your camcorder on DC %2 V (battery
pack) or DC 8.4 V (AC Adaptor).
• For DC or AC operation, use the accessories
recommended in these operating instructions.
• Do not let your camcorder gel wet. for example,
JlOlll rain or sea water. If your canlcorder gets
wet. il lnay malfunction. Sonletinles lhis
malfimction cannot be repaired.
• If troy solid object or liquid gets inside the
casing, unplug your camcoMer and have it
checked by a Sony dealer belorc operating il
any further.
• Avoid rough handling, disassenlbling,
modil}iing, physical shock, or impact such as
hammering, dropping or stepping on the
product. Be particularly camlill of the lens.
• Keep the POWER switch setting to OFF (CHG)
when you arc not Hsing your calncorder,
• Do not wrap your camcorder with a towel, lot
exanlple, and operate it, Doing so ndghl cau_
heal to build up inside.
• When disconnecting the power cord, pull it by
the plug and not the cord.
• Do not damage file power cord such as by
placing anything heavy on it.
• Keep metal conlacls clean.
• Keep the Remole Commander and buuon-type
battery out of children's reactl.If the battel T is
accidentally swallowed, consult a doctor
immediately.
• It the battery electrolytic liquid has leaked,
consult your local authorized Sony selvice
liJcility.
wash oil any liquid that may have contacted
your skin.
if any liquid gets in your eyes, wash whh
plenty of water and consult a doctor.
@When notusing your camcorderfor a
long time
• PcriodicaUy 1111"11(in lhe c_ltllcorder _lnd play it
casseUetot about 3minules.
• U_ up the battery pack completely betore
storing il,
Moisture condensation
If your camcorder is brought directly from a
cold place to a warm place, moisture may
condense inside your camcorder, on tile
surface of tile tape. or on the lens. In this
state, the tape may stick to tile head drum
and be damaged or your camcorder may not
operate correctly. If there is moisture inside
your camcorder. [rltA Moisture
condensation. Eject tile cassette] or [rlt
Moisture condensation. Turn off for IH.]
appears. The indicator will not appear when
tile moisture condenses ou tile lens.
@If moisturecondensationhasoccurred
Nolle of tile f/lnctious except cassette
qjection will work. Eject tile cassette, turn
off your camcorder, and leave it for about
one hour with the cassette lid open. Your
camcorder can be used again when both of
the lk)ll()witlg conditions are met:
• The warning message does not appear when lhe
power is lllrned on.
• Neither [] or A flash when a cg_sseueis inserted
andvideo operation buttons are louched.
If moisture starts to condense, your
camcorder sometimes cannot detect
condensation. If this happens, the cassette is
sometimes not ejected for 10 seconds alter
the cassette lid is opened. This is not a
malfunction. Do not close tile cassette lid
until the cassette is ejected.
M Note on moisture condensation
Moisture tua_ condense when you bring
your camcorder from a cold place into a
warm place (or vice versa) or when you use
your camcorder in a humid place as shown
below.
• When you bring your camcorder hom a ski
slope into a place warmed up by a beating
device.
• When you bring your canlcorder from an air
condilioned car or room into a hoI place oulside,
•When you use your cglt/lcorderafter asquaUor a
shower.
• Whell you use yollr camcorder ill a hot and
bumkl place.
@Now to avoid moisturecondensation
When you bring _ottr c:uncoMer from :,
cold place into a warm place, put your
camcorder in a plastic bag attd seal it
tightly. Remove the bag when the air
temperature inside the plastic bag has
reached the surrounding temperature/after
about one hour).
Videohead
If you play back a tape recorded in HDV
format, tile image and sound may freeze for
a while (about 0.5 seconds).
This occurs if the HDV signals cannot be
recorded or played back correctly because
of dirt on tile tape or video head. Depending -"
on tile cassette, this f:urly infrequently
occurs even if the cassette is braud uew or
is not used a lot. N"
If this freezing point is created while
playing back, you can solve this problem =
and see tile piclures by, rewinding after
slightly forwarding. Such a lheezing point
cannot be recovered if it was created while
recording.
To prevent such a problem, use tile Sony
mini DV cassette.
• If the lollowing problem occurs, clegmthe video
heg_dstot l0 seconds with the Sony DVM-
12CLDcleaning cg_ssette(optional).
Continued-_ 11g

Naiate_a_c÷a_dprecau_ioas {Co_tim_÷d)
Playback pictures do not move.
Playback pictures do not appear.
The sound breaks oil.
[_fi!!!!l Du y video bead. Use a cleaning
cassetle.] appears on lhe screen during
recording.
The lollowing phenomenon occurs in HDV
I_lrnlal.
The playback The playback screen
screen pauses, goes bhmk.
(Solid blue screen)
The lollowing phenomenon occurs in DV
formal
Block-noise
appears.
The playback screen goes blank.
(Solid blue screen)
• Tim video beads will degrade after long use, If
you cannot obtain a clear image even after using
a cleaning cassette (oplionalh it might be
becau_ the video beads are worn out. Please
contact your Sony dealer or local authorized
Sony service l_cility to have the video beads
replaced.
LCDscreen
• Do not exert excessixe pressure on lhe LCD
screen, as il may cause d_lnlage.
• If your camcorder is used in a cold place, a
residual image may appear on the LCD screen.
This is nol a malftmction.
• Wldle using your camcorder, the back of the
LCD screen inay heat up. This is not a
malflmction.
NTo cleanthe LCDscreen
If fingerprints or dust make tile LCD screen
dirty, it is recommended you use a soft
cloth to clean it. When you use the LCD
Cleaning Kit (optional), do not apply tile
cleaning liquid directly to the LCD screen.
Use cleaning paper moistened with tile
liquid.
NOnadjustmentof theLCDscreen
(CALIBRATION)
The h/lttous on tile tollch p:mel may uot
work correctly. If this happens, follow the
procedure below. It is recommended you
connect your camcorder to the wall outlet
using tile supplied AC Adaptor during tile
operation.
(!) Slide the POWER switch to turn on the
PLAY/EDIT lamp.
@ Disconnect cables other than Ihat of the AC
Adaptor from your camcorder, then eject
Ihe cassette and '_Memory Stick Duo" from
your camcorder.
@ Touch [gggff0]---+ MENU ---+ _
(STANDARD SET) ---+ [CALIBRATIONI
---+ FUg].
X CALIBRATION
(_) Touch the "x" displayed on the screen with
the corner of the "MemoUStick Duo" or
the like. The position of the "x" changes.
Touch [CANCEL] to canceh
If you did not press tile right spot, start lhom
step (g)again.
• You cannol calibrate the LCD screen if U is
rotated.
120
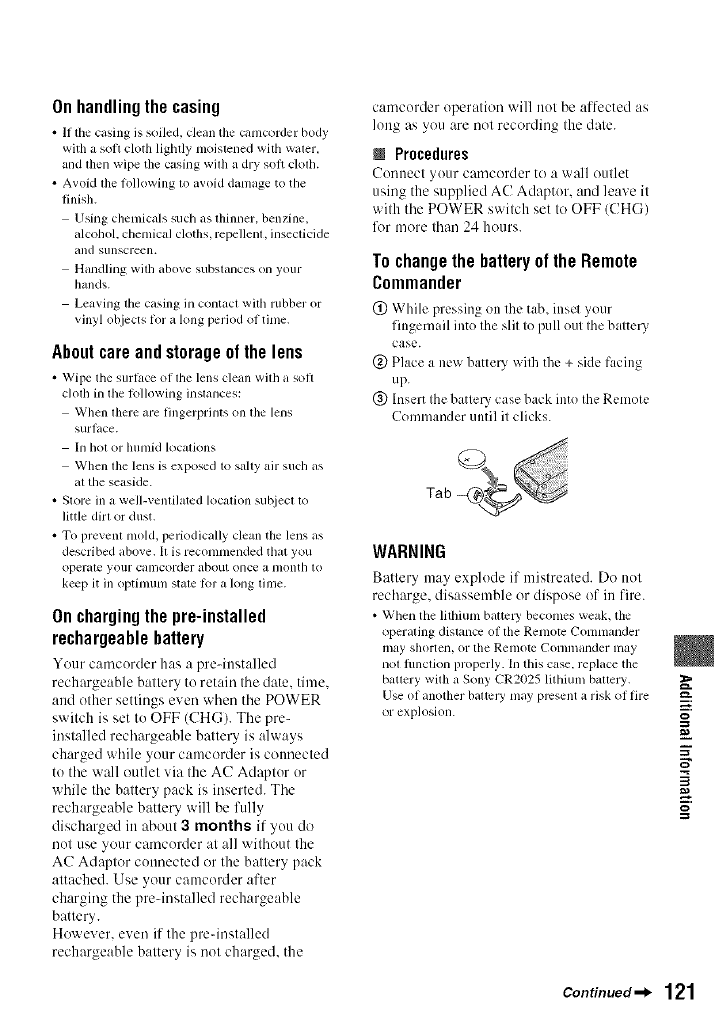
Onhandlingthecasing
•It tile c_tsing is soiled, cleml the camcorder body
widl a soil cloth lightly moistened with w_tter,
and then wipe tile casing with a dry soft cloth.
•AvoM tile following to _woid d_un_lge to tile
finish.
Using chemicalssuchas thinner, benzine,
_dcohol,chemicalcloths, repellent, insecticide
_tnd sunscreen.
Handling wuh above substances on your
hands.
Leaving tile casing in contact with rubber or
vinyl objects lor a long period of tittle.
Aboutcareandstorageofthelens
• Wipetile surt_.ceot tile tens cleimwUlla soft
clolhin the lollowing instances:
When there are fingerprints onlbe lens
surl]/ce.
In hot or lltHllid locatkms
Wllen tile lens is exposed to salty air such as
at tile seaskle.
• Store in a weU-ventilated location subject to
little dirt or dust.
• To prevent nlold, periodically clean the lens as
described above. It is recomnlended that you
operate your caltlcorder about once a nlonth to
keep it in optinnml state R_r a long Ume.
Onchargingthe pre-installed
rechargeahlebattery
Your camcorder has a pre-iustalled
rechargeable battery to retain the date. time.
and other settings even when the POWER
switch is set to OFF (CHG). The pre-
installed rechargeable battery is always
charged while your camcorder is connected
to the wall outlet via the AC Adaptor or
wltile the battery pack is inserted. The
rechargeable batte Uwill be fully
discharged in about 3months if you do
not use your camcorder at all without the
AC Adaptor connected or the battery pack
attached. Use your camcorder after
charging the prednstalled rechargeable
battery.
However. even if the prednstalled
rechargeable battery is not charged, the
camcorder operation will not be affected as
long as you are not recording the date.
NProcedures
Connect )our camcoMer to a wall outlet
using the supplied AC Adaptor. and leave it
with the POWER switch set to OFF/CHG)
lk_rmore than 24 hours.
To change the battery of the Remote
Commander
(_) While pressing on the tab, inscl your
fingernail into the slit to pull out the batter,
case.
@ Place a new batter?.' wilb the + side facing
up.
@ Insert the battel3' case back into the Remote
Commander until it clicks.
Tab
WARNING
Battery may explode if ntistreated. Do not
recharge, disassemble or dispose of in fire.
• When the lithiunl batteW beconles weak, the
operating distance of file Renlote Comnlander
may shorten, or tile tenlotc Connnander may
nol flmclkln properly. In this case. replace the
battery with a Sony CR2025 lithium battery.
Use of another batlclT nlay present a risk of fire
or explosion.
m.
g
Continued_l_ 121
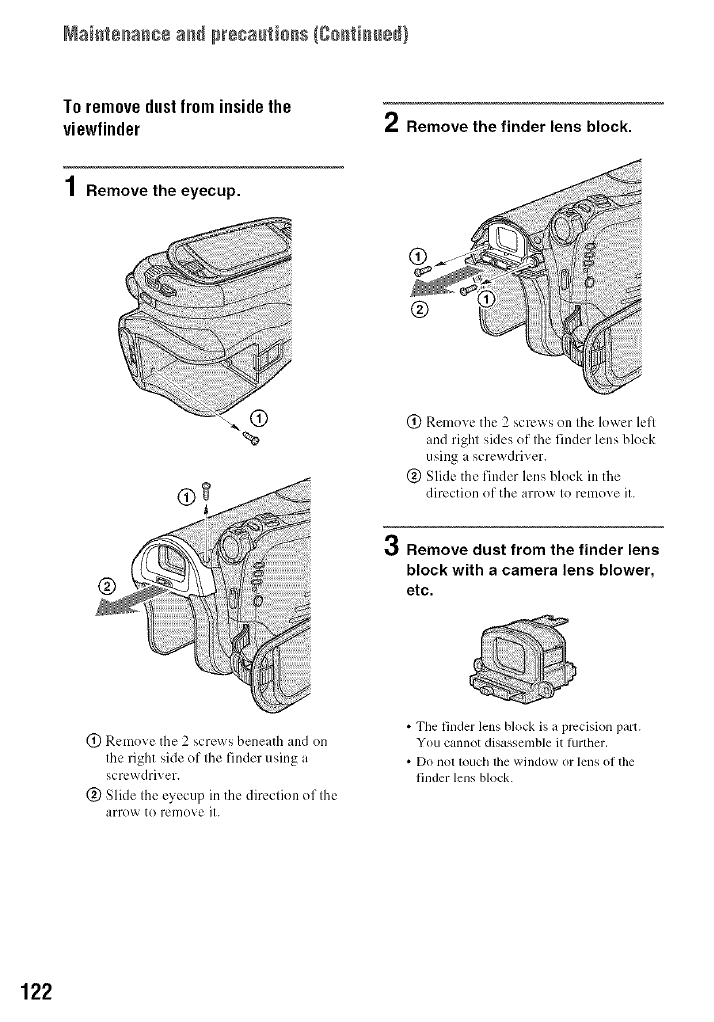
Maiate_a_c÷a_dprecau_ioas (Co_tim_÷d)
Toremovedustfrominsidethe
viewfinder 2Remove the finder lens block.
1 Remove the eyecup.
%
®
(_) Remove the 2 screws on the lower left
and right sides of Ihe finder lens block
using i screwdriver.
(&) Slide the finder lens block in the
direction of the arrow to remove it.
,qj Remove dust from the finder lens
block with a camera lens blower,
etc.
(_) Remove the 2 screws beneath and on
the right side of the finder using a
scr_..wdriver.
(_) Slide the eyecup in the dirvcfion of the
arrow to remove it.
• The finder lens block is a precision part.
You cannot disassemble it turther,
• Do nol louch the window or lens of the
finder lens block.
122
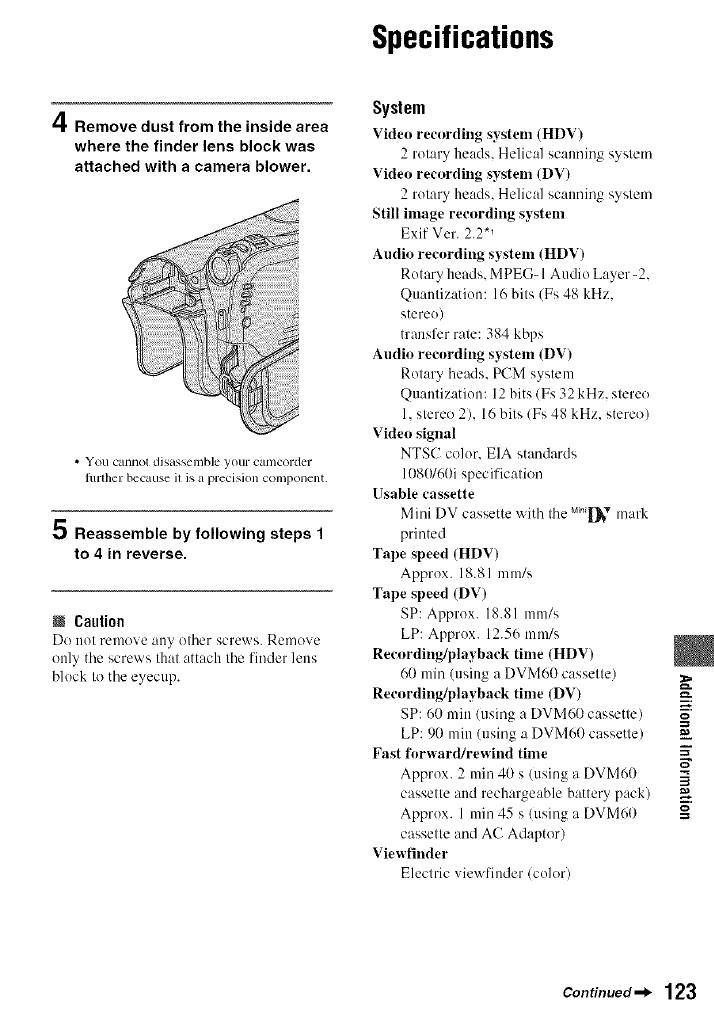
Specifications
A
HI, Remove dust from the inside area
where the finder lens block was
attached with a camera blower.
• You cannot disassemble your cat/lcorder
timber because it is a precision component.
5 Reassemble by following steps 1
to 4 in reverse.
NCaution
DO uot reulove :luy ()tiler screws. Remove
oul_ tile scre_xs that attach tile finder ]ells
block to tile eyecup.
System
VMeo reeording system (HDV)
2 rotary heads. Helical scanning system
Video reeording system (DV)
2rotary heads. Helical scanning system
Still inmge reeording system
Exif Ver. 2.2 *_
Audio recording system (HDV)
Rotary heads. MPEG- 1Audio Layer-2.
Quautization: 16bits (Fs 48 kHz.
stereo)
transfer rate: 384 kbps
Audio recording system (DV)
Rotary heads. PCM system
Quantizatiou: 12 bits/Fs 32 kHz. stereo
1. stereo 2), 16 bits/Fs 48 kHz. stereo)
Vide() signal
NTSC color. EIA standards
108(g60i specification
Usable eassette
Mini DV cassette with tile Min[]_v n/ark
printed
Tape speed (HDV)
Approx. 18.81 mm/s
Tape speed (DV)
SP: Approx. 18.81 mm/s
LP: Approx. 12.56 mm/s
Recording/playback time (HDV)
60 rain (using a DVM60 cassette)
Recording/playback time (DV)
SP: 60 rain/using a DVM60 cassette)
LP: 90 rain (using a DVM60 cassette)
Fast forward/rewind time
Approx. 2 mill 40 s /using a DVM60
cassette and rechargeable battery pack)
Approx. 1 mill 45 s /using a DVM60
cassette and AC Adaptor)
Viewfinder
Electric viewfinder/color)
m.
_=_.
g
Continued.._ 123

124
hnage device
5.9 mm/ 1/3 type) CMOS sensor
Gross: Approx. 2 103 000 pixels
Effective (movie, 4:3):
I 076 000 pixels
Effective/movie, 16:9):
I 434 000 pixels
Effective (still, 4:3):
I 991 000 pixels
Effective (still, 16:9):
1 493 000 pixels
I,ens
Carl Zeiss Vario-Sonnar T*
10 x (Optical), 20 x. 80 x/Digital)
Focal length
f=5.1 - 51 mm (7132 ~ 2 I18 irr.)
When converted to a 35 mm still
camera
IraCAMERA-TAPE *2:41.3 ~ 485 mm
(1 11116 - 19 I18 in.) (16:9), 50.5 - 594
mm (2 ~ 23 112in.) 14:3)
IraCAMERA-MEMORY: 37 ~ 370 mm
/1 1/2 - 14 5/8 ira.) (4:3), 40.4 _ 404
mm (1 5/8 ~ 16 in.) 116:9)
FI.8 _ 2.9
Filter diameter: 30 mm/l 3/16 in.)
Color temperature
[AUTO], lONE PUSH], [INDOOR]
/3 200 K),
[OUTDOOR] 15 800 K)
Minilnum illumination
5 Ix/lux) (F 1.8)
0 lx (lux) (during NightShot function)
*_Exif" is a file format for still images.
established by the JEITA (Japan
Electronics and Information Technology
Industries Association). Files in this
lbnnat carl have additional information
such as your camcordef s setting
information at the time of recording.
*2The lbcal length figures are actual
figures resulting from _i(le angle pixel
read-out.
Output connectors
Audio/Video output
10-pin connector
Video sign:d: I Vp-p, 75 f2 (ohms),
unbalanced
Luminance signal: 1 Vp-p, 75 £2
(ohms), unbalanced
Chrominance signal: 0.286 Vp-p. 75 £2
(ohms), unbalanced
Audio signal: 327 mV/at load
impedance 47 kf2/kilohms)), Output
impedance with less than 2.2 kf2
(kilohms)
COMPONENT OUT jack
Y: 1VDp, 75£2(ohms), unbalanced PB/
PI,:,(!_#(.'I<:+/- 350 mVp-p
HDMI OUT jack
TypeA (19-pin)
Input/Output connectors
LANC jack
Sterer) mini-minijack (0 2.5 ram)
USB jack
mini-B
_, HDV/DV ,jack
i.LINK Interface (IEEE 1394. 4-pin
connector S 100)
LCD screen
Pieture
6.9 cm (2.7 type, aspect ratio 16:9)
Total dot lmlnber
21 I 2IX)(960 x 220)
General
Power requirements
DC 7.2 V (battery pack)
DC 8.4 V (AC Adaptor)
Average power consunlption
During c:m/era recording using tile
viewfinder with nornml brightness:
HDV recording 4.1 W
DV recording 3.9 W
During camera recording using the
LCD with normal brightness:
HDV recording 4.4 W
DV recording 4.2 W
Operating temperature
0'C to +40 'C (32 °Fto 104 >F)
Storage temperature
-20 'C to +60 °C (-4 'F to + 140 'F)
Dimensions (approx.)
82x78x139mm
(3 1/4 × 3 1/8 x 5 1/2 ill.) (w/hN)
excluding tile proiecting parts
Mass (approx.)
500 g (1 lb 1 oz) main unit only
600 g (l lb 5 oz) including the NP-FP60
rechargeable battery pack and DVM60
cassette.
Supplied accessories
See page 14.
ACAdaptorAC-L200
Power requirements
AC I00 - 240 V. 50/60 Hz
Current consumption
0.35- 0.18 A
Power consumption
18W
Output voltage
DC 8.4 V*
Operating temperature
0'C to +40 'C (32 <'Fto 104 'F)
Storage temperature
-20 'C to + 60 'C (_4 'F to + 140 >F)
Dimensions (approx.)
48x29x81 mm(l 15/16×13/16x
3 1/4 in.) (w/h/d) excluding tile
projecting parts
Mass (approx.)
170 g (6.0 oz) excluding the power cord
* See the label on tile AC Adaptor lot other
specifications.
Rechargeablebatterypack(NP-FP60)
Maximum output voltage
DC 8.4 V
Output voltage
DC 7.2 V
Capaeity
7.2 Wh (1 000 mAh)
Dimensions (approx.)
31.8 x 33.3 x 45.0 mm
(I 5/16x 1 5/16x 1 13/16 in.) (w/h/d)
Mass (approx.)
80 g (2.9 oz)
Operating temperature
O'C to +40 'C (32 'F to 104 'F)
Type
Lithium ion
Design and specifications are subject to change
wilhotlt notice.
m.
g
Continued-_ 125
Ontrademarks
•"Handycam _and
r'3Vc.sxl_ _re
rcgistcrcd tradelnarks of Sony Corporation.
•"Memory Slck,'"_ ,' "Melnoly Slck
Duo," "MEMDRY9TIER0U0," "Memory Stick
PRO Duo," "MEMORYSTIEKPRO 0u0,"
"MagicGate," "rJL,_XG | CG_T E ."
"M*_gicGate Memo W Stick" and "MagicGate
Menlory Stick Duo" are trademarks of Sony
Corporation.
• "Inff_LITHIUM" is a trademark of Sony
Corporation.
• i,LINK and _ are trademarks of Sony
Corporation.
M FI _ Digital
• _ _x_,,to is a tradelllark.
• Microsoft, Windows. and Windows Media are
trademarks or registered lrademarks of U.S.
Microsoft Corporalion ill the U,S. and odler
countries,
• Macintosh and Mac OS am trademzwks of Apple
Computer. lnc in the U.S, and other countries.
• HDV and the HDV logo am trademarks of Sony
Corporation and Victor Coral)any of Japan, Ltd.
• HDI_II,_,,,,_r_|, _,ndHigh-DeB,dti....
Mullilnedia lnlerlace are trademarks or
registered trademarks of HDMI Licensing
lntcrl, LceLLC.
• Pcntium is a lrademark or rcgislered trademmk
of Intel Corporalion.
All other product names mentioned herein may be
the trademarks or registered trademarks of dleir
respective companies. Furthermorc, i_1 and "@"
arc not inenlJoned ill each case in lhJs illanual.
NotesontheLicense
ANY USE OF THIS PRODUCT OTHER THAN
CONSUMER PERSONAL USE IN ANY
MANNER THAT COMPLIES WITH THE
MPEG-2 STANDARD FOR ENCODING
VIDEO INFORMATION FOR PACKAGE[)
MEDIA IS EXPRESSLY PROHIBITED
WITHOUT A LICENSE UNDER APPLICABLE
PATENTS IN THE MPEG-2 PATENT
PORTFOLIO, WHICH LICENSE IS
AVAILABLE FROM MPEG LA, L,L,C., 250
STEELE STREET, SUITE 300, DENVER,
COLORADO 80206.
126
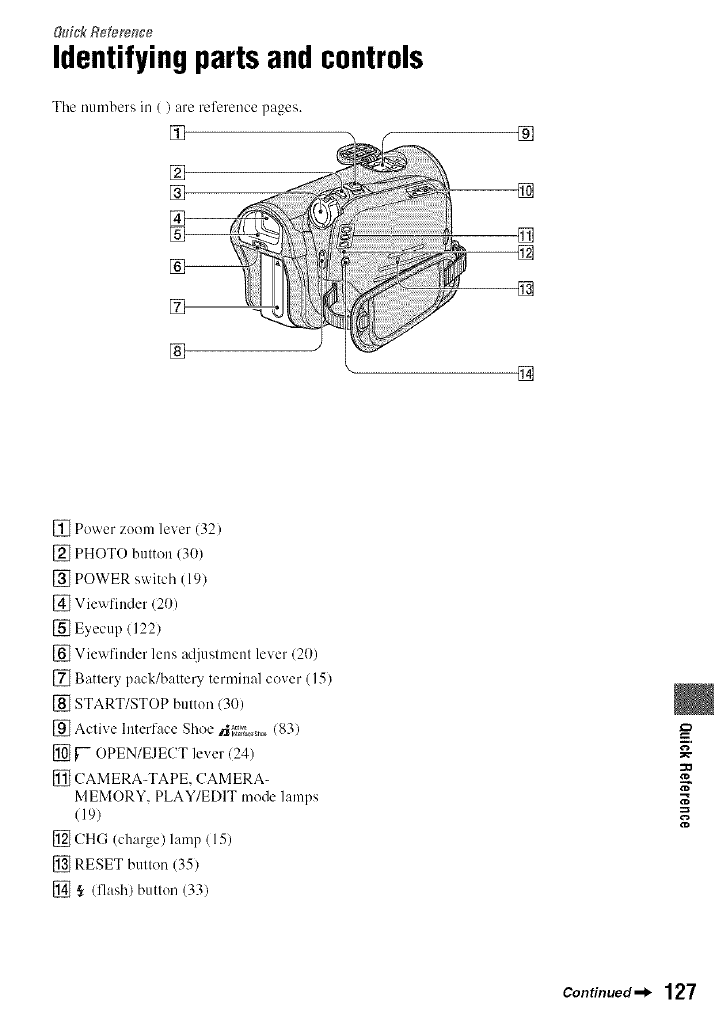
&h'ck Refere_Tce
Identifying parts and controls
Tile numbers in ( ) are reference pages.
[]
[]
[]
[]
[]
[]
[]
[]
[]
[] Power zoom lever (32)
[] PHOTO button (30)
[] POWER switch (19)
[] Viewfiuder (20)
[] Eyecup (122)
[] Viewfiuder lens adjustment lever (20)
[] Battery pack/battery terminal cover (15)
[] START/STOP button (30)
[] Active Interface Shoe _;_ (83)
[] ['- OPEN/EJECT lever (24)
[] CAMERA-TAPE, CAMERA-
MEMORY, PLAY/EDIT mode lamps
(19)
[] CHG (charge) lamp (15)
[] RESET button (35)
[] ,_ (flash) button (33)
Continued_l_ 127
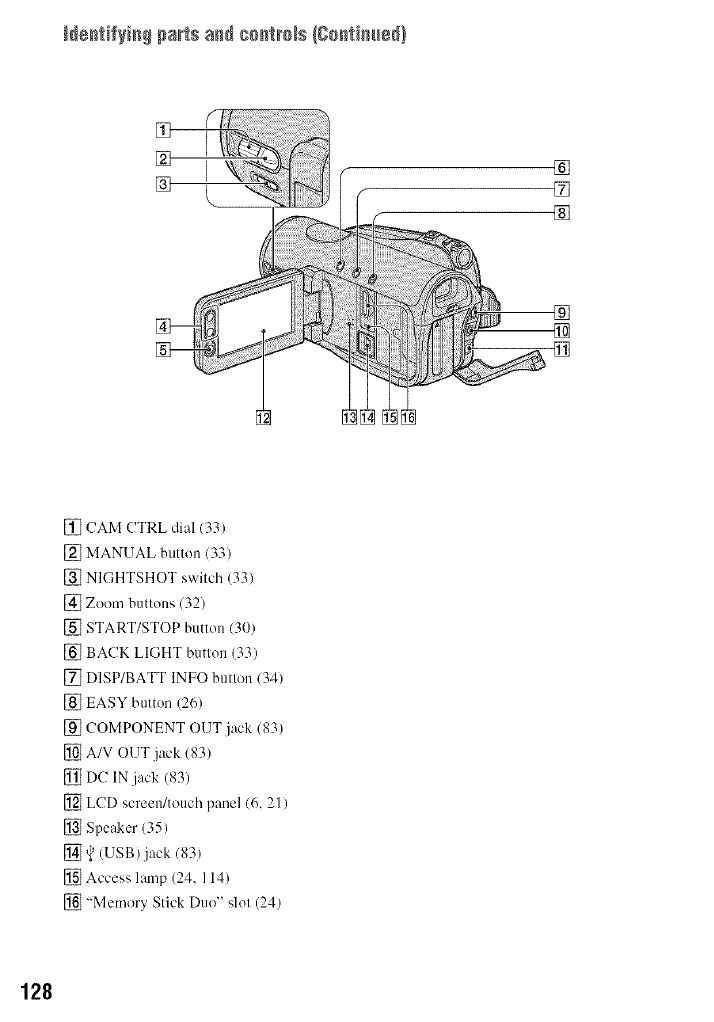
Ne_tif_i_# parts and co_tm_s {8o_tim_÷_}
[]
[] []
[]
[]
[]
[]
[] (!AM CTRL dial (33)
[] MANUAL button (33)
[] NIGHTSHOT switch (33)
[] Zoom buttons 132)
[] START/STOP button (30)
[] BACK LIGHT button (33)
[] DISP/BATT INFO button 134)
[] EASY button (26)
[] COMPONENT OUT jack (83)
[] A/V OUT jack (83)
[] DC IN jack (83)
[] LCD screen/touch panel 16, 21)
[] Speaker (35)
[] v_(USB) jack 183)
[] Access lamp (24, 114)
[] "Memory Stick Duo" slot (24)
128
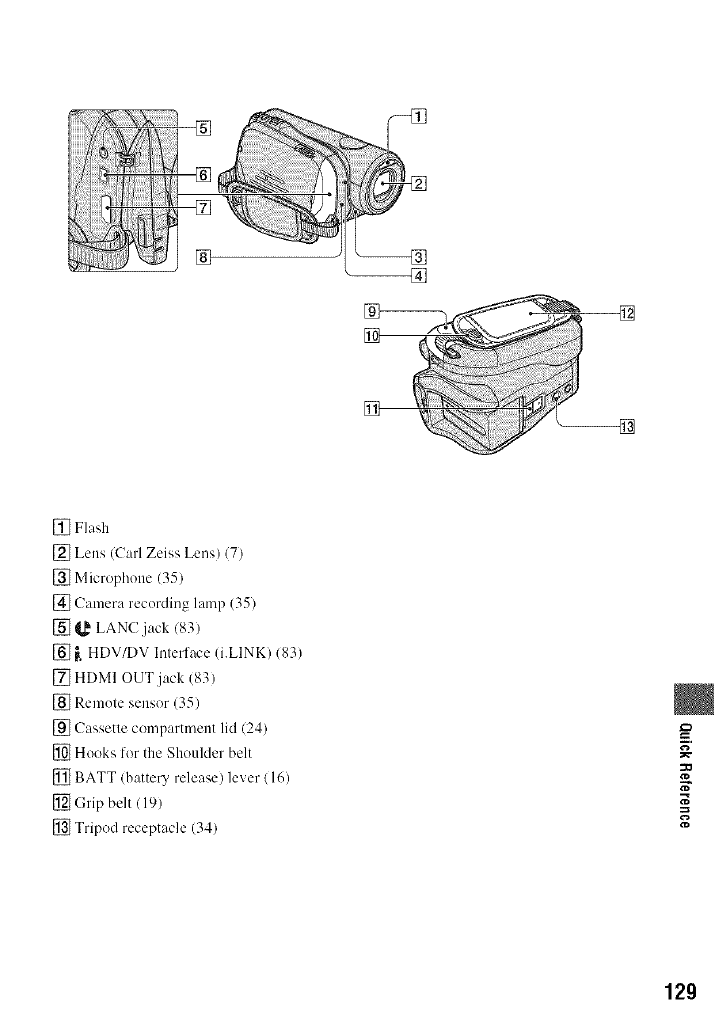
[]
[]
[]
[]
[]
[] Flash
[] Lens (Carl Zeiss Lens) (7)
[] Microphone (35)
[] Camera recording lamp (35)
[] _,_ LANC jack (83)
[] _. HDV/DV Interface (i.LINK) (83)
[] HDMI OUT jack (83)
[] Remote sensor (35)
[] Cassette compartment lid (24)
[] Hooks for the Shoulder belt
[] BATT (battery release) lever (16)
[] (;rip belt (19)
[] Tripod receptacle (34)
N"
129
Index
Numeric
I ttSIIi/480i ............................. 67
12B IT .................................... 66
16BIT .................................... 66
480i ....................................... 67
A
AC Adaptor .......................... 15
Access lamp .......................... 25
Active lnlerlace Shoe ........... 83
Adjusling exposure lot back
light ................................. 33, 97
AE SHIFT ..................... 54, 102
ALL ERASE ......................... 59
AUDIO MIX ........................ 66
AUDIO MODE .................... 66
AUTO SHUTTER ................ 54
A.SHUT OFF
(Auto shut oil) ...................... 70
A/V connecting cable .....43, 74
A/V OUT jack ................ 43, 83
B
BACK LIGHT ................ 33, 97
BATT (battery relea+) lever
.............................................. 1(,
Battery
BATT INFO
(Battm T inli0 ................. 34
Battery pack .................. 15
Remaining battm T ......... 34
BEACH&SKI ....................... 52
BEEP .................................... 69
BLACK FADER .................. 61
BURN DVD ......................... 89
Button-type litlliutll battcry
............................................ 121
B&W .................................... 62
C
CALIBRATION ................ 120
CAM CTRL dial .................. 72
CAMERA COLOR .............. 54
CAMERA DATA ................ 69
CAMERA SET menu .......... 52
Casselte ........................ 24, 112
Insert/Eject .................... 24
Cassette colnpal_ tllelll .......... 24
Charging the baltery ............. 15
Batlery pack .................. 15
Pre-installed mchargeable
battery ......................... 121
Charging time ...................... 17
CHG (charge) lamp .............. 15
CINEMA EFECT
(Cinematic ellPct) ................ 62
Click to DVD ....................... 89
CLOCK SET ........................ 23
COLOR SLOW S
(Color Slow Shutler).... 56. 102
COMPONENT ..................... 67
COMPONENT OUT jack
....................................... 43.83
Componenl video cable ....... 43
Compression lbrmal ........... 114
Connect
Compuler ...................... 84
TV ................................. 42
VCR .............................. 74
CONV.LENS ....................... 57
D
DATA CODE ................ 23.68
Date _arch ........................... 41
DATE/TIME ............ 23, 36. 69
DC IN jack ........................... 15
DC plug ................................ 15
Delete pictures ..................... 80
DEMO MODE ............... 64.92
DIAL SET ............................ 57
DIGITAL ZOOM ........... 57, 98
DISP GUIDE
(Display guide) ..................... 21
DISP OUTPUT .................... 69
Display indicators ................. 36
DISP/BATT INFO button
........................................ 2(I, 34
Down convert flmction ......... 12
Dual Rec ............................... 32
Dubbing ................................ 74
DV Iormat ............................ 65
DV SET ................................ 66
D.EFFECT
(Digital eflPct) .............. 61, 1(13
E
EASY button ........................ 26
Easy Handycam .............. 26, 49
EDIT/PLAY menu ............... 64
END SEARCH ............... 39, 65
END SEARCH/Rec review
display switch butlon ............ 36
ERASE
ALL ERASE ................. 59
Piclures .......................... 80
EXPOSURE ................. 53, 1(}2
Eyecup ................................ 122
F
FADER ......................... 61, 103
FILE NO. (File number)....... 60
FINE ..................................... 58
Fireworks .............................. 52
Flash butlon .................... 33, 97
FLASH LEVEL .............. 55, 97
FLASH SET ......................... 55
FLASH (Flash motion) ......... 62
FOCUS ........................... 54, 97
130
Folder
NEW FOLDER ............. 60
PB FOLDER
(Playback folder) ........... 60
REC FOLDER
(Recording R_lder) ......... 60
FORMAT ...................... 60. 114
Frame-by-hame Playback .-.64
Full charge ............................ 16
6
Grip belt ................................ 19
GUIDEFRAME .................... 68
H
HD (high definition) image
quality ................................... 42
HDMI cable .......................... 43
HDMI OUT jack ............. 43.83
HDV lormat .......................... 65
HDV 1080i ...................... 12. 66
HDV/DV Inlerlace .......... 43.83
HISTOGRAM .............. 56. 103
Holding lhe camcorder, ........ 19
I
Icon .......See Display indicators
ID- 1 ....................................... 68
hnage delete bulton ............... 37
Image prolection ................... 81
Image quality
(QUALITY) .......................... 58
Image size
(lMAGE SIZE) ..................... 58
Index screen .......................... 31
Index screen display button
.............................................. 37
Indicalors .............................. 38
INDOOR ............................... 53
"lntoLlTHIUM" battery pack
............................................ 116
Inilialize (Reset) .................... 35
Insulalion sheet ..................... 40
Internal microl)hone ............. 35
INT.REC-STL
(Inlelval photo recording).... 63
i.LINK ................................ 117
i.LINK cable.......44, 77.87, 89
i.LINK CONV ................ 42, 68
J
Jack ....................................... 83
Jack cover ............................. 83
JPEG ................................... 114
k
Label ................................... 113
LANC jack ........................... 83
LANDSCAPE ...................... 52
LANGUAGE ....................... 70
LCD backlighl ................ 2(I, 94
LCD BL LEVEL
(LCD back lighl level) ......... 67
LCD BRIGHT ...................... 67
LCD COLOR ....................... 67
LCD PANEL ........................ 69
LCD panel ............................ 20
LCD BL LEVEL ........... 67
LCD BRIGHT ............... 67
LCD COLOR ................ 67
LCD screen .......................... 20
LCD/VF SET ....................... 67
Lens cover ...................... 19, 3(I
Lid ........................................ 24
LP (Long Play) ..................... 66
N
Macintosh ............................. 84
Main sound ........................... 67
Mainlenance ....................... 118
MANUAL billion ................. 72
MEMORY SET menu .......... 58
Memol T Stick ....................... 64
"Memory Slick". ................ 114
"Memol T Stick Duo", ........... 24
FORMAT ...................... 60
Insert/Ejecl .................... 24
Number of mcordable
pictures .......................... 58
Write-protecl tab ......... 114
Menloly Stick Duo adaplor
............................................ 115
"Memoly Stick Duo" slo1.....25
Menu ..................................... 48
CAMERA SET menu....52
EDIT/PLAY menu ........ 64
MEMORY SET menu...58
Menu items .................... 50
Personal Menu ......... 48, 71
PICT.APPLL menu .......61
STANDARD SET menu
....................................... (,5
TIMFULANGU. menu ...7()
Using tim menu ............. 48
MENU ROTATE .................. 69
Mirror mode .......................... 34
Moisture condensation ........ 119
MONOTONE ....................... 61
MOSAIC ............................... 63
MOSAIC FADER ................ 61
MULTI-SOUND .................. 67
N
NEG.ART ............................. 62
NEW FOLDER .................... 60 __.
g
NighlSllot .............................. 33
NIGHTSHOT swilch ............ 33 N"
NS LIGHT _'
(NightShol Light) ................. 56
NTSC .......................... 100. 111
Number of recordable pictures
.............................................. 5_
0
OLD MOVIE ........................ 62
ONE PUSH ........................... 53
Continued-_ 131
132
OPEN/EJECT lever. ............. 24
Operation confirmation beep
................................. See BEEP
OUTDOOR .......................... 53
P
PAL .................................... 111
PASTEL ............................... 63
PB FOLDER
(Playback lolder ) .................. 60
PB zoom ............................... 34
Personal Menu ................ 48, 71
Add ................................ 71
Arrange the order .......... 72
Cuslonlize ...................... 71
Delele ............................ 71
Reset .............................. 72
U_ ................................. 48
Personal Menu button ........... 36
PHOTO button ......... 27, 30, 40
PictBridge ............................. 81
PictBridge PRINT ................ g 1
Picture Search ....................... 31
PICT.APPLI. menu (Picture
Application menu) ................ 61
PICT,EFFECT
(Picture eft)c0 ...................... 62
Playback ............................... 31
Fralne ............................. 64
Reverse .......................... 64
Slow ............................... 64
Playing time .......................... 17
PORTRAIT (Sol) portrait) ...52
Power cord ............................ 15
POWER switch ..................... 19
Pro-installed rechargeable
battery ................................. 121
Prcvious/Nexl image button
.............................................. 37
Prinl ...................................... gl
Print mark ............................. 80
PROGRAM AE ............ 52, 101
P.MENU ... See Personal Menu
I1
QUALITY ............................ 58
QUICK REC ........................ 70
R
REC CTRL
(Recording comrol) .............. 78
REC FOLDER
(Recording R_lder) ................ 60
REC FORMAT .................... 66
REC LAMP
(Recording lamp) ................. 69
REC lamp
(Recording lamp) ................. 35
REC MODE
(Recording nlode) ................ 66
Rec review ........................... 39
Recording ............................. 30
Recording capacity' .............. 36
Recording lime ..................... 17
REDEYE REDUC ............... 55
REMAINING ....................... 69
Remaining batlel y ................ 36
Remole Commander ............ 40
REMOTE CTRL
(Remole conlrol) .................. 69
Remote sensor ...................... 35
RESET button ...................... 35
Reversal Playback ................ 64
S
S VIDEO cable .............. 45.74
S VIDEO.jack ................ 42. 74
SD (standard definilion) image
quality .................................. 42
Searching lkw the slarling point
............................................. 39
SellLdiagnosis display ........ 107
SELF-TIMER ...................... 56
SEPIA .................................. 62
Setting the date and linle...,., 23
SHARPNESS ............... 54, 102
Shoulder belt ........................ 34
SKINTONE .......................... 62
Skip Scan .............................. 31
SLIDE SHOW ...................... 61
Slow Playback ...................... 64
SLOW SHUTTR
(Slow shutler) ....................... 62
SMTH SLW REC ................. 63
SOLARIZE ........................... 62
SP (Standard Play) ............... 66
Speaker ................................. 35
Specifications ..................... 123
SPOT FOCUS .............. 54, 102
SPOT METER
(Flexible spol meter) .... 52, 1{}2
SPOTLIGHT ........................ 52
STANDARD ........................ 58
STANDARD SET menu ...... 65
START/STOP button..... 26, 30
STATUS CHECK ................ 68
STEADYSHOT .............. 57, 97
STEREO ............................... 67
STILL ................................... 62
Slill image
Image size ..................... 58
Quality ........................... 58
Still image lomml ....... 114
STILL SET ........................... 58
Sub sound ............................. 67
SUNSET&MOON ............... 52
SUPER NS
(Super NightShol) ................ 55
System rcquircmenls ............ 84
T
Tape counler ......................... 36
Tape playback select bullon
.............................................. 37
Tape ...................... See Casselle
TELE MACRO ............ 55, 102
Telepholo .............................. 32

Timecode.............................36
TIME/LANGU.menu...........70
Touch panel .......................... 21
Trademark ........................... 126
TRAIL .................................. 62
Transmitter ............................ 40
Tripod ................................... 34
TV ......................................... 42
TV color syslems ................ 111
TV TYPE .............................. 68
U
USB jack ............................... 83
USB SELECT ....................... 64
Using abroad ....................... 111
V
VAR.SPD PB
/Various speed playback) .....64
VCR HDV/DV ..................... 65
VF B.LIGHT
/Viewfinder brighmess) ........ 67
Video control buttons ........... 40
Video bead .......................... 119
Video operalion bullons ........ 37
Viewfinder ............................ 20
Brighmess ...................... 67
Viewfinder lens adjustment
level'. ..................................... 20
VOLUME ............................. 67
Volume ................................. 31
V-OUT/PANEL .................... 69
W
Wall outlet ............................ 15
Warning indicalors .............. 107
Warning messages .............. 1tIg
WB SHIFT
(While Balance ShiB) ........... 54
WHITE BAL.
(While balance) ............. 53. 102
WHITE FADER ................... 61
Wide angle ........................... 32
WIDE SELECT .................... 66
Windows .............................. 84
WORLD TIME .................... 70
Wrile-prolecl lab ........ 112, 114
Z
ZEBRA ................................. 56
Zero set memory .................. 40
ZERO SET MEMORY bulmn
.............................................. 40
Zoom .................................... 32
Zoom level-. .......................... 32
=O
u-,,
133
