Sony ICD PX440 User Manual Quick Start Guide ICDPX440 Qsg
User Manual: Sony ICD-PX440 Quick Start Guide
Open the PDF directly: View PDF ![]() .
.
Page Count: 2
IC Recorder
Quick Start Guide
© 2014 Sony Corporation Printed in China
4-534-065-51(1)
ICD-PX440
ˎIC Recorder (1)
ˎStereo headphones* (1)
ˎCarrying pouch* (1)
ˎLR03 (size AAA) alkaline battery
(2)
ˎQuick Start Guide
ˎApplication Software, Sound
Organizer (Installer file stored in
the built‑in memory so that you
can install it to your computer.)
ˎHelp Guide (HTML file stored
in the built‑in memory so it
can easily be copied to your
computer.)
* supplied with some models in
some regions.
Check the supplied items.
ˎElectret condenser microphone
ECM‑TL3, ECM‑CS3
ˎRechargeable battery
NH‑AAA‑B2EN, NH‑AAA‑B2KN
ˎUSB AC adaptor AC‑UD20,
AC‑U50AG, AC‑U501AD (except
Argentina)
ˎCompact charger & 2‑pcAAA
Multi‑Use Premium batteries
BCG‑34HS2KAN,
BCG‑34HW2KAN (except
Argentina)
Optional accessories
Welcome to your new Sony IC recorder!
This is the Quick Start Guide, which provides you with instructions on the basic operations of the IC recorder.
Please read it carefully. We hope you enjoy using your new Sony IC recorder.
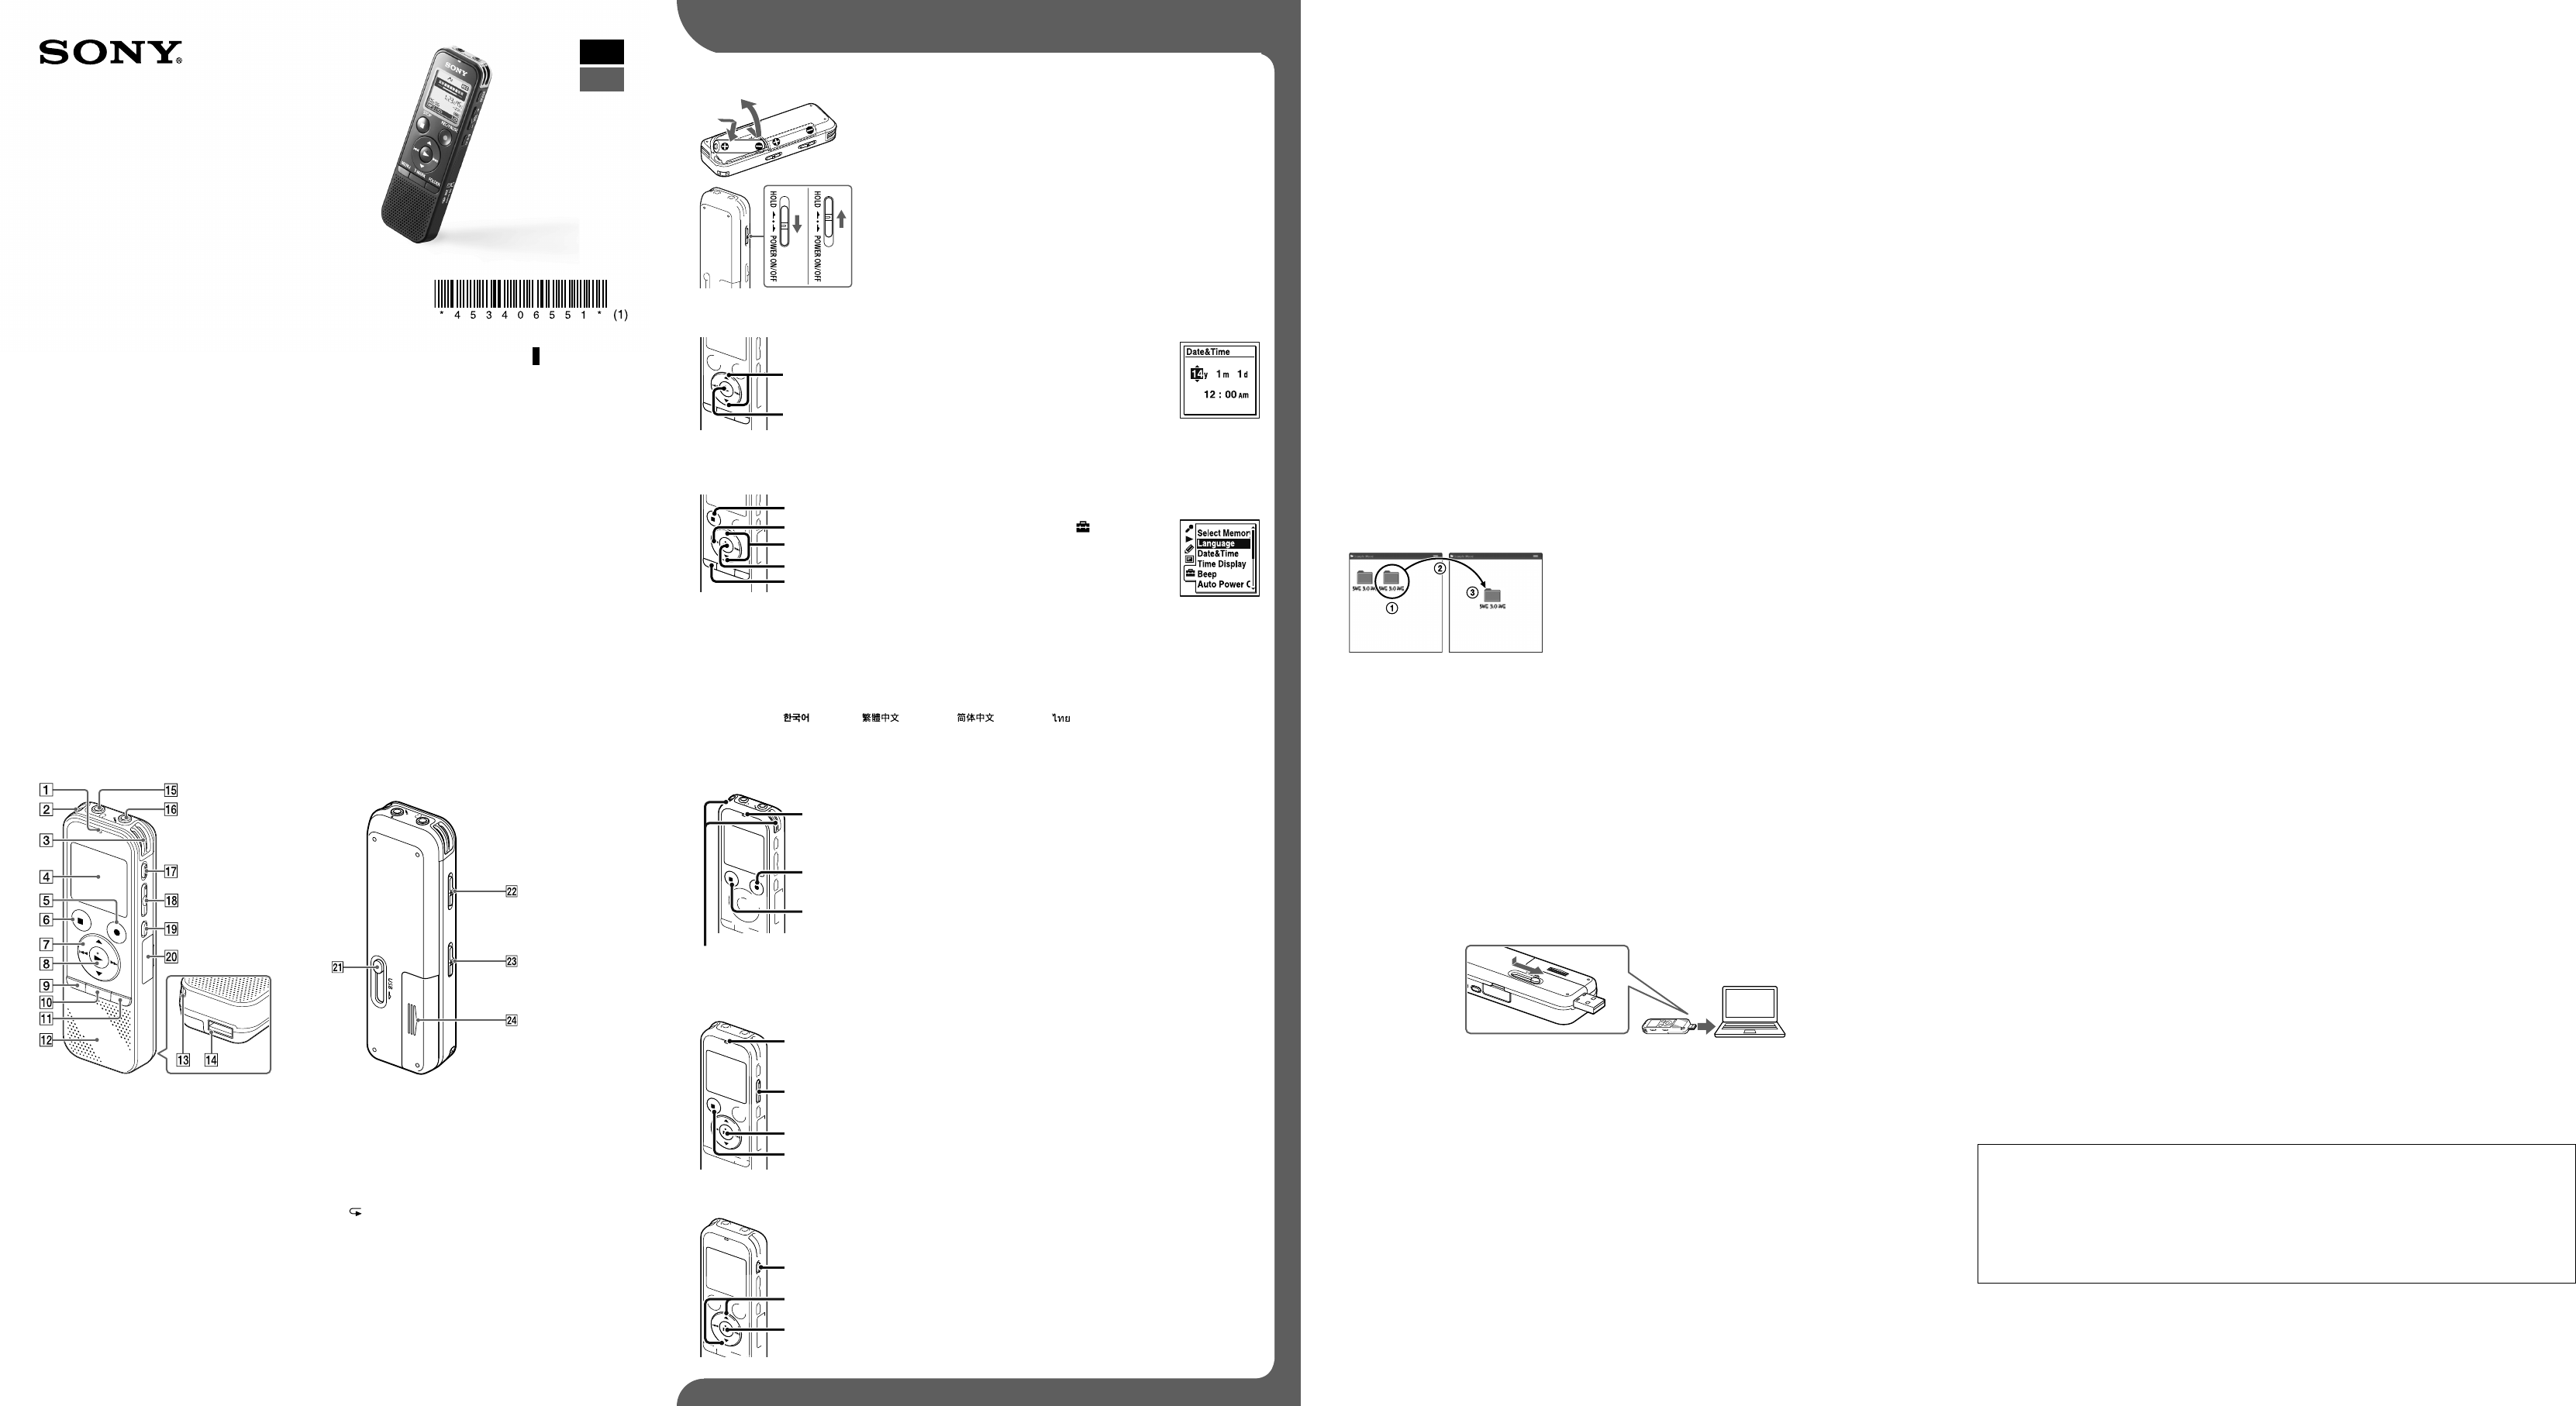
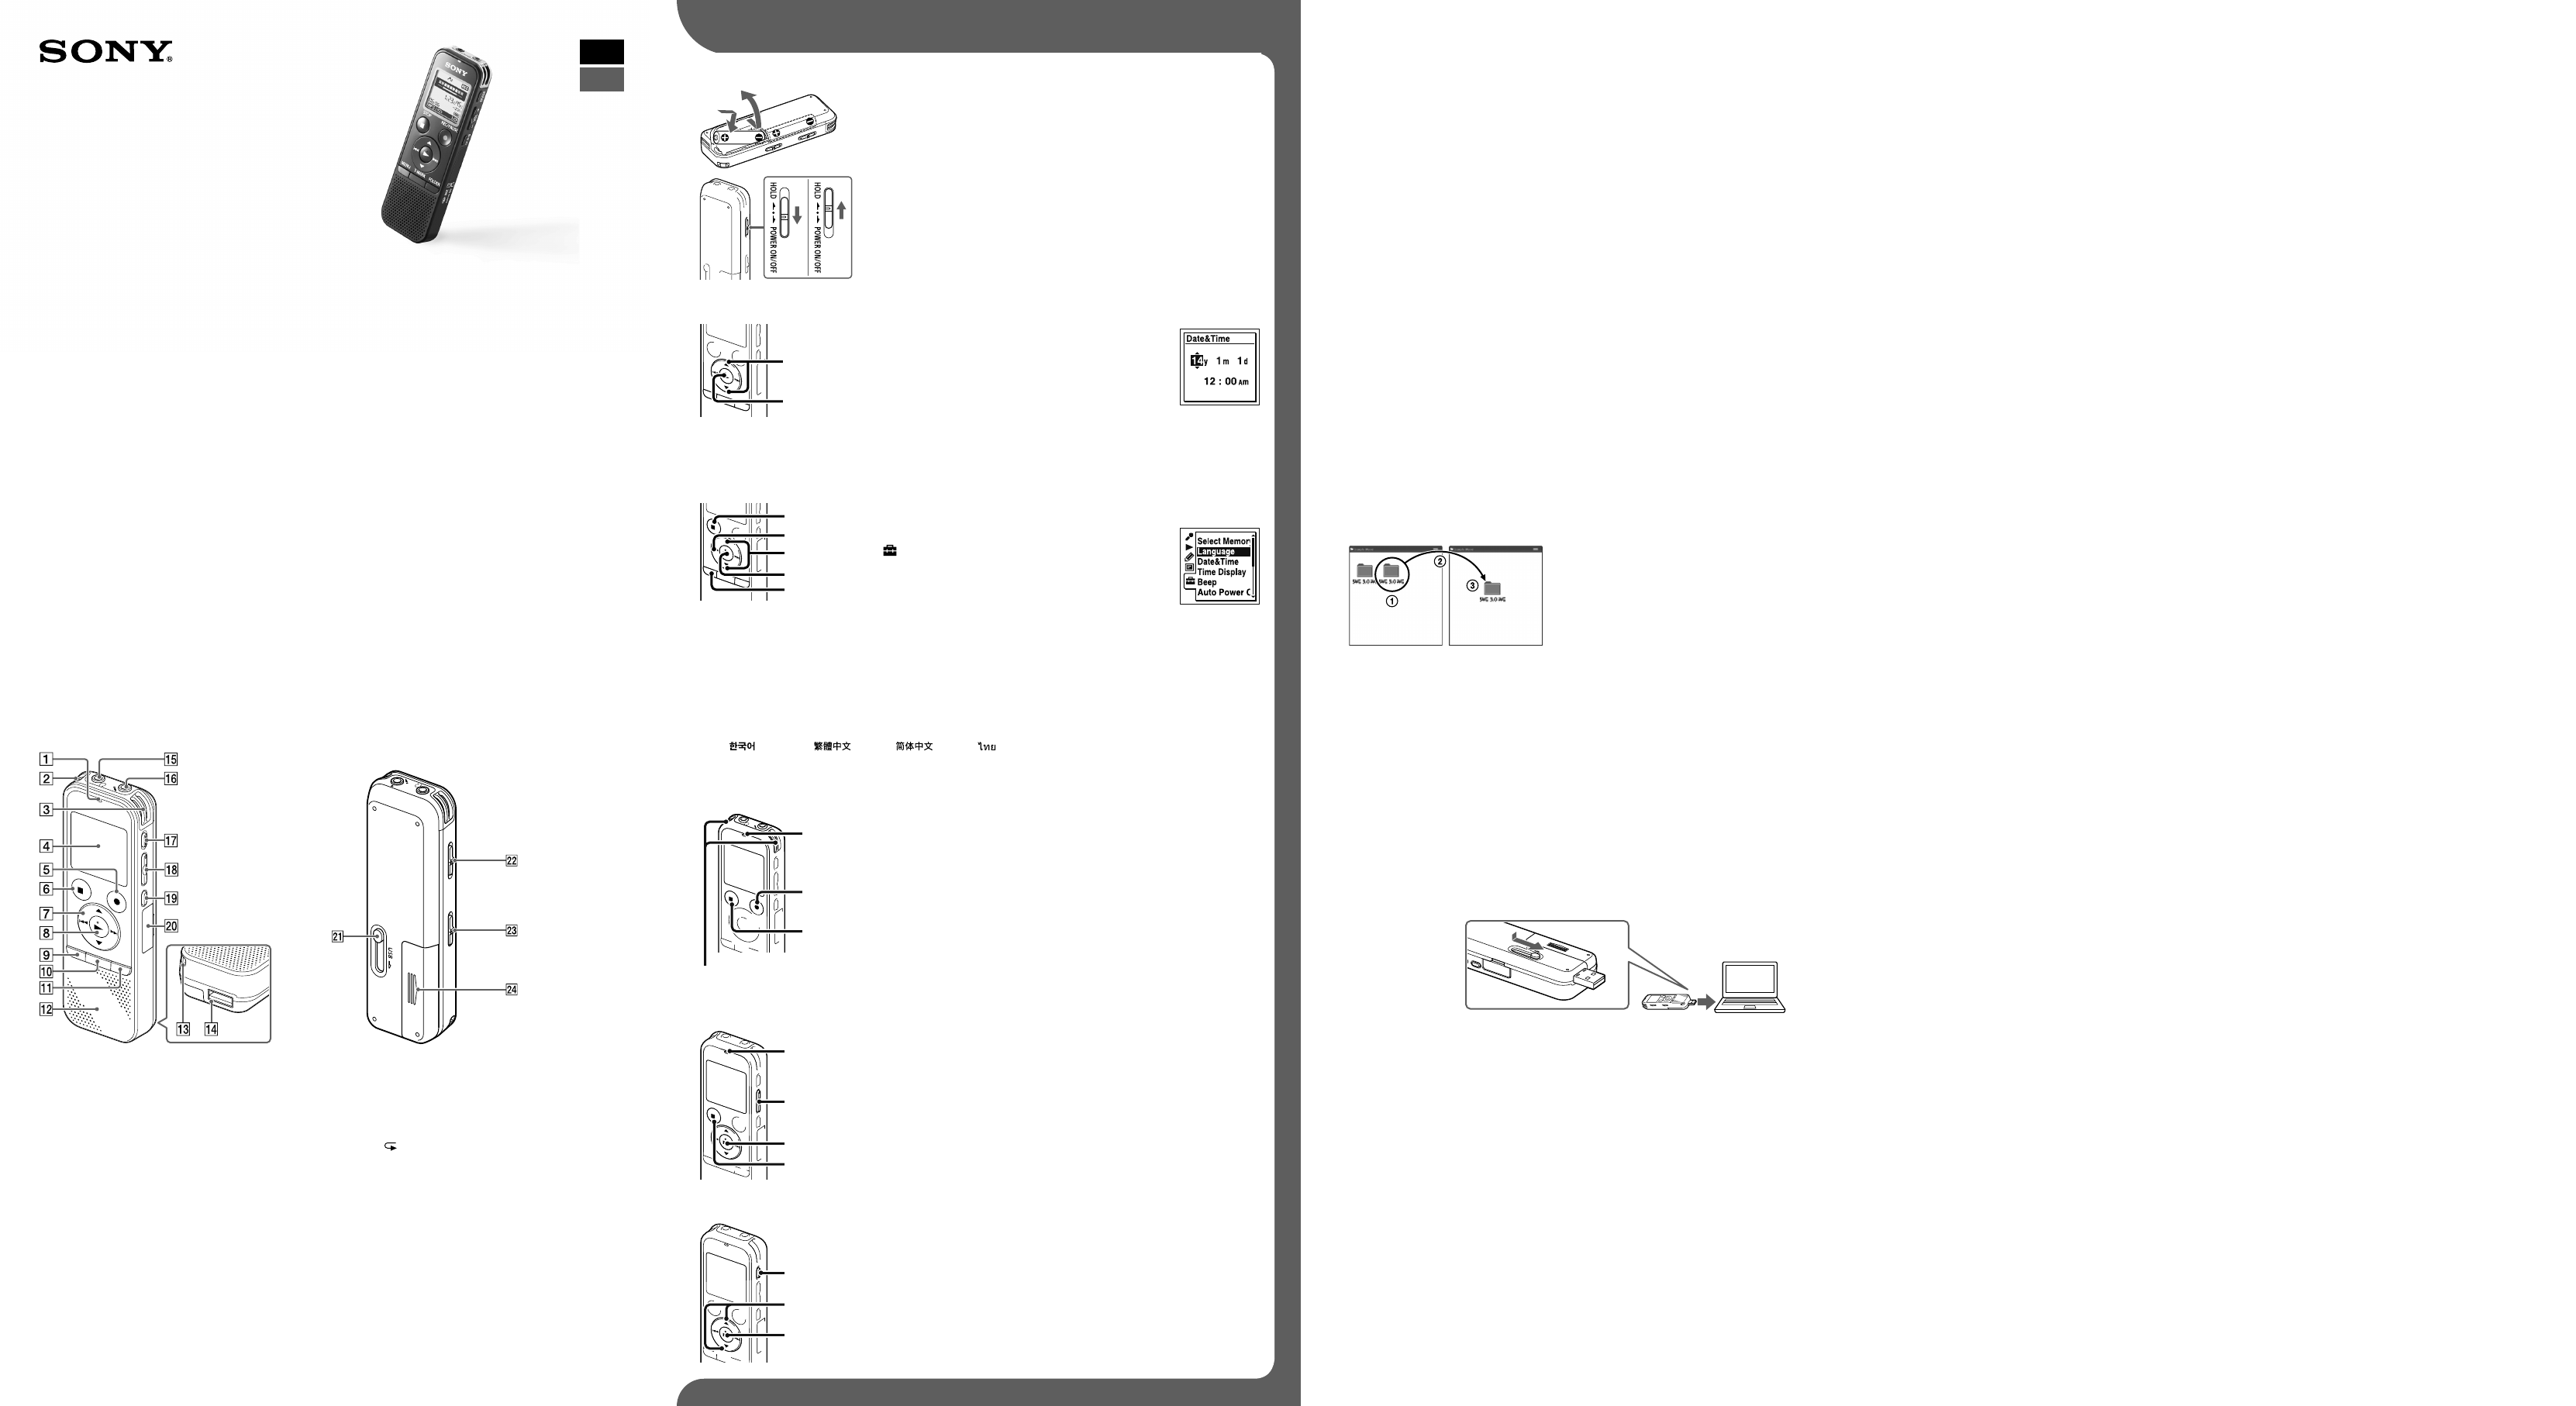
Parts and controls
Operation indicator
Built‑in microphones (stereo) (L)
Built‑in microphones (stereo) (R)
Display window
REC/PAUSE (record/pause) button
STOP button
Control button (, , (review/fast backward),
(cue/fast forward))
(play/enter) button*1
MENU button
T‑MARK (track mark) button
FOLDER button
Speaker
Strap hole (A strap is not supplied.)
USB connector compartment
(headphones) jack
(microphone) (PLUG IN POWER) jack*1
ERASE button
VOL –/+ (volume –/+) button*1
A‑B (repeat A‑B) button
M2™/microSD memory card slot
(The card slot is in the cover.)*2
USB slide lever
HOLD•POWER ON/OFF switch
DPC (SPEED CTRL) switch
Battery compartment
*1 These buttons and the jack have a tactile dot. Use it as a reference point for operations, or to identify each terminal.
*2 In this Quick Start Guide, M2™ and microSD cards are generally referred to as a “memory card.” The M2™/microSD
card slot is referred to as the “memory card slot.”
Let’s try out your new IC recorder Utilizing Your Computer
Installing the help guide on your computer
By installing the help guide on your computer from the built‑in memory of the IC recorder, you can search for
detailed operations and possible solutions when a problem occurs.
Slide the USB slide lever on the back of the IC recorder, and insert the USB connector into the USB
port of a running computer.
In Windows: Click [Computer] (or [My Computer]), then double-click [IC RECORDER] [FOR
WINDOWS].
In Mac: Double-click [IC RECORDER] on the desktop.
Install the help guide.
In Windows: Double‑click [Help_Guide_Installer] (or [Help_Guide_Installer.exe]).
In Mac: Double‑click [Help_Guide_Installer_for_mac.app]. (v10.5.8 or higher)
Follow the instructions that appear on the screen to proceed with installation.
After the installation completes, double-click the [Help_Guide_icdp44_uc.htm] (for the customers
in the U.S.A. and the Latin American countries/regions) or [Help_Guide_icdp44_zz.htm] (for
customers in other countries/regions) icon in the desktop for Windows (or in Finder for Mac).
The help guide is displayed.
You can also view the help guide on the following Sony IC Recorder customer support home page:
For customers in the U.S.A. and the Latin American countries/regions: http://rd1.sony.net/help/icd/p44/uc/
For customers in other countries/regions: http://rd1.sony.net/help/icd/p44/zz/
Copying files from the IC recorder to your computer
You can copy the files and folders from the IC recorder to your computer to store them.
Connect the IC recorder to your computer.
Copy files or folders you want to transfer to your computer.
Drag and drop the files or folders you want to copy from “IC RECORDER” or “MEMORY CARD” to the local
disk on your computer.
To copy a file or folder (Drag and drop)
IC RECORDER or
MEMORY CARD
Your computer
Click and hold,
drag,
and then drop.
Disconnect the IC recorder from your computer.
Installing Sound Organizer
Install Sound Organizer on your computer.
Note
Sound Organizer is compatible with the Windows PC only. It is not compatible with Mac.
¼When installing Sound Organizer, log in to an account with administrator privileges.
Slide the USB slide lever on the back of the IC recorder, and insert the USB connector into the USB
port of a running computer.
If the IC recorder cannot be connected to a computer directly, a dedicated USB connection support cable
PC‑U004 is available as a repair part for a fee.
For more details, consult your nearest Sony dealer.
You can also use a self‑powered USB hub, provided it has a USB logo.
Make sure the IC recorder has been recognized properly.
While the IC recorder is connected to the computer, “Connecting” is displayed in the display window of the
IC recorder.
Go to the [Start] menu, click [Computer] (or [My Computer]), and then double-click [IC RECORDER]
[FOR WINDOWS].
Double-click [SoundOrganizerInstaller_V150] (or [SoundOrganizerInstaller_V150.exe]).
Follow the instructions that appear on the screen.
Make sure that you accept the terms of the license agreement, select [I accept the terms in the
license agreement], and then click [Next].
When the [Setup Type] window appears, select [Standard] or [Custom], and then click [Next].
Follow the instructions on the screen and set the installation settings when you select [Custom].
When the [Ready to Install the Program] window appears, click [Install].
The installation starts.
When the [Sound Organizer has been installed successfully.] window appears, check [Launch
Sound Organizer Now], and then click [Finish].
Note
You may need to restart your computer after installing Sound Organizer.
Note
If you format the built‑in memory, all data stored there will be erased. (The Help Guide and the Sound Organizer
software will also be erased.)
1. Power on.
Slide and lift the battery compartment lid, then insert LR03 (size
AAA) alkaline batteries with the correct polarity.
Turn the power on.
To turn the power on
Slide and hold the HOLD•POWER ON/OFF switch in the direction of
“POWER ON/OFF” until the window display appears.
To prevent unintentional operations (HOLD)
Slide the HOLD•POWER ON/OFF switch in the direction of “HOLD.”
¼To release the IC recorder from the HOLD status, slide the HOLD•POWER
ON/OFF switch towards the center.
2. Set the date and time.
Press or to set the year (the last two digits
of the year), and then press (play/enter).
Repeat this procedure to set month, day, hour,
and minute in sequence.
When you set the minute and press (play/enter),
the clock reflects the setting.
¼You can set the clock setting later. For details, refer to the Help Guide of the IC recorder.
3. Select the menu language.
Press MENU.
Press , press or to select , and then
press (play/enter).
Press or to select “Language,” and then
press (play/enter).
Press or to select the language that you want to use in the display window, and then
press (play/enter).
You can select the following languages: (* Default setting)
ˎfor U.S.A and Latin American countries/regions
English*, Espanol (Spanish), Francais (French)
ˎfor other countries/regions
Deutsch (German), English*, Español (Spanish), Français (French), Italiano (Italian), Русский
(Russian), (Korean), (Chinese), (Chinese), (Thai)
Press STOP.
4. Record.
Operation
indicator
Built‑in microphones
¼Before you start using the IC recorder, make sure that you slide the
HOLD•POWER ON/OFF switch towards the center to release the HOLD status.
Place the IC recorder so that the built-in microphones face the
direction of the source to be recorded.
Press REC/PAUSE.
Recording starts and the operation indicator lights in red.
¼You can pause recording by pressing REC/PAUSE. Press REC/PAUSE
again to restart recording.
Press STOP to stop recording.
The “Accessing...” animation appears and the recording stops.
5. Listen.
Operation
indicator
¼If you do not select a file, the file just recorded or played back most recently
will be played back.
For details of selecting a file, refer to the Help Guide of the IC recorder.
Press (play/enter).
Playback starts and the operation indicator lights in green.
Adjust the volume by pressing VOL –/+.
Press STOP to stop playback.
6. Erase.
Once a file is erased, you cannot restore it.
Press ERASE.
“Erase?” is displayed and the file to be erased is played back for
confirmation.
Select “Execute” using or , and then press (play/enter).
“Erasing…” is displayed while the selected file is being erased.
Additional features
Details of these additional features for recording, playback, and editing are included in the help guide.
ˎScene Selection
ˎRecording Filter
ˎNoise Cut
ˎT‑MARK (Track mark)
ˎDPC (Digital Pitch Control)
ˎA‑B Repeat
ˎVOR (Voice Operated Recording)
ˎEasy Search
ˎDivide
ˎSound Organizer editing software
Note
Depending on the country or region, some of the models or optional accessories are not available.
GB
ES
On power
Operate the IC recorder on 3.0V or 2.4V.
Use two LR03 (size AAA) alkaline batteries or NH‑AAA
rechargeable batteries.
On safety
Do not operate the IC recorder while driving, cycling
or operating any motorized vehicle.
On handling
ˎDo not leave the IC recorder in a location near heat
sources, or in a place subject to direct sunlight,
excessive dust or mechanical shock.
ˎShould any solid object or liquid fall into the IC
recorder, remove the battery and have the IC
recorder checked by qualified personnel before
operating it any further.
If you have any questions or problems concerning
your IC recorder, please consult your nearest Sony
dealer.
Precautions
Owner’s Record
The model number is located at the rear panel and the serial number is located at the rear panel. Record these numbers
in the space provided below. Refer to these numbers whenever you call upon your Sony dealer regarding this product.
Model No. ________________________________
Serial No. _________________________________
WARNING
Do not expose the batteries (battery pack or batteries installed) to excessive heat such as sunshine, fire or the like for a
long time.
CAUTION
Risk of explosion if battery is replaced by an incorrect type.
Dispose of used batteries according to the instructions.
Capacity (User available capacity*1*2)
4 GB (approx. 3.60 GB = 3,865,470,566 Byte)
*1 A small amount of the built‑in memory is used for file management and therefore not available for user storage.
*2 When the built‑in memory is formatted with the IC recorder.
Dimensions (w/h/d) (not incl. projecting parts and controls) (JEITA)*3
Approx. 37.2 mm × 113.2 mm × 19.3 mm (1 1/2 inches × 4 1/2 inches × 25/32 inches)
Mass (JEITA)*3
Approx. 75g (2 5/8oz) including two LR03 (size AAA) alkaline batteries
*3 Measured value by the standard of JEITA (Japan Electronics and Information Technology Industries Association)
The following FCC statement applies only to the version of this model manufactured for sale in the USA. Other versions
may not comply with FCC technical regulations.
INFORMATION
This equipment has been tested and found to comply with the limits for a Class B digital device, pursuant to Part 15 of
the FCC Rules. These limits are designed to provide reasonable protection against harmful interference in a residential
installation. This equipment generates, uses and can radiate radio frequency energy and, if not installed and used in
accordance with the instructions, may cause harmful interference to radio communications.
However, there is no guarantee that interference will not occur in a particular installation. If this equipment does cause
harmful interference to radio or television reception, which can be determined by turning the equipment off and on, the
user is encouraged to try to correct the interference by one or more of the following measures:
Reorient or relocate the receiving antenna.
Increase the separation between the equipment and receiver.
Connect the equipment into an outlet on a circuit different from that to which the receiver is connected.
Consult the dealer or an experienced radio/TV technician for help.
You are cautioned that any changes or modifications not expressly approved in this manual could void your authority to
operate this equipment.
If you have any questions about this product, you may call: Sony Customer Information Service Center 1‑800‑222‑7669
or http://www.sony.com/
Declaration of Conformity
Trade Name : SONY
Model : ICD‑PX440
Responsible Party : Sony Electronics Inc.
Address : 16530 Via Esprillo, San Diego, CA 92127 USA
Telephone Number : 858‑942‑2230
This device complies with part 15 of the FCC Rules. Operation is subject to the following two conditions: (1) This
device may not cause harmful interference, and (2) this device must accept any interference received, including
interference that may cause undesired operation.
IC Recorder
Guía de inicio rápido
ICD-PX440
ˎGrabadora IC (1)
ˎAuriculares estéreo* (1)
ˎFunda de transporte* (1)
ˎPilas alcalinas LR03 (tamaño
AAA) (2)
ˎGuía de inicio rápido
ˎSoftware de la aplicación,
Sound Organizer (Archivo del
instalador almacenado en la
memoria interna para poder
instalarlo en el ordenador.)
ˎGuía de ayuda (archivo HTML
almacenado en la memoria
interna para copiarlo fácilmente
al ordenador.)
* suministrado con algunos
modelos en algunas regiones.
Compruebe los componentes suministrados.
ˎMicrófono de condensador de
electreto ECM-TL3, ECM-CS3
ˎPila recargable NH-AAA-B2EN,
NH-AAA-B2KN
ˎAdaptador de ca USB AC-UD20,
AC-U50AG, AC-U501AD (excepto
Argentina)
ˎCargador compacto y 2 pilas
AAA de primera calidad para
usos múltiples BCG-34HS2KAN,
BCG-34HW2KAN (excepto
Argentina)
Accesorios opcionales
¡Le damos la bienvenida a su nueva Grabadora IC
de Sony!
Esta es la Guía de inicio rápido en la cual se ofrecen instrucciones sobre las operaciones básicas de la
grabadora IC. Léala detenidamente. Esperamos que disfrute utilizando su nueva grabadora IC de Sony.
Componentes y controles
Indicador de funcionamiento
Micrófonos incorporados (estéreo) (Izquierda)
Micrófonos incorporados (estéreo) (Derecha)
Visor
Botón REC/PAUSE (grabación/pausa)
Botón STOP
Botón de control (, , (revisión/retroceso
rápido), (búsqueda/avance rápido))
Botón (reproducción/entrar)*1
Botón MENU
Botón T-MARK (marca de pista)
Botón FOLDER
Altavoz
Orificio para la correa de mano (correa de mano
no suministrada).
Compartimento del conector USB
Toma (auriculares)
Toma (micrófono) (PLUG IN POWER)*1
Botón ERASE
Botón VOL –/+ (volumen –/+)*1
Botón A-B (repetición A-B)
Ranura para la tarjeta de memoria M2™/microSD
(La ranura de tarjetas se encuentra dentro de la
cubierta)*2
Lengüeta deslizante USB
Interruptor HOLD•POWER ON/OFF
Interruptor DPC (SPEED CTRL)
Compartimento de las pilas
*1 Estos botones y la toma tienen un punto táctil. Úselo como punto de referencia para las operaciones o para
identificar cada terminal.
*2 En esta Guía de inicio rápido se utiliza el término “tarjeta de memoria” para referirse indistintamente a las tarjetas
M2™ y microSD. El término “ranura para la tarjeta de memoria” se utiliza para referirse a la ranura para la tarjeta
M2™/microSD.
Vamos a probar la nueva grabadora IC Utilización con el ordenador
Instalación de la guía de ayuda en el ordenador
La instalación de la guía de ayuda en el ordenador desde la memoria interna de la grabadora IC le permitirá
buscar detalles de las operaciones y encontrar soluciones para los problemas que puedan surgir.
Deslice la lengüeta deslizante USB de la parte trasera de la grabadora IC e inserte el conector USB
en el puerto USB de un ordenador que esté encendido.
En Windows: Haga clic en [Equipo] (o [Mi PC]) y, acto seguido, haga doble clic en [IC RECORDER]
[FOR WINDOWS].
En Mac: Haga doble clic en [IC RECORDER] en el escritorio.
Instale la guía de ayuda.
En Windows: Haga doble clic en [Help_Guide_Installer] (o [Help_Guide_Installer.exe]).
En Mac: Haga doble clic en [Help_Guide_Installer_for_mac.app]. (v10.5.8 o superior)
Para continuar con la instalación, siga las instrucciones que aparecen en pantalla.
Cuando haya finalizado la instalación, en Windows, haga doble clic en el icono [Help_Guide_
icdp44_uc.htm] (para clientes en EE.UU. y países/regiones de Latinoamérica) o [Help_Guide_
icdp44_zz.htm] (para clientes en otros países/regiones) del escritorio (o en el Finder para Mac).
La guía de ayuda se visualiza.
La guía de ayuda también puede consultarse en los siguientes sitios de atención al cliente de la grabadora
IC de Sony:
Para clientes en EE.UU. y países/regiones de Latinoamérica: http://rd1.sony.net/help/icd/p44/uc/
Para clientes en otros países/regiones: http://rd1.sony.net/help/icd/p44/zz/
Copia de archivos desde la grabadora IC al ordenador
Puede copiar los archivos y las carpetas desde la grabadora IC al ordenador para su almacenamiento.
Conecte la grabadora IC al ordenador.
Copie los archivos o carpetas que desee transferir al ordenador.
Arrastre y coloque los archivos o carpetas que desee copiar desde “IC RECORDER” o “MEMORY CARD” al
disco local del ordenador.
Para copiar un archivo o una carpeta (Arrastrar y colocar)
IC RECORDER o
MEMORY CARD
Ordenador
Haga clic y, sin soltar el ratón,
arrastre,
y luego coloque.
Desconecte la grabadora IC del ordenador.
Instalación de Sound Organizer
Instale Sound Organizer en su ordenador.
Nota
Sound Organizer solo es compatible con los PC de Windows. No es compatible con Mac.
¼Al instalar Sound Organizer, inicie una sesión con una cuenta con privilegios de administrador.
Deslice la lengüeta deslizante USB de la parte trasera de la grabadora IC e inserte el conector USB
en el puerto USB de un ordenador que esté encendido.
Si no es posible conectar la grabadora IC directamente al ordenador, disponemos de un cable auxiliar
PC-U004 para la conexión USB dedicado como pieza de reparación de pago.
Para más información consulte con el distribuidor Sony más cercano.
Puede también utilizar un concentrador USB autoalimentado, siempre que tenga el logotipo USB.
Asegúrese de que la grabadora IC se reconoce correctamente.
Mientras la grabadora IC esté conectada al ordenador, aparecerá “Connecting” en el visor de la grabadora IC.
Vaya al menú [Inicio], haga clic en [Equipo] (o [Mi PC]) y, a continuación, haga doble clic en [IC
RECORDER] [FOR WINDOWS].
Haga doble clic en [SoundOrganizerInstaller_V150] (o [SoundOrganizerInstaller_V150.exe]).
Siga las instrucciones que aparecen en pantalla.
Asegúrese de aceptar los términos del acuerdo de licencia, seleccione [I accept the terms in the
license agreement] y, a continuación, pulse [Next].
Cuando aparezca la ventana [Setup Type], seleccione [Standard] o [Custom] y, a continuación,
pulse [Next].
Siga las instrucciones que aparecen en la pantalla o, si ha seleccionado [Custom], configure los ajustes de la
instalación.
Cuando aparezca la ventana [Ready to Install the Program], haga clic en [Install].
Comienza la instalación.
Cuando aparezca la ventana [Sound Organizer has been installed successfully.], marque la casilla
de verificación [Launch Sound Organizer Now] y haga clic en [Finish].
Nota
Después de instalar Sound Organizer, puede que tenga que reiniciar el ordenador.
Nota
Si formatea la memoria interna, todos los datos almacenados se borrarán. (También se borrarán la Guía de Ayuda y el
software Sound Organizer.)
1. Encender.
Deslice y levante la tapa del compartimento de las pilas e inserte
pilas alcalinas LR03 (tamaño AAA) con la polaridad correcta.
Encienda la grabadora.
Para conectar la alimentación
Deslice y no suelte el interruptor HOLD•POWER ON/OFF en el sentido
de “POWER ON/OFF” hasta que se muestre el visor.
Para evitar el funcionamiento no intencionado (HOLD)
Deslice el interruptor HOLD•POWER ON/OFF en el sentido de “HOLD”.
¼Para desactivar el estado HOLD de la grabadora IC, deslice el interruptor
HOLD•POWER ON/OFF hacia el centro.
2. Ajustar la fecha y la hora.
Pulse o para ajustar el año (los dos últimos
dígitos del año) y, a continuación, pulse
(reproducción/entrar). Repita este proceso
para ajustar el mes, el día, la hora y los minutos
en este orden.
Cuando haya ajustado los minutos y pulsado
(reproducción/entrar), el reloj reflejará el ajuste.
¼Puede realizar el ajuste del reloj con posterioridad. Para obtener más detalles, consulte la Guía de ayuda de la
grabadora IC.
3. Seleccionar el idioma del menú.
Pulse MENU.
Pulse , pulse o pulse para seleccionar
y, a continuación, pulse (reproducción/
entrar).
Pulse o pulse para seleccionar “Language”
y, a continuación, pulse (reproducción/
entrar).
Pulse o para seleccionar el idioma que desea utilizar en el visor y, a continuación, pulse
(reproducción/entrar).
Puede seleccionar los siguientes idiomas: (* Ajuste predeterminado)
ˎPara EE.UU y países/regiones de Latinoamérica
English* (inglés), Espanol, Francais (francés)
ˎPara otros países/regiones
Deutsch (alemán), English* (inglés), Español, Français (francés), Italiano (italiano), Русский (ruso),
(coreano), (chino), (chino), (tailandés)
Pulse STOP.
4. Grabar.
Indicador de
funcionamiento
Micrófonos incorporados
¼Antes de empezar a utilizar la grabadora IC, asegúrese de deslizar el
interruptor HOLD•POWER ON/OFF hacia el centro para desactivar el estado
HOLD.
Coloque la grabadora IC de forma que los micrófonos incorporados
estén orientados hacia la dirección de la fuente que se va a grabar.
Pulse REC/PAUSE.
La grabación comienza y el indicador de funcionamiento se ilumina en rojo.
¼Puede poner en pausa la grabación pulsando REC/PAUSE. Pulse
REC/PAUSE de nuevo para volver a iniciar la grabación.
Pulse STOP para detener la grabación.
Aparece la animación “Accessing...” y la grabación se detiene.
5. Escuchar.
Indicador de
funcionamiento
¼Si no selecciona un archivo, se reproducirá el archivo que se haya acabado
de grabar o el que se haya reproducido más recientemente.
Para obtener más detalles sobre la selección de un archivo, consulte la Guía
de ayuda de la grabadora IC.
Pulse (reproducción/entrar).
La reproducción comienza y el indicador de funcionamiento se ilumina
en verde.
Para ajustar el volumen, pulse VOL –/+.
Pulse STOP para detener la reproducción.
6. Borrar.
Una vez borrado un archivo, no es posible recuperarlo.
Pulse ERASE.
Aparece “Erase?” y el archivo que se va a borrar se reproduce para su
confirmación.
Seleccione “Execute” mediante o y, a continuación, pulse
(reproducción/entrar).
Aparece “Erasing…” mientras se está borrando el archivo seleccionado.
Características adicionales
La guía de ayuda contiene información sobre las funciones adicionales de grabación, reproducción y edición.
ˎSelección de escenas
ˎRecording Filter (Filtro de grabación)
ˎNoise Cut (Corte de ruido)
ˎT-MARK (Marca de pista)
ˎDPC (Digital Pitch Control)
ˎRepetición A-B
ˎVOR (Voice Operated Recording)
ˎEasy Search (Búsqueda Fácil)
ˎDivisión
ˎSoftware de edición Sound Organizer
Nota
Dependiendo del país o la región, algunos de los modelos o accesorios opcionales podrían no estar disponibles.
ES
GB
Alimentación
Utilice la grabadora IC solo con cc de 3,0V o 2,4V
Utilice dos pilas alcalinas LR03 (tamaño AAA) o pilas
recargables NH-AAA.
Seguridad
No utilice la grabadora IC mientras conduce, va en
bicicleta o utiliza cualquier vehículo motorizado.
Manejo
ˎNo deje la grabadora IC cerca de fuentes de calor,
ni en lugares expuestos a la luz solar directa, polvo
excesivo o golpes mecánicos.
ˎSi se introduce algún objeto sólido o líquido en
la grabadora IC, extraiga las pilas y haga revisar
la grabadora IC por personal cualificado antes de
seguir utilizándola.
Si tiene problemas o preguntas acerca de la
grabadora IC, consulte al distribuidor de Sony más
cercano.
Precauciones
ADVERTENCIA
No exponga las pilas (el cartucho de pilas o las pilas instaladas) a un calor excesivo tal como la luz del sol, fuego o algo
similar durante un periodo largo de tiempo.
PRECAUCIÓN
Riesgo de explosión si la pila se sustituye por un tipo incorrecto.
Deseche las pilas usadas de acuerdo con las instrucciones.
Capacidad (capacidad disponible para el usuario*1*2)
4 GB (aprox. 3,60 GB = 3 865 470 566 Bytes)
*1 Una pequeña parte de la memoria interna se utiliza para la gestión de archivos, por lo que no está disponible para el
almacenamiento.
*2 Cuando la memoria interna se formatea con la grabadora IC.
Dimensiones (ancho/alto/largo) (sin incluir proyecciones ni controles) (JEITA)*3
Aprox. 37,2 mm × 113,2 mm × 19,3 mm
Peso (JEITA)*3
Aprox. 75 g incluyendo dos pilas alcalinas LR03 (tamaño AAA)
*3 Valores de medición obtenidos según el estándar JEITA (Japan Electronics and Information Technology Industries
Association)
