Sony ICF SW1000TS SW1000T User Manual Operating Instructions (primary Manual) ICFSW1000TS
User manual ICFSW1000TS Sony ICF-SW1000TS Radio User Manuals and Instruction Guides
User Manual: Sony ICF-SW1000TS Operating Instructions (primary manual)
Open the PDF directly: View PDF ![]() .
.
Page Count: 87
3-800-621-06(1)
Sony Corporation 1995 Printed in Japan
J
FM Stereo/SW/MW/LW
PLL Synthesized Receiver
Stereo Cassette-Corder
取扱説明書
お買い上げいただき、ありがとうございます。
電気製品は安全のための注意事項を守らないと、
火災や人身事故になることがあります。
この取扱説明書と別冊の「安全のために」をよくお読みのうえ、製品
を安全にお使いください。お読みになったあとは、いつでも見られ
るところに必ず保管してください。
Operating Instructions
KKKKKK K
EN
ICF-SW1000T
ICF-SW1000TS

はじめに
2J
•内蔵のタイマーで、好きな時間にラジオを
受信するスタンバイ機能、自動的に電源を
切るスリープタイマー。
•付属のステレオヘッドホンでFM放送、
テープがステレオで楽しめます。
カセットコーダー
•録音/再生リバースデッキ
ー聞いているラジオをワンタッチで録音で
きるほか、マイクでも録音可能。
ー内蔵のタイマーで好きな時間にラジオが
録音できます。
•音を聞きながら早送り、巻き戻しができ
る、キュー・レビュー機能。
MW
(中波)放送の周波数ステップ(間隔)につ
いて
このラジオは、MW放送の受信間隔(周波数
ステップ)が工場出荷時9kHzに設定されてい
ます。しかし、北米や南米では、放送局の周
波数が10kHz間隔で設定されているため、そ
のような地域でMW放送を聞くときは、周波
数ステップを変更してください(19ページ)
北米、南米の国々:10kHz
その他の国々: 9kHz
ラジオ
•世界中の放送が受信できます。
フェーズ ロックト ループ
ーPLL(Phase Locked Loopの略)シンセサ
イザー方式を採用し、簡単で正確な選局が
できます。
ー国内では以下の放送が受信できます。(詳
しくは付属のウェーブハンドブックおよび
ハウトゥキャッチザウェーブをご覧くださ
い。)
テレビ音声 : 1∼3ch
(90∼108MHz)
FM :76∼90MHz
SW
(短波) : 国内外の短波放送、業務用
通信など
1621∼29999kHz
MW
(中波): 530∼1620kHz
LW
(長波) : ロシアなどの長波放送の一
部、ラジオビーコン(航空無
線標識局、船舶無線標識局)
など
150∼529kHz
•目的に合わせて4種類の選局方法で受信で
きます。
ー手動で少しずつ周波数を調節する、マニュ
アル選局。
ー自動的に放送局を探す、スキャン選局。
ー周波数を直接指定して選局する、ダイレク
ト選局。
ーあらかじめ放送局を登録しておき、ワン
タッチで選局できる、プリセット選局。
こんなことができます
ソニー株式会社
お問い合わせはお客様ご相談センターへ
●東京(03)5448-3311●名古屋(052)232-2611●大阪(06)539-5111
〒141-0001 東京都品川区北品川6-7-35
録音についてのご注意
•録り直しのきかない録音の場合は、必ず事前にためし録りをしてください。
•
ステレオカセットコーダーの不具合により録音されなかった場合の録音内容の補償については、ご容赦くださ
い。
•あなたが録音したものは、個人として楽しむなどのほかは、著作権法上、権利者に無断では使用できませ
ん。

目次 3J
目次
乾電池を入れる・・・・・・・・・・・・・・・・・・・・・・・・・ 4
時計を合わせる・・・・・・・・・・・・・・・・・・・・・・・・・ 5
ラジオを聞く—スキャン選局 ・・・・・・・・・・・・ 6
テープを聞く・・・・・・・・・・・・・・・・・・・・・・・・・・・ 8
ラジオを録音する・・・・・・・・・・・・・・・・・・・・・・ 10
ラジオ
いろいろな受信のしかた
少しずつ周波数を調整する
— マニュアル選局 .............. 12
周波数を直接指定する
— ダイレクト選局 .............. 14
周波数を記憶させる
— プリセット選局 .............. 15
SSBやCWを受信する .................... 17
AM放送を良い状態で受信する
— 同期検波............................... 18
海外で使う—MW周波数ステップの
切り換え .................................... 19
外部アンテナを使う ......................... 20
テープ
マイクで録音をする ......................... 22
タイマー
ラジオで目覚める
— スタンバイ機能 ................... 24
ラジオを聞きながら眠る
— スリープタイマー ............... 26
留守中にラジオを録音する
— タイマー録音 ....................... 27
便利な使いかた
誤操作を防ぐ—ホールド機能......... 29
ストラップをつける ......................... 30
電源
乾電池を交換する.............................31
コンセントや車で使う ..................... 32
その他
各部の名称 ........................................ 33
使用上のご注意とお手入れ ............. 38
故障かな?と思ったら ..................... 39
保証書とアフターサービス ............. 41
主な仕様 ............................................42
ミニ知識 ............................................43
J
4J
乾電池を入れる
ここでは乾電池での使いかたを説明します。
テープを使うときは2か所に乾電池を入れて
ください。
乾電池を入れる
TAPE BATT
RADIO BATT
カチッと音がするまで
差し込む
]
}
}
]
]
}
表示に合わせて
]}を正しく
入れる
コンセントやカーバッテリーで使うには /
「コンセントや車で使う」(32ページ )
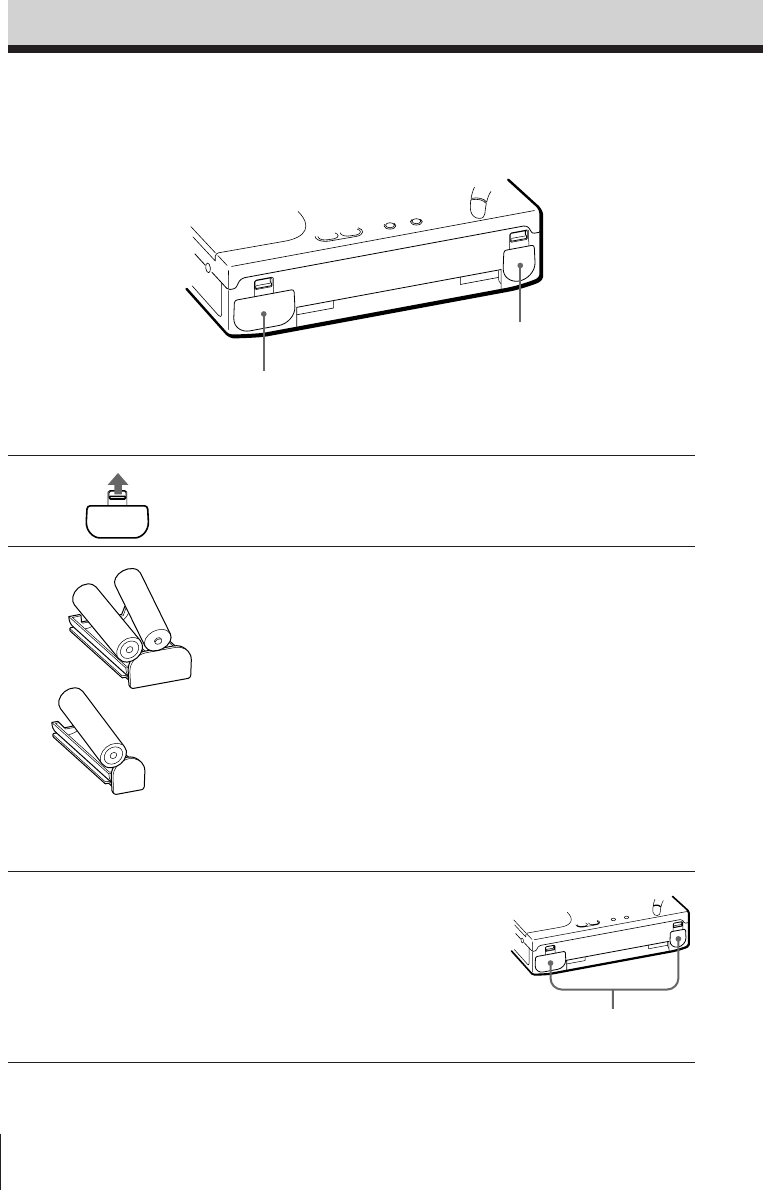
1オープン
OPENつまみを押し上げて、
電池入れを引き出す。
2ラジオ
単3形乾電池をRADIO
バッテリー テープ
BATT側に2本、TAPE
バッテリー
BATT側に1本入れる。
ご注意
ラジオだけ使うときはTAPE BATT側に電
池を入れる必要はありませんが、テープを使
うときは、RADIO BATT側、TAPE BATT
側両方に電池を入れてください。
どちらか一方では動きません。
3両方の電池入れを本体に差し
込む。
ちょっと一言
付属の乾電池はお試し用です。ご使用の際にはアルカリ乾電池をおすすめします。
5J
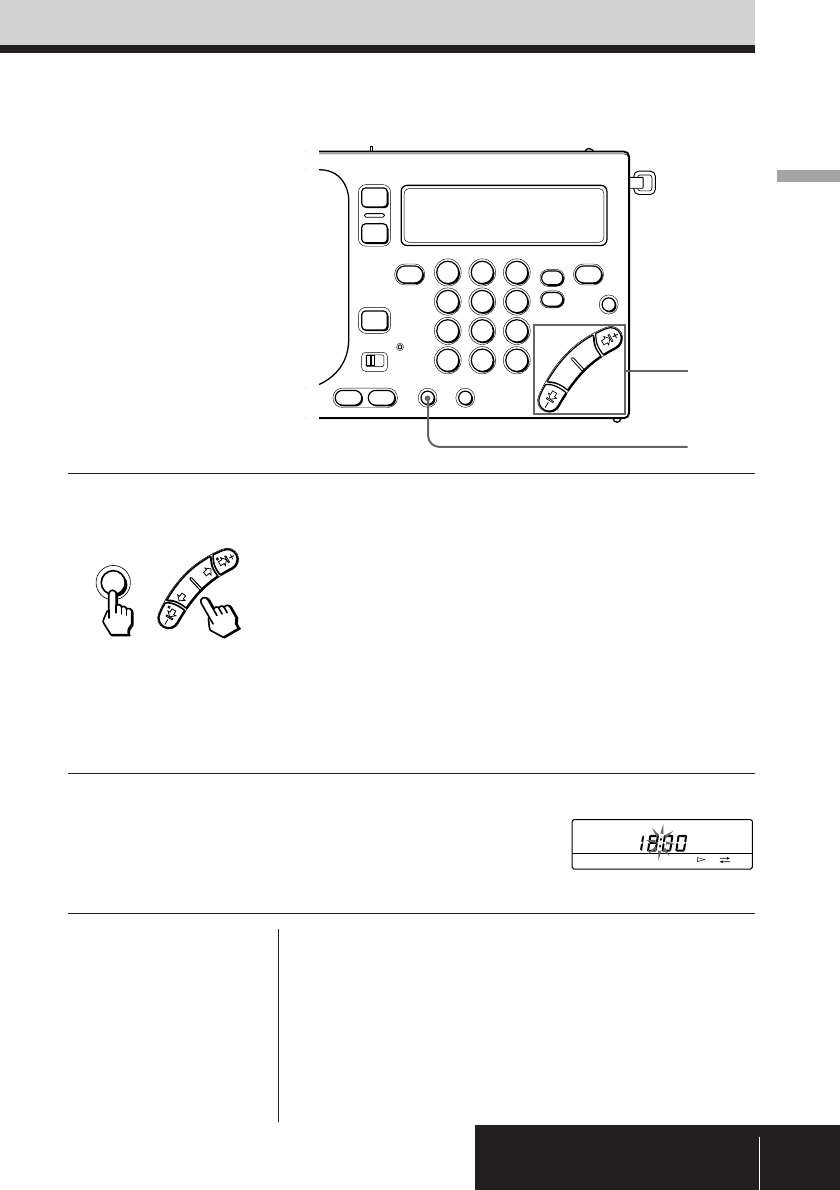
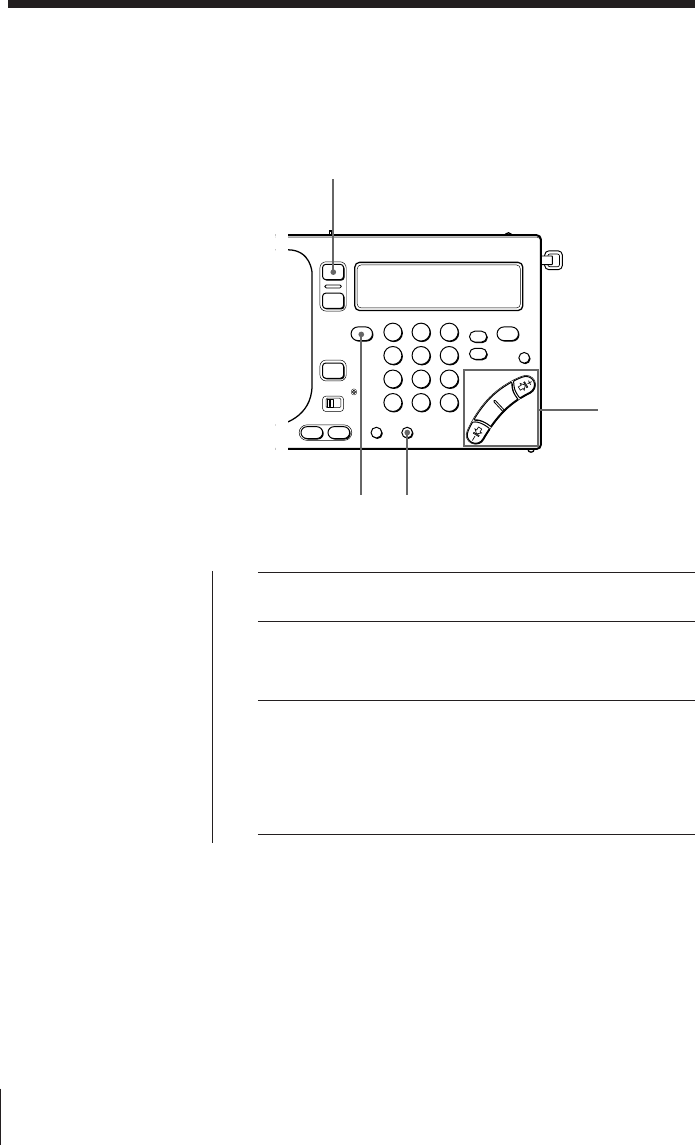
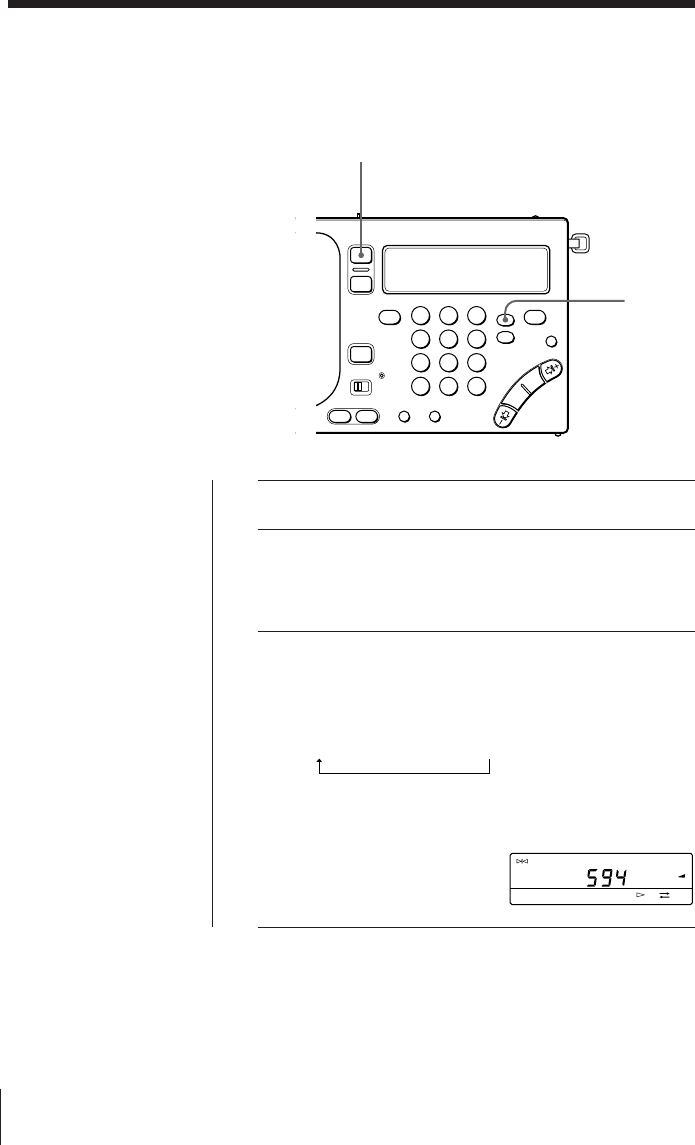
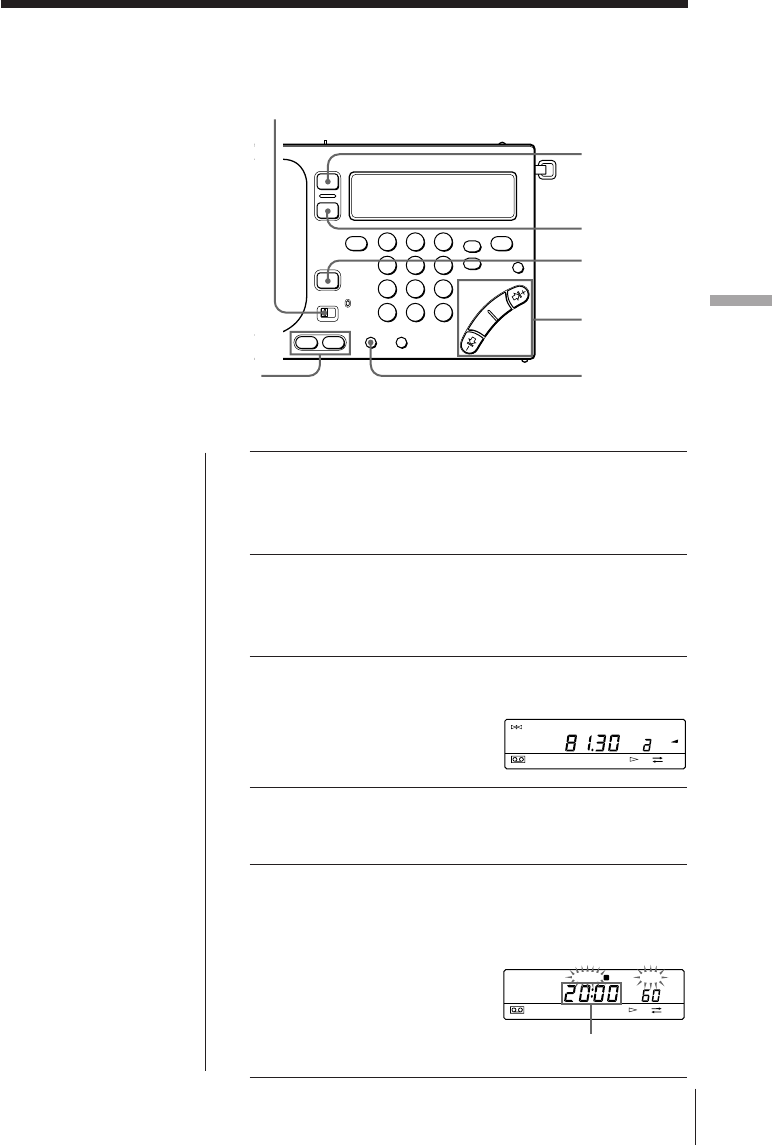
1タイム セット エンター
TIME SET・ENTERを押し
アワー ミニット
たまま、HOURまたはMINを
くり返し押して時刻を合わせ
る。
MIN
(¿または÷)を1回押すたびに
1分ずつ、HOUR
(−I¿または
÷I+)を押すたびに1時間ずつ変わ
ります。
押し続けると速く変わります。
2TIME SET・ENTERから指
を離す。
「:」が点滅し始め、時計が動き出しま
す。
TIME SET
ENTER
時
計
を
合
わ
せ
る
乾
電
池
を
入
れ
る
時計を合わせる
ラジオ受信中やテープ操作中に時刻を見るには
エクセキュート
EXEを押します。もう一度EXEを押すか約10秒たつと元の表
示に戻ります。ただし、ラジオのスキャン選局中は時計表示に
はなりません。
ご注意
ラジオやテープを聞いているときは時計合わせはできません。
RADIO POWER ON/OFFを押してラジオを切るか、pを押してテー
プを止めてください。
ちょっと一言
•本機の時計は24時間表示で
す。
•「0:00」の点滅を止めるに
は、TIME SET・ENTER
を押します。
•秒まで正確に合わせるに
は、電話の時報サービス
(117)をご利用になると便
利です。
+
FWD
1
1,2
123
456
789
0
時計を合わせる
はじめて電池を入れたときや時計
がリセットされたときには、表示
窓に「0:00」が点滅しますので、時
計を合わせてください。

6J
ラジオを聞く—スキャン選局
周波数を少しずつ変えて選局するには/
「マニュアル選局」(12ページ)
周波数を直接指定して選局するには/
「ダイレクト選局」(14ページ)
放送局を覚えさせるには/
「プリセット選局」(15ページ)
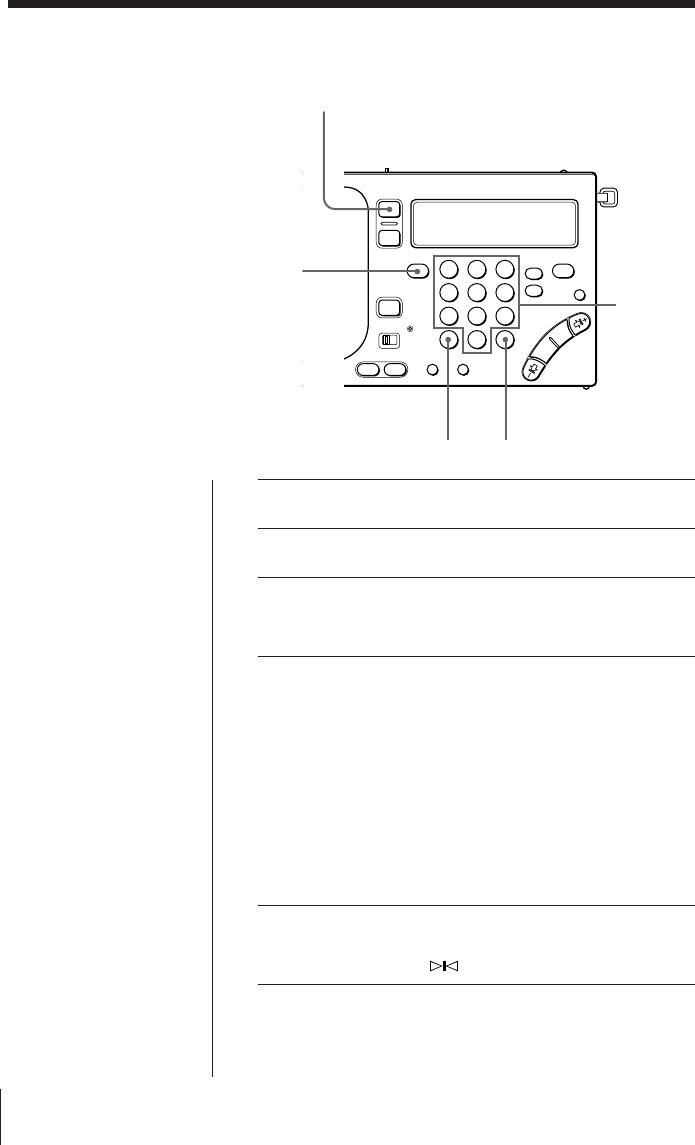
1ラジオ パワー オン オフ
RADIO POWER ON/OFF
を押す。
ラジオの電源が入ります。
2FM/AMを押してFMまたは
AMを選ぶ。
短波(SW)、中波(MW)、長波(LW)
を聞くときはAMにします。
3AMを選んだときは、AM
バンド
BANDを押したままーI¿ま
たは÷I+を押して、MW
(中
波)、LW
(長波)またはメー
ターバンド(短波)を選ぶ。
FM放送を聞く場合は手順4に進んで
ください。
ラジオを聞く
AM BAND
FM/AM
ON/
OFF
AM
PAGE
1
2
3
kHz
FWD
FM
PAGE
1
2
3
MHz
FWD
AM
PAGE
1
2
3
kHz
FWD
+各バンドの最小
周波数が表示される
2
3,4,5
3
123
456
789
0
1
VOLUME
7J
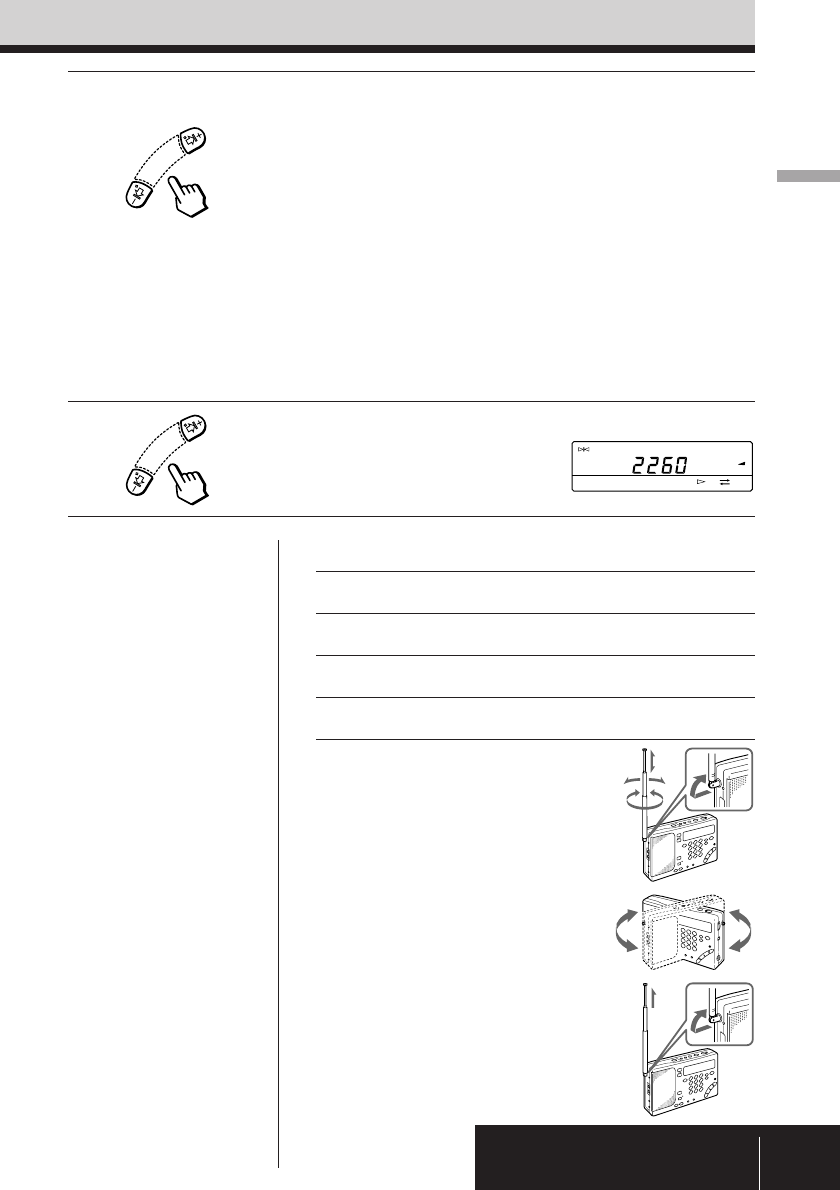
4ーI¿または÷I+を押したま
まにし、数字が動き始めたら
指を離す。
放送局を自動的に受信して、約2秒間
止まり、次の放送局を探します(ス
キャン選局)。
バンドまたはメーターバンド内でス
キャンをくり返します(13ページ)。
また、SSB受信時は150∼
29999kHzの間でスキャンをくり返
します。
5聞きたい局が受信されたところ
で、ーI¿または÷I+を押し
てスキャンを止める。
ラジオを聞く
ラ
ジ
オ
を
聞
く
ちょっと一言
•短波放送のメーターバンド
および各バンドのスキャン
選局の範囲については13
ページをご覧ください。
•ヘッドホンを使うと、FM
ステレオ放送を楽しむこと
ができます。またST・
MONOスイッチでステレ
オとモノラルを切り換える
ことができます。
•ニュース番組などを聞くと
きは、TONEスイッチを
NEWSに合わせると、人の
声などが聞きやすくなりま
す。音楽番組を聞くときは
MUSICに合わせます。
•電波の強い夜間のMW放送
など、自動受信で止まると
ころが多すぎるときや混信
が多いときは、SENSス
イッチをLOCALにしてく
ださい。電波の弱い局をと
ばします。通常はDXにし
ておきます。
ご注意
受信状態が良くならない場
合は、外部アンテナを接続
してください。(20ページ)
その他の操作
こんなときは 使うつまみ、押すボタン
周波数を微調整する ーI¿、¿、÷、÷I+
音量を調節する ボリューム
VOLUME
ラジオの電源を切る RADIO POWER ON/OFF
受信状態を良くするには
FM放送
ロッドアンテナを伸ばして向きや角
度を変えます。
MW、
LW放送
内蔵のバーアンテナが働くので、
ロッドアンテナをたたみ、本体の向
きを変える。
SW放送
ロッドアンテナを垂直いっぱいに伸
ばす。
TUNE
AM
PAGE
1
2
3
kHz
FWD
8J
テープを聞く
1オープン
OPENつまみをずらして、カ
セットを入れる。
テープのたるみをとり、テープが見え
る側を下にして入れます。
2片面再生か両面再生かを選
ぶ。
片面再生: pを押したままFFを押す。
両面再生: pを押しながらREWを押
す。
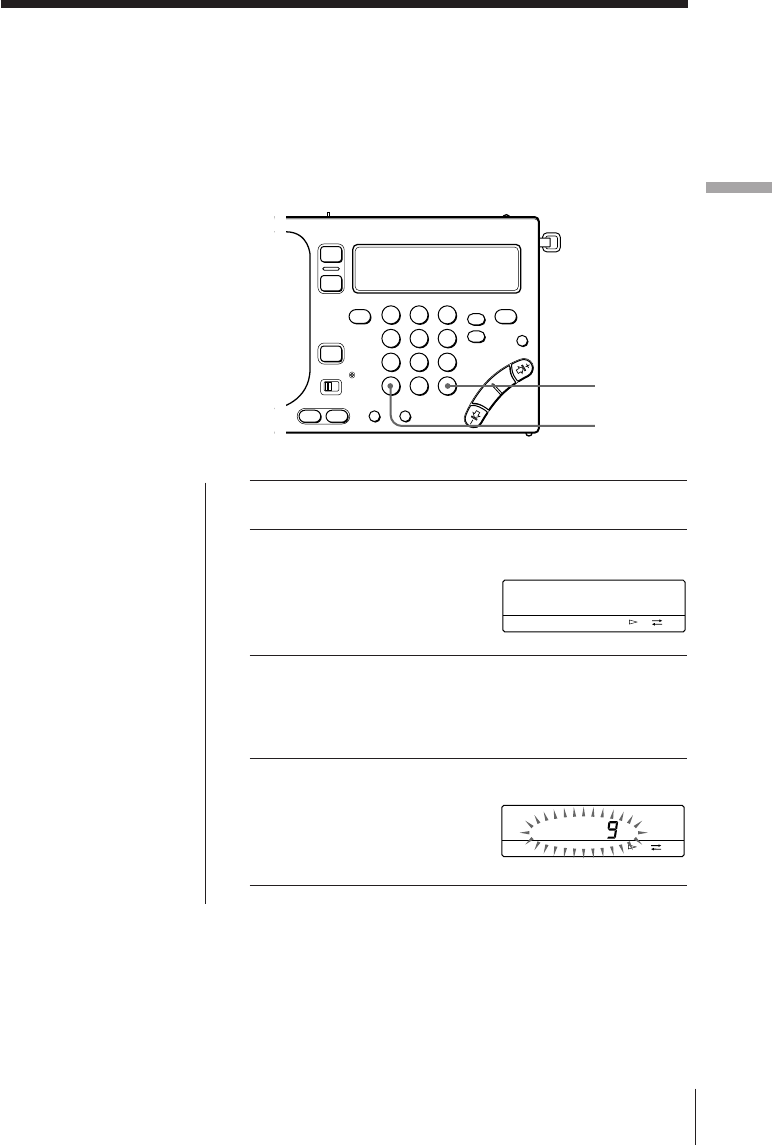
3pを押したまま9(を押し
て、聞く面を選ぶ。
フォワード
ふた側の面(FWD面)を聞くに
は:「FWD·」を表示させる
リバース
本体側の面(REV面)を聞くには:
「ªREV」を表示させる
49(を押す。
OPEN
テープを聞く
3,4 2
A:片面再生
Å:両面再生
FWD
REW
+
FF
または
+
FWD
FWD
1
2,3
9J
ご注意
REV面から再生を始めたと
きは、REV面のみを再生し
ます。
ちょっと一言
•ヘッドホンを使うと、ステ
レオ録音されたテープをス
テレオで楽しめます。
またST・MONOスイッチ
でステレオとモノラルを切
り換えることができます。
•本機はATS
(Auto Tape
Selector)機能により、再
生時のみ、ノーマルテープ
とCrO2/メタルテープを自
動的に判別します。
その他の操作
こんなときは 押すボタン、使うつまみ
音量を調節する VOLUME
再生面を切り換える 再生中に9(
テープを止める p
早送りする 停止中にFF
巻き戻しする 停止中にREW
音を聞きながら早送りする 再生中にFF
(キュー)
音を聞きながら巻き戻しする 再生中にREW
(レビュー)
VOLUME
テープを聞く
REW
FF
pテ
ー
プ
を
聞
く
9(
10J
ラジオを録音する
マイク録音をするときは/
「マイクで録音をする」(22ページ)
1カセットを入れる。
ご注意
カセットを入れる前に、カセットのツメが
折れていないことを確認してください。
ツメが折れていると録音できません。
2片面録音か、両面録音かを選
ぶ。
片面録音:pを押したままFFを押す
両面録音:pを押したままREWを押
す
3テープ走向面をふた側にす
る。
pを押したまま9(を押して
「FWD ·」を表示させます。
4ラジオを受信する。
(6,12∼16ページ参照)
録音を始めたい面をふ
た側にして入れる
ラジオを録音する
1
2
5
3
OPEN
REW
+
FF
または
+
FWD
A 片面録音
Å 両面録音
FWD
11J
5レコード
RECを中央の赤いボタンを押
しながら、矢印の方向にずら
す。
ラジオを録音する
REC
TUNE
PAGE
1
2
3
FWD
REC
録音を止めるには
pを押します。
本体側の面(REV面)を録音するには
録音したい面を本体側にしてカセットを入れ、テープ走行面
をREV面(「ªREV」が点灯)にします。
録音は、片面/両面の設定に関らず、REV面だけで終わりま
す。
FMステレオ放送を録音するときは
ST•MONOスイッチをSTに合わせるとステレオで、MONO
に合わせるとモノラルで録音されます。
AM放送を良い音で録音するには
AM放送を録音中、ラジオを聞いていたときには出なかった
雑音が聞こえるときは、本体底面にあるISSスイッチを雑音
が消える位置(1、
2または3)に切り換えてください。
大切な録音を守るには
ツメを折って取り除きます。 再び録音するには、穴を
ふさぎます。
ツメを折ったカセットテープを入れてRECボタンを押すと
「†」表示が点滅して、録音できません。
ご注意
•録音するテープにはTYPE I
(ノーマル)テープをお使い
ください。CrO2/メタル
テープを使うと、再生する
音がひずんだり、前の録音
が消えずに残ったりするこ
とがあります。
•電池が消耗していると、録
音に雑音が入ったり、性能
を充分に発揮できないこと
があります。なるべく早め
に乾電池を新しいものと交
換してください。
•RECボタンは録音開始の2
秒くらい前に押してくださ
い。直前に押すと最初の部
分が録音されません。
•録音中は9(ボタンを押
しても、録音する面を切り
換えることはできません。
•録音中、ラジオの操作ボタ
ンは働きます。誤操作を防
ぐにはホールド機能を働か
せてください。(29ページ)
ちょっと一言
•録音される音はVOLUME
つまみやTONEスイッチの
設定に影響されません。
•録音中、スピーカーから聞
こえる音はモノラルです。
FMステレオ放送をステレ
オで聞きたいときはヘッド
ホンをお使いください。
•RADIO POWER ON/
OFFを押してラジオの電源
を切ると、録音も自動的に
止まります。
ラ
ジ
オ
を
録
音
す
る
数秒後に周波数
表示に戻る
セロハンテープ
A面
A面のツメ
ラジオ
12J
いろいろな受信のしかた
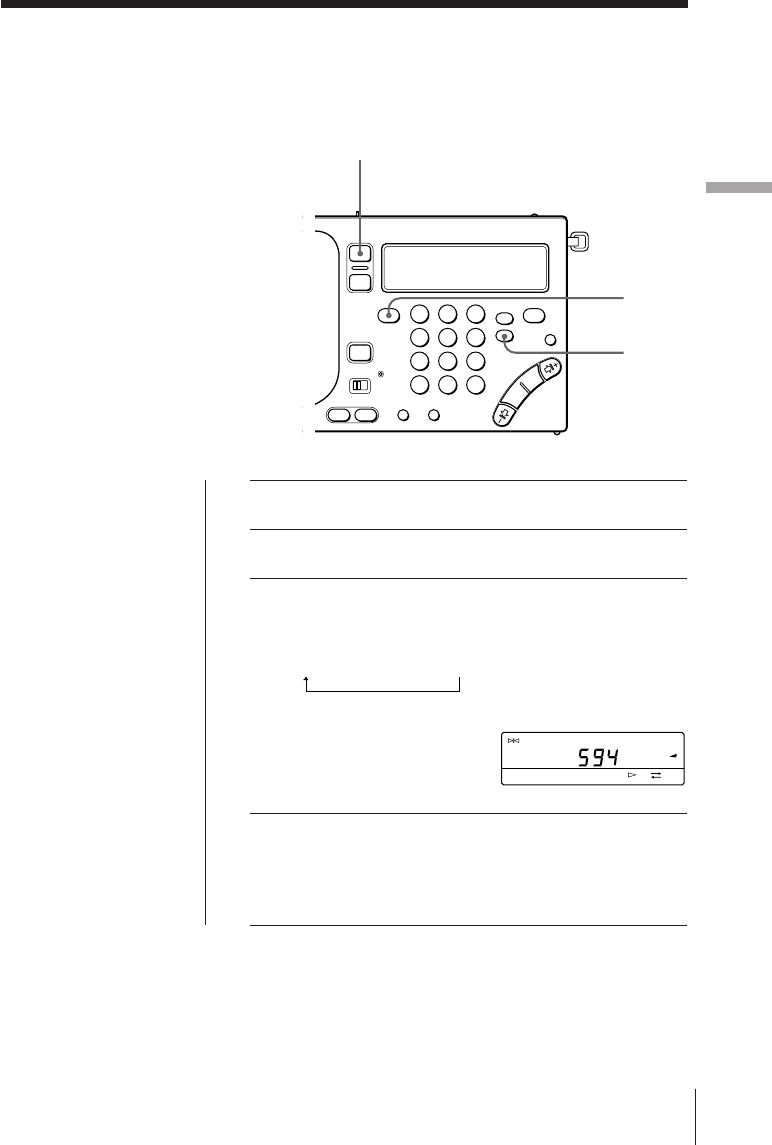
少しずつ周波数を調整する
—マニュアル選局
ーI¿、÷I+または¿、÷ボタ
ンで周波数を送ります。外側のボ
タンでは大きく、内側のボタンで
は細かく周波数が変わります。
123
456
789
0
RADIO POWER ON/OFF
ーI¿、¿、
÷、÷I+
AM BANDFM/AM
1ラジオの電源を入れる。
2FMまたはAMを選ぶ。
SW、
MW、
LWを聞くときはAMにします。
3AMを選んだときは、AM BANDを押したまま
ーI¿または÷I+ボタンを押して、MW、
LWま
たはメーターバンドを選ぶ。
FM放送を聞く場合は手順4に進んでください。
ちょっと一言
電源を入れると、前に聞い
ていた放送局を受信しま
す。

ラ
ジ
オ
ラジオ 13J
ちょっと一言
•−I¿または÷I+ボタン
を押したままにすると、ス
キャン選局になります。
(6ページ)
•¿または÷ボタンを押し
たままにすると、周波数が
速く進み、離すと止まりま
す。
AMバンド(MW、
SW、
LW)では、150∼
29999kHzの範囲で周波
数が連続して変わりま
す。
4ーI¿、÷I+または¿、÷ボタンをくり返し押
して、聞きたい局を探す。
ボタンを押すたびに、次の間隔で周波数が変わります。
バンド −I¿または÷I+¿または÷
FM 0.05MHz 0.05MHz
SW 5kHz 1kHz
MW 9kHzまたは10kHz 1kHz
LW 9kHz 1kHz
SSB 1kHz 0.1kHz*
* 0.1kHzの単位は表示窓には表示されません
各バンド・メーターバンドの周波数範囲
(単位:AMはkHz、
FMはMHz)
放送バンド 周波数範囲 スキャン選局時 メーターバンド
LW 150
∼
529 153
∼
522
−
MW 530
∼
1620 530
∼
1620**
−
531
∼
1620***
−
2250
∼
2550
120
メーター
3150
∼
3450 90
メーター
3850
∼
4050 75
メーター
4700
∼
5100 60
メーター
5900
∼
6250 49
メーター
AM 7100
∼
7400 41
メーター
SW 1621
∼
29999 9400
∼
10000 31
メーター
11500
∼
12150 25
メーター
13500
∼
13900 22
メーター
15000
∼
15700 19
メーター
17450
∼
18000 16
メーター
18850
∼
19100 15
メーター
21450
∼
21950 13
メーター
25600
∼
26100 11
メーター
FM 76.00
∼
108.00 76.00
∼
108.00
−
** 周波数ステップが10kHzのとき(19ページ)
*** 周波数ステップが9kHzのとき(19ページ)
ご注意
•実際の短波(SW)の放送バ
ンドと本機のメーターバン
ドは多少異なっています。
詳しくはウェーブハンド
ブックをご覧ください。
•このラジオは、内部スプリ
アス(ラジオ内部に使われて
いる発振器の信号を受信す
ること)により、3.64MHz
の周波数付近では受信しに
くいことがあります。
ラジオ
14J
いろいろな受信のしかた(つづき)
周波数を直接指定する
—ダイレクト選局
周波数がわかっているときは、数
字ボタンで入力すればすばやく正
確に選局できます。
123
456
789
0
DIRECT EXE
RADIO POWER ON/OFF
数字ボタン
FM/AM
1ラジオの電源を入れる。
2FMまたはAMを選ぶ。
3DIRECTを押す。
表示窓の周波数表示が消えます。
4数字ボタンを押して、聞きたい放送局の周波数を
入力する。
FMの場合:小数点を入力する必要はありません。
例)
84.7MHzのときは、8→4→7の順に押します。
AMの場合:周波数の最後に0が3つ続くときは省略で
きます。
例)
10000kHzのときは、1→0の順に押します。
5EXEを押して決定する。
放送を受信すると「
TUNE
」表示が点灯します。
入力を間違えたときは
DIRECTを押すと入力が取
り消されます。手順3から
操作をやり直してくださ
い。
「TRY AGAIN !」が点滅し
たら
選んだバンドの受信可能周
波数以外の周波数を入力し
ています。周波数を確かめ
て、手順3から操作をやり
直してください。
ちょっと一言
最小入力桁は、FMが
0.05MHz
(50kHz)で、
AMが1kHzです。
ご注意
手順3∼5の各操作は10秒
以内に行なってください。
途中で、それまで聞いてい
た周波数の表示に戻った
ら、もう一度手順3から操
作をやり直してください。
ラ
ジ
オ
ラジオ 15J
いろいろな受信のしかた(つづき)
周波数を記憶させる
—プリセット選局
このラジオには、周波数を記憶さ
せておく場所(ページと呼ぶ)が3つ
あり、各ページにFMまたはAM局
を10局ずつ、合計30局記憶できま
す。
ちょっと一言
記憶させた放送局を変更す
るには放送局を変更したい
ボタンに、別の放送局を記
憶させます。
前に記憶させていた放送局
は消えます。
1ラジオの電源を入れる。
2記憶させたい放送局を受信する。
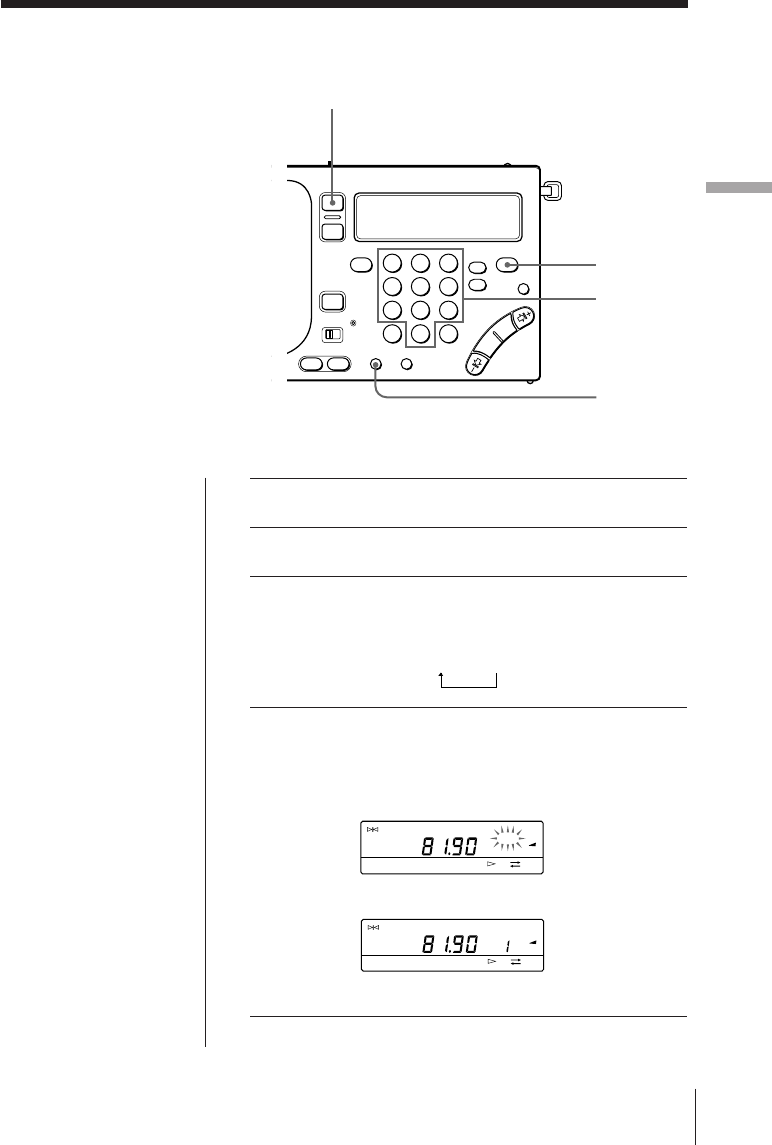
3PAGEをくり返し押して、記憶させたいページを
選ぶ。
PAGE を押すごとに1→2→3の順でページが切り換わ
ります。
4ENTERを押したまま、数字ボタンの0から9の
いずれかを押す。
例)
1ページの1番にFM81.9MHzを記憶させる
選んだ番号のボタンに放送局が記憶されます。
123
456
789
0
ENTER
PAGE
RADIO POWER ON/OFF
数字ボタン
TUNE
FM
PRESET
PAGE
1
2
3
MHz
FWD
≥
TUNE
FM
PRESET
PAGE
1
2
3
MHz
FWD

ラジオ
16J
いろいろな受信のしかた(つづき)
記憶させた局を受信するには
1ラジオの電源を入れる。
2PAGEをくり返し押し、聞きたい局が入っている
ページを選ぶ。
3聞きたい局が入っている数字ボタン(0から9)を押
す。
記憶させている放送局が受信されます。
ラ
ジ
オ
ラジオ 17J
SSB やCWを受信する
内蔵のBFO回路により、SSB
(Single Side Band)通信やCW
(Continuous Wave)通信を受信
することができます。
1ラジオの電源を入れる。
2FM/AMを押して、AMを選ぶ。
3SSBを押して、USBまたはLSB/CWを選ぶ。
SSBを押すごとに
(通常)
→ USB → LSB/CW
の順で表示が切り換わります。
4周波数を合わせて受信する。
受信のしかたは「ラジオを聞く」(6ページ)や「いろいろな
受信のしかた」(12∼16ページ)をご覧ください。
ちょっと一言
SSB、
CWについて詳しく
はミニ知識(44ページ)を
ご覧ください。
123
456
789
0
RADIO POWER ON/OFF
TUNE
USB
AM
PAGE
1
2
3
kHz
FWD
FM/AM
SSB
ラジオ
18J
AM放送を良い状態で受信する
— 同期検波
同期検波回路により、AM放送(特
にSW)を明瞭に受信することがで
きます。
1ラジオの電源を入れる。
2放送を受信する。
受信のしかたは「ラジオを聞く」(6ページ)や「いろいろな
受信のしかた」(12∼16ページ)をご覧ください。
3SYNCをくり返し押して、「SYNC U」または
「SYNC L」のいずれか聞きやすい方を選ぶ。
SYNCを押すごとに
(通常)
→ SYNC U → SYNC L の順で表示が切り換わ
ります。
同期検波が働いていると「LOCK」表示が点灯します。
ちょっと一言
同期検波について詳しくは
ミニ知識(44ページ)をご
覧ください。
ご注意
メイン・ラジオ用電池が消
耗していると、同期検波が
解除されることがありま
す。
123
456
789
0
SYNC
RADIO POWER ON/OFF
TUNE
SYNC U LOCK
AM
PAGE
1
2
3
kHz
FWD
ラ
ジ
オ
ラジオ 19J
海外で使う—MW周波数ステップの切り換え
海外では、MW放送の周波数ス
テップが日本と異なることがあり
ます。
•北米、南米:10kHz
•日本、ヨーロッパ、その他の
国々:9kHz
必要に応じて周波数ステップを切
り換えてください。
1電源を切る。
2DIRECTを押す。
3数字ボタンで周波数ステップを入力する。
9kHz:9
10kHz:1 → 0
4EXEを押して決定する。
入力した周波数表示が約3
秒間点滅したあと、時刻表
示に戻ります。
入力を間違えたときは
DIRECTを押し、もう一度
手順2から操作をやり直し
てください。
「TRY AGAIN !」が点滅し
たら
間違った数字を入力してい
ます(9または1、
0以外の
数字ボタンが押された)。
もう一度、手順2から操作
をやり直してください。
ちょっと一言
手順2∼4の各操作は10秒
以内に行なってください。
途中で時刻表示に戻った
ら、もう一度手順2から操
作をやり直してください。
123
456
789
0
DIRECT
EXE
AM
kHz
FWD
AM
kHz
FWD
ラジオ
20J
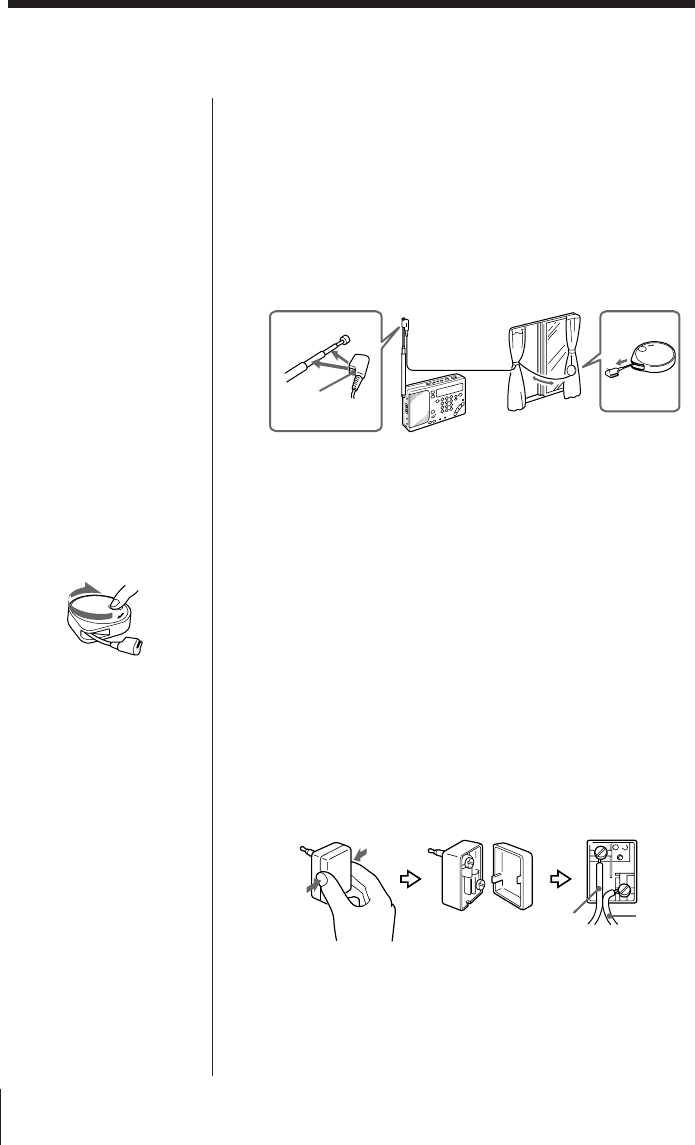
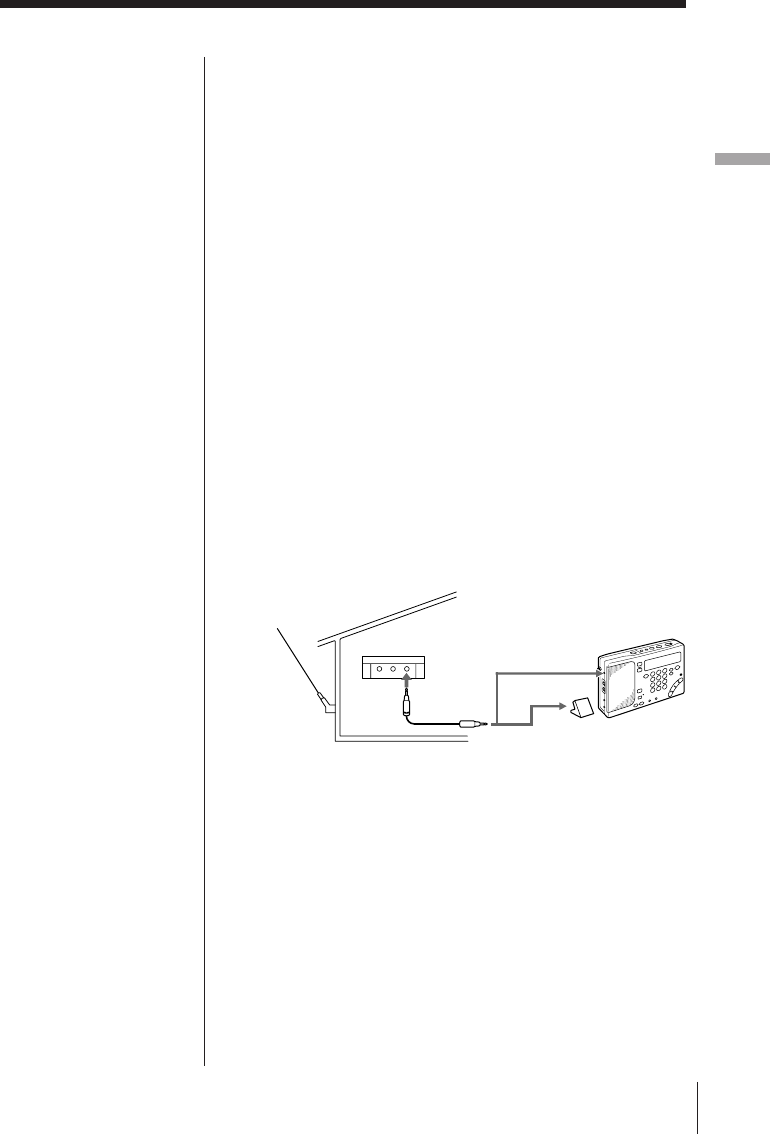
付属のSW用アンテナを使うには
通常はロッドアンテナでSW放送を楽しむことができます
が、鉄筋のビルの中などで受信状態が良くないときや、さら
に安定した受信のためには、付属のSW用アンテナをお使い
ください。
ICF-SW1000Tに付属のコンパクトアンテナ(AN-71)の場
合
1コードをケースから完全に引き出す。
2カプラーをロッドアンテナにはめる。
3窓が開く場合:危険のないことを確かめてから、コード
をケースごと窓の外に出す。
窓が開かない場合:コードを窓の幅いっぱいに張る。
ICF-SW1000TSに付属のアクティブアンテナ(AN-LP1)の
場合
AN-LP1の取扱説明書をご覧のうえお使いください。
付属のアンテナコネクターを使うには
SW(短波)用ワイヤーアンテナなどを使う場合は、付属のア
ンテナコネクタをお使いください。
1アンテナコネクターにアンテナ線をつなぐ。
2アンテナコネクターを本機のAM EXT ANT端子に差し
込む。
外部アンテナを使う
ご注意
コンパクトアンテナを外に
出すときは、他の人の迷惑
にならないように注意し、
また下に落とさないように
しっかり固定してくださ
い。
使い終わったら
リールを矢印の方向に回し
てコードを巻き取ってくだ
さい。
21
コード
カプラー ケース
アース線
アンテナ線
ラ
ジ
オ
ラジオ 21J
ご注意
•AM EXT ANT端子には推
奨のアンテナ以外はつなが
ないでください。この端子
にはアンテナ用電源として
DC 3Vが出力されていま
す。
•室内の蛍光灯やテレビ、電
話、パソコンなどが雑音の
原因となることがあります
ので、本機やアンテナから
なるべく離してお使いくだ
さい。
•外部アンテナなしでMW/
LW放送を受信するとき
は、必ずSW用屋外アンテ
ナを外してください。とり
つけたままでは本機の内部
のMW/LW用バーアンテナ
が働かず、受信できませ
ん。
•外部アンテナでお使いにな
るときは、本機のロッドア
ンテナはたたんでおいてく
ださい。
•外部アンテナはなるべく道
路から離れたところに設置
してください。
•外部アンテナについて詳し
くは、それぞれに付属の取
扱説明書をご覧ください。
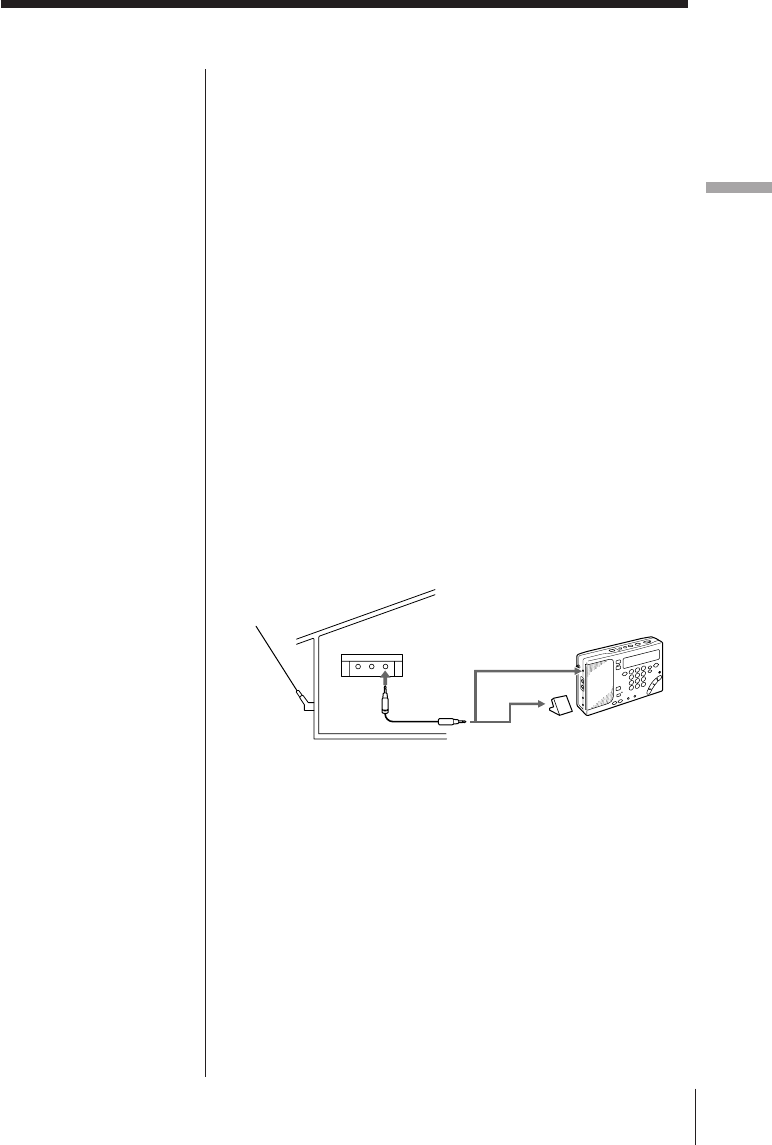
別売りのワイドレンジアンテナを使うに
は
SW、MW、
LW放送の受信状態を良くするためには、別売
りのワイドレンジアンテナAN-1またはAN-102をお使いく
ださい。受信する放送によって、使いかたが以下のように異
なります。
SW放送を受信するとき
接続コード(AN-1やAN-102に付属)を使って、アンテナコ
ントローラーのOUTPUT端子と本機のAM EXT ANT端子を
つないでください。
MW/LW放送を受信するとき
1接続コードを使って、アンテナコントローラーのOUT
PUT端子とアンテナカプラーのINPUT端子をつなぐ(両
方ともAN-1やAN-102に付属)。
2アンテナカプラーを本機に近く、もっとも良く受信でき
るところに置く。
本機のロッドアンテナは、たたんでおいてください。
AN-1を使ったとき:
OUTPUT
へ
アンテナ
コント
ローラー
AN-1
AN-1
INPUTへ
(MW/LW) アンテナカプラー
(SW)
AM EXT ANTへ
テープ
22J
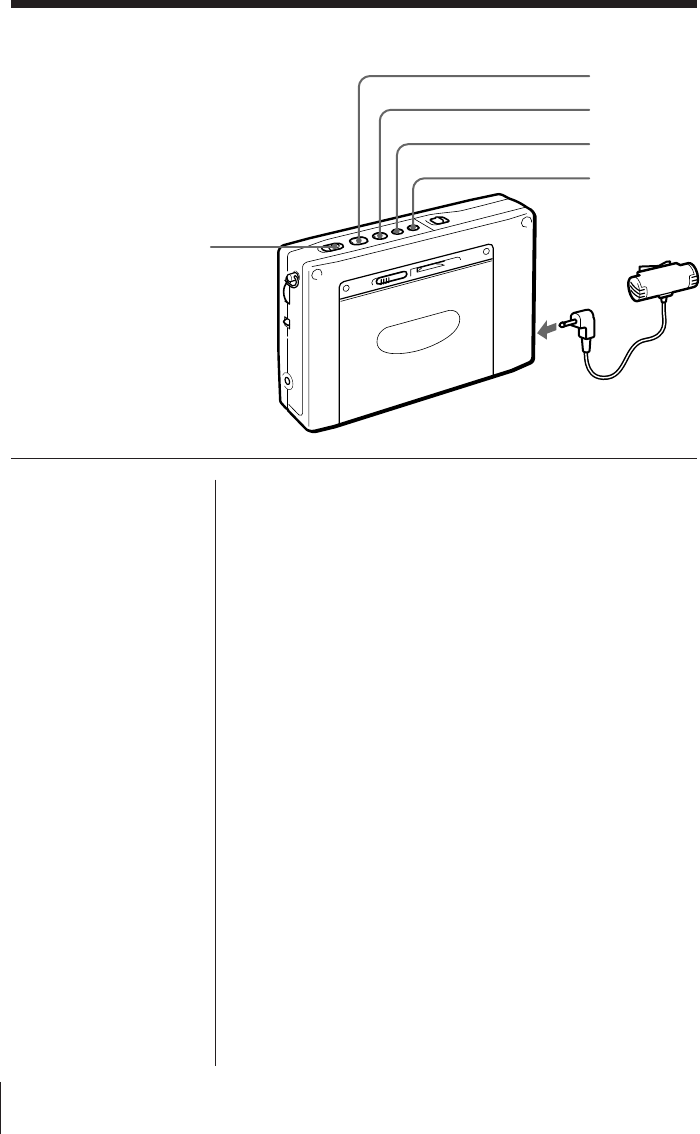
1カセットを入れる。
録音を始めたい面をふた側にして入れます。
カセットのツメが折れていないことを確認してくださ
い。
2片面録音か、両面録音かを選ぶ。
片面録音:pを押したままFFを押す「A」
両面録音:pを押したままREWを押す「Å」
3テープ走行面をふた側「FWD·」にする。
pを押したまま9(を押します。
4付属のマイクをMIC端子に差し込む。
5録音を始める。
録音を止めるには
pを押します。
本体側の面(REV面)を録音するには
録音したい面を本体側にしてカセットを入れ、テープ走行面
をREV面(「ªREV」が点灯)にします。
録音は、片面/両面の設定に関らず、REV面だけで終わりま
す。
付属のマイクを使って会議などを
録音できます。
録音にはTYPE I
(ノーマル)テー
プをお使いください(CrO2/メタ
ルテープでは正しく録音できませ
ん)。 MIC端子へ
マイク
REW
FF
9(
p
REC
マイクで録音する
ご注意
•音量を上げると、その音を
マイクが拾い、ピーッとい
う音が生じることがありま
す(ハウリング現象)。この
場合は音量を下げるか、マ
イクとヘッドホンを離して
ください。
•録音中、マイクを電灯線や
蛍光灯などに近づけすぎる
と、ノイズを拾うことがあ
ります。
ちょっと一言
マイク録音中はスピーカー
から音は出ません。録音中
の音を聞くときはヘッドホ
ンをお使いください。

テープ
テ
プ
23J
ちょっと一言
•付属のマイクは、本機につ
なぐと電源が本機から供給
されるプラグインパワー方
式です。
プラグインパワー方式のマ
イク端子のあるカセットレ
コーダー以外にはご使用に
なれません。
•録音中、誤操作を防ぐに
は、ホールド機能を働かせ
てください。(29ページ)
付属のマイクの使いかた
クリップはマイクをつける場所に合わせて方向を変えられま
す。
録音時のご注意
録音レベルについて
録音レベルは一定です。録音される音は、VOLUMEつまみ
やTONEスイッチの設定に影響されません。
録音について
•カセットを入れる前に、カセットのツメが折れていないこ
とを確認してください。ツメが折れていると録音できませ
ん。
•RECボタンは録音開始の2秒くらい前に操作してくださ
い。直前に操作すると最初の部分が録音されません。
•録音中は9(ボタンを押しても、録音する面を切り換え
ることはできません。
タイマー
24J
123
456
789
0
1聞きたい放送局を受信する。
2VOLUMEつまみで音量を調節する。
3ENTERを押したまま
STANDBY MEMORY
のaまたはbを押す。
選んだボタンに放送局が記
憶されます。
4ラジオの電源を切る。
5手順3で選んだ、STANDBY MEMORYのaま
たはbを押したまま、HOURやMINをくり返し
押してラジオをつけたい時刻を設定する。
ご注意
予約時刻を設定するとき
は、必ず電源を切ってくだ
さい。ラジオ受信中やテー
プが動作中は、時刻設定は
できません。
HOUR・MIN
RADIO
POWER
ON/OFF
SLEEP
STANDBY
ON/OFF
STANDBY
MEMORY
MODE
TIME SET
ENTER
TUNE
FM
PRESET
PAGE
1
2
3
MHz
FWD
STANDBY SLEEP
FWD
a
ラジオをつけたい時刻を
表示させる。
ラジオで目覚める—スタンバイ機能
ラジオ番組を目覚まし代わりにす
ることができます。2つの時刻を設
定できます。
本機の時計を合わせてから操作し
てください。(5ページ)
タイマー
タ
イ
マ
ー
25J
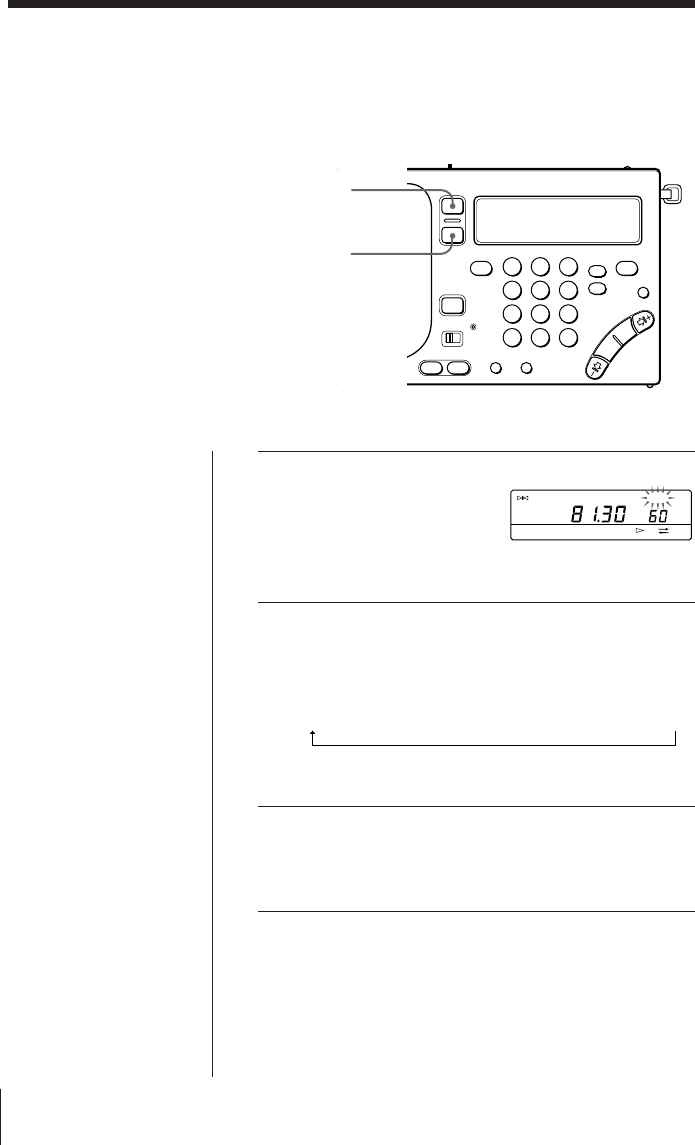
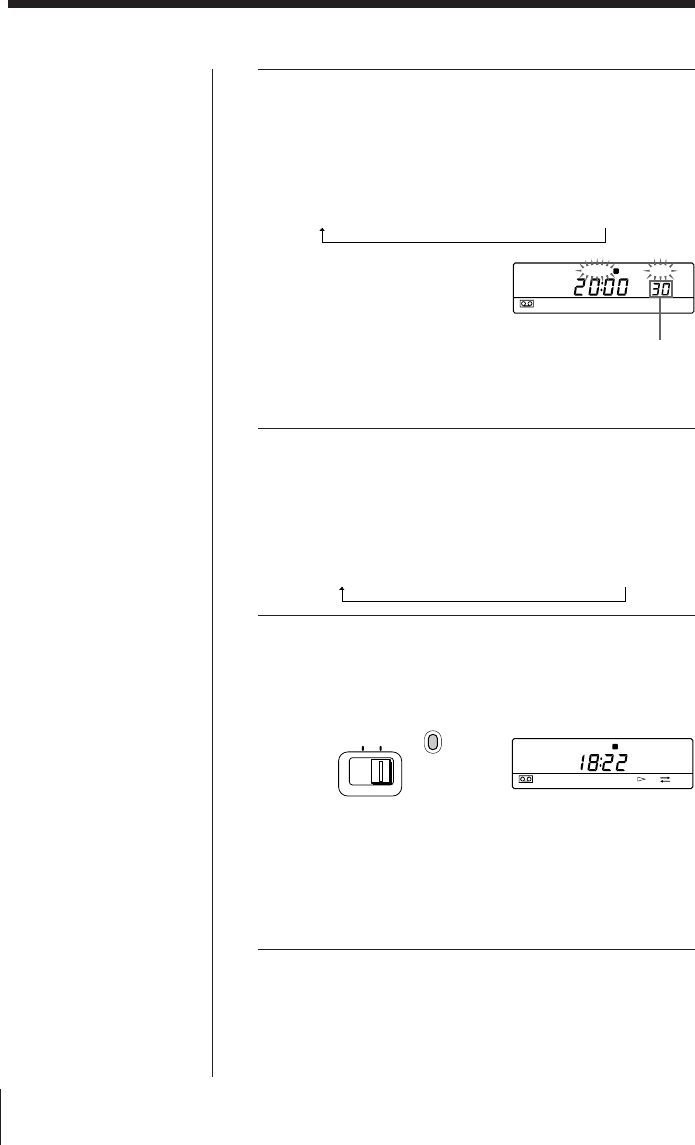
6STANDBY MEMORY aまたはbを押したま
ま、SLEEPをくり返し押して、ラジオの動作時
間を設定する。
押すごとに、次のように切り換わります。
60
(分)
→
50
→
40
→
30
→
20
→
10
→
90
→
80
→
70
aまたはbから指を離すと、現在の時刻表示に戻りま
す。
7STANDBY ON/OFF をくり返し押して、手順3
で選んだ「STANDBY a」または「STANDBY
b」を表示させる。
押すごとに、次のように切り換わります。
STANDBY a→ STANDBY b→ STANDBY a b→(消灯)
8MODEスイッチをRADIOに合わせる。
予約した時刻になると、予約した放送を受信します。
設定した動作時間が経過するとラジオが切れます。
予約を確認するには
STANDBY MEMORYのaまたはbを押します。押してい
る間、予約されている時刻および動作時間が表示されます。
予約した時刻を変更するには
手順5から7の操作をして、あらたに時刻を予約します。
予約を解除するには
STANDBY ON/OFF を押して「STANBY」表示を消しま
す。
STANDBY SLEEP
FWD
a
動作時間を表示させる
ちょっと一言
•予約を一時解除するときは
ラジオの電源を切り、
HOLDスイッチを矢印方
向にずらし「H」を表示さ
せます。「H」表示を消す
と予約は復帰します。(29
ページ)
•STANDBYabを同時に
設定できます
一方の予約でラジオがつい
ているときに、もう一方の
予約が働いた場合、後の予
約に設定した放送局の受信
に切り換わります。
•一度設定した予約は、
STANDBY ON/OFFを押
して解除しない限り、毎日
働きます。
•予約が働くと、ラジオや
テープを聞いていたり録音
をしていても、自動的に予
約した放送局の受信に切り
換わります。
•STANDBYabに同じ時
刻を設定したときは、
STANDBYaのみが働き
ます。
タイマー
26J
123
456
789
0
ラジオを聞きながら眠る
−スリープタイマー
設定した時間(10−90分)が過ぎる
と自動的にラジオが消えます。
ちょっと一言
SLEEPを押して電源を入
れると、前に聞いていた放
送局が受信されます。
ご注意
希望の動作時間を設定する
前にタイマーがスタートし
てしまったら、もう一度手
順1からやり直してくださ
い。SLEEPボタンから指
を離して約5秒たつと、自
動的にタイマーがスタート
します。
ちょっと一言
ラジオを録音中にスリープ
タイマーが働くと、録音は
止まり、ラジオの電源が切
れます。
1SLEEPを押す。
ラジオの電源が入り、ス
リープタイマーの動作時間
(60分)と「SLEEP」が点滅
します。
2SLEEPをくり返し押して、希望の動作時間を表
示させる。
押すごとに、次のように切り換わります。
60
(分)→ 50 → 40 → 30 → 20 → 10 → 90 → 80 → 70
「SLEEP」表示が点滅から点灯に変わり、動作時間表示
が消え、スリープタイマーがスタートします。
3聞きたい放送局を選ぶ。
設定した動作時間が経過すると、自動的に電源が切れま
す。
設定後に動作時間を変えるには
SLEEPボタンをくり返し押して、希望の時間を選びます。
途中でラジオを止めるには
RADIO POWER ON/OFFを押します。
TUNE
FM
SLEEP
MHz
FWD
a
RADIO
POWER
ON/OFF
SLEEP
タイマー
タ
イ
マ
ー
27J
123
456
789
0
留守中にラジオを録音する
−タイマー録音
留守中や深夜など、その場で録音
できないときにタイマーを使って
録音できます。
本機の時計を合わせてから操作を
してください。(5ページ)
1カセットを入れ、録音する面を選ぶ。
カセットのツメが折れていないことを確認してくださ
い。
2録音したい放送局を受信する。
録音される音はVOLUMEつまみやTONEスイッチの設
定に影響されません。
3ENTER を押したままSTANDBY MEMORYの
aまたはbを押す。
選んだボタンに放送局が記
憶されます。
4RADIO POWER ON/OFF
を押して、ラジオの
電源を切る。
5手順3で選んだ、STANDBY MEMORYのa
またはbを押したまま、HOURやMINを押して
ラジオを録音し始める時刻を設定する。
ご注意
予約時刻を設定するとき
は、必ず電源を切ってくだ
さい。ラジオ受信中やテー
プが動作中は、時刻設定は
できません。
MODE
STANDBY
MEMORY
STANDBY
ON/OFF
SLEEP
RADIO
POWER
ON/OFF
HOUR・MIN
TIME SET
ENTER
TUNE
FM
PRESET
PAGE
1
2
3
MHz
FWD
STANDBY SLEEP
FWD
a
ラジオを録音する時刻を
表示させる
タイマー
28J
6STANDBY MEMORY aまたはbを押したま
ま、SLEEPをくり返し押して、ラジオの動作時
間を設定する。
押すごとに、次のように切り換わります。
60
(分)→50→40→30→20→10→90→80→70
aまたはbから指を離すと、現在の時刻表示に戻りま
す。
7STANDBY ON/OFF をくり返し押して、手順
3で選んだ「STANDBY a」または「STANDBY
b」を表示させる。
押すごとに、次のように切り換わります。
STANDBY a → STANDBY b → STANDBY a b →
(消灯)
8MODEスイッチをRECにする。
スイッチ横に赤い表示が出ます。
予約した時刻になると、予約した放送局を受信し録音し
ます。
設定した動作時間が経過すると、ラジオが切れ録音も終
了します。
タイマー録音(つづき)
ちょっと一言
•予約を一時解除するときは
ラジオの電源を切り、
HOLDスイッチを矢印方
向にずらし「H」を表示さ
せます。「H」表示を消す
と予約は復帰します。(29
ページ)
•STANDBYabを同時に
設定できます
一方の予約でラジオを録音
しているときに、もう一方
の予約が働いた場合、後の
予約に設定した放送局の録
音に切り換わります。
•一度設定した予約は、
STANDBY ON/OFFを押
して解除しない限り、毎日
働きます。
•予約が働くと、ラジオや
テープを聞いていたり録音
をしていても、自動的に予
約した放送局の録音に切り
換わります。
•STANDBYabに同じ時
刻を設定したときは、
STANDBYaのみが働き
ます。
•カセットが入っていなかっ
たり、カセットのツメが折
れているときは、録音でき
ず、ラジオ受信のみになり
ます。
動作時間を表示させる
STANDBY SLEEP
a
STANDBY
FWD
a
MODE
RECRADIO
便
利
な
使
い
か
た
便利な使いかた 29J
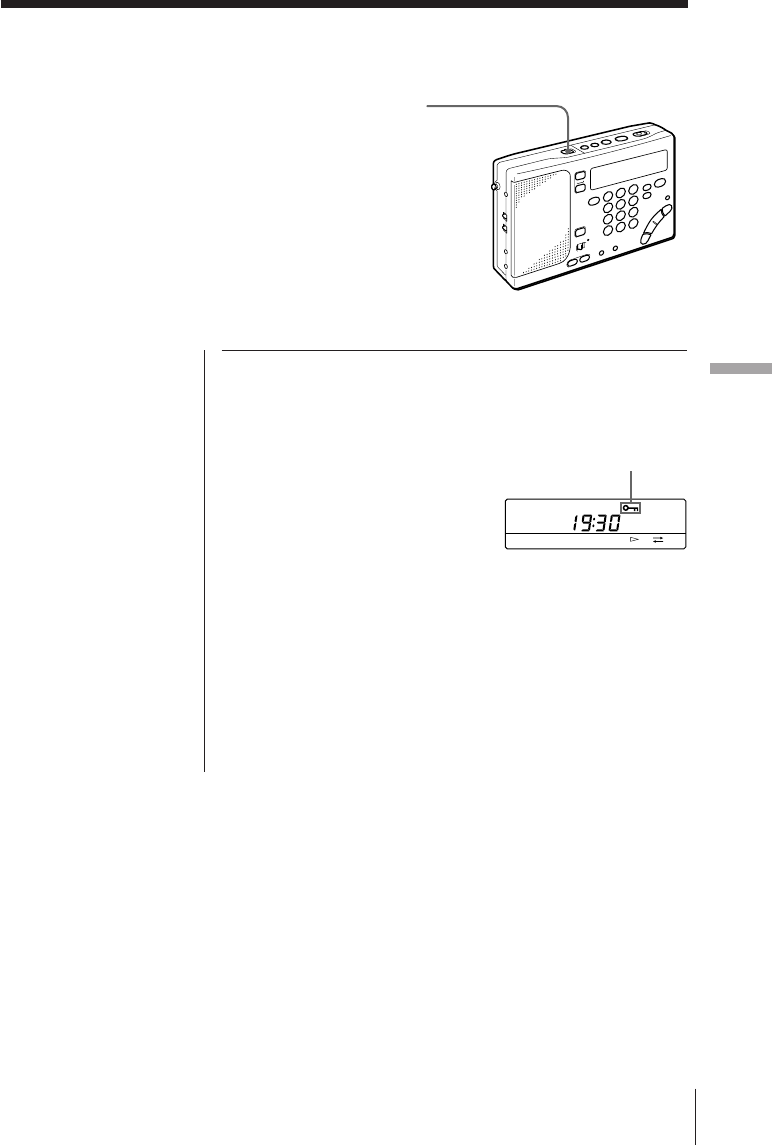
誤操作を防ぐ—ホールド機能
ホールド機能を働かせると、ボタ
ン操作を受けつけなくなり、持ち
運ぶときなどに、あやまって電源
が入ったり、ラジオやテープを聞
いているときに誤操作を防ぐこと
ができます。
また、スタンバイ機能は一時的に
解除することができます。(25、
28ページ)
HOLD
ちょっと一言
ホールド機能を働かせる
と、表示窓の照明は消えま
す。
ご注意
キュー、レビューの状態を
ホールドすることはできま
せん。
HOLDスイッチを矢印の方向にずらします。
「H」表示が点灯し、それ以降、ボタン操作を受け付けなく
なります。
ホールドを解除するには
HOLDスイッチを矢印と反対の方向にずらして「H」表示を
消します。
スタンバイとタイマー録音の設定を一時解除するには
ホールド機能を働かせると、スタンバイとタイマー録音の設
定を一時解除することができます。
この機能はラジオが動作していないときのみ働きます。
Hを点灯させる
FWD
便利な使いかた
30J
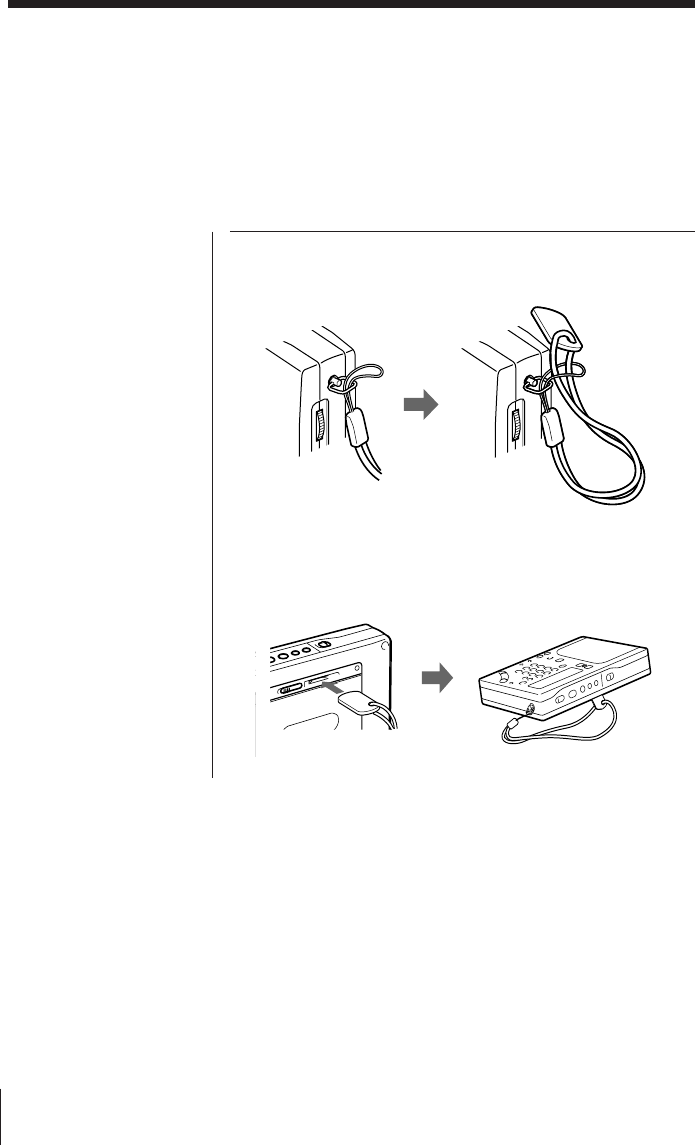
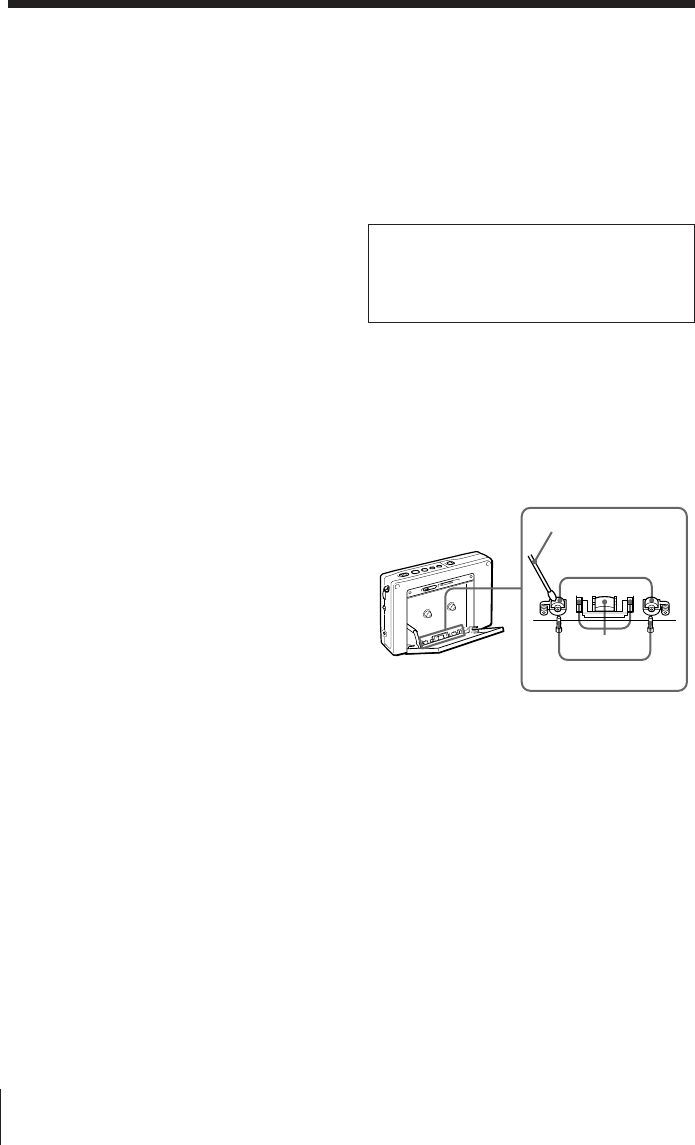
ストラップをつける
付属のストラップを取り付けると
持ち運びに便利です。また、簡易
スタンドとしても使えます。
取り付けるには
本体側面のハンドストラップ取り付け金具に取り付けます。
スタンドとして使うときは
ストラップについているスタンド部分を本体裏面の差し込み
口に差し込みます。
電源
電
源
31J
乾電池を交換する
ちょっと一言
•乾電池の交換は3分以内に
行ってください。
3分以上経過すると、覚え
させた局や時刻は消えてし
まいます。この場合は、も
う一度設定をやり直してく
ださい。
•乾電池の交換後、ラジオの
電源を入れるかテープの操
作をすると「i」表示は消え
ます。
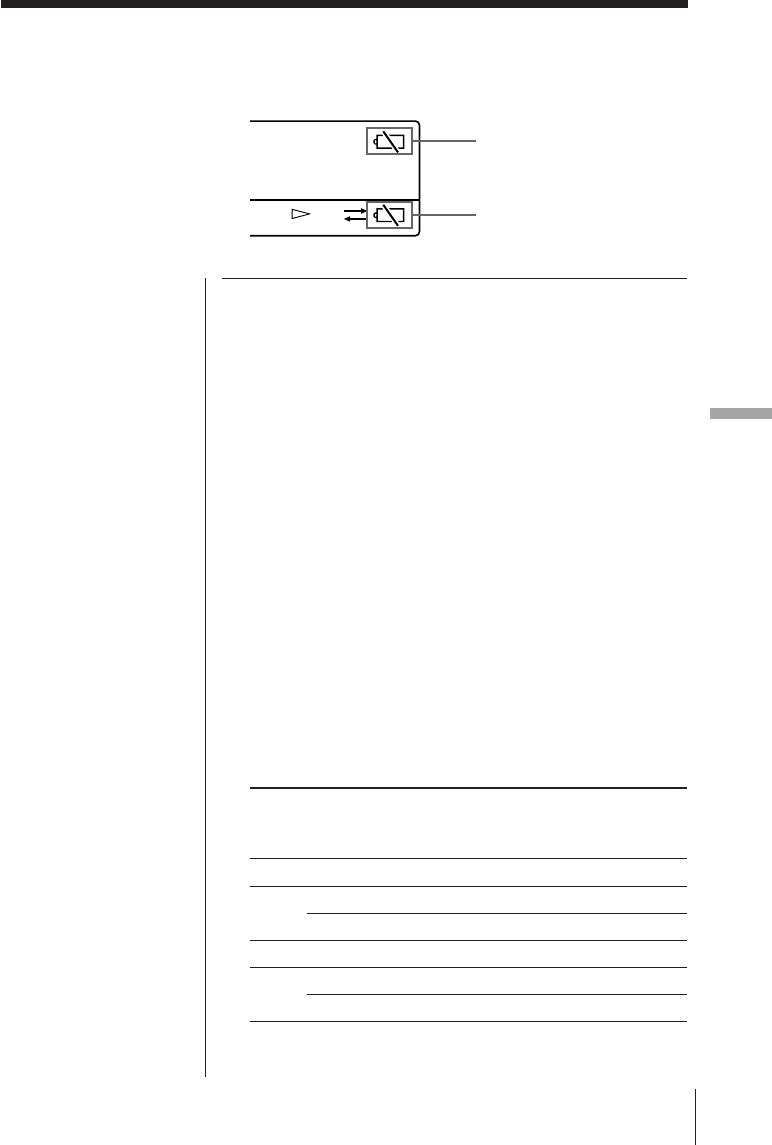
メイン・ラジオ用電池
メイン・ラジオ用電池が消耗してくると、ラジオやテープの
動作が止まって表示窓右上にiが点滅します。
その場合は乾電池を2本とも新しいものと交換してください。
乾電池が完全に消耗すると「i」表示が点灯し、すべての操作
ができなくなります。
テープ用電池
テープ用電池はテープを走行させるモーターに電源を供給し
ています。乾電池が消耗してくると、表示窓右下にiが点滅
し、テープの走行が不安定になったり、雑音が多くなったり
します。その場合は乾電池を新しいものと交換してくださ
い。
乾電池が完全に消耗すると「i」表示が点灯し、テープの操作
ができなくなります。
乾電池の持続時間 (単位:時間)
ソニー単
3
形
(LR6)
ソニー単
3
形
(R6)
アルカリ乾電池 マンガン乾電池
メイン•ラジオ用 テープ用 メイン•ラジオ用 テープ用
テープ再生時 約
37
約
11
約
14
約
3.5
ラジオ
FM
約
27
―約
9
―
受信時
AM
約
21
―約
7
―
マイク録音時 約
36
約
11
約
13
約
3.5
ラジオ
FM
約
18
約
11
約
6.5
約
3.5
録音時
AM
約
15
約
11
約
5
約
3.5
FWD
メイン・ラジオ用
電池消耗表示
テープ用
電池消耗表示
電源
32J
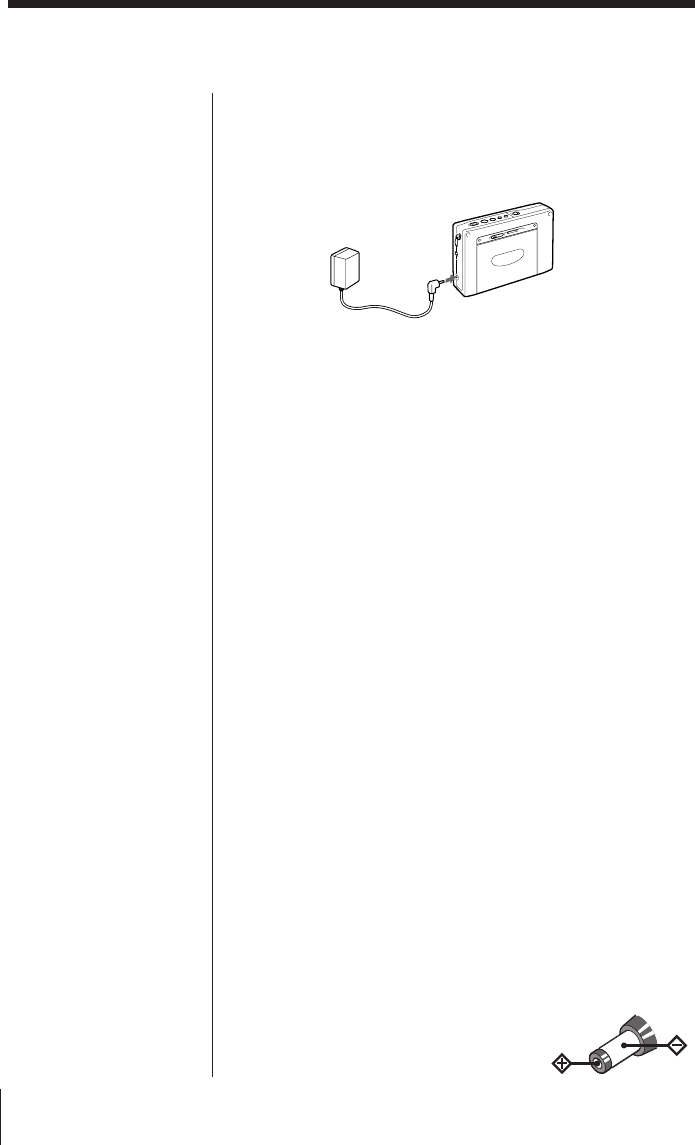
コンセント(家庭用電源)で使うには
付属のACパワーアダプター(ICF-SW1000TS、日本国内モ
デルのみ)または別売りのACパワーアダプターAC-E30L
(国
内)、AC-E30HG
(海外)をDC IN 3V端子につなぎます。
ご注意
•電源コードは、無理に曲げたり、上に重い物を載せたりし
ないでください。
•
コードを抜くときは、必ずプラグを持って抜いてください。
•長い間使わないときは、必ずACパワーアダプターをコン
セントから抜いてください。このときは必ず本体からプラ
グも抜いてください。
車で使うには(12V/24V車)
別売りのカーバッテリーコードDCC-E230
(国内で販売)な
どをDC IN 3V端子につなぎます。詳しくはカーバッテリー
コードの取扱説明書をご覧ください。
ご注意
•外部電源で本機を使うときも、内蔵のマイコンのバック
アップ用としてRADIO BATT入れに電池を入れておいて
ください。この場合も乾電池は消耗しますので、約1年で
交換してください。
•乾電池で使うときは、必ずACパワーアダプターやカー
バッテリーをコンセントや車から抜いたあと、本機のDC
IN 3V端子からプラグを抜いてください。
DC IN 3V端子に外部電源のプラグをつないだまま、本機
を使わないでください。
•外部電源のプラグを抜き差しするときは、本体の電源を
切ってから行なってください。電源を入れたまま行なう
と、電源が切れて「i」表示が出ることがあります。この場
合、もう一度本体の電源を入れると表示は消えます。
•ACパワーアダプターやカーバッテリーコードには、ソ
ニーの推奨品または同等品をお使いください。プラグの極
性、その他の仕様の違う製品を使うと、
故障したり性能を充分に発揮できない
ことがあります。
コンセントや車で使う
ちょっと一言
•DC IN 3V端子にACパ
ワーアダプターやカーバッ
テリーコードをつなぐと、
乾電池が入っていても自動
的に外部電源に切り換わり
ます。
•コンセントやカーバッテ
リーで使用中は、表示窓が
常時照明されます。
ただし、ホールド機能を働
かせると照明は消えます。
コンセントへ
DC IN 3V 端子へ
極性統一形プラグ
その他
そ
の
他
33J
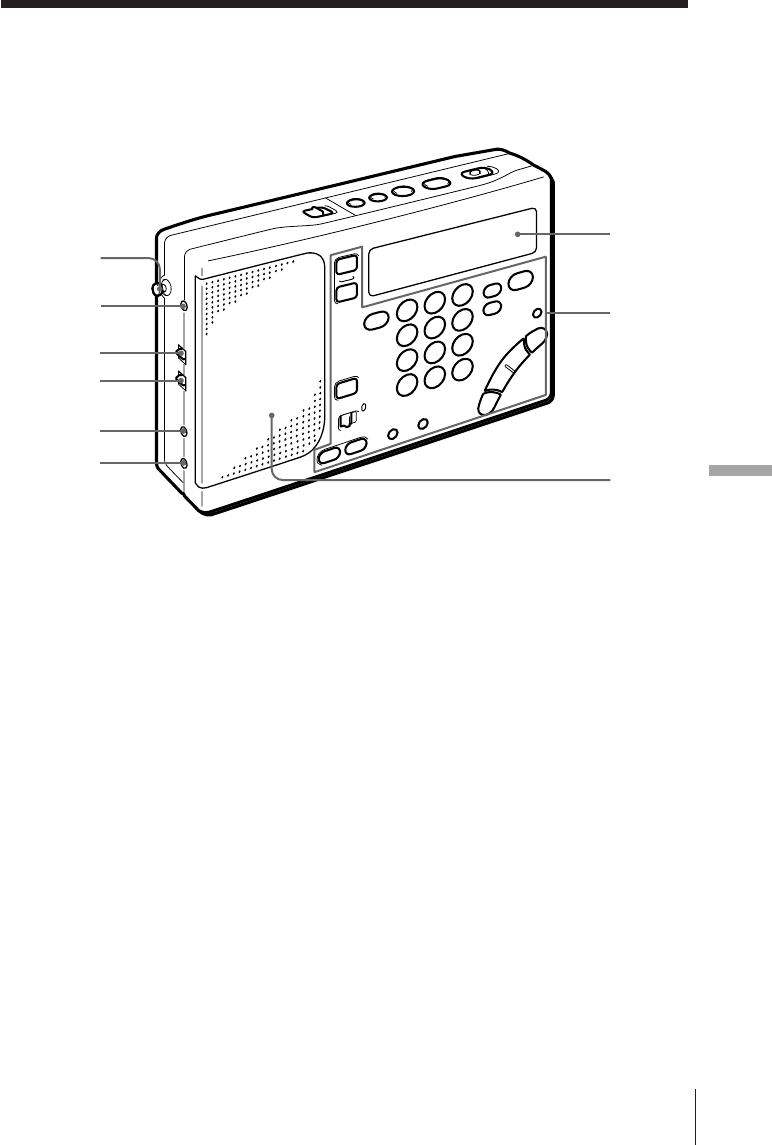
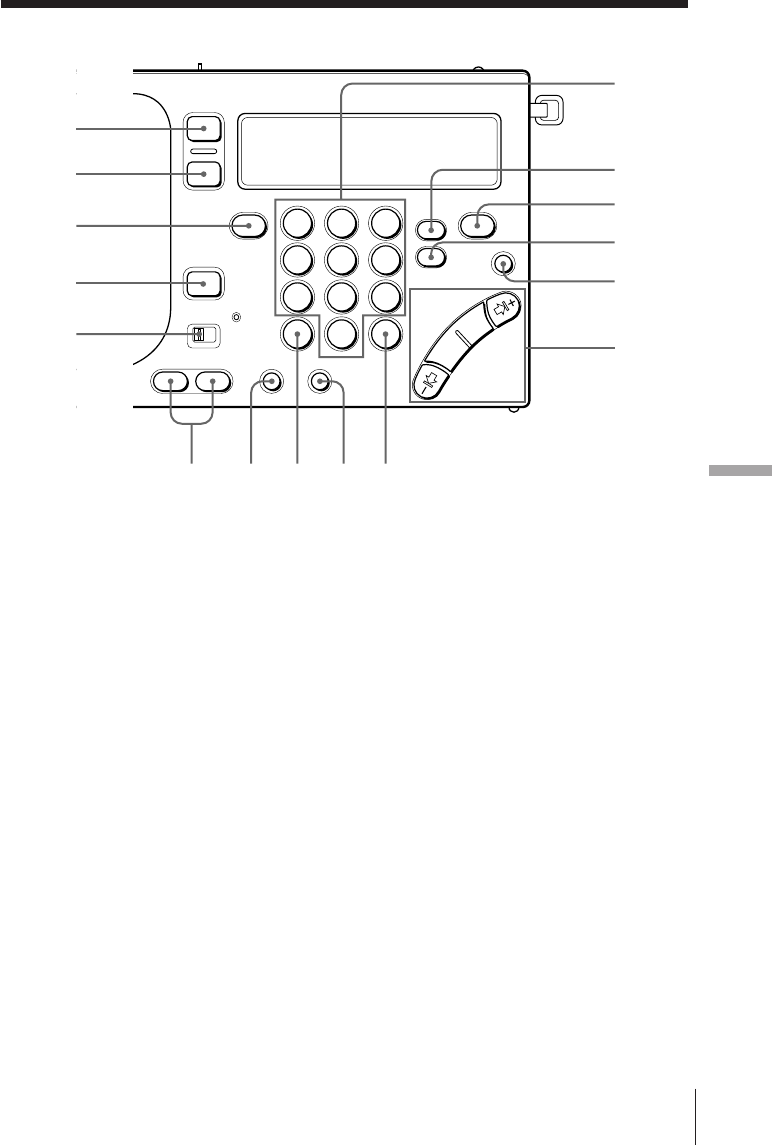
各部の名称
( )内のページに詳しい説明があります。
前面
1ロッドアンテナ(7)
2エクスターナルアンテナ
AM EXT ANT(AM外部アンテナ入力)
端子(20)
3センシティビティ ローカル
SENS DX • LOCAL(FM/AM感度切り
換え)スイッチ(7)
4ステレオ モノラル
ST • MONO(ステレオ/モノラル切り換
え)スイッチ(7)
5マイク
MIC端子(22)
62
(ヘッドホン)端子
7表示窓
8操作部
9スピーカー
7
8
9
2
1
4
3
5
6
その他
34J
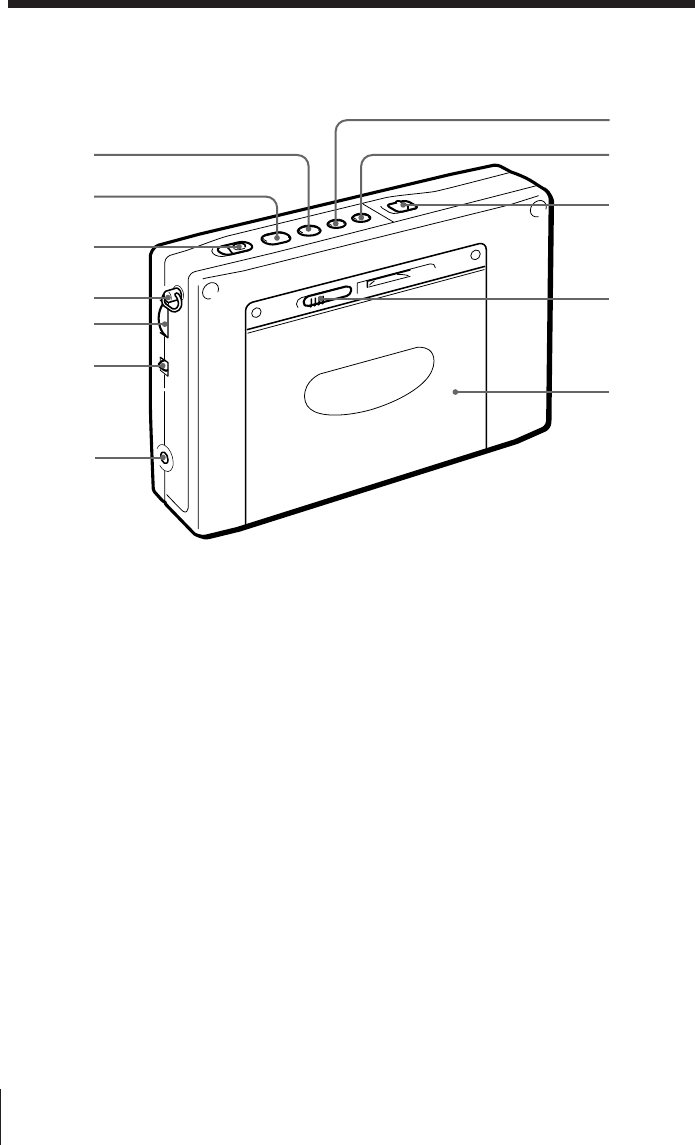
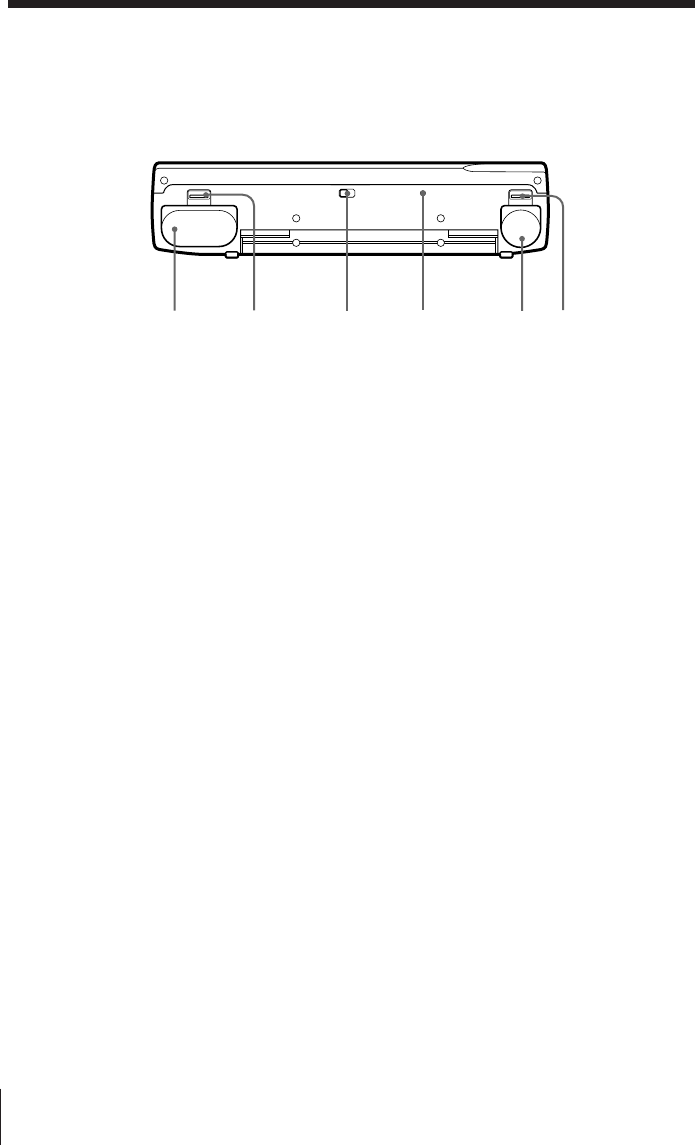
裏面
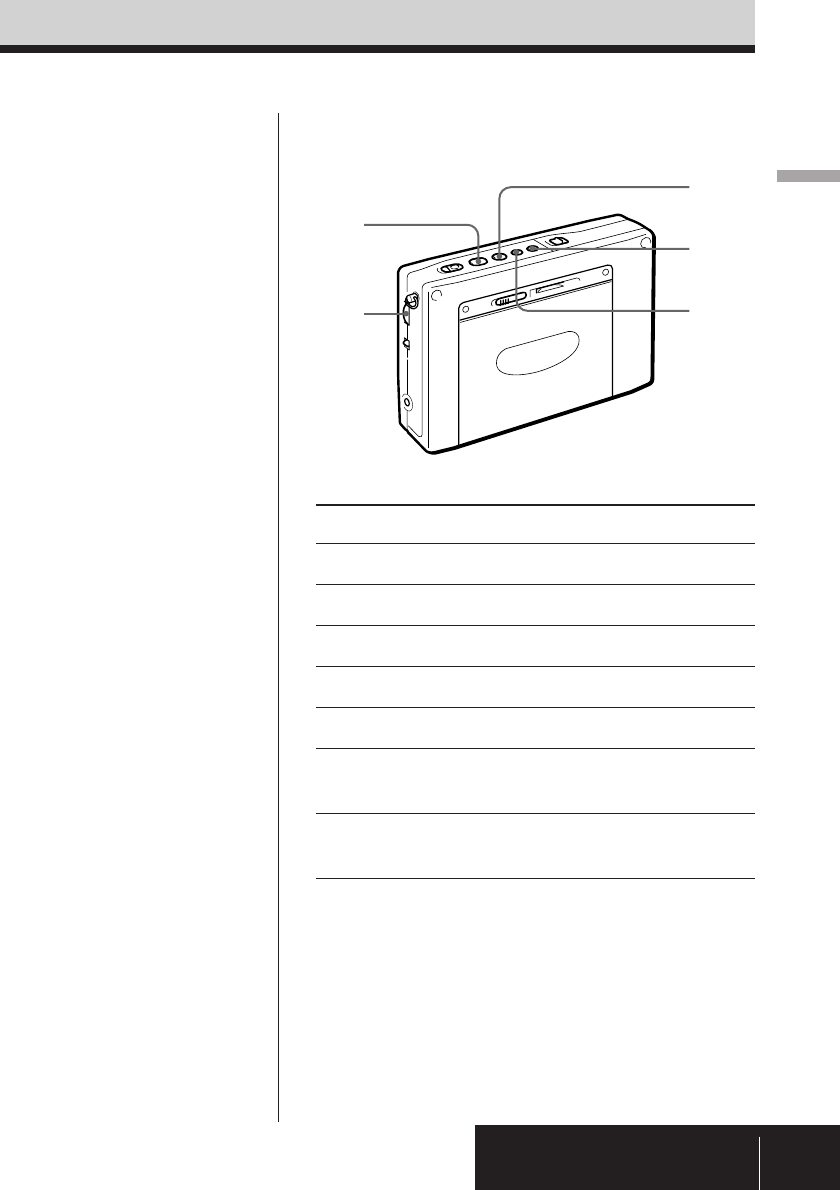
0■(停止)ボタン(8,9)
!¡ 9(
(再生)ボタン(8,9)
!™ レコード
REC(録音)スイッチ(11)
!£ ハンドストラップ取り付け金具(30)
!¢ ボリューム
VOLUME(音量調節)つまみ(7)
!∞ トーン
TONE (音質切り換え)スイッチ(7)
!§ DC IN 3V ¥(外部電源入力)端子
(32)
!¶ FF(早送り)ボタン(9)
!• リワインド
REW(巻戻し)ボタン(9)
!ª ホールド
HOLD(誤操作防止)スイッチ(29)
@º オープン
OPEN
(カセットぶた開け)つまみ(8)
@¡ カセットぶた
!ª
!•
@º
@¡
!¶
!§
!¡
!™
0
!¢
!£
!∞
その他
そ
の
他
35J
123
456
789
0
1ラジオ パワー オン オフ
RADIO POWER ON/OFF(ラジオ電
源入/切)ボタン(6)
2スリープ
SLEEPボタン(26)
3FM/AM切り換えボタン(6)
4スタンバイ オン オフ
STANDBY ON/OFF(スタンバイ入/
切)ボタン(24)
5モード
MODE(スタンバイモード ラジオ/ラ
ジオ録音切り換え)
スイッチ(25)
6メモリー プリセット ダイレクト チューン
MEMORY PRESET/DIRECT TUNE
(プリセット選局/ダイレクト選局)ボタ
ン(14,15)
7シンク
SYNC(同期検波)ボタン(18)
8ページ
PAGE(ページ切り換え)ボタン
(15,16)
9SSBボタン (17)
!º ライト
LIGHT
(照明)ボタン
このボタンを押すと約20秒間表示窓が
照明され、暗いところでも表示が読めま
す。
!¡ マニュアル チューン スキャン
MANUAL TUNE/SCAN •
スタンバイ タイム セット タイム セット
STANDBY TIME SET/TIME SET
(マニュアル選局/スキャン選局 •
タイマー時刻設定/時計合わせ)ボタン
(6)
!™ スタンバイ メモリー スタンバイ
STANDBY MEMORY • STANDBY
タイム セッT
TIME SET(スタンバイメモリー •
スタンバイ時刻設定)ボタン(24,27)
!£ エンター タイム セット
ENTER • TIME SET(入力/時刻設定)
ボタン(5,15)
!¢ ダイレクト
DIRECT(ダイレクト選局)ボタン (14)
!∞ バンド
AM BAND(AMバンド)切り換えボタ
ン(6)
!§
エクセキュート
ディスプレイ
EXE • DISPLAY(実行 • 表示)ボタン
(5,14)
ラジオやテープを聞いているときにボタ
ンを押すと、時刻表示に切り換わり、も
う一度押すと戻ります。
操作部
1
2
3
4
5
6
!™ !¢
!£ !∞ !§
!¡
0
8
7
9
その他
36J
1ラジオ バッテリー
RADIO BATT(メイン・ラジオ用電池)
入れ(4)
2オープン ラジオ バッテリー
OPEN(RADIO BATT入れ 開け)つ
まみ(4)
3ISS(AM放送録音妨害除去)
スイッチ
(11)
4リセット
RESETボタン
不具合が生じたときなどに先の細いもの
で押すと、記憶させた周波数や時刻の内
容が消え、工場出荷時の状態に戻りま
す。
5テープ バッテリー
TAPE BATT(テープ用電池)入れ(4)
6オープン テープ バッテリー
OPEN(TAPE BATT入れ 開け)つま
み(4)
底面
1234 56
その他
そ
の
他
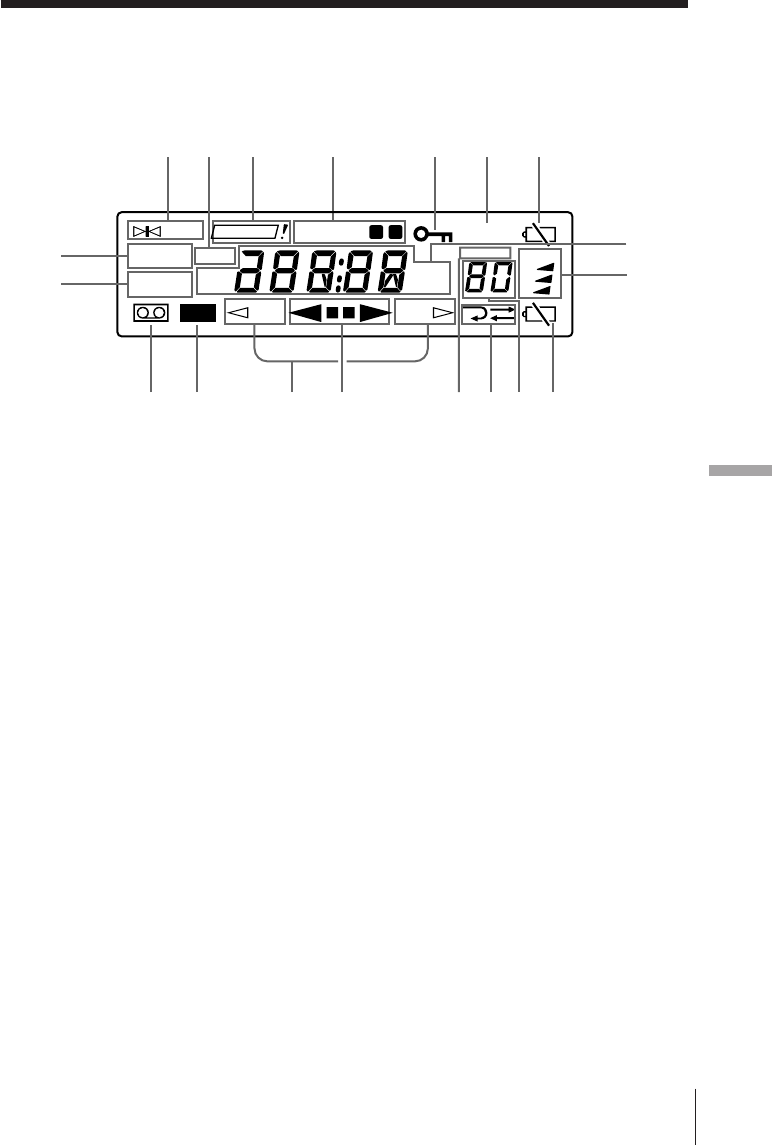
37J
1チューン
TUNE
(選局)表示(14)
放送を受信したときに点灯します。
2トライ アゲイン
TRY AGAIN !
(再設定)表示(14,19)
MW放送の周波数ステップを変えるとき
に間違った数字を入力したり、ダイレク
ト選局時に受信範囲外の周波数を入力す
ると、点滅します。
3スタンバイ
STANDBYa•b表示(25,28)
タイマーが予約されているときに点灯し
ます。
4ホールド(誤操作防止)表示(29)
表示されているときはボタン操作を受け
付けません。
5スリープ
SLEEP表示(26)
スリープタイマーが動作中に点灯しま
す。
6電池消耗表示(メイン・ラジオ電池用)
(31)
7シンク シンク
SYNC U • SYNC L(同期検波)表示
(18)
8USB • LSB / CW(SSB/CW方式)表示
(17)
9ロック
LOCK(同期ロック)
表示(18)
同期検波が働いているときに点灯しま
す。
!º カセット表示
カセットテープが入っているときに点灯
します。
!¡ レコード
REC(録音)表示
!™ テープ走行方向表示(8)
カセットぶた側の面が動作するときは
「FWD·」が、本体側の面が動作する
ときは「ªREV」が点灯します。
!£ テープ動作表示
!¢ PRESET表示
!∞ テープ走行方法表示(8)
!§ プリセット番号/スリープ時間表示
(15,16,26)
!¶ 電池消耗表示(テープ用電池)(31)
!• ページ
PAGE(ページ番号)表示(15)
!ª 周波数/時刻/テープ動作表示
表示部
REV
TUNE
LSB/CW
SLEEP
3
MHz
kHz
FWD
TRY AGAIN
STANDBY
SYNC U
SYNC L
USB
FM
AM
PRESET
PAGE
1
2
LOCK
REC
ab
1293 6
54
!ª
!•
7
8
!º !¡ !£!™ !§ !¶!∞!¢
その他
38J
使用上のご注意とお手入れ
置き場所について
次のような場所には置かないでください。故障の原
因となることがあります。
•暖房器具の近く、窓を閉め切った自動車内(特に
夏季)。
•直射日光や紫外線が長時間当たる場所(夏季の海
岸など)。
•極端に温度が高いところ(周囲温度40℃以上)や
寒いところ(0℃以下)。暑いところでは、表示が
88.88…と見えることがあります。寒いところで
は表示文字の変わりかたがゆっくりになることが
あります(常温に戻せば、元に戻ります)。
•湿度の高いところ(風呂場など)。
•ほこりの多いところ。
•強い振動や衝撃のあるところ。
本体について
•汚れたときは、柔らかい布でからぶきしてくださ
い。シンナーやベンジンなどは表面をいためます
ので使わないでください。
•キャッシュカード、定期券など磁気を利用した
カード類をスピーカーに近づけないでください。
スピーカー内部の磁石の影響でカードの磁気が変
化し、使えなくなることがありますのでご注意く
ださい。
異常や不具合が起きたら
万一、異常や不具合が起きたとき、異物が中に入っ
たときは、すぐに電源を切り、(ACパワーアダプ
ターは必ずコンセントから抜いて)内部を開けずに
お買い上げ店、またはソニーサービス窓口にご相談
ください。
サービス依頼について
修理のために本体をお預けになると、修理内容によ
り、プリセット局の記憶が消えてしまう場合があり
ます。重要なデータは控えをとっておくことをおす
すめします。
特定の相手方に対して行われる無線通信を傍
せつ
受して、その存在または内容を漏らしたり窃
よう
用したりすることは、電波法で禁止されてい
ます。
カセットコーダーについて
ヘッド部のお手入れ
良い音でお楽しみいただくためにおよそ10時間使用
するごとに、ヘッドとキャプスタン、ピンチロー
ラーを別売りのクリーニングキットKK-WM1など
できれいにしてください。
長い間本機を使わなかったときは
使用して数分間は動作が不安定になる場合があり
ます。
長時間テープについて
90分をこえるテープは非常に薄く伸びやすいので、
こきざみな走行、停止、早送り、巻戻しなどを繰り
返さないでください。テープが機械に巻き込まれる
場合があります。
ヘッド
ピンチローラー
キャプスタン
綿棒

その他
そ
の
他
39J
故障かな?と思ったら
本機の調子が悪いとすぐ故障と考えがちですが、修理に出す前にもう一度取扱説明書をお読み
になり、次のような点検をしてください。
共通
悪いところは?
ボタン操作を受け付けない
RADIO POWER ON/OFF
を押しても電源が入らない
表示窓に表示が出ない
表示窓の文字が薄く見にくい
表示窓の文字の変わりかたが遅
い
音がまったく聞こえない
原因は?
ホールド機能が働いている
電池の入れかたが違う
電池が消耗している
ACパワーアダプターまたは
カーバッテリーコードがはずれ
ている
電池の入れかたが違う
電池が消耗している
極端に寒いところ、湿気の多い
ところで使っている
極端に寒いところで使っている
音量が最小になっている
ヘッドホンが差し込まれている
電池の入れかたが違う
直しかた
HOLDスイッチを矢印と反対の
方向にずらす
(「H」表示を消す)
]}を正しく入れ直す
新しい電池を入れる
しっかり差し込む
]}を正しく入れる
新しい電池を入れる
適当な場所を選ぶ
適当な場所を選ぶ
音量を調節する
ヘッドホンを抜く
]}を正しく入れる
悪いところは?
雑音が入る、音が悪い
ダイレクト選局ができない
放送局を覚えさせられない
原因は?
電池が消耗している
選局やアンテナの調節が不充分
電波が弱い
SENSスイッチがLOCALに
なっている
ボタン操作の間隔が10秒以上空
いている
覚えさせかたが間違っている
ラジオ 直しかた
新しい電池を入れる
正しく同調する、または、アン
テナを正しく使う
建物や乗り物の中などでは窓際
で聞く
SENSスイッチをDXに切り換
える
それぞれのボタン操作を10秒
以内に行う
ENTERを押したまま数字ボタン
0∼9を押す(15ページ)

その他
40J
悪いところは?
テープの操作ができない
Åに設定したが両面の連続再
生・録音ができない
録音できない
ラジオのタイマー録音ができな
い
ステレオ音源がモノラルで録音
された
音がとぎれる、汚ない
悪いところは?
覚えさせたはずの放送局が受信
できない
予約した時刻にラジオが鳴らな
い
原因は?
覚えさせた放送局の番号が間
違っている
覚えさせた周波数が消えている
(電池交換に3分以上かかった)
STANDBY ON/OFFボタンを
押し忘れている
ホールド機能が働いている
電池交換に3分以上かかった
音量が最小になっている
直しかた
正しい番号を選ぶ
もう一度覚えさせる(15ペー
ジ)
押す(24ページ)
HOLDスイッチを矢印と反対の
方向ににずらす
(「H」表示を消す)
タイマー予約をやり直す
音量を調節しておく
ラジオ
原因は?
ホールド機能が働いている
メイン・ラジオ用電池が入って
いない
テープ用電池が消耗している
走行方向をªREVで再生・録
音をした
ツメの折れたテープを使ってい
る
MODEスイッチがRADIOに
なっている
ST・MONOスイッチがMONO
になっている
ヘッドが汚れている
直しかた
HOLD スイッチを矢印と反対
の方向にずらす(「H」表示を
消す)
メイン・ラジオ用電池を入れる
新しい電池を入れる
FWD·で再生・録音をする
ツメの穴をセロハンテープなど
でふさぐ
MODE スイッチをREC に切り
換える
ST・MONOスイッチをSTに切
り換えて録音する
ヘッドをクリーニングする
(38ページ)
故障かな?と思ったら(つづき)
カセットコーダー

その他
そ
の
他
41J
保証書と
アフターサービス
保証書
•この製品には保証書が添付されていますの
で、お買い上げの際お受け取りください。
•所定事項の記入および記載内容をお確かめ
のうえ、大切に保存してください。
•保証期間はお買い上げ日より1年間です。
アフターサービス
調子が悪いときはまずチェックを
この説明書をもう一度ご覧になってお調べく
ださい。
それでも具合の悪いときはサービスへ
お買い上げ店または添付の「ソニ−ご相談窓
口のご案内」にあるお近くのソニ−サ−ビス
窓口にご相談ください。
保証期間中の修理は
保証書の記載内容に基づいて修理させていた
だきます。詳しくは保証書をご覧ください。
保証期間経過後の修理は
修理によって機能が維持できる場合は、ご要
望により有料修理させていただきます。
ソニーワールドモデルをお買
い上げのお客様へ
ワールドモデルとは
日本でも海外でも使用できるように海外、国
内の電気事情(電源電圧AC 100∼240 V)に
合わせた規格と仕様で作られたモデルです。
海外での保証とアフターサービスについて
•保証期間は、お買い上げ日より、日本国内
では1年間、海外では90日間です。
•海外での修理やアフターサービスについて
ご不明な点は、保証書に記載の海外ソニー
サービス特約店にお問い合わせください。
部品の保有期間について
当社ではラジオカセットコーダーの補修用性
能部品(製品の機能を維持するために必要な
部品)を、製造打ち切り後最低6年間保有し
ています。この部品保有期間を修理可能な期
間とさせていただきます。保有期間が経過し
た後も、故障箇所によっては修理可能の場合
がありますので、お買い上げ店またはサ−ビ
ス窓口にご相談ください。なお、補修用性能
部品の保有期間は通商産業省の指導にもよる
ものです。

その他
42J
付属品
ソニー単
3
形乾電池(
3
)
AC
パワーアダプター(
1
)
*
2
ステレオヘッドホン(1)
イヤーパッド(2)
ステレオマイク(1)
コンパクトアンテナ AN-71(1)
*
3
アクティブアンテナ AN-LP1(1)
*
4
アンテナコネクター(1)
キャリングケース(1)
ハンドストラップ(1)
ウェーブハンドブック(1)
ハウトゥキャッチザウェーブ(
1
)
*
5
取扱説明書(1)
保証書(1)
ソニーご相談窓口のご案内(1)*5
*1EIAJ(日本電子機械工業会)規格による測定値です
*2ICF-SW1000TS 日本国内モデルのみ
*3ICF-SW1000T のみ
*4ICF-SW1000TS のみ
*5日本国内モデルのみ
別売りアクセサリー
国内のみ販売
LW/MW/SW
ワイドレンジアンテナ
AN-1
AN-102
ACパワーアダプター AC-E30L
カーバッテリーコード
DCC-E230
クリーニングキット KK-WM1
国内、海外で販売
ACパワーアダプター AC-E30HG
国によって扱っているアクセサリーが違います。詳
しくはお買い上げ店、サービス窓口、海外ソニー
サービス特約店にご相談ください。
本機の仕様および外観は、改良のため予告なく変更
することがありますが、ご了承ください。
主な仕様
ラジオ部
回路方式 FM:スーパーヘテロダイン方式
AM:デュアルコンバージョン
スーパーヘテロダイン方式
受信周波数 FM:76∼108MHz
(TV:1–3ch)
SW:1621∼29999kHz
MW:530∼1620kHz
LW:150∼529kHz
中間周波数 FM:10.7MHz
SW/MW/LW:55.845MHz
(1st)、455kHz(2nd)
カセットコーダー部
トラック方式 コンパクトカセットステレオ
周波数範囲 再生時:20∼18000Hz
(EIAJ*1)録音
/再生時:70∼8000Hz
共通部
スピーカー 直径 約45mm、8Ω、1個
実用最大出力 250mW(EIAJ/DC)
電源 RADIO BATT:DC 3V
単3形乾電池 2本
TAPE BATT:DC 1.5V
単3形乾電池 1本
外部電源端子 DC IN 3V
出力端子 2端子(ステレオミニジャック)
1個 16Ω
入力端子 MIC端子(ステレオミニジャック)
1個
最大外形寸法 約176×105×40mm(幅/高さ/
奥行き)(EIAJ)
質量 本体 約464g
ご使用時 約593g(単3形アルカ
リ乾電池、テープC-60HF、ヘッ
ドホン、ストラップ含む)
その他
そ
の
他
43J
ミニ知識
上空を埋めつくす世界の電波。この電波の種
類や特長をよくつかんだうえ、ラジオ放送受
信をお楽しみください。
付属のウェーブバンドブックは、そのための
わかりやすいガイドブックとなるはずです。
よく読んで、ラジオと一緒に保管してくださ
い。
以下はよく使われる用語の説明です。
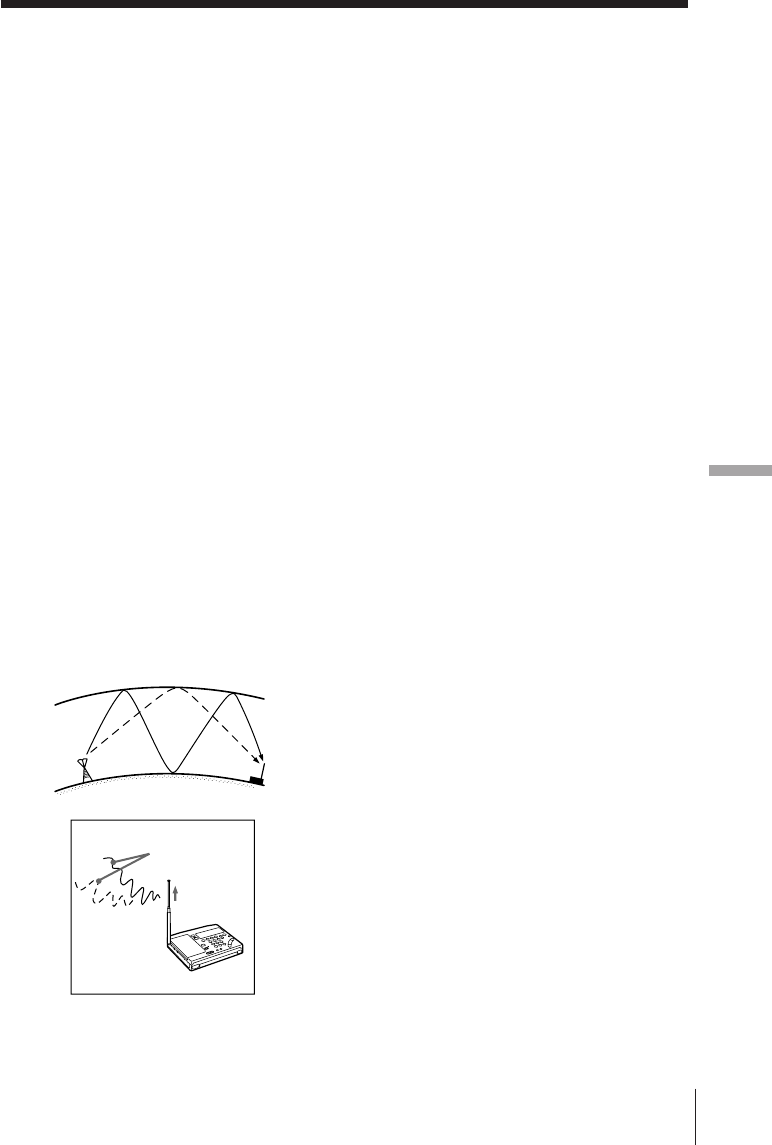
フェージング
短波放送などを聞いていると、音が大きく
なったりすることがありますが、これはラジ
オの故障ではなく、フェージングと呼ばれる
現象です。フェージングは、電離層の変化で
反射される電波の強さが変わったり、いろい
ろな経路を通って伝わってきた電波がお互い
に干渉し合ったりして起こるものです。たと
えば、電離層で1回反射された電波と2回反射
された電波とが同時にラジオに入ってくる
と、2つの電波の位相(波形の位相)がずれて
いることがあり、それらが干渉し合って電波
の強いところと弱いところができ、音が大き
くなったり小さくなったりするわけです。
受信した放送局の判別のしかた
選局すると、次から次へと多くの放送が聞こ
えてきますが、その中のどれが自分の聞きた
い局か、今受信しているのはどの放送か、と
いうのはなかなかわかりにくいものです。こ
のようなときは次のことに注意してみてくだ
さい。
•受信周波数 …表示周波数を放送局の周波
数一覧表示などで調べます。
•放送中のアナウンス …ふつう15∼30分
おきに局名やコールサインをアナウンスし
ています。
•インターバルシグナル…たいていの放送局
では番組の初めや終わりに特有の音楽や動
物の鳴き声を放送します。これらを覚えて
おくと次からはその判別が容易です。
放送時間や番組内容について詳しく知りたい
かたは、希望の放送局に申し込むとプログラ
ムやパンフレットを送ってくれます。
受信機
送信アンテナ 受信機
位相の違う
電波
その他
44J
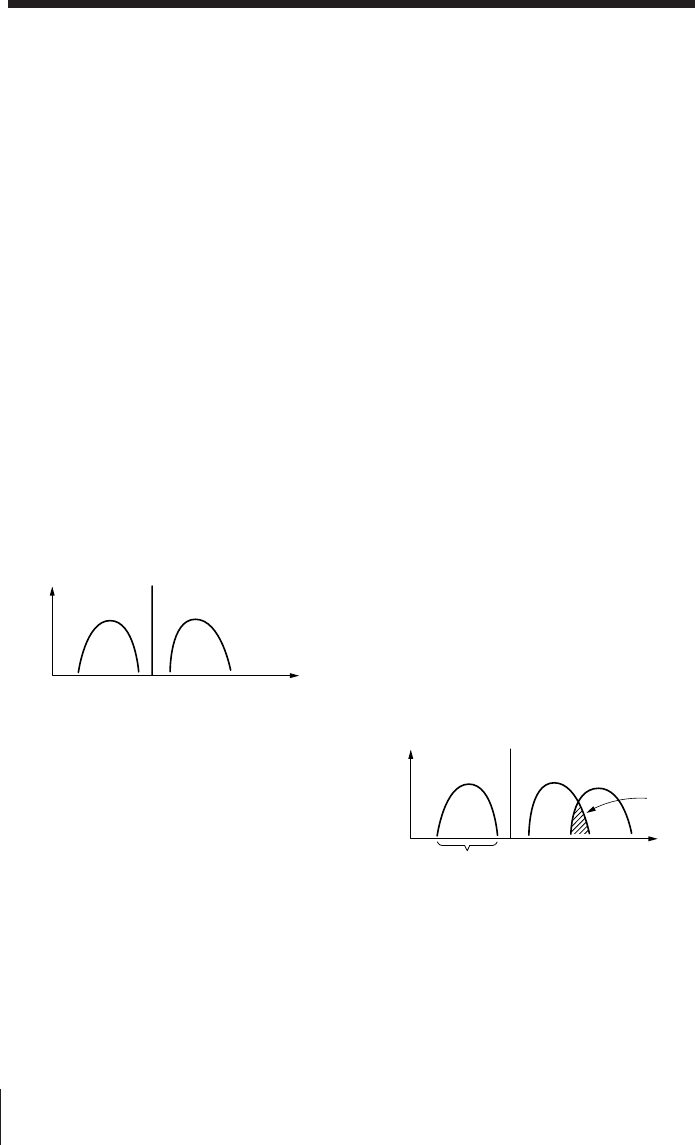
振幅 搬送波
LSB
(下側波帯) USB
(上側波帯)
周波数
同期検波とは
短波放送の受信を困難にしている大きな原因
は、フェージング(43ページ)によるひずみ
と隣接局によるビート妨害です。この2つの
障害の改善に大きな効果を発揮するのが同期
検波方式です。フェージングによるひずみ
は、途中経路でさまざまな電波の干渉によっ
て搬送波が弱められた結果、過変調となって
発生するものです。本機では、まず受信した
電波から搬送波のみを取り出し、その後、同
期検波回路によって、この搬送波と周波数は
もちろん、位相まで同期したレベル変動のな
い純粋な周波数を作り出して、この周波数を
搬送波として受信信号に補っています。これ
により、ひずみが軽減されます。
また、AM(短波、中波、長波)放送では、
普通、搬送波の上下の周波数帯 (USBと
LSB)を使って変調信号を送るDSB
(Double Side Band)方式が用いられてい
ますが、隣接局による妨害はUSBかLSBの
どちらか一方のみが影響を受けている場合が
多いのです。本機の同期検波回路では、
DSB方式のUSBかLSBのどちらか一方のみ
を抽出できますので、妨害を受けていない方
を探して受信することにより、妨害のない明
瞭な受信を楽しむことができます。
妨害のない側だけ受信する
振幅 搬送波
LSB
(下側波帯) USB
(上側波帯)
周波数
隣接局による
妨害
シングル サイド バンド
SSB (Single Side Band) とは
普通の放送では音声などの信号は、下図のよ
うに上側波帯と下側波帯という2つの周波数
成分を用いて送られています。これらのうち
どちらか一方をもちいるのがSSB方式で、搬
送波より高いものをUSB(上側波帯)、低い
ものをLSB(下側波帯)と言います。両方を
ダブル サイド バンド
用いるDSB
(Double Side Band)
に比べて
混信が少なく、業務用通信やアマチュア無線
で広く利用されています。
SSB方式では一般には、USBが採用されて
いますが、10MHz以下のアマチュアバンド
では、LSBが使われることが多くなっていま
す。SSB波は普通のラジオで受信してもモガ
モガという音が聞こえるだけで、音声として
は聞けません。SSB波を正常な音声に戻すた
めには、本機に内蔵されているようなBFO
ビート フリクエンシイ オシレーター
(Beat Frequency Oscillator)という特殊
な回路が必要です。
コンティニュアス ウェーブ
CW
(Continuous Wave)とは
普通の放送は搬送波を音声信号で変調して行
いますが、CWでは変調しない、搬送波の断
続によって信号を送るもので、一般にモール
ス信号で通信が行われます。この通信もBFO
回路を通すことによりビート音の断続として
受信できるようになりますが、通信内容を判
断するためにはモールス符号を理解する必要
があります。CW通信も各種業務用やアマ
チュア無線に用いられています。

Introduction2EN
Before operating the unit, please read this
manual thoroughly and retain it for future
reference.
Warning
To prevent fire or shock hazard, do not
expose the unit to rain or moisture.
To avoid electrical shock, do not open the
cabinet.
Refer servicing to qualified personnel only.
Features
Radio
• FM stereo/SW/MW/LW reception for
worldwide band coverage
Quartz controlled PLL (Phase Locked
Loop) synthesizer system enables simple
and precise tuning
FM: 76–108 MHz
87.5–108 MHz (for the Saudi Arabian
model)
SW: 1621–29999 kHz
1621-26100 kHz (for the Saudi
Arabian model)
MW: 530–1620 kHz
LW: 150–529 kHz
150–285 kHz (for the Saudi Arabian
model)
Refer to the supplied “Wave Handbook” for
more information on worldwide band
coverage (not applicable for the Saudi
Arabian model).
Refer to the supplied “Shortwave Guide” for
more information on shortwave band
coverage (for the Saudi Arabian model only).
• Four flexible tuning methods to obtain
optimum reception under any condition
–Manual tuning for precise control and
hand-operated tuning of the desired
broadcast station.
–Scan tuning for rapid automatic search
of the desired broadcast station through
scanning.
–Direct tuning for immediate selection of
the desired broadcast station when the
frequency is known.
–Preset tuning for instant recall of a
preset broadcast station with a single
press of the button.
• Built-in timer operation with the timer
standby function which turns on the radio
automatically at a preset time, plus the
sleep timer function which turns off the
radio automatically after a specified
number of minutes
• Stereo playback and FM reception with
the supplied stereo headphones
Cassette-Corder
• Auto-reverse recording and playback
cassette-corder
– Instant recording operation of the
desired broadcast station with a single
press of the button, or simply enjoy
recording with the external microphone.
– Record radio broadcasts at the desired
preset time with the convenient built-in
timer.
• Monitor the sound while forwarding or
rewinding with the cue and review
functions
MW channel step
The MW channel step of this unit is factory-
set to 9 kHz.
Change the MW channel step from 9 kHz to
10 kHz when listening to MW broadcasts in
North and South American countries (see
page 19).
North and South American countries: 10
kHz
Japan, Europe, and other countries: 9 kHz
Notes on recording
• Check and make sure that the recording
operation is not malfunctioning prior to
recording important materials.
• IN NO EVENT SHALL SELLER BE
LIABLE FOR ANY DIRECT, INCIDENTAL
OR CONSEQUENTIAL DAMAGES OF
ANY NATURE, OR LOSSES OR
EXPENSES RESULTING FROM ANY
DEFECTIVE PRODUCT OR THE USE OF
ANY PRODUCT.
• Observe the relevant regulations on
copyright relating to your collection of
recordings from the radio. Unauthorized
public performance, broadcasting and
duplication of a recorded broadcast for
commercial purposes are a violation of
applicable laws.

3EN
Table of contents
EN
Table of contents
Basic Operations
4Inserting the batteries
5Setting the clock
6Listening to the radio—Scan tuning
8Playing a cassette
10 Recording radio broadcasts
Radio
12 Various tuning methods for
optimum reception
12 Manual tuning
14 Direct tuning
15 Preset tuning
17 Receiving SSB and CW
transmissions
18 Receiving optimum AM
broadcast—Synchronous
detection
19 Changing the MW channel step
for use in foreign countries
20 Connecting an external antenna
for optimum reception
Cassette
22 Recording with a microphone
Timer
24 To wake up to the desired
broadcast—Standby function
26 To fall asleep while listening to
the desired broadcast—Sleep
timer
27 To record the desired broadcast
with the timer—Timer recording
Other Operations
29 Using the hold function to
prevent accidental operation
30 Attaching the strap
Power Sources
31 Replacing the batteries
32 Operating with house current or
car battery
Additional Information
33 Location and function of controls
38 Precautions and Maintenance
40 Troubleshooting
43 Specifications
44 Tips on radio waves
Basic Operations4EN
To operate the unit with house current or car battery, refer
to “Operating with house current or car battery” on page 32.
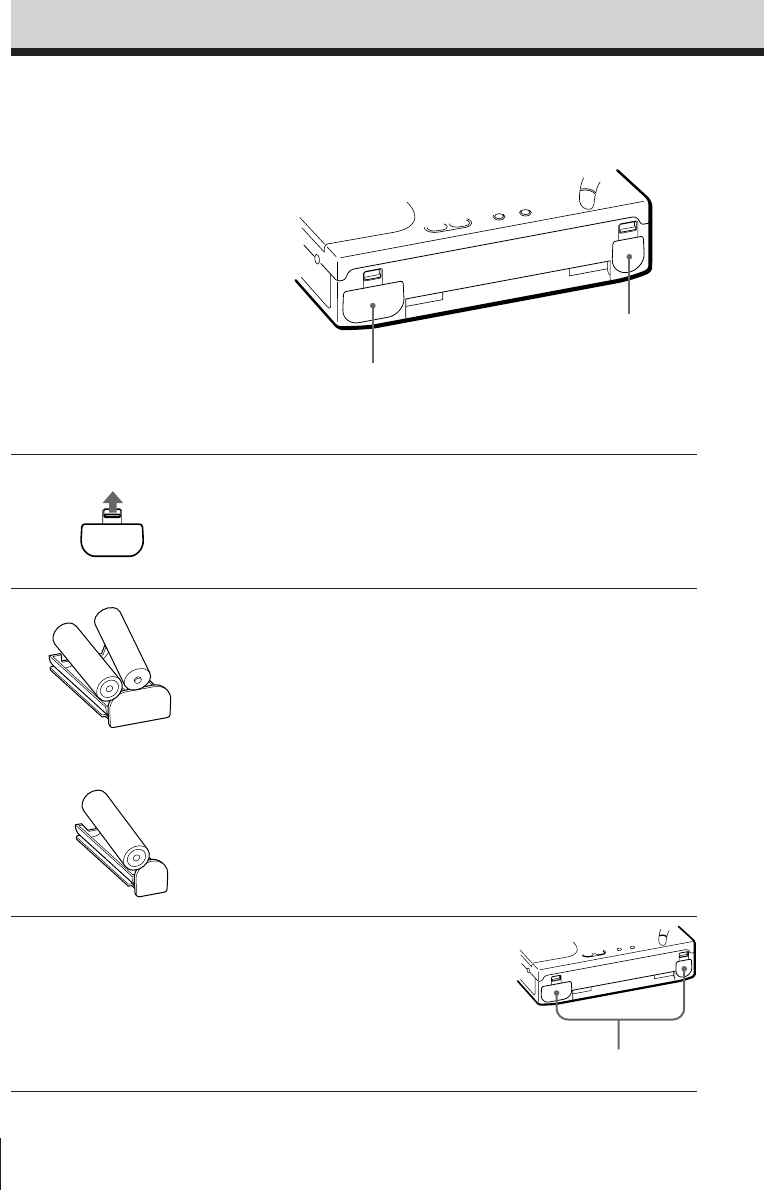
1Push the OPEN tabs and remove
the RADIO BATT and TAPE
BATT battery holders.
2Insert two R6 (size AA) batteries
into the RADIO BATT battery
holder and insert one R6 (size
AA) battery into the TAPE BATT
battery holder.
Note
It is not necessary to insert a battery
into the TAPE BATT battery holder if
you wish to operate the radio only.
However, to use the cassette, insert
the batteries into both the RADIO
BATT and TAPE BATT battery
holders.
Otherwise, the unit may not operate
properly.
3Insert both battery holders back
into the unit.
]
}
]
}
}
]
Inserting the batteries
Basic Operations
Insert until it clicks.
Insert the batteries to operate the unit with
batteries.
Insert the batteries into both battery holders
when using the cassette.
RADIO BATT
TAPE BATT
Insert with the correct
‘’ polarity as
indicated.
Basic Operations
Basic Operations
5EN
FWD
TIME SET
ENTER
123
456
789
0
Setting the clock
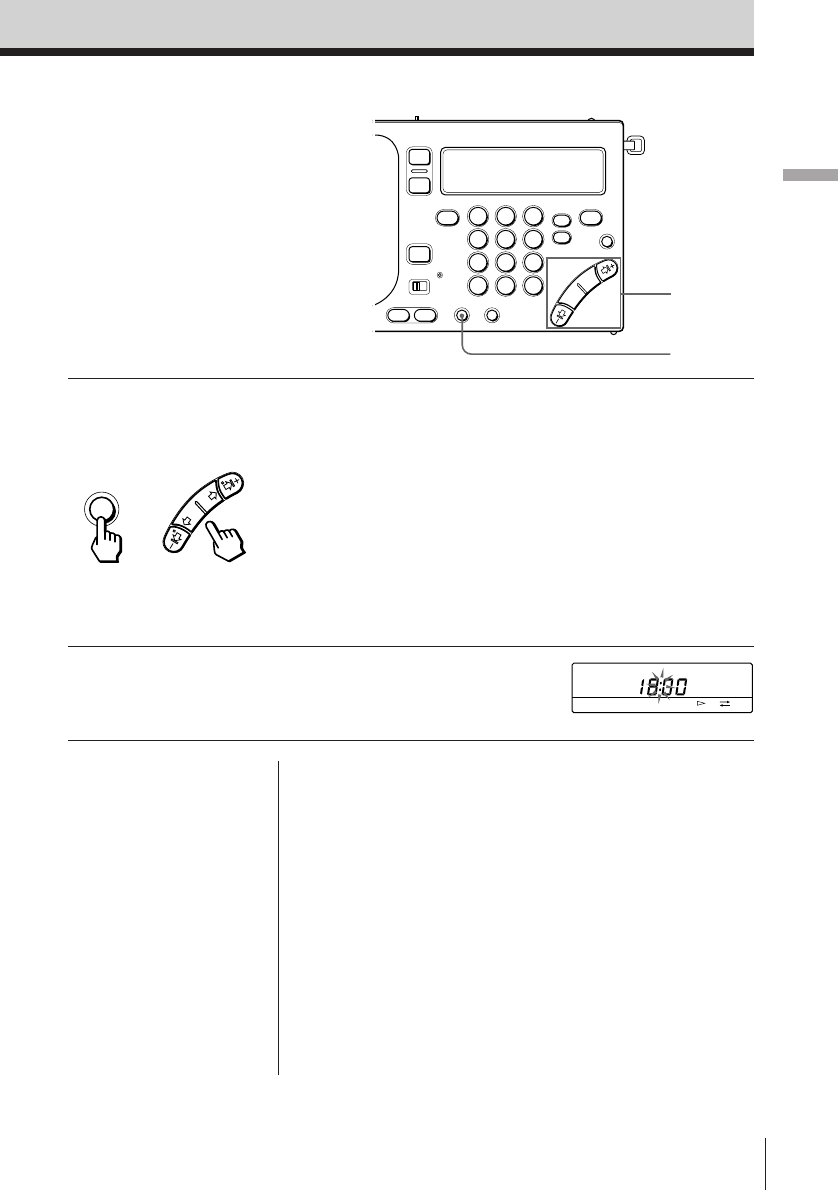
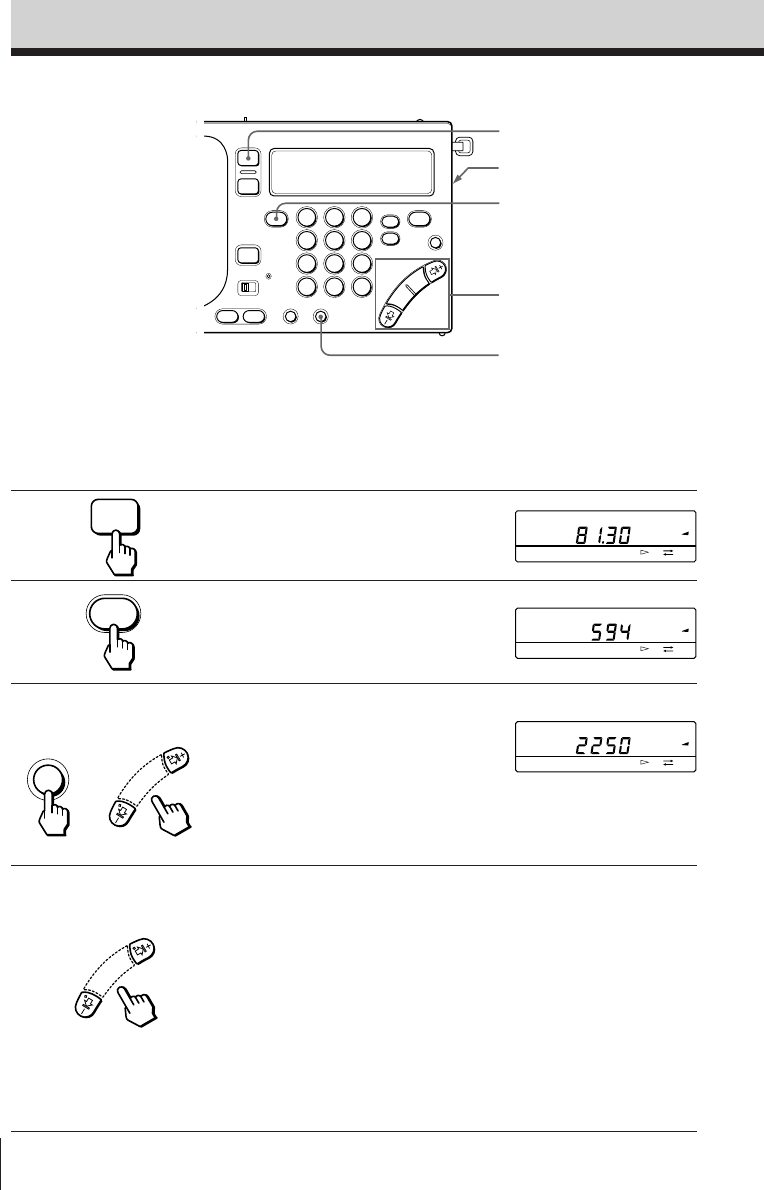
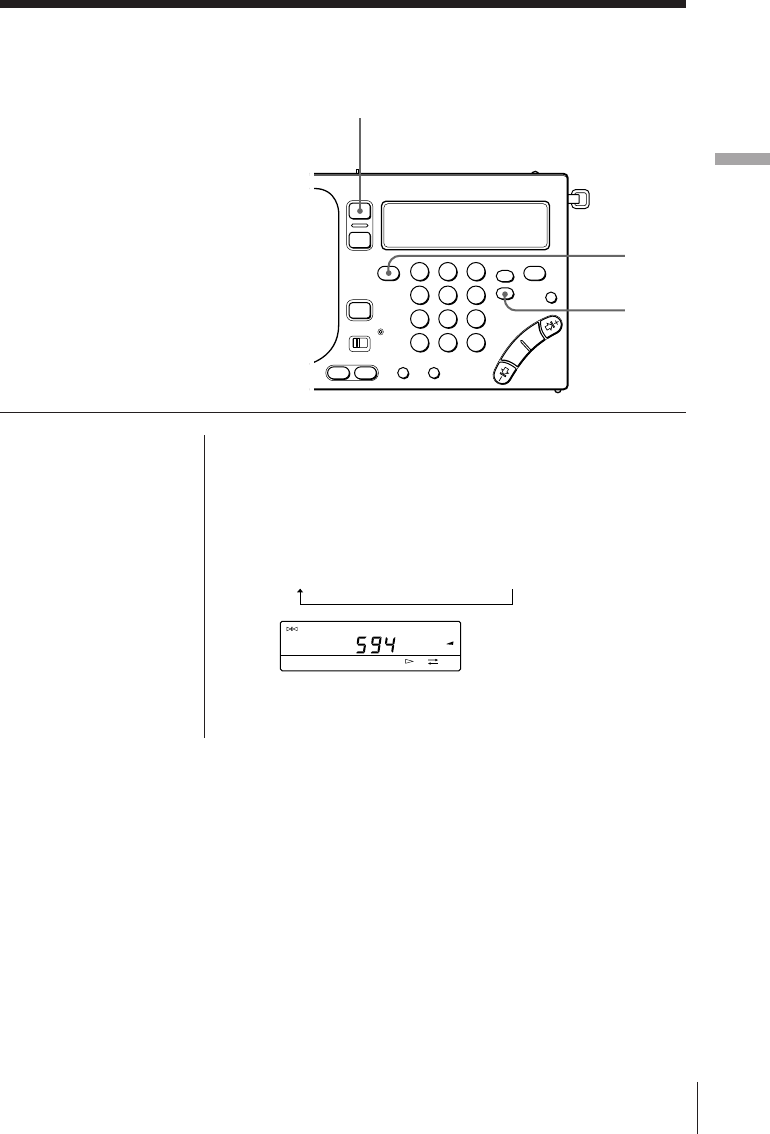
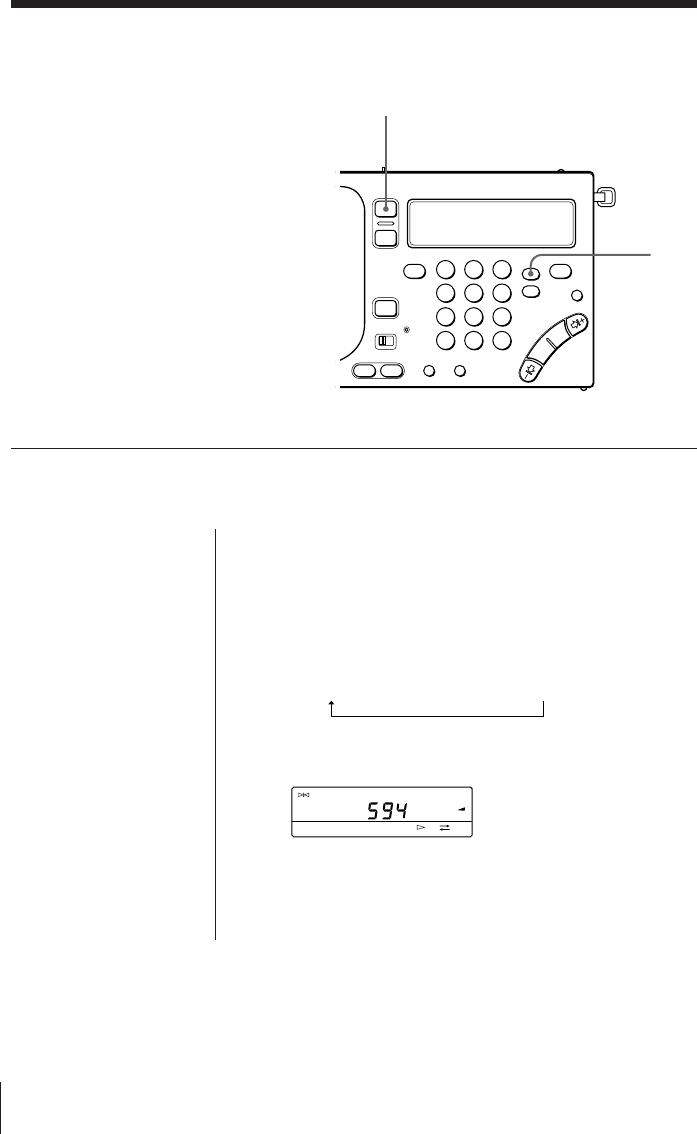
1Press and hold TIME SET •
ENTER while pressing HOUR or
MIN repeatedly until the correct
time is displayed.
Each time MIN (¿ or ÷) is pressed,
the minute will decrease (¿) or
increase (÷) by one minute. Each
time HOUR (–1¿ or ÷1+) is pressed,
the hour will decrease (–1¿) or
increase (÷1+) by one hour.
Press and hold the button to decrease
or increase rapidly.
2Release TIME SET • ENTER.
The “:” starts flashing and the clock
operates.
1
1,2
+
To display the clock
Press EXE to display the clock while operating the
radio or the cassette. The current time appears for
about 10 seconds and then the previous display
returns. However, the clock cannot be displayed
while scan tuning.
While the clock is displayed, press EXE again to
return to the previous display.
Note
You cannot set the clock while operating the radio or the
cassette.
Press RADIO POWER ON/OFF to turn off the radio, or
press p to stop the tape.
Tips
• The clock is displayed in
24-hour indication.
• Press TIME SET•
ENTER to stop the
flashing of “0:00”.
• To set the clock
accurately, release TIME
SET • ENTER at the
time of the tone.
Set the clock when you initially insert the
batteries or when the clock is reset at which
time “0:00” flashes.
Basic Operations6EN
AM
PAGE
1
2
3
kHz
FWD
AM
PAGE
1
2
3
kHz
FWD
FM
PAGE
1
2
3
MHz
FWD
AM BAND
FM/AM
ON/
OFF
123
456
789
0
Listening to the radio—Scan tuning
To manually tune in to the desired broadcast staion, refer to
“Manual tuning” on page 12.
To immediately tune in to the desired broadcast station, refer to
“Direct tuning” on page 14.
To preset a broadcast station for instant recall, refer to “Preset
tuning” on page 15.
1Press RADIO POWER ON/OFF.
The radio turns on.
2Press FM/AM to select either FM
or AM.
Select AM to listen to SW, MW or LW.
3When you select AM, press –1¿
or ÷1+ while pressing AM
BAND to select MW, LW, or
meter band (SW)*.
Skip this step and proceed to step 4 if
you wish to listen to FM.
* For details on the meter band, refer to
“Meter bands and SW” on page 13.
4Press and hold –1¿ or ÷1+ and
release when scanning of the
frequency begins.
When a broadcast station is received
automatically, scanning pauses for
about 2 seconds. Then, scanning
resumes to tune in to the next
broadcast station.
Scanning repeats in a cycle within the
meter band frequency range (see page
13). Scanning during SSB reception
repeats in a cycle within the 150-29999
kHz frequency range.*
3,4,5
3
2
1
VOLUME
The minimum
frequency allocation for
each band is displayed.
+
* Not applicable for the Saudi
Arabian model.
Basic Operations
Basic Operations
7EN
TUNE
AM
PAGE
1
2
3
kHz
FWD
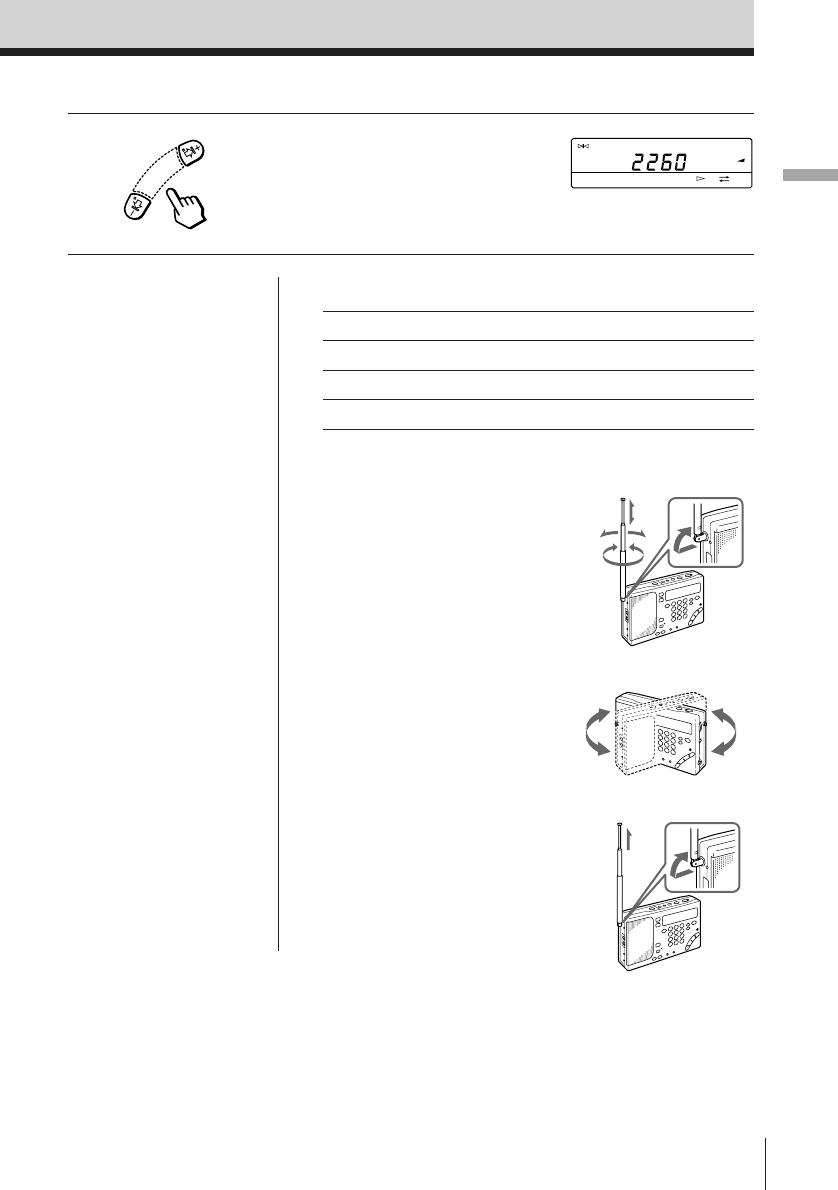
5Press –1¿ or ÷1+ to stop
scanning and to listen to the
currently tuned broadcast station.
Other operations
To Press or turn
Fine tune the reception –1¿, ¿, ÷, ÷1+
Adjust the volume VOLUME
Turn off the radio RADIO POWER ON/OFF
To improve reception
For FM reception
Gently pull out the
telescopic antenna and
adjust the length, angle and
direction to obtain optimum
reception.
For MW/LW reception
Retract the telescopic
antenna and rotate the unit
to reorient the built-in ferrite
bar antenna to obtain
optimum reception.
For SW reception
Gently pull out the
telescopic antenna to its full
length and set vertically to
obtain optimum reception.
Tips
• To enjoy FM stereo
reception, plug the
stereo headphones.
Set ST • MONO to ST or
MONO to select stereo
or monaural reception
as necessary.
• When listening to news,
set TONE to NEWS for
optimum results. Vocal
output will be sharper
and clearer. When
listening to music, set to
MUSIC for optimum
results.
• During MW reception at
nighttime when radio
wave intensity is
dramatically stronger,
or when interference is
prevalent, scanning may
tend to tune in to almost
every null broadcast. Set
SENS to LOCAL so that
the null broadcast of
weaker radio wave
intensity is skipped.
Under normal
conditions, set to DX.
Note
When reception does
not improve, connect an
external antenna (see
page 20).
Basic Operations8EN
FWD
FWD
FWD
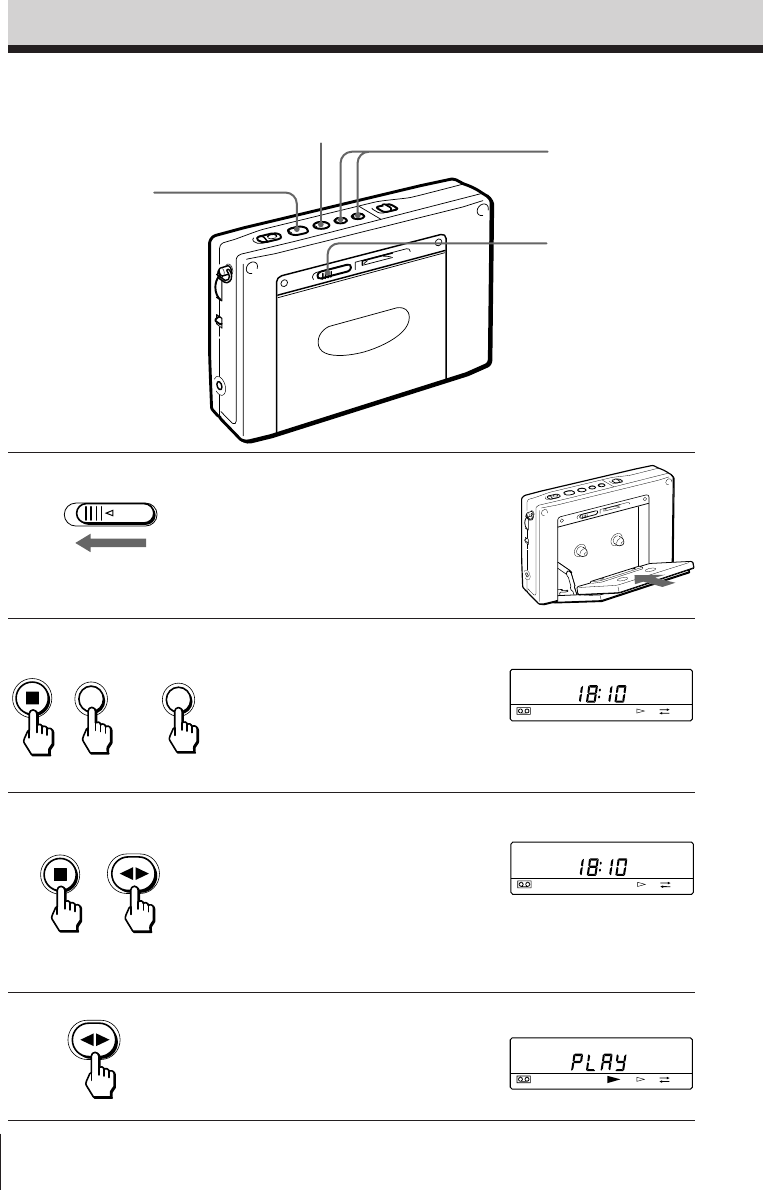
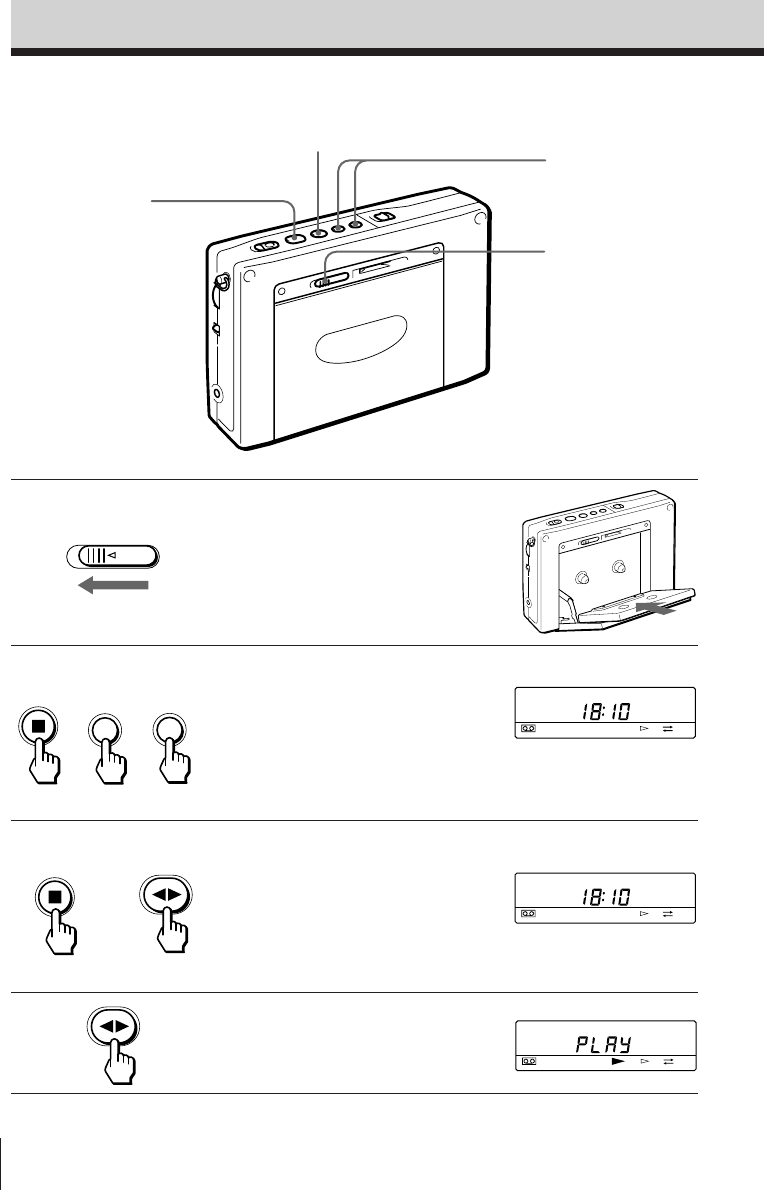
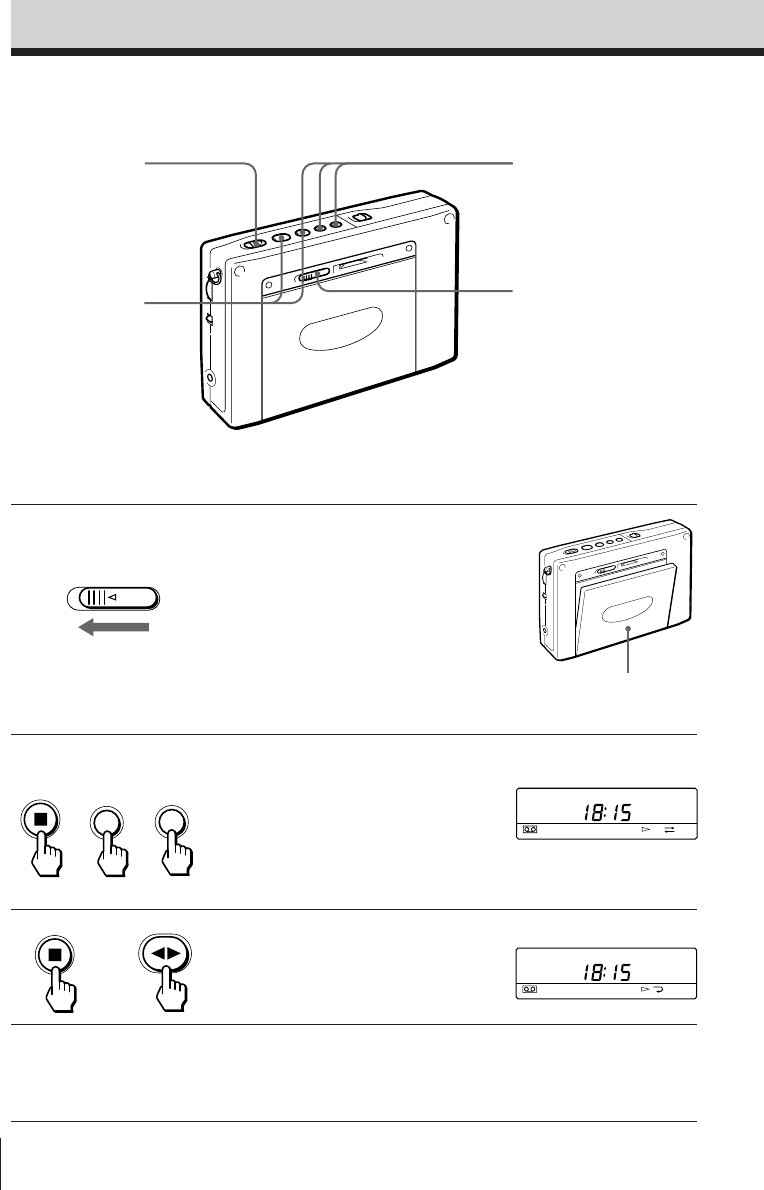
1Slide OPEN and insert a cassette.
Remove the slack of the tape and
insert the cassette with the exposed
side facing down.
2Select whether you wish to play
one side or both sides of the
cassette.
To play one side: Press FF while
pressing p.
To play both sides: Press REW while
pressing p.
3Press œ while pressing p to
select the side you wish to play.
To play the side facing the cassette
holder (forward side): Display
“FWD ·”.
To play the side facing the unit
(reverse side): Display “ª REV”.
4Press œ.
FF
REW
OPEN
Playing a cassette
2,3 2
1
3,4
+or
+
D: one side
Å: both sides
Basic Operations
Basic Operations
9EN
Other operations
Tips
• To enjoy stereo-
recorded cassettes, plug
the stereo headphones.
Set ST • MONO to ST or
MONO to select stereo
or monaural as
necessary.
• The ATS (Auto Tape
Selector) function
automatically
determines and selects
the type of cassette you
wish to use for playback
only: Normal or CrO2/
Metal cassette.
Note
The reverse side only is
played when playback
begins from the reverse
side of the cassette.
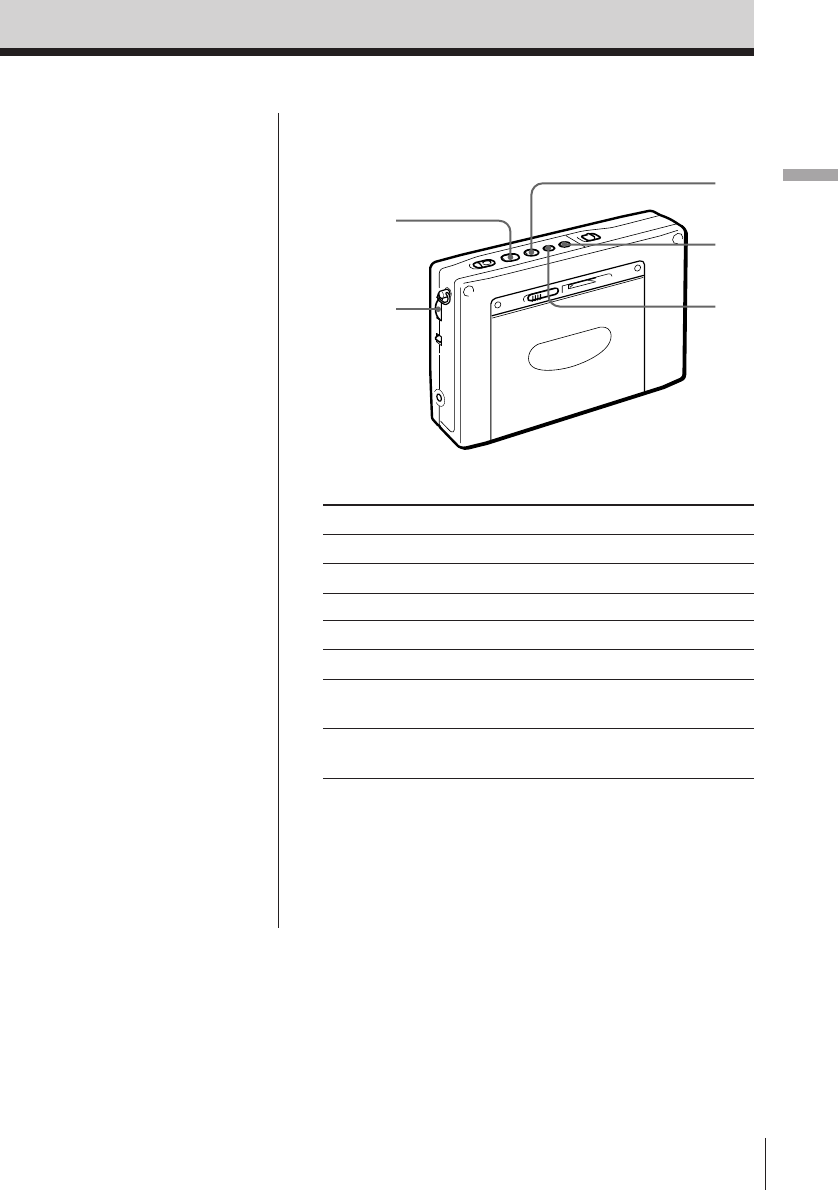
To Press or turn
Adjust the volume VOLUME
Switch the playback side œ during playback
Stop playback, FF, REW, and REC p
Fast forward FF during stop
Rewind REW during stop
Fast forward while monitoring FF during playback
the sound (cue)
Rewind while monitoring REW during playback
the sound (review)
VOLUME
REW
œ
p
FF
Basic Operations10EN
FF
REW
FWD
FWD
OPEN
Recording radio broadcasts
To record with a microphone, refer to “Recording with a
microphone” on page 22.
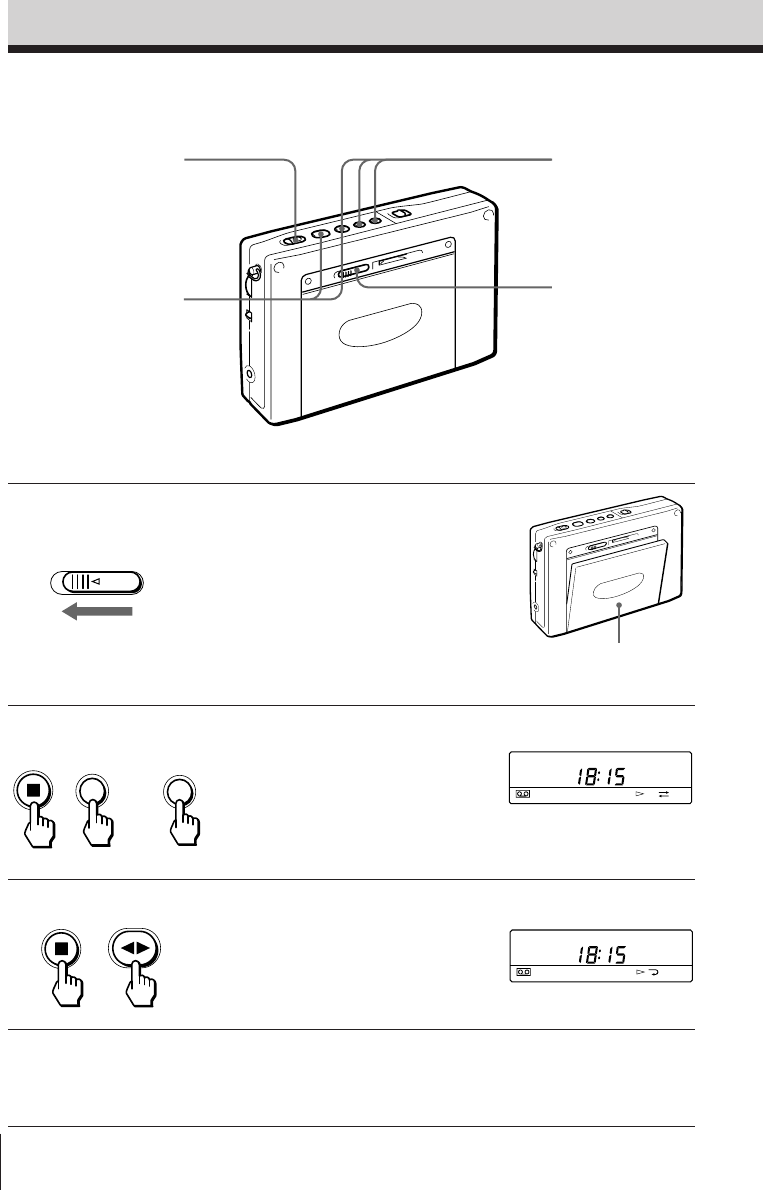
1Slide OPEN and insert a cassette.
Note
Before inserting a cassette, make sure
that the cassette tab is not broken off.
A cassette with a broken tab cannot be
recorded.
2Select whether you wish to record
one side or both sides of the
cassette.
To record one side: Press FF while
pressing p.
To record both sides: Press REW
while pressing p.
3Press œ while pressing p to
display “FWD ·”.
4Tune in to the desired broadcast
station you wish to record.
Refer to pages 6 and 12-16.
2
1
5
3
Insert the cassette with the
side you wish to record
facing the cassette holder.
A: Records one side.
Å: Records both sides.
+or
+

Basic Operations
Basic Operations
11EN
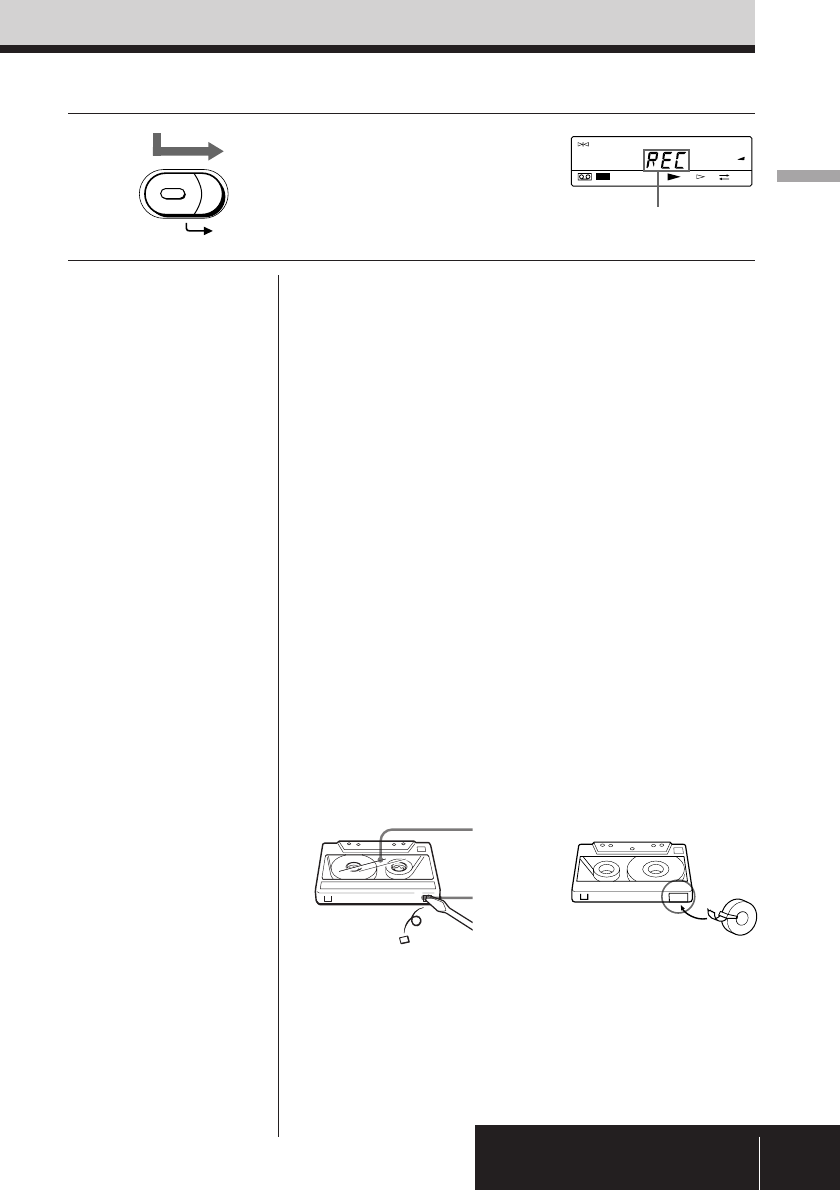
To stop recording
Press p.
To record the side facing the unit (reverse side)
Insert the cassette with the side you wish to record
facing the unit (reverse side). Press œ while pressing
p to display “ª REV”.
Recording stops on the side facing the unit regardless
of whether one side or both sides is selected.
To record an FM stereo broadcast
Set ST • MONO to ST or MONO to select stereo or
monaural recording as necessary.
To improve AM reception for recording
When recording an AM broadcast, the reception may
contain noise interferences that were not present prior
to recording. In this case, set ISS on the bottom of the
unit to the position (1, 2 or 3) in which noise
interferences are minimal to obtain optimum
reception for recording.
To protect your important recorded cassettes
Break off the cassette tab of side A or B to prevent
accidental recording of your important cassettes. If
you wish to use the cassette for recording again, cover
the opening of the broken tab with adhesive tape.
“†” flashes when recording is attempted on a
cassette with a broken tab. A cassette with a broken
tab cannot be recorded.
5Press the red button in the center
and slide REC.
REC
Tips
• Adjusting VOLUME and
TONE does not affect the
sound to be recorded.
• Speaker output is
monaural when recording.
To enjoy FM stereo
reception, plug the stereo
headphones.
• Recording stops
automatically when
RADIO POWER ON/OFF
is pressed to turn off the
radio.
Notes
• Use Type I (normal)
cassettes only for
recording. Playback may
be distorted or a
previously recorded
segment may not be
erased completely when a
CrO2 or metal cassette is
used.
• Recording with weak
batteries generates
unnecessary noise and
produces unsatisfactory
recordings. In this case,
replace the batteries with
new ones.
• Operate REC
approximately 2 seconds
prior to the point you wish
to begin recording. If not,
the leading segment may
not be recorded.
• Switching the recording
side is not possible when
œ is pressed during
recording.
• The buttons for the radio
are operational while
recording. To prevent
accidental operations, use
the hold function (see
page 29).
After a few seconds, the
frequency is displayed.
Side A
Tab
Adhesive tape
TUNE
PAGE
1
2
3
FWD
REC
Radio12EN
RADIO POWER ON/OFF
FM/AM AM BAND
Radio
–1¿, ¿,
÷, ÷1+
123
456
789
0
Various tuning methods for optimum
reception
Manual tuning
Use –1¿ ,¿ ,÷ ,and ÷1+ search for the
desired broadcast station. Use the outer
buttons to search rapidly in large frequency
increments. Use the inner buttons to search
precisely in small frequency increments.
1Turn on the radio.
2Select either FM or AM.
Select AM to listen to SW, MW or LW.
3When you select AM, press –1¿ or ÷1+ while
pressing AM BAND to select MW, LW or meter
band (SW).
Skip this step and proceed to step 4 if you wish to listen
to FM.
4Press –1¿ ,¿ ,÷ ,and ÷1+ repeatedly to search
for the desired broadcast station.
Each time the buttons are pressed, the channel step
changes as shown below.
Band –1¿ or ÷1+¿ or ÷
FM 0.05 MHz 0.05 MHz
SW 5 kHz 1 kHz
MW 9/10 kHz 1 kHz
LW 9 kHz 1 kHz
SSB (AM) *21 kHz 0.1 kHz *3
*2Not applicable for the Saudi Arabian model.
*3Units of 0.1 kHz is not indicated in the display.
Tips
•The previously tuned
broadcast station is
received when you turn
on the radio.
•When ¿ or ÷ is
pressed repeatedly in
the AM band (MW,
SW, and LW), the
frequency repeats
through the range of
150–29,999 kHz to
enable search of all
available broadcast
stations (not applicable
for the Saudi Arabian
model*1).
*1For the Saudi
Arabian model,
when ¿ or ÷ is
pressed repeatedly in
the AM band (MW,
SW, and LW), the
frequency repeats
through the ranges of
150–285 kHz and
530–26,100 kHz.

Radio
Radio 13EN
Note
The SW frequency
range and meter band
may differ from the
actual value. Refer to
the supplied “Wave
Handbook” for more
information on
worldwide band
coverage (not
applicable for the Saudi
Arabian model).
Refer to the supplied
“Shortwave Guide” for
more information on
shortwave band
coverage (for the Saudi
Arabian model only).
AM
Meter bands and SW
SW is divided into 14 bands that are generally referred
to as meter bands. The frequency range that is
applicable for automatic scanning is shown below.
(kHz for AM, MHz for FM)
Band
Frequency Range Scan Frequency Range
Meter band
LW 150–529 153–522 —
150–285 *1153–279 *1
MW 530–1620 530–1620 *2—
531–1620 *3—
2250–2550 120 meter band
3150–3450 90 meter band
3850–4050 75 meter band
4700–5100 60 meter band
5900–6250 49 meter band
7100–7400 41 meter band
SW 1621–29999
9400–10000 31 meter band
1621–26100 *111500–12150 25 meter band
13500–13900 22 meter band
15000–15700 19 meter band
17450–18000 16 meter band
18850–19100 15 meter band
21450–21950 13 meter band
25600–26100 11 meter band
FM 76.00–108.00 76.00–108.00 —
87.50–108.00 *187.50–108.00 *1
*1 For the Saudi Arabian model only.
*2 When the channel step is 10 kHz (see page 19).
*3 When the channel step is 9 kHz (see page 19).
Radio14EN
123
456
789
0
RADIO POWER ON/OFF
FM/AM
Numeric
buttons
DIRECT EXE
1Turn on the radio.
2Select either FM or AM.
Select AM to listen to SW, MW or LW.
3Press DIRECT.
The frequency in the display disappears.
4Enter the frequency of the desired broadcast
station by pressing the numeric buttons.
FM band: A decimal point is not required for entry.
For example, to enter 84.7 MHz, press 8, 4 and 7.
AM band: The lower triple zero digits are omitted for
entry.
For example, to enter 10,000 kHz, press 1 and 0.
5Press EXE.
When the desired broadcast station is received,
“
TUNE
” appears in the display.
Tips
• When you have entered
the wrong frequency in
step 4, press DIRECT to
cancel the current entry
and enter the correct
frequency.
• “TRY AGAIN!” flashes
when the frequency
entered is invalid and
beyond the allocated
frequency range for
reception. Check and
make sure that the
frequency is valid and
repeat from step 3
again.
• The minimum digit
entry is 0.05 MHz (50
kHz) for the FM band,
and 1 kHz for the AM
band.
Note
Complete each button
operation in steps 3 to 5
within 10 seconds. If
the previously tuned
frequency appears in
the display, repeat from
step 3 again.
Various tuning methods for optimum reception (continued)
Direct tuning
When the desired broadcast station is known,
enter the frequency with the numeric buttons
for immediate selection.
Radio
Radio 15EN
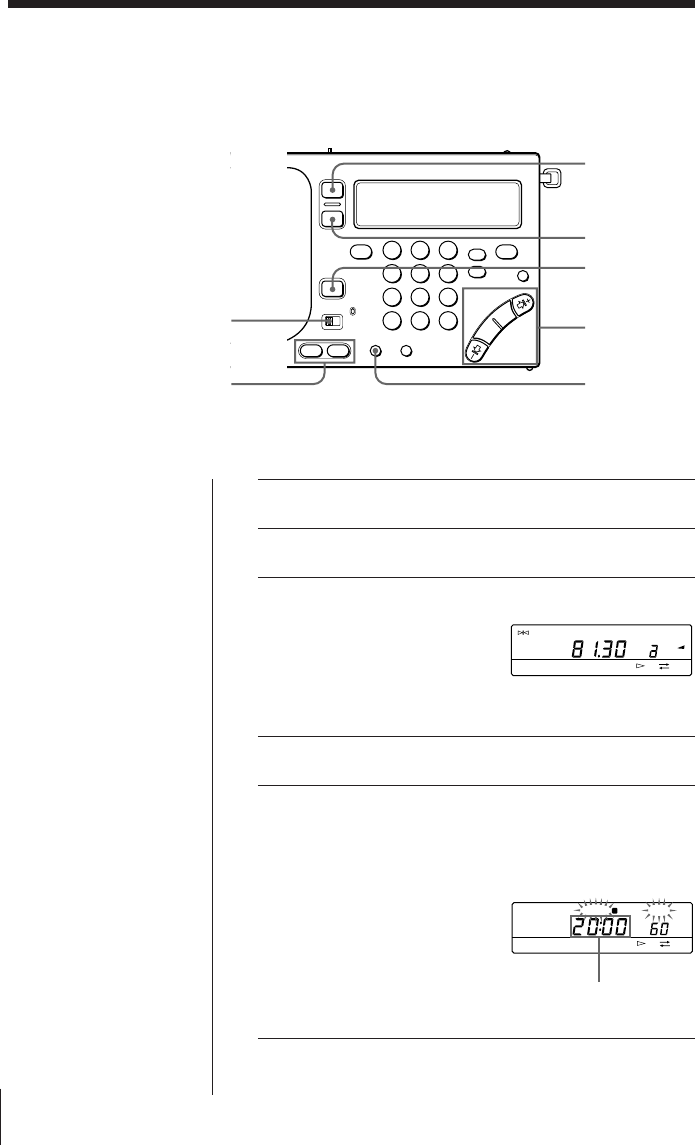
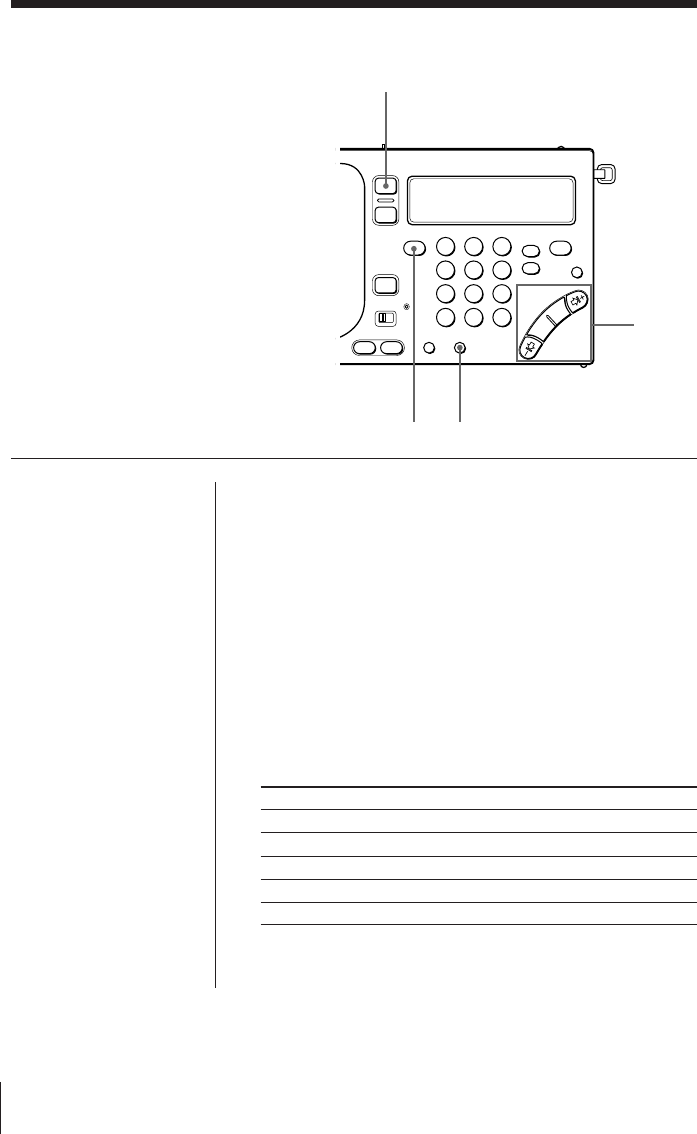
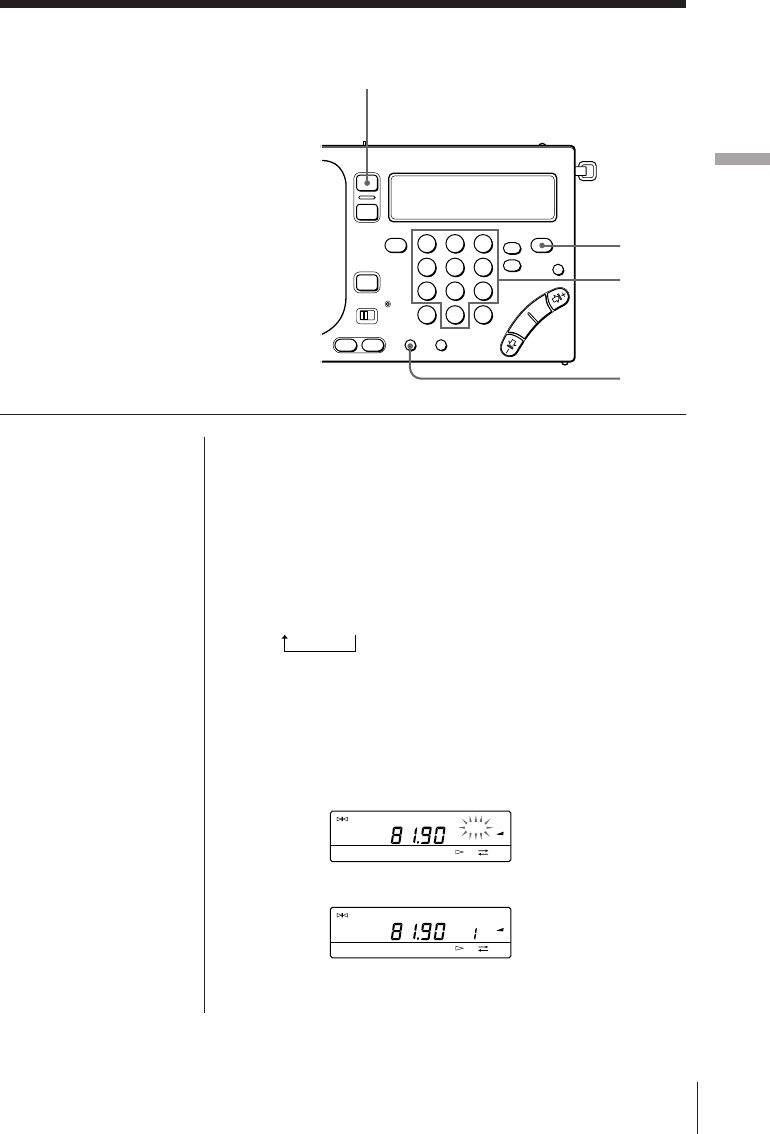
1Turn on the radio.
2Tune in to the desired broadcast station you wish
to preset.
3Press PAGE repeatedly to select the page you wish
to store your favorite broadcast station on.
Each time you press PAGE, the display changes in the
following order:
1 n 2 n 3
4Press a numeric button (0–9) while pressing
ENTER.
When FM 81.9 MHz is assigned to preset number 1 of
page 1.
The broadcast station is assigned to the selected number.
Preset tuning
Your favorite broadcast stations can be stored
on a total of 3 pages. Each page can store up
to 10 broadcast stations.
Before tuning in to a preset broadcast station,
you must complete the procedure below to
preset your favorite broadcast stations.
Tip
To change and modify
the preset broadcast
station, store the new
broadcast station to the
selected preset number.
The previous preset
broadcast station is
overwritten by the new
preset broadcast
station.
123
456
789
0
RADIO POWER ON/OFF
ENTER
PAGE
Numeric
buttons
TUNE
FM
PRESET
PAGE
1
2
3
MHz
FWD
≥
TUNE
FM
PRESET
PAGE
1
2
3
MHz
FWD

Radio16EN
Tuning in to a preset broadcast station
1Turn on the radio.
2Press PAGE repeatedly to select the page which
contains the desired preset broadcast station you
wish to tune in to.
3Press the numeric button (0–9) to which the
desired broadcast station you wish to tune in to is
assigned.
The desired preset broadcast station is received.
Various tuning methods for optimum reception (continued)
Radio
Radio 17EN
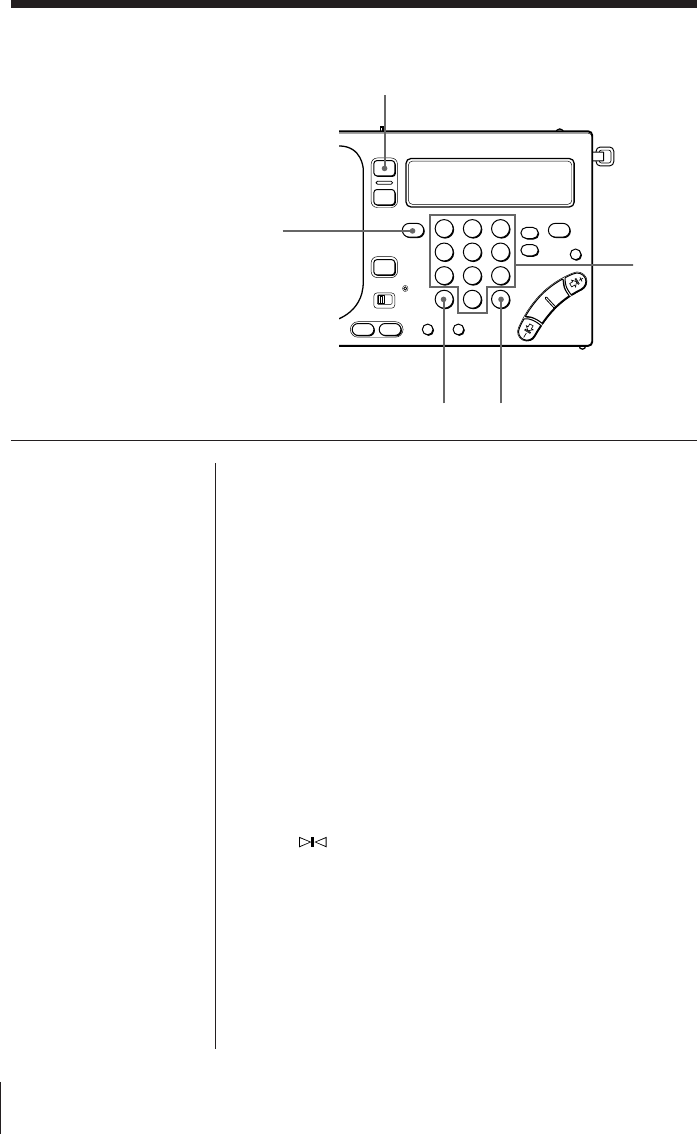
1Turn on the radio.
2Press FM/AM to select AM.
3Press SSB to select USB or LSB/CW.
Each time SSB is pressed, the display changes in the
following order:
(Normal mode) n USB n LSB/CW.
4Tune in to the desired broadcast station.
Refer to pages 6 and 12–16.
Receiving SSB and CW Transmissions
(not applicable for the Saudi Arabian model)
You can receive SSB (Single Side Band) and
CW (Continuous Wave) transmissions with
the built-in BFO circuit.
123
456
789
0
RADIO POWER ON/OFF
SSB
FM/AM
Tip
For more details on SSB
and CW, refer to “Tips
on radio waves” on
page 44.
TUNE
USB
AM
PAGE
1
2
3
kHz
FWD
Radio18EN
123
456
789
0
RADIO POWER ON/OFF
SYNC
Receiving optimum AM broadcast
—Synchronous detection
You can receive AM broadcast (especially SW
broadcast) under optimum condition with the
synchronous detection circuit.
1Turn on the radio.
2Tune in to the desired broadcast station.
Refer to pages 6 and 12–16.
3Press SYNC to select SYNC U or SYNC L to obtain
optimum AM reception.
(not applicable for the Saudi Arabian model)
Each time SYNC is pressed, the display changes in the
following order:
(Normal mode) n SYNC U n SYNC L.
“LOCK” appears in the display when the synchronous
detection mode is operating.
For the Saudi Arabian model, press SYNC U or SYNC L
to obtain optimum AM reception.
Tip
For more details on
synchronous detection,
refer to “Tips on radio
waves” on page 44.
Notes
• If neither SYNC U nor
SYNC L improves AM
reception, or if the
reception deteriorates
even further, press
SYNC again (SYNC U
or SYNC L for the
Saudi Arabian model)
to cancel the
synchronous detection
mode. “LOCK” in the
display disappears.
• The synchronous
detection may be
cancelled when the
Main/radio batteries
become weak.
(not applicable for the Saudi Arabian model)
TUNE
SYNC U LOCK
AM
PAGE
1
2
3
kHz
FWD
Radio
Radio 19EN
Changing the MW channel step for use in
foreign countries
The MW channel step of this unit is factory-
set to 9 kHz. The channel step differs
depending on the area to match the frequency
allocation system of the country. Change the
MW channel step as necessary.
North and South American countries:
10 kHz
Japan, Europe, and other countries:
9 kHz
Notes
• When you have entered
the wrong MW channel
step in step 3, press
DIRECT to cancel the
current entry and enter
the correct value.
• “TRY AGAIN!” flashes
when the MW channel
step entered is invalid
(i.e., not 9 or 1 and 0).
Repeat from step 2
again.
• Complete each button
operation in steps 2 to 4
within 10 seconds. If
the clock display
returns, repeat from
step 2 again.
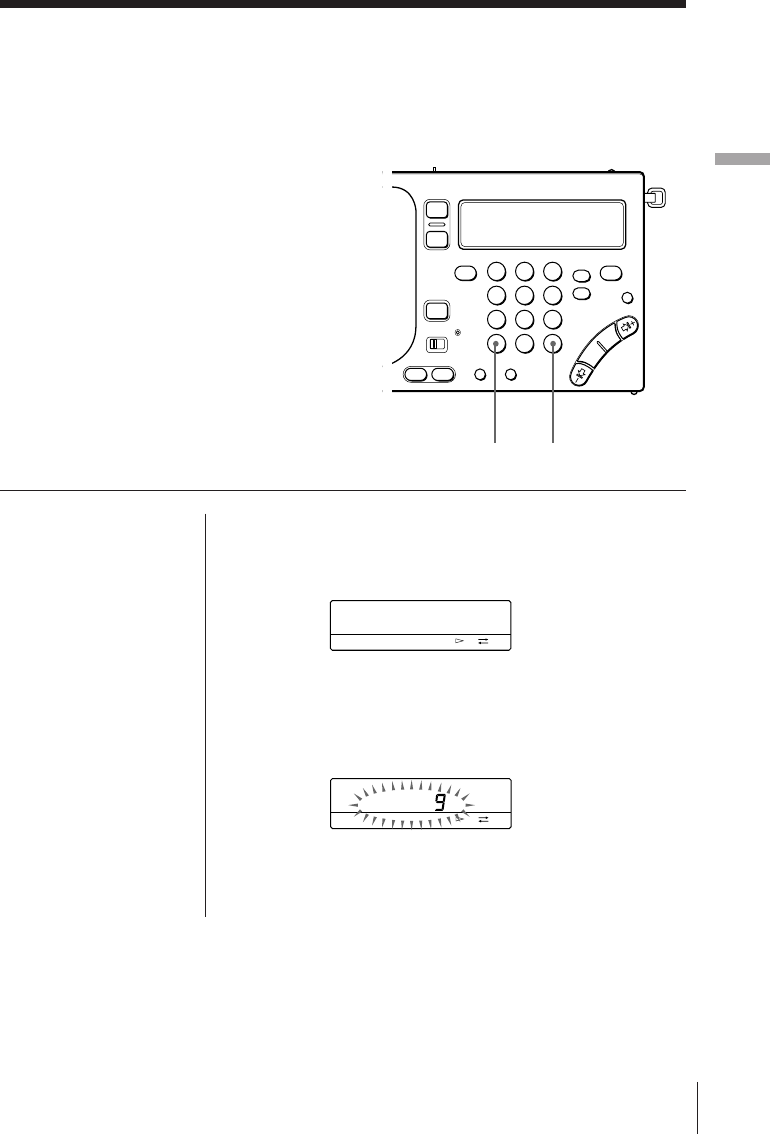
1Turn off the radio.
2Press DIRECT.
3Press the numeric buttons (1, 9 and 0) to enter the
desired MW channel step (9 or 1 and 0).
4Press EXE.
The MW channel step flashes for about 3 seconds and
then the clock display returns.
AM
kHz
FWD
AM
kHz
FWD
123
456
789
0
DIRECT EXE
Radio20EN
Connecting an external antenna for
optimum reception
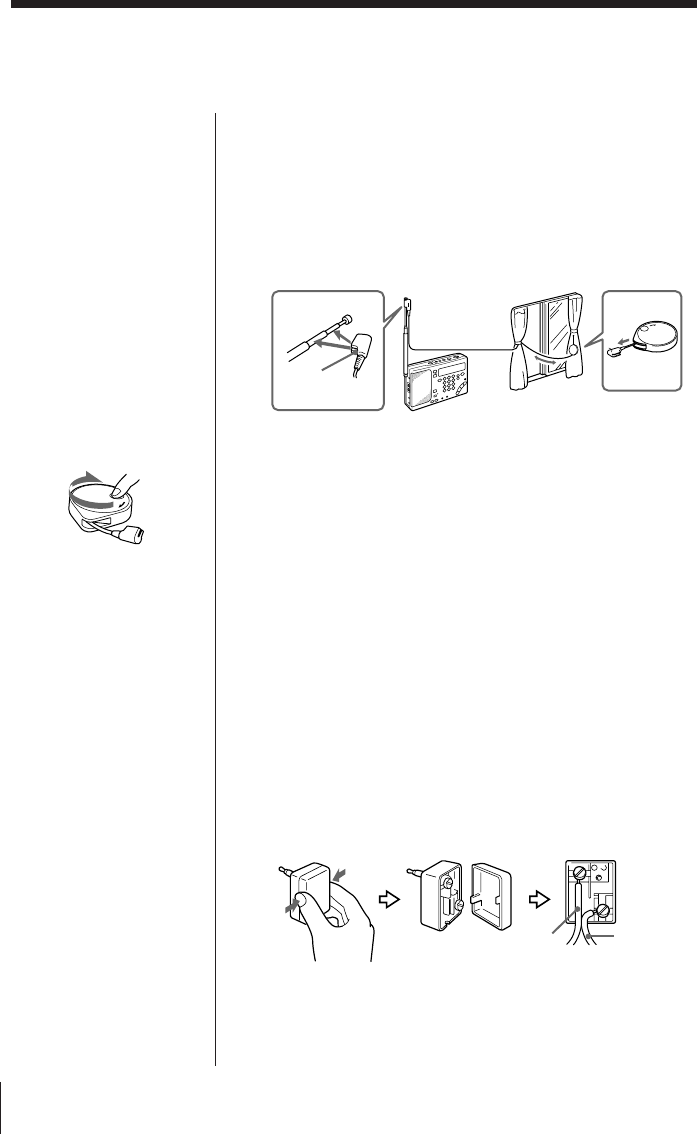
Using the supplied SW antenna
Under normal conditions, the telescopic antenna is
sufficient for optimal SW reception. However, the use
of the supplied SW antenna is recommended if the
reception is poor when listening to the radio inside a
building due to concrete and metal obstructions.
1Fully pull out the cord from the case.
2Attach the coupler to the telescopic antenna.
3If the window can be opened, gently extend the cord
with the case outside the window after making sure
that doing so will not pose any danger.
If the window cannot be opened, fully extend the
cord along the frame of the window.
For the active antenna (AN-LP1) supplied with
ICF-SW1000TS
Before operating the unit, please read the instructions
manual for AN-LP1.
Using the antenna connector (supplied for the
World model only)
Use the supplied antenna connector when using an
SW wire antenna, etc.
1Connect the wire antenna wire to the supplied
antenna connector.
2Connect the antenna connector to the AM EXT ANT
jack of the unit.
Tips
• When extending the
cord and case of the
supplied SW compact
antenna outside the
window, make sure
that doing so will not
pose any threat or
danger to you and
others. In addition,
make sure to secure
firmly so as not to drop
the SW compact
antenna.
• After using the SW
compact antenna, turn
the reel in the direction
of the arrow to wind up
the cord.
For the compact antenna (AN-71) supplied with
ICF-SW1000T
Cord
Coupler
1 Case
2
Earth wire
Wire
antenna
Radio
Radio 21EN
Notes
• Connect the
recommended
antennas only to the
AM EXT ANT jack of
the unit. The AM EXT
ANT jack supplies a 3
V DC power output to
the recommended
antennas. Failure to use
the recommended
antennas where
applicable may lead to
the malfunction of the
unit.
• Keep the unit and
antenna away from
fluorescent lights,
televisions, and
computers which may
generate noise.
• When receiving MW or
LW broadcasts without
using the external
MW/LW antenna,
make sure to
disconnect the SW
external antenna where
applicable. If not, the
built-in ferrite bar
antenna will not
operate and MW/LW
broadcast will not be
received successfully.
• Retract the telescopic
antenna when using an
external antenna.
• Set up the external
antenna as far away
from the street as
possible.
• For more details on the
external antenna, refer
to its Operating
Instructions manual.
Using the wide range antenna (not supplied)
Use the wide range antenna AN-1 or AN-102 (not
supplied) to improve SW, MW and LW receptions as
necessary. Wide range antenna usage will differ for
SW and MW/LW receptions as described below.
For SW reception
Use the connection cord supplied with the AN-1 or
AN-102 to connect between the OUTPUT jack of the
antenna controller and the AM EXT ANT jack of this
unit.
For MW/LW reception
1Use the connection cord and antenna coupler
supplied with the AN-1 or AN-102 to connect
between the OUTPUT jack of the antenna controller
and the INPUT jack of the antenna coupler.
2Position the antenna coupler near the unit where
MW/LW reception is optimal.
Retract the telescopic antenna.
When AN-1 is used.
AN-1 to
output
Antenna
controller
AN-1
to AM EXT
ANT (SW)
Antenna coupler
to INPUT (MW/LW)
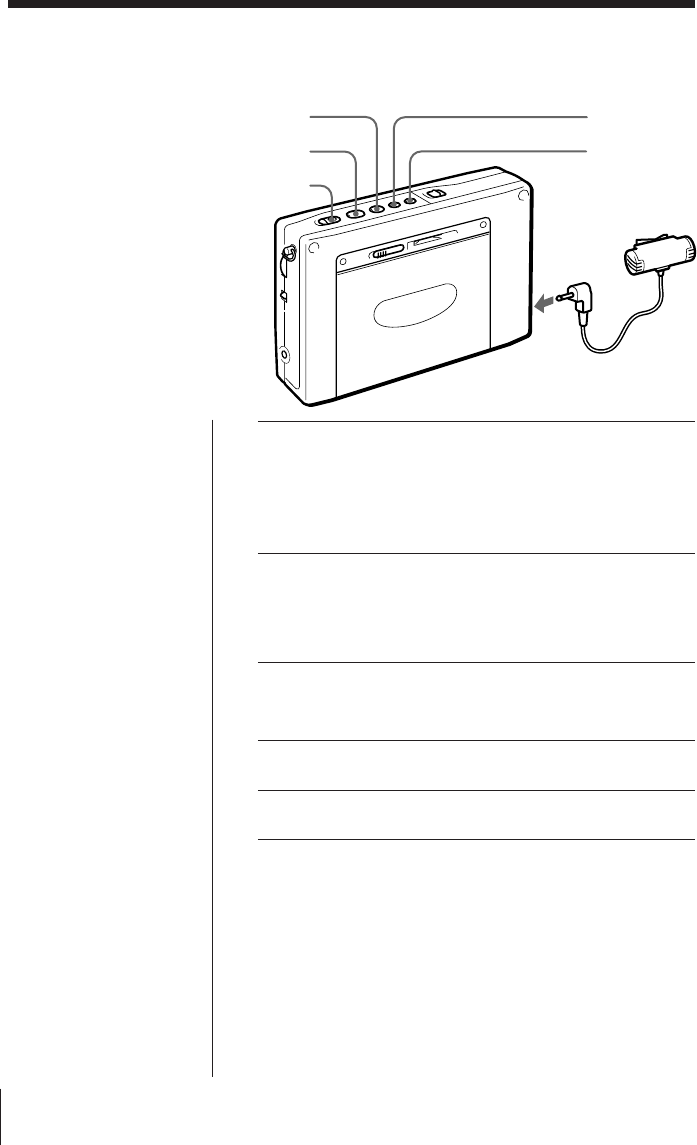
Cassette22EN
Notes
• If acoustic feedback
(howling) occurs, turn
down the volume or
move the microphone
away from the
headphones.
• Keep the microphone
away from fluorescent
lights and electrical
cords which may
generate noise while
recording.
Tip
There is no speaker
output when recording
with the microphone.
To monitor the sound
being recorded, plug
the stereo headphones.
Microphone
to MIC
œ
p
FF
REW
REC
Cassette
Recording with a microphone
Use the supplied microphone to record a
meeting, or simply enjoy recording with the
microphone.
Use Type I (normal) cassettes only for
recording.
1Insert a cassette.
Insert the cassette with the side you wish to record facing
the cassette holder.
Before inserting a cassette, make sure that the cassette tab
is not broken off.
A cassette with a broken tab cannot be recorded.
2Select whether you wish to record one side or both
sides of the cassette.
To record one side D: Press FF while pressing p.
To record both sides Å: Press REW while pressing p.
3Make sure that the cassette is inserted with the side
you wish to record facing the cassette holder.
Press œ while pressing p to display “FWD ·”.
4Connect the supplied microphone to the MIC jack
of the unit.
5Start recording.
To stop recording
Press p.
To record the side facing the unit (reverse side)
Insert the cassette with the side you wish to record
facing the unit (reverse side). Press œ while pressing
p to display “ª REV”.
Recording stops on the side facing the unit regardless
of whether one side or both sides is selected.

Cassette 23EN
Cassette
Tips
• When the supplied
microphone is connected,
power is supplied from
the unit.
The supplied microphone
is a plug-in-power type
and should be connected
to MIC jacks of cassette
recorders that are
compatible with the plug-
in-power type only.
• To prevent accidental
operations of the buttons,
use the hold function (see
page 29).
Using the supplied microphone
The clip of the supplied microphone can be swiveled
in the desired direction and fastened for your
convenience.
Notes on recording
Recording level
The recording level is fixed. Adjusting VOLUME and
TONE does not affect the sound to be recorded.
Recording with the supplied microphone
• Before inserting a cassette, make sure that the
cassette tab is not broken off. A cassette with a
broken tab cannot be recorded to prevent accidental
recording of your important cassette. If you wish to
use the cassette for recording again, cover the
opening of the broken tab with adhesive tape.
• Operate REC approximately 2 seconds prior to the
point you wish to begin recording. If not, the
leading segment may not be recorded.
• Switching the recording side is not possible when
œ is pressed during recording.
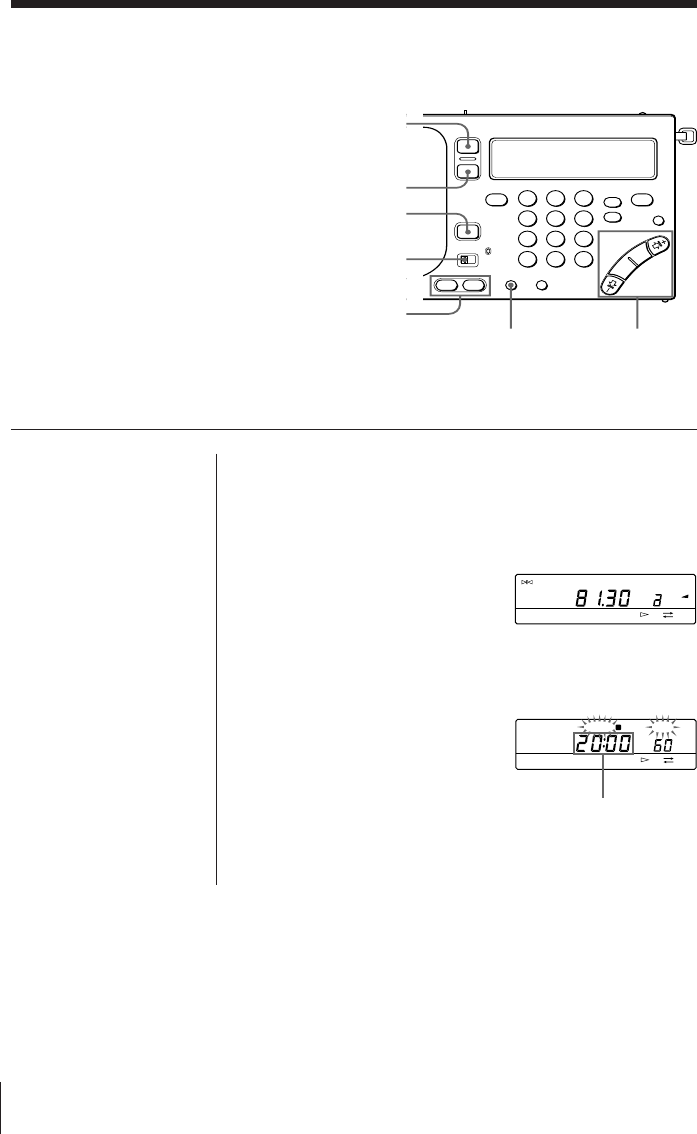
Timer24EN
1Tune in to the desired broadcast station you wish
to preset.
2Adjust VOLUME as necessary.
3Press a or b of
STANDBY MEMORY
while pressing ENTER.
The broadcast station is
assigned to the selected
button.
4Turn off the radio.
5Press HOUR or MIN
repeatedly while pressing
either a or b of
STANDBY MEMORY
(which you pressed in
step 3) to set the desired
standby time for the radio
to turn on.
Timer
TUNE
FM
PRESET
PAGE
1
2
3
MHz
FWD
Note
Make sure that the
radio is turned off
before setting the
desired standby time.
You cannot set the
standby time when the
radio or cassette is
operating.
To wake up to the desired broadcast
—Standby function
The standby function enables you to turn
on the radio and tune in to your favorite
broadcast station at the desired time. The
standby function features a dual alarm so
that you can enter two different preset
times. Before using the standby function,
make sure that the clock is set correctly (see
page 5).
Display the
desired standby
time for the radio
to turn on.
STANDBY SLEEP
FWD
a
123
456
789
0
SLEEP
RADIO
POWER
ON/OFF
STANDBY
ON/OFF
MODE
STANDBY
MEMORY HOUR •
MIN
TIME SET
ENTER
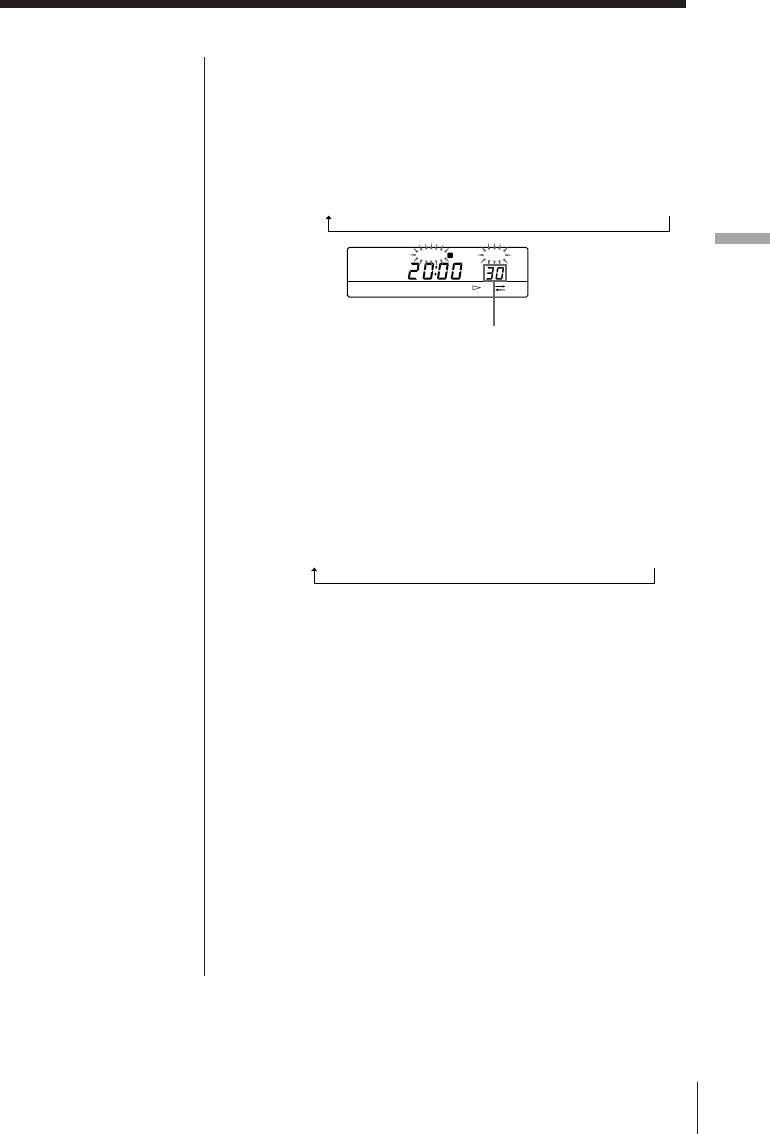
Timer 25EN
Timer
Tip
To temporarily cancel
the standby function,
slide HOLD in the
direction of the arrow
to display “H” while
the radio is turned off.
When “H” in the
display disappears, the
standby function is
operational (see page
29).
Notes
• When you set
STANDBY a and
STANDBY b, and the
preset standby time
arrives while the other
standby function is
operating, the most
recent standby function
will have priority over
the other and receive
the appropriate
broadcast.
• Once you preset the
desired standby time,
the radio turns on at
the preset time
everyday.
• When the preset
standby time arrives
while the radio or
cassette is operated, the
standby function will
have priority over the
current operation and
receive the appropriate
broadcast
automatically.
If you set STANDBY
a and STANDBY b
to an identical preset
time, only STANDBY
a operates.
6Press SLEEP repeatedly while pressing either a
or b of STANDBY MEMORY (which you pressed
in step 3) to set the desired duration for the
operation of the radio.
Each time SLEEP is pressed, the display changes in the
following order:
60 (minutes) n 50 n 40 n 30 n 20 n 10 n 90 n 80 n 70
The clock display returns when a or b is released.
7Press STANDBY ON/OFF repeatedly to display
“STANDBY a” or “STANDBY b” (which you
selected in step 3).
Each time STANDBY ON/OFF is pressed, the display
changes in the following order:
STANDBY a n STANDBY b n STANDBY a b n (None)
8Set MODE to RADIO.
When the preset standby time arrives, the preset
broadcast station is received. After the preset duration
for the operation of the radio has elapsed, the radio turns
off.
To check the preset standby time
Press a or b of STANDBY MEMORY. The preset
standby time and preset duration for the operation of
the radio are displayed while the button is pressed.
To change the preset standby time
Repeat steps 5 through 7 to change the existing preset
standby time.
To cancel the standby function
Press STANDBY ON/OFF repeatedly so that
“STANDBY” in the display disappears.
Display the desired
duration for the
operation of the radio.
STANDBY SLEEP
FWD
a
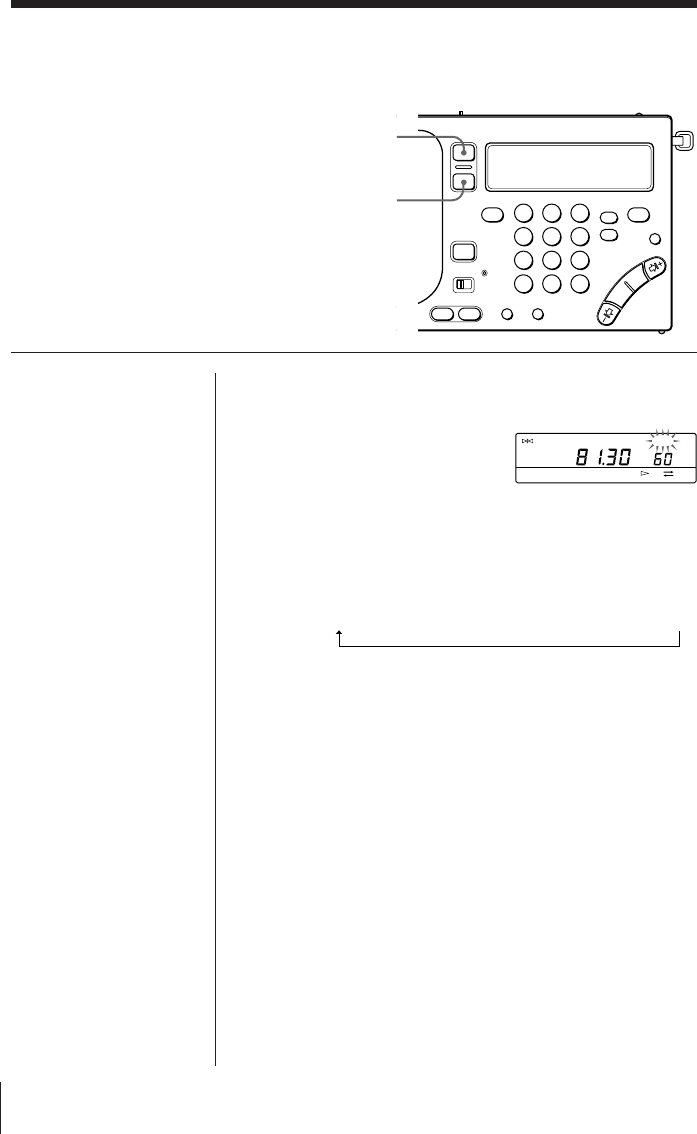
Timer26EN
To fall asleep while listening to the desired
broadcast—Sleep timer
You can turn off the radio automatically after
a specified number of minutes (10–90
minutes) with the sleep timer function.
Tip
The previously tuned
broadcast station is
received when SLEEP
is pressed to turn on
the radio.
Note
Repeat from step 1
again if the sleep timer
begins before you have
set the desired
duration. The sleep
timer begins
automatically after
about 5 seconds when
SLEEP is released.
1Press SLEEP.
The radio turns on.
“SLEEP” flashes and the
duration for the operation
of the sleep timer (60
minutes) appears in the
display.
2Press SLEEP repeatedly to display the desired
duration for the operation of the sleep timer.
Each time SLEEP is pressed, the display changes in the
following order:
60 (minutes) n 50 n 40 n 30 n 20 n 10 n 90 n 80 n 70
Sleep timer begins after “SLEEP” stops flashing and
remains in the display, and the duration for the
operation of the sleep timer disappears.
3Tune in to the desired broadcast station.
The radio turns off automatically after the selected
duration for the operation of the sleep timer elapses.
To change the preset duration for the operation
of the sleep timer
Press SLEEP repeatedly to display the desired
duration for the operation of the sleep timer.
To turn off the radio before the preset duration
has elapsed
Press RADIO POWER ON/OFF.
Note
When the sleep timer is
activated while
recording the radio, the
recording will stop and
the power will turn off.
TUNE
FM
SLEEP
MHz
FWD
a
123
456
789
0
RADIO
POWER
ON/OFF
SLEEP
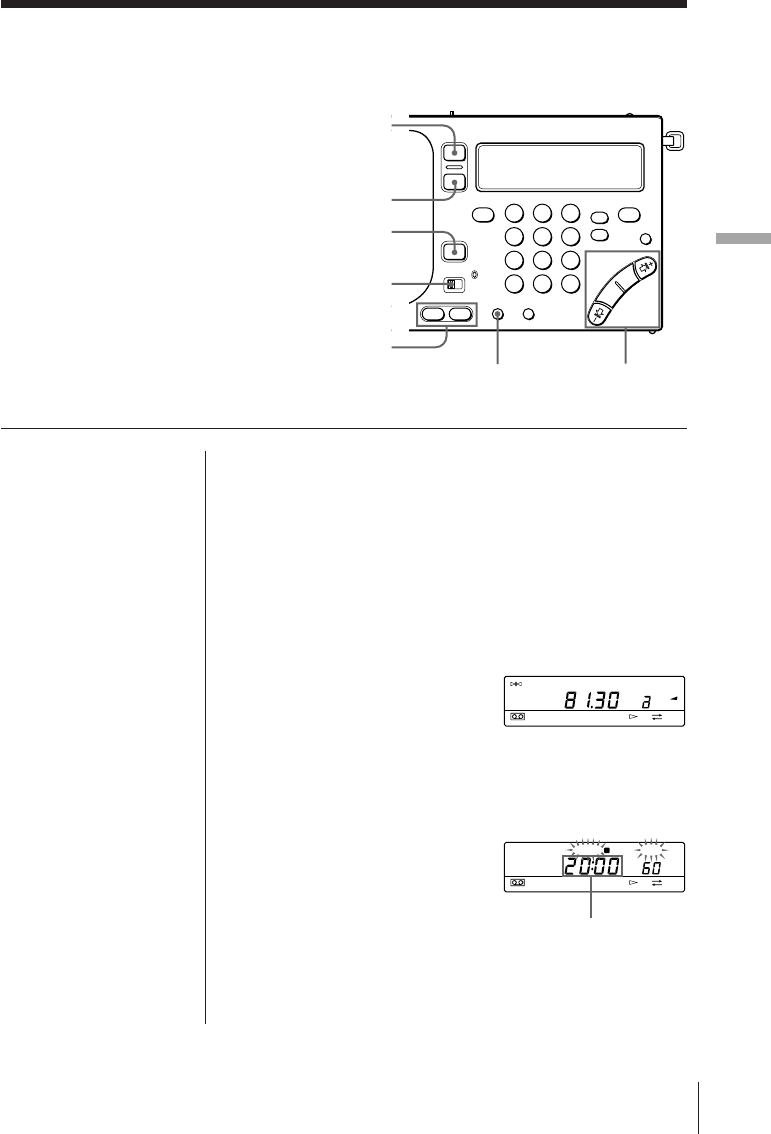
Timer 27EN
Timer
To record the desired broadcast with the
timer
—Timer recording
The timer recording function enables you to
turn on the radio and tune in to your
favorite broadcast station at the desired
time for recording. Use the timer
recording function when you wish to
record a broadcast while away or
unattended. Before using the timer
recording function, make sure that the clock
is set correctly (see page 5).
123
456
789
0
HOUR •
MIN
TIME SET
ENTER
RADIO
POWER
ON/OFF
SLEEP
STANDBY
ON/OFF
MODE
STANDBY
MEMORY
1Insert a cassette.
Insert the cassette with the side you wish to record facing
the cassette holder.
2Tune in to the desired broadcast station you wish
to record.
Adjusting VOLUME and TONE does not affect the
sound to be recorded.
3Press a or b of
STANDBY MEMORY
while pressing ENTER.
The broadcast station is
assigned to the selected
button.
4Turn off the radio.
5Press HOUR or MIN
repeatedly while
pressing either a or b
of STANDBY MEMORY
(which you pressed in
step 3) to set the desired
standby time for the
radio to turn on for
recording.
Note
Make sure that the
radio is turned off
before setting the
desired standby time.
You cannot set the
standby time when the
radio or cassette is
operating.
Display the desired
standby time for
the radio to turn on
for recording.
TUNE
FM
PRESET
PAGE
1
2
3
MHz
FWD
STANDBY SLEEP
FWD
a
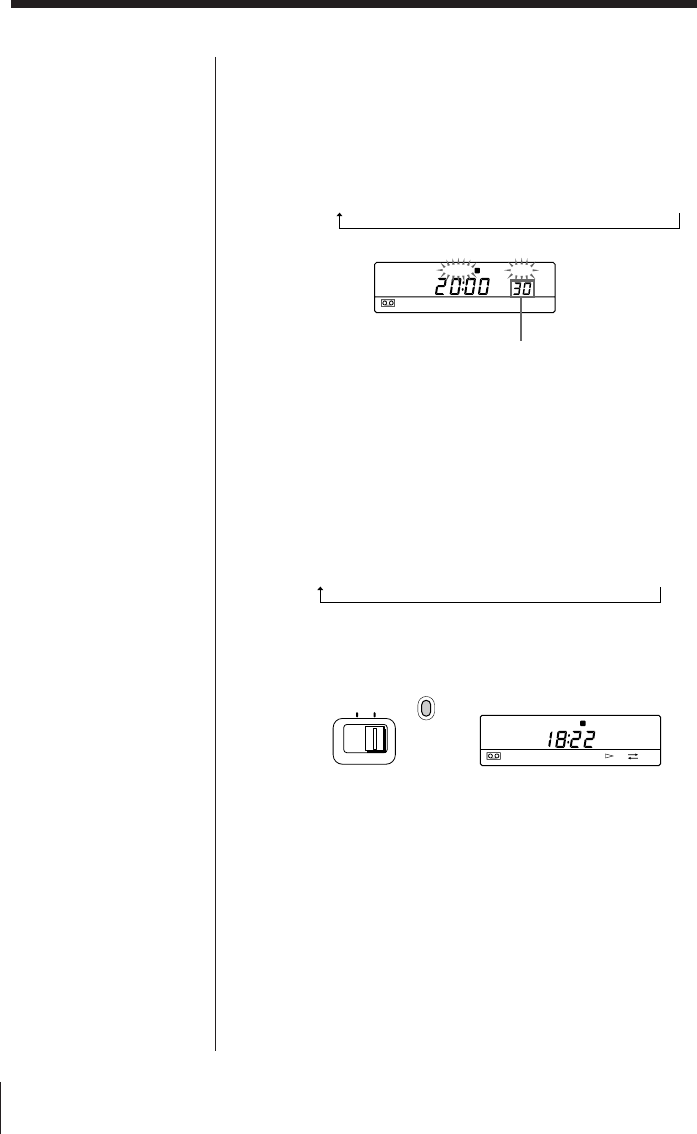
Timer28EN
6Press SLEEP repeatedly while pressing either a
or b of STANDBY MEMORY (which you
pressed in step 3) to set the desired duration for
the operation of the radio.
Each time SLEEP is pressed, the display changes in the
following order:
60 (minutes) n 50 n 40 n 30 n 20 n 10 n 90 n 80 n 70
The clock display returns when a or b is released.
7Press STANDBY ON/OFF repeatedly to display
“STANDBY a” or “STANDBY b” (which you
selected in step 3).
Each time STANDBY ON/OFF is pressed, the display
changes in the following order:
STANDBY
a
n STANDBY
b
n STANDBY
a b
n (None)
8Set MODE to REC.
The indicator beside the switch turns red.
When the preset standby time arrives, the preset
broadcast station is received and recorded. After the
preset duration for the operation of the radio has
elapsed, the radio and recording operation will turn off.
Tip
To temporarily cancel
the standby function,
slide HOLD in the
direction of the arrow
to display “H” while
the radio is turned off.
When “H” in the
display disappears, the
standby function is
operational (see page
29).
Notes
• When you set
STANDBY a and
STANDBY b, and the
preset standby time
arrives while the other
standby function (timer
recording) is operating,
the most recent standby
function will have
priority over the other
and record the
appropriate broadcast.
• Once you preset the
desired standby time,
the radio operates at
the preset time
everyday.
• When the preset
standby time arrives
while the radio or
cassette is operated, the
standby function will
have priority over the
current operation and
record the appropriate
broadcast
automatically.
• If you set STANDBY a
and STANDBY b to
an identical preset time,
only STANDBY a
operates.
• When a cassette is not
inserted, or the tab of
the cassette is broken,
recording is not
possible. Instead, the
radio will receive the
appropriate broadcast.
MODE
RECRADIO
STANDBY
FWD
a
Display the desired
duration for the
operation of the radio.
STANDBY SLEEP
a
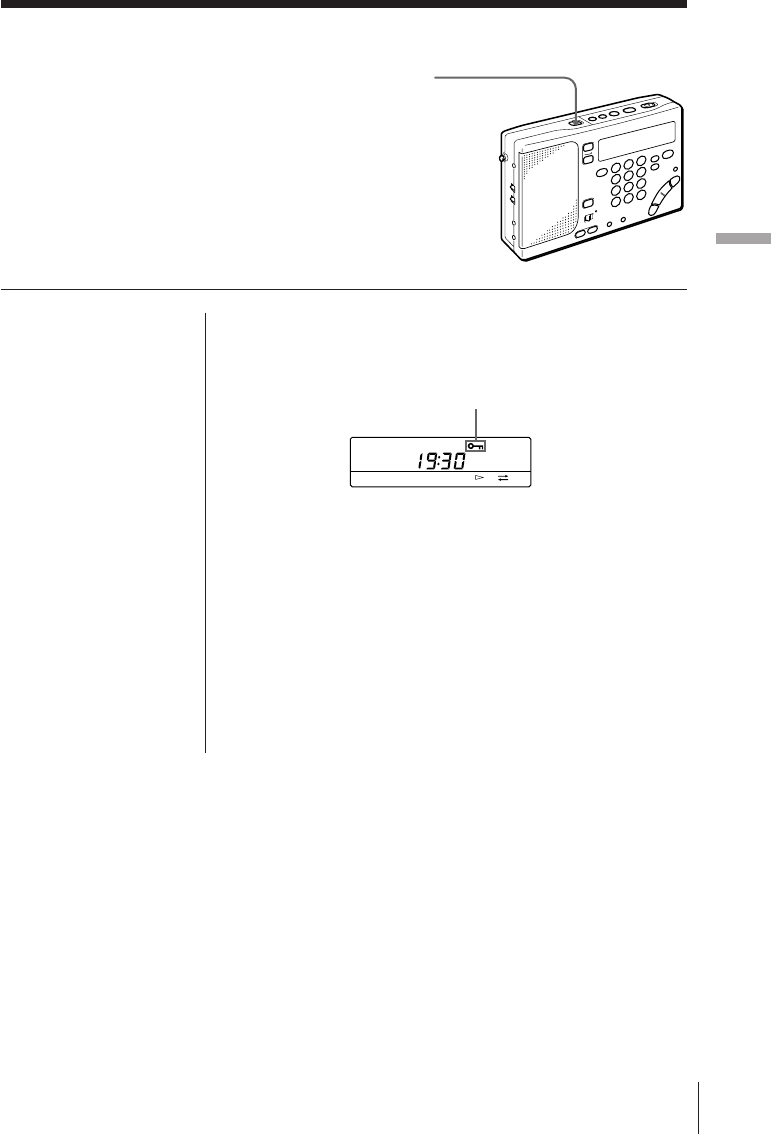
Timer 29EN
Timer
Using the hold function to prevent accidental
operations
Other Operations
HOLD
Other Operations
Other Operations
When the hold function is used, all buttons
are locked and are not operational.
When carrying the unit or operating the radio
or cassette, use the hold function to prevent
accidental operations.
In addition, use the hold function to
temporarily cancel the standby function (see
pages 25 and 28).
Tip
When the hold function
is used, the
illumination of the
display is turned off.
Note
The hold function
cannot be used to hold
cue and review
operations.
Slide HOLD in the direction of the arrow to display
“H”. All buttons are locked and are not operational
when “H” is displayed.
To cancel the hold function
Slide HOLD in the opposite direction of the arrow so
that “H” disappears in the display.
To temporarily cancel the standby and timer
recording functions
When the hold functions is used, the standby and
timer recording functions are temporarily canceled.
This is applicable when the radio is not operating
only.
Display “H”
FWD
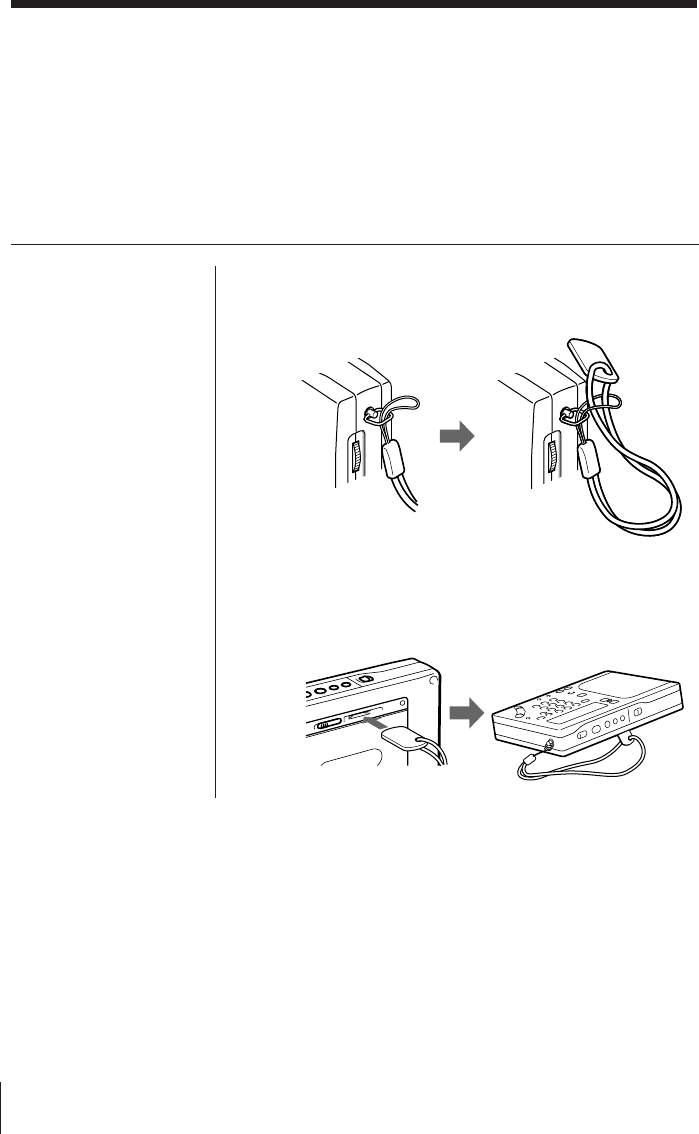
Power Sources30EN
Attaching the strap
Attach the supplied strap to facilitate
handling of the unit. In addition, you can use
the strap as a stand.
To attach
Attach the strap to the fixture on the side of the unit as
shown.
Using the stand
Insert the tab of the strap into the slot on the rear side
of the unit as shown.
Other Operations
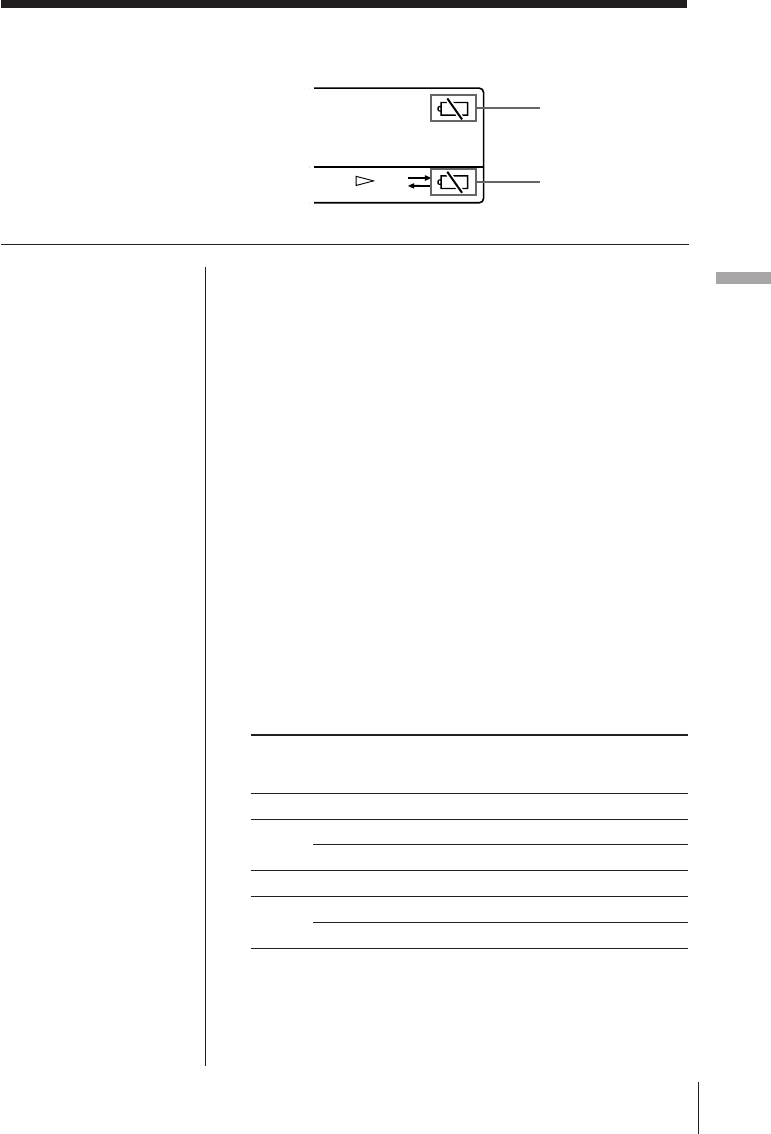
Power Sources 31EN
Power Sources
Replacing the batteries
Power Sources
Main/radio batteries
Radio or tape stops operating, and “i” will flash in
the display when the main/radio batteries require
replacement. Replace with two new R6 (size AA)
batteries.
When the batteries are completely exhausted, “i”
stops flashing and remains in the display. All
operations will not be possible.
Tape battery
The tape battery supplies the necessary power to drive
the motor for tape operation. Sound quality will
deteriorate, tape operation will become unstable, and
“i” will flash in the display when the tape battery
requires replacement. Replace with a new R6 (size
AA) battery.
When the battery is completely exhausted, “i” stops
flashing and remains in the display. All operations
will not be possible.
Battery Life (Approximate hours)
Sony R6 alkaline Sony R6
(size AA) (size AA)
Radio batteriesTape battery Radio batteries Tape battery
Tape Playback
approx. 37 approx. 11 approx. 14 approx. 3.5
Radio FM approx. 27 — approx. 9 —
Play AM approx. 21 — approx. 7 —
MIC recording
approx. 36 approx. 11 approx. 13 approx. 3.5
Radio FM approx. 18 approx. 11 approx. 6.5 approx. 3.5
Recording AM approx. 15 approx. 11 approx. 5 approx. 3.5
Notes
• Replace the batteries
within 3 minutes after
the batteries are
removed from the
holders.
Otherwise, the preset
broadcast stations and
clock settings will be
erased. In this case,
preset the broadcast
stations and set the
time again.
•“i” will disappear in
the display when the
radio or tape is
operated after the
batteries are replace.
Low main/radio
batteries
indicator
Low tape
battery
indicator
FWD
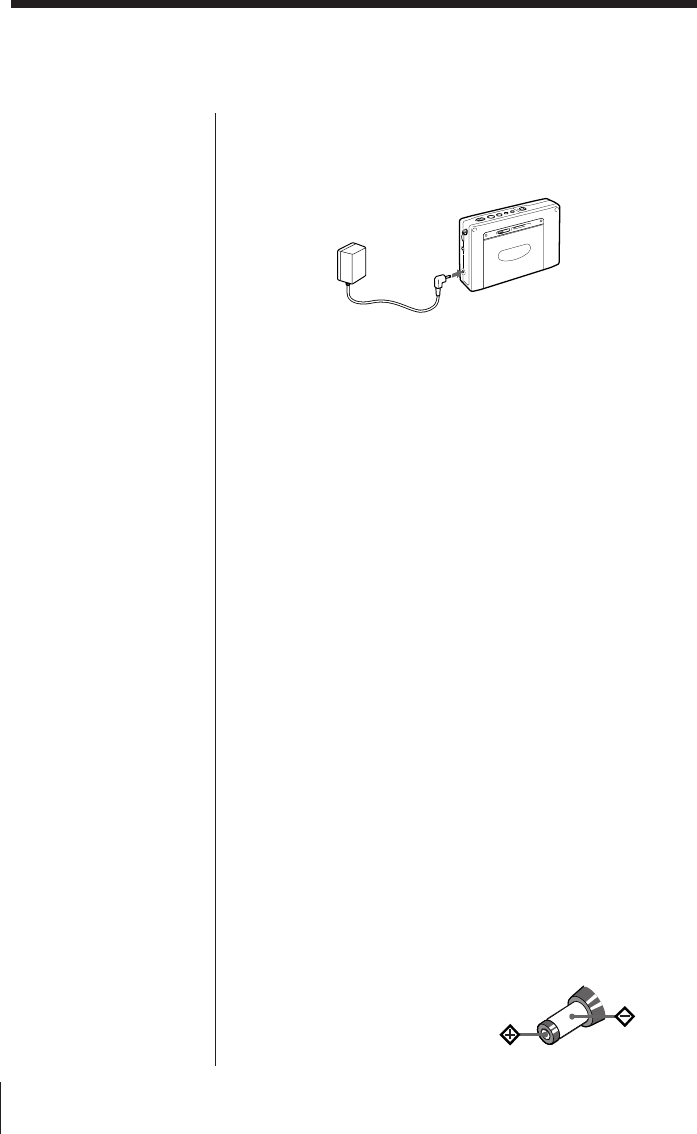
Power Sources32EN
Operating with house current or car battery
Notes
• When the AC power
adaptor or the car
battery cord is
connected to the DC
IN 3V jack of the unit,
the internal batteries
are automatically
disconnected. Power is
automatically supplied
from the external
power source.
• While using the wall
outlet or car battrey,
the display is lit
constantly.
However, the display
disappears when the
Hold function is used.
House current
To operate the unit with house current, connect the optional
AC power adaptor AC-E30HG (supplied for Saudi Arabia
model) to the DC IN 3V jack of the unit.
to a wall outlet
Notes on the AC power adaptor
• Do not bend or twist the power cord unnecessarily and do
not place heavy objects on the power cord.
• When disconnecting the AC power adaptor from the wall
outlet, pull out by the plug. Do not pull the power cord.
• Disconnect the AC power adaptor from the wall outlet
when the unit is not to be used for a long period of time.
Make sure to pull out by the plug.
Car battery
To operate the unit with car battery, connect a car battery
cord to the DC IN 3V jack of the unit.
For more details on the car battery cord, refer to its Operating
Instructions manual.
Notes on external power sources
• When operating the unit with an external power source, do
not remove the batteries in the RADIO BATT battery
holder which serve as a backup of the memory. Replace
the batteries regularly once a year.
• When operating the unit with the internal batteries,
remove the AC power adaptor or car battery cord in the
following order: 1 disconnect from the wall outlet or car
battery, and 2 disconnect from the DC IN 3V jack of the
unit.
Make sure that the plug of the external power source is
disconnected before operating the unit.
• When connecting and disconnecting the external power
source plug, be sure to turn off the unit.
Otherwise, the power will go off and “i” may be
displayed. If this occurs, turn the unit on again and “i”
will disappear.
• Use the recommended Sony AC power adaptor or car
battery cord only. The polarity of the plugs of other
manufacturers may be different. Failure to use the
recommended AC power adaptor or car battery cord may
lead to the malfunction of the unit.
DC IN 3V jack
Polarity of the plug
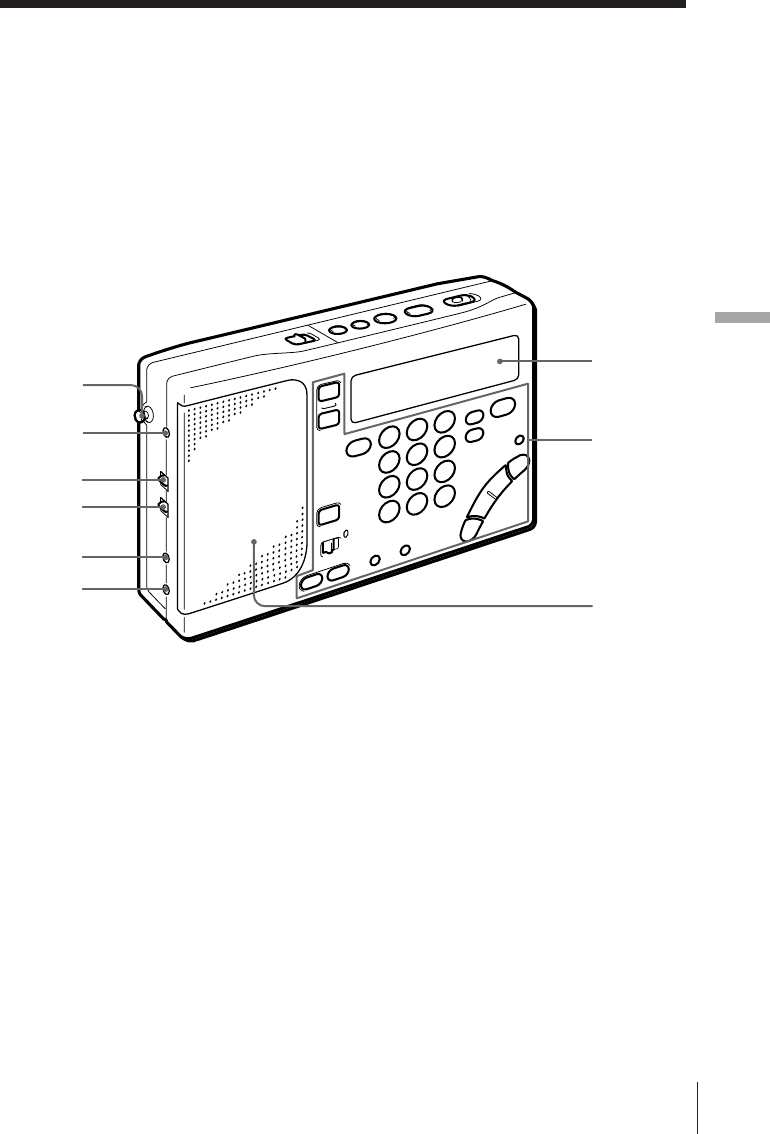
Additional Information 33EN
Additional Information
1Telescopic antenna (7)
2AM EXT ANT jack (20)
3SENS DX•LOCAL (FM/AM
sensitivity) selector (7)
4ST•MONO (stereo/monaural)
selector (7)
5MIC jack (22)
62 (headphones) jack
7Display
8Control panel
9Speaker
8
7
9
Additional Information
1
2
3
4
5
6
Location of controls
Refer to the pages indicated in ( ) for
details.
Front
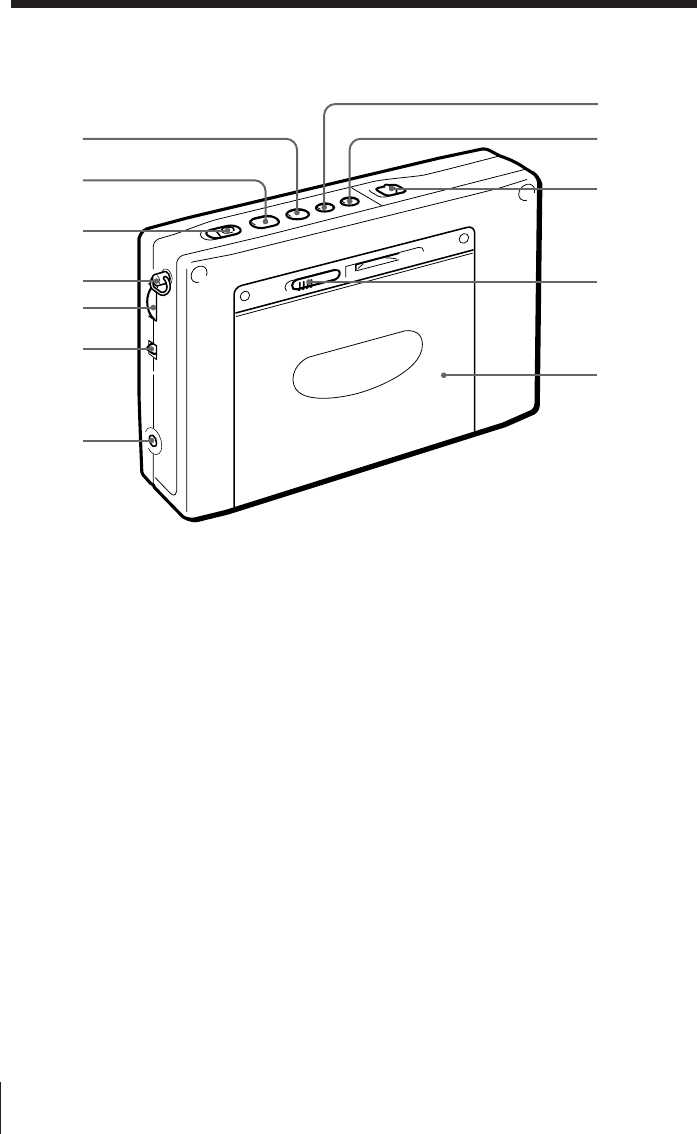
Additional Information34EN
Rear
!º p (stop) button (8, 9)
!¡ œ (play) button (8, 9)
!™ REC (record) switch (11)
!£ Hand strap retainer (30)
!¢ VOLUME control (7)
!∞ TONE selector (7)
!§ DC IN 3V ¥ (external power
input) jack (32)
!¶ FF (fast forward) button (9)
!• REW (rewind) button (9)
!ª HOLD switch (29)
@º ª OPEN (cassette compartment
opener) control (8)
@¡ Cassette compartment
!§
!º
!¡
!™
!∞
!¢
!£
!ª
!•
@º
!¶
@¡
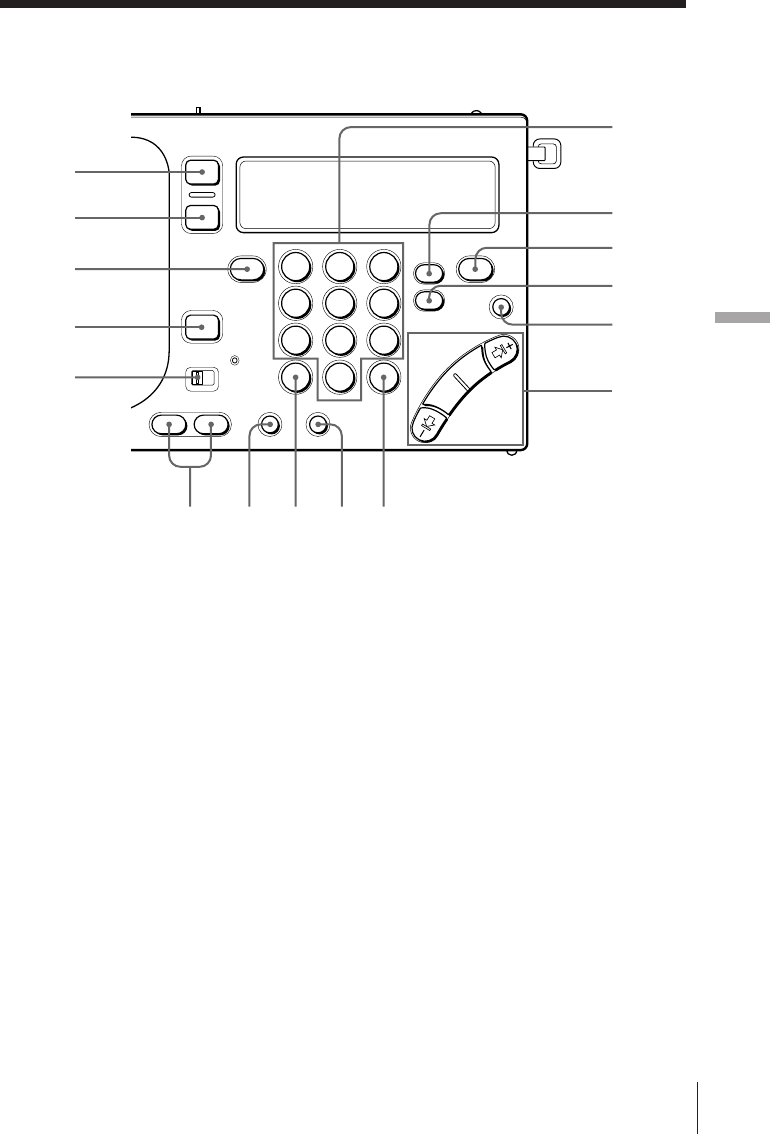
Additional Information 35EN
Additional Information
123
456
789
0
Control panel
1RADIO POWER ON/OFF button
(6)
2SLEEP button (26)
3FM/AM button (6)
4STANDBY ON/OFF button (24)
5MODE selector (25)
6MEMORY PRESET/DIRECT
TUNE numeric buttons (14,15)
7SYNC (Synchronous detection)
button *1 (18)
8PAGE button (15,16)
9SSB (Single Side Band) button *2
(17)
0LIGHT button
Press this button to turn on the
light for about 20 seconds for
display viewing in the dark.
!¡ MANUAL TUNE/
SCAN•STANDBY TIME SET/
TIME SET buttons (6)
!™ STANDBY MEMORY•STANDBY
TIME SET buttons (24,27)
!£ ENTER•TIME SET button (5,15)
!¢ DIRECT button (14)
!∞ AM BAND button (6)
!§ EXE•DISPLAY button (5,14)
Press this button to display the
clock while operating the radio or
cassette.
Press again to return to the
previous display.
*1 SYNC U button for the Saudi Arabian
model.
*2 SYNC L button for the Saudi Arabian
model.
1
2
3
5
4
!™ !£ !¢ !∞ !§
9
8
7
6
!¡
0
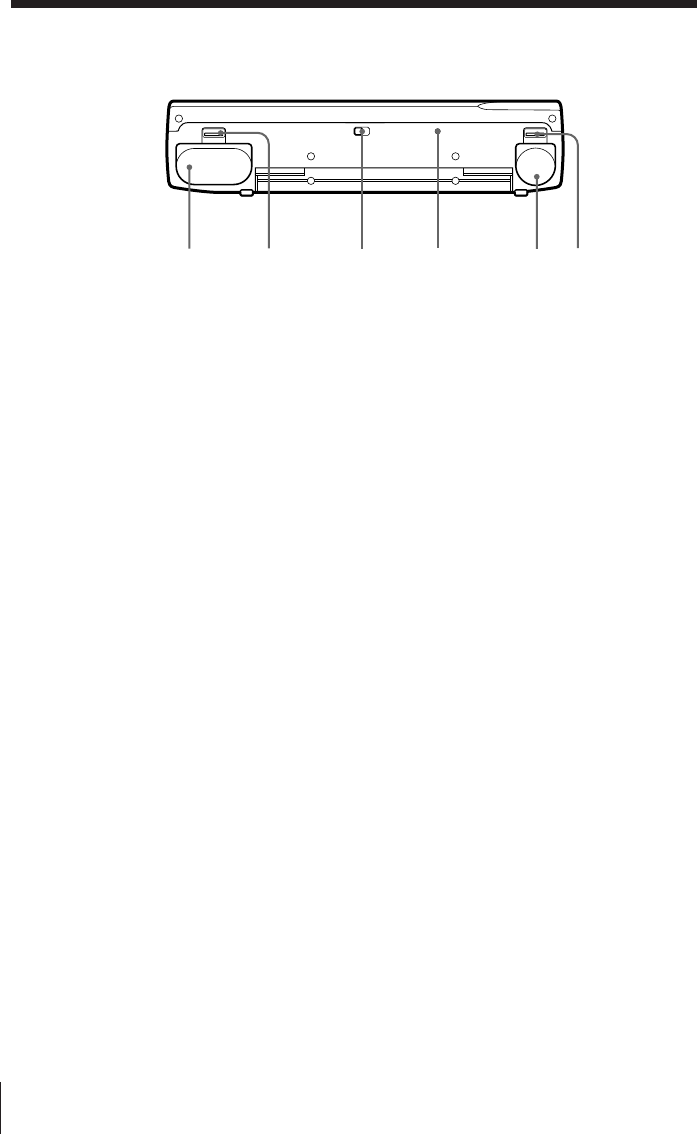
Additional Information36EN
Base
4RESET button
Press this button with a pointed
object when the unit fails to
function properly. When this
button is pressed, the preset
broadcast stations and the clock
settings are erased.
5TAPE BATT battery holder (4)
6OPEN (TAPE BATT opener)
control (4)
1RADIO BATT battery holder (4)
2OPEN (RADIO BATT opener)
control (4)
3ISS (AM interference suppression)
selector (11)
12 34 56

Additional Information 37EN
Additional Information
Display
1TUNE indicator (14)
Appears when a broadcast station
is tuned.
2TRY AGAIN! indicator (14, 19)
Flashes when an invalid MW tune
interval or an invalid frequency
(direct tuning) is entered.
3STANDBY a/b indicators
(24, 27)
Appear when the standby
function is operational.
4HOLD indicator (29)
Appears when the HOLD function
is operational. All buttons will be
locked and will not be operational.
5SLEEP indicator (26)
Appears when the sleep timer is
operational.
6i (low radio batteries) indicator
(31)
7SYNC U/SYNC L (synchronous
detection) indicators (18)
8USB/LSB/CW (single side band/
continuous wave) indicators * (17)
9LOCK (synchronous detection)
indicator (18)
Appears when synchronous
detection mode is operational.
!º ‰ (cassette) indicator
Appears when a cassette is
inserted.
!¡ REC (record) indicator
!™ ª REV/FWD · (tape direction)
indicators (8)
ª REV appears when the current
tape direction is the side facing the
unit (reverse side). FWD ·
appears when the current tape
direction is the side facing the
cassette compartment cover.
!£ 9pp( (tape operation)
indicators
!¢ PRESET indicator
!∞ Å/D (playback/recording
mode) indicators (8)
!§ Preset number/sleep duration
display (15, 16, 26)
!¶ i (low tape battery) indicator
(31)
!• PAGE (page number) indicators
(15)
!ª Frequency/time/tape operation
display
* Not applicable for the Saudi Arabian
model.
REV
TUNE
LSB/CW
SLEEP
3
MHz
kHz
FWD
TRY AGAIN
STANDBY
SYNC U
SYNC L
USB
FM
AM
PRESET
PAGE
1
2
LOCK
REC
ab
192 3654
!º !¡ !™ !£ !¶!§!∞!¢
7
8!•
!ª

Additional Information38EN
On battery
• Insert the batteries with the correct
polarity.
• Do not mix new and used batteries.
• The batteries cannot be charged.
• Remove the batteries when the unit
will not be used for a long time.
• Should any battery leakage occur,
wipe the battery case well and install
new batteries.
On placement
• Do not leave the unit in a location
near heat sources, or in a place
subject to direct sunlight, excessive
dust or mechanical shock.
• If the unit is left in a car parked in
the sun, be sure to choose a location
in the car where the unit will not be
subjected to the direct rays of the
sun.
• Use the unit within a temperature
range of 0°C to 40°C (32°F to 104°F).
If it is used in temperatures outside
this range, an irregular display (i.e.,
88.88...) may appear. If it is used in
temperatures lower than this range,
the display may change very slowly.
These irregularities will disappear
and there will be no damage to the
unit when the unit is used in its
recommended temperature range.
• In vehicles or buildings, radio-
reception may be difficult or noisy.
Try listening near a window.
• Reception of around 3.64 MHz may
be difficult because of internal
spurious signals generated by the
built-in oscillators.
On safety
• Should any solid object or liquid fall
into the unit, unplug the unit, and
have it checked by qualified
personnel before operating it any
further. Make sure that no liquid or
foreign material enters the DC IN 3V
jack of the unit. This may lead to the
malfunction of the unit.
• When the casing becomes soiled,
clean it with a soft dry cloth
dampened with mild detergent
solution. Never use abrasive
cleansers or chemical solvents, as
they may mar the casing.
• Since a strong magnet is used for the
speaker, keep personal credit cards
using magnetic coding or spring-
wound watches away from the unit
to prevent them from possible
damage caused by the magnet.
• When there is lightning and you are
using an external antenna,
immediately disconnect the AC
power adaptor (if connected) from
the wall outlet. Never touch the
antenna wire when there is a
lightning storm.
• Never connect a ground wire to a
gas pipe
Precautions and Maintenance
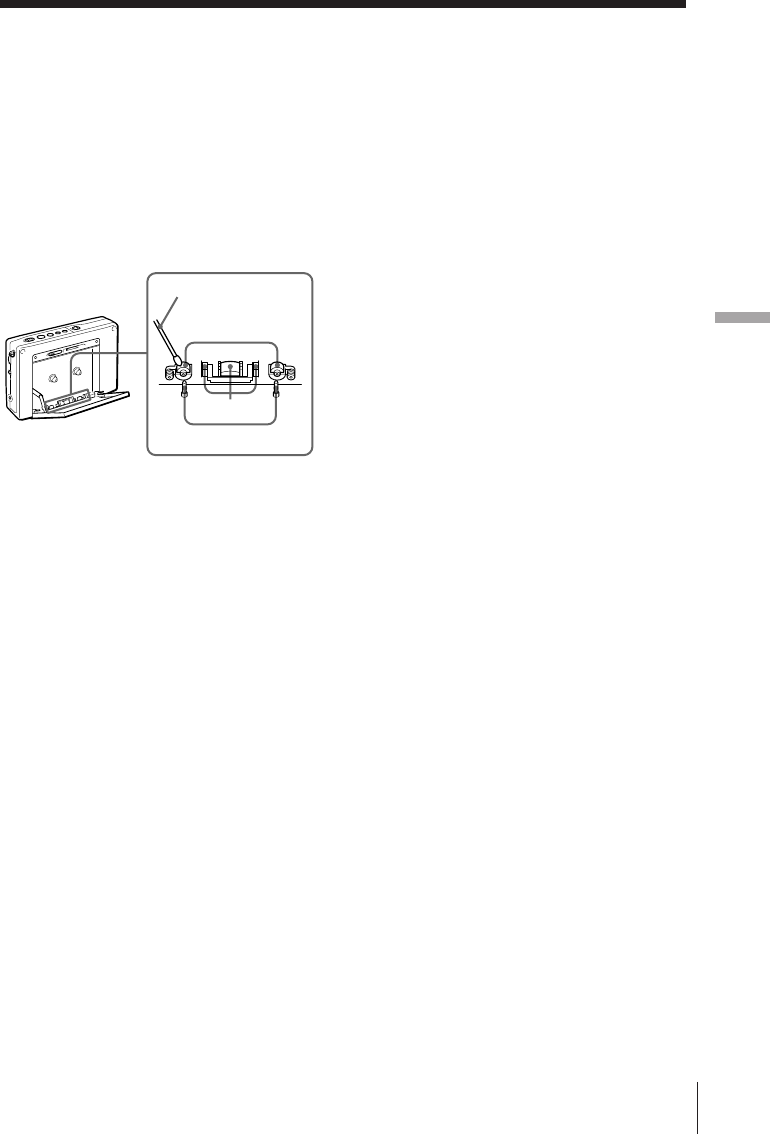
Additional Information 39EN
Additional Information
Cotton swab
Record/
Playback head
Head
Capstan
Pinch roller
On cassette-corder
Cleaning the tape head and tape
path
Use the optional cleaning tape Sony
KK-WM1 to clean the heads, pinch
rollers and capstans regularly after 10
hours of operation for optimum
playback and recording quality.
When the unit is not used for an
extended period of time
The first few minutes of the operation
may be unstable following an
extended period of non-usage.
Use of a cassette with more than 90
minutes of play time
The use of a cassette with more than 90
minutes of play time is not
recommended except for long,
continuous recording or playback.
Service and repair
When bringing your unit for service
and repair, take note of your
important settings in the memory. The
settings may be deleted depending on
the type of repair necessary.
If you have any questions or problems
concerning your unit, please consult
your nearest Sony dealer. Make a note
of your important preset broadcast
stations prior to servicing by qualified
personnel.

Additional Information40EN
Troubleshooting
Troubleshooting describes possible causes and remedies for common problems you
may have with your unit.
Symptom
The buttons are not
operating.
The power is not turned
on when RADIO POWER
ON/OFF is pressed.
The display is not
operating.
The display is dim.
The display appears
slowly.
There is no sound output.
Remedy
• Slide HOLD in the
opposite direction of the
arrow so that “H” in the
display disappears.
• Insert the batteries with
the correct ]} polarity.
• Replace with new
batteries.
• Check and make sure that
the AC power adaptor or
car battery cord is
connected properly.
• Insert the batteries with
the correct ]} polarity.
• Replace with new
batteries.
• Avoid subjecting the unit
to extremely high
temperatures or excessive
moisture.
• Avoid subjecting the unit
to extremely low
temperatures.
• Adjust VOLUME to the
desired setting.
• Unplug the stereo head-
phones as necessary.
• Insert the batteries with
the correct ]} polarity.
General
Cause
• The HOLD function is
operating.
• Incorrect polarity of
batteries.
• The batteries are weak
(“i” flashes in the
display).
• The AC power adaptor or
car battery cord is
disconnected.
• Incorrect polarity of
batteries.
• The batteries are weak
(“i” flashes in the
display).
• The unit is being used in
extremely low
temperatures or in a place
with excessive moisture.
• The unit is being used in
extremely low
temperatures.
• VOLUME is turned down
completely.
• The stereo headphones are
plugged in.
• Incorrect polarity of
batteries.

Additional Information 41EN
Additional Information
Radio
Cause
• The batteries are weak
(“i” flashes in the
display).
• Tuning and antenna
orientation requires
further adjustment.
• The radio signal is weak.
• SENS is set to LOCAL.
• Each button operation was
not completed within 10
seconds.
• An incorrect procedure is
completed.
• The number entered for
the preset broadcast
station is incorrect.
• The preset broadcast
stations are erased because
the batteries were not
replaced within 3 minutes
after their removal from
the holders.
• STANDBY ON/OFF is not
pressed.
• The HOLD function is
operating.
• The preset standby time is
erased because the
batteries were not replaced
within 3 minutes after
their removal from the
holders.
• VOLUME is turned down
completely.
Symptom
Poor reception or
unsatisfactory sound
quality.
Direct tuning is not
operating.
Presetting your favorite
broadcast station is not
possible.
Instant recall of a preset
broadcast station is not
possible.
The radio is not turned on
when the preset standby
time arrives.
Remedy
• Replace with new
batteries.
• Adjust tuning and the
orientation of the antenna
for optimum reception.
• Listen to the radio near a
window when in a vehicle
or building.
• Set SENS to DX.
• Press the next button
within 10 seconds.
• Press a numeric button
(0-9) while pressing
ENTER (see page 15).
• Enter the correct button
assigned to the desired
preset broadcast station.
• Preset the broadcast
stations again (see page 15).
• Press STANDBY ON/OFF
to successfully preset the
standby time (see page 24).
• Slide HOLD in the
opposite direction of the
arrow so that “H” in the
display disappears.
• Preset the standby time
again.
• Adjust VOLUME to the
desired setting.

Additional Information42EN
Cassette-Corder
Symptom
The cassette recorder is not
operating.
Playback and recording of
both sides of the cassette is
not possible.
Recording is not possible.
The timer recording
function is not operating
when the preset standby
time arrives.
A stereo-recordable source
is recorded as monaural
recording.
The sound output is poor
and drops out.
Remedy
• Slide HOLD in the
opposite direction of the
arrow so that “H” in the
display disappears.
• Insert two R6 (size AA)
batteries into the RADIO
BATT battery holder.
• Replace with a new
battery.
• Press œ while pressing
p to display “FWD ·”.
• If you wish to use the tape
for recording again, cover
the opening of the broken
tab with adhesive tape.
• Set MODE to REC.
• Set ST•MONO to ST.
• Clean the tape head and
tape path (see page 39).
Cause
• The HOLD function is
operating.
• The batteries are not
inserted into the RADIO
BATT battery holder.
• The battery in the TAPE
BATT battery holder is
weak (“i” flashes in the
display).
•œ is pressed while
pressing p to display
“ª REV”.
• The cassette tab of the tape
is broken off to prevent
accidental recording of
your important tape.
• MODE is set to RADIO.
• ST•MONO is set to
MONO.
• The tape head is dirty and
requires cleaning.
Troubleshooting (continued)

Additional Information 43EN
Additional Information
Specifications
Radio section
Circuit system
FM: Super heterodyne
AM:Dual conversion super heterodyne
Frequency range
FM: 76–108 MHz
87.5–108 MHz (for the Saudi Arabian
model)
SW: 1,621–29,999 kHz
1,621-26,100 kHz (for the Saudi Arabian
model)
MW: 530–1,620 kHz
LW: 150–529 kHz
150–285 kHz (for the Saudi Arabian model)
Intermediate frequency
FM: 10.7 MHz
SW/MW/LW: 55.845 MHz (1st)
455 kHz (2nd)
Cassette-Corder
Track system
Compact cassette stereo
Frequency response
Playback: 20-18,000 Hz
Recording/Playback: 70-8,000 Hz
General
Speaker
Approx. 45 mm (113/16 inches) diameter, 8 ohms,
one speaker system
Maximum output
250 mW (at 10 % harmonic distortion)
Power requirements
RADIO BATT: DC 3 V, two R6 (size AA)
batteries
TAPE BATT: DC 1.5 V, one R6 (size AA) battery
External power source
DC 3 V
Output
One 2 (headphones) jack (stereo minijack)
16 ohms
Input
One mixing microphone input jack (stereo
minijack)
Dimensions
Approx. 176 x 105 x 40 mm (w/h/d)
(7 x 41/4 x 15/8 inches incl. projecting parts)
MassUnit approx. 464 g (1 lb 0.4 oz)
Approx. 593 g (1 lb 4.9 oz) incl.
alkaline batteries, C-60HF tape,
headphones, and strap
Supplied accessories
Stereo headphones (1)
Ear pads (2)
Stereo microphone (1)
Compact antenna AN-71 (1) *1
Active antenna AN-LP1 (1) *2
Antenna connector (1) *3
Carrying case (1)
Hand strap (1)
Wave Handbook (1) *4
Shortwave Guide (1) *5
Batteries (3) *3
AC power adaptor (1) *5
Optional accessories
AC power adaptor AC-E30HG *6
LW/MW/SW wide range antenna AN-1,
AN-102
Your dealer may not handle some of the above listed
optional accessories. Please ask your dealer for
detailed information on the optional accessories
available in your country.
Design and specifications are subject to change
without notice.
*1ICF-SW1000T only
*2ICF-SW1000TS only
*3For the World model only.
*4Not applicable for the Saudi Arabian model.
*5For the Saudi Arabian model only.
*6The operative voltage for the AC power adaptor is
varied depending upon the country in which it is
sold. Therefore, purchase the AC power adaptor in
the country you intend to use it.

Additional Information44EN
Tips on radio waves
What is SSB (Single Side Band)?
SSB is very popular among ham and
business radio transmissions, and is
commonly used in many amateur
bands because of its superiority in
signal intelligibility. Its impressive
signal intelligibility is achieved with
minimum interferences when
compared to DSB (Double Side Band)
owing to its half bandwidth structure.
In general, SSB transmissions employ
the USB (Upper Side Band)
modulation, while amateur band
transmissions below 10 MHz employ
the LSB (Lower Side Band)
modulation.
Conventional radios without a BFO
(Beat Frequency Oscillator) circuit
cannot receive SSB transmissions
successfully. This unit can receive SSB
transmissions successfully with the
built-in BFO (Beat Frequency
Oscillator) circuit.
What is CW (Continuous Wave)?
CW is also popular among ham and
business radio transmissions. Unlike
other signals, the amplitude of a
carrier is not modulated for CW
transmissions. CW transmissions
convey information by interrupting
the carrier and use Morse code as a
means of communication.
This unit can receive CW
transmissions successfully with the
built-in BFO (Beat Frequency
Oscillator) circuit as beat sound only.
To fully comprehend the information
transmitted by CW transmissions, an
understanding of the Morse code is
prerequisite.
LSB USB
Carrier
Amplitude
Frequency
What is synchronous detection?
There are two underlying obstacles in
optimum AM reception: distortions due
to fading and interferences from adjacent
broadcast stations.
The synchronous detection is effective in
solving these obstacles.
Distortions due to fading are generally
caused by over-modulation which occurs
when a carrier component of the
received signal is attenuated along the
way. The synchronous detection circuit
of this unit generates a pure carrier
frequency with no level variation which
is ideally synchronized with the original
carrier to compensate for the attenuated
carrier component, thus dramatically
reducing distortion.
Likewise, AM (LW, MW, and SW)
broadcast generally employs DSB
(Double Side Band) signals for
transmissions in which the modulated
signals are transmitted using both the
upper and lower side bands (USB and
LSB). In most cases, one of the side bands
is affected by interferences from adjacent
broadcast stations (i.e., beats). The
synchronous detection circuit of this unit
extracts one of the two sides (USB or
LSB) of the DSB (Double Side Band)
signal which is free from interferences.
This allows clear reception without the
interferences from adjacent broadcast
stations.
This side is received only.
USBLSB
Carrier
Interferences
from adjacent
broadcast
stations.
