Sony KDL 26S3000 User Manual LCD TELEVISION Manuals And Guides L0705046
SONY LCD Television Manual L0705046 SONY LCD Television Owner's Manual, SONY LCD Television installation guides
User Manual: Sony KDL-26S3000 KDL-26S3000 SONY LCD TELEVISION - Manuals and Guides View the owners manual for your SONY LCD TELEVISION #KDL26S3000. Home:Electronics Parts:Sony Parts:Sony LCD TELEVISION Manual
Open the PDF directly: View PDF ![]() .
.
Page Count: 46
Operating Instructions
KDL-26S3000
KDL-32S3000
KDL-40S3000
KDL-46S3000
BRAVlA
© 2007 Sony Corporation
Owner's Record
The model and serial numbers are Iocaled
tit file rear of tile TV. Record these
numbers in file spaces provided below.
Reter to them whenever you call upon
your Sony dealer regarding this TV,
Model Name
Serial No.
WARNING
To reduce tile risk of tire or electric shock, do
not expose lhJs WV to rain or moisture.
/_ Tllis sy mbol is intended to alerl
the user lo tile presence of
uninsuhlled "dangerous voltage _
within the TV's enclosure that
may be of sufficient magnitude to
constitute a risk of electric shock
to persons.
_ ills sy mbol is intended lo alert
lhe user lo lhe presence of
ilnportanl ()perating and
maintenance (servicing)
instructions in the lileralum
accompanying the TV.
Tile TV shall not be exposed to dripping or
splaslling and no objects filled with liquids,
such as vases, shall be placed on tile TV.
CAUTION
To pre_ enl electric shock, do not u_ lfiis
polarized AC phlg with an exlenskm cord.
receplacle or other outlet ilnless tile bhldes can
be fully inserted to prcvenl blade exposure.
Declaration of Conformity
Trade Name: SONY
Model: KDL- 26S 30t)0/KDL- 32S 30011/
KDL-40S 3000/KDL-46S 300(1
Responsible Party: Sony Electronics Inc.
Address: 16530 Via Esprillo,
San Diego, CA 92127 U.S.A.
Telephone Number: 858-942-2230 _ =Rt@i,,'If±]=
This device complies wilh part 15 of file
FCC rules. Operation is subject to tile
lollowing two conditions: (1) This device
may nol cause harmflfl intcrlkmnce, and (2)
Ibis device nmst accepl any inlerlerence
received, including intcrlkrence lhal may
cause undesired operation.
NOTIFICATION
This equipnlent Ills been lesled and Iound to
comply with tile limits lor n Class B digital
device, pur uant to Part 15 oI lhe FCC Rules.
These limits are designed 1o provide
reasonable protection againsl harmfid
intcrlPrence in a residential installalion. This
equipmenl generates, uses and can radiate
radio lrequency energy and. if not installed and
used in accordance with the instructions, may
cause harnlfid inlerlerence to radio
COlnnlunications,
However, lhere is no guarantee lhal
interlcrence will not occur in a particular
installation. If this equipment does cause
harmfld interlerence to radio or television
reception, which can be determined by turning
the equipment oil and on, the user is
encouraged lo try to correct tile interlerence by
()lie or lnore oflhe lollowing nleasurcs:
[] Reorient or mlocale lhe receiving antenna.
[] Increa_ the separation between the
equipment and receiver.
[] Connecl the equipnlent inlo an outlet on a
circuit different fi+olnthai to w]licb tile
receiver is connected.
[] Consult file dealer or an experienced radio/
TV technician lot help.
Pursuant 1o FCC regulations, you are
cautioned that any changes or modifica_lkms
not expressly approved in this manual could
void your autborily to operate Ibis
equipmenl.
For Customers in Canada
This Class B digital apparatus complies with
Canadian ICES-l)03.
Safety
[] Operate tile TV only on 120 - 240 V AC.
[] Use die AC power cord specified by Sony
and sudable lot the vollage where you use
il.
[] The plug is designed, lor salPly purposes.
1o fil into lhe wall outlet only ()lie way. If
you are unable to insert the plug fiflly inlo
lhe oullet, contact your dealer.
[] If any liquid or solkl object should hdl
inskle the cabinet, unplug file TV
immedialely and have it checked by
qualified service personnel belore
operaling it hlrther.
[] If you will not be using the TV lot several
days. disconnect the power by pulling lhe
plug itself. Never pull on lhe cord.
[] When disconnecling AC power cord, the
power cord should be easily accessible lbr
disconneclion.
[] For details concerning salcty precautions,
see _hnporlanl galPty InstltlCtions _' on
page 4.
Installing
[] Tile TV should be installed near an easily
accessible power outlet.
[] To prevenl internal heat buildup, do not
block file ventilation openings.
[] Do not inslall the TV in a hot or bumid
place, or in a place subject to excessive
dust or mechanical vibralion.
[] Avoid operaling tile TV al temperatures
below 41 °F (5 °C).
[] Ifthe TV is transported directly from a cold
1o a warm localion, or if lhe roonl
lelnperaturc changes suddenly, file picture
may be blurred or show poor color due to
moisture condensation. In tills case. please
wail a l?w llours to let the moisture
evaporate belore turning on file TV.
[] To obtain the best picture, do nol expo_
llle semen to direct illumination or direct
sunlight. It is recommended to use spot
lighling direcled down fiom the ceiling or
to cover file windows that l_lce the screen
with opaque drapery. It is desirable to
install the TV in a room where the floor and
walls arc not of a reflective material.
CAUTION
Use the lollowing Sony TV only witll the
Iollowing WALL-MOUNT BRACKET.
i!i!i!i!i!i!i!i!i!i!i!i!i!i!i!i!iii ! iii ii!i!!
KDL-32S3000
KDL-26S3000 KDL-40S3000
KDL-46S3000
SU-WL100 SU-WLS00
_i['q_ RHT-G800
Use with oilier WALL-MOUNT BRACKET
or TV stand may cause instability and possibly
rcsull in injury.
To Customers
Sulficient expertise is required Ior installing
file specified TV. Be sure to subcontract lhe
installalkm lo a Sony dealer or licensed
contractor and pay adequate attenlion to salPty
during file installation.
Note
This television inchldes a QAM demodulator
which should allow you to receive
unscrambled digital cable tele_ iskm
programming via subscriplkm _lvice to a
c_lb]oser_ice prm ider. Availability of digital
cnble tele_ ision programming in your alva
depends on lhe type of programming and sigmd
proxided by your cable service proxider.
Trademark Information
Nlachllosh is g,trademark licensed to Apple
Computer. lnc.. registered in lhe U.S.A. and
ol]ler counlries.
HDMI. the HDMI logo and High-Definilkm
Multimedia lnterlhcc are trademarks or
registered m_demarks of HDMI Licensing
LLC.
Manulactumd under license Bom Dolby
Laboralories. "Dolby" and double-D symbol
arc trademarks of Dolby Laboralories.
Blu-ray Disc is a trademark.
"BRAVIA" and BRAVIA, S-Force,
BRAVIA Theatre Sync, [] and DMe x are
trademarks or rcgislcrcd marks of Sony
Corporation.
"XMB", "XrossMediaBar" and "PS3" arc
trademarks of Sony Corporation and/or Sony
Computer Enterlahllnenl Inc,
qlx-,g
DiGiTAL
2
Important Safety Instructions ............................ 4
The Four Steps to Stunning HD Experience:
Set, Sound, Source, and Setup .................... 8
Picture Quality and Aspect Ratio ....................... 8
TV Home Menu: XMB TM (XrossMediaBar) ......... 9
1. Installing the TV ............................................. 11
Preventing the TV from Toppling Over ......... 11
Preparation for Wall-Mounting ...................... 12
2. Locating Inputs and Outputs ....................... 13
Left side ........................................................ 13
Rear .............................................................. 14
3. Connecting the TV ......................................... 16
Cable System or VHF/UHF
Antenna System ........................................ 16
Cable System and VHF/UHF
Antenna System ........................................ 16
HD Cable Box/HD Satellite Box .................... 16
PC................................................................. 18
Other Equipment .......................................... 19
Using HDMI Control for
BRAVIA Theatre Sync TM ........................... 20
Bundling the Connecting Cables .................. 20
4. Setting Up the Channel List
- Initial Setup ............................................... 21
Remote Control and TV
Controls/Indicators ...................................... 22
Inserting Batteries into the Remote
control ....................................................... 22
Remote Control ............................................ 22
Indicators ...................................................... 26
How to Use P&P and PIP Features .................. 27
To display a picture in the Sub Window ....... 27
To change channels in the Sub Window ...... 27
To exit from P&P and PIP ............................ 27
Adjust TV Settings ...................................... 28
Watching TV ................................................. 28
"_Access the equipment connected to
your TV ......................................................... 28
Navigating through TV Home Menu on
XMB TM ........................................................... 29
TV Settings Descriptions .................................. 30
Product Support ...................................... 30
_: Clock/Timers Settings ............................. 30
o_ Picture Settings ...................................... 30
Qb Sound Settings ....................................... 32
Screen Settings ...................................... 32
o_ Video Options Settings ........................... 34
_,) Audio Options Settings ........................... 34
%+Channel Settings .................................... 35
Closed Captions (CC) Settings ............... 36
Parental Lock Settings ............................ 36
External Inputs Settings .......................... 39
?=,HDMI Settings ........................................ 39
General Settings ..................................... 40
_.23Initial Setup ............................................. 40
Troubleshooting ................................................ 41
Specifications .................................................... 44
Index ................................................................... 45
Quick Setup Guide (separate volume)
Provides a variety of optional equipment
connection diagrams.
Customer Support
http://www.sony.com/tvsu pport
On-line Registration
United States
http://productregistration.sony.com
Canada
http://www. SonyStyle.ca/registration
Important
Safety
Instructions
1) Read these instruction,_.
2) Keep these instructions.
31 Heed all warnings.
4 b Follow all instructions,
51 Do not use this apparatus near water.
6) Clean only with dry cloth.
7) Do not block any ventilation openings. Install in
accordance with the manufacturer' s instructions,
USE
AC power cord
Observe the K_llowin gs to prevent the AC power cord trom being
omnaged. If the AC power cord is damaged, it may result in a fire or an
electric shock. Stop using it and ask your dealer or Sony service center v"
excnange it.
[] Do not place the TV where the power cord is subject to wear or abuse.
[] Do not pinch, bend. or twist the cord excessively. The core lines nmy
be bared 8nd cut. causln_ a short-circuiL alld resulting in a tire or all
electric shock.
[] Do not convert or dairlage the power cord.
[] Do not allow anything m rest on or rt 11 over me
p ...... rd. ]i ] I I
[] Do not move tile TV w th the power cord ]J ___J
plugged ill. ['_ _l_z"'_''_ a
[] Keep the power cord away from heat sources. _
[] When you disconnect the AC power cord_
disconnect it from the wall outlet first.
[] Be sure to grasp the plug wnen disconnecting the power cord. Do not
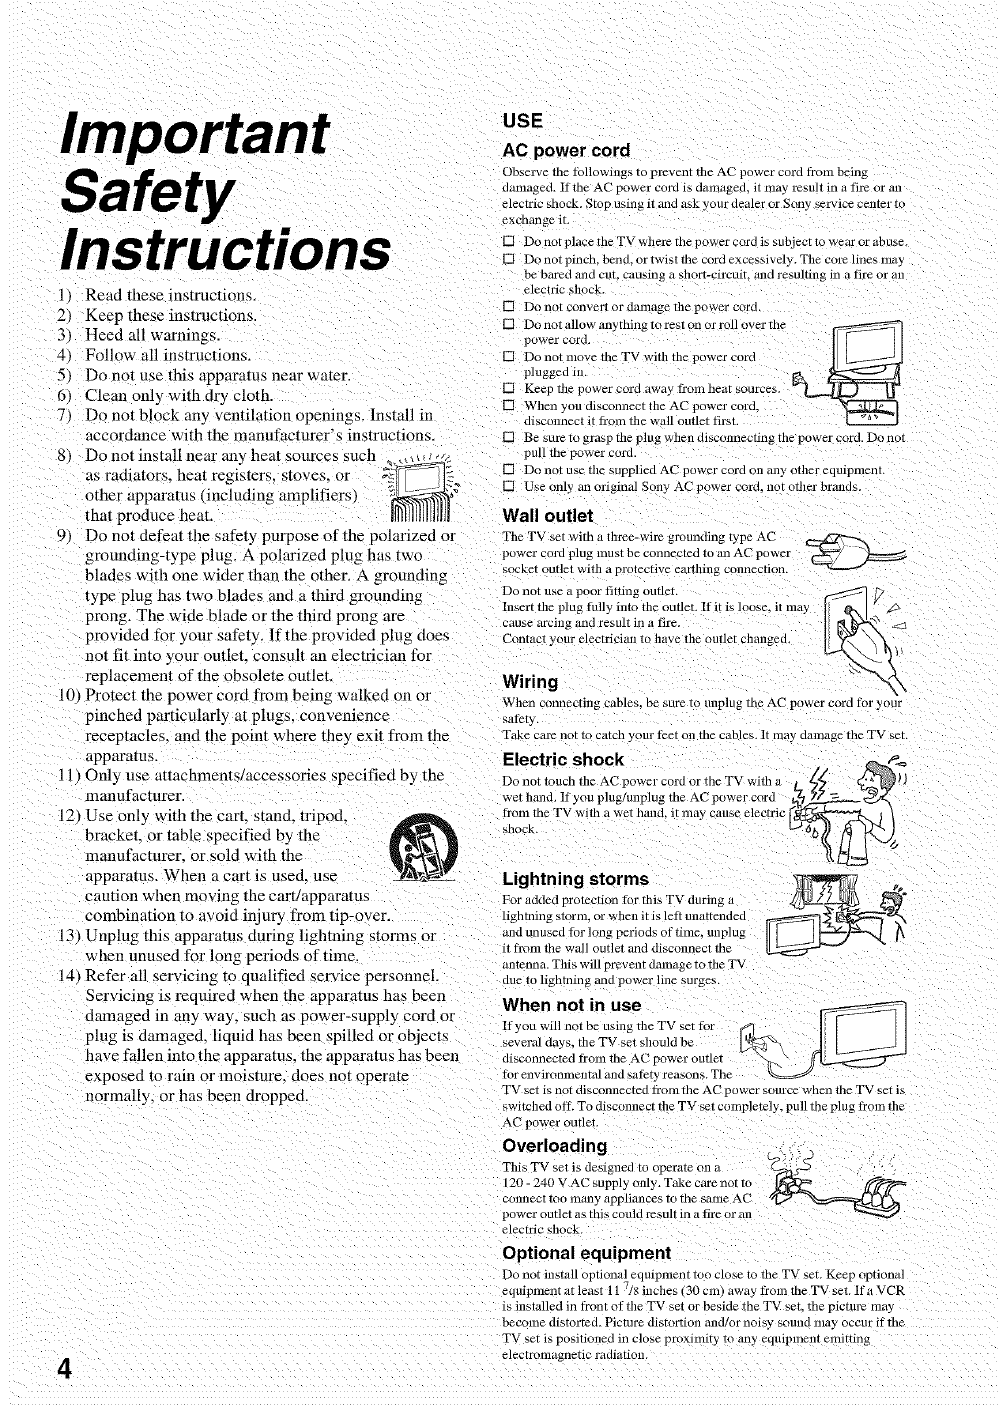
9) Do not defeat the safety purpose of the polarized or
grounding-type plug. A polarized plug has two
blades with one wider than the other. A grounding
type plug has two blades and a third grounding
prong. The wide blade or the third prong are
provided for your safety. If the provided plug does
not fit into your outlet, consult an electrician for
replacement of the obsolete outlet
10t Protect the power cord from being walked on ol
pinched particularly at plugs, convenience
receptacles, and the point where they exit from the
apparatus.
11) Only use attachments/accessories specified by the
ntanufacturer.
12) Use only with the cart. stand, roped,
bracket, or table specified by the
manufacturer, or sold with the
apparatus. When a cart is used. use
caution when moving the cart!apparatus
combination to avoid injury from tip-over.
13) Unplug this apparatus during lightning storms or
when unused for long periods of time.
14 _Refer all servicing to qualified service personnel.
Servicing is required when the apparatus has been
damaged in any way, such as power-supply cord or
plug is damaged, liquid has been .spilled or objects
have fallen into the apparatus, the apparatus has beer_
exposed to rain or moisture, does not operate
normally, or has been dropped.
4
8 b Do not install near an_ heat sources sucn ,_ _ _s/ pull me power cora.
........ A;,._,,.,, heat rer*i_ter_ _tnve_ cw __ [] Do not use the supphed AC power corn on may other eqmpment
-.. , .. ,._. . _1 _ J,'_2 [] Use only an original Sony AC power cord. not other brmads.
other apparatus tmcmatng ampnners/ _
that produce heat. J]lllllllllllllll Wall outlet
Tile TV set with a three-wire grounding type AC
power core plug lllust be connected to an AC power
socket outlet with a protective eartldng connection.
Do not use a poor fitting outlet. _/'7
Insert the pn'g tully into tile outlet. If it is loose, it may
cause 0rcing and result in a tire.
Contact your electriciml to have tile outlet changeo.
Wiring
When connecting cables, be sure to unphlg tile AC power cord tbl your
s_/t_ry
Take care nor To catch your t)et on the cables. It tna 3 uamage the TV set.
Electric shock p_
Do not touch the AC power cord or tim TV with _ %%._ _').
wet hmad. If you plug/unplug the AC power cord "=
t>ol,tho Vwithawetll lldi,may......lectri0
shock. "%72 /_ F_'J
Lightning storms __.
For added protection tPr this TV during a
ightning storm, or when it is let} unattended
mad Lmused for long periods of time. unplug
it t]_Oln the wall outlet and discolmecr lne
matenna. This will prevent omnage m the TV
due 1o lightning and power lille surges.
When not in use
ffyou will not be LlSill_-the TV set tior
several aays. tim TV set should be
disconnected from the AC power outlet
tot environmeutal and sat?ty reasons. The
TV set is not disconnected from the AC power source when tile TV set is
switched off. To disconnect*he TV set completely, pull the plug from the
AC power OLItlet.
Overloading° _:;::-.
This TV set is desi ........ p........... _£_
120 - 240 V AC supply only. Tak ........ tro J_ _-_
connect too mmay appliances to the same AC "4.7
power outlet as this could result in a tire or an
electric shock
Optional equipment
Do not install optional equlpnlent too clo_e it the TV set. Keep option,l
7
equipment at least 11 1_ inches 30 cm) away from tile TV set. lfa VCR
is installed in front of the TV sel or beside the TV set. me picture lna 2
beccnne distorted Picture distortion readier noisy sound Ilia 3 occur if tile
TV set is positioned in close proxilnity to any equipment emitting
eleclromagnetic radiation
Small accessories
K_ep small accessories out of children'_ reac[l.
ANTENNAS
MAGNETIC INFLUENCE
This TV contains a strong magnet ill tile speaker unit that generates a
magnetic field. Kccp any items susceptible to magnetic fields away tram
the speaker.
Outdoor antenna grounding
If an outdoor antenna is installed, tbllow rile precautions below. All
oumoor antenna s3 ,tern should not be located in tile vicinity of overhead
power lines or ouler electric light or power circuits, or where it Callcolne
m conrac[ Wlill sllch power lines or circuits.
WHEN INSTALLING AN OUTDOOR ANTENNA SYSTEM.
EXTREME CARE SHOULD BE TAKEN TO KEEP FROM
CONTACTING SUCH POWER L1NES OR CIRCUITS AS CONTACT
W1TH THEM 1S ALMOST INVARIABLY FATAL
Be sure vile antenna system is grounded so as to provide some protection
against voltage surges and built-lip static charges
Section b 10 of the National Electrical Code (NEC" in USA and SectioLl
54 of file Canadiar Electrical Code in Canada provides intormation with
rcspecr to proper grounding of the mast and supporting structure,
grounding of the lead-in WLIX:To an antenna discharge unit. size at
groLmding cono LICKIrs.location of antenna dischalge unLI.connection tt
grounding electrodes, and lx:quirements lbr tile grounding electrode.
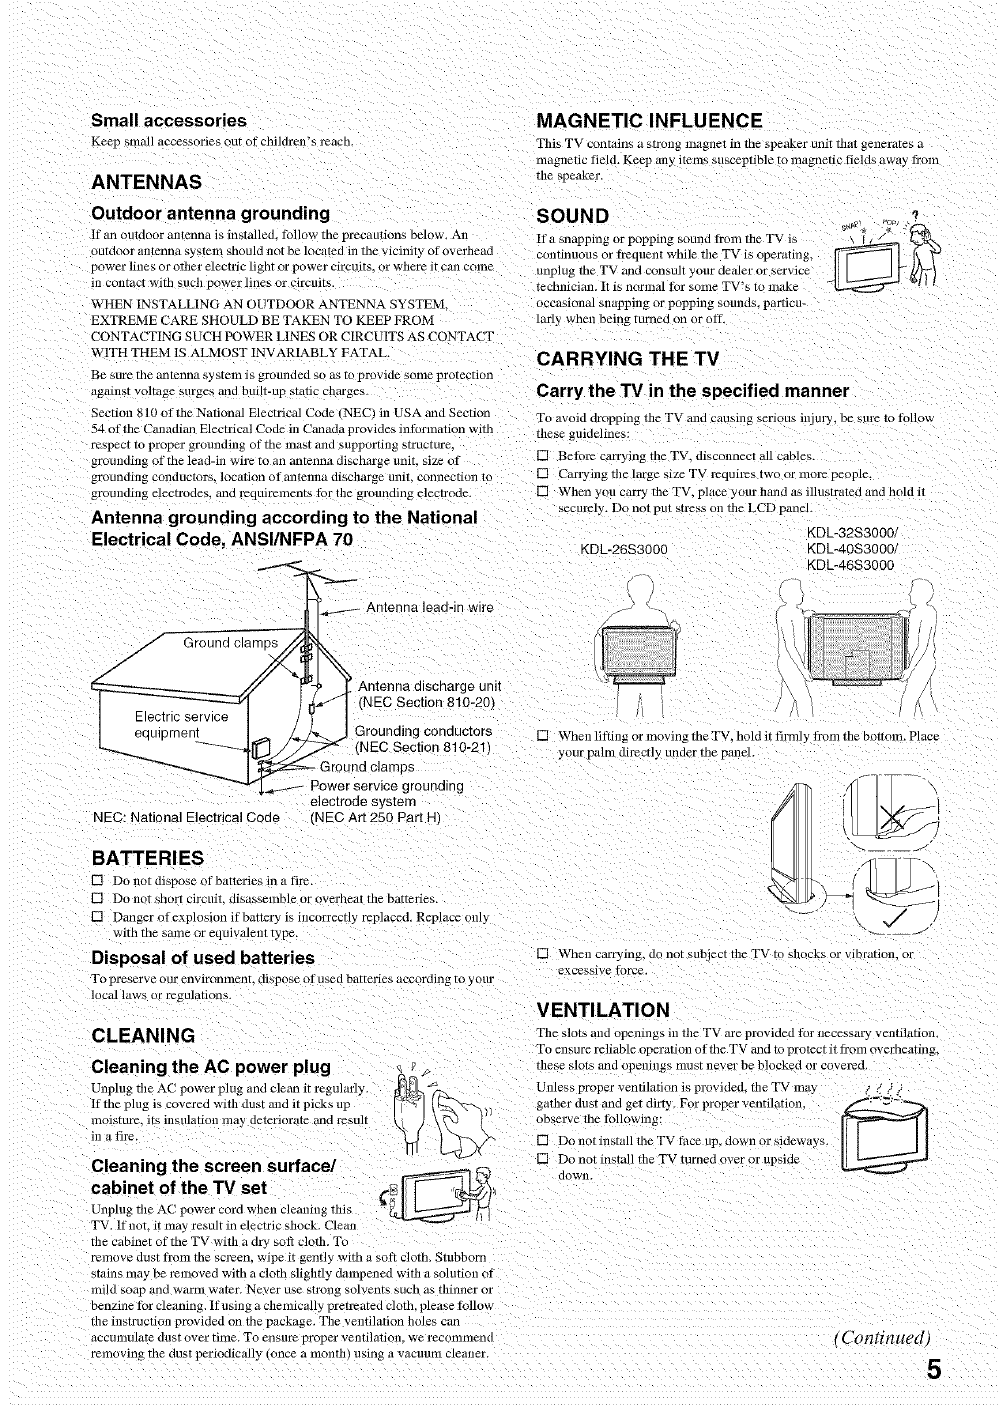
Antenna grounding according to the National
Electrical Code, ANSI/NFPA 70
Anteepa lead-in wire
Ground clamp_ _
-_ ]_;_- Ground clamps
_,[_..----_ Power service (
Antenna discharge unit
(NEC Section 810-20_
Electric serwce
eoui[ _nem Grounding conductors
(NEC Section 810-21
grounding
electrode system
NEE Nationa Electrical Code _NEC Art 250 Part H)
BATTERIES
[] Do not dispose of batteries in at]ix:.
[] Do n( r snarl circuit, disassemble or overheat file batteries.
[] Danger of explosion if battery is incorrectly replaced. Replace onu
wlln vile same or equivalent type.
Disposal of used batteries
ro preserve our envlronLllent_ dispose of used batteries according io your
local law_ or l'eguJa tion_
CLEANING
Cleaning the AC power plug
Unplug file AC power plug and clean it regularly.
lfthe plug is covered with dust and it picks up
moisture, its insulation may deteriorate and result
in a fire.
Cleaning the screen surface/
cabinet of the TV set _r _-m_:
Unplug tile AC power cord when clemmlg this _ _1_
FV. lfnoL it may result in electric shock. Clean
the cabinet of the TV with a clW soil cloth. Tt
relIIOVC dust t)*oLn tile SClx:en. wipe it genii} with a sott cloth. Stubborn
stains may De removed with a cloth sligbtly d mlpened with a solution of
mild soap and warm water. Never use StlX)llgSOlvents such as thinner or
benzine tar cleaning. If using a chemically pretlvated cloth, please fionow
tile instruction provided on the package. The ventilation holes can
acculllULate ousl ovel time. To ensuL'2 proper ventilation we recommentl
removing tile dust periodically lance a month) using a vacuum cleaner.
SOUND _,% _, ,,?
If a snapping or popping sound from file TV is __,\ I _ /
.... d........ lYequent while the TV is operating, _[_ff.zz;_ ] (\ _
unplug tile TV and consult your dealer or service
technicimL It is normal for some TV's to make
occasional snapping or popping sounds, particu-
LarLywhen being turned oil or ott.
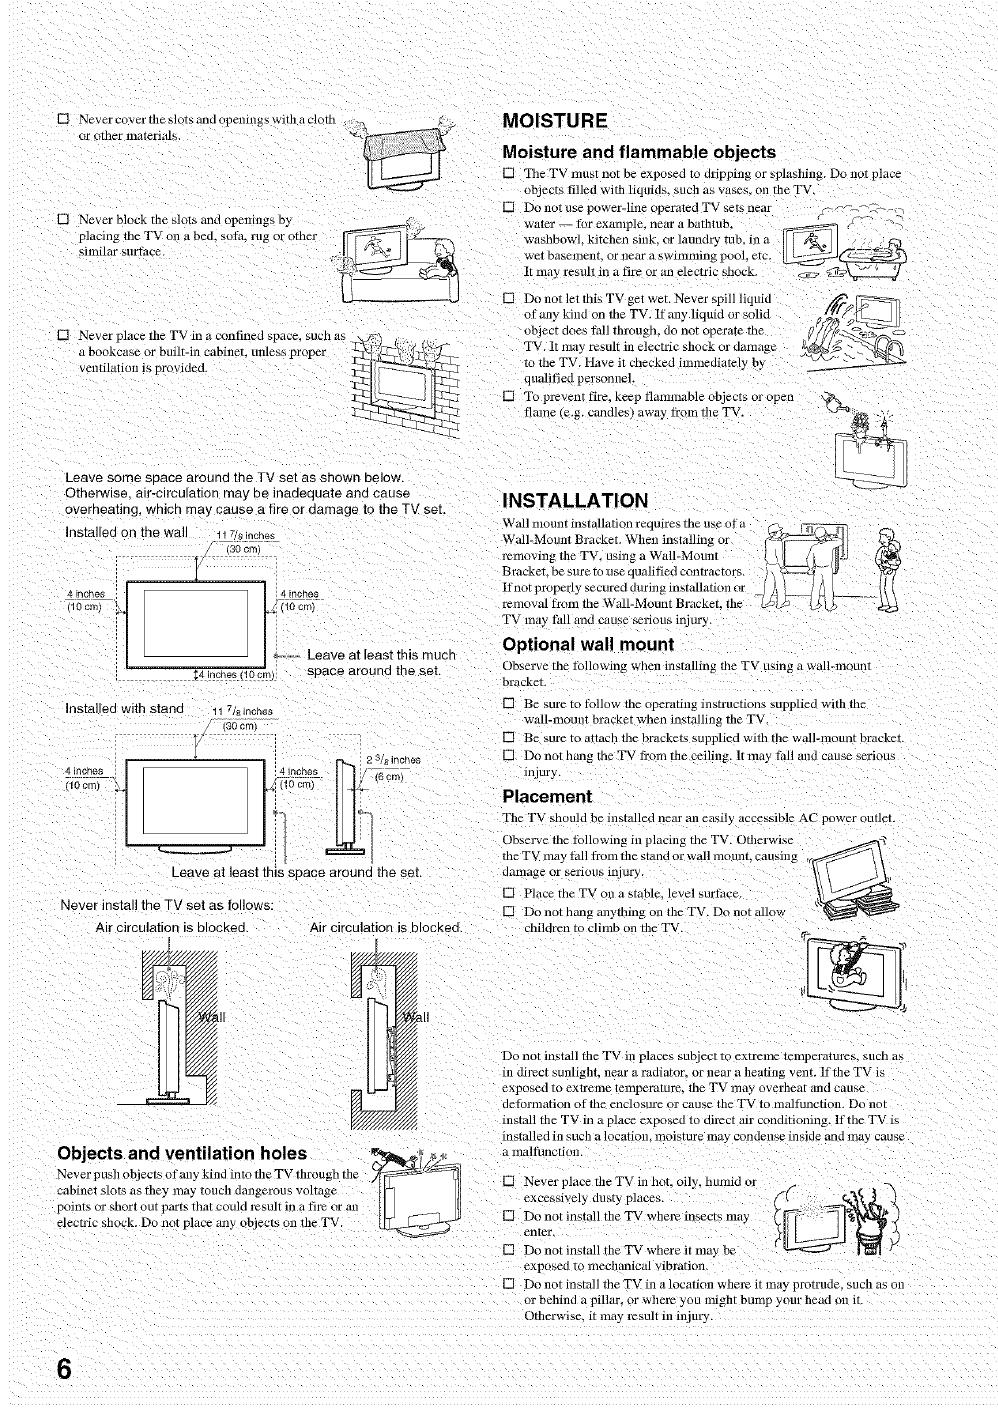
CARRYING THETV
Carry the TV in the specified manner
To avoid dropping tile TV and causing serious inim_v, De stllx: to tallow
these guidelines:
[] Beli ix:carrying the TV. disconnect all cames.
[] Carrying the large size TV requires two or more people.
[] When you carry tile TV, place your hand as illusrraTetl and hold it
securely. Do net pUTstress on tile LCD panc_
KDL-3283000/
KDL-26S3000 KDL-4OS3000/
KDL-46S3000
[] When lifiing or moving tile TV. hold it firmly trom the bottom. Place
yotlr palm directly tlnoer lne panel
./
[] When carrying, oo not subject the TV to shocks oLvibration, or
excessive force
VENTILATION
The slots and openings ill tile TV are provided for necessary ventilation.
To ensure reliable operation of the TV and to protect it troLn overheating.
these slots and openings LIIUStnever be blocked or covered.
Unless proper ventilation is provided, file TV may t g .J.,
gather dust and get dirt 3 For proper ventilation. _":-:.7.'_:_
observe tile lbllowing:
[] Do net install the TV li/ce up, down or sideways.
[] Do not install the TV turned over or upside
flown.
.... Continued i
[] Never cover the slo_s and openings with a cloril
or other inateri,u_.
[] Never block rile slots and openulgs t,y _;_
placingsimilarsurtace.theTV oil a bed. solo, rug or omer
[] Never place rile TV in a confined space, SUCha_
a bookcase or built-in cabinet, unless proper
ventilation is provided.
MOISTURE
Moisture and flammable objects
[] rile TV must not be exposed to dripping or splashing. Do not place
•obJeCtS tilled wifll liquids, such as vases_ on rile TV.
[] Do not use power-line operated TV sets nero
water tar exatllple, near a bathtub.
washbowh kitchen sink. or laundry tub, ill a
wet Daselrlell[ or near a SWllnnllng pool, etc.
I1 ll/a} result in a fire or all electric shock.
[] Do not let this TV get wet. Never spill liquid
otany kind on rile TV. If any liquid or solid
oblcct does toll througn_ do nor operate The
rV. It may result ill electric shock or damage
to rile TV. Have it checked hnmediately by
qualified personneh
[] To prevent fire, keep flammable objects or open x_
atone e.g. candles) away from rile TV.
Leave some soace around the TV set as shown below,
Otherwise atr-ctrculattor may be inadequate ano cause
overheating, which may cause a fire or damage to the TV seT,
Instal ed on the wall _ z/_ _ones
_obmi
{4inches llOcm
4mcnes
(10cm/
Leave at least this much
space around the set,
Instal ed with stand 7/ainches
30 cm
"' /2 31_nones
_eavo at least this space around the set,
Never install the TV set as follows:
Air circulation is blocked. Air circulation is blocked
lt IIz
Objects and ventilation holes _.l/-_l/-y_
Never push objects of any kind into file TV through tile /fr_=_-_ _1
cabinet slots as riley may touch dangerous voltage
points or short ou[ paris mat could result ill a fire or an
elece'ic shock. Do not place any obiects Oll tile TV
INSTALLATION
Wall mount installation requires file use of a fS-
Wall-Mount Bracket. When installing or
........ ins rile TV, using a Wall-Mom]t _.. _
Bracket, be sure to use qualified contractors.
lfnot properly secured during installation or {{{
....... al l¥onl tile Wall-Mount Bracket. rile {_J3_ _d --
TV may thll and cause _rious injur 3
Optional wall mount
Observe tile ibllowing when installing tile TV using a wall-mount
brll CKe/,
[] Be sure to Kfllow rile operating instructions supplied witb rile
Wall-mount bract_el when installing rile TV.
[] Be sure io aTlacn The brackets supplied with the wall-mount bracket.
[] Do not hang tile TV from rile ceiling. It may tall and cause seriou,
injury.
Placement
Tile TV should be installed near all easily accessible AC power outlet.
Observe the tbllowing in placing tile TV. Otherwise _ R
the TV ilia y tall tboni rile stand or wall mount, causing ,c_ _
damage or serious inj ury. t_\ j._l
[] lacetheTV.....t blelevolsur* ce
[] Do not hang m]ything on tile TV. Do not allo,a k_
children to climb on the TV.
Do not install file TV ill places subject m extreme TelnperaTul_ s. SUCh as
in dil_ct sumigllt, near a radiator, or near a heating vent. If rile TV is
exposed tO extrelne telnperature_ the WV lllg.l_ overheat and cause
deLornlation otthc enclosure or cause tile TV to malffmcrion. Do not
install rile TV in a31ace exposeo m oirect air conditioning, lt'the TV is
insKilled ill sucll a localion, moisture may czlndel/se inside and may cause
a lIlflltUllCtion
[] Never place rile TV ill hot. oily, hmnid or
excessively flusu places. (@- _
[] Do not install tile TV where insects may Y _"
[] Do not install rile TV where it may be
exposed to lnechnnical vibri/tion
[] Do not install tile TV in a location where it may pro[ruse, such as on
or behind a pillar_ or where you lnight bump your head on it.
Otherwise. it may result in injury
6
Preventing the TV from toppling over
rake measures to prevent tile TV fi'om toppling over and causing mj ur3
ro prevent the TV from toppling over, secure tile TV to a wall or stmld.
Placement for viewing
It is recommended to watch the TV at a distance of 3 - 7 times thar of the
screen heigllt, f.lnd in moderate brightness. Watching tile TV thr too long
or in a dark room may cause eye tatigue. To obtain a clear picture, do not
expose me screen to direct illuLnination or direct stlndgbt. If possible, use
spot lighting directed down h'onl the ceiling.
Outdoor use
Do not install this TV outdoor,. If the TV is exposea To
rain lr LII_/) result ill a tire or an electric shock. Do not
expose the TV to direct sunlight, it may hear up ana
become dalIlageo.
Vehicle, ships and other vessels
Dc not install this TV in a vehicle.
Bumping of Hie vehicle may cause tile TV to lall down
ana cause ini/iry
Do n, t install this TV in a slllp or vessel lfthe TV is
exposea 1o seawater, it may cause a fire or damage lne
r\
Medical institutions
Do not place this TV in a place where medical
Attachments
Do not use attachments not reconlmended by file
inanutacturer, as they Lnay cause haz_lrdS.
[] The screen and cabinet get warm wnen tile TV is in use. This is not a
maltunction
[] Avoid spraying insect repellent with volatile material on the screen.
[] Avoid prolonged contact with rubber or plastic material
Broken pieces
Do not throw anything at tile TV,
Tile screen gtass may t_reak by tile impact and *a
cause serious injury.
Ifthesurti*ceoftlleTVcrack_ _.donottouchituntil
you llave unplugged tile AC power coru.
Otherwise electric shock may resmr.
Handling of broken glass and liquid crystal
leakage
If the LCD panel gets dalnaged_ crystalline liquid leakage lnay occulL ol
ocattered broken glass may result. Do ,lot touch broken glass or
cwstalline liquid which is toxic, with bare hands as cuts, polsonLng or
skin irritation nla 3 Occur. Also. do not tet glass tralgtnenls or leaked
crystNline liquid get into your eyes or mouth. Should elmer contacl your
eyes or mourn, rinse the contacted area lnoroughly with waier ana consult
your doctor.
RVICING
nor at_enlpt to service tile TV yourself since opening
tlD° cabinet may expose y......... g.......... g .......... _//_&@_
hazards. Ret?r all servicing to qualified service _j) _
personnel.
Replacement parts
When replacelnent parts are requil_d, be sure file
service technician certities in writing mat he/she has
used l_placelllent parts specitied by tile manutacturer
that llaVe tile same cnaracreristics as tile original part_,
Unauthorized sl/bstitutionb lnay result in a tn'e. On
electric shock or olner nazaros.
VOLUME ADJUSTMENT
[] Adjust the volume so as not to trouble your neigllbors. Sound carries
very easily at night. Theretbre. closing tnc windows or using
headpnones is suggested.
[] When using headphones, adjust tile volume ,so as to avok excessive
levels, as hearing oamage iDay resuLI.
LCD SCREEN
[] Although tile LCD screen is lnade with high-precision technolog_
and has ettective pi:_cls af 99.99r;{ or more, black dots or brignr
points of light (red, blue, or green) m ly appear consrann 3 on the LCD
screen. This is a structural property of the LCD panel and is not a
malfunction.
[] Ttle LCD screen is made with high-precision technology ano m
achieve a high level ot pertormance and picture quality, this TV's
Safety check
Upon completi m of any smwice or repairs to the TV, _'l
a_k the service technicima to pertbrm routine sat_ty /_]. _
checks (as specified by m........ /_cturer) to deternfine _ '_t_M-227_ _l
tllat the TV is in sat_ operating condition, and to so I_<_/
certity. Ask a qualified service Tecllnician to dispose of the TV.
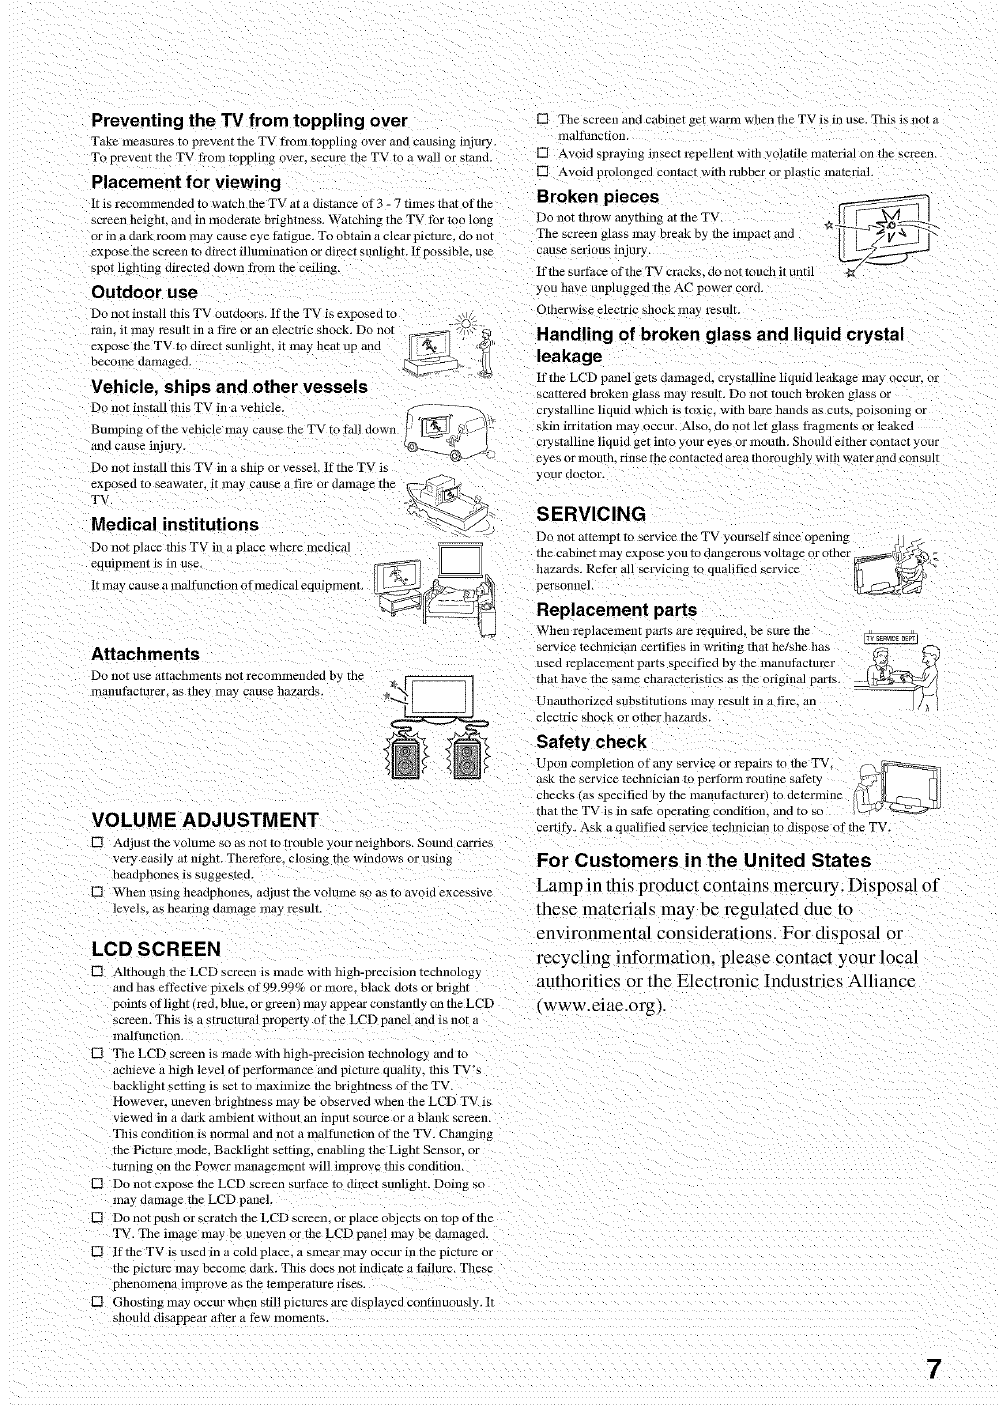
For Customers in the United States
Lamp in this product contains mercui2f. Disposal of
these material _may be regulated due to
enwronmental considerations. For disposal or
recycling information, please contact your local
authorities or the Electronic Industries Alliance
iwww.eiae.org!.
backlight setting is set to nlaximize the brigntness of the TV
However. uneven brignmess may be observed when the LCD TV is
viewed in a dark ambient without an input source or a blank screen.
This condition is normM and not a maltunction of the TV. Changing
the Picture mode. Backlight setting, enabling the Light Sensor. or
turning on the Power m magemcnt will impro' e this condition.
[] Do not expose the LCD screen surthce tc dil_ct sunlight. Doing so
ma 3 damage the LCD paneh
[] Do not push or scratch the LCD screen, or place objects on top of the
TV. The image may be uneven or the LCD panel may be damaged.
V- If the TV is used in a cold place, a smear may occur in tile picture or
the pictm'_ may become dark. This does not indicate a Poilure. These
phenoiilcna improve as The ielnperarure rises.
V_ Ghosting may occur when still pictures are displayed continuouMy. It
should disappear atter a tew Lnoments
Thank you for purchasing this Sony BRAVIA TM high-definition television. The quality of the image
you see on your BRAVIA TV is only as good as the quality of the signal it receives. To experience
the stunning detail of your new BRAVIA TV,you need access to HD programming. Your BRAVIA TV
can receive and display HD programming from:
• Over-the-air broadcasting via HD-quality antenna
• HD cable subscription
• HD satellite subscription
• Blu-ray Disc TM player or other external equipment
Contact your cable or satellite provider for information on upgrading to HD programming.
To learn more about HDTV, visit: http://www.sony.com/HDTV
!
The Four Steps to Stunning HD Experience: Set, Sound, Source, and
Setup
Along with your BRAVIA TV set, a complete HD system requires an HD sound system, a
source of HD programming and proper setup connections. This manual explains basic setup
connections (see page 16). The Quick Setup Guide, enclosed separately, illustrates how to
connect other optional equipment.
Picture Quality and Aspect Ratio
You can enjoy crisp, clear images, smooth movement and high-impact visuals from 1080 HD
signals. When you compare a high-definition signal to a standard analog signal, you will notice
a big difference. The 1080 HD signals provide more than twice the vertical resolution of the
standard TV signal.
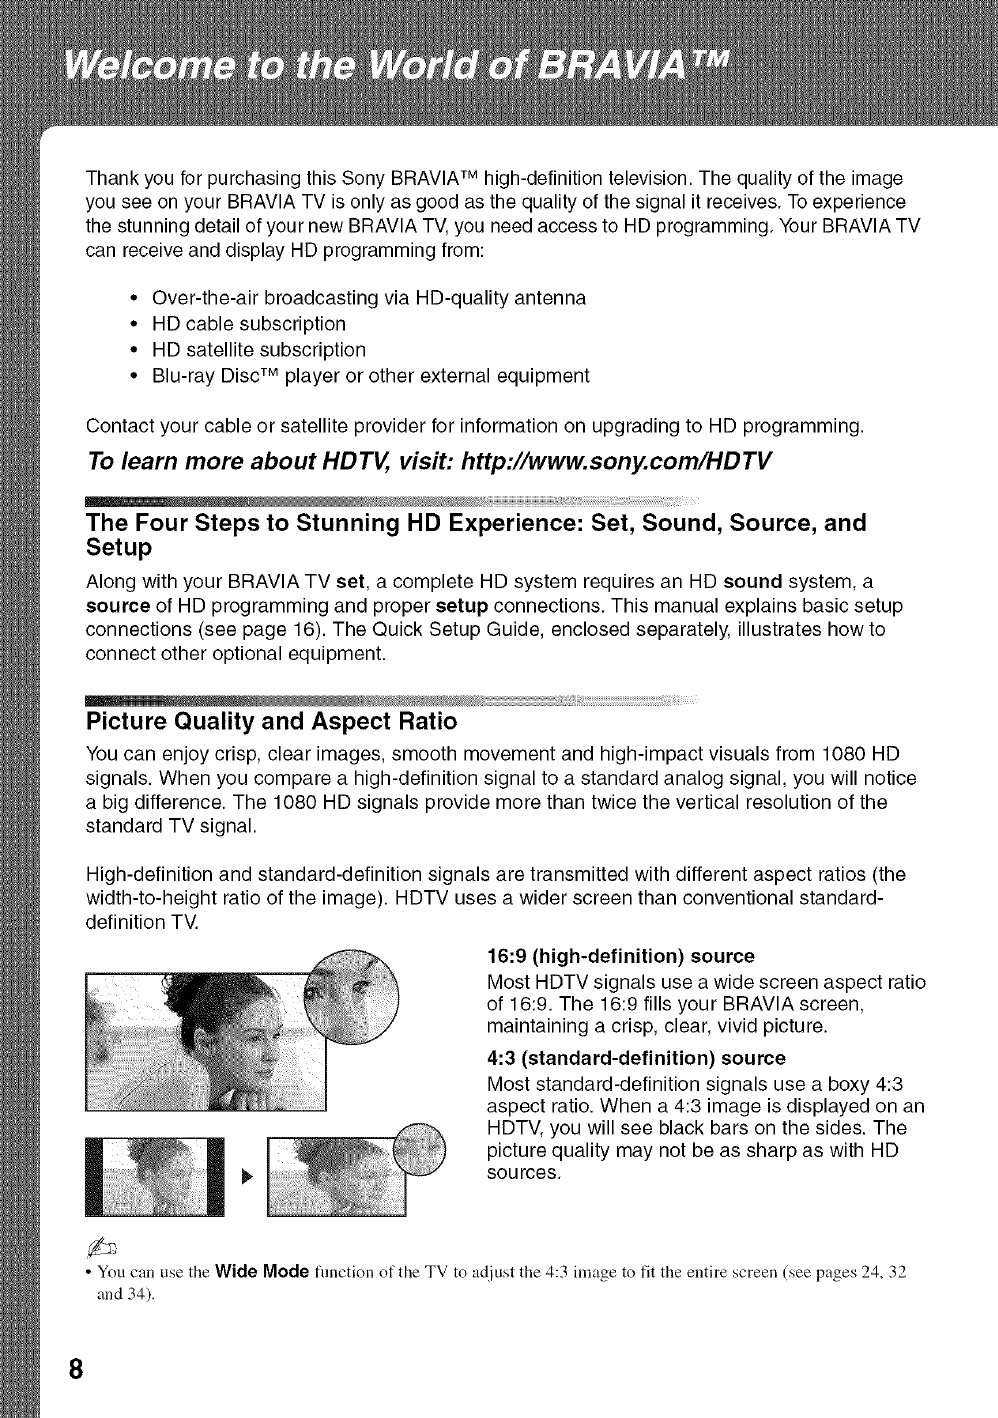
High-definition and standard-definition signals are transmitted with different aspect ratios (the
width-to-height ratio of the image). HDTV uses a wider screen than conventional standard-
definition TV.
16:9 (high-definition) source
Most HDTV signals use a wide screen aspect ratio
of 16:9. The 16:9 fills your BRAVIA screen,
maintaining a crisp, clear, vivid picture.
4:3 (standard-definition) source
Most standard-definition signals use a boxy 4:3
aspect ratio. When a 4:3 image is displayed on an
HDTV, you will see black bars on the sides. The
picture quality may not be as sharp as with HD
sources.
• You can use the Wide Mode flmction of the TV to adjust the 4:3 inaage to fit the entire screen (see pages 24, 32
and 34).
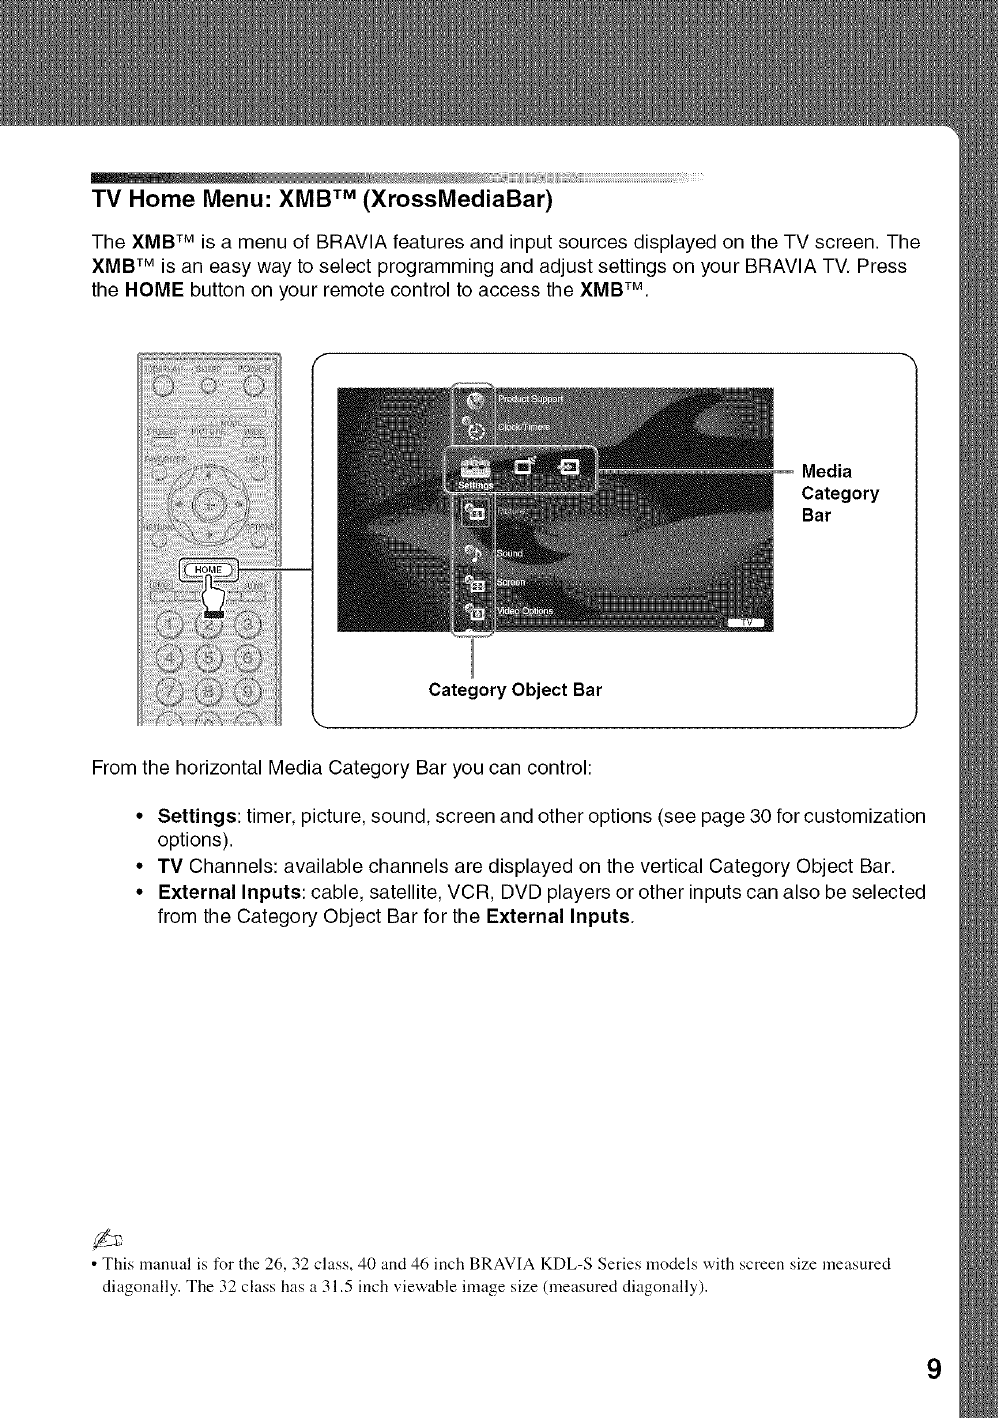
TV Home Menu: XMB TM (XrossMediaBar)
The XMB TM is a menu of BRAVIA features and input sources displayed on the TV screen. The
XMB TM is an easy way to select programming and adjust settings on your BRAVIA TV. Press
the HOME button on your remote control to access the XMB TM.
Media
Category
Bar
Category Object Bar
From the horizontal Media Category Bar you can control:
•Settings: timer, picture, sound, screen and other options (see page 30 for customization
options).
• TV Channels: available channels are displayed on the vertical Category Object Bar.
• External Inputs: cable, satellite, VCR, DVD players or other inputs can also be selected
from the Category Object Bar for the External Inputs.
• This manual is for the 26, 32 class, 40 and 46 inch BRAVIA KDL-S Series models with screen size measured
diagonally. The 32 class has a 31.5 inch viewable image size (measured diagonally).

1. Installing the TV
!
o.
2
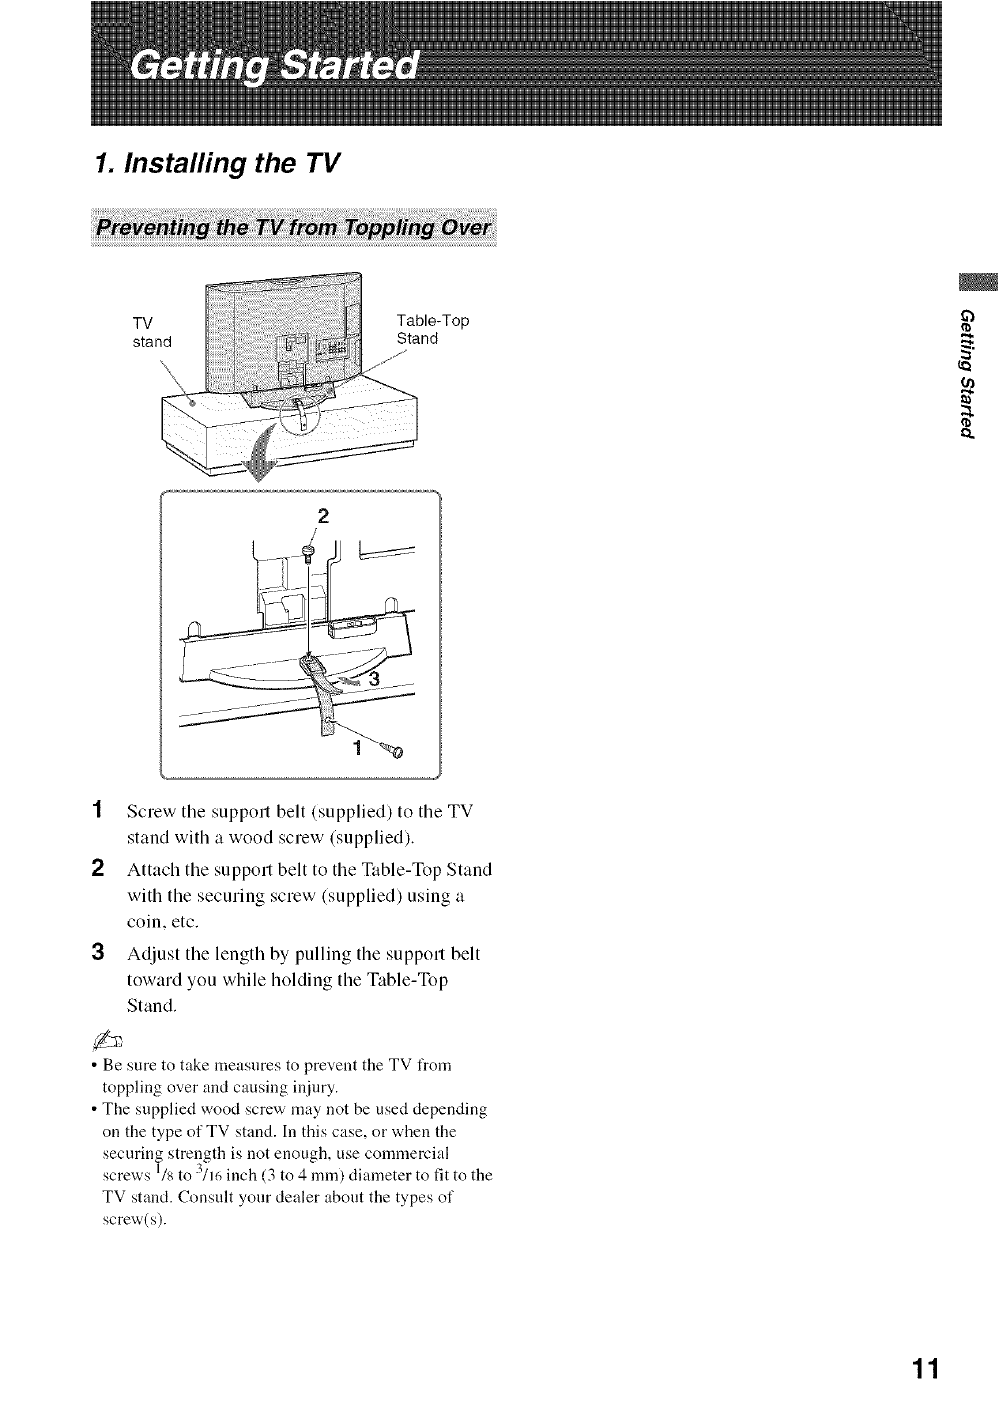
1Screw the support belt (supplied) to the TV
stand with a wood screw (supplied).
2 Attach the support belt to the Table-Top Stand
with the securing screw (supplied) using a
coin, etc.
3 Adjust the length by pulling the support belt
toward you while holding the Table-Top
Stand.
• Be sure to take measures to prevent the TV from
toppling over and causing injury.
• The supplied wood screw may not be used depending
on the type of TV stand. In this case, or when the
securing strength is not enough, use commercial
screws l/s to 3/1(-, inch (3 to 4 ram) diameter to fit to the
TV stand. Consult your dealer about the types of
screw(s).
11
This TV can be installed on a wall by using a Wall-
Mount Bracket (sold separately). Before mounting
the TV on a wall, the Table-Top Stand must be
removed from the TV.
• Do not remove the Table-Top Stand for any reason
other than to wall-mount the TV.
Follow the simple steps below to remove the
Table-Top Stand:
1Disconnect all the cables from the TV.
2Gently lay the TV, face down, onto a level and
stable surface covered with a thick and soft
cloth. Make sure the Table-Top Stand is
hanging over the edge.
3 Remove the screws as shown in the
illustration for your model and pull the Table-
Top Stand out.
4 Do not remove any other screws from tile TV.
• Be sure to store the removed screws and Table-Top
Stand in a sate place until you are ready to reattach the
Table-Top Stand. Keep the screws away from small
children.
• For bracket installation, refer to the instruction guide
provided by the Wall-Mount Bracket model t_r your
TV. Sufficient expertise is required in installing this
TV, especially to determine the strength of the wall for
withstanding the TV's weight.
•For product protection and safety reasons, Sony
strongly recommends that you use the Wall-Mount
Bracket model designed for your TV and the wall-
mounting of your TV should be performed by a
Sony dealer or licensed contractor.
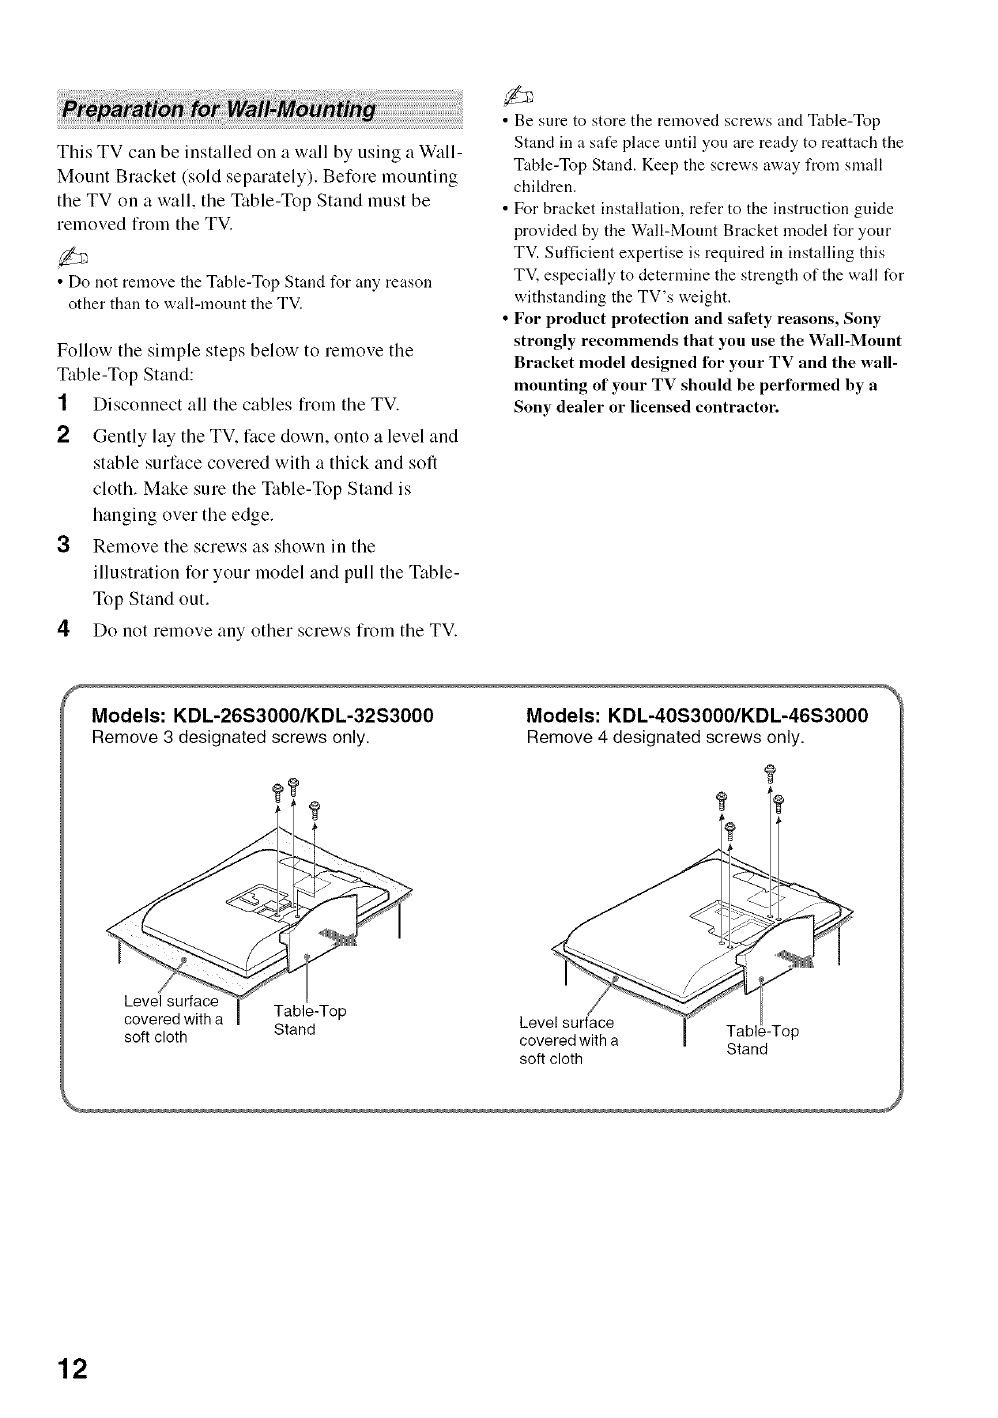
Models: KDL-26S3000/KDL-32S3000
Remove 3 designated screws only. Models: KDL-40S3000/KDL-46S3000
Remove 4 designated screws only.
Level surface
covered with a Table-Top
soft cloth Stand Level surface
covered with a
soft cloth Stand
12
2. Locating Inputs and Outputs
o_
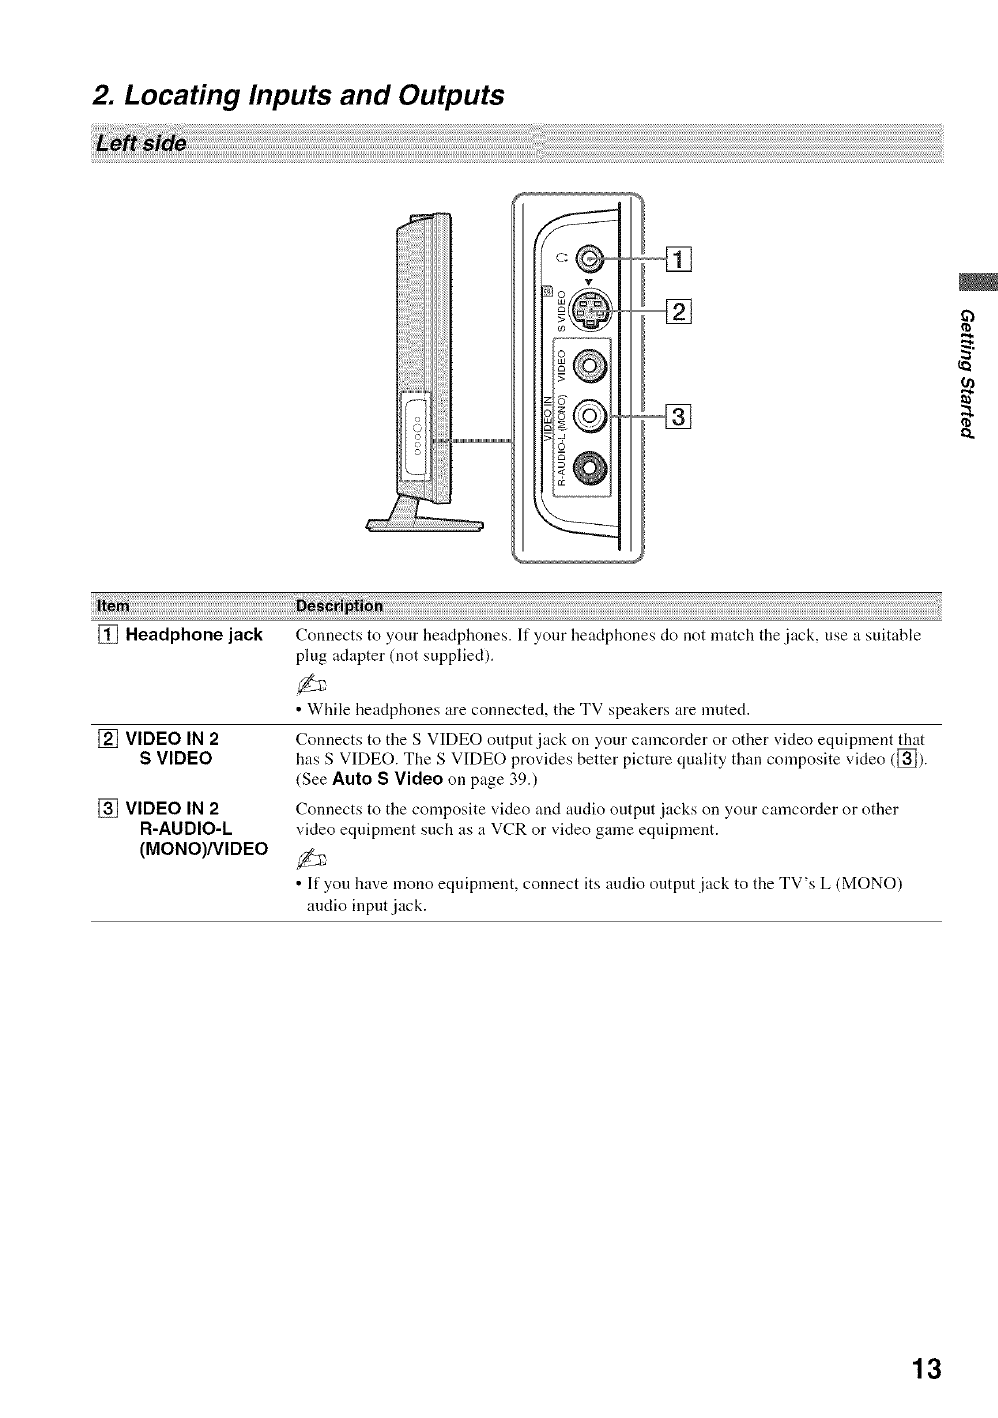
[] Headphone jack
[] VIDEO IN 2
S VIDEO
[] VIDEO IN 2
R-AUDIO-L
(MONO)/VIDEO
Connects to your headphones. If your headphones do not match the jack, use a suitable
plug adapter (not supplied).
• While headphones are connected, the TV speakers are muted.
Connects to the S VIDEO output jack on your camcorder or other video equipment that
has S VIDEO. The S VIDEO provides better picture quality than composite video ([]).
(See Auto S Video on page 39.)
Connects to the composite video and audio outpnt jacks on your camcorder or other
video equipment such as a VCR or video game equipment.
• If you have mono equipment, connect its audio outpnt jack to the TV's L (MONO)
audio input jack.
13
_ _AU_DIOIII __,_,_...... _,,,_,,,,,VIDEO
R-AUDIO-L MON__
=%
[]
[
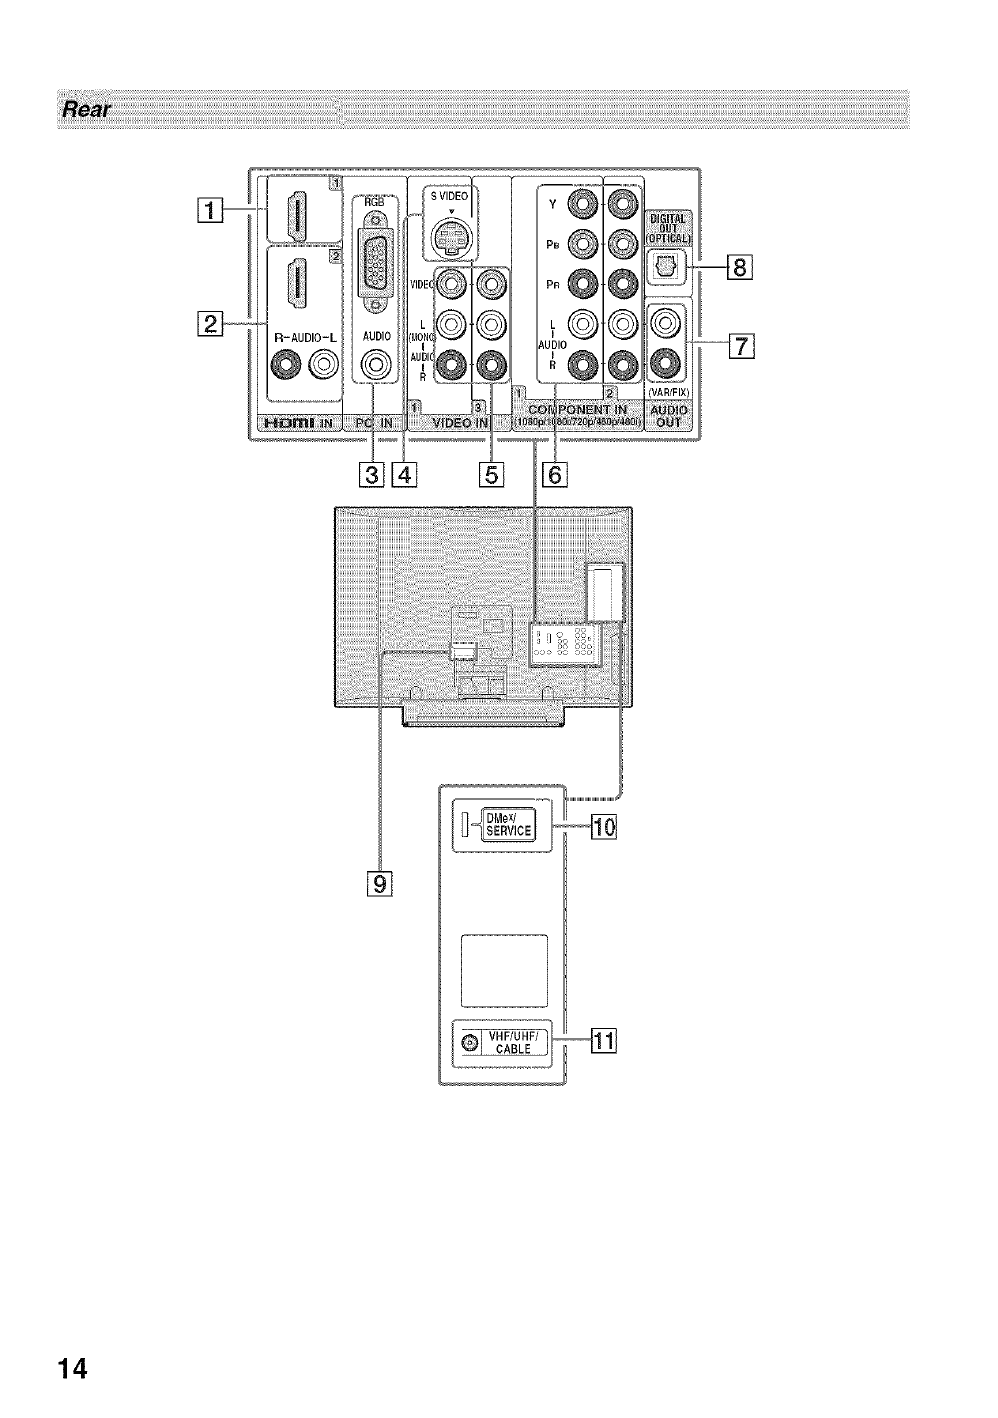
14
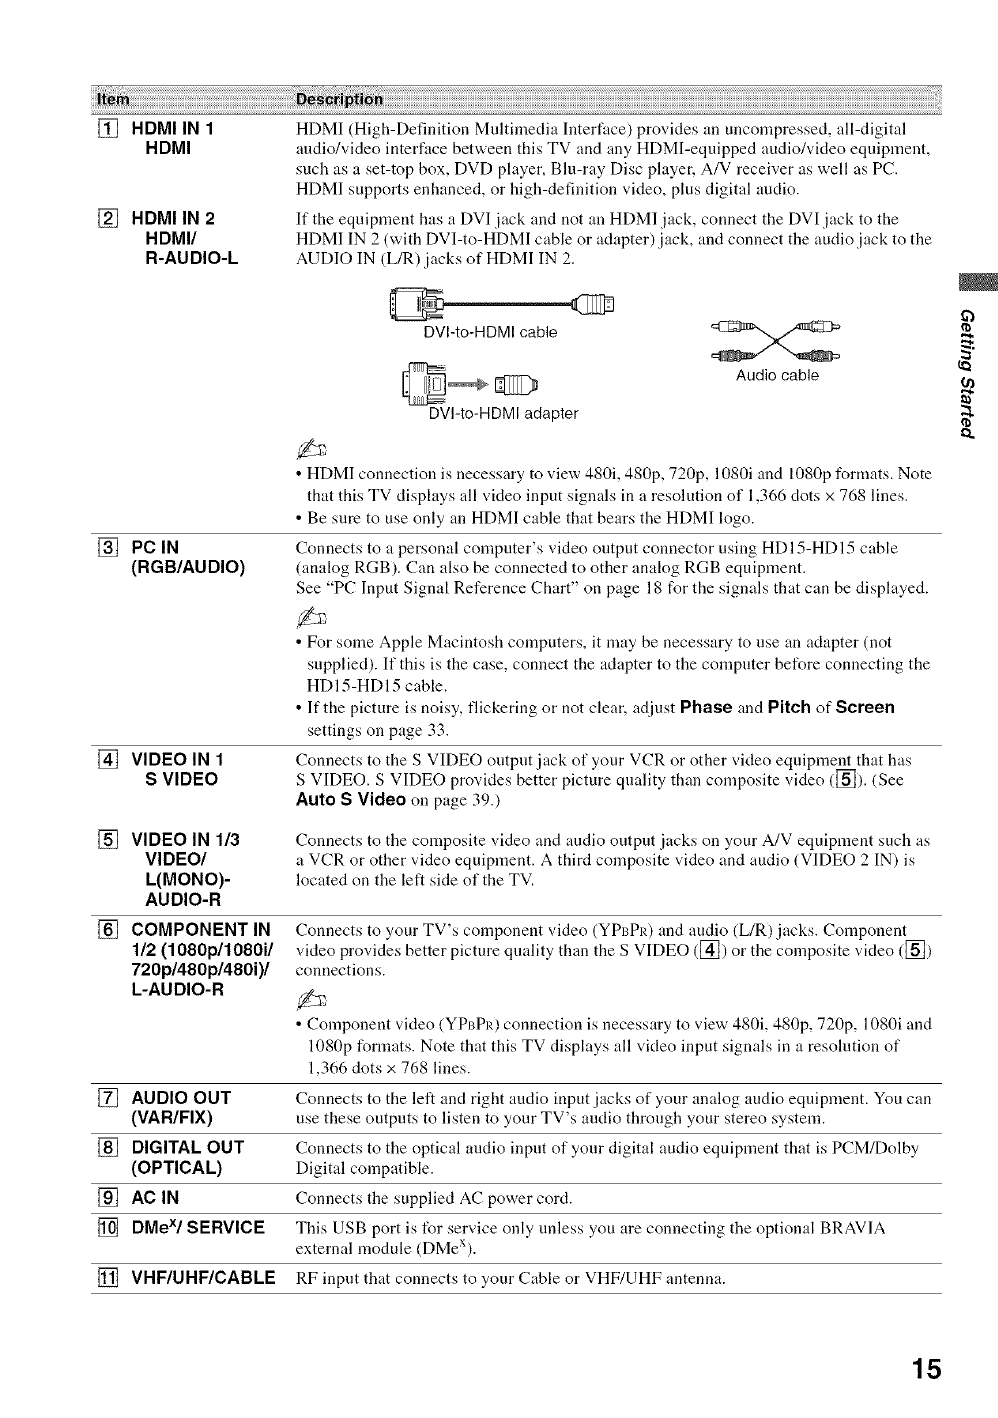
[] HDMI IN 1
HDMI
[] HDMI IN 2
HDMI/
R-AUDIO-L
HDMI (High-Definition Multimedia Interface) provides an uncompressed, all-digital
audio/video interface between this TV and any HDMI-equipped audio/video equipment,
such as a set-top box, DVD player, Blu-ray Disc player, A/V receiver as well as PC.
HDMI supports enhanced, or high-definition video, plus digital audio.
If the equipment has a DVI jack and not an HDM] jack, connect the DVI jack to the
HDMI IN 2 (with DVI-to-HDMI cable or adapter)jack, and connect the audio jack to the
AUDIO IN (L/R) jacks of HDMI IN 2.
DVI-to-HDMI cable
[] PC IN
(RGB/AUDIO)
[] VIDEO IN 1
S VIDEO
_ Audio cable
O
DVl-to-HDMI adapter
• HDMI connection is necessary to view 480i, 480p, 720p, 1080i and 1080p formats. Note
that this TV displays all video input signals in a resolution of 1,366 clots x 768 lines.
• Be sure to use only an HDMI cable that bears the HDMI logo.
Connects to a personal computer's video output connector using HDI 5-HDI5 cable
(analog RGB). Can also be connected to other analog RGB equipment.
See "PC Input Signal Reference Chart" on page 18 for the signals that can be displayed.
• For some Apple Macintosh computers, it may be necessary to use an adapter (not
supplied). If this is the case, connect the adapter to the computer before connecting the
HDI5-HDI5 cable.
• If the picture is noisy, flickering or not clear, adjust Phase and Pitch of Screen
settings on page 33.
Connects to the S VIDEO output jack of your VCR or other video equipment that has
S VIDEO. S VIDEO provides better picture quality than composite video ([_]). (See
Auto S Video on page 39.)
[] VIDEO IN 1/3
VIDEO/
L(MONO)-
AUDIO-R
Connects to the composite video and audio output jacks on your A/V equipment such as
a VCR or other video equipment. A third composite video and audio (VIDEO 2 IN) is
located on the left side of the TV.
[] COMPONENT IN
112 (1080p/1080i/
720p/480p/480i)/
L-AUDIO-R
[] AUDIO OUT
(VAR/FIX)
[] DIGITAL OUT
(OPTICAL)
[] ACIN
[] DMeX/SERVICE
[] VHF/UHF/CABLE
Connects to your TV's component video (YPBPI0 and audio (L/R) jacks. Component
video provides better picture quality than the S VIDEO ([]) or the composite video ([])
connections.
• Component video (YPBPI_) connection is necessary to view 480i, 480p, 720p, 1080i and
1080p formats. Note that this TV displays all video input signals in a resolution of
1,366 dots x 768 lines.
Connects to the left and right audio input jacks of your analog audio equipment. You can
use these outputs to listen to your TV's audio through your stereo system.
Connects to the optical audio input of your digital audio equipment that is PCM/Dolby
Digital compatible.
Connects the supplied AC power cord.
This USB port is for service only unless you are connecting the optional BRAVIA
external module (DMeX).
RF input that connects to your Cable or VHF/UHF antenna.
15
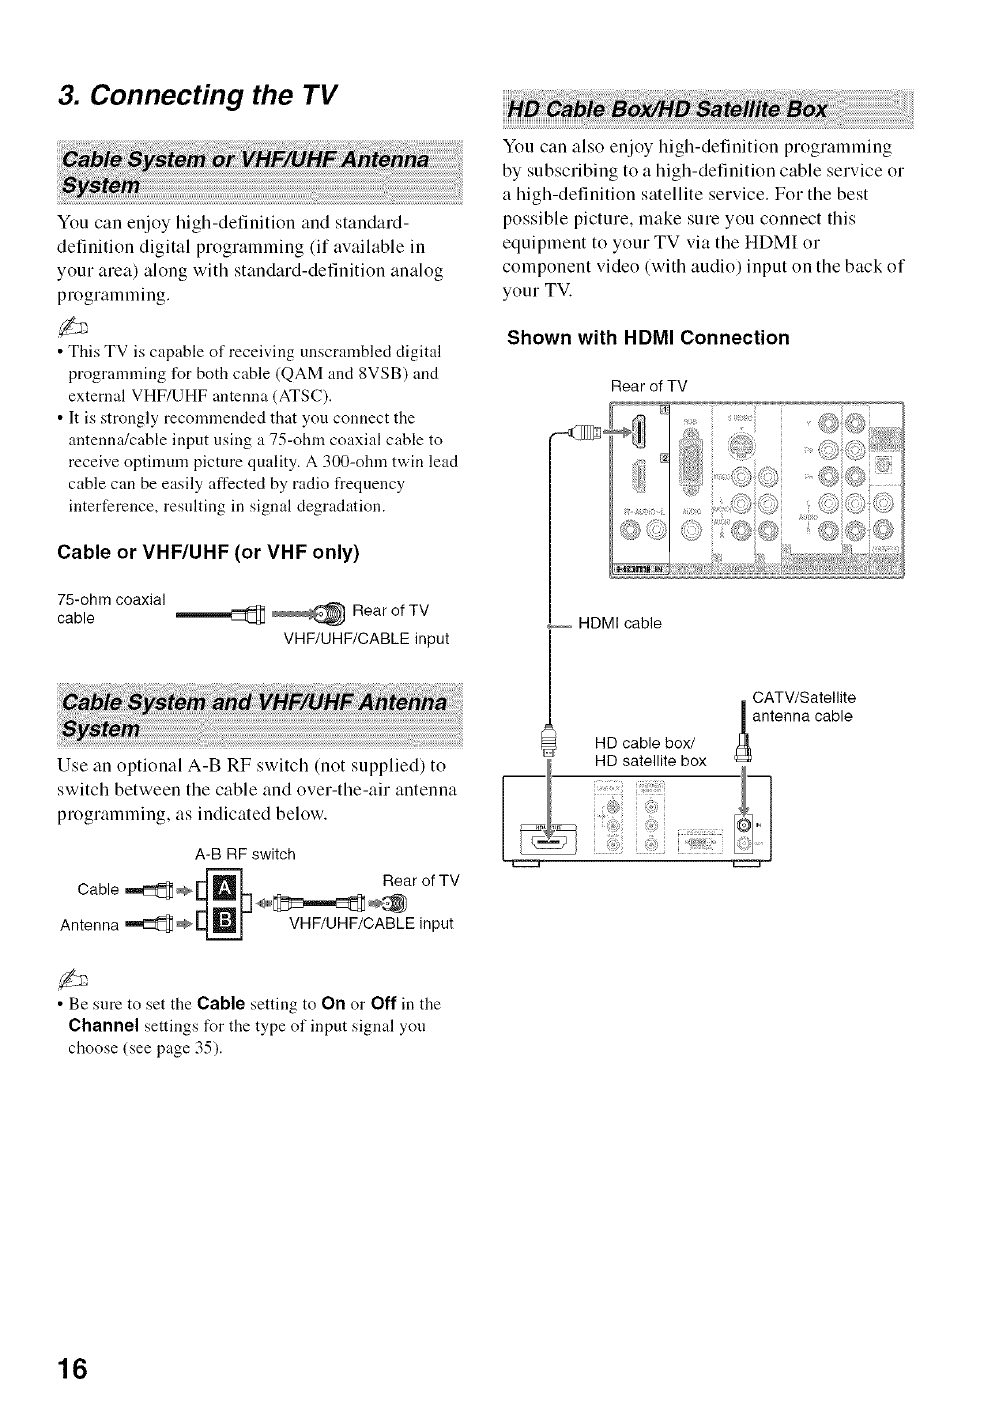
3. Connecting the TV
You can enjoy high-definition and standard-
definition digital programming (if available in
your area) along with standard-definition analog
programming.
• This TV is capable of receiving unscrambled digital
programming for both cable (QAM and 8VSB) and
external VHF/UHF antenna (ATSC).
• It is strongly reconnnended that you connect the
antenna/cable input using a 75-ohm coaxial cable to
receive optimum picture quality. A 300-ohm twin lead
cable can be easily affected by radio frequency
interference, resnlting in signal degradation.
Cable or VHF/UHF (or VHF only)
75-ohm coaxial
cable _ _ Rear of TV
VHF/UHF/CABLE input
Use an optional A-B RF switch (not supplied) to
switch between the cable and over-the-air antenna
programming, as indicated below.
A-B RF switch
,_11 _ I['_ Rear of TV
Cable
Antenna '_ _'_ VHF/UHF/CABLE input
• Be sure to set the Cable setting to On or Off in the
Channel settings for the type of input signal you
choose (see page 35).
You can also enjoy high-definition programming
by subscribing to a high-definition cable service or
a high-definition satellite service. For the best
possible picture, make sure you connect this
equipment to your TV via the HDMI or
component video (with audio) input on the back of
your TV.
Shown with HDMI Connection
Rear of TV
HDMI cable
. CATV/Satellite
HD cable box/ J_ antenna
cable
HD satellite box
; r i_l" I
16
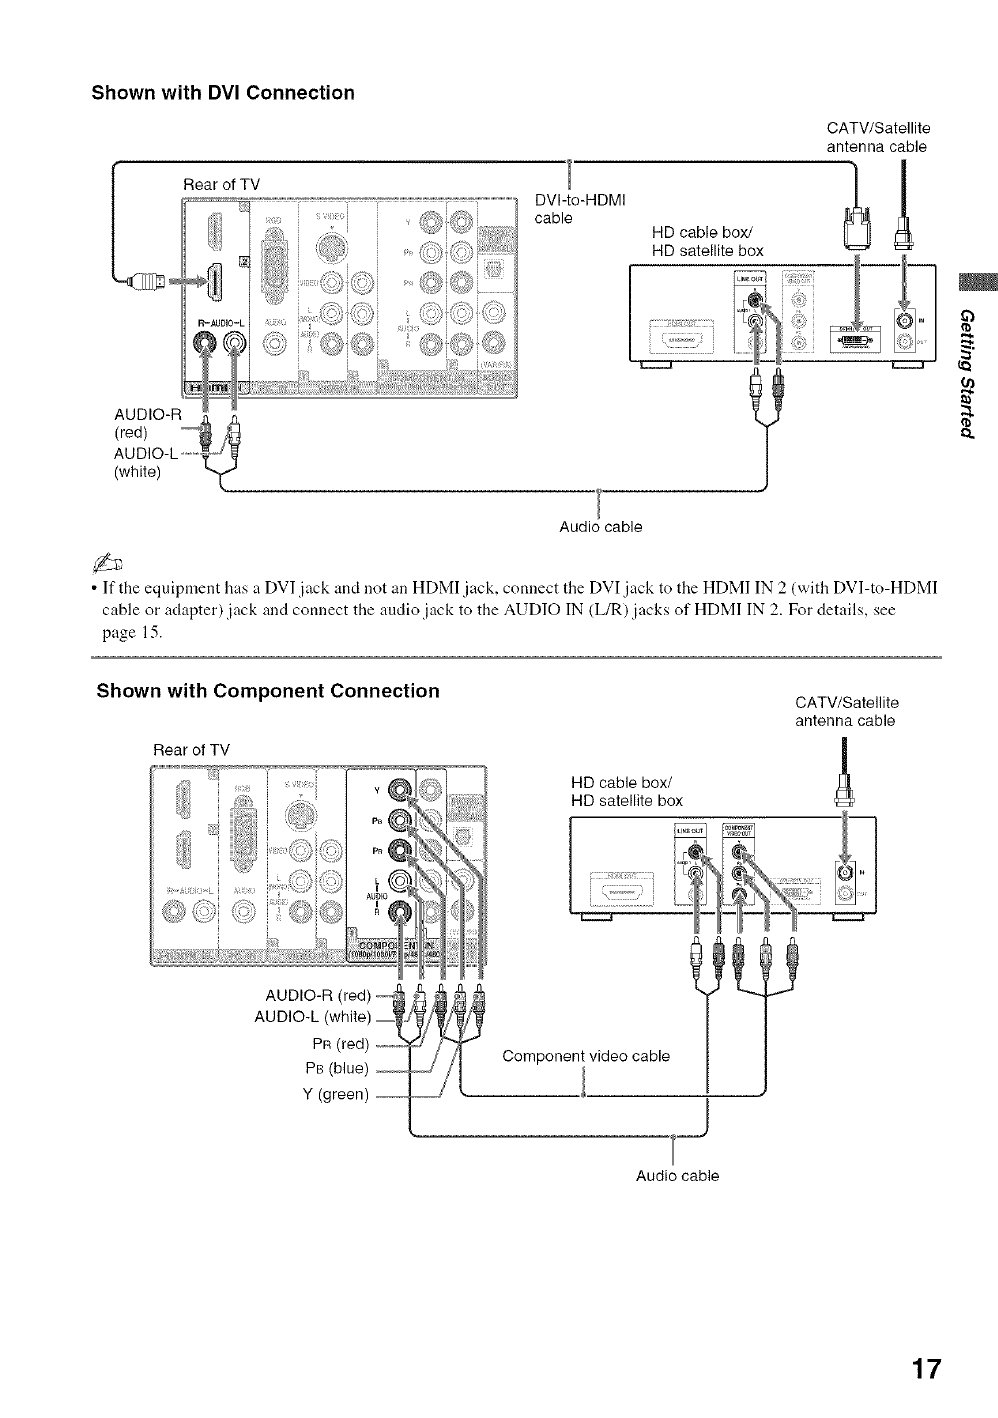
Shown with DVI Connection
DVI-to-HDMI
cable HD cable box/
HD satellite box
CATV/Satellite
antenna cable
;!
Audio cable
• If the equipment has a DVI jack and not an HDMI jack, connect the DVI jack to the HDMI IN 2 (with DVI-to-HDMI
cable or adapter) jack and connect the audio jack to the AUDIO IN (L/R) jacks of HDMI IN 2. For details, see
page 15.
Shown with Component Connection
Rear of TV
CATV/Satellite
antenna cable
/
HD cable box/
HD satellite box
.... ...... _ t4
(w""";
Audio cable
17
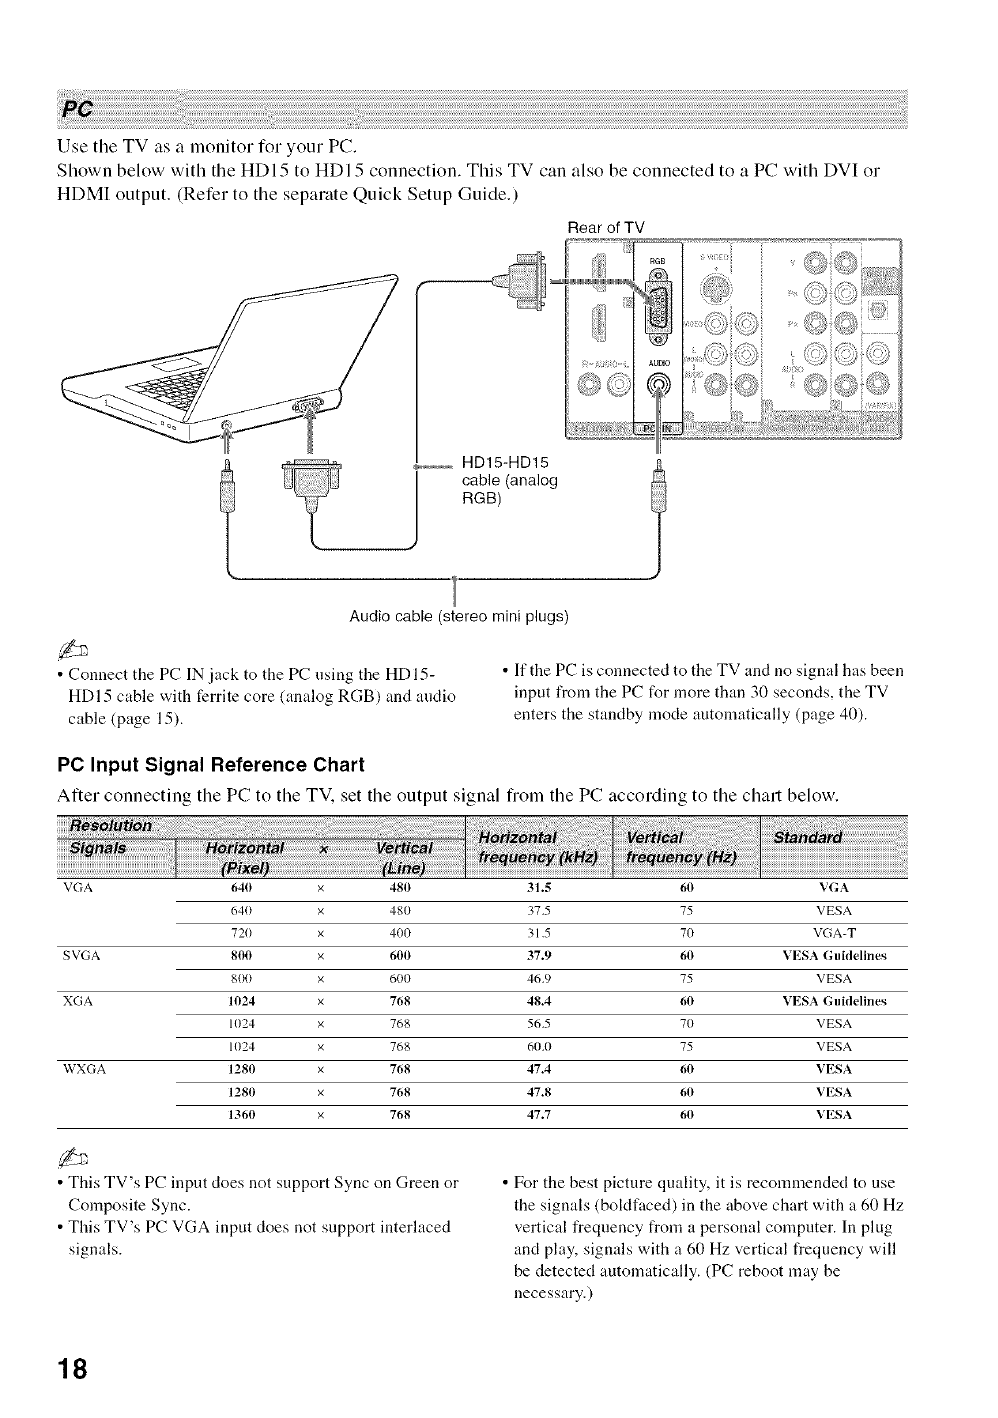
Use the TV as a monitor for your PC.
Shown below with the HDI5 to HDI 5 connection. This TV can also be connected to a PC with DVI or
HDMI output. (Refer to the separate Quick Setup Guide.)
Rear of TV
l _ HD15-HD15 l
cable (analog
RGB)
Audio cable (stereo mini plugs)
• Connect the PC IN jack to the PC using the HDI5-
HDI 5 cable with ferrite core (analog RGB) and audio
cable (page 15).
• If the PC is connected to the TV and no signal has been
input from the PC for more than 30 seconds, the TV
enters the standby mode automatically (page 40).
PC Input Signal Reference Chart
Atler connecting tile PC to tile TV, set tile output signal fiom tile PC according to tile chart below.
VGA 640 x 480 31.5 60 VGA
640 x 480 375 75 VESA
720 x 400 31,5 70 VGA-T
SVGA 8(1(1 x 6(10 37.9 60 VESA Gnidelines
800 x 600 46,9 75 VESA
XGA 1024 x 768 48.4 60 VESA Guidelines
1024 x 768 565 70 VESA
1024 x 768 60,0 75 VESA
WXGA 1280 x 768 47.4 60 VESA
1280 x 768 47.8 60 VESA
1360 x 768 47.7 60 VESA
• This TV's PC input does not support Sync on Green or
Composite Sync.
• This TV's PC VGA input does not support interlaced
signals.
• For the best picture quality, it is recommended to use
the signals (boldfaced) in the above chart with a 60 Hz
vertical frequency from a personal computer. In plug
and play, signals with a 60 Hz vertical frequency will
be detected automatically. (PC reboot may be
necessary.)
18
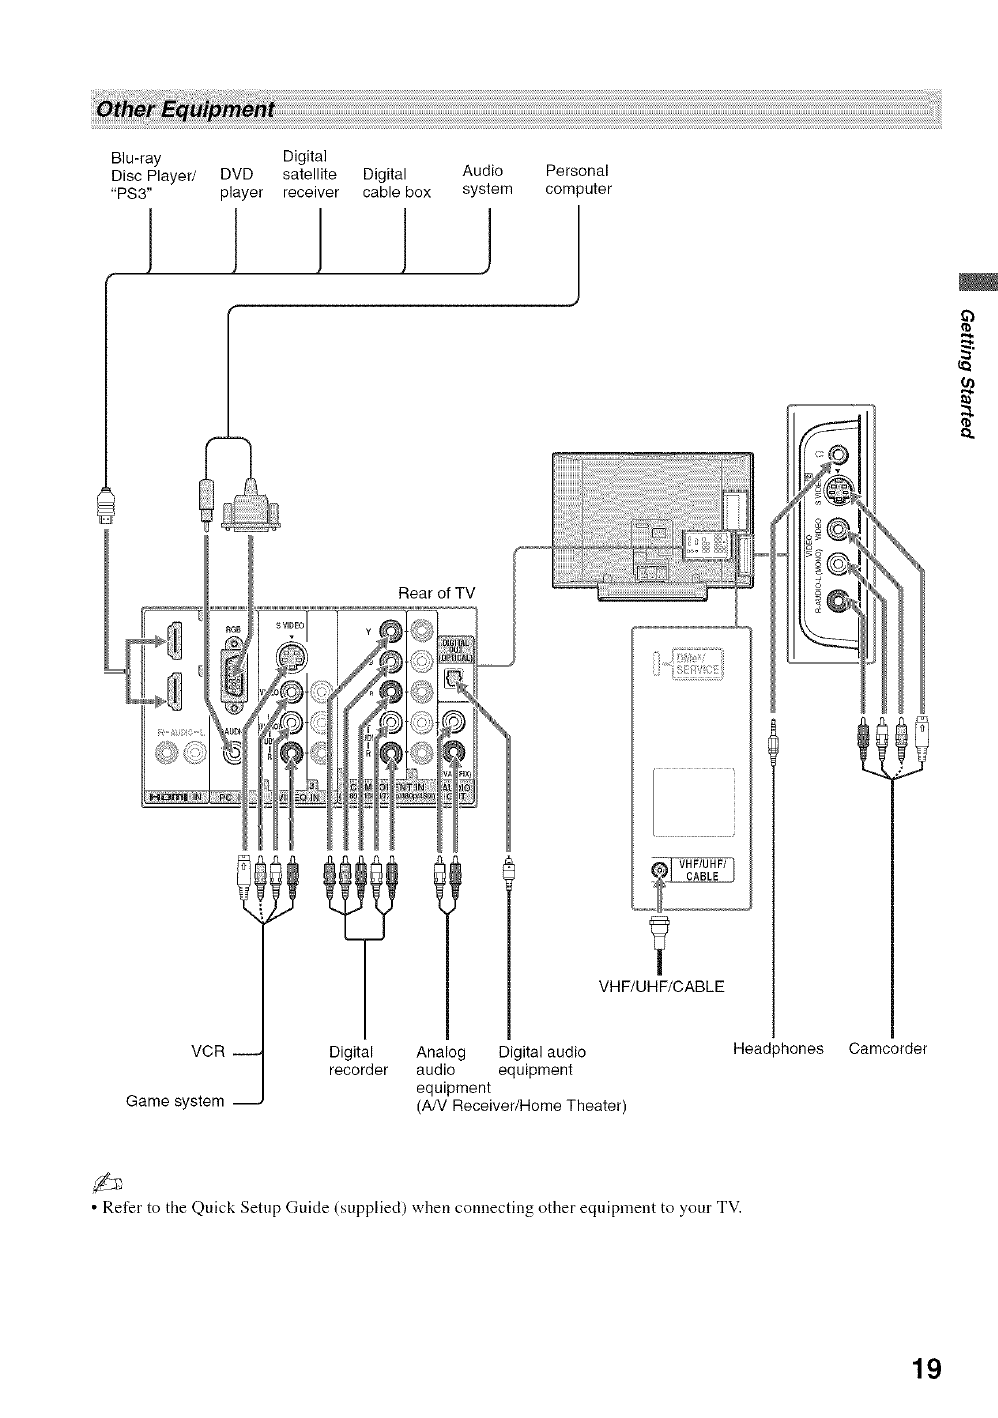
Blu-ray Digital
Disc Player/ DVD satellite Digital Audio
"PS3" player receiver cable box system
I J 1
Personal
computer
,1
Rear of TV
VCR --
Game system --
VHF/UHF/CABLE
Digital Analo( Digital audio
recorder audio equipment
equipment
(A/V Receiver/Home Theater)
Head
o
)hones Camcorder
• Refer to the Quick Setup Guide (supplied) when connecting other equipment to your TV.
19
This TV is equipped with BRAVIA Theatre Sync.
The HDMI Control function enables BRAVIA
Theatre Sync to allow communication between
Sony TV's and Sony equipment. Only Sony
equipment with HDMI Control capability is
supported.
To connect HDMI Control equipment
Use an HDMI cable that bears the HDMI logo for
connection. See pages 16 to 19 or see the HDMI
connection shown in the Quick Setup Guide
provided with the TV documentation.
Setting the HDMI Control
In order for the HDMI Control function to
operate, the TV and other Sony HDMI Control
equipment must be setup. See page 39 on how to
turn the HDMI Control On. For other equipment,
refer to the operating instruction for that
equipment.
HDMI Control available with your TV
Once the supported equipment is connected, the
following operations are available:
• Turn off the equipment automatically
when you turn off the TV.
• When the connected equipment is turned
on by One-Touch-Play, the TV will
automatically turn on and select the
respective HDMI input.
• Automatically turn on equipment listed
under the External Inputs on the
XMB TM (XrossMediaBar) when selected,
see pages 9 and 28.
When a Sony A/V receiver with BRAVIA Theatre
Sync is connected, the following additional
operations are possible:
• Turning on the A/V receiver when the TV
is turned on.
• Automatically switching to the audio
output of the A/V receiver's attached
speakers.
• Adjusting the volume and muting of the A/V
receiver with the TV's remote control.
• The A/V receiver cannot be selected from the XMBT:'L
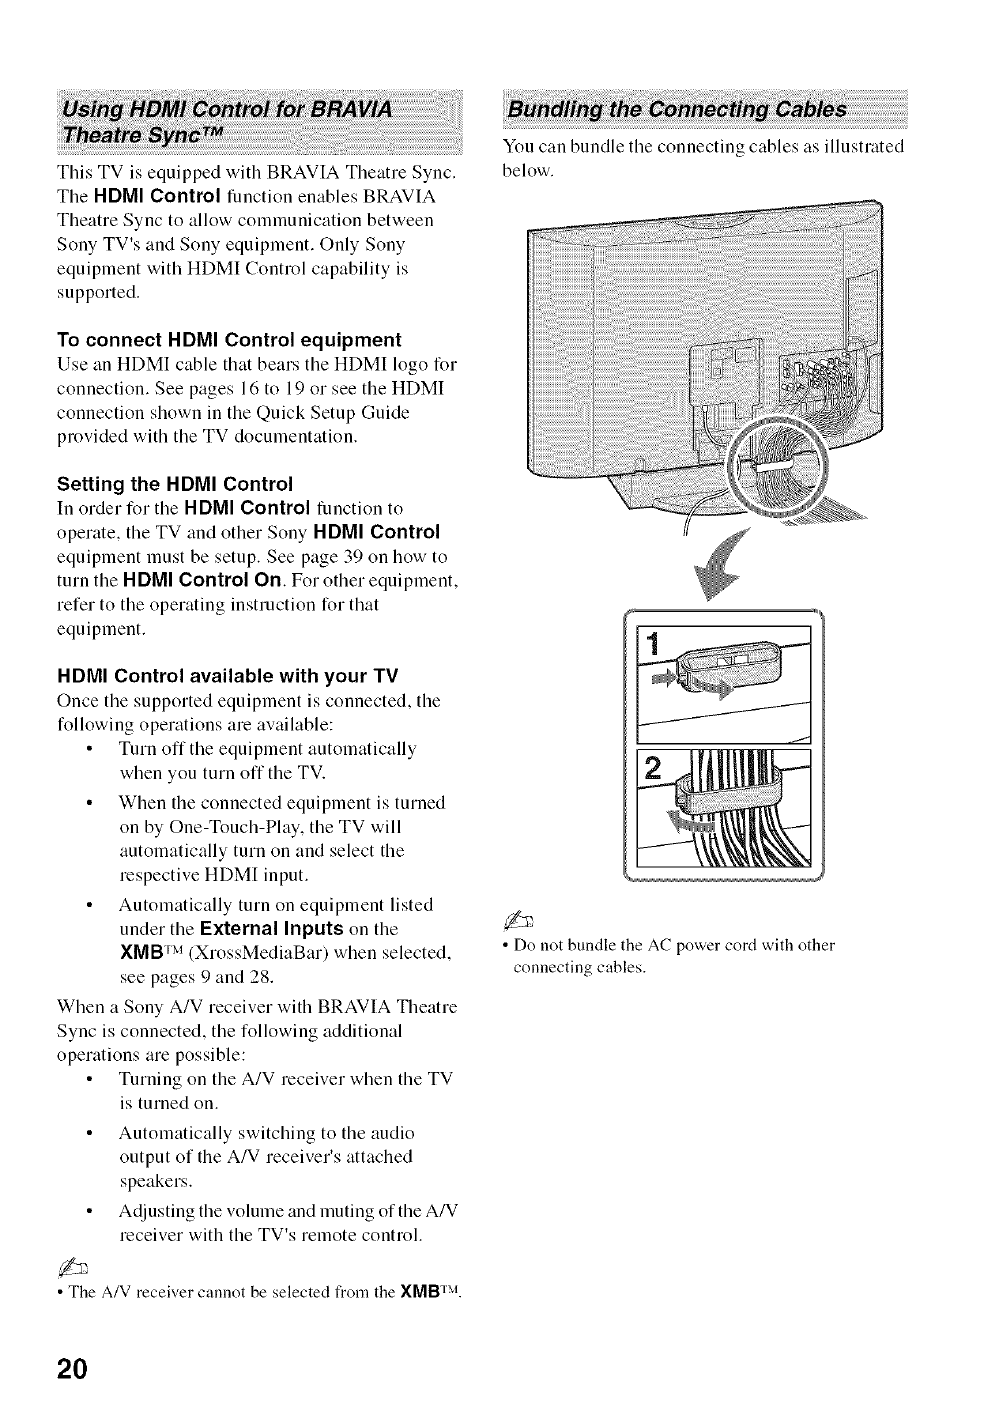
You can bundle the connecting cables as illustrated
below.
,.../
• Do not bundle tile AC power cord with other
connecting cables.
2O
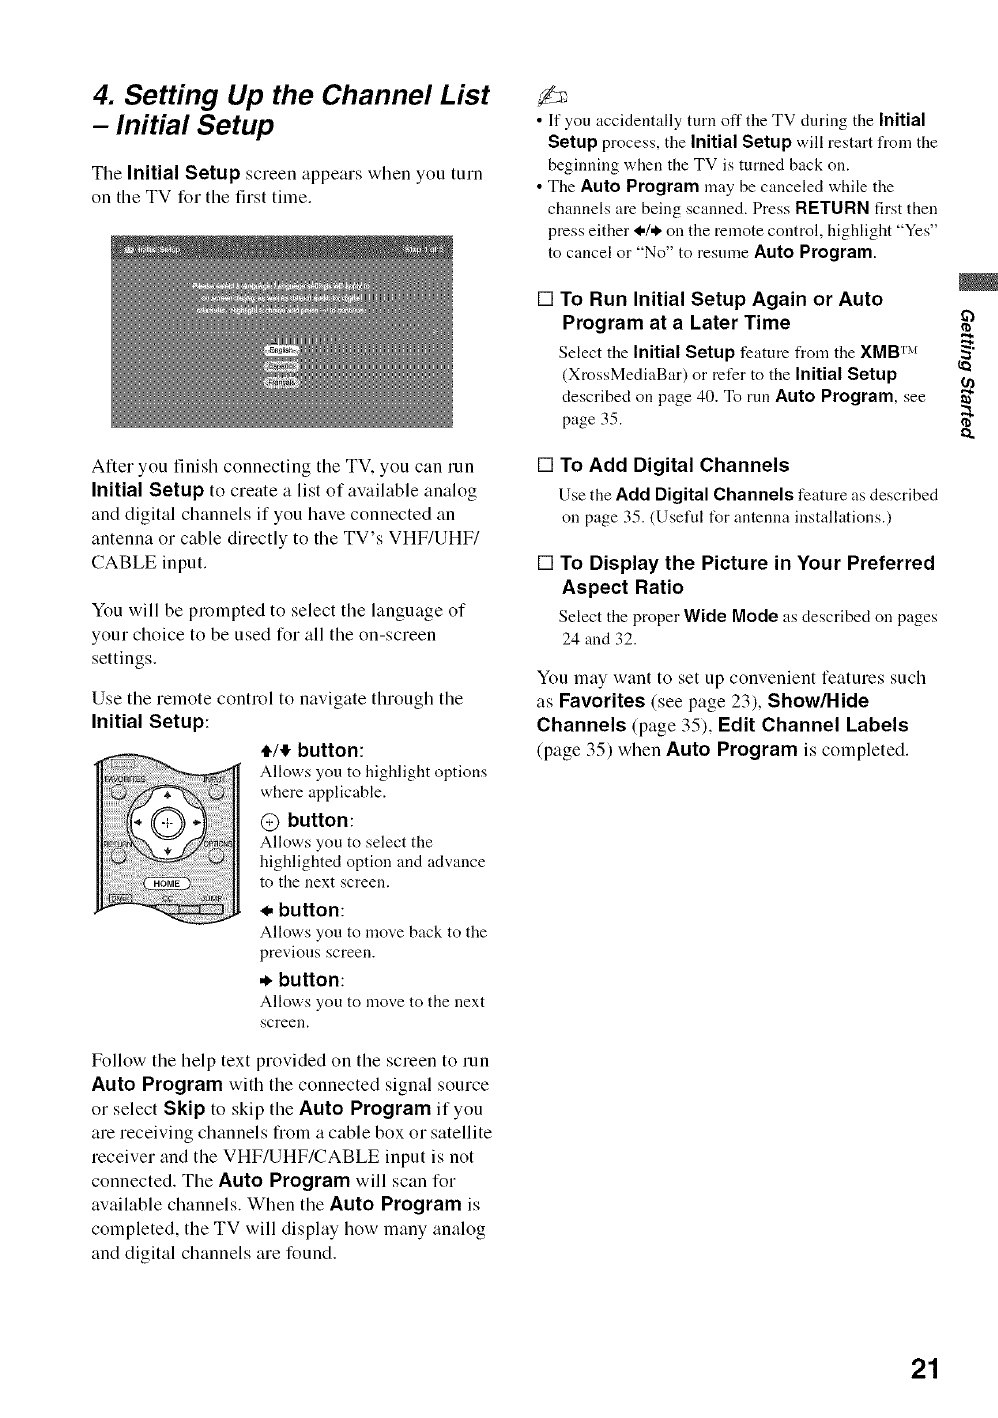
4. Setting Up the Channel List
-Initial Setup
The Initial Setup screen appears when you turn
on tile TV for tile first time.
After you finish connecting the TV. you can run
Initial Setup to create a list of available analog
and digital channels if you have connected an
antenna or cable directly to the TV's VHF/UHF/
CABLE input.
You will be prompted to select the language of
your choice to be used for all the on-screen
settings.
Use the remote control to navigate through the
Initial Setup:
€/_ button:
Allows you to highlight ___ptions
where applicable.
@ button:
Allows you to select the
highlighted option and advance
to the next screen.
.button:
Allows you to mo,_.e back to the
previous screen.
.button:
Allows you to move to the next
screen.
Follow the help text provided on the screen to run
Auto Program with the connected signal source
or select Skip to skip the Auto Program if you
are receiving channels from a cable box or satellite
receiver and the VHF/UHF/CABLE input is not
connected. The Auto Program will scan for
available channels. When the Auto Program is
completed, the TV will display how many analog
and digital channels are found.
•If you accidentally turn off the TV during the Initial
Setup process, the Initial Setup will restart from the
beginning when the TV is turned back on.
• The Auto Program may be canceled while the
channels are being scanned. Press RETURN first then
press either l./,,l, on the remote control, highlight "Yes"
to cancel or "No" to resume Auto Program.
[] To Run Initial Setup Again or Auto
Program at a Later Time
Select tire Initial Setup feature from tire XMB TM _
(XrossMediaBar) or refer to the Initial Setup
described on page 40. To run Auto Program, see
page 35.
[] To Add Digital Channels
Use the Add Digital Channels feature as described
on page 35. (Useful t_r antenna installations.)
[] To Display the Picture in Your Preferred
Aspect Ratio
Select the proper Wide Mode as described on pages
24 and 32.
You may want to set up convenient features such
as Favorites (see page 23), Show/Hide
Channels (page 35), Edit Channel Labels
(page 35) when Auto Program is completed.
21
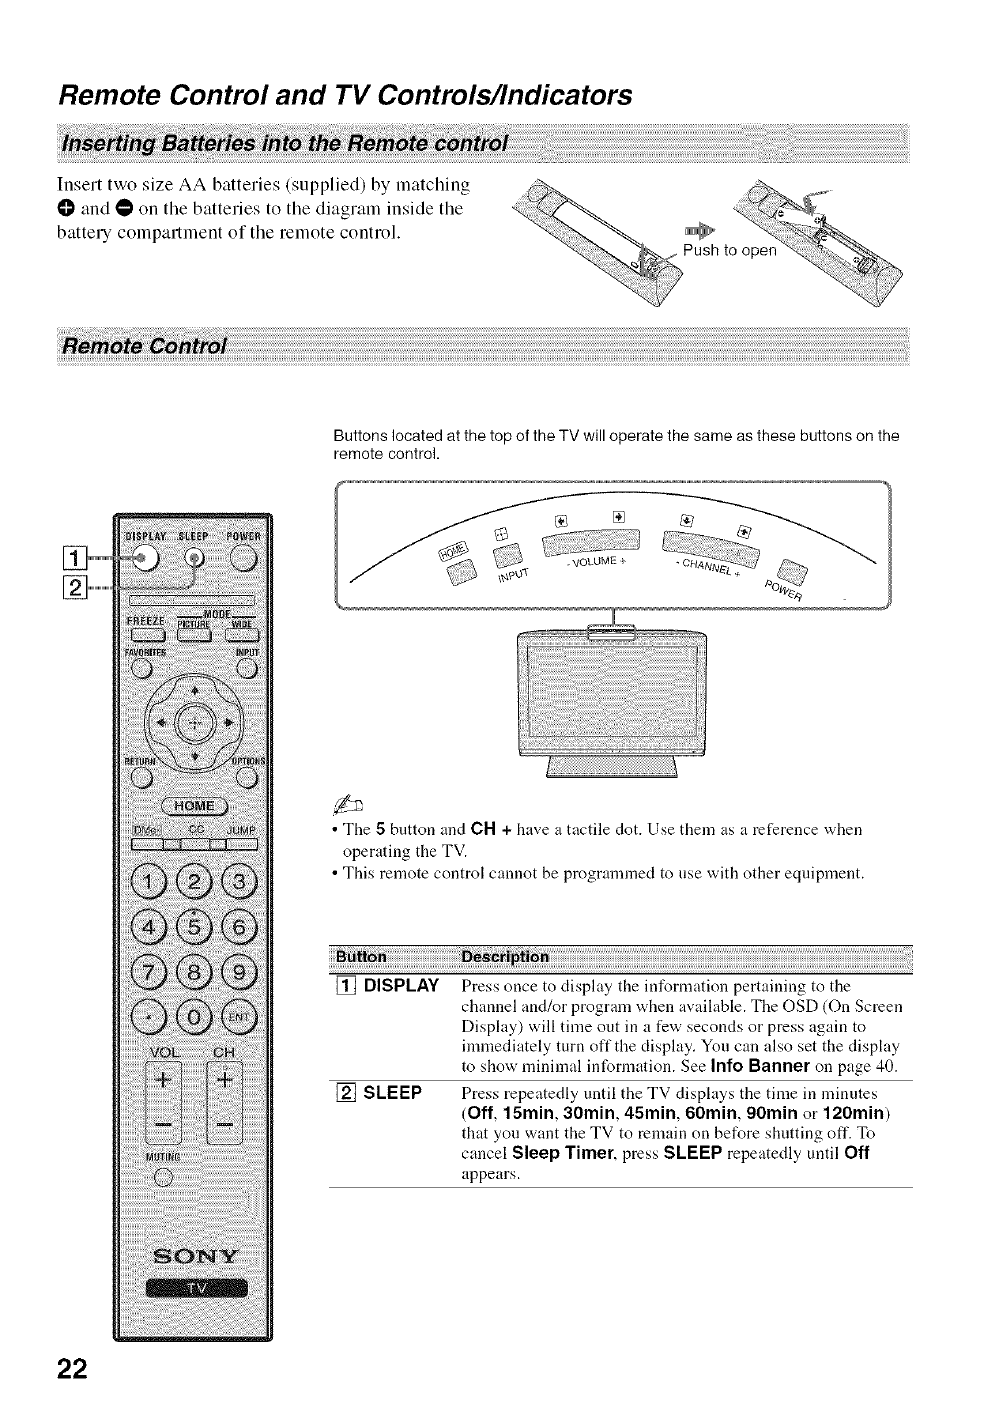
Remote Control and TV Controls/Indicators
Insert two size AA batteries (supplied) by matching
O and 1} on the batteries to the diagram inside the
battery compartment of the remote control.
i!iiii_!_i!_!ii!ii!ii!!i_i_!i_!ii!il!ii!ii!ii!ii!ii!ii!ii!il!ii!ii!ii!ii!ii!ii!ii!il!ii!ii!ii!ii!ii!ii!ii!il!ii!ii!ii!ii!ii!ii!ii!il!ii!ii!ii!ii!ii!ii!ii!il!ii!ii!ii!ii!ii!ii!ii!il!ii!ii!ii!ii!ii!ii!ii!il!ii!ii!ii!ii!ii!ii!ii!il!ii!ii!ii!ii!ii!ii!ii!il!ii!ii!ii!ii!ii!ii!ii!il!ii!ii!ii!ii!ii!ii!ii!il!ii!ii!ii!ii!ii!ii!ii!il!ii!ii!ii!ii!ii!ii!ii!il!ii!ii!ii!ii!ii!ii!ii!il!ii!ii!ii!ii!ii!ii!ii!il!ii!ii!ii!ii!ii!ii!ii!il!ii!ii!ii!ii!ii!ii!ii!il!ii!ii!ii!ii!ii!ii!ii!il!ii!ii!ii!ii!ii!ii!ii!il!ii!ii!ii!ii!ii!ii!ii!il!ii!ii!ii!ii!ii!ii!ii!il!ii!ii!ii!ii!ii!ii!ii!il!ii!ii!ii!ii!ii!ii!ii!il!ii!ii!ii!ii!ii!ii!ii!il!ii!ii!ii!ii!ii!ii!ii!il!ii!ii!ii!ii!ii!ii!ii!il!ii!ii!ii!ii!ii!ii!ii!il!ii!ii!ii!ii!ii!ii!ii!il!ii!ii!ii!ii!ii!ii!ii!il!ii!ii!ii!ii!ii!ii!ii!il!ii!ii!ii!ii!ii!ii!ii!il!ii!ii!ii!ii!ii!ii!ii!il!ii!ii!ii!ii!ii!ii!ii!il!ii!ii!ii!ii!ii!ii!ii!il!ii!ii!ii!ii!ii!ii!ii!il!ii!ii!ii!ii!ii!ii!ii!il!ii!ii!ii!ii!ii!ii!ii!il!ii!ii!ii!ii!ii!ii!ii!il!ii!ii!ii!ii!ii!ii!ii!il!ii!ii!ii!ii!ii!ii!ii!il!ii!ii!ii!ii!ii!ii!ii!il!ii!ii!ii!ii!ii!ii!ii!il!ii!ii!ii!ii!ii!ii!ii!il!ii!ii!ii!ii!ii!ii!ii!il!ii!ii!ii!ii!ii!ii!ii!il!ii!ii!ii!ii!ii!ii!ii!il!ii!ii!ii!ii!ii!ii!ii!il!ii!ii!ii!ii!ii!ii!ii!il!ii!ii!ii!ii!ii!i;
Buttons located at the top of the TV will operate the same as these buttons on the
remote control.
• The 5button and OH + have a tactile dot. Use them as a reference when
operating the TV.
• This remote control cannot be programmed to use with other equipment.
[] DISPLAY
[] SLEEP
Press once to display the information pertaining to the
channel and/or program when available. The OSD (On Screen
Display) will time out in a few seconds or press again to
immediately turn offthe display. You can also set the display
to show minimal information. See Info Banner on page 40.
Press repeatedly until the TV displays the time in minutes
(Off, 15rain, 30rain, 45rain, 60rain, 90rain or 120rain)
that you want the TV to remain on before shutting off. To
cancel Sleep Timer, press SLEEP repeatedly until Off
appears.
22
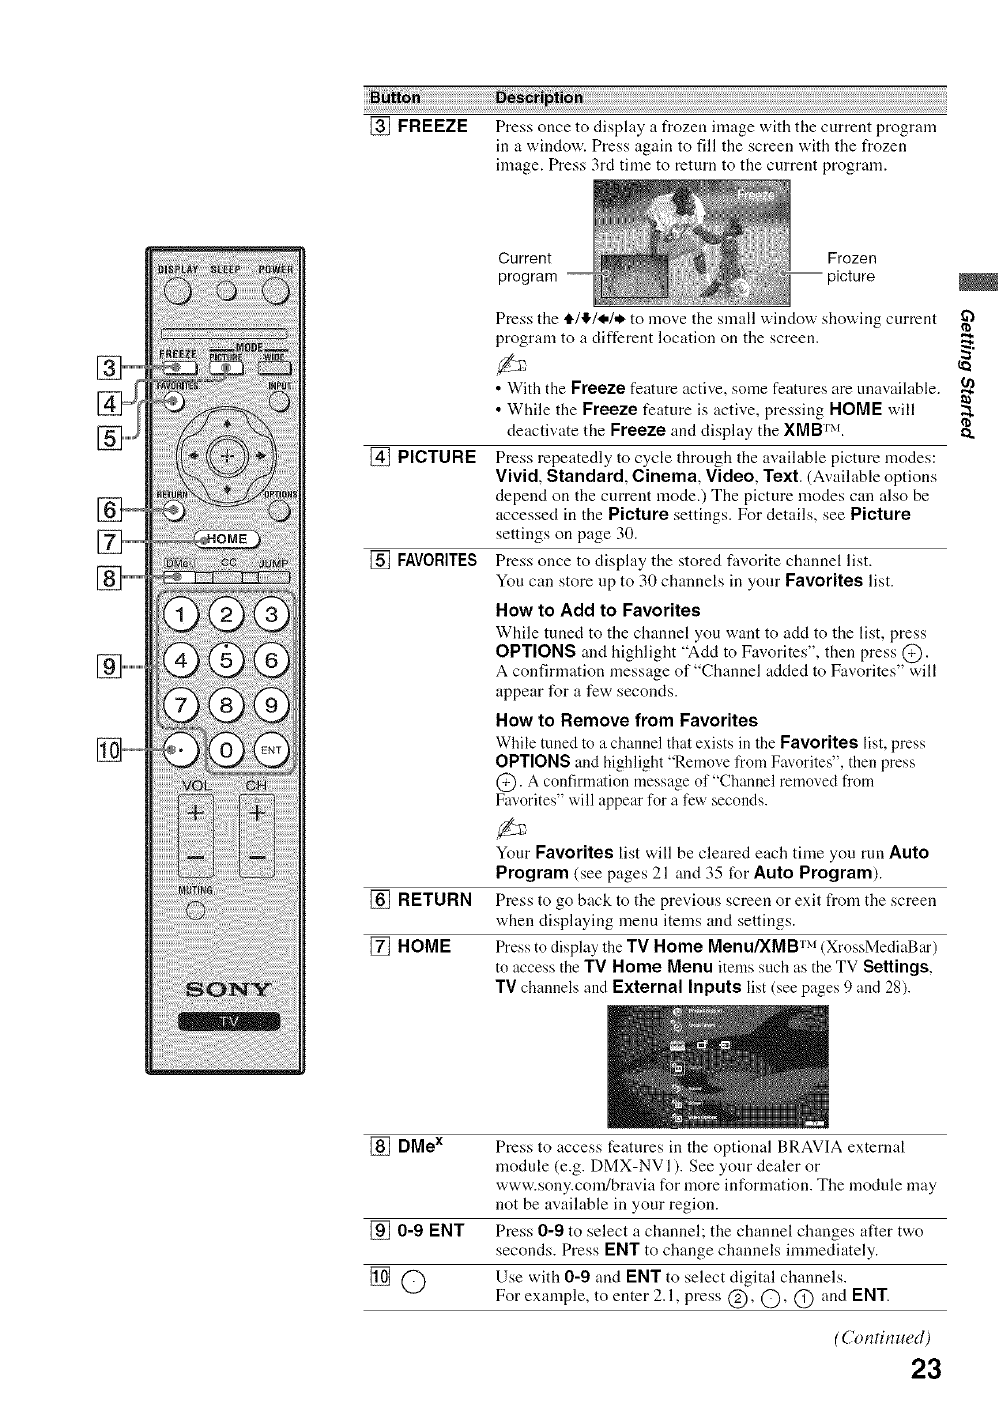
[] FREEZE Press once to display a frozen image with the current program
in a window. Press again to fill the screen with the frozen
image. Press 3rd time to return to the current program.
,,,,,,,,,,
] ...................
[_
i!gi!i!!ii!i!giilg!,:! ! !ii ai !{iiai
:ii:ii ii:ii:i!:!ili !iii!ii!iiiiiiiiiiiili
i!i!ii!i'......... .....
!!!i i !:i:i !ii!i!i!i !i ii ! ! i!ii!ii!ii!i!iiiiiiiiiiii
ili!iiiiiiiii!!i!!
Current
program
Frozen
picture
[] PICTURE
[] FAVORITES
[_RETURN
[] HOME
Press the tl./I!,11./,_to move the small window showing current
program to a different location on the screen.
•With the Freeze feature active, some features are unavailable.
• While the Freeze feature is active, pressing HOME will
deactivate the Freeze and display the XMB TM.
Press repeatedly to cycle through the available picture modes:
Vivid, Standard, Cinema, Video, Text. (Availableoptions
depend on the current mode.) The picture modes can also be
accessed in the Picture settings. For details, see Picture
settings on page 30.
Press once to display the stored favorite channel list.
You can store up to 30 channels in your Favorites list.
How to Add to Favorites
While tuned to the channel you want to add to the list, press
OPTIONS and highlight "Add to Favorites", then press @.
A confirmation message of "Channel added to Favorites" will
appear for a few seconds.
How to Remove from Favorites
While tnned to a cham_el that exists in the Favorites list, press
OPTIONS and highlight "Remove from Favorites", then press
@. A confirmation message of"Channel removed from
Favorites" will appear for a few seconds.
Your Favorites list will be cleared each time you run Auto
Program (see pages 21 and 35 for Auto Program).
Press to go back to the previous screen or exit from the screen
when displaying menu items and settings.
Press to display the TV Home Menu/XMB TM (XrossMediaBar)
to access the TV Home Menu items such as the TV Settings,
TV channels and External Inputs list (see pages 9 and 28).
[] DMex Press to access features in the optional BRAVIA external
module (e.g. DMX-NVI). See your dealer or
www.sony.com/bravia for more information. The module may
not be available in your region.
[] 0-9 ENT Press 0-9 to select a channel; the channel changes after two
seconds. Press ENT to change channels immediately.
[] OUse with 0-9 and ENT to select digital channels.
For example, to enter 2.1, press C)' Q)' C) and ENT.
(Continued)
23

[] VOL +/-
[] MUTING
[] POWER
[] WIDE
Press to adjust tile volume.
Press to mute the sound. Press again or press VOL + to restore
the sound.
Press to turn on and off the TV.
Press repeatedly to step through the Wide Mode settings:
Wide Zoom, Normal, Full, Zoom. The Wide Mode
settings can be also accessed in tile Screen settings (see
page 32).
Changing the Wide Screen Mode
(For PC timing, see below)
4:3 Original source 16:9 Original source
Standard-definition source High-definition source
!, I,
Wide Zoom Wide Zoom
Normal Normal
This mode is not available
Full Full
Zoom Zoom
• When the TV receives a 720p, 1080i or 1080p signal,
Normal cannot be selected.
Changing the Wide Screen Mode for PC timing
Incoming PC signal Incoming PC signal
800 x 600 1280 x 768
t. !1,
Normal Normal
Full 1 Full 1
Full 2 Full 2
24
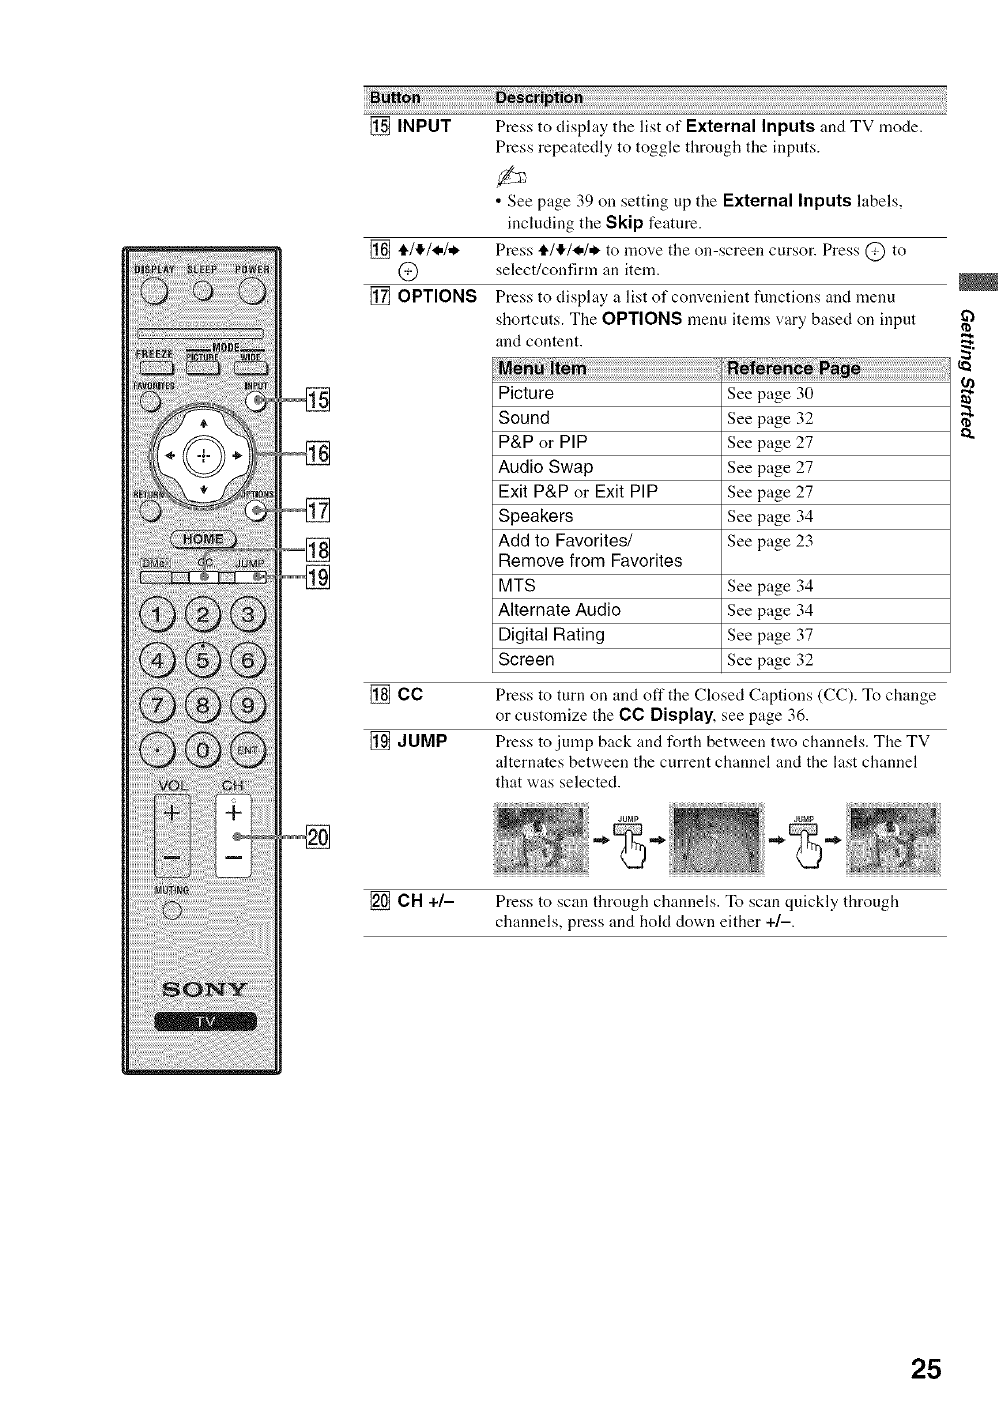
[] INPUT Press to display the list of External Inputs and TV mode.
Press repeatedly to toggle through the inputs.
•See page 39 on setting up the External Inputs labels,
including the Skip feature.
[] ,11./,1_/_,/,_ Press 41"/'!¢1_=1,i_to move the on-screen cursor. Press @ to
C) select/confirm an item.
[] OPTIONS Press to display a list of convenient functions and menu
shortcuts. The OPTIONS menu items vary based on input
and content.
Picture See page 30
Sound See page 32
P&P or PIP See page 27
[] CO
[] JUMP
Audio Swap Seepage 27
Exit P&P or Exit PiP Seepage27
Speakers See page 34
Add to Favorites/ See page 23
Remove from Favorites
MTS See page 34
Alternate Audio See page 34
Digital Rating Seepage 37
Screen See page 32
Press to turn on and off the Closed Captions (CC). To change
or customize the 1313 Display, see page 36.
Press to jump back and forth between two channels. The TV
alternates between the current channel and the last channel
that was selected.
[] CH +/- Press to scan through channels. To scan quickly through
channels, press and hokt down either +/-.
25
PIC
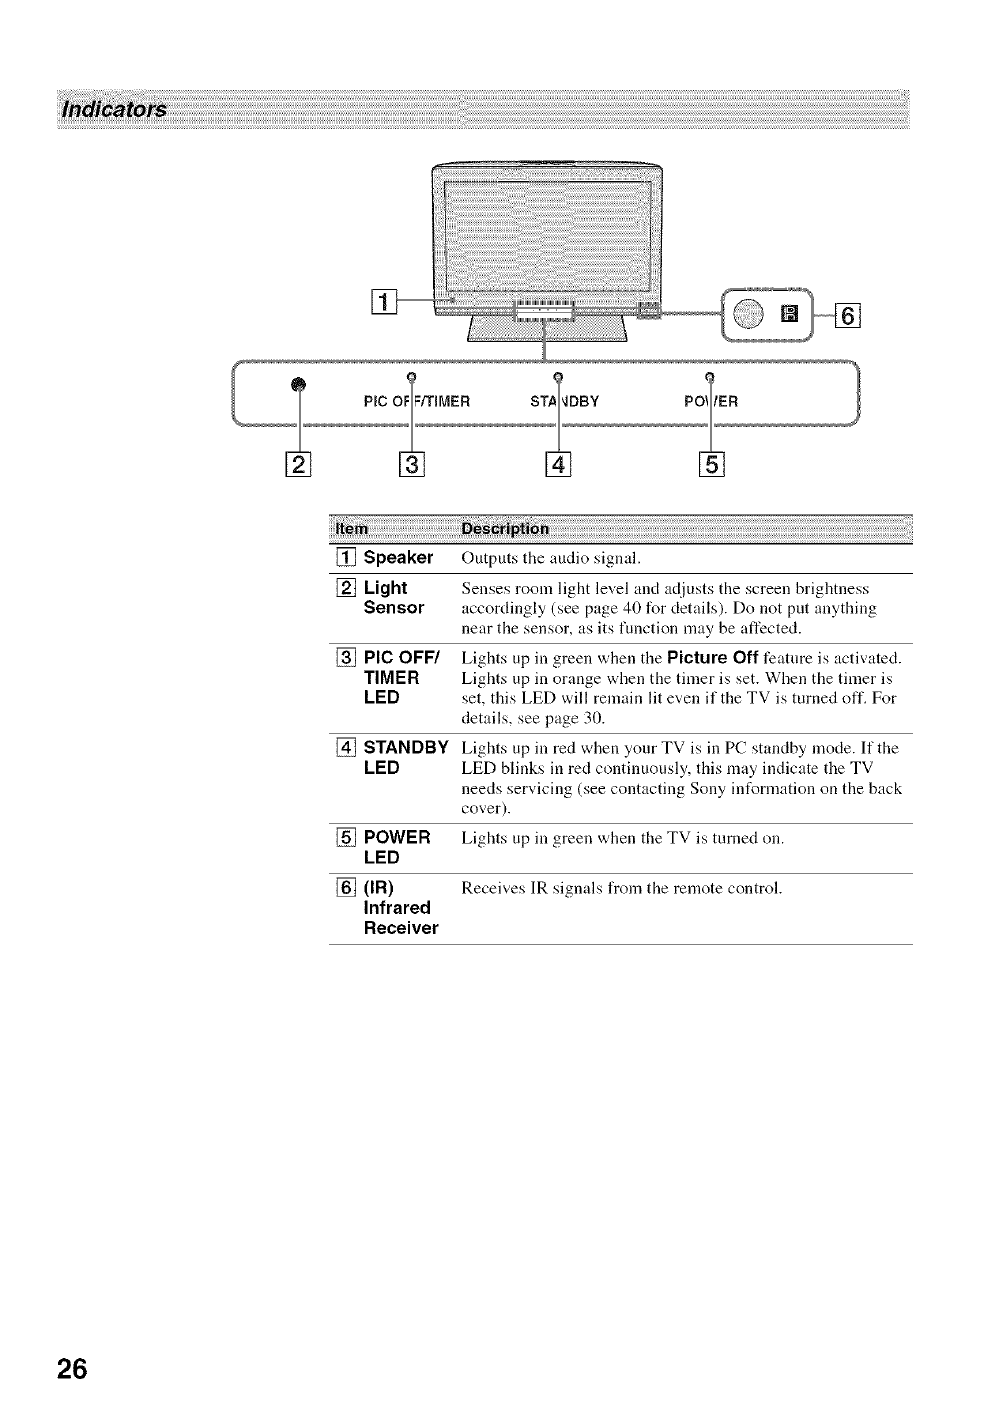
[] Speaker Outputs the audio signal.
[] Light Senses room light level and adjusts the screen brightness
Sensor accordingly (see page 40 for details). Do not put anything
near the sensor, as its function may be affected.
[] Pie OFF/ Lights up in green when the Picture Off feature is activated.
TIMER Lights up in orange when the timer is set. When the timer is
LED set, this LED will remain lit even if the TV is turned off. For
details, see page 30.
[] STANDBY Lights up in red when your TV is in PC standby mode. If the
LED LED blinks in red continuously, this may indicate the TV
needs servicing (see contacting Sony information on the back
cover).
[] POWER Lights up in green when the TV is turned on.
LED
[] (IR) Receives IR signals from the remote control.
Infrared
Receiver
26
How to Use P&P and PIP Features
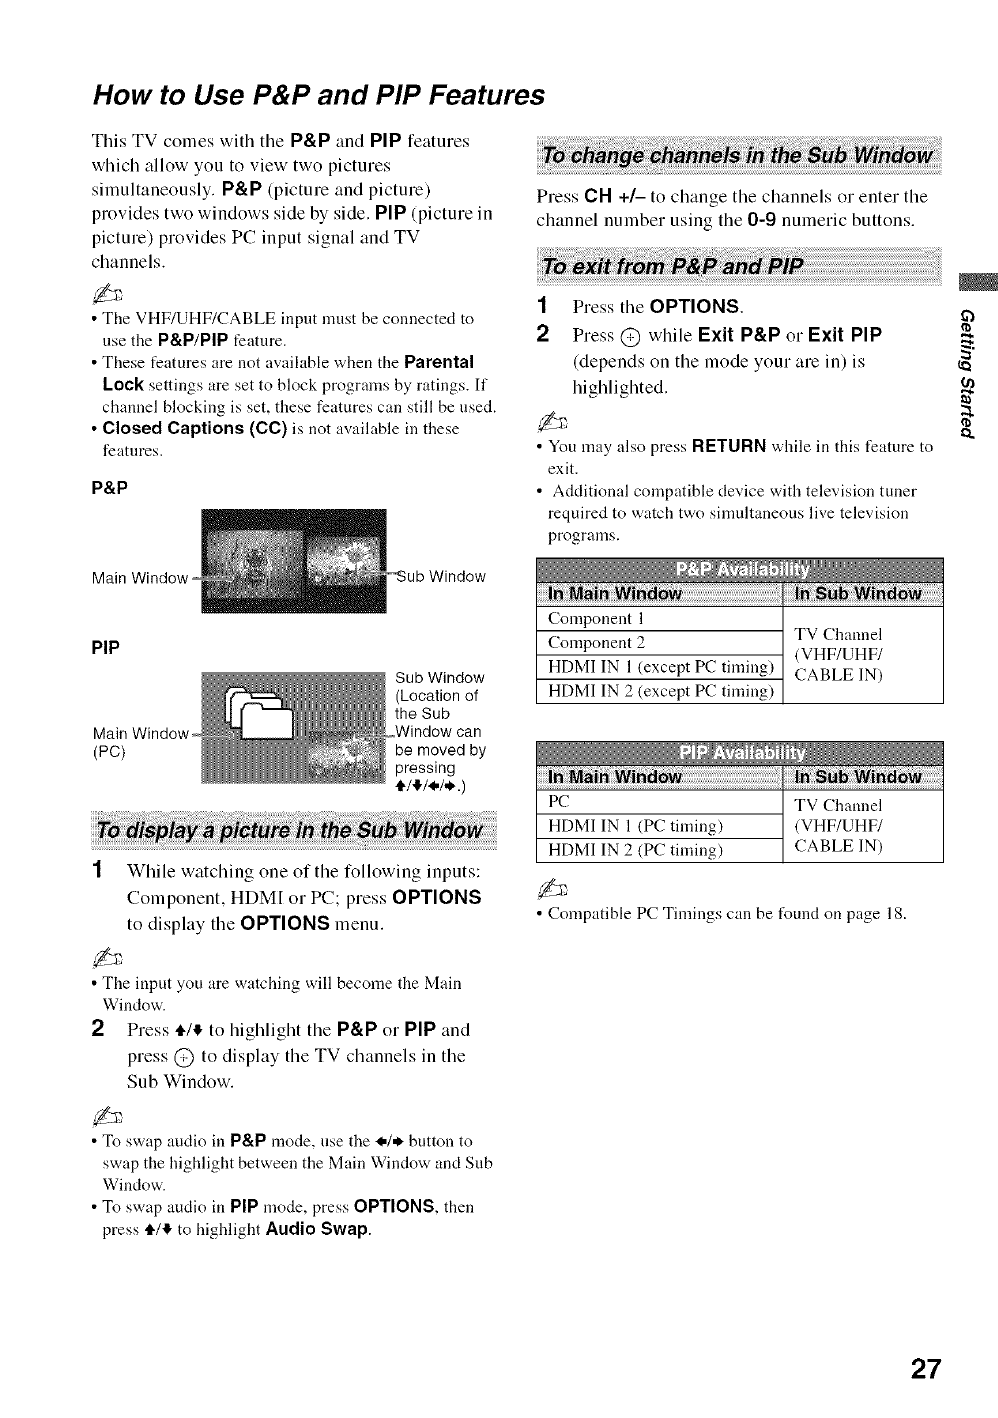
This TV comes with the P&P and PiP features
which allow you to view two pictures
simultaneously. P&P (picture and picture)
provides two windows side by side. PiP (picture in
picture) provides PC input signal and TV
channels.
•The VHF/UHF/CABLE input must be connected to
use the P&P/PIP feature.
• These features are not available when the Parental
Lock settings are set to block programs by ratings. If
channel blocking is set, these features can still be used.
•Closed Captions (CC) is not available in these
features.
P&P
Main Window o Window
PIP
Main Window o
(PC)
Sub Window
(Location of
the Sub
can
be moved by
pressing
t'/4/*/*.)
1While watching one of the following inputs:
Component, HDM[ or PC; press OPTIONS
to display the OPTIONS menu.
• The input you are watching will become tile Main
Window.
2Press 414 to highlight the P&P or PiP and
press @ to display the TV channels in the
Sub Window.
• To swap audio in P&P mode, use the 14. button to
swap the highlight between the Main Window and Sub
Window.
• To swap audio in PiP mode, press OPTIONS, then
press tl./4 to highlight Audio Swap.
Press CH +/- to change the channels or enter the
channel number using the 0-9 numeric buttons.
1
2Press the OPTIONS.
Press @ while Exit P&P or Exit PiP
(depends on the mode your are in) is "_
lfiglfligbted.
o.
• You may also press RETURN while in this feature to
exit.
• Additional compatible device with television tuner
required to watch two sinmltaneous live television
programs.
Component 1
Component 2 TV Channel
(VHF/UHF/
HDMI IN 1 (except PC timing) CABLE IN)
HDMI IN 2(except PC timing)
PC TV Channel
HDMI IN 1 (PC timing) (VHF/UHF/
HDMI IN 2(PC timing) CABLE IN)
• Compatible PC Timings can be t_und on page 18.
27
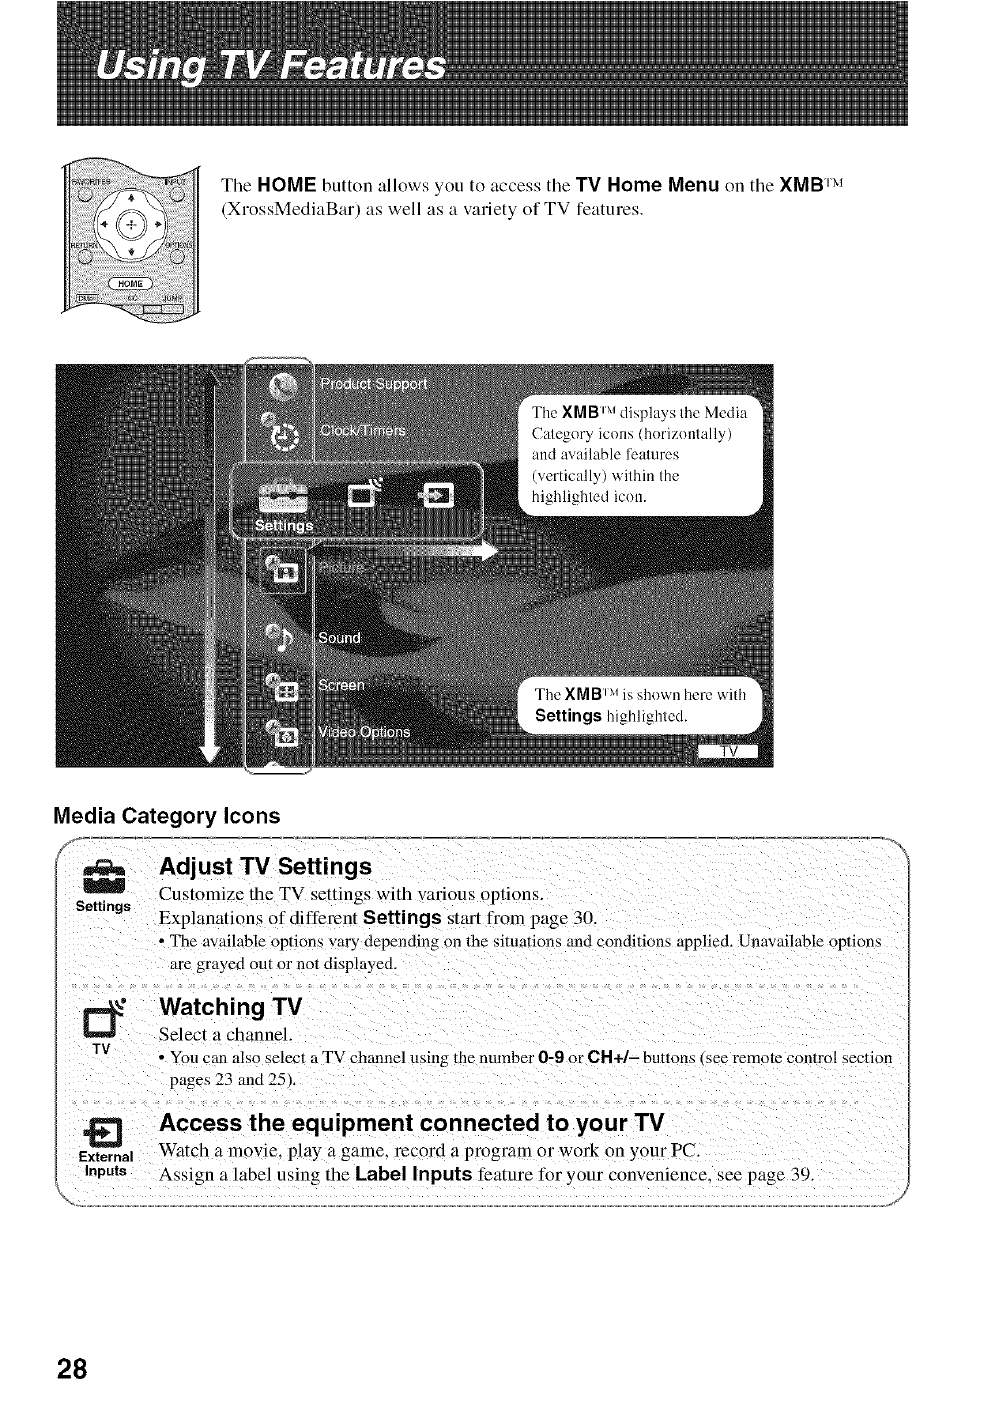
Tile HOME button allows you to access tile TV Home Menu on tile XMB TM
(XrossMediaBar) as well as a variety of TV features.
Media Category Icons
m
Settings
Adjust TV Settings
Customize the TV settings with various options.
Explanations of different Nettings start from page 30,
• The available options wtry depending on the situations and conditions applied. Unavailable options
_re grayed out or not displayed.
r_" Watching TV
Select a channel
TV • Yon can also select a TV channel using the number 0-9 or CH+/- buttons see remote control section
pages 23 and 25_.
=_ Access the equipment connected to your TV
External Watch a movie, play a game. record a program or work on your PC',.
Inputs Assign a label using the Label Inputs feature for your convenience, see page 39.
28
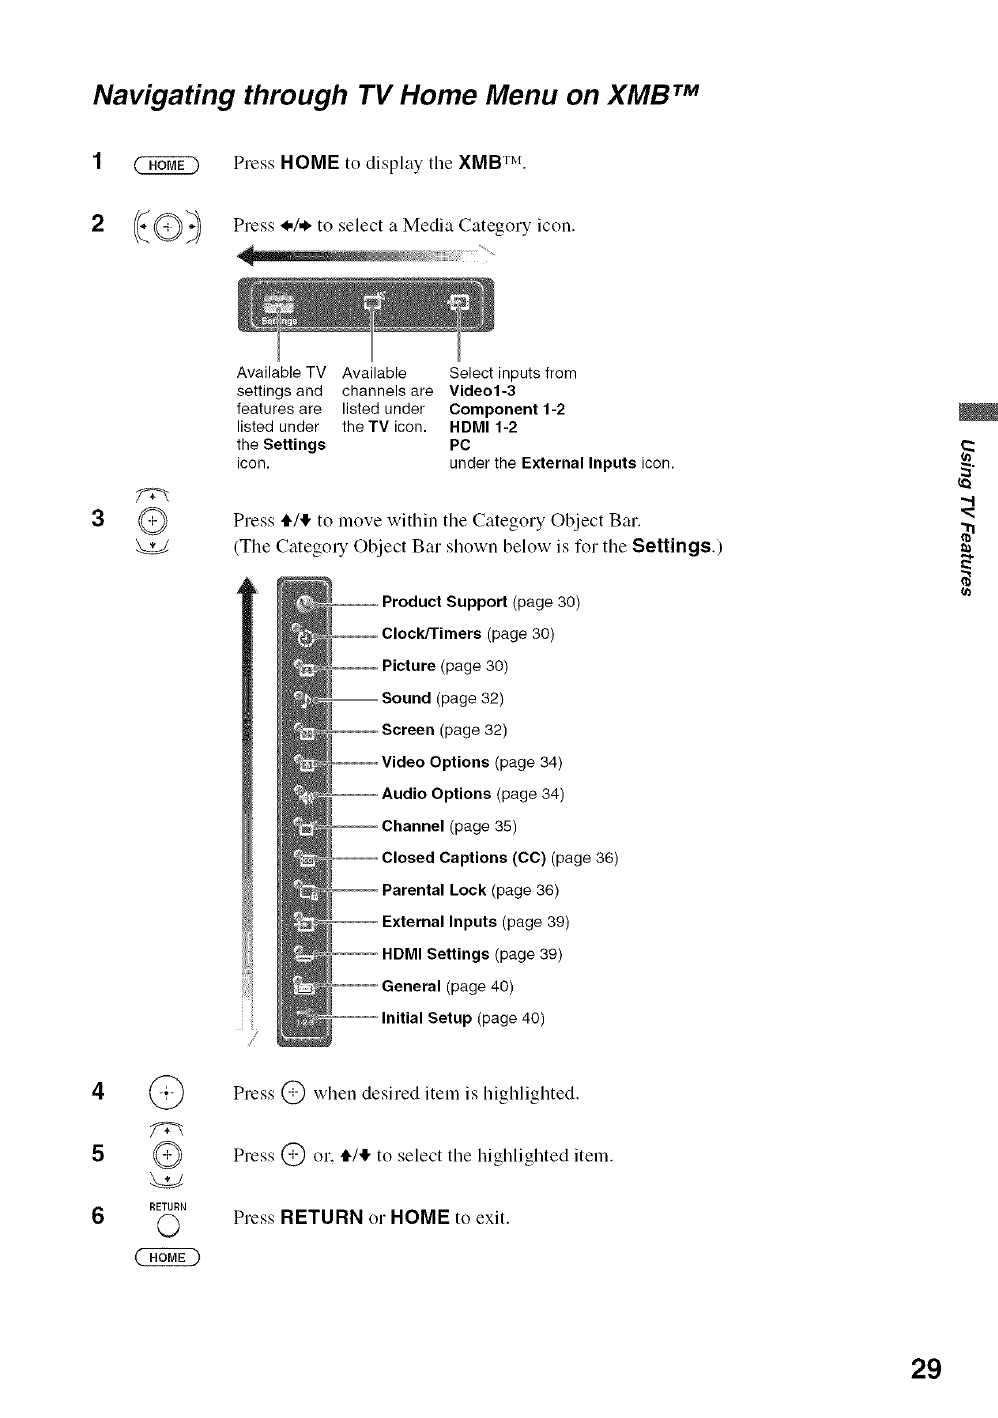
Navigating through TV Home Menu on XMB TM
1
2
Press HOME to display the XMB TM.
Press _,/,# to select a Media Category icon.
3
4
5
6
®
G
Q
RETURN
0
Available TV Available Select inputs from
settings and channels are Video1-3
features are listed under Component 1-2
listed under the TV icon. HDMI 1-2
the Settings PC
icon. under the External Inputs icon.
Press tl./I!,to move within tile Category Object Bar.
(The Category Object Bar shown below is for tile Settings.)
-- Product Support (page 30)
(page 30)
-- Picture (page 30)
(page 32)
(page 32)
Options (page 34)
ptions (page 34)
(page 35)
Captions (CC) (page 36)
-- Parental Lock (page 36)
-- External Inputs (page 39)
,,,,,,,,,,,,,,,,,,,,,,,,,,,,,,,,,,,,.HDMI Settings (page 39)
(page 40)
p (page 40)
/
Press @ when desired item is laiglaliglated.
Press @ or, tl./I!, to select tile highlighted item.
PressRETURN or HOME to exit.
2
"..I
29
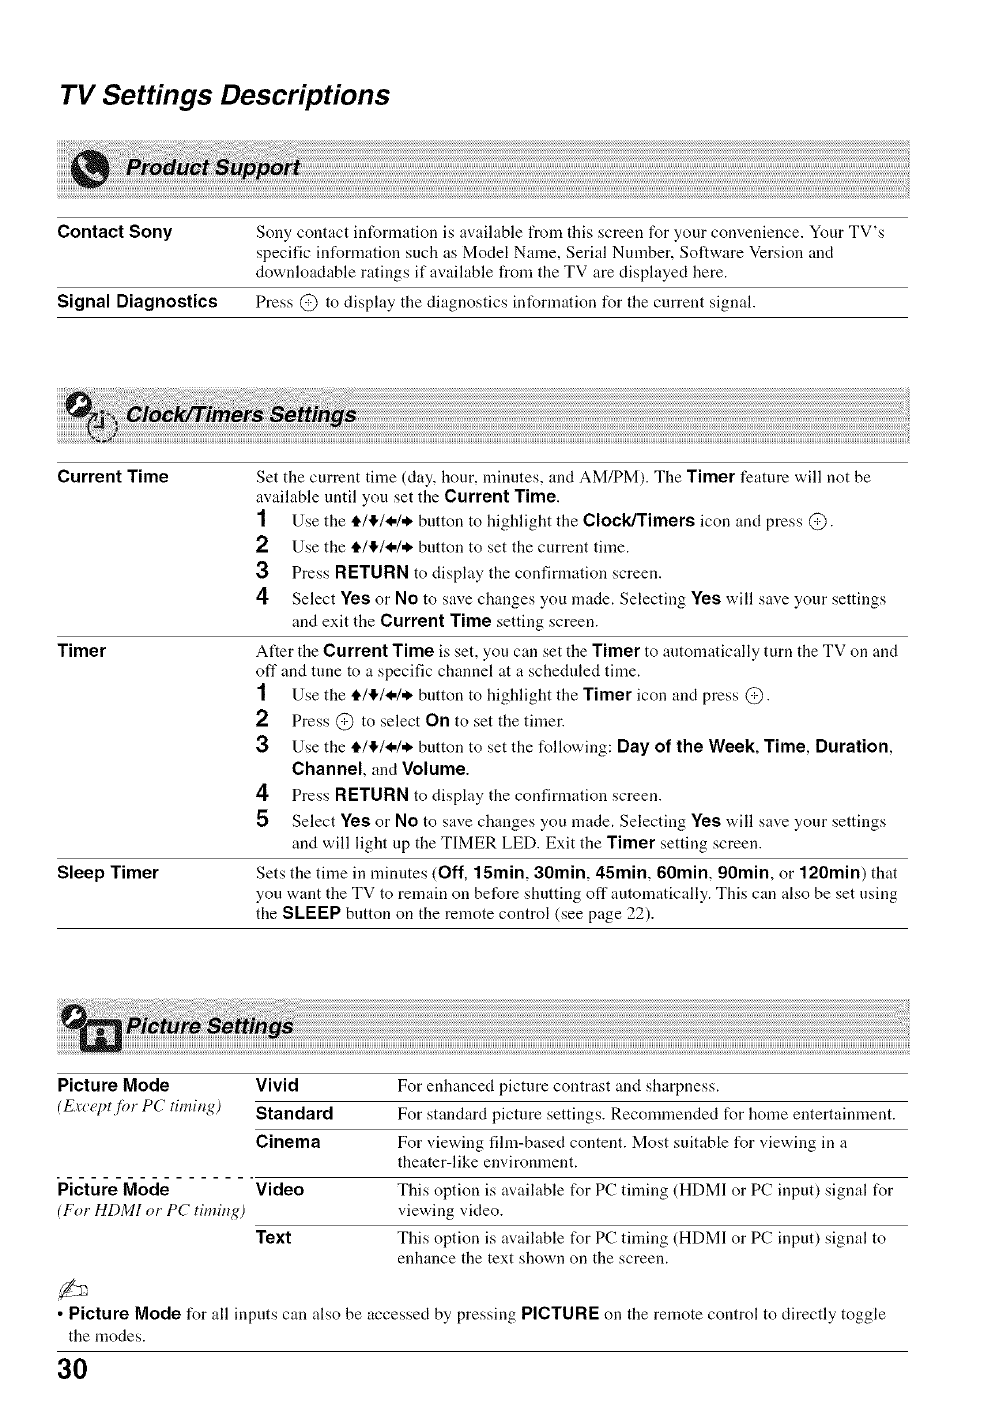
TV Settings Descriptions
Contact Sony Sony contact information is available from this screen for your convenience. Your TV's
specific information such as Model Name, Serial Number, Software Version and
downloadable ratings if available from the TV are displayed here.
Signal Diagnostics Press @ to display the diagnostics information for the current signal.
Current Time
Timer
Sleep Timer
Set the current time (clay, hour, minutes, and AM/PM). The Timer feature will not be
available until you set the Current Time.
1Use the €/'I'/<./<" button to highlight the Clock/Timers icon and press @.
2Use the €/4/<,/* button to set the current time.
3Press RETURN to display the confirmation screen.
4 Select Yes or No to save changes you made. Selecting Yes will save your settings
and exit the Current Time setting screen.
After the Current Time is set, you can set the Timer to automatically turn the TV on and
off and tune to a specific channel at a scheduled time.
1Use the €/,I,/<,/<, button to highlight the Timer icon and press @.
2Press @ to select On to set the timer.
3Use the ,i./,I,/<,/<, button to set the following: Day of the Week, Time, Duration,
Channel, and Volume.
4Press RETURN to display the confirmation screen.
5Select Yes or No to save changes you made. Selecting Yes will save your settings
and will light up the TIMER LED. Exit the Timer setting screen.
Sets the time in minutes (Off, 15min, 30min, 45min, 60min, 90min, or 120min) that
you want the TV to remain on before shutting off automatically. This can also be set using
the SLEEP button on the remote control (see page 22).
Picture Mode Vivid For enhanced picture contrast and sharpness.
(Krce!)tjbr PC timing) Standard For standard picture settings. Recommended for home entertainment.
Cinema For viewing fihn-based content. Most suitable for viewing in a
theater-like environment.
Picture Mode Video This option is available for PC timing (HDMI or PC input) signal for
(For HDMI or PC timing) viewing video.
Text This option is available for PC timing (HDMI or PC input) signal to
enhance the text shown on the screen.
•Picture Mode for all inputs can also be accessed by pressing PICTURE on the remote control to directly toggle
the modes.
30
Reset
Backlight
Picture
Brightness
Color
Hue
Color Temperature
Whito a:lju,_'tm_mt
Sharpness
Noise Reduction
MPEG Noise
Reduction
Advanced Settings
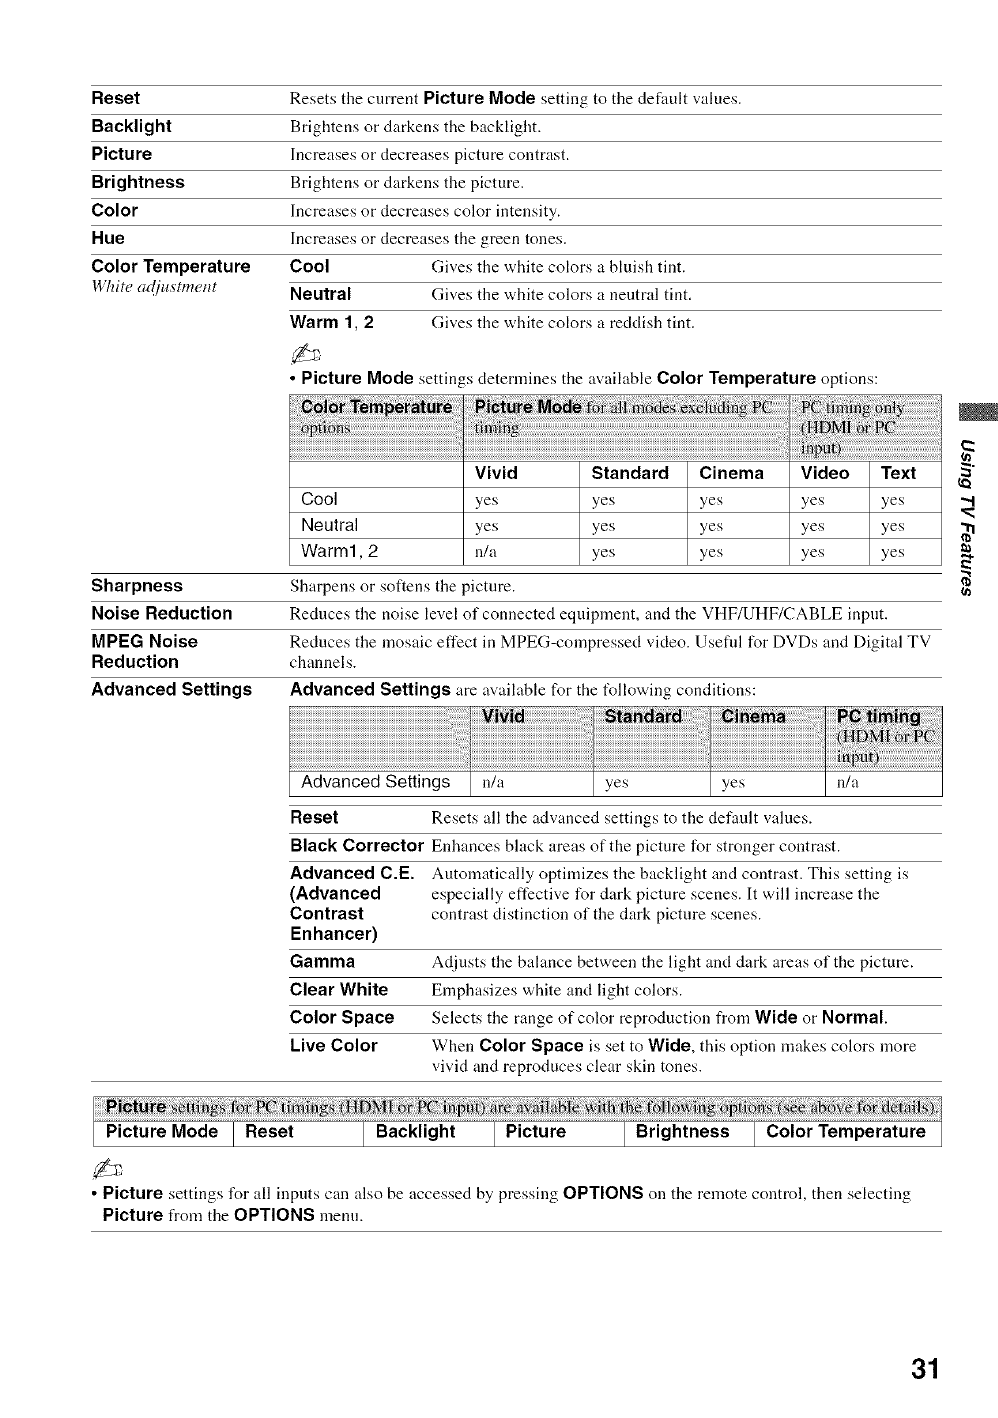
Resets the current Picture Mode setting to the default values.
Brightens or darkens the backlight.
Increases or decreases picture contrast.
Brightens or darkens the picture.
Increases or decreases color intensity.
Increases or decreases the green tones.
Cool Gives the white colors a bluish tint.
Neutral Gives the white colors a neutral tint.
Warm 1, 2 Gives the white colors a reddish tint.
•Picture Mode settin s determines the available Color Temperature options:
Vivid
Cool yes
Neutral yes
Warm1,2 n/a
Sharpens or softens the picture.
Standard Cinema
yes yes
yes yes
yes yes
Video Text
yes yes
yes yes
yes yes
Reduces the noise level of connected equipment, and the VHF/UHF/CABLE input.
Reduces the mosaic effect in MPEG-compressed video. Usefld for DVDs and Digital TV
channels.
Advanced Settings are available for the IUllowing conditions:
ii
Advanced Settings n/a yes yes n/a
Reset Resets all the advanced settings to the default values.
Black Correcter Enhances black areas of the picture for stronger contrast.
Advanced C.E. Automatically optimizes the backlight and contrast. This setting is
(Advanced especially effective for dark picture scenes. It will increase the
Contrast contrast distinction of the dark picture scenes.
Enhancer)
Gamma Adjusts the balance between the light and dark areas of the picture.
Clear White Emphasizes white and light colors.
Color Space Selects the range of color reproduction from Wide or Normal.
Live Color When Color Space is set to Wide, this option makes colors more
vivid and reproduces clear skin tones.
•Picture settings I\_r all inputs can also be accessed by pressing OPTIONS on the remote control, then selecting
Picture from the OPTIONS menu.
E
(n
31
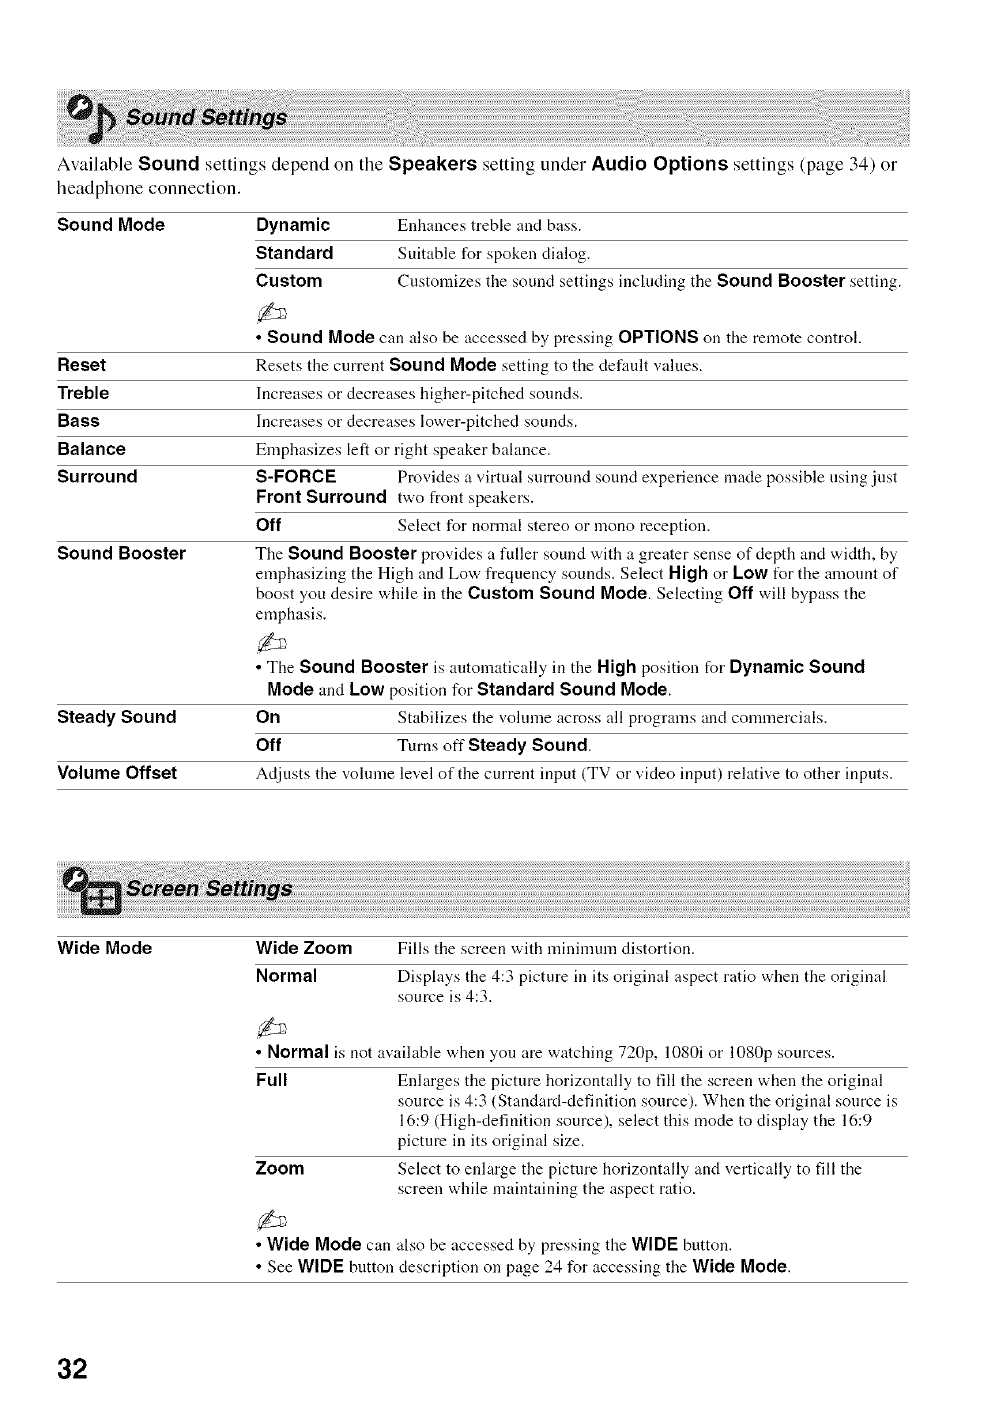
Available Sound settings depend on the Speakers setting under Audio Options settings (page 34) or
headphone connection.
Sound Mode Dynamic Enhances treble and bass.
Standard Suitable for spoken dialog.
Custom Customizes the sound settings including the Sound Booster setting.
•Sound Mode can also be accessed by pressing OPTIONS on the remote control.
Reset Resets the current Sound Mode setting to the default values.
Treble Increases or decreases higher-pitched sounds.
Bass Increases or decreases lower-pitched sounds.
Balance Emphasizes left or right speaker balance.
Surround S-FORCE Provides a virtual surround sound experience made possible using just
Front Surround two front speakers.
Off Select for normal stereo or mono reception.
Sound Booster The Sound Booster provides a fuller sound with a greater sense of depth and width, by
emphasizing the High and Low frequency sounds. Select High or Low for the amount of
boost you desire while in the Custom Sound Mode. Selecting Off will bypass the
emphasis.
• The Sound Booster is automatically in the High position for Dynamic Sound
Mode and Low position for Standard Sound Mode.
On Stabilizes the volmne across all programs and commercials.
Off Turns off Steady Sound.
Adjusts the volume le'*el of the current input (TV or video input) relative to other inputs.
Steady Sound
Volume Offset
_:i:!!!
Wide Mode Wide Zoom Fills the screen with minimunl distortion.
Normal Displays the 4:3 picture in its original aspect ratio when the original
source is 4:3.
•Normal is not available when you are watching 720p, 1080i or 1080p sources.
Full Enlarges the picture horizontally to fill the screen when the original
source is 4:3 (Standard-definition source). When the original source is
16:9 (High-definition source), select this mode to display the 16:9
picture in its original size.
Zoom Select to enlarge the picture horizontally and vertically to fill the
screen while maintaining the aspect ratio.
•Wide Mode can also be accessed by pressing the WIDE button.
• See WIDE button description on page 24 for accessing the Wide Mode.
32
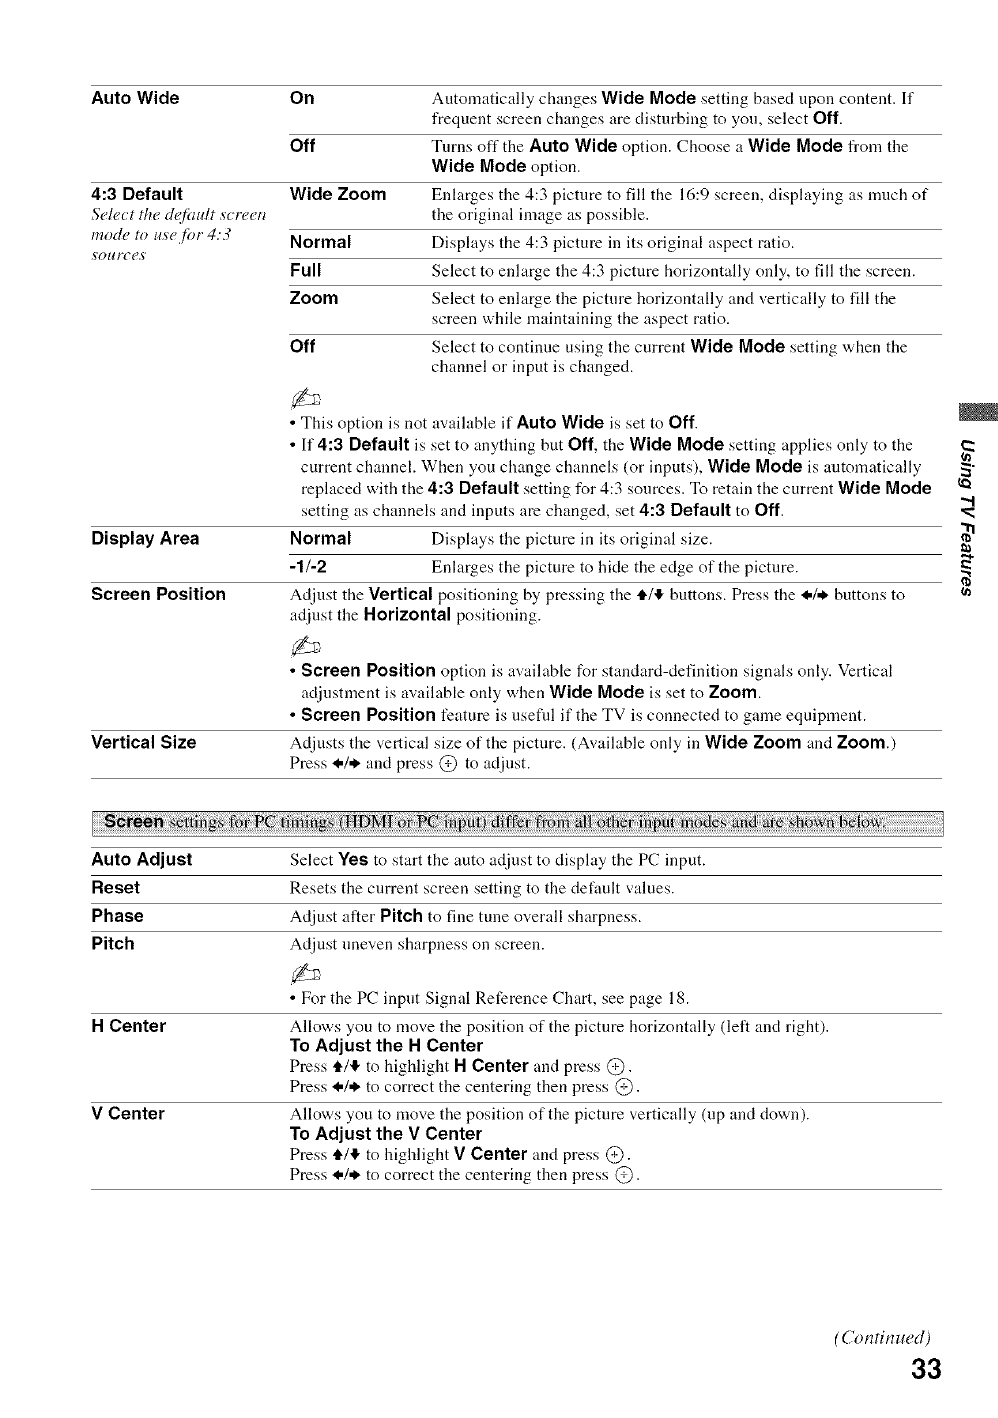
Auto Wide
4:3 Default
Se/_._t the:h_fi:u/ts_reen
mode to 11,_'e./br4:3
,_'OIlF('C,_'
On Automatically changes Wide Mode setting based upon content. If
frequent screen changes are disturbing to you, select Off.
Off Tnrns off the Auto Wide option. Choose a Wide Mode from the
Wide Mode option.
Wide Zoom Enlarges the 4:3 picture to fill the 16:9 screen, displaying as much of
the original image as possible.
Normal Displays the 4:3 picture in its original aspect ratio.
Full Select to enlarge the 4:3 picture horizontally only, to fill the screen.
Zoom Select to enlarge the picture horizontally and vertically to fill the
screen while maintaining the aspect ratio.
Off Select to continue using the current Wide Mode setting when the
channel or input is changed.
• This option is not available if Auto Wide is set to Off.
• If4:3 Default is set to anything but Off, the Wide Mode setting applies only to the
current channel. When you change channels (or inputs), Wide Mode is automatically
replaced with the 4:3 Default setting for 4:3 sources. To retain the current Wide Mode
setting as channels and inputs are changed, set 4:3 Default to Off.
Normal Displays the picture in its original size.
-1/-2 Enlarges the picture to hide the edge of the picture.
Adjust the Vertical positioning by pressing the ,i./,I. buttons. Press the <4* buttons to
adjust the Horizontal positioning.
•Screen Position option is available for standard-definition signals only. Vertical
adjustment is available only when Wide Mode is set to Zoom.
• Screen Position feature is usefld if the TV is connected to game equipment.
Vertical Size Adjusts the vertical size of the picture. (Available only in Wide Zoom and Zoom.)
Press <./* and press @ to adjust.
Auto Adjust Select Yesto start the auto adjust to display the PC input.
Reset Resets the current screen setting to the defimlt values.
Phase Adjust alter Pitch to fine tune overall sharpness.
Pitch Adjust uneven sharpness on screen.
• For the PC input Signal Reference Chart, see page 18.
H Center Allows you to move the position of the picture horizontally (left and right).
To Adjust the H Center
Press ,i./,I, to highlight H Center and press @.
Press <./* to correct the centering then press @.
V Center Allows you to move the position of the picture vertically (up and down).
To Adjust the V Center
Press i./,I, to highlight V Center and press @.
Press <./* to correct the centering then press @.
Display Area
Screen Position
"d
(n
(Continued)
33
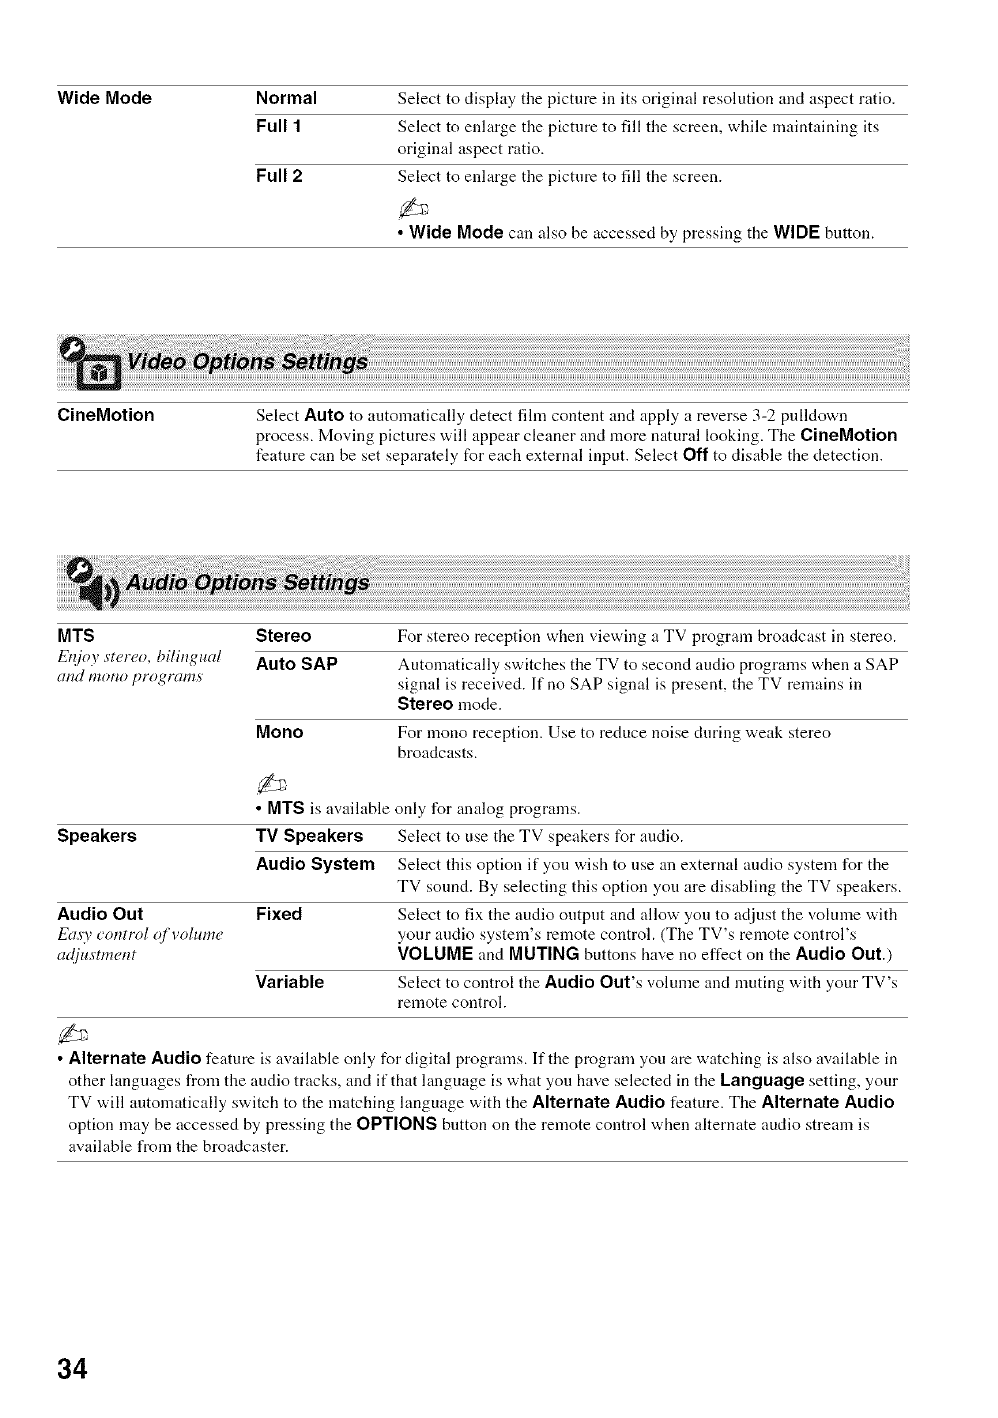
Wide Mode Normal Select to display the picture in its original resolution and aspect ratio.
Full 1 Select to enlarge the picture to fill the screen, while maintaining its
original aspect ratio.
Full 2 Select to enlarge the picture to fill the screen.
•Wide Mode can also be accessed by pressing the WIDE button.
CineMotion Select Auto to atltomatically detect fihn content and apply a reverse 3-2 pulldown
process. Moving pictures will appear cleaner and more natural looking. The CineMotion
feature can be set separately for each external input. Select Off to disable the detection.
MTS Stereo For stereo reception when viewing a TV program broadcast in stereo.
E@* 3stereo, biliiigual Auto SAP Automatically switches the TV to second audio programs when a SAP
at_d morn) t)rograms signal is received. If no SAP signal is present, the TV remains in
Stereo mode.
Mono For mono reception. Use to reduce noise during weak stereo
broadcasts.
•MTS is available only for analog programs.
Speakers TV Speakers Select to use the TV speakers for audio.
Audio System Select this option if you wish to use an external audio system for the
TV sound. By selecting this option you are disabling the TV speakers.
Audio Out Fixed Select to fix the audio output and allow you to adjust the volume with
Eas 3control (_fvolume your audio system's remote control. (The TV's remote control's
ad]z*stmetzt VOLUME and MUTING buttons have no effect on the Audio Out.)
Variable Select to control the Audio Out's volume mid muting with your TV's
remote control.
•Alternate Audio feature is available only for digital programs. If the program you are watching is also available in
other languages from the audio tracks, and if that language is what you have selected in the Language setting, your
TV will automatically switch to the matching language with the Alternate Audio feature. The Alternate Audio
option may be accessed by pressing the OPTIONS button on the remote control when alternate audio stream is
available from the broadcaster.
34
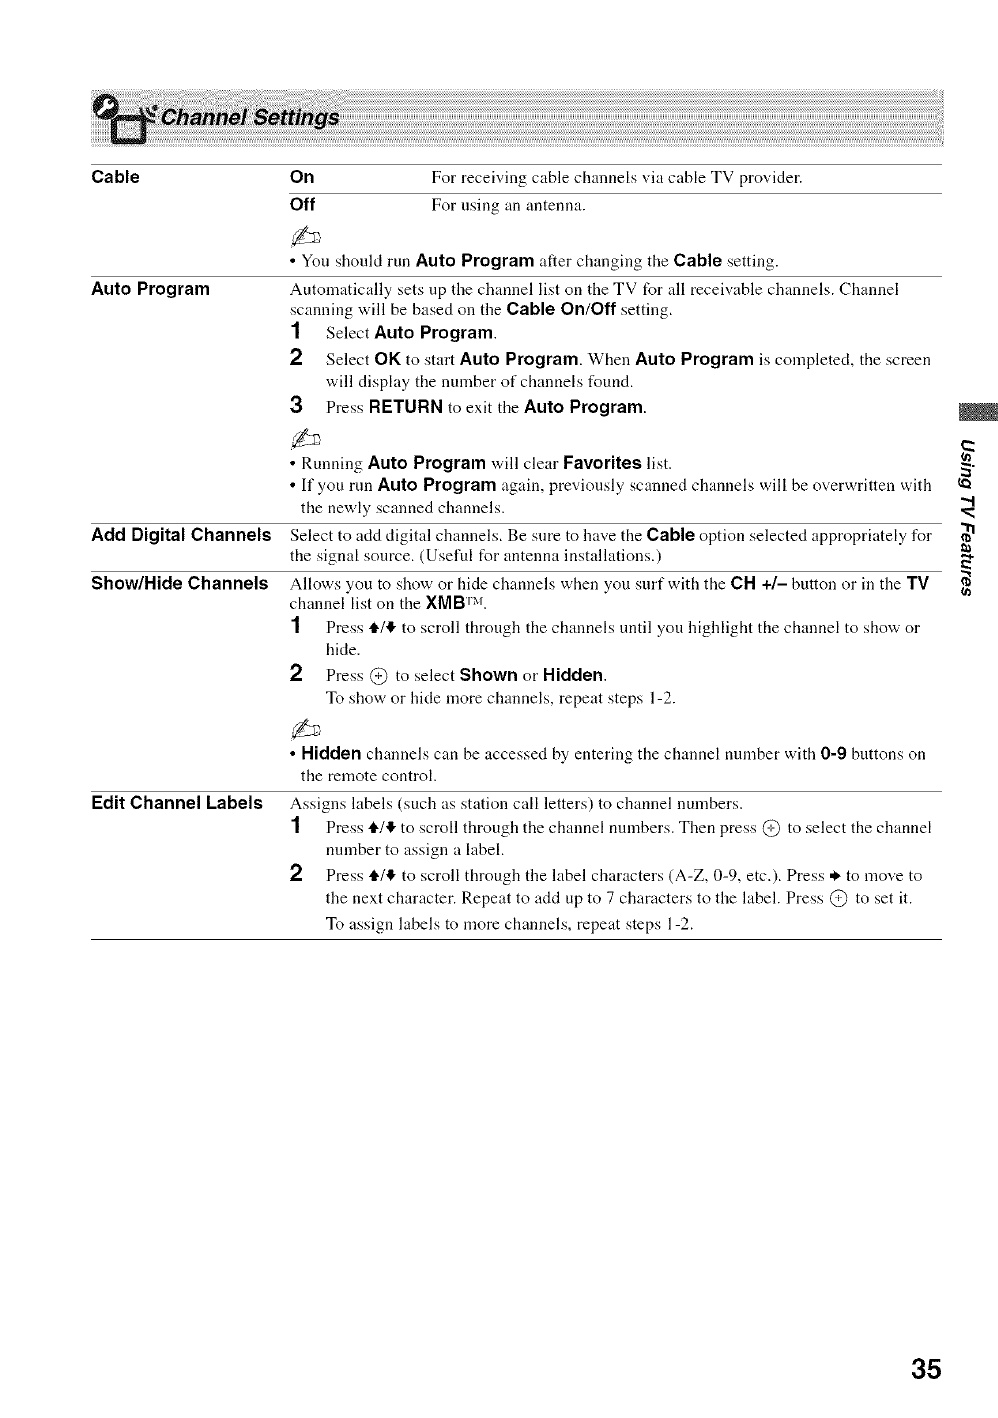
Cable
Auto Program
Add Digital Channels
Show/Hide Channels
Edit Channel Labels
On For receiving cable channels via cable TV provider.
Off For using an antenna.
• You should run Auto Program after changing the Cable setting.
Automatically sets up the channel list on the TV for all receivable channels. Channel
scanning will be based on the Cable On/Off setting.
1Select Auto Program.
2Select OK to start Auto Program. When Auto Program is completed, the screen
will display the number of channels found.
3Press RETURN to exit the Auto Program.
• Running Auto Program will clear Favorites list.
• If you run Auto Program again, previously scanned channels will be overwritten with
the newly scanned channels.
Select to acid digital channels. Be sure to have the Cable option selected appropriately for
the signal source. (Useful for antenna installations.)
Allows you to show or hide channels when you surf with the CH +/- button or in the TV
channel list on the XMB rxt.
1Press 11411,to scroll through the channels until you highlight the channel to show or
hide.
2Press @ to select Shown or Hidden.
To show or hide more channels, repeat steps 1-2.
•Hidden channels can be accessed by entering the channel number with 0-9 buttons on
the remote control.
Assigns labels (such as station call letters) to channel numbers.
1Press tl./!1,to scroll through the channel numbers. Then press @ to select the channel
number to assign a label.
2Press tl./,1!,to scroll through the label characters (A-Z, 0-9, etc.). Press * to move to
the next character. Repeat to add up to 7 characters to the label. Press @ to set it.
To assign labels to more channels, repeat steps 1-2.
2
"d
(n
35
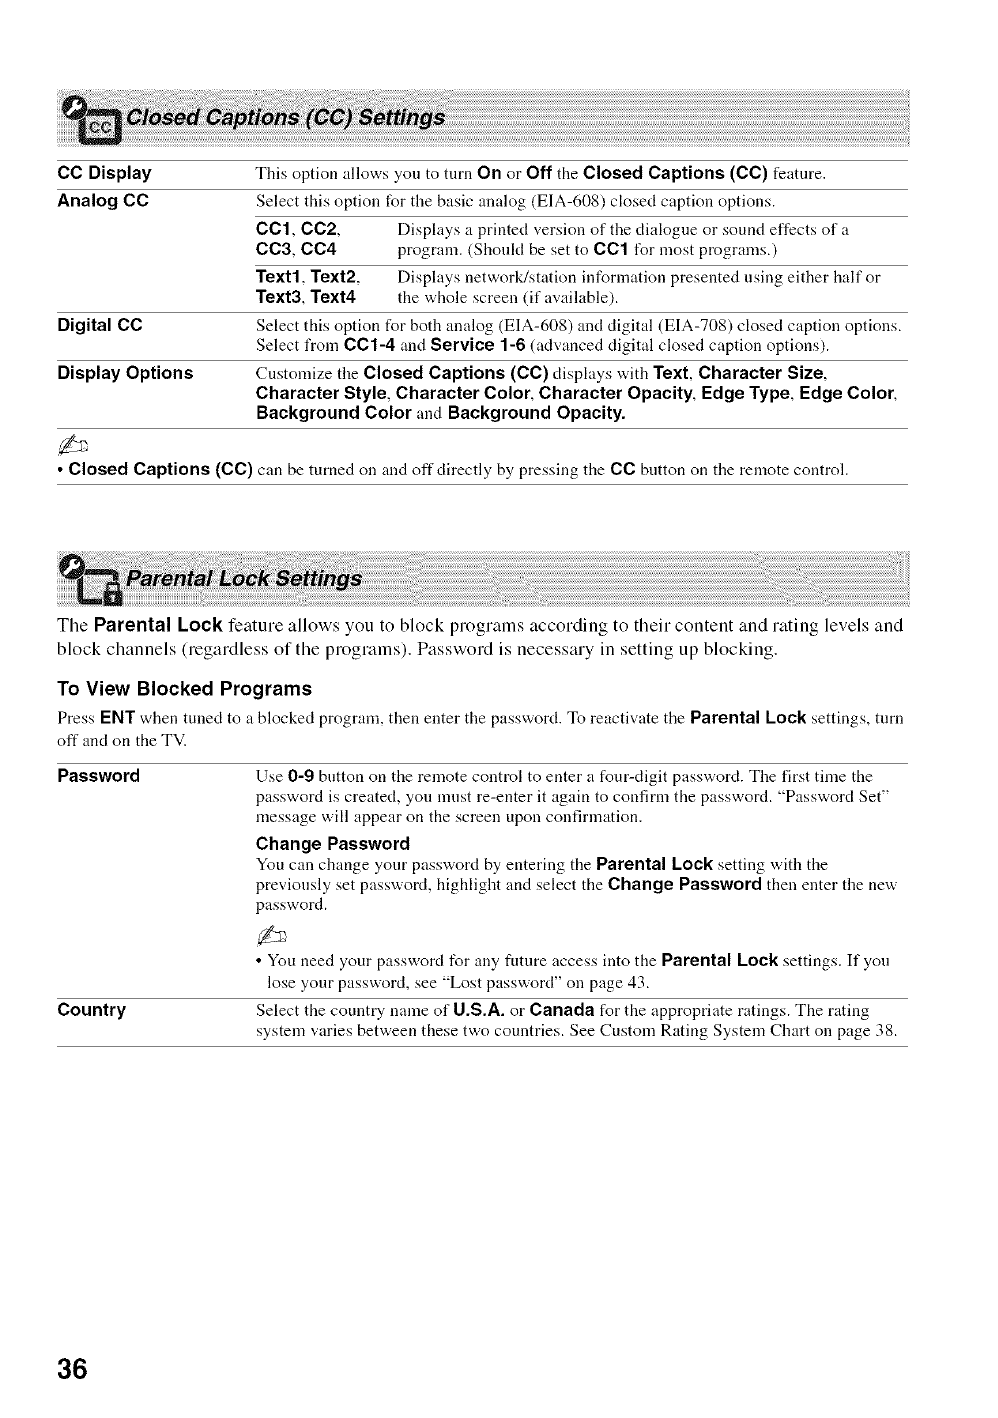
CC Display This option allows you to turn On or Off the Closed Captions (CC) feature.
Analog CC Select this option for the basic analog (EIA-608) closed caption options.
CC1, CC2, Displays a printed version of the dialogue or sound effects of a
CC3, CC4 program. (Shoukt be set to CC1 l\_r most programs.)
Text1, Text2, Displays network/station information presented using either half or
Text3, Text4 the whole screen (if available).
Digital CC Select this option for both analog (EIA-608) and digital (EIA-708) closed caption options.
Select from CC1-4 and Service 1-6 (advanced digital closed caption options).
Display Options Customize the Closed Captions (CC) displays with Text, Character Size,
Character Style, Character Color, Character Opacity, Edge Type, Edge Color,
Background Color and Background Opacity.
• Closed Captions (CC) can be turned on and oft'directly by pressing tile CC bntton on tile remote control.
The Parental Lock feature allows you to block programs according to their content and rating levels and
block channels (regardless of the programs). Password is necessary in setting up blocking.
To View Blocked Programs
Press ENT when tuned to a blocked program, then enter tile password. To reactiw_te tile Parental Lock settings, turn
off and on the TV.
Password
Country
Use 0-9 button on the remote control to enter a four-digit password. The first time the
password is created, you must re-enter it again to confirm the password. "Password Set"
message will appear on the screen upon confirmation.
Change Password
You can change your password by entering the Parental Lock setting with the
previously set password, highlight and select the Change Password then enter the new
password.
• You need your password for any future access into the Parental Lock settings. If you
lose your password, see "Lost password" on page 43.
Select the country name of U.S.A. or Canada for the appropriate ratings. The rating
system varies between these two countries. See Custom Rating System Chart on page 38.
36
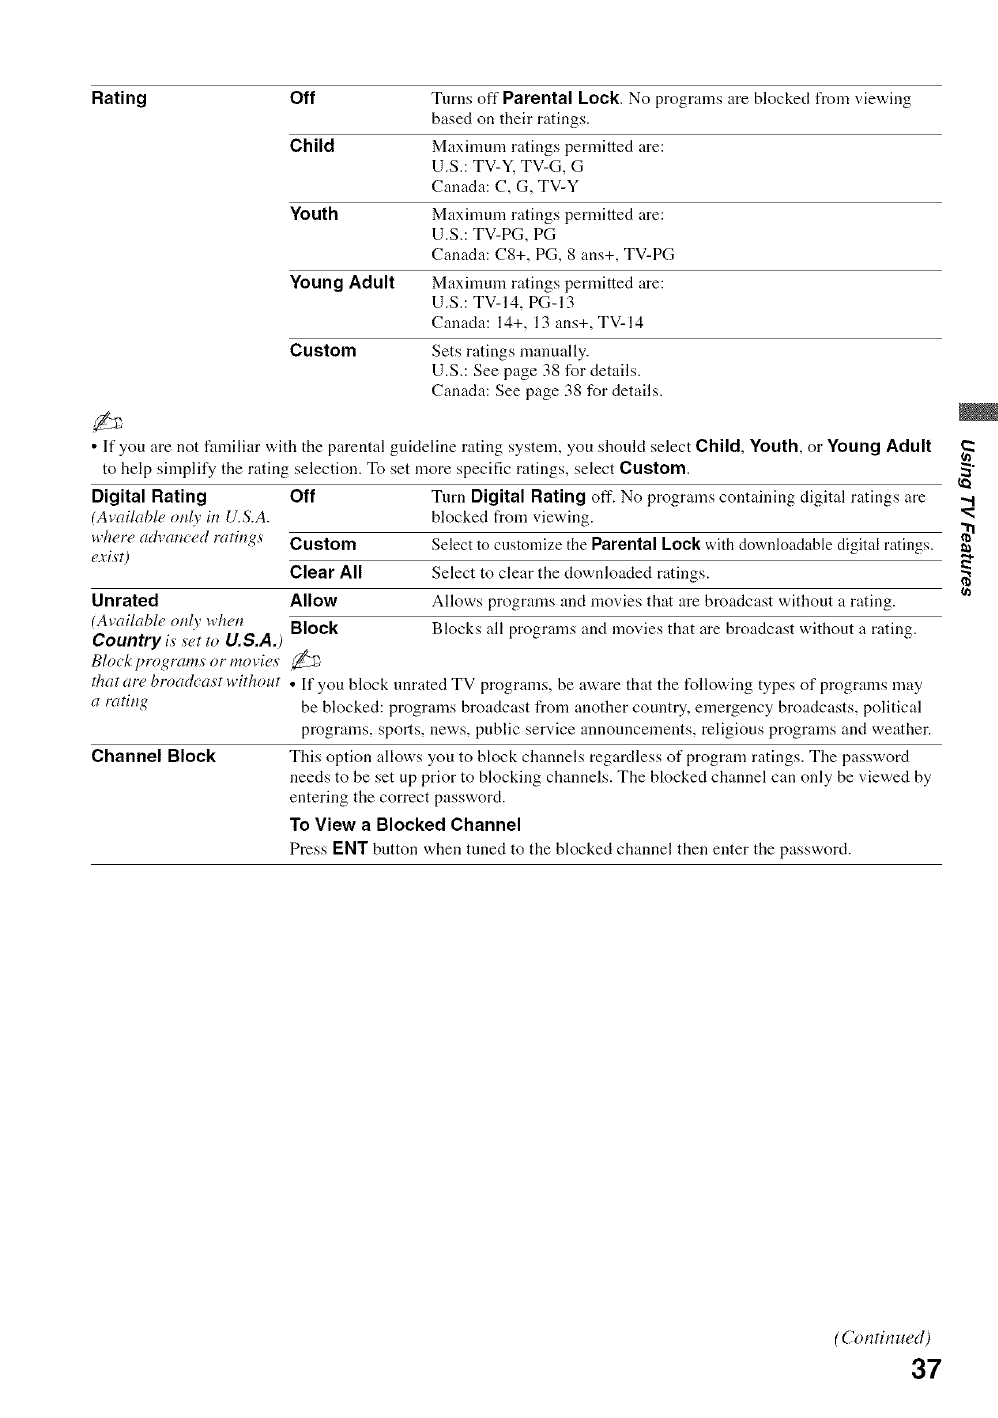
Rating Off
Child
Youth
Young Adult
Custom
Turns off Parental Lock. No programs are blocked from viewing
based on their ratings.
Maximum ratings permitted are:
U.S.: TV-Y. TV-G, G
Canada: C, G, TV-Y
Maximum ratings permitted are:
U.S.: TV-PG, PG
Canada: C8+, PG, 8 ans+, TV-PG
Maximum ratings permitted are:
U.S.: TV-14, PG-13
Canada: 14+, 13 ans+, TV-14
Sets ratings manually.
U.S.: See page 38 for details.
Canada: See page 38 for details.
•If you are not familiar with the parental guideline rating system, you should select Child, Youth, or Young Adult
to help simplify the rating selection. To set more specific ratings, select Custom.
Digital Rating Off Turn Digital Rating off. No programs containing digital ratings are
(Available ot_l_ in U.S.A. blocked from viewing.
where ad_amed rating._ Custom Select to customize the Parental Lock with downloadable digital ratings.
exist) Clear All Select to clear the downloaded ratings.
Unrated Allow Allows programs and movies that are broadcast without a rating.
(Available otzlv whetz Block Blocks all programs and movies that are broadcast without a rating.
Country is set to U.S.A.)
Bhwk programs or movies
that are broadcast without • If you block unrated TV programs, be aware that the t)llowing types of programs may
a rating be blocked: programs broadcast from another country, emergency broadcasts, political
programs, sports, news, public service announcements, religious programs and weather.
Channel Block This option allows you to block channels regardless of program ratings. The password
needs to be set up prior to blocking channels. The blocked channel can only be viewed by
entering the correct password.
To View a Blocked Channel
Press ENT button when tuned to the blocked channel then enter the password.
"d
(n
(Continued)
37

Custom Rating System Chart
For Country selection of U.S.A.:
Movie Rating G All chiktren and general aladience
PG Parental guidance suggested
PG-13 Parental guidance for children under 13
RRestricted viewing, parental guidance is suggested for ages under 17
NC-17 and X No one 17 or under allowed
TV Rating Age-Based Ratings
Block programs by their TV-Y All children
1wring, content or both TV-Y7 Directed to children age 7 and older
TV-G General audience
TV-PG Parental guidance suggested
TV-14 Parents strongly cautioned
TV-MA Mature audience only
Content-Based Ratings
FV Fantasy violence
DSuggestive dialogue
LStrong language
SSexual situations
V Violence
• To ensure maximum blocking capability, set the Age-Based Ratings.
For Country selection of Canada:
English Rating CAll children
08+ Children 8 years and older
GGeneral programming
PG Parental guidance
14+ Viewers 14 and older
18+ Adult programming
French Rating G General programming
8 ans+ Not recommended for young children
13 ans+ Not recommended for ages under 13
16 arts+ Not recommended for ages under 16
18 ans+ Programming restricted to adults
U.S.A. Rating See TV Rating under U.S.A. I\_r details.
38
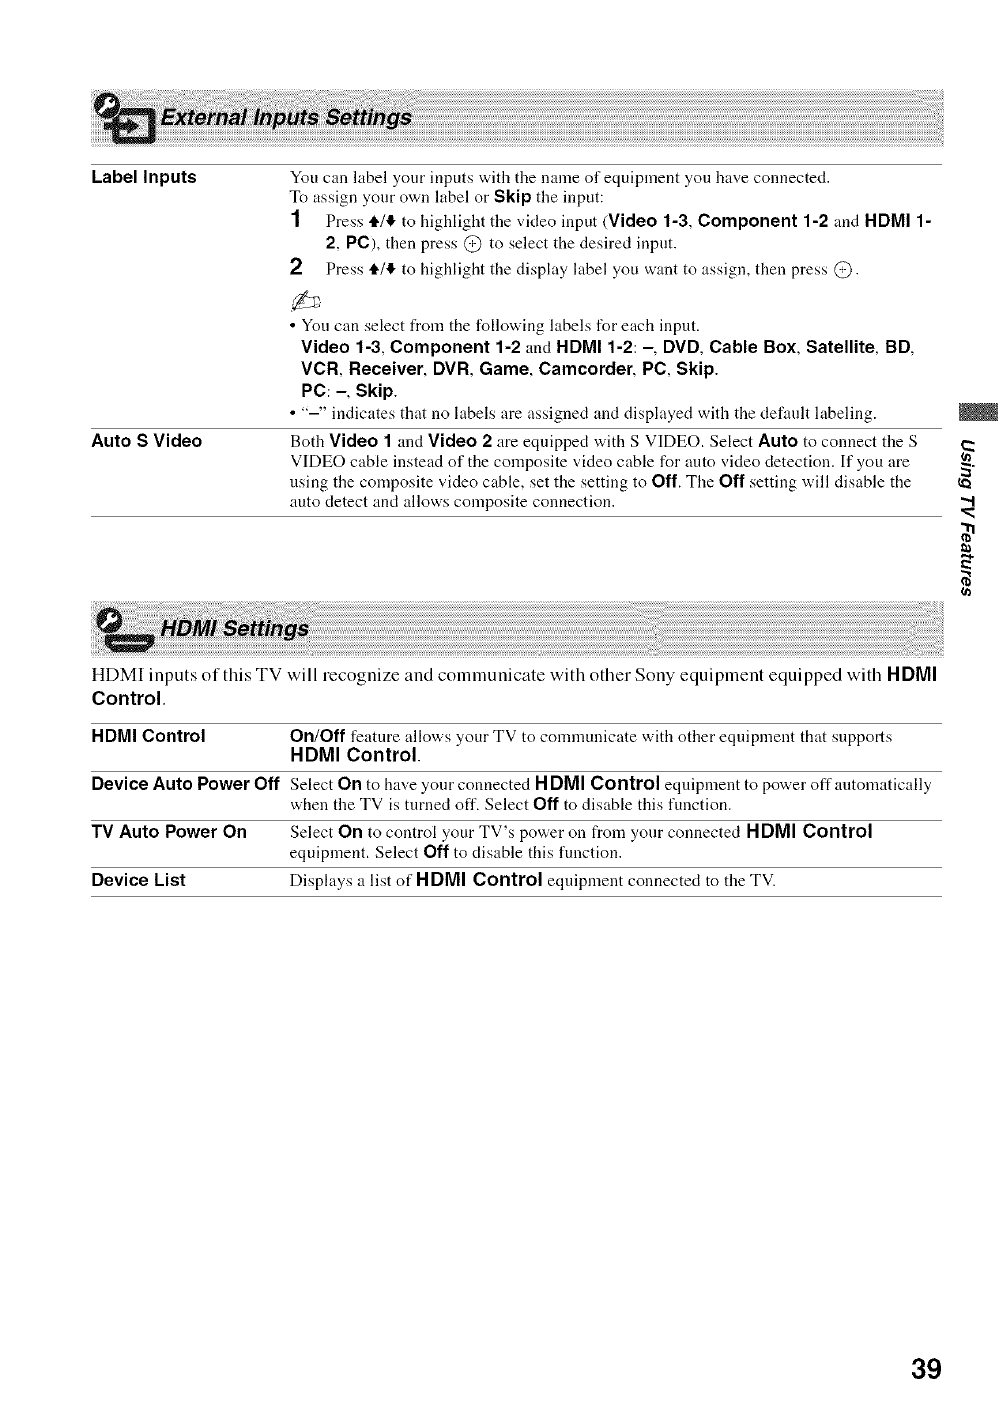
Label Inputs
Auto S Video
You can label your inputs with the name of equipment you have connected.
To assign your own label or Skip the input:
1Press t1.11_,to highlight the video input (Video 1-3, Component 1-2 and HDMI 1-
2, PC), then press @ to select the desired input.
2Press i./4 to highlight the display label you want to assign, then press @.
• You can select from the following labels for each input.
Video 1-3, Component 1-2 and HDMI 1-2: -, DVD, Cable Box, Satellite, BD,
VCR Receiver, DVR, Game, Camcorder, PC, Skip.
PC: -, Skip.
• "-" indicates that no labels are assigned and displayed with the default labeling.
Both Video 1and Video 2 are equipped with S VIDEO. Select Auto to connect the S
VIDEO cable instead of the composite video cable for auto video detection. If you are
using the composite video cable, set the setting to Off. The Off setting will disable the
auto detect and allows composite connection.
2
",,I
(n
HDM[ inputs of this TV will recognize and communicate with other Sony equipment equipped with HDMI
Control.
HDMI Control On/Off feature allows your TV to communicate with other equipment that supports
HDMI Control.
Device Auto Power Off Select On to hax.e your connected H DMI Control equipment to power offantomatically
when the TV is turned off. Select Off to disable this function.
TV Auto Power On Select On to control your TV's power on from your connected HDMI Control
equipment. Select Off to disable this function.
Device List Displays a list of HDMI Control equipment connected to the TV.
39
Language
Info Banner
Power Saving
Light Sensor
PC Power
Management
Select the hmguage of your choice from English, Espafiol and Fran_ais to be used for
displaying all the on-screen settings.
Displays the program name and the program information such as program title and
program rating (if available from the broadcaster) when option is set to On. Select Off for
minimal display information. Selecting Off will not completely disable the banner
display. Info Banner also appears on the screen each time the channel is changed or
DISPLAY button on the remote control is pressed.
• To see the rating information on the banner, Info Banner setting must be set to On.
Reduces the power consumption by adjusting the backlight brightness. This also enhances
the black level. Select from Off, Low, High and Picture Off.
Enables the automatic picture (screen) brightness control. The Light Sensor measures
the room brightness which allows the TV to automatically adjust the backlight brightness
based on the picture settings and the ambient room light conditions.
• Be sure not to put anything around the sensor, as its function may be affected (see page
26).
• In low light the range of the backlight control is reduced when the Light Sensor is set
to On.
On Automatically enters to standby mode when there is no signal input
I\_r more than 30 seconds. The STANDBY LED on the front panel
will illmninate when PC Power Management switches the TV to
standby mode.
Off Turns off PC Power Management.
• To bring the TV out of standby mode and recover TV features, press POWER on the
remote control.
•PC Power Management isnot VESA-compliant.
If you have missed the Initial Setup when you first connected the TV or if you want to scan all receivable
channels, you can run the Initial Setup. Follow the instructions on the screen. Settings such as picture and
sound adjustments will not be affected by this Initial Setup.
•Favorites list will be cleared each time you run the Initial Setup.
40
Troubleshooting
If you have questions, service needs, or require
technical assistance related to the use of your
Sony TV. please visit our website or call one of
the following numbers:
http://www.sony.com/tvsupport
1-800-222-SONY(7669) for US Support
1-877-899-SONY(7669) for Canadian Support
No picture
No picture • Check the Power Saving settings (see page 40).
Cannot receive any channels • Make sure the power cord is connected securely.
• Turn on the power of the TV.
• Check antenna/cable connections.
• Make sure the Cable setting is correct for your TV signal source.
TV is locked to one channel • Perform Auto Program to add receivable channels that are not present in the
TV's memory (see pages 21 and 35).
Cannot receive or select • Perform Auto Program to add receivable channels that are not present in the
channels TV's lnemory (see pages 21 and 35).
• To receive or select cable channels, make sure that Cable in the Channel
settings is set to On (see page 35). To receive or select UHF channels over an
antenna, make sure Cable is set to Off.
The TV turns off • Check if Sleep Timer is activated, or confirm the Duration setting of Timer
automatically (see page 30).
• Check PC Power Management in General Settings (see page 40).
No picture from some video • Check the connection between the optional video equipment and the TV.
sources • Press INPUT on the remote control (see page 25).
• Press HOME on the remote control. Select your desired input from the
External Inputs list.
Poor picture
The quality of the images is • Picture quality depends on the signal content. See Quick Setup Guide
not as good as what I saw at (supplied) to display the best possible picture for that signal.
the store
Double images or ghosts • Check antenna/cable connections.
• Check the antenna location and direction.
Only snow and noise appear • Check if the antenna is broken or bent.
on the screen • Check if the antenna has reached the end of its serviceable life. (3-5 years in
normal use, 1-2 years at the seaside.)
Dotted lines or stripes • Keep the TV away from noise sources such as cars, motorcycles, or hair-dryers.
• If using 300 ohm twin lead, move the excess lead away from the TV or try using
75 ohm coaxial cable instead.
No color/Dark picture/Color is • Press PICTURE to select the desired Picture Mode (see page 23).
not correct/The picture is too • Adjust the Picture Mode options in the Picture settings (see page 30).
bright • If you set the Power Saving mode to Low or High, it will enhance the black
level (see page 40).
Noisy picture • Make sure that the antenna is connected using a 75-ohm coaxial cable.
• Keep the antenna cable away from other connecting cords.
• To avoid TV interference, make sure to use an undamaged antenna cable.
0
o
No sound/Noisy sound
Good picture, no sound • Check the volume control.
• Press MUTING or VOL + so that "Muting" disappears from the screen
(page 24).
• Disconnect your headphones.
• Set Speakers to TV Speakers in the Audio Options settings (see page 34).
If it is set to Audio System, sound is not output from the TV's speakers
regardless of the TV's volnme control.
Audio noise •Make sure that the antenna is connected using a 75-ohm coaxial cable.
• Keep the antenna cable away from other connecting cords.
• To avoid TV interference, make sure to use an undamaged antenna cable.
PC Input
No Picture /No Signal • Confirnl the PC is correctly connected to the TV with either the PC IN (with an
HDI5 cable) or with the HDMI IN.
• Ensure the output signal from the PC is one of the formats listed on page 18.
• Turn the PC oft'. Confirm the PC connection and restart the PC. Plug and play
will auto-detect the TV and correctly set up PC timing.
• Verify PC Power Management is activated (see page 40).
Poor Pictnre •Adjust the resolution (see page 18).
•A@lst Pitch and Phase.
General
Wide Mode changes • The current Wide Mode setting is automatically replaced with the 4:3
automatically Default setting when you change the channel or video input, if 4:3 Default in
the Screen settings is set to other than Off. If you want to lock in Wide Mode
selected with WIDE on the remote control, set 4:3 Default to Off in the
Screen settings (see page 32).
• Check the Auto Wide option in the Screen settings (see page 33).
Suddenly the picture gets • The picture gets smaller during the commercials, this is due to the method the
smaller provider broadcasts their contents. When HD content channels switch to SD
definition content (commercials), the picture may be small with a black border.
"Black box" on screen • You have selected a text option and no text is available (see page 36). To turn off
this feature, set the CC Display option to Off. If you were trying to select
closed captioning, select CC1 instead of Text1-4.
Black bands appear at the • Some wide screen programs are filmed in aspect ratios that are greater than 16:9
edges of the screen (this is especially connnon with theatrical releases). Your TV will show these
programs with black bands at the top and bottom of the screen. For more
details, check the documentation that came with your DVD (or contact your
program provider).
• Programs in 4:3 aspect ratio will have bands on left and right sides of the
screen.
Certain programs on DVD or • This is dne to the digital compression of the source content nsed by certain
other digital sources display a digital broadcasts and DVDs which may cause your TV's screen to display less
loss of detail, especially dnring detail than usual, or cause artifacts (small blocks or dots, pixelations) to appear
fast-motion or dark scenes on your screen. These signal compressions are more visible and are dependent
on the clarity and resolution of the television.
Remote control does not • Check the polarity of the batteries or replace the batteries.
operate •Point the remote control at the remote control sensor located at the front of the TV.
• Fluorescent lamps can interfere with yonr remote control operation; try turning
off the fluorescent lamps.
• Keep the remote control sensor area clear from obstacles.
Some digital cable channels • Certain cable companies have limitations on the broadcast of digital cable
are not being displayed channels. Check with your cable company for more information.
• The digital cable channel may be set to Hidden in the Show]Hide Channels
setting (see page 35).
42
Lost password •Select the Password settings on the Parental Lock settings, then enter the
I_llowing master password: 4357. The master password clears your previous
password and allows you to enter a new password (see page 36).
How to reset the TV to factory •Turn on the TV. While hokting down i. on the remote control, press POWER
settings on the TV. (The TV will turn itself off. then back on again.) Release i..
WARNING: The Reset will clear all of your customized settings including the
Parental Lock setting.
O
o
43
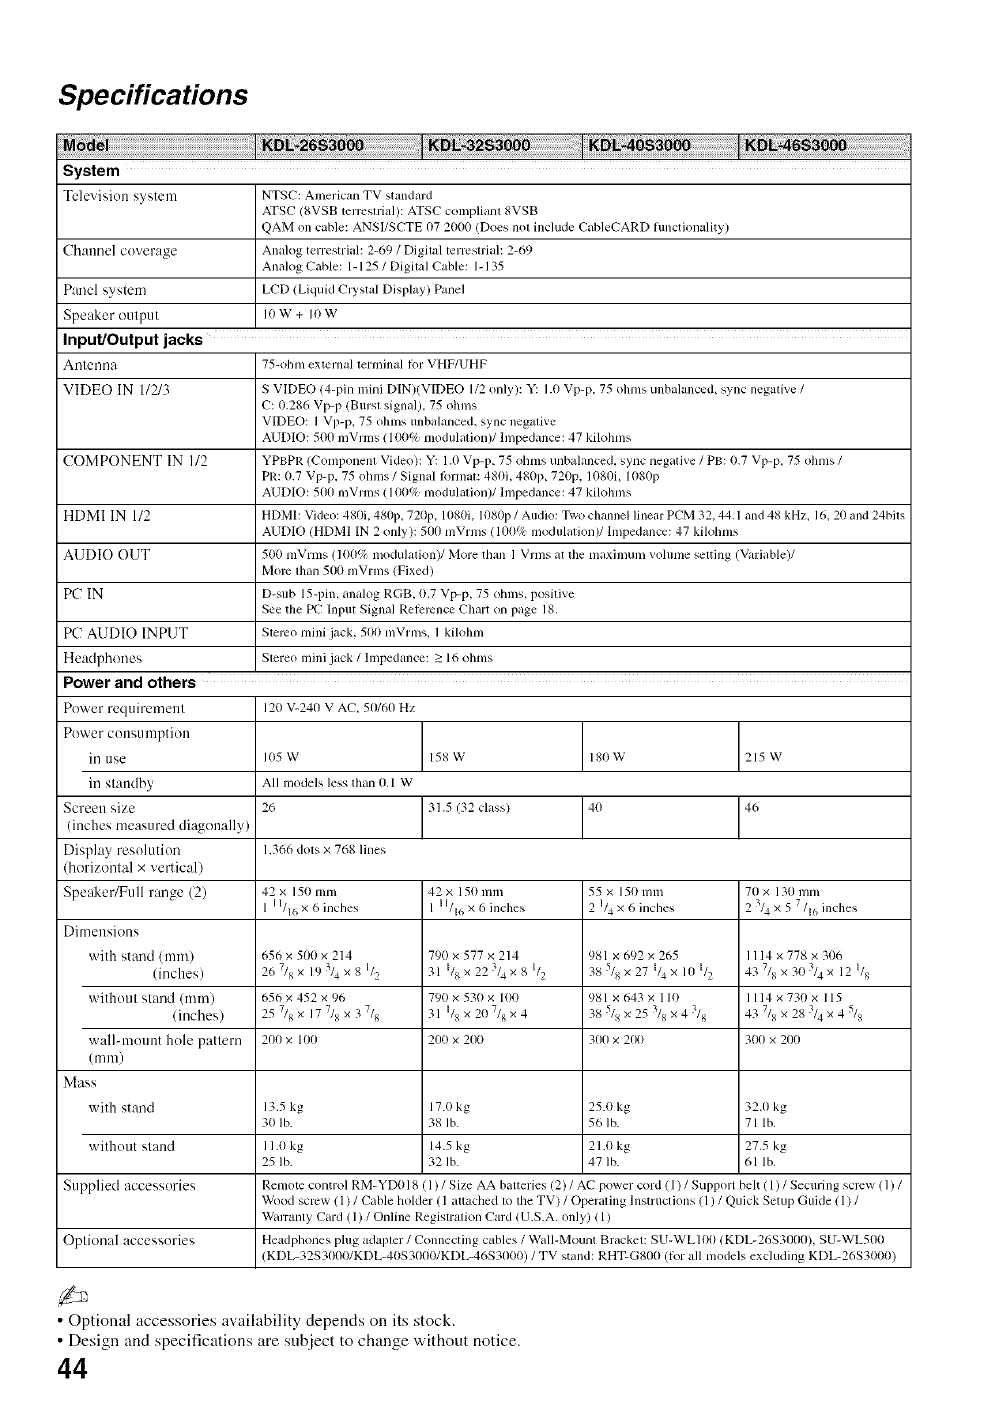
Specifications
System
Tc]evision system NTSC: American TV standard
ATSC/8VSB terrestrial): ATSC colnpliant 8VSB
QAM on cable: ANSI/SCTE 07 2000/Does not include CableCARD functionality)
Channel coverage Analog terreslrial: 2-69 /Digilal terreslrial: 2-69
Analog Cable: 1-125 /Digilal Cable: I- 135
Panel syslem LCD/Liquid CITstal Display) Panel
Speaker oulput Ill w + Ill w
Input!Output jacks
Alllelllla 75-(111111external lerlninal Ior VHF/UHF
VIDEO IN I/2/3 S VIDEO/4-pin lnini DIN)(VIDEO 1/2 onlyh Y: I.t) Vp-p, 75 ohms unbalanced, sync negative /
C: 1).286 Vp-p (Burst signal), 75 ohnls
VIDEO: I VI> p, 75 ohlns unbalanced, sync negative
AUDIO: 511() n/Vrms /1(1() (/_ modulatk)n)/hllpedance: 47 kilohms
COMPONENT IN I/2 YPBPP. (Colnpolmnt Video): Y: l.(/Vp-p, 75 ollms unbalanced, sync negative /PB: 0.7 VI> p, 75 ohms /
PP.: 0.7 Vp-p, 75 ohms/Signal lkmnat: 48(1i, 480p, 720p, 1080i, 1080p
AUDIO: 5(1(I n/Vrms /1(1() c/_ modulation)/hnpedance: 47 kilohms
HDMI IN 1/2 HDMI: Video: 480L 48(1p_ 72(1p_ l(lSl)i, ll)80p / Audio: Two clmnnel line u PCM 32, 44.1 and 48 kHz, 16.20 and 24bits
AUDIO (HDMI IN 2 only): 50(1 mVrms (lt)()c/_ modulation)/hnpedance: 47 kilohms
AUDIO OUT 500 mVrlns (1()0(_ - lnoduhttion)/More than I Vrlns at tim maxinmm vohune setting (Vhriable)/
More than 5(1(/mVrms (Fixed)
PC IN D-sub 15-pin, analog RGB, 0.7 Vp-p, 75 ()hills, positive
See tile PC" [npllt Signal Relerence Chart Oll page 18,
PC AUDIO INPUT Stereo mini jack, 500 mVrms, 1 kilohm
Headphones Stereo inini jack /hnpedance: _>16 ()bills
Power and others
120 V-240 V AC, 51)/6(1 Hz
Power requirement
Power consumption
in use
in standby
Screen size
(inches tneasured diagonally)
Display resolution
(horizontal x vertical)
Speaker/Full range (2)
Ditnensions
with stand (ram)
(inches)
without stand (ram)
(inches)
wall-mottnt hole pattern
(tnm)
Mass
105 W 158 W 180 W 215 W
All models less than (/,l W
26 31.5 (32 class) 4(1 46
1,366 dots x 768 lines
42 x 150 mm
1 I I/i 6 x 6 illcbes
656 x 500 x 214
26 7/8 x 19 3/4 × 8 I/2
42 x 150 Into
1 I I/i 6 x6 inclles
790 X 577 X 214
31 I/g X 223/4 X 8 I/2
55 X 150 nnn
2 I/4 × 6 inches
981 x 692 x 265
38 5/8 x 27 I/4 x 10 I/2
7(1 x 130 nlln
2 3/4 x 5 7/16 inches
I 114 x 778 x 306
43 7/s x 30 3/4 x 12 I/s
656 x 452 x 96 790 x 530 x Ill0 981 x 643 x 1 Ill I 114 x 730 x 115
25 7/Z x 17 7/_ x 3 7/Z 31 I/a x 21)7/z x 4 38 5/8 x 25 3/_ x 4 _/z 43 7/_ x 28 _/4 x 4 5/a
200 x 100 201) x 200 300 x 201) 300 x 200
with stand 13.5 kg 17.0 kg 25.0 kg 32.0 kg
30 lb. 38 lb. 56 lb. 71 lb,
without stand I 1.0 kg 14.5 kg 21.0 kg 275 kg
25 lb. 32 lb. 47 lb. 61 lb,
Supplied accessories Remote control RM-YDt) 18 ( 1) /Size AA batteries (2) /AC power cord ( 1) /Support belt ( 1) /Securing screw ( 1) /
Wood scrcw( 1) /Cable holder ( 1 attached to tile TV) /Operaling lnstructkms (1) /Quick Setup Guide ( 1) /
Warranty Card (1) /Online Registratkm Card/U.S.A, only) ( 1)
Optional accessories Headphones plug adapter /Connecting cables /Wall-Mount Bracket: SU-WL100 (KDL-26S31100), SU-WL500
(KDL-32S3[IO0/KDL-41)S3[IO0/KDL-46S3011()) /TV stand: RHT-GS00 (lor all models excluding KDL-26S311(1())
• Optional accessories availability depends on its stock.
• Design and specifications are subject to change without notice.
44
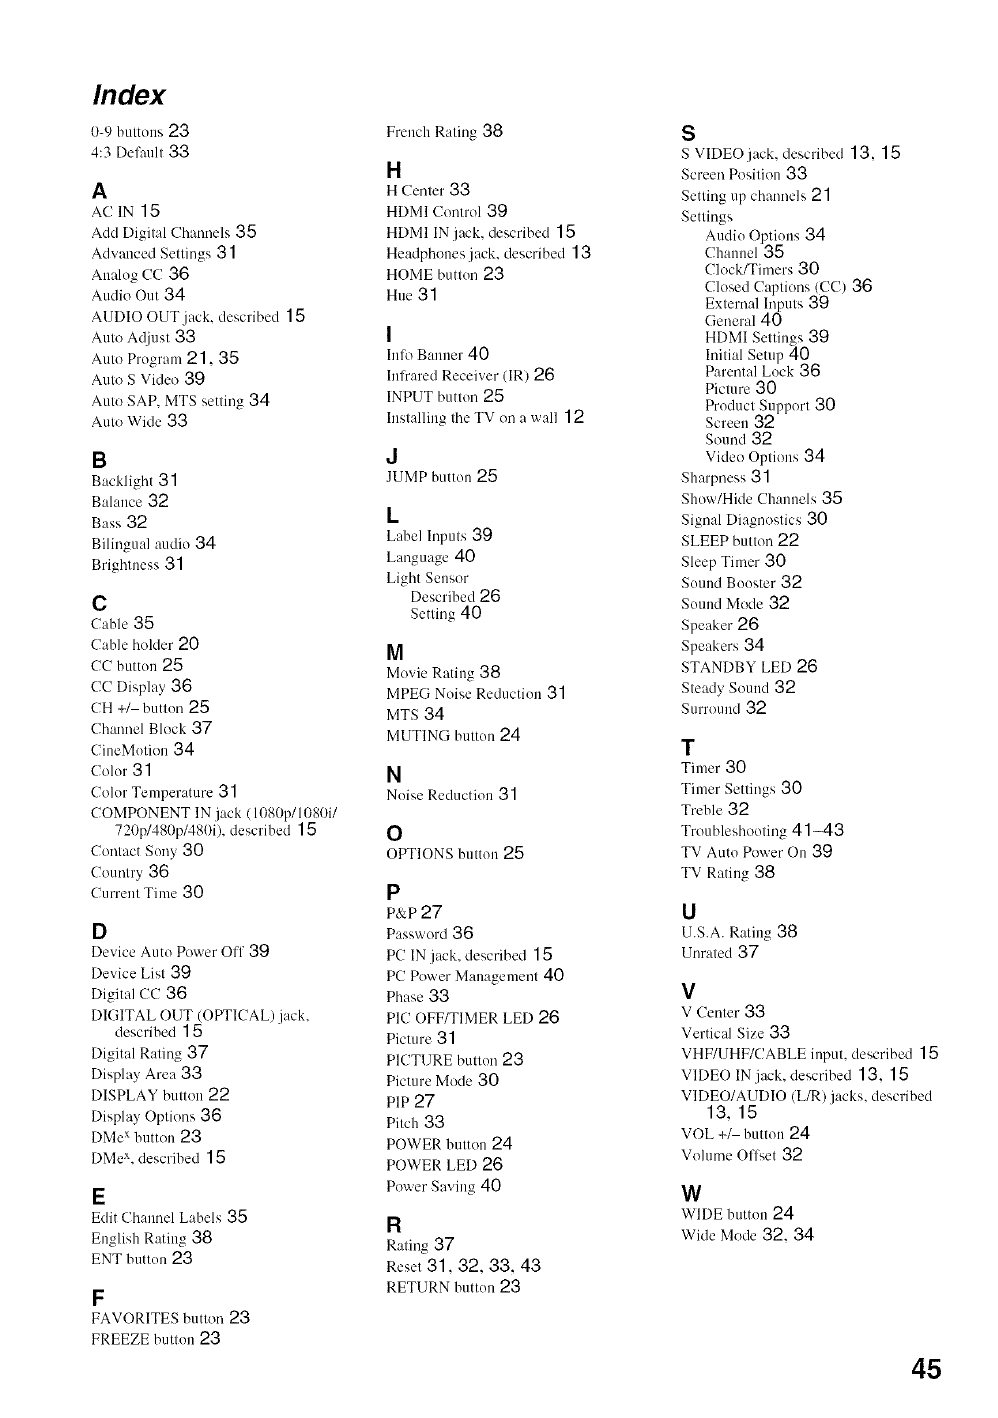
Index
0-9 buttons 23
4:3 Delhult 33
A
ACIN 15
Add Digital Chmmels 35
Adwmced Settings 31
Analog CC 36
Audio Out 34
AUDIO OUT jack, described 15
Auto A_ljust 33
Auto Prugram21,35
Auto S Vide() 39
Auto SAP, MTS setting 34
Auto Wide 33
B
Backlight 31
Balance 32
Bass 32
Bilingual audio 34
Brightness 31
C
Cable 35
CaNe holder 20
CC buttun 25
CC Display 36
CH +/ buttun 25
Chamlel Block 37
CineMution 34
Color 31
Colur Temperature 31
COMPONENT IN jack ( 1080p/1080i/
720p/480p/480i), described 1 5
Contact Soo> 30
Country 36
Current Time 30
D
Device Auto Power Off 39
Device List 39
Digital CC 36
DIGITAL OUT (OPTICAL) jack,
described 15
Digital Rating 37
Displa_ Area 33
DISPLAY button 22
Display Options 36
DMe x button 23
DMe x, described 15
E
Edit Chalmel Labels 35
English Rating 38
ENT buttun 23
F
FAVORITES button 23
FREEZE button 23
French Rating 38
H
H Center 33
HDMI Control 39
HDMI IN jack, described 15
Headphones jack, described 13
HOME buttun 23
Hue 31
I
I1(% Banner 40
Infrared Receiver (IR) 26
INPUT button 25
Installing the TV on a wall 12
d
JUMP button 25
L
Label Inputs 39
Language 40
Light Sensor
Described 26
Setting40
M
Movie Rating 38
MPEG Noise Reduction 31
MTS 34
MUTING buttun 24
N
Noise Reduction 31
O
OPTIONS button 25
P
P&P 27
Password 36
PC IN jack, described 15
PC Power Management 40
Phase 33
PIC OFF/TIMER LED 26
Picture 31
PICTURE button 23
Picture Mode 30
PlP 27
Pitch 33
POWER button 24
POWER LED 26
Power Saving 40
R
Rating 37
Reset 31, 32, 33, 43
RETURN buttun 23
S
S VIDEO jack, described 13, 15
Screen Position 33
Setting up channels 21
Settings
Audiu Options 34
Channel 35
Clock/Timers 30
Closed Captions (CC) 36
External Inputs 39
General40
HDMI Settings 39
Initial Setup 40
Parental Lock 36
Picture 30
Product Support 30
Screen 32
Sound 32
Video Options 34
Sharpness31
Show/Hide Channels 35
Signal Diagnostics 30
SLEEP button 22
Sleep Timer 36
Suund Booster 32
Suund Mode 32
Speaker 26
Speakers 34
STANDBY LED 26
Steady Sound 32
Surround32
T
Timer 30
Timer Settings 30
Treble 32
Troubleshooting41-43
TV Auto Power On 39
TV Rating 38
U
U.S.A. Rating 38
Unrated 37
V
V Center 33
Vertical Size 33
VHF/UHF/CABLE input, described 15
VIDE() IN jack, described 13, 15
VIDEO/AUDIO (L/R) jacks, described
13, 15
VOL +_ button 24
Vohmm Ol'l_,et 32
W
WIDE buttun 24
Wide Mode 32, 34
45
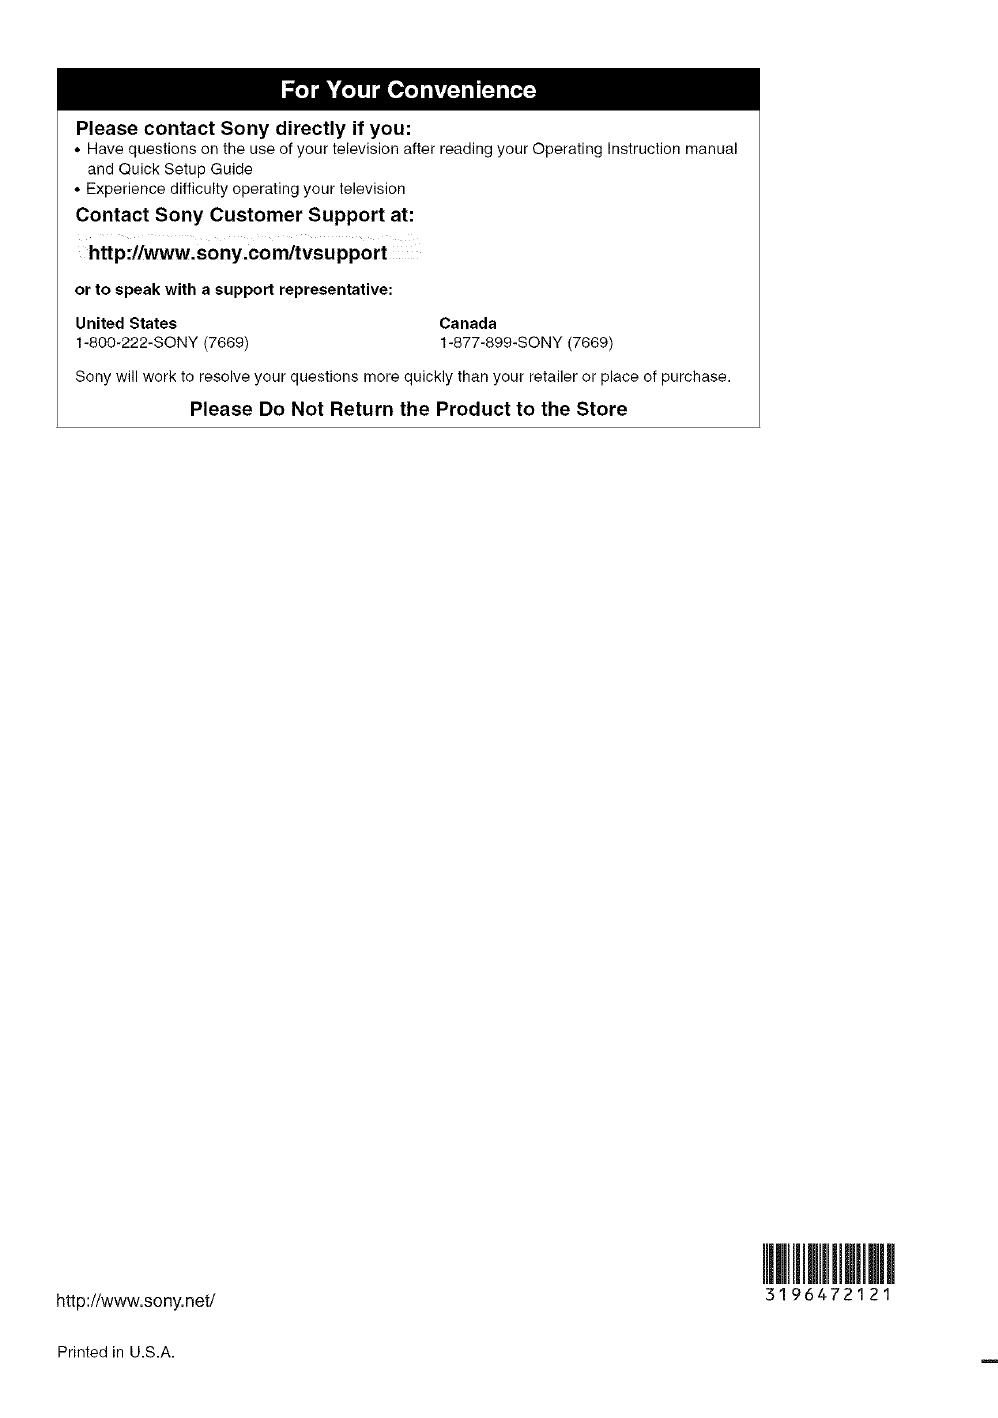
Please contact Sony directly if you:
• Have questions on the use of your television after reading your Operating Instruction manual
and Quick Setup Guide
• Experience difficulty operating your television
Contact Sony Customer Support at:
htt p://www.sony.co m/tvsu pport
or to speak with a support representative:
United States
t-80O-222-SONY (7669)
Canada
1-877-899-SONY (7669)
Sony will work to resolve your questions more quickly than your retailer or place of purchase.
Please Do Not Return the Product to the Store
http:!/www.sony.net/
Printed in U.S.A.
3196472121
