Sony KDL 32S2400 User Manual LCD TELEVISION Manuals And Guides L0610769
SONY LCD Television Manual L0610769 SONY LCD Television Owner's Manual, SONY LCD Television installation guides
User Manual: Sony KDL-32S2400 KDL-32S2400 SONY LCD TELEVISION - Manuals and Guides View the owners manual for your SONY LCD TELEVISION #KDL32S2400. Home:Electronics Parts:Sony Parts:Sony LCD TELEVISION Manual
Open the PDF directly: View PDF ![]() .
.
Page Count: 48

SON&,': 2-893-218-11(1)
LCD Digital Color TV
Operating Instructions
BRAVlA
KDL-32S2400 KDL-40S2400
© 2006 Sony Corporation
Owner's Record
The model and Sel'i_l numbers are loc.tcd _1 llle l_m" of the TV. Record
these numbers in the sp_Lces provided below, Reli:r to them whenever
you c_dl upon your Sony de_ler rcg_Lrding this product.
Model No.
Serial No.
For Your Convenience
Please contact Sony directly if you:
•Have questions on the use of your television after reading your manual
Experience difficulty operating your televsion
Contact Sony Customer Support at:
http://www.Sony.Com/tvsupport
or to speak with asupport representative:
United States
1-800-222-SONY (7669)
8:00 AM - 10:00 PM (EST) Mon-Fri
10:30 AM - 7:15 PM (EST) Sat-Sun
Sony will work to resolve your questions more quickly than your retailer or place of purchase.
Please Do Not Return the Product to the Store
Canada
1-877-899-SONY (7669)
8:00 AM - 6:00 PM (Eastern)
8:00 AM - 5:00 PM (Western)
2
WARNING
To reduce tile risk ol fire or electric shock, do
not expose this apparalllS to rain or IllOisture.
This synlbol is intended to
alert the user to the presence
of uninsulated "dangerous
voltage" within the
prodllct's enclosure that
nlay be of sufficient
nlagnitude to constitute a
risk of electric shock to
persons.
This synlbol is intended to
a]erl the user to the presence
of hllportanl operathlg and
nlaintenance (selwicing)
instructions in tile literature
acconlpanying the
appliance.
The apparatus shall not be exposed to dripping
or splashing and no objects filled with liquids,
such as vases, shall be placed on the apparatus.
CAUTION
To prcvenl electric shock, do not use lids
polarized AC plug with an extension cord,
rcceplacle or olher outlet unless the blades can
be lidly inserted to prevem blade exposure.
Note on Caption Vision
This TV pl'o_ ides display of TV closed
captioning in accordance with §15.119 ol tile
PCC I ules.
Declaration of Conformity
Trade Nanle: SONY
Model: KDL- 32S240(I/KDL-40S24110
Responsible Party: Sony Electronics Inc.
Address: 1653(t Via Esprillo
San Diego, CA 92127 U.S.A.
Telephone Nunlber: 858-942-2230
This device conlplies with part 15 of the FCC
rules. Operation is subject to file tbllowing
two condilions: (1) This device nlay nol
cause hannlul interlPrence, and (2) lhis
device nlusl accept any interii:mnce received,
including interilrmnce thai nlay cause
undesired operation.
NOTIFICATION
This equipment has been tested and lound to
conlply with tile limits Ior a €'lass B digital
device, pursuant to Part 15 ol tile FCC Rules.
These lilnits are designed to provkle reasonable
protection against harnlfld interlcrence ill a
rcsidentiM installation. This equiplnenl
generates, uses and can radiate radio hequency
energy and, i1 not inskd]ed and u_d ill
ac,'ordance with tile instruclions, nlay cause
harlnfill interlcrence to radio COllllllUlliCaliOllS.
However, lher¢ is no guarantee thai interlPrence
will not occur in a particular installation. If this
equipnlent does cause harmful imerlcrence to
radio or television reception, which can be
determined by turning tile equipment offand on.
file user is encouraged to try to correct lhe
interlerence by one or more of die k)llowing
nleasllres:
[] Reorient or relocale tile receiving
antenna.
[] Increase tile separation belween lhe
equipment and receiver.
[] Connect the equipnlent inlo an Ollllet on a
circuil dill_rent hom that lo which the
receiver is connected.
[] Consull the dealer or an experienced
radio/TV technician lor help.
Pursuant to FCC regulations, you am
cautioned thai any changes or modifications
not expressly appwved in this manual could
void your authority to operale this
equipnlenl.
For Customers in Canada
This €'lass B digital apparalus complies wilh
Canadian ICES-003.
Safety
[] Operate the TV only on 120-240 V AC.
[] Use tile AC power cord specified by Sony
and suitable lor tile voltage where you use
il.
[] Tile plug is designed, lor salPty purposes,
to fit into the wall outlet only one way. If
you are unable to insert the plug flflly into
the outleL contacl your dealer.
[] If any liquid or solid ot_iect shouM lall
inside tile cabinet, unphlg tile TV
imnlediately and have it checked by
qualified service personnel belore
operating it fimher.
[] If you will not be using the TV lor several
clays, disconnect the power by pulling the
plug itselL Never pull on file cord.
[] For details concerning salety precatnions,
see '+lll/porlanl Salety Instructions" on
page 4.
Installing
[] Tile TV shouM be installed near an easily
accessible power outlet.
[] To prevent internal Ileal buildup, do nol
block the ventilation openings.
[] Do not install file TV in a hot or hunlid
place, or in a place subject to excessive
dust or mechanical vibration.
[] Avoid operating tile TV al lelnperaturcs
below 41°P (5°C).
[] If tile TV is transported directly tionl a
cold to a warln location, or if file roonl
tenlperature changes suddenly, file picture
may be bhlrred or show poor color due to
inoisture Colldellsatioll. In this case,
please wait a lPw hollrs 1o let file moisture
evaporate belorc turning on the TV.
[] To obtain the best picture, do not expose
the screen to direct illumination or direct
sunlight. It is recomnlended to u_ spot
lighting directed down lrom file ceiling or
to cover the windows lhat lace the screen
with opaque drapery. It is desirable to
install file TV in a room where the floor
and walls arc nol of a reflective material.
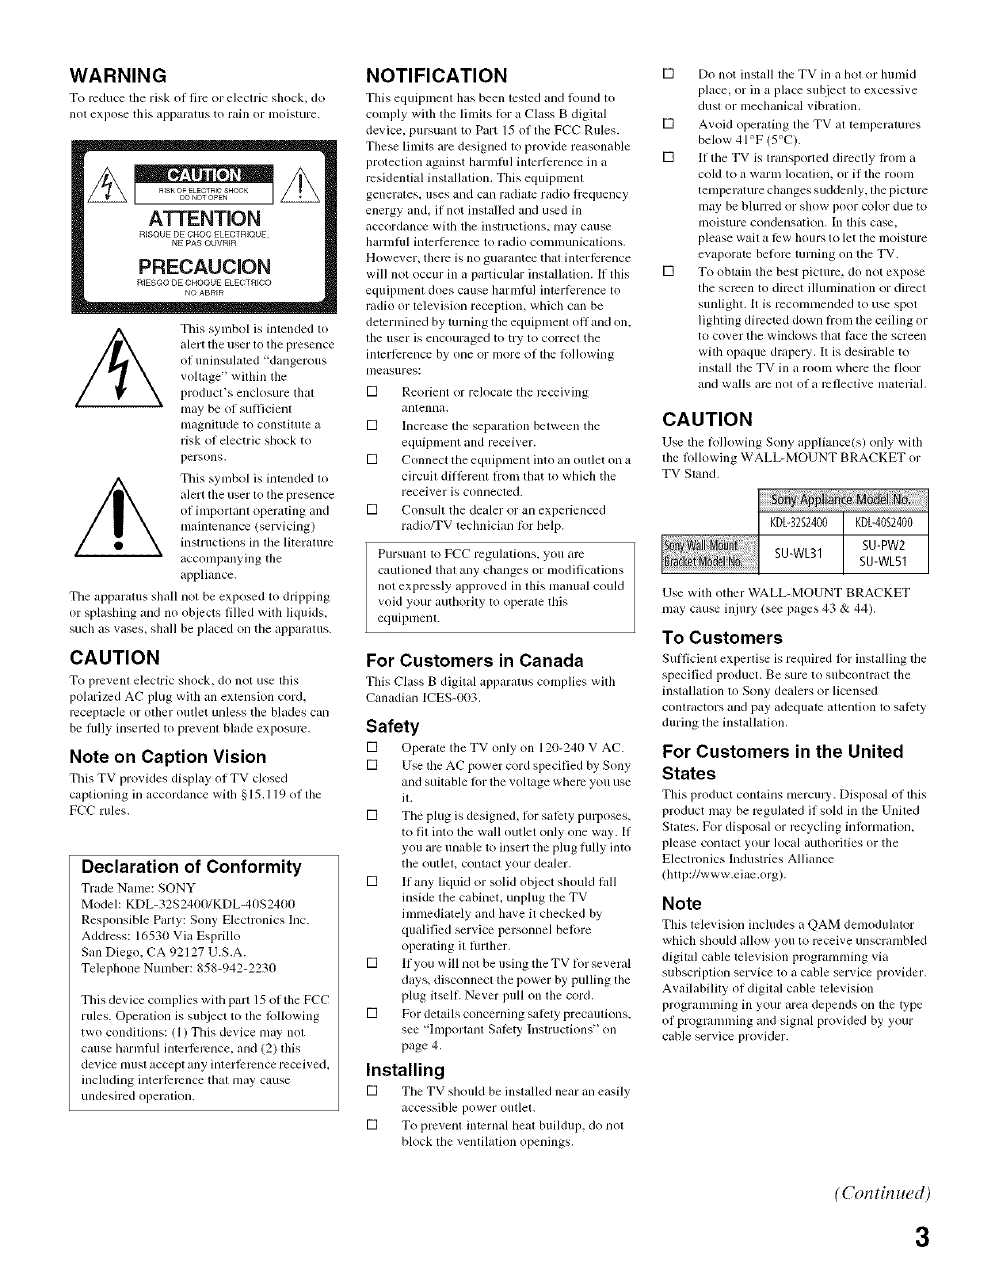
CAUTION
Use tile Iollowing Sony appliance(s) only wifll
file lollowing WALL-MOUNT BRACKET or
TV Sland,
KDL-3252400 KDL-4052400
Sony_ SU-PW2
SU-WL31 SU-WL51
Use with other WALL-MOUNT BRACKET
nlay cause injury (see pages 43 & 44).
To Customers
Sulficient experlise is required 1or installing tile
specified product. Be sure to subcontract the
installation to Sony dealers or licensed
contractors and pay adequate attention to salety
during tile installation.
For Customers in the United
States
This product contains nlerculy. Disposal o1 this
product may be regulated if sold in tile United
States. For disposal or recycling inlbmlation,
please COlltlCI yo/ir local aufllorilies or tile
Electronics Industries Alliance
(htlp://www.eiac,org).
Note
This television includes it QAM demodulator
which shouM allow you to receive unscranlbled
digital cable teleqsion programming via
subscriptkm service to a cable sel'_ice provider.
Availability of digital cable television
programlning ill your area depends on tfie type
of progranmdng and signal provided by your
cable service provider.
(Con tin ued)
3
Trademark Information
TruSurlound XT, SRS and ( • ) symbol al'_ trademarks of SRS Labs, lnc.
TruSurround XTtecbnology is incorporaled under licenseholn SRS Labs,
Inc,
Manutacturcd under license hom BBE Sound, lnc.
Licensed by BBE Sound, Inc, under one or more of the lollowing US
palents: 5510752, 5736897. BBE and BBE symbol are registered
trademarks of BBE Sound, lnc.
Macintosh is a trademark licensed to Apple Compuler, Inc,, registered in
the U.S.A and other countries.
'+BRAVIA"and BRAVIA are trademarks of Sony Corporation.
H_ml This TV incorporates High-Definiti ....
Mtdlilnedia Intell_tce (HDMP M)technology,
HDMI, the HDM[ logo and High-Delinition Multilnedia Interlace are
tradelnarks or registered tradel/larks of HDMI Licensing, LLC.
Manulactured under license fiOln Dolby
DD _ Laboratories. "Dolby" and lhe double-D symbol are
D|G | T A L tradelnarksofDolby Laboratories.
Important
Safety
Instructions
1} Readthese instructions.
2) Keep these instructtons.
3) Heed all warnings.
4_ Follow all instructions.
5) Do not use this apparatus near water.
61 Clean only with dr 3 cloth
7_ Do not block any ventilation openings, install in
accordance with the manufactnrer's instructions
8) Do not install near _y heat sources such
as radiators, heat regis_
apparatus (including amplifiers _that
produce heat.
9) Do not defeat the safety purpose of the polarized or
grounding-type plug. A polarized plug has two blades
with one wider than the other, A grounding type plug
ha- two blades and a third grounding prong. The wide
blade or the third prong are provided for your safety.
ff the provided plug does not fit into your outlet.
a'onsult an electrician for replacement of the obsolete
outlet
10_ Protect the power cord from being walked on or
pinched particularl? at plugs, convemence
receptacles, and the point where the5 exit from the
apparatus
11 )Only use attachments/accessories specified b 3 the
manufacturer.
12 )Use only with the cart. stand, tripod, bracket, or table
specified by the manufacturer, or sold with the
apparatus. When a cart is used. use caution when
moving the cart/apparatus combination to avoid
injury from tip-over.
13} Unplug this apparatus during lightning storms or
when unused for long periods of time.
14} Refer all servicing _o qualified service personnel.
Servicing is required when the apparatus has been
damaged in any way, such as power-supply cord or
plug is damaged, liquid has been spilled or objects
have fallen into the apparatus, the apparatus has been
exposed to rain or moisture, does not operate
normally, or has been dropped.
4
USE grounding conaucrors, location of antenna discharge unit. connection to
grounding electrodes, and requirements tor rile grounding electrode.
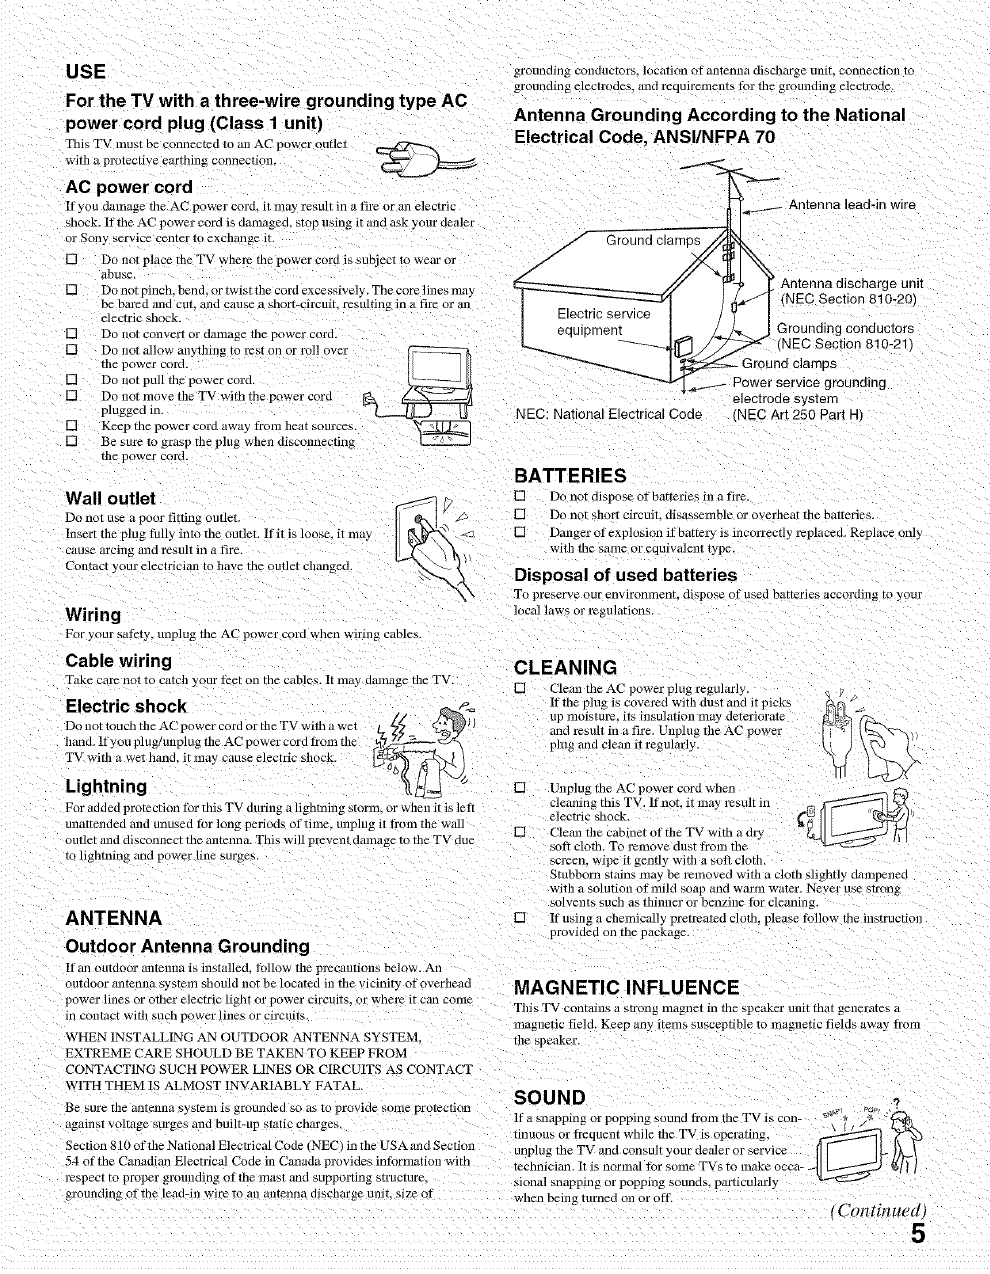
Antenna Grounding According to the National
Electrical Code, ANSI/NFPA 70
-----% <__.
Antenna lead-in wire
Wall outlet
Do not use _1pool" fitting oUHeT.
Insert tile plug tully into tile outlet. If it is loose, it may
cause arcillg and result in utire.
Contact your electfician to have the outlet changecl.
Wiring
For your sat?ty, unplug rile AC power cart] when wiring cames.
Cable wiring
Take care nor to catch your I?et on tile cables. It may f]amage tile TV.
Electric shock p_
DonotrouchtheACpowercordortheTv wmlawe, _L,_,.x-h_= _lI
hand. If you plug/unplug tile AC power cord from tile
TV wit] .... t hand. it may c.......... tric shock. _._
Lightning
For added protection tbr this TV during a lightning srorm, or when it is left
unattended and unused for long periods of time, unplug it h'om tile wmi
outlet and disconnect tile antenna. This will prevent damage to tile TV due
ro lightning and power line surge,
ANTENNA []
Outdoor Antenna Grounding
If an outdoor antenna is installed, tPJlow tile precautions below. An
oumoor an;enna system should not be located in tile vicinfiy of overhead
power lines or oilier electric light or power circuits, or whel_ it can COllie
in contact with suce power lines or circuits.
WHEN INSTALLING AN OUTDOOR ANTENNA SYSTEM.
EXTREME CARE SHOULD BE TAKEN TO KEEP FROM
CONTACTING SUCH POWER LINES OR CIRCUITS AS CONTACT
WITH THEM IS ALMOST 1NVARIABL_ FATAL.
Be sure rile antenna sSMelll is grounaef] so as lo pi wide soJne protection
againsT voltage surges and built-up static cnarges,
Section 810 of tile National Electrical Code (NECt in tile USA and Section
54 of the Canadian Electrical Code in Canada provides intbrnmtion with
respect to proper grounding of tile mast and supporting structure,
grounding of the lead-in wire to all antenna discharge unll. sil£ of when being turned on or off.
BATTERIES
_'_ {'2 [] Do not dispose of batteries in a tire.
_ [] Do not short circuit, disassemble or overheat tile batteries.
%
I _Q _ [] Dmlger of explosion if battery is incorrectly replaced. Replace only
[_'\ \k with tile same or equiwdent type.
Disposal of used batteries
"X\ To preserve our environment dispose of used batteries accordin_ to youI
local laws ol regulations.
CLEANING
[] Clean tile Aft.'power plug regularly i'
uI"moislure= its hlsulafion llla) deteriorate
and resun in a tire. Unplug tile AC power
pmg and clean it regularly. _\/_
[] Unplug rile AC power core wnen __,:_
clemlltag this TV. lfnot it ma3 result in
,
electric shock. __
[] Cleml tile cabinet of tile TV witil a dr},
sOft clotil. To relllove dust fronl tile
scl_en, v ipe it gently with a soft cloth
Stubborn stains may be l_moved with a clotil slightly dampened
with a solution at mild soap and warm water. Never use strong
solvents such as tidnner or benzine for cleaning.
If using a chemically pretreated cloth please tbllow the instructioll
provided on the package.
MAGNETIC INFLUENCE
This TV contains a strong lnagner in tile speaker unit that generates a
magnetic field. Keep any items susceptible m magnetic fields away from
tile speaker.
SOUND
lI _ snapping or popp ng soum from tile TV s con- " * /_ -
..... \ I/
t......... trequent while tile TV ,s operating. _ ,_'m.v3
unplug tile TV and consult your dealer or service
technician. It is normal for some TVs to make occa-
donal snapping or popping sounds, particularly
tContinued, 5
For the TV with a three-wire grounding type AC
power cord plug (Class 1 unit)
This TV lllUSt be connected to all AC power OUrlel
witil a protective earthing connection.
AC power cord
If you damage tile AC power cord, it ma3 result in a fire or an electric
shock. If tile AC power cord is damagea, stop using it and ask your dealer
or Sony service cenmr m excnange it /Ground clamps /_
[] Do not place tile TV where tile po ....... d is subj ........... j_ _
abuse. _5- // _ r Antenna discharge unit
[] Donotpinch, bend_ortwisttilecordexcessively. Thecorelinesmay _ --_"-------J/ .-4" NEC Sectio 810 20
bebaredand cut and cause a short-circuit .... ltinginati .... an ] ....... _1 J"/" I ( n - )
electric shock.
[] Donot ...... t_ordamagethepowe,'cord. I equ_pmen_'WUe ]_ _ ._JGround,ng.coedactors
[] Do not all ..... yflling to rest on or rol .... _ _ "_/_ _ (NEC Section 810-21)
tilepowercord. I{ _ll _ ] _- Groundclamps
[] Do not pull rile power cord. _ _a-_.._._ Power service grounding
[] Do not move tile TV with rile power cord _ _ electrode system
plugged in, _ [J NEC: National Electrical Code _NEC Art 250 Part I-
[] Keep tile power cord away from heat som'ces.
[] Be sure to grasp tile plug when disconnecting
the power cord.
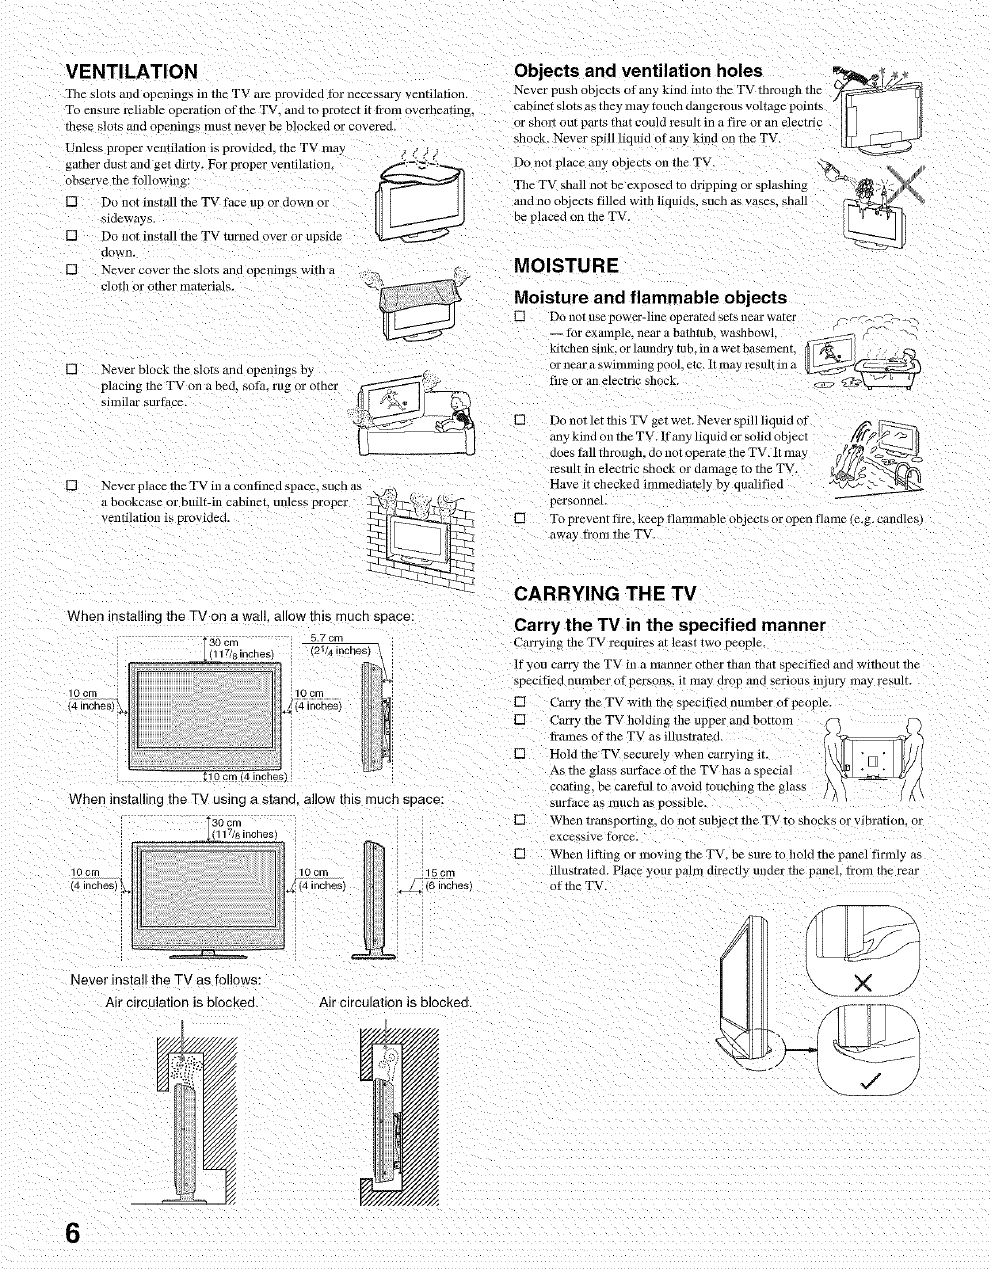
VENTILATION
The slots and openings ill the TV are provided tar necessary ventilation.
To ensur2 reliable operation of the TV. and to protect it trolnoverheating,
mese slots ;llld openil/gs lnust never be blocked or covered.
Unless proper ventilation is provided, the TV may ,, / j j
garner clus[ mlfl get dirty. For proper ventilatiom f:_:2.,._,
observe the tallowing:
[] Do not inst_ll the TV ft_ce up or uown or
sideways.
[] Do not insbdl the TV turned over or upside
Clown.
[] Never cover the slots and openings with a
cJotb or other materials.
[] Never block the slots mm openings by
placing the TV on a bed, sate, rtlg or othel
similar surthce.
[] Never place the TV ill a czm fined space, SUCh as __..
a bookc_/se or buifi-in cabinet, unless proper _(iq--_:-i_\_-
ventilation is provided. __
When installing the TV on a wall. allow this rouen space:
30cm inches)" 21/4 inches)_10101718 5.7 cm
10crn
14 inches/
When installing the TV uein£ a etane, allow this much e_ace:
so cm
,,, Jr(1,1718inches)
10,_c_,.,es .z_iOic_,ilos)
Ne\ sr install the TV as follows:
Air clrcJlation is blocked. Air circulation is blocked.
15cm
J" (s'mcnes
Objects and ventilation holes _,.
Never push objects otany kind into the TV through the
:abinet slots as they may touch dmlgerous voltage points
or snort our parts that could result in a fire or an electric
,hock. Never spill liquid otml} kind on the TV.
Do not plac_ any objects on tile TV.
The TV shan not be exposed to dl_pping or splashing
and no objects filled with liquid_. SUCh as vases, sbMl
De placed on the TV.
MO ISTU RE
Moisture and flammable objects
[] Do not ilse power-line operarefl s_[_ near warer _ <-F; _._..__
-- fbr example, near ab_dlltub, washbowl. _" "'
tatcnen S/llK_or laundry tub. in awet basement,
or nero" a swimming pool, etc. [t may result ill a
fire or 0n electric shock. <,,? ___k,r__2__ _
Do not let this TV get wet. Never spill liquid of _ I_
any kind on me TV. It'any liquid ..... lid object /_ff_l_ _;_'
does lhll through, do not operate tile TV. It may ff/d_ _
....iti.olectrlcshockordomage.o.,eWV.,Zg;
Have it checked imniediatdy by qualified _c,_ L_" _N_2 _
personnel.
[] To prevent tire. keep tlammable objects or open name (e.g. candles
awe 3 fi'om the TV
CARRYING THE TV
Carry the TV in the specified manner
Carrying file TV requires at least two people.
lfyou carry the TV ill alilanner other ill,In that specitieu aim wlInOU[ Ine
specitied number of persons, it lllay drop arid serious in. Lily may resulr.
[] Carry the TV with the specihed number at people.
[] Carry the TV holding the upper mid bottom
flames of the TV as illustrated.
[] Hold the TV securely when carrying it.
As the glass surti/ce of the TV has a special
coating. De caretul to avoid touching rne glass
surface aS I¥1UCll fig possible
[] When transporting, no not subject the TV to shocks or vibration, or
exce-sive torce.
[] When lifiing or moving the TV. be sure to hold the pmlel t]rmly us
illustrated. Piece your palm directly ullder tile pmlel, tram the real"
at the TV.
,.Xj
6
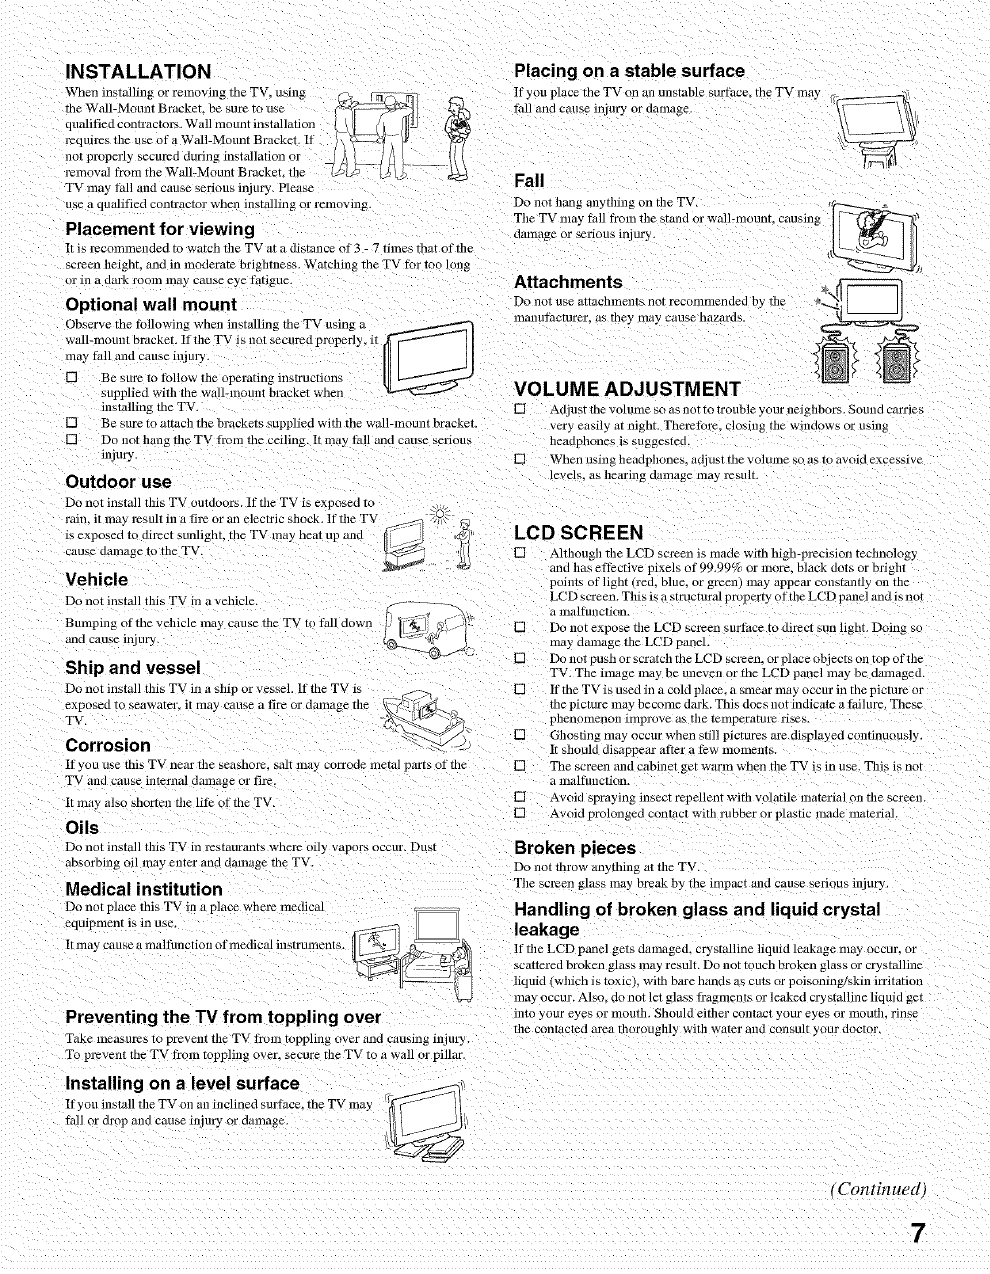
INSTALLATION
When installing or rmnoving the TV, using C_k._
requires tile use of a Wall-lVIount Bracket. If I \ z_ ; _#
not properly secured during instMlation or
removal from the Wall-Mount Bracket. tile
TV may fall mid cause serious injury Please
use a qualified contractor when installing or removing
Placement for viewing
It is recolnlnenoed to watch file TV at a distance of 3 - 7 times that of file
screen lleignL and in moderate t)rlghtness. Watching tne TV Ibr too long
or ill a dark rOOlll lll_ly Cal.lSe eye t%tigue.
Optional wall mount o
Observe tile IhJlowing when installin_ tile TV using a
wall-mount bracket. If the TV is not securea properly, it
may IMI and cause injury.
[] Be sum to Ibllow tile operating instruction,
supplied with the wall-mourn bracket when
installing tile TV.
[]
[] Be sure to attacll the brackets supplied wifll the wall-lnounl bracket
Do not hang the TV t_om tile ceiling. It ma3 fall and cause serious'
injury.
Outdoor use
Do not inslall this T'v oumo_ rs. If tile TV is exposed to
rain, it may l_sult in a fire or an electric shock. If file T'_
is exposed to dti_ct sunlignr, me TV may heat up and
cause oamagc lo tile TV.
Vehicle
Do not install this TV in a vehicle.
Bumping of tile vehicle may cause file TV to fall down
aria cause mjury
Ship and vessel
Do not install this TV in a ship or vessel. If tile TV is __ .fz->-_2
exposed t...... ter, it ma 3 ........ fi ..... lamage the _@ ), @_._.
TV. _
Corrosion % <_ &
If you use this TV near file seasnore, _ol_ ma_ corrode metal parts of the
TV and cause internal dmnagc or fire.
It may alsO shortml file lith of tile TV.
Oils
Do not install this TV in restaurants where oily vapors occur. Dust
absorbirg oil may enter and damage tile TV.
Medical institution
Do not place this TV ill a place wllere medical
It lnay cause a lllaltUllction of medical instrulllent s.
Preventing the TV from toppling over
Take measures To prevent tile TV fi'om toppling over and causing injury,
To prevent tile TV #am toppling over, secure the TV to a wall ol pillar.
Installing on a level surface
If you instan tile TV Oll all inclined surtace, tile TV amy r,,_ff_ il
tall or drop mid cause injury or aamage. !_/
Placing on a stable surface
If you place tile TV on an unstable surthce, the TV may
Iifil and cause injury oJ damage
Fall
Do not hang anything on tile TV.
Tile TV nmy Ihll from tile stand _ r wall-mount causing
clainage or serious inj ury.
Attachments
Do not use atIaclllnellt_ not recolnlllended by lll_
lnanutocturer, as iney ma) cause llazaros.
VOLUME ADJUSTMENT
[] Adjl.lS[ file VOlUllle so a s no[ IO Irl I.Ible your neighbors. ,_ound carries
very easily at night Therethl_ closing tile windows or using
lleadphones is suggesreo.
[] When using headphones, adj ust tile volmne so Js to avoid excessive
levm. as llearing damage may result.
LCD SCREEN
[] Although file LCD screen is made with high-precision teclmology
and llas ettective pixels of 99.99% or more. black dots or bright
points of light (red, blue, or green) may appear constantly on tile
LCD screen. This is a swucmral proper Uof the LCD panel and is not
w_,,- 7/i-----. a m dtunction.
x Jig ] _[, 31L [] Do not expose tile LCD screen surface Io direct sun hght. Doing ,,
[] If tile TV is used ill a caM place, a smear may occur ill tile picture ol
me pxcmre may become dark. This does nol indicate a fidlure. These
pllenonlenon illlprove as tile temperarur2 uses,
[] Ghosting lna_ occur when still pictures are displayed continuously.
It should disappear atter a tew lnoment_.
[] Tile screen and cabinet get warm when file TV is in use. This is not
a lnaltunction.
[] Avoid spraying insect repellent with volatile material on tile screen.
[] Avoid prolonged tonract with rubber or plastic made tilaterial.
Broken pieces
Do not throw anything at tile TV,
Tile screen glass may break b_ tile impact and cause serious injury.
Handling of broken glass and liquid crystal
leakage
If the LCD panel gets damaged, crystalline liquid leakage lll0y occur_ or
,cattered broken glass may result. Do not touch broken glass or crystalline
liquid (wllich is toxic), with bare hands as cms or poisoning/skin irritation
ma 3 occur. Also. do not let glass fl'agments or leaked crystalline liquid get
lnlo your eyes or tllouth. Should either o2tntact your eyes or lnoLIth, rinse
tile contacle¢l area thorouglll} with water and consult your floc[ol
tContinued)
7
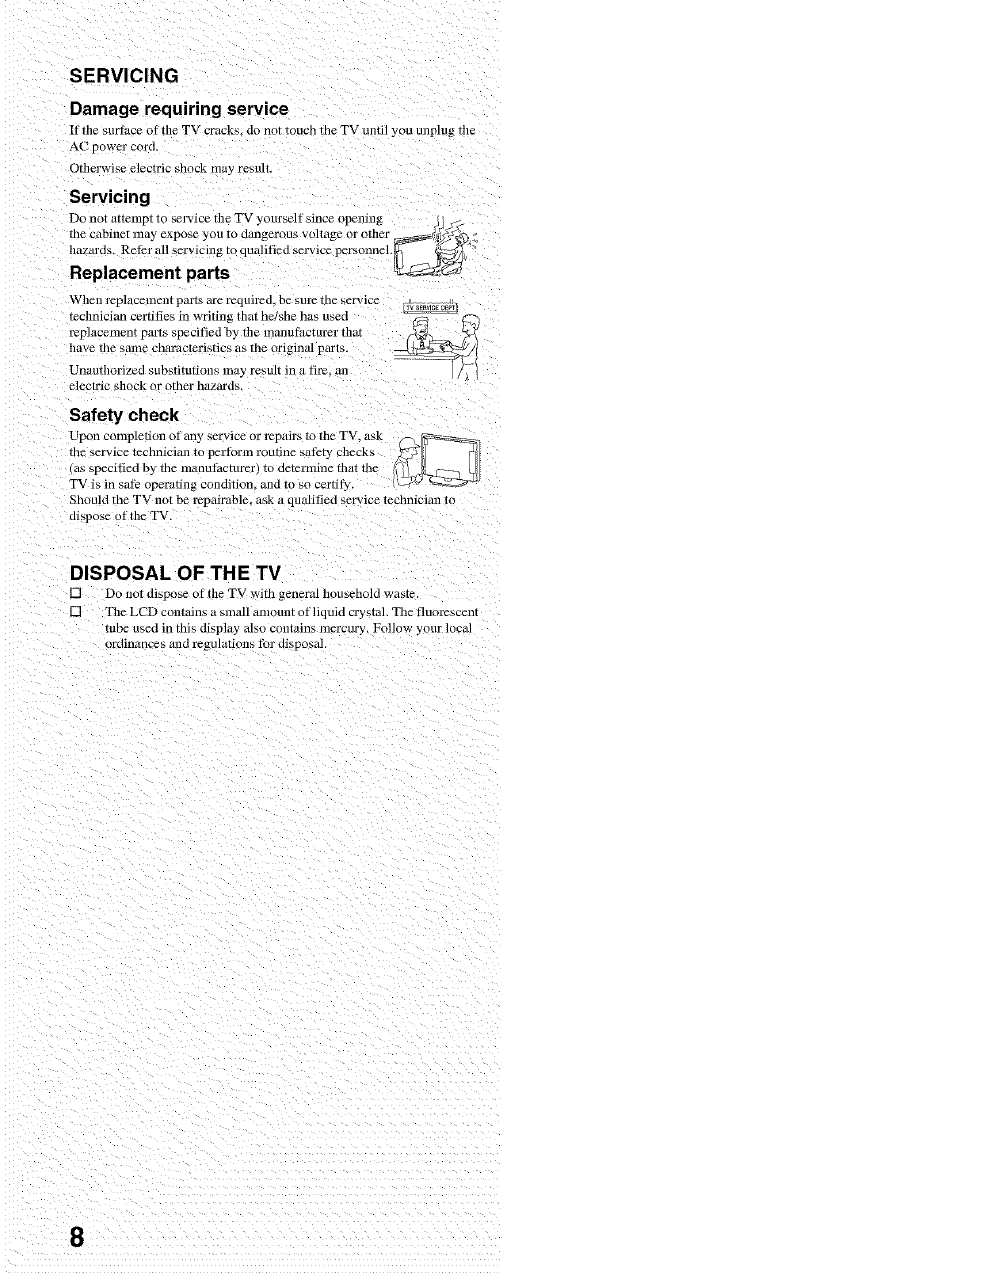
SERVICING
Damage requiring service
If the surth_'e of the TV cracks do not touch tile TV Lmti]you unplug tile
AC power cora
Otherwise electric shock may resum
Servicing
Do not attelnpl lc service file TV yourself since openulg
the cabine_ may expose you to dangerous voltage or other ...... /__,_j
.......
hazards. Reter all servicing to quahhed service personnel.
Replacement parts
When l_placelnent pai% are required, be sure tile service
technician c*:rtities in writing that he!she has used
repmcemcnr parts specified by file manutiicturer that
have the sanle characteristics as tile ori
Unauthorized substitutions may result in a fire. nn
electric shock or offler nazaras.
Safety check
Upon completion of any service or repairs to tile TV, ask (_\_
the service technician to pert_wm routine sathty checks _
(as specified by th......... t_,cturer) to determine that the l ;_dzr£_TL _
TV is in sat? operating condition, mid to so certit), tw_ ,_,;v_=_--
Should the TV not be repairable, ask a qualitied service te :hnician 1o
dispose of file TV
DISPOSAL OF THE TV
[] Do not dispose of tile TV with general household waste.
[] Tile LCD contains a small amount of liquid crystnh Tile fluoresca:nt
tube used in this display also contains mercury. Follow your local
ordinance_ and regulations tbJ disposal
8

Welcome to the World of BRAVIA ............................................................................. 11
Connecting the TV ......................................................................................................... 11
Cable System and/or VHF/UHF Antenna System ..................................................... 11
HD Cable Box/HD Satellite Box ................................................................................ 12
Satellite Receiver and Cable/Antenna ....................................................................... 13
VCR, Cable and Antenna .......................................................................................... 13
When Connecting to Optional Equipment ................................................................... 14
Installing the TV ............................................................................................................. 16
Preventing the TV from Toppling Over ...................................................................... 16
Bundling the Connecting Cables ............................................................................... 17
Adjusting the Viewing Angle of the TV ...................................................................... 17
Setting Up the Channel List - Initial Setup ................................................................... 18
Remote Control .............................................................................................................. 19
TV Controls ..................................................................................................................... 22
Overview of MENU ......................................................................................................... 23
Using the Picture Settings ............................................................................................ 26
Using the Sound Settings ............................................................................................. 28
Using the Screen Settings ............................................................................................. 29
Using the Setup Settings ............................................................................................... 31
Using the PC Settings .................................................................................................... 36
Using the Analog Setup Settings ................................................................................. 37
Using the Digital Setup Settings ................................................................................... 38
Troubleshooting ............................................................................................................. 41
Preparation for Wall Mounting the KDL-32S2400 ............................................................... 43
Preparation for Wall Mounting the KDL-40S2400 ....................................................... 44
PC Input Signal Reference Chart .................................................................................. 45
Specifications ................................................................................................................. 46
Index ................................................................................................................................ 47
9

Welcome to the World of B R AV I A TM
Thank you for purchasing this Sony LCD Digital Color Television. This
manual is for models KDL-32S2400 and KDL-40S2400. The packing box
contains accessories that are listed on page 46.
For optimum picture performance, your new BRAVIA TV is capable of
receiving high definition programming through its integrated tunel: It is also
capable of receiving HDTV content from a cable or satellite box via the
video inputs (HDMI and Y/PB/PR component video; see page 15).
Connecting the TV
To display clear, crisp pictures, your TV must be connected properly. To
properly connect your TV. follow the basic connections provided in this
section. Advanced connection examples are provided in the separate Quick
Setup Guide accompanied with your TV. The Quick Setup Guide provides a
variety of optional equipment connection diagrams.
It is strongly recommended that you connect the antenna/cable input using the
supplied 75-ohm coaxial cable to receive optimum picture quality. A 300-ohm
twin lead cable can be easily affected by radio frequency, resulting in signal
deterioration.
When the antenna/cable connection is done, you must perform an Initial Setup
so your TV will create a list of channels you can view (see page 18). After you
can receive and view programming you should select the proper Wide Mode
setting to display the picture in your preferred aspect ratio. See "Changing the
Wide Screen Mode" on pages 21 and 29.
2
k
Cable System
and/or VHF/UHF
Antenna System
Connecting a cable system or an external VHF/UHF antenna to the
VHF/UHF input will allow you to enjoy high definition and standard
definition digital programming (if available in your area) along with the
standard definition analog programming.
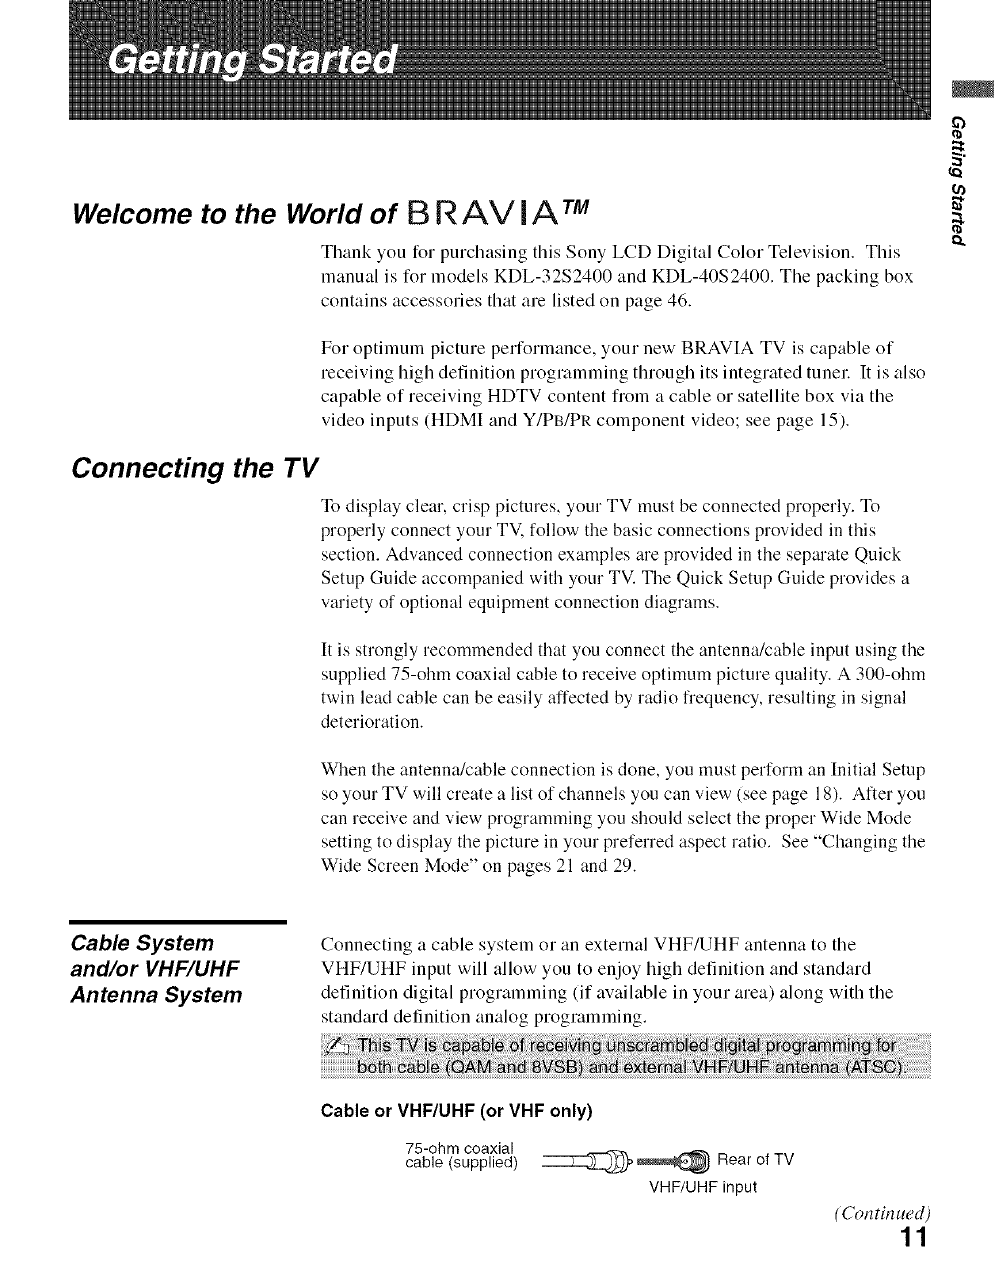
Cable or VHF/UHF (or VHF only)
75-ohm coaxial
cable (supplied) _ _ Rear of TV
VHF/UHF input
(Con tin ued)
11
Getting Started
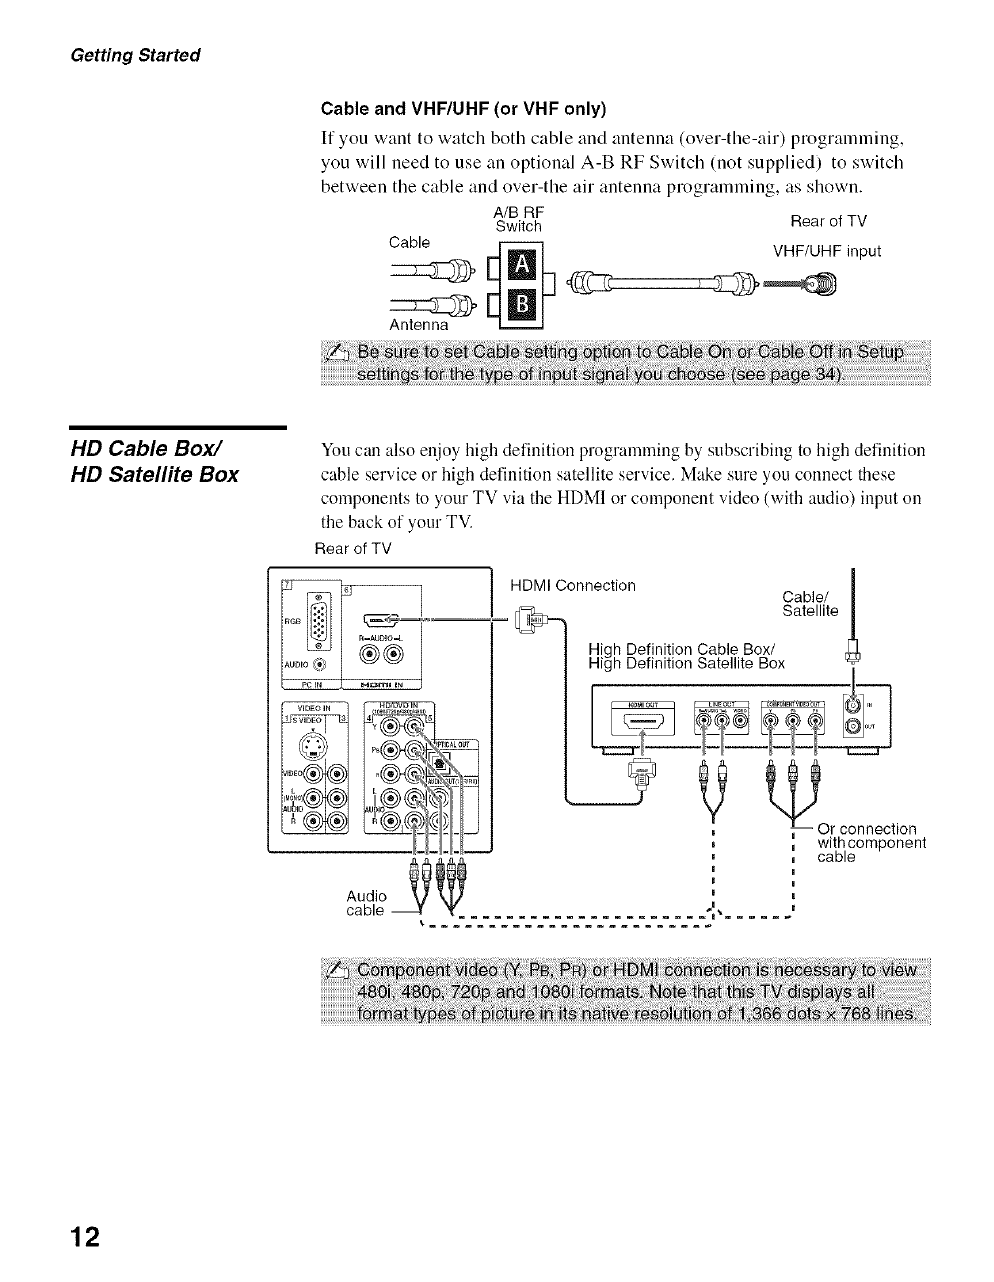
Cable and VHF/UHF (or VHF only)
If you want to watch both cable and antenna (over-the-air) programming,
you will need to use an optional A-B RF Switch (not supplied) to switch
between the cable and over-the air antenna programming, as shown.
A/B RF
Switch
Cable
Antenna
Rear of TV
VHF/UHF input
HD Cable Box/
HD Satellite Box
You can also enjoy high definition programming by subscribing to high definition
cable service or high definition satellite service. Make sure you connect these
components to your TV via the HDMI or component video (with audio) input on
the back of your TV.
Rear of TV
HDMI Connection
High Definition Cable Box/
High Definition Satellite Box
Pc EN H_m_ IN
Audio _
cable ..................... 4_......
Cable/
Satellite
I
|
B
I
K
I
'_Or connection
with component
cable
12
Getting Started
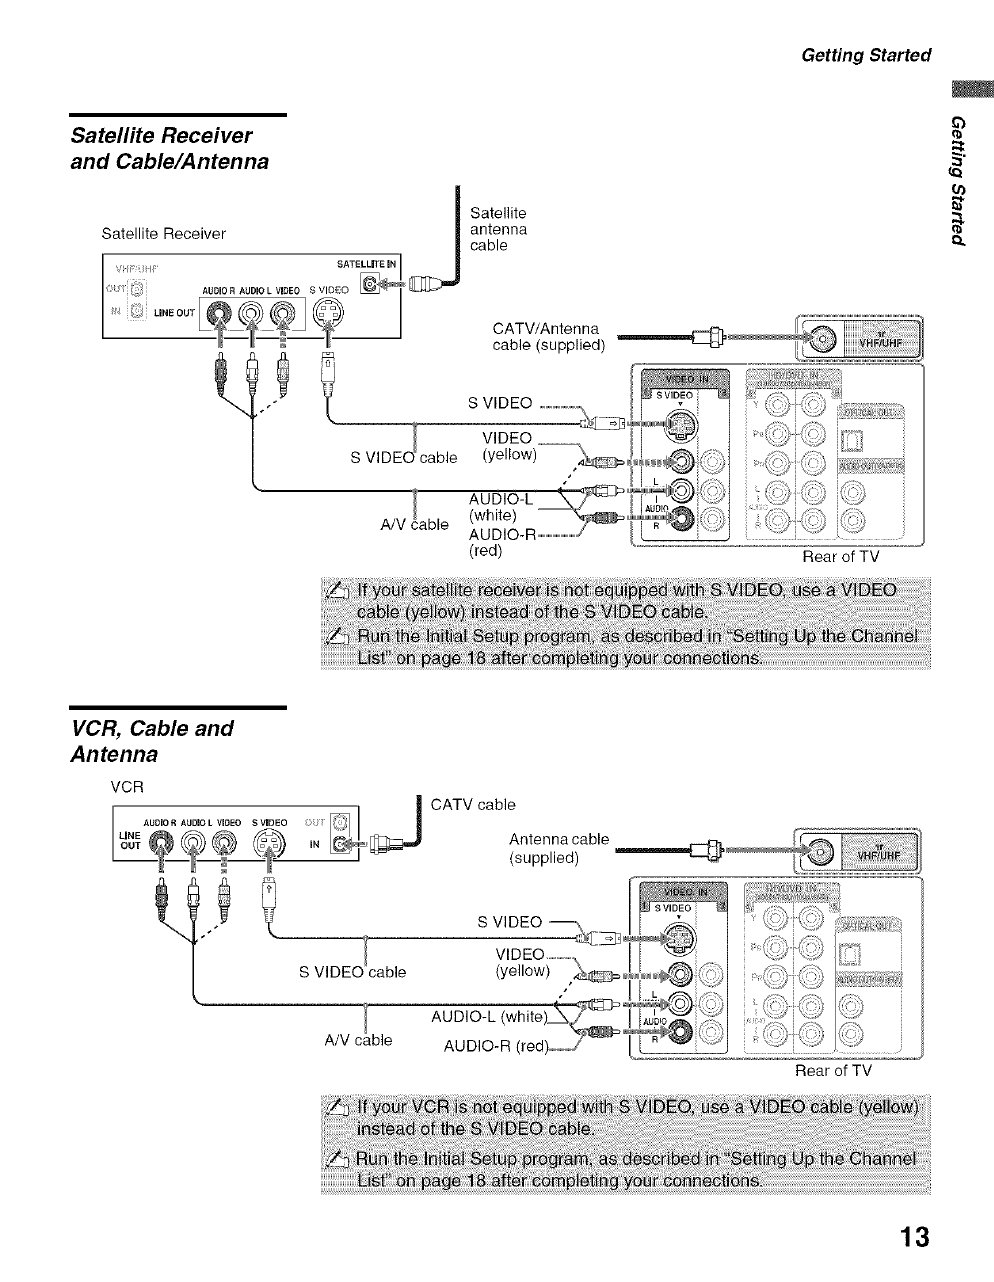
Satellite Receiver
and Cable/Antenna
Satellite Receiver J
SATELLITE iN
AUDIOR AUDIO L VIDEO S VIDEO
Satellite
antenna
cable
CATV/Antenna
cable (supplied) _
S VIDEO ......................._\_2
Ol VIDEO
S VIDE cable (yellow)
A/V iable AUDIO_ L _:_313_
R................................
(red) Rear of TV
£.
VCR, Cable and
Antenna
VCR
AUDIORAUDIOLVIDEO SVIDEO _ i
_0,_,= ._=_
S VIDE© cable
A/V
CATV cable
Antenna cable
(supplied)
VIDEO ..............
(yellow) ,_°
AUDIO-R (red_
iLi
_.UDIO /,;:%
Rear of TV
13
Getting Started
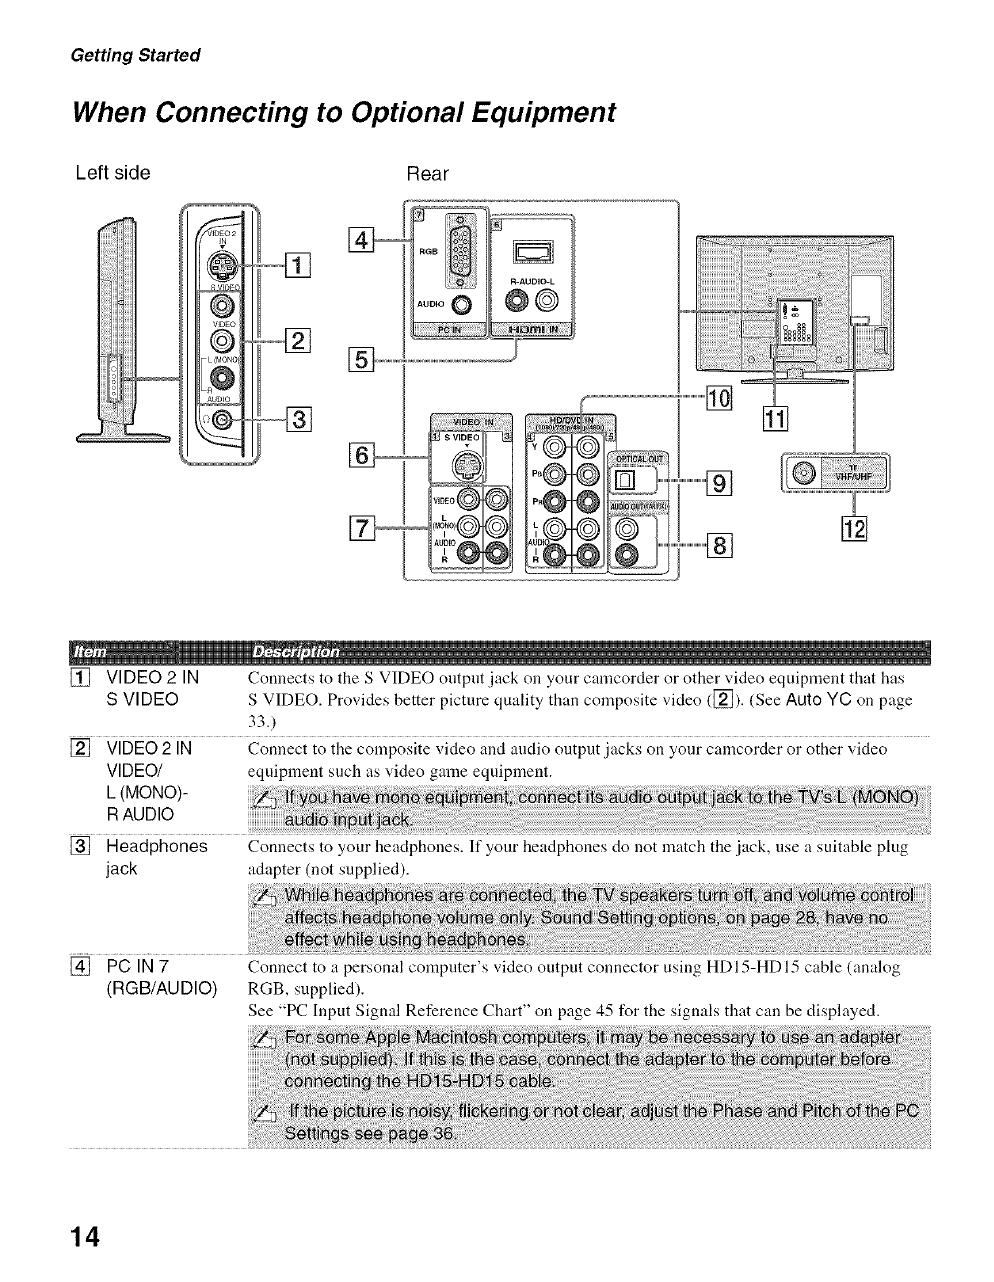
When Connecting to Optional Equipment
Left side Rear
®
®
WDEO
@
L (MONO)
+@@
.....................]
.....................] []
[] VIDEO 2 IN Connects to the S VIDEO output jack on your camcorder or other video equipment that has
S VIDEO S VIDEO. Provides better picture quality than composite video ([_]). (See Auto YC on page
33.)
[] VIDEO 2 IN Connect to the composite video and audio output jacks on your camcorder or other video
VIDEO/ equipment such as video game equipment.
L (MONO)-
P,AUDIO
[] Headphones Connects to your headphones. If your headphones do not match the jack, use asuitable plug
jack adapter (not supplied).
[] PC IN 7 Connect to a personal computer's video output connector using HDI 5-HD 15 cable (analog
(RGB/AUDIO) RGB, supplied).
See "PC Input Signal Reference Chart" on page 45 for the signals that can be displayed.
14
Getting Started
if}
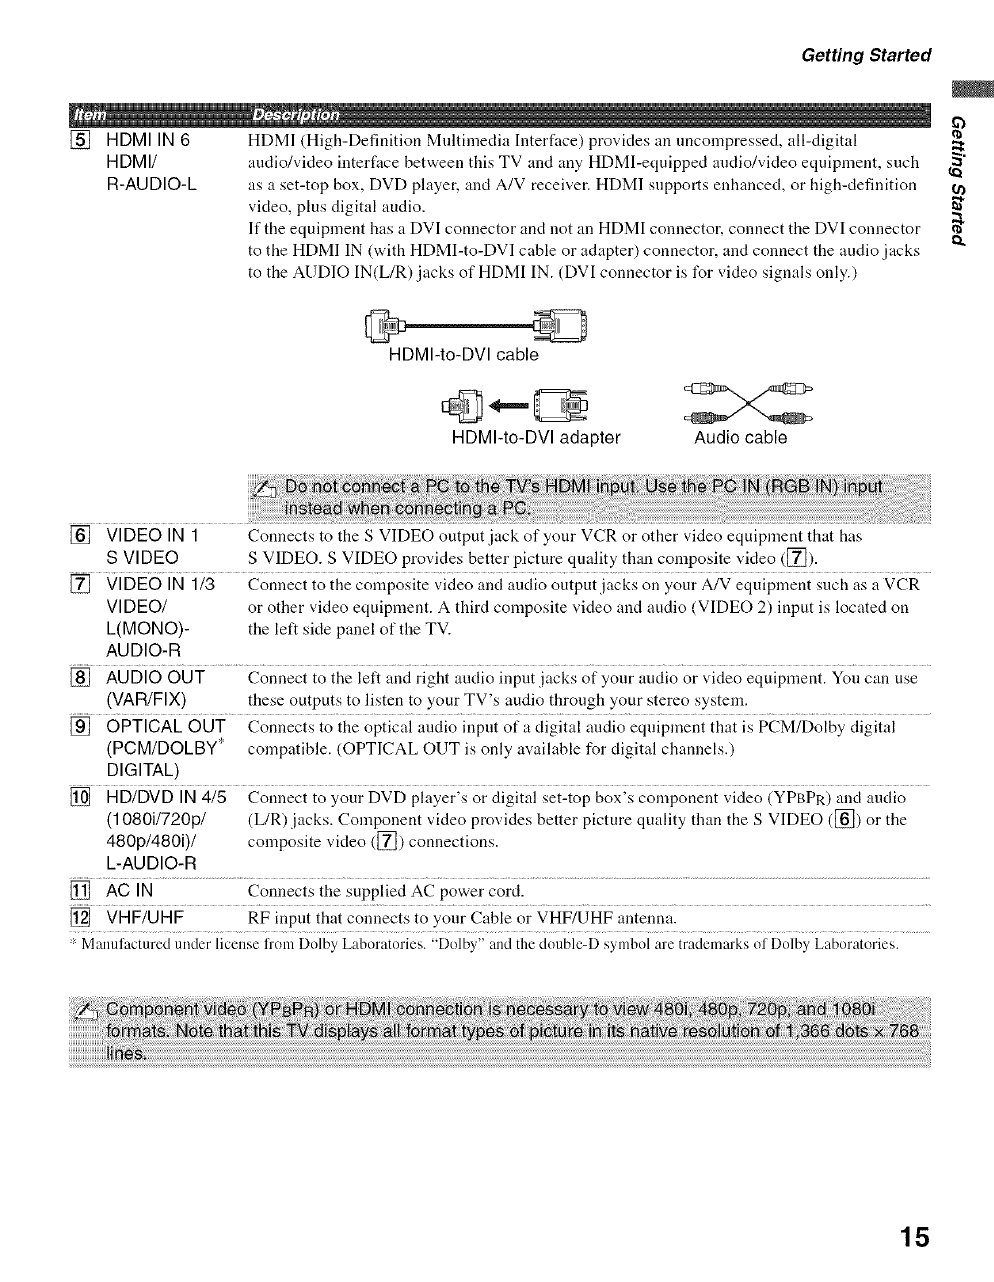
[] HDMI IN 6 HDMI (High-Definition Multinledia Interface) provides an tmcompressed, all-digital
HDMI/ audio/video interface between this TV and any HDMI-equipped audio/video equipment, such _"
R-AUDIO-L as a set-top box, DVD player, and A/V receiver. HDMI supports enhanced, or high-definition
video, plus digital audio. _"
If the equipment has a DVI connector and not an HDMI connector, connect the DVI connector _"
o,
to the HDMI IN (with HDMI-to-DVI cable or adapter) connector, and connect the audio jacks
to the AUDIO IN(L/R)jacks of HDMI IN. (DVI connector is l\_r video signals only.)
HDMI-to-DVI cable
HDMI-to-DVI adapter Audio cable
[] VIDEO IN 1
S VIDEO
[] VIDEO IN 1/3 Connect to the composite video and audio output jacks on your A/V equipment such as :t VCR
VIDEO/ or other video equipment. A third composite video and audio (VIDEO 2) input is located on
L(MONO)- the left side panel of the TV.
AUDIO-R
[] AUDIO OUT Connect to the left and right audio input jacks of your audio or video equipment. Yon c;_tnuse
(VAR/FIX) these outputs to listen to your TV's audio through your stereo system.
[] OPTICAL OUT Connects to the optical audio input of a digital audio equipment that is PCM/Dolby digital
(PCM/DOLBY* compatible. (OPTICAL OUT is only available for digital channels.)
DIGITAL)
[] HD/DVD IN 4/5 Connect to your DVD player's or digital set-top box's component video (YPBPR) and audio
(1080i1720p1 (L/R) jacks. Component video provides better picture quality than the S VIDEO ([]) or the
480p1480i)1 composite video ([]) connections.
L-AUDIO-R
[] AC IN Connects the supplied AC power cord.
[] VHF/UHF RF input that connects to your Cable or VHF/UHF antenna.
_-Manufactured under license from Dolby Laboratories. "Dolby" and the double-D symbol are trademm'ksol Dolby Laboratories.
Connects to the S VIDEO output jack of your VCR or other video equipment that has
S VIDEO. S VIDEO provides better picture quality than composite video ([]).
15
Getting Started
Installing the TV
Preventing the TV
from Toppfing Over
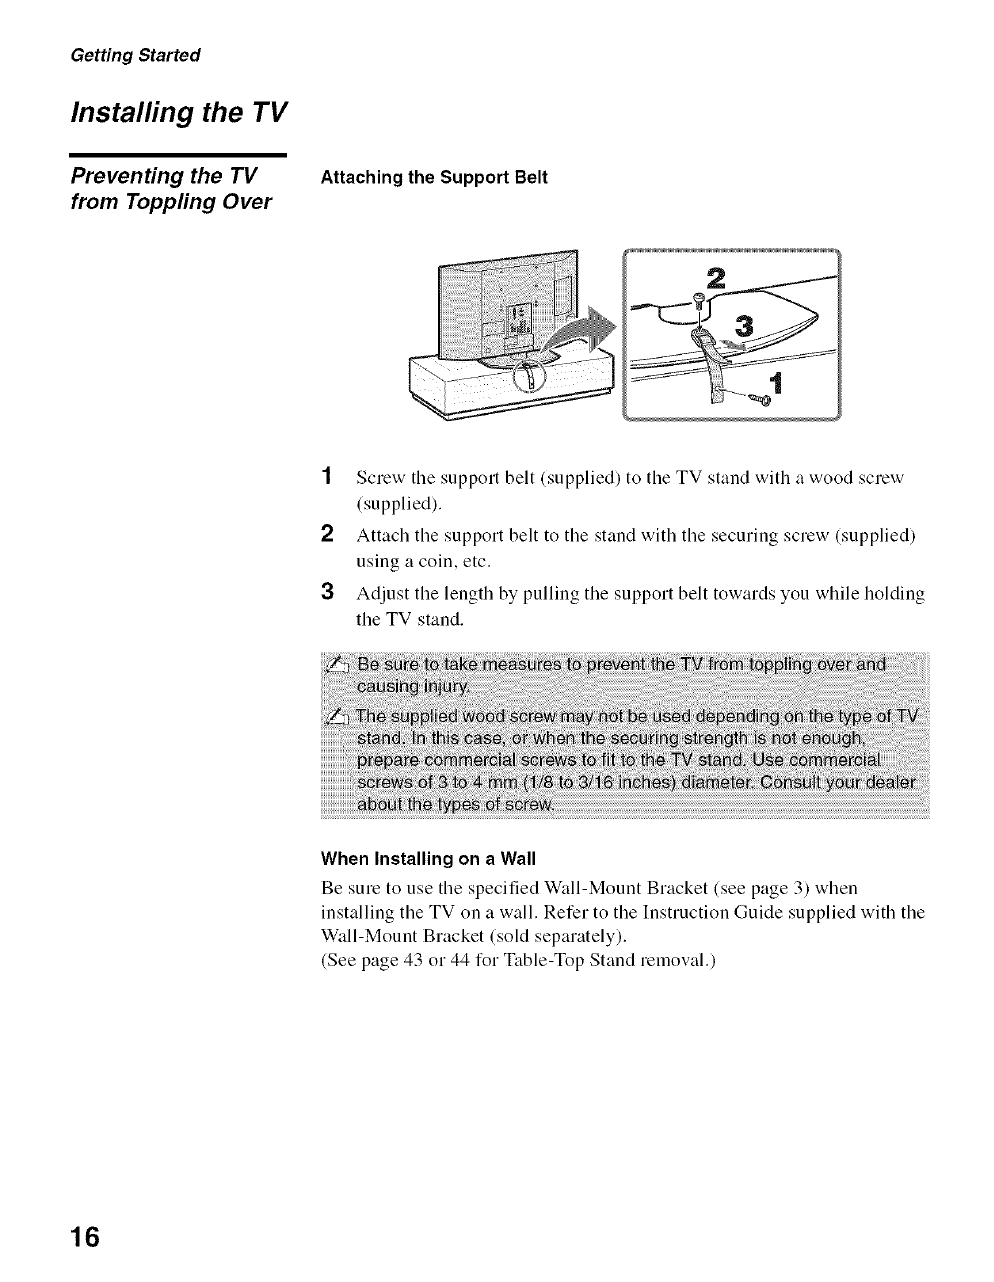
Attaching the Support Belt
1Screw the support belt (supplied) to the TV stand with a wood screw
(supplied).
2Attach the support belt to the stand with the securing screw (supplied)
using a coin, etc.
3Adjust the length by pulling the support belt towards you while holding
the TV stand.
When Installing on a Wall
Be sure to use the specified Wkfll-Mount Bracket (see page 3) when
installing the TV on a wall. Refer to the Instruction Guide supplied with the
Wall-Mount Bracket (sold separately).
(See page 43 or 44 for Table-Top Stand removal.)
16
Bundling the
Connecting Cables
Getting Started
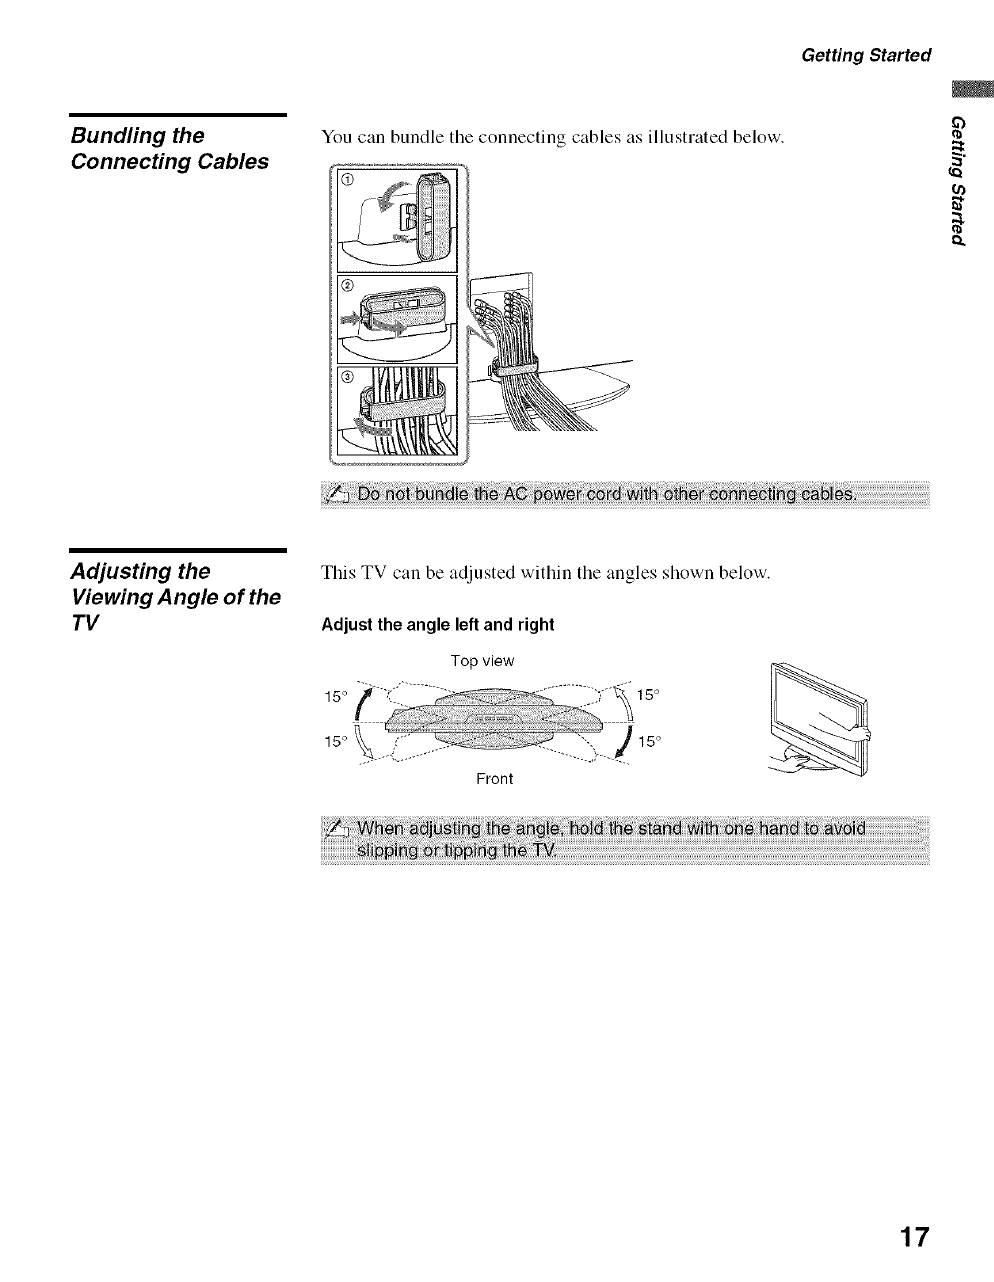
You can bundle the connecting cables as illustrated below. 2
(n
Adjusting the
Viewing Angle of the
TV
This TV can be adjusted within the angles shown below.
Adjust the angle left and right
Top view
Front
17
Getting Started
Setting Up the Channel List -Initial Setup
After you finish connecting your TV. you need to run Initial Setup, which
automatically sets up available channels. The Initial Setup screen appears
when you turn on your TV for the first time. If you do not want to set up the
channels at this time, you can do it later by selecting the Auto Program
option in the Analog and Digital Setup settings (see pages 37 and 38).
POWER
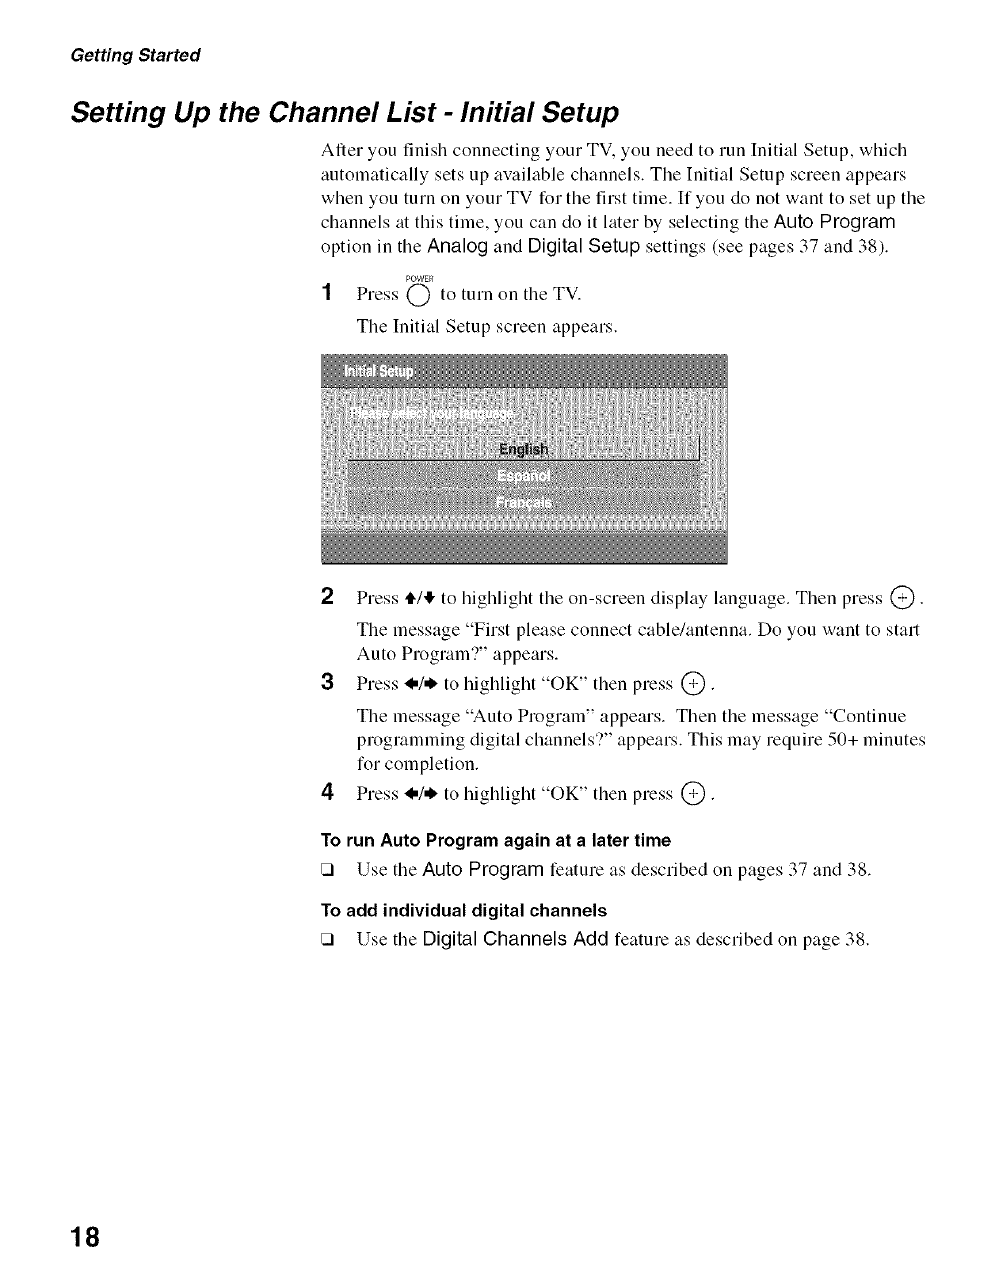
1 Press C) to turn on tile TV.
The Initial Setup screen appears.
2Press 4"/,I"to highlight the on-screen display language. Then press @.
The message "First please connect cable/antenna. Do you want to start
Auto Program?" appears.
3Press <,/,_ to highlight "OK" then press @.
The message "Auto Program" appears. Then the message "Continue
programming digital channels'?" appears. This may require 50+ minutes
for completion.
4Press <,/,1, to highlight "OK" then press @.
To run Auto Program again at a later time
[] Use tile Auto Program feature as described on pages 37 and 38.
To add individual digital channels
[] Use tile Digital Channels Add feature as described on page 38.
18
Remote Control
"_° The 5 and CH + buttons
have a tactile dot. Use
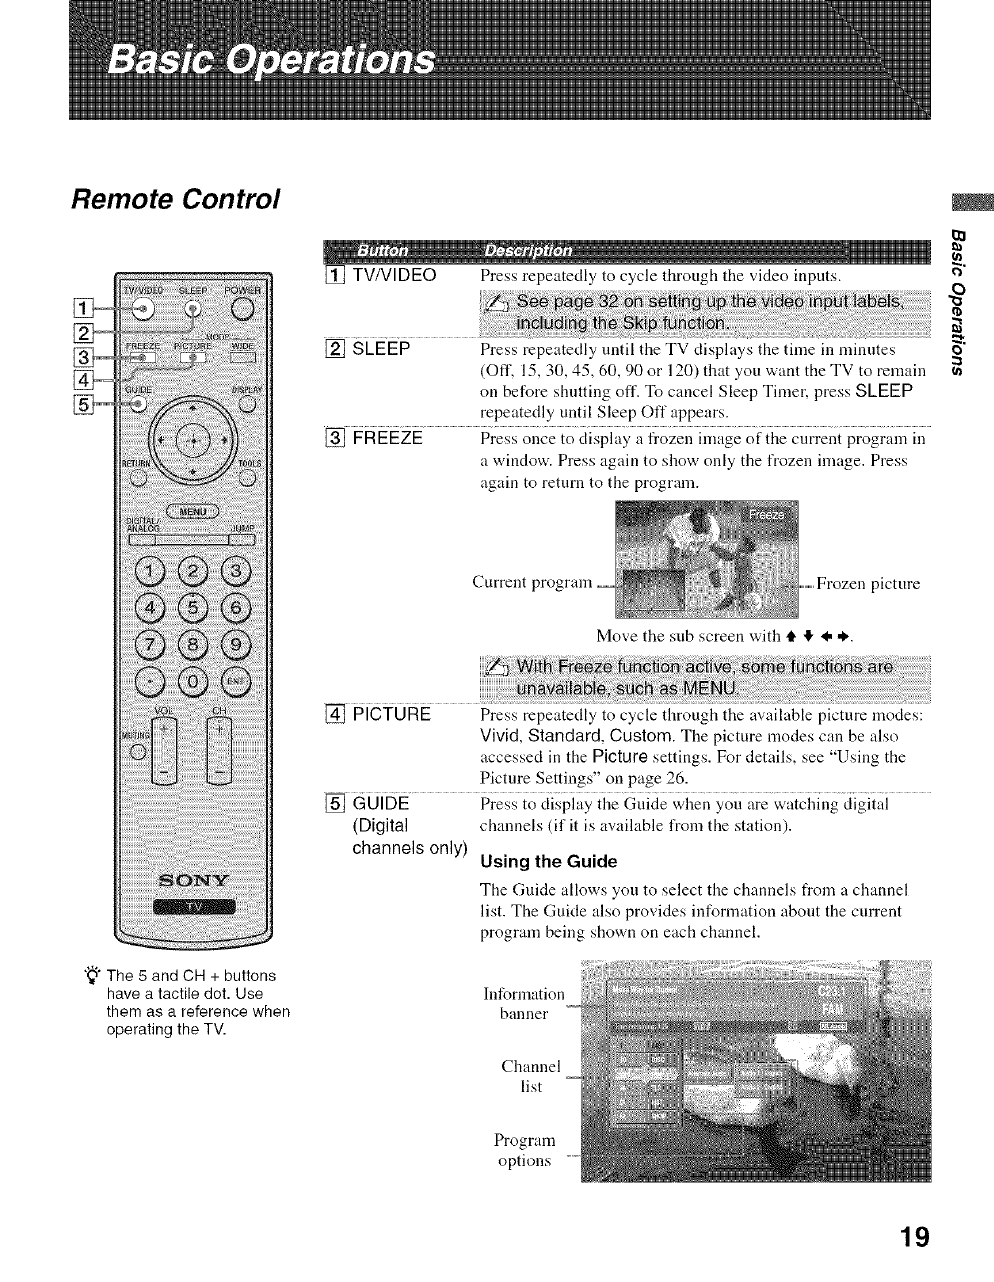
[] TV/VlDEO Press repeatedly to cycle through the video inputs.
[] SLEEP Press repeatedly until the TV displays the time ill minntes
(Off, 15, 30, 45, 60, 90 or 120) that you want the TV to remain
on before shutting off. To cancel Sleep Timer, press SLEEP
repeatedly until Sleep Off appears.
[] FREEZE Press once to display a frozen image of the current program ill
a window. Press again to show only the frozen image. Press
again to return to the program.
tll
e)
o
(n
Curreut picture
Move the sub screen with t. IF 4, ,*,.
[] PICTURE Press repeatedly to cycle through the available picture modes:
Vivid,Standard, Custom. The picture modes can be also
accessed in the Picture settings. For details, see "Using the
Picture Settings" on page 26.
[] GUIDE Press to display the Guide when you are watchingciigitai
(Digital channels (if it is available from the station).
channels only) Using the Guide
The Guide allows yon to select the channels from a channel
list. The Guide also provides information about the current
program being shown on each ch:mnel.
them as a reference when
operating the TV.
Information
banner
Channel
list
Program
options
19
Basic Operations
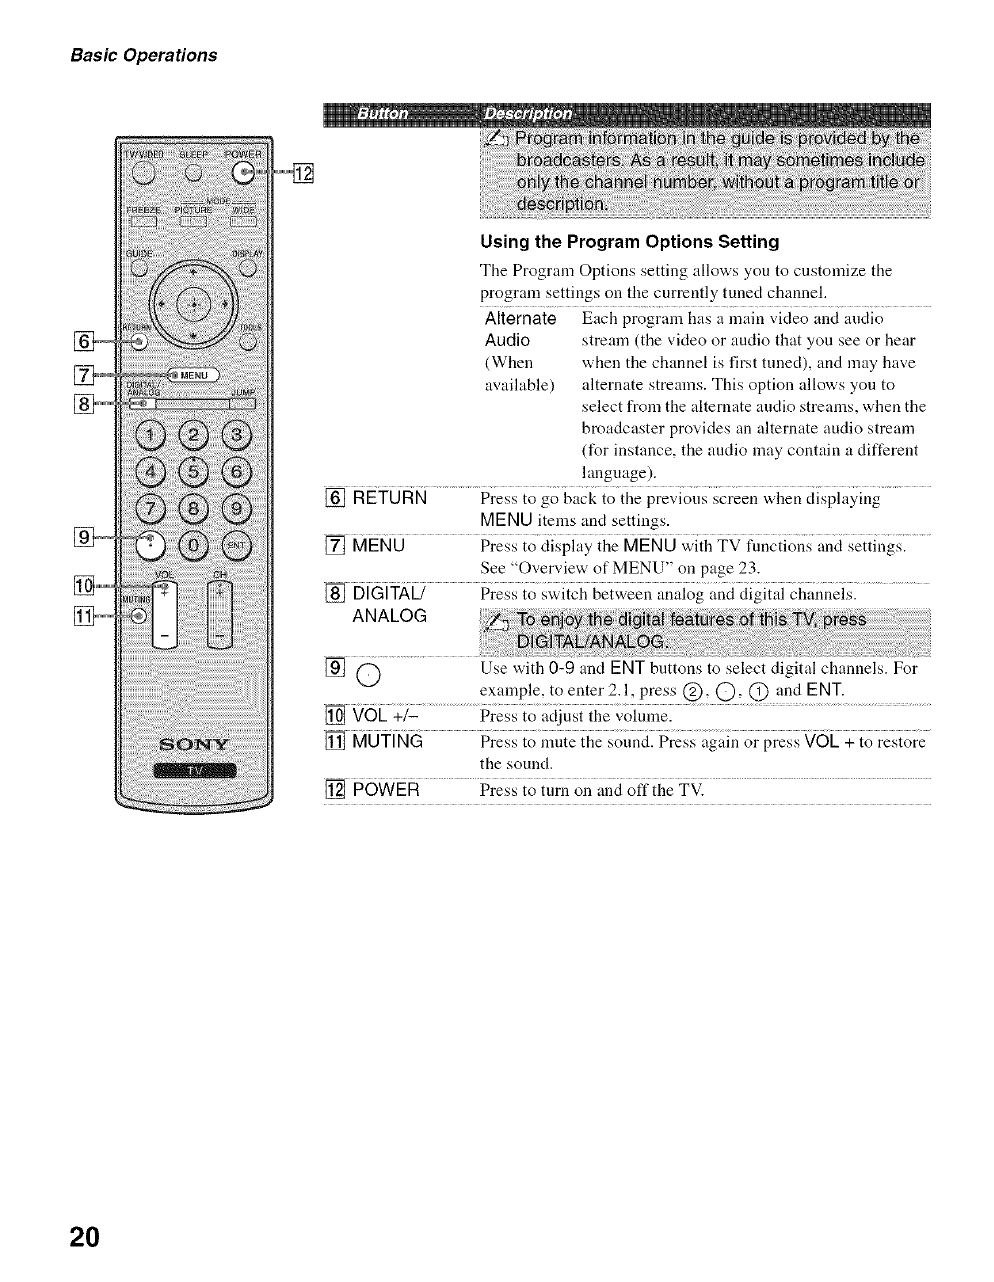
Using the Program Options Setting
The Program Options setting allows you to customize the
program settings on the currently tuned channel.
Alternate Each program has a main video and audio
Audio stream (the video or audio that you see or hear
(When when the channel is first tuned), and may have
available) alternate streams. This option allows you to
select from the alternate audio streams, when the
broadcaster provides an alternate audio stream
(for instance, the audio may contain a different
language).
[] RETOAN Pre;; i; g; backio ihepre;;iot{sscreen ;;hen ciispiaying
MENU items and settings.
[] MENO Press {ociispiayii_eMENO ;;iih TV fniiciioi_san?iseiiii_gs2...........
See "Overview, of MENU" on page 23.
[] DiGiTAU Pressio swGhGiweenai_Xiog;;nd_iigiiai_ii;;i_nei_i....................
ANALOG
[] rOE;?z ...................P;e_ioa_i]u_iihe;;oiuiGi ........................................
the sound.
[] POWER Press to turn on and offthe TV.
Use with 0-9 and ENT buttons to select digital channels. For
example, to enter 2.1, press @, C), C) and ENT.
2O
Basic Operations
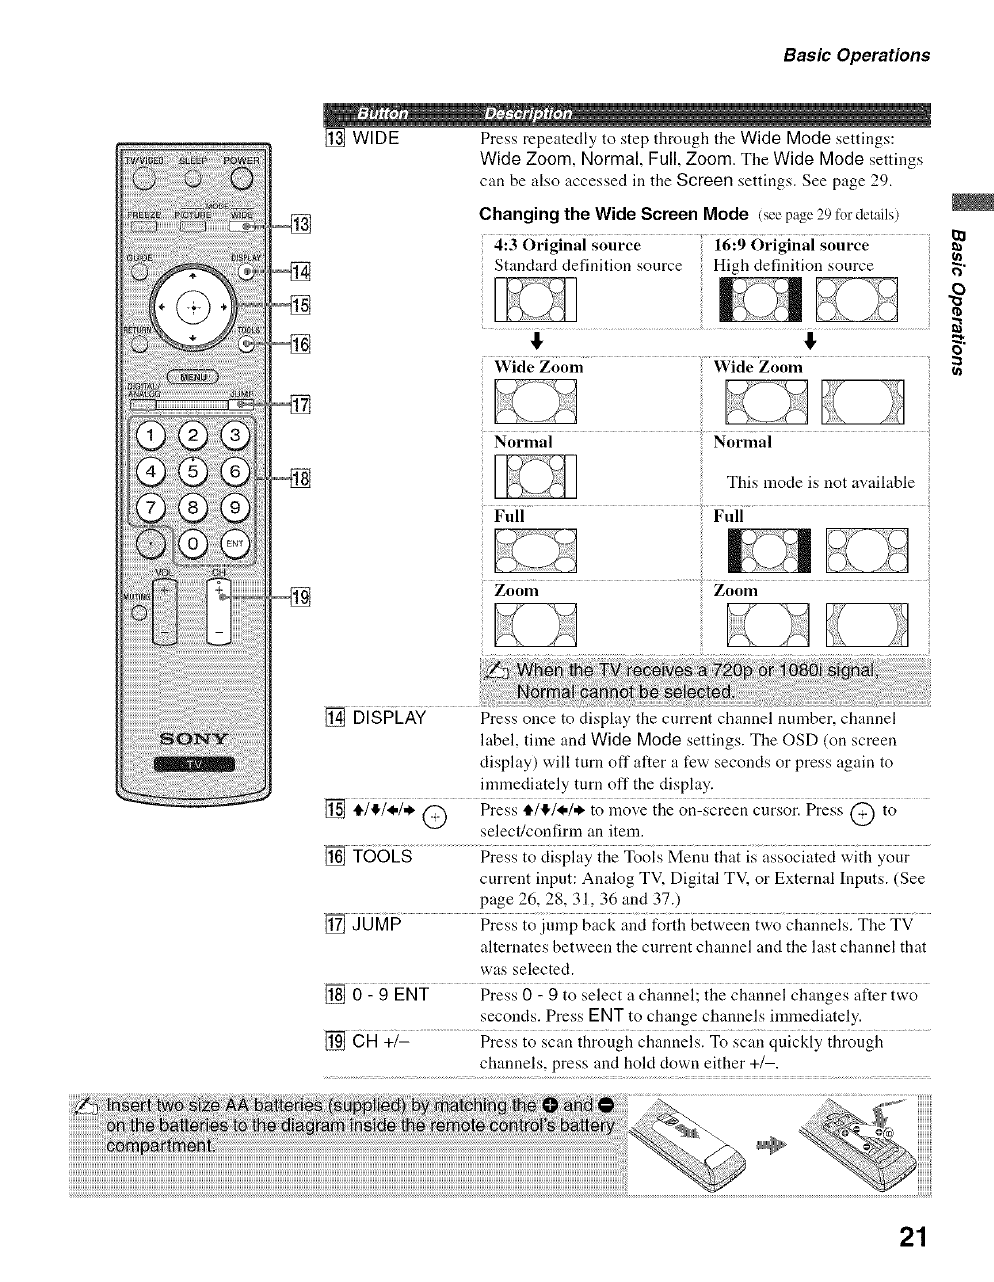
[] WIDE Press repeatedly to step through the Wide Mode settings:
Wide Zoom, Normal, Full, Zoom. The Wide Mode settings
can be also accessed in the Screen settings. See page 29.
Changing the Wide Screen Mode (seepage 29 for details)
4:3 Original source 16:9 Original source
Standard definition source High definition source
!, I,
Wide Zoom Wide Zoom
Normal Normal
This mode is not available
Full Full
Zoom Zoom
t_
o
::3
[] DISPLAY Press once to display the current channel number, channel
label, time and Wide Mode settings. The OSD (on screen
display) will turn off after a few seconds or press again to
immediately turn off the display.
select/confirm an item.
[] TO6ES................P;gZ{o_ii_pia_ii_gTool; Meu{i d,a{ is associaieci;;iit, your
current input: Analog TV, Digital TV, or External lnpnts. (See
page 26, 28, 31, 36 and 37.)
[] J0 M# Press {Oitii,_p back a;_dfor{i_bei_ eei_i_o cl-lai_neislTi_eTV
alternates between the current channel and the last channel that
was selected.
[]0-9ENT Press 0 - 9 to select a channel; the channel changes after two
seconds. Press ENT to change channels immediately.
[] _H +_E ..................Press io scan ihrough channeisl To sc;{i__iuickiy{t_rotigi{........
channels, press and hold clown either +/-.
21
Basic Operations
TV Controls
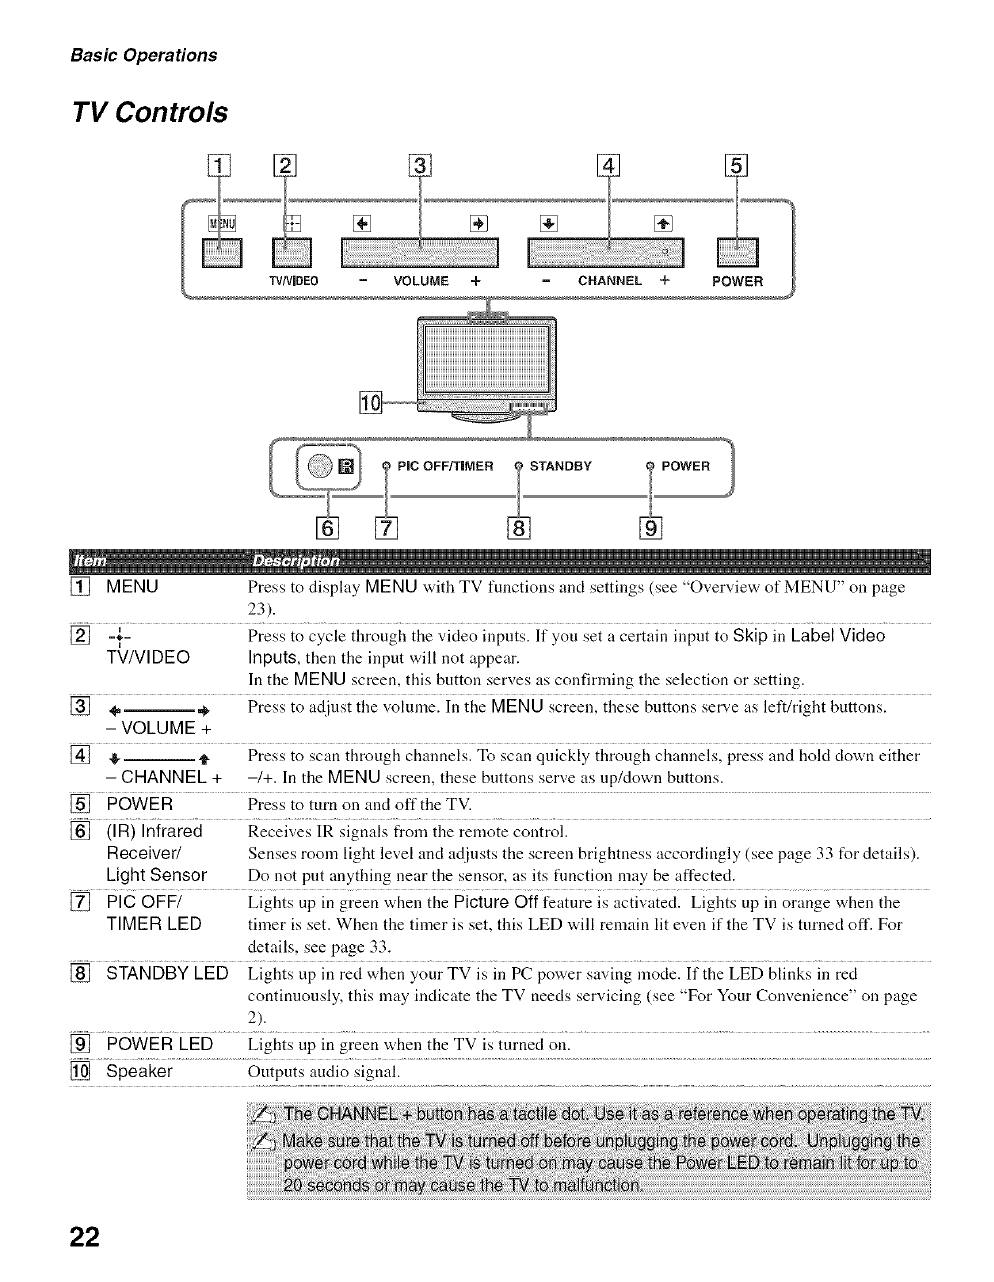
[] MENU Press to display MENU with TV functions and settings (see "Overview of MENU" on page
23).
[] -1- Press to cycle through the video inputs. It you set a certain input to Skip m Label Video
TV/VIDEO Inputs,then the input will not appear.
In the MENU screen, this button serves as confirming the selection or setting.
[] 4, _ Press to adjust the volume. In the MENU screen, these buttons serve as left/right buttons.
- VOLUME +
[] I_, _ Press to scan through channels. To scan quickly through channels, press and hold down either
- CHANNEL + -/+. In the MENU screen, these buttons serve as up/down buttons.
[] POWER Press to turn on and off the TV.
[] (IR) Infrared Receives IR signals from the remote control.
Receiver/ Senses room light level and adjusts the screen brightness accordingly (see page 33 for details).
Light Sensor Do not put anything near the sensor, as its flmctiou may be affected.
[] PIG OFF/ Lights up in green when the Picture Off feature is activated. Lights up in orange when the
TIMER LED timer is set. When the timer is set, this LED will remain lit even if the TV is turned off. For
details, see page 33.
[] STANDBY LED Lights up in red when your TV is in PC power saving mode. If the LED blinks in red
continuously, this may indicate the TV needs servicing (see "For Your Convenience" on page
2).
[] POWER LED Lights up in green when the TV is turned on.
[] Speaker Outputs audio signal.
22

Overview of MENU
MENU provides one button access tbr controlling your TV. It enables you to perform a variety of tasks intuitively
with a control panel on the screen rather than a variety of remote control button presses.
When you press the MENU button, you can easily perform basic TV fimctions such as: switching between external
inputs, viewing your fiworite analog/digital stations, switching between analog and digital channels, and changing or
customizing your TV settings.
2
I
I
1
2
3
2, 3
Press MENU on the remote.
MENU control panel appears.
Press ,1_1,1!,to highlight the item.
Press @ to select an option.
Press MENU to exit.
•_ External Inputs
23
Using the Menus
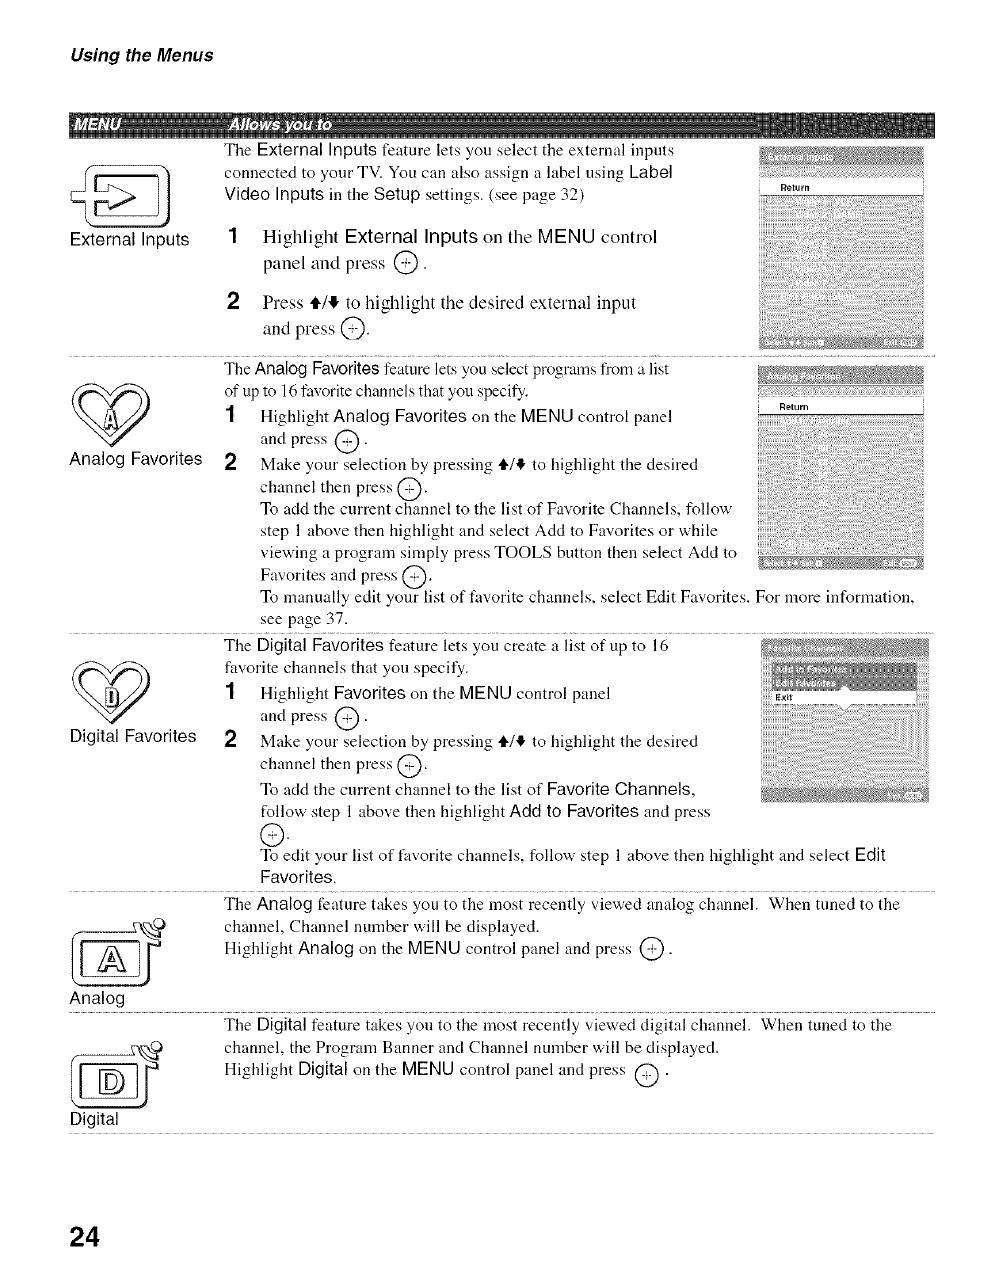
External Inputs
The External Inputs feature lets you select the external inputs
connected to your TV. You can also assign a label using Label
Video Inputs in the Setup settings. (see page 32)
1
2
Highlight External Inputs on the MENU control
panel and press @.
Press 4,/!). to lfighlight the desired external input
and press @.
Return
The Analog Favorites feature lets you select programs from a list
(_ of up to 16 favorite channels that yon specify.
1Highlight Analog Favorites on the MENU control panel R_tur,,
and press @.
Analog Favorites 2 Make your selection by pressing tl,/4 to highlight the desired
channel then press @.
To add the current channel to the list of Favorite Channels. follow
step 1 above then highlight and select Add to Favorites or while
viewing a program simply press TOOLS button then select Add to
Favorites and press @.
To manually edit your list of favorite channels, select Edit Favorites. For more infonnation,
see page 37.
The Digital Favorites feature lets you create a list of up to 16
(_ favorite channels that you specify.
1 Highlight Favorites on the MENU control panel
and press @.
Digital Favorites 2 Make your selection by pressing tl,/!1, to highlight the desired
channel then press @.
To acid the current channel to the list of Favorite Channels,
follow step 1 above then highlight Add to Favorites and press
C._)
To edit your list of favorite channels, follow step 1 above then highlight and select Edit
Favorites.
The Analog feature takes you to the most recently viewed analog channel. When tuned to the
[_ channel, Channel number will be displayed.
Highlight Analog on the MENU control panel and press @.
Analog
The Digitalfeature takes you to the most recently viewed digital channel. When tuned to the
_0 channel, the Program Banner and Channel number will be displayed.
Highlight Digital on the MENU control panel and press @ .
Digital
24
Using the Menus
The Settings feature lets you enter the settings screen. Settings and adjustments can be performed
from the Settings menu. The infornlation on various settings starts from page 26.
Settings
Navigating Through Settings
Tile Settings screen provides access to tile features:
1 Press MENU.
2Select 8"
3Highlight the item: Picture, Sound, Screen, Setup, PC Settings, Analog Setup, Digital Setup.
4Press @ to select an option.
To exit Settings, press MENU. 2
25
Using the Menus
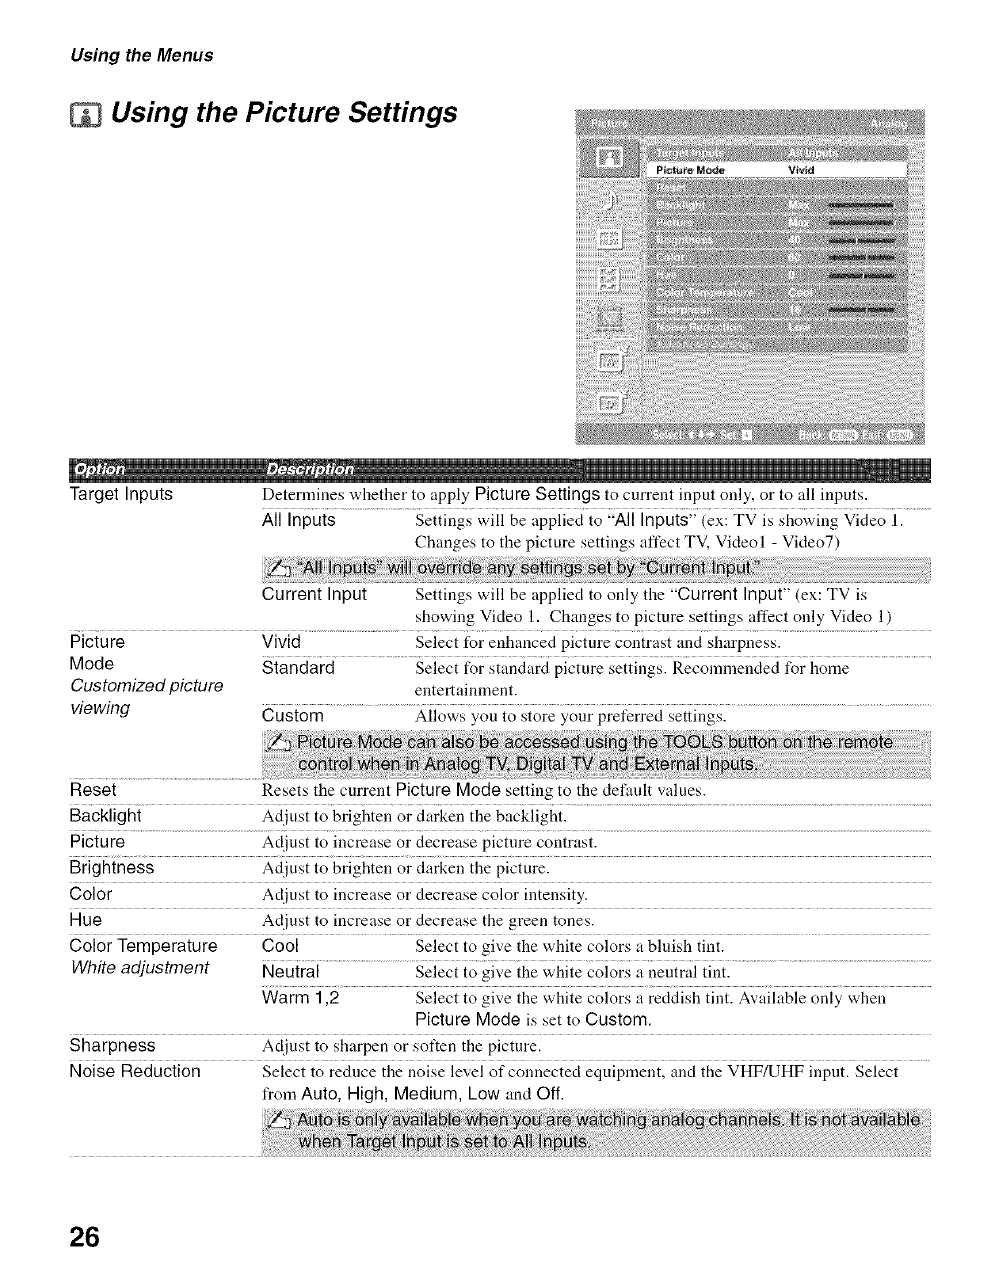
Using the Picture Settings
Target Inputs Determines whether to apply Picture Settings to current input only, or to all inputs.
All Inputs Settings will be applied to "All Inputs" (ex:TV is showing Video 1.
Changes to the picture settings affect TV, Videol - Video7)
Current Input Settings will be applied to only the "Current Input" (ex: TV is
showing Video 1. Changes to picture settings affect only Video 1)
Picture Vivid Select for enhanced picture contrast and sharpness.
Mode Standard .................... Select for standard picture settings. RecolnmeJ_cied for ho;_e ................................
Customized picture entertainment.
viewing Custom ...................................Allows you to store your preferred settings. ...........................................................................
Reset Resets the current Picture Mode setting to the defanlt values.
Backlight Adjust to brighten or darken the backlight.
Picture Adjust to increase or decrease picture contrast.
Brightness Adjust to brighten or darken the picture.
Color Adjust to increase or decrease color intensity.
Hue Adjust to increase or decrease the green tones.
Color Temperature Cool Select to give the white colors a bluish tint.
White adjustment Neutral ................................................Select t0 give the white Colors a neutrai tint. .............................................................................................
Warm 1,2 Select to give the white colors a reddish tint. Available only when
Picture Mode is set to Custom.
Sharpness Adjust to sharpen or soften the picture.
Noise Reduction Select to reduce the noise level of connected equipment, and the VHF/UHF input. Select
from Auto, High, Medium, Low and Off.
26
Using the Menus
Advanced Settings Reset Resets all the advanced settings to the default settings.
A_'ailabale only _tll_,n Black Correcter Enhances black areas of the picture for stronger contrast.
Picture Mode is' s'et to Advanced C.E. Auto;{_a6caliy optimizes the backiight _md co;{irast. This setting is
C¢¢s'tom (Advanced especially effective for dark image scenes. It will increase the contrast
Contrast distinction of the darker picture scenes.
Enhancer)
Gamma Adjusts the balance between the light and clark areas of the picture.
Clear White Emphasizes white and light colors.
Live Color Makes colors more vivid.
MPEG Noise Reduces the mosaic effect in MPEG-compressed video.
Reduction Effective for Digital TV programs.
27
Using the Menus
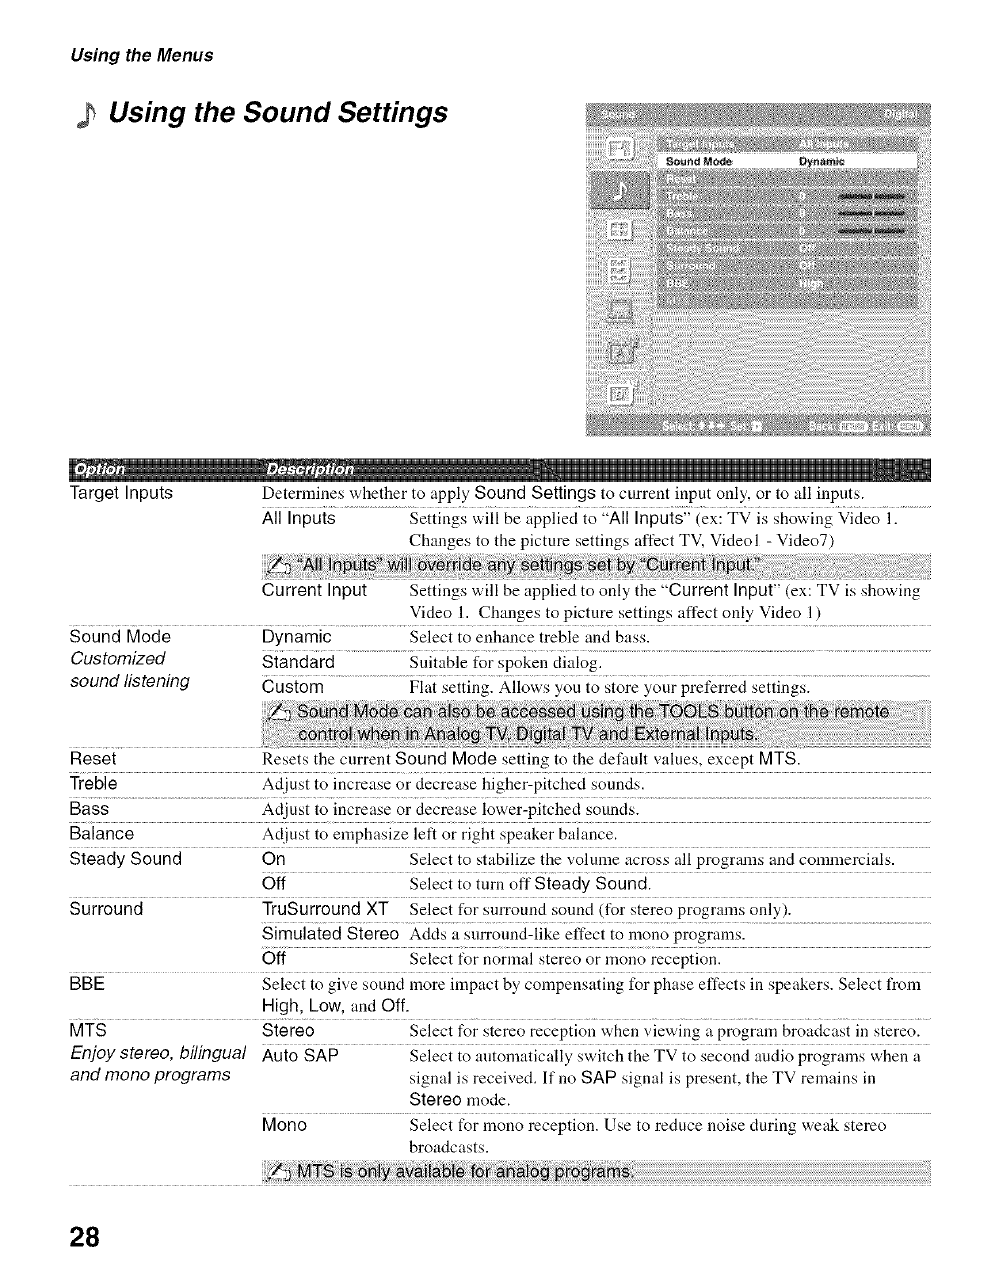
Using the Sound Settings
Target Inputs Determines whether to apply Sound Settings to current input only, or to all inputs.
All Inputs Settings will be applied to "All Inputs" (ex: TV is showing Video 1.
Changes to the picture settings affect TV, Videol - Video7)
Current Input Settings will be applied to only the "Current Input"(ex: TV is showing
Video 1. Changes to picture settings affect only Video 1)
Sound Mode Dynamic Select to enhance treble and bass.
Customized Standard Suitable for spokeu dialog.
sound listening CustOm ..............................................Fiai settiug. AiloWs you to store your preferred settingSl .........................................................
Reset Resets the current Sound Mode setting to the default values, except MTS.
Treble Adjust to increase or decrease higher-pitched sounds.
Bass Adjust to increase or decrease lower-pitched sounds.
Balance Adjust to emphasize left or right speaker bahmce.
Steady Sound On Select to stabilize the volume across all programs and commercials.
Off Select to turu off Steady Sound.
Surround TruSurround XT Select for surround sound (for stereo programs only).
Simulated Stereo Adds a snrround-like effect to mouo programs.
Off Select t_r normal stereo or mouo reception.
BBE Select to give sound more impact by compensating for phase effects iu speakers. Select from
High, Low, and Off.
MTS Stereo Select t\_r stereo receptiou when viewiug a program broadcast iu stereo.
Enjoy stereo, bilingual Auto SAP Select to antomatically switch the TV to second audio programs when a
and mono programs signal is received. If uo SAP signal is present, the TV remains in
Stereo mode.
Mono Select for mono reception. Use to reduce uoise during weak stereo
broadcasts.
g i_:::6i avaii_6i
28
Using the Menus
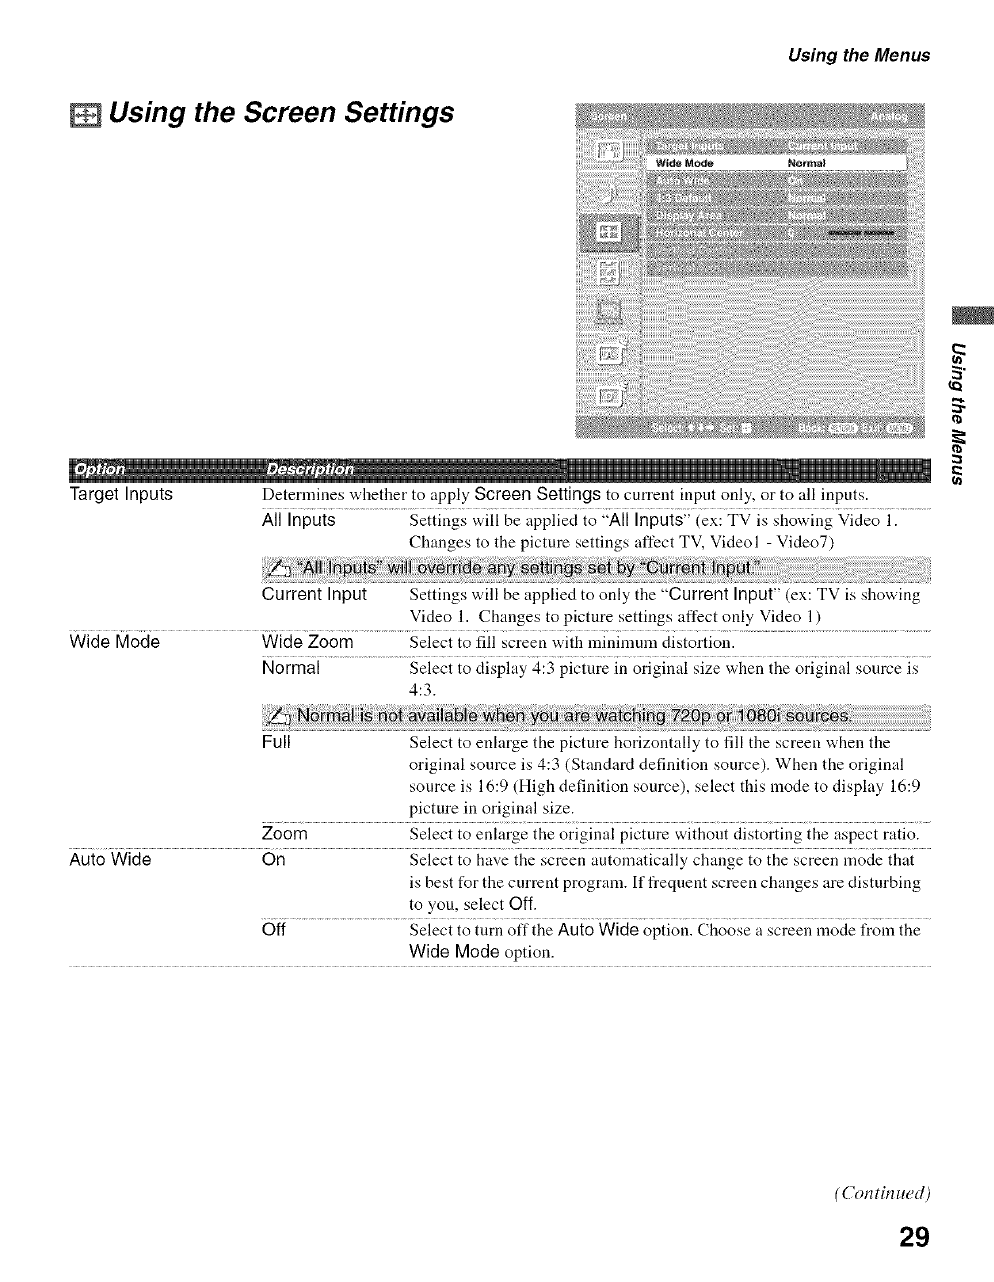
mUsing the Screen Settings
Target Inputs Determines whether to apply Screen Settings to current input only, or to all inputs.
All Inputs Settings will be applied to "All Inputs" (ex: TV is showing Video I.
Changes to the picture settings affect TV, Videol - Video7)
Current Input Settings will be applied to only the "Current Input" (ex: TV is showing
Video 1. Changes to picture settings affect only Video 1)
Wide Mode Wide Zoom Select to fill screen with minimum distortion.
Normal Select to display 4:3 picture in original size when the original source is
4:3.
Full Select to enlarge the picture horizontally to fill the screen when the
original source is 4:3 (Standard definition source). When the original
source is 16:9 (High definition source), select this mode to display 16:9
picture in original size.
Zoom Select to enlarge the original picture without distorting the aspect ratio.
Auto Wide On Select to have the screen automatically change to the screen mode that
is best for the current program. If frequent screen changes are disturbing
to you, select Off.
Off Select to turn offthe Auto Wide option. Choose a screen mode l¥om the
Wide Mode option.
2
(Con tin ued)
29

Using the Menus
4:3 Default Wide Zoom Select to enlarge the 4:3 picture to fill the 16:9 screen, keeping the
Select the default original image as much as possible, with minimal distortion.
Screen Mode to use for Normai ...................Seieci io _iispiay {l,e 4;3 pic{ure ;n i{s origi;3ai size: ....................................
4:3 sources Off.....................................................................Selectt0 c0J{tinueushlg thecnrreut Wide Mode setting when the .........................
channel or input is chauged.
Display Area Select Normal to return to the default display area. Select -1 or -2 to enlarge the picture so
that the edges are outside the visible portion of the screen.
Horizontal Center Allows you to move the position of the picture left and right.
Press 4,/* and press @ to choose a correction betweeu Min, -4 to +4 and Max.
Vertical Center Allows you to move the position of the picture up and down. Available only in Zoom mode.
Press tl4') and press @ to choose a correction between Min,-4 to +4 and Max.
Vertical Size Allows you to adiust the vertical size of the picture. (Available only in Wide Zoom and
Zoom modes.)
Press 4'/11, and press @ to choose a correction between Min,-4 to +4 and Max.
30
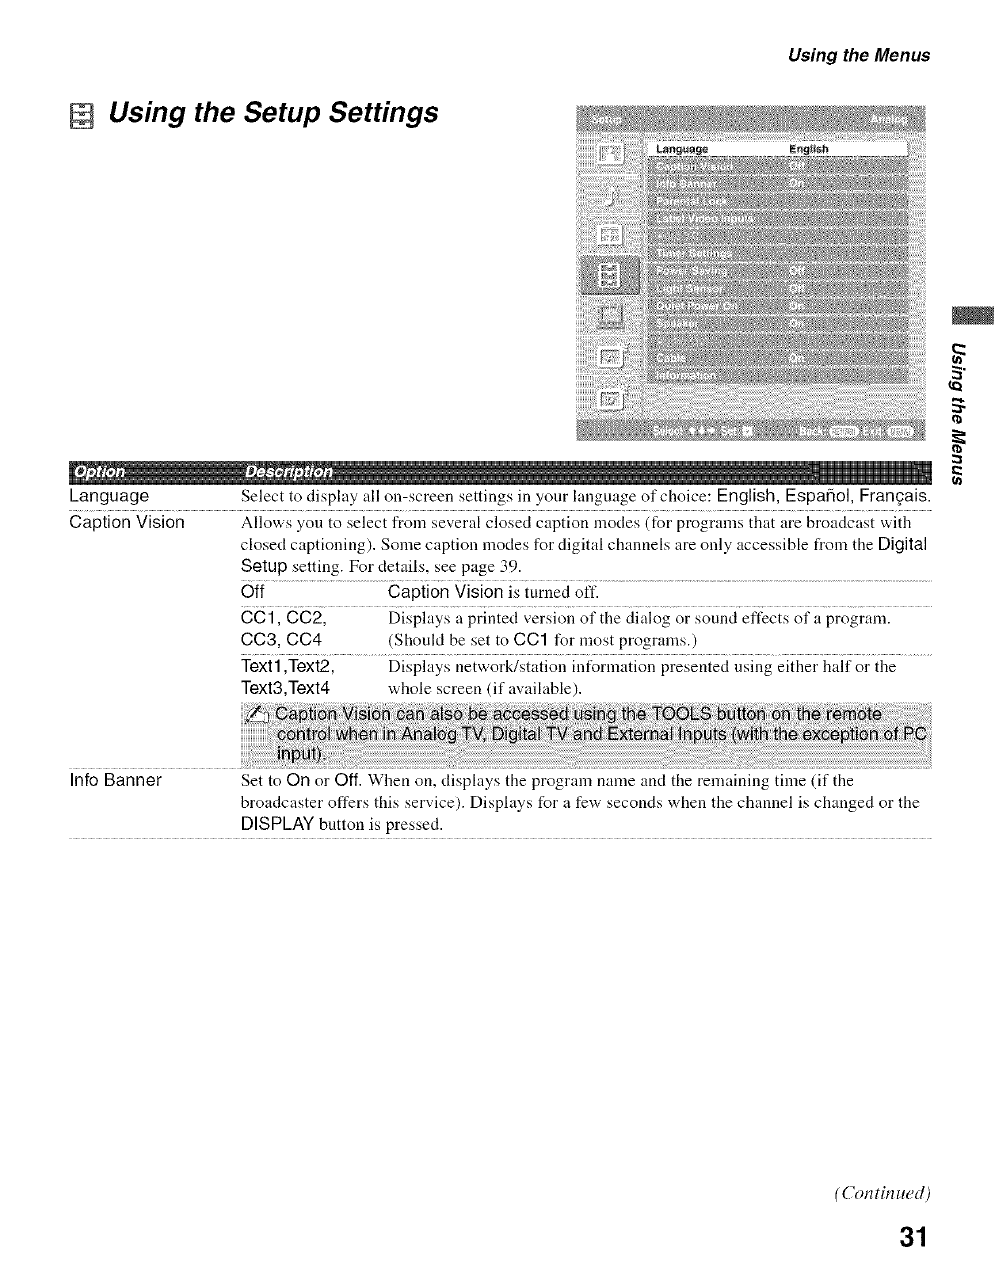
Using the Setup Settings
Using the Menus
Language Select to display all on-screen settings in your hmguage of choice: English, Espa_ol, Fran_ais.
Caption Vision Allows you to select from several closed caption modes (for programs that are broadcast with
closed captioning). Some caption modes for digital channels are only accessible from the Digital
Setup setting. For details, see page 39.
Off Caption Vision is turned off.
CCl, 0C2, Displays a printed version of the dialog or sound effects of a program.
0C3, CC4 (ShouM be set to CC1 for most programs.)
Text1,Text2, Displays network/station information presented using either half or the
Text3,Text4 whole screen (if available).
2
Info Banner Set to On or Off. When on, displays the program name and the remaining time (if the
broadcaster offers this service). Displays for a few seconds when the channel is changed or the
DISPLAY button is pressed.
(Con tin ued)
31
Using the Menus
Parental Lock The Parental Lock settings allows yon to set up the TV to block programs according to their
content and rating levels. Use 0-9 on the remote control to enter a four-digit password. The first
time you create a password, confirm the password by entering it again.
Lock Off Turn Parental Lock off. No programs are
blocked from viewing.
Child Maximum ratings permitted are:
U.S.: TV-Y, TV-G, G
Canada: C, G, TV-Y
Youth Maximum ratings permitted are:
U.S.: TV-PG, PG
Canada: C8+, PC, 8 ans+, TV-PG
Young Adult Maximum ratings permitted are:
U.S.: TV-14, PC-13
Canada: 14+, 13 ans+, TV-14
Custom Select to set ratings manually.
U.S.: See page 34 for details.
Canada: See page 35 for details.
Change Password Select to change your password.
Select Country U.S.A. Select to use U.S.A. ratings (see page 34).
Canada Select to use Canadian ratings (see page 35).
Label Video Inputs Allows you to identify A/V equipment you connected to the TV, such as a VCR, DVD, etc. For
example, if you have a DVD player connected to the Vl DEO 4 jack, you can select the label
DVD for the Video 4 input. Then when you press TVNIDEO to change inputs, the Video Label
o
you assi_,ned to that input appears on screen.
1 Press tl,/,l!, to highlight the video input (Video 1-7) to which you want to assign a label.
Then press @ to select the input.
2 Press tl./!1, to highlight one of the displayed labels. Then press @ to select the label.
You can select from the following labels for each input:
Video 1-6 --, RECEIVER, SATELLITE, CABLE BOX, VCR, DVD, DVR, HD,
GAME, CAMCORDER, Edit:, Skip
Video 7 -, PC, Edit:, Skip
32
Using the Menus
Auto YC Both composite video and S Video can be connected to VIDEO 1 and VIDEO 2. Your TV by
default will automatically select to receive input signal from the S Video. Use this option when
you want to receive the input signal from the composite video.
1 Press TV/VIDEO repeatedly until the desired video input appears.
2 After selecting the Auto YC option, to watch the pictures input from the S VIDEO input
jack:
Press ,i./,1!.to highlight On, then press Q'Z).
To watch the pictures input from the VIDEO input jack:
................................ press 4,!11,to highlight Off, then press @. ...........................
Timer Settings Sleep Timer Set the time in minutes (Off, 15 min, 30 rain, 45 rain, 60 min, 90 min, or
120 min) that you want the TV to remain on before shutting oft"
automatically.
Timer You can use the Timer to program the TV to turn and oft', and to tune to a
specific channel at a scheduled time.
Timer feature will not be available until you set the Current Time.
1Press t1.1!1,to highlight one of the t_llowing options, then press @.
Set: Select to set the timer by Day, Time, Duration, Channel and Volume
Setup.
Oft': Select to turn off the timer. (Your previous settings are saved.)
2If you selected Set in step 1, press tl./,1!./I./,_ to set the day(s), hour,
minute, AM/PM, duration, channel number (VHF/UHF, CATV or
Digital), and volume.
When Digital is selected, the last digital channel yon viewed will
automatically show when the TV is turned on.
3Press MENU to exit Settings.
2
Current Time Select to set the current time (day, hour, minute, and AM/PM).
1Press @ to select Current Time.
2Press tl./,1!./I./* to set the current time (day, hour, minute, and AM/PM).
3Press MENU to exit Settings.
Power Saving Select to reduce the power consumption by adjusting the backlight brightness. This also
enhances the black level. Select from Off, Low, High and Picture Off.
LightSensor Select On to enable the automatic picture (screen) brightness control. The light sensor measures
the room brightness which allows the TV to automatically adjnst the backlight brightness based
on the picture settings and the ambient room light conditions.
Quiet Power On
(Con tin ued)
33
Select to have the TV volume start at the mininmm volume and gradually change to the set level
when you turn it on.
Using the Menus
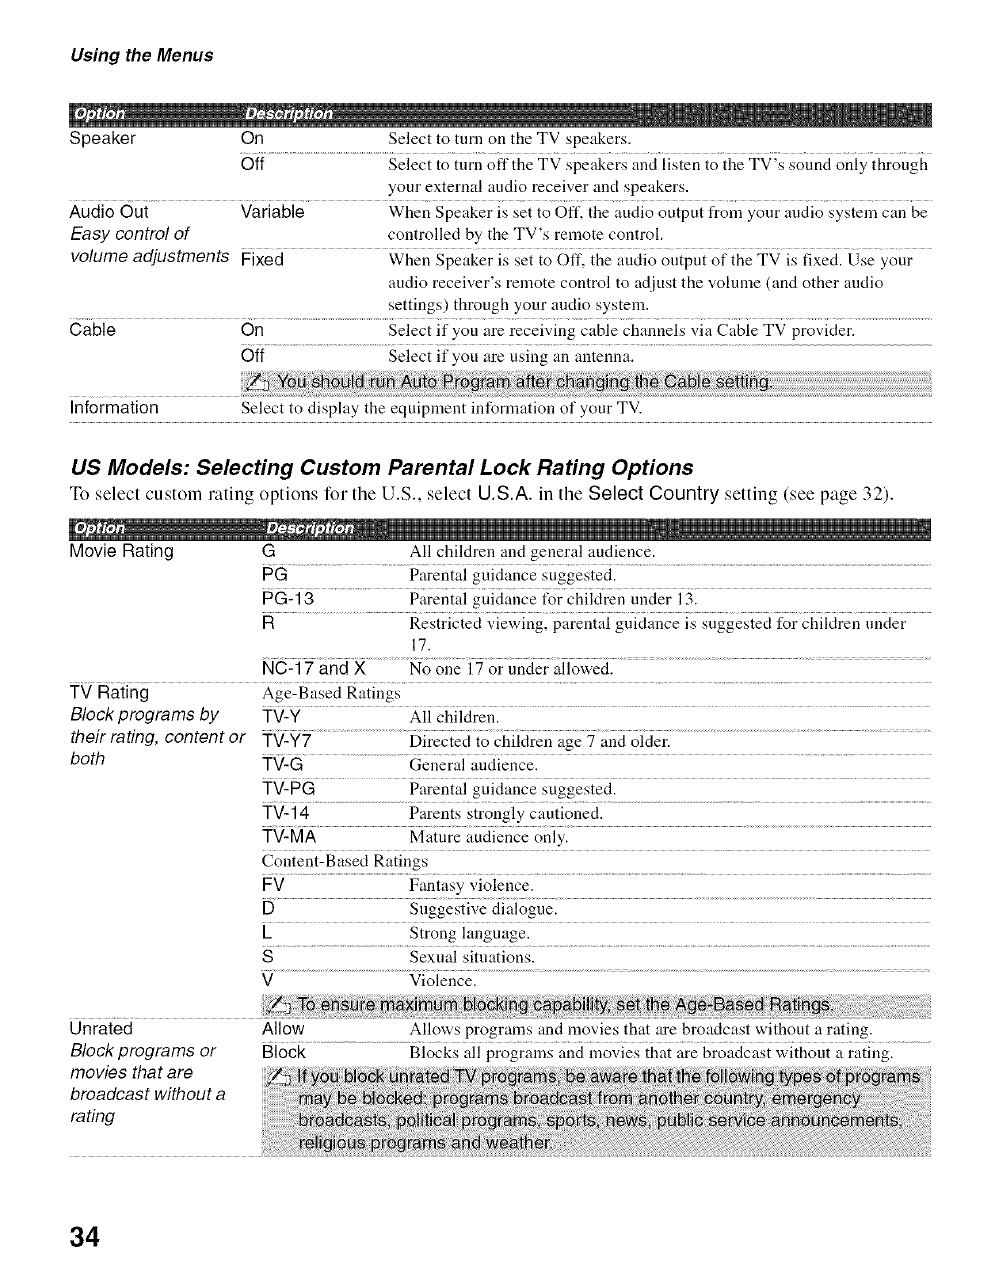
Speaker On Select to tnrn on the TV speakers.
Off Select to turn offthe TV speakers and listen to the TV's sound only through
your external audio receiver and speakers.
Audio Out Variable When Speaker is set to Off, the audio output from your audio system can be
Easy control of controlled by the TV's remote control.
volume adjustments #ixed Wiien Speaker is sei io Off, ihe aiidio otiipui of ihe TV is fixedl Use your
audio receiver's remote control to ac[itlst the volmne (and other audio
settings) through your audio system.
Cable On Select if you are receiving cable channels via Cable TV provider.
Off Select if you are using an antenna.
Information Select to display the equipment information of your TV.
US Models: Selecting Custom Parental Lock Rating Options
To select custelll rating options for the U.S., select U.S.A. in the Select Country setting (see page 32).
Movie Rating G All children and general audience.
PG Parental guidance suggested.
PG-13 Parental guidance tbr chiktren under 13.
R Restricted viewing, parental guidance is suggested for chiktren tinder
17.
NC-17 and X No one 17 or under allowed.
TV Rating Age-Based Ratings
Block programs by TV-Y All children.
their rating, content or TV-Y7 ....................................................5ir_e_i io_hii_iren@_and oiderl.........................................................................................
both TV-G ..............................General audience. .........................
TV-PG Parental guidance suggested.
TV-14 Parents strongly cautioned.
TV-MA Mature audience only.
Content-Based Ratings
FV Fantasy violence.
DSuggestive dialogue.
LStrong language.
SSexual situations.
V Violence.
Unrated
Block programs or
movies that are
broadcast without a
rating
Allow Allows programs and movies that _re broadcast without a rating.
Block Blocks all programs and movies that are broadcast without a rating.
34
Using the Menus
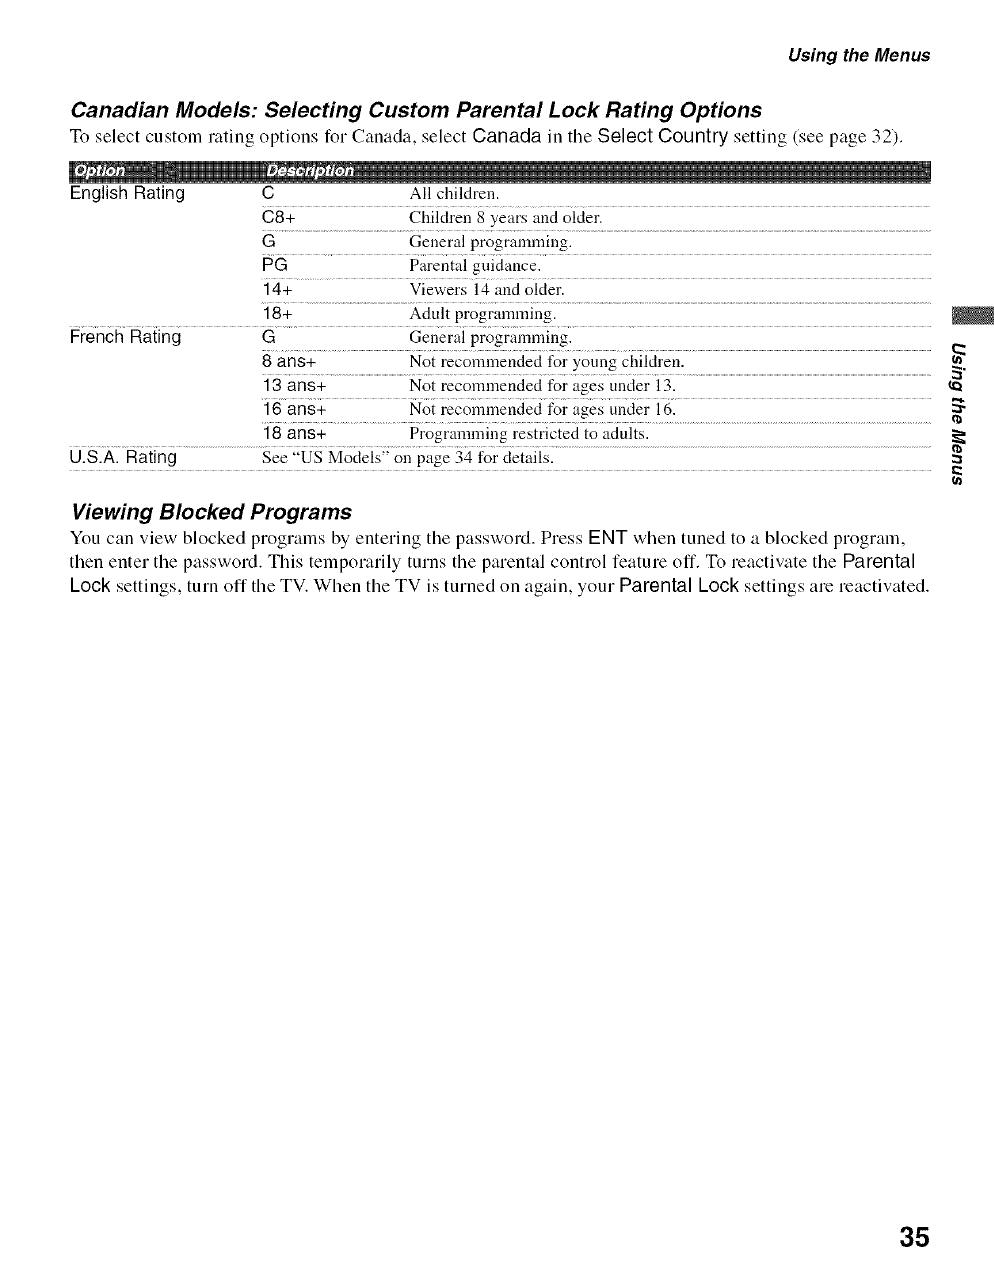
Canadian Models: Selecting Custom Parental Lock Rating Options
To select custom rating options for Canada, select Canada in tile Select Country setting (see page 32).
English Rating C All children.
C8+ Children 8 years and older.
G Geueral programming.
PG Parental guidance.
14+ Viewers 14 and older.
18+ Adult programming.
French Rating G General programming.
8ans+ Not recommended for young children.
13 arts+ .....................................................Not reC0mmended for ages Uuder i 3. ..............................................................................................................................................................................................................._
] 6ans+ ............... Not rec011m}euded for ages under !61..................................................................................................._
!8arts÷
U.S.A. Rating See "US Model. on page ._4 for details. :a
Viewing Blocked Programs
You can view blocked programs by entering the password. Press ENT when tuned to a blocked program,
then enter the password. This temporarily turns the parental control feature off. To reactivate the Parental
Lock settings, turn off the TV. When the TV is turned on again, your Parental Lock settings are reactivated.
35
Using the Menus
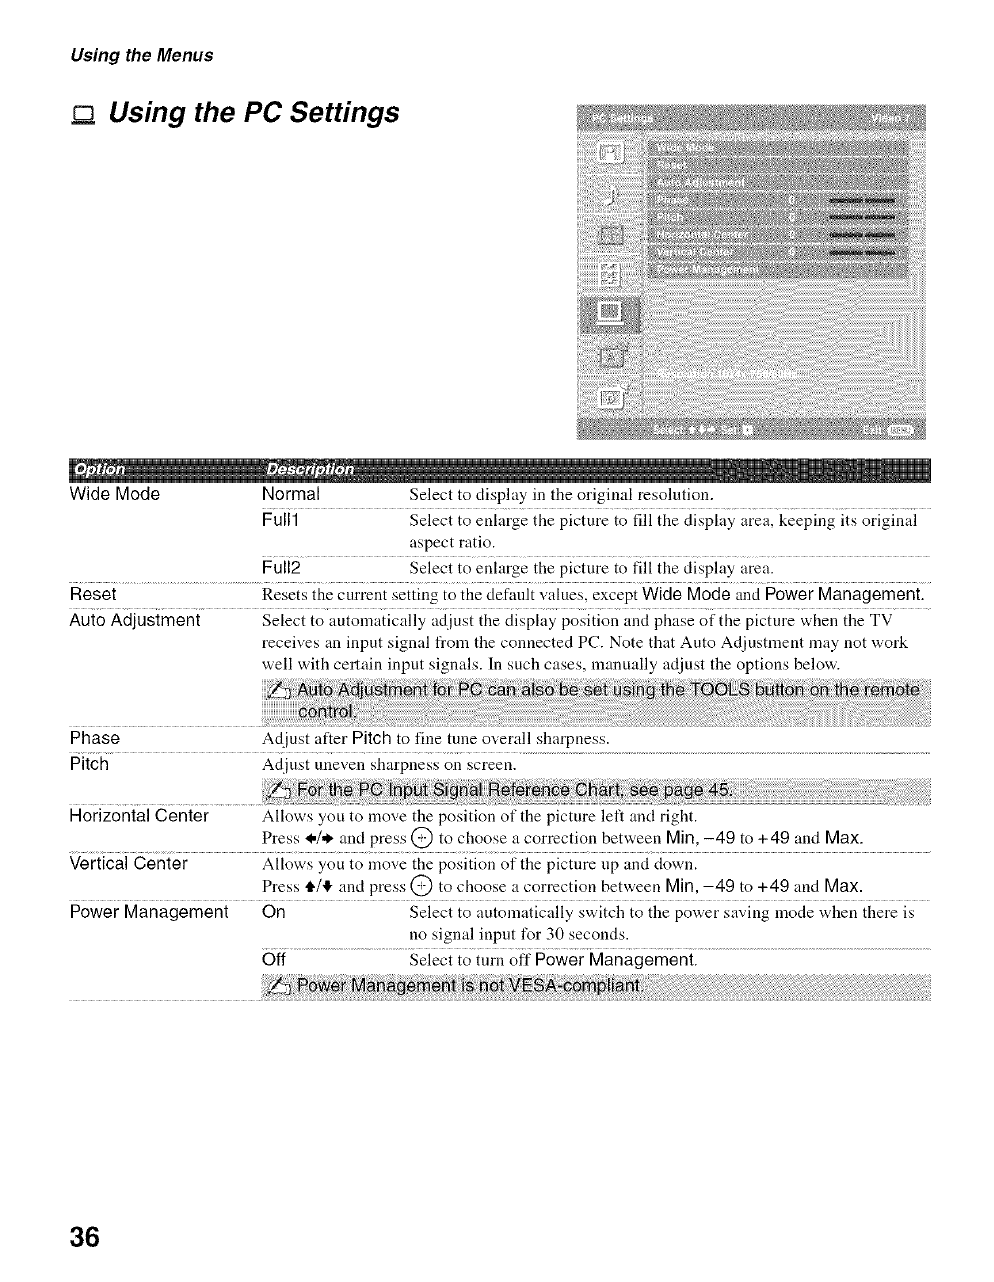
Using the PC Settings
Wide Mode Normal Select to display in the original resolution.
Full1 Select to enlarge the picture to fill the display area, keeping its original
aspect ratio.
Full2 Select to enlarge the picture to fill the display area.
Reset ...................................................Resets iiae curl2eni setting to file default _.'alues, except Wide Mode and power Managementl
Auto Adjustment Select to automatically adjust the display position and phase of the picture when the TV
receives an input signal from the connected PC. Note that Auto Adjustment may not work
well with certain input signals. In such cases, manually adjust the options below.
Adjust after Pitch to fine tulle overall sharpness.
Adjust uneven sharpness on screen.
Phase
Pitch
Horizontal Center Allows you to move the position of the picture left and right.
Press _./* and press @ to choose a correction between Min, -49 to +49 and Max.
Vertical Center Allows you to move the position of the picture up and down.
Press tl./'I" and press @ to choose a correction between Min,-49 to +49 and Max.
Power Management On Select to automatically switch to the power saving mode when there is
no signal input for 30 seconds.
Off Select to turn off Power Management.
36
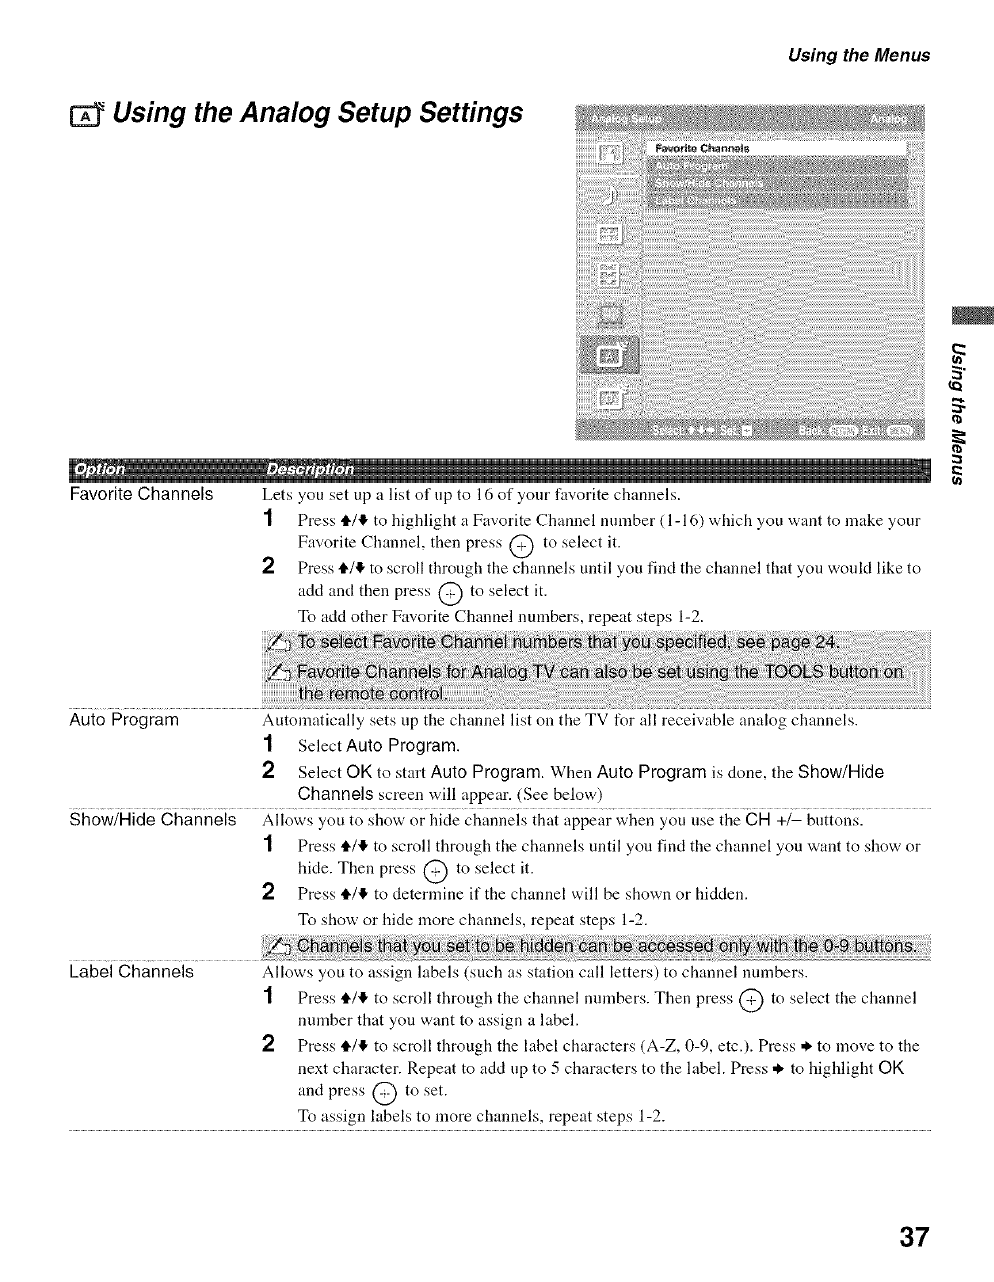
Using the Analog Setup Settings
Using the Menus
Favorite Channels Lets you set up a list of up to 16 of your favorite channels.
] Press tl,/!1,to highlight a Favorite Channel number ( 1- 16) which you want to make your
Favorite Channel, then press @ to select it.
2 Press ,1_/,!,to scroll through the channels until you find the chanuel that you would like to
add and then press @ to select it.
To acid other Favorite Channel numbers, repeat steps 1-2.
2
Auto Program
1Select Auto Program.
2Select OK to start Auto Program. When Auto Program is done, the Show/Hide
Channels screen will appear. (See below)
Show/Hide Channels Allows you to show or hide channels that appear when you use the CH +/- buttons.
1 Press tl./!1,to scroll through the channels until yon find the channel you want to show or
hide. Then press @ to select it.
2 Press tl./I!, to determine if the channel will be shown or hidden.
To show or hide more chanuels, repeat steps 1-2.
Automatically sets up the channel list on the TV for all receivable analog channels.
Label Channels Allows you to assign labels (such as station call letters) to channel numbers.
1 Press tl./!1, to scroll through the channel numbers. Then press @ to select the channel
number that you want to assign a label.
2 Press tl./I!, to scroll through the label characters (A-Z, 0-9, etc.). Press ._, to move to the
next character. Repeat to add up to 5 characters to the label. Press * to highlight OK
and press @ to set.
To assign h_bels to more ch_mnels, repeat steps 1-2.
37
Using the Menus
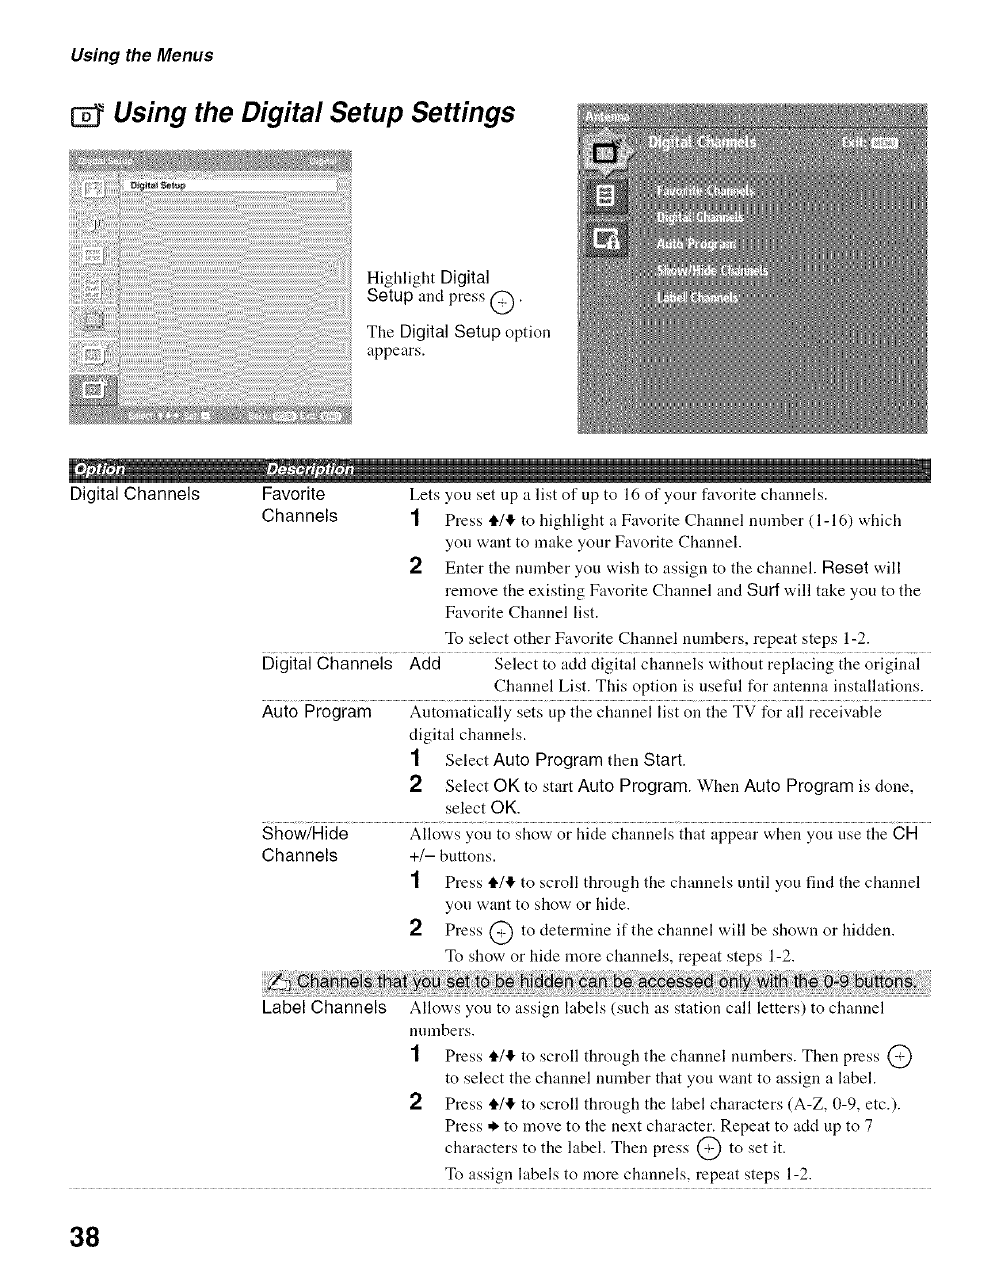
Using the Digital Setup Settings
Highlight Digital
Setup and press @.
The Digital Setup option
appears.
Digital Channels Favorite Lets you set up a list of up to 16 of your favorite chanuels.
Channels 1Press tl./!1, to highlight a Favorite Channel mnnber (1-16) which
you want to make your Favorite Channel.
2 Enter the number you wish to assign to the chanuel. Reset will
remove the existing Favorite Channel and Surf will take you to the
Favorite Channel list.
To select other Favorite Channel numbers, repeat steps 1-2.
Digital Channels Add Select to add digital channels without replacing the original
Channel List. This option is useful for antenna installations.
Auto Program Automatically sets up the channel list on the TV for all receivable
digital channels.
1 Select Auto Program then Start.
2 Select OK to start Auto Program. When Auto Program is done,
select OK.
Show/Hide Allows you to show or hide channels that appear when you use the CH
Channels +/- buttons.
1 Press tl./I!, to scroll through the channels until you find the channel
you want to show or hide.
2 Press @ to determine if the channel will be shown or hidden.
To show or hide more channels, repeat steps 1-2.
Label Channels Allows you to assign labels (such as station call letters) to channel
numbers.
1Press tl./,1!,to scroll through the channel numbers. Then press @
to select the channel number that you want to assign a label.
2Press tl./I!, to scroll through the label characters (A-Z, 0-9, etc.).
Press ._ to move to the next character. Repeat to acid up to 7
characters to the label. Then press @ to set it.
To assign labels to more channels, repeat steps 1-2.
38
Using the Menus
Digital Setup Caption Vision Allows you to select from several closed-caption modes for digital
channels. To set Caption Vision for analog channels, see page 31.
On Caption Vision is turned on.
Off Caption Vision is turned off.
Program Allows you to set basic and advanced Caption Vision
options. See "Programming Caption Vision" below.
AN Sync Off/1/2/3 Use this option to make adjustments to audio and video
synchronization when you have external equipment
connected to OPTICAL OUT of the TV. Select Off
(default setting) to make no adjustments. Select 1,2 or
3 to adjust so that the video and audio from your
connected external equipment are synchronized.
Diagnostics Display diagnostics infonnation about the TV. This can be useflfl in pro-
viding information to an authorized technician or repair person.
Parental Lock The Parental Lock option in the Digital Setup settings allows you to set up the TV to block
digital programs that coutain digital ratings.
2
Password If the password has not been set, or to change the password, use
Change Password option in the Setup settings (see page 32).
Digital Rating Off Turn Parental Lock oft. No programs that contain
downloadable ratings are blocked from viewing.
Custom... Select to block programs based on downloadable ratings.
Clear All Select to clear the entire downloadable rating system.
Programming Caption Vision
If you selected the Program option under Caption Vision, you can change the following settings:
Basic Allows you to select basic analog (EIA-608) closed caption options.
CCll CC2.............s_ Capiionvison init,_geiup;_iiingonp@ _il ..................................................................
CC3, CC4
Tex}ll Texi2; See Cap{ion Vison in ihe Seiup seiiii_g on p;{ge 3ii
Text3, Text4
Digital CC Allows you to set digital closed captioning to Basic (digital EIA-608) or Advanced (digital
EIA-708).
Advanced Allows you to select advanced digital (EIA-708) closed caption options. Select from the
available options.
(Con tin ued)
39

Using the Menus
Advanced Settings Allows you to make additional settings for digital (EIA-708) closed caption options. Select
from As Broadcast, Small Text, Large Text and Custom.
Custom... Allows you to customize the t_llowing settings:
Character Size Small, Standard, Large
Character Style Style 1-7
Character Color Color 1-8
Character Opacity Solid, Translucent
Edge Color Color 1-8
Edge Type None, Raised, Depressed, Outline,
Left Shadow, Right Shadow
Background Color None, Color 1-8
Background Opacity Solid, Translucent
Window Color None, Color 1-8
Window Opacity Solid, Translucent
40
Troubleshooting
If you have additional questions, service needs, or required technical assistance related to the use of your
Sony TV. please visit our website or call one of the following numbers:
http://www.sony.com/TVsupport
1-800-222-SONY(7669) for US Residents
1-877-899-SONY(7669) for Canadian Residents
No picture.
No picture. [] Check Power Saving settings (page 33).
Cannot receive any channels. [] Make sure tile power cord is connected securely.
[] Turn oll the power of the TV.
[] Check antenna/cable connections.
TV is locked to one channel. [] Perform Auto Program to add receivable channels that are not presently in the
TV's memory (pages 37 and 38).
Cannot receive or select ctlannels. [] Perform Auto Program to add receivable channels that are not presently in the
TV's memory (pages 37 and 38).
[] To receive or select cable channels, make sure that Cable in the Setup settings
is set to On (page 34). To receive or select UHF ctlannels over an antenna, make
sure Cable is set to Off.
The TV turns off automatically. [] Check if tile Sleep Timer is activated, or confirm the Duration setting of Timer.
(page 33).
[] Check Power Management in the PC Settings. (page 36)
No picture from some vide() [] Check the connection between the optional video equipment and the TV.
sources. [] Press TVNIDEO on the remote control (page 19).
[] If you connect vide() equipment to the S VIDEO input of the TV, set Auto YC to
On in the Setup settings (page 33).
[] Press MENU oll the remote control. Select your desired input from the External
Inputs list.
Poor picture.
Double images or ghosts. [] Check antenna/cable connections.
[] Check the antenna k)cation and direction.
Only snow and noise appear oll the [] Check if tile antenna is broken or bent.
screen. [] Check if the antenna has reached the end of its serviceable life. (34 years in
normal use, 1-2 years at the seaside.)
Dotted lines or stripes. [] Keep the TV away l]'om noise sources such as cars, motorcycles, or hair-dryers.
[] If using 300 ohm twin lead, move the excess lead away l]'om the TV or try using
75 ohm coaxial cable instead.
No color/Dark picture/Color is not [] Press PICTURE to select the desired picture mode (page 19).
correcdThe picture is too bright. [] Adjust the Picture Mode options in the Picture settings (page 26).
[] If you set tile Power Saving mode to Low or High, it will enhance tile black
level.
Noisy picture. [] Make sure that the antenna is connected using the supplied 75-ohm coaxial
cable.
[] Keep the amenna cable away from other connecting cords.
[] To avoid TV interference, make sure to use an uudamaged antenna cable.
(b
(Continued)41
Other Information
No sound/Noisy sound
Good picture, no sound.
Audio noise.
[]
[]
[]
[]
[]
[]
[]
[]
Wide Mode changes automatically.
[]
[]"Black box" on screen.
Black bands appear at the top and []
bottom of the screen.
Certain programs on DVD or other []
digital sources display a loss of
detail, especially during fast-motion
or dark scenes.
Remote control does not operate. []
[]
[]
[]
Some digital cable channels are not []
being displayed. []
Lost password. []
How to reset the TV to factory []
settings.
Check the volume control.
Press MUTING or VOL + so that "Muting" disappears li'om the screeu
(page 20).
Disconnect your headphones.
Set Speaker to On in the Setup settings (page 34). If it is set to Off, sound is
not output from the TV's speakers regardless ol the TV's volume control.
Make sure that the antenna is connected using the supplied 75-ohm coaxial
cable.
Keep the antenna cable away l_'om other connecting cords.
To avoid TV interference, make sure to use an uudamaged antenna cable.
The current Wide Mode setting is automatically replaced with the 4:3 Default
setting when you change the channel or video input, if 4:8 Default in the Screen
settings is set to other than Off. If you want to lock in the Wide Mode selected
with the WIDE buttou, set 4:3 Default to Off in the Screen settings (page 30).
Check the Auto Wide optiou in the Screen settiugs (page 29).
You have selected a text option in the Setup/Digital Setup setting and no text is
available. (See pages 31 and 39 tu reset Setup selections.) To turn off this Feature,
set fl_e Caption Vision option to Off. If you were trying to select closed
captioning, select CC1 iustead of Text1-4.
Some wide screen programs are fihned in aspect ratios that are greater than 16:9
(tiffs is especially common with theatrical releases). Your TV will show these
programs with hlack bands at the top and bottom of the screen. For more details.
check the documentation that came with your DVD (or contact your program
provider).
The compression used by certain digital broadcasts and DVDs may cause your
TV's screen to display less detail than usual, or cause artit'acts (small blocks or
dots, pixelations) to appear on your screen. This is due to your TV's large screen
and ability to show very line detail, and is normal li_r certain digitally recorded
programs.
Check the polarity of the batteries or replace the hatteries.
Point the remote control at the remote control sensor of the TV.
Florescent lamps can iuterfere with your remote control operation; try turning
off the florescent lamps.
Keep the relnote control sensor area clear l?'oln obstacles.
Certain cable companies have limitations on the broadcast of digital cable
channels. Check with your cable company Rn: more iuRn:mation.
The digital cable channel may be set to Hidden in the Show/Hide Channels
setting (see page 38).
Select the Parental Lock settings on the settings screen, then enter the R)llowiug
master password: 4357. The master password clears your previous password and
allows you to enter a new password (page 32).
Turn on the TV. While holding down the tl. button on the remote control, press
the POWER button on the TV. (The TV will turn itself off, then back on again.)
Release tl_e tl. button.
WARNING: The Reset will clear all of your customized settiugs including
Parental Lock setting.
42
Other Information
Preparation for Wall Mounting the KDL-32S2400
This TV can be installed on a wall by using a wall-mount bracket (sold
separately). Before mounting the TV on a wall, the Table-Top Stand must be
removed fl:om tile TV.
Sony Wall-Mount
Bracket Model
SU-WL31
(KDL-32$2400)
Follow tile simple steps below to remove tile Table-Top Stand:
1Disconnect all the cables from tile TV.
Cover a level and stable surface with a thick and soft cloth.
2
3Gently lay the TV. face down, onto the cloth. Make sure the Table-Top
Stand is banging over the edge.
4Rotate the cable holder 90 degrees, and pull it out completely. [See
illustration AI
5Remove the screws and detach the Table-Top Stand from the TV. [See
illustration B] Be sure to hold the Table-Top Stand firmly while
removing the last screw.
6Do not remove any other screws fiom the TV.
For bracket installation, refer to the instruction guide provided by the Wall-
Mount Bracket model for your TV. Sufficient expertise is required in
installing this TV. especially to determine the strength of the wall for
withstanding the TV's weight. For product protection and safety reasons,
Sony strongly recommends that you use the Wall-Mount Bracket model
designed for your TV and the wall-mounting of your TV should be
performed by Sony dealers or licensed contractors.
Cable holder
o
o
Soft cloth Table-Top Stand
43
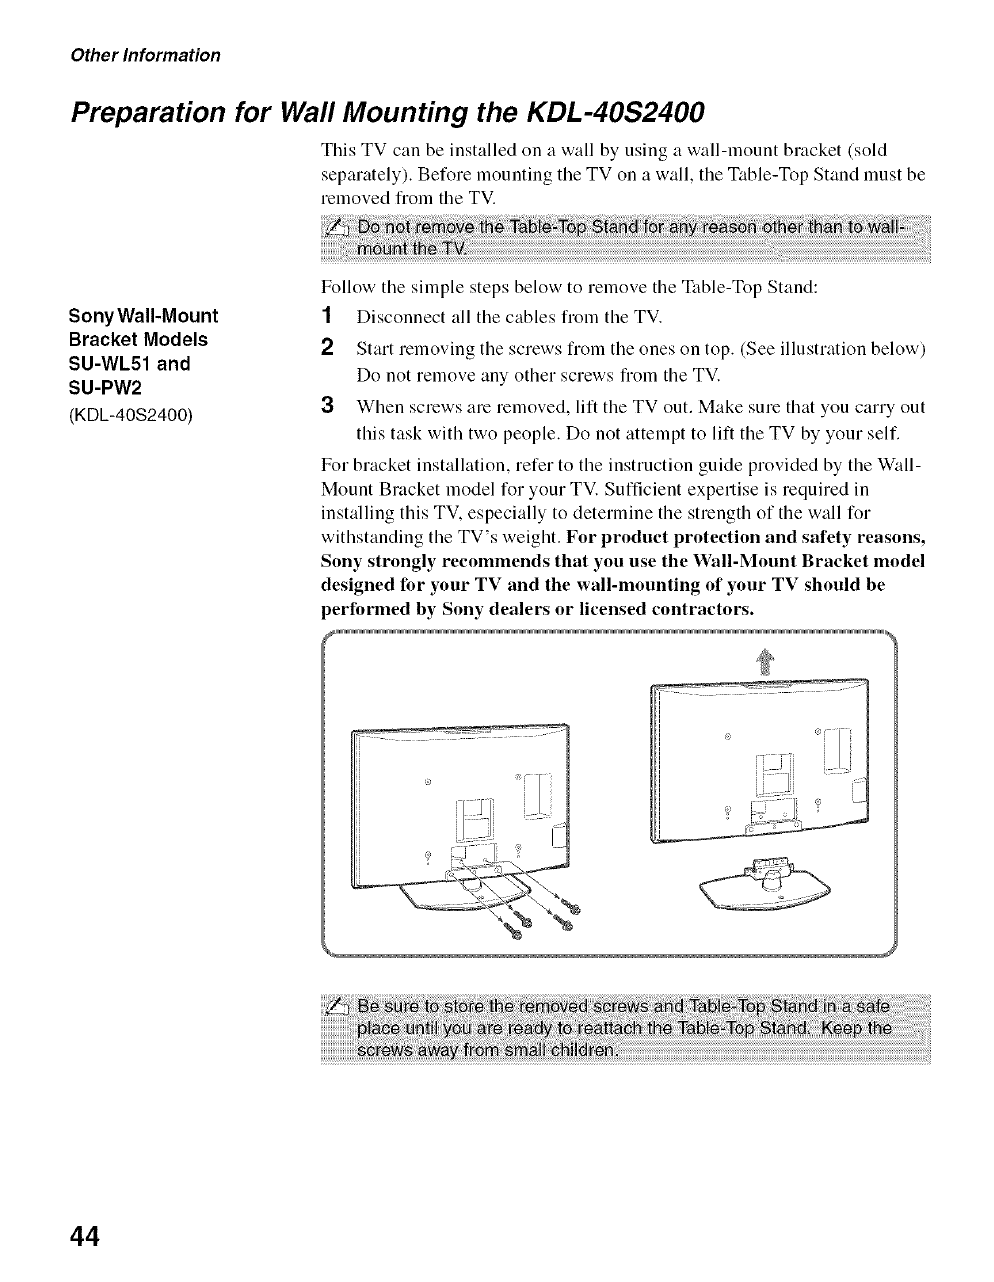
Other Information
Preparation for Wall Mounting the KDL-40S2400
This TV can be installed on a wall by using a wall-mount bracket (sold
separately). Before mounting the TV on a wall, the Table-Top Stand must be
removed fl:om tile TV.
SonyWalI-Mount
Bracket Models
SU-WL51 and
SU-PW2
(KDL-40S2400)
Follow tile simple steps below to remove tile Table-Top Stand:
1Disconnect all the cables from tile TV.
2Start removing the screws from the ones on top. (See illustration below)
Do not remove any other screws from the TV.
3When screws are removed, lift the TV out. Make sure that you carry out
this task with two people. Do not attempt to lilt the TV by your self.
For bracket installation, refer to the instruction guide provided by the Wall-
Mount Bracket model for your TV. Sufficient expertise is required in
installing this TV. especially to determine the strength of the wall for
withstanding the TV's weight. For product proteetion and safety reasons,
Sony strongly recommends that you use the Wall-Mount Bracket model
designed for your TV and the wall-mounting of your TV should be
performed by Sony dealers or licensed contractors.
%
44
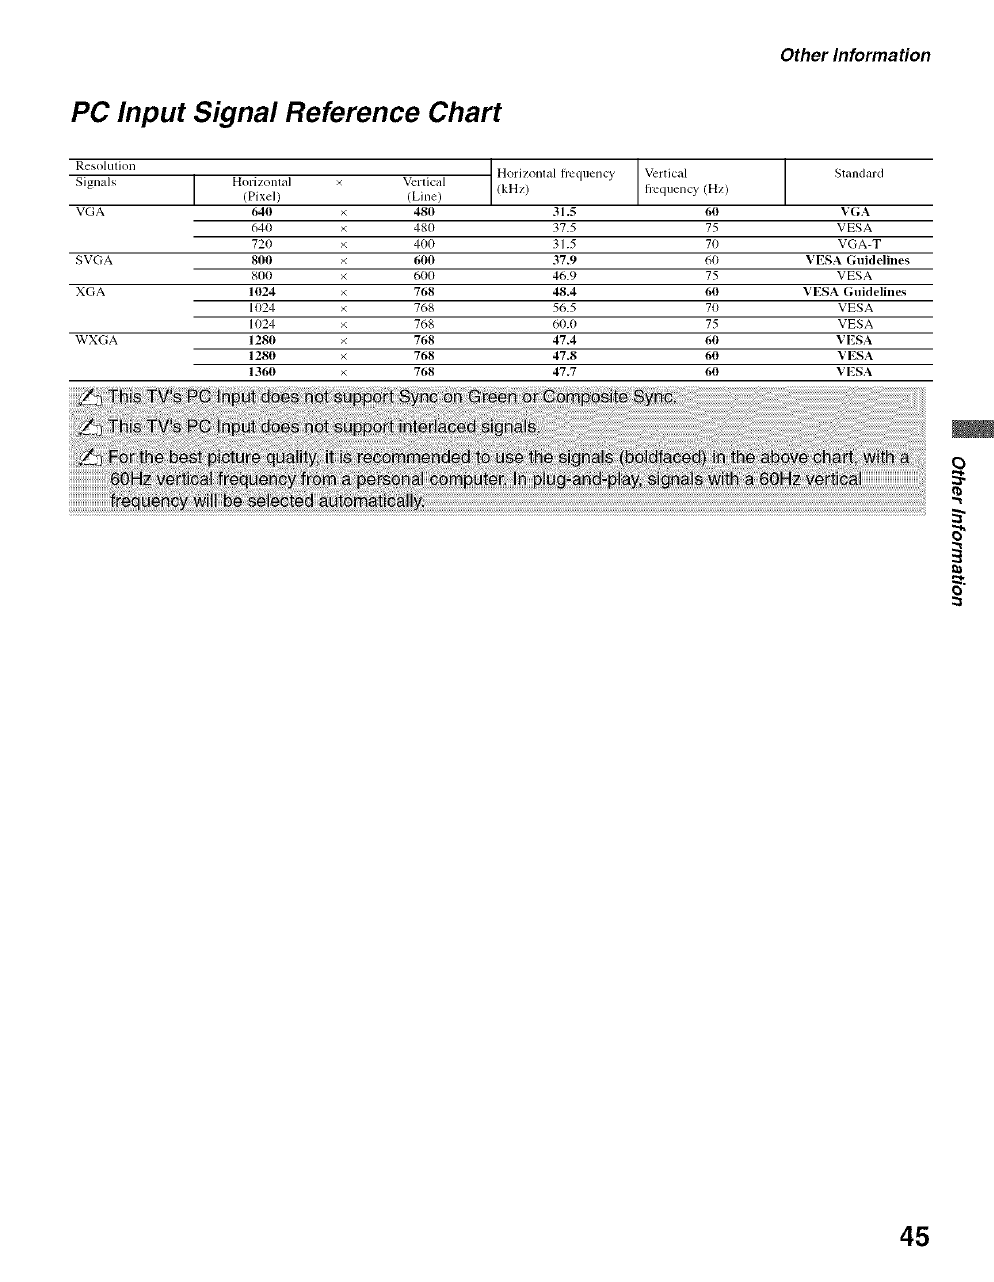
Other Information
PC Input Signal Reference Chart
Resolulion
Signals I Horizonlal(Pixe/)
VGA 640
640
720
SVGA 80(1
800
XGA 1024
1024
1024
WXGA 1280
1280
1360
Vcrlical Horizonlal Irequency Vertical
(¸Line) (kHz) fi:equenc_' (Hz)
480 31.5 60
480 37.5 75
400 31.5 70
600 37.9 60
600 46.9 75
768 48.4 60
768 56.5 70
768 60.0 75
768 47.4 60
768 47.8 60
768 47.7 60
Standard
VGA
VESA
VGA-T
VESA Guidelines
VESA
VESA Guidelhles
VESA
VESA
VESA
VESA
VESA
o
".t
O
45
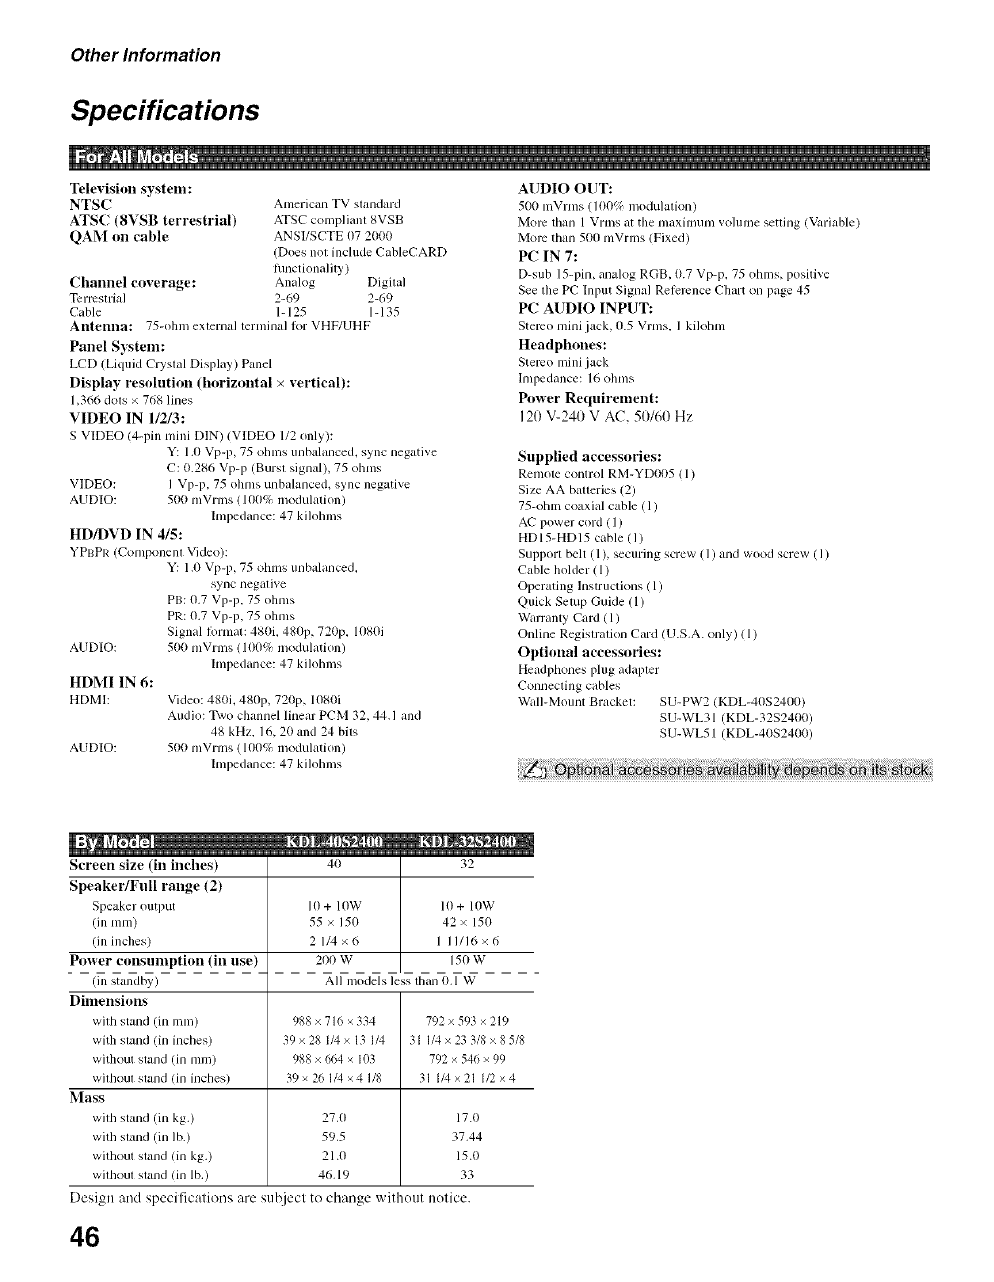
Other Information
Specifications
Television system:
NTSC American TV standard
ATSC (8VSB terrestrial) ATSC compliant gVSB
QAM on cable ANSI/SCTE t)7 2000
(Does not include CableCARD
hmctionality )
Channel coverage: Analog Digital
Tcnvstrial 2-69 2-69
Cable 1-125 1-135
Antenna: 75-ohm external terndnal lor VHF/UHF
Panel System:
LCD (Liquid Crystal Display) Panel
Display resolution (horizontal × vertieal):
1,366 dols x 768 lines
VIDEO IN 112/3:
S VIDEO (4-pin mini [)IN) (VIDEO 1/2 only):
Y: 1.0 Vp-p, 75 olnns unbalanced, sync negative
C: 0.286 Vp-p (Burst signal), 75 ohms
VIDEO: I Vp-p. 75 ohms unbalanced, sync negative
AUDIO: 500 mVrms 1100% modulation)
hnpedance: 47 kilolnns
HD/DVD IN 4/5:
YPBPR (Component Video):
Y: 1.0 Vp-p, 75 ohms unbalanced,
sync negative
PB: 0.7 Vp-p. 75 ohms
PR: 0.7 Vp-p. 75 ohms
Signal liwmat: 480i. 480p, 720p. 1080i
500 nlVrms (I(X)% modulation)
Impedance: 47 kilohms
AUDIO:
HDMI IN 6:
HDMI:
AUDIO:
Vide(): 480i, 480p, 720p, 10g0i
Audio: Two channel linear PCM 32, 44.1 and
48 kHz, 16, 20 and 24 bits
500 mVrnls (1/R1% modulation)
hnpedance: 47 kilolnns
AUDIO OUT:
500 n'[Vrtns (l ()05_ modulation)
More than 1 Vrms at tile maximum vohnne setting (Variable)
More than 5t)t) mVrms (Fixed)
PC IN 7:
D-sub 15-pin, analog RGB, 11.7 Vp-p, 75 ohms, positive
See tile PC Input Signal Relercnce Chart on page 45
PC AUDIO INPUT:
Stereo mini jack, 0.5 Vrms, I kilolnn
Headphones:
Stereo mini jack
Impedance: 16 ohms
Power Requirement:
12(1V-240 V AC, 5(I/60 Hz
Supplied accessories:
Remote control RM-YD005 ( 1)
Size AA batteries (2)
75-ohm coaxial cable (1)
AC power cord (1)
HD 15-HD 15 cable (1)
Support belt (1), securing screw (1) and wood screw ( I)
Cable bolder ( 1)
Operating lnstructkms ( 1)
Quick Setup Guide (l)
Warranty Card (1)
Online Regisn'ation Card (U.S.A. only) (1)
Optional accessories:
Headphones plug adapter
Connecting cables
Wall-Mount Bracket: SU-PW2 KDL-40S241,_I)
SU-WL31 qKDL-32S2400)
SU-WL51 'KDL-40S2400)
Screen size (in inches)
Speaker/Full range (2)
Speaker output
(inmm)
(ill inches)
Power consumption (in use)
(ill standby)
Dimensions
with stand (in rain)
with stand (in inches)
without stand (in ram)
without stand (in inches)
Mass
with stand (in kg.)
with stand (in lb.)
without stand (in kg.)
without stand (in lb,)
41) 32
10 + lOW
55 × 150
2 1/4x6
200 W
10 + lOW
42 × 150
1 11/16×6
1511 W
All models less than 0,1 W
988 x 716 × 334
39x28 l/4x 13 1/4
988 x 664 x I(13
39 x 26 1/4 ×4 1/8
2%0
595
21.0
46.19
792 x 593 × 219
31 1/4 x 23 3/8 x 8 5/8
792 × 546 × 99
31 1/4x21 1/2×4
17.0
3%44
15.0
33
Design and specifications are suiject to change withottt notice.
46
4:3 Defimlt 30
A
A/V Sync 39
ACIN 15
Advanced Settings 27
Altemale Audio 20
Audio Out 34
AUDIO OUT jack, described 15
Auto Adjustment 36
AutoProgram18, 37, 38
Auto SAP, MTS setting 28
Auto Wide 29
Auto YC 33
B
Backlight26
Balance28
Bass28
BBE 28
Bilingual audio 28
Brightness 26
C
Cable
with VCR, connecting 1 3
Caption Vision 31, 39
CH+_ button 21,22
Channels
Creating labels 37, 38
Setting up 18
Closed caption modes 31
Color 26
Color Tmnperature 26
Current Time 33
D
Diagnostics 39
Digital Channels 38
Digital Setup 39
DIGITAL/ANALOG button 20
Display Area 30
DISPLAY button 21
Dynamic, Sound Mode 28
E
English Raling 35
ENT bulton 21
F
Favorite Channels 37, 38
FREEZE button 19
French Rating 35
G
GUIDE button 19
H
HD/DVD IN jack (1080i/720p/480p/
480i), described 15
HDMI IN jack, described 15
Headphones jack, described 14
Horizontal Center 30, 36
Hue26
I
hffo B:mner 31
hfformation 34
lnlrared Receiver (IR) 22
Installing the TV on a wall 43, 44
J,K
JUMP button 21
L
Label Channels 37, 38
Label Video Inputs 32
Laug,age 31
Light Sensor
Described 92
Setting 33
M
MENU
Analog24
Analog Favorites 24
Digital24
Digital Fm..orites24
Settings25
MENU button 20, 22
Mono. MTS setting 28
Movie Rating 34
MTS 28
MUTING button 20
N
Noise Reduction 26
O
OI_ICAL OUT 15
P,Q
Parental Lock 32, 39
PCIN 14
Phase 36
PIC OFF LED 22
Picture26
PICTURE button ] 9
Picture Mode 26
Pitch 36
POWER button 20, 22
POWER LED 22
Power Mmmgmnent 36
Power Saving 33
Preparation43, 44
Problems, troubleshooting 41, 42
Program Options 20
Quiet Power On 33
R
Reset 26, 28, 36, 42
RETURN button 20
S
S VIDEO jack, described 14, 15
Setting up channels 18
Settings
Analog Setup 37
Digital Setup 38
PC 36
Picture 26
Screen29
Setup 3"1
Sound28
Sharpness 26
Show/Hide Channels 37, 38
SLEEP button 19
Sound Mode 28
Speaker 34
STANDBY LED f)f)
Steady Sound 28
Stere(), MTS setting 28
Support Belt 16
Surround28
Swivel 17
T,U
Target Inputs 26, 28, 29
TIMER LED 22
Timer Settings 33
TOOLS button 21
Treble 28
Troubleshooting41,42
TruSurrouud XT 28
Turning on/off the TV 22
TV Rating 34
TV/VIDEO button 19
Unrated 34
US Models 34
V
VCR
With cable, connecting 13
Vertical Center 30, 36
Vertical Size 30
VHF/UHF input, described 15
VIDEO/AUDIO (L/R)jacks, described
14, 15
Viewing Blocked Pro,zrams 35
VOL+/ buttou 20, _2
W,X,Y
WIDE button 21
Wide Mode 29, 36
47
For Your Convenience
Please contact Sony directly if you:
• Have questions on the use of your television after reading your manual
•Experience difficulty operating your televsion
Contact Sony Customer Support at:
http://www'sony.cam/tvsupport
or to speak with asupport representative:
United States
1-800-222-SONY (7669)
8:00 AM - 10:00 PM (EST) Mon-Fri
10:30 AM - 7:15 PM (EST) Sat-Sun
Sony will work to resolve your questions more quickly than your retailer or place of purchase.
Please Do Not Return the Product to the Store
Canada
1-877-899-SONY (7669)
8:00 AM - 6:00 PM (Eastern)
8:00 AM - 5:00 PM (Western)
@ rv" UUR--
._G.-DE_._T_O.TE_V_S_O. DIGITAL
B["IIDOLBYI ° SRS (:O) ®
DiGiTAL
http://www.sony.net/
Printed in Mexico
IIIIIIIIIII
2893218111
