Sony KDL 40V2500 User Manual LCD TV Manuals And Guides L0610692
SONY LCD Television Manual L0610692 SONY LCD Television Owner's Manual, SONY LCD Television installation guides
User Manual: Sony KDL-40V2500 KDL-40V2500 SONY LCD TV - Manuals and Guides View the owners manual for your SONY LCD TV #KDL40V2500. Home:Electronics Parts:Sony Parts:Sony LCD TV Manual
Open the PDF directly: View PDF ![]() .
.
Page Count: 48
01_Y:
LCD Digital Color TV
Operating Instructions
BR IA
KDL-40V2500
KDL-46V2500
© 2006 Sony Corporation
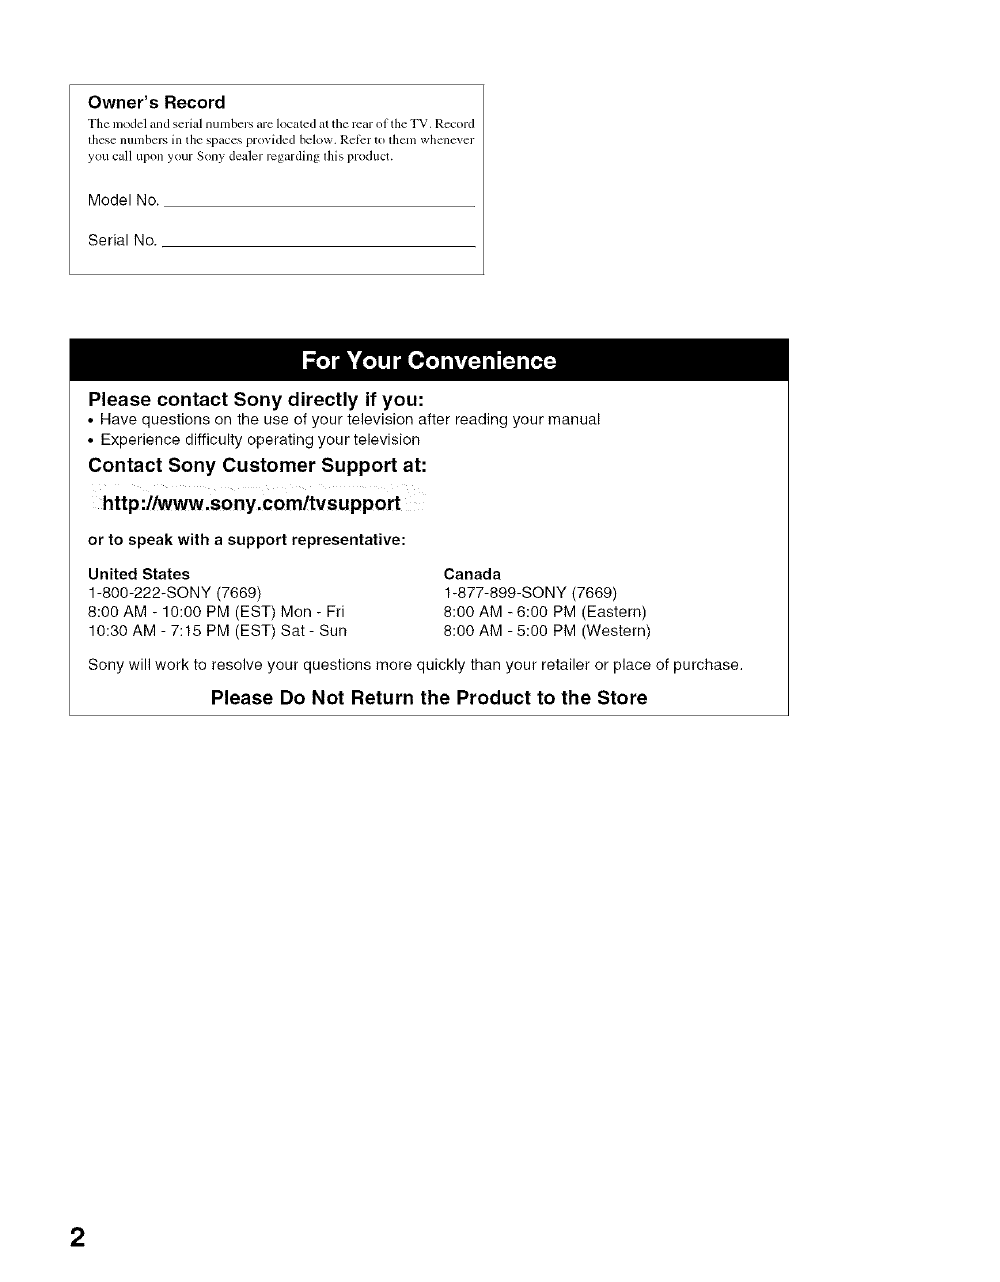
Owner's Record
The model _uld Sel'i_d numbers _lre lock,ted _t the rear olthe TV. Record
these number', in tile s._Lces provided below. Re_r to thcm whcmcver
y,_)u civil upon 5,,_)ur S,_ny deCder r_:g_Lrding this pr,_duct.
Model No.
Serial No.
Please contact Sony directly if you:
• Have questions on the use of your television after reading your manual
• Experience difficulty operating your television
Contact Sony Customer Support at:
http:llwww.sony.comltvsupport
or to speak with a support representative:
United States
1-800-222-SONY (7669)
8:00 AM - 10:00 PM (EST) Mon -Fri
10:30 AM - 7:15 PM (EST) Sat- Sun
Canada
1-877-899-SONY (7669)
8:00 AM - 6:00 PM (Eastern)
8:00 AM - 5:00 PM (Western)
Sony will work to resolve your questions more quickly than your retailer or place of purchase.
Please Do Not Return the Product to the Store
2
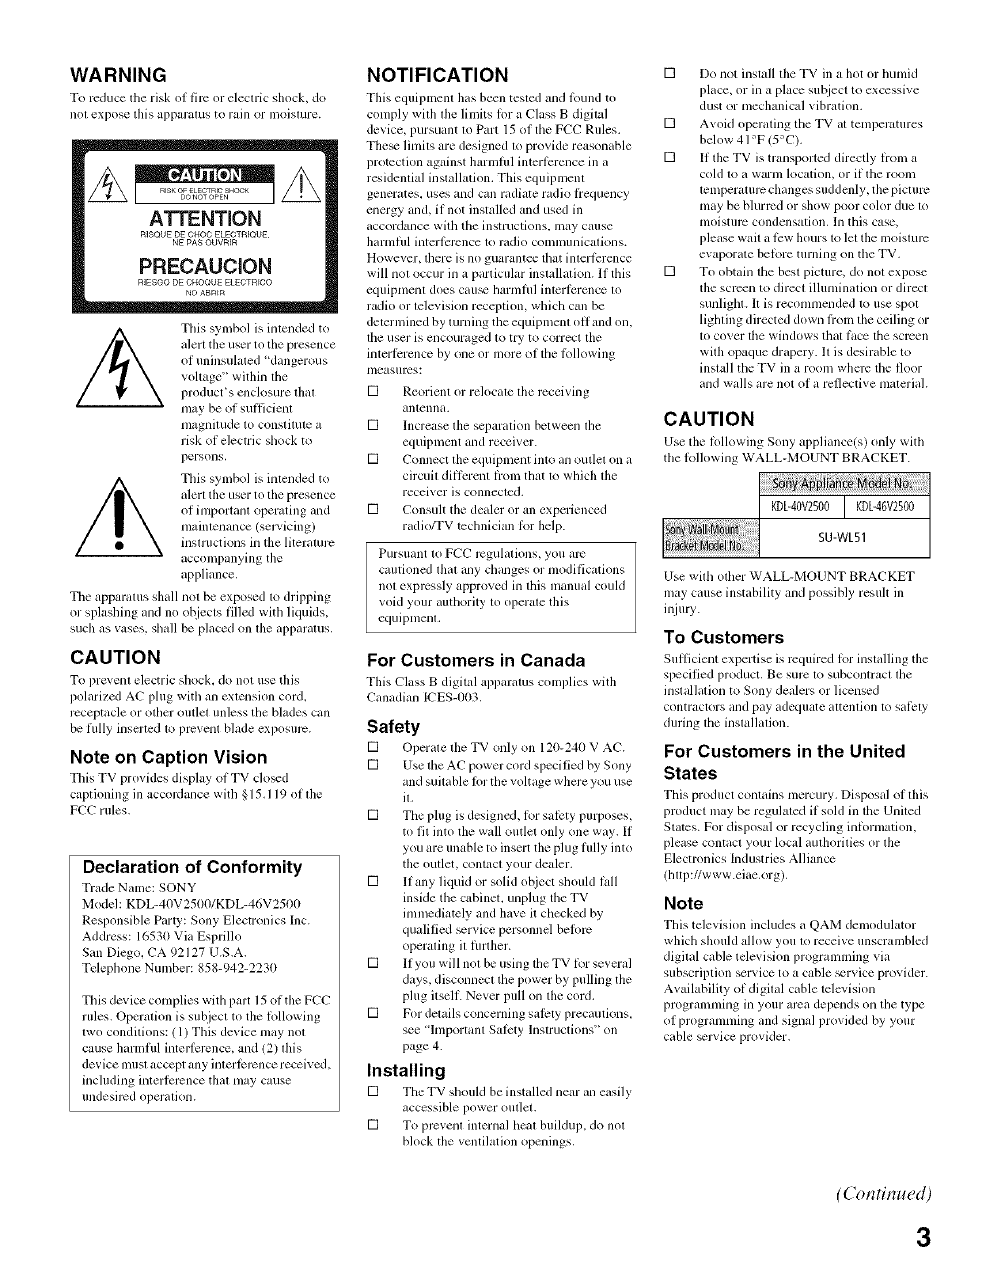
WARNING
To reduce tile risk of tire or electric shock, do
nol expose this apparatus to rain or iiKlist/ire.
/_ This symbol is intended to
alert tile user to the presence
OI uninsulaled 'dangerous
vohage" within the
product's enclosure thal
may be of sufficient
nlagnilude to constilute a
risk of electric shock to
persons.
This synlbol is imended to
alert the user to the presence
of importanl operating and
lllainlenance (selvicing)
inslructions in the literature
acconlpanying the
appliance.
The apparatus shall not be exposed 1o dripping
or splashing and no ot_iects filled with liquids,
such as vases, shMl be placed on file apparatus.
CAUTION
To prc_ enl electric shock, do not use this
polarized AC plug with an exlension cord.
rcceptacle or ()tiler outlet unless tile blades call
be l_llly insm'tcd to prevent blade exposurc.
Note on Caption Vision
This TV provides display oi TV cloud
captioning ill accordance with § 15.119 of file
FCC rules.
Declaration of Conformity
Trade Name: SONY
Model: KDL-40V2500/KDL-46V2500
Responsible Party: Sony Electronics Inc.
Address: 16530 Via Esprillo
San Diego, CA 92127 U.S.A.
Tclephone Number: 858-942-2230
This device complies with part 15 of the FCC
rules. Opermion is subject to the lollowing
two conditions: / 1) This device may nol
cause harmfifl interlcrcnce, and (2) lhis
device musl accept any inlerlcrcncc received,
including interlcrcnce that may cause
undesired operalion.
NOTIFICATION
This equipmcnl has been tesled mid iouM to
comply with file limits ior a Class B digital
device, pursuant to Part 15 of the FCC Rules.
The_ limits are designed to provide reasonable
protection agzdnst harmfifl interfi:rence ill a
rcsidemial installation. This equipmem
generates, uses and call radiate radio liequency
energy and, if not installed and used ill
accordance with the instructkms, may cause
harmfifl interlPrcnce to radio communicalkms.
However, there is no guarantee that interfi:rence
will nol occur in a particular installation. If this
equipment does cau_ harnlfid intcrfi:rence to
radio or television reception, which cml be
determined by turning the equipmcm oH and on.
lhe user is encouraged to try to correct file
interfi:rence by one or more of tile lbllowing
nleasurcs:
[] Reorient or relocale lhe rcceiving
antenna.
[] Increase the scparalion between lhe
equipment and receiver.
[] Connect the equipment into an outlet on a
circuit difli:rent liom that to which file
receiver is connected.
[] Consult the dealer or an experienccd
radio/TV technician Ior help.
Pursuant to FCC rcgulations, you arc
cautioned thai any changes or modifications
not exprcssly approved in lfiis manual could
void your authority to operate this
equipment.
For Customers in Canada
This Class B digital apparatus complies w'ith
Canadian ICES-003.
Safety
[] Operate tile TV only on 120-240 V AC.
[] Use lfie AC power cord specified by Sony
and suitable fi)r the voltage whm'e you use
il,
[] The plug is designcxh lor salcty purposes,
to fit into the wall outlet only one way. If
you are unable to insert the plug fiflly into
the outlet, contacl your dealer.
[] If any liquid or solid object should lall
inside tile c_binet, unplug tile TV
innnediately and have it checked by
qualified _rvice personnd belorc
operating il filrther.
[] If you will not be using the TV lbr several
days, disconnecl the power by pulling the
plug itself. Never pull on the cord.
[] For delails concerning salcty precautions.
see "hnportant Salcty Instructions" on
page 4.
Installing
[] Tile TV should be installed near an easily
accessible power outlet.
[] To prcvenl internal Ileal buildup, do nol
block the ventilation openings.
[] Do not inslall file TV in a hot or humid
placc, or in a place subject to excessive
dust or mechanical vibration.
[] Awfid operaling tile TV al tetnper_mlres
bdow 41 °F (5°C).
[] If tile TV is transported directly lrom a
cold to a warnl location, or if tile rooln
temperaturc changes suddenly, the picture
may be blurrcd or show poor color due to
nloisturc condensalion, In this case,
please wait a fi:w hours to let the inoislurc
evaporate belore turning on tile TV.
[] To obtain tile best picture, do nol expose
the screen to direct illumination or direcl
sunlight. 11is recommended to use spol
lighdng directed down liom the ceiling or
to cover lhe windows that lace tile sclven
with opaque drapery. 11 is desirable to
install the TV in a room where tile floor
and walls are not of a reflective material.
CAUTION
Use tile Mlowmg Sony appliance(s) only with
tile lollowing WALL-MOUNT BRACKET.
Use with other WALL-MOUNT BRACKET
may cause instability and possibly result in
iJliuo'.
To Customers
Sullicient expertise i required lor installing tile
specified product. Be sure to subcomract the
installation to Sony dealers or licensed
contractors and pay adequate altenlion 1o sallxly
during the installation.
For Customers in the United
States
This product contains mercury. Disposal ol this
product may be regulated il sold ill tile United
States. For disposal or recycling inlormation.
please contact your local authorities or the
Electronics Industries Alliance
(hltp://www.eiae.org).
Note
This television includes aQAM demodulator
which should allow you 1oreceive unscrambled
digilal cable television programming via
subscription service to a cable _rvice provider.
Availability of digilal cable television
programming in your area depends on the type
of progrannning and signal provided by your
cable _Jvicc provider.
(Continued)
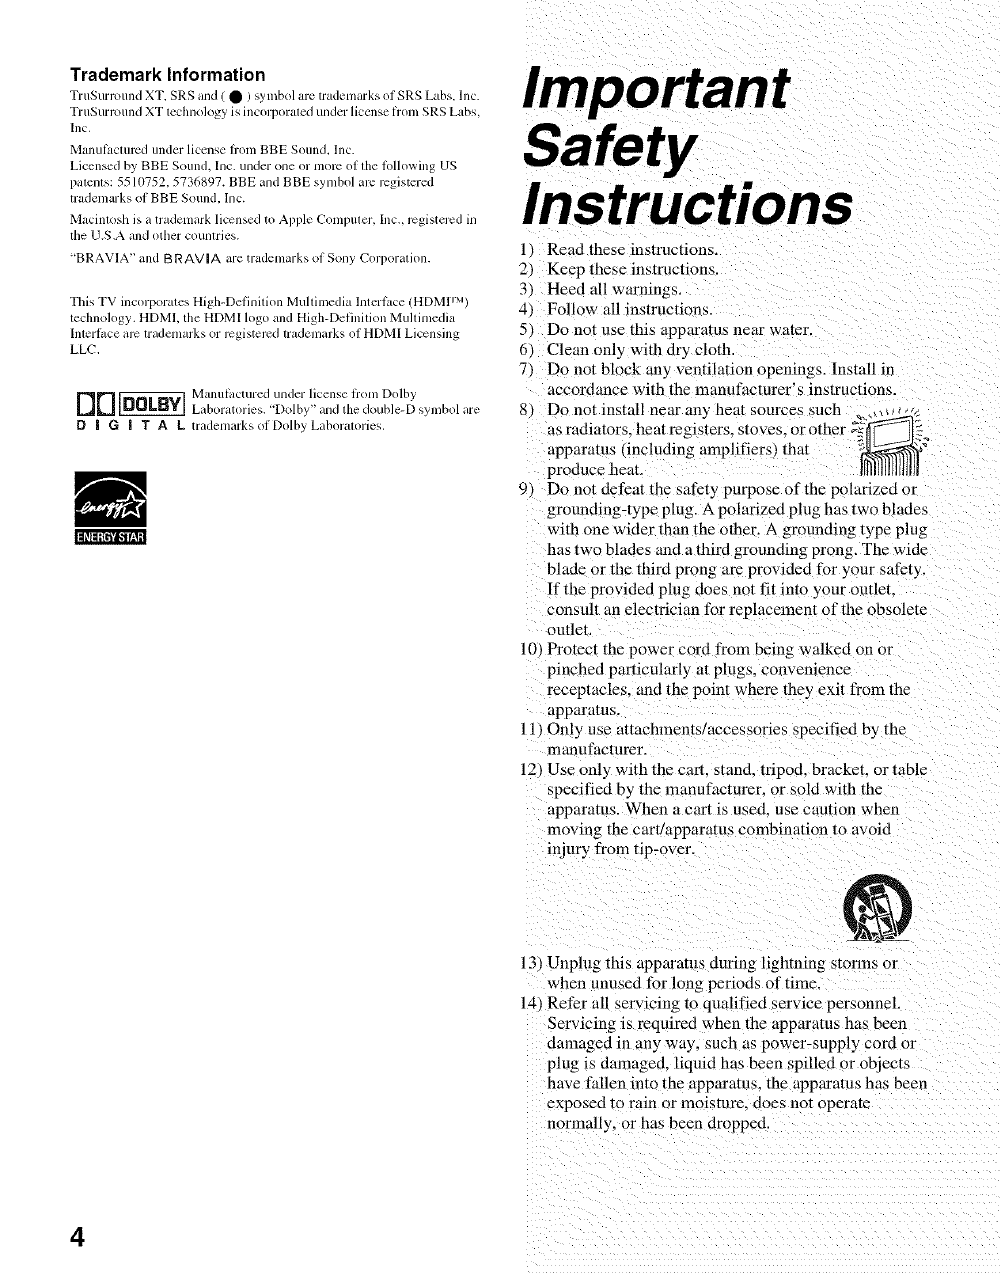
Trademark Information
TruSurronnd XT, SRS and ( • ) sylnbol arc trademarks of SRS Labs, lnc.
TruSurround XT technology is incorporated under license fi()m SRS Labs,
Inc,
Manul_lclurcd under license fiom BBE Sound, Inc.
Licensed by BBE Sound, Inc. under one or more of the lollowing US
patents: 5510752, 5736897. BBE and BBE symbol arc registered
trademarks of BBE Sound, Inc.
Macintosh is a trademark licensed to Apple ConlpuD2r, Inc,, rcgistercd in
lhe U.S.A and odmr counlries.
'BRAVIA" and B RAVIA arm trademarks of Sony Corporalion.
This TV incorporates High-Definition Muhimedia lnterl_lce (HDMP M)
technology. HDML the HDMI logo and High-Definition Muhimedia
Intert_lce arc trademarks or rcgistercd trademarks of HDMI Licensing
LLC.
'_ _ Manuli_cmred under license fi'om Dolby
_ Laboratories. ' Dolby" and the double-D symbol are
D | G| T A L trademarksot Dolby Laboratories.
Important
Safety
Instructions
1/ Read these instructions.
2} Keep these instructions.
3} Heed all warnings.
4_ Follow"all instructions.
5_ Do not use this apparatus near water.
b) Clean only with dry cloth
7_ Do not block any ventilation openings. Install in
accordance with the manufacturer's instructions.
8) Do not install near any heat sources such , ,,,,,,,,_
as radiators, heat registers, stoves, or other -_'_---'_i _
apparatus (including amplifiers) that _e
produce heat. IIlllIlllllllllIl
91 Do not defeat the safety purpose of the polarized or
grounding-type plug. A polarized plug has two blades
with one wider than the other. A grounding type plug
has two blades and a third grounding prong. The wide
blade or the third prong are provided for your safety.
ff the provided plug does not fit into your outlet.
consult an electrician for replacement of the obsolete
outlet
10}Protect the power cord from being walked on or
pinched particularly at plugs, convemence
receptacles, and the point where they exit from the
apparatus.
11_Oniy use attachments/accessories specified by the
mmmfacturer.
12) Use only with the cart. stand, tripod, bracket, or table
specified by the manufacturer, or sold with the
apparatus. When a cart is used. use caution when
moving the cart!apparatus combination to avoid
injury front tip-over.
_@ig'tNi
13 )Unplug this apparatus during lightning storlns or
when unused for long periods of time.
141 Refer all servicing to qualified service personnel.
Servicing is required when the apparatus has been
damaged in any way, such as power-supply cord or
plug is damaged, liquid has been spilled or objects
have fallen into the apparatus, the apparatus has been
exposed to ram or moisture, does not operate
normally, or has been dropped.
4
USE
For the TV with a three-wire grounding type AC
power cord plug (Class I unit)
This TV must be connected to all AC power socket
outlet with ,i protective eailhing connection.
AC power cord
If you dmnage tile AC power corck it may result in a tire or all electric
shock. If tile AC power cord is damaged, stop using it and ask your deMer
or Sony service center 1o exchallge it.
[] Do not place tile FV where tile power cord is subject to wear or
abuse.
[] Do not _inch, bend. or twist tile cord excessively. The core lines may
be bared and cut. and cause a short-circuit, resulting in a fire or an
electric shock
[] Do not convert or damage tile power cord.
[] Do not Mlow anything to l_st on or roll over
tile power cord.
[] Do not pull file power cord
[] Do not move file TV with the power cord
plugged in•
[] Keep file power cord away from heat sources
[] Be sure to gras I- file plug when disconnecting
the power cord.
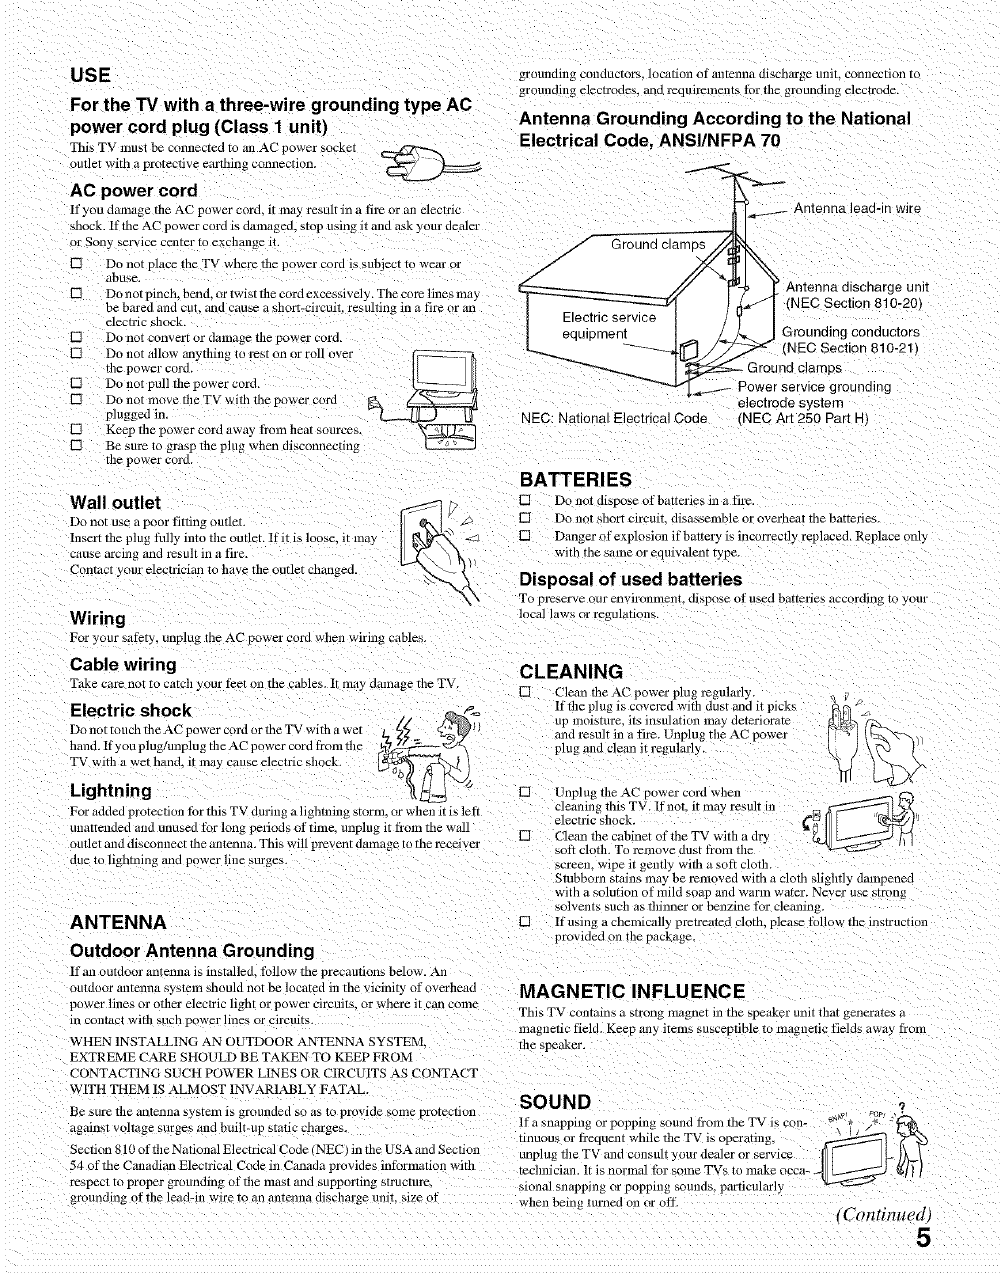
grounding conductors, locution of antenna discharge uniL connection to
grounding electrodes, and requirements for the grounding electrode.
Antenna Grounding According to the National
Electrical Code, ANSI/NFPA 70
Antenna discharge unit
(NEC Section 810-201
NEC: National Electrical Code
Grounding conductors
'NEC Section 810-21t
-Ground clamps
grounding
electrode system
_NEC Art 250 Part F,
BATTERIES
Wall outlet c_]//_ [] Donotdisp.... lbatteri_sinafi,_.
Do not use a poor fitting outlet, t R'X t .. [] Do nor &err circuit, disassemble or overheat tile batteries.
Insert tile plug fitly into tile outlet. If it is loose it may I _,_ _<a [] Danger of explosion if battery is incorrectly replaced• Replace only
c Lsearc lgandrest t n fi'e ] "/'-\ _, with the same or equiwdent type,
Contact yore' electncmn to have the outlet changed, t._ i) ........
_--_, ulsposal or usea oatterles
\\ To preserve our environment, dispose of used batteries according to yore
Wiring local laws or reguh,tions.
Fo_ your sat)ty, unplug the AC power cord when wiring cables
Cable wiring CLEAN ING
Take care not to catch your Ieet on the :ables. It may damage tile TV. [] Clean tile AC power plug regularly.
Electric shock _If the plug is covered with dust and it picks -
// _ up moisture, its insulati ........ y deteriorate fl_
DonottouchtheACpowercordormeTVwithawer /7_- _ / mld result in a fire. Unplug the AC power _"[ /_'wx
hand. If you plug/unplug file &C power cord from the h_ plug a ld clean it regularly, k )\_'x5 /
TVwitt....thanditm.......lectricshoc N_
llJ c--<2.j_
Lightning '),_ _ [] Unplug the AC p.......... d wl ....
For added protection for this TV during a lightning storm, or when it is left electricCleaningshock.thisTV. If not. it ma3 result in _ _""_U'_ [_.
unattended and unused lbr long periods of rime. unplug it fl'om tile wall
outlet and disccmnect tile antenna. This will prevent danlage to tile receivel
due to lighming and power line surges.
ANTENNA
Outdoor Antenna Grounding
If all outdoor antenna is installed, follow tile precautions below• All
outdoor antenna system should not be located in the vicinity of overhead
power lines or other electric light or power circuits, or where it can come
in contact with such power lines or circuits.
WHEN INSTALLING AN OUTDOOR ANTENNA SYSTEM.
EXTREME CARE SHOULD BE TAKEN TO KEEP FROM
CONTACTING SUCH POWER LINES OR CIRCUITS AS CONTACT
WITH THEM IS ALMOST INVARIABLY FATAL.
Be sure tile antenna _ystelI/is grounded so us to provide seine protection
against voltage surges and built-up static charges.
Section 810 of the National Electrical Code (NEC _in tile USA and Section
54 of tile Canadian Elecndcal Code in Canada provides iniormation with
respect to proper grounding of the mast and supporting structm'e,
size of
grounding of the lead-in wire to on antenna discharge mtit. _ when being mined on or off.
[] Clean the cabinet of the TV with a dr,
soft cloth. To remove dust from tile "
screem wipe it gently with a soft cloth.
";tubborn stains may be removed with u cloth slightly dampened
with a solution of mild sea I and warm water. Never use smmg
solvents such as thinner or benzine for cleaning.
[] If using a chemically pretreated cloth, please follow file instructiml
provided on tile package.
MAGNETIC INFLUENCE
This TV contains a strong lllagnet ill tile speaker unit that generaTes a
magnetic field. Keep any items susceptible to magnetic fields away f;rom
tile speaker.
SOUND
,Continued)5
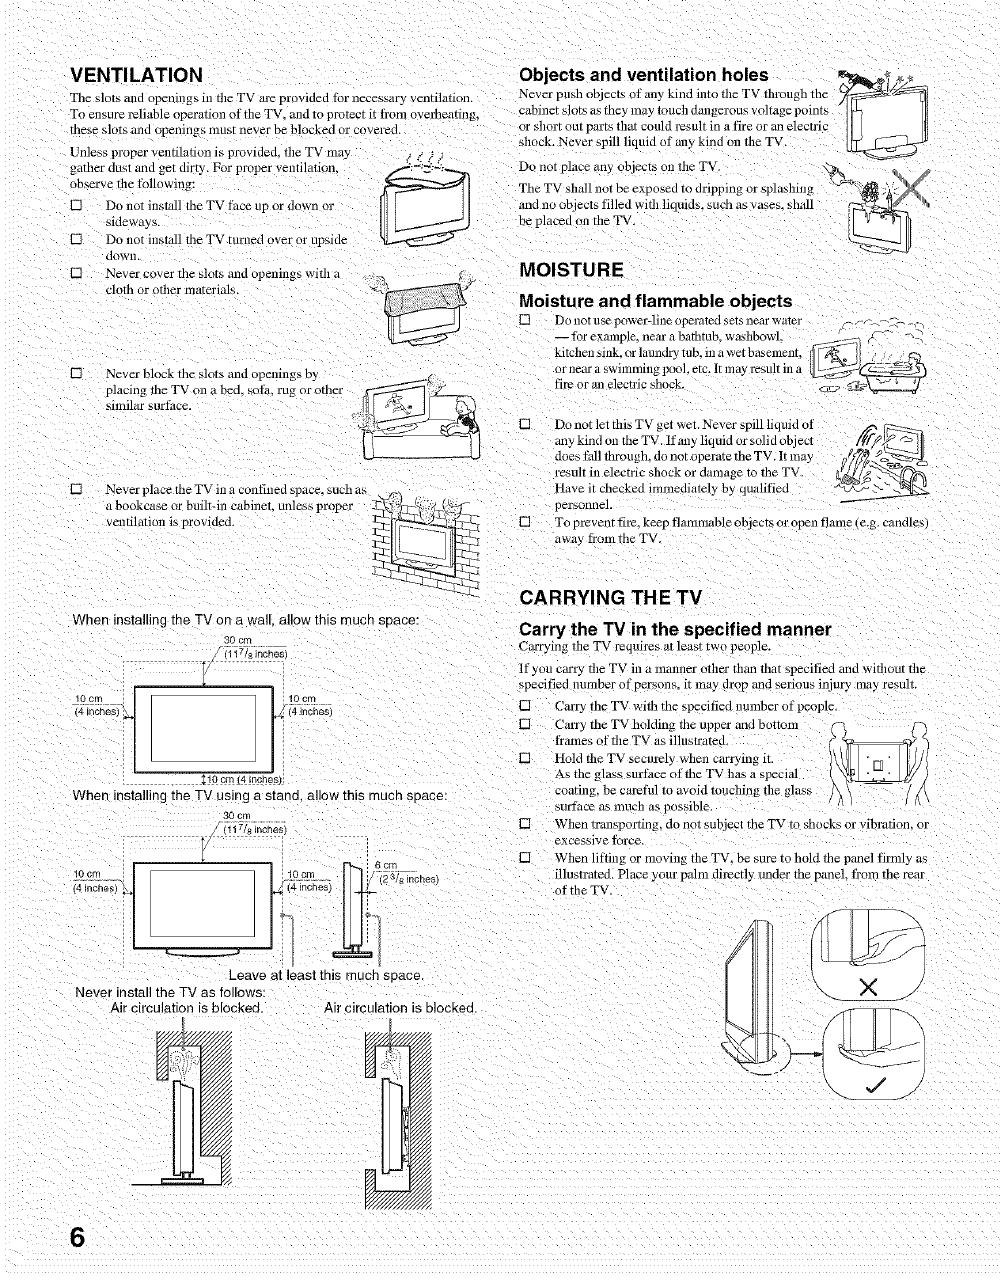
VENTILATION
Tile slots and openings in the TV al_ provided tar necessary ventilation.
To ensure reliable operation of the TV. and to protect it ti'om overheating,
fllese slots and openings nmst never be blocked or covered.
Unless ploper ventilation is provided, the TV may ,__,_j
gather dust and get dirty. For proper ventilation i,_:2::_2_._
observe the following: _ [
[] Do not install the TV face up or d ..... "II I II
sideways. II
[] Do not install the TV turned over or upside
down
[] Never cever tile slots and openings with a
L1oth or other materials.
[] Never block the slots mad openings, by
placing the TV on a bed, sofa, rug or other
Mnlilur sllrf_lce.
[] Never place the TV in a confined space, such as
a bookcase or built-in cabinet, unless proper _:;'2j_\_-f-
When installing the TV on a wall. allow this mucn space:
30 cIY
(117/8ihc_;;i
)
4inCheS 4 incn_
:_10 era 14inches)
When installing the TV using a stand, allow this mucn space:
30 cm
117/_ inche_
lOcn t
Leave at least this much space.
Never install the TV as follows:
Air circulation is blocked. Air circulation is blocked.
Objects and ventilation holes _%_=_ ,_
Never push objects o f any kind into the TV through the _
2abinet slots as they may touch dangerous voltage points
or short out parts tllat could result in _ fire or r.lnelecedc
shock. Never spill liquid of ml3 kind on the TV.
Do not place any objects on tile TV.
The TV shall not be exposed to dripping or splashing v.a_ _:_
and no objects filled with liquids_ such as vases, shall
be placed on the TV. i_f%_l
MOISTURE
Moisture and flammable objects
[] Do not use power-line oper0t_d _ers near Wafer - _._,2 -
mr example, near a bathtub washbowl. _" -C
kitchen sink. or laundry tub. in a wet basemenl.
or near a swimming pool. er_ It may result in a
fire or an electric shock.
[] Do not let fills TV get wet. Never spill liquid of
any kind on the TV. If any liquid ..... lid object _/_
does fall through, donut operatetheTV, lt may /////P_P/_/_P_
result ill electric shock or damage to tile TV. _.[_/_ ._O__ . _-4e ,
Have it checked immediately by qualified _'_-5_ .'_ __::_
personnel. -'----------
[] T_ prevent tire. keep flammable objects _r open flame (e.g. candles
awl3 fl_omthe T\
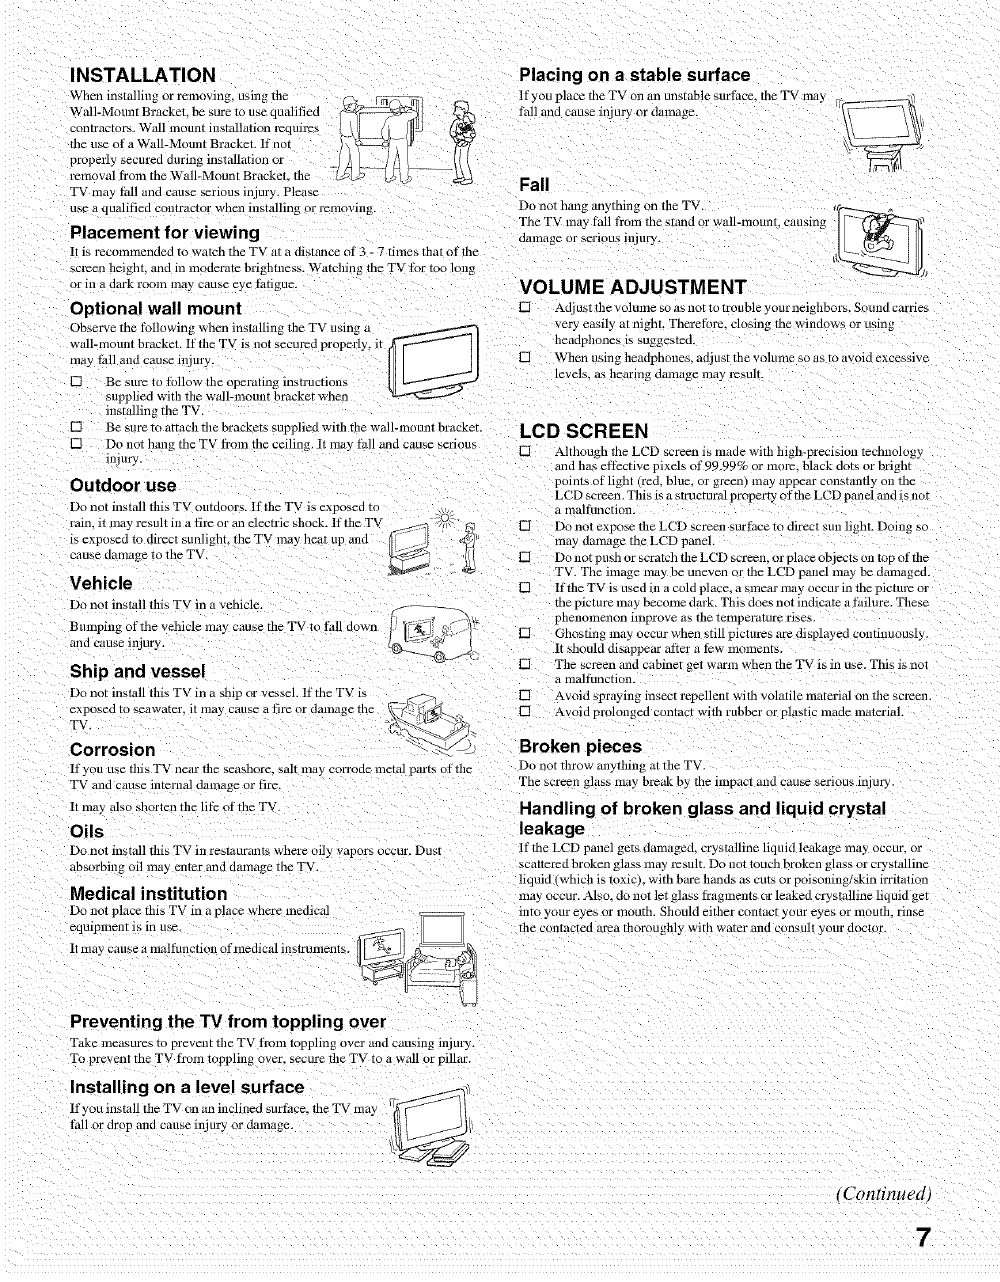
CARRYING THE TV
Carry the TV in the specified manner
Carrying tile TV requires at least two pe( ple.
lfyou carW the TV in a rammer other than that specified and without the
,pecified nmnber of pers_ ns. it may drop and serious injury may result.
[] Carry the TV with the specified number of people.
[] Carry the TV holding tile upper and bottom
mm_es of file TV as illustrated
[] Hold the TV securely when carrying it.
As the glass surfhce of the TV has a special
coating, be careful to avoid touching the glass
surface a_ inLicll as possible
[] When trmlsportieg, do not subject tile TV to shocks _ r vibration, or
excessive force.
[] When lifting or moving the TV= be sure to hold tim panel firmly as
illustrated. Place your palm directly under die paneh ti'om the rear
of tile TV.
6
INSTALLATION
When installing or removing, using tile fi_
Wall-Mount Bracket, b ...... t.... qualified _1 _
contractors. Wall ....... t installati ...... luires _ _q _11_
d/ .... f a Wall-Momlt Bracket. If not I_22_ i_'ff
properly ......... I during installati ..... _ _t _ _/ !
removal from the Wall-Mount Bracket. the /_L._ L+_,_
TV may tifll and cause serious injury. Please
use a quMified contractor when instMling or remevmg.
Placement for viewing
It is recolnlnended to watch tile TV at a distance of 3 - 7 times that of die
scleen height, .rod in moderate brightness. Watching tile TV lbl too long
or in a dark room lna_ cause eye fatigue.
Optional wall mount
Observe tile tbllowing when installing tile TV using a
w_ll-mount bracket. If the TV is not secured properly, it
tully fall and cause injury.
[] Be sm_ to follow tile operanng instructiom
supplied with the wall-mount bracket when
installin_ tile TV.
Placing on a stable surface
If you place tile TV on an unstable surPace, the TV may _.,
MI and cause injury or damage. IV-- \ _\,
Fall
Do not hang _nything on tile TV.
Tile TV m_y tM1 tYom tile stand or wan-mount, causing
dmnage or serious injury.
VOLUME ADJUSTMENT
[] Adj usT die volume so as not to trouble your neighbors. Sound carries
very easily at night. TherefoJ :, closing tile windows or using
headphones is suggested.
[] When using headphones, adjust the volmne so as to avoid excessive
levels, as llearing damage may l_,_ult.
[] B ...... to attach the brack ..... pplied with the wall ......... t bracket. LCD SCREEN
[] Do not hmlg tile TV from the ceiling It may tidl and cause serious [] Although the LCD screen is made with ldgh-precision technology
injury, and tl_s effective pixels of 99.99% or more. black dots or bright
Outdoor use points of light (red, blue, or green) may appear constmltly on the
LCD screen. This is u sTructurM property of the LCD pmlel mid is not
Do not instMl this TV outdoors. If tile TV is exposed to a malfunction
rain, it may result in a fire or an electric shock. If file T'_
is exposed to direct sunlight, the TV may heat up and
c_tuse damage to the TV.
Vehicle
Do not install tills TV in _ vehicle.
Bmnping of the vehicle may cause the TV to thll down
and cause injury.
Ship and vessel
Do not install this TV in a ship or vessel. If file TV is
cause a hre or dmnage the ?;,_ _ _,
Tv.eXp°sed to seawater, ir IIla}
Corrosion "_-<_ -)
If you use this TV near tile seashore, salt ma 3 corrode metal parts of tile
TV and cause internal damage or fire.
It may also shorten the lit? of the TV
Oils
Do not install this TV in restaurants where oily vapors occur. Dust
absorbing oil may enter and damage the TV.
Medical institution
Do not place this TV in a place _here medical
eqmpment is i..... _&
It ma 3 cause a mMfunction of medical instrument,.
Preventing the TV from toppling over
Take measures to prevent tile TV fl'onl toppling over and causing injury.
To prevent tile TV il'Oln toppling over. secure tile TV to a wan r pinar.
[] Do not expo_ tile LCD screen sur t:ace to direct sun light. Doing so
may danmge tile LCD panel.
[] Do not push or scratch tile LCD screen, o_ place objects on top of the
TV. The image ma_ be uneven o_ tile LCD panel may be damaged.
[] If the TV is used in a cold place, asmear may occur in tile pictm_ ol
tile picture may become dark. This does not indicate _ failure. These
pllenolnenon improve as tile tenlperaiure rises.
[] Ghosting ma} occur when still pictures are displayed continuousl 3
It should disappear after a t_w m._ments.
[] Tile screen mad cabinet gc_ warm when tile TV is in use. This is not
a maltunction.
[] Avoid spr_,ymg insec_ repellenl wits volatile materiM on tile screen.
[] Avoid prt longed contact witll rubber or plastic nlad_ material.
Broken pieces
Do not throw anytldng at tile TV
The screen gh_ss may break by rile impact and cause _erious injury.
Handling of broken glass and liquid crystal
leakage
If tile LCD panel gets damaged, crystanine liquid le_kage may occur, or
scattered broken glass may result. Do not touch broken glass or crystalline
liquid (which is toxicl, with bare hands as cuts or poisoning/skin irritation
may occur. Also. do not let glass fi_agments or leaked crystalline liquid get
taro your eyes or moLIth. Should either contact your eyes or mouth, rinse
tile contacted ;q'ea thoroughly with water and consult yt Litdoctor
Installing on a level surface
If you install tile TV on an inclined surface, tile TV may
tMI or drop m_d cause injury or damage.
,Continued_
7
SERVICING
Damage requiring service
lfthe sLirthce of the TV cracks= do not touch the TV until you unplug the
AC power cord.
Otherwise electric shock may result.
Servicing
Do not attclnpt to service the TV yourself since openin_
the cabinet may expose you to dangerous voltage or other
hazards. RefEr MI servicing m qualified service personnel
Replacement parts
When replacement parts are required, be sure the service
technician certifies in writing that he/she has used
replacement p_-ts specified by
]lave the salne characteristics as file ori
Unauthorized substitutions may resuh in a fire= an
electric shock or other hazards.
Safety check
Upon completion of any _erwce or repairs to the TV. ask
the -ervice t_chnician to perform routine safety checks
as specified by the manul:octurer to detcrndne that tile
TV is in sate operating condition, and to so certit}¢
Should tile TV not be repmrable, ask a qualified service technician to
dispose of the TV,
DISPOSAL OF THE TV
[] Do not dispose of tile TV with general household waste.
[] The LCD contains a small amount of liquid cr 3 ,tal. Tile fluorescent
rube used in this display also contains mercury. Follow yc .ir local
ordinances and regulations fi)r disposal.
8
Welcome to the World of BRAVIA TM ......................................................................... 10
Connecting the TV ......................................................................................................... 10
Gable System and/or VHF/UHF Antenna System ..................................................... 10
HD Gable Box/HD Satellite Box ................................................................................ 11
Satellite Receiver and Gable/Antenna ....................................................................... 12
VGR, Gable and Antenna .......................................................................................... 12
When Connecting to Optional Equipment ................................................................... 13
Installing the TV ............................................................................................................. 15
Preventing the TV from Toppling Over ...................................................................... 15
Bundling the Connecting Gables ............................................................................... 16
Adjusting the Viewing Angle of the TV ...................................................................... 16
When Installing on a Wall .......................................................................................... 17
Setting Up the Channel List - Initial Setup .................................................................. 18
Remote Control .............................................................................................................. 19
TV Controls ..................................................................................................................... 22
Overview of MENU ......................................................................................................... 23
Using the Picture Settings ............................................................................................ 26
Using the Sound Settings ............................................................................................. 28
Using the Screen Settings ............................................................................................. 29
Using the Setup Settings ............................................................................................... 31
Using the PC Settings .................................................................................................... 36
Using the Analog Setup Settings ................................................................................. 37
Using the Digital Setup Settings ................................................................................... 38
Troubleshooting ............................................................................................................. 41
PC Input Signal Reference Chart .................................................................................. 43
Specifications ................................................................................................................. 44
Index ................................................................................................................................ 45
9
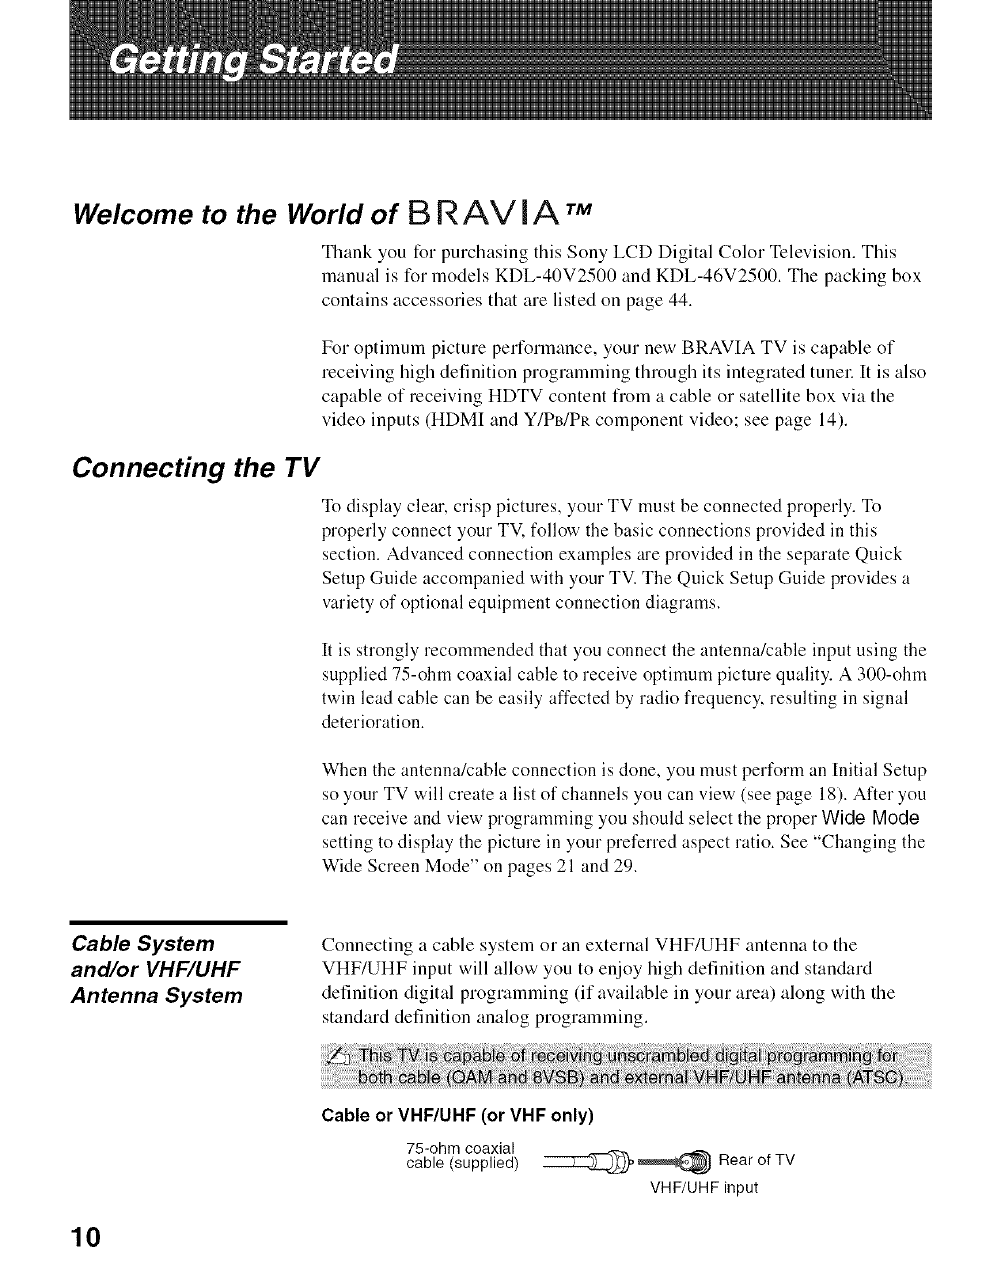
Welcome to the World of B R AV I n rM
Thank you for purchasing this Sony LCD Digital Color Television. This
manual is for models KDL-40V2500 and KDL-46V2500. The packing box
contains accessories that are listed on page 44.
For optimum picture performance, your new BRAVIA TV is capable of
receiving high definition programming through its integlated tunel: It is also
capable of receiving HDTV content flom a cable or satellite box via the
video inputs (HDMI and Y/PB/PR component video; see page 14).
Connecting the TV
To display clear, crisp pictures, your TV must be connected properly. To
properly connect your TV. follow the basic connections provided in this
section. Advanced connection examples are provided in the separate Quick
Setup Guide accompanied with your TV. The Quick Setup Guide provides a
variety of optional equipment connection diagrams.
It is strongly recommended that you connect the antenna/cable input using the
supplied 75-ohm coaxial cable to receive optimum picture quality. A 300-ohm
twin lead cable can be easily affected by radio frequency, resulting in signal
deterioration.
When the antenna/cable connection is done, you must perform an Initial Setup
so your TV will create a list of channels you can view (see page 18). After you
can receive and view programming you should select the proper Wide Mode
setting to display the picture in your preferred aspect ratio. See "Changing the
Wide Screen Mode" on pages 21 and 29.
Cable System
and/or VHF/UHF
Antenna System
Connecting a cable system or an external VHF/UHF antenna to the
VHF/UHF input will allow you to enjoy high definition and standard
definition digital programming (if available in your area) along with the
standard definition analog programming.
Cable or VHF/UHF (or VHF only)
75-ohm coaxial
cable (supplied) _ _ Rear of TV
VHF/UHF input
10
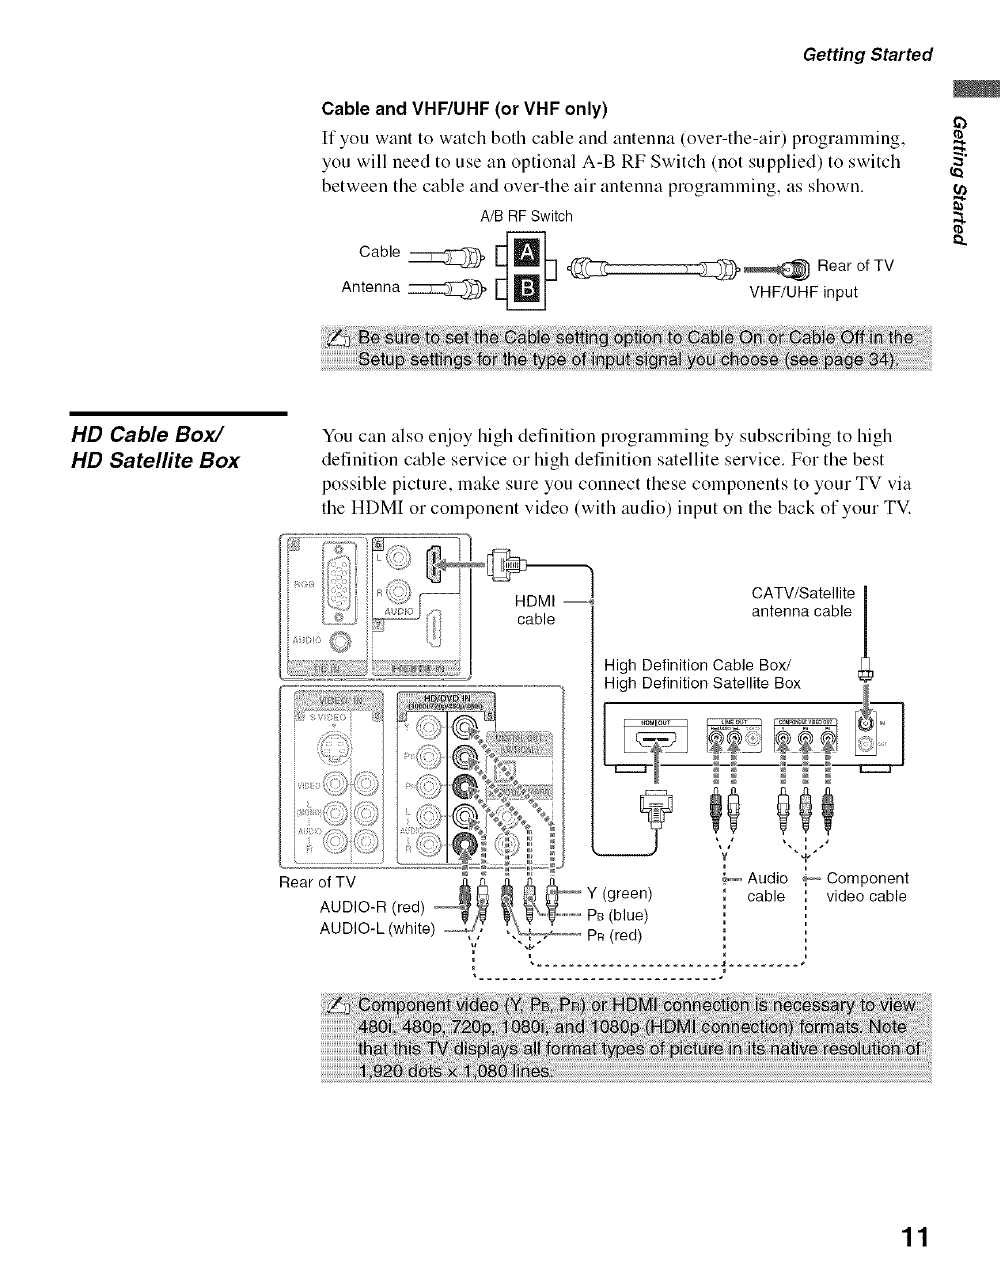
GettingStarted
Cable and VHF/UHF (or VHF only)
If you want to watch both cable and antenna (over-the-air) programming,
you will need to use an optional A-B RF Switch (not supplied) to switch
between the cable and over-the air antenna programming, as shown.
A/B RF Switch
Cable 2::::::::Z::::_, _h , __ RearofTV
Antenna _ _ VHF/UHF input
HD Cable Box/
HD Satelfite Box You can also enjoy high definition programming by subscribing to high
definition cable service or high definition satellite service. For the best
possible picture, make sure you connect these components to your TV via
the HDMI or component video (with audio) input on the back of your TV.
HDMI --,_
cable
CATV/Satellite !
antenna cable
High Definition Cable Box/
High Definition Satellite Box
_ i _ _, i j_
'¢ "I"
Audio _ Component
, cable video cable
/
= =
11
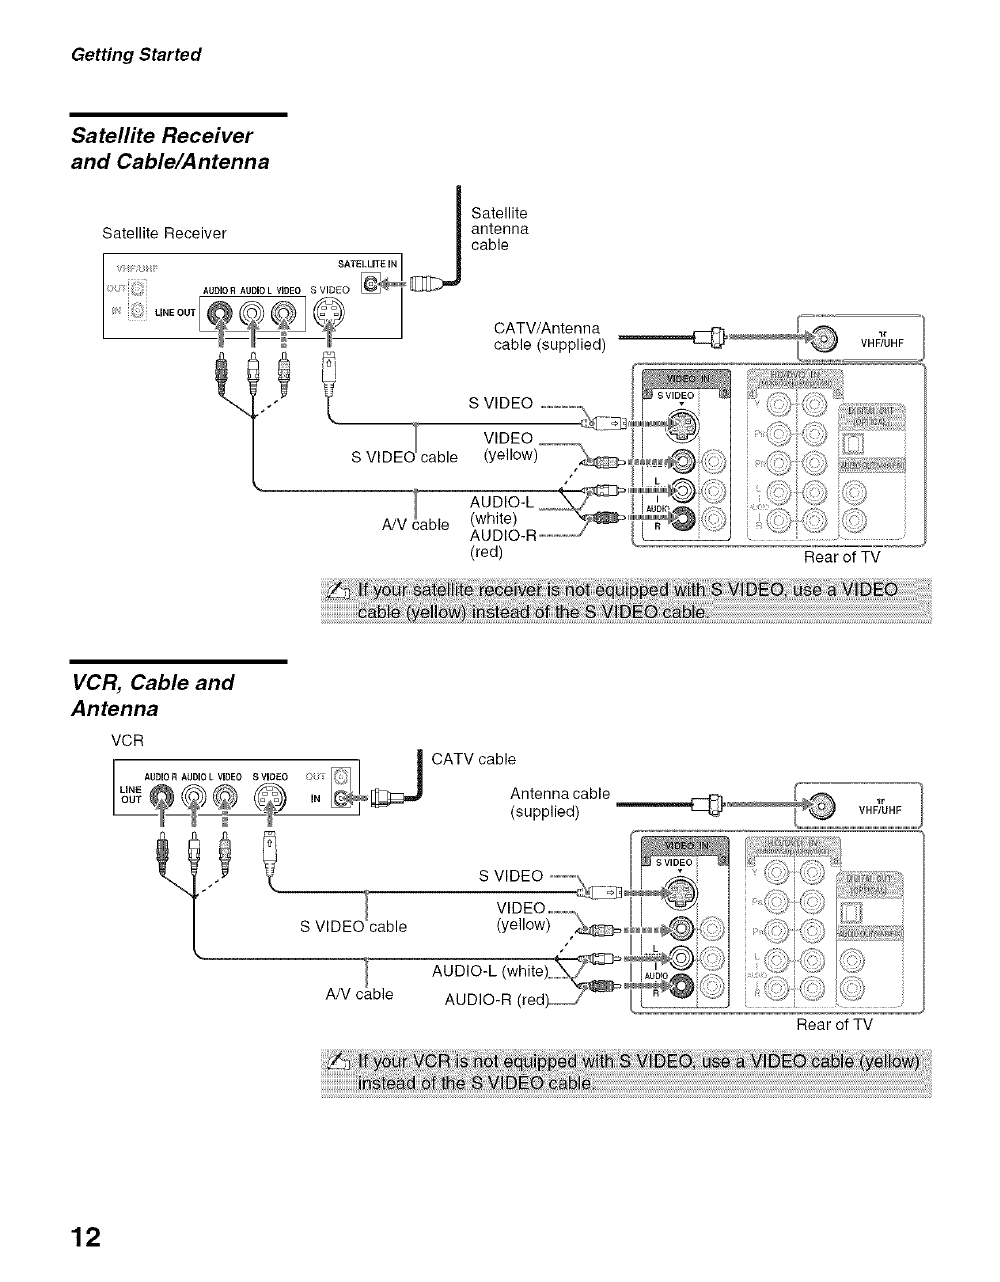
GettingStarted
Satellite Receiver
and Cable/A ntenna
Satellite
antenna
cable
CATV/Antenna
cable (supplied)
S VIDEJcable
A/V !able
S VIDEO .................
VIDEO
(yellow)
J
AUDIO-L ___"
(white) _,,,
AUDIO-R ...........
(red)
_r
VHF/UHF
v i
Rear of TV
VCR, Cable and
Antenna
VCR
CATV cable
(supplied)
S VlDEOlcable
AN c!ble
S VIDEO ...............__q3°
VIDEO ..................
(yellow) ,_°
AUglO-L (white) _
AUDIO-R (red}___Y
vi
AUpEO i
12
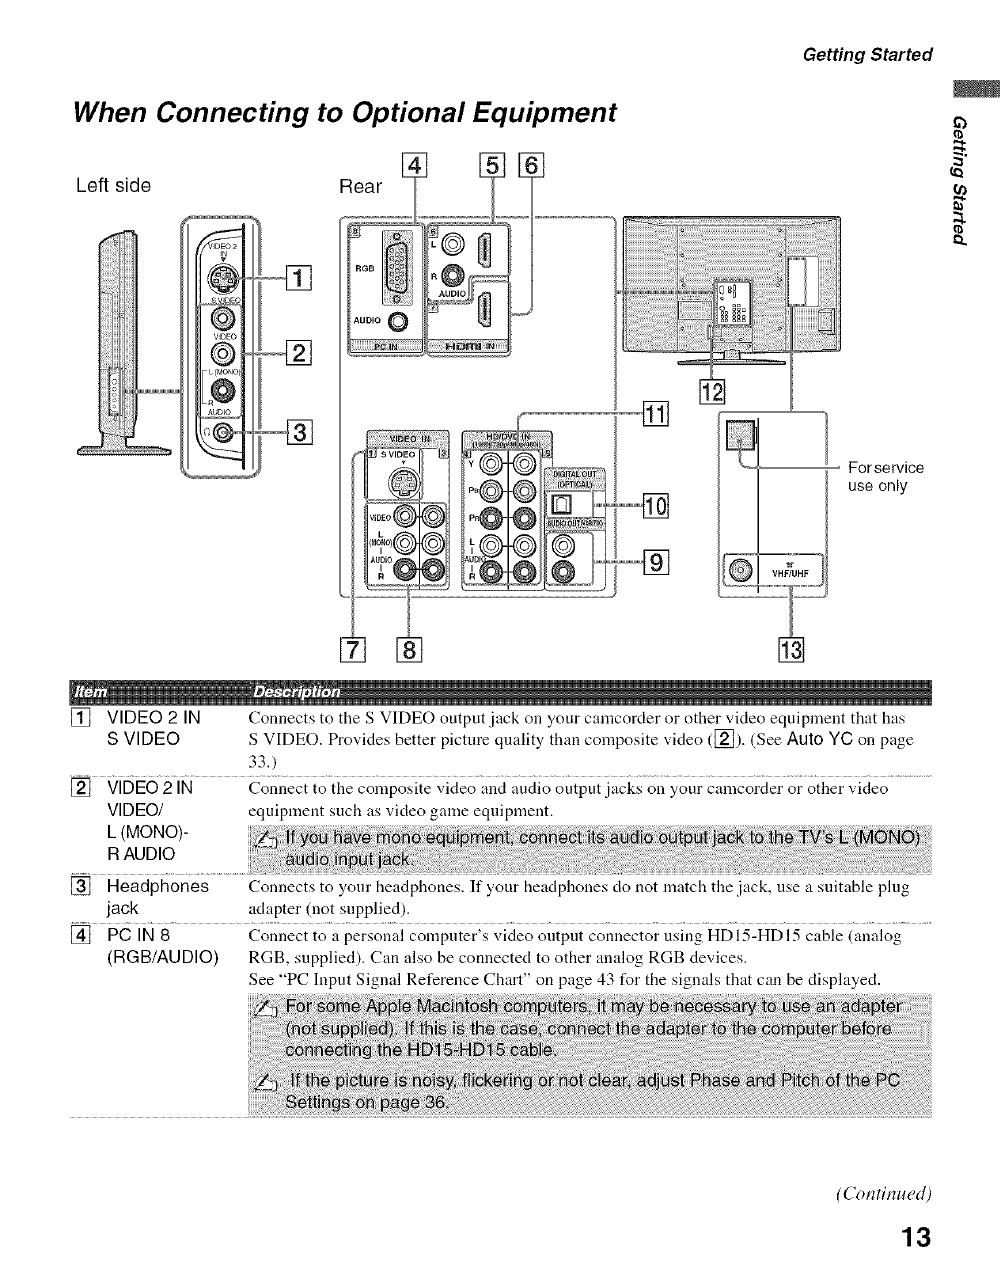
When Connecting to Optional Equipment
Left side Rear
¢
VIOEO
@
L (MONO)
#
AUDIO
3q
Getting Started
For service
use only
[] VIDEO 2 IN Connects to the S VIDEO output jack on your camcorder or other video equipment that has
S VIDEO S VIDEO. Provides better picture quality than composite video ([_]). (See Auto YC on page
333
[] VIDEO 2 IN Connect to the composite video and audio output jacks oil your camcorder or other video
VIDEO/ equipment such as video game equipment.
L (MONO)-
R AUDIO
[] Headphones
jack
[] PC IN 8 Connect to a personal computer's video output connector using HD 15-HD 15 cable (analog
(RGB/AUDIO) RGB, supplied). Can also be connected to other analog RGB devices.
See "PC Input Signal Reference Chart" on page 43 for the signals that can be displayed.
Connects to your headphones. If your headphones do not match the jack, nse a suitable plug
adapter (not supplied).
(Continued)
13
GettingStarted
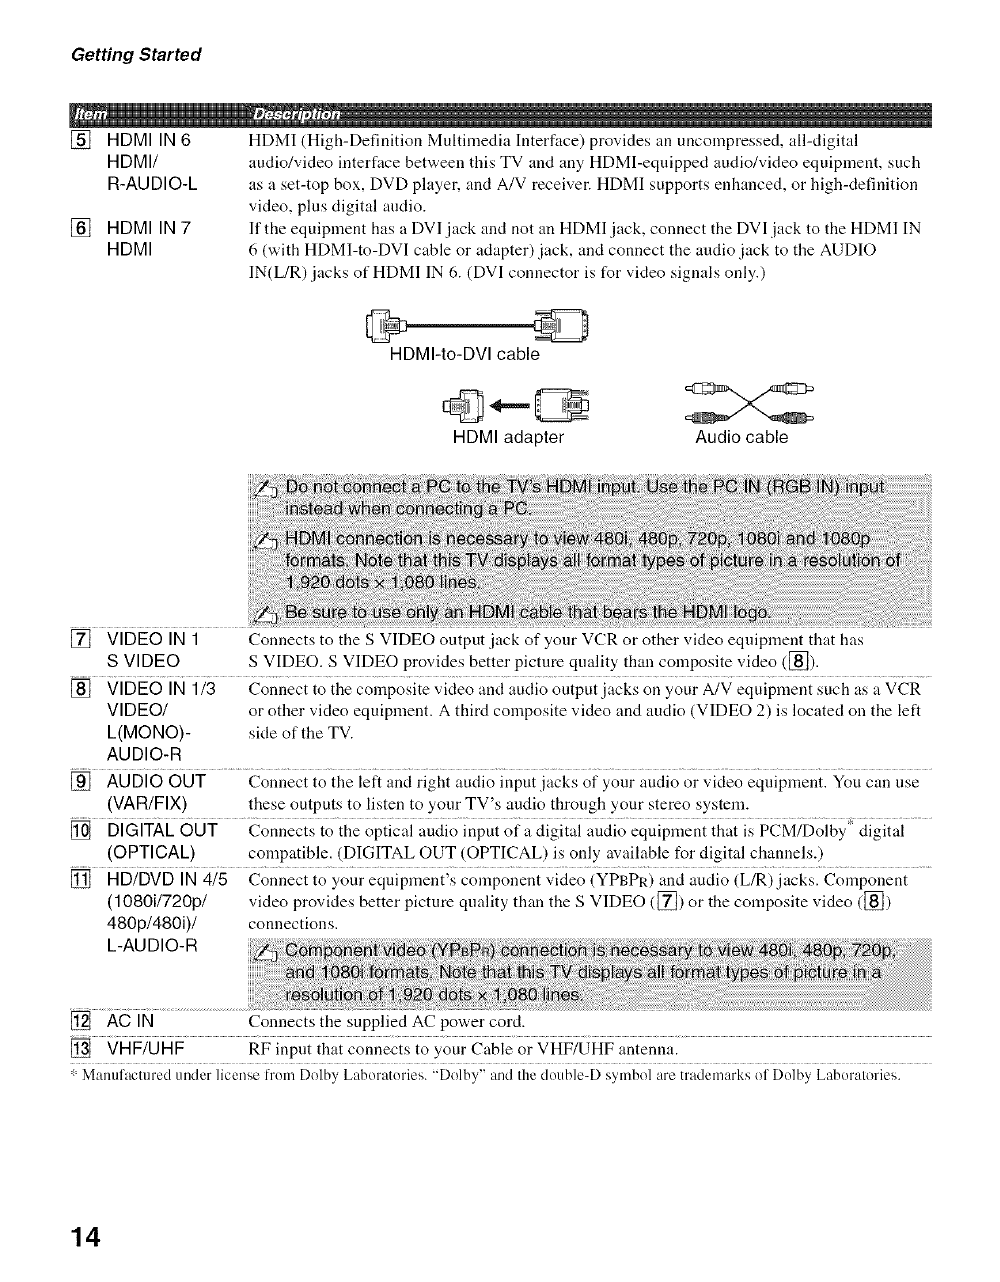
[] HDMI IN 6
HDMI/
R-AUDIO-L
[] HDMI IN 7
HDMI
HDMI (High-Definition Multimedia Interface) provides an uncompressed, all-digital
audio/video interface between this TV and any HDMI-equipped audio/video equipment, such
as a set-top box, DVD player, and A/V receiver. HDMI supports enhanced, or high-definition
video, plus digital audio.
If the equipment has a DVI jack and not an HDMI jack, connect the DVI jack to the HDMI IN
6 (with HDMI-to-DVI cable or adapter) jack, and connect the audio jack to the AUDIO
IN(L/R) jacks of HDMI IN 6. (DVI connector is for video signals only.)
HDMI-to-DVI cable
HDMI adapter Audio cable
[] VIDEO IN 1
S VIDEO
[] VIDEO IN 1/3 Connect to the composite video and audio output jacks on your A/V equipment such as a VCR
VIDEO/ or other video equipment. A third composite video and audio (VIDEO 2) is located on the left
L(MONO)- side of the TV.
AUDIO-R
[] AUDIO OUT Connect to the left and right audio input.jacks of your audio or video equipment. You can use
(VAR/FIX) these outputs to listen to your TV's audio through )'our stereo system.
[] DIGITAL OUT C°nnects tothe optical audio input of a digiial audio equipment that is PCI'a)Dolby ,_digitai .....
(OPTICAL) compatible. (DIGITAL OUT (OPTICAL) is only available for digital channels.)
[] HD/DVD IN 4/5 Connect to your equipment's component video (YPBPR) and audio (L/R)jacks. Component
(1080i/720p/ video provides better picture quality than the S VIDEO ([_) or the composite video ([_)
480p/480i)/ connections.
L-AUDIO-R
Connects to the S VIDEO output jack of your VCR or other video equipment that has
S VIDEO. S VIDEO provides better picture quality than composite video ([_]).
[] ACIN
[] VHF/UHF RF input that connects to your Cable or VHF/UHF antenna.
': Manufactured under license from DolbyLaboratories. "Dolby" and Ihe double_Dsymbol are trademarksof Dolby Laboralories.
Connects the supplied AC power cord.
14
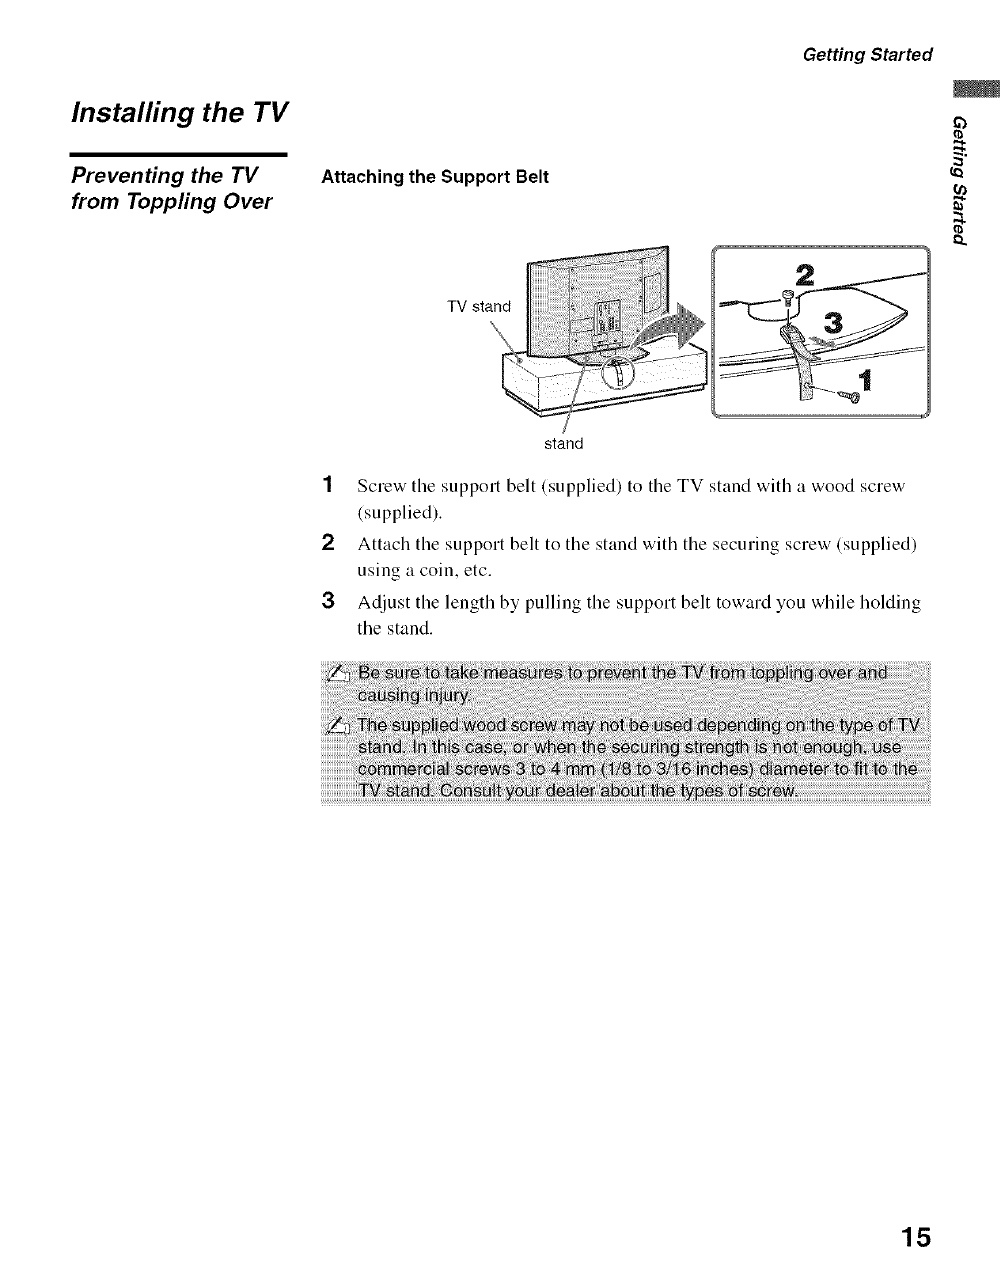
Installing the TV
Preventing the TV
from Toppling Over
Getting Started
Attaching the Support Belt
TV stand
stand
1Screw the support belt (supplied) to the TV stand with a wood screw
(supplied).
2Attach the support belt to the stand with the securing screw (supplied)
using a coin, etc.
3Adjust the length by pulling the support belt toward you while holding
the stand.
15
GettingStarted
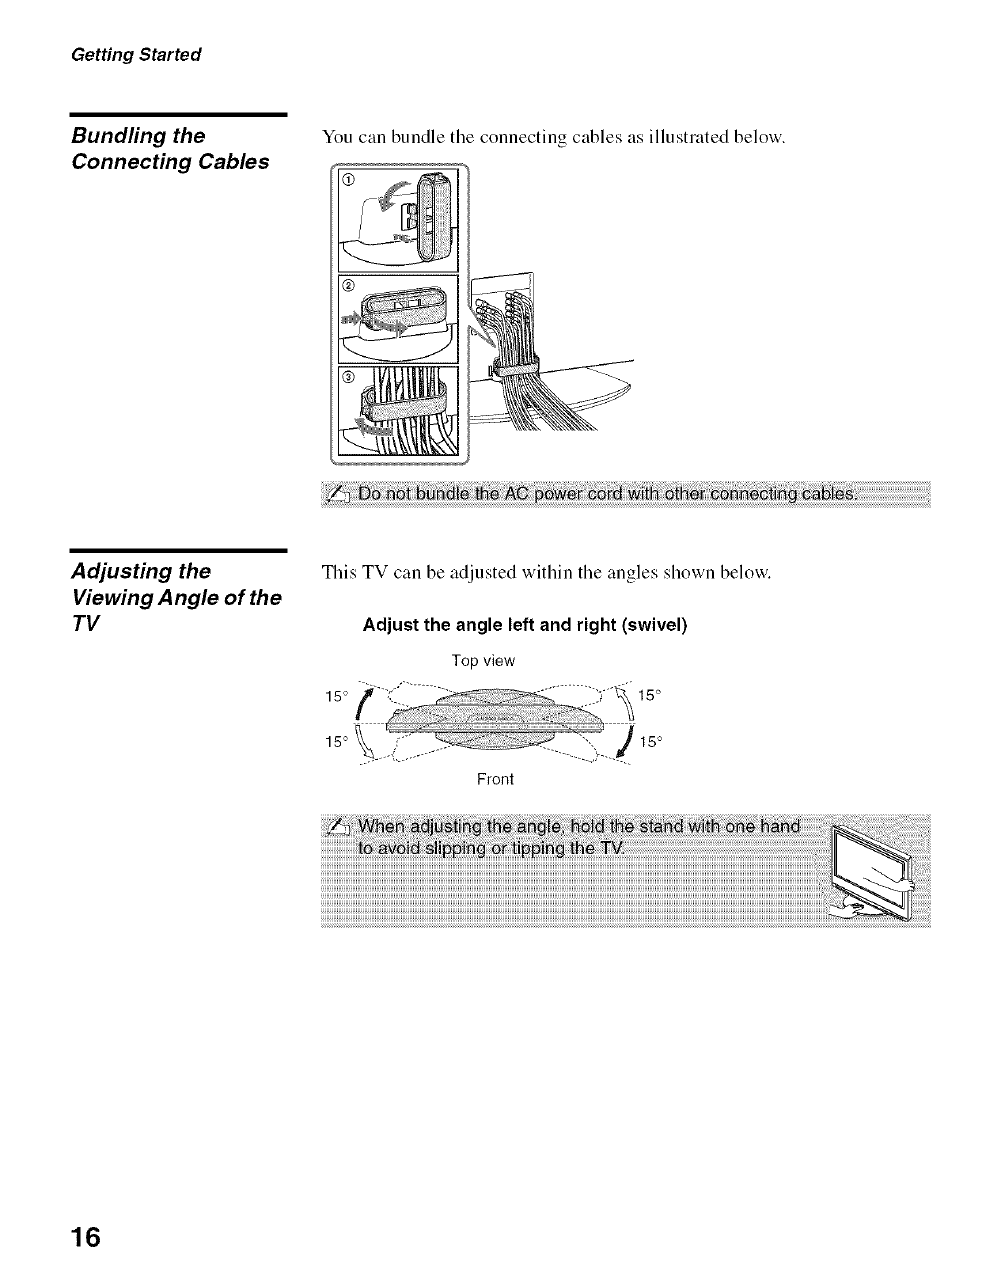
Bundfing the
Connecting Cables
You can bundle tile connecting cables as illustrated below.
(_) ,_
Adjusting the
Viewing Angle of the
TV
This TV can be adjusted within tile angles shown below.
Adjust the angle left and right (swivel)
Top view
15° ?----,,"............. 15°
Front
16
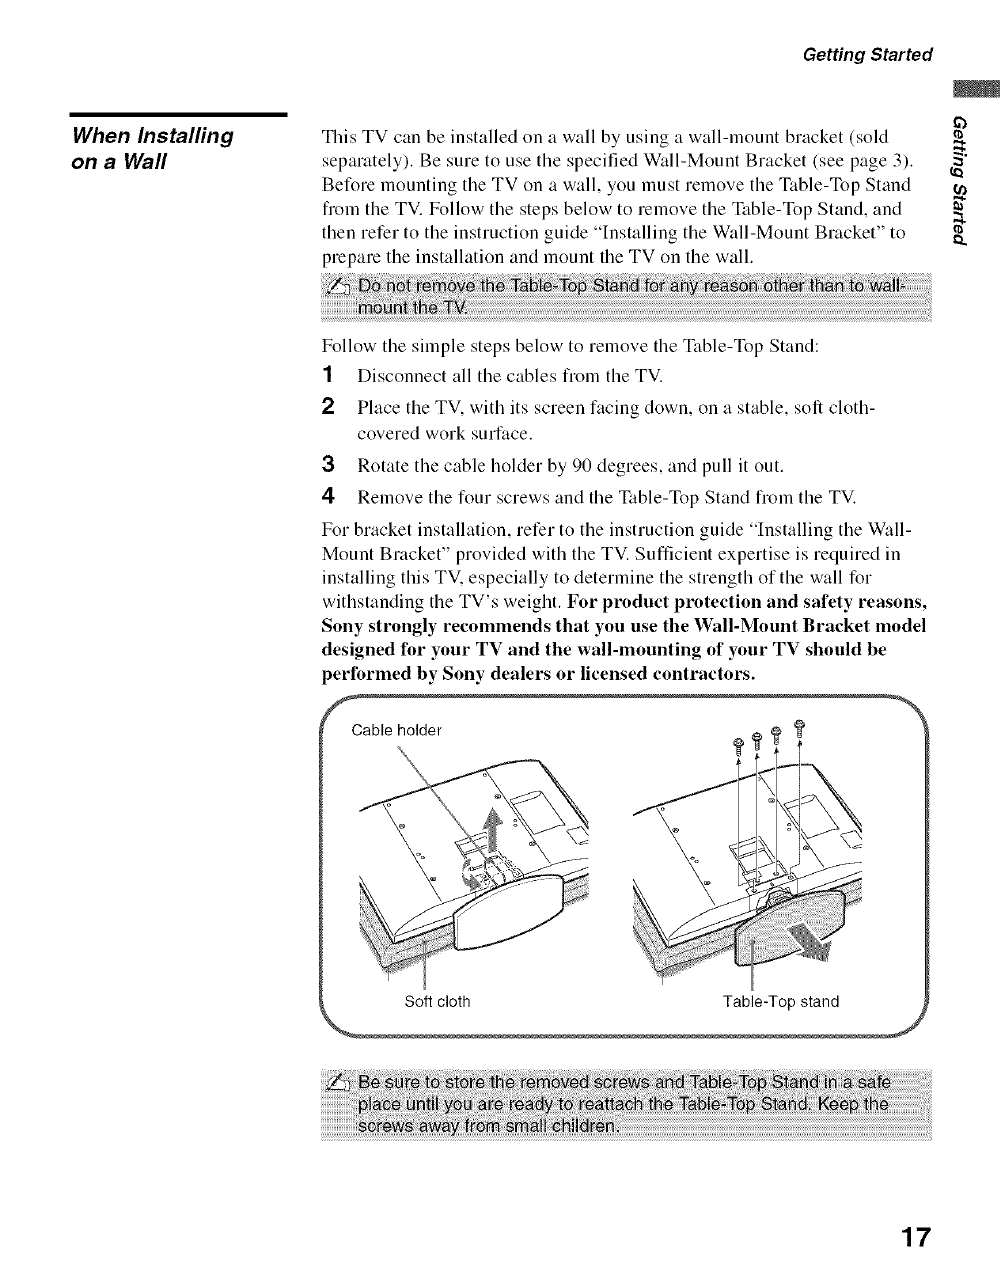
When Installing
on a Wall
Getting Started
!
This TV can be installed on a wall by using a wall-mount bracket (sold =
separately). Be sure to use the specified Wall-Mount Bracket (see page 3). "_'
Before mounting the TV on a wall, you must remove the Table-Top Stand
from the TV. Follow the steps below to remove the Table-Top Stand, and
then refer to the instruction guide "Installing tile Wall-Mount Bracket" to _..
prepare the installation and mount the TV on the wall.
Follow the simple steps below to remove the Table-Top Stand:
1Disconnect all the cables flom the TV.
2Place the TV. with its screen facing down, on a stable, soft cloth-
covered work surface.
3Rotate the cable holder by 90 degrees, and pull it out.
4 Remove the four screws and the Table-Top Stand flom the TV.
For bracket installation, refer to the instruction guide "Installing the Wall-
Mount Bracket" provided with the TV. Sufficient expertise is required in
installing this TV. especially to determine the strength of the wall for
withstanding the TV's weight. For product protection and safety reasons,
Sony strongly recommends that you use the Wall-Mount Bracket model
designed for your TV and the wall-mounting of your TV should be
performed by Sony dealers or licensed contractors.
Cable holder
Soft cloth Table-Top stand
17
GettingStarted
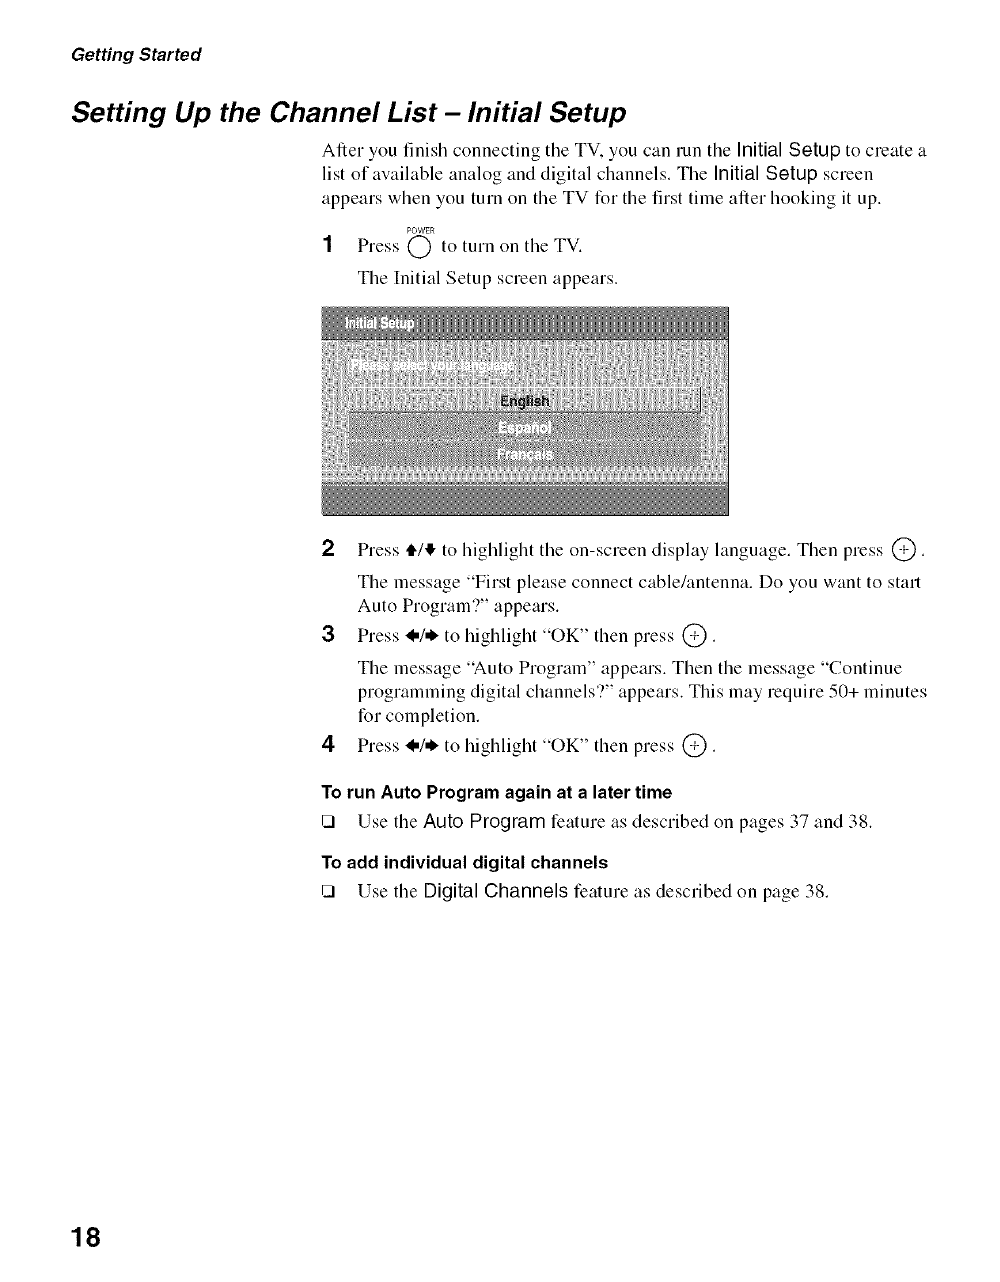
Setting Up the Channel List -Initial Setup
After you finish connecting the TV. you can run the Initial Setup to create a
list of awfilable analog and digital channels. The Initial Setup screen
appears when you turn on the TV for the first time after hooking it up.
POWER
1Press Q) to turn on the TV.
The Initial Setup screen appears.
2Press _/,!, to highlight the on-screen display language. Then press @.
The message "First please connect cable/antenna. Do you want to start
Auto Program?" appears.
3Press <,/,_ to highlight "OK" then press @.
The message "Auto Program" appears. Then the message "Continue
programming digital channels?" appears. This may require 50+ minutes
for completion.
4- Press <,/* to highlight "OK" then press @.
To run Auto Program again at a later time
CI Use the Auto Program feature as described on pages 37 and 38.
To add individual digital channels
CI Use the Digital Channels feature as described on page 38.
18
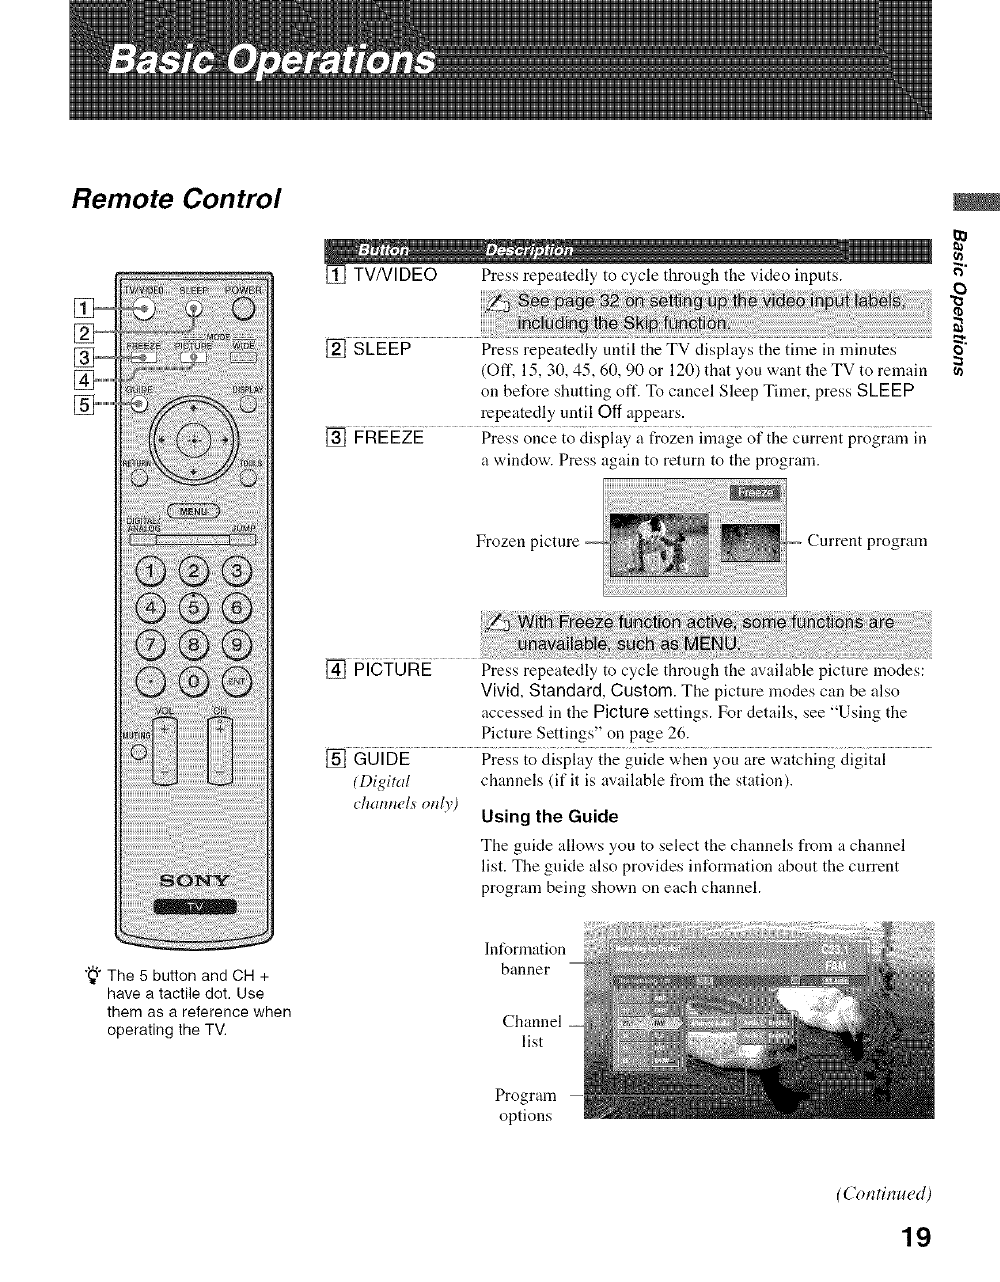
Remote Control
"_" The 5 button and CH +
have a tactile dot, Use
[] TVNI DEO Press repeatedly to cycle through the video inputs.
[] SLEEP Press repeatedly until the TV displays the time in minutes
(Off. 15, 30, 45, 60, 90 or 120) that you want the TV to remain
on before shutting oft'. To cancel Sleep Timer, press SLEEP
repeatedly until Off appears.
[] FREEZE Press once to dispiay a frozen image of the current program in
a window. Press again to return to the program.
e_
o
(n
Frozen Current program
[] PICTURE Press repeatedly to cycle through the available picture modes:
Vivid,Standard, Custom. The picture lnodes can be also
accessed in the Picture settings. For details, see "Using the
Picture Settings" on page 26.
[] GUIDE Press to display the guide when you are watching digital
(Digital channels (if it is available from the station).
chauueLs only) Using the Guide
The guide allows you to select the channels from a channel
list. The guide also provides information about the current
prograln being shown on each channel.
them as a reference when
operating the TV.
Information
banner
Channel
list
Program
options
(Continued)
19
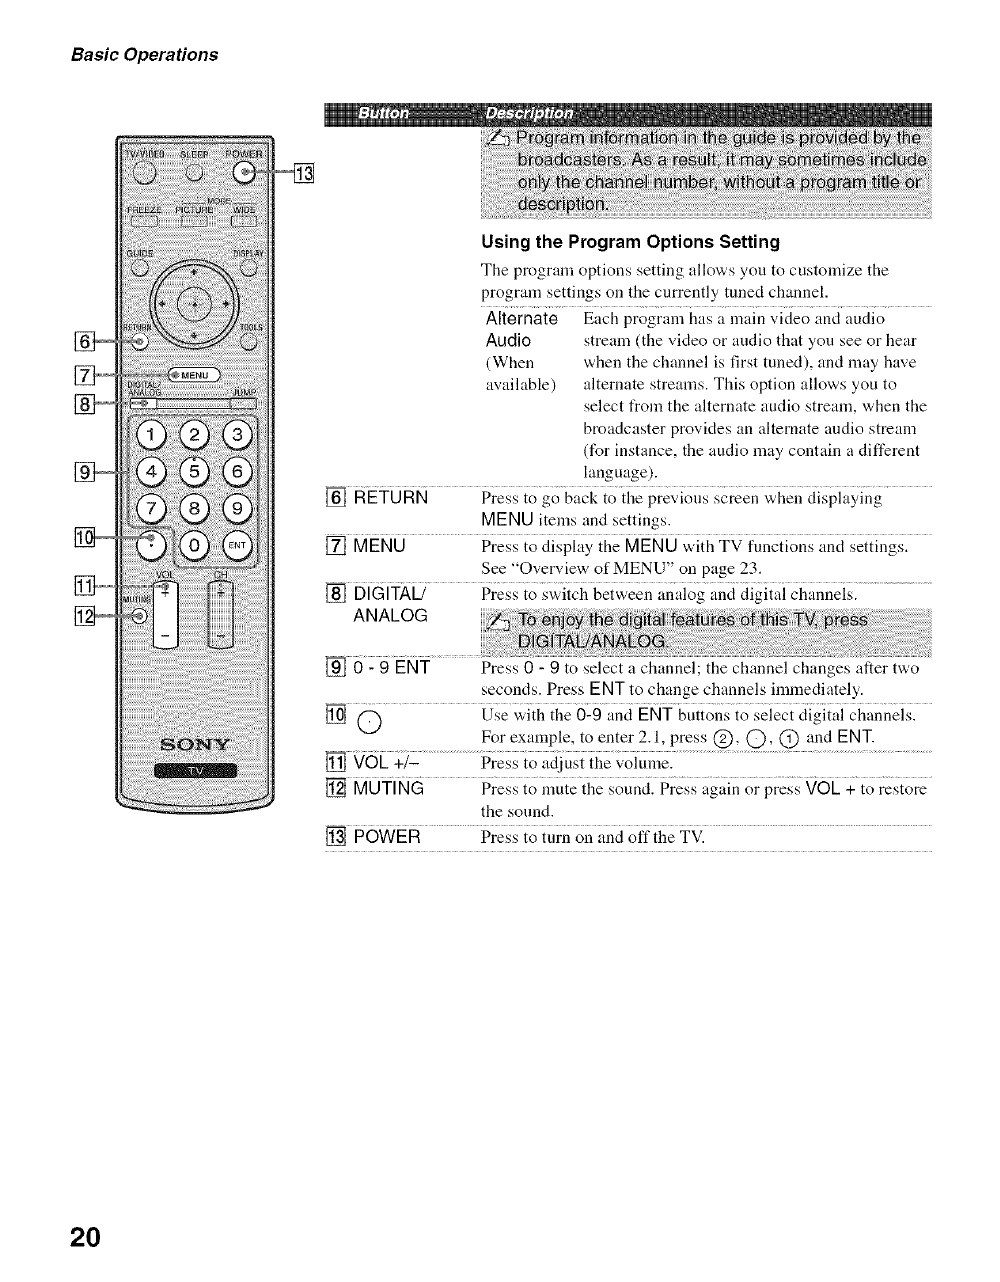
Basic Operations
Using the Program Options Setting
The program options setting allows you to custolnize the
program settings on the currently tuned channel.
Nternate Each prograln has a main video and audio
Audio stream (the video or audio that you see or hear
(When when the channel is first tuned), and may have
available) alternate streams. This option allows you to
select from the alternate audio stream, when the
broadcaster provides an alternate audio stream
(for instance, the audio may contain a different
language).
MENU items and settings.
[] MENU Press to display the MENU with TV functions and settings.
See "Overview of MENU" on page 23.
[] DiGiTAU >re;; io sWiich ge{_:eei] anaiog an,_iaigi{ai channds ....................
ANALOG
0 - 9 ENT Press 0 - 9 to select a channel; the channel changes after two
seconds. Press ENT to change channels immediately.
For example, to enter 2.1, press (_), O, C) and ENT.
[] 96L +_z.........................pr_ io aCu;tihe,_'oiu;_Z..................................................................................................................
the sound.
[] POWER Press to tnrn on and offthe TV.
20
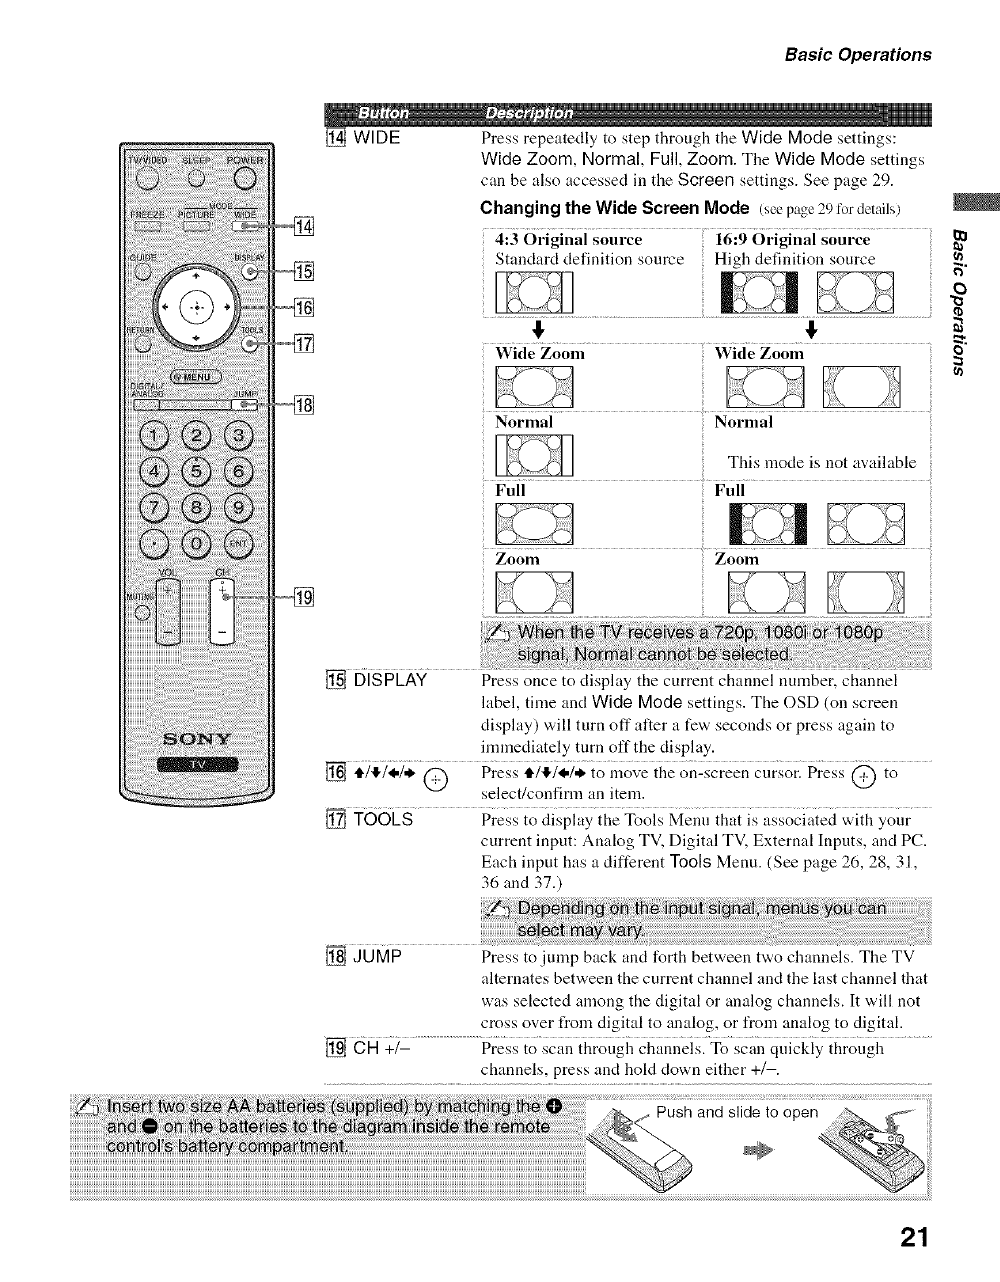
Basic Operations
[] WIDE Press repeatedly to step through the Wide Mode settings:
Wide Zoom, Normal, Full, Zoom. The Wide Mode settings
can be also accessed ill the Screen settings. See page 29.
Changing the Wide Screen Mode (see page 29 for details)
4:3 Original source 16:9 Original source
Standard definition source High definition source
€ €
@
o
::3
Normal Normal
This mode is not available
Full Full
Zoom Zoom
[] DISPLAY Press once to display the current channel number, channel
label, time and Wide Mode settings. The OSD (on screen
display) will turn off after a few seconds or press again to
inunediately turn off the display.
[] i?i/;/. _ Press i)i/;); to _o,,'eihe onlscreenc{irsorlPress@ io
select/confirnl an item.
[] TOOLS Press to display the Tools Menu that is associated with your
current input: Analog TV, Digital TV. External Inputs, and PC.
Each input has a different Tools Menu. (See page 26, 28, 31,
36 and 37.)
[] JUMP Press to jump back and forth between two channels. The TV
alternates between the current channel and the last channel that
was selected among the digital or analog channels. It will not
cross over from digital to analog, or l¥om analog to digital.
[] CH +/- .............................................Press to scan through channeisl To scan quickiy through ........
channels, press and hold down either +/-.
21
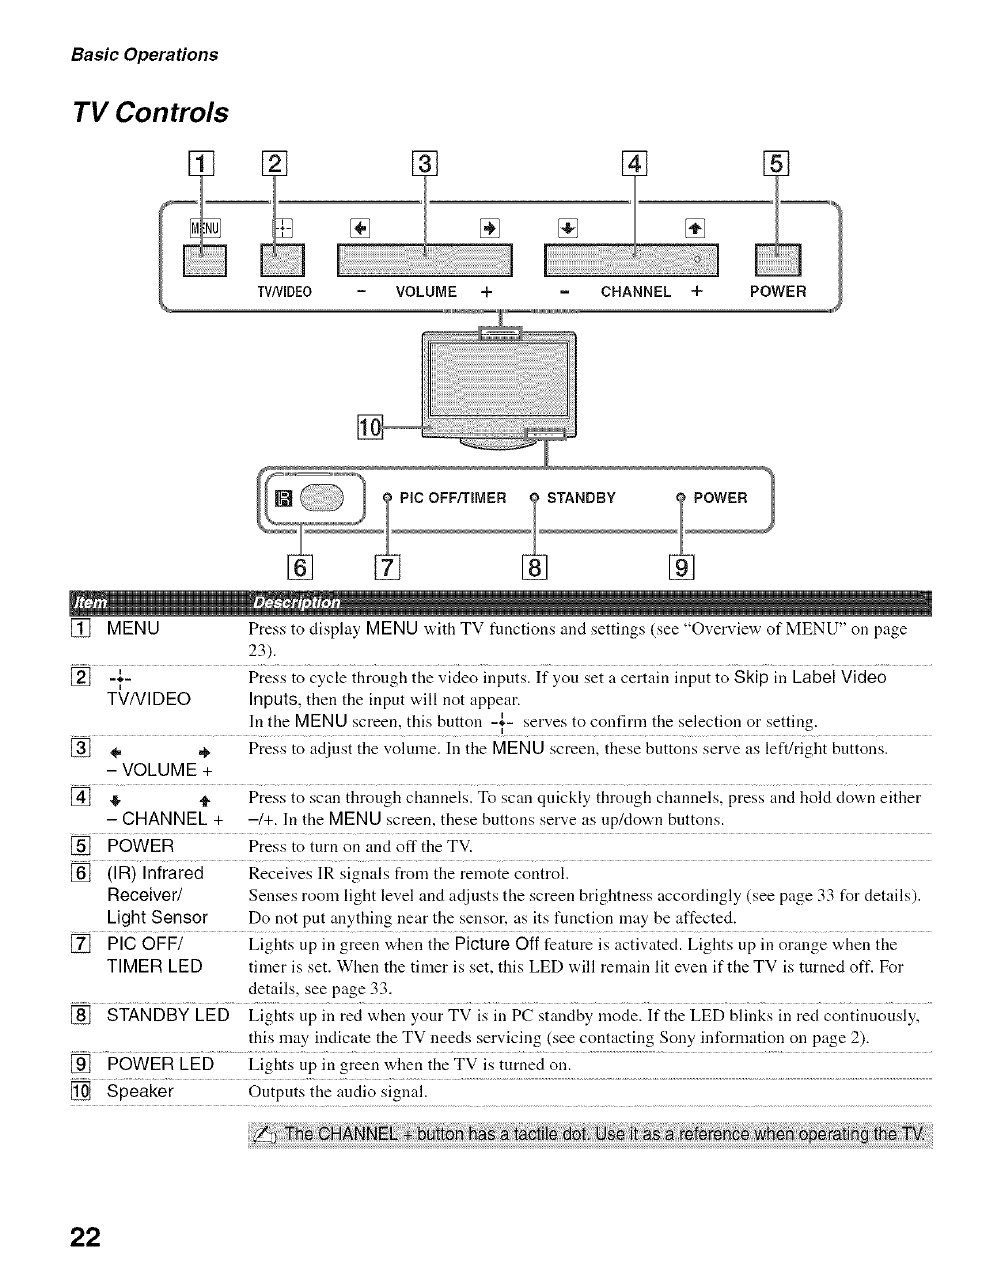
Basic Operations
TV Controls
= VOLUME + = CHANNEL +
PIC OFF/TIMER
[] MENU Press to display MENU with TV functions and settings (see "Overview of MENU" on page
23).
[] =_.- Press to cycle through the video inputs. If you set a certain input to Skip in Label Video
T{7/VIDEO Inputs, then the input will not appear.
In the MENU screen, this button -'- serves to confirm the selection or setting.
i
[] ÷ ,_ Press to adjust the volume. In the MENU screen, these buttons serve as left/right buttons.
- VOLUME +
[] ,I, t_" Press to scan through channels. To scan quickly through channels, press and hold down either
-CHANNEL + -/+. In the MENU screen, these buttons serve as up/down buttons.
[] POWER Press to turn on and off the TV.
[] (IR) Infrared Receives IR signals from the remote control.
Receiver/ Senses room light level and adjusts the screen brightness accordingly (see page 33 for details).
Light Sensor Do not put anything near the sensor, as its function may be affected.
[] PIG OFF/ Lights up in green when the Picture Off feature is activated. Lights up in orange when the
TIMER LED timer is set. When the timer is set, this LED will remain lit even if the TV is turned off. For
details, see page 33.
[] STANDBY LED Lights up in red when your TV is in PC standby mode. If the LED blinks in red continuously,
this may indicate the TV needs servicing (see contacting Sony information on page 2).
[] POWER LED Lights up in green when the TV is turned on.
[] Speaker Outputs the audio signal.
:!
22

Overview of MENU
MENU provides one-button access for controlling your TV. It enables you to perform a variety of tasks intuitively
with a control panel on the screen rather than a variety of remote control button presses.
When you press the MENU button, you can select from basic TV functions such as: switching between external
inputs, viewing your favorite analog/digital stations, switching between analog and digital channels, and changing or
customizing your TV settings.
1Press MENU ontlle remote.
The MENU control panel appears.
2Press 4"/,!,to highlight the item.
3Press @ to select an option.
Press MENU to exit.
Externallnputs
(Continued)
23

Using the Menus
External Inputs
The External Inputs feature lets you select the external inpnts
connected to your TV. You can also assign a label using Label
Video Inputs in the Setup settings. (see page 32)
1Highlight External Inputs on the MENU control
panel and press @.
2 Press tt/!l, to highlight the desired external input
and press @.
Return
The Analog Favorites feature lets you select programs from a list
(_ of up to 16 favorite channels that you specify.
1Highlight Analog Favorites on the MENU control panel Roturn
and press @.
Analog Favorites 2 Press tl./4 to highlight the desired channel and press @.
To acid the current channel to the list of Favorite Channels, follow
step 1 above then highlight and select Add to Favorites and press
(9
To manually edit your list of favorite channels, select Edit
Favorites. For more information, see page 37.
The Digital Favorites feature lets you create a list of up to 16
(_ favorite channels. To create your favorite list:
1 Highlight Digital Favorites on the MENU control panel
and press (9.
Digital Favorites 2 Highlight Add to Favorites and press (9 to add the
current channel to the list of Favorite Channels.
To acid the current channel to the list of Favorite Channels,
t_llov,,' step 1 above then highlight Add to Favorites and
press (9.
To edit your list of favorite channels, follow step 1 above then highlight and select Edit
Favorites. Reset will allow you to make the change and Surf will take you to the Favorite
Channels list.
The Analog feature displays the most recently viewed analog channel. When tuned to tile channel,
O the Channel number will be displayed.
Highlight Analog on the MENU control panel and press (9.
Analog
The Digital feature displays the most recently viewed digital channel. When tuned to the channel,
_O the Program Banner and Channel number will be displayed.
Highlight Digital on the MENU control panel and press (9 .
Digital
24
Using the Menus
Settings
The Settings feature lets you enter the settings menu. Settings and adinstments can be performed
from the Settings menu. The information on various settings starts from page 26.
Navigating Through Settings
1Press MENU.
2Select [_.
3Highlight the item: Picture, Sound, Screen, Setup, PC Settings, Analog Setup, Digital
Setup.
4Press @ to select an option.
To exit Settings, press MENU. 2
25
Using the Menus
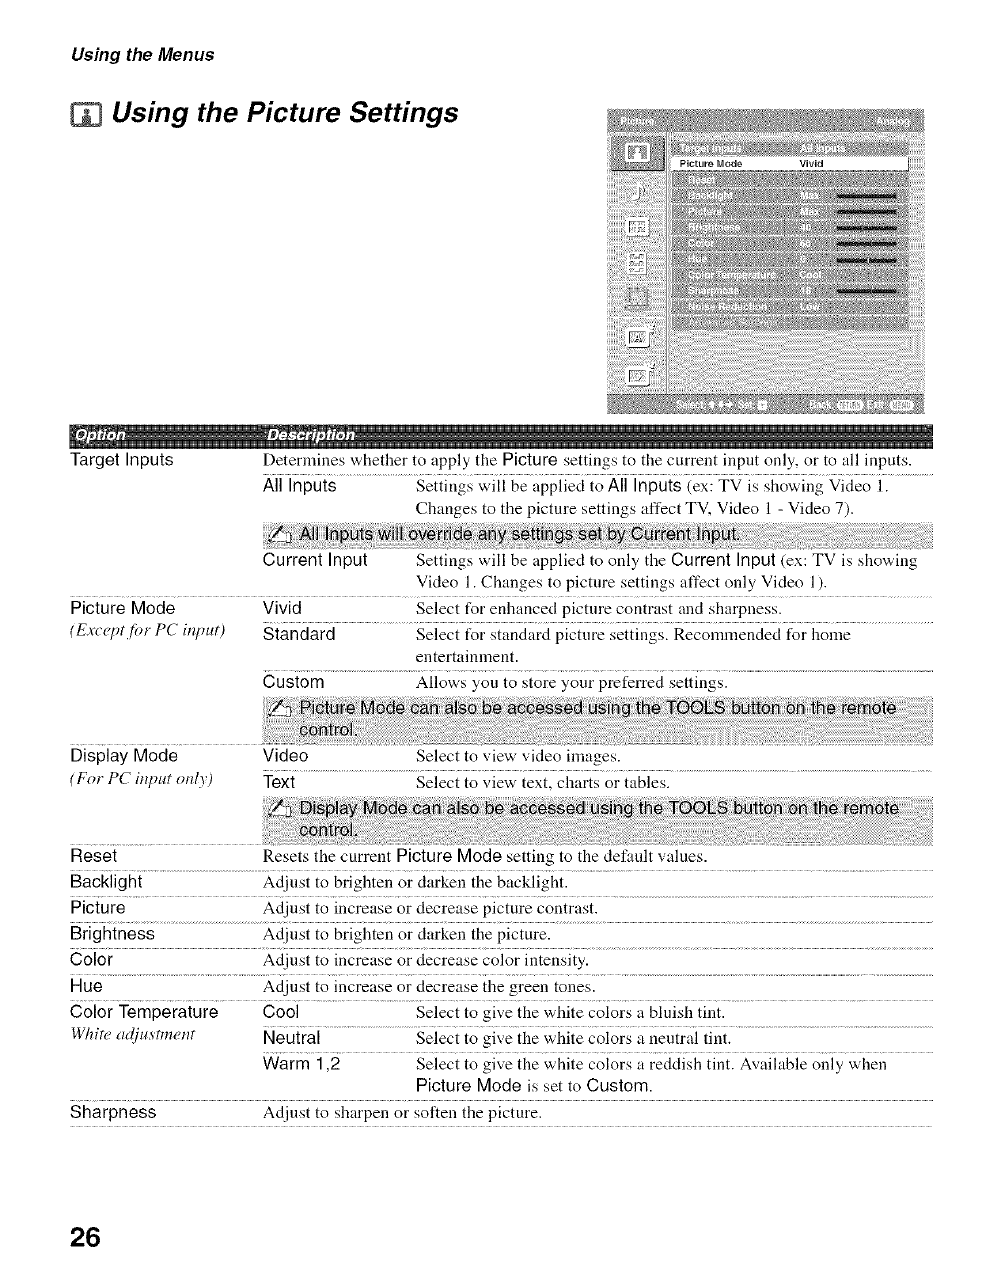
Using the Picture Settings
Target Inputs Determines whether to apply the Picture settings to the current input only, or to all inputs.
All Inputs Settings will be applied to All Inputs (ex: TV is showing Video 1.
Changes to the picture settings affect TV, Video 1 - Video 7).
Current Input Settings will be applied to only the Current Input (ex: TV is showing
Video 1. Changes to picture settings affect only Video 1).
Picture Mode Vivid Select for enhanced picture contrast and sharpness.
(ExcU_tfi_r PC input) Standard Select for standard picture settings. Recommended for home
entertainment.
Custom Allow.s you to store your preferred settings.
Display Mode
(For PC inpl¢t only)
Video Select to view video images.
Text Select to view text, charts or tables.
Reset Resets the current Picture Mode setting to the default values.
Backlight Adjust to brighten or darken the backlight.
Picture Adjust to increase or decrease picture contrast.
Brightness Adjust to brighten or darken the picture.
Color Adjust to increase or decrease color intensity.
Hue Adjust to increase or decrease the green tones.
Color Temperature Cool Select to give the white colors a bluish tint.
Whit_ adjt_stnlent Neutral Select to give the white colors a neutral tint.
Warm112 Seiect io give {he Whiie colors a reddish iinil Avaiiabie oi;iy _hen
Picture Mode is set to Custom.
Sharpness Adjust to sharpen or soften the picture.
26
Using the Menus
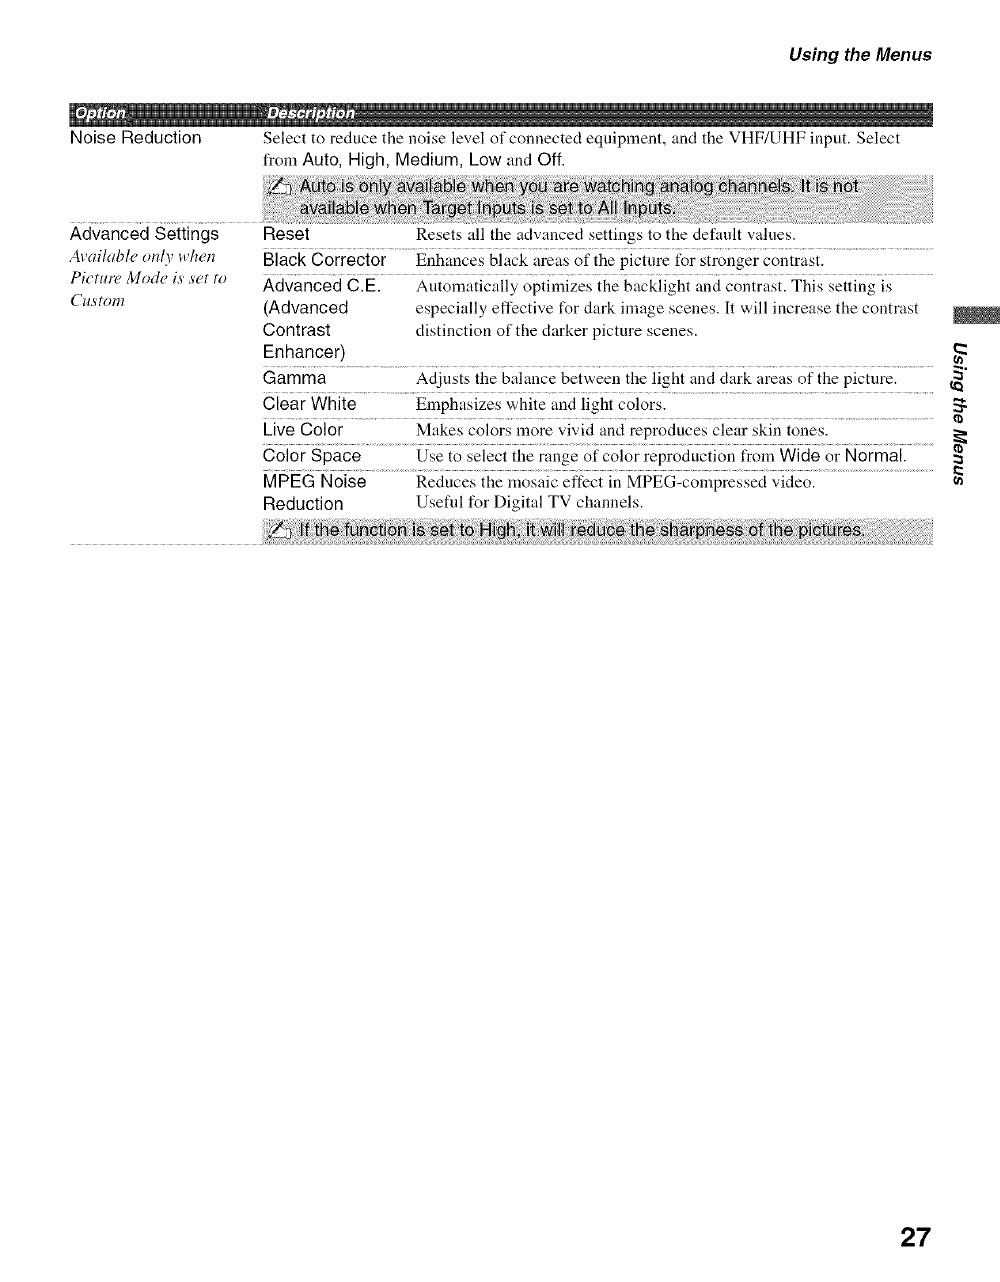
Noise Reduction Select to reducethe noise level of connected equipment, and the VHF/UHF input. Select
from Auto, High, Medium, Low and Off.
Advanced Settings Reset Resets all the advanced settings to the default valnes.
Available only ,then Black Corrector Enhances black areas of the picture for stronger contrast.
Picrm'(_ Mode is s(,t to Advanced C.E. Autolnatically optimiZes the backiight and contrast. This setting is
C_srom (Advanced especially effective for dark image scenes. It will increase the contrast
Contrast distinction of the darker picture scenes.
Enhancer)
Gamma Adjusts the balance between the light and clark areas of the picture.
Clear White Emphasizes white and light colors.
Live Color Makes colors more vivid and reproduces clear skin tones.
Color Space Use to select the range of color reproduction from Wide or Normal.
MPEG Noise Reduces the mosaic effect in MPEG-colnpressed video.
Reduction Useful for Digital TV channels. !!re
27
Using the Menus
Using the Sound Settings
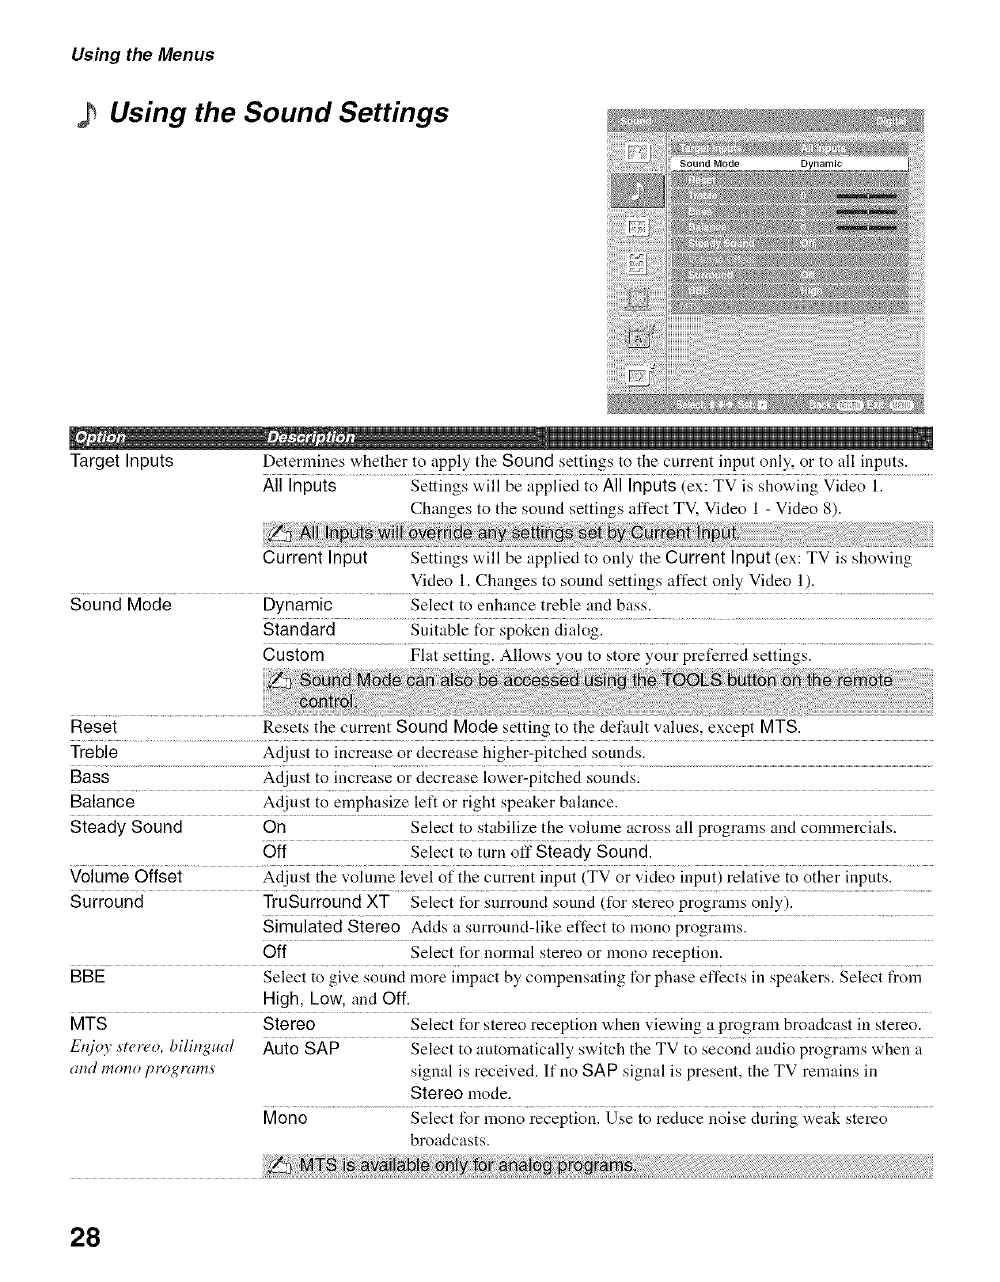
Target Inputs Determines whether to apply the Sound settings to the current input only, or to all inputs.
All Inputs Settings will be applied to All Inputs (ex: TV is showing Video I.
Changes to the sound settings affect TV, Video 1 - Video 8).
Current Input Settings will be applied to only the Current Input (ex: TV is showing
Video 1. Changes to sound settings affect only Video 1).
Sound Mode Dynamic Select to enhance treble and bass.
Standard Suitable for spoken dialog.
Custom Flat setting. Allow's you to store ":,,our preferred settings.
Reset Resets the current Sound Mode setting to the default values, except MTS.
Treble Adjust to increase or decrease higher-pitched sounds.
Bass Adjust to increase or decrease lower-pitched sounds.
Balance Adjust to emphasize left or right speaker balance.
Steady Sound On Select to stabilize the volmne across all programs and commercials.
Off Select to turn off Steady Sound.
Volume Offset Adjnst the volume level of the current input (TV or video input) relative to other inputs.
Surround TruSurround XT Select for surround sound (for stereo programs only).
Simulated Stereo Adds a surround-like effect to mono programs.
Off Select for normal stereo or mono reception.
BBE Select to give sound more impact by compensating for phase effects in speakers. Select from
High, Low, and Off.
MTS Stereo Select for stereo reception when viewing a program broadcast in stereo.
Et{jov .stereo, bilingl¢al Auto SAP Select to automatically switch the TV to second audio programs when a
and mono program.s signal is received. If no SAP signal is present, the TV remains in
Stereo mode.
Mono Select for mono reception. Use to reduce noise during weak stereo
broadcasts.
28
mUsing the Screen Settings
Using the Menus
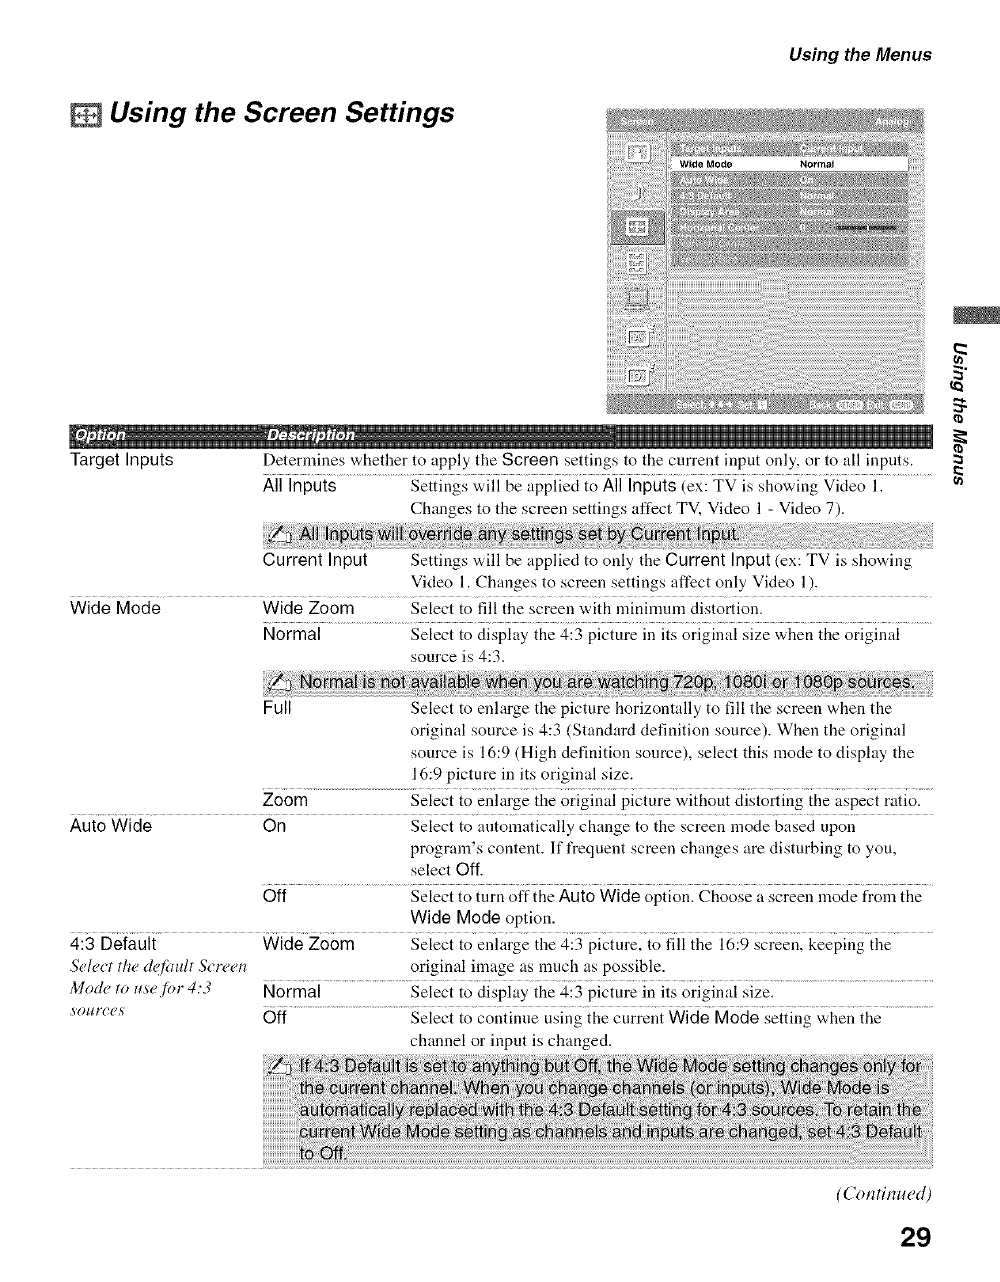
Target Inputs Determines whether to apply the Screen settings to the current input only, or to all inputs.
All Inputs Settings will be applied to All Inputs (ex: TV is showing Video 1.
Changes to the screen settings affect TV, Video 1 - Video 7).
Current Input Settings will be applied to only the Current Input(ex: TV is showing
Video 1. Changes to screen settings affect only Video 1).
Wide Mode Wide Zoom Select to fill the screen with mininmm distortion.
Normal Select to display tile 4:3 picture in its original size when the original
source is 4:3.
Full Select to enlarge the picture horizontally to fill the screen when the
original source is 4:3 (Standard definition source). When the original
source is 16:9 (High definition sonrce), select this mode to display the
16:9 picture in its original size.
Zoom Select to enlarge the original picture without distorting the aspect ratio.
Auto Wide On Select to automatically change to the screen mode based upon
program's content. If frequent screen changes are disturbing to you,
select Off.
Off Select to turn offthe Auto Wide option. Choose a screen mode from the
Wide Mode option.
4:3 Default Wide Zoom Select to enlarge the 4:3 picture, to fill the 16:9 screen, keeping the
Select the d(Ifimlt Screen original image as nmch as possible.
Mode to u.sefbr 4:3 Normal Select to display the 4:3 picture in its original size.
som'_ e_ Off Select to continue using the current Wide Mode setting when the
channel or input is changed.
_a
(Continued)
29
Using the Menus
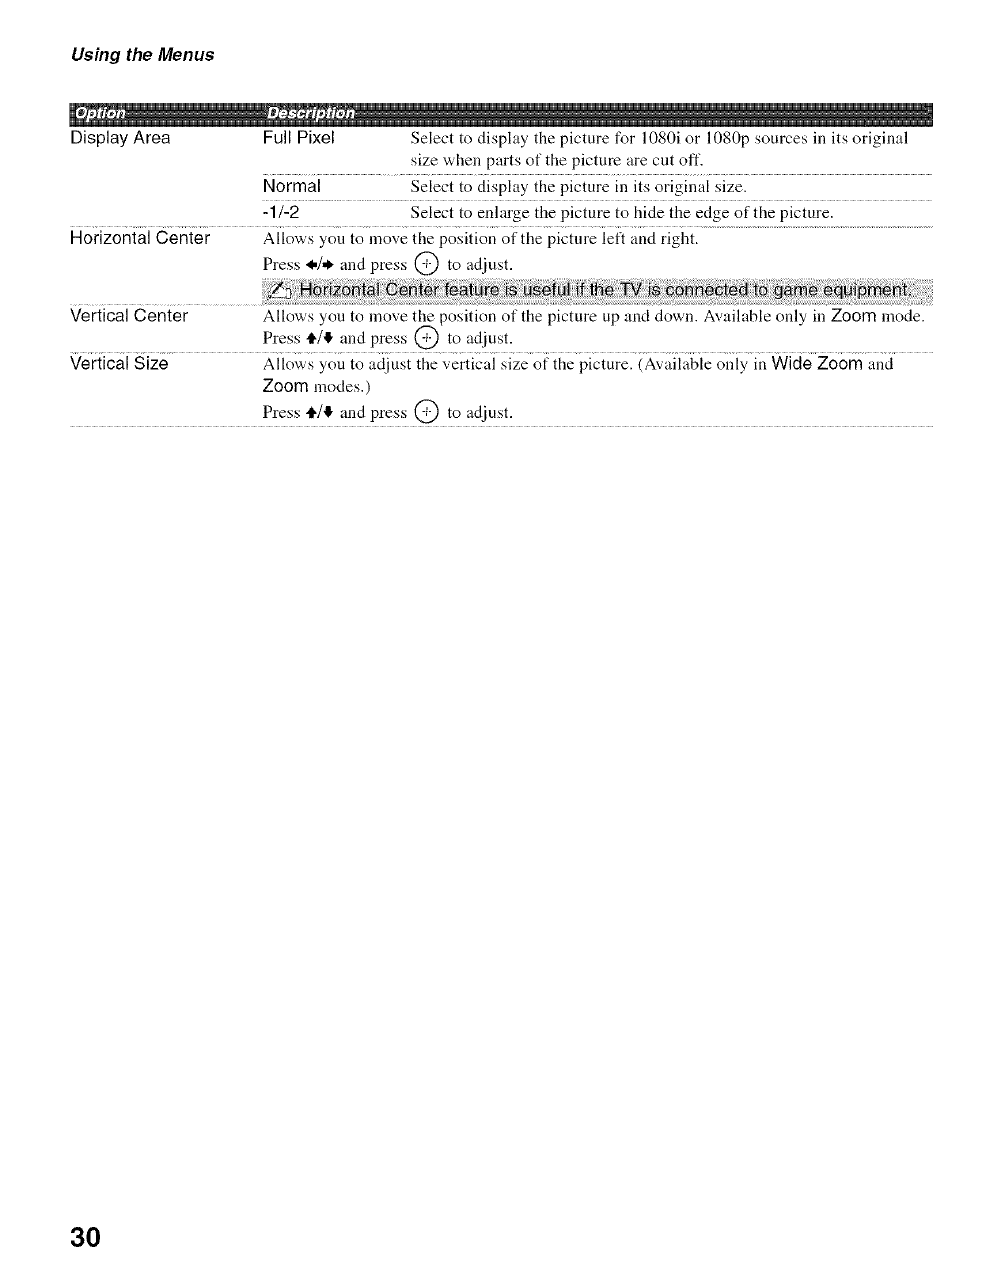
Display Area Full Pixel Select to display the picture for 1080i or 1080p sources in its original
size when parts of the picture are cut oft'.
Normal Select to display the picture in its original size.
-1/-2 Select to enlarge the picture to hide the edge of the picture.
Horizontal Center Allows you to move the position of the picture left and right.
Press _./* and press @ to adjust.
Vertical Center Allows you to move the position of the picture up and down. Available only ill Zoom mode.
Press tl,/,!1,and press @ to adjust.
Vertical Size Allows you to adjust the vertical size of the picture. (Available only in Wide Zoom and
Zoom modes.)
Press 4"/11,and press @ to adjust.
3O
Using the Menus
Using the Setup Settings
Language Select !o display all on-screen settings in your hmgnage of choice: English, EsPafiol, Frans}ais.
Caption Vision Allows you to select from several closed caption modes (for programs that are broadcast with
closed captioning). Some caption modes for digital channels are only accessible from the Digital
Setup setting. For details, see page 39.
Off Caption Vision is turned off.
COl, C02, Displays a printed version of the dialog or sound effects of a program.
CC3, CC4 (ShouM be set to CCl for most programs.)
Text1 ,Text2, Disphtys network/station information preseuted using either half or the
Text3,Text4 whole screen (if available).
Info Banner Set to On or Off. When On, displays the program name and the program infonnation (if the
broadcaster offers this service). Displays for few seconds when the channel is changed or the
DISPLAY button is pressed.
(Continued)
31

Using the Menus
Parental Lock The Parental Lock settings allows you to set up the TV to block programs according to their
content and rating levels. Use 0-9 on the remote control to enter a four-digit password. The first
tilne you create a password, confirm the password by entering it again.
Lock Off Turn Parental Lock off. No programs are
blocked from viewing.
Child Maxinmm ratings permitted are:
U.S.: TV-Y. TV-G, G
Canada: C, G, TV-Y
Youth Maximum ratings permitted are:
U.S.: TV-PG, PG
Canada: C8+, PC, 8 ans+, TV-PG
Young Adult Maxinmm ratings permitted are:
U.S.: TV-14, PC-13
Canada: 14+, 13 ans+, TV-14
Custom Select to set ratings manually.
U.S.: See page 34 for details.
Canada: See page 35 for details.
Change Password Select to change your password.
Select Country U.S.A. Select to use U.S.A. ratings (see page 34).
Canada Select to use Canadian ratings (see page 35).
Label Video Inputs Allows yon to identify A/V equipment you connected to the TV. such as a VCR, DVD, etc. For
example, if you have a DVD player connected to the VIDEO 4 jack, you can select the label
DVD for the Video 4 input. Then when you press TVNIDEO to change inputs, the video label
you assigned to that input appears on screen.
1 Press tl./I!, to highlight the video input (Video 1-8) to which you want to assign a label.
Then press @ to select the input.
2 Press tl./I!, to highlight one of the displayed labels. Then press @ to select the label.
You can select from the following labels for each input:
Video 1-7 --, DVD, Cable Box, Satellite, BD, VCR, Receiver, DVR, Game,
Camcorder, Edit, Skip
Video 8 --, PC, Edit, Skip
32
Using the Menus
Auto YC When connecting both VIDEO IN and S VIDEO IN, you can select the jack from which the TV
receives the input signal. The TV is by default set to receive S VIDEO input signals.
1 Press TVNIDEO repeatedly until the desired video input appears.
2 After selecting the Auto YC option, to watch the pictures input from the S VIDEO input
jack:
Press l./tf, to highlight On, then press @.
To w'atch the pictures input from the VIDEO input jack:
press l./!. to highlight Off, then press @.
Timer Settings Sleep Timer Set the time in minutes (Off, 15 rain, 30 min, 45 min, 60 min, 90 min, or
120 min) that you want the TV to remain on before shutting off
automatically.
Timer You can use the Timer to turn the TV on, turn it off, and tune to a specific
channel at a scheduled time.
The Timer feature will not be available until you set the Current Time.
1 Press l./l!, to highlight one of the following options, then press @.
Set: Select to set the timer by Day, Time, Duration, Channel and
Volume Setup.
Off: Select to turn off the timer. (Your previous settings are saved.)
2If you selected Set in step 1, press l./tf./l./,t, to set the day(s), hour,
minute, AM/PM, duration, channel number (VHF/UHF, CATV or
Digital), and vohune.
When Digital is selected, the last digital channel you viewed will
automatically show when the TV is turned on.
:3 Press MENU to exit Settings.
Current Time Select to set the current time (day, hour, minute, and AM/PM).
1 Press @ to select Current Time.
2 Press l./l!./l./,t, to set the current time (day, hour, minute, and AM/PM).
:3 Press MENU to exit Settings.
Power Saving Select to reduce the power consumption b), adjusting the backlight brightness. This also
enhances the black level. Select from Off, Low, High and Picture Off.
LightSensor Select On to enable the automatic picture (screen) brightness control. The light sensor measures
the room brightness which allows the TV to automatically adjust the backlight brightness based
on the picture settings and the ambient room light conditions.
Quiet Power On
(CO n tin u ed)
aa
Select to have the TV volume start at the minimum volume and gradually change to the set level
when you turn it on.
Using the Menus
Speaker On Select to turn on the TV speakers.
Off Select to tuna offthe TV speakers and listen to the TV's sound only through
your external audio receiver and speakers.
Audio Out Variable When Speaker is set to Off, the audio output t_om your audio system call
Ea_sy (ontrol of volume be controlled by the TV's remote control.
adju*srments Fixed When Speaker is set to Off, the audio output of the TV is fixed. Use your
audio receiver's remote control to adjust the volume (and other andio
settings) through your audio system.
Cable On Select if you are receiving cable channels via cable TV provider.
Off Select if you are using au antenna.
Product Information Select to display the equipment information of 2,,our TV.
US Models: Selecting Custom Parental Lock Rating Options
To select custom rating options for the U.S., select U.S.A. in the Select Country setting (see page 32).
Movie Rating G All children and general audience.
PG Parental guidance suggested.
PG-13 Pareutal guidance t_r children under 13.
RRestricted viewing, parental guidance is suggested for children under
17.
NC-17 and X No one 17or under allowed.
TV Rating Age-Based Ratings
Block programs by their TV-Y All children.
rating, content or both TViY7 DireCte_i to chiMren age 7 and Oiderl ........................................
TV-G General audience.
TV-PG P_rental guidance suggested.
TV-14 Parents strongly cautioned.
TV-MA Mature audience only.
Content-Based Ratings
FV Fantasy violence.
DSuggestive dialogue.
LStrong language.
SSexual situations.
V Violence.
Unrated
Block programs' or
movies that are broadcast
n'ithout araring
Allow Allows programs and movies that tire broadcast without a rating.
Block Blocks all programs and movies that tire broadcast without a rating.
34

Using the Menus
Canadian Models: Selecting Custom Parental Lock Rating Options
To select custom rating options for Canada, select Canada in tile Select Country setting (see page 32).
English Rating C All children.
C8+ Children 8 years and older.
G General programming.
PG Parental guidance.
14+ Viewers 14 and older.
18+ Adult programming.
French Rating G General programn_ing.
8 and+.......................Not reCo;_nne_{3ecil\_r¥0ul{g Children. _
13 ans+ Not recommended for ages under 13.
16arts+...............................................................................Not reC01_m_eudedfor ages un__ieri 6..............................................................................._
...........................................!8 ans+ .... Pr°grammiug ....................................................................................................................................................................
U.S.A. Rating See "US Models" on page 34 for details.
Viewing Blocked Programs
You can view blocked programs by entering the password, PressENT when tunedto a blocked program,
then enter the password. This temporarily turns the parental control feature off. To reactiw_te the Parental
Lock settings, turn offthe TV. When the TV is turned on again, your Parental Lock settings are reactivated.
35
Using the Menus
Using the PC Settings
Wide Mode Normal Select to display in the original image size.
Full1 Select to enlarge the picture to fill the display area, keeping its original
aspect ratio.
Full2 Select to enlarge the picture to fill the display area.
Reset Resets the cnrrent setting to the default values, except Wide Mode and Power
Management.
Auto Adjustment Select to automatically adjust the display position and phase of the picture when the TV
receives an input signal from the connected PC. Note that Auto Adjustment may not work
well with certain input signals. In such cases, nmnually adjust the options below.
Adjust after Pitch to fine tune overall sharpness.
Adjust uneven sharpness on screen.
Phase
Pitch
Horizontal Center Allows you to move the position of the picture lei't and right.
Vertical Center Allows you to move the position of the picture up and down.
Power Management On Select to automatically switch to the standby mode when there is no
signal input for 30 seconds.
Off Select to turn off Power Management.
36
Using the Menus
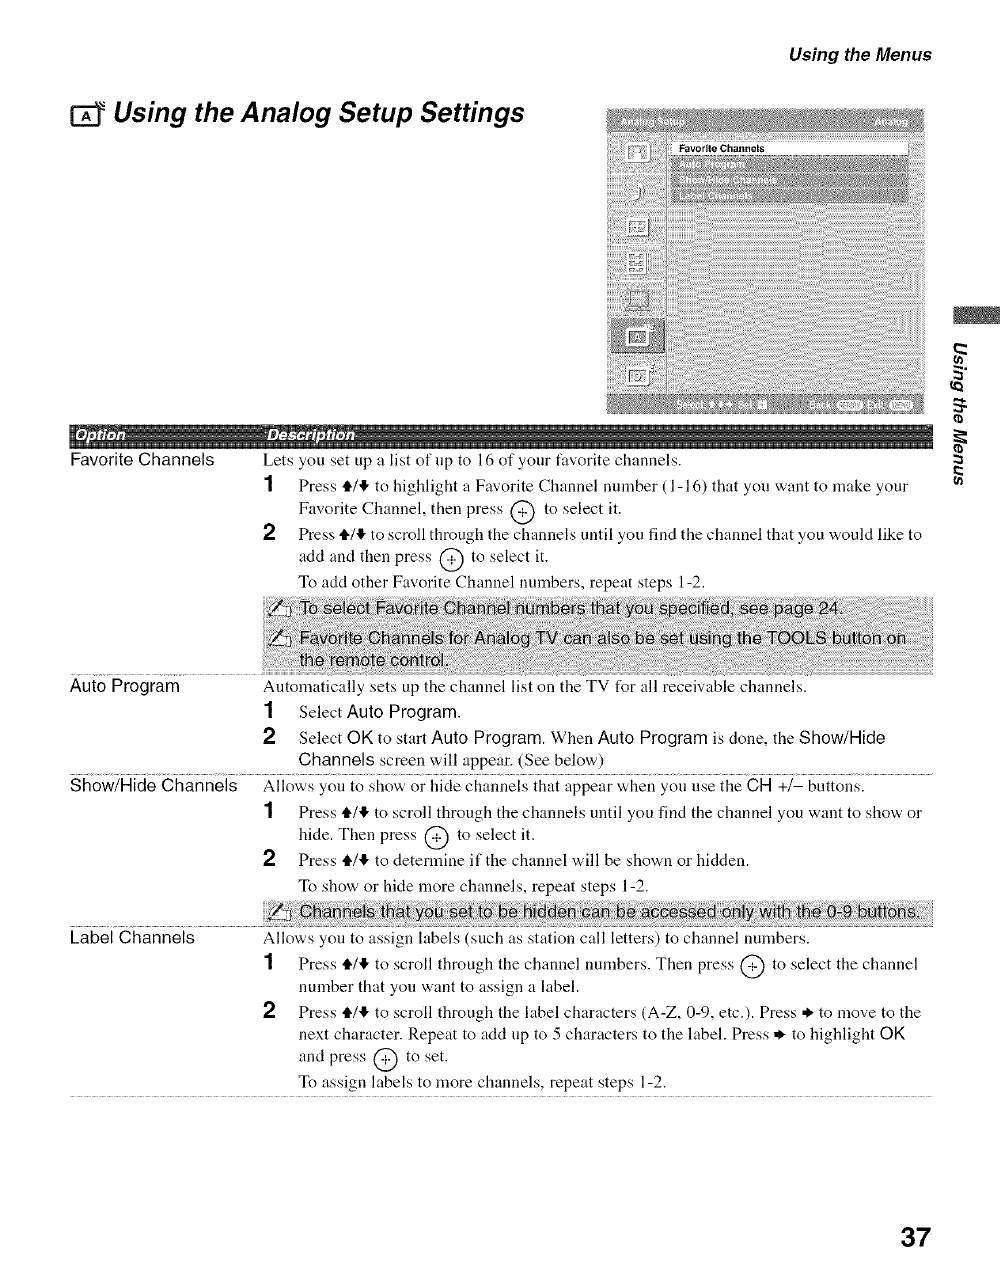
Using the Analog Setup Settings
Favorite Channels Lets you set up a list of up to 16 of your favorite channels.
1 Press 11411,to highlight a Favorite Channel number ( 1- 16) that you want to make your
Favorite Channel, then press @ to select it.
2Press t_/,!- to scroll through the channels until you find the channel that you would like to
add and then press @ to select it.
To acid other Favorite Channel numbers, repeat steps 1-2.
2
Auto Program
1Select Auto Program.
2Select OK to start Auto Program. When Auto Program is done, the Show/Hide
Channels screen will appear. (See below)
Show/Hide Channels Allows you to show or llide channels that appear when you use the CH +/- buttons.
1Press tl4'!" to scroll through the channels until you find the channel you want to show or
hide. Then press @ to select it.
2 Press tl4,1, to determine if the channel will be shown or hidden.
To show or hide more channels, repeat steps 1-2.
Automatically sets up the channel list on the TV for all receivable channels.
Label Channels Allows you to assign labels (such as station call letters) to channel numbers.
1 Press tl4,1, to scroll through the channel numbers. Then press @ to select the channel
number that you want to assign a label.
2 Press tl4,1, to scroll through the label characters (A-Z, 0-9, etc.). Press * to move to the
next character. Repeat to add tip to 5 characters to the label. Press * to highlight OK
and press @ to set.
To assign labels to more channels, repeat steps 1-2.
37
Using the Menus
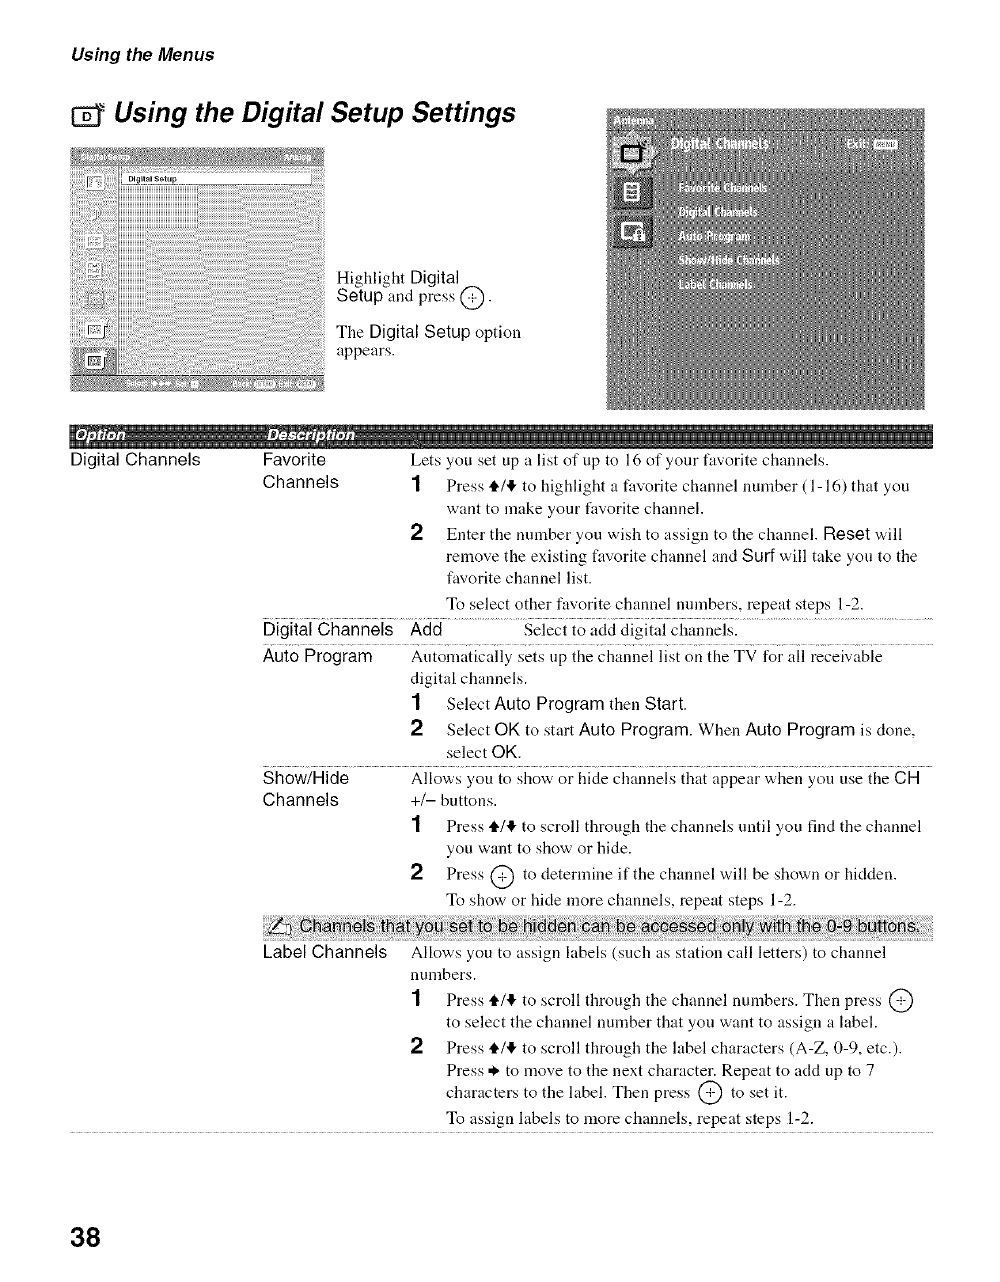
Using the Digital Setup Settings
Highlight Digital
Setup and press @.
The Digital Setup option
appears.
Digital Channels Favorite Lets you set up a list of up to 16 of your favorite channels.
Channels 1 Press tl./,II, to highlight a favorite channel number ( 1-16) that you
want to make your fi/vorite channel.
2 Enter the number you wish to assign to the channel. Reset will
relnove the existing favorite channel and Surf will take yon to the
favorite channel list.
To select other favorite channel numbers, repeat steps 1-2.
Digital Channels Add Select to acid digital channels.
Auto Program Automatically sets up the channel list on the TV for all receivable
digital channels.
1 Select Auto Program then Start.
2 Select OK to start Auto Program. When Auto Program is clone,
select OK.
Show/Hide Allows you to show or hide channels that appear when you use the CH
Channels +/- buttons.
1Press tl./,1!,to scroll through the channels until you find the channel
you want to show or hide.
2 Press @ to deterlnine if the channel will be shown or hidden.
To show or hide more channels, repeat steps 1-2.
Label Channels Allows you to assign labels (such as station call letters) to channel
numbers.
1 Press tl./,1!,to scroll through the channel numbers. Then press @
to select the channel number that you want to assign a label.
Press tl./,1!,to scroll through the label characters (A-Z, 0-9, etc.).
Press * to move to the next character. Repeat to add up to 7
characters to the label. Then press @ to set it.
To assign labels to more channels, repeat steps 1-2.
38
Using the Menus
Digital Setup Caption Vision Allows you to select from several closed-caption modes for digital
channels. To set Caption Vision for analog channels, see page 31.
On Caption Vision is turned on.
Off Caption Vision is turned off.
Program Allows you to set basic and advanced Caption Vision
options. See "Progrmnming Caption Vision" below.
AN Sync Off/1/2/3 Use this option to make adjustments to audio and video
synchronization when you have external equipment
connected to DIGITAL OUT of the TV. Select Off
(default setting) to make no adjustments. Select 1,2 or
3 to adjust so that the video and audio from your
connected external equipment are synchronized.
Diagnostics Display diagnostics information about the TV. This can be useful in pro-
viding information to an authorized technician or repair person.
Parental Lock The Parental Lock option in the DigitalSetup settings allows you to set up the TV to block
digital programs that contain digital ratings.
Password If the password has not been set, or to change the password, use
Change Password option in the Setup settings (see page 32).
Digital Rating Off Turn Parental Lock off. No programs that contain
downloadable ratings are blocked from viewing.
Custom... Select to block programs based on downloadable ratings.
Clear All Select to clear the entire downloadable rating system.
Programming Caption Vision
If you selected the Program option under Caption Vision, you can change the following settings:
Basic Allows you to select basic analog (EIA-608) closed caption options.
CC3, CC4
Texil i Tex}2 See Capiion vision in ii_eSeiup seiiin{ o;_piige3ii
Text3, Text4
Digital.................CC Aiio;;s yo{iio sei digii;{i i_iigiiaiEiA2;08i or Advanced i_iigiiai
EIA-708).
Advanced Allows you to select advanced digital (EIA-708) closed caption options. Select l¥om the
available options.
(Continued)
39
Using the Menus
Advanced Settings Allows you to make additional settings for digital (EIA-708) closed caption options. Select
from As Broadcast, Small Text, Large Text _mdCustom.
Custom... Allows you to customize the following settings:
Character Size Small, Standard, Large
Character Style Style 1-7
Character Color Color 1-8
Character Opacity Solid, Translucent
Edge Color Color 1-8
Edge Type None, Raised, Depressed, Outline,
Left Shadow, Right Shadow
Background Color None, Color 1-8
Background Opacity Solid, Translucent
Window Color None, Color 1-8
Window Opacity Solid, Translucent
4O
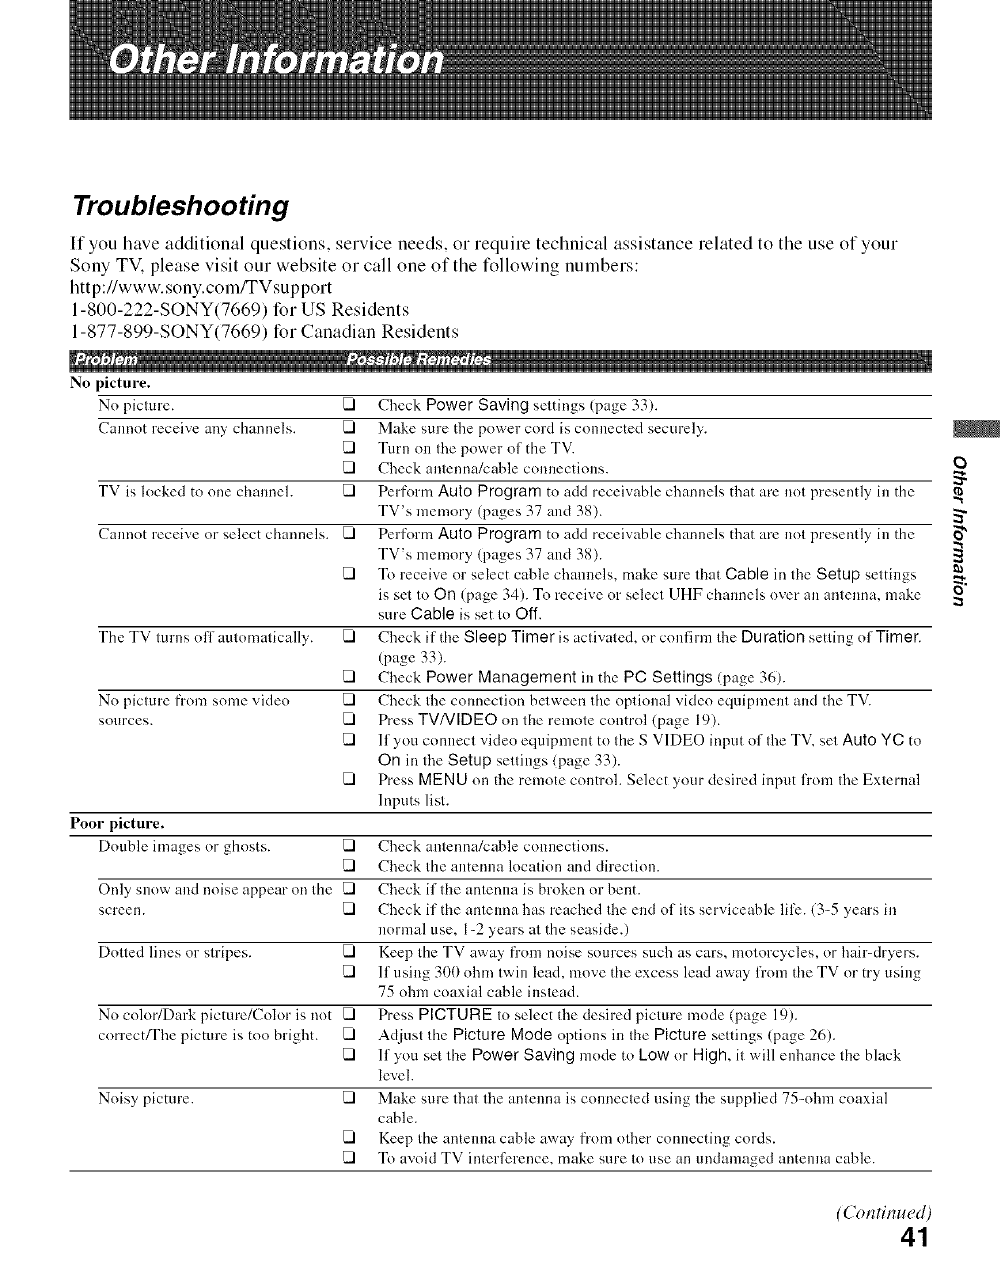
Troubleshooting
If you have additional questions, service needs, or require technical assistance related to the use of your
Sony TV. please visit our website or call one of the following numbers:
http://www.sony.com/TVsupport
1-800-222-SONY(7669) for US Residents
1-877-899-SONY(7669) for Canadian Residents
No picture.
No picture. Fql Check Power Saving settings (page 33).
Cannot receive any channels. FI Make sure tire power cord is connected securely.
Fql Turn on tire power of the TV.
FI Check antenna/cahle connections.
TV is locked to one channel. FI Perform Auto Program to add receivable channels that are not presently in the
TV's memory (pages 37 and 38).
Cannot receive or select channels. FI Perform Auto Program to add receivable channels that arc not presently in the
TV's memory (pages 37 and 38).
To receive or select cahle channels, make sure that Cable in the Setup settings
is set to On (page 34). To receive or select UHF channels over an antenna, make
sure Cable is set to Off.
The TV turus off automatically. Fql Check it'tlre Sleep Timer is activated, nr cnuf]rnl the Du ration setting of Timer.
(page 33).
FI Check Power Management in the PC Settings (page 36).
No picture from some video Fql Check the connection between the optional video equipment and the TV.
sources. FI Press TV/VIDEO on the remote control (page 19).
Fql If you connect video equipment to the S VIDEO input of the TV, set Auto YC to
On in tire Setup settings (page 33).
FI Press MENU on tire remote control. Select your desired input from tire External
Inputs list.
Poor picture.
Double images or ghosts. FI Check autenna/cahle connections.
Fql Check the antenna location and direction.
Only snow and noise appear on the FI Check if tire antenna is broken or bent.
screen. FI Check if the antenna has reached tire end of its serviceable life. (34 years in
normal use, 1=2 years at the seaside.)
Dotted lines or stripes. Fql Keep the TV away from noise sources such as cars, motorcycles, or hair-dryers.
Fql If using 300 ohm twin lead, move tire excess lead away from tire TV or try using
75 ohm coaxial cable instead.
No color/Dark picture/Cnlor is not FI Press PICTURE to select the desired picture mode (page 19).
correct/The picture is too bright. Fql Adjust the Picture Mode options in the Picture settings (page 26).
FI tf you set tire Power Saving mode to Low or High, it will enhance tire black
level.
Noisy picture. Fql Make sure that tire antenna is connected using tire supplied 75=olun coaxial
cable.
Fql Keep the antenna cable away from other connecting cords.
Fql To avoid TV interference, make sure to use an undamaged antenna cable.
{b
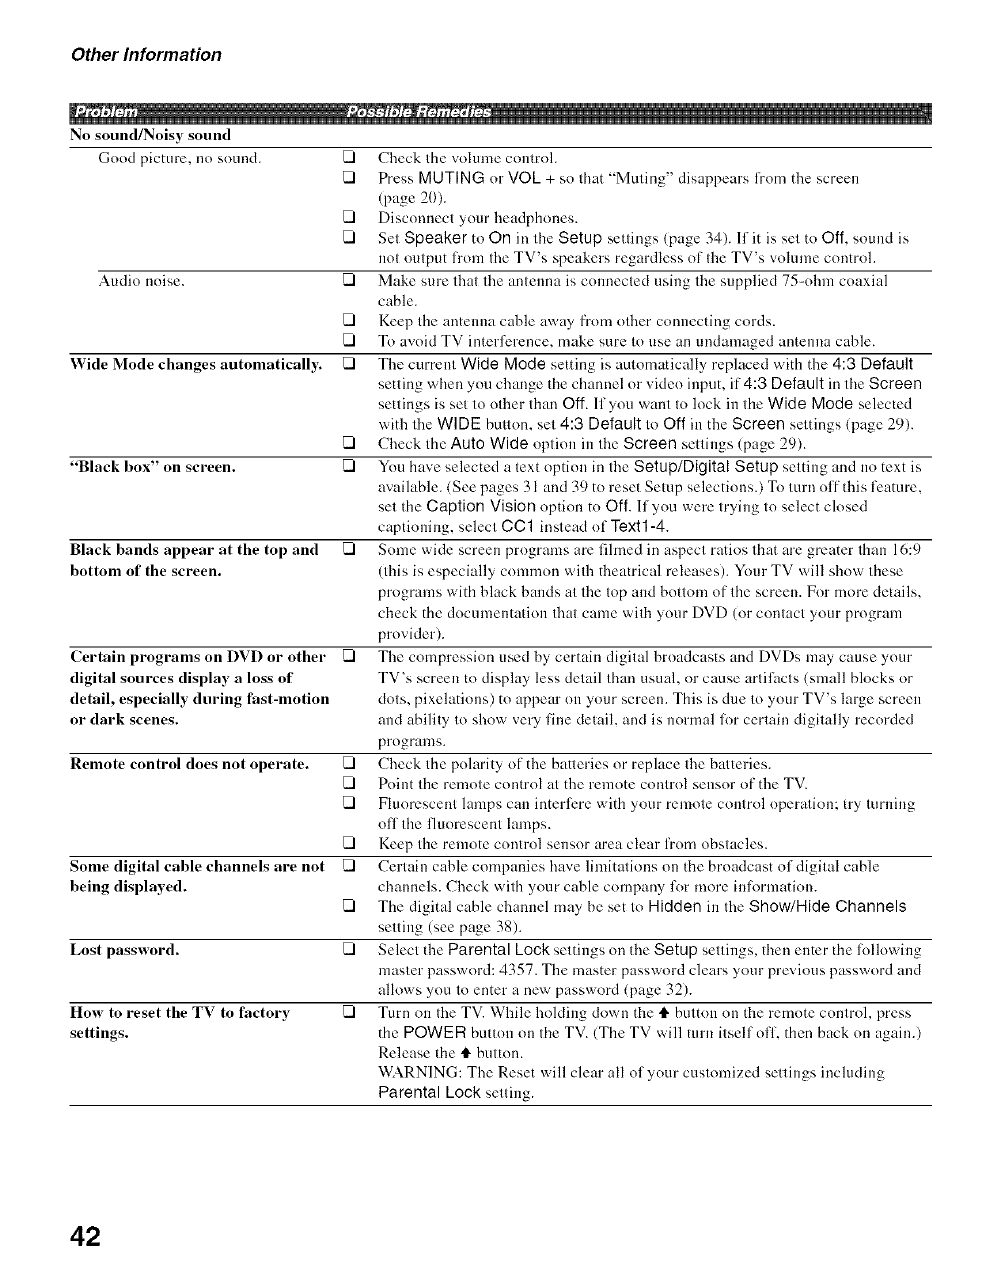
Other Information
No sound/Noisy sound
Good picture, no snuud.
Audio noise.
Wide Mode changes automatically.
"Black box" on screen.
Black bands appear at the top and 17
bottom of the screen.
Certain programs on DVD or other 17
digital sources display a loss of
detail, especially during fast-motion
or dark scenes.
Remote control does not operate. FI
Some digital cable channels are not FI
being displayed. rq
Lost passvrord.
How to reset the TV to factory FI
settings.
Check the volume control.
Press MUTING or VOL + so that "Muting" disappears li'om the screen
(page 20).
Disconnect ynur headphones.
Set Speaker to On in the Setup settings (page 34). lfit is set to Off, sound is
not output from the TV's speakers regardless of the TV's volume corrtrol.
Make sure that the antenna is connected using the supplied 75-ohm coaxial
cable.
Keep the antenna cahle away from other connecting cords.
To avoid TV irrterference, make sure to use an undamaged arrteuna cable.
The current Wide Mode setting is automatically replaced with the 4:3 Default
setting when yon change the channel or vide() input, if 4:3 Default in the Screen
settings is set to other than Off. If you want to lock in the Wide Mode selected
with the WIDE button, set 4:3 Default to Off in the Screen settings (page 29).
Check the Auto Wide option in the Screen settings (page 29).
You have selected a text option in the Setup/Digital Setup setting and no text is
available. (See pages 31 and 39 to reset Setup selections.) To turn off this ti:ature,
set tire Caption Vision option to Off. If you were trying to select closed
capdnuing, select CCl irrstead nf Text1-4.
Some wide screen programs are fihned in aspect ratios that are greater than 16:9
(this is especially common with theatrical releases). Your TV will show these
programs with black hands at the top arrd hnttnm nfthe screen. Fnr mnre details,
check the documentation that came with your DVD (nr contact ynur program
provider).
The compression used by certain digital brnadcasts and DVDs may cause your
TV's screen to display less detail than usual, or cause artilhcts (small blocks or
dots, pixeladnns) to appear on your screen. This is due to ynur TV's large screen
and ability to show very fine detail, arrd is normal lor certain digitally recorded
programs.
Check the pnlarity nf the batteries or replace the batteries.
Point the remote control at the remote control sensor of the TV.
Fluorescent lamps can interli:re with your remote control operation; try turning
nff the fluorescent lamps.
Keep the remote corrtrol sensor area clear from nbstacles.
Certain cable companies have limitations on the broadcast nf digital cable
channels. Check with your cable company l\_r mnre irrli.)rmation.
The digital cable channel may be set to Hidden in the Show/Hide Channels
setting (see page 38).
Select the Parental Lock settings nn the Setup settings, then enter tire lollowing
master passwnrd: 4357. The master password clears your previnus password arrd
allows ynu tn enter a new passwnrd (page 32).
Turn nu the TV. While holding down the t1"button on the remote control, press
the POWER button on the TV. (The TV will turn itself off, then back on again.)
Release the t1"button.
WARNING: The Reset will clear all of your customized settings irrcluding
Parental Lock setting.
42
Other Information
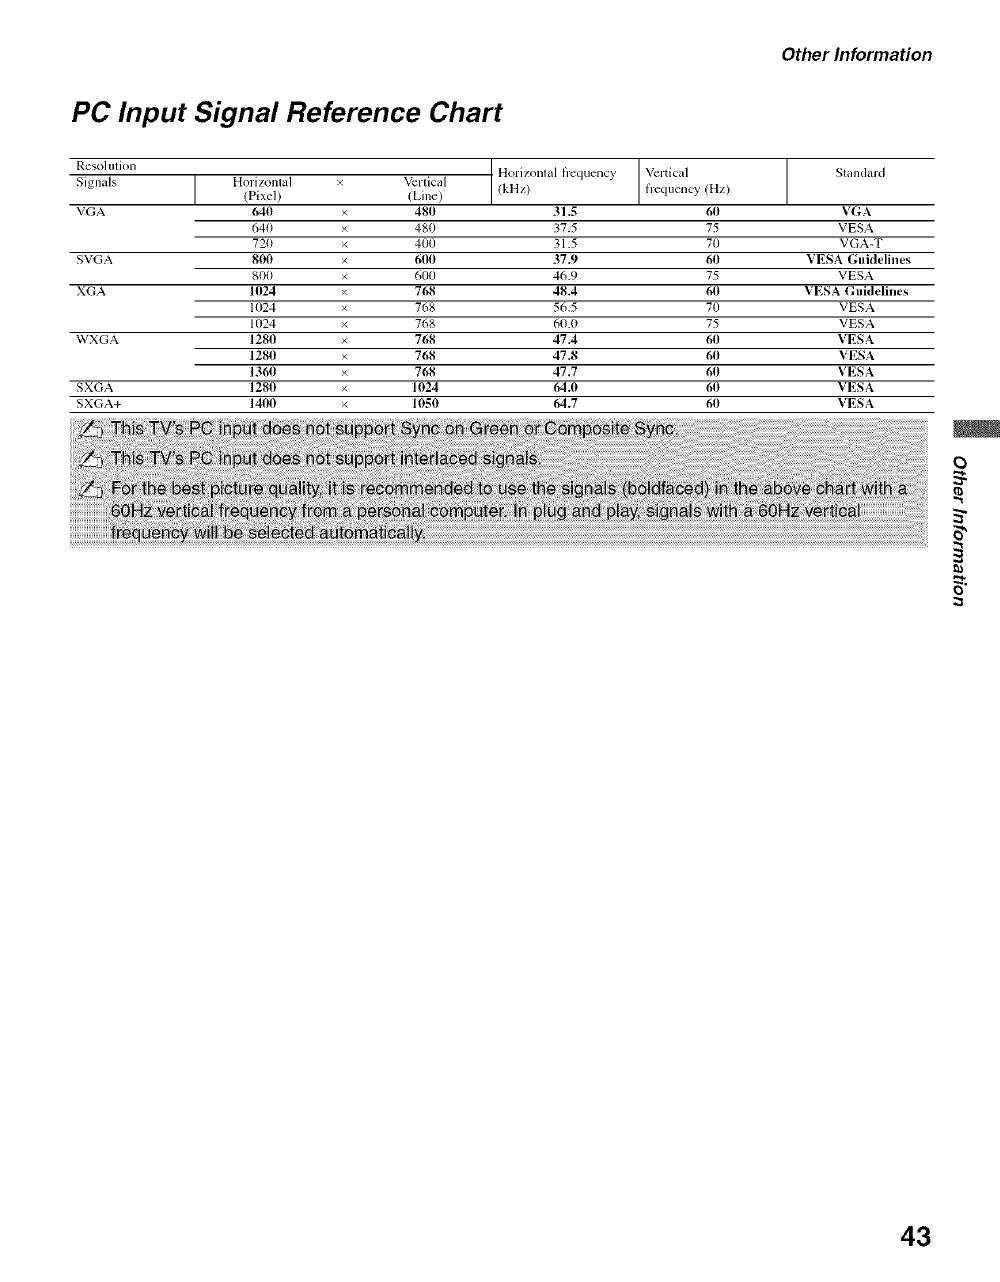
PC Input Signal Reference Chart
Resolution
Signals [ Horizontal(Pixel)
VGA 640
640
720
SVGA 800
800
XGA 1024
1024
1024
WXGA 1280
1280
1360
SXGA 1280
SXGA+ 1400
Vertical
(Line)
480
48O
400
600
600
768
768
768
768
768
768
11124
1t)50
I Horizontal h'equency
(kHz)
31.5
37.5
31.5
37.9
46.9
48.4
565
60.0
47.4
47.8
47.7
64.0
64.7
l Vertical (Hz)
6(}
75
70
6{}
75
6(}
70
75
6(}
6(}
6(}
6(}
6(}
Standard
VGA
VESA
VGA-T
VESA Guidelines
VESA
VESA Guidelines
VESA
VESA
VESA
VESA
VESA
VESA
VESA
o
43
Other Information
Specifications
•I
Televisitm system:
NTSC American TV standard
ATSC (SVSB terrestrial) ATSC compliant 8VSB
QAM on cable ANSI/SCTE 07 2t)t)0
(Does not include CableCARD
flmctionality)
Channel coverage: Analog Digital
Tcrrcstrial 2-69 2-69
Cable 1-125 1-135
Antenna: 75-ohm extcrnal terminal for VHF/UHF
Panel System:
LCD (Liquid Crystal Display) Pand
Display resohttitm (horiztmtal × vertical):
1,920 dots x 1.080 lines
VIDEO IN 1/2/3:
S VIDEO (4-pin mini DIN) (VIDEO 112 only):
Y: 1.0 Vp-p, 75 ohms unbalanced, sync negative
C: 0.286 Vp-p (Bursl signal), 75 oluns
VIDEO: 1 Vp-p, 75 ohms unbalanced, sync negative
AUDIO: 500 nlVrms (100% modulation)
hnpedance: 47 kilohms
HD/DVD IN 4/5:
YPBPR (Component Video):
Y: 1.0 Vp-p. 75 ohms unbalanced,
sync negative
PB: 0.7 Vp-p, 75 ohms
PR: 0.7 Vp-p, 75 ohms
Signal lonnat: 480i. 480p. 720p. 11180i
AUDIO: 500 mVrms (100% modulation)
hnpedance: 47 kilohms
HDMI IN 6/7:
HDMI: Video: 480i. 480p. 720p. 1080i. 1080p
Audio: Two channel linear PCM 32, 44.1 and
48 kHz, 16.20 and 24 bits
AUDIO (HDMI IN 6 only):
500 mVrms (100% modulation)
hnpedancc: 47 kiloluns
AUDIO OUT:
500 mVrlns (1/,_1% modulation)
More than 1 Vrlns at the nlaxinmm volume setting (Variable)
More than 500 mVrms (Fixed)
PC IN 8:
D-sub 15-pin, analog RGB, 0.7 Vp-p, 75 ohms, positive
See tile PC Input Signal Relcrencc Chart on page 43
PC AUDIO INPUT:
Stereo mini jack, 0.5 Vrms, 1 kilohm
Headphtmes:
sire-co nfini jack
hnpedance: 16 ohms
Speaker output:
10w + lOW
Power Requirement:
120 v-241) v AC, 50/6t) Hz
Supplied accessories:
Renlote control RM-YDOI 2 (l)
Size AA batteries (2)
75-ohm coaxial cable ( 1)
AC power cord (1)
HD 15-HD 15 cable ( 1)
Support belt ( 17. securing screw (1) and wood scrcw( 1)
Cable hokler (1)
Operating Instructkms (1)
Quick Setup Guide ( 1)
Warranty Card (1)
Online Registratkm Card (U.S.A, only) (1)
Optitmal accessories:
Headphones plug adapter
Connecting cables
Wall-Mount Bracket: SU-WL51
Screen size (in inches) 46 4t)
Speaker/Full range (2)
(in ram) 70 × 130 55 x 150
(in inclles) 2 3/4 × 5 7/16 2 1/4 × 6
Power etmsumption (in use) 24t) w 200 w
(in standby) All models less than 11.1W
Dimensions
with stand (in ram) 1120 x 805 × 334 988 x 715 x 266
with stand (in inclles) 44 I/8 x 31 3/4 x 13 1/4 39 x 28 I/4 × 10 1/2
without stand (in into) 1120 × 755 × 118 988 x 665 x 105
wifl_om stand/in inches) 44 1/8 x 29 3/4 x 4 3/4 39 x 26 1/4 x 4 1/4
Mass
with stand 36.0 kg 2%5 kg
with stand 79 lb. 6 oz. 60 lb. 10 oz.
without stand 30,0 kg 23.0 kg
without stand 66 lb. 3 oz, 5(I lb. 12 oz,
Design and specifications are subject to change without notice.
44

4:3 Default 29
A
A/V Sync 39
AC IN 14
Advanced Settings 27
Alternate Audio 20
Audio Out 34
AUDIO OUT jack, described 14
Auto A_[iustment 36
Auto Program 18, 37, 38
Auto SAP, MTS setting 28
Auto Wide 29
Auto YC 33
B
Backlight26
Balance28
Bass28
BBE28
Bilingual audio 28
Brightness26
C
Cable
Described34
With VCR, connecting 12
(!able holder 17
Caption Vision 31, 39
CH+_ button 21, 22
Cham_els
Creating labels 37, 38
Setting up 18
Closed cal)lioll modes 31
Color 26
Color Temperature 26
D
Diagnostics39
Digital Channels 38
DIGITAL OUT (OPTICAL) 14
Digital Rating 39
Digital Setup 39
DIGITAL/ANALOG button 20
Display Area 30
DISPLAY button 21
Display Mode 26
E
English Rating 35
Ei'_T bulton 20
F
Favorite Channels 37, 38
FREEZE button 19
French Rating 35
G
GUIDE button 19
H
HD/DVD IN jack ( 1080i/720p/480p/
480i), described 14
HDMI IN.jack, described 1 4
Headphones jack, described 13
Horizontal Center 30, 36
Hue 26
I
hffo Banner 31
Infrared Receiver (IR) 22
Installing the TV on a wall 17
J
JUMP button 21
L
Label Channels 37, 38
Label Video Inputs 32
Language31
Light Sensor
Described 22
Setting 33
M
MENU
Analog24
Analog Favorites 24
Digital24
Digital Favorites 24
External h_uls 24
Settings 20
MENU button 20, 22
Movie Rating 34
MTS 28
MUTING button 20
N
Noise Reduction 27
P
Parental Lock 32, 39
Password 39
PCIN 13
Phase 36
PIC OFF LED 22
Picture 26
PICTURE button 19
Picture Mode 26
Pitch 36
POWER button 20, 22
POWER LED 22
Power Management 36
Power Saving 33
Product hfformation 34
Pwgram Options 20
Q
Quiet Power On 33
R
Reset 26, 28, 36, 42
RETURN button 20
S
S VIDEO jack, described 13, 14
Setting up channels 18
Settings
Analog Setup 37
Digital Setup 38
PC 36
Picture 26
Screen 29
Setup 31
Sound28
Sharpness 26
Show/Hide Channels 37, 38
SLEEP button 19
Sound Mode 28
Speaker22, 34
STANDBY LED 22
Steady Sound 28
Support Belt 15
Surround 28
Swivel 16
T
Target Inputs 26, 28, 29
TIMER LED 22
Timer Settings 33
TOOLS button 21
Treble 28
Troubleshooting41,42
Turning on/off the TV 22
TV Rating 34
TV/VIDEO button ] 9, 22
U
ILS.A. Rating 35
Unrated 34
V
VCR
With cable, connecting 12
Vertical Center 30, 36
Vertical Size 30
VHF/UHF input, described 14
VIDEO/AUDIO (L/R) jacks,
described 13, 14
Viewin_ Blocked Pro{*rams 35
VOL+/Z button 20, _2
Volume Offset 28
W
WIDE button 21
Wide Mode 29, 36
45


Please contact Sony directly if you:
• Have questions on the use of your television after reading your manual
• Experience difficulty operating your television
Contact Sony Customer Support at:
http:llwww.sony.comltvsupport ....
or to speak with a support representative:
United States
1-800-222-SONY (7669)
8:00 AM - 10:00 PM (EST) Mon -Fri
10:30 AM - 7:18 PM (EST) Sat - Sun
Canada
1-877-899-SONY (7669)
8:00 AM - 6:00 PM (Eastern)
8:00 AM - 5:00 PM (Western)
Sony will work to resolveyour questions more quickly than your retailer or place of purchase.
Please Do Not Return the Product to the Store
BBE DDLooL.vjSRs ®)°
........... _,o._......... DiGiTAL D | G i T A L _ __r_l
http:iiwww.sony.net/
Printed in U.S.A.
2697121111
