Sony KDL 40V3000 User Manual LCD TELEVISION Manuals And Guides L0707335
SONY LCD Television Manual L0707335 SONY LCD Television Owner's Manual, SONY LCD Television installation guides
User Manual: Sony KDL-40V3000 KDL-40V3000 SONY LCD TELEVISION - Manuals and Guides View the owners manual for your SONY LCD TELEVISION #KDL40V3000. Home:Electronics Parts:Sony Parts:Sony LCD TELEVISION Manual
Open the PDF directly: View PDF ![]() .
.
Page Count: 45

Operating Instructions
KDL-40V3000
KDL-46V3000
BRAVlA
© 2007 Sony Corporation
Owner's Record
The model and serial nunlbers my located
at tile rear of the TV. Record dlese
numbers in die spaces provided below.
Relcr to diem whenever you call upon
your Sony dealer regarding this TV.
Model Name
Serial No.
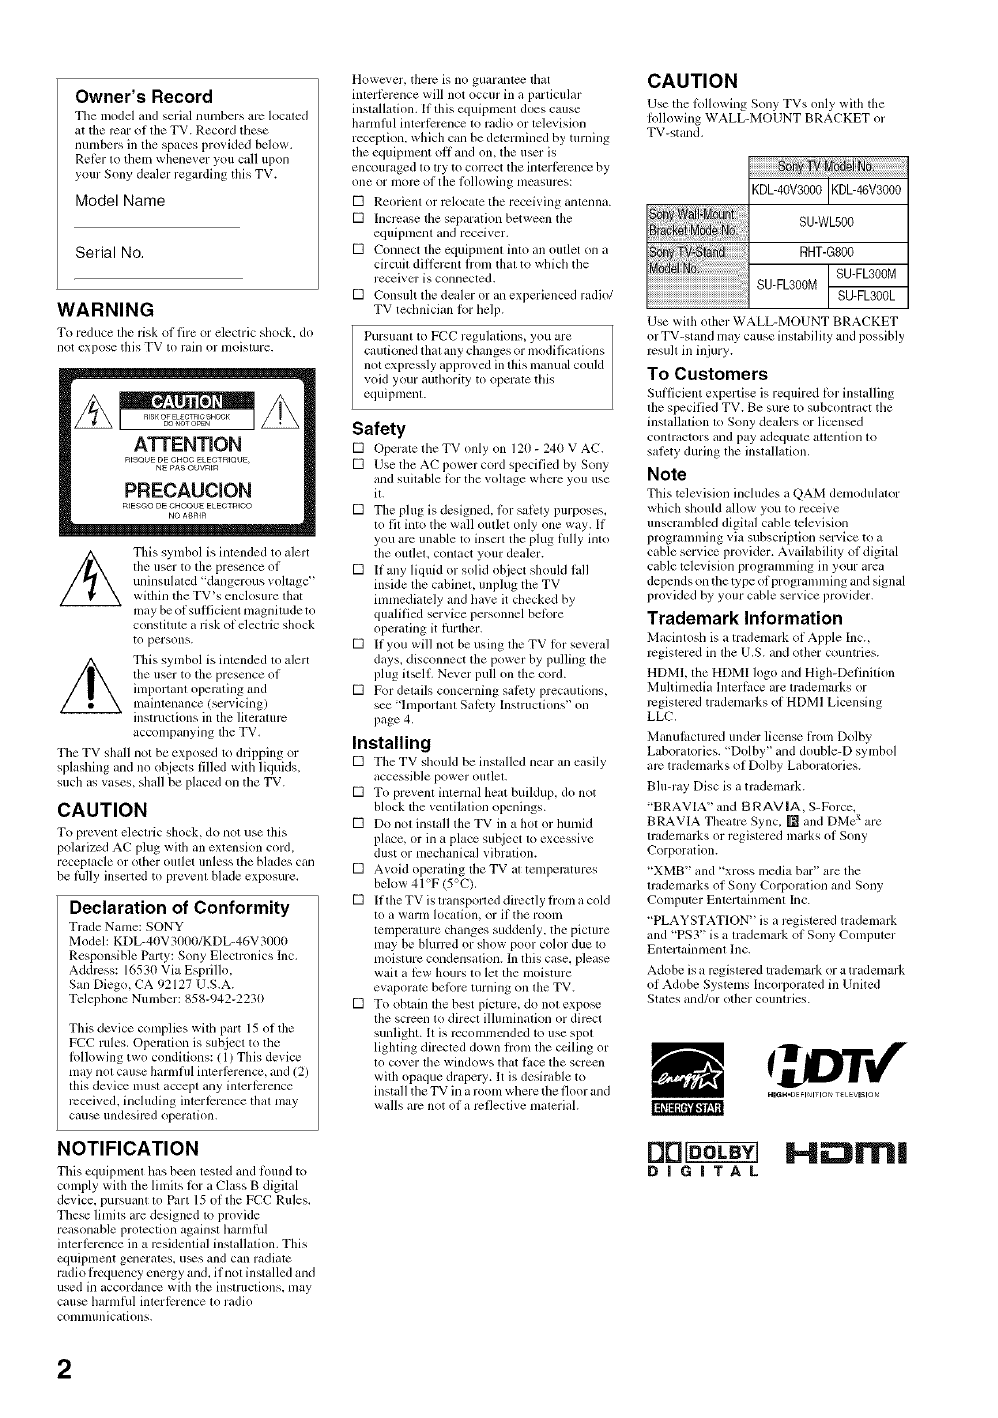
WARNING
To reduce file risk ot fire or electric shock, do
not expose this TV to rain or moisture.
/_ Tiffs synlbol is intended to alert
the user to tile presence ol
uninsulated 'dangerous vohage"
widlin tile TV's enclosure that
may be of sufficient nlagnimde to
constitute a risk of electric shock
to persons.
/_ Tiffs synlbol is intended to alert
tile user to tile presence of
ilnl)ortanl operadllg and
lnaintenance (seMcing)
instructions in the literature
accompanying file TV.
Tim TV shall not be exposed to dripping or
splaslfing and no objects tilled with liquids,
such as vases, shall be i?laced on the TV.
CAUTION
To pl'e_enl eleclric shock, do not use tiffs
polarized AC phlg with an extension cord,
receplacle or other outlet unless tile blades can
be lhlly inserted to prevenl blade exposure.
Declaration of Conformity
Trade Nanle: SONY
Model: KDL-40V 30e0/KDL-46V 3000
Responsible Party: Sony Electronics Inc.
Address: 16530 Via Esprillo,
San Diego, CA 92127 U.S.A.
Tdephone Number: 858-942-2230
This device complies with part 15 of tile
FCC rules. Oper_Jtion is subjecl to tile
Iollowing two conditions: (1) This device
nlay nol cause harmfifl interlcrence, and (2)
tiffs device must accept any interlcrence
received, including interlcrence that may
cau_ undesired operalion, =IN=[_t6"ig'tf.*1Z
NOTIFICATION
Tiffs equiplnent hasbecn tested and lkmnd to
comply widl file limits lor aClass B digital
device, pursuant to Part 15 of tile FCC Rules.
Tllese linlits armdesigned to provide
reasonable protection against llarnllifl
interlcrence in a rcsidemial installation. This
equipment generates, u_s and can radiate
radio licquency enelgy and, if not installed and
used in accordance wifll tile instructions, nlay
cau_ harnllhl inlerlcrence lo radio
conllnunicalions.
However, there is no guarante_ lbat
interlPrence will not occur in a particular
instullmion. If this equipment does cause
harnlhd interlcrence to radio or television
reception, which can be deternlined by turning
the equipnlent ol1 and on, the user is
encouraged lo try to correct the interfi:rence by
one or IIl()l't2 of tile l_lllowing nleasurcs:
[] Reorient or relocate the receiving antenna.
[] Increase file separation between tile
equipnlent and receiver.
[] Connect file equipment into all outlet on a
circuit dillcrcnt h'om thin to wlficll tile
receiver is collllected.
[] Consuh tile dealer or an experienced radio/
TV teclmician Ior help.
Pursuant to FCC regulations, you arm
cautioned that any cllanges or modifications
not expressly approved in tiffs manual could
void your autllority to operate tiffs
equi pnlent.
Safety
[] Operate the TV only on 120-240VAC.
[] Use tile AC power cord specified by Sony
and suilable lbr tim vohage whcrc you use
it.
[] The plug is designed, liar salcty purposes.
lo fil into the wall outlet only one way. If
you arc unable to insert the plug fiflly inlo
the out]el, contact your dealer.
[] If any liquid or solid object sllould hdl
inside file cabinet, unplug the TV
imnlediately and have it checked by
qualified service personnel belbre
operating it lhrtller.
[] If you will not be using file TV lor several
days. disconnect the power by pulling file
plug it.ll. Never pull on the cord.
[] For details concerning salPly precautions,
see ']nll)orlanl Salcly Instruclions" on
page 4.
Installing
[] The TV should be installed nero m] easily
accessible power outlet.
[] To prevent internal heat buildup, do not
block tile ventilation openings.
[] Do not install the TV in a hot or lmnlid
place, or in a place sut_iect to excessive
dust or mechanical vibration.
[] Avoid operaling the TV al temperatures
below 41°F (5°C).
[] Ifthe TV is transported directly li-om a cold
lO a warnl localion, or if tile roonl
temperature changes suddenly, the picture
nlay be blurred or show poor color due to
nloisture condensation. In this case, please
wait a low hours to let tile moisture
evaporate belbre turning on file TV.
[] To obtain file best picture, do not expo_
file screen to direct ilhmlination or direct
sunlight. It is rcconmlcnded to use spot
lighting directed down honl tile ceiling or
lo cover file windows that lhce tile screen
with opaque drapery. It is desirable to
install the TV in a roonl where tile floor and
walls arc not of a reflective nlalerial.
CAUTION
Use tile lbllowing Sony TVs only with tile
Iollowing WALL-MOUNT BRACKET or
TV-stand.
KDL-4OV3000IKDL-46V3000
SU-WL500
RHT-G800
8_8_i R tSU-FL300M
SU-FL300M SU-FL300L
Use witll {)tiler WALL-MOUNT BRACKET
or TV-stund may cause inslabilily and possibly
rcsul[ ill injury.
To Customers
Sul]icient expertise is required lbr installing
file specified TV. Be sure to subcontract tile
installalion 1o Sony dealers or licensed
contractors and pay adequate allenlion lo
salcty during the installation.
Note
This television includes a QAIvl demodulator
wlficll should allow you to recei_ e
unscrambled digilal cable television
i)rogralnming via subscriplion selwice to a
cable service provider. Availability of digital
cable television programming in your area
depends on the type of programming and signal
provided by your cable service provider.
Trademark Information
Macintosh is a trademark ol Apple Inc.,
registered in tile U.S. and other countries.
HDMI. tile HDMI logo and Higll-Delinilion
Muhimcdia lnterl2_ce armtrademarks or
registered tradenlarks of HDMI Licensing
LLC.
Manu£,ctur,:d under license l_om Dolby
Laboratories. "Dolby" and double-D symbol
arc tradenlarks of Dolby Laboratories.
Blu-ray Disc is a trademark.
"BRAVIA" and BRAVIA, S-Force,
BRAVIA Theatre Sync. [] and DMc xarm
lrademarks or regislered marks of Sony
Corporation.
"XMB" and "xross media bar" are the
trademarks of Sony Corporation and Sony
Coll/puter Enlertainlnenl Inc.
"PLAYSTATION" is a registered trademark
and 'PS3" is a lrademark of Sony C{mlpuler
Enlertainnlenl Inc.
Adobe is a registered tradenlark or a tradenlark
of Adobe Systems Incorporated ill United
Stales and/or other counlries.
,fix'€"
DO I-t :::]IITlll
DIGITAL
2

Important Safety Instructions ............................ 4
The Four Steps to Full HD Experience: Set,
Sound, Source, and Setup ............................ 8
Picture Quality and Aspect Ratio ....................... 8
TV Home Menu: XMB,M (Xross Media Bar) ........ 9
1. Installing the TV ............................................. 10
Preventing the TV from Toppling Over ......... 10
Preparation for Wall-Mounting ...................... 10
2. Locating Inputs and Outputs ....................... 11
Left Side ....................................................... 11
Rear .............................................................. 12
3. Connecting the TV ......................................... 14
Cable System or VHF/UHF Antenna
System ...................................................... 14
Cable System and VHF/UHF Antenna
System ...................................................... 14
HD Cable Box/HD Satellite Box .................... 14
PC................................................................. 16
Other Equipment .......................................... 17
Using HDMI Control for BRAVIA Theatre
Sync TM ....................................................... 18
Bundling the Connecting Cables .................. 18
4. Setting Up the Channel List
- Initial Setup ............................................... 19
Remote Control and TV Controls/
Indicators ..................................................... 20
Inserting Batteries into the Remote
Control ....................................................... 20
Remote Control and TV Controls ................. 20
Indicators ...................................................... 24
Using P&P Feature ............................................ 25
To Display the Sub Window ......................... 25
To Change Inputs or Channels in the
Window ..................................................... 25
To Exit from P&P .......................................... 25
Adjusting TV Settings ................................. 26
Watching TV ................................................. 26
"_Accessing the Equipment Connected to
Your TV ......................................................... 26
Navigating through TV Home Menu on
XMB .............................................................. 27
TV Setting Description ...................................... 28
Product Support ...................................... 28
o_ Clock/Timers Settings ............................. 28
o_ Picture Settings ...................................... 28
Q.bSound Settings ....................................... 30
Screen Settings ...................................... 31
Video Options Settings ........................... 32
%,_Audio Options Settings ........................... 33
Channel Settings .................................... 33
Closed Captions (CC) Settings ............... 34
___Parental Lock Settings ............................ 35
External Inputs Settings .......................... 37
o=,HDMI Settings ........................................ 37
_------------------_General Settings ..................................... 38
,=_
_.23Initial Setup ............................................. 38
Troubleshooting ................................................ 39
Specifications .................................................... 42
Index ................................................................... 44
Quick Setup Guide (separate volume)
Provides a variety of optional equipment
connection diagrams.
Customer Support
http://www.sony.com/tvs upport
On-line Registration
United States
http://productregistration.sony.com
Canada
http://www.SonyStyle.ca/registration
Important
Safety
Instructions
1 _ Readthese instructions
21 Keep these instructions.
3 _ Heed all warnings.
4t Follow all instructions.
5 b Do not use this apparatus near water.
61 Clean only with dry cloth.
7} Do not block any ventilation openings. Install in
accordance with the manufacturer's instructions.
USE
AC power cord
Observe the K_llowings m prevent tile AC' power cord fl'onl being
dmnaged. If the AC power cord is damaged, it may result in a fire or an
electric shock. Stop using it and ask your dealer or Son? ,ervme cen_er m
exchange it.
[] Do not place the TV where the power cord is subject to wear or abuse
[] Do not pincll, bend. or twist the cord excessivdy. Tlle core lines may
be bared _md CUT.Causing a short-circuit, and resulting in a fire or nn
electric shock.
[] Do not convert or damage the po,_ er cord.
[] powerD°not allow mlythin_ TOrest on orroll overthecord.
[] Do not move die TV with the power cord
plugged im
[] Keep the power cord away t;rom heat sources
[] When you disccmnect the AC power cord.
disconnect it f_om the wall outlet first.
[] Be sure to grasp tim plug wtien disconnecting the power cord. Do not
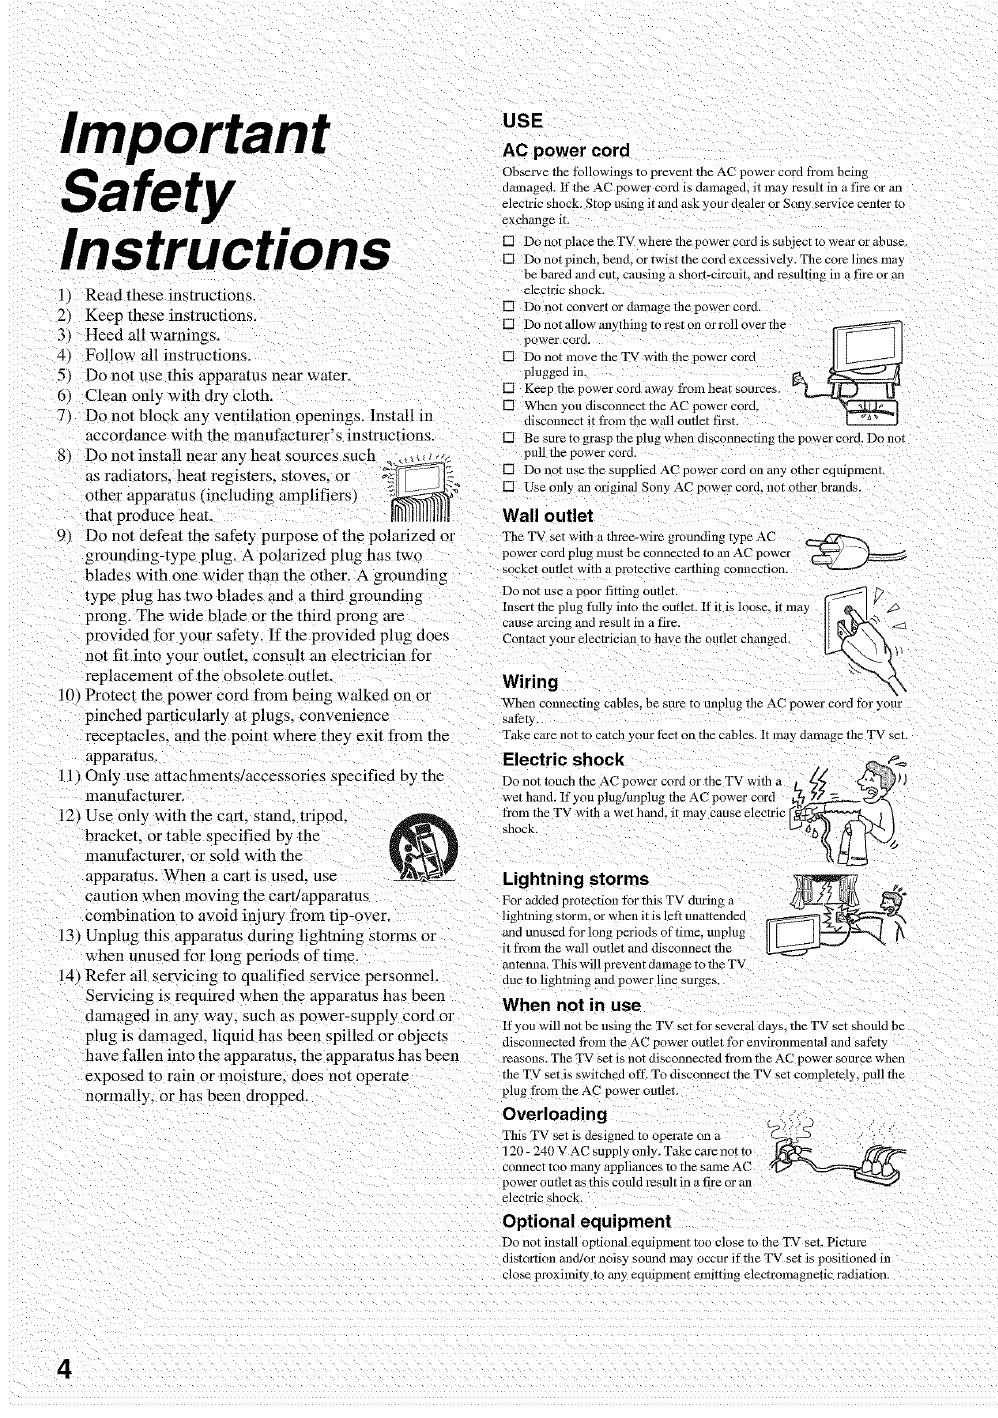
81 DO not install near any heat sources such _ ,_,,, t << pull the power cord.
as r diat r heat re isters stoves r _b_: rq Do not use the supplied AC power cord on any other equipmenl
•a " O s_ ' g ',', ; ', 0 _-_ I_
.... . , ,. ,._. ,_[__._ N Else only an original Sony AC power cord. not other brmld_.
otner apparatus _mcmtung ampnners_ _"1
that produce heat. Jllllll[]llllllll Wall outlet
91 Do not defeat the safety purpose oflhe polarized ol
grounding-type plug. A polarized plug has two
blade_ with one wider than the other. A grounding
type plug has two blades and a third grounding
prong. The wide blade or the third prong are
provided for your safety. Iflhe provided plug does
not fit into your outlet, consult an electrician for
replacement of the obsolete outleL
10t Protect tile power cord from being walked on or
pinched particularly at plugs, convenience
receptacles, and the point where the} exit from the
apparatus.
11) Only use attaehments/aecessories specified by the
manufacturer.
12} Use only with the cart. stand, mpod,
bracket, or table specified by the
manufacturer, or sold with the
apparatus. When a cart is used. use
caution when moving the cart!apparatus
combination to avoid injury from lip-over.
l 3 } Unplug lhis apparatus during lightning storms or
when unused for long periods of time.
14 _Refer all servicing to qualified service personnel.
Servicing is required when the apparatus has been
damaged in auy way, such as power-supply cord or
plug is damaged, liquid has been spilled or objects
have fallen into the apparatus, lhe apparatus has been
exposed to rain or moisture, does not operate
normally, or has been dropped.
The TV set wifll a three-wire grounding type AC
power cord plug must be connected to an AC power _
socket outlet witli a protective earthing connection.
Do not use a poor fitting outlet. ,"_F/
Insert the plug fully into the outlet. If it is loose it may
cause arcing and result in a fire.
Contacr your electriciml to buve the outlet clmnged
When connecting cables, be sure m unplug the AC power cord fL_ryour
s_,fkTy
Take care not to catch your feet on the cables. It may damage the TV set.
Electric shock p_
Do not touch the AC power cord or tim TV with a L_ _l)
wet halld. If you plug/unplug the AC power cord %__7/"; - _-a
fl'om the TV witl .... t hand. it may ....... lectric _1_
shock
-Lightning storms __,,
For added protection for thi_ TV during a __-
lightning s_orm or when it is left unattended
and unused for long periods of time. unplug
it f}om the wall outlet and disconnect *tie
antenna. This will prevent damage to the TV
due to lighming and power line surges.
When not in use
If you will not be using the TV set fl0r several da 3 ,. the TV set should be
disconnected i_om tim AC power outlet for environmental and saf_t}
reasons. The TV set is not disconnected fi'om tile AC power source when
the TV set is switched off. To disconnect the TV set completely, pull tim
plug t?om the AC power outlet.
Overloading
Tlds TV set is designed to operare on a
120- 240 V AC supply only Take care not to
connect Ioo mmly applimlces to the same AC
power outlet as this could result in a tire or all
electric shock
Optional equipment
Do not install optional equipment too close to tile TV set. Picture
dist _rtion and!or noisy sound may occur if the TV set is positioned in
close proximity to any equipment entitting electromagnetic radiation.
4
Small accessories
K_ep small accessorie_ out of children's l_ach.
ANTENNAS
Outdoor antenna grounding
If an outdoor antenna h installed, follow the precautions below. An
outdoor antenna _yst_m should not be located in tile vicinity of overhead
power lines or other electric light or power circuits, or where it can come
in contact witll sllch power lines or circuits.
WHEN INSTALLING AN OUTDOOR ANTENNA SYSTEM.
EXTREME CARE SHOULD BE TAKEN TO KEEP FROM
CONTACTING SUCH POWER LINES OR CIRCUITS AS CONTACT
WITH THEM IS ALMOST INVARIABLY FATAL.
Be sure tile antenna sysleln is grounded so as to provide solne prolection
_gainst voltage surges and built-up smdc charges.
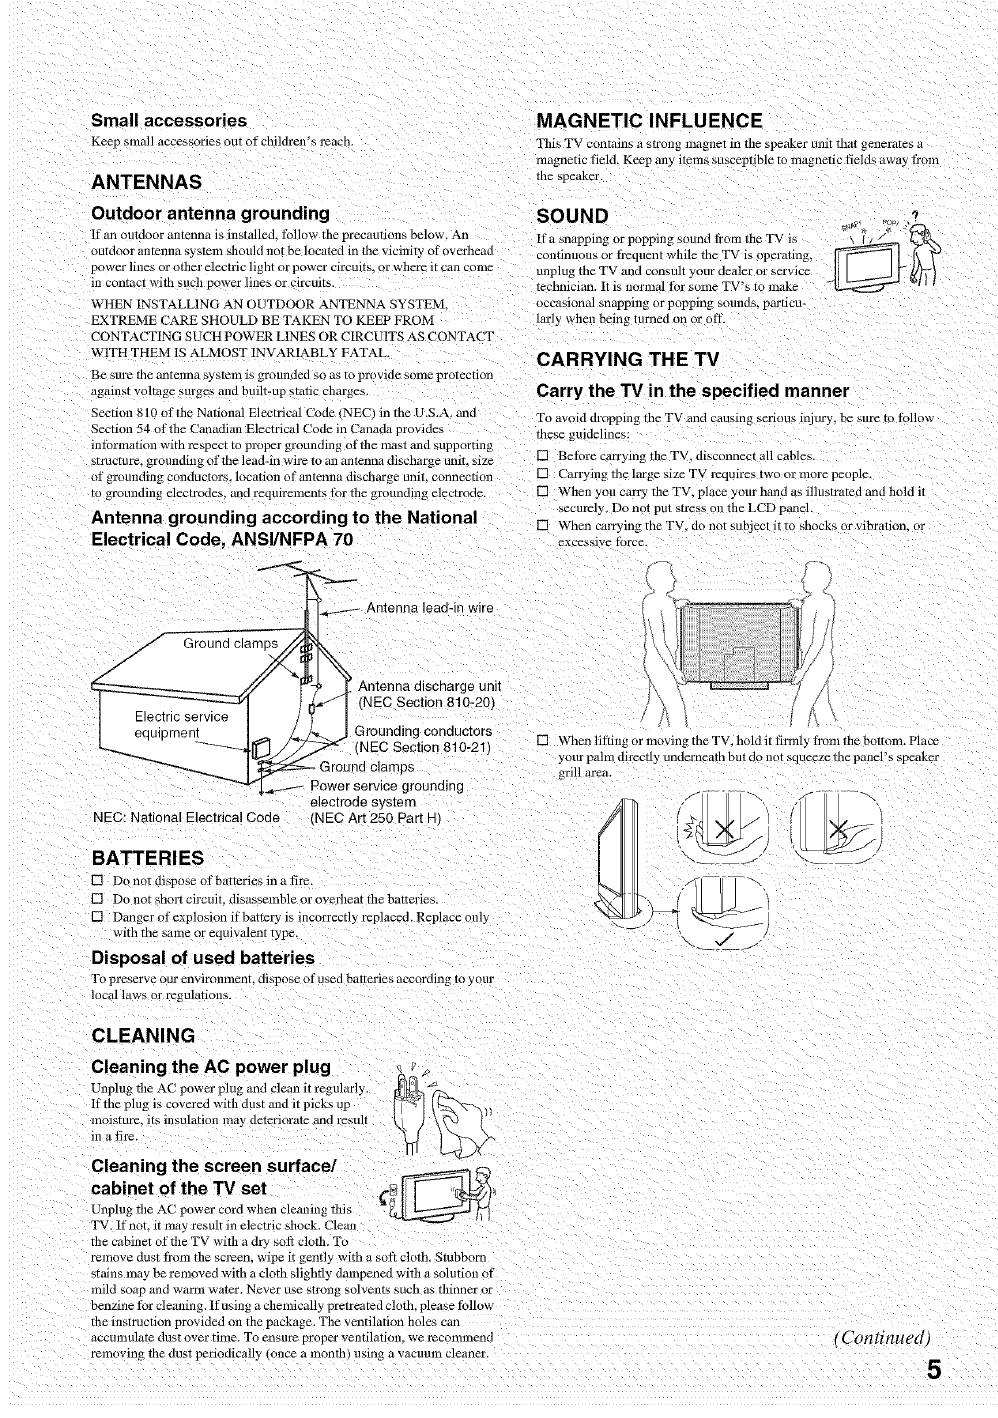
Section g10 of the National Electrical Ck_dc NEC" in tile U.S.A. and
Section 54 of tile Canadian Electrical Code in Canada provides
intormation witll respect to proper grounding of the nmst and suppornng
smlcmre, grounding of tile lead-in wire to an antenna discharge unit. size
of grounding conductors, location of antenna discharge unH. connection
ro groundinR electrodes= and requirements Ik_rtile grounding electrode
Antenna grounding according to the National
Electrical Code, ANSI/NFPA 70
MAGN ETIC INFLUENCE
This TV contains a strong magnet in tile speaker unit tllat generates a
magnetic field. Keep any items susceptible ro magnetic fields away 1ram
tile speaker.
SOUND _% ],_,:_?
If a snapping or popping sound _om tile TV is \ f _
continuous or fi'equent while tile TV is operating, _ [\
nnplug the TV and ...... It yoLirdeal ......... ice Jl I_ _j Ugh/
technician. It is normal fi)r some TV's to make - &-2m:::::_"_
occasional snapping or popping sounds, particu-
larly when being turned on or off.
CARRYING THE TV
Carry the TV in the specified manner
To avoid dropping tile TV and causing serious injury: be sure to Ibllow
these guidelines:
[] Before carrying tile TV disconnect all cables.
[] Carrying tile large size TV J_quires TWOor more people.
[] When you carry the TV, place your hand as illustrate l and hold it
securely, Do not pUTstress on file LCD panel.
[] WhencarryingtbeTV, donotsub]ectittoshock, orvibration, or
excessive force
la lead-in wire
Ground clamus
Electric serwce
eaulg _nenl
Antenna dmscharge unit
(NEC Section 810-201
Grounding conductors
(NEC Section 810-21)
grounding
electrode system
NEC: National Electrical Code (NEC Art 250 Part H,
BATTERIES
[] Do not dispose o f batterie_ in a tire.
[] Do not ,hall circuit= disassemble or overheat tile batteries.
[] Danger oi explosion if battery is incorrectly replaced. Replace only
witll tile same or equivalent Type.
Disposal of used batteries
ro preserve our envlrounlent, dispose of used batteries a c_2ording TOyour
local laws or regulations.
[] When lifting or moving the TV. hold it firmly ti'om the bottom. Place
your pahn directly underneath but do not squeeze tile panel's speaker
grill area.
CLEANING
Cleaning the AC power plug _;
Unplug tile AC power plug and clean it regularly. 1_4_ _f_,
If the plug is covered with dust talc it picks up
[nolsmre. its insulation may deteriorate and result
Ill H tire.
Cleaning the screen surface/
cabi net of the TV set _L_1[[---- ,_
Unplug the AC power cord when cleaning this _J_
FV. IfnoL it m*,yresult in electric shock. Clean
tile cabinet of tile TV with a dry soft clofll. Tu
remove dust ti_om tim scleen, wipe it gently with _ sot} cloth. Stubborr
sirens may be removed with a cloth slightly dampened witll a solution of
mild soap and warm water. Never use strong solvents such as thinner or
benzine for cleaning. If using a chemically pretreated cloth, please follow
the instruction provided on tile package. Tile ventilation holes can
accmnulatc dust over time. To ensure proper ventilation we recommend .... Conli_llggd )
removing tile dust periodicall_ "once a month) using a wtcumn cleaner. 5
VENTILATION Objects and ventilation holes t_l_>_
The slots and openings in tile TV are provided tbr necessary ventilation. Nevei push objects of any kind into tile TV through tile
To ensure reliable operation of the TV and to protect it from overheating, cabinet slots a_ they may touch &mgerous voltage
these slots and openings alust never be blocked or covere_ points or short om parts that could result ill a fire or el?
Unless proper ventilation is provided, the TV may _ g .J ,_ electric shock. Do not place ally objects on tile TV.
MOISTURE
down.
gadler dust and get dirty. For proper ventilatiom
observe tile tbllowing:
[] Dt not install tile TV titce up, down or sideways.
[] Do not install tile TV mined over or upside
[] Never cover the slots and openings with a cloth
or other materMs.
[] Never block the slots and openings by
placing the TV on a bed. sofa, rug or other
similar surface.
[] Never place file TV in a confined space, such a_
bookcase or built-in cabinet, Ltrlless proper
ventilation is provided.
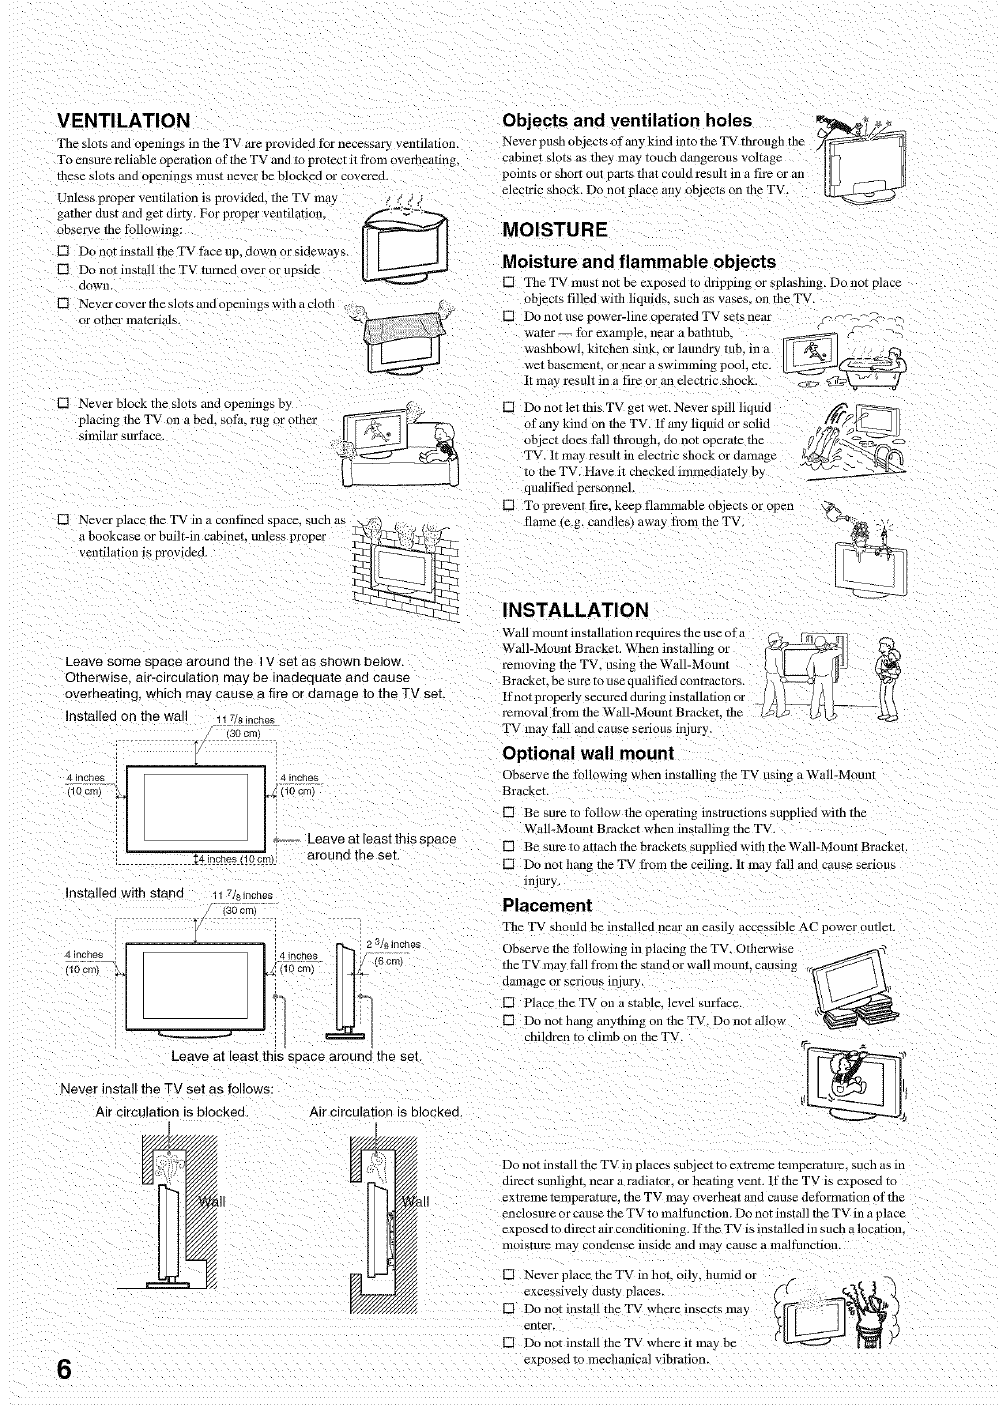
Leave some space around the I V set as shown below,
Otherwise air-circulation may be inadequate and cause
overheating, which may cause s fire or damage to the TV set.
Installee on the wall 117/_ inches
30cm/
4 inches
_ldc_
t 4 mctlas
j/10 :m)
__ | Leave at least this space
_4 incr/es tlocm) around the set.
4 Inches
lucre
Instal ed with stand °- 7/£inches
36c'm
i
z3/8 inches
nchg# ' 6cm'
) cm/
Leave ai least this seace arouno me set
Never install the TV set as follows:
Air circulation is blocked,
Moisture and flammable objects
[] rile TV must not be exposed to aripping ar splashing. Do not place
objects filled with liquids, such as vases, on tile TV.
[] Do not use power-line operated TV sets nee1 F-_-_;-.",_- .
wa_er-- Tor example, near a bathtub, _ l_"
washbowl,kitchensink,or laundrytub,ina ___ __
wet basemenL or near a swimming pool, etc.
It may result in a fire or an electric shock.
[] DonotletthisTV getwet. Never spillliquid
of any kind on tile TV. If ally liquid or solid
object aoes fbll through, do not operate tile
rV. It may result in electric shock or damage
to tile TV. Ha_ e it checked immediately by
:lualified personnel
[] To pmvem fire, keep flammable objects or open
flame (e.g. candle 0away troln tile TV
INSTALLATION
Wall moLmt installation requires tile use eta I _ r_'. :_
Wall-iVlom_t Bracket. When installing or _1 _.
removing tile TV, using the Wall-Mount / I /I /[ll_ l.lq_g
Bracket, be surer ..... qualified contract .... I\ _ZZ_ ," {_
lfnot properly ....... d during installati ..... ._;_.l_ _- {((
removal Prom the Wall-Mount Bracket_ the L_ _ i.+ _
TV may fall and cause serious injm'y
Optional wall mount
Observe tile following when installillg tile TV Llslng a WalJ-Mollnt
Bracket.
[] Be sure to follow the operating instructions supplied with tile
W_ ll-Mount Bracket when installing tile TV.
[] Be sure TOattach the brackets supplied with the WMI-Mount Bracket
[] Do not hang tile TV Ii'om tile ceiling. It may fall and cause serious
mjurl
Placement
Tile TV should be installed near an easily accessible AC power outlet.
Observe tile following in placing tile TV. Otherwise J-sq_
tile TV may tbll fl'om tile stand or wall mount, causing
damage or serious injury. 1'
[] Place the TV on a stable, level surface.
[] Do not hang anything on the TV. Do not Mlow
children to climb on the TV.
'l_) I
Air circulation is blocked,
6
Do not install file TV in places subject to exTrenle Temperaml'e. such as in
dil_ct sunhght, near a radiator or heating vent. If the TV is exposed to
exirelne Ielnperature. tile rv may overheat alia cause deformation of tile
enclosure or cause the TV to malflmction. Do not install tile TVin a place
exposed to direct air conditioning. If the TV is installed in such a location.
tlloisIL/l'e lnay condense inside and Ins} Cause a maltPlnction
[] Never place tile TV in hot. oily, hmnid or K-(_ _-_C I _
[] Do not install tile TV where insects lllay Y / /_
enter
[] Do not install the TV where it may be
exposed to mechanical vibration.
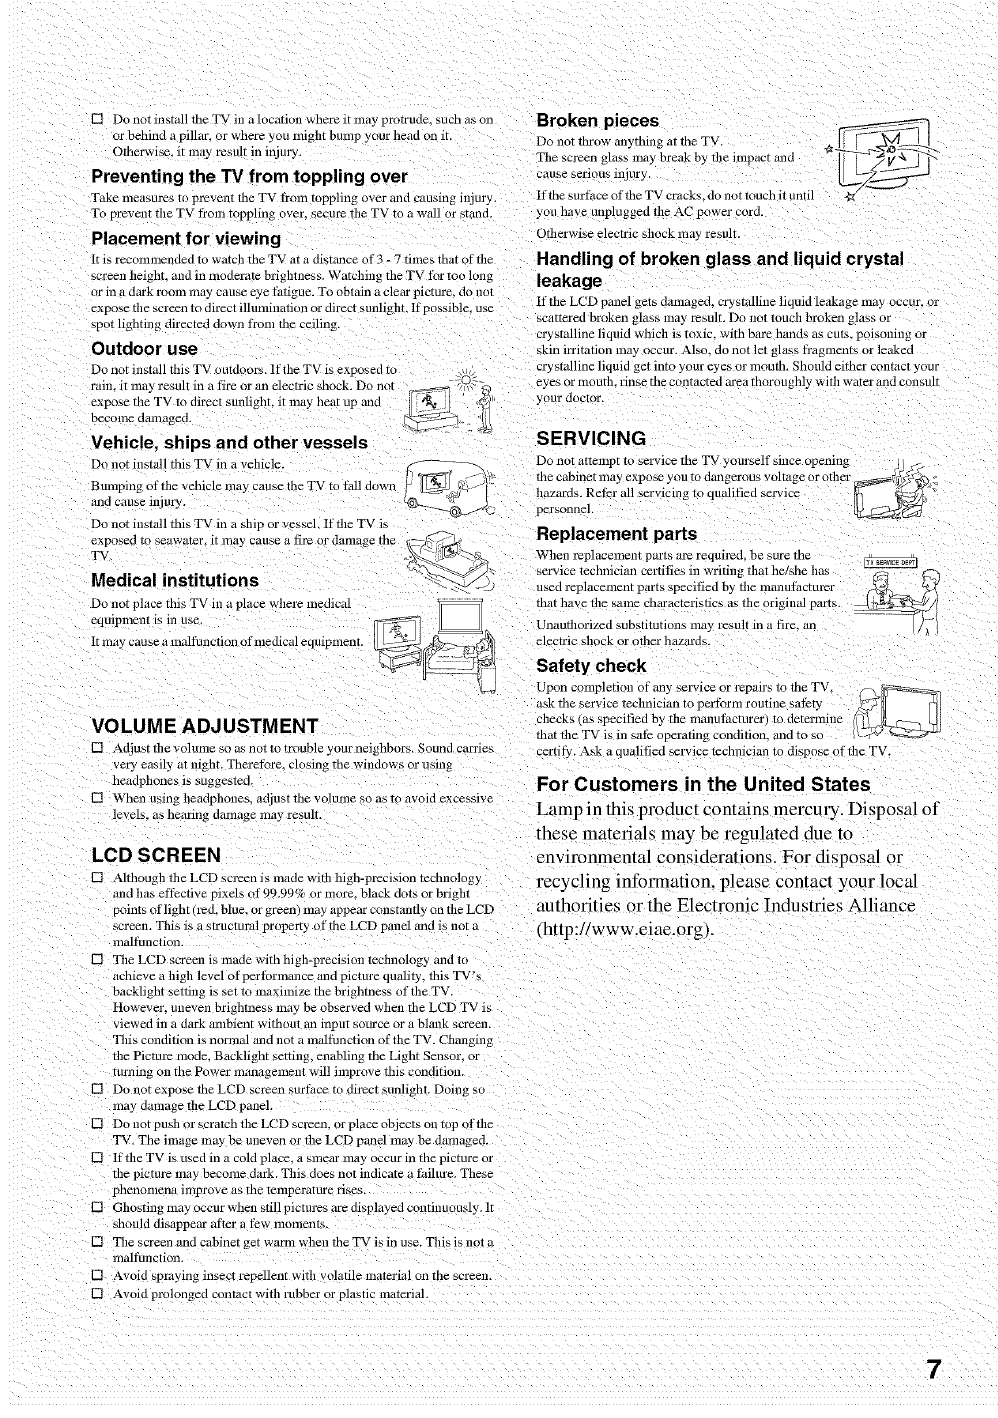
F_ Do not install the TV in a loca6on where it may protrude, such as on Broken pieces
or behind a pinar, or where you might bump your head on it. Do not throw anything at tile TV.
Otherwise. it may result in injm'y. The screen gl_!ss may break by the mpact and
Preventing the TV from toppling over causesen. asulJury.
rak_ measures tl prevent tile TV from tt ppling over and causing injury. If the surfhce of the TV cracks, do not touch it until 4a:"
re prevent the TV from toppling over. secur_ the TV to a wM1 or stand, you have unplugged the AC power cord.
Placementfor viewing Otherwise electric shock may result.
ltisrecommendcd m watchtheTV at adi.tanceof3- 7timesthat ofthe Handling of broken glass and liquid crystal
screen height and in moderate brightness. Watching the TV for too long
or in a dark room may cause eye fatigue. To obtain a clear picture, do not
expose the screen to direct inmnination or direct sunlight. If possible, use
spot lighting directed down fl'om the ceiling.
Outdoor use
Do not install this TV outdoors. If the TV is exposed to
rain it ma 3 result in a fire or an electric shock. Do nor
expose tile TV to direct sunlight, it may heat up and
become damaged.
Vehicle, ships and other vessels
Do not install this TV in a vehicle.
Bmnping of the vehicle may cause thl
and cause injury.
Do nm install this TV in a ship or vessel If the TV is
leakage
It tile LCD panel gets damaged, crystalline liquid leakage may occur, or
scattered broken glass may result. Do not touch broken glass or
crystalline liquid which is toxic, with bare hands as cuts, poisoning or
skin irritation may occur. Also. do not lel glass fi'agments or leaked
crystalline liquid get into your eyes or mouth. Should either conmcl your
eyes or mouth, rinse tile contacted area thoroughly with water and consult
your doctur.
SERVICING
Do not attempt [_ service tile TV yourself since opening i
tile cabinet may expose you to danger? ..... l_,g .... ther r_r_4_
uahhed service _ _
Replacement parts
exposed to seawater, it may cause a fire or damage the {_--_-
FV. ,_L_y%._._L[._ Wl ...... pl .......... t part ...... quired, b...... tile
=. _ ._<_ service tuchnician certifies in writing that he/she has _ 'r_,
ivlealcal institutions "%_)J ..... I repla ....... tparts specified by fl]e manufact ..... __.
Donotplo thi ,i,,apl....boremedical th ,thove*'..........har ,cter sti....tboorioinal ,,p ,rt .
_qmpment is in use. _ _ Unauthorized. substitutions• may result in a fire, an _/xl
ltmay .......... alfunction of medical equiplnent. __/ electric shock or other hazards.
__ Safety check
_2 Upon completion of any service or repairs to tile TV, (_ __._1
ask the service teclmician tu per fll........ ti..... fcty /_5 _ _l
VOLUME ADJUSTMENT checks (as specified by tl....... mfacturer) to determine ({_7_ LI[
that the TV is in saf_ operating condition, and to so F, _v,
[] Adjust the volmne so as not m trouble your neighbors. Sound carrms certify. Ask a qualified service technician to dispose of the TV.
very easily at night. Therefore. closing the windows or using
headphones is suggestud.
[] When using headphones, adjust the volume s_ as ro avoid excessive
levels, as hearing damage may result.
LCD SCREEN
[] Although the LCD screen is made with high-precision technology
and has effective pixels of 99.99% or more, black dots or bright
points of light 0_:d, blue, or green) may appear constantl 3 on the LCD
screen. This is a s_rucmral property of the LCD panel and is not a
malfunction.
F_ The LCD screen is made with high-precision technology and to
achieve a high level of per formance and picture quality, this TV's
backlight setting is set to maximize the brighmess of the TV.
However. uneven brightness may be observed when the LCD TV is
viewed in a dark alllbient without an input source or a bhlllK screen.
This condition is normM and not a malfhnction of the TV. Changing
the Pictur_ mode. Backlight setting, enabling the Light Sensor. or
turning on the Power management will improve this condition.
F- Do not expose tile LCD screen mrfdce to direct sunlight. Doing so
may damage the LCD panel.
F- Do not push or scratch the LCD screen, or place objects on tof of the
TV. The image real be uneven or the LCD panel may be damaged.
F- lfthe TV is used in a cold place, a smear may occur in the plcrure or
the picture may become dark. This does not indicate _failure. These
phenomena improve as lne ielnperamre ri_es
[] Ghosting may occur when still pictal_s are displayed continuously. It
should disappear after a few momenb.
[] The screen and cabinet get warm when tile TV is in use. This is not a ....
malfunction.
[] Avoid spraying insect repellent with _ olatile material on the screen.
[] Avoid prolonged contact with rubber or plastic material.
For Customers in the United States
Lamp in this product contains mercu U. Disposal of
these materials may"be regulated due fo
enwronmental considerations. For disposal or
recycling infolTnation, please contact your local
authorities or the Electronic Indu stries Alliance
(http://www.eiae.org).
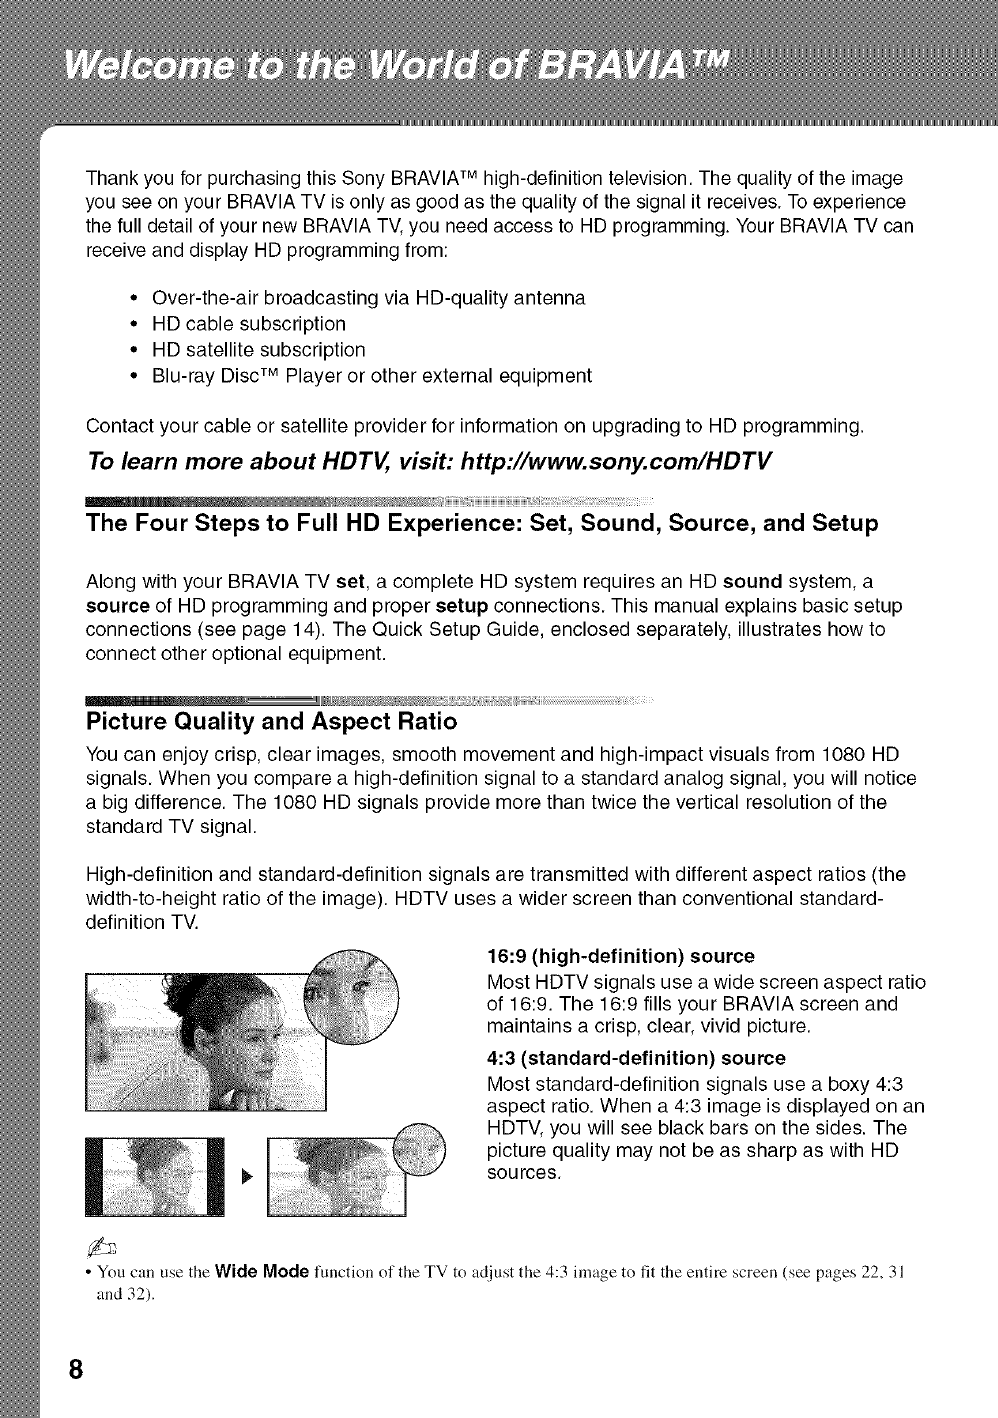
Thank you for purchasing this Sony BRAVIATM high-definition television. The quality of the image
you see on your BRAVIA TV is only as good as the quality of the signal it receives. To experience
the full detail of your new BRAVIA TV, you need access to HD programming. Your BRAVIA TV can
receive and display HD programming from:
• Over-the-air broadcasting via HD-quality antenna
• HD cable subscription
• HD satellite subscription
• Blu-ray Disc TM Player or other external equipment
Contact your cable or satellite provider for information on upgrading to HD programming.
To learn more about HDTV, visit: http://www.sony.com/HDTV
iiii iiiiiiiiiiiiiiiii_iiiiiiii _!ii
The Four Steps to Full HD Experience: Set, Sound, Source, and Setup
Along with your BRAVIA TV set, a complete HD system requires an HD sound system, a
source of HD programming and proper setup connections. This manual explains basic setup
connections (see page 14). The Quick Setup Guide, enclosed separately, illustrates how to
connect other optional equipment.
----c =.......... II
Picture Quality and Aspect Ratio
You can enjoy crisp, clear images, smooth movement and high-impact visuals from 1080 HD
signals. When you compare a high-definition signal to a standard analog signal, you will notice
a big difference. The 1080 HD signals provide more than twice the vertical resolution of the
standard TV signal.
High-definition and standard-definition signals are transmitted with different aspect ratios (the
width-to-height ratio of the image). HDTV uses a wider screen than conventional standard-
definition TV.
16:9 (high-definition) source
Most HDTV signals use a wide screen aspect ratio
of 16:9. The 16:9 fills your BRAVIA screen and
maintains a crisp, clear, vivid picture.
4:3 (standard-definition) source
Most standard-definition signals use a boxy 4:3
aspect ratio. When a 4:3 image is displayed on an
HDTV, you will see black bars on the sides. The
picture quality may not be as sharp as with HD
sources.
• You can use the Wide Mode function of the TV to adjust the 4:3 image to fit the entire screen (see pages 22, 31
and 32).
_iiiiiiiiiiiiiiiiiiiiiiiiiiiiiiiiiiiiiiiiiiiiiiiiiiiiiiiii_i!_i!_iii!iii!iii_iiiiiiiiiiii!_;;_iiiiiiiiiiiiiiiiiiiiiiiiiiiii;i¸;;i!iii;
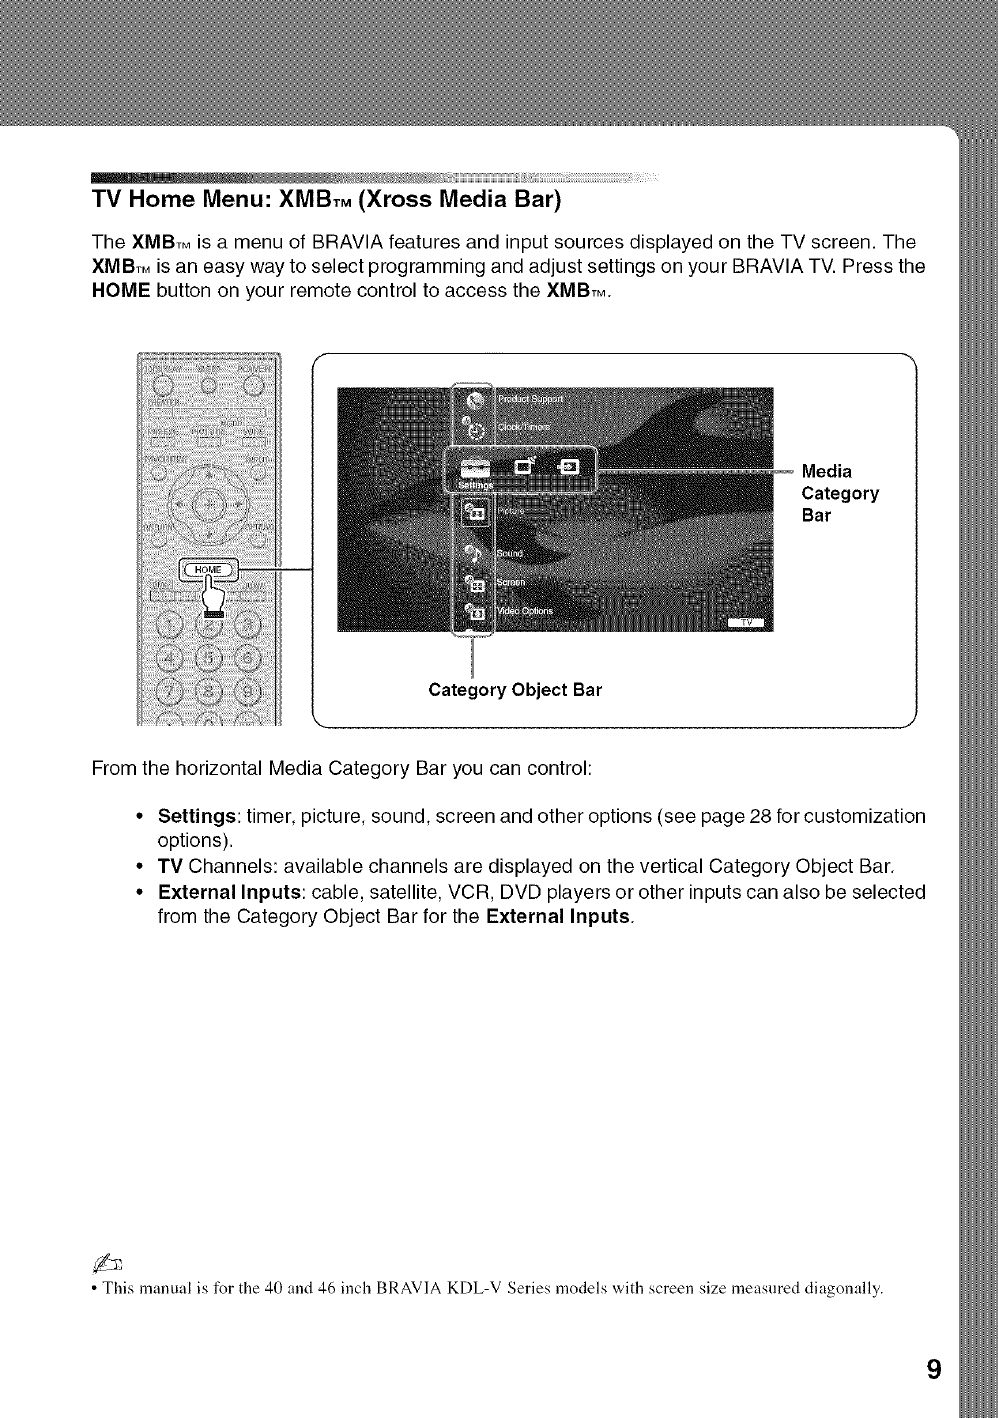
TV Home Menu: XMBTM (Xross Media Bar)
The XMBTMis a menu of BRAVIA features and input sources displayed on the TV screen. The
XMBTMis an easy way to select programming and adjust settings on your BRAVIA TV. Press the
HOME button on your remote control to access the XMBTM.
Media
Category
Bar
Category Object Bar
From the horizontal Media Category Bar you can control:
•Settings: timer, picture, sound, screen and other options (see page 28 for customization
options).
• TV Channels: available channels are displayed on the vertical Category Object Bar.
• External Inputs: cable, satellite, VCR, DVD players or other inputs can also be selected
from the Category Object Bar for the External Inputs.
• This manual is for the 40 and 46 inch BRAVIA KDL-V Series models with screen size measured diagonally.
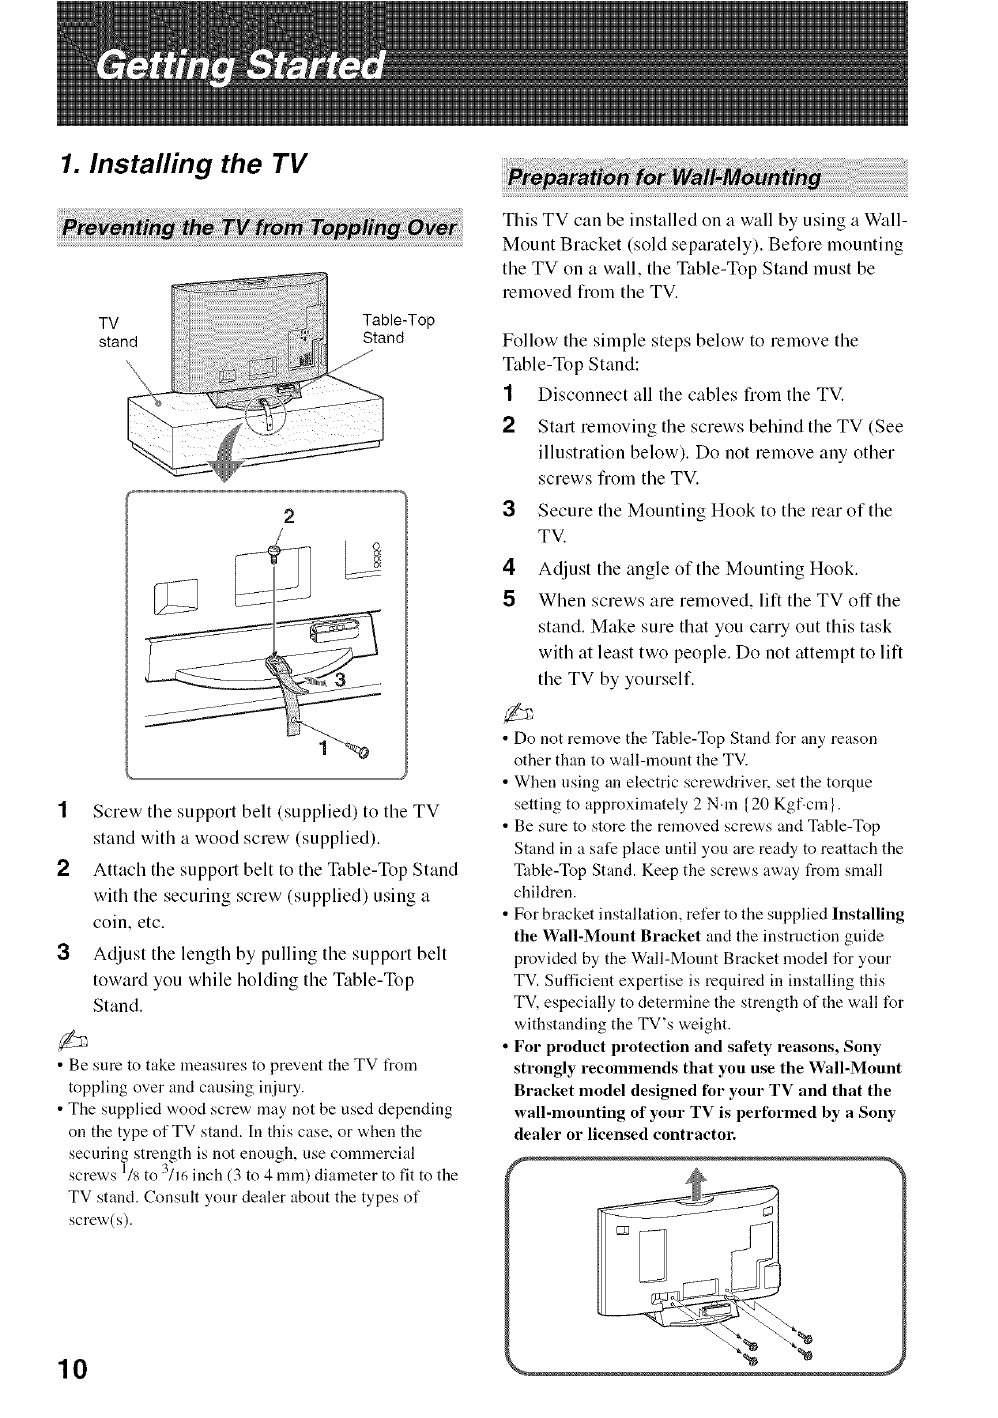
1. Installing the TV
2
!
1Screw the support belt (supplied) to the TV
stand with a wood screw (supplied).
2Attach the support belt to the Table-Top Stand
with the securing screw (supplied) using a
coin, etc.
3Adjust the length by pulling the support belt
toward you while holding the Table-Top
Stand.
•Be sure to take measures to prevent the TV t_om
toppling over and causing injury.
• The supplied wood screw may not be used depending
on the type of TV stand. In this case, or when the
securing strength is not enough, use commercial
screws 1/8to 3/16 inch (3 to 4 ram) diameter to fit to the
TV stand. Consult your dealer about the types of
screw(s).
10
This TV can be installed on a wall by using a Wall-
Mount Bracket (sold separately). Before mounting
the TV on a wall, the Table-Top Stand must be
removed l¥om the TV.
Follow the simple steps below to remove the
Table-Top Stand:
Disconnect all the cables from the TV.1
2Start removing the screws behind the TV (See
illustration below). Do not remove any other
screws from the TV.
Secure the Mounting Hook to the rear of the
TV.
4 Adjust the angle of the Mounting Hook.
5When screws are removed, lift the TV off the
stand. Make sure that you carry out this task
with at least two people. Do not attempt to lilt
the TV by yourself.
• Do not remove the Table-Top Stand l\_r any reason
other than to wall-mount the TV.
• When using an electric screwdriver, set the torque
setting to approximately 2 N.m {20 Kgf.cm}.
• Be sure to store the removed screws and Table-Top
Stand in a safe place until you are ready to reattach the
Table-Top Stand. Keep the screws away from small
children.
• For bracket installation, refer to the supplied Installing
the Wall-Mount Bracket and the instruction guide
provided by the Wall-Mount Bracket model for your
TV. Sufficient expertise is required in installing this
TV, especially to determine the strength of the wall for
withstanding the TV's weight.
•For product protection and safety reasons, Sony
strongly recommends that you use the Wall-Mount
Bracket model designed for your TV and that the
wall-mounting of your TV is performed by a Sony
dealer or licensed contractor.
f
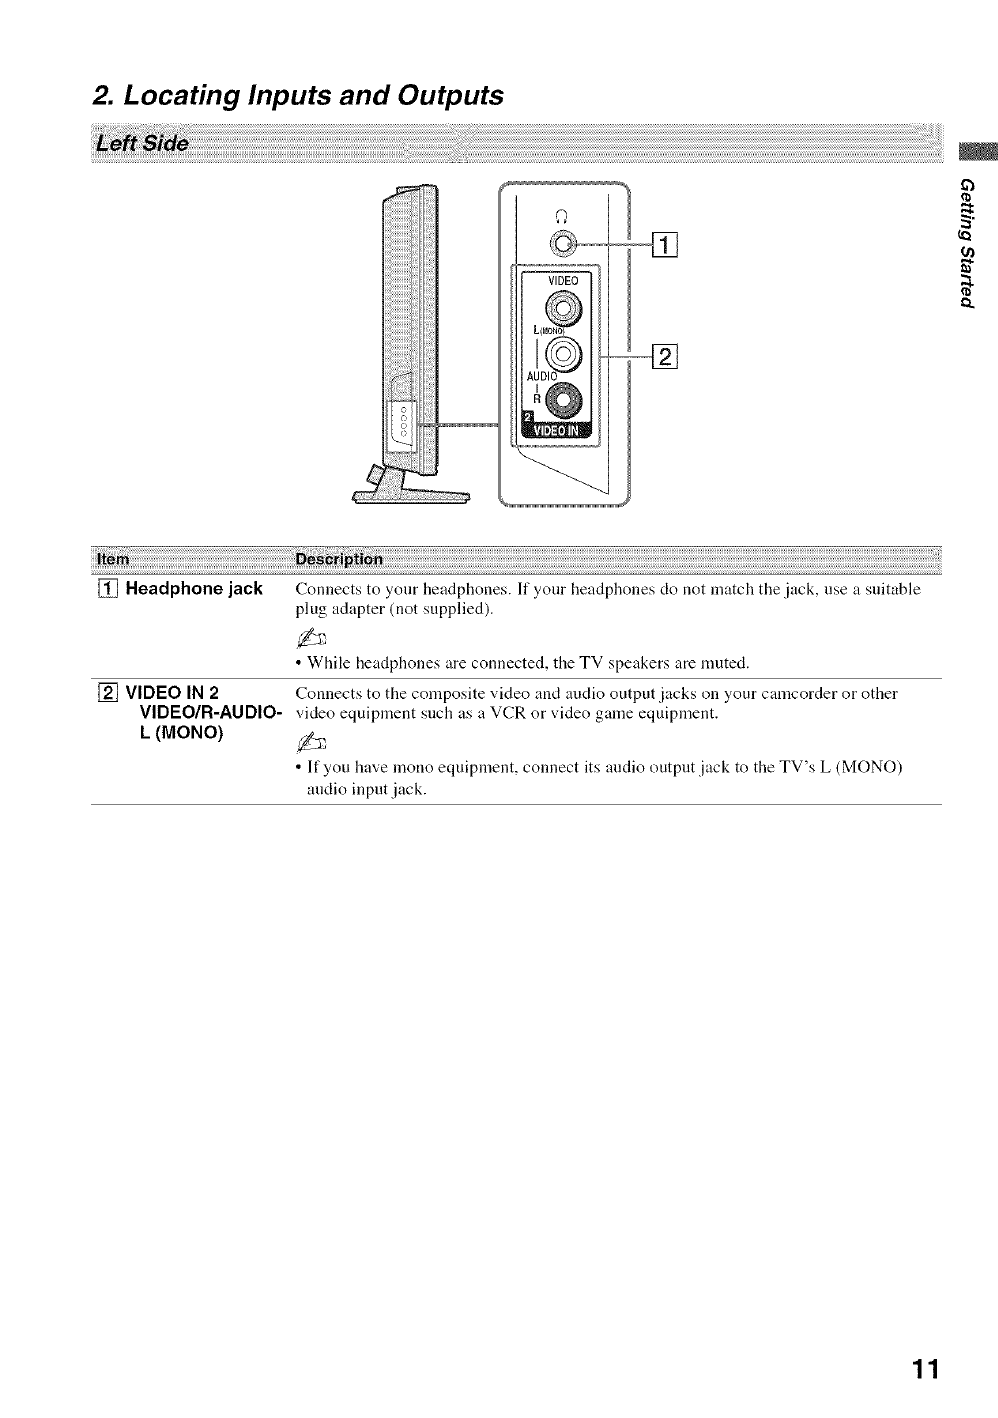
2. Locating Inputs and Outputs
0
VIDEO g.
[] Headphone jack Connects to your headphones. If your headphones do not match the jack, use a suitable
plug adapter (not supplied).
• While headphones are connected, the TV speakers are muted.
[] VIDEO IN 2Connects to the composite video and audio output jacks on your camcorder or other
VIDEO/R-AUDIO- video equipment such as a VCR or video game equipment.
L (MONO)
• If you have mono equipment, connect its audio output jack to the TV's L (MONO)
audio input jack.
11
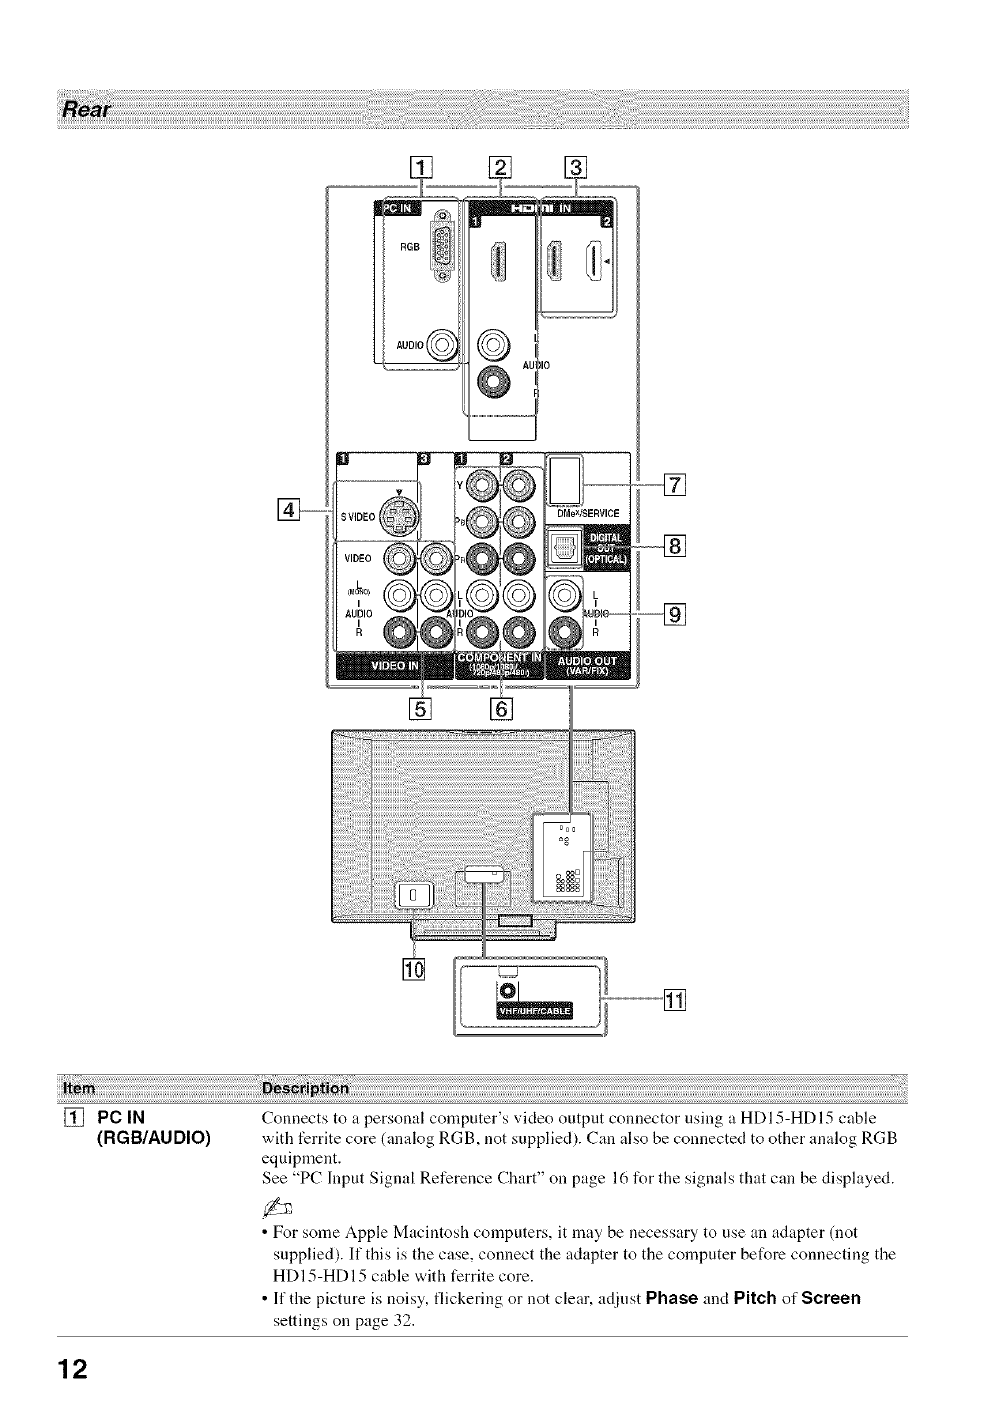
n
[] PC IN
(RGB/AUDIO) Connects to a personal computer's video output connector using a HDI 5-HD 15 cable
with ferrite core (analog RGB, not supplied). Can also be connected to other analog RGB
equipment.
See "PC Input Signal Reference Chart" on page 16 for the signals that can be displayed.
• For some Apple Macintosh computers, it may be necessary to use an adapter (not
supplied). If this is the case, connect the adapter to the computer before connecting the
HDI5-HDI5 cable with ferrite core.
• If the picture is noisy, flickering or not clear, adjust Phase and Pitch of Screen
settings on page 32.
12

[] HDMI IN 1
HDMI/
R-AUDIO-L
[] HDMI IN 2
HDMI
HDMI (High-Definition Mnltimedia Interface) provides an uncompressed, all-digital
audio/video interface between this TV and any HDMI-equipped audio/video equipment,
such as a set-top box, DVD player, Blu-ray Disc Player, A/V receiver as well as PC.
HDMI supports enhanced, or high-definition video, plus digital audio.
If the equipment has a DVI jack and not an HDMI jack, connect the DVI jack to the
HDMI IN 1(with DVI-to-HDMI cable or adapter) jack, and connect the audio jack to the
AUDIO IN (L/R) jacks of HDMI IN 1.
DVI-to-HDMI cable
[] VIDEO IN 1
S VIDEO
[] VIDEO IN 113
VIDEO/L(MONO)-
AUDIO-R
[] COMPONENT IN
112 ( 1080p/1080i/
720p1480p1480i)l
L-AUDIO-R
@_ Audio cable
O
DVl-to-HDMI adapter
•HDMI connection is necessary to view 480i, 480p, 720p, 1080i, 1080p and 1080/24p
formats. Note that this TV displays all video input signals in a resolution of 1,920 dots x
1,080 lines.
• Be sure to nse only an HDMI cable that bears the HDMI logo.
• When HDMI control compatible equipment is connected, conmmnication with the
connected equipment is supported. Refer to page 37 to set up this connnunication.
• When connecting a HDMI control compatible audio system with HDMI jack, be sure to
also connect to the OPTICAL OUT jack.
Connects to the S VIDEO output jack of your VCR or other video equipment that has
S VIDEO. S VIDEO provides better picture quality than composite video ([]) connection.
If both composite video and S VIDEO are connected, S VIDEO signal has priority.
Connects to the composite video and audio output jacks on your A/V equipment such as
a VCR or other video equipment. A third composite video and audio (VIDEO IN 2) is
located on the left side of the TV.
Connects to your equipment's component video (YPBPR) and audio (L/R)jacks.
Component video_ovides better picture quality than the S VIDEO ([]) or the
composite video (1__) connection.
• Component video (YPBPI0 connection is necessary to view 480i, 480p, 720p, 1080i and
1080p formats. Note that this TV displays all video input signals in a resolution of
1,920 dots x 1,080 lines.
[] DMeX/SERVICE This USB port is for service only unless you are connecting the optional BRAVIA
external module (DMeX).
[] DIGITAL OUT Connects to the optical andio input of your digital audio equipment that is PCM/Dolby
(OPTICAL) Digital compatible. Dolby Digital Audio signal from the HDMI inpnt will be output as
PCM.
[] AUDIO OUT Connects to the left and right audio input jacks of your analog audio equipment. You can
(VAR/FIX) use these outpnts to listen to your TV's audio through your stereo system.
[] AC IN Connects the supplied AC power cord.
[] VNF/UNF/CABLE RF input that connects to your Cable or VHF/UHF antenna.
g.
13
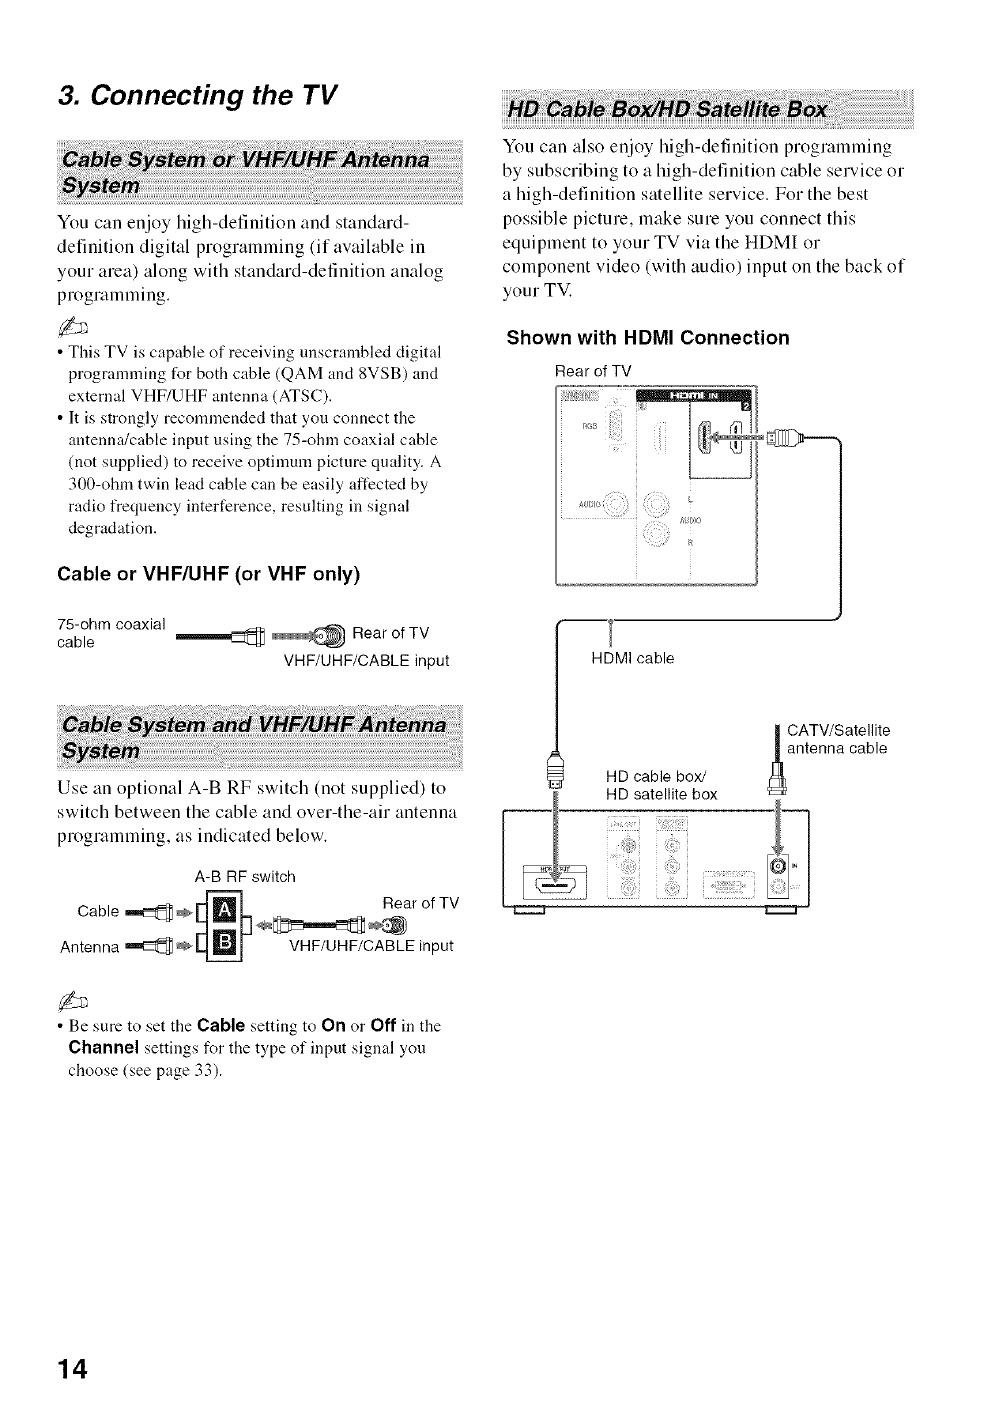
3. Connecting the TV
You can enjoy high-definition and standard-
definition digital programming (if available in
your area) along with standard-definition analog
programming.
• This TV is capable of receiving unscrambled digital
programming for both cable (QAM and 8VSB) and
external VHF/UHF antenna (ATSC).
• It is strongly recommended that you connect the
antenna/cable input using the 75-ohm coaxial cable
(not supplied) to receive optimum picture quality. A
300-ohm twin lead cable can be easily affected by
radio frequency interference, resulting in signal
degradation.
Cable or VHF/UHF (or VHF only)
75-ohm coaxial
cable _ _ Rear of TV
VHF/UHF/CABLE input
Use an optional A-B RF switch (not supplied) to
switch between the cable and over-the-air antenna
programming, as indicated below.
A-B RF switch
Cable _ _ _ Rear of TV
Antenna _ _ _ VRF/UHF/CABLE input
• Be sure to set the Cable setting to On or Off in the
Channel settings for the type of input signal you
choose (see page 33).
You can also enjoy high-definition programming
by subscribing to a high-definition cable service or
a high-definition satellite service. For the best
possible picture, make sure you connect this
equipment to your TV via the HDMI or
component video (with audio) input on the back of
your TV.
Shown with HDMI Connection
Rear of TV
A I?; i L
AUI>)O
HDMI cable
| CATV/Satellite
HD cable box/ _antenna cable
RD satellite box
14
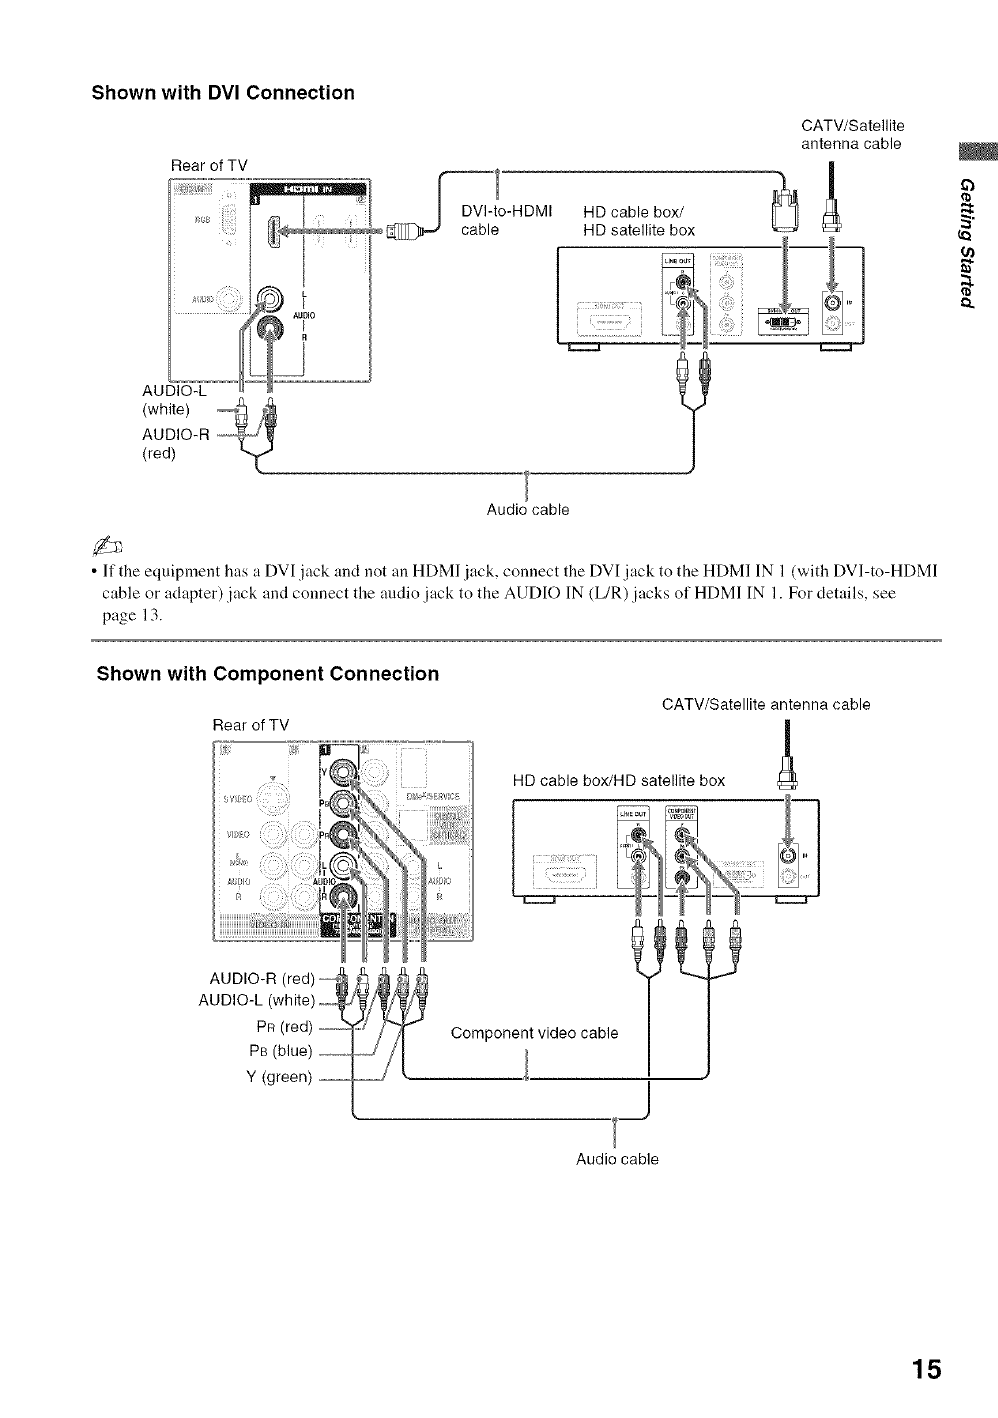
Shown with DVI Connection
AUDIO-L
(white) 4_
AUDIO-R
(red)
o-HDMI HD cable box/
HD satellite box
CATV/Satellite
antenna cable
Audio cable
• If the equipment has a DVI jack and not an HDMI jack, connect the DVI jack to the HDM] IN 1 (with DVI-to-HDMI
cable or adapter) jack and connect the audio ack to the AUDIO IN (L/R) jacks of HDMI IN 1. For details, see
page 13.
g.
Shown with Component Connection
Rear of TV
CATV/Satellite antenna cable
/
HD cable box/HD satellite box
AUDIO-R (red) _ _
AUDIO-L (white)_/_//_/_ '
PR (red) ---T_ /"_
o(blue)......b II
Y (green) _
Component video cable
Audio cable
15
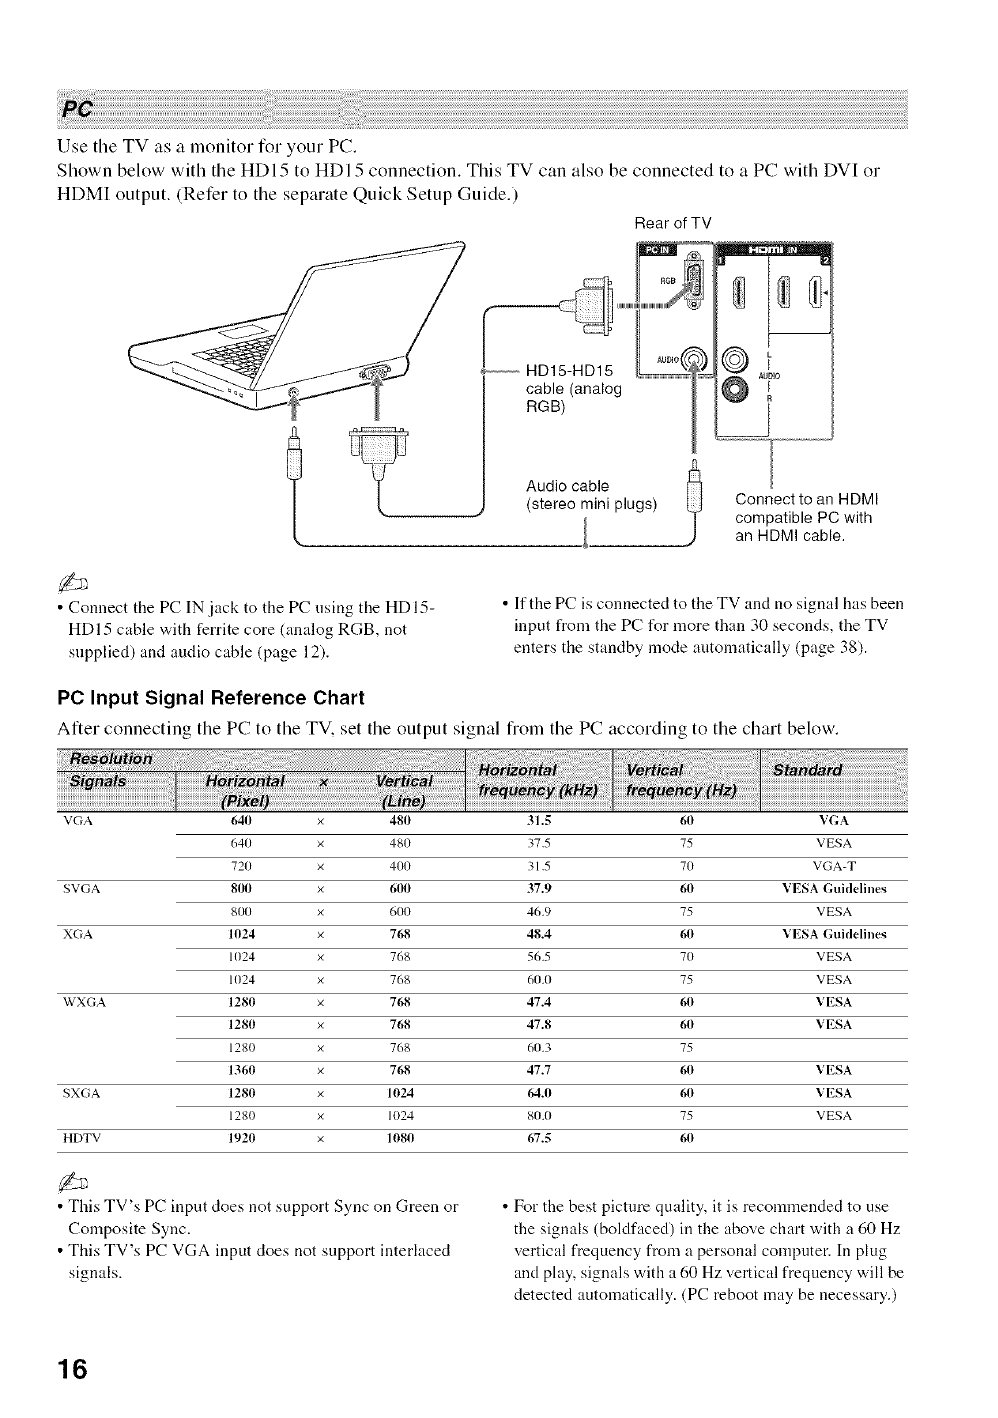
Use tile TV as a monitor for your PC,
Shown below with tile HDI5 to HDI 5 connection, This TV can also be connected to a PC with DVI or
HDMI output, (Refer to the separate Quick Setup Guide.)
Rear of TV
HD15-HD15
cable (analog
RGB)
l Audio cable
(stereo mini plugs) Connect to an HDMI
compatible PC with
an HDMI cable.
• Connect the PC IN jack to the PC using the HDI5-
HDI5 cable with ferrite core (analog RGB, not
supplied) and audio cable (page 121.
• If the PC is connected to the TV and no signal has been
input from the PC l\_r more than 30 seconds, the TV
enters the standby mode antomatically (page 38).
PC Input Signal Reference Chart
After connecting tile PC to tile TV. set tile output signal from tile PC according to tile chart below.
VGA 640 x 480 31.5 611 VGA
640 x 480 375 75 VESA
720 × 4(X) 31,5 70 VGA-T
SVGA 8110 x 6110 37.9 ,.50 VESA Guidelines
800 x6(X) 46,9 75 VESA
XGA 1024 x 768 48.4 611 VESA Guidelines
1024 x 768 565 70 VESA
1024 x 768 60,0 75 VESA
WXGA 1280 x768 47.4 ,.50 VESA
1280 x768 47.8 ,.50 VESA
1280 x 768 60,3 75
1360 x768 47.7 ,.50 VESA
SXGA 1280 x1024 64.0 ,.50 VESA
1280 x 1024 8(I.0 75 VESA
HDTV 1920 x 11180 67.5 60
• This TV's PC input does not support Sync on Green or
Composite Sync.
• This TV's PC VGA input does not support interlaced
signals.
• For the best picture quality, it is recommended to use
the signals (boldfaced) in the above chart with a 60 Hz
vertical frequency from a personal computer. In plug
and play, signals with a 60 Hz vertical frequency will be
detected automatically. (PC reboot may be necessary.)
16
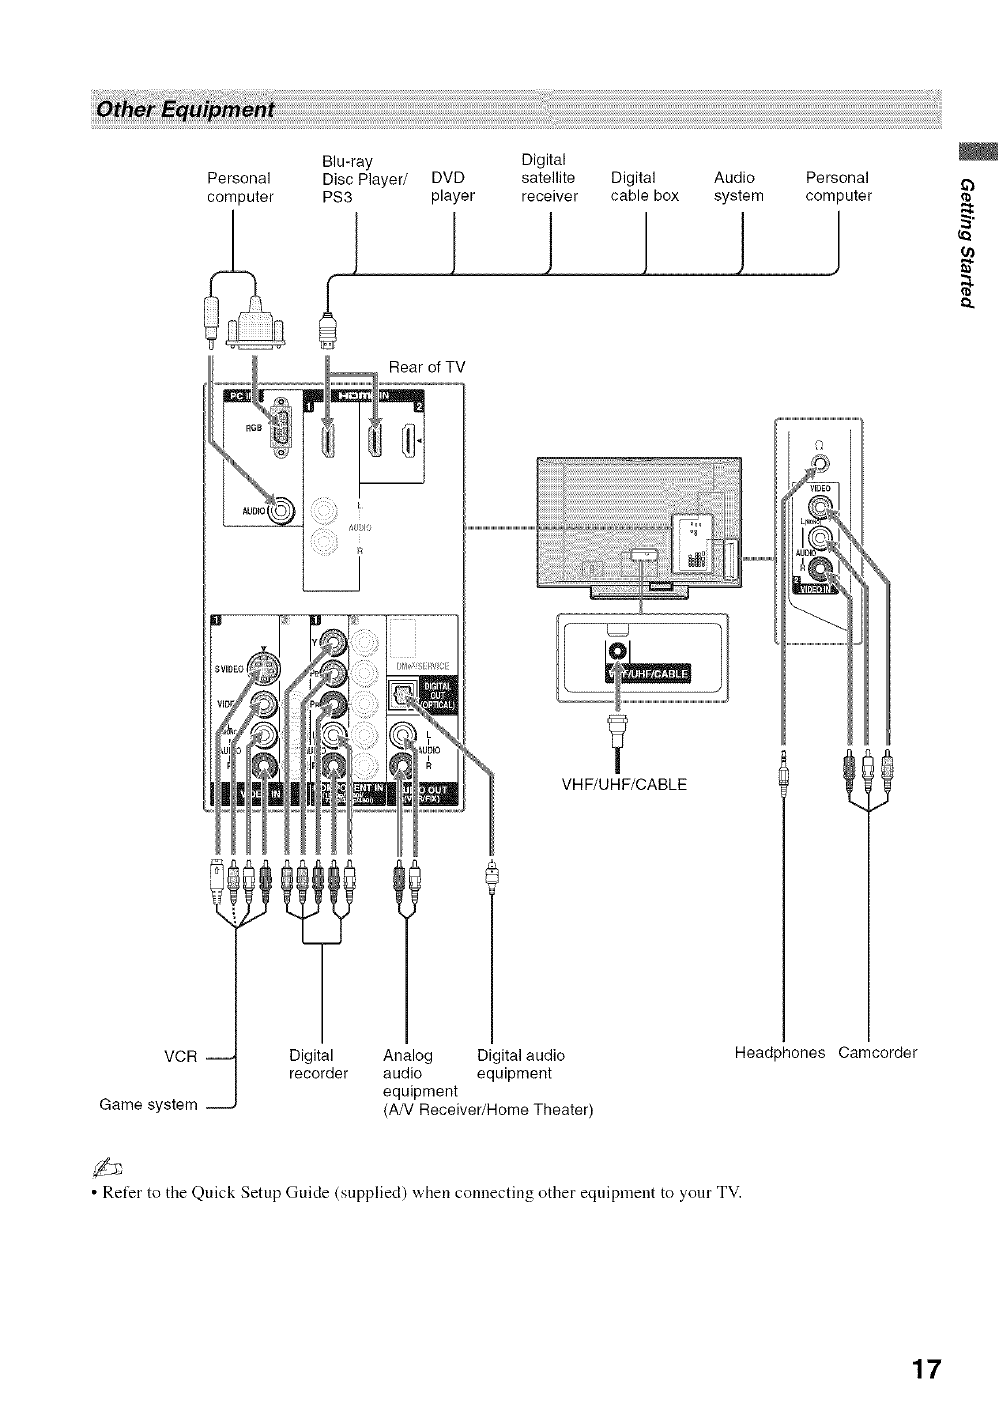
Personal
corn 3uter
Blu-ray
Disc Player/
PS3
Digital
DVD satellite
player receiver
Digital Audio
cable box system
I l
Personal
computer
VCR --
Game system --
VHF/UHF/CABLE
l
Digital Analog Digital audio
recorder audio equipment
equipment
(AN Receiver/Home Theater)
Heac _hones Camcorder
• Refer to the Quick Setup Guide (supplied) when connecting other equipment to your TV.
17
This TV is equipped with BRAVIA Theatre Sync.
The HDMI Control function enables BRAVIA
Theatre Sync to allow communication between
Sony TV's and Sony equipment. Only Sony
equipment with HDMI Control capability is
supported.
To Connect HDMI Control Equipment
Use an HDMI cable that bears the HDMI logo for
connection. See page 17 or see the HDMI
connection shown in the Quick Setup Guide
provided with the TV documentation.
Setting the HDMI Control
In order for the HDMI Contlol function to operate,
the TV and other Sony HDMI Control equipment
must be setup. See page 37 on how to turn the
HDMI Control On. For other equipment, refer to
the operating instruction for that equipment.
HDMI Control Available with Your TV
Once the supported equipment is connected, the
following operations are available:
• Turn offthe equipment automatically when
you turn off the TV.
• When the connected equipment is turned on
by One-Touch-Play, the TV will automatically
turn on and select the respective HDMI input.
• Automatically turn on equipment listed under
the External Inputs on the XMB_x_when
selected, see pages 9 and 26.
When a Sony A/V receiver with BRAVIA Theatre
Sync is connected, the following additional
operations are possible:
• Turning on the A/V receiver when the TV is
turned on.
• Automatically switching to the audio output of
the A/V receiver's attached speakers.
• Adjusting the volume and muting of the A/V
receiver with the TV's remote control.
• The A/V receiver cannot be selected from the XMB_.
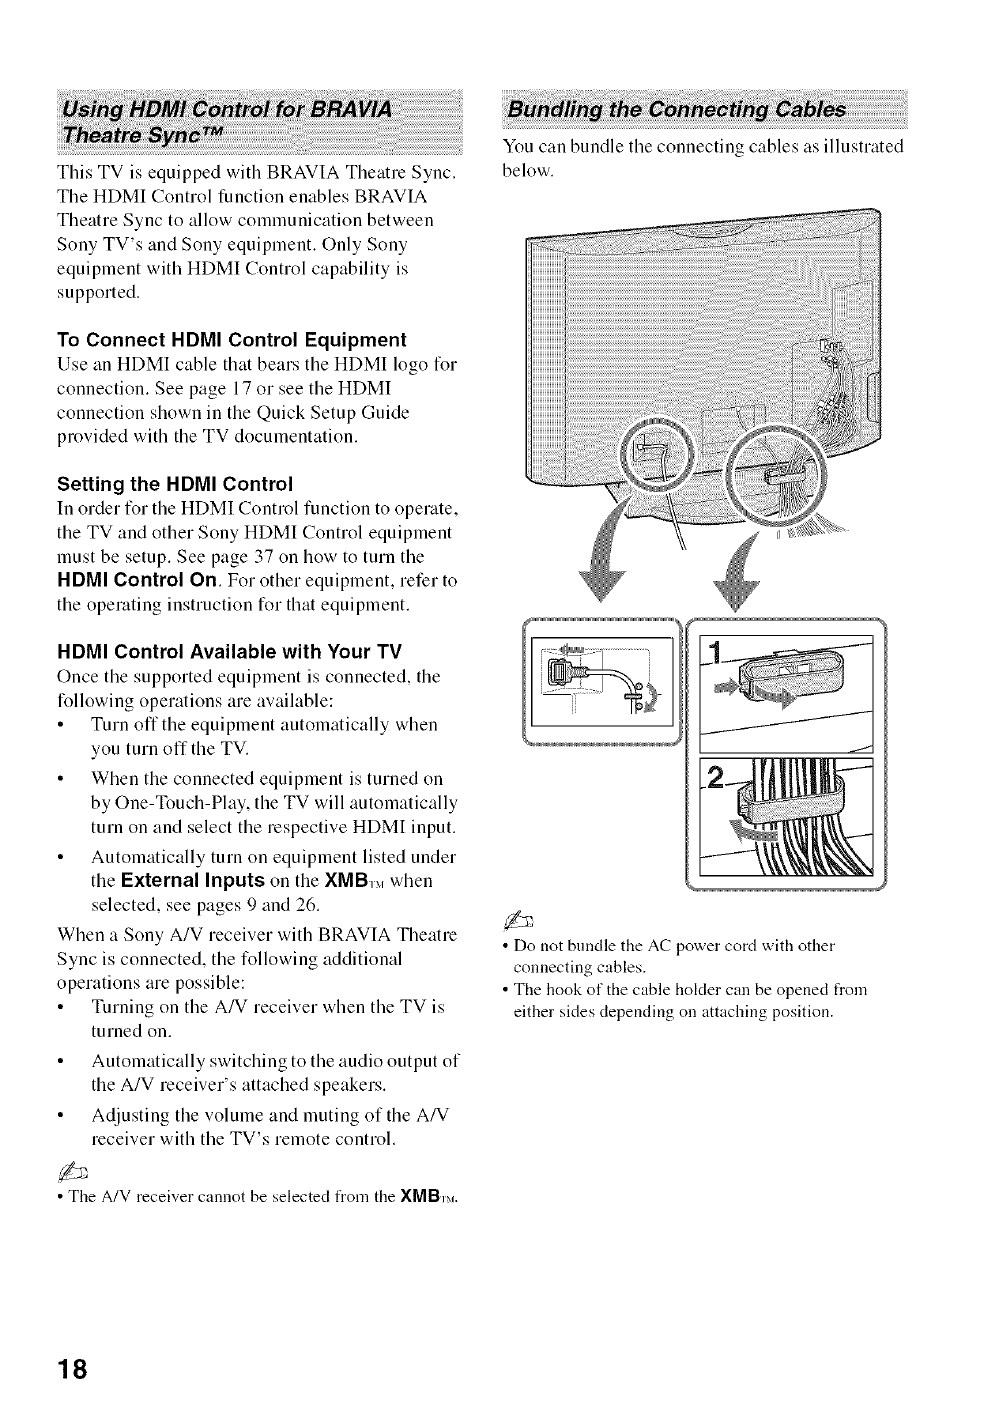
You can bundle the connecting cables as illustrated
below.
• Do not bundle the AC power cord with other
connecting cables.
• The hook of the cable hokter can be opened from
either sides depending on attaching position.
18
4. Setting Up the Channel List
-Initial Setup
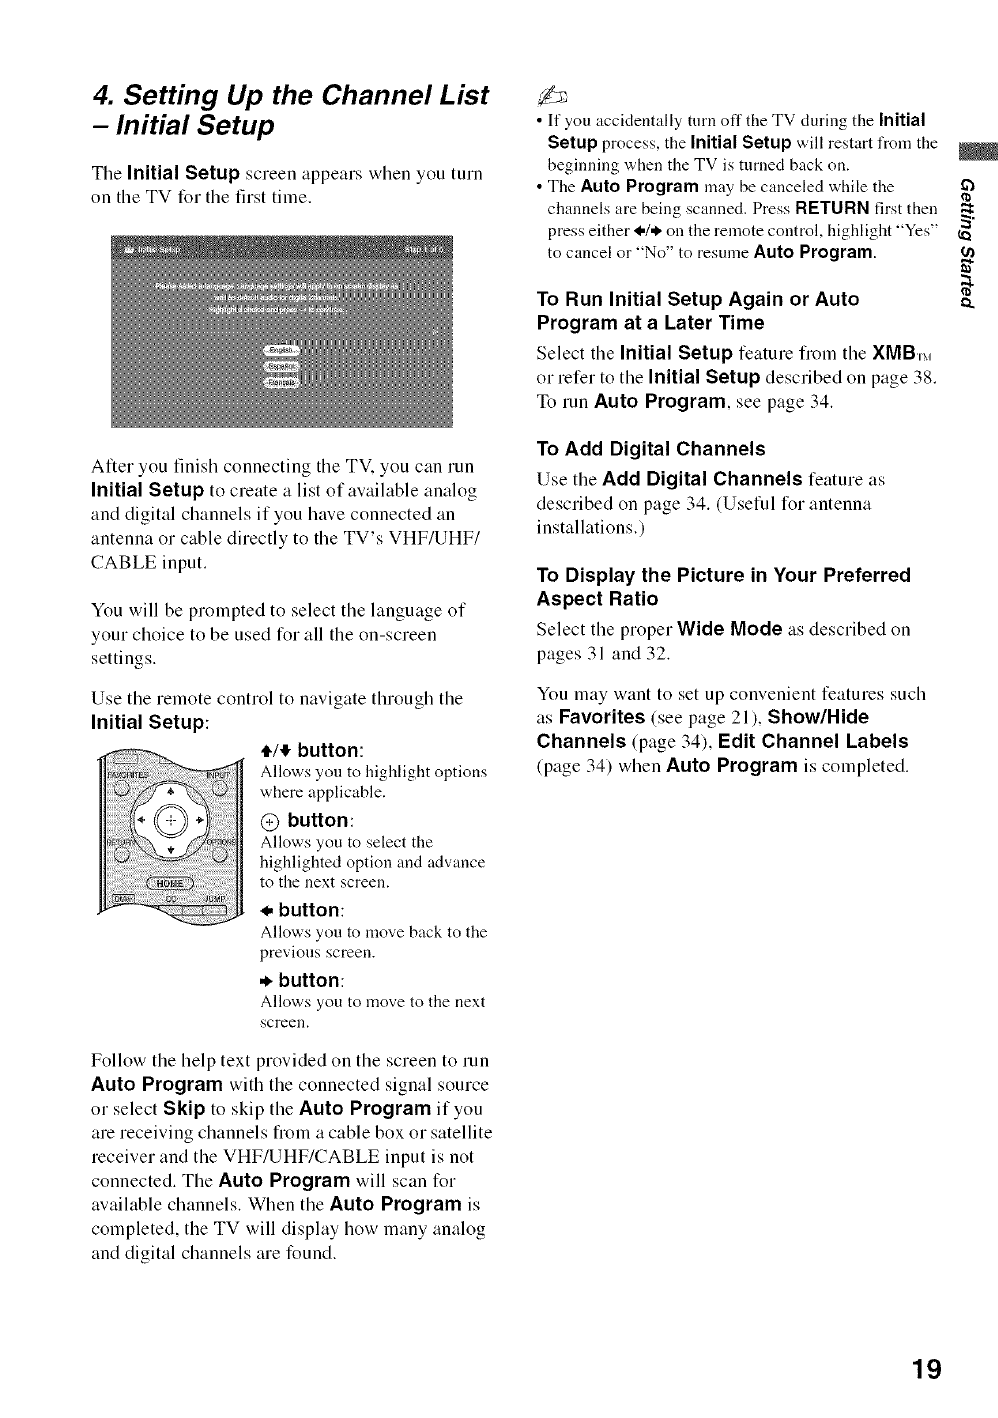
The Initial Setup screen appears when you turn
on the TV for tile first time.
After you finish connecting the TV. you can run
Initial Setup to create a list of available analog
and digital channels if you have connected an
antenna or cable directly to the TV's VHF/UHF/
CABLE input.
You will be prompted to select tile language of
your choice to be used for all the on-screen
settings.
Use the remote control to navigate through the
Initial Setup:
#/# button:
Allows you to highlight options
where applicable.
@button:
Allows you to select the
highlighted option and advance
to the next screen.
. button:
Allows you to move back to the
previous screen.
. button:
Allows you to move to the next
screen.
Follow the help text provided on the screen to run
Auto Program with the connected signal source
or select Skip to skip the Auto Program if you
are receiving channels fiom a cable box or satellite
receiver and the VHF/UHF/CABLE input is not
connected. The Auto Program will scan for
available channels. When the Auto Program is
completed, the TV will display how many analog
and digital channels are found.
• If you accidentally tnrn off the TV during the Initial
Setup process, the Initial Setup will restart from the
beginning when the TV is turned back on.
• The Auto Program may be canceled while the
channels are being scanned. Press RETURN first then
press either I,/* on the remote control, highlight "Yes"
to cancel or "No" to resume Auto Program.
To Run Initial Setup Again or Auto
Program at a Later Time
Select the Initial Setup feature fi'om the XMB,_,
or refer to the Initial Setup described on page 38.
To run Auto Program, see page 34.
To Add Digital Channels
Use the Add Digital Channels feature as
described on page 34. (Useful for antenna
installations.)
To Display the Picture in Your Preferred
Aspect Ratio
Select the proper Wide Mode as described on
pages 31 and 32.
You may want to set up convenient features such
as Favorites (see page 21), Show/Hide
Channels (page 34), Edit Channel Labels
(page 34) when Auto Program is completed.
if)
(n
19
Remote Control and TV Controls/Indicators
Insert two size AA batteries (supplied) by matching
0 and 1} on the batteries to the diagram inside the
battery compartment of the remote control.
Push and lift the cover to open.
Buttons located at the top of the TV will operate the same as these buttons on the
remote control.
vOLUME +
•The 5button and CH +have a tactile dot. Use them as a reference when
operating the TV.
• This remote control cannot be programmed to use with other equipment.
[] DISPLAY
[] SLEEP
[]THEATER
Press once to display the information pertaining to the
channel and/or program when available. The OSD (On Screen
Display) will time out in a few seconds or press again to
immediately turn off the display. You can also set the display
to show minimal information. See Info Banner on page 38.
Press repeatedly until the TV displays the time in minutes
(Off, 15rain, 30rain, 45rain, 60rain, 90rain or 120rain)
that you want the TV to remain on before shutting off. T___
cancel Sleep Timer, press SLEEP repeatedly until Off
appears.
Press to turn on and off the Theater Mode. The picture settings
will be set for a cinema like experience and the audio will be
switched to the audio output of the attached speakers of your
BRAVIA Theatre Sync audio system. Your BRAVIA Theatre
Sync andio system must be connected by an HDMI connection
to your TV (see page 17 for details).
20
[] FREEZE Press once to display a frozen image with the current program
in a window. Press again to return to the current program.
Frozen
picture program
[] FAVORITES
[]RETURN
_]HOME
• With the Freeze feature active, some features are unavailable. _"
• While the Freeze feature is active, pressing HOME will .,_
deactivate Freeze and display the XMB,_,. "-.I
Press once to display the stored favorite channel list..._'<
Yon can store up to 30 channels in your Favorites list. _'
How to Add to Favorites
While tuned to the channel you want to add to the list, press
OPTIONS and highlight "Add to Favorites", then press @.
A confirmation message of "Channel added to Favorites" will
appear for a few' seconds.
How to Remove from Favorites
While tnned to a channel that exists in the Favorites list,
press OPTIONS and highlight "Remove from Favorites",
then press @.
A confirmation message of"Channel removed from
Favorites" will appear for a few seconds.
Your Favorites list will be cleared each time you run Auto
Program (see pages 19 and 34 l\_r Auto Program).
Press to go back to the previous screen or exit from the screen
w'hen displaying menu items and settings.
• While the P&P feature is active, pressing RETURN will
exit from the screen (see page 25).
Press to display the TV Home Menu/XMB_M to access the TV
Home Menu items such as the TV Settings, TV channels and
External Inputs list (see pages 9 and 26).
[] DMe x Press to access features in the optional BRAVIA external
module. See your dealer or www.sony.com/bravia for more
information. The module may not be available in yonr region.
[] 0-9 ENT Press 0-9 to select a channel; the channel changes alter two
seconds. Press ENT to change channels immediately.
[] @ Use with 0-9 and ENT to select digital channels.
For example, to enter 2.1, press @, C)' C) and ENT.
(Continued)
21
[] VOL +/-
[] MUTING
[] POWER
[] WIDE
Press to adjust the volume.
Press to mute the sound. Press again or press VOL + to restore
the sound.
Press to turn on and off the TV.
Press repeatedly to step through the Wide Mode settings:
Wide Zoom, Normal, Full, Zoom. The Wide Mode
settings carl be also accessed in the Screen settings (see page
31).
Changing the Wide Screen Mode
(For PC timing, see below)
4:3 Original source 16:9 Original source
Standard-definition source High-definition source
Wide Zoom Wide Zoom
Normal Normal
Full Full
Zoom Zoom
Changing the Wide Screen Mode for PC Timing
Incoming PC signal Incoming PC signal
800 x600 1280 x768
Normal Normal
Full 1 Full 1
Full 2 Full 2
22
m
i!ii!iiiiT!ii!i;i_, .....;i:iliI
i . 'I" JJPTli
777777777777777777
[] PICTURE Press repeatedly to cycle through the available picture modes:
Vivid, Standard, Cinema, Custom. (Available options
depend on the current mode.) The picture modes can also be
accessed in the Picture settings. For details, see Picture
settings on page 28.
[] INPUT Press to display the list of External Inputs and TV mode.
Press repeatedly to toggle through the inputs.
• Inputs can be changed by pressing t/!l, and @ while the list
of External Inputs is displayed.
• See page 37 on setting up the External Inputs labels,
including the Skip feature.
[] t/!/*/* Press t.l!l*!,*, to move the on-screen cursor. Press @ to
@ select/confirm an item.
[] OPTIONS Press to display a list of convenient functions and menu
shortcuts. The option menu items vary based on input and
content.
Picture See page 28
Sound See page 30
P&P See page 25
Exit P&P See page 25
Speakers See page 33
Add to Favorites/ See page 21
Remove from Favorites
MTS See page 33
Alternate Audio See page 33
Digital Rating See page 35
Screen See page 31
• Detailed information of digital rating will appear if Digital
Rating is selected when an icon to inl\_rm you the digital
rating information appears.
[] CC Press to turn on and off Closed Captions (CC). To change
or customize CC Display, see page 34.
[] JUMP Press to jump back and forth between two channels. The TV
alternates between the current channel and the last channel
that was selected.
"t
I
[] CH +/- Press to scan through channels. To scan quickly through
channels, press and hold down either +/-.
23
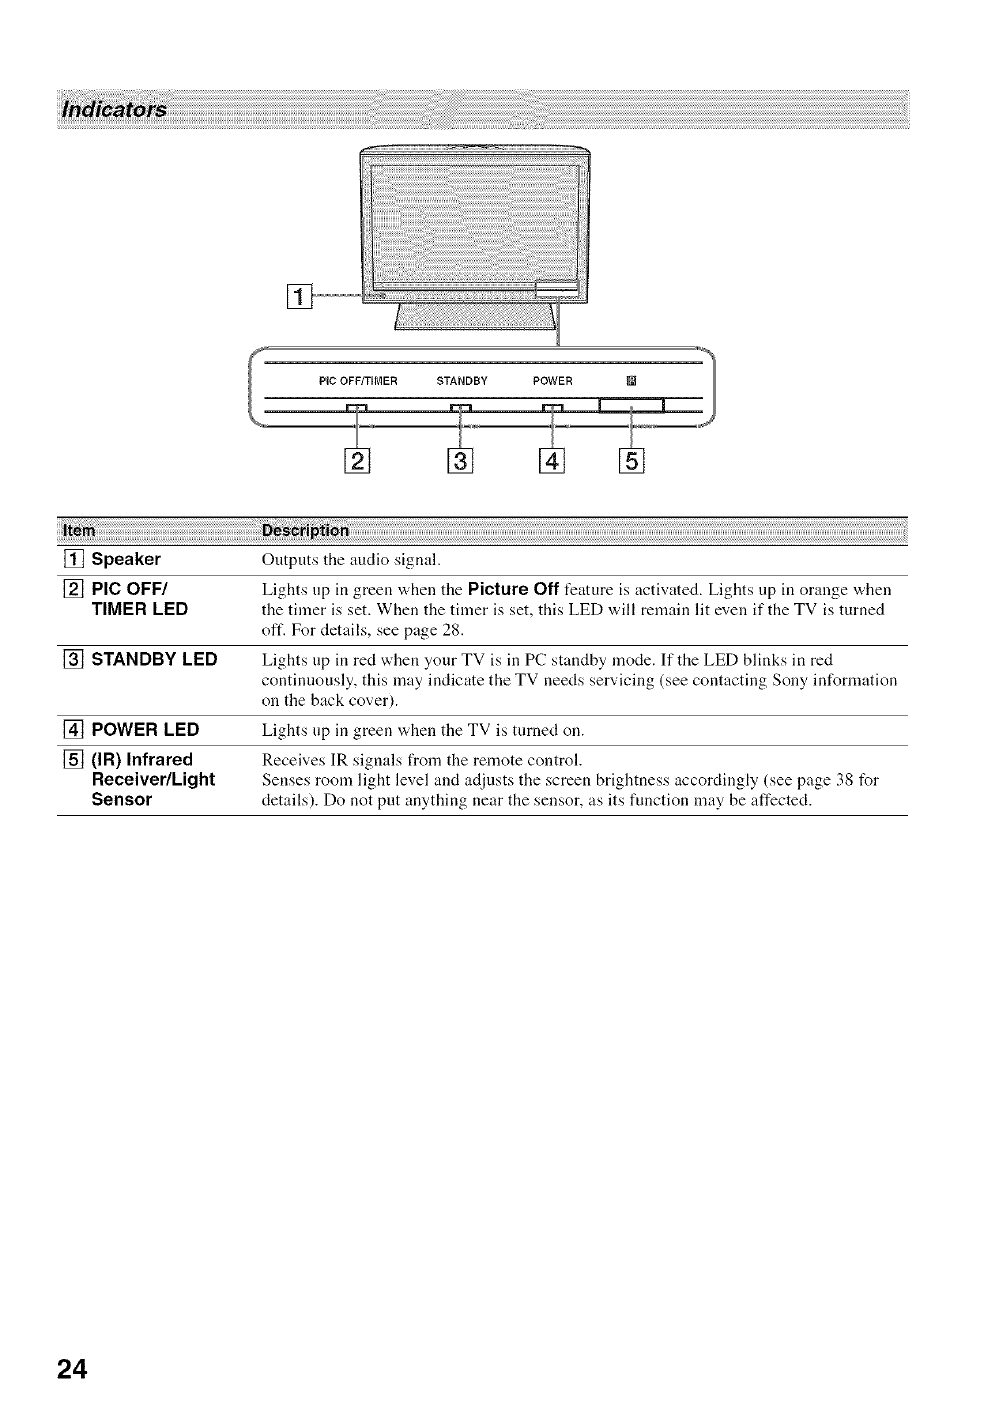
[_--
STANDBY POWER
[] Speaker Outputs the audio signal.
[] PIC OFF/ Lights up in green when the Picture Off feature is activated. Lights up in orange when
TIMER LED the timer is set. When the timer is set, this LED will remain lit even if the TV is turned
oft'. For details, Bee page 28.
[] STANDBY LED Lights up in red when your TV is in PC standby mode. If the LED blinks in red
continuously, this may indicate the TV needs servicing (see contacting Sony information
on the back cover).
[] POWER LED Lights up in green when the TV is turned on.
[] (IR) Infrared Receives IR signals from the remote control.
Receiver/Light Senses room light level and adjusts the screen brightness accordingly (see page 38 for
Sensor details). Do not put anything near the sensor, as its function may be affected.
24
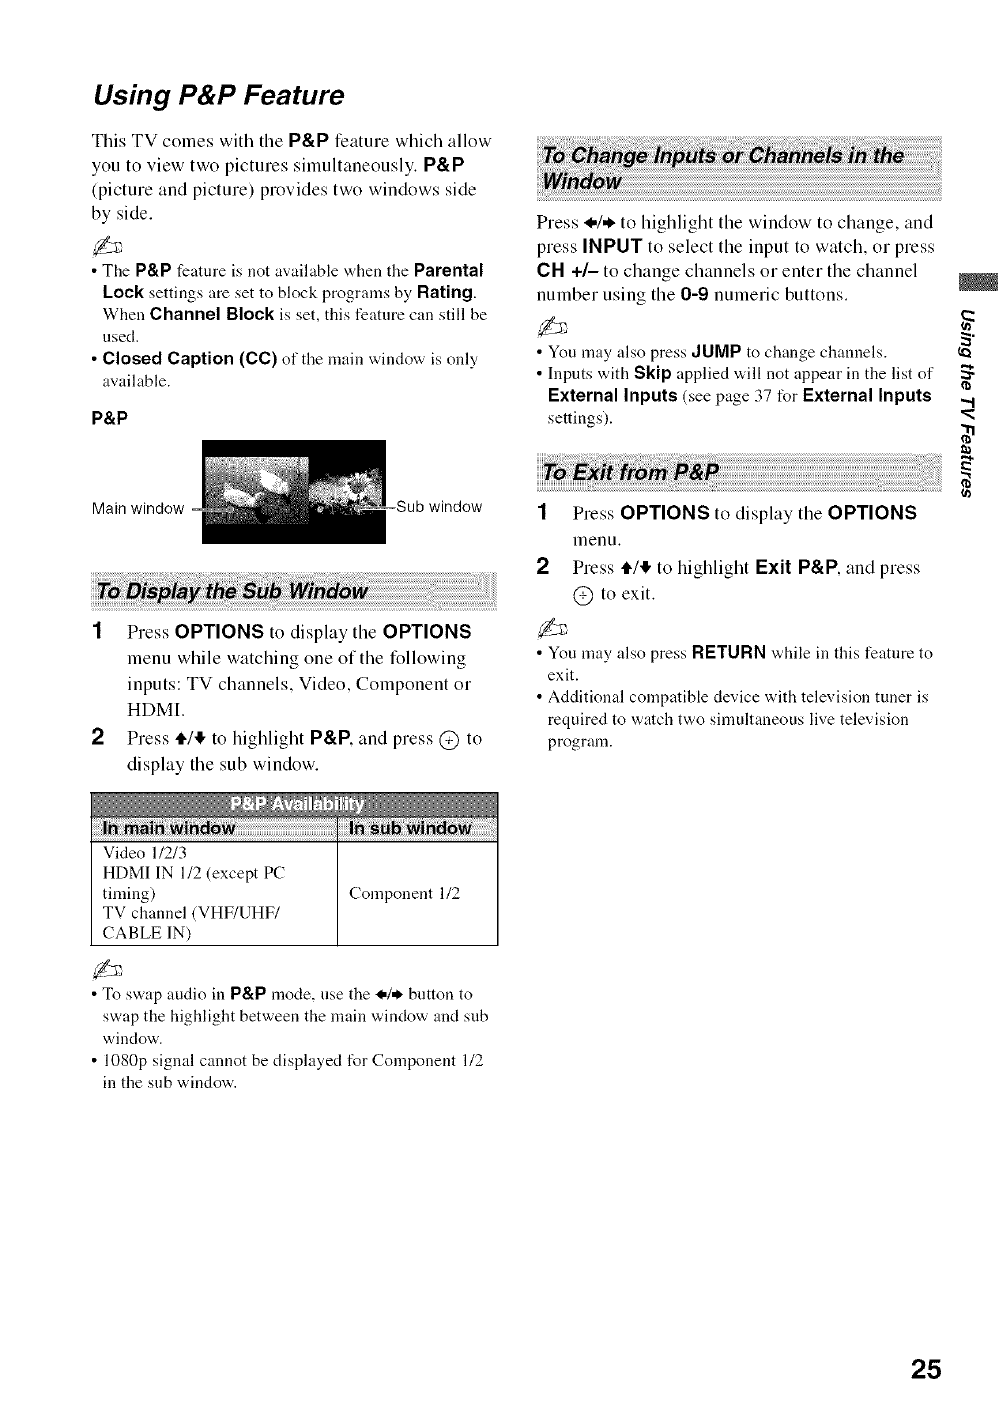
Using P&P Feature
This TV comes with the P&P feature which allow
you to view two pictures simultaneously. P&P
(picture and picture) provides two windows side
by side.
• The P&P feature is not available when the Parental
Lock settings are set to block programs by Rating.
When Channel Block is set, this feature can still be
used.
•Closed Caption (CC) of the main window is only
available.
P&P
Main window window
1Press OPTIONS to displaythe OPTIONS
menu while watching one of the following
inputs: TV channels, Video, Component or
HDML
2Press tl,/& to highlight P&P. and press @ to
display the sub window.
Video 1/2/3
HDMI IN 112 (except PC"
tinting) Component 1/2
TV channel (VHF/UHF/
CABLE IN)
• To swap audio in P&P mode, use the I./* button to
swap the highlight between the main window and sub
window.
• 1080p signal cannot be displayed for Component 1/2
in the sub window.
Press _,/* to highlight the window to change, and
press INPUT to select the input to watch, or press
CH +/- to change channels or enter the channel
number using the 0-9 numeric buttons.
• You may also press ,JUMP to change channels.
• Inputs with Skip applied will not appear in the list of
External Inputs (see page 37 for External Inputs
settings).
1Press OPTIONSto display the OPTIONS
menu.
2Press tl,/_ to highlight Exit P&P, and press
@ to exit.
• You may also press RETURN while in this feature to
exit.
• Additional compatible device with television tuner is
required to watch two simultaneous live television
program.
2
25
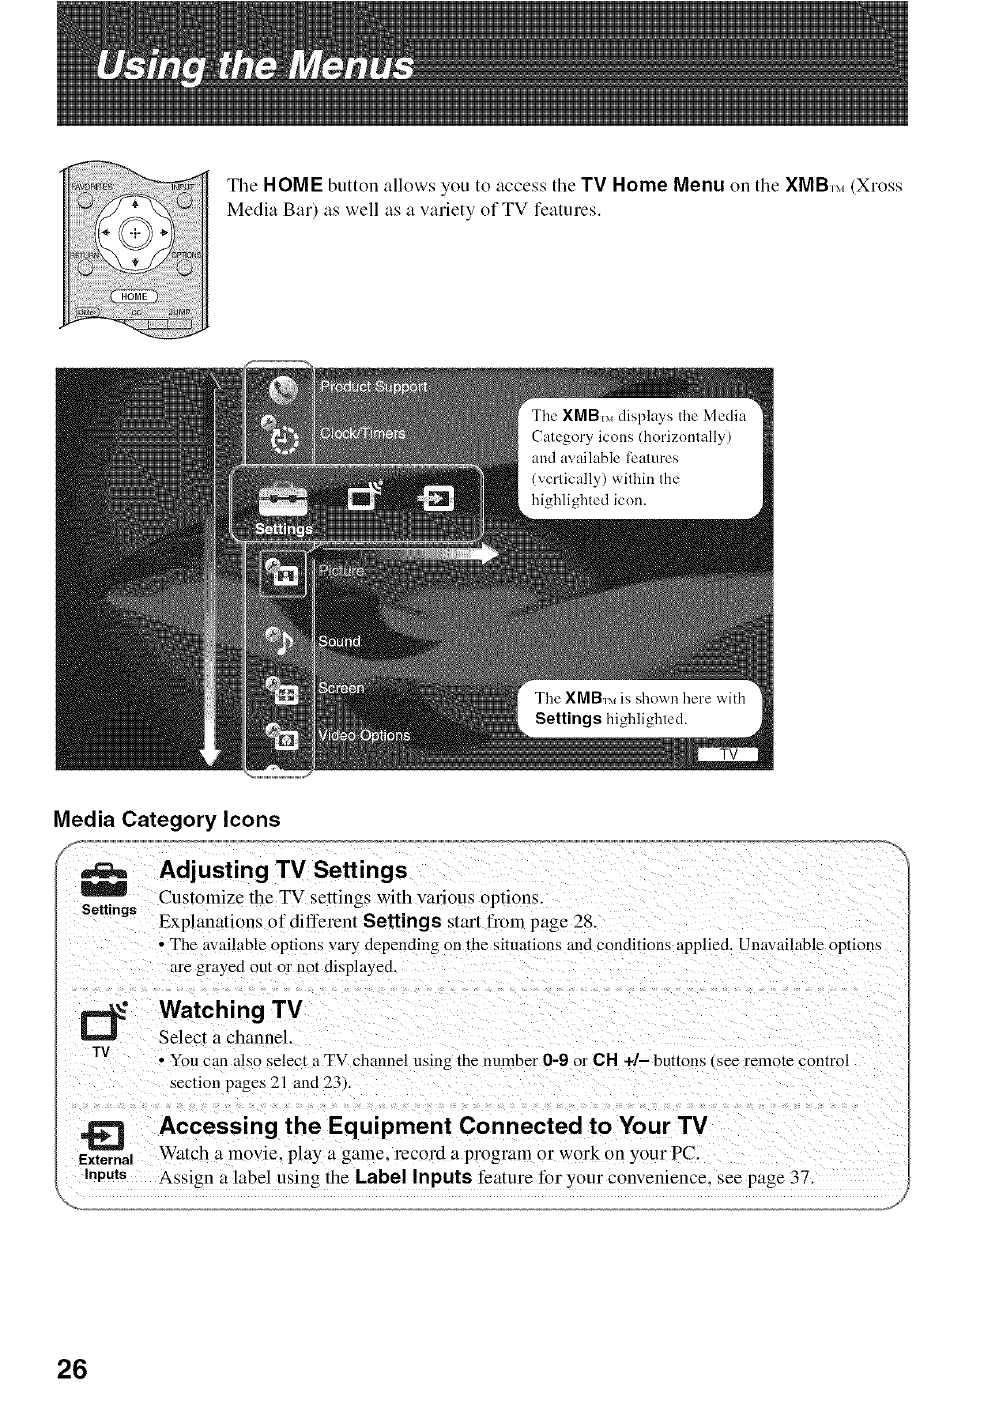
Tile HOME button allows you to access tile TV Home Menu on the XMB,_, (Xross
Media Bar) as well as a variety of TV features.
Settings highlighted.
Media Category Icons
m
Settings
Adjusting TV Settings
Customize the TV settings with various options.
Explanations of different Settings stm't t¥om page 28,
• The available options vary depending on the situations and conditions applied. Unavailable option_
are grayed out or not displayed
_" Watching TV
Select a channel
TV • You can also select a TV channel using the number 0-9 or CH +/- buttons, see remote control
section pages 21 and 23L
=_ Accessing the Equipment Connected to Your TV
External Watch a movie, play a game. record a program or work on your PC.
Inputs Assign a label using the Label Inputs feature 1"ol-your convenience, see page 37.
26
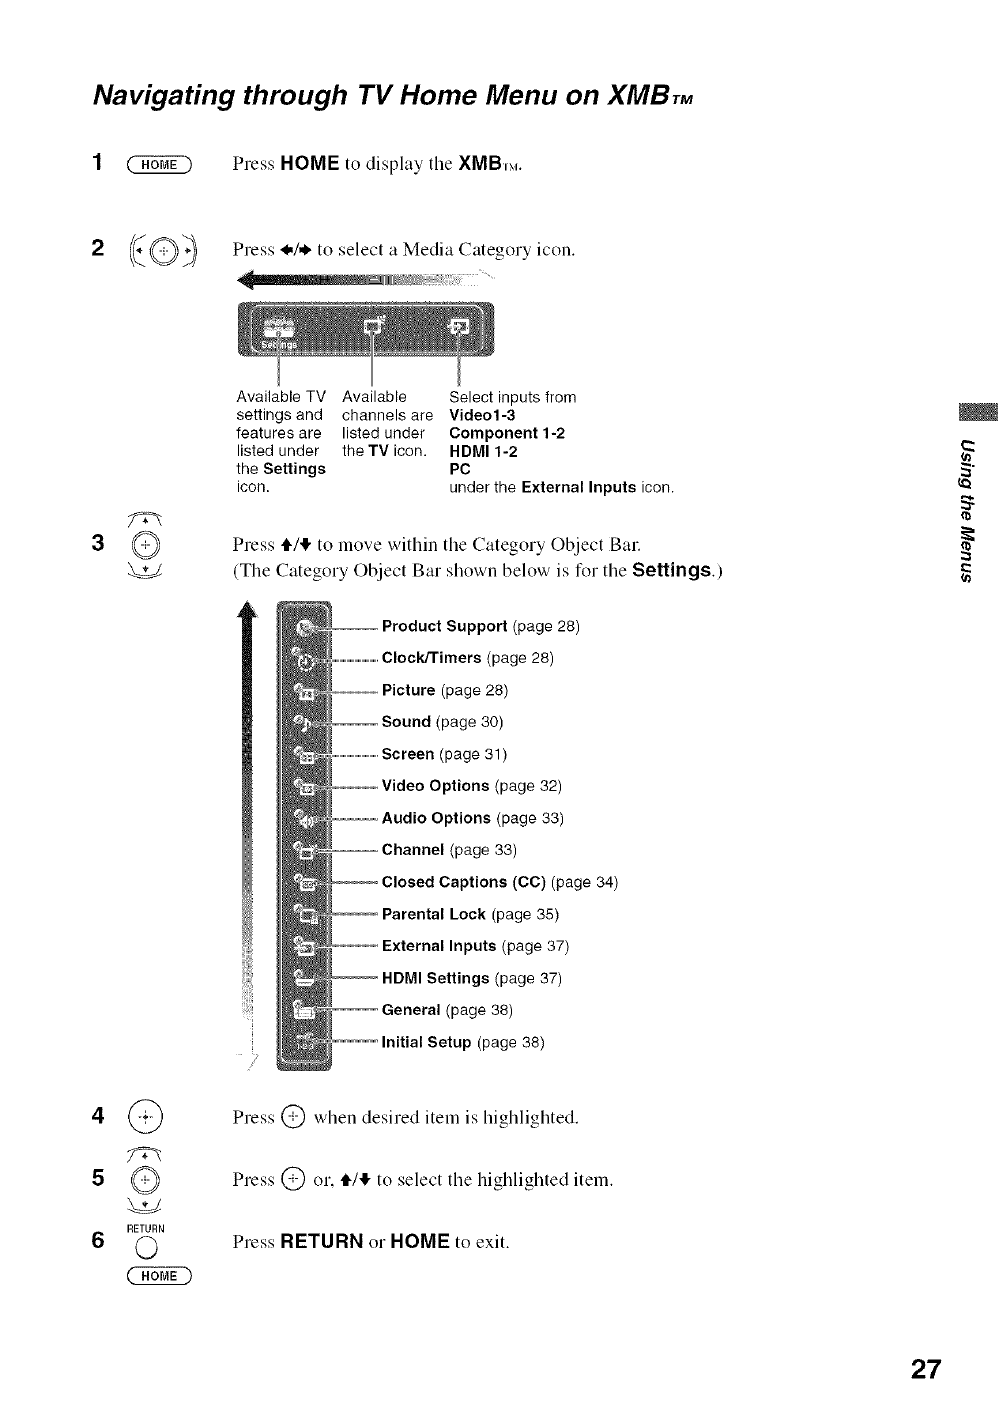
Navigating through TV Home Menu on XMBTM
1_Press HOME to display tile XMB,_,.
2(_@_ Press */* to select a Media Category icon.
37w_
®
4G
s®
RETURN
6©
Available TV Available Select inputs from
settings and channels are Video1-3
features are listed under Component 1-2
listed under the TV icon. HDMI 1-2
the Settings PC
icon. under the External Inputs icon.
Press ,i,/,!,to move within the Category Object Bin:
(The Category Object Bar shown below is for the Settings.)
,,,,,,,,,,,,,,,,,,.Product Support (page 28)
(page 28)
-- Picture (page 28)
(page 30)
(page 31)
Options (page 32)
ptions (page 33)
(page 33)
Captions (CC) (page 34)
Parental Lock (page 35)
External Inputs (page 37)
HDMI Settings (page 37)
_,page38)
p (page 38)
Press @ when desired item is highlighted.
Press @ or, 4"/,!,to select the higlflighted item.
Press RETURN or HOME to exit.
2
27
TV Setting Description
Contact Sony Sony contact information is available from this screen for your convenience. Your TV's
specific information such as Model Name, Serial Number, Software Version and
downloadable ratings if available from the TV is displayed here.
Signal Diagnostics Press @ to display the diagnostics intbrmation t\_r the current signal.
Current Time
Timer
Sleep Timer
Sets the current time (clay, hour, minutes, and AM/PM). The Timer feature will not be
available until you set Current Time.
1Use the i./'I'/<,/,€, button to highlight the Clock/Timers icon and press @.
2Use the i./,I,/<,/,€, button to set the current time.
3Press RETURN to display the confirmation screen.
4Select Yes or No to save changes you made. Selecting Yes will save your settings
and exit the Current Time setting screen.
Timer can be set, so the TV tunes to a certain channel as well as a specified volume at the
specified time you set. Alter this is executed the TV will turn off at the specified time you
set.
1Use the i./,I,/<,/* button to highlight the Timer icon and press @.
2Press @ to select On to set the timer.
3Use the i.l'!_l_,!,l, button to set the following: Day of the Week, Time, Duration,
Channel, and TV On Volume.
4Press RETURN to display the confirmation screen.
5Select Yes or No to save changes you made. Selecting Yes will save your settings
and will light up the TIMER LED. Exit the Timer setting screen.
Sets the time in minutes (Off, 15rain, 30rain, 45rain, 60rain, 90rain, or 120rain) that
yon want the TV to remain on before shutting off automatically. Can also be set using the
SLEEP button on the remote control (see page 20).
Picture Mode Vivid For enhanced picture contrast and sharpness.
Standard For standard picture settings. Recommended for home entertainment.
Cinema For viewing fihn-based content. Most snitable for viewing in a
theater-like environment.
Custom Allows you to store your preferred settings.
•Picture Mode for all inputs can also be accessed by pressing PICTURE on the remote control to directly toggle
the modes.
28
Reset Resets the current Picture Mode setting to the default values.
Backlight Brightens or darkens the backlight.
Picture Increases or decreases picture contrast.
Brightness Brightens or darkens the picture.
Color Increases or decreases color intensity.
Hue Increases or decreases the green tones.
Color Temperature Cool Gives the white colors a bluish tint.
White adjustment Neutral Gives the white colors a neutral tint.
Warm 1, 2 Gives the white colors a reddish tint.
Sharpness Sharpens or softens the picture.
Noise Reduction Reduces the noise level of connected equipment, and the VHF/UHF/CABLE input.
MPEG Noise Reduces the mosaic effect in MPEG-compressed video. Usefid for DVDs and Digital TV
Reduction channels.
DRC Mode High Density Creates a high-resolution picture with 4 x density, for high quality
sources (i.e., DVD player, satellite receiver).
Progressive Recommended for still pictures.
Off Turns off DRC Mode.
• DRC Mode is available only with 480i source.
• DRC Mode is not available when Game/Text Mode is set to On.
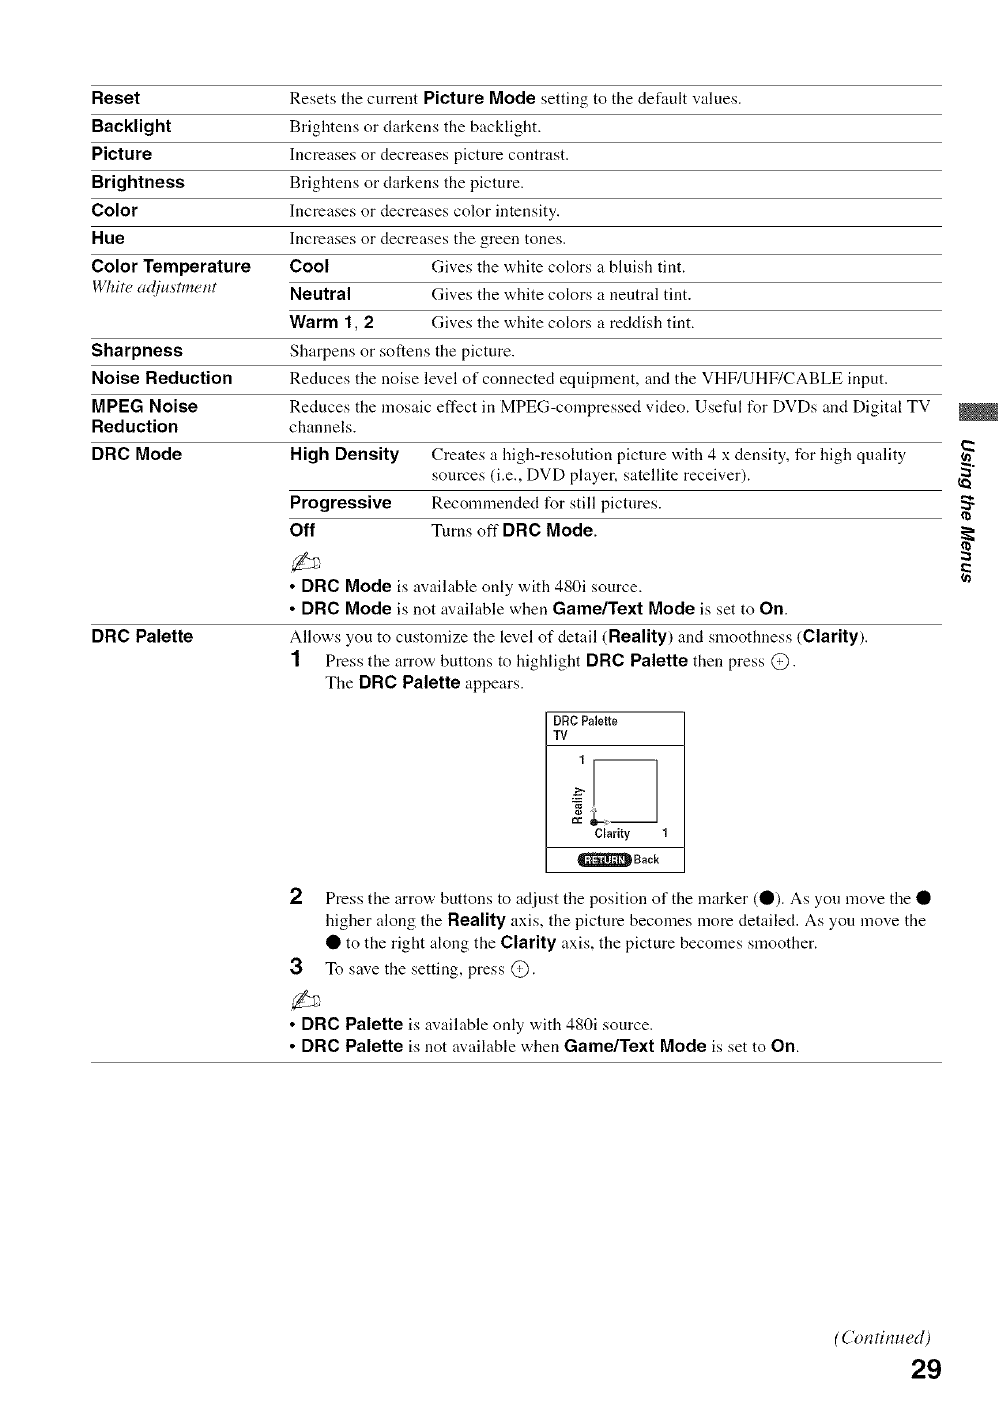
DRC Palette Mlows you to customize the level of detail (Reality) and smoothness (Clarity).
1 Press the arrow buttons to highlight DRC Palette then press @.
The DRC Palette appears.
DRC Palette
TV
Clarity 1
_Back
2Press the arrow buttons to adjust the position of the marker (O). As you move the •
higher along the Reality axis, the picture becomes more detailed. As you move the
• to the right along the Clarity axis, the picture becomes smoother.
3 To save the setting, press @.
• DRC Palette is available only with 480i source.
• DRC Palette is not available when Game/Text Mode is set to On.
2
(Continued)
29
Advanced Settings Reset Resets all the advanced settings to the default values.
Black Corrector Enhances black areas of the picture for stronger contrast.
Advanced C.E, Automatically optimizes the backlight and contrast. This setting is
(Advanced especially effective t_r dark picture scenes. It will increase the
Contrast contrast distinction of the dark picture scenes.
Enhancer)
Gamma Adjusts the balance bet'a,een the light and dark areas of the picture.
Clear White Emphasizes white and light colors.
Color Space Selects the range of color reproduction from Wide or Standard.
Live Color Makes colors more vivid and reproduces clear skill tones.
White Balance Adjusts the color temperature color by color.
Detail Enhancer Enhances the details of the picture.
Edge Enhancer Enhances the outline of the picture.
•Picture settings for all inputs can also be accessed by pressing OPTIONS on tile remote control, then selecting
Picture from the OPTIONS menu.
•Picture settings for PC Timings (HDMI or PC inpnt) are the same as other input modes (see above for details), but
Noise Reduction, MPEG Noise Reduction, DRC Mode, DRC Palette and Detail Enhancer are not
av:dlable.
Available Sound settings depend on the Speakers setting under Audio Options settings (page 33) or
headphone connection.
Sound Mode Dynamic Enhances treble and bass.
Standard Suitable for spoken dialog.
Custom Customizes the sound settings including the Sound Booster setting.
•Sound Mode can also be accessed by pressing OPTIONS on the remote control.
Reset Resets the current Sound Mode setting to tile default values.
Treble Increases or decreases higher-pitched sounds.
Bass Increases or decreases lower-pitched sounds.
Balance Emphasizes left or right speaker balance.
Surround S-FORCE Provides a virtual surround sound experience made possible using just
Front Surround two front speakers.
Off Select for normal stereo or mono reception.
Voice Zoom Adjusts the clarity of human voices. For example, if the voice of a news announcer is
indistinct, you can turn up this setting to make the voice clearer. Conversely, if yon are
•a,atching a sports program, you can turn do'an this setting to soften the voice of the
conlnlentator.
Sound Booster Sound Booster provides a fuller sound with a greater sense of depth and width, by
emphasizing the high and low frequency sounds. Select High or Low for the amount of
boost you desire while in Custom of Sound Mode. Selecting Off will bypass the
emphasis.
•Sound Booster is automatically set to High for Dynamic of Sound Mode and
Low for Standard of Sound Mode.
30
Steady Sound On Stabilizes the volume across all programs and commercials.
Off Turns off Steady Sound.
Volume Offset Adjusts tile volume level of tile current input (TV or video input) relative to other inputs.
•Sound settings for PC Timings (HDMI or PC input) are same as all other input modes (see above for details).
Wide Mode
Auto Wide
4:3 Default
Scl(,ct tlw {t_ff21ult,str_'_'n
motif" n) us_"fi)r 4:3
SO_IF( ('S
Display Area
Wide Zoom Fills the screen with minimum distortion.
Normal Displays the 4:3 picture in its original aspect ratio when the original
source is 4:3.
Full Enlarges the picture horizontally to flu the screen when the original
source is 4:3 (Standard-definition source). When the original source is
16:9 (High-definition source), select this mode to display the 16:9
picture in its original size.
Zoom Enlarges the picture horizontally and vertically to fill the screen while
maintaining the aspect ratio.
•Wide Mode can also be accessed by pressing WIDE on the remote control.
• See WIDE button description on page 22 for accessing Wide Mode.
On Automatically changes Wide Mode setting based upon content. If
frequent screen changes are disturbing to you, select Off.
Off Turns off Auto Wide. Choose a screen mode from the Wide Mode
option.
Wide Zoom Enlarges the 4:3 picture to fill the 16:9 screen, displaying as much of
the original image as possible.
Normal Displays the 4:3 picture in its original aspect ratio.
Full Enlarges the 4:3 picture horizontally only, to fill the screen.
Zoom Enlarges the picture horizontally and vertically to fill the screen while
maintaining the aspect ratio.
Off Continues using the current Wide Mode setting when the channel or
input is changed.
• 4:3 Default is not available when Auto Wide is set to Off.
• If4:3 Default is set to anything but Off, the Wide Mode setting applies only to the
current channel. When you change channels (or inputs), Wide Mode is automatically
replaced with the 4:3 Default setting for 4:3 sources. To retain the current Wide Mode
setting as channels and inputs are changed, set 4:3 Default to Off.
Full Pixel Displays the picture for 1080i or 1080p sources in its original size.
+1 Displays the original picture area. This setting can be selected for
HDMI input signals except for 1080i or 1080p signals.
Normal Displays the recommended picture area.
-1/-2 Enlarges the picture to hide the edge of the picture.
ro
(Continued)
31
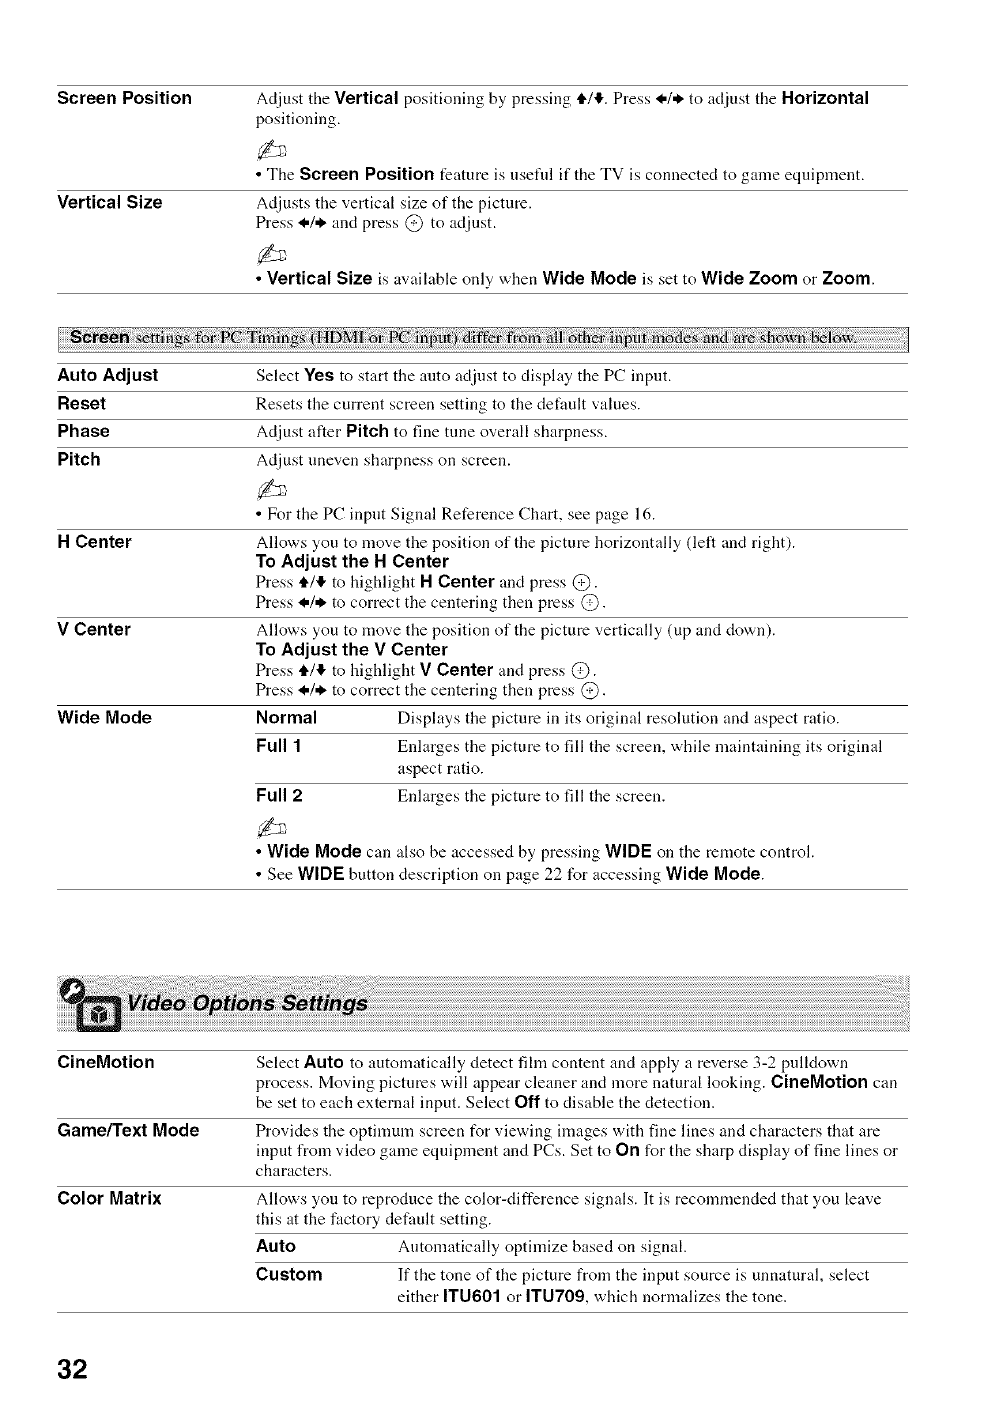
Screen Position Adjust the Vertical positioning by pressing tl44. Press _,/* to adjust the Horizontal
positioning.
• The Screen Position feature is usefld if the TV is connected to game equipment.
Vertical Size Adjusts the vertical size of the picture.
Press I,/* and press @ to adjust.
•Vertical Size isavailableonly when Wide Mode issetto Wide Zoom or Zoom.
Auto Adjust Select Yes to start tile auto adjust to display tile PC input.
Reset Resets the current screen setting to the default values.
Phase Adjust alter Pitch to fine tune overall sharpness.
Pitch Adjust uneven sharpness on screen.
• For the PC input Signal Reference Chart, see page 16.
H Center Allows you to move the position of the picture horizontally (left and right).
To Adjust the H Center
Press ,1,/,11'to highlight H Center and press @.
Press I,/* to correct the centering then press @.
V Center Allows you to move the position of the picture vertically (up and down).
To Adjust the V Center
Press tl4,1!,to highlight V Center and press @.
Press I,/* to correct the centering then press @.
Wide Mode Normal Displays the picture in its original resolution and aspect ratio.
Full 1 Enlarges the picture to fill the screen, while maintaining its original
aspect ratio.
Full 2 Enlarges the picture to fill the screen.
•Wide Mode can also be accessed by pressing WIDE on the remote control.
• See WIDE button description on page 22 for accessing Wide Mode.
CineMotion Select Auto to automatically detect film content and apply a reverse 3-2 pulldown
process. Moving pictures will appear cleaner and more natural looking. CineMotion can
be set to each external input. Select Off to disable the detection.
Game/Text Mode Provides the optimum screen t_r viewing images with fine lines and characters that are
input from video game equipment and PCs. Set to On for the sharp display of fine lines or
characters.
Color Matrix Allows you to reproduce the color-difference signals. It is recommended that you leave
this at the factory default setting.
Auto Automatically optimize based on signal.
Custom If the tone of the picture from the input source is unnatural, select
either ITU601 or ITU709, which normalizes the tone.
32
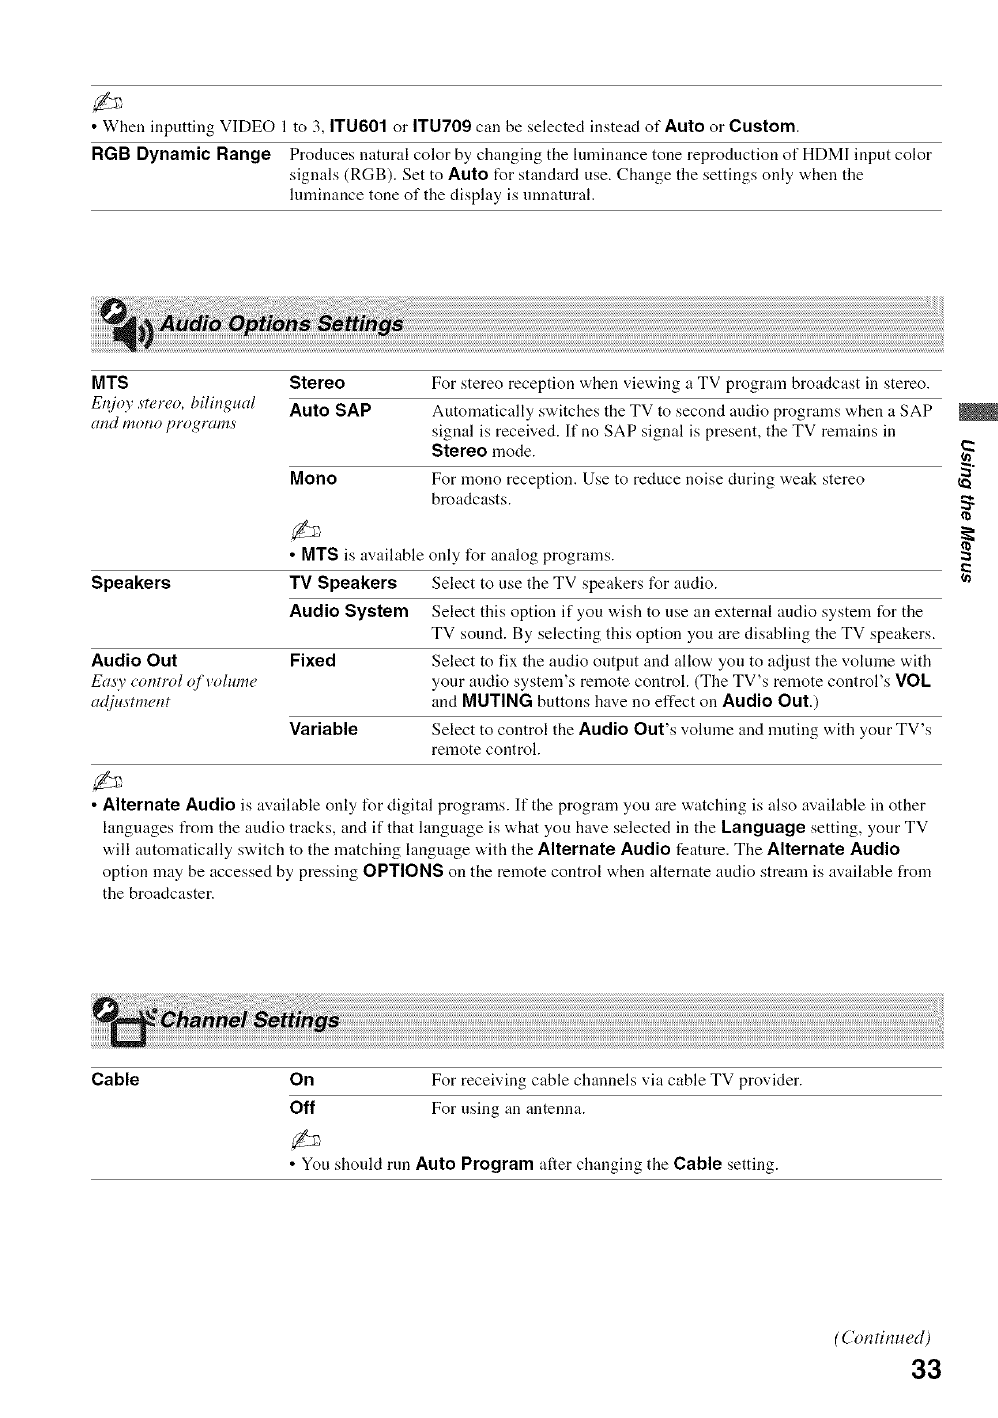
• When inputting VIDEO 1 to 3, ITU601 or ITU709 can be selected instead of Auto or Custom.
RGB Dynamic Range Produces natural color by changing the lmninance tone reproduction of HDMI input color
signals (RGB). Set to Auto t_r standard use. Change the settings only v,,hen the
luminance tone of the display is unnatural.
MTS Stereo For stereo reception when viewing a TV program broadcast in stereo.
Et_]o 3stereo, bilingual Auto SAP Automatically switches the TV to second audio programs when a SAP
and mono program.s signal is received. If no SAP signal is present, the TV remains in
Stereo mode.
Mono For mono reception. Use to reduce noise during "a,eak stereo
broadcasts.
• MTS is available only for analog programs.
Speakers TV Speakers Select to use the TV speakers for audio.
Audio System Select this option if you wish to use an external audio system for the
TV sound. By selecting this option you are disabling the TV speakers.
Audio Out Fixed Select to fix the audio output and allow you to adjust the volume with
Ea_s3control qfvolume your andio system's remote controh (The TV's remote control's VOL
a(ljus'tment and MUTING buttons have no effect on Audio Out.)
Variable Select to control the Audio Out's volume and nmting with your TV's
remote control.
•Alternate Audio is available only for digital programs. If the program you are watching is also available in other
languages from the andio tracks, and if that language is what you have selected in the language setting, your TV
will automatically switch to the matching language with the Alternate Audio feature. The Alternate Audio
option may be accessed by pressing OPTIONS on the remote control when alternate audio stream is available from
the broadcaster.
Cable On For receiving cable channels via cable TV provider.
Off For using an antenna.
• You should run Auto Program after changing the Cable setting.
(Continued)
33

Auto Program
Add Digital Channels
Show/Hide Channels
Edit Channel Labels
Automatically sets up the channel list on the TV l\_r all receivable channels. Channel
scanning will be based on On/Off of gable.
1Select Auto Program.
2sdeot OK to start Auto Program. When Auto Program is completed, tile screen
will display the number of channels found.
3Press RETURN to exit Auto Program.
•Running Auto Program ,a,ill clear Favorites list.
• If you run Auto Program again, previously scannedchannels will be overwritten with
tile newly scannedchannels.
Select to add digital channels. Be sure to have the Cable option selected appropriately for
the signal source. (Usefifl for antenna installation)
Allows you to show or hide channels when yon surf with the CH +/- button or in the TV
channel list on the XMB_x_.
1Press 11411,to scroll through the channels until you highlight the channel to show or
hide.
2Press @ to select Shown or Hidden.
To show or hide more channels, repeat steps 1-2.
•Hidden channels can be accessed by entering the channel number with 0-9 buttons on
the remote control.
Assigns labels (such as station call letters) to channel numbers.
1Press t1.1,1!,to scroll through the channel numbers. Then press @ to select the channel
number to assign a label.
2Press t1.1!1,to scroll through the label characters (A-Z, 0-9, etc.). Press * to move to
the next character. Repeat to add up to 7 characters to the label. Press @ to set it.
To assign labels to more channels, repeat steps 1-2.
CC Display Allows you to turn On or Off the Closed Captions (CC) feature.
Analog CC For the basic analog (EIA-608) closed caption options.
CC1, CC2, Displays a printed version of the dialogue or sound effects of a
CC3, CC4 program. (Should be set to CC1 for most programs.)
Text1, Text2, Displays network/station information presented using either half or
Text3, Text4 the whole screen (if available).
Digital CC For both analog (EIA-608) and digital (EIA-708) closed caption options.
Select from Service 1-6 and CC1-4 (advanced digital closed caption options).
Display Options Customizes the Closed Captions (CC) displays with Text, Character Size,
Character Style, Character Color, Character Opacity, Edge Type, Edge Color,
Background Color and Background Opacity.
•Closed Captions (CC) can be tnrned on and off directly by pressing CC on tile remote control.
34
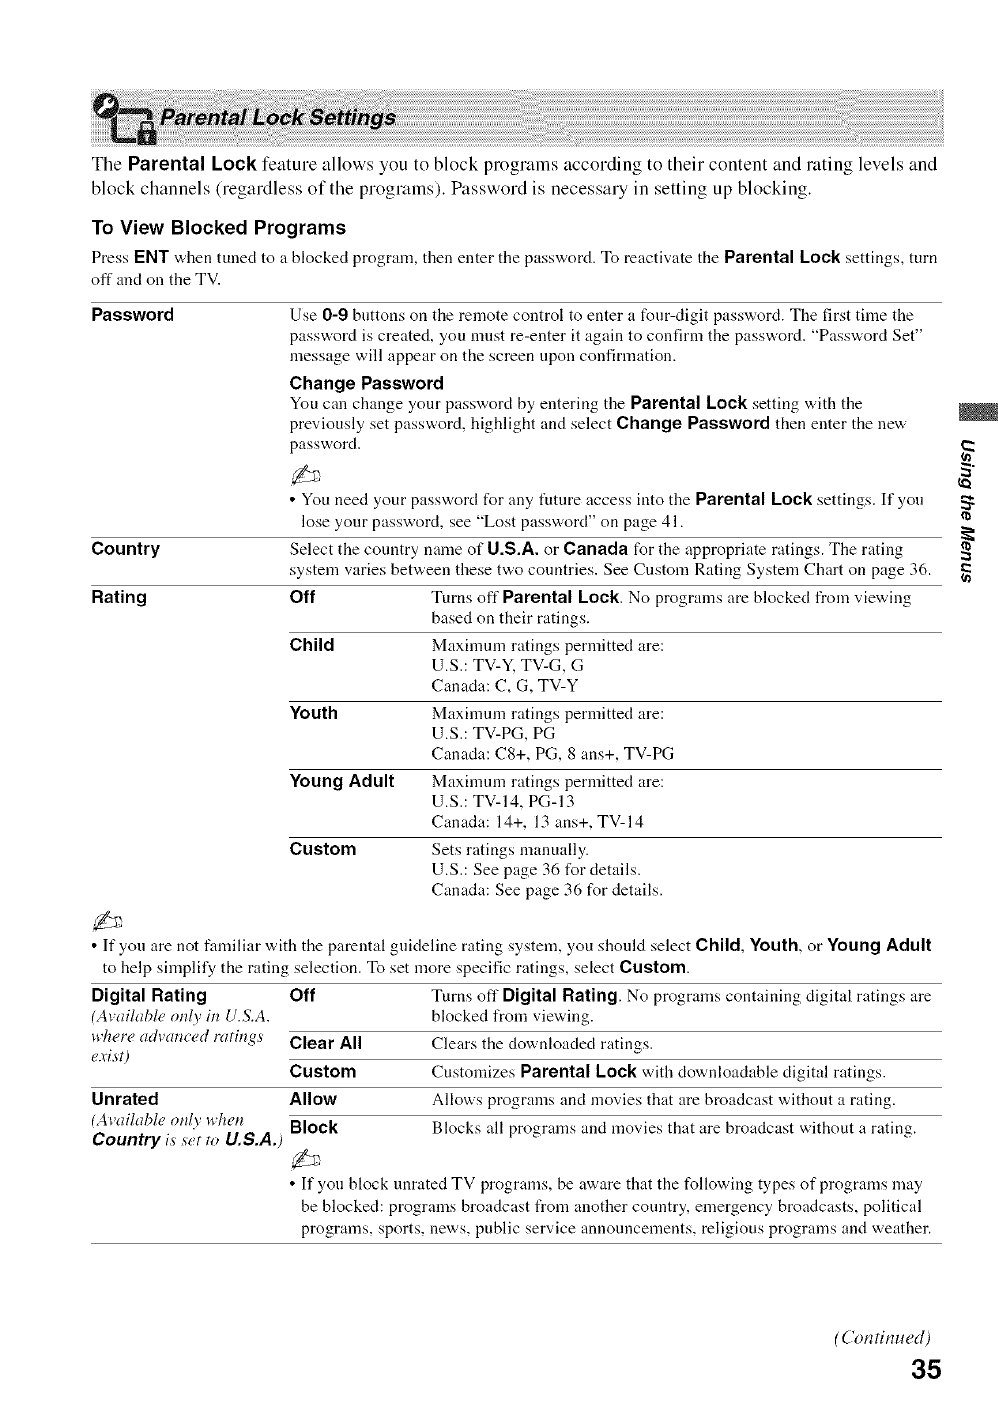
The Parental Lock feature allows you to block programs according to their content and rating levels and
block channels (regardless of the programs). Password is necessary in setting up blocking.
To View Blocked Programs
Press ENT when tuned to a Mocked program, then enter tile password. To reactivate the Parental Lock settings, turn
off and on the TV.
Password Use 0-9 buttons on the remote control to enter a four-digit password. The first time the
password is created, you must re-enter it again to confirm the password. "Password Set"
message will appear on the screen upon confirmation.
Change Password
You can change your password by entering the Parental Lock setting with the
previously set password, highlight and select Change Password then enter the new
password.
• You need your password for any future access into the Parental Lock settings. If you
lose your password, see "Lost password" on page 41.
Country Select the country name of U.S.A. or Canada for the appropriate ratings. The rating
system varies between these two countries. See Custom Rating System Chart on page 36.
Rating Off Turns off Parental Lock. No programs are blocked from viewing
based on their ratings.
Child Maximum ratings permitted are:
U.S.: TV-Y, TV-G, G
Canada: C, G, TV-Y
Youth Maximum ratings permitted are:
U.S.: TV-PG, PG
Canada: C8+, PG, 8 ans+, TV-PG
Young Adult Maximum ratings permitted are:
U.S.: TV-14, PG-13
Canada: 14+, 13 ans+, TV-14
Custom Sets ratings manually.
U.S.: See page 36 for details.
Canada: See page 36 for details.
• If you are not familiar with the parental guideline rating system, you should select Child, Youth, or Young Adult
to help simplify the rating selection. To set more specific ratings, select Custom.
Digital Rating Off Turns off Digital Rating. No programs containing digital ratings are
(Alailable on! 3in U.S.A. blocked from viewing.
where advanced ratings Clear All Clears the downloaded ratings.
exist)
Custom Customizes Parental Lock with downloadable digital ratings.
Unrated Allow Allows programs and movies that are broadcast without a rating.
(Available on@ when Block Blocks all programs and movies that are broadcast without a rating.
Country is set to U.S.A.)
• If you block unrated TV programs, be aware that the following types of programs may
be blocked: programs broadcast from another country, emergency broadcasts, political
programs, sports, news, public service announcements, religious programs and weather.
_o
(Continued)
35
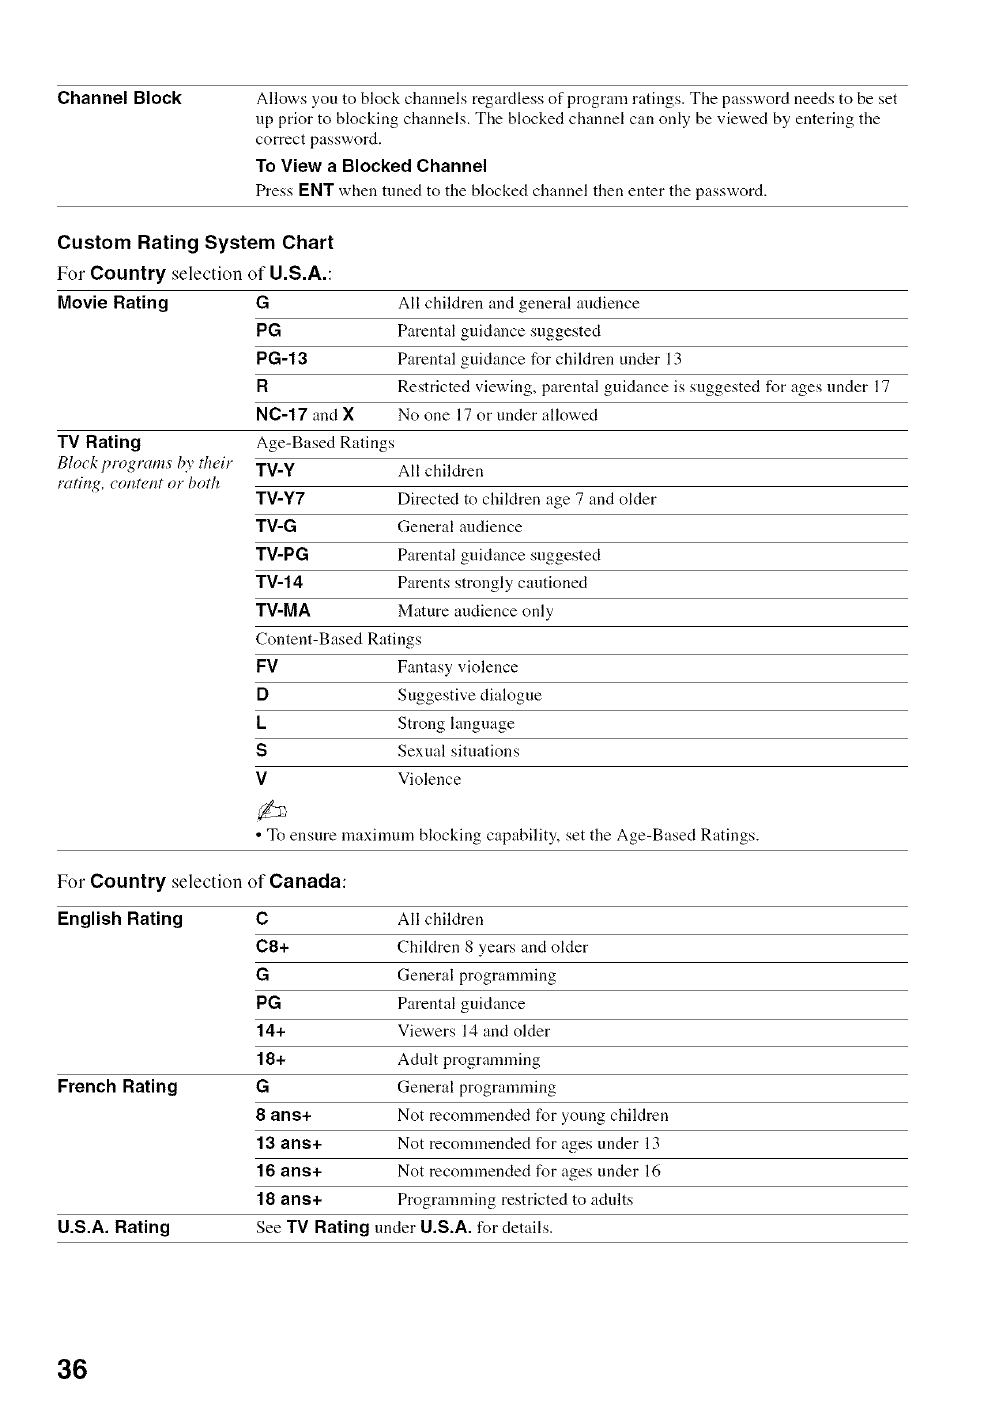
Channel Block Allows you to block channels regardless of program ratings. The password needs to be set
up prior to blocking channels. The blocked channel can only be viewed by entering the
correct password.
To View a Blocked Channel
Press ENT when tuned to tile blocked channel then enter the pass'a, ord.
Custom Rating System Chart
For Country selection of U.S.A.:
Movie Rating G All children and general audience
PG Parental guidance suggested
PG-13 Parental guidance for children under 13
RRestricted viewing, parental guidance is suggested for ages under 17
NC-17 and X No one 17 or under allowed
TV Rating Age-Based Ratings
Bloc k program._ b), their TV-Y All children
rating, cont_,nt or both TV-Y7 Directed to chiktren age 7 and older
TV-G General audience
TV-PG Parental guidance suggested
TV-14 Parents strongly cautioned
TV-MA Mature audience only
Content-Based Ratings
FV Fantasy violence
DSuggestive dialogue
LStrong language
SSexual situations
V Violence
•To ensure maximum blocking capability, set the Age-Based Ratings.
For Country selection of Canada:
English Rating CAll children
C8+ Chiktren 8 years and older
GGeneral programming
PG Parental guidance
14+ Viewers 14 and older
18+ Adult programming
French Rating G General programming
8 arts+ Not recommended for young children
13 ans+ Not recommended for ages under 13
16 ans+ Not recommended for ages under 16
18 ans+ Programming restricted to adults
U.S.A. Rating See "IV Rating under U.S.A. for details.
36
Label Inputs You can label your inputs with the name of equipment you have connected.
To assign your own label or Skip the input:
1Press t1.1!1,to highlight the video input (Video 1-3, Component 1-2 and HDMI 1-
2, PC), then press @ to select the desired input.
2Press t1¢4 to highlight the disphty label you want to assign, then press @.
• You can select from the following labels for each input.
Video 1-3, Component 1-2 and HDMI 1-2: -, DVD, Cable Box, Satellite, BD,
VCR Receiver, DVR, Game, Camcorder, PC, Skip.
PC:-, Skip.
• "-" indicates that no labels are assigned.
2
HDMI inputs of this TV will recognize and colnmunicate with other Sony equipment equipped with
HDMI Control.
HDMI Control On/Off feature allows your TV to communicate with other equipment that supports
HDMI Control.
Device Auto Power Off Select On to have your connected HDMI Control equipment to power off antomatically
when the TV is turned off. Select Off to disable this function.
TV Auto Power On Select On to control your TV's power on from your connected HDMI Control equipment.
Select Off to disable this function.
Device List Displays a list of HDMI Control equipment connected to the TV.
37
Language
Info Banner
Power Saving
Light Sensor
PC Power
Management
Select the hmguage of your choice from English, Espahol and Franqais to be used for
displaying all the on-screen settings.
Displays the program name and the program information such as program title and
program rating (if available from the broadcaster) when option is set to On. Select Off for
minimal display information. Selecting Off will not completely disable the banner
display. Info Banner also appears on the screen each time the channel is changed or
DISPLAY on the remote control is pressed.
•To see the rating information on the banner, Info Banner setting must be set to On.
Reduces the power consumption by adjusting the backlight brightness. This also enhances
the black level. Select from Off, Low, High and Picture Off.
Enables the automatic picture (screen) brightness control. Light Sensor measures the
room brightness which allows the TV to automatically adjust the backlight brightness
based on the picture settings and the anabient room light conditions.
• Be sure not to put anything around the sensor, as its function may be affected (see
page 24).
• In low light the range of the backlight control is reduced when Light Sensor is set to
On.
On Automatically enters to standby mode when there is no signal input
for more than 30 seconds. The STANDBY LED on the front panel
will illuminate when PC Power Management switches the TV to
standby mode.
Off Turns off PC Power Management.
• To bring the TV out of standby mode and recover TV features, press POWER on the
remote control.
•PC Power Management is not VESA-compliant.
If you have missed the Initial Setup when you first connected the TV or if you want to scan all receivable
channels, you can run the Initial Setup. Follow the instructions on the screen. Settings such as picture and
sound adjustments will not be affected by this Initial Setup.
•Favorites list will be cleared each time you run the Initial Setup.
38
Troubleshooting
If you have questions, service needs, or require
technical assistance related to the use of your
Sony TV. please visit our website or call one of
the following numbers:
htt p://www.sony.com/tvsupport
1-800-222-SONY(7669) for US Support
1-877-899-SONY(7669) for Canadian Support
iili___i_i__j________________________________________________________________________________________________________________________________________________________________________________________________________________________________________________________________________________________________________________!,_i!_!!___!!i_ii_!!_!_!___ _!_i_i_:_ii_i6_i!!_i!_i!_i!_i!_i!_i!_i!_i!_i!_i!_i!_i!_i!_i!_i!_i!_i!_i_i!_i_i_iii_!_ii_iiiiiiiiiiiii_iii_i!i_i_i_iii_iii_i!i_i_i_iii_iii_i!i_i_i_iiiiiiiiiiiiii!i_;iii_i_i_!i_i_!!_!_!i_!_!_!_!_!_!_!_!_!_!_!_!_!_!_!_!_!_!_!_!_!_!_!_!_!_!_!_!_!_!_!_!_!_!_!_!_!_!_!_!_!;_ii_!_i_!i!!i!i!i_i!_!!_ii_ii!i_¸__ "_iii!i!i_!_ii!jil
No picture
No picture • Check the Power Saving settings (see page 38).
Cannot receive any channels • Make sure the power cord is connected securely.
• Turn on the power of the TV.
• Check antenna/cable connections.
• Make sure the Cable setting is correct for your TV signal source.
TV is locked to one channel • Perform Auto Program to add receivable channels that are not present in the
TV's memory (see pages 19 and 34).
Cannot receive or select • Perform Auto Program to add receivable channels that are not present in the
channels TV's memory (see pages 19 and 34).
• To receive or select cable channels, make sure that Cable in the Channel
settings is set to On (see page 33). To receive or select UHF channels over an
antenna, make sure Cable is set to Off.
The TV turns off • Check if Sleep Timer is activated, or confirm the Duration setting of Timer
automatically (see page 28).
• Check PC Power Management in the General Settings (see page 38).
No picture from some video • Check the connection between the optional video equipment and the TV.
sources • Press INPUT on the relnote control (see page 23).
• Press HOME on the remote control. Select your desired input from the
External Inputs list.
Poor picture
The quality of the images is • Picture quality depends on the signal content. See Quick Setup Guide
not as good as what I saw at (supplied) to display the best possible picture t_r that signal.
the store
Double images or ghosts • Check antenna/cable connections.
• Check the antenna location and direction.
Only snow and noise appear • Check if the antenna is broken or bent.
on the screen • Check if the antenna has reached the end of its serviceable life. (3-5 years in
normal use, 1-2 years at the seaside.)
Dotted lines or stripes • Keep the TV away from noise sources such as cars, motorcycles, or hair-dryers.
• If using the 300-ohm twin lead, move the excess lead away from the TV or try
using the 75-ohm coaxial cable (not supplied) instead.
No color/Dark picture/Color is •Press PICTURE to select the desired Picture Mode (see page 28).
not correct/The picture is too • Adjust the Picture Mode options in the Picture settings (see page 28).
bright • If you set Power Saving to LOW or High, it will enhance the black level (see
page 38).
Noisy picture • Make sure that the antenna is connected using the 75-ohm coaxial cable (not
supplied).
• Keep the antenna cable away from other connecting cords.
• To avoid TV interference, make sure to use an undamaged antenna cable.
0
"t
o
(Continued)
39
No sound/Noisy sound
Good picture, no sound • Check the vohnne control.
• Press MUTING or VO1 + so that "Muting" disappears from the screen
(see page 22).
• Disconnect your headphones.
•Set Speakers to TV Speakers in the Audio Optionssettings (see page 33).
If it is set to Audio System, sound is not output from the TV's speakers
regardless of the TV's volume control.
Audio noise •Make sure that the antenna is connected using the 75-ohm coaxial cable (not
supplied).
• Keep the antenna cable away tYom other connecting cords.
• To avoid TV interference, make sure to use an undamaged antenna cable.
PC Input
No Picture /No Signal • Confirm the PC is correctly connected to the TV with either the PC IN (with
HDI5-HDI5 cable with ferrite core (not supplied)) or with the HDMI IN.
• Ensure the output signal from the PC is one of the formats listed on page 16.
• Turn the PC oft'. Confirm the PC connection and restart the PC. Plug and play
will auto-detect the TV and correctly set up PC tinting.
• Verify PC Power Management is activated (see page 38).
Poor Picture •Adjust the resolution (see page 16).
•Adjust Pitch and Phase.
General
Wide Mode changes • The current Wide Mode setting is automatically replaced with the 4:3
automatically Default setting when you change the channel or video input, if 4:3 Default in
the Screen settings is set to other than Off. If you want to lock in Wide Mode
selected with the WIDE button on the remote control, set 4:3 Default to Off in
the Screen settings (see page 31 ).
• Check Auto Wide in the Screen settings (see page 31).
Suddenly the picture gets • The picture gets smaller during the commercials, this is due to the method the
smaller provkter broadcasts their contents. When HD content channels switch to SD
definition content (commercials), the picture may be small with a black border.
"Black box" on screen •You have selected a text option and no text is available (see page 34). To turn off
this feature, set CC Display to Off. If you were trying to select closed
captioning, select CC1 instead of Text1-4.
Black bands appear at the • Some wide screen programs are filmed in aspect ratios that are greater than 16:9
edges of the screen (this is especially common with theatrical releases). Your TV will show these
programs with black bands at the top and bottom of the screen. For more
details, check the documentation that came with your DVD (or contact your
program provider).
• Programs in 4:3 aspect ratio will have bands on left and right sides of the
screen.
Certain programs on DVD or • This is clue to the digital compression of the source content used by certain
other digital sources display a digital broadcasts and DVDs which may cause your TV's screen to display less
loss of detail, especially during detail than usual, or cause artifacts (small blocks or dots, pixelations) to appear
fast-motion or dark scenes on your screen. These signal compressions are more visible and are dependent
on the clarity and resolution of the television.
• Set the Game/Text Mode to ON (see page 32).When playing a video game,
there is delay between the
remote control and the actual
video
40
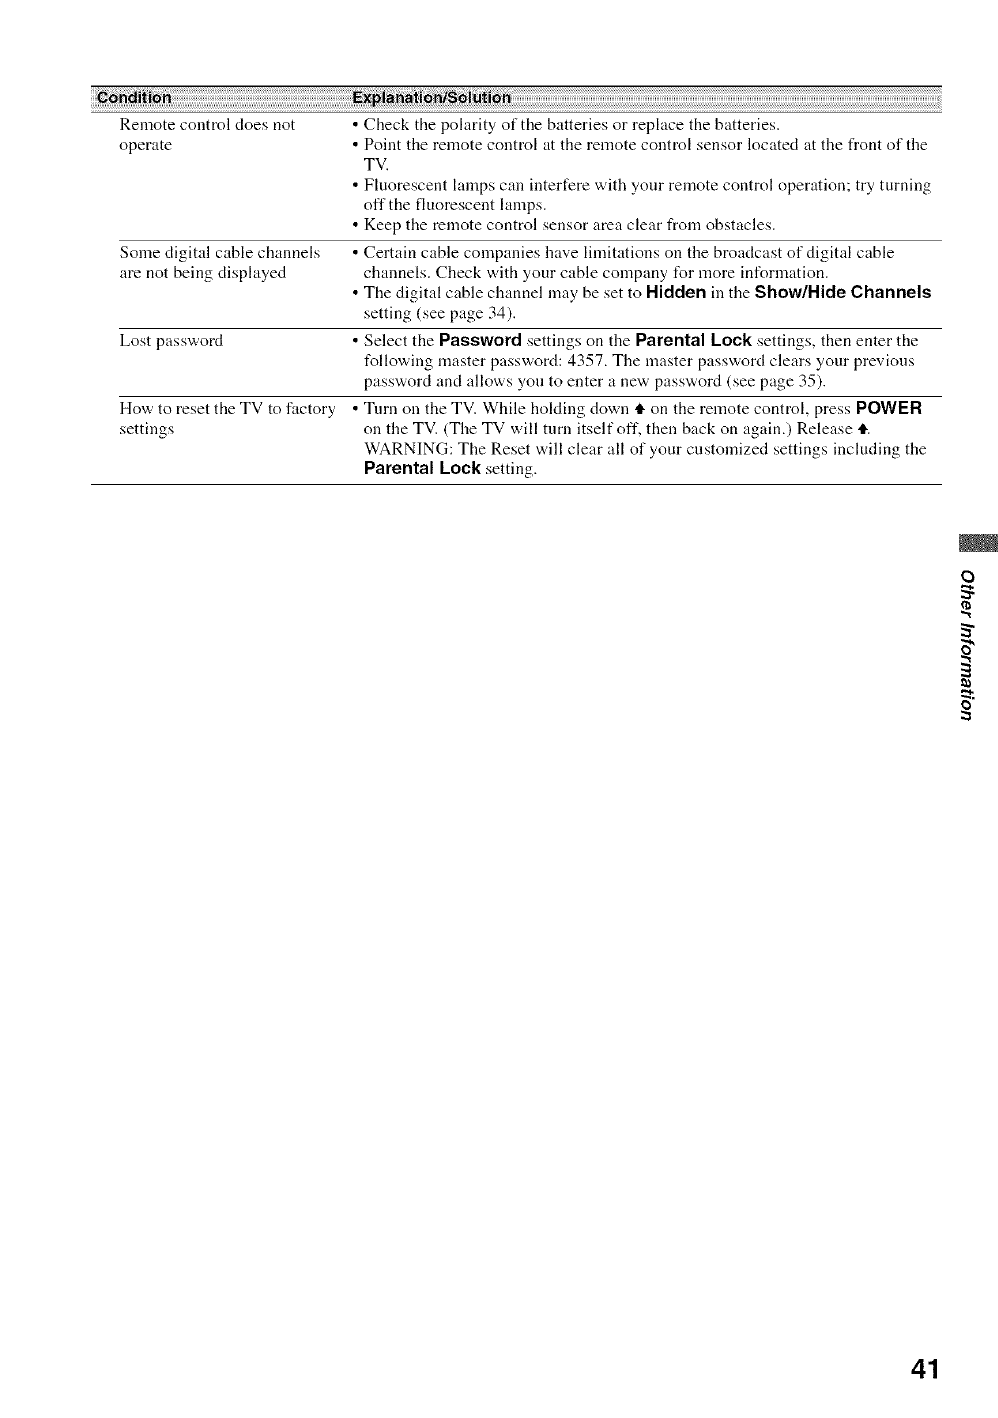
Remote control does not
operate
Some digital cable channels
are not being displayed
Lost password
How to reset the TV to factory
settings
• Check the polarity of the batteries or replace the batteries.
• Point the remote control at the remote control sensor located at the front of the
TV.
• Fluorescent lamps can interfere with your remote control operation; try turning
off the fluorescent lamps.
• Keep the remote control sensor area clear from obstacles.
• Certain cable companies have limitations on the broadcast of digital cable
channels. Check with your cable company for more information.
• The digital cable channel may be set to Hidden in the Show/Hide Channels
setting (see page 34).
• Select the Password settings on the Parental Lock settings, then enter the
following master password: 4357. The master password clears your previous
password and allows you to enter a new password (see page 35).
• Tnm on the TV. While hokting down tl. on the remote control, press POWER
on the TV. (The TV will turn itself off, then back on again.) Release tl..
WARNING: The Reset will clear all of your customized settings including the
Parental Lock setting.
O
S
"t
o
41

Specifications
_;_L_;_ ____ ¸¸¸¸_:_;_ _ ____
System
Television system NTSC: American TV standard
ATSC (8VSB lerreslrial): ATSC compliant 8VSB
QAM on cable: ANSI/SCTE (}7 2tIIX) (Does not indude CableCARD lhnctionalily)
(-!hannel coverage Analog terrestrial: 2-69 /Digital terrestrial: 2-69
Analog Cable: 1-125 /Digital Cable: I - 135
Panel syslem LCD (Liquid CiTstal Display) Panel
Speaker OtllptlI I 1 W + I I W
Input/Output jacks
Anlenna 75-ohm external lerminal lot VHF/UHF
VIDEO IN I12/3 S VIDEO (4-pin mini DIN)(VIDEO 1 only): Y: l.t) Vp-p, 75 ohnls unbalancvd, sync negative /
C: (1.286 Vp-p (Bursl signal), 75 ohms
VIDEO: I Vp-p, 75 ohms unbalanced, sync negative
AUDIO: 5(_1 nlVrms ( l t)()_/_ modulalion)/hnpedance: 47 kilohms
COMPONENT IN I/2 YPBPP. (Component Video): Y: l.(/Vp-p, 75 ohms unba[anced, sync negative /PB: 0.7 VI> p, 75 ohms /
PP.: 0.7 Vp-p, 75 ohms/Signal formal: 480i, 480p, 720p, 1080i, 1080p
AUDIO: 5(10 mVrms [ l t)()_/_modulalion)/hnpedance: 47 kilohms
HDMI IN ]/2 HDMI: Video: 48(1i. 480p, 720p, l(/8(ti, 1tI8(/p, l II80/24p /Audio: Two channel linear PCM 32_ 44.1 and 48 kHz,
16, 20 and 24bits, Dolby Digital
AUDIO (HDMI IN 1 only): 500 mVrms (100c/_ modulation)/hnpedance: 47 kilohms
AUDIO OUT 500 mVrms (lt)OC/_modulation) (Fixed) /1 Vrms al the ma×imum volume setting (Variable)
DIGITAL OUT (OPTICAL) Oplical Digital Audio Output (PCM/Dolby digilal)
PC IN D-sub 15-pin, ana[og RGB, (}.7 Vp-p, 75 ohms, positive
See the PC Input Signal Ret_rence Chart on page 16.
PC AUDIO INPUT Stereo mini jack, 500 mVrms, 1 kilohm
Headphones Slereo mini jack /hnpedance: _>16 ohms
Power and others
Power requirement 120 V-240 V AC, 5(1160 Hz
Power cons/lmplion
in use 220 w 260 w
ill slandby All models less lhan 0,4 W
Screen size (inches 40 46
measured diagonally)
Display resolution 1.92(/dots x 1,080 lines
(horizontal x vertical)
Speaker Full range: 42 x 150 nml (15/8 × 57/8 inches) [2) Full range: 55 x 155 mm (21/8 × 61/8 inches) (2)
Dimensions (W x H x D)
with stand (ram) 992 x 688 × 265 1135 x 779x 306
(inches) 39 1/8 x 27 I/g x l(/I/2 44 3/4 × 30 3/4 × 12 I/8
without sland (ram) 992 x 643 × 122 1135 x 734 x 122
(inches) 39 1/8 x 25 3/8 x 4 7/,_ 44 3/4 x 29 x 4 7/8
wall-mount hole pattern 3(1(Ix 200 3IX}× 200
( m m )
Mass
with stand 25.0 kg 32.1)kg
561b. 71 lb.
without sland 21.5 kg 28.0 kg
48 lb. 62 lb.
42
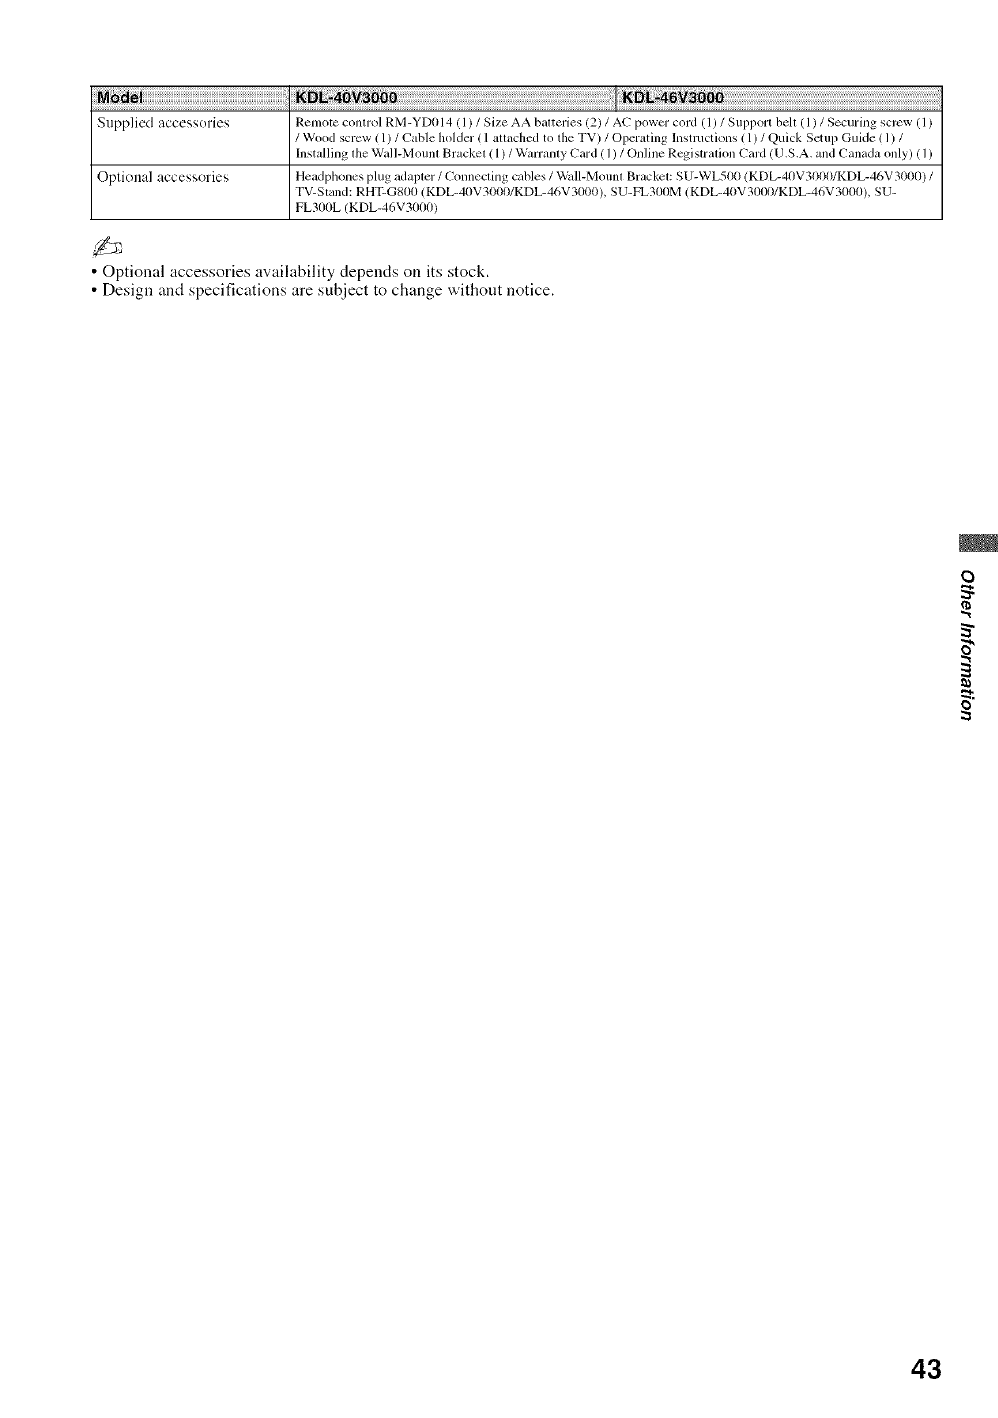
i!i!i!_!_j_!!!!!!!!!!!!!!!!!!!!!!!!!!!!!!!!!!!!!!!!!!!!!!!!!!!!!!!!!!!!!!!!!!!!!!!!!!!!!!!!_'i!i!i!_!_a__I_I_I_I_I_I_I_I_I_I_I_I_I_I_I_I_I_I_I_I_I_I_I_I_I_I_I_I_I_I_I_I_I_I_I_I_I_I_I_I_I_I_I_I_I_I_I_I_I_I_I_I_I_I_I_I_I_I_I_I_I_I_I_I_I_I_I_I_I_I_I_I_I_I_I_I_I_I_I_I_I_I_I_I_I_I_I_I_I_I_I_I_I_I_I_I_I_I_I_I_I_I_I_I_I_I_I_I_I_I_I_I_I_I_I_I_I_I_I_I_I_I_iiii_!_!_!_:i_i___
Supp]iecl accessories Remote control RM-YD014 ( 1) /Size AA baueries (2) /AC power cord ( 1) /Support bell (1 ) /Securing screw ( 1)
/Wood screw (1) /Cable bolder (1 attached to the TV) / Operating lnstluctions (1) /Quick Setup Guide ( 1) /
Installing the Wall-Mount Bracket ( 1) /Warranty Card ( 1) /Online Registration Card (U.S.A. and Canada only) ( 1)
Opliona] accessories Headphones plug adapter/Connecting cables /Wall-Mount Bracket: SU-WLS00 (KDL-40V3000/KDL-46V 3000) /
TV-Sland: RHT-G8(_} (KDL-40V3000/KDL-46V3000), SU-FL3(_JM (KDL-40V3(X)0/KDL-46V3(_}), SU-
FL300L (KDL-46V3000)
• Optional accessories availability depends on its stock.
• Design and specifications are subject to change without notice.
o
43
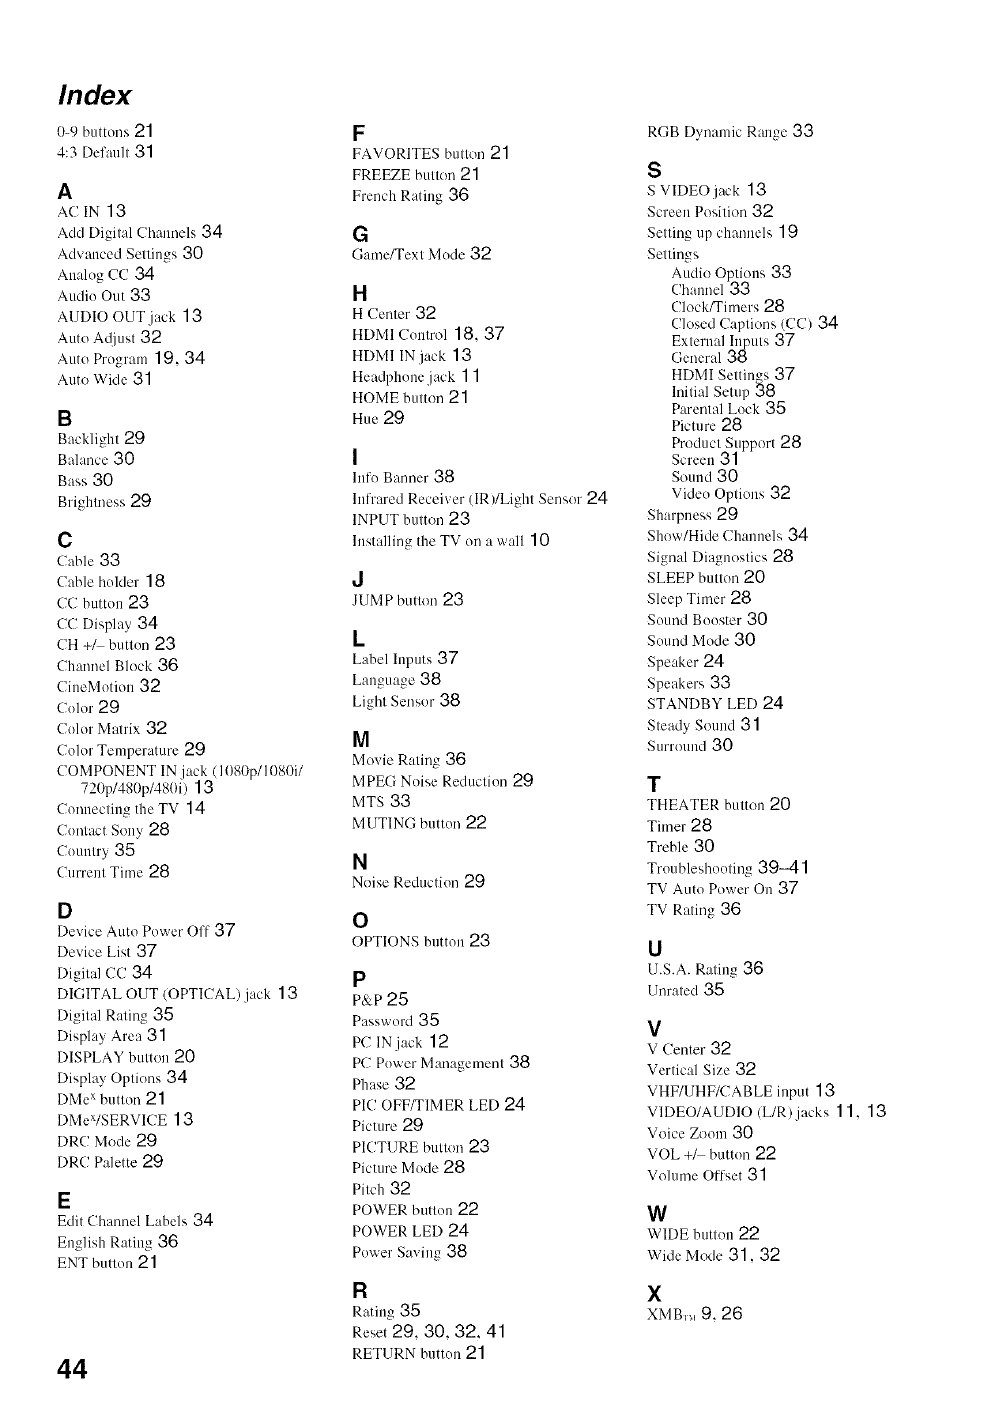
Index
0-9 buttons 21
4:3 Default 31
A
ACIN 13
Acid Digital Chalmels 34
Advanced Settings 30
Analug CC 34
Audio Out 33
AUDIO OUT jack 13
Auto Atliust 32
Auto Prugmm ] 9, 34
Auto Wide 31
B
Backlight 29
Balance30
Bass30
Brightness 29
C
Cable 33
Cable huMer 18
CC butt(((( 23
CC Display 34
CH +_ button 23
Channel Block 36
CiueMotion 3P
Culor 29
Culor Malrix 32
Color Temperature 29
COMPONENT IN jack (1080p/1080i/
721)p/480p/4811i) 13
Connecting the TV 14
Cuntact Sony 28
Cuuutry 3{3
Current Time 28
D
Device Auto Power Off 37
Device List 37
Digital CC 34
DIGITAL OUT (OPTICAL) jack 13
Digital Rating 35
Display Area 31
DISPLAY button PO
Display Options 34
DMe ×button 21
DMeX/SERVICE 13
DR(! Mode 29
DR(! Palette 29
E
Edit Channel Labels 34
English Rating 36
ENT button 21
44
F
FAVORITES button 21
FREEZE button 21
French Rating 36
G
Game/Text Mude 32
H
H Center 32
HDMI Conlrol 18, 37
HDMI IN jack 13
Headphone jack 1 1
HOME button 21
Hue 29
I
hffu Banner 38
hffrared Receiver (IR)/Light Sensor 24
INPUT button 23
Installing the TV on a wall 10
d
JUMP button 23
I_
Label Inputs 37
Language 38
Light Sensor 38
M
Movie Rating 36
MPEG Noise Reductiun 29
MTS 33
MUTING buttun PP
N
Noise Reductiun 29
O
OPTIONS button 23
P
p&p25
Password 35
PC lNjack 12
PC Puwer Management 38
Ph,se 32
PIC OFF/TIMER LED 24
Picture 29
PICTURE button 23
Picture Mode 28
Pitch 32
POWER button 22
POWER LED 24
Power Saving 38
IR
Rating 35
Reset 29, 30, 32. 41
RETURN buttun 21
RGB Dynamic Range 33
$
S VIDEO jack 13
Screen Position 32
Setting up channels 19
Settings
Audio Options 33
Channel 33
ClockfFimers 28
Closed Captious (CC) 34
Exlerua] hlpuls 37
General 3a
HDMI Seltinas 37
lnilial Selup _8
Parental Lock 35
Picture 28
Product Support 28
Screen 31
Sound 30
Vide() Options 3P
Sharpness 29
Show/Hide Channels 34
Signal Diagnostics P8
SLEEP button PO
Sleep Timer 98
Suund Booster 30
Suund Mode 30
Speaker 24
Speakers 33
STANDBY LED 24
Steady Sound 31
Surround 30
T
THEATER button 20
Timer 28
Treble30
Truubleshouting39-41
TV Auto Power On 37
TV Rating 36
U
U.S.A. Rating 36
Unrated 35
V
V Center 32
Vertical Size 32
VHF/UHF/('ABLE input 13
VIDEO/AUDIO/UR)jacks11, 13
Voice Zoom 30
VOL +/ buttun 22
Volume Offset 31
W
WIDE buttou 22
Wide Mode 31, 32
X
XMB,,,, 9, 26
Please contact Sony directly if you:
• Have questions on the use of your television after reading your Operating Instruction manual
and Quick Setup Guide
• Experience difficulty operating your television
Contact Sony Customer Support at:
http:llwww.sony 'comltvsupport
or to speak with a support representative:
United States Canada
1-800-222-SONY (7669) 1-877-899-SONY (7669)
Sony will work to resolve your questions more quickly than your retailer or place of purchase.
Please Do Not Return the Product to the Store
http:i/www.sony.net/
Printed in U.S.A,
3212686111
