Sony KDL 52XBR2 User Manual LCD TELEVISION Manuals And Guides L0705130
SONY LCD Television Manual L0705130 SONY LCD Television Owner's Manual, SONY LCD Television installation guides
User Manual: Sony KDL-52XBR2 KDL-52XBR2 SONY LCD TELEVISION - Manuals and Guides View the owners manual for your SONY LCD TELEVISION #KDL52XBR2. Home:Electronics Parts:Sony Parts:Sony LCD TELEVISION Manual
Open the PDF directly: View PDF ![]() .
.
Page Count: 55
SON_ 2_802.386.,,/1t
LCD Digital Color TV
Operating Instructions
BR
KDL-52XBR2
IA
KDL-52XBR3
© 2006 Sony Corporation
Owner's Record
The modeland serialnumbers arclocated atthe lvarof the TV. Record
these lmnfl)ersin lhe spaces provided below. Refl:r1o thenl whenexer
you callupon your Sony dealer regarding this product.
Medel Ne.
Serial Ne.
Please contact Sony directly if you:
• Have questions on the use of your television after reading your manual
• Experience difficulty operating your television
Contact Sony Customer Support at:
htt p://www.so ny.com/tvsu pport
or to speak with a support representative:
United States
1-800-222-SONY (7669)
8:00 AM - 10:00 PM (EST) Mon - Fri
10:30 AM - 7:15 PM (EST) Sat - Sun
Canada
1-877-899-SONY (7669)
8:00 AM - 6:00 PM (Eastern)
8:00 AM - 5:00 PM (Western)
Sonywill work to resolve your questions more quickly than your retailer or place of purchase.
Please Do Not Return the Product to the Store
WARNING
To reduce tile risk of tire or elecuic shock, do
not expose this apparatus to rahl or nloislure.
/_ This synlbol is intended to
alert the u_r to the pl+ese nee
of uninsulated "dangerous
voltage" within the
product's enclosure that
nlay be of suffcient
nlagnitude to constitute a
risk of elec_ic shock to
persons+
/_ This synlbol is intended to
alert the u_r to the pl+ese nee
of inlportanl operating and
nlaintenance (sep.'icing)
instructklns in the literature
accompanying the
appliance.
Tile apparatus shall not be exposed to dripping
or splashing and no objects flied with liquids,
such as vases, shall be placed on the apparatus.
CAUTION
To prevent electric shock, do not use this
polarized AC plug with an extension cord.
receptucle or other outlet unless tile blades call
be lhlly inserted to prevent blade exposure.
Note on Caption Vision
This TV provides display of TV cloud
captioning in accordance with §15.119 ol tile
FCC I ules.
Declaration of Conformity
Trade Nanle: SONY
Model: KDL-52XBR2/KDL-52XBR3
Responsible Party: Sony Electronics Inc.
Address: 16530 Via Esprfllo
San Diego, CA 92127 U.S.A.
Telephone Number: 858-942-2230
This device complies with part 15 of tile FCC
rules, Operation is subject to tile Rlllowing
two conditions: (1) This device nlay not
cause harnlflfl interlkrence, and (2) this
device must accept any interlcrence received.
including inlerlcrence thai nlay cau_
undesired operation.
NOTIFICATION
This equipment has been tested and totmd tit
conlply with tile limits Ior a (-'lass B digital
device, pursuant to Part 15 of file FCC Rules.
The_ limits are designed tit provide reasonable
protection against harmfifl interlhrence in a
resklential installation. This equipment
generates, uses and can radiate radio Irequency
energy and, if not installed and used in
accordance with the instructions, lnay cause
hartnl/ll interlercnce to radio conlll/Unicalions.
However, there is no guarantee that interlPrence
will not occur in a particular installation. If this
equipment does cause harufful interlerence to
radio or television reception, which can be
determined by turning the equipment ofland on,
the user is encouraged to try to correct the
interl_rence by one or more of the Iollowing
nleasurcs:
[] Reorient orrelocate tile receiving
antenna.
[] Increase tile separation between the
equipnlent and receiver.
[] Connect tile equipment into an outlet on a
circuit ditlcrent hom that to which the
receiver is connected.
[] Consult the dealer or an experienced
radio/TV technician Ior help.
Pursuant tit FCC regulations, you are
cautioned thai any changes or modifications
not expressly approved in this lnanual couM
void your authority to operate this
equipnlent.
For Customers in Canada
This Class B digital apparatus complies wilh
Canadian ICES-003.
Safety
[] Operate tile TV only on 120-240 V AC.
[] Tile plug is designed, lor sali:ty purposes,
to fit into tile wall outlet only one way. If
you are unable to insert the plug fiflly into
tile outlet, contact your dealer,
[] If any liquid or solid object should fdl
inside the cabinet, unplug tile TV
immediately and have it checked by
qualified service personnel belore
operating it flmher.
[] If you will not be using tile TV Ior several
days, disconnect the power by pulling the
plug itselL Never pull on the cord.
[] For details concerning salcty precautkms,
see "Important Salety Instnlctions" on
page 4.
Installing
[] The TV should be installed near an eaqly
accessible power outlet.
[] To prevent internal heat buiMup, do not
block the ventilation openings.
[] Do not install tile TV ill a hot orlnnnid
place, or in a place subject to excessive
dust or mechanicul vibration.
[] Avoid operating tile TV at temperatures
below 41°F/5°C).
[] If tile TV is transported directly ffonl a
cold to a warnl locatkln, or if tile rOOlll
tenlperature changes suddenly, the picture
may be bhlrred or show poor color due to
illOiSlUl_2 condensation. Ill this cage_
please wait a lPw hours to let tile lnoisture
evaporate belorc turning on tile TV.
[] To obtain tile best picture, do not expo_
the screen to direct ilhmlination or direct
sunlight. It is reconlnlended to use spot
lighting directed down l?om the ceiling or
to cover tile windows that lace tile screell
with opaque drape W. It is desirable to
install the TV in a room where tile floor
and walls are not of a reflective u/aterial,
CAUTION
Use tile lollowing Sony appliance(s) (till}' with
file lollowing WALL-MOUNT BRACKET.
SU-WL51
Use with other WALL-MOUNT BRACKET
nlay cause instability and possibly result ill
in.iulT.
To Customers
Sufficient experti_ is required Ior instulling tile
specified product. Be sure to subcontract the
installation tit Sony dealers or licensed
contractors and pay adequate atlention to salety
during the installation.
For Customers in the United
States
This product contains nlercury. Disposal ol this
product may be regulated if sold ill tile United
States. For disposal or recycling inlol'lnation,
please contact }'(till" local a/ithol'ities or tile
Electronics Industries Alliance
(http://www.eiae.org).
Note
This television inchldes aQAIM denlodulator
which shouM allow you to receive unscrambled
digital cable tcle_ ision progrmnming ;ia
subscription service tit acame service p]o_ ide].
A_ ailability ol digital cable television
programnling in your area depends on the type
of prograumling and signal provided by your
cable service provider.
(Continued)
3
Trademark Information
TruSurround XT, SRS and ( • ) symbol arc trademm'ks of SRS Labs, lnc,
TruSurround XT lechllology is illcorl)orated ullder license fl'() 111SRS Labs,
Inc,
Manul_cmred under license flom BBE Sound, lnc.
Licensed by BBE Sound, lnc. under one or morn of the lollowing US
palents: 5510752, 5736897. BBE and BBE symbol arc rcgislered
trademarks of BBE Sound, lnc.
Manul_cmred under license from Dolby Laboratories. "Dolby" and lhe
double-D symbol are trademarks of Dolby Laboralories.
Macinlosh is a trademark licensedto Apple Computer, Inc., registered in
the U.S.A and otller countries.
Blu-ray Disc is a trademark.
"BRAVIA" and BRAVlA arc trademarksof Sony Corporalion.
This TV incorporales High-Definition Multimedia Interlace (HDMPM)
lechnology. HDMI, the HDMI logo and High-DefinilionMullimedia
Inlerlace are trademarks or regislcrcd trademarks of HDMI Licensing
LLC,
BB£
D | G | T A L DIGITAL
sRs(®) i-ii rlrlll TM
HIGH.OEFINITIO _ MULTIMEDIA IN_'ERFS_C_
Important
Safety
Instructions
1 I Read these in structions.
2) Keepthese instructions.
31 Heed all warnings.
4) Follow all instructions.
5 _ Do not use this appamms near water.
61 Clean only with dry cloth.
% Do not block any ventilation openings. Installin
accordarme with the manufacturer's instructions.
8) Do not install near any heat source:
as radiators, heat reg
apparatus (including amplifiers _that
produce heat.
9) Do not defeat the safe_y purpose of the polarized or
grounding-type plug. A polarized plug has two blades
with one wider than the other. A grounding type plug
has two blades and a thiM grounding prong. The wide
blade or the third prong are provided for your safet 3 .
If the provided plug does not fit into your outlet.
consult an electrician for replacement of the obsolete
outlet.
10} Protect the power cord from being walked on or
pinched particularly at plugs, convenience
receptacles, and the point where they exit from the
apparatus.
11 t Only use ar[achments/aecessories specified by the
manufacturer.
12} Use only with the cart. stand, tripod, bracket, or table
specified 9y the manufacturer, or sold with the
apparatus. When a cart is used. use caution when
moving the cart/apparatus combination to avoid
injury from tip-over
13, Unplug this apparatus during lightning storms or
when unused for long periods of time.
14 _Refer all servicing to qualified service personnel.
Servicing is required when the apparatus has beee
damaged in any way, such as power-supply cord or
plug is damaged, liquid has been spilled or objects
have fallen into the apparatus, the apparatus has been
exposed to rain or moisture, does not operate
normally, or has been dropped.

USE
For the TV with a three-wire grounding type AC
power cord plug (Class I unit)
This TV must be czmnecrea ro an AC power secKe_
outlet v [th a protective carihing connection
AC power cord
If you damage the AC power cord= it may result in a fire or all electric
dlock. If the AC power cord is damaged, stop using iF and ask your dealer
grounding COllOUCiOrs. locafion at antenna discharge Unkl, connection tc
grounding el#ca'odes, and requit'ements tbr tile groundiug electrode.
Antenna Grounding According to the National
Electrical Code, ANSI/NFPA 70
._.._._ Antenna lead-in wire
ur Sony service center to exchmlge it _/- Ground clamps
IN Do not place the TV where tile p......... d is subject t....... j'_ _
buse
..... // , "_ Antenna discharge unll
U Donotplnch bend_ortwlstthecordexcesslvely. Thecorehnesmay _r----- -- // _" N C Sect"
be bared and cut and ....... hart-circuit, result ng ill ali ....... ] _,_ v""- I ( E IOn 810-20)
electric shock. I _qutl;m_n_'_'_ ] _ _ |
I'q Donot ....... t or damage the p........ d, . J Groundlng.conducto[s
F3 Do not all ..... ytlfing to rest on .... 11...... _ _ _]_/ ;_ (NEC Section 810-21 l
thepower cord. t{ {ll _ I _ Ground clamps
[] Do not pull tile power cord. _ _.__...-_ Power service grounding
[] Do not move tile TV witl tile power cord _ _ electrode system
plugged in. _ IJ NEC: National Electrical Code _NEC Art 250 Part H
[] Keep tile power cord away lydia heat sources.
IN Be sure to gras F the plug when disconnecting
Thepower core.
Wall outlet
Do not 1.1se_.1poor fitting outlet.
Insert the ph g tully into tl]e outlet. If it is loose, it may
cause arcing _lnd result in a fire.
Contaci your electrician to have the outlet changed
Wiring
For your safety, unplug tile ACpower cord whell wiring cables
Cable wiring
Take care riot to catch your Iect on tile cables. It kllSy _.l_.l[llglge the TV
BATTERIES
[] Do not dispose of batteries ill atire
[] Do nor snort circuit, disasselnble or overheat the batteries.
[] Danger of explosion it" battery is incorrectly replaced. Replace only
with the same or equiwdent type
Disposal ot used batteries
To preserve our envlronknellt, dispose of used batteries according to your
local laws er regulatiorls.
CLEANING
[] Clean tile AC power plug regularly.
E ectric sh"ck _If the plug is covered with dust _nd it picks q V _,
.... . . /g. ,, _ , up moisture, its insulati ........ y deteriorate ,°,_/._ "_
Do not touch tile AC power cord or the TV with awet J_ and result ill a fire Un lu e AC owe
hand. lfyou plug/unph, g tile AC p....... d fl'onl the _C_ pl,,g and clean it regul:lyg Ill p r
TV with a wet hand it may cause electric shock _ -_'_ /
• . /w
Lightning [] Unplug tile AC power cord when
cleaning, this TV. lfnot, it tile} resulr kn _
For added protection tar this rv miring a lightning srornL or when it is lett electric shock.
unattended mid unused tar long periods of time. unplug it from tile walloutlet mid disconnect file alltenna. This will prevenl tlamage to tile receiver [] Cleml tile cabinet of the TV witll a dry
salt clotll. To remove dust from me
due tc/ighlning and power lille surges, screen, wipe it gently with a soft cloth.
ANTENNA
Outdoor Antenna Grounding
If an outdoor antenna is installed, tallow the precautions below. An
OUTfiOOr antenna syMeln should not be located in the vicinity of overhead
power lines or otllel ekecmc light or power circuJts_ or where it can come
111 contact with sUCtl power lines Ok circuklS.
WHEN INSTALLING AN OUTDOOR ANTENNA SYSTEM.
EXTREME CARE SHOULD BE TAKEN TO KEEP FROM
CONTACTING SUCH POWER LINES OR CIRCUITS AS CONTAC_I
WITH THEiVI IS ALMOST INVARIABLY FATAL.
Be SLIr_ tile al/tenna systelZl is grounaeo so as l( provide some protection
against voltage surges and _uilt-up static charges.
Section 810 of the NationM Elece'ical Code INEC' in tim USA and Section
54 of the Canadian Electrical Code in Canada provides intbrnmtion with
l_specT to proper grounding of the mast and supporting structure,
groundin_ ottbe lead-in wire to an antenna dischar=e unit. size of
Stubborn stains may be l_moved with a cloth slightly dampened
with a solution of mild soap and warm water. Never use su'ong
Solvenls SUCh as thinner or benzine tar cleaning.
[] If using a chemically pretreated cloth, please tallow tile instruction
provided on the package.
MAGNETIC INFLUENCE
This TV contains a strong magnet ill the speaker unit that generates a
magnetic field. Keep any lfelns susceptible to tnagnetic fields away train
the speaker.
SOUND
If a snapping or popping sound tram the TV is con- s_ !U" :' "
fga
tinuous or t?'equent while the TV is operating, _ _'N@
unplug the TV and ....... It your deal ........ ice I I Ik )_-k
technician. It is nortnal tbr some TVs to make occa- _ [_/_ _/} I
sional snapping or popping sounds, particularly
when being turned on or oft. tContinued} 5
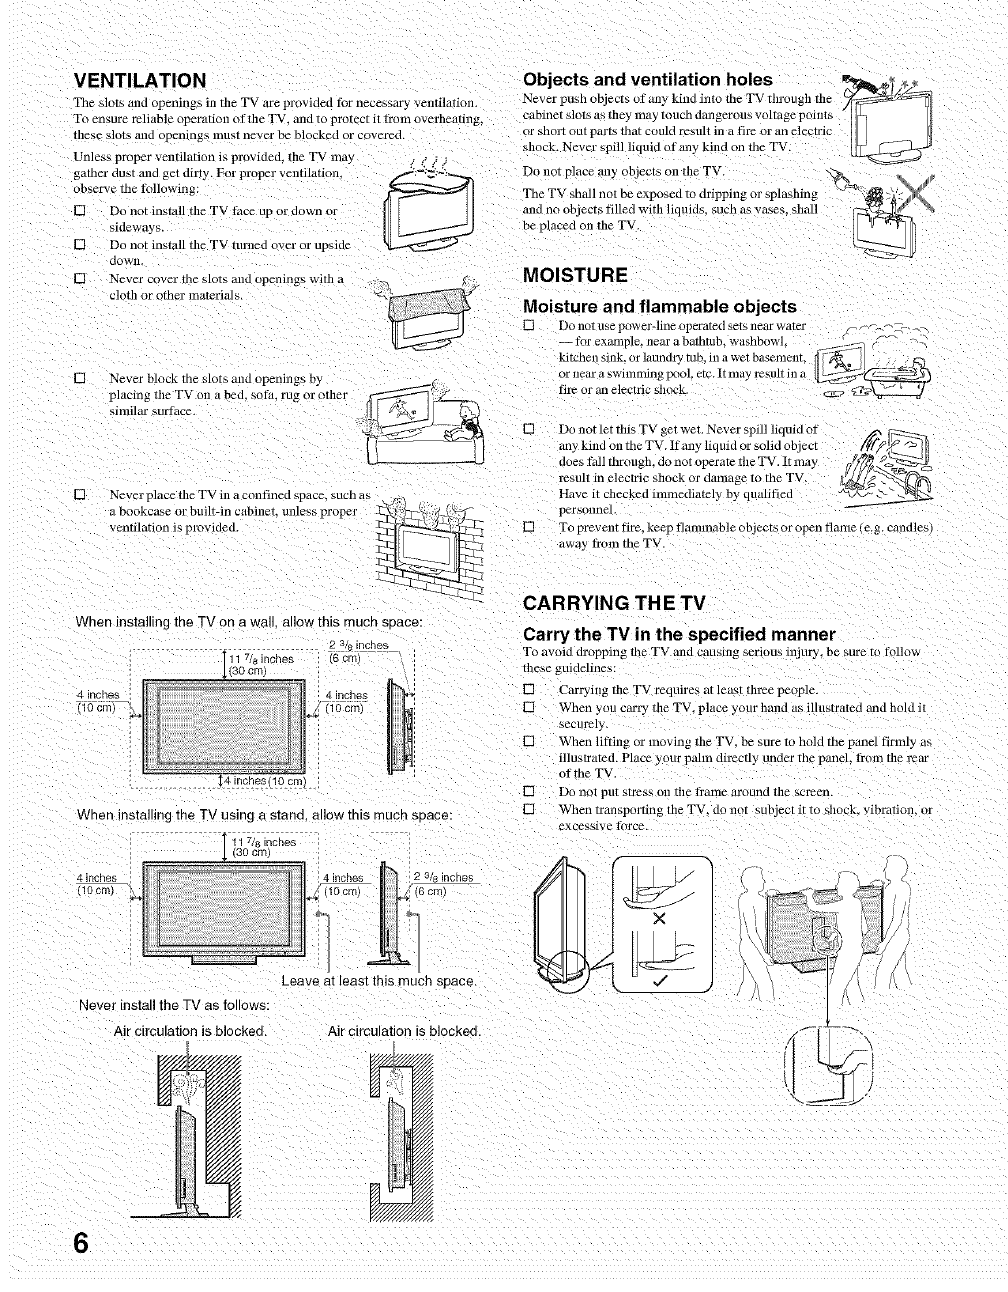
VENTILATION Objects and ventilation holes _ •
The slots and openings in the TV are provided t_r necessary ventilation. NeverpusllobjectsofanykindintotlleTVtllrougbtl]e _
To ensure reliable operation of the TV. mad to protect it them overheating, cabinet slots as they may touch dmlgerous voltage points I1_ II
or short out parts that could result ill a fire or an electric II I ._-_ t]
these slots mad openings must never be blocked or covered, shock. Never spill liquid of ally kind on tile TV.
Unless proper ventilation is provided, tbe TV may
gather dust allc get dirty. For propel" ventilati .... .=,_"¢_i_ D0 not pl ....... y oblects on the TV. \_
ob ..... thetoll ..... g: _l TheTVshallnotbeexposedtodrippingorsplabbing _4s_@. ,xJ
[] Do not install the TV t:ace up or d...... II I ]_ and no objects filled with liquid ...... h ......... hall
sideways. ] I I iJ be placed on the TV. i _ "'_ [_
12] Do not install the TV turned over or upside _
[] N;_l:rcc::hr :l:eas::::,;md oPen ings witll a _ _" MOISTURE
•"" " Moisture and flammable objects
_[ _._j [] DonotusepoweMineoperatedsetsnearwater <-_ ...--._-,.<.
lk_rexample, near a bathtub, washbowl. _ ,_
kitchen sink.or l_undry ruo, mawet basement, _7-_ J:2O
ornearaswimti_ngpc_ol etc.ltmayresultina [_.'_X-_ _._
[] Never bloc_: the blots mid { penings by
placing tile TV on a bed. sota. rug or ethel tire or an electric shock, c_:_
similar surtbce
[] Never place file TV in a confined space. SUCh as
Z%2 Lo;lb ti2dThi............p oper
When installing me TV on a wal allow this much soace:
2 3/s )ncnes
11 7& inches s crr30 cm/
.incnes / _ . 4 inches
(ld cm _ i10 cm)
When installing the TV usin 9 a stand, allow this mucn seace:
11 7/8 inches
(30 cm/
Leave at least this much space
Never install the TV as follows:
Air clrcutatJon is blocked, Air clrcutauon is blockec
[] Do not let fills TV get wet. Never spill liquid of _
any kind on tile TV. It" ally liquid .... lid object ._ IA_
does ti, ll througb, do not operate the TV. It may og/_/_p>._
result in electric sllock or damage to tile TV. [_g _ , 7F._
Have it checked immediately by qualified _v7/%_ _
personnel.
[] Tc prevent tire. keep tlammable objects or open flame (e.g. candles)
awa} from tile TV.
CARRYING THE TV
Carry the TV in the specified manner
To avoid dropping the TV and causiJlg serious illJury, be sure to tbllow
tbese guidelines:
[] Carryillg file TV requires at least tbree people
[] When you carry tile TV, place your tam]d as illustrated rand hold it
securely
[] When litling or moving tile TV_ be sure to holcl me panel tirmly as
illustrated. Place your palm directly under the panel, _bom the rear
ot the TV.
[] Do nol put stress on tile lbame around tile screen.
[] When transporting tile TV, do not subject it to shock, vibratiom or
excessive torce.
6
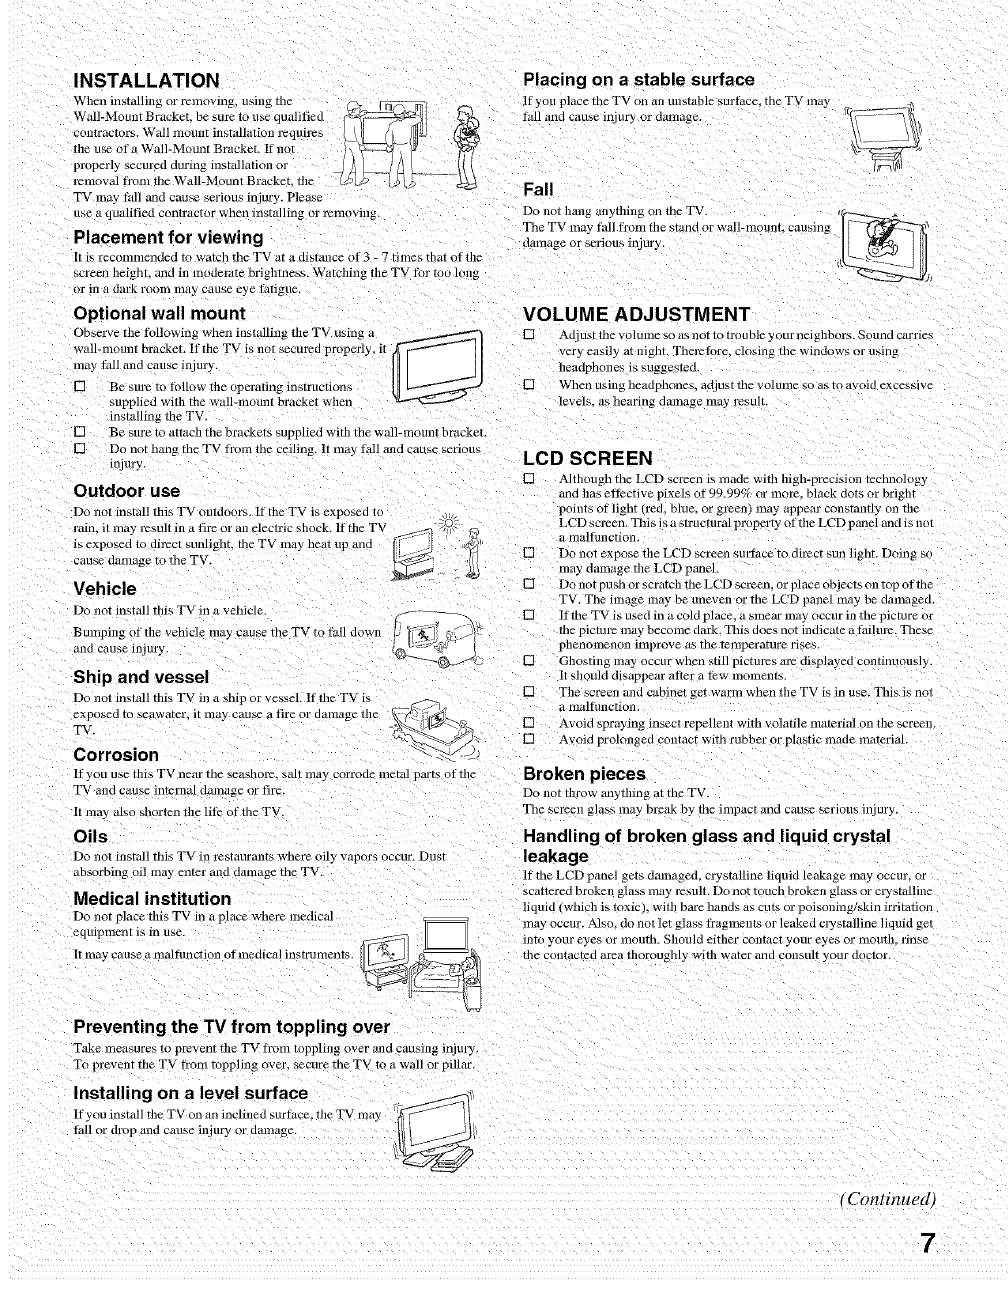
INSTALLATION
When installillg or removing, using tile _(-
WalIMountBrocket,b......,.....qu*ified %
.....tractors.W*l.......tinstallation, qu.'es !HIS
tile use of a Wall-Mo Lint Bracket. IX"not
properly secured during installation or
removal fi'om tile Wall-Mount BrackeL tile
TV may lull and cause serious mjur 3 Please
use a qualified contractor when installing or relllOX ing.
Placement for viewing
It is reconnnended to watch tile TV at a distmlce of 3 -7 times tilat of tile
screen heidnr, and in moderate brightness. Watching tile TV tkw too long
or in a dark room mg, y cause eye Iatigne.
Optional wall mount
Observe tile tbllowin_ o, when installin_ _ tile TV using a
wall-mom, t bracket. If the TV is not secured properly, it
tnay/:0II and ..... injm'y. _-_ j[
[] Be sure to thllow tile operating instructions [ I L------"_._._.- J
supplied with tbe wan-mount bracket whell
installing me TV.
[] Be sure to attach the bracKets supplied with the wail-mount br_tcket
[] Do not hang the TV fi'om tile ceiling. It may fall m,d cause serious
injury.
Outdoor use
Do not it>_ull this TV outdoors. It" tile TV is expose_ _o
rain, it ma 3Jesuit in a fire or an electric shock. If file TV :o
is exposed to dil_ct sunlighL tile TV may heat up anra
Catl_ O_llllLIge tO tile TV.
Vehicle
Do not install tills TV in a vehicle.
Bumping of the vehicle may cause tile TV to thll down
and cause Injury.
Ship and vessel
Do not install this TV in a shi r or vessel. It" tim TV is
Placing on a stable surface
lt'you place tile TV on all mlstable Bur fi, ce_ the TV may
tall and cause iniury or dmnage.
Fall
Do not hang anyflling on tile TV
Tile TV may tall fi'om tile stand or wall-nmunt, causing
damage or serious inlury
VOLUME ADJUSTMENT
[] Adjust the volume so as not to trouble your neighbors. Sound carries
very easily at night. Theretore, closing rile windows or using
lleadphones is suggested.
[] Wllell using neaopnones, acqus[ ine VOlUlne _o as [o avoid excessive
levels, as hearing clamage inay I_SLIIt.
LCD SCREEN
[] Altilougn me LCD screen is made witll lllgn-precision technology
and has ettective pixels of 99.99% or more. block dots or brigllt
points of light (red, blue, or green) may appear constantly on tile
LCD selden. This is a strucrural property of the LCD panel and is hal
a lnaltunction.
[] Do not expose tile LCD screen surtSce to direct sun light. Doing so
may damage tile LCD panel
[] Do not push or scratch tile LCD screen, or place objects on top at tile
TV. Tile image may be uneven or the LCD panel nmy be damaged.
[] If tile TV is used in a cold pl ace. a smear may occur in tile picture at
tile picture may become dark. This does not indicate a tailul_. These
phenolnenon improve as rile relllpera[ure rises.
[] Ghosting may occur when sun pictm_s are displa: ed continuousl}.
It should disappear utter a tew moments.
[] Tile screen and cabinet get warm when tile TV is in use. This is not
exposed to seawater_ it may cause a fir_ or damage th_ _
.._>_. 'J.b_- -_:_ [] Avoid spraying insect repellent with volatile material on tile screen
TV. _-- -. "
Q_'-'_ ,> [] Avoid prolonged contact with rubber or ph/stic made materiah
Corrosion '-_/
If you use tills TV near me seashore, sail n,ay corroae meraJ parts of the Broken pieces
TV and cause internal damage or fire.
It ma 3 also shorten tile lit) of the T\
Oils
Do not instltil this TV in restaurants where oily vapol s occur. Dust
absorbing oil may enter and damage tile TV.
Medical institution
Do not place tills TV in a place where medical
Preventing the TV from toppling over
Take measures to prevent tile TV tYom toppling over and causing injury.
Ttl prevent tile TV tram toppling over, secure me TV to a wall or pillar.
Do not tilrow anytiling at the TV.
Tile screen glass may m'eak by tile impact and cause serious injury.
Handling of broken glass and liquid crystal
leakage
IX"tile LCD panel gets damaged, crystMline liquid leakage may acorn= or
scattered broken gt_ss lila3 result. Do not touch broken glass or crystalline
liquid (which is toxic . wifll Dare nanas as curs o* poisoning skin irrit_ltion
may occur. Also, do not let glass tragments or leaked cwstalline liquid gel
into your eyes { r moutil. Should either contact your eyes or mouth, rinse
tile contacted area tilorougnly witil water and consult ._our {locror.
Installing on a level surface _'_1'
If you install tile TV on an inclined surthce, tile TV ma 3
tall or drop m,d cause injury or _a_unage. /
tContinued,
7
SERVICING
Damage requiring service
If file surface of'file TV cr_lcK b=do not touch tile TV until you unplug tile
AC power corcl
Otherwise electric shock may I_SUlT.
Servicing
Do not attempt m service tile TV yourself since opennlg
tilecobinetmoyexpo youtodang.........ltag.....file
haI_rds. Refer all servicing to qmdified service personnel._, '_
Replacement parts
Wllen replacelne fir pairs are require d. be sure tile ser_ Ice
technician certifies in writing filat heLshe has used
replacement parts specified by tile manufacturer that
have tile same characteriMics as tile ori
Unauthorized substitutions may result in a life= an
electric shock or diner nazoros.
Safety check
Upon completion otany .ervlce or repairs to tile TV, ask _-_--
file selwice technician to perf,, ........ ti ..... fkty checks /_7_ _]
(as specified by fi........ t_lcrurer) to determine that the _ _)<_El_ _l
TV is in saf) operating condifioll. _uld to so certJ l_< Iwr _ _==;_='_"
Should tile TV no be repairable, ask a quNitied service technician TO
dispose otthe TV
DISPOSAL OF THE TV
[] Do not dispose of" tile TV with general household waste
[] Tile LCD contains a small amount of liquid crystuh Tile fluorescent
tube used in this display Nso contains mercuu. Follow your local
ordinances 0iici regulations to,, di.sposm.
8
Welcome to the World of BRAVIA TM ............................................................................ 11
Connecting the TV ......................................................................................................... 11
Cable System and VHF/UHF Antenna System ......................................................... 11
Cable Box/Digital Cable Box and Antenna ................................................................ 12
Cable Box/Digital Cable Box ..................................................................................... 12
Satellite Receiver and Cable/Antenna ....................................................................... 13
VCR and Cable ......................................................................................................... 14
VCR and Cable Box/Digital Cable Box...................................................................... 15
When Connecting to Optional Equipment ................................................................... 16
Installing the TV ............................................................................................................. 18
Preventing the TV from Toppling Over ...................................................................... 18
Bundling the Connecting Cables ............................................................................... 18
When Installing on a Wall .......................................................................................... 19
Setting Up the Channel List - Initial Setup .................................................................. 20
Remote Control .............................................................................................................. 21
Programming the Remote Control ............................................................................... 25
Using Other Equipment with Your Remote Control .................................................... 27
TV Controls ..................................................................................................................... 30
Overview of MENU ......................................................................................................... 31
Picture Settings .............................................................................................................. 33
Sound Settings ............................................................................................................... 35
Screen Settings .............................................................................................................. 37
Channel Settings ............................................................................................................ 39
Parental Lock Settings .................................................................................................. 40
Setup Settings ................................................................................................................ 43
PC Settings ..................................................................................................................... 46
Troubleshooting ............................................................................................................. 48
PC Input Signal Reference Chart .................................................................................. 51
Specifications ................................................................................................................. 52
Index ................................................................................................................................ 53
9

Welcome to the World of B R AV I A TM
Thank you for purchasing this Sony LCD Digital Color TV. This manual is
for models KDL-52XBR2 and KDL-52XBR3. The packing box contains
accessories that are listed on page 52.
Connecting the TV
To display clear crisp pictures, you must connect your TV correctly and
select the correct Wide Mode to display the picture in the correct aspect
ratio (see "Changing the Wide Screen Mode" on page 24). It is strongly
recommended that you connect the antenna/cable input using the supplied
75-ohm coaxial cable to receive optimum picture quality signal. A 300-ohm
twin lead cable can be easily affected by radio noise and the like, resulting in
signal deterioration. If you use a 300-ohm twin lead cable, keep it as far
away from the TV as possible.
You can also connect a variety of optional equipment to your TV (see page
16). For multiple equipment connections, please refer to the separate Quick
Setup Guide.
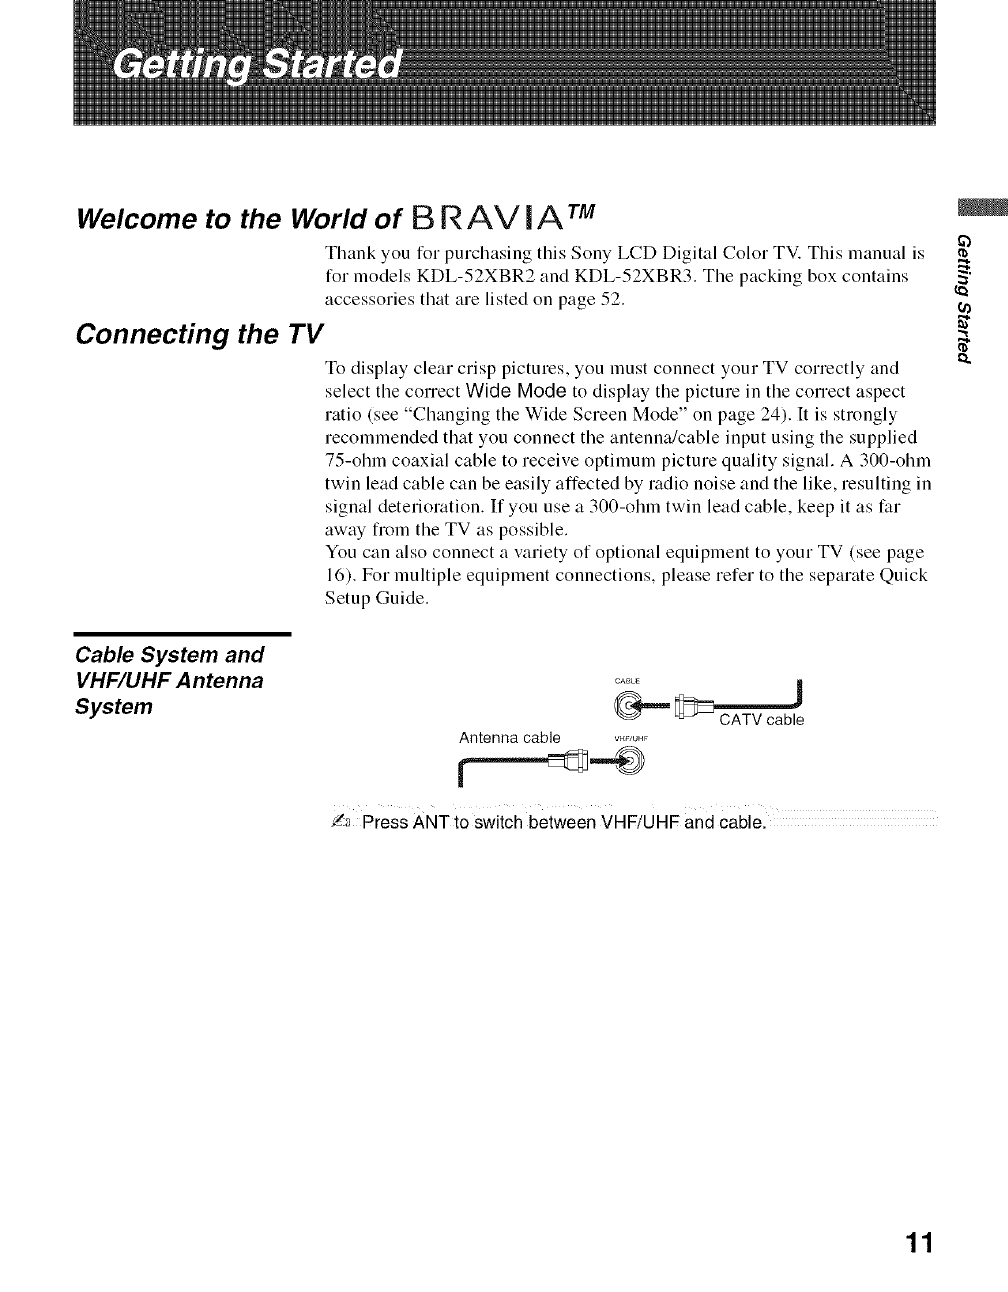
Cable System and
VHF/UHF A ntenna
System
CA_,E
Antenna cable VHF/UHF
'/-:_ Press ANT to switch between VHF/UHF and cablel
_b
(a
11
Getting Started
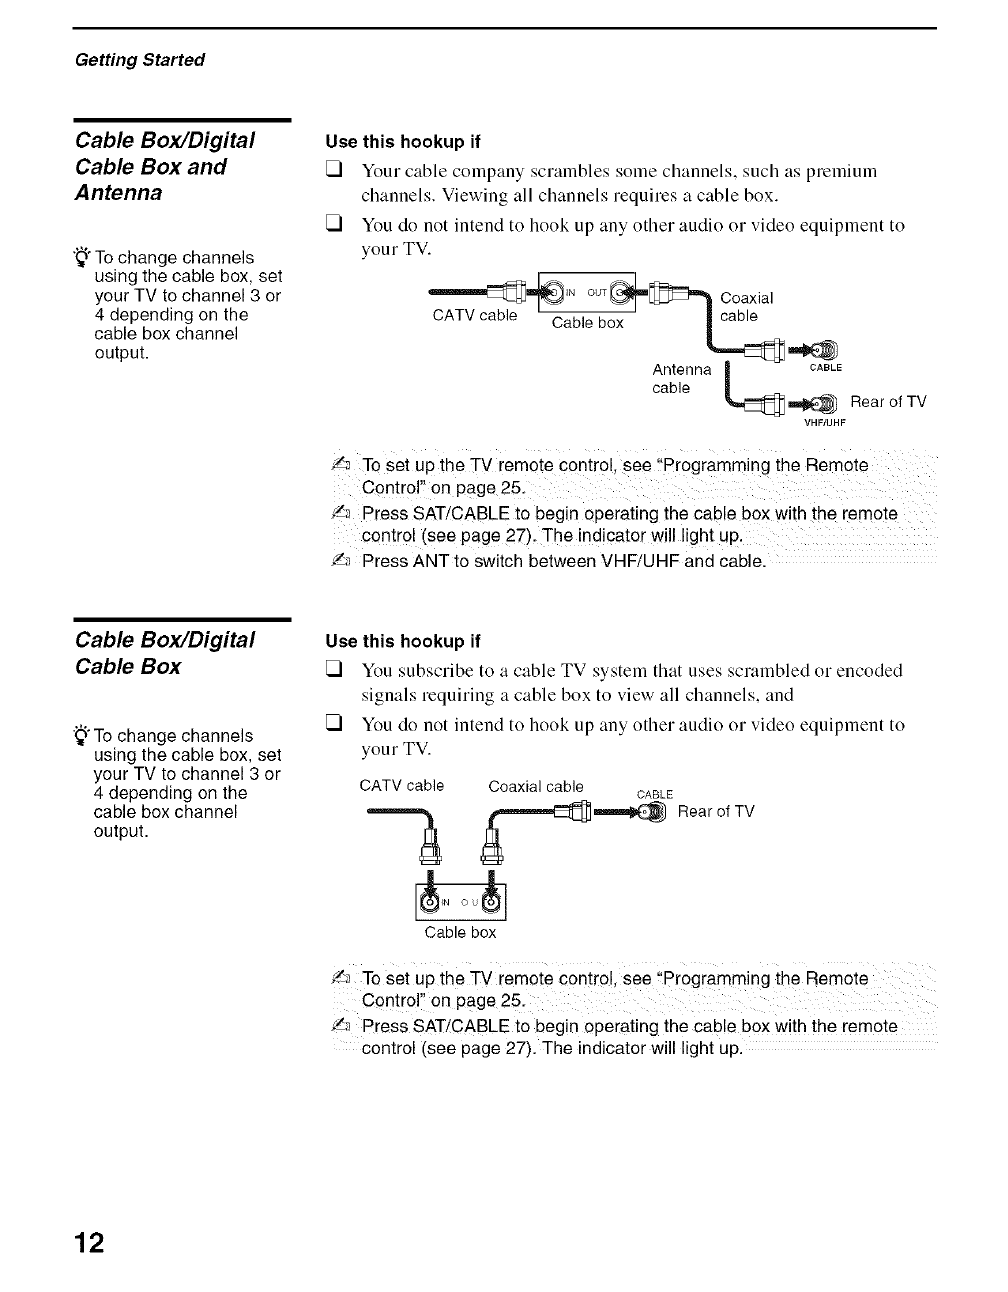
Cable Box/Digital
Cable Box and
Antenna
_° To change channels
using the cable box, set
your TV to channel 3 or
4 depending on the
cable box channel
output.
Use this hookup if
Vi Your cable company scrambles some channels, such as premium
channels. Viewing all channels requires a cable box.
Vi You do not intend to hook up any other audio or video equipment to
your TV.
CATV cable Cable box _
Antenna L_ E
cable Rear of TV
VHF/UHF
/_ To set up the TV remote control see !'Programming the Remote
Contror! on page 25.
_ Press SAT/CABLE to begin operating the cable box with the remote
control (see page 27). The indicator wi!l light up.
f,_ Press ANT to switch between VHF/UHF and cable.
Cable Box/Digital
Cable Box
'_'To change channels
using the cable box, set
your TV to channel 3 or
4 depending on the
cable box channel
output.
Use this hookup if
Vi You subscribe to a cable TV system that uses scrambled or encoded
signals requiring a cable box to view all channels, and
Vi You do not intend to hook up any other audio or video equipment to
your TV.
CATV cable Coaxial cable CABLE
Cable box
Rear of TV
f_ To set up the TV remote contro!, see "Programming the Remote
Control onpage25.
Press SAT/CABLE to begin operating the cable box with the remote
control (see page 27). The indicator will light up.
12
Getting Started
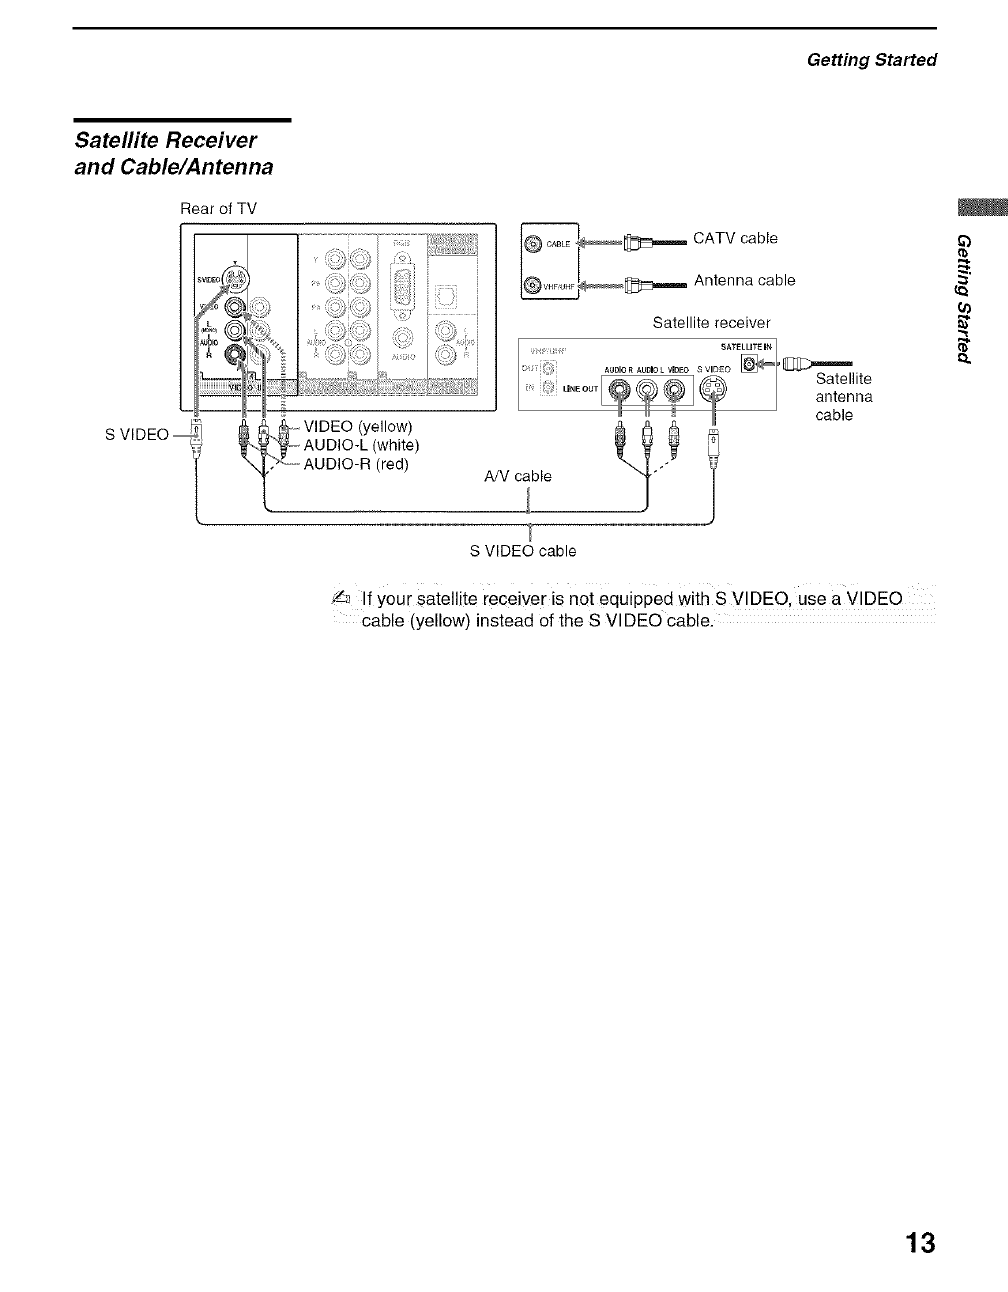
Satellite Receiver
and Cable/Antenna
Rear of TV
S VIDEO -- _i_ lDEe (yellow)
AUDIO-L (white)
AUDIO-R (red)
_,..,.m CATV cable
___ Antenna cable
Satellite receiver
S VIDEO cable
If your satellite receiver is not equipPed with S VIDEO, use a VIDEO
cable (yellow) instead of the S VIDEO cable.
{a
13
Getting Started
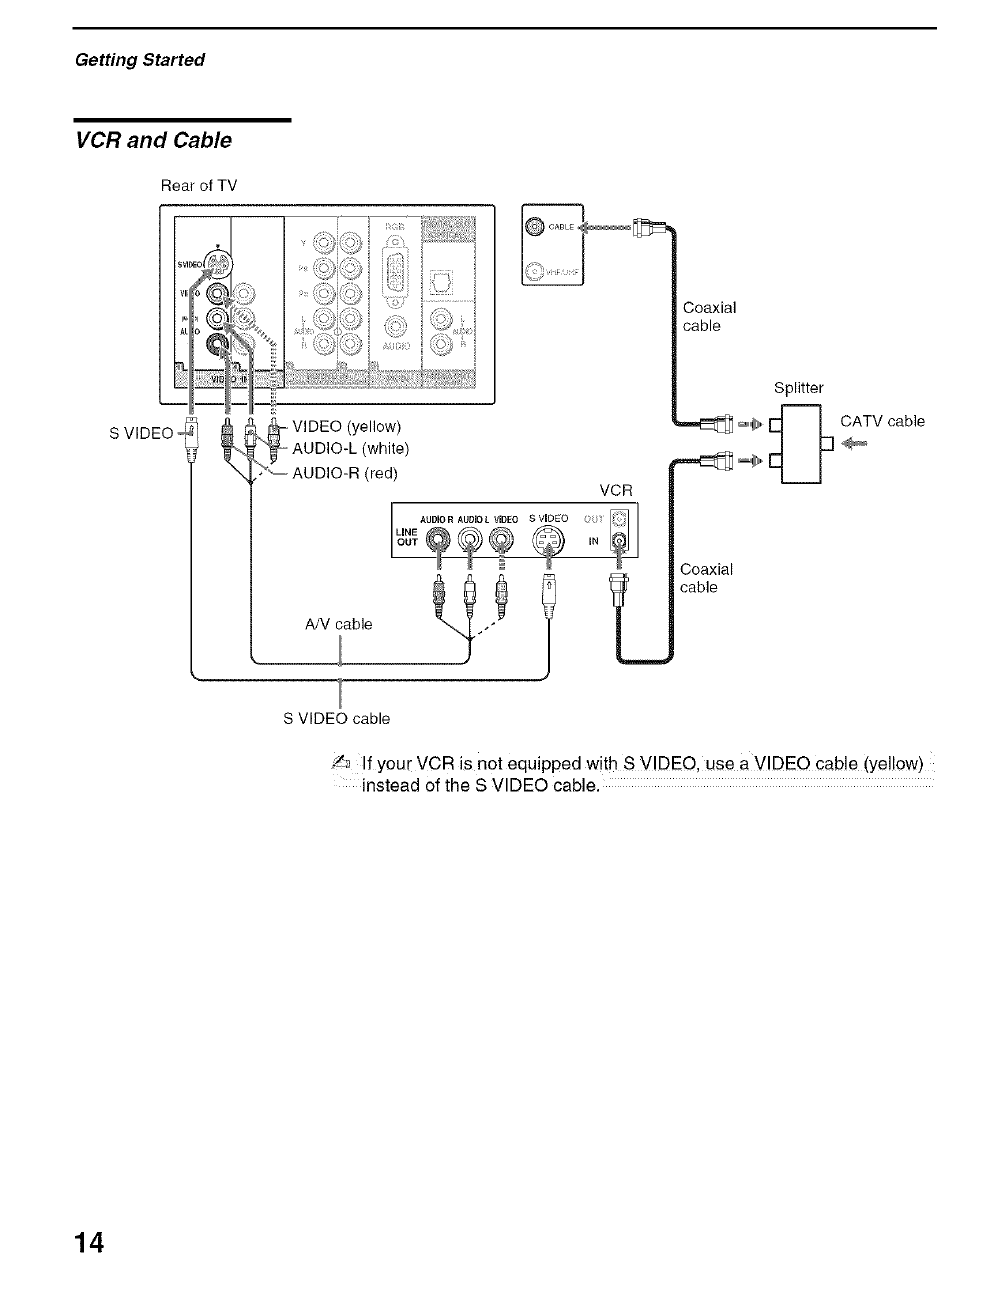
VCR and Cable
Rear of TV
S VIDEO-
I
VIDEO (yellow)
AUDIO-L (white)
...... AUDIO-R (red)
A/V cable
VCR
AUDIO R AUDIO L VIDEO S VIDEO _ I
LINE _ IN
Coaxial
cable
Splitter
_,,,,_,,[_ CATV cable
I L]
_' __J
Coaxial
cable
S VIDEO cable
_ If your VCR is not equipped with S V!DEO, use a VIDEO cable (yellow)
instead of the S VIDEO cable.
14
Getting Started
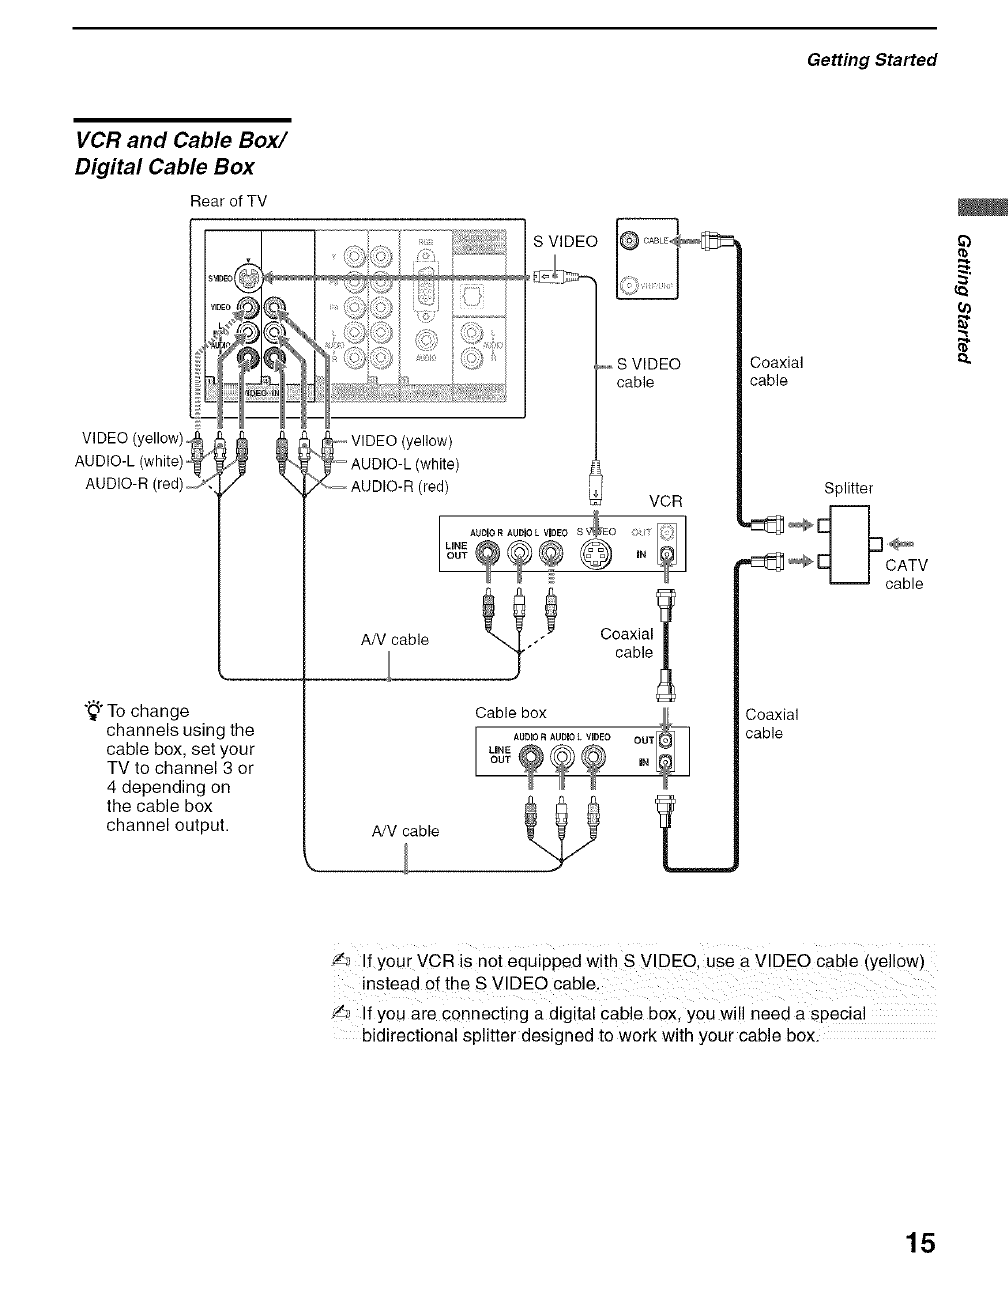
VCR and Cable Box/
Digital Cable Box
Rear of TV
VlDEO(yellow)_
AUDIO-L(white)
AUDIO-R(red)_
"_"To change
channels using the
cable box, set your
TV to channel 3 or
4 depending on
the cable box
channel output.
,/
/,........................
#; ,"2:
_ VIDEO(yellow)
AUDIO-L(white)
AUDIO-R(red)
AN cable
S VIDEO
S VIDEO
cable
VCR
AUDIOR AUDIOL VIDEO S_ _j
LINE O IN
Cable box
A/V cable
Coaxial
cable
Coaxial
cable
Splitter
{a
_ If your VCR is not equiPpedwith S VIDEO, use a VIDEO cable(yell0w)
instead of the S VIDEO cable.
'/,_ If you are connecting a digital cable box, you will need a special
bidirectional splitter designed to work with your cable box.
15
Getting Started
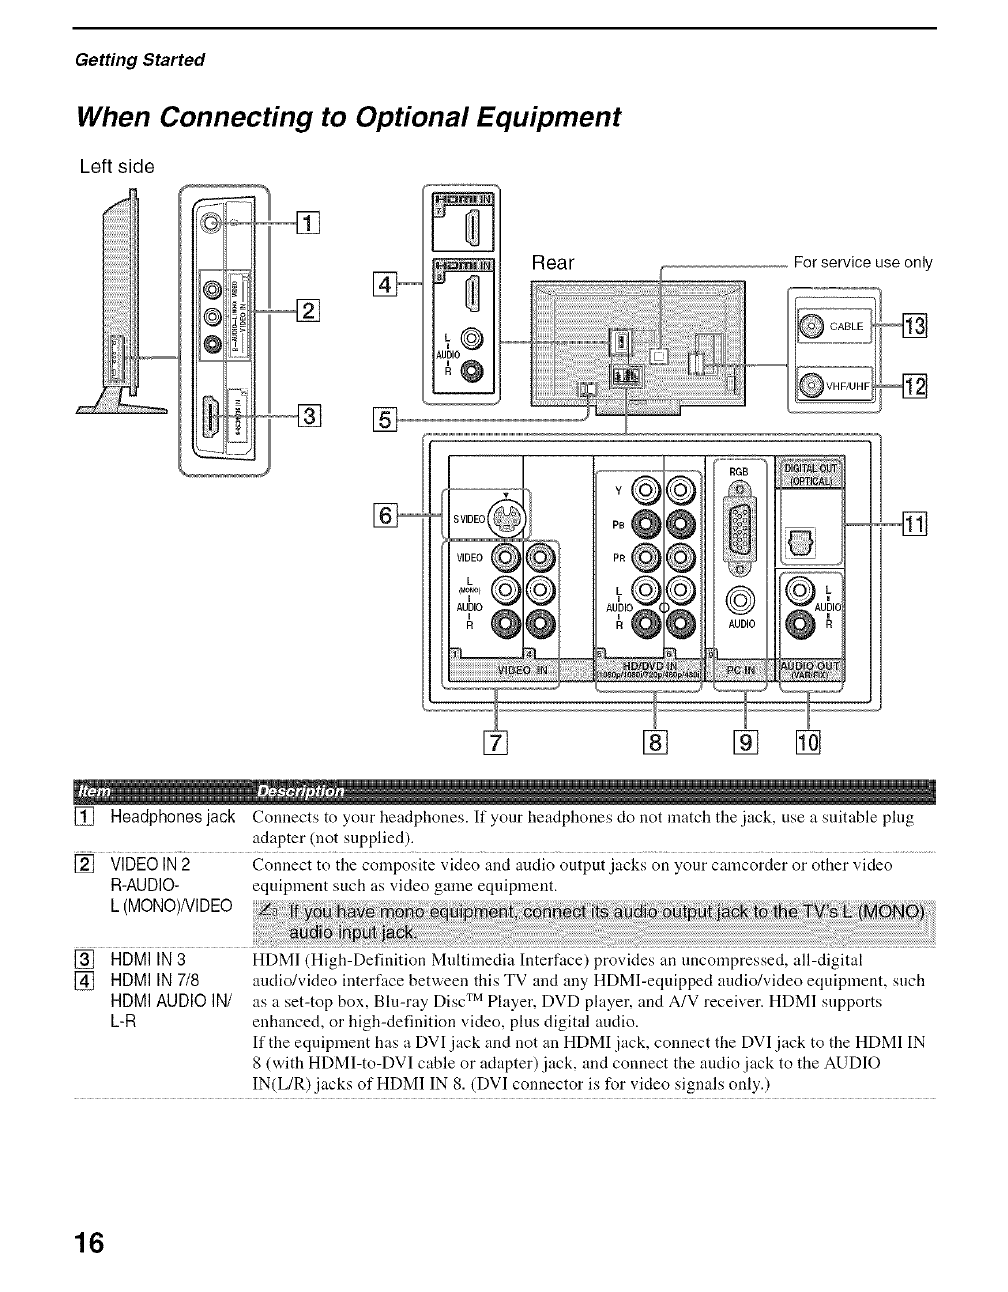
When Connecting to Optional Equipment
Left side
I1_
B_III_
@_1
{?3
, []
Rear For service use only
U[/O@L
iiiiiiiiiii iJiiii_ilii
R @ ........ '--'
VIDEO @
+@@@
@
...........;&....
p0@@ i!L,
o
AUDIO
U IC
[] Headphones jack Connects to your headphones. If your headphones do not match the jack, use a suitable plug
adapter (not supplied).
[] VIDEOIN2 Connect to the composite video anci auciio output jacks on your camcorder or other x.ideo.......................
R-AUDIO- equipment such as video game equipment.
L (MONO)NIDEO
[] HDMI IN 3 HDMI (High-Definition Multimedia Interface) provides an nncompressed, all-digital
[] HDMI IN 718 audio/video interface between this TV and any HDMI-equipped audio/video equipment, such
HDMI AUDIO IN/ as a set-top box, Bin-ray Disc TM Player, DVD player, and A/V receiver. HDMI snpports
L-R enhanced, or high-definition video, pins digital audio.
If the equipment has a DVI jack and not an HDMI jack, connect the DVI jack to the HDMI IN
8 (with HDMI-to-DVI cable or adapter)jack, and connect the audio jack to the AUDIO
IN(L/R) jacks of HDMI IN 8. (DVI connector is for video signals only.)
16
Getting Started
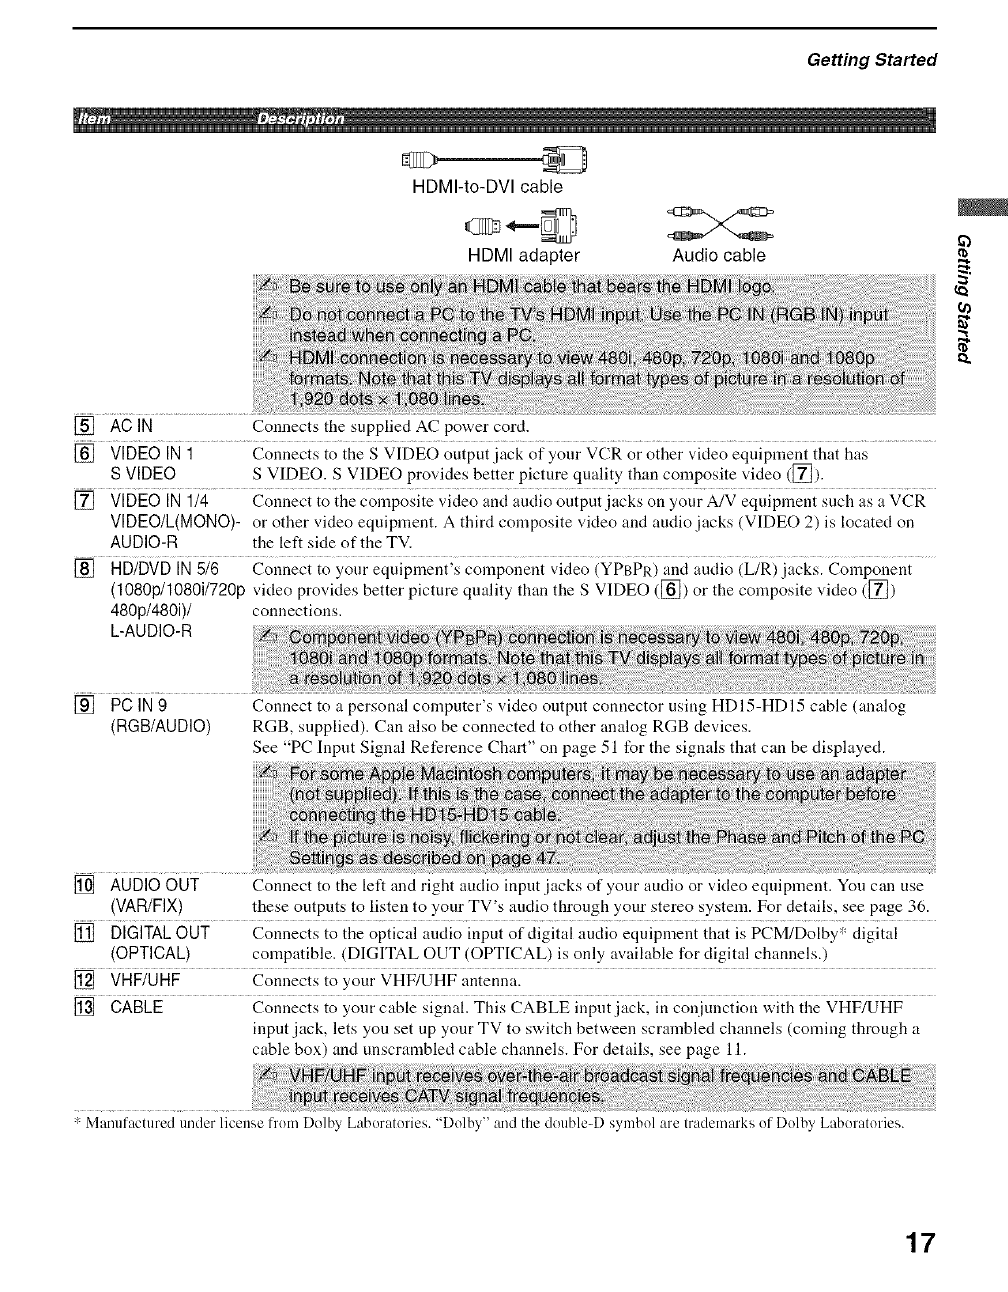
HDMI-to-DVI cable
HDMI adapter Audio cable
I1.
[] ACIN
[] VIDEO IN 1 Connects to tile S VIDEO output.jack of your VCR or other video equipment that has
S VIDEO S VIDEO. S VIDEO provides better picture quality than composite video ([_).
[] VIDEO IN 1/4 Connect to the composite video and audio output.jacks on your A/V equipment such as a VCR
VIDEO/L(MONO)- or other video equipment. A third composite video and audio.jacks (VIDEO 2) is located on
AUDIO-R the left side of the TV.
[] HD/DVD IN 5/6 Connect to your equipment's component video (YPBPR) and audio (L/R).jacks. Componeut
(tO80p/1080i/720p video provides better picture quality than the S VIDEO ([]) or the composite video ([])
480p/480i)/ connections.
L-AUDIO-R
Connects the supplied AC power cord.
[] PCIN9
(RGB/AUDIO)
Connect to a personal computer's video output connector using HDIh-HDI5 cable (analog
RGB, supplied). Can also be connected to other analog RGB devices.
See "PC Inpnt Signal Reference Chart" on page 51 for the signals that can be displayed.
[] AUDIO OUT
(VAR/FIX)
[] DIGITAL OUT Connects to the optical andio input of digital audio equipment that is PCM/Dolby* digital
(OPTICAL) compatible. (DIGITAL OUT (OPTICAL) is only available for digital channels.)
[] VHF/UHF Connects to your VHF/UHF antenna.
[] CABLE Connects to your cable signal. This CABLE input jack, in conjunction with the VHF/UHF
input.jack, lets you set up your TV to switch between scrambled channels (confing through a
cable box) and unscrambled cable channels. For details, see page 11.
Connect to the left and right audio input jacks of your audio or video equipment. You can use
these outputs to listen to your TV's audio through your stereo system. For details, see page 36.
: Manufactured under license from Dolby Laboratories. "Dolby" and the double-D symbol are trademarks of Dolby Laboratories.
17
Getting Started
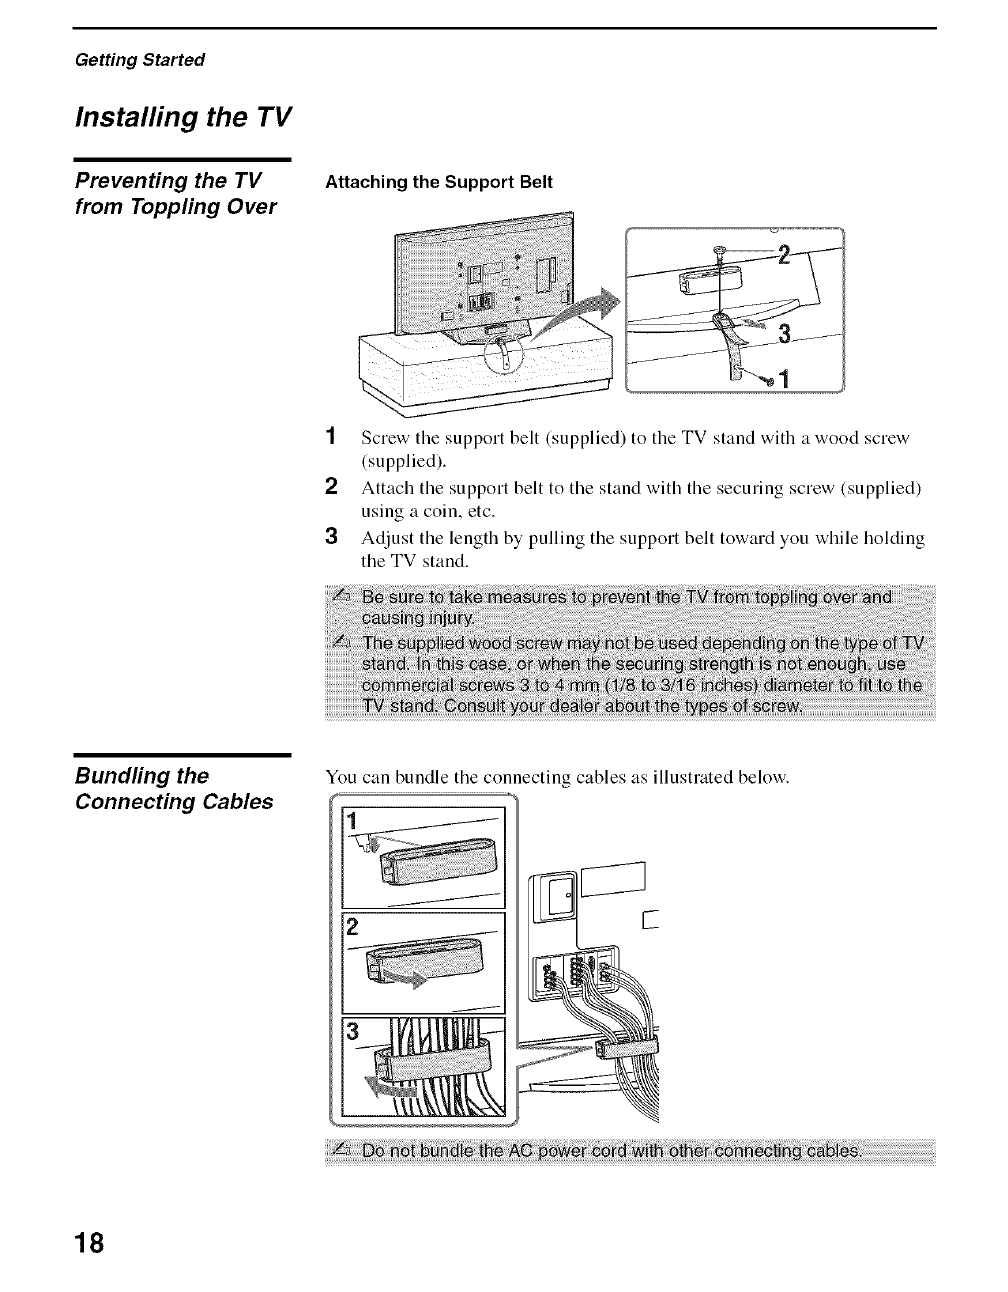
Installing the TV
Preventing the TV
from Toppling Over
Attaching the Support Belt
1Screw the support belt (supplied) to the TV stand with a wood screw
(supplied).
2Attach the support belt to the stand with the securing screw (supplied)
using a coin, etc.
3Adjust the length by pulling the support belt toward you while holding
the TV stand.
Bundfing the
Connecting Cables
You can bundle tile connecting cables as illustrated below.
18
Getting Started
When Installing
on a Wall
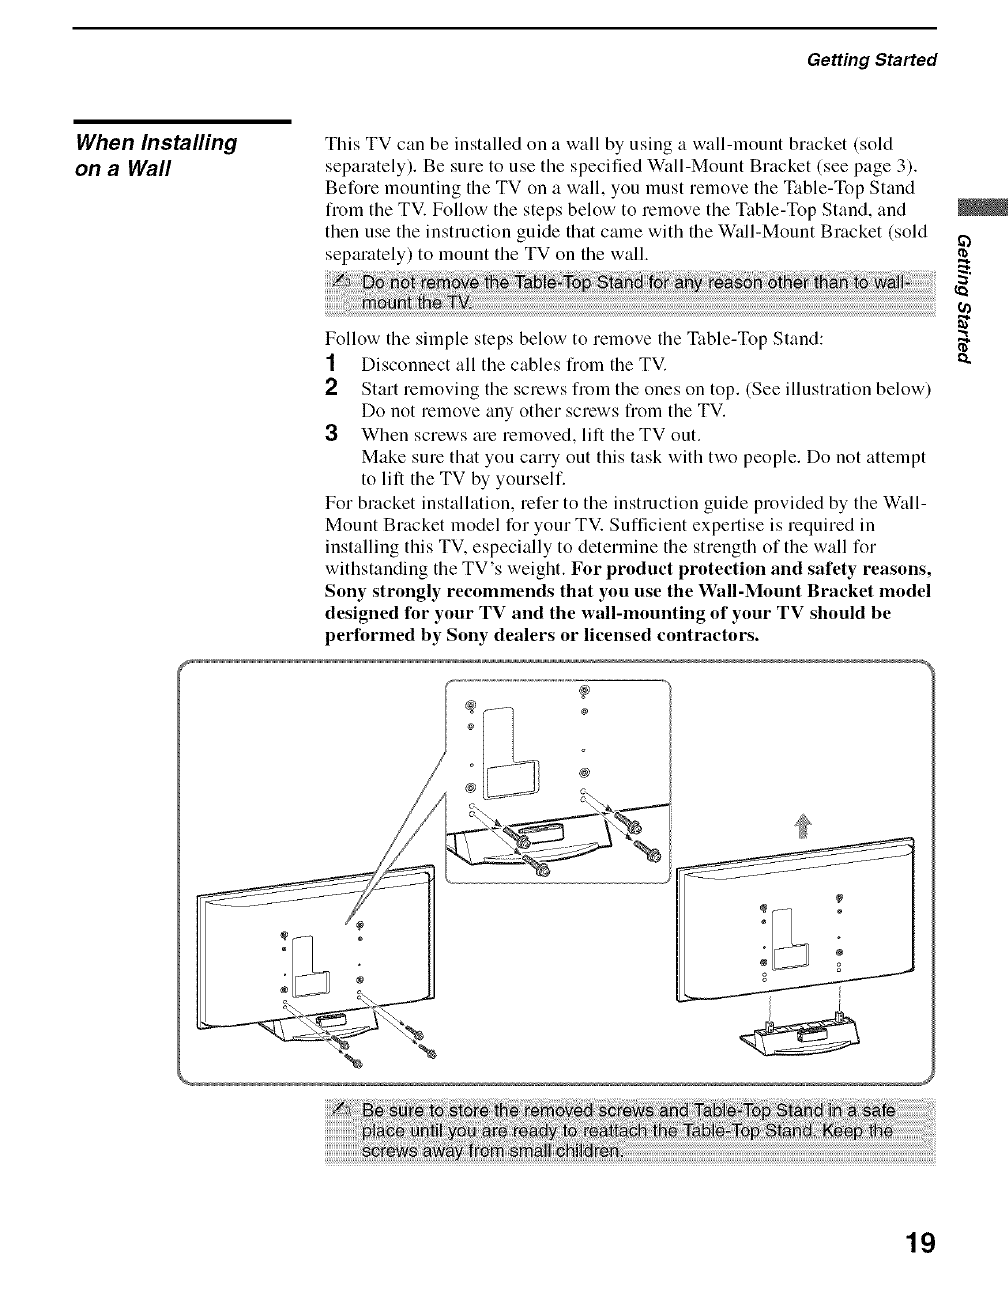
This TV can be installed on a wall by using a wall-mount bracket (sold
sepalately). Be sure to use the specified Wall-Mount Bracket (see page 3).
Before mounting the TV on a wall, you must remove the Table-Top Stand
from the TV. Follow the steps below to remove the Table-Top Stand, and
then use the instruction guide that came with the Wall-Mount Bracket (sold
separately) to mount the TV on the wall.
Follow the simple steps below to remove the Table-Top Stand:
1 Disconnect all the cables from the TV.
2 Start removing the screws from the ones on top. (See illustration below)
Do not remove any other screws from the TV.
3When screws are removed, lift the TV out.
Make sure that you carry out this task with two people. Do not attempt
to lift the TV by yourself.
For bracket installation, refer to the instruction guide provided by the Wall-
Mount Bracket model for your TV. Sufficient expertise is required in
installing this TV. especially to determine the strength of the wall for
withstanding the TV's weight. For product protection and safety reasons,
Sony strongly recommends that you use the Wall-Mount Bracket model
designed for your TV and the wall-mounting of your TV should be
performed by Sony dealers or licensed contractors.
@
@
ca
o_
t_
19
Getting Started
Setting Up the Channel List -Initial Setup
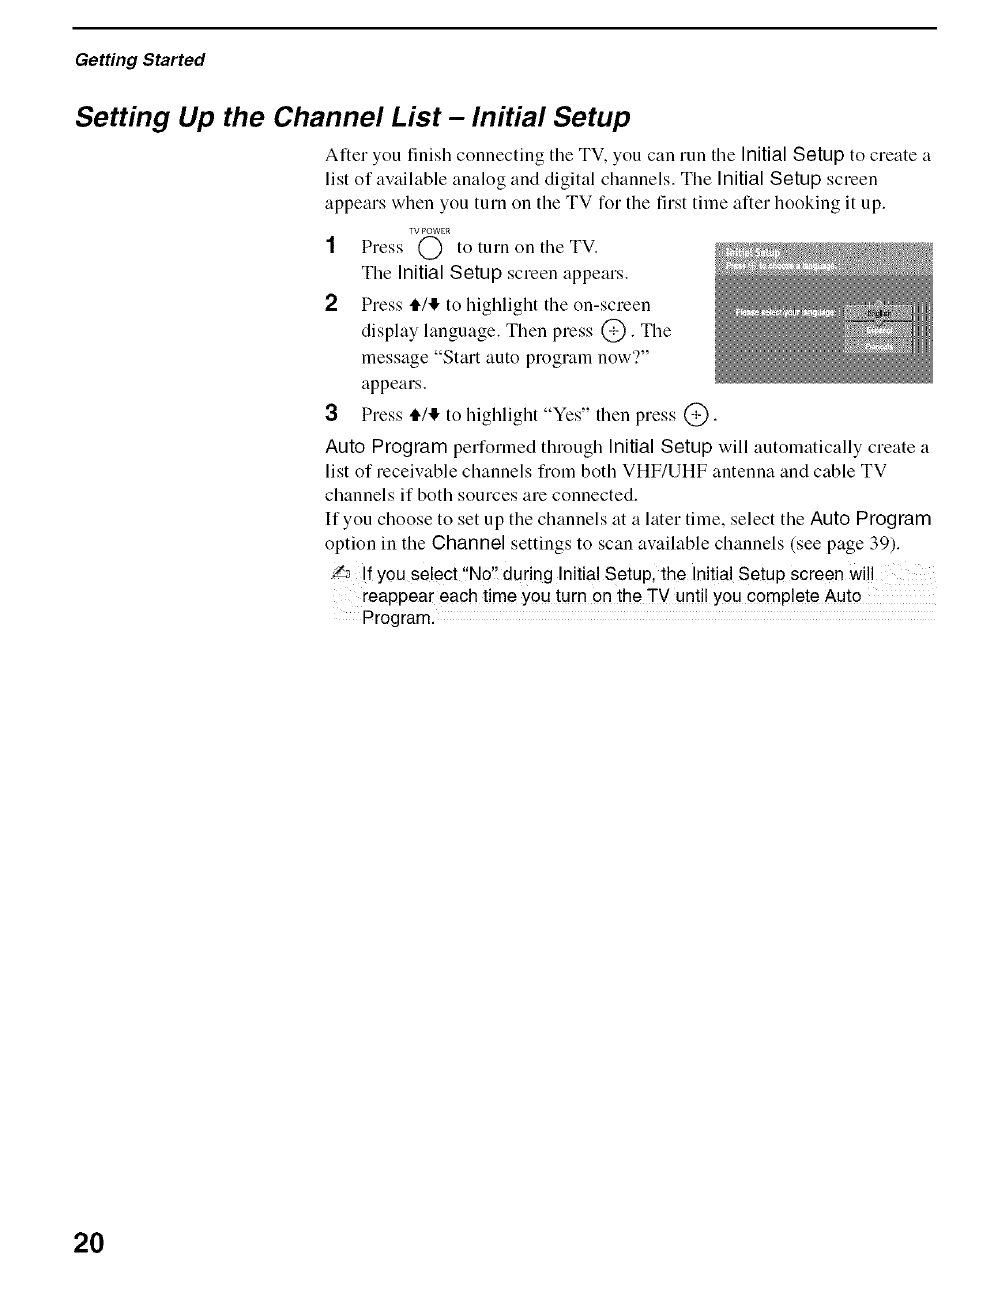
Ariel you finish connecting tile TV, you can run tile Initial Setup to create a
list of available analog and digital channels. The Initial Setup screen
appears when you turn on the TV for the first time after booking it up.
YV POWER
1Press (_ to turn on tile TV.
Tile Initial Setup screen appears.
2 Press ,I./I!, to highlight the on-screen
display language. Then press @. The
message "Start auto program now'?"
appears.
3 Press tl4,!, to h@lhght Ye.' then press @.
Auto Program performed through Initial Setup will automatically create a
list of receivable channels from both VHF/UHF antenna and cable TV
channels if both sources are connected.
If you choose to set up the channels at a later time, select the Auto Program
option in the Channel settings to scan available channels (see page 39).
'/_ If you select "No'! during Initial Setup, the Initial Setup screen will
reappear each time you turn on the TV until you complete Auto
Program.
2O
Remote Control
_o
] ....
88888888
88888888
88888888
88888888
88888888
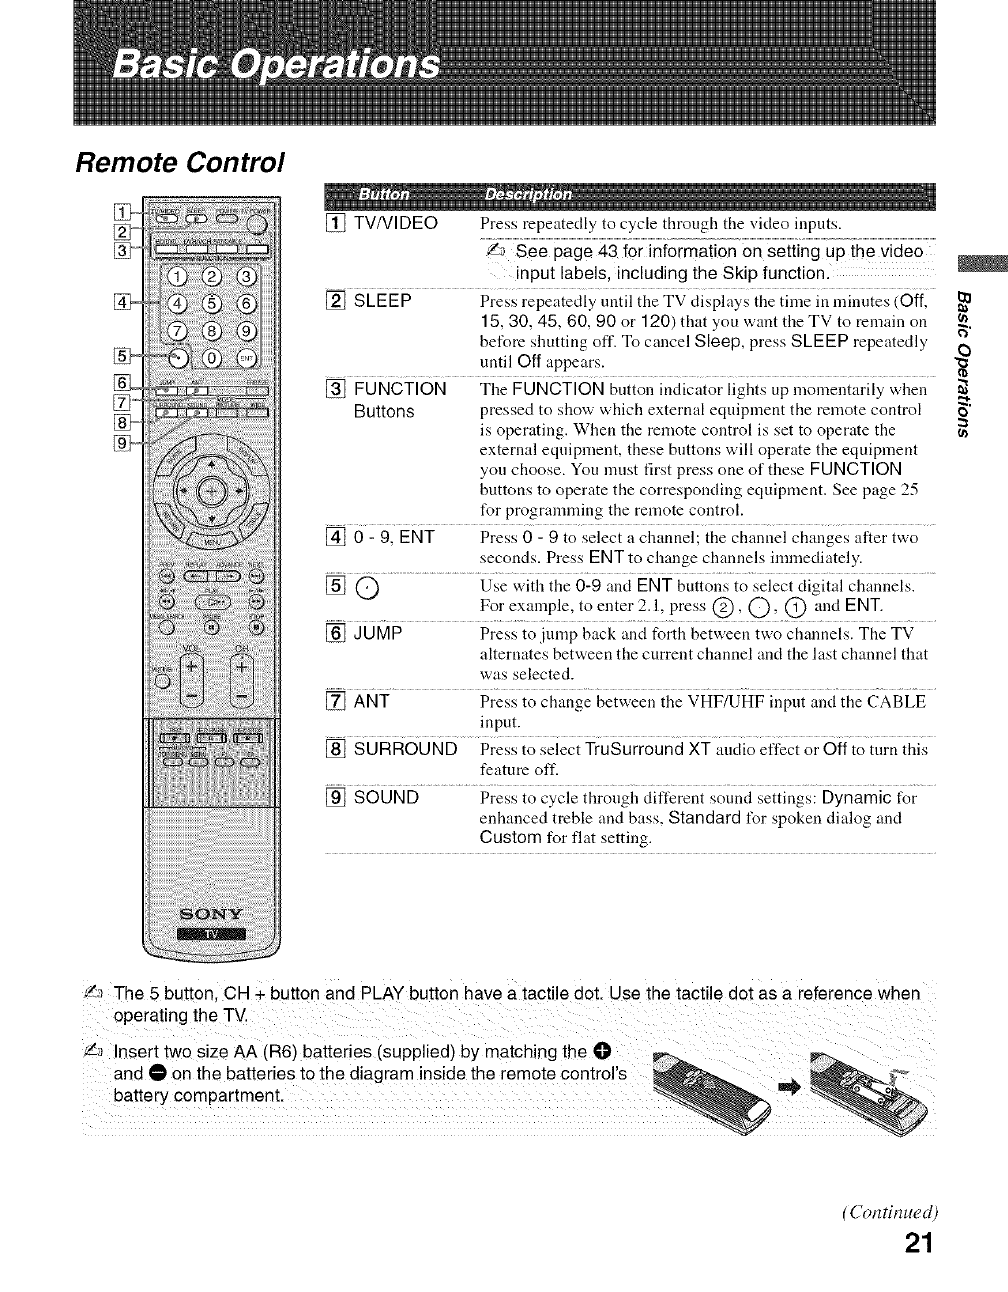
[] TV/VIDEO Press repeatedly to cycle through the video inputs.
.... imaiion
input labels, including the Skip function.
[] SLEEP Press repeatedly until the TV displays the time in minutes (Off,
t 5, 30, 45, 60, 90 or t 20) that you want the TV to remain on
before shutting off. To cancel Sleep, press SLEEP repeatedly
.... until Off appears. .....
[] FUNCTION The FUNCTION button indicator lights up momentarily when
Buttons pressed to show which external equipment the remote control
is operating. When the remote control is set to operate the
external equipment, these buttons will operate the equipment
you choose. You must first press one of these FUNCTION
buttons to operate the corresponding equipment. See page 25
for programming the remote control.
[] 0 - 9, ENT Press 0 - 9 to select a channel; the channel changes after two
seconds. Press ENT to change channels immediately.
[] O Use with the 0-9 and ENT buttons to select digital channels.
For exalnple, to enter 2.1, press @, O' @ and ENT.
[] JUMP Press to jump back and forth between two channels. The TV
alternates between the current channel and the last channel that
was selected.
[] ANT Press to change between the VHF/UHF input and the CABLE
input.
[] SURROUND Press to select TruSurround XT audio effect or Off to turn this
feature off.
[] SOUND Press to cycle through different sound settings: Dynamic for
enhanced treble and bass, Standard for spoken dialog and
Custom for flat setting.
,_.7The 5 button. CH + button and PLAY outton have a tactile dot. Use the tactile dot as a reference when
operating the TV.
'/_ nsert two size AA (R6) batteries (supplied) by matching the O,
and • on the batteries to the diagram inside the remote controls _ .__ _....,
battery compartment.
@}
o
=
u_
(Continued)
21
Basic Operations
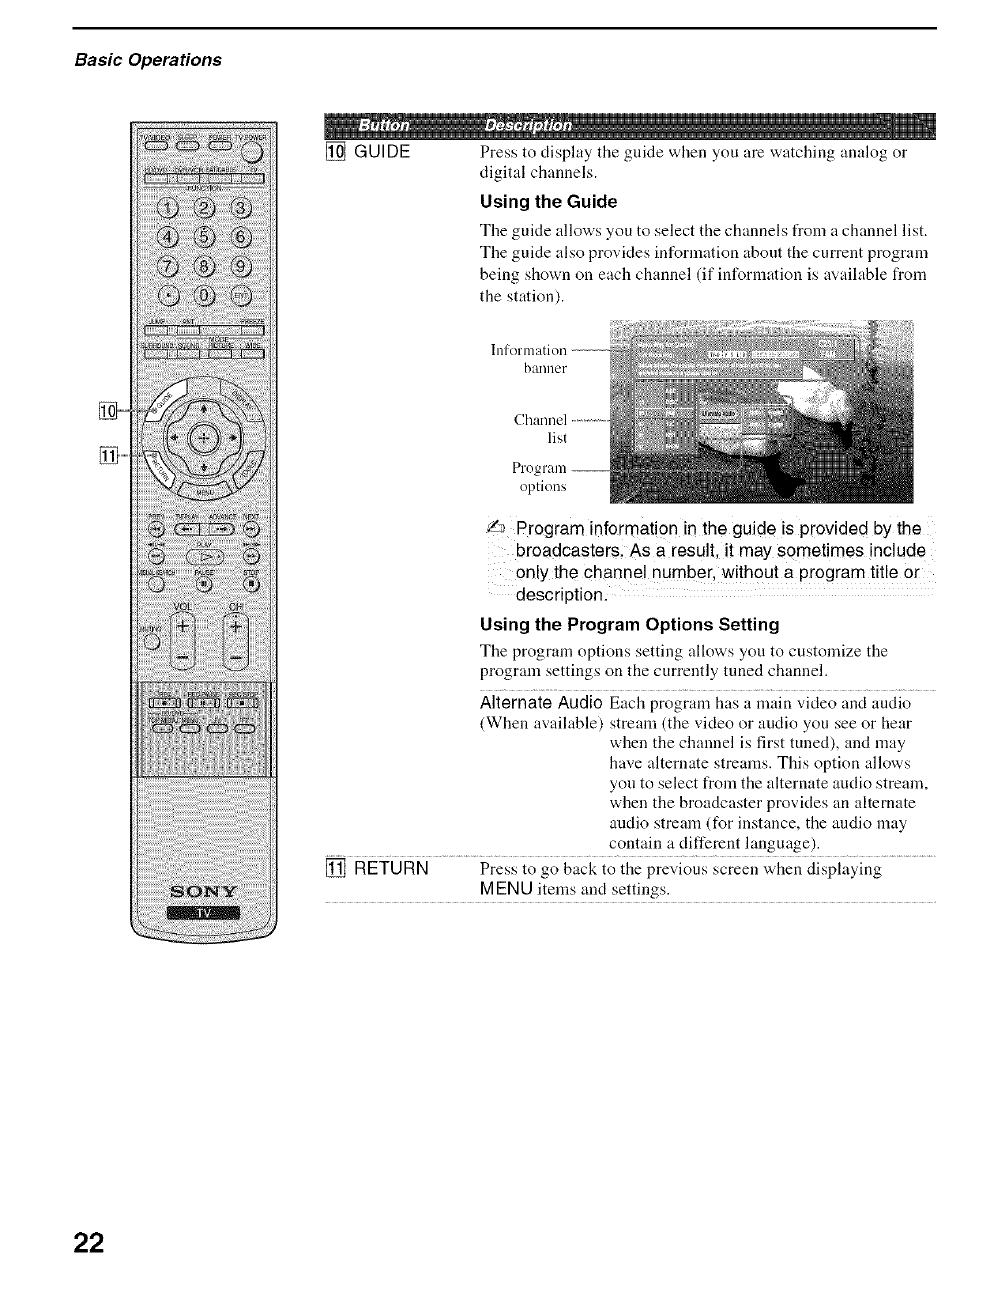
[] GUIDE Press to display the guide when you are watching analog or
digital channels.
Using the Guide
The guide allows you to select tile channels from achannel list.
The guide also provides information about the current program
being shown on each channel (if information is a,_ailable from
the station).
banner
Channel
list
options
/a Program information in the guide is provided by the
broadcasters: As a result, it may sometimes include
only the channel number, without a program title or
description.
Using the Program Options Setting
The program options setting allows you to customize the
program settings on the currently tuned channel.
Alternate Audio Each program has a main video and andio
(When available) stream (the video or audio you see or hear
when the channel is first tuned), and may
have alternate streams. This option allows
you to select from the alternate audio stream,
when the broadcaster provides an alternate
audio stream (for instance, the audio may
contain a different language).
[] RETURN Press to go back to the previous screen when displaying
MEN U items and settings.
22
Basic Operations
] .......
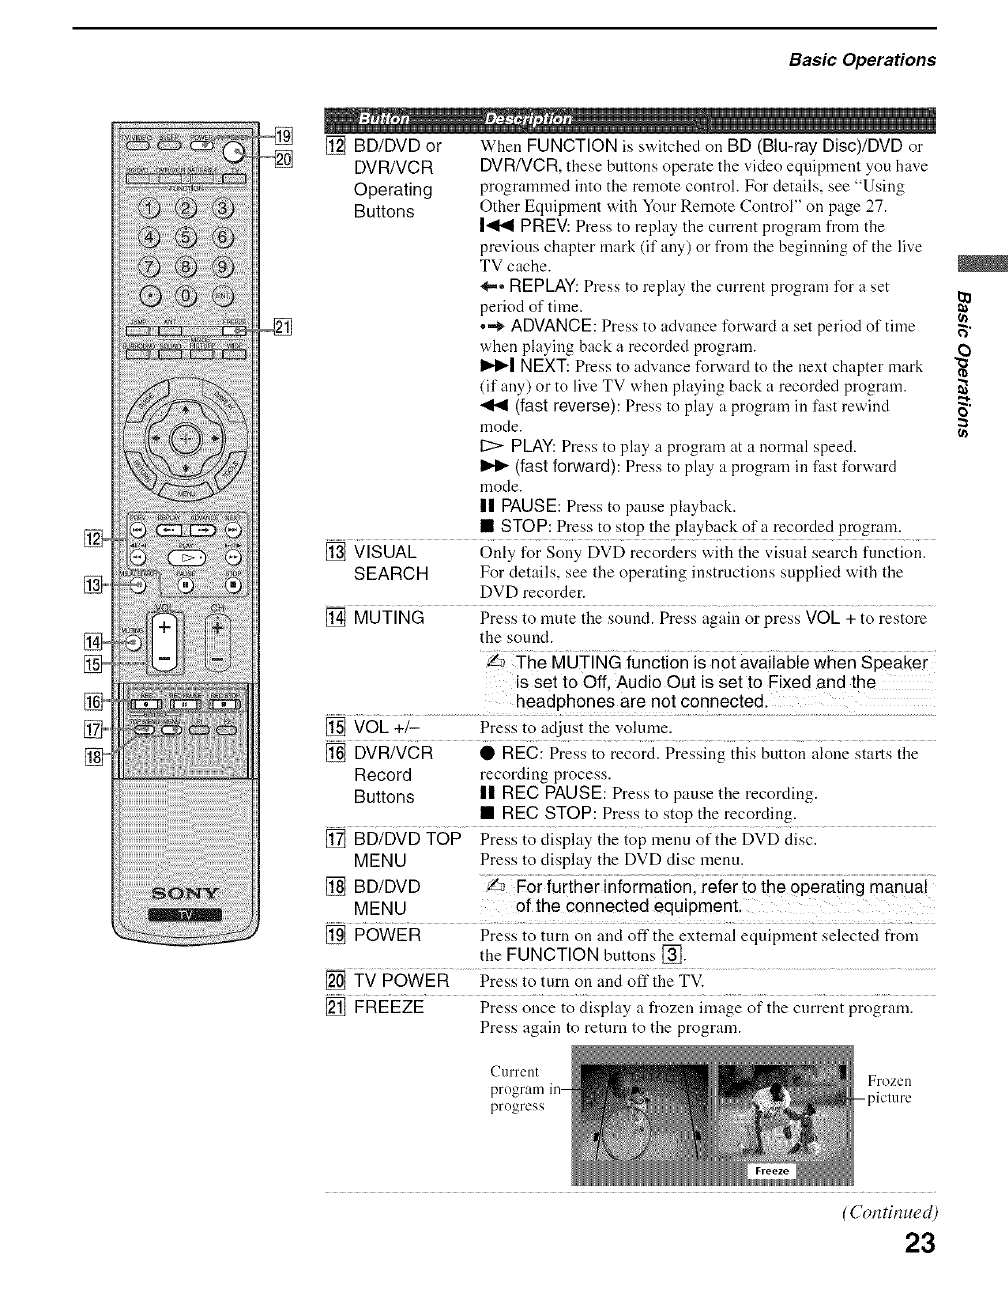
[] BD/DVD or When FUNCTION is switched on BD (Blu-ray Disc)/DVD or
DVR/VCR DVR/VCR, these buttons operate the video equipment you have
Operating programmed into the remote control• For details, see "Using
Buttons Other Eqnipment with Your Remote ControP' on page 27.
1<14 PREV: Press to replay tile current program from the
previous chapter mark (if any) or from the beginning of the live
TV cache.
_,,,, REPLAY: Press to replay the current program for a set
period of time.
•,,_ ADVANCE: Press to advance forward a set period of time
when playing back a recorded program.
IH_I NEXT: Press to advance fo_vard to the next chapter mark
(if any) or to live TV when playing back a recorded program.
-_1 (fastreverse):Press to play a program in fast rewind
mode.
12:> PLAY: Press to play a program at a normal speed.
(fast forward}: Press to play a program in fast forward
mode.
II PAUSE: Press to pause playback.
• STOP: Press to stop the playback of a recorded program.
[] VISUAL Only for Sony DVD recorders with the visual search function.
SEARCH For details, see the operating instructions supplied with the
DVD recorder.
[] MUTING Press to mute the sound. Press again or press VOL + to restore
the sound.
it,is The MUTING funciion is n°t avNiaNe when Speaker
is set to Off, Audio Out is set to Fixed and the
.........................................................headphones a!e not €onnec!ed: .............................................
[] VOL +/- Press to adjust the volume.
[] DVR/VCR • REC: Press to record. Pressing this button alone starts the
Record recording process.
Buttons n REC PAUSE: Press to pause the recording.
• REC STOP: Press to stop the recording.
[] BD/DVD TOP Press to display the top menu of the DVD disc.
MENU Press to display the DVD disc menu.
[] BD/DVD Z_
MENU of the connected equipment,
[] POWER Press to turn on and off the external equipment selected from
the FUNCTION buttons [_.
[] TV POWER Press to turn on and off the TV.
[] FREEZE Press once to display a frozen image of the current program.
Press again to return to the program.
CulTent
program
progress
Frozen
-piclure
o
=
u)
(Continued)
23
Basic Operations
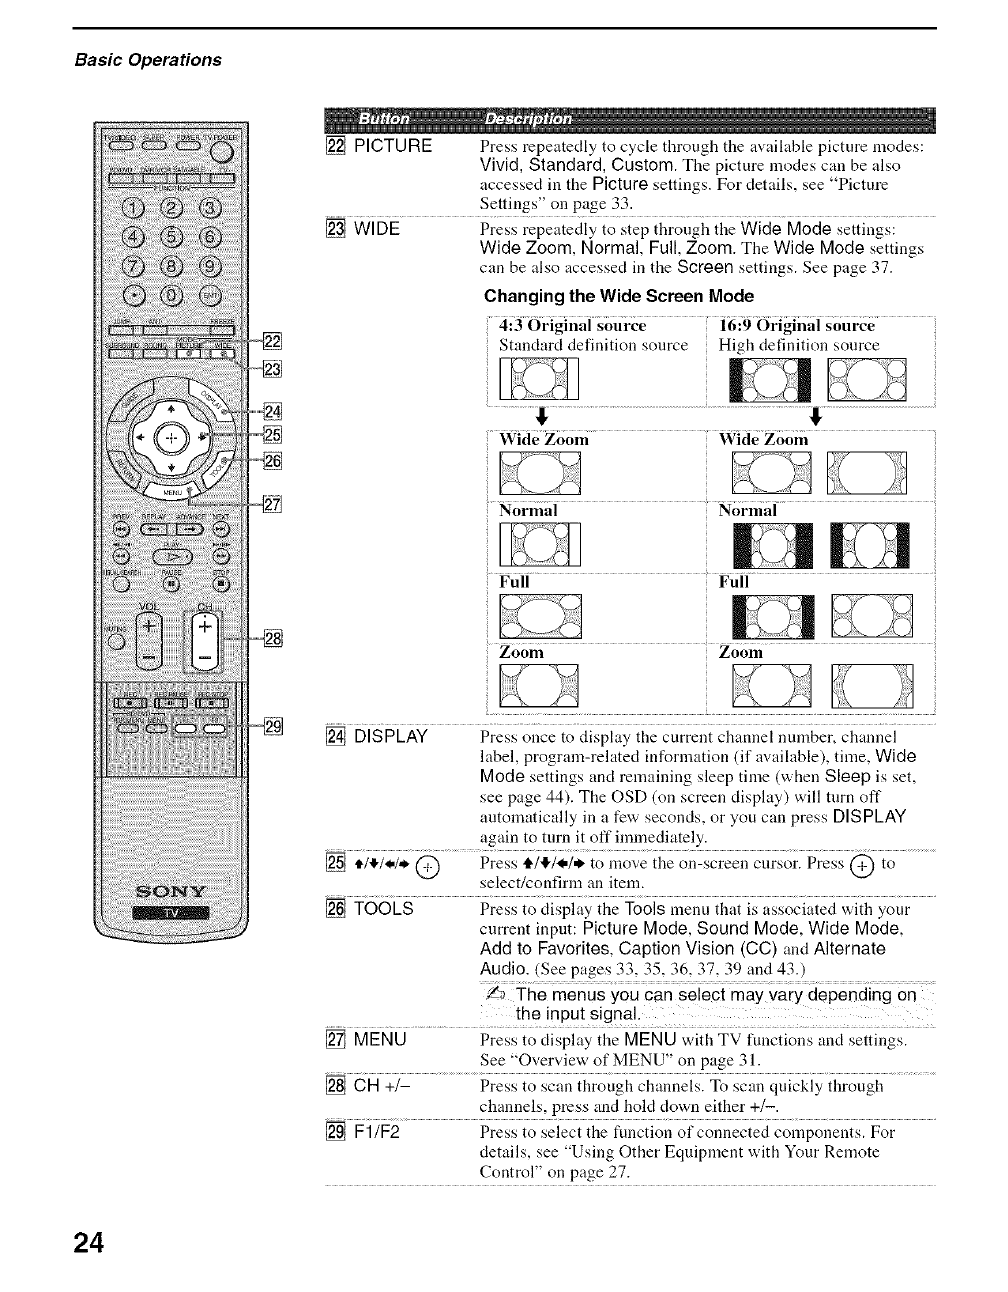
[] PICTURE Press repeatedly to cycle through the available picture modes:
Vivid, Standard, Custom. The picture modes can be also
S
accessed in the Picture settings. For details, • ee P cture
Settings" on page 33.
[] WIDE Press repeatedly to step through the Wide Mode settings:
Wide Zoom, Normal, Full, Zoom. The Wide Mode settings
can be also accessed in the Screen settings. See page 37.
Changing the Wide Screen Mode
4i30rlg]nai source 16i9 (_r]g]naisource
Standard definition source High definition source
..........................Wide Zoom Wide Zoom
Full Full
Zoom Zoom
[] DISPLAY Press once to display the current channel nmnber, channel
label, program-related information (if available), time, Wide
Mode settings and remaining sleep time (when Sleep is set,
see page 44). The OSD (on screen display) will turn off
automatically in a few seconds, or you can press DISPLAY
again to turn it off immediately.
[] illl, l,_,l,,_@ Press 4,1,!,1<.1. to move the on-screen cursor. Press @ to
select/confirm an item.
[] TOOLS Press to disph/y the Tools menu that is associated with your
current input: Picture Mode, Sound Mode, Wide Mode,
Add to Favorites, Caption Vision (CC) and Alternate
Audio. (See pages 33, 35, 36, 37, 39 and 43.)
[] MENU Press to display the MENU with TV functions and settings.
See "Overview of MENU" on page 31.
[] CH +/- Press to scan through channels. To scan quickly through
channels, press and hold down either +/-.
[] F1/F2 Press to select the function of connected components. For
details, see "Using Other Equipment with Your Remote
Control" on page 27.
24

Basic Operations
Programming the Remote Control
The remote control is preset to operate Sony brand video equipment.
BD/DVD 101 (Sony Blu-ray Disc Player)
DVR/VCR 901 (Sony Dretun System)
SAT/CABLE 801 (Sony Satellite Receiver)
Follow tile steps below to program your TV's remote control to operate non-
Sony video equiprnent.
Find the three-digit code for your equipment fiorn the Manutacturer.'
Codes" listed on page 26. If more than one code number is listed, try
entering fiorn the code listed first.
[] Press and hold the _, _R or _ FUNCTION button you want to
program on the remote control and press the % button sirnultaneously.
The selected FUNCTION button (BD/DVD, DVR/VCR or SAT/CABLE)
will flash.
[] Enter the three-digit manufacturer's code number using the (_)-(_)
buttons while the FUNCTION button is lit. If the code is not entered
within 10 seconds, you must start again fiom step 1.
[] Press the (_ button while the FUNCTION button is lit.
When the programming is correct, the selected FUNCTION button blinks
twice, and when not, blinks five times.
'/_ While _; _c_:3_and _E buttons are labeled as such, you can still
program any of your connecte d equipment using any one of the buttons
regardless of the label. For example, _ button can be programmed to
operate your VCR. If you have a DVD/VCR combo that you want to
operate with your TV remote control, you can program with the _ or
_c_" or even the _*_1 but remember which button you have
programmed for your particular use.
To check if the code works
Aim your TV's remote control at the equipment, and press tbe green
button. If you can turn tbe equipment on and off by using tbe remote control,
then the programming is complete. If not, try the next code listed.
f,_ If no code is input within the above specified time, or an invalid or
incorrect code number is input, the remote control automatically goes
f,_ In some cases, you may not be ab!e to program your remote control to
operate other equipmen t. !n such cases, use the equipment's own
remote control.
e}
F,"
o
=
(n
25

Basic Operations
Manufacturer's Codes
DVD Players
Sony 751,763
General 755
Electric/RCA
Hitachi 758
JVC 756
Magnavox 757
Mitsubishi 761
Orilron 759
Panasoeic 753
Philips 757
Pioneer 752. 778
RCA/PROSCAN 755
Samsung 758
Toshiba 754
Zenilh 760. 762
DVD/VCR Combo Units
Sony 767
Broksonic 776
JVC 775
Pmmsonic 777
Samsung 774
Sony DV 348 Samsung 313, 321. 322
.................... sa_,_i!!......................................................330,335............
Aiwa _ 338, 344 Scott 312.313.321,323.
324, 325. 326. 335
Audio Dynamic 314. 337
Broksonic 317.319 Sharp 327. 328
Canon 308. 309 Signature 2000 327. 338
Citizen .......................................332 ....... (M. Ward)
di:;i{.......................................!/62133i...........................................8v2000 338
Curtis Mathes 304. 3119.338
Daewoo 309, 312, 341
DBX 314. 336, 337
Dimensia 304
Emerson 316.317. 318.319.
320. 341
Symphonic 338
Tashiro 332
Tatm_g 314. 336. 337
Teac 314, 336. 337. 338
Technics 308. 309
Fisher ........ 330, 335 .......... Toshiba .... 3 iil 3 i9 ......
Funai 338 Wards 327,328, 331,332,
General ElecMc 3()4_309. 329 335
Go ...................................................................Video 322, 339, 34(1 Yamaha.................... 3i41 53{ii 31_6133"7
Goldstm" 332.................. Zenith 331
Hi{bi{i......................................................_{ia5635ii6_g
I!!s!an!Rep! !?i..........................3!?S' 309........................
JC Penney 304, 305, 31)9,314,
330, 336, 337
JVC 314. 336. 337. 345.
346. 347
Sony 231)
Hamlin/Regal 222.223.224. 225.
226
Jerrold/ 201. 202.203.204.
...... 77_ ..................
Toshiba Kenwood 314. 332,336, 337 General Inst./ 205. 206, 207.208,
............ 768 ................................... 218, 222
Zenilh LG ............ 332 Mo!{?rola .............................................
HDD/DVD Combo Units
Sony 770, 771,772
DVD Changers
Sony 765
Pmmsonic 766
DVR
Sony 901
LXI (SEARS) 305,330, 332,335, Oak 227, 228, 229
338 Pmmsonic 219,220, 221
Magnavox 3(t8. 309.310 Pioneer 211, 214. 215
Mar:mtz 314. 336. 337 Scientific Atlanta 2()9, 210, 211
Marta 332 Tocom 216, 217
_l_iiibi_ex ...... :1(i923_5................ z_iiiii_.............. _i21_i_....
Minolta 304, 305
....................................................... Satellite Receivers
Milsubishi/MGA 323. 324 325 326
.............................................................. ............................... l/a _ _ _ _ - _ e_ _
Mullitech 321,325, 338
NE_............................................._i_i_6 __ S°"Y 8ol
....................................................................................................Dish Network 810
O!yn?p!c..................3(!S:399 .......... gchosmr ................810..............
Blu-ray Disc Player (BD)
Sony 101, 102, 1!_13
5.1ch DVD AV System
Sony (DAV) 601,602, 603,604
AV Receivers
Sony 764
VCRs
Sony 301,302. 303
(VHS, 8ram, Beta)
Optimus 327
Orion 317
Pentax 304, 305
Philco 308, 309
Phiiips ....... 5697309 5i6 .....
Pic;iieer.....................................3_,}8 .........
Quasar 306, 308,309
RCX/PROS(?XN J()4_ 305 3ii8 5092
310,311,312,313,
329
Realistic 309,324, 328,330,
335,338
Sm_sui 314
General Eleclric 802
.................... ..........
Hughes 81)4
JVC 810
Mitsubishi 81)9
p:,ri:,;_;i_ic s03............
ph!lips .................... 8 {!.......................................
RCA/PROSCAN 802, 808
%;i_m;_..........................gggls67...................
Samsung 812
* If an Aiwa VCR does not work even
though you enter the code forAiwa, enter
the code for Sony instead,
26
Basic Operations
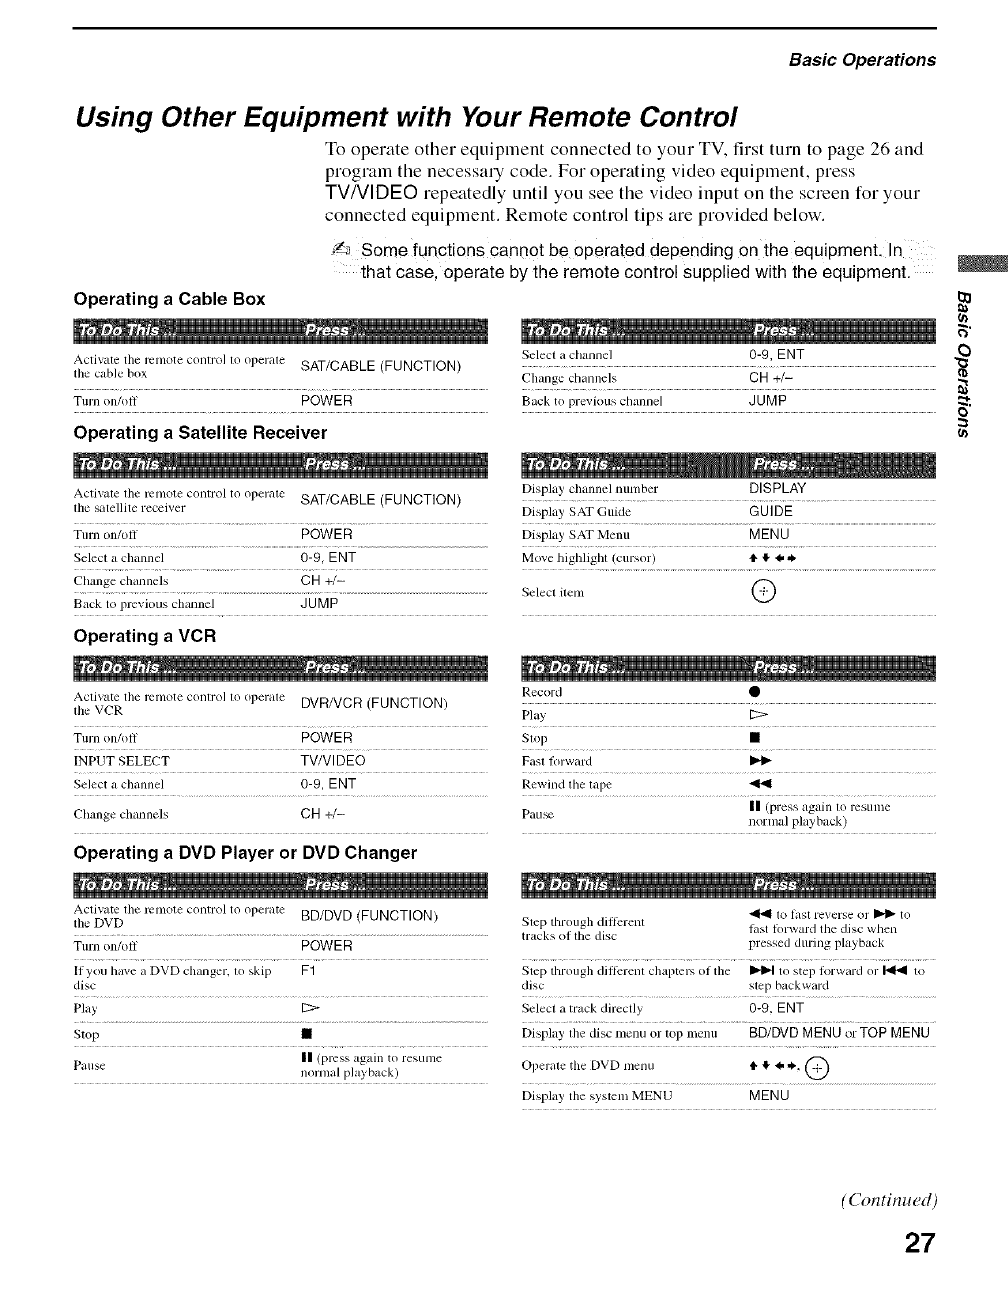
Using Other Equipment with Your Remote Control
To operate other equipment connected to your TV. first turn to page 26 and
program the necessary code. For operating video equipment, press
TV/VIDI:::O repeatedly until you see the video input on the screen for your
connected equipment. Remote control tips are provided below.
S_ Some functions cannot be operated depending on the equipment,
that case, operate by the remote control supplied with the equipment.
Operating a Cable Box
Activate the relnote control to operate SAT/CABLE (FUNCTION)
tile cable box
Turn on/off POWER
Operating a Satellite Receiver
Activate the relnote control to operate SAT/CABLE (FUNCTION)
tile satellite receiver
Turn on/off POWER
Select a chalmel 0-9, ENT
Chmage channels CH +/-
Back to previous channel JUMP
Operating a VCR
Activate tile relnote control to operate DVR/VCR (FUNCTION)
lhe VCR
Turn on/oil: POWER
INPUT SELECT TV/VI DEO
Select a channel 0-9, ENT
Change chmmels CH +/-
Operating a DVD Player or DVD Changer
Activate tile relnote control to operate BD/DVD (FUNCTION)
tile DVD
Turn on/oll POWER
11you have a DVD changer, to skip F1
disc
Play I_>
Stop •
Pause II (press again to resume
norlnal playback)
Select a channel 0-9, ENT
Change channels CH +/-
Back to previous channel JUMP
Display channel number DISPLAY
Display SAT Guide GUIDE
Dispk_y SAT Menu MENU
Move highlight (cursor) t1",I, I, ,_
Select item Q
Record •
Play [2:>
Stop •
Fast lorward I_
Rewind tile tape
|| (press again to resulne
Pause normal playback)
to htst reverse or _ to
Step through dillcrent last lorward the disc when
tracks ol tile disc pressed during playback
Step through dillcrenl chaptel>, ol tile _ to step lorward or I_ to
disc step backward
Select a track directly 0-9, ENT
Display' tile disc menu or top menu BD/DVD MENU or TOP MENU
Operale tile DVD l/lellU t1'I!",_ ,_., ('_
Display' the system MENU MENU
o
=
(n
(Continued)
27
Basic Operations
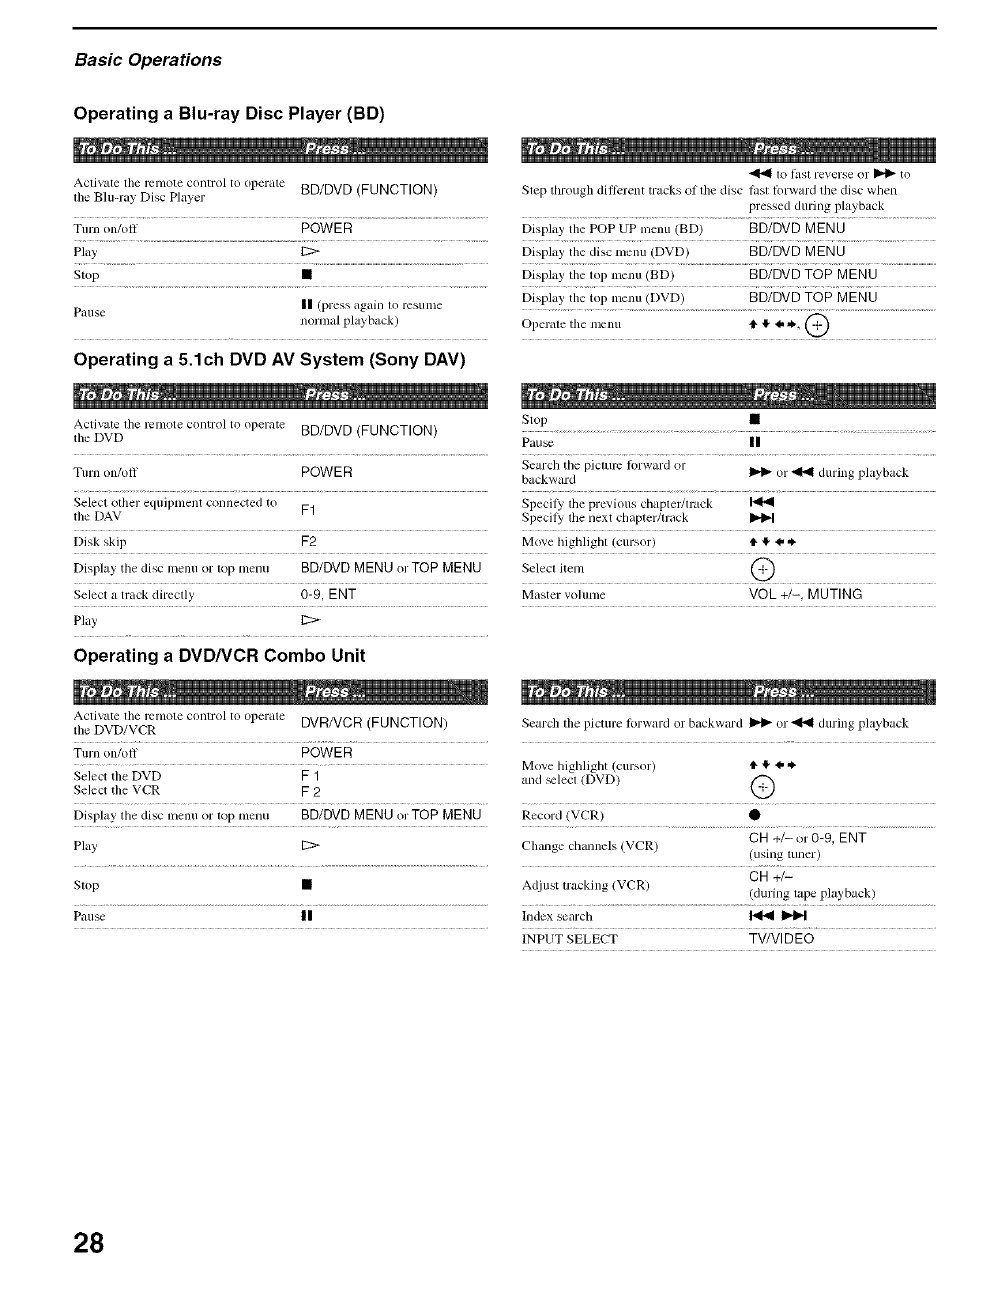
Operating a Blu-ray Disc Player (BD)
Activate tile remote control to operate BD/DVD (FUNCTION)
lhe Blu-ray Disc Player
Turn im/oll POWER
Play
Stop •
Pause II (press again lo resmne
normal playback)
Operating a 5.1ch DVD AV System (Sony DAV)
Activate the remote control to operate BD/DVD (FUNCTION)
the DVD
Turn on/ofl POWER
Select olher eqtlJpl/lent connected to
tile DAV F1
Disk skip F2
Display the disc menu or top menu BD/DVD MENU or TOP MENU
Select a track directly 0-9, ENT
Pla t, E:>
Operating a DVD/VCR Combo Unit
1o htsl reverse or _ to
Slep through dillcrent tracks olthe disc lasl Iorward tile disc when
pressed during playback
Display' the POP UP menu (BD) BD/DVD MENU
Display' the disc menu (DVD) BD/DVD MENU
Display' tile top menu (BD) BD/DVD TOP MENU
Display tile top menu (DVD) BD/DVD TOP MENU
Operate tile menu _ 4!' _ _, _-!f)
Stop •
Pause II
Search the picture lorward or
backward _ or _ during playback
Specily tile previous chapter/lrack
Specily tile llext chapter/track I1_
Move highlighl (cursor) tl, ,I, 4, _.
Selecl item @
Master volume VOL +/-, MUTING
Activate tile remote control to operate DVR/VCR (FUNCTION)
tile DVD/VCR
Turn on/off POWER
Select the DVD F 1
Select tile VCR F 2
Display the disc nlenu or top menu BD/DVD MENU or TOP MENU
Play' [2>
Stop •
Pause II
Search tile picture fi)rward or backwm'd _ or _ during playback
Move highlight (cursor) _. _ 4, ,_.
alld _lecl (DVD) (_
Record (VCR) O
CH +/- or 0-9, ENT
Change channels (VCR) (using tuner)
CH +l-
Adjust uacking (VCR) (during tape playback)
Index search _
INPUT SELECT TV/Vl DEO
28
Basic Operations
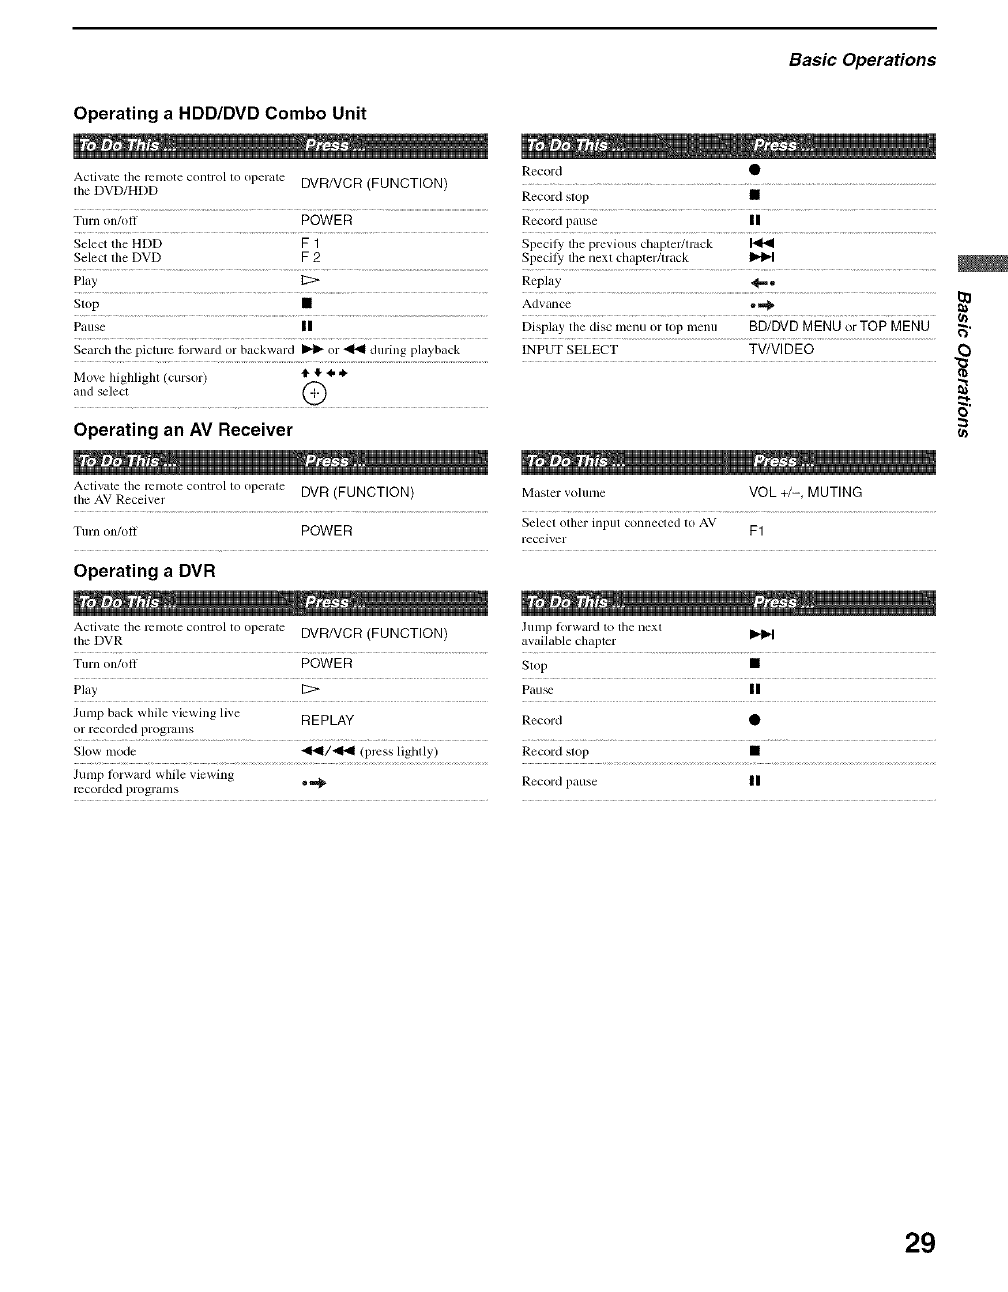
Operating a HDD/DVD Combo Unit
Record •
Activate the renlote controlto oper_ae DVR/VCR (FUNCTION) ....................................................................................................................................
lhe DVD/HDD Record stop •
Turn on/oil POWER Record pause II
Select the HDD F 1 Specily the previous chapter/track
Select the DVD F 2 Specily the next chapter/track _
Play 12:> Replay _.
................................................................................................................................................................................................................... {/)
Pause II Display' the disc nlenu or top menu BD/DVD MENU or TOP MENU _.
Search the picture lblward or backward _ or _ during playback INPUT SELECT TV/VIDEO
Move highlight (cursor) t_' 4, _.
;lnd select ....... MCJ
Operating an AV Receiver
Activate the remote control to operate DVR (FUNCTION) Master volume VOL +1-, MUTING
the AV Receiver
Turn o11/oll POWER Select other illput Collnecled to AV F1
leceiver
Operating a DVR
o
(n
Activate lhe remote cont]'ol to operate DVR/VCR (FUNCTION) .hunp lorward to the next
the DVR available chapter
Ttlrn on/off POWER Ship •
Play _ Pau_ II
Jump back while viewing live REPLAY Record •
or recorded progralllS
Slow mode <1.91/<1_1 (press lightly) Record stop •
Jump lorward while viewing ===_ Record pause II
recorded programs
29
Basic Operations
TV Controls
,[]
STANDBY ?POWER
[] []
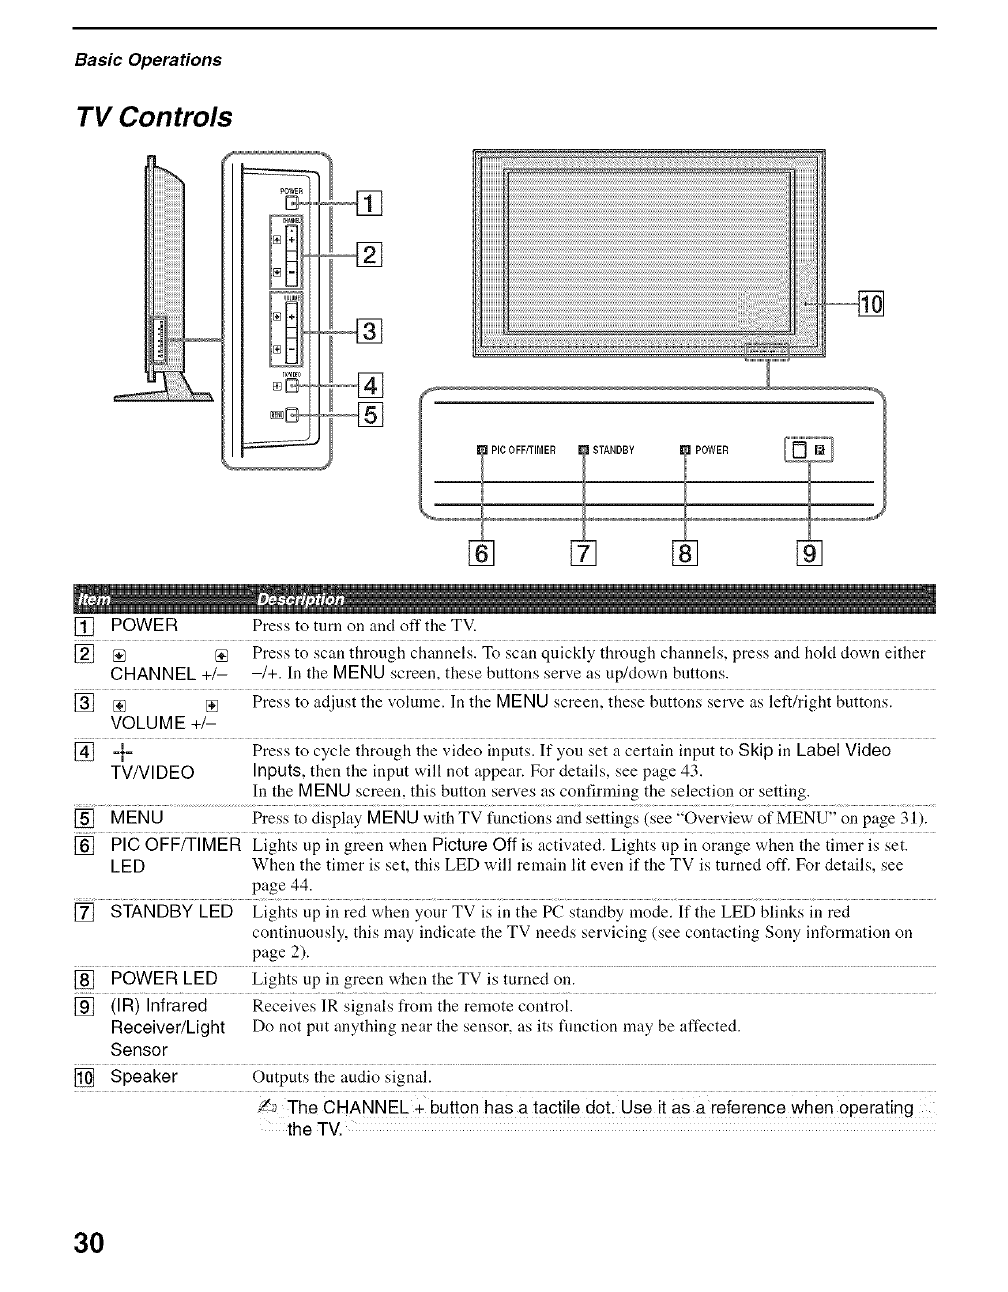
[] POWER Press to turn on and off the TV.
[] [] {_ Press to scan through channels. To scan quickly through channels, press and hold down either
CHANNEL +/- -/+. In the MENU screen, these buttons serve as up/down buttons.
[] [] [] Press to adjust the volume. In the MENU screen, these buttons serve as left/right buttons.
VOLUME +/-
[] -}- Press to cycle through the video inputs. If you set a certain input to Skip in Label Video
TVNIDEO Inputs, then the input will not appear. For details, see page 43.
In the MENU screen, this button serves as coufirming the selection or setting.
[] MENU Press to display MENU with TV functions and settings (see "Overview of MENU" on page 31).
[] PIG OFF/TIMER Lights up in green when Picture Off is activated. Lights lip in orange when the timer is set.
LED When the timer is set, this LED will remain lit eveu if the TV is turned oft'. For details, see
page 44.
[] STANDBY LED Lights up in red when your TV is in the PC standby mode. If the LED blinks in red
continuously, this may indicate the TV needs servicing (see contacting Sony information on
page 2).
[] POWER LED Lights up in green when the TV is turned ou.
[] (IR) Infrared Receives ]R signals from the remote control.
Receiver/Light Do not put anything near the sensor, as its flmctiou may be affected.
Sensor
[] Speaker Ontputs the audio signal.
_ The CHANNEL + button has a tactile dot. Use it as a reference when operating
the TV.
3O
Overview of MENU
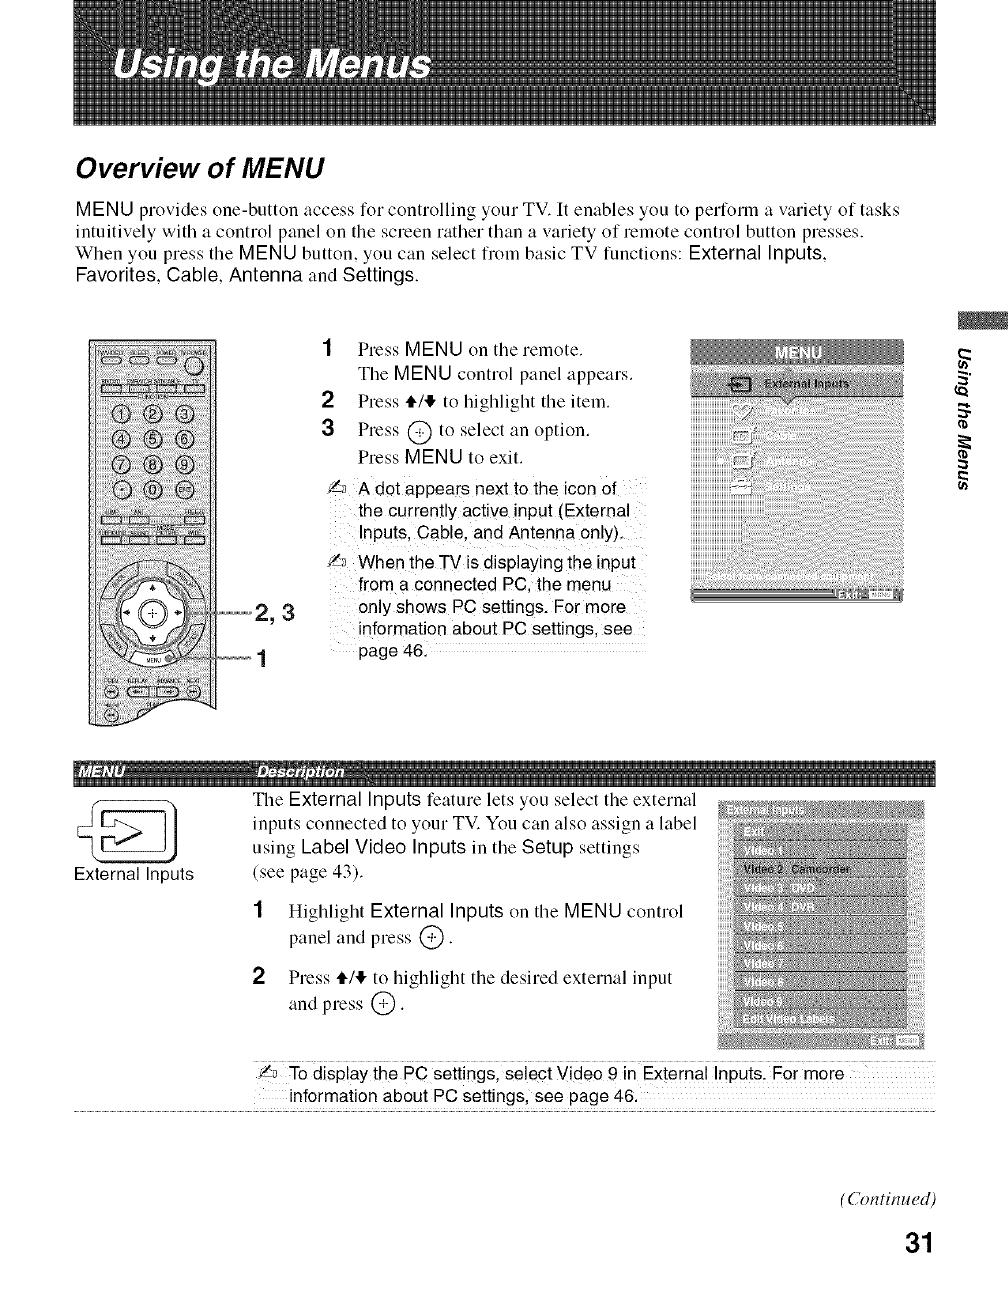
MENU provides one-button access for controlling your TV. [t enables you to perform a variety of tasks
intuitively with a control panel on the screen rather than a variety of remote control button presses.
When you press the MENU button, you can select from basic TV functions: External Inputs,
Favorites, Cable, Antenna and Settings.
--2,3
1Press MENU on tile remote.
The MENU control panel appears.
2Press tl./!1,to highlight the item.
3Press @ to select an option.
Press MENU to exit.
'/_ A dot appears next to the icon of
the currently active input (Externa
Inputs, Cable. and Antenna only).
f,_ When the TV is displaying the input
from a connected PC. the menu
only shows PC settings. For more
information about PC settings, see
page 46.
_iiiii_ii_ii_ii_iiiiiiiiiiiiiiiiiiiiiiiiiiiiiiiiiiiiiiiii_i_iiiiiiii__iiiiiiiiiiiiiiiiiiiiiiiii
2
The External Inputs feature lets you select the external
inputs connected to your TV. You can also assign a label
using Label Video Inputs in the Setup settings
External Inputs (see page 43).
1Highlight External Inputs on the MENU control
panel and press @.
2Press _/I!, to highlight the desired external input
and press @.
/_ _re dispiay ih; PC setiings; s;ieci Video 9 in Exiernai inpuisl For more
information about PC settings, see page 46.
(Continued)
31

Using the Menus
The Favorites feature lets you select programs from a
list of up to 16 favorite channels that you specify.
1Highlight Favorites fi-orn the MENU control
Favorites panel and press @.
The Favorite Channels list appears.
2 Make your selection by pressing tl./$
to highlight the desired channel then press @.
To add the current channel to the list of Favorite
Channels, highlight Add to Favorites and
press @.
To manually edit your list of favorite channels, select Edit Favorites.
For more information, see page 39.
O Tile Cable feature displays tile most recently viewed channel on tile cable input.
When tuned to the channel, the program banner and channel number will be
displayed.
Cable i_ Totum ect Setiings andset the Info Banner option to
On in the Setup settings (see page 43).
The Antenna feature displays the most recently viewed channel on the antenna
input. When tuned to the channel, the program banner and channel number will be
displayed.
Ante nna an ne i eii nei opiio n
On in the setup settings (see page 43).
The Settings feature lets you enter the settings menu. Settings and adjustments can
be performed from the Settings menu. The information on various settings starts
from page 33. 2221
Settings Navigating Through Settings
1Press MENU.
2Select C_"
3 Highlight an item: Picture, Sound, Screen, Channel, Parental Lock, Setup.
4Press @ to select an option.
To exit Settings, press MENU.
onsyou can adjust vary depend n: Unava!lab
are grayed 0ut 0r not diSp!aye&
,/9 To display PC settings (see page 46), select Video 9in External Inputs and
switch to PC input, Pressing MENU shows PC settings when the TVis displaying
the input from a connected PC.
32
Using the Menus
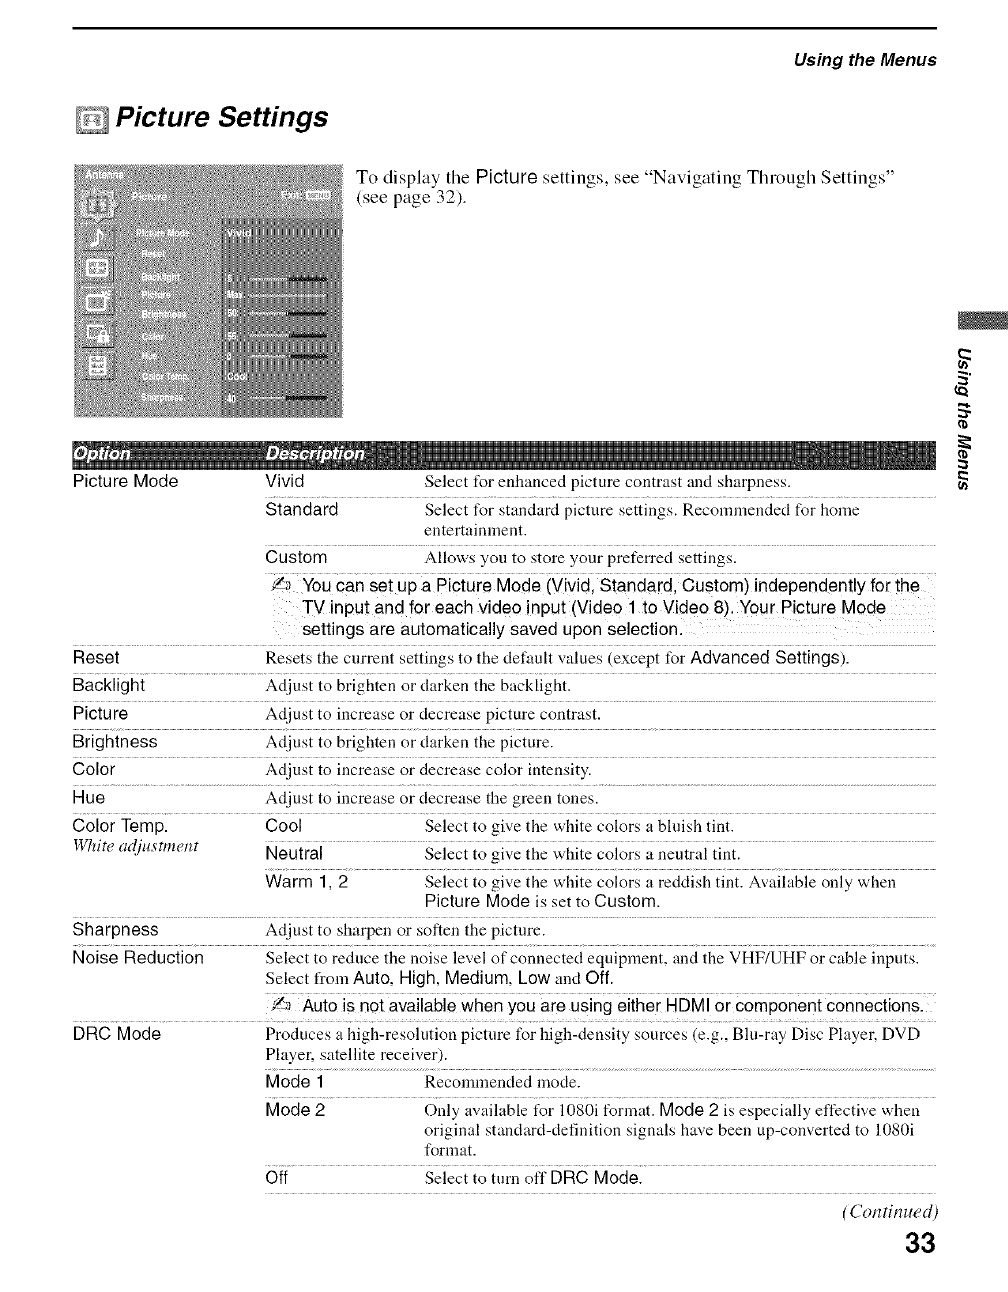
@Picture Settings
To display the Picture settings, ,'ee Na 1gating Through Settings"
(see page 32).
Picture Mode Vivid Select for enhanced picture contrast and sharpness.
Standard Select for standard picture settings. Recommended for home
entertainment.
Custom Allows you to store your preferred settings.
IY,_YOUcan S;i upa Piciur; Mod; ivivid; Siandard; Cusiomi ind;p;nd;niiy for ih;
TV input and for each video input (Video 1 to Video 8). Your Picture M0de
settings are automatically saved upon selection.
Reset Resets the current settings to the deftmlt values (except for Advanced Settings).
Backlight Ac[iust to brighten or darken the backlight.
Picture Adjust to increase or decrease picture contrast.
Brightness Ac[iust to brighten or darken the picture.
Color Adjust to increase or decrease color intensity.
Hue Adjust to increase or decrease the green tones.
Color Temp. Cool Select to give the white colors a bhfish tint.
White cl:lju_tment Neutral ..............................Select to give the white colors a neutral tint. ..........................................................
Warm 1, 2 Select to give the white colors a reddish tint. Available only when
Picture Mode is set to Custom.
Sharpness Adjust to sharpen or soften the picture.
Noise Reduction Select to reduce the noise level of connected equipment, and the VHF/UHF or cable inputs.
Select from Auto, High, Medium, Low and Off.
i_ Auio is not avaiiabi; wh;n you ar; using eiih;r H[3Mi
DRC Mode Produces a high-resolution picture for high-density sources (e.g., Blu-ray Disc Player, DVD
Player, satellite receiver).
Mode 1 Recommended mode.
Mode 2 Only available t_r 1080i format. Mode 2 is especially effective when
original standard-definition signals have been up-converted to 1080i
format.
Off Select to turn off DRC Mode.
(Continued)
33
Using the Menus
_,_ DRC Mode is available when you are watching 480i, 480p, 720p or 1080i
sources. It is not available when Game Mode is On or you are using the Freeze
feature.
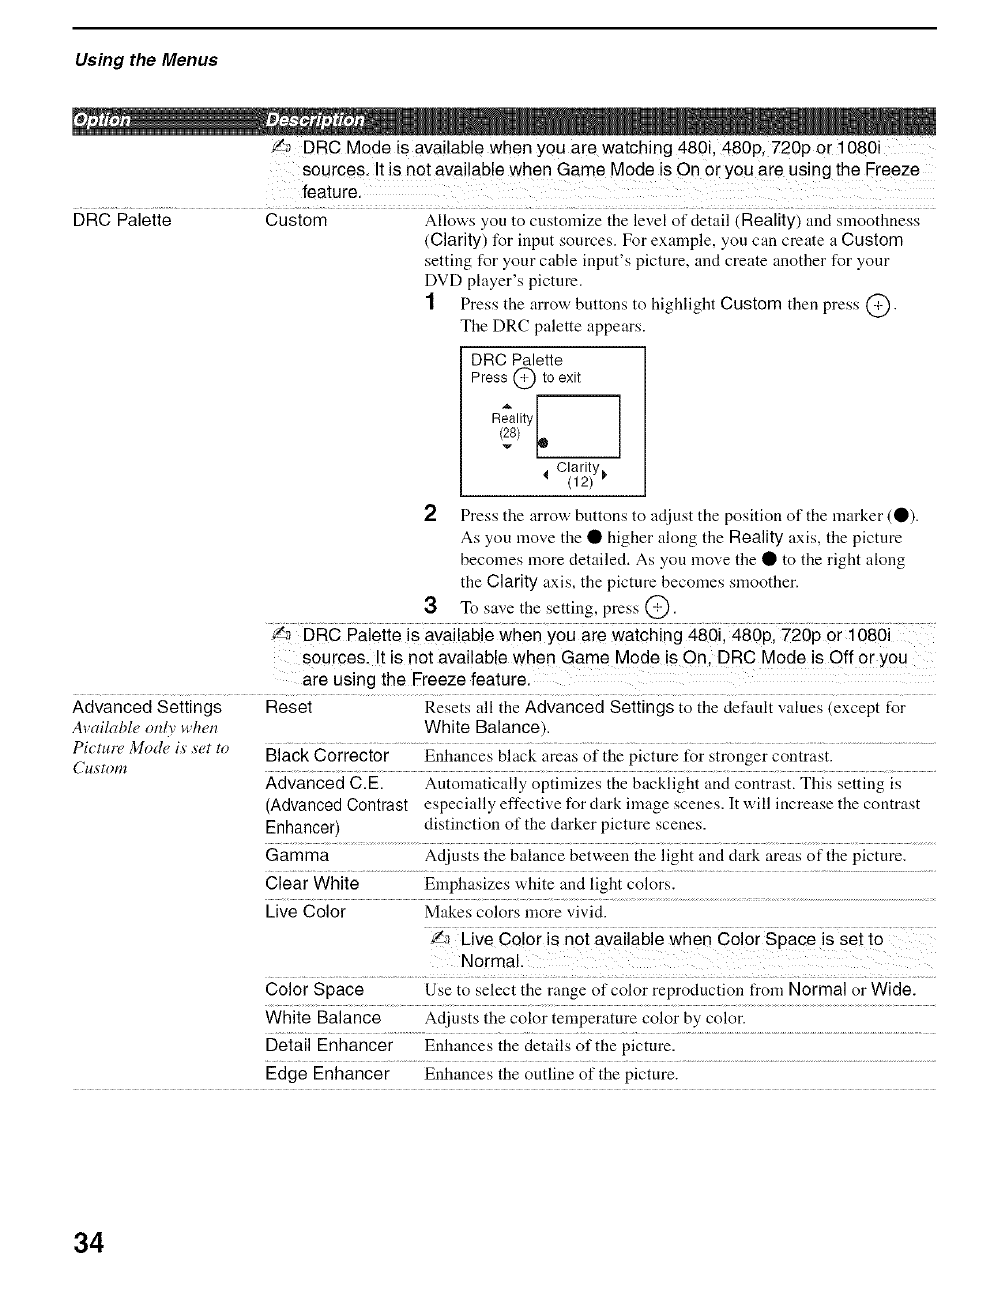
DRC Palette Custom Allows you to customize the level of detail (Reality) and smoothness
(Clarity) for input sources. For example, you can create a Custom
setting for your cable inpnt's picture, and create another for your
DVD player's picture.
1 Press the arrow buttons to highlight Custom then press O.
The DRC palette appears.
DRC Palette
Press @ to exit
Reality[
Clarity
(12) _
2Press the arrow buttons to adjust the position of tlle marker (O).
As you move the • higher along the Reality axis, the picture
becomes more detailed. As you move the • to the right along
the Clarity axis, the picture becomes smoother.
3 To save the setting, press @.
:L_ :SRCPaieiieis avaiiabie when you a_ewaicNng 4§6i; 4§6p; 726p or log6i
sources. It is not available when Game Mode is On, DRC Mode is Off or yo u
are using the Ereeze feature.
Advanced Settings Reset Resets all the Advanced Settings to the default values (except for
Availabl_, only n'ln, r_ White Balance).
Picture Mode is set to BlaCk C0rrector ..............Enhances black areas of the picture for stronger Contrast. ..............................................
Advanced C.E. Automatically optimizes the backlight and contrast. This setting is
(AdvancedContrast especially effective for clark image scenes. It will increase the contrast
Enhancer) distinction of the darker picture scenes.
Gamma Adjusts the balance between the light and clark areas of the picture.
Clear White Emphasizes white and light colors.
Live Color Makes colors more vivid.
vecoor snoiavaabewii;nco orSpace s sei io
Normal.
Color Space Use to select the range of color reproduction from Normal or Wide.
White Balance Adjusts the color temperature color by color.
Detail Enhancer Enhances the details of the picture.
Edge Enhancer Enhances the outline of the picture.
34
Sound Settings
Using the Menus
S _ V* *
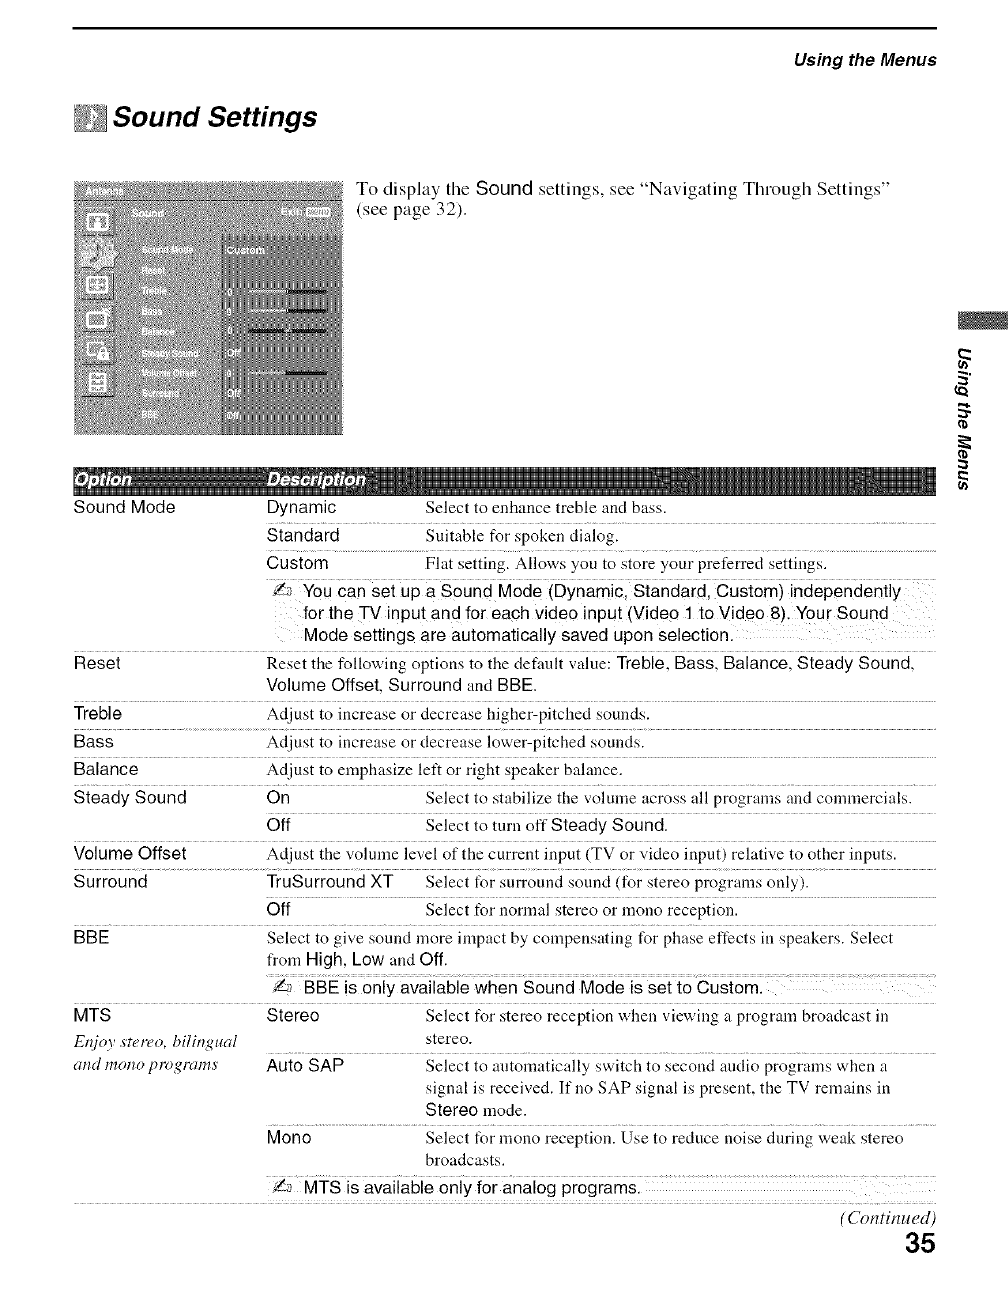
To display the Sound settings, ,'ee Na 1gating Through Settings"
(see page 32).
Sound Mode Dynamic Select to enhance treble and bass.
Standard Suitable for spoken dialog.
Custom Flat setting. Allows you to store your preferred settings.
i_ Youcan s;i up a Sound M;de (Dynamic; Sianaard; Cusiomi inaep;nd;niiy
for the TV input and for each video input (Videe 1 to Video 8). Your Sound
Mode settings are automatically saved upon selection.
Reset Resei ihe foiio_iug opiions io ihe defi_tiii vaiuei Trebiel Bassl Baiancel Sieady Soundl
Volume Offset, Surround and BBE.
Treble Adjust to increase or decrease higher-pitched sounds.
Bass Adjust to increase or decrease lower-pitched sounds.
Balance Adjust to emphasize left or right speaker balance.
Steady Sound On Select to stabilize the volume across all programs and comlnercials.
Off Select to turn off Steady Sound.
Volume Offset Adjust the vohune level of the current input (TV or video input) relative to other inputs.
Surround TruSurround XT Select for surround sound (for stereo programs only).
Off Select for normal stereo or mono reception.
BBE Select to give sound more impact by compensating for phase effects in speakers. Select
from High, Low and Off.
MTS Stereo Select t_r stereo reception when viewing a program broadcast in
Eqjoy stereo, bilingual stereo.
and mono programs' Auto SAP Select to automatically switch to second audio programs when a
signal is received. If no SAP signal is present, the TV remains in
Stereo mode.
Mono Select for mono reception. Use to reduce noise during weak stereo
broadcasts.
!a MTS is avaiiabie only for analog programsl
(Continued)35
Using the Menus
Alternate Audio Select among the available options to switch among the alternate audio streams. The
Digital d_annels only program you are tuned to may be broadcast in a different language in the alternate audio
streams.
_ The Alternate Audio option is not available if the program is not broadcast with
alternate audio streams.
Speaker On Select to turn on the TV speakers.
Off Select to turn offthe TV speakers and listen to the TV's sound only
through your external audio receiver and speakers.
.... ai;
Audio Out Variable The audio output from your audio system can be controlled by the
Easy _ontrol qf volume TV's remote control.
adjustments' Fixed The audio output of the TV is fixed. Use your audio receiver's remote
control to adjust the volume (and other audio settings) through your
audio system.
A/V Sync Off/1/2/3 Use this option to make adjustments to audio and video
synchronization when you have external equipment connected to
DIGITAL OUT of the TV. Select Off (default value) to make no
adjustments. Select 1,2 or 3 to synchronize the video and audio from
your connected external equipment.
36
DScreen Settings
Using the Menus
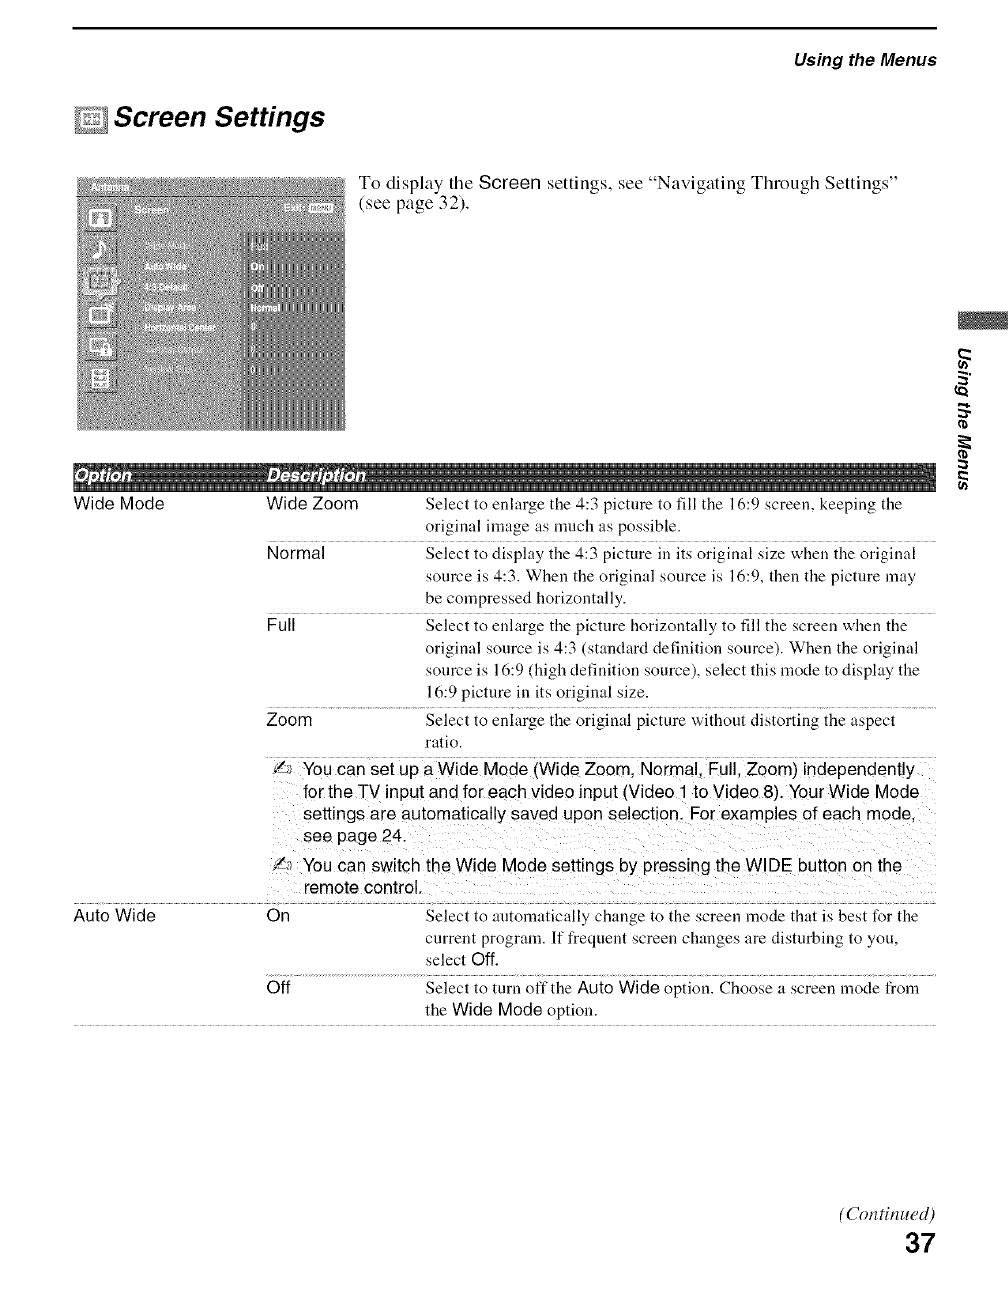
To display tile Screen settings, see "Navigating Through Settings"
(see page 32).
#
Wide Mode Wide Zoom Select to enlarge the 4:3 picture to fill the 16:9 screen, keeping the
original image as much as possible.
Normal Select to display the 4:3 picture in its original size when the original
source is 4:3. When the original source is 16:9, then the picture may
be compressed horizontally.
Full Select to enlarge the picture horizontally to fill the screen when the
original source is 4:3 (standard definition source). When the original
source is 16:9 (high definition source), select this mode to display the
16:9 picture in its original size.
Zoom Select to enlarge the original picture without distorting the aspect
ratio.
You can sei up aWide Mode iWide Zoom; Normai; Fuiil Zoomi independen{iy
for the -rv input and for each video input (Video 1 to Video 8). Your Wide Mode
settings are automatically saved upon selection, For examples of each mode,
see page 24.
!a You can sw tch the Wide Mode settings by press ng the WIDE button on the
remote control
Auto Wide On Select to antomaticaHy change to the screen mode that is best for the
current program. If frequent screen changes are disturbing to you,
select Off.
Off Select to turn offthe Auto Wide option. Choose a screen mode from
the Wide Mode option.
a
(Continued)
37
Using the Menus
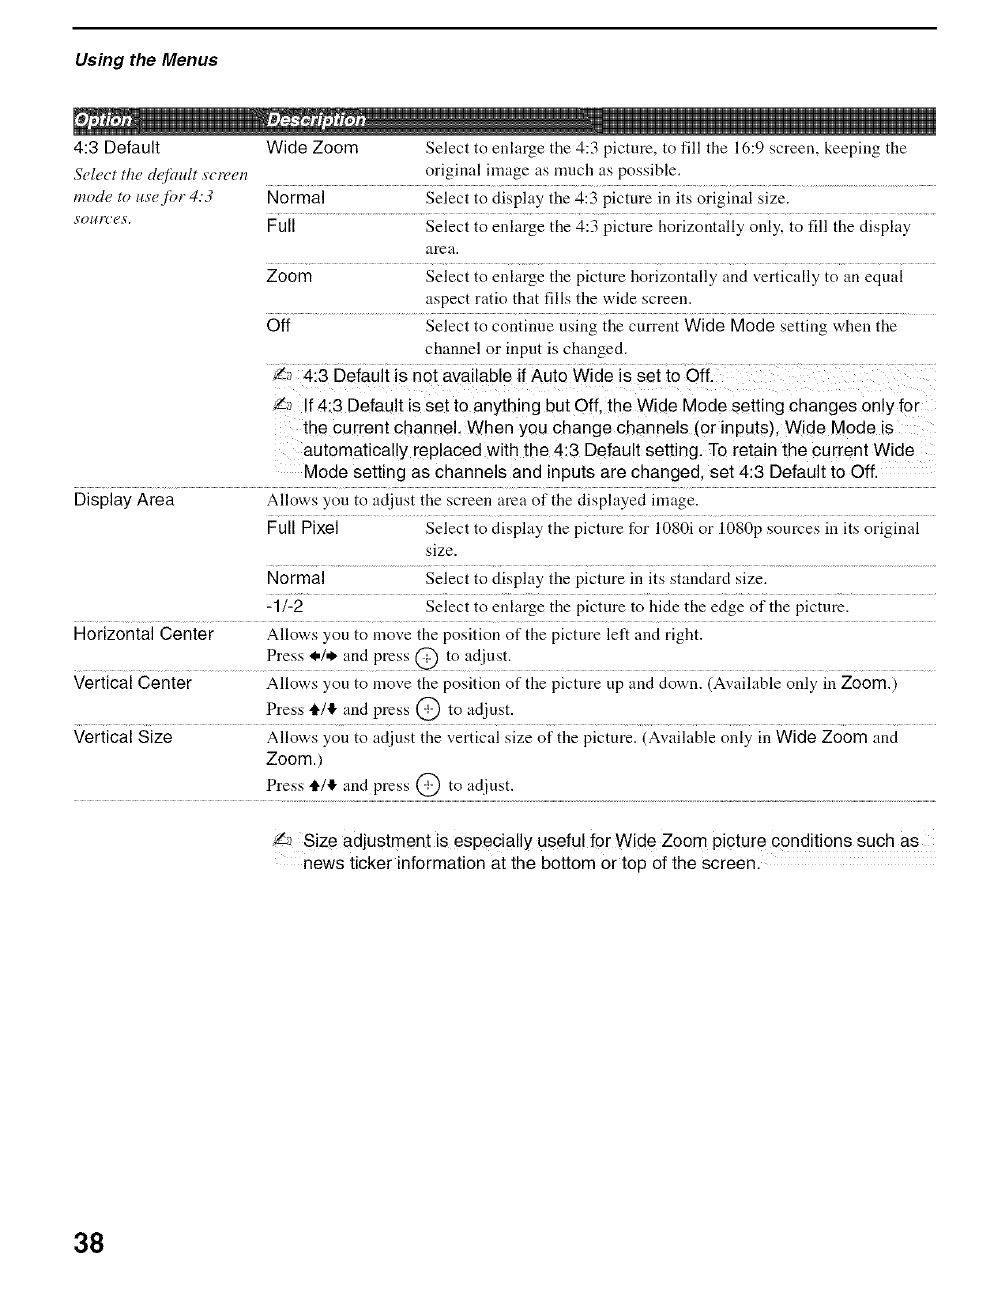
4:3 Default Wide Zoom Select to enlarge the 4:3 picture, to fill the 16:9 screen, keeping the
Select the dqfimlt screen original image as much as possible.
mode to us'e for 4:3 Normal Select to display the 4:3 picture in its original size.
s'ources'. Full Select to eularge the 4:3 picture horizontally only, to fill the display
area.
Zoom Select to enlarge the picture horizontally and vertically to an equal
aspect ratio that fills the wide screen.
Off Select to continue usiug the current Wide Mode settiug when the
channel or input is changed.
i_ 4i3 Deiaui{ is n°t available ff Auio wide is sei io offl
!a If 4:3 Default is set to anything but Off, the Wide Mode setting changes only for
the current channel, When you change channels (or inputs), Wide Mode is
automatically replaced with the 4:3 Default setting. To retain the current Wide
Mode setting as channels and inputs are changed, set 4:3 Default to Off.
Display Area Allows you to adjust the screen area of the displayed image.
Full Pixel Select to display the picture for 1080i or 1080p sources in its original
size.
Normal Select to display the picture in its standard size.
-1/-2 Select to enlarge the picture to hide the edge of the picture.
Horizontal Center Allows you to move the position of the picture left and right.
Press I./* and press @ to adjust.
Vertical Center Allows you to move the position of the picture tip and down. (Available only in Zoom.)
Press 4,/,!, and press @ to adjust.
Vertical Size Allows you to adjust the vertical size of the picture. (Available only in Wide Zoom and
Zoom.)
Press tl4'!" and press @ to adjust.
Size adjustment is especially useful for Wide Zoom picture conditions such as
news ticker information at the bottom or top of the screen.
38
Channel Settings
Using the Menus
" V" " " S_'
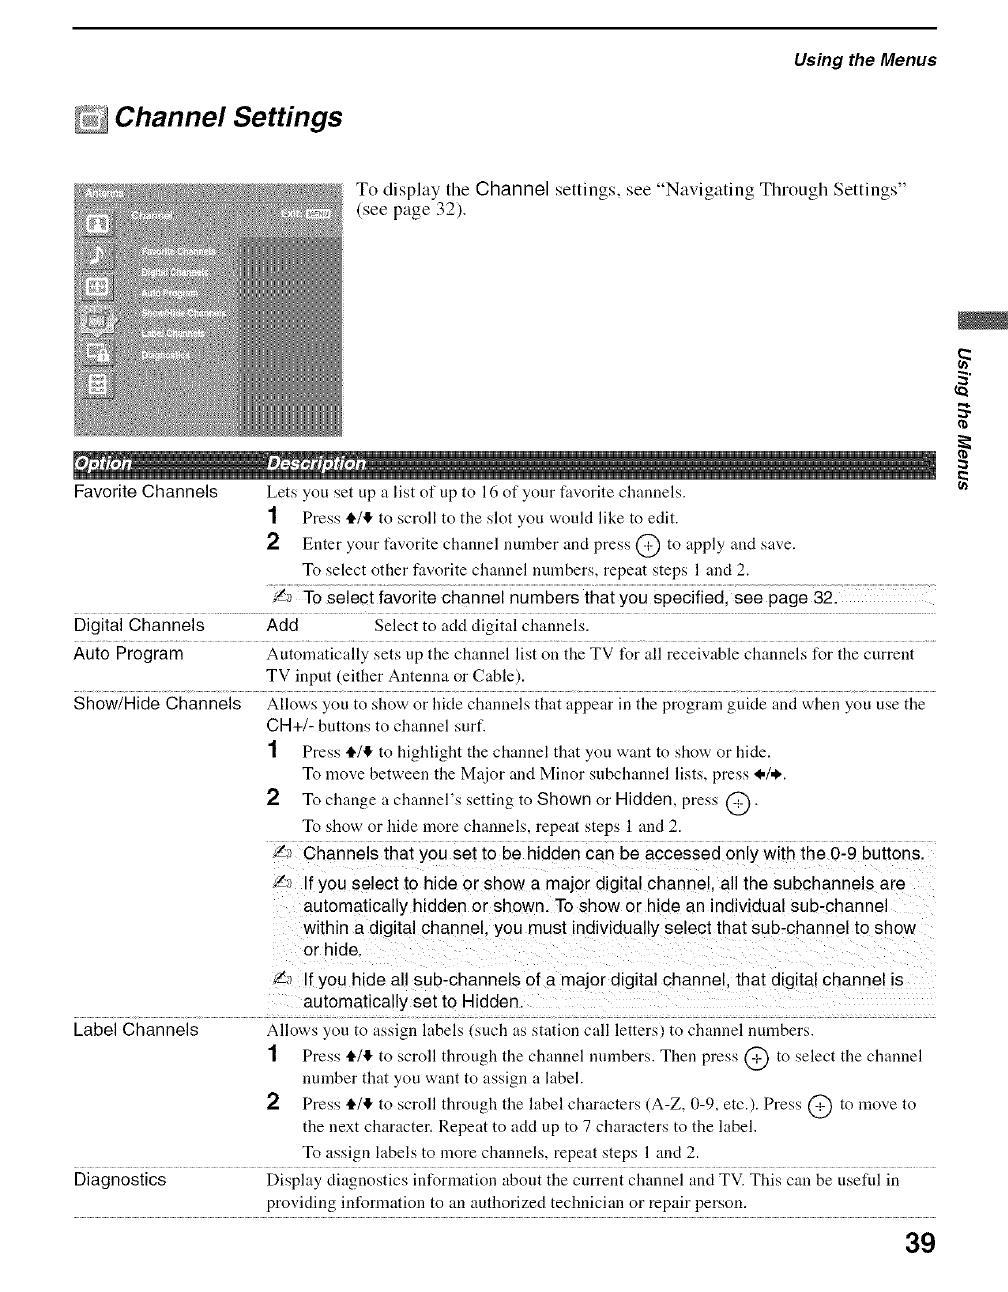
To display the Channel settings, see Na gating Thlough Sett ng,
(see page 32).
I
Favorite Channels Lets you set up a list of up to 16 of your favorite channels.
1 Press i'/4 to scroll to the slot you would like to edit.
2 Enter your favorite channel number anti press @ to apply and save.
To select other favorite channel numbers, repeat steps 1 and 2.
_ To select favorite channel numbers that you specified, see page 32.
Digital Channels Add Select to acid digital channels.
Auto Program Automatically sets up the channel list on the TV for all receivable channels for the current
TV input (either Antenna or Cable).
Show/Hide Channels Allows you to show or hide channels that appear in the program guide and when you use the
CH+/- buttons to channel surf.
1Press tl./I!, to highlight the channel that you want to show or hide.
To move between the M_tjor and Minor subchannel lists, press I./*.
2 To change a channel's setting to Shown or Hidden, press @.
To show or hide more channels, repeat steps 1 and 2.
',_ Channels that you set to be hidden can be accessed only with the 0-9 buttons.
',_ If you select to hide or show a major digital channel, all the subchannels are
automatically hidden or shown. To show or hide an individual sub-channe
within a digital channel, you must individually select that sub-channel to show
or hide.
f,_ If you hide all sub-channels of a major digital channel, that digital channel is
automatically set to Hidderl
Label Channels Allows you to assign labels (such as station call letters) to channel numbers.
1Press t_/€, to scroll through the channel nnmbers. Then press @ to select the channel
number that you want to assign a label.
2 Press tl./!1, to scroll through the label characters (A-Z, 0-9, etc.). Press @ to move to
the next character. Repeat to add up to 7 characters to the label.
To assign labels to more channels, repeat steps 1 anti 2.
Diagnostics Display diagnostics information about the current channel and TV. This can be useful in
providing information to an authorized technician or repair person.
39
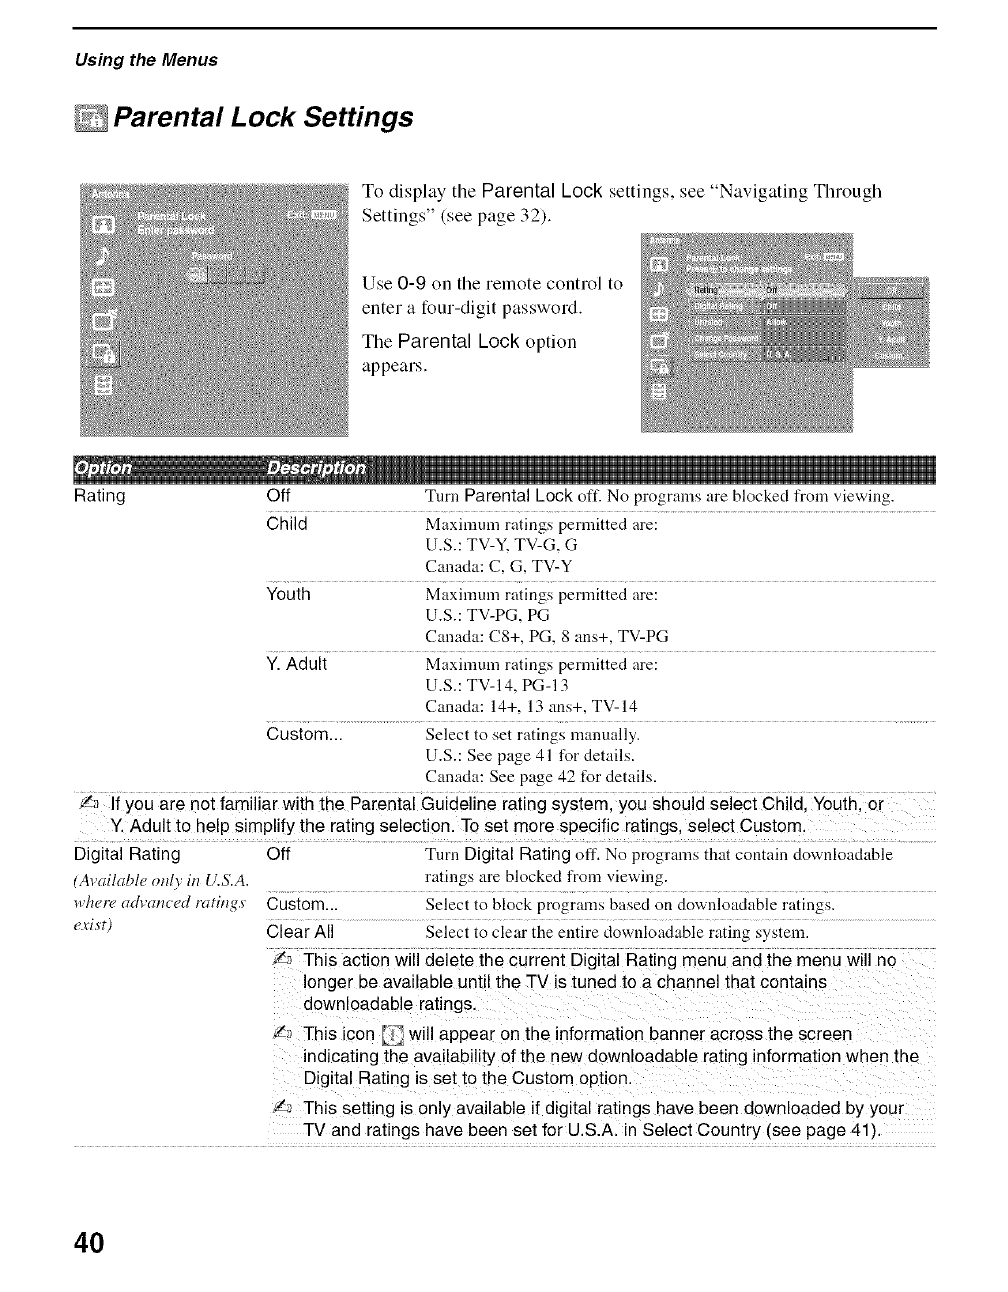
Using the Menus
Parental Lock Settings
To display tile Parental Lock settings, see "Navigating Through
Settings" (see page 32).
Use 0-9 on the remote control to
enter a four-digit password.
The Parental Lock option
appears.
Rating Off Turn Parental Lock oft: No programs are blocked from viewing.
Child Maximum ratings permitted are:
U.S.: TV-Y, TV-G, G
Canada: C, G, TV-Y
Youth Maximum ratings permitted are:
U.S.: TV-PG, PG
Canada: C8+, PC, 8 ans+, TV-PG
Y. Adult Maximum ratings permitted are:
U.S.: TV-14, PC-13
CtmacD: 14+, 13 arts+, TV-14
Custom... Select to set ratings manually.
U.S.: See page 41 for details.
Canada: See page 42 for details.
!_ If you are net familiar with the Parental Guideline rating system, you should select Child, Youth, or
Y. Adult to help simplify the rating selection. To set more specific ratings, select Custom.
Digital Rating Off Turn Digital Rating off. No programs that col:ltain downloadable
(Awfilable only in U.S.A. ratings ure blocked from viewing.
whetw advanced ratings Custom... Select to block progrmns based on downloadable ratings.
exist) Clear All Select to clear the entire downloadable rating system.
_,_ This action will delete the current Digital Rating menu and the menu will no
longer be available until the TV is tuned to a channel that contains
downloadable ratings.
_._ This icon _, will appear on the information eanner across the screen
indicating the availability of the new downloadable rating information when the
Digital Rating is set to the Custom option.
'/_ This setting is only available if digital ratings have been downloaded by your
TV and ratings have been set for U.S.A. in Select Country (see page 41).
4O
Using the Menus
Unrated Allow Allows programs and movies that are broadcast without a rating.
(available only in Block Blocks all programs and movies that are broadcast without a rating.
u.s.a.) .... uniaie i ai
programs may be blocked: programs broadcast from another country,
emergency broadcasts, political programs, sports, news, public service
announcements, religious programs and weather,
Change Password Select to change your password.
_ You need your password for any future access into the Parental Lock settings.
!fyou lose your password, see "Lost password" on page SO_
Select Country U.S.A. Select to use U.S.A. ratings (see below).
Canada Select to use Canadian ratings (see page 42).
US Models: Selecting Custom Parental Lock Rating Options
To select custom rating options for the U.S., select U.S.A. in the Select Country setting (see above).
Movie Rating G All chiMren and general audience.
PG Parental guidance suggested.
PG-13 Parental guidance for children under 13.
R Restricted viewing, parental guidance is suggested for chiMreu under [ 7.
NC-17 and X No one 17 or under allowed.
TV Rating Age-Based Ratings
Block programs' by their TV-Y All chiMren.
rating, cont('nt or both TV-Y7 Directed to children age 7 an_l 0ider.
TV-G General audience.
TV-PG Parental guidance suggested.
TV-14 Parents strongly cautioned.
TV-MA Mature audience only.
Content-Based Ratings
FV Fantasy violence.
DSuggestive dialogue.
k Strong language.
SSexual situations.
VViolence.
!a To ensure maximum blocking capability, set the Age-Based Ratings.
(Continued)
41
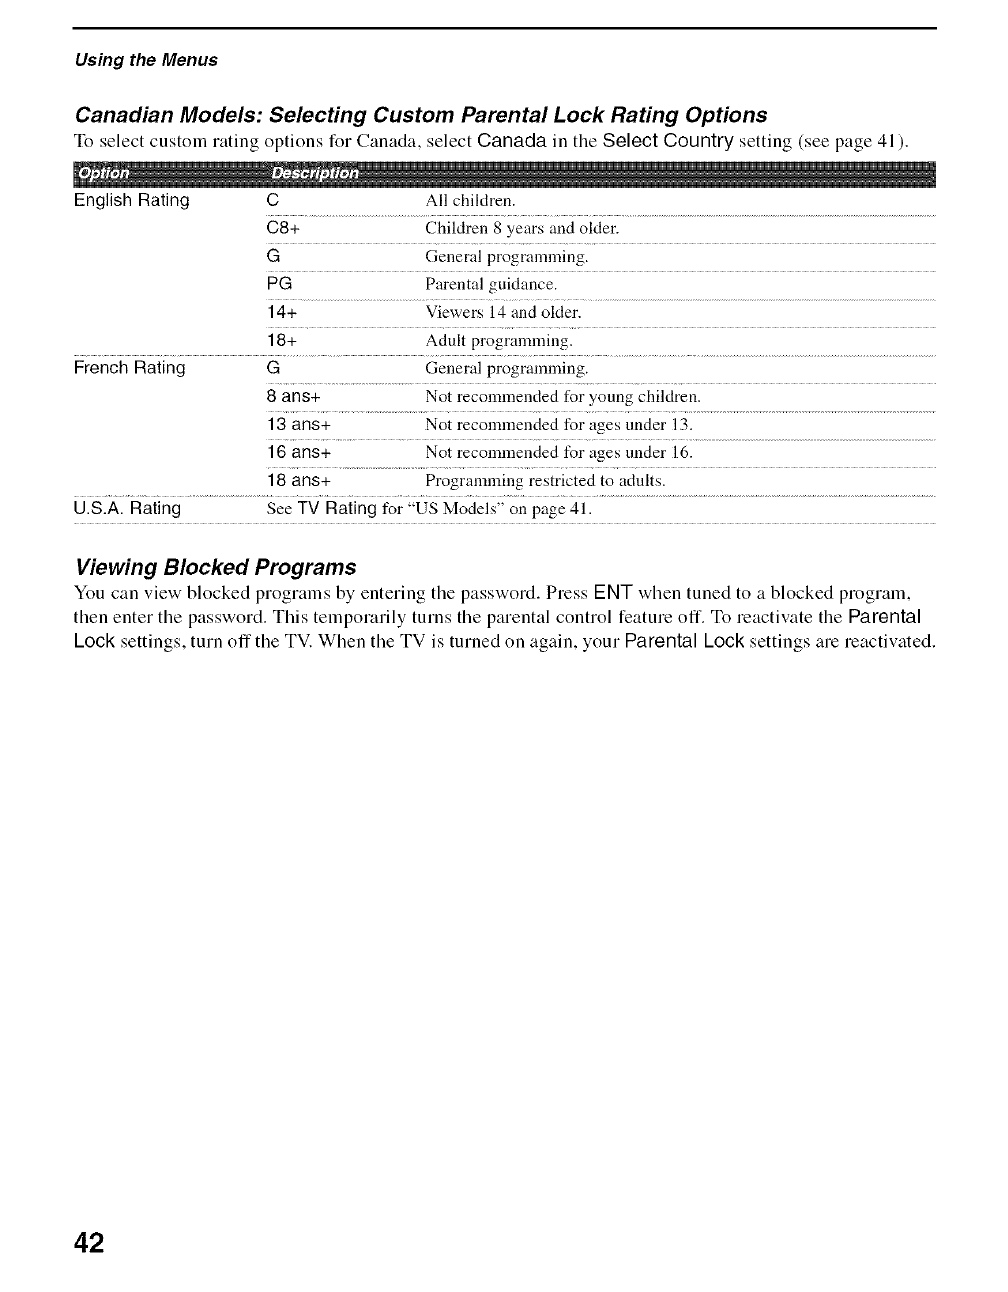
Using the Menus
Canadian Models: Selecting Custom Parental Lock Rating Options
To select custoln rating eptions for Canada, select Canada in the Select Country setting (see page 41 ).
English Rating C All chiMren.
C8+ Children 8 years and oMer.
GGeneral programming.
PG Parental guidance.
14+ Viewers 14 and oMer.
18+ Adult programming.
French Rating G General programming.
8 ans+ Not recommended for young children.
13 ans+ Not recommended for ages tinder 13.
16 ans+ Not recommended for ages tinder 16.
18 at/s+ Programming restricted to adults.
U.S.A. Rating See TV Rating for "US Models" on page 41.
Viewing Blocked Programs
You can view blocked programs by entering the password. Press ENT when tuned to a blocked prograln,
then enter the password. This temporarily turns the parental control feature off. To reactivate the Parental
Lock settings, turn off the TV. When the TV is turned on again, your Parental Lock settings are reactivated.
42
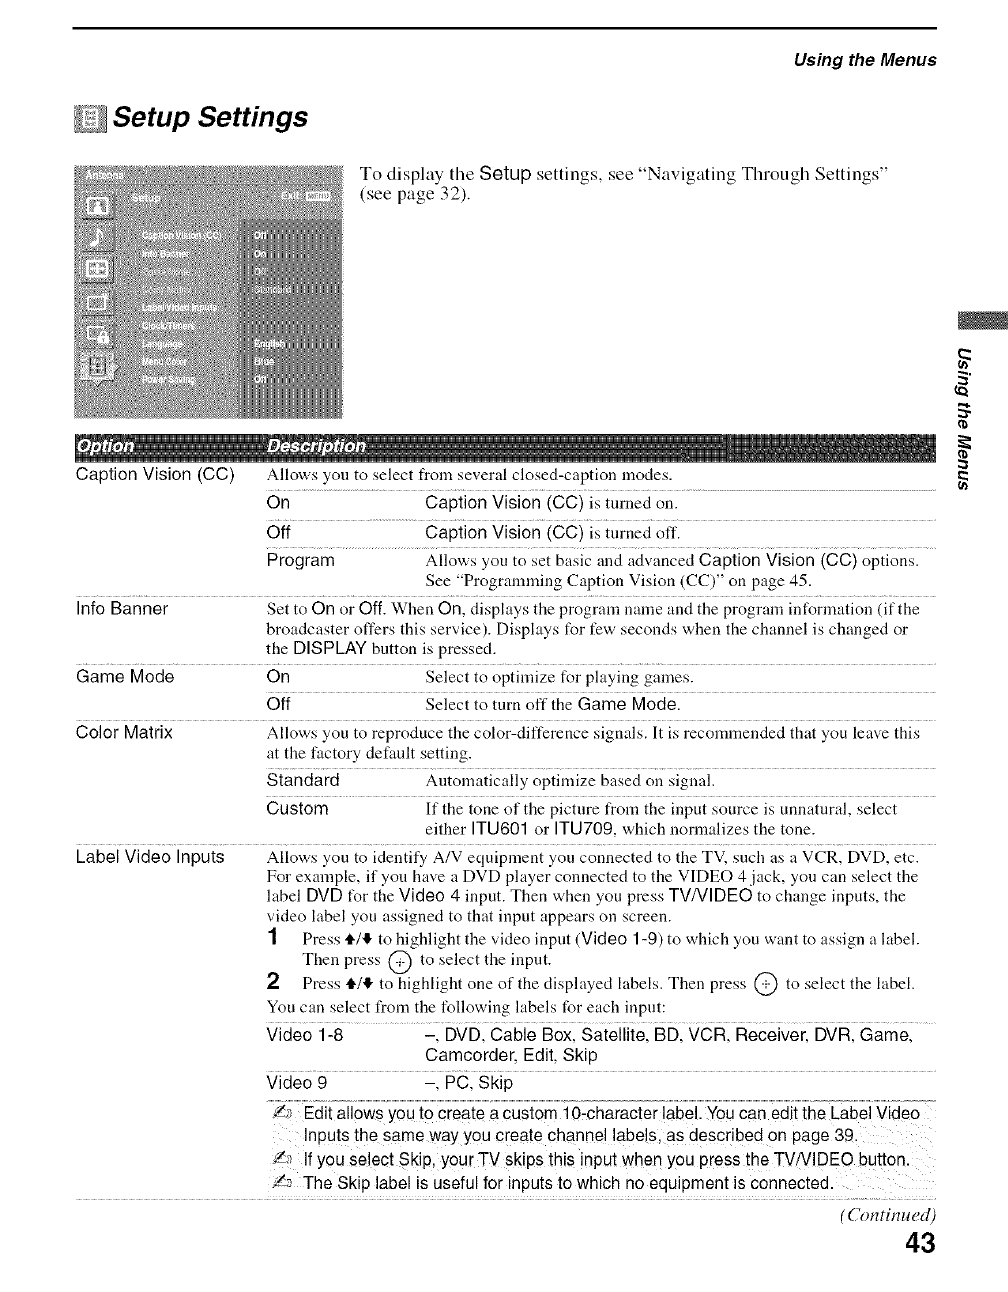
Setup Settings
Using the Menus
To display tile Setup settings, see "Navigating Through Settings"
(see page 32).
Caption Vision (CC) Allows you to select from several closed-caption modes.
On Caption Vision (CC) is turned on.
Off Caption Vision (CC) is turned off.
Program Allows you to set basic and advanced Caption Vision (CC) options.
See "Programming Caption Vision (CC)" on page 45.
Info Banner Set to On or Off. When On, displays the program name and the progrmn information (if the
broadcaster offers this service). Disphtys for few seconds when the channel is changed or
the DISPLAY button is pressed.
Game Mode On Select to optimize for playing games.
Off Select to turn off the Game Mode.
Color Matrix Allows you to reproduce the color-difference signals. It is recommended that you leave this
at the factory default setting.
siandard Atltomatically optimize based o;{ sigi{al.
Custom If the tone of the picture from the input source is unnatural, select
either ITU601 or ITU709, which normalizes the tone.
Label Video Inpuis Allowsyou to identify A/V equipment you c0i{nected to the TV, such asa VcR DVDI etc.
For example, if you have a DVD player connected to the VIDEO 4 jack, you can select the
label DVD t_r the Video 4 input. Then when you press TV/VIDEO to change inputs, the
video label you assigned to that input appears on screen.
1Press 4,/11"to highlight the video input (Video 1-9) to which you want to assign a label.
Then press @ to select the input.
2Press 4,/11"to highlight one of the displayed labels. Then press @ to select the label.
You can select from the following labels for each input:
Video i28 ......... 21 DVDI Cabie Boxl gaielliiel BDI VdRI Receiveil DVRI Gamel
Camcorder, Edit, Skip
Viaeo9 ci Ski5
.... 0-chaiaciei iabel.You can editthe LabelVideo
Inputs the same way you create Channel !abe!s, as described on page 39,
'2",_ If you select Skip, your TV skips this input when you press the TV/VlDEO button.
!_ The Skip label is useful for inputs to which no equipment is connected.
(Continued)
43
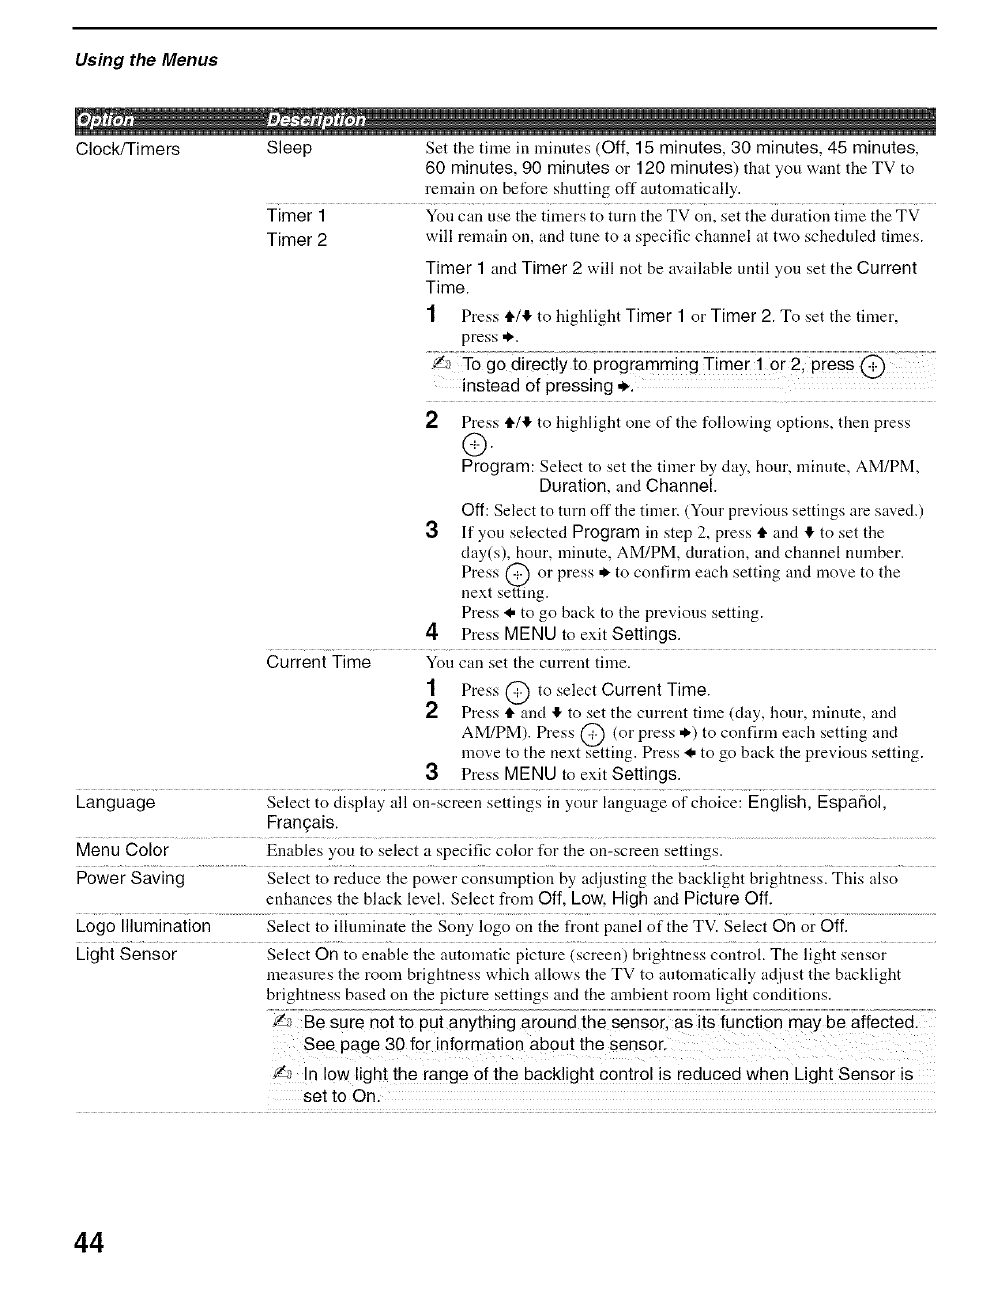
Using the Menus
Clock/Timers Sleep Set the time in minutes (Off, 15 minutes, 30 minutes, 45 minutes,
60 minutes, 90 minutes or 120 minutes) that you want the TV to
rem_dn on before shutting off autom_tically.
Timer 1 You can use the timers to turn the TV on, set the duration time the TV
Timer 2 will remain on, and tune to a specific channel at two scheduled times.
Timer 1 and Timer 2 will not be available until you set the Current
Time.
1 Press i./4 to highlight Timer 1 or Timer 2. To set the timer,
press *.
.... go ii;cii io
instead of pressing ..
2 Press tl./,1!,to highlight one of the following options, then press
®
Program: Select to set the timer by day, hour, minute, AM/PM,
Duration, and Channel.
Off: Select to turn off the timer. (Your previous settings are saved.)
3If you selected Program in step 2, press tl. and !1.to set the
day(s), hour, minute, AM/PM, duration, and channel number.
Press @ or press * to confirm each setting and move to the
next setting.
Press _, to go back to the previous setting.
4 Press MENU to exit Settings.
Current Time You can set the current time.
1 Press @ to select Current Time.
Press tl. and ,1!,to set the current time (clay, hour, minute, and
AM/PM). Press @ (or press *) to confirm each setting and
move to the next 2etting. Press _, to go back the previous setting.
Press MENU to exit Settings.
Language Select to display all on-screen settings in your hmguage of choice: English, Espa_ol,
Frangais.
Menu Color Enables you to select a specific color for the on-screen settings.
Power Saving Select to reduce the power consumption by adjusting the backlight brightness. This also
enh_mces the black level. Select from Off, Low, High and Picture Off.
Logo Illumination Select to illuminate the Sony logo on the t¥ont panel of the TV. Select On or Off.
LightSensor Select On to enable the automatic picture (screen) brightness control. The light sensor
measures the room brightness which allows the TV to automatically adjust the backlight
brightness based on the picture settings and the ambient room light conditions.
Be sure not to put anything around the sensor, as its Iuncti0n may be affected.
See page 30 f0r inf0rmation about the sens0r,
fa In low light the range of the backlight control is reduced when Light Sensor is
set to On.
44
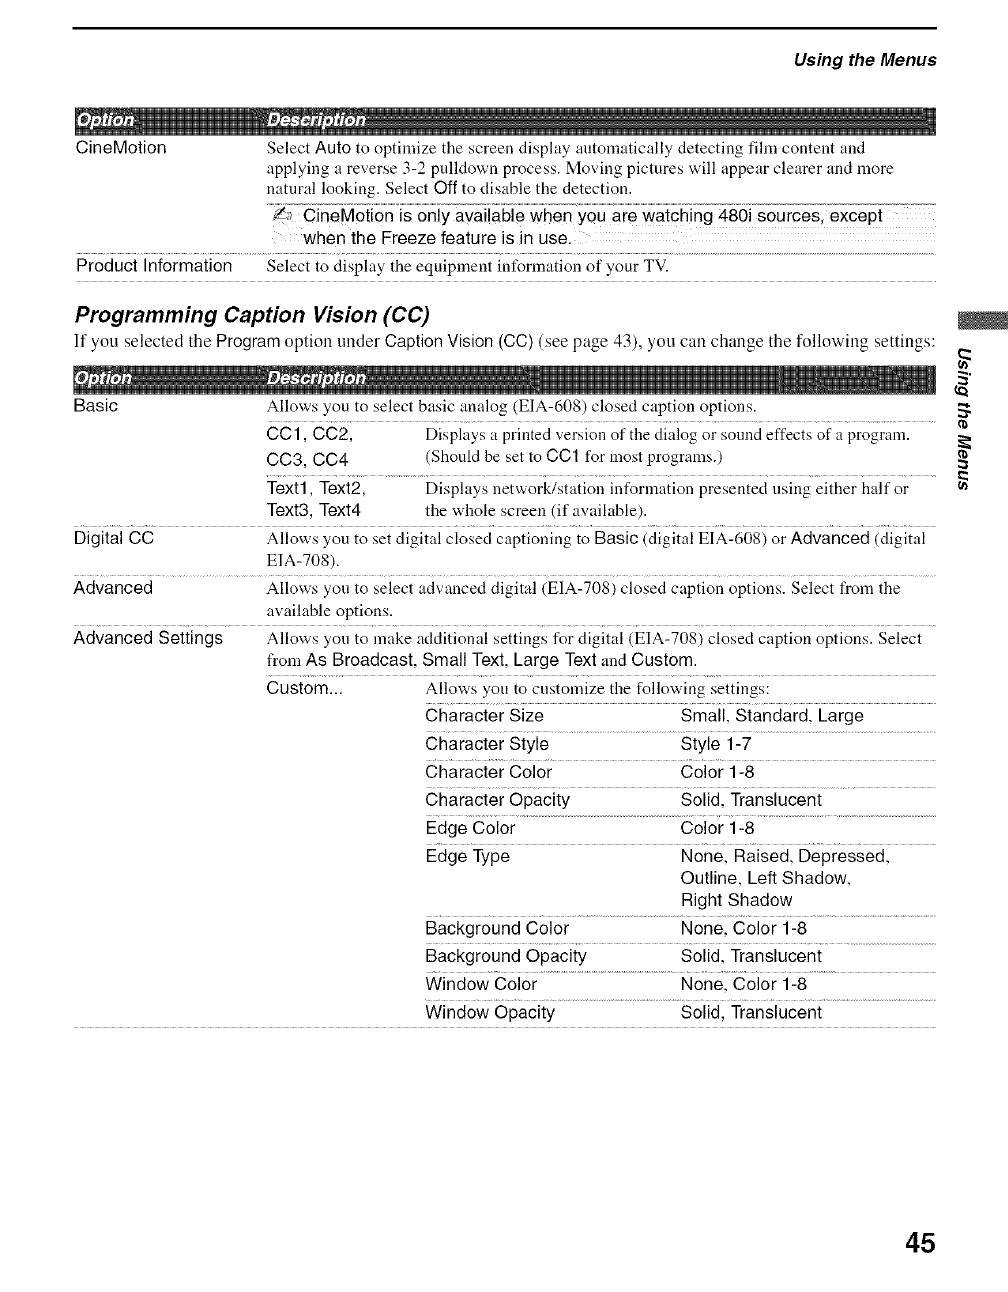
Using the Menus
CineMotion Select Auto to optimize the screen display autonlatically detecting fihn content and
applying a reverse 3-2 pulldown process. Moving pictures will appear clearer and more
natural looking. Select Off to disable the detection.
.... ggi souicgsl;xcapi
when the Freeze feature is in use.
Product Information Select to display the equipment intUrmation of your TV.
Programming Caption Vision (CC)
If you selected tile Program option under Caption Vision (CC)(see page 43), you can change the following settings:
Basic Allows you to select basic analog (EIA-608) closed caption options.
CC1, CC2, Displays a printed version of the dialog or sound effects of a program.
CC3, C04 (Should be set to CC1 for most programs.)
Text1, Text2, Displays network/station inforlnation presented using either half or
Text3, Text4 the whole screen (if available).
Digital CC Allows you to set digital closed captioning to Basic (digital EIA-608) or Advanced (digital
EIA-708).
Advanced Allows you to select advanced digital (EIA-708) closed caption options. Select t¥om the
available options.
Advanced Settings Allows you to make additional settings for digital (EIA-708) closed caption options. Select
from As Broadcast, Small Text, Large Text and Custom.
Custom... Allows you to customize the following settings:
SmaiilgiandaidlLaige
Character Size
Character Style Style 1-7
Character Color Color 1-8
..... soiidl Transiuceni
Character Opacity
Edge Color Color 1-8
Edge....... Type Nonel Raisedl Depiessedl
Outline, Left Shadow,
Right Shadow
Background..........................................................Color None Coloi i-8 ......................................................
Background Opacity Solid, Translucent
Window..................................................................Color Nonel 8oioi i-8 ..............
Window Opacity Solid, Translucent
45
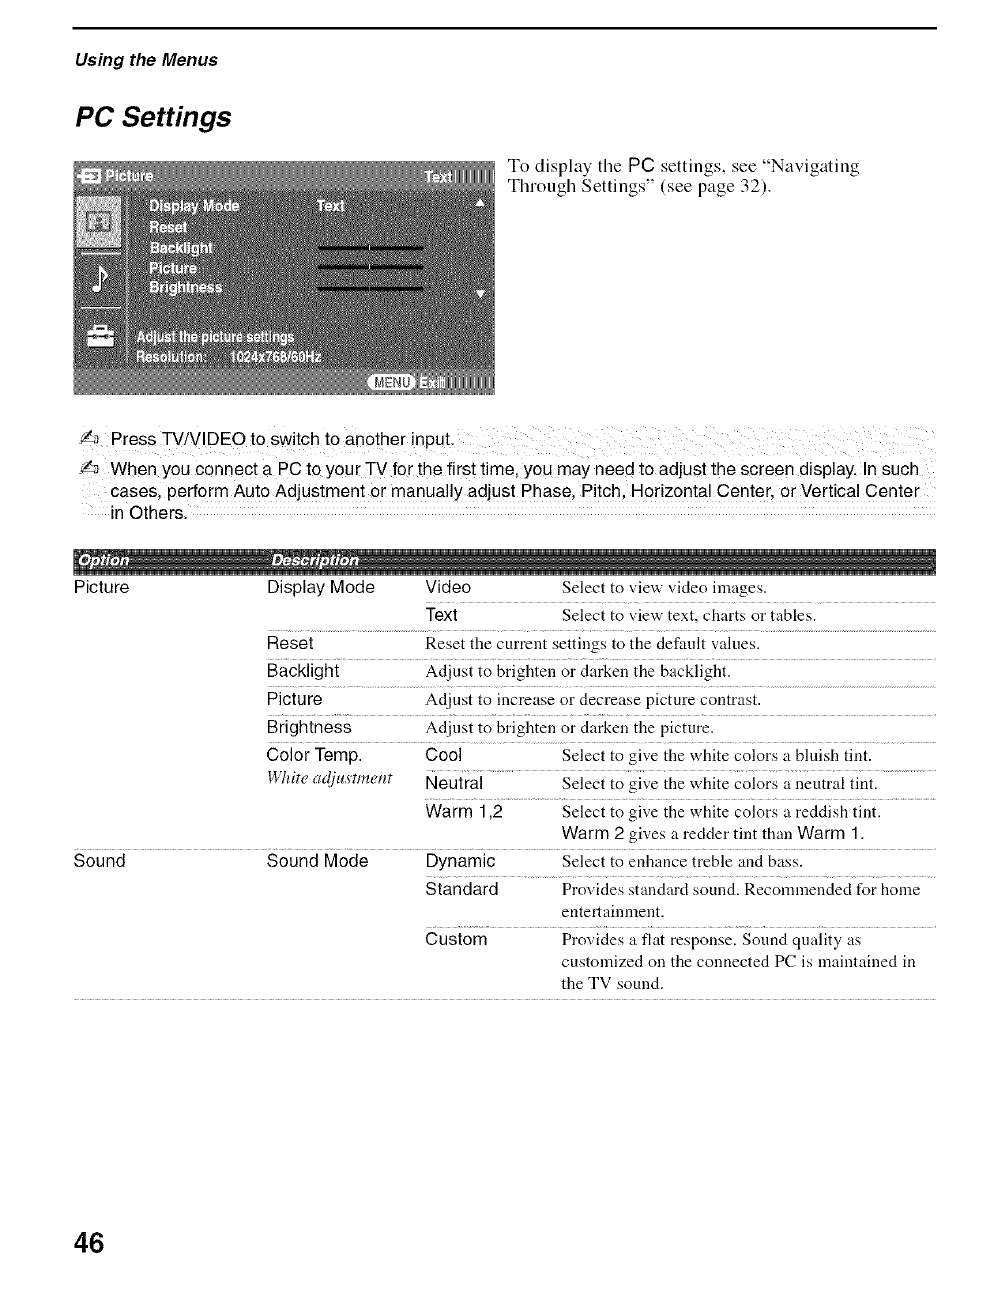
Using the Menus
PC Settings
To display tile PC settings, see "Navigating
Through Settings" (see page 32).
_',_ Press TV/VlDEO to switch to another input.
_'_ When you connect a PC to your TV for the first time, you may need to adjust the screen display, In such
cases, perform Auto Adjustment or manually adjust Phase, Pitch, Horizontal Center, or Vertical Center
in Others.
, , i
Picture Display Mode Video Select to view video images.
Text Select to view text, charts or tables.
Reset Reset the current settings to the defunlt values.
Backlight Adjust to brighten or darken the backlight.
Picture Adjust to increase or decrease picture contrast.
Brightness Adjust to brighten or darken the picture.
Color Temp. Cool Select to give tile white colors a bluish tint.
White ac!justment Neutial ............. Select to gb,'e the white colors a neutral tint. ......................
Warm 1,2 Select to give the white colors a reddish tint.
Warm 2 gives a redder tint than Warm 1.
Sound Sound Mode Dynamic Select to enhance treble and bass.
Standard Provides standard sound. Recommended for home
entertainment.
Custom Provides a flat response. Sound quality as
customized on the connected PC is maintained in
the TV sound.
46
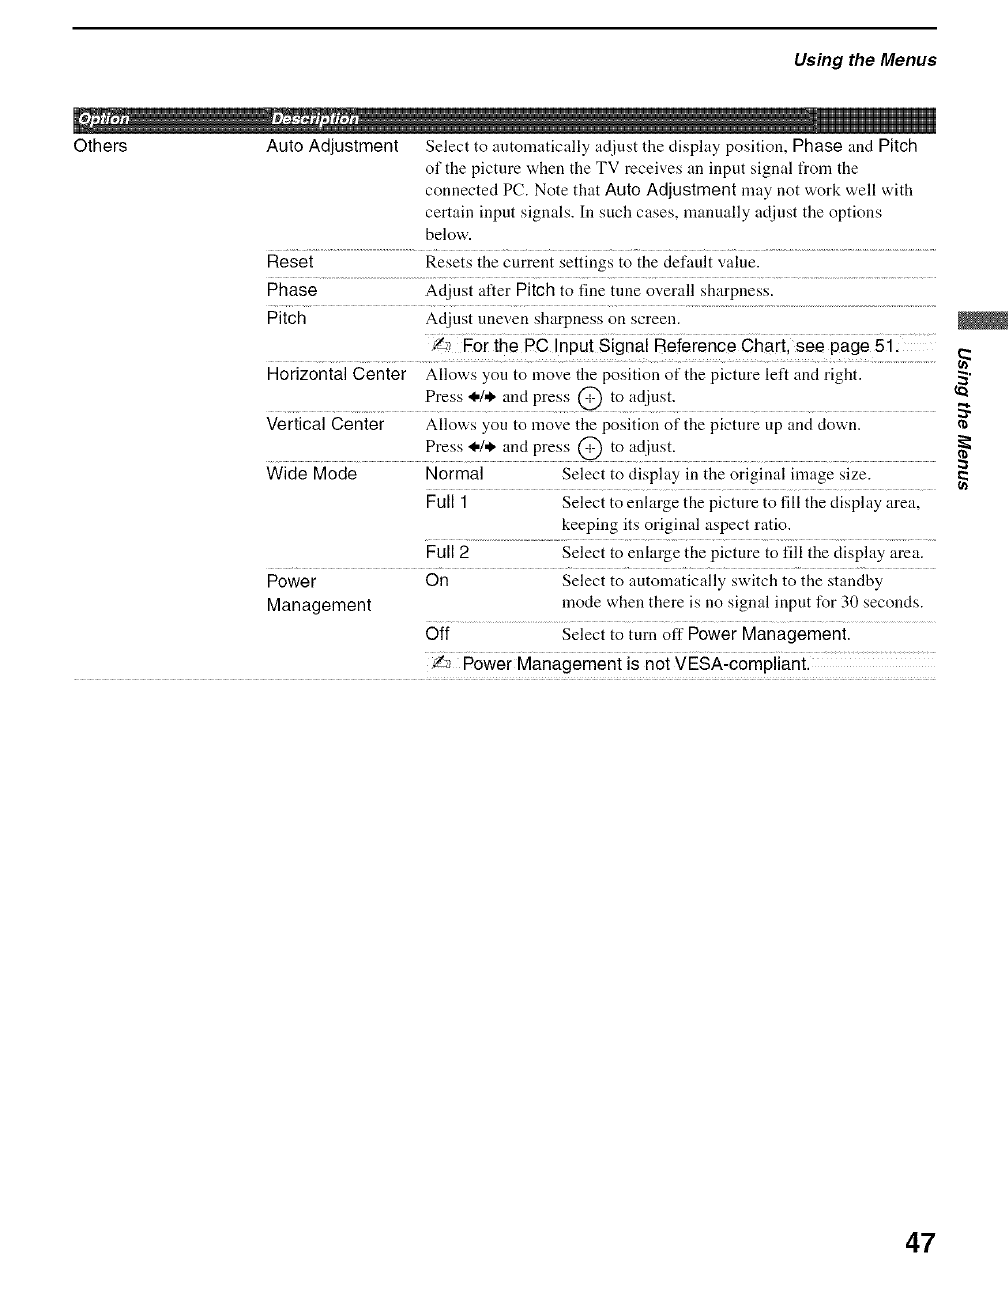
Using the Menus
Others Auto Adjustment Select to automatically adjust the display position, Phase and Pitch
of the picture when the TV receives an input signal from the
connected PC. Note that Auto Adjustment may not work well with
certain input signals. In such cases, manually adjust the options
below.
Reset Resets the current settings to the default value.
Phase Adjust after Pitch to fine tune overall sharpness.
Pitch Adjnst uneven sharpness on screen.
f,_ For the PC Input Signal Reference Chart, see page 51:
Horizontal Center Allows you to move the position of the picture left and right.
Press 44* and press @ to adjust.
Vertical Center Allows you to move the position of the picture up and down.
Press 14. and press @ to adjust.
Wide Mode Normal Select to display in the original image size.
Full 1 Select to enlarge the picture to fill the display area,
keeping its original aspect ratio.
Full 2 Select to enlarge the picture to fill the display area.
Power On Select to automatically switch to the standby
Management mode when there is no signal input for 30 seconds.
Off Select to turn off Power Management.
:_ Power Management is not VESA-compliant.
2
47
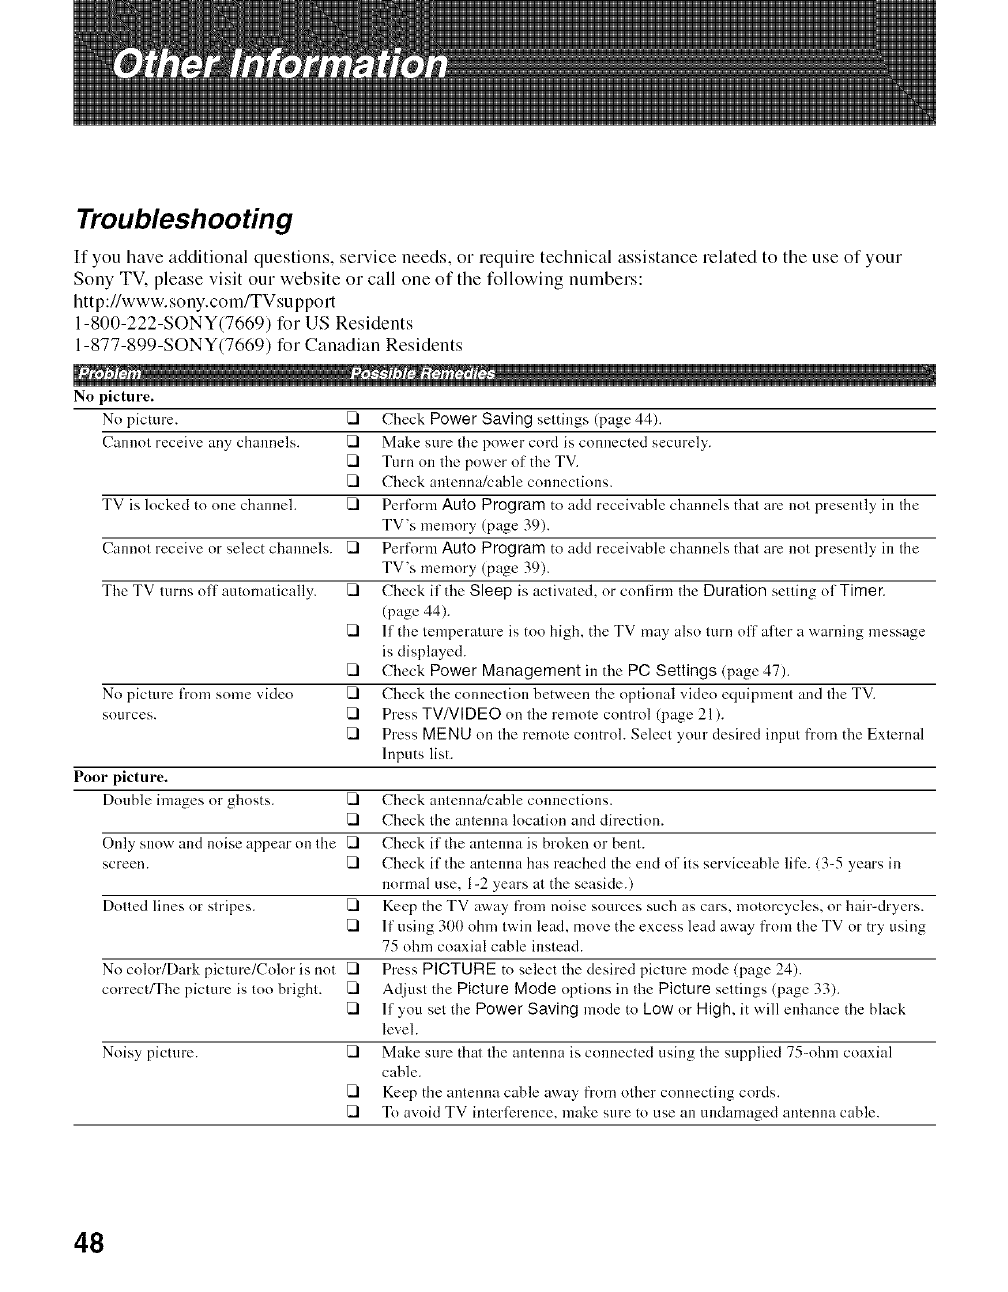
Troubleshooting
If you have additional questions, service needs, or require technical assistance rehtted to the use of your
Sony TV. please visit our website or call one of the following numbers:
htt p://www.sony.com/TVsuppotl
1-800-222-SONY(7669) for US Residents
1-877-899-SONY(7669) for Canadian Residents
No picture.
No picture. [] Check Power Saving senings (page 44).
Cannot receive any channels. [] Make sure tile power cord is connected securely.
[] Turn on tire power of the TV.
[] Check antenna!cable connections.
TV is locked to one channel. [] Perform Auto Program to add receivable channels that are not presently ill the
TV's memory (page 39).
Cannot receive or select channels. [] Perform Auto Program to add receivable channels that are not presently ill the
TV's memory (page 39).
The TV tnrns off automatically. [] Check if the Sleep is activated, or confirm the Duration setting of Timer.
(page 44).
[] If tile temperature is too high. the TV may also tnrn off afler a warning message
is displayed.
[] Check Power Management in the PC Settings (page 47).
No picture fi'om some vide() [] Check the connection between the optional video equipment and tire TV.
sources. [] Press TVNIDEO on the remote control (page 21 ).
[] Press MENU on tire remote control. Select your desired input from the External
Inputs list.
Poor picture.
Double images or ghosts. [] Check antenna/cable connections.
[] Check the antenna location and direction.
Only snow and noise appear on the [] Check if tile antenna is broken or bent.
screen. [] Check if the antenna has reached the end of its serviceable life. (3-5 years ill
normal use. 1-2 years at the seaside.)
Dotted lines or stripes. [] Keep the TV away from noise sources such as cars. motorcycles, or hair-dryers.
[] If using 300 olml twill lead, move the excess lead away from the TV or try using
75 ohm coaxial cable instead.
No color/Dark picture/Color is not [] Press PICTURE to select tire desired picture mode (page 24).
correct/The picture is too bright. [] Adjust the Picture Mode options in the Picture settings (page 33).
[] If you set tile Power Saving mode to Low or High, it will enhance tile black
level.
Noisy picture. [] Make sure thai the antenna is connected using the supplied 75-ohm coaxial
cable.
[] Keep the antenna cable away from other connecting cords.
[] To avoid TV interli_rence, make sure to use all undamaged antenna cable.
48
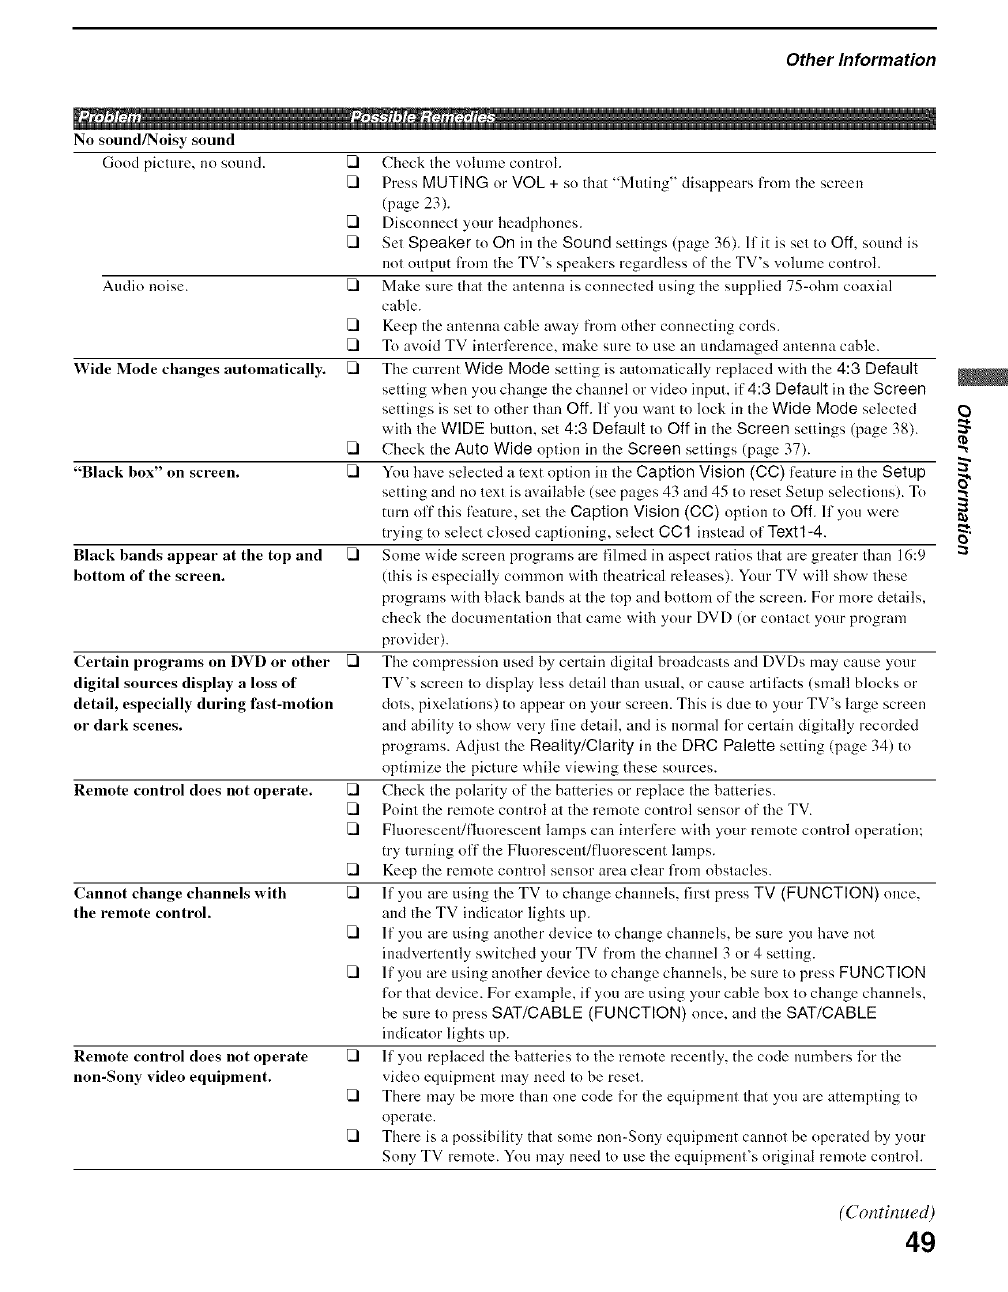
Other Information
No sound/Noisy sound
Good picture, no sound.
Audio noise.
Wide Mode changes automatically.
"Black box" on screen.
Black bands appear at the top and []
bottom of the screen.
Certain programs on DVD or other []
digital sources display a loss of
detail, especially during fast-motion
or dark scenes.
Remote control does not operate.
Cannot change channels with
the remote control.
Remote control does not operate
non-Sony video equipment.
[] Check the volume controh
[] Press MUTING or VOL + st) that "Muting" disappears from the screen
(page 23).
[] Disconnect your headphones.
[] Set Speaker to On in the Sound settings (page 36). If it is set to Off, sound is
not output tYom the TV's speakers regardless of the TV's volume control.
[] Make sure thai the antenna is connected using the supplied 75=ohm coaxial
cable.
[] Keep the antenna cable away from other connecting cords.
[] To avoid TV interference, make sure to use an undamaged antenna cable.
[] The current Wide Mode setting is automatically replaced with the 4:3 Default
setting when you change the channel or video input, if"4:3 Default in the Screen
settings is set to other than Off. If you want to lock in the Wide Mode selected
with the WIDE button, set 4:3 Default to Off in the Screen settings (page 38).
[] Check the Auto Wide optkm in the Screen settings (page 37).
[] You have selected a text option in the Caption Vision (GG) t_ature in the Setup
setting and no text is available (see pages 43 and 45 to reset Setup selections). To
turn off this feature, set the Caption Vision (CC) option to Off. If you were
trying to select closed captioning, select OG1 instead of Text1-4.
Some wide screen programs are filmed in aspect ratios that are greater than 16:9
(this is especially common with theatrical releases). Your TV will show these
programs with black bands at the top and bottom of the screen. For more details,
check the documentation that came with your DVD (or contact your program
provider).
The compression used by certain digital broadcasts and DVDs may cause your
TV's screen to display less detail than usual, or cause artifacts (small blocks or
dots, pixelations) to appear on your screen. This is due to your TV's large screen
and ability to show very fine detail, and is normal for certain digitally recorded
programs. Adjust the Reality/Clarity in the DRG Palette setting (page 34) to
optimize the picture while viewing these sources.
[] Check the polarity of the batteries or replace the batteries.
[] Point the remote control at the remote control sensor of the TV.
[] Fluorescent/fluorescent lamps can iuterlere with your remote control operation:
try turning off the Fluorescent/fluorescent lamps.
[] Keep the remote control sensor area clear from obstacles.
[] If you are using the TV to cha_;ge chmmels, first press TV (FUNCTION) once,
and the TV indicator lights up.
[] If you are using another device to change channels, be sure you have not
inadvertently switched your TV fi'om the channel 3 or 4 setting.
[] If you are using another device to change channels, be sure to press FUNCTION
tk_rthat device. For example, if you are using your cable box to change channels,
be sure to press SAT/CABLE (FUNCTION) once, and the SAT/CABLE
indicator lights up.
[] If you replaced the batteries to the remote recently, the code numbers lk)r the
video equipment may need to be reset.
[] There may be more than one code for the equipment that you are attempting to
operate.
[] There is a possibility that some non-Sony equipment cannot be operated by your
Sony TV remote. You may need to use the equipment's original remote control.
"X"
r_
o
(Continued)
49
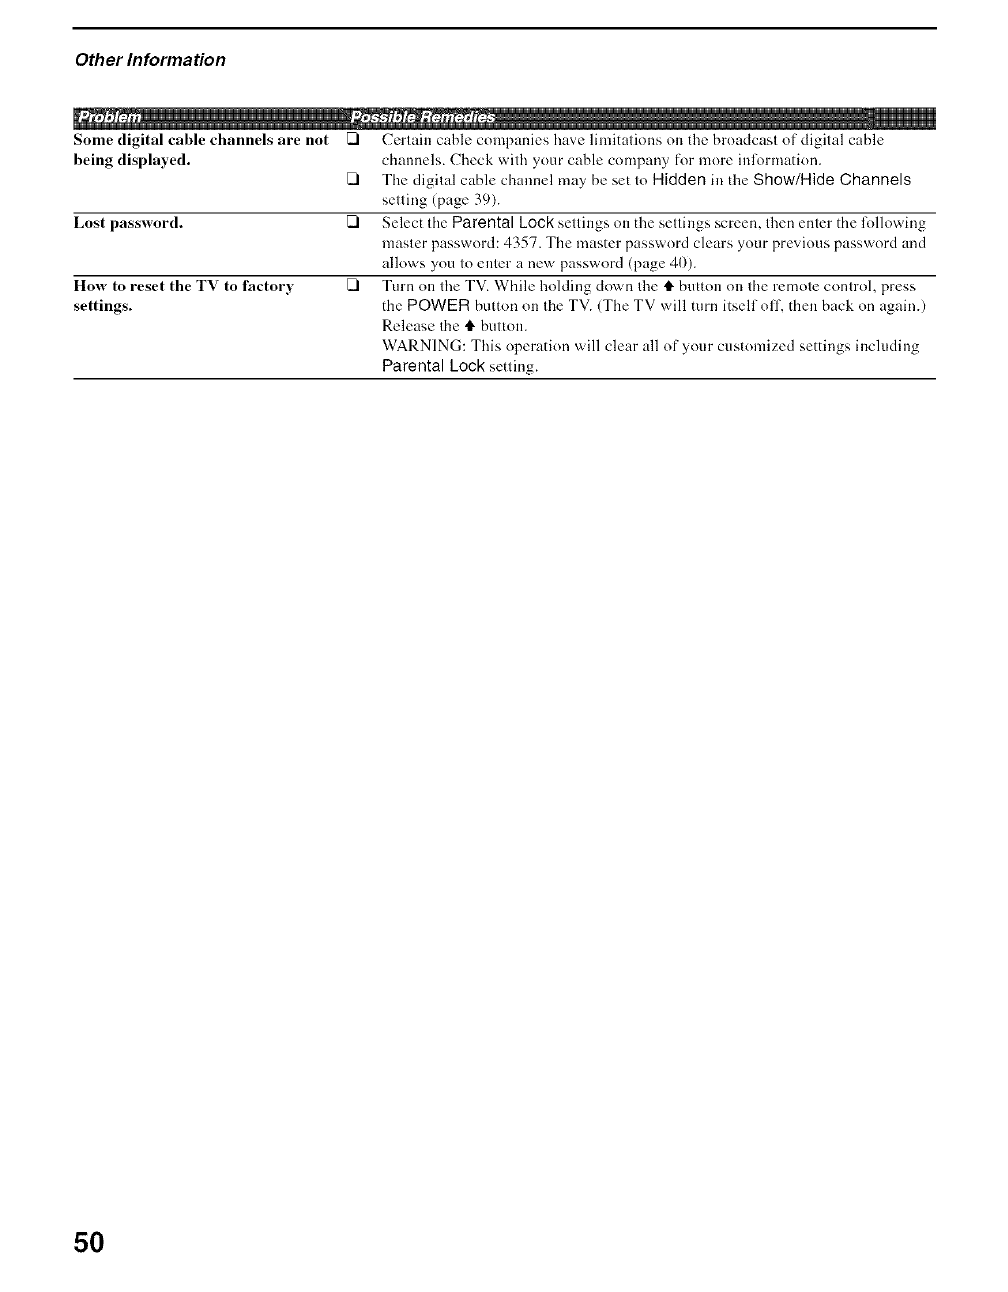
Other Information
Some digital cable channels are not []
being displayed. []
Lost password. []
How to reset the TV to factory []
settings.
Certain cable companies have limitations on the brnadcast nf digital cable
channels. Check with your cable company for more inl_,)rmatinn.
The digital cable channel may be set to Hidden in the Show/Hide Channels
setting (page 39).
Select tire Parental Lock settings on the settings screen, then enter the lk_llnwing
master password: 4357. The master password clears your previous password and
allows you to enter a new passwnrd (page 41)).
Turn on the TV. While holding down the tl. button on the remote control, press
the POWER button on the TV. (The TV will turn itself off, then back on again.)
Release the tl. button.
WARNING: This operation will clear all of your customized settings including
Parental Lock setting.
50
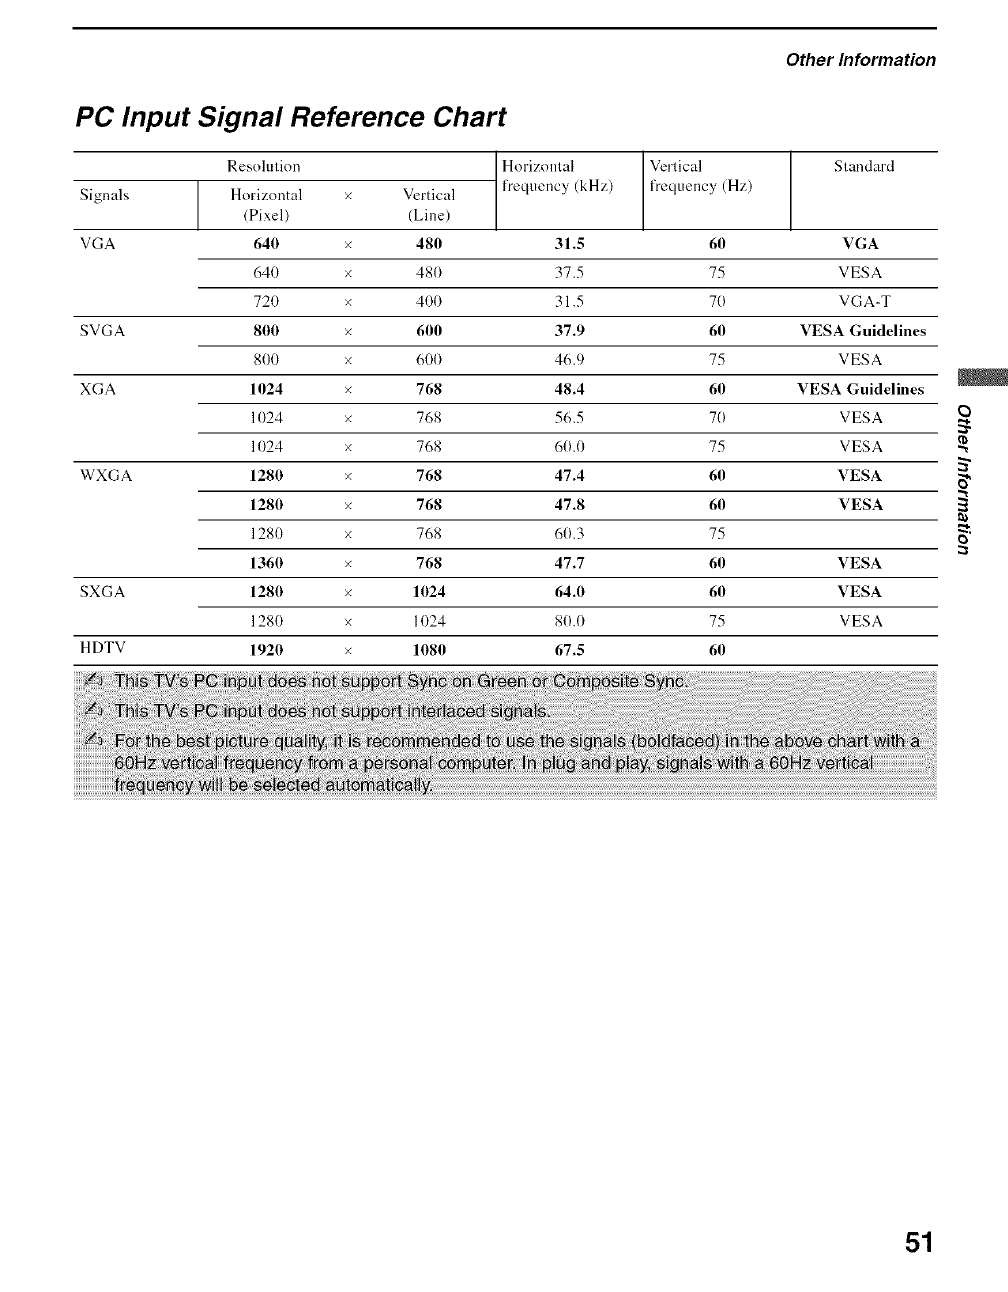
Other Information
PC Input Signal Reference Chart
Resolutkm
Horizontal
(Pixel)
640
640
720
Signals
VGA
Horizontal Vertical
requency (Hz)
61[)
75
7O
frequency (kHz)
Standard
Vertical
(Line)
x 481[) 31.5 VGA
x 480 37.5 VESA
x 4(t(t 31.5 VGA-T
SVGA 800 x 61111[) 37.9 61[) VESA Guidelines
800 x 600 46.9 75 VESA
XGA 11[)24 x 768 48.4 61[) VESA Guidelines
1024 x 768 56.5 70 VESA
1024 x 768 60.0 75 VESA
WXGA 1280 x 768 47.4 60 VESA
1280 x 768 47.8 60 VESA
1280 × 768 60.3 75
1360 x 768 47.7 60 VESA
SXGA 1280 x 1024 64.0 61[) VESA
1280 × 1024 80.0 75 VESA
HDTV 1920 x 1080 67.5 60
×
5"
o
51
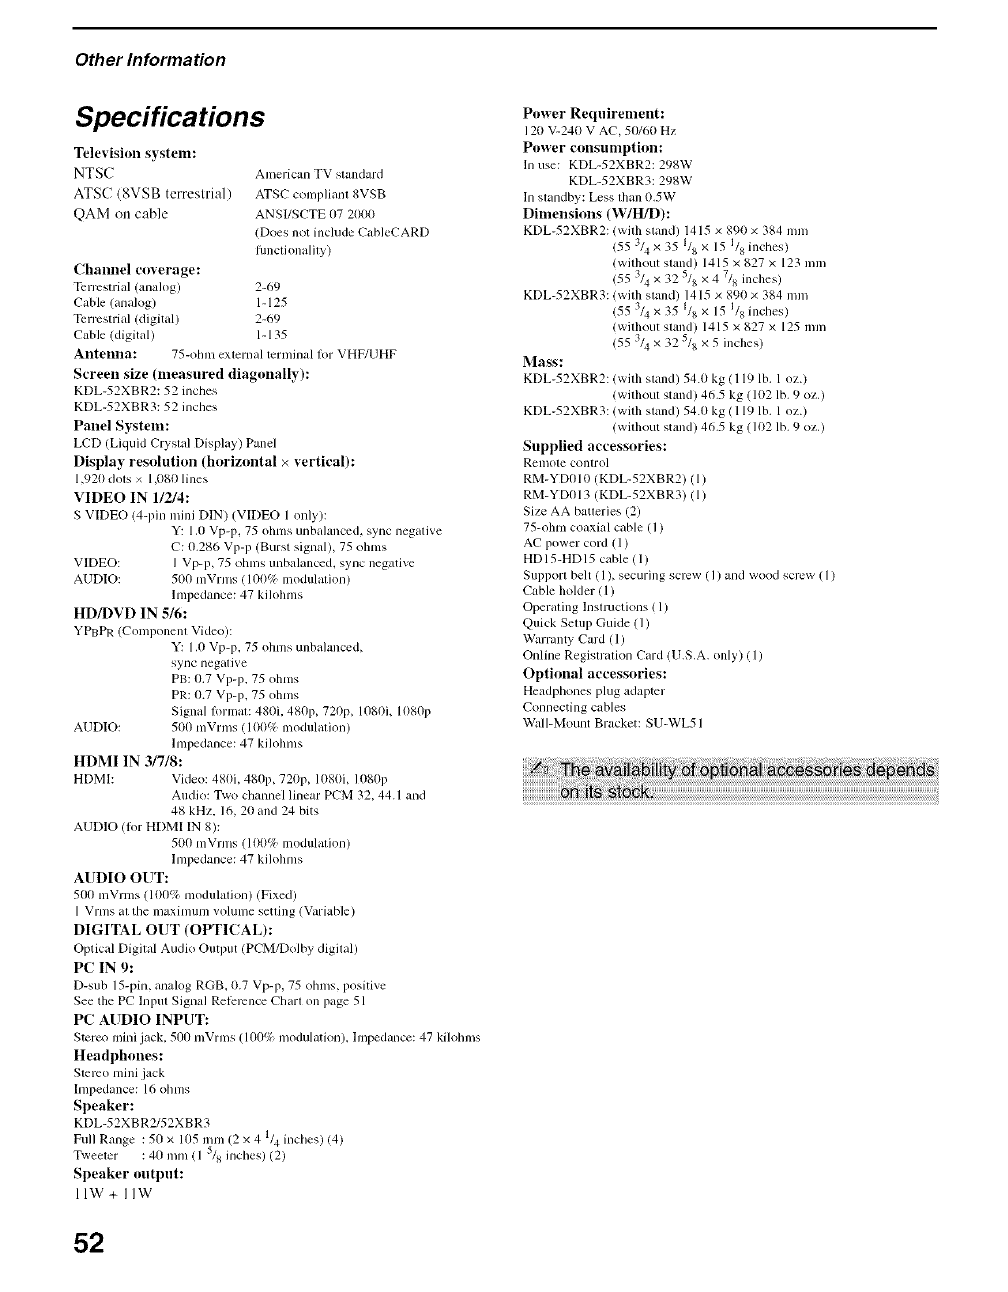
Other Information
Specifications
Television system:
NTSC
ATSC (8VSB terrestrial )
QAM on cable
Americ;m TV standard
ATSC compliant 8VSB
ANSI/SCTE 07 21tltlt
(Does not include C_bIeCARD
fimctionality)
Channel ctwerage:
Terrestrial (analog) 2-69
Cable (analog) 1-125
Terrestrial (digital) 2-69
Cable (digital) 1-135
Antenna: 75-ohm external terndnal lor VHF/UHF
Screen size (measured diagonally):
KDL-52XBR2:52 inches
KDL-52XBR3:52 inches
Panel System:
LCD (Liquid Crystal Display) Panel
Display resolution (horizontal × vertical):
1,92t) dots x 1,080 lines
VIDEO IN 1/2/4:
S VIDEO (4-pin mini DlN) (VIDEO 1 only):
Y: 1.0 Vp-p, 75 ohms unbalanced, sync negative
C: 0.286 Vp-p (Burst signal), 75 ohms
VIDEO: I Vp-p, 75 ohms unbalanced+ sync negative
AUDIO: 500 mVrms (101)% modulation)
hnpedance: 47 kilohms
HD/DVD IN 516:
YPBPR (Conlponent Video):
Y: 1.0 Vp-p, 75 ohms unbahmced,
sync negative
PB: 0.7 Vp-p, 75 ohms
PR: 0.7 Vp-p, 75 ohms
Signal lormat: 4811i,480p, 7211p, 10811L11t80I)
AUDIO: 51t0 mVrms ( 11t0% lnodulation)
hnpedance: 47 kih)hms
HDMI IN 3/7/8:
HDMI: Video: 481)i, 480p, 7211p, 10811i, 1080p
Audio: Two channel linear PCM 32, 44.1 and
48 kHz, 16, 20 and 24 bits
AUDIO (lot HDMI IN 8):
500 mVrms (1 t)0% modulation)
hnpedance: 47 kilohms
AUDIO OUT:
5/111mVrms 11tt0% modulation) (Fixed)
1Vrms at the maximum volunle setting (Variable)
DIGITAL OUT (OPTICAL):
Optical Digfial Audio Output (PCM/DoIby digital)
PC IN 9:
D-sub 15-pin, analog RGB+ 1t.7 Vp-p, 75 ohms, positive
See the PC lnpm Signal Relcrcnce Chart on page 51
PC AUDIO INPUT:
Sterc*, mini jack, 500 mVrms 11/111%modulation), hnpedance: 47 kilohms
Headphones:
Stereo mini jack
hnpedance: 16 ohms
Speaker:
KDL-52XBR2152XBR3
Full Range : 50 x 11/5 n)m (2 x 4 1/4 inches) (4)
Tweeter : 40 mm (1 _/s inches) (2)
Speaker output:
llW+llW
52
Power Requirement:
120 V-240 V AC, 50160 Hz
Power consumption:
In use: KDL-52XBR2: 298W
KDL-52XBR3: 298W
In standby: Less tllan (h5W
Dinlensions (W/H/D):
KDL-52XBR2: (with stand) 1415 × 89t) × 384 mm
(55 3/4x 35 1/8 x 15 118inches )
(without stand) 1415 x 827 x 123 mm
(55 3/4 x 32 5/8 x 4 71s inches)
KDL-52XBR3: (with stand) 1415 × 89tt × 384 mm
(55 3/4 x 35 1/8 x 15 l/8 inches)
(without stand) 1415 x 827 x 125 nml
3 _5
(55 "/4 x. _ "/S x 5 inches)
Mass:
KDL-52XBR2: (with stand) 54+0 kg ( 119 lb. 1 oz.)
(without stand) 46.5 kg (102 lb. 9 oz.)
KDL-52XBR3: (with stand) 54+0 kg ( 119 lb. 1 oz.)
(without stand) 46.5 kg (102 lb. 9 oz.)
Supplied accessories:
Remote control
RM-YD0111 (KDL-52XBR2) (1)
RM-YD013 (KDL-52XBR3) (1)
Size AA batteries (2)
75-ohm coaxiM cable (1)
AC power cord (1)
HD 15-HD 15 cable (1)
Support belt ( 1), securing screw (1) and wood screw ( 1)
Ct_ble bolder (1)
Operating lnstluctions ( 1)
Quick Setup Guide (1)
Warranty Card (1)
Online Registration Card (U.S.A. only) (1)
Optional accessories:
Headphones plug adapter
Connecting cables
Wall-Mount Bracket: SU-WL51
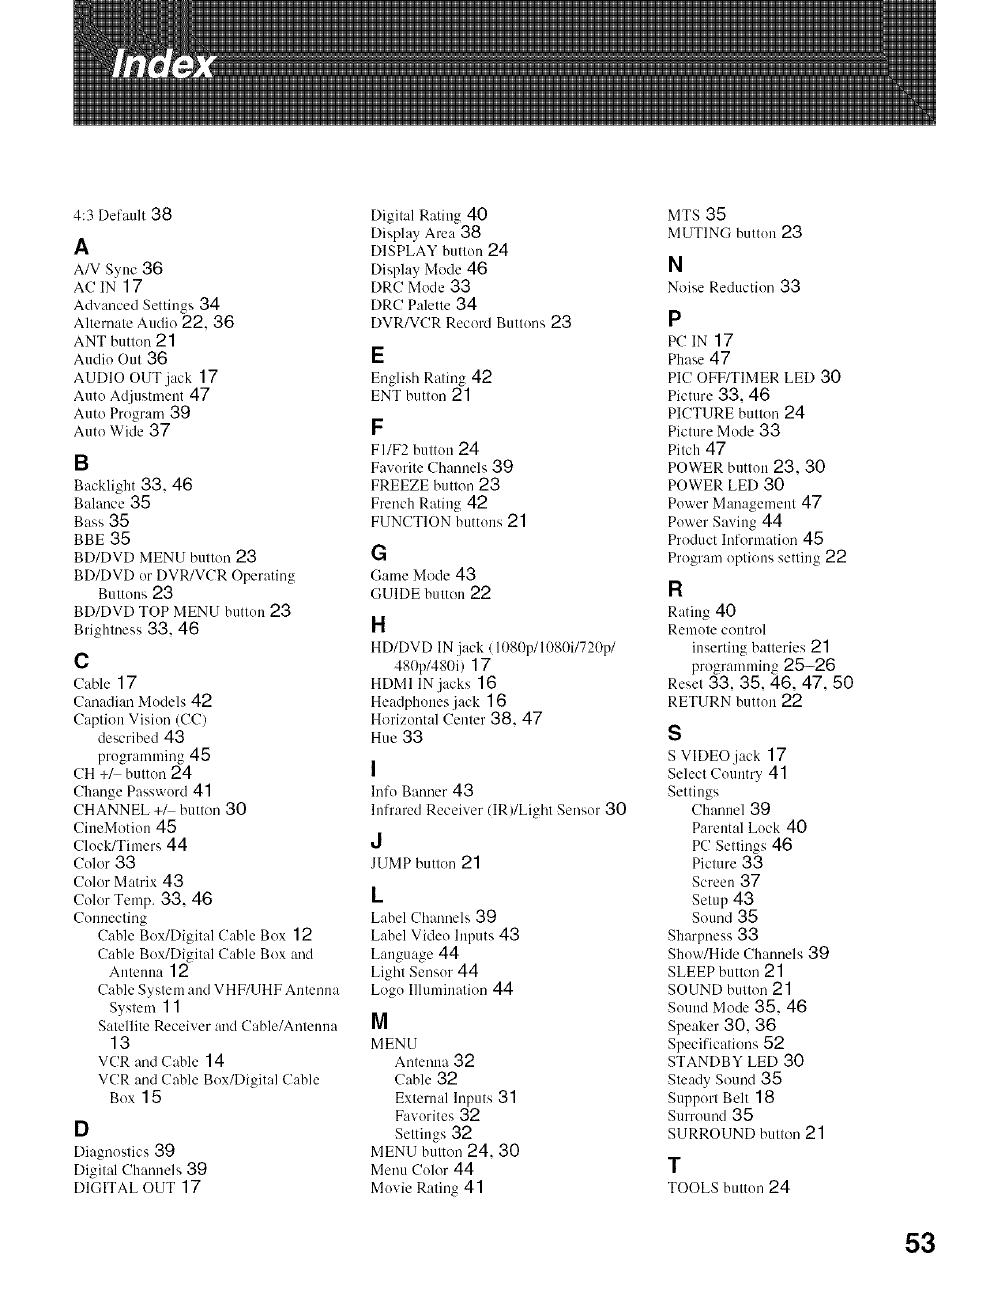
4:3 Default 38
A
A/V Sync 36
AC IN 17
Advanced Settings 34
Alternate Audio 22, 36
ANT buttcm 21
Audio Out 36
AUDIO OUT jack 17
Auto Adjustmm)t 47
Auto Program 39
Auto Wide 37
B
Backlight 33, 46
Balance 35
Bass 35
BBE 35
BD/DVD MENU button 23
BD/DVD or DVR/VCR Operating
Buttons 23
BD/DVD TOP MENU button 23
Brighmess 33, 46
C
Cable 17
C:madi:m Models 42
Caption Vision (CC)
described 43
programming45
CH +_ button 24
Change Password 41
CHANNEL +_ button 30
CiueMotion 45
Clock/Timers44
Color 33
Color Matrix 43
Color Temp. 33, 46
Connecting
Cable Box/Digital Cable Box 12
Cable Box/Digital Cable Box and
Antenna 12
Cable System and VHF/UHF Antenna
System 11
Satellite Receiver and Cable/Antenna
13
VCR and Cable 14
VCR and Cable Box/Digital Cable
Box 15
D
Diagnostics 39
Digital Ch:mnels 39
DIGITAL OUT 17
Digital Rating 40
Display Area 38
DISPLAY button 24
Display Mode 46
DRC Mode 33
DRC Palette 34
DVR/VCR Record Buttons 23
E
English Rating 42
ENT button 21
F
FI/F2 button 24
Favorite Channels 39
FREEZE button 23
French Rating 42
FUNCTION buttons 21
G
Game Mode 43
GUIDE button 22
H
HD/DVD IN jack (1080p/1080i/720p/
480p/480i) ] 7
HDMI IN jacks 16
Headphones jack ] 6
Horizontal Center 38, 47
Hue 33
I
hffo Banner 43
hffrared Receiver (IR)/Light Sensor 30
J
JUMP button 21
L
Label Channels 39
Label Video Inputs 43
Language44
Light Sensor 44
Log() Ilhnnination 44
M
MENU
Antenna 32
Cable 32
External Inputs 31
Favorites32
Settings 32
MENU button 24, 30
Menu Color 44
Movie Rating 41
MTS 35
MUTING button 23
N
Noise Reduction 33
P
PC IN 17
Phase47
PIC OFF/TIMER LED 30
Picture 33, 46
PICTURE button 24
Picture Mode 33
Pitch 47
POWER button 23, 30
POWER LED 30
Power Management 47
Power Saving 44
Product hfformation 45
Program options setting 22
R
Rating40
Remote control
inserting batteries 21
programming 25-26
Reset 33, 35, 46, 47, 50
RETURN button 22
S
S VIDEO jack 17
Select Country 41
Settings
Channel39
Parental Lock 40
PC Settings 46
Picture 33
Screen37
Setup43
Sotmd35
Sharpness33
Show/Hide Channels 39
SLEEP button 21
SOUND button 21
Sound Mode 35, 46
Speaker 30, 36
Specifications 52
STANDBY LED 30
Steady Sound 35
Support Belt 18
Stlrro/lnd 35
SURROUND button 21
T
TOOLS button 24
53
Treble 35
Troubleshooting 48-50
TV POWER button 23
TV Rating 41
TV/VIDEO button 21,30
U
U.S.A. Rating 42
Unrated 41
US Models 41
Using with remote control
5.1ch DVD AV System 28
AV Receiver 29
Blu-ray Disc Player 28
Cable Box 27
DVD Player or DVD Changer 27
DVD/VCR Combo Unit 28
DVR 29
HDD/DVD Combo ldnit 29
Satellite Receiver 27
VCR 27
V
Vertical Center 38, 47
Vertical Size 38
VHF/UHF input 17
VIDEO/AUDIO (L/R)jacks 16, 17
Viewing Blocked Programs 42
VISUAL SEARCH button 23
VOL +/ button 23
VOLUME +1 button 30
Volume Offset 35
W
WIDE button 24
Wide Mode 37, 47
54
Please contact Sony directly if you:
• Have questions on the use of your television after reading your manual
• Experience difficulty operating your television
Contact Sony Customer Support at:
http://www.sony.com/tvsupport
or to speak with a support representative:
United States
1-800-222-SONY (7669)
8:00 AM - 10:00 PM (EST) Men - Fri
10:30 AM - 7:15 PM (EST) Sat - Sun
Canada
1-877-899-SONY (7669)
8:00 AM -6:00 PM (Eastern)
6:00 AM - 5:00 PM (Western)
Sony will work to resolveyour questions more quickly than your retailer or place of purchase.
Please Do Not Return the Product to the Store
HIGH'DEFINITION TELEVISION
http://www.sony.net/
Printed in U.S.A.
2892388111
