Sony KP 46WT510 User Manual PROJECTION TV Manuals And Guides L0307313
SONY Projection/Digital 42 and above TV Manual L0307313 SONY Projection/Digital 42 and above TV Owner's Manual, SONY Projection/Digital 42 and above TV installation guides
User Manual: Sony KP-46WT510 KP-46WT510 SONY PROJECTION TV - Manuals and Guides View the owners manual for your SONY PROJECTION TV #KP46WT510. Home:Electronics Parts:Sony Parts:Sony PROJECTION TV Manual
Open the PDF directly: View PDF ![]() .
.
Page Count: 83
Operating #nstructk
©2003SonyCorporation
WARNING
To prevent fire or shock hazard,
expose the projection TV to rain
moisture.
Note on Caption Vision
do not This television receiver provides displa) of television
or closed captioning in accordance with § 15.119 of the FCC
rules,
A'rrENTION
RISQUE DE C_C EL_CTRIQLIE
_E PAS OUVRIR
PRECAUCION
RIESGO DE CHOQU_ ELECTRICC
NO 0,BR_R
CAUTION : TO REDUCE THE RiSK OF ELECTRIC SHOC}
DO NOT REMOVE COVER (OR BACK]
'40 USER.SERVICEABLE PARTS INSIDE¸
REFER _ERVICING TO QUALIFIED SERVICE PERSONNEL
This symbol is inteaded to alert the user to the
//_ presence "dangerous voltage"
of uninsulated
wilhin the product's enclosure thai may be of
sufficient magnitude to constitute a risk of
electric shock to persons
This symbol is intended to alerl the user to the
//_ presence of important operating and
maintenance tservicing) instructions in the
literature accompanying the appliance.
CAUTION
"Ibpreventelectric shock, do not use this polarized AC
plug with an extension cord. receptacle or other outlel
unless the blades can he full3 inserted to prevent blade
exposure.
CAUTION
When using TV games, computers, and
similar products with your projection
TV, or viewing a TV station whose logo
always stays on the screen, keep the
brightness and picture functions at low
settings. If a fixed (non-moving) pattern
such as a station logo is left on the
screen for long periods of time,
especially at a high brightness or
picture setting, the image can be
permanently imprinted onto the screen.
These types of imprints are not covered
by your warranty.
Note on convergence adjustment
Before you use your projection TV. make sure m adjus[
convmgence. For details, see "'Adjusting the Convergence
Ataomadcally - FLASH FOCUS TM -" on page 33.
Note to CATV system installer
"['hisreminder is provided to call the CATV system
installer's attention m Article 820-40 of the NEC thai
provides guidelines for proper grounding and in
pm_ticular, specifies 1hat the cable ground shall be
connected m the grounding system of the building, as
close lo the point of cable entry as practical.
Use of this television receiver for other than private
viewing of programs broadcast on UHF, VHE
transmilted by cable companies or satellite for the use of
the general public may require authorization from the
broadcaster/cable company and/or program ownm-.
NOTiFiCATiON
This equipment has been tested and found to comply wi_h
the limits for a Class B digital device, pursuan/to Par/15
of the FCC Rules. These limits are designed to provide
reasonable protection against harmful interference in a
residential installation, This equipment generates, uses.
and can radiate radio frequency energ) and. if not
installext and used in accordance wi/h the instructions.
ma3 cause harmful interference with radio
communications. Howevm: _here is no guarantee that
interference will not occur in a particular installation, If
this equipment does cause harmful interference to radio
or television reception, which can be determined b 3
turning the equipment off and on. Ihe user is encouraged
m u-) to correct the interference by one or more of the
following measm-es:
_J Reorient or relocate _he receiving anmnna.
J Increase the separation between the equipment and
receiver.
d Connect 1he eqmpment inlo an oullet on a circuil
differem from that to which the receiver is
connected.
J Consult the dealer or an experienced radiofrV
technician for help,
You are cautioned that any changes or
modifications not expressly approved in
this manual could wfld your warramy and
your authority to operate this eqmpmenL
2
CAUTION
How to reduce the risk of "Image Retention"
on your Projection TV
Bright, stationary images such as TV station logos
displayed on your TV can cause permanent damage to your
PV. resulting in retention oftbe image in the picture
Please take the fol!owing steps 1o reduce the risk of causing
Hnage retention:
View a variety of program som_zes or programming
malerial.
hnage retention can occur when bright stationm2€ images
such as TV sla/ion !ogos are viewed Changing the
program rff_terial viewed reduces the possibilit 3 that a
single image will become imprinled on the picture tubes in
your TV.
When viewing programs with stationary images, adjust the
picture setling to reduce the "Piclure" and "Brightness"
levels. Image retention is accelerated by higher
"Bfiglltness" and higher "Piclure" seltings.
Please lefer m your ins®uction manual for ins/ructions on
adjusting picture selting_,
This will heip you leduce lhe risk of causing image
retention.
IMAGE RETENTION IS NOT COVERED BY
YOUR WARRANTY
This documenl is for the remote control RM-Y909.
MODELS: KP-46WT510. KP-51WS510. KP-57WS510.
and KP-65WS510.
Please keep this notice with the instruction manual.
Safety
JOperate the projection TV only on 120 V AC.
J The plug is designed, for safety puq_oses, In fil inlc
the wall outlet only one way, If you are unable to
insert the plug fully into the outlel, comact your
dealer.
J If any liquid or solid object should fall inside the
cabinet, unplug the projection TV immediateb and
have i/checked by qualified service personnel before
operating i/furlber.
J If you will no/be using the projection TV for several
da_. disconnect the power by pulling the plug ilself.
Never pull on the cord.
For details concerning safety precautions, see
-'IMPORTANT SAFEGUARDS" on page 4,
installing
J To prevent internal heat buildup, do not block the
ventilation openings.
JDo not ins/all the projection TV in a hot or humid
place, or in a place subjec_ lo excessive dusl or
mechanical vibration.
J Avoid operating the projection TV at tempei-amres
below 5°C 41°FL
-1 If Ihe projection TV is transported directly from a
cold Io a warm location, or if the room temperature
changes suddenly, the picture ma5 be blurred or show
t_oor color due to moistme condensation. In this case
please wail a few hours to let the moisture evaporate
before turning on the projection TV.
J To obtain the best piclure, do not expose the screen to
direct illumination or direct sunlight. It is
recommended to use spot lighting directed down from
1he ceiling or m cover the windows that face/be
screen wilh opaque drapery. It is desirable lo install
1he projection TV in a room where 1he floor and walls
are not of a reflective material.
As an ENERGY STAR ® Partner
Sony Corporation has determined
that th=s product meets the
ENERGY STAR ® guidelines for
energy efficiency.
Trademark information
I'ruSurround and the, • )">s3mbol ate trademarks of SRS
Labs. Inc. TruSurround technNogy is incorporaled under
license from SRS Labs. Inc.
BBE and BBE S3mbol are trademarks of BBE Sound. lnc
and are licensed by BBE Sound, Inc. under U.S. Patent No.
4,638,258 and 4,482,866
Steady Sound. Digital Reality Creation. Caption
Vision. CineMotion. Memor1 Stick. and Twin View
are registered tradem_ks of Sony Co_20oranon.
ClearEdge VM and HD Detailer are trademarks of
Sony Corporation.
Owner's Record
The model and serial numbers are located at the rear of the
projection TV, below the Sony logo. on the stickeL and
also on the TV box white label,. Record these numbers in
the spaces provided below. Refer to them whenever you
_'all upon your Sony dealer regarding this product.
Model No.
Serial No.
3
IMPORTANTSAFEGUARDS
For your protection, please read these instructions
completely, and keep this manual for fulure reference
Carefull 3 observe and comply with all warnings, cautions
and instructions placed on the set or described in the
operating instructions or service manual.
WARNING
"Ib guard against injury, the following basic safety
precautions should be observed in the installation, use
and servicing of the set.
USe
Power Sources
This sel should be operated only from
1be type of power source indicated on
1he serial/m(xtel plate. If you ale not sure
of 1he type of electrical power supplied
To your home. consult your dealer or
local power company. For those sets designed to operate
from baeery power, refer 1o the operating inslructions_
Grounding or Polarization
This set is equipped with a polarized AC power cord plug
(a plug having one blade wider than the olher_, or with
three-wire grounding type plug (a plug having a lhird pin
for grounding . Follow the instructions below:
Overloading
Do not overload wal! outlets, extension
cords or convenience receptacles
beyond their capacity, since this can
result in fire or electric shock
Always turn the set off when it is nol
being usexL When the set is left
unattended and unused for long
perio_ts of time. unplug it from 1he
wall outlet as a precaution against the
possibility' of an internal malfunction that could creale a
fire hazard.
If a snapping or popping sound from a TV _
set is continuous or frequent while the TV ..... __.. ,!_2)]
is operating, unplug the TV and consult _=__._"! ' '" I_,,_,
your dealer or service technician. It is , ,,Ill - _1 _[1_"
normal for some TV sets to make Z5 L
occasional snapping or popping sounds.
particularly when being turned on or off.
Object and Liquid Entry
Never push objects of an_, kind into the
set through the cabinet slots as they may _._
touch dangerous voltage points or short )_ _r/,_,_]
out parts thai could result in a fire or " I _ I
electric shock. Never spill liquid of any
kind on the eel
For the set with apolarized AC power cord
plug
This plug will fit into the power outlet
only one way, This is a safety feature. If _"_
you m'e unable to insert the plug fully "_./===_
into the outlet. _ry reversing the plug. If
the plug still fails to fit. contact your electrician to have a
suitable outlet installed. Dc not defeal the safety purpose
of the polarized plug by forcing it in. Cleaning
Clean the cabinet of the projection TV
For the set with a three-wire grounding type with a dr) softcloth. To removedust ...... @
AC pJug from the screen, wipe it gently with a soft I_" /[--_f]
This plug will only fit into a grounding- cloth. Stubborn stains may be removed C_L_
type power outlet. This is a safety
feature. If you are unable to insert 1he
plug into the outlet, conracl your
electrician to have a suitable outlel
installed. Do not defeat the safety purpose of the
grounding plug,
Attachments
Do not use auachments not
recommended b) the manufacture]-, as
they ma) cause hazards.
with a cloth slightly dampened with
solution of mild soap and warm water. Never use strong
sNvents such as thinner or benzine for cleaning.
If the picture becomes dm'k after using the projection TV
for a long period of time. it ma 3 be necessary to clean the
inside of the projection TV. Consult qualified service
personnel.
4
|nstallation
Water and Moisture
D_ not use power-line operated sets ,-->,L,,--_n
nero" water-- for example, near a
bathtub, washbowl, kitchen sink. or
laundr2, tub. in a wet basement or
near a swimming pool, etc, _Y_'P _
Accessories
L_ not place the set on an unst_le
carl stand, t_le or shel£ The set
may fall. causing serious injury To a
child or an adult and serious dama
to the set. Use only a cart or stand
recommended by Son 5 for the
specific model of TV. No part of the
TV set should overhang any edge of
the TV cart or stand: any
overhanging exJge is a safety hazard.
An appliance and carl combination
should be moved with care, Quick
stops, excessive force, and uneven
surfaces may cause the appliance
and cart combination to overturn,
Ventilation
The slots and openings in the cabinet and in the back el
bottom ate provided for necessar 3 ventilation. To ensure
Power=Cord Protection
Do not allow anything Io test on or roll
over the power cord, and do not place the
set where the newer cord is subiecl To
wear or abuse.
Anteneae
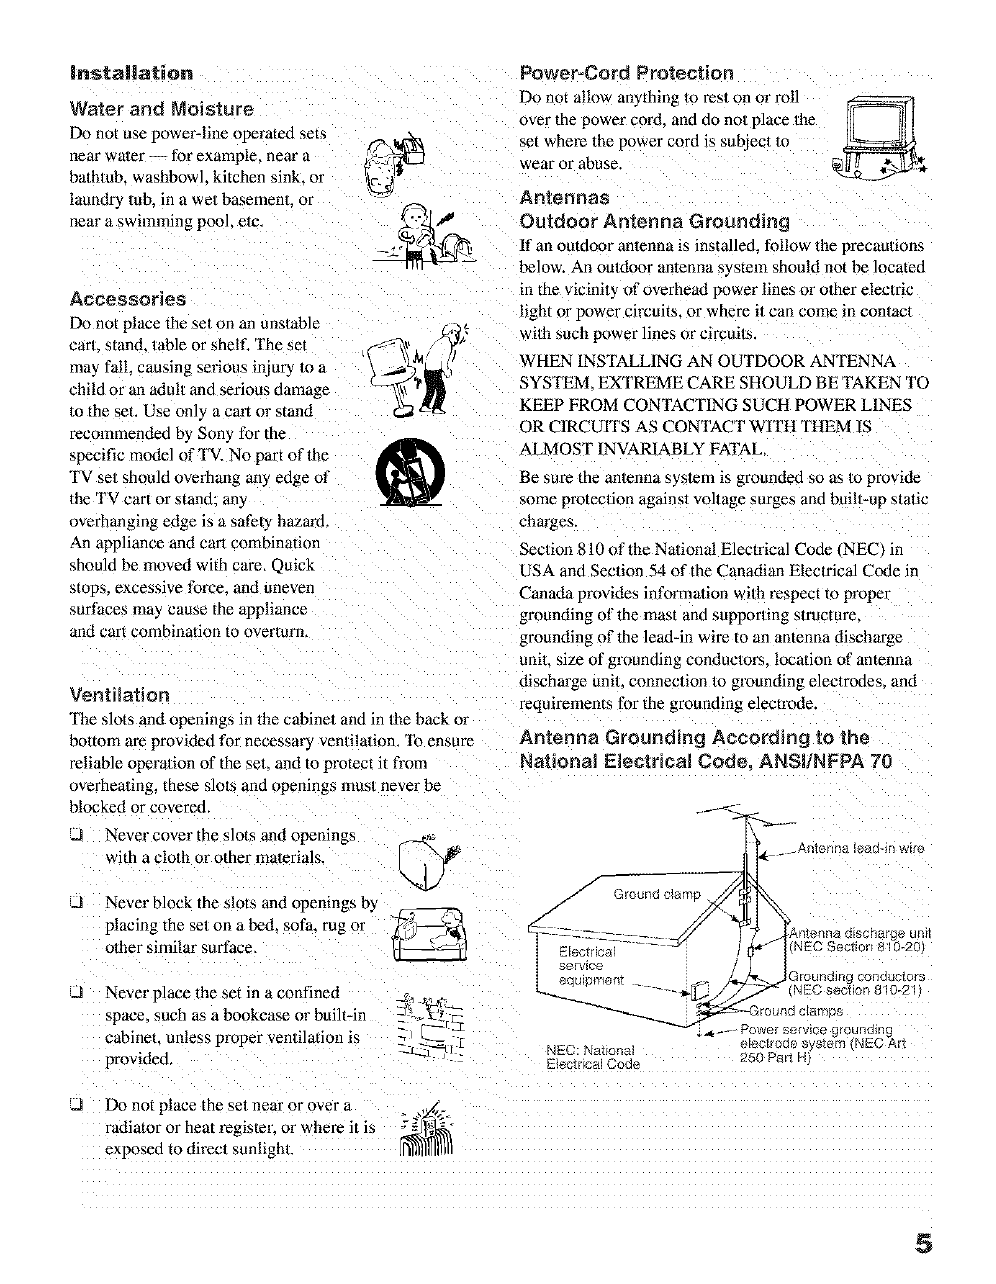
Outdoor Antenna Grounding
ff an outdoor antenna is installed, follow the precautions
below. An ouUloor antenna system should not be located
in the vicinit_ of overhead power lines or other electric
light or power circuits_ or where it can come in con/acl
with such power lines or circuils
WHEN INSTALLING AN OUTDOOR ANTENNA
SYSTEM. EXTREME CARE SHOULD BE TAKEN TO
KEEP FROM CONTACTING SUCH POWER LINES
OR CIRCUITS AS CONTACT WITH THEM IS
ALMOST INVARIABLY FATAL,
Be sm'e the antenna system is grounded so as m provide
some protection against voltage surges and built-up static
charges,
Section 810 of the National Electrical Code/NEC) in
USA and Section 54 of the Canadian Electrical Code in
Canada provides informadon with respect to proper
grounding of the mast and supporting structure,
grounding of the lead-in wire to an antenna discharge
uniL size of grounding conductors, location of antenna
discharge unit connection 1o grounding elecmxles, and
requirements for the grounding electr(Me.
Antenna Grounding According to the
reliable operation of the set. and to protec[ it from National Electrical Code. ANSI/NFPA 70
overheating, these s]ols and opening_ must never be
blocked or covered.
_d Never cover the slots and opemngs
with a cloth or other materials
J Never block the slots and openings by
placing the set on a bed, sofa, rug or
olher similar surface,
JNever place the set in a confined
space, such as a bookcase or built-in
cabinet, unless proper ventilation is
provided,
_. Afltenna lead-_r/w
NEC: Natfonal
E{edt r_cN Coda 250 ParI H
JDo not place the sol near or over a )._.
radiator or heat register, or where it is _--_ _°
exposed to direct sunlight.
5
Lightning Safety Check
For added protection for this television receiver during _ Upon completion of any service or repairs
lightning sierra, or when it is left unattended and unused m the set. ask the service technician to
for long periods of time. unplug it from the wall outlet perform routine safely checks (as specified
and disconnect the antenna. This will prevent damage to by the manufacturer to determine that the
the receiver due to lightning and power-line surges.
Service
Damage RequMng Service
Unplug the set from the wall outlet and ret_r servicing to
qualified service personnel under the following
condilions:
JWhen the power cord or
plug is damaged or frayed.
JIf liquid has been spilled isle
the seL
J If the set has been exposed
lo rain or water.
J If the set has been subjecl To
excessive shock by being
dropped, or the cabinet has ,ll;¢Y
been damaged, 0_,,
J It"the set does not operate
normally when following the
operating instructions,
Adjust only those conlrols
thai are specified in the (c_.-_,--
operating instructions.
Improper adjustment of
otber comrols ma 3 result in
damage and will often
require exlensive work by u
qualified lechnician to _estore the set to normal
opemlion.
J When the set exhibits a distinct change m
set is in safe operating condition, and to so q_
certify. When the se/reaches the end of its [[t_
usetul hfe, _mproper disposal could result a ._>/_
in a picture tube implosion. Ask a qualified "-'-_'Y-
service technician to dispose of the set.
For Safety
_E_"_=cTT".-_ - Be careful when moving
_2_ _'2°_ .... _"_"-'_o_' the projection TV
When you place the projection TV
,1_2:=_1 _._ in position, be careful not to drop it _ J_ __
[ J ]_//k._ on your foot or fingers, c_< J
'_7_-_ _3 Watch yore" footing while installing the projection TV.
Carry the projectien TV in the
specified manner
lfyou carry the projection TV in a manner
o/ber than the specified manner and
without the specified number of persons, i/
may drop and a serious injury ma_ be
caused, Be sure to follow the instructions men/ioned
below.
,A Carry the projeclion TV with the specified number
of persons, {see page 11
JDo no_ carry the projection TV hNding the speaker
grill.
d Hold the projeclion TV tightl,*, when carrying il.
performance, it indicates a need for service. JModel KP-65WS510 has handles that you can use m
Servicing carry the unit.
Do not a/tempt to service the set by yom_elf
since opening the cabinet may expose you to
dangerous voltage or other hazards. Refer all
servicing to qualified service personnel,
Replacement Parts
When l_placement parts are requited, be sure Ibe serwce
technician cerlifies in writing Ihat he has used
replacement paris specified b) the manufactm'er that have
the same charactefislics as the original paris,
Unauthorized subsfi/utions ma) result in fire. electric
shock or other hazards,
6
Contents
Introducing the Sony Projection TV
Presenling the Sony Projection TV .......................... 8
Using this manual ................................................... 9
/nstafling and Connecting the
Projection TV
Contents ................................................................ 10
Inserting Batteries into the Remote Conlrol .......... 10
Carrying Your Projection TV ................................ 11
Installing the Projeclion TV ................................... l 1
Cormecmr Types .................................................... 12
ProJection TV (-'ontrols and Conneclors ................ 13
Basic Connections (Connecting Cable TV or
Antenna, ........................................................ 16
Connecling a VCR and Cable ................................ 19
Connecting a VCR and Cable Box ........................ 20
Connecling Two VCRs for Tape Editing .............. 22
Connecling a Satellile Receiver ............................. 23
Connecting a Sate/lile Receiver with a VCR ......... 24
Connec/ing an Audio Receiver .............................. 25
Connecling a DVD Player with Component
Usino the Menus
Overview ................................................................ 51
Using the Video Menu .......................................... 52
Using the Audio Menu .......................................... 54
Using the Channel Menu ...................................... 56
Using the Wide Menu ........................................... 58
Using the Timer Menu .......................................... 60
Using the Setup Menu ......................................... 61
Other Information
Programming the Remote Control ......................... 71
Operating OIher Comtxments with Your P_*_iection
FV Remo_e Control ..................................... 74
Trouhleshooting ..................................................... 76
Specificalions ......................................................... 79
Index ...................................................................... 81
Video Connectors .......................................... 26
Connecling a DVD Player wilh A/V Connectors ..2-
Connecting a Digital TV Receiver ......................... 28
Connecling a Camcorder ....................................... 29
Connecling an AV Receiver .................................. 30
Using the CONTROL S Fealure ............................ 31
Setting Up the Projeclion TV Aummalicall3, ......... 32
Adjusting the Convergence Automaticalll.
FLASH FOCUS TM -. .................................. 33
Adjusting the Convergence Manually ................... 34
Using the Features
Using the Remole ("onlrol .....................................37
Watching the TV .................................................... 40
Watching the Digital TV ........................................ 42
Using Favorite Channels ........................................ 43
Using Twin View TM ............................................... 44
Using the Freeze Function ..................................... 47
Using Scrolling Channel Index .............................. 48
Using Wide Semen Mode ...................................... 50
3'
Presenting the Sony Projection TV
Thank you for purchasing the Sony Projection TV.
This manual is for models KP-46WT510, KP-51WS510, KP-57WS510, and
KP-65WS510. KP-51WS510 is used for illustration proposes, unless
indicated otherwise.
Features Some of the features that you will enjoy with your new projection TV
include:
Hi Scan 1080"_: Enables you to receive the 1080i, 720p, 480p and 480i
digital TV formats. By using the VIDEO 5/6/7 IN jacks, you can
connect a DTV (digital television) _ceiver to view DTV programs.
DRC TM Multi-Function: Unlike conventional line doublers, the DRC
feam_e doubles vertical and horizontal lines, resulting in four times the
density for quality sources such as DVD, Satellite and Digital
camcordeE
• . TM
ClneMotmn :Reverse 3-2 pulldown processing provides optimal
picture quality for film-based sources (media originally shot in 24
frames per second).
• . TM .....
Twin V_ew :Using Multi-Image Drwer (MID-X), Twin View allows
you lo watch two programs side by side with the ability to zoom in on
one pictm'e and listen to the program in the selected window. You can
watch pictures from two different sources (1080i, 720p, 480p or 480i)
simultaneously.
Steady SoundrM: Equalizes volume levels so there is consistent output
between programs and commercials.
Parental Control: V-Chip technology allows parents to block
unsuitable programming for younger viewers.
Component Video Inputs: Offers the best video quality for DVD
(480p, 480i) and Digital Set-top box (1080i, 720p, 480p, 480i)
connections.
S-VIDEO Inputs: ProvMes a high-quality image for connected
equipment.
Favorite Channel Preview: Preview up to eight favorite channels
without leaving the cmTent channel.
Scrolling Channel Index: Allows you to view and choose channels
from scrolling pictures without leaving the cun_nt channel.
8
Using this manual
Introducing the Sony Projection TV
,J Wide Screen Mode: Allows you to watch 4:3 normal broadcasls in
wide screen mode (16:9 aspect ratioL 5_
JAuto Wide: Allows you to select the wide screen mode automatically.
uFlash FOCUSTM:Allows you to adjust convergence automaticall 3
u Manual Convergence: Allows you to manually adjust the convergence
of specific areas of the screen.
uDigital Visual Interface (DVIt: Can accommodate a copyprotected
digital connection _HDCP*/to other device_. _such as digital set-top
boxes, that have compatible interfaces. The DV1-HDTV input terminal
is compliant with the EIA-861 standard and is not intended for use with
personal computers.
We recommend that you carefull) review the contents of the following three
sections in the order shown to ensure that you full? understand the operation
of your new projection TV.
1 Installing and Connecting the Projection T¥
This section guides you through ) our initial setup. It shows yon how to
install your projection TV. to connect ,our new components and to connect
the antenna and cable.
2 Using the Features
This section shows you how to begin using your new projection TV. It also
shows you how to use your remole control functions.
3 Using the menus
This section teaches you how lo access on-screen menus and adjust your
projection TV settings.
e_
Instructions in this manual are written for the remote control. Similar
controls are also found on the projection TV console.
_ High-bandwidth Digital Content Protection
9
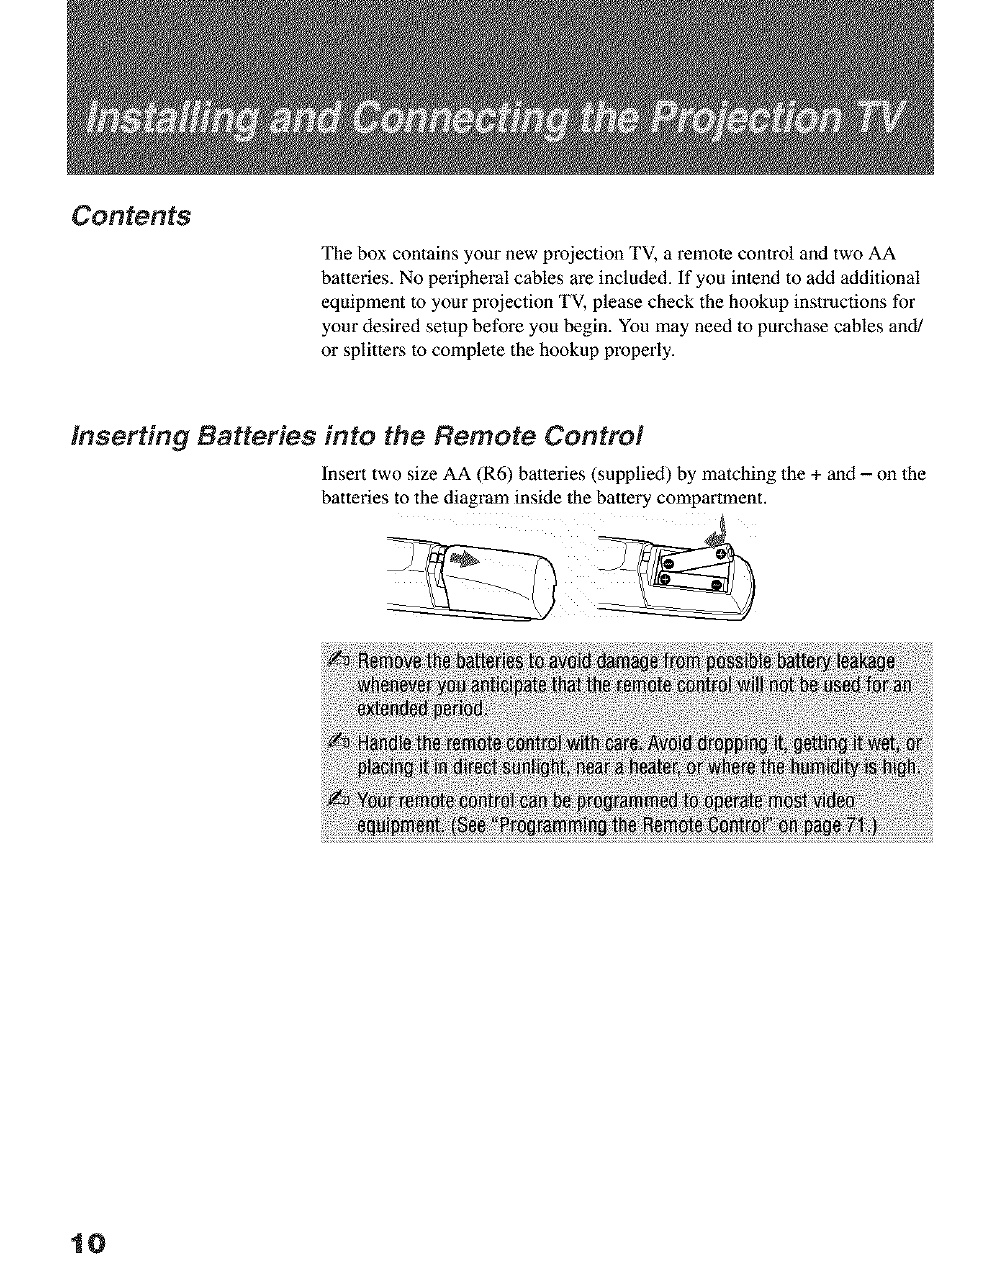
Contents
The box contains your new projection TV, a remote control and two AA
batteries. No peripheral cables are included. If you intend to add additional
equipment to your projection TV, please check the hookup instructions for
your desired setup before you begin. You may need to purchase cables and/
or splittei:s to complete the hookup properly.
Inserting Batteries into the Remote Control
Insert two size AA (R6) balteries (supplied) by matching the + and - on lhe
batteries to the diagram inside the battery compartment.
10
Installing and Connecting the PrQiection TV
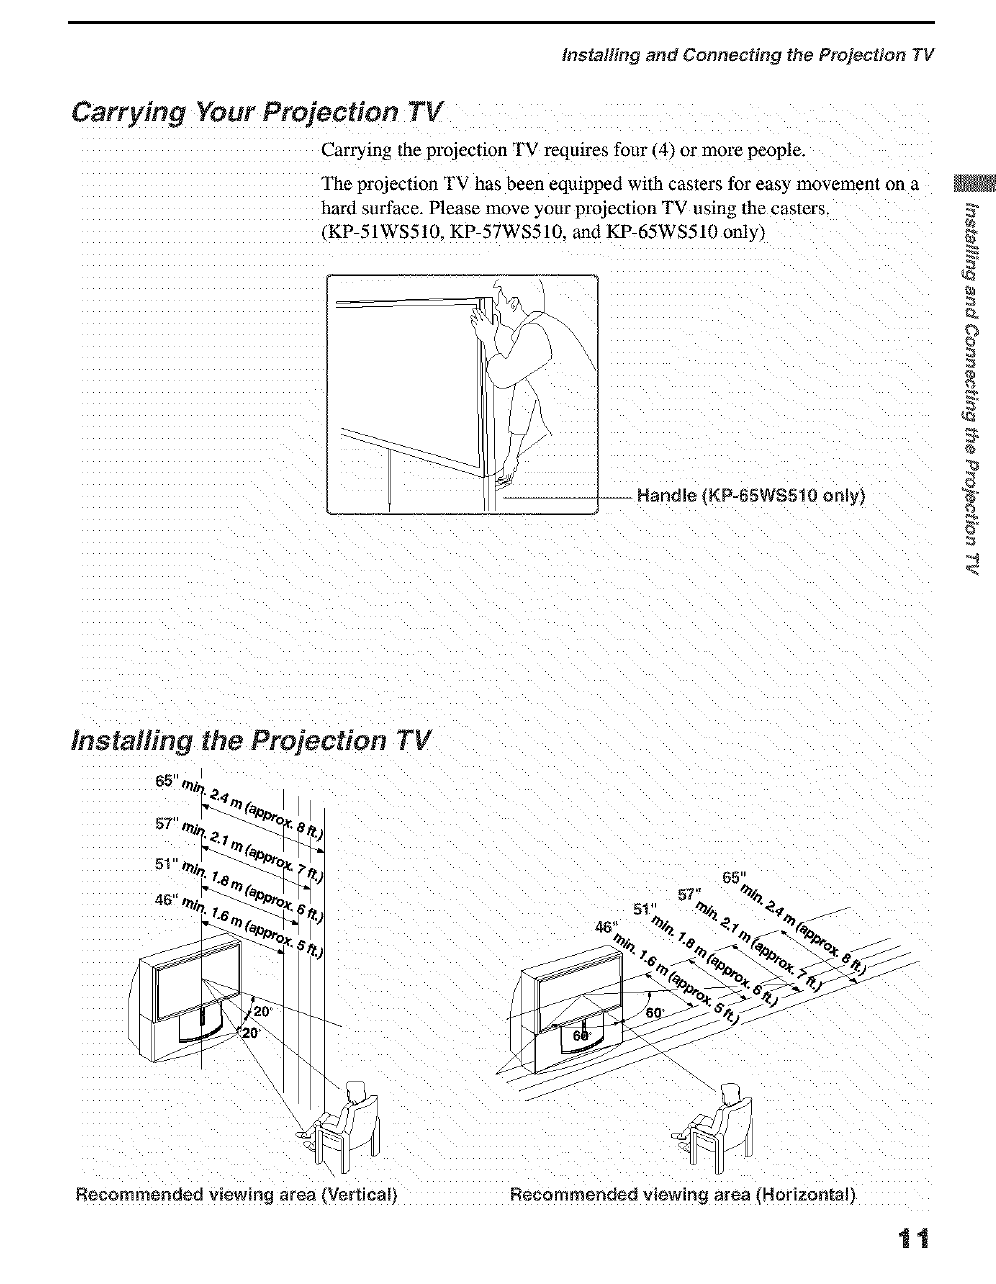
Carrying Your Projection TV
Carrying the projection TV requires four 14_ o1"more people.
The projection TV has been equipped with casters for easy movement on a
hard surface. Please move your projection TV using the casters.
KP-51WS51ll. KP-57WS510. and KP-65WS510 only)
O
].-- Handle (KP=65WS510 only_
Recommended viewing area {Vertical)
65'
,, 5t" _ _%
_.._ __ _:
cO
Recommended viewing area {Horizontal I
11
installing and Connecting the Projection TV
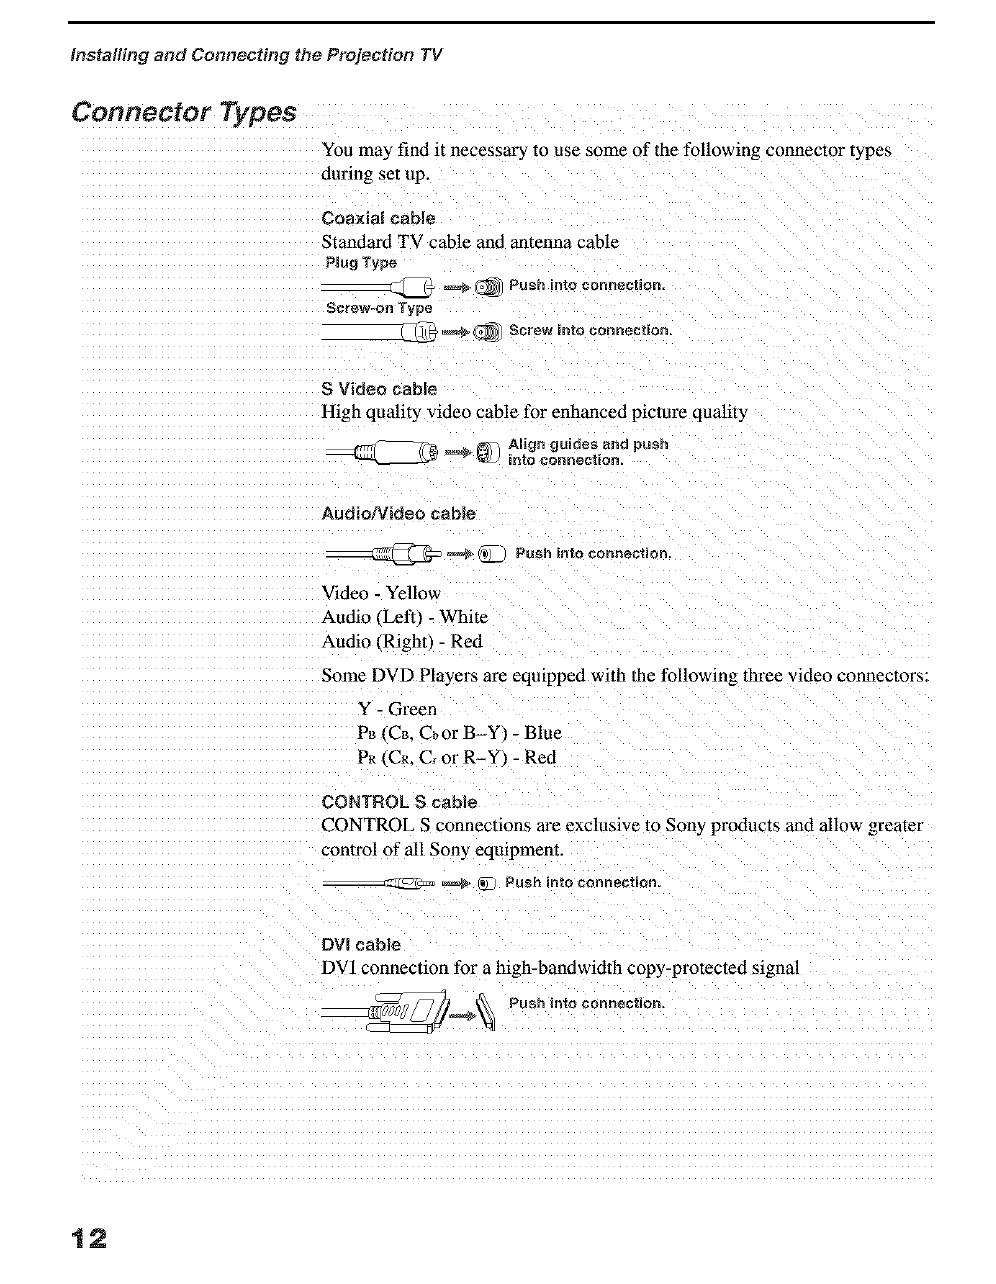
Connector Types
You may find it necessar 3 to use some of the following connector types
during set up.
Coa×ial cable
Standard TV cable and antenna cable
Plug Type
_ _(_ Push into connection.
Screw-on Type
_ @ Screw into connection.
S Video cable
High quality video cable for enhanced picture quality
@ _ _ ALign guides and push
into _onneetion.
AudielVideo cable
_ _ _0)_._Push into connection,
Video- Yellow
Audio (Left -White
Audio/Right) - Red
Some DVD Players are equipped with the following three video connectors:
Y - Green
PB _CB. CbOr B Y _- Blue
PR _Cm C, or R-Y _- Red
CONTROL S cable
CONTROL S connections are exclusive to Sony products and alloa greater
control of all Sony equtpmem.
_ (_ Push into connection.
DVI cable
DV1 connection for a high-bandwidth copy-protected signal
__ Push into connection,
12
Installing and Connecting the Projection TV
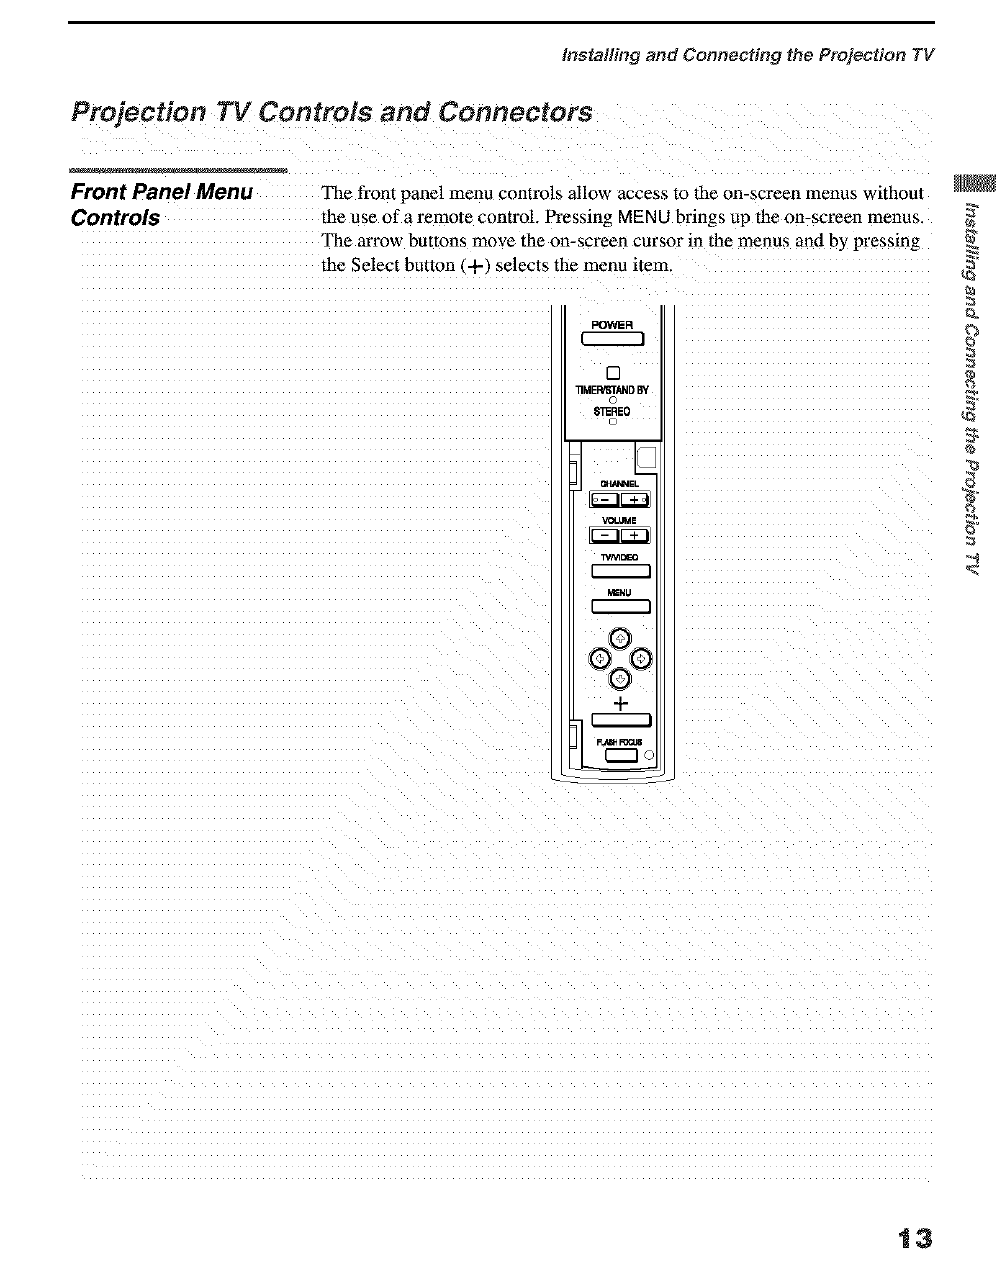
Front Panel Menu The front panel menu controls allow access to the on-screen menus without
Controls the use of a remote control. Pressing MENU brings up the on-screen menus.
The arrow buttons move the on-screen cursor in the menus and by pressing
the Select button (+) selects the menu item.
11MEI_AND BY
D _
S3_REO _
, - _
WM_
MENU
OZO
+ .
13
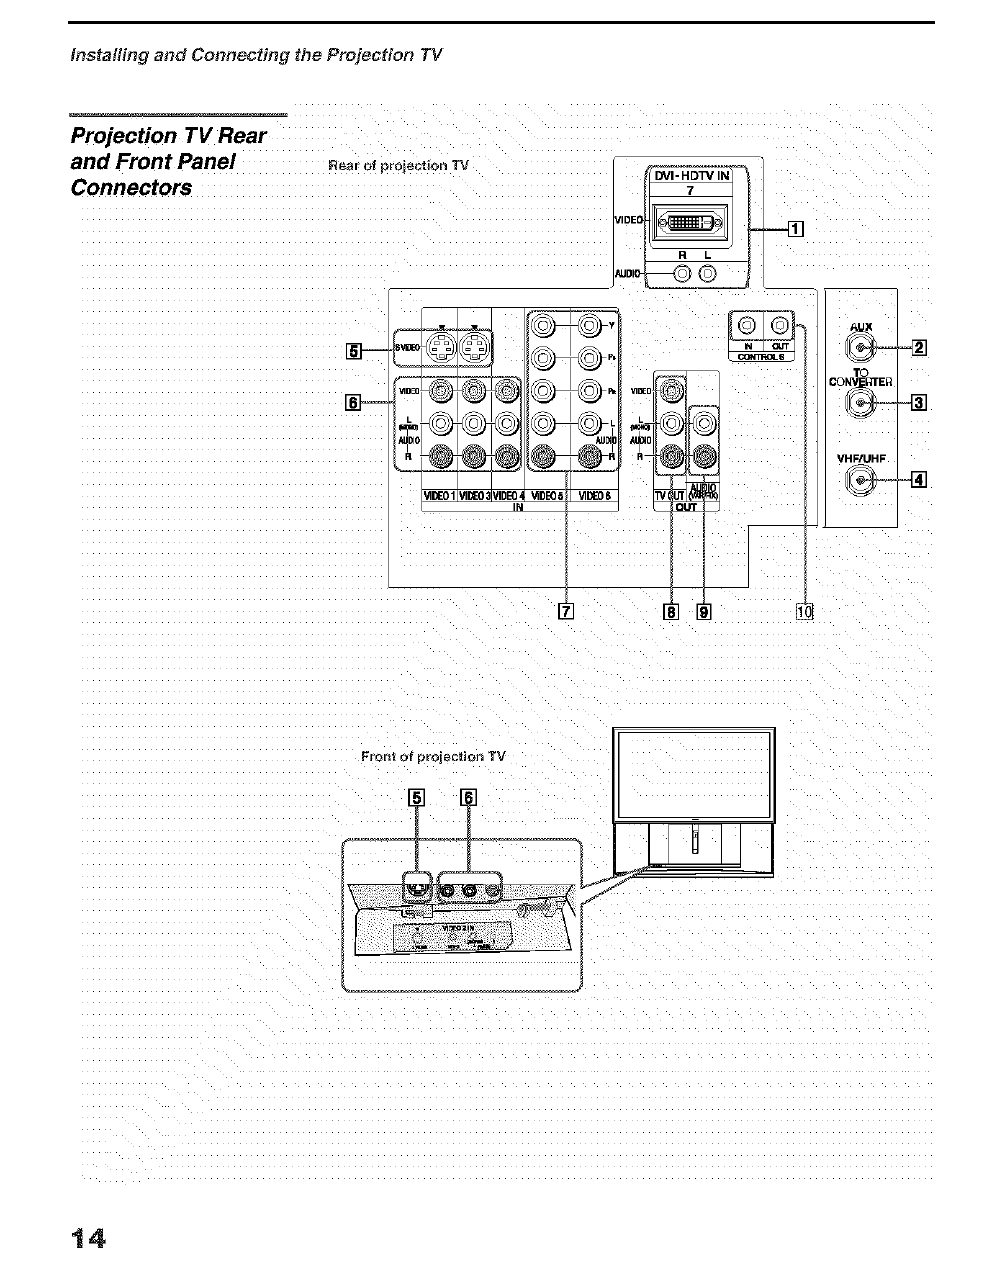
Installing and Connecting the Projection TV
Projection TV Rear
and Front Panel
Connectors
Rear oi projection TV
VIDE
_DI_
@
IIDEON
AUX
TO
_NVILtTER
VHF/UHF
Front of projection TV
14
Installing and Connecting the Projection TV
Connection Description
[_ DVt-HDTV Can accommodate a copy-protected digital connection
VIDEO •HDCP_ to other devices (such as digita! set-lop boxes) Ihat
AUDIO R/L have compatible interfaces. The DVI-HDTV inpu/terminal is
(VIDEO 7 IN compliant with the EIA-861 standard, and is no/intended for
use with personal compu/ers, See the instruction manual thai _
came wilh your equipment for details abeut connecting and
using it with the T_ :z
[_ AUX AHows you to view local and cable channels if your cable
provider does not feature local channels. You can switch
belween local and cable channels easily by pressing ANT
on the remote control. Devices connected to the AUX
input canno/be viewed in Twin Vie_
[] TO CONVERTER This is a VHF/UHF OUT iack thai le/s you sel up your
[_] VHF/UHF
[_] S VIDEO
(Rear and front)
[] VIDEO
(L/R) AUDIO
(Rear and fronb
Y/PB/PR
(L!R) AUDIO
[] TV OUT
[] AUDIO OUT
(VAR/FIX)
L (MONO)/R
projection "IV to switch between scrammed channels
(through a cable box_ and normal cable channels (CATV).
Use this jack instead of a splitter to get belier picture
quality when switching between scrambled and
unscrambled cable channels.
Connects to your VHF/UHF antenna or cable.
Connects to the S VIDEO OUT jack of your VCR or other S
VlDEO-eqmpped video component, Provides better pictare
qualit 3 than the VHF/UHF jacks or the Video tN jack,
Connects to the audio and video OUT jacks on your VCR
or other video componen/. A fourlh video inpul i VIDEO 2
is located on the front panel of the projection TV.
Connec/s to your DVD player's or Digital Set-top box's
component video I Y. PB. PR and audio (LtR) jacks.
Outputs the signal thai the TV is tuned lo _regardless of
the piclure displayed on the screen P.
Connects to the left and right audio inpu/s of your audio or
video component.
[] CONTROL S To control other Sony eqmpment with the projection TV's
IN/OUT remote control, connec//be CONTROL S IN jack of the
eqmpmen/to the CONTROL S OUT jack on the
projection TV with the CONTROL S cable.
_lb control the projection TV wilh a remote control for
another Sony product, connect the CONTROL S OUT
jack of the eqmpment to the CONTROL S IN jack on the
projection TV with the CONTROL S cable.
-High-bandwidth Digital Content Protection.
15
installing and Conneeth_g the Projection TV
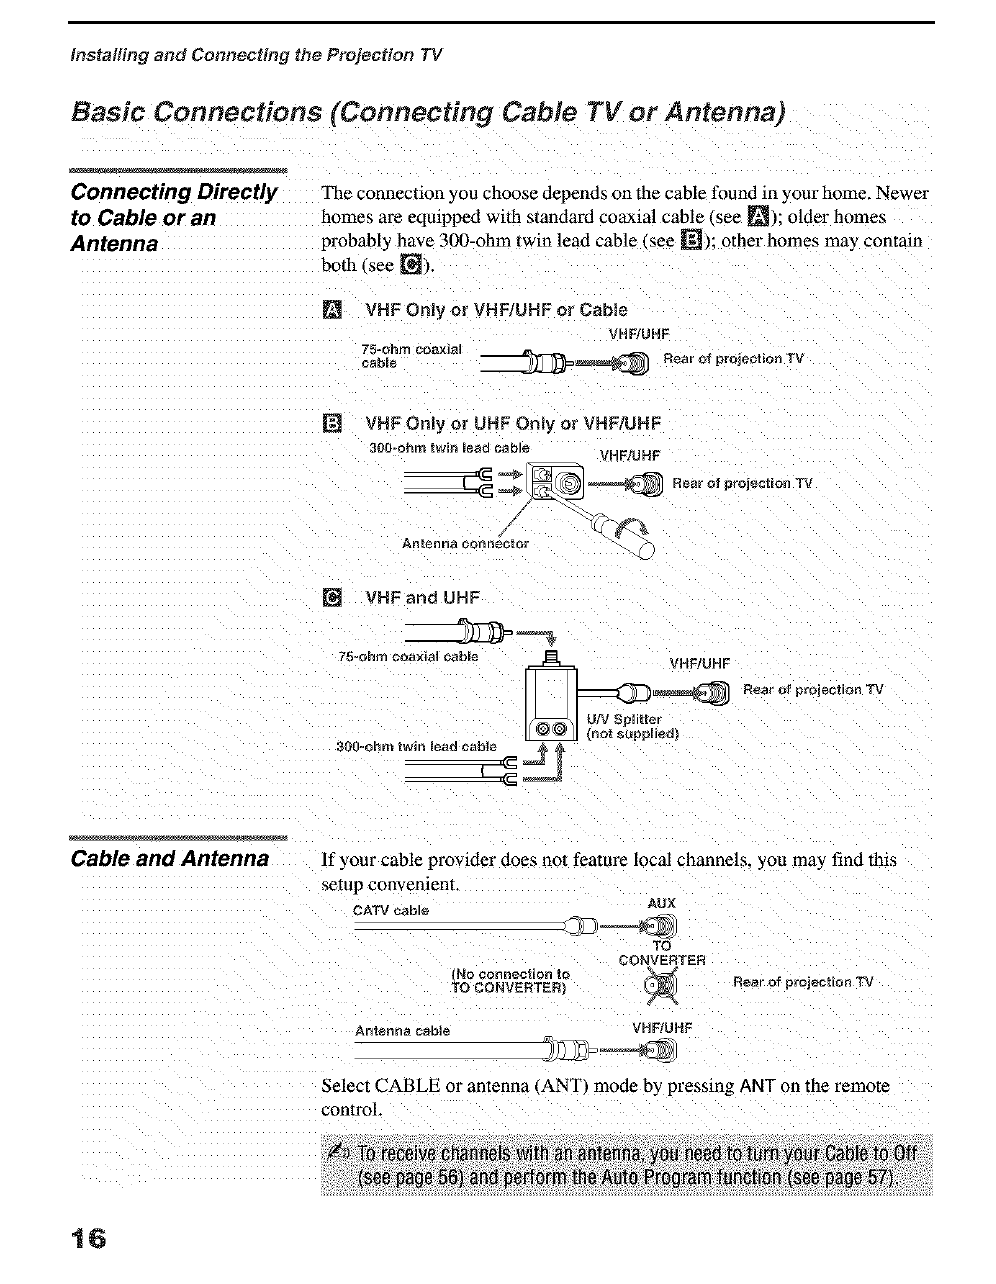
Basic Connections (Connecting Cable TV or Antenna)
Connecting Directly The connection you choose depends on the cable found in your home. Newer
to Cable or an homes are eqaipped with standard coaxial cable (see _); older homes
Antenna probably have 300-ohm twin lead cable (see [_); other homes mat commn
both (see []).
mVHF Only or VHF/UHF or Cable
VHF/UHF
75=ohm co_l_lltl
cable __ Rear of projection TV
NVHF Only or UHF Only or VHF/UHF
300oohrn twin lead cable VHFtUHF
___ __ Rear of projection TV_
Antenna connector
VHF and UHF
75=ohm ¢r_axial cable VHF/UHF
_R_a_ofp_oieotiooTv
(not supplied t
300=ohm twin mead cable
Cable and Antenna If your cable provider does nat feature local channels, you may find this
setup convenient.
CATV cab]_ AUX
TO
_ONVEF_TEF_
No connection ta _ R_ar of project{onTV
TO CONVEBTEB
Antenna cable VH F,'UHF
Select CABLE or antenna (ANT) mode by pressing ANT an the remote
control
16
Installh_g and Connecting the Projection TV
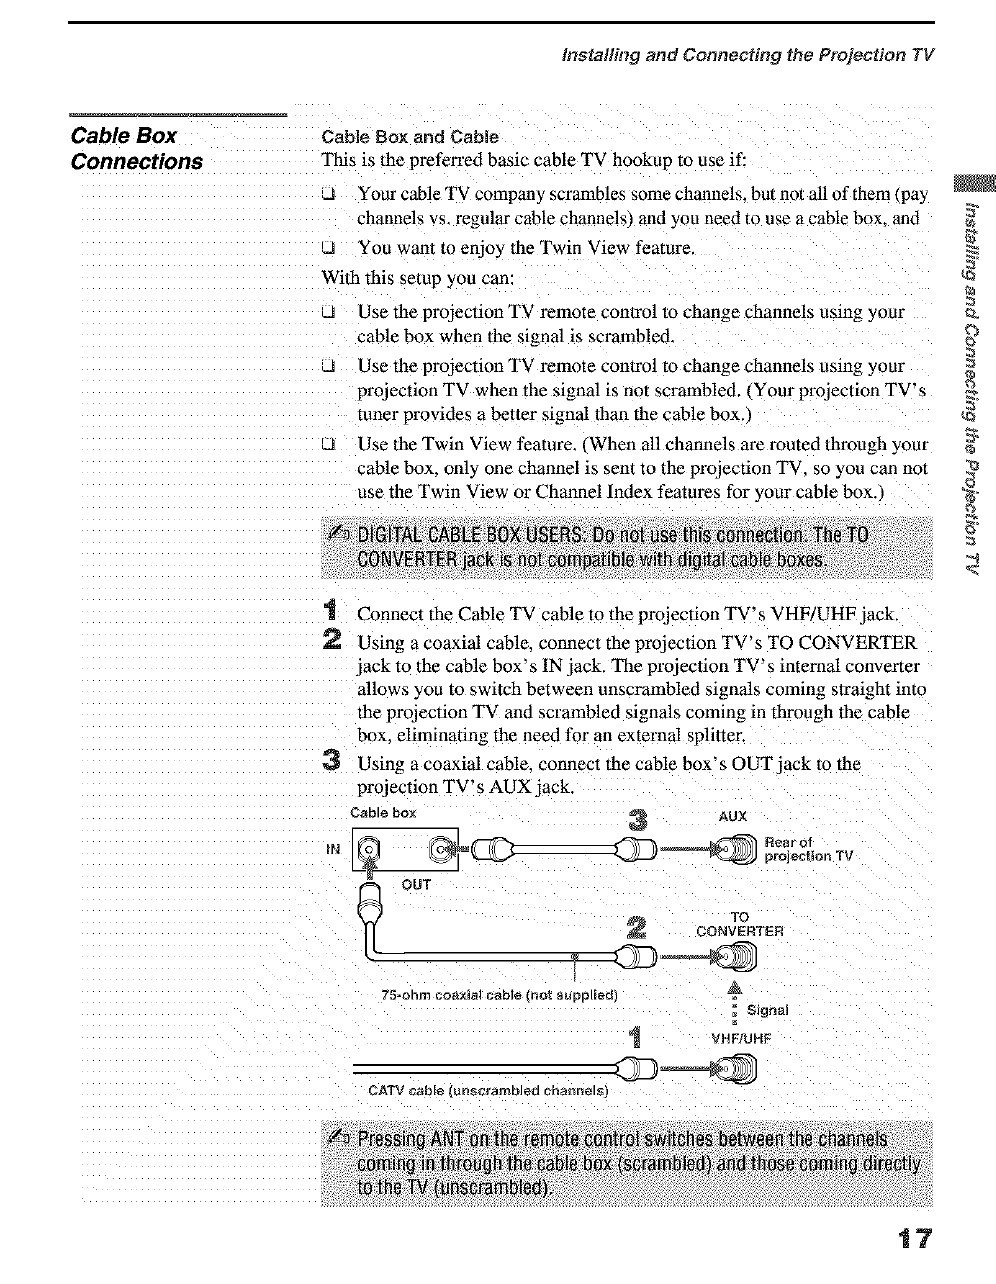
CableBox Cab{e Box artd Cable
Connections This is the preferred basic cable TV h0okup to use if;
Your cable TV company scrambles some channels, but not all of them (pay
channels vs. regular cable channels) an d YoU need to use a cable box, and
;J You want to enjoy the Twin View feature.
Use the projection TV remote control to change channels using your
cable box when the signa 1is scrambled.
Q Use the projection TV remote conlrol to change channels using your
projection TV when the signal is not scrambled, (your projection TV's
tuner provides a better signal than the cab!e box.)
Q Use the Twin View feature. (When all charmels are routed through your
cable box, only one channel is sent to the projection TV, so you can not
use the Twin View or Channel !ndex features for your cable box.)
Connect the Cable TV cane to the projection TV' s VHF/UHF jack.
_') Using a coaxial cable, connect the projection TV's TO CONVERTER
jack to the cable box's IN jack. The projection TV's internal converter
allows you to switch between unscrambled signals coming straight into
the projection TV and scrambled signals coming in through the cable
box. eliminating the need for an external splitter
Using a coaxial cable, connect the cable box's OUT jack to the
projection TV's AUX jack.
Cable box _ AUR
,. CD=
CONVERTEN
75=ohm coaxial cable {not supplied)
= Signal
VHF]UHF
_ATV cable 3nscrambleO cbann_lsl
17
Installing and Connecting the Projection TV
If you have a digital
cable box, you cannot use
this connection because
the TO CONVERTER
jack is not compatible with
digital cable boxes.
Setting the Channel
Fix feature in the Channel
menu (see "Using the
Channel Menu" on page
56), ensures that you do
not accidentally switch
the channels using your
projection TV.
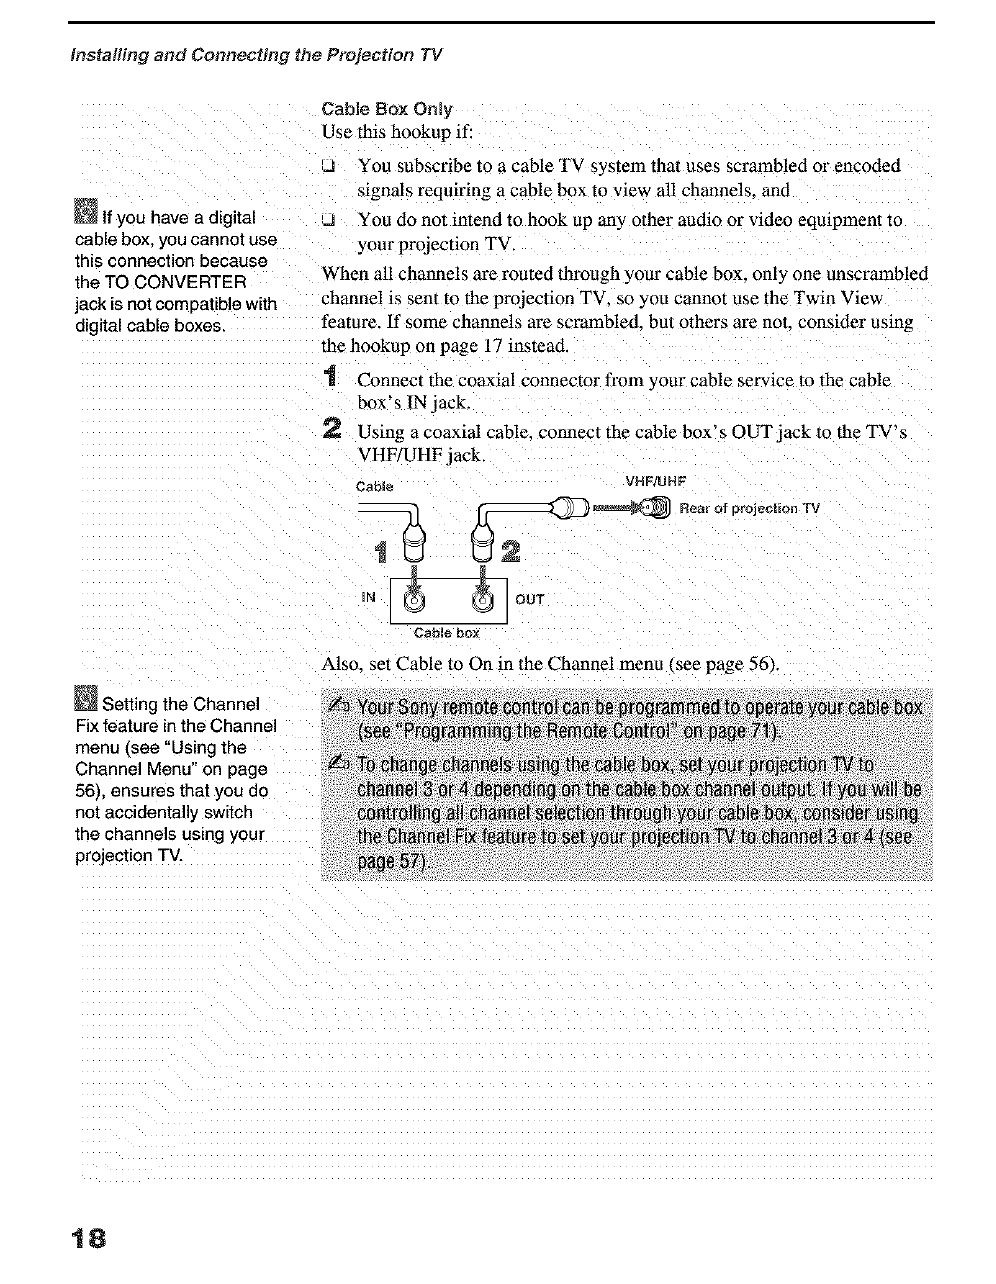
Cable Box Only"
Use this hookup if:
_J You subscribe to a cable TV system that uses scrambled or encoded
signals reqtflring a cable box to view all channels, and
_J You do not intend to hook up an) other audio or video eqmpmen[ to
your projection TV.
When all channels are routed through your cable box. only one unscrambled
channel is sent to the projeclion TV. so you cannot use the Twin View
feature. If some channels are scrambled, but others are noL consider using
the hookup on page 17 instead.
1 Connec_ the coaxial connector from your cable service to the cable
box's IN jack.
2 Using a coaxial cable, connecl the cable box's OUT jack to the TV's
VHF/UHF jack.
Cable VHF!UHF
,-?
IN _ OUT
Cable box
Also. set Cable to On in the Channel menu _see page 56).
18
Instalih_g and Connecting the Projection TV
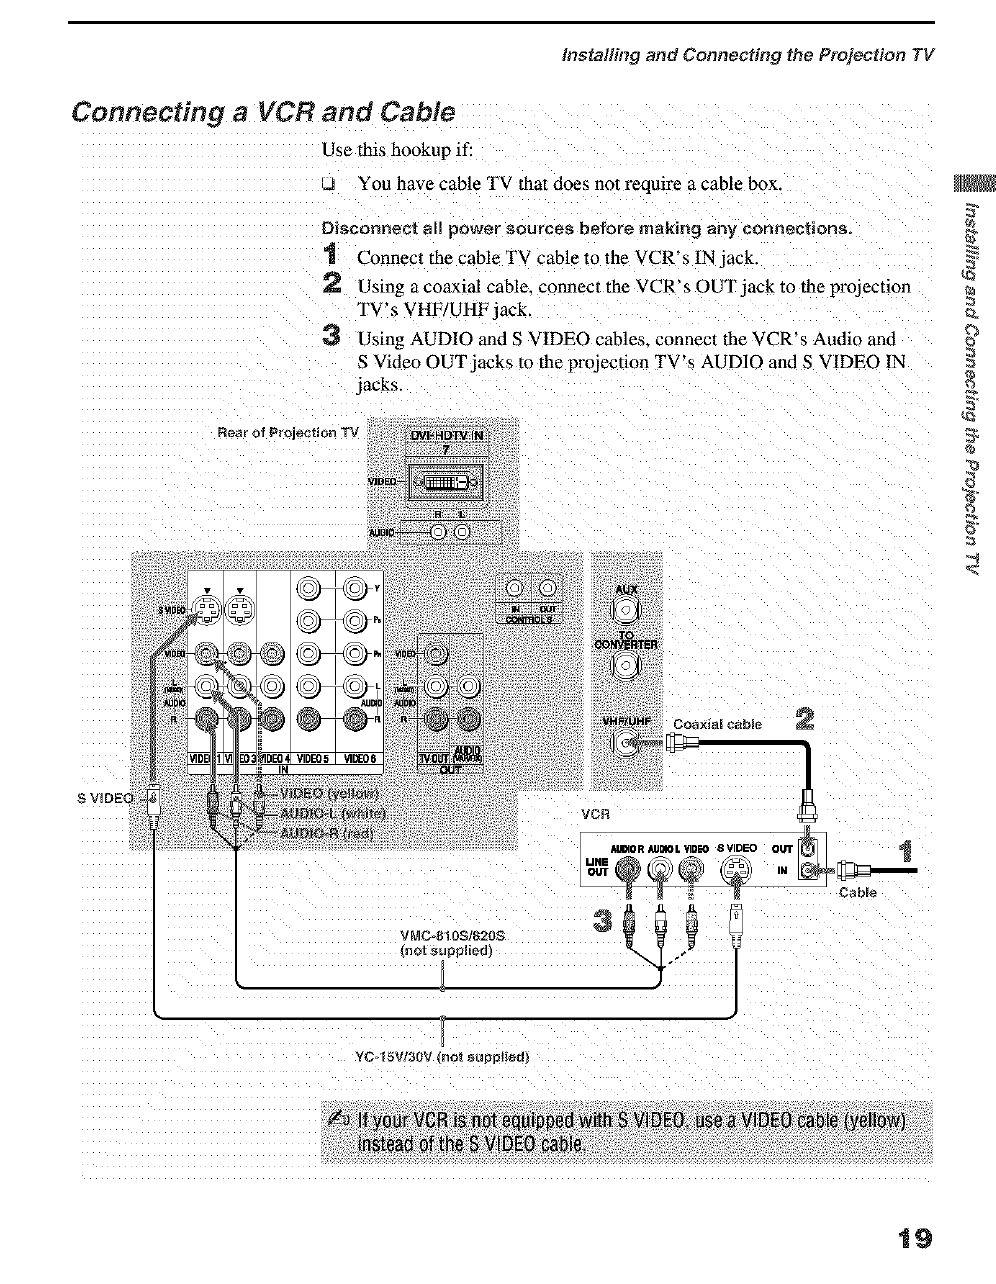
Connecting aVCR and Cable
Use this hookup if:
You have cable TV that does not require a cable box.
Disconnect M! power sources before making any connections=
"1 Connect the cable TV cable to the VCR's IN jack.
2 Using a coaxial cable, connect the VCR's OUT jack to the projection
TV's VHF/UHF jack.
3 Using AUDIO and S VIDEO cables_ connect the VCR's Audio and
S Video OUT jacks to the projection TV's AUDIO and S VIDEO IN
jacks.
S VIDEO
{3
V[_C 810Sl820S
(not supplied)
Cabme
YC 15W3nV Inot supplied)
19
installing and Conneeth_g the Projection TV
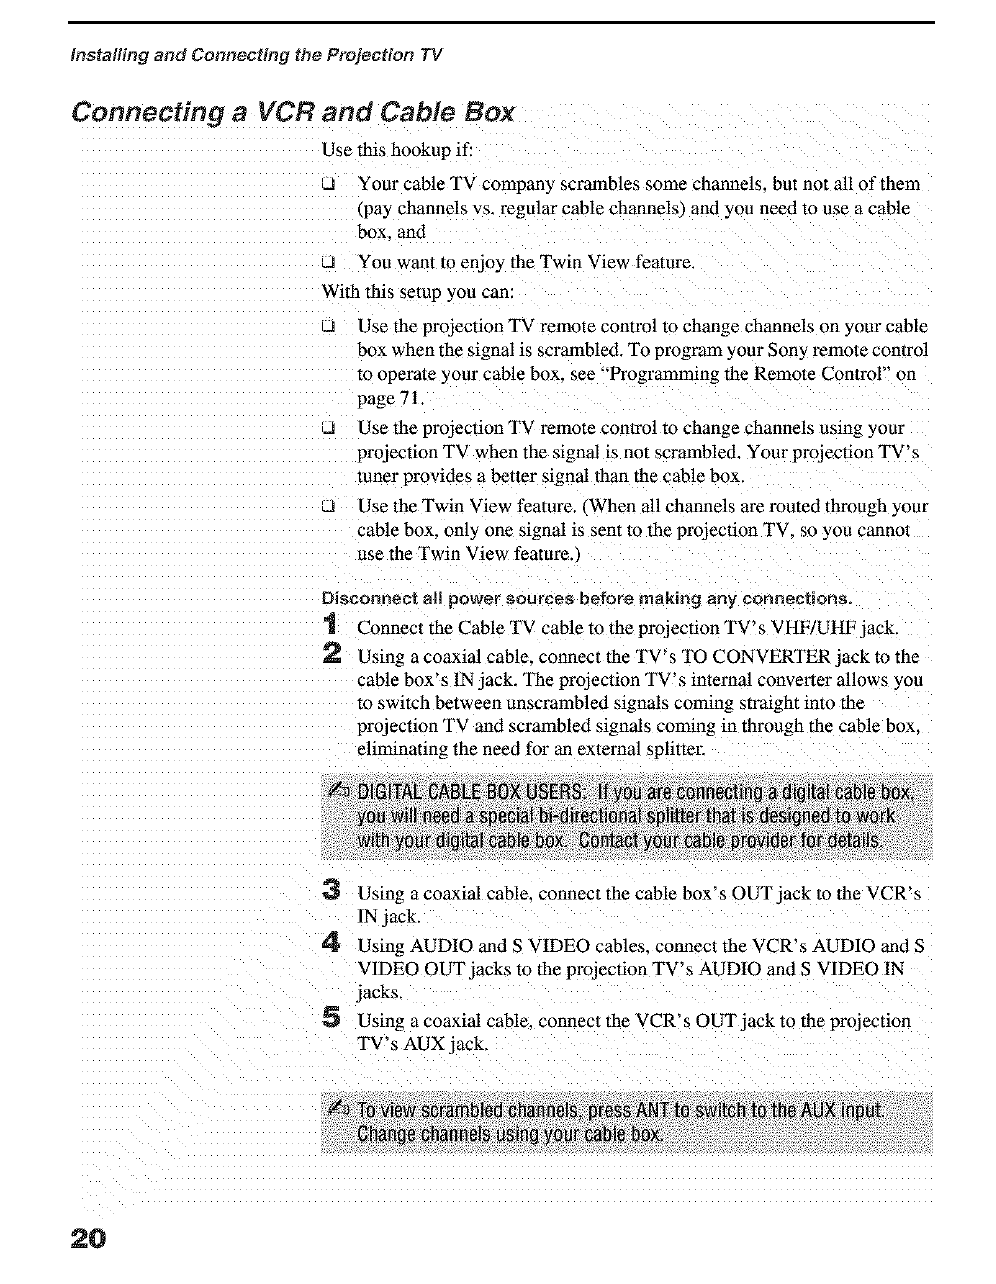
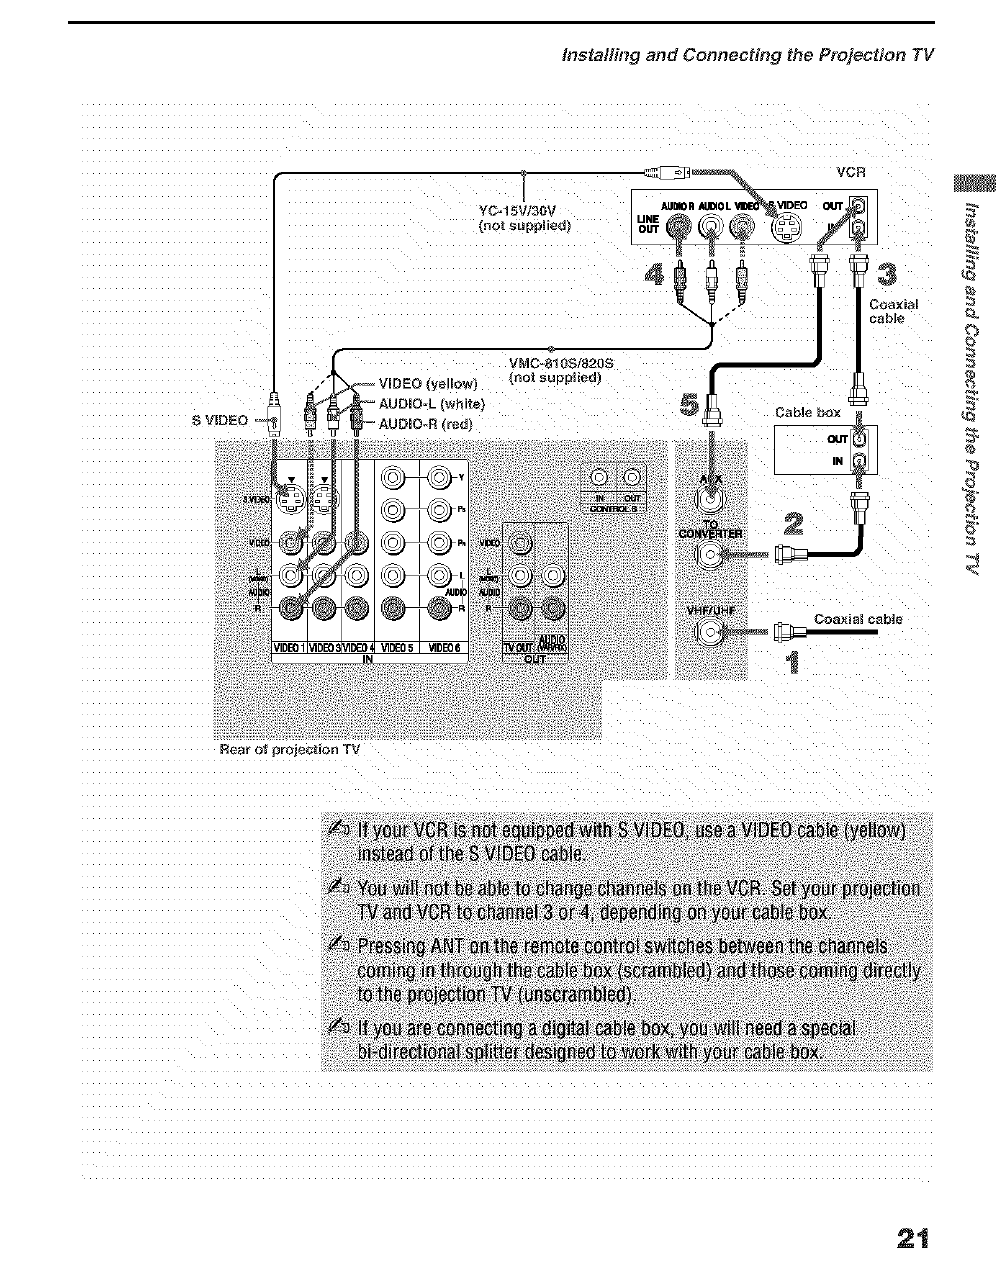
Connecting a VCR and Cable Box
Use this hookup if:
U Your cable TV company scrambles some channels, but not all of them
/pay channels vs. regular cable channels_ and you need to use a cable
box. and
u You want to enjoy the Twin View feature.
With this setup you can:
u Use the projection TV remote control to change channels on your cable
box when the signal is scrambled. To program your Sony remote control
to operate your came box. see "Programming the Remote Control" on
page 71.
Use the projection TV remote control to change channels using your
projection TV when the signal is not scrambled. Your projection TV's
tuner provides a better signal than tire cable box.
U Use the Twin View feature., When all channels are routed through your
cane box. only one signal is sent to the projection TV. so you cannot
use the Twin View feature.J
Disconnect al_ power sources before making any connections.
1 Connect the Cable TV cable to the proJection TV's VHF/UHF jack.
_'_ Using a coaxial cable, connect the TV's TO CONVERTER jack m the
cane box's IN jack. The projectien TV's internal convener allows you
to switch between unscrambled signals coming straight into the
projection TV and scrambled signals cording in through the cable box.
eliminating the need for an external splitter.
3 Using a coaxial cable, connect the cable box's OUT jack to the VCR's
!N jack.
4 Using AUDIO and S VIDEO cables, connect the VCR's AUDIO and S
VIDEO OU T jacks to the projection TV's AUDIO and S VIDEO IN
jacks,
5 Using a coaxial cable, connect the VCR's OUT jack to the projection
20
Installh_g and Connecting the Projection TV
S VIDEO
YC=I 5V!30V
_no_ supplied)
.__ vMco81os/82os
VIDEO (yellow) (not supplied)
Co_xial
cabl_
Real o_ proiec_lo[l TV
21
Installing and Connecting the Projection TV
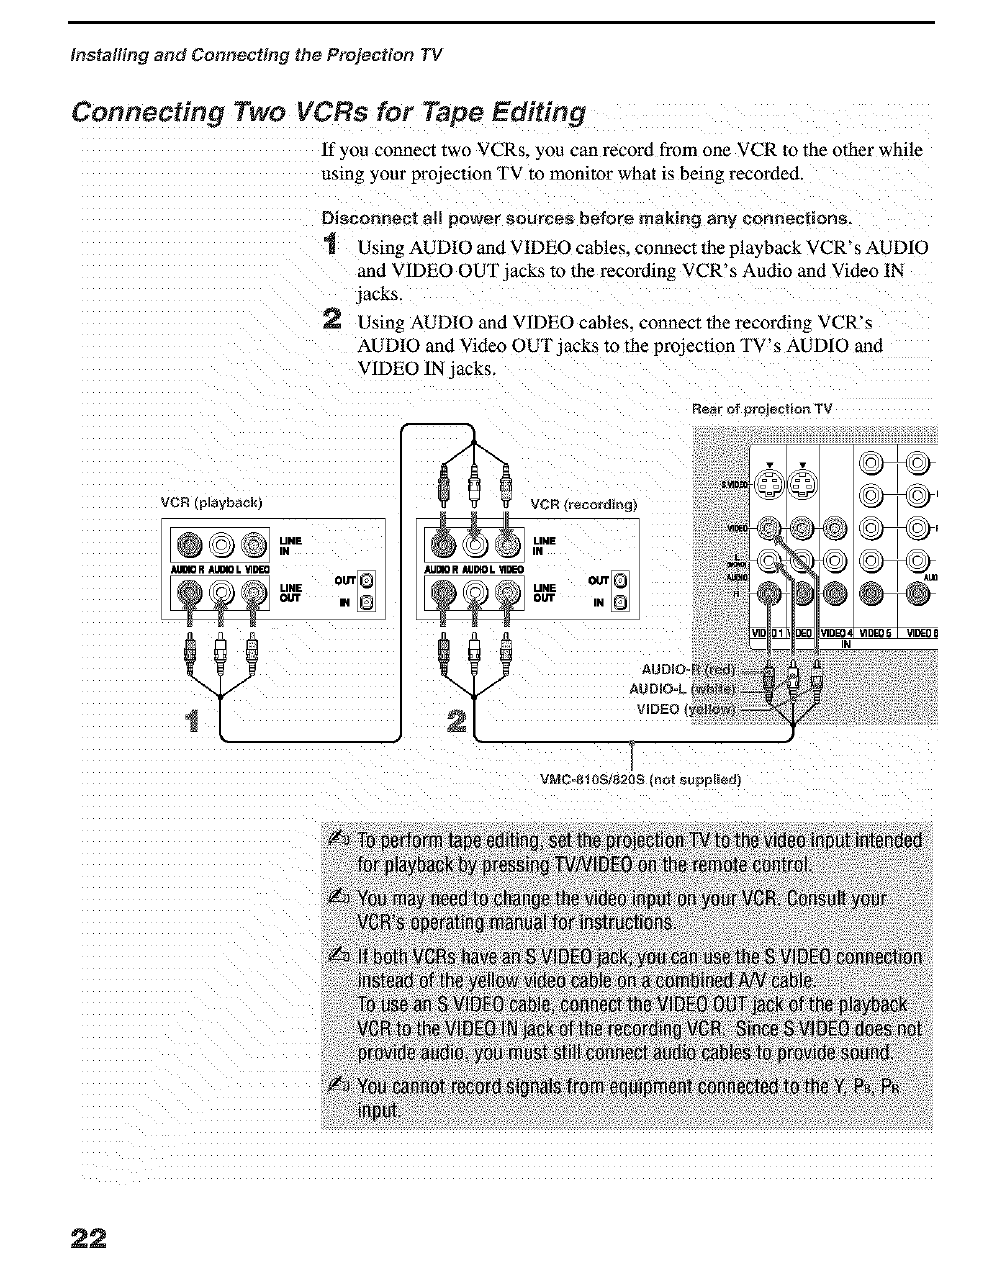
Connecting Two VCRs for Tape Editing
If you connect two VCRs, you can record from one VCR to the other while
using your projection TV to monitor what is being recorded.
Disconnect all power sources before making any connections,
1 Using AUDIO and VIDEO cables, connect lhe playback VCR's AUDIO
and V1DEO OUT jacks to 1he recording VCR's Audio and Video IN
jacks.
2 Using AUDIO and VIDEO cables, connect the recording VCR's
AUDIO and Video OUT jacks to the projection TV's AUDIO and
VIDEO IN jacks.
Rear of prolec_ion TV
VCR (playback)
22
lnstallh_g and Connecth_g the Projection TV
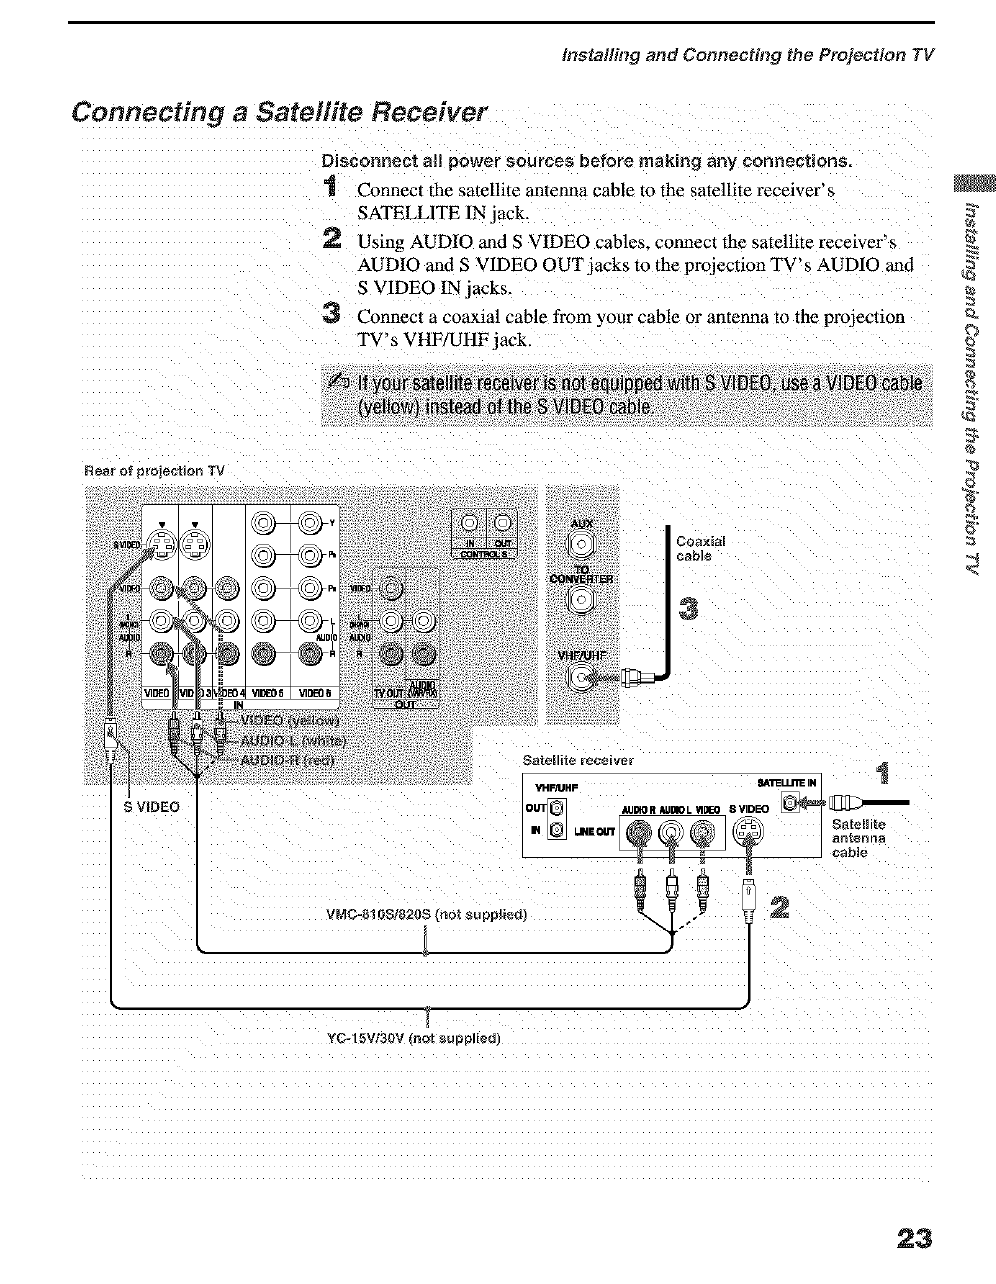
Connecting a Satellite Receiver
Disconnect aJ| power sources before making any connections.
1 Connect the satellite anlenna cable to the satellite receiver's
SATELLITE IN jack.
2 Using AUDIO and S VIDEO cables_ connect tbe satellite receiver's
AUDIO and S VIDEO OUT jacks to the proJection TV's AUDIO and
S VIDEO IN jacks.
3 Connect a coaxial cable from your cable o1"antenna to the projeclion
TV's VHF/UHF jack.
Rear of 9roie_tian 33/
-[
YC-15Vt30V {not _upplied
23
installing and Conneeth_g the Projection TV
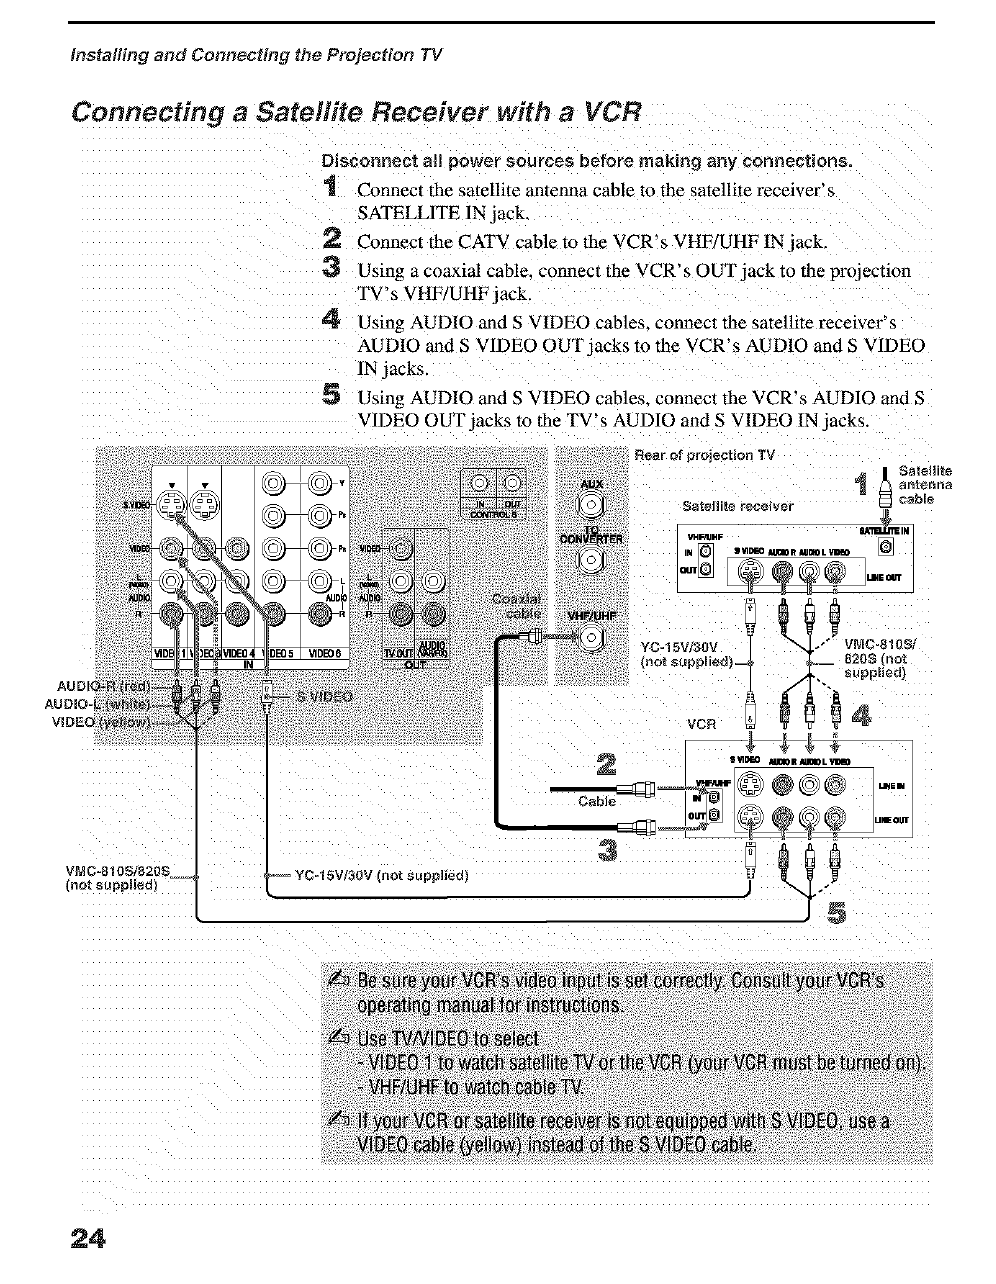
Connecting a Satellite Receiver with a VCR
Disconnect aJ| power sources before making any connections,
1 Connect the satellite anlenna cable to the satellite receiver's
SATELLITE IN jack.
2 Connect the CATV cable to the VCR's VHF/UHF IN jack.
3 Using a coaxial cable, connect the VCR's OUT jack to the projection
TV's VHF/UHF jack.
4 Using AUDIO and S VIDEO cables_ connect tbe satellite receiver's
AUDIO and S VIDEO OUT jacks to the VCR's AUDIO and S VIDEO
IN jacks
5 Using AUDIO and S VIDEO cables_ connect the VCR's AUDIO and S
VIDEO OUT jacks to the TV's AUDIO and S VIDEO IN jacks.
24
Instal#rig and Connecting the Projection TV
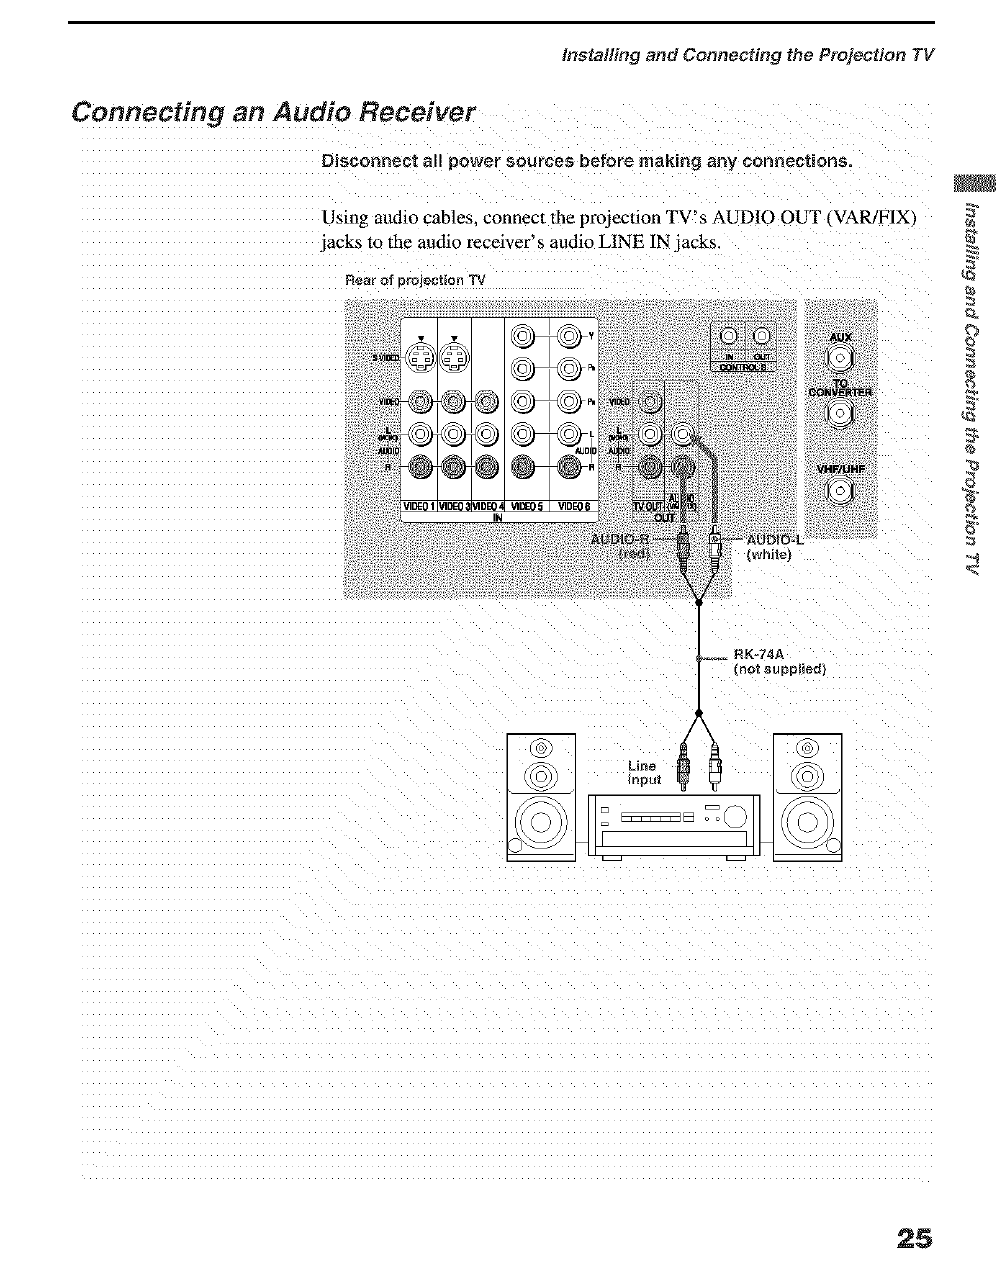
Connecting an Audio Receiver
Disconnect all power SntiFces bafoFe making any connections,
Using audio cables, connecl the projection TV's AUDIO OUT _VAR/FIX_
jacks to the audio receiver's audio LINE IN jacks.
Rear ot projection TV
?
IN
25
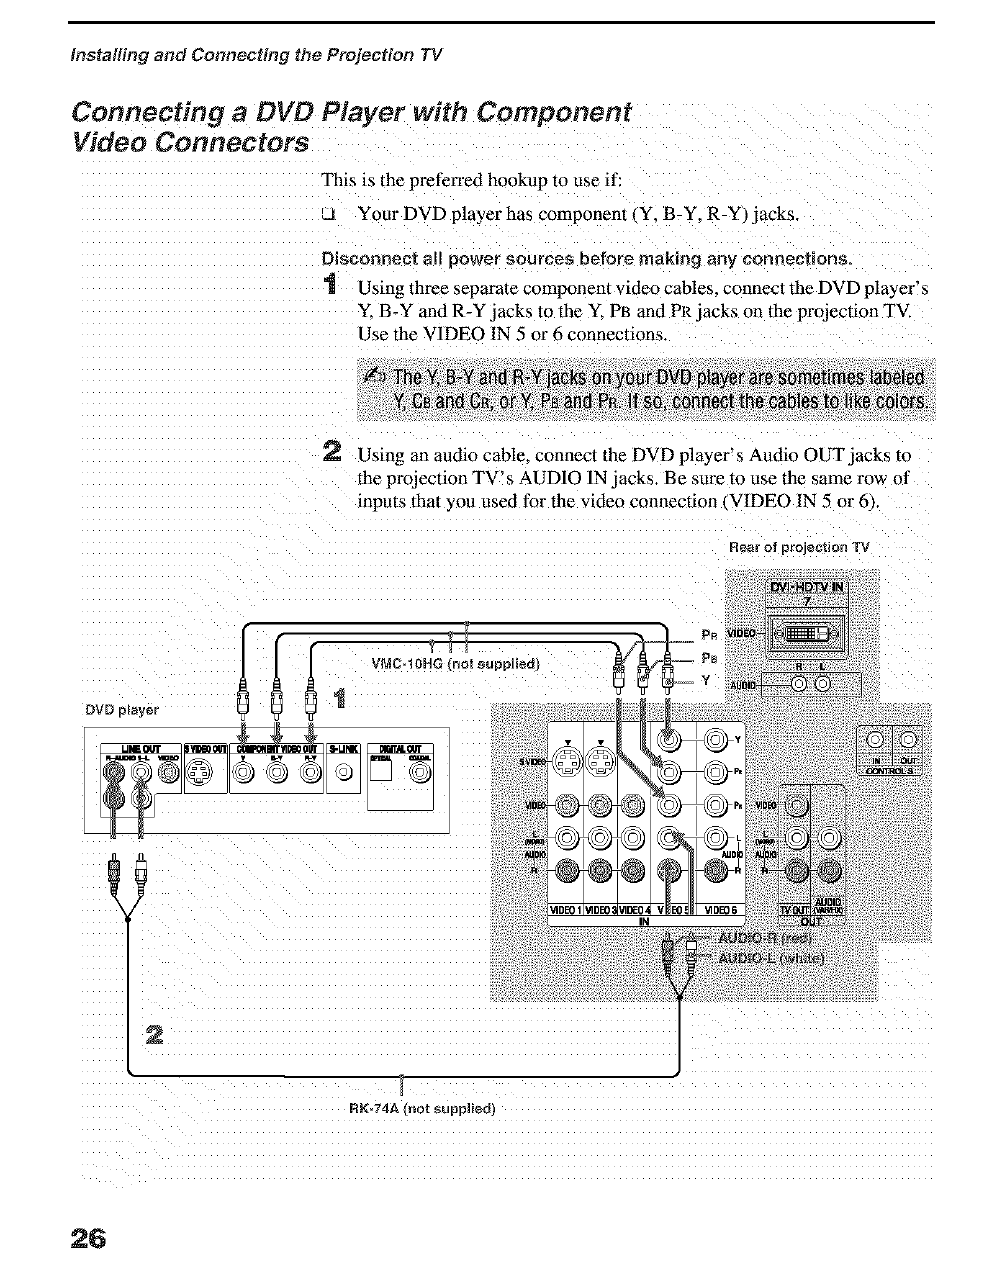
Installing and Conneeth_9 the Projection TV
Connecting a DVD Player with Component
Video Connectors
This is the prefen'ed ho0kup to use if:
Your DVD player has component (Y, B-Y, R-Y) jacks.
Using three separate component video cables, connect the DVD player!s
Y, B-Y and R-Y jacks to the Y, PI3 and PR jacks on the projection TV.
Use the V1DEO IN 5 or 6 connections.
iiiiiiiiiiiiiiiiiiiiiiiiiiiiiiiiiiiiiiiiiii i
2 Using an audio cable, connect the DVD player's Audio OUT jacks to
the projection TV! s AUDIO IN jacks. Be sure to use the same row of
inputs that you used for the video connection (VIDEO IN 5 or 6).
Rear of projeetion TV
26
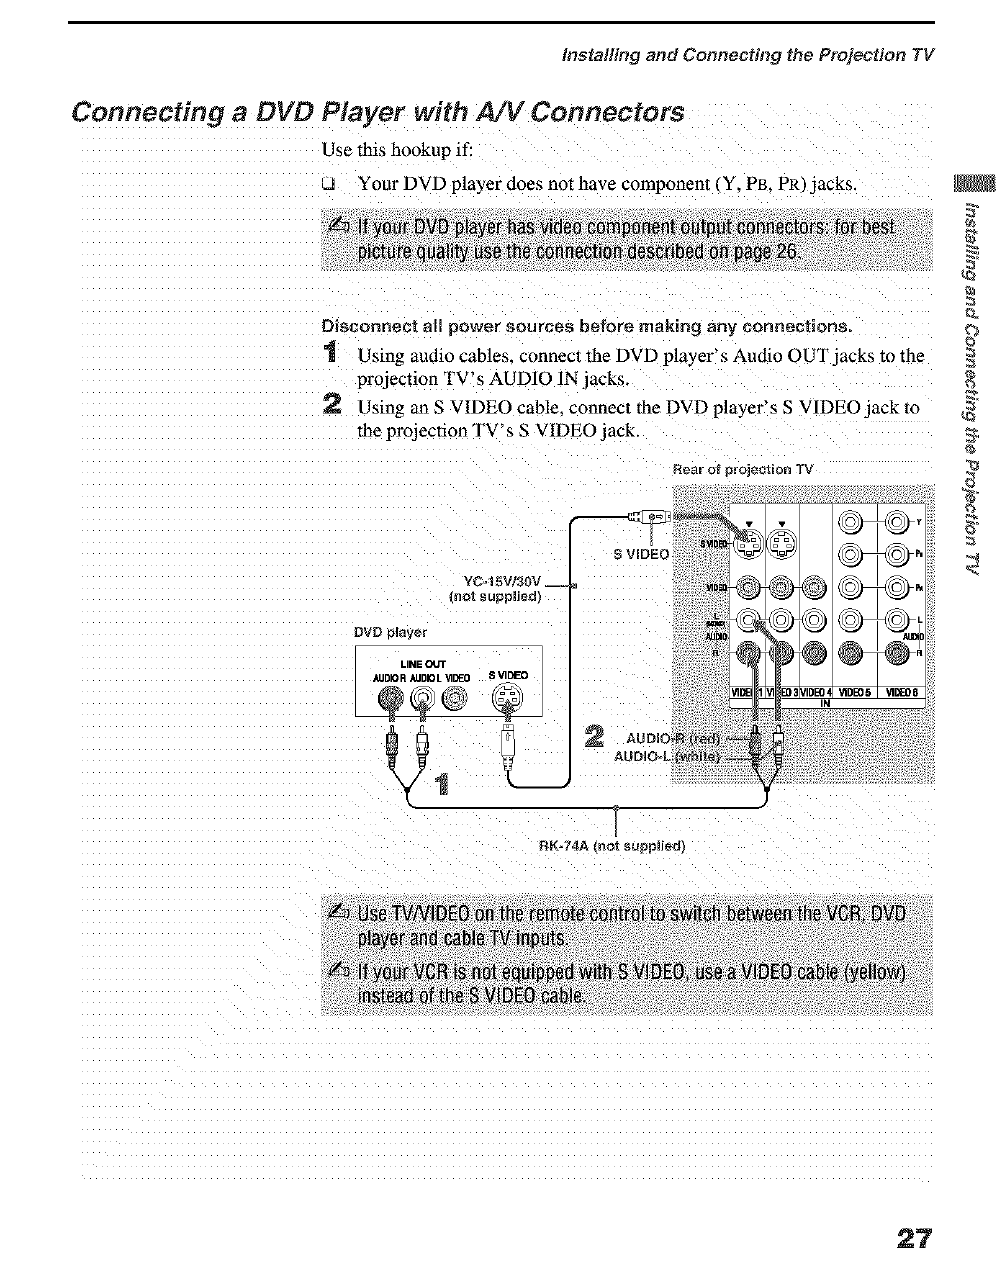
Installing and Connecting the Projection TV
Connecting a DVD Player with A/V Connectors
Use this hookup if:
Your DVD player does not have component (Y, PB, PR) jacks
Disconnect all power sources before making any connection_.
1 Using audio cables, connect the DVD player's Audio OUT jacks to the
projection TV's AUDIO IN jacks.
2 Using an S VIDEO cable, connect lhe DVD player's S V1DEO jack 1o
the projection TV' s S VIDEO jack.
Near ot projection TV
YC=15V/30V __
(not supplied
DVD player
\
RK°74A (not supplied
27
Installing and Connecting the Projection TV
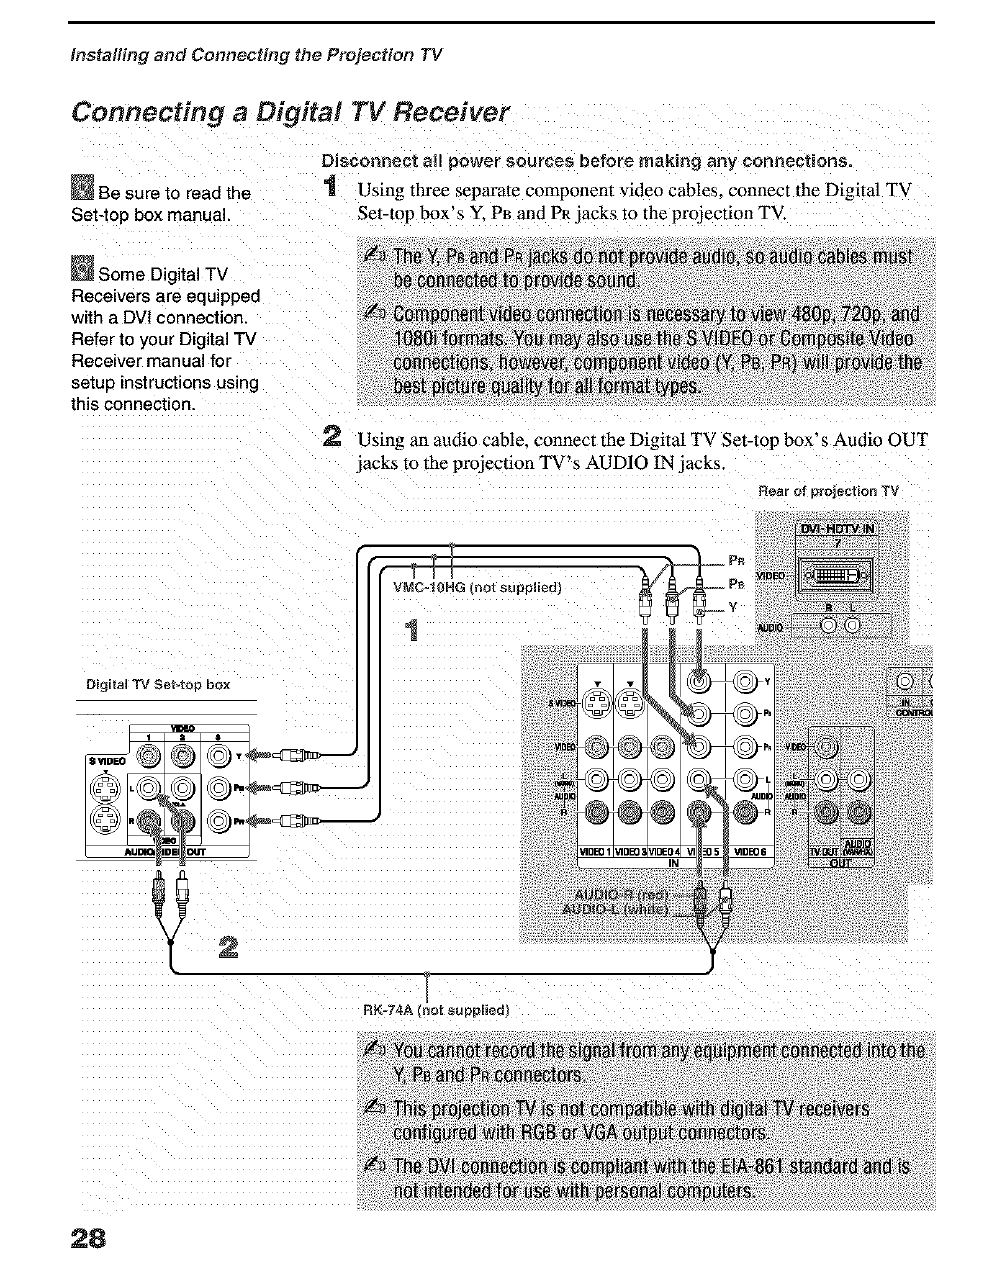
Connecting aDigital TV Receiver
Disconnect aft power sources before making soy connections,
Be sure to read the '1 Using three separate component video cables, connect the Digital TV
Set-top box manual. Set-top box's Y. PB and PR jacks to the projection TV.
Some Digital TV
Receivers are equipped
with a DVI connection.
Refer to your Digital TV
Receiver manual for
setup instructions using
this connection.
Using an audio cable, connect the Digital TV Set-top box' s Audio OUT
jacks to the projection TV's AUDIO IN jacks.
Rear of projection TV
VMCol0HG (not supplied)
1
RK-74A (rmt suppl_ed}
28
Installh_g and Connecting the PrQiection TV
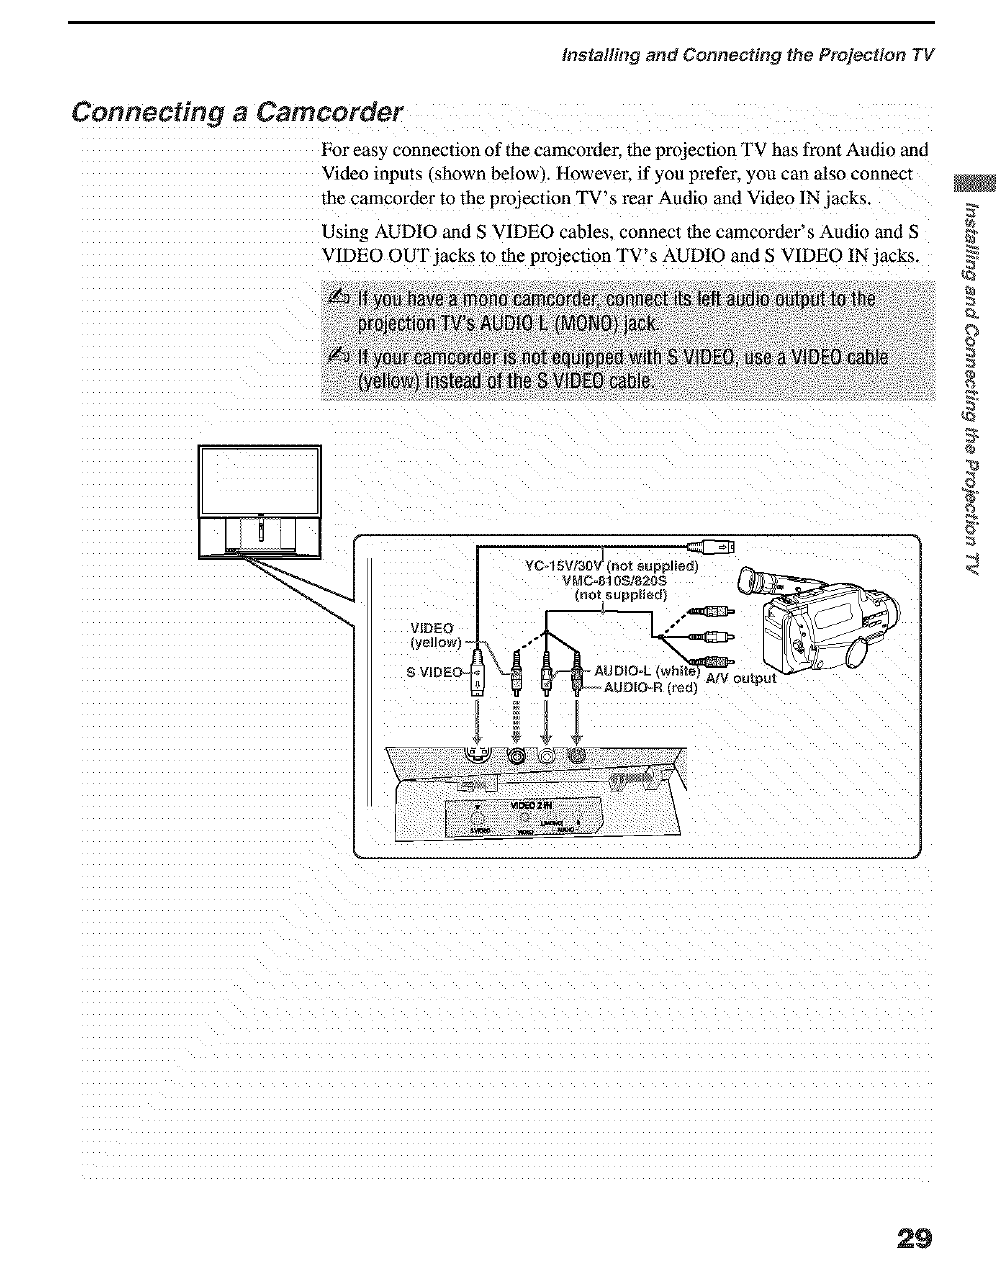
Connecting a Camcorder
For easy connection of the camcorder, the projection TV has front Audio and
Video inputs ishown below,. Howevel: if you prefer, you can also connect
the camcorder to the projection TV's rear Audio and Video IN jacks.
Using AUDIO and S VIDEO cables, connect the camcorder's Audio and S
VIDEO OUT jacks to the projection TV's AUDIO and S VIDEO IN jacks.
VIDEO
_yellOW) =
S VIDEO.
YC-15V/30V_ _no_ suppliedl
VNC=810St82as
(notsupplied)
e_
29
installing and Conneeth_g the Projection TV
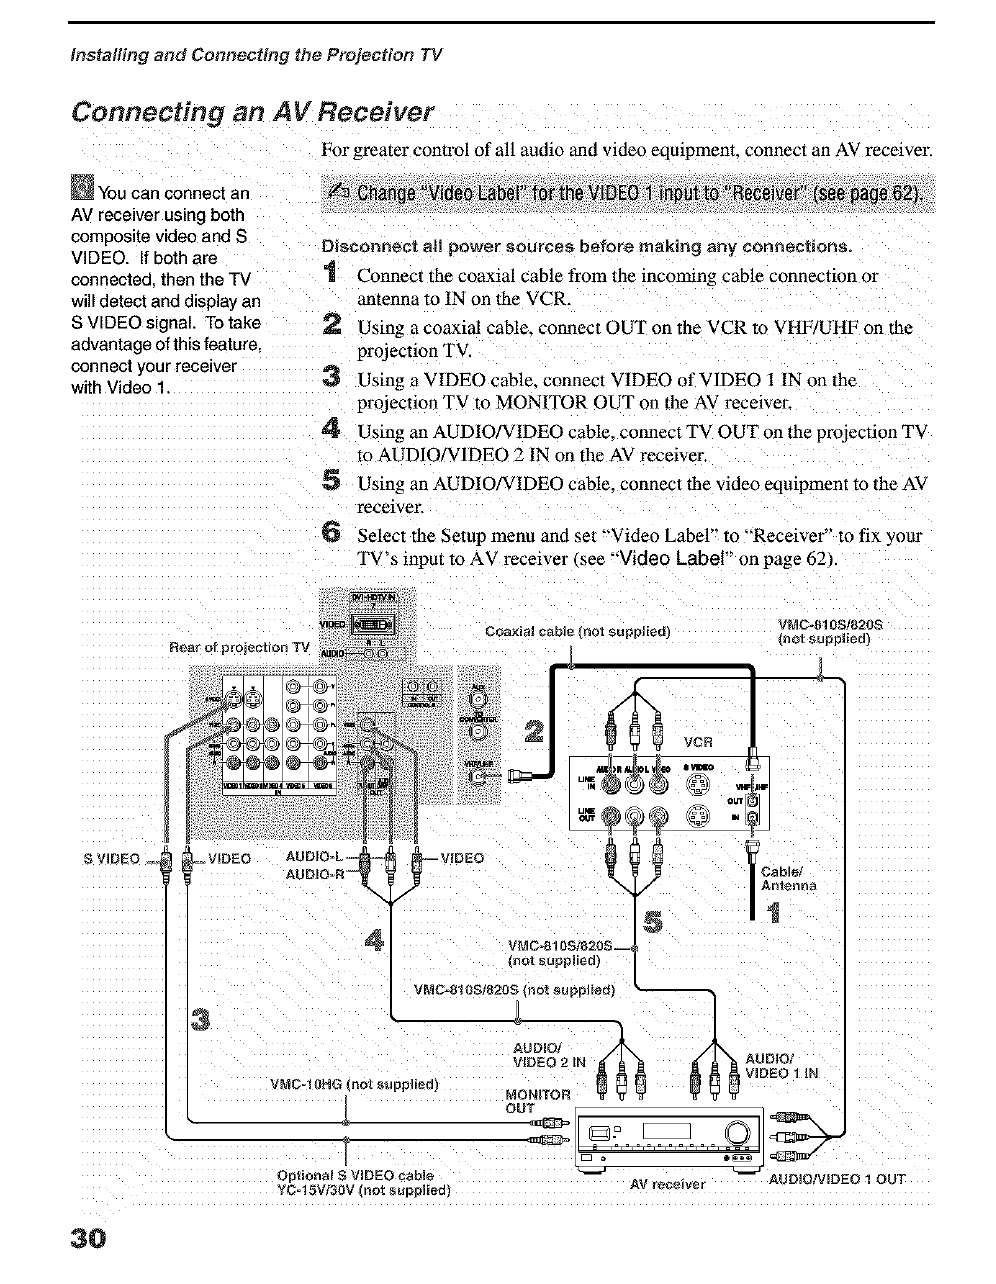
Connecting an AV Receiver
For greater control of all audio and video equipment, connect an AV receiver.
You canconnectan _ _hange"VdeeLabe for theV DE01 nDutto' Recever (see;page62)
AV receiver using botl"
composite video and S D}sconnent eli power sources before making any eennectmns.
VIDEO. If both are
connected then the TV "1 Connect the coaxial cable from the incoming cable conneclion or
will detect and display an antenna to IN on lhe VCR.
S VIDEO signal. To take 2 Using a coaxial cable_ connect OUT on the VCR to VHF/UHF on the
advantage of this feature proJection TV.
connect your receiver 3 Using a VIDEO cable, connect VIDEO of VIDEO 1 IN on lhc
with Videc 1. projection TV to MONITOR OUT on lhe AV receiver.
4 Using an AUDIO/VIDEO cable, connect TV OUT on lhe projection TV
to AUDIO/VIDEO 2 IN on the AV receiver.
5 Using an AUDIO/VIDEO cable, connect the video equipment to the AV
receiver.
6 Select the Setup menu and set "'Video Label" to "'Receiver" to fix yoar
TV's input to AV receiver _see "'Video Label" on page 621
R_ar of proiectlonTV
VMC-810S1820S
{not suppbed)
Cable/
Antenna
5 /I
VMC4_I 0S/8208--
_, _, (not suppJied)
vMco_!0s_820s_.0t_u_p,ed)
a
I I
,,uo,o/v,o o,ooT
3O

Installing and Connecting the Projection TV
Using the CONTROL S Feature
CONTROL S allows you to control your projection TV system and other
Sony equipment with one remote control. In addition to allowing you to
control multiple devices with one remote control, the CONTROL S feature
allows :_ou to always point your remote control at your projection TV.
instead of having to point it at the other equipment, which might be hidden
or out of direct line of sight.
IN
?
3t
installing and Connecting the Projection TV
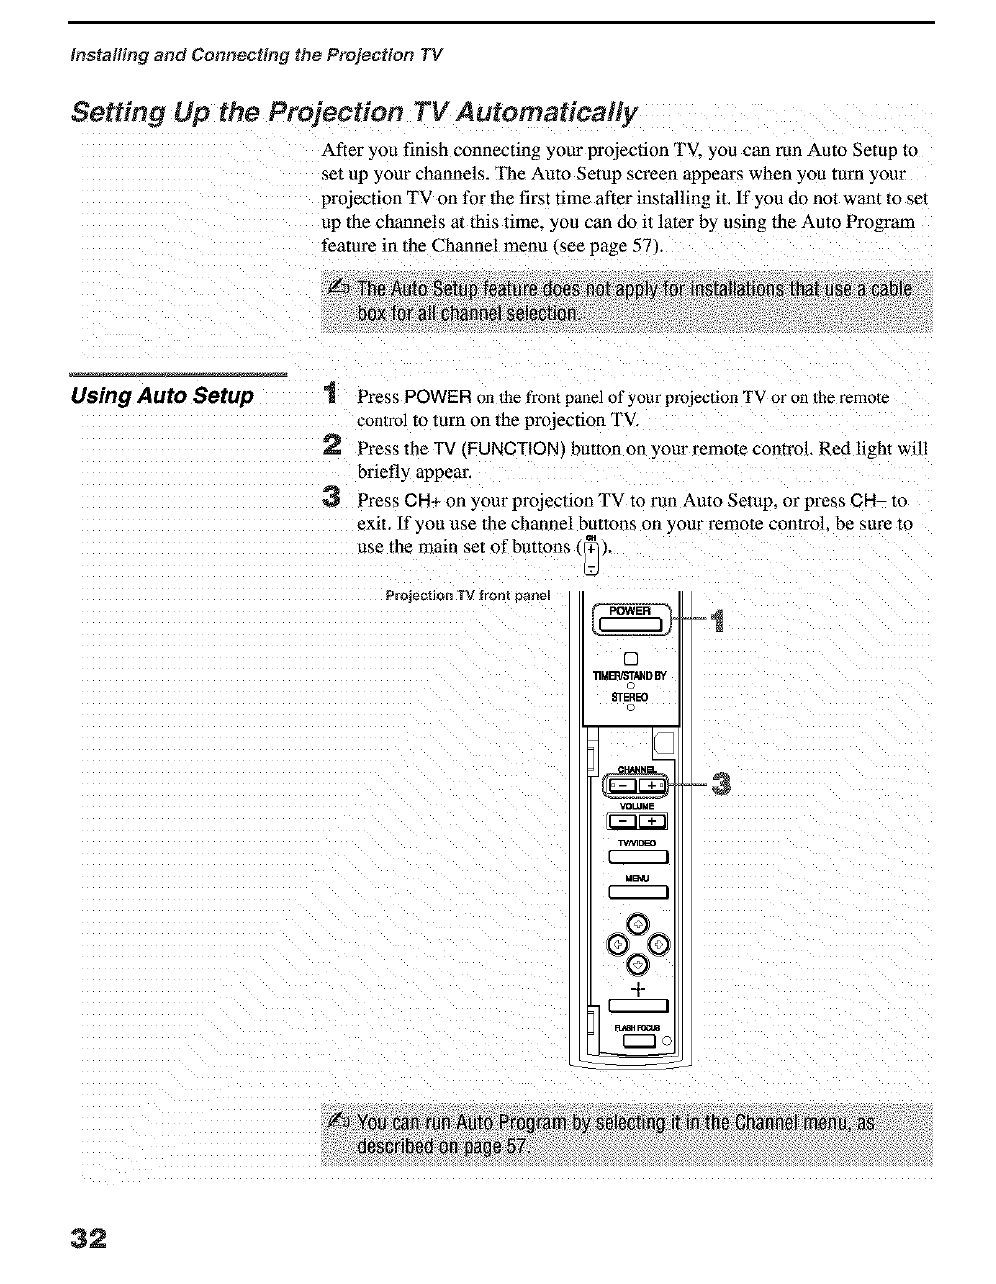
Setting Up the Projection TV Automatically
After you finish connecting your projection TV. you can mn Auto Setup m
set up your channels. The Auto Setup screen appears when you turn your
projection TV on for the first time after installing it. If you do not want to set
up the channels at this time, you can do it later by using the Auto Program
feature in the Channel menu _see page 57.
Using Auto Setup "! Press POWER on the front panel of your projection TV or on 1he remole
con/rol to turn on the projection TV.
J"_ Press the TV (FUNCTIONI butten on your remote control. Red light will
bYiefly appear.
3 Press CH+ on your projection TV to run Auto Setup, or press CH- to
exit. lI you use the channel buttons on your remote control, be sure to
use the main set of buttons, _] ,.
ProjectionTVfront oanel
[]
lIMB'S/STUD BY
©
_EREO
©
VOLUME
T./M_
MB_I
+
I
n _
-1
32
Installing end Connecth_g the Projection TV
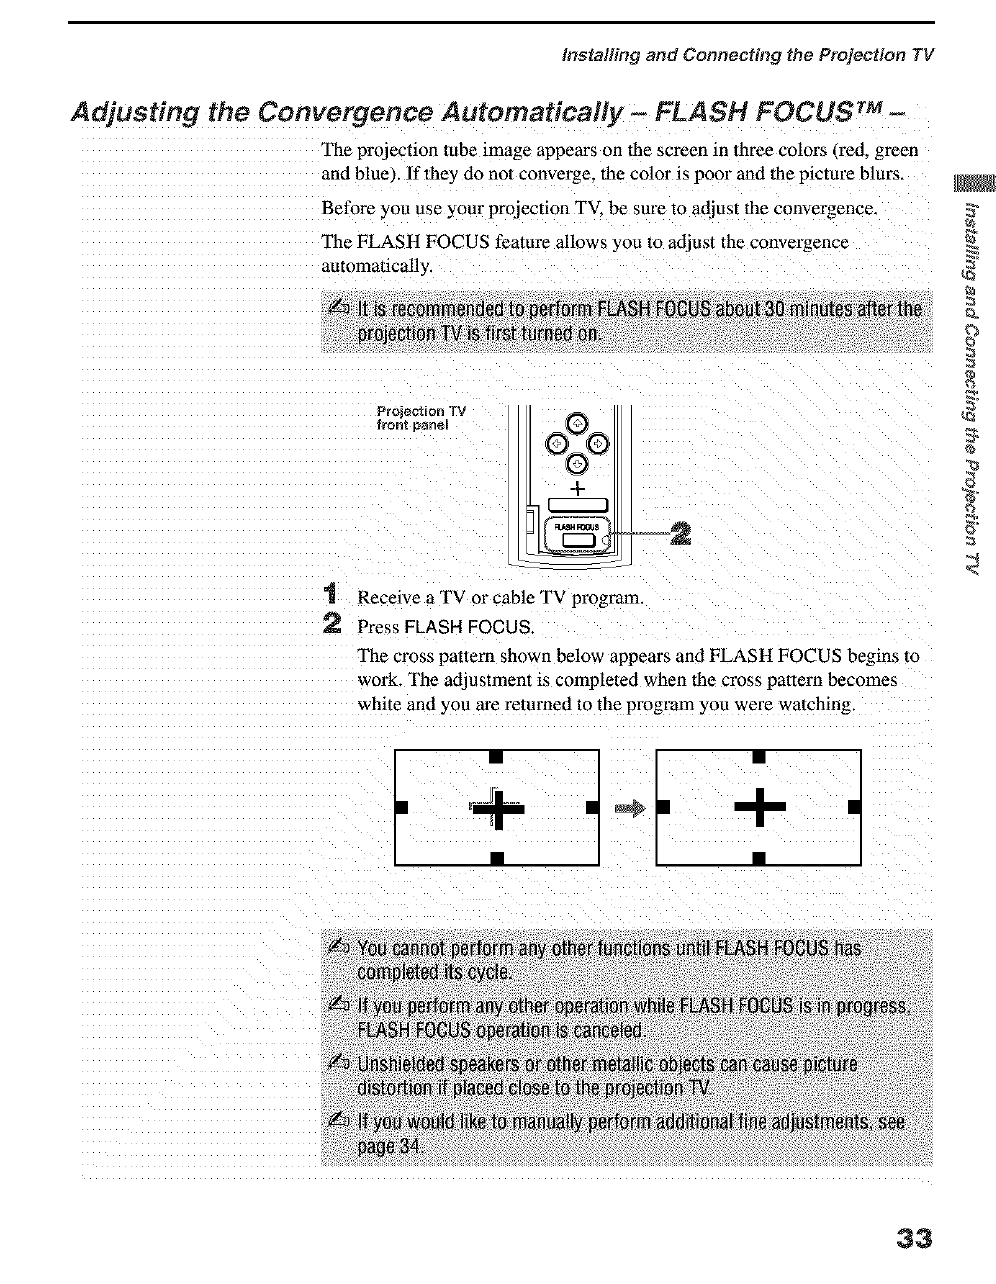
Adjusting the Convergence Automatically-- FLASH FOcusr M-
The projection tube image appears on the screen in three colors (red, green
and blue). !f they do not converge, the color is po01" and the picture blurs.
Before yon use your projection TV, be sure to adjust the convergence.
The FLASH FOCUS feature allows YOUto adjust the convergence
automatically.
Projection TV
front _ane_ QZQI
i
1 Recewe a TV or cable TV program.
2 Press FLASH FOCUS.
The cross pattern shown below appears and FLASH FOCUS begins to
work. The adjustment is compleled when the cross paltern becomes
white and _ou are returned to the program you were watching.
-I-
33
Insta#ing and Connecting the Projection TV
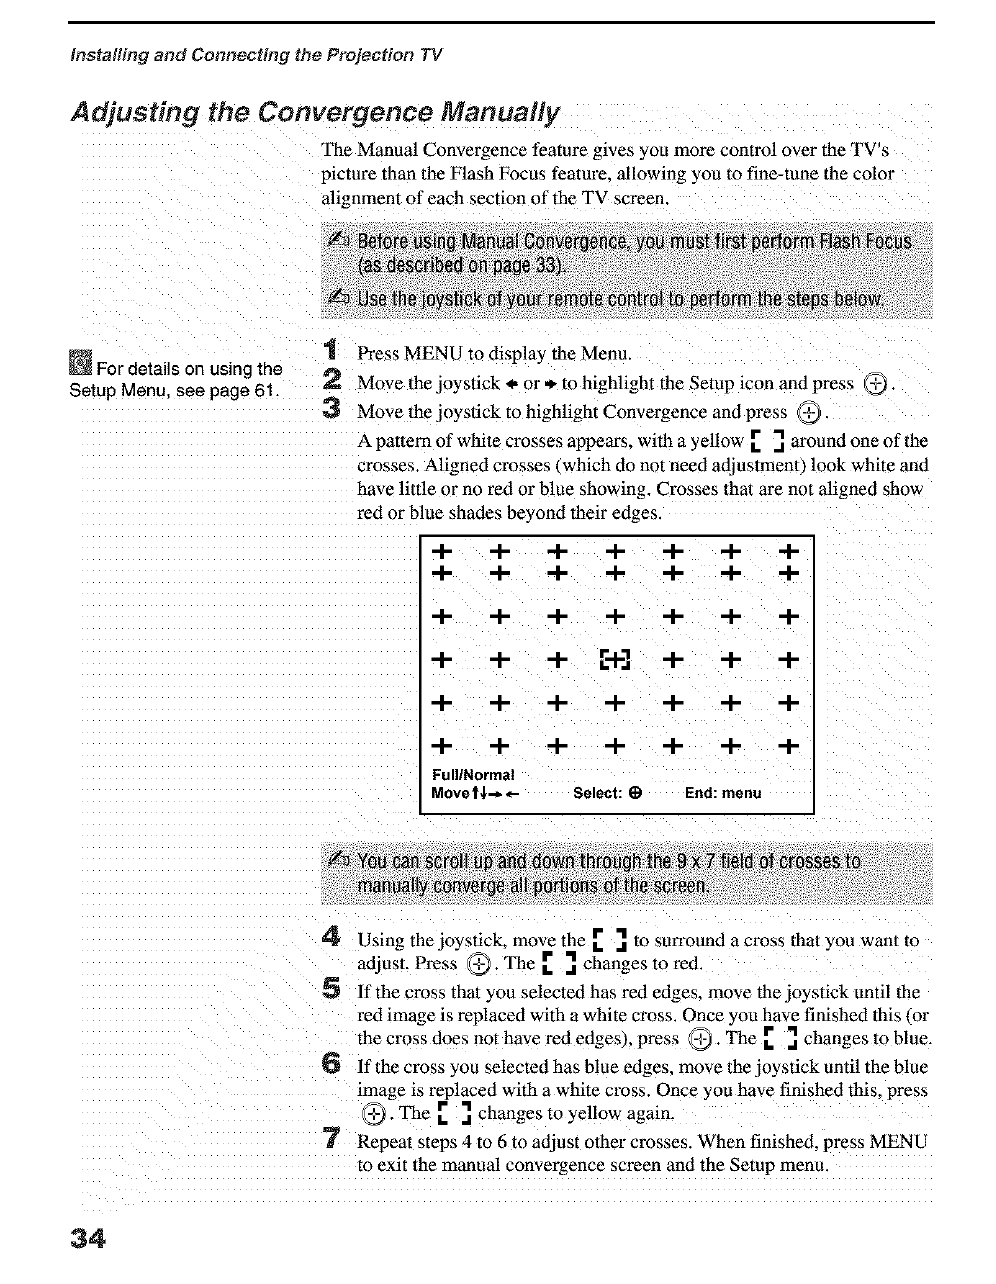
Adjusting the Convergence Manually
The Manual Convergence feature gives you more control over the TV's
picture than the Flash Focus feature, allowing you to fine-tune the color
alignment of each section of the TV screen.
For details on using the
Setup Menu. see page 61.
t Press MENU to displa,_ the Menu.
2Move the joyslick *, or * to highlight the Setup icon and press _,
3 Move lhejoystick to highlight Convergence and press @.
A pattem of white crosses appears, witha yellow [ .] aroundoneofthe
crosses. Aligned crosses 4which do not need adjuslmem) look white and
have little or no red or blue showing. Crosses that are not aligned show
red or blue shades beyond their edges.
-I- -I- -t- -I- -I- -I- "4-
-I- -I- -4- -I- -I- -4- -I-
-I- -I- -4- -I- -I- -4- -I-
+ + + r+l + + +
-I- -I- -I- -I- -I- -I- -I-
"4- -I- -I- "4- -I- -I- "4-
Full/Normal
Movet$-_ _- Select: _) End:menu
4 Using the joystick, move the .r _. to san'ound a cross that you want to
adjust. Press @.The. r_. changes to red.
5 If the cross that you selected has red edges, move the joystick until the
red image is replaced with a white cross. Once you have finished this (or
the cross does not have red edges), press @. The _ _. changes to blue.
6 ifthecrossyoa selected has blue edges, movethejoystickuntiltheblae
image is replaced with a white cross. Once you have finished this, press
@. The [ ] changes to yellow again.
7 Repeat Steps 4 to 6 to adjust other crosses. When finished, press MENU
to exit the manual convergence screen and the Setup menu.
34
Installing and Com_ecting the Projection TV
Notes on Adjusting
the Convergence
Manually
U For best results, stand about 3 to 5 feet back from the picture when
adjusting the convergence. Begin with the crosses in the center area of
the screen and. once those are adjusted+ move to the crosses on the edges
of the screen. m
dYou can make separate adjustments to each _ ide mode: Full/Normal.
Zoom_ Wide Zoom. and 108(li high-definition input. The cross pattern
set+ings appear different in each wide mode. but the adjustment
procedure is the same. Press the WIDE MODE button on the remote to ca+
toggle through the wide mode screens.
ca
ca
35

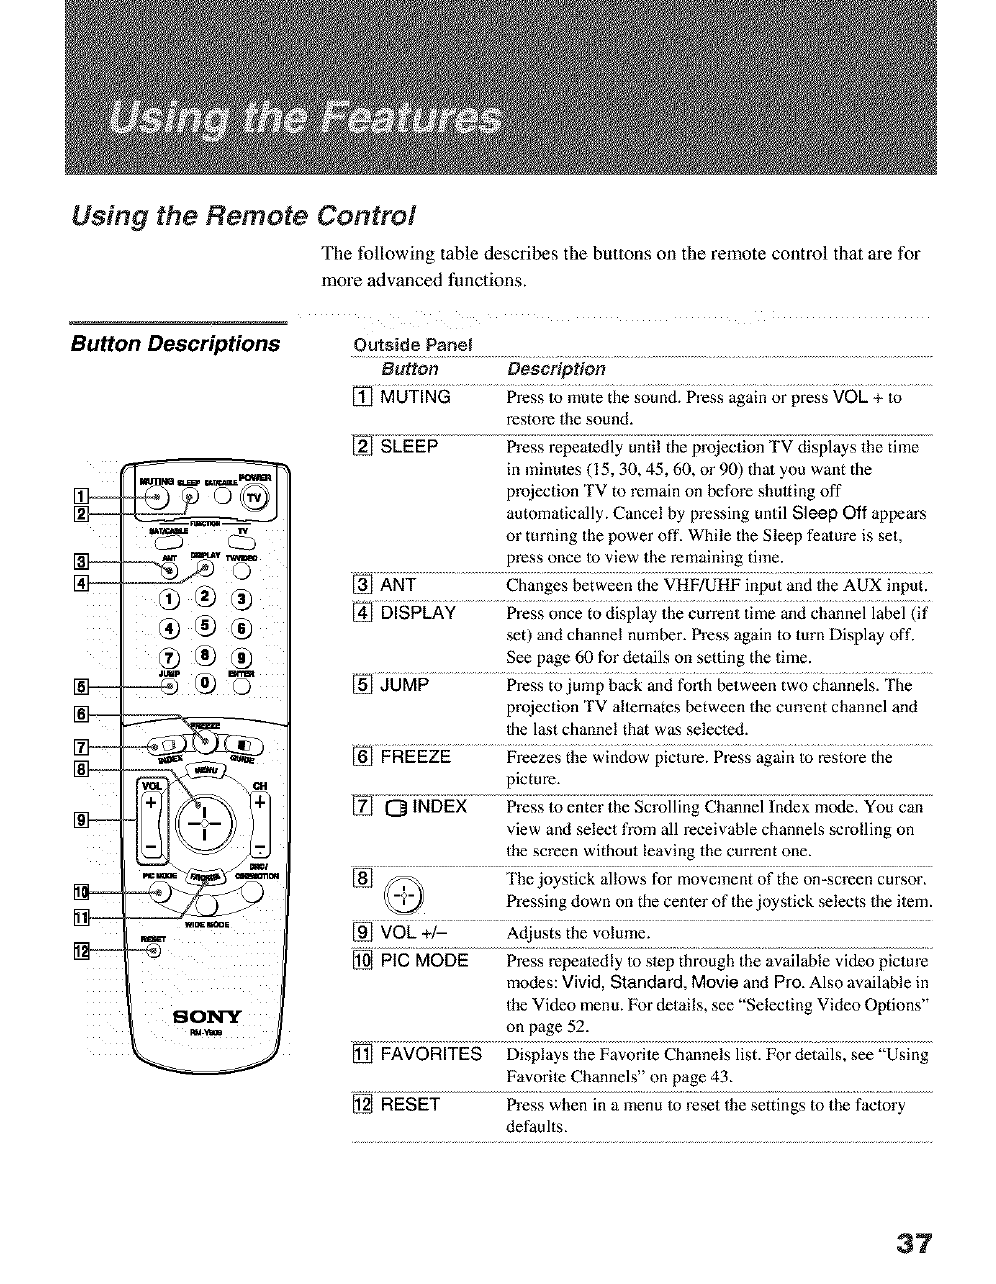
Using the Remote Control
The following table describes the buttons on the ]'emote control that are for
more advanced functions,
Button Descriptions Outside Panel
® ®
I
ISO1NY
Button Description
[] MUTING Press to mute the sound. Press again or press VOL + to
restore the sound.
@ ....................... .....
in minutes (15, 30, 45, 60, or 90) that you want the
projection TV to remain on before shutting off
automatically. Cancel by pressing until Sleep Off appears
or turning the power off. While the Sleep feature is set,
press once to view the remaining time.
[] ANT Changes between the VHF/UHF input and the AUX input.
[] DISPLAY Press once to display the current time and channel label (if
set) and channel number. Press again to turn Display off.
See page 60 for details on setting the time.
[] JUMP Press to jump back and forth between two channels. The
projection TV alternates between the current channel and
1be last channel that was selected.
[] FREEZE Freezes the window picture. Press again to restore the
picture.
_ _i_5_ .............
view and select from all receivable channels scrolling on
the screen without leaving the current one.
[] f/_,_ The joystick allows for movement of the on-screen cursor.
Pressing down on the center of the joystick selects the item.
[] VOk +/- Adjusts the volume.
[] PIG MODE Press repeatedly to step through the available video pictm'e
modes: Vivid, Standard, Movie and Pro. Also available in
the Video menu. For details, see "Selecting Video Options"
on page 52.
[] FAVORITES Displays the Favorite Channels list. For details, see "Using
Favorite Channels" on page 43.
[] RESET Press when in a menu to reset the settings to the factory
defaults.
37
Using the Features
®
nm_'t
©
SONY
GUIDE
[] MENU
[] CH+/-
-'_ [] DRC/CINEMOTION
-..-.-N
Button Description
[] POWER Turn on and off the projeedon TV and olher audio/video
buttons equipment you have programmed into the remote control.
(GREEN) For instructions, see "Programming the Remote Control"
on page 71
[] FUNCTION Select the equipment i TV. SAT/CABLEI that you wan/_o
buttons operate, The indicator lights up momentarily when pushed
1o show which device the remote control is operating.
[] TV/VtDEO Cycles through the video equipmen/connected m your
projeclion TV's video inputs: TV, VIDEO 1, VIDEO 2,
VIDEO 3, VIDEO 4, VIDEO 5, VIDEO 6 and VIDEO 7.
[] 0 - 9 and Press 0 - 9 to select a channel. Ihe channel changes after 2
ENTER seconds. Press ENTER to selecl immediately.
Turns ordoff Twin View. For details, see "Using Twin
View TM" on page 44.
Displays the program guide of your satellite.
Press to display the prejeclion TV on-screen menu. Press
again 1o exit from the menu.
Scan through channels.
Press l_peatedly to step through the available hlgh-
resolu/ion picture modes: Interlaced. Progressive and
CineMotien. For details, see "Using 1he Video Menu" on
page 52
[] WIDE MODE Press to step through the wide screen modes: Wide Zoom.
Normal. Full and Zoom. For details, see "Using Wide
Mode" on page 50.
_To scan rapidly through the
channels, press and hold down
CH+ or CH-.
38
Using the Features
m_
raRE
9
Inside Panel
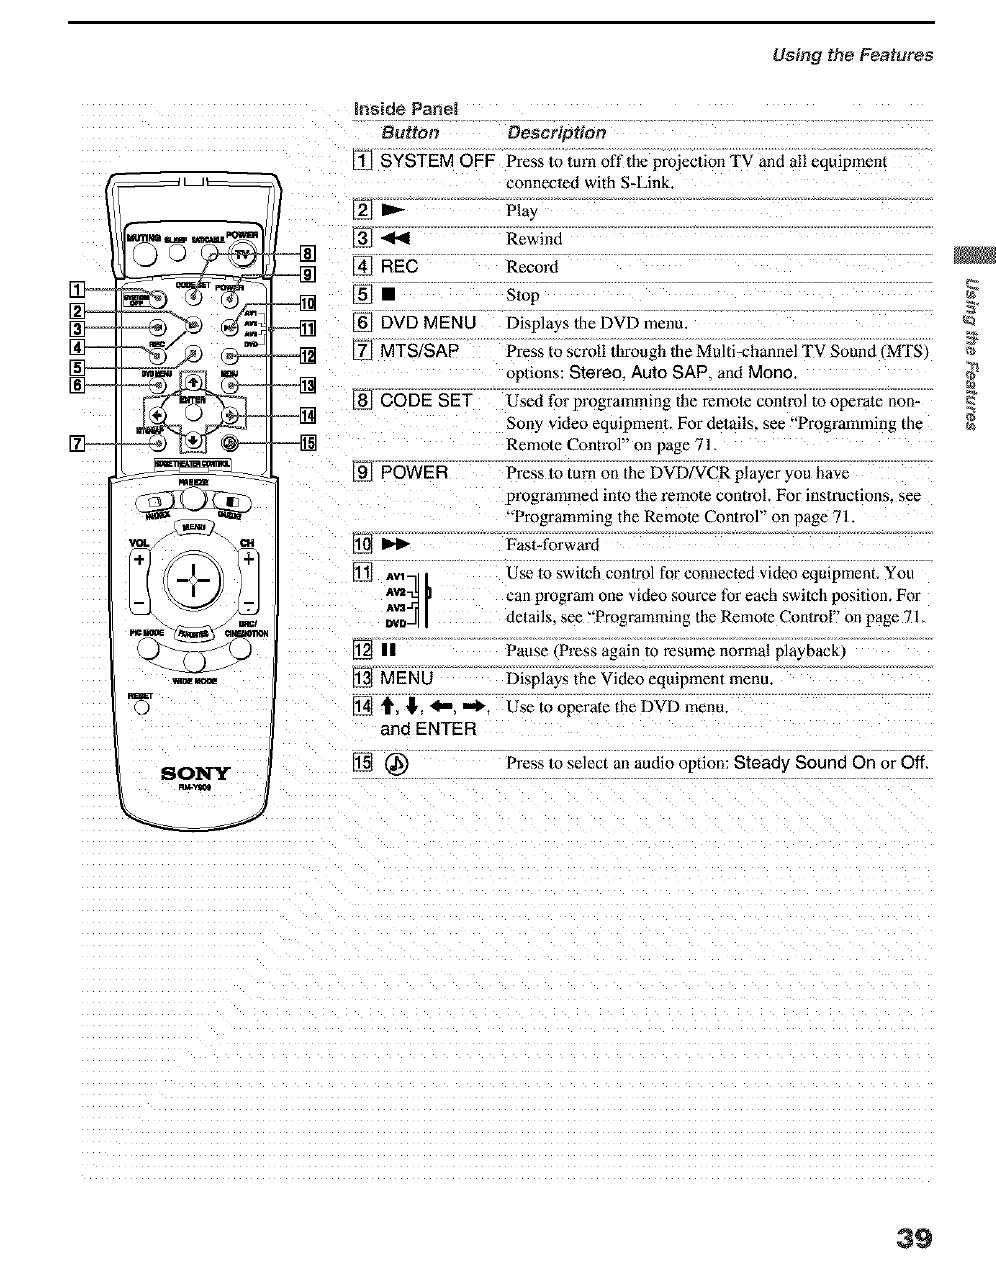
Button Description
[] SYSTEM OFF Press to turn off lhe projection TV and all equipment
connecled with S-Link.
[] _ Play
,_ql Rewind
--[_] REc Record
[] •s,op
_=_ [] DVD MENU Displays the DVD menu
===[_ [] MTS/SAP Press to scroll through lhe Multi-channel TV Sound _MTS_
[] CODE SET
[] POWER
]AV1 --
[] iz
[] MENU
[] t, lk
and ENTER
SONY [] @
options: Stereo. Auto SAP. and Mono
Used for programming the remote control to operate non-
Sony video equipment. For delails, see "Programming the
Remote Control" on page 71,
Press to turn on the DVD/VCR player you have
programmed into the remote control. For instructions, see
-Programming the Remote Control" on page 71
Fast-forward
Use to switch conlrol for connected video eqmpment. You
can program one video source for each switch posilion. For
delails. _ee "Programming the Remote Conlrol" on page 71,
Pause ¢Press agmn to resume normal playbackl
Displays the Video equipment menu.
Use to operate the DVD menu.
Press to select an audio option: Steady Sound On or Off,
39
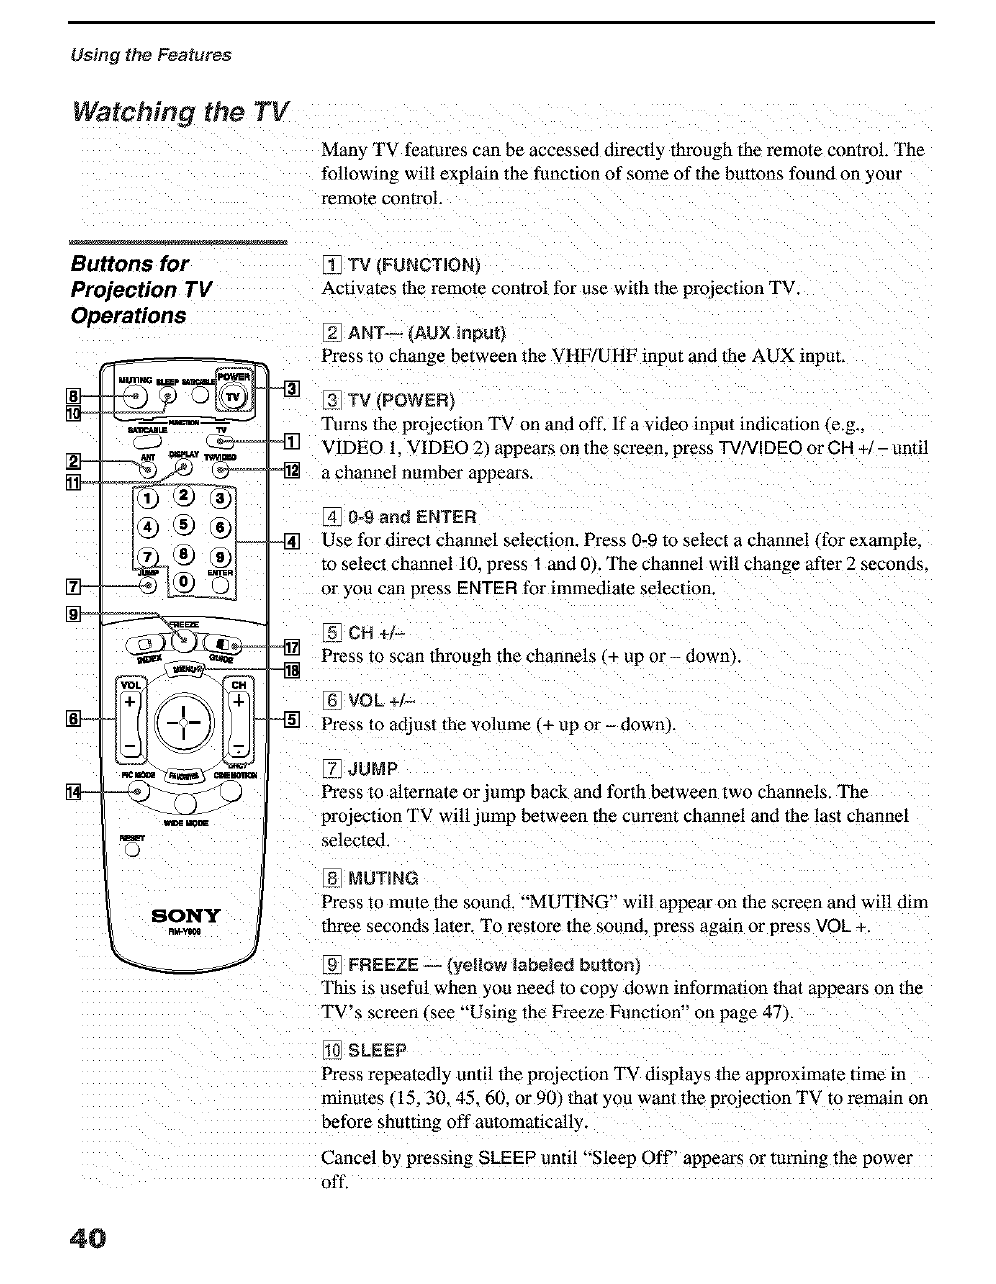
Using the Features
Watching the TV
Many TV features can be accessed directly through the remote control. The
following will explain the function of some of the buttons found on your
remote control.
Buttons for
Projection TV
Operations
+= 77
=9=
=- -'4 ;2'
N_
801_IY
R_
[_ TV (FUNCT+ON/
Activates the remote control for use with the projection TV.
[_ ANT-- (AUX input}
Press to change between the VHF/UHF input and the AUX input.
-'[i] [3 TV (POWER}
Turns the projection TV on and off. If a video input indication {e.g.,
VIDEO 1. VIDEO 2/appears on the screen, press TVNIDEO or CR +/- until
a channel number appears.
_4 0=9 and ENTER
,-[_] Use for direct channel selection. Press 0-9 Toselect a channel ffer example,
to select channel 10, press 1 and 0 _ The channel will change after 2 seconds.
or you can press ENTER for immediate selection.
[_ CH +l-
Press to scan through the channels I,+ up or - down _.
[6 VOL+i-
Press to adjust the volume _+ up or - dowel
_7 JUMP
Press to alternate or jump back and forth between two channels. The
projection TV will jump between the cun'ent channel and the last channel
selected.
[8 MUTING
Press to mute the sound. "MUTING' will appear on the screen and will dim
three seconds later. To restore the sound, press again or press VOL +.
_9 FREEZE--/VeRQw labeled buttonj
This is useful when you need to cop'] down information that appears on the
TV's screen/see "Using the Freeze Function" on page 47/.
SLEEP
Press repeatedly until the projection TV displays the approximate time m
tmnutes 115.30. 45.60. or 90/that you want the projection TV to remain on
before shutting off automatically.
Cancel by pressing SLEEP until "Sleep Off" appears or turning the powm
off.
4O
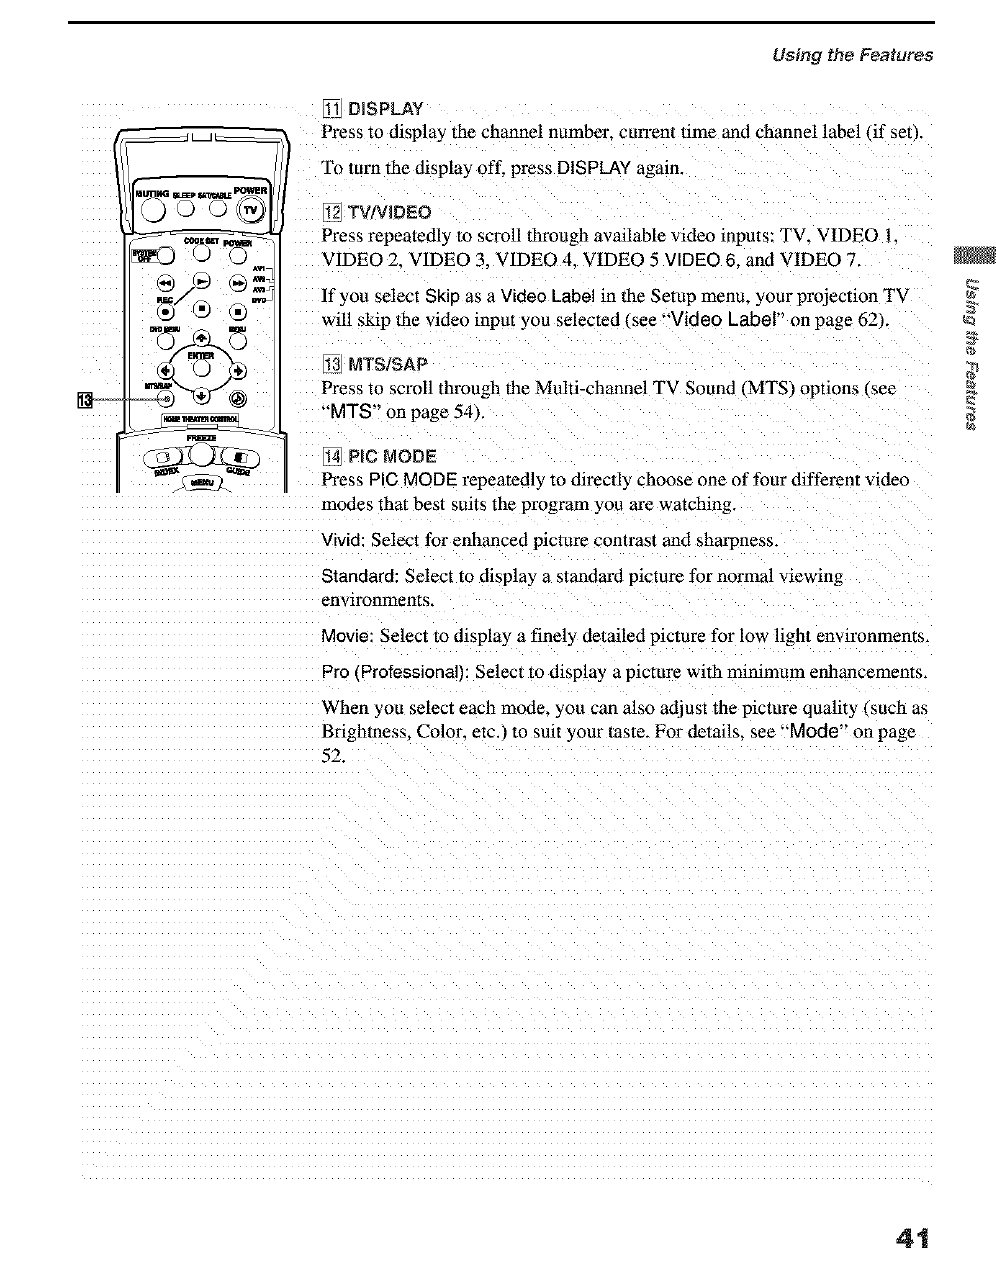
Using the Features
®-
DISPLAY
Press to displa} the channel number_ cun'eot time and channel label tif set/.
To turn the display off, press DISPLAY again.
[12 TV/VJDEO
Press repeatedly to scroll through available video inputs: TV. VIDEO 1.
VIDEO 2. VIDEO 3. VIDEO 4. VIDEO 5 VIDEO 6. and VIDEO 7.
If you select Skip as a Video Label in the Setup menu, your projection TV
will skip the video input t ou selected I _ee "Video Label" on page 62).
_3 MTS/SAP
Press to scroll through the Multi-channel TV Sound (MTS) options (see
_* T _
M S on page 54).
1_4PlC MODE
Press PIC MODE repeatedl3 to directl) choose one of four different video
modes that best suits the program you are watching.
Vivid: Select for enhanced picture contrast and sharpness.
Standard: Select to display a standard picture for normal viewing
environments.
Movie: Select to display a finely detailed picture for low light environmems.
Pro €Zrofessionar_ Select to display a picture with minimum enhancements.
When you select each mode, you can also adjust the picture quality (such as
Brightness. Color. etc._ m suit your taste. For details, see "Mode" on page
52.
41
Using the Features
Watching the Digital TV
When you have connected the DTV receiver, you can enjoy digital TV
programs. This projection TV is capable of receiving 1080i. 720p, 480p and
480i digital TV formals i note that 720p is displayed as 480p).
To view a digital TV program
1 Connect the DTV receiver to VIDEO 5.6 or 7 1N on the projection TV.
, for details, see page 28)
2 Press TVNIDEO to select VIDEO 5.6 or 7.
3 Select a digital channel on the DTV receiver. For details_ see the
Operating Manual of the DTV receiver.
4 Adjust the volume of the projection TV as necessary.
42
Using the Features
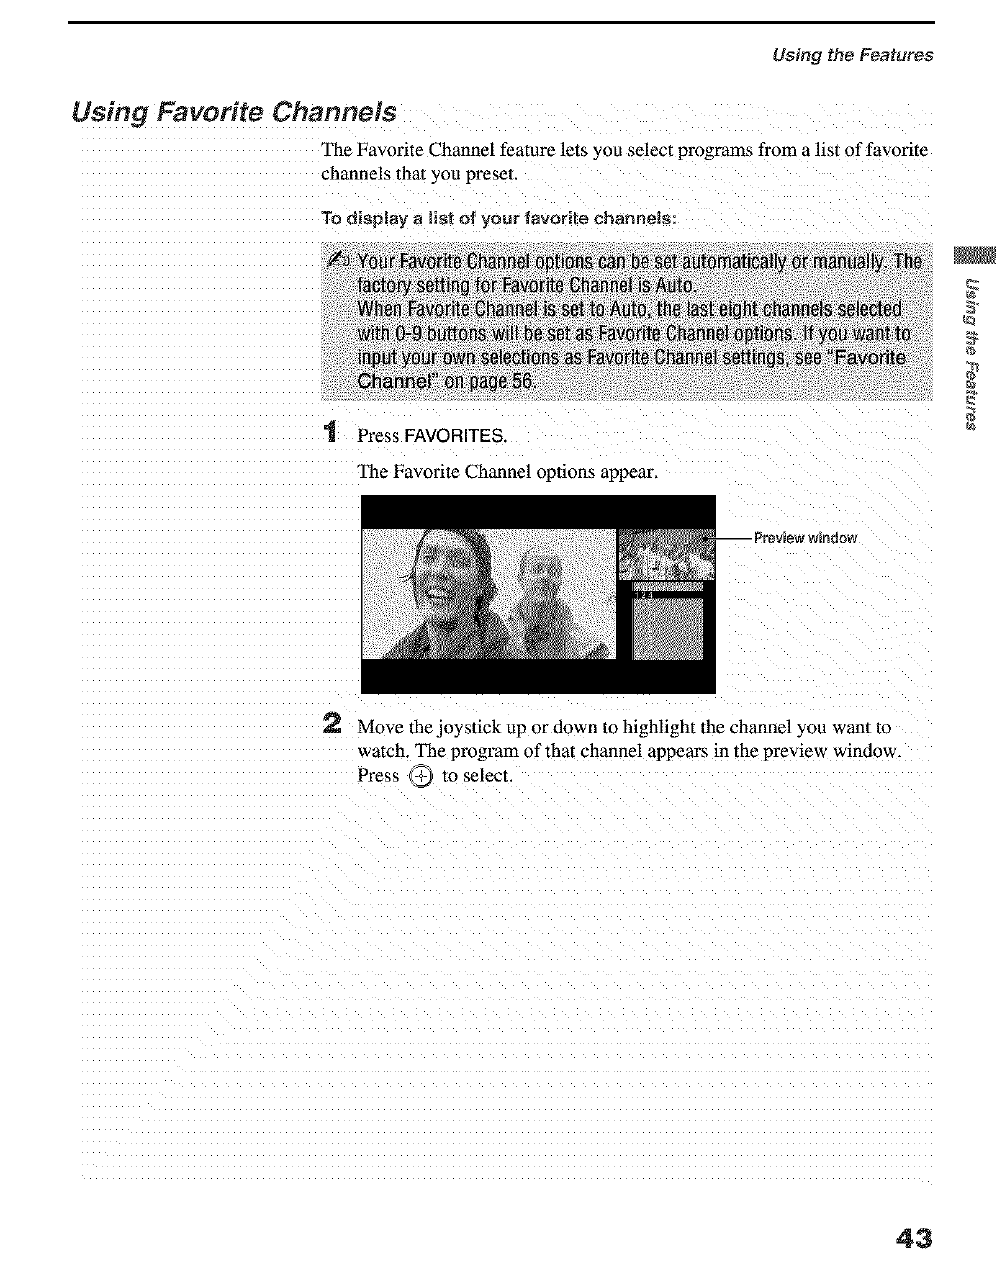
Using Favorite Channels
The Favorite Channel featm'e lets you select programs from a list of favorite
1Press FAVORITES.
The Favorite Channel opuons appear,
Preview window
2 Move the joystick up or down to highlight the channel you want to
watch. The program of that channel appem's in the preview window.
Press _ to select.
43
Using the Features
Using Twin View TM
Twin View enables you to watch two programs at the same time. You can
also change the size of both the left and right pictures.
Activating Twin
Pictures
To display twin pictures
=1 Make sure your projection TV is tuned to
a working channel.
2 Press [_.
I_
°r
To canes! twin pictures
JPress ._1 again (or press @ ,
Activating the
Picture
Although two pictures appear on the screen at the same time. only one
picture is active. For an active picture, you can:
_J Change channels.
u Adjust the volume.
u Switch the inpu[ sources from VHF/UHF to cable by pressing ANT or
W/VIDEO to switch the video input.
When the picture on the right is activated, the input sources cannot be
swilched to VIDEO 5.6. 7. or AUX by pressing ANT.
LJ Change the picture size _see page 46).
To activate the right picture
J Move the joystick to the right.
i
To activate the left p}ctute
LI Move the joystick to the left.
44
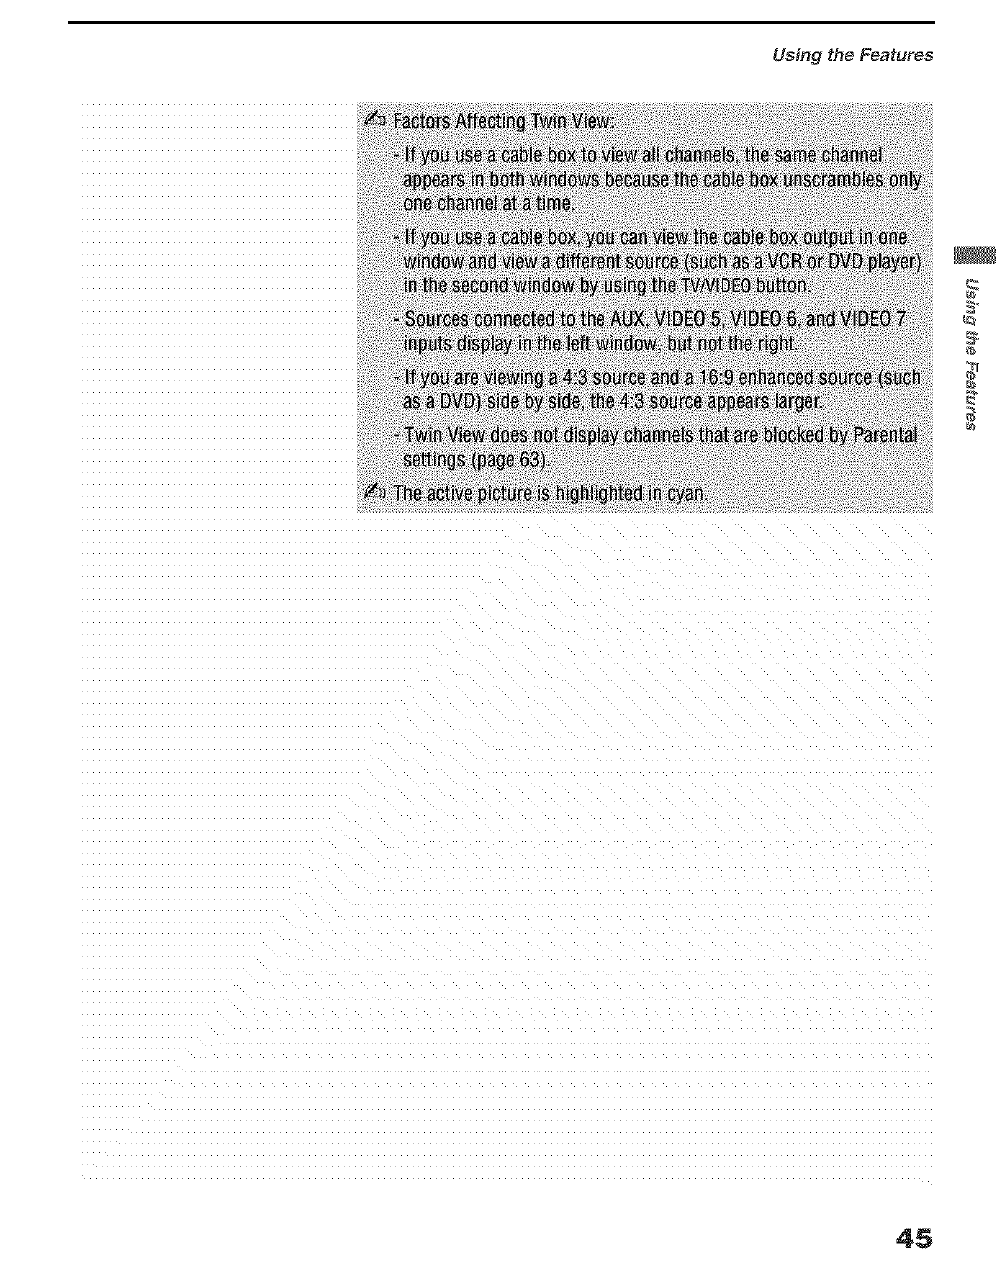
Using the Features
45
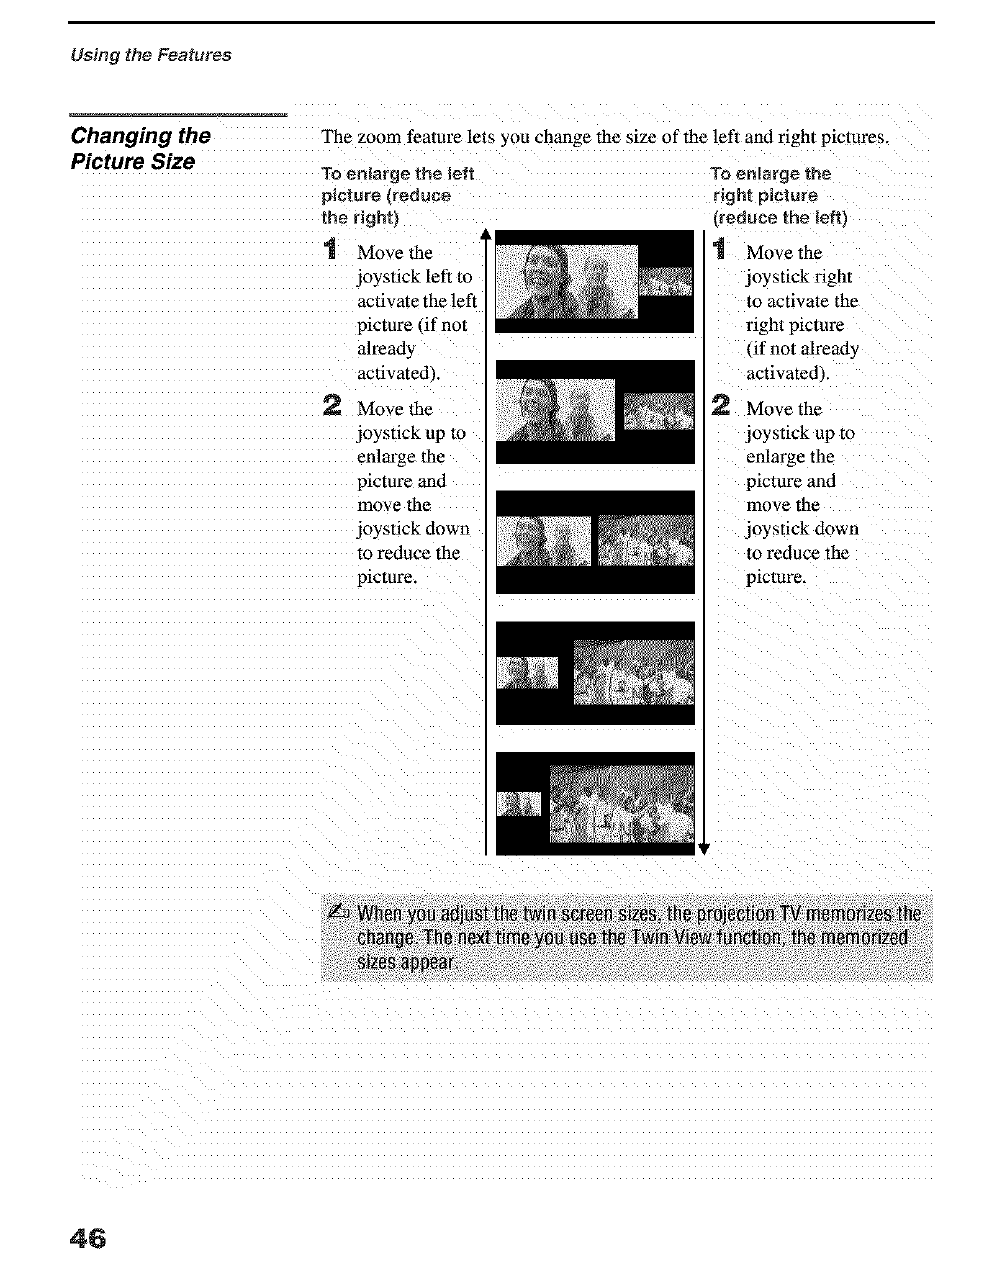
Using the Features
Changing the
Picture Size
The zoom feature lets you change the size of the left and right pictures.
To enlarge the left
picture treduee
the right}
Move the '
joystick left to
activate the left
picture (if not
already
activated,
2 Move the
joystick up to
enlarge the
picture and
move the
joystick down
to reduce the
picture
To enlarge the
right picture
reduce the left}
tMove the
joystick fight
to activate the
fight picture
, if not already
activated.
Move the
joystick up to
enlarge the
picture and
move the
joystick down
to reduce the
picture.
46

UsingtheFeatures
Using the Freeze Function
The FREEZE button allows you to temporarily capture a program!s picture.
You can use this feature to write down information such as phone numbers,
To use the Freeze function
When the program information you want to capture is displayed, press
FREEZE. 3'
2 The projection TV switches to Twin View mode and displays the
"frozen, picture on the right, while the current program continues onthe
_i iiii i i iiii i i
TO cancel and return tOnormal viewing, press FREEZE.
47
Using the Features
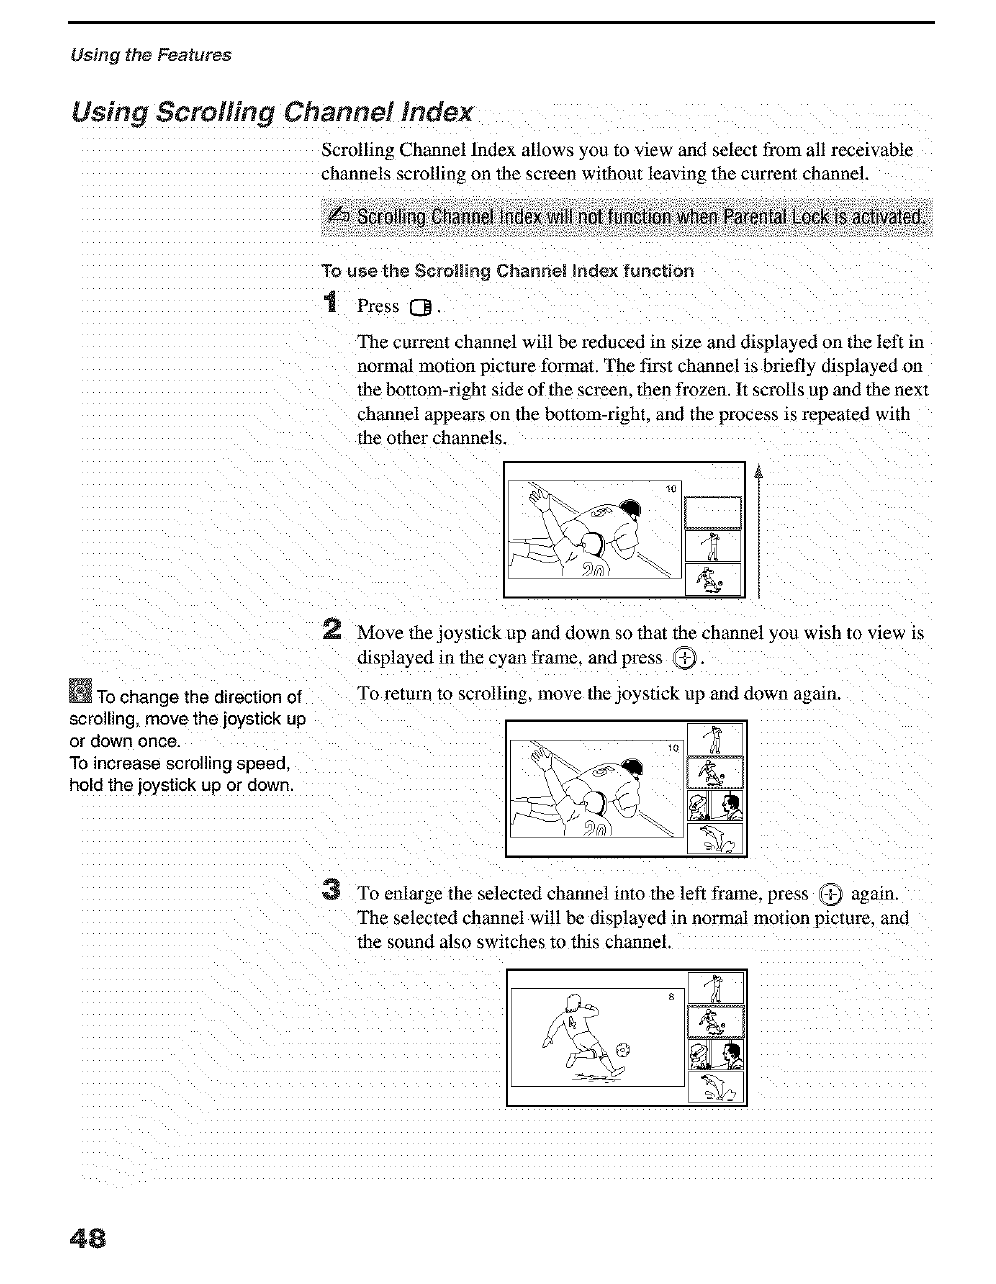
Using Scrolling Channel mdex
Scrolling Channel lndex allows you to view and select from all receivable
channels scrolling on the screen without leavin_ the current channel,
_ro I _gGh_ _ :_:_ctvaN_
To use the Scrolling Channel Index function
1 Press 1_.
The current channel will be reduced in size and displayed on the left in
normal motion picture format. The first channel is briefly (hsplayed on
the bottom-fight side of the screen_ then frozen. It scrolls up and the next
channel appears on the N)ttom-right. and the process is repeated with
the other channels.
2 Move the joystick up and down so that the channel '.ou wish to view is
displayed in the cyan frame, and press _,
To change the direction of To return to scrolling, move the joystick up and down again+
scrollin§, move the joystick up [_]
or down once, 107
To increase scrolling speed,
hold the joystick up or down. _]
3 To enlarge the selected channel into the left flame, press _ again.
The selected channel will be displayed in normal motion picture, and
the sound also switches to this channel.
48
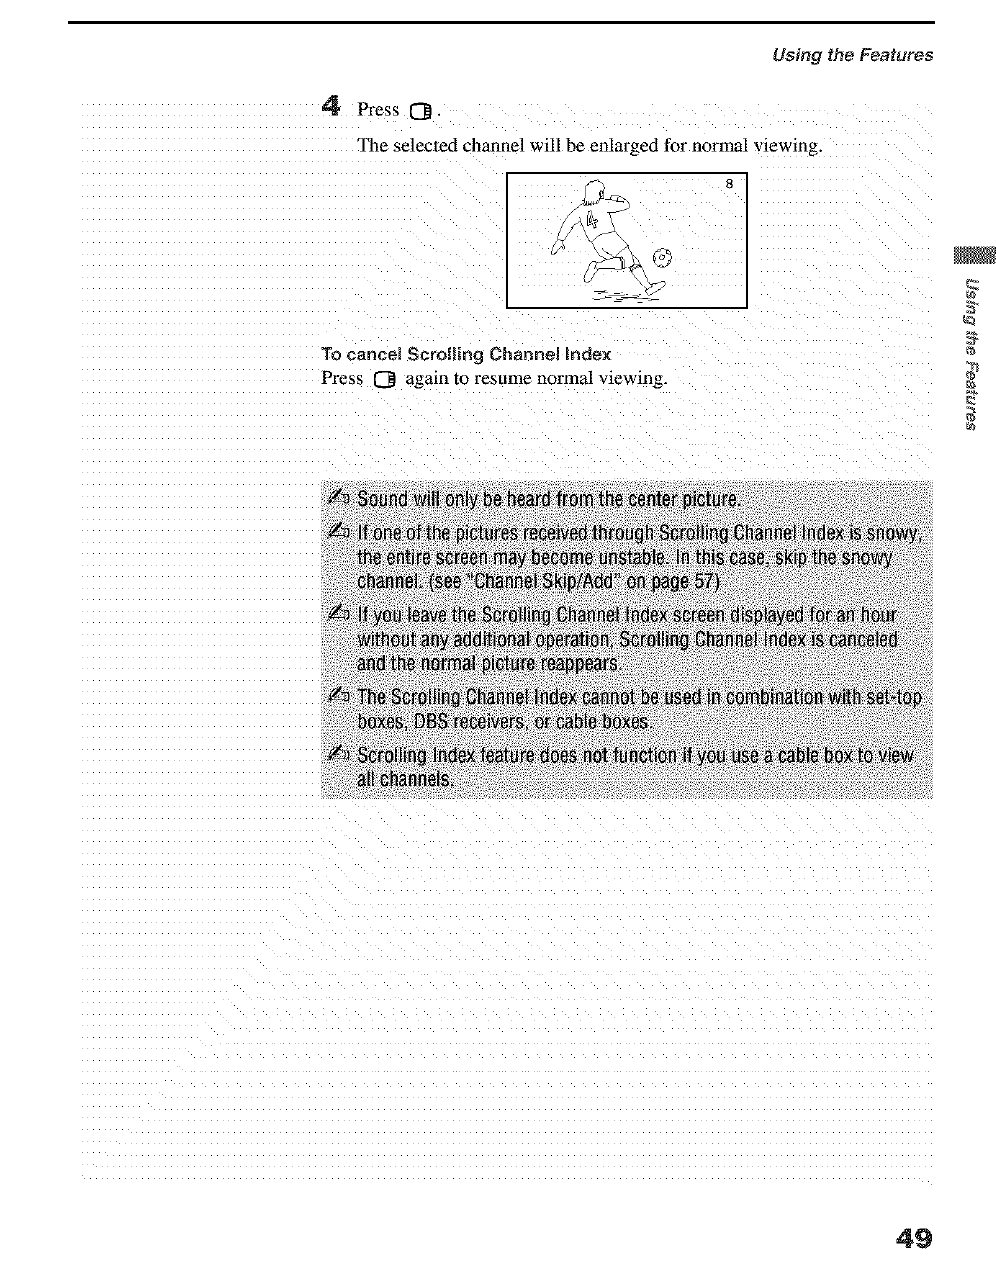
Using the Features
iiiiiiiiiiiiiiiiiiiiiiiiiiiiiiiiiiiiiiiiiiiiiiii_ _
To cancel Scrolling Channel index ...............
Press 0 again to resume normal viewing.
49
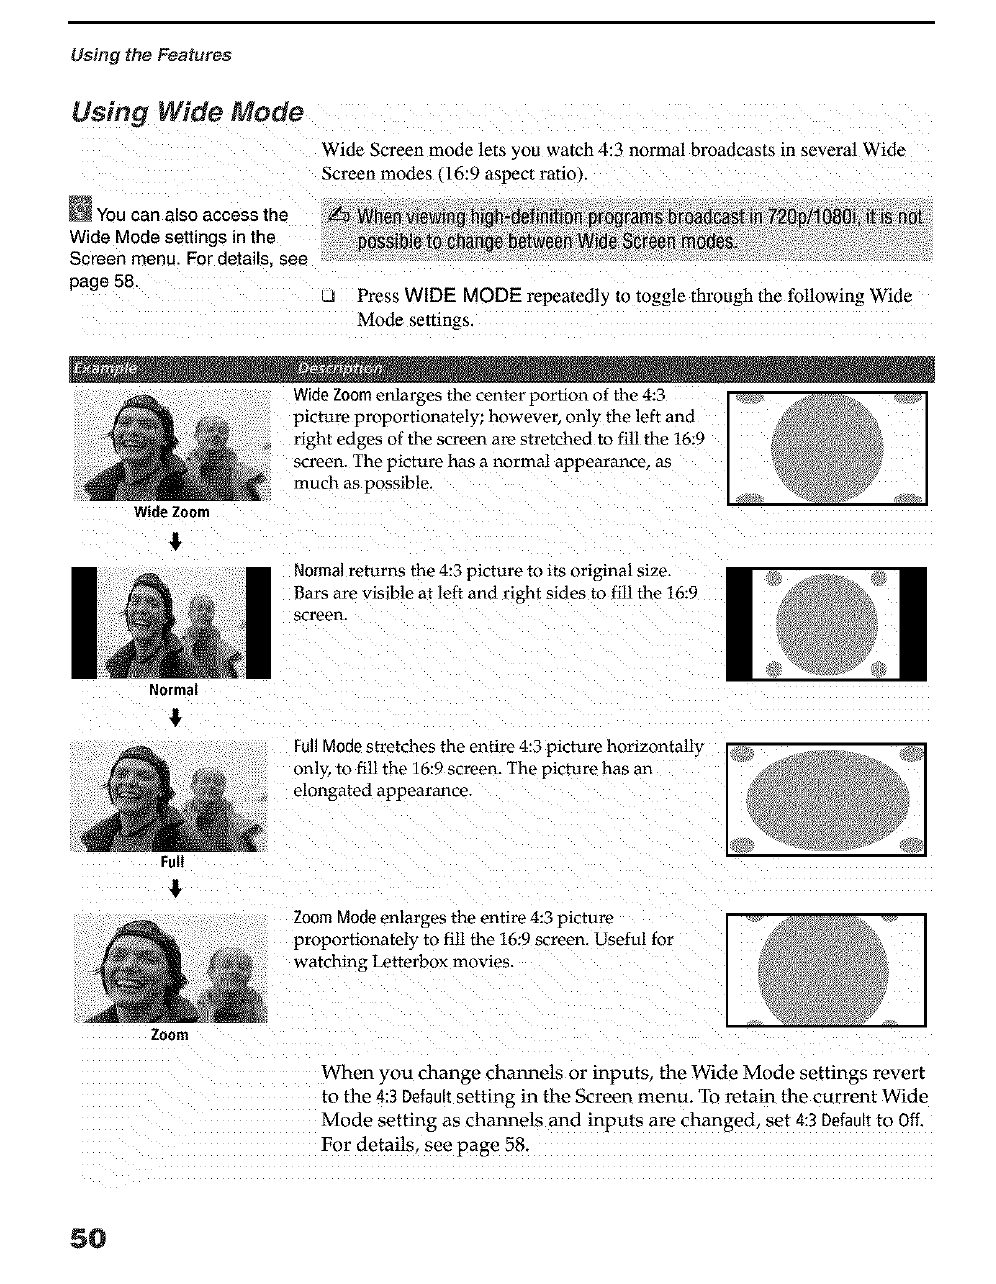
Using the Features
Using Wide Mode
Wide Screen mode lets you watch 4:3 normal broadcasts in several Wide
Screen modes (16:9 aspect ratio).
You can also access the
Wide Mode settings in the
Screen menu. For details, see
page 58. _ Press WIDE MODE repeatedly to toggle through the following Wide
Mode settings.
Wide Zoom enlarges the center portion of the 4:3
picture proportionately; however, only the left and
right edges of the screen are stretched to fill the 16:9
screen. The picture has a normal appearance, as
much as possible.
Wide Zoonl
Normal
&
Full
&
Zoom
Normal returns the 4:3 picture to its original size.
Bars are visible at left and right sides to fill the 16:9
screen.
FullMode stretches the entire 4:3 picture horizontally
only, to fill the 16:9 screen. The picture has an
elongated appearance.
! I
Zoom Mode enlarges the entire 4:3 picture
proportionately to fill the 16:9 screen. Useful for
watching Letterbox movies.
When you change channels or inputs, the Wide Mode settings revert
to the 4:3 Defaultsetting in the Screen menu. To retain the current Wide
Mode setting as channels and inputs are changed set 4:3 Defaultto Off,
For details, see page 58.
5O
Overview
' ® ®
f E
To end a menu session:
Press MENU again.
To end one menu
session and meve to
snother:
Press the joystick _, to
return to the menu icons.
Move the joystick 4, or ,_.to
choose the next menu icon
and press @ to select it.
Opening and choosing amenu:
1 Press MENU to display the menu screen.
2 Move the joystick to the desired menu icon and press @to select it.
3 Use the joystick to scroll through the features.
4See the specific menu page for instructions on moving through the
menu.
The menu gives you access to the following featm'es:
Menu leon Description Page
Allows you to make adjustments to your picture settings. 52
m
R*I[_[:I'_
It also allows you to customize the Picture Mode based onthe type of program you are viewing.
Offers enhanced audio options such as listening to second 54
audio programming (SAP), or customizing the Effect ofthe sound on your projection TV.
Allows you to set up a Favorite Channel list, run the Auto 56
m
[_q Program function, and more.
Allows you to set the wide screen mode, adjust the 58
m
vertical center in wide mode, and set the 4:3 Defaultmode,
Lets you set the clock on your projection TV and allows 60
you to program your projection TV for scheduled viewing
using the Timers.
Provides several options for setting up your channels, 61
m
[_] labeling your Video inputs, and selecting the language of
the on-screen menus.
51
Using the Menus
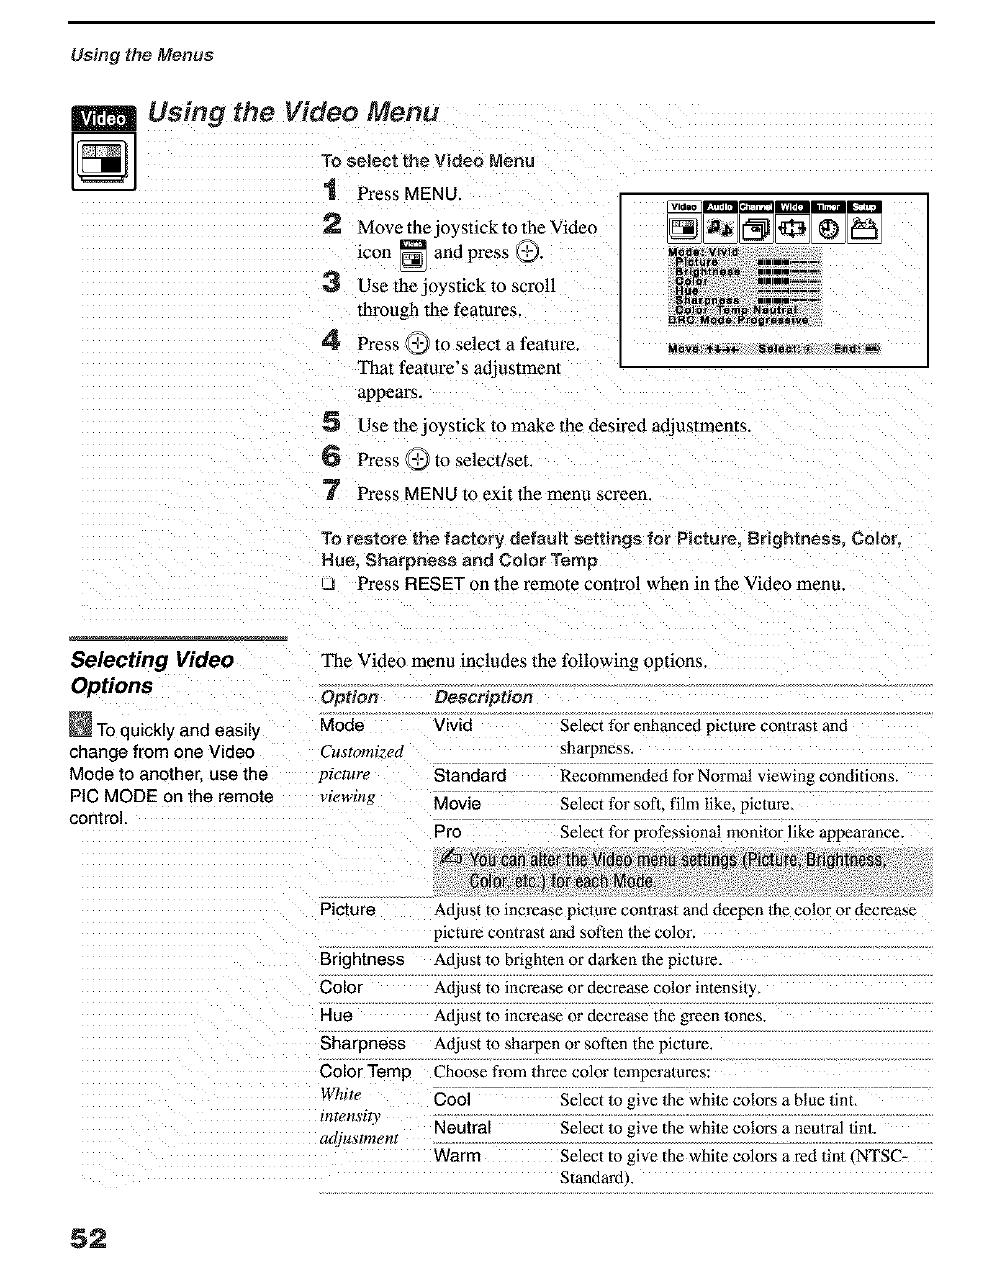
Using the Video Menu
To select the Video Menu
"1 Press MENU.
2 Move the joystick to the Video
icon _ and press Q,
3 Use thejo3 stick to scroll
through the features.
4 Press _ to select a feature.
That feature's adjusrmem
appears,
5 Use the joystick to make the desired adjustments
6 Press _ to selecuset.
7 Press MENU to exit the menlt screen.
To r_-store the factory default settings for Picture, Brightness. Color,
Hue, Sharpness and Color Temp
u Press BESET on the remote control when in the Video menu.
Selecting Video The Video menu includes the following options.
Options Option Description
TOquickly and easily Mode Vivid
change from one Video Customized
Mode to another use the picture Standard
PIC MODE on the remote ;,iewmg Movie
control. Pro
Select for enhanced picture con/rast and
sharpness.
Recommended for Normal viewing conditions.
Select for sol1, film like, picture.
Select for professional monitor like appearance.
Picture Adjust to increase picture con/rast and deepen the color or decrease
picture contrast and soften the color.
Brightness Atliust to brighten or darken the picture
Color Adjust to increase or decrease color intensi/y,
Hue Adjust to increase or decrease the green 1ones.
Sharpness Adjust to sharpen or soften the picture.
Color Temp Choose from three color temperalures:
White Cool Select to give the white colors a blue tint,
tnTensi_y Neutral Select to give the white colors a neu/ral finL
adjustment
Warm Select to give the white colors a ted tint _NTSC-
Standard ,.
52
Using the Menus
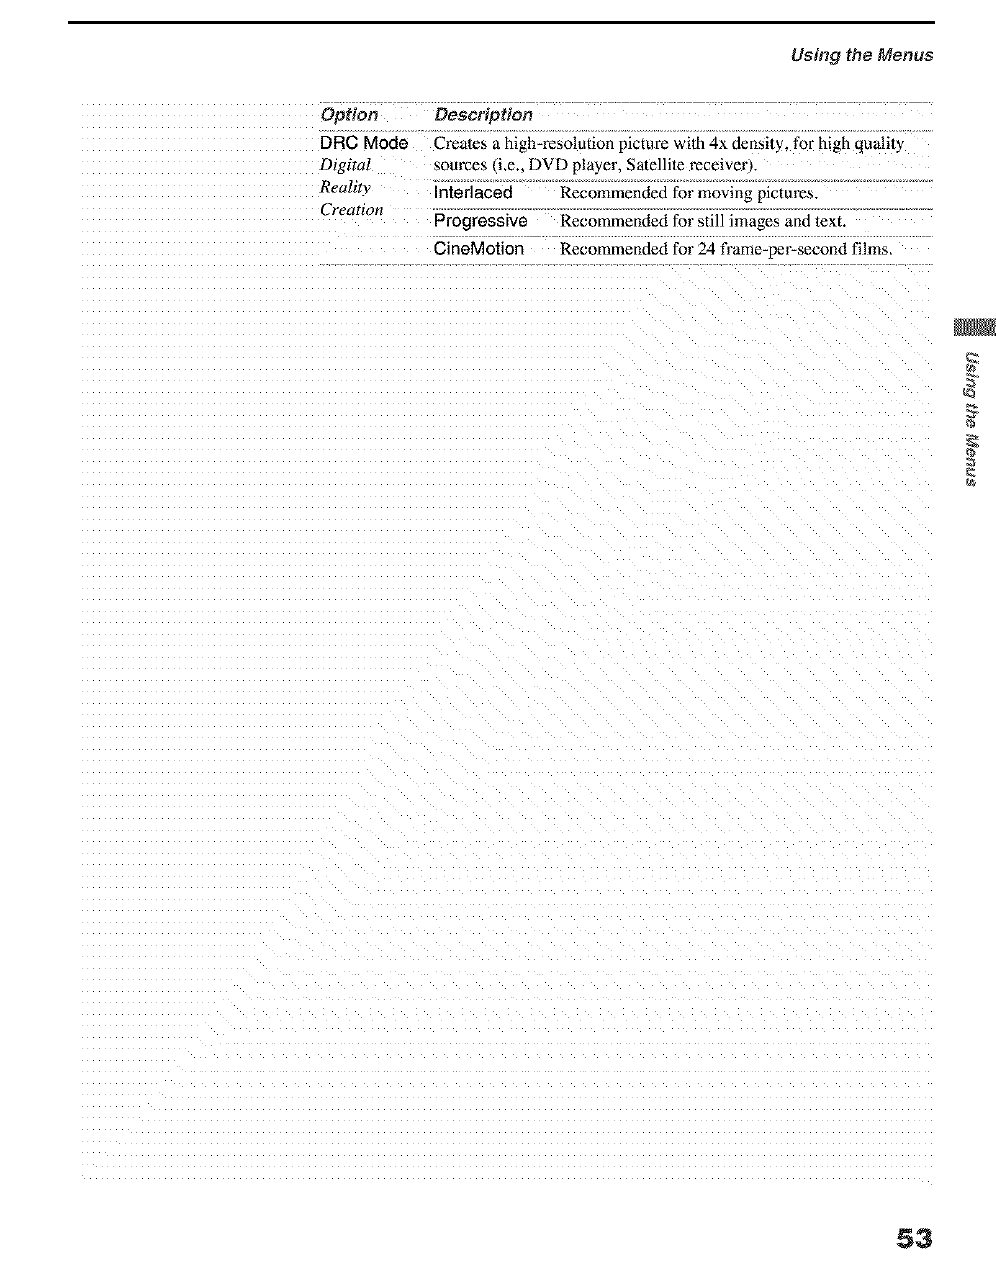
Opfion Description
DFIC Mode Creates a high-resolution picture wilh 4x density, for high quality
Digital sources (i.e.. DVD pla3 er. Satellite receiver_.
Realit_ Interlaced Recommended for moving pictures.
Creation Progressive Recommended for still images and text.
CineMotion Recommended for 24 frame-per-second films,
53
Using the Menus
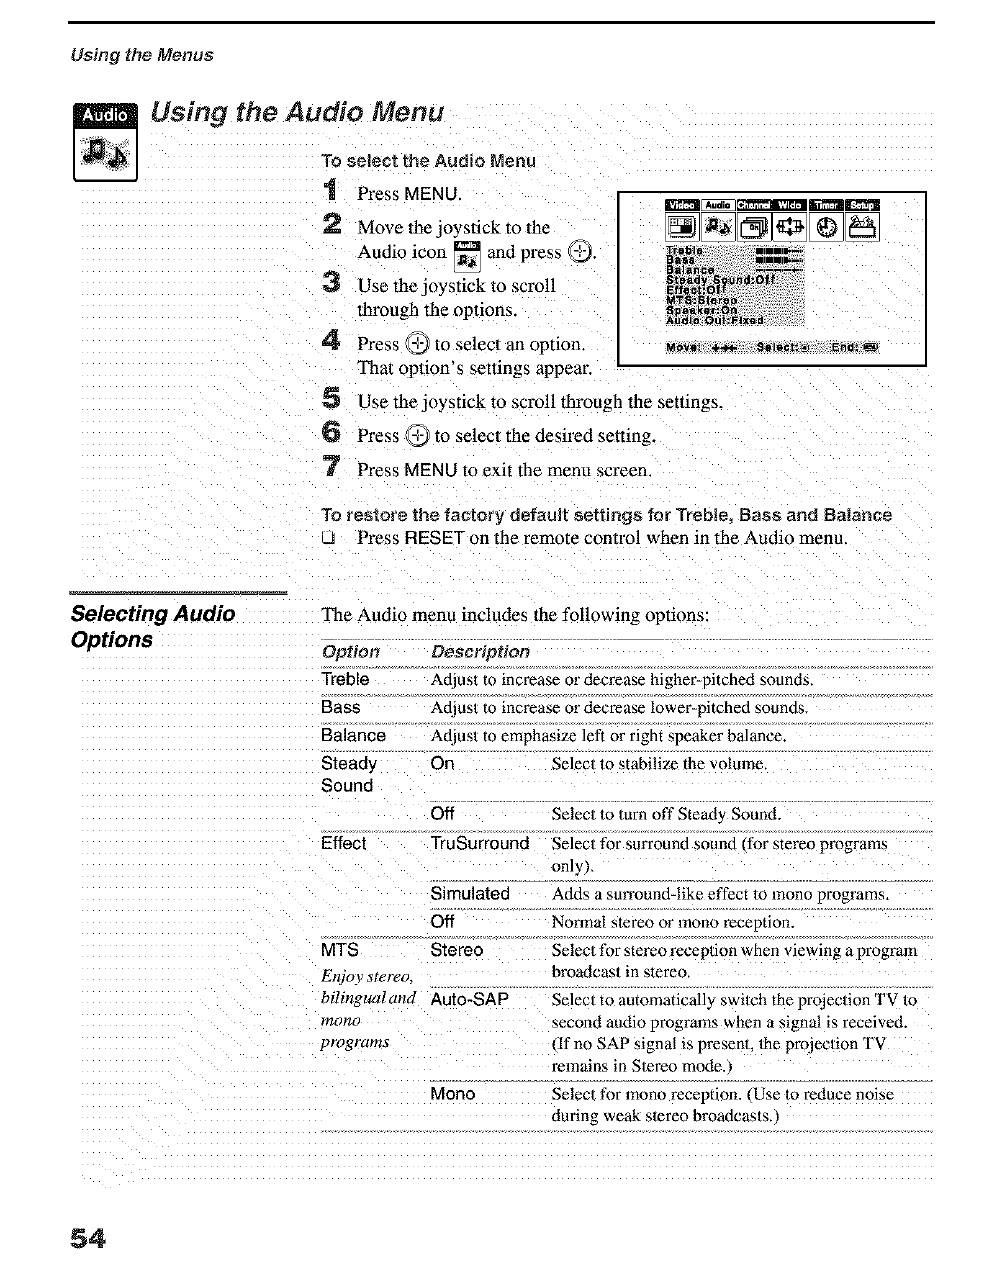
Using the Audio Menu
To select the Audio Menu
1 Press MENU.
r_ Move the joystick to the
Audio icon [] and press O.
3 Use thcjo 3stick to scroll
through the options.
4 Press _ to selecl an option. _._=
That option's settings appear.
5 Use the joystick to scroll through the settings.
6 Press O to select the desired setting.
7 Press MENU to exit the men_t screen.
To restore the factory default settings for Treble. Bass and Balance
LJ Press RESET on the remote control when in the Audio menu.
Selecting Audio
Options Option
Treble
Bass
Balance
Steady
Sound
The Audio menu includes the following opnons:
Description
Adjust to increase or decrease higher-pitched sounds.
Adiust to increase or decrease lower-pitched sounds
Adjust to emphasize left or right speaker balance.
On Selecl to stabilize the volume,
Effect
Off Selec/to turn off Steady Sound.
TruSurround Select for surround sound (for stereo programs
only),
Simulated
Off
MTS Stereo
Enjoy stereo.
Adds a surround-like effect to mono programs
Normal stereo or mono receotion.
Selecl for stereo reception when viewing a program
broa4cas/in stereo.
bilingualand Auto-SAP Select to automatically swilch the projection TV 1o
_nono second audio programs when a signal is received.
programs If no SAP signal is present, me projection T\
remains in Stereo mode.,
Mono Selecl for mono reception. (Use to reduce noise
during weak stereo broadcas/s.
54
Using the Menus
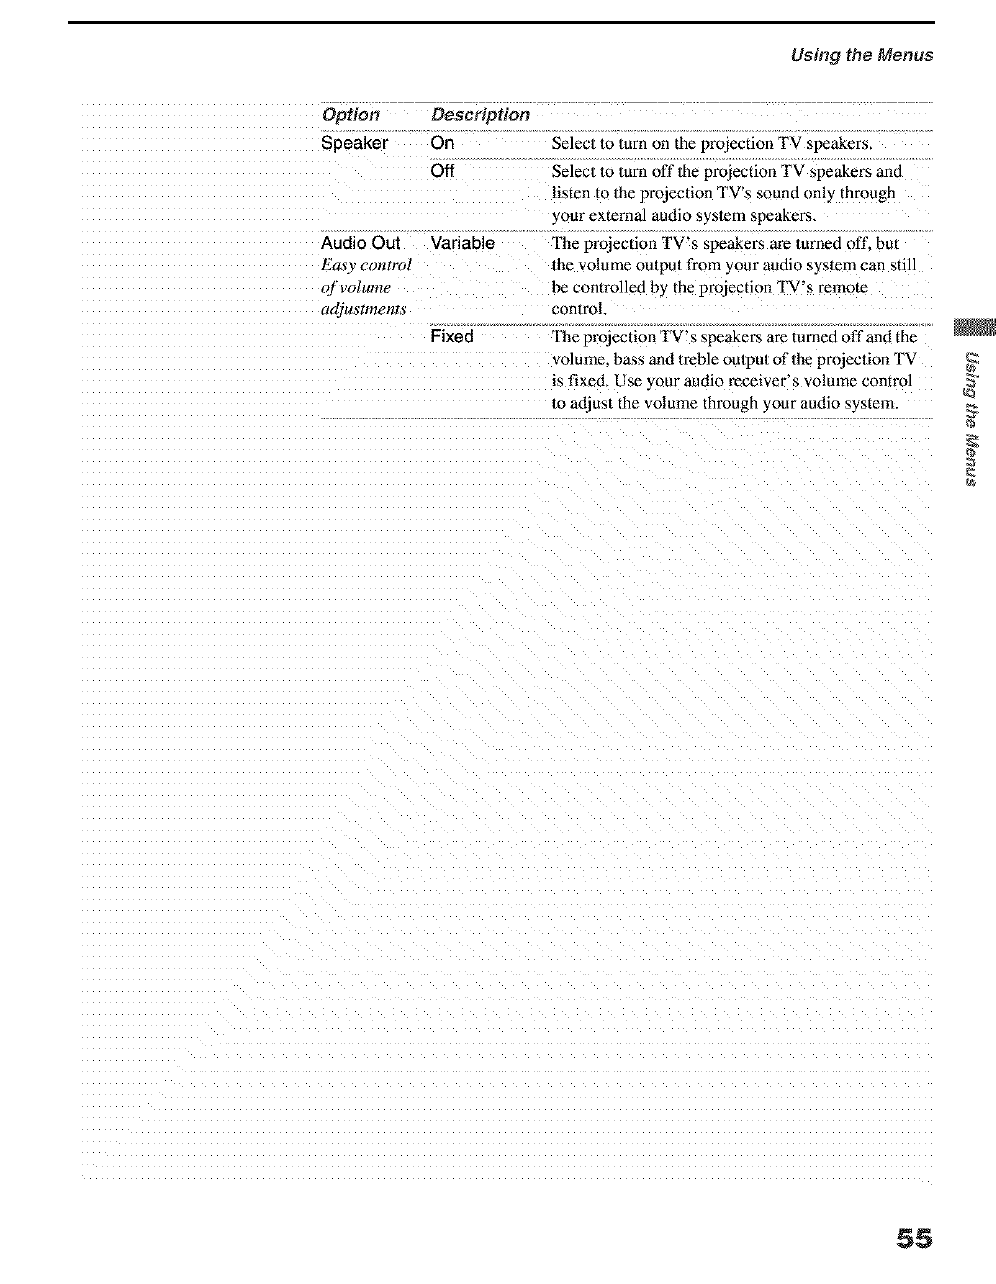
Option Description
Speaker On Selec/to lurn on the projection TV speakers,
Off Selecl to lurn off lhe projection TV speakers and
listen to 1he projeclion TV's sound only through
your external audio syslem speakers.
['he projection TV's speakers are turned off, but
/he volume outpu/from your audio syslem can still
be controlled by the pro)ection TV's remote
control
Fixed Fhe projeclion TV's speaket_ are turned off and the
volume, bass and lt'eble outpu/of the projeclion TV
is fixed, Use your audio receiver's volume contro]
/o adjust the volume through your audio system.
Audio Out Variable
Easy corttrol
Of'VOild#_?e
_djus_mems
$$
Using the Menus
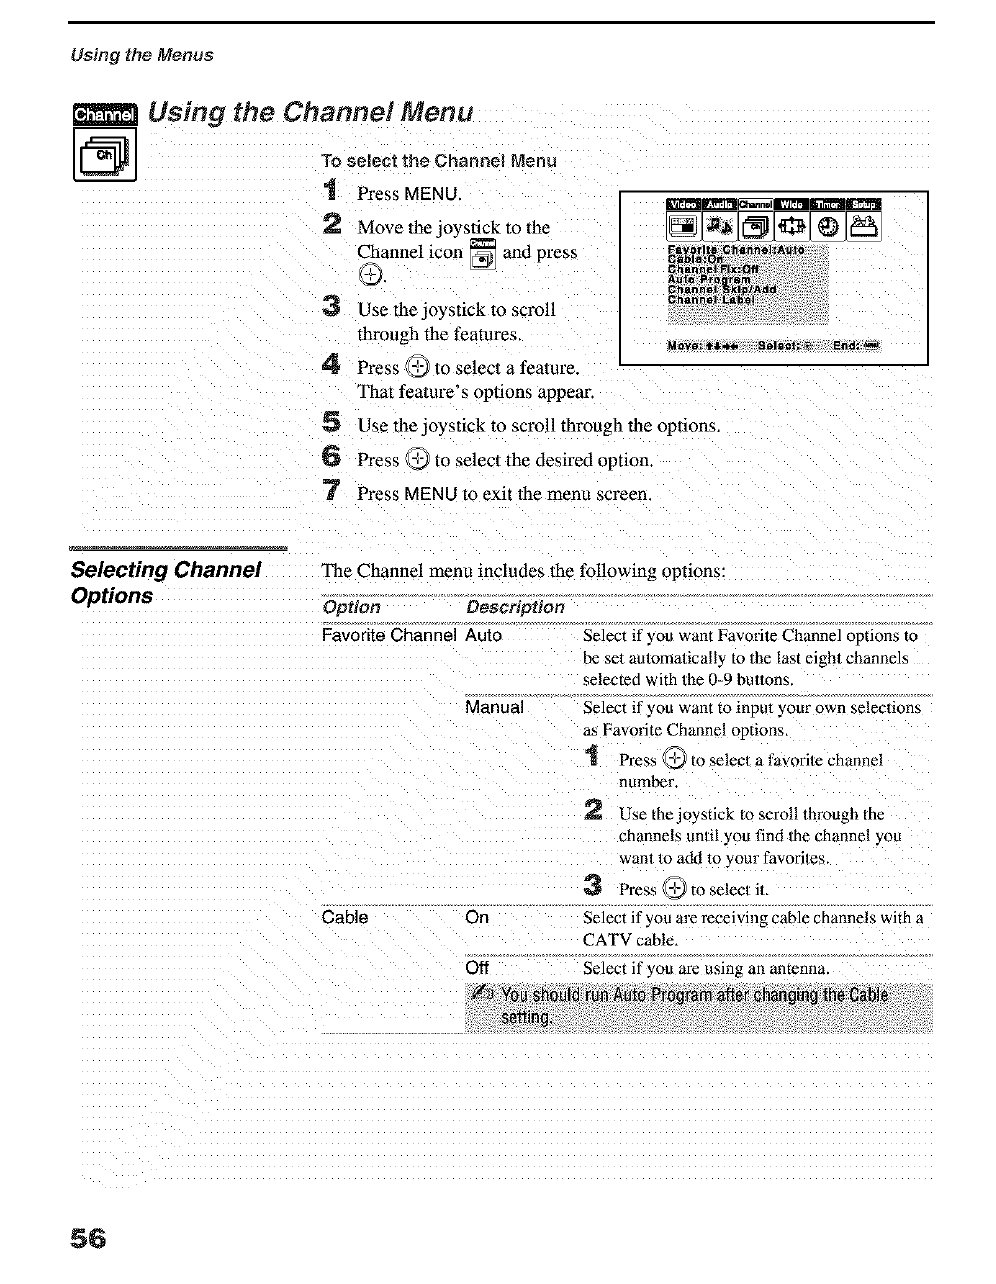
Using the Channel Menu
@To select the Channel Menu
'1 Press MENU.
2 Move the joystick to lhe
Channel icon _ and press
9.
3 Use thejo) stick to scroll
through the features.
4 Press _ lo select a feature.
That feature's options appear.
5 Use thejo) stick to scroll throagh the opnons.
6 Press _'_ to select the desired option
7 Press MENU to exit the menu screen.
Selecting Channel The Channel menu includes the following options:
Options Option Description
Favorite Channel Auto
Manual
Cable On
Off
Select if ? ou want Favorile Channel options to
be set automatically to the last eight channels
selected with 1he 0-9 bu//ons.
Select if _ ou want to inpul your own selec|ions
as Favorite Channel options,
'1 Press _ to selecl a favorile channel
number.
Use the joystick to scroll through the
channels until you find 1he channel you
wan1 to add to your favorites.
Press _,_ to selecl iL
Select if you are receiving cable channels with
CATV cable.
Select if you are using an amenna.
56
Using the Menus
Option Description
Channel Fix 2-6 "'Fix" your project on TV s channel semn_ to 3
Useful when .you or 4 and use the cable box. VCR or salelli/e
!lave a cable box rece ver to change channels, Selecl one of these
or satellite seltings if you have connected the device 1o the
receiver connected VHF/UHF jack.
AUX 2-6 Same as 2-6. except you select one of these
seltings if you have connected the device to the
AUX jack. (see page 151
Video 1 Use when connecting a cable box to conlrol
exlernal video sources. TV output should be
connec/ed through the cable box.
Auto Program Aulomalically programs the projection TV for all receivable
channels
Channe Removes and adds viewable channels.
Skip/Add 1 Use the joystick 1o scroll through the channels until you
find the channel you wan/lo skip/add.
2 Press _ Io selecl il,
3 Press the joystick up or down to toggle between "'Add" and
"Skip.
4Press @ 1o selecL
Channel Label Label up lo 20 channels with their s/arian call letters.
57
Using the Menus
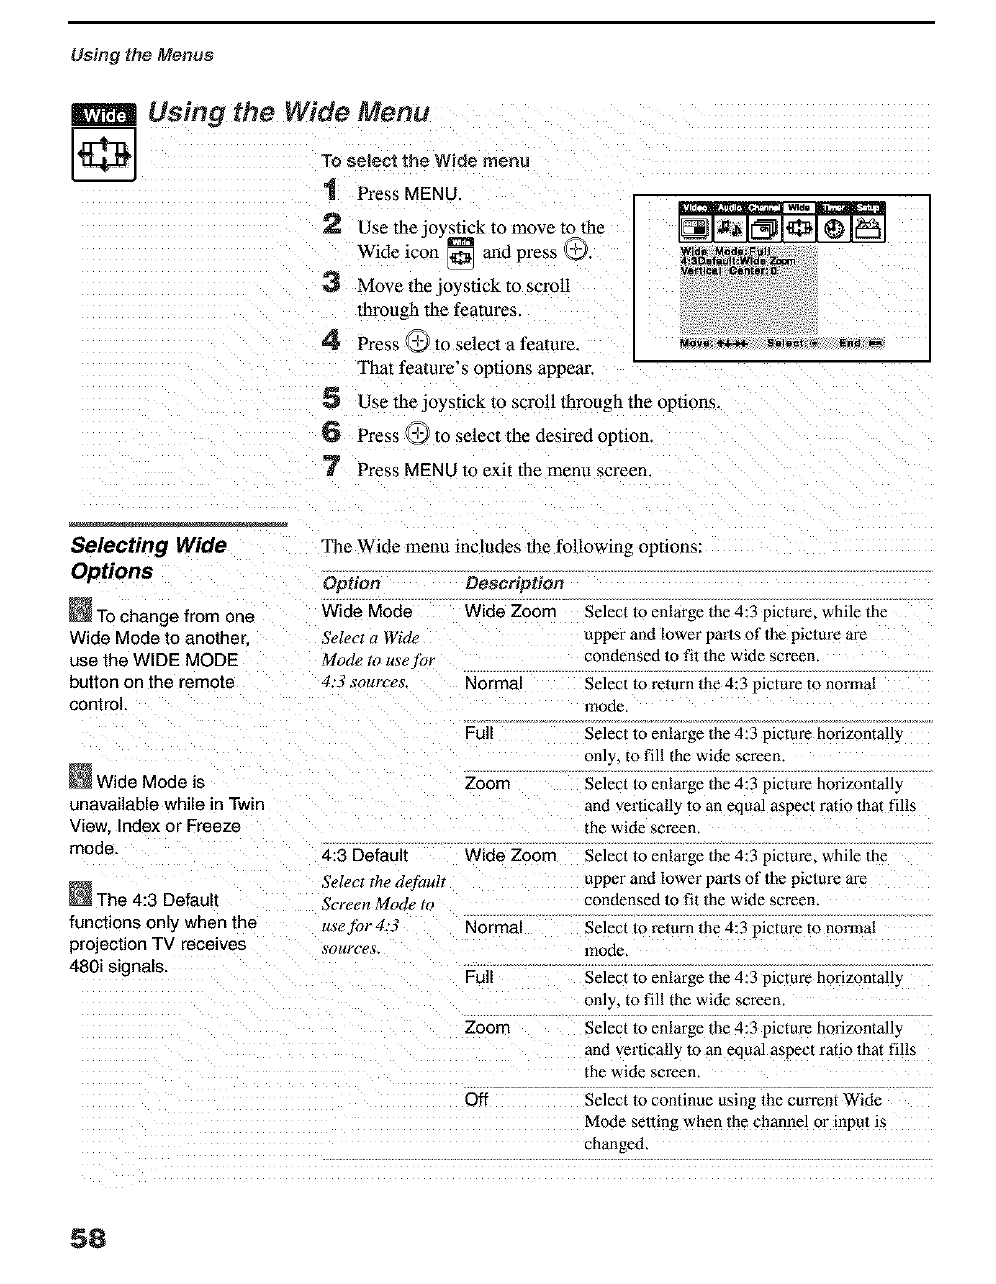
Using the Wide Menu
To select the Wide menu
"1 Press MENU.
2Use thejo) stick to move to lhe
Wide icon _ and press O.
3 Move the joystick to scroll
through the features.
4' Press _'_ lo select a feature.
That feature's opuons appear.
5Use thejo) stick to scroll through the options.
6 Press _,_ to select the desired option
'7 Press MENU to exit the metal screen.
Wide MOde;F',_11
4:so_f_uJt Wda
Vettidal Oenter:_
Selecting Wide The Wide menu includes the following options:
Options Option Desersption
To change from one Wide Mode Wide Zoom
Wide Mode to another Select a Wide
use the WIDE MODE Mode,to useyor
button on the remote 4:3 sources. Normal
control.
Wide Mode is
unavailable while in Twin
View Index or Freeze
mode. 4:3 Default
The 4:3 Default
functions only when the
projection TV receives
480i signals.
Select the dej_ult
Screen Mode to
use for 4:3
_'ources_
Full
Zoom
Wide Zoom
Normal
Full
Zoom
Off
Select to enlarge the 4:3 picture, while the
upper and lower parts of the picture are
condensed 1o fit the wide screen.
Select to _lurn the 4:3 picture to normal
12qode,
Select to enlarge the 4:3 picture horizontall_
only, to fill the wide screen
Select Io enlarge the 4:3 pictut'e horizontally
and vertically to an equal aspec/ratio 1hal fills
the wide screen.
Select to enlarge the 4:3 picture, while the
upper and lower paris of the picture are
condensed 1o fil the wide screen.
Select 1o relurn the 4:3 picture to normal
mode,
Select to enlarge the 4:3 picture horizontally
only, to fill the wide screen
Select to enlarge the 4:3 picture horizontally
and vertically to an equal aspecl ratio that fills
the wide sct'een.
Select to continue using the curt'ent Wide
Mode selting when the channel or inpu; is
changed,
58
Using the Menus
Option
tf 4:3 Default is set to Vertical Center
anything but Off the Wide
Mode setting changes
only for the current
channel. When you
change channels (or
inputs), Wide Mode is
automatically replaced
with the 4:3 Default
setting. To retain the
current Wide Mode setting
as channels and inputs
are changed, set 4:3
Default to Off.
Oescription
Allows you 1omove the position of lhe picture up and down 111
1he window. Available only in Wide Zoom and Zoom modes.,
Move the joystick up or down to choose a position and press
G
59
Using the Menus
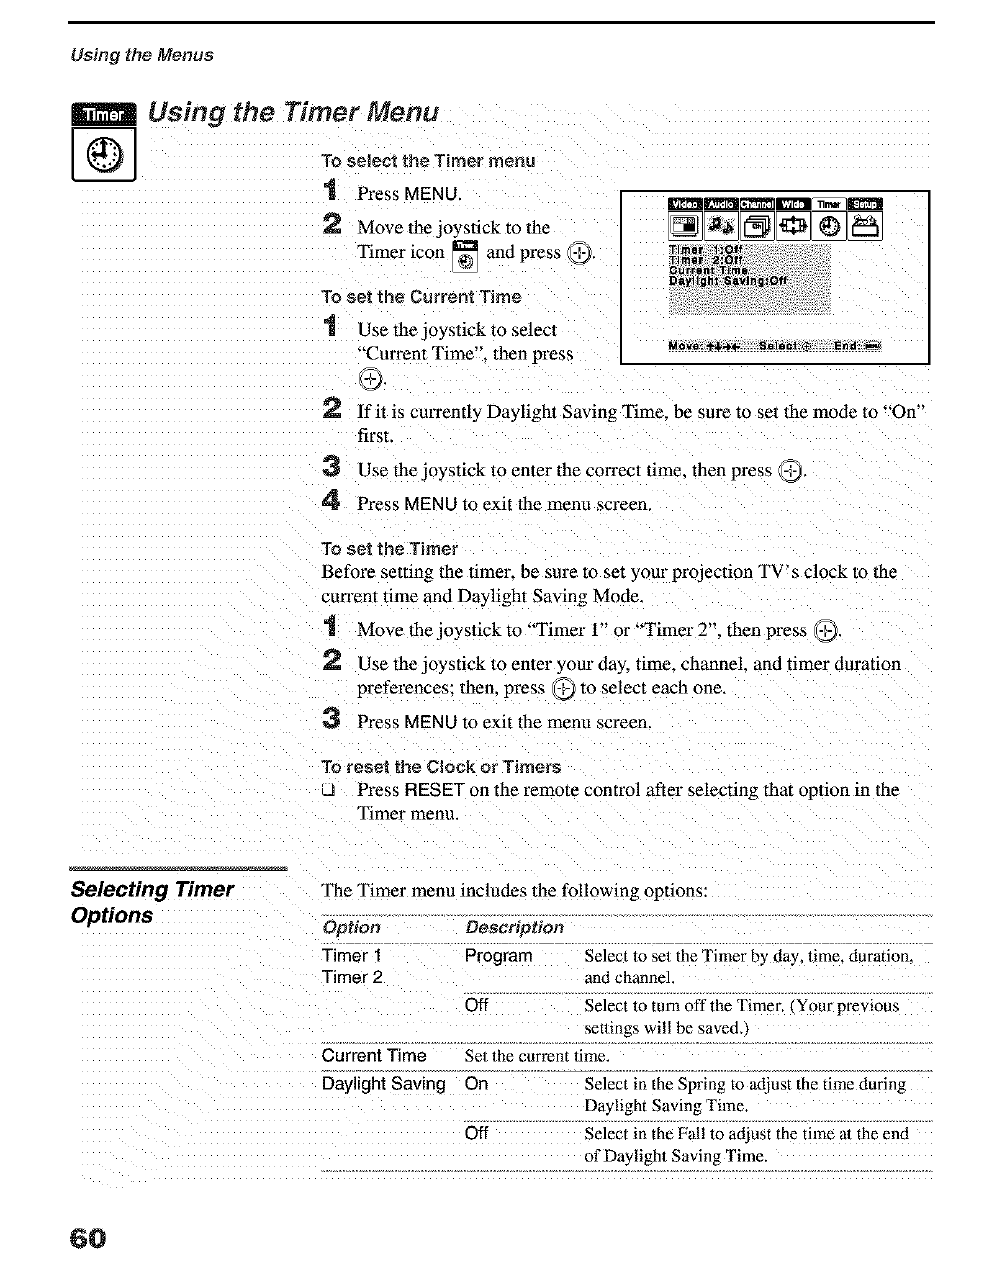
Using the Timer Menu
To select the Timer menu
"1 Press MENU.
2 Move the joystick to the
Timer icon [] and press 9'
To set the Current Time
1 Use the jo 3 stick to select
""Current Time". then press Mov.:_._ S,l,_t:® Ena_
9.
lfit is currently Daylight Saving Time. be sure to set the mode to "On"
first.
3 Use thejo3 stick to enter the correct time. then press 9"
4 Press MENU to exit the menu screen.
To set the Timer
Before setting the timer, be sure to set your projection TV's clock to the
cun'ent time and Daylight Saving Mode.
1 Move the joystick to "Timer 1" or "Timer 2". then press _.
rA_ Use the jo) stick to enter your da) time. channel, and timer duration
preferences: then. press _ to select each one.
Press MENU to exit the menu screen.
To reset the Clock er Timers
JPress RESET on the remote control after selecting that option in the
Timer menu.
Selecting Timer
Options
The Timer menu includes the following options:
Option Description
Timer 1 Program
Timer 2
Off
Current Time
Daylight Saving On
Select m eel the Timer by day, time. duration.
and channel.
Select 1o turn off the 'rimer. (Your previous
setlings will be saved.,
Sel 1he currant time.
Select in the Spring to adjust the time during
Daylight Saving Time.
Off Select in the Fall to adjust the time al the end
of Daylight Saving Time.
6O
Using the Menus
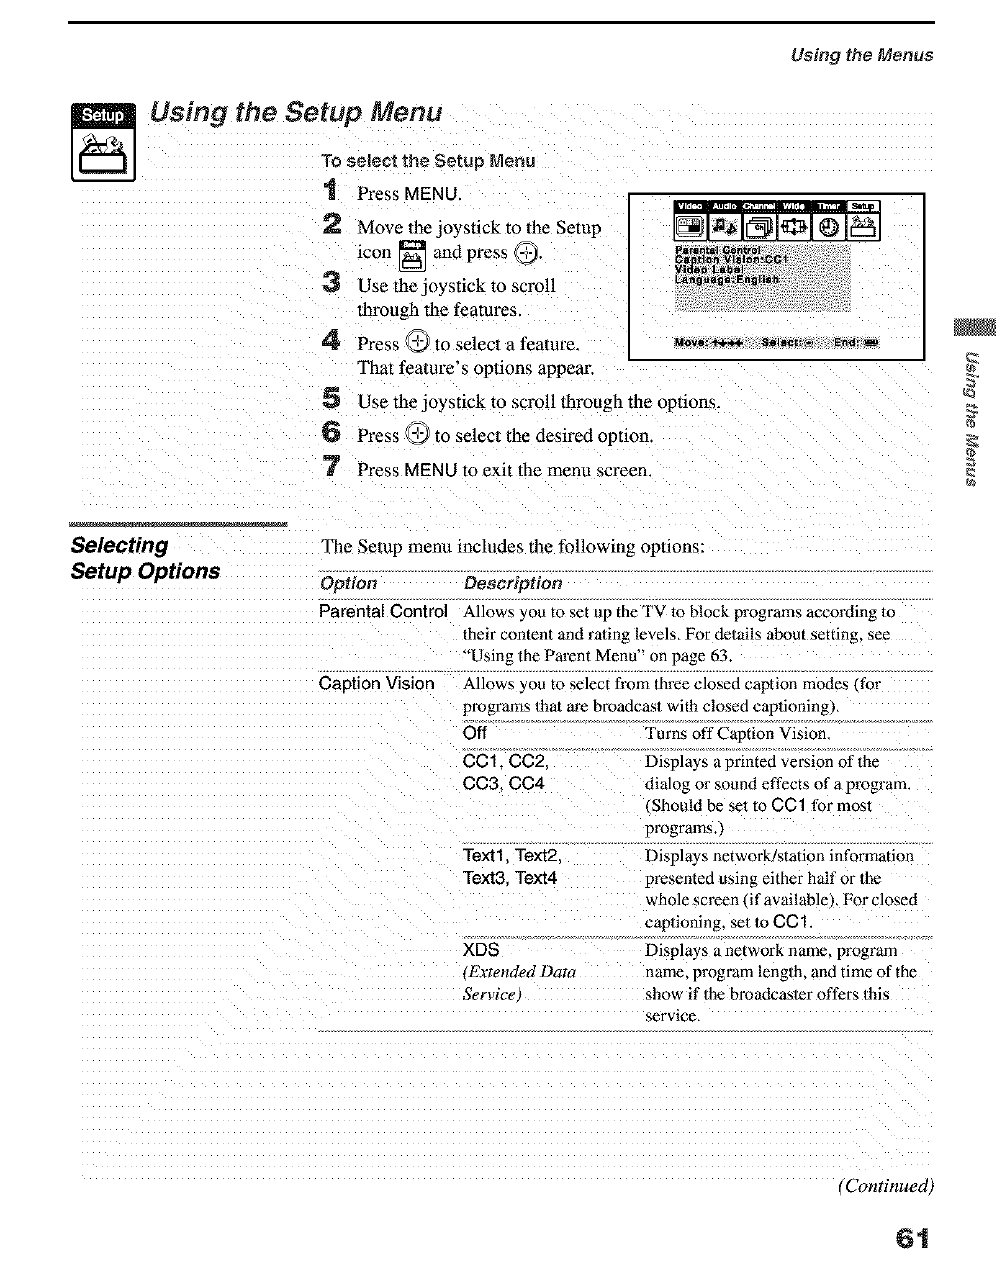
Using the Setup Menu
To select the Setup _,,_enu
1 Press MENU.
2 Move the joystick to the Setup
icon [] and press _.
3 Use the JO3stick to scroll
through the features.
4 Press _'_ lo select a feature, u._o,,_ s._,_:_ _.d_
That feature's opuons appear.
5 Use the jo3 stick to scroll through the options.
6 Press _ to select the desired option
7 Press MENU to exit the menu screen.
Selecting
Setup Options
The Setup menu includes the following opnons:
Option
Parental Control
Caption Vision
Description
Allows you to set up the TV 1o block programs according To
their content and rating levels, For delails about setting, see
'Using the Parent Menu" on page 63.
Allows you to select from Ihree closed caption modes ¢for
programs 1hat are broadcas/with closed captioning),
Off Turns off Caption Vision.
CC 1, CC2, Displays a printed version of the
CC3. CC4 dialog or sound effects of a program.
. Should be set to CC1 for mosl
programs.)
Texll Text2. Displays network/station in forrfrat ion
Text3 Text4 presented using either half or the
whole screen •if available ,. For closed
captioning, set 1o CC1.
XDS Displays a network name, program
•Extended Dat_ name, program length, and time of the
Servict _ show if the broadcasler offers 1his
service,
(Continued,
61
Using the Menus
Option
Video Label
Description
Allows you to label the audio/video components you connected
to the projection TV so you can identify them when using TV
VIDEO, When in the Setup menu's Video Label feature, use
the joystick to highlight an input to labe!, then press @ to
select it. Use the joystick/o scroll through the labels. Press @
to select the component you connected to each of the input
jacks on the back of your projection TV. Select "Skip" if you do
not have a component connected to a particular set of input
jacks_
VIDEO 1 Receiver, VHS, DVD, Satellite. Cable
Box. 8 ram. DTV, LD, Beta, Skip
VIDEO 2/314 VHS. DVD. Satellite. Cable Box.
8 ram, DTV, LD, Beta, Skip
VIDEO 5/6/7 DVD, Satellite, Cable Box. DTV, HD,
Skip
ff you select "Skip", your prolecfion TV skips this connec/ion
when you press TV/VIDEO,
Language Select to display all on-screen menus in your language of
choice: English, Espafiol. Franga_s,
62
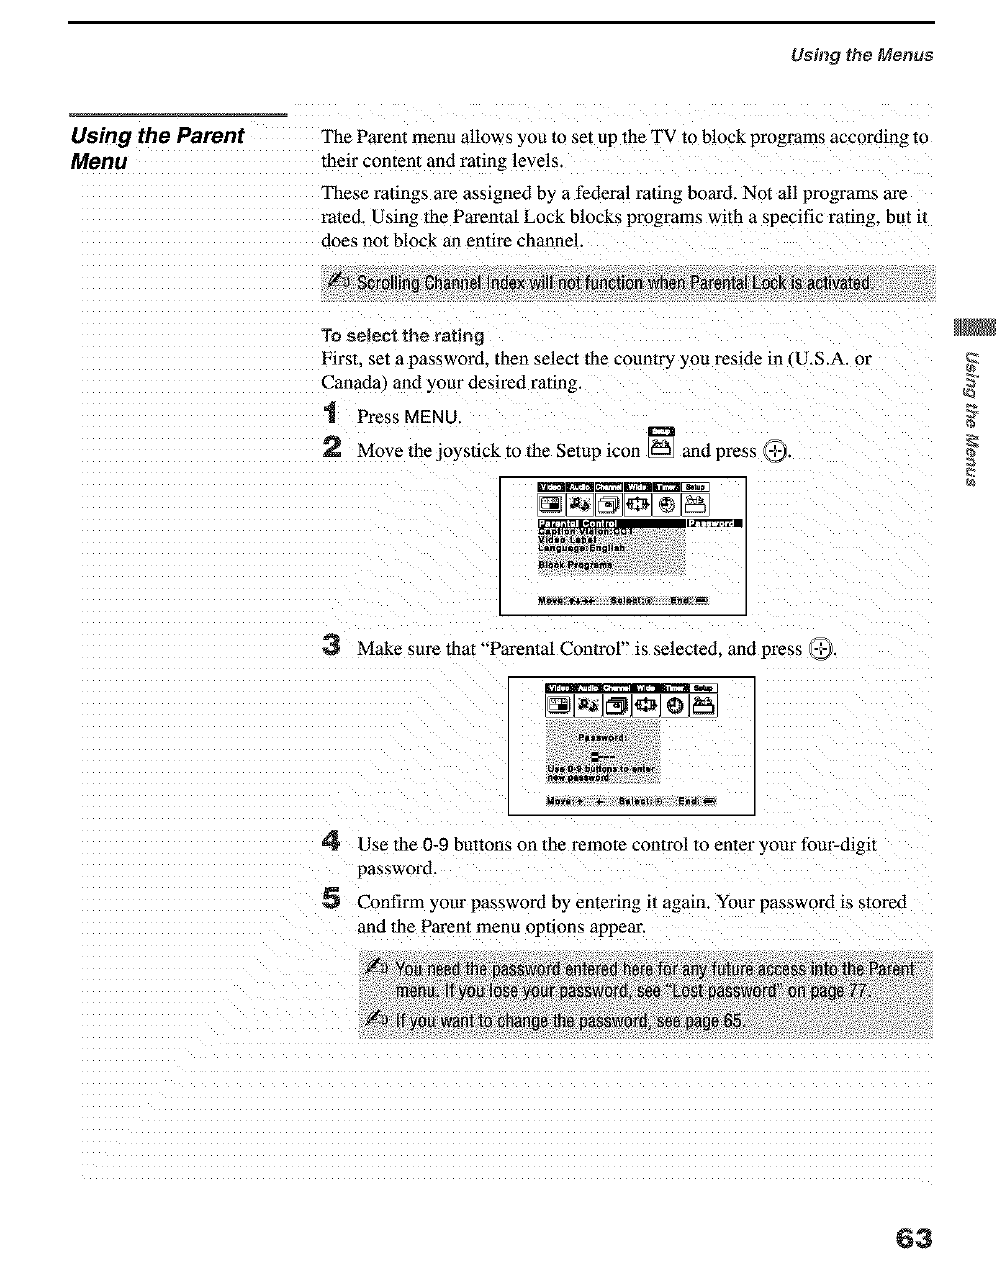
Using the Menus
Using the Parent The Parent menu allows you to set up the TV to b!ock programs according to
Menu their content and rating levels.
These ralings are assigned by a federal rating board. Not all programs are
rated, Using the Parental Lock blocks programs with a specific rating, but it
does not block an entire channel.
To selectthe rating
First. set a password, then select lhe country you reside in U.S.A. or
Canada) and your desired rating.
1 Press MENU.
Move the joystick to lhe Setup icon [] and press @.
Make sure that "Parental Control" is selected, and press
4 Use the 0-9 buttons on the remote control to enter your four-digit
password.
Confirm your password by entering it again. Your password is stored
and the Pm'ent menu opuons appear.
63
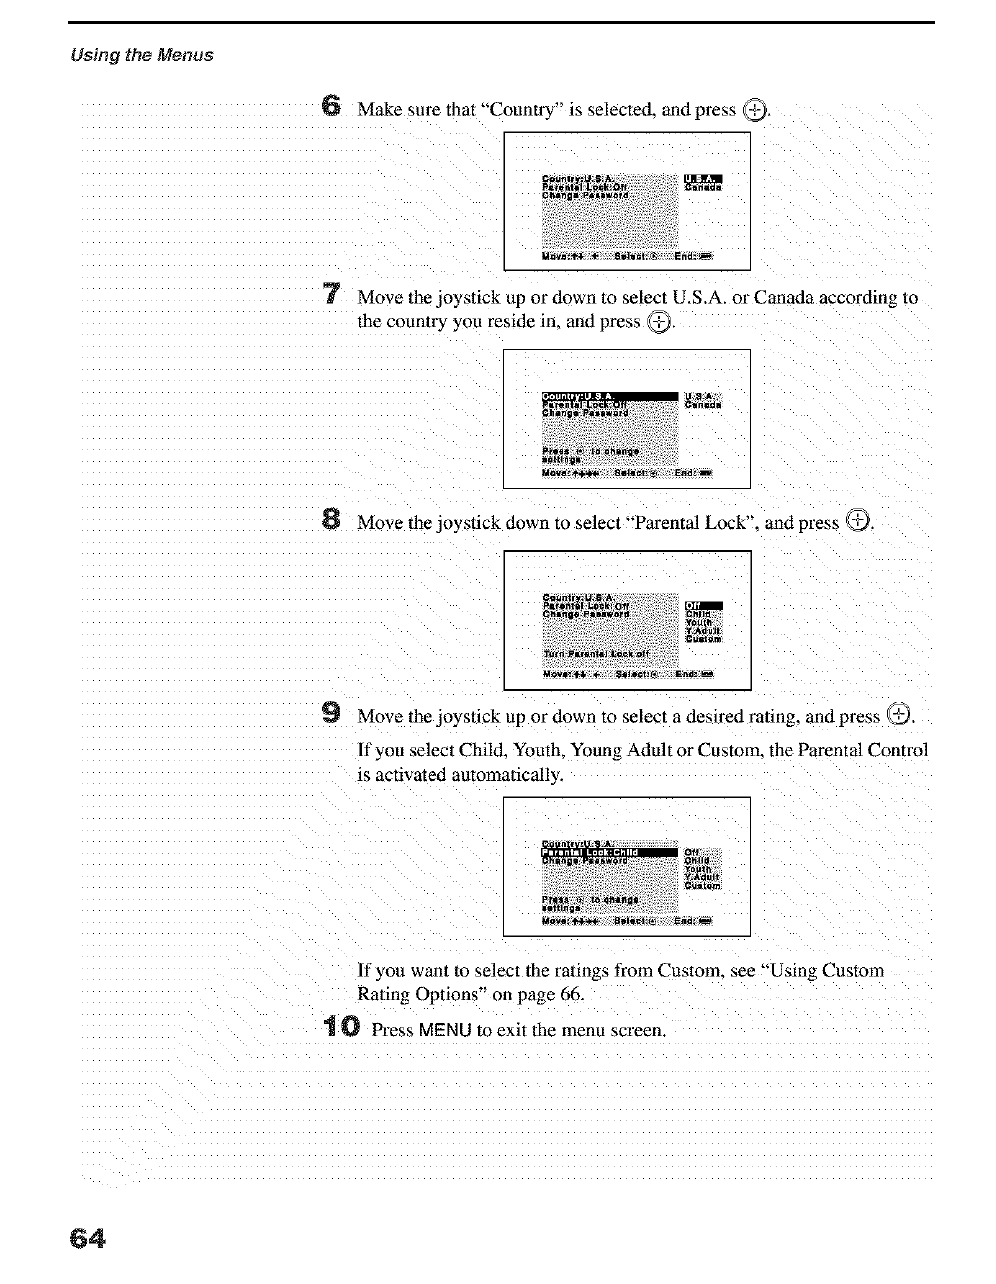
Using the Menus
6 Make sure that "Country" is selected, and press 2,,._,
Gc,¢r, lr ItI .II.A.
Par_.t*l_n_k/OH
Ohlngll Palll_tQ_d
14 llvl:,l*_ 4. tlt*lwct: t_ End:_
7 Move the joystick up or down to select U.S.A. or Canada according ro
the country you reside in. and press _,
N,Dml: _s.,,,_¢,. 8elll_tzl_ End:_
6 Move the joystick down to select "Parental Lock". and press @.
9Move the joystick up or down to select a desired rating, and press 7,._.
If you select Child. Youth. Young Adult or Custom. the Parental Control
is activated automatically,
If you want to select the rulings from Custom_ see "Using Custom
Rating Options" on page 66
_ Press MENU to exit the menu screen.
64
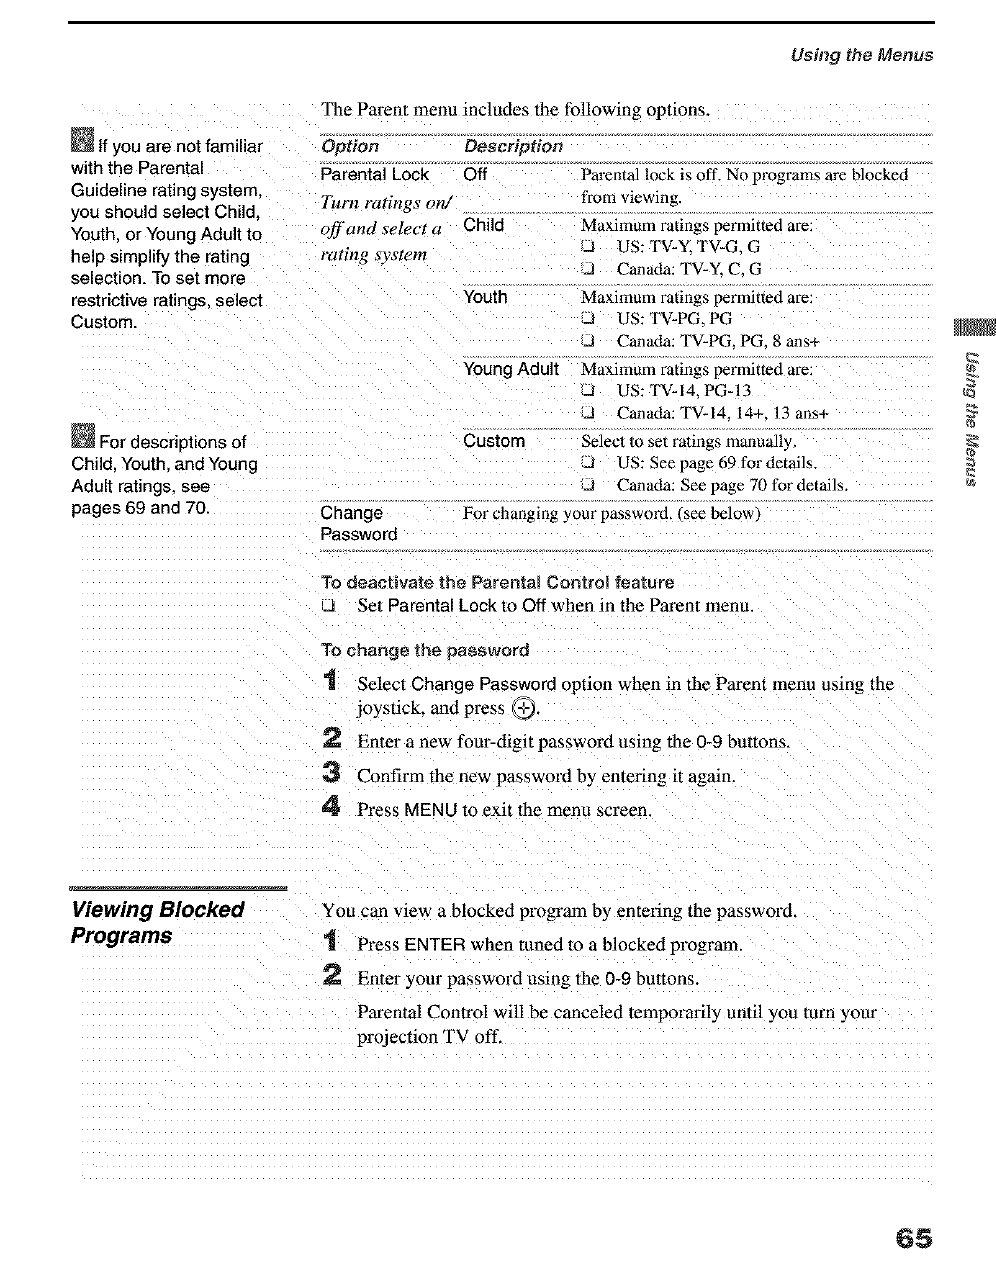
Using the Menus
The Parent menu includes the following options.
If you are not familiar
with the Parental
Guideline rating system.
you should select Child
Youth. or Young Adult to
help simplify the rating
selection. To set more
restrictive ratings, select
Custom.
Option Descrtption
Parental Lock Off
Turn ratings on/
off and select a Child
rating _vs_em
Youth
Parental kxzk is oft'. No programs are blocked
from viewing.
Maximum ratings permitted are:
J US: TV-Y. TV-G. G
d Canada: TV-Y, C. G
Maximum ratings permitted are:
J US: TV-PG. PG
J Canada: TV-PG. PG. 8 alas-,
_For descriptions of
Child. Youth. and Young
Adult ratings, see
pages 69 and 70 Change
Password
Young Adult
Custom
Maximum ratings permitted are:
dUS: TV-14. PG-13
d Canada: TV-14. 14+, 13 ans+
Select to set ratings manually,
d US: See page 69 for details.
d Canada: See page 70 for details.
For changing your password. (see below)
To deactivate the Parental Control feature
,J Set Parental Lock to Off when in the Parent menu.
To change the password
1 Select Change Password option when in the Parent menu using the
joystick, and press 9.
2 Enter a new four-digit password using the 0-9 buttons.
3 Confirm the new passwmxl by enteFmg it again.
4 Press MENU to exit the menu screen.
_b
Viewing Blocked
Programs
You can view a blocked program by entering the password.
"1 Press ENTER when tuned to a blocked program.
Enter your password usin_ the 0-9 buttons.
Parental Control will be canceled temporarily until you turn yore"
projection TV off.
65
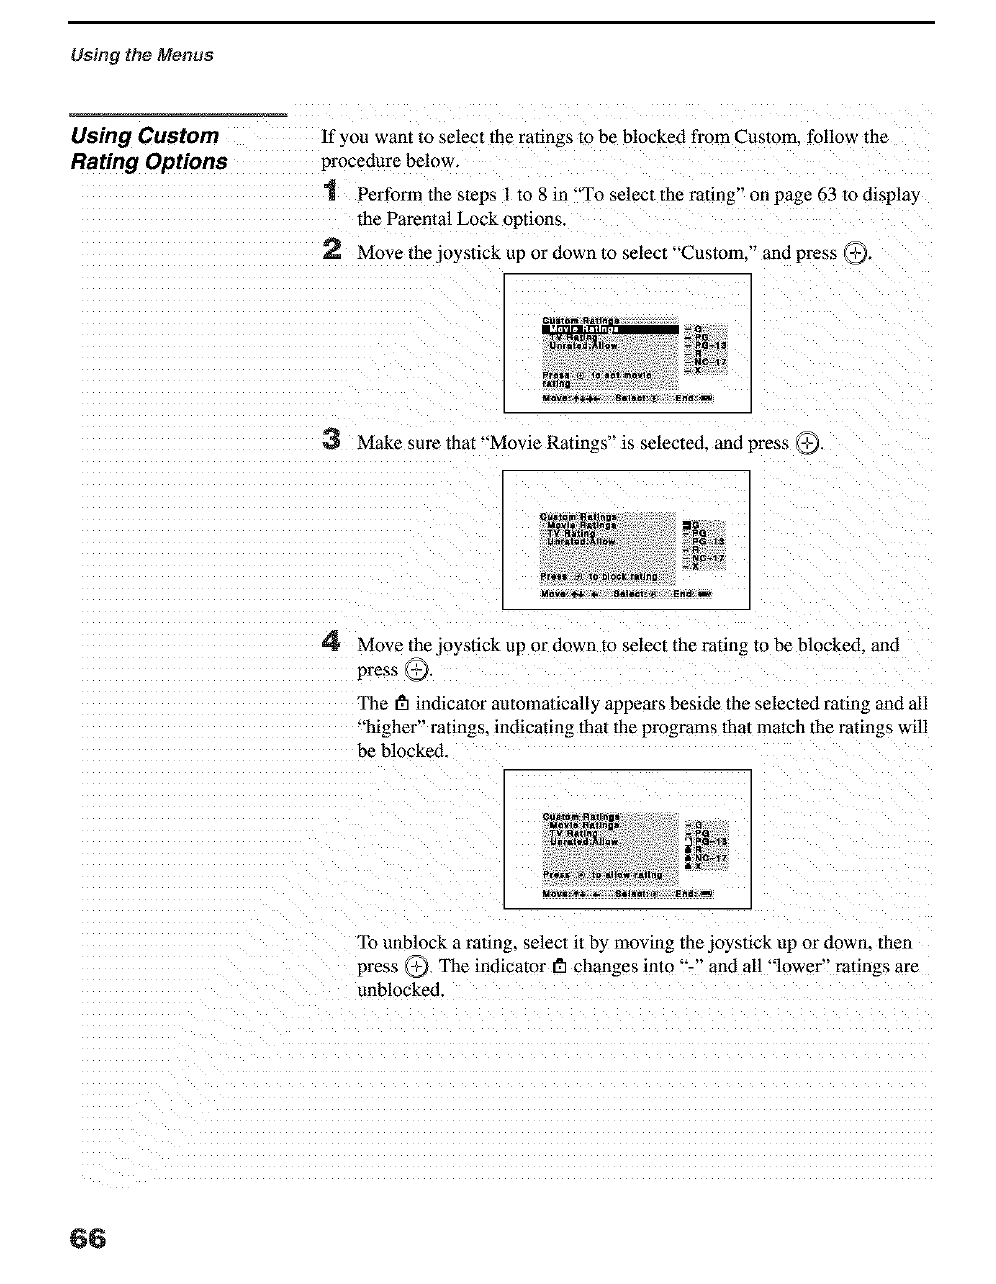
Using the Menus
Using Custom
Rating Options
If you want to select the ratings to be blocked from Custom. follow the
procedure below.
1 Perform the steps l to 8 in "To select the rating" on page 63 to display
the Parental Lock options.
2 Move the joystick up or down to select "'Custom." and press 9.
3 Make sure that "'Movie Ratings" is selected, and press 7_.
4 Move the joystick up or down to select the rating m be blockexL and
press _.
The gl indicator automatically appears beside the selected rating and all
"higher" ratings, indicating that the programs that match the ratings will
be blocked. 1
I
To unblock a rating, select it by moving the joystick up or down. then
press _ The indicator gl changes into "-" and all "lower" ra_ings are
unblocked.
66
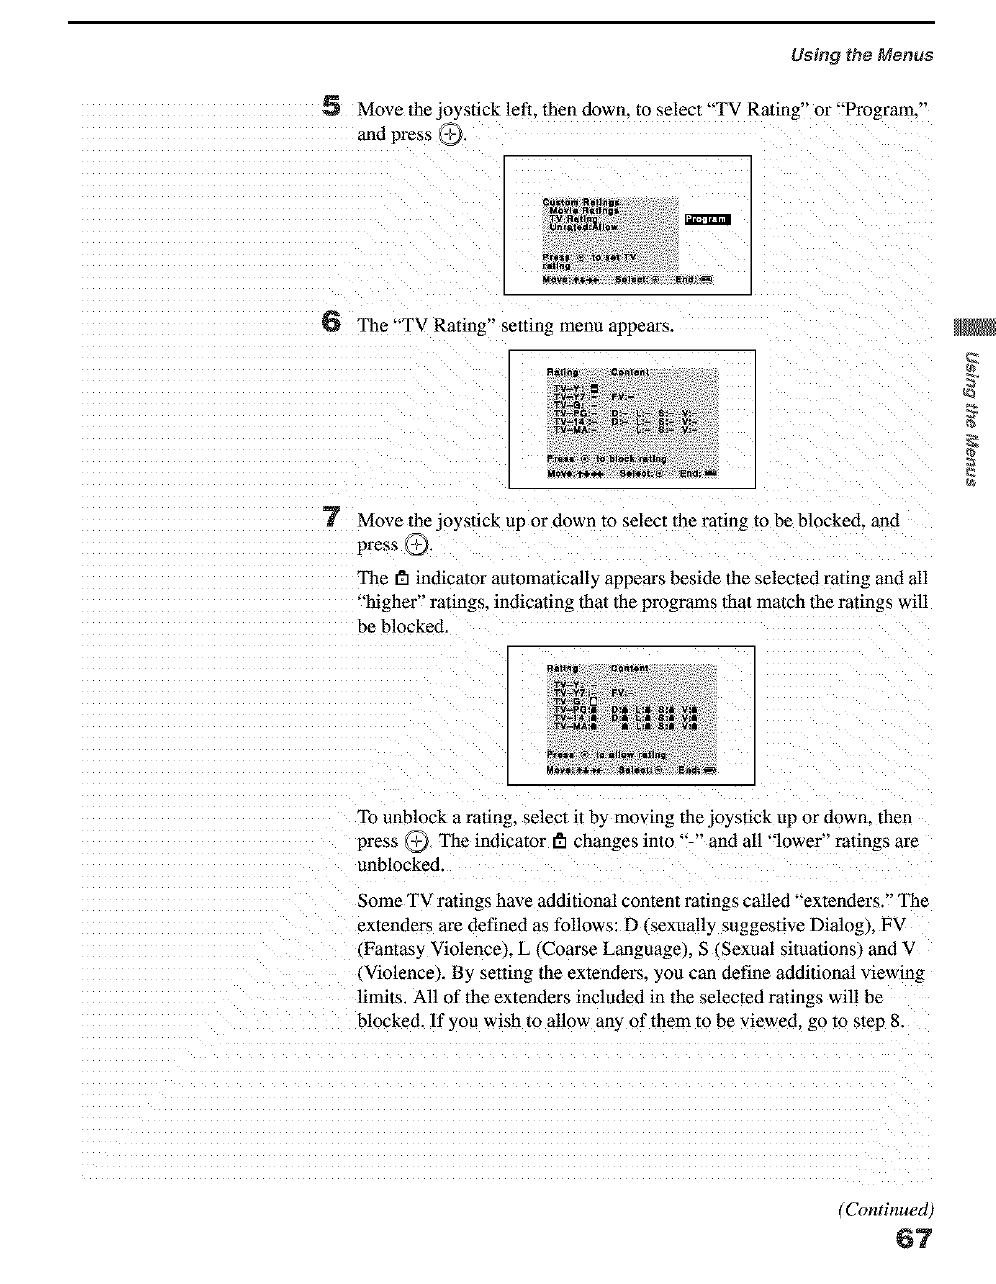
Using the Menus
6 Move the joystick left. then down. to select "TV Rating" or "Program."
and pres_ _.
6 The "TV Rating" setting menu appears.
7 Move the joystick up or down to select 1he rating to be blocked, and
press 9.
The _5 indicator antomatically appears beside the selected rating and all
"higher" ratings, indicating thai the programs that match the ratings will
be blocked.
To unblock a rating, select it by moving the joystick up or down. then
press _ The indicator _ changes into "-" and all "lower" ratings are
unblocked.
Some TV ratings have additional content ratings called "extenders." The
extenders are defined as follows: D sexually suggestive Dialog), FV
(Fantas) Violence), L _Coarse Language/. S (Sexual situafions_ and V
(Violence). By setting the extenders, you can define additional viewing
limits. All of the extenders included in the selected ratings will be
blocked. If you wish to allow an', of them to be viewed, go to slep 8.
(Continued)
67
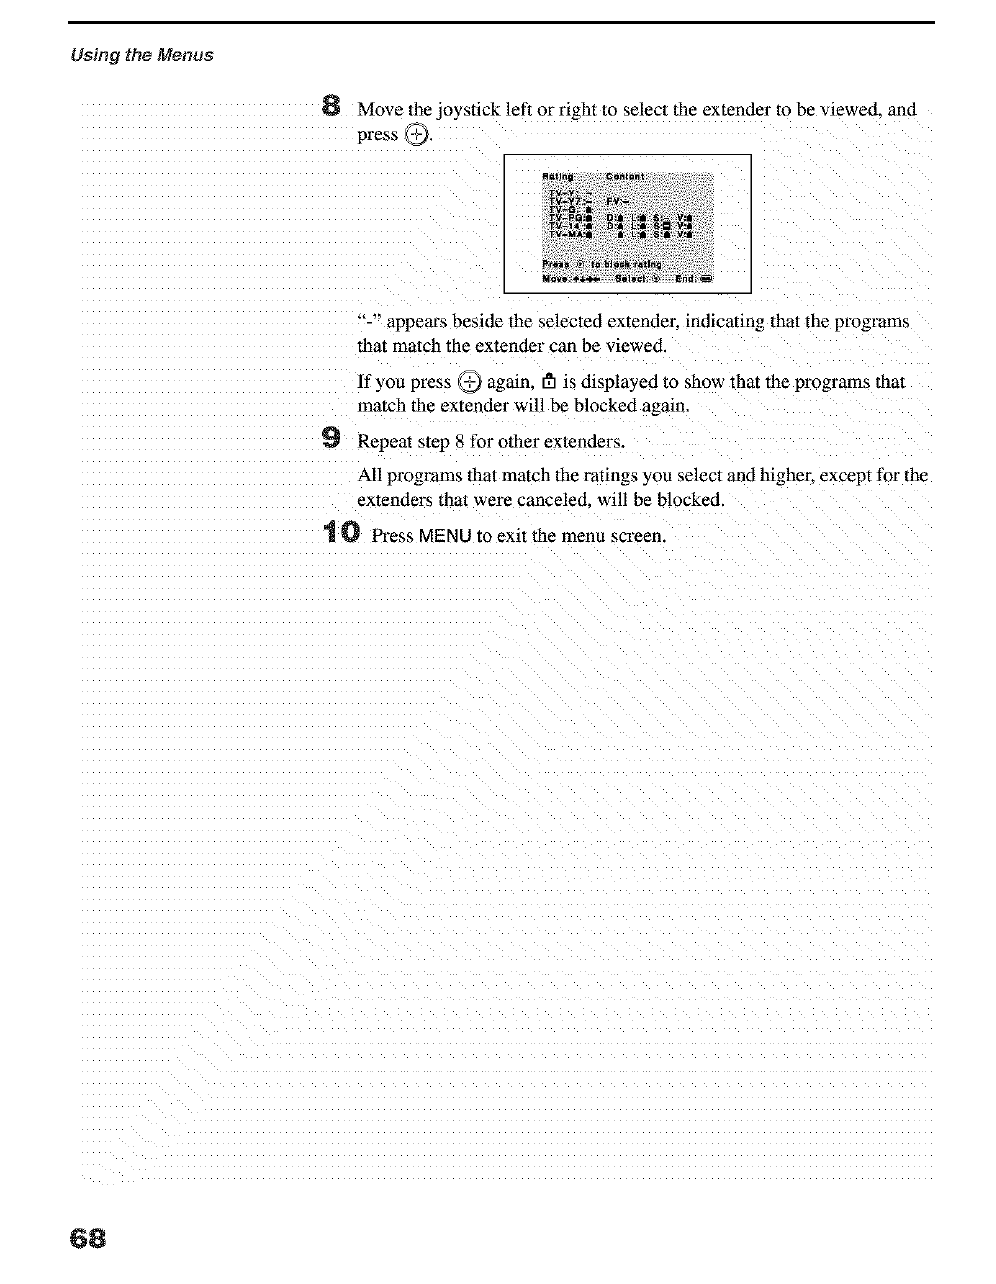
Using the Menus
6 Move the joyslick left or right to selecl the extender to be viewed, and
press _.
"-" appears beside the selected extender, indicating that the programs
that match the extender can be viewed.
If you press @ again, gh is displayed to show that the programs that
match the extender will be blocked again.
9 Repeat s/ep 8 for other extenders.
All programs 1hat match lhe ratings you selecl and higher, except for the
extenders that were cancelecL will be blocked.
t O Press MENU to exit the menu screen.
68
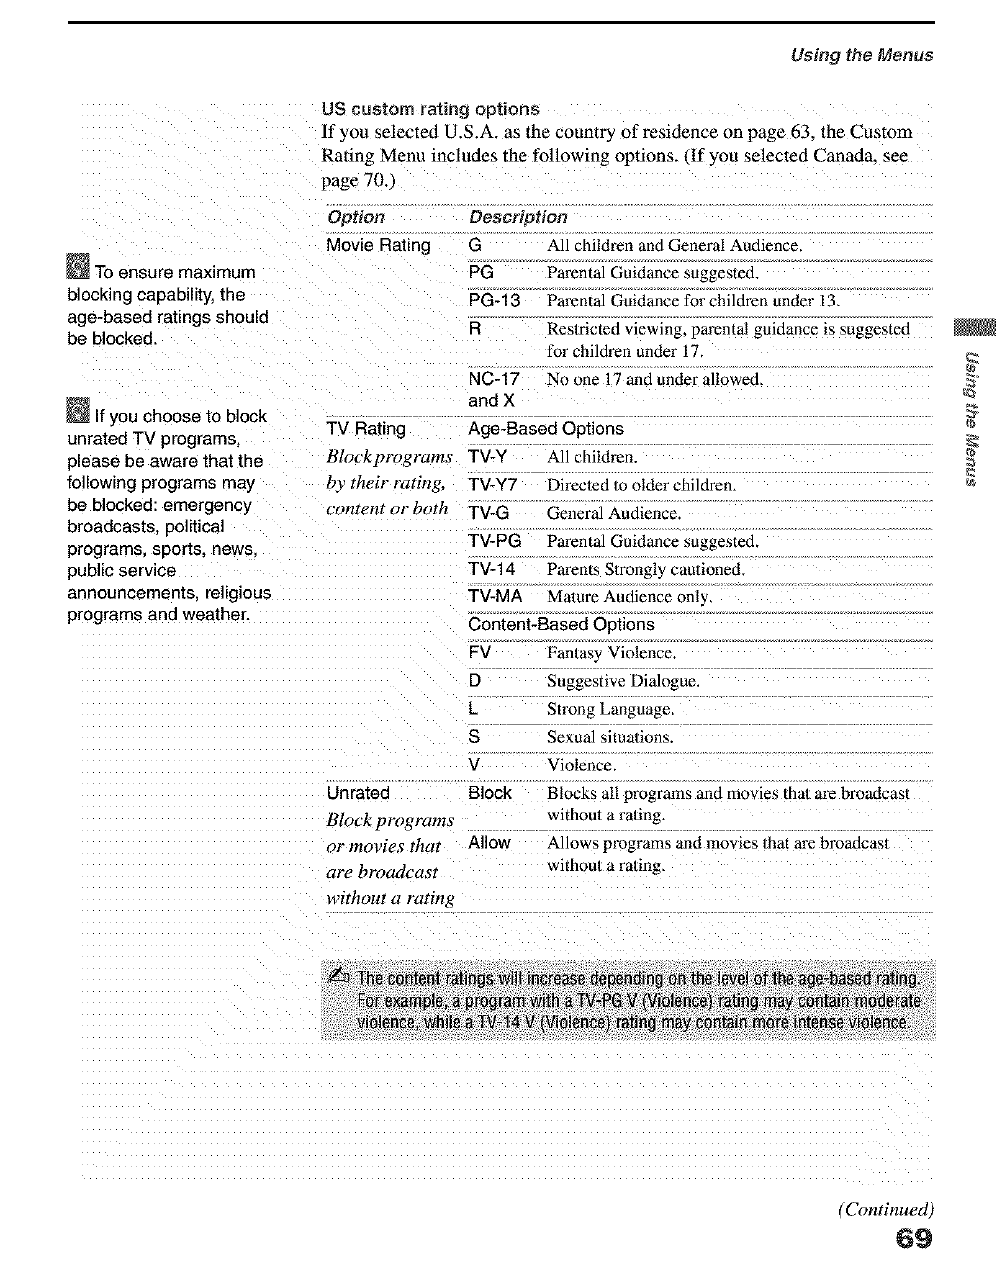
Using the Menus
US custom rating options
If you selected U.S.A. as the country of residence on page 63. the Custom
Rating Menu includes the following options. (If you selected Canada. see
page 70./
Option
Movie Rating
_To ensure maximum
blocking capability, the
age-based ratings should
be blocked.
_lf you choose to block
unrated TV programs,
please be aware that the
following programs may
be blocked: emergency
broadcasts, political
programs, sports, news,
public service
announcements, religious
programs and weather.
Description
G All :hildren and General Audience
PG Parental Guidance suggested.
PG-f 3 Parental Guidance for children under 13.
RReslricted viewing, parental guidance is suggested
for children under 17.
No one 17 and under allowed.NC-17
and X
TV Rating Age-Based Options
Blockprograms TV-Y All zhildren.
by their rating, TV-Y7 Directed m older children.
content or both TV-G General Audience.
TV-PG Parental Guidance suggested.
TV-14 Parents Strongl 3 cautioned
TV-MA Mature Autfience only,
Content-Based Options
FV Fan/as 3 Violence
D Suggestive Dialogue.
L Strong Language,
SSexual situalions.
VViolence.
Unrated Block Blocks all programs and movies thai ale broadcast
Block programs without a ra/ing,
or movies that Allow Allows programs and movies 1hat are broadcasl
are broadcast withou/a radng.
without a rating
(Continued)
69

Using the Menus
Canadian custom rating options
If you selected Canada as the countr 3 of residence on page 63. the Custom
Rating Menu includes the following options. (If you selected U.S.A.. see
page 69.,
Option Description
English Rating C
Cg*
G
PG
14+
18.
French Rating G
8 ans+
13 ans+
16 ans+
18 ans+
USA Rating
All children.
Children 8 years and oMer.
General programming.
Parental Guidance.
Viewers 14 and older
Adult programming,
General programming.
Not recommended for young childrem
No1 lecommended for ages under 13.
No| lecommended for ages under 16.
Programming restricted to adulls,
See "TV Rating" on page 69 for details.
70

Programming the Remote Control
The remote control is preset to operate Sony brand video equipment.
Sony Switch Position Programmable
Equipment on Remote Control Code Number
Beta, ED Beta VCRs AVI 303
8 mm VCR AV2 302
VHS VCR AV3 301
DVD Player DVD 751
If you have video equipment other than Sony brand that you want to control
with the projection TV's remote control, use the following procedures to
program the remote control.
From the "Manufacturer's Codes" listed on page 73, select the three-digit
code number for the manufaclurer' s code for yam" component. If more than
one code number is listed, start with the number listed first. Use the code
number to complete the following procedure.
-2
To program a cable box or asatelIRe receiver
1 Open the panel of the remote control.
2 Press CODE SET inside the panel.
3 Close the panel and press SAT/CABLE (FUNCTON).
4 Enter the th "ee-digit manafactu "er s code number using the 0-9 buttons.
5Press ENTER.
6 To check if the code number works, aim the projection TV's remote
control at the component and press the green POWER button that
corresponds with that component. If it responds, the programming is
completed. If not, try using the other codes listed for that manufacturer.
7t
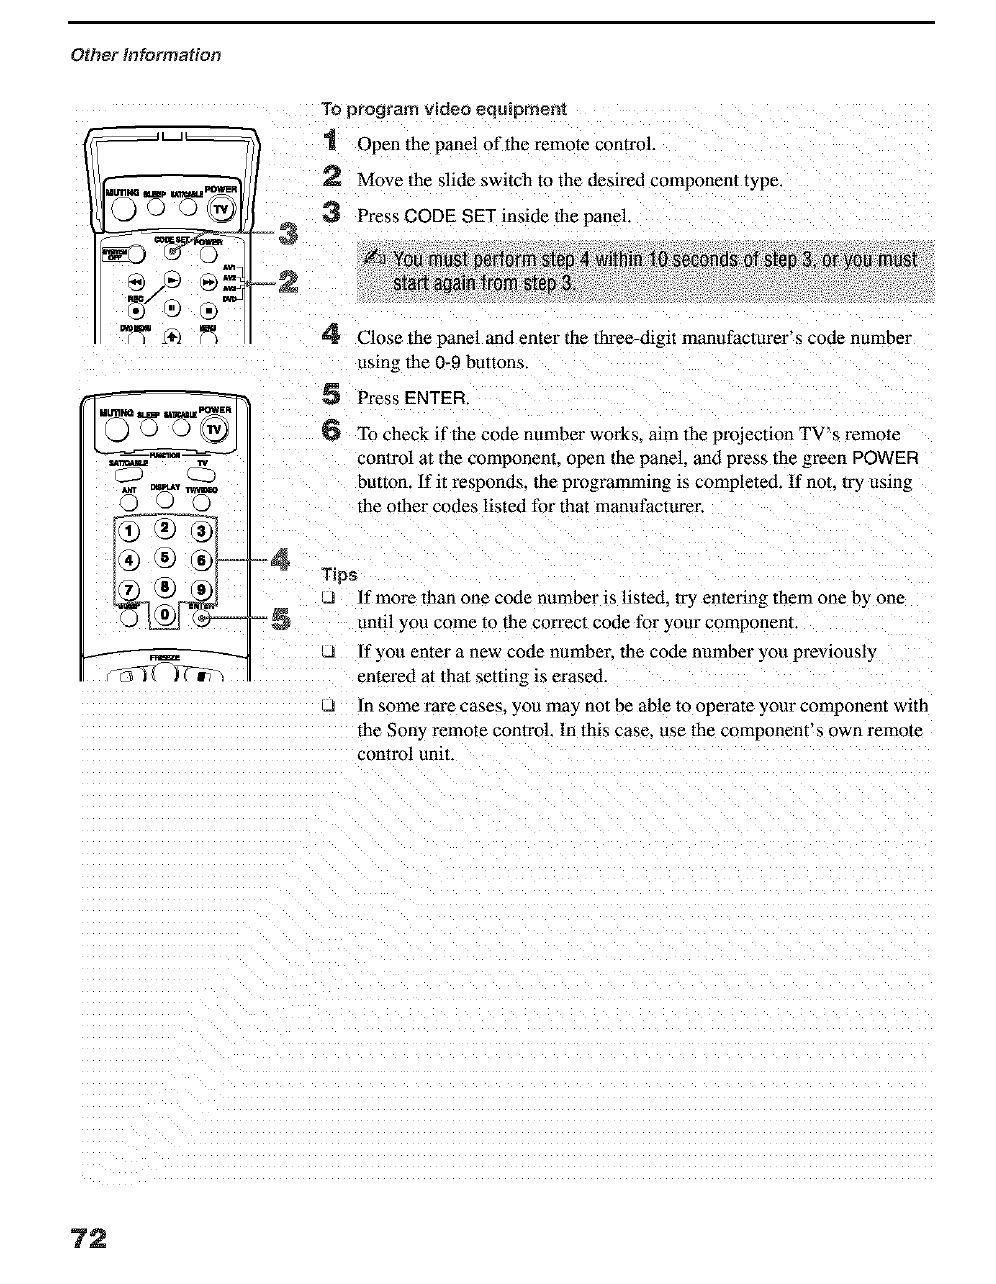
Otl_er information
=3
AVl
_J
=5
To program video _quipment
1 Open the panel of the remote control.
2 Move the slide switch to the desired component type.
Press CODE SET inside the panel.
4 Close the panel and enter the three-digit manufacturer's code number
using the 0-9 buttons.
5 Press ENTER.
6 To check if the code number works, aim the projection TV's remote
control at the component, open the panel, and press the green POWER
button. If it responds, the programming _s completed. If not. try using
the other codes listed for that manufacturer.
_s
If more than one code number is listed, try entering them one by one
until } ou come to the co_ect code for your componeur.
J If you enter a new code number, the code number you previously
entered at that setting is erased.
cJ In _ome rare cases, you ma) not be aNe 1o operate your component with
the Sony remote control. In this case. use the component's own remote
control unit
72
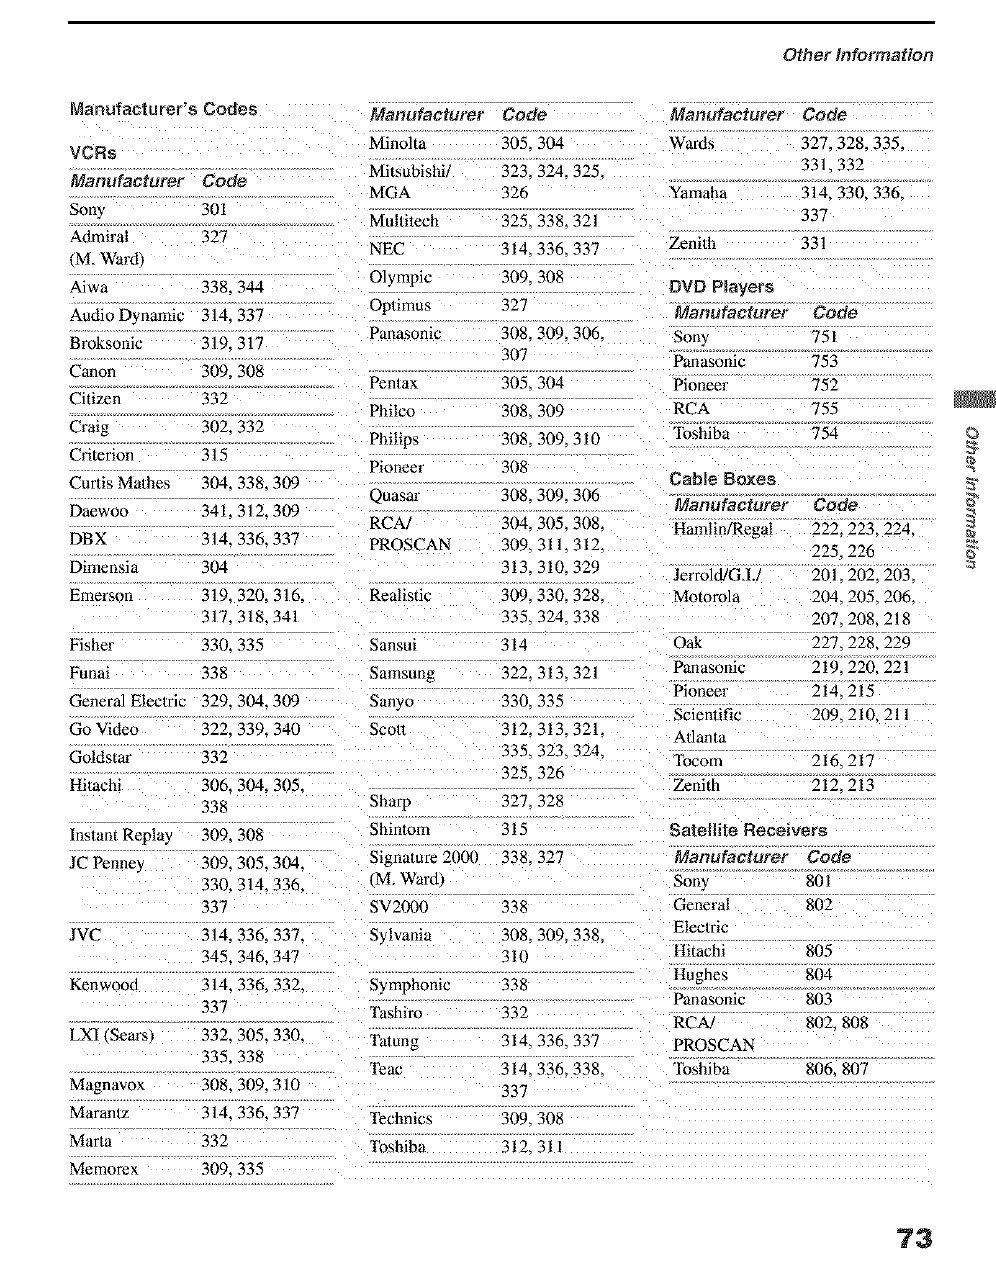
Other Information
Manufacturer's Codes
VCRs
Manufacturer Code
Sony 301
Admiral 327
(M. Ward1
Aiwa 338. 344
Audio Dynamic 314. 337
Broksonic 319. 317
Canon 309. 308
Citizen 332
Craig 302. 332
Criterion 315
Curtis Ma/hes 304. 338. 309
Daewoo 341 312.309
DBX 314. 336. 337
Dimens]a 304
Emerson 319. 320. 316.
317.318. 341
Fisher 330. 335
Funai 338
General Electric 329. 304. 309
Go Video 322. 339. 340
Gddstar 332
Hitachi 306. 304. 305.
338
Instant Replay 309. 308
JC Penne'v 309. 305. 304.
330. 314. 336.
337
JVC 314. 336. 337.
345. 346. 347
Kenwood 314. 336. 332.
337
LXl (Sears) 332. 305.330.
335. 338
Magnavox 308. 309. 310
Maranlz 314. 336. 337
Marta 332
Memorex 309. 335
Manufacturer Code Manufacturer Code
Minolta 305. 304 Wards 327. 328. 335.
Mitsubishi/ 323. 324. 325. 331. 332
MGA 326 Yamaha 314. 330. 336.
Multitech 325. 338. 321 337
NEC 314. 336. 337 Zenith 331
Olympic 309. 308 DVD Players
Oplimus 327 Manufacturer Code
Panasonic 308. 309. 306. Sony 751
307 Panasonic 753
Pen/ax 305. 304 Pioneer 752
Philco 308. 309 RCA 755
Philips 308. 309. 310 "Ibshiba 754
Pioneer 308 Cable Boxes
Quasar 308. 309. 306 Manufacturer Code
RCA/ 304. 305. 308. l+amlin/Regal 222. 223. 224.
PROSCAN 309. 311. 312. 225. 226
313. 310. 329 Jerrold/GJ.! 201. 202. 203.
Realistic 309. 330. 328. Motorola 204. 205. 206.
335. 324. 338 207. 208. 218
Sansui _14 Oak 22- 228,229
Samsung 322.313.321 Panasonic 219. 220,221
Pioneer 214. 215
Sanyo 330. 335 Scientific 209.210.211
Sco/t 312. 313.321. Adanta
335.323.324. Tocom 216. 217
325. 326 Zenith 212. 213
Sharp 327. 328
Shintom 315 Satellite Receivers
Signature 2000 338. 327 Manufacturer
(M. Wardt Sony
SV2000 338 General
Sylvania 308. 309. 338. Elec/ric
310 Hitachi
Symphonic 338 Hughes
Panasonic
Tashiro 332 RC,_
Tatong 314. 336. 337 PROSCAN
Code
801
8O2
805
8O4
803
802, 808
Teac 314. 336. 338. Toshiba
337
806. 807
TEchnics 309. 308
'l_shiba 312. 3ll
©
73
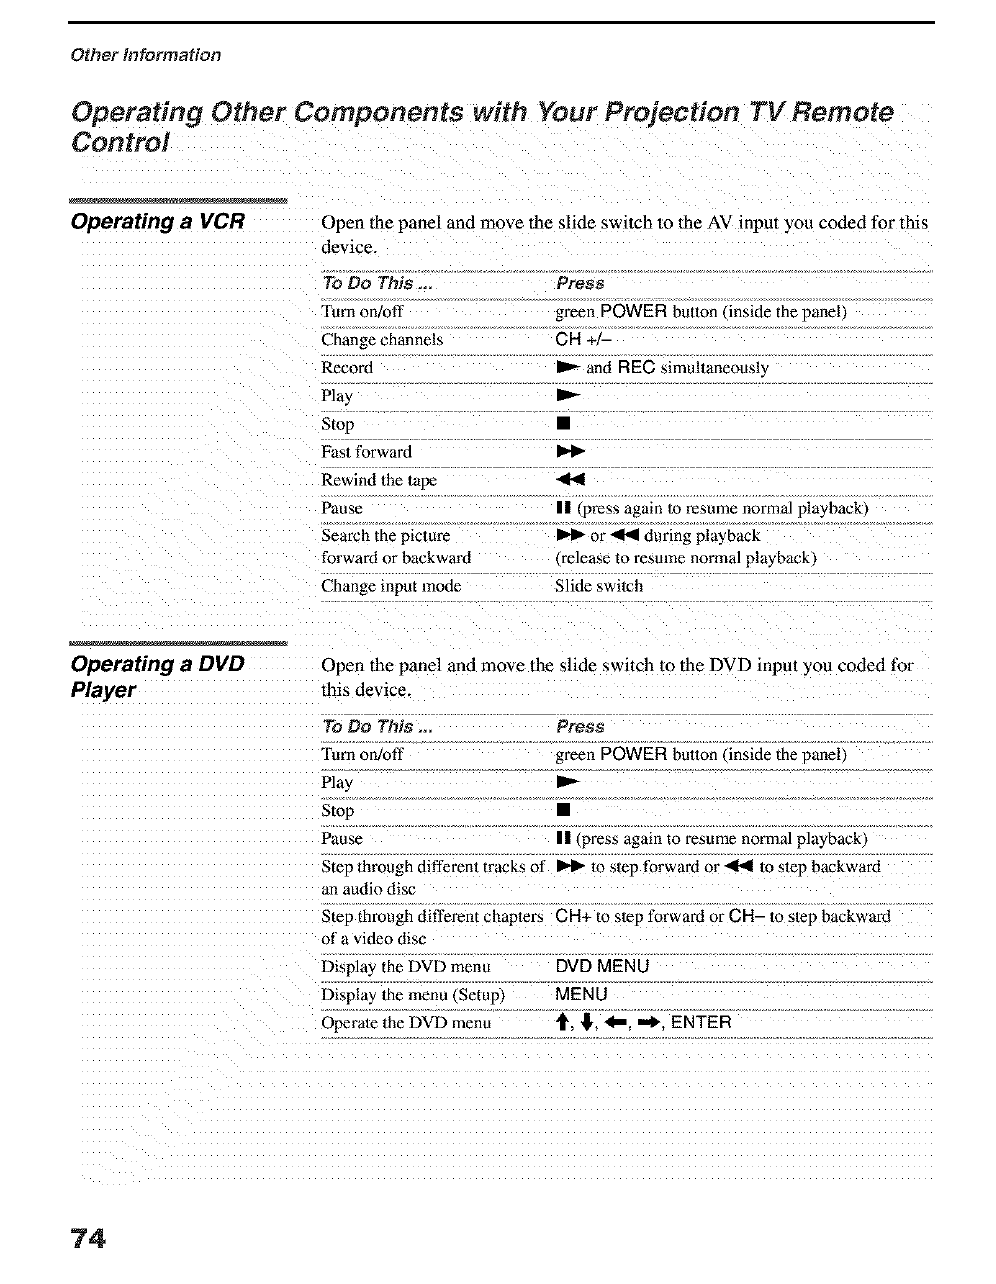
Other Information
Operating Other Components with Your Projection TV Remote
Control
Operating a VCR Open lhe panel and move the slide switch to the AV input you coded for this
device.
To Do This _.
Turn on/off
Change channels
Record
Play
Stop
Fas/tbrward
Rewind the 1ape
Pause
Search the picture
forward or backward
Change input mode
Prsss
green POWER bulton/inside the panell
CH+J-
P'- and REC simultaneously
p.-
II _press again to resume normal playback/
or _ during playback
_release 1o resume normal pla* back_
Slide switch
Operating a DVD
Player
Open the panel and move lhe slide switch to the DVD input you coded for
this device.
To Do This ... Press
I'urn olvoff green POWER button/inside the oanell
Play
Stop •
Pause || (press again to resume normal playback_
Step through different tracks of _ m step forward or _ m step backward
an audio disc
Step through different chapters CR+ to step forward or GR- to slep backwaM
of a video disc
Display the DVD menu DVD MEN O
Display the menu (Setup) MENU
Operate 1he DVD menu "_, !J', <_, "_, ENTER
74
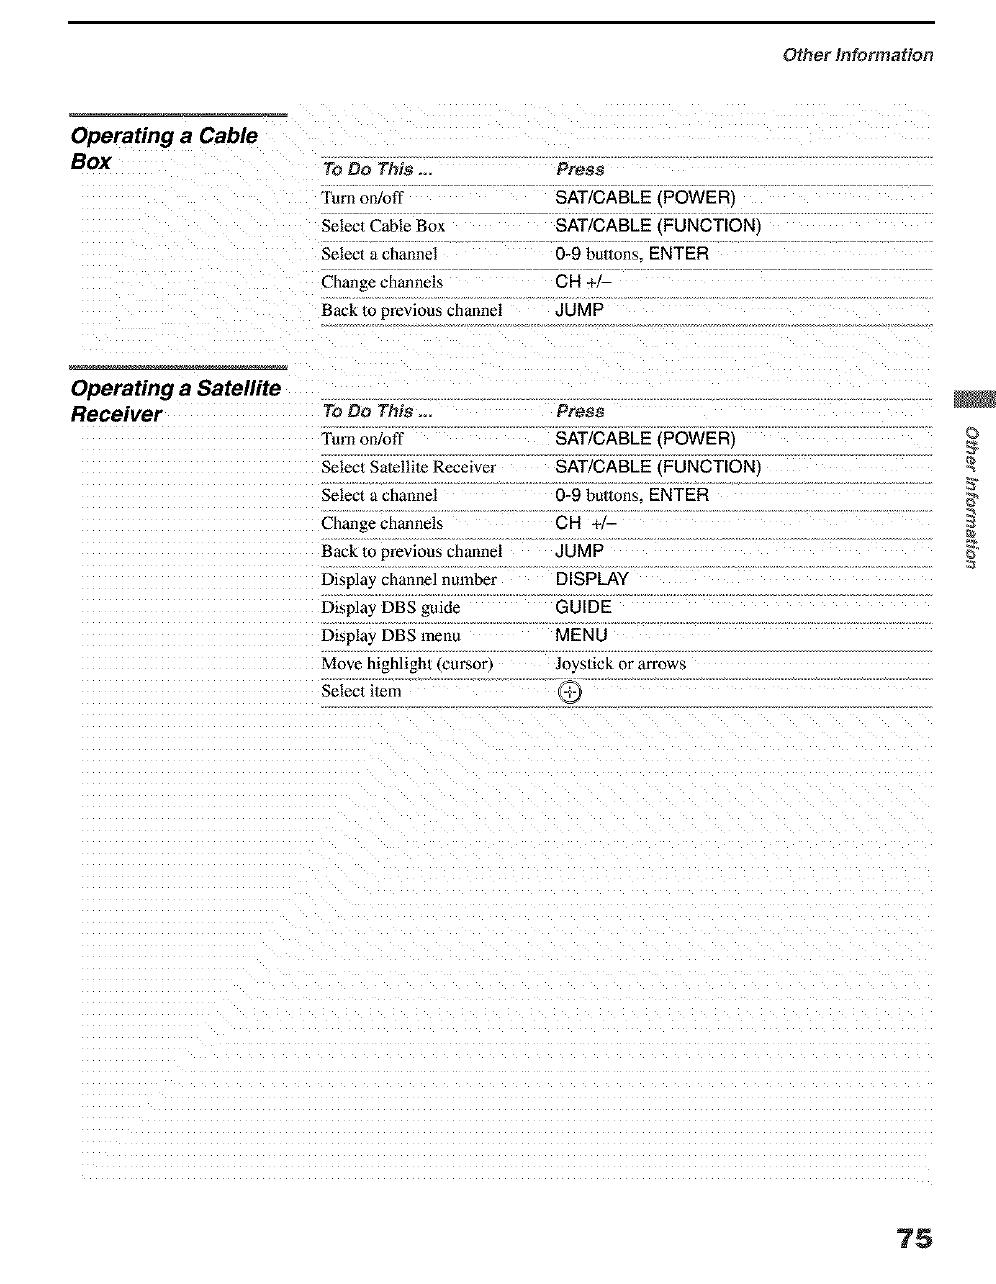
Other Information
Operating a Cable
Box To Do This _.
Furn on/oft
Selec| Cable Box
Select a channel
Change channels
Back 1oprevious channel
Press
SAT/CABLE (POWER_
SAT/CABLE {FUNCTION_
0-9 buttons. ENTER
CH .-,-
JUMP
Operating a Satellite
Receiver To Do This ...
Turn on/off
Selecl Satellite Receiver
Select a channel
Change channels
Back lo previous channel
Display channel nuraber
Display DBS guide
Display DBS menu
Move highlight €cursor,
Selec| ilem
Press
SAT/CABLE (POWER)
SAT/CABLE (FUNCTIONI
0-9 buttons. ENTER
CH ÷,-
JUMP
DISPLAY
GUIDE
MENU
Joys/ick or arrows
©
75
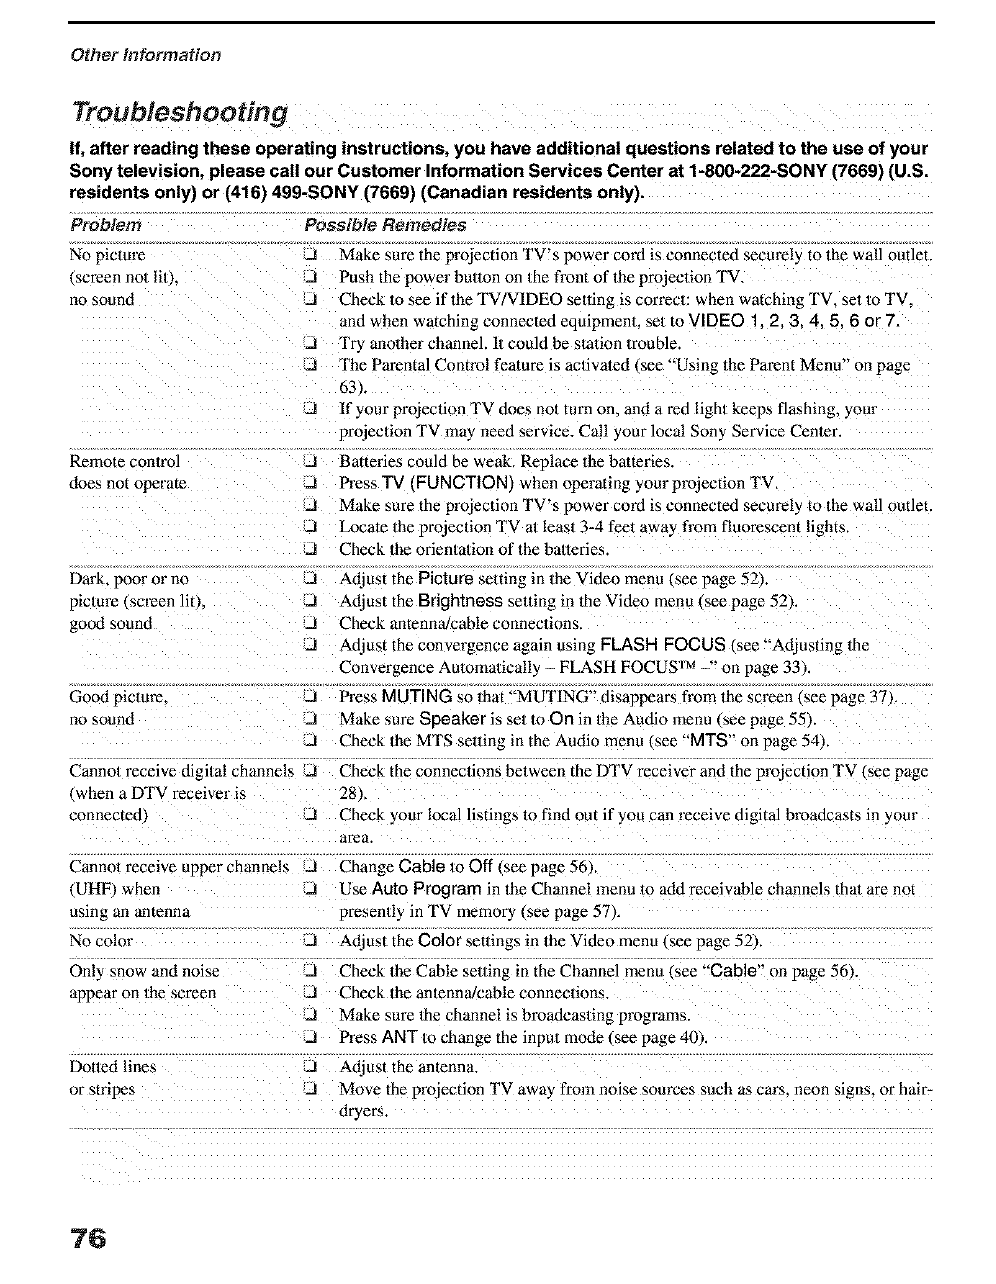
Other information
Troubleshooting
If, after reading these operating instructions, you have additional questions related to the use of your
Sony television, please call our Customer Information Services Center at 1-800-222-SONY (7669) (U.S.
residents only) or (4161 499-SONY (7669) (Canadian residents only).
Problem Possible Remedies
No pictm_
.screen no/lit J,
ilo sound
Remote conlro]
does not operate
J Make sure the projection TV's power cord is connected secme!_ to the wall outlet.
Push the power hulton on Ihe front of the projection TV.
J Check m see if the TV VIDEO selting is correct: when watching TV, set to TV,
and when watching connected equipmenl, set to VIDEO 1, 2, 3.4.5.6 or 7.
J Try another channel. 1/could be station trouble.
J The Parental Control feature is activated (see "Using the Parent Menu" on page
63 L
J If your projection TV does not turn on. and a ted light keeps flashing, your
projection TV ma) need service. Call your local Sony Service Center.
J Batteries could be weak. Replace the batteries.
J Press TV IFUNCTION} when operat rig your projection TV.
.J Make sure the projection TV's power cord is connected securel_ to/he wall outlet.
JLocate 1he projection TV al least 3-4 feet away from fluorescent lights.
J Check the orien/a/ion of the balteries.
Dark, poor or 11o J
oic/ure (smeen lit1.
good sound
Good picture.
no sound
Cannot receive digital channels
, when a DTV receiver is
connected3
Adjust the Picture setting in the Video menu [,see page 52'_
d Adjust the Brightness setdng in the Video rnen_ tsee page 52k
.d Check antenna/cable connections.
A Adjust the convergence again using FLASH FOCUS (see "Adjusting the
Convergence Automatically - FLASH FOCUS TM -" on page 33k
d Press MUTING so that "MUTING" disappears from the screen (see page 37).
A Make sure Speaker is se/to On in/he Autfio menu csee pape 55k
dCheck the MTS setting in the Audio menu _see "MTS'" on page 541.
J Check the connections between the DTV receiver and the projection TV Isee page
28 _.
-I Check _our local listings m find out if you can receive digital broadcasts in yore
area.
Cannol receive upper channels _J Change Cable to Off isee page 56),
(UHI _ when .d Use Auto Program in the Channel menu m add receivable channels that are not
using an antenna presently in TV memory Lsee page 57/.
No color J Adjust the Color settings in the Video menu {see page 52/
Only snow and noise d Check the Cable selling in the Channel menu Lsee "Cable" on page 561.
appear on the screen J Check the antenna/cable connections.
J Make sure 1he channel is broadcasling programs.
d Press ANT to change the input mode (see page 40k
Doned lines J Adjust the antenna.
or stripes .J Move the projection TV awa2_ from noise sources such as cars, neon signs, or hair-
dryers
76
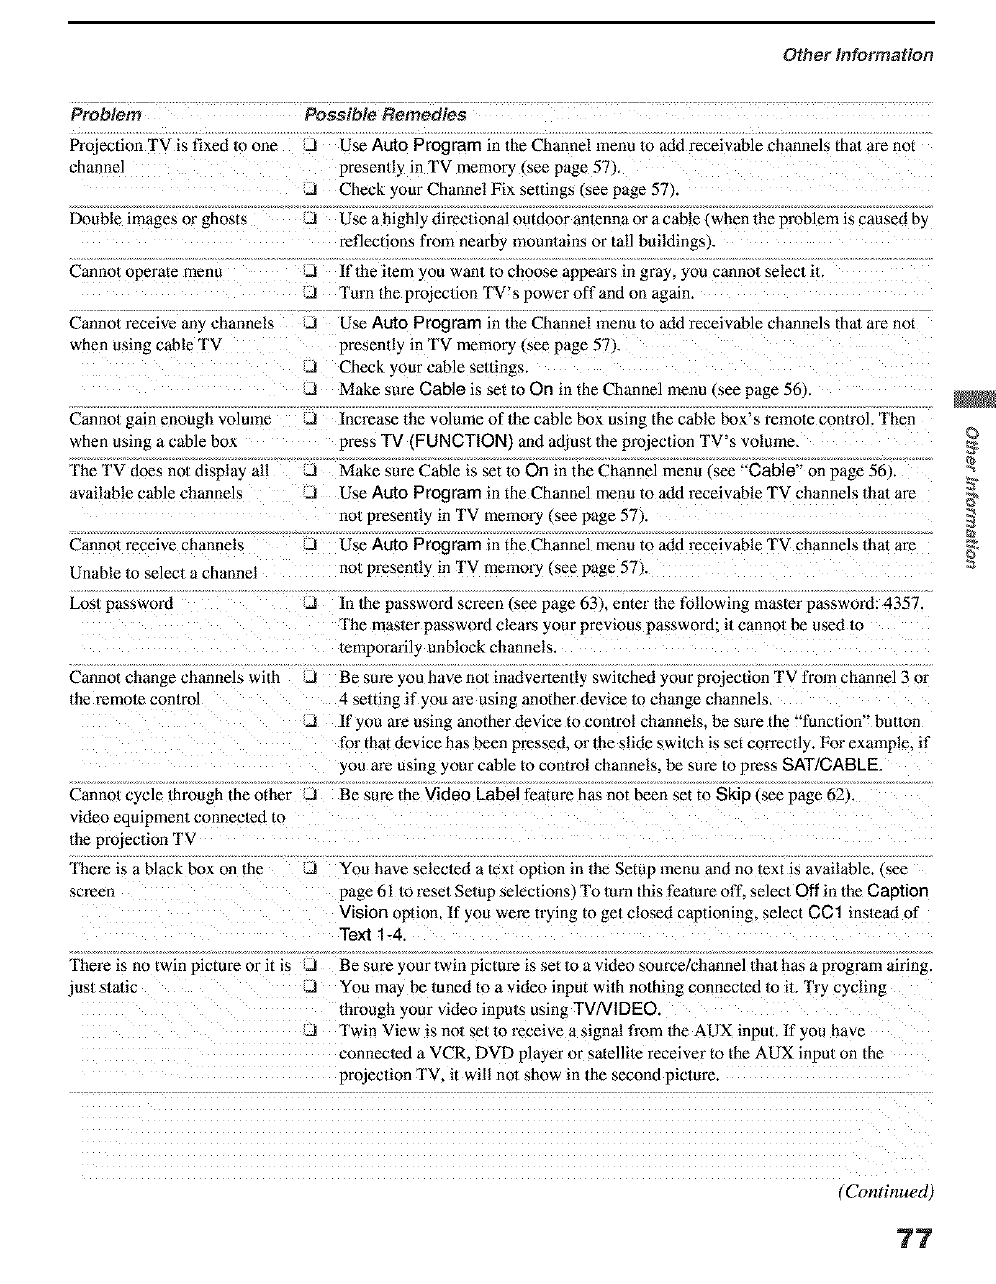
Other Information
Problem Possible Remedies
Projection TV is fixed to one JUse Auto Program in the Channel menu to add receivable channels thai are not
channel presently in TV memory (see page 57),
J Check your Channel Fix settings tsee page 57k
Double images or ghosts J Use a highly directional outdoor antenna or a cable __ hen the problem is caused by
reflections from nearby mountains or tall buildings I.
Cannot operate menu -1 If the item you want to choose appears in gray, you cannot selec/il.
J Turn the projection TV's power off and on again.
Cannot receive an_ channels J Use Auto Program in the Channel menu to add receivable channels thal are not
when using cable TV presently in TV memory _,seepage 57k
J Check your cable se/dngs,
J Make sure Cable is set to On in the Channel menu Isee page 56k
Cannot gain enough volume J Increase the volume of the cable box using the cable box's remote contmh Then
when usin_ a cable box press 3"5/(FUNCTION/and adjust the projection TV's volume,
The TV does not displa_ all J Make sure Cable is set to On in the Channel menu see "Cable" on page 561.
available cable channels _1 Use Auto Program in the Channel menu to add receivable TV channels that are
not presenlly in TV memory _,seepage 571.
Cannot receive channels 21 Use Auto Program in the Channel menu to add receivable TV channels that are
Unable 1o select a channel no_ presen/ly in TV memory (see page 57).
Los1 password JIn the password screen isee page 63), enter the following master password: 4357
The masler password clears your previous password: il cannol be used 1o
lemporafily unblock channels.
Cannot change channels with J Be sure you have no/inadverten/ly switched your projection TV from channel 3 or
lbe remote conlrol 4 selting if you are using another device m change channels,
J If you are using another device to connol channels, be sure the "function" bulton
for that device has been pressed, or the slide swilch is set correctly. For example, if
you are using your cable to control channels, be sure to press SAT]CABLE,
Cannoa cycle through the other !LI Be sm'e the Video Label feature has not been set to Skip (see page 62)
video equipment connected to
1be projection TV
Them is a black box on the
screen
You have selected a text option in the Setup menu and no text is available, see
page 61 m resel Selup selections, Fo turn this feat ure off. select Off in the Caption
Vision option, If you were trying to get closed captioning, select CC1 instead of
Text 1-4.
"I'here is no twin picture or it is JBesureyourtwinpictureissettoavideosourcelchannelthathasaprogramairing.
jus/slatic JYou may be luned to a video input with nothing connected 1o it. Try cycling
lhrough your video inputs using TV/VIDEO.
J Twin View is no1 se/to receive a signal from the AUX input, If you have
connected a VCR. DVD player or satellite receiver to the AUX input on the
projection TV. it will not show in the second picture.
(Continued)
?7
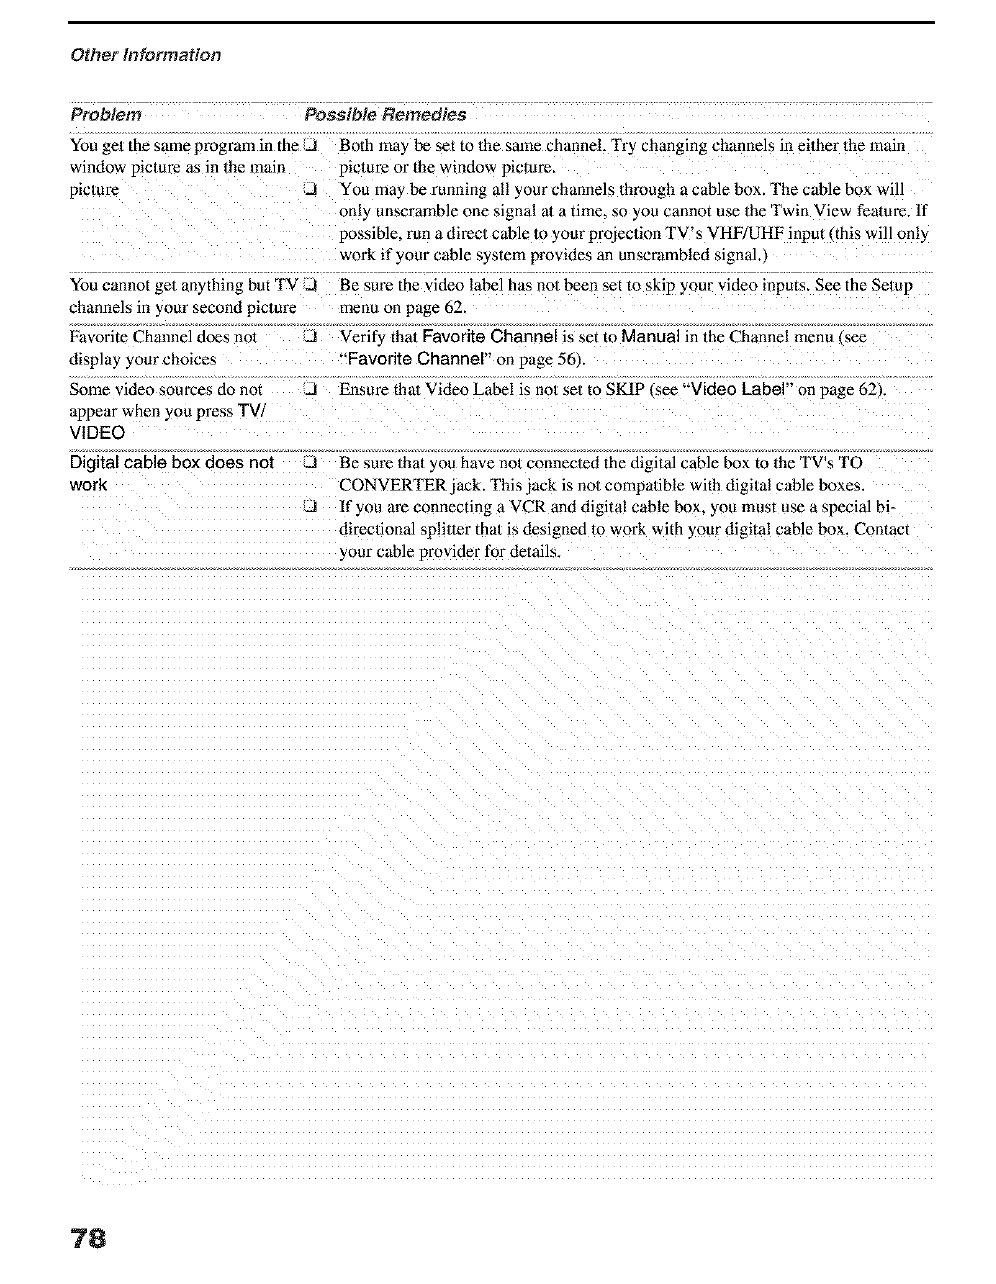
Other Information
Problem Possible Remedies
You gel the same program in the J
window picture as in the main
plc/ure J
You cannot get anything but TV iJ
channels in your second pic/ure
Favorite Channel does no1 J
display your choices
Some video sources do not d
appear when you press TV/
VIDEO
Digital cable box does not
work
Both may be set to the same channel. "I'_2€changing channels in either the main
picture or the window picture.
You may be running all your channels through a cable box. The cable box will
only unscramble one signal at a time. so you cannot use the Twin View feature, ff
possible, run a direct cable to your projection TV's VHF/UHF input (this will only
work if your cable system provides an unscrambled signal.)
Be sure the video label has not been set to skip your video inputs. See the Setup
menu on page 62.
Verify thai Favorite Channel is set to Manual in the Channel menu Isee
'Favorite Channel" on page 56).
Ensure that Video Label is no/set to SKIP _ee "Video Label" on page 62).
JBe sure thai you have no/connected the digital cable box to the TV's TO
CONVERTER jack. This jack is no/compatible with digi/a! cable boxes.
AIf you are connecting a VCR and digital cable box, you must use a special bi-
directional spliner that is designed m work with your digital cable box. Contact
your cable provider for details
78
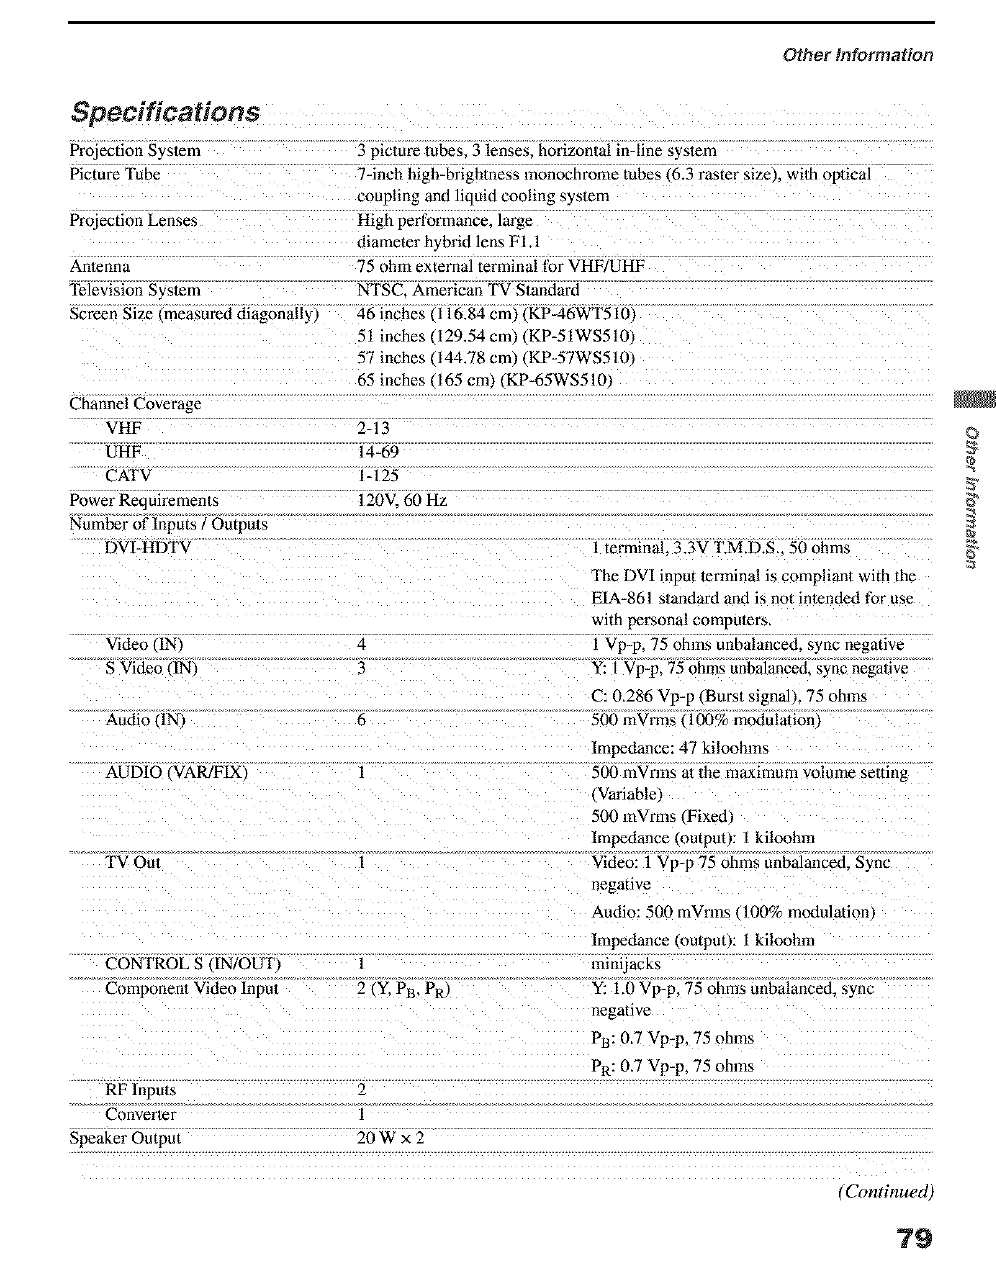
Other Information
Specifications
Projection System
Picture Tube
Projection Lenses
Antenna
Television Sysmm
Screen Size _measured diagonally)
3 picture tubes. 3 lenses, horizon/al in-line system
7-inch high-brightness monochrome tubes _6.3 raster size}, wilh optical
coupling and liquid cooling sysmm
High performance, large
diameter h3 brid lens FI.I
75 ohm external terminal t_ar VHF/UHF
NTSC. American TV Standard
46 inches 116.84 cm'_ KP46WT5 le,
51 inches 129.54cm) (KP-51WS510
57 inches 144.78 cm) (KP-57WS510
65 inches 165 cm) (KP-65WS51t]
Channel Coverage
VHF 2-13
UHF 14-69
CATV 1-125
Power Requiremen/s 120V. 60 Hz
Number of Inputs /Outputs
DVI-HDTV
Video tlN_ 4
S Video (IN} 5
Audio "[Nl 6
AUDIO tVAR/FIX'_ ]
TV Oul 1
CONTROL S (IN/OUT] l
Component Video lnpm 2 tY. PB, PR)
RF lnpuls 2
Converter 1
1 terminal. 3.3V 'EM.D.S_ 50 ohms
l'be DVI input terminal is compliant with the
EIA-861 s/andard and is not intended for use
with personal compumrs.
1 Vp-p, 75 ohms unbalanced, sync negative
Y: I Vp-p, 75 ohms unbalanced, sync nega/ive
C: 0.286 Vp-p (Burst signalL 75 ohms
500 mVrms _100% modulation
Impedance: 47 kiloohms
500 mVrms at the maximum volume seuing
_Vafiable'_
500 mVrms tFixed
Impedance (output): I kiloohm
Video: 1 Vp-p 75 ohms unbalanced. Sync
negative
Audio: 500 mVrms 100% m_utulation,
Impedance (output): l kiloohm
mini jacks
Y: 1.0 _ p-p, 75 ohms unbalanced. _ync
negative
PB: 0_7 Vp-p, 75 ohms
PR: 0,7 Vp-p, 75 ohms
Speaker Output 20Wx2
(Continued)
79
©
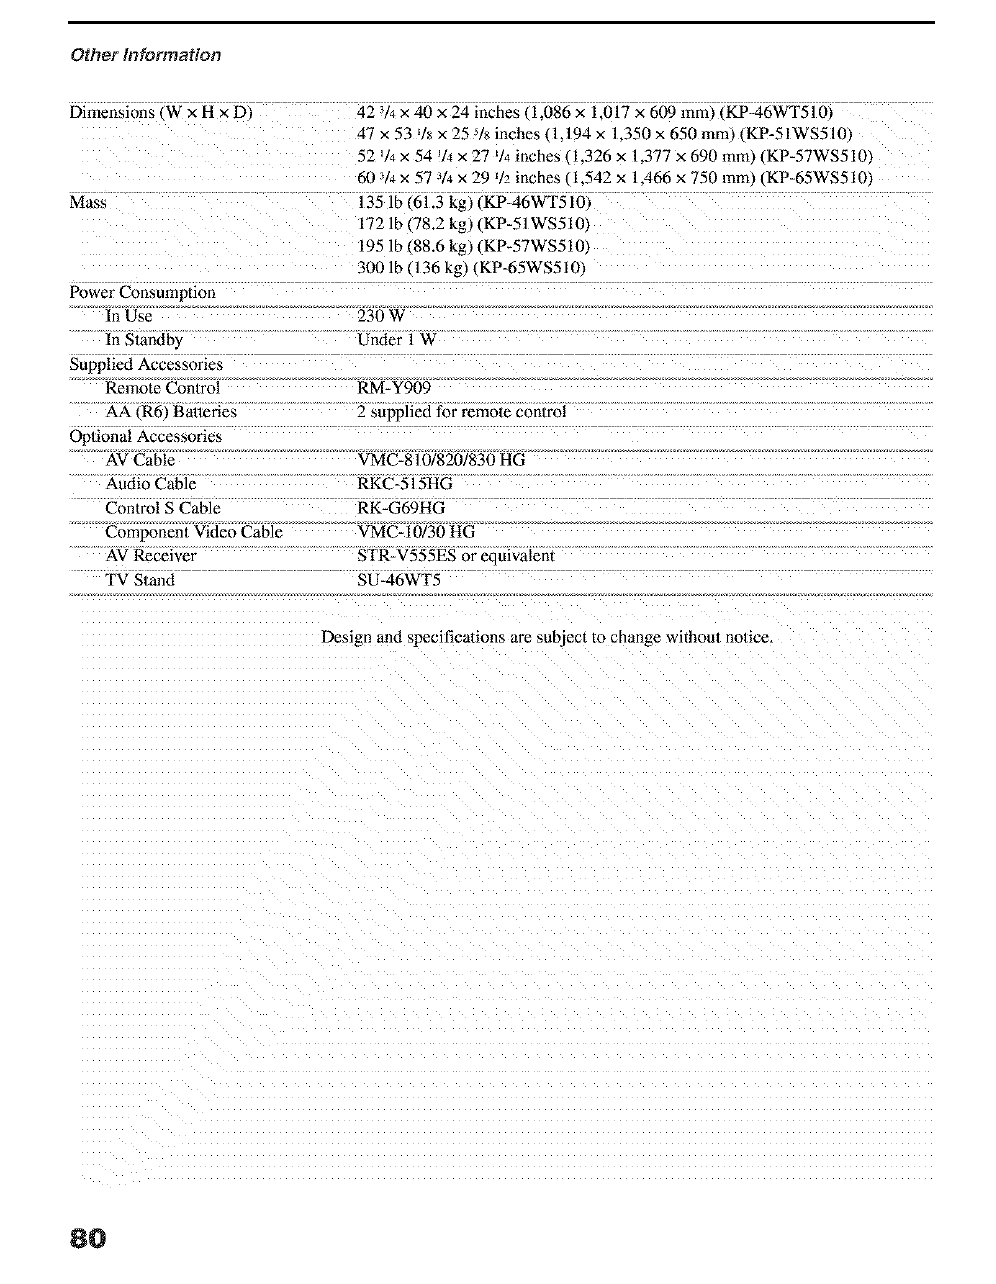
Other Information
DimenslOflS W x H x D,
Mass
Power Consumption
In Use
In Standby
Supplied Accessories
Remote Con/rol
AA (R6/Batteries
Oplional Accessories
AV Cable
Audio Cable
Control S Cable
Componen/Video Cable
AV Receiver
TV Stmld
42 V4 × 40 x 24 inches, 1.086 x 1.017 x 609 ram, ,KP-46WT510_
4- × 53 % × 25 % inches I l. 194 × 1.350 x 650 romp _KP-51WS510,
52 _14× 54 q4 × 27 _14inches (1.326 x 1.377 x 690 mm_, KP-57WS5101
60 314× 57 -q4x 29 _h inches 1.542 x 1A66 x 750 ram,, KP-65WSS10_
135 lb _61.3 kg, _KP-46WT510_
172 lb 78.2 kg, KP-51WS5101
195 lb ¢88.6 kg, _KP-57WS510
3001b 136kg ,KP-65WS510_
230 W
Under l W
RM-Y909
2 supplied for remote con/rol
VMC-810/8201830 HG
RKC-515HG
RK-G69HG
VMC- 10/30 HG
STR-V555ES or equivalenl
SU-46WT5
Design and specifications ate subject to change without no/ice,
8O
Index
A
Activating a Twin View screen 44
Adding channels to the channel list 57
Adjusting audio. Steady Sound 64
ANT button 37
Antenna. connecting 16
Audio menu 51.54
Audio receiver, connecting 25
Audio/Video cable 12
Auto Program qchannel setup) 32. 57
AV receiver_ connecnng to TV OUT 16. 30
}3
Balance. adjusting 5;4
Bass. adjusting 5;4
Batteries. inserting in remote 10
Bilingual audio 54
Brightness, adjusting 62
C
Cable
connecting 16-16
setting On/Off 56
wilh VCR. connecting 19--20
Cable box
connecting with VCR 20
using wilh TV remote control 74
Contents of box 10
CONTROL S 31
Convergence, adjusting automaticall) 33
Convergence, adjusting manually 34
13
Daylight saving 60
Digital Realit) Creation 53
Digital TV
connecting 28
watching 42
Digital TV program 42
Digital TV receiver, connecting 28
DISPLAY button 37
Display, turning off 37
DRC (Digital Realit) Creation/Mode. described 6
DRC/CINEMOTION button 36
DVD MENU button 39
DVD player
using wi/h TV remote control 74
wilh A/V connectors, connecting 27
with component video conneclors, connecting 26
E
Effect
Off 54
Simulated 64
TruSurround 54
Enlarging pictures, in Twin View 46
Extended Data Service 61
Camcorder. connecting 29
Caption Vision 61
CATV. See cable.
Channel list. adding channels 57
Channel menu 51.56
Channel Skip/Add 57
Channels
Aulo Program 57
crea/ing labels 57
setting up 32
CineMotion. DRC 38.53
Closed caption modes 61
CODE SET button 39
Color temperature, adjusting 62
Color. adjusting 52
Connecting
Audio receiver 25
AV receiver 30
Cable box 16-21
Cable or antenna 16
Camcorder 29
Digital TV Receiver 26
DVD player 26. 27
Satellite receiver 93, 24
VCR 20--22. 24
Connector Types 12
F
Favorite Channel
aura 56
described 8
manual 56
setting up 56
using 43
FAVORITES button 37
Features 8
Flash Focus
described 9
performing 33
FREEZE button 37
Freeze. using 40.47
Front Panel Controls 13
FUNCTION buttons WHITE/38
H
Hookups 16--31
Hue. adjusting 52
1
Inputs. labeling 62
Installation of the projection TV 16-31 ,Continued )
81
©
J Audio options 54
JUMP button 37 Timer op/ions 60
Jump, using 40 Video options 52
L
Label
channels 57
video inpuls 62
N
MENU button 38
Menus
Audio 51, 54
Channel 51.56
Setup 51.61
Timer 51, 60
Video 51, 52
Wide 51,58
MODE
Movie 41. 52
Pro 41. 52
Standard 41. 52
Vivid 41.52
MTS/SAP button 41
MTS/SAP. using 54
Muting, using 40
P
Parental control, described 8
Password. changing 65
PIC MODE button 37
Picture con_ask adjusting 52
Picture size. adjusting in Twin View 46
POWER button 39
POWER buttons (GREEN/38
Presetting channels 32. 57
Problems. troubleshooting 76
R
Ratings
setting 63--68
viewing Nocked programs 65
Rear panel controls and connections 14. 15
Remote control
bultons inside panel 39
Function of banons 40. 41
inserting baueries 10
programming 71--73
Remote control operating other components with
Cable box 75
DVD player 74
Satellite receiver 75
VCR 74
Removing channels from the channel list 57
RESET button 37
Resetting
82
S
S Video cable 12
SAT/CABLE function button 38
SAT/CABLE power button 38
Satellite receiver
connecting 23
using wi/h TV remote control 75
Setting up channels 32. 57
Setup menu 51.61
Sharpness, adjusting 52
SLEEP button 37
Sleep, using 40
Specifications 79-80
Steady Sound
adjusting 54
described 8
Surround sound 54
SYSTEM Off button 39
T
Time
set current 60
set daylight saving 60
Timer menu 51,60
Timer setting 60
Treble. adjusting 54
Troubleshooting 76-78
TV function button 38
TV power button 38
TV/VIDEO button 38
Twin View r_A
activating a picture 44
described 8
using 44
V
VCR
connecting two, for tape editing 22
using wi/h TV remote control 74
wi/h cable box. connecting 20
wilh cable, connecling 19
wilh satellite receiver, connecting 24
Video inputs, labeling 62
Video menu 51.52
Video Modes. selecting 52
Viewing area. recommended 11
VOL +1- button 37. 40
Z
Zoom feature_ with Twin View 46

