Sony KV 13VM20 User Manual TRINITRON COLOR TELEVISION Manuals And Guides 97100248
SONY TV/VCR or DVD Combo Manual 97100248 SONY TV/VCR or DVD Combo Owner's Manual, SONY TV/VCR or DVD Combo installation guides
User Manual: Sony KV-13VM20 KV-13VM20 SONY TRINITRON COLOR TELEVISION - Manuals and Guides View the owners manual for your SONY TRINITRON COLOR TELEVISION #KV13VM20. Home:Electronics Parts:Sony Parts:Sony TRINITRON COLOR TELEVISION Manual
Open the PDF directly: View PDF ![]() .
.
Page Count: 48
SON' 9-908-084-21
Contents
Preface
This section tells you about specia(
features, safety information, and
preparatory information for using this
manual.
Chapter 1: Setting UP
This section shows you the steps
necessary for installing and presetting your
VIDEO TV, and how to connect optional
video and audio equipment•
Trin itro n Color
Video TV
-OperatingInstructions.
Before operating your VIDEO IV, please read this
manual thoroughly and retain it for future reference.
KV-13VM20/21
KV-20VM20
Owner's Record
The model and serial numbers are located at the
rear of the VIDEO TV. Record these numbers in the
spaces provided below. Refer to them whenever you
call upon your Sony dealer regarding this product.
Model No. Serial No.
@ 1994 by Sony Corporation
Chapter 2: Using Basic VIDEO.TV
Features
This section gives you basic information
about operating and adjusting your VIDEO
".TV,
Chapter 3: using Advanced TV
Features
This section shows you the steps-for other
useful TV features with using the On-
Screen Menus. •
Chapter 4: Using Basic VCR
Features
This section gives you basic information
about ope,ating and adjusting your-VCR.
Chapter 5: Using advanced VCR
Features
This section shows you the steps for other
useful VCR features with using the On-.
Screen Menus. . .
Appendix
This section gives you specifications and
troubleshooting information.
• For a detailed table of contents t see
p. 3
WARNING Precautions
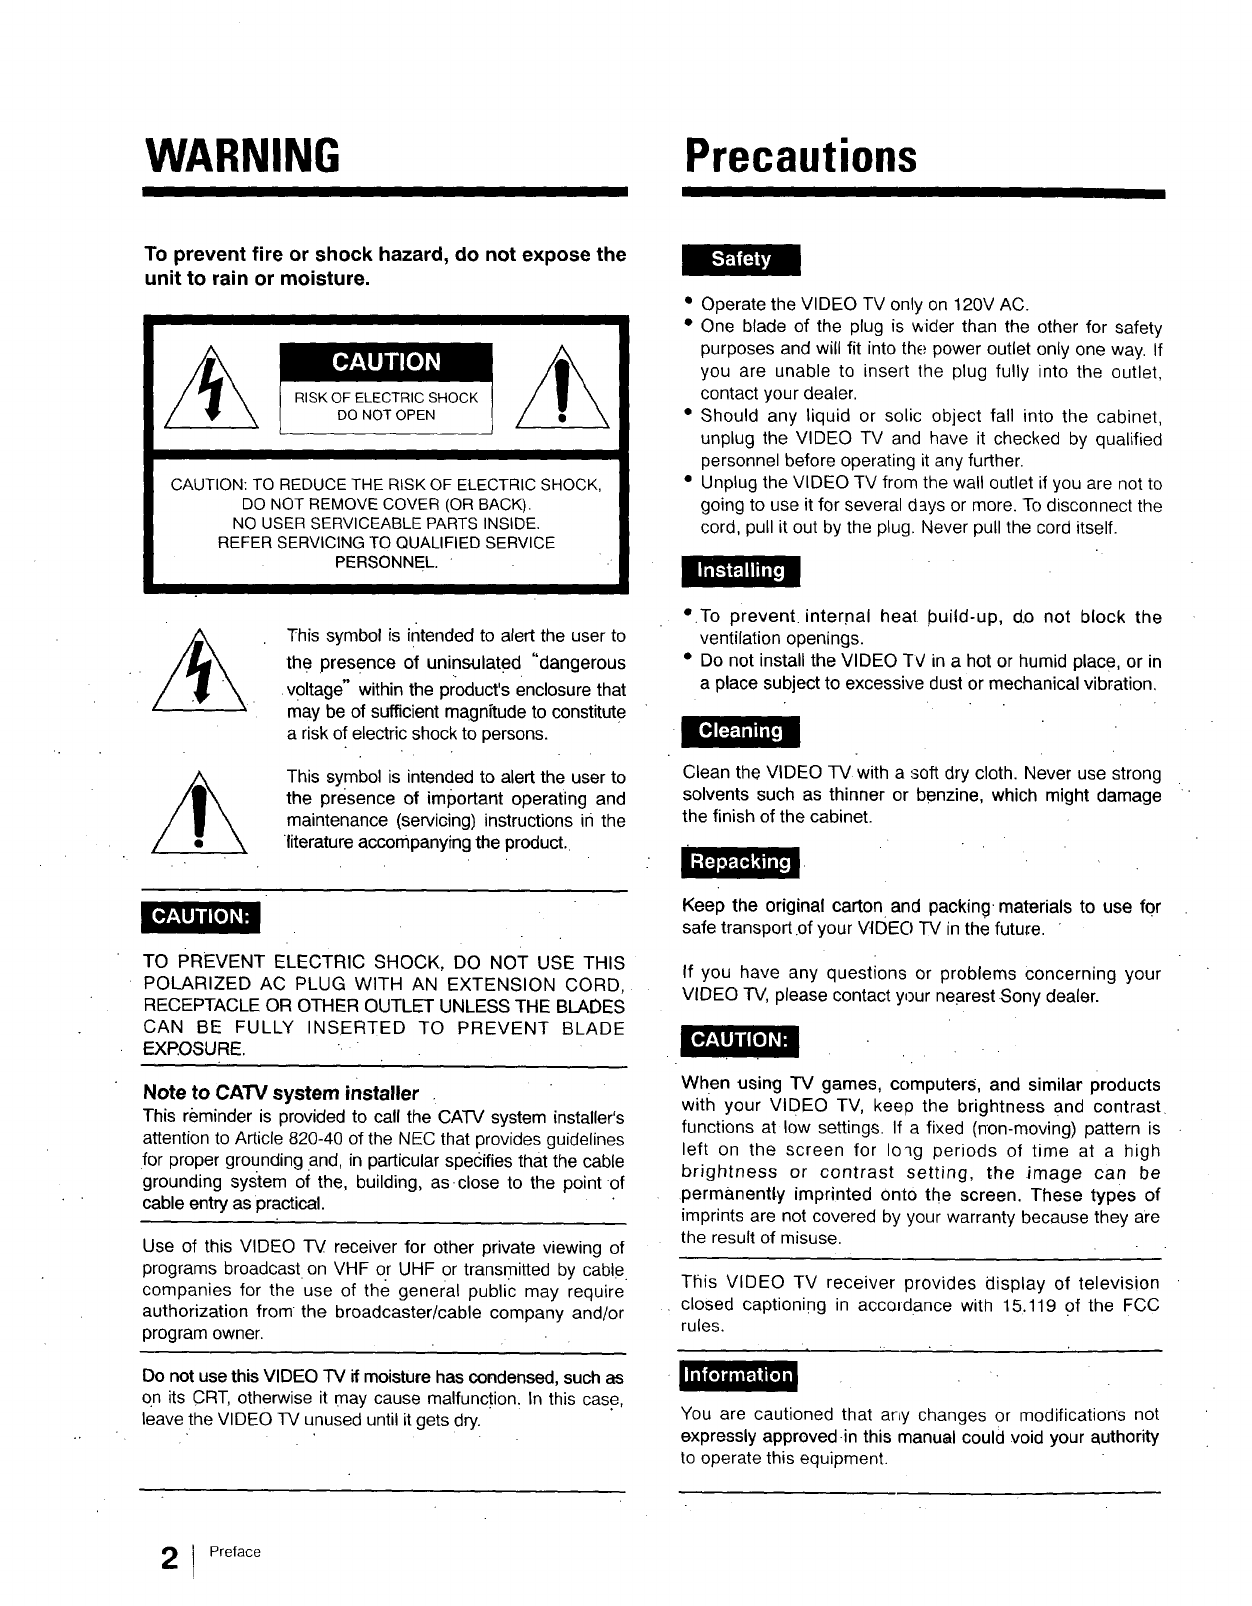
To prevent fire or shock hazard, do not expose the
unit to rain or moisture,
RISK OF ELECTRIC SHOCK
DO NOT OPEN
CAUTION: TO REDUCE THE RISK OF ELECTRIC SHOCK,
DO NOT REMOVE COVER (OR BACK).
NO USER SERVICEABLE PARTS INSIDE.
REFER SERVICING TO QUALIFIED SERVICE
PERSONNEL. " -
I
This symbol is intended to alert the user to
the presence of uninsulated "dangerous
•voltage" within the product's enclosure that
may be of sufficient magnitude to constitute
a risk of electric shock to persons.
This sYmbol is intended to alert the user to
the presence of important operating and
maintenance (servicing) instructions in the
literature accompanying the product.•
*Operate the VIDEO TV only on 120V AC.
• One blade of the plug is wider than the other for safety
purposes and will fit into the; power outlet only one way. If
you are unable to insert the plug fully into the outlet,
contact your dealer.
• Should any liquid or solic object fall into the cabinet,
unplug the VIDEO TV and have it checked by qualified
personnel before operating it any further.
• Unplug the VIDEO TV from the wall outlet if you are not to
going to use it for several days or more. To disconnect the
cord, pull it out by the plug. Never pull the cord itself.
• .To prevent internal heal build-up, d.o not block the
ventilation openings.
• Do not install the VIDEO TV in a hot or humid place, or in
a place subject to excessive dust or mechanical vibration.
Clean the VIDEO TV with a soft dry cloth. Never use strong
solvents such as thinner or benzine, which might damage
the finish of the cabinet.
TO PREVENT ELECTRIC SHOCK, DO NOT USE THIS
POLARIZED AC PLUG WITH AN EXTENSION CORD,
RECEPTACLE OR OTHER OUTLET UNLESS THE BLADES
CAN BE FULLY INSERTED TO PREVENT BLADE
EXPOSURE. . "
Note to CA'FV system installer .
This reminder is provided to call the CATV system installer's
attention to Article 820-40 of the NEC that provides guidelines
for proper grounding .and, in particular specifies that the cable
grounding system of the, building, as.close to the point of
cable entry as practical.
Use of this VIDEO IV receiver for other private viewing of
programs broadcast on VHF or UHF or transmitted by cable
companies for the use of the general public may require
authorization from the broadcaster/cable company and/or
program owner.
II11_
Do not use this VIDEO TV if moisture has condensed, such as
on its CRT, otherwise it may cause malfunction. In this case,
leave the VIDEO -IV unused until it gets dry.
Keep the original carton and packing, materials to use for
safe transport.of your VIOEO TV in the future. "
If you have any questions or problems concerning your
VIDEO TV, please contact your nearest.Sony dealer.
When using TV games, computers, and similar products
with your VIDEO TV, kee0 the brightness and contrast
functions at low settings. If a fixed (non-moving) pattern is
left on the screen for Ioqg periods of time at a high
brightness or contrast setting, the .image can be
permanently imprinted onto the screen. These types of
imprints are not covered by your warranty because they are
the result of misuse.
This VIDEO TV receiver provides display of telev sion
closed captioning in accordance with 15.119 of the FCC
rules.
You are cautioned that arby changes or modifications not
expressly approved-in this manual could void your authority
to operate this equipment.
Preface
Table of Contents
Preface
Warning/Precautions ............................................................ 2
Introducing the Sony Trinitron® Color VIDEO TV ................ 4
Locating the Controls ........................................................... 5
Chapter 1: Setting Up
Connecting TV Antenna/Cable ............................................. 8
Using the On-Screen Menus .............................................. 10
Navigating through the menus ....................................... 11
Turning the Cable Mode On or Off ..................................... 12
Presetting TV Channels ..................................................... 13
Erasing unnecessary channels - CHANNEL ERASE .... 15
Presetting only desired channels - CHANNEL ADD ...... 17
Connecting Other Equipment ............................................. 18
Chapter 2: Using Basic VIDEO TV Features
Watching "IV Programs ....................... ................................ 19
Using Convenient Features ............................. ,.................. 20
Muting the sound - MUTING .......................................... 20
Keeping the displays on-screen - DISPLAY ......: ...........20
Setting the sleep timer - SLEEP .......... :.............................. 20
,Switching quickly between two channels - JUMP .......... 20
Adjusting PiCture Quality ................................. _................. 21
Using Noise Reduction Function ......... .... .......... :................ 23
Chapter 3: Using Advanced TV Featm'es "
Using Closed Caption, ......................................... ".............. 24
Using the Timer -Activated Functiqns. .......................... L..25
Setting theclock - CURRENT TIME SET. ..................... 25
Setting the ON/OFF TIMER ....... :................. ................... 27
Chapter 4: Using Basic VCR Features
Playback ............................... :............................................. 30
Inserting a Video Cassette ....... ...................................... 30
Playing back a prerecorded cassette tape ..................... 32
Variable speed playback ...... ..................................... .....32
Viewing TV programs during tape playback .................. 33
Playing back a tape recorded on another VCR ............. 34
Using Counter/Remain .................................................. 35
Using Counter Memory Function .......................... ......... 35
Chapter 5" Using Advanced VCR Features
Recording TV Programs....L... ................................ '............ 36
Recording TV programs ................... _....-........................ 36 °
Recording a program without watching the TV .............. 36
Timer Recording ......................... ................. _........ :.............. 37
Setting the timer ....... :..................................................... 37
When preset timer recordings overlap ............................ 40
Checking the timer settings .......................................... :41
Appendix
Changing or cancelling the timer settings.., ...... :.... ........ 41
Quick Timer Recording .................... :................................. 42
Index Function .................................................................... 43
Marking INDEX signals ................................................. 43
Playing back from the INDEX point ............... :. .............. 44
Locsting the desired prograrn(!NDEX Search) .............. 45
Erasing INDEX signals .................................................. 45
Specifications ................................. i ................................... 46
Troubleshooting .............................. :......................... ............ 47
Preface13
Introducing the Sony Trinitron®Color VIDEO TV
We highly recommend that you read this manual before
using your VIDEO TV combined Television and VCR.
Keep the manual handy for future reference.
I=F;FJ0rlIFJ_
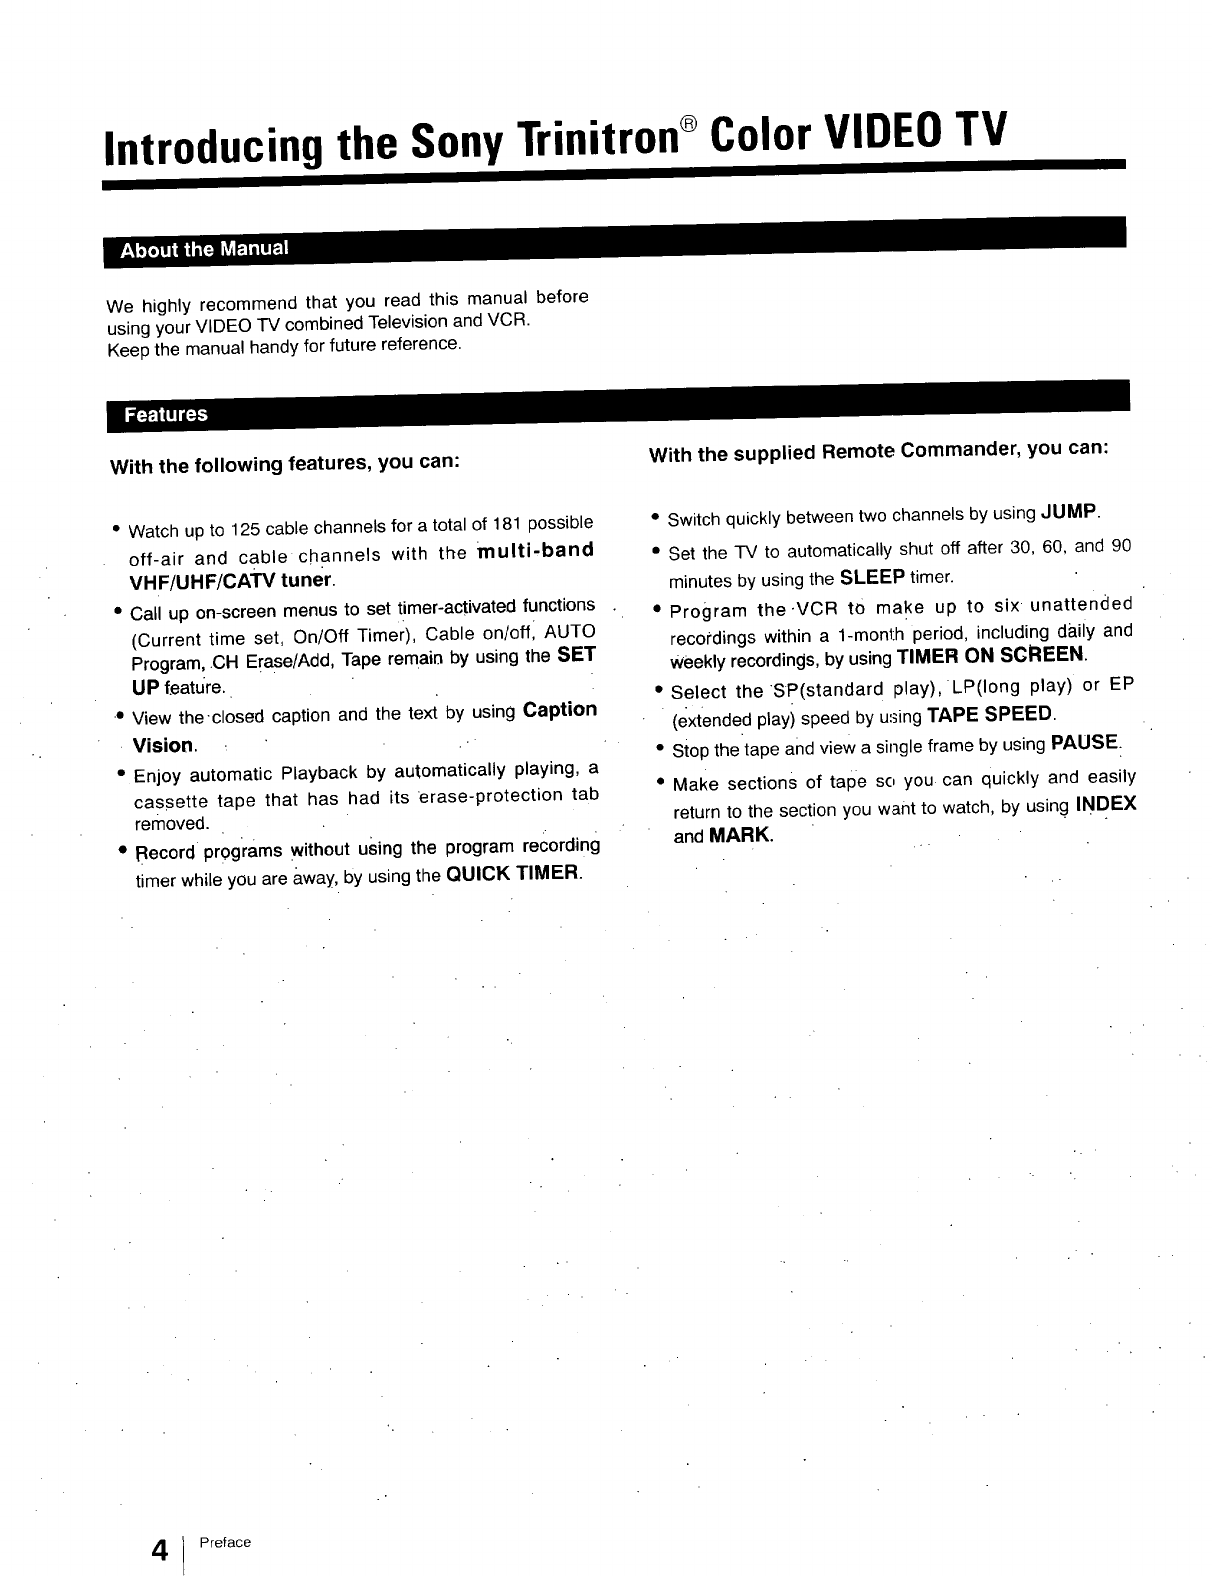
With the following features, you can: With the supplied Remote Commander, you can:
• Watch up to 125 cable channels for a total of 181 possible
off-air and cable channels with the multi-band
VHF/UHF/CATV tuner.
• Call up on-screen menus to set timer-activated functions
(Current time set, On/Off Timer), Cable on/offl AUTO
Program, CH Erase/Add, Tape remain by using the SET
UP f.eature.
.o View the-closed caption and the text by using Caption
Vision, ..
•Enjoy automatic Playback by automatically playing, a
cassette tape that has had its erase-protection tab
removed.
•Record programs without using the program recording
timer while you are away, by using the QUICK TIMER.
•Switch quickly between two channels by using JUMP.
• Set the TV to automatically shut off after 30, 60, and 90
minutes by using the SLEEP timer.
• Program the'VCR to make up to six unattended
recordings within a 1-month period, including daily and
weekly recordings, by using TIMER ON SCREEN.
• Select the SP(standard play), LP(Iong play) or EP
(extended play) speed by u,._ingTAPE SPEED.
• Stop the tape and view a single frame by using PAUSE.
• Make sections of tape so you can quickly and easily
return to the section you want to watch by using INDEX
and MARK.
Preface
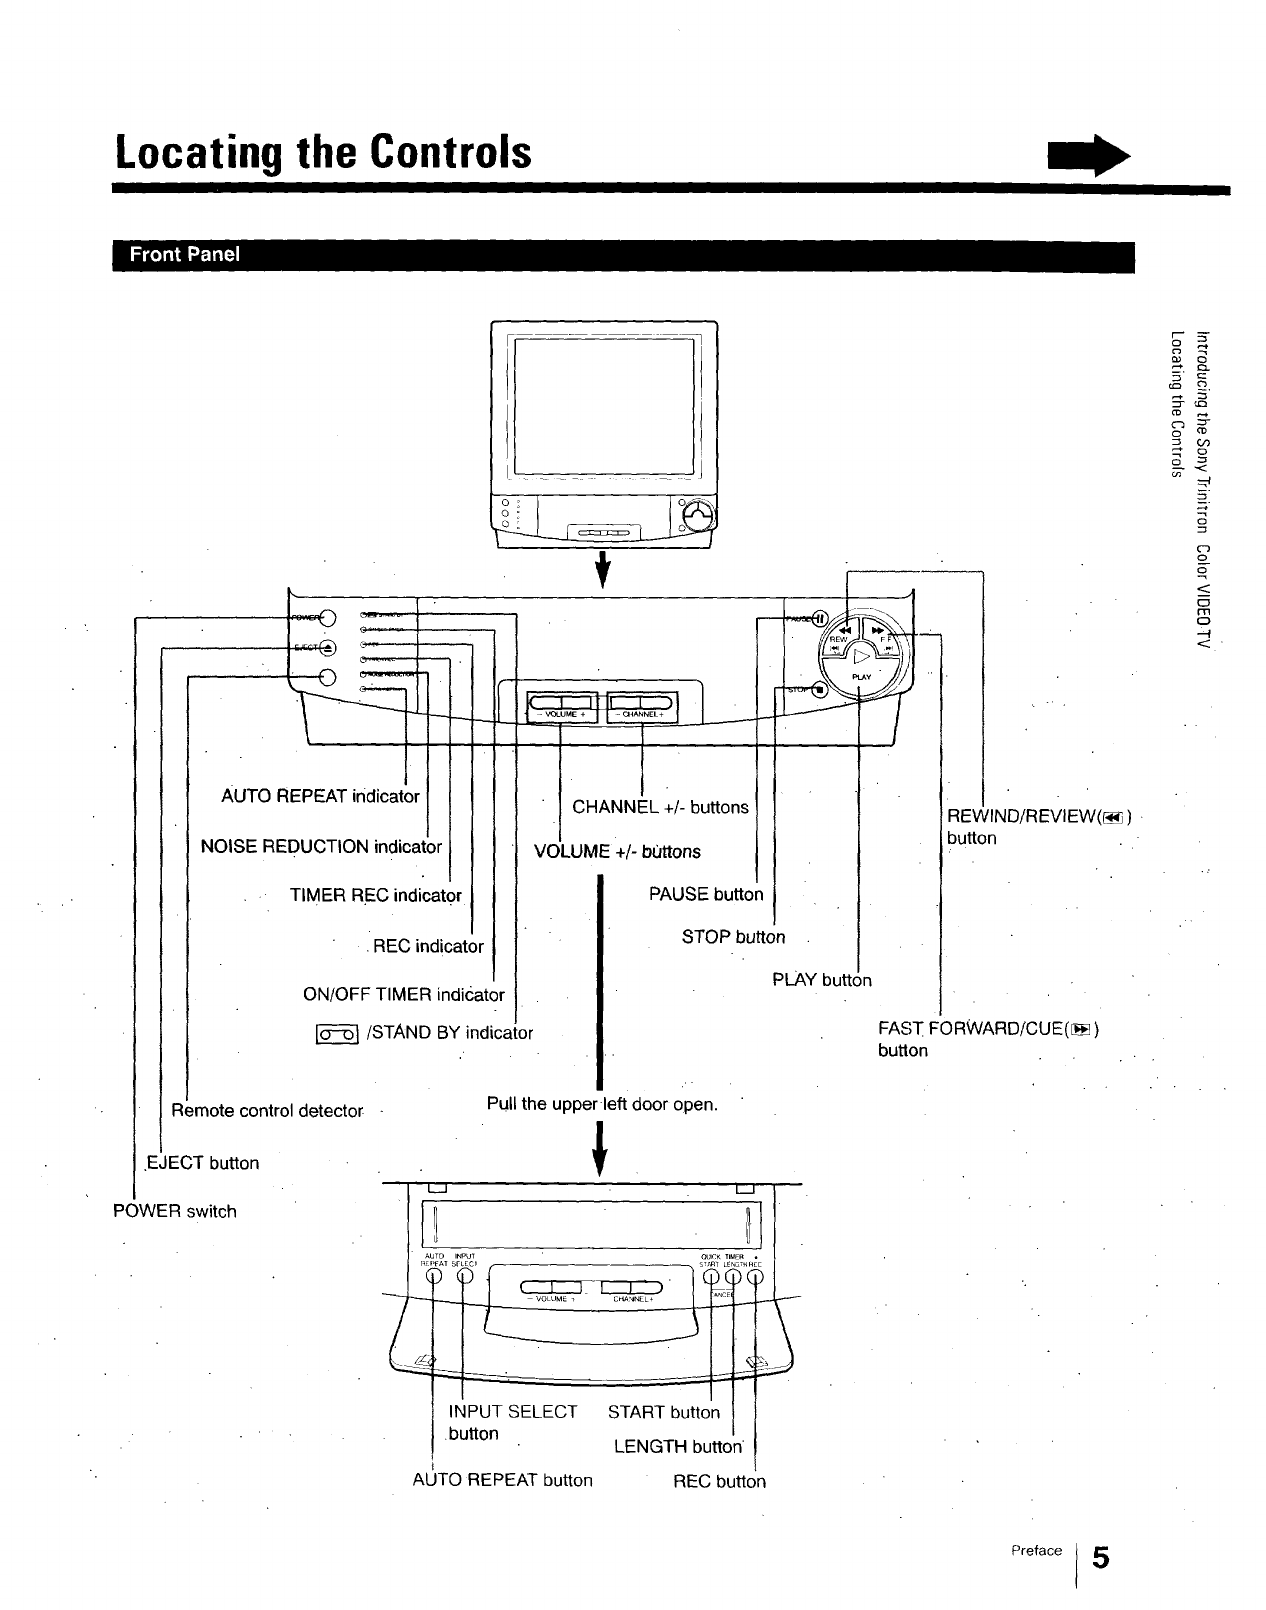
Locating the Controls
I
AUTO REPEAT indicator
NOISE REDUCTION indicator
TIMER REC indicator
•REC indicator
ON/OFF TIMER indk_ator
/STAND BY indicator
Remote control detector
EJECT button
POWER switch
CHANNEL +/- buttons
E
VOLUME +/- bt_ttons
PAUSE button
• £EW
STOP button
PLAY button
Pull the upper left door open.
!
! !
VOLUME i CP_NNEL _ _N
INPUT SELECT START button
,button LENGTH button
button
(_)
FAST FORWARD/CUE([_
button
AUTO REPEAT button REC button
r- 5-
o
c1)
c_
c3
£
o
--4
Preface I 5
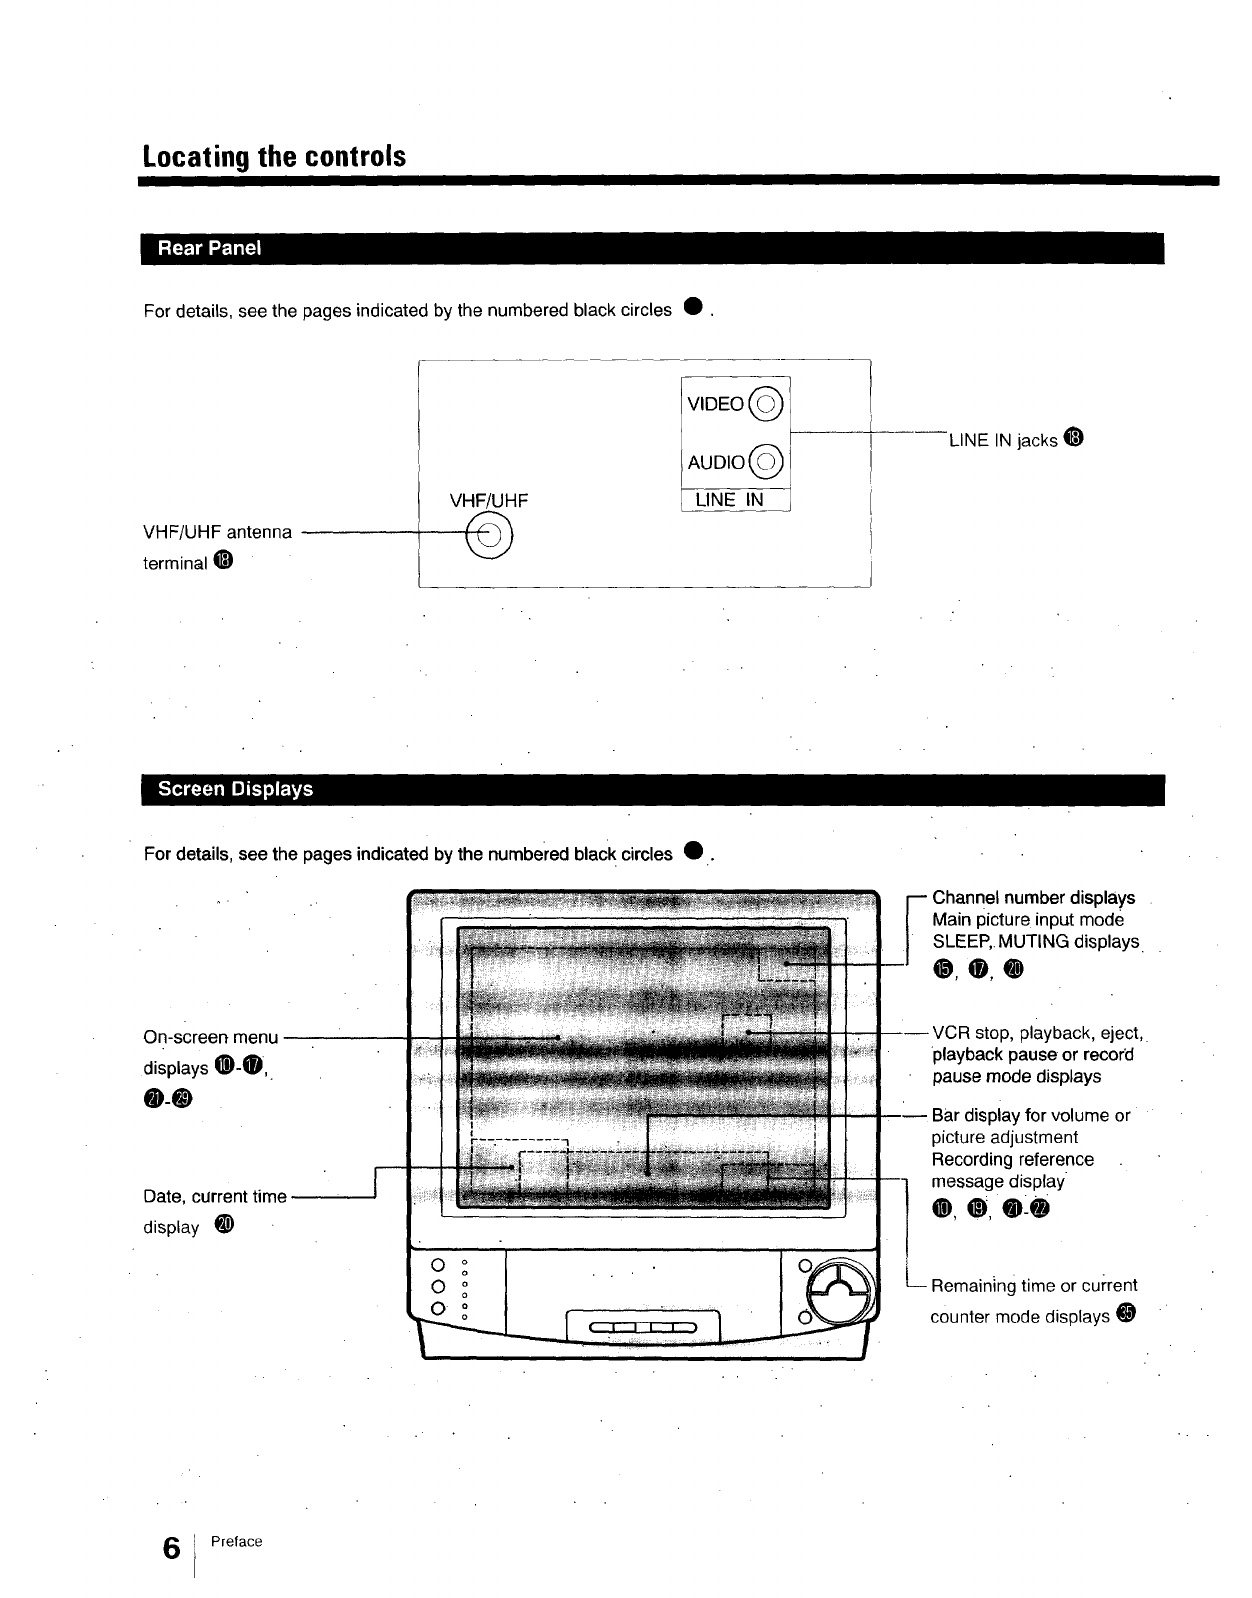
Locating the controls
For details, see the pages indicated by the numbered black circles •.
VHF/UHF antenna
terminal I_)
VHF/UHF
©
VIDEO Q
AUDIO Q
LINE IN
LINE IN jacks _)
For details, see the pages indicated by the numbered black circles •.
number displays
Main picture input mode
SLEEP,. MUTING displays.
0,0,0
On-screen menu
displays 0-0,
0-0
Date, current time
display _)
stop, playback, eject,•
playback pause or record
pause mode displays
display for volume or
picture adjustment
Recording reference
message display
0,0,0-0
g time or current
counter mode displays 0
t Preface
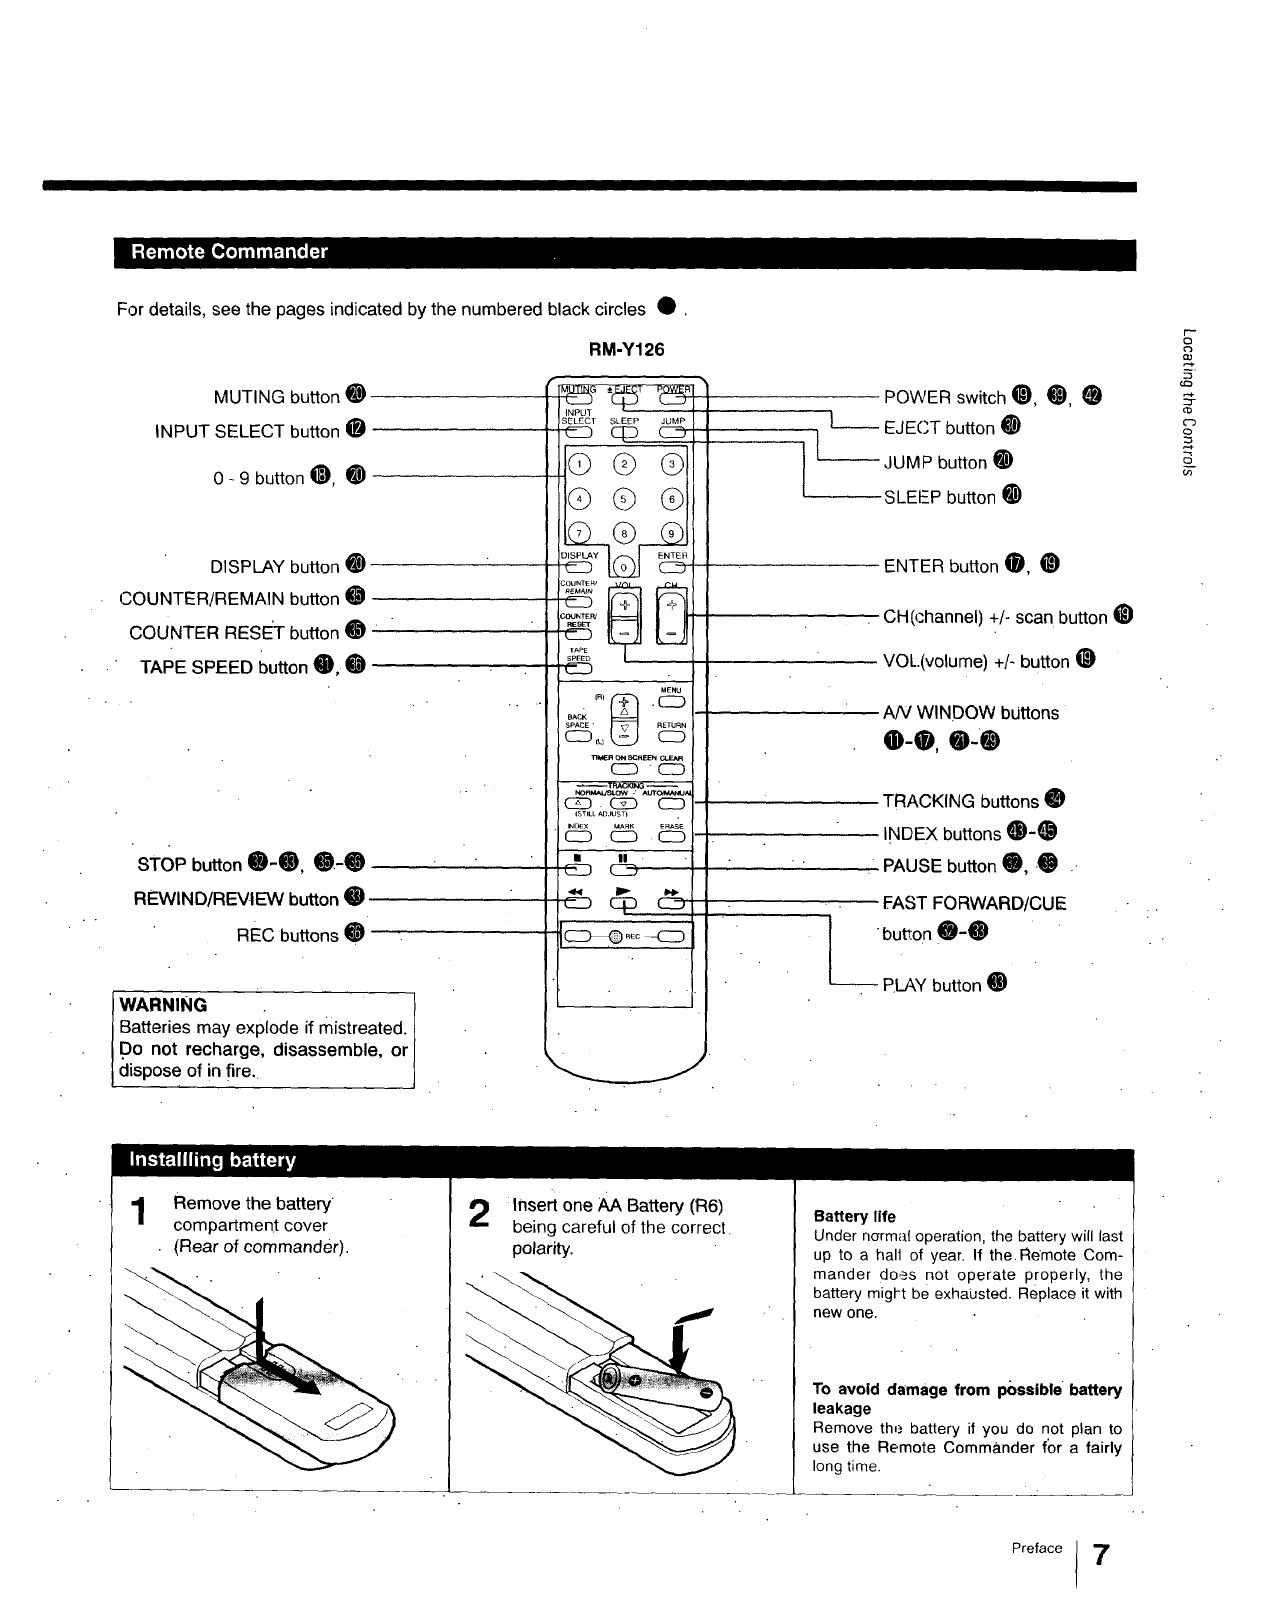
For details, see the pages indicated by the numbered black circles •.
RM-Y126
INPUT
SELECT SLEEP JUMP
c_ OlD _
QQ Q
MUTING button O
INPUT SELECT button O
0- 9 button O, O
DISPLAY button O
COUNTER/REMAIN button O
COUNTER RESE_T button O
TAPE SPEED button O, O
STOP button O-O, O.-O
REWIND/REVIEW button O
REC buttons O
WARNING .
Batteries may explode if mistreated. I
Do not recharge, disassemble, or I
clispose of in fire I
G© Q
Q
counte_
TAPE
SPEED
C_D
MENU
BACI<
SPACE•
_TRAC_NG --
_)n_Jsl.ow :Auro_IUAI
c_ C2D C_D
ISTILL ADJUST)
INOEX _AFtK eRAse
CD C_2DCD
• II .
CSD CD
C:D C_ _
POWER switch _), O, (_
L____ EJECT button _)
I--JUMP button O
...... SLEEP button _)
ENTER button O, _)
CH(channel) +/- scan button _)
VOL.(volume) +/- button O
AN WINDOW bdttons
0-0, O-O
TRACKING buttons O
INDEX buttons O-O
PAUSE button 0, -O .-
FAST FORWARD/CUE
button O-O
-- PLAY button _)
co
c')
s_
O3
Remove the battery •
compartment cover
(Rear of commander).
2:Insert one AA Battery (R6)
being careful of the correct.
polarity.
Battery life
Under normal operation, the battery will last
up to a hall of year• If the. Remote Com-
mander does not operate properly, the
battery migkt be exhausted. Replace it with
new one.
To avoid damage from possible battery
leakage
Remove the battery if you do not plan to
use the Remote Commander for a fairly
long time.
Preface !7
Chapter 1:Setting Up
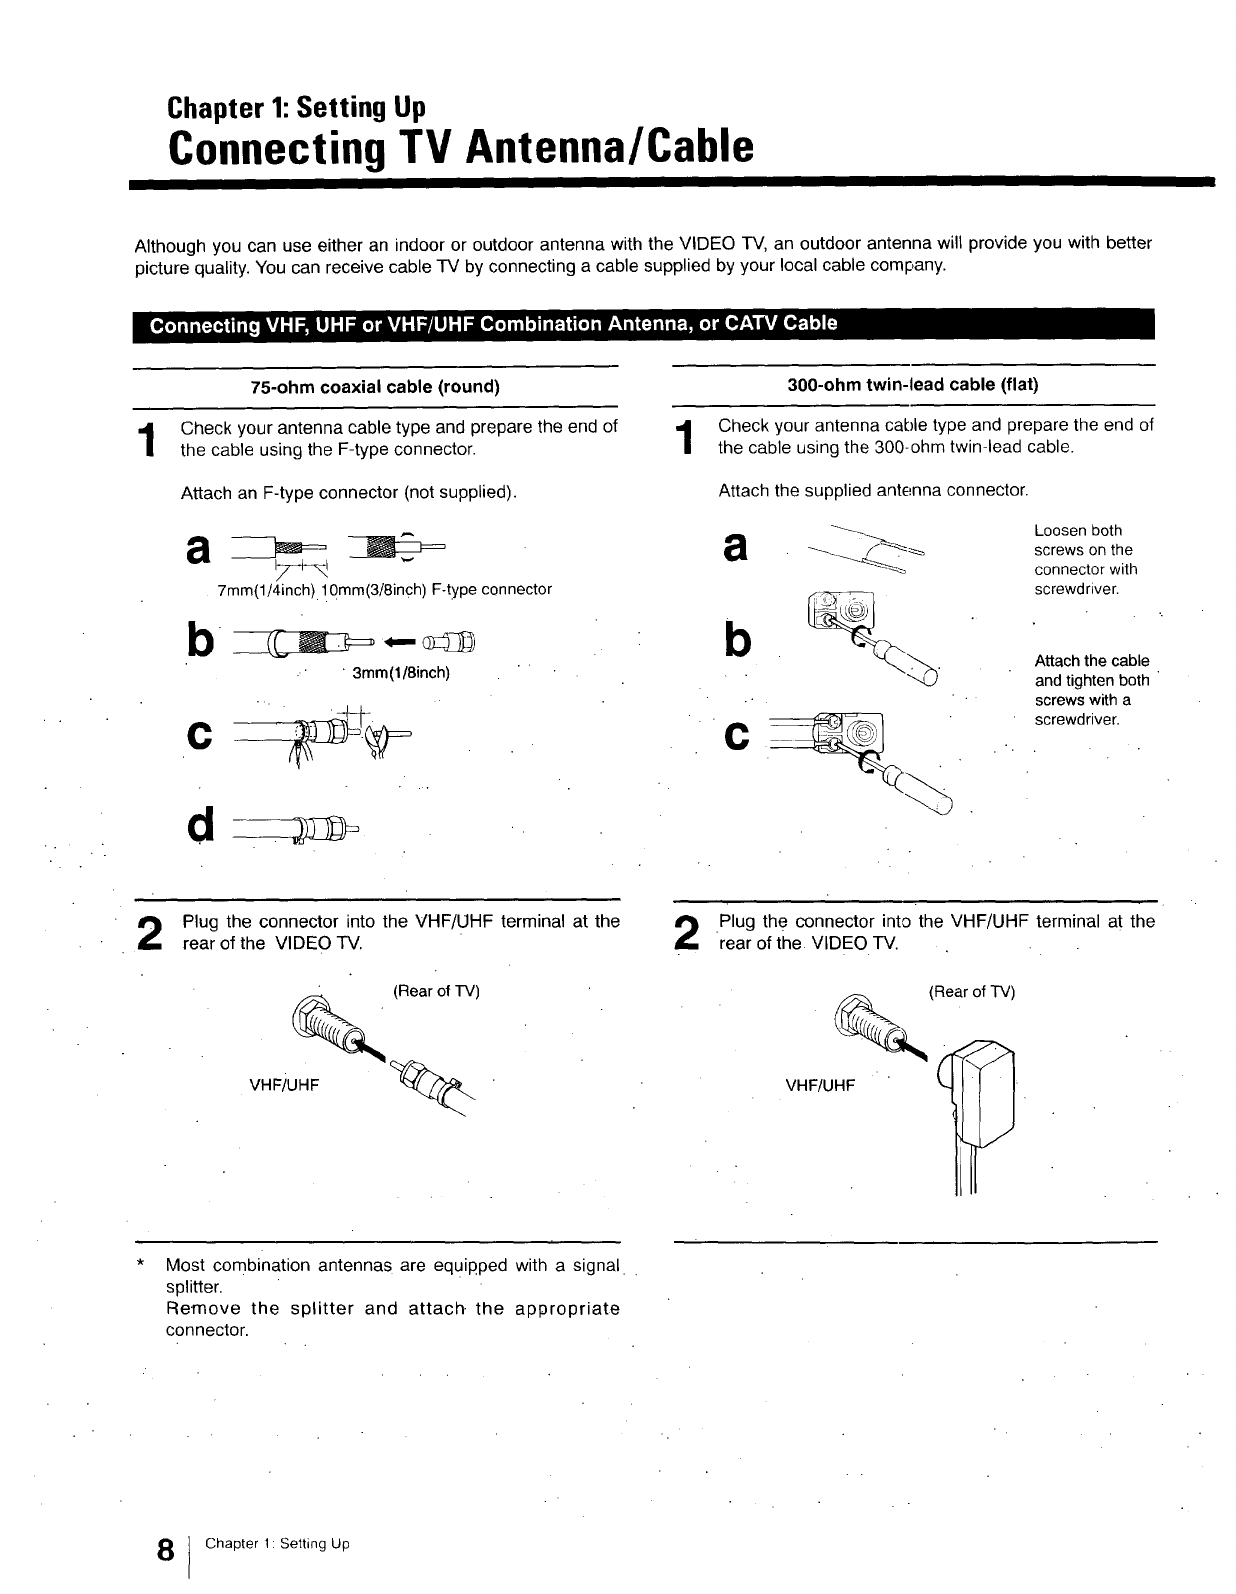
Connecting TV Antenna/Cable
Although you can use either an indoor or outdoor antenna with the VIDEO TV, an outdoor antenna will provide you with better
picture quality. You can receive cable TV by connecting a cable supplied by your local cable company.
1
75-ohm coaxial cable (round)
Check your antenna cable type and prepare the end of
the cable using the F-type connector.
Attach an F-type connector (not supplied).
,7+-_
7mm(1/4inch). 1.Qmm{a/8inch) F-type connector
b
.... 3mm(l/8inch) "
c
300-ohm twin-lead cable (flat)
Check your antenna cable type and prepare the end of
the cable using the 300-ohm twin-lead cable.
Attach the supplied antenna connector.
Loosen both
a_._._ screws on the
connector with
screwdriver.
Attach the cable
and tighten both
screws with a
screwdriver.
Plug the connector into the VHF/UHF terminal at the
rear of the VIDEO TV.
(Rear of TV)
VHFiU_ q_
Plug the connector into the VHF/UHF terminal at the
rear of the VIDEO TV. .
(Rear of TV)
VHF/UHF _1 _,
Most combination antennas are equipped with a signal
splitter.
Remove the splitter and attach, the appropriate
connector.
Chapter 1 Setting Up

Use the EAC-66 U/V mixer (not supplied).
Prepare the VHF antenna end using the appropriate
connecter (p. 8).
2
3
Connect the cables to the mixer.
Attach the mixer to the VHF/UHF terminal.
VH_/UHF_------J 1
When the UN mixer is used
Snow and noise may appear in the pictures when viewing cable TV channels over 37 (W + 1).
For better picture quality, we Would recor_mend you to connect an outdoor antenna.
o
('3
--4
=>
==
o-
rB
Chapter 1: Setting Up I 9
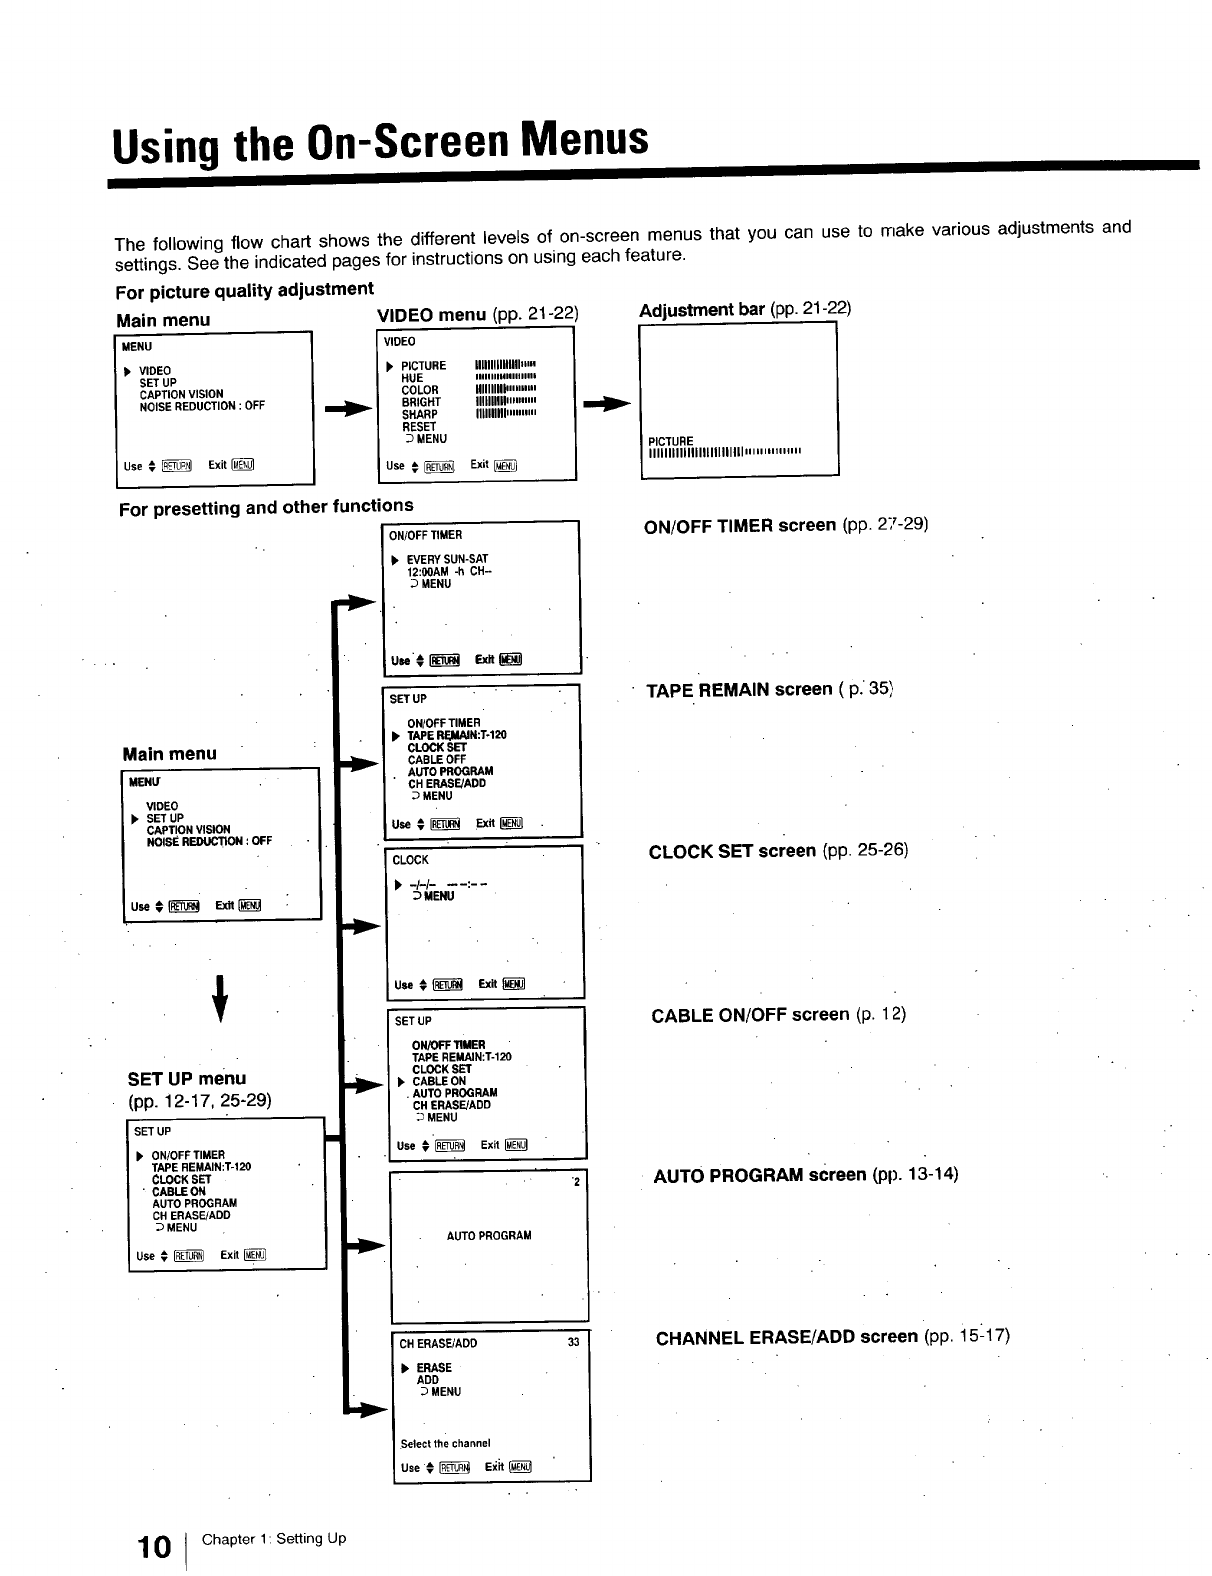
Using the On-Screen Menus
The following flow chart shows the different levels of on-screen menus that you can use to make various adjustments and
settings. See the indicated pages for instructions on using each feature.
For picture quality adjustment
Main menu VIDEO menu (pp. 21-22)
MENU VIDEO
• VIDEO _PICTURE Illllllinlnllnm
SET UP HUE iiiiiiinUlllllnll
CAPTION VISION COLOR IIIIIIIIIIm,"m
NOISE REDUCTION : OFF _BRIGHT Illlllllllz,n,m
SHARP Illlllllll""""
RESET
MENU
Use _, _Exit _Use _ _ Exit
Adjustment bar (pp. 21-22)
PICTURE
IIIIIIIIIIIIIIIIIIIIIIIII" m '" """'
For presetting and other functions
ON/OFF TIMER
Main menu
MENU
VIDEO
k SET UP
CAPTION VISION
NOISE REDUCTION : OFF
u_¢_ Ex_
SET UP menu
(pp. 12-17, 25-29)
SET UP
ON/OFF TIMER
TAPE REMAIN:T-120
CLOCK SET
•CABLE ON
AUTO PROGRAM
CH ERASE/ADD
MENU
Use # _ Exit
_. EVERY SUN-SAT
12:00AM -h CH-
MENU
SET UP
ONtOFF TIMER
TAPE RF.,MAIN:T-120
CLOCK SET
CABLE OFF
AUTO PROGRAM
CH ERASE/ADD
MENU
use¢_ Ex_
CLOCK
•-I-I- ---:- -
MENU
SET UP
ON/OFF TIMER
TAPE REMAIN:T-120
CLOCK SET
•CABLE ON
•AUTO PROGRAM
CH ERASE/ADD
MENU
Use t _Exit
AUTO PROGRAM
CH ERASE/ADD
• ERASE
ADD
MENU
Select the channel
use, _E_it
ON/OFF TIMER screen (pp. 27-29)
•TAPE REMAIN screen ( p. 35}
CLOCK SET screen (pp 25-26)
CABLE ON/OFF screen (p. 12)
AUTO PROGRAM screen (pp. 13-14)
CHANNEL ERASE/ADD screen (pp i5-17)
0Chapter 1: Setting Up
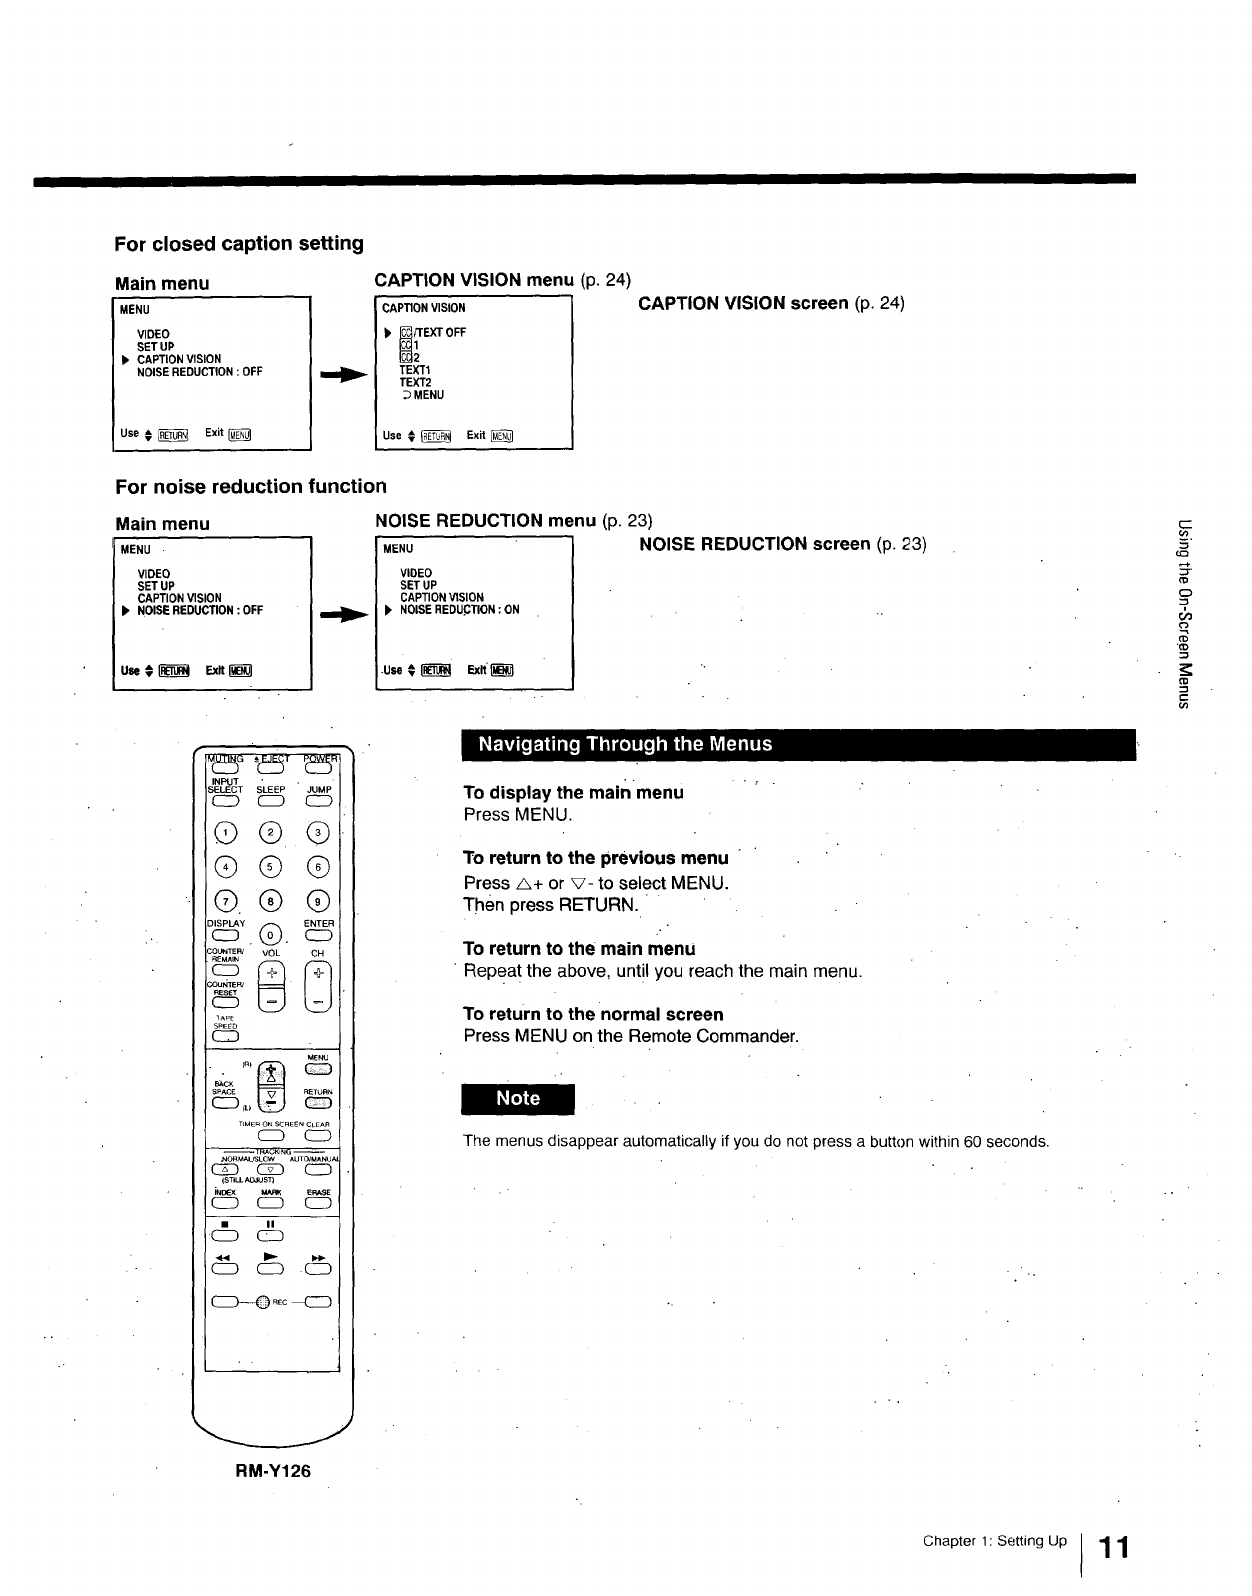
For closed caption setting
Main menu
MENU
VIDEO
SET UP
II' CAPTION VISION
NOISE REDUCTION : OFF
Use € _Exit
CAPTION VISION menu (p. 24)
CAPTION VISION
_EXT OFF
TEIGt
TEXT2
DMENU
Use € _Exit
CAPTION VISION screen (p. 24)
For noise reduction function
Main menu
MENU •
VIDEO
SET UP
CAPTION VISION
b NOISE REDUCTION : OFF
NOISE REDUCTION menu (p. 23)
MENU NOISE REDUCTION screen (p. 23)
VIDEO
SET UP
CAPTION VISION
1' NOISE REDU.CTION : ON
.use€ _ _xk_
_D
?
==
INPUT SLEEP JUMP
RM-Y126
To display the mainmenu
PressMENU.
To return to the previous menu
Press A+ or v- to select MENU.
Then press RETURN.
To return to the main menu
•Repea t the above, until you reach the main menu.
To return to the normal screen
Press MENU on the Remote Commander.
The menus disappear automatically if you do not press a button within 60 seconds•
Chapter 1: Setting Up 11

Turningthe Cable Mode On or Off
All of the controls are on the Remote
Commander. If you have cable connected to your VIDEO TV (p. 10) follow the steps below to turn
the cable connection on or off. CABLE is preset to OFF when you use your VIDEO
TV for the first time. Turn CABLE to OFF to preset or watch VHF or UHF channels.
INPUT
SELECT SLEEP JUMP
_ cID c2D
©Q©
Q© Q
©QQ
o_© _
COUNTER'_ 8 VOL
COUNT[R
_5
S_ED
C3
MENU
SPACE
CD ,L_
TIMERON SCREENCLEAR
CD CD"
--TRACKING --
NO_USLOW AUTO;MANU_I
(5_ CZD CID
{STI_ A_OST)
i_Ex _ E_
CD CD C_
• |1
CD CD
CID CD CD
RM-Y126
1
2
3
Press _+ or _- to select SET UP, in main menu.
(L)
Press RETURN.
The SET uP menu appears.
RETURN
MENU
VIDEO
SET UP
CAPTION VISION
NOISE REDUCTION : OFF
Use € _N_ Exit
SET UP
)' ON/OFF TIMER
TAPE REMAIN:T-120
CLOCK SET
CABLE : OFF
AUTO PROGRAM '
CH ERASE/ADD
DMENU
Use € _Exit
i
Press A+ or _- to select CABLE.
(L)
Press RETURN.
SETUP
ON/OFF TIMER
TApE REMAIN:T-120
CLOCK SET
p, CABLE :OFF
AUTO PROGRAM
CH ERASE/ADD
_MENU
use¢_ Ex_I_
Press A+ or V- to select ON or OFF alternately.
SET UP
ON/OFF TIMER
TAPE REMAIN:T-120
CLOCK SET
k CABLE :OFF
AUTO PROGRAM
CN ERASE/ADD
MENU
SETUP
ON/OFF TIMER
TAPE REMAIN:T-120
CLOCK SET
bCABLE : ON
AUTO PROGRAM
CHERASE/ADD
MENU
use€_ Exk_
Press RETURN.
Thesetting is completed,
To return to the normal screen
Press MENU. _"3F4
If the VIDEO TV is in LINE mode, you cannot select CABLE. Repeatedly press INPUT
SELECT to change to TV mode.
12 IChapter 1: Setting Up
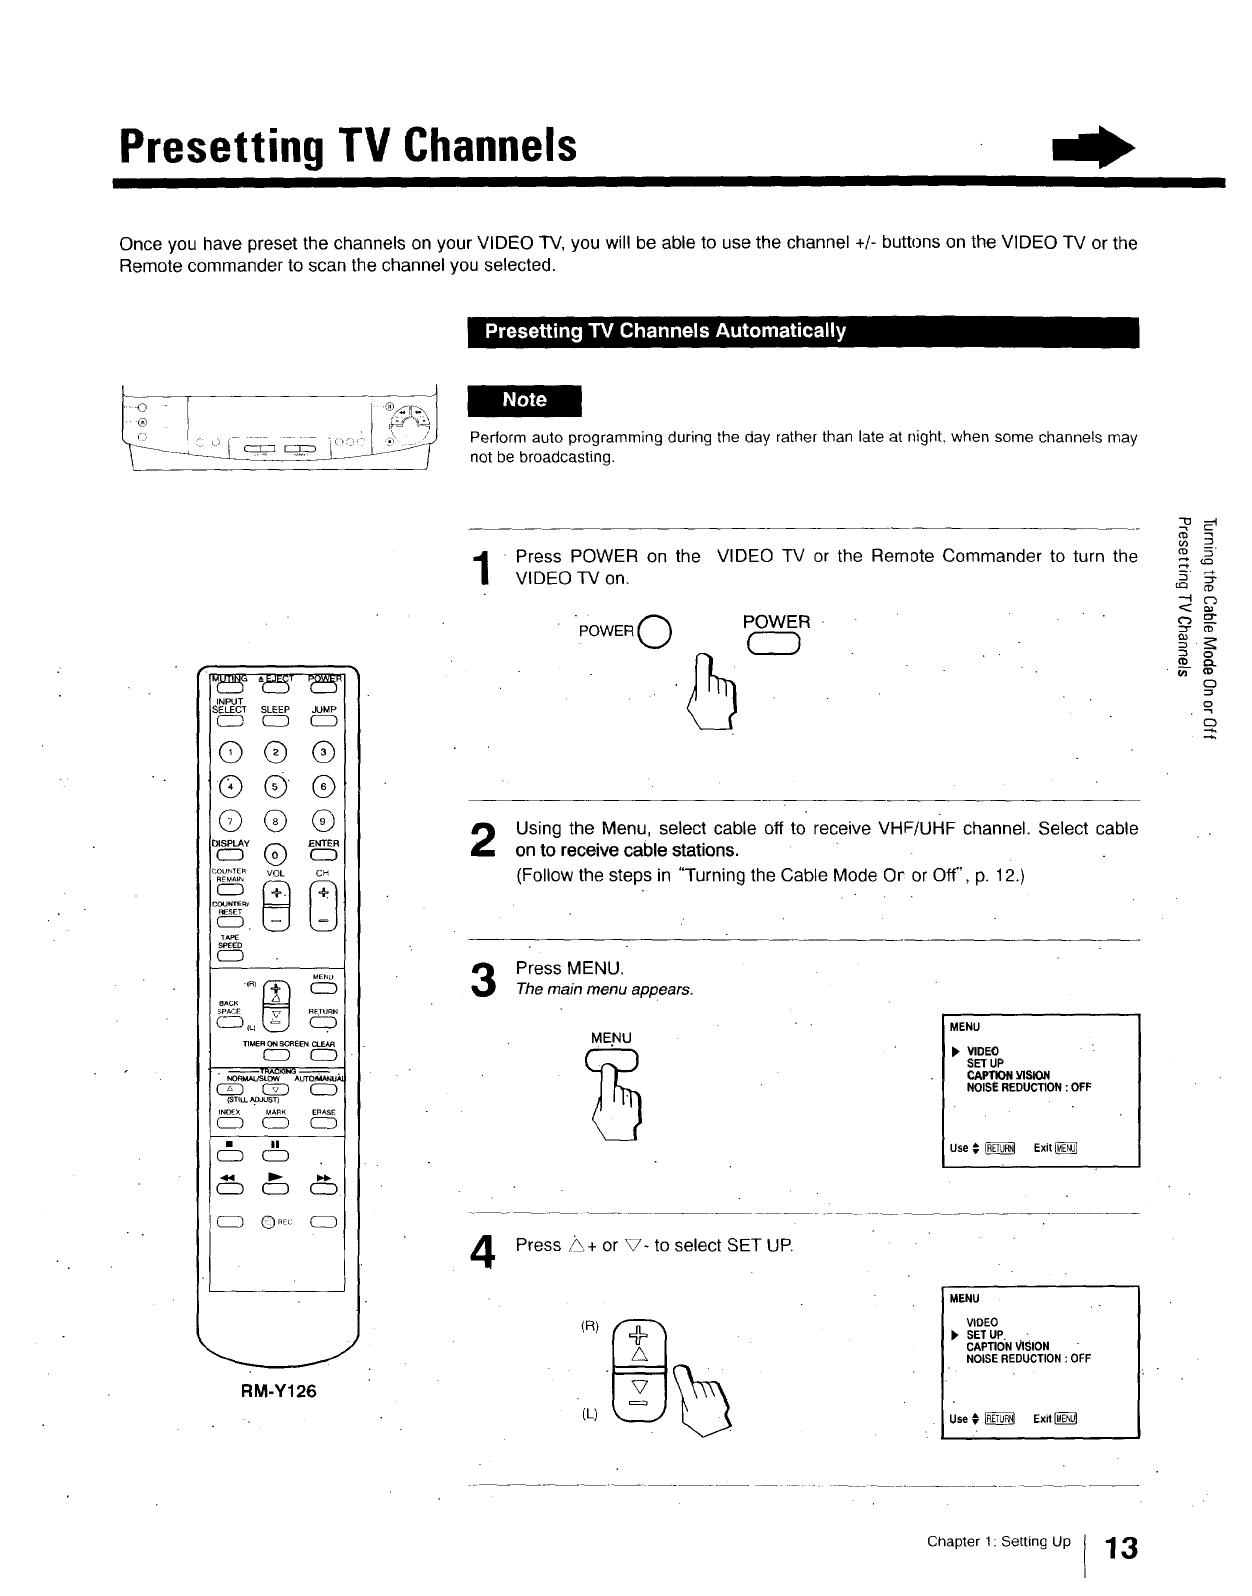
Presetting TV Channels
Once you have preset the channels on your VIDEO TV, you will be able to use the channel +/- buttons on the VIDEO TV or the
Remote commander to scan the channel you selected.
Perform auto programming during the day rather than late at night, when some channels may
not be broadcasting•
M425° -'_2_T t25"
INPUT
SELECT SLEEP JUMP
CD C_D CD
©@@
COUNIE_COU_rrER__,_ _VOL
SPE_D
CD
ME_
eACK.qRj_
SPACE
TIMERONSCREB_
C:D CD
• --T_.CK1NG _ .
NOm_ALroLOW AUTOr_ANUA
_ CSZD CD
(s'rlu__:l_u'sl3
INOEX MAnK E_ASE
CD CID CD
(_ II
Q
CD C_D
CD ©nE_ CD
RM-Y126
1
2
Press POWER on the VIDEO TV or the Remote Commander to turn the
VIDEO -IV on.
"POWER 0 '5POWER
CD
Using the Menu, select cable off to receive VHF/UHF channel. Select cable
on to receive cable stations.
(Follow the steps in "Turning the Cable Mode Or or Off', p. 12.)
Press MENU.
Themain menu ap#ears.
4
ME.NU MENU
VIDEO :
SET UP
CAPTION VISION
NOISE REDUCTION : OFF
Use _ _ Exit
Press _+ or V- to select SET UP.
MENU
VIDEO
), SET UP, •
CAPTION VISION
NOISE REDUCTION : OFF
Use _ _ Exit_
o
o
£
Chapter 1: Setting Up 13
Presetting TV Channels
INPUT
SELECT SLEEP JUMP
C_D C_ CD
©@ @
@© @
©@@
COUNTE_'_ _VOL _
COUNTER_
TAPE
SPEED
CD
MEI_U
_PACE
TIMERONSCREE_ el-EAR
CD C_D
--13aAC KING --
C_D CS_D CD
(STILLAO._S13
It40£X' MARK _.
C_D CD
CD
CD CD
RM-Y126
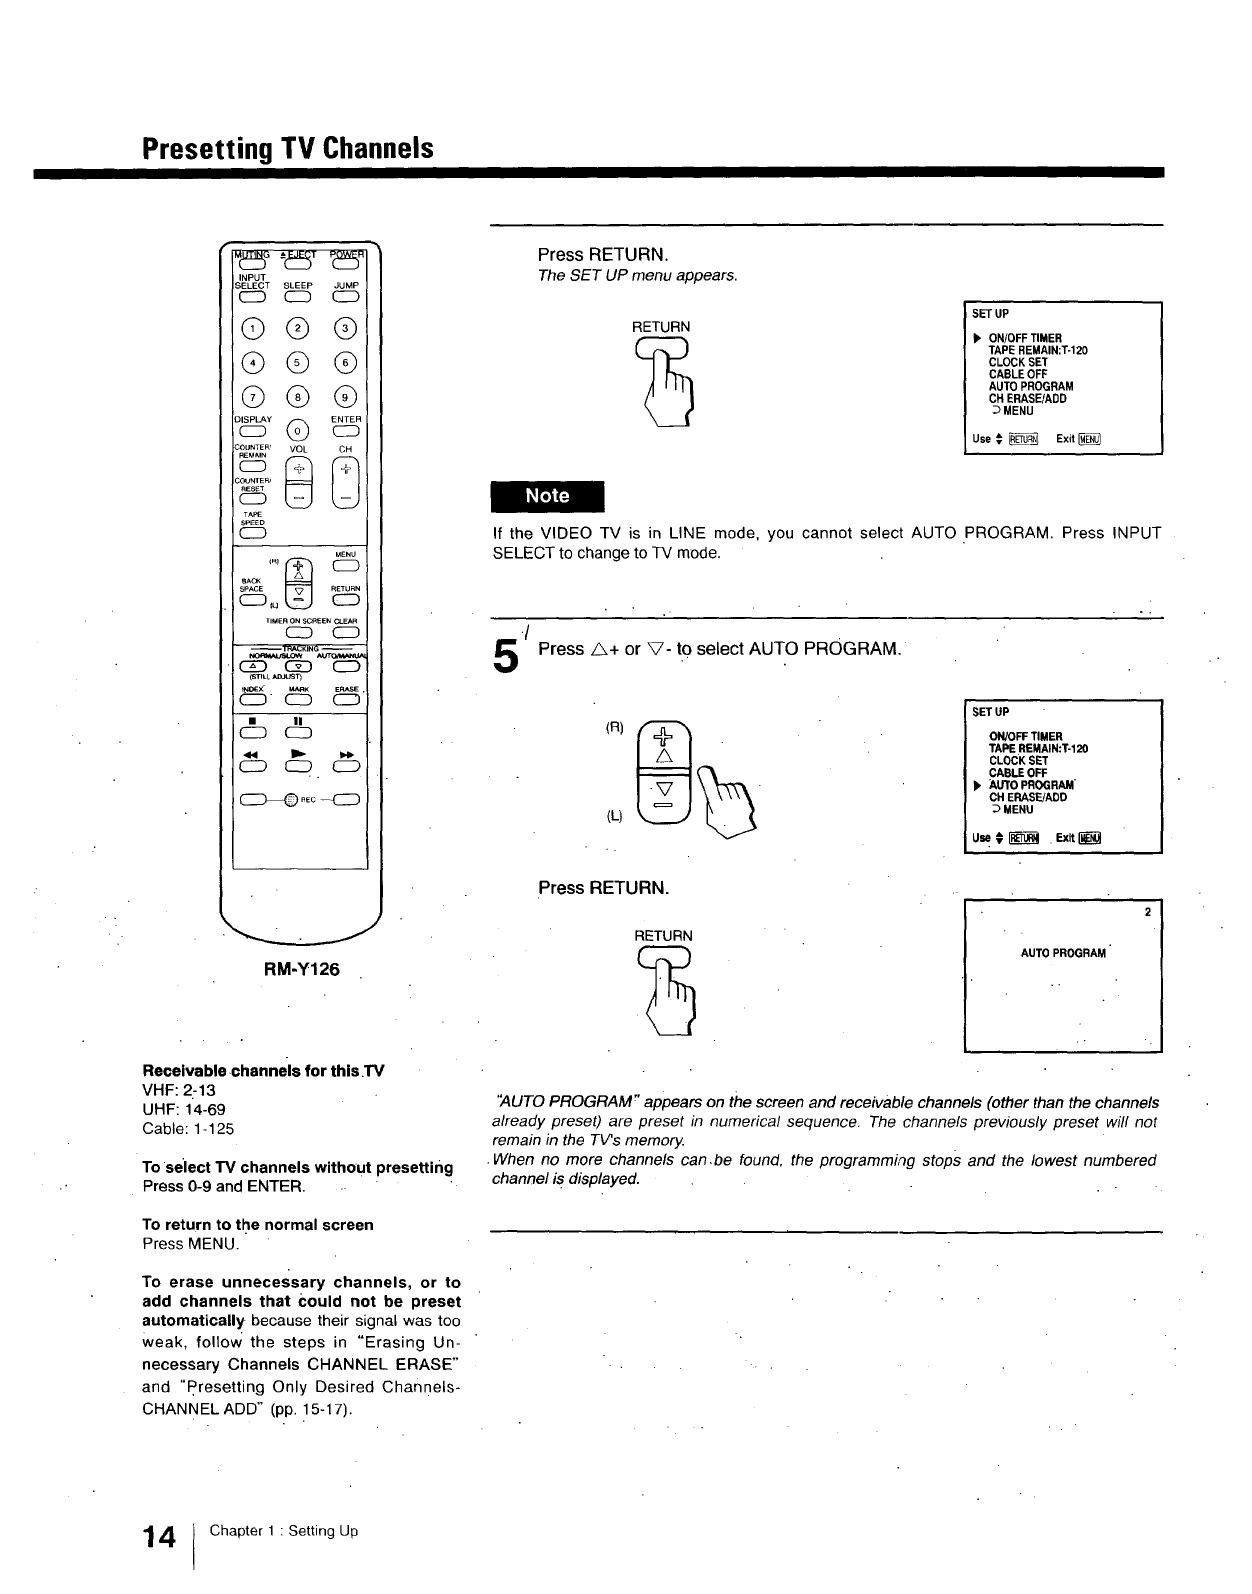
Receivable,channels for this TV
VHF: 2:13
UHF: 14-69
Cable: 1-125
To select TV channels without presetting
Press 0-9 and ENTER.
To return to the normal screen
Press MENU.
To erase unnecessary channels, or to
add channels that Could not be preset
automatically because their signal was too
weak, follow the steps in "Erasing Un-
necessary Channels CHANNEL ERASE"
and "Presetting Only Desired Channels-
CHANNEL ADD" (pp. 15-17).
Press RETURN.
TheSET UP menu appears•
RETURN SET UP
ON/OFF TIMER
TAPE REMAIN:T-120
CLOCK SET
CABLE OFF
AUTO PROGRAM
CH ERASE/ADD
DMENU
Use _ _ Exit
If the VIDEO TV is in LINE mode, you cannot select AUTO PROGRAM. Press INPUT
SELECT to change to TV mode.
5/ Press z_+ or _- to select AUTO PROGRAM.
(L)
Press RETURN.
SET UP
ON/OFF TIMER
TAPE REMAIN:T-120
CLOCK SET
CABLE OFF
b AUTO PROGRAM"
CH ERASE/ADD
MENU
uu,_r-_-_-_-_-_-_-_-_-_.ExR_
RETURN
AUTO PROGRAM
"AUTO PROGRAM r'appears on the screen and receivable channels (other than the channels
already preset) are preset in numerical sequence. The channels previously preset will not
remain in the TV's memory.
•When no more channels can.be found, the programming stops and the lowest numbered
channel is displayed.
4Chapter 1: Setting Up

Use this feature to erase unnecessary TV channels, so that when you press CH+/-,
the channel(s) are skipped.
"INPUT
SELECT SLEEP JUMP
_ C_D CD
®® ®
Q®Q
©®.®
SOUNTE_ VOL CH
;CtJNTE_
SPEED
c_
TIMERONSCREENCLEAR
C_D CD
NORMALFoLOW /_dTO_M_NU_
_ C2_D CD
(STI_ AOJUS'_
INDEX MARK ERASE
CD C2D CD
c_ c_ c_
CD O.oo <2_
RM,Y126
Press the CH +/- button to select the channel you want to erase.
For example, to erase channel 8, press CH + or - until 8 appears•
3
4
Press MENU.
The main menu appears.
• MENU
MENU
VIDEO
. SET UP
CAPTION VISION
NOISE REDUCTION : OFF
Use € _Exit [_
Press ,_+ or V- to select SET UP.
' (L)
Press RETURN.
TheSET uP menu appears.
RETURN
MENU
VIDEO
), SET UP
CAPTION VISION
NOISE REDUCTION : OFF
Use € _EXil
SET UP
b ON/OFF TIMER
TAPE REMAIN:T-120
CLOCK SET
CABLEOFF
AUTO PROGRAM
CH ERASE/ADD
MENU
Use¢ _Exit_
Press A+ or V- to select CH ERASE/ADD.
(L)
SET UP
•ON!OFF TIMER
TAPE REMAIN:T-120
CLOCK SET
CABLE OFF " '
AUTO PROGRAM
)_ CH ERASE/ADD
MENU
use€ _l E_t
-0
h.
"-4
==-
¢D
Chapter 1 :Setting Up ! 15
Presetting TV Channels
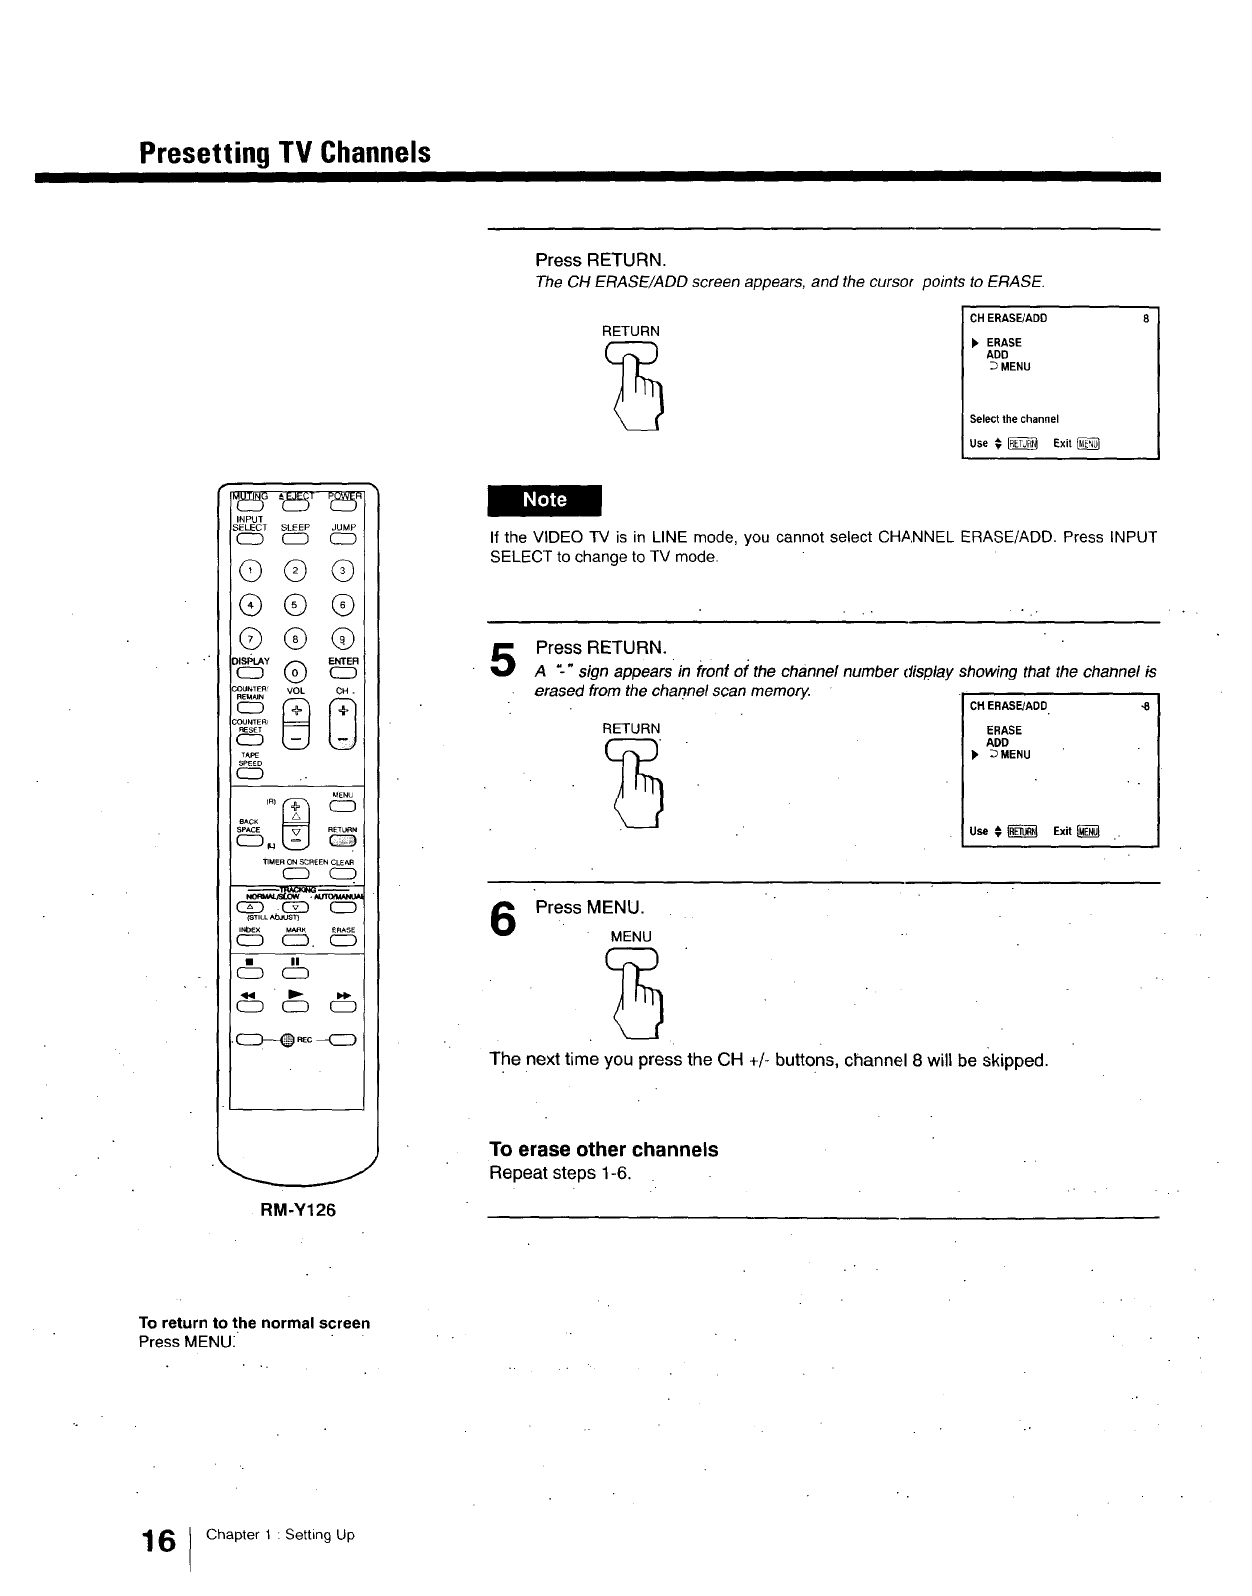
Press RETURN.
TheCH ERASE/ADD screen appears, and the cursor points to ERASE•
RETURN CH ERASE/ADD
ERASE
ADD
DMENU
Select the channel
Use _ RE_ Exit
_LftJFJ
INPU]"
"_ELECT SLEEP JUMP
(_3 (ZC) C_)
©© ©
®® @
Q@@
_OUNTER' VOL CH.
_5
T_P£
SPEED
C2D
_ENU
SPACE U
tIMER ONSCREENCLE_
CD CZD
_ CS_D CD
_ILL _
INblEX M_ _RASE
_ CD. CZD
CD
CD C_D _
.c_-_o -_
RM-Y126
If the VIDEO TV is in LINE mode, you cannot select CHANNEL ERASE/ADD. Press INPUT
SELECT to change to TV mode.
5Press RETURN.
A"-" sign appearsin front of the channel number display showing that the channel is
erased from the channel scan memory. CH ERASE!ADD -8
RETURN ERASE
ADD
b' _MENU
Use # _ Exit
Press MENU.
MENU
The next time you press the CH +/- buttons, channel 8 will be skipped.
To erase other channels
Repeat steps 1-6.
To return to the normal screen
Press MENU:
6Chapter 1 : Setting Up
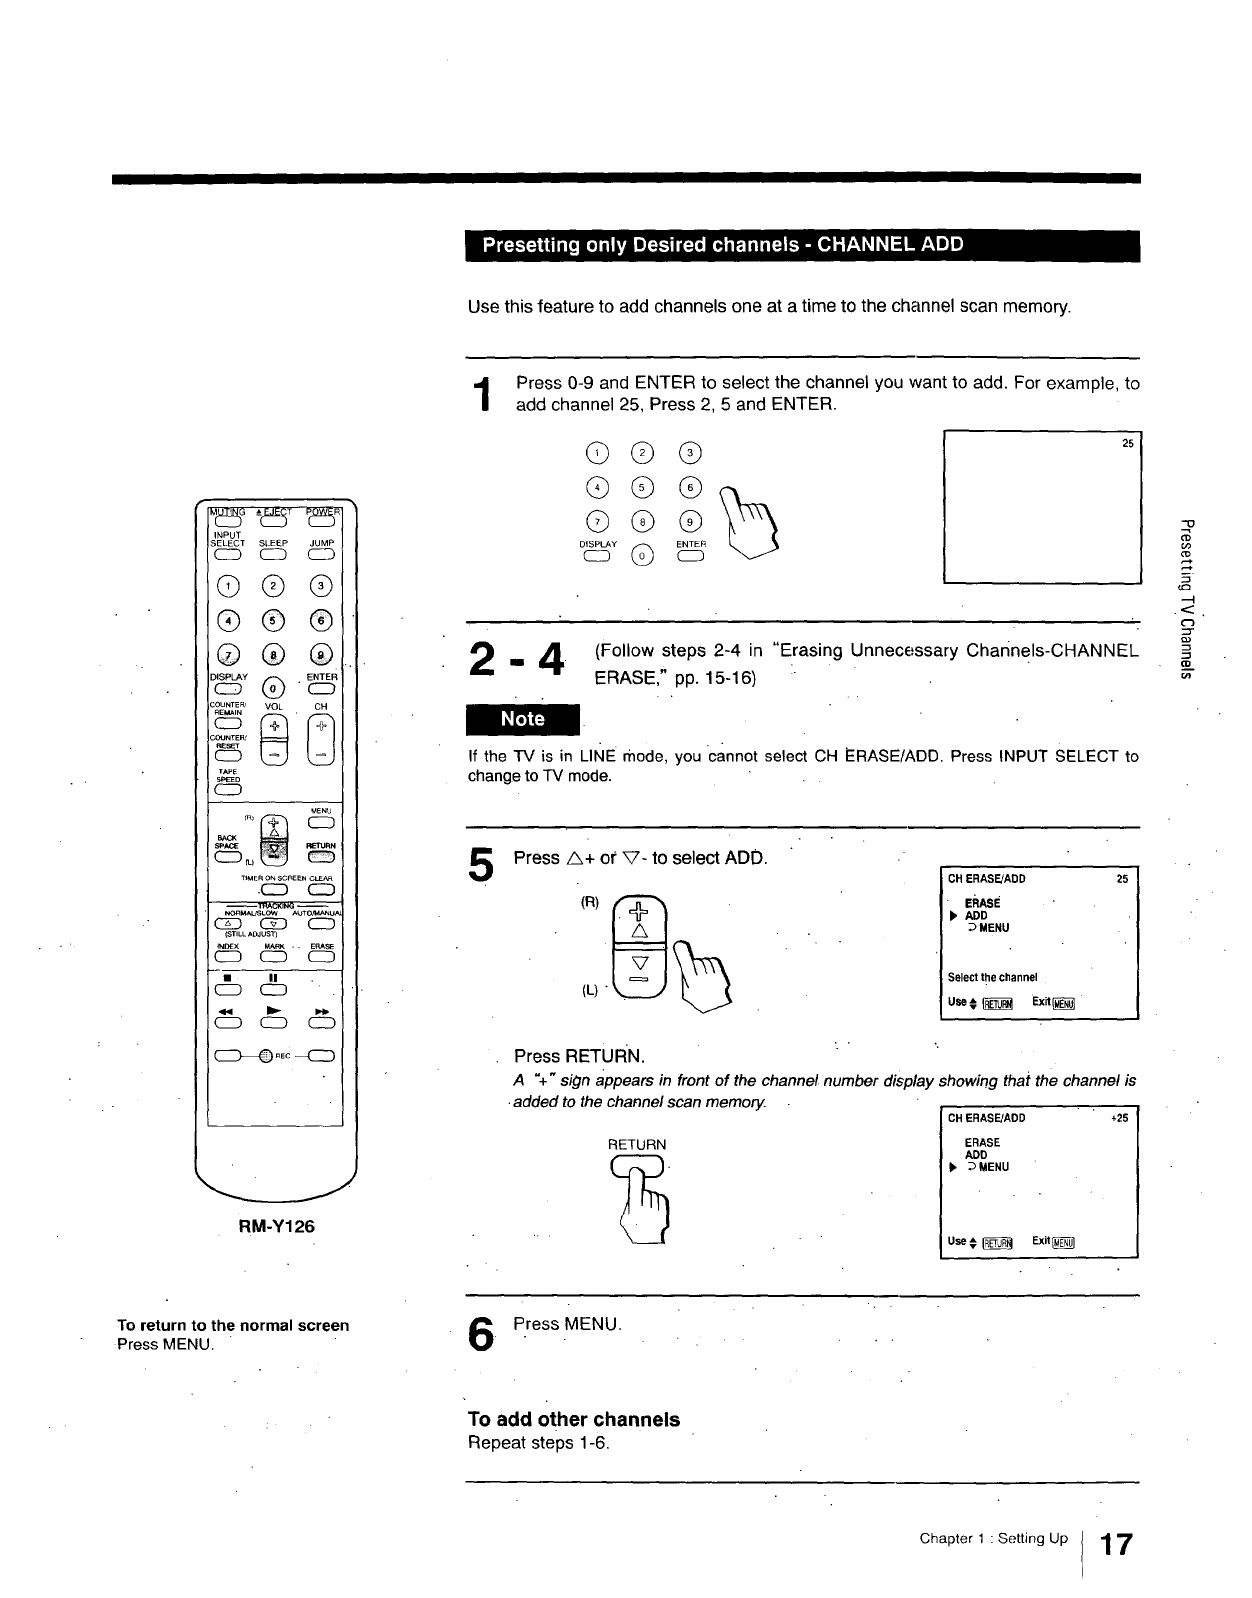
Use this feature to add channels one at a time to the channel scan memory.
INPUT
SELECT SLEEP JUMP
C_D C23 CD
©@ @
®®®
@® ®
COUNTER/ VOL CH
_OUNTEI_'
TIOE
S_-_D
C2D
TIMER ON SCREEN CLEAR
.CD CD I
NORMAL_LOW AUTO/t_U_
CZD C_D CD
(STILLAc_us_
INC_X UARK ,, E_S_
C_D C2D CD
CD '
c_ c_ c_
RM-Y126
Press 0-9 and ENTER to select the channel you want to add. For example, to
add channel 25, Press 2, 5 and ENTER.
©©q})
¢)6)®
_[ (Follow steps 2-4 in "Erasing Unnecessary channels-CHANNEL
I"-ir ERASE," pp. 15-16)
If the TV is in LINE mode, you cannot select CH ERASE/ADD, Press INPUT SELECT to
change to TV mode.
5Press A+ or _- to select ADD.
CH ERASE/ADD
-EhASE
ADD
:.>MENU
Select the channel
Use t _Exit_
25
--_--_--.BI:'TIII_kl. """
Press
A"+" sign appears in front of the channel number display showing that the channel is
•added to the channel scanmemorjz. CH ERASE/ADD +25
RETURN ERASE
ADD
b_MENU
Use# _Exit_
"13
u)
¢0
F.
U_
To return to the normal screen
Press MENU. Press MENU.
To add other channels
Repeat steps 1-6,
Chapter 1 :Setting Up 1 7
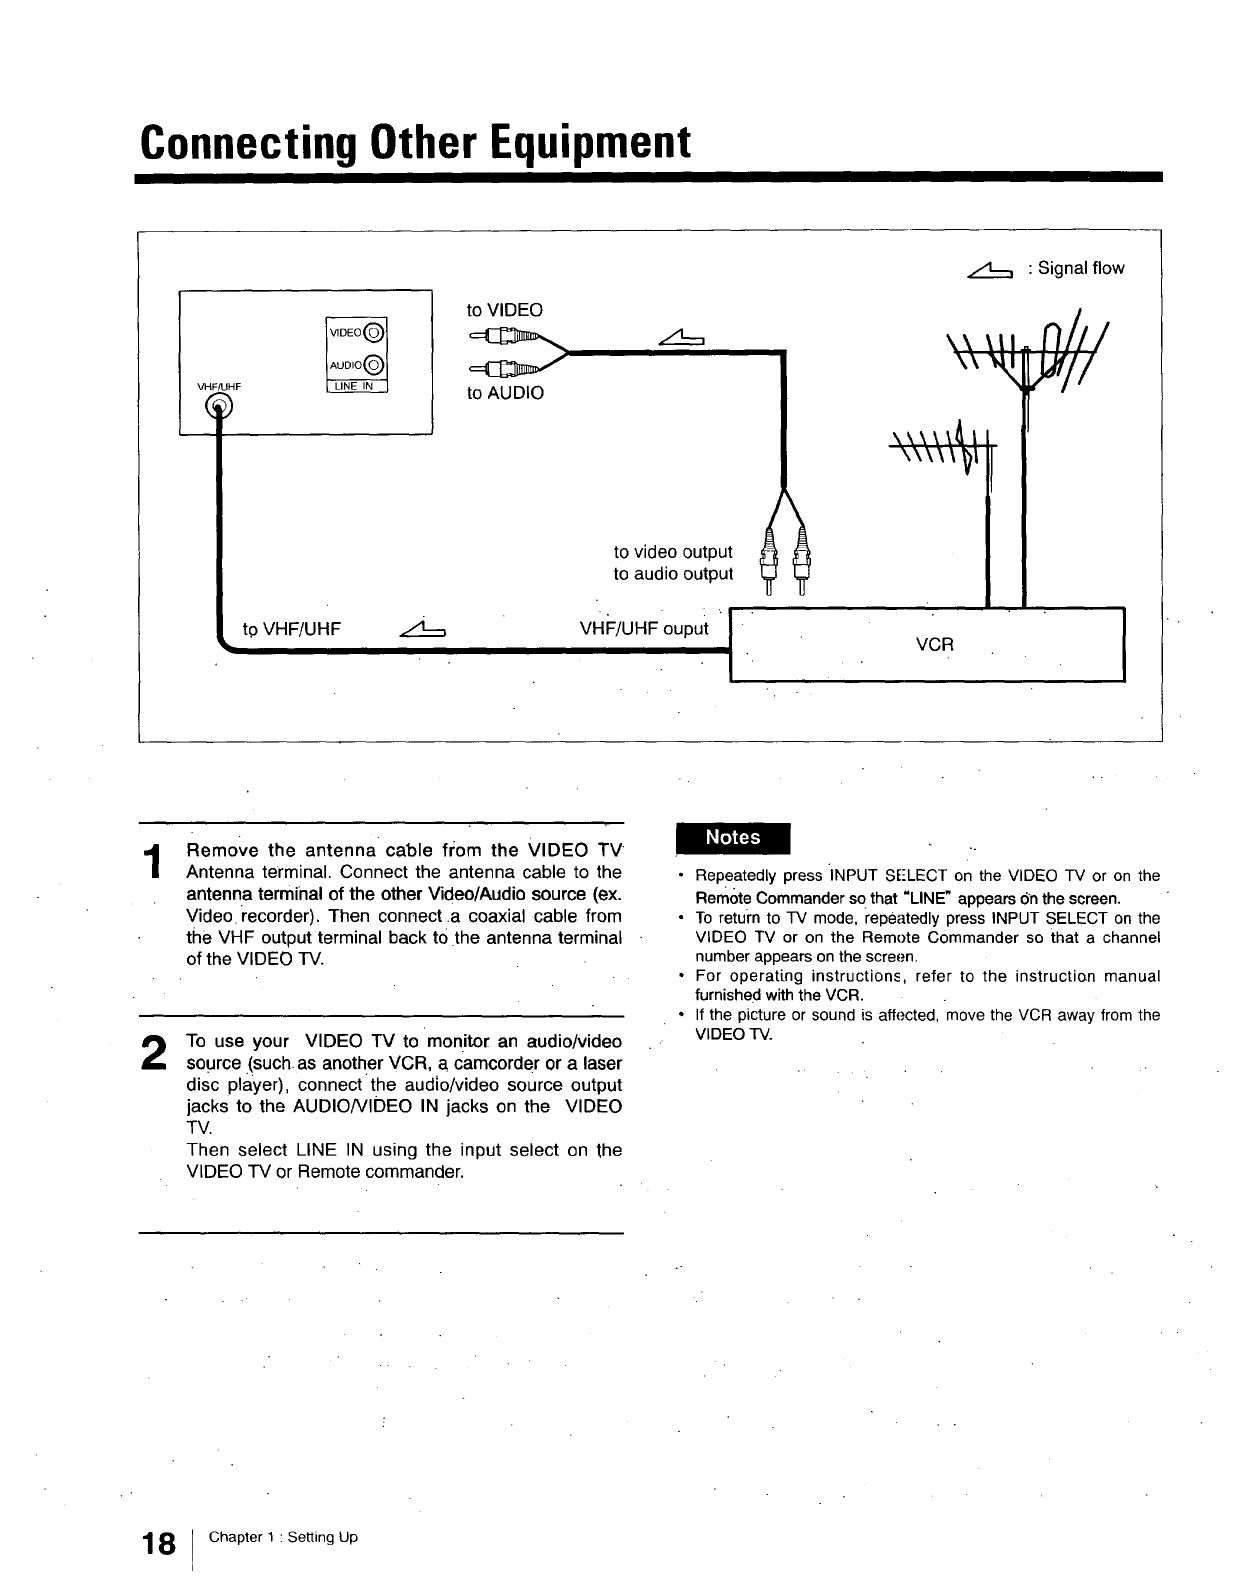
Connecting Other Equipment
VHFfUHF
to VHF/UHF
to VIDEO
to AUDIO
z:_==
to video output
to audio output
vHi:/UHFouputI
• Signal flow
kk\\\_ I
\\\ \ \ _I
VCR I
1
2
Remove the antenna cable from the VIDEO TV
Antenna terminal. Connect the antenna cable to the
antenna terminal of the other Video/Audio source (ex.
Video recorder). Then connect.a coaxial cable from
the VHF output terminal back tO the antenna terminal
of the VIDEO TV.
To use your VIDEO TV to monitor an audio/video
source !such as another VCR, a camcorder or a laser
disc player), connectthe audio/video source output
jacks to the AUDIO/VIDEO IN jacks on the VIDEO
TV.
Then select LINE IN using the input select on the
VIDEO TV or Remote commander.
•Repeatedly press INPUT SE-LECTon the VIDEO TV or on the
Remote Commander so that "LINE" appears Onthe screen.
•To return to TV mode, repeatedly press INPUT SELECT on the
VIDEO TV or on the Remote Commander so that a channel
number appears on the screen.
•For operating instructions, refer to the instruction manual
furnished with the VCR.
• If the picture or sound is affected, move the VCR away from the
VIDEO TV.
8Chapter 1 : Setting Up
Chapter 2: UsingBasic VIDEOTV Features
Watching TV Programs
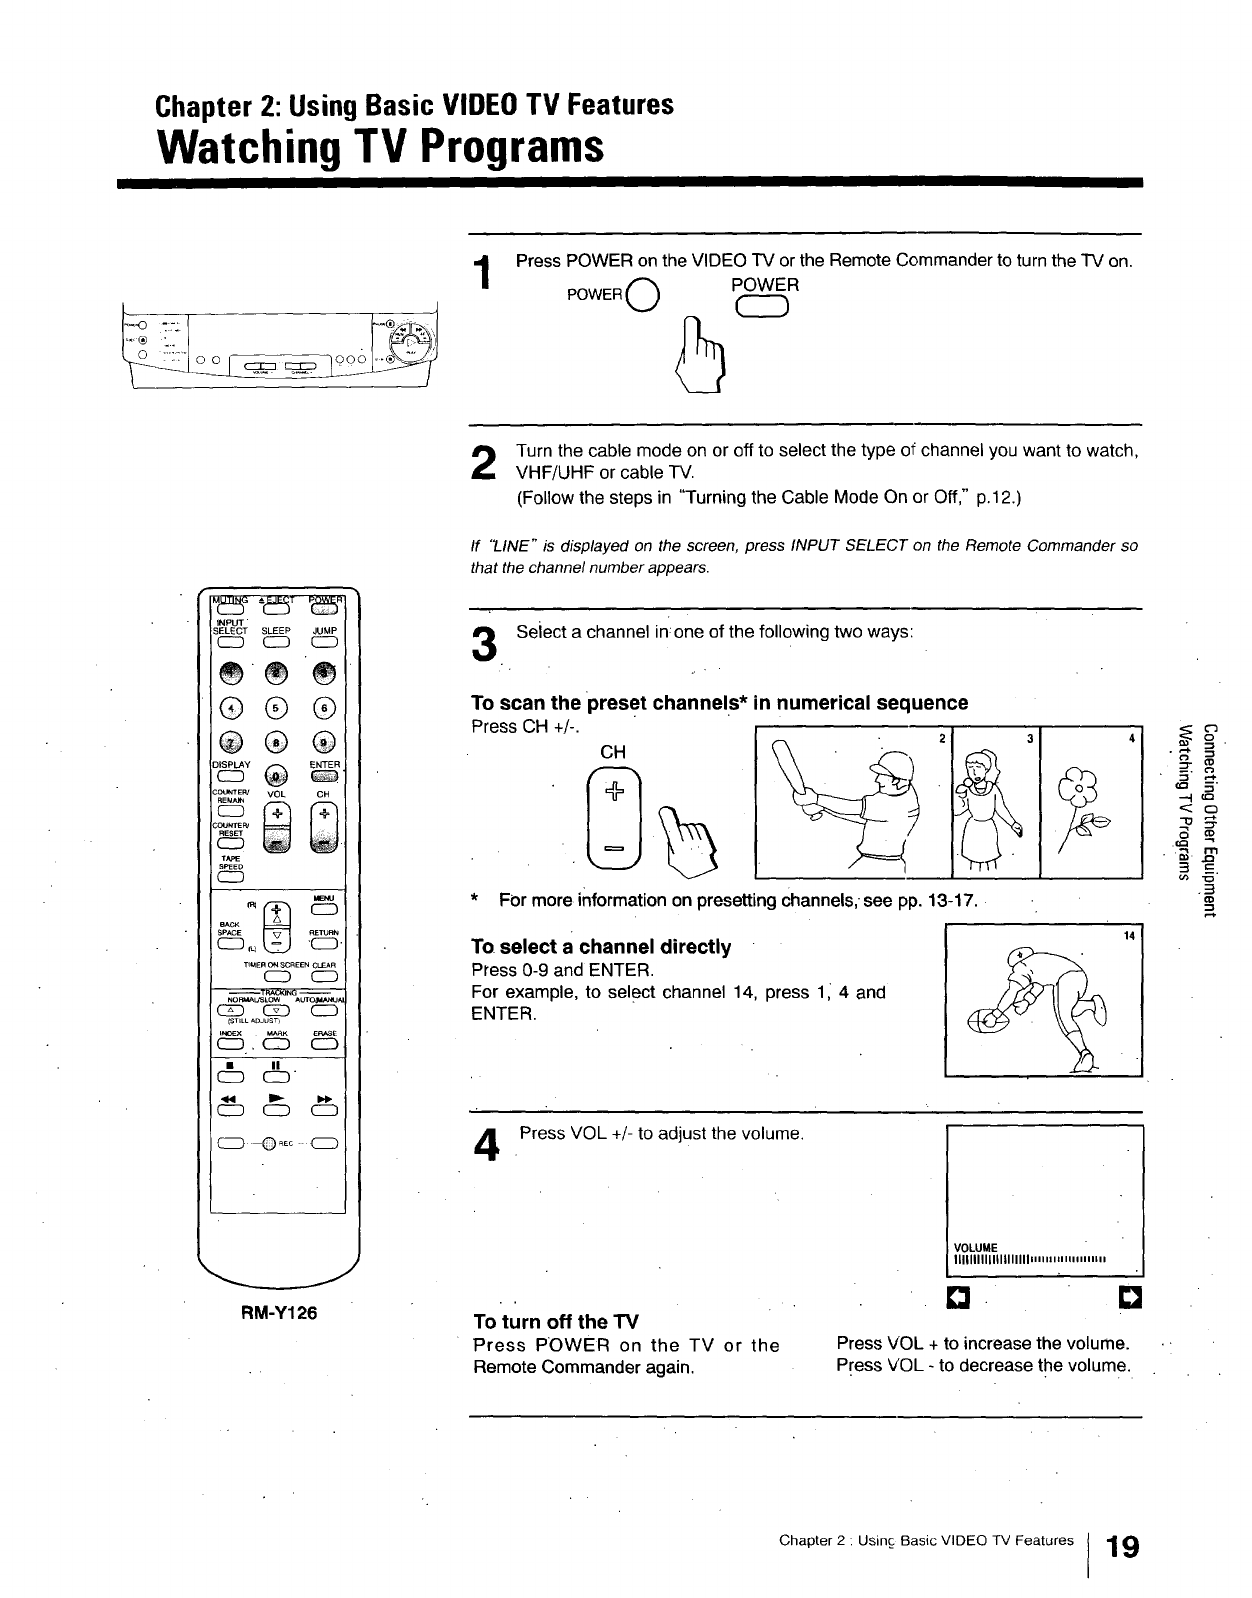
1Press POWER on the VIDEO TV or the Remote Commander to turn the TV on.
POWER O POWER
Md_SG"-d_+ Pd_5"
INPUT"
SELECT SLEEP JUMP
C_D CD (ZD
_®_
®® ®
®®®
REM._
T_
SPEED
C:D
SPACE
TI_ER O_ SCREENCLEAR
CD C:D
NORU_LtSLOW _UtO_,MJA
CZD CS_D C_
[STILL &D JUST)
LHOEX _K ERASE
C2D CD
CZD
C_D C_ C3
C2D ©_+ CD
RM-Y126
Turn the cable mode on or off to select the type of channel you want to watch,
VHF/UHF or cable TV.
(Follow the steps in "Turning the Cable Mode On or Off," p.12.)
If "I_INE" is displayed on the screen, press INPUT SELECT on the Remote Commander so
that the channel number appears•
Seiect a channel in:one of the following two ways:
To scan the preset channels* in numerical sequence
Press CH +/-.
CH
For more information on presetting channels,-see pp. 13-17.
To select a channel directly
Press 0-9 and ENTER.
For example, to select channel 14, press 11 4 and
ENTER.
14!
Press VOL +/- to adjust the volume.
To turn off the "FV
Press POWER on the TV or the
Remote Commander again.
VOLUME
llllllllllllllllllll.,i,.,, m,.,,,m
Press VOL +to increase the volume.
Press VOL - to decrease the volume.
'3 .
,,_ ._%-
--.I ¢:2
<: O
7;
2m
_-.3
Chapter 2 : Usinc Basic VIDEO TV Features 19
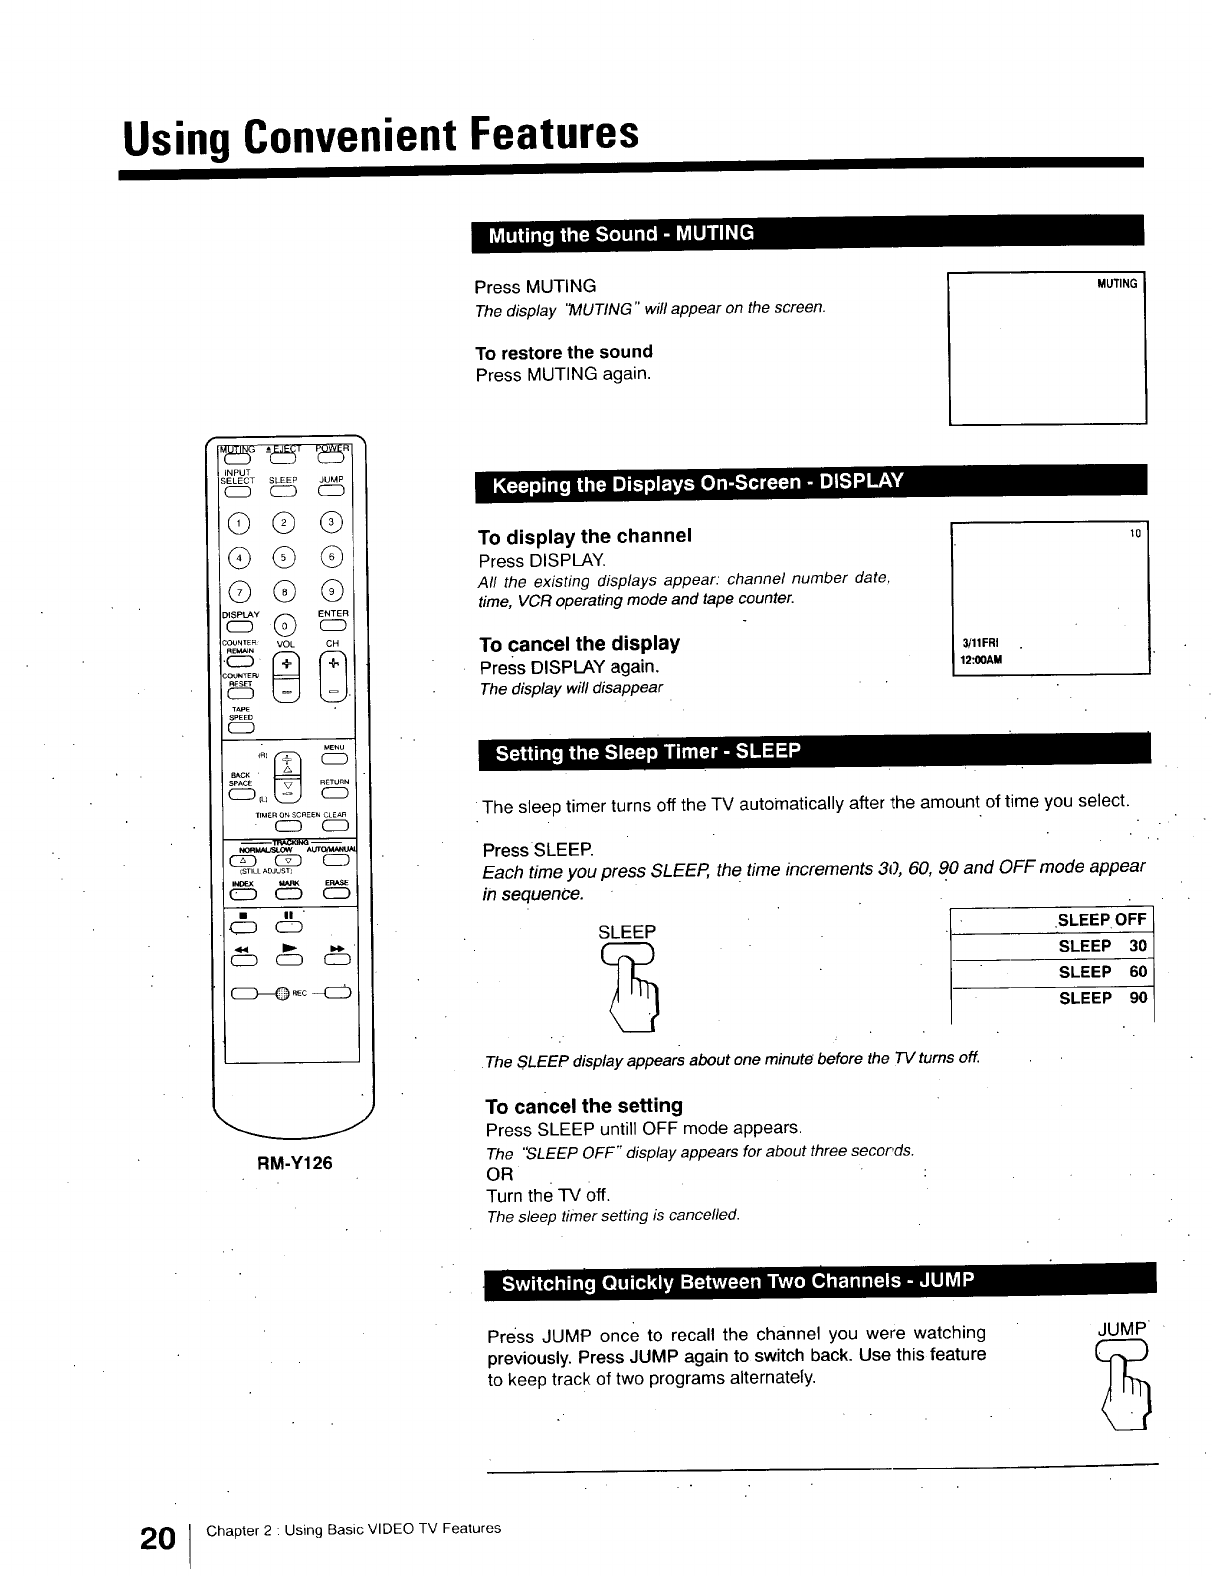
Using Convenient Features
Press MUTING
The display 'MUTING" will appear on the screen.
To restore the sound
Press MUTING again.
MUTING
INPUT
SELECT SLEEP JUMP
c_ CD _
©© Q
@@ @
©® @
COUNTER"_ 8 VOL
COUNTER:
t_E
SPEEtJ
CD
MENU
SPACE
TIMERon SCA_ENCLE_
CD CD
C_ C2D CD
_STILL ADJUST]
INOF-X MARK EP,ASe
CD C_D CD
_ |1 "CD
"c_ c_
CD--Q _o -C_
RM-Y126
To display the channel
Press DISPLAY.
All the existing displays appear.•channel number date,
time, VCR operating mode and tape counter.
To cancel the display
Press DISPLAY again,
The display willdisappear
3/11FRI
12:00AM
The sleep timer turns off the TV automatically after the amount of time you select.
Press SLEEP.
Each time you press SLEEP, the time increments 30, 60, 90 and OFF mode appear
in sequence.
SLEEP . .EPOll
SLEEP 30
SLEEP 60
SLEEP
•The SLEEP display appears about one minute before the TV turns off.
To cancel the setting
Press SLEEP untill OFF mode appears.
The "SLEEP OFF" display appears for about three seconds.
OR
Turn the TV Off.
Thesleep timer setting is cancelled.
Press JUMP once to recall the channel you were watching
previously. Press JUMP again to switch back. Use this feature
to keep track of two programs alternately.
JUMP
0Chapter 2 : Using Basic VIDEO TV Features
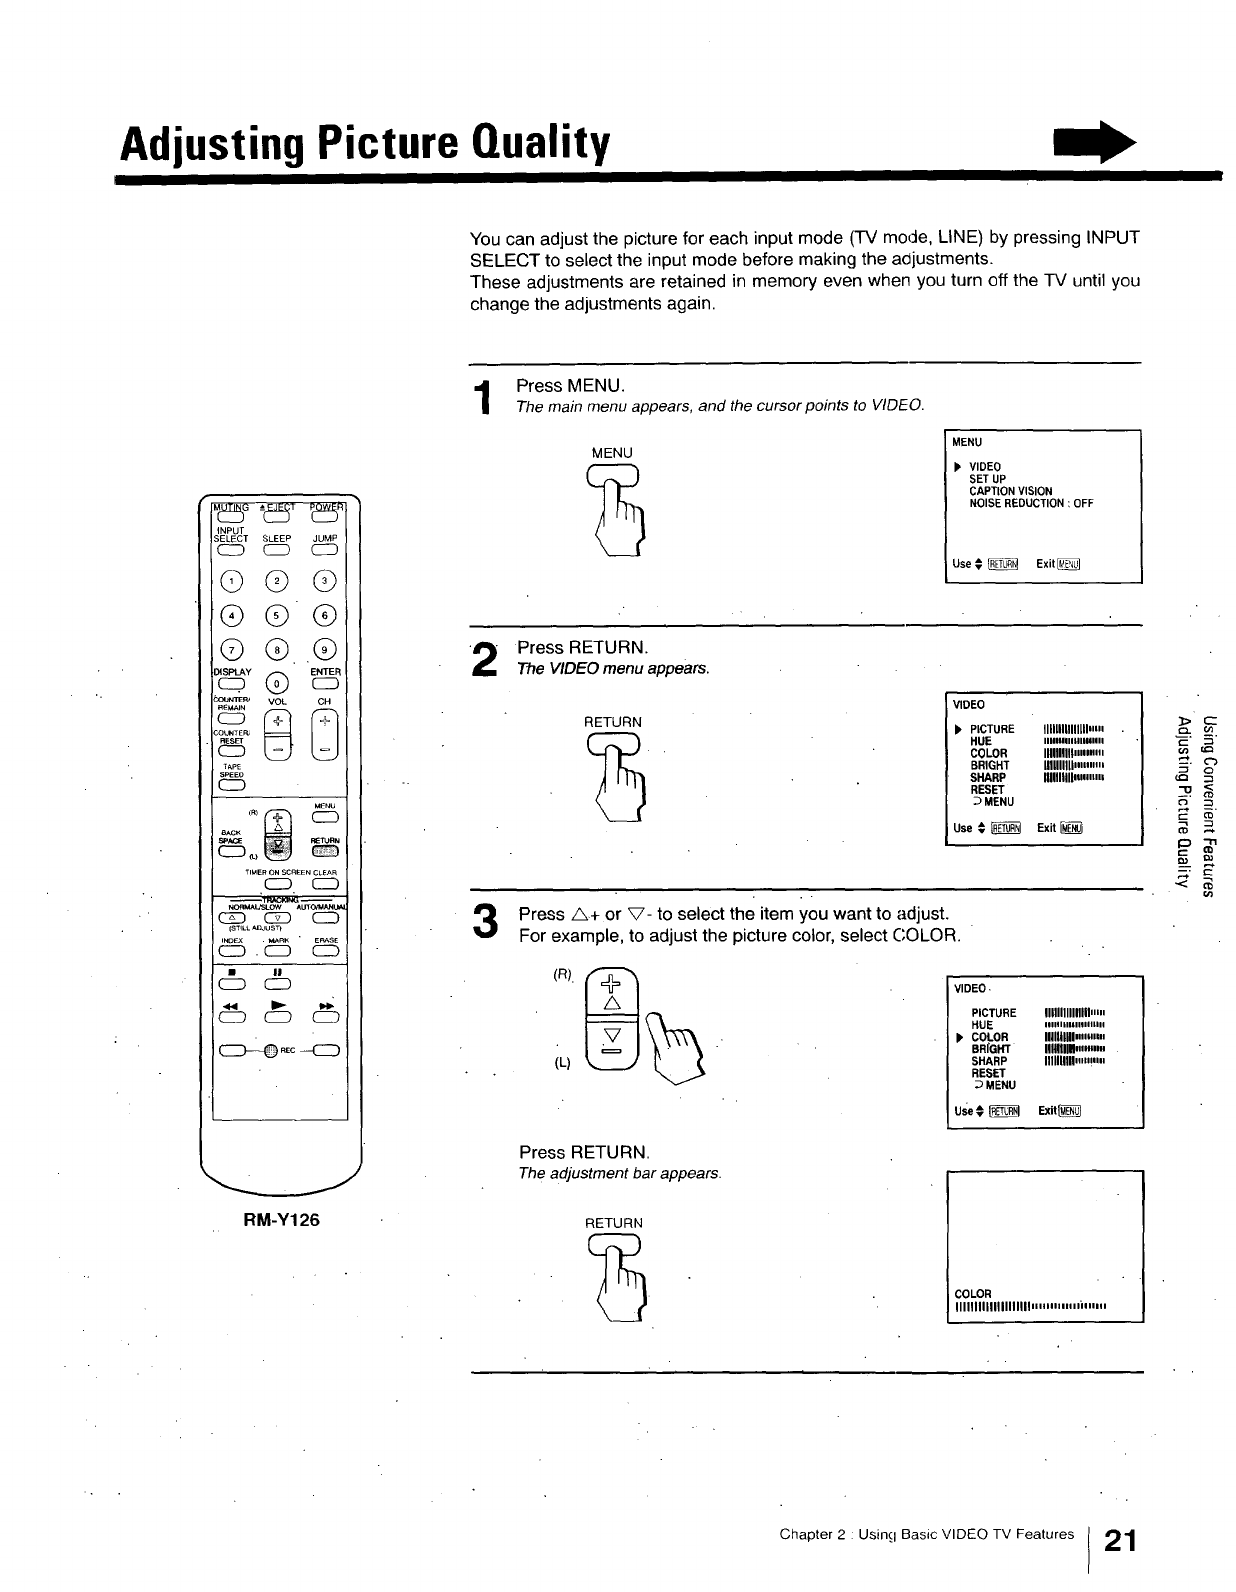
Adjusting Picture Quality
You can adjust the picture for each input mode (TV mode, LINE) by pressing INPUT
SELECT to select the input mode before making the aajustments.
These adjustments are retained in memory even when you turn off the TV until you
change the adjustments again•
iNPUT
3ELECT SLEEP JUMP
CID CD C_
©@ @
®®®
© ® ®
:O_NTER_ VOL CH
;OUNTE_
TApE
SPEED
c_
_'NU
TIMER ON _REEN CLEAR
CID CD
(ZD C_ CD
(STILL_Jus'l
i_Ex . _RK E_SE
CZD . CD C_D
CD
CZD CID CID
RM-Y126
Press MENU.
The main menu appears, and the cursor points to V/DFO.
MENU MENU
P VIDEO
SET UP
CAPTION VISION
NOISE REDUCTION :OFF
Use €_Exit
2Press RETURN.
The VIDEO menu appears.
RETURN
VIDEO
b PICTURE lllllllllllllll.m
HUE IIIlUlllllnlllllll
COLOR IIIIIIIIIl.,,m,.
BRIGHT llllllllllmm..i
SHARP lllllnllllmm.,
RESET
DMENU
Use # _Exit
Press A.+ or V- to seLect the item you want to adjust.
For example, to adjust the picture color, seLect COLOR.
(L)
VIDEO.
PICTURE lllllllllllllllm.
HUE iiiiiiiiiiiiiii11111
). COLOR IIIlUllll.,.mm
BRIGHT llflflllH,..m,,
SHARP IIIIIIIIII..mi,,
RESET
DMENU
Use_ _Exit_
Press RETURN•
The adjustment bar appears•
RETURN
COLOR
IIIIIIIIIIIIIIIIIIII,,. "'m,.i"",,,
R
Chapter 2 Using Basic VIDEO TV Features 21
Adjusting Picture Quality
INPUT
SELECT SLEEP JUMP
c_ CD CD
@@@
@@@
@®@
VOL CH
° 8 8
C.OU_TE_
_5
TAPE
S_ED
CD
MENU
SpAcE
_TRACK]NG --
NORM_SLOW _UTO_AN_
G_ C2D CD
_MARK ERASE
C:D CZD CD
•II
CD C_
c_ c_
RM-Y126
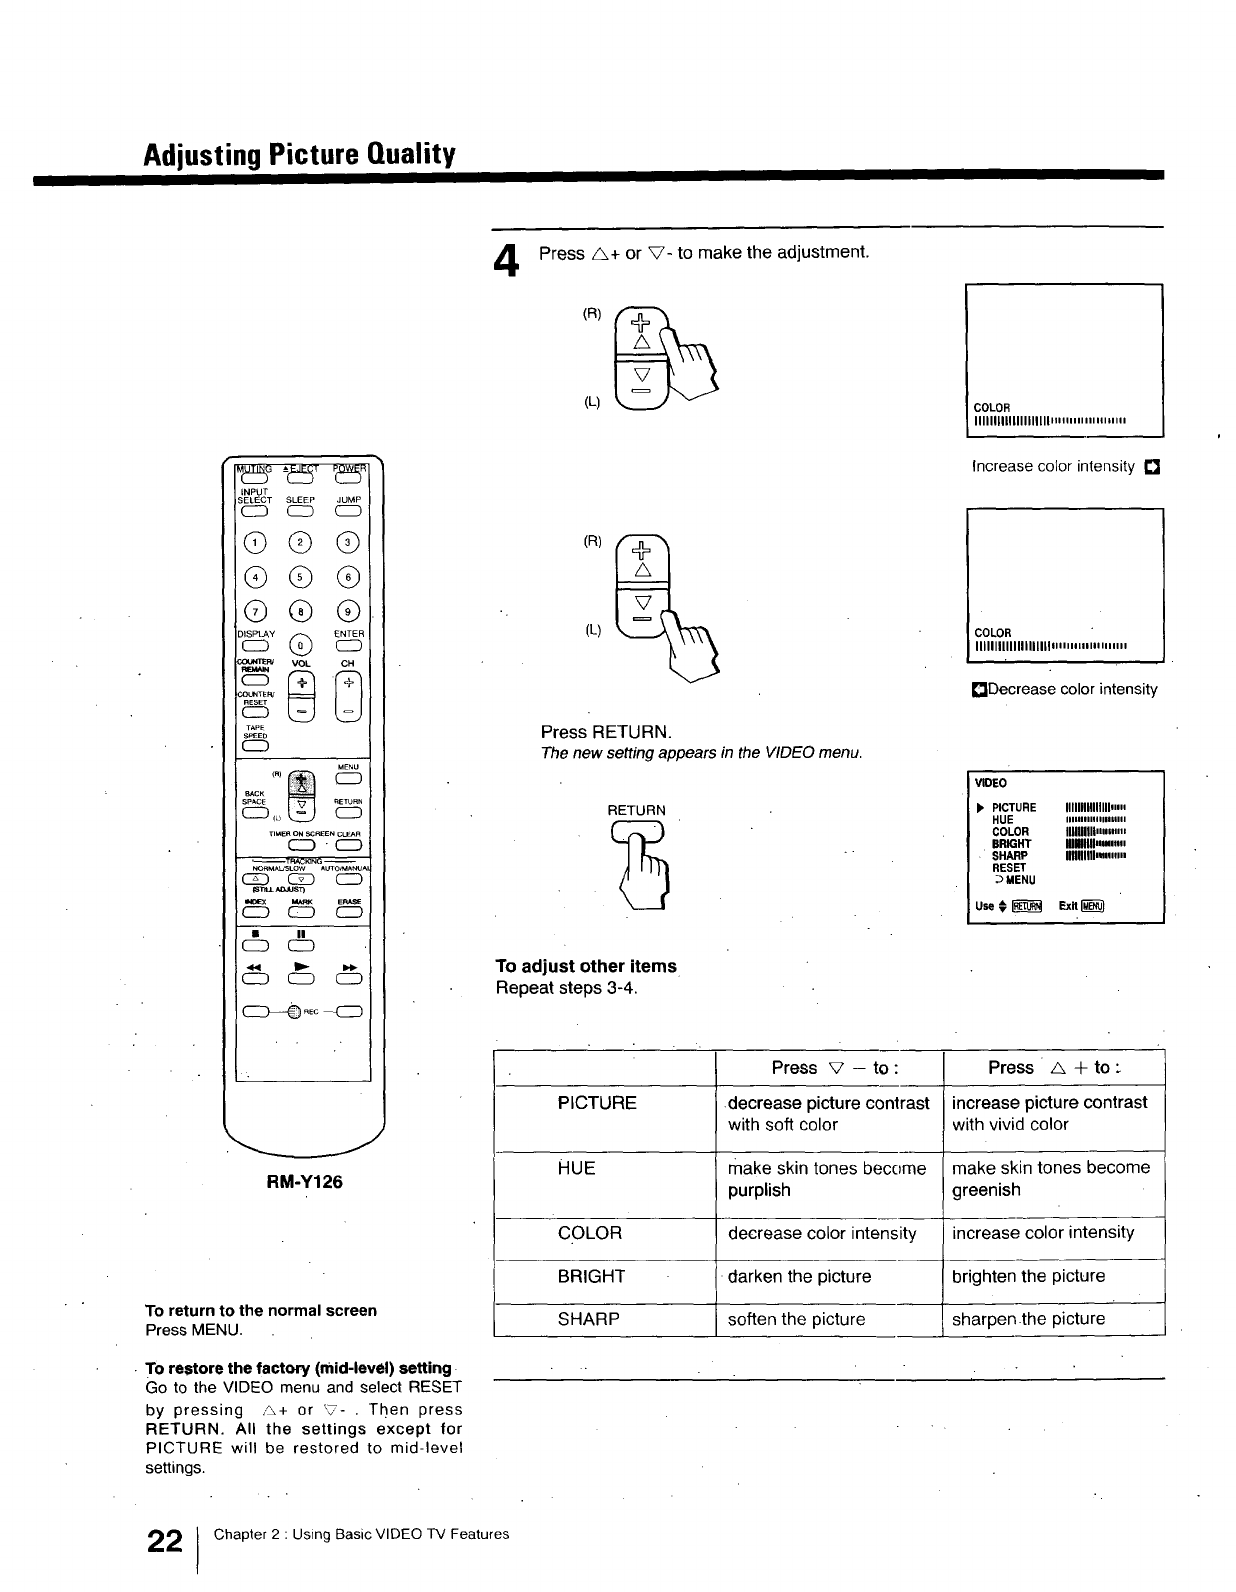
To return to the normal screen
Press MENU.
• To restore the factory (mid-level) setting
Go to the VIDEO menu and select RESET
by pressing ,,_+ or '7- . Then press
RETURN. All the settings except for
PICTURE will be restored to mid-level
settings.
4Press A+ or V- to make the adjustment.
(L) i
COLOR
IIIIIIIIIIIIIIIIIIIIm........,
i
Increase color intensity []
(L)
Press RETURN.
The new setting appears in the VIDEOmenu.
RETURN
COLOR
IIIIIIIIIIIIIIIIIIII...,... m..
r_Decrease color intensity
VIDEO
). PICTURE IIIIIIIIIIIIIII.m
HUE IIIIl,llllllnliºlll
COLOR InMIIIn,nm.
BRIGHT IIIMIII,Mm.
•SHARP llflllllll.,_,...
RESET
•_MENU
To adjust other items
Repeat steps 3-4.
Press V -to : Press ' _ +to-
PICTURE .decrease picture contrast increase picture contrast
with soft color with vivid color
HUE make skin tones become make skin tones become
purplish greenish
COLOR decrease color intensity increase color intensity
BRIGHT darken the picture brighten the picture
SHARP soften the picture sharpen.the picture
2]Chapter 2 : Using Basic VIDEO TV Features
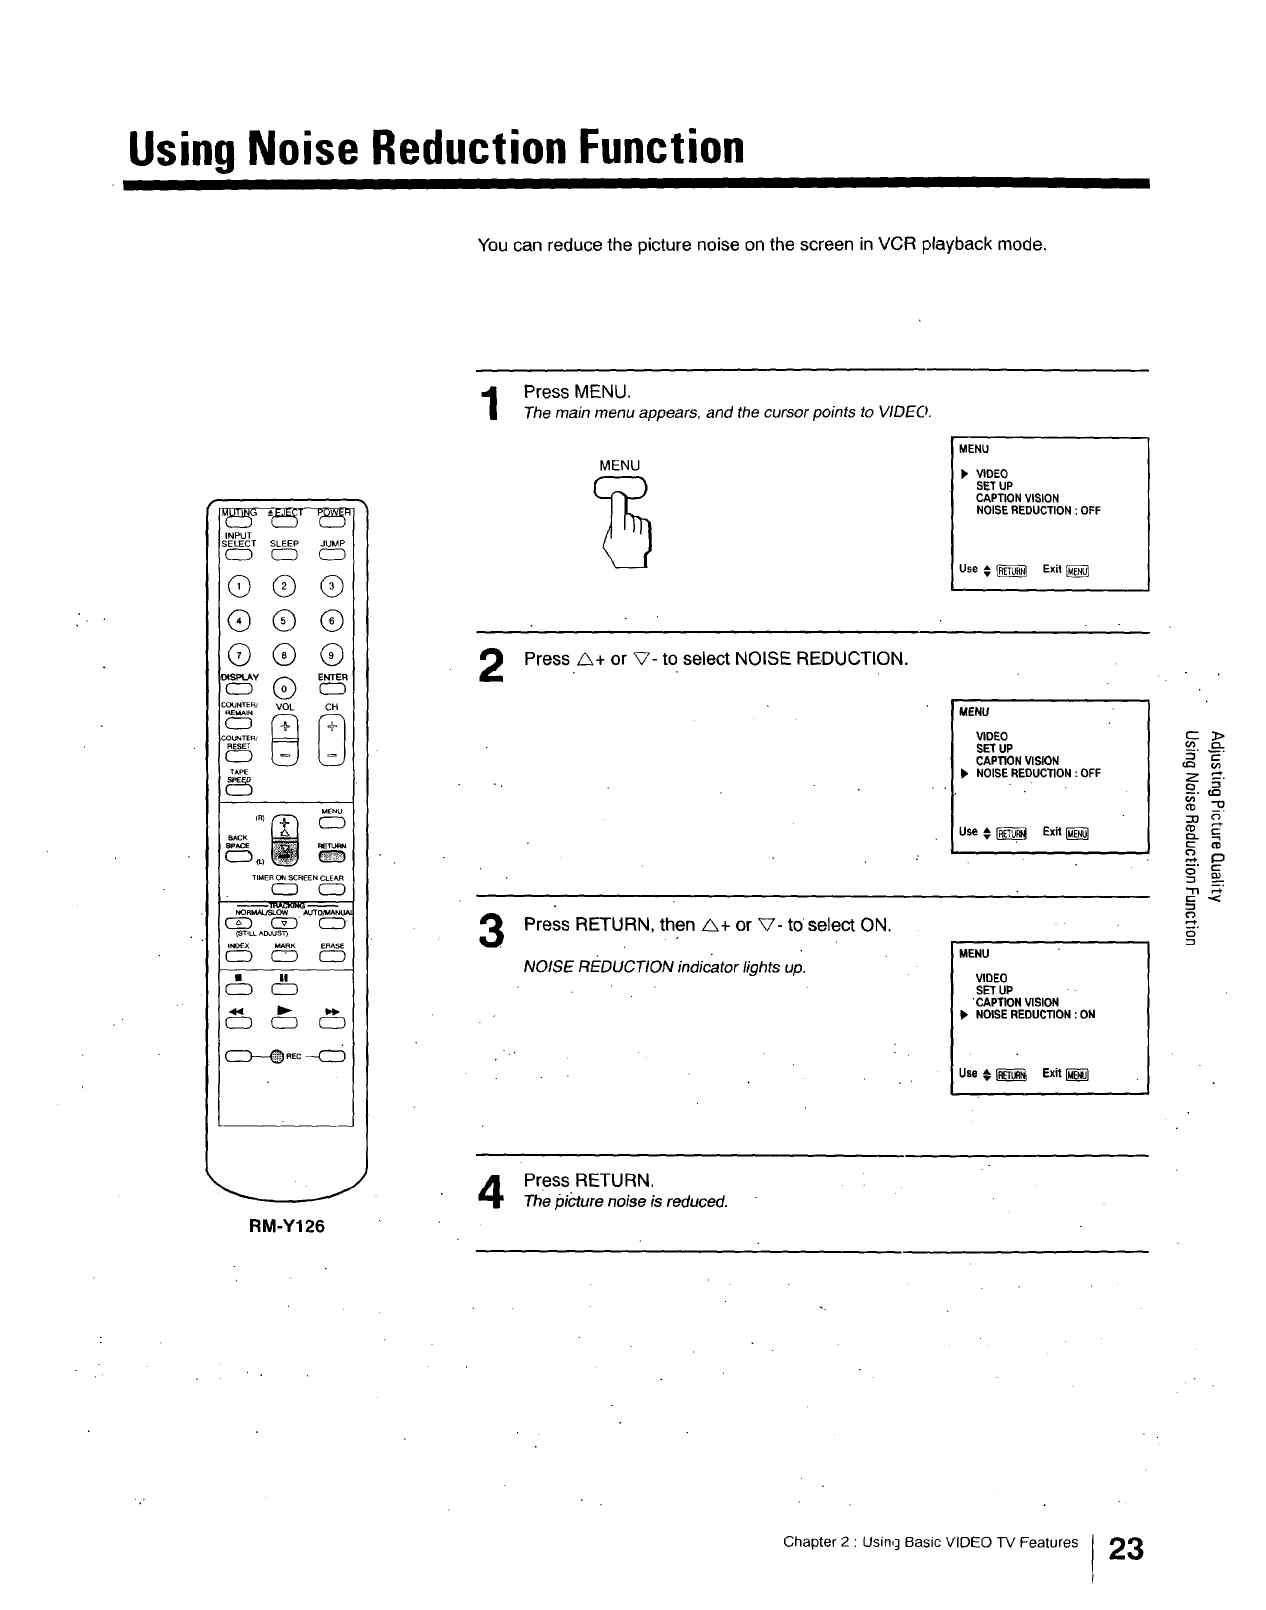
Using Noise Reduction Function
You can reduce the picture noise on the screen in VCR playback mode,
INPUT
SELECT SLEEP JUMP
C2D C:D (_D
QGQ
®®®
GQQ
:OUNTER/
:OUNTE_'
5
TAPE
_IMERONSCaEENC_E_R
c_ CD
c_ CSD CD
_ST_LLAC_US_
SN_'X MARK ERASE
C:D CID CD
CZ)
CD _ CD
Press MENU.
Themain menu appears, and the cursor points to VIDEO.
2
3
MENU
MENU
_, VIDEO
SET UP
CAPTION VISION
NOISE REDUCTION : OFF
Use € _Exit
Press _+ or _- to select NOISE REDUCTION.
MENU
VIDEO
SET UP
CAPTION VISION
NOISE REDUCTION :OFF
use€_ Exit
Press RETURN, then _+ or _'- to select ON.
NOISE REDUCTION indicator lights up. MENU
VIDEO
SET UP
"CAPTION VISION
•NOISE REDUCTION : ON
Use €_ Ex_[_'_7
RM-Y126
Press RETURN.
Thepicture noiseis reduced.
Chapter 2 :Using Basic VIDEO TV Features 23
Chapter 3: UsingAdvancedTV Features
Using Closed Caption
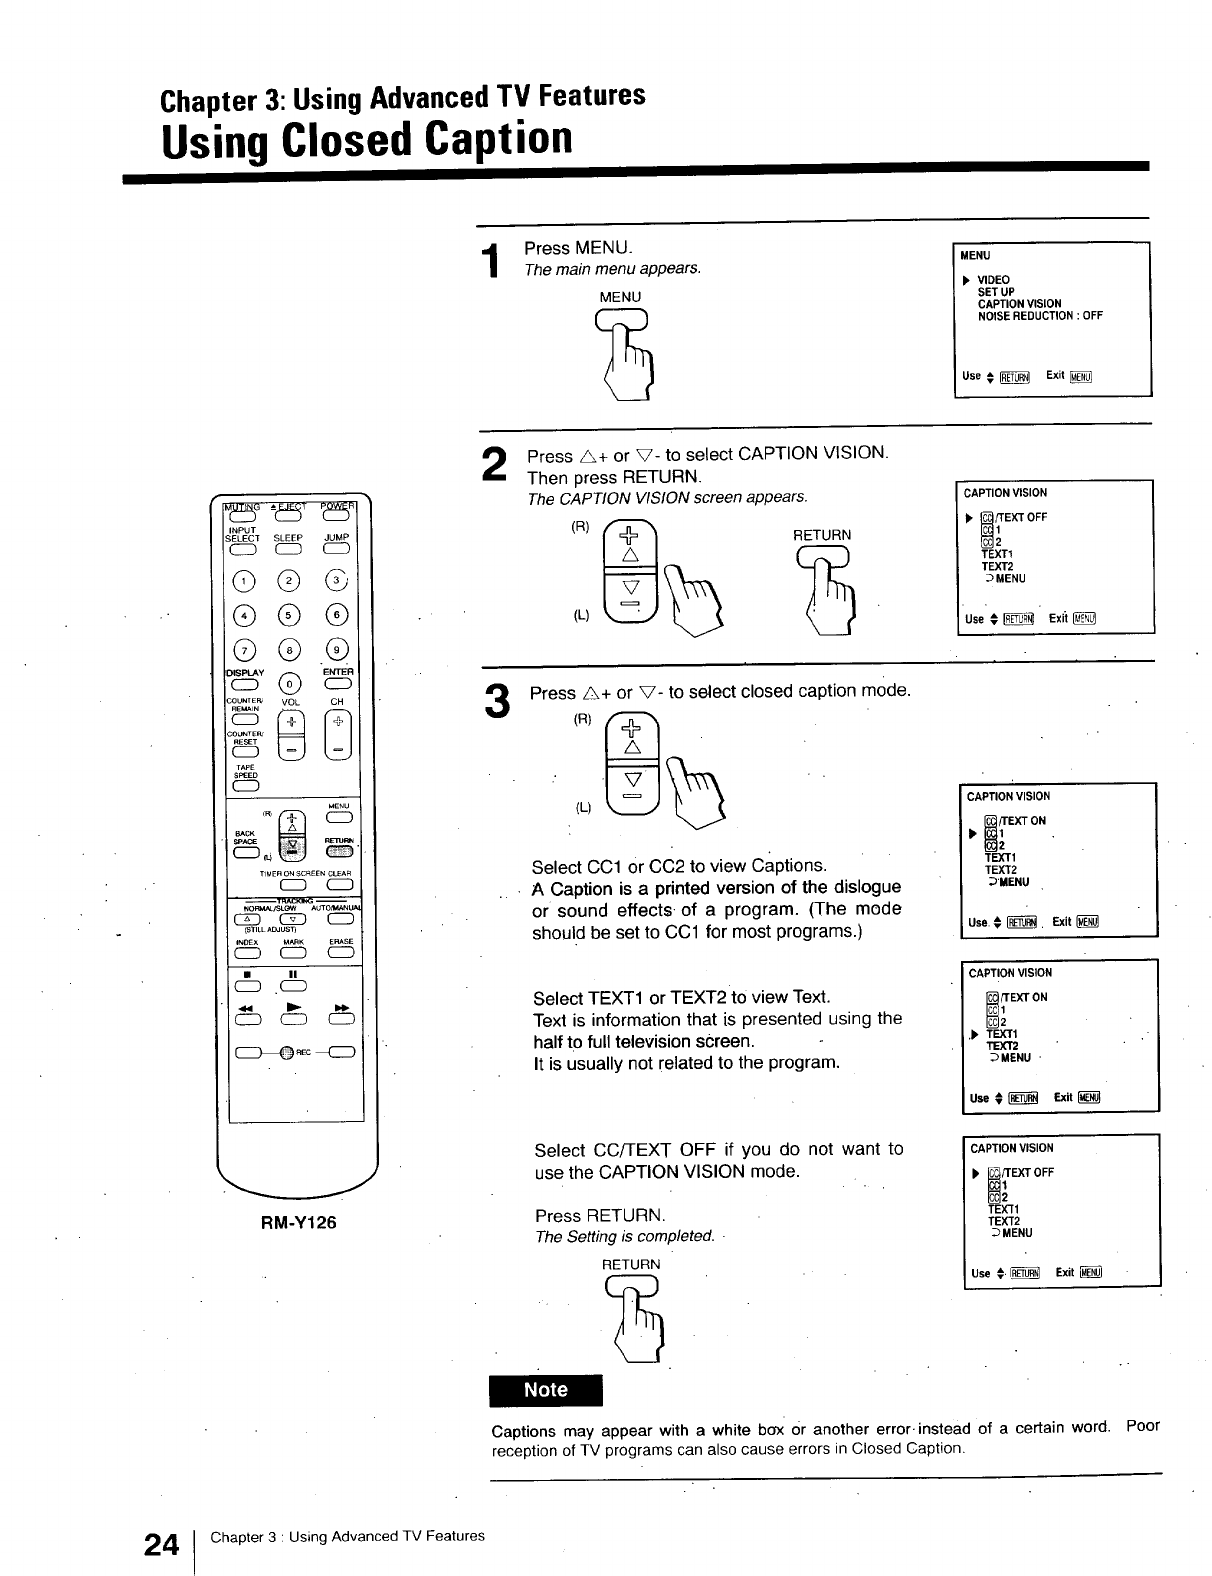
1Press MENU.
The main menu appears.
MENU
MENU
b' VIDEO
SET UP
CAPTION VISION
NOISE REDUCTION :OFF
Use € _Exit
INPUT
TSLEEP JUMP
©@ @
®®®
©®®
COUNTE__ BVOL [_
_5
TAPE
SPEED
C_D
MENU
SPACE
TIMERONSCREEWC_AR
WORMAU_W AUTO_A_U_
CZD CZD C_
(S_ILLA_US_I
IN0_X M_K ERASE
•n
(_) .(_)
RM-Y126
Press Z&+ or V- to select CAPTION VISION.
Then press RETURN,
The CAPTION VISION screen appears,
3
(R)__(L) RETUR(_
CAPTION VISION
), _EX'r OFF
TEXTt
TEXT2
_MENU
Use # _ Exii
Press A+ or V- to select closed caption mode.
(L)
Select CC1 Or CC2 to view Captions.
• A Caption is a printed version of the dislogue
or sound effects, of a program. (The mode
should be set to CC1 for most programs.)
Select TEXT1 or TEXT2 to view Text.
Text is information that is presented using the
half to full television screen.
It is usually not related to the program.
CAPTION VISION
{_/T_IEXTON.
TEXT1
TEXT2
_'MENU
Use.#_. Exit
CAPTION VISION
TEXT ON
), TEXT1
TEXT2
_MENU "
Use _ _ Exit
Select CC/-FEXT OFF if you do not want to
use the CAPTION VISION mode.
Press RETURN.
TheSetting is completed..
RETURN
CAPTION VISION
_TEXT OFF
TEXT1
TEXT2
DMENU
Use €. _Exit
Captions may appear with a white box Or another error.instead of a certain word. Poor
reception of TV programs can also cause errors in Closed Caption.
4Chapter 3 : Using Advanced TV Features
Using the Timer-Activated Functions
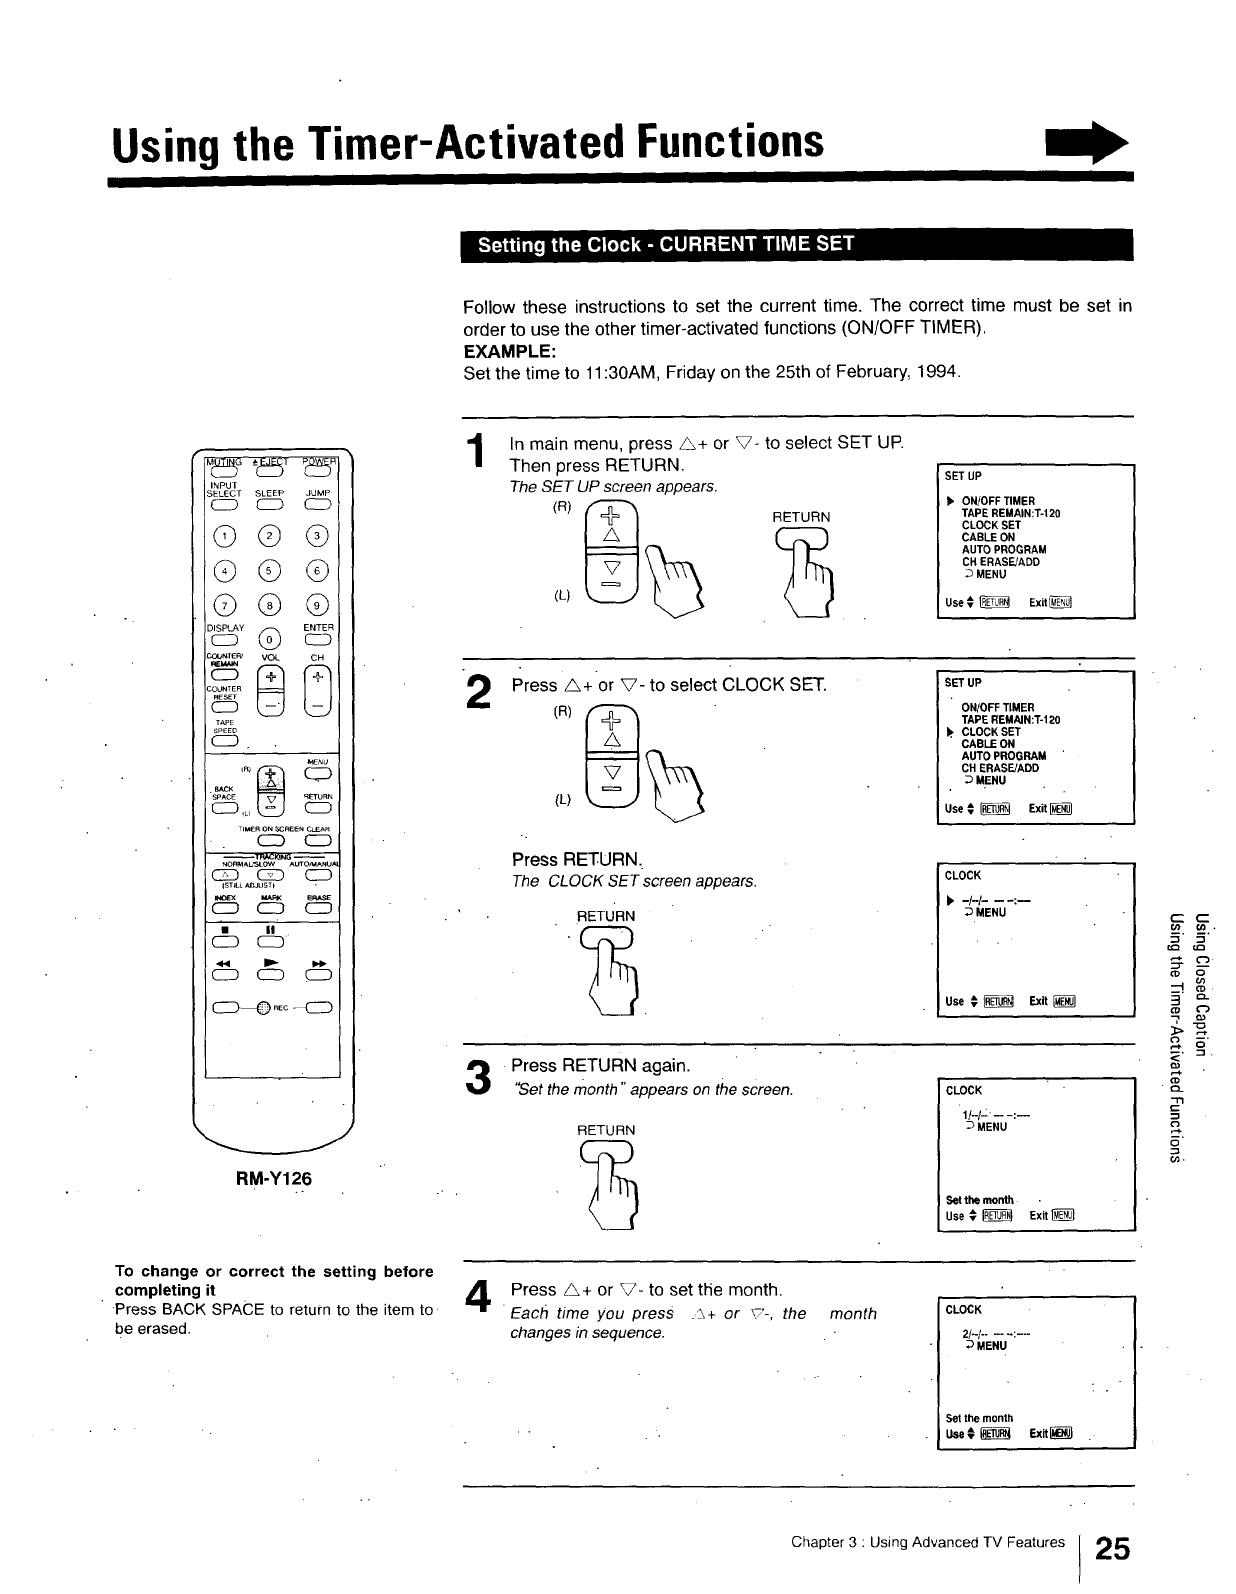
Follow these instructions to set the current time. The correct time must be set in
order to use the other timer-activated functions (ON/OFF TIMER).
EXAMPLE:
Set the time to 11:30AM, Friday on the 25th of February, 1994.
INPUT
SELECT SLEEP JUMP
C2D C:D C2D
©@ @
@©©
©@ @
_O_NIE_ VOL CH
COUNTER
TAPE
SPEED
CD
_ENU
"SPACE
C:Z) ,L,
TIMERONSCREENCLEAR
CZD CD
NORMAL,_LOW AUTCtMANUAI
C_ (_ CD
IST_LL AI_IUST)
_ MARK E_SE
CD C_ CZD
(_D
_RE¢ - _ZD
_J
RM-Y126
1
2
In main menu, press/_+ or V- to select SET UP.
Then press RETURN.
The SET UP screen appears.
(R)__(L) RETUR_
SET UP
b' ONtOFF TIMER
TAPE REMAIN:T-120
CLOCK SET
CABLE ON
AUTO PROGRAM
CH ERASF.JADD
DMENU
Use € _Exit
Press A+or V- to select CLOCK SET.
(L)
Press RETURN.
The CLOCKSEr screon appears.
RETURN
SET UP
ONIOFF TIMER
TAPE REMAIN:T-120
b. CLOCK SET
CABLE ON
AUTO PROGRAM "
CH ERASE/ADD
DMENU
Use € _Exit
CLOCK
b-I-I- -- -:--
_MENU
Use € _Exit
Press RETURN again.
"Setthe month "appears on the screen.
RETURN
CLOCK
If-I-:.-- -:--
DMENU
Setthe month •
Use _ _ Exit
=<
"rl
o_.
To change or correct the setting before
completing it
Press BACK SPACE to return to the item to
be erased.
Press _+ or _?- to set the month.
•Each time you press __+ or _'-, the
changes in sequence.
month CLOCK
2t-I ...... :---
DMENU
Set the month
U,se¢ _ Exit_ .
Chapter 3 : Using Advanced TV Features 25
Usingthe Timer-Activated Functions
INPUT
S_)T SLEEP JUMP
CD CD
©Q®
Q®®
QG ®
;oumERJ
TAPE
SP_-EC_
CD
ME_
SPACE
TIMERO_ SCREENCLEAR
C_D CD
C_D C_D CD
(SnLL _JUS13
_DeX _RK ERASE
C_CD CD
• ||
CD CD
CD C_ CD
RM-Y126
To display the time
Press DISPLAY.
To return to the normal screen
Press MENU.
I_FIFJ_
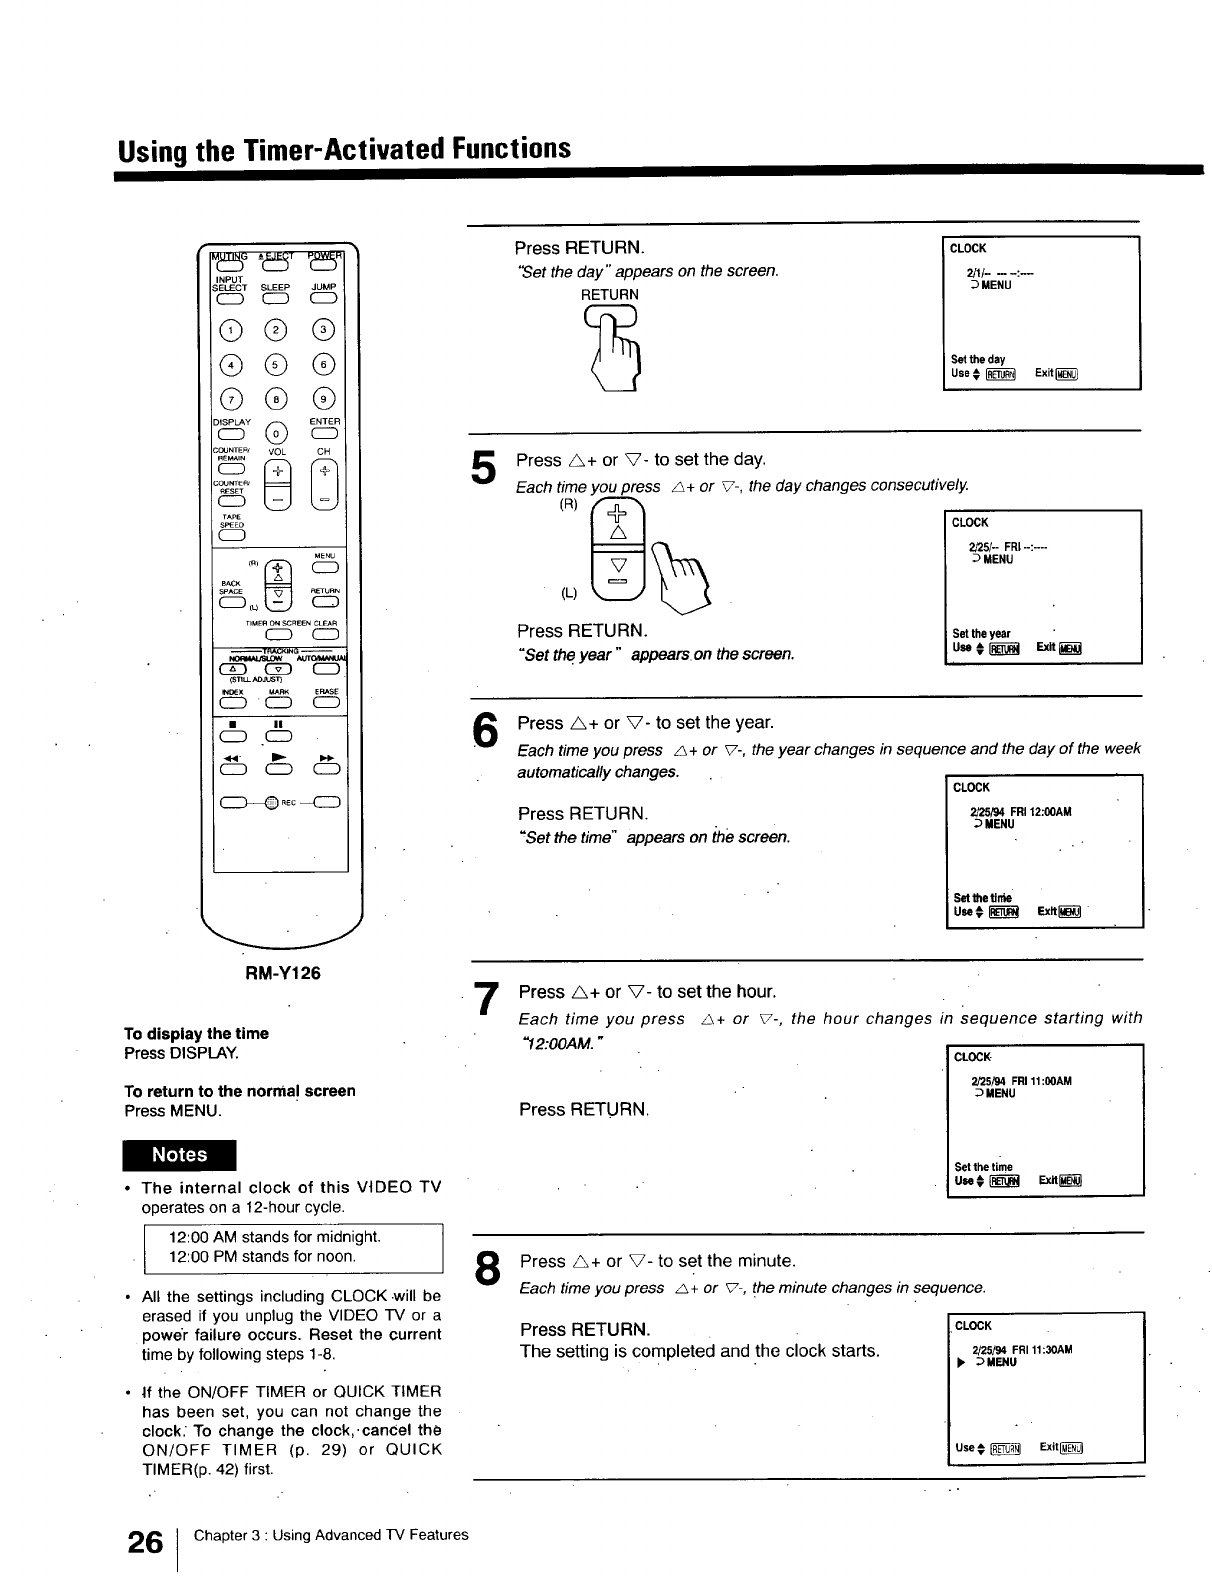
•The internal clock of this VIDEO TV
operates on a 12-hour cycle.
12:00 AM stands for midnight.
12:00 PM stands for noon.
All the settings including CLOCK •will be
erased if you unplug the VIDEO TV or a
power failure occurs. Reset the current
time by following steps 1-8.
if the ON/OFF TIMER or QUICK TIMER
has been set, you can not change the
clock: To change the clock, . cancel the
ON/OFF TIMER (p. 29) or QUICK
TIMER(p. 42) first•
5
6
Press RETURN.
"Set the day" appears on the screen.
RETURN
CLOCK
2/1/- -- -:--
:_ MENU
Set the day
Use€ _Exit _}
Press A+ or _- to set the day.
Each time you press A+ or _7-, the day changes consecutively.
(L)
Press RETURN.
"Set the year "appoam, on the screen.
CLOCK
2/25/- FRI--: ....
MENU
Set the year
use, li_ Exe[_l
Press A+ or V- to set the year.
Each time you press _+ or _-, the year changes in sequence and the day of the week
automatically changes.
CLOCK
Press RETURN. 2_st94FRI12:00AM
MENU
"Set the time" appears on the screen. ..
Set the t]ffbe
u_ ¢ _ _x_
"7 Press A+ or V- to set the hour.
Jr _ + or _-, the hour changes in sequence starting withEach time you press
"12:00AM."
Press RETURN.
CLOCK
2/25/94 FR111:00AM
;_ MENU
Set the time
u_¢ _ Exn_--_
Press A+ or V- to set the minute.
Each time you press _ + or _-, the minute changes in sequence.
Press RETURN.
The setting is completed and the clock starts.
CLOCK
2/25/94 FR111:30AM
), _ MENU
Use € _Exit
6Chapter 3 : Using Advanced TV Features
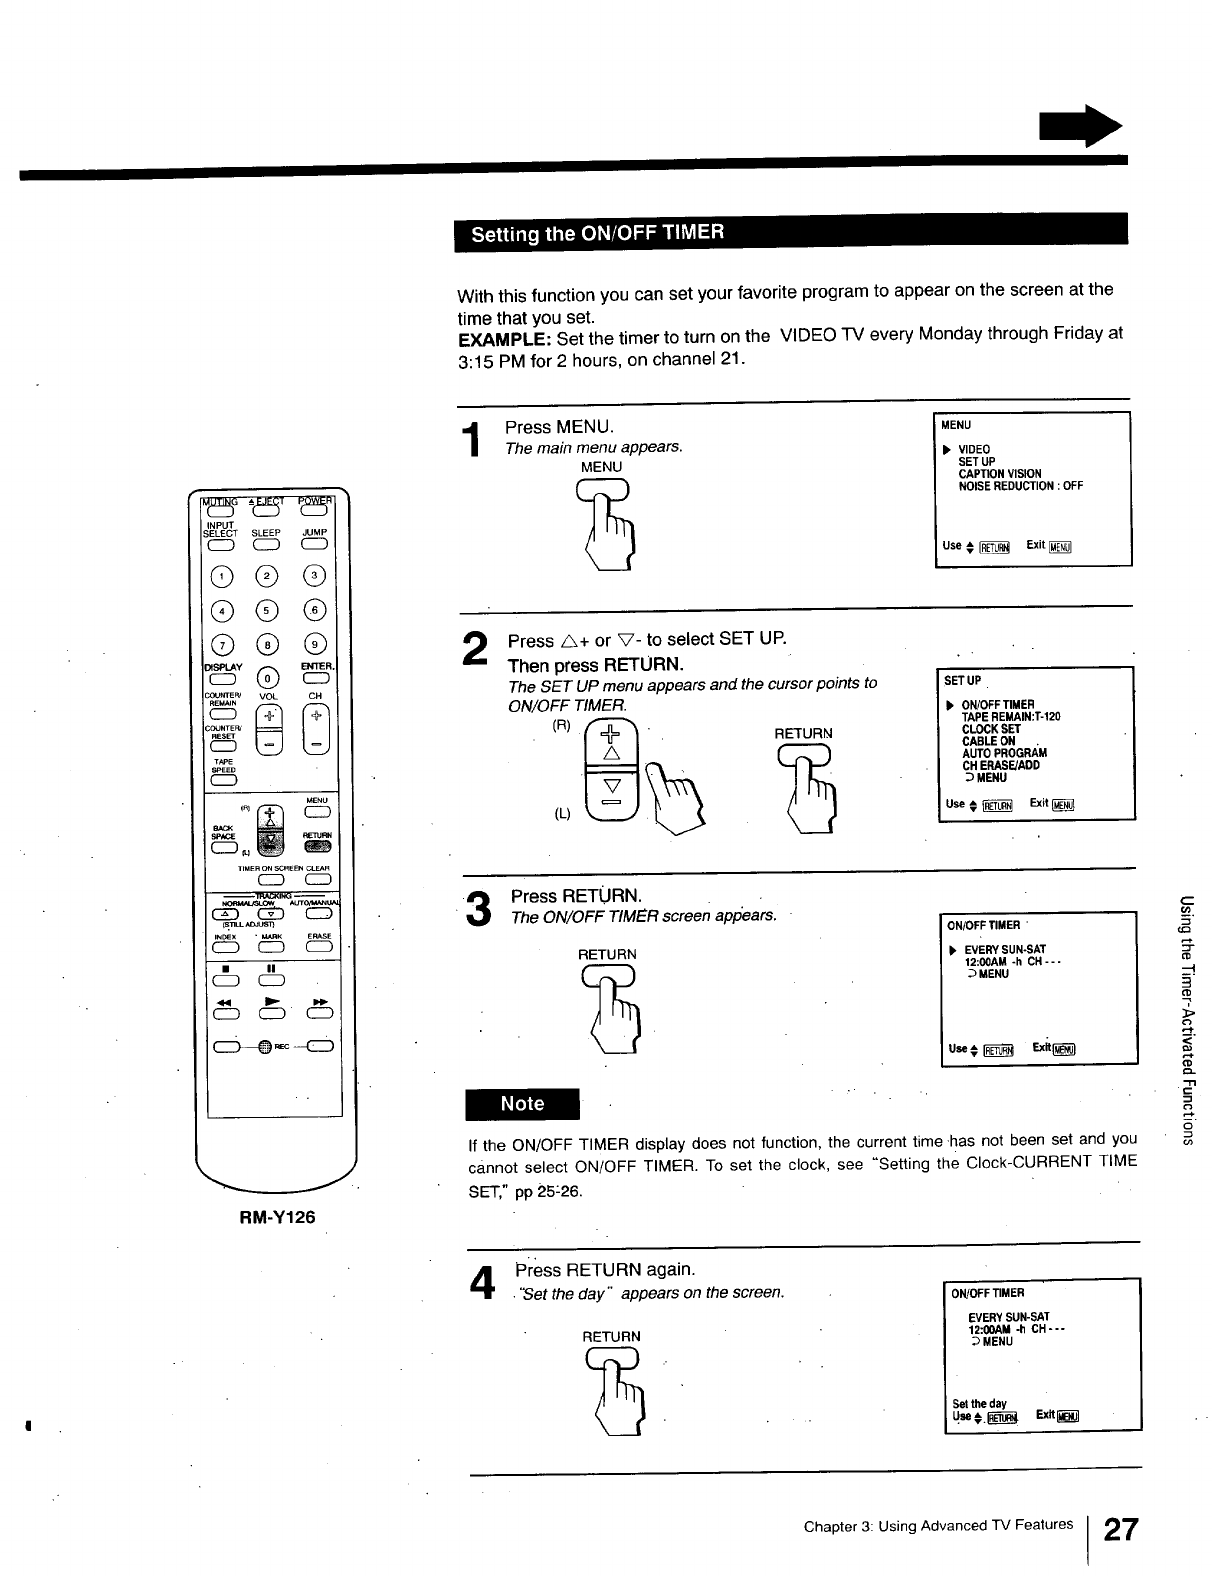
With this function you can set your favorite program to appear on the screen at the
time that you set.
EXAMPLE: Set the timer to turn on the VIDEO TV every Monday through Friday at
3:15 PM for 2 hours, on channel 21.
T
INPUT
S_T SLEEP JUMP
CD (ZD
@®@
®®®
©®®
3OUNTE_ VOL CH
COUNTEF_
T,_E
SPEED
CD
MENU
TIMER ON _[_ _
CD CD
(SnLL _JUST}
INDEX ._ _ERASE
(_ II
(E_ C_ ¸ CE_
RM-Y126
1Press MENU.
The main menu appears.
MENU
MENU
b VIDEO
SET UP
CAPTION VISION
NOISE REDUCTION : OFF
Use # _Exit
Press A+ or XT- to select SET UP.
Then press RETURN.
The SET UP menu appears and the cursor points to
ON/OFF TIMER.
(L)
RETURN
ISET UP
b ON/OFF TIMER
TAPEREMAIN:T-120
CLOCK SET
CABLEON
AUTO PROGRAM
CH ERASFJADD
_) MENU
Use € _ Exit
3Press RETURN.
The ON/OFF TIMER screen app'ears.
RETURN
ON/OFF TIMER "
_, EVERY SUN-SAT
12:00AM -h CH---
_) MENU
usa¢_ Ex_
If the ON/OFF TIMER display does not function, the current time-has not been set and you
cannot select ON/OFF TIMER. To set the clock, see "Setting the Clock-CURRENT TIME
SET," pp 25-26.
--I
=<
E
o_
Press RETURN again.
•"Set the day" appears on the screen.
RETURN
ON/OFF TIMER
EVERY SUN-SAT
12:0OAM -h CH---
DMENU
Set the day
Chapter 3: Using Advanced r'v Features [27
Usingthe Timer-Activated Functions
INPUT
S_)T SLEEP JUMP
CD CD
©© @
®@ ®
©@@
COUNTER/ VOL CH
COUNTEF_
T_
SPEED
CD :
MENU
SPACE
CD._
T_MERON SCREENCLEAR
CD CD
NO_/_JSLOW AUTO_ANL_
C_. _ CD
{STILL/¢_Js'n
INDEX MARK ERASE
CD CD C_D
C_D "
C_D
CD CD C_D
RM-Y126
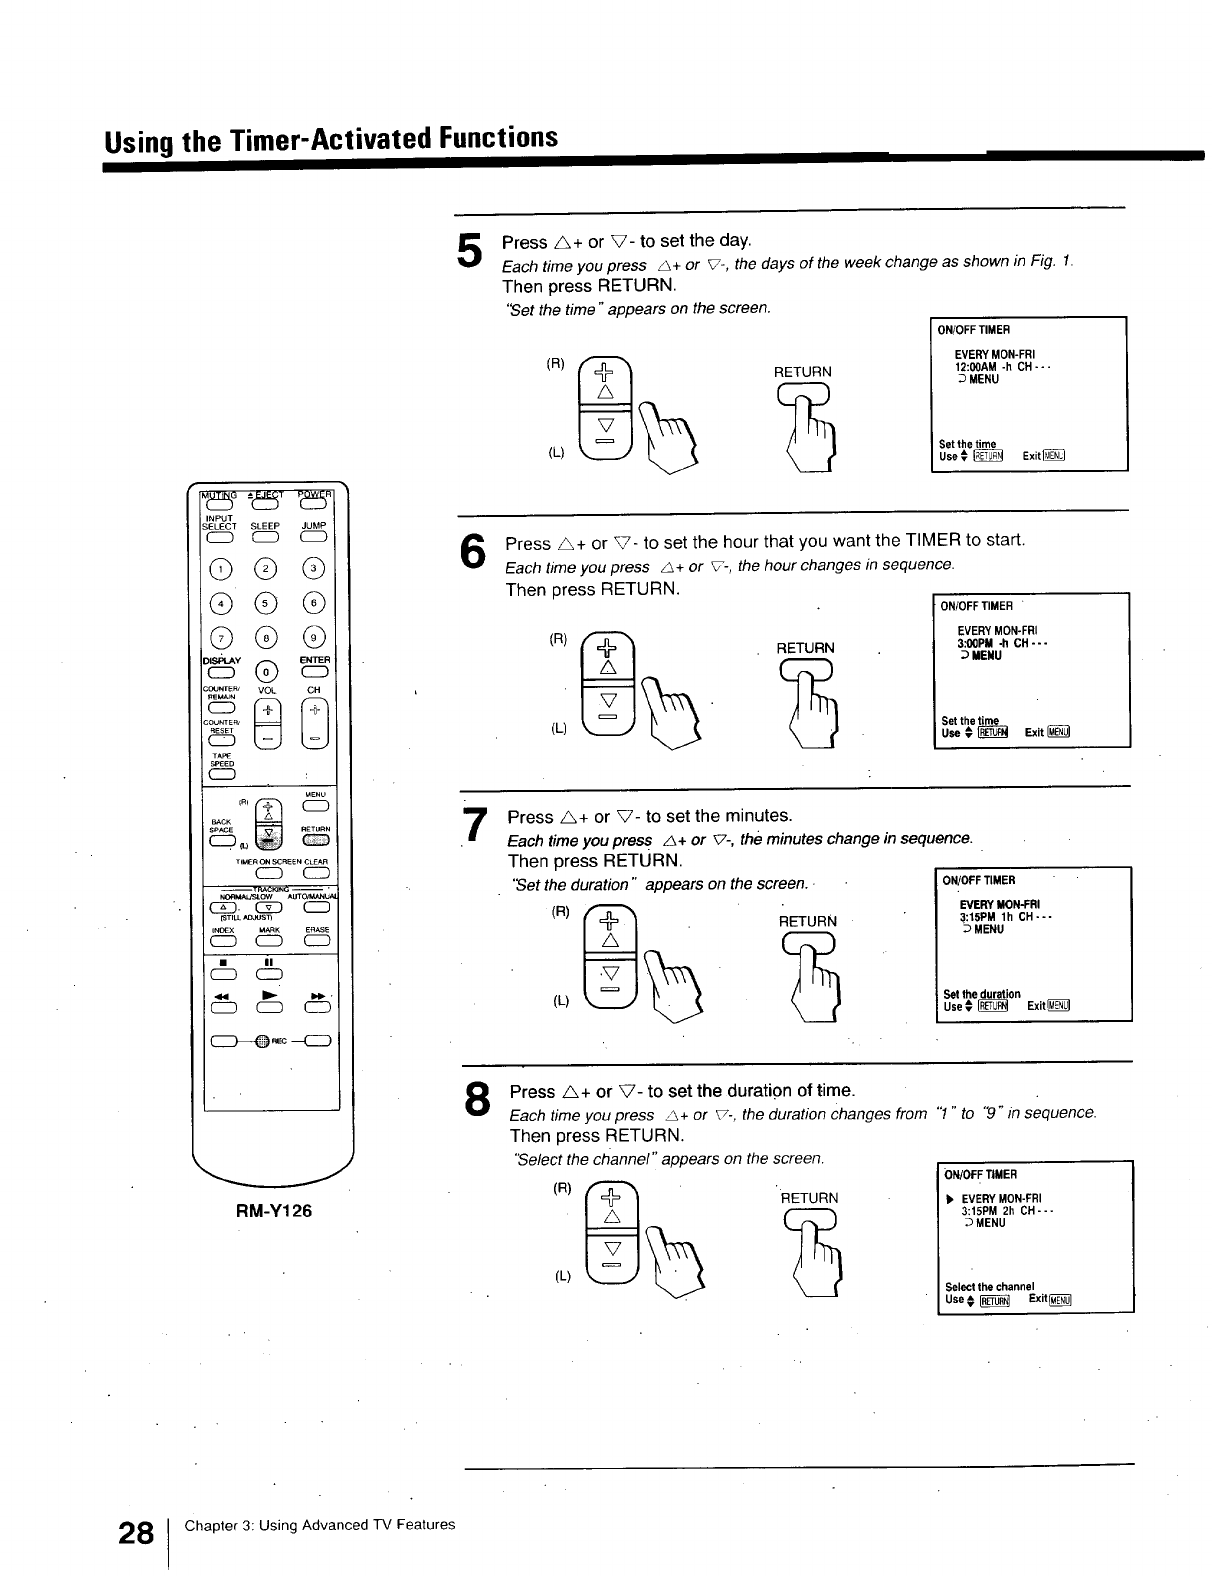
5Press A+ or V- to set the day.
Each time you press _ + or V-, the days of the week change as shown in Fig. I.
Then press RETURN.
'Set the time"appears on the screen.
ON/OFF TIMER
EVERY MON-FRI
12:00AM -h CH---
DMENU
Set thetime
Use # _ Exitl_
Press A+ or V- to set the hour that you want the TIMER to start.
Each time you press _ + or _-, the hour changes in sequence•
Then press RETURN.
7
8
(R)__(L) "RETUR_
ON/OFF TIMER •
EVERY MON-FRI
3:00PM -h CH---
MENU
Set the time
Use € _Exit I_
Press A+ or V- to set the minutes.
Each timeyou press _+or _7-,the minuteschange in sequence.
Then press RETURN.
'Set the duration "appears on the screen..
(R)8_(L) RETUR_
ON/OFF TIMER
EVERY MON-FRI
:]:15PM lh CH---
DMENU
Set the duration
Use_ _Exit_
Press A+ or V- to set the duration of time.
Each time you press _ + or 7-, the duration changes from "1" to "9" in sequence•
Then press RETURN.
'Select the channel" appears on the screen•
(L)
RETURN
ON/OFF TIMER
EVERY MON-FRI
3:15PM 2h CH---
DMENU
Select the channel
Use _ _ Exit_
8Chapter 3: Using Advanced TV Features
I_l;Im
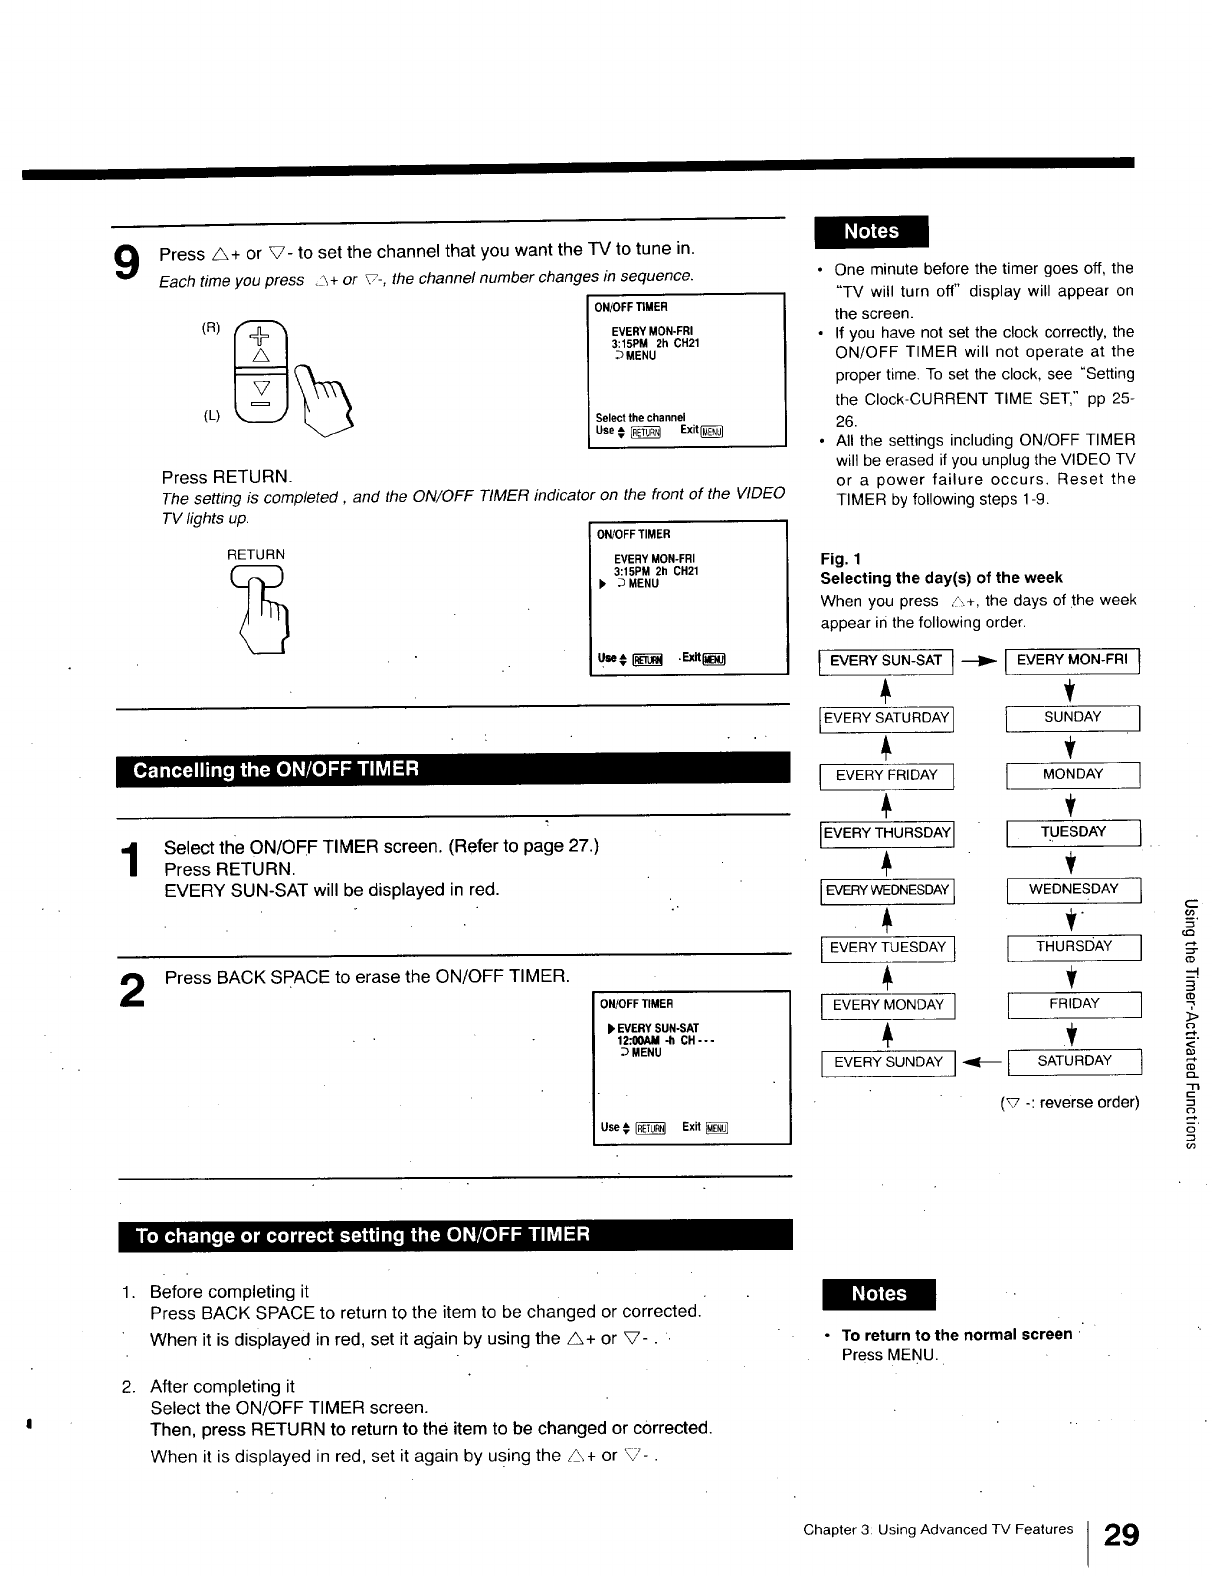
Press A+ or V- to set the channel that you want the TV to tune in.
Each time you press __+ or %, the channel number changes in sequence.
1
2
(L)
ON/OFF TIMER
EVERY MON-FRI
3:15PM 2h CH21
DMENU
Select the channel
Use _ _ Exit_
Press RETURN•
The setting is completed, and the ON/OFF TIMER indicator on the front of the VIDEO
TV lights up.
RETURN
ON/OFF TIMER
EVERY MON-FRI
3:15PM 2h CH21
bDMENU
Select the ON/OFF TIMER screen. (Refer to page 27.)
Press RETURN.
EVERY SUN-SAT will be displayed in red.
Press BACK SPACE to erase the ON/OFF TIMER.
ON/OFF TIMER
EVERY SUN-SAT
12:00AM -h CH---
DMENU
LJse¢ _Exit
• One minute before the timer goes off, the
"TV will turn off" display will appear on
the screen•
• If you have not set the clock correctly, the
ON/OFF TIMER will not operate at the
proper time• To set the clock, see "Setting
the Clock-CURRENT TIME SET," pp 25-
26.
° All the settings including ON/OFF TIMER
will be erased if you unplug the VIDEO TV
or a power failure occurs. Reset the
TIMER by following steps 1-9.
Fig. 1
Selecting the day(s) of the week
When you press /\+, the days of the week
appear in the following order.
[ EVERY SUN-SAT I _ I EMERYMON-FRI l
{EVERY SATURDAY] I SUNDAY I
v
IEVER_FR,OA_][ MO.DA_!
IEWRYT"URSOA_II T_ES°A_I
I_Y*EONESO*_[[ WEONESOA_1
LEVER_T_ESDAY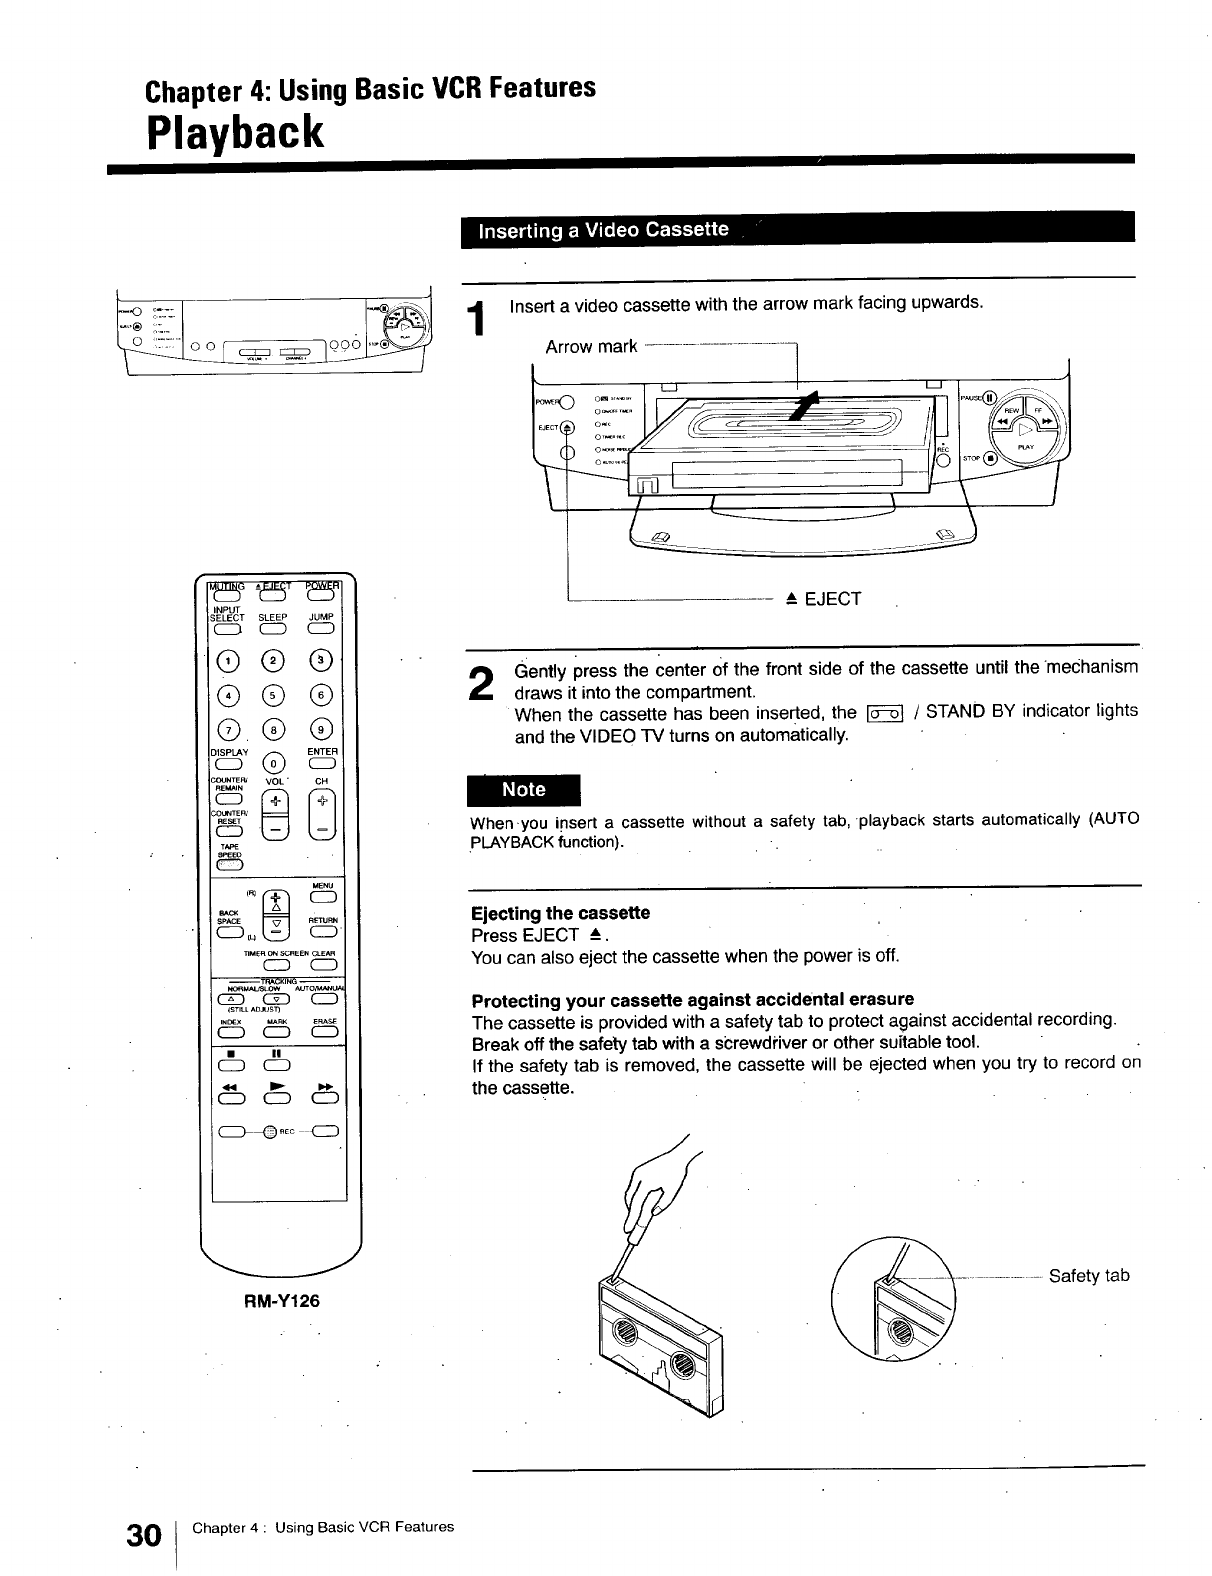
Chapter 4: Using Basic VCRFeatures
Playback
INPUT
SELECT SLEEP JUMP
c_ CD CD
®®®
QQ®
G.Q®
o_© _
COUNTEP__ _VOL"
COU_TER/
MENU
SPACE
TIMERON SCAEENCLEAR
CD C_D
_OR_AI_OW _OnC_NUA
C_D CS[D CD
_STlU-ADJUS_
IN_:X _RK ERAS_
CD CD CD
CD
CD C_D CD
C_.Eo CD
RM-Y126
Insert a video cassette with the arrow mark facing upwards.
:rrow mark ..................................._ _ IP'_sE®_r%_
-EJECT
2Gently press the center Of the front side of the cassette until the mechanism
draws it into the compartment.
When the cassette has been inserted, the _ /STAND BY indicator lights
and the VIDEO TV turns on automatically.
When.you insert a cassette without a safety tab, .playback starts automatically (AUTO
PLAYBACK function). -.
Ejecting the cassette
Press EJECT _.
You can also eject the cassette when the power is off.
Protecting your cassette against accidental erasure
The cassette is provided with a safety tab to protect against accidental recording.
Break off the safety tab with a screwdriver or other suitable tool.
If the safety tab is removed, the cassette will be ejected when you try to record on
the cassette.
Safety tab
0Chapter 4 : Using Basic VCR Features
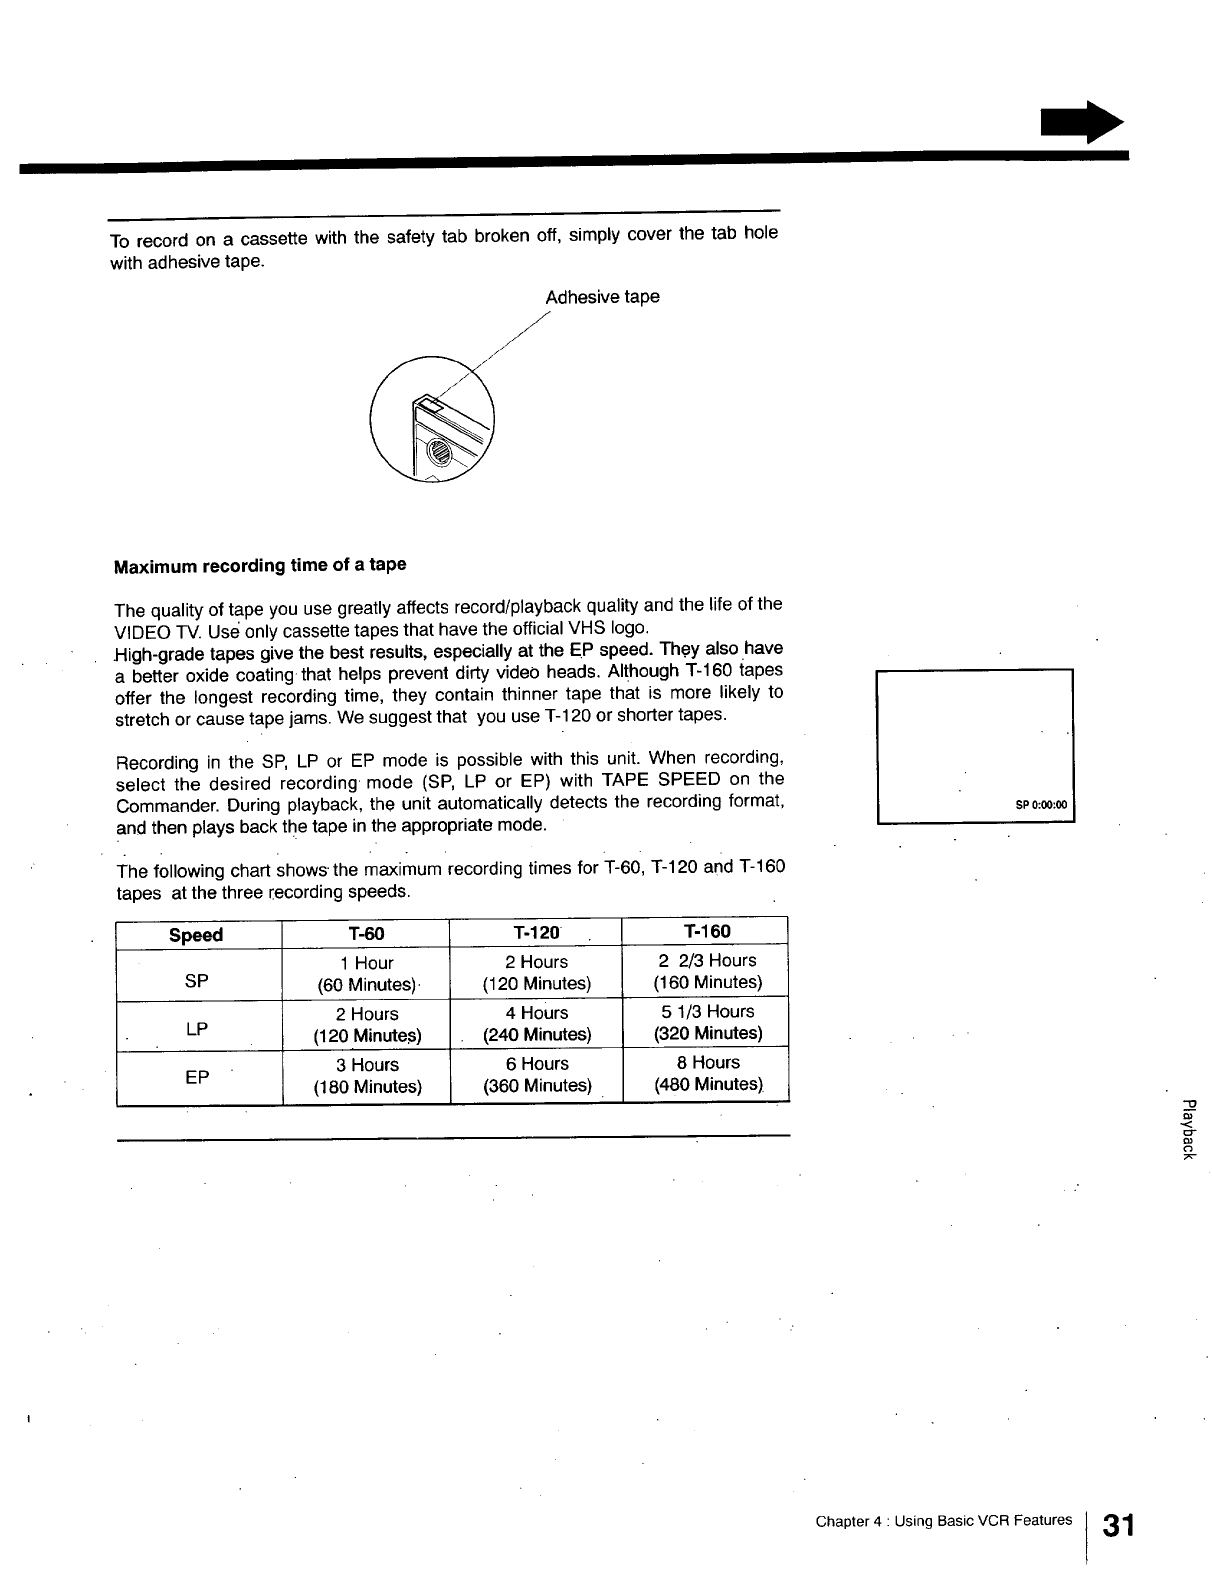
To record on a cassette with the safety tab broken off, simply cover the tab hole
with adhesive tape.
Adhesive tape
,/
Maximum recording time of a tape
The quality of tape you use greatly affects record/playback quality and the life of the
VIDEO TV. Use only cassette tapes that have the official VHS logo.
High-grade tapes give the best results, especially at the EP speed. Th.ey also have
a better oxide coating-that helps prevent dirty video heads. Although "1"-160tapes
offer the longest recording time, they contain thinner tape that is more likely to
stretch or cause tape jams. We suggest that you use T-120 or shorter tapes.
Recording in the SP, LP or EP mode is possible with this unit. When recording,
select the desired recording mode (SP, LP or EP) with TAPE SPEED on the
Commander. During playback, the unit automatically detects the recording format,
and then plays back the tape in the appropriate mode.
The following chart shows the maximum recording times for T-60, T-120 and T-160
tapes at the three recording speeds.
Speed T-60 3"-120 T-160
1 Hour 2 Hours 2 2/3 Hours
SP (60 Minutes). (120 Minutes) (160 Minutes)
2 Hours 4 Hours 5 1/3 Hours
LP (120 Minutes) (240 Minutes) (320 Minutes)
3 Hours 6 Hours 8 Hours
EP (180 Minutes) (360 Minutes) . (480 Minutes)
SP 0:00:0(
"0
Chapter4 : Using BasicVCR Features !31
Playback
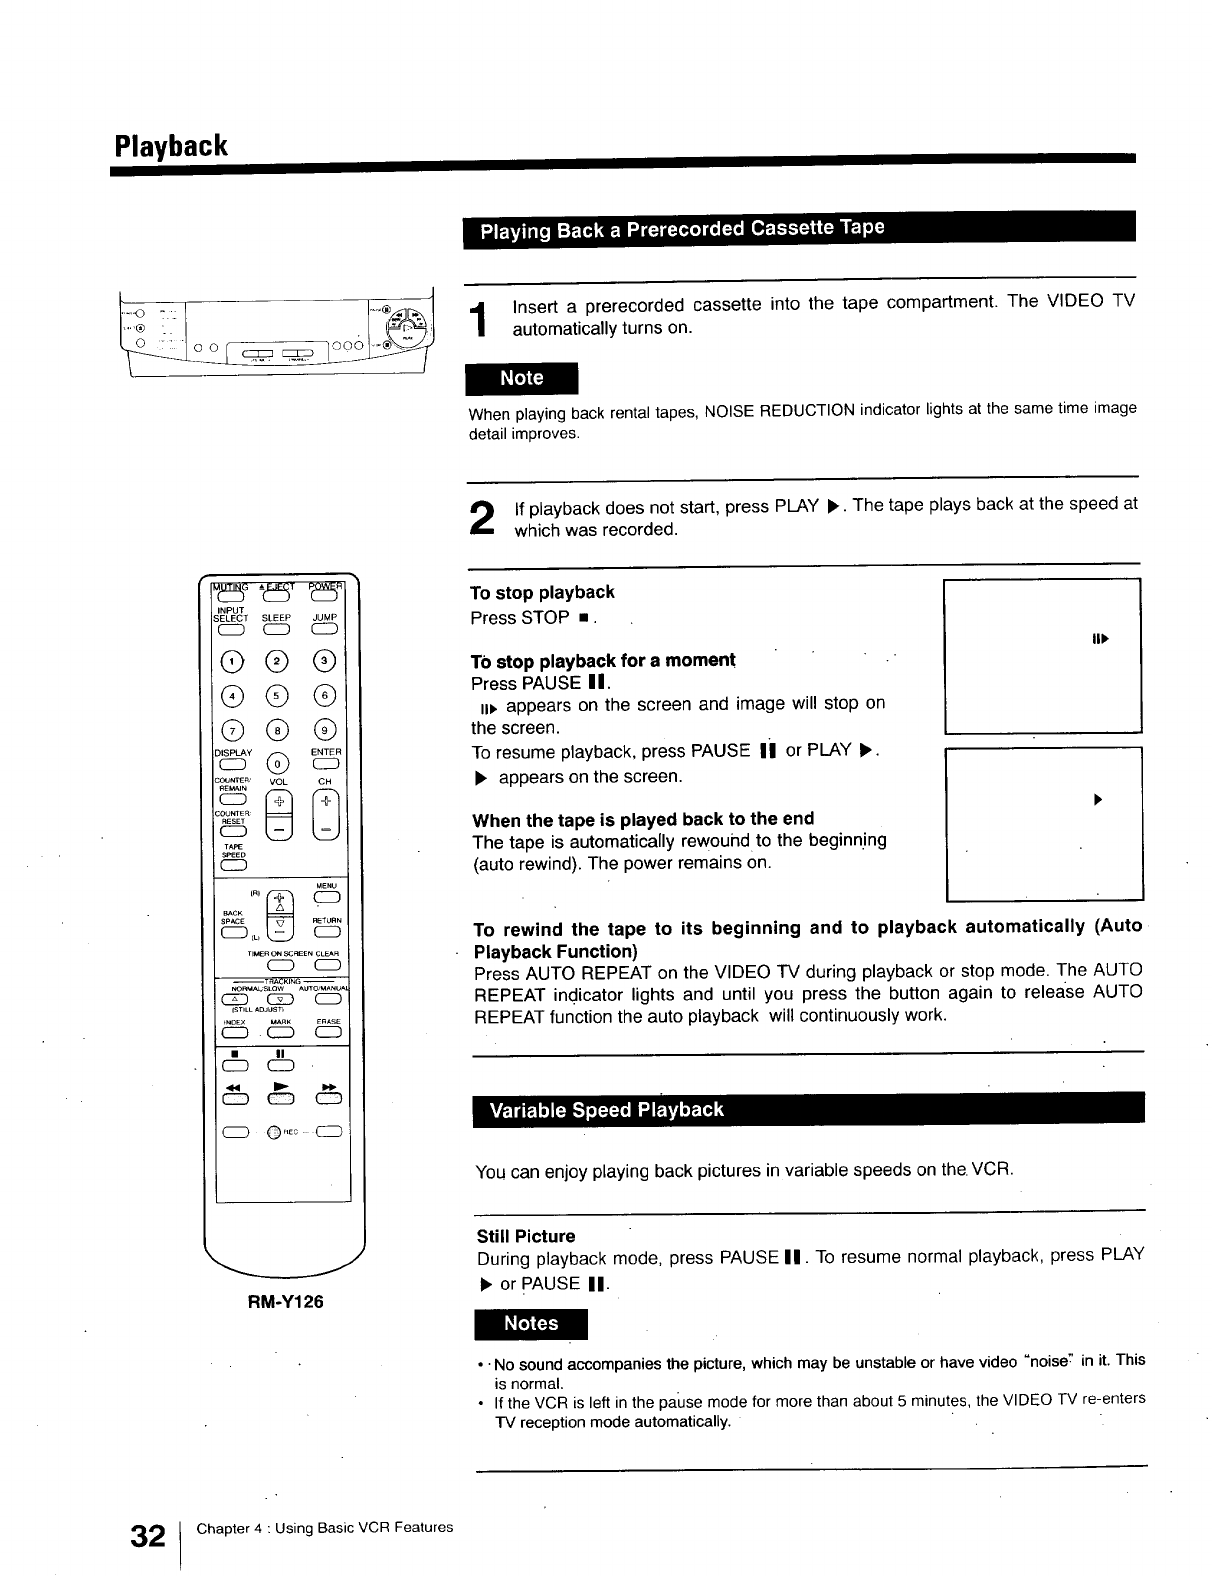
Insert a prerecorded cassette into the tape compartment. The VIDEO TV
automatically turns on.
When playing back rental tapes, NOISE REDUCTION indicator lights at the same time image
detail improves•
If playback does not start, press PLAY •. The tape plays back at the speed at
which was recorded.
INPUT
BELECT SLEEP JUMP
CD C_ C2D
@®®
®®®
©®@
CC_NER'_ 8VOL _
COUNTER
TAI_:
S_ED
CD
MENU
SPACE
TIMERON SCOI:ENCLEAR
cz) CD
--TRACKING --
NORM,_,_'SLOW AUTO/MANUA
CZD (ZD CD
{STILL ADJLIS]3
iNDEX MARK ERASL
CD . C_D CD
C_ P
CD
CD ©_Eo C2D
_J
RM-Y126
To stop playback
Press STOP •.
TO stop playback for amoment -
Press PAUSE II.
u_ appears on the screen and image will stop on
the screen.
To resume playback, press PAUSE Ii or PLAY •.
• appears on the screen.
When the tape is played back to the end
The tape is automatically rewound to the beginn.ing
(auto rewind). The power remains on.
lit
To rewind the tape to its beginning and to playback automatically (Auto
Playback Function)
Press AUTO REPEAT on the VIDEO TV during playback or stop mode. The AUTO
REPEAT indicator lights and until you press the button again to release AUTO
REPEAT function the auto playback will continuously work.
You can enjoy playing back pictures in variable speeds on the. VCR.
Still Picture
During playback mode, press PAUSE II. To resume normal playback, press PLAY
• or PAUSE II.
••No sound accompanies the picture, which may be unstable or have video "noise:' in it. This
is normal.
•If the VCR is left in the pause mode for more than about 5 minutes, the VIDEO TV re-enters
rv reception mode automatically.
32 !Chapter 4 : Using Basic VCR Features
To advance the tape rapidly
While the tape is being played back, pressing FAST FORWARD =,_ will move the
tape forward at high speed so you can see the picture and choose where to stop.
When you do this, E_ _ appears on the screen.
If you release the button, the VCR will return to normal playback.
When tape is not being played back and the VCR is in the stop mode, pressing
FAST FORWARD =,_ winds the tape forward at very high speed without displaying
the picture.
When you do this, _ appears on the screen.
You can stop the forward running of the tape at any time by pressing STOP •.
If during the operation, the tape rewinds forward to the end, the machine wilt
automatically stop and then rewind the tape back to the beginning again.
[_,'l
To rewind the tape rapidly
If you press REWIND/REVIEW .<< while the tape is being played back, you can
play the tape backwards to find a particular spot. When you do this, E.<_3 appears
on the screen and the tape will be rewound at very high speed.
At the end, • appears on the screen and invite you to press PLAY b'.
[,4_1
While a tape is being played, you can switch to watching TV broadcasts.
Press STOP =.
The VIDEO TV returns to normal TV reception mode.
Chapter 4 : Using Basic VCR Features 33
Playback
° tt 5T
INPUT
SELECT SLEEP JUMP
CD CD CD
@@(9
®® ®
@@(9
COUmEN
TAPE
SF_EO
CD
MENU
SPACE _TUnN
CD _ C:D
riMER ON SC_ CLE_
CD. C_
_K_M/_JSLOW mu'ro/MANtJ_
_ CS[D _
INOEX _K ERASE
CD CD C_
CD
CD CD CD
C:D--Q .... CD
RM-Y126
When playing back a tape recorded on another VCR, there might be some picture
noise.
Tracking ensures that the tape is correctly aligned with the playback head. It only
works in the "playback" mode and its principle purpose is to minimize picture shake
and what is called "noise" (fuzzy lines across the picture during playback and still
picture).
It is adjusted either automatically or manually.
Automatic tracking adjustment function
When playback starts, the auto tracking automatically adjusts the picture. "AUTO
TRACKING" flashes for 5 seconds.
The automatic tracking control is activated in the following conditions:
•When the cassette is inserted for the first time.
• When the recording mode on the playback tape is switched from SP to EP and
back again.
• When the picture is distorted by scratches on the tape.
• When TRACKING AUTO/MANUAL is pressed after the picture is adjusted
manually.
If auto tracking does not work, the tracking was probably last adjusted manually.
Adjusting the tracking manually
When the playback picture-proves to have _treaks or snow during normal playback,
adjust the picture manually with TRACKING NORMAL/SLOW (STILL ADJUST).
Press either _ or V to obtain the best possible picture. When playing back a tape
recorded on another VCR, the tracking condition is automatically adjusted on this
VCR.
• Auto tracking adjustment may be impossible when the recording condition of the tape is
poor.
•During auto tracking adjustment, streaks or noise may appear.
4Chapter 4: Using Basic VCR Features
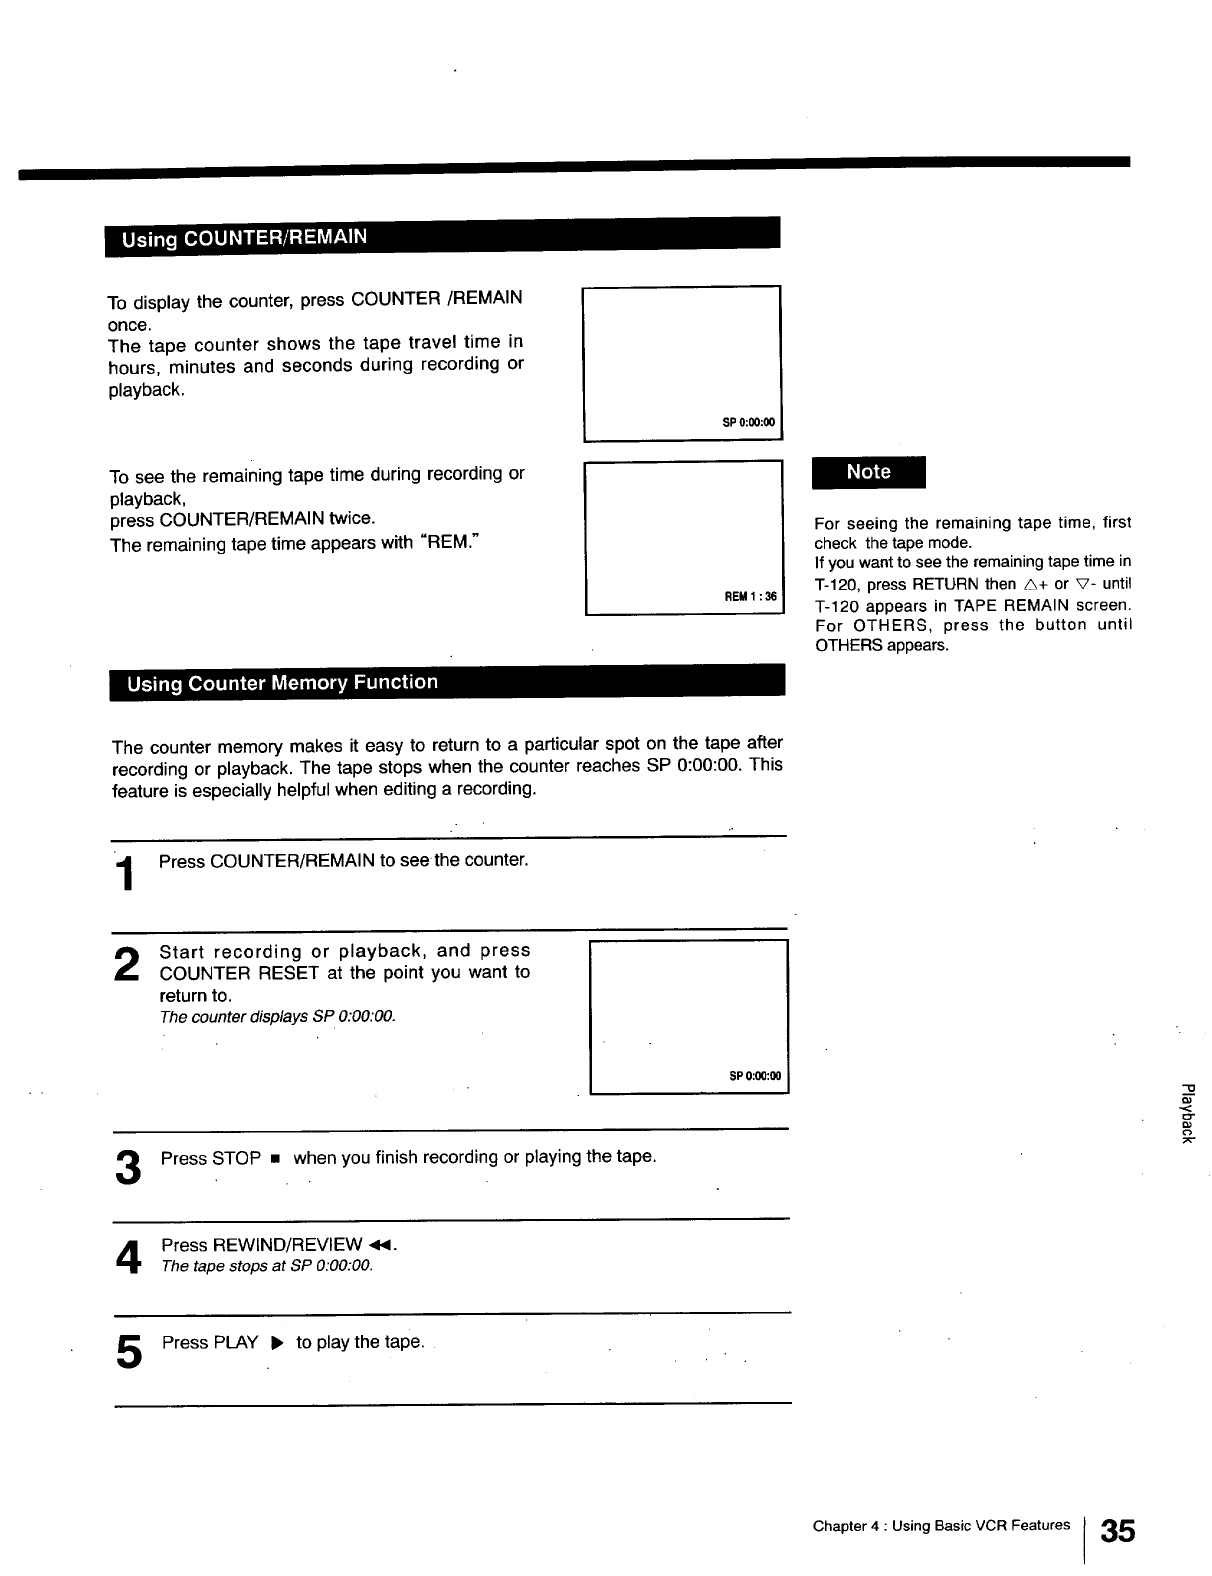
To display the counter, press COUNTER/REMAIN
once.
The tape counter shows the tape travel time in
hours, minutes and seconds during recording or
playback.
SP 0:00:00
To see the remaining tape time during recording or
playback,
press COUNTER/REMAIN twice.
The remaining tape time appears with "REM."
REM 1:36
For seeing the remaining tape time, first
check the tape mode.
If you want to see the remaining tape time in
T-120, press RETURN then A+ or v- until
T-120 appears in TAPE REMAIN screen.
For OTHERS, press the button until
OTHERS appears.
The counter memory makes it easy to return to a particular spot on the tape after
recording or playback. The tape stops when the counter reaches SP 0:00:00. This
feature is especially helpful when editing a recording.
Press COUNTER/REMAIN to seethe counter.
2Start recording or playback, and press
COUNTER RESET at the point you want to
return to.
The counter displays SP 0:00.'00.
SP O:O0:O0
Press STOP • when you finish recording or playing the tape.
Press REWIND/REVIEW 4,1.
Thetape stops at SP 0.'00:00.
Press PLAY • to playthe tape.
Chapter 4 : Using Basic VCR Features 35
Chapter 5: UsingAdvancedVCRFeatures
Recording TV Programs
o::: .... ..,
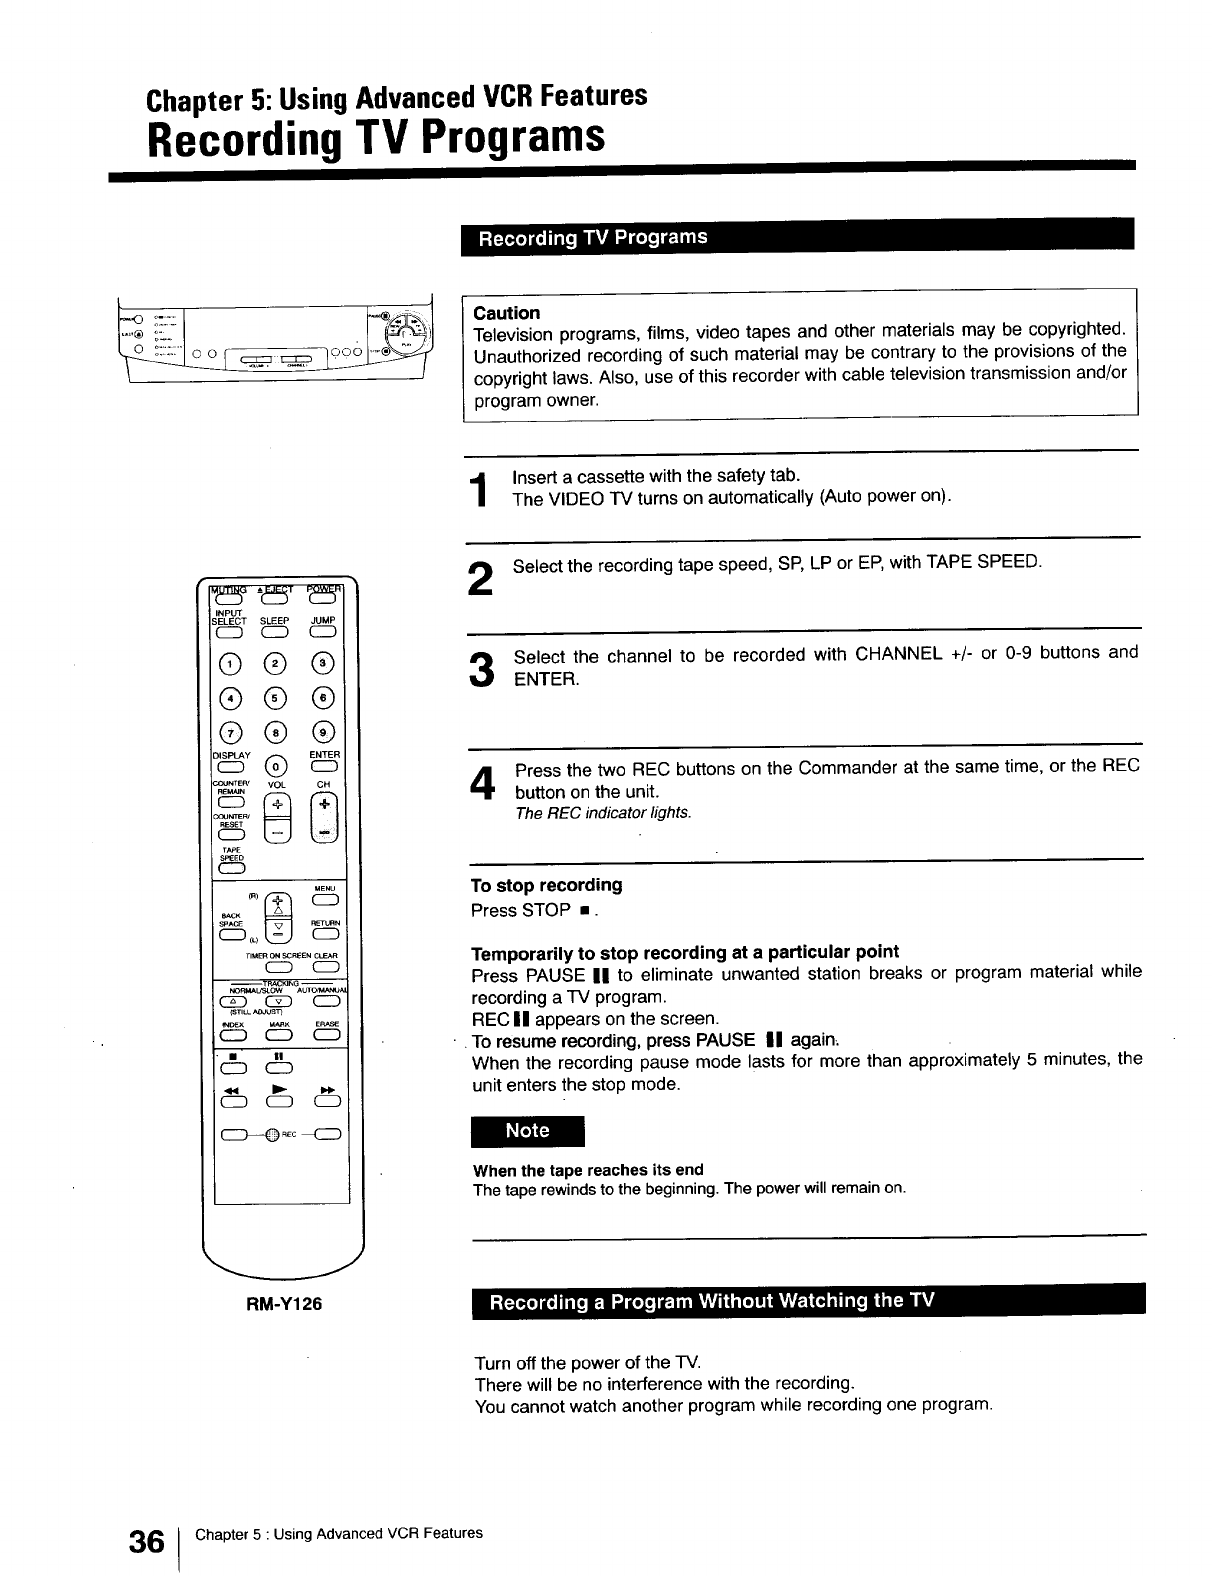
Caution
Television programs, films, video tapes and other materials may be copyrighted.
Unauthorized recording of such material may be contrary to the provisions of the
copyright laws. Also, use of this recorder with cable television transmission and/or
program owner.
Insert a cassette with the safety tab.
The VIDEO TV turns on automatically (Auto power on).
Select the recording tape speed, SP, LP or EP, with TAPE SPEED.
INPUT
SELECT SLEEP JUMP
CD C_ CD
®®®
®®®
®®®
°s" ®
CoUNrE_Cou_rrE___ _VOL
T,_OE
S_EO
CD
MENU
sp^cE
TIMk_ON SCFtEENCLEAR
CD CD
--TR_C_,IN0 --
Gg3 _ CD
rS'rlLLP_0Sl)
CD CD CD
C_ "
CD
Q CD
REC
Select the channel to be recorded with CHANNEL +/- or 0-9 buttons and
ENTER.
Press the two REC buttons on the Commander at the same time, or the REC
button on the unit.
The REC indicator lights.
To stop recording
Press STOP ,,.
Temporarily to stop recording at a particular point
Press PAUSE II to eliminate unwanted station breaks or program material while
recording a TV program.
REC U appears on the screen.
•. To resume recording, press PAUSE II again_
When the recording pause mode lasts for more than approximately 5 minutes, the
unit enters the stop mode.
When the tape reaches its end
The tape rewinds to the beginning. The power will remain on.
RM-Y126
Turn off the power of the TV.
There will be no interference with the recording.
You cannot watch another program while recording one program.
6 Chapter 5 : Using Advanced VCR Features
Timer Recording
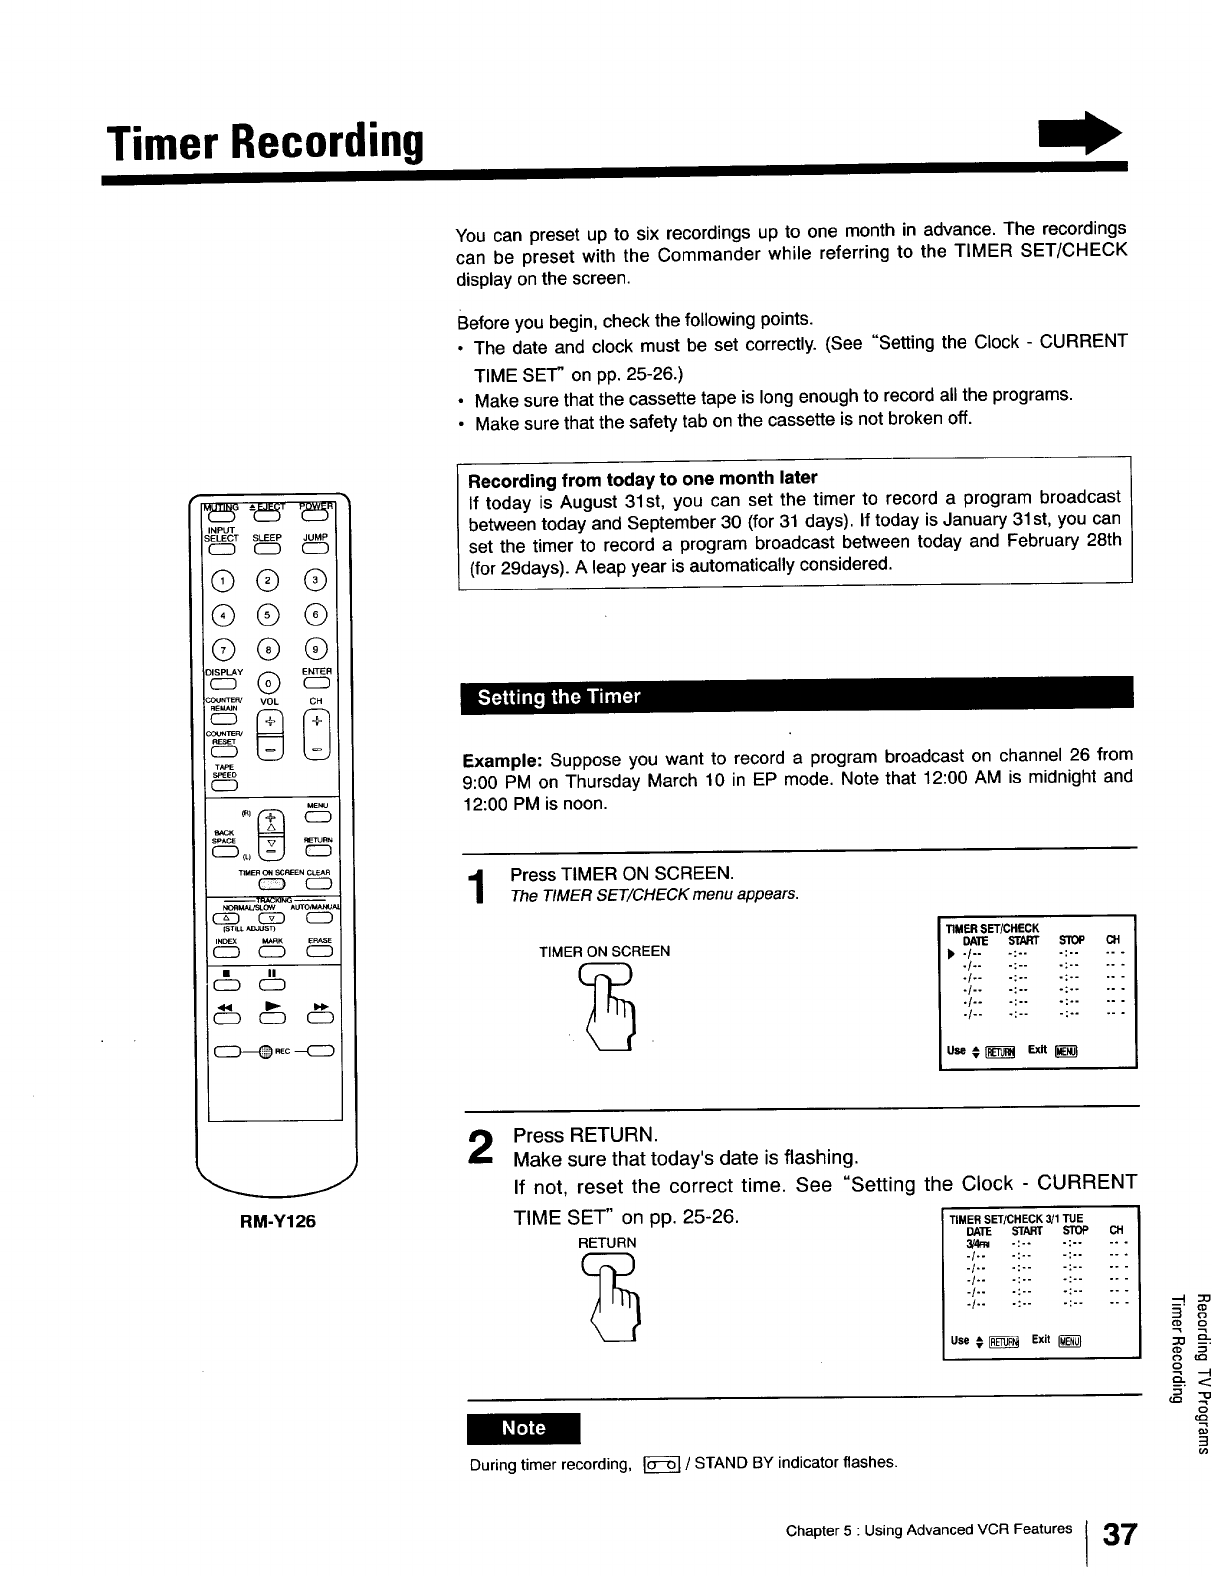
You can preset up to six recordings up to one month in advance. The recordings
can be preset with the Commander while referring to the TIMER SET/CHECK
display on the screen.
Before you begin, check the following points.
• The date and clock must be set correctly. (See "Setting the Clock - CURRENT
TIME SET" on pp. 25-26.)
• Make sure that the cassette tape is long enough to record all the programs.
• Make sure that the safety tab on the cassette is not broken off.
INPUT
SELECT SLEEP JUMP
C_D CSD C_D
@®®
®®®
@®®
TAPE
S_Et)
CD
Me_'tJ
SPACE
TIMER ON SCREEN CLEAR
_ CD
G_ C5_ CD
IST_LLADJUST)
INC_ _RK E_SE
CD CD C_
(_ II
CD
CD CD CD
RM-Y126
Recording from today to one month later
If today is August 31st, you can set the timer to record a program broadcast
between today and September 30 (for 31 days). If today is January 31 st, you can
set the timer to record a program broadcast between today and February 28th
(for 29days). A leap year is automatically considered.
Example: Suppose you want to record a program broadcast on channel 26 from
9:00 PM on Thursday March 10 in EP mode. Note that 12:00 AM is midnight and
12:00 PM is noon.
Press TIMER ON SCREEN.
The TIMER SET/CHECK menu appears.
TIMER ON SCREEN
TIMER SET/CHECK
DAlE START STOP CH
P' 4- -:-- -: ....
./.. .:~. .: ....
./.. .:.. .: ....
./.. .:.. -: ....
.[.. .:.. .: ....
-/-- -:-- -: ....
2Press RETURN.
Make sure that today's date is flashing.
If not, reset the correct time. See "Setting the Clock - CURRENT
TIME SET" on pp. 25-26. TIMERSFrlC.ECK_ITUE
RETURN 3/4':W -:-- -; ....
-/-- ":'- -: ....
-/-- ":'- -: ....
.1.. .:.. .: ....
-/*- -: -- -I ....
./.. .:.. .: ....
Use € _Exit
_sJY_
During timer recording, _ /STAND BY indicator flashes.
Chapter 5 : Using Advanced VCR Features I37
Timer Recording
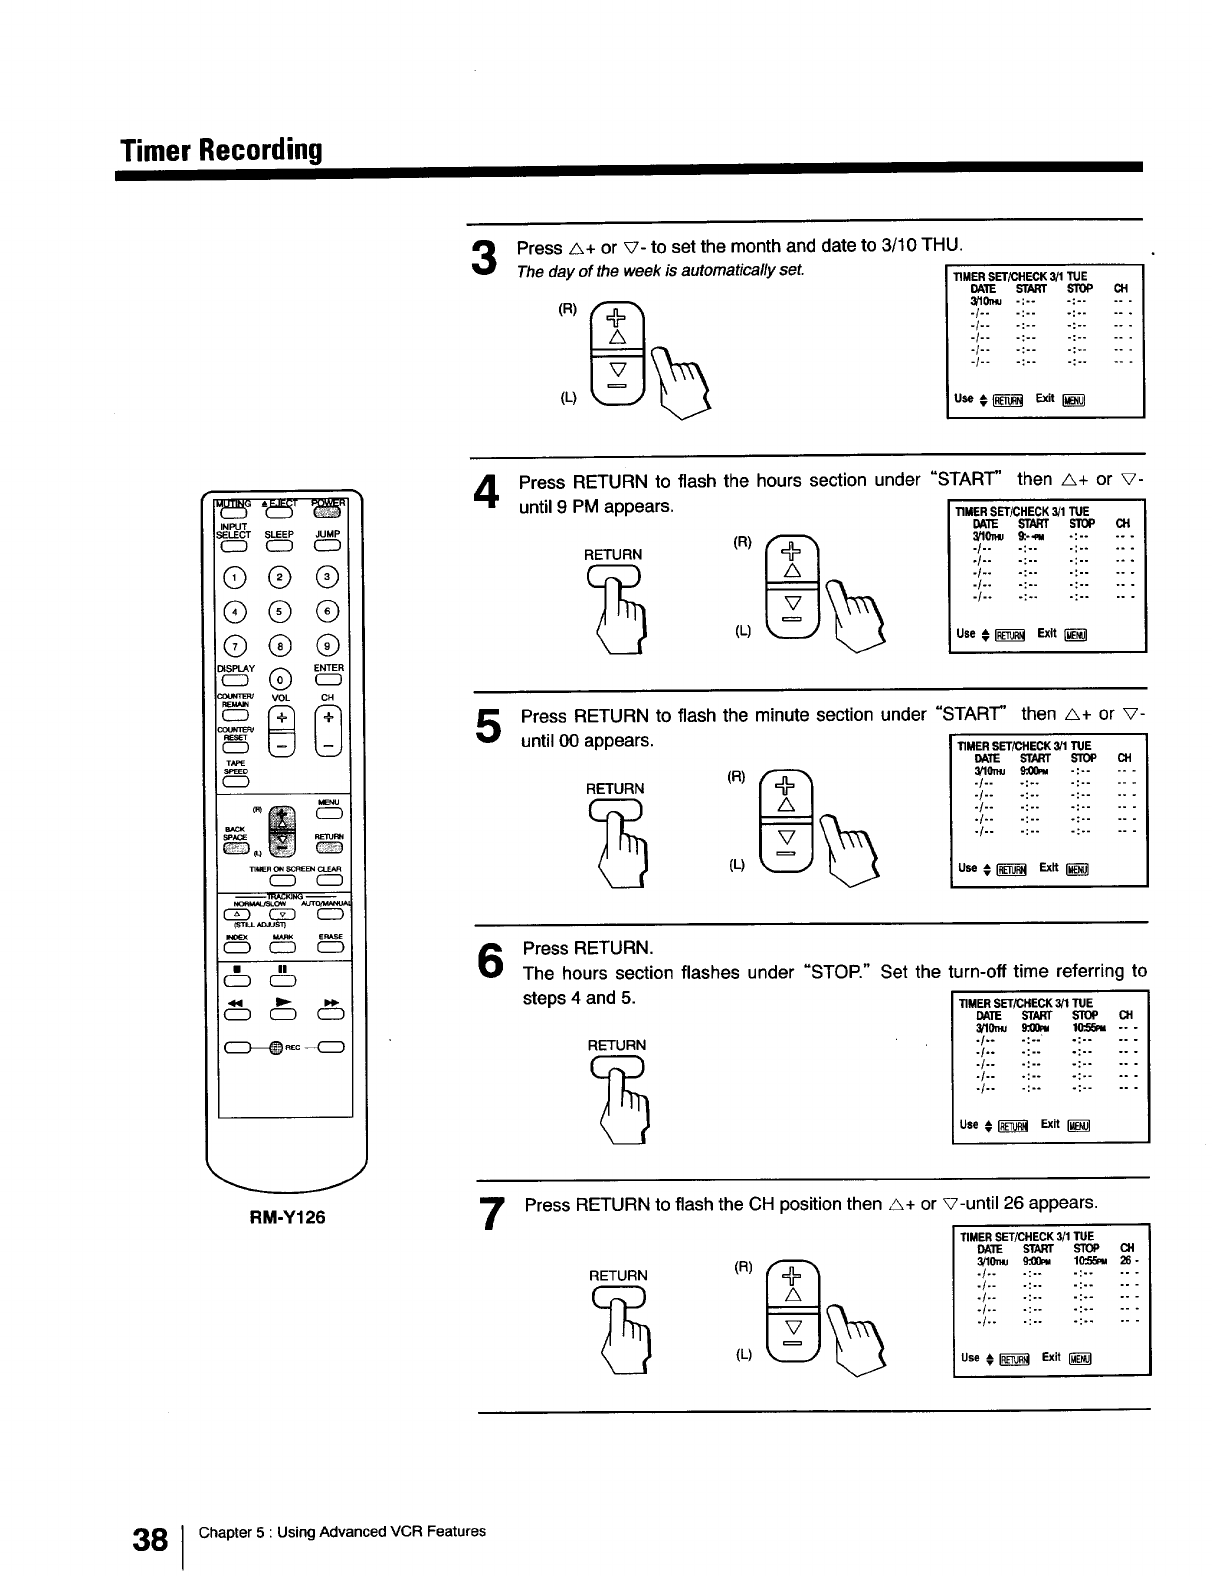
Press _+ or V- to set the month and date to 3/10 THU.
The day of the week is automatically set.
(L)
TIMER SET/CHECK 3/1 "_E
I_TIE START STOP (_H
3/10x_ -;-- -: ....
./.. .:.. .: ....
./.. .:.. .. ....
./.. .:.. .: ....
"/'" ":'" ":....
-1"" ":'" ": ....
Use € _Exit
INPUT
SLEEP JUMP
c_ c_
@®®
®®®
®®®
ss" ®
T/OE
SP_O
C_D
g
_UER O_ _EN C_R
CZD C_ CD
__eRASE
CD C_D CD
• IN
c_ c_
RM-Y126
Press RETURN to flash the hours section under "START' then A+ or v-
until 9PM appears. TIMERSET/CHECK3/1TUE
RETURN (R) _
(_ (L)
DA'I_ STARt SlOP CH
_lO_u 9:.- -_ -: ....
./.. .:.. .: ....
./.. .:.. .: ....
.1.. .:.. .: ....
./.. .:.. .: ....
./.. .:.. .:..
Use 0_ Exit 1_
Press RETURN to flash the minute section under "START" then A+ or V-
until 00 appears. TIMERSET/CMECK_TUE
RETURN (R) _
(_ (L)
DATE START STOP CH
3!lOr.u 9".00m -: ....
./.. .:.. .: ....
./.. .:.. .: ....
./.. .:.. .: ....
./.. .:.. .: ....
./.. .:.. .: ....
use€ _Ex_
Press RETURN.
The hours section flashes under "STOP." Set the turn-off time referring to
steps 4 and 5. TIMERSET/CNECK_TUE
7
RETURN
DATE START STOP CH
3/10_ 9:00_ IO".GGm --
./.. .:.. .: ....
-/'* ":'" ": ....
./.. .:.. .: ....
./.. .:.. .: ....
./.. .:.. .: ....
use€ I_ _ r_
Press RETURN to flash the CH position then A+ or V-until 26 appears.
TIMER SET/CHECK 3/1 TUE
DAlE START STOP Ot
3/10mu 9_ 10_ 26 -
.!.. .:.. .: .....
./.. .:.. .: .....
.!.. .:.. .: .....
.t.. .:.. .: .....
./.. .:.. -: .....
Use € _Exit
38 I Chapter 5 : Using Advanced VCR Features
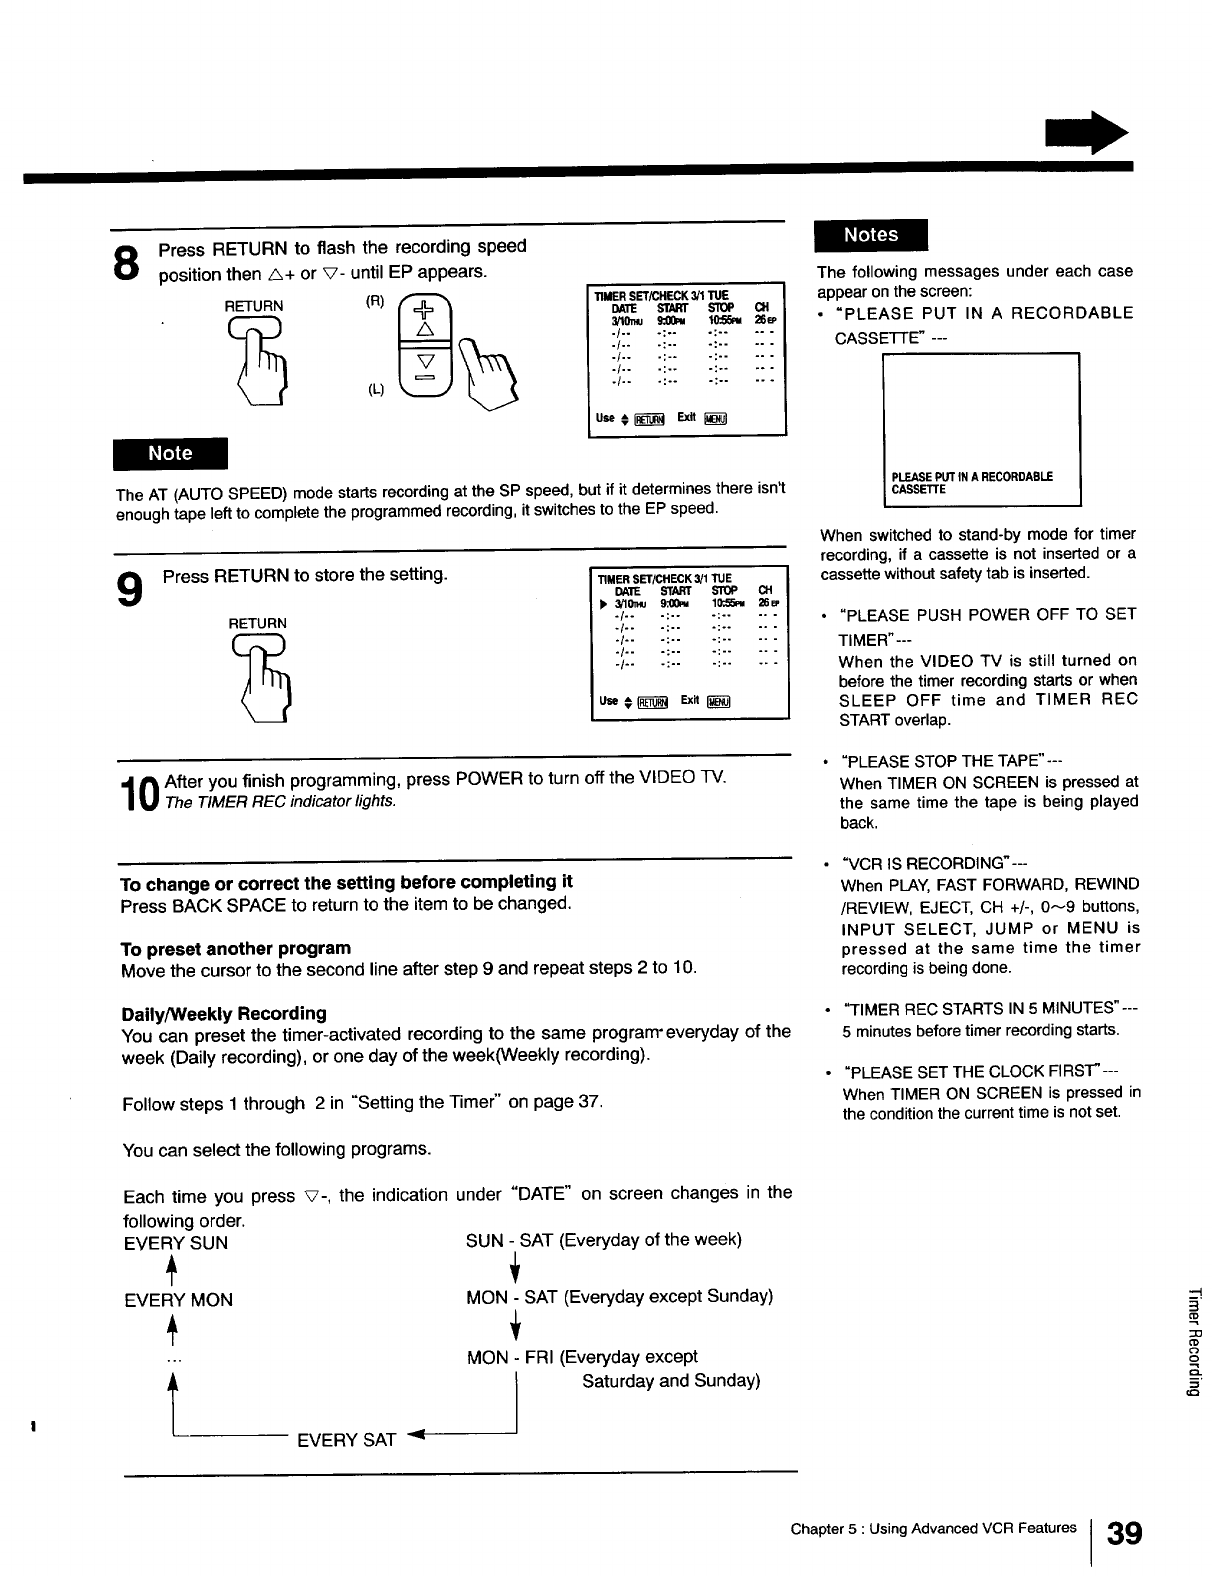
8Press RETURN to flash the recording speed
position then _+ or V- until EP appears.
RETURN (R) _
(_ (L)
TIMER SET/CHECK 3/1 "rUE
DATE START STOP CH
3/10_ s:00m 10:S5_ _
./.. .:.. .: .....
-!-- -:-- -: .....
./.. .:-. .: .....
-!-- -:-- -: .....
-/-- -:-- ": .....
The AT (AUTO SPEED) mode starts recording at the SP speed, but if it determines there isn't
enough tape left to complete the programmed recording, it switches to the EP speed.
9Press RETURN to store the setting.
RETURN
TIMER SET/CHECK 3/1 TUE
DA'I1E START STOP CH
),, 3/'10'n_ 9:00_ 1_ 26_
.1.. .:.. -: .....
./.. .:.. .: .....
./o. .:o. -: .....
./.. °:.. -: .....
./.. .:o. .: .....
use€ _Ex,
0After you finish programming, press POWER to turn off the VIDEO TV.
The TIMER REC indicator lights.
To change or correct the setting before completing it
Press BACK SPACE to return to the item to be changed,
To preset another program
Move the cursor to the second lineafter step 9 and repeat steps 2 to 10.
Daily/Weekly Recording
You can preset the timer-activated recording to the same program'everyday of the
week (Daily recording), or one day of the week(Weekly recording).
Follow steps 1 through 2 in "Setting the Timer" on page 37.
You can select the following programs.
Each time you press _-, the indication under "DATE" on screen changes in the
following order.
EVERY SUN
EVERY MON
SUN - SAT (Everyday of the week)
MON - SAT (Everyday except Sunday)
MON FRI (Everyday except
Saturday and Sunday)
EVERY SAT <
The following messages under each case
appear on the screen:
•"PLEASE PUT IN A RECORDABLE
CASSE'I-FE" ---
=LEASE PUT IN A RECORDABLE
CASSETTE
When switched to stand-by mode for timer
recording, if acassette is not inserted or a
cassette without safety tab is inserted.
"PLEASE PUSH POWER OFF TO SET
TIMER"---
When the VIDEO TV is still turned on
before the timer recording starts or when
SLEEP OFF time and TIMER REC
START overlap.
"PLEASE STOP THE TAPE"---
When TIMER ON SCREEN is pressed at
the same time the tape is being played
back.
"VCR IS RECORDING"---
When PLAY, FAST FORWARD, REWIND
/REVIEW, EJECT, CH +/-, 0_9 buttons,
INPUT SELECT, JUMP or MENU is
pressed at the same time the timer
recording is being done.
'q-IMER REC STARTS IN 5 MINUTES"---
5 minutes before timer recording starts.
"PLEASE SET THE CLOCK FIRST"---
When TIMER ON SCREEN is pressed in
the condition the current time is not set.
--I
m,
o
m.
Chapter 5 : Using Advanced VCR Features I 39
Timer Recording
INPUT
SELECT SLEEP JUMP
CD CD CD
@®®
®®®
Q® ®
_8_ VOL
T_
_O
MENU
SPACE
cu
TIMER ON SCREEN CLEAR
C_D (5_D C:D
(STILL ADJUST)
INO_-X MARK ERASE
CD CD C:D
O
C:D CD CD
_REC _
RM-Y126
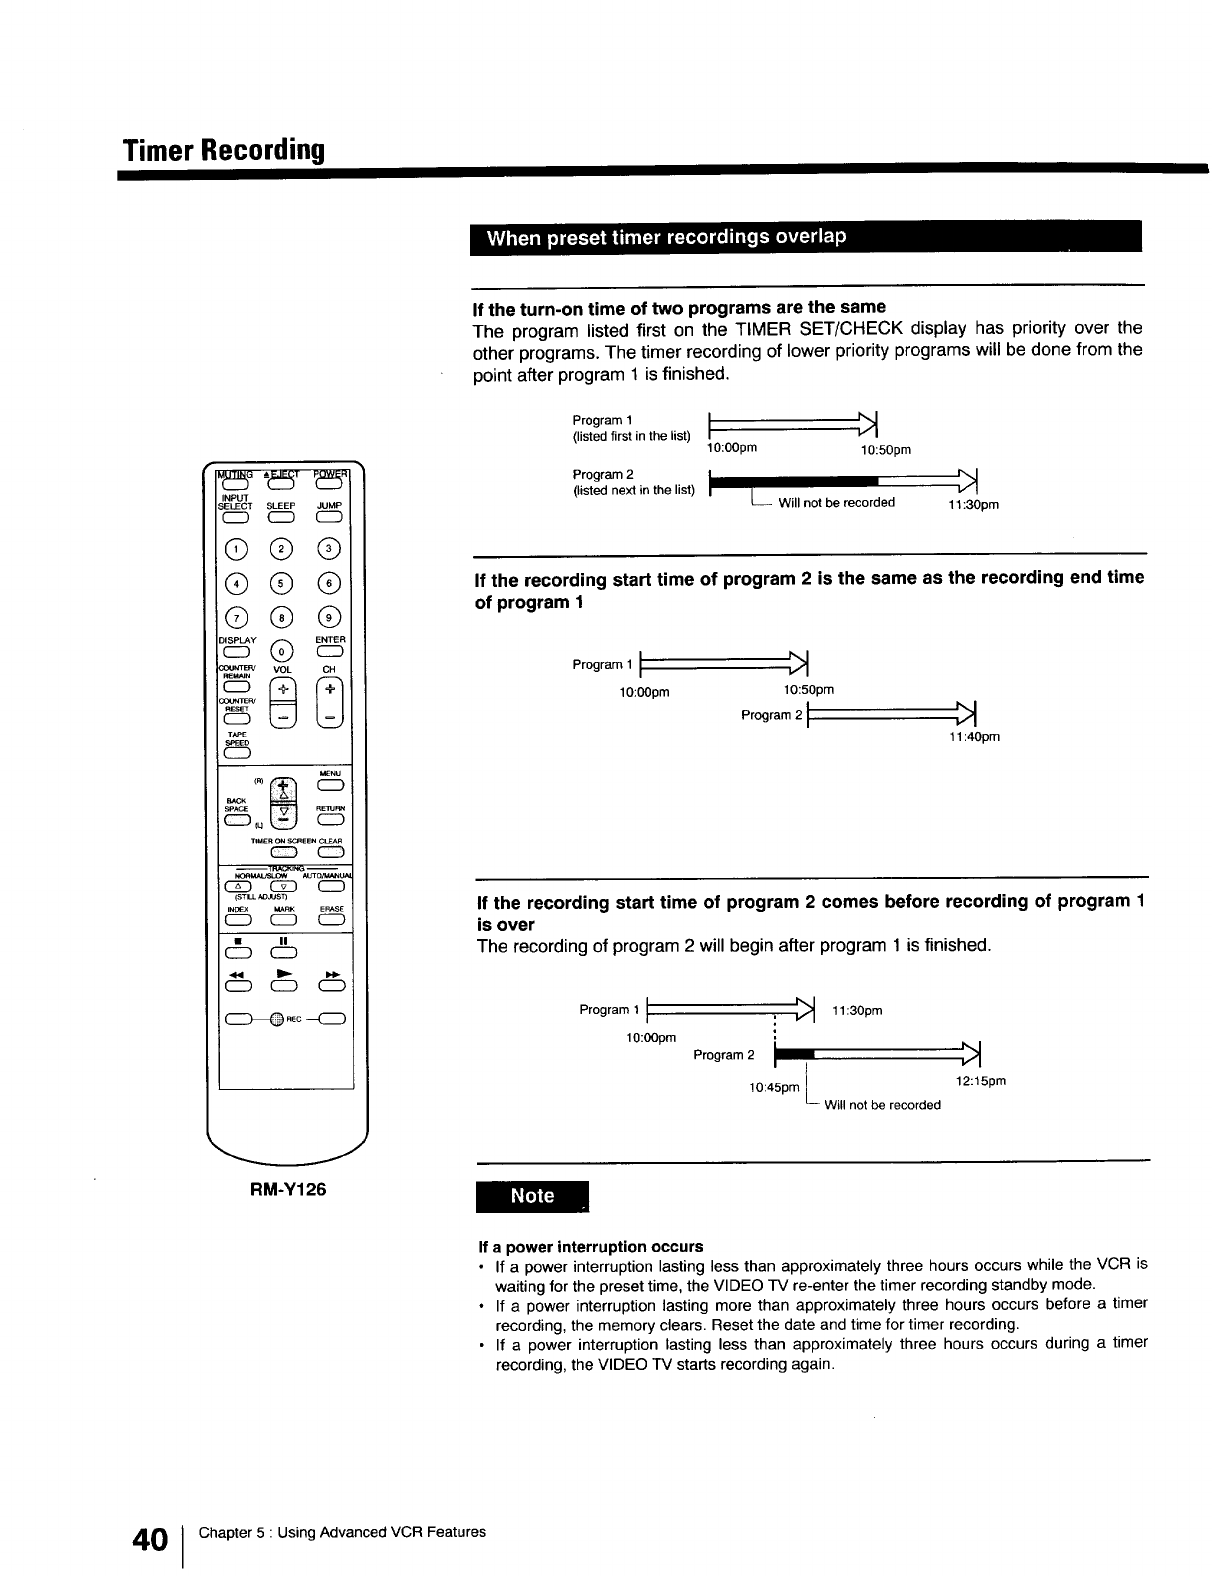
If the turn-on time of two programs are the same
The program listed first on the TIMER SET/CHECK display has priority over the
other programs. The timer recording of lower priority programs will be done from the
point after program 1 is finished.
Program 1 I
(listed first in the list)
10:00pro 10:50pro
Program 2 _1
(listed next in the list) [L_ Will not be recorded 11:30pro
If the recording start time of program 2 is the same as the recording end time
of program 1
Program 1 I _:_
10:00pm 10:50prn
Program 2 1
11:40pm
If the recording start time of program 2 comes before recording of program 1
is over
The recording of program 2 will begin after program 1 is finished.
Program1 I : _:_ 11:30pm
lO:OOprn Program IO:4Lpm L
Will not be recorded 12:15pm
If a power interruption occurs
• If a power interruption lasting less than approximately three hours occurs while the VCR is
waiting for the preset time, the VIDEO TV re-enter the timer recording standby mode.
•If apower interruption lasting more than approximately three hours occurs before a timer
recording, the memory clears. Reset the date and time for timer recording.
•If a power interruption lasting less than approximately three hours occurs during atimer
recording, the VIDEO "IV starts recording again.
40 I Chapter 5 : Using Advanced VCR Features
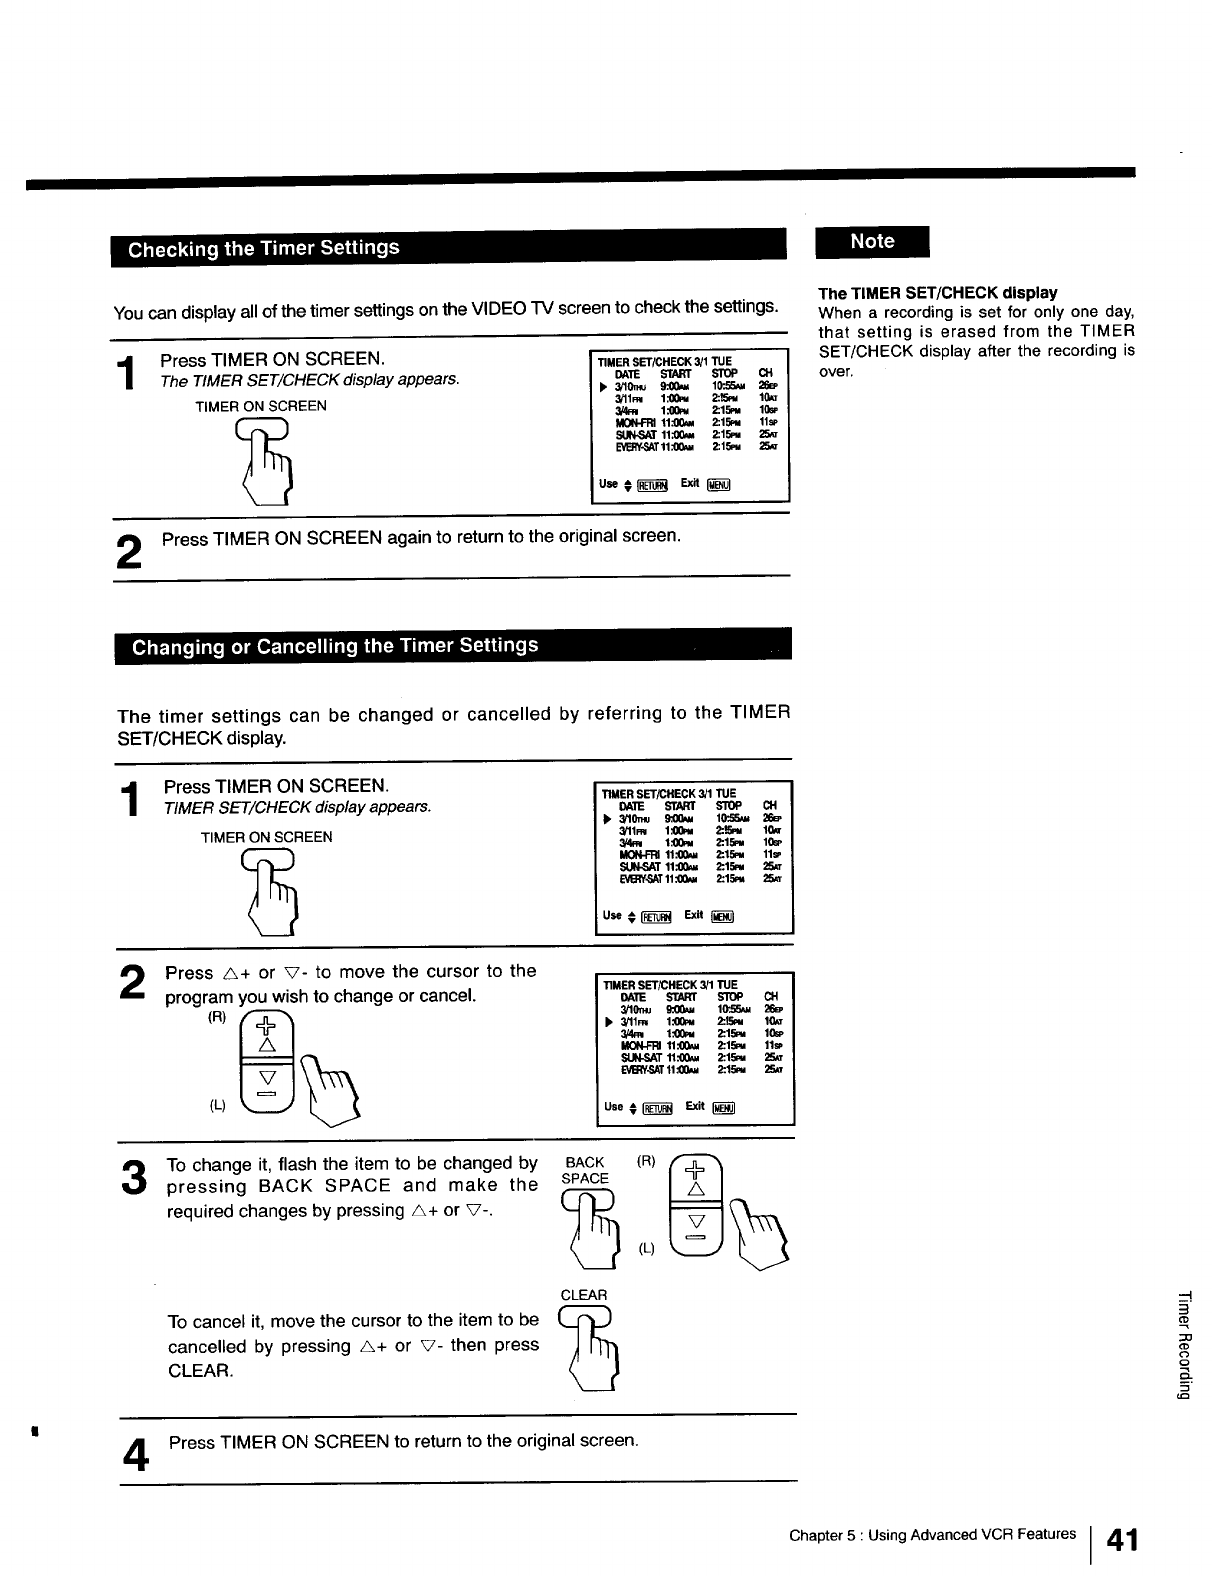
You can display all of the timer settings on the VIDEO TV screen to check the settings.
1Press TIMER ON SCREEN.
The TIMER SET/CHECK display appears.
TIMER ON SCREEN
TIMER SET/CHECK 3/1 TUE
DATE START STOP CH
k' 3/10mu 9:00_ 10'.55_ 26_
3/11m 1.'00_ 2:JSm 10,LT
1.'00_ 2:15_ 10a,
MON-FRItl.'00_ 2:.15_ 11s_
SUN.SAT11:00_ 2:15m 25_
E'VB_Y-SAT11_2:15m 25_
use,__ Ex.I_
Press TIMER ON SCREEN again to return to the original screen.
The TIMER SET/CHECK display
When a recording is set for only one day,
that setting is erased from the TIMER
SET/CHECK display after the recording is
over.
The timer settings can be changed or cancelled by referring to the TIMER
SET/CHECK display.
1Press TIMER ON SCREEN.
TIMER SET/CHECK display appears.
TIMER ON SCREEN
TIMER SET/CHECK 3/1 "rUE
DA'IE START STOP CH
k' 3/10n_ _10'.55_
3/11m l:00m 2:_ IG,e"
t.'00m 2:.15m 10sP
MON-FRI11.'00_ 2:15m 11sP
SUN-SAT11:00_ 2:.15m 25_
E_-SAT 11_2:15m 25_
use#I-_i_l E.,dt_--I
2Press _+ or v- to move the cursor to the
program you wish to change or cancel.
(L)
To change it, flash the item to be changed by
pressing BACK SPACE and make the
required changes by pressing A+ or V-.
To cancel it, move the cursor to the item to be
cancelled by pressing A+ or V- then press
CLEAR.
BACK
SPACE
CLEAR
TIMER SET/CHECK 3/1 TUE
DATE START STOP O!
3!10mu _10".5_
k' 3/11FN l:O0m 2:L_v 10,_.T
I.'QQ_v 2:15m 10S_'
MON-FRI 11.'00_ 2:15,,. 11sp
SUN-SAT11.'00_ 2:.15m 25_
E_,.SAT 11:00_ 2:15,_ 25_
Use _ _ Exit
(L)
Press TIMER ON SCREEN to return to the original screen.
--I
_o
o
Chapter 5 : Using Advanced VCR Features 41
Quick Timer Recording
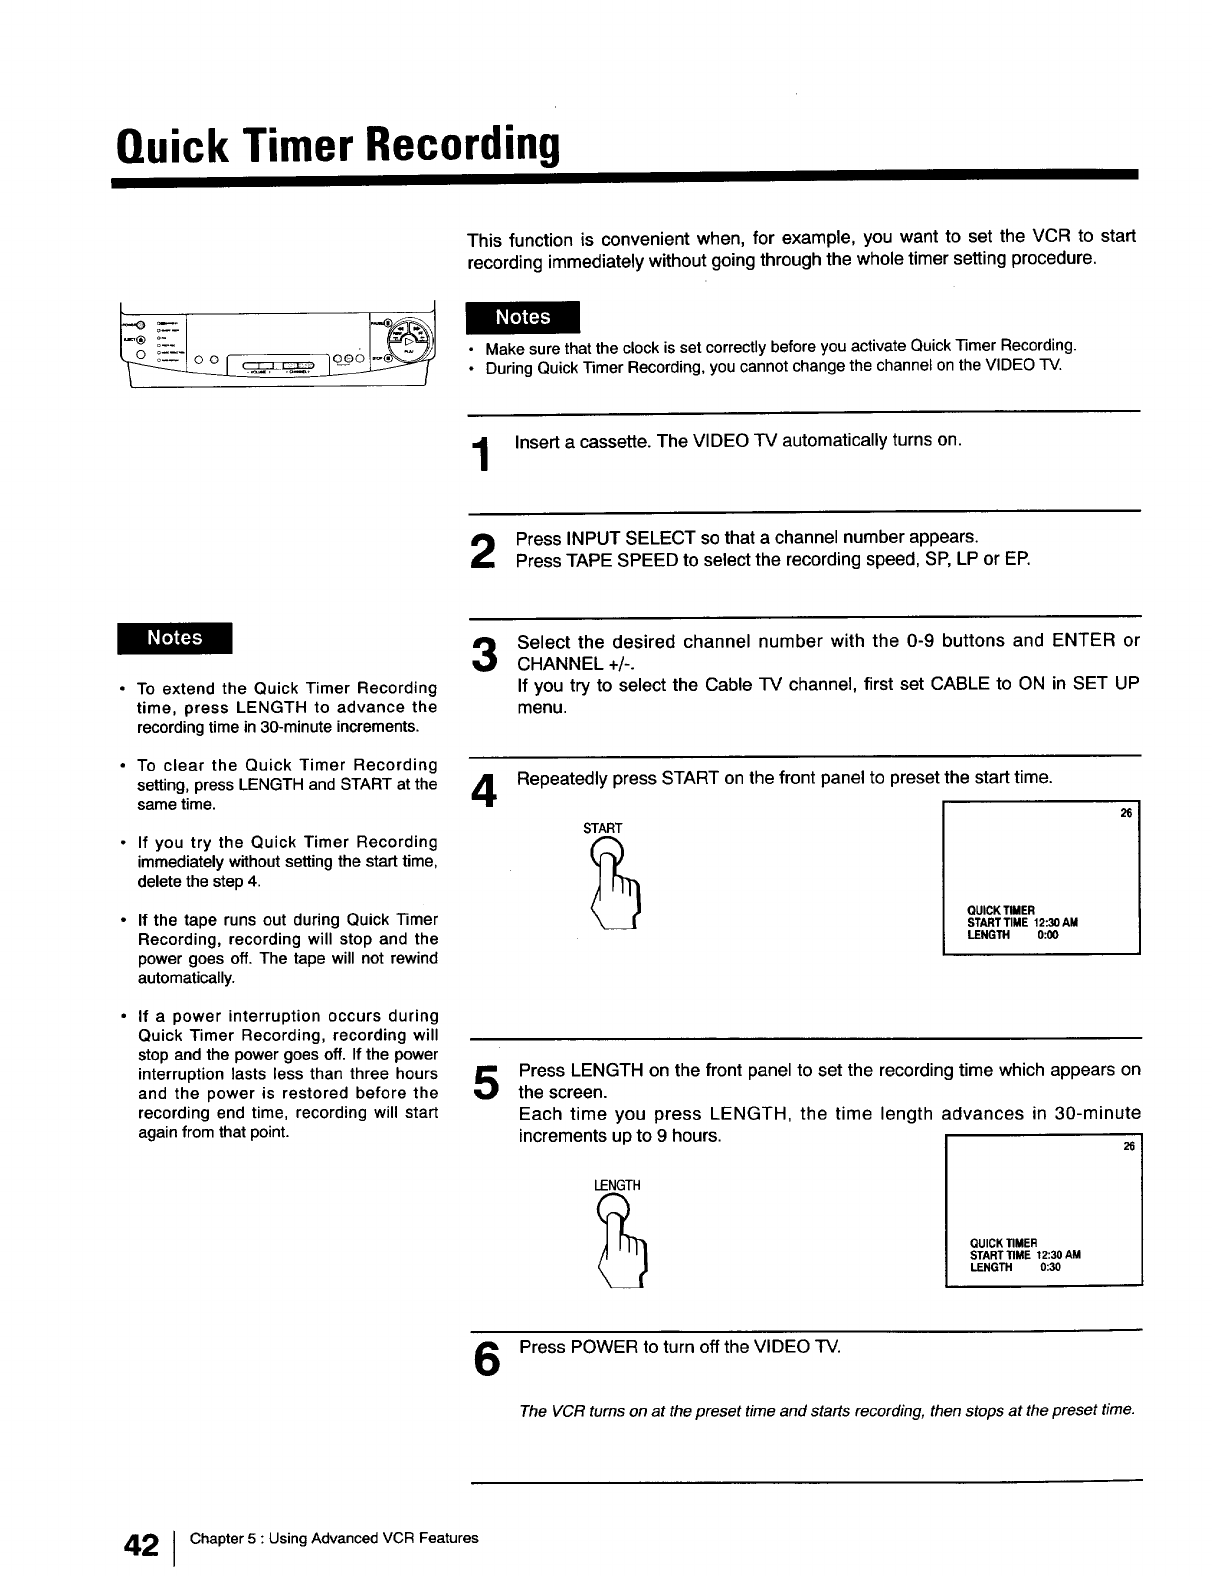
This function is convenient when, for example, you want to set the VCR to start
recording immediately without going through the whole timer setting procedure.
• Make sure that the clock is set correctly before you activate Quick Timer Recording.
• During Quick Timer Recording, you cannot change the channel on the VIDEO TV.
Insert a cassette. The VIDEO TV automatically turns on.
Press INPUT SELECT so that a channel number appears.
Press TAPE SPEED to select the recording speed, SP, LP or EP.
•To extend the Quick Timer Recording
time, press LENGTH to advance the
recording time in 30-minute increments.
3
• To clear the Quick Timer Recording
setting, press LENGTH and START at the _1_
same time. '-lr
• If you try the Quick Timer Recording
immediately without setting the start time,
delete the step 4.
If the tape runs out during Quick Timer
Recording, recording will stop and the
power goes off. The tape will not rewind
automatically.
5
If a power interruption occurs during
Quick Timer Recording, recording will
stop and the power goes off. If the power
interruption lasts less than three hours
and the power is restored before the
recording end time, recording will start
again from that point.
Select the desired channel number with the 0-9 buttons and ENTER or
CHANNEL +/-.
If you try to select the Cable TV channel, first set CABLE to ON in SET UP
menu.
Repeatedly press START on the front panel to preset the start time.
START
QUICK TIMER
START TIME 12:30 AM
LENGTH 0:00
Press LENGTH on the front panel to set the recording time which appears on
the screen.
Each time you press LENGTH, the time length advances in 30-minute
increments up to 9 hours.
LENGTH
QUICK TIMER
START TIME 12:30 AM
LENGTH 0:30
6Press POWER to turn off the VIDEO TV.
The VCR turns on at the preset time and starts recording, then stops at the preset time.
42 IChapter 5 : Using Advanced VCR Features

Index Function
INDEX signal marks on the tape let you scan through the start of different programs
or search for a specific section of tape.
Automatic INDEX mark
An INDEX signal is automatically marked at the beginning of recording.
iNPUT
S_)T SLEEP JUMP
@q)®
(9@@
@@(9
TAPE
SPEED
CD
MENU
_ _8 CD
SPACE
T_ER ONSCREENCLEAR
CD C2D
C_ _D CD
(SnLLA_q
MARK ERASE
•II
RM-Y126
INDEX MARK
Manual INDEX mark
INDEX signals can be marked at any desired point during any recording or normal
playback.
Press INDEX once.
INDEX 00 appears.
INDEX O0
Then press MARK at the point where you want to mark INDEX signal. INDEX
MARK appears on the screen.
•Leave an interval of more than 2minutes between INDEX signals when marking them one
after the other so that the VCR can detect them correctly.
• While an INDEX signal is being marked during playback, the recorded sound will not be
heard, but it will not be erased.
• You cannot mark an INDEX signal in the following cases:
- On a tape without safety tab.
- On an unrecorded portion of a tape.
- Immediately before a point on the tape where the tape speed changes.
Q
S.
m.
Chapter 5 : Using Advanced VCR Features I43
Index Function
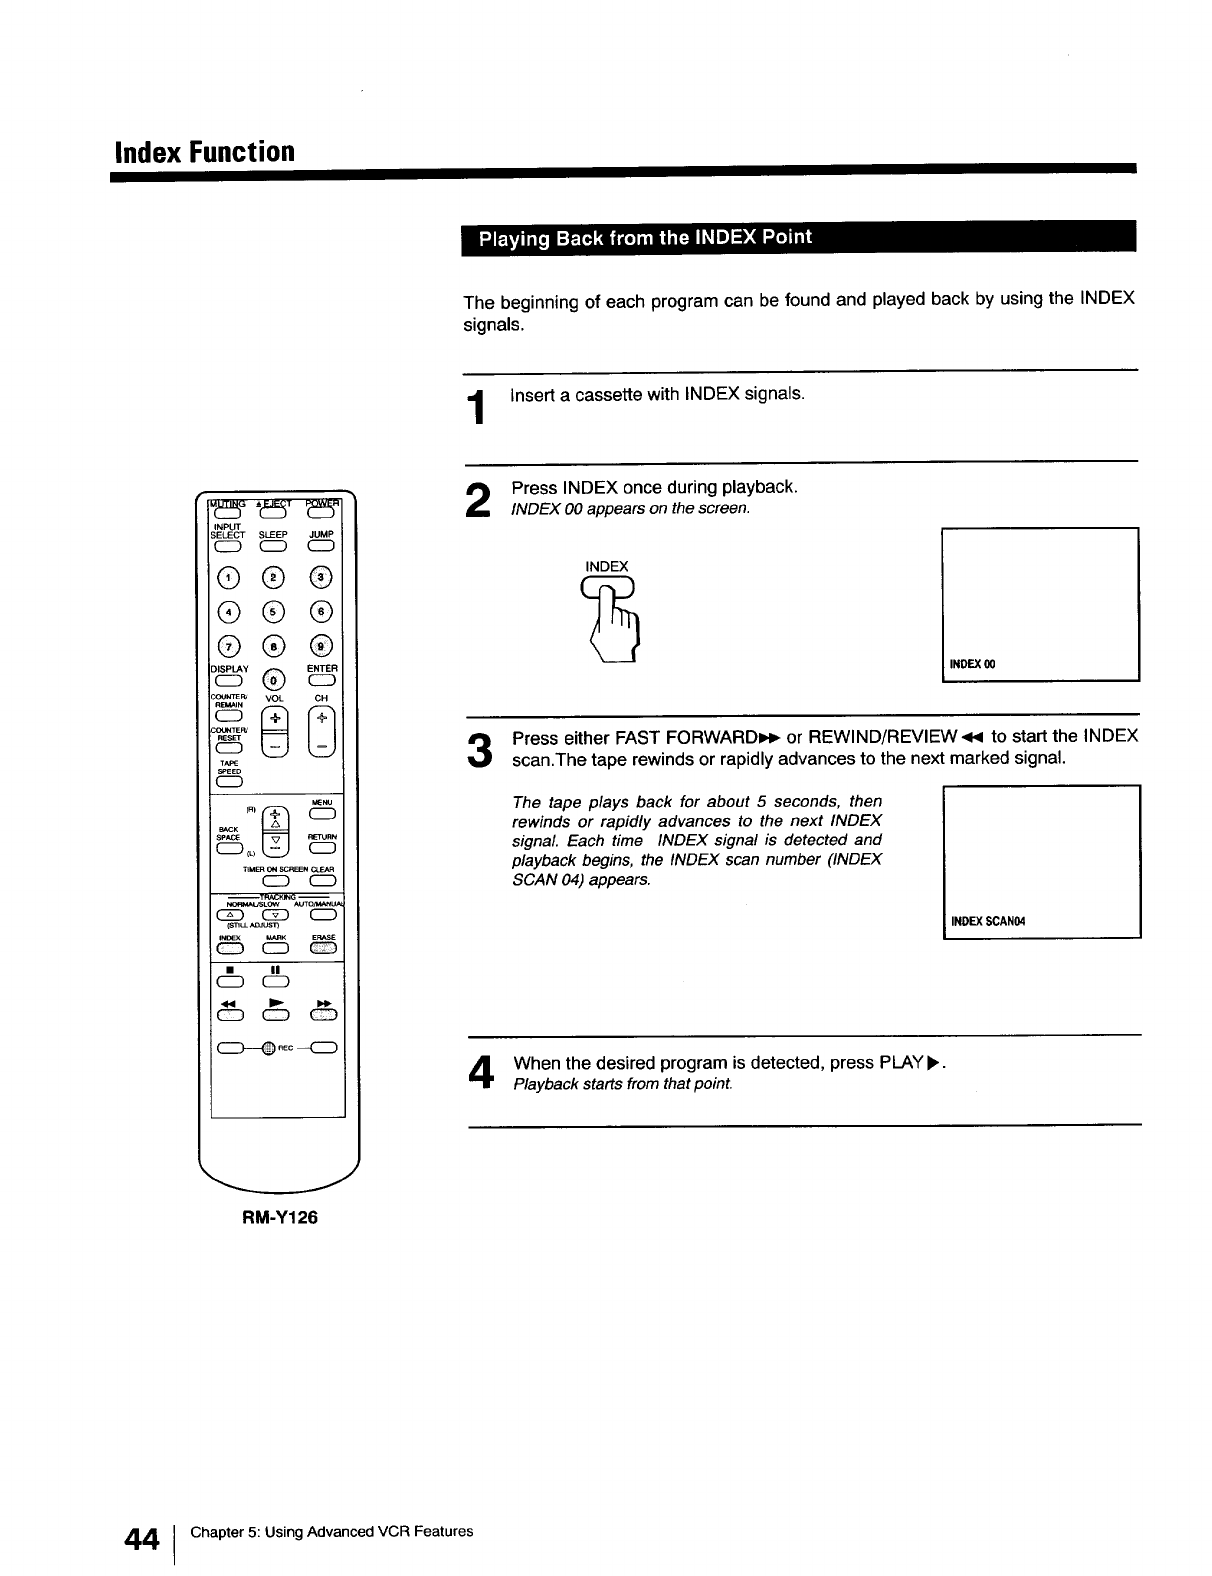
The beginning of each program can be found and played back by using the INDEX
signals.
Insert a cassette with INDEX signals.
INPUT
S_)CT SLEEP JUMP
CD CD
®®®
®®®
®®®
®
co_FuCOOW_RV_ _(_ VOL
T_:
SPEED
CD
_NU
TtM_ ONSCPI_N _
CD C_D
--T_K_G --
CZD C5_ CD
(SI_LL_JUS_
INDEX V,_RK ERASE
_ CD _
c db
(_---_ _c _
Press INDEX once during playback.
INDEX O0appears on the screen.
INDEX
INDEX 00
i
Press either FAST FORWARDI,_ or REWIND/REVIEW<< to start the INDEX
scan.The tape rewinds or rapidly advances to the next marked signal.
The tape plays back for about 5 seconds, then
rewinds or rapidly advances to the next INDEX
signal. Each time INDEX signal is detected and
playback begins, the INDEX scan number (INDEX
SCAN 04) appears.
INDEX SCAN04
When the desired program is detected, press PLAYb,.
Playback starts from that point.
RM-Y126
4 Chapter 5: Using Advanced VCR Features
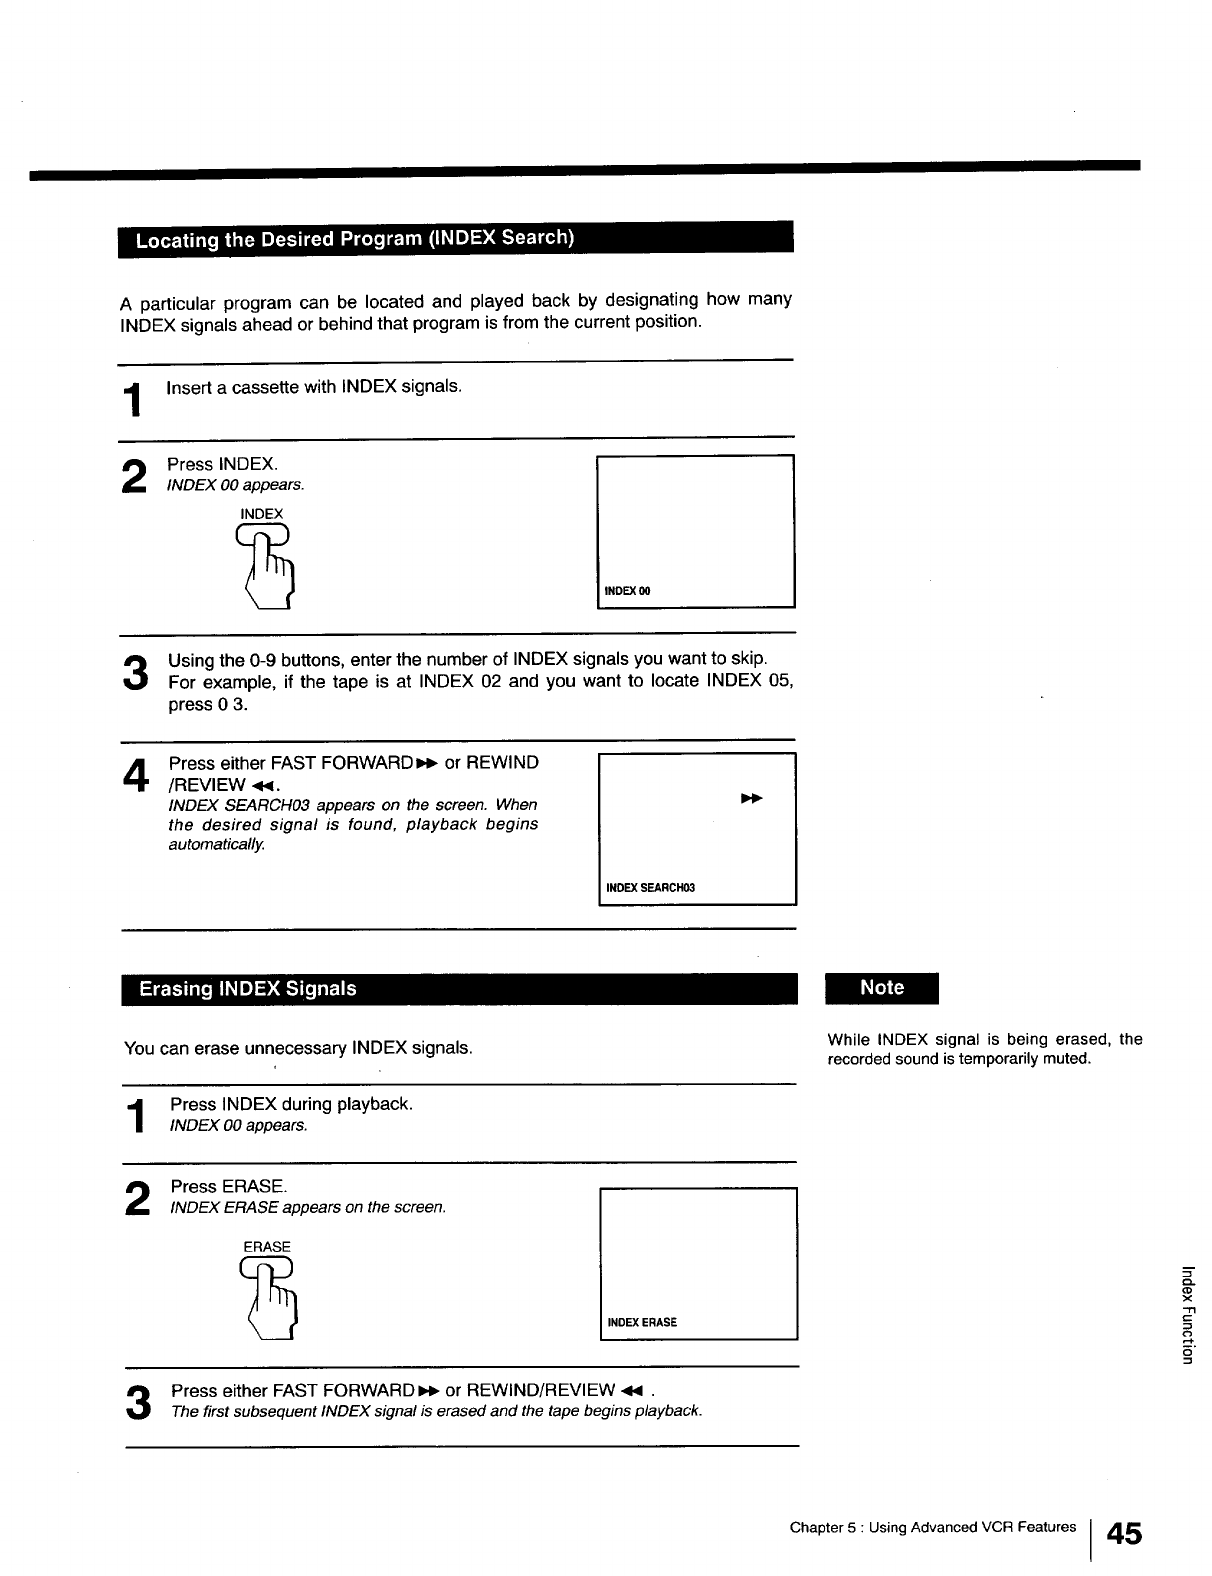
A particular program can be located and played back by designating how many
INDEX signals ahead or behind that program is from the current position.
Insert a cassette with INDEX signals.
2Press INDEX.
INDEX O0appears.
INDEX
INDEX O0
Using the 0-9 buttons, enter the number of INDEX signals you want to skip.
For example, if the tape is at INDEX 02 and you want to locate INDEX 05,
press 0 3.
4Press either FAST FORWARD_ or REWIND
/REVIEW .<,,I.
INDEX SEARCH03 appears on the screen. When
the desired signal is found, playback begins
automatically.
INDEX SEARCH03
I_F_
You can erase unnecessary INDEX signals.
Press INDEX during playback.
INDEX O0appears.
While INDEX signal is being erased, the
recorded sound is temporarily muted.
Press ERASE.
INDEX ERASE appears on the screen.
ERASE
INDEX ERASE
Press either FAST FORWARDI_ or REWIND/REVIEW <4 .
The first subsequent INDEX signal is erased and the tape begins playback.
Chapter 5 : Using Advanced VCR Features 45
Appendix
Specification
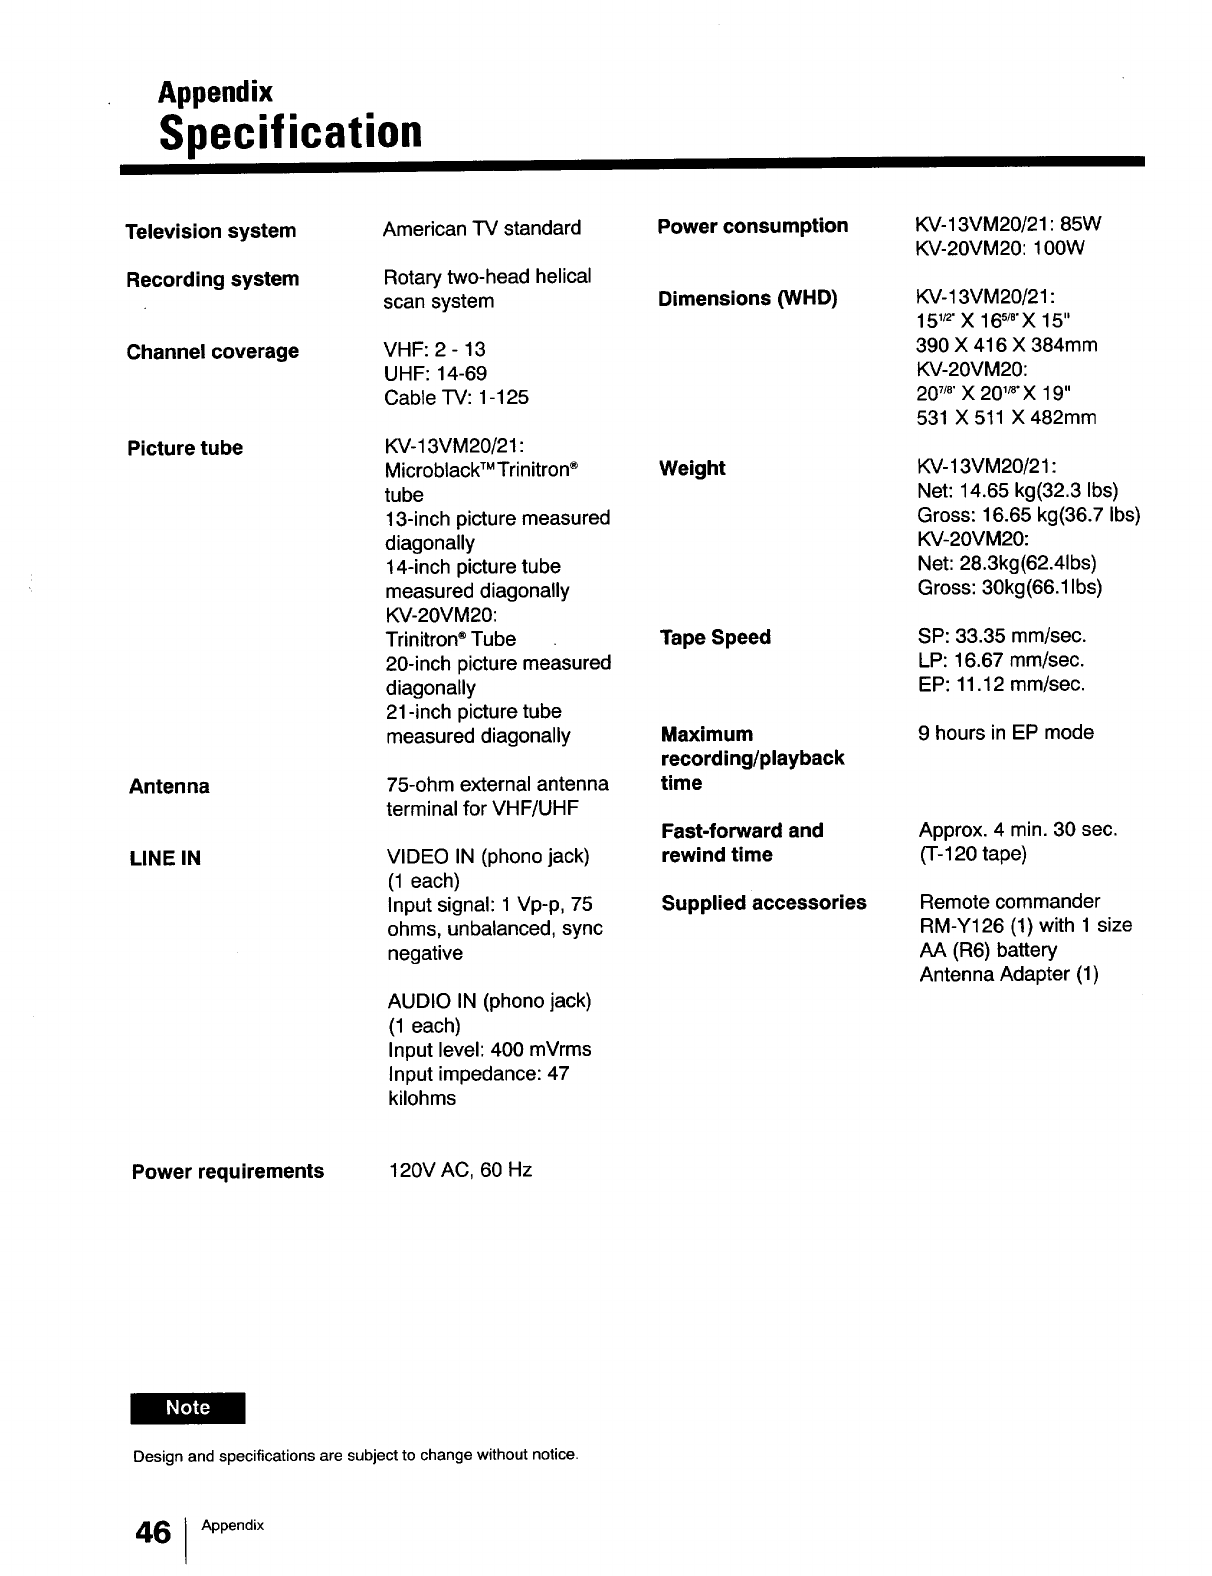
Television system
Recording system
Channel coverage
Picture tube
Antenna
LINE IN
American TV standard
Rotary two-head helical
scan system
VHF: 2 - 13
UHF: 14-69
Cable TV: 1-125
KV-13VM20/21:
MicroblackTMTrinitron ®
tube
13-inch picture measured
diagonally
14-inch picture tube
measured diagonally
KV-20VM20:
Trinitron ®Tube
20-inch picture measured
diagonally
21 -inch picture tube
measured diagonally
75-ohm external antenna
terminal for VHF/UHF
VIDEO IN (phono jack)
(1 each)
Input signal: 1 Vp-p, 75
ohms, unbalanced, sync
negative
AUDIO IN (phono jack)
(1 each)
Input level: 400 mVrms
Input impedance: 47
kilohms
Power consumption
Dimensions (WHD)
Weight
Tape Speed
Maximum
recording/playback
time
Fast-forward and
rewind time
Supplied accessories
KV-13VM20/21 : 85W
KV-20VM20:100W
KV-13VM20/21:
15_" X 16s_'X 15"
390 X 416 X 384mm
KV-20VM20:
20_/8"X 20 '_"X 19"
531 X 511 X 482mm
KV-13VM20/21 :
Net: 14.65 kg(32.3 Ibs)
Gross: 16.65 kg(36.7 Ibs)
KV-20VM20:
Net: 28.3kg(62.41bs)
Gross: 30kg(66.1 Ibs)
SP: 33.35 mm/sec.
LP: 16.67 mm/sec.
EP: 11.12 mm/sec.
9 hours in EP mode
Approx. 4 min. 30 sec.
(T-120 tape)
Remote commander
RM-Y126 (1) with 1 size
AA (R6) battery
Antenna Adapter (1)
Power requirements 120V AC, 60 Hz
Design and specifications are subject to change without notice.
46 IAppendix
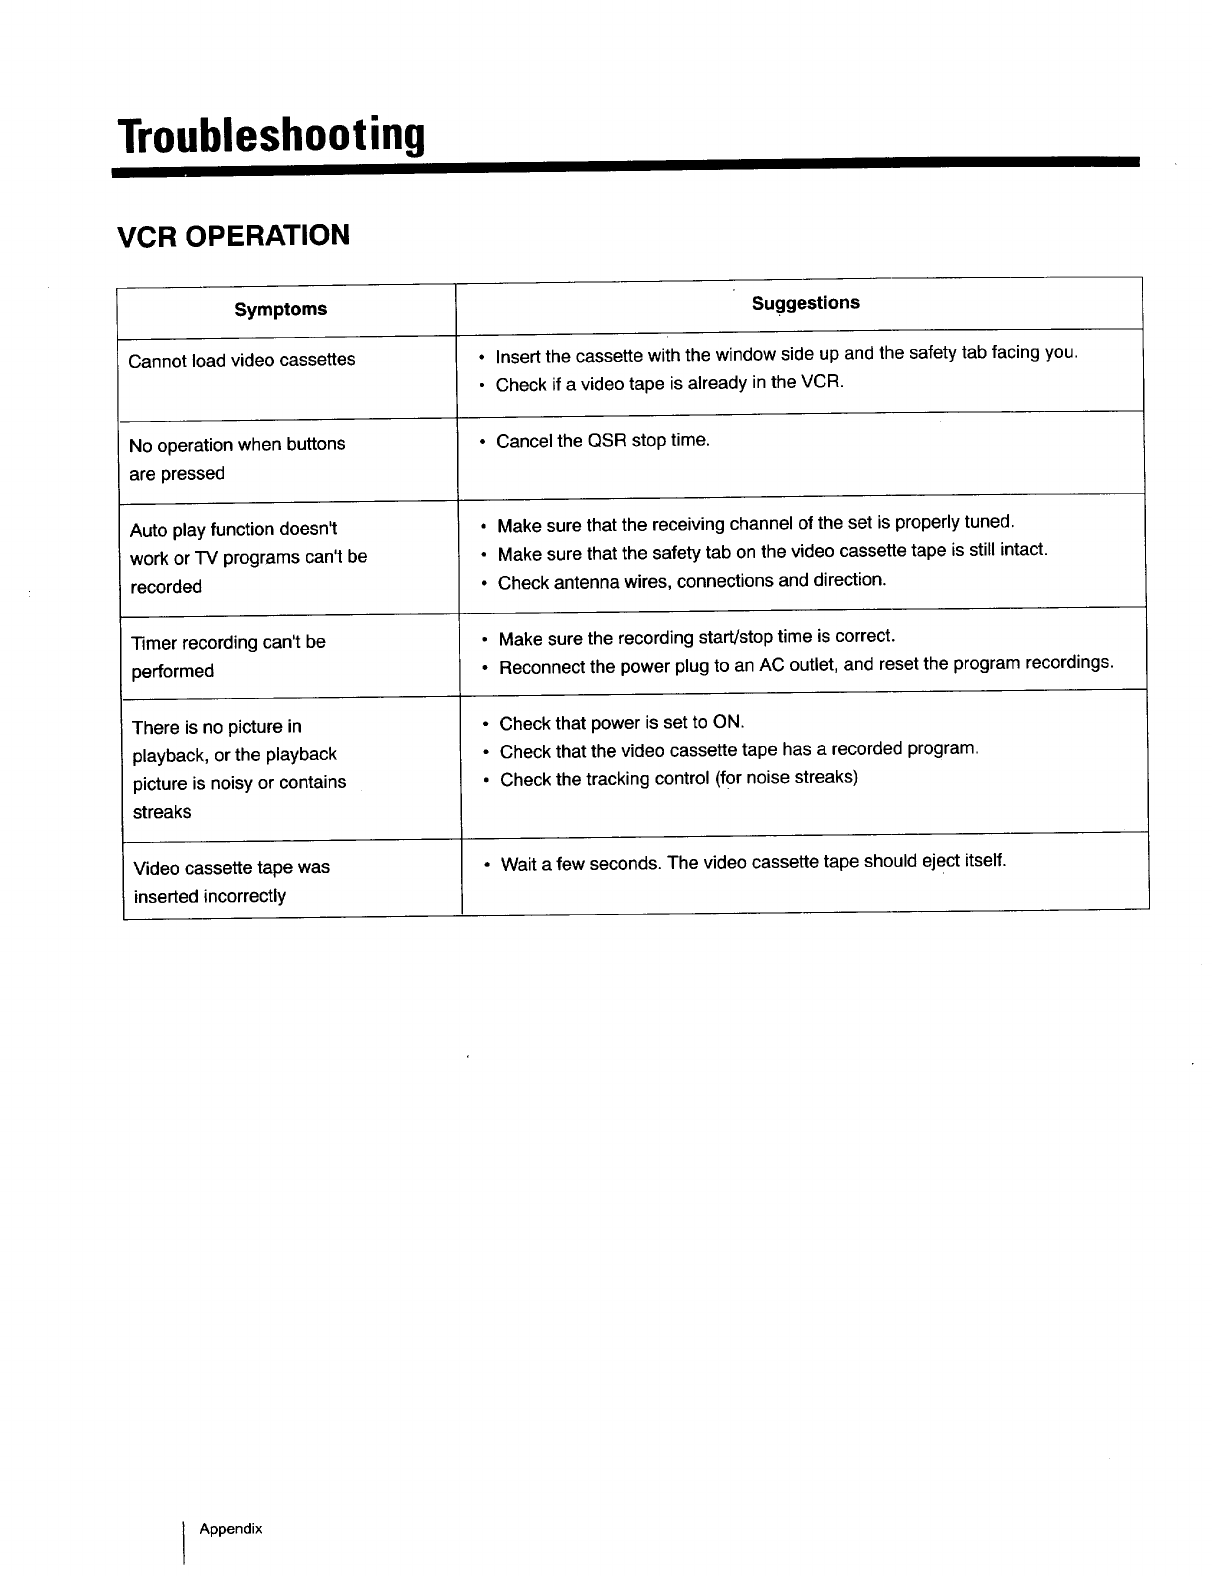
Troubleshooting
VCR OPERATION
Symptoms
Cannot load video cassettes
No operation when buttons
are pressed
Auto play function doesn't
work or TV programs can't be
recorded
Timer recording can't be
performed
There is no picture in
playback, or the playback
picture is noisy or contains
streaks
Video cassette tape was
insertedincorrectly
Suggestions
•Insert the cassette with the window side up and the safety tab facing you.
•Check if a video tape is already in the VCR.
• Cancel the QSR stop time.
• Make sure that the receiving channel of the set is properly tuned.
• Make sure that the safety tab on the video cassette tape is still intact.
• Check antenna wires, connections and direction.
• Make sure the recording start/stop time is correct.
•Reconnect the power plug to an AC outlet, and reset the program recordings.
•Check that power is set to ON.
• Check that the video cassette tape has a recorded program.
• Check the tracking control (for noise streaks)
• Wait a few seconds. The video cassette tape should eject itself.
Appendix
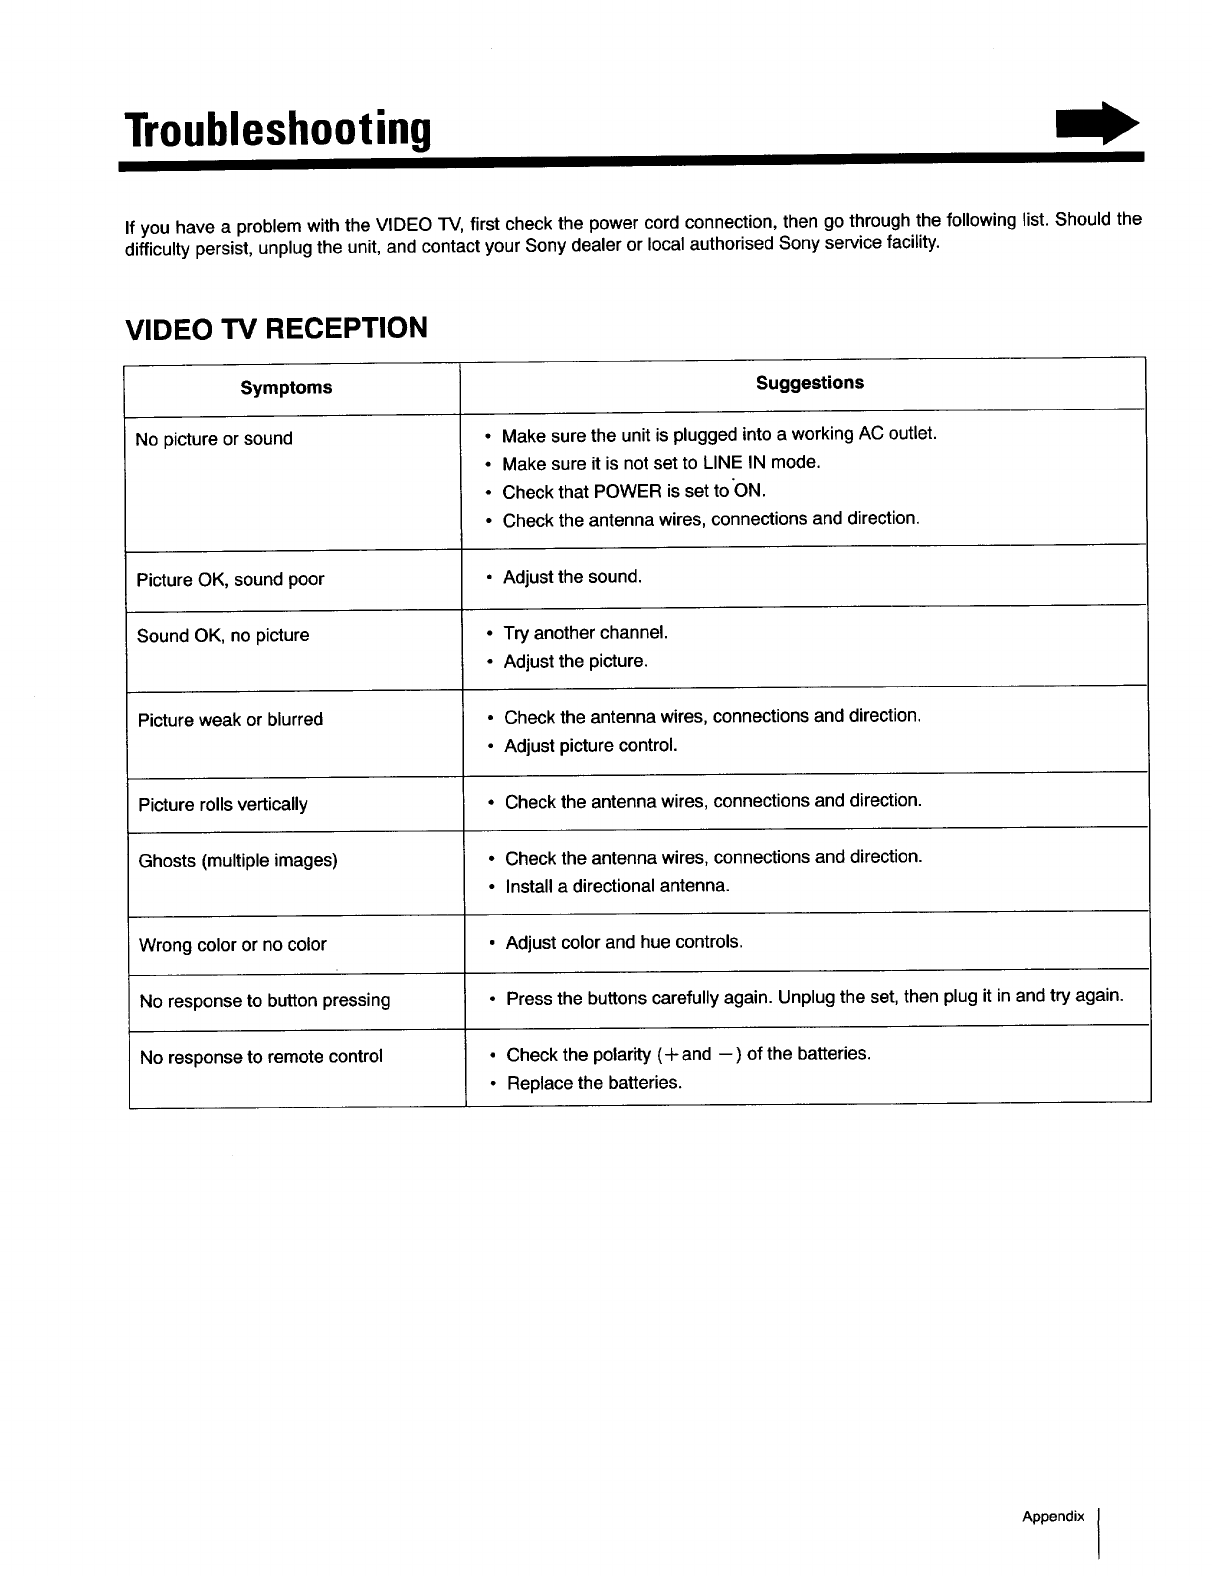
Troubleshooting
If you have a problem with the VIDEO TV, first check the power cord connection, then go through the following list. Should the
difficulty persist, unplug the unit, and contact your Sony dealer or local authorised Sony service facility.
VIDEO TV RECEPTION
Symptoms
No picture or sound
Picture OK, sound poor
Sound OK, no picture
Picture weak or blurred
Picture rolls vertically
Ghosts (multiple images)
Wrong color or no color
No response to button pressing
No response to remote control
Suggestions
• Make sure the unit is plugged into a working AC outlet.
• Make sure it is not set to LINE IN mode.
• Check that POWER is set to'ON.
•Check the antenna wires, connections and direction.
• Adjust the sound.
• Try another channel.
• Adjust the picture.
• Check the antenna wires, connections and direction.
• Adjust picture control.
• Check the antenna wires, connections and direction.
• Check the antenna wires, connections and direction.
• Install a directional antenna.
• Adjust color and hue controls.
• Press the buttons carefully again. Unplug the set, then plug it in and try again.
• Check the polarity (+and --) of the batteries.
• Replace the batteries.
Appendix
