Sony PCG41215L Personal Computer User Manual VPCSA Series VPCSB Series VPCSC Series

Sony Corporation Personal Computer VPCSA Series VPCSB Series VPCSC Series

Contents

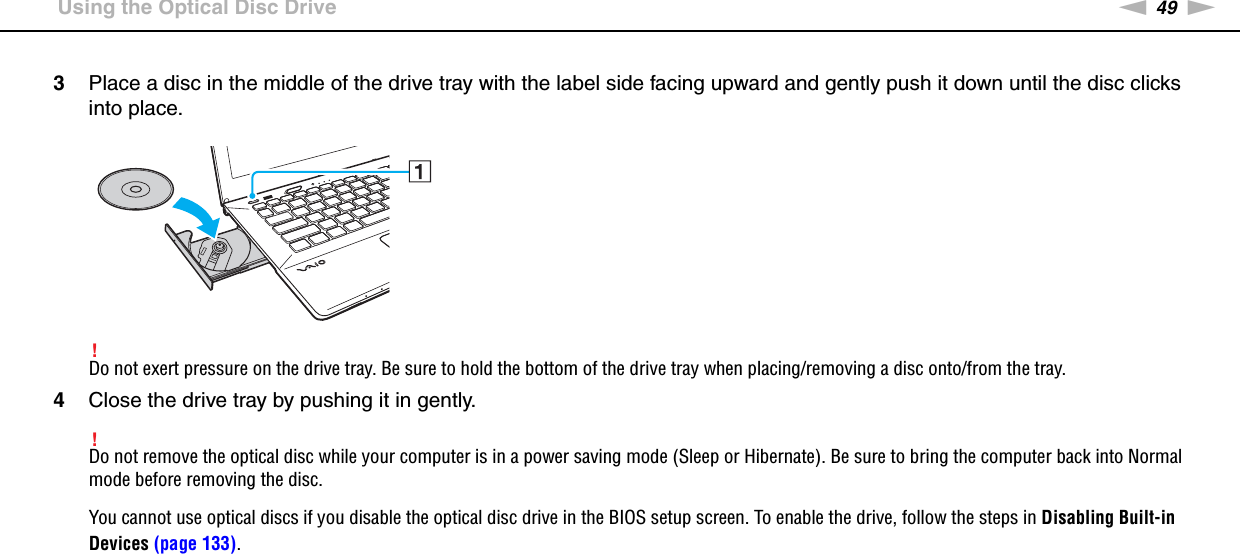
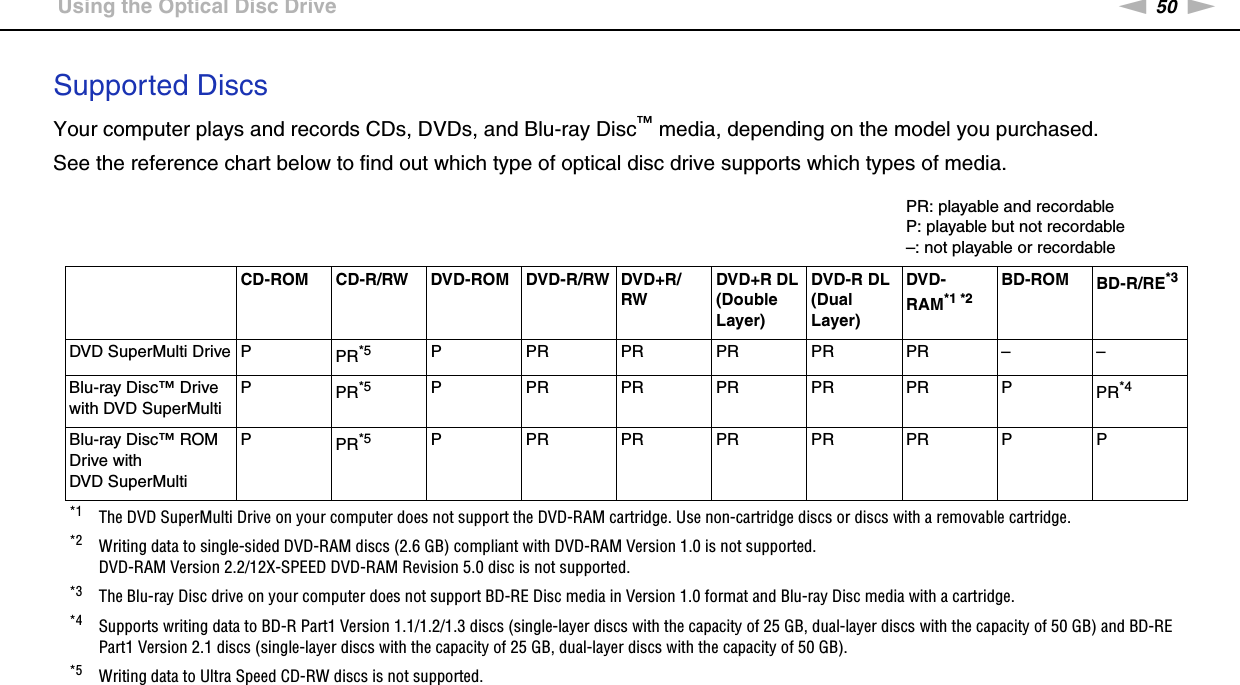
UserMan_AK8PCG41215L

NUser GuidePersonal ComputerVPCSA Series / VPCSB Series / VPCSC Series
2nNContentsBefore Use.......................................................................... 4Finding More about Your VAIO Computer .................... 5Ergonomic Considerations ............................................ 9Getting Started.................................................................. 11Locating Controls and Ports........................................ 12About the Indicator Lights ........................................... 20Connecting a Power Source ....................................... 21Using the Battery Pack................................................ 23Shutting Down Your Computer Safely ........................ 32Using the Power Saving Modes .................................. 33Keeping Your Computer in Optimum Condition .......... 36Using Your VAIO Computer.............................................. 39Using the Keyboard..................................................... 40Using the Touch Pad................................................... 43Using Special-function Buttons ................................... 44Using the Quick Web Access Function ....................... 45Using the Built-in Camera ........................................... 47Using the Optical Disc Drive ....................................... 48Using "Memory Stick".................................................. 55Using Other Modules / Memory Cards........................ 62Using the Internet........................................................ 66Using the Network (LAN) ............................................ 67Using the Wireless LAN...............................................69Using the Wireless WAN .............................................74Using the International Roaming Service ....................76Using the BLUETOOTH Function................................79Using Fingerprint Authentication .................................85Using the TPM.............................................................90Using Peripheral Devices ................................................100Connecting a Port Replicator.....................................101Connecting External Speakers or Headphones ........108Connecting an External Display ................................109Selecting Display Modes ...........................................116Using the Multiple Monitors Function ........................117Connecting a USB Device .........................................119Customizing Your VAIO Computer..................................121Selecting Performance Modes ..................................122Setting the Password.................................................124Using Intel(R) VT .......................................................130Using the VAIO Control Center .................................131Using the VAIO Power Management.........................132Protecting Data from Unauthorized Use ....................133Protecting the Hard Disk............................................135
3nNUpgrading Your VAIO Computer .................................... 136Adding and Removing Memory................................. 137Precautions..................................................................... 143Safety Information ..................................................... 144Care and Maintenance Information........................... 147Handling Your Computer........................................... 148Handling the LCD Screen ......................................... 150Using the Power Source ........................................... 151Handling the Built-in Camera .................................... 152Handling Discs .......................................................... 153Using the Battery Pack.............................................. 154Handling "Memory Stick"........................................... 155Handling the Built-in Storage Device ........................ 156Using Fingerprint Authentication ............................... 157Using the TPM .......................................................... 158Troubleshooting .............................................................. 159Computer Operations................................................ 161System Update / Security.......................................... 167Recovery / Recovery Media ...................................... 168Partition ..................................................................... 172Battery Pack.............................................................. 173Built-in Camera ......................................................... 175Networking (LAN/Wireless LAN) ............................... 177Wireless WAN ........................................................... 181BLUETOOTH Technology .........................................182Optical Discs..............................................................185Display.......................................................................190Printing ......................................................................195Microphone................................................................196Speakers ...................................................................197Touch Pad .................................................................199Keyboard ...................................................................200Floppy Disks ..............................................................201Audio/Video ...............................................................202"Memory Stick" ..........................................................204Peripherals ................................................................205Trademarks .....................................................................206Notice ..............................................................................209
4nNBefore Use >Before UseCongratulations on your purchase of this Sony VAIO® computer and welcome to the on-screen User Guide. Sony has combined leading-edge technology in audio, video, computing, and communications to provide you with a state-of-the-art computing experience.!External views illustrated in this manual may look slightly different from those of your computer. How to find specificationsSome features, options, and supplied items may not be available on your computer.To find out about the configuration of your computer, visit the Sony online support web site at the following URLs:❑For customers in USAhttp://esupport.sony.com/EN/VAIO/ ❑For customers in Canadahttp://www.sony.ca/support/ (English)http://www.fr.sony.ca/support (French)❑For customers in Spanish-speaking Latin American countries or areashttp://esupport.sony.com/ES/VAIO/LA ❑For customers in Brazilhttp://esupport.sony.com/PT/VAIO/BR/
5nNBefore Use >Finding More about Your VAIO ComputerFinding More about Your VAIO ComputerThis section provides support information about your VAIO computer.1. Printed Documentation❑Quick Start Guide — An overview of components connection, set-up information, etc.❑Recovery, Backup and Troubleshooting Guide❑Safety Information — Safety guidelines and owner information.✍Before activating the wireless functions such as the wireless LAN and BLUETOOTH technology, read the Safety Information carefully.
6nNBefore Use >Finding More about Your VAIO Computer2. On-screen Documentation❑VAIO User Guide — General information of your VAIO computer including support and troubleshooting information.To access VAIO User Guide, click Start  , All Programs, and VAIO Manual.❑Help and Support — General information and technical assistance for your VAIO computer.To access Help and Support:1Click Start and Help and Support.2Choose from the following categories to find the answers you need.❑Program help files — May be included with the preinstalled software programs on your computer. You may be able to access the help files from the help menu on a specific program.Get started with my VAIO Get help with Internet and wireless setup, security setup, personalizing your VAIO computer, creating Recovery Media, and more.Use my VAIO Get assistance with your VAIO computer by accessing useful information such as interactive VAIO tutorials, how-to articles, the VAIO technology page, specifications, and system and software information. The available information varies depending on the model you purchased.You can find useful documentation such as general and model specific user guide on your VAIO computer.Troubleshoot my VAIO Maintain and troubleshoot your VAIO computer with the VAIO Care, system restore, backup and recovery, and contact Sony support.
7nNBefore Use >Finding More about Your VAIO Computer3. Support Web Sites❑Sony online support web siteThe Sony online support web site provides instant access to information on commonly encountered problems. Type a description of the problem and the Knowledge Database searches for the corresponding solutions online.❑For customers in USAhttp://esupport.sony.com/EN/VAIO/ ❑For customers in Canadahttp://www.sony.ca/support/ (English)http://www.fr.sony.ca/support (French)❑For customers in Spanish-speaking Latin American countries or areashttp://esupport.sony.com/ES/VAIO/LA ❑For customers in Brazilhttp://esupport.sony.com/PT/VAIO/BR/ ❑Operating system online support web siteYour computer comes preinstalled with a Microsoft Windows operating system. For operating system support, you can visit Microsoft customer support at http://support.microsoft.com/directory/.
8nNBefore Use >Finding More about Your VAIO Computer4. Customer Information CenterIf you do not find the information you are looking for at our site, you may call Sony directly. You can find the contact numbers on the Sony online support web site. In order to receive the fastest and most efficient services, have the following information readily available:1Your VAIO computer modelYou can find it at the lower right corner of the display on the computer.2Your computer's serial numberYou can find it on the bottom, the back panel, or inside the battery compartment of your Sony VAIO computer. The serial number is the last 7 digits of the number below the barcode.3The operating system on your computer4The hardware component or the software program that is causing the problem5A brief description of the problem5. In Store Service & Support (available in USA only)Make an appointment with a Sony certified technician at a U.S. Sony Style store and get personalized service and support for your VAIO computer. Sony Style Backstage Technicians can assist with the setup of your new VAIO computer, system optimization, data rescue, and any repair service you might need.Visit the web site at www.sonystyle.com/backstage to find the nearest location.
9nNBefore Use >Ergonomic ConsiderationsErgonomic ConsiderationsYou will be using your computer as a portable device in a variety of environments. Whenever possible, you should attempt to take account of the following ergonomic considerations for both stationary and portable environments:❑Position of your computer – Place the computer directly in front of you. Keep your forearms horizontal, with your wrists in a neutral, comfortable position while using the keyboard or the pointing device. Let your upper arms hang naturally at your sides. Take frequent breaks while using your computer. Excessive use of the computer may strain eyes, muscles, or tendons.❑Furniture and posture – Sit in a chair with good back support. Adjust the level of the chair so your feet are flat on the floor. A footrest may make you more comfortable. Sit in a relaxed, upright posture and avoid slouching forward or leaning far backwards.
10nNBefore Use >Ergonomic Considerations❑Viewing angle of the computer display – Use the display tilting feature to find the best position. You can reduce eye strain and muscle fatigue by adjusting the tilt of the display to the proper position. Adjust the brightness level of the display as well.❑Lighting – Choose a location where windows and lights do not cause glare and reflection on the display. Use indirect lighting to avoid bright spots on the display. Proper lighting adds to your comfort and work efficiency. ❑Positioning an external display – When using an external display, set the display at a comfortable viewing distance. Make sure the display screen is at or slightly below eye level when you are sitting in front of the monitor.
11nNGetting Started >Getting StartedThis section describes how to get started using your VAIO computer.!Before starting your computer for the first time, do not connect any other hardware that did not originally come with your computer. Upon completion, connect one device (for example, a printer, an external hard disk drive, a scanner, and so on) at a time, following the manufacturer's instructions.❑Locating Controls and Ports (page 12)❑About the Indicator Lights (page 20)❑Connecting a Power Source (page 21)❑Using the Battery Pack (page 23)❑Shutting Down Your Computer Safely (page 32)❑Using the Power Saving Modes (page 33)❑Keeping Your Computer in Optimum Condition (page 36)
12nNGetting Started >Locating Controls and PortsLocating Controls and PortsTake a moment to identify the controls and ports shown on the following pages.!The appearance of your computer may be different from those illustrated in this manual due to variations in specifications.
13nNGetting Started >Locating Controls and PortsFrontABuilt-in camera (page 47)BBuilt-in camera indicator (page 20)CAmbient light sensor (page 42), (page 193)Measures ambient light intensity for automatically adjusting the LCD brightness to an optimum level.DNum lock indicator (page 20)ECaps lock indicator (page 20)FScroll lock indicator (page 20)GLCD screen (page 150)HBuilt-in speakers (stereo)IPower button/Power indicator (page 20)JKeyboard (page 40)KTouch pad (page 43)LLeft button (page 43)MFingerprint sensor* (page 85)NRight button (page 43)* On selected models only.
14nNGetting Started >Locating Controls and PortsAASSIST button (page 44)BWEB button* (page 44)CVAIO button (page 44)DWireless Display button* (page 44)EDrive eject button (page 44), (page 48)FPerformance selector switch (page 122)GWIRELESS switch (page 69), (page 74), (page 79)HWIRELESS indicator (page 20)ICharge indicator (page 20)JDisc drive indicator (page 20)KBuilt-in microphone (monaural)* Your computer is equipped with either of the buttons.
15nNGetting Started >Locating Controls and PortsBackAAir vent
16nNGetting Started >Locating Controls and PortsRightA"Memory Stick Duo" slot*1 (page 55)BMedia Access indicator (page 20)CSecurity slotDSD memory card slot (page 62)EMonitor port*2 (page 110)FHDMI output port*2 (page 113)GUSB port*3 (page 119)HUSB ports*4 (page 119)ILAN port*2 (page 67)JDC IN port*2 (page 21)*1 Your computer supports only Duo-size "Memory Stick".*2 Not accessible when your computer is attached to the port replicator.*3 Compliant with the USB 2.0/3.0 standards. USB ports that are compliant with the USB 3.0 standard are identifiable by their blue color.*4 Compliant with the USB 2.0 standard.
17nNGetting Started >Locating Controls and PortsLeftAHeadphones jack (page 108)BOptical disc drive (page 48)CManual eject hole (page 185)
18nNGetting Started >Locating Controls and PortsBottom (with the bottom cover)AAir ventsBPort replicator connector cover (page 102)CExtended battery pack connector cover*1DBattery off button (page 27), (page 174)ESIM card cover*2 (page 76)FBottom cover*1 For detailed instructions on how to attach an extended battery pack, see the manual that came with your extended battery pack.While the extended battery pack is attached to your computer, be sure to keep the removed connector cover for future use.*2 On selected models only.
19nNGetting Started >Locating Controls and PortsBottom (without the bottom cover) AMemory module (page 137)BBattery connector (page 23)
20nNGetting Started >About the Indicator LightsAbout the Indicator LightsYour computer is equipped with the following indicator lights: Indicator FunctionsPower 1Illuminates in green while the computer is in Normal mode, blinks slowly in orange while the computer is in Sleep mode, and turns off when the computer is turned off or enters Hibernate mode.Charge  Illuminates while the battery pack is charging. See Charging the Battery Pack (page 28) for more information.Built-in camera Illuminates while the built-in camera is in use.Media Access Illuminates while data access to a memory card, such as "Memory Stick" and an SD memory card, is in progress. (Do not place the computer into Sleep mode or turn it off while this indicator light is lit.) When the indicator light is unlit, the memory card is not in use.Disc drive  Illuminates while data access to the built-in storage device or the optical disc drive is in progress. Do not place the computer into Sleep mode or turn it off while this indicator light is lit.Num lock  Press the Fn+Num Lk keys to activate the numeric keypad. Press the keys a second time to deactivate the numeric keypad. The numeric keypad is not active when the indicator light is unlit.Caps lock  Press the Caps Lock key to type letters in uppercase. Letters appear in lowercase if you press the Shift key while the indicator light is lit. Press the key a second time to turn off the indicator light. Normal typing resumes when the Caps lock indicator light is turned off.Scroll lock  Press the Fn+Scr Lk keys to change how you scroll the display. Normal scrolling resumes when the Scroll lock indicator light is turned off. The Scr Lk key functions differently depending on the program you are using and does not work with all programs. WIRELESS Illuminates while one or more wireless options are enabled.
21nNGetting Started >Connecting a Power SourceConnecting a Power SourceYou can use either an AC adapter or a rechargeable battery pack for supplying power to your computer. Before using the computer for the first time, you need to connect an AC adapter to your computer.!Do not use your computer without installing the battery pack as it may cause the computer to malfunction.Using the AC AdapterWhile your computer is directly connected to an AC power source and has a battery pack installed, it uses power from the AC outlet. ✍Use only the supplied AC adapter for your computer.To use the AC adapter1Plug one end of the power cord (1) into the AC adapter (3).2Plug the other end of the power cord into an AC outlet (2).3Plug the cable from the AC adapter (3) into the DC IN port (4) on the computer.!The shape of the DC In plug varies depending on the AC adapter.
22nNGetting Started >Connecting a Power Source✍To disconnect your computer completely from an AC power source, unplug the AC adapter from the AC outlet.Make sure that an AC outlet is easily accessible.If you do not intend to use your computer for an extended period of time, place the computer into Hibernate mode. See Using Hibernate Mode (page 35).
23nNGetting Started >Using the Battery PackUsing the Battery PackThe battery pack is already installed on your computer at the time of delivery but is not fully charged.!Do not use your computer without installing the battery pack as it may cause the computer to malfunction.Installing/Removing the Battery Pack✍In order to distinguish the battery pack which is installed on your computer at the time of delivery from an extended battery pack (supplied with selected models only), it may be referred to as the primary battery pack in this manual.For detailed instructions on how to attach and charge an extended battery pack, see the manual that came with your extended battery pack.To install the battery pack1Turn off the computer, close the LCD screen lid, and unplug the AC adapter if plugged.2Unscrew the two screws (1), slide the bottom cover in the direction of the arrow (2), and remove the cover.!Be careful not to lose the removed screws.Be careful not to touch the wires and the projections inside the bottom cover.
24nNGetting Started >Using the Battery Pack3Slide the battery pack into the battery compartment in the direction of the arrow.4Push the battery pack down into the compartment until the projection (3) clicks into place.
25nNGetting Started >Using the Battery Pack5Replace the cover. Make sure all the tabs on the cover are slid in place and push the cover in the direction of the arrow.6Replace and tighten the removed screws.To remove the battery pack!You will lose all unsaved data if you remove the battery pack while your computer is on and not connected to the AC adapter.1Turn off the computer, close the LCD screen lid, and unplug the AC adapter if plugged.2Unscrew the two screws (1), slide the bottom cover in the direction of the arrow (2), and remove the cover.!Be careful not to lose the removed screws.
26nNGetting Started >Using the Battery Pack3Pull and hold the tab in the direction of the arrow (3) and pull the battery pack in the direction of the arrow (4).4Slide the battery pack away from the computer in the direction of the arrow.
27nNGetting Started >Using the Battery Pack✍If your computer does not recognize the battery pack, turn off your computer and push and hold the battery off button for three seconds with a thin, straight object (such as a paper clip). If this does not solve the problem, remove the battery pack and install it once again.If an extended battery pack is attached to the computer, turn off the computer and remove the extended battery pack. If this does not solve the problem, push and hold the battery off button for three seconds. If the problem persists, remove both battery packs and install them once again.!This computer is designed to operate only with genuine Sony battery packs.
28nNGetting Started >Using the Battery PackCharging the Battery PackThe battery pack supplied with your computer is not fully charged at the time of delivery.To charge the battery pack1Install the battery pack.2Connect the computer to a power source with the AC adapter.The charge indicator light is on while the battery pack is charging. When the battery pack charges close to the maximum charge level you selected, the charge indicator turns off.!Charge the battery pack as described in this manual from your first battery charge.Charge indicator status MeaningLit in orange The battery pack is charging.Blinks along with the green power indicatorThe battery pack is running out of power. (Normal mode)Blinks along with the orange power indicatorThe battery pack is running out of power. (Sleep mode)Blinks fast in orange A battery error has occurred due to a failed battery pack or an unlocked battery pack.
29nNGetting Started >Using the Battery Pack✍Keep the battery pack in your computer while it is directly connected to an AC power source. The battery pack continues to charge while you are using the computer.When the battery pack is running out of power and both the charge and power indicator lights blink, you should either connect the AC adapter to recharge the battery pack or shut down your computer and install a fully charged battery pack.Your computer is supplied with a lithium ion battery pack and can be recharged any time. Charging a partially discharged battery pack does not affect the life of battery.While some software applications or peripheral devices are in use, your computer may not enter Hibernate mode even when the remaining battery life becomes short. To avoid loss of data while the computer is running on the battery, you should save your data frequently and manually activate a power management mode, such as Sleep or Hibernate.If the battery pack runs out of power while the computer is in Sleep mode, you will lose all unsaved data. Going back to the previous work state is impossible. To avoid loss of data, you should save your data frequently.About the use of an extended battery pack❑If an extended battery pack is attached to your computer, the primary battery pack is charged first up to about 80% of its battery capacity. Then, the extended battery pack starts charging up to about 80%. After both battery packs are charged up to about 80%, the primary battery pack starts charging to 100%. Then, the extended battery pack starts charging to 100%.❑If an extended battery pack is attached to your computer, battery power of the extended battery pack is used first. Battery power of the primary battery pack will be used after the extended battery pack runs out of power.
30nNGetting Started >Using the Battery PackChecking the Battery Charge CapacityThe battery charge capacity gradually decreases as the number of battery charging increases or the duration of use of the battery pack extends. To get the most out of the battery pack, check the battery charge capacity and change the battery settings.To check the battery charge capacity1Click Start, All Programs, and VAIO Control Center. 2Click Power Management and Battery.✍Additionally, you can enable the battery care function to extend the life of the battery pack.
31nNGetting Started >Using the Battery PackExtending the Battery LifeWhen your computer is running on battery power, you can extend the battery life using the following methods.❑Decrease the LCD brightness of your computer screen.❑Use the power saving mode. See Using the Power Saving Modes (page 33) for more information.❑Change the power saving settings on the Power Options. See Using the VAIO Power Management (page 132) for more information.✍For more information on how to extend the battery life, see the help file after following the steps in Checking the Battery Charge Capacity (page 30).
32nNGetting Started >Shutting Down Your Computer SafelyShutting Down Your Computer SafelyTo avoid losing unsaved data, be sure to shut down your computer properly, as described below.To shut down your computer1Turn off any peripherals connected to the computer.2Save your data and close all running software applications.3Click Start and the Shut down button.After a short time, the computer automatically turns off. Make sure the power indicator light turns off.
33nNGetting Started >Using the Power Saving ModesUsing the Power Saving ModesYou can take advantage of the power management settings to conserve battery life. In addition to the normal operating mode, your computer has two distinct power saving modes to suit your preference: Sleep and Hibernate.!If you do not intend to use your computer for an extended period of time while it is disconnected from an AC power source, place the computer into Hibernate mode or turn it off.If the battery pack runs out of power while your computer is in Sleep mode, you will lose all unsaved data. Going back to the previous work state is impossible. To avoid loss of data, you should save your data frequently.Mode DescriptionNormal mode This is the normal state of your computer while it is in use. The green power indicator light is lit while the computer is in this mode.Sleep mode Sleep mode turns off the LCD screen and places the built-in storage device(s) and the CPU into a low power consumption mode. The orange power indicator light blinks slowly while your computer is in this mode. Your computer comes out of Sleep mode quicker than out of Hibernate mode. However, Sleep mode uses more power than Hibernate mode.Hibernate mode While your computer is in Hibernate mode, the state of the system is saved on the built-in storage device(s) and power is turned off. Even when the battery pack runs out of power, no data will be lost. The power indicator light is unlit while your computer is in this mode.
34nNGetting Started >Using the Power Saving ModesUsing Sleep ModeTo activate Sleep modeClick Start, the arrow   next to the Shut down button, and Sleep.To return to Normal mode❑Press any key.❑Press the power button on your computer.!If you press and hold the power button for more than four seconds, your computer will turn off automatically. You will lose all unsaved data.
35nNGetting Started >Using the Power Saving ModesUsing Hibernate ModeTo activate Hibernate modePress the Fn+F12 keys.Alternatively, you can click Start, the arrow next to the Shut down button, and Hibernate.!Do not move your computer before its power indicator light turns off.To return to Normal modePress the power button.!If you press and hold the power button for more than four seconds, your computer will turn off automatically.
36nNGetting Started >Keeping Your Computer in Optimum ConditionKeeping Your Computer in Optimum ConditionUpdating Your ComputerBe sure to update your VAIO computer with the following software applications for enhancing your computer's efficiency, security, and functionality.The VAIO Update automatically notifies you of new updates available on the Internet, and downloads and installs them on the computer.❑Windows UpdateClick Start, All Programs, and Windows Update and then follow the on-screen instructions.❑VAIO Update 5Click Start, All Programs, and VAIO Update and then follow the on-screen instructions.!Your computer must be connected to the Internet to download the updates.
37nNGetting Started >Keeping Your Computer in Optimum ConditionKeeping the Antivirus Software UpdatedYou can keep the Internet security software programs current with the latest updates by downloading and installing the updates from the web site of the manufacturer.!Your computer must be connected to the Internet to download the updates.❑When using the McAfee:1Click Start, All Programs, McAfee, and McAfee SecurityCenter or McAfee Internet Security.2Click the update tab and select the option to check for updates.3Follow the on-screen instructions to complete the updates.❑When using the Norton Internet Security:1Click Start, All Programs, Norton Internet Security, and LiveUpdate or Norton Internet Security.2Follow the on-screen instructions to complete the updates.✍See the help file included with your software program for more information.!The actual procedure may be different from the above depending on updates installed on your computer. In such a case, follow the on-screen instructions.
38nNGetting Started >Keeping Your Computer in Optimum ConditionUsing the VAIO CareWith the VAIO Care, you can regularly conduct performance checks and tune-ups on your computer to keep it running at an optimum level. Launch the VAIO Care whenever a problem is found on your computer. The VAIO Care will provide appropriate measures to solve the problem.To launch the VAIO Care❑On models with the ASSIST buttonPress the ASSIST button while your computer is on.❑On models without the ASSIST buttonClick Start, All Programs, and VAIO Care.✍See the help file included with the VAIO Care for more information.On models with the ASSIST button, pressing the ASSIST button while the computer is off launches the VAIO Care Rescue. The VAIO Care Rescue can be used to recover your computer in case of emergency, for example, when the Windows does not start.
39nNUsing Your VAIO Computer >Using Your VAIO ComputerThis section describes how to get the most out of using your VAIO computer.❑Using the Keyboard (page 40)❑Using the Touch Pad (page 43)❑Using Special-function Buttons (page 44)❑Using the Built-in Camera (page 47)❑Using the Optical Disc Drive (page 48)❑Using "Memory Stick" (page 55)❑Using Other Modules / Memory Cards (page 62)❑Using the Internet (page 66)❑Using the Network (LAN) (page 67)❑Using the Wireless LAN (page 69)❑Using the Wireless WAN (page 74)❑Using the International Roaming Service (page 76)❑Using the BLUETOOTH Function (page 79)❑Using Fingerprint Authentication (page 85)❑Using the TPM (page 90)
40nNUsing Your VAIO Computer >Using the KeyboardUsing the KeyboardYour keyboard has additional keys that perform model-specific tasks.Combinations and Functions with the Fn Key✍Some keyboard functions can be used only after the operating system is finished launching.Combination/Feature FunctionFn +   (F1): touch pad operation Disables and enables the touch pad.Fn + % (F2): muting Turns on and off the built-in speakers or the headphones.Fn + 2 (F3/F4): volume control Changes the volume level.To increase the volume, press the Fn+F4 keys and then the M or , key, or keep pressing the Fn+F4 keys.To decrease the volume, press the Fn+F3 keys and then the m or < key, or keep pressing the Fn+F3 keys.Fn + 8 (F5/F6): brightness control Changes the LCD brightness of your computer screen.To increase lighting intensity, keep pressing the Fn+F6 keys or press the Fn+F6 keys and then the M or , key.To decrease lighting intensity, keep pressing the Fn+F5 keys or press the Fn+F5 keys and then the m or < key.
41nNUsing Your VAIO Computer >Using the Keyboard Fn +  /T (F7): display output Switches the display output between your computer screen and an external display. Press the Enter key to select the display output.!If you disconnect a display cable from your computer while an external display is selected as the display output destination, the computer screen goes blank. In such a case, press the F7 key twice while holding down the Fn key, and then press the Enter key to switch the display output to the computer screen.Use of multiple monitors may not be supported depending on the connected external display.Fn +  /  (F9/F10): zooming Changes the size of an image or a document displayed on some software.To make the view look smaller and further away (zoom out), press the Fn+F9 keys.To make the view look bigger and closer (zoom in), press the Fn+F10 keys.See the help file included with the VAIO Control Center for more information.Fn +   (F12): hibernation Provides the lowest level of power consumption. When you execute this command, the states of the system and the connected peripheral devices are saved to the built-in storage device and the system power is turned off. To return the system to its original state, use the power button to turn on the power.For details on power management, see Using the Power Saving Modes (page 33).Combination/Feature Function
42nNUsing Your VAIO Computer >Using the KeyboardChanging the Backlit Keyboard SettingsIf your computer is equipped with a backlit keyboard, you can set the keyboard light to automatically turn on and off according to ambient light intensity.Additionally, you can set a time period to turn off the keyboard backlight after inactivity of keyboard operations.To change the backlit keyboard settings1Click Start, All Programs, and VAIO Control Center.2Click Keyboard and Mouse and Backlit Keyboard.✍Ambient light intensity is measured by the ambient light sensor. Blocking the ambient light sensor may turn on the keyboard backlight.
43nNUsing Your VAIO Computer >Using the Touch PadUsing the Touch PadYou can point to, select, drag, and scroll objects on the screen using the touch pad.✍You can disable/enable the touch pad by pressing the Fn+F1 keys. You can also use the VAIO Control Center to change the touch pad settings.!Be sure to connect a mouse before disabling the touch pad. If you disable the touch pad before connecting a mouse, you will be able to use only the keyboard for pointer operations.Action DescriptionPoint Slide your finger on the touch pad (1) to place the pointer (2) on an item or object.Click Press the left button (3) once.Double-click Press the left button twice in a row.Right-click Press the right button (4) once. With many applications, this action displays a context-sensitive shortcut menu (if any).Drag Slide your finger on the touch pad while pressing the left button.Scroll Slide your finger along the right edge of the touch pad to scroll vertically. Slide your finger along the bottom edge to scroll horizontally. Once vertical or horizontal scrolling is engaged, you can move your finger in circles on the touch pad to keep scrolling without taking the finger off the touch pad (the scroll function is available only with applications that support a touch pad scroll feature).Flick Slide two fingers linearly in quick motion on the touch pad. On web browser software or image viewer software, you can flick left to move backward and flick right to move forward.Pinch With some software applications, you can pinch on the touch pad with two fingers for zooming. Pinch open to zoom in or pinch close to zoom out.
44nNUsing Your VAIO Computer >Using Special-function ButtonsUsing Special-function ButtonsYour computer is equipped with special buttons to help you use specific functions of the computer.Some features and options in this section may not be available on your computer.See the specifications to find out about the configuration of your computer. Special-function button FunctionsASSIST button  Launches the VAIO Care while the computer is on.While the computer is off, the ASSIST button launches the VAIO Care Rescue. The VAIO Care Rescue can be used to recover the computer in case of emergency, for example, when the Windows does not start. See Using the VAIO Care (page 38) for more information.WEB button*While the computer is in Normal mode, the WEB button launches the web browser assigned to the button by default.While the computer is off, the WEB button activates the Quick Web Access function and launches the web browser used with this function. See Using the Quick Web Access Function (page 45) for more information.!The WEB button is not functional while the computer is in Sleep mode or Hibernate mode.Intel® Wireless Display button*Launches the Intel® Wireless Display. When used with a wireless display adapter unit (not supplied), you can wirelessly connect your computer with a TV or projector.VAIO button  Executes the task that is assigned to the button by default.You can change the default assignment with the VAIO Control Center.Drive eject button Ejects the optical disc drive tray.* Your computer is equipped with either of the buttons.
45nNUsing Your VAIO Computer >Using the Quick Web Access FunctionUsing the Quick Web Access FunctionThe Quick Web Access function enables you immediately to access the Internet without launching the Windows operating system.Some features and options in this section may not be available on your computer.Activating the Quick Web Access FunctionTo activate the Quick Web Access function, your computer must be off.To activate the Quick Web Access function1Press the WEB button on the computer.2Follow the instructions in the initial setup wizard.Once you have completed the initial setup, the web browser used with the Quick Web Access function launches just by pressing the WEB button from the next time.
46nNUsing Your VAIO Computer >Using the Quick Web Access FunctionExiting the Quick Web Access Function!To launch the Windows operating system, you first need to exit the Quick Web Access function.To exit the Quick Web Access function, do any of the following:❑Click the   icon located at the lower left corner of the screen.❑Press the WEB button.❑Press the power button on the computer.For detailed information on how to use or restrictions on the Quick Web Access function, click the   icon located at the lower right corner of the screen.Notes on Using the Quick Web Access FunctionWhile the Quick Web Access function is activated, you cannot use:❑the Scr Lk key in combination with the Fn key for a shortcut.❑any port and jack except the DC IN port, the LAN port, the USB ports, and the headphones jack.❑the "Memory Stick Duo" slot and the SD memory card slot.❑the wireless WAN function (available on selected models only).❑the Intel® Wireless Display (installed on selected models only).❑the WiMAX function (available on selected models only).
47nNUsing Your VAIO Computer >Using the Built-in CameraUsing the Built-in CameraYour computer is equipped with a built-in camera.With the appropriate image capture software, you can perform the following operations:❑Capture still images and movies❑Sense and capture object movements for monitoring purposes❑Edit captured data✍Turning on the computer activates the built-in camera.Video calls are possible with the appropriate software.!Launching or exiting your instant messaging or video editing software does not activate or deactivate the built-in camera.To use the image capture software1Click Start, All Programs, ArcSoft Webcam Suite, and WebCam Companion 4.2Click your desired icon in the main window.For detailed information on how to use the software, see the help file included with the software.!If you cannot capture images properly, for example captured images are not displayed smoothly, click the current resolution of the capturing image at the upper right of the main window and lower the resolution.
48nNUsing Your VAIO Computer >Using the Optical Disc DriveUsing the Optical Disc DriveYour computer is equipped with a built-in optical disc drive.Some features and options in this section may not be available on your computer.See the specifications to find out about the configuration of your computer.To insert a disc1Turn on the computer.2Press the drive eject button (1) to open the drive.The drive tray slides out.
49nNUsing Your VAIO Computer >Using the Optical Disc Drive3Place a disc in the middle of the drive tray with the label side facing upward and gently push it down until the disc clicks into place.!Do not exert pressure on the drive tray. Be sure to hold the bottom of the drive tray when placing/removing a disc onto/from the tray.4Close the drive tray by pushing it in gently.!Do not remove the optical disc while your computer is in a power saving mode (Sleep or Hibernate). Be sure to bring the computer back into Normal mode before removing the disc.You cannot use optical discs if you disable the optical disc drive in the BIOS setup screen. To enable the drive, follow the steps in Disabling Built-in Devices (page 133).
50nNUsing Your VAIO Computer >Using the Optical Disc DriveSupported DiscsYour computer plays and records CDs, DVDs, and Blu-ray Disc™ media, depending on the model you purchased.See the reference chart below to find out which type of optical disc drive supports which types of media.PR: playable and recordableP: playable but not recordable–: not playable or recordableCD-ROM CD-R/RW DVD-ROM DVD-R/RW DVD+R/RWDVD+R DL (Double Layer)DVD-R DL (Dual Layer)DVD-RAM*1 *2BD-ROM BD-R/RE*3DVD SuperMulti Drive P PR*5 P PRPRPRPRPR– –Blu-ray Disc™ Drive with DVD SuperMultiPPR*5 P PRPRPRPRPRP PR*4Blu-ray Disc™ ROM Drive with DVD SuperMultiPPR*5 P PRPRPRPRPRP P*1 The DVD SuperMulti Drive on your computer does not support the DVD-RAM cartridge. Use non-cartridge discs or discs with a removable cartridge.*2 Writing data to single-sided DVD-RAM discs (2.6 GB) compliant with DVD-RAM Version 1.0 is not supported.DVD-RAM Version 2.2/12X-SPEED DVD-RAM Revision 5.0 disc is not supported.*3 The Blu-ray Disc drive on your computer does not support BD-RE Disc media in Version 1.0 format and Blu-ray Disc media with a cartridge.*4 Supports writing data to BD-R Part1 Version 1.1/1.2/1.3 discs (single-layer discs with the capacity of 25 GB, dual-layer discs with the capacity of 50 GB) and BD-RE Part1 Version 2.1 discs (single-layer discs with the capacity of 25 GB, dual-layer discs with the capacity of 50 GB).*5 Writing data to Ultra Speed CD-RW discs is not supported.
51nNUsing Your VAIO Computer >Using the Optical Disc Drive!This unit is designed to playback discs that conform to the Compact Disc (CD) standard. DualDiscs and some music discs encoded with copyright protection technologies do not conform to the Compact Disc (CD) standard. Therefore, these discs may not be compatible with this unit.When you buy pre-recorded or blank discs for use with your VAIO computer, be sure to read the notices on the disc package carefully to check both playback and recording compatibility with your computer's optical disc drives. Sony does NOT guarantee the compatibility of VAIO optical disc drives with discs that are not compliant with the official "CD," "DVD," or "Blu-ray Disc" standard. USING NON-COMPLIANT DISCS CAN CAUSE FATAL DAMAGE TO YOUR VAIO COMPUTER OR CREATE SOFTWARE CONFLICTS AND CAUSE SYSTEM HANGING.For inquiries about disc formats, contact the individual publisher of the pre-recorded disc or the manufacturer of the recordable disc.✍8 cm disc writing is not supported.!To play copyright protected Blu-ray Disc media continually, update the AACS key. The AACS key update requires Internet access.As with other optical media devices, circumstances may limit compatibility or prevent Blu-ray Disc media playback. VAIO computers may not support movie playback on packaged media recorded in AVC or VC1 formats at high bit rates.Region settings are required for some contents of DVD and BD-ROM Disc media. If the region setting on the optical disc drive does not match the region coding on the disc, playback is not possible.Unless your external display is compliant with the High-bandwidth Digital Content Protection (HDCP) standard, you cannot play or view the contents of copyright protected Blu-ray Disc media.Some content may restrict video output to standard definition or prohibit analog video output. When you output video signals through digital connections, such as an HDMI connection or a DVI connection, it is strongly recommended that a digital HDCP compliant environment be implemented for optimum compatibility and viewing quality.Exit all memory-resident utility software before playing or writing a disc as it may cause the computer to malfunction.
52nNUsing Your VAIO Computer >Using the Optical Disc DriveNotes on Using the Optical Disc DriveNotes on writing data to a disc❑Only use circular discs. Do not use discs in any other shape (star, heart, card, etc.), as this may damage the optical disc drive.❑Do not strike or shake your computer while the optical disc drive is writing data to a disc.❑Do not plug or unplug the power cord or the AC adapter while the optical disc drive is writing data to a disc.❑Do not attach or disconnect your computer to or from the port replicator (optional) while the optical disc drive is writing data to a disc.Notes on playing discsTo achieve optimum performance of disc playback, you should follow these recommendations:❑Some CD players and computer optical disc drives may not be able to play audio CDs created with the CD-R or CD-RW media.❑Some DVD players and computer optical disc drives may not be able to play DVDs created with the DVD+R DL, DVD-R DL, DVD+R, DVD+RW, DVD-R, DVD-RW, or DVD-RAM media.❑When your computer is equipped with a Blu-ray Disc drive, Blu-ray Disc playback is available on your computer. However, the drive may not be able to play some Blu-ray Disc content, or the computer may become unstable during Blu-ray Disc playback. To play content normally, download and install the latest updates for Blu-ray Disc playback software using the VAIO Update.For information on how to use the VAIO Update, see Updating Your Computer (page 36).❑Depending on system environment, you may find sound interruptions and/or dropped frames during AVC HD playback.❑Do not place your computer into either of the power saving modes while your computer is playing a disc.
53nNUsing Your VAIO Computer >Using the Optical Disc DriveNotes on region codesRegion code indicators are labeled on the discs or packages to indicate in which region and on what type of player you can play the disc. If the region code indicates "all," you can play this disc in most regions of the world. If the region code for your residence area is different from the label, you cannot play the disc on your computer.
54nNUsing Your VAIO Computer >Using the Optical Disc DrivePlaying DiscsTo play a disc1Insert a disc into the optical disc drive.!Connect the AC adapter to the computer and close all running software applications before playing a disc.2If nothing appears on the desktop, click Start, All Programs, and your desired software to play the disc.For instructions on how to use the software, see the help file included with the software. Copying Files to DiscsTo copy files to a disc1Insert a recordable disc into the optical disc drive.!Connect the AC adapter to the computer and close all running software applications before copying files to a disc.2If nothing appears on the desktop, click Start, All Programs, and your desired disc burning software to copy files to the disc.For instructions on how to use the software, see the help file included with the software.
55nNUsing Your VAIO Computer >Using "Memory Stick"Using "Memory Stick""Memory Stick" is a compact, portable, and versatile IC recording media especially designed for exchanging and sharing digital data with compatible products, such as digital cameras, mobile phones, and other devices. Because it is removable, it can be used for external data storage.!You cannot use "Memory Stick" if you disable the "Memory Stick Duo" slot in the BIOS setup screen. To enable the slot, follow the steps in Disabling Built-in Devices (page 133).Before You Use "Memory Stick"The "Memory Stick Duo" slot on your computer can accommodate the following sizes and types of media:❑"Memory Stick Duo"❑"Memory Stick PRO Duo"❑"Memory Stick PRO-HG Duo"!Your computer supports only Duo-size "Memory stick", and does not support standard-size "Memory Stick".For the latest information about "Memory Stick", visit http://www.sony.net/memorycard/.
56nNUsing Your VAIO Computer >Using "Memory Stick"Inserting and Removing "Memory Stick"To insert "Memory Stick"1Locate the "Memory Stick Duo" slot.2Hold "Memory Stick" with the arrow pointing toward the slot.
57nNUsing Your VAIO Computer >Using "Memory Stick"3Carefully slide "Memory Stick" into the slot until it clicks into place.Do not force the media into the slot.✍If "Memory Stick" does not go into the slot easily, remove it gently and verify you are inserting it in the proper direction.When you insert "Memory Stick" into the slot for the first time, you may be prompted to install driver software. If prompted, follow the on-screen instructions to install the software."Memory Stick" is automatically detected by your system and the contents of "Memory Stick" are displayed. If nothing appears on the desktop, click Start, Computer, and double-click the "Memory Stick" icon.The "Memory Stick" icon will appear in the Computer window after you insert "Memory Stick" into the slot.!Before using "Memory Stick Micro" ("M2"), be sure to insert it into an "M2" Duo adaptor. If you insert the media directly into the "Memory Stick Duo" slot without the adaptor, you may not be able to remove it from the slot.
58nNUsing Your VAIO Computer >Using "Memory Stick"To remove "Memory Stick"!Do not remove "Memory Stick" while the Media Access indicator light is lit. If you do, you may lose data. Large volumes of data may take time to load, so make sure the indicator light is unlit before removing "Memory Stick".1Locate the "Memory Stick Duo" slot.2Check that the Media Access indicator light is unlit.3Push in "Memory Stick" toward the computer and release."Memory Stick" ejects.4Pull "Memory Stick" out of the slot.!Be sure to remove "Memory Stick" gently, or it may pop out unexpectedly.
59nNUsing Your VAIO Computer >Using "Memory Stick"Formatting "Memory Stick"To format "Memory Stick""Memory Stick" is formatted by default and is ready for use.If you want to reformat the media with your computer, follow these steps.!Be sure to use the device that is designed to format the media and supports "Memory Stick" when formatting the media.Formatting "Memory Stick" erases the entire data stored on the media. Before formatting the media, make sure that it does not contain your valuable data.Do not remove "Memory Stick" from the slot while formatting. This could cause a malfunction.1Locate the "Memory Stick Duo" slot.2Carefully slide "Memory Stick" into the slot until it clicks into place.3Click Start and Computer.4Right-click the "Memory Stick" icon and select Format.5Click Restore device defaults.!The size of the allocation unit and file system may change.Do not select NTFS from the File system drop-down list as it may cause a malfunction.✍The formatting process will be completed more quickly if you select Quick Format in Format options.
60nNUsing Your VAIO Computer >Using "Memory Stick"6Click Start.7Follow the on-screen instructions.!It may take time to format "Memory Stick" depending on the media type.
61nNUsing Your VAIO Computer >Using "Memory Stick"Notes on Using "Memory Stick"❑Your computer has been tested and found compatible with Sony branded "Memory Stick" with capacity of up to 32 GB that are available as of September 2010. However, not all "Memory Stick" are guaranteed of compatibility.❑Be sure to hold "Memory Stick" with the arrow pointing in the correct direction as you insert it into the slot. To avoid damaging your computer or the media, do not force "Memory Stick" into the slot if you cannot insert it smoothly.❑Use care when inserting or removing "Memory Stick" from the slot. Do not force it in or out of the slot.❑Inserting "Memory Stick" with multiple conversion adaptors is not guaranteed of compatibility.❑"MagicGate" is the general name of the copyright protection technology developed by Sony. Use "Memory Stick" with the "MagicGate" logo to take advantage of this technology. The "Memory Stick Duo" slot on your computer does not support "MagicGate" technology of "Memory Stick" with capacity of up to 256 MB.❑Except for your personal use, it is against the copyright law to use any audio and/or image data you recorded without prior consent from the respective copyright holders. Accordingly, "Memory Stick" with such copyrighted data can be used only within the law.❑Do not insert more than one memory card into the slot. Improper insertion of the media may damage both your computer and the media.
62nNUsing Your VAIO Computer >Using Other Modules / Memory CardsUsing Other Modules / Memory CardsUsing the SD Memory CardYour computer is equipped with an SD memory card slot. You can use this slot to transfer data among digital cameras, camcorders, music players, and other audio/video devices.!You cannot use SD memory cards if you disable the SD memory card slot in the BIOS setup screen. To enable the slot, follow the steps in Disabling Built-in Devices (page 133).Before you use the SD memory cardThe SD memory card slot on your computer can accommodate the following memory cards:❑SD memory card❑SDHC memory card❑SDXC memory cardFor the latest information on compatible memory cards, see Finding More about Your VAIO Computer (page 5) to visit the appropriate support web site.
63nNUsing Your VAIO Computer >Using Other Modules / Memory CardsTo insert an SD memory card1Locate the SD memory card slot.2Hold the SD memory card with the arrow pointing toward the slot.3Carefully slide the SD memory card into the slot until it clicks into place.Do not force the card into the slot.✍When you insert the SD memory card into the slot for the first time, you may be prompted to install driver software. If prompted, follow the on-screen instructions to install the software.The SD memory card icon will appear in the Computer window after you insert the card into the slot.
64nNUsing Your VAIO Computer >Using Other Modules / Memory CardsTo remove an SD memory card1Locate the SD memory card slot.2Check that the Media Access indicator light is unlit.3Push in the SD memory card toward the computer and release.The SD memory card ejects.4Pull the SD memory card out of the slot.
65nNUsing Your VAIO Computer >Using Other Modules / Memory CardsNotes on Using Memory CardsGeneral notes on using the memory card❑Be sure to use memory cards that are compliant with the standards supported by your computer.❑Be sure to hold the memory card with the arrow pointing in the correct direction as you insert it into the slot. To avoid damaging your computer or the media, do not force the memory card into the slot if you cannot insert it smoothly.❑Use care when inserting or removing the memory card from the slot. Do not force it in or out of the slot.❑Do not remove the memory card while the media access indicator light is lit. If you do, you may lose data.❑Do not attempt to insert a memory card or memory card adaptor of a different type into the memory card slot. An incompatible memory card or memory card adaptor may cause difficulty in removing from the slot and can cause damage to your computer.❑Do not insert more than one memory card into the slot. Improper insertion of the media may damage both your computer and the media.Notes on using the SD memory card❑Your computer has been tested and found compatible only with major memory cards available as of September 2010. However, not all memory cards are guaranteed of compatibility.❑SD memory cards (up to 2 GB), SDHC memory cards (up to 32 GB), and SDXC memory cards (up to 64 GB) have been tested and found compatible with your computer.
66nNUsing Your VAIO Computer >Using the InternetUsing the InternetBefore using the Internet, you need to sign up with an Internet Service Provider (ISP) and set up devices required for connecting your computer to the Internet.The following types of Internet connection services may be available from your ISP:❑Fiber to the Home (FTTH)❑Digital Subscriber Line (DSL)❑Cable modem❑Satellite❑Dial-upFor detailed information on devices required for Internet access and how to connect your computer to the Internet, ask your ISP.✍To connect your computer to the Internet using the wireless LAN function, you need to set up the wireless LAN network. See Using the Wireless LAN (page 69) for more information.!When you connect your computer to the Internet, be sure to take appropriate security measures to protect the computer against online threats.Depending on the service contract with your ISP, you may need to connect an external modem device, for example a USB telephone modem, a DSL modem, or a cable modem, to your computer to connect to the Internet. For detailed instructions on connection setups and modem configuration, see the manual that came with your modem.
67nNUsing Your VAIO Computer >Using the Network (LAN)Using the Network (LAN)You can connect your computer to 1000BASE-T/100BASE-TX/10BASE-T type networks with a LAN cable. Connect one end of a LAN cable (not supplied) to the LAN port on the computer or the optional port replicator and the other end to your network. For detailed settings and devices required for LAN access, ask your network administrator.!The LAN port on your computer is not accessible when the computer is attached to the optional port replicator.You cannot access LAN networks if you disable the LAN port in the BIOS setup screen. To enable the port, follow the steps in Disabling Built-in Devices (page 133).✍You can connect your computer to any network without changing the default settings.
68nNUsing Your VAIO Computer >Using the Network (LAN)!Do not plug a telephone cable into the LAN port on your computer.If the LAN port is connected to one of the telephone lines mentioned below, high electric current to the port may cause damage, overheating, or fire.- Home (intercom speakerphone) or business-use telephone lines (multi-line business telephone)- Public telephone subscriber line- Private branch exchange (PBX)
69nNUsing Your VAIO Computer >Using the Wireless LANUsing the Wireless LANThe Wireless LAN (WLAN) allows your computer to connect to a network through a wireless connection.The WLAN uses the following IEEE 802.11a/b/g/n standard, which specifies the type of technology used.See the specifications to find out about the configuration of your computer.!You cannot access wireless networks if you disable the wireless LAN function in the BIOS setup screen. To enable the function, follow the steps in Disabling Built-in Devices (page 133).WLAN standard Frequency band RemarksIEEE 802.11a  5 GHz Available only on models compliant with the IEEE 802.11a/b/g/n standard.IEEE 802.11b/g 2.4 GHz The IEEE 802.11g standard provides higher-speed communications than the IEEE 802.11b standard.IEEE 802.11n 5 GHz/2.4 GHz On models compliant with the IEEE 802.11b/g/n standard, only the 2.4 GHz band can be used.
70nNUsing Your VAIO Computer >Using the Wireless LANNotes on Using the Wireless LAN FunctionGeneral notes on using the wireless LAN function❑In some countries or regions, using WLAN products may be restricted by the local regulations (e.g. limited number of channels).❑The IEEE 802.11a standard and the IEEE 802.11n standard are not available on ad-hoc networks.❑The 2.4 GHz band, with which wireless LAN devices work, is used by various devices. Although the wireless LAN devices use the technology to minimize radio interference from other devices that use the same band, such radio interference may cause slower communication speeds and narrower communication ranges or communication failures.❑The communication speed and range may vary depending on the following conditions:❑Distance between communication devices❑Existence of obstacles between devices❑Device configuration❑Radio conditions❑Ambient environment that includes existence of walls and materials of such walls❑Software in use❑Communications may be cut off depending on radio conditions.❑Actual communication speed may not be as fast as the one displayed on your computer.❑Deploying WLAN products compliant with different standards that use the same band on the same wireless network may reduce the communication speed due to radio interference. Taking this into consideration, WLAN products are designed to reduce the communication speed to ensure communications with another WLAN product if it is compliant with a different standard that uses the same band. When the communication speed is not as fast as expected, changing the wireless channel on the access point may increase the communication speed.
71nNUsing Your VAIO Computer >Using the Wireless LANNote on the data encryptionThe WLAN standard includes the encryption methods: Wired Equivalent Privacy (WEP), which is a security protocol, Wi-Fi Protected Access 2 (WPA2), and Wi-Fi Protected Access (WPA). Proposed jointly by the IEEE and Wi-Fi Alliance, both WPA2 and WPA are specifications of standards based on interoperable security enhancements that increase the level of data protection and access control for existing Wi-Fi networks. WPA is designed to be forward compatible with the IEEE 802.11i specification. It utilizes the enhanced data encryption Temporal Key Integrity Protocol (TKIP) in addition to user authentication using 802.1X and Extensible Authentication Protocol (EAP). Data encryption protects the vulnerable wireless link between clients and access points. Besides that, there are other typical LAN security mechanisms to ensure privacy, such as: password protection, end-to-end encryption, virtual private networks, and authentication. WPA2, the second generation of WPA, provides stronger data protection and network access control and is also designed to secure all versions of 802.11 devices, including 802.11b, 802.11a, 802.11g, and 802.11n standards, multi-band and multi-mode. In addition, based on the ratified IEEE 802.11i standard, WPA2 provides government grade security by implementing the National Institute of Standards and Technology (NIST) FIPS 140-2 compliant AES encryption algorithm and 802.1X-based authentication. WPA2 is backward compatible with WPA.
72nNUsing Your VAIO Computer >Using the Wireless LANStarting Wireless LAN CommunicationsYou first need to establish wireless LAN communications between your computer and an access point (not supplied). See Windows Help and Support for more information. For help on setting up a wireless network, launch the VAIO Wireless Wizard from the VAIO Gate or click Start, All Programs, and VAIO Wireless Wizard, and follow the on-screen instructions of the Easy Internet Connection Setup.!For details on how to select the channel that will be used by the access point, see the manual that came with your access point.To start wireless LAN communications1Make sure an access point is set up.See the manual that came with your access point for more information.2Turn on the WIRELESS switch.3Click the VAIO Smart Network icon   on the taskbar.4Click the switch next to Wi-Fi to toggle it to On in the VAIO Smart Network window.Make sure the WIRELESS indicator light turns on.!5 GHz band wireless LAN communications, available on selected models only, are disabled by default. To enable 5 GHz band communication, you need to select the option to use the 5 GHz band or both the 2.4 GHz and 5 GHz bands from the drop-down list for Wi-Fi Settings in the VAIO Smart Network settings window.5Click   or   on the taskbar.6Select the desired access point and click Connect.
73nNUsing Your VAIO Computer >Using the Wireless LANStopping Wireless LAN CommunicationsTo stop wireless LAN communicationsClick the switch next to Wi-Fi to toggle it to Off in the VAIO Smart Network window.!Turning off the wireless LAN function while accessing remote documents, files, or resources may result in data loss.
74nNUsing Your VAIO Computer >Using the Wireless WANUsing the Wireless WANUsing the wireless WAN (WWAN) allows your computer to connect to the Internet through the wireless network wherever there is the mobile phone coverage.The WWAN may not be available in some countries or regions.Some features and options in this section may not be available on your computer.See the specifications to find out about the configuration of your computer.
75nNUsing Your VAIO Computer >Using the Wireless WANStarting the Wireless WAN CommunicationsTo start the wireless WAN communications!Make sure that the SIM card cover is properly closed, otherwise the wireless WAN function may not work.1Turn on the WIRELESS switch.2Click the VAIO Smart Network icon   on the taskbar.3In the VAIO Smart Network window, make sure that the switch next to Wireless WAN is On.4Click the down arrow button next to the Wireless WAN switch and the Connect button to launch the VAIO Mobile Broadband Setup.5Follow the on-screen instructions on the VAIO Mobile Broadband Setup to sign up with a supported carrier.✍A long term contract may not be required. Some carriers may offer prepaid plans, such as one-day usage.Once you have finished signing up with the supported carrier with the VAIO Mobile Broadband Setup, Wireless WAN in the VAIO Smart Network window will be replaced with the name of the carrier which you have selected and signed up.6Click Connect to launch the carrier's connection manager and make a mobile broadband connection.✍For more information on how to use the wireless WAN function, see the help file included with the VAIO Smart Network or the carrier's connection manager.
76nNUsing Your VAIO Computer >Using the International Roaming ServiceUsing the International Roaming ServiceTo use the international roaming service, you first need to insert a SIM card into the SIM card holder on your computer. Follow these steps to insert the SIM card.Some features and options in this section may not be available on your computer.See the specifications to find out about the configuration of your computer.To insert a SIM card1Turn off your computer.2Open the SIM card cover on the bottom of the computer.
77nNUsing Your VAIO Computer >Using the International Roaming Service3Remove the SIM card (1) by pushing it out from the base plate.4Slide the SIM card holder in the direction of the arrow (2) and then lift the holder.5Insert the SIM card into the SIM card holder with its printed circuit side up.
78nNUsing Your VAIO Computer >Using the International Roaming Service6Close the SIM card holder and then slide the holder in the direction of the arrow (3).!Do not touch the printed circuit on the SIM card. Be sure to hold your computer firmly before inserting or removing the card.Do not damage the SIM card in any way, either by bending or exerting pressure on the card.7Close the SIM card cover.!Make sure that the SIM card cover is properly closed, otherwise the roaming connection may not work.
79nNUsing Your VAIO Computer >Using the BLUETOOTH FunctionUsing the BLUETOOTH FunctionYou can establish wireless communications between your computer and other BLUETOOTH® devices such as another computer or a mobile phone. You can transfer data between these devices without cables at a range of up to 33 feet / 10 meters in an open area.BLUETOOTH SecurityThe BLUETOOTH wireless technology has an authentication function, which allows you to determine with whom you choose to communicate. With the authentication function, you can prevent any anonymous BLUETOOTH devices from accessing your computer.The first time two BLUETOOTH devices communicate, a common passkey (a password required for authentication) should be determined for both devices to be registered. Once a device is registered, there is no need to re-enter the passkey.✍The passkey can be different each time, but must be the same at both ends.For certain devices, such as a mouse, no passkey can be entered.
80nNUsing Your VAIO Computer >Using the BLUETOOTH FunctionCommunicating with Another BLUETOOTH DeviceYou can connect your computer to a BLUETOOTH device such as another computer, a mobile phone, a PDA, a headset, a mouse, or a digital camera without the use of any cables.
81nNUsing Your VAIO Computer >Using the BLUETOOTH FunctionTo communicate with another BLUETOOTH deviceTo communicate with another BLUETOOTH device, you first need to set up the BLUETOOTH function. For information on setting up and using the BLUETOOTH function, see Windows Help and Support.1Turn on the WIRELESS switch.2Click the VAIO Smart Network icon   on the taskbar.3Click the switch next to BLUETOOTH to toggle it to On in the VAIO Smart Network window.Make sure the WIRELESS indicator light turns on.
82nNUsing Your VAIO Computer >Using the BLUETOOTH FunctionStopping BLUETOOTH CommunicationsTo stop BLUETOOTH communications1Turn off the BLUETOOTH device that is communicating with your computer.2Click the switch next to BLUETOOTH to toggle it to Off in the VAIO Smart Network window.
83nNUsing Your VAIO Computer >Using the BLUETOOTH FunctionNotes on Using the BLUETOOTH Function❑The data transfer rate varies, depending on the following conditions:❑Obstacles, such as walls, located between devices❑Distance between devices❑Material used in walls❑Proximity to microwaves and cordless telephones❑Radio frequency interference and other environmental conditions❑Device configuration❑Type of software application❑Type of operating system❑Use of both wireless LAN and BLUETOOTH functions at the same time on your computer❑Size of file being exchanged❑Large files may occasionally be corrupted during continuous transfer due to limitations of the BLUETOOTH standard and electromagnetic interference in the environment.❑All BLUETOOTH devices must be certified to make sure that the applicable standard requirements are maintained. Even if standards are met, individual device performance, specifications, and operation procedures can vary. Data exchange may not be possible in all situations.❑Video and audio may not be synchronized if you play videos on your computer with audio output from a connected BLUETOOTH device. This is a frequent occurrence with BLUETOOTH technology and does not indicate a malfunction.❑The 2.4 GHz band, with which BLUETOOTH devices or wireless LAN devices work, is used by various devices. Although BLUETOOTH devices use the technology to minimize radio interference from other devices that use the same band, such radio interference may cause slower communication speeds and shorter distances or communication failures.
84nNUsing Your VAIO Computer >Using the BLUETOOTH Function❑The BLUETOOTH function may not work with other devices, depending on the manufacturer or the software version employed by the manufacturer.❑Connecting multiple BLUETOOTH devices to your computer may cause channel congestion, resulting in poor performance of the devices. This is normal with BLUETOOTH technology and does not indicate a malfunction.
85nNUsing Your VAIO Computer >Using Fingerprint AuthenticationUsing Fingerprint AuthenticationYour computer may be equipped with a fingerprint sensor to provide you with additional convenience.Some features and options in this section may not be available on your computer.See the specifications to find out about the configuration of your computer.Once you have registered your fingerprint(s), the fingerprint authentication function offers:❑A substitute for password entry to log onto Windows (page 89)If you have registered your fingerprints for your user account, you can substitute fingerprint authentication for password entry when logging onto Windows.❑Website Log On for quick web site accessOnce you have registered your user information (user accounts, passwords, etc.) for web sites in the Website Log On, you can substitute fingerprint authentication for entering information required to access the password-protected web sites.For detailed information, see the help file included with the TrueSuite.✍To see the help file, click Start, All Programs, TrueSuite, and TrueSuite.!You may not be able to use the Website Log On feature depending on the web site you access.❑Quick Launch function for quick application accessThe Quick Launch feature is available on your computer for launching your preferred application (executable file) that is assigned to one of your fingers with a registered fingerprint. Once you have assigned an application to your finger, you can launch the assigned application simply by swiping the finger across the fingerprint sensor.
86nNUsing Your VAIO Computer >Using Fingerprint AuthenticationRegistering a FingerprintTo use the fingerprint authentication function, you must register your fingerprint(s) in your computer.To register a fingerprint1Click Start, All Programs, TrueSuite, and TrueSuite.2Click Get Started.3Follow the on-screen instructions.If the Windows password setting window appears, set the Windows password.✍See the help file included with the TrueSuite for more detailed information.
87nNUsing Your VAIO Computer >Using Fingerprint AuthenticationIf you have failed to register a fingerprint, follow these steps to try again.1Place the top joint of your finger flat in the center of the fingerprint sensor (1).2Swipe your finger perpendicularly across the fingerprint sensor and scan from the top joint of the finger to the fingertip.
88nNUsing Your VAIO Computer >Using Fingerprint Authentication!Keep your finger in contact with the fingerprint sensor while swiping.Fingerprint registration may fail if you move your finger too quickly or too slowly. Let the fingerprint sensor take about one second to scan your fingerprint.You may not be able to register and/or have your fingerprint(s) recognized if your finger is too dry or wet, wrinkled, injured, dirty, etc.Register more than one fingerprint in case that the fingerprint sensor fails to recognize the fingerprint.Be sure to clean your fingertip(s) and the fingerprint sensor before swiping in order to keep good recognition performance.
89nNUsing Your VAIO Computer >Using Fingerprint AuthenticationLogging Onto WindowsTo use the fingerprint authentication function in place of Windows password entry to log onto your system, you need to set the Windows password and configure your computer for fingerprint authentication. For information on how to set the Windows password, see Setting the Password (page 124).To log onto WindowsSwipe the registered finger across the fingerprint sensor when the Windows log-on screen appears. For detailed information, see the help file included with the TrueSuite.
90nNUsing Your VAIO Computer >Using the TPMUsing the TPMThe Trusted Platform Module (TPM) may be embedded in your computer to provide basic security functions. In combination with the TPM, you can encrypt and decrypt your data to strengthen computer security against inappropriate access.Some features and options in this section may not be available on your computer.See the specifications to find out about the configuration of your computer.TPMs are defined by Trusted Computing Group (TCG) and also called security chips.
91nNUsing Your VAIO Computer >Using the TPMImportant NoticeNotes on encrypting the operating system or program filesEncrypting files used by your operating system or any software application, using the Encrypting File System (EFS) with the TPM, will disable you to launch or operate such software.To avoid such problems, observe the following before using the EFS:❑Be sure to save data you want to encrypt to the following destinations:❑The Encrypted Data folder created with the default settings in the user initialization process❑A new encrypted folder created in the My Documents folder or the Documents folder on your account❑The Personal Secure Drive✍The Personal Secure Drive is a virtual drive that is created by using the Personal Secure Drive feature and automatically encrypts data that is saved to it.❑Do not change the following settings on the View tab in the Folder Options window displayed by clicking Folder and search options from Organize in the menu of Windows Explorer.❑Don't show hidden files, folders, or drives❑Hide protected operating system files (Recommended)❑Do not change the system attributes of the files, unless necessary.❑Do not encrypt the Windows folder, the Program Files folder, and all files in each folder.❑Do not encrypt the Users folder and all account folders in it.
92nNUsing Your VAIO Computer >Using the TPMNotes on encrypting key files or files on the Personal Secure DriveEncrypting files created in the following folders when your user account is initialized and the EFS is enabled will disable you to launch your TPM software and decrypt the encrypted data.With the default settings, the files in the folders below cannot be encrypted because they have system attributes.Do not change the system attributes of the files in the folders below.!The following folders are hidden by default.❑Folders containing key files❑C:\ProgramData\Infineon❑C:\Users\All Users\Infineon(C:\Users\All Users is a shortcut to C:\ProgramData.)❑ C:\Users\<account>\AppData\Roaming\Infineon❑Files on the Personal Secure DriveC:\Security Platform\Personal Secure Drive\System Data\xxx.FSF
93nNUsing Your VAIO Computer >Using the TPMNotes on encrypting backup files or other filesEncrypting backup archive files or emergency recovery token files will disable you to recover your computer system for emergency, and encrypting password reset token files or secret files will disable you to reset the password.Do not encrypt the following files or folders:✍The default path for files below or displayed by clicking Browse is My Documents (or Documents)\Security Platform or Security Platform in removal media.❑Automatic backup archive fileDefault file name: SPSystemBackup.xml or SPSystemBackup_<your computer name>.xml❑Storage folder for automatic backup archive filesFolder name (Fixed):❑SPSystemBackup (The folder is created as the subfolder for the SPSystemBackup.xml file.)❑SPSystemBackup_<your computer name> (The folder is created as the subfolder for SPSystemBackup_<your computer name>.xml file.)❑Emergency recovery token fileDefault file name: SPEmRecToken.xml❑Password reset token fileDefault file name: SPPwResetToken.xml❑Token file for emergency recovery/password resetDefault file name: SPToken_<your computer name>.xml❑Password reset secret fileDefault file name: SPPwdResetSecret.xml or SPPwdResetSecret_<your computer name>_<user name>.<domain name>.xml
94nNUsing Your VAIO Computer >Using the TPM❑Key and certificate backup fileDefault file name: SpBackupArchive.xml❑PSD backup fileDefault file name: <Drive name>-Personal Secure Drive.fsb❑Owner password backup fileDefault file name: SpOwner_<your computer name>.tpm❑Protocol fileDefault file name: SpProtocol_<your computer name>_<user name>.<domain name>.txt
95nNUsing Your VAIO Computer >Using the TPMConfiguring the TPMTo use the embedded TPM, you need to:1Enable the TPM in the BIOS setup screen.2Install the Infineon TPM Professional Package.3Initialize and configure the TPM.To enable the TPM in the BIOS setup screen1Turn on the computer and press the F2 key repeatedly until the VAIO logo disappears.The BIOS setup screen appears. If the screen does not appear, restart the computer and try again.2Press the < or , key to select the Security tab, the M or m key to select Change TPM State, and then the Enter key.3Press the M or m key to select Enable and then the Enter key.4Press the < or , key to select Exit, select Exit Setup, and then press the Enter key.5After your system restarts, select Execute in the confirmation window and then press the Enter key.✍You can also disable the TPM and clear the TPM configuration in the BIOS setup screen.!Before enabling the TPM, be sure to set the power-on password to protect against unauthorized modification of the TPM configuration.If the TPM is enabled, it will take longer before the VAIO logo appears due to security checks at computer startup.You will not be able to access any TPM-protected data if you clear the TPM ownership. Before clearing the TPM configuration, be sure to make backup copies of the TPM-protected data.
96nNUsing Your VAIO Computer >Using the TPMTo install the Infineon TPM Professional PackageRead the Readme.txt in the C:\Infineon\Readme folder. Then, double-click setup.exe in the C:\Infineon folder to install the package.To install this package, you must have administrative rights on the computer.!You need to set a few passwords while installing the Infineon TPM Professional Package. Without these passwords, you will not be able to restore any TPM-protected data or backup files. Be sure to write down the passwords and keep them safe and private from other people.To initialize and configure the TPMSee the on-screen documentation for detailed information. To open the documentation, click Start, All Programs, Infineon Security Platform Solution, and Help.!The maintenance and management of TPM-protected data must be carried out at your own risk. Sony assumes no liability for any defects arising out of your data maintenance and management.
97nNUsing Your VAIO Computer >Using the TPMUsing BitLocker Drive Encryption with the TPMBitLocker Drive Encryption is a data encryption feature that is available on models with Windows 7 Ultimate. Enabling BitLocker Drive Encryption in conjunction with the TPM encrypts all data on the built-in storage device.For detailed information on how to use and configure BitLocker Drive Encryption, see Windows Help and Support.See the specifications to find out about the configuration of your computer. Notes on using BitLocker Drive Encryption❑Be sure to initialize the TPM with the Infineon TPM Professional Package before enabling BitLocker Drive Encryption. If you enable it without initializing the TPM, a TPM owner password is not generated, so you will not be able to configure the Infineon TPM Professional Package.❑The Infineon TPM Professional Package does not make a backup copy of a file (recovery password) for BitLocker Drive Encryption.❑An additional BitLocker system partition has been pre-configured. This system partition uses 100 MB of your total built-in storage device volume.❑You must enable the TPM in the BIOS setup screen in order to turn on BitLocker Drive Encryption.❑Do not encrypt data on a storage device (such as a USB flash memory device) on which a recovery key is stored using BitLocker Drive Encryption.
98nNUsing Your VAIO Computer >Using the TPMTo unlock the encrypted data with a recovery key stored on a USB flash memory deviceTo unlock the encrypted data with a recovery key stored on a USB flash memory device, your system needs to access the USB flash memory device when you boot the computer. Follow these steps to configure the boot order in the BIOS setup screen:!You cannot use USB devices if you disable the USB ports in the BIOS setup screen. To enable the ports, follow the steps in Protecting Data from Unauthorized Use (page 133).1Connect a USB flash memory device.2Turn on the computer and press the F2 key repeatedly until the VAIO logo disappears.The BIOS setup screen appears. If the screen does not appear, restart the computer and try again.3Press the < or , key to select the Security tab, the M or m key to select Change TPM State, and then the Enter key.4Press the M or m key to select Enable and then the Enter key.5Press the < or , key to select Boot and then select Enabled for External Device Boot.6Press the M or m key to select Boot Priority and then the Enter key.7Press the F5 or F6 key to change the boot device order so that Internal Hard Disk is listed higher than External Device.!You need to move Internal Optical Drive to the top of the list to recover the computer system using your Recovery Media.8Press the < or , key to select Exit, select Exit Setup, and then press the Enter key.9After your system restarts, select Execute in the confirmation window and then press the Enter key.10 Follow the instructions in Windows Help and Support to enable BitLocker Drive Encryption.11 Save the recovery password to the USB flash memory device in the window for saving the recovery password.12 Follow the on-screen instructions.The encryption process will start.
99nNUsing Your VAIO Computer >Using the TPM!Updating your BIOS with updating software, such as the VAIO Update, changes the BIOS settings back to the default. You need to repeat the steps above again.It takes several hours to complete the encryption process.
100nNUsing Peripheral Devices >Using Peripheral DevicesYou can add functionality to your VAIO computer by using the various ports on the computer.❑Connecting a Port Replicator (page 101)❑Connecting External Speakers or Headphones (page 108)❑Connecting an External Display (page 109)❑Selecting Display Modes (page 116)❑Using the Multiple Monitors Function (page 117)❑Connecting a USB Device (page 119)
101nNUsing Peripheral Devices >Connecting a Port ReplicatorConnecting a Port ReplicatorAttaching an optional port replicator enables you to connect additional peripherals to your computer, such as a printer and an external display.Locating Ports on the Port Replicator!While the port replicator is attached to you computer, you cannot use the following ports.- HDMI output port on your computer- MONITOR port on your computer- LAN port on your computerSimultaneous use of the MONITOR port and the HDMI output port on the port replicator is not possible.ADC IN indicatorIlluminates while the port replicator is powered.BDC IN port (page 21)CUSB ports*1 (page 119)DLAN ports*2 (page 67)EHDMI output port (page 113)FMONITOR port (page 110)GSecurity slot*1 Compliant with the USB 2.0 standard.*2 The port replicator has a protective sticker   covering each LAN port. Connect a 10BASE-T, 100BASE-TX, 1000BASE-T cable to the LAN port. Using an incorrect cable, such as a phone cable, may result in an electric current overload that can cause a malfunction, excessive heat, or fire in the LAN port.
102nNUsing Peripheral Devices >Connecting a Port ReplicatorAttaching Your Computer to the Port Replicator!Be sure to install the battery pack(s) before attaching your computer to the port replicator.To attach your computer to the port replicator!If the AC adapter is supplied with your port replicator, be sure to use it to connect the port replicator to a power source. If not, use the AC adapter supplied with your computer.To prevent loss of unsaved data, be sure to turn off your computer before attaching it to the port replicator.Do not move your computer when it is attached to the port replicator. This may detach the port replicator and cause damage to both units.The monitor port, the HDMI output port, and the LAN port on your computer is not accessible when the computer is attached to the port replicator. Use the MONITOR port, the HDMI output port, or the LAN port on the port replicator for connection.1Shut down the computer, close the LCD screen lid, and disconnect all peripheral devices and the AC adapter.2Plug one end of the power cord (1) into the AC adapter (2) and the other end into an AC outlet.3Plug the cable connected to the AC adapter (2) into the DC IN port (3) on the port replicator (4).
103nNUsing Peripheral Devices >Connecting a Port Replicator4Remove the port replicator connector cover from the bottom of the computer.!You may find it difficult to remove the port replicator connector cover, as it is tight in place on your computer. Do not exert extra pressure when removing the cover so as not to damage the computer or the port replicator connector cover.Be sure to keep the removed port replicator connector cover for future use.
104nNUsing Peripheral Devices >Connecting a Port Replicator5Align the rear bottom corners of the computer with the guides on the port replicator.
105nNUsing Peripheral Devices >Connecting a Port Replicator✍If an optional extended battery pack is attached to your computer, slide the tab (1) in the direction of the arrow to lift the connector (2) on the port replicator to attach the computer.!Be sure to slide the tab (1) to the end. If not, the connector (2) is not locked in the correct position, resulting in a contact failure between your computer and the port replicator.6Gently push down the computer until it clicks into place.7Lift open the LCD screen lid and turn on the computer.
106nNUsing Peripheral Devices >Connecting a Port ReplicatorDisconnecting Your Computer from the Port Replicator!To prevent loss of unsaved data, be sure to turn off your computer before disconnecting it from the port replicator.When the battery pack is running out of power, disconnecting your computer from the port replicator may result in loss of unsaved data.To disconnect your computer from the port replicator1Lift the computer away from the port replicator.
107nNUsing Peripheral Devices >Connecting a Port Replicator2Replace the port replicator connector cover on the bottom of the computer.✍It is extremely important that you replace the port replicator connector cover after disconnecting your computer from the port replicator. If the connector is left uncovered, dust may get inside and damage the computer.To disconnect the port replicator completely from an AC power source, unplug the AC adapter.
108nNUsing Peripheral Devices >Connecting External Speakers or HeadphonesConnecting External Speakers or HeadphonesYou can connect external sound output devices (not supplied), such as speakers or headphones, to your computer.To connect external speakers✍Make sure your speakers are designed for computer use.!Turn down the volume of the speakers before you turn them on.Connect external speakers (1) to the headphones jack (2) i with a speaker cable (3) (not supplied).
109nNUsing Peripheral Devices >Connecting an External DisplayConnecting an External DisplaySome features and options in this section may not be available on your computer.!Blu-ray Disc playback on a connected external display may be interrupted, depending on the type or bit rate of the video. You may be able to solve this problem by lowering the screen resolution of the display. Follow the steps in Why doesn't my screen display a video? (page 193) to change the screen resolution.✍If disconnecting the external display from the optional port replicator does not automatically change the LCD resolution of your computer, change the current display settings. To change the settings, see Selecting Display Modes (page 116).
110nNUsing Peripheral Devices >Connecting an External DisplayConnecting a Computer Display or a ProjectorYou can connect an external display, such as a computer display or a projector, either directly to your computer or via the optional port replicator.To connect a computer display or a projector!The monitor port on your computer is not accessible when the computer is attached to the port replicator.1Plug the power cord (1) of your external display or the projector into an AC outlet.2Connect the external display or the projector to the monitor port (2) on the computer or the port replicator with a display cable (3).
111nNUsing Peripheral Devices >Connecting an External Display✍If necessary, connect the headphones jack on the projector and the headphones jack (4) i on the computer with a speaker cable (5).!Your computer is compliant with the HDCP standard and capable of encrypting the transmission channel of digital video signals for the purpose of copyright protection, which enables you to play and view a wide variety of copyright protected and high-quality content. To view the copyright protected content, connect an HDCP-compliant monitor to the HDMI output port on your computer or the port replicator. If your computer has a non-compliant monitor connected, you will not be able to play or view any copyright protected content.
112nNUsing Peripheral Devices >Connecting an External Display✍If the external computer display is equipped with an HDMI input port, plug one end of an HDMI cable into the HDMI output port on the computer or the port replicator and the other end into the HDMI input port on the computer display.To connect a TFT/DVI monitor, use an HDMI to DVI-D adapter to connect it to the HDMI output port on the computer or the port replicator.DVI-D stands for Digital Visual Interface - Digital. It is a type of DVI port that supports only digital video signals (no analog video signals). It has 24 pins.A DVI-I (Digital Visual Interface - Integrated) port supports digital video and analog video signals. It has 29 pins.The HDMI cable carries both video and audio signals.
113nNUsing Peripheral Devices >Connecting an External DisplayConnecting a TV with an HDMI Input PortYou can connect a TV with an HDMI input port to your computer.To connect a TV to your computer!To hear sound from the device connected to the HDMI output port, you need to change the device for sound output. For detailed instructions, see How do I change the sound output device? (page 202).1Plug the power cord of your TV (1) into an AC outlet.2Plug one end of an HDMI cable (2) to the HDMI output port (3) on the computer or the port replicator and the other end to the TV.3Switch the input channel of the TV to external input.4Set up the TV configuration system.!If a device driver other than the one provided by Sony is used, the image will not be displayed and the audio will not be heard. Always use the device driver provided by Sony for updates.
114nNUsing Peripheral Devices >Connecting an External Display✍See the manual that came with your TV for more information on installation and use.The HDMI cable carries both video and audio signals.To play Blu-ray 3D Disc mediaSome features and options may not be available on your computer.See the specifications to find out about the configuration of your computer.On models with the Blu-ray Disc Drive, you can play Blu-ray 3D™ Disc media and view 3D images on a 3D-capable display, such as a 3D TV, by connecting the display to the computer with an HDMI cable.!Be sure to use the 3D glasses specified by the TV manufacturer while viewing 3D images.✍See the manual that came with your 3D TV for detailed information on the 3D function.1Follow the steps in To connect a TV to your computer (page 113) for connecting your 3D TV to the computer with an HDMI cable and set up the TV configuration system.2Select the STAMINA mode with the performance selector switch.✍For information on how to select the performance mode, see Selecting Performance Modes (page 122).3Press the Fn+F7 keys to change the display output to an external display.4Click Start, All Programs, CyberLink PowerDVD BD, and CyberLink PowerDVD BD.5Click   located at the lower right corner of the PowerDVD BD window, enable the 3D function, and click Auto Detect.
115nNUsing Peripheral Devices >Connecting an External Display✍You can change the screen resolution of your computer. Click   located at the lower right corner of the PowerDVD BD window and the menu item for changing the screen resolution.See the help file included with the PowerDVD BD for more information.6Insert Blu-ray 3D Disc media into the optical disc drive.To connect a high-quality digital sound output device between your computer and a TVYou can connect a high-quality home theater receiver or other surround sound decoder devices between your computer and TV using an HDMI connection.!Before connecting the device to the computer, make sure the HDMI connection has been set up between the TV and the home theater receiver or surround sound decoder device first.To hear sound from the device connected to the HDMI output port, you need to change the device for sound output. For detailed instructions, see How do I change the sound output device? (page 202).1Turn on the TV and set its input to the HDMI input.2Turn on the home theater receiver or surround sound decoder device and set its input to the HDMI input.3Plug one end of an HDMI cable to the HDMI input port on the home theater receiver or surround sound decoder device and the other end to the HDMI output port on the computer or the port replicator.✍You can adjust the screen resolution of the connected TV with your computer. See Why doesn't my screen display a video? (page 193) for more information.With the HDMI connection, the volume can be adjusted by the connected audio device only. Your computer has no control over the output volume of any connected devices.
116nNUsing Peripheral Devices >Selecting Display ModesSelecting Display ModesWhen an external display is connected, you can select either your computer screen or the connected display to use as the primary monitor.!The monitor port on your computer is not accessible when the computer is attached to the port replicator.The screen resolution of your external display may change when you change the performance mode.✍You may not be able to display the same content on your computer screen and the external display or projector at the same time, depending on the type of your external display or projector.Turn on the external display before turning on your computer.To select a display mode with the Fn+F7 keysYou can select a display mode with the Fn+F7 keys. See Combinations and Functions with the Fn Key (page 40) for more information.To select a display mode from the display settings1Right-click on the desktop and select Screen resolution.2Click the drop-down list next to Multiple Displays, select your desired setting, and then click OK.
117nNUsing Peripheral Devices >Using the Multiple Monitors FunctionUsing the Multiple Monitors FunctionThe Multiple Monitors function allows you to distribute portions of your desktop across separate displays. For example, if you have an external display connected to your computer, your computer screen and the external display can function as a single desktop.You can move the cursor from one display to the other. This allows you to drag objects, such as an open application window or a toolbar, from one display to the other.
118nNUsing Peripheral Devices >Using the Multiple Monitors FunctionTo use the Multiple Monitors function!The monitor port on your computer is not accessible when the computer is attached to the port replicator.The screen resolution of your external display may change when you change the performance mode.✍Your external display may not support the Multiple Monitors function.Certain software applications may not be compatible with Multiple Monitors settings.Make sure that your computer does not enter Sleep or Hibernate mode while you are using the Multiple Monitors function, or the computer may not return to Normal mode.If you set different colors on each display, do not expand a single window across two displays, or your software may not work properly.1Right-click on the desktop and select Screen resolution.2Click the drop-down list next to Multiple Displays, select Extend these displays, and then click OK.✍You can set the display colors and resolution for each display and customize the Multiple Monitors function.Set fewer colors or a lower resolution for each display.
119nNUsing Peripheral Devices >Connecting a USB DeviceConnecting a USB DeviceYou can connect a Universal Serial Bus (USB) device, such as a mouse, a floppy disk drive, a speaker, or a printer, to your computer.!You cannot use USB devices if you disable the USB ports in the BIOS setup screen. To enable the ports, follow the steps in Disabling Built-in Devices (page 133).To connect a USB device1Choose the USB port (1) you prefer to use.2Plug the USB device cable (2) into the USB port.
120nNUsing Peripheral Devices >Connecting a USB DeviceNotes on connecting a USB device❑You may need to install the driver software supplied with your USB device before use. See the manual that came with the USB device for more information.❑Be sure to use a USB printer compatible with your version of Windows to print documents.❑For information on how to remove a USB device, see the manual that came with the device.❑To protect your computer and/or USB devices from damage, observe the following:❑When moving the computer with USB devices connected, avoid exposing the USB ports to shock or impact.❑Do not put the computer into a bag or carrying case when it has USB devices connected.
121nNCustomizing Your VAIO Computer >Customizing Your VAIO ComputerThis section briefly describes how to change the main settings of your VAIO computer. Among other things, you will learn how to use and customize the look of your Sony software and utilities.❑Selecting Performance Modes (page 122)❑Setting the Password (page 124)❑Using Intel VT (page 130)❑Using the VAIO Control Center (page 131)❑Using the VAIO Power Management (page 132)❑Protecting Data from Unauthorized Use (page 133)❑Protecting the Hard Disk (page 135)
122nNCustomizing Your VAIO Computer >Selecting Performance ModesSelecting Performance ModesYour computer is equipped with the performance selector switch for changing the performance mode without restarting the computer. You can select either of the performance modes: STAMINA mode for lower power consumption or SPEED mode for faster performance.!While any software application that prevents your computer from changing the performance mode is in use, selecting another mode with the performance selector switch may not change the performance mode. In such a case, close the application. The selected mode will automatically be activated. Changing the performance mode without closing the application may cause loss of unsaved data.
123nNCustomizing Your VAIO Computer >Selecting Performance ModesTo select a performance modeSlide the performance selector switch (1) to select a performance mode.To check the current performance mode❑Find out which mode is selected with the performance selector switch.❑Find out which performance mode icon is displayed on the Windows desktop notification area.Type of Mode DescriptionSTAMINA mode Uses the Intel Graphics Media Accelerator and disables some hardware devices on your computer to conserve battery power.SPEED mode Uses the AMD Radeon Graphics to provide faster performance.
124nNCustomizing Your VAIO Computer >Setting the PasswordSetting the PasswordSetting the password allows you to protect your computer from unauthorized access by making the user enter the password when the computer is turned on or returns to Normal mode from Sleep mode or Hibernate mode.!Do not forget your password. Write down the password and keep it in a secure place.Type of Password DescriptionPower-on password You can use BIOS functions to set two types of passwords: - Machine password: Allows users with administrative rights to change all the setup options in the BIOS setup  screen, as well as to start the computer.- User password: Allows the standard users to change some of the BIOS setup options, as well as to start the   computer. To set the user password, you must first set the machine password.✍Entry of the power-on password will be prompted after the VAIO logo appears to start your computer.!If you forget the machine password, the password needs to be reset and a fee will be charged. To reset the password, contact an authorized Sony service/support center. To find the nearest center or agent, see Finding More about Your VAIO Computer (page 5).You can reset the user password at the BIOS setup screen by entering the machine password.Windows password Allows users to log onto your computer and protect each user account with its own password.✍Entry of the Windows password will be prompted after you select your user account.
125nNCustomizing Your VAIO Computer >Setting the PasswordSetting the Power-on PasswordTo add the power-on password (machine password)1Turn on the computer and press the F2 key repeatedly until the VAIO logo disappears.The BIOS setup screen appears. If the screen does not appear, restart the computer and try again.2Press the < or , key to select Security to display the Security tab, select Set Machine Password, and then press the Enter key.3On the password entry screen, enter the password twice and press the Enter key.The password can be up to 32 alphanumeric characters long (including spaces).4Select Password when Power On under Security and press the Enter key.5Change the setting from Disabled to Enabled.6Press the < or , key to select Exit, select Exit Setup, and then press the Enter key.At the confirmation prompt, press the Enter key.
126nNCustomizing Your VAIO Computer >Setting the PasswordTo add the power-on password (user password)!Make sure you set the machine password before setting the user password.1Turn on the computer and press the F2 key repeatedly until the VAIO logo disappears.The BIOS setup screen appears. If the screen does not appear, restart the computer and try again.2Enter the machine password and press the Enter key.3Press the < or , key to select Security to display the Security tab, select Set User Password, and then press the Enter key.4On the password entry screen, enter the password twice and press the Enter key.The password can be up to 32 alphanumeric characters long (including spaces).5Press the < or , key to select Exit, select Exit Setup, and then press the Enter key.At the confirmation prompt, press the Enter key.To change or remove the power-on password (machine password)1Turn on the computer and press the F2 key repeatedly until the VAIO logo disappears.The BIOS setup screen appears. If the screen does not appear, restart the computer and try again.2Enter the machine password and press the Enter key.3Press the < or , key to select Security to display the Security tab, select Set Machine Password, and then press the Enter key.4On the password entry screen, enter the current password once and a new password twice, and then press the Enter key.To remove the password, leave the Enter New Password and Confirm New Password fields blank and press the Enter key.5Press the < or , key to select Exit, select Exit Setup, and then press the Enter key.At the confirmation prompt, press the Enter key.
127nNCustomizing Your VAIO Computer >Setting the PasswordTo change or remove the power-on password (user password)1Turn on the computer and press the F2 key repeatedly until the VAIO logo disappears.The BIOS setup screen appears. If the screen does not appear, restart the computer and try again.2Enter the user password and press the Enter key.3Press the < or , key to select Security to display the Security tab, select Set User Password, and then press the Enter key.4On the password entry screen, enter the current password once and a new password twice, and then press the Enter key.To remove the password, leave the Enter New Password and Confirm New Password fields blank and press the Enter key.5Press the < or , key to select Exit, select Exit Setup, and then press the Enter key.At the confirmation prompt, press the Enter key.
128nNCustomizing Your VAIO Computer >Setting the PasswordSetting the Windows PasswordTo add the Windows password1Click Start and Control Panel.2Click User Accounts and Family Safety or User Accounts.3Click User Accounts.4Click Create a password for your account under Make changes to your user account.5In the New password and Confirm new password fields, enter the password for your account.6Click Create password.✍See Windows Help and Support for more information on the Windows password.To change the Windows password1Click Start and Control Panel.2Click User Accounts and Family Safety or User Accounts.3Click User Accounts.4Click Change your password.5In the Current password field, enter your current password.6In the New password and Confirm new password fields, enter a new password.7Click Change password.
129nNCustomizing Your VAIO Computer >Setting the PasswordTo remove the Windows password1Click Start and Control Panel.2Click User Accounts and Family Safety or User Accounts.3Click User Accounts.4Click Remove your password.5In the Current password field, enter the current password that you want to remove.6Click Remove password.
130nNCustomizing Your VAIO Computer >Using Intel(R) VTUsing Intel(R) VTIntel(R) Virtualization Technology (VT) allows you to use hardware virtualization software for enhancing your computer's performance.!Intel VT may not be available depending on the CPU installed on your computer.For information on virtualization and how to use hardware virtualization software, contact the software publisher.To enable Intel VT1Turn on the computer and press the F2 key repeatedly until the VAIO logo disappears.The BIOS setup screen appears. If the screen does not appear, restart the computer and try again.2Press the < or , key to select Advanced.3Press the M or m key to select Intel(R) Virtualization Technology or Intel(R) VT, press the Enter key, select Enabled, and press the Enter key.!If the Advanced tab is not displayed in the BIOS setup window or you cannot select Intel(R) Virtualization Technology, Intel VT is not available on the computer.4Press the < or , key to select Exit, select Exit Setup, and then press the Enter key.At the confirmation prompt, press the Enter key.
131nNCustomizing Your VAIO Computer >Using the VAIO Control CenterUsing the VAIO Control CenterThe VAIO Control Center utility allows you to access system information and to specify preferences for system behavior.To use the VAIO Control Center1Click Start, All Programs, and VAIO Control Center.2Select your desired control item and change the settings.3Once finished, click OK.The setting of the desired item is changed.✍For more information about each option, see the help file included with the VAIO Control Center.Some of the control items will not be visible if you open the VAIO Control Center as a standard user.
132nNCustomizing Your VAIO Computer >Using the VAIO Power ManagementUsing the VAIO Power ManagementPower management helps you set up power plans for running on AC or battery power to suit your requirements for power consumption.The VAIO Power Management function is added to the Windows Power Options. With this software application, you can enhance the Windows power management functions to ensure better operation of your computer and longer battery life.Selecting a Power PlanWhen you start the computer, a power status icon appears on the taskbar. This icon indicates what kind of power source you are currently using. Click this icon to display the window that shows your power status.To select a power plan1Right-click the power status icon on the taskbar and select Power Options.2Select your desired power plan.To change the power plan settings1Click Change plan settings on the right of your desired power plan in the Power Options window.Change the Sleep mode and display settings as needed.2If you need to change the advanced settings, click Change advanced power settings and go to step 3.Otherwise, click Save changes.3Click the VAIO Power Management tab.Change the settings for each item.4Click OK.
133nNCustomizing Your VAIO Computer >Protecting Data from Unauthorized UseProtecting Data from Unauthorized UseDisabling Built-in DevicesYou can use one of the BIOS functions to disable the following built-in devices and prohibit external connections and communications.❑USB Ports❑Memory Card Slot ("Memory Stick Duo" slot and SD memory card slot)❑Optical Disc Drive (built-in optical disc drive)❑Wireless Devices (wireless LAN, WiMAX, wireless WAN, BLUETOOTH, and GPS functions)❑ LAN Device (LAN port)✍The built-in devices you can disable depends on the model you purchased.
134nNCustomizing Your VAIO Computer >Protecting Data from Unauthorized UseTo disable built-in devices1Turn on the computer and press the F2 key repeatedly until the VAIO logo disappears.The BIOS setup screen appears. If the screen does not appear, restart the computer and try again.2Press the < or , key to select Advanced.3Press the M or m key to select your desired built-in device, and press the Enter key.4Press the M or m key to select Disabled and press the Enter key.✍To enable the device, select Enabled instead of Disabled.5If you want to disable more built-in devices, repeat steps 4 and 5 for each device.6Press the < or , key to select Exit, select Exit Setup, and then press the Enter key.At the confirmation prompt, press the Enter key.
135nNCustomizing Your VAIO Computer >Protecting the Hard DiskProtecting the Hard DiskIf your computer is equipped with a built-in hard disk drive, then the hard disk drive protection function is available. This function protects your hard disk drive against shock hazards.See the specifications to find out about the configuration of your computer.!Be aware that the hard disk drive protection function does not work for the solid state drive.The hard disk drive protection function is designed to minimize possibilities of damage to hard disk drives and user data. It does not ensure 100% data protection under any circumstances.
136nNUpgrading Your VAIO Computer >Upgrading Your VAIO ComputerYour VAIO computer and memory modules use high precision components and electronic connectors technology. To avoid invalidation of the warranty during your product warranty period, we recommend that:❑You should contact your dealer to install a new memory module.❑You should not install it yourself, if you are not familiar with upgrading memory on a computer.❑You should not touch the connectors or open the memory module compartment cover.For assistance, contact an authorized Sony service/support center. To find the nearest center or agent, see Finding More about Your VAIO Computer (page 5).The type of module and the amount of memory installed on your computer may differ depending on the model you purchased.See the specifications to find out about the configuration of your computer.
137nNUpgrading Your VAIO Computer >Adding and Removing MemoryAdding and Removing MemoryIf you want to expand the functionality of your computer, you can increase the amount of memory by replacing the installed memory module. Before you upgrade your computer's memory, read the notes and procedures in the following pages.Notes on adding memory modules❑Be sure to place your computer on a flat surface before adding or removing memory modules.❑Be careful when changing memory. Improper installation of memory modules may cause damage to your system. This damage may void your manufacturer's warranty.❑Only use memory modules that are compatible with your computer. If a memory module is not detected by the computer or the Windows operating system becomes unstable, contact the sales dealer or the manufacturer of your memory module.❑Electrostatic discharge (ESD) can damage electronic components. Before touching a memory module, ensure the following:❑The procedures described in this document assume user familiarity with the general terminology associated with personal computers and with the safety practice and regulatory compliance requirements for using and modifying electronic equipment.❑Turn off your computer and disconnect it from its power sources (battery pack and AC adapter) and from any telecommunication links or networks before you remove any cover or panel from the computer. Failure to do so may result in personal injury or equipment damage.❑ESD can damage memory modules and other components. Install the memory module only at an ESD workstation. If such a station is not available, do not work in a carpeted area, and do not handle materials that produce or hold static electricity (cellophane wrappers, for example). Ground yourself by maintaining contact with an unpainted metal portion of the chassis while performing the procedure.
138nNUpgrading Your VAIO Computer >Adding and Removing Memory❑Do not open the memory module package before you are ready to change the module. The package protects the module from ESD.❑Use the special bag supplied with the memory module or wrap the module in aluminum foil to protect it from ESD.❑Introducing any liquids, foreign substances, or objects into the memory module slots or other internal components of your computer will result in damage to the computer and any repair costs will not be covered by the warranty.❑Do not place the memory module in a location subject to:❑Heat sources such as radiators or air ducts❑Direct sunlight❑Excessive dust❑Mechanical vibration or shock❑Strong magnets or speakers that are not magnetically shielded❑Ambient temperature of more than 95°F / 35°C or less than 41°F / 5°C❑High humidity❑Handle the memory module with care. To avoid injuries to your hands and fingers, do not touch the edges of the components and circuit boards inside your computer.
139nNUpgrading Your VAIO Computer >Adding and Removing MemoryRemoving and Installing a Memory ModuleTo change or add a memory module1Shut down the computer and disconnect all peripheral devices.2Wait about an hour until the computer cools down.3Unscrew the two screws (1), slide the bottom cover in the direction of the arrow (2), and remove the cover.!Be careful not to lose the removed screws.4Touch a metal object to discharge static electricity.5Remove the battery pack (page 25).
140nNUpgrading Your VAIO Computer >Adding and Removing Memory6Remove the currently installed memory module as follows:❑Pull the latches in the direction of the arrows (1).The memory module is released.❑Make sure that the memory module tilts up and then pull it out in the direction of the arrow (2).7Remove the new memory module from its packaging.
141nNUpgrading Your VAIO Computer >Adding and Removing Memory8Slide the memory module into the memory module slot and push it in until it clicks into place.!Do not touch any components on the motherboard other than the memory module.Be careful not to touch the wires and the projections inside the bottom cover.Be sure to insert the connector edge of the memory module into the slot while aligning the notch on the module with the small projection in the open slot. Do not force the memory module into the slot in a wrong orientation, as it may cause damage to the slot and the module.9Replace the cover and the removed screws and then tighten the screws.10 Turn on the computer.
142nNUpgrading Your VAIO Computer >Adding and Removing MemoryViewing the Amount of MemoryTo view the amount of memory1Turn on the computer.2Click Start, All Programs, and VAIO Control Center.3Click System Information and System Information.You can view the amount of system memory in the right pane. If the additional memory does not appear, repeat the installation procedure and restart the computer.
143nNPrecautions >PrecautionsThis section describes safety guidelines and precautions to help you protect your VAIO computer from potential damage.Some features and options in this section may not be available on your computer.❑Safety Information (page 144)❑Care and Maintenance Information (page 147)❑Handling Your Computer (page 148)❑Handling the LCD Screen (page 150)❑Using the Power Source (page 151)❑Handling the Built-in Camera (page 152)❑Handling Discs (page 153)❑Using the Battery Pack (page 154)❑Handling "Memory Stick" (page 155)❑Handling the Built-in Storage Device (page 156)❑Using Fingerprint Authentication (page 157)❑Using the TPM (page 158)
144nNPrecautions >Safety InformationSafety InformationComputer❑Use your computer on a solid, stable surface.❑Do not use your computer directly on your lap. The temperature of the base of the unit will rise during normal operation and over time could result in discomfort or burns.❑Use only specified peripheral equipment and interface cables.❑Keep small parts such as "Memory Stick" and "Memory Stick" adaptors out of reach of children. There is a risk of swallowing them. Power Source❑Do not place the AC adapter in contact with your skin. Remove the AC adapter away from your body if it becomes warm and causes discomfort.❑Do not place heavy objects on the power cord, or this could cause a fire.❑To disconnect the power cord, pull it out by holding the plug. Never pull the cord itself.❑Unplug your computer from the AC outlet if you are not planning to use the computer for an extended period of time.❑When the AC adapter is not used, unplug it from the AC outlet.❑Make sure that an AC outlet is easily accessible.
145nNPrecautions >Safety InformationBattery Pack❑Do not leave battery packs in temperatures above 140°F / 60°C, such as in a car parked in the sun or under direct sunlight.❑For your safety, Sony recommends using the genuine Sony battery pack and AC adapter provided with this product. If these items need to be replaced during the life of the product, be sure to use a compatible genuine Sony battery pack or AC adapter. Information about compatible models can be found at the following URLs:❑For customers in USAhttp://www.sonystyle.com/vaio/ ❑For customers in Canadahttp://www.sonystyle.ca/vaio/ (English)http://www.fr.sonystyle.ca/vaio/ (French)❑For customers in Latin American countries or areashttp://vaio.sony-latin.com/ ❑Sony disclaims and shall assume no responsibility in case of any losses or damages arising from:❑The use of non-genuine Sony battery packs or AC adapters with your VAIO computer.❑The disassembly, alteration of, or tampering of any Sony battery pack.❑Keep the battery pack away from all sources of heat.❑Keep the battery pack dry.❑Do not open or try to disassemble the battery pack.❑Do not expose the battery pack to any mechanical shock, such as caused by dropping it on a hard surface.❑If you are not using your computer for an extended period of time, remove the battery pack from the computer to prevent damage to the battery pack.
146nNPrecautions >Safety Information❑If you have not used the battery pack for a considerable amount of time, the remaining battery life may become short. This is normal and does not indicate a malfunction. The battery pack will gradually discharge over time even while not in use. Connect the AC adapter to your computer and recharge the battery pack before using the computer again. Headphones❑Road safety – Do not use headphones while driving, cycling, or operating any motorized vehicle. It may create a traffic hazard and is illegal in some areas. It can also be potentially dangerous to play loud music while walking, especially at pedestrian crossings.❑Preventing hearing damage – Avoid using headphones at high volume. Hearing experts advise against continuous, loud and extended play. If you experience a ringing in your ears, reduce the volume or discontinue use.
147nNPrecautions >Care and Maintenance InformationCare and Maintenance InformationComputer❑Clean the cabinet with a soft, dry or lightly moistened cloth with a mild detergent solution. Do not use an abrasive pad, scouring powder, or solvent such as alcohol or benzine, as these may damage the finish of your computer. ❑Make sure you unplug the AC adapter and remove the battery pack before cleaning your computer. LCD ScreenUse a soft, dry cloth to wipe the surface of the LCD screen. Rubbing the surface could damage the screen. Built-in CameraClean the lens protection cover of the built-in camera with a blower brush or a soft brush. If the cover is extremely dirty, wipe it off with a soft dry cloth. Do not rub the cover, as it is sensitive to pressure. Discs❑Proper care of the disc is essential to its continuous reliability. Do not use solvents (such as benzine, thinner, alcohol, commercially available cleaners, or anti-static spray) which may cause damage to the disc.❑For normal cleaning, hold the disc by its edges and use a soft cloth to wipe the surface from the center out.❑If the disc is badly soiled, moisten a soft cloth with water, wring it out well, and use it to wipe the surface of the disc from the center out. Wipe off any remaining moisture with a dry soft cloth.
148nNPrecautions >Handling Your ComputerHandling Your Computer❑If you drop a solid object or any liquid onto your computer, shut down the computer, unplug it, and remove the battery pack. You may want to have the computer checked by qualified personnel before operating it again.❑Do not drop your computer or place any objects on top of the computer.❑Do not place your computer in a location subject to: ❑Heat sources, such as radiators or air ducts❑Direct sunlight❑Excessive dust❑Moisture or rain❑Mechanical vibration or shock❑Strong magnets or speakers that are not magnetically shielded❑Ambient temperature of more than 95°F / 35°C or less than 41°F / 5°C❑High humidity❑Do not place electronic equipment near your computer. The electromagnetic field of the equipment may cause the computer to malfunction.❑Do not use your computer without installing the battery pack as it may cause the computer to malfunction.❑Your computer uses high-frequency radio signals and may cause interference to radio or TV reception. If this occurs, move the computer a suitable distance away from the radio or TV.❑Do not use cut or damaged connection cables.
149nNPrecautions >Handling Your Computer❑If your computer is brought directly from a cold location to a warm one, moisture may condense inside the computer. In such a case, allow at least one hour before turning on the computer. If any problems occur, unplug the computer and contact an authorized Sony service/support center. To find the nearest center or agent, see Finding More about Your VAIO Computer (page 5).❑To avoid losing data when your computer is damaged, back up your data regularly.❑Do not exert pressure on the LCD screen or its edges when opening the LCD screen lid or lifting your computer. The LCD screen may be sensitive to pressure or added stress, and exerting pressure may damage the screen or cause it to malfunction. To open the computer, hold the base with one hand and gently lift the LCD screen lid with the other. To carry the computer with the lid open, be sure to hold the computer with both hands.❑Use a carrying case specially designed to carry your computer.
150nNPrecautions >Handling the LCD ScreenHandling the LCD Screen❑Do not leave the LCD screen facing the sun. This could damage the LCD screen. Be sure to block direct sunlight when using your computer near a window.❑Do not scratch the surface of the LCD screen or exert pressure on it. This could cause a damage.❑Using your computer in low temperature conditions may produce a residual image on the LCD screen. This does not indicate a malfunction. When the computer returns to normal temperature, the screen returns to normal.❑A residual image may appear on the LCD screen if the same image is displayed for an extended period of time. The residual image disappears after a while. You can use a screen saver to prevent residual images.❑The LCD screen becomes warm during operation. This is normal and does not indicate a malfunction.❑The LCD screen is manufactured using high-precision technology. You may, however, see tiny black points and/or bright points (red, blue, or green) that continuously appear on the LCD screen. This is a normal result of the manufacturing process and does not indicate a malfunction.❑Do not change the LCD screen orientation setting in the Tablet PC Settings window even when there are change options available for selection, as this may make your computer unstable. Sony assumes no liability for any malfunctions arising from changes to the settings.❑Do not exert pressure on the LCD screen lid with the lid closed as it may scratch the LCD screen or soil it.
151nNPrecautions >Using the Power SourceUsing the Power Source❑Do not share an AC outlet with other power-consuming equipment, such as a photocopier or a shredder.❑You can purchase a power strip with a surge protector. This device helps prevent damage to your computer caused by sudden power surges, in an electrical storm, for example.❑Use the AC adapter supplied with your computer or genuine Sony products. Do not use any other AC adapter as it may cause a malfunction.
152nNPrecautions >Handling the Built-in CameraHandling the Built-in Camera❑Do not touch the lens protection cover of the built-in camera, as it may cause scratches on the cover and such scratches will appear on the captured images.❑Do not let the direct sunlight get into the lens of the built-in camera regardless of your computer's power state, as it may cause the camera to malfunction.
153nNPrecautions >Handling DiscsHandling Discs❑Fingerprints and dust on the surface of a disc may cause read errors. Be sure to hold the disc by its edges and central hole, as shown below: ❑Never affix an adhesive label to a disc. This will affect the use of the disc and may result in irreparable damage.
154nNPrecautions >Using the Battery PackUsing the Battery Pack❑Battery life is shorter in a cold environment. This is due to decreased battery efficiency at low temperatures.❑Charge battery packs at temperatures between 50°F / 10°C to 86°F / 30°C. Lower temperatures require longer charging time.❑Do not charge the battery pack in any way other than as described in this user guide or as designated by Sony in writing.❑While the battery pack is in use or being charged, heat builds up in the battery pack. This is normal and is not cause for concern.❑You do not need to discharge the battery pack before recharging.❑If the battery pack quickly runs out of power after being fully charged, it may be reaching the end of its life and should be replaced.
155nNPrecautions >Handling "Memory Stick"Handling "Memory Stick"❑Do not touch the "Memory Stick" connector with your finger or metallic objects.❑Use only the adhesive label supplied with "Memory Stick".❑Do not bend, drop, or expose "Memory Stick".❑Do not disassemble or modify "Memory Stick".❑Keep "Memory Stick" dry.❑Do not use or store "Memory Stick" in a location subject to:❑Static electricity❑Electrical noise❑Extremely high temperatures, such as in a car parked in the sun❑Direct sunlight❑High humidity❑Corrosive substances❑Use the storage case supplied with "Memory Stick".❑Be sure to make a backup copy of your valuable data.❑When using "Memory Stick Duo", do not use a fine-tipped pen to write on the label adhered to "Memory Stick Duo". Exerting pressure on the media may damage internal components.
156nNPrecautions >Handling the Built-in Storage DeviceHandling the Built-in Storage DeviceThe built-in storage device (hard disk drive or solid state drive) has a high storage density and reads or writes data in a short time. However, it can be easily damaged if improperly used. If the built-in storage device is damaged, the data cannot be restored. To prevent losing data, you should be careful when handling your computer.To avoid damaging your built-in storage device❑Do not subject your computer to sudden movements.❑Keep your computer away from magnets.❑Do not place your computer in a location subject to mechanical vibration or in an unstable position.❑Do not turn off the power or restart your computer while reading or writing data to the storage device.❑Do not use your computer in a place subject to extreme changes in temperature.❑Do not remove the storage device from your computer.
157nNPrecautions >Using Fingerprint AuthenticationUsing Fingerprint Authentication❑The fingerprint authentication technology does not ensure complete user authentication or complete protection of your data and hardware.Sony assumes no liability for any problems and damages arising out of your use of or inability to use the fingerprint sensor.❑The fingerprint recognition rate depends on your operating conditions and varies among individuals as well.❑In case the built-in storage device has to be initialized, for example after the repair work, the fingerprint templates will be lost. You will have to register them all over again.❑The maintenance and management of data concerning fingerprint authentication must be carried out at your own risk.Sony assumes no liability for any defects arising out of your data maintenance and management.❑A fingerprint sensor may malfunction or be damaged if you scratch its surface with:❑a solid or sharp-pointed object❑fine objects, for example swiping a finger covered with dirt across the fingerprint sensor❑Discharge static electricity from your finger by touching a metallic object especially during dry seasons (e.g. winter) before scanning your fingerprint. Static electricity may cause the fingerprint sensor to malfunction.
158nNPrecautions >Using the TPMUsing the TPM❑Although your computer is provided with the TPM security functions, these functions do not ensure complete protection of your data and hardware. Sony assumes no liability for any problems and damages arising out of your use of the functions.❑After you have installed the Infineon TPM Professional Package, you need to set a few TPM passwords on your computer. Without these passwords, you will not be able to restore any TPM-protected data. Be sure to write down the passwords and keep them safe and private from other people.❑Be sure to make backup copies of the latest emergency recovery archive file, emergency recovery token file, password reset token file, and personal secret file and keep them safe and private from other people before sending your computer for repair. The data stored in the TPM that is embedded on the motherboard may be lost or corrupted during the course of repair.❑During the course of repair, the TPM will also be replaced if the motherboard needs replacement. In such a case, use the backup copies of the emergency recovery archive file, emergency recovery token file, password reset token file, and personal secret file to restore the TPM configuration.❑Be sure to make a backup copy of the data stored on the built-in storage device before sending your computer for repair. The built-in storage device may be initialized and returned after the repair work and, in such a case, you will not be able to restore the data on the device using the backup copies of the emergency recovery archive file, emergency recovery token file, password reset token file, and personal secret file.❑Make sure you set up the automatic backup operations after completing the TPM initialization wizard. If the window containing the Run automatic backup now check box is displayed after the setup, select the check box and update the backup files. The restore process using the backup files may fail if you do not set up the automatic backup operations.❑The maintenance and management of TPM-protected data must be carried out at your own risk. Sony assumes no liability for any defects arising out of your data maintenance and management.
159nNTroubleshooting >TroubleshootingThis section describes how to solve common problems you might encounter when using your VAIO computer. Many problems have simple solutions. If these suggestions fail to solve your problems, use the VAIO Care. To launch the software, see Using the VAIO Care (page 38).If the problems still cannot be solved and you need assistance, visit the support web sites listed in Finding More about Your VAIO Computer (page 5).Some features and options in this section may not be available on your computer.❑Computer Operations (page 161)❑System Update / Security (page 167)❑Recovery / Recovery Media (page 168)❑Partition (page 172)❑Battery Pack (page 173)❑Built-in Camera (page 175)❑Networking (LAN/Wireless LAN) (page 177)❑Wireless WAN (page 181)❑BLUETOOTH Technology (page 182)❑Optical Discs (page 185)❑Display (page 190)❑Printing (page 195)❑Microphone (page 196)
160nNTroubleshooting >❑Speakers (page 197)❑Touch Pad (page 199)❑Keyboard (page 200)❑Floppy Disks (page 201)❑Audio/Video (page 202)❑"Memory Stick" (page 204)❑Peripherals (page 205)
161nNTroubleshooting >Computer OperationsComputer OperationsWhat should I do if my computer does not start?❑Make sure your computer is securely plugged into a power source and turned on and the power indicator light is lit.❑Make sure the battery pack is installed properly and charged. If an extended battery pack is attached to the computer, make sure both the primary battery pack and the extended battery pack are installed properly and charged.❑Disconnect all connected USB devices (if any), and then restart your computer.❑Remove any extra memory modules you may have installed since purchase, and then restart your computer.❑If your computer is plugged into a power strip or an uninterruptible power supply (UPS), make sure the power strip or UPS is plugged into a power source and turned on.❑If you are using an external display, make sure it is plugged into a power source and turned on. Make sure the brightness and contrast controls are adjusted correctly. See the manual that came with your display for more information.❑Unplug the AC adapter and remove the battery pack. Wait three to five minutes. Reinstall the battery pack, plug the AC adapter, and then press the power button to turn on your computer.❑Condensation may cause your computer to malfunction. If this occurs, do not use the computer for at least one hour.❑Check that you are using the supplied Sony AC adapter. For your safety, use only the genuine Sony rechargeable battery pack and AC adapter, which are supplied by Sony for your VAIO computer.
162nNTroubleshooting >Computer OperationsWhat should I do if the green power indicator light turns on but my screen remains blank?❑Press the Alt+F4 keys several times to close the application window. An application error may have occurred.❑If the Alt+F4 keys do not work, click Start, the arrow next to the Shut down button, and Restart to restart your computer.❑If your computer does not restart, press the Ctrl+Alt+Delete keys and click the arrow   next to the Shut down   button and Restart.If the Windows Security window appears, click Restart.❑If this procedure does not work, press and hold the power button for more than four seconds to shut down your computer. Unplug the AC adapter and leave the computer for about five minutes. Then plug the AC adapter and turn on the computer again.!Turning off your computer with the Ctrl+Alt+Delete keys or the power button may cause loss of unsaved data.
163nNTroubleshooting >Computer OperationsWhat should I do if my computer or software stops responding?❑If your computer stops responding while a software application is running, press the Alt+F4 keys to close the application window.❑If the Alt+F4 keys do not work, click Start and the Shut down button to turn off your computer.❑If your computer does not turn off, press the Ctrl+Alt+Delete keys and click the Shut down button.If the Windows Security window appears, click Shut Down.❑If this procedure does not work, press and hold the power button until the computer turns off.!Turning off your computer with the Ctrl+Alt+Delete keys or the power button may cause loss of unsaved data.❑Unplug the AC adapter and remove the battery pack. Wait three to five minutes. Reinstall the battery pack, plug the AC adapter, and then press the power button to turn on your computer.❑Try reinstalling the software.❑Contact the software publisher or designated provider for technical support.
164nNTroubleshooting >Computer OperationsWhy doesn't my computer enter Sleep or Hibernate mode?Your computer may become unstable if the operating mode is changed before the computer completely enters Sleep or Hibernate mode.To restore your computer to Normal mode1Close all open programs.2Click Start, the arrow next to the Shut down button, and Restart.3If your computer does not restart, press the Ctrl+Alt+Delete keys and click the arrow next to the Shut down button and Restart.If the Windows Security window appears, click Restart.4If this procedure does not work, press and hold the power button until the computer turns off.!Turning off your computer with the Ctrl+Alt+Delete keys or the power button may cause loss of unsaved data. What should I do if the charge indicator light is blinking fast and my computer does not start?❑This problem could be due to the battery pack not being installed properly. To solve this problem, turn off your computer and remove the battery pack. Then reinstall the battery pack to the computer. For details, see Installing/Removing the Battery Pack (page 23).❑If the problem persists, it means the installed battery pack is not compatible. Remove the battery pack and contact an authorized Sony service/support center. To find the nearest center or agent, see Finding More about Your VAIO Computer (page 5).
165nNTroubleshooting >Computer OperationsWhy does the System Properties window display a slower CPU speed than the maximum?This is normal. Because your computer's CPU utilizes a type of CPU speed controlling technology for power conservation purposes, System Properties may display the current CPU speed instead of the maximum speed. What should I do if my computer does not accept my password and returns a message, Enter Onetime Password?If you enter a wrong power-on password three times consecutively, the Enter Onetime Password message appears and Windows will not start. Press and hold the power button for more than four seconds to check that the power indicator light turns off. Wait for 10 to 15 seconds, then restart your computer and enter the correct password. The password is case sensitive, so be sure to check letters for the current case before you enter the password. What should I do if my game software does not work or it keeps crashing?❑Check the web site of the game if there are any patches or updates to download.❑Make sure you have installed the latest video driver software.❑On some VAIO models, the graphics memory is shared with the system. The optimal graphic performance in such a case is not guaranteed. Why doesn't my screen turn off after the automatic turn-off time has passed?Some software applications or screen savers are designed to temporarily disable the feature of your operating system that turns off the computer screen or places the computer into Sleep mode after a certain period of inactivity. To solve this problem, exit the running software application(s) or change the current screen saver.
166nNTroubleshooting >Computer OperationsHow can I change the boot device order?You can use one of the BIOS functions to change the boot device order. Follow these steps:1Turn on the computer and press the F2 key repeatedly until the VAIO logo disappears.The BIOS setup screen appears. If the screen does not appear, restart the computer and try again.2Press the < or , key to select Boot.3Press the M or m key to select the drive whose boot device order you want to change.4Press the F5 or F6 key to change the boot device order.5Press the < or , key to select Exit, select Exit Setup, and then press the Enter key.At the confirmation prompt, press the Enter key. What should I do if I cannot boot my computer from the USB floppy disk drive connected to the computer?To boot your computer from the USB floppy disk drive, you need to change the boot device.Turn on your computer and press the F11 key repeatedly until the VAIO logo disappears.
167nNTroubleshooting >System Update / SecuritySystem Update / SecurityHow can I find important updates for my computer?You can find and install the latest updates on your computer with the software applications: the Windows Update and the VAIO Update. See Updating Your Computer (page 36) for more information. How do I schedule the installation of Windows updates to my computer?The Microsoft Windows operating system is preinstalled on your computer. The best way to protect your computer against security threats, such as viruses, is to download and install the latest Windows updates regularly.You can get important Windows updates by doing the following:!Your computer must be connected to the Internet to download the updates.1Click Start and Control Panel.2Click System and Security.3Click Action Center.4Follow the on-screen instructions to set up automatic or scheduled updates.
168nNTroubleshooting >Recovery / Recovery MediaRecovery / Recovery MediaHow can I create Recovery Media?You can create Recovery Media using the VAIO Care. The media are used to restore your computer system to its factory default settings. To create the media, launch the VAIO Care (page 38) and then click Recovery & restore, Recovery, and Create Recovery Media.!If your computer is not equipped with a built-in optical disc drive, you need to connect an external optical disc drive (not supplied).See the Recovery, Backup and Troubleshooting Guide for more information. How can I restore my computer system to its factory default settings?There are two ways to recover your computer system: from Recovery Media and from the recovery area. See the Recovery, Backup and Troubleshooting Guide for more information. How can I reinstall the original software and drivers?You can restore the preinstalled software and drivers using the VAIO Care. To restore them, launch the VAIO Care (page 38) and then click Recovery & restore, Recovery, and Reinstall Applications and Drivers.See the help file included with the VAIO Care for more information.
169nNTroubleshooting >Recovery / Recovery MediaHow do I check the volume of the recovery area?Your built-in storage device contains the recovery area where the data for the system recovery is stored. To check the volume of the recovery area, follow these steps:1Click Start, right-click Computer, and select Manage.2Click Disk Management under Storage in the left pane.The volume of the recovery area and the total volume of the C drive are displayed in the Disk 0 row in the center pane.
170nNTroubleshooting >Recovery / Recovery MediaHow do I reduce the volume of the recovery area?Your built-in storage device contains the recovery area where the data for system recovery is stored. If your computer includes a solid state drive, you might want to minimize the recovery area by removing such data.1If you recover your computer from Recovery Media (optical discs) on the model without a built-in optical disc drive, connect an external optical disc drive (not supplied) to the computer and to an AC power source.2Insert the disc into the optical disc drive or connect the USB flash drive (not supplied) to the USB port while the computer is in Normal mode.!Use Recovery Media you created upon delivery of your computer.You cannot use USB devices if you disable the USB ports in the BIOS setup screen. To enable the ports, follow the steps in Disabling Built-in Devices (page 133).3Turn off the computer and turn it on once again.✍If you are using the external optical disc drive or USB flash drive, press the F11 key repeatedly until the VAIO logo disappears.4Press the M or m key to select VAIO Care Rescue and press the Enter key.5Click Tools and Start advanced recovery wizard.✍When the Do you need to rescue data? message appears, make a backup copy of your data, if needed.6Follow the on-screen instructions until the Select recovery type window appears.7Select Custom recovery - Remove recovery contents.8Follow the on-screen instructions.
171nNTroubleshooting >Recovery / Recovery Media!The above procedure involves system recovery. The applications and data you added on the storage device before removing the data for system recovery will all be lost.Once you have removed the data for system recovery, you need the Recovery Media for later system recovery.
172nNTroubleshooting >PartitionPartitionHow can I create a hard disk partition?The Windows feature allows you to create a partition without recovering your computer system.1Click Start, Control Panel, System and Security, and Create and format hard disk partitions under Administrative Tools.2If the User Account Control window appears, click Yes.If you are currently logged onto your computer as a standard user, you may be prompted to enter an administrator name and password.3Right-click the C drive and select Shrink Volume.4Enter the size of the partition to be created in Enter the amount of space to shrink in MB and click Shrink.5Right-click Unallocated and select New Simple Volume.6Follow the on-screen instructions.✍If you use the VAIO Care Rescue, you can create a partition in the recovery process. See Using the VAIO Care (page 38) for more information.
173nNTroubleshooting >Battery PackBattery PackHow do I find the battery charging status? You can check the charge indicator for the battery charging status. See Charging the Battery Pack (page 28) for more information. When is my computer using AC power? When your computer is connected to an AC outlet with the AC adapter, it uses AC power, even if the battery pack is installed. When should I recharge the battery pack? Recharge the battery pack when:❑The battery pack is running out of power and both the charge and power indicator lights blink.❑You have not used the battery pack for an extended period of time. When should I replace the battery pack?A message prompting you to replace the battery pack appears when the battery pack reaches the end of its life. You can check the battery charge capacity with the Battery function on the VAIO Control Center. Should I be concerned that the installed battery pack is warm? No, it is normal for the battery pack to be warm while it is powering your computer.
174nNTroubleshooting >Battery PackCan my computer enter Hibernate mode while running on battery power? Your computer can enter Hibernate mode while running on battery power, but some software programs and peripheral devices prevent the system from entering Hibernate mode. If you are using a program that prevents the system from entering Hibernate mode, save your data frequently to avoid losing data. See Using Hibernate Mode (page 35) for information on how you can manually activate Hibernate mode. Why can't I fully charge my battery pack?The battery care function is enabled to extend the life of your battery pack on the VAIO Control Center. Check the settings on the VAIO Control Center. What should I do if a message appears notifying of either incompatibility or the improper installation of the battery pack and my computer then enters Hibernate mode?❑This problem could be due to the battery pack not being installed properly. To solve this problem, turn off your computer and push and hold the battery off button for three seconds with a thin, straight object (such as a paper clip). If this does not solve the problem, remove the battery pack and install it once again.If an extended battery pack is attached to the computer, turn off the computer and remove the extended battery pack. If this does not solve the problem, push and hold the battery off button for three seconds. If the problem persists, remove both battery packs and install them once again. For information on how to install and remove the battery pack, see Installing/Removing the Battery Pack (page 23).❑If the problem persists, it means the installed battery pack is not compatible. Remove the battery pack and contact an authorized Sony service/support center. To find the nearest center or agent, see Finding More about Your VAIO Computer (page 5).
175nNTroubleshooting >Built-in CameraBuilt-in CameraWhy does the viewfinder show no images or poor-quality images?❑The built-in camera cannot be shared by more than one software application. Exit the current application before launching another. On models with Media Gallery, you cannot use another camera application that uses the built-in camera while using the gesture function of Media Gallery.❑The viewfinder may show some noise, for example horizontal streaks, when you are viewing a rapid-moving object. This is normal and does not indicate a malfunction.❑If the problem persists, restart your computer. Why are captured images poor in quality?❑The images captured under the fluorescent light may show reflections of light.❑A dark portion in captured images may appear as a noise.❑If the lens protection cover is dirty, you cannot take a clear shot. Clean the cover. See Built-in Camera (page 147). What should I do if captured images contain dropped frames and audio interruptions?❑The effect settings on your software application may cause dropped frames. See the help file included with your software application for more information.❑There may be more software applications running than your computer can handle. Exit the applications that you are not currently using.❑The power management function of your computer may be active. Check the CPU performance.
176nNTroubleshooting >Built-in CameraWhat should I do if movie playback shows dropped frames while my computer is running on battery power?The battery pack is running out of power. Connect your computer to an AC outlet. What should I do if captured images flicker?This problem occurs when you use the camera under fluorescent lights due to a mismatch between the lighting output frequency and the shutter speed.To reduce flicker noise, change the direction of the camera or the brightness of camera images. In some software applications, you can set an appropriate value to one of the camera properties (e.g. light source, flicker, etc.) to eliminate flicker noise. Why is the video input from the built-in camera suspended for a few seconds?The video input may be suspended for a few seconds if:❑a shortcut key with the Fn key is used.❑the CPU load increases.This is normal and does not indicate a malfunction.
177nNTroubleshooting >Networking (LAN/Wireless LAN)Networking (LAN/Wireless LAN)What should I do if the VAIO Smart Network icon is not displayed on the taskbar?❑Show the VAIO Smart Network icon   hidden on the taskbar.❑If the VAIO Smart Network icon   is not on the taskbar, follow these steps to display the icon:1Click Start, All Programs, and VAIO Control Center.2Click Network Connections and VAIO Smart Network.3Click Advanced settings. What should I do if my computer cannot connect to a wireless LAN access point?❑Connection capability is affected by distance and obstructions. You may need to move your computer away from obstructions or closer to any access point you may be using.❑Make sure the WIRELESS switch is on and the WIRELESS indicator light is lit on your computer.❑Make sure power to the access point is on.❑If you want to connect your computer to a wireless LAN access point using the 5 GHz band, make sure the option to use the 5 GHz band or both the 2.4 GHz and 5 GHz bands is selected for Wi-Fi Settings in the VAIO Smart Network settings window. Wireless LAN communication (IEEE 802.11a standard) using only the 5 GHz band, available on selected models only, is disabled by default.❑Follow these steps to check the settings:1Click Start and Control Panel.2Click View network status and tasks under Network and Internet.3Click Connect to a network to confirm that your access point is selected.
178nNTroubleshooting >Networking (LAN/Wireless LAN)❑Make sure the encryption key is correct.❑Make sure Maximum Performance is selected for Wireless Adapter Settings in the Power Options window. Selecting any other option may result in a communication failure. To change the settings, follow these steps:1Right-click the power status icon on the taskbar and select Power Options.2Click Change plan settings.3Click Change advanced power settings.4Select the Advanced settings tab.5Double-click Wireless Adapter Settings and Power Saving Mode.6Select Maximum Performance from the drop-down list both for On battery and Plugged in.❑If you have disabled the wireless LAN function in the BIOS setup screen, you cannot connect to wireless access points. To enable the function, follow the steps in Disabling Built-in Devices (page 133).
179nNTroubleshooting >Networking (LAN/Wireless LAN)What should I do if I cannot access the Internet?❑Check the access point settings. See the manual that came with your access point for more information.❑Make sure your computer and the access point are connected to one another.❑Move your computer away from obstacles or closer to any access point you may be using.❑Make sure your computer is properly configured for Internet access.❑Make sure Maximum Performance is selected for Wireless Adapter Settings in the Power Options window. Selecting any other option may result in a communication failure. Follow the steps in What should I do if my computer cannot connect to a wireless LAN access point? (page 177) to change the settings.❑If you have disabled the wireless LAN function or the LAN port in the BIOS setup screen, you cannot access the Internet through a wireless network or a LAN. To enable the function or the port, follow the steps in Disabling Built-in Devices (page 133). Why is the data transfer speed slow?❑The wireless LAN data transfer speed is affected by distance and obstructions between devices and access points. Other factors include device configurations, radio conditions, and software compatibility. To maximize the data transfer speed, move your computer away from obstacles or closer to any access point you may be using.❑If you are using a wireless LAN access point, the device may be temporarily overloaded depending on how many other devices are communicating via the access point.❑If your access point interferes with other access points, change the access point channel. See the manual that came with your access point for more information.❑Make sure Maximum Performance is selected for Wireless Adapter Settings in the Power Options window. Selecting any other option may result in a communication failure. Follow the steps in What should I do if my computer cannot connect to a wireless LAN access point? (page 177) to change the settings.
180nNTroubleshooting >Networking (LAN/Wireless LAN)How do I avoid data transfer interruptions?❑While your computer is connected to an access point, data transfer interruptions may occur if a large file is exchanged or the computer is placed in close proximity to microwaves and cordless telephones.❑Move your computer closer to the access point.❑Make sure the access point connection is intact. ❑Change the access point channel. See the manual that came with your access point for more information.❑Make sure Maximum Performance is selected for Wireless Adapter Settings in the Power Options window. Selecting any other option may result in a communication failure. Follow the steps in What should I do if my computer cannot connect to a wireless LAN access point? (page 177) to change the settings. What are channels?❑Wireless LAN communication uses divided frequency bands known as channels. Third-party wireless LAN access point channels may be preset to different channels from Sony devices.❑If you are using a wireless LAN access point, see connectivity information contained in the manual that came with your access point. Why does the network connection stop when I change the encryption key?Two computers with the wireless LAN function may lose a peer-to-peer network connection if the encryption key is changed. You can either change the encryption key back to the original profile or re-enter the key on both computers so the key matches.
181nNTroubleshooting >Wireless WANWireless WANWhat should I do if my computer cannot connect to the wireless WAN?❑Make sure the battery pack is installed properly and charged.❑Activate a mobile broadband service account with a supported carrier.❑Have adequate mobile coverage in your area. Check with your network provider for additional coverage information for your location.❑Make sure the WIRELESS switch is on and the WIRELESS indicator light is lit on your computer.❑Make sure the switch next to Wireless WAN is set to On in the VAIO Smart Network window.❑Check that your connection manager software has detected the wireless WAN modem successfully. It may take some time for the software to detect the wireless WAN modem.✍For further information on the wireless WAN function, visit the Sony online support web site.❑Make sure the SIM card cover is closed.
182nNTroubleshooting >BLUETOOTH TechnologyBLUETOOTH TechnologyWhat should I do if other BLUETOOTH devices cannot find my computer?❑Make sure both devices have the BLUETOOTH function enabled.❑Make sure the WIRELESS switch is on and the WIRELESS indicator light is lit on your computer.❑You cannot use the BLUETOOTH function while your computer is in a power saving mode. Bring the computer back to Normal mode, then turn on the WIRELESS switch.❑Your computer and the device may be too far apart. Wireless BLUETOOTH technology works best when the devices are within 33 feet / 10 meters of each other. What should I do if I cannot find the BLUETOOTH device I want to communicate with?❑Check that the BLUETOOTH function of the device you want to communicate with is on. See the other device's manual for more information.❑If the device you want to communicate with is already communicating with another BLUETOOTH device, it may not be found or it may not be able to communicate with your computer.❑To allow other BLUETOOTH devices to communicate with your computer, follow these steps:1Click Start and Devices and Printers.2Right-click the BLUETOOTH device icon and click Bluetooth settings.3Click the Options tab and select the Allow Bluetooth devices to find this computer check box.
183nNTroubleshooting >BLUETOOTH TechnologyWhat should I do if other BLUETOOTH devices cannot connect to my computer?❑Check the suggestions in What should I do if I cannot find the BLUETOOTH device I want to communicate with? (page 182).❑Make sure the other devices are authenticated.❑The data transfer distance can be shorter than 33 feet / 10 meters depending on existing obstacles between the two devices, on radio wave quality, and on the operating system or the software in use. Move your computer and BLUETOOTH devices closer to each other. Why is my BLUETOOTH connection slow?❑The data transfer speed depends on the obstructions and/or the distance between the two devices, on the radio wave quality, and on the operating system or the software in use. Move your computer and BLUETOOTH devices closer to each other.❑The 2.4 GHz band, with which BLUETOOTH devices or wireless LAN devices work, is used by various devices. Although BLUETOOTH devices use the technology to minimize radio interference from other devices that use the same band, such radio interference may cause slower communication speeds and shorter distances or communication failures.❑If a version of a BLUETOOTH standard employed on the BLUETOOTH device with which you want to communicate is not the same version as the one employed on your computer, the communication speed becomes slower.  Can I use a device with BLUETOOTH technology on airplanes?With BLUETOOTH technology, your computer transmits a radio frequency of 2.4 GHz. Sensitive locations, such as hospitals and airplanes, may have restrictions on use of BLUETOOTH devices to avoid radio interference. Check with facility staff to see if use of the BLUETOOTH function on the computer is permitted.
184nNTroubleshooting >BLUETOOTH TechnologyWhy can't I use the BLUETOOTH function when I log onto my computer as a user with a standard user account?The BLUETOOTH function may not be available to a user with a standard user account on your computer. Log onto the computer as a user with administrative rights. Why can't I use the BLUETOOTH devices when I switch users?If you switch users without logging off your system, the BLUETOOTH devices will not work. Be sure to log off before switching users. To log off your system, click Start, the arrow next to the Shut down button, and Log off. Why can't I exchange business card data with a mobile phone?The business card exchange function is not supported. What should I do if the BLUETOOTH icon is not displayed on the taskbar?❑Make sure that the switch next to BLUETOOTH is set to On in the VAIO Smart Network window.❑To display the BLUETOOTH icon on the taskbar, follow these steps:1Click Start and Devices and Printers.2Right-click the BLUETOOTH device icon and click Bluetooth settings.3Click the Options tab and select the Show the Bluetooth icon in the notification area check box.
185nNTroubleshooting >Optical DiscsOptical DiscsWhy does my computer freeze when I try to read a disc?The disc that your computer is trying to read may be dirty or damaged. Follow these steps:1Press the Ctrl+Alt+Delete keys and click the arrow next to the Shut down button and Restart to restart the computer.!Turning off your computer with the Ctrl+Alt+Delete keys may cause loss of unsaved data.2Remove the disc from the optical disc drive.3Check the disc for dirt or damage. If you need to clean the disc, see Discs (page 147) for instructions. What should I do if the drive tray does not open?❑Make sure your computer is in Normal mode.❑Press the drive eject button.❑The optical disc drive on your computer may have been disabled in the BIOS setup screen. Follow the steps in Disabling Built-in Devices (page 133) to enable the drive.❑If the drive eject button does not work, click Start and Computer, right-click the optical disc drive icon, and select Eject.❑If none of the above options work, insert a thin, straight object (such as a paper clip) into the manual eject hole on the optical disc drive.❑Try restarting your computer.
186nNTroubleshooting >Optical DiscsWhat should I do if I cannot play a disc properly on my computer?❑Make sure the disc is inserted into the optical disc drive with the label facing upward.❑Make sure the necessary program(s) is installed according to the manufacturer's instructions.❑Blu-ray Disc playback on a connected external display may be interrupted, depending on the type or bit rate of the video. You may be able to solve this problem by lowering the screen resolution of the display. Follow the steps in Why doesn't my screen display a video? (page 193) to change the screen resolution.❑If a disc is dirty or damaged, your computer will stop responding. Follow these steps:1Press the Ctrl+Alt+Delete keys and click the arrow next to the Shut down button and Restart to restart the computer.!Turning off your computer with the Ctrl+Alt+Delete keys may cause loss of unsaved data.2Remove the disc from the optical disc drive.3Check the disc for dirt or damage. If you need to clean the disc, see Discs (page 147) for instructions.❑If you are playing a disc and cannot hear sound, do any of the following:❑The volume may have been turned off by the Fn+F2 keys. Press them once again.❑The volume may have been minimized by the Fn+F3 keys. Keep pressing the Fn+F4 keys to turn up the volume loud enough to hear sound.❑Right-click the volume icon on the taskbar and click Open Volume Mixer to check the settings.❑Check the volume setting in the audio mixer.❑If you are using external speakers, check the volume settings on the speakers and the connections between the speakers and your computer.
187nNTroubleshooting >Optical Discs❑Make sure the correct driver software is installed. Follow these steps:1Click Start and Control Panel.2Click System and Security.3Click System.4Click Device Manager in the left pane.The Device Manager window appears with a listing of your computer's hardware devices.If an "X" or an exclamation point appears on the listed device, you may need to enable the device or reinstall the driver software.5Double-click the optical disc drive device to open a list of the optical disc drives of your computer.6Double-click your desired drive.You can confirm the driver software by selecting the Driver tab, and clicking Driver Details.7Click OK to close the window.❑Make sure an adhesive label is not affixed to a disc. Adhesive labels can come off while the disc is in the optical disc drive and damage the drive or cause it to malfunction.❑If a region code warning appears, the disc may be incompatible with the optical disc drive. Check the package to make sure the region code is compatible with the optical disc drive.❑If you notice condensation on your computer, do not use the computer for at least one hour. Condensation can cause the computer to malfunction.❑Make sure your computer is running on AC power and try the disc again.
188nNTroubleshooting >Optical DiscsWhat should I do if I cannot play Blu-ray Disc media or my computer becomes unstable during Blu-ray Disc playback?❑Check if your optical disc drive supports the Blu-ray Disc media.❑To play copyright protected Blu-ray Disc media continually, you need to update the AACS key. If a message prompts you to update the AACS key, follow the message.!Your computer must be connected to the Internet to update the AACS key.❑You may not be able to play some Blu-ray Disc content on your computer, or the computer may become unstable during Blu-ray Disc playback. To play content normally, download and install the latest updates for Blu-ray Disc playback software using the VAIO Update. For information on how to use the VAIO Update, see Updating Your Computer (page 36). What should I do if I cannot write data to CD media?❑Make sure you neither launch any software application nor allow any to launch automatically, not even a screen saver.❑If you are using a CD-R/RW disc with an adhesive label affixed, replace it with one with no affixed adhesive label. Using a disc with an affixed adhesive label could cause a write error or other damage. What should I do if I cannot write data to DVD media?❑Make sure you are using the correct DVD recordable media.❑Check which DVD recordable format is compatible with your optical disc drive. Some brands of DVD recordable media do not work.
189nNTroubleshooting >Optical DiscsWhy can't I write data to Blu-ray Disc media?❑Check if your optical disc drive supports the Blu-ray Disc writing function.❑BD-R Disc media are not rewritable. You cannot add or erase data to or from the BD-R Disc media. What should I do if my external optical disc drive does not work properly?Make sure that your external optical disc drive is connected to an AC power source and the USB port. If it is not connected, the external optical disc drive may not work properly.!You cannot use USB devices if you disable the USB ports in the BIOS setup screen. To enable the ports, follow the steps in Disabling Built-in Devices (page 133). What should I do if I cannot play discs?The optical disc drive on your computer may have been disabled in the BIOS setup screen. Follow the steps in Disabling Built-in Devices (page 133) to enable the drive.
190nNTroubleshooting >DisplayDisplayWhy did my screen go blank?❑Your computer screen may go blank if the computer loses power or enters a power saving mode (Sleep or Hibernate). If the computer is in LCD (Video) Sleep mode, press any key to bring the computer back into Normal mode. See Using the Power Saving Modes (page 33) for more information.❑Make sure your computer is securely plugged into a power source and turned on and the power indicator light is lit.❑If your computer is running on battery power, make sure the battery pack is installed properly and is charged. See Using the Battery Pack (page 23) for more information.❑If the display output is directed to the external display, press the Fn+F7 keys. See Combinations and Functions with the Fn Key (page 40) for more information.❑While a performance selection is in progress, your computer screen becomes dark and may temporarily show some noise or flicker. This is normal and does not indicate a malfunction.
191nNTroubleshooting >DisplayWhat should I do if I do not see proper images or videos?❑Be sure to select True Color (32 bit) for the display colors before using video/image software or starting DVD playback. Selecting any other option may prevent such software from displaying images successfully. To change the display colors, follow these steps:1Right-click on the desktop and select Screen resolution.2Click Advanced settings.3Click the Monitor tab.4Select True Color (32 bit) under Colors.❑Do not change the display resolution or colors while using video/image software or playing DVDs, as it may cause unsuccessful playback/display or unstable system operations.Additionally, it is recommended you disable your screen saver before starting DVD playback. If the screen saver is enabled, it may be activated during DVD playback and prevent the playback from running successfully. Some screen savers have been found to even change the display resolution and colors. What should I do if some items do not fit on the computer screen?Check that the text size is set to 100%. If not, some items, for example a software menu, may not be displayed correctly, depending on the software you are using. See Windows Help and Support for more information on how to change the text size.
192nNTroubleshooting >DisplayWhat should I do if no image is displayed on my TV screen or external display connected to the HDMI output port?❑Make sure you are using an HDCP-compliant display. The copyright protected content is not displayed on a non-HDCP compliant display. See Connecting a TV with an HDMI Input Port (page 113) or Connecting a Computer Display or a Projector (page 110) for more information.❑Another external display may be connected to the monitor port on your computer or the port replicator. Press the Fn+F7 keys to change the display output. See Connecting a TV with an HDMI Input Port (page 113) or Connecting a Computer Display or a Projector (page 110) for more information. What should I do if 3D images are not displayed on my 3D TV connected to the HDMI output port?❑Change the 3D playback settings. To change the settings, click   located at the lower right corner of the PowerDVD BD window. See the help file included with the PowerDVD BD for more information.❑If the computer is connected to your 3D TV through an AV amplifier, make sure the AV amplifier supports 3D playback.❑Check the HDMI output resolution settings on the computer. If the resolution is not set to 1920 x 1080 or 1280 x 720, images are not displayed in 3D.❑You should also see the manual that came with your 3D TV for more information on 3D playback.
193nNTroubleshooting >DisplayWhy doesn't my screen display a video?❑If the display output is directed to the external display and the external display is disconnected, you cannot display a video on your computer screen. Stop video playback, change the display output to the computer screen, and then restart video playback. See Selecting Display Modes (page 116) for changing the display output. Alternatively, you can press the Fn+F7 keys to change the display output. See Combinations and Functions with the Fn Key (page 40) for more information.❑The video memory of your computer may be insufficient for displaying high resolution videos. In such a case, lower the resolution of the LCD screen. To change the screen resolution, follow these steps:1Right-click on the desktop and select Screen resolution.2Click the drop-down list next to Resolution.3Move the slider up to increase or down to decrease the screen resolution.✍You can check the total amount of the graphics and video memory available. Right-click on the desktop, select Screen resolution, and click Advanced Settings and the Adapter tab. The displayed value may be different from the actual amount of memory on your computer. What should I do if my screen is dark?❑Press the Fn+F6 keys to brighten your computer screen.❑Blocking the ambient light sensor turns your screen dark. Make sure that the sensor is unblocked. What should I do if the external display remains blank?Press the Fn+F7 keys to change the display output. See Combinations and Functions with the Fn Key (page 40) for more information.
194nNTroubleshooting >DisplayHow do I run Windows Aero?To run Windows Aero, follow these steps:1Right-click on the desktop and select Personalize.2Select your desired theme from Aero Themes.For information about the Windows Aero features, such as Windows Flip 3D, see Windows Help and Support.
195nNTroubleshooting >PrintingPrintingWhat should I do if I cannot print a document?❑Make sure your printer is on, and the printer cable is securely connected to the ports on the printer and your computer.❑Make sure your printer is compatible with the Windows operating system installed on your computer.❑You may need to install the printer driver software before you use your printer. See the manual that came with your printer for more information.❑If your printer is not functioning after your computer resumes from a power saving mode (Sleep or Hibernate), then restart the computer.❑If the bidirectional communication functions are provided with your printer, disabling the functions on your computer may enable printing. Follow these steps:1Click Start and Devices and Printers.2Right-click the printer icon and select Properties.3Click the Ports tab.4Click to cancel the Enable bidirectional support check box.5Click OK.This disables the bidirectional communication functions of the printer, such as data transfer, status monitoring, and remote panel.When your printer is connected to the optional port replicator, check to see if the port replicator is connected to an AC power source.❑If you have disabled the USB ports in the BIOS setup screen, you cannot use the printer connected to one of the USB ports. To enable the ports, follow the steps in Disabling Built-in Devices (page 133).
196nNTroubleshooting >MicrophoneMicrophoneWhat should I do if my microphone does not work?❑Your computer is not equipped with the microphone jack. You cannot use an external microphone.❑Your sound input device may have been incorrectly configured. To configure the sound input device, follow these steps:1Close all open programs.2Click Start and Control Panel.3Click Hardware and Sound.4Click Manage audio devices under Sound.5On the Recording tab, select your desired device for sound input and click Set Default. How can I prevent microphone feedback?Microphone feedback occurs when the microphone receives the sound from a sound output device, such as a speaker.To prevent this problem:❑Keep the microphone away from a sound output device.❑Turn down the volume of the speakers and the microphone.
197nNTroubleshooting >SpeakersSpeakersWhat should I do if I do not hear sound from the built-in speakers?❑If you are using a program that has its own volume control, make sure the volume control is properly set. See the program's help file for more information.❑The volume may have been turned off by the Fn+F2 keys. Press them once again.❑The volume may have been minimized by the Fn+F3 keys. Keep pressing the Fn+F4 keys to turn up the volume loud enough to hear sound.❑Check the Windows volume controls by clicking the volume icon on the taskbar.❑Your sound output device may have been incorrectly configured. To change the sound output device, see How do I change the sound output device? (page 202).
198nNTroubleshooting >SpeakersWhat should I do if my external speakers do not work?❑Check the suggestions in What should I do if I do not hear sound from the built-in speakers? (page 197).❑If you are using a program that has its own volume control, make sure the volume control is properly set. See the program's help file for more information.❑Make sure your speakers are properly connected and the volume is turned up loud enough to hear sound.❑Make sure your speakers are designed for computer use.❑If your speakers have a muting button, set the button to off.❑If your speakers require external power, make sure the speakers are connected to a power source. See the manual that came with your speakers for more information.❑Check the Windows volume controls by clicking the volume icon on the taskbar.❑Your sound output device may have been incorrectly configured. To change the sound output device, see How do I change the sound output device? (page 202).
199nNTroubleshooting >Touch PadTouch PadWhat should I do if the touch pad does not work?❑You may have disabled the touch pad. Press the Fn+F1 keys to enable it. See Using the Touch Pad (page 43).❑Make sure that a mouse is not connected to your computer.❑If the pointer does not move while a software application is running, press the Alt+F4 keys to close the application window.❑If the Alt+F4 keys do not work, press the Windows key once and then the , key several times, select Restart with the M or m key, and press the Enter key to restart your computer.❑If your computer does not restart, press the Ctrl+Alt+Delete keys, select the arrow next to the Shut down button with the m and , keys, press the Enter key, select Restart with the M or m key, and press the Enter key to restart your computer.❑If this procedure does not work, press and hold the power button until the computer turns off.!Turning off your computer with the Ctrl+Alt+Delete keys or the power button may cause loss of unsaved data.
200nNTroubleshooting >KeyboardKeyboardWhat should I do if the keyboard configuration is wrong?The language layout of your computer's keyboard is labeled on the packaging box. If you choose a different regional keyboard when you complete the Windows setup, the key configuration will be mismatched.To change the keyboard configuration, follow these steps:1Click Start and Control Panel.2Click Clock, Language, and Region, and then Change keyboards or other input methods under Region and Language.3Click Change keyboards on the Keyboards and Languages tab.4Change the settings as desired. What should I do if I cannot enter certain characters with the keyboard?If you cannot enter U, I, O, P, J, K, L, M, and so on, the Num Lk key may be activated. Check that the Num lock indicator light is unlit. If the Num lock indicator is lit, press the Fn+Num Lk keys to turn it off before entering these characters.
201nNTroubleshooting >Floppy DisksFloppy DisksWhy doesn't the Safely Remove Hardware and Eject Media icon appear on the taskbar when the drive is connected?Your computer does not recognize the floppy disk drive. First, make sure the USB cable is properly connected to the USB port. If you need to secure the connection, wait a few moments for the computer to recognize the drive. If the icon still does not appear, follow these steps:1Close all programs that are accessing the floppy disk drive.2Wait until the indicator light on the floppy disk drive turns off.3Push the eject button to remove the disk, and unplug the USB floppy disk drive from your computer.4Reconnect the floppy disk drive by plugging the USB cable into the USB port.5Restart the computer by clicking Start, the arrow next to the Shut down button, and Restart. What should I do if I cannot write data to a floppy disk?❑Make sure the floppy disk is properly inserted in the drive. ❑If the disk is inserted properly and you are still unable to write data to it, the disk may be full or write-protected. You can either use a floppy disk that is not write-protected or disable the write-protect feature.❑If you have disabled the USB ports in the BIOS setup screen, you cannot write data to the floppy disk in the external disk drive connected to one of the USB ports. To enable the ports, follow the steps in Disabling Built-in Devices (page 133).
202nNTroubleshooting >Audio/VideoAudio/VideoHow do I turn off the Windows startup sound?To turn off the Windows startup sound, follow these steps:1Click Start and Control Panel.2Click Hardware and Sound.3Click Manage audio devices under Sound.4On the Sounds tab, click to cancel the Play Windows Startup sound check box.5Click OK. How do I change the sound output device?If you do not hear sound from the device connected to a port, such as the USB port, HDMI output port, optical output port, or headphones jack, you need to change the device for sound output.1Close all open programs.2Click Start and Control Panel.3Click Hardware and Sound.4Click Manage audio devices under Sound.5On the Playback tab, select your desired device for sound output and click Set Default.
203nNTroubleshooting >Audio/VideoWhat should I do if I do not hear the sound from the sound output device connected to the HDMI output port, optical output port, or headphones jack?❑You need to change the sound output device if you want to hear sound from the device connected to a port, such as the HDMI output port, optical output port, or headphones jack. For the detailed procedure, see How do I change the sound output device? (page 202).❑If you still hear no sound from the sound output device, follow these steps:1Follow steps 1 to 4 in How do I change the sound output device? (page 202).2On the Playback tab, select the HDMI or S/PDIF icon and click Properties.3Click the Advanced tab.4Select the sample rate and bit depth (for example, 48000 Hz, 16 bit) which the device supports.5Click OK. Why do sound interruptions and/or dropped frames occur when I play high-definition videos, such as those recorded with the AVCHD digital video camcorder?Playing high-definition videos requires substantial hardware resources, such as CPU, GPU, or system memory performance on your computer. During the video playback, some operations and/or functions may become unavailable, and sound interruptions, dropped frames, and playback failure may occur depending on the configuration of your computer.
204nNTroubleshooting >"Memory Stick""Memory Stick"What should I do if I cannot use "Memory Stick" that was formatted on a VAIO computer on other devices?You may need to reformat your "Memory Stick".Formatting "Memory Stick" erases all data, including music data previously saved on it. Before you reformat "Memory Stick", back up important data and confirm that "Memory Stick" does not contain files you want to keep.1Copy the data from "Memory Stick" onto your built-in storage device to save data or images.2Format "Memory Stick" by following the steps in Formatting "Memory Stick" (page 59). Can I copy images from a digital camera using "Memory Stick"?Yes, and you can view video clips that you have recorded with digital cameras that are compatible with "Memory Stick". Why can't I write data to "Memory Stick"?❑Some versions of "Memory Stick" are equipped with an erasure prevention switch to protect data from unintentional erasure or overwriting. Make sure the erasure prevention switch is off.❑If you have disabled the "Memory Stick Duo" slot in the BIOS setup screen, you cannot use "Memory Stick" in the slot. To enable the slot, follow the steps in Disabling Built-in Devices (page 133).
205nNTroubleshooting >PeripheralsPeripheralsWhat should I do if I cannot connect a USB device?❑If applicable, check the USB device is turned on and using its own power supply. For example, if you are using a digital camera, check if the battery is charged. If you are using a printer, check if the power cable is connected properly to an AC outlet.❑Try using another USB port. The driver software could be installed to the specific port you used the first time you connected the device.❑See the manual that came with your USB device for more information. You may need to install software before you connect the device.❑Try connecting a simple, low-powered device such as a mouse to test if the port is working at all.❑USB hubs may prevent a device from working because of a power distribution failure. We recommend you connect the device directly to your computer without a hub.❑If you have disabled the USB ports in the BIOS setup screen, you cannot use any connected USB devices. To enable the ports, follow the steps in Disabling Built-in Devices (page 133). What should I do if I cannot use a peripheral device?The USB ports may have been disabled in the BIOS setup screen.To enable the ports, follow the steps in Disabling Built-in Devices (page 133).
206nNTrademarks >Trademarks© 2011 Sony Electronics Inc. All rights reserved. Reproduction in whole or in part without written permission is prohibited.Sony and the Sony logo are trademarks or registered trademarks of Sony Corporation.VAIO, the VAIO logo, VAIO Care, Media Gallery, Share My Connection, and Backstage are trademarks or registered trademarks of Sony Electronics Inc."BRAVIA" is a trademark of Sony Corporation. and "Memory Stick", "Memory Stick Duo", "MagicGate", "OpenMG", "Memory Stick PRO", "Memory Stick PRO Duo", "Memory Stick PRO-HG Duo", "Memory Stick Micro", "M2", and the "Memory Stick" logo are trademarks or registered trademarks of Sony Corporation.Walkman is a registered trademark of Sony Corporation.S-FORCE is a trademark or registered trademark of Sony Corporation.i.LINK is a name to denote IEEE 1394. i.LINK and i.LINK logo " " are the trademarks of Sony Corporation.Intel, Intel Inside, Pentium, Intel SpeedStep, and Atom are trademarks or registered trademarks of Intel Corporation in the United States and/or other countries.Microsoft, MS-DOS, Windows, Windows Vista, BitLocker, Aero, and the Windows logo are trademarks of Microsoft group of companies.Blu-ray Disc™, Blu-ray 3D™, the Blu-ray Disc logo, and the Blu-ray 3D logo are trademarks of the Blu-ray Disc Association.The BLUETOOTH word mark and logos are registered trademarks owned by Bluetooth SIG, Inc. and any use of such marks by Sony Corporation is under license. Other trademarks and trade names are those of their respective owners.Roxio Easy Media Creator is a trademark of Sonic Solutions.
207nNTrademarks >WinDVD is trademark of Corel Inc.PowerDVD is trademark of CyberLink.Inc.NVIDIA and 3D Vision are registered trademarks and/or trademarks of NVIDIA Corporation in the United States and other countries.ArcSoft and the ArcSoft logo are registered trademarks of ArcSoft, Inc. ArcSoft WebCam Companion is a trademark of ArcSoft, Inc.AMD, the AMD Arrow logo, ATI, and combinations thereof, Radeon, AMD Phenom, AMD Turion, AMD Athlon, AMD Virtualization, AMD-V are trademarks of Advanced Micro Devices, Inc.SD Logo is a trademark.SDHC Logo is a trademark.SDXC Logo is a trademark.The ExpressCard word mark and logos are owned by the PCMCIA and any use of such marks by Sony Corporation is under license. Other trademarks and trade names are those of their respective owners.HDMI, the HDMI logo, and High-Definition Multimedia Interface are trademarks or registered trademarks of HDMI Licensing LLC.CompactFlash® is a trademark of SanDisk Corporation., "XMB," and "xross media bar" are trademarks of Sony Corporation and Sony Computer Entertainment Inc.PlayStation, PS3, and PS family logos are trademarks of Sony Computer Entertainment Inc."PlaceEngine" is a registered trademark of Koozyt, Inc.
208nNTrademarks >"PlaceEngine" was developed by Sony Computer Science Laboratories, Inc. and is licensed by Koozyt, Inc."TransferJet" and the "TransferJet" logo are trademarks of Sony Corporation."AVCHD" is a trademark of Panasonic Corporation and Sony Corporation.All other names of systems, products, and services are trademarks of their respective owners. In the manual, the ™ or ® marks are not specified.Features and specifications are subject to change without notice.All other trademarks are trademarks of their respective owners.Not all the software listed above may be delivered with your model.
209nNNotice >Notice© 2011 Sony Corporation. All rights reserved.This manual and the software described herein, in whole or in part, may not be reproduced, translated, or reduced to any machine-readable form without prior written approval.Sony Corporation provides no warranty with regard to this manual, the software, or other information contained herein and hereby expressly disclaims any implied warranties or merchantability or fitness for any particular purpose with regard to this manual, the software, or such other information. In no event shall Sony Corporation be liable for any incidental, consequential, or special damages, whether based on tort, contract, or otherwise, arising out of or in connection with this manual, the software, or other information contained herein or the use thereof.In the manual, the ™ or ® marks are not specified.Sony Corporation reserves the right to make any modification to this manual or the information contained herein at any time without notice. The software described herein is governed by the terms of a separate user license agreement.Sony Corporation is not liable and will not compensate for any lost recordings made to your computer, external recording media, or recording devices or any relevant losses, including when recordings are not made due to reasons including your computer failure, or when the contents of a recording are lost or damaged as a result of your computer failure or repair undertaken to your computer. Sony Corporation will not restore, recover, or replicate the recorded contents made to your computer, external recording media, or recording devices under any circumstances.
© 2011 Sony Corporationn

Navigation menu