Sony PM-0000 Mobile phone with Bluetooth, WLAN 802.11abgn, GPS/A-GPS, RFID and FM Rx User Manual 08 user guide
Sony Mobile Communications Inc Mobile phone with Bluetooth, WLAN 802.11abgn, GPS/A-GPS, RFID and FM Rx 08 user guide
Sony >
Contents
- 1. 08 user guide
- 2. 08 user guides
08 user guide

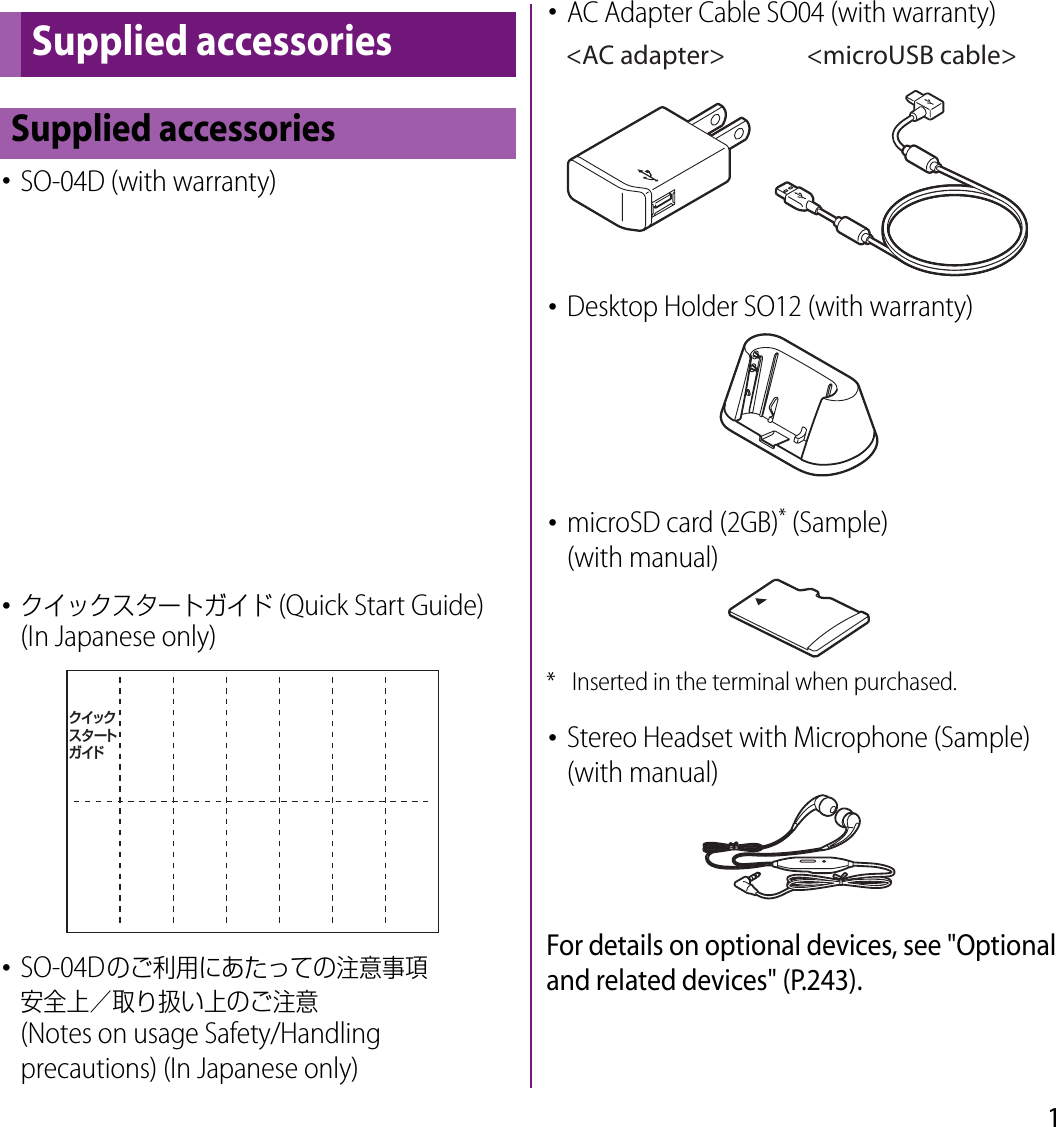
![2In addition to this manual, the operations of SO-04D are described in "クイックスタートガイド (Quick Start Guide)" (in Japanese only) and "Instruction Manual" application of the terminal.The initial operations and settings after purchasing the terminal, screen view contents and operations of main function are explained. (In Japanese only)Similarly to this manual, operations and settings of each function are explained.To use "Instruction Manual" application, from the Home screen, uTap [Instruction Manual]. For the first time using, download and install it according to the onscreen instructions. You can use the application as an electronic book. You can also shift to actual operations by tapping the description in the contents or view reference contents.❖Note・For downloading or updating the application, a high packet communication charge will be applied because of a large amount data communication. For this reason, subscription of packet flat-rate service is highly recommended.* If you use Wi-Fi function to download, packet communication charges are not applied.Operations and settings of each function are explained.It can be downloaded from NTT DOCOMO website.http://www.nttdocomo.co.jp/english/support/trouble/manual/download/index.html* You can download the latest information of "クイックスタートガイド (Quick Start Guide)" (in Japanese only). The URL and contents are subject to change without prior notice.❖Note・Reproduction or reprint of all or part of this manual without prior permission is prohibited.・Important information for SO-04D is posted in the following website. Be sure to check before using.http://www.sonymobile.co.jp/support/use_support/product/so-04d/About manuals of SO-04D"クイックスタートガイド (Quick Start Guide)" (Supplied accessories)"Instruction Manual" (Application of the terminal)"Instruction Manual" (PDF file)](https://usermanual.wiki/Sony/PM-0000.08-user-guide/User-Guide-1725539-Page-4.png)
![3In this manual, each key operation is described with p, x, y, t, m, k. And selection operations of the icons or function items on the touch panel are described as follows.❖Information・In this manual, the instructions are described with the default Home screen. If you set the other application to the home screen, the operations may differ from the descriptions.・Display examples and illustrations used in this manual are just images for explanations and may be different from actual ones.・In this manual, the easier procedure is described for the functions and settings which have multiple operating procedures.・Please note that "SO-04D" is called "the terminal" in this manual.・In this manual, explanations for "docomo" as Home application are provided. To switch the Home applications, see "Learning Home screen" (P.66).Operation descriptionsDescription OperationFrom the Home screen, tap t and tap [Settings].From the Home screen, tap t (Menu) key and tap "Settings" on the screen.Tap [Settings]u[Date & time]u[Set date].Tap "Settings" displayed on the screen, and then tap "Date & time" on the next screen and "Set date" on the following screen in order.Tap to zoom in or out on a map.Tap displayed on the screen to zoom in or out the map.Touch and hold icon.Keep touching the icon longer (1-2 seconds).](https://usermanual.wiki/Sony/PM-0000.08-user-guide/User-Guide-1725539-Page-5.png)
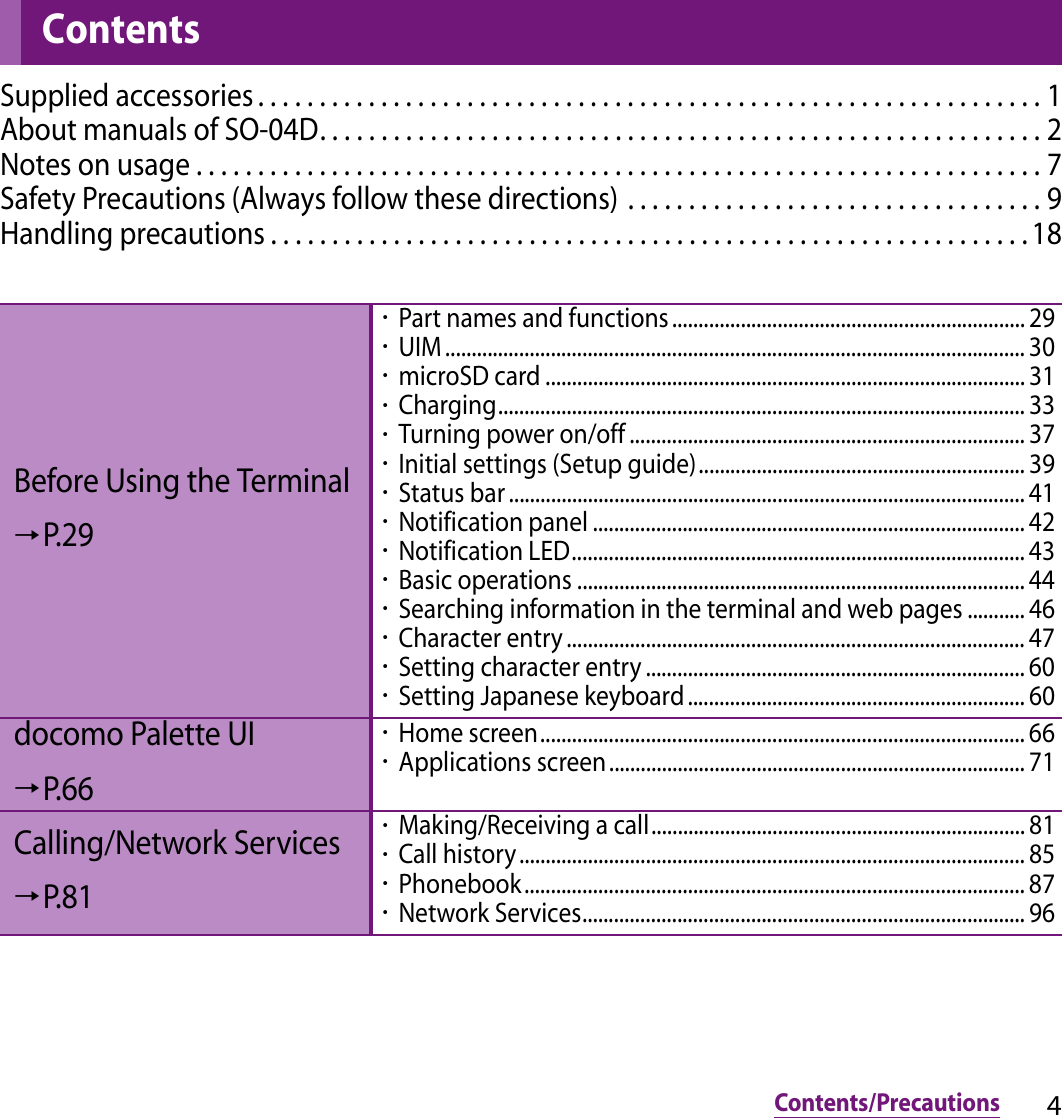
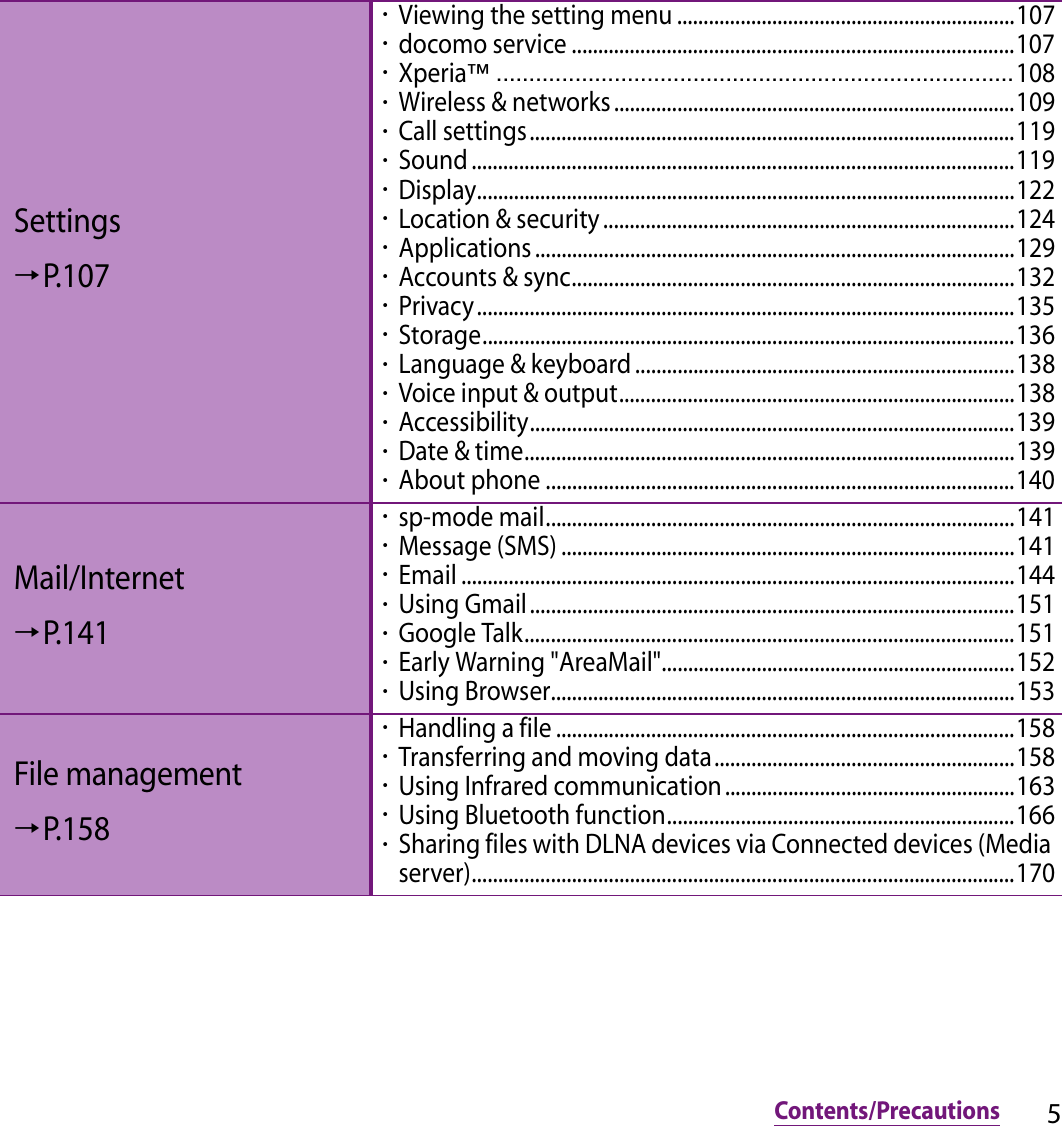
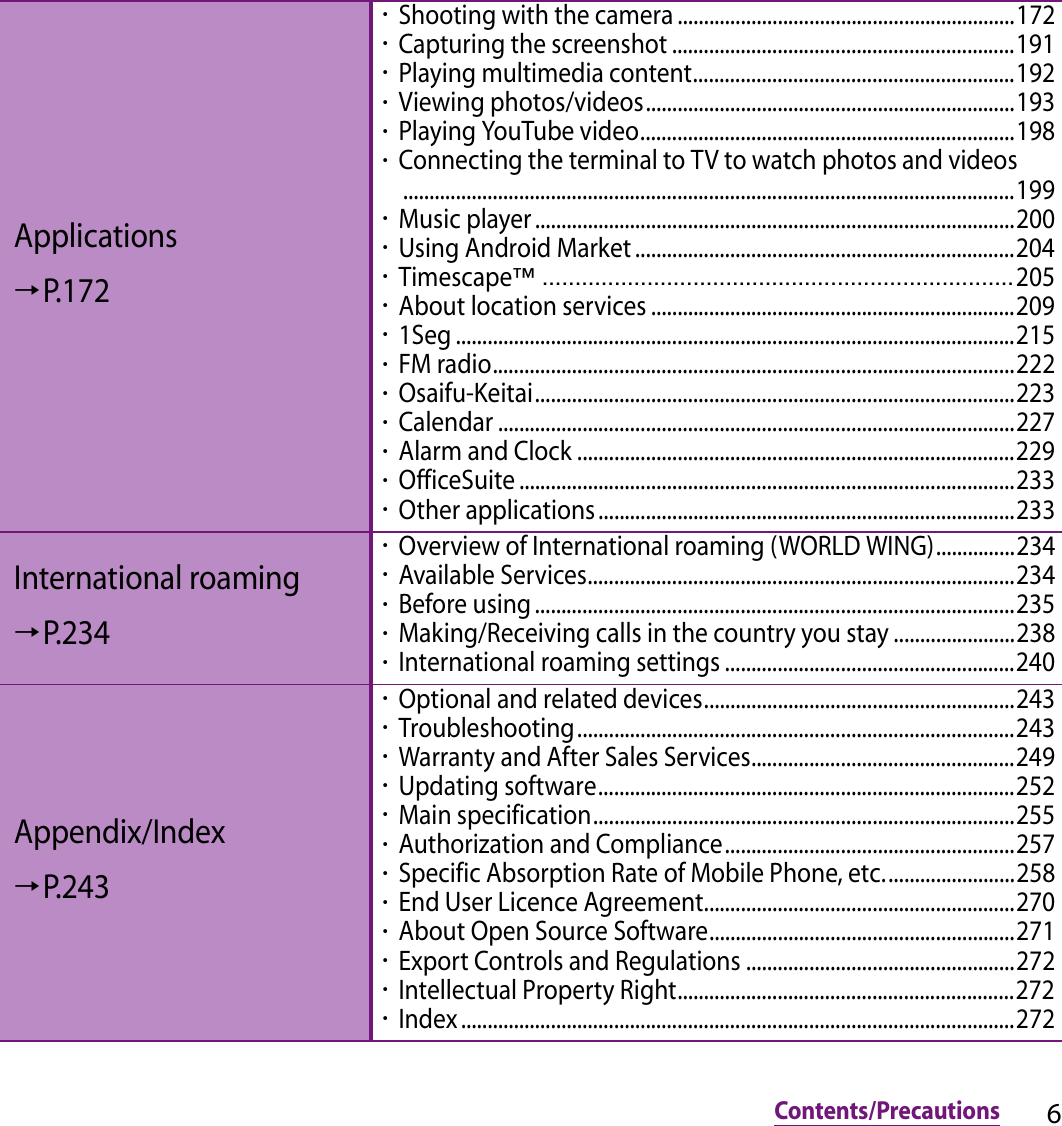
![7Contents/PrecautionsContents/Precautions・The terminal does not support i-mode sites (programs) or i-Dppli.・The terminal automatically performs communication for synchronizing data, checking the latest software version, maintain connection with the server, etc. If you transmit a large amount of data such as downloading applications or watching movie, a packet communication charge becomes high. Subscription of packet flat-rate service is highly recommended.・Public mode (Driving mode) is not supported.・Setting the phone to silent mode does not mute playback sound of video or music, alarm, etc.・The names of the operators are displayed on key lock canceling screen (P.39).・Your phone number (own number) can be checked as follows:From the Home screen, tap t and tap [Settings]u[About phone]u[Status].・The software version of your terminal can be checked as follows:From the Home screen, tap t and tap [Settings]u[About phone].・You can perform software update by downloading an update file with a PC via Internet and connecting the PC to the terminal. For details, see "Connecting to a PC and updating" (P.254).・By some software updates, the operating system (OS) may be version-upgraded for improving the terminal quality. For this reason, you always need to use the latest OS version. And some applications that used in the previous OS version may not be available or some unintended bugs may occur.・When using the terminal inserting some UIM (FOMA card) (green), voice calls and packet communication may not be available in some overseas networks. For using overseas, please visit a docomo Shop near you. DOCOMO exchanges UIM (FOMA card) (green) for UIM free of charge.・Set the screen lock to ensure the security of your terminal for its loss. For details, see "Screen lock" (P.127).・If your terminal is lost, change your each account password to invalidate authentication using a PC to prevent other persons from using Google services such as Google Talk, Gmail, Android Market, etc., Facebook, Twitter and mixi.・The terminal supports only sp-mode, mopera U and Business mopera Internet. Other providers are not supported.Notes on usage](https://usermanual.wiki/Sony/PM-0000.08-user-guide/User-Guide-1725539-Page-9.png)
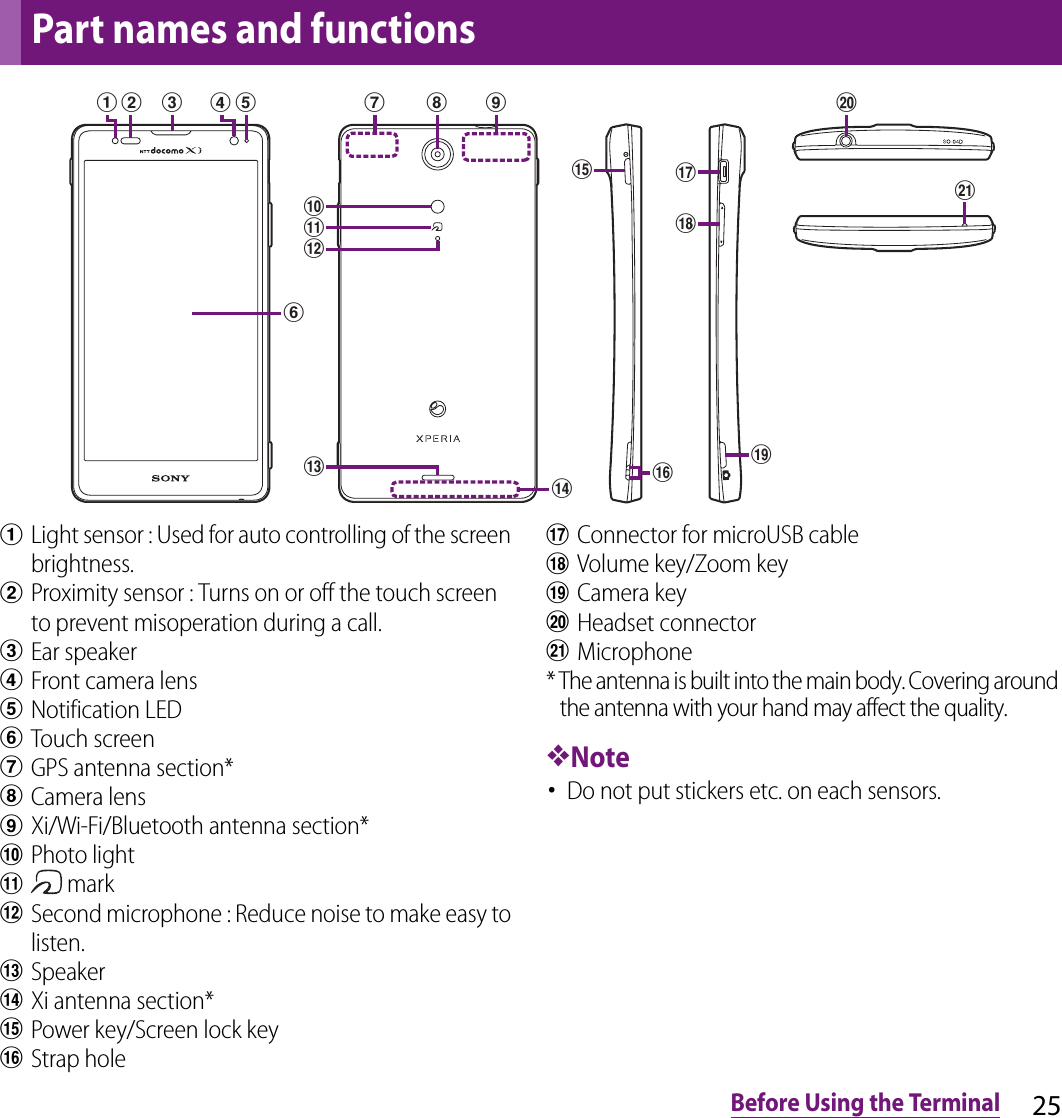
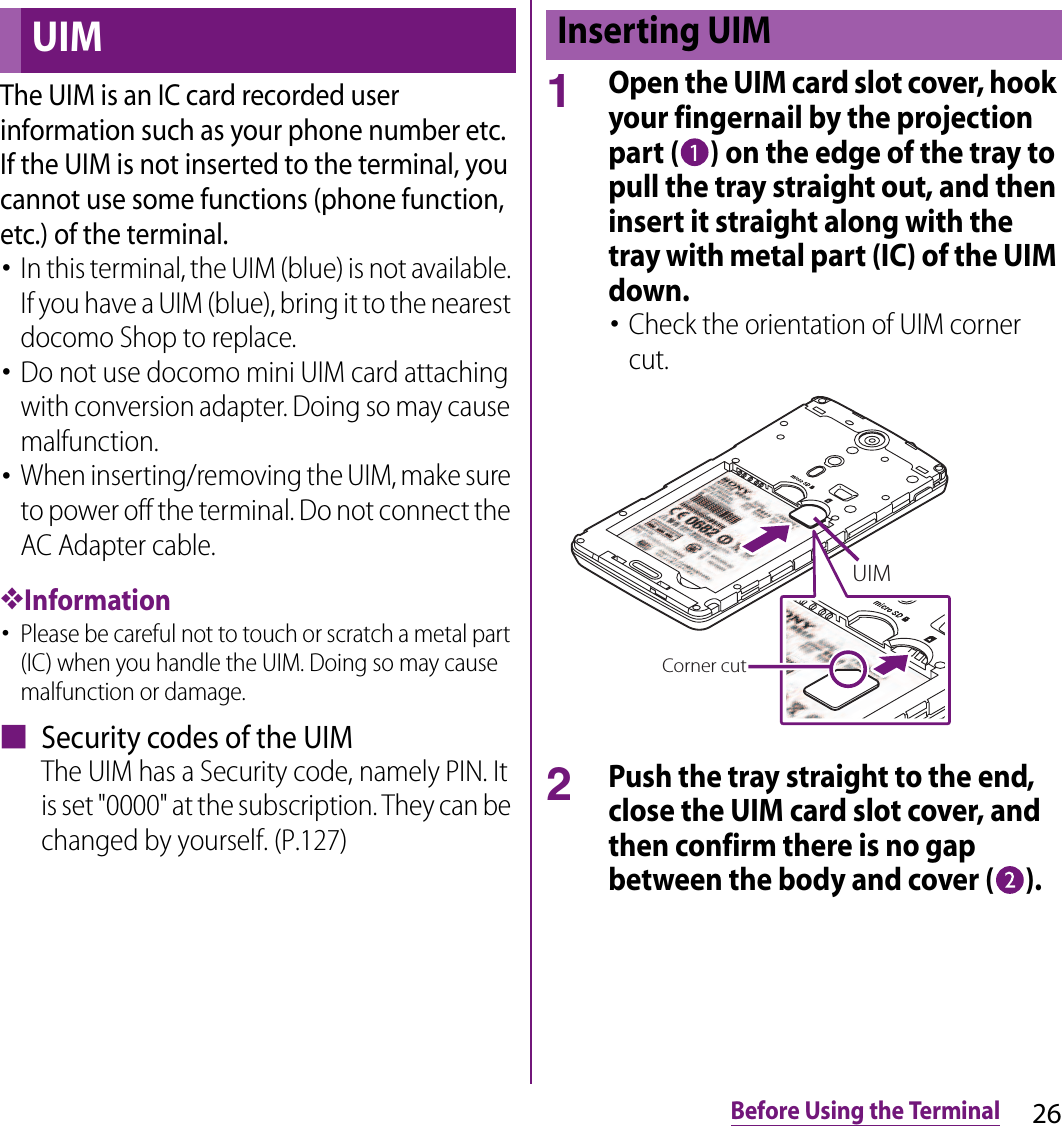
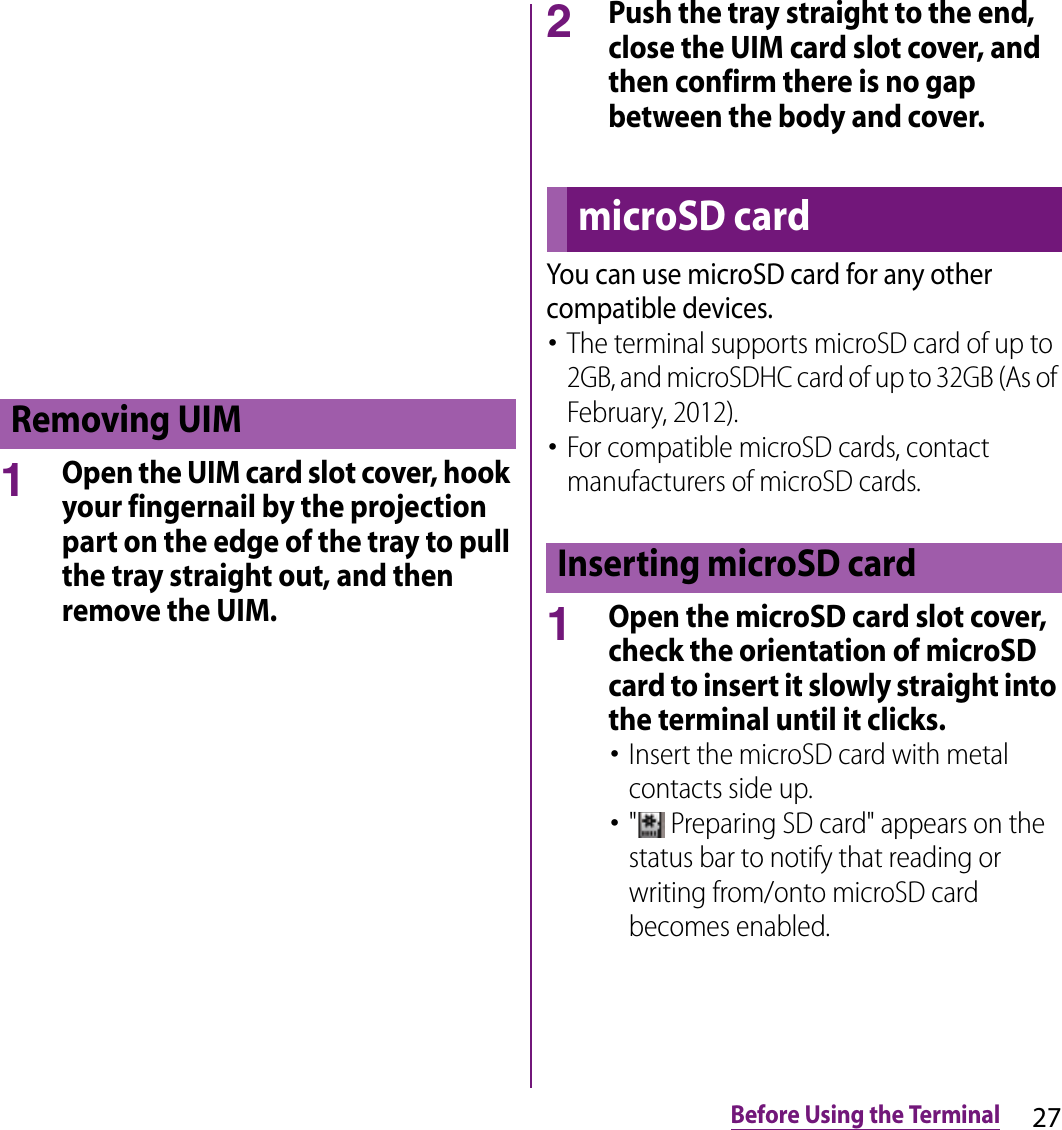
![28Before Using the Terminal2Close the microSD card slot cover and confirm there is no gap between the body and cover ( ).Make sure to unmount (disable reading and writing) microSD card before removing.1From the Home screen, tap t and tap [Settings]u[Storage]u[Unmount SD card].・When unmounting microSD card, " SD card safe to remove" appears in the status bar to notify that reading or writing from/onto microSD card becomes disabled.2Open the microSD card slot cover and insert the microSD card straight into the slot all the way until it clicks.3Pull out microSD card slowly.・" Removed SD card" appears on the status bar to notify that microSD card is removed.Removing microSD card](https://usermanual.wiki/Sony/PM-0000.08-user-guide/User-Guide-1725539-Page-30.png)
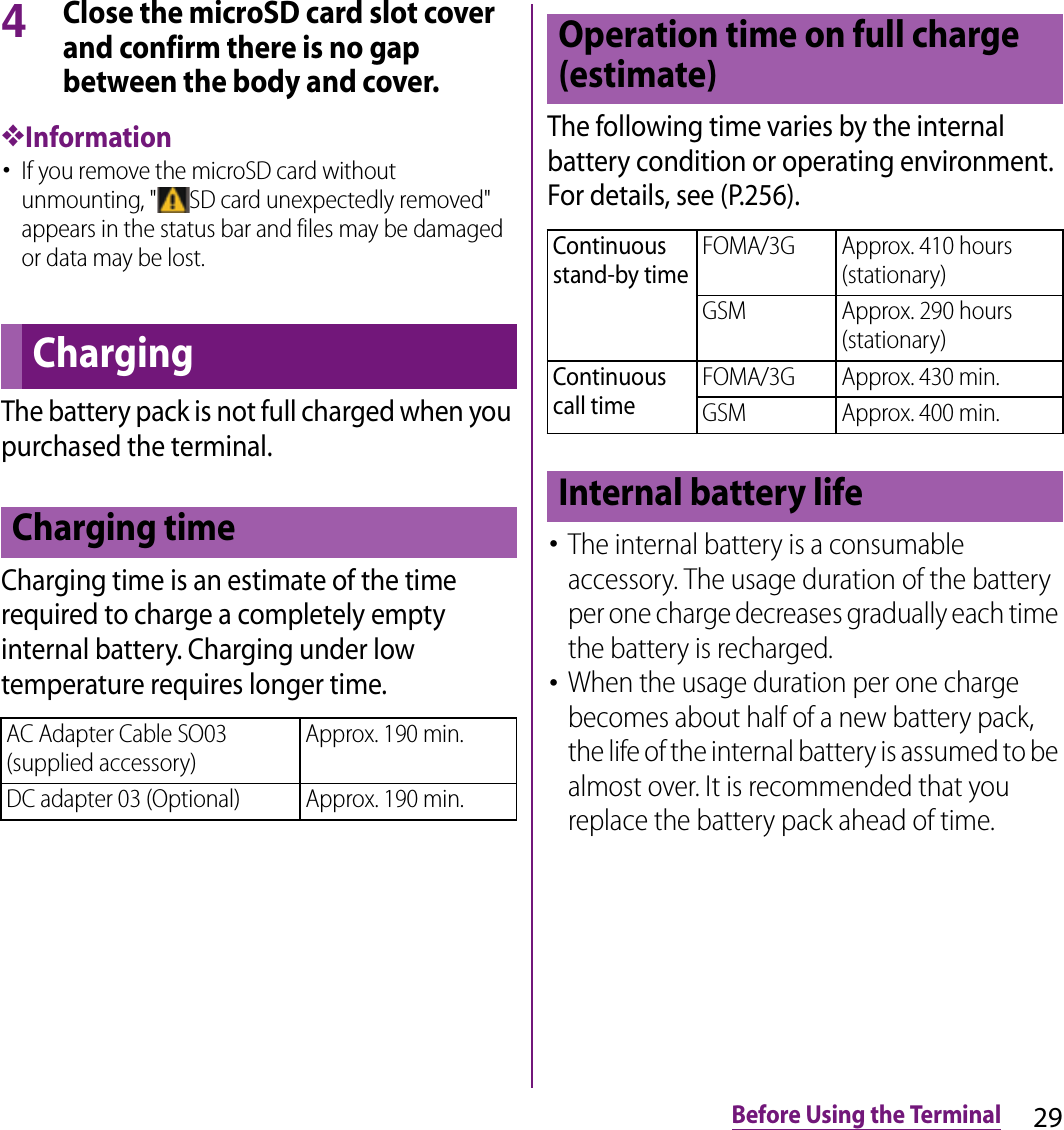
![30Before Using the Terminal・The supplied AC adapter's power plug is compatible with AC 100 V to 240 V. For using the terminal overseas, a plug adapter that fits the electrical outlets in the country you stay is needed. Do not use an electrical transformer for overseas use to charge the terminal.・Use the supplied AC Adapter cable for charging.・When charging starts, the notification LED turns on in red/orange/green. Green means the remaining battery level reaches 90% or more. To check the battery level, tap tfrom the Home screen, then tap [Settings]u[About phone]u[Status] and check "Battery level". When charging is completed, "100%" is displayed in the battery level.・When you start charging the battery with the terminal powered off, the power turns on. However, you cannot operate the terminal. Do not charge the battery in a place where the use is prohibited such as in airplane or hospital.Do not charge the battery pack for a long time (several days)・If you remain charging the terminal for a long time, the power supply starts from the internal battery after completion of charging. The usage time duration may be short. In that case, please charge it again correctly. For recharging, remove the terminal from the AC Adapter cable and reconnect it again.For charging, attach the backside cover to the terminal. For the backside cover, see "Part names and functions" (P.29).1Insert the supplied microUSB cable with the microUSB plug engraved side facing up into the connecting jack of the supplied desktop holder ( ).2Insert the microUSB cable horizontally with the USB plug engraved side facing up into the USB connecting jack of the supplied AC Adapter, and insert the AC Adapter plug to the power outlet.ChargingCharging with the desktop holder](https://usermanual.wiki/Sony/PM-0000.08-user-guide/User-Guide-1725539-Page-32.png)
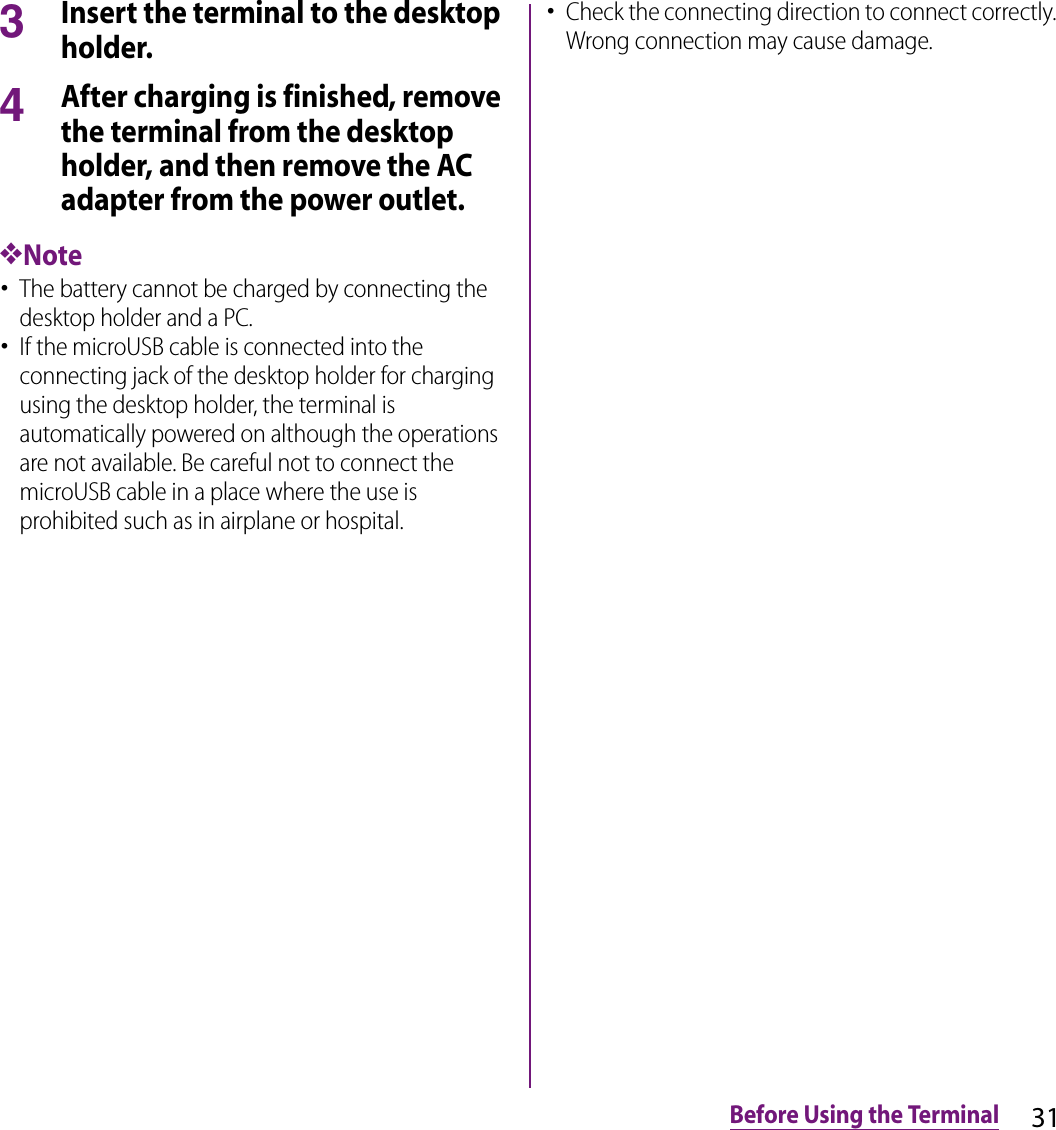
![32Before Using the Terminal1Open the microUSB connecting jack cover, and insert the microUSB cable horizontally with the microUSB plug engraved side facing down into the microUSB connecting jack of the terminal.2Insert the microUSB cable horizontally with the USB plug engraved side facing up into the USB connecting jack of the supplied AC Adapter, and insert the AC Adapter plug to the power outlet.3When the charging is completed, remove the microUSB plug of the microUSB cable from the terminal.4Remove the AC Adapter from the power outlet.❖Note・If the microUSB cable is connected into the USB connecting jack for charging etc., the terminal is automatically powered on although the operations are not available. Be careful not to connect the microUSB cable in a place where the use is prohibited such as in airplane or hospital.1Open the microUSB connecting jack cover, and insert the microUSB cable horizontally with the microUSB plug engraved side facing down into the microUSB connecting jack of the terminal.2Insert the USB plug of the microUSB cable horizontally into the USB port of a PC.・When "PC Companion software" screen appears on the terminal, tap [Skip].・When a screen for new hardware detection etc. appears on the PC, select [Cancel].3When the charging is completed, remove the microUSB plug of the microUSB cable from the terminal.4Remove the USB plug of the microUSB cable from the USB port of the PC.❖Note・If the microUSB cable is connected into the USB connecting jack for charging etc., the terminal is automatically powered on although the operations are not available. Be careful not to connect the microUSB cable in a place where the use is prohibited such as in airplane or hospital.Charging with AC adapter Charging with a PC](https://usermanual.wiki/Sony/PM-0000.08-user-guide/User-Guide-1725539-Page-34.png)
![34Before Using the Terminal1Press and hold p for over a second.・Phone options menu appears.2Tap [Power off].3Tap [OK].You can force the terminal quit if the screen does not respond or the power cannot be turned off.1Press and hold p and upper of m at the same time for approximately 10 seconds.2Lift up your finger after the terminal vibrates 3 times.・The terminal is forced quit and the power turns off.❖Information・To restart the terminal, press p and upper of m at the same time for approximately 5 seconds, and release your fingers after the terminal vibrates once.When the key lock is set, the screen light turns off. You can avoid the touch screen or button from false operations.・The terminal keys are locked with turning the screen light off after the specified time duration.1Press p.❖Information・For details on settings for turning the backlight off and the duration of time before the key lock activation, see "Adjusting the idle time before the screen turns off" (P.123).・There is no function to deactivate the key lock.・You can check the notifications or activate application even if you do not unlock the keys. For details, refer to "Setting information displayed on the key unlock screen" (P.123).・If you set the screen lock, entering the pattern, PIN or password is needed when the key lock is canceled. For setting the screen lock, see "Screen lock" (P.127).Turning power offPerforming force-quit Setting key lock](https://usermanual.wiki/Sony/PM-0000.08-user-guide/User-Guide-1725539-Page-36.png)
![35Before Using the TerminalA key unlocking screen appears when turning the power on or the backlight on by pressing p.1Touch and drag to until it laps over.❖Information・ appears on the right until you touch . Touch and drag left to switch the manner mode on and off without unlocking the keys or screen lock.When you turn on the terminal for the first time, Setup guide appears to set up the display language, wireless network, online services, etc. and to import contacts.❖Information・You can set or change the items later as required.To change the settings later, from the Home screen, tap , then tap [Settings] or [Setup guide] to set up from the menu.1Press and hold p for over a second.・A screen for selecting language appears.2Tap [English (United States)]u[Done].・"Welcome!" screen appears and you can learn how to use the function and make initial settings.3Tap .・The Internet connection screen appears. Tap [Mobile network and Wi-Fi] or [Wi-Fi only] to select.Unlocking the keysKey lockInitial settings (Setup guide)](https://usermanual.wiki/Sony/PM-0000.08-user-guide/User-Guide-1725539-Page-37.png)
![36Before Using the Terminal4Tap .・The wireless network screen appears. Tap [Search for networks] to add Wi-Fi network.5Tap .・A service screen appears. Make settings of "Google (P.132)", "Facebook (P.133)", "Exchange ActiveSync (P.144)".6Tap .・Automatic renewal screen appears. Tap [Synchronize automatically] or [No thank you] to select.7Tap .・The import contacts screen appears. For information on import contacts, see "Using PhoneBookCopy" (P.94).8Tap .・Preferred applications screen appears. Tap either [doocmo applications] or [Xperia™ applications] to select.9Tap u[Finish].・Initial settings (Setup guide) end and an initial setting screen for docomo service appears.10Tap .・Application batch installation screen appears. Tap [Install] or [Not install] to select.11Tap .・Osaifu-Keitai screen appears. Tap [Set] or [Not set] to select. If you select [Set], the initial setting screen for Osaifu-Keitai appears. Follow the onscreen instructions.12Tap .・A setting screen for docomo application password appears. Tap [Set] and enter a password.13Tap .・A setting screen for location provision appears. Tap any of [Location providing ON]/[Location providing OFF]/[Unknown blocking] to select.14Tap u[OK].・A home screen appears.❖Information・Make sure to check if the data connection is available (3G/GPRS) before setup online services. For checking the data connection status, see "Status icon" (P.41).](https://usermanual.wiki/Sony/PM-0000.08-user-guide/User-Guide-1725539-Page-38.png)
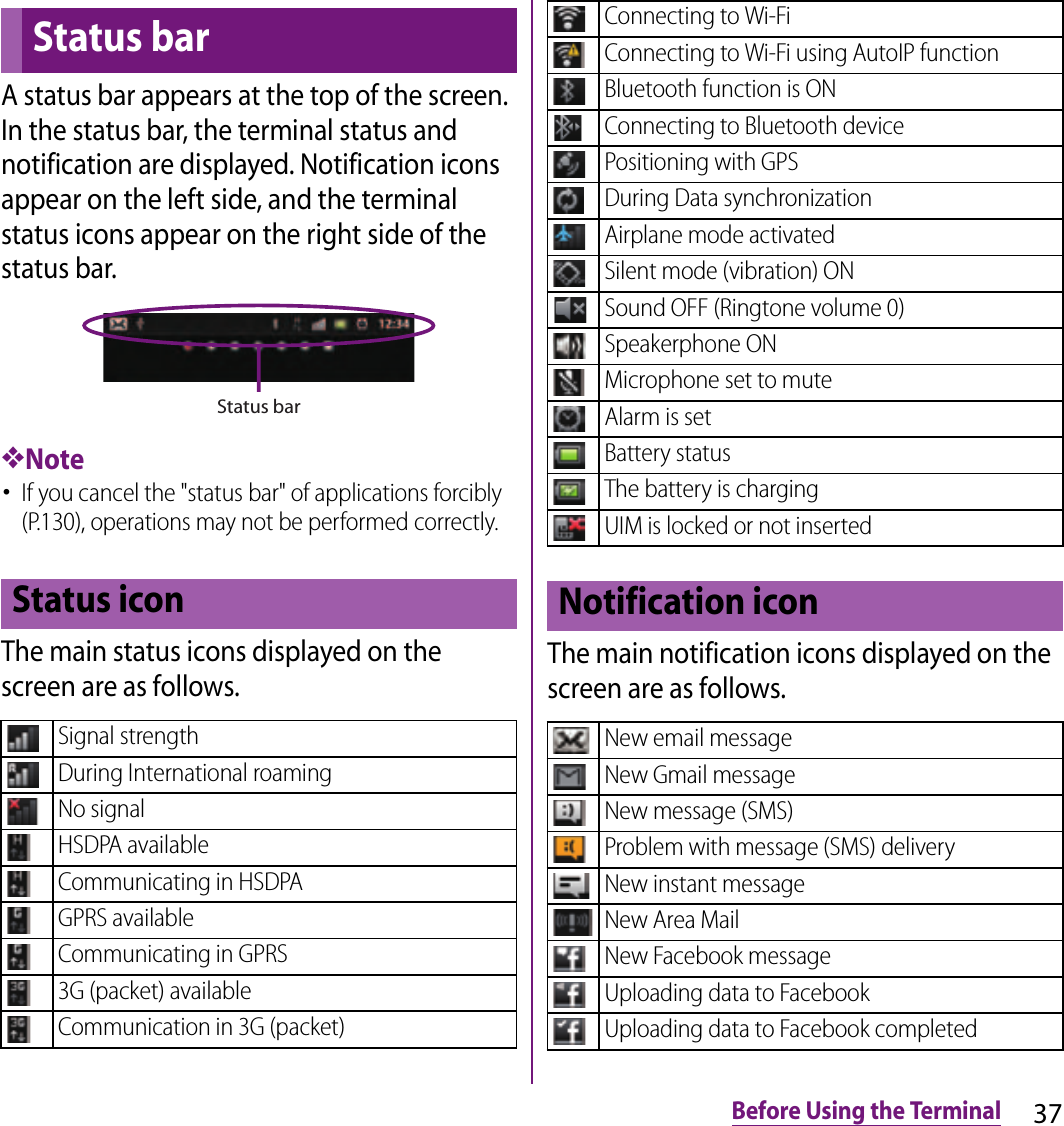
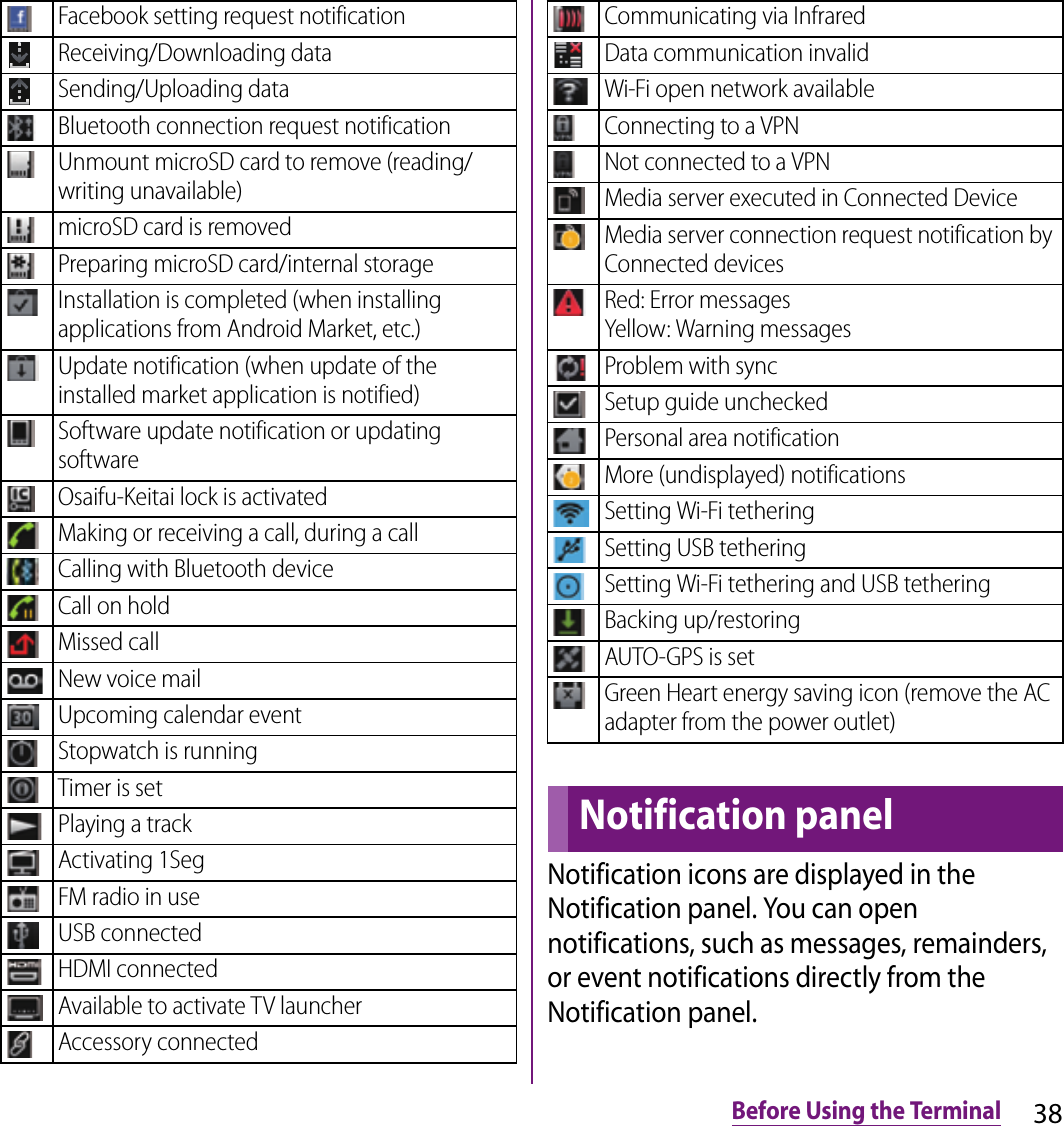
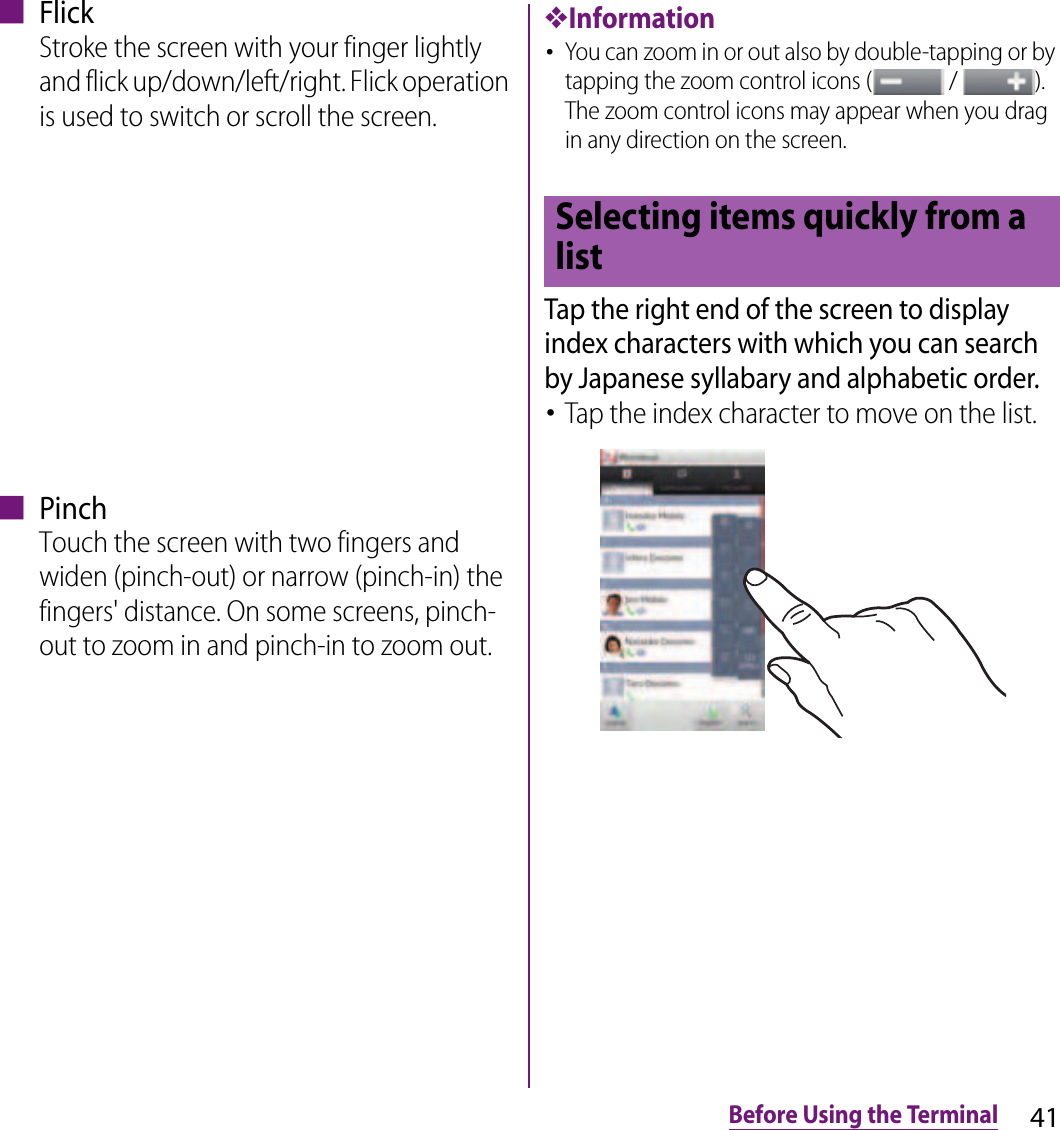
![39Before Using the Terminal1Drag the status bar downwards.・Tap x to close the notification panel.1On the Notification panel, tap [Clear].❖Information・Some notifications cannot be cleared.Notification LED provides information on the terminal status, incoming/receiving, etc.Opening/Closing the Notification panelClearing contents on the Notification panelNotication panelNotification LEDLED statusStatus IndicationRedThe battery is charging when the remaining battery level is 10% or less.Flashing redThe remaining battery level is 10% or less.GreenThe battery is charging when the remaining battery level is 90% or more.Flashing greenReceived Gmail mails while backlight is off exist.Flashing blueWhile backlight is off, missed calls/incoming messages (SMS)/new email messages are notified.OrangeThe battery is charging when the remaining battery level is 11% - 89%.Flashing whitemicroSD card is mounted/unmounted.](https://usermanual.wiki/Sony/PM-0000.08-user-guide/User-Guide-1725539-Page-41.png)
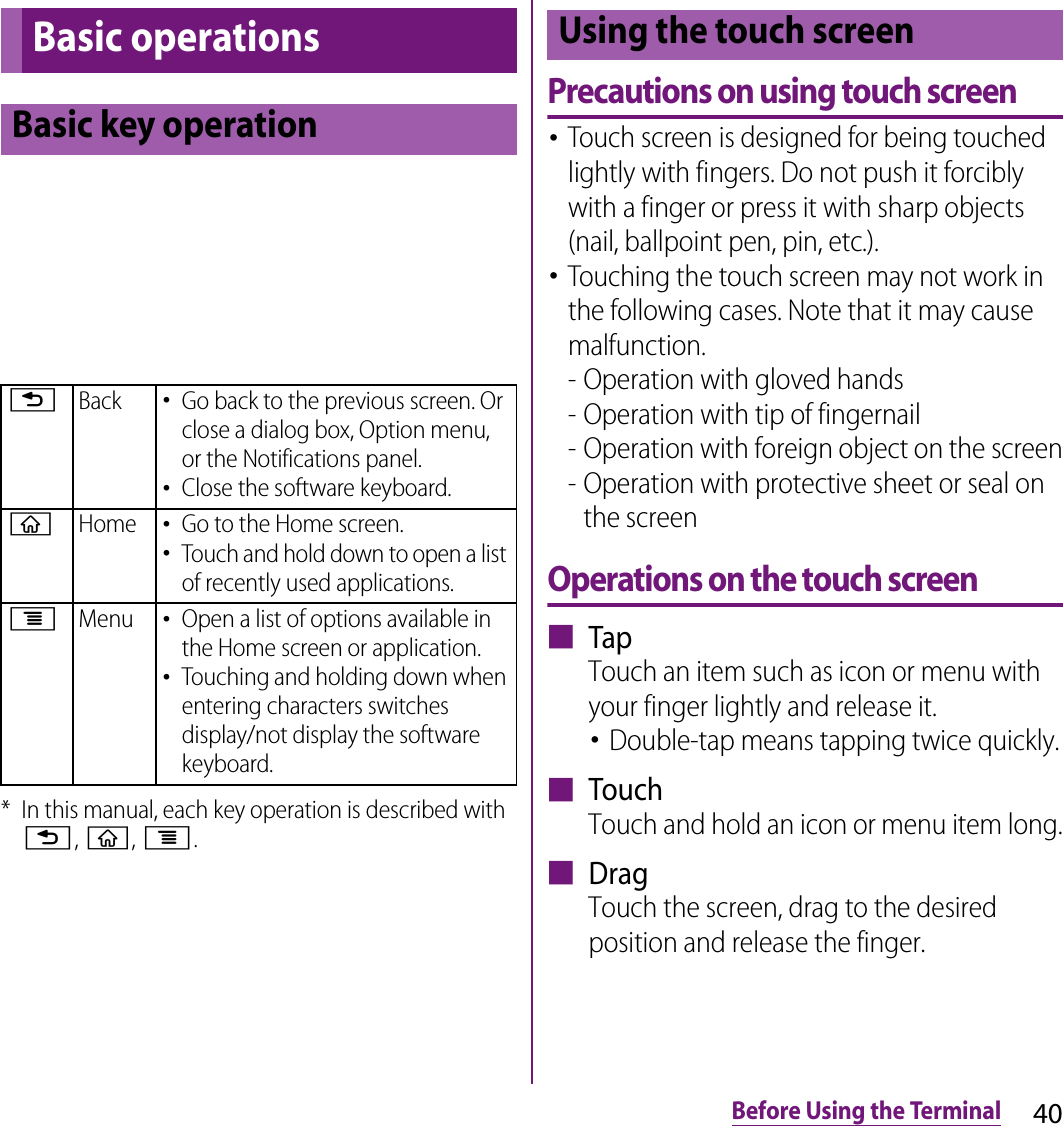
![42Before Using the TerminalYou can switch on/off of the option settings by marking or unmarking the checkboxes or radio buttons.・To switch on/off of the option setting, tap the checkbox or radio button.■ Checkboxes■ Radio buttonEnter a word in the search box to browse the information in the terminal or on the Internet.1From the Home screen, tap , then tap [Google Search].・For the first time to join Latitude, a message confirming whether to agree to Google's privacy policy appears. Select [Agree] or [Disagree].・The software keyboard appears.2Enter a search word.・Search suggestions appear as you enter a character.・For character entry, see "Character entry" (P.47).・To enter a new search word, tap .3Tap a search item or .❖Information・Tap on the right of the search box to input a search word by voice to browse the Internet.Marking or unmarking option checkboxMarkUnmarkMarkUnmarkSearching information in the terminal and web pages](https://usermanual.wiki/Sony/PM-0000.08-user-guide/User-Guide-1725539-Page-44.png)
![43Before Using the TerminalYou can set search engines to use for Quick search box or set search objectives in the terminal.1From the Home screen, tap , then tap [Google Search].2Tap t and then [Search settings].・A search settings screen appears. You can set the following items.To enter characters, use the software keyboard which appears when you tap the character input box in a message, phonebook, etc.❖Information・To return to the previous screen from the character entry screen, tap x.In this terminal, you can select Input method (keyboard type) from "Xperia™ Chinese keyboard", "Xperia™ Japanese keyboard" or "Xperia™ keyboard".1On a character entry screen, touch and hold the text box.2Tap [Input method]u[Xperia™ Chinese keyboard]/[Xperia™ Japanese keyboard]/[Xperia™ keyboard].Search settingsGoogle searchSet whether to display search options when a search word is entered, or whether to reflect the previous search result in the search options. You can also open the web search log settings page by Browser.・You need to create your Google account.Searchable itemsChange the search range by marking/unmarking data categories (Web, Apps, Contacts, Email, Messaging, Music player, OfficeSuite, Phonebook, Voice Search) in the terminal.Clear shortcutsSet not to display recently selected search results.Character entrySelecting input methodXperia™ Chinese keyboardSelect to enter Chinese.Xperia™ Japanese keyboardSelect to enter Japanese.Xperia™ keyboardSelect a language for text entry. Select to enter language other than Japanese.](https://usermanual.wiki/Sony/PM-0000.08-user-guide/User-Guide-1725539-Page-45.png)
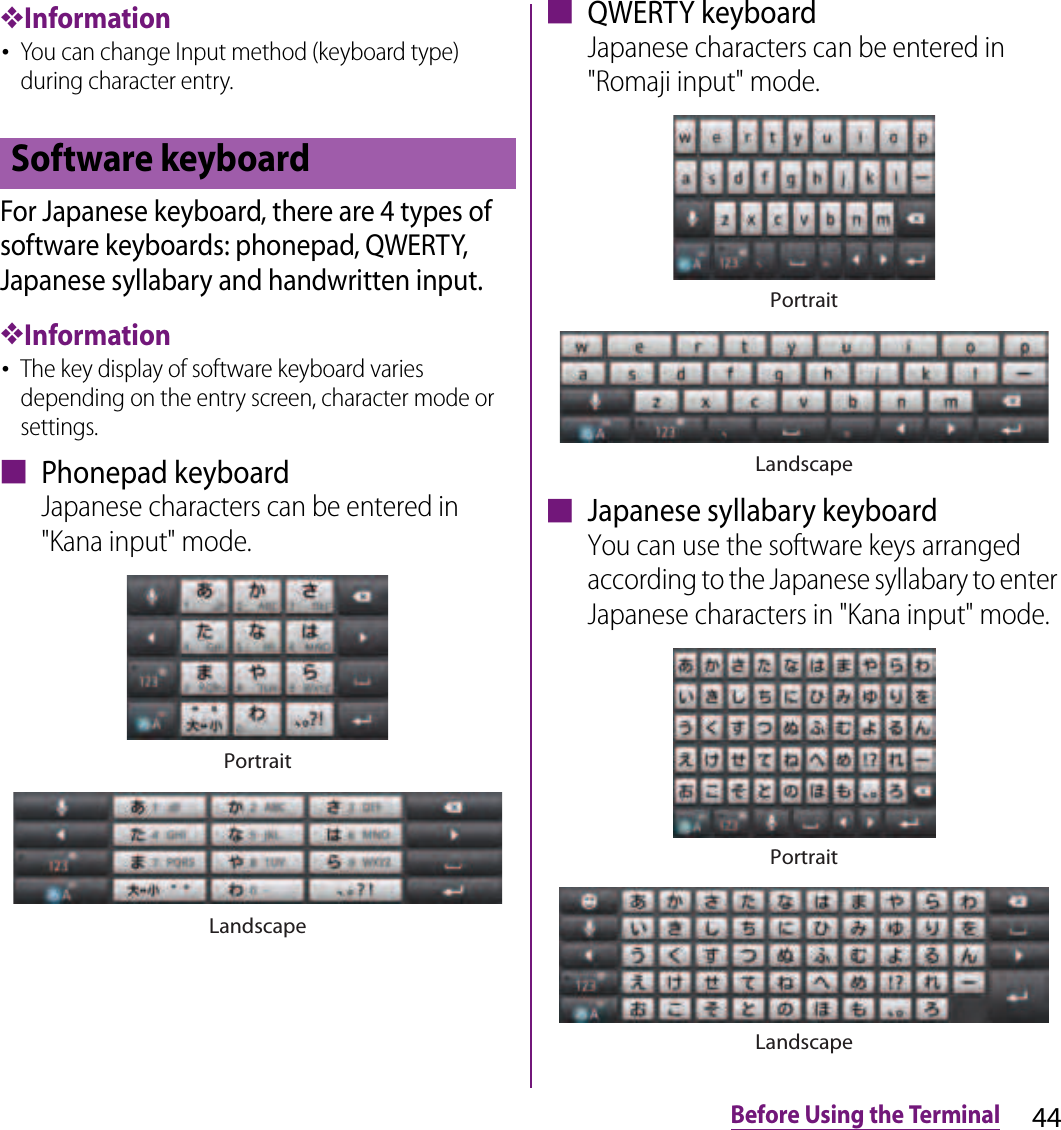
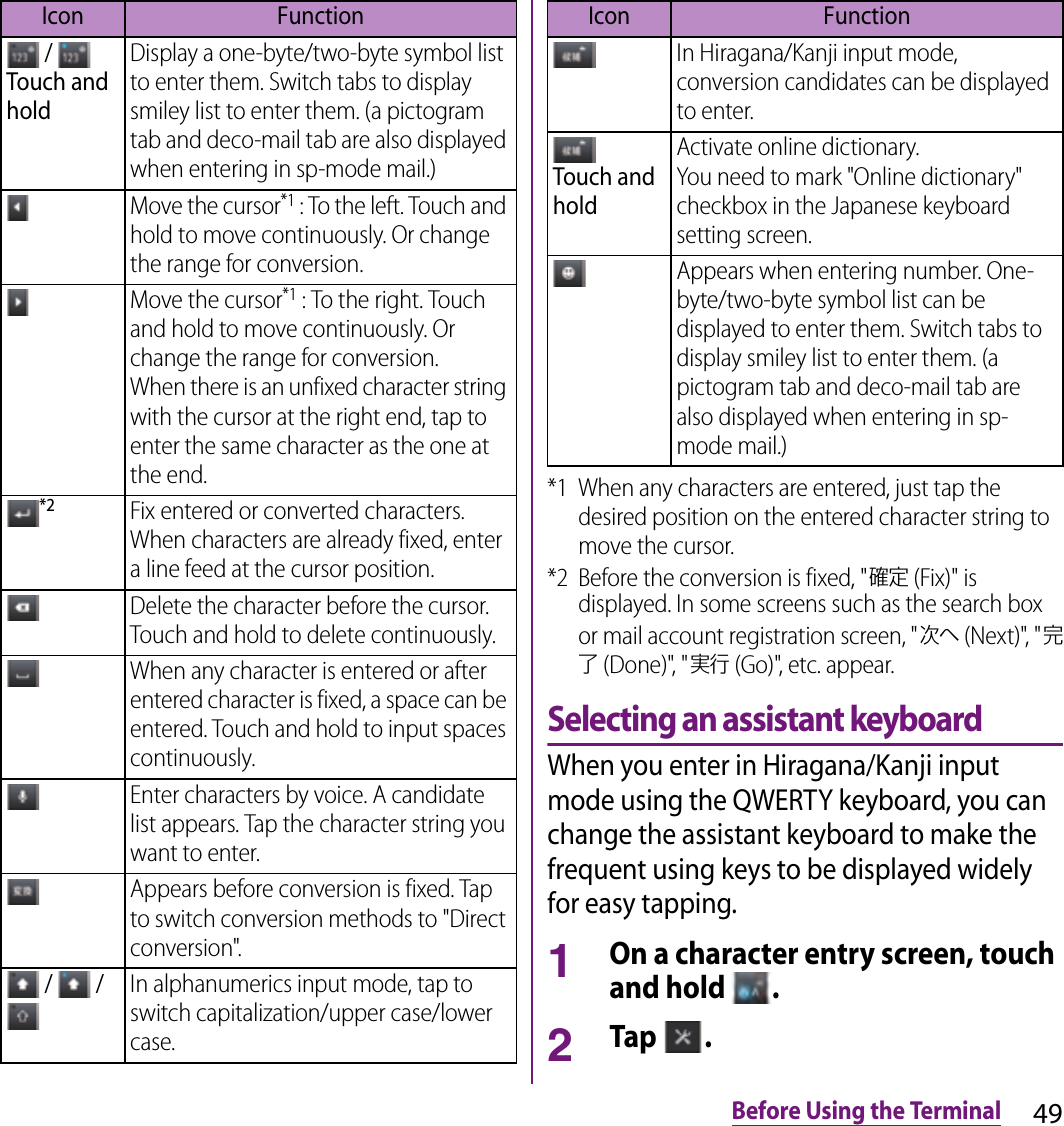
![45Before Using the Terminal■ Handwritten inputJapanese characters can be entered in "Handwritten input" mode.1On a character entry screen, touch and hold .2Tap / / / / / / / .・ : The phonepad keyboard appears.・ : The QWERTY keyboard appears.・ : The Japanese syllabary keyboard appears.・ : The handwritten input appears.・Tap to display Japanese keyboard settings screen and you can check/change the settings.・Tap to display plug-in applications list. Tap [Contact Picker 2.3] to quote contacts to enter.・ : Switch one-byte/two-byte character.・ : Hide the software keyboard.❖Information・The phonepad keyboard is set by default. Also, "Auto capitalization", "Word suggestions", "Error correction" and "Pop-up on key press" are set to on.You can use the software keys arranged according to the Japanese syllabary to enter Japanese characters in "Kana input" mode.The main functions of the touch-keys・To change character modes and other entering operations, tap the following icons on the phonepad keyboard.Switching the keyboardPortraitLandscapeEntering characters on the phonepad keyboardIcon Function / Each time you tap, the character mode switches "Hiragana/Kanji" → "Alphanumeric" in order and a status icon, → / / appears in the status bar.](https://usermanual.wiki/Sony/PM-0000.08-user-guide/User-Guide-1725539-Page-47.png)
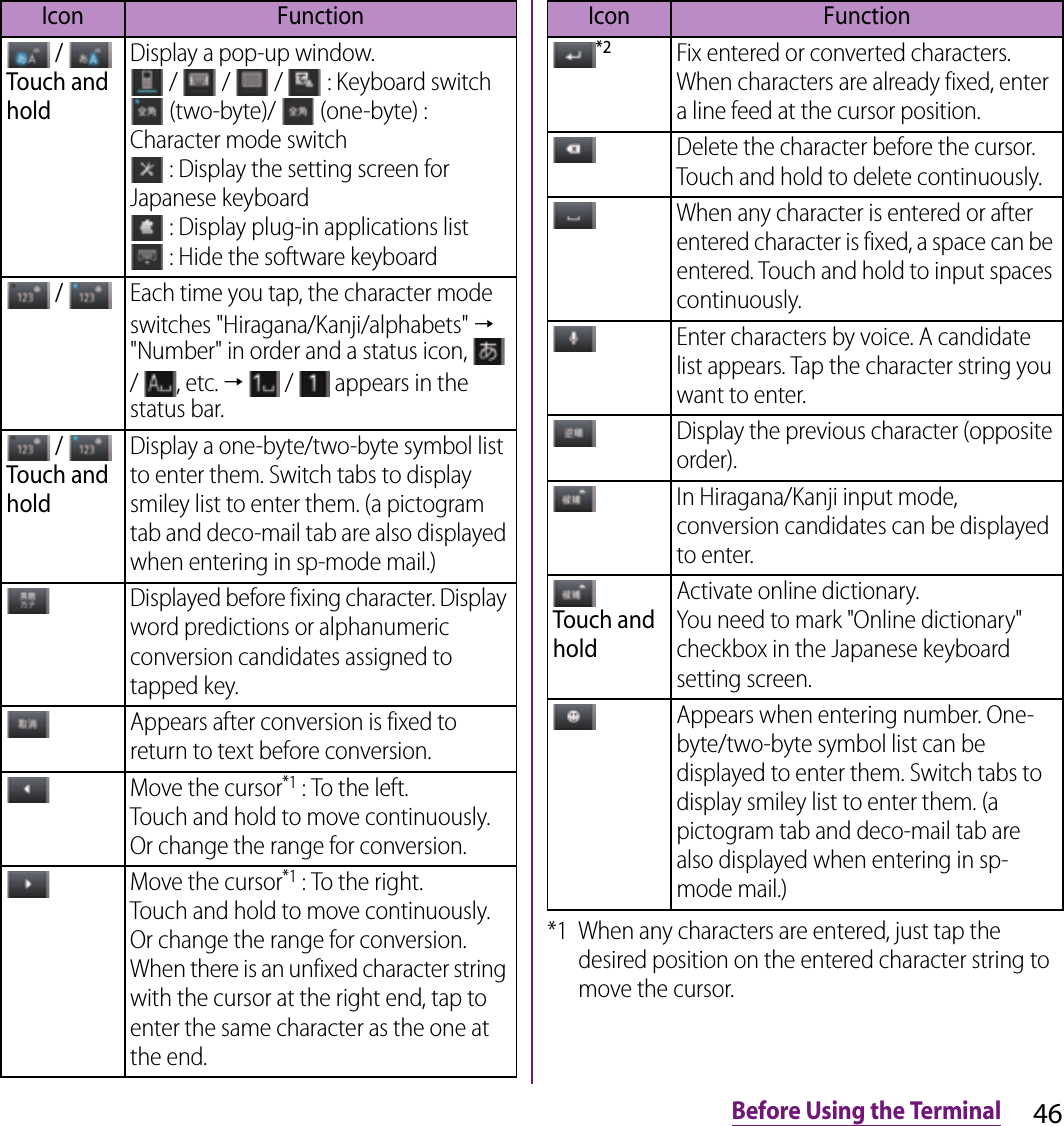
![47Before Using the Terminal*2 Before the conversion is fixed, "確定 (Fix)" is displayed. In some screens such as the search box or mail account registration screen, "次へ (Next)", "完了 (Done)", "実行 (Go)", etc. appear.Settings of key entry■ Flick inputFlick up/down/left/right to enter characters in each column of kana syllabary.・Ex: Entering characters in "な" columnYou can enter "な" only by tapping. Flick left for "に", up for "ぬ", right for "ね" and down for "の".・To switch upper/lower case or change to voiced sound, flick or tap .・Flick input is available by default. You can cancel by the following operation beforehand.aFrom the Home screen, tap t and tap [Settings].bTap [Language & keyboard] → [Xperia™ Japanese keyboard] → [On-screen keyboard settings].cUnmark [Flick input] checkbox.・To change sensitivity of the flick input, on the Japanese keyboard setting screen, tap [On-screen keyboard settings]u[Select sensitivity], then select "High"/"Medium (default)"/"Low".■ Toggle entryTap the same key continuously to enter the assigned character.To enter characters assigned to the same key continuously, operate the followings.・Ex: To enter "あお"aTap "あ" once.bTap , and tap "あ" 5 times.・Ex: To enter "ca"aTap "abc" 3 times.bTap *.cTap "abc" once.※In some applications, tap in Step b.ぬねにのなFlick leftFlick up TapFlick rightFlick down](https://usermanual.wiki/Sony/PM-0000.08-user-guide/User-Guide-1725539-Page-49.png)
![48Before Using the Terminal❖Information・When a certain time is passed after the key tapped, the tapped key's highlighter goes off and you can enter a character assigned to the same key consecutively without tapping .・To switch upper/lower case or change to voiced/semi-voiced sound, tap .・Multitap text input is available by default. You can cancel by the following operation beforehand.aFrom the Home screen, tap t and tap [Settings].bTap [Language & keyboard] → [Xperia™ Japanese keyboard] → [On-screen keyboard settings].cUnmark [Multitap text input] checkbox.Use the QWERTY keyboard to enter Japanese characters in "Romaji input" mode.The main functions of the touch-keys・To change character modes and other input operations, tap the following icons on the QWERTY keyboard.Entering characters on the QWERTY keyboardIcon Function / Each time you tap, the character mode switches "Hiragana/Kanji" → "Alphanumeric" in order and a status icon, → / / / / / appears in the status bar. / Touch and holdDisplay a pop-up window. / / / : Keyboard switch (two-byte)/ (one-byte) : Character mode switch : Display the setting screen for Japanese keyboard : Display plug-in applications list : Hide the software keyboard / Each time you tap, the character mode switches "Hiragana/Kanji/alphabets" → "Number/symbol" in order and a status icon, / , etc. → / appears in the status bar.](https://usermanual.wiki/Sony/PM-0000.08-user-guide/User-Guide-1725539-Page-50.png)
![50Before Using the Terminal3Tap [On-screen keyboard settings]u [Choose key type].4Tap any of [Static key resizing]/[Key highlight while typing]/[Dynamic key resizing with highlight]/[Off].■ Static key resizingWiden frequent using key for easy tapping.■ Key highlight while typingWiden frequent using key and highlight the key that is predicted for the next entry.■ Dynamic key resizing with highlightWiden the key that is predicted for the next entry much further and highlight it.■ OffDisplay equally the width of each key.Changing display keys・For Japanese input, you can set not to display less-frequent-used keys (Q, X, C, etc.) on the QWERTY keyboard.1On a character entry screen, touch and hold .2Tap .](https://usermanual.wiki/Sony/PM-0000.08-user-guide/User-Guide-1725539-Page-52.png)
![51Before Using the Terminal3Tap [On-screen keyboard settings]u[Select display keys].・When the assist keyboard (P.53) is set to "Off", [Select display keys] cannot be selected and you cannot change a displaying key.4Unmark the checkbox of the key you want to hide.5Tap [OK].Customizing keyboard・You can switch the position for symbols of the keyboard displayed when entering numbers.1On a character entry screen, touch and hold .2Tap .3Tap [On-screen keyboard settings]u[Keyboard customization].4Tap a symbol you want to change and delete character previously set, then enter a character to display.・Only one character (two-byte or one-byte character) can be entered.5Tap [OK]u[OK].❖Information・To return to the default status, in Step 3, tap [Reset]u[OK].](https://usermanual.wiki/Sony/PM-0000.08-user-guide/User-Guide-1725539-Page-53.png)
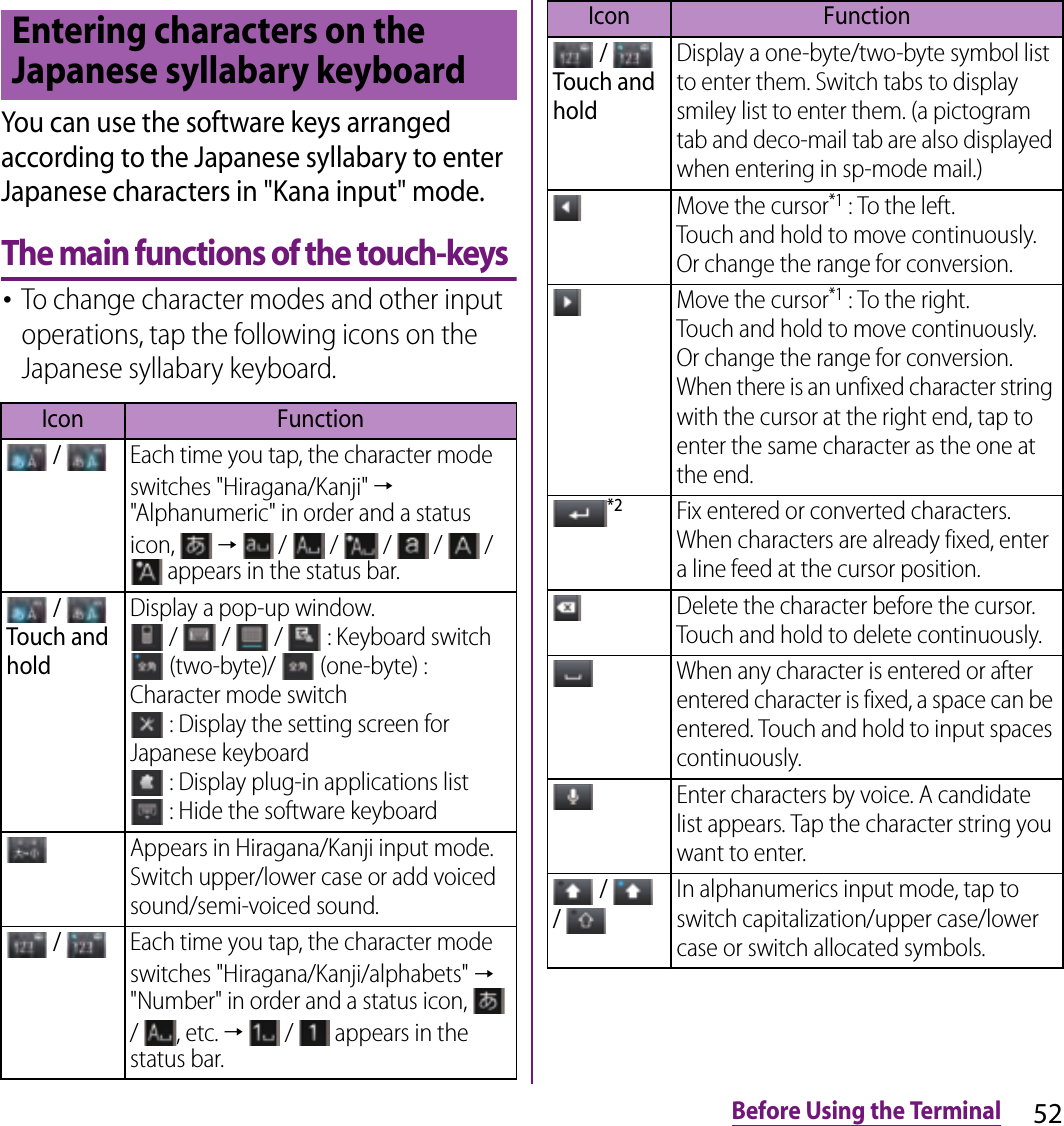
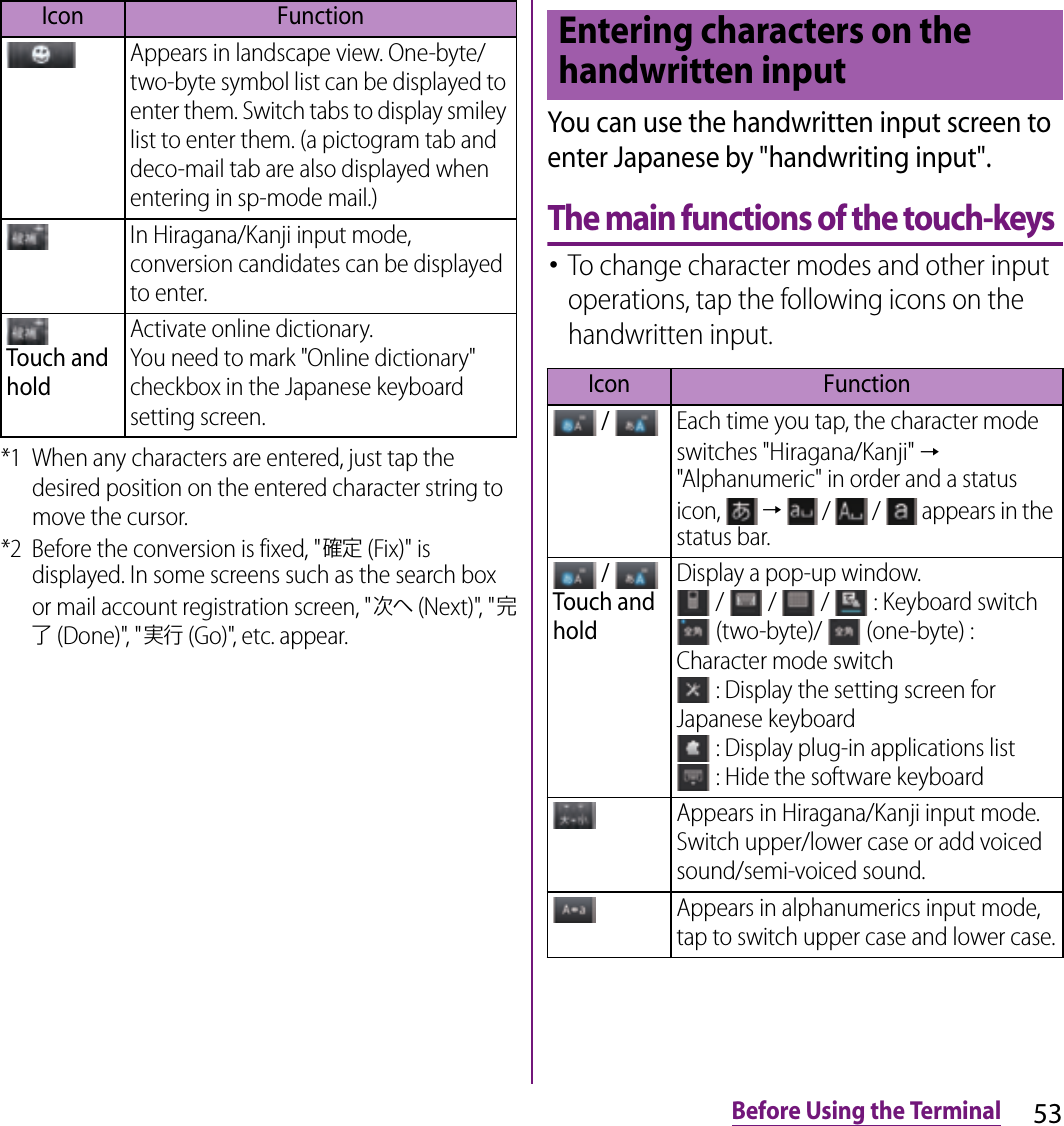

![55Before Using the Terminal❖Information・When you enter character by handwritten input for the first time, a screen indicating how to input appears. Tap [OK] or x.・In handwritten input, hiragana, alphabet, number, some symbols can be entered.・You can enter a character continuously without deleting entered character.・For voiced sound and semi voiced sound mark, enter in the right upper part of the handwritten input screen.・For punctuation mark and lower case, enter in the lower part from the center of the handwritten input.・For entering alphabet, enter it with reference to lower horizontal line of the handwritten input screen.While entering characters, touch and hold the text box to display the "Edit text" menu and edit entered text.Editing textSelect wordDrag the slider to select a part of entered text.Select allSelect all entered text.Input methodP.47Add "xx" to dictionaryAdd the entered text to the User dictionary.CutDisplay when [Select word]/[Select all] is selected. Cut the text selected by [Select word]/[Select all].CopyDisplay when [Select word]/[Select all] is selected. Copy the text selected by [Select word]/[Select all].PasteDisplay when [Cut]/[Copy] is selected. Paste the cut/copied text by [Cut]/[Copy].](https://usermanual.wiki/Sony/PM-0000.08-user-guide/User-Guide-1725539-Page-57.png)
![56Before Using the TerminalFor each type of keyboard, you can make settings related to character entry.1From the Home screen, tap t and tap [Settings]u[Language & keyboard].2Tap [Xperia™ keyboard]/[Xperia™ Chinese keyboard]/[Xperia™ Japanese keyboard].・The settings screen for each keyboard appears. Tap an item displayed on the screen to set.❖Information・The items vary depending on the keyboard type.Make keyboard settings such as Key sound, Vibrate, etc.1From the Home screen, tap t and tap [Settings]u[Language & keyboard]u[Xperia™ Japanese keyboard].・The setting screen for Japanese keyboard appears.2Tap [On-screen keyboard settings].・Tap (mark/unmark) an item in "Common on-screen keyboard settings" to set.Setting character entry Setting Japanese keyboardCommon settings of software keyboardKey soundSet whether to sound at the time of key tapping.VibrateSet whether to vibrate at the time of key tapping.Pop-up on key pressSet to popup the key you have tapped at the time of key tapping.Keep keyboard typeSet to stabilize the last status of keyboard (phonepad/QWERTY/Japanese syllabary keyboard/handwritten input) in the each portrait/landscape screen by kana/alphabet/number input mode.](https://usermanual.wiki/Sony/PM-0000.08-user-guide/User-Guide-1725539-Page-58.png)
![57Before Using the TerminalAuto capitalizationSet to capitalize automatically the top letter you enter in English input mode.1From the Home screen, tap t and tap [Settings]u[Language & keyboard]u[Xperia™ Japanese keyboard].2Mark [Auto capitalization].You can change keyboard skin.1From the Home screen, tap t and tap [Settings]u[Language & keyboard].2Tap [Xperia™ Japanese keyboard]u[Select keyboard skin].3Select from displayed keyboards and tap [Set skin].❖Information・To download and add keyboard skins from a website, tap [Search for skin] in Step 3. Some keyboard skins downloaded from website may not support the terminal. To delete the downloaded keyboard skin, from the Home screen, tap t, and tap [Settings]u[Applications]u[Manage applications], and tap the keyboard skin you want to delete in the "Downloaded" tab, and then tap [Uninstall]u[OK]u[OK].The Word suggestion function shows predicted conversion candidates when you enter Japanese/English characters. Mark the checkbox of Word suggestion checkbox to set options "Error correction" and "Auto space". These options help you entering characters with ease.Setting Word suggestion1From the Home screen, tap t and tap [Settings]u[Language & keyboard].2Tap [Xperia™ Japanese keyboard].3Mark [Word suggestions] checkbox.❖Information・Flick or drag downward in the word suggestion field to enlarge suggestion field in which you can see more word suggestions and to hide the keyboard. Tap [前候補 (previous suggestion)]/[次候補 (next suggestion)]/[確定 (fix)] shown at the bottom of the word suggestions screen to select/fix characters to be entered. To show the software keyboard, tap [戻る (Back)] or x.Keyboard skin settingsWord suggestion settings](https://usermanual.wiki/Sony/PM-0000.08-user-guide/User-Guide-1725539-Page-59.png)
![58Before Using the TerminalSetting Error correction・Error correction corrects mistyped characters and shows conversion candidates before conversion in one-byte alphabet input mode when entering characters with QWERTY keyboard.1From the Home screen, tap t and tap [Settings]u[Language & keyboard].2Tap [Xperia™ Japanese keyboard].3Mark [Error correction] checkbox.Setting Auto space・When selecting English word suggestion, Auto space enters next to the entered character. However, space is not entered automatically in the mail address or URL input fields.1From the Home screen, tap t and tap [Settings]u[Language & keyboard].2Tap [Xperia™ Japanese keyboard].3Mark [Auto space] checkbox.To display the word as the preferred candidate when entering characters, set the user dictionary beforehand.Registering words in user dictionariesThere are 2 types of user dictionaries: "My words Japanese" and "My words English".1From the Home screen, tap t and tap [Settings]u[Language & keyboard].2Tap [Xperia™ Japanese keyboard].3Tap [My words Japanese]/[My words English].4Tap t and [Add].5Tap the character input box for "Reading" and fill it out, then tap [次へ (Next)].6Enter a word in the input box for "Word" and tap [完了 (Done)].7Tap [Save].❖Information・Up to 50 characters (regardless of one-byte or two-byte characters) can be stored for a "Reading" and "Word", and up to 500 items can be stored in the user dictionary.User dictionary settings](https://usermanual.wiki/Sony/PM-0000.08-user-guide/User-Guide-1725539-Page-60.png)
![59Before Using the Terminal・When entering characters, tapping [直変 (Direct conversion)] in the word suggestion field may give priority to some registered words.Editing user dictionary1On the user dictionary screen, select a word you want to edit.2Tap t and [Edit].3Edit the content and tap [Save].Deleting words from user dictionary1On the user dictionary screen, select a word you want to delete.2Tap tand tap [Delete]u[OK].・To delete all words in the list, tap [Delete all]u[OK].Setting Words by learning1From the Home screen, tap t and tap [Settings]u[Language & keyboard].2Tap [Xperia™ Japanese keyboard]u[Learn words].3Mark [Save word while typing].・To reset already learned words, tap [Delete saved words]u[OK].❖Information・To delete learned words individually, touch and hold a word you want to delete and tap [学習データ削除 (Delete learned word)].Setting online dictionaryWhen entering characters, touch and hold to activate online dictionary.1From the Home screen, tap t and tap [Settings]u[Language & keyboard].2Tap [Xperia™ Japanese keyboard]u[Online dictionary].3Tap [Online dictionary].4Read the note and tap [Agree].・[Online dictionary] is marked.Backing up and restoring dictionaryUser dictionary and Words by learning can be backed up onto an internal storage and restored when needed.1From the Home screen, tap t and tap [Settings]u[Language & keyboard].2Tap [Xperia™ Japanese keyboard]u[Backup & restore].3Tap [Backup]/[Restore].](https://usermanual.wiki/Sony/PM-0000.08-user-guide/User-Guide-1725539-Page-61.png)
![60Before Using the Terminal4Mark a dictionary you want to back up or restore from among [My words Japanese], [My words English], or [Learn words].5Tap [Go].・When backing up, a screen asking whether to overwrite the user dictionary on the internal storage appears. When restoring, a screen asking whether to overwrite the user dictionary in the terminal appears.6Tap [OK]u[OK].・The data is backed up or restored.❖Information・If restoring data is failed, user dictionary in the terminal restores to the default.・User dictionary and Words by learning are not backed up onto microSD card.When entering characters, touch and hold and tap to display the plug-in application list and use desired plug-in applications.Using Contact Picker 2.3If contacts are registered to the Contacts, you can use "Contact Picker 2.3" to enter contact information when entering characters. "Contact Picker 2.3" is a preinstalled plug-in application.1On a character entry screen, touch and hold .2Tap .3Tap [Contact Picker 2.3].4On the contacts list screen, tap the contact to be quoted.5Mark the item you want to enter and tap [Done].・If you want to select/deselect all items, tap [Mark all]/[Unmark all].❖Information・On the contacts list screen, tap [History] or [Favorites] to display specified contacts.Adding a plug-in applicationYou can install and add plug-in applications to use when entering characters.1From the Home screen, tap t and tap [Settings]u[Language & keyboard].2Tap [Xperia™ Japanese keyboard]u[Manage extensions].3On the Info screen, tap [OK].・The POBox plug-in setting screen appears.Using a plug-in application](https://usermanual.wiki/Sony/PM-0000.08-user-guide/User-Guide-1725539-Page-62.png)
![61Before Using the Terminal4Tap [Download new extensions].5Tap an application and follow the onscreen instructions.❖Information・Marked plug-in applications in the POBox plug-in setting screen can be activated in the character entry screen. Checkboxes for preinstalled plug-in applications, "Contact Picker 2.3" is marked by default.You can view the detailed explanations on the high performance Japanese keyboard from the basic to application. The latest information can be obtained from the websites for plug-in applications or keyboard skins.1From the Home screen, tap t and tap [Settings]u[Language & keyboard].2Tap [Xperia™ Japanese keyboard]u[POBox Touch User Guide].❖Information・Touch and hold in the handwritten input to activate the handwritten input guide in the POBox Touch User Guide (Japanese) to view the detailed explanations on the handwritten input.POBox Touch User Guide](https://usermanual.wiki/Sony/PM-0000.08-user-guide/User-Guide-1725539-Page-63.png)
![62docomo Palette UIdocomo Palette UIHome screen is a start screen for using applications. You can personalize the Home screen by adding or moving, for example, application shortcuts and widgets, or changing the wallpaper.Tapping y displays Home screen which consists of up to 12 screens you can use flicking left and right.aHome screen position : Current position in 7 home screensbWidget : Google SearchcWidget : i-ChanneldWidget : Machi-charaeShortcuts (applications)fApplications buttongWallpapers❖Information・You can switch the home application between "docomo" and "Xperia™" in the terminal."docomo" is set to the home application by default. To switch the home application, from the Home screen, tap u[Setup guide] and on the Preferred applications screen, [Change now]u[Home screen], or from the Home screen, tap t, [Settings]u[Xperia™]u[Preferred apps settings]u[Home screen]. To switch applications (Home, phonebook (contacts), video or music player) to be used in the terminal all at once, from the Home screen, tap [Preferred apps settings]u[OK], or from the Home screen, tap t, [Settings]u[Xperia™]u[Preferred apps settings]u[Set all to].・When the home application is switched, widgets or shortcuts on the screen may not be displayed correctly depending on home screen layout etc.Switching the Home screen1Flick the Home screen to left or right.・The Home screen switches.❖Information・You can check the current position of the Home screen with at the top of the screen.・Alternatively, display "Home screens" (P.67) and then tap any home screen to switch.Home screenLearning Home screenabcef egd](https://usermanual.wiki/Sony/PM-0000.08-user-guide/User-Guide-1725539-Page-64.png)
![63docomo Palette UIDisplaying a list of home screens1From the Home screen, pinch-in.・A home screen list appears.❖Information・At the left end home screen, tap y or from the Home screen, tap t and tap [Home screens] to display the list.・To return to the home screen, pinch-out, or tap y or x.1From the Home screen, tap t.2Tap [Add].・"Add to home screen" menu appears to change the Home screen.■ Add to home screen❖Information・"Add to home screen" appears also by touching and holding anywhere on the Home screen without icons.Adding a shortcut to the Home screen1In "Add to home screen" menu, tap [Shortcut].2Select a shortcut you want to add.・The shortcut appears on the Home screen.❖Information・Alternatively, you can add from the Home screen, and touch and hold an icon you want to add, tap [Add].Adding to the Home screenShortcutAdd shortcuts of applications or setting screens. (P.67)WidgetAdd widgets. (P.68)FolderCreate new folder or add folders related to the Phonebook. (P.69)KisekaeChange the background of the home screen or application screen, or download from website to add. (P.69)WallpaperChange the wallpaper or download from website to add. (P.69)GroupAdd group shortcut of applications screen. (P.70)](https://usermanual.wiki/Sony/PM-0000.08-user-guide/User-Guide-1725539-Page-65.png)
![64docomo Palette UIAdding a widget to the Home screen1In "Add to home screen" menu, tap [Widget].・A list of widgets appears.2Select an item.❖Information・If you install an application with widget from Android Market, the installed widget is added to the widget list.CalendarDisplay the calendar.Contents HeadlineDisplay the latest contents information of music, video, e-book, etc.docomo location informationDisplay docomo location information application.FacebookView comments of members.Google SearchDisplay the Quick search box.Google+Display Google+, compose article to post.Home screen tipsDisplay tips of the Home screen operation.InfraredDisplay "Send Myself" button and "Receive file" button for infrared communication.iチャネルウィジェット (i-Channel widget)Display the latest information such as news or weather information in ticker.LatitudeView locations of members.Machi-charaDisplay reception of mails or calls information with Machi-chara.MarketDisplay recommended applications of Android Market.Personal areaDisplay personal area.Phonebook Select membersDisplay history of calls or message (SMS) of 3 contacts selected from the Phonebook fixed/at random.Schedule & MemoDisplay memos or photo memos on the calendar.TrafficDisplay necessary time to transfer from your current location to your destination and the widget on the Home screen when you enter a widget name or destination. Tap to confirm the provided traffic condition.YouTubeDisplay the list of frequently played movies and recommended.ドコモ地図ナビウィジェット (DOCOMO map navigation widget)Display a map around current location and neighboring spots](https://usermanual.wiki/Sony/PM-0000.08-user-guide/User-Guide-1725539-Page-66.png)
![65docomo Palette UIAdding a folder to the Home screen1In "Add to home screen" menu, tap [Folder].2Select a folder you want to add.・The folder appears on the Home screen.・You can rename or add items to a folder by selecting [New folder] on the folder selection screen.■RenamingTouch and hold a folder you want to renameuTap [Edit name]uTap the [Folder name] entry box to enter a folder name and tap [OK].■Adding an itemFrom the Home screen, touch and hold a shortcut you want to add to the folderuDrag it onto a folder and lift up your finger.・A shortcut is moved into a folder.❖Information・Alternatively, open a folder by tapping and then touch and hold the title bar to display the [Folder name] entry box to change.Changing Kisekae1In "Add to home screen" menu, tap [Kisekae].2Select Kisekae you want to change to and tap [Set].❖Information・You can add Kisekae contents by tapping [Search] to download from website. To delete added Kisekae contents, select the image and tap [Delete]u[Delete].・Alternatively, from the Home screen, tap t and tap [Kisekae/Wallp].Changing wallpaper1In "Add to home screen" menu, tap [Wallpaper].2Tap [Gallery]/[Live wallpapers]/[Wallpaper gallery]/[Xperia™ wallpapers].・When you tap [Xperia™ wallpapers], select an image to set to the wallpaper, tap [Set wallpaper].・When you tap [Gallery], select an image to set to the wallpaper, pinch or the cropping frame or drag it to area you want to use as wallpaper, and tap [Save] to set wallpaper.](https://usermanual.wiki/Sony/PM-0000.08-user-guide/User-Guide-1725539-Page-67.png)
![66docomo Palette UI・When you tap [Live wallpapers], select a content, tap [Set wallpaper]. You can also download and add Live wallpaper content from a web page. For some contents, you can change type or contents displayed on the wallpaper by tapping [Settings].・When you tap [Wallpaper gallery], select an image you want to use as wallpaper, then tap [Set wallpaper].❖Information・Alternatively, from the Home screen, tap t and tap [Kisekae/Wallp].Adding a group to the Home screen1In "Add to home screen" menu, tap [Group].2Select a group of applications you want to add.❖Information・Alternatively, on the Applications screen (P.71), touch and hold the group name and then tap [Add].You can add, delete, sort home screens while the home screen list is displayed.・For details on the home screen list, see "Displaying a list of home screens" (P.67).Adding a home screen1From the Home screen, tap t and tap [Home screens].2Tap .❖Information・There are 7 home screens by default. You can add 5 home screens moreover.Deleting a home screen1From the Home screen, tap t and tap [Home screens].2Touch and hold a home screen you want to delete and tap [Delete].❖Information・Alternatively, touch and hold a home screen you want to delete from the home screen list and drag to displayed at the bottom of the screen.Sorting home screens1From the Home screen, tap t and tap [Home screens].2Touch and hold a home screen you want to sort.3Drag it to the place you want to move and lift up your finger.Changing the Home screen](https://usermanual.wiki/Sony/PM-0000.08-user-guide/User-Guide-1725539-Page-68.png)
![67docomo Palette UIMoving an icon on the Home screen1From the Home screen, touch an icon you want to move.2Drag it anywhere.・To move to another Home screen, keep touching the icon and drag to left or right.3Release your finger from the icon.Deleting an icon from the Home screen1From the Home screen, touch an icon you want to delete.2Tap [Delete].❖Information・Alternatively, touch and hold an icon you want to delete from the Home screen and drag to displayed at the bottom of the screen.You can access the applications installed in the terminal using the Applications screen.1From the Home screen, tap .・The Applications screen appears.aGroup name・To display/hide applications in the group, tap the group name.bApplication icon・ is displayed for newly arrived application.・Some application icons are displayed with a number of missed calls or unread mails.cApplications in the group・To display/hide all applications in the group, pinch on the Applications screen.dNumber of applications in the group❖Information・To close the Applications screen, tap x or y.・If you download applications from website, icons with are added to the Applications screen.Applications screenLearning Applications screenadcb](https://usermanual.wiki/Sony/PM-0000.08-user-guide/User-Guide-1725539-Page-69.png)
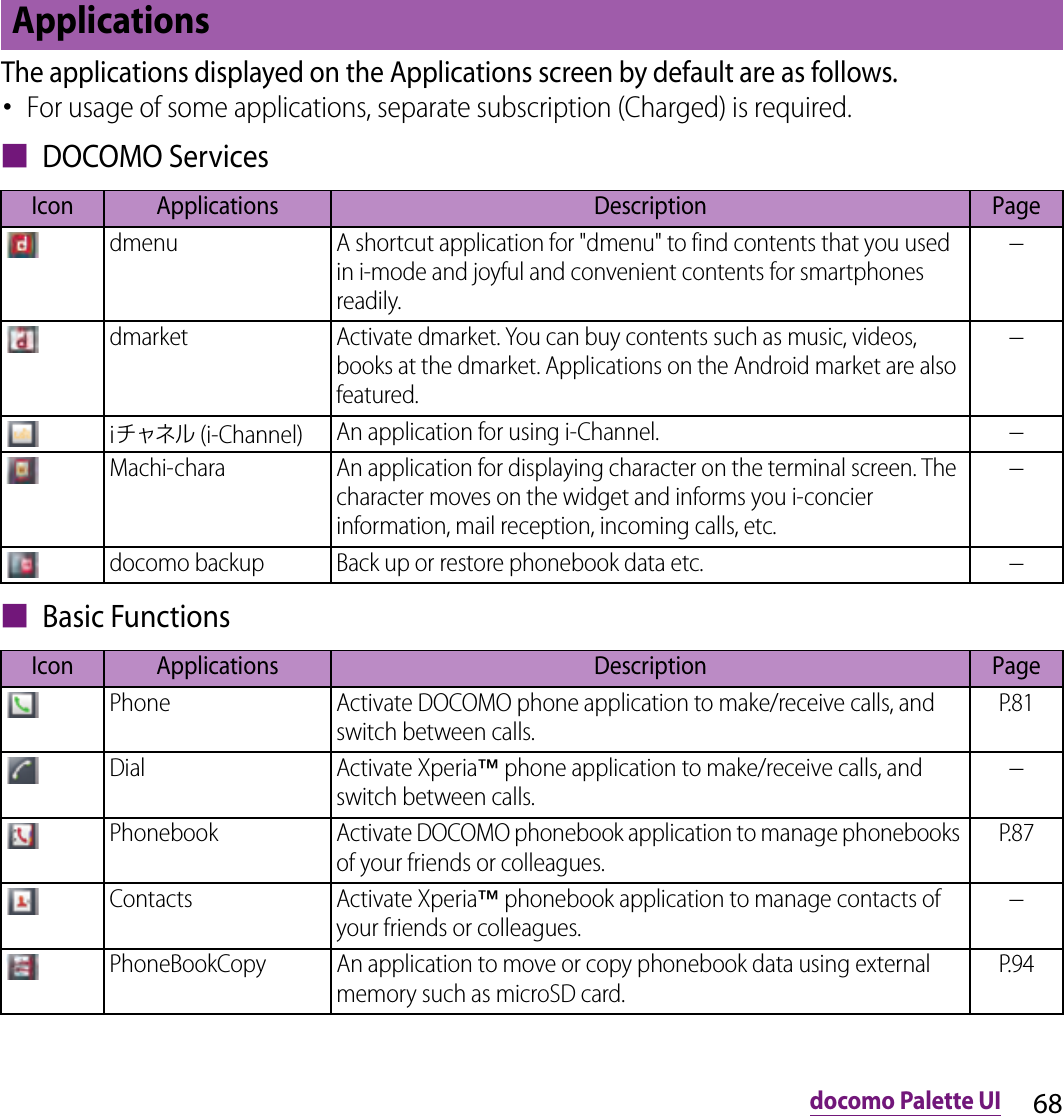
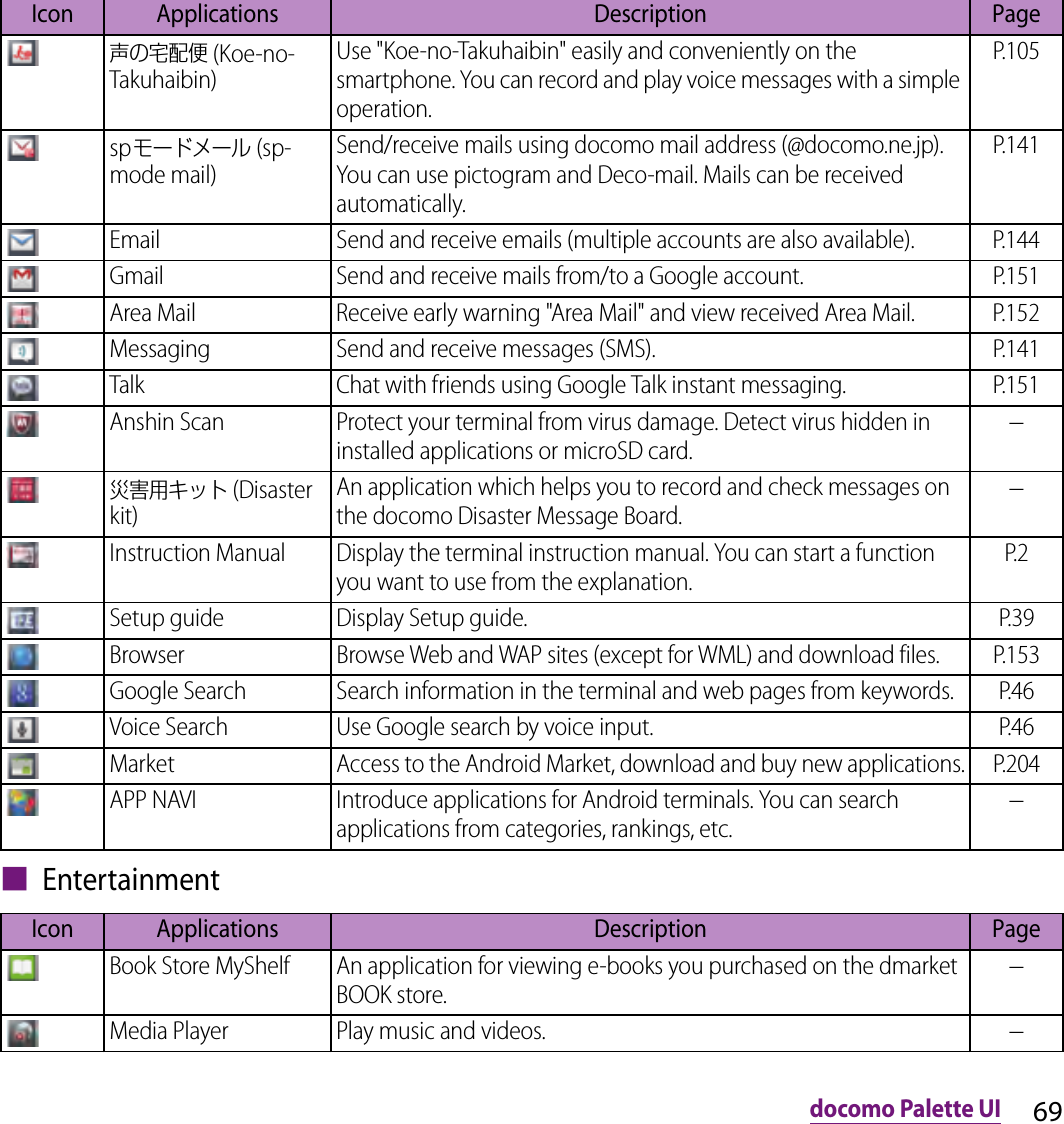
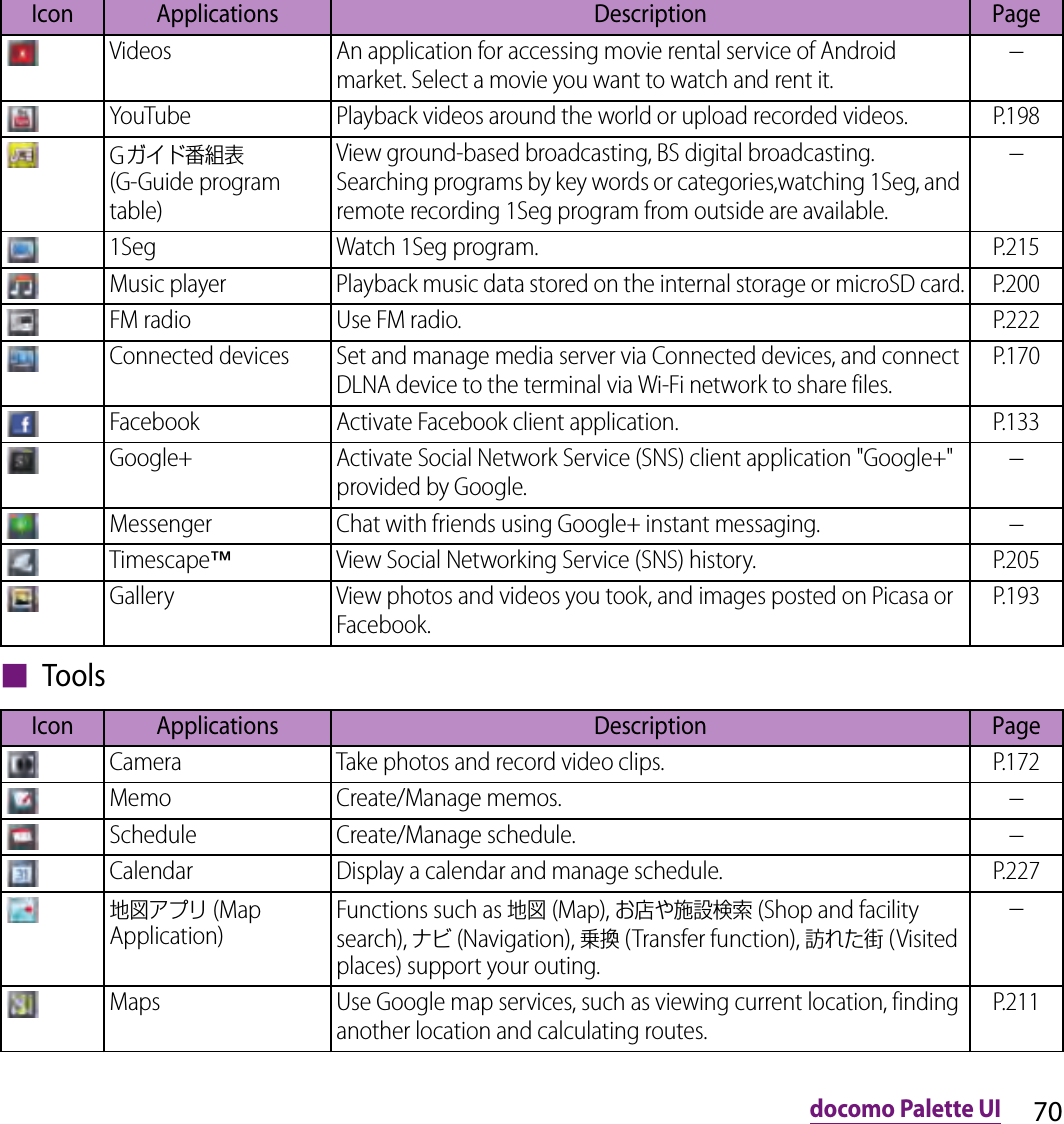
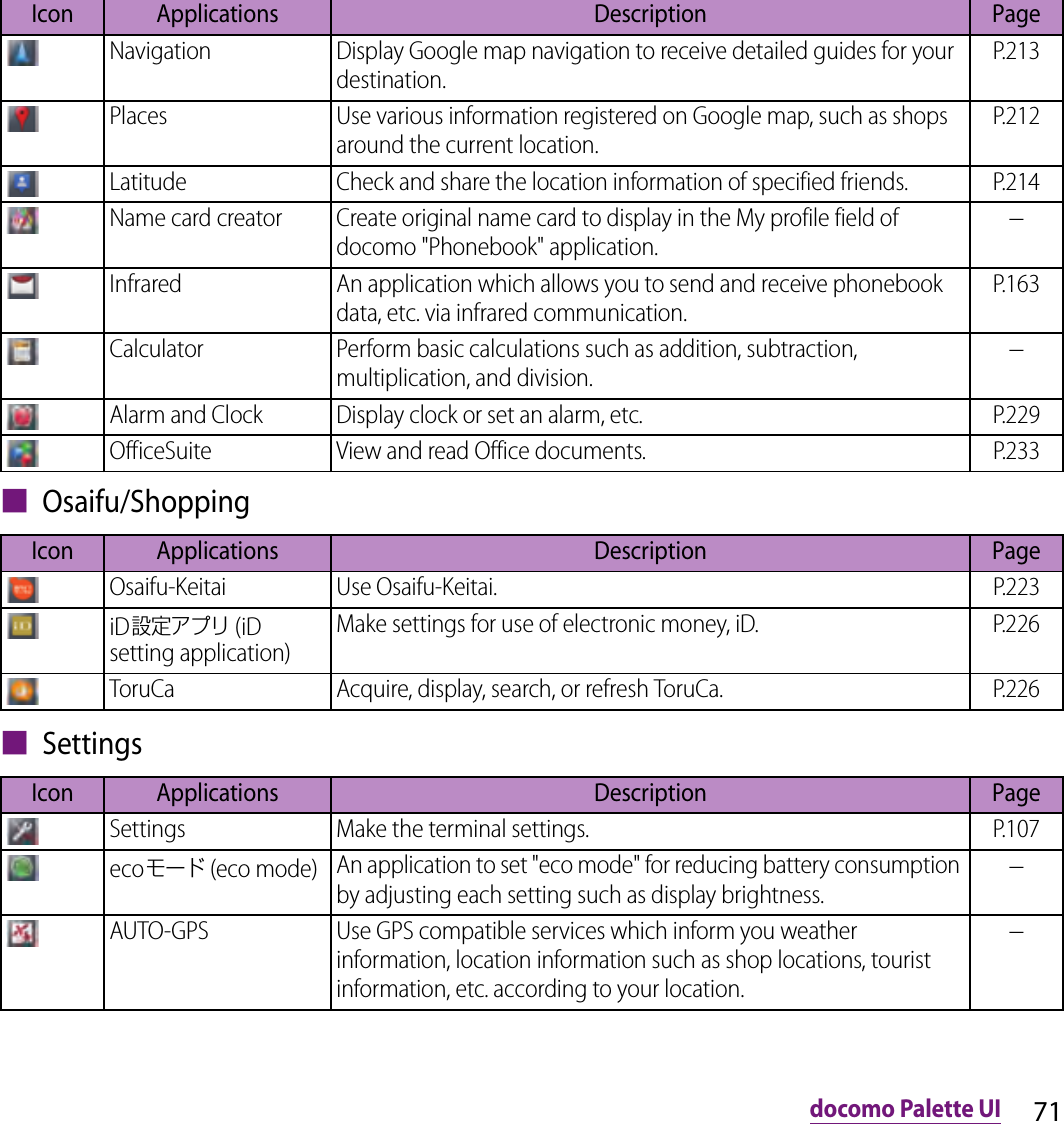
![72docomo Palette UI❖Information・Some application names may not be displayed fully.・Some application require downloading and installation. If you cannot download application by tapping, from the Home screen, tap t and [Settings]u[Applications]u[Unknown sources]u[OK], mark the checkbox and then tap the application.docomo location informationProvide location information such as imadoco search, imadocokantan search, Keitai-Osagashi Service, Emergency Location Report. Also access service website to change or make various settings.−Update center Update the latest software or application. P.252Flash Player Settings Change settings for controlling application running method in Flash Player.−Icon Applications Description Page](https://usermanual.wiki/Sony/PM-0000.08-user-guide/User-Guide-1725539-Page-74.png)
![73docomo Palette UIFrom the Applications screen, you can add icons, sort icons, uninstall applications. Also you can change group setting.Adding an application icon to the Home screen1From the Applications screen, touch and hold an icon you want to add to the Home screen.2Tap [Add].・The application icon is added onto the Home screen.❖Information・From the Home screen, tap t and [Add]u[Shortcut]uTap [Application] and select an application to add.Sorting application icons1From the Applications screen, touch and hold an application icon you want to sort.2Drag it to the place you want to move and lift up your finger.・The application icon moves.❖Information・To move an application icon to another application group, touch and hold the icon on the Applications screen, tap [Move], then select a group you want to move to.Uninstalling an applicationSome application icons can be deleted from the Applications screen.・Before uninstalling application, back up contents related to the application that you want to save including data saved in the application.・Some applications cannot be uninstalled.1From the Applications screen, touch and hold an icon of application you want to uninstall.2Tap [Uninstall].・Uninstall screen appears.3Tap [OK]u[OK].❖Information・Some applications pre-installed in the terminal may not be uninstalled.・Application icons can be deleted from the managing applications screen. For details, refer to "Deleting installed application" (P.131).Changing the Applications screen](https://usermanual.wiki/Sony/PM-0000.08-user-guide/User-Guide-1725539-Page-75.png)
![74docomo Palette UIAdding a shortcut of group to the Home screen1From the Applications screen, touch and hold a group you want to add to the Home screen.2Tap [Add].・Shortcuts to the group is added to the Home screen.❖Information・From the Home screen, tap t and [Add]uTap [Group] and select a group to add.Changing a label color of the group name1From the Applications screen, touch and hold a group you want to change the color.2Tap [Edit label] and select label color to change.・The color for group name is changed.Deleting a group1From the Applications screen, touch and hold a name of a group you want to delete.2Tap [Delete]u[OK].・Application icons belonged to the deleted group move to the "Download Application" group.❖Information・"Recently", "DOCOMO Services", and "Download Application" groups cannot be deleted.Changing a group name1From the Applications screen, touch and hold a group name you want to rename.2Tap [Edit name].3Enter a group name in the [Group name] entry box and tap [OK].・The group is renamed.❖Information・"Recently", "DOCOMO Services", and "Download Application" groups cannot be renamed.Adding a group1From the Applications screen, tap t and tap [Add group].2Enter a group name in the [Group name] entry box and tap [OK].・A new group is added.](https://usermanual.wiki/Sony/PM-0000.08-user-guide/User-Guide-1725539-Page-76.png)
![75docomo Palette UISorting groups1From the Applications screen, touch and hold an group name you want to sort.2Drag it to the place you want to move and lift up your finger.・The group is moved.You can view and access recently used applications from this window.1Touch and hold y.・Recently used applications appear on a list.Search application installed into the terminal to activate.1From the Applications screen, tap t and then tap [Search].・For the first time to join Latitude, a message confirming whether to agree to Google's privacy policy appears. Select [Agree] or [Disagree].・The software keyboard appears.2Tap at the left of the search box and select [Apps].3Enter application name you want to search.・Search suggestions appear as you enter a character.4Tap a search item.・The application activates.❖Information・Alternatively, from the Home screen, tap , then tap [Google Search] to search application. For details, refer to "Searching information in the terminal and web pages" (P.46).Opening the recently used applications windowSearching applications](https://usermanual.wiki/Sony/PM-0000.08-user-guide/User-Guide-1725539-Page-77.png)
![76docomo Palette UIIcons on the Applications screen can be displayed in a list or tiles.1From the Applications screen, tap t and then tap [List format]/[Tile format].You can check information on the home application and make display setting.Displaying the Home application information1From the Home screen, tap t and then tap [More].2Tap [Application info].・The home application information appears.Making display setting for the Home screen1From the Home screen, tap t and then tap [More].2Tap [Home settings].・The "Home settings" screen appears and the following setting can be made.Switching application screensHome application informationPersonal areaSet whether to display personal area on the Home screen.Wallpaper loopSet whether to loop wallpaper on the Home screen.Sync functionSet whether to automatically refresh personal area information.International roamingSet whether to automatically refresh personal area information during International roaming.](https://usermanual.wiki/Sony/PM-0000.08-user-guide/User-Guide-1725539-Page-78.png)
![77Calling/Network ServicesCalling/Network Services1From the Home screen, tap [Phone]u[Dial].2Enter the number of the recipient and tap .・If a wrong number is entered, tap to delete the number.❖Information・To activate Xperia™ phone application, from the Home screen, tap , then tap [Dial].Entering pause (,)This function allows you to operate voice mail at home, to reserve tickets, or to check the balance of a bank account, etc.1From the Home screen, tap [Phone]u[Dial].2Enter the phone number, then tap t and tap [Add 2–sec pause].When the terminal is within range of the service area, you can make an emergency call of 110 (Police), 119 (Fire and ambulance), or 118 (Japan Coast Guard).1From the Home screen, tap [Phone]u[Dial].2Enter the number of the emergency call and tap .・If a wrong number is entered, tap to delete the number.❖Note・If UIM is not inserted to the terminal, emergency calls (110, 119, 118) cannot be made in Japan.・This terminal supports "Emergency call location information". If you use the terminal to place a call to emergency numbers such as 110, 119, or 118, the information of a location where you are calling from (location information) is automatically notified to the Emergency call acceptance organization such as the Police Station.The Emergency call acceptance organization may not be able to figure out your exact location depending on the location where you place a call or radio wave condition.If you make a call hiding your caller ID, such as by entering a phone number with "184" for each call, the location information and phone number are not notified. However, the Emergency call acceptance organization may decide to obtain the location information and phone number regardless of your settings when they consider it is necessary for lifesaving, etc. Note that the areas/time for which the "Emergency call location information" is ready to be used vary depending on the preparatory state of each Emergency call acceptance organization.Making/Receiving a callMaking a callEmergency call](https://usermanual.wiki/Sony/PM-0000.08-user-guide/User-Guide-1725539-Page-79.png)
![78Calling/Network Services・When calling 110, 119 or 118 for emergency from the terminal, tell that you are calling from a mobile phone, and give your phone number and your current location precisely for checking callback from the police/fire department. Also, make a point to call in a stationary position to prevent the call from being dropped. Do not power off the terminal for at least 10 minutes after the emergency call just in case the Police or Fire/Ambulance may have to get in contact with you.・Note that you may not connect to the local Fire Department or Police Station depending on where you are calling from. In this case, try to call from a public phone or an ordinary phone in the neighborhood.Making an emergency call while UIM is locked1Tap [Emergency call].2Enter the emergency number and tap [Call].・If a wrong number is entered, tap on the right of the phone number field to delete the number.❖Note・In Japan, while entering PIN code on the screen (P.126) or during PUK lock (P.127), the emergency numbers of 110/119/118 are not available.1Tap [End call].For details on WORLD CALL, refer to DOCOMO International Services website.1From the Home screen, tap [Phone]u[Dial].2Touch and hold [0] key until "+" sign appears.・When making an international call, "+" is replaced by an international access code.3Enter Country codeuArea code (City code)uthe number of the recipient and tap .・If the area code begins with "0", omit "0". However, "0" may be required to dial to some countries or areas such as Italy.1While receiving a call, touch (left) and drag it to (right).❖Information・If you are using regular headphones without a microphone, you need to speak to the microphone of the terminal.・Even during the screen lock or key lock, the icon appears and you can answer a call by the same operation.Ending a callMaking an international call (WORLD CALL)Receiving a call](https://usermanual.wiki/Sony/PM-0000.08-user-guide/User-Guide-1725539-Page-80.png)
![81Calling/Network Services❖Information・During a call/on hold, tap t to display "Hold"/"Retrieve call".・To set a call on hold, "Call waiting" subscription is required. (P.101)❖Note・Do not bring the terminal close to your ear with the speakerphone on to avoid from hearing damage.1From the Home screen, tap [Phone]u[Recent calls].・The Recent calls screen appears.On the Recent calls screen, incoming call history and outgoing call history are displayed in chronological order.aIncoming historybCall status icons : Caller ID notified : Caller ID hidden・Notified if calls are made with "186" (Notify)/"184" (Hide) prefixed to the number.・If entering phone number and tap t, then select [Caller ID notification]u[Notify]/[Not notify] to make a call, / does not appear in the call log list. : Koe-no-Takuhaibin・For details on Koe-no-Takuhaibin, refer to "声の宅配便 (Koe-no-Takuhaibin)" (P.105) or NTT DOCOMO website. : Outgoing international call : Incoming international callcPhone number/namedConsecutive calls with the same party・Tap a history or to display combined history, tap again to display individually.Call historyShowing call historyRecent calls screenabceghdf](https://usermanual.wiki/Sony/PM-0000.08-user-guide/User-Guide-1725539-Page-83.png)
![82Calling/Network Services・Number in bracket indicates number of combined history.eOutgoing historyfOutgoinggHistory icons : Missed call : Incoming call : Outgoing callhDate❖Information・On the Recent calls screen, tap t and tap [Search location] to check the current location of the party using imadocokantan search.When you have missed calls, appears in the status bar.1Drag the status bar downwards.2Tap [Missed call].❖Information・When you have missed calls, a missed call icon appears on the key lock screen. For details on the setting to show/hide icons, see "Setting information displayed on the key unlock screen" (P.123).1On the Recent calls screen (P.85), tap .1On the Recent calls screen (P.85), touch and hold a phone number and then tap [Add to phonebook].・You can also select by tapping the number and then [Add to phonebook] at the bottom of the screen.2Tap desired phonebook entry, or tap [Register new].・Tap [Register new] to display a screen for selection of the saving locations appears. You can select Phone contacts or docomo as the saving location.3Edit the phonebook entry and tap [Save].1On the Recent calls screen (P.85), tap [Incoming history]/[Outgoing history].2On the incoming history list screen/outgoing history list screen, tap t and tap [Delete all]u[OK].Displaying missed callsMaking a call from call historyAdding a number from the call history to PhonebookDeleting a call history](https://usermanual.wiki/Sony/PM-0000.08-user-guide/User-Guide-1725539-Page-84.png)
![83Calling/Network Services❖Information・On the Recent calls screen, touch and hold a log you want to delete, tap [Remove from call log]u[OK] to delete an item.In the Phonebook, you can enter various information for contacts, for example, phone numbers, mail addresses and web service accounts. You can display phonebook entry to get quick access to that contact.1From the Home screen, tap , then tap [Phonebook].・The phonebook list screen appears.・Alternatively, from the Home screen, tap [Phone] and tap [Phonebook] tab to display phonebook list screen.❖Information・To activate Xperia™ phone application, from the Home screen, tap , then tap [Contacts].On the phonebok list screen, you can view details of your contacts. You can add a picture to a phonebook entry, and display phonebook entries by group.aPhonebook tabbEntry items・Icons indicate entry items.cName registered in the phonebook entrydPhoto set in the phonebook entryeGroup・Select a group to be displayed.fCommunication tab・History of communication exchanged by calls and mails is shown.gMy profile tabhIndex character area・Tap the right end of the phonebook list screen to display index character with which you can search a name in Japanese syllabary and alphabetic order.iRegisterjSearchPhonebookOpening PhonebookPhonebook list screeniafjbcdegh](https://usermanual.wiki/Sony/PM-0000.08-user-guide/User-Guide-1725539-Page-85.png)
![84Calling/Network ServicesAdding a new phonebook entry1On the phonebook list screen (P.87), tap [Register].2Tap [Phone contacts]/[docomo].・When you set Google account etc., set account appears as a saving location.3Enter a name.4Select or enter desired additional information for the contact.・You can add items besides ringtone, phone number and mail address by tapping in "Others", then tap [Add] to add items.5Tap [Save].❖Information・When you save "Phonetic name (family/given)", phonebook list is displayed according to Japanese syllabary order or alphabets order of "Phonetic name".Using shortcuts of PhonebookWhen you tap the photo (image) part on the phonebook list screen, shortcuts for phone, mail, etc. appear. Tap the shortcut to make a call, or create and send a mail.* You can also use the registered addresses, etc.❖Information・When you tap a part other than photo (image) on the phonebook list screen, profile screen of the phonebook appears instead of shortcuts.・Email shortcut appears when email address is saved in the selected phonebook entry and you have set your email account. If you have not set your email account, shortcut for Gmail ( ) appears.・For a phonebook entry with only name, tapping photo (image) does not display the shortcut.Searching for a phonebook entry1On the phonebook list screen (P.87), tap [Search].2Enter name or reading you want to search in the search field.・All phonebook entries beginning with those letters appear.Managing phonebookMake a call to saved phone number.Create and send message (SMS).Select Email application to create and send an email.・If [Use by default for this action.] checkbox is marked, application selection screen will not appear for the next time.](https://usermanual.wiki/Sony/PM-0000.08-user-guide/User-Guide-1725539-Page-86.png)
![85Calling/Network ServicesChanging display conditions for phonebook entriesYou can set registered phonebook entries to be displayed in the phonebook list.1On the phonebook list screen (P.87), tap t, then tap [Others]u[Display settings].■Setting display conditionMark [Only contacts with phones].・Only phonebook entries with phone numbers registered are displayed.■Setting show/hideTap a Social Networking Service (SNS) name which is made phonebook entry saving location setting or account setting (P.133)uMark/Unmark [Other phonebook], [All phonebook].・Mark to display synchronized phonebook entries, or unmark not to display them.2Tap [Done].Editing a phonebook entry1On the phonebook list screen (P.87), tap a phonebook entry to edit.・The profile screen of the phonebook appears.2Tap [Edit].・By tapping [Add] on the profile editing screen, you can add information to enter.3Edit the desired information and tap [Save].❖Information・Alternatively, touch and hold a phonebook entry in the phonebook list and tap [Edit] to display profile editing screen.Combining phonebook entriesYou can bind multiple phonebook entries together into one.1On the phonebook list screen (P.87), tap a phonebook entry to combine.・The profile screen of the phonebook appears.2Tap t and [Join/Separate].・Phonebook entries to be combined are displayed.3Tap the phonebook entry to combine.❖Information・To cancel binding, on the profile screen of the phonebook, tap t, then tap [Join/Separate]u[Separate].](https://usermanual.wiki/Sony/PM-0000.08-user-guide/User-Guide-1725539-Page-87.png)
![86Calling/Network ServicesDeleting a phonebook entry1On the phonebook list screen (P.87), tap t, then tap [Delete].2Mark the phonebook entry you want to delete.・If you want to delete all phonebook entries, tap [Select all].3Tap [Delete]u[OK].❖Information・Alternatively, on the phonebook list screen, touch and hold a phonebook entry you want to delete, tap [Delete]u[OK] to delete.Making a call using the phonebook1On the phonebook list screen (P.87), tap a phonebook entry to call.・The profile screen of the phonebook appears.2Tap a desired phone number.3Tap [Call].❖Information・Alternatively, touch and hold a phonebook entry in the phonebook list and tap [Phone] to make a call.Checking My profile and editing information1On the phonebook list screen (P.87), tap [My profile].2Tap [Edit].・Profile editing screen appears.3Enter the new information or make the changes you want.・By tapping [Add] on the profile editing screen, you can add information to enter.・Tap in "Others", then tap [Add] to add information.4When you are done, tap [Save].❖Information・You can register multiple phone numbers, mail addresses, etc. in "My profile". Registered phone number and logs of calls and mails between you and registered phone numbers can be displayed in the "Communication" tab.](https://usermanual.wiki/Sony/PM-0000.08-user-guide/User-Guide-1725539-Page-88.png)
![87Calling/Network ServicesSending phonebook via infrared communication/Bluetooth/Email/GmailRegistered phonebook and My profile information can be sent using infrared communication (P.163), Bluetooth function (P.166), or email attachment function.■ Sending phonebook1Tap a phonebook entry you want to send on the phonebook list screen (P.87).・The profile screen of the phonebook appears.2Tap t and [Share].3Select sending method and follow the onscreen instructions.■ Sending My profile1Tap [My profile] on the phonebook list screen (P.87).2Tap t and [Share].3Select sending method and follow the onscreen instructions.❖Information・If you use Bluetooth function, tap [Turn on] to turn on the Bluetooth function, search receiver's Bluetooth device and send.・If you want to send data as files attached to email/Gmail, send from the compose screen for the mail service in which you have set an account. When you have not set a Gmail account, setup wizard appears. You can create and send email after settings are done.・Messaging is not available.・You cannot send some information such as name card data set in phonebook.・For sending all phonebook entries, see "Sharing phonebook entry currently displayed" (P.94).Registering a phonebook entry to FavoritesYou can mark a phonebook entry as a favorite. The favorite list provides quick access to the phonebook entry you have marked.1On the phonebook list screen (P.87), tap a phonebook entry you want to mark.・The profile screen of the phonebook appears.2Tap .❖Information・Only phonebook entries saved to the docomo account can be added to Favorites.・To display phonebook entries added to Favorites, tap [Groups] on the phonebook list screenu[Favorites] or from the Home screen, tap [Phone]u[Favorites] tab.](https://usermanual.wiki/Sony/PM-0000.08-user-guide/User-Guide-1725539-Page-89.png)
![88Calling/Network Services・From the Home screen, tap [Phone]u[Favorites] to display the phonebook data registered in Favorites and "Commonly used phonebook data". Touch and hold the phonebook data registered in Favorites or Commonly used phonebook data to select "Remove from favorites"/"Add to favorites".Setting photo in a phonebook entry1On the phonebook list screen (P.87), tap a phonebook entry you want to add a picture.・The profile screen of the phonebook appears.2Tap [Edit].3Tap [Settings] for image.4Tap [Add image]/[Take photo].・If you select [Add image], select a saved photo and tap [Save].・Select [Take photo] to shoot a photo and save it.5Tap [OK].6Tap [Save].❖Information・You can also set photo to a phonebook entry by the following operation.From the Home screen, tap u[Gallery]. View an image you want to set and tap t, [Set as]u[Phonebook icon]/[Contact picture]. Select a phonebook entry to register to and tap [Save].You can export/import phonebook entries from/to microSD card or UIM. This is useful, for example, when you want to transfer the contact information to another phone.❖Information・You can also use a synchronization service for synchronizing your phonebook. For details, refer to "Data synchronization" (P.134).Exporting phonebook to microSD card1On the phonebook list screen (P.87), tap t, then tap [Others]u[Import/Export].2Tap [Export to SD card].3Select a phonebook you want to export.・Tap to select any of [Export one phonebook data]/[Export multiple phonebook data]/[Export all phonebook data], then tap [OK].・If you select [Export one phonebook data]/[Export multiple phonebook data] and tap [OK], select phonebook entries to export then tap [OK].Exporting/Importing phonebook entries](https://usermanual.wiki/Sony/PM-0000.08-user-guide/User-Guide-1725539-Page-90.png)
![89Calling/Network Services4Select [Yes]/[No] to attach name card.5Tap [OK].Importing phonebook from microSD card1On the phonebook list screen (P.87), tap t, then tap [Others]u[Import/Export].2Tap [Import from SD card].3Tap [Phone contacts]/[docomo].・When you set Google account etc., it appears as an import destination.4Select vCard file you want to import.・If there is only one file, vCard file selection screen does not appear. The file is imported immediately.・If a file has multiple phonebook entries, they are imported all at once.・If there are two or more vCard files, tap any of [Import one phonebook data]/[Import multiple phonebook data]/[Import all phonebook data] to select.5Tap [OK].・If you select [Import one phonebook data]/[Import multiple phonebook data] and tap [OK], select vCard files to import then tap [OK].❖Information・For some phonebook entries, a part of data may not be imported or exported.Importing phonebook entries from UIM1On the phonebook list screen (P.87), tap t, then tap [Others]u[Import/Export].2Tap [Import from SIM card].3Tap [Phone contacts]/[docomo].・When you set Google account etc., it appears as an import destination.4To import one contact, tap the contact you want to import.・To import all contacts, tap [Import all].・If there is a phonebook entry whose name is matched with the imported entry, the entry is imported as a separated one.❖Information・Names and phone numbers can be imported.](https://usermanual.wiki/Sony/PM-0000.08-user-guide/User-Guide-1725539-Page-91.png)
![90Calling/Network Services・Alternatively, on the phonebook list screen, tap [My profile] tab, then tap t and [General settings]u[Data management]u[Import]u[Import from SIM card] to import contacts from the UIM.・To export phonebook entries to UIM, use Xperia™ phonebook application. Note that only name and the first phone number can be saved because of memory space of UIM. For some phonebook entries, a part of data may not be exported.Sharing phonebook entry currently displayed1On the phonebook list screen (P.87), tap t, then tap [Others]u[Import/Export].2Tap [Share phonebook data].3Select sending method and follow the onscreen instructions.・If [Use by default for this action.] checkbox is marked, application selection screen will not appear for the next time.❖Information・If display conditions for phonebook (P.89) are set, only phonebook entries to be displayed are exported.・If you use Bluetooth function, tap [Turn on] to turn on the Bluetooth function, search receiver's Bluetooth device and send.・If you want to send data as files attached to email/Gmail, send from the compose screen for the mail service in which you have set an account. When you have not set a Gmail account, setup wizard appears. You can create and send email after settings are done.・Messaging is not available.・When sending two or more phonebook entries via infrared communication, you need to enter a passcode to authenticate. Passcode is a 4-digit number fixed up between you and other parties in advance.・You cannot send some information such as name card data set in phonebook.Phonebook data can be copied to another terminal using microSD card. You can also copy the Contacts data registered in Google account to docomo account.1From the Home screen, tap , then tap [PhoneBookCopy].・When you use for the first time, agree to "使用許諾契約書 (License Agreement)".Using PhoneBookCopy](https://usermanual.wiki/Sony/PM-0000.08-user-guide/User-Guide-1725539-Page-92.png)
![91Calling/Network ServicesImporting phonebook from microSD card1Attach the microSD card with phonebook entries saved to the terminal.2On the "インポート (Import)" tab screen, tap a file you want to import.3Tap [上書き (Overwrite)]/[追加 (Add)].・Imported phonebook data is saved in docomo account.Exporting phonebook to microSD card1Attach the microSD card to the terminal.2On the "エクスポート (Export)" tab screen, tap [開始 (Start)].・The Phonebook data saved in docomo account is saved onto the microSD card.Copying contacts registered in Google account to docomo account1On the "docomoアカウントへコピー (Copy to account)" tab screen, tap a Google account you want to copy.2Tap [上書き (Overwrite)]/[追加 (Add)].・Copied phonebook data is saved in docomo account.・You can also copy the phonebook data saved in "Phone contact" to docomo account as well as Google account.❖Information・If phonebook item names (e.g. Phone number, etc.) of the other terminal are different from ones of your terminal, the item names may be changed or deleted. Also, some text may be deleted in copied destination, because savable characters in a phonebook entry vary by terminal.・When importing phonebook entries from microSD card, files created by "all backup" cannot be loaded.・When exporting phonebook entries to microSD card, data without Name cannot be copied.・If you use phonebook entries created (exported) by PhoneBookCopy in other than PhoneBookCopy, they may not be displayed correctly.](https://usermanual.wiki/Sony/PM-0000.08-user-guide/User-Guide-1725539-Page-93.png)
![92Calling/Network ServicesYou can use the following DOCOMO network services on the terminal. For details on the outline and how to use each service, see the relevant pages indicated in the following table.・You cannot use the network services when you are outside of the service area or in a location without the radio wave.・"Stop of service" does not mean canceling the subscription such as Voice Mail service, Call Forwarding Service, etc.・For details, see the "Mobile Phone User's Guide [Network Services]".・For subscription and inquiry, contact "General Inquiries" on the last page of this manual.・Besides, you can use International roaming setting (P.240).❖Information・In this manual, the outlines of each network service are described with menu operations.Network ServicesAvailable Network ServicesService name Monthly charge Application PageVoice Mail servicePaid Required P.97Call forwardingFree Required P.99Call WaitingPaid Required P.101Caller ID NotificationFree Not required P.102Nuisance Call Blocking serviceFree Not required P.103Caller ID Display Request ServiceFree Not required P.103Second call settingsFree Not required P.104Remote operation settingsFree Not required P.104声の宅配便 (Koe-no-Takuhaibin)Free Not required P.105](https://usermanual.wiki/Sony/PM-0000.08-user-guide/User-Guide-1725539-Page-94.png)
![93Calling/Network ServicesThe Voice Mail Service takes messages for you, as long as it answers a call with the answering message, if there is an incoming call when you are in a location without the radio wave, while the terminal is powered off, or when you cannot answer a call within the preset ring time.・When the Voice Mail service is set to "Activate" and if you do not answer an incoming voice call, the call is saved in "Recent calls" as a "Missed call" and (Missed call) appears in the status bar.❖Information・This terminal does not have Record message function which records voice messages on internal memory. Use the Voice Mail Service.・The message can be recorded up to 3 minutes for 1 message, up to 20 messages, and stored up to 72 hours.・The number of Voice Mail messages appears until you have played all messages.Basic flow of the Voice Mail ServiceVoice Mail serviceYour terminal receives a callIf you do not answer the call, it is connected to the Voice Mail service centerThe caller leaves a messageThe receiver is notied that the Voice Mail service center has taken the voice messagePlay the voice message▼Activate the Voice Mail Service▼▼▼▼If you are in a hurry and wish to leave a message without listening to the Voice Mail answering message, you can interrupt the answering message and switch to message recording mode immediately by tapping [Dialpad]→[#]](https://usermanual.wiki/Sony/PM-0000.08-user-guide/User-Guide-1725539-Page-95.png)
![94Calling/Network ServicesSetting Voice Mail Service1From the Home screen, tap t and tap [Settings].2Tap [Call settings]u[Network service setting].3Tap [Voicemail].・Select items you want to use.* After operation is finished, you receive the "NTT DoCoMo VM:XX" SMS.❖Information・If messages are stored at the Voice Mail service center, (New SMS message) and (Voice Mail message) appear on the status bar. (Voice Mail message) disappears when you delete all messages.・The notification setting and notifications (message (SMS) reception) are not charged.Activate VoicemailTap [OK] to activate the Voice Mail Service.Set ring timeEnter the ring time (0 to 120 seconds).It changes only the ring time.If the ring time is set to 0 seconds, an incoming call is not saved in "Recent calls".Deactivate VoicemailTap [OK] to deactivate the Voice Mail Service.Check Voicemail settingCheck the current service settings.Play messages*Tap [OK] to call the Voice Mail service center. After this step, follow the voice prompts to play the message.Voicemail setting*Tap [OK] to change the Voice Mail setting with the voice prompts. The call is connected to the Voice Mail service center. After this step, follow the voice prompts to operate.Check messages*Check if a new message is stored. After checking, the completion message appears.Notification settingsSet whether to alert you of a new message with the tone or vibration.Activate Missed Call Notif.When it is received while the terminal is powered off or outside of the service area, an SMS is sent to notify you of the information about the call (date, time and the caller ID) once you turn the terminal back on or move back in to the service area.Select [All Calls] to notify you of all received calls.Select [Calls with Caller ID] to notify you of only the calls with the caller ID.Deactiv. Missed Call Notif.While starting the notification, tap [OK] to deactivate the notification.Check settingCheck the notification settings.](https://usermanual.wiki/Sony/PM-0000.08-user-guide/User-Guide-1725539-Page-96.png)
![95Calling/Network ServicesPlaying the voice message1When the SMS notification "NTT DoCoMo VM:XX" appears, tap [New message] from the Notification panel (P.43).・A recorded message plays.2Follow the voice prompts to operate.The Call Forwarding Service forwards a voice call to a preset forwarding number when you are in a location without the radio wave, the terminal is powered off, or you do not answer the call within the preset ring time.・When the Call Forwarding Service is set to "Activate Call Forwarding" and if you do not answer an incoming voice call, the call is saved in "Recent calls" as a "Missed call" and (Missed call) appears in the status bar.Basic flow of the Call Forwarding ServiceCall charge for the Call Forwarding ServiceCall forwarding▼▼▼Save the forwarding numberActivate the Call Forwarding ServiceYour terminal receives a callIf you do not answer the call, it is automatically forwarded to the specied forwarding numberCall Forwarding Service subscriberCallerForwarding partyThe caller is charged for a call feeThe Call Forwarding Service subscriber is charged for a call fee](https://usermanual.wiki/Sony/PM-0000.08-user-guide/User-Guide-1725539-Page-97.png)
![96Calling/Network Services❖Information・Even when the Call Forwarding Service is set to "Activate Call Forwarding", you can answer the call during a ringtone sounds.Setting Call Forwarding Service1From the Home screen, tap t and tap [Settings].2Tap [Call settings]u[Network service setting].3Tap [Call Forwarding].・Select items you want to use.* A subscription of Voice Mail service is required.Setting on/off of the Call Forwarding guidance1From the Home screen, tap [Phone]u[Dial].2Tap [1][4][2][9]u.・Follow the voice prompts to operate. For details, see the "Mobile Phone User's Guide [Network Services]".Activate Call ForwardingEnter the forwarding phone number and ring time, then tap [OK] to activate the Call Forwarding Service.Change forwarding numberMark the checkbox and enter the forwarding number.Register ring timeMark the checkbox and enter the ring time (0 to 120 seconds).If the ring time is set to 0 seconds, an incoming call is not saved in "Recent calls".Deactivate Call ForwardingTap [OK] to deactivate the Call Forwarding Service.Register numberChange the forwarding phone number. Enter the forwarding phone number and tap [OK].Activate Call ForwardingMark the checkbox to change the forwarding phone number and to activate the Call Forwarding Service simultaneously.If fwd number busy*When the forwarding number is busy, an incoming call is connected to the Voice Mail service center. Tap [Connect] to turn on the setting; tap [Do not connect] to turn off the setting.Check settingCheck the current service settings.](https://usermanual.wiki/Sony/PM-0000.08-user-guide/User-Guide-1725539-Page-98.png)
![97Calling/Network ServicesWhen there is another incoming call while you are on a call, the in-call ringtone notifies you of the second call. You can answer the second call by putting the first call on hold. You can also put your current call on hold and place a call to another party.❖Information・Even when the call is on hold, the caller is charged for a call fee.Setting Call Waiting1From the Home screen, tap t and tap [Settings].2Tap [Call settings]u[Network service setting].3Tap [Call Waiting].・Select items you want to use.Putting the current call on hold and answering an incoming call1When you hear the beep during a call, tap [Answer].・The first call is put automatically on hold and the incoming call is received.- The terminal does not support Conference call.- Tap [Busy] to connect the incoming call to the Voice Mail service center. Activating Voice Mail service is required beforehand.2Switch to the first call.・To end the later call, tap [End call].The later call is terminated and switched to the first call.・To put the later call on hold, tap [Switch to this call].The later call is put on hold and switched to the first call. Tapping [Switch to this call] switches the party.Ending the current call and answering an incoming call1When you hear the beep during a call, tap [End current call and answer].・The first call is terminated and the incoming call is received.Call WaitingActivate Call WaitingTap [OK] to activate the Call Waiting Service.Deactivate Call WaitingTap [OK] to deactivate the Call Waiting Service.Check settingsCheck the current service settings.](https://usermanual.wiki/Sony/PM-0000.08-user-guide/User-Guide-1725539-Page-99.png)
![98Calling/Network ServicesPutting the current call on hold and making a call to another party1During a call, tap (Phonebook)/ (Dialpad).2Enter the other party's phone number, then tap .・The first call is automatically on hold and switched to the new call you made. You can also search for a party by tapping (Phonebook).3Switch to the first call.・To terminate the new call, tap [End call].The new call is terminated and switched to the first call.・To put the new call on hold, tap [Switch to this call].The new call is put on hold and switched to the first call. Tapping [Switch to this call] switches the party.When making a call, your phone number can be shown in the display of the recipient's phone you are calling. The caller ID is important personal information. Carefully decide whether you notify a recipient of your caller ID.・You cannot set the Caller ID notification where the terminal indicates the outside of service area ( ).・The setting is available only the other party's phone can display the caller ID.・If an announcement requesting caller ID is heard when making a call, set Caller ID notification or add prefix 186 to the phone number to call again.1From the Home screen, tap t and tap [Settings].2Tap [Call settings]u[Network service setting].3Tap [Caller ID Notification].・Select items you want to use.Caller ID NotificationActivate Caller ID NotificationEnter the Network security code, then tap [OK].Your phone number is notified to the other party.Deactivate Caller ID NotificationEnter the Network security code, then tap [OK].The caller ID notification is deactivated.Check settingsCheck the current settings.](https://usermanual.wiki/Sony/PM-0000.08-user-guide/User-Guide-1725539-Page-100.png)
![99Calling/Network ServicesYou can register "crank call" such as prank call not to be received. When call rejection is registered, follow-on incoming calls are automatically rejected. Guidance responds to the caller.And, you can register, check, delete phone numbers to be rejected connecting Nuisance Call Blocking service setting site.・Even if there is an incoming call from the phone number with rejection registered, ringtone does not sound. And the call is not recorded in the call log.Setting Nuisance Call Blocking service1From the Home screen, tap t and tap [Settings].2Tap [Call settings]u[Network service setting].3Tap [Nuisance call blocking].・Select items you want to use.Request number notification for calls without phone number with guidance. Calls can be ended automatically after guidance.・When a call is not received because of the Caller ID Display Request Service, the call is not recorded in "Recent calls" as "incoming call" or (Missed call) does not appear on the status bar.Setting Caller ID Display Request Service1From the Home screen, tap t and tap [Settings].Nuisance Call Blocking serviceCaller ID reject registrationTap [OK] to register the last answered call to be rejected.Specified caller ID rejectEnter a phone number you want to reject and tap [OK]u[OK] to reject incoming calls from the specified phone number.Delete all registered caller IDTap [OK] to delete phone numbers with rejection registered.Delete latest registered numberTap [OK] to delete the last registered phone number. By repeating the same operation, you can delete registrations one by one from the last.Check the number of registrationCheck number of registrations.Advanced settingsConnect Nuisance Call Blocking service setting site to make advanced settings. To sign in, a network security code is needed.Caller ID Display Request Service](https://usermanual.wiki/Sony/PM-0000.08-user-guide/User-Guide-1725539-Page-101.png)
![100Calling/Network Services2Tap [Call settings]u[Network service setting].3Tap [Caller ID request service].・Select items you want to use.Set how to respond incoming call and 64K data communication during a call for the customers subscribed Voice Mail Service, Call forwarding Service and Call Waiting Service.・If you do not subscribe Voice Mail Service, Call forwarding Service and Call Waiting Service, an incoming call during a call cannot be responded.・To use Second call settings, set Second call settings to "Activate". When Call Waiting is set to "Activate", you do not need to set Second call settings to "Activate Second call settings".Setting Second call settings1From the Home screen, tap t and tap [Settings].2Tap [Call settings]u[Network service setting].3Tap [Second call settings].・Select items you want to use.Set to operate Voice Mail Service or Call forwarding Service using push system land-line phone, public phone or DOCOMO mobile phone, etc.Setting remote operation1From the Home screen, tap t and tap [Settings].2Tap [Call settings]u[Network service setting].3Tap [Remote operation settings]u[OK].・Call "159" and follow the voice prompts to operate.Activate caller ID requestTap [OK] to activate Caller ID Display Request Service.Deactivate caller ID requestTap [OK] to deactivate Caller ID Display Request Service.Check settingsCheck the current service settings.Second call settingsActivate second call settingsTap [OK] to activate the Second call settings.Deactivate second call settingsTap [OK] to deactivate the Second call settings.Check settingsCheck the current service settings.Remote operation settings](https://usermanual.wiki/Sony/PM-0000.08-user-guide/User-Guide-1725539-Page-102.png)
![102Calling/Network ServicesRecording a messageYou can record a message by making a call with Koe-no-Takuhaibin.1From the Home screen, tap [Phone]u[Dial] tab.2Enter a phone number and tap [Koe-no-Takuhaibin].・Operate the following voice prompts.Playing the voice messagePlay a recorded message in Koe-no-Takuhaibin. Follow the voice prompts to operate. You can delete or protect a message after playing.1Call a phone number displayed in a record notification message (SMS).・Operate the following voice prompts.Setting Koe-no-Takuhaibin1From the Home screen, tap , then [声の宅配便 (Koe-no-Takuhaibin)].・Activate Koe-no-Takuhaibin application.2Tap [設定 (Setting)].・Select items you want to use.設定確認・変更(サイト接続) (Check/change settings (connecting website))Connect website to check/change settings.設定確認・変更(音声発信) (Check/change settings (voice prompt))Make a call to check/change settings.](https://usermanual.wiki/Sony/PM-0000.08-user-guide/User-Guide-1725539-Page-104.png)
![103SettingsSettings1From the Home screen, tap t.2Tap [Settings].■ Setting menu❖Information・Alternatively, from the Home screen, tap , then tap [Settings].You can set passwords for applications provided by docomo or to use the services supporting AUTO-GPS.Viewing the setting menudocomo serviceP.107Xperia™P.108Wireless & networksP.109Call settingsP.119SoundP.119DisplayP.122Location & securityP.124ApplicationsP.129Accounts & syncP.132PrivacyP.135StorageP.136Language & keyboardP.138Voice input & outputP.138AccessibilityP.139Date & timeP.139About phoneP.140docomo serviceApplication managerSet to check update for applications regularly.Wi-FiSet to use docomo service via Wi-Fi.docomo apps passwordSet a password for applications provided by docomo.AUTO-GPSSet to use the services supporting AUTO-GPS.Open source licensesView open source licenses.](https://usermanual.wiki/Sony/PM-0000.08-user-guide/User-Guide-1725539-Page-105.png)
![104SettingsYou can back up/restore data or files in the terminal or set preferred applications. You can also set synchronization function for Facebook in the terminal, make settings for USB connection or Wi-Fi connection to a PC or other devices.Back up contacts, call log, messages (SMS), bookmarks in the terminal or photos and videos shot by the terminal camera to microSD card, and restore them when needed. Mount a microSD card in advance.❖Information・Do not perform "Unmount SD card" during backup/restore.Backing up to microSD cardBack up contacts, call log, messages (SMS), bookmarks in the terminal or photos and videos shot by the camera of the terminal to the microSD card.1From the Settings screen (P.107), tap [Xperia™]u[Backup & restore].2Tap [Back up].■Contacts/Call log/Message (SMS)/BookmarkTap [Back up data now]u[OK].・Contacts, call log, messages (SMS) and bookmark data are copied to the microSD card.・You cannot back up phonebook registered to docomo account (P.134), Google account (P.132), etc.■Photos and videos taken with the terminalTap [Back up media now]u[OK].・Photo and video files are copied to the microSD card.・Check that the battery level is high enough.❖Information・You cannot back up sp-mode mails, Gmails, photos or videos downloaded from websites, etc.Xperia™Backup & restoreP.108Battery lifeView built-in battery performance.ConnectivityP.158Facebook inside Xperia™P.133Preferred apps settingsSet applications used for the terminal (Home, phonebook, playing video or music) to "docomo" or "Xperia™" collectively or individually.Backing up and Restoring](https://usermanual.wiki/Sony/PM-0000.08-user-guide/User-Guide-1725539-Page-106.png)
![105SettingsRestoring the back up file to the terminalYou can restore data or files previously backed up to the microSD card.1From the Settings screen (P.107), tap [Xperia™]u[Backup & restore].2Tap [Restore].■Contacts/Call log/Message (SMS)/BookmarkTap [Restore data now]u[OK]u[OK].・The back up data in the microSD card is restored to the terminal. If the restoring data already exists in the terminal, the back up data cannot be added.■Photos and videos taken with the terminalTap [Restore media now]u[OK]u[OK].・Photo and video files are deleted and backup file of photo and video in the microSD card are restored.・Check that the battery level is high enough.❖Information・Do not turn off the power for 5 minutes after restoring contacts, call log, messages (SMS) and bookmarks since the system operates in the background.You can make settings related to networks such as Wi-Fi, Bluetooth function.An access point for connecting to the Internet (sp-mode, mopera U) is already registered. You can add or change it if necessary.By default, sp-mode (P.110) is set for the usual access point.Checking the access point you use1From the Settings screen (P.107), tap [Wireless & networks]u[Mobile networks]u[Access Point Names].・Available access points (APN) appear.・It is recommended that you use the displayed access point without editing.Wireless & networksAirplane modeP.111Wi-Fi/Wi-Fi settingsP.112Bluetooth/Bluetooth settingsP.166TetheringP.116VPN settingsP.118Mobile networksP.109, P.238Setting an access point](https://usermanual.wiki/Sony/PM-0000.08-user-guide/User-Guide-1725539-Page-107.png)
![106Settings❖Information・If you have several available connections, a marked radio button to the right indicates the active network connection.Setting an access point additionally1From the Settings screen (P.107), tap [Wireless & networks]u[Mobile networks]u[Access Point Names].2Tap t.3Tap [New APN].4Tap [Name], enter a name and tap [OK].5Tap [APN] and enter the access point name and tap [OK].6Tap and enter all other information required by your network operator.7Tap t and [Save].❖Information・Do not change the MCC/MNC. If you change MCC/MNC to other than the default value (440/10), the settings do not appear on the APNs screen. When the MCC/MNC settings do not appear on the APNs screen, make APN settings with [Reset to default] or [New APN] again.・Note that, when using the prediction conversion by one-byte alphabet entry mode (English mode) with mark in [Auto space] checkbox on Japanese keyboard settings screen (P.62), spaces may be entered automatically. In this case, delete spaces.By initializing an access point, the default state is restored.1From the Settings screen (P.107), tap [Wireless & networks]u[Mobile networks]u[Access Point Names].2Tap t and tap [Reset to default].sp-mode is ISP for NTT DOCOMO smartphone. In addition to accessing Internet, you can use the mail service using the same address as imode mail (@docomo.ne.jp), etc. sp-mode is a service requiring subscription. For details on sp-mode, refer to NTT DOCOMO website.Initializing an access pointsp-mode](https://usermanual.wiki/Sony/PM-0000.08-user-guide/User-Guide-1725539-Page-108.png)
![107Settingsmopera U is ISP of NTT DOCOMO's Internet connection. If you have subscribed to mopera U, you can use Internet after making the simple settings. mopera U is a service requiring subscription.Setting mopera U1From the Settings screen (P.107), tap [Wireless & networks]u[Mobile networks]u[Access Point Names].2Mark [mopera U (スマートフォン定額) (mopera U (Smartphone flat-rate))]/[mopera U設定 (mopera U settings)] radio button.・Return to the Home screen and open the Browser. You can enjoy the nice Internet access.❖Information・"mopera U設定 (mopera U settings)" is an access point for setting mopera U. When you use the access point for setting mopera U, packet communication charges for setting do not apply. Note that you can set only the initial setting screen or the change setting screen. For details on mopera U settings, refer to mopera U website.・Subscription to packet flat-rate service is required for using "mopera U (スマートフォン定額) (mopera U (Smartphone flat-rate))". For details on mopera U (Smartphone flat-rate), refer to NTT DOCOMO website.In this mode, the functions of using radio wave transmissions such as calling, accessing to the Internet (including sending/receiving mails), etc. are disabled. It is useful when you want to operate the terminal with no interruption of incoming calls or mails.Turning on Airplane mode1From the Settings screen (P.107), tap [Wireless & networks].2Mark [Airplane mode] checkbox.・When you unmark [Airplane mode] checkbox, the Airplane mode turns off.❖Information・You can also switch on/off of the Airplane mode by pressing and holding p for over a second to switch to the Phone options menu, then tapping [Airplane mode].・Even if Airplane mode is on, Wi-Fi and Bluetooth function can be turned on.mopera UAirplane mode](https://usermanual.wiki/Sony/PM-0000.08-user-guide/User-Guide-1725539-Page-109.png)
![108SettingsUsing the Wi-Fi function, you can connect to an access point for your home, company network or public wireless LAN services to use mail and Internet.・Even when Wi-Fi is on, packet communication is available. However, while you connect Wi-Fi network, Wi-Fi comes first.・When a Wi-Fi network is disconnected, connection is automatically switched to a 3G/GPRS network. Note that packet communication fee applies for using 3G/GPRS network.・Turn the Wi-Fi function to off when you do not use Wi-Fi to cut battery power consumption.Before using Wi-FiTo use Wi-Fi, turn on Wi-Fi and search available Wi-Fi network, then connect it.・To access the Internet using Wi-Fi, connect to Wi-Fi network in advance.❖Information・Make sure to receive enough signal strength for using Wi-Fi. The signal strength of the Wi-Fi network varies by the location of the terminal. Moving closer to the Wi-Fi router might enhance the signal strength.■ Reception interference caused by Bluetooth devicesBluetooth devices and wireless LAN (IEEE802.11b/g/n) devices use the same frequency band (2.4GHz). If you use Bluetooth devices near a wireless LAN device, reception interference may occur or the communications speed may lower. Also, you may hear noise or have a connection problem. Communication may be interrupted or sound may be lost while streaming data, etc. In these cases, do the following:・Keep the terminal and Bluetooth device to be connected wirelessly 10 or more meters away from a wireless LAN device.・Within 10 meters, turn off the Bluetooth device to be connected.1From the Settings screen (P.107), tap [Wireless & networks].2Mark [Wi-Fi] checkbox.・The terminal scans for available Wi-Fi networks.❖Information・It may take a few seconds before the Wi-Fi connection is on.About Wi-FiTurning on Wi-Fi](https://usermanual.wiki/Sony/PM-0000.08-user-guide/User-Guide-1725539-Page-110.png)
![109Settings1From the Settings screen (P.107), tap [Wireless & networks]u[Wi-Fi settings].・Available Wi-Fi networks are displayed under "Wi-Fi networks". The available networks may be open or secured. This is indicated by or next to the Wi-Fi network name. appears next to the name of the Wi-Fi network that can be connected with WPS functions.2Select Wi-Fi network you want to connect, tap [Connect].・If you are trying to connect to a protected Wi-Fi network, you are asked to enter the security key for that Wi-Fi network before you can connect to it.❖Information・The next time you connect to a Wi-Fi network, the security key is saved in the terminal.・If you enter a wrong security key (WEP key) when connecting to Wi-Fi network, "Limited connectivity" may appear after IP address acquisition starts, when the terminal is not connected to Wi-Fi network. Check the security key (WEP key) and reconnect.If the above method cannot solve the problem, the correct IP address may not have been acquired. Check the signal status and reconnect.■ Wi-Fi network status icons on status barThe following icons appear according to the Wi-Fi network connection status.* Without connected to Wi-Fi network, you need to set Wi-Fi Network notification to on beforehand. (P.114)1From the Settings screen (P.107), tap [Wireless & networks]u[Wi-Fi settings].2Touch and hold the Wi-Fi network that you are connected to.3Tap [Forget network].When you are connected to a Wi-Fi network or when there are Wi-Fi networks available in your vicinity, you can see the status of these Wi-Fi networks. You can also set the terminal to notify you when an unsecured Wi-Fi network is detected.Connecting to a Wi-Fi networkAppears when connected to Wi-Fi network.Appears when connected to Wi-Fi network using AutoIP function.Appears when any open network within the service area is detected.*Disconnecting a Wi-Fi networkWi-Fi network status](https://usermanual.wiki/Sony/PM-0000.08-user-guide/User-Guide-1725539-Page-111.png)
![110SettingsSetting the Wi-Fi network notification to ON1Confirm Wi-Fi is ON and from the Settings screen (P.107), tap [Wireless & networks]u[Wi-Fi settings].2Mark [Network notification] checkbox.Scanning for Wi-Fi networks manually1From the Settings screen (P.107), tap [Wireless & networks]u[Wi-Fi settings].2Tap t.3Tap [Scan].・Scanning for Wi-Fi networks is started, and they are displayed under "Wi-Fi networks".4Tap a Wi-Fi network in the list to connect to it.You need to turn on the Wi-Fi setting beforehand. (P.112)Connecting to Wi-Fi network using a WPS deviceWPS is a function that enables you to simply make complicated settings for wireless LAN connection and security. WPS function in the terminal enables you to connect to Wi-Fi network using a WPS compatible wireless LAN device as an access point. Make setting for the WPS device as required.1From the Settings screen (P.107), tap [Wireless & networks]u[Wi-Fi settings].2Tap [Auto setup (WPS)].3Press the WPS button of the WPS device that functions as an access point within 120 seconds.・Press the WPS button according to the settings of the WPS device.Adding a Wi-Fi network manually1From the Settings screen (P.107), tap [Wireless & networks]u[Wi-Fi settings].2Tap [Add Wi-Fi network].Advanced Wi-Fi settings](https://usermanual.wiki/Sony/PM-0000.08-user-guide/User-Guide-1725539-Page-112.png)
![111Settings3Enter [Network SSID] name of the Wi-Fi network you want to add.4Tap [Security] field, then mark a radio button of security type for the Wi-Fi network you want to add.・4 options, "Open", "WEP", "WPA/WPA2 PSK", or "802.1x EAP", appear.5If required, enter security information for the Wi-Fi network you want to add.6Tap [Save].Viewing detailed information on a connected Wi-Fi network1From the Settings screen (P.107), tap [Wireless & networks]u[Wi-Fi settings].2Tap the Wi-Fi network that you are currently connected to.・The detailed network information is displayed.❖Information・From the Settings screen (P.107), tap [Wireless & networks]u[Wi-Fi settings] and tap t and [Advanced] to check "MAC address" and "IP address".By changing Wi-Fi sleep policy, you can choose to disable the Wi-Fi function in the terminal when the screen backlight turns off. You can also set the terminal to always turn on the Wi-Fi function or to turn it on when the terminal is charged.❖Information・When a Wi-Fi network is disconnected, connection is automatically switched to a 3G/GPRS network.Adding a Wi-Fi sleep policy1From the Settings screen (P.107), tap [Wireless & networks]u[Wi-Fi settings].2Tap t.3Tap [Advanced].4Tap [Wi-Fi sleep policy].5Tap any of [When screen turns off]/[Never when plugged in]/[Never].Wi-Fi sleep policy](https://usermanual.wiki/Sony/PM-0000.08-user-guide/User-Guide-1725539-Page-113.png)
![112SettingsYou can set up the terminal to connect to a Wi-Fi network using a static IP address.Setting up a static IP address1From the Settings screen (P.107), tap [Wireless & networks]u[Wi-Fi settings].2Tap t.3Tap [Advanced].4Mark [Use static IP] checkbox.・Item of IP settings can be selected.5Tap an item to enter necessary information.・Enter "IP address", "Gateway", "Netmask", "DNS 1" to use a static IP address.6Tap t.7Tap [Save].Tethering stands for using mobile devices such as smartphone as modem to allow USB compatible devices or wireless LAN devices to access the Internet.❖Information・Packet communication charge when using tethering varies depending on the charging plan you use. Subscription of packet flat-rate service is highly recommended.・For details on usage charge, etc., refer to http://www.nttdocomo.co.jp/ .・For details on tethering, from the Settings screen (P.107), tap [Wireless & networks]u[Tethering]u[Help] to refer.Setting USB tetheringConnecting the terminal to a USB compatible PC with supplied microUSB cable, and using the terminal as a modem, you can connect the PC to the Internet.1From the Settings screen (P.107), tap [Wireless & networks]u[Tethering].2Connect the terminal to a PC using a microUSB cable (P.36).・When you connect a USB cable for the first time, driver software for the terminal is installed to the PC. Wait for a while until installation is completed. A confirmation screen for installation of PC Companion software appears when the driver software installation is completed.3Tap [Skip].Using a static IP addressUsing tethering function](https://usermanual.wiki/Sony/PM-0000.08-user-guide/User-Guide-1725539-Page-114.png)
![113Settings4Tap [USB tethering].5Confirm details of the cautions displayed, tap [OK].・[USB tethering] is marked.❖Information・System requirements (OS) for USB tethering are as follows. A required driver is automatically installed.- Microsoft Windows 7- Microsoft Windows Vista- Microsoft Windows XPSetting up a portable Wi-Fi hotspotYou can use the terminal as a Wi-Fi access point to connect up to 8 wireless LAN devices to the Internet simultaneously.1From the Settings screen (P.107), tap [Wireless & networks]u[Tethering].2Tap [Port. Wi-Fi hotspot settings].3Tap [Configure Wi-Fi spot].4Enter [Network SSID] of the Wi-Fi hotspot to set.・By default, "Xperia acro HD SO-04D_XXXX" is set.5Tap [Security] field and mark the radio button for the security type of Wi-Fi hotspot to set.・Either "WPA2 PSK" or "Open" appears.6Enter security information of the Wi-Fi hotspot to set as required.7Tap [Save].❖Information・By default, the password is set at random. You can change the password as desired.Setting Wi-Fi tethering1From the Settings screen (P.107), tap [Wireless & networks]u[Tethering].2Tap [Portable Wi-Fi hotspot].3Confirm details of the cautions displayed, tap [OK].・[Portable Wi-Fi hotspot] is marked.❖Information・If USB tethering starts while connecting to Wi-Fi network, Wi-Fi network is disconnected and automatically connected when Wi-Fi tethering ends. Alternatively, when the terminal and DLNA device are connected via Wi-Fi network, starting/ending Wi-Fi tethering affects Wi-Fi connection.・USB tethering and Wi-Fi tethering can be used at the same time.](https://usermanual.wiki/Sony/PM-0000.08-user-guide/User-Guide-1725539-Page-115.png)
![114SettingsVirtual Private Network (VPN) is a technology to connect to the information in a protected local network from another network. Generally, VPNs are provided to companies, schools and other facilities. A user can access to the information in the local network from outside of the premises.To set up a VPN access from the terminal, you need to retrieve the information related to security from your network administrator. For details, refer to http://www.sonymobile.co.jp/support/.❖Information・If you set sp-mode as an ISP, you cannot use PPTP.Adding a VPN1From the Settings screen (P.107), tap [Wireless & networks]u[VPN settings].2Tap [Add VPN].3Tap a VPN type to add.4If a setting screen appears, follow the instruction of the network administrator to set required items of VPN settings.5Tap t and [Save].・A new VPN is added in the list on VPN settings screen.❖Information・Added VPNs can be edited or deleted.To edit VPNs, touch and hold a desired VPN, then tap [Edit network]. Change the VPN settings as required and tap t and tap [Save].To delete, touch and hold a VPN to be removed, then tap [Delete network]u[OK].Connecting to a VPN1From the Settings screen (P.107), tap [Wireless & networks]u[VPN settings].・Added VPNs are displayed in the list on the VPN setting screen.2Tap a VPN to connect to.3If the dialog box appears, enter the desired authentication information and tap [Connect].・When you are connected to a VPN, appears in the status bar. When you are disconnected, the notification indicating to return to the VPN setting screen appears, so that you can reconnect to. When not connected, appears in the status bar.Connecting to a VPN (Virtual Private Network)](https://usermanual.wiki/Sony/PM-0000.08-user-guide/User-Guide-1725539-Page-116.png)
![116Settings1Press and hold p for over a second.・Phone options menu appears.2Tap [Silent mode].❖Information・Alternatively, from the Settings screen (P.107), tap [Sound] and mark [Silent mode], or from the key unlocking screen (P.39), touch and drag to the left to set silent mode.・Setting the phone to silent mode does not mute sounds for playback of video or music, alarm, etc.1From the Settings screen (P.107), tap [Sound]u[Vibrate].2Tap any of [Always]/[Never]/[When sound is off]/[When sound is on].1From the Settings screen (P.107), tap [Sound]u[Volume].・Adjust the volume of following items.- Ringtone- Media (sounds of the Music player, Gallery and FM radio, etc.)- Alarm- Notification tone2Drag the slider left or right to adjust the level.・Drag the slider to the left for volume down, or to the right for volume up.3Tap [OK].❖Information・By default, Notification volume is adjusted to the same as Ringtone volume. To adjust Ringtone and Notification separately, unmark [Use incoming call volume for notifications] in Step 1. Ringtone and Notification volume adjustment sliders appear, then drag each slider to the right or left to adjust volume.Setting Silent modeSetting vibratorAdjusting each sound volume](https://usermanual.wiki/Sony/PM-0000.08-user-guide/User-Guide-1725539-Page-118.png)
![117Settings1From the Home screen, press up or down of m.・The volume adjustment bar appears, you can adjust the volume up or down.❖Information・You can also press m or p to mute the ringtone for an incoming call.1From the Settings screen (P.107), tap [Sound]u[Phone ringtone].2Select a ringtone and tap [Done].・You can set voice file in ".wav", ".m4a" or in other format which is transferred from Media Go (P.162) or downloaded from the Internet as a ringtone. (P.203)❖Information・To set a ringtone other than the ones stored by default, you can also set from "Music library".1From the Settings screen (P.107), tap [Sound]u[Notification ringtone].2Select a ringtone and tap [Done].❖Information・To set a notification sound other than the ones stored by default, you can also set from "Music library".1From the Settings screen (P.107), tap [Sound].2Mark [Audible touch tones], [Audible selection].・If you unmarked them, any operation tone does not sound when you touch or tap.❖Information・"Audible touch tones" is a tone for numeric key operations. "Audible selection" is a tone when selecting menu item.・To set the key sound of software keyboard, from the Settings screen (P.107), tap [Language & keyboard], and select a type of software keyboard.Adjusting the ringtone volume with the volume keySetting a ringtoneSelecting a notification ringtoneSetting touch tones to ON](https://usermanual.wiki/Sony/PM-0000.08-user-guide/User-Guide-1725539-Page-119.png)
![118SettingsSet brightness, orientation of the screen, etc.* Setting Mobile BRAVIA Engine improves image quality when using Xperia™ application.1From the Settings screen (P.107), tap [Display]u[Brightness].2Drag the slider to the right or left.・Drag the slider to the left for dimmer screen, or to the right for brighter screen.3Tap [OK].You can set the screen orientation to change automatically between landscape and portrait view when you turn the terminal sideways/paleways.❖Information・Even when you change the orientation of the terminal, the screen may not change to landscape view depending on the screen such as Home screen, etc.Setting to change to landscape view1From the Settings screen (P.107), tap [Display].2Mark [Auto-rotate screen] checkbox.Set animation effect which shows transition of screen smoothly.1From the Settings screen (P.107), tap [Display]u[Animation].2Select an animation option.DisplayMobile BRAVIA EngineTo view photos or movies colorfully and beautifully, set image quality improving procedure (Mobile BRAVIA Engine). It adjusts contrast, color shade, etc.*BrightnessP.122Auto-rotate screenP.122AnimationP.122Screen timeoutP.123ThemeSet the background image for the Home screen or Settings screen.Lock screen settingsP.123Adjusting the screen brightnessChanging orientation of the screenSetting animation effect to transition](https://usermanual.wiki/Sony/PM-0000.08-user-guide/User-Guide-1725539-Page-120.png)
![119Settings1From the Settings screen (P.107), tap [Display]u[Screen timeout].2Select a time option before the screen back light turns off.❖Information・To turn the screen back light off immediately, press p.Yon can set information displayed on the key unlock screen (P.39).1From the Settings screen (P.107), tap [Display]u[Lock screen settings].■Displaying notificationMark [Missed calls]/[New sp-mode mails]/[New messages]/[New emails]/[Calendar events].・By default, "Missed calls", "New sp-mode mails" and "New messages" checkboxes are marked.・When you log in to Facebook and set "Facebook inside Xperia™" (P.134), "Facebook notifications" checkbox appears. Mark the checkbox to display the notification for a new Facebook message on the key unlock screen. (Some notifications such as "Friends requests", "Event invites", etc. cannot be displayed.)■Hiding detailed information on notificationMark [Privacy] checkbox.・Notification and a number of messages, calls, etc. are displayed while information on the other party or message contents are not displayed.■Changing shortcuts of applicationsTap [Application shortcuts]u[Add new shortcuts]/[Contacts]/[Messaging]/[Google Search] and flick up and down to select the application you want to change.・By default, "Contacts", "Messaging" and "Google Search" are set, which can be customized.Adjusting the idle time before the screen turns offSetting information displayed on the key unlock screen](https://usermanual.wiki/Sony/PM-0000.08-user-guide/User-Guide-1725539-Page-121.png)
![120Settings・Flick right around date and time displayed on the key unlock screen to display a shortcut for the preset application, or flick left to display Music player widget. You can activate the application or play music without unlocking key lock. You cannot replace the Music player widget.■Changing wallpaperTap [Wallpaper]u[Gallery]/[Xperia™ wallpapers].・For setting procedure, see Step 2 (P.69) in "Changing wallpaper".■Displaying Machi-charaMark [Machi-chara] checkbox.・Set "Machi-chara" widget on the Home screen in advance. For setting procedure, see "Adding a widget to the Home screen" (P.68).・If [Machi-chara] checkbox is marked, three checkboxes or less can be marked for Notification (P.123).Set options related to location information and security.*1 To use Omakase Lock, enable "Omakase Lock". Omakase Lock is not available as of February, 2012.Location & securityUse wireless networksP.211Use GPS satellitesP.211Set up screen lockP.127Set up SIM card lockP.126Visible passwordsSet whether to show the input character before "・" appears on the password entry screen.Select device administratorsSet whether to enable device administrators. By default, "Omakase Lock" is activated.*1Use secure credentialsAllow applications to access secure certificates and other credentials.*2Install from internal storageInstall encrypted certificates from internal storage.Set passwordSet or change the credential storage*3 password.Clear storageDelete all certificates and credential information from the credential storage*3 and reset its password.](https://usermanual.wiki/Sony/PM-0000.08-user-guide/User-Guide-1725539-Page-122.png)
![122SettingsYou can set a security code called PIN code to the UIM. The code is set to "0000" at the time of subscription. It can be changed by yourself.PIN code is a 4- to 8-digit number (code) that must be entered for user confirmation to prevent unauthorized use by a third party every time you insert the UIM into the terminal or when the terminal is powered on. Entering the PIN code enables making/receiving calls and terminal operation.・If you use a newly purchased terminal with UIM you have been using inserted, use the PIN code set on the former terminal. If you did not change the setting, the code is "0000".・If you enter a wrong PIN code 3 times consecutively, the PIN code is locked and cannot be used anymore. In this case, unlock with "PUK". (P.126)PUK code (Personal Unblocking Key)The PUK code is an 8-digit number for canceling the locked PIN code. The PUK code cannot be changed by yourself.・If you failed to enter PUK code 10 times consecutively, the UIM is locked. Please contact a docomo Shop.By setting PIN (security code) and entering PIN code when powered on, you can protect the UIM from improper use.1From the Settings screen (P.107), tap [Location & security]u[Set up SIM card lock]u[Lock SIM card].2Enter the PIN code of the UIM and tap [OK].・[Lock SIM card] is marked.Entering the PIN code when powered on1On the PIN code entry screen, enter the PIN code of the UIM.2Tap [OK].❖Information・Even if you do not unlock the SIM card lock, you can make an emergency call by tapping [Emergency call] on the screen unlocking screen after unlocking the SIM card lock. For details, refer to "Emergency call" (P.81).PIN code Enabling the UIM PIN](https://usermanual.wiki/Sony/PM-0000.08-user-guide/User-Guide-1725539-Page-124.png)
![123SettingsChanging the PIN code・You can change the PIN code only when the UIM PIN is enabled.1From the Settings screen (P.107), tap [Location & security]u[Set up SIM card lock]u[Change SIM PIN].2Enter the current PIN code of the UIM and tap [OK].3Enter a new PIN code of the UIM and tap [OK].4Enter the new PIN code of the UIM again and tap [OK].Unblocking the locked UIM1On the PUK code entry screen, enter the PUK code and tap [OK].2Enter the new PIN code of the UIM and tap [OK].3Enter the new PIN code of the UIM again and tap [OK].You can secure your data by requiring a screen unlock pattern every time the terminal is turned on or every time it is activated from sleep mode.There are 3 types of screen lock settings: "Pattern", "PIN" and "Password". (P.127)❖Information・You can use Key lock (P.38) to prevent unintended operation or save the power consumption of the terminal without setting screen lock.Setting screen unlock method1From the Settings screen (P.107), tap [Location & security]u[Set up screen lock].2Tap [Pattern]/[PIN]/[Password].・When you tap [Pattern], follow the onscreen instructions to enter screen unlock pattern.Set security question and answer in case you forget the pattern.・When you tap [PIN], follow the onscreen instructions to enter 4 or more numbers. This "PIN" code is different from a PIN code to be set to UIM (P.126).Screen lock](https://usermanual.wiki/Sony/PM-0000.08-user-guide/User-Guide-1725539-Page-125.png)
![124Settings・When you tap [Password], follow the onscreen instructions to enter 4 or more characters including alphabets.Changing screen unlock method1From the Settings screen (P.107), tap [Location & security]u[Change screen lock].・Enter current screen unlock pattern, PIN or password.・If you should fail 5 times when you enter the unlock pattern, wait 30 seconds and then try again.2Tap [Pattern]/[PIN]/[Password].・Select items you want to change into. For setting procedure, see Step 2 (P.127) of "Setting screen unlock method".Locking the screenOnce screen unlock pattern (P.127) is set, keys and screen are locked when the terminal enters in the sleep mode or when p is pressed.Unlocking the screen1Press p to turn the backlight on.2Unlock the key lock (P.39), then enter the screen unlock pattern, PIN, or password.・Enter preset screen unlock pattern, PIN or password.❖Information・Even if you do not unlock the screen lock, you can make an emergency call by tapping [Emergency call] on the screen unlocking screen after unlocking the key lock. For details, refer to "Emergency call" (P.81).If you forget how to unlock■ If you set "Pattern""Incorrect pattern" appears when you enter incorrect unlock pattern 5 times consecutively.・Tap [Next], and answer the security question that you set for the unlock pattern setting, then tap [Unlock] to unlock the screen lock.・If you set Google account, on the "Incorrect pattern" screen, tap [Next] to display "Answer question" and "Enter Google account details".- Mark [Answer question] and tap [Next], and answer the question that you set for the unlock pattern, then tap [Unlock] to unlock the screen lock.](https://usermanual.wiki/Sony/PM-0000.08-user-guide/User-Guide-1725539-Page-126.png)
![125Settings- Mark [Enter Google account details], tap [Next], and enter Google account and password, then tap [Unlock] to unlock the screen lock.・When setting new unlock pattern after unlocking screen lock, "Screen unlocked" appears. Tap [Yes] to reset unlock pattern.❖Information・Tap [Try again] to retry entering pattern in 30 seconds.・Alternatively, tap [Try again] and [Forgot pattern?] to display answering question screen that you set the unlock pattern.・You can set multiple Google accounts. To unlock the screen with Google account and password, enter one of those accounts.■ If you set "PIN"/"Password"Please contact a docomo Shop.Canceling screen lockYou can cancel screen lock pattern after you set.1From the Settings screen (P.107), tap [Location & security]uTap [Change screen lock].・Enter preset screen unlock pattern, PIN or password.2Tap [None].You can set options related to application display and management.Before you can download unknown source's applications, set the terminal to enable downloading.Applications you download may be of unknown origin. To protect your terminal and personal data, only download applications from trusted sources such as the Android Market etc.1From the Settings screen (P.107), tap [Applications].2Tap [Unknown sources].ApplicationsUnknown sourcesP.129Manage applicationsP.130Running servicesDisplay/Manage the currently running services.Storage useDisplay size of all applications, usage condition, etc.Battery useDisplay operations which has been using the battery.DevelopmentSet options for application development.Permitting downloading unknown source's application](https://usermanual.wiki/Sony/PM-0000.08-user-guide/User-Guide-1725539-Page-127.png)
![126Settings3Read the cautions displayed, tap [OK].・[Unknown sources] checkbox is marked.Checking downloaded applicationsYou can check data downloaded from websites, such as unknown source's applications, in the following steps.1From the Home screen, tap [Browser].2Tap t and tap [More]u[Downloads].❖Information・Applications downloaded from Android Market do not appear.Manage and delete installed applications, display memory usage condition, etc. or change the settings.Viewing permitted operation of the applications in the terminalYou can check functions which are permitted to access to each application in the progress of performing, such as network communication function or location information function of the terminal.1From the Settings screen (P.107), tap [Applications]u[Manage applications].2Tap an application to view.3Scroll down the screen to view permitted operations.・If all permitted operations do not appear, tap [All].Shutting down an applicationIf a pop-up window that indicates the application does not reply appears, you can force quit the application.1From the Settings screen (P.107), tap [Applications]u[Manage applications].2Tap an application to force-quite.3Tap [Force stop].4Read the cautions displayed, tap [OK].❖Information・When you do not want to force stop the application, tap [Cancel] and wait for a reply of the application.❖Note・If you cancel the "status bar" of applications forcibly, operations may not be performed correctly.Managing your applications](https://usermanual.wiki/Sony/PM-0000.08-user-guide/User-Guide-1725539-Page-128.png)
![127SettingsDeleting all data of the application・Before deleting all installed application data, back up contents related to the application that you want to save including data saved in the application.1From the Settings screen (P.107), tap [Applications]u[Manage applications].2Tap an application to delete the data.3Tap [Clear data].4Read the cautions displayed, tap [OK].Deleting installed application・Before deleting installed application, back up contents related to the application that you want to save including data saved in the application.・Some applications cannot be deleted.1From the Settings screen (P.107), tap [Applications]u[Manage applications].2Tap an application to be deleted.3Tap [Uninstall].4Tap [OK].5When uninstallation is completed, tap [OK].❖Information・Some applications pre-installed in the terminal cannot be uninstalled.・Applications can be deleted from the Applications screen. For details, refer to "Uninstalling an application" (P.77).Deleting cache of the application1From the Settings screen (P.107), tap [Applications]u[Manage applications].2Tap an application to delete cache.3Tap [Clear cache].Deleting settings for activating the applicationYou can delete settings for activating the application and restore to the default.1From the Settings screen (P.107), tap [Applications]u[Manage applications].2Tap an application to delete its settings.3Tap [Clear defaults].](https://usermanual.wiki/Sony/PM-0000.08-user-guide/User-Guide-1725539-Page-129.png)
![128Settings1From the Settings screen (P.107), tap [Applications]u[Development].2Mark [Stay awake] checkbox.You can manage (add or delete) online service accounts or synchronize contacts, messages, etc. saved in online services with the terminal.You can add or delete an online service account.Setting Google accountYou can create a Google account on your terminal and use Google services such as Gmail, Google Talk, Google Calendar, Android Market, etc.You can set multiple Google accounts on the terminal.1From the Settings screen (P.107), tap [Accounts & sync]u[Add account]u[Google].2Follow the registration wizard, set a Google account.・If you have no Google account, create an account.・If you have already the Google account, sign in.❖Information・You can use the terminal without creating your Google account, however the services such as Google Talk, Gmail, Android Market, etc. are not available.・To sign in, you need a Google account and a password.Keeping the screen backlight ON while chargingAccounts & syncBackground data trafficAll the applications installed to the terminal perform automatic data communications.Activate auto-syncP.135Manage accountsP.132Managing accounts](https://usermanual.wiki/Sony/PM-0000.08-user-guide/User-Guide-1725539-Page-130.png)
![129Settings・If you set a Google account, you can tap your Google account displayed on the "Accounts & sync" screen in the setting menu to manually synchronize data from the following items.* To upload photos automatically, select settings to enable the instant upload on the confirmation screen when you set a Google account to log in Google+.・If you set a Google account and use Picasa in it, "Sync Picasa Web Albums" appears. Tapping to synchronize displays Picasa Web Album in the Gallery on the terminal.・If you set a Google account and use Google+ in it, "Sync Google+" appears. Tap it to synchronize and display instant upload photos in the Gallery in the terminal.・Make sure to check if the data connection is available before sign in to the Google account. For checking the data connection status, see "Status icon" (P.41).Setting Facebook accountWhen you register or sign in Facebook, you can display profile information published by online "Friend" to Phonebook. And you can display Facebook updates of "Friends" in Timescape.❖Information・If you do not have a Facebook account, you can also create a new account at http://www.facebook.com.・If you download and install client applications for Twitter, mixi, you can setup accounts and synchronize contacts information in the same manner as Facebook.1From the Settings screen (P.107), tap [Accounts & sync]u[Add account]u[Facebook].・If you already have a Facebook account and set account from Phonebook or Timescape of the terminal, you need not add a new account.2Enter your sign in information.・If you have no Facebook account, register an account.・If you have Facebook account, sign in.Sync Instant Upload*Synchronize photos taken with the camera or screen shots or photos in a microSD card with photos in Google+.Sync ContactsSynchronize contacts stored in Gmail with the phonebook stored in the terminal.Sync GmailSynchronize Mail logs used in Gmail account with Gmail on the terminal.Sync CalendarSynchronize calendar information such as schedule, etc., stored in Google account with Calendar in the terminal.](https://usermanual.wiki/Sony/PM-0000.08-user-guide/User-Guide-1725539-Page-131.png)
![130Settings❖Information・Set Facebook account to display in the status bar. Drag the status bar downwards, tap [Facebook inside Xperia™], mark the [Facebook integration] checkbox, read the displayed note, and then tap [Accept]. Tap (Facebook inside Xperia™) added to the "Accounts & sync settings" screen, and tap the following items to synchronize and display corresponding data.Setting other account■ Exchange ActiveSync account・If you have Exchange ActiveSync account, from the Settings menu screen (P.107), tap [Accounts & sync]u[Add account]u[Exchange Active Sync] and set according to the onscreen instruction.■ docomo account・docomo account helps you to use "docomo backup" service (P.72) provided by NTT DOCOMO. docomo account is set by default.Deleting an account1From the Settings screen (P.107), tap [Accounts & sync] and select a service account you want to delete.2Tap [Remove account]u[Remove account].❖Information・The first set Google account cannot be removed from "Remove account". To remove the first set Google account, reset the terminal. For resetting procedure, see "Resetting the terminal" (P.135).・docomo account cannot be deleted.Synchronize online information such as your Gmail, calendar, contacts, etc. to the terminal. You can display and edit information on the terminal or a PC.❖Information・You need to set your online service account such as Google account, etc. on the terminal to synchronize. You can set to synchronize manually or automatically through use of background data.Sync CalendarSynchronize events such as Friends' birthdays, etc., stored in Facebook with Calendar in the terminal.Sync Albums in GalleryDisplay images posted on Facebook onto the album in Gallery of the terminal.Sync ContactsSynchronize profile of Friends stored in Facebook with the phonebook stored in the terminal.Data synchronization](https://usermanual.wiki/Sony/PM-0000.08-user-guide/User-Guide-1725539-Page-132.png)
![131SettingsSetting Auto-sync1From the Settings screen (P.107), tap [Accounts & sync].2Mark [Background data traffic] checkbox.3Tap [Activate auto-sync].4Read the cautions displayed, tap [OK].・[Activate auto-sync] checkbox is marked.5Tap an online service whose account is set.6Tap to mark an item for automatic synchronization.・If the items to be synchronized are marked and checkboxes are led by , synchronization starts. When is not displayed, tap t and tap [Sync now] to start synchronization.❖Note・If you mark [Background data traffic], all the applications installed to the terminal are permitted automatic data communications to online services whose accounts are set. And, if you mark [Activate auto-sync], your Gmail, calendar, contacts, and profile information published by "Friend", etc. are permitted automatic data communications by Google account. These communications may cause you to pay packet communications charges.・If you do not mark "Activate auto-sync", you can synchronize manually. On the settings screen (P.107), tap [Accounts & sync], tap the service where your account is set to display the synchronizing items, then tap items you want to synchronize.Canceling synchronization1During synchronization ( appears in the status bar), tap t.2Tap [Cancel sync].Restore the terminal to default.Resetting the terminal deletes all data, including downloaded applications and Google accounts, and resets the terminal back to the initial (default) state. Make sure to back up important data you have on the terminal before you reset the terminal.For the initial settings, see "Initial settings (Setup guide)" (P.39).PrivacyFactory data resetP.135Resetting the terminal](https://usermanual.wiki/Sony/PM-0000.08-user-guide/User-Guide-1725539-Page-133.png)
![132Settings1From the Settings screen (P.107), tap [Privacy]u[Factory data reset]u[Reset phone].・Mark [Erase internal storage] checkbox to delete all contents (music, photos, videos, etc.) on the internal storage.・Enter your screen unlock method as required.2Tap [Erase everything].・By tapping [Erase everything], the terminal restarts automatically.❖Information・If you reset the terminal, license information for the DRM protected content may be erased making the content unable to be played.Check memory volume of the microSD card, USB storage, internal storage and phone memory. And you can format microSD card, USB storage and internal storage.USB storage is an external memory such as a microSD card connected to the terminal using commercially available reader/writer cable.* Display changes depending on condition of USB storage or microSD card recognition.StoragemicroSD cardTotal spaceCheck memory volume of microSD card.Available spaceCheck available memory of a microSD card.Unmount SD card*Cancel connection of microSD card to remove it safely.Mount SD card*Have microSD card recognized.Erase SD cardP.137USB storageTotal spaceCheck memory volume of USB storage.Available spaceCheck available memory of USB storage.Mount USB storage*Have USB storage recognized.Unmount USB storage*Cancel connection of USB storage to remove it safely.Clear USB storageP.137Internal storageTotal spaceCheck memory volume of internal storage.Available spaceCheck available memory of internal storage.Clear internal storageP.137Phone memoryAvailable spaceCheck available memory of the phone memory.](https://usermanual.wiki/Sony/PM-0000.08-user-guide/User-Guide-1725539-Page-134.png)
![133Settings❖Information・Note that when available memory of internal storage becomes 32KB or less, microSD card cannot be mounted.Formatting microSD card1From the Settings screen (P.107), tap [Storage]u[Unmount SD card].2Tap [Erase SD card].3Tap [Erase SD card]u[Erase everything].❖Information・Formatting microSD card deletes all the data in it.Formatting USB storageInsert external memory such as a microSD card into commercially available reader/writer cable and connect the cable to the terminal in advance.1From the Settings screen (P.107), tap [Storage]u[Unmount USB storage].2Tap [Clear USB storage].3Tap [Clear USB storage]u[Erase everything].❖Information・Formatting USB storage (external memory such as microSD card) deletes all the data in it.Formatting the internal storage of the terminal1From the Settings screen (P.107), tap [Storage]u[Clear internal storage].2Tap [Clear internal storage].3Tap [Erase everything].❖Information・Formatting the terminal deletes all the data in it.Checking total memory space and available memory of internal storage.1From the Settings screen (P.107), tap [Storage].・Check total volume and available memory of microSD card, USB storage, internal storage and phone memory.Managing memory](https://usermanual.wiki/Sony/PM-0000.08-user-guide/User-Guide-1725539-Page-135.png)
![134SettingsIncreasing the available memory of the terminalIf the terminal has a small memory, you can perform the following operations to increase available memory:・In the browser, you can clear all temporary Internet files and browser history information. For details, refer to "Clearing history" (P.157).・Uninstall programs that you no longer use. For details, refer to "Deleting installed application" (P.131).You can select language and keyboard input.Changing phone language1From the Settings screen (P.107), tap [Language & keyboard]u[Select language].2Select a language and tap [Done].・When you select Japanese, "完了 (Done)" is displayed, but its display varies by the language you selected.❖Information・If you choose the wrong language and cannot read the menu texts, go to http://www.sonymobile.co.jp/so-04d/faq.html for help.You can set Google voice recognizer and Text-to-speech settings.■ Voice recognizer settings■ Text-to-speech settingsLanguage & keyboardSelect languageP.138User dictionaryRegister words.Xperia™ keyboardP.60Xperia™ Chinese keyboardXperia™ Japanese keyboardVoice input & outputLanguageSelect language used for Google voice search.SafeSearchSet filter explicit.Block offensive wordsSet whether to display recognized offensive voice results.Listen to an examplePlayback sample of audio synthesis.Always use my settingsOverwrite application settings with content of "Default Engine", "Install voice data", "Speech rate", "Language" and "Pico TTS".Default EngineSet audio synthesis engine to read out text. By default, "Pico TTS" is set.Install voice dataInstall voice data required to voice synthesis. If voice data is not installed, connect to Android Market to search voice data.Speech rateSet speed at reading out text.](https://usermanual.wiki/Sony/PM-0000.08-user-guide/User-Guide-1725539-Page-136.png)
![135Settings* Japanese is not supported.You can set call end operation and user support service which sounds or vibrates according to user's operation.❖Information・A user support application is not installed by default. For the first time of use, install a screen reader for the terminal from the Android Market according the onscreen instructions.・To use Android Market, you need to set Google account (P.132).You can change the date and time in the terminal.To set date, time zone and time manually, unmark "Automatic" (Use network-provided values) under Date & time settings.1From the Settings screen (P.107), tap [Date & time]u[Set date].2Tap number to adjust the date.3Tap [Set].❖Information・Correction of the time differences may not be performed correctly depending on the overseas telecommunication carrier. In that case, set time zone manually (P.140).LanguageSet language for reading out text.Pico TTS*Make settings for installed voice synthesis engine.AccessibilityAccessibilitySet user support service on/off.Power button ends callSet to end a call by pressing p.Date & timeAutomaticAdjust date, time zone, and time automatically by using network-provided information.Set dateP.139Select time zoneP.140Set timeP.140Use 24-hour formatP.140Select date formatP.140Setting the date](https://usermanual.wiki/Sony/PM-0000.08-user-guide/User-Guide-1725539-Page-137.png)
![136Settings1From the Settings screen (P.107), tap [Date & time]u[Select time zone].2Select time zone you want to set.1From the Settings screen (P.107), tap [Date & time]u[Set time].2Tap number to adjust the hour and minute.・When you unmark [Use 24-hour format], you can change AM/PM. When you tap [am], it changes to [pm] (or vice versa).3Tap [Set].1From the Settings screen (P.107), tap [Date & time] and mark/unmark [Use 24-hour format] checkbox.・Mark the checkbox to shift to 24-hour format, and unmark to shift to 12-hour format.1From the Settings screen (P.107), tap [Date & time]u[Select date format].2Select date format you want to set.You can check your own phone number, signal level, legal information, etc.Setting the time zoneSetting the timeSetting the time formatSetting the date formatAbout phoneSoftware updateP.252StatusCheck your own phone number, signal level, battery level, etc.Battery useDisplay operations which have been using the battery.Legal informationCheck license agreement, terms of use, etc.Model numberCheck version and number.Android versionBaseband versionKernel versionBuild number](https://usermanual.wiki/Sony/PM-0000.08-user-guide/User-Guide-1725539-Page-138.png)
![137Mail/InternetMail/InternetSend/receive mails using i-mode mail address (@docomo.ne.jp).You can use pictogram and Deco-mail. Mails can be received automatically. For details on sp-mode mail, refer to "ご利用ガイドブック (spモード編) (Mobile Phone User's Guide [sp-mode])" (in Japanese only).1From the Home screen, tap [spモードメール (sp-mode mail)].2Scroll the screen, then tap [ダウンロード (Download)].・After this step, follow the instructions on the screen.❖Information・When you receive an sp-mode mail, an icon indicating sp-mode mail appears on the key unlock screen. For the setting to show or hide icons, see "Setting information displayed on the key unlock screen" (P.123).You can send and receive text messages up to 70 two-byte characters (160 one-byte characters) with a mobile phone number as the destination.1From the Home screen, tap , then tap [Messaging].2Tap (New mail).3Tap , then mark a checkbox for the other party to send to from the contacts list.・When you enter a name or phone number in the box at the top of the screen, a list of contacts beginning with the entered numbers or letters appears.・Alternatively, you can enter a phone number in the box at the top of the screen, then tap [Add] to add a recipient.4Tap [Done].sp-mode mail Message (SMS)Sending message (SMS)](https://usermanual.wiki/Sony/PM-0000.08-user-guide/User-Guide-1725539-Page-139.png)
![138Mail/Internet5Tap "Write message" field and enter a message.・When the number of entered characters comes close to a limit, a counter appears on the upper left of the text box and you can check the remaining entry space.6Tap [Send].❖Information・For the character entry, see "Character entry" (P.47).・You can also send/receive text messages to/from customers of overseas network operators. See "Mobile Phone User's Guide [International Services]" or the DOCOMO International Services website.・To send SMS to users of overseas network operators, enter "+", "Country code" and then "the recipient mobile phone number". Enter the phone number without a leading "0", if any. You can also enter "010", "Country code" and "the recipient mobile phone number" to send messages (To reply to the received SMS overseas, enter "010").1From the Home screen, tap , then tap [Messaging].2Tap someone whose messages you want to read from the recipient list.・A received message appears.❖Information・When you receive a message (SMS), appears on the status bar. To read the mail, drag the status bar downward, tap an item of notified message (SMS).・When you receive a message (SMS), an icon indicating message appears on the key unlock screen. For the setting to show or hide icons, see "Setting information displayed on the key unlock screen" (P.123).・Tap / in the message to turn to (yellow). From the Home screen, tap , then tap [Messaging]ut, and tap [Starred messages] to quickly access to the mail you have marked.1From the Home screen, tap , then tap [Messaging].2Select a thread whose phone number you want to save.3Tap t, then tap [Add to Contacts].4Tap [Register new].5Tap [Phone contacts]/[docomo].・When you set Google account etc., it appears as a saving location.6Enter required items and tap [Save].Receiving and reading message (SMS)Saving phone number of message to Contacts](https://usermanual.wiki/Sony/PM-0000.08-user-guide/User-Guide-1725539-Page-140.png)
![139Mail/Internet1From the Home screen, tap , then tap [Messaging].2Tap t and [Settings].・You can set the following options.❖Information・Even if Notification light is unmarked, notification LED blinks white once, letting you know that a message has arrived.1From the Home screen, tap , then tap [Messaging].2Tap a thread to select.3Touch and hold a message you want to delete.4Tap [Delete message]u[Yes].1From the Home screen, tap , then tap [Messaging].2Touch and hold a thread to delete.3Tap [Delete conversation]u[Yes].1From the Home screen, tap , then tap [Messaging].2Tap t and tap [Delete several].3Tap [Mark all]u[Delete].・After tapping [Mark all], you can tap individual thread to unmark. Tap [Unmark all] to unmark all of the threads.Setting message (SMS)Delivery reportMark to mark a message thread you sent each time a recipient receives the message.NotificationsMark if you want to receive a notification in the status bar when a new message arrives.Notification toneSet if you want to receive a notification in selected ringtone when a new message arrives.Notification vibrationSet if you want to receive a notification by vibration when a new message arrives.Notification lightMark to set to notify of reception by notification LED when notification setting is made.SIM messagesManage messages saved to UIM.Push settingsReports of message settings can be received from the provider.Deleting a messageDeleting a threadDeleting all threads](https://usermanual.wiki/Sony/PM-0000.08-user-guide/User-Guide-1725539-Page-141.png)
![140Mail/InternetYou can create an email account provided by mopera U mail, a POP3 or IMAP compatible email account provided by general ISP (provider), or an Exchange ActiveSync account to send or receive email.Email setup wizard appears. Set according the onscreen instructions. Multiple email accounts can be set.1From the Home screen, tap , and then tap [Email].2Enter your email address and password.3Tap [Next].・To make the email account settings manually, tap [Manual setup] and follow the onscreen instructions.4Enter an account name and name you want to display on outgoing messages.・If "What type of account is this?" appears, tap an email account type and follow the onscreen instructions to set.・If you set an Exchange ActiveSync account, a name displayed for sent mail cannot be set.5Tap [Done].・Inbox for set email account appears.❖Information・If you need to make the settings manually, contact your email service provider or system administrator for the correct email account settings.・If you set an Exchange ActiveSync account as email account, and if server manager sets Remote wipe, the data saved in the terminal may be deleted.・Emails are not displayed in Timescape.1From the Home screen, tap , and then tap [Email].2Tap (New mail).3Enter the email address of recipient.・Tap to display the contacts list screen to select from registered contacts. If you enter alphabets or a name, email address options appear from the contacts beginning with the entered character.・To Cc or Bcc, tap t and tap [Add Cc/Bcc].EmailMaking initial setting for EmailCreating and sending email](https://usermanual.wiki/Sony/PM-0000.08-user-guide/User-Guide-1725539-Page-142.png)
![141Mail/Internet・To enter multiple email addresses directly, separate with a comma (,) and then enter the next email address.4Enter a subject.5Enter a message text.6To attach a file, tap .・Attach a file in the following operations.・Image/video/music file up to 5MB can be attached in Email.7Tap (Send).❖Information・When you want to save a mail as draft while creating a mail, enter any of recipient, subject or message or attach a file. If you do not enter or attach anything, a mail is not saved as draft. (When only automatic signature is attached, a mail is not saved as draft either.)・While creating a mail, tap x and tap [Yes] in the "Save as draft" screen to save a mail as draft. Also, when you move to the other screen while creating a mail, the mail is automatically saved as draft.・In sent/received emails, a communication data is also included other than text and image displayed on the screen and charges will apply to the data.・Email is handled as an email from a PC. You cannot send or receive email if "Reject emails from PCs" is set on a recipient terminal.1From the Home screen, tap , and then tap [Email].・When two or more email accounts are set, the Email screen appears. Tap and select an email account to receive from an account list.2On the Inbox, tap t and tap [Refresh].3Tap an email.❖Information・The sender name of a received email is the name set on sender's terminal.・If you set "Email notifications" in Account settings (P.148) and set "Inbox check frequency" to an item other than "Manual", appears in the status bar when you receive a new email. Drag the status bar downwards to read the received email.Add pictureSelect a file from the saved image file list.Take photoStart the camera to take a photo and attach it.Add videoSelect a file from the saved video file list.Record videoStart the camera to record a video and attach it.Add sound Music player : Select a saved music file.Sound Recorder : Record a voice message and attach it.Receiving and reading email](https://usermanual.wiki/Sony/PM-0000.08-user-guide/User-Guide-1725539-Page-143.png)
![142Mail/Internet・If you set "Inbox check frequency" in Account settings (P.148) to an item other than "Manual", and if you are using the pay-as-you-go data communication, you may be charged every time you check your email.・If you tap the address of a received email, you can register it in Contacts. If it has been already registered, you can display the details of the contact.・Tap (gray) to turn (yellow) on the mail message screen to add the marked mail to "Starred" on the email screen. From "Starred", you can quickly access to the mail you have marked.If is not displayed on the mail message screen, tap to display.・When phone memory becomes low, a message indicating low memory space appears and receiving emails is not available. Delete saved mails etc. to make available memory space.Changing Inbox view1From the Home screen, tap , and then tap [Email].・When the Email screen appears, tap and select an email account to receive from an account list.2Tap t, then tap [More]u[Preview pane].・You can set the following options.❖Information・If you have two or more accounts, change made in any of the accounts applies to all accounts.1From the Home screen, tap , and then tap [Email].・When the Email screen appears, tap and select an email account whose attachment you want to save from an account list.2Tap mail and .・The attachment icon is displayed.3Tap the icon of a file you want to save, then tap [Save].・The attached file is saved on the internal storage.・You can display attachment files by tapping [Open].OffInbox is not shown piecewise.LandscapeTap in landscape view to cut the Inbox to show the selected mail body.OnTap in portrait view or in landscape view to cut the Inbox to show the selected mail body.Saving attachment file of email](https://usermanual.wiki/Sony/PM-0000.08-user-guide/User-Guide-1725539-Page-144.png)
![143Mail/Internet1From the Home screen, tap , and then tap [Email].・When the Email screen appears, tap and select an email account whose email you want to reply or forward from an account list.■ReplyingTap an emailuTap (Reply) or (Reply all)uEnter the text and tap (Reply).■ForwardingTap an emailuTap (Reply)uEnter the email address of recipientuEnter the text and tap (Reply).❖Information・When you reply or forward an email, the original message contents for replying or forwarding is quoted. To delete the quoted message text, tap .・When you forward an email, the attachment file of the original message is quoted. To cancel quoting attached file, tap .・You can also touch and hold the email to reply or forward an email.1From the Home screen, tap , and then tap [Email].・When the Email screen appears, tap and select an email account whose email you want to delete from an account list.2Touch and hold an email you want to delete.3Tap [Delete]u[Yes].❖Information・To delete several emails at the same time, operate as follows.Tap t, then tap [Mark several]uCheckboxes to the right of mails you want to delete, tap at the bottom of the screen, and then tap [Yes].・To delete mail while sending, tap t then tap [Folders]u[Outbox], then touch and hold a mail you want to delete and then tap [Delete]uTap [Yes].Replying/forwarding email Deleting email](https://usermanual.wiki/Sony/PM-0000.08-user-guide/User-Guide-1725539-Page-145.png)
![144Mail/Internet1From the Home screen, tap , and then tap [Email].・When the Email screen appears, touch and hold an account that you want to change the settings from an account list and tap [Account settings] to change the settings.2Tap t, then tap [More]u[Account settings].・You can set the following options.❖Information・You can also set "Inbox check frequency", "Sync contacts", and "Sync calendar" for an Exchange ActiveSync account. "Outgoing settings" cannot be set.・If you set "Inbox check frequency" to other than "Manual", and if you are using the pay-as-you-go data communication, you may be charged every time you check your email.1From the Home screen, tap , and then tap [Email].・If a screen other than Email screen appears, tap t and tap [More]u[Accounts].2Tap t and tap [Add account].3Enter your email address and password.・If required, mark [Send email from this account by default.] checkbox.4Tap [Next].・To make the email account settings manually, tap [Manual setup] and follow the onscreen instructions.Changing Email account settingsAccount nameChange account name.Your nameChange your name (sender name).SignatureChange your signature.Inbox check frequencySet whether to check new messages automatically and intervals of automatic check.Default accountSet to the default account to send email, if you set two or more email accounts.Email notificationsSet whether to show email arrival notification in the status bar.Select ringtoneSet ringtone when receiving an email.VibrateSet whether to vibrate when receiving an email.Incoming settingsSet mail server for receiving.Outgoing settingsSet mail server for sending.Setting another Email account](https://usermanual.wiki/Sony/PM-0000.08-user-guide/User-Guide-1725539-Page-146.png)
![145Mail/Internet5Enter an account name and name you want to display on outgoing messages.・If "What type of account is this?" appears, tap an email account type and follow the onscreen instructions to set.・If you set an Exchange ActiveSync account, a name displayed for sent mail cannot be set.6Tap [Done].・Inbox for set email account appears.❖Information・If you need to make the settings manually, contact your email service provider or system administrator for the correct email account settings.・If you set an Exchange ActiveSync account as email account, and if server manager sets Remote wipe, the data saved in the terminal may be deleted.・On the Inbox, tap t and tap [More]u[Accounts] to display the email screen and set account list.・All received mails for the set accounts are shown in the "Combined Inbox" on the email screen.・Tap an account name to open the inbox for selected account alone.・Emails are not displayed in Timescape.1From the Home screen, tap , and then tap [Email].・If a screen other than email screen is displayed, tap t and tap [More]u[Accounts].2Touch and hold an account to delete, and tap [Delete account]u[OK].mopera U users (for the setting, see "Setting mopera U" (P.111)) can use mopera U Mail.In mopera U Mail, POP mail and IMAP mail are available. The mail box supports 50MB. Also, the Web mail system is available.■ POP mail1From the Home screen, tap , and then tap [Email].・If you have already set an email account, operate the following operations.- If the Email screen appears, tap t and tap [Add account].- If a screen other than Email screen appears, tap t and tap [More]u[Accounts]ut and [Add account].Deleting Email accountUsing mopera U Mail](https://usermanual.wiki/Sony/PM-0000.08-user-guide/User-Guide-1725539-Page-147.png)
![146Mail/Internet2Enter mopera U mail address and mopera U password, then tap [Manual setup]/[Next].・If you tap [Next], it changes automatically to POP3 account. Go to Step 4.3Tap [POP3] from the type of the mail account.4Check that you have entered [User name] and [Password] for mopera U correctly, and [mail.mopera.net] for the POP3 server.・If you tap [Next] in Step 2, "mail.mopera.net" is entered in the SMTP server field.5Select the security type.・If you do not select, tap [Next] and go to Step 8.6On the security selection screen, mark the security radio button to be used.7Confirm the entry, then tap [Next].8Enter [mail.mopera.net] for the SMTP server and confirm the entry of [User name] and [Password] for mopera U.・If you tap [Next] in Step 2, you need to mark [Require sign–in] to check entered [User name], [Password] for mopera U.・If you tap [Next] in Step 2, "mail.mopera.net" is entered in the SMTP server field. Set "587" in the Port field.9Tap [Next].10On the option setting screen, set frequency of checking Emails etc. and tap [Next].11On the mail account registration screen, enter a name you want to display on outgoing messages, then tap [Done].・The mailer is displayed and the set mail account is available.❖Information・When [Require sign-in.] is unmarked on the SMTP server setting screen, sending mails is not available. Mark [Require sign-in.].](https://usermanual.wiki/Sony/PM-0000.08-user-guide/User-Guide-1725539-Page-148.png)
![147Mail/InternetIf you have a Google account, you can send/receive emails by using Gmail on your terminal. If you have no Google account, see "Setting Google account" (P.132).❖Information・Gmail messages are not displayed in Timescape.1From the Home screen, tap , then tap [Gmail].2On the Inbox, tap t and tap [Refresh].・Synchronizing Gmail application in the terminal with your Gmail account starts, and the Inbox is refreshed.❖Information・For details Gmail, on Gmail screen, tap t and tap [More]u[Help] to refer the mobile help.You can use Google Talk instant messaging to chat with friends. To use Google Talk, you need to make settings of your Google account. For details, refer to "Setting Google account" (P.132).Signing in Google TalkSigning in is unnecessary if you have already set a Google account.1From the Home screen, tap , then tap [Talk].2Tap [Next]u[Sign in] and enter your user name and password.3Tap [Sign in].❖Information・For details on Google Talk, on the Google Talk screen, tap t and tap [More]u[Help] to refer to the mobile help.Using GmailRefreshing GmailGoogle TalkSign in and online chat](https://usermanual.wiki/Sony/PM-0000.08-user-guide/User-Guide-1725539-Page-149.png)
![148Mail/InternetEarly warning "Area mail" is a service with which you can receive earthquake early warning, etc. delivered by the Meteorological Agency.・Area Mail is a free service for which subscription is not required.・Area Mail cannot be received in the following case.- During a voice call- Out of service area- While power is off- During International roaming- During Airplane mode- While updating software - When a SIM other than by DOCOMO is inserted - While sending/receiving a message (SMS)・Area Mail may not be received when tethering is set or during packet communications.・Area Mail that could not be received cannot be received later.When the terminal is in service area, Area Mail is sent automatically.1Receive Area Mails automatically.2A dedicated ring tone sounds and notification LED flashes when an Area Mail is received.・Ringtone and ringtone volume cannot be changed.・The notification LED blinks only when backlight is off.3A message body of Area Mail appears automatically.View received Area Mail later1From the Home screen, tap , then tap [Area Mail].2Select an Area Mail from the Area Mail list.・You can view message of Area Mail.Early Warning "AreaMail"Receiving Early Warning "AreaMail"](https://usermanual.wiki/Sony/PM-0000.08-user-guide/User-Guide-1725539-Page-150.png)
![149Mail/Internet1From the Home screen, tap , then tap [Area Mail].2Tap t and [Settings].❖Information・Area Mail cannot be set when UIM is not inserted.1From the Home screen, tap [Browser].1Tap the search box on the top of the browser screen.2Using the keyboard, enter the web page address or keyword to be searched for.・As you enter an address or characters, retrieved web pages list appears.3Tap the displayed candidates list or .・You can move the web page.❖Information・You can tap to enter search words by voice and search a web page.Going back to the previous page1Tap x.Setting Early Warning "AreaMail"Receive settingSet whether to receive Area Mails.Beep toneSet sounding time for Area Mail reception and whether to sound a dedicated ringtone even in silent mode.Check screen image and beep toneCheck the ringtone and screen for reception of earthquake early warning or Area Mail for disaster/evacuation information.Other settingsSet receiving/deleting Area Mail.Using BrowserOpening BrowserMoving to a web page](https://usermanual.wiki/Sony/PM-0000.08-user-guide/User-Guide-1725539-Page-151.png)
![150Mail/Internet1Tap y.・All open windows are closed and Browser ends.Browser offers advanced features that let you view web pages like on a PC.Opening a new browser windowYou can open up to 8 browser windows.1While viewing a web page, tap t and tap [New window].・A new browser window opens in the default home page.Switching browser windowsYou can easily switch from one website to another by opening several windows.1On the Browser screen, tap t and tap [Windows].2Tap a browser window you want to view.Closing browser window1On the Browser screen, tap t and tap [Windows].2Tap on the browser window you want to close.Zooming in/out a web pageTo zoom in/out a webpage, perform any of the following operations.・Double-tap at the point you want to zoom in/out.・Pinch-out at the point you want to zoom in or pinch-in at the point you want to zoom out.・Tap the zoom control icon (the zoom control icon may appear when you drag in any direction on the screen).❖Information・Web pages created to fit to the screen cannot be zoomed in/out.Searching text in a web page1While viewing a web page, tap t and tap [More]u[Find on page].・The search bar appears in the upper part of the screen.Exiting BrowserDisplaying web pageZoom outZoom in](https://usermanual.wiki/Sony/PM-0000.08-user-guide/User-Guide-1725539-Page-152.png)
![151Mail/Internet2Enter the search item.・As you enter, matching characters are highlighted in green.3Tap to close the search bar.Copying text in a web page1While viewing a web page, tap t and tap [More]u[Select text].2Place your finger at the start of the text you want to copy and then drag to the end of the text you want to copy.・Copied text is highlighted in orange.3Take your finger away from the screen and tap the selected text.・After copying text is completed, a message "Text copied to clipboard." appears.4To paste text in an email, text message or multimedia message, touch and hold the text box on a message or email and tap [Paste] in the menu.❖Information・On some web pages, selecting characters may not be available.Auto-fitting a web pageAdjust display size of web pages automatically to fit the screen.1On the Browser screen, tap t and [More]u[Settings]uMark [Auto-fit pages].❖Information・Some web pages cannot be adjusted automatically.Adjusting Browser settings1On the Browser screen, tap t and tap [More]u[Settings] and make Browser settings and the options.Setting a home page1On the Browser screen, tap t and tap [More]u[Settings].2Tap [Set home page], enter URL you want to set as the home page, tap [OK].❖Information・The URL set as the home page appears when opening a new browser window.Back to the previous matched itemGo to next matched item](https://usermanual.wiki/Sony/PM-0000.08-user-guide/User-Guide-1725539-Page-153.png)
![152Mail/InternetOperating links in web pages1Open the web page you want to operate the links.2To open the web page, tap the link.・The links get enclosed in an orange box when selected.・If you touch and hold the link, the menus, "Open", "Open in new window", "Bookmark link", "Save link", "Share link" and "Copy link URL", appear. When you touch and hold an image or a link contained image, "Save image", "View image" and "Set as wallpaper" also appear. "Share link" enables you to share the link via Bluetooth, Facebook, Gmail, Google+, Web page widget (docomo Palette UI), Messaging, etc.・Browser recognizes some phone numbers that allow you to call the phone number. Tap the phone number to call.・When you download a file by "Save link" from websites which require Basic authentication or SSL session, the downloading may be failed.You can check history and store many bookmarks on the terminal.Bookmarking a web page1On the Browser screen, go to the web page you want to bookmark.2Tap t and [Bookmarks].・A list of bookmarks appears.・You can also access the list screen by tapping on the right side of the URL.・You can switch thumbnail view and list view by tapping t on the bookmark list screen.■Thumbnail viewTap [★Add] at the upper left screenuEdit a bookmark name if required, and then tap [OK].■List viewTap [Add bookmark...] in the upper part of the screenuEdit a bookmark name as required, and then tap [OK].❖Information・Alternatively, in the bookmarks list, tap t, then [Bookmark last-viewed page]uTap [OK] to bookmark the page.Operating links Managing bookmarks and history](https://usermanual.wiki/Sony/PM-0000.08-user-guide/User-Guide-1725539-Page-154.png)
![153Mail/Internet・Tap [Most visited]/[History] tab in the bookmark list screen and tap on the right side of the record. turns into and the web page is added to the bookmark list.Opening a bookmark1On the Browser screen, tap t and [Bookmarks].2Tap the bookmark you want to open.・If you do not tap a bookmark but touch and hold it, the menus, "Open", "Open in new window", "Edit bookmark", "Add shortcut to Home", "Share link", "Copy link URL", "Delete bookmark" and "Set as homepage" appear. Tap "Add shortcut to Home" to create a shortcut on the Home screen. "Share link" enables you to share the link via Bluetooth, Facebook, Gmail, Google+, Web page widget (docomo Palette UI), Messaging, etc.Checking browsing history1On the Browser screen, tap t and tap [Bookmarks]u[History] tab.2Tap the time you browsed the web page, such as [Today], [Yesterday], etc.・To open the web page, tap an item.・To check your most visited web pages, tap [Most visited] tab.❖Information・On the Browser screen, touch and hold x to check the history.Clearing history1On the Browser screen, tap t and tap [Bookmarks]u[History] tab.2Tap t and tap [Clear history].・When you delete the history, a list in "Most visited" tab is also deleted.❖Information・To clear temporary internet files such as cache, on the Browser screen, tap t and tap [More]u[Settings] and set each item in "Privacy" menu.](https://usermanual.wiki/Sony/PM-0000.08-user-guide/User-Guide-1725539-Page-155.png)
![155File management・The terminal is connected by "Media transfer mode (MTP)" and "Mass storage mode (MSC)", which are USB connection modes set by default, and 2 screens "Xperia acro HD SO-04D" and "リムーバブル ディスク (Removal disk)" appear on the PC. "Media transfer mode (MTP)" allows you to access the internal storage and "Mass storage mode (MSC)" allows you to access the microSD card inserted into the terminal.2Tap [Skip].❖Information・Window that appears when connecting to a PC may vary depending on the operating system (OS) of a PC.・While in a connection, drag the status bar downwards and tap [Internal storage connected] or tap [SD card connected]u[Connectivity settings] to check connection status or change the following connection settings.・If you mark [Auto connect in MSC] and connect the terminal to a PC, microSD card can be accessed as a removal disk. microSD card cannot be accessed from the terminal and functions using microSD card may become unavailable in Camera, Gallery, Music player, etc.・If you install PC Companion, you can use the following applications on a PC for managing media files, creating backup files, etc. when connecting the terminal and the PC. For details, check on the PC Companion screen after installation.Install PC CompanionDisplay PC Companion installation wizard when connected to a PC.USB connection modeCheck initial settings when connecting to a PC.Auto connect in MSCWhen the terminal is connected to a PC, USB connection mode is set to "MSC" automatically. If you unmark the checkbox, you cannot access microSD card from a PC.TetheringSet terminal data communication via USB cable or as portable Wi-Fi hotspot. (P.116)Trusted devicesConnect the terminal and a host device in a pair via Wi-Fi network. (P.161)Media GoP.162Support ZoneUpdate software of the terminal connecting to a PC. (P.254)Sync ZoneSynchronize calendar and contacts between Outlook and the terminal.File ManagerCheck file type, update time, location, etc. on the terminal.Contacts SetupCopy the contacts data of the mobile phone previously used to the terminal.Back up and restoreBack up the terminal data or move the data to another terminal.](https://usermanual.wiki/Sony/PM-0000.08-user-guide/User-Guide-1725539-Page-157.png)
![156File management・When the terminal is connected to a PC, charging starts automatically.Disconnecting the microUSB cable safely・Do not disconnect the microUSB cable during data transferring. Otherwise, data may be damaged.・If you connect the terminal in the Media transfer mode (MTP) only, make sure that data transfer is not in progress and just disconnect the microUSB cable.1Drag the status bar downwards.・When "Connect your phone" is displayed, go to Step 4.When "SD card connected" is displayed, go to Step 2.2Tap [SD card connected].3Tap [Disconnect].・"Preparing SD card" then "Connect your phone" appear in the status bar.4Disconnect the microUSB cable.Dragging and dropping data on the terminal and a PC■ Media transfer mode (MTP)1Connect the terminal to a PC using a microUSB cable.・"Internal storage connected" appears in the status bar.2Drag and drop selected data between the terminal and a PC.■ Mass storage mode (MSC)1Connect the terminal to a PC using a microUSB cable.・"SD card connected" appears in the status bar.2Drag and drop selected data between the terminal and a PC.❖Information・You can transfer files using a microUSB cable on most devices and the following operating systems (OSs) that supports the USB mass-storage memory interface.- Microsoft Windows 7- Microsoft Windows Vista- Microsoft Windows XP](https://usermanual.wiki/Sony/PM-0000.08-user-guide/User-Guide-1725539-Page-158.png)
![157File managementIf the terminal and a PC* are connected in a pair on a Wi-Fi network, automatic connection/disconnection of internal storage of the terminal or a microSD card with a PC is enabled when the terminal user comes in and out of the Wi-Fi area. You can easily access to files in the internal storage of the terminal or a microSD card from a connected PC.* Use Microsoft Windows 7 to make a pair setting. Pair setting cannot be made under Microsoft Windows XP, Microsoft Windows Vista or other OS.1Connect a PC you want to set in a pair to a Wi-Fi network.2Connect the terminal to a Wi-Fi network (P.113).3Connect the terminal to a PC using a microUSB cable.・When a confirmation screen for installation of PC Companion software appears on the terminal, tap [Skip].4Make sure that "Xperia acro HD SO-04D" is displayed as a portable device on the explorer of the PC.5Right click the portable device icon, then click "ネットワーク構成 (network composition)".6Click "次へ (Next)".7On the pop-up screen of the terminal, tap [Pair].8On the network composition of the portable device screen of the PC, click " 完了 (Done)".9Disconnect the microUSB cable.10From the Home screen, tap t and tap [Settings]u[Xperia™]u[Connectivity]uTap "Host name" (PC name) in the "Trusted devices" field.11Tap [Connect].・The terminal and the PC are connected in "Media transfer mode (MTP)" on a Wi-Fi network, and you can exchange data files.Connecting the terminal to a PC on a Wi-Fi network](https://usermanual.wiki/Sony/PM-0000.08-user-guide/User-Guide-1725539-Page-159.png)
![158File management❖Information・From the Home screen, tap t, then tap [Settings]u[Xperia™]u[Connectivity] to display "Host name" (PC name) in the "Trusted devices" field. To cancel connection setting, tap the host name and [Forget]. Until "Forget" is tapped, the connection setting retains even if you connect/disconnect repeatedly by coming in and out of a Wi-Fi area.・If the privacy separator function for Wi-Fi network (access point) is enabled, pair setting cannot be made.The Media Go computer application helps you transfer and manage media content in the terminal and PC.With Media Go, you can load music from a CD to a PC and transfer to the terminal.You need one of these operating systems (OS) to use the Media Go application:・Microsoft Windows 7・Microsoft Windows Vista・Microsoft Windows XP, Service Pack 3 or higher❖Information・To learn more about how to use the Media Go application, see the help section in the main menu of the Media Go application.Installing Media Go1Connect the terminal to a PC using a microUSB cable.・"PC Companion software" screen appears on the terminal.2Tap [Install].・An Installer screen appears on the PC screen.3On the installer screen of PC, select "English (U.K.)" or "English (U.S.)" and click "Install".・After this step, follow the onscreen instructions.4After the installation, on the "Sony PC Companion" screen of the PC, install "Media Go".❖Information・You can also download Media Go from http://www.sonymobile.co.jp/mediago/.Using Media Go](https://usermanual.wiki/Sony/PM-0000.08-user-guide/User-Guide-1725539-Page-160.png)
![159File managementTransferring data using Media Go1Connect the terminal to a PC using a microUSB cable.・When "PC Companion software" screen appears on the terminal, tap [Skip].2Select Media Go from the PC's start menu and activate Media Go.・Using Media Go, you can move files between the terminal and the PC.You can send/receive data of contacts, photos or videos taken by the camera to/from terminals etc. supporting infrared communication function.・The communication range for infrared communication is 20 cm or less. Keep the devices pointing at the infrared data port each other, and do not move them until data exchange completes.・If the infrared data port is soiled, clean the data port with a dry soft cloth to prevent from scratching. Performing infrared communication with the data port soiled or scratched may cause communication failure.・Infrared communication may not be performed in areas exposed to direct sunlight, directly under fluorescent lights or near infrared devices.・Depending on the terminal of the other party, it may be difficult to exchange data.❖Information・Do not cover the infrared data port with the fingers, etc. while performing infrared communication.・Infrared communication for the terminal conforms to IrMC version 1.1. However, some data cannot be sent or received even if the receiver's phone conforms IrMC version 1.1.・Authentication passcode may be required while sending or receiving infrared data. Authentication passcode is a 4-digit number fixed up between you and other party in advance. The same number string must be entered by the sender and receiver.Using Infrared communication](https://usermanual.wiki/Sony/PM-0000.08-user-guide/User-Guide-1725539-Page-161.png)
![160File management・If the terminal receives a call during infrared communication, data exchange is interrupted and the incoming call screen appears.・If the set alarm time comes during infrared communication, data exchange is interrupted and the alarm starts to sound.・ is displayed in the status bar during infrared communication.・Up to 2MB of data of contacts*, Myself*, photos, videos and music can be sent and received. It may take a time to exchange data depending on the data amount or device of other party.・Some data, such as data with copyright protection, etc., cannot be played back on other devices.・Received data cannot be played back or saved depending on the sender's device, data type or data amount.・The received data is saved in the internal storage.・If "Notification tone ON" is set with the Infrared application, when sending/receiving data is complete, it is notified by notification tone set in "Selecting a notification ringtone" (P.121). For details on the notification tone volume settings, see "Adjusting each sound volume" (P.120). Notification tone is muted while silent mode is set. To switch on/off notification tone, from the Home screen, tap and tap [Infrared] ut, then tap [Notification tone ON]/[Notification tone OFF].* You cannot send some information such as name card data set in contacts.Start Infrared application and select data to send. Or select "Infrared" as a sending method from the application menu for Phonebook, Gallery or Music player.■ Sending data using infrared communication application1From the Home screen, tap , then tap [Infrared]u[Send].2Select a data type to send.* You cannot send some information such as name card data set in contacts.Sending data via infrared communicationMyself*Send Myself data including own number.Contact*Select an item from the contact list screen and send.All contacts*Enter authentication passcode to send.PictureSelect an image from an album in the Gallery and send.VideoSelect a video from an album in the Gallery and send.AudioSelect a track from the Artists in the Music player or record a voice message using the voice recorder to send.](https://usermanual.wiki/Sony/PM-0000.08-user-guide/User-Guide-1725539-Page-162.png)
![161File management■ Sending data from an application menu1From the application menu, tap [Share]u[Infrared].・To send 1 phonebook entry, from the Home screen, tap u[Phonebook] u[(a phonebook entry to send)]ut and tap [Share]u[Infrared].・To send all phonebook entries, from the Home screen, tap u[Phonebook]ut and tap [Others]u[Import/Export]u[Share phonebook data]u[Infrared], then enter the same authentication passcode as that of the recipient and tap [OK].❖Information・You cannot send two or more images, videos, or audio data at a time.・You can use Infrared widget on the Home screen to send Myself easily.・You cannot send some information such as name card data set in phonebook.1From the Home screen, tap , then tap [Infrared]u[Receive]/[Receive several].・Enter authentication passcode if you select "Receive several".2When receiving data is completed, tap [Yes] and store received data.・If you received contacts, you can select saving location.❖Information・You cannot receive two or more images, videos, or audio data at a time.・You may not be able to save contacts if the phone memory becomes low.・A file name may be changed when saving. A file named with 127 characters or more (Unicode) may not be saved properly.・You can use Infrared widget on the Home screen to receive a file easily.Receiving data via infrared communication](https://usermanual.wiki/Sony/PM-0000.08-user-guide/User-Guide-1725539-Page-163.png)
![162File managementThe Bluetooth function creates a wireless connection to other Bluetooth devices, for example, handsfree devices. A range within 10 meters, with no solid objects in between, is recommended. You must turn on the Bluetooth function to communicate with Bluetooth devices. You may also have to make pair setting for the terminal and Bluetooth device.❖Information・By default, Bluetooth function is off. If you turn Bluetooth on and then turn off the terminal, Bluetooth function turns off. When you turn on the terminal again, Bluetooth function turns on automatically.・When you do not use Bluetooth function, turn it off to save the battery.■ Reception interference caused by wireless LAN devicesThe terminal's Bluetooth function and wireless LAN devices use the same frequency band (2.4GHz). If you use the terminal near a wireless LAN device, reception interference may occur or the communications speed may lower. Also, you may hear noise or have a connection problem. In these cases, do the following:・Keep the Bluetooth device 10 meters or more away from a wireless LAN device.・Within 10 meters, turn off either the Bluetooth device or the wireless LAN device.* The terminal does not communicate wirelessly with all types of Bluetooth devices. Bluetooth DUN is not supported.1From the Home screen, tap t.2Tap [Settings]u[Wireless & networks].3Mark [Bluetooth] checkbox.・ appears on the status bar and Bluetooth function turns on.4Tap [Bluetooth settings].5Mark [Discoverable] checkbox.・The terminal becomes detectable by other Bluetooth devices for 120 seconds.Using Bluetooth functionMaking the terminal detectable with the Bluetooth function on](https://usermanual.wiki/Sony/PM-0000.08-user-guide/User-Guide-1725539-Page-164.png)
![163File managementYou can name the terminal. The name appears on Bluetooth devices when you use the Bluetooth function.1Make sure that the Bluetooth function is on.2From the Home screen, tap t.3Tap [Settings]u[Wireless & networks]u[Bluetooth settings]u[Device name].4Enter a name.5Tap [OK].By making pair setting for the terminal and another Bluetooth device, you can use the device such as Bluetooth handsfree headset etc. connecting to the terminal to make and receive calls.Once you have made pair setting for the terminal and a Bluetooth device, the setting is saved. When making pair setting for the terminal and a Bluetooth device, you may need to enter a passkey (PIN). The terminal automatically tries the generic passkey "0000". If this passkey does not work, see the documentation of your Bluetooth device. You do not need to re-enter the passkey the next time you connect to a paired Bluetooth device already set.You cannot make pair setting for the terminal and two Bluetooth headsets. However, you can pair with two or more Bluetooth devices of different profiles. The terminal supports the following Bluetooth profiles: A2DP, AVRCP, HFP, HSP, OPP, PBAP, and SPP.Entering the terminal's name Making pair setting for the terminal and Bluetooth device](https://usermanual.wiki/Sony/PM-0000.08-user-guide/User-Guide-1725539-Page-165.png)
![164File management1From the Home screen, tap t.2Tap [Settings]u[Wireless & networks]u[Bluetooth settings].3Tap [Scan for devices].・A list of detected Bluetooth devices appears.4Tap a Bluetooth device name to pair with the terminal.5If necessary, enter the passkey (PIN).・You can use the Bluetooth device that has been paired. The pairing and connection status appear below the device name in the Bluetooth device list.・Some Bluetooth devices make connections continuously after making pair setting.❖Information・Make sure that the Bluetooth function and Bluetooth detection function of the target device are on.・When you make pair setting with the Bluetooth device supporting Secure Simple Pairing (SSP) function, a passkey appears on the screen. Check the passkey and make the pair setting.1From the Home screen, tap t.2Tap [Settings]u[Wireless & networks]u[Bluetooth settings].3Touch and hold a Bluetooth device name you want to connect.・Touch and hold a device with "Pair with this device" displayed under the device name.4Tap [Pair & connect].・If the pairing is complete, the connection status appears below the device name in the Bluetooth device list. While connecting to a device, appears in the status bar.Connecting the terminal with another Bluetooth device](https://usermanual.wiki/Sony/PM-0000.08-user-guide/User-Guide-1725539-Page-166.png)
![165File management1From the Home screen, tap t.2Tap [Settings]u[Wireless & networks]u[Bluetooth settings].3Touch and hold the currently connected Bluetooth device name.・The pairing and connection status is shown below the connected device name.4Tap [Disconnect].・Alternatively, tap the device name and tap [OK] on the confirmation screen to disconnect. The display under the device name changes to "Paired but not connected" while the pair setting remains set. To reconnect, tap the device name.1From the Home screen, tap t.2Tap [Settings]u[Wireless & networks]u[Bluetooth settings].3Touch and hold the currently connected Bluetooth device name.4Tap [Disconnect & unpair].・Connection disconnects and the pair setting is canceled.❖Information・When the terminal is only set to pair with Bluetooth device (not connected), "Unpair" appears.Deactivating the connection of a Bluetooth deviceCanceling the pair setting of a Bluetooth device](https://usermanual.wiki/Sony/PM-0000.08-user-guide/User-Guide-1725539-Page-167.png)
![166File managementWith Media server, you can share media files with other client (DLNA: Digital Living Network Alliance) devices using Wi-Fi function.Set Wi-Fi connection (P.112) with another client device.1From the Home screen, tap , then tap [Connected devices].・If you activate for the first time, "Welcome!" screen appears. Tap [Done].2Tap t, then tap [Media server].・You can set the following options.❖Information・Tap t to set Wi-Fi connection or check help.Set Wi-Fi connection with a DLNA device to allow access from the terminal in advance.1From the Home screen, tap , then tap [Connected devices].・If the device name appears in the server list, go to Step 4.2Tap [Wireless & networks] to mark [Wi-Fi] checkbox.3Tap x.・Go back to "Connected devices" screen.4Tap the device name displayed in the server list and tap the desired category folder.5Tap a media file to play it.Sharing files with DLNA devices via Connected devices (Media server)Setting Connected devices (Media server)Media server settingsRename the terminal (server) displayed on a client device.Share contentsSet to connect from a client device to the terminal via Wi-Fi.Pending devicesManage client devices waiting access permissions.Registered devicesManage client device registered to the terminal.Playing media files in the DLNA device with the terminal](https://usermanual.wiki/Sony/PM-0000.08-user-guide/User-Guide-1725539-Page-168.png)
![167File managementSet Wi-Fi connection on a DLNA device in advance.1From the Home screen, tap , then tap [Connected devices].2Tap t, then tap [Media server] to mark [Share contents] checkbox.3Tap [OK] to mark [Wi-Fi] checkbox.・"Media server turned on" appears in the status bar.4Tap y and tap and [Gallery].・Album list screen appears.5Tap an album, then tap a file you want to play.6Tap t and [Play on].・A "Play on device" screen appears.7Tap a device displayed on the "Play on device" screen.・The file is played by a DLNA device.Playing a media file in the terminal with a DLNA device](https://usermanual.wiki/Sony/PM-0000.08-user-guide/User-Guide-1725539-Page-169.png)
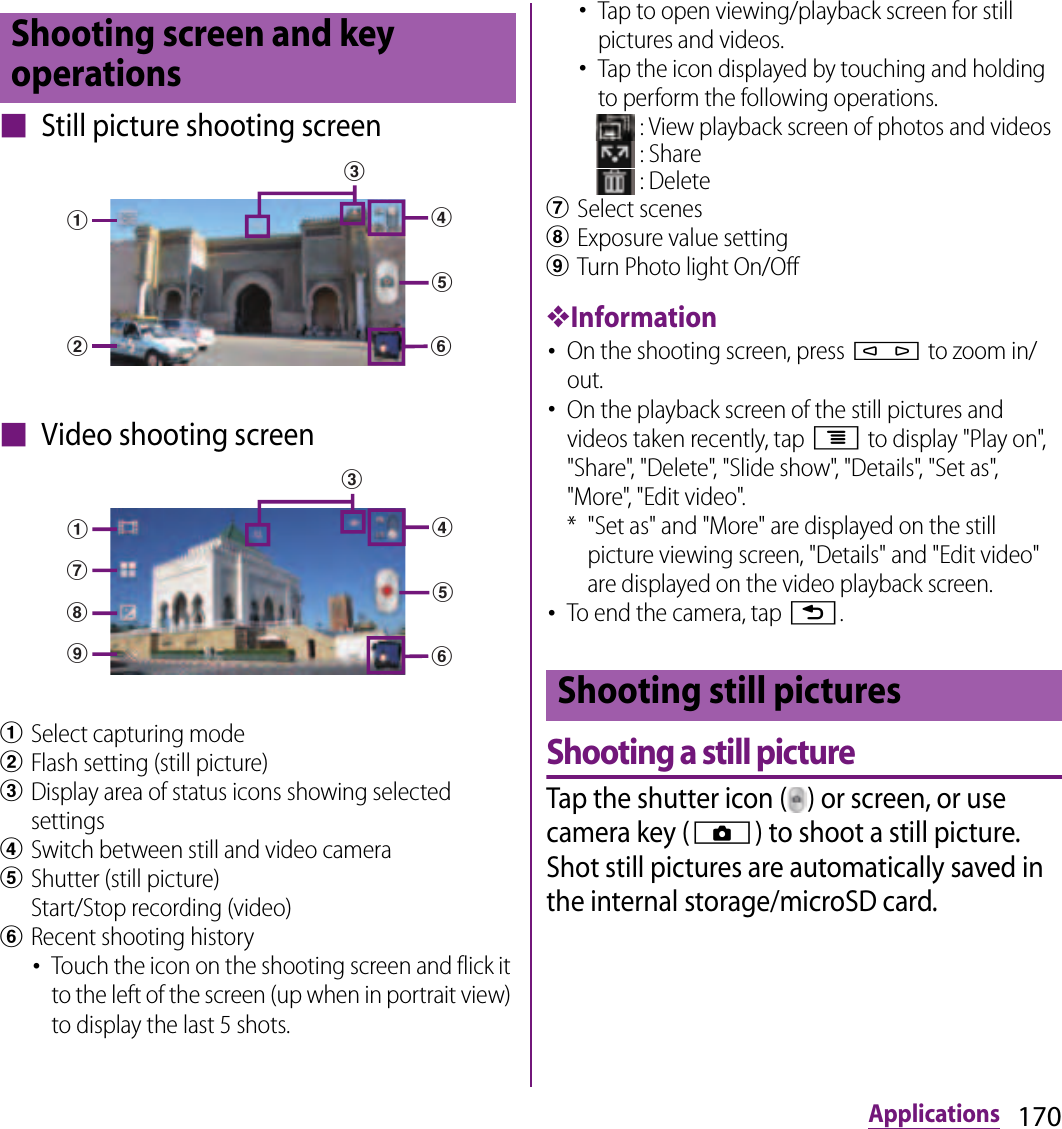
![171Applications1From the Home screen, press and hold k for over a second.・The still picture shooting screen (P.174) appears.■Tapping the shutter icon ( )Tap the shutter icon ( ) on the shooting screen.・To take a photo using auto-focus function, touch and hold the shutter icon ( ) and release your finger when the focus frame turns green and sound beeps. The photo is taken as soon as you release the finger. If the focus frame turns red, auto-focus does not operate correctly.■Tapping the screenOn the shooting screen, tap tu[Capturing method]u[Touch capture]uTap the screen.・To take a photo using auto-focus function, touch and hold the screen and release your finger when the focus frame turns green and sound beeps. The photo is taken as soon as you release the finger. If the focus frame turns red, auto-focus does not operate correctly.■Using the camera key (k)On the shooting screen, press k.・Even if "Capturing method" (P.185) is set to "On-screen button" or "Touch capture", you can press k to shoot.・To take a photo using auto-focus function, press k half way and when the focus frame turns green, press k the rest of the way down until it stops. If the focus frame turns red, auto-focus does not operate correctly. Press k halfway again.❖Information・Auto-focus cannot be operated if "Focus mode" (P.183) is set to "infinity".・When you connect Stereo Headset with Microphone (Sample), commercially available earphone set or other Bluetooth device, shutter sound may be softer.](https://usermanual.wiki/Sony/PM-0000.08-user-guide/User-Guide-1725539-Page-173.png)
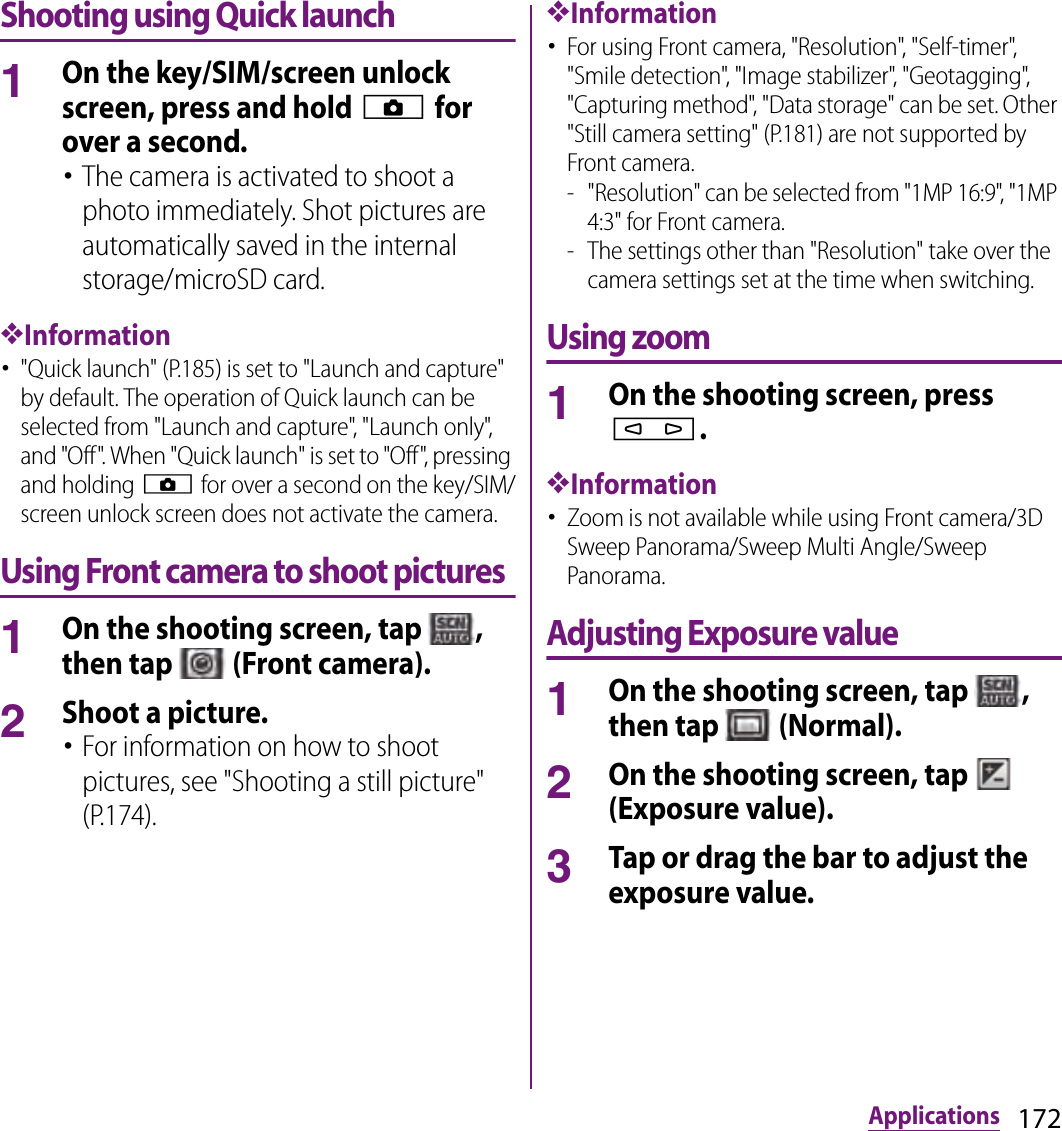
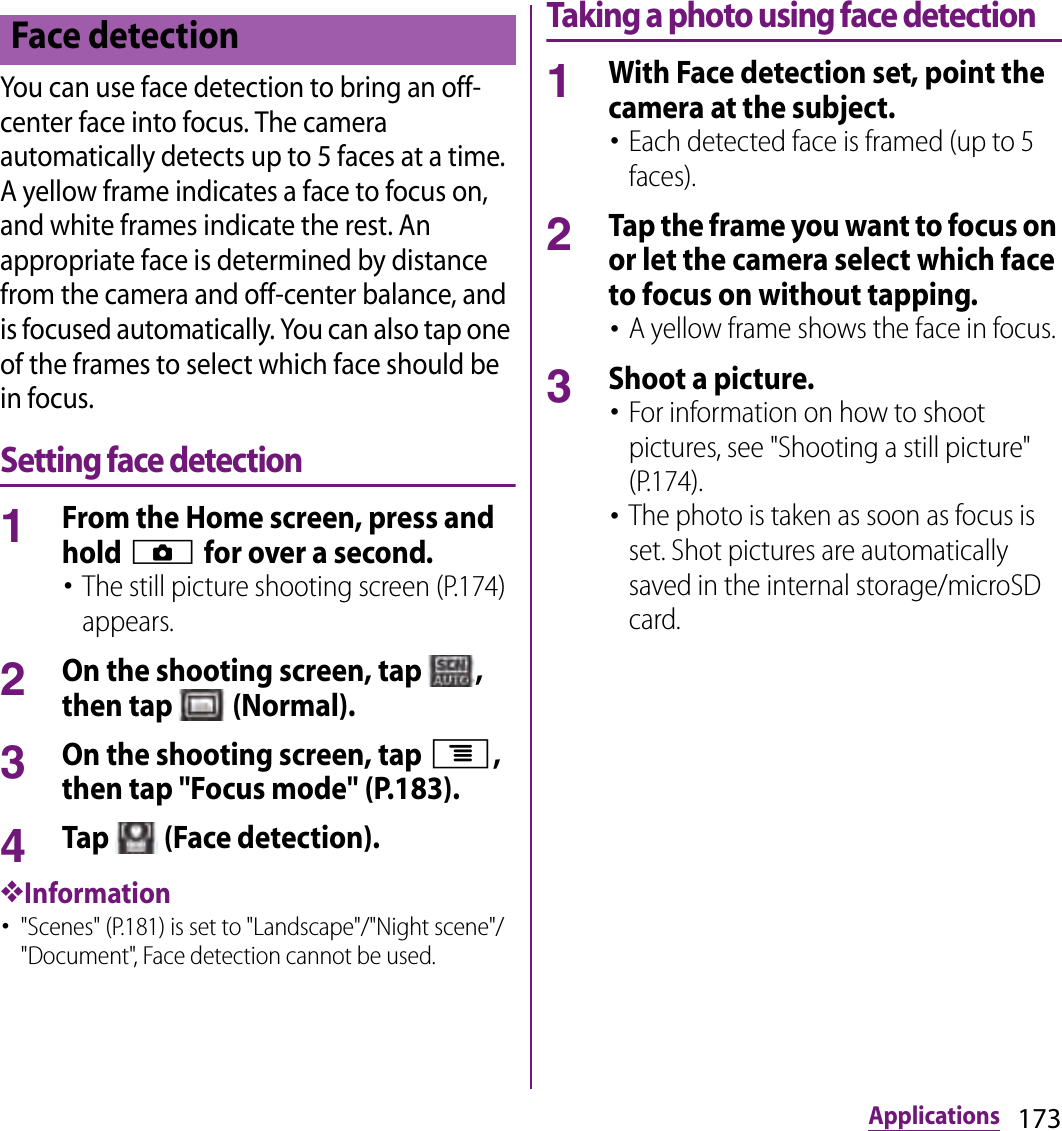
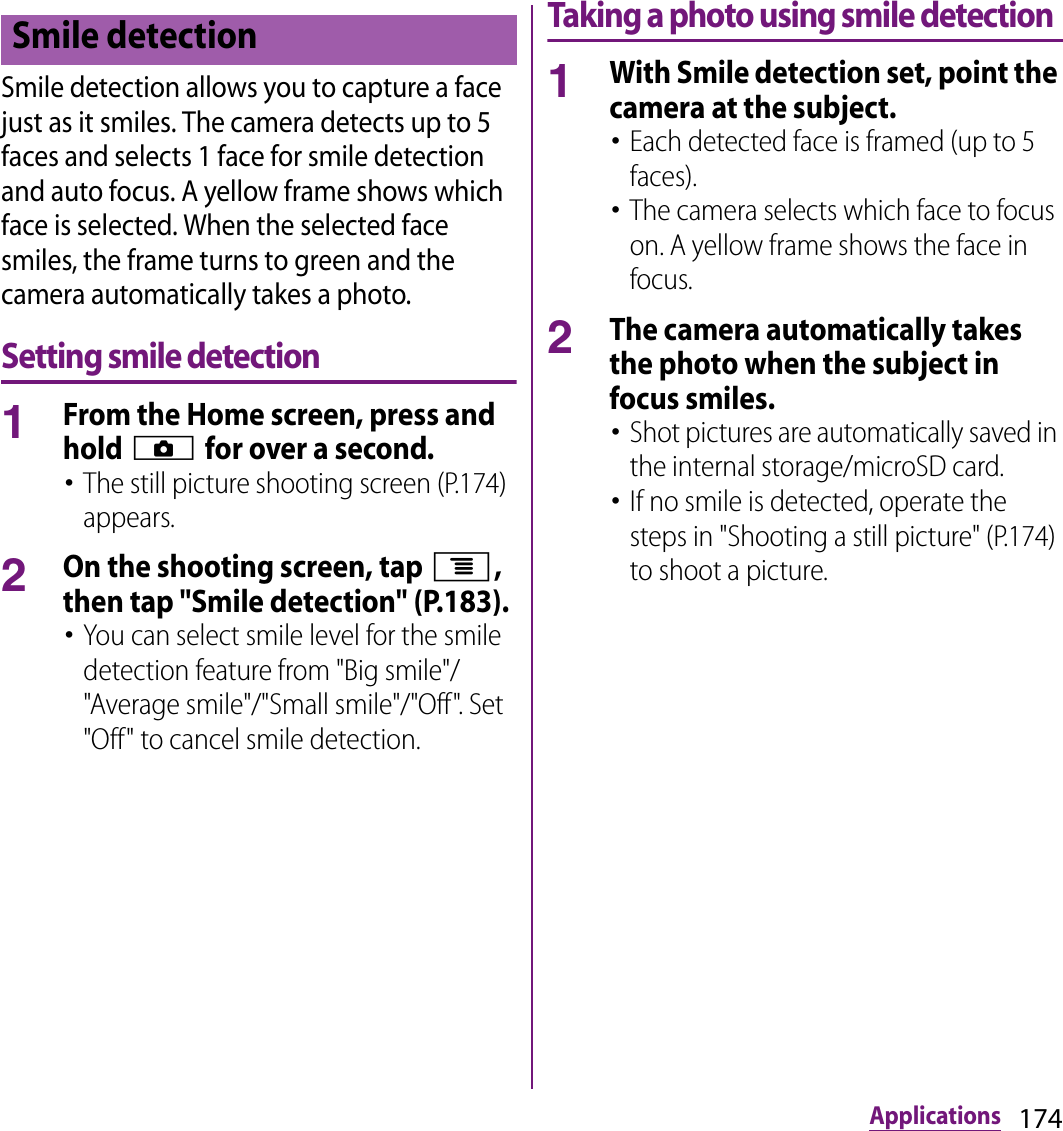
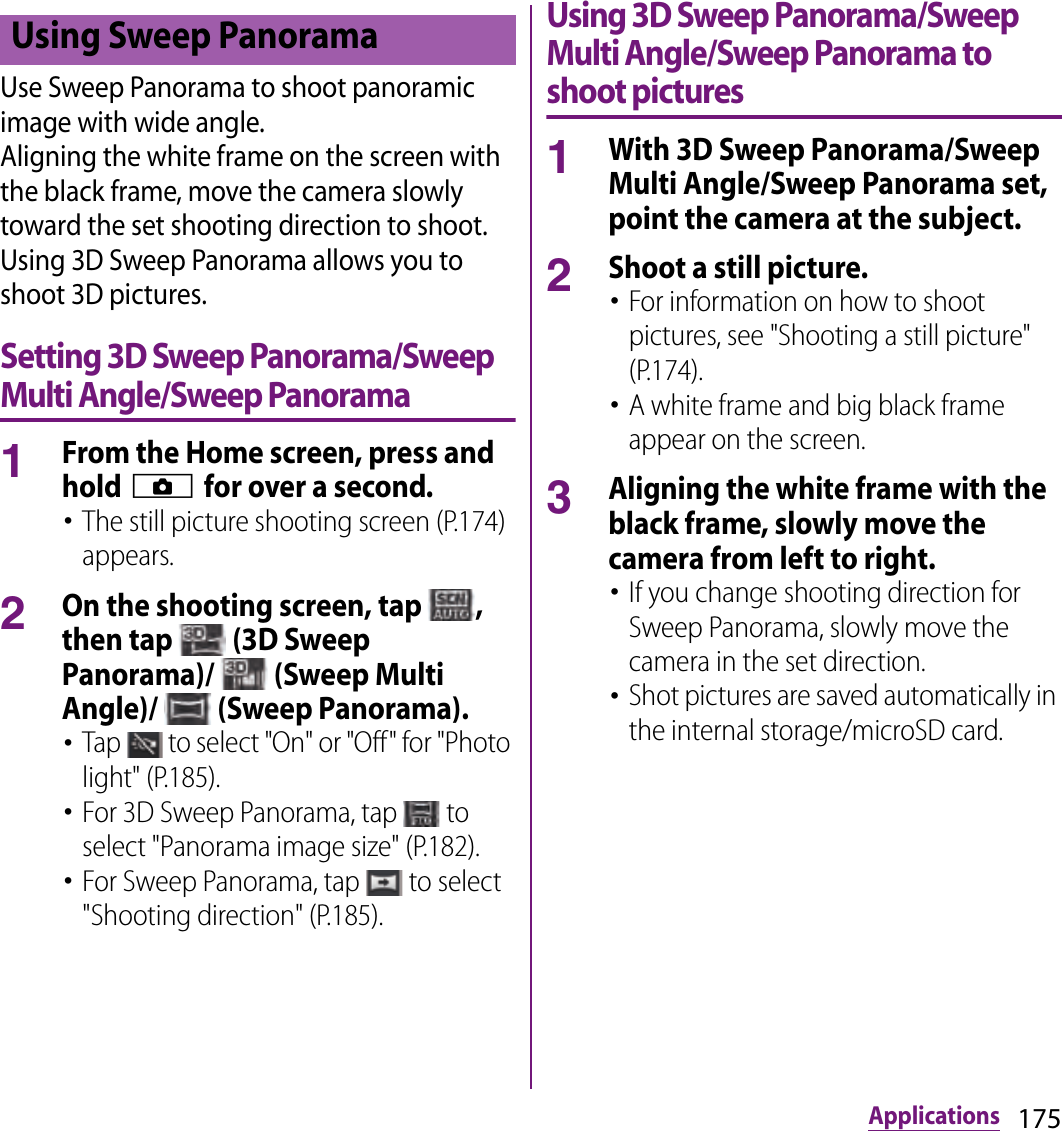
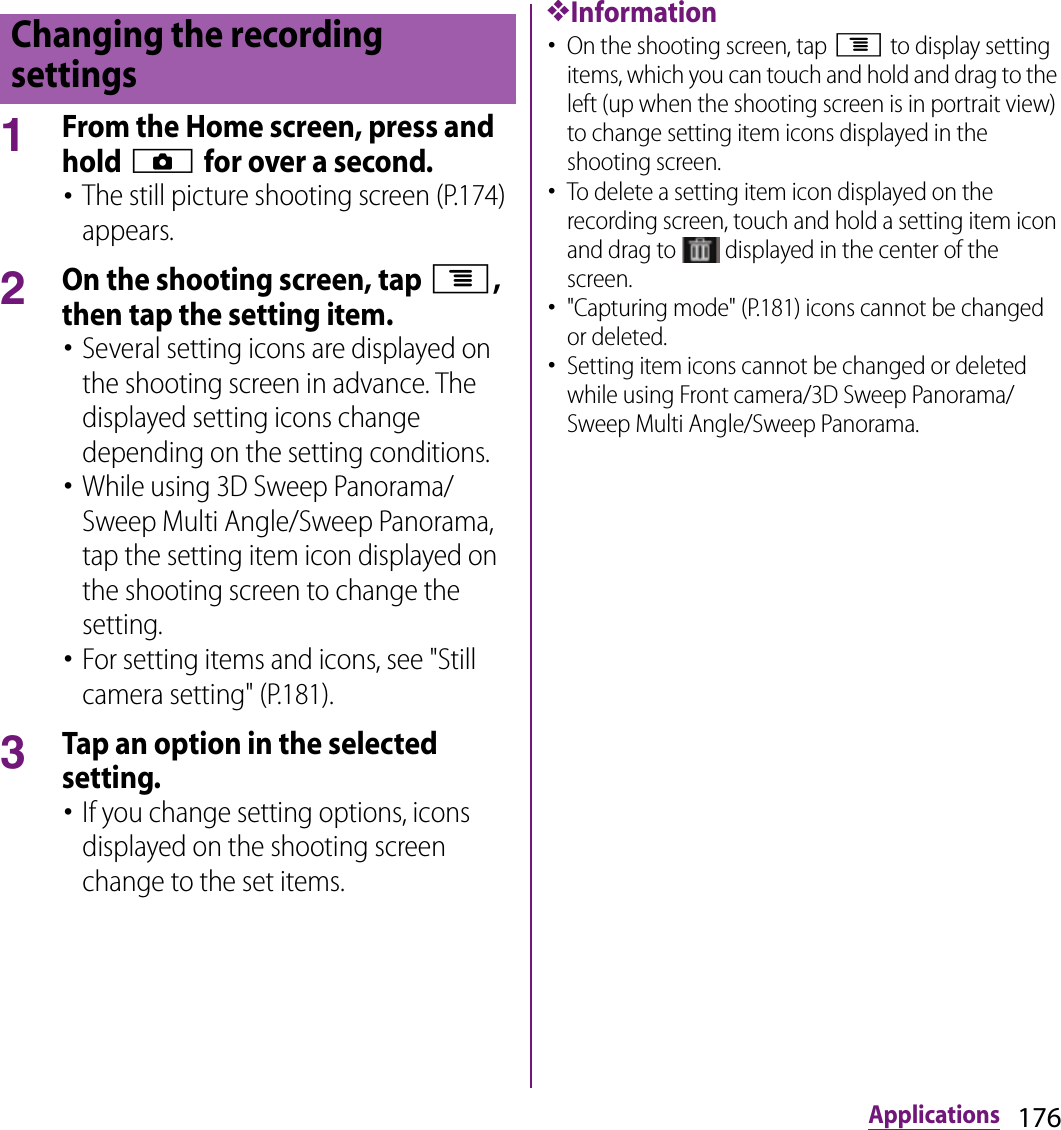
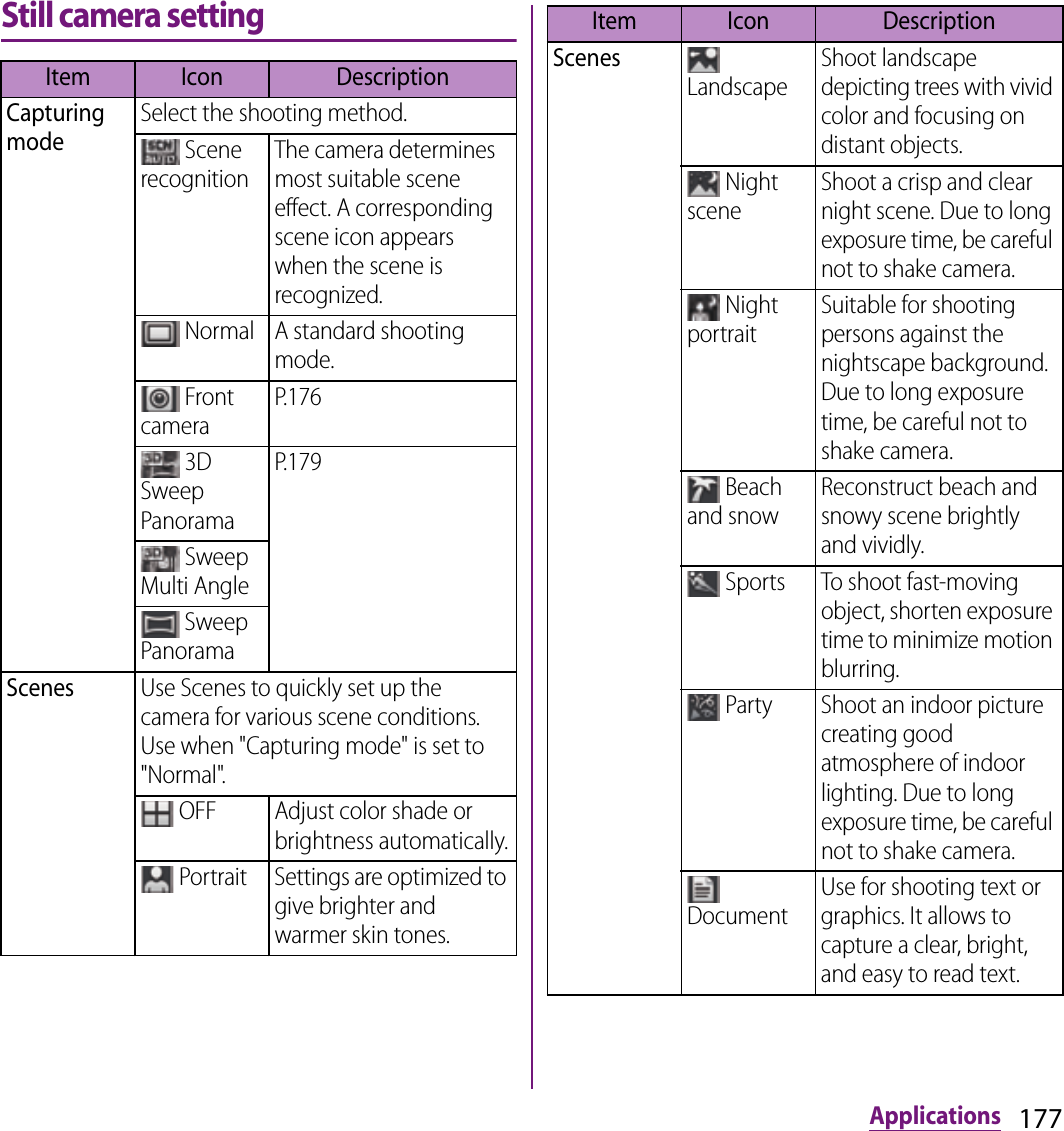
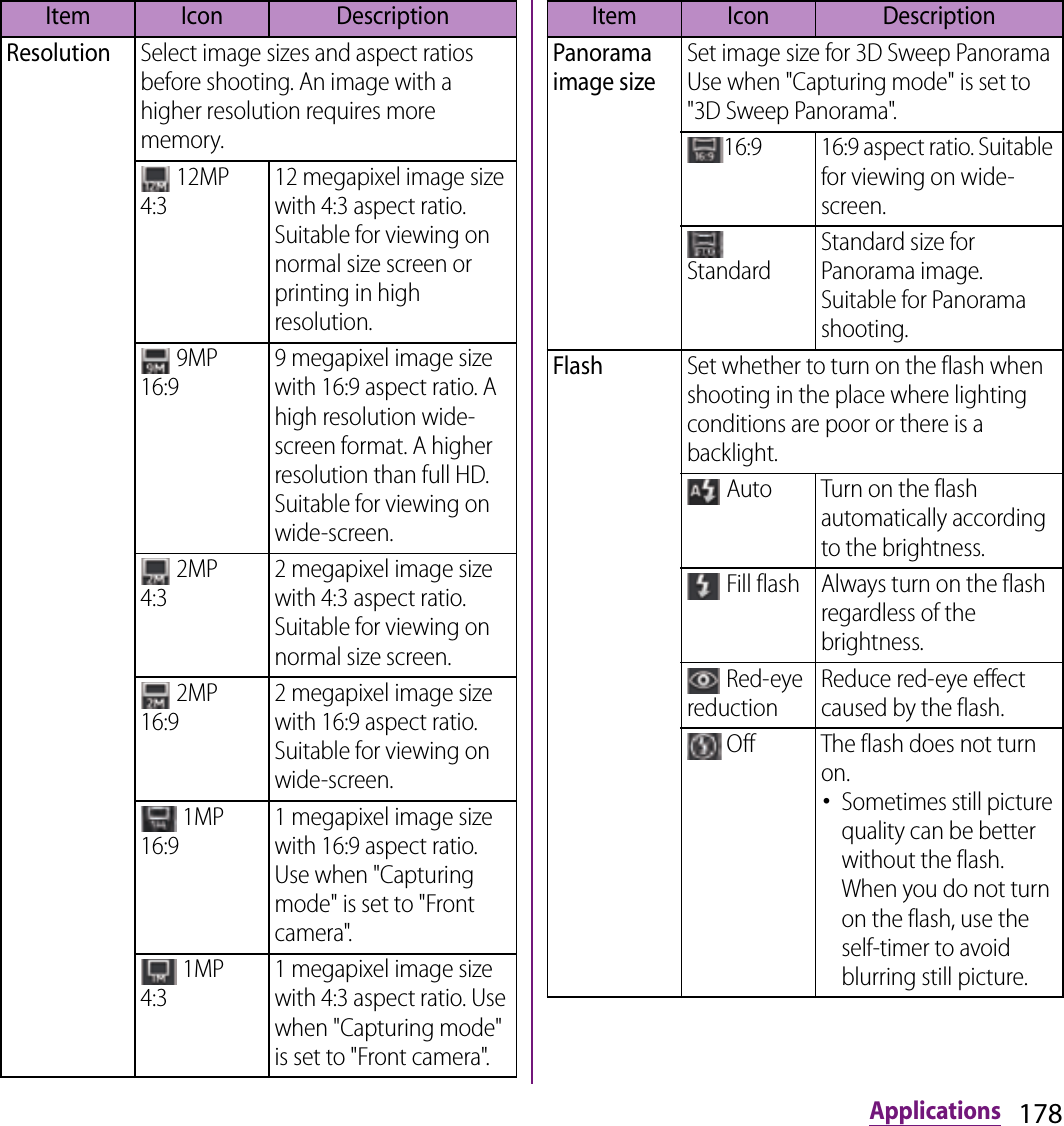
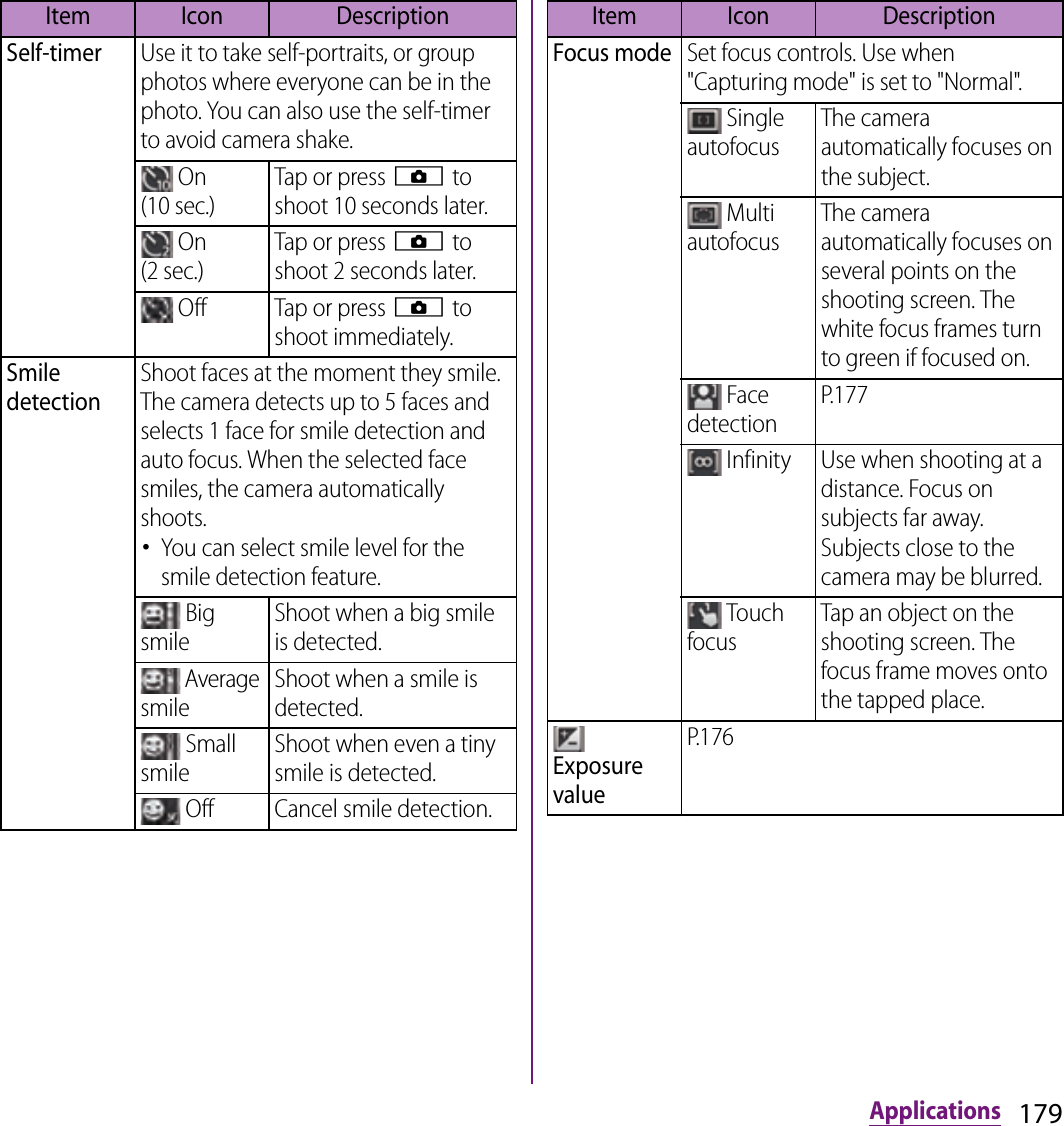
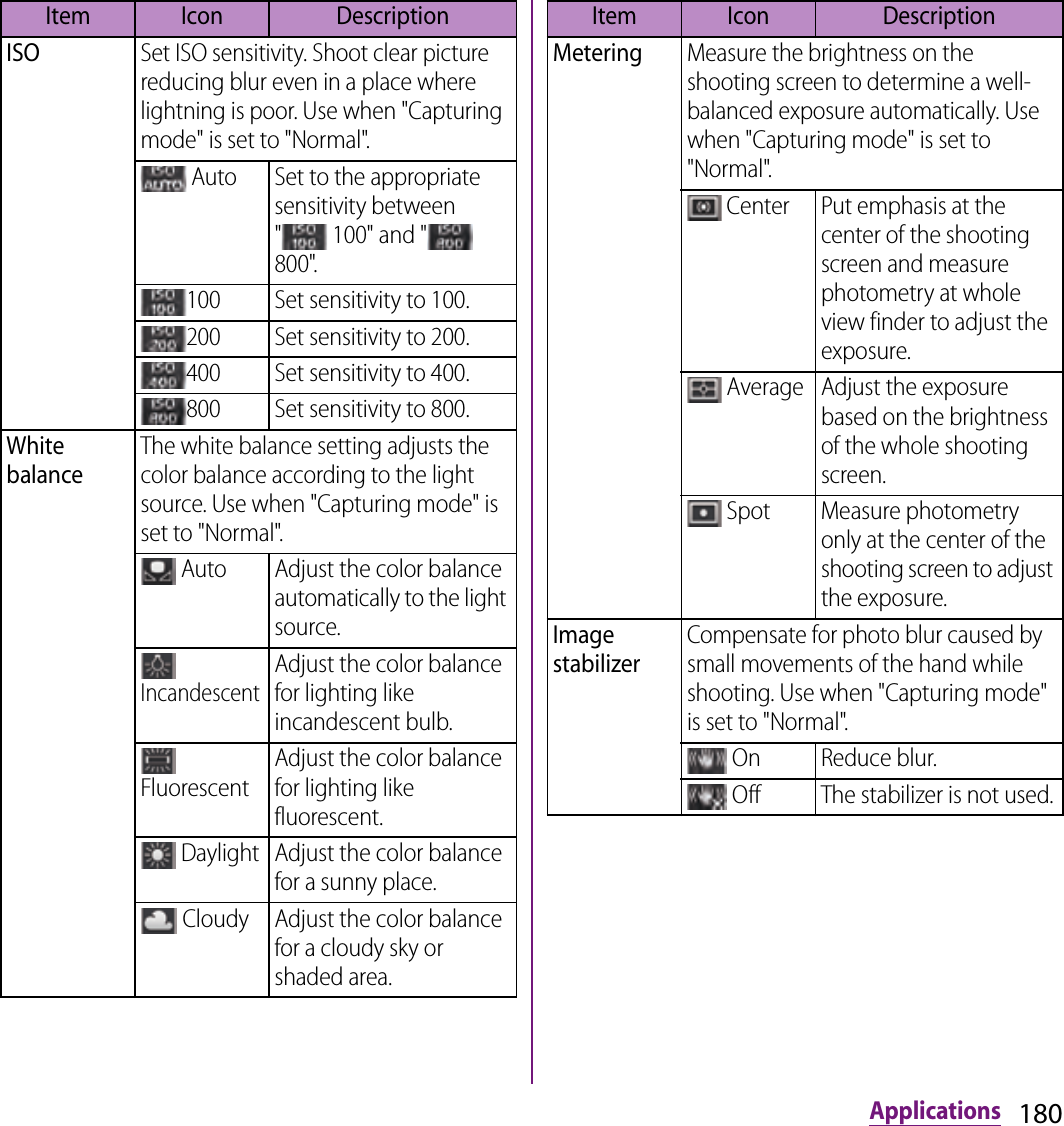
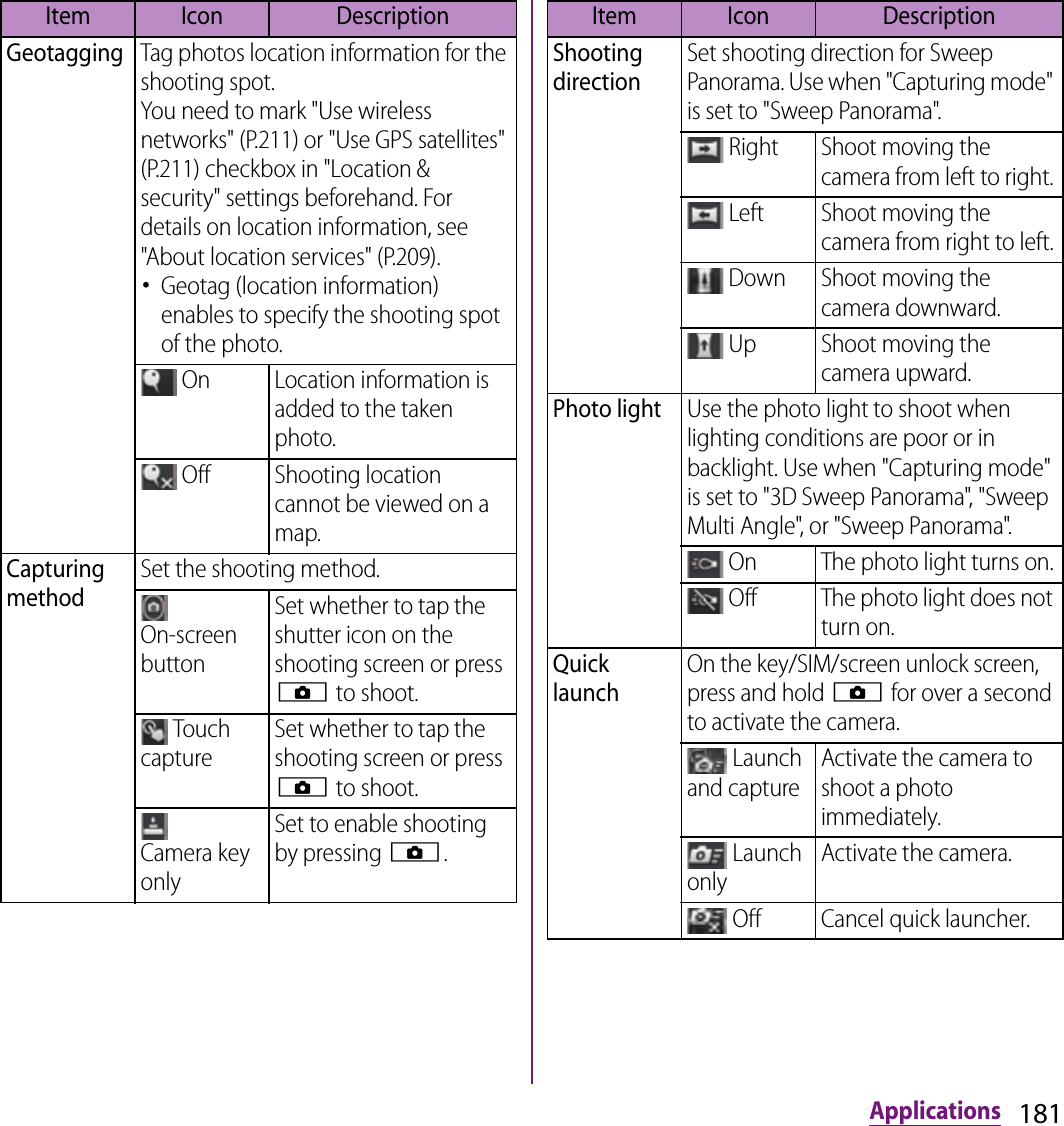
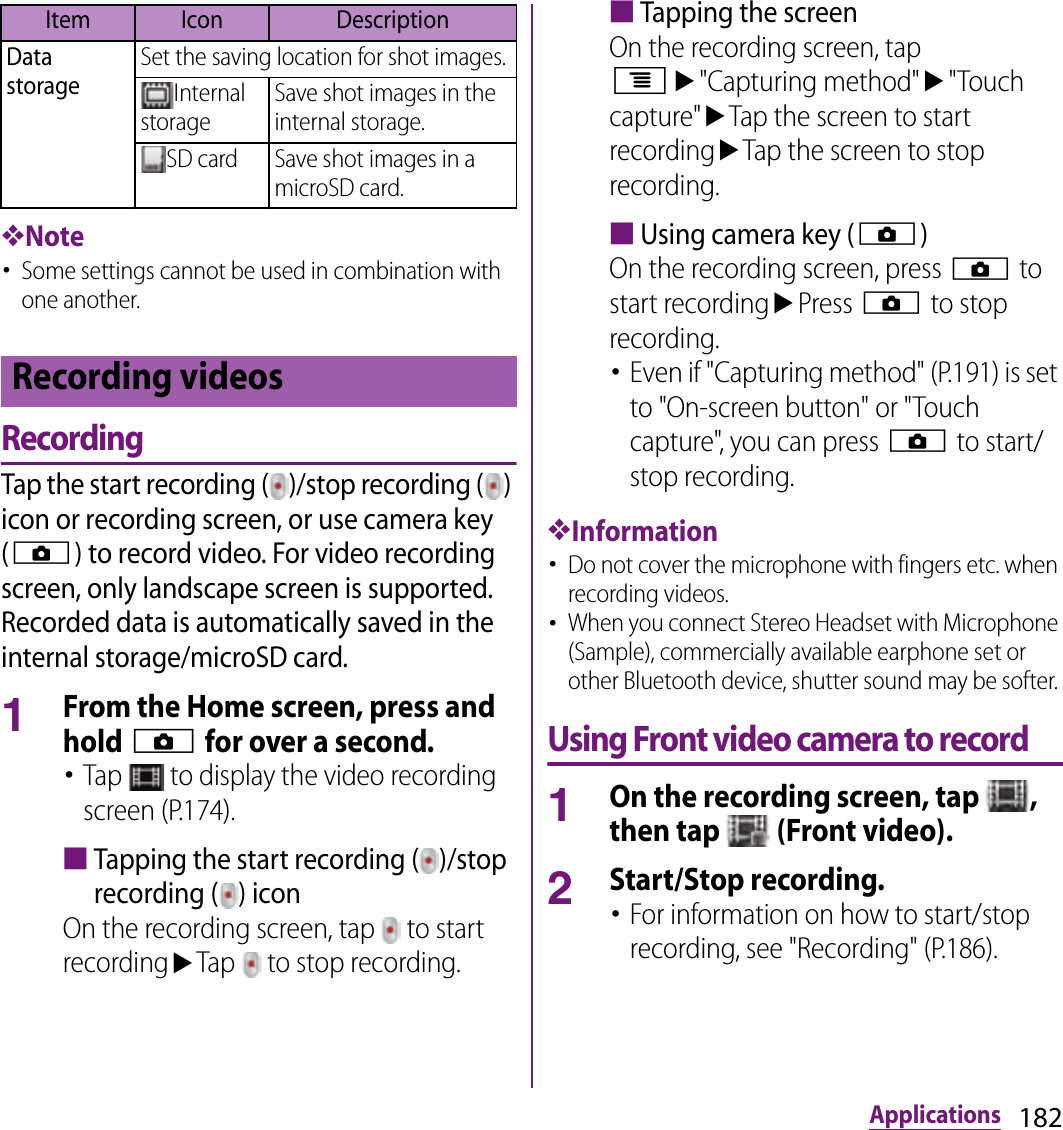
![183Applications❖Information・For using Front video camera, "Video size", "Self-timer", "Microphone", "Capturing method", "Data storage" can be set. Other "Video camera setting" (P.188) are not supported by Front camera.- The settings take over the video settings set at the time when switching (if "Video size" is set to "Full HD", the video size is changed to "HD 720p").Adjusting Exposure value1On the recording screen, tap (Exposure value).2Tap or drag the bar to adjust the exposure value.On the recording screen, tap the shooting history at the bottom left or right to display video, tap t and tap [Edit video] to crop the part of video to save.1On the recording screen, tap the shooting history to display video.2Tap t and tap [Edit video].・ (Progress bar) appears at the bottom of the screen.3Drag at the left of the progress bar to the right, to the starting point of cropping.4Drag at the right of the progress bar to the left, to the end point of cropping.・Tap the screen to play the cropped part for check.5Tap [Save].・Tap [Cancel] to return to the video playback screen without saving the cropped video.❖Information・If "Video size" (P.189) is set to "Full HD", videos cannot be cropped.1From the Home screen, press and hold k for over a second.・Tap to display the video recording screen (P.174).2On the video recording screen, tap t, then tap the setting item.・There are 4 setting icons on the recording screen in advance. The displayed setting icons change depending on the setting conditions.・For setting items and icons, see "Video camera setting" (P.188).Cropping video Changing the recording settings](https://usermanual.wiki/Sony/PM-0000.08-user-guide/User-Guide-1725539-Page-185.png)
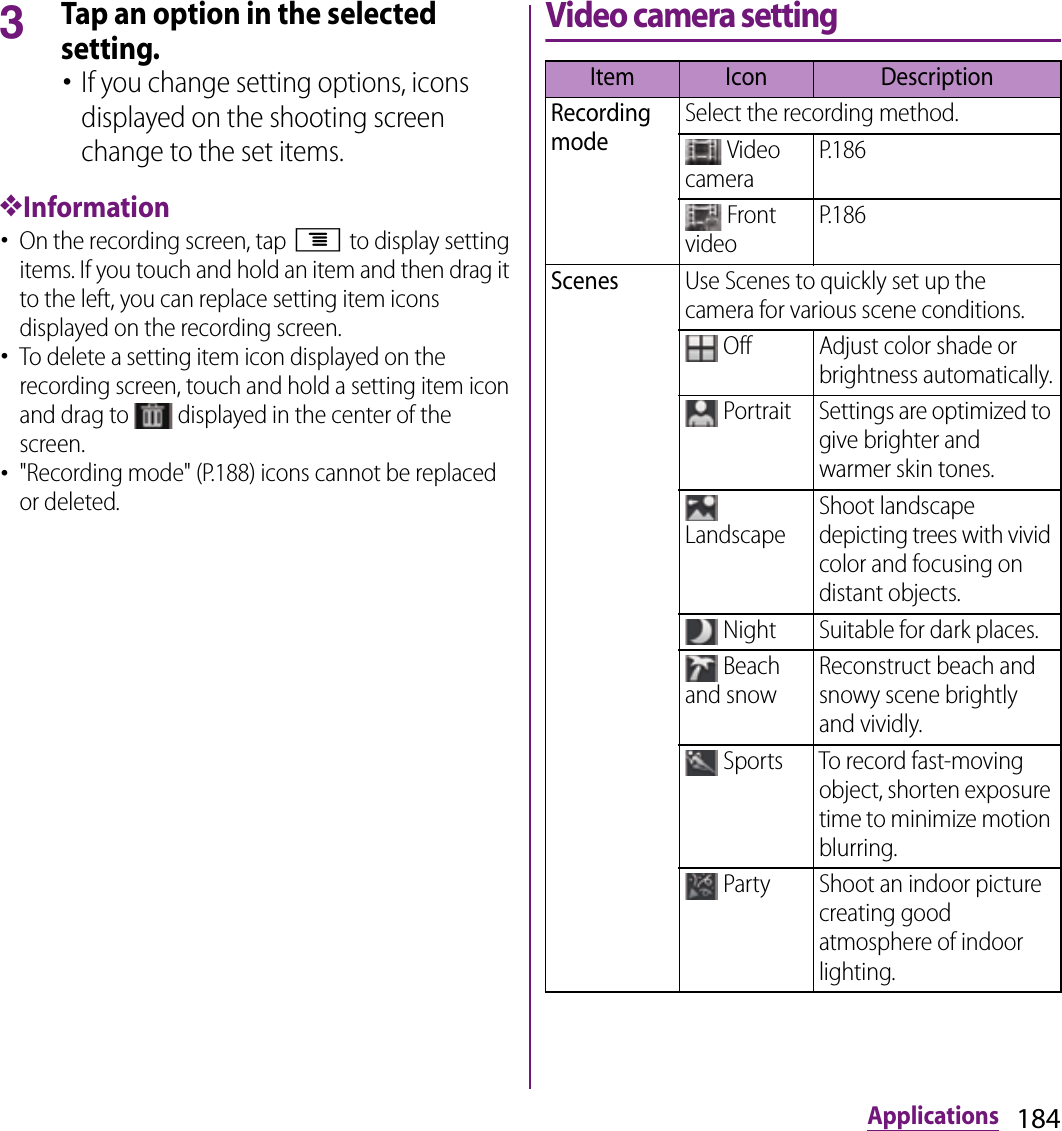
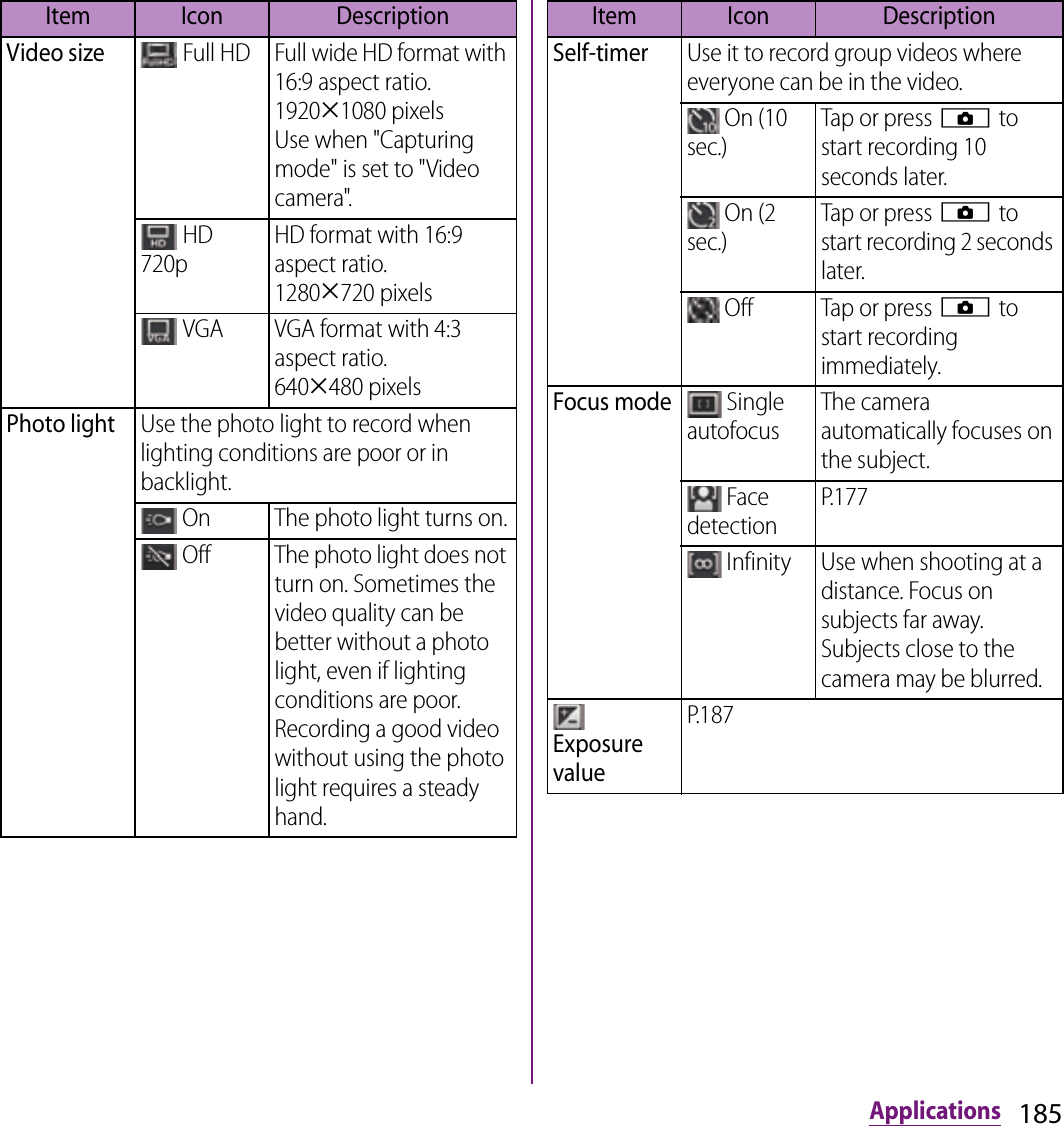
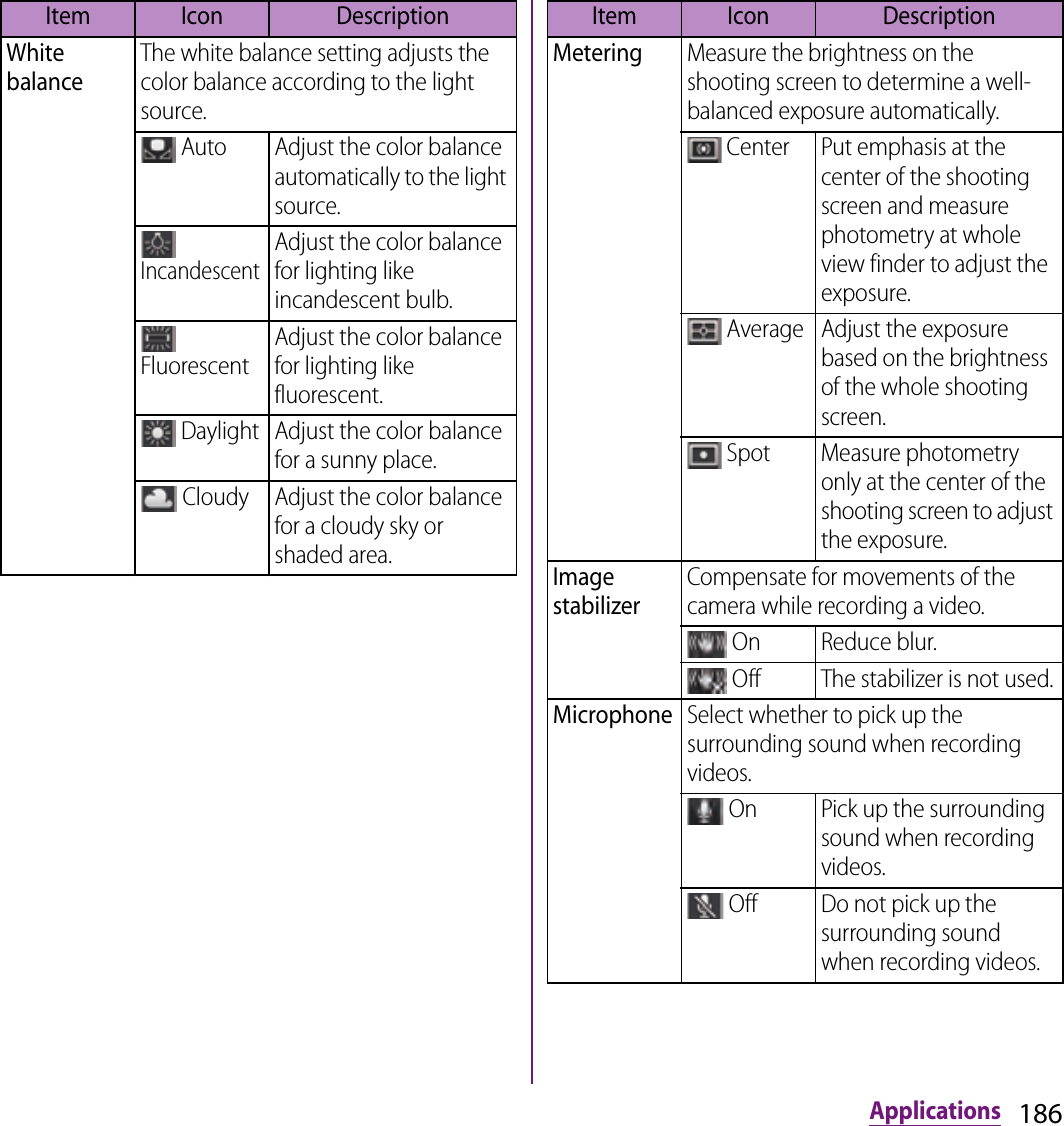
![187Applications❖Note・Some settings cannot be used in combination with one another.You can save the current displayed screen as an image (screen shot).Captured screen shots are shown on the "Pictures" album in the Gallery (P.193).1On the screen you want to capture, press and hold p for over a second.・Phone options menu appears.2Tap [Take screenshot].・A screen shot is taken and a message notifying the saving location appears on the screen.❖Information・By tapping [Share]/[Set as] on the shooting completion screen, you can share (send) the image via Bluetooth or email, or register as wallpaper or contact icon.Capturing methodSet the shooting method.On-screen buttonSet to start/stop recording videos by tapping the record starting/stopping icon or pressing k. Touch captureSet to start/stop recording videos by tapping the recording screen or pressing k.Camera key onlySet to start/stop recording by pressing k.Data storageSet the saving location for recorded videos. Internal storageSave recorded videos in the internal storage. SD card Save recorded videos in a microSD card.Item Icon DescriptionCapturing the screenshot](https://usermanual.wiki/Sony/PM-0000.08-user-guide/User-Guide-1725539-Page-189.png)
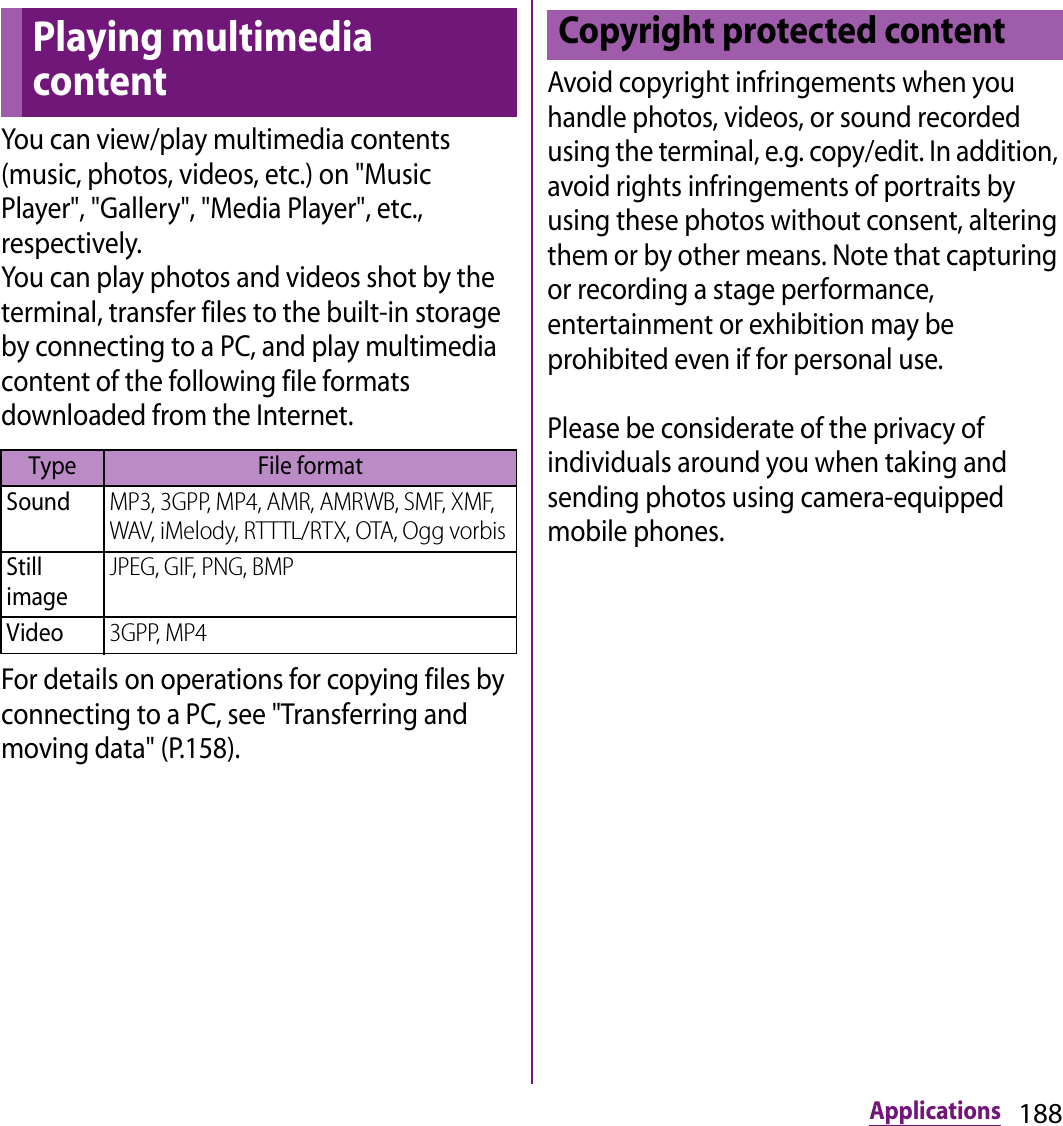
![190ApplicationsPhotos and videos that you took or saved in the internal storage or microSD card from a PC are displayed in albums.1From the Home screen, tap , then tap [Gallery].・Album list screen appears.・If you signed in online service available to be synchronized such as Facebook/Google+/Picasa, online albums also appear after synchronization.2Tap an album you want to view.・A screen listing Photo/Video files in album appears.❖Information・When you tap an album, then tap to the upper right of the screen, the albums are sorted by date. When you tap the date album, the list of all files appears. The files of selected date appear with the thicker frame than the other files.・Depending on the number of photos saved, it may take some times to load all photos on the screen.■ Album list screenaCamera album (Camera) : Display still picture/videos saved in the internal storage.bCamera album (100ANDRO) : Display still pictures/videos saved in the microSD card.cCamera button : Activate the camera.d3D album : View 3D Sweep Panorama/Sweep Multi Angle・Tap / to switch display.eAlbum listViewing photo/video albumadebc](https://usermanual.wiki/Sony/PM-0000.08-user-guide/User-Guide-1725539-Page-192.png)
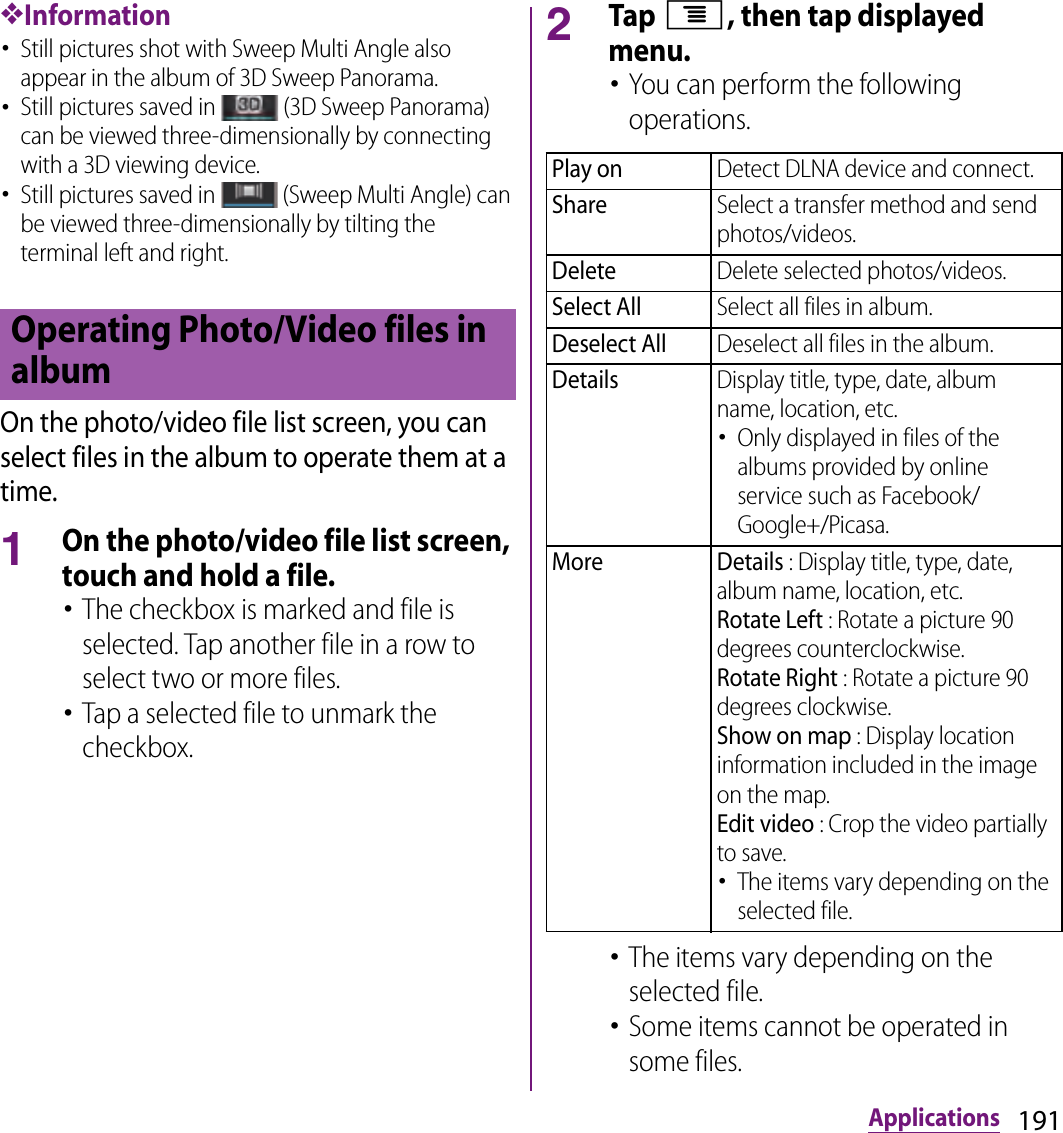
![192Applications❖Information・While selecting a file, tap t and tap [Play on] to display the connection device selection screen (if you do not connect Wi-Fi network in advance, tap [Settings] to display the setting screen for wireless & networks). Select a device detected on the connection device selection screen, and tap the device name to play on to share a file between a DLNA device and the terminal.・For shared files, file size and the file type are not particularly limited, but may be limited by the application to transfer. DRM content cannot be shared.・Before selecting a file, tap t to automatically mark the file displayed near the middle of the screen. If once a certain file is selected, the file in the middle is not always marked.・On the photo viewing screen, tap t to operate picture files individually.1From the Home screen, tap , then tap [Gallery].2Tap an album.・A list screen of files in the album appears.3Tap a photo to view it.■ Still picture viewing screenaAlbum informationbZoom outcZoom In❖Information・On the viewing screen, tap t to display "Play on", "Share", "Delete", "Slide show", "Set as", "More", "Set as wallpaper", "Details".* "Set as wallpaper" and "Details" only appear in images of the albums provided by an online service such as Facebook/Google+/Picasa.・The items vary depending on the selected file.・From the photo viewing screen for the Facebook album, you can post comments or "Like" onto Facebook.Starting slideshow1On the still picture viewing screen, tap t, then tap [Slide show].・A slideshow of the photos or first frames of videos in the album starts.Viewing photosabc](https://usermanual.wiki/Sony/PM-0000.08-user-guide/User-Guide-1725539-Page-194.png)
![193Applications1From the Home screen, tap , then tap [Gallery].2Tap an album.・A list screen of files in the album appears. icon is displayed on the video files.3Tap a video.■ Video playback screenaProgress bar : Display the playback position in the playback durationbMarker : Playback position. Drag to change the playback positioncDisplay the Media player list screendPlayback volume adjustment bareAuto-rotate screen On/Off switchfPlay/Pause keyAdjusting the volume of a video1On the video playback screen,press top or bottom of m.❖Information・Volume can be adjusted by operating the playback volume adjustment bar on the video playback screen.Fast forwarding and rewinding a video1Drag the progress bar marker right or left.Playing videoacbefd](https://usermanual.wiki/Sony/PM-0000.08-user-guide/User-Guide-1725539-Page-195.png)
![194ApplicationsYouTube is a free online video streaming service. You can play, search for and upload videos.・A packet communication charge is applied when downloading or uploading video content using 3G network.1From the Home screen, tap , then tap [YouTube].・YouTube video list screen appears.・You can tap t, then tap [Browse] to select video from each category.2Tap a video to play it.・While playing a video, tap the screen to display the play control keys which you can switch Play/Pause. Double-tap to switch landscape/portrait. In landscape, drag the marker on the progress bar at the bottom of the play screen left or right to change playing point.・Tap x to stop playing and return to the video list screen.・To quit YouTube, tap y.❖Information・For movies with caption function which can display subtitles, "CC" appears on the playback screen in the landscape mode. For your first activation, tap [CC] and tap language for the subtitles.1While playing a video, double-tap the screen to switch to the landscape screen.2Tap the screen to display the play control keys, then tap [HQ].❖Information・A video plays in high quality when Wi-Fi is connected.・On the YouTube screen, tap t, then tap [Settings], then mark [High quality on mobile] checkbox to always play video in high quality even when 3G network is connected.Playing YouTube videoPlaying YouTube videoPlaying YouTube videos in high quality](https://usermanual.wiki/Sony/PM-0000.08-user-guide/User-Guide-1725539-Page-196.png)
![195Applications1On the YouTube video list screen, tap t, then tap [Search].2Enter the search keyword.3Scroll the result and tap a video you want to play.1On the YouTube video list screen, tap t, then tap [Settings].2[Clear search history]uTap [OK].You can watch photos and videos on television by connecting the terminal using an HDMI cable (type D).1Connect the terminal with Home screen or application screen displayed to a TV using an HDMI cable.■When the Home screen is displayed・Activate TV launcher automatically.■When the Applications screen is displayed・, appear in the status bar. Drag the status bar downwards and tap [TV launcher] to activate TV launcher.Searching for a video with keywordsDeleting search historyConnecting the terminal to TV to watch photos and videosConnecting TV and activating an application by TV launcher](https://usermanual.wiki/Sony/PM-0000.08-user-guide/User-Guide-1725539-Page-197.png)
![196Applications2Scroll an icon left and right to select the desired application.・When you connect an HDMI cable for the first time, "HDMI cable connected" appears.- On the "HDMI cable connected" screen, tap [Learn more] to show how to use the TV remote controller.・You may be able to operate applications with the TV remote controller.❖Information・While HDMI is connected, drag the status bar downward and tap [HDMI connected] to set HDMI control or output. Operations may not be available depending on the TV remote controller.・On the TV launcher screen, select an album art in Music player on the upper left to display Music player screen.・On the TV launcher screen, select [Add] and select the desired shortcut to add the shortcut to the TV launcher screen.・On the TV launcher screen, select [Home] to display the Home screen of the terminal.・On the option menu, select [Rearrange] to rearrange shortcuts on the TV launcher screen.・Removing an HDMI cable severs connection, however, TV may remain to HDMI input mode. Follow the instructions on the TV to switch to digital terrestrial television mode, etc.・When you do not use HDMI connection, remove the HDMI cable. If the HDMI cable remains connected, the battery may be consumed quickly.You can browse and listen to your music, playlists and podcasts using Music player.Tap [MY MUSIC] tab on the Music player screen, you can browse and play audio content saved in the internal storage or microSD card by category.❖Note・Do not perform "Unmount SD card" while a track is playing.1From the Home screen, tap , then tap [Music player].・The Music player screen appears.2Tap [MY MUSIC] tab.3Browse tracks by tapping TRACKS/ALBUMS/ARTISTS/PLAYLISTS/SensMe™ channels/MY FAVORITES category.・When a shortcut is added, you can also tap the shortcut to view/play a track. For adding a shortcut, see "Adding a shortcut" (P.202).4Tap a track to play it.Music playerPlaying music](https://usermanual.wiki/Sony/PM-0000.08-user-guide/User-Guide-1725539-Page-198.png)
![197Applications■ Music player screenaPlaying tabbArtist name, song title, album titlecFavorites/"Like" icon・Display when added to Favorites or "Like" specified.dAlbum art : Tap to display "Like"/Add to favorites/Play on device/Play queue.・"Like" appears if you log in to Facebook.e[Previous] key : Go to the previous track, or to the beginning of the track in the current playlist.fProgress bar : Resume playback from the specified point by dragging or tapping.gTrack play timehMy MUSIC tab : Display categories, TRACKS/ALBUMS/ARTISTS/PLAYLISTS/SensMe™ channels/MY FAVORITES.iInfinite button : Connect to Google, Wikipedia, YouTube, etc. to display related information of the current track.jPlay/Pause keyk[Next] key : Go to the next track in the current playlist.❖Information・On the playback screen of the Music player, tap t to display "Shuffle mode", "Repeat mode", "Equalizer", "Edit".- Tap [Equalizer] to change sound quality with "Equalizer" tab, or to select surround effect for headphones with "More" tab, or to set xLOUD™ on/off for speakers.- Tap [Edit] to enter information such as title of the track, artist, album, release year, number of track manually. Alternatively, tap [Edit album art], then set album art downloaded from network or select an image from Gallery to set album art. Tap [Save] in the "Edit music info" screen to display edited contents on the music player screen.・On the playback screen of the Music player, tap album art and tap [Play queue] to display playing track and the list containing the track.- You can switch to play/pause the playing track, and change the track by tapping other track in the list.- Touch and hold a track to display menu items such as Send, Add to playlist, Set as ring tone, etc.- Tap [Save] to save tracks on the list as a playlist.- Drag up and down on the left of the track to change order.- To add a track to the list, touch and hold the desired track from the category of TRACKS/ALBUMS/ARTISTS/PLAYLISTS/MY FAVORITES, and tap [Queue track].・On the track list of each category, Tap t to display "Download music info".- Tap [Download music info] and tap [Start] to download album art, artist image, title of track, information for artist, album, then manually refresh album information.dkfcabeghij](https://usermanual.wiki/Sony/PM-0000.08-user-guide/User-Guide-1725539-Page-199.png)
![198Applications・On the unlocking screen, flick left around date to display the Music player widget to operate by tapping Play/Pause/[Rewind]/[Forward] key without unlocking the keys. While playing music, Music player widget automatically appears on the key unlock screen.・You can return to the Home screen to perform another operation while listening to the Music player in the background. To return to the playback screen of the Music player, from the Home screen, tap and [Music player], or drag the status bar down to tap playing music title from the Notification panel.Adjusting the volume1While playing music, press top or bottom of m.Adding a shortcutYou can add a shortcut of track or album to MY MUSIC screen.1In the Music player screen, tap [MY MUSIC] tab.2Tap TRACKS/ALBUMS/ARTISTS/PLAYLISTS/SensMe™ channels/MY FAVORITES category.3Touch and hold a track or album you want to add as a shortcut.4Tap [Add as shortcut].❖Information・To move a shortcut or tile for each category in MY MUSIC screen, touch and hold a shortcut or tile for each category and drag to the desired location.・To delete a shortcut in MY MUSIC screen, touch and hold a shortcut and drag to displayed at the right of the screen.Sharing trackYou can share (send) files by Bluetooth, email attachment, infrared communication.1In the Music player screen, tap [MY MUSIC] tab.2Tap TRACKS/ALBUMS/ARTISTS/PLAYLISTS/MY FAVORITES category.3Touch and hold a track you want to share.4Tap [Send].5Select sending method and send.・Mark [Use by default for this action.] checkbox not to display the application selection screen next time.❖Information・For shared (to be sent) files, file size and the file type are not particularly limited, but may be limited by the application to transfer. DRM content cannot be shared.](https://usermanual.wiki/Sony/PM-0000.08-user-guide/User-Guide-1725539-Page-200.png)
![199ApplicationsDeleting a track1In the Music player screen, tap [MY MUSIC] tab.2Tap TRACKS/ALBUMS/ARTISTS/PLAYLISTS/MY FAVORITES category.3Touch and hold a track you want to delete.4Tap [Delete]u[Delete].Using a track as a ringtone1In the Music player screen, tap [MY MUSIC] tab.2Tap TRACKS/ALBUMS/ARTISTS/PLAYLISTS/MY FAVORITES category.3Touch and hold a track you want to use.4Tap [Set as ringtone].In Music player, you can create new playlists with your desired tracks.You can use Media Go (P.162) to maintain your music library and create your own playlists. Playlists that you create by yourself are stored on the terminal in the m3u format.You can connect the terminal to a PC using the supplied microUSB cable and can use the internal storage or a microSD card as a removal disk. For details, refer to "Using microUSB cable" (P.158).Creating a playlist1In the Music player screen, tap [MY MUSIC] tab.2Tap [PLAYLISTS]u[Create new playlist].3Tap the entry box to enter a playlist name and tap [OK].4Mark the service you want to post and tap [Save].Playlist](https://usermanual.wiki/Sony/PM-0000.08-user-guide/User-Guide-1725539-Page-201.png)
![200ApplicationsPlaying Playlists1In the Music player screen, tap [MY MUSIC] tab.2Tap [PLAYLISTS].・The following playlists appear by default.3Tap a playlist you want to playuTap a track.・The playlist plays from the track you tap.With Android Market, you can directly access useful applications or fun games which you can download and install on the terminal. And you can send feedback and comments about an application, or report objectionable application or incompatible application with the terminal as an inappropriate content.・To use Android Market, you need to set Google account (P.132).・Some applications and games are free of charge, and the others are paid. In the applications list of Market, distinction between free and paid is clearly specified. For details on purchasing, returning and refunding of paid applications, see "Help" (P.205).1From the Home screen, tap [Market].・When you open Android Market for the first time, the Terms of Service for Android Market window appears. Tap [Accept].My favoritesDisplay the list of tracks in My favorites.Newly addedDisplay the list of tracks newly added.Most playedDisplay the list of frequently played tracks.Never playedDisplay the list of available tracks which have not played wholly.Using Android MarketOpening Android Market](https://usermanual.wiki/Sony/PM-0000.08-user-guide/User-Guide-1725539-Page-202.png)
![201Applications❖Information・Be sure to check the security of application, then install it at your own risk. The terminal may be infected with a virus and the data may be damaged.・NTT DOCOMO is not liable for malfunctions, if any, caused by the application you installed. In such case, the repair is charged even during the warranty period.・NTT DOCOMO is not liable for any disadvantage brought to you or any third party due to an application you installed.・Some applications automatically perform packet communications. Packet communication is kept active unless you disconnect it or the time-out is occurred. To disconnect packet communication manually, from the Home screen, tap t and [Settings]u[Wireless & networks]uTap [Mobile networks] and then unmark [Data enabled].・Some applications may be updated automatically.When you need help or have any questions about Android Market, in the Andoroid Market screen, tap t and tap [Help]. The Browser opens the Android Market Help web page.Timescape™ (hereinafter referred to as Timescape) displays various information such as Facebook, Foursquare, Twitter or mixi updates, etc. in chronological order. You can see a tile preview of events before choosing to view the full content. With (infinite button), you can view all communication information related to the registered contacts. (P.208)❖Information・To make best use of Timescape, you can set up your social networking service (SNS) account.・Note that, you cannot view emails of Gmail or other Email application accounts in Timescape.・If you do not have a Facebook account, you can create a new account at http://www.facebook.com.・If you do not have a Foursquare account, you can create a new account at https://ja.foursquare.com.・If you do not have a Twitter account, you can create a new account at http://www.twitter.com.・If you do not have a mixi account, you can create a new account at http://mixi.jp (in Japanese only).・You can check the update of set Facebook, Foursquare, Twitter or mixi by Timescape.HelpTimescape™](https://usermanual.wiki/Sony/PM-0000.08-user-guide/User-Guide-1725539-Page-203.png)
![202Applications・The first time you start Timescape, a setup wizard will guide you the necessary steps to set up account.1From the Home screen, tap , then tap [Timescape™].2Tap a tile.3If you want, enter your Facebook/Foursquare/Twitter/mixi account information.4Tap [Done].❖Information・In the setup wizard, tap [Extension search] on the account registration screen to connect to Android Market and search new services for Timescape.・After completion of setup wizard, you can change the settings. On the Timescape screen, tap t and tap [Settings].・If the automatic update of Facebook/Foursquare/Twitter/mixi is set, you can check information update sooner; however, the battery runs out quickly. To save the battery, set to manual update.aLatest comment : Display the latest comments posted to Facebook/Foursquare/Twitter/mixi.・To narrow the services to post down, use filter.bTile : Display various information such as Facebook, Foursquare, Twitter or mixi friend's updates in chronological order.cFilter : Tap a filter item to narrow the information down to a certain type.・Display order of filters may differ.Scrolling through tiles in Timescape1Drag a tile up and down.Previewing tiles in TimescapeSelect a tile to view the content on the tile.1Tap a tile.Setting up Timescape Timescape screenabc](https://usermanual.wiki/Sony/PM-0000.08-user-guide/User-Guide-1725539-Page-204.png)
![203ApplicationsFiltering the displayed tile1Tap the filter icons on the Timescape screen.Refreshing the Timescape screenWhen you refresh the Timescape screen, the terminal connects to the Internet to update information from your Facebook, Foursquare, Twitter and mixi whose accounts are set in Timescape.1On the Timescape screen, tap t and tap [Refresh].Posting to Facebook, Foursquare, Twitter, mixi from Timescape1On the Timescape screen, tap t and tap [Update status].2Mark the service you want to post and tap [Continue].3Enter the text and tap [Post].Filter iconsFilter Icon Displayed tileAll tilesUpdates from your Facebook contactsUpdates from your Foursquare contactsUpdates from your Twitter contactsUpdates from your mixi contacts](https://usermanual.wiki/Sony/PM-0000.08-user-guide/User-Guide-1725539-Page-205.png)
![204ApplicationsThe following icons on a tile indicate a type of event.Displaying tile information1On the Timescape screen, tap a tile.When you tap a tile, (infinite button) may appear in the upper right corner. By tapping , you can view the communication log by registered information in the contacts or tile filter event.Viewing the registered information of contacts in Timescape1On the Timescape screen, tap a tile.2Tap .・Communication logs and information related to the selected tile by event appear. Flick the filter at the bottom of the screen to switch displayed information.Displaying the Timescape setting screen1On the Timescape screen, tap t, then tap [Settings].・You can set the following operations.Tile iconsIcon EventA Facebook update. Tap the tile to display the update.A Foursquare update. Tap the tile to display the update.A Twitter update. Tap the tile to display the update.A mixi update. Tap the tile to display the update.The infinite button in TimescapeTimescape settingsUpdate modeSet your Facebook/Foursquare/Twitter/mixi account information to be updated manually/automatically when Timescape is activated.Timescape™ contentChange a content type displayed in Timescape.Set up servicesSet Facebook/Foursquare/Twitter/mixi account or search new service of Timescape.](https://usermanual.wiki/Sony/PM-0000.08-user-guide/User-Guide-1725539-Page-206.png)
![207ApplicationsEnabling GPS function1From the Home screen, tap t and tap [Settings].2Tap [Location & security].3Tap [Use GPS satellites].4Read the note and tap [Agree].・[Use GPS satellites] is marked.Enabling Wireless networks to find position・Enable to search a current location using mobile network and Wi-Fi.1From the Home screen, tap t and tap [Settings].2Tap [Location & security].3Tap [Use wireless networks].4Read the note and tap [Agree].5Read the note on location information and tap [Agree].・[Use wireless networks] is marked.・Wireless network users' location information is stored without specifying who they are. Some location information is stored even when the application is not running.The Google Maps application lets you view your current location, find other locations and calculate routes. When you start the Google Maps application, your approximate location is shown using information from nearby mobile towers. Your location is updated with a more precise position when the GPS receiver finds your location.❖Information・Make sure to enable the current location information setting before trying to get your position.・To use Google Maps, enable data connection (3G/GPRS) or connect to Wi-Fi.・Google Maps does not cover the whole world.・Only using 3G/Wi-Fi connection may not detect some locations.・Google may provide updated service or function.1From the Home screen, tap .2Tap [Maps]u[OK].・A map screen appears.Finding the current location on the map1On the map screen, tap .・The blinking blue arrow shows the current location.Using Google Maps](https://usermanual.wiki/Sony/PM-0000.08-user-guide/User-Guide-1725539-Page-209.png)
![208ApplicationsViewing Street View・Street View does not cover some areas.1Touch and hold a spot on the map that you are going to look at in Street View.2Tap the displayed call-out.3Tap (Street View)u[OK].・On the Street View display, tap t and tap [Compass mode]. The compass in Street View shows the same direction as the terminal's geomagnetic compass.・Uncovered area for Street View appears in light gray.Searching for a location you want to look at1On the map screen, tap t, then tap [Search].2Fill out the search box.・You can enter addresses, city names, business types and institution names (for example, London and art museum).・If a list of places searched or referred previously appears on the screen, tap an address, etc. on the list to check the location on the map.3Tap .・Search result appears on the map.・If appears, tap to select the place to display.・When "Do you mean:" appears at the top of the map, you can tap "Do you mean:" to select the place.4Tap a destination.・A detailed information screen appears.❖Information・You can use / / on the detailed information screen. The options you can use vary depending on the location.・On the map screen, tap t and [More], then tap (Places) to select a category such as "Restaurants", "Cafes", etc. to search around your current location and show it on the map. You can add the search categories.](https://usermanual.wiki/Sony/PM-0000.08-user-guide/User-Guide-1725539-Page-210.png)
![209ApplicationsZooming in or out on a map1Tap to zoom in or out on a map.❖Information・Alternatively, double-tap or pinch on the screen to zoom in/out.Changing the layersYou can select information to overlay on the map.1On the map screen, tap .2Tap the information you want to view.・Traffic information and routes are not available in all locations.Receiving guidesGoogle Maps helps you receive detailed guides for your destination.1On the map screen, tap t, then tap [Directions].2Enter a start point in the upper text box, and an end point in the lower text box.・Alternatively, tap at the right of the text box to select a Start point and End point from [My current location]/[Contacts]/[Point on map]/[My Places].3Select a transportation from (Driving)/ (Transit)/ (Walking).4Tap [Get directions].・A list of guides for your destination appears.5If you search directions for public transportation, tap a route in the list.・A route is displayed on the map if you search in car or walk option. Tap to display routes on the list, and tap to display routes on the map.❖Information・With "Navigation" application, you can use easy route search with current location as a departure point.TrafficShow traffic condition.SatelliteDisplay satellite photo.TerrainDisplay geological formation.Transit LinesShow route information.LatitudeJoin Latitude.My MapsView My Maps that you create on a PC. Only viewing : You cannot create My Maps on the terminal.WikipediaDisplay .Tap to display a Wikipedia article related to the location.](https://usermanual.wiki/Sony/PM-0000.08-user-guide/User-Guide-1725539-Page-211.png)
![210ApplicationsClearing the MapsClear displayed layers, route search results and some others.1On the map screen, tap t and tap [Clear Map].・If there is nothing to clear, "Clear Map" is displayed in light gray.Google Latitude enables you to check where a friend is on the map, and to share status messages. Latitude also enables you to send messages (SMS) and emails, to make phone calls, and to find the route to where a friend is.Location information cannot be automatically shared. You need to join Latitude and invite a friend who gives his or her location information, or to receive an invitation from him or her.Joining Latitude1On the map screen, tap t, then tap [More]u[Join Latitude].・For the first time to join Latitude, a message confirming whether to agree to share location information with friends appears.・Once you join Latitude, the menu name changes into [Latitude].❖Information・To set Latitude or log out, tap t on the map screen, then tap [Settings]u[Location reporting] to display a screen for the operation.Opening LatitudeIf you join Latitude, you can confirm where a friend is, and check update with opening the screen.1On the map screen, tap t, then tap [More]u[Latitude].❖Information・For details of Latitude, tap t on the map screen, then tap [Help] to view the mobile help.Checking where a friend is by Google Latitude](https://usermanual.wiki/Sony/PM-0000.08-user-guide/User-Guide-1725539-Page-212.png)
![212Applications・A place far from the tower that the airwaves are sent from・Mountain-ringed regions or a place between buildings where airwaves are interrupted by geography or buildings・Tunnel, underground or far back from a building where airwaves are weak or do not reach1Seg antennaTo make the reception condition better, stretch out the 1Seg antenna.To make the reception condition better, try to change the direction of the antenna or move to another location.・Stretch out the 1Seg antenna until it stops.・1Seg antenna can be rotated by 360 degrees. Use 1Seg antenna in the direction you can receive a stronger airwaves.❖Information・Please note the followings when you operate 1Seg antenna.- When changing the direction of the 1Seg antenna, hold a part close to the root of the 1Seg antenna and check the direction.- When retracting the 1Seg antenna, shorten the antenna, set it up and retract it carefully checking its direction.Make channel setting from 1Seg menu when you activate 1Seg for the first time. After setting is complete, you can watch 1Seg programs.1From the Home screen, tap , and then tap [1Seg].2Tap [Channel setting]u[Current area].・Available channels are searched.Initial settings for 1Seg](https://usermanual.wiki/Sony/PM-0000.08-user-guide/User-Guide-1725539-Page-214.png)
![213Applications3Tap [YES].4Tap entry box, enter a title name and tap [OK].・To go back to 1Seg menu, tap x.❖Information・Alternatively, tap [Select area] in Step 2 then select area to make channel setting.・Channel setting may not be made in the area where a terrestrial digital TV broadcasting service has just started.1From the Home screen, tap , and then tap [1Seg].2Tap [Activate 1Seg].・1Seg watching screen appears. Tap the image to temporarily view program information such as channel, program name, multi-channel formation (multiple services), etc.・Tap t on the 1Seg watching screen to display operation bar.❖Information・It may take a time to acquire image data or broadcasted data when you activate 1Seg or change channels due to characteristic of digital broadcasting.・According to the airwave condition, image or sound may be interrupted or stopped.・If the terminal receives a call while watching 1Seg, 1Seg is interrupted and resumes after the call ends.■ 1Seg screenWatching 1Seg programkacb1Seg watching screen (Full screen)1Seg watching screen (operation bar screen)dabghfeijkab1Seg watching screen (with Data broadcasting)](https://usermanual.wiki/Sony/PM-0000.08-user-guide/User-Guide-1725539-Page-215.png)
![214ApplicationsaImagebSubtitlecProgram informationdSwitch screen view : Switch screen between full screen data broadcasting and 1Seg program with data broadcasting (only for vertical view).eAdvanced settingsfDOWN selection/UP selection : Select previous or next channel you are currently watching.gRemote controller : Display numeric keys 1-12 to switch channels and keys for searching stations.hMuteiData broadcasting : Display data broadcasting content.jRemote controller for data broadcasting : Display operation keys for data broadcasting such as Move focus, Select focus, Back, Show numeric keys, etc.k1Seg status bar : Display icons for reception level, subtitle, muting, channel, volume, off timer, etc.❖Information・Press m on the 1Seg watching screen to adjust volume.・Recording 1Seg program is not supported.・You can watch 1Seg turning the terminal sideways. If the screen orientation does not change automatically when you turn the terminal sideways, from the Home screen, tap t and tap [Settings]u[Display], then mark [Auto-rotate screen] checkbox.・For data broadcasting, screen display supports portrait only.・Flick the 1Seg watching screen left and right to select the previous or next channel you are currently watching.・To exit 1Seg, tap x on the 1Seg watching screen.1On the 1Seg watching screen (P.217), tap t and tap [Setting].・You can set the following options.Setting 1SegChannel infoDisplay information for available channels.Program infoDisplay information for received programs.Channel listRegistered areas (broadcasting service area) are listed as a channel list.Channel settingMake channel setting.Add to channel listAdd a channel from 1Seg watching screen.Program guideActivate "Gガイド番組表 (G-Guide program table)" to view program table.・Alternatively, from the 1Seg menu, tap [Program guide] to activate "Gガイド番組表 (G-Guide program table)".Switch displaySwitch display between image and data broadcasting.Caption settingSwitch Display subtitle to on or off.Off timerMake a timer setting to end 1Seg watching.Main/sub soundSet main/sub sound.Sound switchSet to switch sound.Volume settingAdjust the volume level.Sound effect settingSwitch sound effect of data broadcasting between on and off.](https://usermanual.wiki/Sony/PM-0000.08-user-guide/User-Guide-1725539-Page-216.png)
![215ApplicationsFor data broadcasting, you can view various information by following the onscreen instructions.❖Information・To watch data broadcasting, call charge or packet communication charge is not required. If you use additional services of data broadcasting, etc. via packet communication, packet communication fees are charged.For some data broadcasting programs, link information to related websites (TVlink) is displayed. Save TVlinks to connect to related websites later.Saving TVlinks1On the 1Seg watching screen (including data broadcasting) (P.217), select TVlink to store.・After this step, follow the onscreen instructions to operate.Display TVlinks1From the Home screen, tap , and then tap [1Seg].2Tap [TVlink].・A TV link list screen appears.3Select a TVlink.■When a link content or HTML content is selectedTap [Yes]/[OK].❖Information・Some TVlinks have period of validity. Out of date TVlinks are no longer available.Reset confirmation statusInitialize the confirmation screen display.Back to data BCDisplay data broadcasting.Tune serviceYou can select a sub-channel when several programs (services) are broadcasted for separated sub-channels in a channel.TVlinkStored TVlinks appear.Operation guideA guide for watching 1Seg appears.Watching data broadcastingUsing TVlink](https://usermanual.wiki/Sony/PM-0000.08-user-guide/User-Guide-1725539-Page-217.png)
![216ApplicationsViewing/Deleting details of TVlink1From the Home screen, tap , and then tap [1Seg].2Tap [TVlink] and tap t.・A menu list appears.❖Information・On the list screen in TVlink, touch and hold a TVlink item to display menus for displaying detailed information, etc.・When TVlink is not registered, tapping t on the list screen in TVlink does not display the menu.Available channels vary depending on the area (broadcasting service area) you are using in.Storing broadcasting service areas1From the Home screen, tap , and then tap [1Seg].2Tap [Channel setting]u[Current area].・Available channels are searched.3Tap [YES].4Tap entry box, enter a title name and tap [OK].❖Information・Alternatively, tap [Select area] in Step 2 then select area to make channel setting.Changing broadcasting service area1From the Home screen, tap , and then tap [1Seg].2Tap [Channel list] to select a list from registered channel lists.・The broadcasting service area is changed.Check the number of registrationCheck the number of stored TVlinks.Delete allDelete all stored TVlinks.Delete selectedDelete several stored TVlinks.Mark TVlink to delete and tap t, tap [Delete data?]u[YES].Storing/Changing broadcasting service areas](https://usermanual.wiki/Sony/PM-0000.08-user-guide/User-Guide-1725539-Page-218.png)
![217Applications■ Using menus on the channel list selection screenTouch and hold the channel list selection screen to display menus for displaying information, setting, editing titles, deleting, etc.Change TV remote number assigned to each broadcasting station. Each broadcasting station can be called up via the corresponding TV remote number.1From the Home screen, tap , and then tap [1Seg].2Tap [Channel list]uA list you want to change.3Touch and hold the channel information.4Tap [Remote control No.]uA broadcasting service area you want to change.5Tap a remote number you want to save to.6Tap x, then tap [YES].You can set, initialize, and reset watching screen, data broadcasting screen from User setting.Initializing settingsYou can initialize the channel setting and 1Seg setting.1From the Home screen, tap , and then tap [1Seg].2Tap [User setting]u[Reset channel setting]/[Reset 1Seg settings].3Tap [YES].Changing numbers for TV remoteMaking User setting](https://usermanual.wiki/Sony/PM-0000.08-user-guide/User-Guide-1725539-Page-219.png)
![218ApplicationsYou can listen to the FM radio with the terminal. Tuning can be made automatically or manually, and you can register your favorite channels to Favorites. To use FM radio, use a handsfree device such as Stereo Headset with Microphone (Sample), etc. or a headphone. They work as antenna.1Connect Stereo Headset with Microphone (Sample) to the terminal.・For connection of Stereo Headset with Microphone (Sample), see "Using Stereo Headset with Microphone" (P.193).2From the Home screen, tap , then tap [FM radio].・FM radio screen appears and selecting channel starts automatically. You can select channel by dragging the screen. To select channel automatically furthermore, go to Step 3.3Tap t, then tap [Search for channels].・Alternatively, tap / to search for channels.・The search ends when radio waves are received.4Tap , then tap [+ Add XX.X to favorites].5Tap entry box, enter a name and tap [Save].・The frequency bands of searched channels are registered to Favorites.6To stop the FM radio, tap .❖Information・You can return to the Home screen to perform another operation while listening to FM radio in the background. To return to the FM radio screen, from the Home screen, tap then tap [FM radio], or drag the status bar downward and tap [FM radio] on the Notification panel.・When the UIM is not inserted, the frequency band range is 87.5MHz - 108.0MHz. You cannot listen to the FM radio programs in Japan.FM radioSearching and registering channels](https://usermanual.wiki/Sony/PM-0000.08-user-guide/User-Guide-1725539-Page-220.png)
![219Applications■ FM radio screenaMonaural sound/stereo effect bPlay in speaker/Play in handsfreecChannel point displayed in a good radio wave conditiondOn/Off of FM radioeBroadcasting station now listeningfChannel assigned to favoritegSearch channels automaticallyhMove left to select next favoriteiTuning button ( for Favorites)jMove right to select next favorite1On the FM radio screen, tap t.2Tap [Play in speaker]/[Play in headphones].・The sound output is switched to the speaker/handsfree device.Osaifu-Keitai equipped with IC card is a function which allows you to pay money or to use coupon, stamp-rally, etc. only by holding the terminal over an IC card reader in stores etc.You can access a site or website, obtain the latest coupon, check credit or payment of electronic money, etc. by holding the terminal over the IC card reader. In addition, you can lock your Osaifu-Keitai to provide against loss or theft, and you can use Osaifu-Keitai with safe.For details on Osaifu-Keitai, refer to "ご利用ガイドブック (spモード編) (Mobile Phone User's Guide [sp-mode]) (in Japanese only)" or dmarket.* A setting from the dedicated website or application is required to use Osaifu-Keitai compatible services.Switching the speaker and handsfree devicecdejihfgabOsaifu-Keitai](https://usermanual.wiki/Sony/PM-0000.08-user-guide/User-Guide-1725539-Page-221.png)
![220ApplicationsPrecautions on using Osaifu-Keitai・The data (including electronic money, points, etc.) in the IC card may be lost or modified because of the malfunction of the terminal (When we take your Osaifu-Keitai for repair etc., as we cannot take it with data remained, you are required to erase the data by yourself). For support such as reissuance, restoration, temporary preservation or transfer of data, contact Osaifu-Keitai compatible service providers. For important data, be sure to use a service with backup service.・If the data in the IC card is lost, modified or damaged by any means related to Osaifu-Keitai compatible service such as malfunction or model change, DOCOMO assumes no responsibility for the loss of data.・If the terminal is stolen or misplaced, immediately contact Osaifu-Keitai compatible service provider for an advice.・The terminal does not support iC transfer service.1From the Home screen, tap then tap [Osaifu-Keitai].2Select a service you want to use from a service list.・At the first time you activate Osaifu-Keitai, an initial setting screen appears. Follow the onscreen instructions.You can exchange data with an IC card reader only by holding mark over the card reader.・When holding mark over an IC card reader, make sure not to hit the terminal strongly.・Hold mark horizontally over the center of the IC card reader.・Slowly move the terminal to hold mark over the IC card reader.Using Osaifu-KeitaiHolding Osaifu-Keitai over IC card reader](https://usermanual.wiki/Sony/PM-0000.08-user-guide/User-Guide-1725539-Page-222.png)
![221Applications・If mark is not recognized even when holding over the IC card reader, try slightly picking the terminal up off the reader, or moving the terminal back, forth and around.・If there are metal objects between mark and an IC card reader, scanning may be failed. And note that a sticker put on nearby the mark may affect communication performance.❖Information・You can scan and write data to or from an IC card reader without activating Osaifu-Keitai compatible application.・The function is available even if the terminal is off, but it may not be available in case you leave the terminal off for a long time or the battery level is low, etc.Use "Osaifu-Keitai Lock Setting" to restrict the use of Osaifu-Keitai function and related services.・Osaifu-Keitai lock is different from screen lock for the terminal, SIM card lock.1From the Home screen, tap then tap [Osaifu-Keitai].2Tap t, then tap [Osaifu-Keitai Lock Setting].3Follow the onscreen instructions to enter unlock pattern.❖Information・ is displayed in the status bar when you set "Osaifu-Keitai Lock Setting".・Note that you cannot cancel "Osaifu-Keitai Lock Setting", if the battery runs out while using "Osaifu-Keitai Lock Setting". Be careful about remaining battery level. If the battery runs out, charge the terminal before canceling "Osaifu-Keitai Lock Setting".・You need to enter unlock pattern to use Osaifu-Keitai menu while using "Osaifu-Keitai Lock Setting".・IC card unlock pattern will not be deleted even if you reset the terminal.・Note that you cannot cancel "Osaifu-Keitai Lock Setting" if you forget both the lock pattern and answer for security question.Locking Osaifu-Keitai function](https://usermanual.wiki/Sony/PM-0000.08-user-guide/User-Guide-1725539-Page-223.png)
![222ApplicationsiD is a convenient electronic money by credit clearance scheme. You can enjoy shopping simply and conveniently only by holding Osaifu-Keitai with credit information set or the iD-compatible card over the IC card reader in stores. Because up to 2 types of credit information can be registered in Osaifu-Keitai, you can use them according to the benefits, etc. It also supports cashing, depending on the card issuer.・To use iD with Osaifu-Keitai, subscribing to a card issuer that supports iD, settings for iD setting application are required.・The charges required for iD service (including the annual charge) vary by card issuer.・For using the application, a packet communication charge is applied.・A packet communication fee for oversea use differs from the one in Japan.・For details on iD, refer to iD website (http://id-credit.com/ (In Japanese only)).ToruCa is an electronic card that can be obtained to mobile terminals. It can be obtained from the IC card reader or site as store information, coupon ticket, etc. Obtained ToruCa is saved to the "ToruCa" application. Use the "ToruCa" application to display, search or update.For details on ToruCa, refer to "ご利用ガイドブック (spモード編) (Mobile Phone User's Guide [sp-mode]) (in Japanese only)" or dmarket.❖Information・For obtaining, displaying or updating ToruCa, a packet communication charge may be applied.・Some ToruCa provided to i-mode terminal may not be obtained/displayed/updated.・Depending on the settings of IP (Information Provider), the following functions may not be available.- Obtaining/Updating from the IC card reader, sharing ToruCa, moving to microSD card, copying/displaying map・Some ToruCa which can be displayed in a map from ToruCa (details) may not be displayed in a map from the ToruCa list depending on the IP settings.・While using Osaifu-Keitai Lock Setting, you cannot obtain ToruCa with an IC card reader.・If you set 重複チェック (Duplication check) to "ON", obtaining the same ToruCa redundantly is not available. To obtain the same ToruCa redundantly, set it to "OFF".iD設定アプリ (iD setting application)ToruCa](https://usermanual.wiki/Sony/PM-0000.08-user-guide/User-Guide-1725539-Page-224.png)
![223Applications・When you send ToruCa attaching to email, it is sent in the condition before obtaining ToruCa (details).・Depending on email application, ToruCa received via the emails may not be saved.・Depending on browser, ToruCa cannot be obtained.・When ToruCa is moved/copied to the microSD card, it is moved/copied in the condition before obtaining ToruCa (details).・You may not be able to obtain ToruCa with an IC card reader, if you do not make initial setting for Osaifu-Keitai.The terminal has a built-in calendar for the schedule. If you have a Google account, you can synchronize the terminal's calendar and web calendar. See "Accounts & sync" (P.132).・When you register Google account, tap the Google account displayed in "Accounts & sync" and a sync item "Sync Calendar". You can create schedule etc.1From the Home screen, tap , then tap [Calendar].2Tap [Month]/[Week]/[Day] to select.CalendarSetting the calendar view](https://usermanual.wiki/Sony/PM-0000.08-user-guide/User-Guide-1725539-Page-225.png)
![224Applications1From the Home screen, tap , then tap [Calendar].2Tap at the upper right.・Tap t and tap [New event] to create a schedule in Calendar.3Enter a schedule name, date, and time.4If you have two or more calendar accounts, select one.5If necessary, select the repetition intervals of the calendar.6Select the notification intervals of the schedule.・Tap to add a new notification into the schedule.7Enter a place and some others of schedule.8Tap [Save].❖Information・Tap [More] and scroll through the screen to set "Time zone", "Guests (Email addresses)", "Show me as:", and "Privacy".Displaying a schedule in Calendar1From the Home screen, tap , then tap [Calendar].・Flick the calendar left or right to display the next or previous month/week/day according to the view mode.2Tap a schedule you want to display.❖Information・To view the events created in "Schedule" application in the Calendar, while the Calendar is displayed, tap t and [My calendars] to synchronize with the docomo account.・If you log in to Facebook, tap [Sync Calendar] in the "Facebook inside Xperia™" (P.134) to display events in Facebook in the Calendar.1If a reminder icon ( ) appears in the status bar, drag the bar downward.・The notification panel opens.・The reminder icon appears at set Notification time.2Tap a schedule.3Tap [Snooze all] or [Dismiss all].・If you have any schedules on hold, they appear on the same screen.Creating a schedule in CalendarReleasing the reminder of a schedule or setting the snooze](https://usermanual.wiki/Sony/PM-0000.08-user-guide/User-Guide-1725539-Page-226.png)
![225Applications・If you tap [Snooze all], all the alarms sound again 5 minutes later.(Snooze is a function that sounds the alarm some time later even though you stop it.)Set Calendar view, reminder notifications, ringtone, vibration, reminder time.1From the Home screen, tap , then tap [Calendar].2Tap t and [Settings].3Select an item to change.With "Alarm and Clock" application, you can set an alarm, show the clock or photo slideshow on the display, or play music with the Media player.1From the Home screen, tap .2Tap [Alarm and Clock].・The Clock screen appears.aAlarm display・Appear when there is a set alarm.b : Turn off the backlight.・Tap the screen to light up.cClock display・When 5 minutes are passed without touching the display, the day and time view appears.d : Display the alarm list screen.e : Display a slideshow.f : Display the Media player screen.g : Go to the Home screen.Changing the calendar settingsAlarm and Clockbacefgd](https://usermanual.wiki/Sony/PM-0000.08-user-guide/User-Guide-1725539-Page-227.png)
![226Applications❖Information・If you tap t on the Clock screen, "Dock settings" appears. However the dock compatible to this function is not sold by Sony Mobile Communications Japan, Inc. (as of February, 2012).1From the Home screen, tap , then [Alarm and Clock]uTap .・The alarm list screen appears.2Tap [Add alarm].・An alarm setting screen appears. You can set the following items.3Tap [Done].・Return to the alarms list screen.❖Information・To set on/off of the alarm, mark the checkbox on the alarm list screen.・On the alarms list screen, tap "Time" at the top of the screen to display the clock screen (P.229).・While using World clock/Stopwatch/Timer, tap [Alarm] at the bottom of the screen to display the alarm list screen.Deleting the alarm1On the alarm list screen, tap t and [Delete].2Mark the alarm setting you want to delete.3Tap [Delete]u[Yes].❖Information・Alternatively, on the alarm list screen, touch and hold the alarm setting you want to delete, then tap [Delete alarm]u[Yes] to delete the alarm setting.Setting alarmTimeTap number to set the time.RepeatSet a day of the week for the alarm.Alarm textEnter texts that appear while alarm is sounding.Snooze durationSet time interval to sound the ringtone again after stopping the ringtone.Style settingsMark the checkbox to display an image while alarm is sounding.Alarm soundSet alarm sound.VibrateMark to vibrate at the alarm time.Mute alarmMark not to sound at the alarm time.Customize volumeMark to change alarm volume.Alarm volumeDrag the slider left or right to adjust the level.Alarm in silent modeMark to sound alarm even in silent mode.Side keys behaviorSelect an effect when pressing m / k while alarm is sounding.](https://usermanual.wiki/Sony/PM-0000.08-user-guide/User-Guide-1725539-Page-228.png)
![227ApplicationsStopping an alarm while the alarm is sounding1While alarm is sounding, touch and drag it to the right.Display the date and time in cities around the world.1From the Home screen, tap , then [Alarm and Clock]uTap .2Tap [World clock].・The list screen of the world clock appears.3Tap [Add new].4Drag the screen up and down to select a city.❖Information・Date and time of the world clock synchronizes with date and time set on the terminal.・On the list screen of the world clock, tap "Time" at the top of the screen to display the clock screen (P.229).・On the list screen of the world clock, tap [Compare time] to graphically display dates and time in regions around the world that you set.Changing World clockYou can switch, sort or delete Celsius/Fahrenheit displayed on World clock.1On the list screen of the world clock, tap t.■Switching Celsius/FahrenheitTap [Celsius]/[Fahrenheit].・Switch Celsius/Fahrenheit.■SortingTap [Rearrange]uDrag of the date in the world clock up and downuTap [Done].■DeletingTap [Delete]uMark world clock checkbox you want to deleteuTap [Delete]u[Yes].Using World clock](https://usermanual.wiki/Sony/PM-0000.08-user-guide/User-Guide-1725539-Page-229.png)
![228Applications1From the Home screen, tap , then [Alarm and Clock]uTap .2Tap [Stopwatch].3Tap [Start].・Measurement starts and appears in the status bar.・Tap [Lap] to measure elapsed time.4Tap [Stop].・Tap [Start] to resume measuring.・Tap [Reset] to delete measured time and lap time.1From the Home screen, tap , then [Alarm and Clock]uTap .2Tap [Timer].・Time screen appears.3Tap [Set time].4Tap number to adjust the time and then tap [Set].5Tap [Start].・Timer starts, and appears in the status bar.6Tap [Stop].・Stop sounding alarm after a set time has elapsed.・Tap [Stop] within a set time duration to pause timer. Tap [Start] to resume timer.❖Information・To change alarm sound, on the timer screen, tap t, then [Settings] and select the alarm sound you want to change, and then tap [Done].Using Stopwatch Using Timer](https://usermanual.wiki/Sony/PM-0000.08-user-guide/User-Guide-1725539-Page-230.png)
![229ApplicationsWith OfficeSuite, you can view files of Word, Excel, etc. from the terminal or a microSD card.1From the Home screen, tap .2Tap [OfficeSuite].・OfficeSuite starts.You can use the following online services on the terminal.PlayNow is a web application which allows you to use news flash, dictionary service, etc.To use the application, on the Browser screen, tap t and tap [Bookmarks] and tap [PlayNow] to connect the dedicated site. For membership registration etc., operate following the onscreen instructions.Show dedicated website to access SE Home. To use the function, from the Home screen, tap [SE HOME].Follow the screen to download the "SE Home" application, allowing you to access "SE Home", the website for the smart phone introducing Sony Ericsson products and campaign information.Show dedicated website to access the PS Store.To use the application, from the Home screen, tap [PS Storeを始めよう (Let's start PS Store)].Follow the onscreen instructions to download necessary application. You can buy games from PS Store to enjoy it on your terminal.OfficeSuiteStarting OfficeSuiteOther applicationsPlayNowSE HomePS Storeを始めよう (Let's start PS Store)](https://usermanual.wiki/Sony/PM-0000.08-user-guide/User-Guide-1725539-Page-231.png)
![230International roamingInternational roamingWith the international roaming (WORLD WING), you can use the terminal without changing phone number or mail address in the service area of the overseas network operator affiliated with DOCOMO. You do not need to change the settings of call and SMS.■ Service areaThe terminal works in a 3G roaming area and GSM/GPRS service area. Services are also available in countries and areas supporting 3G850MHz/GSM850MHz. Check available areas.■ Before using the terminal overseas, refer to the followings.・"Mobile Phone User's Guide [International Services]"・DOCOMO International Services website❖Information・For Country codes, International call access codes, Universal number international prefix, supported countries/areas and network operators, refer to "Mobile Phone User's Guide [International Services]" or DOCOMO International Services Website.*1 To use data communication during roaming, mark [Data roaming] checkbox in Mobile network settings. (P.238)*2 For GPS positioning (Positioning location), a packet communication charge is applied.・Some services are not available depending on the overseas network operator or network.Overview of International roaming (WORLD WING)Available ServicesMain communication services 3G GSM/GPRS GSMPhone○ ○ ○Message (SMS)○ ○ ○Email*1○ ○uBrowser*1○ ○uPosition location of GPS*2○ ○u](https://usermanual.wiki/Sony/PM-0000.08-user-guide/User-Guide-1725539-Page-232.png)
![232International roamingWhen you arrive overseas and turn on the terminal, an available network is automatically set.ConnectivityWhen you have set search mode of "Available networks" to "Automatic" in "Service providers" settings, optimized network is automatically selected.When you connect to the network operator conducted in flat-rate service manually, you can use the service with flat-rate packet communication charges overseas up to the specified upper limit per day. To use this service, subscription of packet flat-rate service is required. For details, refer to "Mobile Phone User's Guide [International Services]" or DOCOMO International Services Website.DisplayIn the status bar, the type of your operator's network is displayed. : During International roaming/ : GPRS available/in communication/ : 3G (packet) available/in communication/ : HSDPA available/in communication・You can confirm the name of the connected network operator on the Notification panel.Date & time settingsWhen "Date & time" is set to "Automatic", the date, time and time differences of the terminal clock are corrected by receiving the information related to time and time differences from the network of overseas network operator you connect to. ・Correction of the time/time differences may not be performed correctly depending on the network of overseas network operator. In that case, set time zone manually.・Timing of correction varies by the overseas network operator.・Date & time (P.139)About inquiries・For loss or theft of the terminal or UIM, immediately contact DOCOMO from the spot to take the necessary steps for suspending the use. For inquiries, see the last page of this manual. Note that you are still liable for the call and communication charge incurred after the loss or theft occurred.・For using from land-line phone, entering "International call access code" or "Universal number international prefix" for the country is needed.After arriving overseas](https://usermanual.wiki/Sony/PM-0000.08-user-guide/User-Guide-1725539-Page-234.png)
![233International roamingAfter returning to JapanWhen you return to Japan, the terminal is connected to DOCOMO network automatically. If connection is failed, perform the following operations.・Set "Network Mode" to "WCDMA (preferred)/GSM". (P.238)・Set "Search mode" to "Automatic" in "Service providers" settings. (P.237)When you start the international roaming or move out of your operator's network, you need to reconnect the terminal to another available network.❖Information・Some applications automatically perform packet communications. To disconnect packet communication manually, from the Home screen, tap t and tap [Settings]u[Wireless & networks]u[Mobile networks]u[Data enabled] to unmark.Confirming and switching the network search modeBy default, network search mode is set to "Automatic". When you connect manually to an overseas network operator conducted in flat-rate service, confirm the search mode with the following operations and switch to "Manual".1From the Home screen, tap t and tap [Settings].2Tap [Call settings]u[Service providers].3Tap [Search mode]u[Manual].4From "Available networks", tap a network to mark.・To display available networks, tap [Search networks].❖Information・If you set a network manually, the terminal is not reconnected to another network automatically even if you move out of the network area.・To return to "Automatic", tap [Automatic] in Step 3.Making setting for international use](https://usermanual.wiki/Sony/PM-0000.08-user-guide/User-Guide-1725539-Page-235.png)
![234International roamingChanging network mode settingsYou can change network mode settings according to the network mode (communication method) adopted by the overseas network operator.1From the Home screen, tap t and tap [Settings].2Tap [Wireless & networks]u[Mobile networks]u[Network Mode].3Select a network mode you use.・You can select from [WCDMA only], [GSM only] or [WCDMA (preferred)/GSM]. If you select [WCDMA (preferred)/GSM], you can use both GSM and WCDMA.Activating data roaming1From the Home screen, tap t and tap [Settings].2Tap [Wireless & networks]u[Mobile networks].3Tap [Data roaming].4Read the cautions displayed, tap [Yes].・[Data roaming] checkbox is marked.When you arrive overseas and turn on the terminal, an available network is automatically set.・Check that the battery and signal levels are high enough.・Depending on the network operator, even if the Caller ID notification is active, the caller ID may not be notified or appear properly.In this case, calls cannot be made from the call log.You can make a call from overseas using the international roaming service.・You can easily make international calls from the country you stay to Japan or to other countries by entering prefix "+" and then the country code and phone number.1From the Home screen, tap [Phone]u[Dial] tab.Making/Receiving calls in the country you stayMaking a call to outside country you stay (including Japan)](https://usermanual.wiki/Sony/PM-0000.08-user-guide/User-Guide-1725539-Page-236.png)
![235International roaming2Dial + (touch and hold [0])uCountry codeuArea code (City code)uEnter a phone number.・If the area code begins with "0", omit "0". However, "0" may be required to dial to some country or area such as Italy.・To call an overseas "WORLD WING" user, enter "81" (Japan) for the country code.・You can enter country code using the preset Convert country code list. Enter a phone number and tap t to tap [International call], then select country code from the Convert country code.3Tap .❖Information・During international roaming, if you make an international call to Japan using DOCOMO's phonebook application, the "International dialing assist" screen appears. You can make a call without entering country code from that screen.・Convert country code list cannot be edited.You can make a call by entering the phone number of the other party's land-line phone or mobile phone in the same way you do in Japan.1From the Home screen, tap [Phone]u[Dial] tab.2Enter the other party's phone number.・To make a call to land-line phone, enter the area code (city code) + other party's phone number.3Tap .When the other party uses international roaming service, make a call as an international call to Japan even when you stay in the same country as the other party.You can receive a call using the international roaming service.Making a call within the country you stayMaking a call to WORLD WING user overseasReceiving a call in the country you stay](https://usermanual.wiki/Sony/PM-0000.08-user-guide/User-Guide-1725539-Page-237.png)
![236International roaming1While receiving a call, touch (left) and drag it to (right).2When the conversation is finished, tap [End call].❖Information・When you received a call during the international roaming, regardless of which country the call is from, it is forwarded internationally from Japan. A caller is charged for a call fee to Japan, and the receiver is charged for a reception fee.■ Having the other party call you・Calling from Japan to the country you stayTo have the other party make a call from a land-line phone or mobile phone in Japan to the terminal in the country you stay, the other party only needs to dial the phone number as in Japan.・Calling from the country except Japan to the country you stayYou have to receive a call through Japan no matter where you are; therefore, the other party needs to enter the international call access code and "81" (Country code of Japan). International access code - 81 - 90 (or 80) - XXXX - XXXXMake settings for using international roaming or international calls.Set restricting incoming calls overseas or using roaming guidance.・For some overseas network operators, settings may not be made.Restricting incoming calls for roaming1From the Home screen, tap t and tap [Settings].2Tap [Call settings]u[Network service setting]u[Roaming settings].3Tap [Restricting incoming calls].・Select items you want to use.International roaming settingsSettings for making/receiving calls overseasActivate restrictingTap any of [Restricting all incomings]/[Restricting incoming of video call/64K data], enter the network security code, and tap [OK].Deactivate restrictingEnter the network security code and tap [OK].](https://usermanual.wiki/Sony/PM-0000.08-user-guide/User-Guide-1725539-Page-238.png)
![237International roamingSetting roaming guidance1From the Home screen, tap t and tap [Settings].2Tap [Call settings]u[Network service setting]u[Roaming settings].3Tap [Roaming guidance].・Select items you want to use.Settings Network service (overseas)Set network service such as voice mail from overseas.・If you make the settings overseas, you are charged a call fee to Japan from the country you stay.・For some overseas network operators, settings may not be made.1From the Home screen, tap t and tap [Settings].2Tap [Call settings]u[Network service setting]u[Roaming settings].3Tap [Network service].・Select items you want to use. You need to set "Remote access" to activate.Check settingsCheck the current service settings.Activate roaming guidanceTap [OK] to activate roaming guidance.Deactivate roaming guidanceTap [OK] to deactivate roaming guidance.Check settingsCheck the current service settings.Voice mail(charged)Activate Voice mail (roaming)Tap [OK], and then tap .*Deactivate Voice mail (roaming)Tap [OK], and then tap .*Play voice mail message (roaming)Tap [OK], and then tap . After this step, follow the voice prompts to play the message.Voice mail settings (roaming)Tap [OK], and then tap .*](https://usermanual.wiki/Sony/PM-0000.08-user-guide/User-Guide-1725539-Page-239.png)
![238International roaming* Follow the voice prompts to operate.Voice mail(charged)Voice mail ring time (roaming)Tap [OK], and then tap .*Roaming guidance (charged)Tap [OK], and then tap .*Remote operation (charged)Tap [OK], and then tap .*](https://usermanual.wiki/Sony/PM-0000.08-user-guide/User-Guide-1725539-Page-240.png)
![243Appendix/Index■ Osaifu-Keitai■ International roaming■ Data managementOsaifu-Keitai function is unavailable.・Is Osaifu-Keitai lock activated? P.225・Do you place mark of the terminal over an IC card reader?P.224Cannot use the terminal overseas.■When antenna mark is displayed・Do you subscribe WORLD WING?Check if you subscribe WORLD WING.−■Out of service area indicator appears・Check if you are out of the international roaming service area or in an area with poor signal strength. Check if the service area and network operator are available, referring to "Mobile Phone User's Guide [International Services]" or DOCOMO International Services website.・Try to change the network settings or overseas network operator settings.Set "Search mode" of "Service providers" to "Automatic".Set "Network Mode" to "WCDMA preferred/GSM".・Turning off the terminal and then turning on again may work for the restoration.P.236P.238P.37Cannot perform data communication overseas.・Mark the data roaming checkbox. P.238The terminal suddenly became unavailable while using overseas.・Check if usage amount exceeds the limit of maximum charges for use.For use of "International roaming (WORLD WING)", the limit of maximum charges for use is set in advance. If exceeding the limit of maximum charges for use, pay the charges.−Cannot receive calls overseas.・Is "Restricting incoming calls" set to "Activate restricting"?P.240No caller ID is notified/A notified caller ID is different from that of the caller/Functions for using contents saved in phonebook or those using Caller ID notification do not operate.・Even if a caller notifies its caller ID, it is not displayed on the terminal unless the network or network operator notifies it. And a different caller ID may be notified depending on the network or network operator you use.−Data transfer is not performed.・Check if USB hub is used. If you use USB hub, operations may not be performed correctly.−Data saved in microSD card is not displayed.・Remove the microSD card and insert it again.P.31](https://usermanual.wiki/Sony/PM-0000.08-user-guide/User-Guide-1725539-Page-245.png)
![248Appendix/IndexYou can update the terminal to the most recent software for optimal performance and to get the latest enhancements.❖Note・When the terminal is connected to the Internet using the mobile network connection, data communication fee is applied.・Make sure you back up and save all data contained in the terminal before you start updating the terminal.・For the first time activating the terminal after software update, the operation may be slower from several minutes to several ten minutes due to data update. The required time varies by the data in the terminal. Do not turn the power off until usual operation speed comebacks.❖Information・For details, refer to http://www.sonymobile.co.jp/support/.Setting notification of Software updateYou can set to be notified of updating software.1From the Home screen, tap , then tap [Update center].2Tap t, then tap [Settings].3Mark [Notifications] checkbox.・To change the notification tone, tap [Notification tone], then tap notification tone you want to change, and then tap [Done].❖Information・If you mark [Notification vibration] checkbox in Step 3, Software update is notified by vibration.Updating software](https://usermanual.wiki/Sony/PM-0000.08-user-guide/User-Guide-1725539-Page-250.png)
![249Appendix/IndexDownloading software to updateSoftware can be downloaded wirelessly directly from your terminal via the Internet by using mobile network connection or by using a Wi-Fi network connection.1From the Home screen, tap , then tap [Update center].2Tap [System] tab, then tap t, and then tap [Refresh].・The terminal searches for software updates.❖Information・"Updates"/"New" tabs in the Update center screen are not available because the services are not provided in Japan.❖Note・For software update via mobile network, a high packet communication charge will be applied because of a large amount data communication. For this reason, subscription of packet flat-rate service is highly recommended.・While you are using roaming service overseas, you cannot search for or download update software through the mobile network.Updating the latest software automaticallyYou can update the latest software update automatically on regular basis. If software update is searched, appears on the status bar.1From the Home screen, tap , then tap [Update center].2Tap t and [Settings].3Tap [Allow automatic update:]u[Via Wi-Fi only]/[Via 3G/Wi-Fi].❖Note・Note that if you select [Via 3G/Wi-Fi] in the Step 3, a Wi-Fi connection automatically switches to 3G connection when the Wi-Fi connection is unstable and packet communication fee may apply.・Note that packet communication fee may apply for searching automatically.Downloading software updates wirelessly](https://usermanual.wiki/Sony/PM-0000.08-user-guide/User-Guide-1725539-Page-251.png)
![250Appendix/IndexYou can update software by using PC Companion that can be installed into a PC from the terminal.❖Information・To install PC Companion on a PC, an Internet connection is required.When PC Companion is not installed on your PC1Use the supplied microUSB cable to connect the terminal to a PC.2On the terminal, tap [Install].・Installer of PC Companion starts on the PC.3Follow the onscreen instructions on the PC to install.・After installation, PC Companion starts on the PC. If further software update is searched, it is automatically notified. Follow the onscreen instructions on the PC.When PC Companion is installed on your PC1Check if PC Companion is activated on the PC. If not, activate PC Companion from the Start menu.2Connect the terminal to a PC using a microUSB cable.3Follow the onscreen instructions on the PC.・If available software update is found, it is automatically notified.Connecting to a PC and updating](https://usermanual.wiki/Sony/PM-0000.08-user-guide/User-Guide-1725539-Page-252.png)
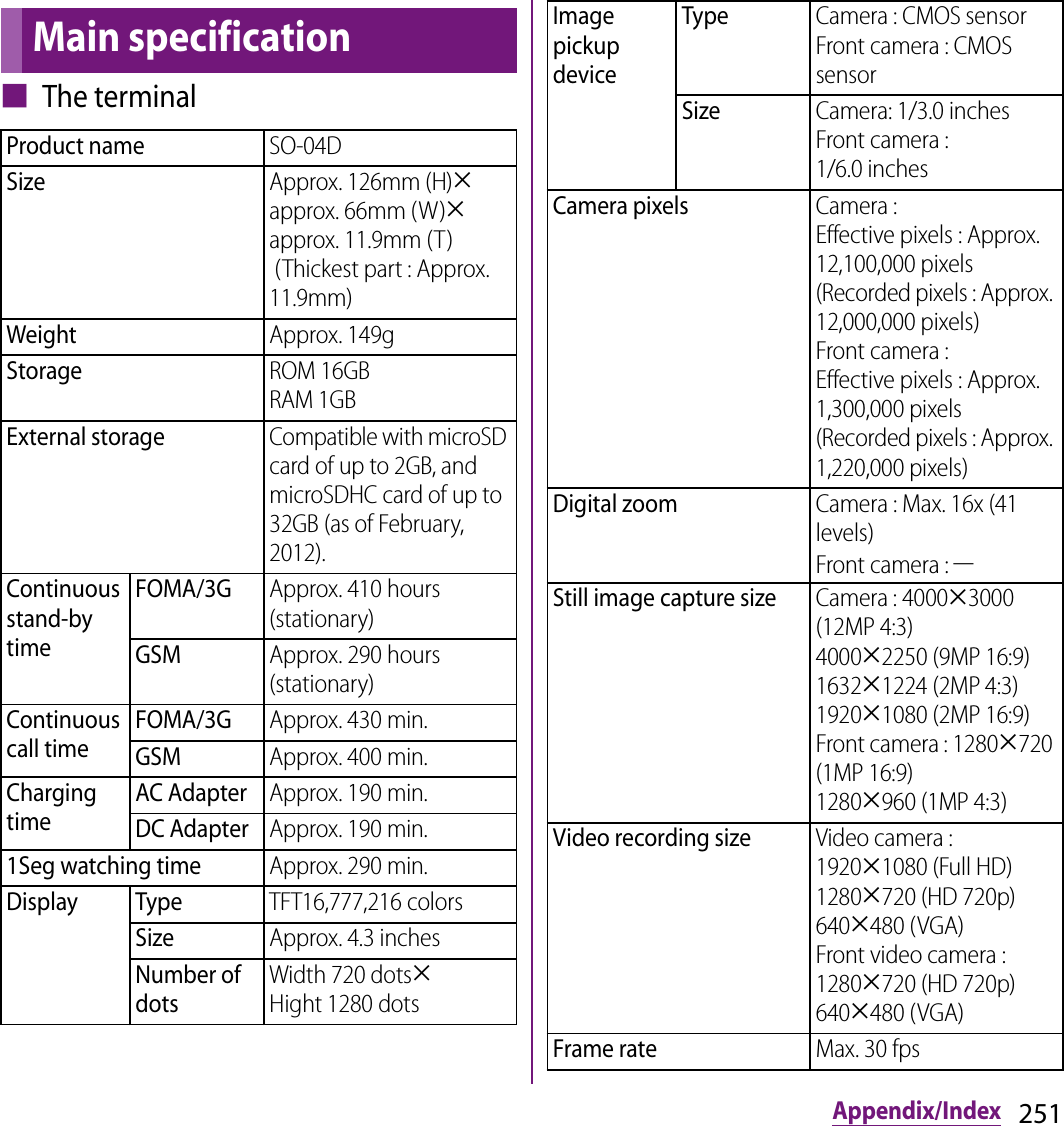
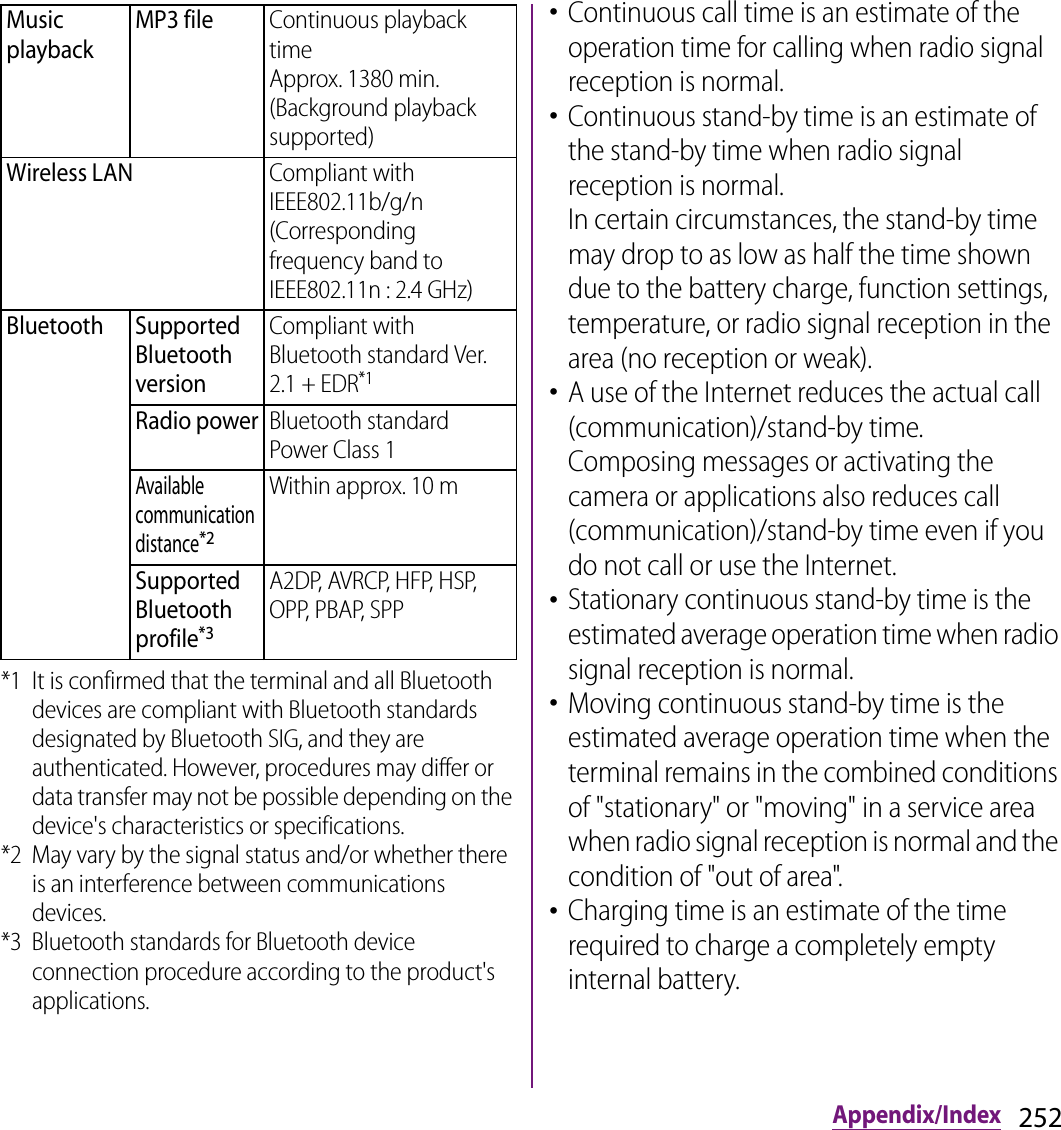
![253Appendix/Index■ Internal battery■ File formatThe terminal supports the display or playback of the following file format:* Still images are saved in JPEG format.■ Numbers of still images (Estimation)* Number of images shot with a resolution of 2MP.■ Time length of shooting video (Estimation)* Time of recording with a resolution of 640u480 (VGA).To refer to details (including certification numbers) on authorization and compliance mark particular to the terminal, perform the following operation.From the Home screen, tap t and tap [Settings]u[About phone]u[Legal information]u[Certificates].Battery typeLithium Ion BatteryVoltageDC3.7VCurrent1840mAhType File formatSoundMP3, 3GPP, MP4, AMR, AMRWB, SMF, XMF, WAV, iMelody, RTTTL/RTX, OTA, Ogg vorbisStill imageJPEG, GIF, PNG, BMPVideo3GPP, MP4Savable number of shot images to the internal storageUp to approx. 18500 imagesSavable number of shot images to a microSD card (2GB)Up to approx. 3300 imagesSavable time of recording to the internal storagePer video : Up to approx. 134 min.In total : Up to approx. 753 min.Savable time of recording to a microSD card (2GB)Per video : Up to approx. 134 min.In total : Up to approx. 134 min.Authorization and Compliance](https://usermanual.wiki/Sony/PM-0000.08-user-guide/User-Guide-1725539-Page-255.png)
