Sony PM-0810 GSM/WCDMA/LTE Phone + Bluetooth, DTS/UNII a/b/g/n/ac, ANT+ & NFC User Manual Sony Mobile Communications AB
Sony Mobile Communications Inc GSM/WCDMA/LTE Phone + Bluetooth, DTS/UNII a/b/g/n/ac, ANT+ & NFC Sony Mobile Communications AB
Sony >
Contents
Users Manual
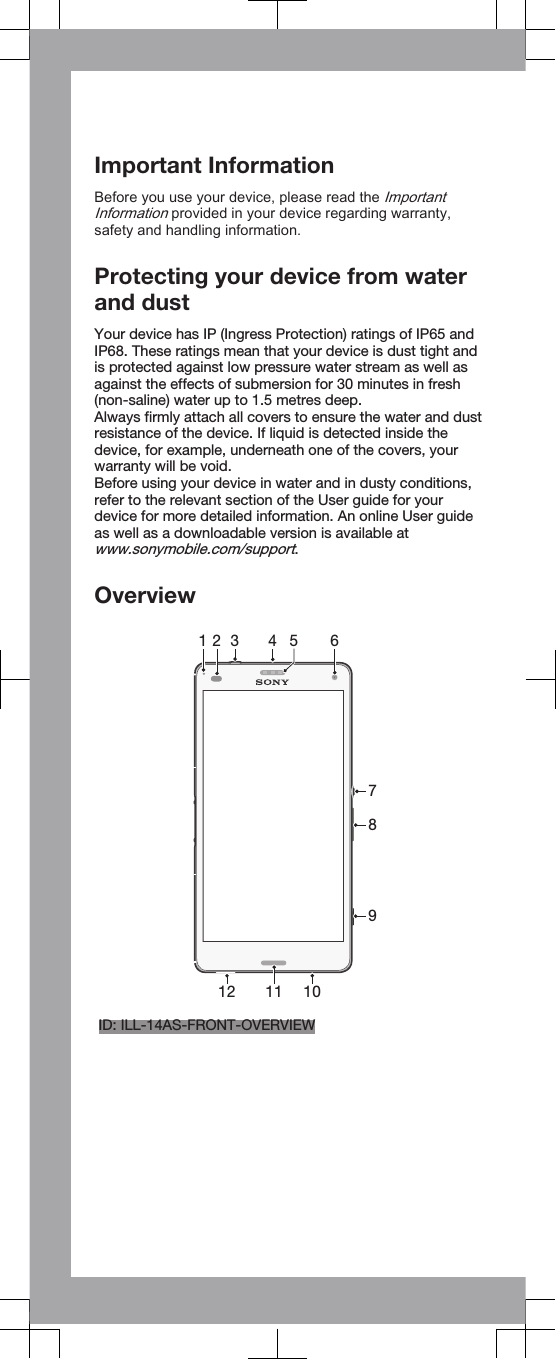
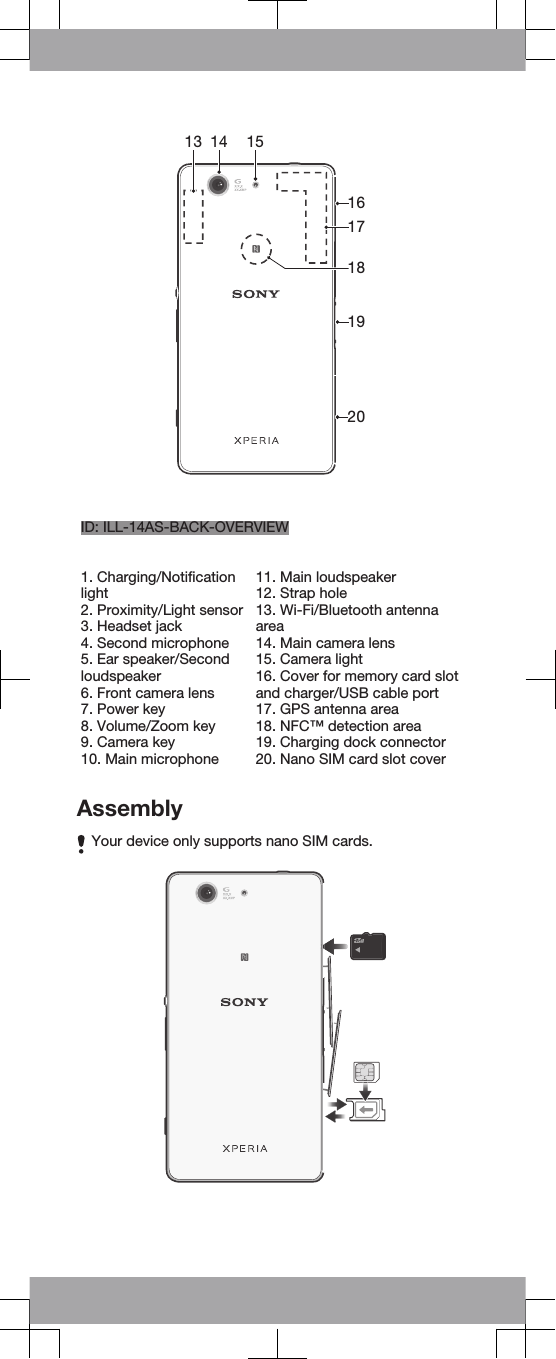
![ID: ILL-14AS-INSERT-SIM-AND-MEM-CARDMake sure you insert the nano SIM card into the nano SIMcard holder before inserting it into the device. Also, don’tconfuse the nano SIM card slot with the memory card slot.To insert the nano SIM cardIf you insert the nano SIM card while the device ispowered on, the device restarts automatically.1Detach the cover for the nano SIM card holder.2Using a fingernail or other similar object, drag out the nanoSIM card holder.3Place the nano SIM card in the nano SIM card holder, thenreinsert the holder.4Re-attach the cover.Make sure you reinsert the nano SIM card holder in thecorrect orientation. When you drag the holder out to insertthe nano SIM card, do not turn the holder around.To insert the memory card1Remove the memory card slot cover.2With the gold coloured contacts facing down, insert thememory card into the memory card slot, then re-attach thememory card slot cover.BasicsTurning on the deviceMake sure that the battery is charged for at least 30 minutesbefore you turn on the device for the first time.To turn on the deviceID: ILL-14AS-ON1Press and hold down the power key ID: KEY-AND-POWER-K90 until the device vibrates.2Wait a while for the device to start.Waking up the screenTo activate the screen•Briefly press the power key ID: KEY-AND-POWER-K90.•If Tap to wake up mode is enabled, double-tap the screen.To enable Tap to wake up mode, go to the Home screen,then tap ID: ICN-AND-APP-TRAY > Settings [settings_la-bel] > Display [display_settings_title] > Tap to wake up[touch_to_wake_up] .](https://usermanual.wiki/Sony/PM-0810.Users-Manual/User-Guide-2344572-Page-3.png)
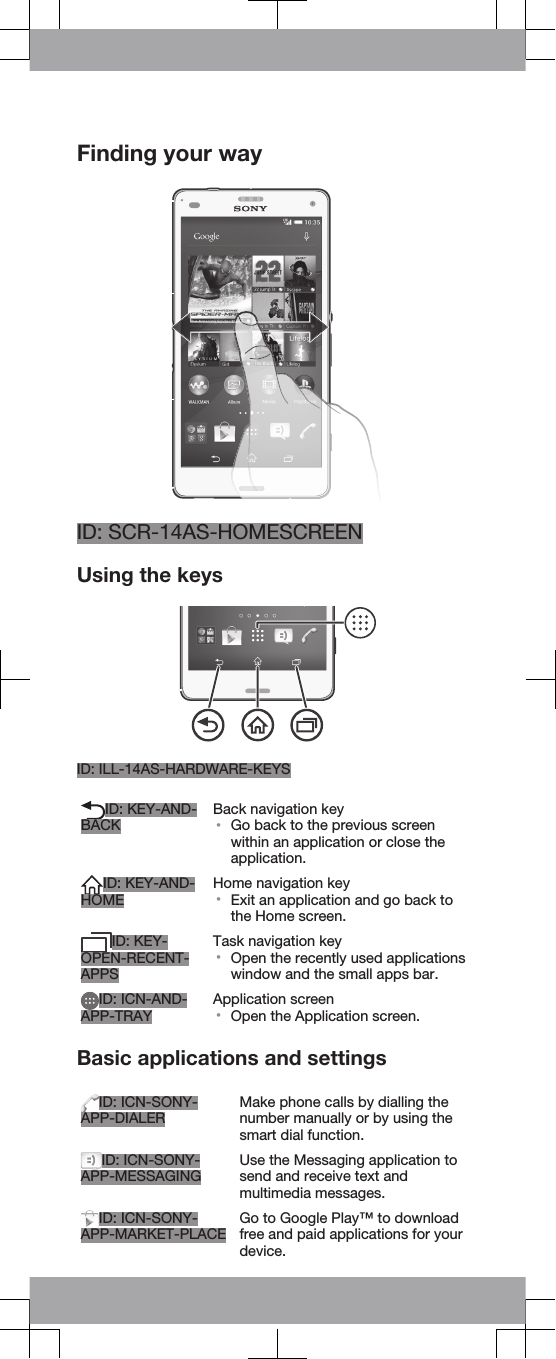
![Setting up your deviceSetup guideThe first time you start your device, a setup guide opens tohelp you configure basic settings, sign in to some accounts(for example, your Google™ account), and personalise yourdevice. You can also manually access the setup guide at alater stage.To access the setup guide manually1From the Home screen, tap ID: ICN-AND-APP-TRAY.2Tap ID: ICN-SONY-APP-SETTINGS > Setup guide [se-tupguide_settings_title] .Accessing settingsView and change settings for your device from the Settingsmenu. The Settings menu is accessible from both theApplication screen and the Quick settings panel.To access your device settings1From your Home screen, tap ID: ICN-AND-APP-TRAY.2Find and tap ID: ICN-SONY-APP-SETTINGS.Transferring your contactsXperia™ Transfer is an application within the PC Companionand the Sony Bridge for Mac computer programs that helpsyou to collect contacts from your old device and transferthem to your new device. Xperia™ Transfer supports severaldevice brands, including iPhone, Samsung, HTC, BlackBerry,LG, and Nokia.You need:•An Internet-connected computer.•A USB cable for your old device.•A USB cable for your new Android™ device.•Your old device.•Your new Android™ device.To transfer contacts to your new device1Search and download PC Companion (on a PC) or Bridgefor Mac (on a Mac computer) from www.sonymobile.com ifthe application is not already installed.2After successful installation, open the PC Companionapplication or the Sony Bridge for Mac application, thenclick Xperia™ Transfer and follow the relevant instructionsto transfer your contacts.](https://usermanual.wiki/Sony/PM-0810.Users-Manual/User-Guide-2344572-Page-4.png)
![Legal informationSony D5803/D5833[Textvar-Product] [Textvar-Phone-type]Publication number: 1286-1999.1 [Textvar-Partnr-i-ROW-basic]This Startup guide is published by Sony MobileCommunications Inc. or its local affiliated company, withoutany warranty. Improvements and changes to this Startupguide necessitated by typographical errors, inaccuracies ofcurrent information, or improvements to programs and/orequipment, may be made by Sony Mobile CommunicationsInc. at any time and without notice. Such changes will,however, be incorporated into new editions of this Startupguide. All illustrations are for illustration only and may notaccurately depict the actual device.See regulatory information such as the CE mark in therelevant label tray in the device.All product and company names mentioned herein are thetrademarks or registered trademarks of their respectiveowners. Any rights not expressly granted herein are reserved.Visit www.sonymobile.com/us/legal/ for more information.Product compliance: This product has been manufactured byor on behalf of Sony Mobile Communications Inc., 1-8-15Konan, Minato-ku, Tokyo 108-0075, Japan. Inquiries relatedto product compliance based on national legislation shall beaddressed to Sony Mobile Quality Office, Sony MobileCommunications Inc., 1-8-15 Konan, Minato-ku, Tokyo108-0075, Japan. For any service or guarantee matters,please refer to the contact details provided in the separateservice or guarantee documents.© 2014 Sony Mobile Communications Inc. All rights reserved.To view the CE mark and the FCC IDFCC ID: PY7PM-XXXXPPID: ILL-14AS-CEMARK1Detach the cover for the nano SIM card holder.2Insert the tip of an unfolded paper clip (or a similar objectwith a long, fine tip) into the hole in the label tray, then dragthe tray outwards. The information is displayed on the tray.](https://usermanual.wiki/Sony/PM-0810.Users-Manual/User-Guide-2344572-Page-7.png)