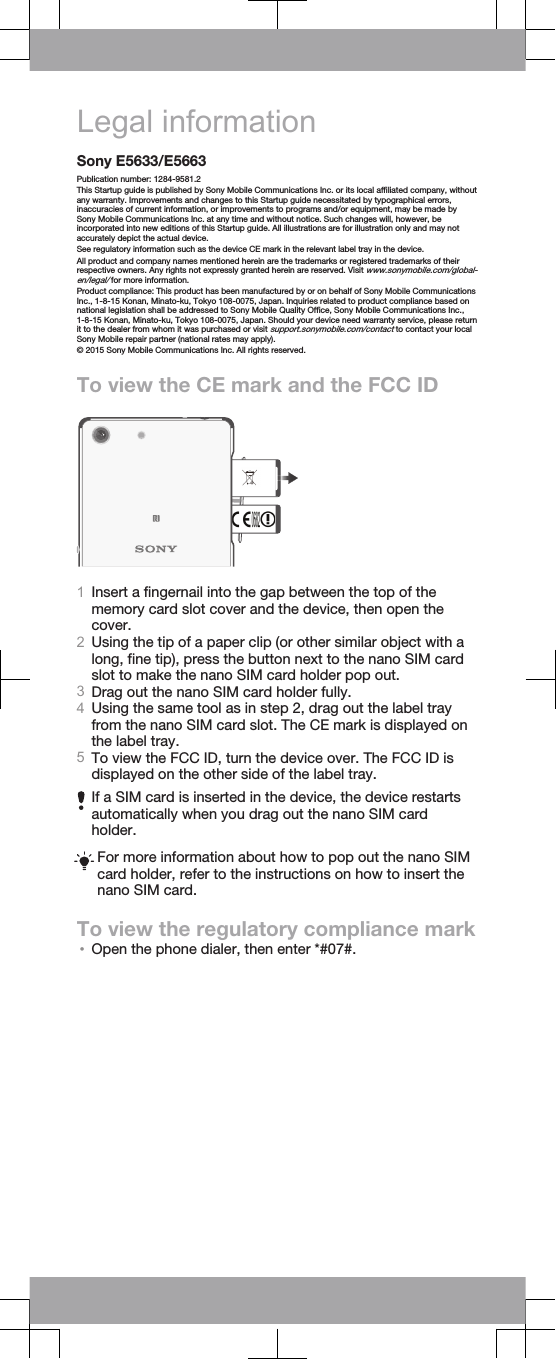
Sony PM0871 PDA Phone User Manual Sony Mobile Communications AB

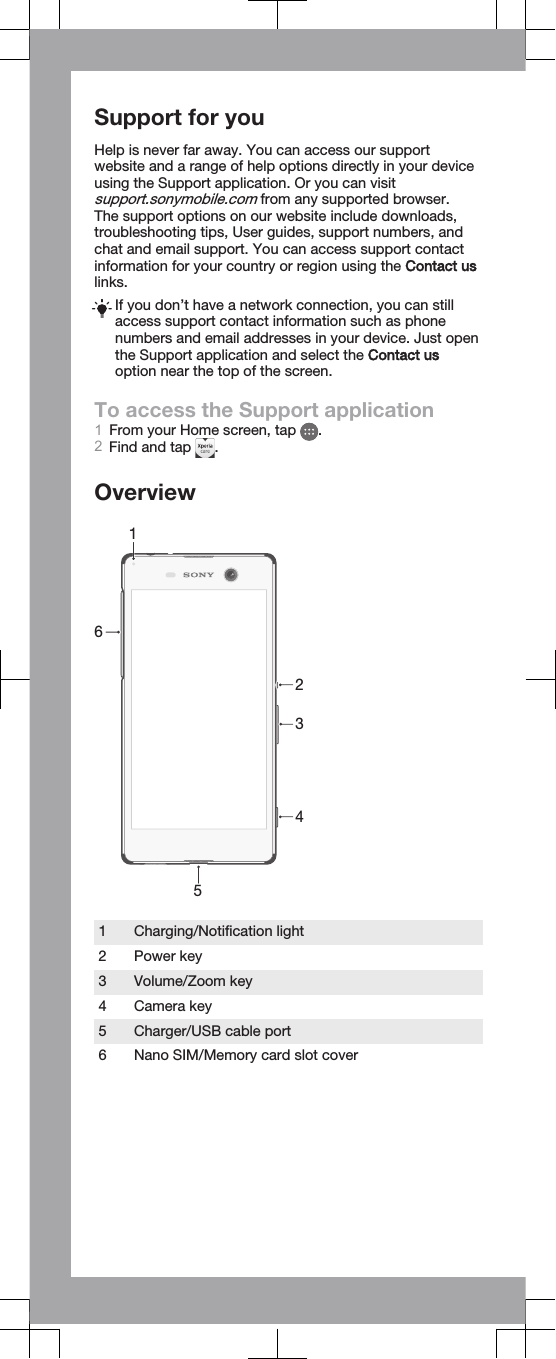
Sony Mobile Communications Inc PDA Phone Sony Mobile Communications AB

Contents

Holly DS StartUp Guide Publication1StartUpGuide_A7_Booklet_Printen

Support for youHelp is never far away. You can access our supportwebsite and a range of help options directly in your deviceusing the Support application. Or you can visitsupport.sonymobile.com from any supported browser.The support options on our website include downloads,troubleshooting tips, User guides, support numbers, andchat and email support. You can access support contactinformation for your country or region using the Contact uslinks.If you don’t have a network connection, you can stillaccess support contact information such as phonenumbers and email addresses in your device. Just openthe Support application and select the Contact usoption near the top of the screen.To access the Support application1From your Home screen, tap  .2Find and tap  .Overview2341561 Charging/Notification light2 Power key3 Volume/Zoom key4 Camera key5 Charger/USB cable port6 Nano SIM/Memory card slot cover
To insert a memory card1Insert a fingernail into the gap between the top of thememory card slot cover and the device, then open thecover.2Using the tip of a paper clip (or other similar object with along, fine tip), press the button next to the memory cardslot (as illustrated) to make the memory card holder popout.3Drag out the memory card holder fully.4Place the memory card in the holder, then re-insert theholder.5Close the cover.Make sure you insert the memory card in the correctorientation.To insert the nano SIM cardsYour device only supports nano SIM cards. Make sure youuse the nano SIM card holder and don’t confuse the nanoSIM card slot with the memory card slot.1Insert a fingernail into the gap between the top of the nanoSIM card slot cover and the device, then open the cover.2Using the tip of a paper clip (or other similar object with along, fine tip), press the button next to the nano SIM cardslot (as illustrated) to make the nano SIM card holder popout.3Drag out the nano SIM card holder fully.4Place the nano SIM card (or cards) in the relevant nanoSIM card slot (or slots ) in the holder, then re-insert theholder.5Close the cover.If you insert a nano SIM card while the device is poweredon, the device restarts automatically.To turn on the device1Make sure your device is charged for at least 30 minutesbefore you turn it on for the first time.
2Press and hold down the power key   until the devicevibrates.3Wait a while for the device to start.To activate the screen•Briefly press the power key  .Starting upThe first time you start your device, a Setup guide opens tohelp you configure basic settings, personalise your deviceand sign in to some accounts. The Setup guide can also beaccessed later from the Settings menu.Important InformationBefore you use your device, please read the Importantinformation provided in the Setup guide in your device. Fromhere, you can find legal information as well as warranty,safety and SAR information.Transferring contacts and othercontentIf you need help to find and transfer contacts, messages,photos and other data from an old device to your new device,we recommend that you use the Xperia™ Transferapplication. Visit www.sonymobile.com/xperiatransfer formore information.Dust and water protectionYour device is waterproof and protected against dust, sodon’t worry if you get caught in the rain or want to wash offdirt under a tap, but remember: all ports and attached coversshould be firmly closed. You should not put the devicecompletely under water or expose it to sea water; salt water;chlorinated water; or liquids such as drinks. Abuse andimproper use of the device will invalidate the warranty. Yourdevice has the Ingress Protection ratings IP65 and IP68. Tounderstand what these ratings mean and how they affectyour usage of the device, visitwww.sonymobile.com/waterproof.Your device has a capless USB port. The USB port mustbe completely dry before a cable can be connected forcharging or data transfer, for example. If your device getsexposed to water and the USB port gets wet, wipe thedevice dry with a microfibre cloth and shake it severaltimes with the USB port facing downwards. Repeat theprocedure until no moisture is visible in the USB port.Learn moreYou are now ready to start using your new device. To learnmore about your device and its full functionality, access oursupport website directly in your device using the Supportapplication or by visiting support.sonymobile.com.Frequency bands and model infoBelow is the model number and supported frequency bandsfor your device. You can find your model number underSettings > About phone.
E5633UMTS HSPA Band 1 2 5 8 GSM GPRS/EDGE850/900/1800/1900 LTE Band 1 3 5 7 8 20E5663UMTS HSPA Band 1 2 5 8 GSM GPRS/EDGE850/900/1800/1900 FDD LTE Band 1 3 5 7 8 28 TDD LTEBand 40Some frequency bands might be turned off in certainmarkets or by certain operators.
Legal informationSony E5633/E5663Publication number: 1284-9581.2This Startup guide is published by Sony Mobile Communications Inc. or its local affiliated company, withoutany warranty. Improvements and changes to this Startup guide necessitated by typographical errors,inaccuracies of current information, or improvements to programs and/or equipment, may be made bySony Mobile Communications Inc. at any time and without notice. Such changes will, however, beincorporated into new editions of this Startup guide. All illustrations are for illustration only and may notaccurately depict the actual device.See regulatory information such as the device CE mark in the relevant label tray in the device.All product and company names mentioned herein are the trademarks or registered trademarks of theirrespective owners. Any rights not expressly granted herein are reserved. Visit www.sonymobile.com/global-en/legal/ for more information.Product compliance: This product has been manufactured by or on behalf of Sony Mobile CommunicationsInc., 1-8-15 Konan, Minato-ku, Tokyo 108-0075, Japan. Inquiries related to product compliance based onnational legislation shall be addressed to Sony Mobile Quality Office, Sony Mobile Communications Inc.,1-8-15 Konan, Minato-ku, Tokyo 108-0075, Japan. Should your device need warranty service, please returnit to the dealer from whom it was purchased or visit support.sonymobile.com/contact to contact your localSony Mobile repair partner (national rates may apply).© 2015 Sony Mobile Communications Inc. All rights reserved.To view the CE mark and the FCC ID1Insert a fingernail into the gap between the top of thememory card slot cover and the device, then open thecover.2Using the tip of a paper clip (or other similar object with along, fine tip), press the button next to the nano SIM cardslot to make the nano SIM card holder pop out.3Drag out the nano SIM card holder fully.4Using the same tool as in step 2, drag out the label trayfrom the nano SIM card slot. The CE mark is displayed onthe label tray.5To view the FCC ID, turn the device over. The FCC ID isdisplayed on the other side of the label tray.If a SIM card is inserted in the device, the device restartsautomatically when you drag out the nano SIM cardholder.For more information about how to pop out the nano SIMcard holder, refer to the instructions on how to insert thenano SIM card.To view the regulatory compliance mark•Open the phone dialer, then enter *#07#.
Startup guideXperia™ M5 DualE5633/E5663Sony Mobile Communications Inc.1-8-15 Konan, Minato-ku, Tokyo 108-0075, Japan1284-9581.2

Navigation menu