Sony PM0941 GSM/WCDMA/LTE Phone with BT, DTS/UNII a/b/g/n/ac & NFC User Manual
Sony Mobile Communications Inc GSM/WCDMA/LTE Phone with BT, DTS/UNII a/b/g/n/ac & NFC
Sony >
Contents
- 1. PY7-PM0941_SAR leaflet_US_0330_
- 2. user manual_PY7-PM0941_EN_TA_20160329
user manual_PY7-PM0941_EN_TA_20160329
![IntroductionThank you for your purchase of "SO-04H".For proper use of the SO-04H, read this manual carefully before and while you use the SO-04H.About manuals of SO-04H●"クイックスタートガイド (Quick Start Guide)" (Supplied accessories)Part names and functions are explained●"Instruction Manual" (Application of the terminal)Operations and settings of each function are explained. To use "Instruction Manual" application, from the Home screen, u[Instruction Manual]. When using for the first time, download and install the application according to the onscreen instructions. If you uninstall "Instruction Manual" application, access to Google Play from Play Store to download it again. From the Home screen, tap [Play Store], search "取扱説明書 (Instruction Manual)" application to select, then install it following the onscreen instructions. You can use the application as an electronic book. You can also shift to actual operations by tapping the description in the contents or view reference contents.●"Instruction Manual" (PDF file)Operations and settings of each function are explained. It can be downloaded from NTT DOCOMO website.https://www.nttdocomo.co.jp/english/support/trouble/manual/download/index.html* The URL and contents are subject to change without prior notice.❖Note・Reproduction or reprint of all or part of this manual without prior permission is prohibited.・Important information for SO-04H is posted in the following website. Be sure to check before using.http://www.sonymobile.co.jp/support/use_support/product/so-04h/ (In Japanese only)](https://usermanual.wiki/Sony/PM0941.user-manual-PY7-PM0941-EN-TA-20160329/User-Guide-2951981-Page-2.png)
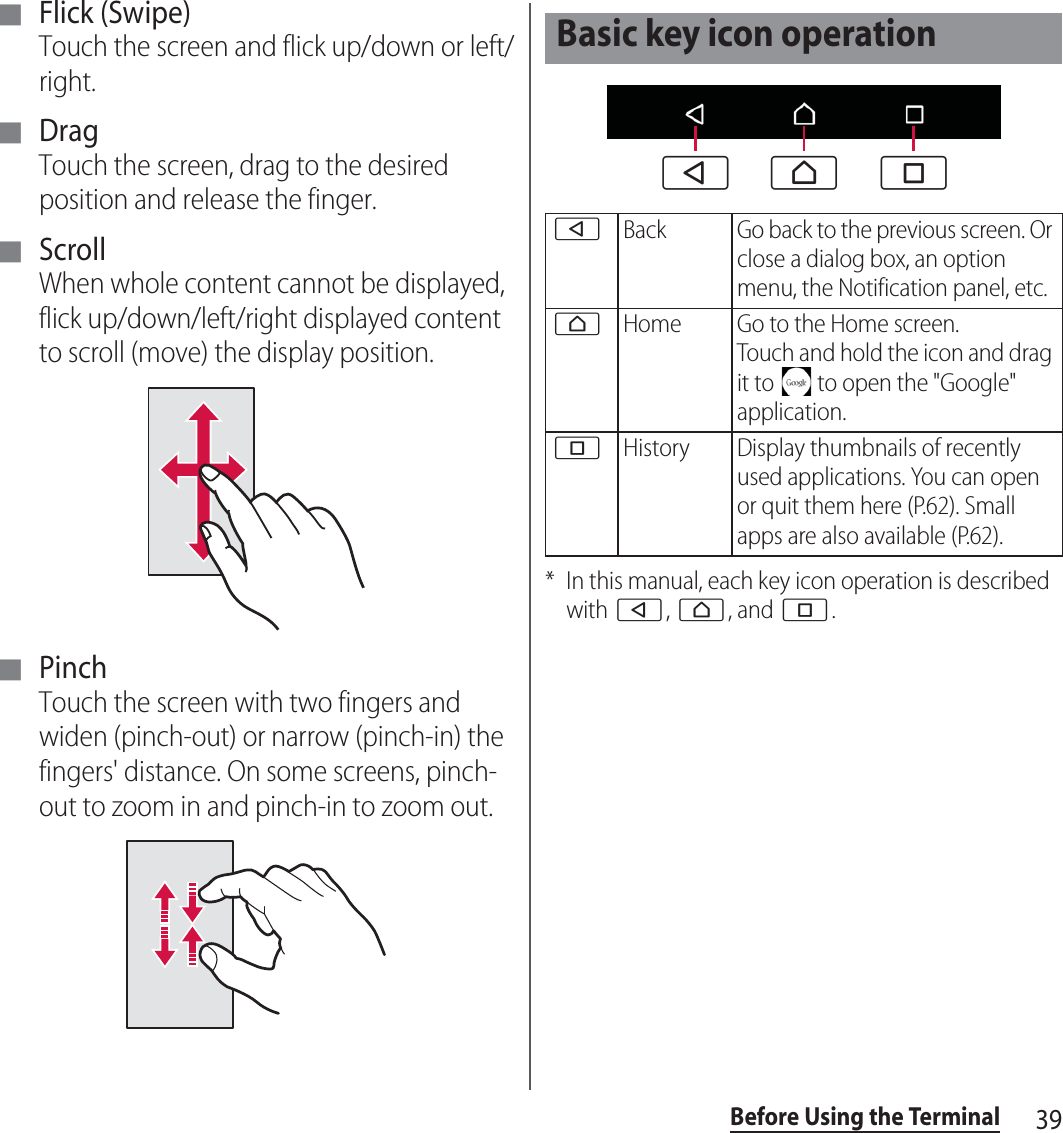
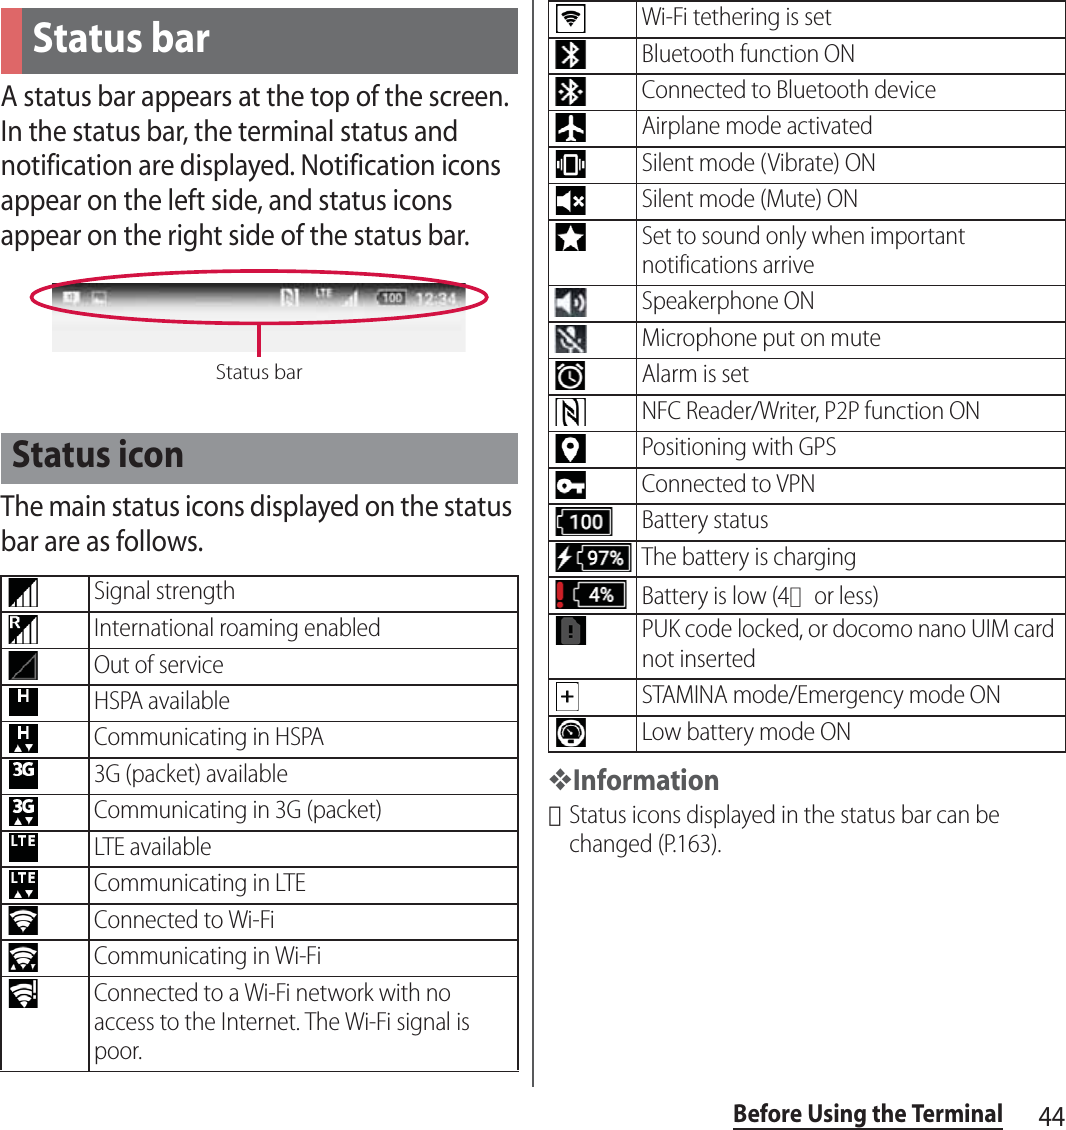
![1Operation descriptionsIn this manual, each key (key icon) operation is described with O, k, b, h and n, and operations for selecting icon or item are described as follows.❖Information・Display examples and illustrations used in this manual are just images for explanations and may be different from actual ones.・In this manual, the easier procedure is described for the functions and settings which have multiple operating procedures.・Please note that "SO-04H" is called "the terminal" in this manual.・In this manual, explanations for "docomo LIVE UX" as Home application are provided (P.63).・In this manual, the instructions are described with the default Home screen. If you set the other application to the home screen, the operations may differ from the descriptions.Description OperationPress and hold k for at least 1 second.Press and hold Camera key (k) on the side of the terminal for at least 1 second.On the TV watching screen, b.On the TV watching screen, .From the Home screen, u[Settings]u[About phone].From the Home screen, tap (Apps button), and then tap "Settings" on the next screen and "About phone" on the following screen in order.Touch and hold an icon.Keep touching an icon longer (1-2 seconds).](https://usermanual.wiki/Sony/PM0941.user-manual-PY7-PM0941-EN-TA-20160329/User-Guide-2951981-Page-3.png)
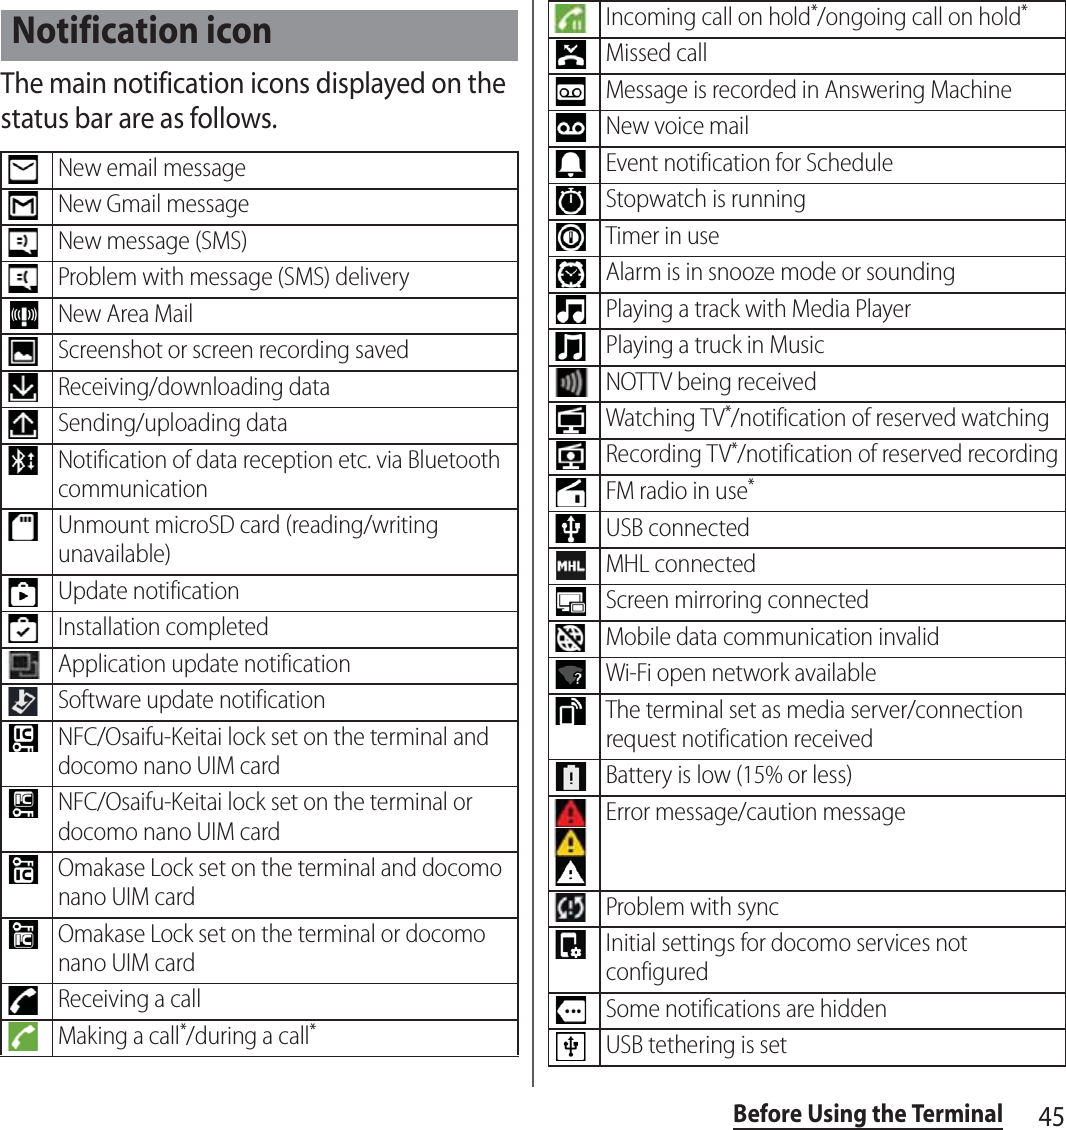
![6Contents/Precautions・This terminal has FOMA Plus-Area and FOMA HIGH-SPEED Area support.・The terminal does not support i-mode sites (programs) or i-Dppli.・The terminal automatically performs communication for synchronizing data, checking the latest software version, and maintaining a connection with the server, and for other purposes. If you transmit a large amount of data, such as when downloading applications or watching video, a packet communication charge becomes high. Subscription to Packet Pack/packet flat-rate service is highly recommended.・Depending on the applications or service you use, packet communication charge may be applied even in Wi-Fi communication.・Since NOTTV is a service linking communication, using the service requires packet communication charge. Subscription to Packet Pack/packet flat-rate service is recommended.・Public mode (Driving mode) is not supported.・Setting the terminal to silent mode does not mute sounds for shutter, start/stop when shooting video, alarm, playback of video or music, or sound emitted when is tapped during a call.・The name of the operator is displayed on the lock screen (P.37).・To check your phone number (own number), from the Home screen, u[Settings]u[About phone]u[Status]u[SIM status] to see "My phone number".・To check the software version, from the Home screen, u[Settings]u[About phone].・If available memory in the microSD card or the terminal is low, running applications may not operate correctly. In that case, delete the saved data.・You can update software on the terminal to the latest one (P.215, P.218).・The operating system (OS) may be upgraded via software updates to improve the quality of the terminal. For this reason, you always need to use the latest OS version. And some applications that used in the previous OS version may not be available or some unintended bugs may occur.・You can use the terminal only with a docomo nano UIM card. If you have a docomo mini UIM card, UIM, or FOMA card, bring it to a docomo Shop to replace it with a docomo nano UIM card.・Set password etc. for screen lock to ensure the security of your terminal for its loss (P.177).](https://usermanual.wiki/Sony/PM0941.user-manual-PY7-PM0941-EN-TA-20160329/User-Guide-2951981-Page-8.png)

![22Contents/Precautions■ Note・Do not use a remodeled terminal. Using a remodeled terminal violates the Radio Law/Telecommunications Business Act.The terminal is compliant with rules on the technical standard conformance of specified wireless equipment based on the Radio Law/Telecommunications Business Act, and as a proof of it, the "Technical Compliance Mark " is depicted on the electronic nameplate of the terminal. To check the certificate, from the Home screen, u[Settings]u[About phone]u[Certificates].If you remove the screws and alter the inside of the terminal, the technical regulations conformity certification becomes invalid.Do not use the terminal with the certification invalid, as it is a violation of the Radio Law and Telecommunications Business Act.・Be careful when using the terminal while driving.Using the terminal with holding with your hand while driving will result in a penalty.However, absolutely necessary cases such as rescue of a sick person or maintaining public safety are exempted.・FeliCa and NFC reader/writer function of the terminal conforms to Japanese radio standards. Check the regulations of the country/region beforehand if you try to use the function overseas.・Do not alter the basic software illegally.It is regarded as the software modification and Repairs may be refused.SO-04H provides waterproofness property of IPX5*1, IPX8*2, and dustproofness property of IP6X*3 with the docomo nano UIM card/microSD card slot cover firmly attached.*1 IPX5 means that a phone keeps functioning after applying a jet flow of 12.5 L/min. from every direction from a distance of approximately 3 m for at least 3 minutes using water nozzle in 6.3 mm inner diameter.*2 IPX8 means that a phone keeps functioning after SO-04H is slowly submerged to depth of 1.5 m in static tap water at room temperature, left there for approximately 30 minutes and then taken out.*3 IP6X indicates that a phone has the ability to prevent dust from entering it even when it has been shaken for 8 hours in an apparatus containing dust particles 75 μm or less in diameter.Waterproofness/Dustproofness](https://usermanual.wiki/Sony/PM0941.user-manual-PY7-PM0941-EN-TA-20160329/User-Guide-2951981-Page-24.png)

![32Before Using the TerminalThe internal battery is not fully charged at the time of purchase.・Estimated charging time (P.219)The charging time varies by the internal battery condition or operating environment.・"Continuous standby time", "Continuous call time" (P.221)・The internal battery is a consumable part. Each time the internal battery is recharged, the battery usage time per one charge gradually decreases.・When the battery usage time per one charge becomes about half of that at the time of purchased, replacing the internal battery is recommended because the internal battery is near the end of life.・Watching TV etc. for a long time while charging may shorten the lifetime of the internal battery.・To check the charging performance, from the Home screen, tap u[Settings]u[About phone]u[Status]u[Battery life].ChargingOperation time on full charge (estimate)Continuous stand-by timeFOMA/3GStationary (Auto) : Approx. 440 hoursGSMStationary (Auto) : Approx. 350 hoursLTEStationary (Auto) : Approx. 410 hoursContinuous call timeFOMA/3GApprox. 740 minutesGSMApprox. 680 minutesVoLTE call (voice)Approx. 1,160 minutesLife of the internal battery](https://usermanual.wiki/Sony/PM0941.user-manual-PY7-PM0941-EN-TA-20160329/User-Guide-2951981-Page-34.png)
![33Before Using the Terminal・It is recommended to use the AC Adapter 05 (optional) for charging. For details on the AC Adapter 05, refer to the AC Adapter 05 manual.・The AC Adapter 05 is compatible with 100V to 240V AC. For using the terminal overseas, a plug adapter that fits the electrical outlets in the country you stay is needed. Do not use an electrical transformer for overseas use to charge the terminal.・Use a compatible AC adapter or microUSB cable for charging. If you use a charger other than compatible ones, charging may not be available or operations may not be performed correctly.・Insert and remove the AC adapter cable or microUSB cable slowly and evenly so that excessive force is not applied.・When charging starts, notification LED of the terminal turns on (P.43).・To check the battery level, see the status bar at the top of the screen or from the Home screen, tap u[Settings]u[About phone]u[Status] to see "Battery level".・If you start charging with the terminal powered off, the power turns on, although you cannot operate the terminal. Therefore, do not charge the battery in a place where the use of the terminal is prohibited.To charge the battery using the Desktop Holder SO25 (optional) and AC Adapter 05 (optional), operate the following steps.・Be sure to mount the supplied attachment (Attachment 52A/52B/52C) on the desktop holder when charging the battery (P.34). Placing the terminal on the desktop holder without the attachment on it may damage the microUSB jack or other parts.1Insert the microUSB plug of the AC adapter into the charging jack on the back of the desktop holder, with the engraved side (B) facing up.2Unfold the power plug of the AC adapter and insert it into a power outlet. Then place the terminal on the desktop holder.・Notification LED of the terminal turns on (P.43).Before charging Charging with desktop holder](https://usermanual.wiki/Sony/PM0941.user-manual-PY7-PM0941-EN-TA-20160329/User-Guide-2951981-Page-35.png)
![36Before Using the Terminal・When "Install software" screen appears on the terminal, tap [SKIP] or [CANCEL].・When the USB tethering confirmation screen appears, tap [DO NOT USE].・When a screen for new hardware detection etc. appears on the PC, select "キャンセル (Cancel)".3When charging is complete, disconnect the USB plug of the microUSB cable from the USB port on your PC and disconnect the microUSB plug from the terminal.❖Note・Check the connecting direction to connect correctly. Wrong connection may cause damage.1Press and hold O for at least 1 second.・The terminal vibrates and lock screen appears after a while.・When you first turn on the terminal after purchasing, follow the onscreen instructions to make initial settings (P.37).2Cancel the screen lock.・Canceling the screen lock (P.37).❖Information・If the notification LED flashes red three times or an icon appears indicating that the battery is low when you press O with the terminal powered off, the battery is running low. Charge the terminal (P.32).・When SIM card lock (P.174) is set, enter PIN code on the PIN code entry screen (P.174).Turning power on/offTurning power on](https://usermanual.wiki/Sony/PM0941.user-manual-PY7-PM0941-EN-TA-20160329/User-Guide-2951981-Page-38.png)
![37Before Using the Terminal1Press and hold O for at least 1 second.2[Power off].When the sleep mode is set, the screen backlight turns off so that you can avoid misoperations of the touch screen and keys, and lock the screen.1Press O.・Press O again to exit sleep mode and turn on the screen backlight.❖Information・Also, when the screen backlight goes off after a specified time elapses, the terminal goes into sleep mode. You can change the time-out period for turning off the screen backlight (P.163).The lock screen appears when you turn the power on or press O to exit sleep mode.1Swipe (or flick) up on the lock screen.❖Information・On the lock screen, swipe (or flick) to open the "Phone" application, or swipe (or flick) to open the "Camera" application.・You can change screen unlock method (P.177).・Once you register your fingerprint in the Fingerprint Manager, you can use fingerprint authentication to unlock the screen (P.175).When you first turn on the terminal after purchasing, follow the onscreen instructions to make initial settings for language, services, etc.1[English (United States)]u[START]u[NEXT]・After this step, follow the onscreen instructions to configure the settings below, and then tap [NEXT] or [FINISH].- Set your Google account- Select the home application you want to use2When the initial settings screen for docomo services appears, mark [Agree to all]u[Start settings].・After this step, follow the onscreen instructions and tap [Next].- Set up your docomo ID (d ACCOUNT)- Set docomo cloud- Set docomo apps passwordTurning power offSetting sleep modeCanceling the screen lockInitial settings](https://usermanual.wiki/Sony/PM0941.user-manual-PY7-PM0941-EN-TA-20160329/User-Guide-2951981-Page-39.png)
![38Before Using the Terminal- Set whether to provide location information- Set up Remote Initialization Service (not displayed if a docomo apps password is not set)- Select whether to install all applications now or later3[Start using].❖Information・Some settings can be changed later (P.170, P.179).・Make sure that the data connection is available (LTE/3G/GPRS) or the terminal is connected to a Wi-Fi network before setting up online services (P.44).・You can use the terminal without setting your Google account, however the Google services such as Gmail, Google Play, etc. are not available.・"docomo ID" will be renamed to "d ACCOUNT" in December, 2015.Precautions on using touch screen・Touch screen is designed for being touched lightly with fingers. Do not push the touch screen hard with a finger or press sharp objects (nail, ballpoint pen, pin, etc.) against the screen.・Touching the touch screen may not work in the following cases. Note that it may cause malfunction.- Operation with tip of fingernail- Operation with foreign object on the screen- Operation with protective sheet or seal on the screen- Operation on the wet touch screen- Operation with fingers wet with sweat or water- Operation under waterOperations on the touch screen■ TapTouch an item such as icon or menu with your finger lightly and release it.・Double-tap means tapping twice quickly.■ Touch and holdTouch and hold an icon or menu item long.Basic operationsUsing the touch screen](https://usermanual.wiki/Sony/PM0941.user-manual-PY7-PM0941-EN-TA-20160329/User-Guide-2951981-Page-40.png)
![40Before Using the TerminalYou can set the screen orientation to switch between landscape and portrait view automatically according to the terminal orientation.1From the Home screen, u[Settings]u[Display].2[When device is rotated].3[Rotate the contents of the screen].・Select "Stay in portrait view" to lock the screen in portrait orientation.❖Information・Even when you change the orientation of the terminal, the screen may not change to landscape view depending on what is displayed.・Changing orientation of the terminal in nearly horizontal state against the ground does not switch to portrait view/landscape view automatically.・Even when silent mode is on, the following sounds are not muted: the shutter sound; the sounds produced when starting and ending video recording; alarms; sounds from video and music; and the sound produced when you tap during a call.・Silent mode is canceled when you press the volume up key to turn up the volume. Silent mode (Vibrate) is canceled when you adjust the "Ring volume" (P.166) in "Sound & notification".Setting silent mode (Vibrate)1Press the volume up or down key.2Tap .・The icon in the volume control bar will change to .・Tap to adjust the volume for the ringtone, media playback, and alarms. Note that adjusting the Ring volume cancels the function.・Tap for "Alarm and notification" to configure sound settings for alarms, ringtones, and incoming notifications (P.166).Setting silent mode (Mute)1Press the volume up or down key.2Tap .3Tap .・The icon in the volume control bar changes to .・Alternatively, when silent mode (Vibrate) is set, press the volume down key once.Switching portrait or landscape view automaticallySetting silent mode](https://usermanual.wiki/Sony/PM0941.user-manual-PY7-PM0941-EN-TA-20160329/User-Guide-2951981-Page-42.png)
![41Before Using the TerminalYou can capture what is displayed on the screen. (Take screenshot/Record screen)Capturing a still image (Take screenshot)1On the screen you want to capture, press and hold O and the volume down key at the same time for at least 1 second.・Screenshot is captured and appears in the status bar.❖Information・Alternatively, press and hold O for at least 1 seconduTap [Take screenshot] to capture a screenshot.・Drag the status bar downwardsuTap [Screenshot captured.] to view the captured image in the "Album", "Photos", or "Sketch" application. Also, tap [SHARE] to attach captured images to an application to send or to share them.Recording a video (Record screen)1Press and hold O for at least 1 secondu[Record screen].・The control panel appears.2Tap to start recording.3Tap the recording time buttonuTap to finish recording.・Screen recording is recorded and appears in the status bar.・Tap to close the control panel.❖Information・The control panel allows you to:- Tap to display an image from the front camera and capture the video together with that image.- Tap to change the image quality or orientation of the video.・Drag the status bar downwardsuTap [Screen recording saved]. This allows you to view the recorded video. Tap [SHARE] to send by attaching recorded video to app, or tap [EDIT] to edit video.Capturing a still image or video displayed on the screen](https://usermanual.wiki/Sony/PM0941.user-manual-PY7-PM0941-EN-TA-20160329/User-Guide-2951981-Page-43.png)
![42Before Using the TerminalIn case of emergency such as disaster, restrict functions to save the battery power.1Press and hold O for at least 1 second.2[Emergency mode]uConfirm "IMPORTANT INFORMATION"uMark "I have read the important information"u[TURN ON].・All running applications end and the terminal restarts.❖Information・To cancel emergency mode, press and hold O for at least 1 seconduTap [Emergency mode]u[TURN OFF], or drag the status bar downuTap [Emergency mode is on]u[TURN OFF]. Emergency mode is canceled and the terminal restarts.・For details on available applications in emergency mode, from the Home screen, u[Settings]u[Power management]u[Emergency mode]u[IMPORTANT INFORMATION]uTap [Available apps] to see the information.・If you set/cancel emergency mode, you may need to reconfigure widgets or small apps (displayed in a small window) on the Home screen.If you have more than one application available when sending an email or displaying an image, an application selection screen appears where you can select which application to use.Example : When selecting an application to send an email from the phonebook1From the Home screen, [ドコモクラウド (docomo cloud)]u[docomo phonebook]uTap "Contacts" tabuSelect a contact.2Select an email address.・An application selection screen appears.3Select an applicationu[JUST ONCE]/[ALWAYS].・Select "JUST ONCE" to view available applications each time, or "ALWAYS" to use the same application all the time. If you select "ALWAYS", an application selection screen does not appear the next time you perform the same task.・If you previously selected "JUST ONCE" for an application, then a screen with that application selected appears when you perform the same task. Select another application in the "Use a different app" area as needed.Setting Emergency mode Selecting an application to use](https://usermanual.wiki/Sony/PM0941.user-manual-PY7-PM0941-EN-TA-20160329/User-Guide-2951981-Page-44.png)
![43Before Using the Terminal❖Information・Some tasks may require you to select an application each time, with "JUST ONCE" or "ALWAYS" not displayed on an application selection screen.・To deselect the application set to "ALWAYS", from the Home screen, tap u[Settings]u[Apps]uFlick left on the screenuOpen the "ALL" tabuTap the application you want to deselectu[CLEAR DEFAULTS].Notification LED provides information on the terminal status, incoming calls, mail reception, etc.* Blinks when the backlight is off.❖Information・If the notification LED flashes red three times when you press O with the terminal powered off, the battery is running low.・When charging starts with the power off, notification LED turns on in red first.・When STAMINA® mode is on, the notification LED may flash in a different color and pattern than usual.Notification LEDStatus IndicationRedIndicate that the battery level is 14% or less while the battery is being chargedOrangeIndicate that the battery level is 15% - 89% while the battery is being chargedGreenIndicate that the battery level is 90% or more while the battery is being chargedFlashing redIndicate that the battery level is 14% or lessFlashing pale purple*Indicate missed calls, new messages (SMS), or new Gmails exist](https://usermanual.wiki/Sony/PM0941.user-manual-PY7-PM0941-EN-TA-20160329/User-Guide-2951981-Page-45.png)
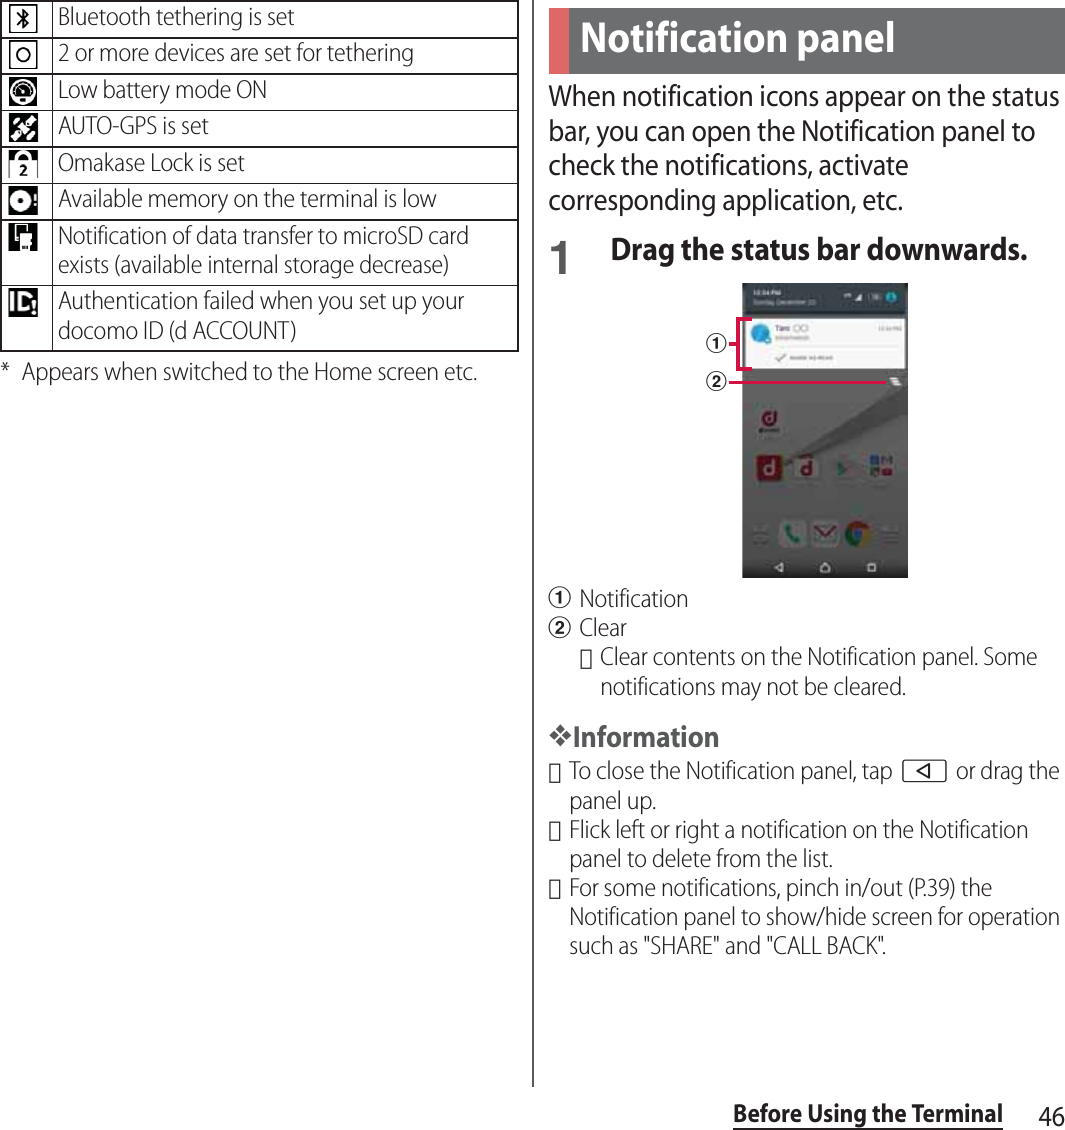
![47Before Using the Terminal・You can also swipe (or flick) down on the lock screen to see notifications. (You do not need to operate the terminal to see new notifications that have arrived after the screen is locked.) You can set the lock screen to hide notifications (P.166) or to show them all the time (P.166).You can open the quick settings panel to enable or disable functions.1Drag the status bar downwards with two fingers.aName of network operatorbPower management・Display "Power management" in the Settings menu (P.168).cEdit・Add or delete the quick settings. You can also rearrange them.dSettings・Display the Settings menu (P.152).eUser・Add or switch users or guests who use the terminal, or delete guests.・Tap [MORE SETTINGS] to display "Users" in the Settings menu (P.169).fQuick settingsQuick settings panelfba cdeBrightness levelAdjust the screen brightness.Wi-FiEnable/disable Wi-Fi function.・Tap to scan for available Wi-Fi networks and get connected.BluetoothEnable/disable Bluetooth function.・Tap to scan for Bluetooth devices paired with the terminal and get connected.NFCEnable/disable NFC Reader/Writer, P2P function.HotspotEnable/disable Tethering & portable hotspot function.LocationEnable/disable location information.Airplane modeEnable/disable Airplane mode.Auto-rotateSet whether to switch portrait/landscape view automatically according to the terminal orientation.SoundEnable sound, silent mode (Vibrate), or silent mode (Mute).Glove modeEnable/disable Glove mode.Detect USB deviceHave the terminal recognize a USB device connected to it (P.158).](https://usermanual.wiki/Sony/PM0941.user-manual-PY7-PM0941-EN-TA-20160329/User-Guide-2951981-Page-49.png)
![49Before Using the TerminalAdding a home screenUp to 7 home screen can be set.1Touch and hold an area of the Home screen where no icons are displayed.2Flick left or right on the Home screenuTap .❖Information・To return to the Home screen, tap h or b, or tap any home screen.・To delete home screen, switch to the home screen you want to delete and then touch and hold the area of the Home screen where no icons are displayeduTap .Adding a widget to the Home screenWidget is an application which can be added to the Home screen to use. Use a widget to start an application easily.1Touch and hold an area of the Home screen where no icons are displayed.2[Widgets & Apps]uSelect the widget you want to add.・If a settings screen etc. appears, follow the onscreen instructions.❖Information・To return to the Home screen, tap h or b, or tap any home screen.・If a blue frame is displayed around the added widget, you can drag the frame to resize the widget.・To delete a widget, on the Home screen, touch and hold the widget you want to deleteuDrag it to "Remove from Home screen", which appears at the top of the screen.Adding a shortcut to the Home screenYou can add shortcuts of application, bookmark, etc.1Touch and hold an area of the Home screen where no icons are displayed.2[Widgets & Apps]u[Apps]/[Shortcuts].3Select the application or shortcut you want to add.・When a data selection screen or setting screen appears, follow the onscreen instructions.❖Information・To return to the Home screen, tap h or b, or tap any home screen.・To delete a shortcut, on the Home screen, touch and hold the shortcut you want to deleteuDrag it to "Remove from Home screen", which appears at the top of the screen.](https://usermanual.wiki/Sony/PM0941.user-manual-PY7-PM0941-EN-TA-20160329/User-Guide-2951981-Page-51.png)
![50Before Using the TerminalAdding folders on the Home screenYou can put applications, shortcuts, etc. added to the Home screen into a folder to manage them.1From the Home screen, touch and hold an iconuDrag it over another icon.❖Information・To move an icon to a folder, on the Home screen, touch and hold an icon you want to moveuDrag it over a folder.・To change a folder name, tap a folderuTap the folder nameuEnter a folder nameuTap [DONE].・To delete a folder, on the Home screen, touch and hold the folder you want to deleteuDrag it to "Remove from Home screen", which appears at the top of the screenuTap [DELETE]. Applications, shortcuts, etc. in the folder are also deleted.Changing wallpaperYou can change wallpaper of the Home screen.1Touch and hold an area of the Home screen where no icons are displayed.2[Wallpapers].3Tap [Album]/[Live Wallpapers]/[Photos]/your desired image.・If you tap [Album], [Live Wallpapers], or [Photos], select an image and follow the onscreen instructions to set the wallpaper.❖Information・To return to the Home screen, tap h or b, or tap any home screen.Changing themeYou can change themes for the Home screen, wallpaper of the lock screen, etc.1Touch and hold an area of the Home screen where no icons are displayed.2[Themes]uSelect a theme to set.3u[OK].Setting the Home screen1Touch and hold an area of the Home screen where no icons are displayed.](https://usermanual.wiki/Sony/PM0941.user-manual-PY7-PM0941-EN-TA-20160329/User-Guide-2951981-Page-52.png)
![51Before Using the Terminal2[Home Settings]Set Simple Home to use Home screen and the setting menu limited to basic functions.1From the Home screen, u[Settings]u[Home]uTap "Simple Home" radio buttonu[OK].2[OK].・To set the font size to "Extra large", mark "Set font size to Extra large".■ Applications on the Simple Home screenIcon sizeSet the size of icons on the Home and application screens.Show names in dockSet whether to display the names of shortcuts and other items arranged on the dock at the bottom of the Home screen (on either side of Apps button).Application screen iconSet whether to add a shortcut to the Home screen simply by touching and holding an icon on the Application screen.Simple Home screenMapsP. 1 4 5ChromeP. 1 0 5SettingsP. 5 3My AppsP. 5 3Tools ContactsP. 5 7CalendarP. 5 5Alarm & clockP. 1 4 7CalculatorP. 5 6Osaifu-KeitaiP. 1 1 0GmailP. 1 0 2Play StoreP. 1 0 9dメニュー (dmenu)P. 1 0 8dmarketP. 1 0 8しゃべってコンシェル (Shabette concier)P. 5 5iコンシェル (i-concier)P. 5 8Media MusicP. 5 7AlbumP. 1 4 0VideoP. 5 7TVP. 1 2 0FM radioP. 1 2 6YouTubeP. 5 9NOTTVP. 1 1 4CameraP. 1 2 7docomo mailP. 9 5MessagingP. 9 5DialP. 5 5](https://usermanual.wiki/Sony/PM0941.user-manual-PY7-PM0941-EN-TA-20160329/User-Guide-2951981-Page-53.png)
![52Before Using the Terminal* Applications such as "Anshin Scan", "docomo backup", etc. appear.❖Information・To change to the standard Home screen, from the Simple Home screen, tap [Settings]u[Exit Simple Home]u[OK]u[docomo LIVE UX]/[Xperia™ Home].Using speed dialsSave frequently used contacts to "Speed dial" to easily make a call or send a message.■ Saving contactsSave phone numbers and mail addresses to "Contacts" beforehand.1On the Simple Home screen, [Speed dial]u[OK].2Select a contact to save.・The name "Speed dial" on the Simple Home screen will change to the name saved in the "Contacts" application.■ Making a call1On the Simple Home screen, select a speed dialu[Call].・Operation during a call (P.84)■ Sending messages (SMS)/mail1On the Simple Home screen, select a speed dialu[Send message]/[Send email].・How to send a message (SMS) (P.95)・How to send email (P.99)・How to send Gmail (P.102)❖Information・To change/delete/edit contacts saved in the speed dials, select a contact saved in the speed dialu[MENU]uTap any of [Edit entry]/[Delete entry]/[Edit contact].Apps*―Speed dialP. 5 2](https://usermanual.wiki/Sony/PM0941.user-manual-PY7-PM0941-EN-TA-20160329/User-Guide-2951981-Page-54.png)
![53Before Using the TerminalUsing Settings1On the Simple Home screen, [Settings].Saving applications in My AppsIf frequently used applications, etc are saved in the "My Apps" folder, the applications can easily be activated1On the Simple Home screen, [My Apps]u[EDIT]u[OK].2Mark applications to saveu[DONE].My profileCheck your own phone number and mail address, etc.Display WallpaperSet the wallpaper for the Simple Home screen or the lock screen.ThemesSet the theme for the wallpaper on the Simple Home screen or the lock screen.BrightnessAdjust the screen brightness.Auto-rotate screenSet whether to switch portrait/landscape view automatically according to the terminal orientation.Font sizeSet font size for the "Contacts" application, etc.SleepSelect a time duration before the screen back light turns off.Screen lockSet screen unlock method.Sound Silent/Vibrate modeSet silent mode.RingtoneSet ringtone.Vibrate on touchSet whether to vibrate the terminal for some operations such as specified software key operation.Touch soundsSet whether to emit sound when selecting menu.Vibrate when ringingSet whether to vibrate the terminal when receiving a call.Customize HomeChange appsP. 5 4Reorder appsResetMore settingsDisplay Settings menu on the standard Home screen (P.152).Exit Simple HomeChange to the standard Home screen.](https://usermanual.wiki/Sony/PM0941.user-manual-PY7-PM0941-EN-TA-20160329/User-Guide-2951981-Page-55.png)
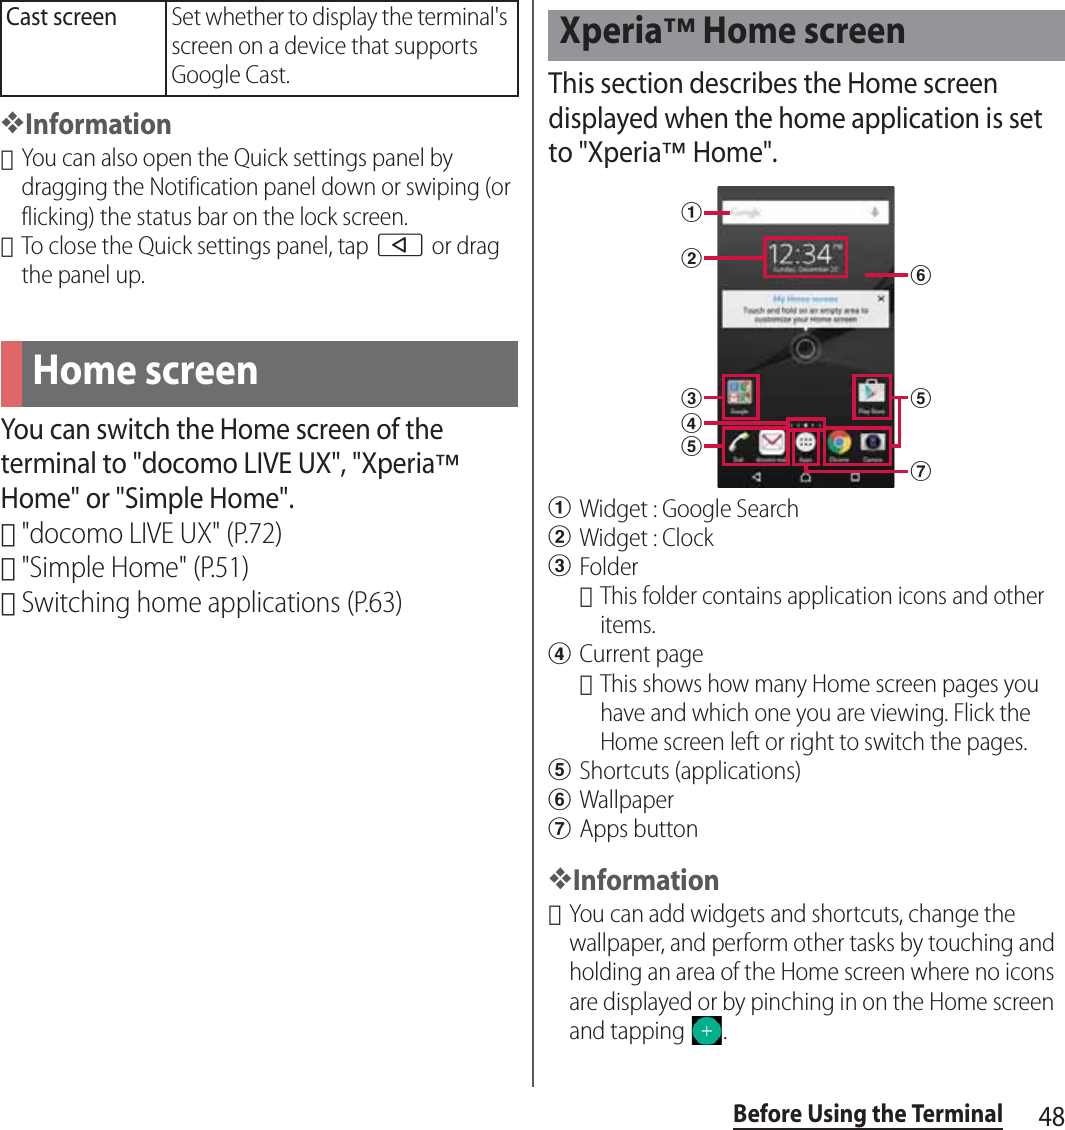
![54Before Using the Terminal❖Information・To delete applications saved in the "My Apps" folder, in Step 2, unmark applications to deleteuTap [DONE].Changing applications on the Simple Home screen1On the Simple Home screen, [Settings]u[Customize Home].2[Change apps]/[Reorder apps].3Select applications to changeuSelect applications to display/select a location to move to.・Grayout applications cannot be changed.4[OK].❖Information・In Step 2, tap [Reset]u[OK] to restore the defaults. Note that contacts saved in the speed dials and applications saved in "My Apps" folder are not restored.This section describes the application screen displayed when the home application is set to "Xperia™ Home".・Switching Home application (P.63)1From the Home screen, tap .aSearch for applicationsbOption menu・This menu allows you to rearrange application icons and manage applications (for example, by moving or deleting them).cCurrent displayed position・Indicates the number of application screen sheets and current position. Flick the application screen left or right to switch sheets.dApplication icons・Some application icons are displayed with a number of missed calls, unread mails, etc.Xperia™ Application screendcab](https://usermanual.wiki/Sony/PM0941.user-manual-PY7-PM0941-EN-TA-20160329/User-Guide-2951981-Page-56.png)
![60Before Using the Terminal❖Information・Some pre-installed applications can be uninstalled. Even if uninstalled, some applications can be downloaded from "Play Store" (P.109) etc. again.・Some applications require downloading and installation. If downloading an application is not available, set to allow to download (P.172).・Having multiple applications running can consume more battery power, resulting in fewer hours of use. For this reason, it is recommended to quit applications that you are not using. To quit an application, nuFlick left or right on its thumbnail.Add shortcuts of application to the Home screen.1On the application screen, touch and hold an icon you want to add to the Home screen.・For the application icons in a folder, drag out from the folder.2Drag it to "Add to Home screen" displayed at the top of the screen.・When the Home screen is displayed, drag it to a position to locate the shortcut.・Before uninstalling application, back up contents related to the application that you want to save including data saved in the application.・Some applications may not be uninstalled.1Pinch in or touch and hold on the application screen.2Tap an application icon with .3[OK].Adding an application to the Home screenUninstalling an application](https://usermanual.wiki/Sony/PM0941.user-manual-PY7-PM0941-EN-TA-20160329/User-Guide-2951981-Page-62.png)
![61Before Using the TerminalWhen the order of application icons is set to "Own order" in the option menu (P.54), you can manage your application icons on the application screen by putting them in folders.1On the application screen, touch and hold an application iconuDrag it over another one.❖Information・To move an icon to a folder, on the application screen, touch and hold an icon you want to moveuDrag it over a folder.・To take out an application icon from a folder, tap the folderuTouch and hold the application iconuDrag it to a place you want to locate.・To change a folder name, tap a folderuTap the folder nameuEnter a folder nameuTap [DONE].When the order of application icons is set to "Own order" in the option menu (P.54), you can rearrange your application icons as you like.1On the application screen, touch and hold an iconuDrag it to any position you like.❖Information・While sorting application icons, drag an icon to the right edge of the application screen to add an application screen.・Select "Most used", "By name", or "By date" to sort the icons.Adding a folder to the application screenRearranging application icons](https://usermanual.wiki/Sony/PM0941.user-manual-PY7-PM0941-EN-TA-20160329/User-Guide-2951981-Page-63.png)
![63Before Using the TerminalAdding small apps1nuTap .・Small apps list appears.2Touch and hold the small app or widget you want to adduDrag it to the Favorites bar.❖Information・Alternatively, select an app/widget in the small app list to activate a small app.・In the small app list, tap u[Google Play™]/[Widgets] to install a new small app from Google Play or add a widget as a small app.・To delete a small app from the Favorites bar, touch and hold that small appuDrag it to , which appears outside the Favorites bar.・To delete a widget or small app, in the small app list, tap u[Delete widget]/[Uninstall small app]uSelect a widget or small app to deleteu[OK].You can switch the Home application of the terminal to "docomo LIVE UX", "Xperia™ Home" or "Simple Home".1From the Home screen, u[Settings]u[Home].2Tap the radio button of "Simple Home"/"Xperia™ Home"/"docomo LIVE UX"u[OK].・If you tap "Simple Home", see how it looks and tap [OK].・A home application, lock screen, phonebook application, and music and video player applications are set all at once for "docomo" or "Xperia™".❖Information・When the home application is switched, widgets or shortcuts on the screen may not be displayed correctly depending on home screen layout etc.・To set a home application, lock screen, phonebook application, and music and video player applications individually, from the Home screen, tap u[Settings]u[Display]u[Preferred apps settings].Switching Home application](https://usermanual.wiki/Sony/PM0941.user-manual-PY7-PM0941-EN-TA-20160329/User-Guide-2951981-Page-65.png)
![64Before Using the TerminalEnter a word in the search box to browse the information in the terminal or on the Internet.1From the Home screen, tap the Google search widget.2Enter a search word.・Character entry (P.65)・The search candidate list appears.3Tap an item or on the software keyboard.❖Information・Alternatively, from the Home screen, tap [Google]u[Google] to open the "Google" application.・In Step 1, the explanation screen for Google Now may appear. Follow the onscreen instructions.・When applications appear in Step 2, select an application to activate.・When is displayed in the search result screen etc., tap u[Settings] to make settings for the search function or Google Now.Using Google Voice SearchEnter a search word by voice.1From the Home screen, tap on the Google Search widget.2Speak a search word to the microphone.❖Information・Alternatively, from the Home screen, tap u[Voice Search] to activate the "Voice Search" application.Searching information in the terminal and web pages](https://usermanual.wiki/Sony/PM0941.user-manual-PY7-PM0941-EN-TA-20160329/User-Guide-2951981-Page-66.png)
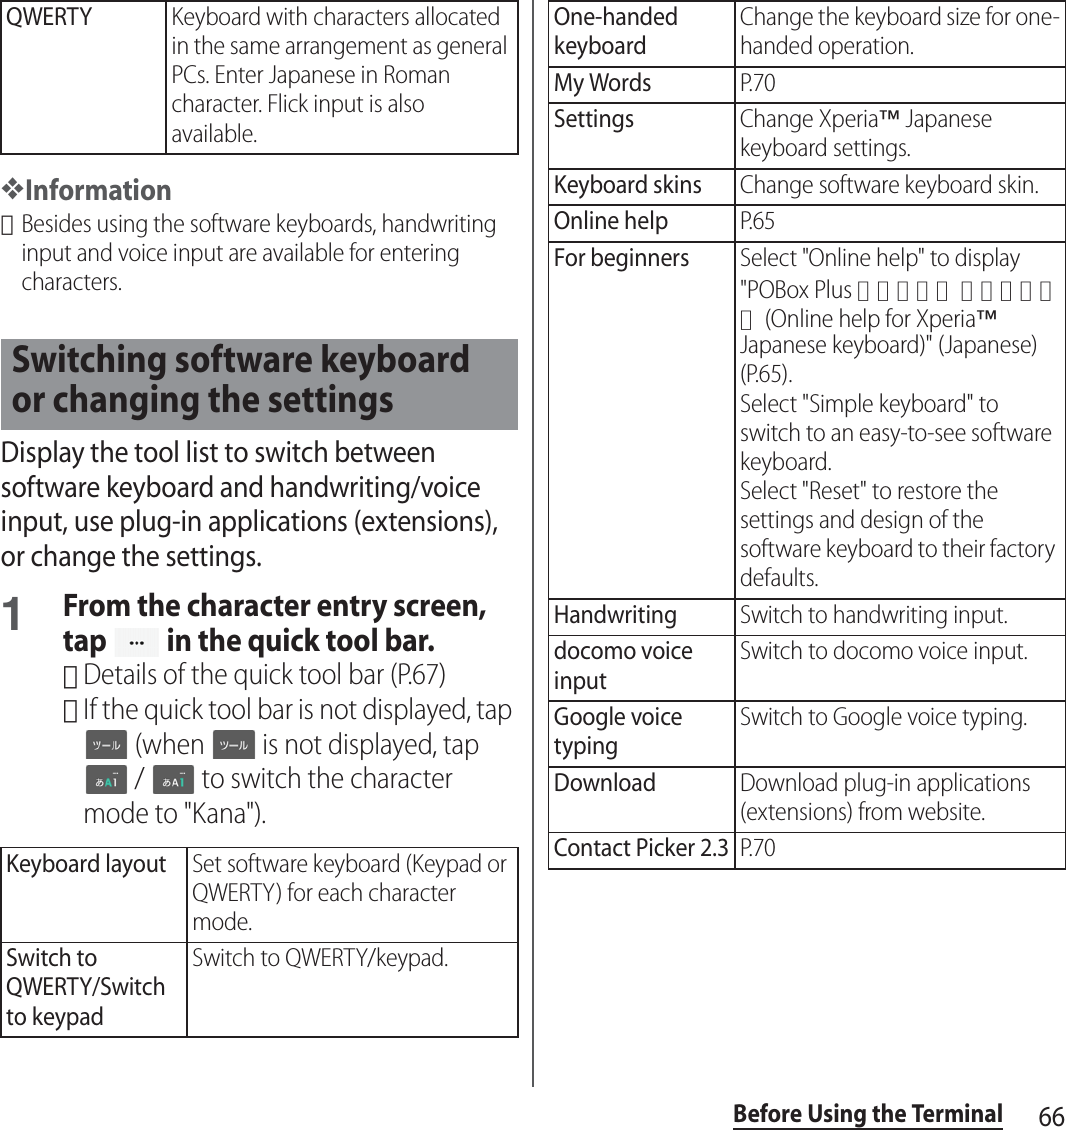
![65Before Using the TerminalEnter characters using the software keyboard which appears when you tap the character input box in a mail, phonebook, etc.❖Information・To hide software keyboard, tap displayed at the lower left of the screen.・Touch and hold a text on the character entry screen to display the enlarged text.Character input method for the terminal is set to "Xperia™ Japanese keyboard" by default when the language is set to 日本語 (Japanese). Details on using Xperia Japanese keyboard are explained in "POBox Plus 使い方ガイド (Online help)".1From the character entry screen, tap in the quick tool bar.・Details of the quick tool bar (P.67)・If the quick tool bar is not displayed, tap (when is not displayed, tap / to switch the character mode to "Kana").2[Online help].1From the Home screen, u[Settings].2[Language & input]u[Current Keyboard]3[Xperia™ Japanese keyboard]/[International keyboard (Xperia™ keyboard)].❖Information・When the language is set to English, the default input method is set to "International keyboard". To use the Japanese keyboard, tap [Xperia™ Japanese keyboard] in Step 3. In this manual, explanations are given only for "Xperia™ Japanese keyboard".・You can also select a keyboard by tapping displayed at the lower right of the screen when entering characters.・To select or deselect a keyboard to use, tap [CHOOSE KEYBOARDS] in Step 3.For Xperia™ Japanese keyboard, the following software keyboard can be used.・Character input method (P.67)Character entryPOBox Plus 日本語入力 使い方ガイド (Xperia™ Japanese keyboard Online help)Selecting a keyboardSoftware keyboardKeypadKeyboard with the same key arrangement as a mobile phone. Repeatedly tap a key to select a character (multi-tap input). Flick input is also available.](https://usermanual.wiki/Sony/PM0941.user-manual-PY7-PM0941-EN-TA-20160329/User-Guide-2951981-Page-67.png)
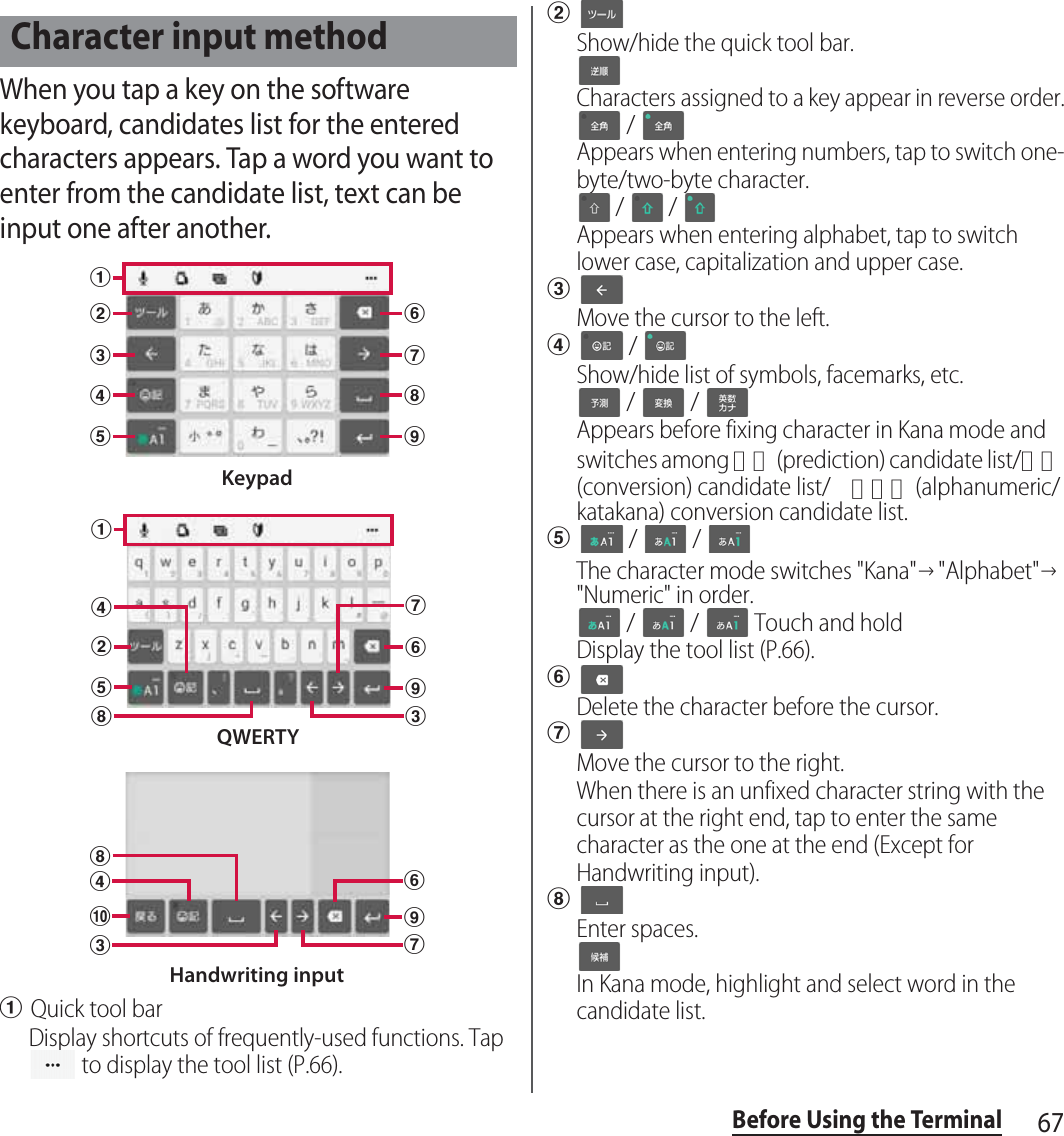
![68Before Using the TerminaliEnter a line feed.*Appears before fixing character and fixes the character.* In some screens, , "次へ (Next)", "完了 (Done)", "実行 (Go)", etc. appear.jReturn to keypad/QWERTY.❖Information・To return to the display before conversion after the conversion is fixed, tap displayed in つながり予測 (associative) candidate (except in handwriting input mode) etc.・To enlarge the display area, tap in the candidate list. To display the software keyboard, tap or [閉じる (Close)].・Note the following when you use Handwriting input.- For voiced sound and semi voiced sound mark, enter in the right upper part of the input screen.- For punctuation mark and lower case, enter in the lower part from the center of the input screen.・For Handwriting input, the following operations are available.- Tap an icon at the upper left of entered character to display candidates for the entered character. Recognized character is displayed in light blue and characters are displayed at the bottom of candidate list in different colors by type.- Tap at the upper right of entered character to delete the entered character.- When entering 2 or more characters and tapping the icon at the upper left, appears. Tap to combine entered 2 characters to 1 character. Combine characters with this operation if 1 Kanji character is recognized as 2 characters or other.Flick inputFlick up/down/left/right to enter characters in each column of kana syllabary.Ex: Entering characters in "な" columnYou can enter "な" only by tapping. Flick left for "に", up for "ぬ", right for "ね" and down for "の".](https://usermanual.wiki/Sony/PM0941.user-manual-PY7-PM0941-EN-TA-20160329/User-Guide-2951981-Page-70.png)
![69Before Using the TerminalMulti-tap inputTap the same key continuously to enter the assigned character.To enter a character assigned to the same key, wait for changing color of tapped key to the original (approx. 1 second), then enter the next character (for entering the next character soon, tap to move the cursor). With the key in the original color, tap to enter the last entered character again.Ex: Entering "あお"1Tap "あ" onceuWait approximately 1 second (until the key color returns to the original).2Tap "あ" 5 times.or1Tap "あ" onceuTap (immediately).2Tap "あ" 5 times.❖Information・To switch the input method used on the keypad between "Flick input" and "Multi-tap input", tap in the quick tool bar on the character entry screenu[Settings]u[Input style & sensitivity]u[Input style], then select your desired item.On the character entry screen, double-tap character you want to edit so that text edit menu appears at the top of the screen. Drag or to change the character string to select.❖Information・To paste a copied or cut character string, touch and hold a position where you want to insertuTap [PASTE]. When text is already entered, tap a position where you want to insertuuTap [PASTE].・Edit menu icons vary by applications.・In the landscape screen, editing menu may not be displayed.・On some applications, the function may not be available.Editing text (SELECT ALL)Select all text. (CUT)Cut a selected character string. (COPY)Copy a selected character string. (PASTE)Paste a copied/cut character string. (Complete)Close the edit menu.](https://usermanual.wiki/Sony/PM0941.user-manual-PY7-PM0941-EN-TA-20160329/User-Guide-2951981-Page-71.png)
![70Before Using the TerminalIf contacts are registered to the Contacts, you can use "Contact Picker 2.3" to enter contact information when entering characters.1From the character entry screen, tap in the quick tool bar.・Details of the quick tool bar (P.67)・If the quick tool bar is not displayed, tap (when is not displayed, tap / to switch the character mode to "Kana").2[Contact Picker 2.3]uTap "CONTACTS" tab.3Tap the contact to pick up.4Mark items you want to quoteu[OK].❖Information・The "HISTORY" tab displays your own contact information and contact information you retrieved when you entered characters previously.You can add words to My Words beforehand to have them appear as preferred candidates when entering characters.1From the character entry screen, tap in the quick tool bar.・Details of the quick tool bar (P.67)・If the quick tool bar is not displayed, tap (when is not displayed, tap / to switch the character mode to "Kana").2[My Words].3Tap .4Tap the character input box for "Reading"uFill it out.5Tap the character input box for "Word"uFill it out.6[OK].❖Information・To delete registered words, in Step 3, mark words in My Words to deleteuuTap [DELETE].Quoting contacts My Words](https://usermanual.wiki/Sony/PM0941.user-manual-PY7-PM0941-EN-TA-20160329/User-Guide-2951981-Page-72.png)
![71Before Using the TerminalFor each input method, you can make settings related to character entry.1From the Home screen, u[Settings]u[Language & input].2Tap [Xperia™ keyboard]/[Google voice typing]/[Moji-Henshu]/[Xperia™ Japanese keyboard].・Tap an item displayed on the screen to set.❖Information・The items vary depending on the input method.・When entering characters with Xperia™ Japanese keyboard, on the character entry screen, tap of the quick tool baru[Settings] to display the settings screen for Xperia™ Japanese keyboard.Setting character entry](https://usermanual.wiki/Sony/PM0941.user-manual-PY7-PM0941-EN-TA-20160329/User-Guide-2951981-Page-73.png)