Sony Adp Maa Lighting Guide
Sony-Fa-Ma1Am-Lighting-Guide-597148 sony-fa-ma1am-lighting-guide-597148
Sony-Fa-Cs1Am-Lighting-Guide-597140 sony-fa-cs1am-lighting-guide-597140
Sony-Adp-Ama-Lighting-Guide-592255 sony-adp-ama-lighting-guide-592255
Sony-Fa-Cc1Am-Lighting-Guide-597138 sony-fa-cc1am-lighting-guide-597138
Sony-Fa-Ec1Am-Lighting-Guide-597145 sony-fa-ec1am-lighting-guide-597145
2015-03-13
: Sony Sony-Adp-Maa-Lighting-Guide-592261 sony-adp-maa-lighting-guide-592261 sony pdf
Open the PDF directly: View PDF ![]() .
.
Page Count: 30
lighting guide
A lighting and lighting accessories

Table of ContentsTable of Contents
the power of light
Photography. The literal meaning is “Writing” (graphy) with “light” (photo).
When you press the shutter, you are capturing light. The more effectively you
control that light, the better your photographs will be.
The pages within this guide are designed to provide examples and solutions
to assist you in capturing light effectively in both natural and artificial light.
We will start with an overview of different types of natural light, lighting
concepts and how you can make a dramatic difference to your photographs
by adding artificial light in the form of a single flash. We will then explore using
single and multiple wireless flash to further customize how light is captured.
Portraits, action, landscape, daytime, nighttime, close-ups and much more
are here for you to discover, learn and hopefully implement.
capturing light
06 Light Temperature
06 Direction of Light
07 Time of Day
07 Distance of Light
using artificial light
10 Hard vs. Soft
10 Light Coverage
11 Diffused Light
11 Guide Number (GN)
on-camera flash basics
14 Using Bounce Flash
16 Quick Shift Bounce Advantage
18 Fill Flash
20 High Speed Sync
22 Slow Sync Flash
24 Rear Sync Flash
26 Multi Flash, Stopping Motion
off-camera flash basics
30 On-camera vs. Off-camera Flash Effect
32 One Flash, Two Lights
34 One Flash, Three Lights
36 Wireless Ratio Control
38 Isolate the Subject
40 Mixing Light
products
42 HVL-F60M
44 HVL-F43AM
46 HVL-F20AM
48 HVL-F20S
specialized
50 Macro Photography
52 Ring Light - HVL-RL1
54 Twin Flash - HVL-MT24AM
56 Video Light - HVL-LE1
57 Lighting Accessories
03
Capturing Light
To capture a photograph, light has to be present in
some shape or form. Used effectively, lighting can even
become the subject or that supporting player that
works behind the scenes elevating the quality of our
image. When not used effectively, lighting will leave
the image too light, too dark, blurry or even filled with
poorly placed shadows.
Tackling light is one of the most challenging and
rewarding things one will face as a photographer.
Learning how to include light effectively in our
photographs will take them from simple snapshots
to images you would be proud to share with anyone.
The following pages outline some considerations to think
about when preparing for lighting and photography.
capturing light
05
Capturing Light
understanding light
Distance of Light
It seems obvious to state, but light will be more powerful closer to the source and
weaker farther away from it. In fact, an object that is twice the distance from a
source of light will receive a quarter of the illumination. This is known as the
“Inverse Square Law” which states; “The amount of light is inversely proportional
to the square of the distance between the light source and subject”.
In other words, a subject that is four feet from a light source will need four times
as much light as a subject that is only two feet away. With this in mind, you
will need to compensate for the changing amount of light by adjusting your
camera’s aperture, shutter speed or add more artificial lighting.
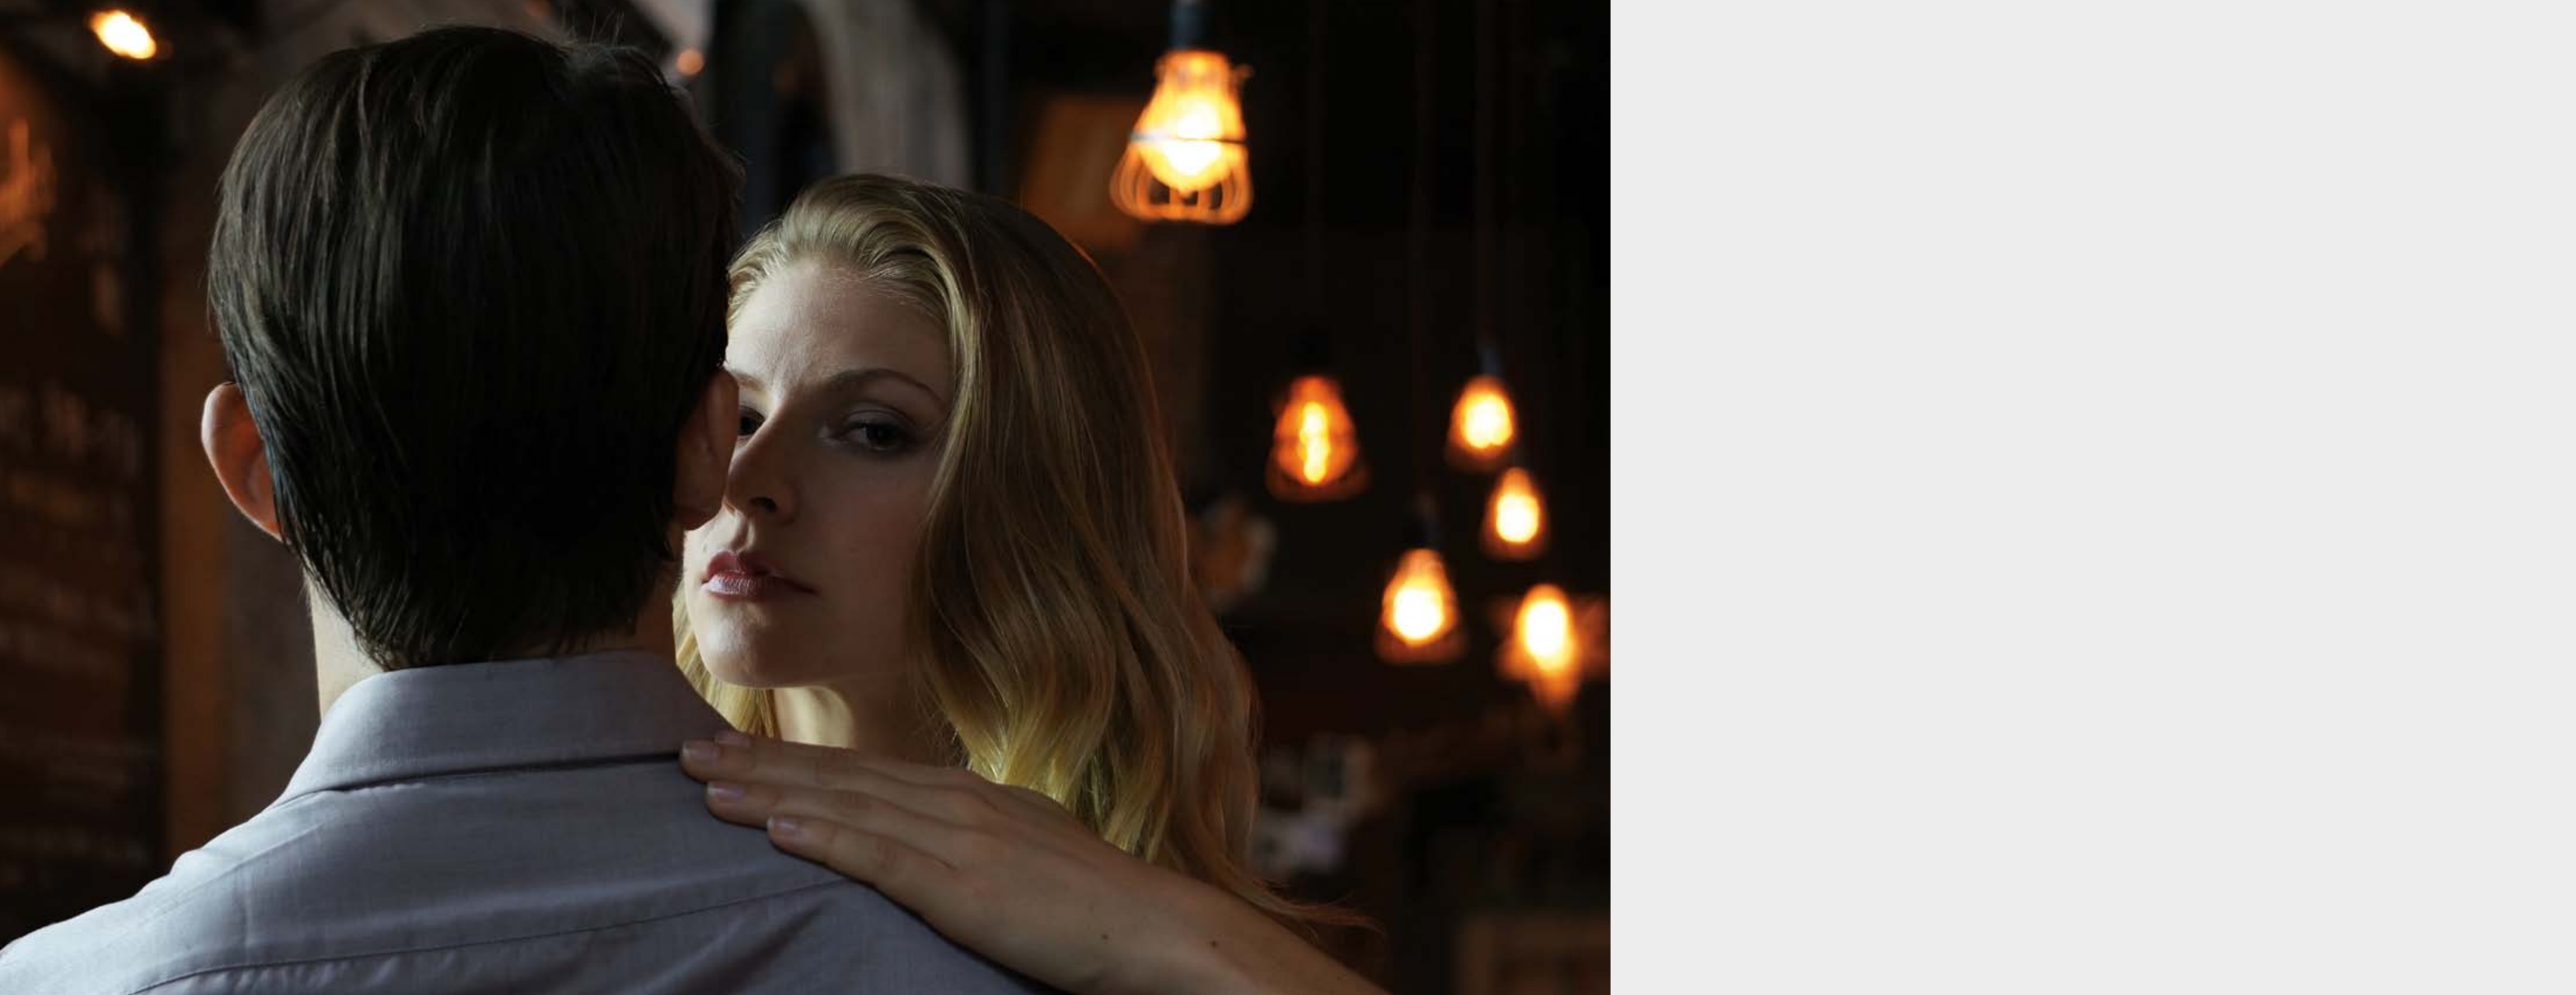
Direction of Light
We normally see objects in everyday life lit from above, whether the sun or a
light fixture in the ceiling. Light can also come from different angles; front, side,
left, right or even below. There are also times when multiple light sources can
illuminate an object from different sides at the same time.
Pay close attention to where the light source is coming from as this can
dramatically affect how your photograph will turn out. Further on in this guide
we will discuss how to bounce light to get a natural look by lighting from
above and adding multiple light sources to improve your image quality and
open your creative freedom.
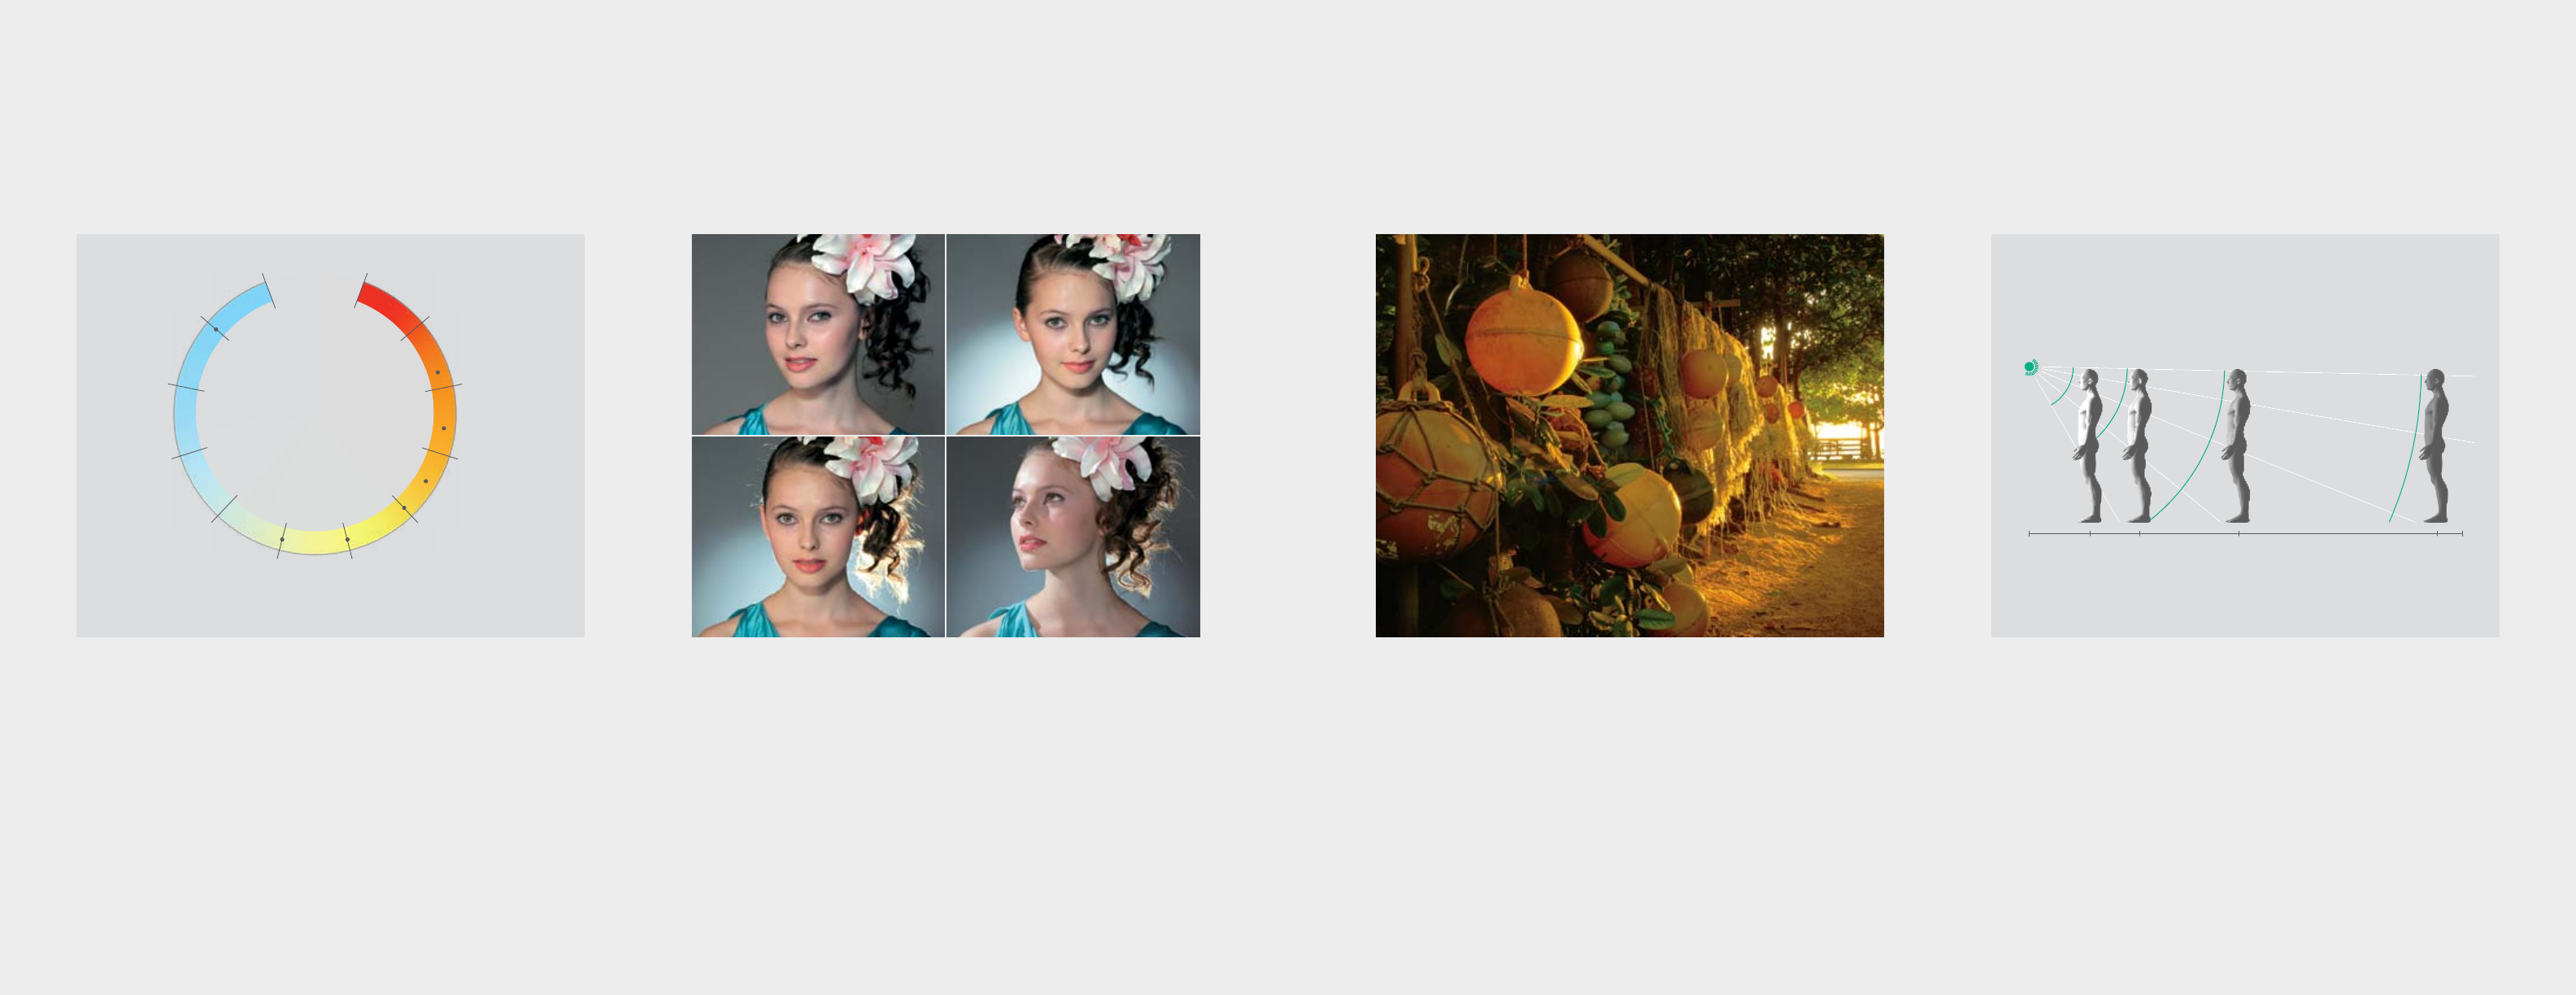
Time of Day
Consider the time of day when deciding to photograph outdoors. Distance,
direction, quality/quantity of light will change throughout the course of the
day and play an important role in how your images turn out.
Typically, the best time of day to shoot is sunrise or sunset. Also known as “The
Golden Hours”, they provide warmer color tones and long shadows which
deliver a desirable photographic effect. “The Blue Hour” refers to dawn and
dusk, one hour before sunrise and one hour after sunset. This is the time of
day when the light is a clean, cold, blue in color and no shadows are cast.
At midday when the sun is highest, you often get dark shadows and your images
can appear flat, lacking detail, color or dimension. On a cloudy day shadows
will be diminished through diffusion, giving your photos a softer feel.
2ftDistance
Aperture
4ft 8ft 16ft
F/11 F/5.6 F/2.8 F/1.4
Light Temperature
Every light source—whether the sun, a candle or camera flash—emits a color
temperature that can be measured in the Kelvin scale; named after physicist
William Thomson, 1st Baron Kelvin.
In general, higher temperature objects (sun, sun through clouds) are referred to as
cool, and contains more blue colors—while lower temperatures (candles and
light bulbs) are referred to as warm, which contain more red and orange colors.
Objects absorb or reflect light rays to give us color. While our human eyes can
recognize the changes in reflected color, digital cameras often “see” light
differently. We may adapt to the yellow glow from a candle light on a white piece of
paper, but your camera may see the paper as yellow. White Balance is a camera
setting, which allows you to adjust the color tone to approximate what you see.
1
0
,000 K
9
,
0
00
K
8,0
0
0
K
7,0
0
0
K
6,000
K
5,000 K
4,00
0
K
3,000
K
2,
0
00 K
1,00
0
K
D
ay
l
i
g
h
t
Fl
a
sh
b
u
l
b
Flood Lamp
Light B
u
lb
C
andlelig
h
t
S
ky Light
Electronic
Flash
Light
Temperature
06 07
Using Artifical Light
using
artificial light
Without light, we would not have photography. The lower
the amount of light on our subject, the longer it will take
to capture our photograph. While we sometimes can use
this to our creative advantage, low levels of light make it
very difficult to capture the subject without blur, especially
if we are not using a tripod or other stabilizing device.
When natural light is diminished, we need to introduce
artificial lighting to capture our image quickly. Lamps,
streetlights, headlights are all examples of commonly seen
artificial light. In photography, all of these can be used
as well as adding artificial light with flash photography.
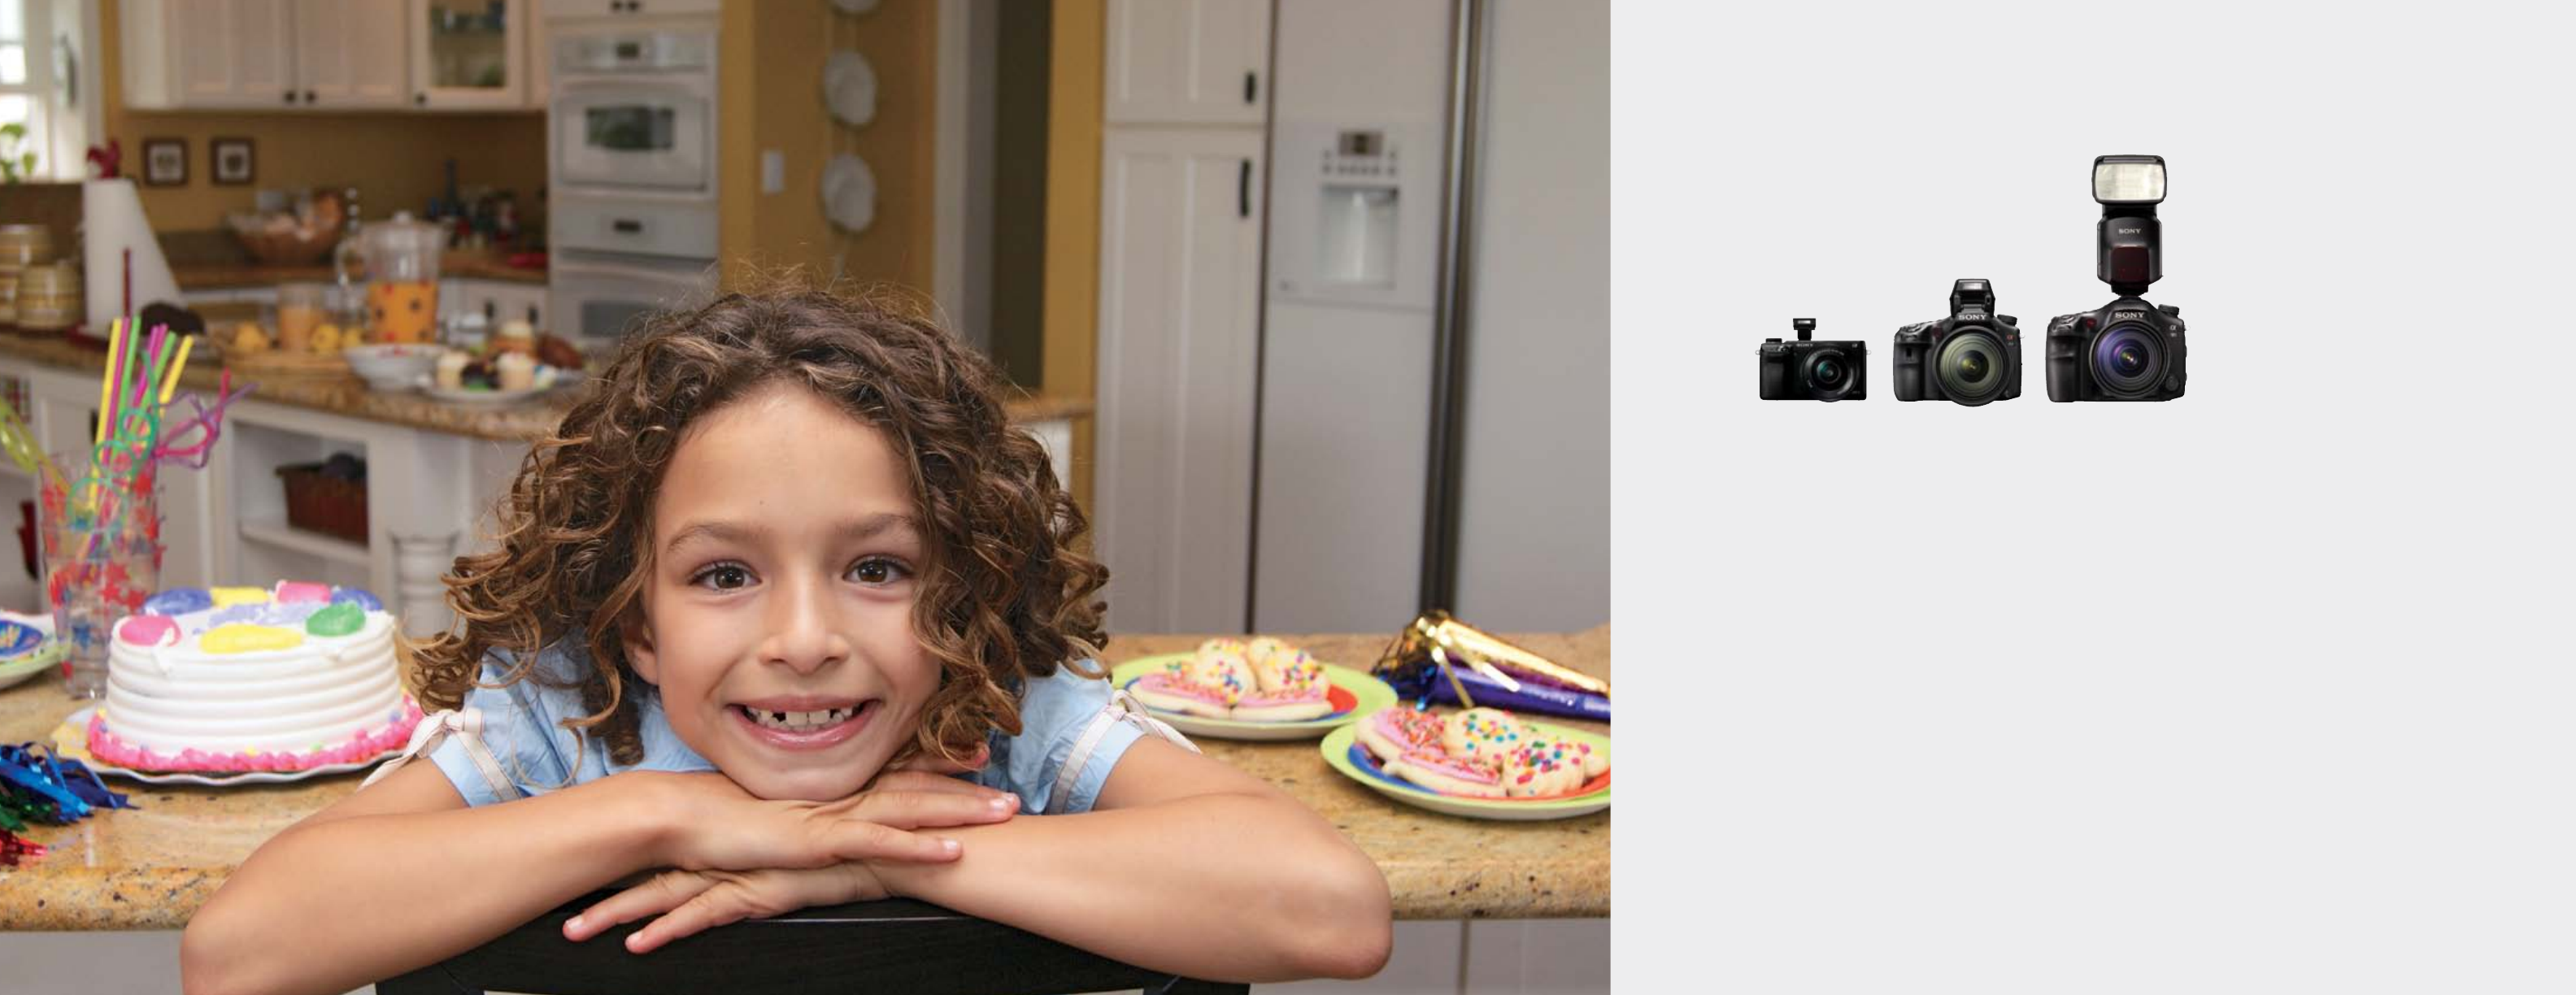
Many cameras have an on-camera flash. While an
on-camera flash can be handy in a pinch, it limits our
options due to the fact that the flash is attached at a
single position to the camera, and has limited power.
Adding an external flash provides us with a more
powerful light with a flash head that can be aimed in
multiple directions allowing us to position our light more
creatively and effectively.
Some flashes can also be used wirelessly, which allows
for even greater creative control. With wireless flash,
our camera can trigger one or more flashes to fire, even
when it is not attached to the camera. This allows us to
add artificial lighting at a variety of locations and angles.
When we combine artificial and natural lighting,
a new level of dynamic photography is achieved.
08 09

Using Artifical Light
~3m
~11m
built-in flash
HVL-F43AM
HVL-F60AM
~15m
Illumination range
85mm ISO100 Aperture F4
Hard vs. Soft
Hard light produces stark shadows and bright highlights. You will typically see
hard light in your photographs when your main light source falls directly on your
subject. A cloudless, midday sun produces hard light, as would a light-bulb or
direct flash from a camera.
Soft light smooths hard lines and edges, reveals more shadow detail and
produces softer highlights. You will typically see soft light in your photographs
when your main light source is close to your subject, reflected off another
surface or diffused. Sun hitting clouds first before hitting the subject, light from
multiple sources and directions, light from a very large light source close to
the subject or light passed through a diffuser are all examples of soft light.
Light Coverage
When using artificial light, you can control the amount of hard vs. soft light you
want on your subject. If you move the subject further away, the light source
becomes proportionally smaller, casting a harder light. If you move the subject
closer, the light source becomes proportionally larger, casting a softer light.
Using a larger light source and diffusers have the same effect as moving your
subject closer as the light source becomes proportionately larger. Conversely,
using a smaller light source will have the same effect as moving your subject
away from the light source.
Diffused Light
Light that has been scattered by first hitting a translucent property before
hitting our subject is called “diffused light”. Diffused light creates a soft light,
which is more even, with softer shadows.
Diffusers can be anything from a window, white sheet, clouds or even an
actual diffuser, which is commonly used in photography.
Guide Number (GN)
Every flash system has a guide number, or GN. It is used to measure the system’s
ability to illuminate the subject to be photographed. It’s good to know the GN when
deciding to buy a flash and how best to use it. The GN represents the output of
illumination that is metered at a distance of 1 meter (3 feet) from the subject at ISO
100. The larger the GN, the larger the amount of illumination the flash produces.
understanding artificial light
The optimum aperture setting can be determined as:
(f-stop) = GN/(Illumination range between subject and flash in meters).
The optimum illumination range can be calculated as:
Illumination range (m) = GN/(f-stop)
For example, when the GN is 60 and the aperture is F4, the illumination
range = 60/F4 = 15m (Approx.)
HVL-F60M
10 11
light
light
subject
subject
On-Camera Flash Basics
on-camera flash basics
An on-camera flash is either the built-in pop-up flash
or an external flash that can be easily added to any
camera that has a hot shoe.
On-camera flash provides the photographer with a
more powerful light source and the ability to better
control the direction of light being emitted.
On-camera flash works with most exposure modes.
The most basic setting on the flash is Auto. Simply
choose your camera mode then set your flash to
Auto. The flash will use a built-in sensor to survey the
surrounding light, fire the flash, and add additional
light to properly illuminate the subject.
Adding flash when needed to your images adds
control and creativity to your results. The Following are
some common practices for using an on-camera flash.
13
Bounce Sheet
Some flashes have a bounce sheet built into the
camera. Bounce sheets make the subject look more
vibrant. They also add catch lights in the subject’s
eyes. In this case, it also removed some of the
shadows present under the subject’s hat.
using
bounce flash
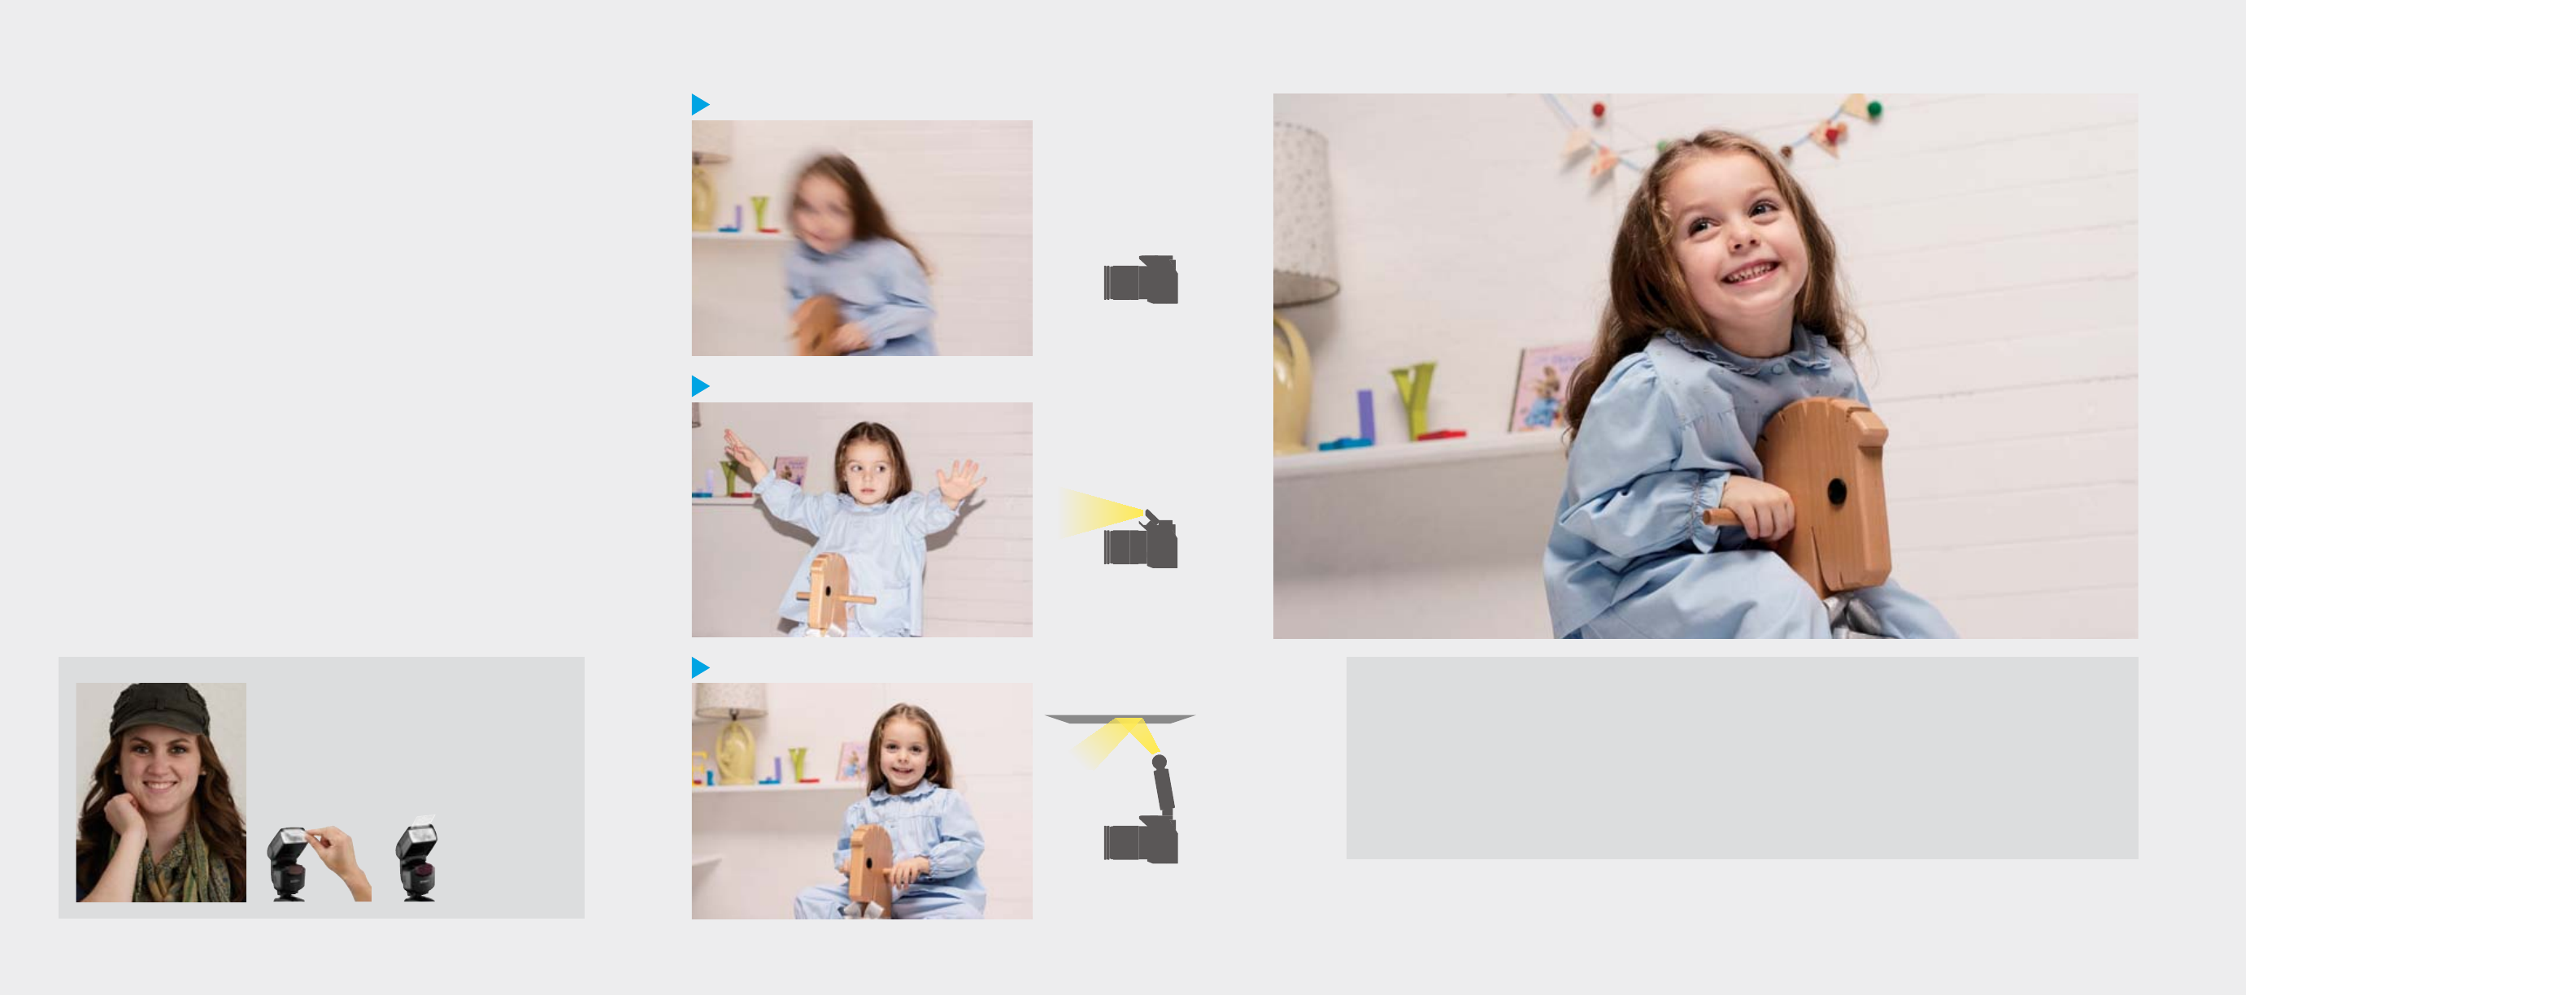
Bounce flash should be used when trying to achieve a more natural look.
We normally see the world with light from above, whether the sun or an overhead
light fixture in the ceiling. Using the camera’s built-in flash normally creates
unnatural highlights on our subject or casts shadows on walls and surfaces
behind our subject.
One of the simplest ways to cut back on harsh shadows in our photograph
is to use a bounce flash.
Point the flash at any reflective surface instead of your subject. Ceilings, walls
and white cards are commonly used. Light emitted from the flash will first hit the
flat reflective object, which will then reflect diffused soft light onto the subject.
This effectively makes our light source larger, which produces soft light and soft,
more natural, shadows.
Without flash
With built-in camera flash
With external flash HVL-F20AM (bounce flash)
On-Camera Flash Basics
Extras
Would you ever use direct flash? While used rarely, direct
flash is effective when there is minimal ambient light
and you do not have any items to bounce light off of.
Photographing a subject with harsh shadows is better
than not photographing the subject at all.
No Wall? No Ceiling? You can still bounce your flash when
you do not have a wall or ceiling to work with. Simply use
a large white surface instead. It can be a large card,
reflector or even someone’s white shirt.
What is it?
Technique of reflecting light off of
a nearby surface to change light
direction and soften light source.
How to use it?
• Point your flash to any reflective
surface instead of the subject
• The lighter the surface the
more light will be diffused into
your photo
• Experiment by bouncing your
flash off of walls and different
colored surfaces
Where to use it?
Use bounce flash to create
more natural light and
pleasing shadows.
14 15
quick shift
bounce
advantage
A unique feature—exclusive to Sony—Quick Shift Bounce* enables you to
quickly pivot the flash head 180 degrees around the flash body. The head
of the flash can also tilt forward for direct flash and backwards to bounce
off surfaces behind you.
Not only does this give you faster creative control, it also allows you to set the same
bounce flash position while holding your camera horizontally, as well as vertically.
Bouncing flash off walls and objects on either side of the camera is as easy as
pivoting and pointing the flash to the object you want the light to bounce off.
*Quick Shift Bounce is available on the HVL-F43M, HVL-F58AM and HVL-F60M
Landscape: Direct Flash
Camera horizontal with flash
pointed directly at the subject in
the standard position.
Portrait: Direct Flash
Camera turned vertical
with flash pointed directly at
the subject in the standard
position. The harsh shadow
on the left is due to the flash
now hitting the subject at an
angle and not straight on.
Taking it vertical
The great thing about Quick Shift Bounce is
that it allows you to easily change and shoot
in portrait orientation and still keep the light
direction consistent. Previously that would
have required a complicated bracket that
attached to the camera. That functionality is
now built into this type of flash.
Portrait: Quick Shift Flash
Camera turned vertical with
quick shift used so flash is still
aimed directly at the subject,
but is closer to the camera.
By moving the Quick Shift
Flash 90 degrees, we are
able to tone down the harsh
shadow behind the subject
by positioning the flash closer
to the camera, and in a more
direct path to the subject.
Landscape: Bounce Flash
Camera horizontal with flash tilted up
45 degrees to bounce light off the
ceiling and further eliminate shadow
and harsh light.
On-Camera Flash Basics
What is it?
Exclusive range of motion offered
on some Sony flashes that allows
for the flash head to remain in
proper orientation, regardless of
camera position or angle.
How to use it?
Simply pivot the flash head
around the body of the flash.
You can move the camera
horizontally or vertically and
re-adjust the flash to keep your
lighting results consistent.
Where to use it?
Use Quick Shift Bounce when you
want to reposition the flash head
or camera quickly and efficiently.
Portrait: Bounce
Camera turned vertical with
flash tilted up 45 degrees to
bounce light off the wall or
reflective surface on the side.
Bouncing Flash off of walls and
objects on either side of the
camera is as easy as pivoting
and pointing the flash to the
object you want to bounce off
of. In this example, we pointed
our flash to a wall on the right.
Portrait: Quick Shift Bounce
Camera turned vertical
with quick shift used and
flash tilted up 45 degrees to
bounce light off the ceiling to
further reduce shadows and
harsh light.
quick shift bounce
Proper orientation when shooting
portrait compositions
180° Left/Right 156° Front/Back
16 17
Split-second Breakdown
On-Camera Flash Basics
What is it?
Technique used to add light to
shadows to balance exposure
between the foreground and
background.
How to use it?
Fill flash works with any flash in
any camera mode. For a flash
built into a camera, make sure
you are at least 10ft or closer to
the item you want to illuminate.
Where to use it?
• To remove unwanted shadows
from your subject
• Balance lighting by adjusting
for an overexposed background
and use fill flash to illuminate an
underexposed foreground
• Landscapes where you want to
illuminate the foreground
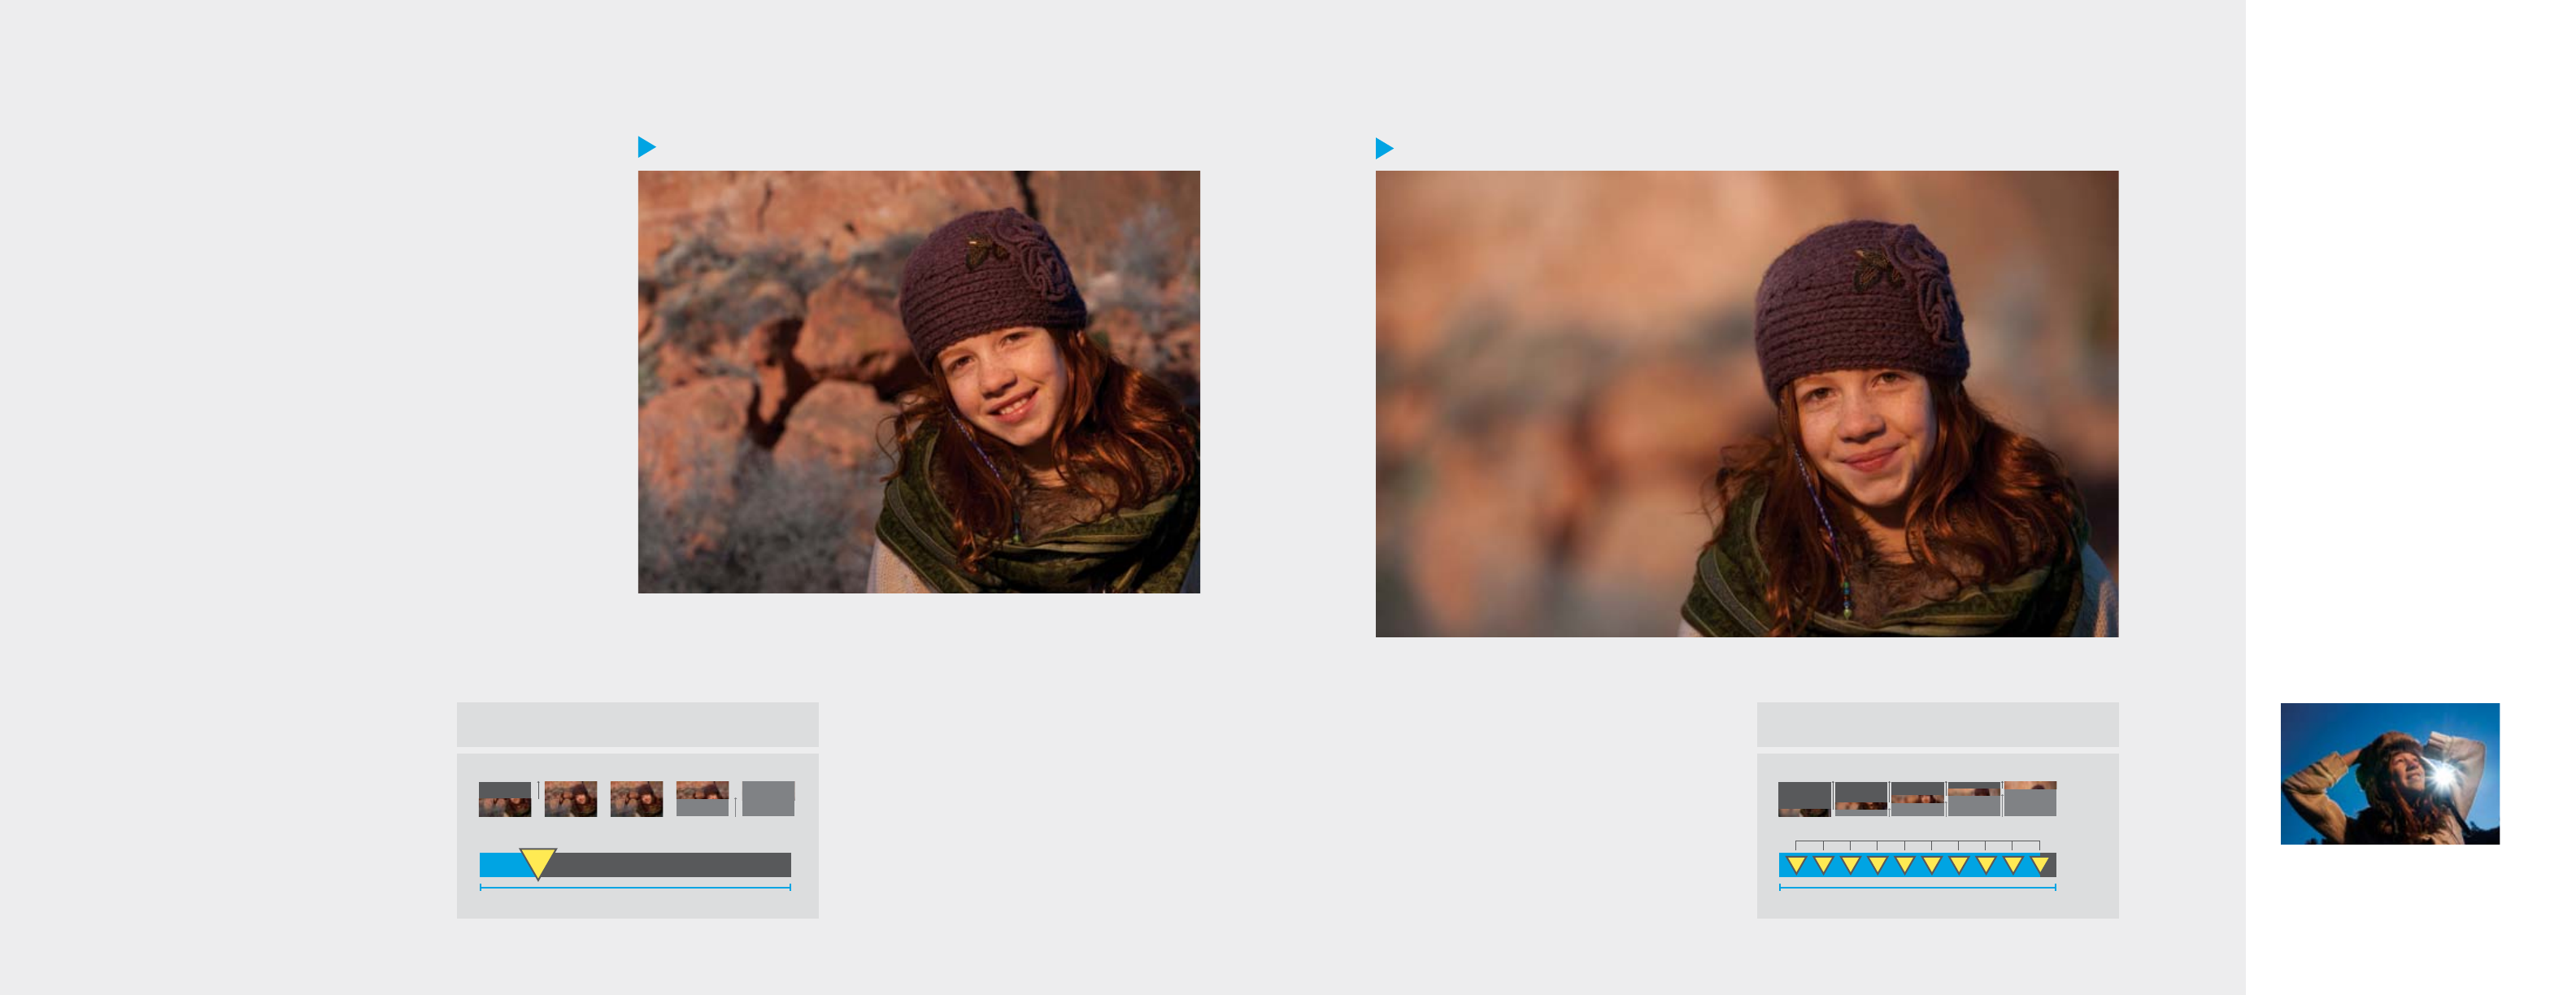
Set it up in advance.
When photographing a person, do a test shot
before the model is in the scene to get the exposure
spot-on in advance.
1. Over-exposed background
2. Under-exposed subject
Properly exposed with fill flash on subject
fill flash
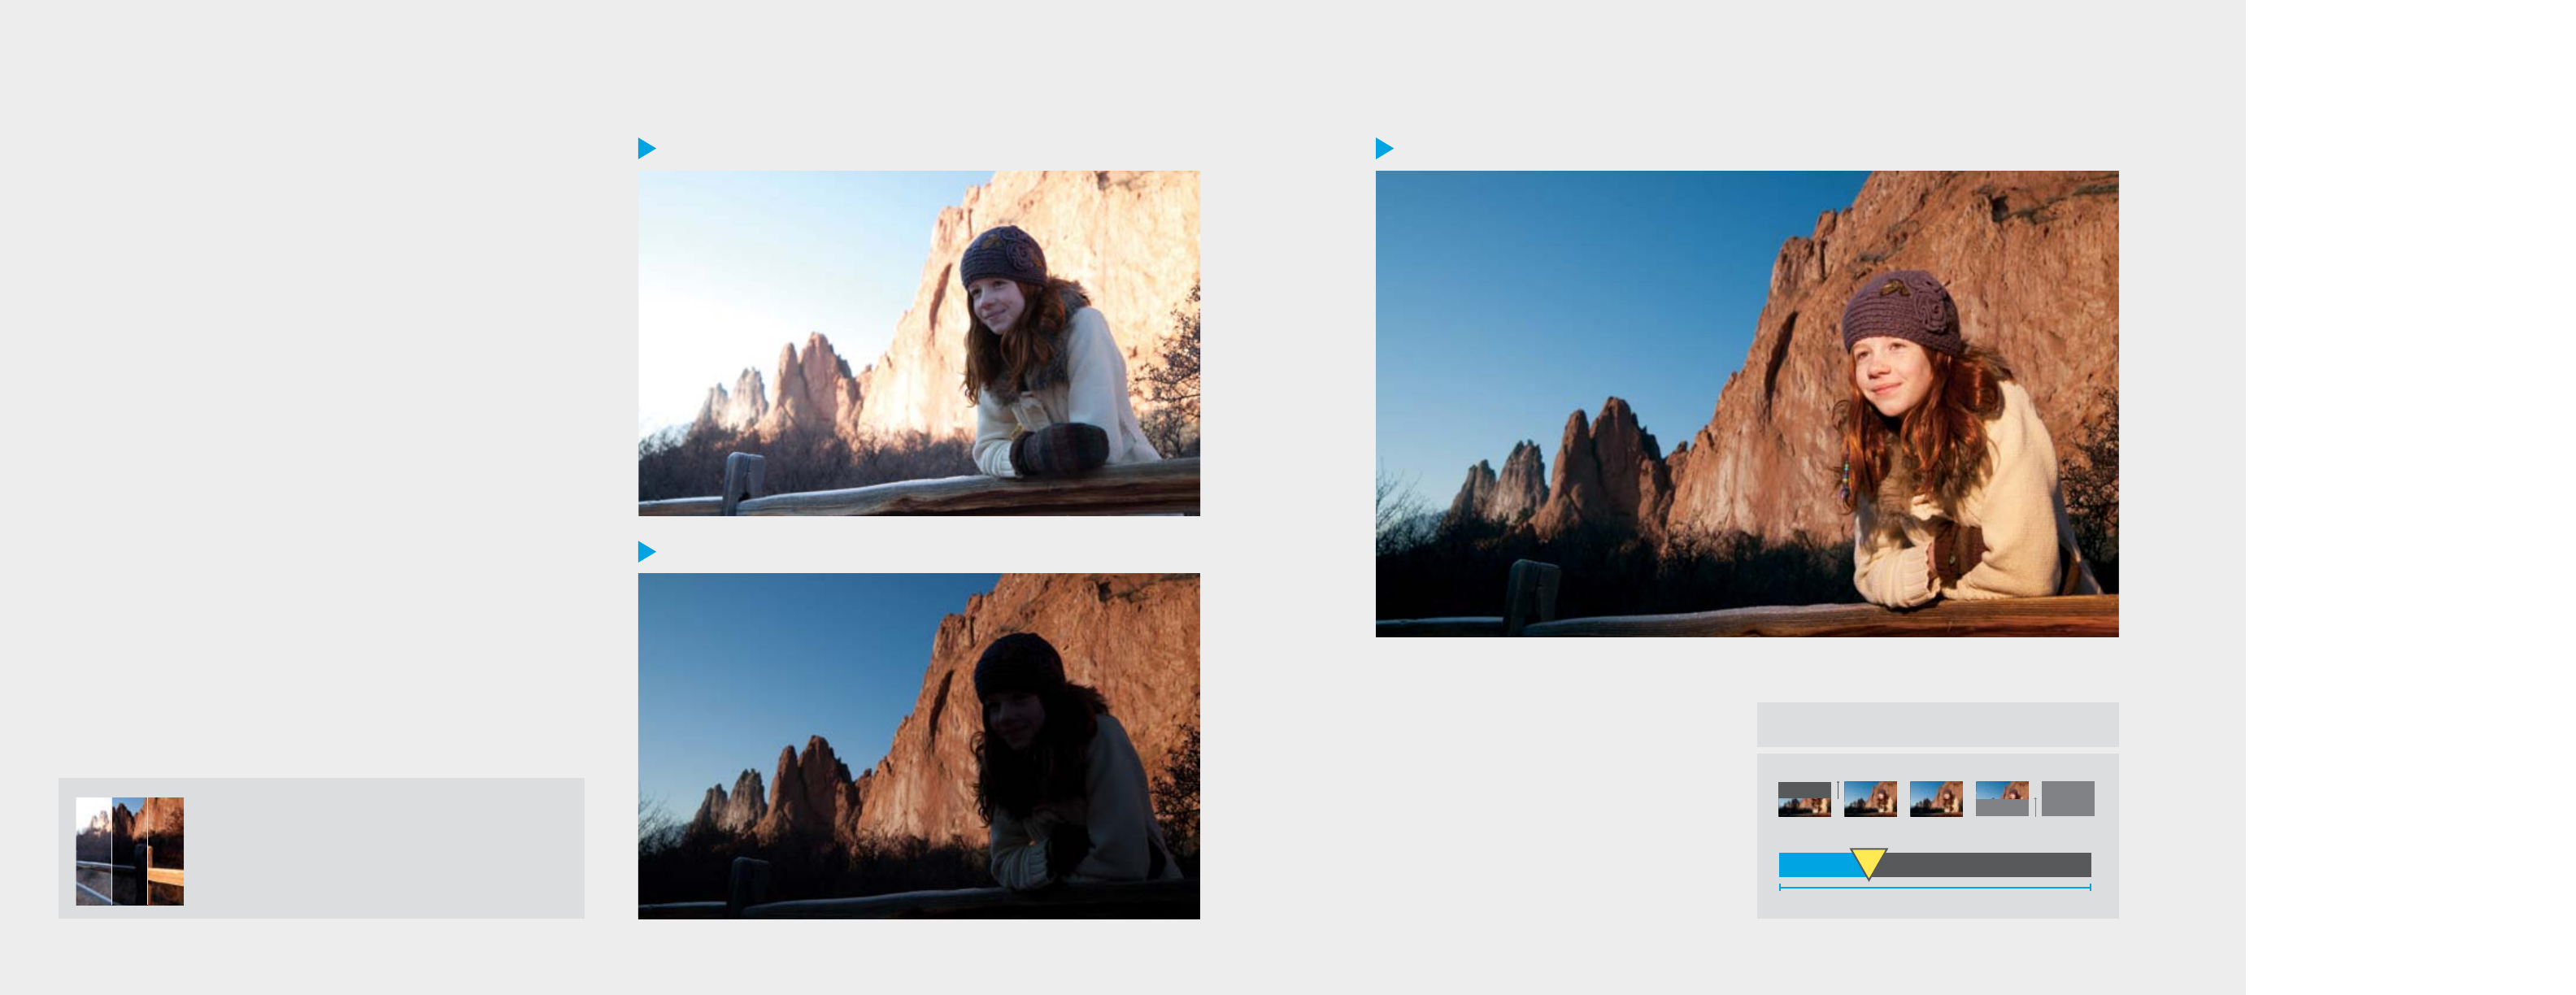
Fill flash is a technique used to brighten deep shadow areas, particularly
when photographing backlit subjects. Fill flash is typically used outdoors
on sunny days, though the technique is useful any time the background is
significantly brighter than the subject, or your subject has harsh shadows
caused by an overhead light (like the sun).
To use fill flash, the aperture and shutter speed are adjusted to correctly
expose the background, and the flash is fired to lighten the foreground.
In the first sample image (1) a tree shades our subject, but the rocks behind
her are directly in the sunlight. Changing our camera settings to properly
expose for our subject makes the rocks behind her overexposed.
The second image (2) is the same scene, but this time we have adjusted our
exposure for the rocks in the background. Now our subject standing in the
shade of the tree is grossly underexposed.
Since we now have the rocks properly exposed, all we have to do is add flash.
We used the same settings for the final image as used in shot (2), the only
difference is that the flash fired.
We were able to use the natural light to illuminate our background as well
as use artificial fill flash to illuminate our subject in the foreground.
F5.6, 1/125 SEC, ISO 100
Shutterblade position over time
Total exposure: 1/125 SEC
Flash
18 19
Total exposure: 1/200 SEC
Flash
Shutterblade position over time
On-Camera Flash Basics
What is it?
Allows for use of flash on bright
days with fast shutter speeds
that would normally not sync,
avoiding shutter curtain shadows.
How to use it?
• High Speed Sync can be found
in the Custom Settings of your
Flash. It is usually labeled HSS
• Set your camera to wireless flash
mode for High Speed Sync to
work or attach an off-camera
flash cord
• Activating High Speed Sync
gives you access to the entire
range of shutter speeds that
your camera offers
Where to use it?
Portraits where the available
light is so abundant that
exposing for your subject leaves
too much depth of field or an
overexposed background.
high speed
sync (HSS)
A sunny day gives us the ability to take nice fast photos, but chances are we
might also have to deal with shadows and shade and need to use a fill flash.
We may also want to maintain a nice defocused background at the same time.
In normal fill flash mode we would be limited to a shutter speed of 1/160 to 1/250
sec. depending on our camera, in turn, this would limit our aperture which would
be forced to a high f-stop and result in not much of a defocused background.
In normal flash photography, an instantaneous flash illuminates the subject
when the shutter is fully open. At shutter speeds up to 1/160 or 1/250 sec. the
first curtain shutter opens to completely reveal the sensor before the second
curtain starts moving. When the sensor is fully exposed your flash can fire to
illuminate your subject. However, in faster shutter speeds the second curtain
starts moving while the first curtain is still in motion. If your fill flash had to fire,
only a portion of your image would be illuminated.
In “High-Speed Synchronization” mode (HSS), the flash will emit multi-bursts of
light, illuminating each sliver of sensor exposed while high-speed shutters are open
as slits. This enables flash synchronization up to 1/4000 sec. high-speed shutters.
F14, 1/200 SEC, ISO 160
F2.8, 1/4000 SEC, ISO 160
HSS allowed for use of flash to fill-in shadows
from sun in bright conditions
High Speed Sync Fill Flash
This photo is a perfect example. To minimize shadows
and shade, a flash was used. However, the goal was
to have the rocks defocused. We can see that did not
happen. Why? With a flash set to a standard setting, it
could not sync with a shutter speed faster than 1/160 to
1/250 sec. With this in mind, the camera adjusted the
aperture accordingly. In this case, in manual mode,
we were limited to an aperture of F16, which allowed in
enough light to give undesired detail to the rocks.
In this photo, High Speed Sync allowed us to use our flash
throughout the entire shutter speed/aperture range
of the camera. This works in both Aperture Priority and
Manual Mode. For the above photo, we turned on High
Speed Sync, put the camera in Manual Mode set an
aperture of F2.8* and a shutter speed of 1/4000 sec.
The flash fired, illuminating our subject. Aperture F2.8 gave
the rocks behind our subject a soft focus and the fast
shutter speed made sure the rocks were not overexposed.
* It is important to note that lenses vary in aperture settings and while our
lens was able to set an aperture of 2.8, your lens might not. Refer to your
lens owners manual for its specifications.
Standard Sync Fill Flash
Split-second Breakdown
Total exposure: 1/4000 SEC
Flashes
Shutterblade position over time
Split-second Breakdown
20 21
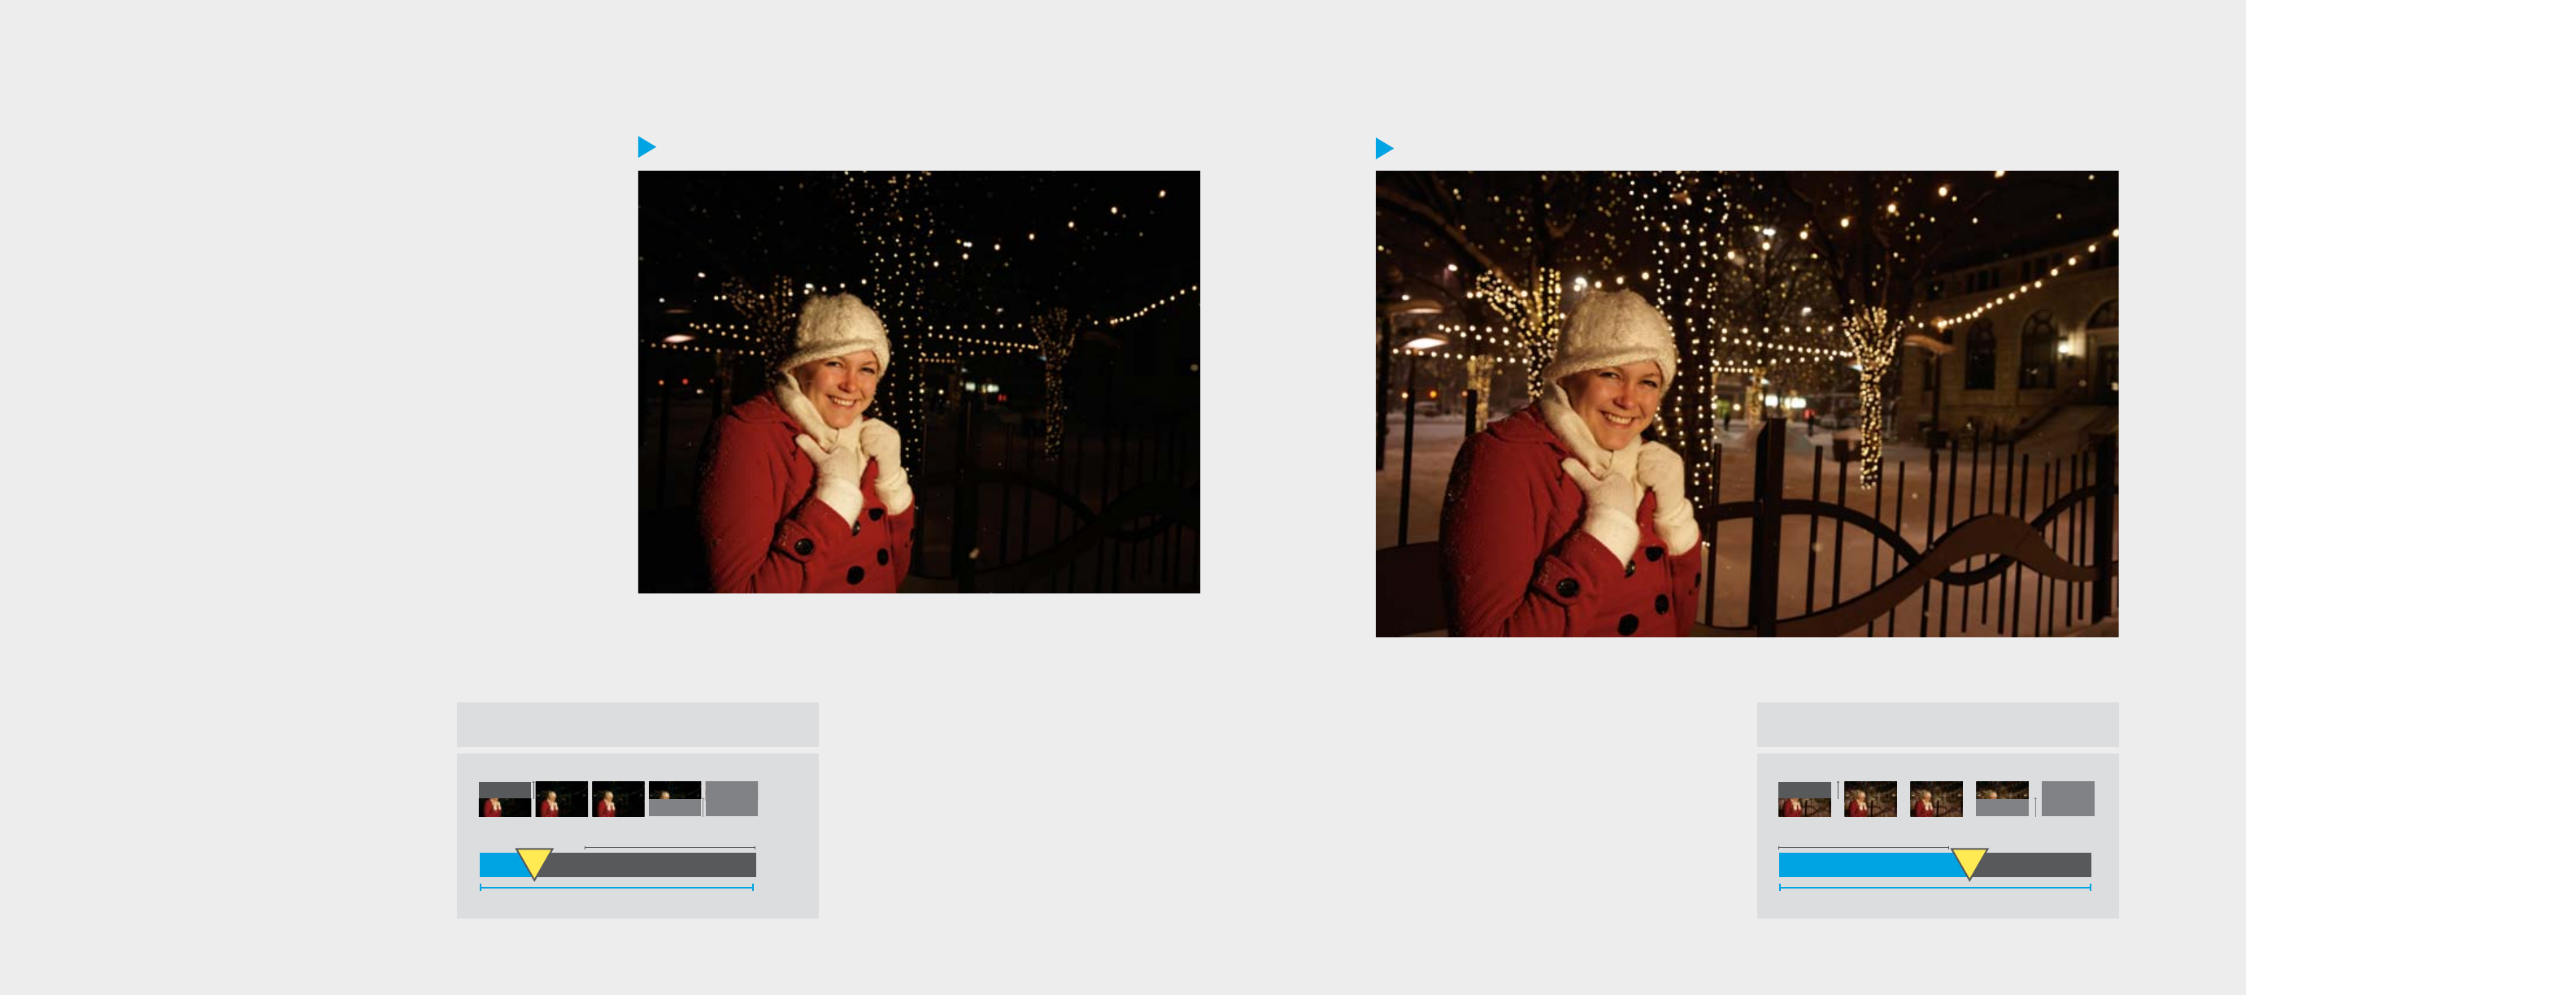
Slow Sync Flash
On-Camera Flash Basics
What is it?
Creates a long exposure with
flash to allow ambient light to be
seen and balance natural light
with flash light.
How to use it?
• Set your camera to Slow
Sync Mode
• Place your camera down or use
a tripod to keep it stable
• Set the self-timer or use the
optional wired or wireless remote
control so you are not moving
the camera while it is capturing
the image
• If photographing a person, have
them remain still for the duration
of the photo
Where to use it?
Nighttime shots where the
background is important to
the overall image. Great for
capturing ambient light from
decorations or city lights, while
keeping your subject sharp.
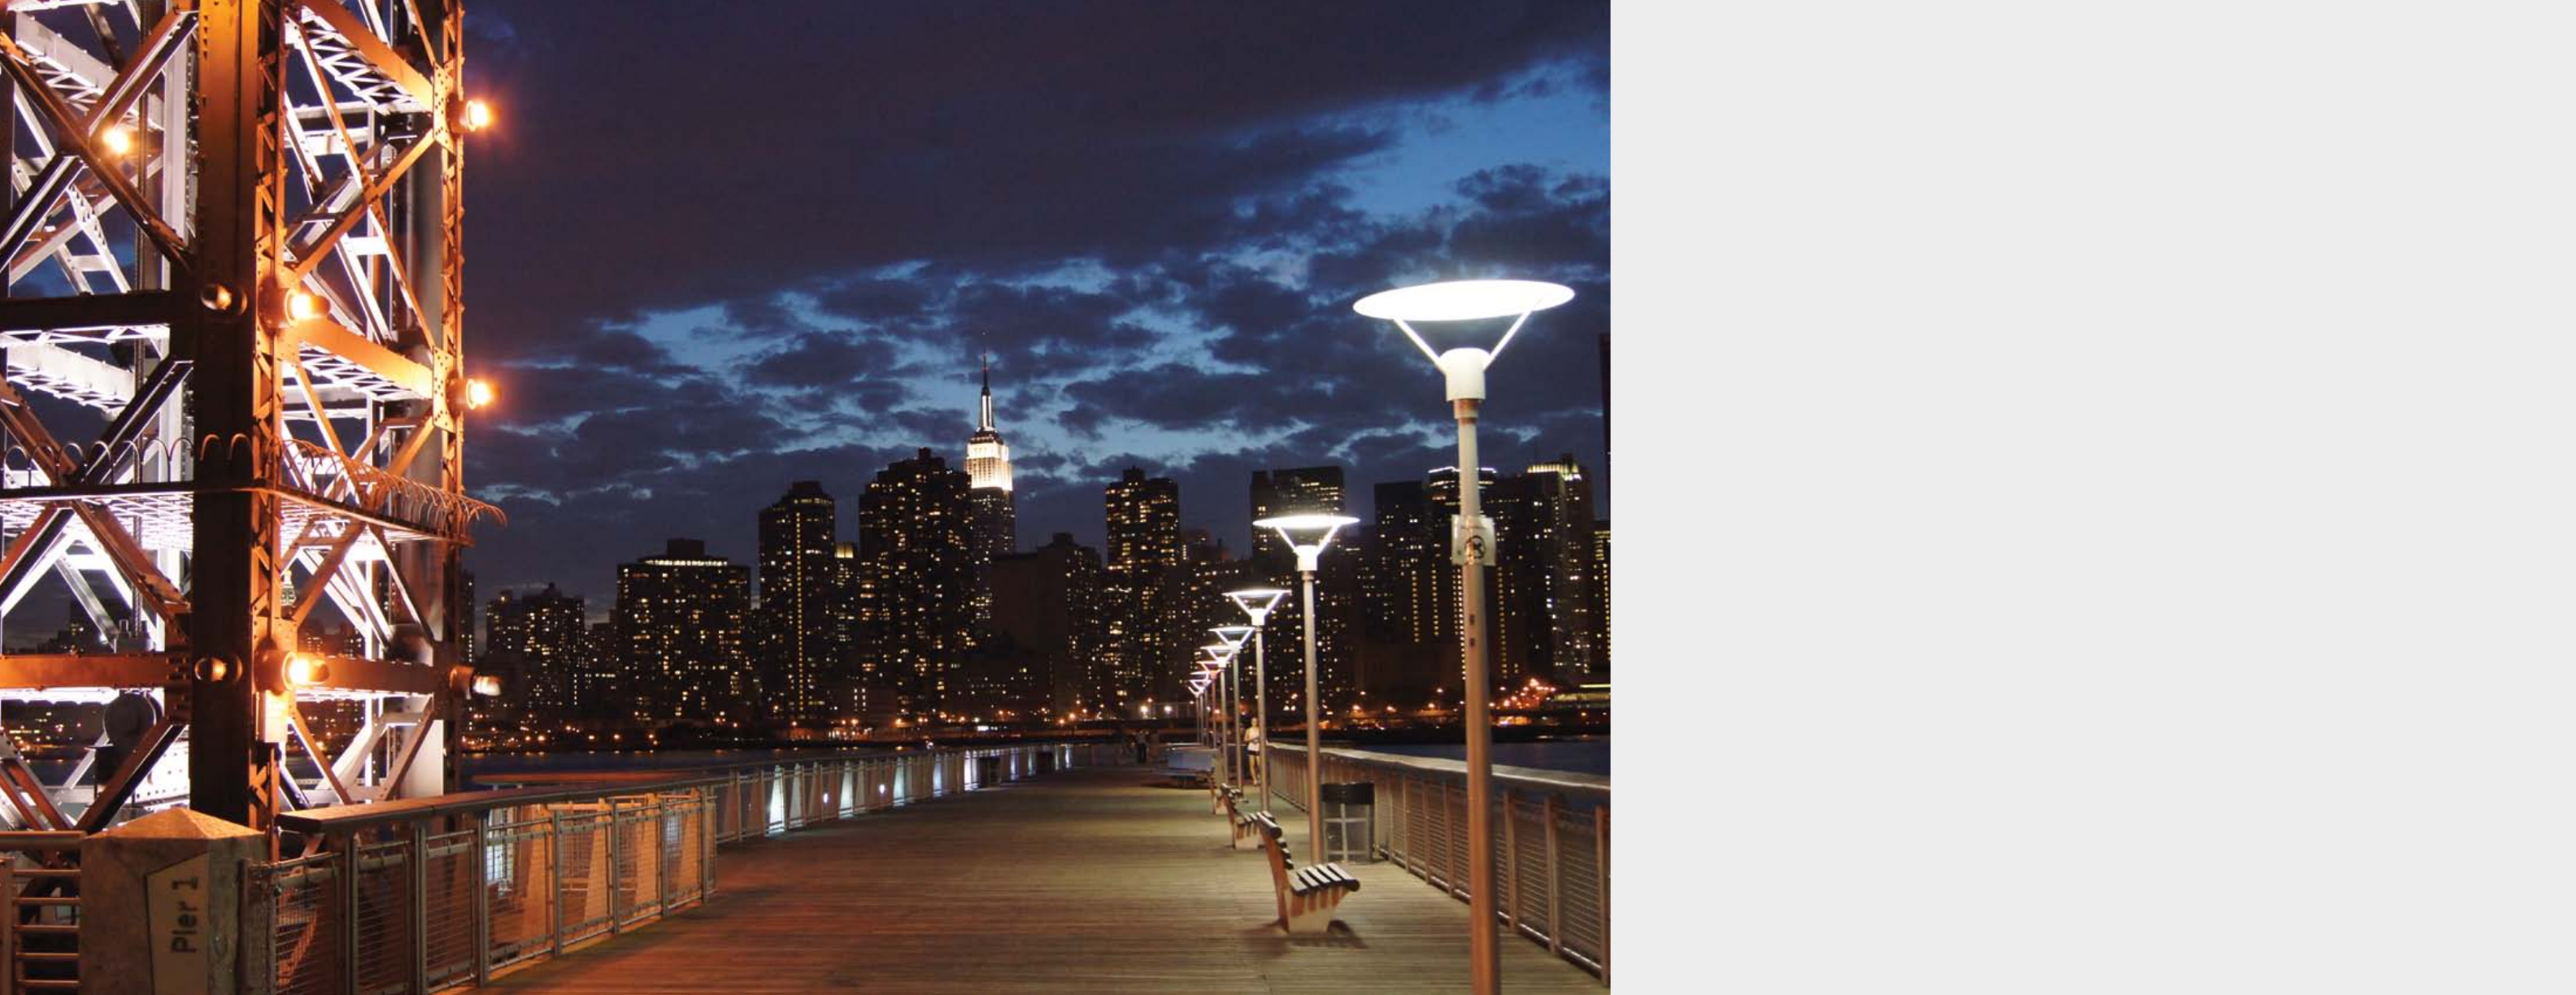
slow sync
flash
Recreate what your eyes see and tell the whole story.
It’s a lovely evening and you’re out for a stroll when you come across the
perfect setting for a photograph, but you face a problem. Your camera
will either need a long exposure to capture the ambient detail of the lights
which would leave your subject in the foreground in the dark, or your fill
flash will illuminate your subject leaving the background dark and lacking
the mood you originally wanted to capture.
Most of the time, capturing a moment at night will
require a flash to illuminate the image. However, if you
simply fire the flash you will not be telling the entire story.
The main goal of a flash is to illuminate what is directly in
front of it. At night, this is useful for capturing the subject
but not for capturing what is happening beyond the
range of your flash.
Slow Sync flash allows you to capture both the subject
as well as the background. How? Slow Sync flash will
slow down your shutter speed as well as fire the flash
later in the exposure. A slower shutter speed will allow
more ambient light to be captured and the flash will
ensure your subject and the background behind them
are properly lit.
Background Under Exposed
Standard Fill Flash
F5, 1/60 SEC, ISO 320
F5, 1/8 SEC, ISO 320
Flash
Split-second Breakdown
Shutterblade position over time
Total exposure: 1/60 SEC Total exposure: 1/200 SEC
Flash
Shutterblade position over time
Split-second Breakdown
Capturing Ambient Light
22 23
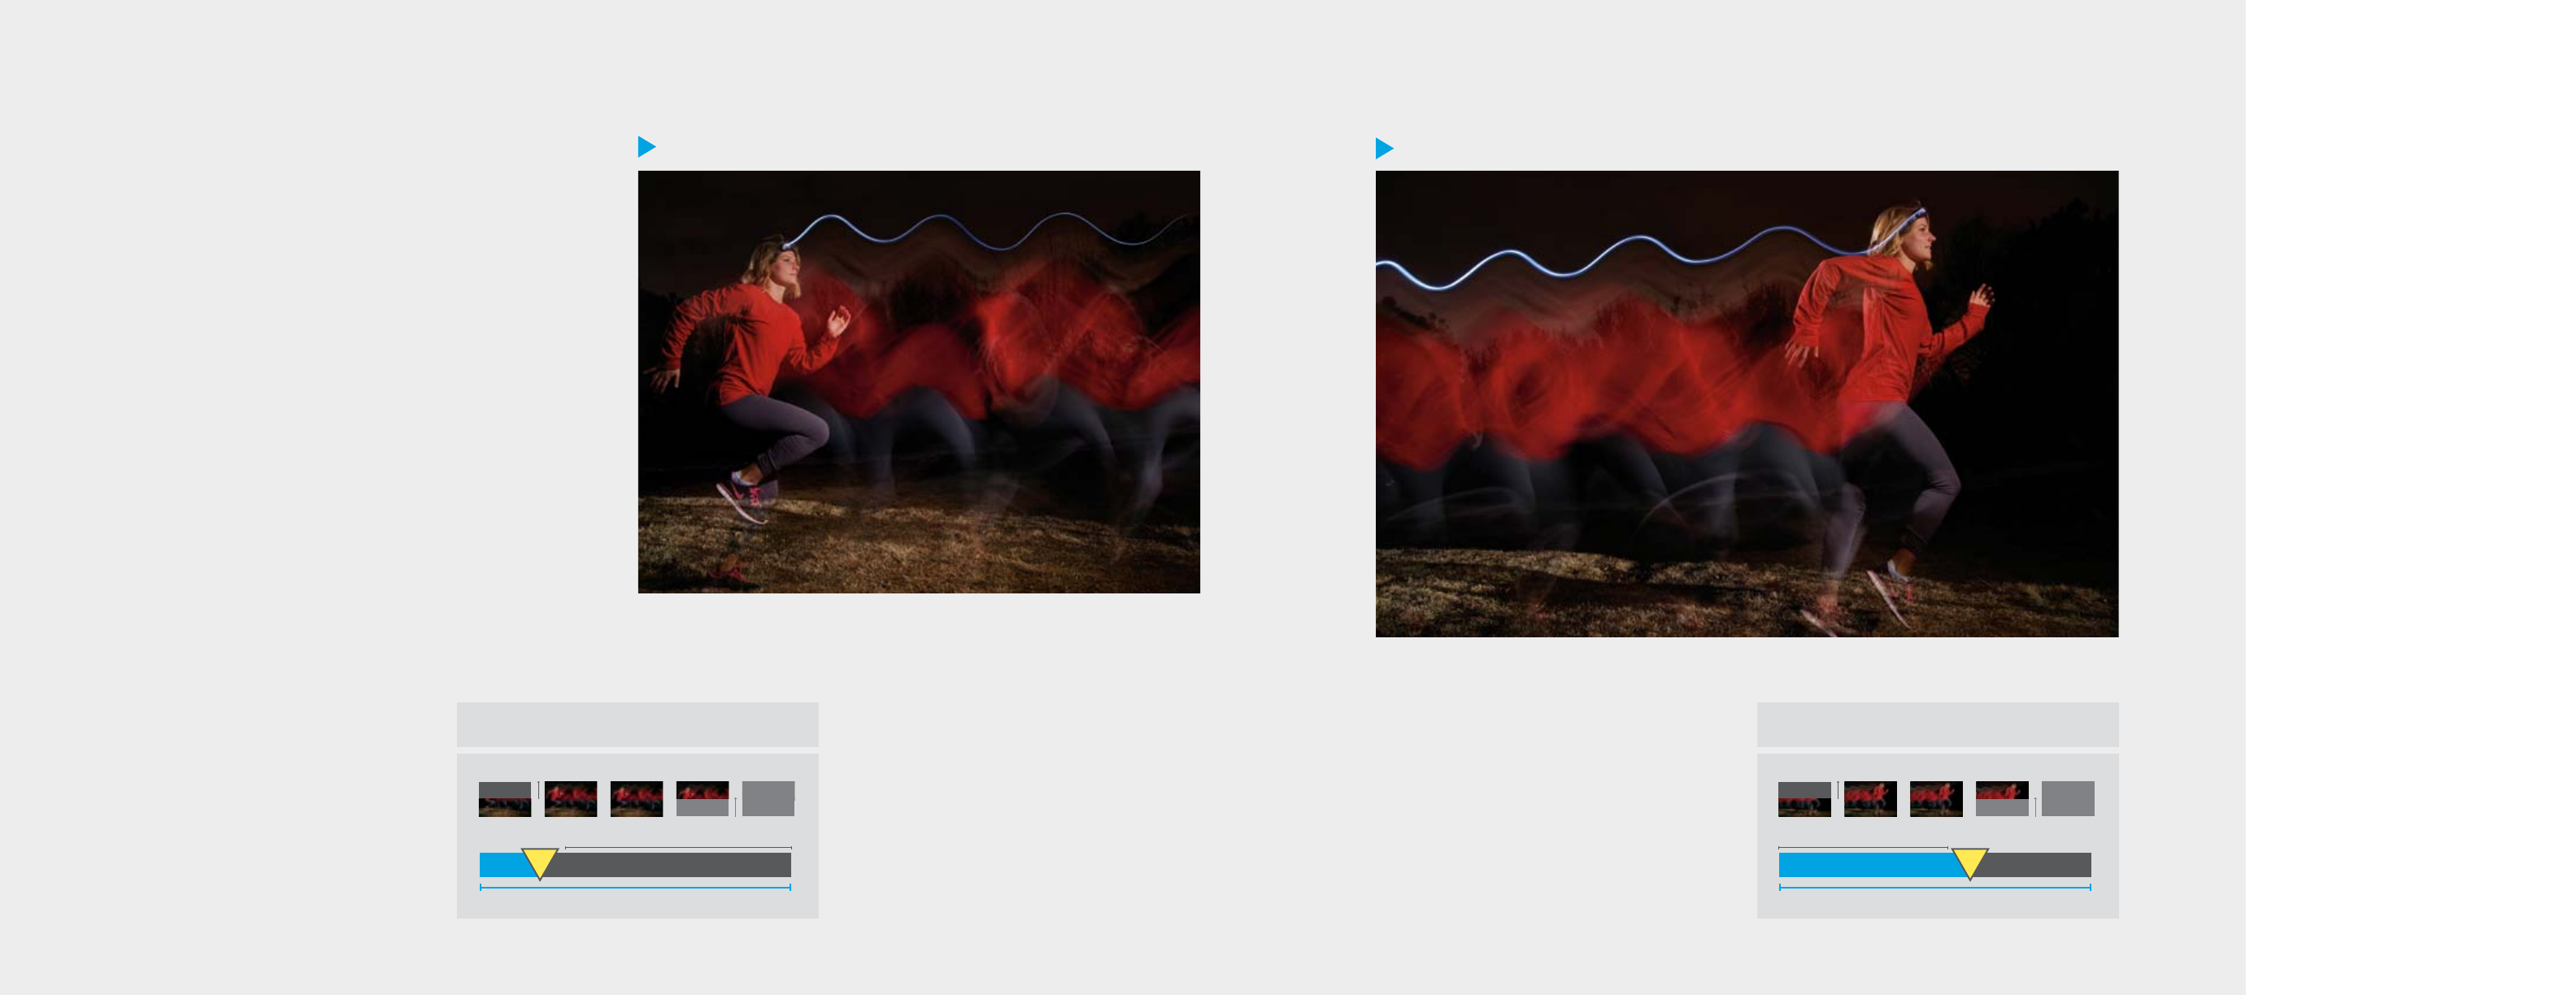
2. With Rear Sync Flash
1. Without Rear Sync Flash
On-Camera Flash Basics
What is it?
Triggers flash at end of exposure
instead of beginning to allow for
ambient light to be captured.
How to use it?
• Rear Sync Flash is found within
the flash options of your camera
menu and can be used with a
built in or external flash
• You will need to use a longer
shutter speed so keep the
camera still by using a tripod or
other stabilizing device
• Consider using a remote shutter
release to cut back on-camera
movement
Where to use it?
Use it when you want to capture
the trail of an object in motion or
flowing light more naturally.
rear sync
flash
Adding motion to your image presents an added level of creativity. Being
able to capture some blur followed by freezing the action allows you to tell a
story about the direction your subject was moving in. To do this; activate the
Rear Sync function in your flash settings and select a slow shutter speed.
In these photographs, we wanted to capture a runner in motion. The photo 1
shows the correct use of Rear Sync. Photo 2 shows what happens when the
standard flash settings are used such as Auto, Fill-Flash or Slow Sync. As you
can see, it looks like the runner is running backwards. Why? A flash set to a
standard setting will fire right after the shutter has been released freezing
the action at the beginning of the motion and capturing the light trail
during the long exposure. This will create an interesting effect that almost
looks like reversed motion.
Manual Mode. Flash set to Fill Flash. 2.5 seconds
F5.6 250 ISO. Because the flash fires first, the remaining
exposure time captures an unnatural trail of light.
With Rear Sync, the flash does not fire when the shutter
has been released. The flash fires as the shutter closes
at the end of the exposure. This will create a blur of motion
during the exposure and then capture the subject at the
very end creating a more natural trailing light.
F5.6, 2 1/2 SEC, ISO 250
F5.6, 2 1/2 SEC, ISO 250
Total exposure: 2.5 SEC Total exposure: 2.5 SEC
Flash Flash
Shutterblade position over time Shutterblade position over time
Blurred motion exposed Blurred motion exposed
Split-second Breakdown Split-second Breakdown
24 25
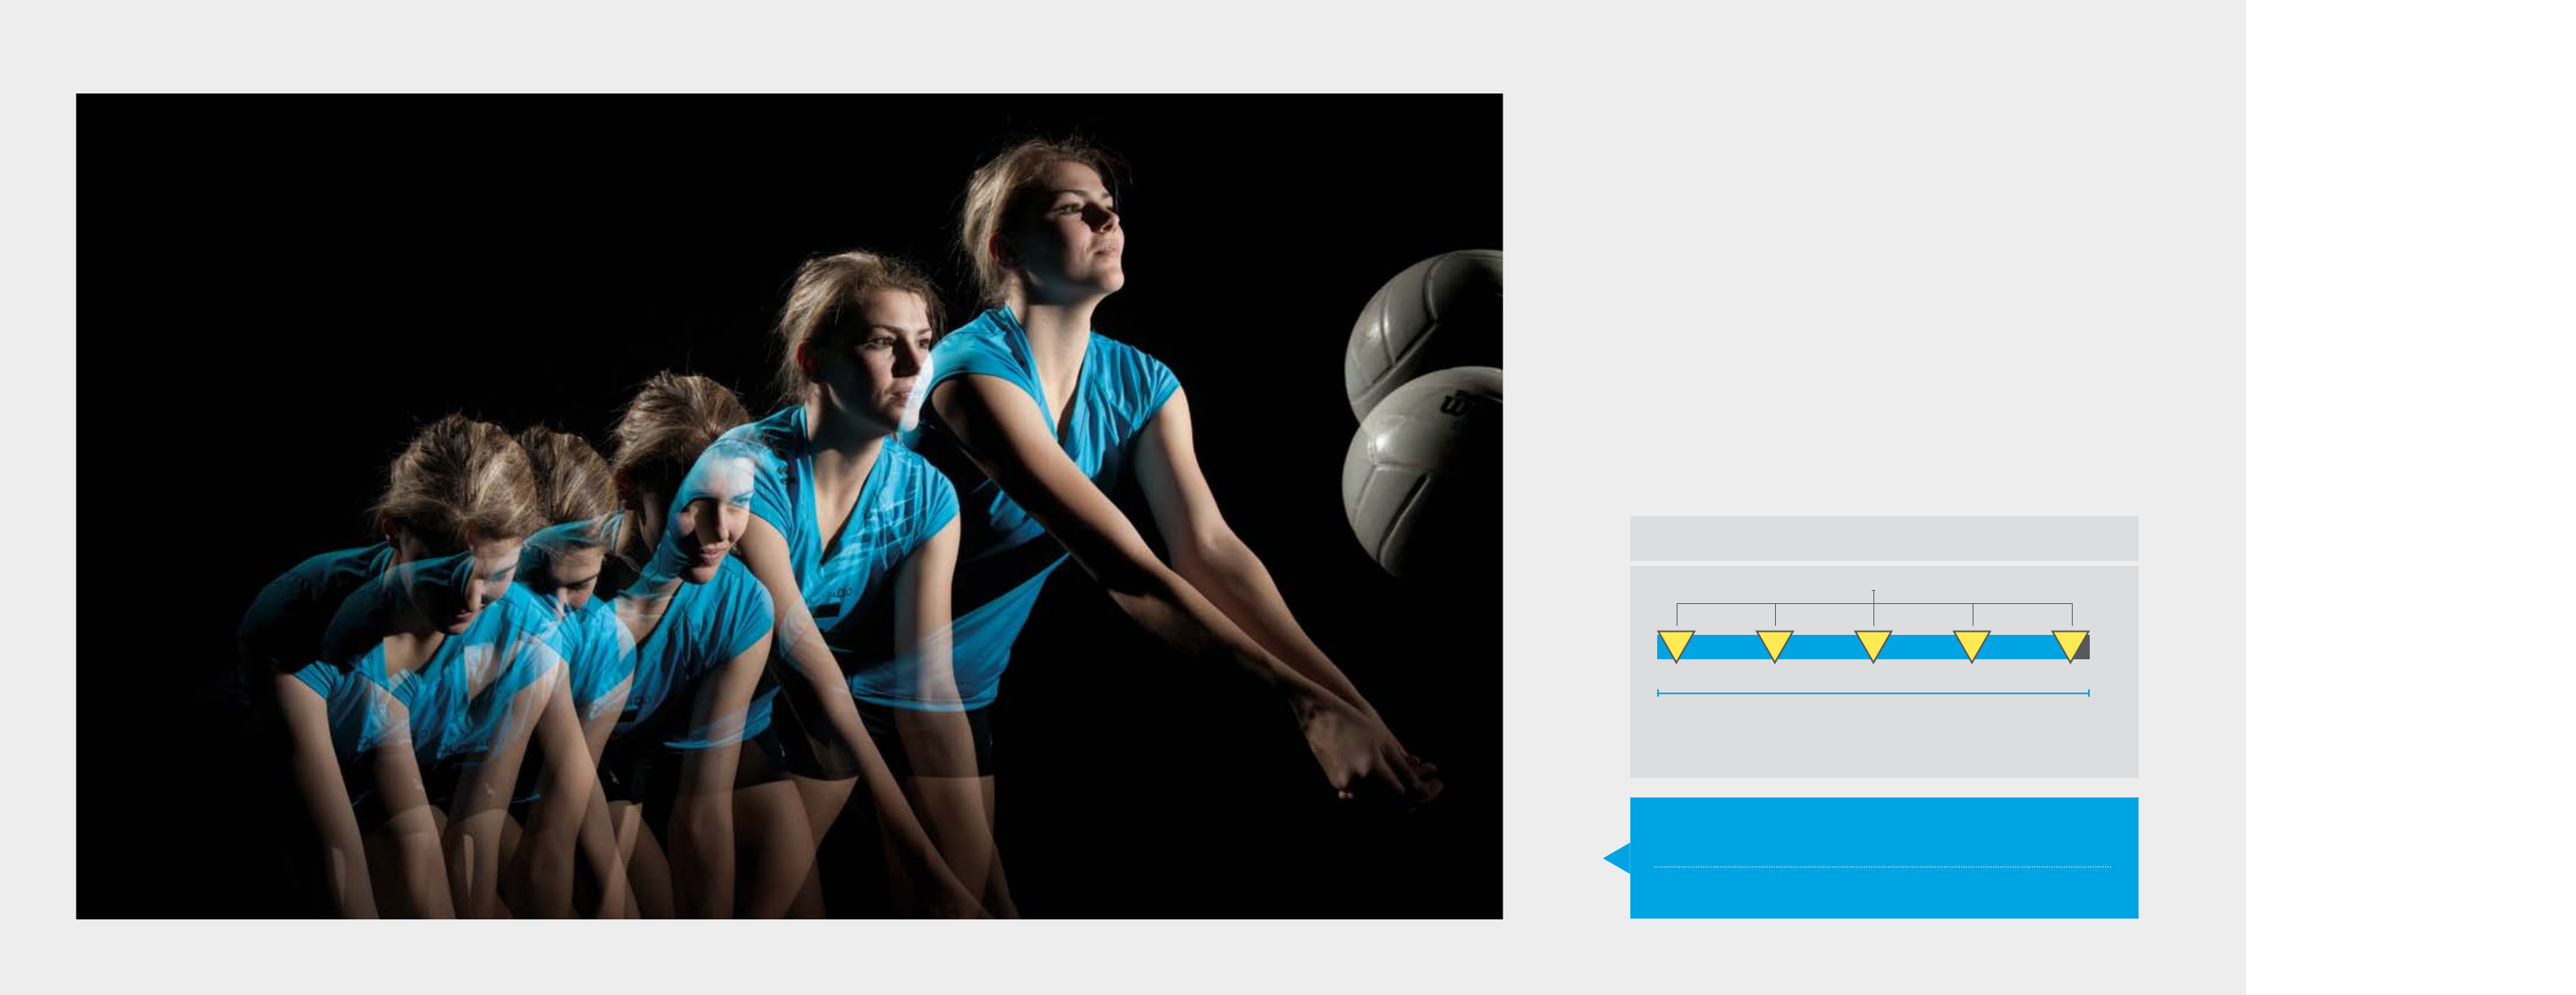
On-Camera Flash Basics
What is it?
Fires flash multiple times in same
exposure to capture movement.
How to use it?
•Use a tripod
•Set your camera to Manual
• Press the MULTI function on your
flash (check the manual as flash
setting change by model). Then
set the number of flashes you
want to fire and the duration
between each flash.
• Set a longer shutter speed based
on the number of flashes/Hz
• Shoot this in a dark room or
outside at night with minimal
ambient light
Where to use it?
Use it when you want to capture
multiple images showing your
subject in motion.
multi flash,
stopping motion
To capture the subject in motion, you can set your flash to trigger multiple times
during a single exposure when the subject is moving.
Multi Flash will only work in Manual Mode, you should set your shutter speed
based on the speed that your subject is moving and the desired number of
times you want to freeze the action in a single exposure.
When setting the Flash to Multi, set the number of times you want the flash to
fire and the hertz (time delay) between each flash. For the photo to the left, the
flash was set to fire 5 times at 3hz, which gave us a shutter speed of 1.6 seconds.
Total exposure: 1.6 SEC
Flash
Split-second Breakdown
3Hz 3Hz 3Hz 3Hz
How to calculate:
5/3hz = 1.6 seconds (Frequency/Hz = shutter speed)
Final Shot
Elegant sequence showing progression of an athlete.
F8, 1.6 SEC, ISO 100. Flash at 1/8 power.
26 27

Off-camera Flash Basics
off-camera
flash basics
Sometimes you need light to come from an angle that
the on-camera flash just cannot create, even with
bounce. Or, you need multiple light sources to create
the masterpiece you envision.
Off-camera flash, either wired or wireless, allows us
to fire the flash at the precise moment, intensity and
duration required.
In this section, we’ll cover various off-camera flash
basics, show you how to get multiple light sources from
one flash and dive into wireless ratio control
29
11f t 11f t
On-Camera with Bounce Flash Wired Off-Camera Flash
Off-camera Flash Basics
on-camera
vs. off-camera
flash effect
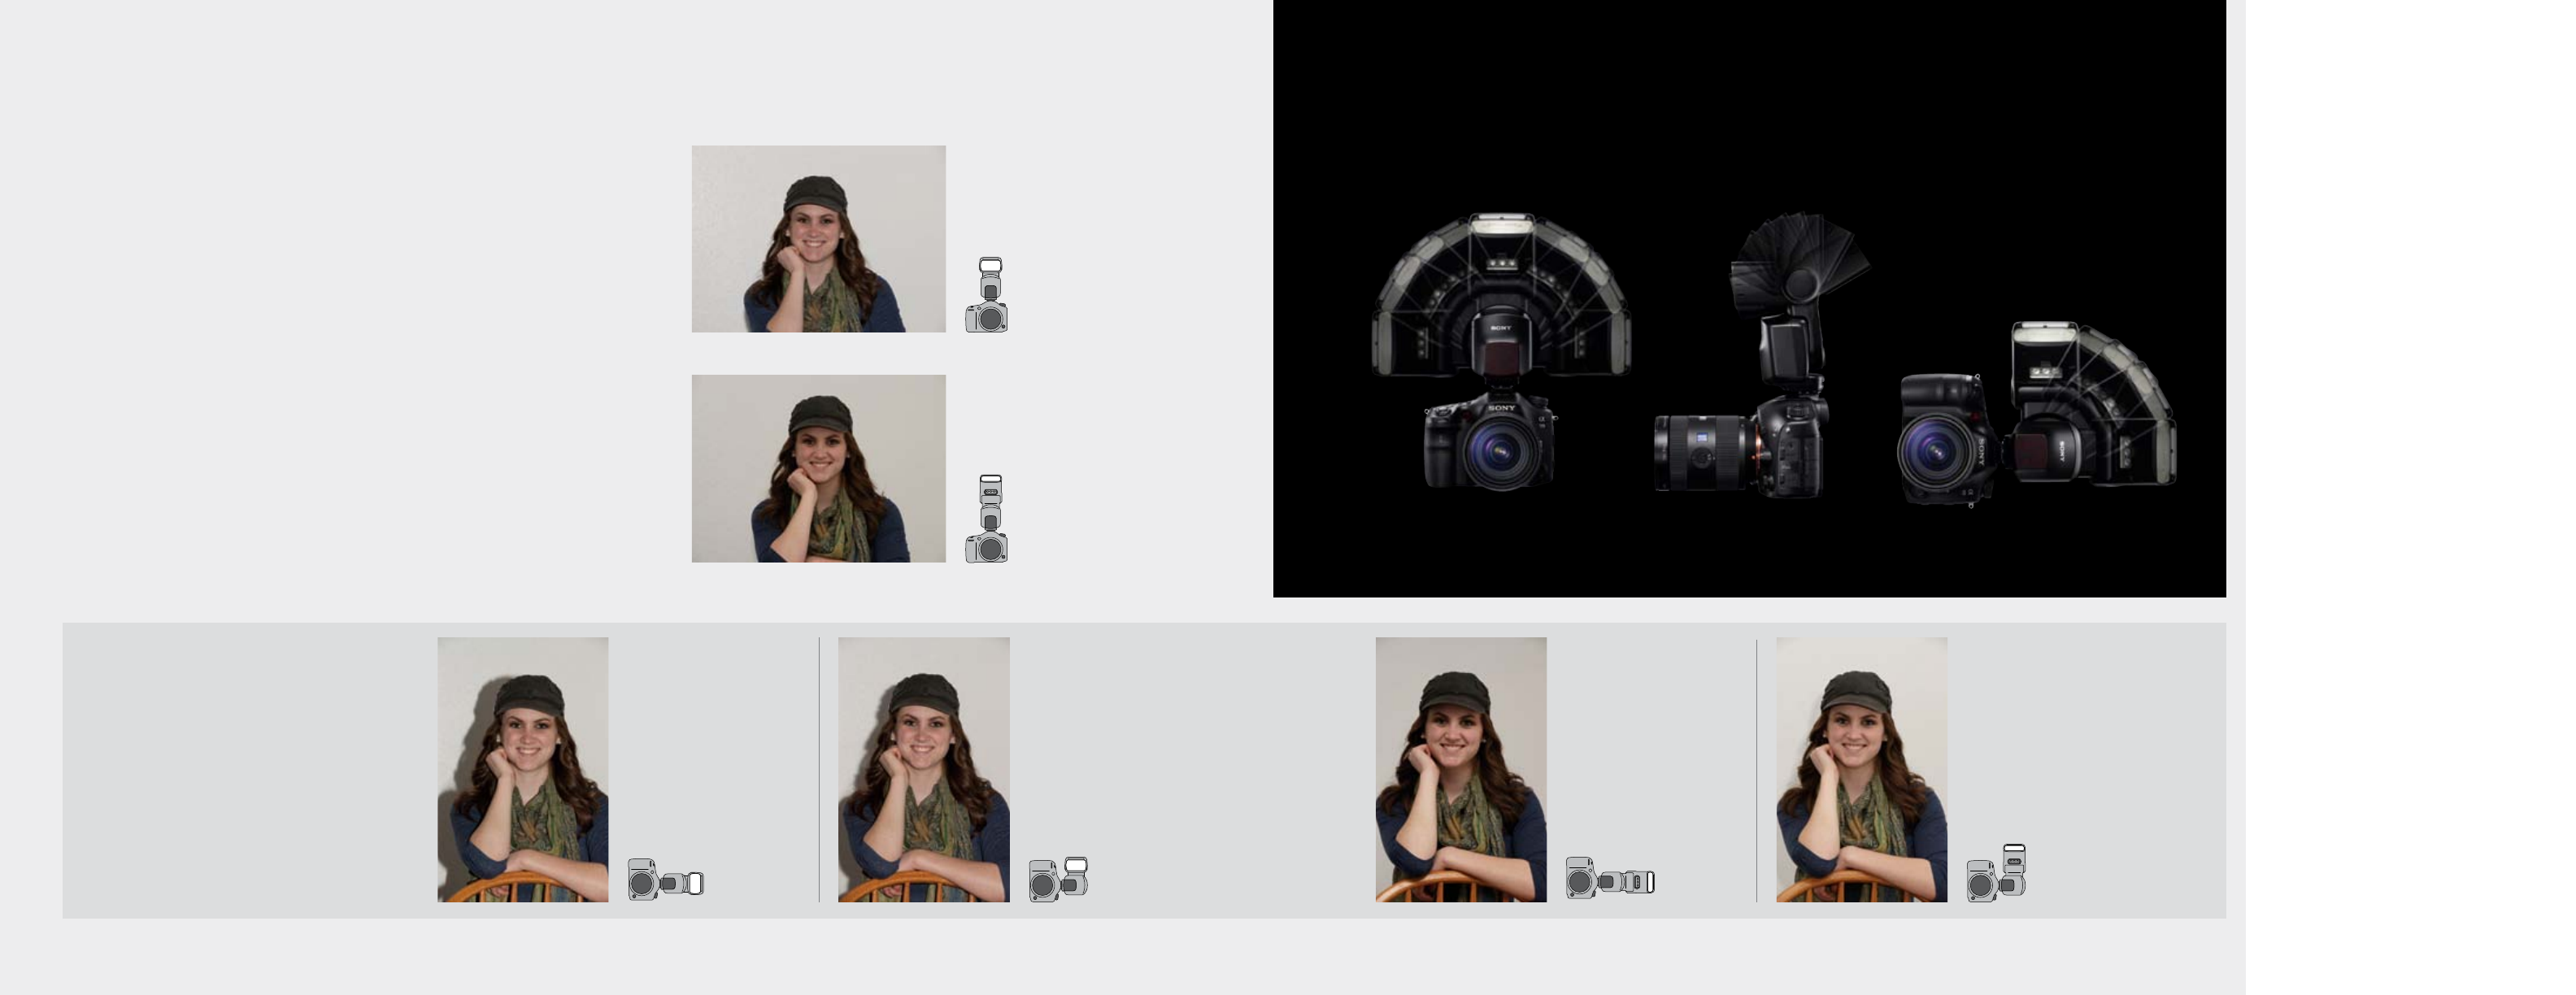
Using the on-camera flash has many advantages such as providing more light
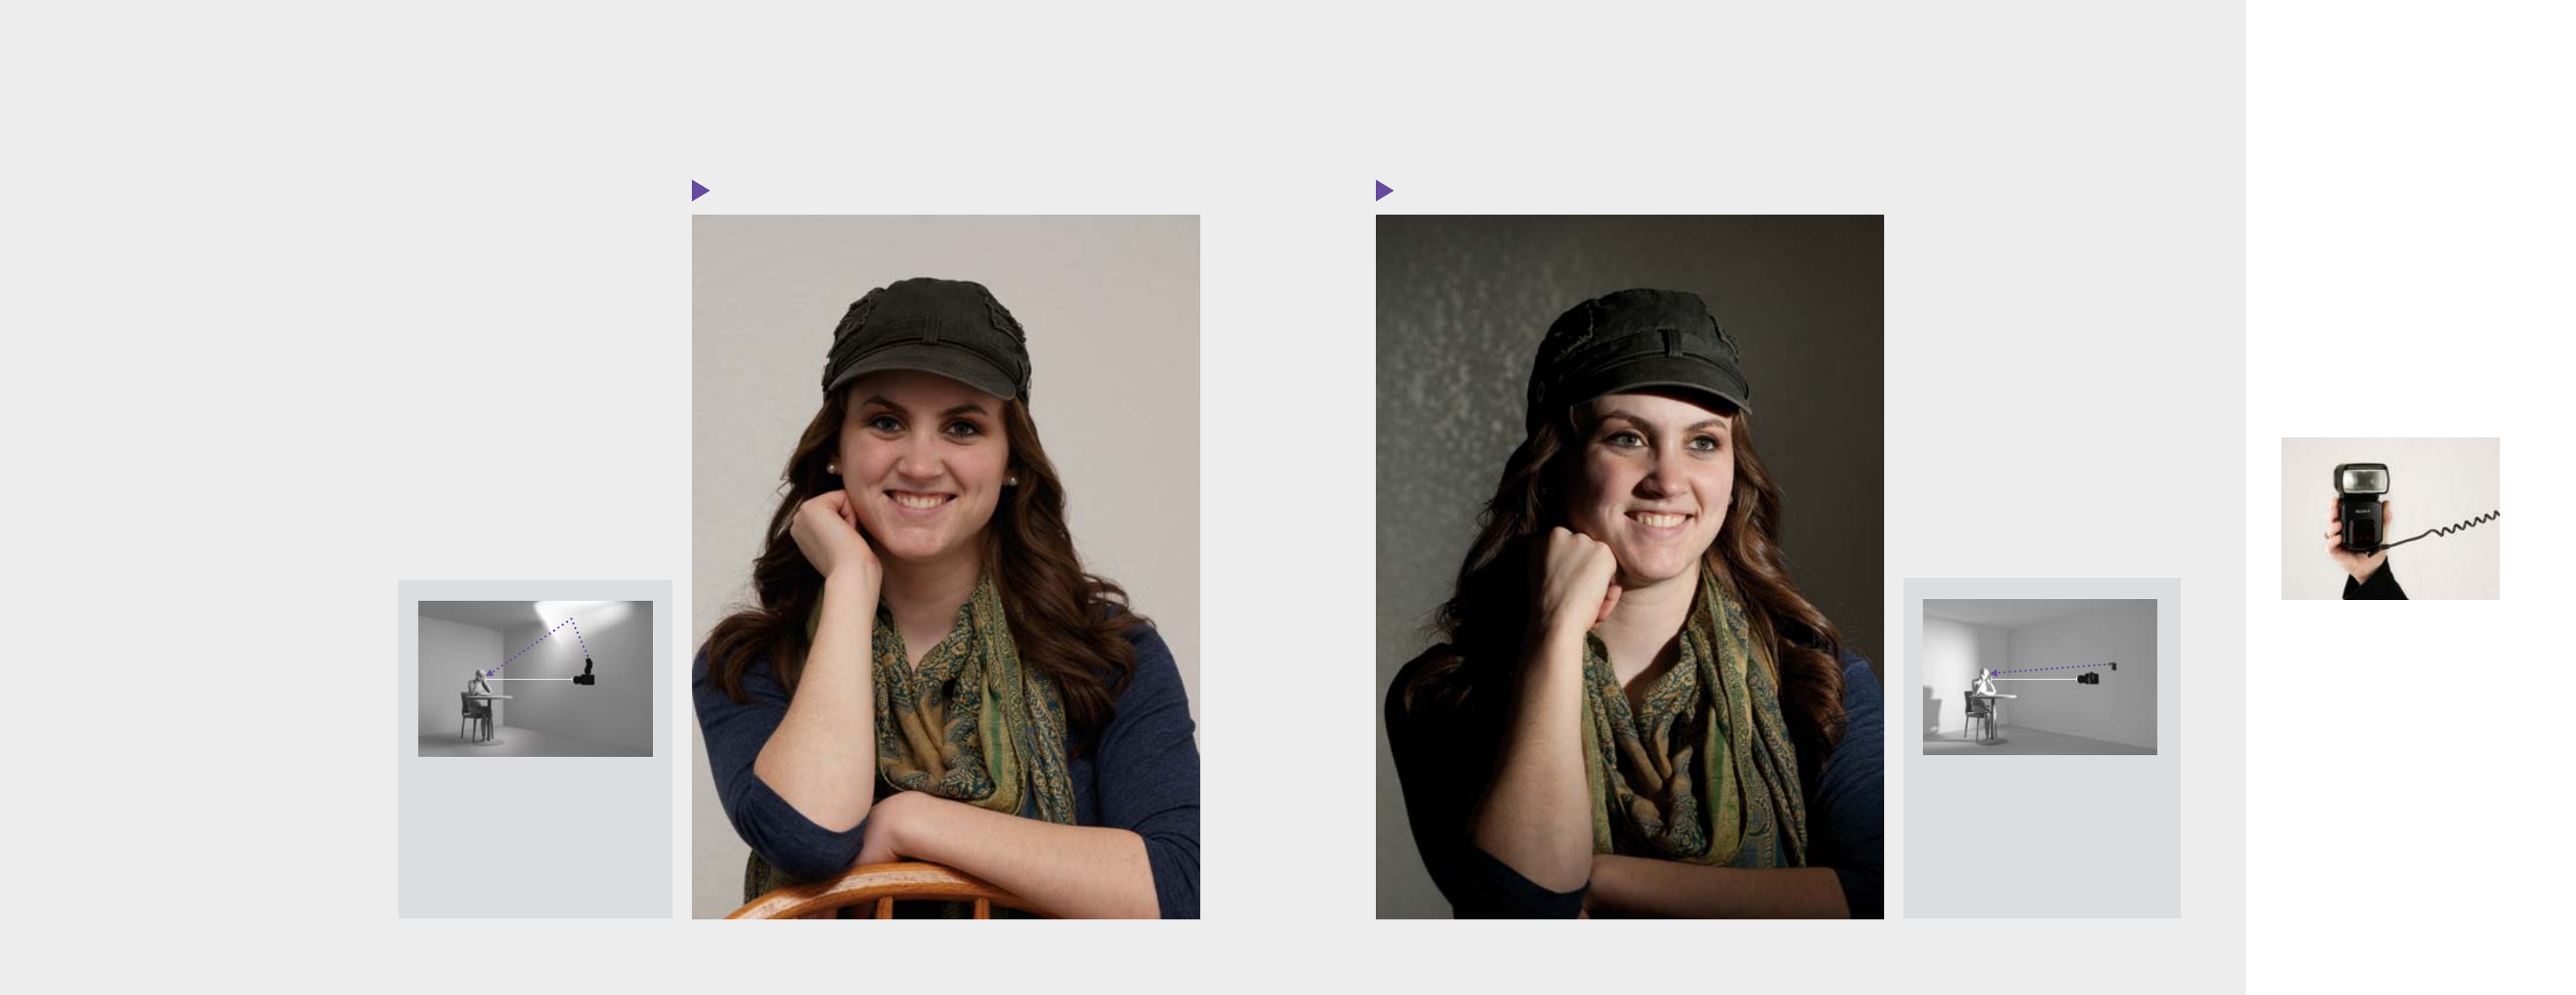
where there isn’t enough, or filling in shadows to highlight detail. Although good
to have, on-camera flash is still limited to a single light source close to the lens.
Off-camera flash increases your creative control and greatly improves the
images we can get by enabling us to move the flash away from the camera.
This allows us to get the angle shot we need, as well as the desired lighting
angle—which can be different.
The examples on these pages show how a good image using on-camera flash
with bounce can become a great image by taking the flash off the camera
and lighting the subject from the side.
What is it?
A technique used to move flash
off-camera and change light
direction. Wired flashes use a
physical sync cable to connect
to the camera. Wireless flashes
give you more flexibility than a
wired flash.
How to use it?
• Wired: Attach the wired flash
cable for one flash and use the
flash to flash cable for each
additional flash. Your flash will
work with the flash settings in
your camera
• Wireless: Set the camera and
flash setting to wireless. Place
the flash within line-of-sight of
the camera
Where to use it?
When you need to light your
subject from different angles
than where you’re taking the
photograph from.
The flash is on the camera, which
is 11ft from the subject. The
photographer used bounce flash
to soften the light on subject.
F7.1, 1/125 SEC, -0.3 EV, ISO 200
Same distance, but this time, the
photographer moved slightly to the
left of the subject and placed the
wired flash 4ft right of the camera.
F7.1, 1/125 SEC, -0.3 EV, ISO 200
30 31
On-camera flash
Off-camera bounce flash, diffuser, reflector
What is it?
A technique used to create
a studio looking shot with two
indirect light sources.
How to use it?
• Set the camera and flash
to wireless
• Position the flash on one side
of your subject
• Aim the flash at your subject
through a white diffuser or
simply use a piece of white
linen with translucent qualities
like a tablecloth
• Place a reflector or reflective
surface on the other side of
your subject
Where to use it?
When you only have one flash, but
want to create a studio looking
shot with two indirect light sources.
Commonly used for portrait or
product shots to get a 2:1 ratio.
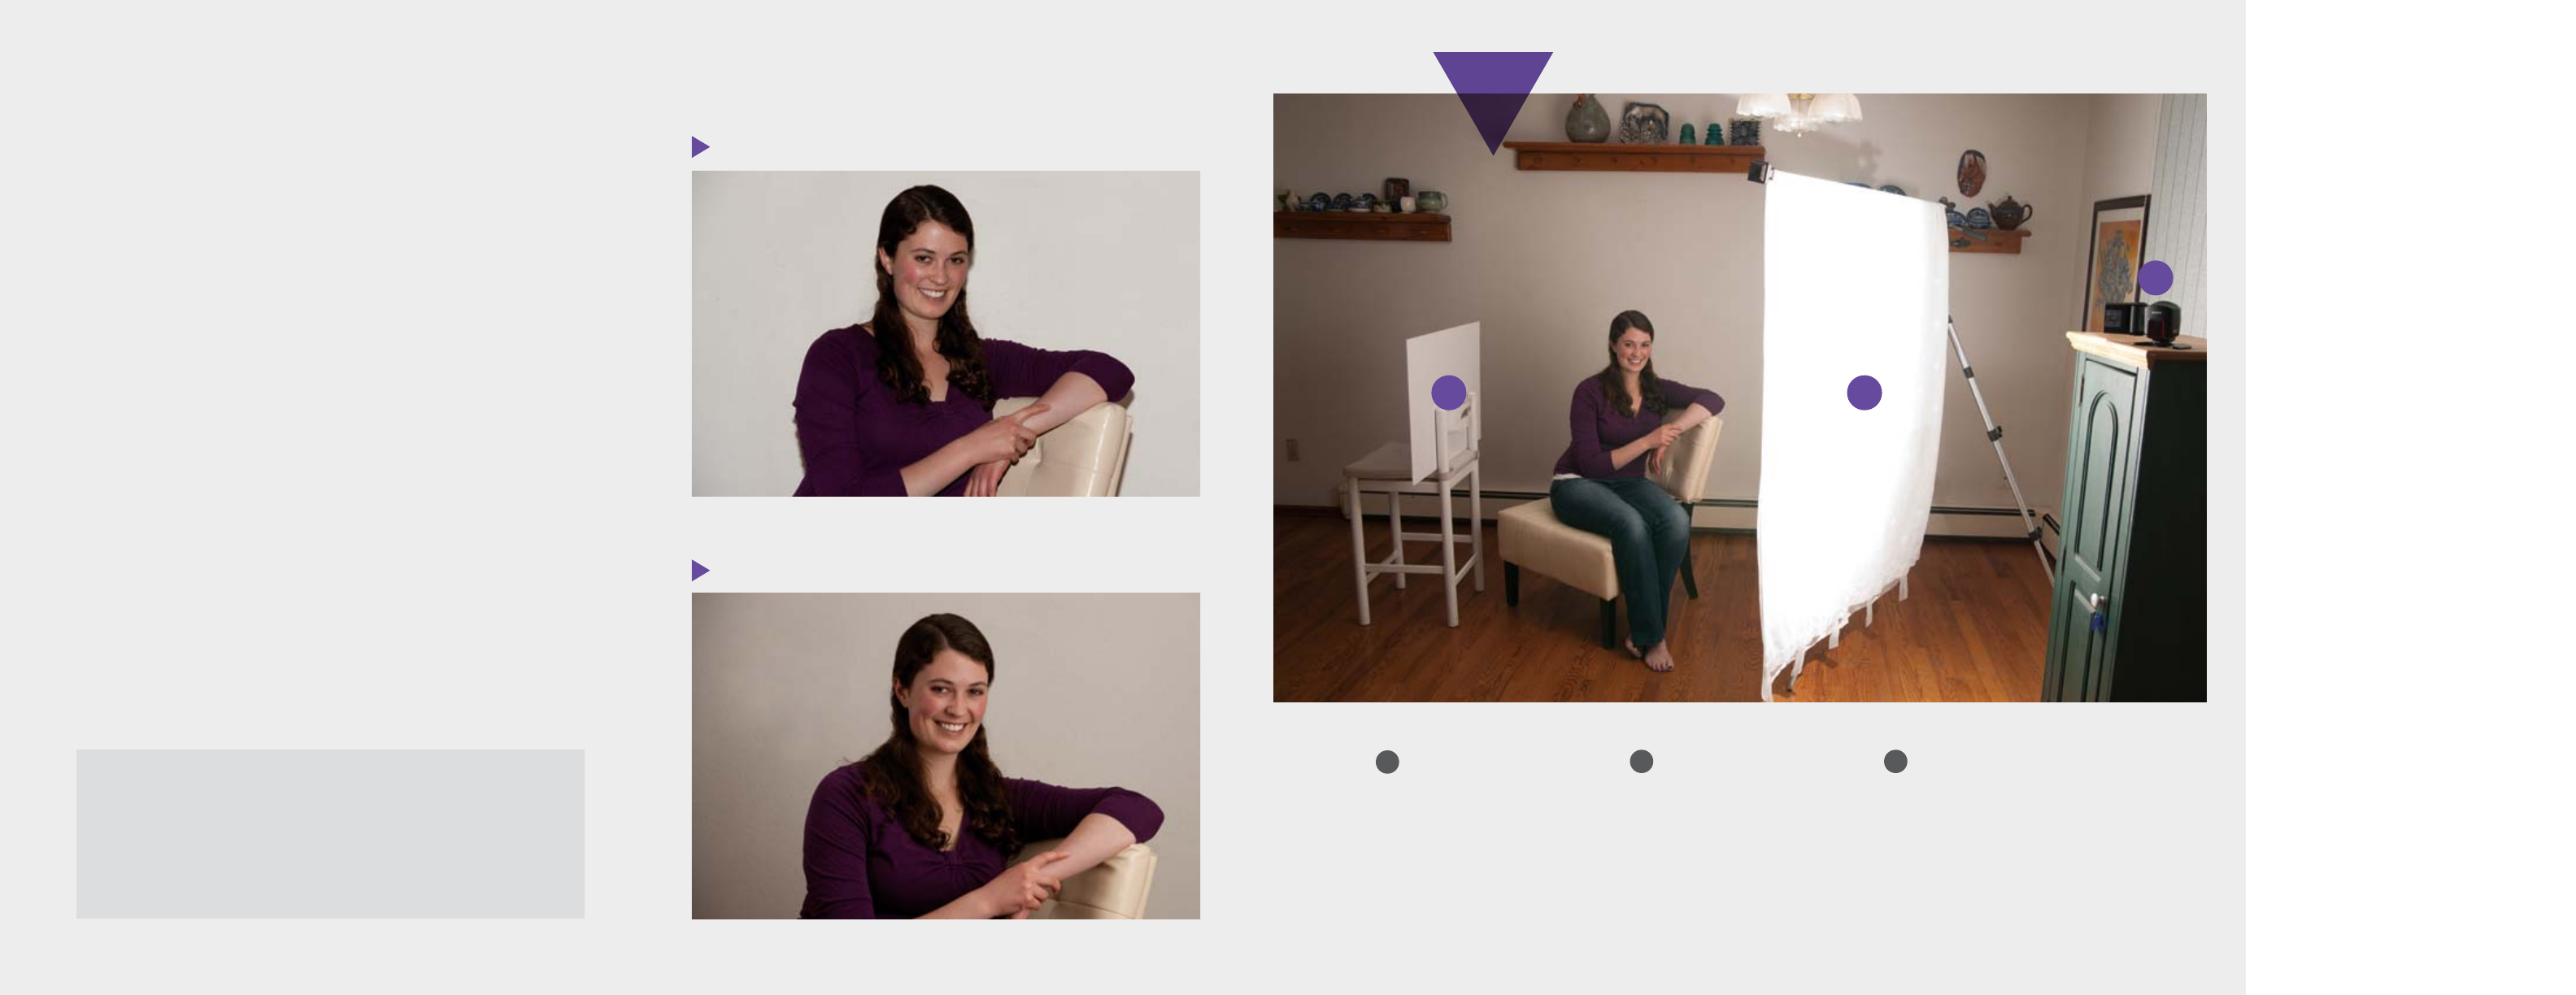
2:1 Light ratio
Different levels of light on your subject can highlight detail and make
your photograph more interesting. These are expressed as ratios. In
this photograph there are two light sources; one direct (Key Light) and
one reflected (Fill Light). The direct light is about twice as strong as
the reflected light. Therefore we have a light ratio of 2:1.
03
01
02
one flash,
two lights
Being able to place the flash separate from the camera opens a world of creative
possibilities. We now have better control over the location, amount and
direction of the artificial light added to our images. With the flash on the camera,
this photograph looks flat with harsh shadows.
Now, let’s remove the flash from the camera and position if elsewhere.
The cloth diffuser was able to reduce the shadows, but the right side of the
subject’s face is not as illuminated as her left side. To address this, we simply
placed a white reflective card on the right of the subject. We now have a
single wireless flash illuminating a white cloth to create diffused light on one
side of the subject, which then reflects off of a white card to illuminate both
sides of the subject’s face. This gives us a nice soft light with depth and costs
no more than a single flash and a bit of ingenuity.
Off-camera Flash Basics
Off-camera Setup
For an even softer light, we moved
the position of both the flash
and white cloth. The flash still
hits the white cloth first, but then
it bounces off of the reflective
surface behind it.
02 Diffuser
White linen tablecloth. Translucent
quality allows for diffused soft light
to pass through and increase the
size of our light source.
01 Flash
HVL-60M for adjustable power
and Quick Shift maneuverability.
Attached to included stand for
easy wireless positioning.
03 Bounce Card
3' x 2' sheet of white foam
core board.
SETUP
32 33
Off-camera as rim light
Off-camera as rim light with bounce cards
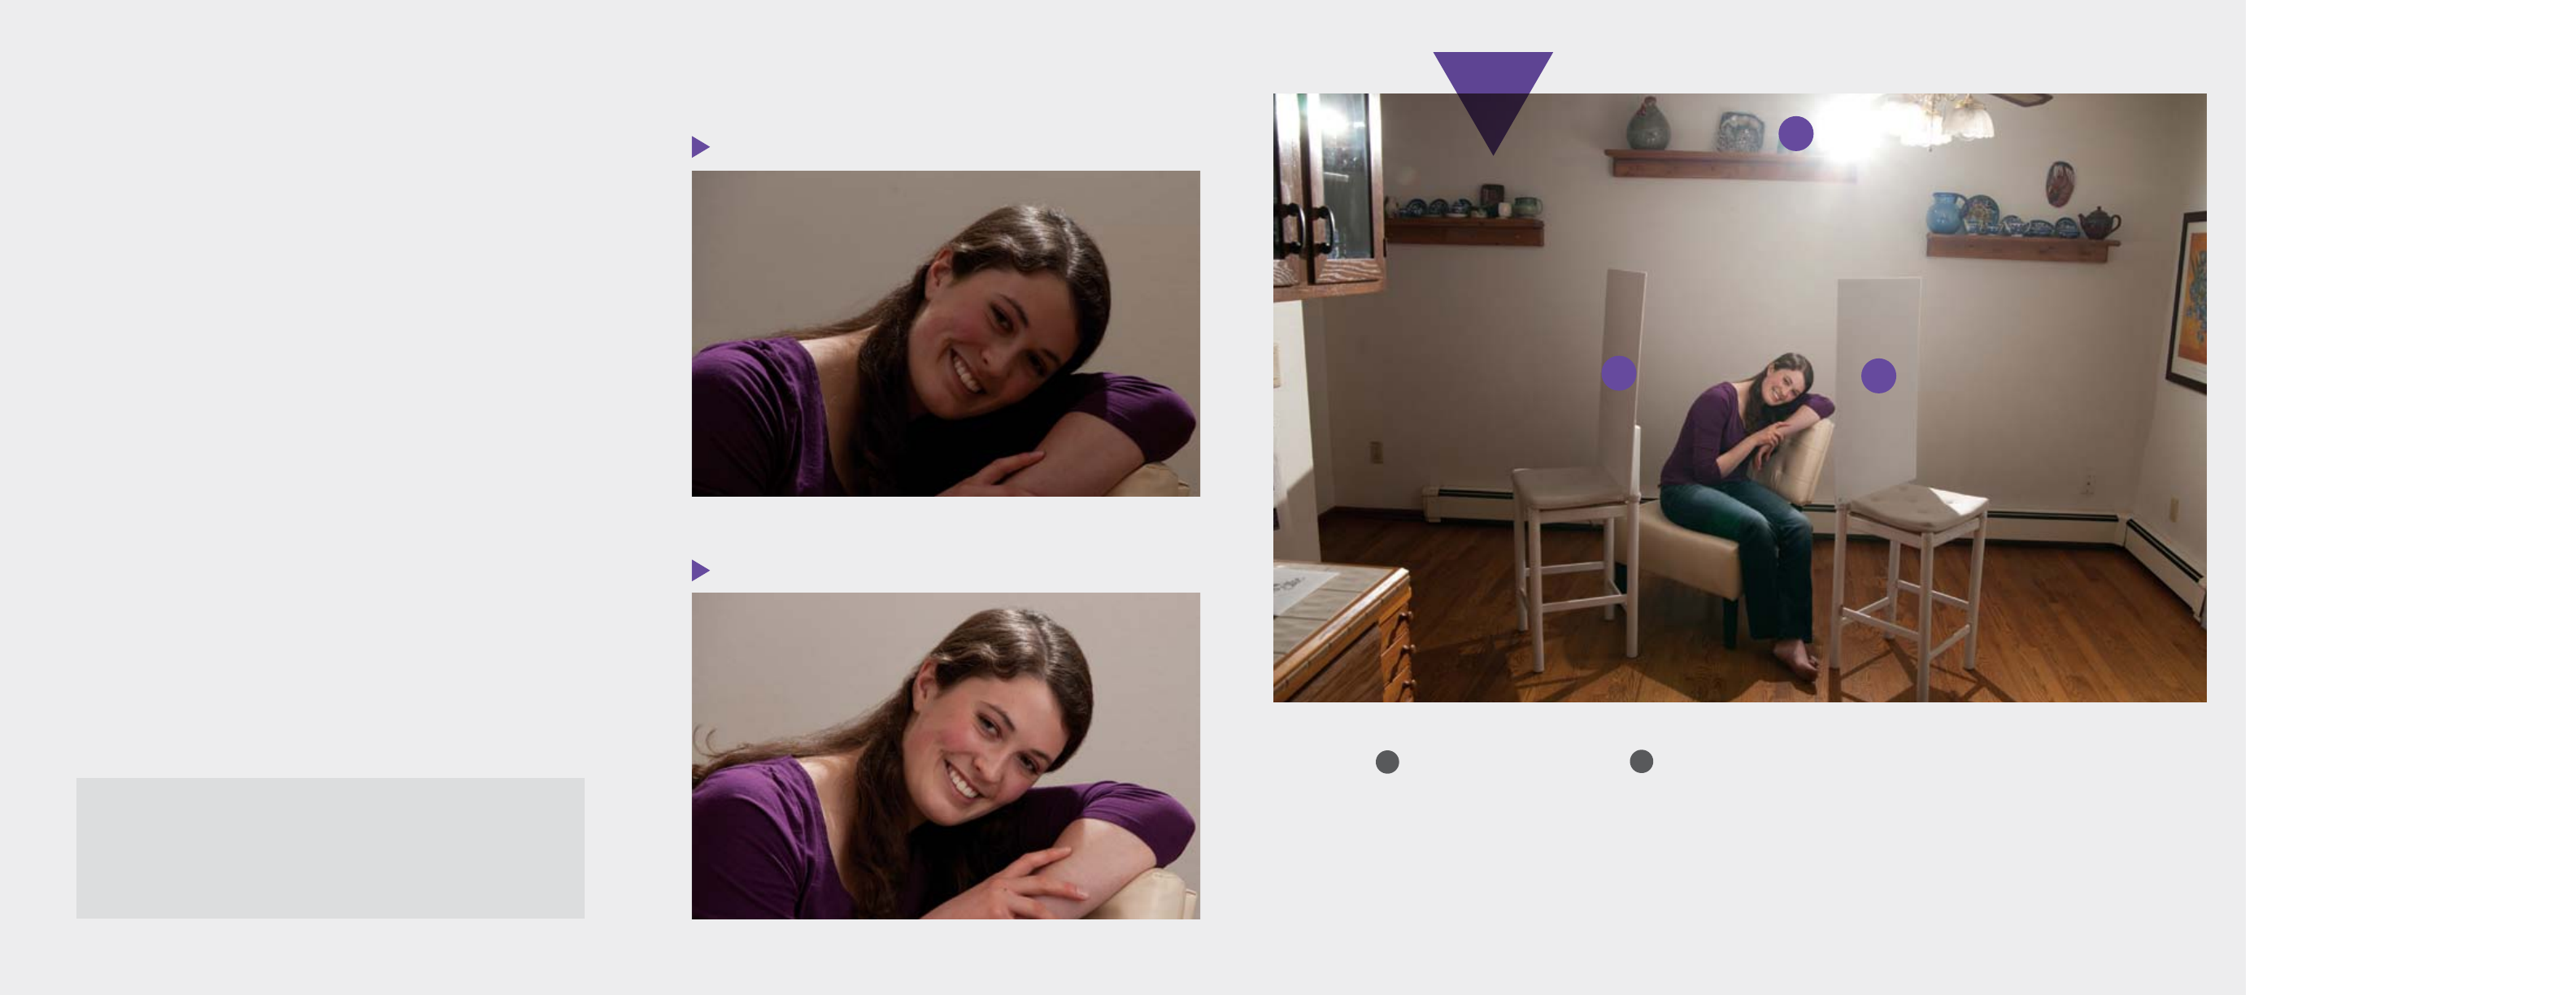
2:1:1 Light ratio
This photograph has a 2:1:1 ratio where the direct light (Rim Light)
from the back is twice as strong as the two reflected light sources
(Key Light, Fill Light).
01
02 02
What is it?
A technique used to create a
studio looking shot with three
indirect light sources.
How to use it?
• Set the camera and flash to
wireless
• Position the flash above and
behind your subject
• Aim the flash at your subject, this
will create the rim light
• Place two reflectors or reflective
surfaces in front of your subject on
either side. These will reflect the
light back creating a nice fill light
Where to use it?
When you only have one flash,
but want to create a studio
looking shot with three light
sources. Commonly used for
portrait shots to get a 2:1:1 ratio.
one flash,
three lights
Adding a rim light to our subject creates a halo glow around her helping
define our subject from the background. We now have the flash sitting on a
shelf behind the subject. The flash is backlighting her hair but not much else.
With the flash in the same position we added two white cards in front and to
the sides of the subject at an angle towards the light. The flash now backlights
her hair and then reflects off the white cards to illuminate each side of her
face. The result is a well composed image lit from three sides with one flash.
Off-camera Flash Basics
Off-camera Setup
For this photograph, the flash was
placed above and behind the
subject pointing down at them.
Two white cards were placed at
an angle in front of the subject
to bounce the light back at her,
illuminating her from three sides.
02 Bounce Card
3' x 2' sheet of white foam
core board.
01 Flash
HVL-F60M for adjustable power
and Quick Shift maneuverability.
Attached to included stand for
easy wireless positioning.
SETUP
34 35
01
1:1
1:2
0:1
6ft 6ft
14ft
6
ft
14
ft
Off-camera Flash Basics
wireless
ratio control
The light ratio represents how much stronger one light
source is compared to another. A direct light source
could be twice as strong as that same light from a
reflected surface. Therefore, we would have a 2:1 ratio
of direct light vs. reflected light.
Wireless Ratio Control allows us to control the volume
of light that is emitted from each flash or set of flashes
wirelessly. Each set can include more than one flash.
This is easy to do and allows us to set the ratio of the
control flash on the camera plus two more flashes or sets
of flashes. Being able to control all of our flashes from one
source saves time while also allowing for more creativity.
What is it?
Dynamically control the volume
of light that is emitted from each
flash in a multiple light setup.
How to use it?
Set all your flashes in wireless
mode (WL). Set your flash on
the camera to control (CTL) and
the other flashes to one of the
wireless zone settings (RMT1 or
RMT2). Then set the Ratio Control
in the “control” flash settings.
Here you can set the ratio of
the control flash on the camera
plus two more flashes or sets
of flashes. (Refer to Instruction
Manual for more details)
Where to use it?
Use this when you want to control
the amount of light emitted from
your wireless flashes.
Final Shot
In this three flash setup, we want to add some
dramatic lighting to the subject’s face. We could
move one flash further or closer to the subject
adjusting the amount of light hitting one side
of her face but that would be cumbersome.
Instead we used Wireless Ratio Control from the
flash on our camera.
F7.1, 1/160 SEC, ISO 125
02 Camera Right Full
With the flash off behind the subject, we
focus on setting the two flashes slightly
in front and on each side. Here, the right
flash was set to a ratio of 8 while the left
flash was set.
01 Background
A flash is placed 14ft away to illuminate
the water behind the subject and is
controlled from the secondary remote
channel of the flash–RMT2.
03 (1+2) Left/right balanced
Two flashes are 6ft away on each side of
the subject. Here is the result of all three
flashes firing at equal power of 16.
03
01
02
Getting Creative
Because we were able to change the
Flash Ratio from our on camera flash
we were able to quickly experiment with
different ratios until we achieved the
desired result.
36 37
SETUP
05
01
03
02
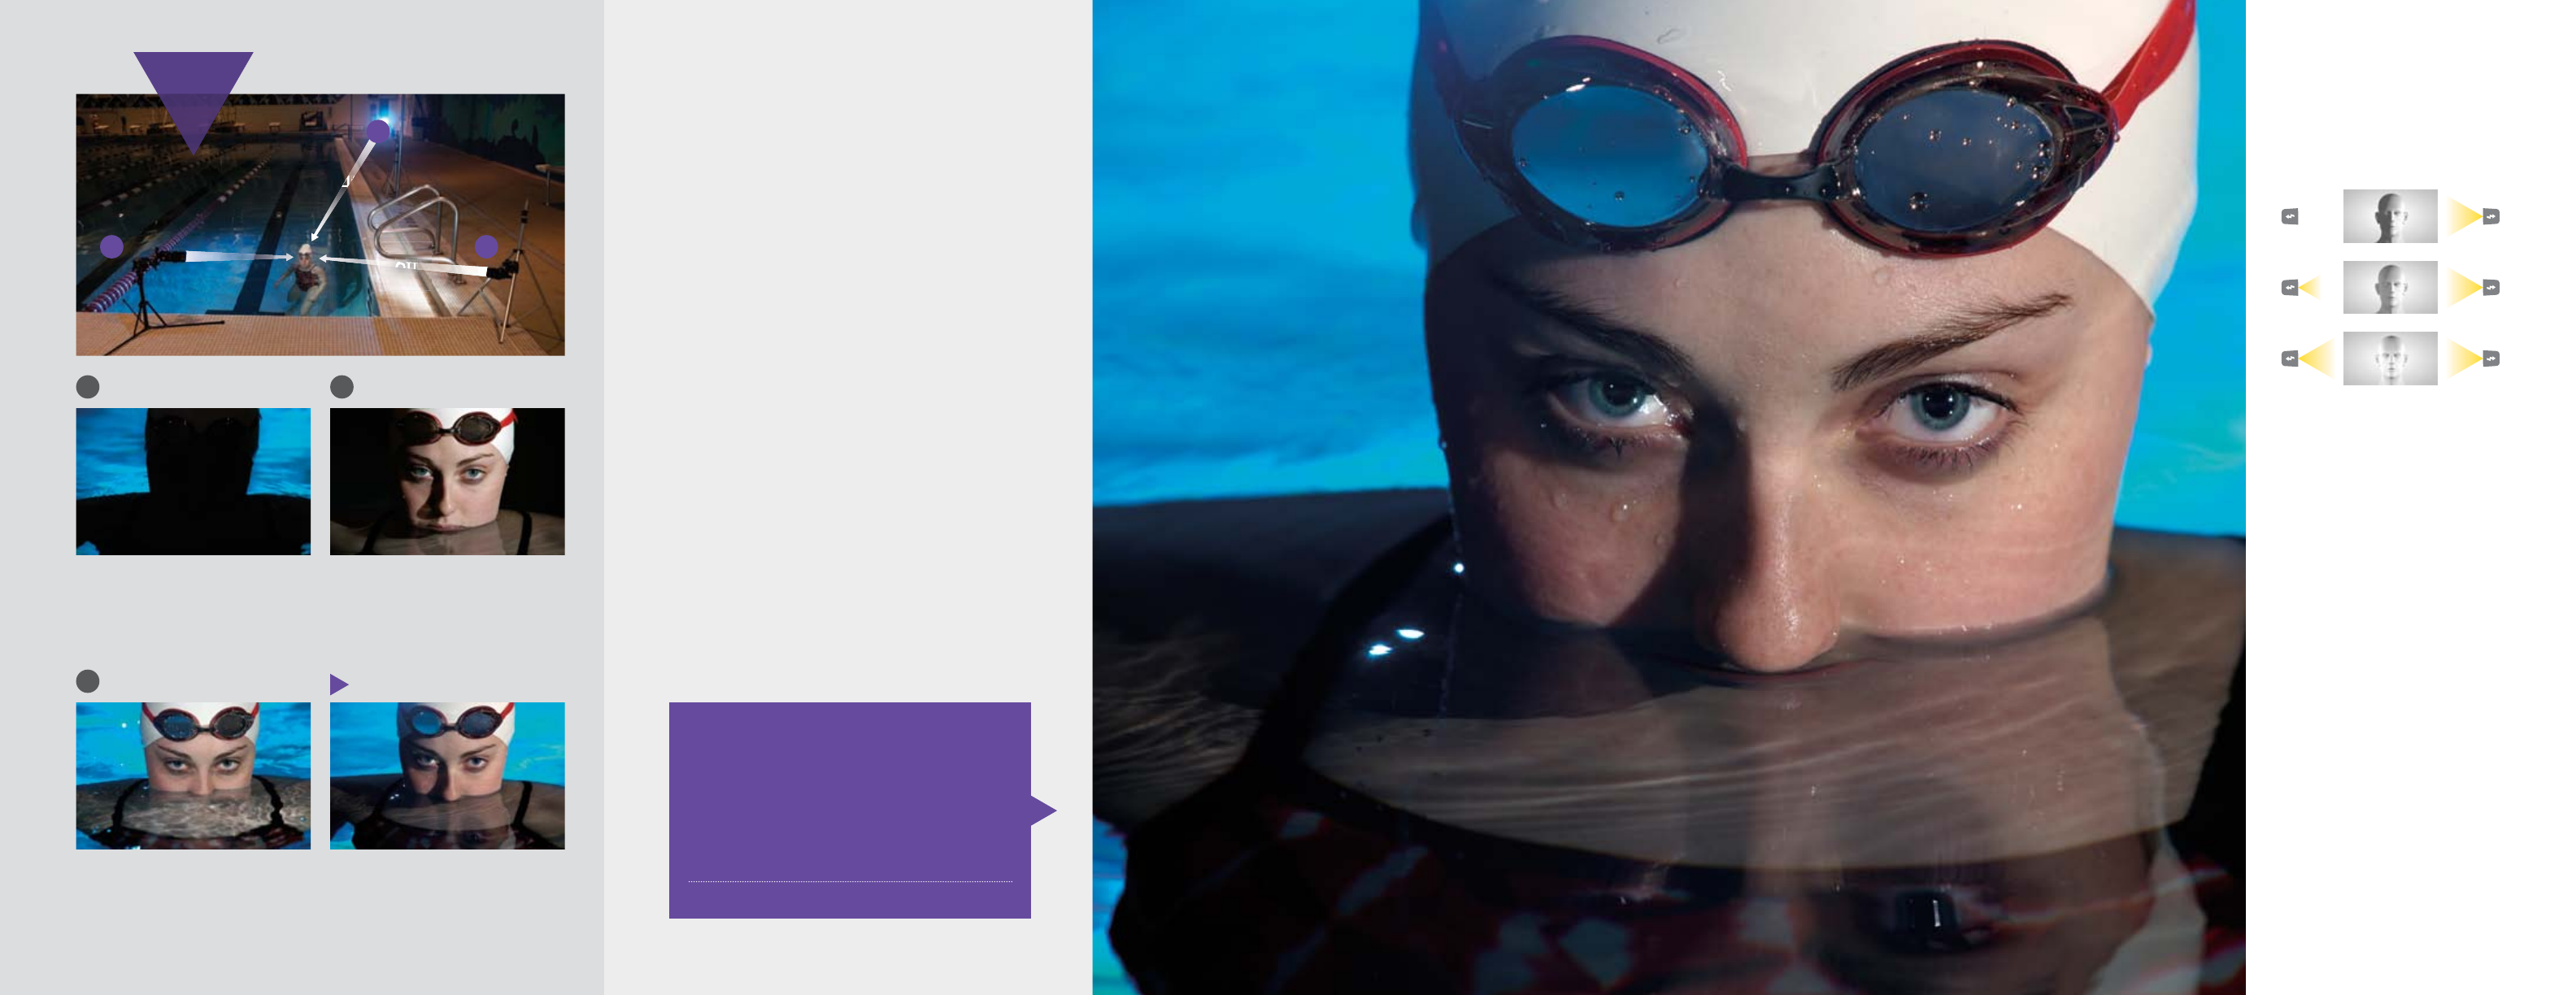
Final Shot
A bucket of water was poured over the subject to
add drama and a sense of action. The flash froze the
droplets in time, adding a narrative to this image.
F9, 1/200 SEC, ISO 400
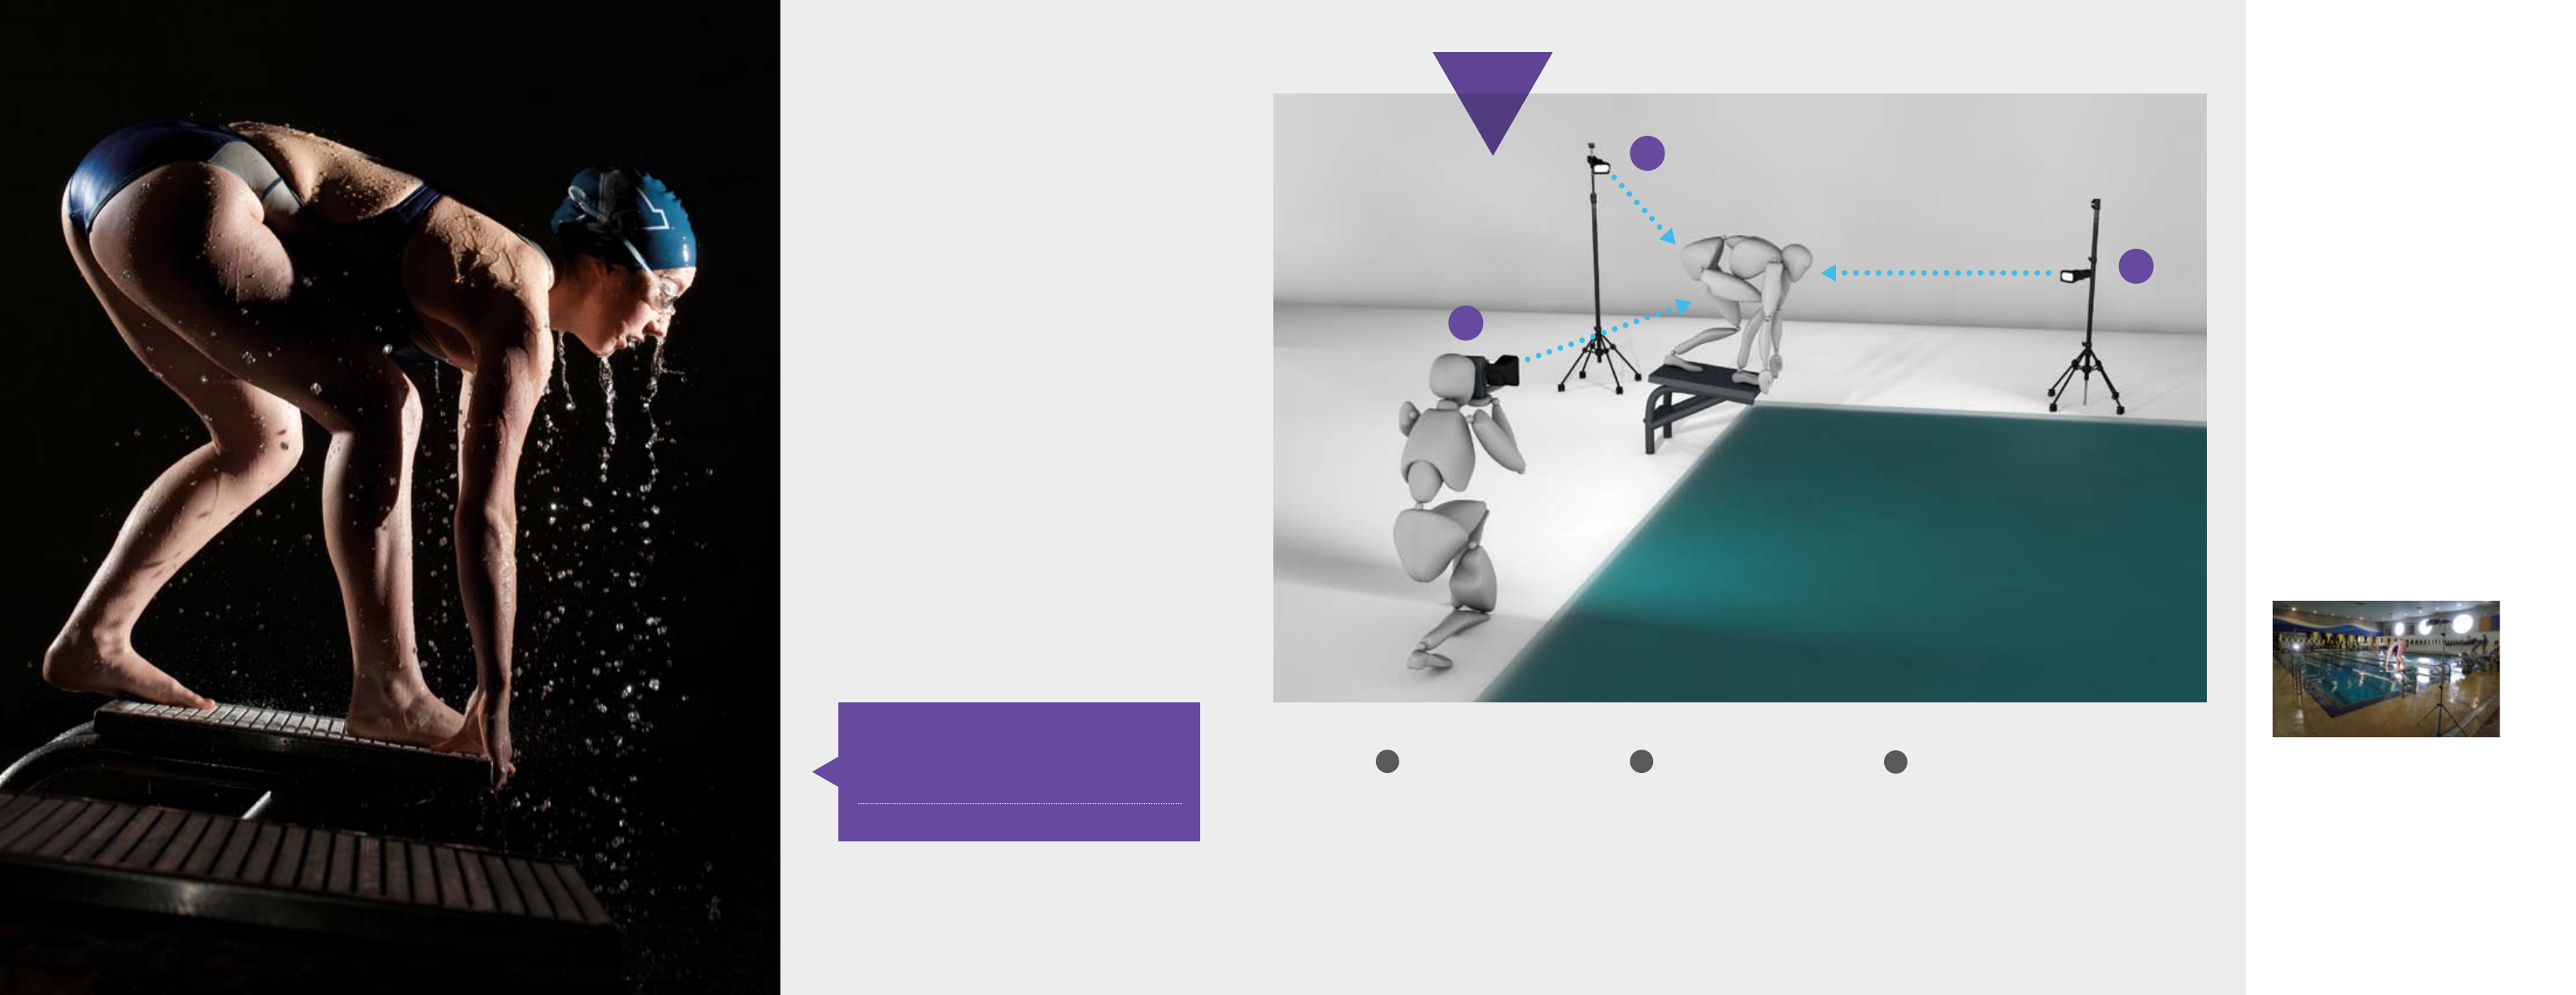
isolate the
subject
Put the focus on the subject. Using a wireless flash is
also a great way to minimize a background. This photo
was captured at a pool with a white wall 8 feet behind
the subject. Firing the flash directly at the subject would
also illuminate the wall behind her. We were able to
direct the light away from the background by placing a
wireless flash on each side of the swimmer. The flashes
emit a more powerful light than the ambient light, to
effectively minimizing the background behind the
swimmer. The resulting shot is a creative way to capture
just the subject without a distracting background.
Off-camera Flash Basics
What is it?
A technique used to isolate
the subject and drop out the
background. This is achieved by
exposing only for the subject
and overpowering the surrounding
ambient light that hits
the background.
How to use it?
Aim any and all light sources at
the subject and avoid light spill
onto the background. Avoid any
direct flash when shooting.
Where to use it?
• Any image where the background
is not important to the overall
image. Use this technique when
highlighting the subject’s role in
the image
• To illuminate boring or distracting
backgrounds
02 Rim Light
The rim light is added for a finishing
highlight that gives definition to
an edge, or rim of an object or
subject. It gives an additional stylistic
element that helps add detail. It is
usually placed above or behind a
subject at a sharp angle, creating a
small but very intense highlight.
03 Fill Light
The fill light is added to reduce the
intensity of the shadows cast by the
key light. It is usually added second
and is less intense than the key
light, providing detail in areas that
would normally be too dark with
just a key light.
01 Key Light
The key light, or primary light, is the
main light that defines the image. It
is the first light setup and is generally
the brightest, giving definition to the
subject of the image.
Creative lighting removes this busy background
from the final image
39
SETUP
22ft
11f t
11f t
02 Rim Light
A second flash is placed to the rear
of the subject to give a defining
highlight and help separate him from
the background and add depth.
01 Key Light
The main light is placed 15 feet away
to light up the entire subject and
surrounding scene.
Set the tone.
The night sky plays a key role in establishing the mood and drama in
this shot. The flash is used to light the subject after we have exposed
the scene for the night sky. This gives a beautiful background for a
properly lighted bicycle rider in action.
F7.1, 1/160 SEC, -0.3 EV, ISO 125 DAYLIGHT
15ft
10ft
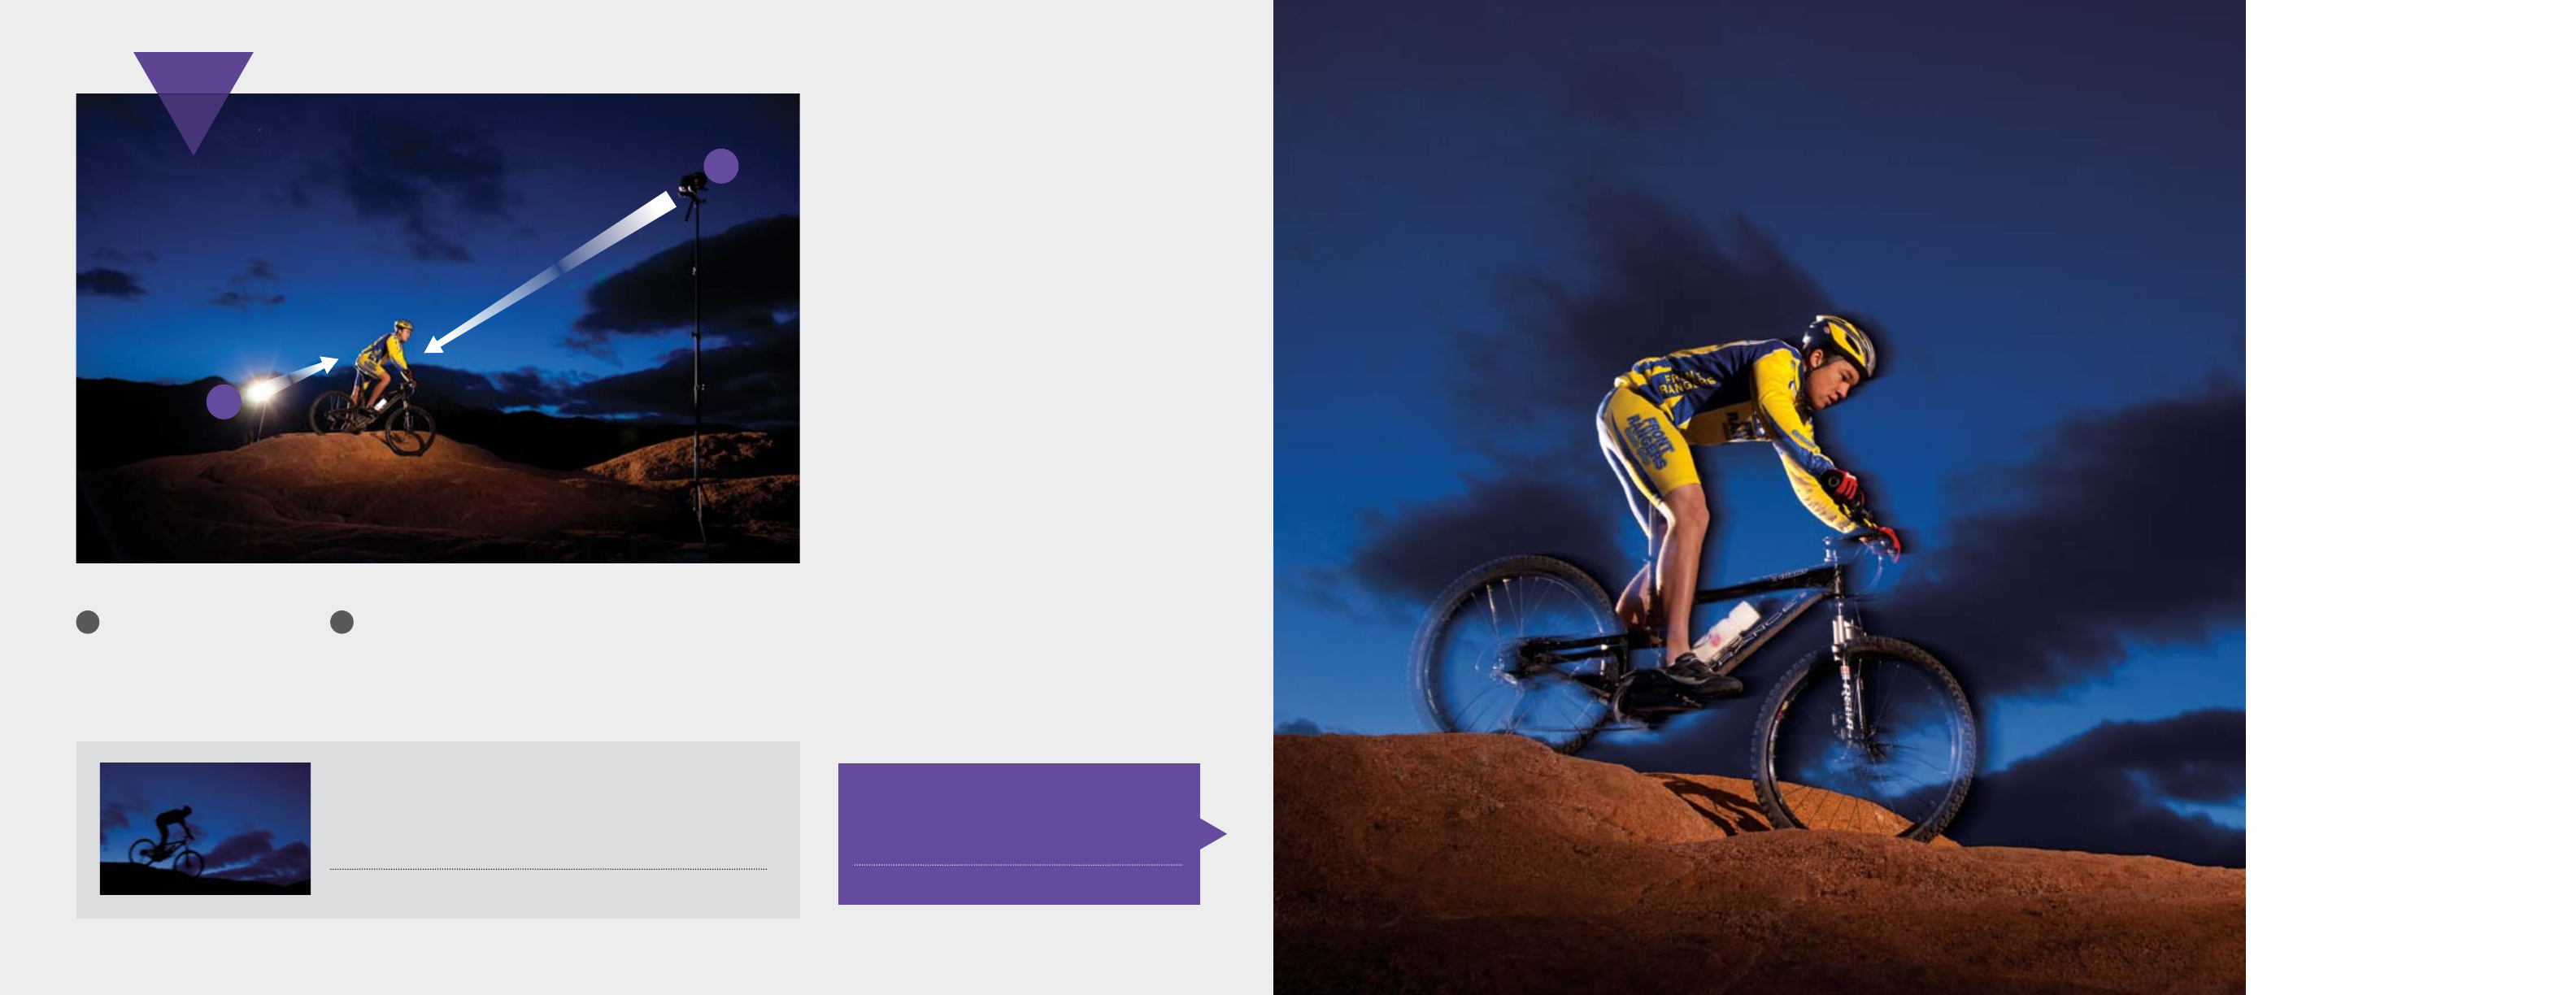
mixing light
A new world of creative photography emerges when we
can turn night into day.
Freezing action in a photograph is simple when we
have a lot of available light. However, trying to capture
movement when there is minimal available light usually
results in the subject being blurry. Using wireless flash in
an environment with minimal ambient light will help us
capture our subject in motion while cutting back on the
amount of blur.
In this scenario, we want to illuminate the bicycle rider.
We are too far away (20ft) from the subject to illuminate
him with on-camera flash. Also, we want to increase the
light coverage by lighting him from the front and back.
Knowing that we will be adding flash to this image,
we work on our camera settings to properly capture
the clouds and sky behind him.
Once we are happy with the background we add two
wireless flashes. One is 10ft behind the subject and the
other is 15ft away directly in front of the subject. If we
wanted, we could change the power of each flash or
use wireless ratio control to customize the amount of
flash being added to the image.
Final Shot
Exposing for the background creates a beautiful
contrast with the bicyclist’s yellow uniform and the
flash freezes the motion in place.
F5.6, 1/15 SEC, ISO 400
02
01
Off-camera Flash Basics
What is it?
Multiple flashes synced wirelessly
to allow for freedom of movement
and lighting techniques not
possible with wired flashes.
How to use it?
• Set your camera to Wireless
Flash Mode
• With your Flash in TTL, press the
Mode button to display WL
• Set the on-camera flash to
control (CTL)
• Set your Flash to RMT1 or RMT2
which are two unique channels
your flashes can operate on
• A red blinking light will be
displayed at the base of the flash
showing you it is in wireless mode
• Make sure the blinking red
light is in the direction of your
camera to ensure the camera
can see and operate the
wireless flash effectively
Where to use it?
In this situation, a wireless flash
helped us capture motion in a
low ambient light environment.
However, wireless flash can be
used anytime you want to add
creative artificial lighting to
your image.
40 41
SETUP
Products
HVL-F60M
The Sony® HVL-F60M is the flagship flash
with LED light features the “Quick Shift
Bounce” system, “Quick Navi” interface
and Wireless Ratio Control for advanced
lighting in still/movie.
Specifications
Flash
• Flash Type: Auto electronic flash (clip-on type)
• Flash Modes: Automatic Light Control (TTL), Continuous
(10 flashes/sec., up to 40),
pre-flash control, manual control
• Flash Coverage: Covers the angle of view at focal
length between 24mm and 105mm. Automatically
switched at changes in focal length. Manual
24/28/35/50/70/105mm. Covers the angle of view
of at 15mm focal length with the wide panel
• Flash Metering System: Direct TTL
• Guide Number: 60
• Modes: High-Speed sync, Wireless, Bounce, Modeling,
Multi-burst
• Function: LED light
• Number of Flashes: 10/sec. up to 40 total
• Recycling Time: 2.6 sec. Ni-MH/3.5 sec. Alkaline
Weights and Measurements
• Dimensions (Approx.): (W x H x D) 3-1/4 x 6 x 4-1/8"
(80 x 150 x 102mm)
• Weight (Approx.): 450g (15.9 oz)
(excluding AA batteries)
Power
•Battery Type: AA Alkaline /AA Ni-MH-requires 4
General
•Material: Poly-carbonate plastic
High-illumination output
Delivers high-illumination output in a compact, lightweight
body, with an effective range of more than 90ft (28m)
and guide number 60. (Guide number measures the
illumination capability of the flash; the higher the number,
the higher the light output. Tested at ISO100, 105mm).
New LED video light
With the new built-in LED video light it has never been
easier to switch between stills and movie shooting even
in low-light conditions. LED enables checking and setting
the light and shadow conditions before shooting still
image or movie with live view function of EVF equipped
camera. Maximum luminance of 1200 lux/(0.5m), with
illuminating distance of approximately 6-1/2ft (2m) at
ISO 3200/F5.6.
Quick Shift Bounce
Sony’s patented “Quick Shift Bounce” system allows
the HVL-F60M to quickly orbit 90 degrees left and right,
allowing you to maintain horizontal light distribution even
when shooting vertically. In addition to pivoting side-to-
side, the flash unit can also tilt down 10 degrees or back
150 degrees, ensuring customers the lighting freedom
they need to capture that perfect shot.
Quick Navi and Large Dot Matrix LCD
Quick Navi control is the intuitive User Interface from Sony
A camera bodies that make it a snap to locate and
change settings. A large dot matrix LCD display is easy-to
see and intuitive button layout makes it easy to configure
the HVL-F60M for a variety of shooting needs.
Wireless Ratio Control
Wireless Ratio Control allows customers to wirelessly
control up to three groups of flashes, as well as specify
the luminosity ratio for each group, so they can enjoy
multiple-flash lighting techniques without the need for
special equipment or tedious exposure settings.
36 42 43 56
60
20
42 43

Products
HVL-F43AM
Sony A System HVL-F43AM Flash Unit.
Powerful range, fast recharging, versatile
bounce angles, intelligent features like
auto WB, auto zoom, wireless operation
(guide number: 43).
Specifications
Flash
•Flash Type: Auto electronic flash (clip-on type)
• Flash Modes: Automatic Light Control (TTL),
Continuous (10 flashes/sec., up to 40), pre-flash control,
manual control
• Flash Coverage: Bounce angles: Upward - 150 degrees;
Left - 90 degrees; Right - 90 degrees; Down - 8 degrees
•Flash Metering System: Direct TTL
•Guide Number: 43
•Modes: Wireless, Bounce, Modeling, Multi-burst
•Number of Flashes: 10/sec. up to 40 total
•Recycling Time: 2.9 sec.
Advanced Features
•Smooth Slow Rec
Weights and Measurements
• Dimensions (Approx.): (W x H x D) 3 x 5-1/8 x 3-1/2"
(75 x 129 x 87mm)
• Weight (Approx.): 12oz (340g)
(excluding AA batteries)
Power
•Battery Type: AA Alkaline /AA Ni-MH-requires 4
General
•Material: Poly-carbonate plastic
Operating Conditions
• Storage Temperature: -4 to +140°F
(-20 to +60°C)
High-power illumination
High-power illumination (guide number: 43)
Longer effective range
Longer effective range of over 30ft (10.5m)
“Quick Shift Bounce”
The innovative “Quick Shift Bounce” system allows the
HVL-F43M to orbit 90 degrees left and right, allowing
you to maintain horizontal light distribution even when
shooting vertically. In addition to pivoting side-to-side,
the flash unit can also tilt down 8 degrees or back 150
degrees, ensuring customers the lighting freedom they
need to capture that perfect shot.
Versatile bounce angles
Versatile bounce angles: 90° up, 90° left. This allows
the flash head to be rotated while maintaining the
set bounce angle, so you can quickly switch between
horizontal and vertical format without changing
the light angle.
Built-In Bounce sheet
The built-in bounce sheet can be used even when
shooting in a vertical position without changing the
angle of reflected light.
Auto white balance
Auto white balance (signals color temp. to camera)
Auto zoom
Auto zoom optimized for camera sensor size
Dust and Moisture resistant design
Sealing materials are set at joints of outer materials
(body, LCD panel, Mounting Foot etc.) and around
movement/operating parts thereby increasing the life
of your flash unit.
Modeling light capability
Modeling light capability allows the HVL-F43M to pulse,
helping photographers determine where shadows will
fall before taking the picture, so they can alter lighting
or subject positioning as necessary.
36 42
43
56 6020
44 45
Products
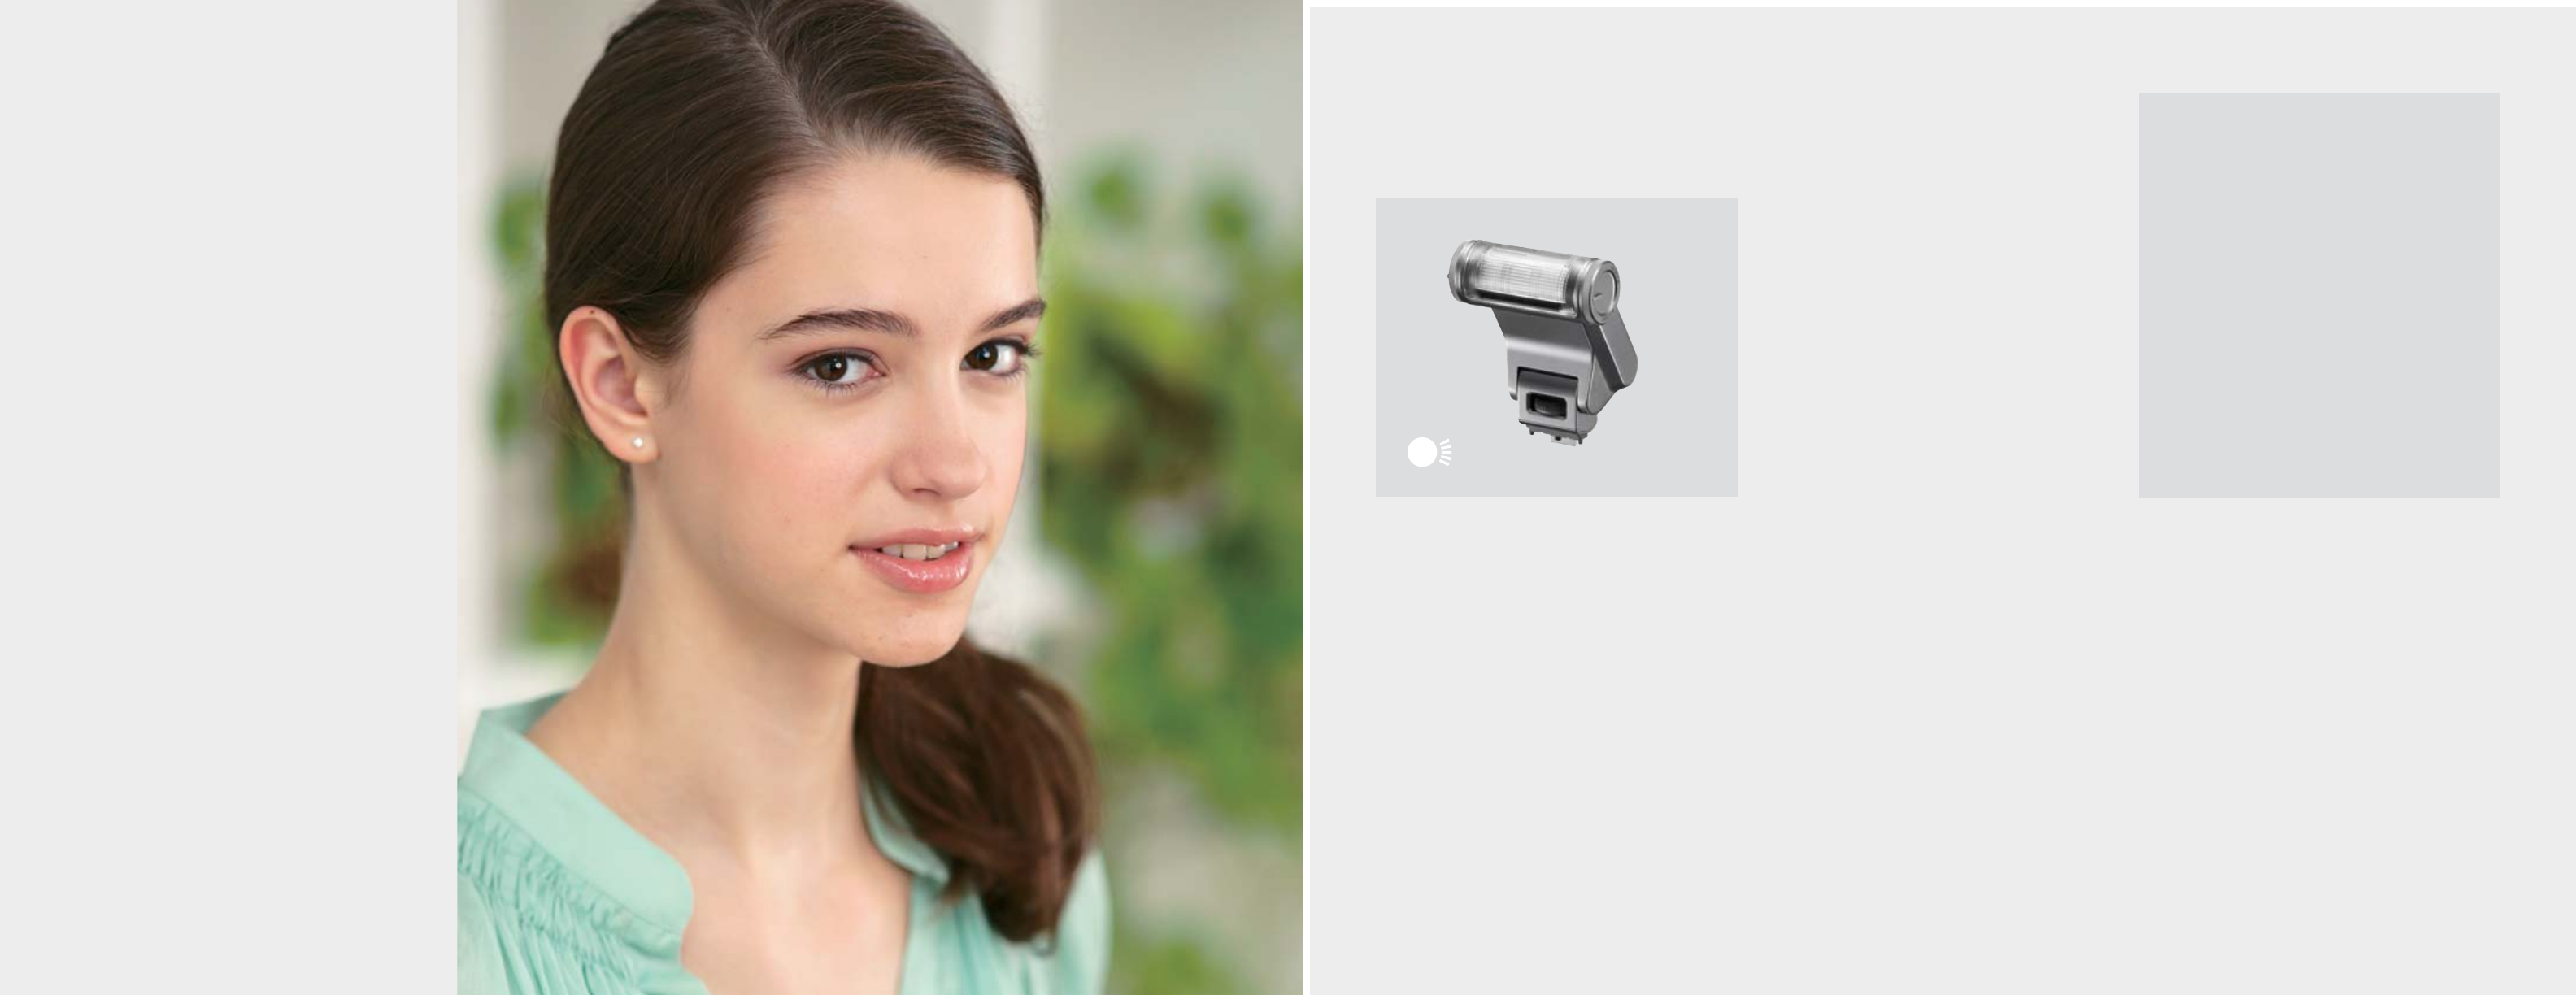
HVL-F20AM
Expand your creativity with the
revolutionary HVL-F20AM compact
external flash, which extends
illumination range beyond the camera’s
built-in flash. Intuitive operation, bounce
capability and TTL auto metering.
Specifications
Flash
•Flash Type: Auto electronic flash (clip-on type)
• Flash Modes: Automatic Light Control (TTL),
Continuous (10 flashes/sec., up to 40), Re-flash Control,
Manual Control
• Flash Coverage: Bounce angles:
Upward - 150 degrees; Left - 90 degrees; Right - 90
degrees; Down - 8 degrees
•Flash Metering System: Direct TTL
•Guide Number: 43
• Modes: Wireless, Bounce, Modeling,
Multi-burst
•Number of Flashes: 10/sec. up to 40 total
•Recycling Time: 2.9 sec.
Advanced Features
•Smooth Slow Rec
Weights and Measurements
• Dimensions (Approx.): (W x H x D) 3 x 5-1/8 x 3-1/2"
(75 x 129 x 87mm)
• Weight (Approx.): 12oz (340g)
(excluding AA batteries)
Power
•Battery Type: AA Alkaline /AA Ni-MH-requires 4
General
•Material: Poly-carbonate plastic
Operating Conditions
• Storage Temperature: -4 to +140°F
(-20 to +60°C)
Extends flash range beyond camera’s built-in flash
Though compact and lightweight, the HVL-F20AM has a
maximum range twice that of the built-in flash units on 230,
330 and 380 cameras. This is represented as the guide
number (GN) of 20 with a 50mm focal distance at ISO 100.
Bounce flash enables shadowless indirect lighting
When set to “indoor” shooting mode, the flash points up
to bounce light off the ceiling for shadowless illumination
of your subject. When set to the “outdoor” shooting
mode, the flash directs light directly at your subject.
Built-in diffuser for wide and telephoto shooting
With the built-in diffuser the flash illumination covers an
angle of view of 27mm at the default Standard Position
setting. If users want to shoot at a greater distance,
they can rotate the dial on the side of the flash unit to
the “Tele” Position. Although this reduces flash coverage
to an angle of view of 50mm, it extends the range to
illuminate more distant subjects.
Easy intuitive operation
Unlike most external flash units, the HVL-F20AM has no
dedicated ON/OFF switch. Instead, power is automatically
switched on simply by raising the flash unit into the
shooting position. In addition, a switch on the side of the
unit offers Indoor and Outdoor settings, making it easy to
obtain flash illumination that suits the shooting situation.
A charging lamp indicates when the flash is ready to fire.
Light (90g/3.2oz), slim (24mm/1")
ultra-compact design
With a weight of only 90g (Approx.) and a thickness of
only 24mm (1 inch), the HVL-F20AM is so compact it can
simply be folded down and left mounted on the camera
when it is not in use, or detached and carried in a shirt
pocket. When removed from the camera, the flash unit’s
hot shoe can be folded to the side, making the body
even more compact.
36 42 43 56 60
20
46 47
Products
HVL-F20S
Designed exclusive for Sony E-mount
cameras, the HVL-F20S external flash is
the perfect accessory for extending
illumination range and includes bounce
capability and TTL auto metering.
36 42 43 56 60
20
Specifications
Flash
•Flash Coverage: F4: 1m–5m
•Guide Number: 20
Weights and Measurements
• Dimensions (Approx.): (W x H x D) 2-3/8 x 2-7/8 x 2-1/8";
(60 x 71 x 53mm)
•Weight (Approx.)(Main unit only): 2.3oz (63g)
Extends flash range beyond camera’s included flash
Though compact and lightweight, the HVL-F20S has
a maximum range twice that of the included flash
units of the NEX-3, NEX-5 and NEX-C3 cameras. This is
represented as the guide number (GN) of 20 with a
50mm focal distance.
Bounce flash enables shadowless indirect lighting
When set to “indoor” shooting mode, the flash points up
to bounce light off the ceiling for shadowless illumination
of your subject. When set to the “outdoor” shooting
mode, the flash directs light directly at your subject.
Built-in diffuser for wide and telephoto shooting
With the built-in diffuser, the flash illumination covers
a wider angle of view or if users want to shoot at a
greater distance, they can rotate the dial on the side
of the flash unit to the “Tele” Position. While the “Tele”
setting reduces the width of flash coverage, it extends
the range to illuminate more distant subjects.
Easy intuitive operation
Unlike most external flash units, the HVL-F20S has no
dedicated ON/OFF switch. Instead, power is automatically
switched on simply by raising the flash unit into the
shooting position. In addition, a switch on the side of the
unit offers Indoor and Outdoor settings, making it easy to
obtain flash illumination that suits the shooting situation.
A charging lamp indicates when the flash is ready to fire.
ADI Flash Metering System
The ADI (Advanced Distance Integration) flash metering
system offers the optimum flash metering and
automatic white-balance compensation regardless of
the background conditions or the subject’s reflectance.
ADI flash metering works in combination with cameras
and lenses that incorporate a distance encoder. When
used with these lenses, the camera calculates a guide
number to control TTL (through the lens) flash metering.
This guide number is calculated according to distance
from the subject, ambient light and pre-flash reflectivity
of the subject and the background.
48 49
Specialized
What is it?
Photographing small items very
close to bring out minute details.
How to use it?
•Get Close
• Stabilize the camera if not using
a flash
• Aperture Priority F11 but
experiment with different
numbers. Remember the larger
your aperture the less of your
subject will be in focus
Where to use it?
•Flowers
•Objects
•Insects
• Anything where getting closer to
the subject will uncover things
you never knew were there
Final Shot
Utilizing a twin flash, we added precise lighting giving a soft dynamic
mood, and capturing a beautiful floral macro shot.
F9, 1/200 SEC, ISO 100
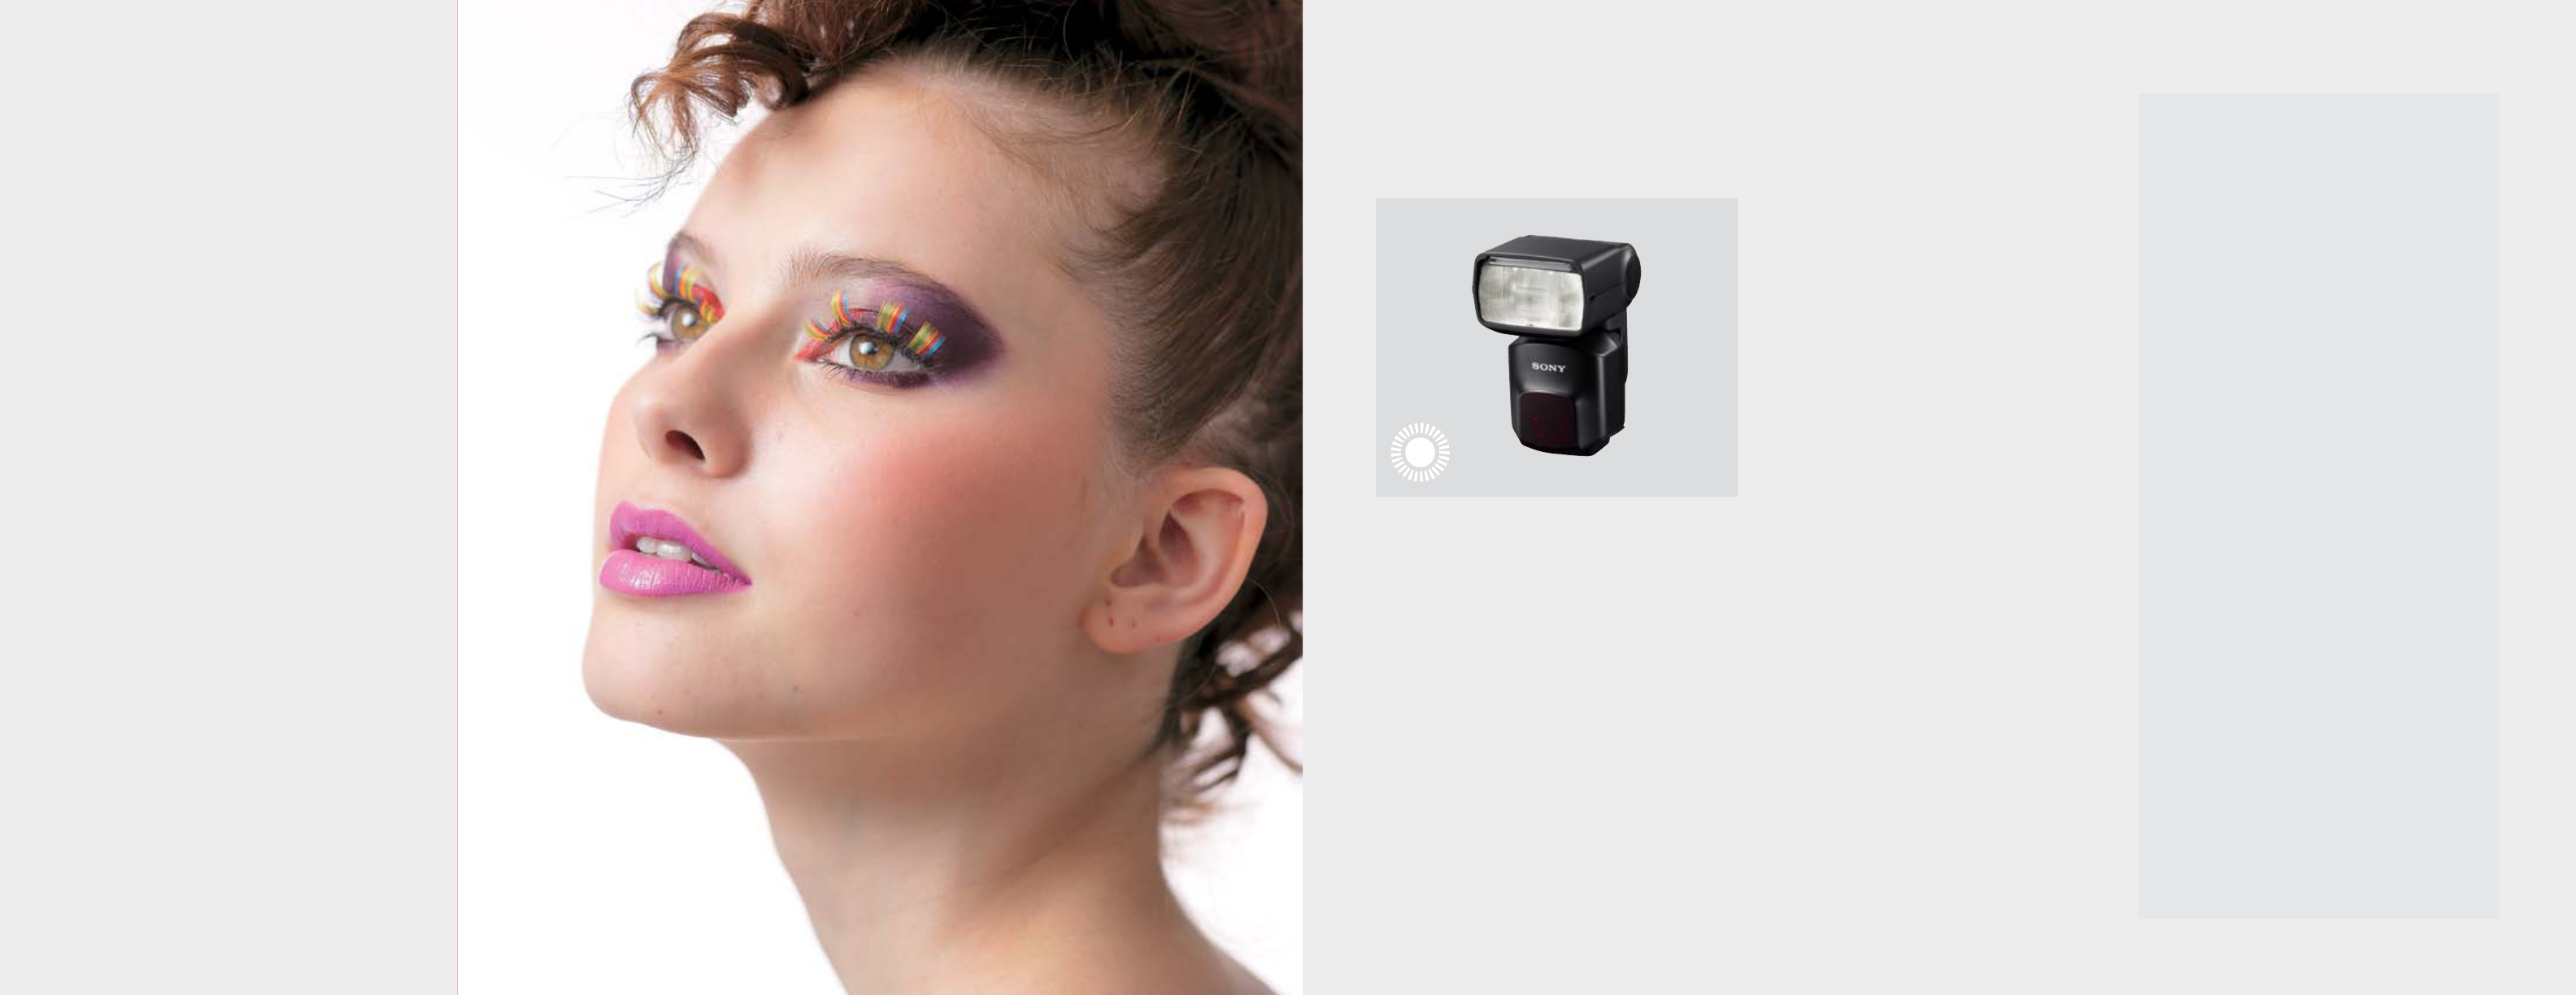
Specialized
lighting
for macro
photography
Macro photography most often refers to capturing extreme close-ups of small
objects. Normally the size of the resultant image is equal to or larger than the
subject itself.
Even though macro lenses are often capable of a large aperture and very
shallow depth of field, which may be good for portrait photography, is not always
good for macro photography. Depth of field is extremely shallow when focusing
on close objects which means you may need to use a smaller aperture like F11
to get the entire subject in focus. This will require either a slow shutter speed, high
ISO or brilliant lighting. That’s where specialized lighting for macro photography
can help us take better macro photographs.
Adding a flash or ring light will introduce additional light and reduce the time
needed to take the photo. Using a flash or ring light will also allow us to remove
the need for a tripod allowing you to position the camera easier for more
creative results. We can also move quickly and effectively to capture our image.
Adding a flash or ring light also allows us to highlight our subject and remove the
background from our photographs.
50 51
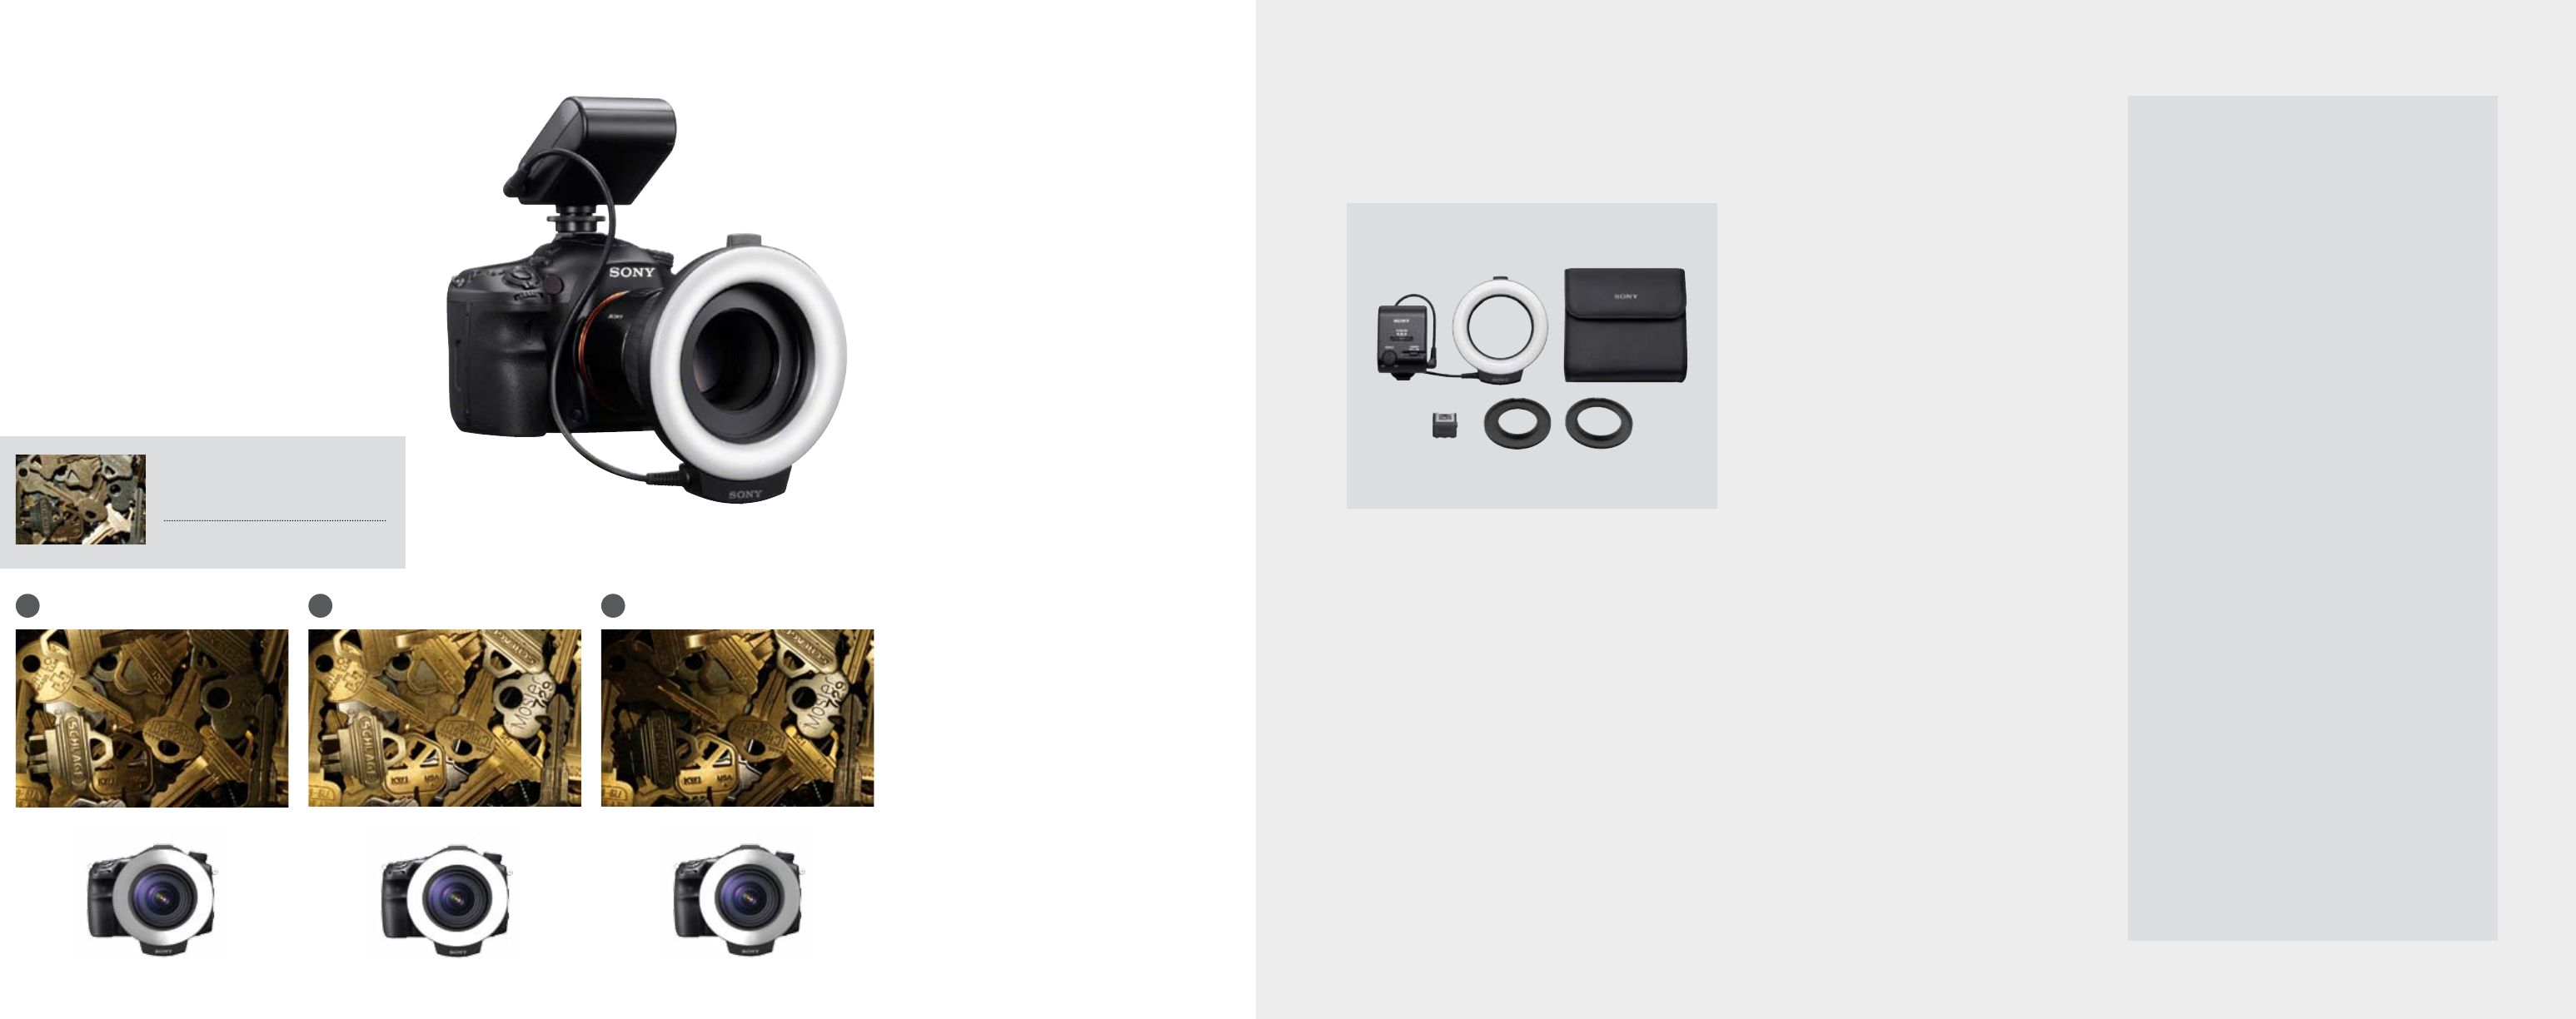
ring light
A Ring Light actually surrounds the entire lens with
constant light. This allows us to illuminate the entire
subject evenly from all directions. Our resulting photo will
have even lighting with minimal shadows. Ring Lights are
used frequently in Macro Photography due to the amount
of detail they are able to capture.
The intensity of the powerful LED light can also be varied
with the dimmer. In addition we can chose to light only
one side of our subject for dramatic affect or to highlight
detail. Adjust the switching from either having the entire
ring light on or have only the left side, right side on.
01 Left side solo
F16, 1/8 SEC, -0.3 EV, ISO 320
Direct Flash
Hard directional light, casts strong
shadows and obscures detail.
F16, 1/100 SEC, -0.3 EV, ISO 320
F16, 1/8 SEC, -0.3 EV, ISO 320 F16, 1/8 SEC, -0.3 EV, ISO 320
02 Both sides active 03 Right side solo
What is it?
Lens mounted ring of light that
evenly lights close items with
uniform light.
How to use it?
• Attach the Ring Light and set light
intensity with the dimmer to get
the exposure you are looking for
in your selected aperture
• You can also set the Ring Light
to only illuminate the left or right
side of your subject
Where to use it?
• Macro photography with
minimal shadows
• Portrait photography where
you want a ring of light in the
subject’s eyes
Specialized
HVL- RL1
Capture even and well-lit macro
photography with this ring light attachment
and your compatible Sony A camera. It’s
the perfect tool for creating compelling
close-up artwork.
Specifications
Ring Light
•Flash Type: Auto electronic ring light (clip-on type)
•Lighting Modes: Full, 50% Left, 50% Right
•Luminance: 700 lux (at 0.3m)
Advanced Features
•Dimmer for precise control
Weights and Measurements
• Dimensions (Approx.): (W x H x D) 4-7/8 x 5-1/2 x 15/16"
(124 x 141 x 24mm)
• Weight (Approx.): 6.9oz (195g)(excluding AA batteries)
Power
•Battery Type: AA Alkaline /AA Ni-MH-requires 4
General
•Material: Poly-carbonate plastic
Operating Conditions
• Operating Temperature: 32 to +104°F
(0 to +40°C)
The HVL-RL1 offers highly effective illumination of small
subjects for macro shooting. Its powerful 700 lx/0.3m
(Approx.) LED performance is approximately 4 times
brighter than conventional models. The brightness can
also be dimmed with a control dial to achieve creative
lighting that subtly reflects your intentions. Extremely
smooth lighting effects can also be achieved without
clearly revealing the source of light.
•Full-ringilluminationforshadowlesslighting
•Half-ringilluminationforshadowsandcontrast
•Continuousilluminationallowslightingtobechecked
at any time
•Filterdiameter:49mm,55mm
•ShoeAdaptor(ADP-AMA) is included for usage with
Auto-lock Accessory Shoe cameras
52 53
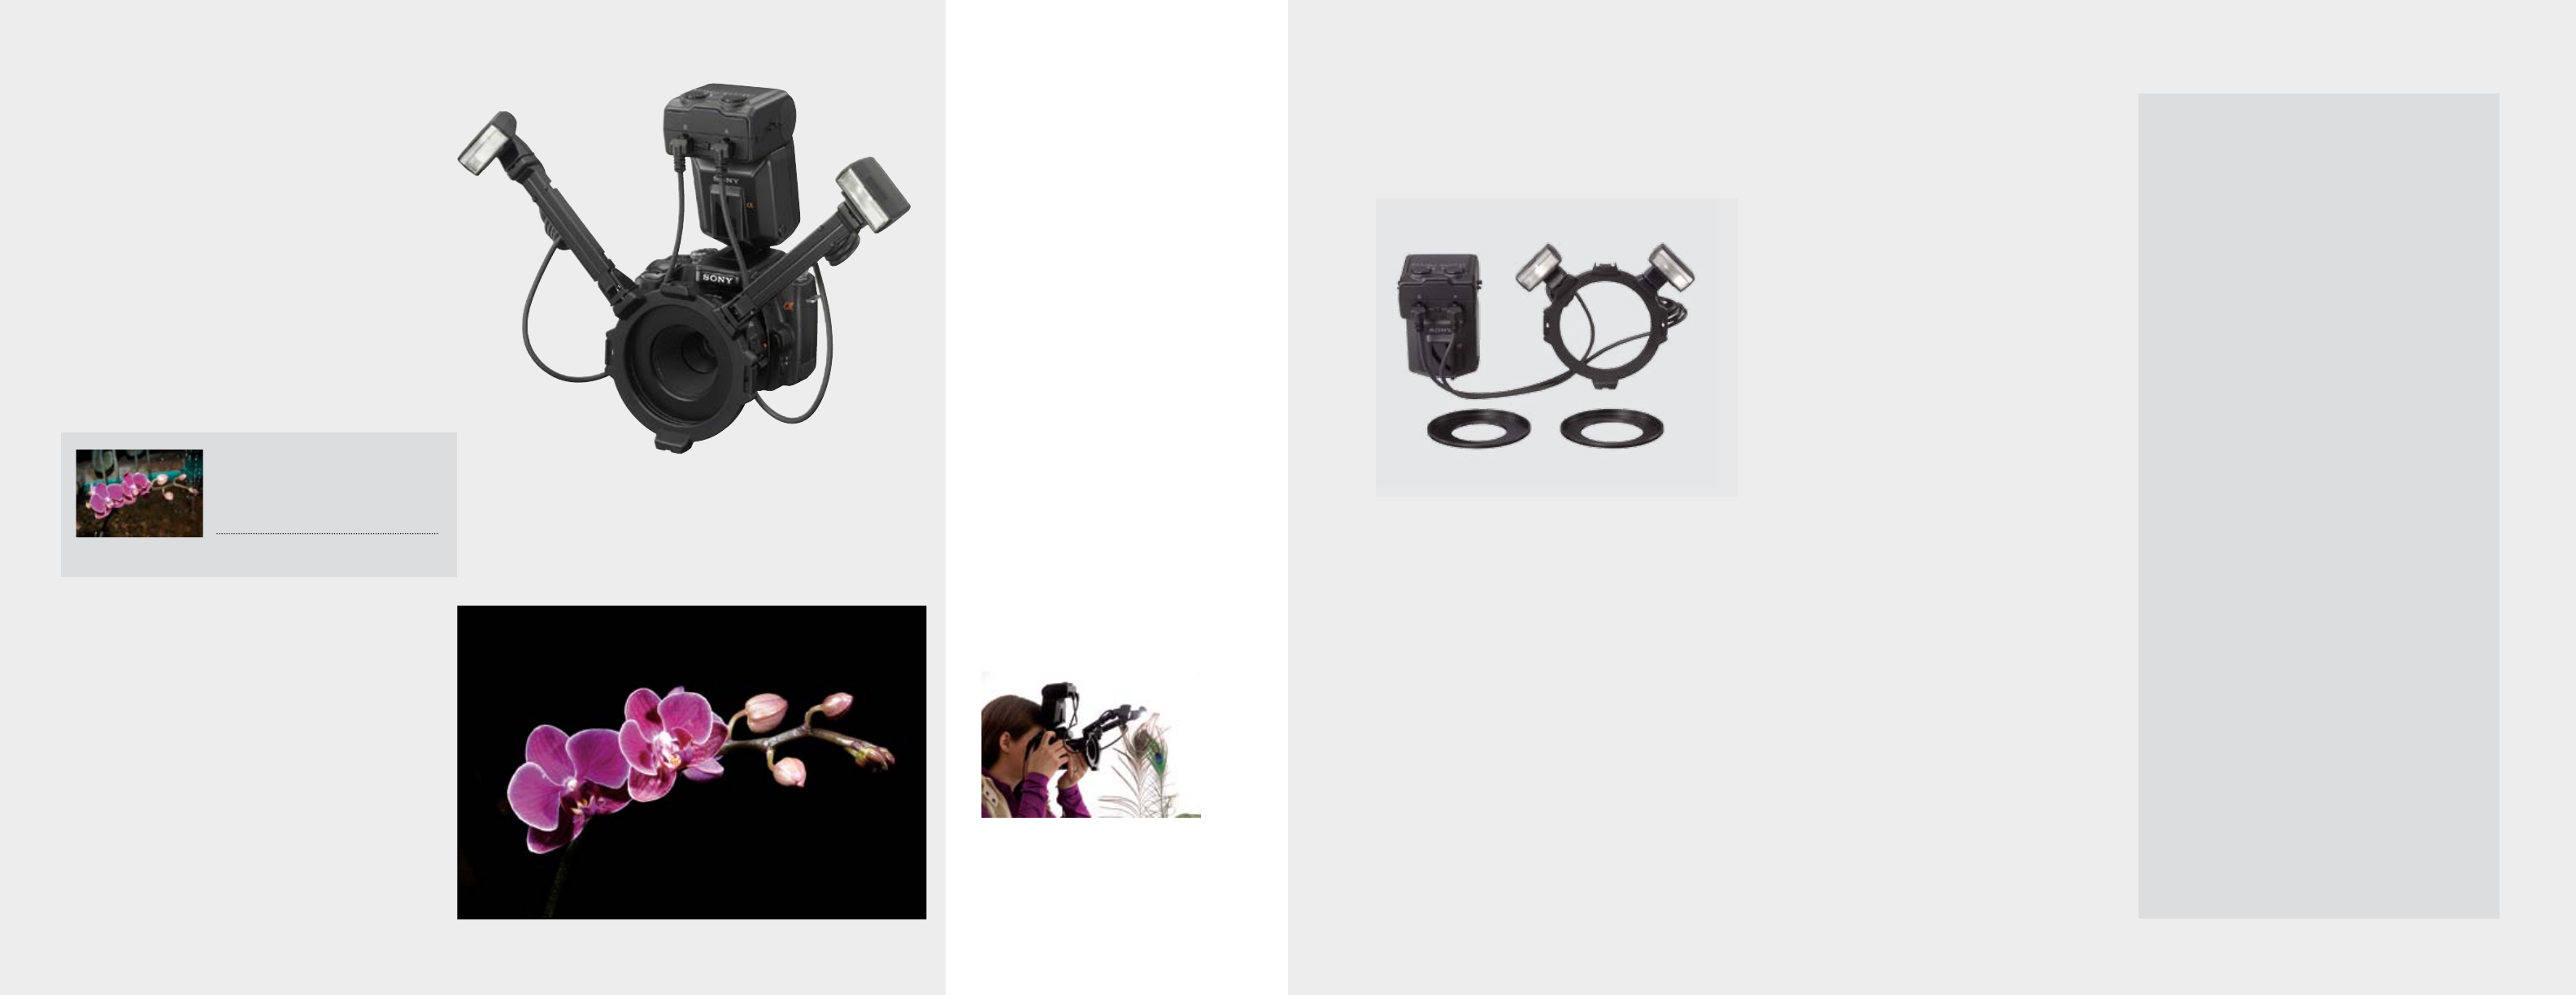
twin flash
A Twin Flash is exactly that—two flashes. They give you far
greater control when photographing objects close-up.
The Twin Flash attaches to the front of the lens. Each
flash is on its own individual arm, which can be
adjusted in a variety of angles. You can also move the
flash arms around the ring attachment itself which gives
you a multitude of lighting possibilities. The output level
on each individual Twin Flash can also be adjusted to
create an even more dramatic lighting effect.
Using a Twin Flash in your close up photography will give
your photos additional detail, texture and dimension.
Direct Flash
Makes petals appear flat and
lacking dimension. Blows out color
and contrast.
F18, 1/200 SEC, ISO 100
What is it?
Dual lens-mounted flashes
which can be extended, moved,
positioned and adjusted for close
up photography.
How to use it?
• Simply attach the twin flash to
your camera lens
• You can physically change the
length and the position of each
flash as well as change the
mode and coverage using the
included accessory shoe
• Keep changing the distance and
location of the flashes to discover
a variety of lighting effects
Where to use it?
For macro photography, when
adding dimension as well as
minimizing backgrounds.
Twin Flash in use
By switching to a twin flash not only were we were able
to direct the location of our light more effectively, we
were able to do this with two light sources allowing
us to capture more depth and detail. Both flashes
were extended the full seven inches from the lens and
were set at the 10 o’clock and 2 o’clock position. The
background is eliminated as the flash only highlights the
orchid in the foreground.
Specialized
HVL-MT24AM
Capture impeccably lit macro photographs
every time with the HVL-MT24AM macro
twin flash kit and your a DSLR camera.
Take your extreme close-up photography
to the next level by easily arranging the
twin adjustable flash heads in countless
configurations.
Specifications
Flash
• Flash Modes: Wide Panel lighting angle: Approx. 60
degrees (Vertical), Approx. 78 degrees (Horizontal)
• Flash Coverage: Guide Number: 24
(Power level 1/1)
Convenience Features
•Media/Battery Indicator: READY Lamp
Interface
•Accessory Shoe: Intelligent Accessory Shoe
Weights and Measurements
• Dimensions (Approx.): (W x H x D) 68 x 123 x 91mm for
Macro flash controller, 43 x 41 x 37mm for Twin flash unit
• Weight (Approx.): 8.3oz (235g) for Macro flash
controller, 1.2oz (33g) for Twin flash unit
Power
• Battery Type: AA Alkaline/AA Ni-MH
[Weight (Approx.): AA Alkaline 23g x 4, AA Ni-MH 29g x 4]
•Power Requirements: 4 batteries required
General
•Material: Poly-carbonate plastic
Operating Conditions
•Color Temperature Control: Approx. 5700K
•Storage Temperature: -4 to +140°F (-20 to +60°C)
Twin flashes
Twin flashes: 45° vertical, 60° horizontal. When wide
panel is mounted: 60° vertical, 78° horizontal. When
diffuser (1 flash) is mounted: 90° vertical, 90° horizontal
Wide coverage
Covers fields of view of 24mm lenses
Auto locking
Auto locking foot
54 55
The arms of the twin flash allow for precise
lighting of small objects that a larger flash
would miss or overpower
Specialized
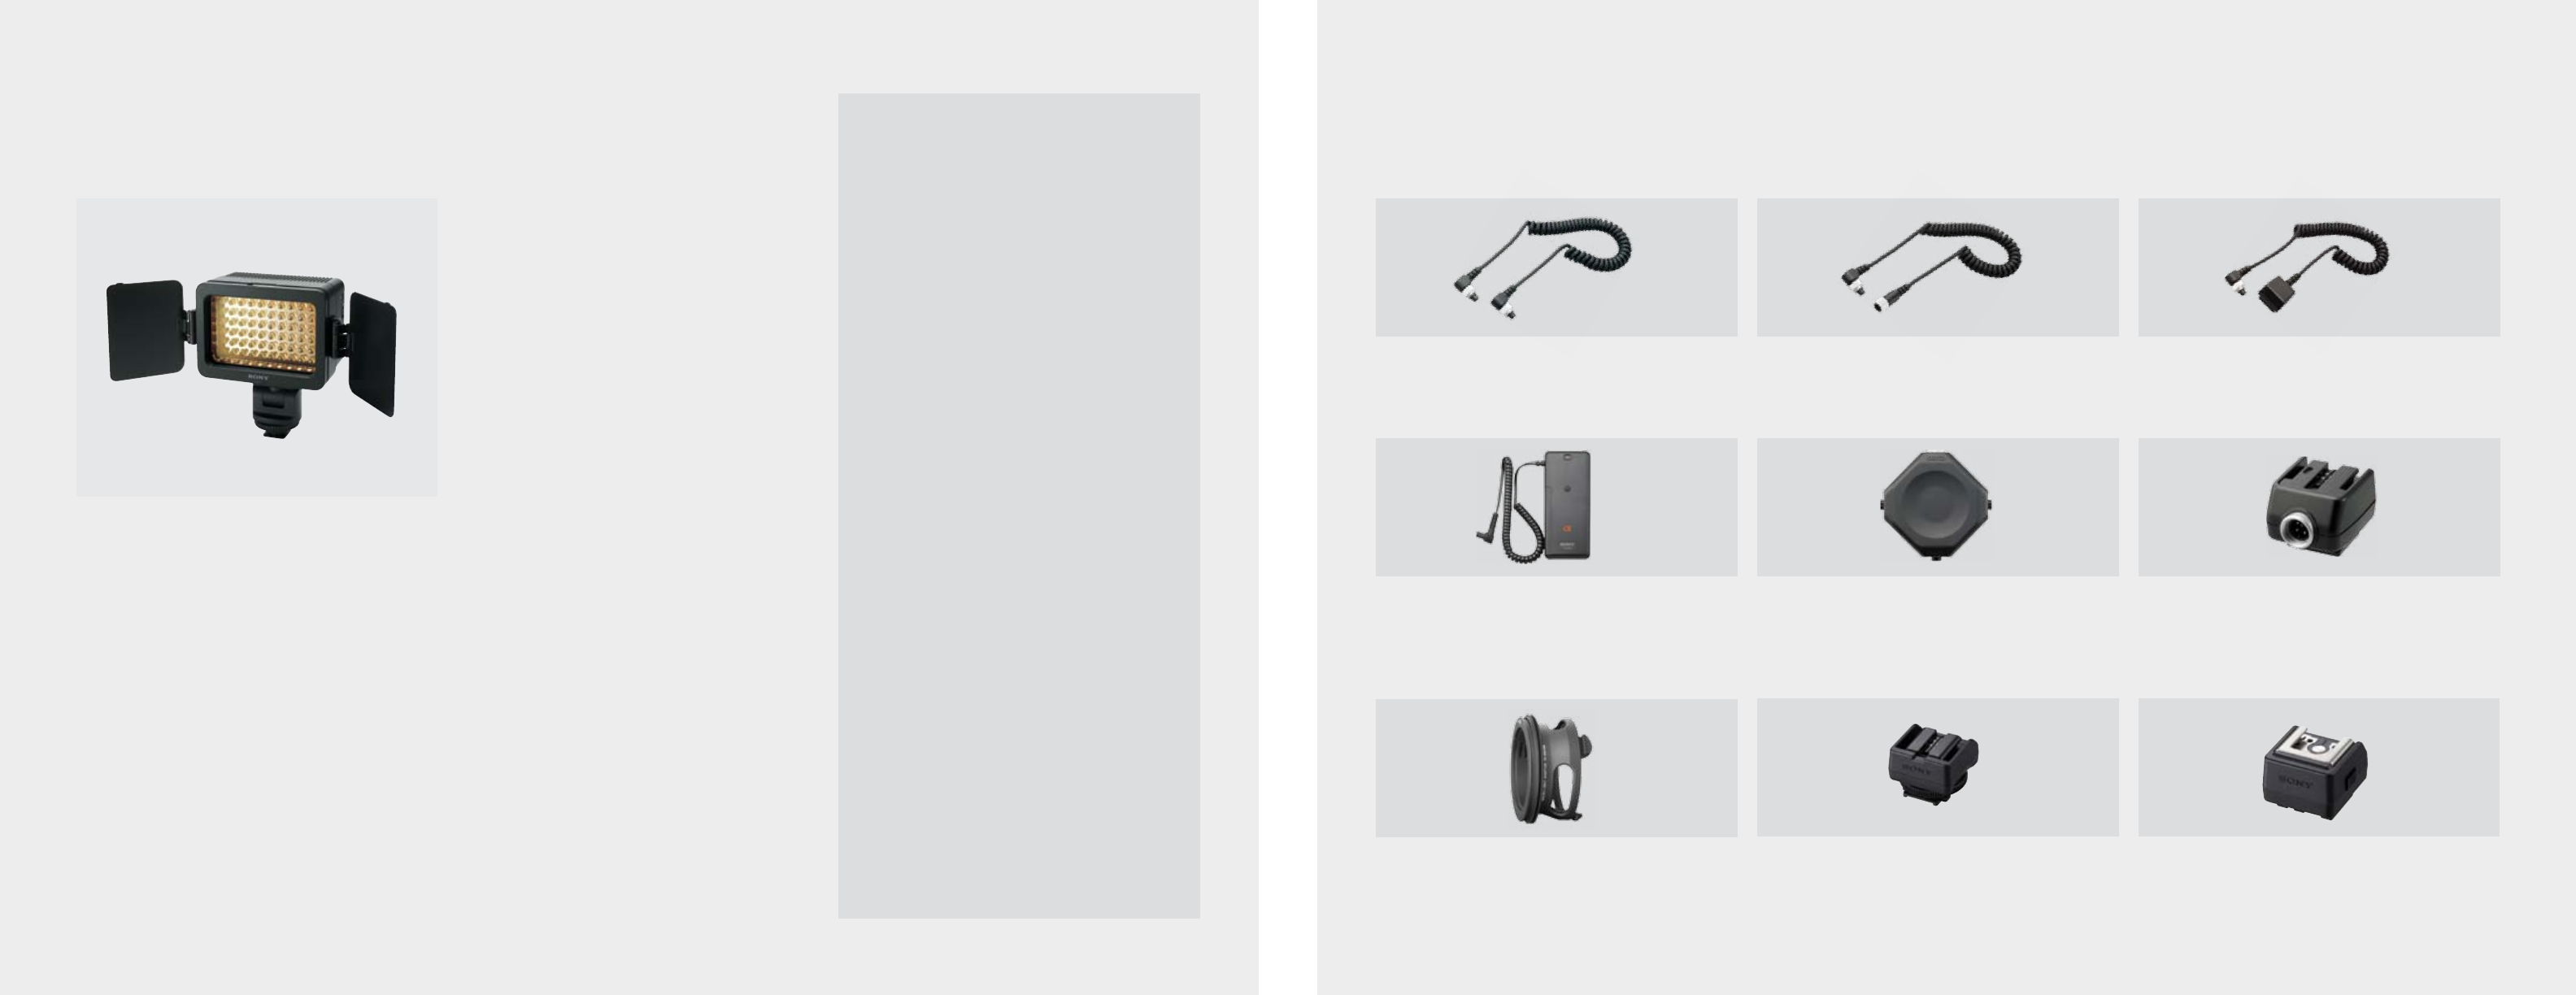
HVL-LE1
Solves lighting issues quickly with the
HVL-LE1 and see an instant difference in the
way things appear. Wide choice of battery
options—AA Alkaline, AA Ni-MH, NPFV or
NP-FM50 Sony lithium-ion batteries.
Specifications
Battery LED Video Light
• Light Type: Auto electronic light (clip-on type)
• Lighting Modes: Adjustable brightness control
(10–100%)
•Max. Luminance: 1800 lux/0.5m, 450 lux/1m
Weights and Measurements
• Dimensions (Approx.): (W x H x D) 4-3/4 x 3 x 2-1/2"
(120 x 75 x 63mm)
• Weight (Approx.): 8.9oz (250g)
(excluding AA batteries)
Power
• Battery Type: AA Alkaline /AA Ni-MH-requires 4,
NP-FV50/FV70/FV100, NP-F50 Sony
Lithium-ion batteries
General
• Material: Poly-carbonate plastic
•Operating Conditions
•Operating Temperature: 32 to +104°F (0 to +40°C)
Don’t let low lighting ruin your shoot. Solve lighting issues
quickly by attaching a battery powered LED video light
and see an instant difference in the way things appear.
Choose from a variety of battery options—AA Alkaline,
AA Ni-MH, NPFV or NP-FM50—to power up this light. With
a handy battery life indicator, you’ll know ahead of time
if power is running low so you won’t miss that crucial
shot. Ships with diffuser, color conversion filter (3200K),
barn door, A shoe adaptor and ISO shoe adaptor.
Advanced Features
•Supplied3200Kcolordiffuser,barndoor
•Swivel-ableshoe,180degreesleftorright,80degrees
forwards or backwards
•IncludesAuto-lockandcold-shoeadaptersfor
maximum versatility
External Battery Adaptor - FA-EB1AM
• External battery pack for HVL-F56AM
Triple Connector for Flash - FA-TC1AM
• Enables synchronized operation of up to 3 external
flash units
Off-Camera Shoe - FA-CS1AM
• Allows for easily mounting the external flash onto the
off-camera shoe and connecting to the camera body
via the off-camera-cable
lighting accessories
Multi Flash Cable - FA-MC1AM
• Connector cable enables flash illumination from
multiple flash units
Extension Cable for Flash - FA-EC1AM
• Approx. 1.5m extension for off-camera cable
FA-CC1AM (sold separately)
Off-Camera Cable - FA-CC1AM
• Connector cable for external flash units
(HVL-58AM/HVL-F56AM: connects directly.
HVL-F42AM/HVLF20AM: requires off camera shoe FA-CS1AM.)
Macro light adaptor - FA-MA1AM
• Adaptor for connecting Macro Light and lens
•Easy to attach and detach
Shoe Adapter - ADP-MAA
•This shoe adapter allows you to use auto-lock
shoe-compatible accessories with cameras and
camcorders that feature a new multi-interface shoe
Shoe Adapter - ADP-AMA
•This shoe adapter allows you to use new
multi-interface accessories with your Alpha DSLR
camera’s auto-lock accessory shoe
56 57

Sony Electronics Inc. | 16530 Via Esprillo | San Diego, CA 92127 | 1-800-222-7669 | www.sony.com
Please visit the online training guide at
www.sonydigitalimaging.com
a is trademark of Sony Corporation
Screen displays are simulated.
Simulated effects are used to illustrate some functions.
© 2012 Sony Electronics Inc. All rights reserved. Reproduction in whole or in part without written permission is prohibited. All other trademarks are trademarks of their respective
owners. Features and specifications are subject to change without notice.
DI12022
