Sony Bluetooth 4 158 429 311 Users Manual MEX BT3800U
Bluetooth 4-158-429-31 4158429311
4-158-429-31 to the manual fd114891-5e85-4c05-9b61-ef1d111f66ed
2015-01-24
: Sony Sony-Bluetooth-4-158-429-311-Users-Manual-287734 sony-bluetooth-4-158-429-311-users-manual-287734 sony pdf
Open the PDF directly: View PDF ![]() .
.
Page Count: 196 [warning: Documents this large are best viewed by clicking the View PDF Link!]
- GB
- Getting Started
- Quick Guide for Bluetooth function
- Location of controls and basic operations
- Radio
- CD
- USB devices
- iPod
- Bluetooth (Handsfree calling and Music streaming)
- Other functions
- Additional Information
- DE
- Vorbereitungen
- Kurzanleitung für die Bluetooth-Funktion
- Lage und Grundfunktionen der Teile und Bedienelemente
- Radio
- CD
- USB-Geräte
- iPod
- Bluetooth (Freisprechanrufe und Musik-Streaming)
- Weitere Funktionen
- Weitere Informationen
- FR
- Préparation
- Présentation rapide de la fonction Bluetooth
- Emplacement des commandes et opérations de base
- Radio
- CD
- Périphériques USB
- iPod
- Bluetooth (appels en mains libreset transmission de musique encontinu)
- Autres fonctions
- Informations complémentaires
- IT
- Operazioni preliminari
- Guida rapida per la funzione Bluetooth
- Posizione dei comandi e operazioni di base
- Radio
- CD
- Dispositivi USB
- iPod
- Bluetooth (chiamate vivavoce e streaming musicale)
- Altre funzioni
- Informazioni aggiuntive
- NL
- Aan de slag
- Snelle startgids voor Bluetooth-functie
- Bedieningselementen en algemene handelingen
- Radio
- CD
- USB-apparaten
- iPod
- Bluetooth (handsfree bellen en muziek streamen)
- Overige functies
- Aanvullende informatie
Operating Instructions
Bedienungsanleitung
Mode d’emploi
Istruzioni per l’uso
Gebruiksaanwijzing
DE
GB
FR
IT
NL
©2009 Sony Corporation
4-158-429-31(1)
MEX-BT3800U
To cancel the demonstration (DEMO) display, see page 7.
Zum Deaktivieren der Demo-Anzeige (DEMO) schlagen Sie bitte auf Seite 7 nach.
Pour annuler la démonstration (DEMO), reportez-vous à la page 7.
Per annullare la dimostrazione (DEMO), vedere pagina 7.
Om de demonstratie (DEMO) te annuleren, zie pagina 7.
Bluetooth® Audio System
Bluetooth®
Audio System
2
The nameplate indicating operating voltage, etc.,
is located on the bottom of the chassis.
Hereby, Sony Corp., declares that this MEX-
BT3800U is in compliance with the essential
requirements and other relevant provisions of
Directive 1999/5/EC.
For details, please access the following URL:
http://www.compliance.sony.de/
Use of this radio equipment is not allowed in the
geographical area within a radius of 20 km from
the centre of Ny-Alesund, Svalbard in Norway.
The Bluetooth word mark and logos are owned
by the Bluetooth SIG, Inc. and any use of such
marks by Sony Corporation is under license.
Other trademarks and trade names are those of
their respective owners.
ZAPPIN is a trademark of Sony Corporation.
Be sure to install this unit in the dashboard of
the car for safety. For installation and
connections, see the supplied installation/
connections manual.
This label is located on the bottom of the
chassis.
Notice for customers: the following
information is only applicable to
equipment sold in countries applying
EU Directives
The manufacturer of this product is Sony
Corporation, 1-7-1 Konan, Minato-ku Tokyo,
108-0075 Japan.
The Authorized Representative for EMC and
product safety is Sony Deutschland GmbH,
Hedelfinger Strasse 61, 70327 Stuttgart,
Germany. For any service or guarantee matters
please refer to the addresses given in separate
service or guarantee documents.
Disposal of Old Electrical &
Electronic Equipment (Applicable in
the European Union and other
European countries with separate
collection systems)
This symbol on the product or on its
packaging indicates that this product shall not be treated
as household waste. Instead it shall be handed over to the
applicable collection point for the recycling of electrical
and electronic equipment. By ensuring this product is
disposed of correctly, you will help prevent potential
negative consequences for the environment and human
health, which could otherwise be caused by inappropriate
waste handling of this product. The recycling of materials
will help to conserve natural resources. For more detailed
information about recycling of this product, please contact
your local Civic Office, your household waste disposal
service or the shop where you purchased the product.
Applicable accessory: Remote commander
Disposal of waste batteries
(applicable in the European Union
and other European countries with
separate collection systems)
This symbol on the battery or on the packaging indicates
that the battery provided with this product shall not be
treated as household waste. On certain batteries this
symbol might be used in combination with a chemical
symbol. The chemical symbols for mercury (Hg) or lead
(Pb) are added if the battery contains more than 0.0005%
mercury or 0.004% lead. By ensuring these batteries are
disposed of correctly, you will help prevent potentially
negative consequences for the environment and human
health which could otherwise be caused by inappropriate
waste handling of the battery. The recycling of the
materials will help to conserve natural resources.
In case of products that for safety, performance or data
integrity reasons require a permanent connection with an
incorporated battery, this battery should be replaced by
qualified service staff only. To ensure that the battery will
be treated properly, hand over the product at end-of-life to
the applicable collection point for the recycling of
electrical and electronic equipment.
For all other batteries, please view the section on how to
remove the battery from the product safely. Hand the
battery over to the applicable collection point for the
recycling of waste batteries.
For more detailed information about recycling of this
product or battery, please contact your local Civic Office,
your household waste disposal service or the shop where
you purchased the product.
3
iPod is a trademark of Apple Inc., registered in
the U.S. and other countries.
iPhone is a trademark of Apple Inc.
Warning if your car’s ignition has no
ACC position
Be sure to set the Auto Off function (page 26).
The unit will shut off completely and
automatically in the set time after the unit is
turned off, which prevents battery drain.
If you do not set the Auto Off function, press
and hold (SOURCE/OFF) until the display
disappears each time you turn the ignition off.
Windows Media and the
Windows logo are trademarks
or registered trademarks of
Microsoft Corporation in the
United States and/or other countries.
MPEG Layer-3 audio coding technology and
patents licensed from Fraunhofer IIS and Thomson.
This product is protected by certain intellectual
property rights of Microsoft Corporation. Use or
distribution of such technology outside of this
product is prohibited without a license from
Microsoft or an authorized Microsoft subsidiary.
Content providers are using the digital rights
management technology for Windows Media
contained in this device (“WM-DRM”) to protect
the integrity of their content (“Secure Content”) so
that their intellectual property, including copyright,
in such content is not misappropriated.
This device uses WM-DRM software to play
Secure Content (“WM-DRM Software”). If the
security of the WM-DRM Software in this device
has been compromised, owners of Secure Content
(“Secure Content Owners”) may request that
Microsoft revoke the WM-DRM Software’s right
to acquire new licenses to copy, display and/or
play Secure Content. Revocation does not alter the
WM-DRM Software’s ability to play unprotected
content. A list of revoked WM-DRM Software is
sent to your device whenever you download a
license for Secure Content from the Internet or
from a PC. Microsoft may, in conjunction with
such license, also download revocation lists onto
your device on behalf of Secure Content Owners.
Note on the lithium battery
Do not expose the battery to excessive heat such as
direct sunlight, fire or the like.

4
Table of Contents
Getting Started
Playable discs on this unit . . . . . . . . . . . . . . . . . 6
Notes on Bluetooth . . . . . . . . . . . . . . . . . . . . . . 6
Resetting the unit. . . . . . . . . . . . . . . . . . . . . . . . 6
Canceling the DEMO mode . . . . . . . . . . . . . . . 7
Preparing the card remote commander . . . . . . . 7
Setting the clock . . . . . . . . . . . . . . . . . . . . . . . . 7
Detaching the front panel . . . . . . . . . . . . . . . . . 7
Attaching the front panel . . . . . . . . . . . . . . . 7
Quick Guide for Bluetooth function
3 steps to Bluetooth function. . . . . . . . . . . . . . . 8
Buttons and icons . . . . . . . . . . . . . . . . . . . . . . . 9
1Pairing . . . . . . . . . . . . . . . . . . . . . . . . . . . . 10
2Connection . . . . . . . . . . . . . . . . . . . . . . . . . 10
3Handsfree calling and Music streaming . . . 11
Location of controls and basic
operations
Main unit. . . . . . . . . . . . . . . . . . . . . . . . . . . 12
Card remote commander RM-X304 . . . . . . 14
Searching for a track . . . . . . . . . . . . . . . . . . . . 15
Searching a track by name
— Quick-BrowZer . . . . . . . . . . . . . . . . . . . 15
Searching a track by listening to track passages
— ZAPPIN™ . . . . . . . . . . . . . . . . . . . . . . . 16
Radio
Storing and receiving stations . . . . . . . . . . . . . 16
Storing automatically — BTM . . . . . . . . . . 16
Storing manually. . . . . . . . . . . . . . . . . . . . . 16
Receiving the stored stations . . . . . . . . . . . 16
Tuning automatically . . . . . . . . . . . . . . . . . 16
RDS . . . . . . . . . . . . . . . . . . . . . . . . . . . . . . . . . 17
Overview. . . . . . . . . . . . . . . . . . . . . . . . . . . 17
Setting AF and TA . . . . . . . . . . . . . . . . . . . 17
Selecting PTY . . . . . . . . . . . . . . . . . . . . . . . 18
Setting CT. . . . . . . . . . . . . . . . . . . . . . . . . . 18
CD
Display items . . . . . . . . . . . . . . . . . . . . . . . 18
Repeat and shuffle play . . . . . . . . . . . . . . . 18
USB devices
Playing back a USB device. . . . . . . . . . . . . . . 19
Display items . . . . . . . . . . . . . . . . . . . . . . . 19
Repeat and shuffle play . . . . . . . . . . . . . . . 19
iPod
Playing back iPod . . . . . . . . . . . . . . . . . . . . . . 20
Display items . . . . . . . . . . . . . . . . . . . . . . . 20
Setting the play mode . . . . . . . . . . . . . . . . . . . 21
Repeat and shuffle play . . . . . . . . . . . . . . . 21
Operating an iPod directly
— Passenger control . . . . . . . . . . . . . . . . . . . . 21
Bluetooth (Handsfree calling and
Music streaming)
Bluetooth operations. . . . . . . . . . . . . . . . . . . . 22
Pairing. . . . . . . . . . . . . . . . . . . . . . . . . . . . . . . 22
About Bluetooth icons . . . . . . . . . . . . . . . . 22
Connection . . . . . . . . . . . . . . . . . . . . . . . . . . . 23
To switch the Bluetooth signal output of this
unit to on . . . . . . . . . . . . . . . . . . . . . . . . . . 23
Connecting a cellular phone. . . . . . . . . . . . 23
Connecting an audio device . . . . . . . . . . . . 23
Handsfree calling . . . . . . . . . . . . . . . . . . . . . . 23
Receiving calls . . . . . . . . . . . . . . . . . . . . . . 23
Making calls. . . . . . . . . . . . . . . . . . . . . . . . 24
Call transfer . . . . . . . . . . . . . . . . . . . . . . . . 24
Voice Dial Activation . . . . . . . . . . . . . . . . 24
Music streaming . . . . . . . . . . . . . . . . . . . . . . . 24
Listening to music from an audio
device . . . . . . . . . . . . . . . . . . . . . . . . . . . . . 24
Operating an audio device with this
unit . . . . . . . . . . . . . . . . . . . . . . . . . . . . . . . 25
Deleting registration of all paired devices . . . 25
5
Support site
If you have any questions or for the latest support information on this
product, please visit the web site below:
http://support.sony-europe.com/
Provides information on:
• Models and manufacturers of compatible digital audio players
• Supported MP3/WMA/AAC files
• Models and manufacturers of compatible cellular phones and the FAQ
about Bluetooth function
Other functions
Changing the sound settings . . . . . . . . . . . . . . 25
Adjusting the sound characteristics . . . . . . 25
Customizing the equalizer curve
— EQ3 . . . . . . . . . . . . . . . . . . . . . . . . . . . . 26
Adjusting setup items — SET . . . . . . . . . . . . . 26
Using optional equipment . . . . . . . . . . . . . . . . 27
Auxiliary audio equipment . . . . . . . . . . . . . 27
External microphone XA-MC10 . . . . . . . . 27
Additional Information
Precautions . . . . . . . . . . . . . . . . . . . . . . . . . . . 28
Notes on discs . . . . . . . . . . . . . . . . . . . . . . . 28
Playback order of MP3/WMA/AAC
files . . . . . . . . . . . . . . . . . . . . . . . . . . . . . . . 28
About iPod . . . . . . . . . . . . . . . . . . . . . . . . . 28
About Bluetooth function . . . . . . . . . . . . . . 29
Maintenance . . . . . . . . . . . . . . . . . . . . . . . . . . 29
Removing the unit . . . . . . . . . . . . . . . . . . . . . . 30
Specifications . . . . . . . . . . . . . . . . . . . . . . . . . 31
Troubleshooting. . . . . . . . . . . . . . . . . . . . . . . . 32
Error displays/Messages . . . . . . . . . . . . . . . 34
6
Getting Started
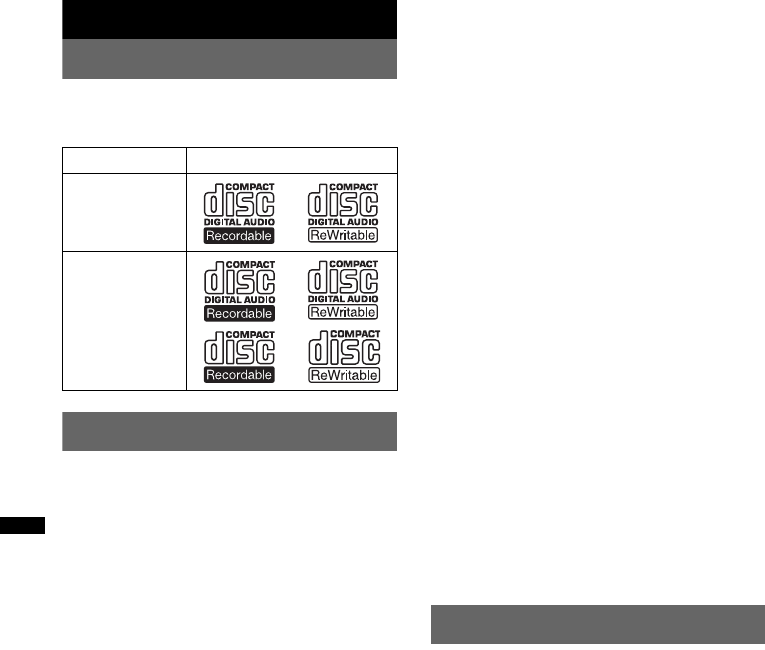
Playable discs on this unit
This unit can play CD-DA (also containing CD
TEXT) and CD-R/CD-RW (MP3/WMA/AAC
files (page 28)).
Notes on Bluetooth
Caution
IN NO EVENT SHALL SONY BE LIABLE FOR
ANY INCIDENTAL, INDIRECT OR
CONSEQUENTIAL DAMAGES OR OTHER
DAMAGES INCLUDING, WITHOUT
LIMITATION, LOSS OF PROFITS, LOSS OF
REVENUE, LOSS OF DATA, LOSS OF USE OF
THE PRODUCT OR ANY ASSOCIATED
EQUIPMENT, DOWNTIME, AND
PURCHASER’S TIME RELATED TO OR
ARISING OUT OF THE USE OF THIS
PRODUCT, ITS HARDWARE AND/OR ITS
SOFTWARE.
IMPORTANT NOTICE!
Safe and efficient use
Changes or modifications to this unit not expressly
approved by Sony may void the user’s authority to
operate the equipment.
Please check for exceptions, due to national
requirement or limitations, in usage of Bluetooth
equipment before using this product.
Driving
Check the laws and regulations on the use of cellular
phones and handsfree equipment in the areas where
you drive.
Always give full attention to driving and pull off the
road and park before making or answering a call if
driving conditions so require.
Connecting to other devices
When connecting to any other device, please read its
user guide for detailed safety instructions.
Radio frequency exposure
RF signals may affect improperly installed or
inadequately shielded electronic systems in cars,
such as electronic fuel injection systems, electronic
antiskid (antilock) braking systems, electronic speed
control systems or air bag systems. For installation
or service of this device, please consult with the
manufacturer or its representative of your car. Faulty
installation or service may be dangerous and may
invalidate any warranty that may apply to this
device.
Consult with the manufacturer of your car to ensure
that the use of your cellular phone in the car will not
affect its electronic system.
Check regularly that all wireless device equipment
in your car is mounted and operating properly.
Emergency calls
This Bluetooth car handsfree and the electronic
device connected to the handsfree operate using
radio signals, cellular, and landline networks as well
as user-programmed function, which cannot
guarantee connection under all conditions.
Therefore do not rely solely upon any electronic
device for essential communications (such as
medical emergencies).
Remember, in order to make or receive calls, the
handsfree and the electronic device connected to the
handsfree must be switched on in a service area with
adequate cellular signal strength.
Emergency calls may not be possible on all cellular
phone networks or when certain network services
and/or phone features are in use.
Check with your local service provider.
Resetting the unit
Before operating the unit for the first time, or
after replacing the car battery or changing the
connections, you must reset the unit.
Detach the front panel (page 7) and press the
RESET button (page 12) with a pointed object,
such as a ball-point pen.
Note
Pressing the RESET button will erase the clock setting
and some stored contents.
Type of discs Label on the disc
CD-DA
MP3
WMA
AAC
7
Canceling the DEMO mode
You can cancel the demonstration display which
appears during turning off.
1Press and hold the select button.
The setup display appears.
2Press the select button repeatedly
until “DEMO” appears.
3Rotate the control dial to select
“DEMO-OFF.”
4Press and hold the select button.
The setup is complete and the display returns
to normal reception/play mode.
Preparing the card remote
commander
Remove the insulation film.
Tip
For how to replace the battery, see page 29.
Setting the clock
The clock uses a 24-hour digital indication.
1Press and hold the select button.
The setup display appears.
2Press the select button repeatedly
until “CLOCK-ADJ” appears.
3Press (SEEK) +.
The hour indication flashes.
4Rotate the control dial to set the hour
and minute.
To move the digital indication, press (SEEK)
–/+.
5After setting the minute, press the
select button.
The setup is complete and the clock starts.
To display the clock, press (DSPL). Press
(DSPL) again to return to the previous display.
Tip
You can set the clock automatically with the RDS
feature (page 18).
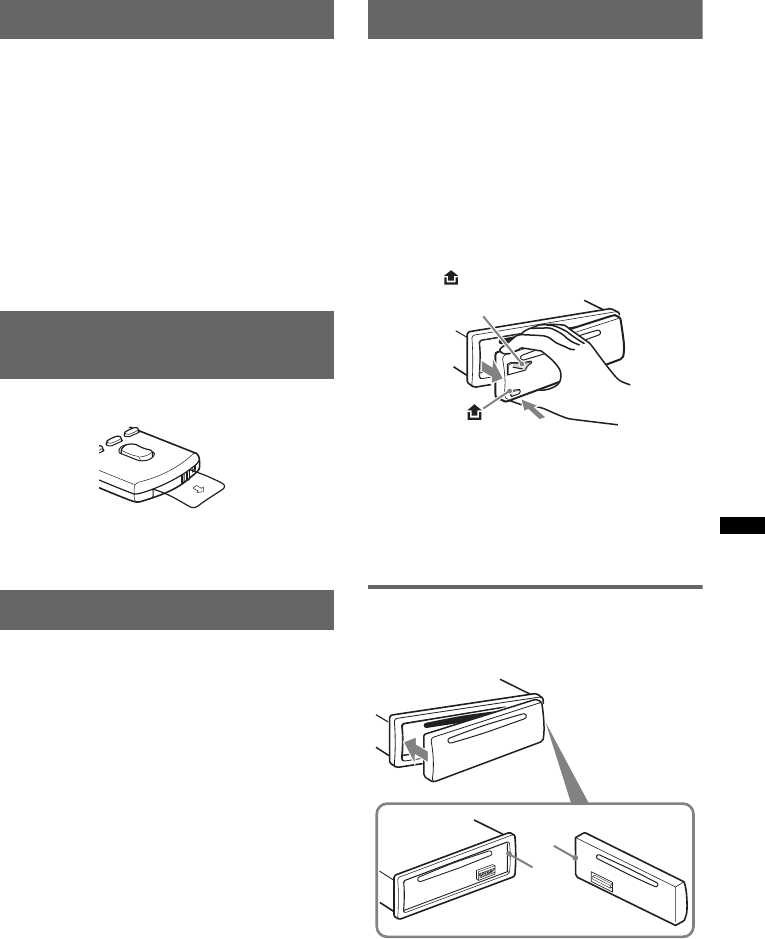
Detaching the front panel
You can detach the front panel of this unit to
prevent theft.
Caution alarm
If you turn the ignition switch to the OFF
position without detaching the front panel, the
caution alarm will sound for a few seconds.
The alarm will only sound if the built-in
amplifier is used.
1Press and hold (SOURCE/OFF).
The unit is turned off.
2Press , then pull it off towards you.
Notes
•Do not drop or put excessive pressure on the front
panel and display window.
•Do not subject the front panel to heat/high
temperature or moisture. Avoid leaving it in a parked
car or on a dashboard/rear tray.
•Do not detach the front panel during playback of the
USB device, otherwise USB data may be damaged.
Attaching the front panel
Engage part A of the front panel with part B of
the unit, as illustrated, and push the left side into
position until it clicks.
Note
Do not put anything on the inner surface of the front
panel.
(SOURCE/OFF)
B
A

8
Quick Guide for Bluetooth function
For full details on operation, see “Bluetooth (Handsfree calling and Music streaming)” (page 22) and
the Bluetooth device operating instructions.
3 steps to Bluetooth function
1Pairing
First, register (“pair”) Bluetooth device (cellular phone, etc.) with this unit. Pairing is no longer
required after the first time.
2Connection
Sometimes pairing allows to connect automatically. To use the device after pairing is made, start
the connection.
3Handsfree calling/Music streaming
You can talk handsfree and listen to music when the connection is made.
Support site
http://support.sony-europe.com/
9
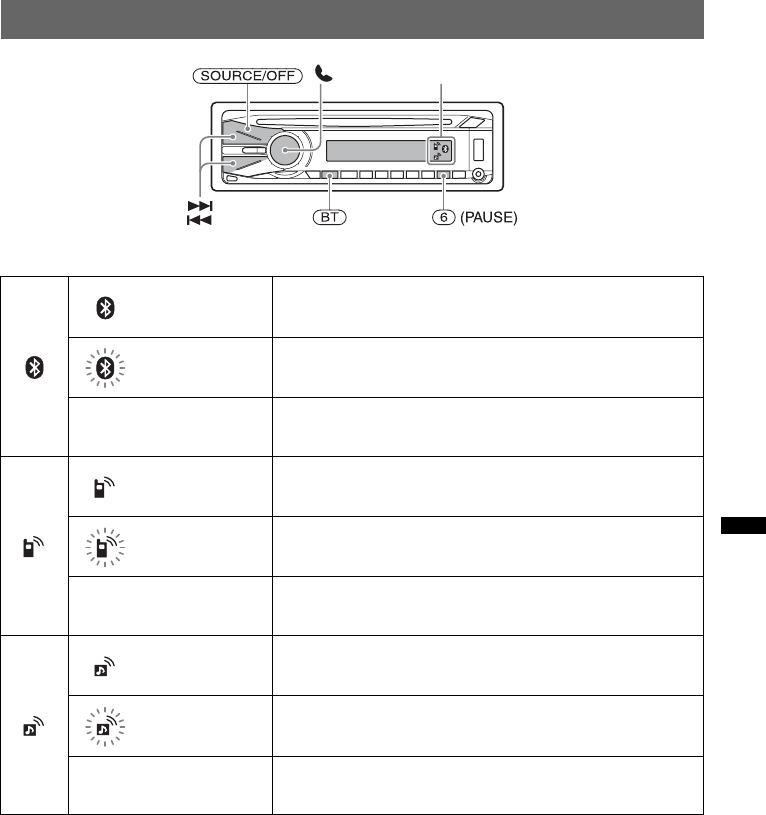
Buttons and icons
Icon status descriptions
Lit Bluetooth signal on
Flashing Pairing standby mode
None Bluetooth signal off
Lit Cellular phone connection successful
Flashing Unit connecting to cellular phone
None No connection
Lit Audio device connection successful
Flashing Unit connecting to audio device
None No connection
Icons
10
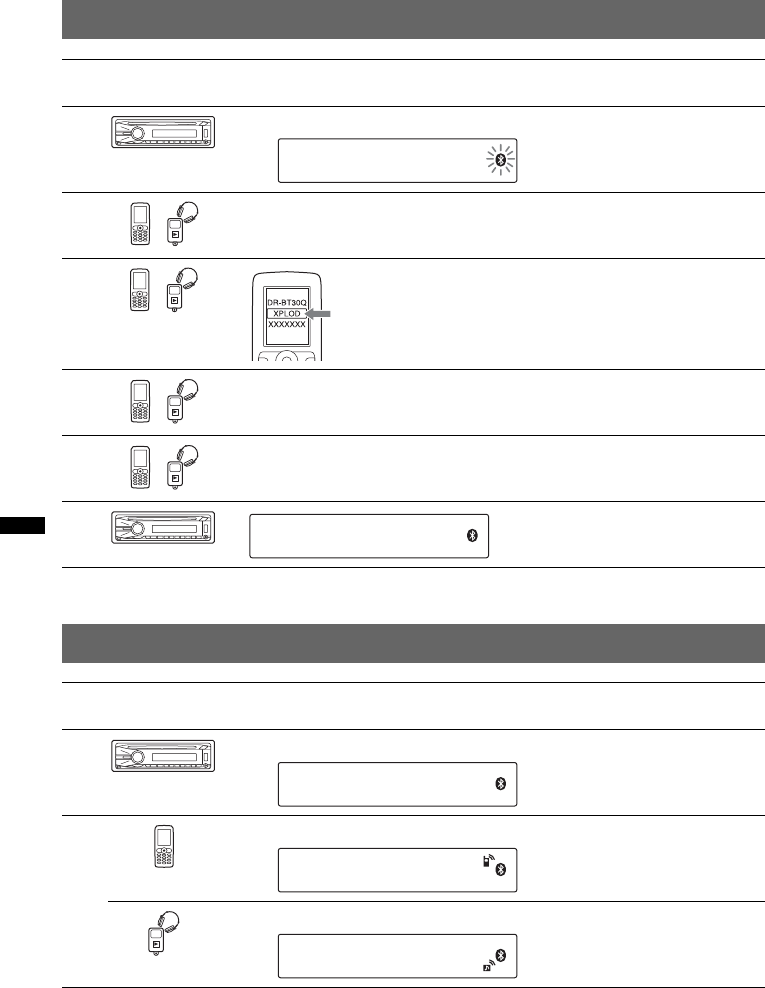
1Pairing
2Connection
Note
You can connect from this unit to a Bluetooth device (page 23).
If you cannot connect from this unit to the Bluetooth device, start pairing again.
Operated
equipment Operation
1Press and hold (BT) for about 5 seconds.
2Search for this unit.
3
4Input passkey “0000”.
5Follow display directions.
6
Operated
equipment Operation
1Press and hold (BT) for about 3 seconds.
2Connect to this unit using a cellular phone.
Connect to this unit using an audio device.
t
Select “XPLOD”.
(Pairing successful)
t
t
t
11
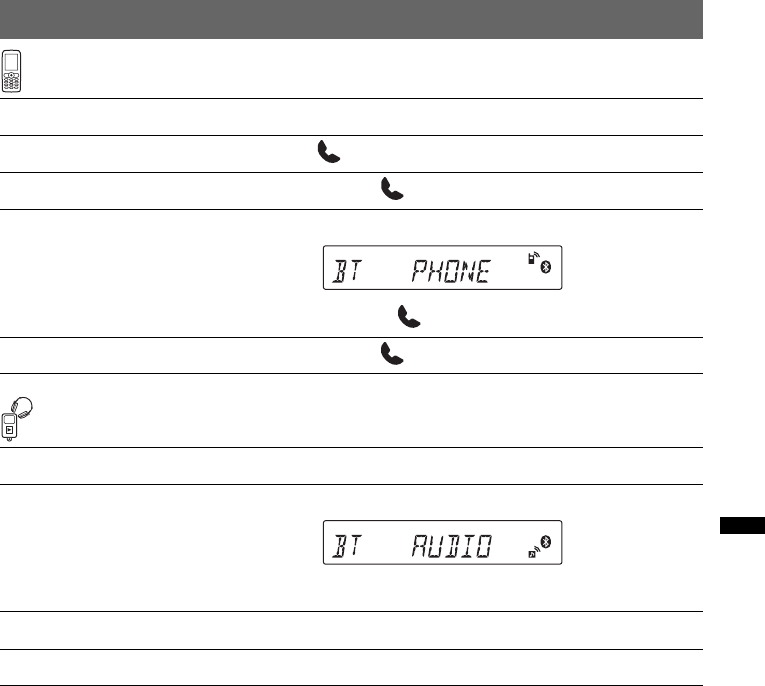
3Handsfree calling and Music streaming
Handsfree calling
Music streaming
*The operation may differ depending on the audio device.
To do Operation
Receive a call/end a call Press .
Reject a call Press and hold for 2 seconds.
Redial 1Press (SOURCE/OFF).
2Press and hold for 3 seconds.
To transfer a call Press and hold for 2 seconds.
To do Operation
Listen 1Press (SOURCE/OFF).
2Press Start playback on the audio device.
Play back/pause (AVRCP)* Press (6) (PAUSE).
Skip tracks (AVRCP)* Press ./>.
t
t

12
Location of controls and basic operations
Main unit
Front panel removed This section contains instructions on the location
of controls and basic operations.
For details, see the respective pages.
ASEEK +/– buttons
CD/USB:
To skip tracks (press); skip tracks
continuously (press, then press again within
about 1 second and hold); reverse/fast-
forward a track (press and hold).
Radio:
To tune in stations automatically (press); find
a station manually (press and hold).
Bluetooth audio device*1:
To skip tracks (press).
B (BACK)/MODE button page 15, 16,
20, 21
Press to: Return to the previous display/
select the radio band (FM/MW/LW)/select
the play mode of iPod.
Press and hold to: Enter/cancel the passenger
control.
CSOURCE/OFF button*2
Press to turn on the power/change the source
(Radio/CD/USB/AUX/Bluetooth audio/
Bluetooth phone).
Press for 1 second to turn off the power.
Press for 2 seconds or more to turn off the
power and the display disappears.
DControl dial/select / (handsfree)
button
To adjust volume (rotate); select setup items
(press and rotate); receive/end a call (press).
P
U
S
H
E
N
T
E
R
/
S
E
L
E
C
T
/
AUX
ALBM REP SHUF PAUSE
SOURCE
SEEK OFF
SCRL
ZAP
SEEK
123456
DSPL
PTY
AF
/
TA
BLUETOOTH
BT
MODE
MIC
9 q
;
q
a
q
d
q
s
q
f
q
h
2
q
j
q
g
1 83 4 5 6 7
RESET
qlqk

13
EDisc slot
Insert the disc (label side up), playback
starts.
FDisplay window
GZ (eject) button
To eject the disc.
HUSB connector page 19, 20
To connect to the USB device.
I (front panel release) button page 7
J (BROWSE) button page 15
To enter the Quick-BrowZer mode.
KZAP button page 16
To enter ZAPPIN™ mode.
LReceptor for the card remote
commander
MBT (BLUETOOTH) button page 22
For Bluetooth signal on/off, pairing.
NAF (Alternative Frequencies)/
TA (Traffic Announcement)/
PTY (Program Type) button page 17,
18
To set AF and TA (press); select PTY (press
and hold) in RDS.
ONumber buttons
CD/USB:
(1)/(2): ALBM –/+ (during MP3/WMA/
AAC playback)
To skip albums (press); skip albums
continuously (press and hold).
(3): REP*2 page 18, 19, 21
(4): SHUF page 18, 19, 21
(6): PAUSE
To pause playback. To cancel, press
again.
Radio:
To receive stored stations (press); store
stations (press and hold).
Bluetooth audio device*1:
(6): PAUSE
To pause playback. To cancel, press
again.
Bluetooth phone:
(5): MIC page 23
PDSPL (display)/SCRL (scroll) button
page 17, 18, 19, 20, 21
To change display items (press); scroll the
display item (press and hold).
QAUX input jack page 27
To connect a portable audio device.
RRESET button (located behind the front
panel) page 6
SMicrophone page 23
Note
Do not cover the microphone, the handsfree
function may not work properly.
*1 When a Bluetooth audio device (supports AVRCP
of Bluetooth technology) is connected. Depending
on the device, certain operations may not be
available.
*2 This button has a tactile dot.
Note
When ejecting/inserting a disc, keep any USB devices
disconnected to avoid damage to the disc.

14
Card remote commander
RM-X304
Remove the insulation film before use (page 7).
AOFF button
To turn off; stop the source.
BSOURCE button
To turn on; change the source (Radio/CD/
USB/AUX/Bluetooth audio/Bluetooth
phone).
C< (.)/, (>) buttons
To control Radio/CD/USB/Bluetooth audio,
the same as (SEEK) –/+ on the unit.
Setup, sound setting, etc., can be operated by
< ,.
DDSPL (display) button
To change display items.
EVOL (volume) +*/– button
To adjust volume.
FATT (attenuate) button
To attenuate the sound. To cancel, press
again.
GMODE button
Press to select the radio band (FM/MW/LW)/
select the play mode of iPod.
Press and hold to enter/cancel the passenger
control.
HSEL (select)/ (handsfree) button
The same as the select button on the unit.
IM (+)/m (–) buttons
To control CD/USB, the same as (1)/(2)
(ALBM –/+) on the unit.
Setup, sound setting, etc., can be operated by
M m.
JSCRL (scroll) button
To scroll the display item.
KNumber buttons
To receive stored stations (press); store
stations (press and hold).
*This button has a tactile dot.
Note
If the unit is turned off and the display disappears, it
cannot be operated with the card remote commander
unless (SOURCE/OFF) on the unit is pressed, or a disc
is inserted to activate the unit first.
OFF
DSPL SCRL
SEL
SOURCE
MODE
132
465
ATT
VOL
+
–
+
–
28
7
1
0
3
6
5
4
qa
9
15
Searching for a track
Searching a track by name
— Quick-BrowZer
You can search for a track in a CD or USB device
easily by category.
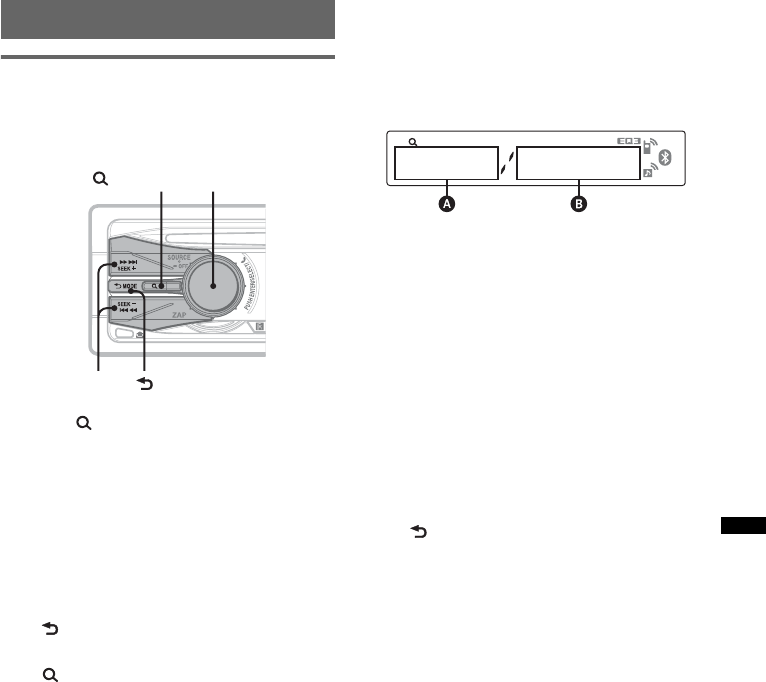
1Press (BROWSE).
The unit enters the Quick-BrowZer mode,
and the list of search categories appears.
2Rotate the control dial to select the
desired search category, then press it
to confirm.
3Repeat step 2 until the desired track is
selected.
Playback starts.
To return to the previous display
Press (BACK).
To exit the Quick-BrowZer mode
Press (BROWSE).
Note
When entering the Quick-BrowZer mode, the repeat/
shuffle setting is canceled.
Searching by skip items
— Jump mode
When many items are in a category, you can
search the desired item quickly.
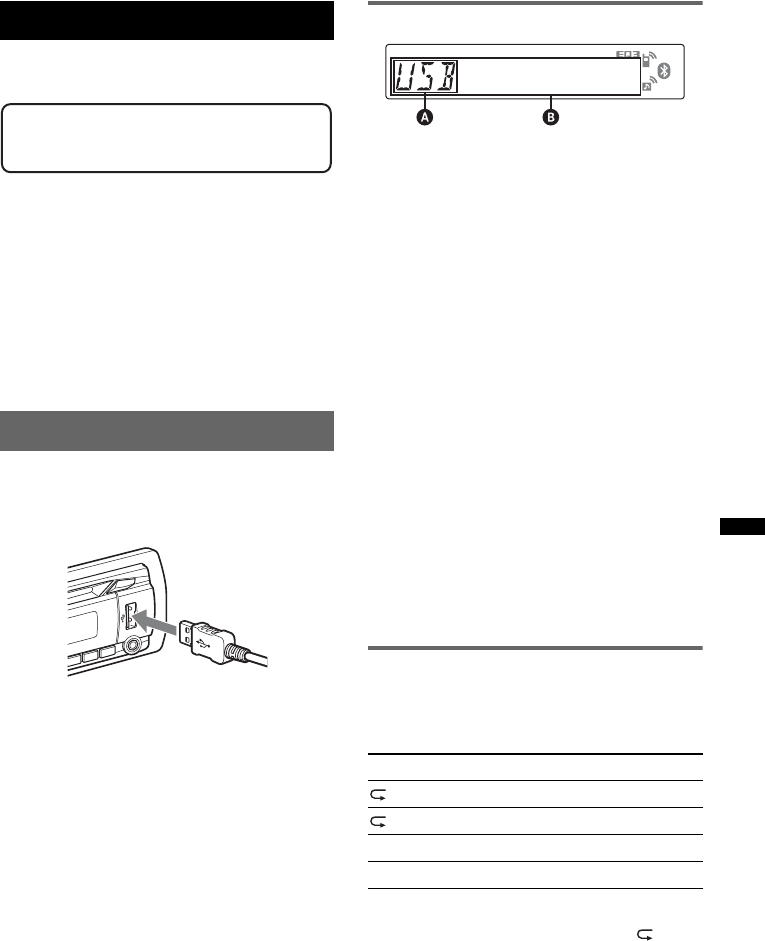
1Press (SEEK) + in Quick-BrowZer mode.
The following display appears.
ACurrent item number
BTotal item number in the current layer
Then the item name will appear.
2Rotate the control dial to select the desired
item, or one near the desired item.
It skips in steps of 10% of the total item
number.
3Press the select button.
The display returns to the Quick-BrowZer
mode and the selected item appears.
4Rotate the control dial to select the desired
item and press it.
Playback starts if the selected item is a track.
To cancel Jump mode
Press (BACK) or (SEEK) –.
(BROWSE) Control dial/
select button
(BACK)
SEEK +/–
16
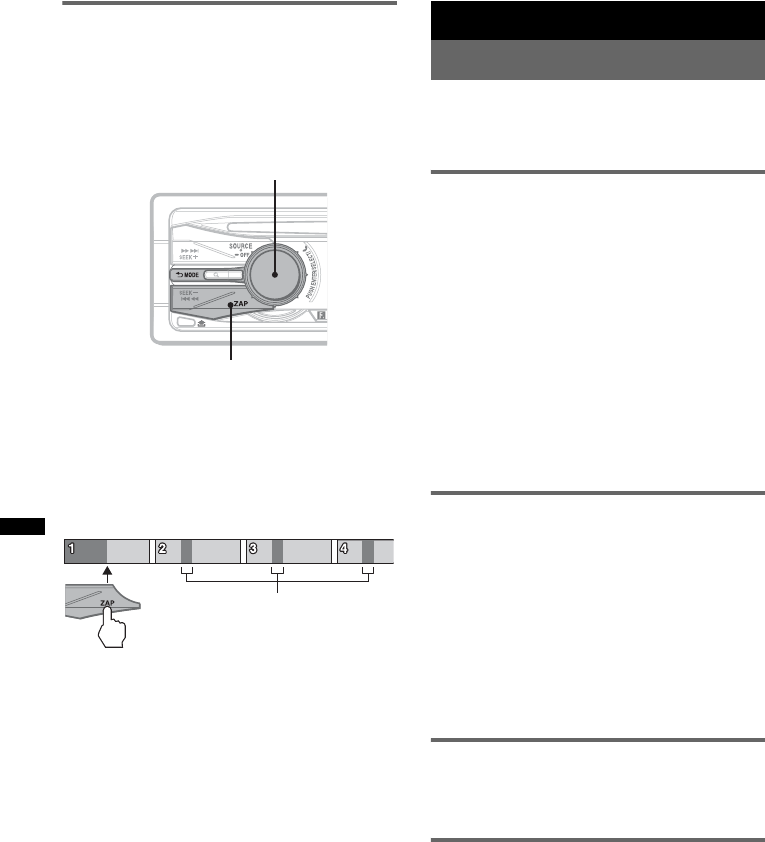
Searching a track by listening to
track passages — ZAPPIN™
While playing back short track passages in a CD
or USB device in sequence, you can search for a
track you want to listen to.
ZAPPIN mode is suitable for searching for a
track in shuffle or shuffle repeat mode.
1Press (ZAP) during playback.
After “ZAPPIN” appears in the display,
playback starts from a passage of the next
track.
The passage is played for the set time, then a
click sounds and the next passage starts.
2Press the select button or (ZAP) when
a track you want to listen is played
back.
The track that you select returns to normal
play mode from the beginning.
To search a track by ZAPPIN mode again,
repeat steps 1 and 2.
Tips
•You can select the playback time from about 6
seconds/9 seconds/30 seconds (page 26). You
cannot select the passage of the track to playback.
•Press (SEEK) +/– or (1)/(2) (ALBM –/+) in ZAPPIN
mode to skip a track or album.
Radio
Storing and receiving stations
Caution
When tuning in stations while driving, use Best
Tuning Memory (BTM) to prevent an accident.
Storing automatically — BTM
1Press (SOURCE/OFF) repeatedly until
“TUNER” appears.
To change the band, press (MODE)
repeatedly. You can select from FM1, FM2,
FM3, MW or LW.
2Press and hold the select button.
The setup display appears.
3Press the select button repeatedly
until “BTM” appears.
4Press (SEEK) +.
The unit stores stations in order of frequency
on the number buttons.
A beep sounds when the setting is stored.
Storing manually
1While receiving the station that you
want to store, press and hold a
number button ((1) to (6)) until
“MEM” appears.
Note
If you try to store another station on the same number
button, the previously stored station will be replaced.
Tip
When a RDS station is stored, the AF/TA setting is
also stored (page 17).
Receiving the stored stations
1Select the band, then press a number
button ((1) to (6)).
Tuning automatically
1Select the band, then press (SEEK) +/–
to search for the station.
Scanning stops when the unit receives a
station. Repeat this procedure until the
desired station is received.
Tip
If you know the frequency of the station you want to
listen to, press and hold (SEEK) +/– to locate the
approximate frequency, then press (SEEK) +/–
repeatedly to fine adjust to the desired frequency
(manual tuning).
ZAP
Select button
The part of each track to
playback in ZAPPIN mode.
Track
17
RDS
Overview
FM stations with Radio Data System (RDS)
service send inaudible digital information along
with the regular radio program signal.
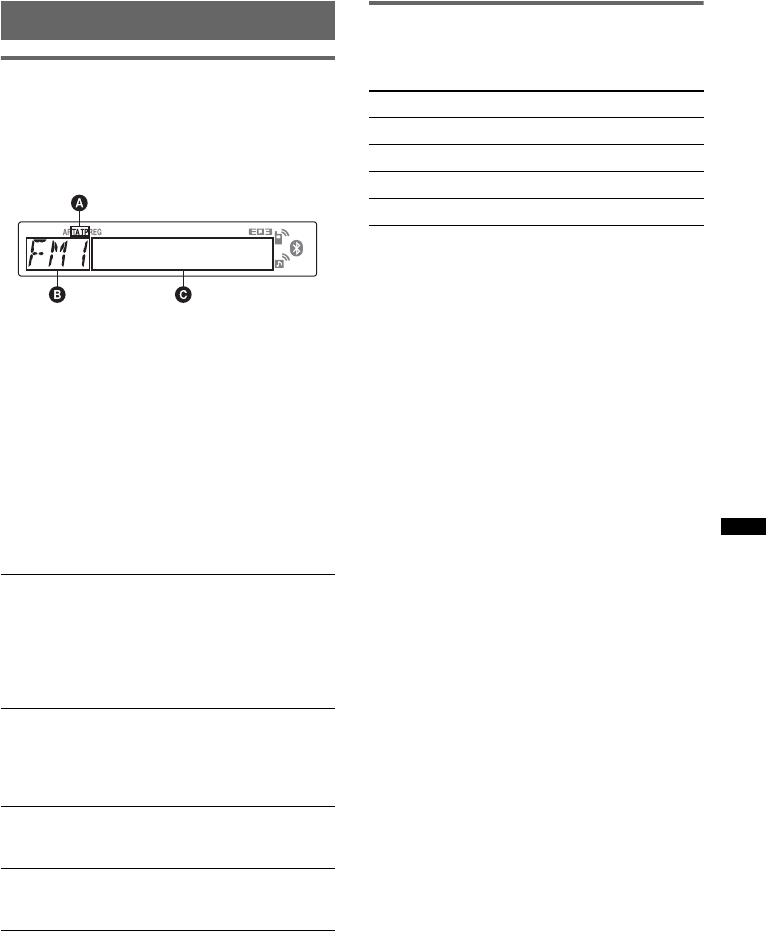
Display items
ATA/TP*1
BRadio band, Function
CFrequency*2 (Program service name), Preset
number, Clock, RDS data
*1 “TA” flashes during traffic information. “TP” lights
up while such a station is received.
*2 While receiving the RDS station, “ *” is displayed
on the left of the frequency indication.
To change display items C, press (DSPL).
RDS services
This unit automatically provides RDS services as
follows:
Notes
•Depending on the country/region, not all RDS
functions may be available.
•RDS will not work if the signal strength is too weak,
or if the station you are tuned to is not transmitting
RDS data.
Setting AF and TA
1Press (AF/TA) repeatedly until the
desired setting appears.
Storing RDS stations with the AF and
TA setting
You can preset RDS stations along with the AF/
TA setting. If you use the BTM function, only
RDS stations are stored with the same AF/TA
setting.
If you preset manually, you can preset both RDS
and non-RDS stations with the AF/TA setting for
each.
1Set AF/TA, then store the station with BTM or
manually.
Receiving emergency
announcements
With AF or TA on, the emergency
announcements will automatically interrupt the
currently selected source.
Tip
If you adjust the volume level during a traffic
announcement, that level will be stored into memory
for subsequent traffic announcements, independently
from the regular volume level.
Staying with one regional program
— REG
When the AF function is on: this unit’s factory
setting restricts reception to a specific region, so
you will not be switched to another regional
station with a stronger frequency.
If you leave this regional program’s reception
area, set “REG-OFF” in setup during FM
reception (page 26).
Note
This function does not work in the UK and in some
other areas.
Local Link function (UK only)
This function enables you to select other local
stations in the area, even if they are not stored on
your number buttons.
1During FM reception, press a number button
((1) to (6)) on which a local station is stored.
continue to next page t
AF (Alternative Frequencies)
Selects and retunes the station with the
strongest signal in a network. By using this
function, you can continuously listen to the
same program during a long-distance drive
without having to retune the same station
manually.
TA (Traffic Announcement)/TP (Traffic
Program)
Provides current traffic information/programs.
Any information/program received, will
interrupt the currently selected source.
PTY (Program Types)
Displays the currently received program type.
Also searches your selected program type.
CT (Clock Time)
The CT data from the RDS transmission sets
the clock.
Select To
AF-ON activate AF and deactivate TA.
TA-ON activate TA and deactivate AF.
AF, TA-ON activate both AF and TA.
AF, TA-OFF deactivate both AF and TA.

18
2Within 5 seconds, press again a number button
of the local station.
Repeat this procedure until the local station is
received.
Selecting PTY
1Press and hold (AF/TA) (PTY) during
FM reception.
The current program type name appears if the
station is transmitting PTY data.
2Press (AF/TA) (PTY) repeatedly until
the desired program type appears.
3Press (SEEK) +/–.
The unit starts to search for a station
broadcasting the selected program type.
Type of programs
Note
You cannot use this function in countries/regions
where no PTY data is available.
Setting CT
1Set “CT-ON” in setup (page 26).
Notes
•The CT function may not work even though an RDS
station is being received.
•There might be a difference between the time set by
the CT function and the actual time.
CD
Display items
ASource
BTrack name*1, Disc/artist name*1, Artist
name*1, Album number*2, Album name*1,
Track number/Elapsed playing time, Clock
*1 The information of a CD TEXT, MP3/WMA/AAC is
displayed.
*2 Album number is displayed only when the album is
changed.
To change display items B, press (DSPL).
Tip
Displayed items may differ depending on model, disc
type, recording format and settings.
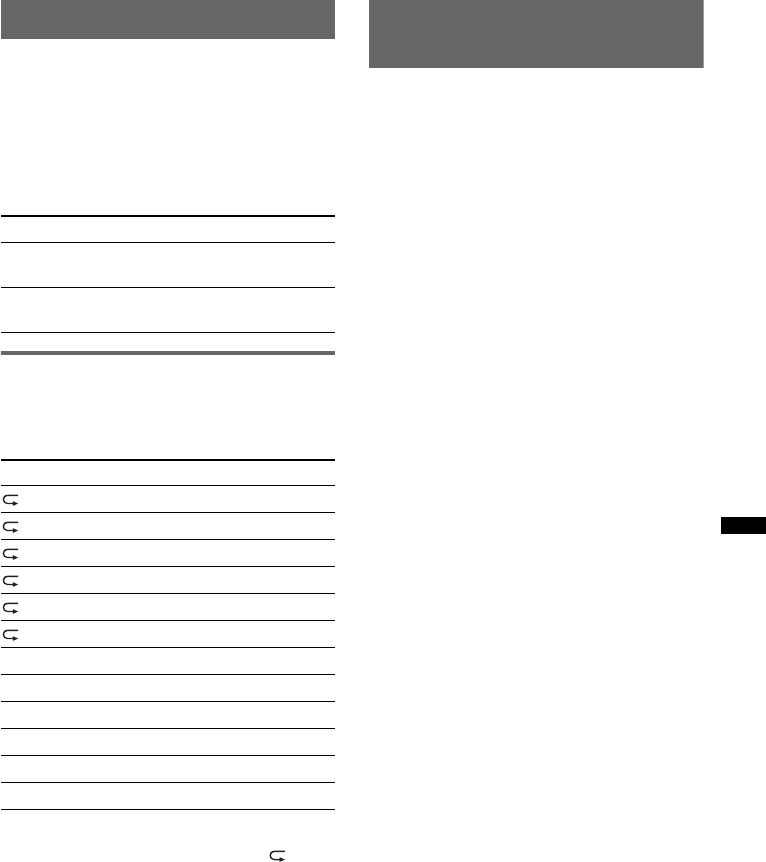
Repeat and shuffle play
1During playback, press (3) (REP) or
(4) (SHUF) repeatedly until the
desired setting appears.
*When an MP3/WMA/AAC is played.
To return to normal play mode, select “ OFF”
or “SHUF OFF.”
NEWS (News), AFFAIRS (Current Affairs),
INFO (Information), SPORT (Sports),
EDUCATE (Education), DRAMA (Drama),
CULTURE (Culture), SCIENCE (Science),
VARIED (Varied), POP M (Pop Music),
ROCK M (Rock Music), EASY M (M.O.R.
Music), LIGHT M (Light classical),
CLASSICS (Serious classical), OTHER M
(Other Music), WEATHER (Weather),
FINANCE (Finance), CHILDREN (Children’s
program), SOCIAL A (Social Affairs),
RELIGION (Religion), PHONE IN (Phone In),
TRAVEL (Travel), LEISURE (Leisure), JAZZ
(Jazz Music), COUNTRY (Country Music),
NATION M (National Music), OLDIES (Oldies
Music), FOLK M (Folk Music), DOCUMENT
(Documentary)
Select To play
TRACK track repeatedly.
ALBUM* album repeatedly.
SHUF ALBUM* album in random order.
SHUF DISC disc in random order.
19
USB devices
For details on the compatibility of your USB
device, visit the support site.
• MSC (Mass Storage Class) and MTP (Media
Transfer Protocol) type USB devices compliant
with the USB standard can be used.
• Corresponding codec is MP3 (.mp3), WMA
(.wma) and AAC (.m4a).
• Backup of data in a USB device is
recommended.
Note
Connect the USB device after starting the engine.
Depending on the USB device, malfunction or damage
may occur if it is connected before starting the engine.
Playing back a USB device
1Connect the USB device to the USB
connector.
When using a cable, use the one supplied with
the USB device to connect.
Playback starts.
If a USB device is already connected, to start
playback, press (SOURCE/OFF) repeatedly until
“USB” appears.
Press (SOURCE/OFF) for 1 second to stop
playback.
Removing the USB device
1Stop the USB device playback.
2Remove the USB device.
If you remove your USB device during
playback, data in the USB device may be
damaged.
Notes
•Do not use USB devices so large or heavy that they
may fall down due to vibration, or cause a loose
connection.
•Do not detach the front panel during playback of the
USB device, otherwise USB data may be damaged.
•This unit cannot recognize USB devices via a USB
hub.
Display items
ASource
BTrack name, Artist name, Album number*,
Album name, Track number/Elapsed playing
time, Clock
*Album number is displayed only when the album is
changed.
To change display items B, press (DSPL).
Notes
•Displayed items will differ, depending on the USB
device, recorded format and settings. For details,
visit the support site.
•The maximum number of displayable data is as
follows.
– folders (albums): 128
– files (tracks) per folder: 500
•Do not leave a USB device in a parked car, as
malfunction may result.
•It may take time for playback to begin, depending on
the amount of recorded data.
•DRM (Digital Rights Management) files may not be
played.
•During playback or fast-forward/reverse of a VBR
(Variable Bit Rate) MP3/WMA/AAC file, elapsed
playing time may not display accurately.
•Playback of the following MP3/WMA/AAC files is not
supported.
– lossless compression
– copyright-protected
Repeat and shuffle play
1During playback, press (3) (REP) or
(4) (SHUF) repeatedly until the
desired setting appears.
After 3 seconds, the setting is complete.
To return to normal play mode, select “ OFF”
or “SHUF OFF. ”
Support site
http://support.sony-europe.com/
Select To play
TRACK track repeatedly.
ALBUM album repeatedly.
SHUF ALBUM album in random order.
SHUF DEVICE device in random order.

20
iPod
For details on the compatibility of your iPod, see
“About iPod” on page 28 or visit the support site.
In these Operating Instructions, “iPod” is used as
a general reference for the iPod functions on the
iPod and iPhone, unless otherwise specified by
the text or illustrations.
Playing back iPod
Before connecting the iPod, turn down the
volume of the unit.
1Connect the iPod to the USB
connector via the dock connector to
USB cable.
The iPod will turn on automatically, and the
display will appear on the iPod screen as
below.*
Tip
We recommend the RC-100IP USB cable (not
supplied) to connect the dock connector.
The tracks on the iPod start playing
automatically from the point last played.
If an iPod is already connected, to start
playback press (SOURCE/OFF) repeatedly
until “USB” appears. (“IPD” appears in the
display when iPod is recognized.)
*In the case of an iPod touch or iPhone being
connected, or that the iPod was last played back
using passenger control, the logo will not appear on
the screen.
2Press (MODE) to select the play mode.
The mode changes as follows:
RESUMING t ALBUM t TRACK t
PODCAST* t GENRE t PLAYLIST
t ARTIST
*May not appear depending on iPod setting.
3Adjust the volume.
Press (SOURCE/OFF) for 1 second to stop
playback.
Removing the iPod
1Stop the iPod playback.
2Remove the iPod.
Caution for iPhone
When you connect an iPhone via USB, telephone
volume is controlled by iPhone itself. In order to avoid
sudden loud sound after a call, do not increase the
volume on the unit during a telephone call.
Notes
•Do not detach the front panel during playback of the
iPod, otherwise data may be damaged.
•This unit cannot recognize iPod via a USB hub.
Tips
•When the ignition key is turned to the ACC position,
and the unit is on, the iPod will be recharged.
•If the iPod is disconnected during playback, “NO
DEV” appears in the display of the unit.
Resuming mode
When the iPod is connected to the dock
connector, the mode of this unit changes to
resuming mode and playback starts in the mode
set by the iPod.
In resuming mode, the following buttons do not
function.
– (3) (REP)
– (4) (SHUF)
Display items
ASource (iPod) indication
BTrack name, Artist name, Album name, Track
number/Elapsed playing time, Clock
To change display items B, press (DSPL).
Tip
When album/podcast/genre/artist/playlist is changed,
its item number appears momentarily.
Note
Some letters stored in iPod may not be displayed
correctly.
Support site
http://support.sony-europe.com/
>
.
MENU
21
Setting the play mode
1During playback, press (MODE).
The mode changes as follows:
ALBUM t TRACK t PODCAST* t
GENRE t PLAYLIST t ARTIST
*May not appear depending on iPod setting.
Skipping albums, podcasts, genres,
playlists and artists
Repeat and shuffle play
1During playback, press (3) (REP) or
(4) (SHUF) repeatedly until the
desired setting appears.
After 3 seconds, the setting is complete.
To return to normal play mode, select “ OFF”
or “SHUF OFF.”
Operating an iPod directly
— Passenger control
You can operate an iPod connected to the dock
connector directly.
1During playback, press and hold
(MODE).
“MODE IPOD” appears and you will be able
to operate the iPod directly.
To change the display item
Press (DSPL).
The display items change as follows:
Track name t Artist name t Album name t
MODE IPOD t Clock
To exit the passenger control
Press and hold (MODE).
Then “MODE AUDIO” will appear and the play
mode will change to “RESUMING.”
Notes
•The volume can be adjusted only by the unit.
•If this mode is canceled, the repeat setting will be
turned off.
To Press
Skip (1)/(2) (ALBM –/+)
[press once for each]
Skip
continuously
(1)/(2) (ALBM –/+)
[hold to desired point]
Select To play
TRACK track repeatedly.
ALBUM album repeatedly.
PODCAST podcast repeatedly.
ARTIST artist repeatedly.
PLAYLIST playlist repeatedly.
GENRE genre repeatedly.
SHUF ALBUM album in random order.
SHUF PODCAST podcast in random order.
SHUF ARTIST artist in random order.
SHUF PLAYLIST playlist in random order.
SHUF GENRE genre in random order.
SHUF DEVICE device in random order.
22
Bluetooth (Handsfree calling
and Music streaming)
Bluetooth operations
To use the Bluetooth function, the following
procedure is necessary.
1Pairing
When connecting Bluetooth devices for the
first time, mutual registration is required. This
is called “pairing.” This registration (pairing)
is required only for the first time, as this unit
and the other devices will recognize each
other automatically from the next time. You
can pair up to 8 devices. (Depending on the
device, you may need to input a passkey for
each connection.)
2Connection
To use the device after pairing is made, start
the connection. Sometimes pairing allows to
connect automatically.
3Handsfree calling/Music streaming
You can talk handsfree and listen to music
when the connection is made.
Pairing
First, register (“pair”) a Bluetooth device
(cellular phone, etc.) and this unit with each
other. You can pair up to 8 devices. Once pairing
is established, there is no need for pairing again.
1Place the Bluetooth device within 1 m
(3 ft) of this unit.
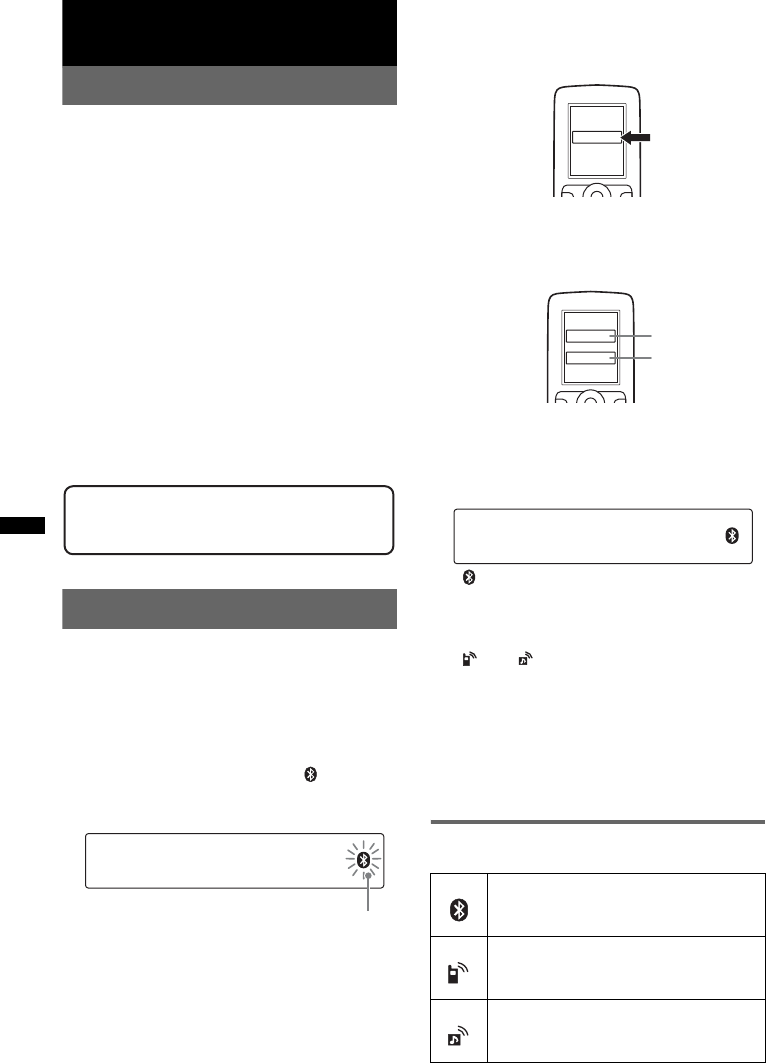
2Press and hold (BT) until “ ” flashes
(about 5 seconds).
The unit enters pairing standby mode.
3Set the Bluetooth device to search for
this unit.
A list of detected devices appears in the
display of the device to be connected. This
unit is displayed as “XPLOD” on the device
to be connected.
4If Passkey* input is required on the
display of the device to be connected,
input “0000.”
This unit and the Bluetooth device memorize
each other’s information, and when pairing is
made, the unit is ready for connection to the
device.
“ ” flashes and then stays lit after pairing is
complete.
5Set the Bluetooth device to connect to
this unit.
“ ” or “ ” appears when the connection is
made.
*Passkey may be called “passcode,” “PIN code,” “PIN
number” or “Password,” etc., depending on the
device.
Note
Pairing standby mode is not released until the
connection is made.
About Bluetooth icons
The following icons are used by this unit.
Support site
http://support.sony-europe.com/
flashing
lit:
flashing:
off:
Bluetooth signal on
Pairing standby mode
Bluetooth signal off
lit:
flashing:
off:
Connection successful
Connecting
No connection
lit:
flashing:
off:
Connection successful
Connecting
No connection
XXXXXXX
DR-BT30Q
XPLOD
XXXX
Input passkey.
“0000”
23
Connection
If pairing has already been achieved, start
operation from here.
To switch the Bluetooth signal
output of this unit to on
To use the Bluetooth function, switch the
Bluetooth signal output of this unit to on.
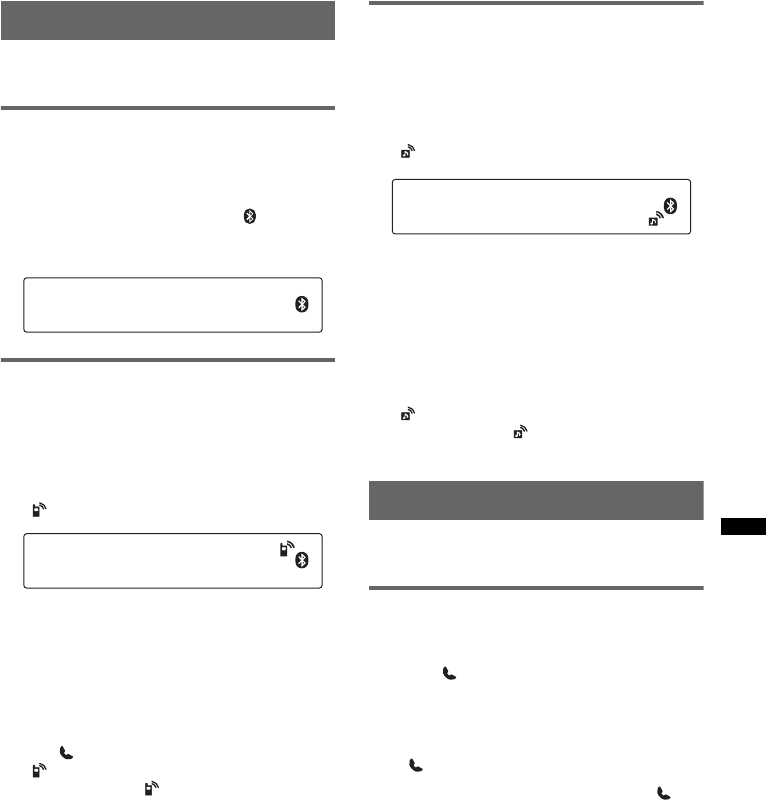
1Press and hold (BT) until “ ” lights
(about 3 seconds).
Bluetooth signal is switched to on.
Connecting a cellular phone
1Be sure that both this unit and the
cellular phone are switched to
Bluetooth signal on.
2Connect to this unit using the cellular
phone.
“ ”appears when the connection is made.
Connecting the last-connected
cellular phone from this unit
1Be sure that both this unit and the cellular
phone are switched to Bluetooth signal on.
2Press (SOURCE/OFF) repeatedly until “BT
PHONE” appears.
3Press (handsfree).
“ ” flashes while the connection is being
made. And then “ ” stays lit when the
connection is made.
Note
While streaming Bluetooth audio, you cannot connect
from this unit to the cellular phone. Connect from the
cellular phone to this unit instead. A connecting noise
may be heard over playback sound.
Tip
With Bluetooth signal on: when the ignition is switched
to on, this unit reconnects automatically to the last-
connected cellular phone. But automatic connection
also depends on the cellular phone’s specification. If
this unit does not reconnect automatically, connect
manually.
Connecting an audio device
1Be sure that both this unit and the
audio device are switched to
Bluetooth signal on.
2Connect to this unit using the audio
device.
“ ” appears when the connection is made.
Connecting the last-connected audio
device from this unit
1Be sure that both this unit and the audio device
are switched to Bluetooth signal on.
2Press (SOURCE/OFF) repeatedly until “BT
AUDIO” appears.
3Press (6).
“ ” flashes while the connection is being
made. And then “ ” stays lit when the
connection is made.
Handsfree calling
Check that the unit and cellular phone are
connected beforehand.
Receiving calls
When receiving a call, a ring tone is output from
your car speakers.
1Press (handsfree) when a call is
received with a ring tone.
The phone call starts.
To end a call
Press (handsfree) again.
To reject an incoming call, press and hold
(handsfree) for 2 seconds.
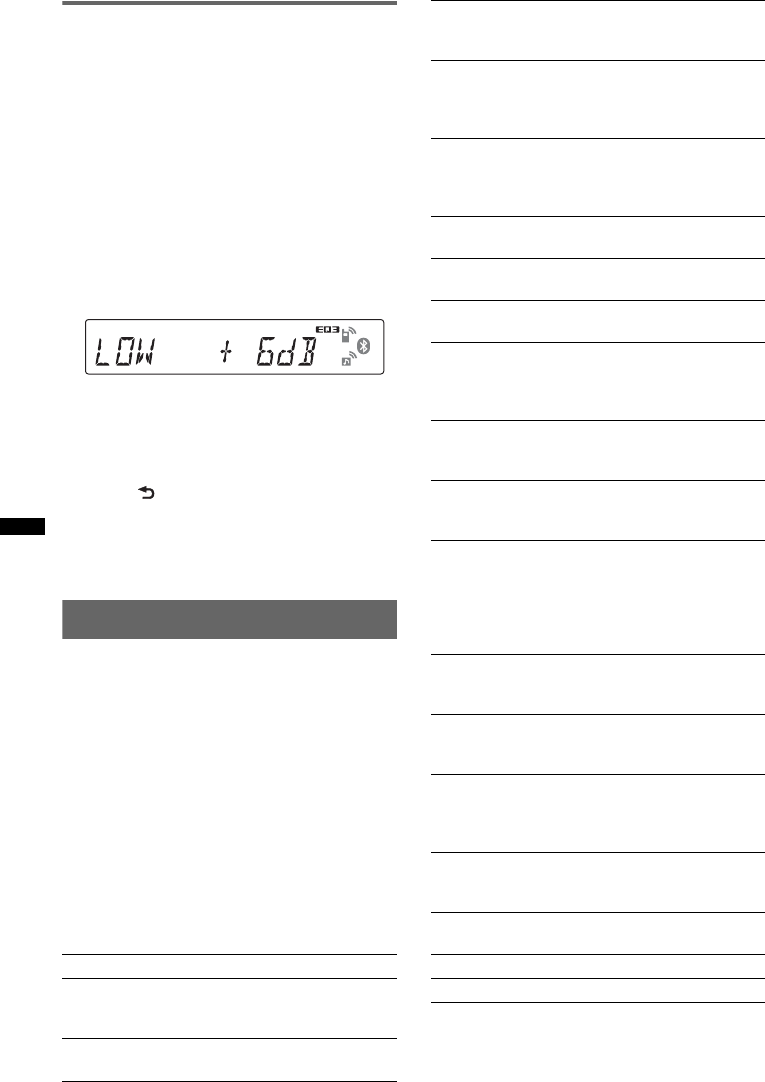
Mic Gain adjustment
You can switch between two volume levels
(“LOW” or “HI”) to set a suitable level for the
other party during a call.
1Press (5) during a call.
The item changes as follows:
MIC-LOW y MIC-HI
Note
The microphone of this unit is located on the rear of
the front panel (page 12). Do not cover the
microphone with tape, etc.
24
Making calls
In the case of making calls from this unit, redial
is used.
1Press (SOURCE/OFF) repeatedly until
“BT PHONE” appears.
2Press and hold (handsfree) for 3
seconds or more.
The phone call starts.
To end a call
Press (handsfree) again.
To call another phone, use your cellular phone,
and then transfer the call.
For call transfer details, check the following.
Call transfer
In order to activate/deactivate the appropriate
device (this unit/cellular phone), check the
following.
1Press and hold (handsfree) or use
your cellular phone.
For details on cellular phone operation, refer to
your cellular phone manual.
Note
Depending on the cellular phone, handsfree
connection may be cut off when call transfer is
attempted.
Voice Dial Activation
You can activate voice dialing with a cellular
phone connected to this unit by saying the voice
tag stored on the cellular phone, then make a call.
1Press (SOURCE/OFF) repeatedly until
“BT PHONE” appears.
2Press (handsfree).
The cellular phone enters voice dialing mode.
3Say the voice tag stored on the cellular
phone.
Your voice is recognized, and the call is
made.
Notes
•Check that unit and cellular phone are connected
beforehand.
•Store a voice tag on your cellular phone beforehand.
•If you activate voice dialing with a cellular phone
connected to this unit, this function may not always
work in some cases.
•Noises such as the engine running may interfere
with sound recognition. In order to improve
recognition, operate under conditions where noise is
minimized.
•Voice dialing may not work in some situations,
depending on the effectiveness of the cellular
phone’s recognition function. For details, see the
support site (page 22).
Tips
•Speak in the same way as you did when you stored
the voice tag.
•Store a voice tag while seated in the car, via this unit
with “BT PHONE” source selected.
Music streaming
Listening to music from an audio
device
You can listen to music of an audio device on this
unit if the audio device supports A2DP
(Advanced Audio Distribution Profile) of
Bluetooth technology.
1Turn down the volume on this unit.
2Press (SOURCE/OFF) repeatedly until
“BT AUDIO” appears.
3Operate the audio device to start
playback.
4Adjust the volume on this unit.
Adjusting the volume level
The volume level is adjustable for any difference
between the unit and the Bluetooth audio device.
1Start playback of the Bluetooth audio device at
a moderate volume.
2Set your usual listening volume on the unit.
3Press the select button repeatedly until “BTA”
appears, and rotate the volume control dial to
adjust the input level (–8 dB to +18 dB).
25
Operating an audio device with this
unit
You can perform the following operations on this
unit if the audio device supports AVRCP (Audio
Video Remote Control Profile) of Bluetooth
technology. (The operation differs depending on
the audio device.)
*Depending on the device, it may be necessary to
press twice.
Operations other than the above should be
performed on the audio device.
Notes
•During audio device playback, information such as
track number/time, playback status, etc., of a
connected audio device is not displayed on this unit.
•Even if the source is changed on this unit, playback
of the audio device does not stop.
Tip
You can connect a cellular phone that supports A2DP
(Advanced Audio Distribution Profile) as an audio
device and listen to music.
Deleting registration of all
paired devices
1Press and hold (SOURCE/OFF) for 1
second to turn off the power.
2If “ ” lights, press and hold
(BT) until “ ” turns off.
3Press and hold the select button.
4Press the select button repeatedly
until “BT INIT” appears.
5Press (SEEK) +.
Initializing starts.
It takes 3 seconds to cancel all registration.
Do not turn off the power while “INITIAL” is
flashing.
Other functions
Changing the sound settings
Adjusting the sound
characteristics
1Press the select button repeatedly
until the desired item appears.
2Rotate the control dial to adjust the
selected item.
3Press (BACK).
The setting is complete and the display
returns to normal reception/play mode.
The following items can be set (follow the page
reference for details):
To Press
Play (6) (PAUSE)* on this unit.
Pause (6) (PAUSE)* on this unit.
Skip tracks SEEK –/+ (./>) [once for
each track]
EQ3
Selects an equalizer curve from 7 music types
(XPLOD, VOCAL, EDGE, CRUISE, SPACE,
GRAVITY, CUSTOM or OFF).
LOW*1, MID*1, HI*1 (page 26)
BAL (Balance)
Adjusts the sound balance between the left and
right speakers.
FAD (Fader)
Adjusts the relative level between the front and
rear speakers.
SUB*2 (Subwoofer volume)
Adjusts the subwoofer volume.
AUX*3 (AUX level)
Adjusts the volume level for each connected
auxiliary equipment: “+18 dB” – “0 dB” – “–8
dB.”
This setting negates the need to adjust the
volume level between sources.
BTA*4 (BT-Audio level)
Adjusts the volume level for each connected
Bluetooth audio device: “+18 dB” – “0 dB” –
“–8 dB.”
This setting negates the need to adjust the
volume level between sources (page 24).
*1 When EQ3 is activated.
*2 “ATT” is displayed at the lowest setting, and can be
adjusted up to 21 steps.
*3 When AUX source is activated (page 27).
*4 When Bluetooth audio source is activated
(page 24).
26
Customizing the equalizer curve
— EQ3
“CUSTOM” of EQ3 allows you to make your
own equalizer settings.
1Select a source, then press the select
button repeatedly to select “EQ3.”
2Rotate the control dial to select
“CUSTOM.”
3Press the select button repeatedly
until “LOW,” “MID” or “HI” appears.
4Rotate the control dial to adjust the
selected item.
The volume level is adjustable in 1 dB steps,
from –10 dB to +10 dB.
Repeat steps 3 and 4 to adjust the equalizer
curve.
To restore the factory-set equalizer curve,
press and hold the select button before the
setting is complete.
5Press (BACK).
The setting is complete and the display
returns to normal reception/play mode.
Tip
Other equalizer types are also adjustable.
Adjusting setup items — SET
1Press and hold the select button.
The setup display appears.
2Press the select button repeatedly
until the desired item appears.
3Rotate the control dial to select the
setting (example “ON” or “OFF”).
4Press and hold the select button.
The setup is complete and the display returns
to normal reception/play mode.
Note
Displayed items will differ, depending on the source
and setting.
The following items can be set (follow the page
reference for details):
*1 When the unit is turned off.
*2 When FM is received.
CLOCK-ADJ (Clock Adjust) (page 7)
CT (Clock Time)
Activates the CT function: “ON,” “OFF”
(page 17, 18).
BEEP
Activates the beep sound: “ON,” “OFF.”
AUX-A*1 (AUX Audio)
Activates the AUX source display: “ON,”
“OFF” (page 27).
A.OFF (Auto Off)
Shuts off automatically after a desired time
when the unit is turned off: “NO,” “30S
(Seconds),” “30M (Minutes),” “60M (Minutes).”
MIC*1 (Microphone)
– “EXT”: to automatically switch to the external
microphone when it is connected.
– “INT”: to select only the internal microphone.
DEMO
(Demonstration)
Activates the demonstration: “ON,” “OFF.”
DIM (Dimmer)
Changes the display brightness: “ON,” “OFF.”
A.SCRL (Auto Scroll)
Scrolls long items automatically: “ON,” “OFF.”
LOCAL (Local Seek Mode)
– “ON”: to only tune into stations with stronger
signals.
– “OFF”: to tune normal reception.
MONO*2 (Monaural Mode)
Selects monaural reception mode to improve
poor FM reception: “ON,” “OFF.”
REG*2 (Regional)
Restricts reception to a specific region: “ON,”
“OFF” (page 17).
Z.TIME (Zappin Time)
Selects the playback time for the ZAPPIN
function.
– “Z.TIME-1 (about 6 seconds),” “Z.TIME-2
(about 9 seconds),” “Z.TIME-3 (about 30
seconds).”
LPF (Low Pass Filter)
Selects the subwoofer cut-off frequency: “OFF,”
“80Hz,” “100Hz,” “120Hz,” “140Hz,” “160Hz.”
LPF NORM/REV (Low Pass Filter Normal/
Reverse)
Selects the subwoofer phase: “NORM,” “REV.”
HPF (High Pass Filter)
Selects the front/rear speaker cut-off frequency:
“OFF,” “80Hz,” “100Hz,” “120Hz,” “140Hz,”
“160Hz.”
LOUD (Loudness)
Reinforces bass and treble for clear sound at low
volume levels: “ON,” “OFF.”
DM+
Activates the DM+ function: “ON,”“OFF.”
BTM (page 16)
BT INIT*1 (Bluetooth Initialize) (page 25)
27
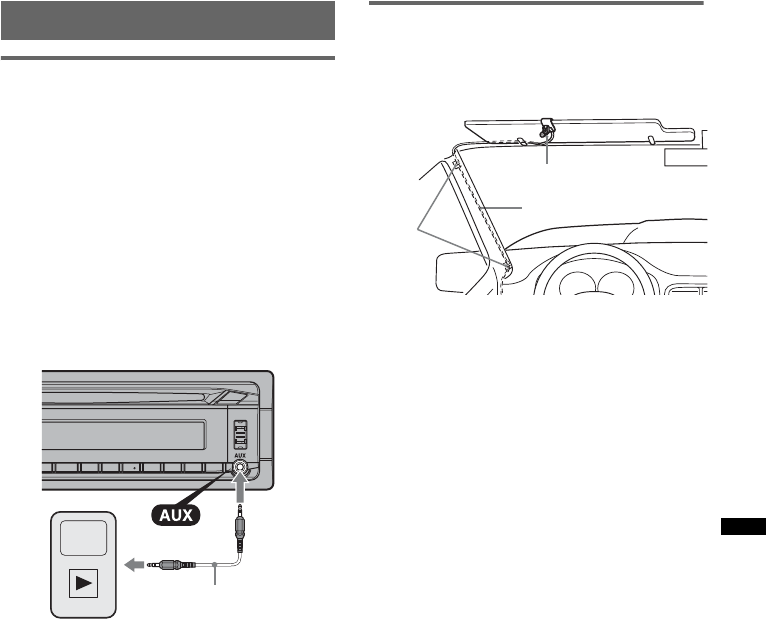
Using optional equipment
Auxiliary audio equipment
By connecting an optional portable audio device
to the AUX input jack (stereo mini jack) on the
unit and then simply selecting the source, you
can listen on your car speakers. The volume level
is adjustable for any difference between the unit
and the portable audio device. Follow the
procedure below:
Connecting the portable audio
device
1Turn off the portable audio device.
2Turn down the volume on the unit.
3Connect to the unit.
*Be sure to use a straight type plug.
Adjust the volume level
Be sure to adjust the volume for each connected
audio device before playback.
1Turn down the volume on the unit.
2Press (SOURCE/OFF) repeatedly until “AUX”
appears.
After that, “AUX FRONT IN” appears.
3Start playback of the portable audio device at a
moderate volume.
4Set your usual listening volume on the unit.
5Adjust the input level (page 25).
External microphone XA-MC10
By connecting an optional external microphone
to the microphone input connector, you can
improve audio quality while talking through this
unit.
Tip
You can set the priority of the microphones (page 26).
Note
Connect XA-MC10 as the external microphone. You
may not be able to call or malfunction may occur if
another device is connected.
Connecting cord*
(not supplied)
External microphone
Connecting cord
Clamps
28
Additional Information
Precautions
• Cool off the unit beforehand if your car has been
parked in direct sunlight.
• Power antenna (aerial) extends automatically.
Moisture condensation
Should moisture condensation occur inside the unit,
remove the disc and wait for about an hour for it to
dry out; otherwise the unit will not operate properly.
To maintain high sound quality
Do not splash liquid onto the unit or discs.
Notes on discs
• Do not expose discs to direct sunlight or heat
sources such as hot air ducts, nor leave it in a car
parked in direct sunlight.
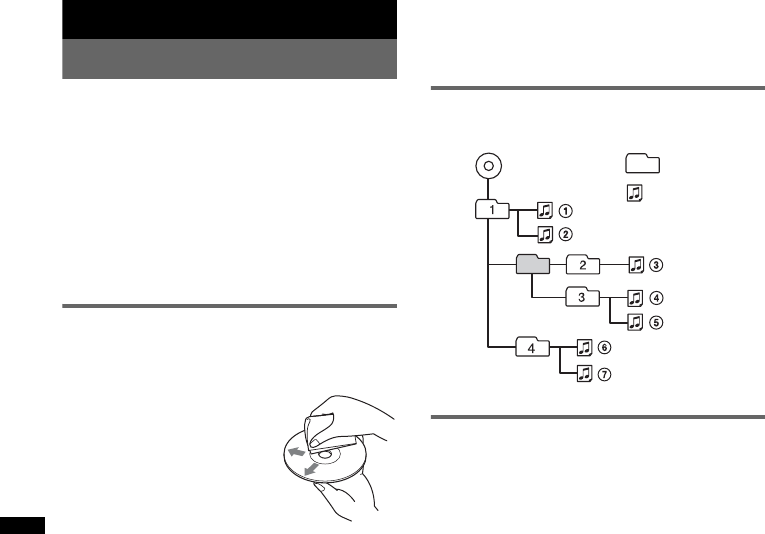
• Before playing, wipe the discs
with a cleaning cloth from the
center out. Do not use solvents
such as benzine, thinner,
commercially available
cleaners.
• This unit is designed to
playback discs that conform to
the Compact Disc (CD)
standard. DualDiscs and some of the music discs
encoded with copyright protection technologies do
not conform to the Compact Disc (CD) standard,
therefore, these discs may not be playable by this
unit.
•Discs that this unit CANNOT play
– Discs with labels, stickers, or sticky tape or
paper attached. Doing so may cause a
malfunction, or may ruin the disc.
– Discs with non-standard shapes (e.g., heart,
square, star). Attempting to do so may damage
the unit.
–8 cm (3 1/4 in) discs.
Notes on CD-R/CD-RW discs
• The maximum number of: (CD-R/CD-RW only)
– folders (albums): 150 (including root folder)
– files (tracks) and folders: 300 (may less than 300
if folder/file names contain many characters)
– displayable characters for a folder/file name: 32
(Joliet)/64 (Romeo)
• If the multi-session disc begins with a CD-DA
session, it is recognized as a CD-DA disc, and
other sessions are not played back.
•Discs that this unit CANNOT play
– CD-R/CD-RW of poor recording quality.
– CD-R/CD-RW recorded with an incompatible
recording device.
– CD-R/CD-RW which is finalized incorrectly.
– CD-R/CD-RW other than those recorded in
music CD format or MP3 format conforming to
ISO9660 Level 1/Level 2, Joliet/Romeo or
multi-session.
Playback order of MP3/WMA/AAC
files
About iPod
• You can connect to the following iPod models.
Update your iPod devices to the latest software
before use.
Made for
– iPod touch
– iPod touch (2nd generation)
– iPod classic
– iPod classic (120 GB)
– iPod with video*
– iPod nano (4th generation)
– iPod nano (3rd generation)
– iPod nano (2nd generation)
– iPod nano (1st generation)*
Works with
– iPhone
– iPhone 3G
– iPhone 3GS
*Passenger control is not available for iPod nano (1st
generation) or iPod with video.
• “Made for iPod” means that an electronic
accessory has been designed to connect
specifically to iPod and has been certified by the
developer to meet Apple performance standards.
• “Works with iPhone” means that an electronic
accessory has been designed to connect
specifically to iPhone and has been certified by the
developer to meet Apple performance standards.
• Apple is not responsible for the operation of this
device or its compliance with safety and
regulatory standards.
Folder
(album)
MP3/WMA/
AAC file
(track)
MP3/WMA/AAC
29
About Bluetooth function
What is Bluetooth technology?
• Bluetooth wireless technology is a short-range
wireless technology that enables wireless data
communication between digital devices, such as a
cellular phone and a headset. Bluetooth wireless
technology operates within a range of about 10 m
(about 33 feet). Connecting two devices is
common, but some devices can be connected to
multiple devices at the same time.
• You do not need to use a cable for connection
since Bluetooth technology is a wireless
technology, neither is it necessary for the devices
to face one another, such is the case with infrared
technology. For example, you can use such a
device in a bag or pocket.
• Bluetooth technology is an international standard
supported by millions of companies all over the
world, and employed by various companies
worldwide.
On Bluetooth communication
• Bluetooth wireless technology operates within a
range of about 10 m.
Maximum communication range may vary
depending on obstacles (person, metal, wall, etc.)
or electromagnetic environment.
• The following conditions may affect the
sensitivity of Bluetooth communication.
– There is an obstacle such as a person, metal, or
wall between this unit and Bluetooth device.
– A device using 2.4 GHz frequency, such as a
wireless LAN device, cordless telephone, or
microwave oven, is in use near this unit.
• Because Bluetooth devices and wireless LAN
(IEEE802.11b/g) use the same frequency,
microwave interference may occur and result in
communication speed deterioration, noise, or
invalid connection if this unit is used near a
wireless LAN device. In such as case, perform the
following.
– Use this unit at least 10 m away from the
wireless LAN device.
– If this unit is used within 10 m of a wireless
LAN device, turn off the wireless LAN device.
– Install this unit and Bluetooth device as near to
each other as possible.
• Microwaves emitting from a Bluetooth device may
affect the operation of electronic medical devices.
Turn off this unit and other Bluetooth devices in
the following locations, as it may cause an
accident.
– where inflammable gas is present, in a hospital,
train, airplane, or petrol station
– near automatic doors or a fire alarm
• This unit supports security capabilities that
comply with the Bluetooth standard to provide a
secure connection when the Bluetooth wireless
technology is used, but security may not be
enough depending on the setting. Be careful when
communicating using Bluetooth wireless
technology.
• We do not take any responsibility for the leakage
of information during Bluetooth communication.
• Connection with all Bluetooth devices cannot be
guaranteed.
– A device featuring Bluetooth function is
required to conform to the Bluetooth standard
specified by Bluetooth SIG, and be
authenticated.
– Even if the connected device conforms to the
above mentioned Bluetooth standard, some
devices may not be connected or work correctly,
depending on the features or specifications of the
device.
– While talking on the phone hands free, noise
may occur, depending on the device or
communication environment.
• Depending on the device to be connected, it may
require some time to start communication.
Others
• Using the Bluetooth device may not function on
cellular phones, depending on radio wave
conditions and location where the equipment is
being used.
• If you experience discomfort after using the
Bluetooth device, stop using the Bluetooth device
immediately. Should any problem persist, consult
your nearest Sony dealer.
If you have any questions or problems concerning
your unit that are not covered in this manual, consult
your nearest Sony dealer.
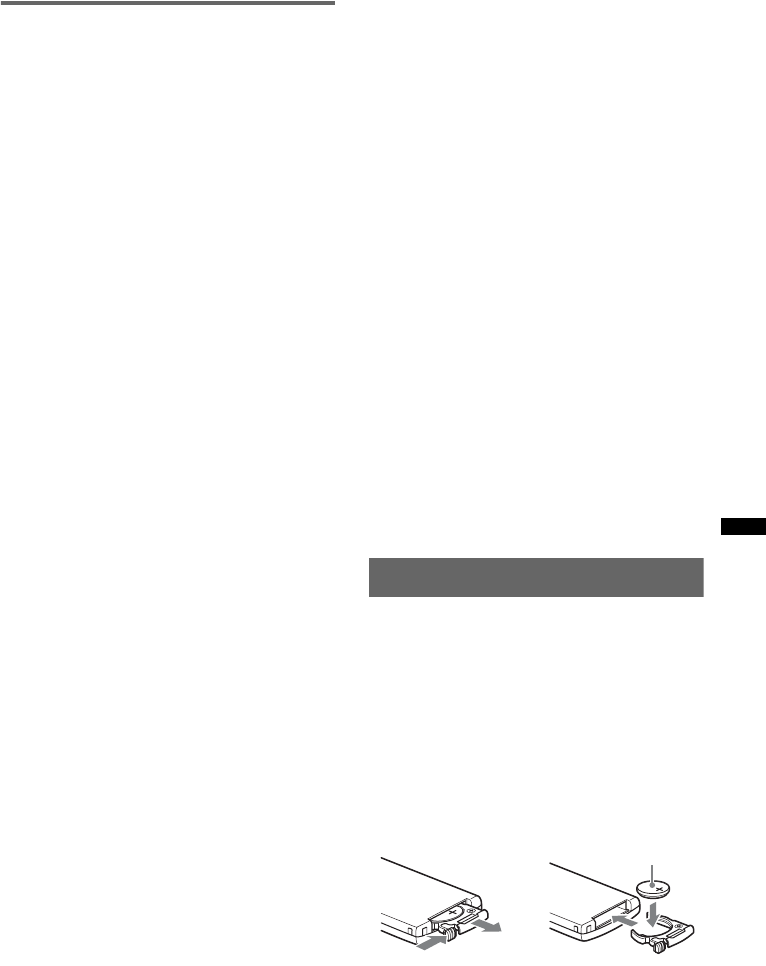
Maintenance
Replacing the lithium battery of the
card remote commander
Under normal conditions, the battery will last
approximately 1 year. (The service life may be
shorter, depending on the conditions of use.)
When the battery becomes weak, the range of the
card remote commander becomes shorter.
Replace the battery with a new CR2025 lithium
battery. Use of any other battery may present a
risk of fire or explosion.
continue to next page t
1
2
+ side up
c
30
Notes on the lithium battery
•Keep the lithium battery out of the reach of children.
Should the battery be swallowed, immediately
consult a doctor.
•Wipe the battery with a dry cloth to assure a good
contact.
•Be sure to observe the correct polarity when
installing the battery.
•Do not hold the battery with metallic tweezers,
otherwise a short-circuit may occur.
Fuse replacement
When replacing the fuse, be
sure to use one matching the
amperage rating stated on the
original fuse. If the fuse blows,
check the power connection and
replace the fuse. If the fuse
blows again after replacement,
there may be an internal
malfunction. In such a case,
consult your nearest Sony
dealer.
Cleaning the connectors
The unit may not function properly if the connectors
between the unit and the front panel are not clean. In
order to prevent this, detach the front panel (page 7)
and clean the connectors with a cotton swab. Do not
apply too much force. Otherwise, the connectors
may be damaged.
Notes
•For safety, turn off the ignition before cleaning the
connectors, and remove the key from the ignition
switch.
•Never touch the connectors directly with your fingers
or with any metal device.
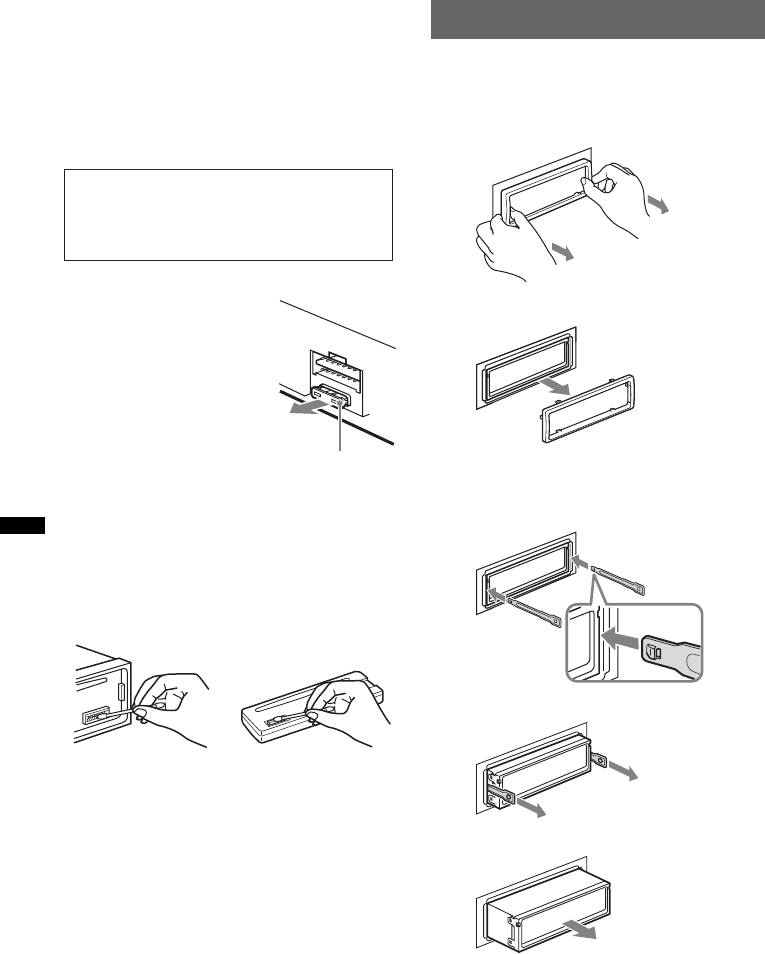
Removing the unit
1Remove the protection collar.
1Detach the front panel (page 7).
2Pinch both edges of the protection collar,
then pull it out.
2Remove the unit.
1Insert both release keys simultaneously
until they click.
2Pull the release keys to unseat the unit.
3Slide the unit out of the mounting.
WARNING
Battery may explode if mistreated.
Do not recharge, disassemble, or dispose of
in fire.
Fuse (10 A)
Main unit Back of the front
panel
x
Hook facing
inwards.

31
Specifications
Tuner section
FM
Tuning range: 87.5 – 108.0 MHz
Antenna (aerial) terminal:
External antenna (aerial) connector
Intermediate frequency: 150 kHz
Usable sensitivity: 10 dBf
Selectivity: 75 dB at 400 kHz
Signal-to-noise ratio: 70 dB (mono)
Separation: 40 dB at 1 kHz
Frequency response: 20 – 15,000 Hz
MW/LW
Tuning range:
MW: 531 – 1,602 kHz
LW: 153 – 279 kHz
Antenna (aerial) terminal:
External antenna (aerial) connector
Intermediate frequency: 25 kHz
Sensitivity: MW: 26 µV, LW: 45 µV
CD Player section
Signal-to-noise ratio: 120 dB
Frequency response: 10 – 20,000 Hz
Wow and flutter: Below measurable limit
USB Player section
Interface: USB (Full-speed)
Maximum current: 500 mA
Wireless Communication
Communication System:
Bluetooth Standard version 2.0
Output:
Bluetooth Standard Power Class 2 (Max. +4 dBm)
Maximum communication range:
Line of sight approx. 10 m (33 ft)*1
Frequency band:
2.4 GHz band (2.4000 – 2.4835 GHz)
Modulation method: FHSS
Compatible Bluetooth Profiles*2:
A2DP (Advanced Audio Distribution Profile)
AVRCP (Audio Video Remote Control Profile)
HFP (Handsfree Profile) 1.5
HSP (Headset Profile)
*1 The actual range will vary depending on factors
such as obstacles between devices, magnetic
fields around a microwave oven, static electricity,
reception sensitivity, antenna’s performance,
operating system, software application, etc.
*2 Bluetooth standard profiles indicate the purpose of
Bluetooth communication between devices.
Power amplifier section
Output: Speaker outputs (sure seal connectors)
Speaker impedance: 4 – 8 ohms
Maximum power output: 52 W × 4 (at 4 ohms)
General
Outputs:
Audio outputs terminal (front/rear)
Subwoofer output terminal (mono)
Power antenna (aerial) relay control terminal
Power amplifier control terminal
Inputs:
BUS control input terminal
BUS audio input terminal
Telephone ATT control terminal
Remote controller input terminal
Antenna (aerial) input terminal
MIC input terminal
AUX input jack (stereo mini jack)
USB signal input connector
Tone controls:
Low: ±10 dB at 60 Hz (XPLOD)
Mid: ±10 dB at 1 kHz (XPLOD)
High: ±10 dB at 10 kHz (XPLOD)
Power requirements: 12 V DC car battery
(negative ground (earth))
Dimensions: Approx. 178 × 50 × 179 mm
(7 1/8 × 2 × 7 1/8 in) (w/h/d)
Mounting dimensions: Approx. 182 × 53 × 162 mm
(7 1/4 × 2 1/8 × 6 1/2 in) (w/h/d)
Mass: Approx. 1.2 kg (2 lb 11 oz)
Supplied accessories:
Card remote commander: RM-X304
Parts for installation and connections (1 set)
Optional accessories/equipment:
BUS cable (supplied with an RCA pin cord):
RC-61 (1 m), RC-62 (2 m)
Source selector: XA-C40
USB connection cable for iPod: RC-100IP
External microphone: XA-MC10
Your dealer may not handle some of the above listed
accessories. Please ask the dealer for detailed
information.
Design and specifications are subject to change
without notice.
• Halogenated flame retardants are not used in the
certain printed wiring boards.
• Halogenated flame retardants are not used in
cabinets.
• Packaging cushions are made from paper.
32
Troubleshooting
The following checklist will help you remedy
problems you may encounter with your unit.
Before going through the checklist below, check the
connection and operating procedures.
If the problem is not solved, visit the following
support site.
General
No power is being supplied to the unit.
• Check the connection or fuse.
• If the unit is turned off and the display disappears, it
cannot be operated with the remote commander.
tTurn on the unit.
The power antenna (aerial) does not extend.
The power antenna (aerial) does not have a relay box.
No sound.
• The ATT function is activated, or the Telephone ATT
function (when the interface cable of a car telephone
is connected to the ATT lead) is activated.
• The position of the fader control “FAD” is not set for
a 2-speaker system.
• The Bluetooth audio device is in pause.
tCancel pause.
No beep sound.
• The beep sound is canceled (page 26).
• An optional power amplifier is connected and you are
not using the built-in amplifier.
The contents of the memory have been erased.
• The RESET button has been pressed.
tStore again into the memory.
• The power supply lead or battery has been
disconnected or it is not connected properly.
Stored stations and correct time are erased.
The fuse has blown.
Makes noise when the position of the ignition
is switched.
The leads are not matched correctly with the car’s
accessory power connector.
During playback or reception, demonstration
mode starts.
If no operation is performed for 5 minutes with
“DEMO-ON” set, demonstration mode starts.
tSet “DEMO-OFF” (page 26).
The display disappears from/does not appear
in the display window.
• The dimmer is set to “DIM-ON” (page 26).
• The display disappears if you press and hold
(SOURCE/OFF).
tPress (SOURCE/OFF) on the unit until the
display appears.
• The connectors are dirty (page 30).
Support site
http://support.sony-europe.com/
The Auto Off function does not operate.
The unit is turned on. The Auto Off function activates
after turning off the unit.
tTurn off the unit.
Radio reception
The stations cannot be received.
The sound is hampered by noises.
• The connection is not correct.
tConnect a power antenna (aerial) control lead
(blue) or accessory power supply lead (red) to the
power supply lead of a car’s antenna (aerial)
booster (only when your car has built-in FM/
MW/LW antenna (aerial) in the rear/side glass).
tCheck the connection of the car antenna (aerial).
tIf the auto antenna (aerial) will not go up, check
the connection of the power antenna (aerial)
control lead.
Preset tuning is not possible.
• Store the correct frequency in the memory.
• The broadcast signal is too weak.
Automatic tuning is not possible.
• Setting of the local seek mode is not correct.
tTuning stops too frequently:
Set “LOCAL-ON” (page 26).
tTuning does not stop at a station:
Set “LOCAL-OFF” (page 26).
• The broadcast signal is too weak.
tPerform manual tuning.
During FM reception, the “ST” indication
flashes.
• Tune in the frequency accurately.
• The broadcast signal is too weak.
tSet “MONO-ON” (page 26).
An FM program broadcast in stereo is heard in
monaural.
The unit is in monaural reception mode.
tSet “MONO-OFF” (page 26).
RDS
The SEEK starts after a few seconds of
listening.
The station is non-TP or has weak signal.
tDeactivate TA (page 17).
No traffic announcements.
• Activate TA (page 17).
• The station does not broadcast any traffic
announcements despite being TP.
tTune in another station.
PTY displays “- - - - - - - -.”
• The current station is not an RDS station.
• RDS data has not been received.
• The station does not specify the program type.
CD playback
The disc cannot be loaded.
• Another disc is already loaded.
• The disc has been forcibly inserted upside down or in
the wrong way.
33
The disc does not play back.
• Defective or dirty disc.
• The CD-Rs/CD-RWs are not for audio use (page 28).
MP3/WMA/AAC files cannot be played back.
The disc is incompatible with the MP3/WMA/AAC
format and version. For details on playable discs and
formats, visit the support site.
MP3/WMA/AAC files take longer to play back
than others.
The following discs take a longer time to start
playback.
– a disc recorded with a complicated tree structure.
– a disc recorded in Multi Session.
– a disc to which data can be added.
The display items do not scroll.
• For discs with very many characters, those may not
scroll.
• “A.SCRL” is set to “OFF.”
tSet “A.SCRL-ON” (page 26).
tPress and hold (DSPL) (SCRL).
The sound skips.
• Installation is not correct.
tInstall the unit at an angle of less than 45° in a
sturdy part of the car.
• Defective or dirty disc.
The operation buttons do not function.
The disc will not eject.
Press the RESET button (page 6).
USB playback
You cannot play back items via a USB hub.
This unit cannot recognize USB devices via a USB
hub.
Cannot play back items.
A USB device does not work.
tReconnect it.
The USB device takes longer to play back.
The USB device contains files with a complicated tree
structure.
A beep sounds.
During playback, the USB device has been
disconnected.
tBefore disconnecting a USB device, make sure to
stop playback first for data protection.
The sound is intermittent.
The sound may be intermittent at a high-bit-rate of
more than 320 kbps.
Bluetooth function
The connecting device cannot detect this unit.
• Before the pairing is made, set this unit to pairing
standby mode.
• While connected to a Bluetooth device, this unit
cannot be detected from another device. Disconnect
the current connection and search for this unit from
another device.
• When the device pairing is made, set the Bluetooth
signal output to on (page 23).
Connection is not possible.
• Connect to this unit from a Bluetooth device or vice
versa. The connection is controlled from one side
(this unit or Bluetooth device), but not both.
• Check the pairing and connection procedures in the
manual of the other device, etc., and perform the
operation again.
The talker’s voice volume is low.
Adjust the volume level.
A call partner says that the volume is too low
or high.
Adjust the volume accordingly using Mic Gain
adjustment (page 23).
Echo or noise occurs in phone call
conversations.
• Lower the volume.
• If the ambient noise other than the phone call sound
is loud, try reducing this noise.
E.g.: If a window is open and road noise, etc., is loud,
shut the window. If the air conditioner is loud, lower
the air conditioner.
The phone is not connected.
When the Bluetooth audio is played back, the phone is
not connected even if you press (handsfree).
tConnect from the phone.
The phone sound quality is poor.
Phone sound quality depends on reception conditions
of cellular phone.
tMove your car to a place where you can enhance
the cellular phone’s signal if the reception is poor.
The volume of the connected audio device is
low (high).
Volume level will differ depending on the audio
device.
tAdjust the volume of the connected audio device or
this unit.
The sound skips during playback of a
Bluetooth audio device.
• Reduce the distance between the unit and the
Bluetooth audio device.
• If the Bluetooth audio device is stored in a case
which interrupts the signal, remove the audio device
from the case while using.
• Several Bluetooth devices or other devices which
emit radio waves are used nearby.
tTurn off the other devices.
tIncrease the distance from the other devices.
• The playback sound stops momentarily when the
connection between this unit and the cellular phone is
being made. This is not a malfunction.
The connected Bluetooth audio device cannot
be controlled.
Check that the connected Bluetooth audio device
supports AVRCP.
Some functions do not work.
Check if the connecting device supports the functions
in question.
continue to next page t
34
Error displays/Messages
If these solutions do not help improve the situation,
consult your nearest Sony dealer.
If you take the unit to be repaired because of CD
playback trouble, bring the disc that was used at the
time the problem began.
A call is answered unintentionally.
The connecting phone is set to answer a call
automatically.
No sound is output from the car speakers
during handsfree call.
If the sound is output from the cellular phone, set the
cellular phone to output the sound from the car
speakers.
“OFF BT” appears when initializing.
Press and hold (BT) until “ ” turns off. Then
initialize again (page 25).
The external microphone does not work.
The setting of the microphone is not correct.
tSet “MIC-EXT” (page 26).
CHECKING
The unit is confirming the connection of a USB device.
tWait until confirming the connection is finished.
ERROR
• The disc is dirty or inserted upside down.
tClean or insert the disc correctly.
• A blank disc has been inserted.
• The disc cannot play due to a problem.
tInsert another disc.
• USB device was not automatically recognized.
tReconnect it again.
• Press Z to remove the disc.
FAILURE
The connection of speakers/amplifiers is incorrect.
tSee the installation/connections manual of this
model to check the connection.
HUB NO SUPRT (HUB Not Support)
USB hub is not supported on this unit.
L. SEEK +/–
The local seek mode is on during automatic tuning.
NO AF
There is no alternative frequency for the current
station.
tPress (SEEK) +/– while the program service name
is flashing. The unit starts searching for another
frequency with the same PI (Program
Identification) data (“PI SEEK” appears).
NO DEV (No Device)
USB is selected as source without a USB device
connected. A USB device or a USB cable has been
disconnected during playback.
tBe sure to connect a USB device and USB cable.
NO MUSIC
The disc or USB device does not contain a music file.
tInsert a music CD in this unit.
tConnect a USB device with a music file in it.
NO NAME
A disc/album/artist/track name is not written in the
track.
NO TP
The unit will continue searching for available TP
stations.
OFFSET
There may be an internal malfunction.
tCheck the connection. If the error indication
remains on in the display, consult your nearest
Sony dealer.
OVERLOAD
USB device is overloaded.
tDisconnect the USB device, then change the source
by pressing (SOURCE/OFF).
tIndicates that the USB device is out of order, or an
unsupported device is connected.
READ
The unit is reading all track and album information on
the disc.
tWait until reading is complete and playback starts
automatically. Depending on the disc structure, it
may take more than a minute.
RESET
This unit or USB device cannot be operated due to a
problem.
tPress the RESET button (page 6).
USB NO SUPRT (USB Not Support)
The connected USB device is not supported.
tFor details on the compatibility of your USB
device, visit the support site.
“” or “”
During reverse or fast-forward, you have reached the
beginning or the end of the disc and you cannot go any
further.
“”
The character cannot be displayed with the unit.

35
2
Das Typenschild mit Betriebsspannung usw.
befindet sich an der Geräteunterseite.
Hiermit erklärt die Sony Corp., dass sich dieser
MEX-BT3800U in Übereinstimmung mit den
grundlegenden Anforderungen und den anderen
relevanten Vorschriften der Richtlinie 1999/5/EG
befindet.
Weitere Informationen erhältlich unter:
http://www.compliance.sony.de/
Die Verwendung dieses Funkgeräts ist in einem
Umkreis von 20 km um das Zentrum von Ny-
Ålesund, Svalbard (Norwegen), nicht erlaubt.
Wichtig!
Bitte nehmen Sie sich etwas Zeit, um
den Geräte-Pass vollständig
auszufüllen. Dieser befindet sich auf
der hinteren Umschlagseite dieser
Bedienungsanleitung.
Montieren Sie dieses Gerät aus
Sicherheitsgründen im Armaturenbrett des
Fahrzeugs. Zur Installation und zum
Anschluss siehe die mitgelieferte
Installations-/Anschlussanleitung.
Dieses Etikett befindet sich an der Unterseite
des Gehäuses.
Hinweis für Kunden: Die folgenden
Informationen gelten nur für Geräte, die
in Ländern verkauft werden, in denen
EU-Richtlinien gelten
Der Hersteller dieses Produktes ist Sony
Corporation, 1-7-1 Konan Minato-ku Tokio,
108-0075 Japan.
Bevollmächtigter für EMV und
Produktsicherheit ist Sony Deutschland GmbH,
Hedelfinger Strasse 61, 70327 Stuttgart,
Deutschland. Für Kundendienst- oder
Garantieangelegenheiten wenden Sie sich bitte
an die in Kundendienst- oder
Garantiedokumenten genannten Adressen.
Entsorgung von gebrauchten
elektrischen und elektronischen
Geräten (anzuwenden in den
Ländern der Europäischen Union
und anderen europäischen Ländern
mit einem separaten Sammelsystem
für diese Geräte)
Das Symbol auf dem Produkt oder seiner Verpackung
weist darauf hin, dass dieses Produkt nicht als normaler
Haushaltsabfall zu behandeln ist, sondern an einer
Annahmestelle für das Recycling von elektrischen und
elektronischen Geräten abgegeben werden muss. Durch
Ihren Beitrag zum korrekten Entsorgen dieses Produkts
schützen Sie die Umwelt und die Gesundheit Ihrer
Mitmenschen. Umwelt und Gesundheit werden durch
falsches Entsorgen gefährdet. Materialrecycling hilft, den
Verbrauch von Rohstoffen zu verringern. Weitere
Informationen über das Recycling dieses Produkts
erhalten Sie von Ihrer Gemeinde, den kommunalen
Entsorgungsbetrieben oder dem Geschäft, in dem Sie das
Produkt gekauft haben.
Geeignetes Zubehör: Fernbedienung
Entsorgung von gebrauchten
Batterien und Akkus (anzuwenden in
den Ländern der Europäischen
Union und anderen europäischen
Ländern mit einem separaten
Sammelsystem für diese Produkte)
Das Symbol auf der Batterie/dem Akku oder der
Verpackung weist darauf hin, dass diese nicht als normaler
Haushaltsabfall zu behandeln sind. Ein zusätzliches
chemisches Symbol Pb (Blei) oder Hg (Quecksilber) unter
der durchgestrichenen Mülltonne bedeutet, dass die
Batterie/der Akku einen Anteil von mehr als 0,0005%
Quecksilber oder 0,004% Blei enthält. Durch Ihren
Beitrag zum korrekten Entsorgen dieser Batterien/Akkus
schützen Sie die Umwelt und die Gesundheit Ihrer
Mitmenschen. Umwelt und Gesundheit werden durch
falsches Entsorgen gefährdet. Materialrecycling hilft, den
Verbrauch von Rohstoffen zu verringern.
Bei Produkten, die auf Grund ihrer Sicherheit, der
Funktionalität oder als Sicherung vor Datenverlust eine
ständige Verbindung zur eingebauten Batterie benötigen,
sollte die Batterie nur durch qualifiziertes Servicepersonal
ausgetauscht werden.
Um sicherzustellen, dass die Batterie korrekt entsorgt
wird, geben Sie das Produkt zwecks Entsorgung an einer
Annahmestelle für das Recycling von elektrischen und
elektronischen Geräten ab.
Für alle anderen Batterien entnehmen Sie die Batterie
bitte entsprechend dem Kapitel über die sichere
Entfernung der Batterie. Geben Sie die Batterie an einer
Annahmestelle für das Recycling von Batterien/Akkus ab.
Weitere Informationen über das Recycling dieses Produkts
oder der Batterie erhalten Sie von Ihrer Gemeinde, den
kommunalen Entsorgungsbetrieben oder dem Geschäft, in
dem Sie das Produkt gekauft haben.
3
Der Bluetooth-Schriftzug und die Bluetooth-
Logos sind Eigentum von Bluetooth SIG, Inc.,
und ihre Verwendung durch die Sony
Corporation erfolgt in Lizenz. Andere
Markenzeichen und Produktnamen sind
Eigentum der jeweiligen Rechteinhaber.
ZAPPIN ist ein Markenzeichen der Sony
Corporation.
iPod ist in den USA und in anderen Ländern ein
eingetragenes Markenzeichen von Apple Inc.
iPhone ist ein Markenzeichen von Apple Inc.
Windows Media und das
Windows-Logo sind
Markenzeichen oder
eingetragene Markenzeichen
der Microsoft Corporation in den USA und/oder
anderen Ländern.
MPEG Layer-3 Audiocodiertechnologie und
Patente lizenziert von Fraunhofer IIS und Thomson.
Dieses Produkt ist durch bestimmte gewerbliche
Schutz- und Urheberrechte der Microsoft
Corporation geschützt. Die Verwendung oder der
Vertrieb derartiger Technologie außerhalb dieses
Produkts ohne eine Lizenz von Microsoft oder
einer autorisierten Microsoft-Niederlassung ist
untersagt.
Inhaltsanbieter verwenden die in diesem Gerät
enthaltene Technologie zur Verwaltung digitaler
Rechte für Windows Media („WM-DRM“,
Windows Media Digital Rights Management), um
die Integrität des Inhalts („Sicherer Inhalt“) zu
gewährleisten, sodass sich keine Person das
geistige Eigentum, einschließlich Urheberrecht, an
diesen Inhalten widerrechtlich aneignen kann.
Bei diesem Gerät wird WM-DRM-Software zum
Wiedergeben sicherer Inhalte verwendet („WM-
DRM-Software“). Bei Gefährdung der Sicherheit
der WM-DRM-Software dieses Geräts können
Eigentümer sicherer Inhalte („Secure Content
Owners“) fordern, dass Microsoft das Recht der
WM-DRM-Software zum Erwerb neuer Lizenzen
zum Kopieren, Anzeigen und/oder Wiedergeben
von sicherem Inhalt aufhebt. Trotz der Aufhebung
kann mithilfe der WM-DRM-Software
ungeschützter Inhalt wiedergegeben werden. Eine
Liste widerrufener WM-DRM-Software wird jedes
Mal an Ihr Gerät gesendet, wenn Sie eine Lizenz
für sicheren Inhalt aus dem Internet oder von
einem PC herunterladen. Microsoft lädt
möglicherweise im Auftrag von Secure Content
Owners zusammen mit einer solchen Lizenz
Sperrlisten auf Ihr Gerät herunter.
Warnhinweis, wenn die Zündung Ihres
Fahrzeugs nicht über eine
Zubehörposition (ACC oder I) verfügt
Aktivieren Sie unbedingt die
Abschaltautomatik (Seite 30).
Nach dem Ausschalten wird das Gerät dann
nach der voreingestellten Zeit automatisch
vollständig abgeschaltet, so dass der
Autobatterie kein Strom mehr entzogen wird.
Wenn Sie die Abschaltautomatik nicht
aktivieren, müssen Sie jedes Mal, wenn Sie die
Zündung ausschalten, die Taste
(SOURCE/OFF) gedrückt halten, bis die
Anzeige ausgeblendet wird.
Hinweis zur Lithiumbatterie
Schützen Sie die Batterie vor übermäßiger Hitze, wie
z. B. direktem Sonnenlicht, Feuer o. Ä.

4
Inhalt
Vorbereitungen
Mit diesem Gerät abspielbare CDs . . . . . . . . . . 6
Hinweise zu Bluetooth . . . . . . . . . . . . . . . . . . . 6
Zurücksetzen des Geräts . . . . . . . . . . . . . . . . . . 7
Abbrechen des DEMO-Modus . . . . . . . . . . . . . 7
Vorbereiten der Kartenfernbedienung. . . . . . . . 7
Einstellen der Uhr . . . . . . . . . . . . . . . . . . . . . . . 8
Abnehmen der Frontplatte. . . . . . . . . . . . . . . . . 8
Anbringen der Frontplatte. . . . . . . . . . . . . . . 9
Kurzanleitung für die Bluetooth-
Funktion
3 Schritte für die Bluetooth-Funktion . . . . . . . 10
Tasten und Symbole . . . . . . . . . . . . . . . . . . . . 11
1Pairing . . . . . . . . . . . . . . . . . . . . . . . . . . . . 12
2Verbindung. . . . . . . . . . . . . . . . . . . . . . . . . 12
3Freisprechanrufe und Musik-Streaming. . . 13
Lage und Grundfunktionen der
Teile und Bedienelemente
Hauptgerät. . . . . . . . . . . . . . . . . . . . . . . . . . 14
Kartenfernbedienung RM-X304 . . . . . . . . . 16
Suchen nach einem Titel . . . . . . . . . . . . . . . . . 17
Suchen nach einem Titel anhand seines
Namens — Quick-BrowZer . . . . . . . . . . . . 17
Suchen nach einem Titel durch Anspielen der
Titel — ZAPPIN™. . . . . . . . . . . . . . . . . . . 18
Radio
Speichern und Empfangen von Sendern . . . . . 18
Automatisches Speichern von Sendern
— BTM. . . . . . . . . . . . . . . . . . . . . . . . . . . . 18
Manuelles Speichern von Sendern . . . . . . . 18
Einstellen gespeicherter Sender . . . . . . . . . 18
Automatisches Einstellen von Sendern. . . . 19
RDS . . . . . . . . . . . . . . . . . . . . . . . . . . . . . . . . . 19
Übersicht. . . . . . . . . . . . . . . . . . . . . . . . . . . 19
Einstellen von AF und TA . . . . . . . . . . . . . 19
Auswählen des Programmtyps (PTY) . . . . 20
Einstellen der Uhrzeit (CT). . . . . . . . . . . . . 20
CD
Informationen im Display . . . . . . . . . . . . . 21
Repeat und Shuffle Play. . . . . . . . . . . . . . . 21
USB-Geräte
Wiedergabe mit einem USB-Gerät. . . . . . . . . 21
Informationen im Display . . . . . . . . . . . . . 22
Repeat und Shuffle Play. . . . . . . . . . . . . . . 22
iPod
Wiedergabe mit einem iPod . . . . . . . . . . . . . . 23
Informationen im Display . . . . . . . . . . . . . 24
Einstellen des Wiedergabemodus. . . . . . . . . . 24
Repeat und Shuffle Play. . . . . . . . . . . . . . . 24
Direktes Bedienen eines iPod
— Direkte Steuerung . . . . . . . . . . . . . . . . . . . 25
Bluetooth (Freisprechanrufe und
Musik-Streaming)
Nutzen der Bluetooth-Funktion . . . . . . . . . . . 25
Pairing. . . . . . . . . . . . . . . . . . . . . . . . . . . . . . . 25
Die Bluetooth-Symbole . . . . . . . . . . . . . . . 26
Verbindung . . . . . . . . . . . . . . . . . . . . . . . . . . . 26
So schalten Sie die Bluetooth-Signalausgabe
dieses Geräts ein. . . . . . . . . . . . . . . . . . . . . 26
Herstellen einer Verbindung zu einem
Mobiltelefon. . . . . . . . . . . . . . . . . . . . . . . . 27
Herstellen einer Verbindung zu einem
Audiogerät . . . . . . . . . . . . . . . . . . . . . . . . . 27
Telefonieren mit Freisprecheinrichtung . . . . . 27
Entgegennehmen von Anrufen. . . . . . . . . . 27
Tätigen von Anrufen . . . . . . . . . . . . . . . . . 28
Anrufweiterleitung . . . . . . . . . . . . . . . . . . . 28
Einschalten der Sprachwahl. . . . . . . . . . . . 28
Musik-Streaming . . . . . . . . . . . . . . . . . . . . . . 28
Wiedergeben von Musik von einem
Audiogerät . . . . . . . . . . . . . . . . . . . . . . . . . 28
Steuern eines Audiogeräts mit
diesem Gerät. . . . . . . . . . . . . . . . . . . . . . . . 29
Löschen der Registrierung für alle Geräte,
mit denen das Pairing erfolgte . . . . . . . . . . . . 29
5
Weitere Funktionen
Ändern der Klangeinstellungen. . . . . . . . . . . . 29
Einstellen der Klangeigenschaften . . . . . . . 29
Individuelles Einstellen der Equalizer-Kurve
— EQ3 . . . . . . . . . . . . . . . . . . . . . . . . . . . . 30
Einstellen von Konfigurationsoptionen
— SET. . . . . . . . . . . . . . . . . . . . . . . . . . . . . . . 30
Verwenden gesondert erhältlicher Geräte . . . . 31
Zusätzliche Audiogeräte . . . . . . . . . . . . . . . 31
Externes Mikrofon XA-MC10 . . . . . . . . . . 32
Weitere Informationen
Sicherheitsmaßnahmen . . . . . . . . . . . . . . . . . . 32
Hinweise zu CDs . . . . . . . . . . . . . . . . . . . . 32
Wiedergabereihenfolge von
MP3-/WMA-/AAC-Dateien . . . . . . . . . . . . 33
Der iPod . . . . . . . . . . . . . . . . . . . . . . . . . . . 33
Informationen zur
Bluetooth-Kommunikation . . . . . . . . . . . . . 34
Wartung . . . . . . . . . . . . . . . . . . . . . . . . . . . . . . 35
Ausbauen des Geräts . . . . . . . . . . . . . . . . . . . . 36
Technische Daten . . . . . . . . . . . . . . . . . . . . . . 36
Störungsbehebung . . . . . . . . . . . . . . . . . . . . . . 37
Fehleranzeigen/Meldungen. . . . . . . . . . . . . 40
Support-Website
Wenn Sie Fragen haben oder die neuesten Support-Informationen zu
diesem Produkt abrufen möchten, rufen Sie bitte folgende Website auf:
http://support.sony-europe.com/
Hier finden Sie folgende Informationen:
• Modelle und Hersteller kompatibler digitaler Audioplayer
• Unterstützte MP3-/WMA-/AAC-Dateien
• Modelle und Hersteller kompatibler Mobiltelefone sowie häufig gestellte
Fragen (FAQs) über die Bluetooth-Funktion
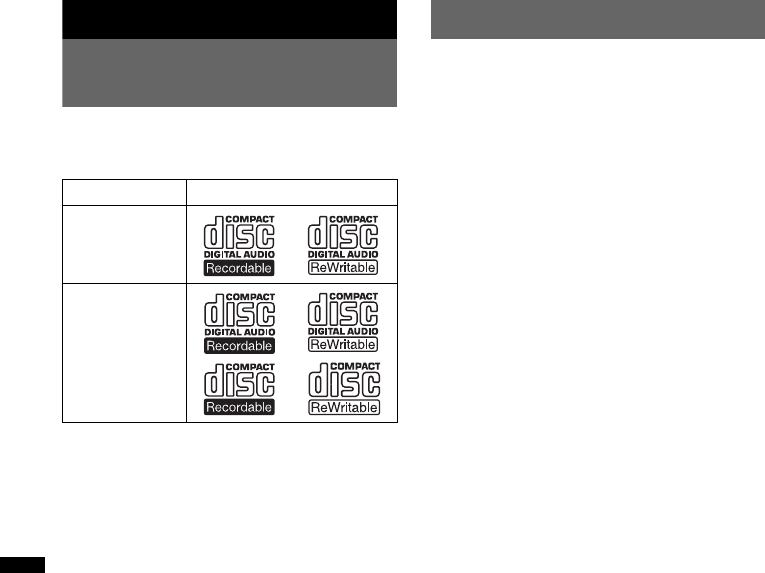
6
Vorbereitungen
Mit diesem Gerät abspielbare
CDs
Mit dem Gerät lassen sich CD-DAs (auch solche
mit CD TEXT) und CD-Rs/CD-RWs (MP3-/
WMA-/AAC-Dateien) abspielen (Seite 33).
Hinweise zu Bluetooth
Achtung
UNTER KEINEN UMSTÄNDEN ÜBERNIMMT
SONY DIE HAFTUNG FÜR INDIREKTE,
NEBEN- ODER FOLGESCHÄDEN ODER FÜR
IRGENDWELCHE SCHÄDEN. DIESER
HAFTUNGSAUSSCHLUSS GILT OHNE JEDE
EINSCHRÄNKUNG FÜR ENTGANGENEN
GEWINN, ENTGANGENES EINKOMMEN,
DATENVERLUST, NUTZUNGSAUSFALL DES
PRODUKTS ODER ZUGEHÖRIGER GERÄTE,
AUSFALLZEITEN UND ZEITAUFWAND DES
KÄUFERS, DIE AUF DIE VERWENDUNG
DIESES PRODUKTS, DER HARDWARE UND/
ODER SEINER SOFTWARE ZURÜCKGEHEN
ODER IN VERBINDUNG DAMIT AUFTRETEN.
WICHTIGER HINWEIS!
Sicherer und effizienter Gebrauch
Jegliche Änderungen am Gerät, die ohne die
ausdrückliche Genehmigung von Sony durchgeführt
werden, können die Befugnis des Betreibers zur
Verwendung des Geräts aufheben.
Bitte überprüfen Sie vor dem Gebrauch dieses
Produkts, ob es auf nationaler Ebene Vorschriften
oder Bestimmungen gibt, die die Verwendung von
Bluetooth-Geräten einschränken.
Führen von Fahrzeugen
Erkundigen Sie sich in den Gebieten, in denen Sie
unterwegs sind, nach Gesetzen und Vorschriften
zum Gebrauch von Mobiltelefonen und
Freisprecheinrichtungen.
Richten Sie Ihre Aufmerksamkeit beim Fahren
immer uneingeschränkt auf das Verkehrsgeschehen.
Wenn die Verkehrssituation es erfordert, fahren Sie
an den Straßenrand und halten Sie, bevor Sie einen
Anruf tätigen oder entgegennehmen.
CD-Typ Beschriftung auf der CD
CD-DA
MP3
WMA
AAC
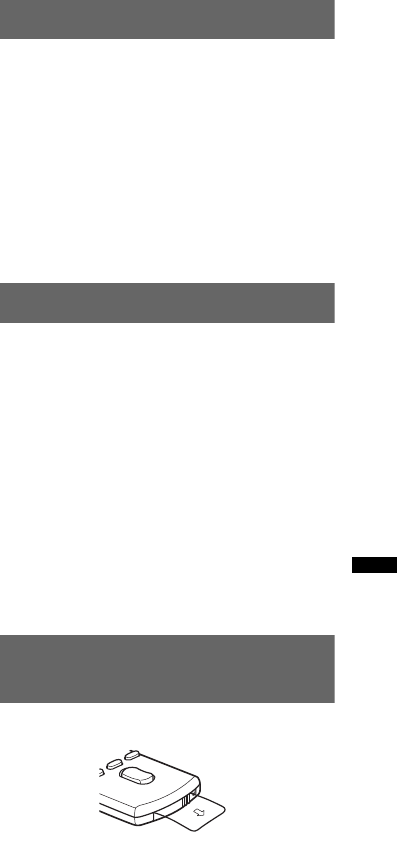
7
Herstellen einer Verbindung zu
anderen Geräten
Wenn Sie eine Verbindung zu einem anderen Gerät
herstellen, lesen Sie in der dazugehörigen
Bedienungsanleitung bitte die ausführlichen
Sicherheitshinweise.
Hochfrequenzstrahlung
HF-Signale beeinträchtigen möglicherweise nicht
ordnungsgemäß installierte oder unzureichend
abgeschirmte elektronische Systeme in
Kraftfahrzeugen, wie z. B. elektronische
Kraftstoffeinspritzsysteme, elektronische
Antiblockiersysteme, elektronische
Geschwindigkeitsregelsysteme oder Airbag-
Systeme. Zur Installation oder Wartung dieses
Geräts wenden Sie sich bitte an den
Fahrzeughersteller oder einen Vertreter des
Herstellers. Eine fehlerhafte Installation oder
Wartung kann gefährlich sein und zum Erlöschen
der für dieses Gerät gültigen Gewährleistung führen.
Wenden Sie sich bitte an den Fahrzeughersteller und
klären Sie ab, ob der Gebrauch von Mobiltelefonen
im Fahrzeug die Fahrzeugelektronik in ihrer
Funktionsfähigkeit beeinträchtigen könnte.
Überprüfen Sie regelmäßig, ob alle drahtlosen
Geräte in Ihrem Fahrzeug richtig montiert sind und
ordnungsgemäß funktionieren.
Notrufe
Diese Bluetooth-Freisprecheinrichtung für das Auto
und das elektronische Gerät, das mit der
Freisprecheinrichtung verbunden ist, arbeiten mit
Radiosignalen, Mobilfunk- und Festnetzen sowie
benutzerprogrammierten Funktionen, bei denen
nicht unter allen Umständen eine Verbindung
garantiert werden kann.
Verlassen Sie sich daher bei wichtigen Mitteilungen
(wie z. B. medizinischen Notfällen) nicht
ausschließlich auf elektronische Geräte.
Wenn Sie Anrufe tätigen oder empfangen wollen,
denken Sie daran, dass die Freisprecheinrichtung
und das elektronische Gerät, das mit der
Freisprecheinrichtung verbunden ist, eingeschaltet
sein müssen und nur in Gebieten mit ausreichender
Mobilfunksignalstärke verwendet werden können.
Notrufe sind unter Umständen nicht bei allen
Mobilfunknetzen möglich oder stehen bei
Verwendung bestimmter Netzwerkdienste und/oder
Telefonfunktionen nicht zur Verfügung.
Weitere Informationen erhalten Sie bei ihrem
lokalen Mobilfunkanbieter.
Zurücksetzen des Geräts
Bevor Sie das Gerät zum ersten Mal benutzen
oder wenn Sie die Autobatterie ausgetauscht
oder die Verbindungen gewechselt haben,
müssen Sie das Gerät zurücksetzen.
Nehmen Sie die Frontplatte ab (Seite 8) und
drücken Sie die Taste RESET (Seite 14) mit
einem spitzen Gegenstand, wie z. B. einem
Kugelschreiber.
Hinweis
Wenn Sie die Taste RESET drücken, werden die
eingestellte Uhrzeit und einige weitere gespeicherte
Einstellungen gelöscht.
Abbrechen des DEMO-Modus
Sie können die Demo, die beim Ausschalten des
Geräts angezeigt wird, abbrechen.
1Halten Sie die Auswahltaste gedrückt.
Die Einstellanzeige erscheint.
2Drücken Sie die Auswahltaste so oft,
bis „DEMO“ angezeigt wird.
3Wählen Sie durch Drehen des
Steuerreglers die Einstellung
„DEMO-OFF“.
4Halten Sie die Auswahltaste gedrückt.
Die Einstellung ist damit abgeschlossen und
im Display erscheint wieder die Anzeige für
den normalen Empfangsmodus bzw.
Wiedergabemodus.
Vorbereiten der
Kartenfernbedienung
Entfernen Sie die Isolierfolie.
Tipp
Informationen zum Austauschen der Batterie finden
Sie auf Seite 35.
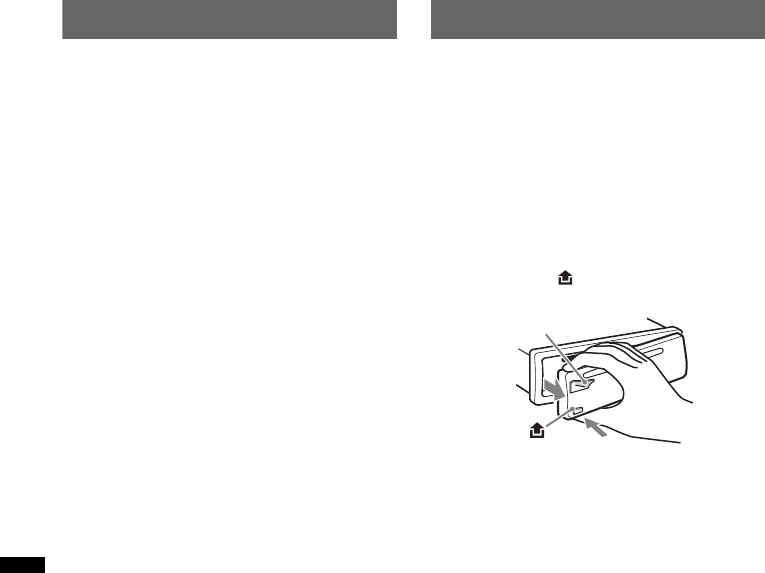
8
Einstellen der Uhr
Die Uhr zeigt die Uhrzeit im 24-Stunden-Format
digital an.
1Halten Sie die Auswahltaste gedrückt.
Die Einstellanzeige erscheint.
2Drücken Sie die Auswahltaste so oft,
bis „CLOCK-ADJ“ angezeigt wird.
3Drücken Sie (SEEK) +.
Die Stundenanzeige blinkt.
4Drehen Sie den Steuerregler, um die
Stunden und Minuten einzustellen.
Drücken Sie (SEEK) –/+, um zur jeweils
nächsten Ziffer in der Digitalanzeige zu
wechseln.
5Drücken Sie nach dem Einstellen der
Minuten die Auswahltaste.
Der Einstellvorgang ist damit abgeschlossen
und die Uhr beginnt zu laufen.
Zum Einblenden der Uhrzeit drücken Sie
(DSPL). Drücken Sie (DSPL) erneut, um zur
vorherigen Anzeige zurückzuschalten.
Tipp
Mithilfe der RDS-Funktion können Sie die Uhr auch
automatisch einstellen lassen (Seite 20).
Abnehmen der Frontplatte
Um zu verhindern, dass das Gerät gestohlen
wird, können Sie die Frontplatte abnehmen.
Warnton
Wenn Sie den Zündschlüssel in die Position OFF
stellen, ohne die Frontplatte abzunehmen, ertönt
einige Sekunden lang ein Warnton.
Der Warnton wird nur ausgegeben, wenn der
integrierte Verstärker verwendet wird.
1Halten Sie (SOURCE/OFF) gedrückt.
Das Gerät schaltet sich aus.
2Drücken Sie und ziehen Sie die
Frontplatte auf sich zu und heraus.
(SOURCE/OFF)
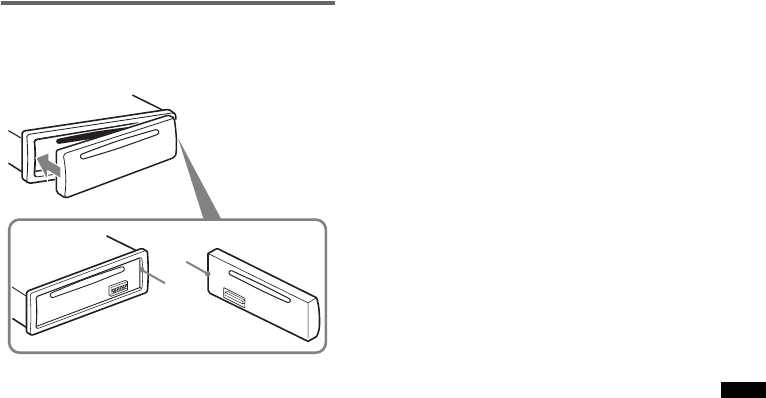
9
Hinweise
•Lassen Sie die Frontplatte nicht fallen und drücken
Sie nicht zu stark auf die Frontplatte und das Display.
•Schützen Sie die Frontplatte vor Hitze bzw. hohen
Temperaturen und vor Feuchtigkeit. Lassen Sie sie
nicht in geparkten Autos, auf dem Armaturenbrett
oder auf der Hutablage liegen.
•Nehmen Sie die Frontplatte nicht ab, während die
Wiedergabe am USB-Gerät läuft. Andernfalls
können die USB-Daten beschädigt werden.
Anbringen der Frontplatte
Setzen Sie Teil
A
der Frontplatte wie abgebildet an
Teil
B
am Gerät an und drücken Sie dann die linke
Seite hinein, bis sie mit einem Klicken einrastet.
Hinweis
Legen Sie auf der Innenseite der Frontplatte nichts ab.
B
A

10
Kurzanleitung für die Bluetooth-Funktion
Detaillierte Erläuterungen zu dieser Funktion finden Sie unter „Bluetooth (Freisprechanrufe und Musik-
Streaming)“ (Seite 25) und in der Bedienungsanleitung zum Bluetooth-Gerät.
3 Schritte für die Bluetooth-Funktion
1Pairing
Zunächst müssen Sie ein Bluetooth-Gerät (Mobiltelefon usw.) und dieses Gerät füreinander
registrieren („Pairing“). Nach dem ersten Mal ist kein weiteres Pairing mehr erforderlich.
2Verbindung
In bestimmten Fällen ermöglicht das Pairing einen automatischen Verbindungsaufbau. Wenn Sie
das Gerät nach dem Pairing verwenden wollen, stellen Sie einfach eine Verbindung her.
3Freisprechanrufe/Musik-Streaming
Sobald die Verbindung besteht, können Sie Musik hören und mit der Freisprecheinrichtung
telefonieren.
Support-Website
http://support.sony-europe.com/
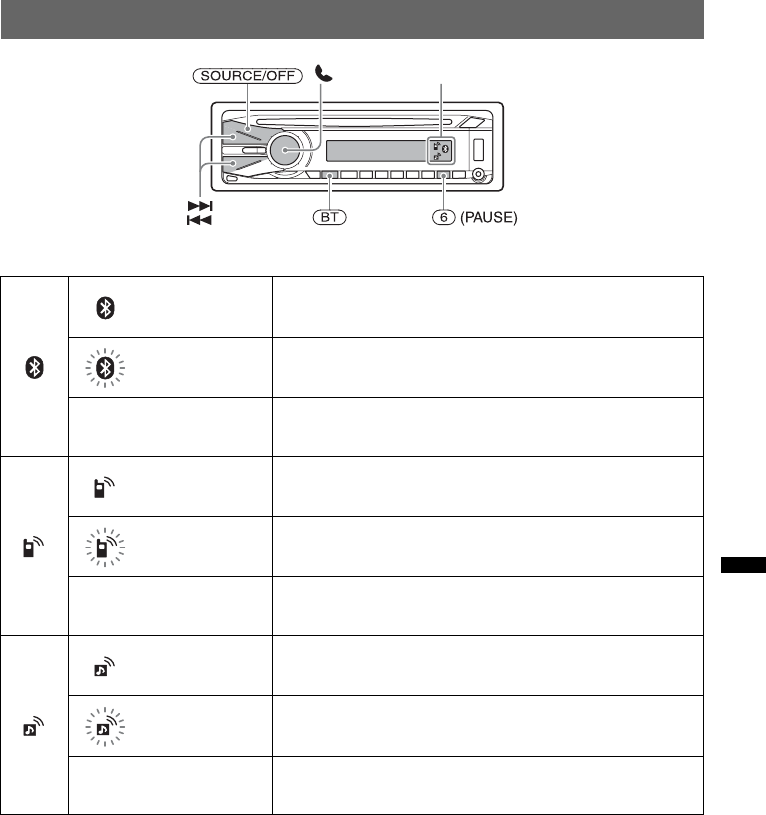
11
Tasten und Symbole
Beschreibung des Status der Symbole
Leuchtet Bluetooth-Signal ein
Blinkt Bereitschaftsmodus für das Pairing
Aus Bluetooth-Signal aus
Leuchtet Verbindung zum Mobiltelefon erfolgreich
Blinkt Verbindung zum Mobiltelefon wird hergestellt
Aus Keine Verbindung
Leuchtet Verbindung zum Audiogerät erfolgreich
Blinkt Verbindung zum Audiogerät wird hergestellt
Aus Keine Verbindung
Symbole
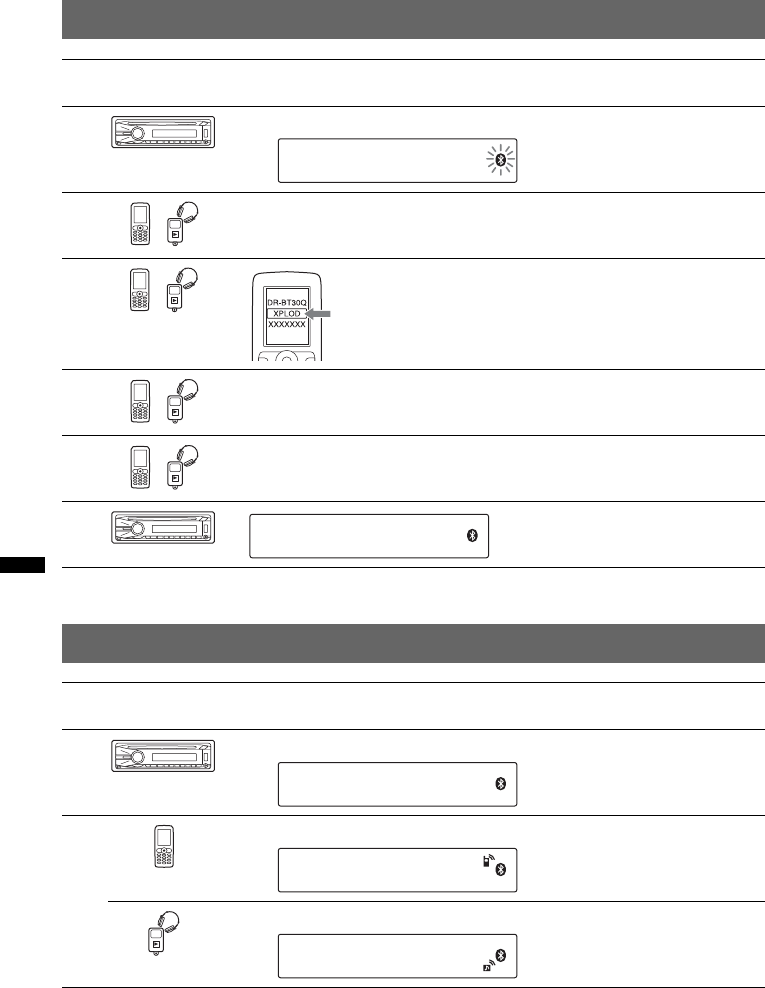
12
1Pairing
2Verbindung
Hinweis
Sie können auch von diesem Gerät aus eine Verbindung zu einem Bluetooth-Gerät herstellen (Seite 26).
Wenn Sie von diesem Gerät aus keine Verbindung zum Bluetooth-Gerät herstellen können, beginnen Sie noch
einmal mit dem Pairing.
Zu bedienendes
Gerät
Vorgehen
1Halten Sie (BT) etwa 5 Sekunden lang gedrückt.
2Lassen Sie das andere Gerät nach diesem Gerät suchen.
3
4Geben Sie als Passwort „0000“ ein.
5Gehen Sie nach den angezeigten Anweisungen vor.
6
Zu bedienendes
Gerät
Vorgehen
1Halten Sie (BT) etwa 3 Sekunden lang gedrückt.
2Stellen Sie vom Mobiltelefon aus eine Verbindung zu diesem Gerät her.
Stellen Sie vom Audiogerät aus eine Verbindung zu diesem Gerät her.
t
Wählen Sie „XPLOD“.
(Pairing erfolgreich)
t
t
t
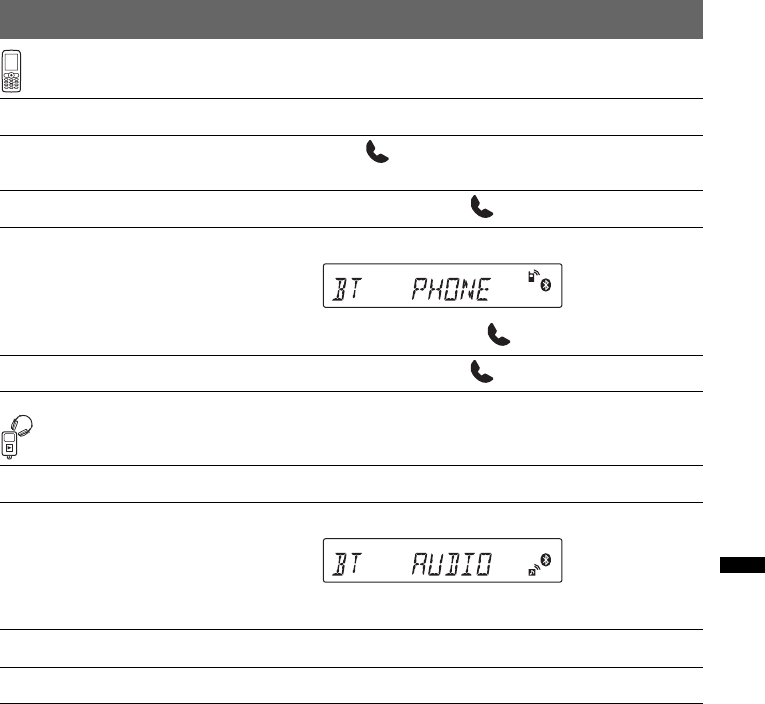
13
3Freisprechanrufe und Musik-Streaming
Telefonieren mit Freisprecheinrichtung
Musik-Streaming
*Das Vorgehen hängt vom Audiogerät ab.
Funktion Vorgehen
Entgegennehmen/Beenden eines
Anrufs Drücken Sie .
Zurückweisen eines Anrufs Halten Sie 2 Sekunden lang gedrückt.
Wahlwiederholung 1Drücken Sie (SOURCE/OFF).
2Halten Sie 3 Sekunden lang gedrückt.
Weiterleiten eines Anrufs Halten Sie 2 Sekunden lang gedrückt.
Funktion Vorgehen
Wiedergeben von Musik 1Drücken Sie (SOURCE/OFF).
2Starten Sie die Wiedergabe am Audiogerät.
Wiedergabe/Pause (AVRCP)* Drücken Sie (6) (PAUSE).
Überspringen von Titeln (AVRCP)* Drücken Sie ./>.
t
t

14
Lage und Grundfunktionen der Teile und Bedienelemente
Hauptgerät
Mit abgenommener Frontplatte In diesem Abschnitt werden Lage und
Grundfunktionen der Teile und Bedienelemente
beschrieben.
Nähere Erläuterungen finden Sie auf den
jeweiligen Seiten.
ATasten SEEK +/–
CD/USB:
Überspringen von Titeln (drücken),
Überspringen mehrerer Titel hintereinander
(drücken, dann innerhalb von 1 Sekunde
erneut drücken und gedrückt halten) bzw.
Rückwärts-/Vorwärtssuchen in einem Titel
(gedrückt halten).
Radio:
Automatisches Einstellen von Sendern
(drücken) bzw. manuelle Sendersuche
(gedrückt halten).
Bluetooth-Audiogerät*1:
Überspringen von Titeln (drücken).
BTaste (BACK)/MODE Seite 17, 18,
23, 24, 25
Drücken: Zurückschalten zur vorherigen
Anzeige/Auswählen des
Radiofrequenzbereichs (FM (UKW)/MW/
LW)/Auswählen des Wiedergabemodus am
iPod.
Gedrückt halten: Einschalten/Abbrechen der
direkten Steuerung.
P
U
S
H
E
N
T
E
R
/
S
E
L
E
C
T
/
AUX
ALBM REP SHUF PAUSE
SOURCE
SEEK OFF
SCRL
ZAP
SEEK
123456
DSPL
PTY
AF
/
TA
BLUETOOTH
BT
MODE
MIC
9 q
;
q
a
q
d
q
s
q
f
q
h
2
q
j
q
g
1 83 4 5 6 7
RESET
qlqk

15
CTaste SOURCE/OFF*2
Einschalten des Geräts bzw. Wechseln der
Tonquelle (Radio/CD/USB/AUX/Bluetooth-
Audio/Bluetooth-Telefon) (drücken).
Ausschalten des Geräts (1 Sekunde lang
drücken).
Ausschalten des Geräts und Ausblenden der
Anzeige (mindestens 2 Sekunden lang
drücken).
DSteuerregler/Auswahltaste/
Taste (Freisprechen)
Einstellen der Lautstärke (drehen),
Auswählen von Einstelloptionen (drücken
und drehen) bzw. Entgegennehmen/Beenden
eines Anrufs (drücken).
ECD-Einschub
Legen Sie eine CD mit der beschrifteten
Seite nach oben ein. Die Wiedergabe
beginnt.
FDisplay
GTaste Z (Auswerfen)
Auswerfen der CD.
HUSB-Anschluss Seite 21, 23
Anschließen eines USB-Geräts.
ITaste (Lösen der Frontplatte)
Seite 8
JTaste (BROWSE) Seite 17
Aktivieren des Quick-BrowZer-Modus.
KTaste ZAP Seite 18
Aufrufen des ZAPPIN™-Modus.
LEmpfänger für die
Kartenfernbedienung
MTaste BT (BLUETOOTH) Seite 26
Zum Ein-/Ausschalten des Bluetooth-Signals
bzw. Pairing.
NTaste AF (Alternativfrequenzen)/
TA (Verkehrsdurchsagen)/
PTY (Programmtypauswahl) Seite 19,
20
Einstellen von AF und TA (drücken) bzw.
Auswählen des Programmtyps (PTY) bei
einem RDS-Sender (gedrückt halten).
OZahlentasten (Stationstasten)
CD/USB:
(1)/(2): ALBM –/+ (während der
MP3-/WMA-/AAC-Wiedergabe)
Überspringen von Alben (drücken)
bzw. Überspringen mehrerer Alben
hintereinander (gedrückt halten).
(3): REP*2 Seite 21, 22, 24
(4): SHUF Seite 21, 22, 24
(6): PAUSE
Anhalten der Wiedergabe. Zum
Beenden der Funktion drücken Sie die
Taste erneut.
Radio:
Einstellen gespeicherter Sender (drücken)
bzw. Speichern von Sendern (gedrückt
halten).
Bluetooth-Audiogerät*1:
(6): PAUSE
Anhalten der Wiedergabe. Zum
Beenden der Funktion drücken Sie die
Taste erneut.
Bluetooth-Telefon:
(5): MIC Seite 27
PTaste DSPL (Anzeige)/SCRL (Bildlauf)
Seite 19, 21, 22, 24, 25
Wechseln der Informationen im Display
(drücken) bzw. Durchlaufenlassen der
Informationen im Display (gedrückt halten).
QAUX-Eingangsbuchse Seite 31
Anschließen eines tragbaren Audiogeräts.
RTaste RESET (hinter der Frontplatte)
Seite 7
SMikrofon Seite 27
Hinweis
Decken Sie das Mikrofon nicht ab. Andernfalls ist
das Freisprechen nicht möglich.
*1 Wenn ein Bluetooth-Audiogerät, das das
Bluetooth-Profil AVRCP unterstützt,
angeschlossen ist. Je nach Gerät stehen
möglicherweise nicht alle Funktionen zur
Verfügung.
*2 An dieser Taste befindet sich ein fühlbarer Punkt.
Hinweis
Wenn Sie eine CD auswerfen bzw. einlegen wollen,
schließen Sie kein USB-Gerät an. Andernfalls kann
die CD beschädigt werden.
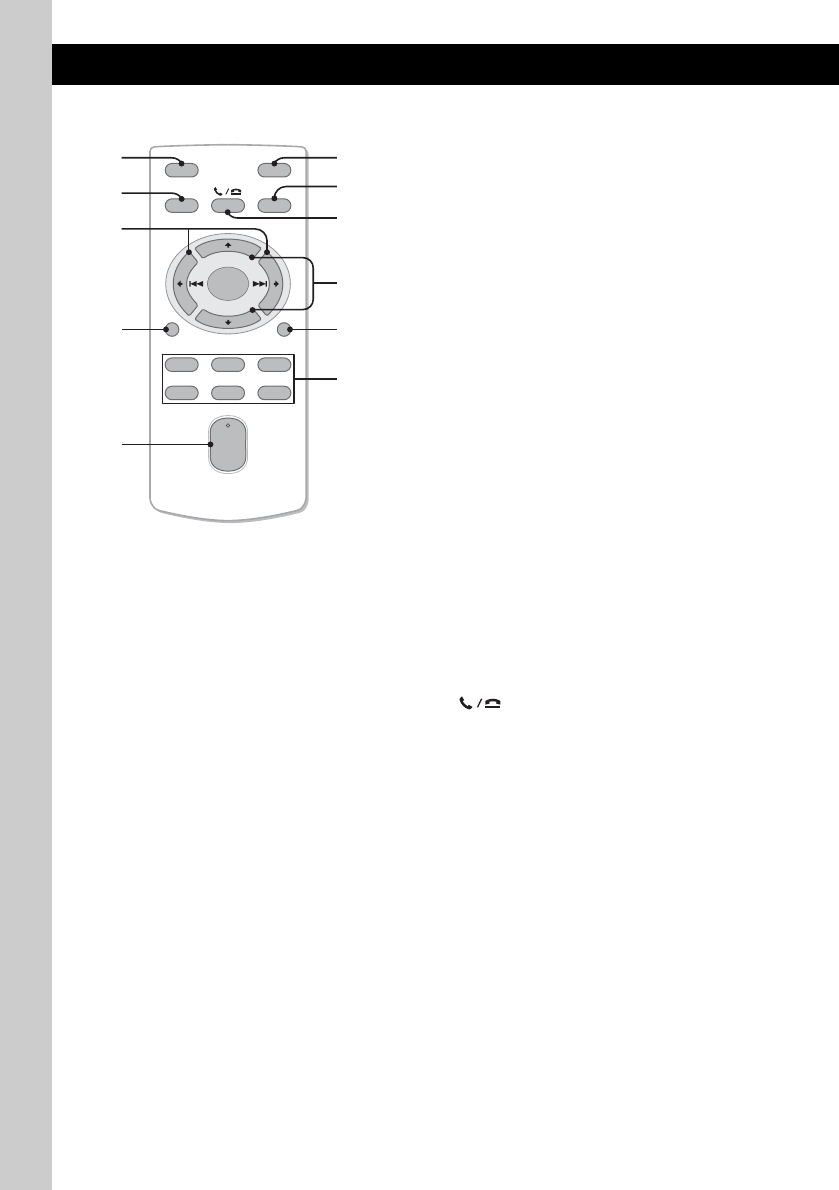
16
Kartenfernbedienung RM-X304 Ziehen Sie vor dem Gebrauch die Isolierfolie
heraus (Seite 7).
ATaste OFF
Ausschalten bzw. Stoppen der Tonquelle.
BTaste SOURCE
Einschalten bzw. Wechseln der Tonquelle
(Radio/CD/USB/AUX/Bluetooth-Audio/
Bluetooth-Telefon).
CTasten < (.)/, (>)
Beim Steuern von Radio-, CD-, USB- und
Bluetooth-Funktionen entsprechen diese
Tasten den Tasten (SEEK) –/+ am Gerät.
Konfiguration, Klangeinstellung usw.
können Sie mit < , vornehmen.
DTaste DSPL (Anzeige)
Wechseln der Informationen im Display.
ETaste VOL (Lautstärke) +*/–
Einstellen der Lautstärke.
FTaste ATT (Dämpfen des Tons)
Dämpfen des Tons. Zum Beenden der
Funktion drücken Sie die Taste erneut.
GTaste MODE
Auswählen des Radiofrequenzbereichs (FM
(UKW)/MW/LW)/Auswählen des
Wiedergabemodus am iPod (drücken).
Einschalten/Abbrechen der direkten
Steuerung (gedrückt halten).
HTaste SEL (Auswählen)/
(Freisprechen)
Diese Taste entspricht der Auswahltaste am
Gerät.
ITasten M (+)/m (–)
Beim Steuern von CD- und USB-Funktionen
entsprechen diese Tasten den Tasten
(1)/(2) (ALBM –/+) am Gerät.
Konfiguration, Klangeinstellung usw.
können Sie mit M m vornehmen.
JTaste SCRL (Bildlauf)
Hiermit lassen Sie die Informationen im
Display durchlaufen.
KZahlentasten (Stationstasten)
Einstellen gespeicherter Sender (drücken)
bzw. Speichern von Sendern (gedrückt
halten).
*An dieser Taste befindet sich ein fühlbarer Punkt.
Hinweis
Wenn Sie das Gerät ausschalten und die Anzeige
ausgeblendet ist, können Sie es nicht mit der
Kartenfernbedienung bedienen. Drücken Sie zunächst
(SOURCE/OFF) am Gerät oder legen Sie eine CD ein,
um das Gerät zu aktivieren.
OFF
DSPL SCRL
SEL
SOURCE
MODE
132
465
ATT
VOL
+
–
+
–
28
7
1
0
3
6
5
4
qa
9
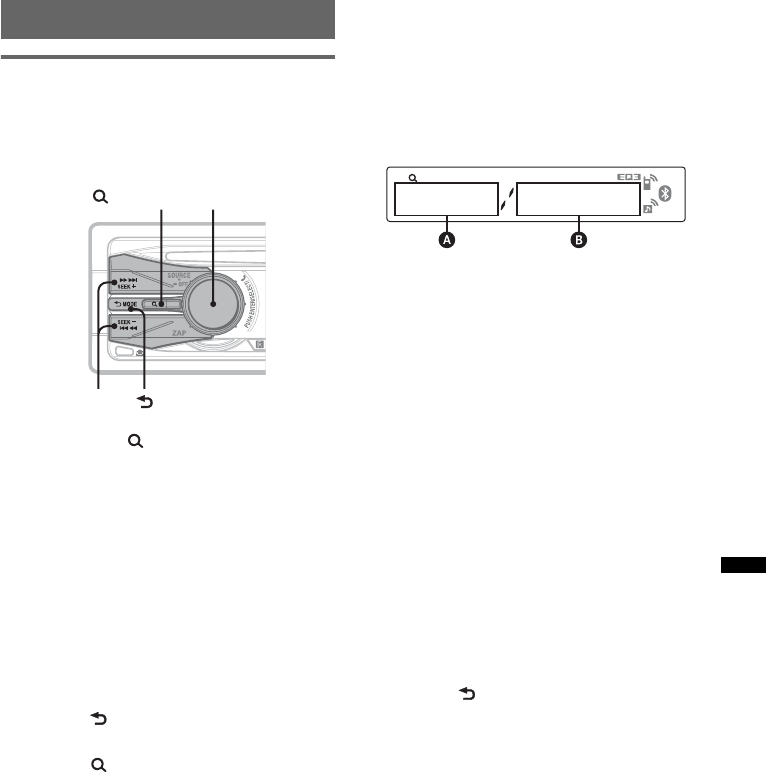
17
Suchen nach einem Titel
Suchen nach einem Titel anhand
seines Namens — Quick-BrowZer
Sie können anhand der Kategorie mühelos nach
einem Titel auf einer CD oder einem USB-Gerät
suchen.
1Drücken Sie (BROWSE).
Das Gerät wechselt in den Quick-BrowZer-
Modus und die Liste der Suchkategorien
erscheint.
2Wählen Sie durch Drehen des
Steuerreglers die gewünschte
Kategorie für die Suche aus und
drücken Sie zum Bestätigen den
Steuerregler.
3Gehen Sie wie in Schritt 2 erläutert vor,
bis der gewünschte Titel ausgewählt
ist.
Die Wiedergabe beginnt.
Zurückschalten zur vorherigen Anzeige
Drücken Sie (BACK).
Deaktivieren des Quick-BrowZer-Modus
Drücken Sie (BROWSE).
Hinweis
Wenn Sie den Quick-BrowZer-Modus aktivieren, wird
die Einstellung für die Wiedergabewiederholung bzw.
Zufallswiedergabe außer Kraft gesetzt.
Suchen mit Überspringen von
Elementen — Jump-Modus
Auch wenn eine Kategorie viele Elemente
enthält, können Sie das gewünschte Element
schnell ausfindig machen.
1Drücken Sie im Quick-BrowZer-Modus die
Taste (SEEK) +.
Die folgende Anzeige erscheint.
ANummer des aktuellen Elements
BGesamtzahl der Elemente in der aktuellen
Ordnerebene
Anschließend erscheint der Name des
Elements.
2Drehen Sie den Steuerregler, um das
gewünschte Element oder ein Element in der
Nähe des gewünschten Elements auszuwählen.
Das Gerät durchsucht die Elemente in
Schritten von 10 % der Gesamtzahl an
Elementen.
3Drücken Sie die Auswahltaste.
Im Display erscheint wieder die Anzeige für
den Quick-BrowZer-Modus und das
ausgewählte Element wird angezeigt.
4Drehen Sie den Steuerregler, um das
gewünschte Element auszuwählen, und
drücken Sie den Steuerregler.
Die Wiedergabe beginnt, wenn es sich bei dem
ausgewählten Element um einen Titel handelt.
So deaktivieren Sie den Jump-Modus
Drücken Sie (BACK) oder (SEEK) –.
(BROWSE) Steuerregler/
Auswahltaste
(BACK)
SEEK +/–
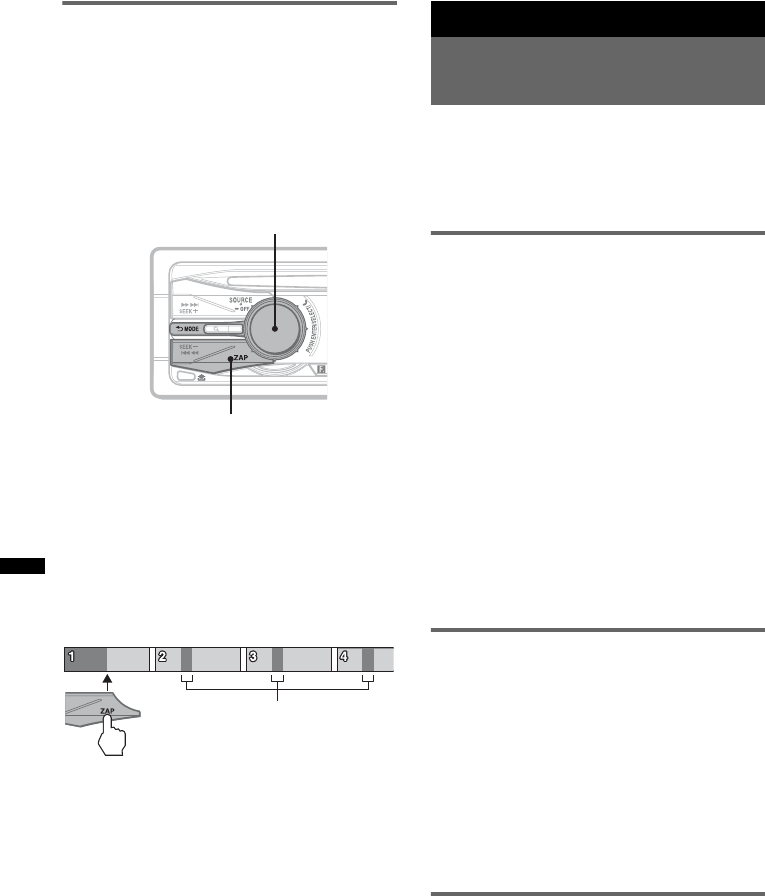
18
Suchen nach einem Titel durch
Anspielen der Titel — ZAPPIN™
Sie können kurze Passagen der Titel auf einer
CD oder einem USB-Gerät nacheinander
anspielen, um nach dem gewünschten Titel zu
suchen.
Der ZAPPIN-Modus eignet sich besonders für
die Titelsuche, wenn die Wiedergabe in
willkürlicher Reihenfolge oder die wiederholte
Wiedergabe in willkürlicher Reihenfolge läuft.
1Drücken Sie während der Wiedergabe
(ZAP).
„ZAPPIN“ erscheint im Display und dann
beginnt die Wiedergabe einer Passage aus
dem nächsten Titel.
Die Passage wird die eingestellte Anzahl an
Sekunden wiedergegeben, danach ist ein
Klicken zu hören und die Wiedergabe der
nächsten Passage beginnt.
2Drücken Sie die Auswahltaste oder
(ZAP), sobald eine Passage aus einem
Titel wiedergegeben wird, den Sie
ganz hören möchten.
Der ausgewählte Titel wird automatisch im
normalen Wiedergabemodus ab dem Anfang
wiedergegeben.
Wenn Sie im ZAPPIN-Modus einen weiteren
Titel suchen wollen, gehen Sie wie in Schritt
1 und 2 erläutert vor.
Tipps
•Sie können als Wiedergabedauer etwa 6 Sekunden,
9 Sekunden oder 30 Sekunden auswählen
(Seite 31). Welche Passage des Titels
wiedergegeben wird, lässt sich nicht einstellen.
•Drücken Sie im ZAPPIN-Modus (SEEK) +/– oder
(1)/(2) (ALBM –/+), um einen Titel bzw. ein Album
zu überspringen.
Radio
Speichern und Empfangen von
Sendern
Achtung
Wenn Sie während der Fahrt Sender einstellen,
sollten Sie die BTM-Funktion
(Speicherbelegungsautomatik) verwenden.
Andernfalls besteht Unfallgefahr.
Automatisches Speichern von
Sendern — BTM
1Drücken Sie (SOURCE/OFF) so oft, bis
„TUNER“ erscheint.
Zum Wechseln des Frequenzbereichs drücken
Sie mehrmals (MODE). Sie können zwischen
FM1 (UKW1), FM2 (UKW2), FM3
(UKW3), MW und LW wählen.
2Halten Sie die Auswahltaste gedrückt.
Die Einstellanzeige erscheint.
3Drücken Sie die Auswahltaste so oft,
bis „BTM“ angezeigt wird.
4Drücken Sie (SEEK) +.
Das Gerät speichert die Sender in der
Reihenfolge der Frequenzen auf den
Zahlentasten (Stationstasten).
Ein Signalton ist zu hören und die Einstellung
wird gespeichert.
Manuelles Speichern von Sendern
1Während der zu speichernde Sender
empfangen wird, halten Sie eine
Stationstaste ((1) bis (6)) gedrückt,
bis „MEM“ erscheint.
Hinweis
Wenn Sie auf der gleichen Stationstaste einen
anderen Sender speichern, wird der zuvor
gespeicherte Sender ersetzt.
Tipp
Wenn ein RDS-Sender gespeichert wird, wird auch
die AF/TA-Einstellung gespeichert (Seite 19).
Einstellen gespeicherter Sender
1Wählen Sie den Frequenzbereich aus
und drücken Sie eine Stationstaste
((1) bis (6)).
ZAP
Auswahltaste
Passagen der Titel, die im ZAPPIN-
Modus wiedergegeben werden.
Titel
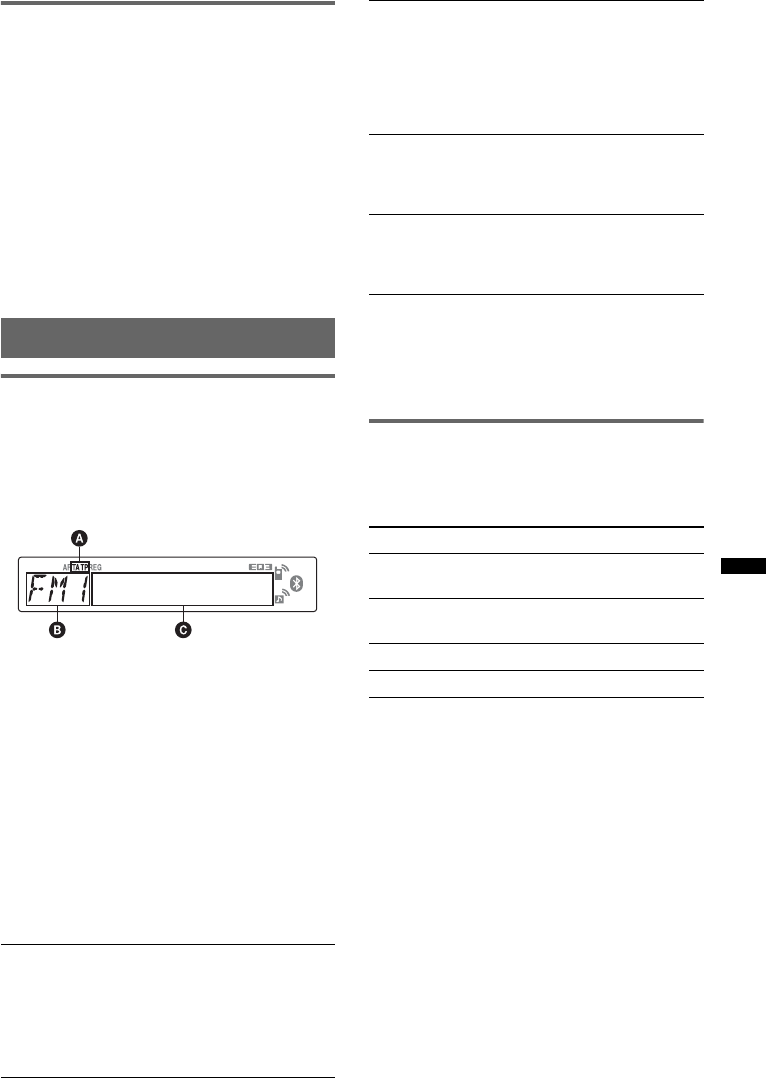
19
Automatisches Einstellen von
Sendern
1Wählen Sie den Frequenzbereich aus
und starten Sie mit (SEEK) +/– die
Suche nach dem Sender.
Der Suchlauf stoppt, wenn ein Sender
empfangen wird. Wiederholen Sie diesen
Vorgang, bis das Gerät den gewünschten
Sender empfängt.
Tipp
Wenn Sie die Frequenz des gewünschten Senders
kennen, halten Sie (SEEK) +/– gedrückt, bis die
Frequenz in etwa erreicht ist, und drücken Sie
(SEEK) +/– dann so oft, bis die gewünschte Frequenz
genau eingestellt ist (manuelle Sendersuche).
RDS
Übersicht
UKW-Sender, die RDS (Radiodatensystem)
unterstützen, strahlen zusammen mit den
normalen Radioprogrammsignalen nicht hörbare,
digitale Informationen aus.
Informationen im Display
ATA/TP*1
BRadiofrequenzbereich, Funktion
CFrequenz*2 (Programmdienstname),
Speichernummer, Uhrzeit, RDS-Daten
*1 „TA“ blinkt während einer Verkehrsdurchsage. „TP“
leuchtet, wenn ein Sender mit Verkehrsdurchsagen
empfangen wird.
*2 Beim Empfang eines RDS-Senders wird „ *“ links
neben der Frequenz angezeigt.
Zum Wechseln der angezeigten Informationen
im Display C drücken Sie (DSPL).
RDS-Funktionen
Mit diesem Gerät stehen folgende RDS-
Funktionen automatisch zur Verfügung:
Hinweise
•Je nach Land bzw. Region stehen möglicherweise
nicht alle RDS-Funktionen zur Verfügung.
•Die RDS-Funktion arbeitet möglicherweise nicht,
wenn die Sendesignale zu schwach sind oder wenn
der eingestellte Sender keine RDS-Daten ausstrahlt.
Einstellen von AF und TA
1Drücken Sie (AF/TA) so oft, bis die
gewünschte Einstellung angezeigt
wird.
Speichern von RDS-Sendern
zusammen mit der AF- und TA-
Einstellung
Sie können zusammen mit den RDS-Sendern die
AF/TA-Einstellung speichern. Mit der BTM-
Funktion werden nur RDS-Sender mit derselben
AF/TA-Einstellung gespeichert.
Beim manuellen Speichern von Sendern können
Sie RDS- und Nicht-RDS-Sender mit
unterschiedlicher AF/TA-Einstellung speichern.
1Stellen Sie AF/TA ein und speichern Sie die
Sender dann mit BTM oder manuell ab.
AF (Alternativfrequenzen)
In einem Netzwerk wird der Sender mit den
stärksten Signalen ausgewählt und neu
eingestellt. So können Sie auch bei einer langen
Fahrt über eine große Entfernung hinweg
ununterbrochen denselben Sender empfangen,
ohne ihn manuell neu einstellen zu müssen.
TA (Verkehrsdurchsagen)/
TP (Verkehrsfunksender)
Aktuelle Verkehrsinformationen bzw.
Verkehrsfunksender werden empfangen. Wenn
solche Informationen bzw. Sendungen
empfangen werden, wird die gerade
ausgewählte Tonquelle unterbrochen.
PTY (Programmtypauswahl)
Der gerade empfangene Programmtyp wird
angezeigt. Außerdem kann nach dem
ausgewählten Programmtyp gesucht werden.
CT (Uhrzeit)
Mit den CT-Daten (Uhrzeitdaten), die von
RDS-Sendern ausgestrahlt werden, lässt sich
die Uhr einstellen.
Einstellung Funktion
AF-ON AF wird aktiviert und TA wird
deaktiviert.
TA-ON TA wird aktiviert und AF wird
deaktiviert.
AF, TA-ON AF und TA werden aktiviert.
AF, TA-OFF AF und TA werden deaktiviert.
Fortsetzung auf der nächsten Seite t
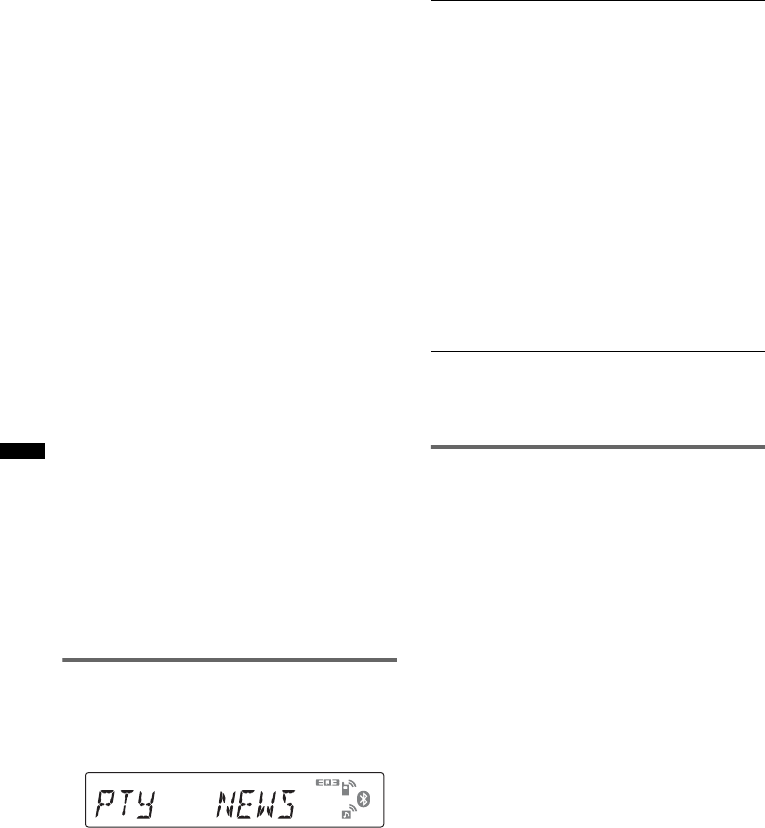
20
Empfangen von
Katastrophenwarnungen
Wenn AF oder TA aktiviert ist, unterbrechen
Katastrophenwarnungen automatisch die
ausgewählte Tonquelle.
Tipp
Wenn Sie die Lautstärke während einer
Verkehrsdurchsage einstellen, wird der eingestellte
Pegel für spätere Verkehrsdurchsagen gespeichert,
und zwar unabhängig von der sonst eingestellten
Lautstärke.
Unveränderter Empfang eines
Regionalsenders — REG
Wenn die AF-Funktion aktiviert ist, wird der
Empfang dieses Geräts werkseitig auf eine
bestimmte Region beschränkt, so dass nicht zu
einem anderen Regionalsender mit einer
stärkeren Frequenz gewechselt wird.
Wenn Sie den Empfangsbereich des betreffenden
Regionalsenders verlassen, stellen Sie während
des Empfangs eines UKW-Senders bei der
Konfiguration „REG-OFF“ ein (Seite 31).
Hinweis
Diese Funktion steht in Großbritannien und in einigen
anderen Regionen nicht zur Verfügung.
Lokalsenderfunktion (nur
Großbritannien)
Mithilfe dieser Funktion können Sie andere
Lokalsender auswählen, auch wenn diese zuvor
nicht unter einer Stationstaste gespeichert
wurden.
1Drücken Sie während des UKW-Empfangs
eine Stationstaste ((1) bis (6)), unter der ein
Lokalsender gespeichert ist.
2Drücken Sie innerhalb von 5 Sekunden erneut
die Stationstaste des Lokalsenders.
Wiederholen Sie diesen Vorgang, bis das Gerät
den Lokalsender empfängt.
Auswählen des Programmtyps
(PTY)
1Halten Sie während des UKW-
Empfangs (AF/TA) (PTY) gedrückt.
Der Name des aktuellen Programmtyps
erscheint, wenn der Sender PTY-Daten
ausstrahlt.
2Drücken Sie (AF/TA) (PTY) so oft, bis
der gewünschte Programmtyp
angezeigt wird.
3Drücken Sie (SEEK) +/–.
Das Gerät beginnt, nach einem Sender zu
suchen, der den ausgewählten Programmtyp
ausstrahlt.
Programmtypen
Hinweis
Sie können diese Funktion in Ländern/Regionen, in
denen keine PTY-Daten zur Verfügung stehen, nicht
verwenden.
Einstellen der Uhrzeit (CT)
1Stellen Sie bei der Konfiguration
„CT-ON“ ein (Seite 30).
Hinweise
•Die CT-Funktion steht möglicherweise nicht zur
Verfügung, auch wenn ein RDS-Sender empfangen
wird.
•Die mit der CT-Funktion eingestellte Uhrzeit ist nicht
immer korrekt.
NEWS (Nachrichten), AFFAIRS (Aktuelles
Zeitgeschehen), INFO (Informationen),
SPORT (Sport), EDUCATE (Erziehung und
Bildung), DRAMA (Hörspiele), CULTURE
(Kultur), SCIENCE (Wissenschaft), VARIED
(Verschiedenes), POP M (Pop-Musik),
ROCK M (Rock-Musik), EASY M
(Unterhaltungsmusik), LIGHT M (Leichte
Klassik), CLASSICS (Klassik), OTHER M
(Sonstige Musik), WEATHER (Wetter),
FINANCE (Finanzberichte), CHILDREN
(Kinderprogramme), SOCIAL A
(Magazinsendungen), RELIGION (Religion),
PHONE IN (Hörertelefon), TRAVEL
(Reiseinformationen), LEISURE
(Freizeitprogramm), JAZZ (Jazz), COUNTRY
(Country-Musik), NATION M (Volksmusik),
OLDIES (Oldies), FOLK M (Folk-Musik),
DOCUMENT (Dokumentarbeiträge)
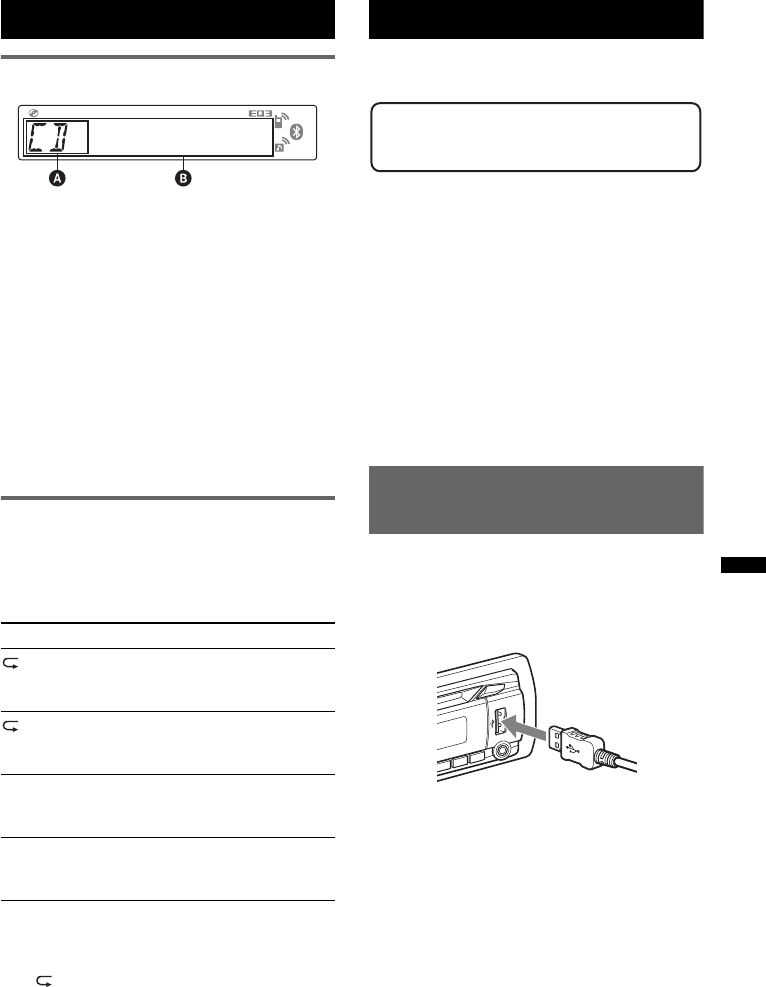
21
CD
Informationen im Display
ATonquelle
BTitelname*1, CD-/Interpretenname*1,
Interpretenname*1, Albumnummer*2,
Albumname*1, Titelnummer/Verstrichene
Spieldauer, Uhrzeit
*1 Die Informationen einer CD TEXT bzw. einer
MP3-/WMA-/AAC-Datei werden angezeigt.
*2 Die Albumnummer wird nur beim Wechseln des
Albums angezeigt.
Zum Wechseln der angezeigten Informationen
B drücken Sie (DSPL).
Tipp
Je nach Modell, CD-Typ, Aufnahmeformat und
Einstellungen werden unterschiedliche Informationen
angezeigt.
Repeat und Shuffle Play
1Drücken Sie während der Wiedergabe
(3) (REP) oder (4) (SHUF) so oft, bis
die gewünschte Einstellung im Display
erscheint.
*Bei Wiedergabe einer MP3-/WMA-/AAC-Datei.
Wenn Sie wieder in den normalen
Wiedergabemodus wechseln möchten, wählen
Sie „ OFF“ bzw. „SHUF OFF“.
USB-Geräte
Einzelheiten zur Kompatibilität Ihres USB-
Geräts finden Sie auf der Support-Website.
• Sie können USB-Geräte des Typs MSC
(Massenspeicherklasse) und MTP
(Medientransferprotokoll) verwenden, die dem
USB-Standard entsprechen.
• Der entsprechende Codec ist MP3 (.mp3),
WMA (.wma) und AAC (.m4a).
• Es empfiehlt sich, eine Sicherungskopie der
Daten auf dem USB-Gerät zu erstellen.
Hinweis
Lassen Sie den Motor an, bevor Sie das USB-Gerät
anschließen.
Bei manchen USB-Geräten kann es zu Fehlfunktionen
und Beschädigungen kommen, wenn Sie zuerst das
Gerät anschließen und dann den Motor anlassen.
Wiedergabe mit einem USB-
Gerät
1Schließen Sie das USB-Gerät an den
USB-Anschluss an.
Verwenden Sie zum Anschließen, falls Sie ein
Kabel verwenden, das mit dem USB-Gerät
gelieferte Kabel.
Die Wiedergabe beginnt.
Wenn bereits ein USB-Gerät angeschlossen ist,
drücken Sie zum Starten der Wiedergabe
(SOURCE/OFF) so oft, bis „USB“ erscheint.
Drücken Sie zum Stoppen der Wiedergabe
(SOURCE/OFF) 1 Sekunde lang.
Einstellung Funktion
TRACK Wiederholtes
Wiedergeben eines
Titels.
ALBUM* Wiederholtes
Wiedergeben eines
Albums.
SHUF ALBUM* Wiedergeben eines
Albums in willkürlicher
Reihenfolge.
SHUF DISC Wiedergeben einer CD
in willkürlicher
Reihenfolge.
Fortsetzung auf der nächsten Seite t
Support-Website
http://support.sony-europe.com/
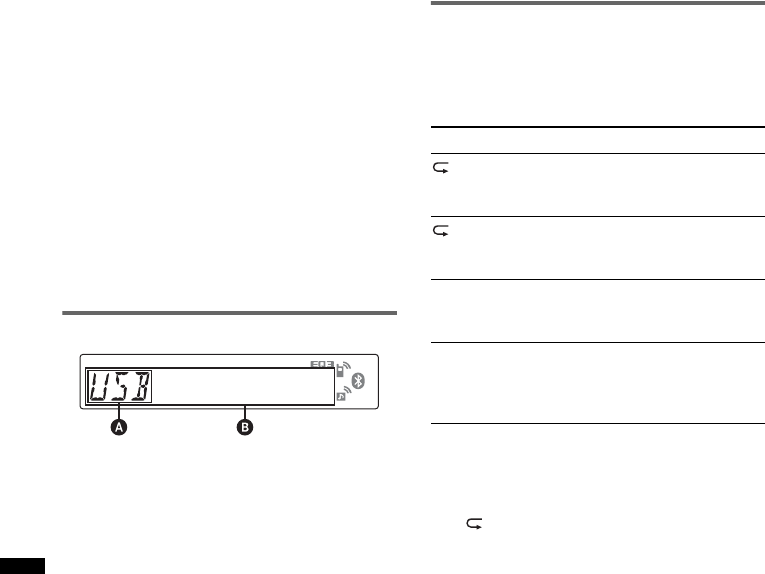
22
Lösen des USB-Geräts
1Stoppen Sie die Wiedergabe am USB-Gerät.
2Trennen Sie das USB-Gerät von diesem Gerät.
Wenn Sie das USB-Gerät während der
Wiedergabe vom Gerät trennen, können die
Daten auf dem USB-Gerät beschädigt werden.
Hinweise
•Verwenden Sie keine USB-Geräte, die so groß oder
schwer sind, dass sich bei einer Erschütterung die
Verbindung lösen bzw. das Gerät herunterfallen
kann.
•Nehmen Sie die Frontplatte nicht ab, während die
Wiedergabe am USB-Gerät läuft. Andernfalls
können die USB-Daten beschädigt werden.
•Dieses Gerät kann keine USB-Geräte erkennen, die
über einen USB-Hub angeschlossen sind.
Informationen im Display
ATonquelle
BTitelname, Interpretenname,
Albumnummer*, Albumname, Titelnummer/
Verstrichene Spieldauer, Uhrzeit
*Die Albumnummer wird nur beim Wechseln des
Albums angezeigt.
Zum Wechseln der angezeigten Informationen B
drücken Sie (DSPL).
Hinweise
•Je nach USB-Gerät, Aufnahmeformat und
Einstellungen werden unterschiedliche
Informationen angezeigt. Näheres dazu finden Sie
auf der Support-Website.
•Im Folgenden wird die Höchstzahl an anzeigbaren
Daten angegeben.
– Ordner (Alben): 128
– Dateien (Titel) pro Ordner: 500
•Lassen Sie das USB-Gerät nicht in einem geparkten
Fahrzeug liegen. Andernfalls kann es zu
Fehlfunktionen kommen.
•Je nach Menge der aufgezeichneten Daten kann es
etwas dauern, bis die Wiedergabe beginnt.
•DRM-Dateien (digitale Rechteverwaltung) werden
unter Umständen nicht wiedergegeben.
•Bei der Wiedergabe bzw. beim Vorwärts-/
Rückwärtssuchen in einer VBR-MP3-/WMA-/
AAC-Datei (variable Bitrate) wird die verstrichene
Spieldauer möglicherweise nicht richtig angezeigt.
•Die Wiedergabe folgender MP3-/WMA-/AAC-
Dateien wird nicht unterstützt:
– Dateien mit verlustfreier Komprimierung
– Kopiergeschützte Dateien
Repeat und Shuffle Play
1Drücken Sie während der Wiedergabe
(3) (REP) oder (4) (SHUF) so oft, bis
die gewünschte Einstellung im Display
erscheint.
Nach 3 Sekunden ist die Einstellung
abgeschlossen.
Wenn Sie wieder in den normalen
Wiedergabemodus wechseln möchten, wählen
Sie „ OFF“ bzw. „SHUF OFF“.
Einstellung Funktion
TRACK Wiederholtes
Wiedergeben eines
Titels.
ALBUM Wiederholtes
Wiedergeben eines
Albums.
SHUF ALBUM Wiedergeben eines
Albums in willkürlicher
Reihenfolge.
SHUF DEVICE Wiedergeben des Inhalts
auf einem Gerät in
willkürlicher
Reihenfolge.
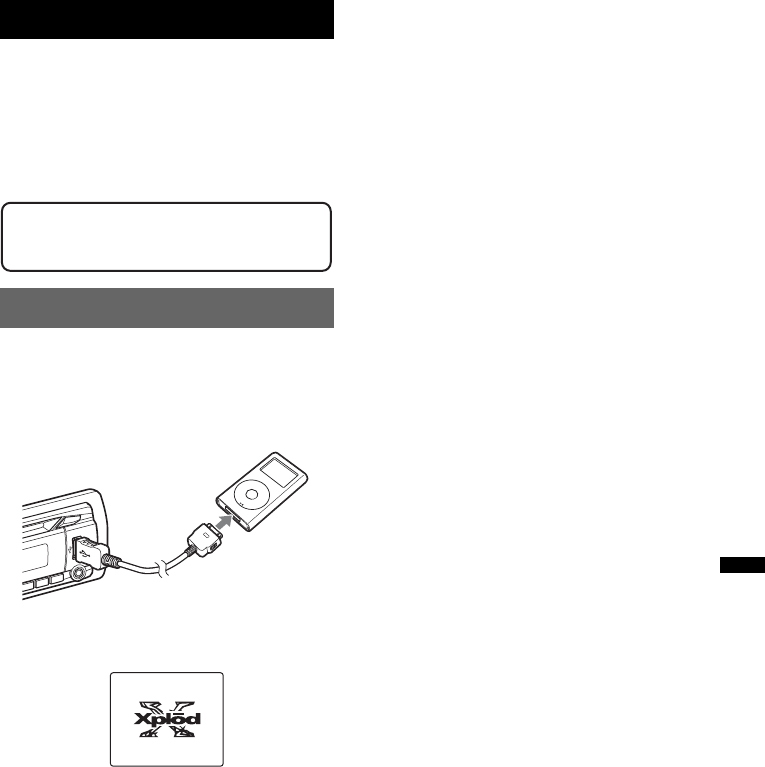
23
iPod
Einzelheiten zur Kompatibilität Ihres iPod finden
Sie unter „Der iPod“ auf Seite 33 oder auf der
Support-Website.
In dieser Bedienungsanleitung wird „iPod“ als
allgemeiner Begriff für die iPod-Funktionen bei
einem iPod und iPhone verwendet, sofern nicht
im Text oder in Abbildungen anders angegeben.
Wiedergabe mit einem iPod
Drehen Sie die Lautstärke an diesem Gerät
herunter, bevor Sie den iPod anschließen.
1Schließen Sie den iPod über das USB-
Kabel mit Dock-Anschluss an den
USB-Anschluss an.
Der iPod schaltet sich automatisch ein und im
iPod-Display erscheint die unten abgebildete
Anzeige.*
Tipp
Zum Anschließen des Dock-Anschlusses empfehlen
wir das USB-Kabel RC-100IP (nicht mitgeliefert).
Die Titel auf dem iPod werden automatisch
ab der zuletzt wiedergegebenen Stelle
abgespielt.
Wenn bereits ein iPod angeschlossen ist,
drücken Sie zum Starten der Wiedergabe
(SOURCE/OFF) so oft, bis „USB“ erscheint.
(„IPD“ erscheint im Display, wenn der iPod
erkannt wird.)
*Wenn ein iPod touch oder iPhone angeschlossen ist
oder wenn die Wiedergabe des iPod zuletzt mit der
direkten Steuerung erfolgte, wird das Logo nicht im
Display angezeigt.
2Drücken Sie (MODE), um den
Wiedergabemodus auszuwählen.
Der Modus wechselt folgendermaßen:
RESUMING t ALBUM t TRACK t
PODCAST* t GENRE t PLAYLIST
t ARTIST
*Wird je nach iPod-Einstellung möglicherweise nicht
angezeigt.
3Stellen Sie die Lautstärke ein.
Drücken Sie zum Stoppen der Wiedergabe
(SOURCE/OFF) 1 Sekunde lang.
Lösen des iPod
1Stoppen Sie die Wiedergabe am iPod.
2Trennen Sie den iPod von diesem Gerät.
Vorsicht beim iPhone
Wenn Sie ein iPhone über USB anschließen, wird die
Lautstärke beim Telefonieren vom iPhone selbst
gesteuert. Um nach einem Telefonat plötzliche laute
Geräusche zu vermeiden, erhöhen Sie während des
Telefonats nicht die Lautstärke am Gerät.
Hinweise
•Nehmen Sie die Frontplatte nicht ab, während die
Wiedergabe am iPod läuft. Andernfalls können die
Daten beschädigt werden.
•Dieses Gerät kann keinen iPod erkennen, der über
einen USB-Hub angeschlossen ist.
Tipps
•Sofern der Zündschlüssel in der Position ACC oder I
steht und das Gerät eingeschaltet ist, wird der iPod
geladen.
•Wenn der iPod während der Wiedergabe vom Gerät
getrennt wird, erscheint „NO DEV“ im Display des
Geräts.
Wiedergabefortsetzung
Wenn der iPod an den Dock-Anschluss
angeschlossen ist, wird an diesem Gerät als
Modus die Wiedergabefortsetzung eingestellt
und die Wiedergabe startet in dem am iPod
eingestellten Modus.
Bei der Wiedergabefortsetzung stehen folgende
Tasten nicht zur Verfügung.
– (3) (REP)
– (4) (SHUF)
Support-Website
http://support.sony-europe.com/
>
.
MENU
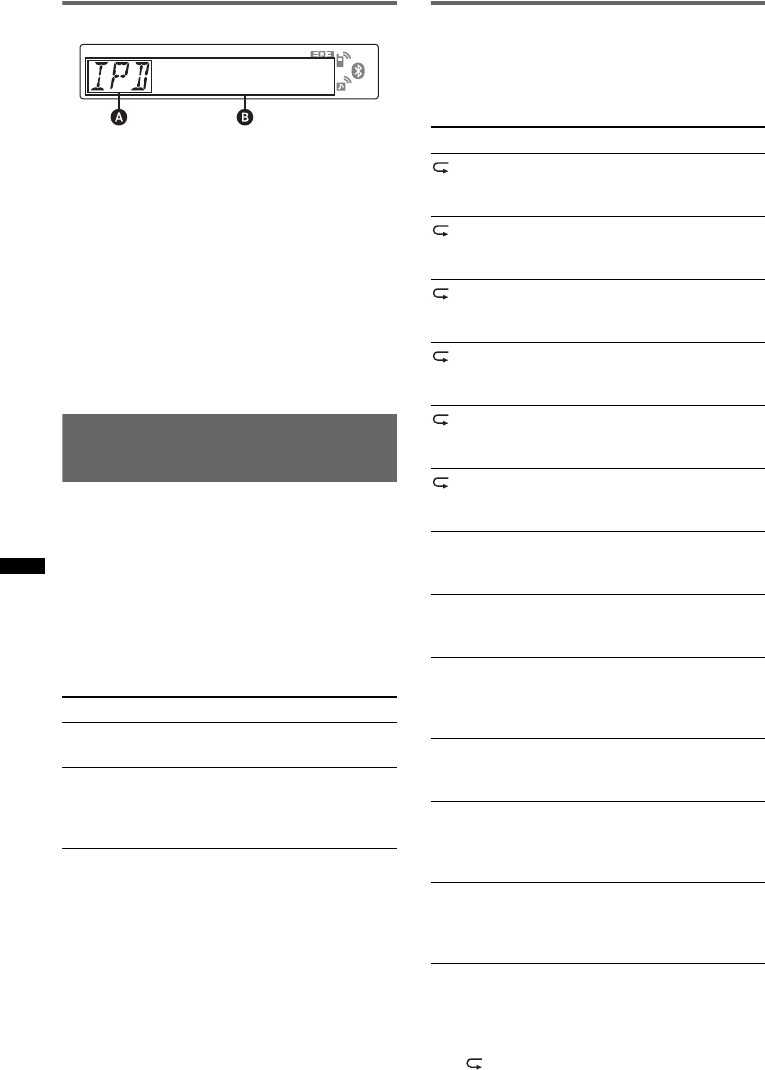
24
Informationen im Display
ATonquellenanzeige (iPod)
BTitelname, Interpretenname, Albumname,
Titelnummer/Verstrichene Spieldauer,
Uhrzeit
Zum Wechseln der angezeigten Informationen B
drücken Sie (DSPL).
Tipp
Beim Wechseln des Albums, des Podcasts, des
Genres, des Interpreten bzw. der Playlist wird kurz die
entsprechende Nummer angezeigt.
Hinweis
Manche auf dem iPod gespeicherte Zeichen werden
möglicherweise nicht richtig angezeigt.
Einstellen des
Wiedergabemodus
1Drücken Sie während der Wiedergabe
(MODE).
Der Modus wechselt folgendermaßen:
ALBUM t TRACK t PODCAST* t
GENRE t PLAYLIST t ARTIST
*Wird je nach iPod-Einstellung möglicherweise nicht
angezeigt.
Überspringen von Alben, Podcasts,
Genres, Playlists und Interpreten
Repeat und Shuffle Play
1Drücken Sie während der Wiedergabe
(3) (REP) oder (4) (SHUF) so oft, bis
die gewünschte Einstellung im Display
erscheint.
Nach 3 Sekunden ist die Einstellung
abgeschlossen.
Wenn Sie wieder in den normalen
Wiedergabemodus wechseln möchten, wählen
Sie „ OFF“ bzw. „SHUF OFF“.
Funktion Taste
Überspringen (1)/(2) (ALBM –/+)
[pro Element einmal drücken]
Überspringen
mehrerer
Elemente
hintereinander
(1)/(2) (ALBM –/+)
[bis zur gewünschten Stelle
gedrückt halten]
Einstellung Funktion
TRACK Wiederholtes
Wiedergeben eines
Titels.
ALBUM Wiederholtes
Wiedergeben eines
Albums.
PODCAST Wiederholtes
Wiedergeben eines
Podcasts.
ARTIST Wiederholtes
Wiedergeben der Titel
eines Interpreten.
PLAYLIST Wiederholtes
Wiedergeben einer
Playlist.
GENRE Wiederholtes
Wiedergeben der Titel
eines Genres.
SHUF ALBUM Wiedergeben eines
Albums in willkürlicher
Reihenfolge.
SHUF PODCAST Wiedergeben von
Podcasts in willkürlicher
Reihenfolge.
SHUF ARTIST Wiedergeben der Titel
eines Interpreten in
willkürlicher
Reihenfolge.
SHUF PLAYLIST Wiedergeben einer
Playlist in willkürlicher
Reihenfolge.
SHUF GENRE Wiedergeben der Titel
eines Genres in
willkürlicher
Reihenfolge.
SHUF DEVICE Wiedergeben des Inhalts
auf einem Gerät in
willkürlicher
Reihenfolge.

25
Direktes Bedienen eines iPod
— Direkte Steuerung
Ein iPod, der an den Dock-Anschluss
angeschlossen ist, lässt sich direkt bedienen.
1Halten Sie während der Wiedergabe
(MODE) gedrückt.
„MODE IPOD“ erscheint und Sie können den
iPod direkt bedienen.
Wechseln der Informationen im Display
Drücken Sie (DSPL).
Die Informationen im Display wechseln
folgendermaßen:
Titelname t Interpretenname t Albumname
t MODE IPOD t Uhrzeit
So beenden Sie die direkte Steuerung
Halten Sie (MODE) gedrückt.
„MODE AUDIO“ erscheint und das Gerät
schaltet in den Wiedergabemodus
„RESUMING“.
Hinweise
•Die Lautstärke lässt sich nur mit diesem Gerät
einstellen.
•Wenn dieser Modus deaktiviert wird, wird auch die
Wiederholeinstellung deaktiviert.
Bluetooth (Freisprechanrufe
und Musik-Streaming)
Nutzen der Bluetooth-Funktion
Damit Sie die Bluetooth-Funktion nutzen
können, müssen Sie das folgende Verfahren
ausführen.
1Pairing
Wenn Sie zum ersten Mal eine Verbindung
zwischen Bluetooth-Geräten herstellen
wollen, ist eine gegenseitige Registrierung
erforderlich. Dies wird als „Pairing“
bezeichnet. Diese Registrierung (Pairing) ist
nur beim ersten Mal erforderlich, da dieses
Gerät und die anderen Geräte sich ab dem
nächsten Mal automatisch erkennen. Das
Pairing kann mit bis zu 8 Geräten ausgeführt
werden. (Je nach Gerät muss beim Herstellen
einer Verbindung möglicherweise jedes Mal
ein Passwort eingegeben werden.)
2Verbindung
Wenn Sie das Gerät nach dem Pairing
verwenden wollen, stellen Sie einfach eine
Verbindung her. In bestimmten Fällen
ermöglicht das Pairing einen automatischen
Verbindungsaufbau.
3Freisprechanrufe/Musik-Streaming
Sobald die Verbindung besteht, können Sie
Musik hören und mit der
Freisprecheinrichtung telefonieren.
Pairing
Zunächst müssen Sie ein Bluetooth-Gerät
(Mobiltelefon usw.) und dieses Gerät füreinander
registrieren („Pairing“). Das Pairing kann mit bis
zu 8 Geräten ausgeführt werden. Ist das Pairing
einmal erfolgt, braucht es nicht erneut ausgeführt
zu werden.
1Platzieren Sie das Bluetooth-Gerät
maximal 1 m von diesem Gerät
entfernt.
Fortsetzung auf der nächsten Seite t
Support-Website
http://support.sony-europe.com/

26
2Halten Sie (BT) gedrückt, bis „ “
blinkt (etwa 5 Sekunden).
Das Gerät wechselt in den
Bereitschaftsmodus für das Pairing.
3Starten Sie am Bluetooth-Gerät die
Suche nach diesem Gerät.
Die Liste der erkannten Geräte erscheint im
Display des Geräts, zu dem eine Verbindung
hergestellt werden soll. Dieses Gerät wird an
dem Gerät, zu dem eine Verbindung
hergestellt werden soll, als „XPLOD“
angezeigt.
4Wenn Sie im Display des Geräts, zu
dem eine Verbindung hergestellt
werden soll, zur Eingabe eines
Passworts* aufgefordert werden,
geben Sie „0000“ ein.
In diesem Gerät und im Bluetooth-Gerät
werden die Informationen für das jeweils
andere Gerät gespeichert und nachdem das
Pairing erfolgt ist, können Sie eine
Verbindung zwischen diesem und dem
anderen Gerät herstellen.
„ “ blinkt, bis das Pairing abgeschlossen ist,
und leuchtet dann stetig.
5Starten Sie am Bluetooth-Gerät das
Herstellen der Verbindung mit diesem
Gerät.
„ “ oder „ “ erscheint, sobald die
Verbindung hergestellt wurde.
*Das Passwort wird bei einigen Geräten auch
„Kennwort“, „PIN-Code“, „PIN-Nummer“ oder
„Passcode“ genannt.
Hinweis
Der Bereitschaftsmodus für das Pairing wird erst
beendet, wenn eine Verbindung hergestellt wurde.
Die Bluetooth-Symbole
Bei diesem Gerät werden die folgenden Symbole
verwendet.
Verbindung
Wenn das Pairing bereits erfolgt ist, fangen Sie
hier an.
So schalten Sie die Bluetooth-
Signalausgabe dieses Geräts ein
Wenn Sie die Bluetooth-Funktion dieses Geräts
nutzen möchten, müssen Sie die Bluetooth-
Signalausgabe dieses Geräts einschalten.
1Halten Sie (BT) gedrückt, bis „ “
leuchtet (etwa 3 Sekunden).
Das Bluetooth-Signal ist jetzt eingeschaltet.
blinkt
XXXXXXX
DR-BT30Q
XPLOD
XXXX
Geben Sie ein
Passwort ein.
„0000“
leuchtet:
blinkt:
aus:
Bluetooth-Signal ein
Bereitschaftsmodus für das
Pairing
Bluetooth-Signal aus
leuchtet:
blinkt:
aus:
Verbindung erfolgreich
Verbindung wird hergestellt
Keine Verbindung
leuchtet:
blinkt:
aus:
Verbindung erfolgreich
Verbindung wird hergestellt
Keine Verbindung
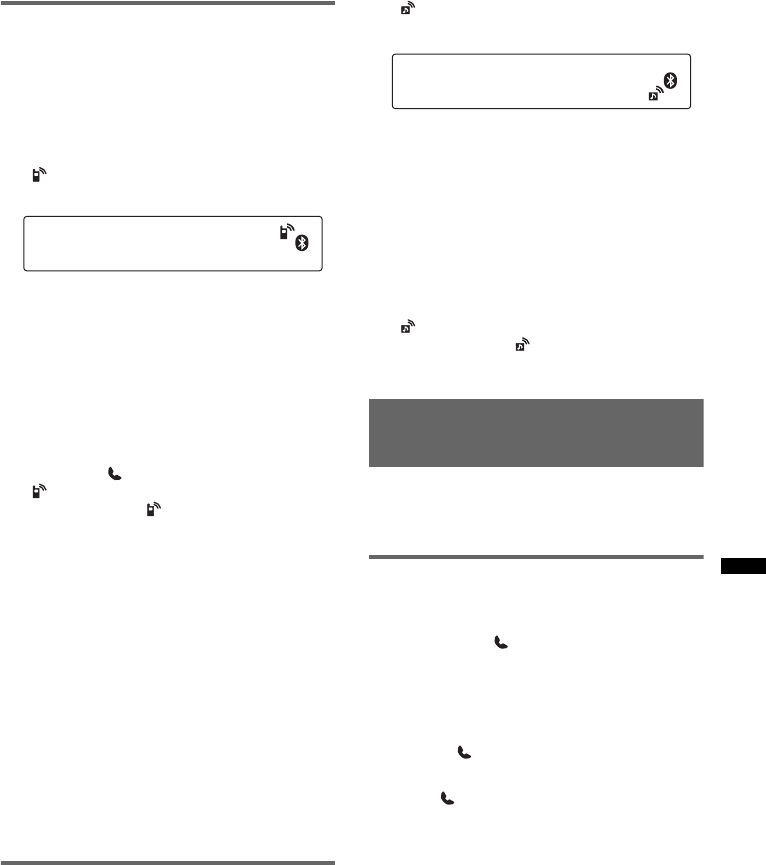
27
Herstellen einer Verbindung zu
einem Mobiltelefon
1Vergewissern Sie sich, dass das
Bluetooth-Signal an diesem Gerät und
am Mobiltelefon eingeschaltet ist.
2Stellen Sie vom Mobiltelefon aus eine
Verbindung zu diesem Gerät her.
„ “ erscheint, sobald die Verbindung
hergestellt wurde.
Herstellen einer Verbindung zu dem
zuletzt verbundenen Mobiltelefon
von diesem Gerät aus
1Vergewissern Sie sich, dass das Bluetooth-
Signal an diesem Gerät und am Mobiltelefon
eingeschaltet ist.
2Drücken Sie (SOURCE/OFF) so oft, bis „BT
PHONE“ erscheint.
3Drücken Sie (Freisprechen).
„ “ blinkt, während die Verbindung
hergestellt wird. „ “ leuchtet stetig, wenn
die Verbindung hergestellt wurde.
Hinweis
Beim Streaming von Bluetooth-Audiodaten können
Sie von diesem Gerät aus keine Verbindung zum
Mobiltelefon herstellen. Stellen Sie die Verbindung zu
diesem Gerät stattdessen vom Mobiltelefon aus her.
Der Wiedergabeton wird beim Herstellen der
Verbindung möglicherweise durch ein Geräusch
gestört.
Tipp
Bei eingeschaltetem Bluetooth-Signal: Wenn die
Zündung eingeschaltet wird, versucht dieses Gerät
automatisch, eine Verbindung zu dem Mobiltelefon
herzustellen, mit dem es zuletzt verbunden war. Ob
die Verbindung automatisch hergestellt werden kann,
hängt allerdings auch von den Spezifikationen des
Mobiltelefons ab. Wenn dieses Gerät die Verbindung
nicht automatisch herstellen kann, stellen Sie sie
manuell her.
Herstellen einer Verbindung zu
einem Audiogerät
1Vergewissern Sie sich, dass das
Bluetooth-Signal an diesem Gerät und
am Audiogerät eingeschaltet ist.
2Stellen Sie über das Audiogerät eine
Verbindung zu diesem Gerät her.
„ “ erscheint, sobald die Verbindung
hergestellt wurde.
Herstellen einer Verbindung zu dem
zuletzt verbundenen Audiogerät von
diesem Gerät aus
1Vergewissern Sie sich, dass das Bluetooth-
Signal an diesem Gerät und am Audiogerät
eingeschaltet ist.
2Drücken Sie (SOURCE/OFF) so oft, bis „BT
AUDIO“ erscheint.
3Drücken Sie (6).
„ “ blinkt, während die Verbindung
hergestellt wird. „ “ leuchtet stetig, wenn
die Verbindung hergestellt wurde.
Telefonieren mit
Freisprecheinrichtung
Überprüfen Sie vorab, ob eine Verbindung
zwischen diesem Gerät und dem Mobiltelefon
besteht.
Entgegennehmen von Anrufen
Wenn ein Anruf eingeht, wird über die
Autolautsprecher ein Rufzeichen ausgegeben.
1Drücken Sie (Freisprechen), wenn
das Rufzeichen für einen eingehenden
Anruf ertönt.
Das Telefongespräch beginnt.
So beenden Sie einen Anruf
Drücken Sie (Freisprechen) erneut.
Zum Zurückweisen eines eingehenden Anrufs
halten Sie (Freisprechen) 2 Sekunden lang
gedrückt.
Einstellen der Mikrofonverstärkung
Sie können zwischen zwei Lautstärkepegeln
(„LOW“ und „HI“) umschalten und so eine für
den anderen Gesprächsteilnehmer angenehme
Lautstärke einstellen.
1Drücken Sie während eines Anrufs (5).
Die Anzeige wechselt folgendermaßen:
MIC-LOW y MIC-HI
Hinweis
Das Mikrofon dieses Geräts befindet sich an der
Rückseite der Frontplatte (Seite 14). Decken Sie das
Mikrofon nicht durch Klebeband o. Ä. ab.
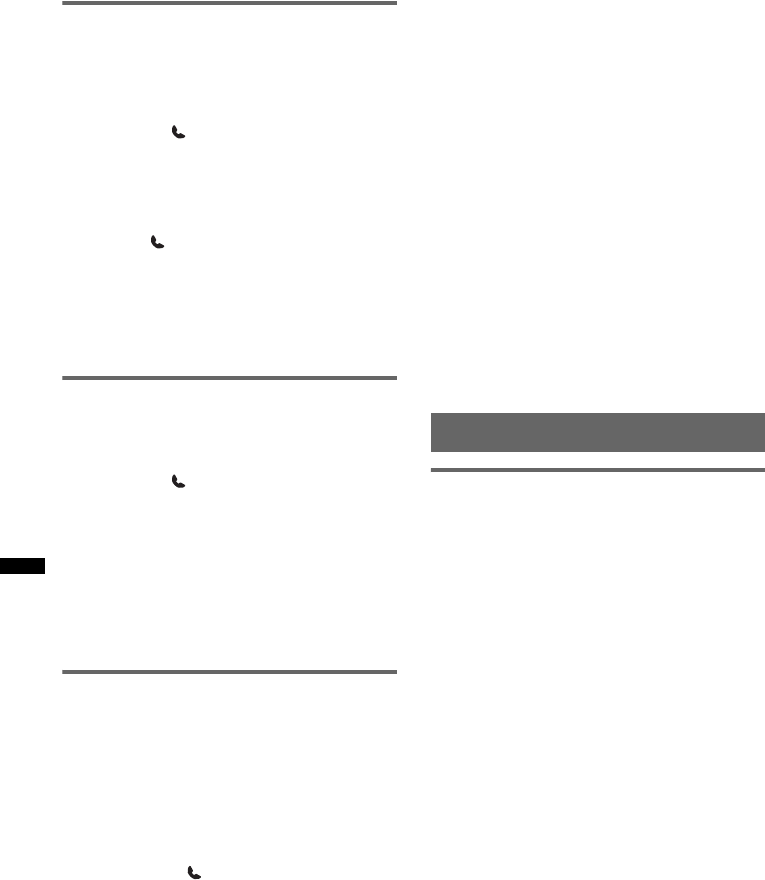
28
Tätigen von Anrufen
Beim Tätigen von Anrufen von diesem Gerät aus
steht die Wahlwiederholung zur Verfügung.
1Drücken Sie (SOURCE/OFF) so oft, bis
„BT PHONE“ erscheint.
2Halten Sie (Freisprechen)
mindestens 3 Sekunden lang
gedrückt.
Das Telefongespräch beginnt.
So beenden Sie einen Anruf
Drücken Sie (Freisprechen) erneut.
Zum Anwählen einer anderen Telefonnummer
verwenden Sie zunächst Ihr Mobiltelefon und
leiten den Anruf dann weiter.
Nähere Informationen zur Anrufweiterleitung
finden Sie im folgenden Abschnitt.
Anrufweiterleitung
Gehen Sie zum Aktivieren/Deaktivieren des
jeweiligen Geräts (dieses Gerät/Mobiltelefon)
folgendermaßen vor.
1Halten Sie (Freisprechen) gedrückt
oder verwenden Sie das Mobiltelefon.
Nähere Informationen zur Bedienung des
Mobiltelefons finden Sie im Handbuch zum
Mobiltelefon.
Hinweis
Je nach Mobiltelefon wird die Freisprechverbindung
möglicherweise unterbrochen, wenn Sie versuchen,
einen Anruf weiterzuleiten.
Einschalten der Sprachwahl
Sie können an einem mit diesem Gerät
verbundenen Mobiltelefon die Sprachwahl
einschalten und dann zum Tätigen eines Anrufs
den zusammen mit der Telefonnummer
gespeicherten Namen des gewünschten
Gesprächsteilnehmers laut aussprechen.
1Drücken Sie (SOURCE/OFF) so oft, bis
„BT PHONE“ erscheint.
2Drücken Sie (Freisprechen).
Das Mobiltelefon wird in den
Sprachwahlmodus geschaltet.
3Sprechen Sie den Namen des
gewünschten Gesprächsteilnehmers
laut aus.
Die entsprechende Telefonnummer wird
angewählt.
Hinweise
•Überprüfen Sie vorab, ob eine Verbindung zwischen
diesem Gerät und dem Mobiltelefon besteht.
•Speichern Sie vorab den Namen zusammen mit der
Telefonnummer im Mobiltelefon.
•In manchen Fällen funktioniert die Sprachwahl nicht,
auch wenn Sie sie an einem mit diesem Gerät
verbundenen Mobiltelefon eingeschaltet haben.
•Aufgrund von Motorengeräuschen und anderen
Nebengeräuschen wird der von Ihnen laut
ausgesprochene Name möglicherweise nicht
erkannt. Verringern Sie Nebengeräusche so weit
wie möglich, um eine gute Erkennung zu
gewährleisten.
•Je nachdem, wie gut die Spracherkennungsfunktion
des Mobiltelefons ist, funktioniert die Sprachwahl in
manchen Fällen möglicherweise nicht. Näheres
dazu finden Sie auf der Support-Website (Seite 25).
Tipps
•Sprechen Sie den Namen genauso aus, wie Sie ihn
beim Speichern gesprochen haben.
•Sie können im Fahrzeug über dieses Gerät Namen
speichern, wenn als Tonquelle „BT PHONE“
ausgewählt ist.
Musik-Streaming
Wiedergeben von Musik von einem
Audiogerät
Sie können mit diesem Gerät Musik von einem
Audiogerät wiedergeben lassen, wenn das
Audiogerät das Bluetooth-Profil A2DP
(Advanced Audio Distribution Profile)
unterstützt.
1Drehen Sie die Lautstärke an diesem
Gerät herunter.
2Drücken Sie (SOURCE/OFF) so oft, bis
„BT AUDIO“ erscheint.
3Starten Sie am Audiogerät die
Wiedergabe.
4Stellen Sie die Lautstärke an diesem
Gerät ein.
Einstellen des Lautstärkepegels
Unterschiede im Lautstärkepegel zwischen
diesem Gerät und dem Bluetooth-Audiogerät
können korrigiert werden.
1Starten Sie die Wiedergabe am Bluetooth-
Audiogerät mit gemäßigter Lautstärke.
2Stellen Sie die gewohnte Hörlautstärke an
diesem Gerät ein.
3Drücken Sie die Auswahltaste so oft, bis
„BTA“ erscheint, und stellen Sie durch Drehen
des Lautstärkereglers den Eingangspegel
(–8dB bis +18dB) ein.
29
Steuern eines Audiogeräts mit
diesem Gerät
Sie können die folgenden Funktionen an diesem
Gerät ausführen, wenn das Audiogerät das
Bluetooth-Profil AVRCP (Audio Video Remote
Control Profile) unterstützt. Das Vorgehen hängt
vom Audiogerät ab.
*Bei manchen Geräten muss die Taste zweimal
gedrückt werden.
Andere als die oben genannten Funktionen
müssen am Audiogerät ausgeführt werden.
Hinweise
•Während der Wiedergabe am Audiogerät werden
Informationen wie die Titelnummer, die verstrichene
Spieldauer und der Wiedergabestatus des
angeschlossenen Audiogeräts nicht an diesem
Gerät angezeigt.
•Auch wenn die Tonquelle an diesem Gerät
gewechselt wird, stoppt die Wiedergabe am
Audiogerät nicht.
Tipp
Sie können ein Mobiltelefon, das A2DP (Advanced
Audio Distribution Profile) unterstützt, als Audiogerät
anschließen und auf diese Weise Musik hören.
Löschen der Registrierung für
alle Geräte, mit denen das
Pairing erfolgte
1Halten Sie (SOURCE/OFF) zum
Ausschalten des Geräts 1 Sekunde
lang gedrückt.
2Wenn „ “ leuchtet, halten Sie (BT)
gedrückt, bis „ “ erlischt.
3Halten Sie die Auswahltaste gedrückt.
4Drücken Sie die Auswahltaste so oft,
bis „BT INIT“ angezeigt wird.
5Drücken Sie (SEEK) +.
Die Initialisierung beginnt.
Das Löschen aller
Registrierungsinformationen dauert
3 Sekunden. Schalten Sie das Gerät nicht aus,
solange „INITIAL“ blinkt.
Weitere Funktionen
Ändern der Klangeinstellungen
Einstellen der Klangeigenschaften
1Drücken Sie die Auswahltaste so oft,
bis die gewünschte Option angezeigt
wird.
2Stellen Sie durch Drehen des
Steuerreglers die ausgewählte Option
ein.
3Drücken Sie (BACK).
Die Einstellung ist damit abgeschlossen und
im Display erscheint wieder die Anzeige für
den normalen Empfangsmodus bzw.
Wiedergabemodus.
Folgende Optionen können eingestellt werden
(Einzelheiten finden Sie jeweils auf den
angegebenen Seiten):
Funktion Taste
Wiedergabe (6) (PAUSE)* an diesem
Gerät.
Unterbrechen
der Wiedergabe
(Pause)
(6) (PAUSE)* an diesem
Gerät.
Überspringen
von Titeln SEEK –/+ (./>) [pro
Titel einmal drücken]
EQ3
Sie können für 7 Musiktypen (XPLOD,
VOCAL, EDGE, CRUISE, SPACE, GRAVITY,
CUSTOM oder OFF) eine spezielle Equalizer-
Kurve auswählen.
LOW*1, MID*1, HI*1 (Seite 30)
BAL (Balance)
Stellen Sie hier die Balance zwischen den
Lautsprechern links und rechts ein.
FAD (Fader)
Stellen Sie hier die relative Lautstärke der
Front- und Hecklautsprecher ein.
SUB*2 (Lautstärke des Tiefsttonlautsprechers)
Stellen Sie hier die Lautstärke des
Tiefsttonlautsprechers ein.
AUX*3 (AUX-Pegel)
Stellen Sie hier die Lautstärke der einzelnen
angeschlossenen Zusatzgeräte ein: „+18 dB“
– „0 dB“ – „–8 dB“.
Wenn Sie die Einstellung hier vornehmen,
brauchen Sie die Lautstärke der einzelnen
Tonquellen nicht mehr einzustellen.
BTA*4 (BT-Lautstärke)
Stellen Sie hier die Lautstärke der einzelnen
angeschlossenen Bluetooth-Audiogeräte ein:
„+18 dB“ – „0 dB“ – „–8 dB“.
Wenn Sie die Einstellung hier vornehmen,
brauchen Sie die Lautstärke der einzelnen
Tonquellen nicht mehr einzustellen (Seite 28).
Fortsetzung auf der nächsten Seite t
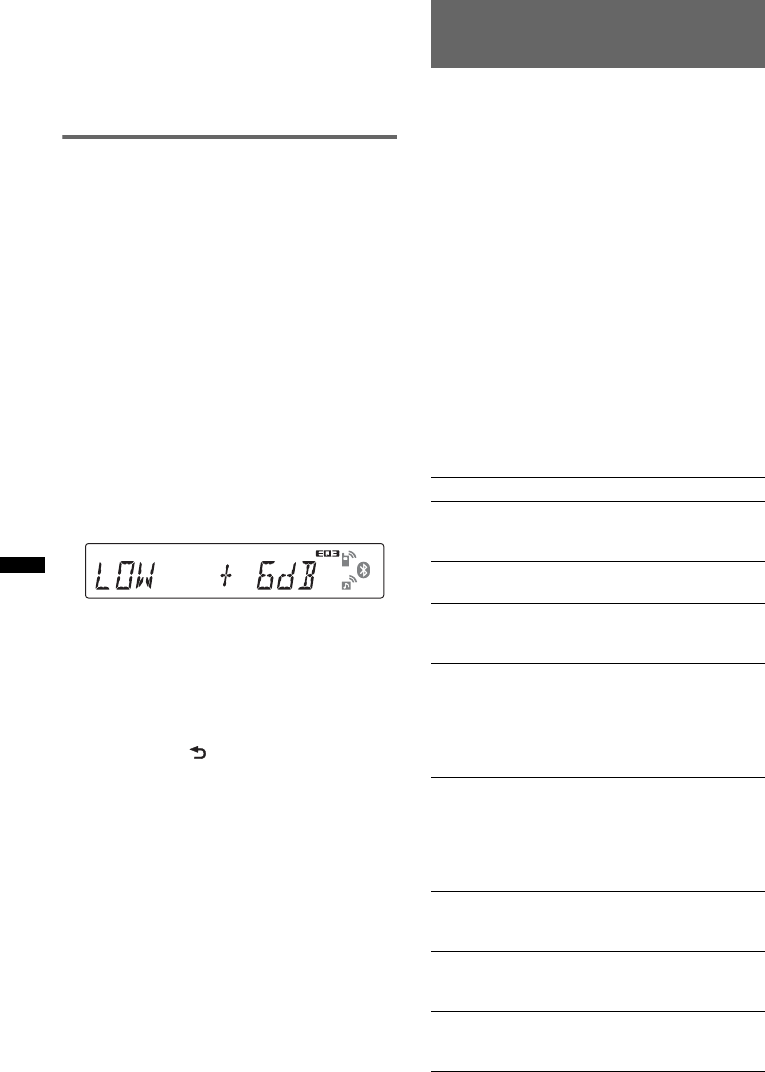
30
Individuelles Einstellen der
Equalizer-Kurve — EQ3
Mit „CUSTOM“ unter EQ3 können Sie Ihre
individuellen Equalizer-Einstellungen
vornehmen.
1Wählen Sie eine Tonquelle aus und
drücken Sie mehrmals die
Auswahltaste, um „EQ3“
auszuwählen.
2Wählen Sie durch Drehen des
Steuerreglers „CUSTOM“ aus.
3Drücken Sie die Auswahltaste so oft,
bis „LOW“, „MID“ oder „HI“ erscheint.
4Stellen Sie durch Drehen des
Steuerreglers die ausgewählte Option
ein.
Die Lautstärke lässt sich in Schritten von
1 dB auf einen Wert zwischen –10 dB und
+10 dB einstellen.
Gehen Sie wie in Schritt 3 und 4 vor, wenn
Sie weitere Frequenzbereiche der Equalizer-
Kurve einstellen wollen.
Wenn Sie die werkseitig eingestellte
Equalizer-Kurve wiederherstellen wollen,
halten Sie die Auswahltaste gedrückt, bevor
die Einstellung abgeschlossen ist.
5Drücken Sie (BACK).
Die Einstellung ist damit abgeschlossen und
im Display erscheint wieder die Anzeige für
den normalen Empfangsmodus bzw.
Wiedergabemodus.
Tipp
Andere Equalizer-Typen lassen sich ebenfalls
einstellen.
Einstellen von
Konfigurationsoptionen — SET
1Halten Sie die Auswahltaste gedrückt.
Die Einstellanzeige erscheint.
2Drücken Sie die Auswahltaste so oft,
bis die gewünschte Option angezeigt
wird.
3Wählen Sie durch Drehen des
Steuerreglers die Einstellung aus
(beispielsweise „ON“ oder „OFF“).
4Halten Sie die Auswahltaste gedrückt.
Die Einstellung ist damit abgeschlossen und
im Display erscheint wieder die Anzeige für
den normalen Empfangsmodus bzw.
Wiedergabemodus.
Hinweis
Die angezeigten Optionen unterscheiden sich je nach
Tonquelle und Einstellung.
Folgende Optionen können eingestellt werden
(Einzelheiten finden Sie jeweils auf den
angegebenen Seiten):
*1 Wenn EQ3 eingeschaltet ist.
*2 „ATT“ wird bei der niedrigsten Einstellung
angezeigt. Die Lautstärke lässt sich in 21 Stufen
einstellen.
*3 Wenn die AUX-Tonquelle aktiviert ist (Seite 31).
*4 Wenn die Bluetooth-Tonquelle aktiviert ist
(Seite 28).
CLOCK-ADJ (Uhr einstellen) (Seite 8)
CT (Uhrzeit)
Zum Einstellen der CT-Funktion: „ON“, „OFF“
(Seite 19, 20).
BEEP (Signalton)
Zum Einstellen des Signaltons: „ON“, „OFF“.
AUX-A*1 (AUX-Audio)
Zum Einstellen der AUX-Tonquellenanzeige:
„ON“, „OFF“ (Seite 31).
A.OFF (Abschaltautomatik)
Das Gerät kann nach dem Ausschalten nach
einer voreingestellten Zeit automatisch
vollständig abgeschaltet werden: „NO“,
„30S“ (Sekunden), „30M“ (Minuten), „60M“
(Minuten).
MIC*1 (Mikrofon)
– „EXT“: Es wird automatisch zum externen
Mikrofon gewechselt, sofern ein solches
angeschlossen ist.
– „INT“: Es ist immer nur das eingebaute
Mikrofon ausgewählt.
DEMO
(Demo-Modus)
Zum Einstellen des Demo-Modus: „ON“,
„OFF“.
DIM (Dimmer)
Zum Wechseln der Helligkeit im Display:
„ON“, „OFF“.
A.SCRL (Automatischer Bildlauf)
Zum Einstellen des automatischen Bildlaufs für
lange Informationen: „ON“, „OFF“.
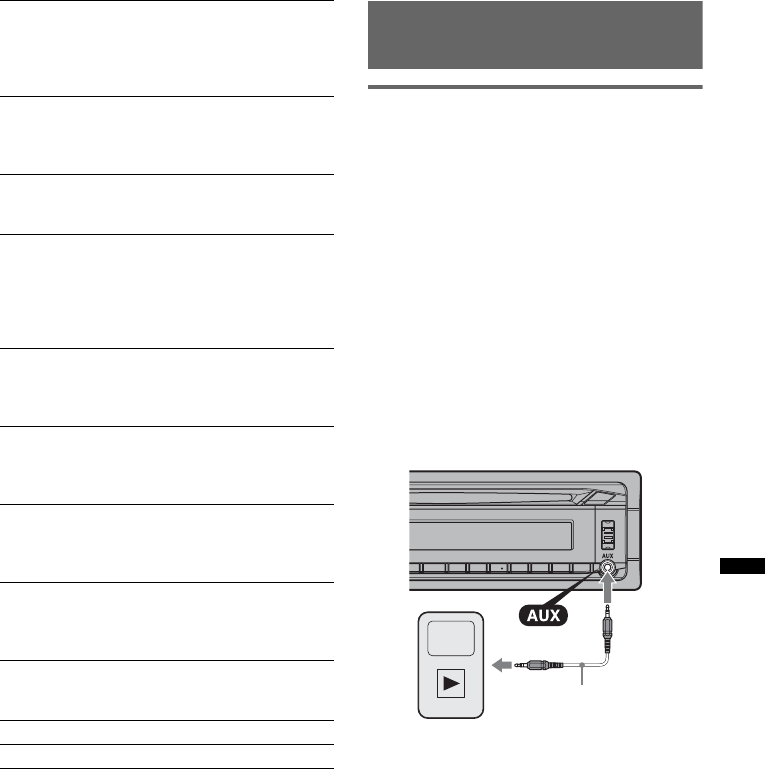
31
*1 Bei ausgeschaltetem Gerät.
*2 Wenn ein UKW-Sender empfangen wird.
Verwenden gesondert
erhältlicher Geräte
Zusätzliche Audiogeräte
Wenn Sie ein gesondert erhältliches tragbares
Audiogerät an die AUX-Eingangsbuchse
(Stereominibuchse) am Gerät anschließen und
dann einfach die Tonquelle auswählen, können
Sie den Ton über die Lautsprecher des Fahrzeugs
wiedergeben lassen. Unterschiede im
Lautstärkepegel zwischen diesem Gerät und dem
tragbaren Audiogerät können korrigiert werden.
Gehen Sie wie im Folgenden erläutert vor:
Anschließen eines tragbaren
Audiogeräts
1Schalten Sie das tragbare Audiogerät aus.
2Drehen Sie die Lautstärke an diesem Gerät
herunter.
3Schließen Sie das Audiogerät an dieses Gerät
an.
*Verwenden Sie unbedingt einen geraden Stecker.
Einstellen des Lautstärkepegels
Stellen Sie unbedingt vor der Wiedergabe die
Lautstärke der einzelnen angeschlossenen
Audiogeräte ein.
1Drehen Sie die Lautstärke an diesem Gerät
herunter.
2Drücken Sie (SOURCE/OFF) so oft, bis
„AUX“ erscheint.
Danach wird „AUX FRONT IN“ angezeigt.
3Starten Sie die Wiedergabe am tragbaren
Audiogerät mit gemäßigter Lautstärke.
4Stellen Sie die gewohnte Hörlautstärke an
diesem Gerät ein.
5Stellen Sie den Eingangspegel ein (Seite 29).
LOCAL (Lokaler Suchmodus)
– „ON“: Nur Sender mit starken Signalen
werden eingestellt.
– „OFF“: Normaler Empfang beim Einstellen
von Sendern.
MONO*2 (Monauraler Modus)
Zum Verbessern des UKW-Empfangs durch
Auswahl des monauralen Empfangsmodus:
„ON“, „OFF“.
REG*2 (Regional)
Zum Beschränken des Empfangs auf eine
bestimmte Region: „ON“, „OFF“ (Seite 20).
Z.TIME (Zappin-Dauer)
Zum Einstellen der Wiedergabedauer für die
Funktion ZAPPIN.
– „Z.TIME-1“ (etwa 6 Sekunden), „Z.TIME-2“
(etwa 9 Sekunden), „Z.TIME-3“ (etwa
30 Sekunden).
LPF (Niedrigpassfilter)
Zum Auswählen der Grenzfrequenz des
Tiefsttonlautsprechers: „OFF“, „80Hz“,
„100Hz“, „120Hz“, „140Hz“, „160Hz“.
LPF NORM/REV (Niedrigpassfilter Normal/
Reverse (umgekehrt))
Zum Auswählen der Phase des
Tiefsttonlautsprechers: „NORM“, „REV“.
HPF (Hochpassfilter)
Zum Auswählen der Grenzfrequenz der Front-/
Hecklautsprecher: „OFF“, „80Hz“, „100Hz“,
„120Hz“, „140Hz“, „160Hz“.
LOUD (Loudness)
Zum Verstärken von Bässen und Höhen, so dass
auch bei niedriger Lautstärke ein Klang von
guter Qualität erzielt wird: „ON“, „OFF“.
DM+
Zum Einstellen der DM+-Funktion: „ON“,
„OFF“.
BTM (Speicherbelegungsautomatik) (Seite 18)
BT INIT*1 (Bluetooth-Initialisierung) (Seite 29)
Verbindungskabel*
(nicht mitgeliefert)
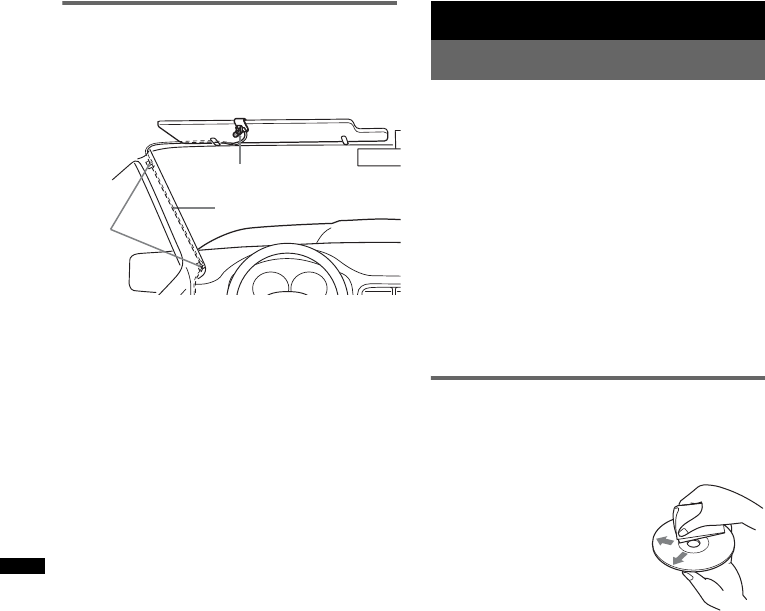
32
Externes Mikrofon XA-MC10
Sie können ein gesondert erhältliches, externes
Mikrofon an den Mikrofoneingang anschließen
und auf diese Weise die Tonqualität beim
Telefonieren über dieses Gerät verbessern.
Tipp
Sie können einstellen, welches der Mikrofone Priorität
haben soll (Seite 30).
Hinweis
Schließen Sie als externes Mikrofon das Modell
XA-MC10 an. Bei anderen Geräten können Sie unter
Umständen keine Anrufe tätigen oder es kommt zu
sonstigen Fehlfunktionen.
Weitere Informationen
Sicherheitsmaßnahmen
• Lassen Sie das Gerät vor dem Betrieb abkühlen,
wenn das Auto in direkter Sonne geparkt war.
• Die Motorantenne wird automatisch ausgefahren.
Feuchtigkeitskondensation
Sollte sich im Inneren des Geräts Feuchtigkeit
niederschlagen, nehmen Sie die CD heraus und
warten Sie etwa eine Stunde, bis sie verdunstet ist.
Andernfalls funktioniert das Gerät nicht
einwandfrei.
So bewahren Sie die hohe
Tonqualität
Achten Sie darauf, dass keine Flüssigkeiten auf das
Gerät oder die CDs gelangen.
Hinweise zu CDs
• Setzen Sie CDs weder direktem Sonnenlicht noch
Wärmequellen wie zum Beispiel
Warmluftauslässen aus. Lassen Sie sie auch nicht
in einem in der Sonne geparkten Auto liegen.
• Reinigen Sie CDs vor dem
Abspielen mit einem
Reinigungstuch. Wischen Sie
dabei von der Mitte nach außen.
Verwenden Sie keine
Lösungsmittel wie Benzin oder
Verdünner und keine
handelsüblichen
Reinigungsmittel.
• Dieses Gerät ist auf die Wiedergabe von CDs
ausgelegt, die dem Compact Disc-Standard (CD)
entsprechen. DualDiscs und manche Musik-CDs
mit Urheberrechtsschutzcodierung entsprechen
nicht dem Compact Disc-Standard (CD) und
können daher mit diesem Gerät nicht
wiedergegeben werden.
•Auf diesem Gerät NICHT abspielbare CDs
– CDs mit Etiketten, Aufklebern oder
aufgeklebtem Band oder Papier. Wenn Sie
solche CDs verwenden, kann es zu einer
Fehlfunktion kommen oder die CD kann
beschädigt werden.
– CDs mit außergewöhnlichen Formen (z. B.
herzförmige, quadratische oder sternförmige
CDs). Falls Sie es doch versuchen, kann das
Gerät beschädigt werden.
–8-cm-CDs.
Externes Mikrofon
Verbindungskabel
Klam-
mern
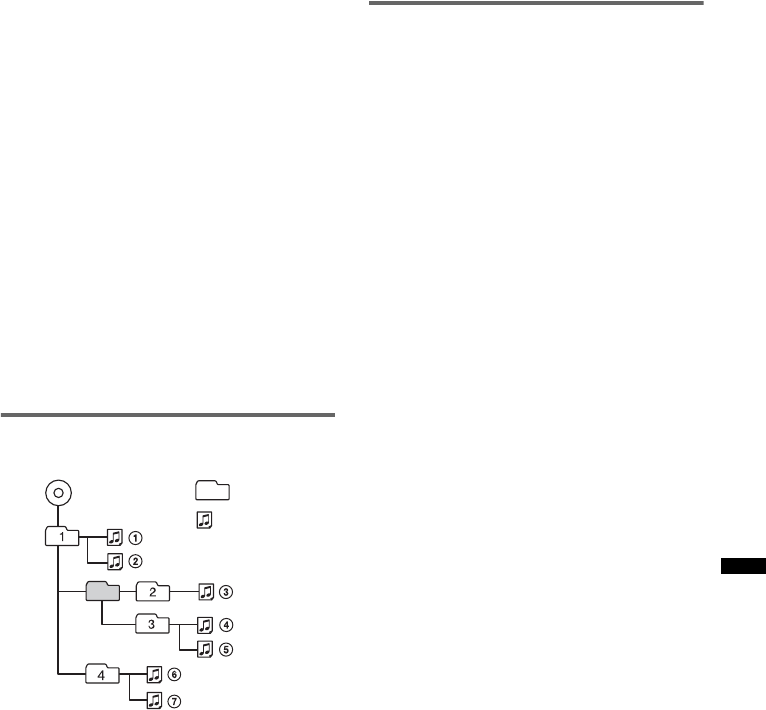
33
Hinweise zu CD-Rs/CD-RWs
• Höchstzahl an: (nur CD-Rs/CD-RWs)
– Ordnern (Alben): 150 (einschließlich
Stammordner)
– Dateien (Titeln) und Ordnern: 300
(gegebenenfalls weniger als 300, wenn die
Ordner-/Dateinamen viele Zeichen enthalten)
– Anzeigbaren Zeichen für einen Ordner-/
Dateinamen: 32 (Joliet)/64 (Romeo)
• Wenn eine Multisession-CD mit einer CD-DA-
Session beginnt, wird sie als CD-DA erkannt und
andere Sessions werden nicht wiedergegeben.
•Auf diesem Gerät NICHT abspielbare CDs
– CD-Rs/CD-RWs mit schlechter
Aufnahmequalität.
– CD-Rs/CD-RWs, die mit einem inkompatiblen
Aufnahmegerät bespielt wurden.
– CD-Rs/CD-RWs, die nicht richtig abgeschlossen
wurden.
– CD-Rs/CD-RWs, die nicht im Musik-CD-
Format oder im MP3-Format (ISO9660 Stufe
1/Stufe 2, Joliet/Romeo oder Multisession)
bespielt wurden.
Wiedergabereihenfolge von
MP3-/WMA-/AAC-Dateien
Der iPod
• An dieses Gerät können folgende iPod-Modelle
angeschlossen werden. Aktualisieren Sie Ihren
iPod vor dem Gebrauch anhand der neuesten
Software.
Made for
– iPod touch
– iPod touch (2. Generation)
– iPod classic
– iPod classic (120 GB)
– iPod mit Videofunktion*
– iPod nano (4. Generation)
– iPod nano (3. Generation)
– iPod nano (2. Generation)
– iPod nano (1. Generation)*
Works with
– iPhone
– iPhone 3G
– iPhone 3GS
*Die direkte Steuerung steht bei einem iPod nano
(1. Generation) oder iPod mit Videofunktion nicht zur
Verfügung.
• „Made for iPod“ bedeutet, dass elektronisches
Zubehör speziell für den Anschluss an einen iPod
konzipiert und vom Entwickler entsprechend der
Leistungsstandards von Apple getestet wurde.
• „Works with iPhone“ bedeutet, dass
elektronisches Zubehör speziell für den Anschluss
an ein iPhone konzipiert und vom Entwickler
entsprechend der Leistungsstandards von Apple
getestet wurde.
• Apple übernimmt keine Garantie für die
Funktionsfähigkeit dieses Geräts bzw. die
Einhaltung von Sicherheitsstandards.
Ordner
(Album)
MP3-/WMA-/
AAC-Datei
(Titel)
MP3/WMA/AAC

34
Informationen zur Bluetooth-
Kommunikation
Was ist die Bluetooth-Technologie?
• Die Bluetooth-Funktechnologie ermöglicht eine
drahtlose Datenkommunikation über kurze
Strecken zwischen digitalen Geräten, wie z. B.
Mobiltelefonen und Headsets. Die Reichweite der
Bluetooth-Funktechnologie beträgt ca. 10 m. In
der Regel wird eine Verbindung zwischen zwei
Geräten hergestellt, manche Geräte können aber
auch gleichzeitig mit mehreren Geräten verbunden
werden.
• Für die Verbindung ist kein Kabel erforderlich, da
es sich bei Bluetooth um eine Funktechnologie
handelt. Außerdem müssen die Geräte nicht
aufeinander weisen, wie z. B. bei der
Infrarottechnologie. Sie können ein solches Gerät
beispielsweise auch in einer Tasche verwenden.
• Die Bluetooth-Technologie ist ein internationaler
Standard, der von Millionen von Unternehmen auf
der ganzen Welt unterstützt und von zahlreichen
Unternehmen weltweit eingesetzt wird.
Bluetooth-Kommunikation
• Die Reichweite der Bluetooth-Funktechnologie
beträgt ca. 10 m.
Die maximale Kommunikationsreichweite kann je
nach Hindernissen (Personen, Metall, Wände
usw.) oder elektromagnetischer Umgebung
variieren.
• Die folgenden Bedingungen können die
Empfindlichkeit der Bluetooth-Kommunikation
beeinträchtigen.
– Zwischen diesem Gerät und dem Bluetooth-
Gerät befindet sich ein Hindernis, wie z. B.
Personen, Metall oder eine Wand.
– Ein Gerät mit 2,4-GHz-Frequenz, wie z. B. ein
WLAN-Gerät, ein schnurloses Telefon oder ein
Mikrowellenherd, wird in der Nähe dieses
Geräts verwendet.
• Da Bluetooth-Geräte und WLANs
(IEEE802.11b/g) mit derselben Frequenz arbeiten,
kann es zu Interferenzen im Mikrowellenbereich
kommen. Daher kann sich die
Kommunikationsgeschwindigkeit verringern oder
Rauschen und Störungen usw. können auftreten,
wenn dieses Gerät in der Nähe eines WLAN-
Geräts verwendet wird. Gehen Sie in einem
solchen Fall folgendermaßen vor.
– Verwenden Sie dieses Gerät in einem Abstand
von mindestens 10 m vom WLAN-Gerät.
– Wenn dieses Gerät innerhalb von 10 m
Entfernung von einem WLAN-Gerät verwendet
wird, schalten Sie das WLAN-Gerät aus.
– Stellen Sie dieses Gerät und das Bluetooth-Gerät
möglichst nahe beieinander auf.
• Von einem Bluetooth-Gerät ausgehende
Mikrowellen können den Betrieb von
medizinischen Geräten beeinflussen. Schalten Sie
dieses Gerät und andere Bluetooth-Geräte an
folgenden Orten aus. Andernfalls besteht
Unfallgefahr.
– An Orten mit entzündlichen Gasen, in einem
Krankenhaus, Zug, Flugzeug oder an einer
Tankstelle
– In der Nähe von automatischen Türen oder
Feuermeldern
• Dieses Gerät unterstützt dem Bluetooth-Standard
entsprechende Sicherheitsfunktionen, um die
Verbindungssicherheit bei Bluetooth-
Funkverbindungen zu gewährleisten. Je nach
Einstellung bieten diese jedoch möglicherweise
keinen ausreichenden Schutz. Seien Sie bei der
Kommunikation mit Bluetooth-Funktechnologie
also vorsichtig.
• Für Sicherheitslücken bei der Übertragung von
Informationen während der Bluetooth-
Kommunikation kann keine Haftung übernommen
werden.
• Eine Verbindung mit allen Bluetooth-Geräten
kann nicht garantiert werden.
– Für die Authentifizierung benötigen Sie ein
Gerät mit Bluetooth-Funktion, das dem von
Bluetooth SIG spezifizierten Bluetooth-Standard
entspricht.
– Auch bei Geräten, die dem oben erwähnten
Bluetooth-Standard entsprechen, kann es
vorkommen, dass je nach Funktionen oder
Spezifikationen der Geräte keine Verbindung
hergestellt werden kann oder sie nicht
einwandfrei funktionieren.
– Wenn Sie freihändig telefonieren, kann je nach
Gerät oder Kommunikationsumgebung
Störrauschen zu hören sein.
• Je nach dem Gerät, zu dem eine Verbindung
hergestellt werden soll, kann es eine Weile dauern,
bis die Kommunikation startet.
Sonstiges
• Je nach dem Zustand der Radiowellen und dem
Ort, an dem die Geräte verwendet werden,
funktioniert das Bluetooth-Gerät u. U. nicht mit
Mobiltelefonen.
• Wenn Sie sich nach dem Verwenden des
Bluetooth-Geräts nicht wohl fühlen, verwenden
Sie das Bluetooth-Gerät auf keinen Fall weiter.
Sollte das Problem bestehen bleiben, wenden Sie
sich an Ihren Sony-Händler.
Sollten an Ihrem Gerät Probleme auftreten oder
sollten Sie Fragen haben, auf die in dieser Anleitung
nicht eingegangen wird, wenden Sie sich bitte an
Ihren Sony-Händler.

35
Wartung
Austauschen der Lithiumbatterie der
Kartenfernbedienung
Unter normalen Bedingungen hält die Batterie
etwa 1 Jahr. Die Lebensdauer der Batterie kann
je nach Gebrauch des Geräts jedoch auch kürzer
sein.
Wenn die Batterie schwächer wird, verkürzt sich
die Reichweite der Kartenfernbedienung.
Tauschen Sie die Batterie gegen eine neue
CR2025-Lithiumbatterie aus. Bei Verwendung
einer anderen Batterie besteht Feuer- oder
Explosionsgefahr.
Hinweise zur Lithiumbatterie
•Bewahren Sie die Lithiumbatterie außerhalb der
Reichweite von Kindern auf. Sollte eine
Lithiumbatterie verschluckt werden, ist umgehend
ein Arzt aufzusuchen.
•Wischen Sie die Batterie mit einem trockenen Tuch
ab, um einen guten Kontakt zwischen den
Batteriepolen und -anschlüssen sicherzustellen.
•Achten Sie beim Einlegen der Batterie auf die
richtige Polarität.
•Halten Sie die Batterie nicht mit einer Metallpinzette.
Dies könnte zu einem Kurzschluss führen.
Austauschen der
Sicherung
Wenn Sie eine Sicherung
austauschen, achten Sie darauf,
eine Ersatzsicherung mit dem
gleichen Ampere-Wert wie die
Originalsicherung zu
verwenden. Dieser ist auf der
Originalsicherung angegeben.
Wenn die Sicherung
durchbrennt, überprüfen Sie
den Stromanschluss und
tauschen die Sicherung aus. Brennt die neue
Sicherung ebenfalls durch, kann eine interne
Fehlfunktion vorliegen. Wenden Sie sich in einem
solchen Fall an Ihren Sony-Händler.
Reinigen der Anschlüsse
Das Gerät funktioniert möglicherweise nicht
ordnungsgemäß, wenn die Anschlüsse zwischen
dem Gerät und der Frontplatte verschmutzt sind.
Um dies zu vermeiden, nehmen Sie die Frontplatte
ab (Seite 8) und reinigen Sie die Anschlüsse mit
einem Wattestäbchen. Drücken Sie dabei nicht zu
fest auf die Anschlüsse. Andernfalls können sie
beschädigt werden.
Hinweise
•Schalten Sie aus Sicherheitsgründen vor dem
Reinigen der Anschlüsse die Zündung aus und
ziehen Sie den Schlüssel aus dem Zündschloss.
•Berühren Sie die Anschlüsse unter keinen
Umständen direkt mit den Händen oder einem
Metallgegenstand.
1
2
Mit der Seite + nach oben
c
VORSICHT
Die Batterie kann bei falscher Handhabung
explodieren!
Auf keinen Fall darf sie aufgeladen,
auseinandergenommen oder ins Feuer
geworfen werden.
Entsorgungshinweis: Bitte werfen Sie nur
entladene Batterien in die Sammelboxen beim
Handel oder den Kommunen. Entladen sind
Batterien in der Regel dann, wenn das Gerät
abschaltet und „Batterie leer“ signalisiert oder
nach längerer Gebrauchsdauer der Batterien
nicht mehr einwandfrei funktioniert.
Um sicherzugehen, kleben Sie die Batteriepole
z. B. mit einem Klebestreifen ab oder geben Sie
die Batterien einzeln in einen Plastikbeutel.
Sicherung (10 A)
Hauptgerät Rückseite der
Frontplatte
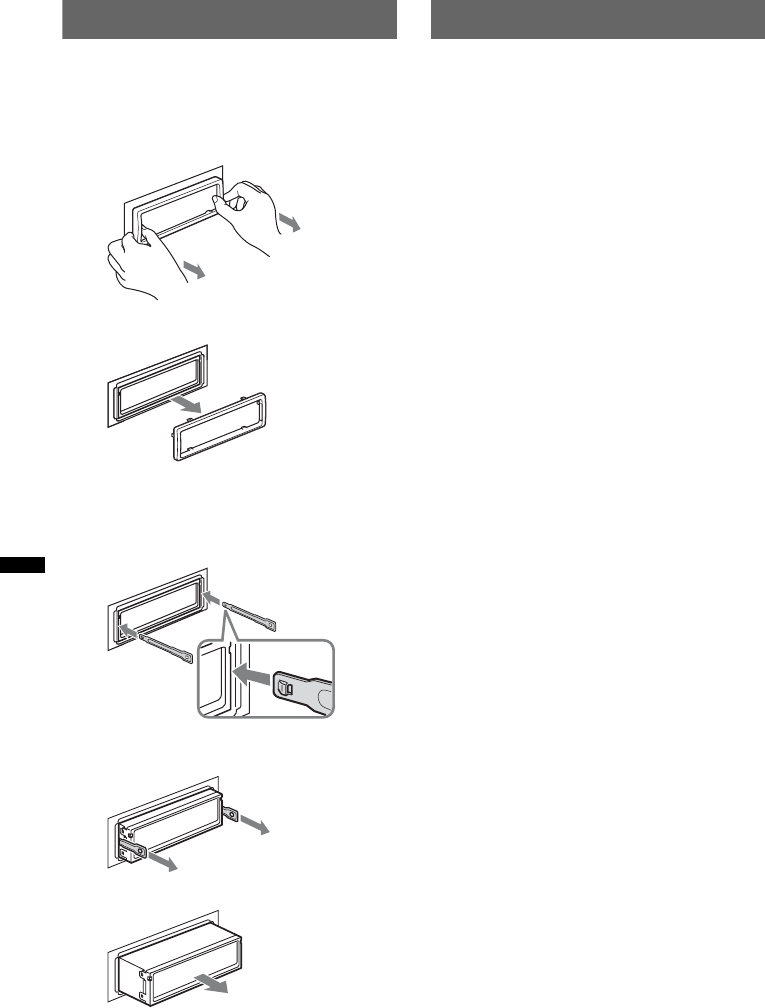
36
Ausbauen des Geräts
1Entfernen Sie die Schutzumrandung.
1Nehmen Sie die Frontplatte ab (Seite 8).
2Fassen Sie die Schutzumrandung mit den
Fingern an den Seitenkanten und ziehen
Sie sie heraus.
2Nehmen Sie das Gerät heraus.
1Setzen Sie beide Löseschlüssel
gleichzeitig so ein, dass sie mit einem
Klicken einrasten.
2Ziehen Sie an den Löseschlüsseln, um das
Gerät zu lösen.
3Ziehen Sie das Gerät aus der Halterung.
Technische Daten
Tuner
FM (UKW)
Empfangsbereich: 87,5 – 108,0 MHz
Antennenanschluss: Anschluss für Außenantenne
Zwischenfrequenz: 150 kHz
Nutzbare Empfindlichkeit: 10 dBf
Trennschärfe: 75 dB bei 400 kHz
Signal-Rauschabstand: 70 dB (mono)
Kanaltrennung: 40 dB bei 1 kHz
Frequenzgang: 20 – 15.000 Hz
MW/LW
Empfangsbereich:
MW: 531 – 1.602 kHz
LW: 153 – 279 kHz
Antennenanschluss: Anschluss für Außenantenne
Zwischenfrequenz: 25 kHz
Empfindlichkeit: MW: 26 µV, LW: 45 µV
CD-Player
Signal-Rauschabstand: 120 dB
Frequenzgang: 10 – 20.000 Hz
Gleichlaufschwankungen: Unterhalb der Messgrenze
USB-Player
Schnittstelle: USB (Full-Speed)
Maximale Stromstärke: 500 mA
Drahtlose Kommunikation
Kommunikationssystem:
Bluetooth-Standard Version 2.0
Sendeleistung:
Bluetooth-Standard Leistungsklasse 2
(max. +4 dBm)
Maximale Kommunikationsreichweite:
Sichtlinie ca. 10 m*1
Frequenzbereich:
2,4 GHz Frequenzbereich (2,4000 – 2,4835 GHz)
Modulationsverfahren: FHSS
Kompatible Bluetooth-Profile*2:
A2DP (Advanced Audio Distribution Profile)
AVRCP (Audio Video Remote Control Profile)
HFP (Handsfree Profile) 1.5
HSP (Headset Profile)
*1 Die tatsächliche Reichweite hängt von
verschiedenen Faktoren ab, wie z. B. Hindernissen
zwischen Geräten, Magnetfeldern um einen
Mikrowellenherd, statischer Elektrizität,
Empfangsempfindlichkeit, Leistung der Antenne,
Betriebssystem, Softwareanwendung usw.
*2 Bluetooth-Standardprofile geben den Zweck der
Bluetooth-Kommunikation zwischen den Geräten
an.
Endverstärker
Ausgänge: Lautsprecherausgänge (versiegelte
Anschlüsse)
Lautsprecherimpedanz: 4 – 8 Ohm
Maximale Ausgangsleistung: 52 W × 4 (an 4 Ohm)
x
Der Haken muss
nach innen
weisen.
37
Allgemeines
Ausgänge:
Audioausgänge (vorne/hinten)
Ausgang für Tiefsttonlautsprecher (mono)
Motorantennen-Steueranschluss
Steueranschluss für Endverstärker
Eingänge:
BUS-Steuereingang
BUS-Audioeingang
Steueranschluss für Stummschaltung beim
Telefonieren
Fernbedienungseingang
Antenneneingang
MIC-Eingang
AUX-Eingangsbuchse (Stereominibuchse)
USB-Signaleingang
Klangregler:
Bässe: ±10 dB bei 60 Hz (XPLOD)
Mitten: ±10 dB bei 1 kHz (XPLOD)
Höhen: ±10 dB bei 10 kHz (XPLOD)
Betriebsspannung: 12 V Gleichstrom, Autobatterie
(negative Erdung)
Abmessungen: ca. 178 × 50 × 179 mm (B/H/T)
Einbaumaße: ca. 182 × 53 × 162 mm (B/H/T)
Gewicht: ca. 1,2 kg
Mitgeliefertes Zubehör:
Kartenfernbedienung: RM-X304
Montageteile und Anschlusszubehör (1 Satz)
Sonderzubehör/gesondert erhältliche Geräte:
BUS-Kabel (mit einem Cinchkabel geliefert):
RC-61 (1 m), RC-62 (2 m)
Signalquellenwähler: XA-C40
USB-Verbindungskabel für iPod: RC-100IP
Externes Mikrofon: XA-MC10
Ihr Händler führt unter Umständen nicht alle der
oben genannten Zubehörteile. Fragen Sie Ihren
Händler nach ausführlichen Informationen.
Änderungen, die dem technischen Fortschritt dienen,
bleiben vorbehalten.
Störungsbehebung
Anhand der folgenden Checkliste können Sie die
meisten Probleme, die möglicherweise an Ihrem
Gerät auftreten, selbst beheben.
Bevor Sie die folgende Checkliste durchgehen,
überprüfen Sie bitte zunächst, ob Sie das Gerät
richtig angeschlossen und bedient haben.
Wenn das Problem sich nicht beheben lässt,
besuchen Sie folgende Support-Website.
• In bestimmten Leiterplatten werden keine
halogenierten Flammschutzmittel verwendet.
• Im Gehäuse werden keine halogenierten
Flammschutzmittel verwendet.
• Papier wird als Verpackungsfüllmaterial verwendet.
Allgemeines
Das Gerät wird nicht mit Strom versorgt.
• Prüfen Sie die Verbindung oder Sicherung.
• Wenn Sie das Gerät ausschalten und die Anzeige
ausgeblendet ist, können Sie es nicht mit der
Kartenfernbedienung bedienen.
tSchalten Sie das Gerät ein.
Die Motorantenne wird nicht ausgefahren.
Die Motorantenne hat kein Relaiskästchen.
Es ist kein Ton zu hören.
• Die Funktion zum Dämpfen des Tons (ATT) oder die
Stummschaltfunktion zum Telefonieren (wenn das
Schnittstellenkabel eines Autotelefons mit der ATT-
Leitung verbunden ist) ist aktiviert.
• Der Fader-Regler „FAD“ ist nicht für ein
2-Lautsprecher-System eingestellt.
• Das Bluetooth-Audiogerät ist in den Pausemodus
geschaltet.
tBeenden Sie den Pausmodus.
Kein Signalton ertönt.
• Der Signalton ist deaktiviert (Seite 30).
• Ein gesondert erhältlicher Endverstärker ist
angeschlossen und Sie verwenden nicht den
integrierten Verstärker.
Der Speicherinhalt wurde gelöscht.
• Die Taste RESET wurde gedrückt.
tSpeichern Sie die Einstellungen erneut.
• Das Stromversorgungskabel wurde gelöst, die
Verbindung zur Batterie besteht nicht mehr oder das
Kabel bzw. die Batterie ist falsch angeschlossen.
Gespeicherte Sender und die korrekte Uhrzeit
werden gelöscht.
Die Sicherung ist durchgebrannt.
Störgeräusche sind zu hören, wenn der
Zündschlüssel gedreht wird.
Die Leitungen sind nicht korrekt an den
Stromanschluss für Zubehörgeräte angeschlossen.
Fortsetzung auf der nächsten Seite t
Support-Website
http://support.sony-europe.com/
38
Das Gerät wechselt während der Wiedergabe
bzw. des Radioempfangs in den Demo-Modus.
Wenn „DEMO-ON“ eingestellt ist und 5 Minuten lang
keine Funktion ausgeführt wird, wechselt das Gerät in
den Demo-Modus.
tStellen Sie „DEMO-OFF“ ein (Seite 30).
Die Anzeige wird ausgeblendet bzw. erscheint
nicht im Display.
• Der Dimmer ist auf „DIM-ON“ eingestellt (Seite 30).
• Die Anzeige wird ausgeblendet, wenn Sie
(SOURCE/OFF) gedrückt halten.
tDrücken Sie (SOURCE/OFF) am Gerät, bis die
Anzeige eingeblendet wird.
• Die Anschlüsse sind verschmutzt (Seite 35).
Die Abschaltautomatik funktioniert nicht.
Das Gerät ist eingeschaltet. Die Abschaltautomatik
wird nach dem Ausschalten des Geräts aktiviert.
tSchalten Sie das Gerät aus.
Radioempfang
Sender lassen sich nicht empfangen.
Der Ton ist stark gestört.
• Die Verbindung wurde nicht richtig hergestellt.
tSchließen Sie eine Motorantennen-Steuerleitung
(blau) oder eine Stromversorgungsleitung für
Zubehörgeräte (rot) an die
Stromversorgungsleitung für den
Antennenverstärker des Fahrzeugs an (nur, wenn
das Fahrzeug mit einer in der
Heck-/Seitenfensterscheibe integrierten FM
(UKW)/MW/LW-Antenne ausgestattet ist).
tPrüfen Sie die Verbindung der Autoantenne.
tWenn die Motorantenne nicht automatisch
ausgefahren wird, prüfen Sie die Verbindung der
Motorantennen-Steuerleitung.
Gespeicherte Sender lassen sich nicht
einstellen.
• Speichern Sie den/die Sender unter der korrekten
Frequenz ab.
• Das Sendesignal ist zu schwach.
Der automatische Sendersuchlauf funktioniert
nicht.
• Die Einstellung für den lokalen Suchmodus ist nicht
korrekt.
tDer automatische Sendersuchlauf stoppt zu oft:
Stellen Sie „LOCAL-ON“ ein (Seite 31).
tDer automatische Sendersuchlauf hält bei keinem
Sender an:
Stellen Sie „LOCAL-OFF“ ein (Seite 31).
• Das Sendesignal ist zu schwach.
tStellen Sie die Sender manuell ein.
Während des UKW-Empfangs blinkt die
Anzeige „ST“.
• Stellen Sie die Frequenz genau ein.
• Das Sendesignal ist zu schwach.
tStellen Sie „MONO-ON“ ein (Seite 31).
Eine UKW-Stereosendung ist nur monaural zu
hören.
Das Gerät ist in den monauralen Empfangsmodus
geschaltet.
tStellen Sie „MONO-OFF“ ein (Seite 31).
RDS
Der Sendersuchlauf (SEEK) startet nach ein
paar Sekunden Radioempfang.
Der Sender ist kein Verkehrsfunksender (TP) oder die
Sendesignale sind zu schwach.
tDeaktivieren Sie TA (Seite 19).
Es sind keine Verkehrsdurchsagen zu hören.
• Aktivieren Sie TA (Seite 19).
• Der Sender sendet keine Verkehrsdurchsagen,
obwohl es sich um einen Verkehrsfunksender (TP)
handelt.
tStellen Sie einen anderen Sender ein.
Bei der PTY-Funktion wird „- - - - - - - -“
angezeigt.
• Der aktuelle Sender ist kein RDS-Sender.
• Es wurden keine RDS-Daten empfangen.
• Der Sender gibt den Programmtyp nicht an.
CD-Wiedergabe
Es lässt sich keine CD einlegen.
• Es ist bereits eine andere CD eingelegt.
• Die CD wurde mit Gewalt falsch herum oder falsch
eingelegt.
Die CD lässt sich nicht abspielen.
• Die CD ist beschädigt oder verschmutzt.
• Die CD-R/CD-RW ist nicht als Audio-CD konzipiert
(Seite 33).
MP3-/WMA-/AAC-Dateien können nicht
wiedergegeben werden.
Die CD ist nicht mit dem MP3-/WMA-/AAC-Format
bzw. der Version kompatibel. Einzelheiten zu
abspielbaren CDs und den Formaten finden Sie auf der
Support-Website.
Es dauert länger, bis die Wiedergabe von
MP3-/WMA-/AAC-Dateien beginnt.
Bei folgenden CDs dauert es länger, bis die
Wiedergabe beginnt:
– CDs mit einer komplizierten Datei-/Ordnerstruktur.
– Multisession-CDs.
– CDs, zu denen noch Daten hinzugefügt werden
können.
Fortsetzung auf der nächsten Seite t
39
Im Display angezeigte Informationen laufen
nicht automatisch durch.
• Bei CDs mit sehr viel Textinformationen laufen diese
im Display möglicherweise nicht durch.
• „A.SCRL“ ist auf „OFF“ eingestellt.
tStellen Sie „A.SCRL-ON“ ein (Seite 30).
tHalten Sie (DSPL) (SCRL) gedrückt.
Tonsprünge treten auf.
• Das Gerät ist nicht richtig installiert.
tInstallieren Sie das Gerät in einem Winkel von
unter 45° an einem stabilen Teil des Fahrzeugs.
• Die CD ist beschädigt oder verschmutzt.
Die Funktionstasten funktionieren nicht.
Die CD lässt sich nicht auswerfen.
Drücken Sie die Taste RESET (Seite 7).
USB-Wiedergabe
Sie können über einen USB-Hub nichts
wiedergeben lassen.
Dieses Gerät kann keine USB-Geräte erkennen, die
über einen USB-Hub angeschlossen sind.
Die Wiedergabe ist nicht möglich.
Das USB-Gerät funktioniert nicht.
tSchließen Sie das Gerät nochmals an.
Es dauert länger, bis am USB-Gerät die
Wiedergabe beginnt.
Die Dateien auf dem USB-Gerät befinden sich in einer
komplizierten Datei-/Ordnerstruktur.
Ein Signalton ist zu hören.
Das USB-Gerät wurde während der Wiedergabe vom
Gerät getrennt.
tVor dem Trennen eines USB-Geräts müssen Sie
zuerst die Wiedergabe stoppen, um die Daten zu
schützen.
Der Ton setzt aus.
Bei einer hohen Bitrate von über 320 Kbps kommt es
möglicherweise zu Tonaussetzern.
Bluetooth-Funktion
Das zu verbindende Gerät kann dieses Gerät
nicht erkennen.
• Schalten Sie dieses Gerät in den Bereitschaftsmodus
für das Pairing, bevor Sie das Pairing vornehmen.
• Während eine Verbindung zu einem Bluetooth-Gerät
besteht, kann dieses Gerät von einem anderen Gerät
nicht erkannt werden. Trennen Sie die aktuelle
Verbindung und lassen Sie dann vom anderen Gerät
aus nach diesem Gerät suchen.
• Schalten Sie die Bluetooth-Signalausgabe ein, wenn
das Pairing bereits erfolgt ist (Seite 26).
Es kann keine Verbindung hergestellt werden.
• Stellen Sie von einem Bluetooth-Gerät aus eine
Verbindung zu diesem Gerät her oder umgekehrt. Die
Verbindungsherstellung kann nur von einem Gerät
aus gesteuert werden (diesem Gerät oder dem
Bluetooth-Gerät).
• Schlagen Sie die Erläuterungen zum Pairing und zum
Herstellen einer Verbindung im Handbuch zu dem
anderen Gerät usw. nach und führen Sie den Vorgang
erneut aus.
Die Stimme des Gesprächsteilnehmers ist sehr
leise.
Stellen Sie den Lautstärkepegel ein.
Ihr Gesprächspartner teilt Ihnen mit, dass die
Lautstärke zu hoch oder zu niedrig ist.
Verringern oder erhöhen Sie die Lautstärke, indem Sie
die Mikrofonverstärkung einstellen (Seite 27).
Bei Telefongesprächen ist ein Echo oder
Rauschen zu hören.
• Verringern Sie die Lautstärke.
• Wenn Umgebungsgeräusche das Telefongespräch
überlagern, versuchen Sie, diese Geräusche zu
reduzieren.
Beispiel: Wenn das Fenster geöffnet ist und
Straßenlärm usw. hereindringt, schließen Sie das
Fenster. Wenn die Klimaanlage laut ist, drehen Sie
diese herunter.
Es besteht keine Verbindung zum Telefon.
Während der Bluetooth-Audiowiedergabe lässt sich
auch mit (Freisprechen) keine Verbindung zum
Mobiltelefon herstellen.
tStellen Sie die Verbindung vom Mobiltelefon aus
her.
Die Tonqualität beim Telefonieren ist nicht gut.
Die Tonqualität beim Telefonieren hängt von den
Empfangsbedingungen des Mobiltelefons ab.
tFahren Sie bei schlechtem Empfang mit dem Auto
an eine Stelle, an der der Empfang für das
Mobiltelefon besser ist.
Die Lautstärke des verbundenen Audiogeräts
ist zu niedrig (hoch).
Der Lautstärkepegel variiert je nach Audiogerät.
tStellen Sie am verbundenen Audiogerät oder an
diesem Gerät die Lautstärke ein.
Fortsetzung auf der nächsten Seite t
40
Fehleranzeigen/Meldungen
Der Ton setzt während der Wiedergabe mit
einem Bluetooth-Audiogerät aus.
• Verringern Sie den Abstand zwischen diesem Gerät
und dem Bluetooth-Audiogerät.
• Wenn sich das Bluetooth-Audiogerät in einem
Behälter befindet, der die Signalübertragung stört,
nehmen Sie das Audiogerät während des Betriebs aus
dem Behälter.
• In der Nähe werden einige Bluetooth- oder andere
Geräte verwendet, die Radiowellen ausstrahlen.
tSchalten Sie die anderen Geräte aus.
tErhöhen Sie den Abstand zu den anderen
Geräten.
• Der Wiedergabeton setzt kurz aus, wenn die
Verbindung zwischen diesem Gerät und dem
Mobiltelefon hergestellt wird. Dies ist keine
Fehlfunktion.
Das verbundene Bluetooth-Audiogerät lässt
sich nicht steuern.
Überprüfen Sie, ob das verbundene Bluetooth-
Audiogerät das Profil AVRCP unterstützt.
Einige Funktionen stehen nicht zur Verfügung.
Vergewissern Sie sich, dass das verbundene Gerät die
betreffenden Funktionen unterstützt.
Ein Anruf wird unbeabsichtigt
entgegengenommen.
Das verbundene Telefon ist so eingestellt, dass Anrufe
automatisch entgegengenommen werden.
Bei einem Anruf über die
Freisprecheinrichtung wird über die
Lautsprecher des Fahrzeugs kein Ton
ausgegeben.
Wenn der Ton über das Mobiltelefon ausgegeben wird,
stellen Sie dieses so ein, dass der Ton über die
Lautsprecher des Fahrzeugs ausgegeben wird.
„OFF BT“ erscheint während der
Initialisierung.
Halten Sie (BT) gedrückt, bis „ “ erlischt. Führen
Sie die Initialisierung dann erneut aus (Seite 29).
Das externe Mikrofon funktioniert nicht.
Die Einstellung für das Mikrofon ist nicht korrekt.
tStellen Sie „MIC-EXT“ ein (Seite 30).
CHECKING
Das Gerät überprüft die Verbindung mit einem USB-
Gerät.
tWarten Sie, bis das Überprüfen der Verbindung
beendet ist.
ERROR
• Die CD ist verschmutzt oder falsch herum eingelegt.
tReinigen Sie die CD bzw. legen Sie sie korrekt
ein.
• Eine leere CD wurde eingelegt.
• Die CD kann aufgrund eines Problems nicht
wiedergegeben werden.
tLegen Sie eine andere CD ein.
• Das USB-Gerät wurde nicht automatisch erkannt.
tSchließen Sie das Gerät nochmals an.
• Drücken Sie Z, um die CD herauszunehmen.
FAILURE
Die Lautsprecher-/Verstärkeranschlüsse sind nicht
korrekt.
tSchlagen Sie in der Installations-/
Anschlussanleitung zum jeweiligen Modell nach,
wie die Anschlüsse korrekt vorgenommen werden
müssen.
HUB NO SUPRT (HUB nicht unterstützt)
Ein USB-Hub wird von diesem Gerät nicht unterstützt.
L. SEEK +/–
Beim automatischen Sendersuchlauf ist der lokale
Suchmodus aktiviert.
NO AF
Für den aktuellen Sender gibt es keine
Alternativfrequenz.
tDrücken Sie (SEEK) +/–, solange der
Programmdienstname blinkt. Das Gerät beginnt
dann mit der Suche nach einer Frequenz mit
denselben PI-Daten (Programmkennung).
„PI SEEK“ wird angezeigt.
NO DEV (Kein Gerät)
USB wurde als Tonquelle ausgewählt, aber es ist kein
USB-Gerät angeschlossen. Ein USB-Gerät oder ein
USB-Kabel wurde während der Wiedergabe von
diesem Gerät getrennt.
tSchließen Sie unbedingt USB-Gerät und USB-
Kabel an.
NO MUSIC
Die CD bzw. das USB-Gerät enthält keine
Musikdateien.
tLegen Sie eine Musik-CD in dieses Gerät ein.
tSchließen Sie ein USB-Gerät an, das eine
Musikdatei enthält.
41
Wenn sich das Problem mit diesen
Abhilfemaßnahmen nicht beheben lässt, wenden Sie
sich an einen Sony-Händler.
Wenn Sie das Gerät aufgrund einer Störung bei der
CD-Wiedergabe zur Reparatur bringen, bringen Sie
bitte auch die CD mit, die eingelegt war, als das
Problem zum ersten Mal auftrat.
NO NAME
Für den Titel gibt es keinen CD-, Album-, Interpreten-
bzw. Titelnamen.
NO TP
Das Gerät sucht weiter nach verfügbaren
Verkehrsfunksendern.
OFFSET
Es liegt möglicherweise eine interne Fehlfunktion vor.
tÜberprüfen Sie die Verbindungen. Wenn die
Fehleranzeige weiterhin im Display angezeigt wird,
wenden Sie sich an einen Sony-Händler.
OVERLOAD
Das USB-Gerät ist überlastet.
tTrennen Sie das USB-Gerät von diesem Gerät und
wechseln Sie mit (SOURCE/OFF) die Tonquelle.
tZeigt an, dass das USB-Gerät nicht einwandfrei
funktioniert oder dass ein nicht unterstütztes Gerät
angeschlossen ist.
READ
Das Gerät liest gerade alle Titel- und
Albuminformationen von der CD ein.
tBitte warten Sie, bis das Einlesen abgeschlossen ist.
Die Wiedergabe beginnt danach automatisch. Je
nach CD-Struktur kann das Einlesen länger als eine
Minute dauern.
RESET
Dieses Gerät bzw. das USB-Gerät kann wegen einer
Störung nicht bedient werden.
tDrücken Sie die Taste RESET (Seite 7).
USB NO SUPRT (USB nicht unterstützt)
Das angeschlossene USB-Gerät wird nicht unterstützt.
tEinzelheiten zur Kompatibilität Ihres USB-Geräts
finden Sie auf der Support-Website.
„“ oder „“
Sie sind beim Rückwärts- oder Vorwärtssuchen am
Anfang bzw. Ende der CD angelangt und können nicht
weitersuchen.
„“
Das Zeichen kann mit diesem Gerät nicht angezeigt
werden.
2
La plaque signalétique indiquant la tension de
fonctionnement, etc. se trouve sous le boîtier de
l’appareil.
Par la présente, Sony Corp. déclare que l’appareil
MEX-BT3800U est conforme aux exigences
essentielles et aux autres dispositions pertinentes
de la directive 1999/5/CE.
Pour toute information complémentaire, veuillez
consultez l’URL suivante :
http://www.compliance.sony.de/
L’utilisation de cet équipement radio n’est pas
autorisée dans un rayon de 20 km à partir du
centre de Ny-Alesund, Svalbard en Norvège.
Pour plus de sécurité, installez cet appareil
dans le tableau de bord de votre véhicule. Pour
de plus amples informations sur l’installation
et les raccordements, reportez-vous au manuel
d’installation et de raccordement fourni.
Cette étiquette est située sur la partie inférieure
du châssis.
Avis à l’attention des clients : les
informations suivantes s’appliquent
uniquement aux appareils vendus dans
des pays qui appliquent les directives
de l’Union Européenne
Le fabricant de ce produit est Sony Corporation,
1-7-1 Konan Minato-ku Tokyo, 108-0075 Japon.
Le représentant autorisé pour les questions de
compatibilité électromagnétique (EMC) et la
sécurité des produits est Sony Deutschland
GmbH, Hedelfinger Strasse 61, 70327 Stuttgart,
Allemagne. Pour toute question relative au SAV
ou à la garantie, merci de bien vouloir vous
référer aux coordonnées contenues dans les
documents relatifs au SAV ou la garantie.
Traitement des appareils électriques
et électroniques en fin de vie
(Applicable dans les pays de l’Union
Européenne et aux autres pays
européens disposant de systèmes
de collecte sélective)
Ce symbole, apposé sur le produit ou sur son emballage,
indique que ce produit ne doit pas être traité avec les
déchets ménagers. Il doit être remis à un point de collecte
approprié pour le recyclage des équipements électriques et
électroniques. En s’assurant que ce produit est bien mis au
rebut de manière appropriée, vous aiderez à prévenir les
conséquences négatives potentielles pour l’environnement
et la santé humaine. Le recyclage des matériaux aidera à
préserver les ressources naturelles. Pour toute information
supplémentaire au sujet du recyclage de ce produit, vous
pouvez contacter votre municipalité, votre déchetterie ou
le magasin où vous avez acheté le produit.
Accessoire compatible : télécommande
Elimination des piles et accumulateurs
usagés (Applicable dans les pays de
l’Union Européenne et aux autres pays
européens disposant de systèmes de
collecte sélective)
Ce symbole, apposé sur les piles et accumulateurs ou sur
les emballages, indique que les piles et accumulateurs
fournis avec ce produit ne doivent pas être traités comme
de simples déchets ménagers. Sur certains types de piles,
ce symbole apparait parfois combiné avec un symbole
chimique. Les symboles pour le mercure (Hg) ou le plomb
(Pb) sont rajoutés lorsque ces piles contiennent plus de
0.0005% de mercure ou 0.004% de plomb. En vous
assurant que ces piles et accumulateurs sont mis au rebut
de façon appropriée, vous participez activement à la
prévention des conséquences négatives que leur mauvais
traitement pourrait provoquer sur l’environnement et sur la
santé humaine. Le recyclage des matériaux contribue par
ailleurs à la préservation des ressources naturelles.
Pour les produits qui pour des raisons de sécurité, de
performance ou d’intégrité de données nécessitent une
connexion permanente à une pile ou à un accumulateur, il
conviendra de vous rapprocher d’un service technique
qualifié pour effectuer son remplacement. En rapportant
votre appareil électrique en fin de vie à un point de collecte
approprié vous vous assurez que la pile ou l’accumulateur
incorporé sera traité correctement.
Pour tous les autres cas de figure et afin d’enlever les piles
ou accumulateurs en toute sécurité de votre appareil,
reportez-vous au manuel d’utilisation. Rapportez les piles
ou accumulateurs usagés au point de collecte approprié
pour le recyclage.
Pour toute information complémentaire au sujet du
recyclage de ce produit ou des piles et accumulateurs, vous
pouvez contacter votre municipalité, votre déchetterie
locale ou le point de vente où vous avez acheté ce produit.
3
La marque Bluetooth et les logos appartiennent à
Bluetooth SIG, Inc. et sont utilisés sous licence
uniquement par Sony Corporation. Les autres
marques commerciales et noms commerciaux
appartiennent à leurs propriétaires respectifs.
ZAPPIN est une marque commerciale de Sony
Corporation.
iPod est une marque commerciale de Apple Inc.
enregistrée aux Etats-Unis et dans d’autres pays.
iPhone est une marque commerciale de Apple
Inc.
Windows Media et le logo
Windows sont des marques
commerciales ou des marques
déposées de Microsoft
Corporation aux Etats-Unis et/ou dans d’autres
pays.
Licence de la technologie de codage audio MPEG
Layer-3 et des brevets obtenue de Fraunhofer IIS et
Thomson.
Ce produit est protégé par des droits de propriété
intellectuelle de Microsoft Corporation. Toute
utilisation ou diffusion de la technologie décrite
sortant du cadre de l’utilisation de ce produit est
interdite sans licence accordée par Microsoft ou
une filiale autorisée de Microsoft.
Les fournisseurs de ce contenu utilisent la
technologie de gestion des droits numériques pour
Windows Media contenue dans cet appareil
(« WM-DRM ») pour protéger l’intégrité de leur
contenu (« Contenu sécurisé ») pour que la
propriété intellectuelle, y compris les droits
d’auteur, de ce contenu, ne soit pas détournée.
Cet appareil utilise le logiciel WM-DRM pour lire
le contenu sécurisé (« Logiciel WM-DRM »). Si la
sécurité du logiciel WM-DRM de cet appareil a été
compromise, les propriétaires du contenu sécurisé
(« Propriétaires du contenu sécurisé ») peuvent
exiger de Microsoft qu’il refuse le droit à WM-
DRM Software d’acquérir de nouvelles licences
pour copier, afficher et/ou lire le contenu sécurisé.
La révocation ne modifie pas l’autorisation de
WM-DRM Software de lire le contenu non
protégé. Une liste des WM-DRM Software
révoqués est envoyée sur votre appareil lorsque
vous téléchargez une licence relative au contenu
sécurisé à partir d’Internet ou d’un PC. Microsoft
peut également, conjointement à cette licence,
télécharger les listes de révocation sur votre
appareil pour le compte des propriétaires du
contenu sécurisé.
Avertissement au cas où le contact de
votre véhicule ne dispose pas d’une
position ACC
Veillez à activer la fonction arrêt automatique
(page 30).
L’appareil s’éteint complètement et
automatiquement à l’issue d’un délai défini
une fois l’appareil mis hors tension, afin
d’éviter que la batterie ne se décharge.
Si vous n’activez pas la fonction arrêt
automatique, appuyez sur la touche
(SOURCE/OFF) et maintenez-la enfoncée
jusqu’à ce que l’affichage disparaisse chaque
fois que vous coupez le contact.
Remarque sur la pile au lithium
N’exposez pas la pile à une chaleur excessive,
comme en plein soleil, près d’un feu ou autre.

4
Table des matières
Préparation
Disques pouvant être lus sur cet appareil . . . . . 6
Remarques sur la fonction Bluetooth . . . . . . . . 6
Réinitialisation de l’appareil . . . . . . . . . . . . . . . 7
Annulation du mode DEMO . . . . . . . . . . . . . . . 7
Préparation de la mini-télécommande. . . . . . . . 7
Réglage de l’horloge . . . . . . . . . . . . . . . . . . . . . 8
Retrait de la façade . . . . . . . . . . . . . . . . . . . . . . 8
Installation de la façade . . . . . . . . . . . . . . . . 9
Présentation rapide de la fonction
Bluetooth
La fonction Bluetooth en 3 étapes . . . . . . . . . . 10
Touches et icônes . . . . . . . . . . . . . . . . . . . . . . 11
1Pairage . . . . . . . . . . . . . . . . . . . . . . . . . . . . 12
2Connexion . . . . . . . . . . . . . . . . . . . . . . . . . 12
3Appel en mains libres et transmission en
continu de musique . . . . . . . . . . . . . . . . . . . . . 13
Emplacement des commandes et
opérations de base
Appareil principal . . . . . . . . . . . . . . . . . . . . 14
Mini-télécommande RM-X304. . . . . . . . . . 16
Recherche d’une plage. . . . . . . . . . . . . . . . . . . 17
Recherche d’une plage par nom
— Quick-BrowZer . . . . . . . . . . . . . . . . . . . 17
Recherche d’une plage en écoutant des
passages de la plage — ZAPPIN™ . . . . . . 18
Radio
Mémorisation et réception des stations . . . . . . 18
Mémorisation automatique — BTM. . . . . . 18
Mémorisation manuelle . . . . . . . . . . . . . . . 18
Réception des stations mémorisées. . . . . . . 18
Recherche automatique
des fréquences. . . . . . . . . . . . . . . . . . . . . . . 19
Fonction RDS . . . . . . . . . . . . . . . . . . . . . . . . . 19
Aperçu. . . . . . . . . . . . . . . . . . . . . . . . . . . . . 19
Réglages AF et TA . . . . . . . . . . . . . . . . . . . 19
Sélection de PTY . . . . . . . . . . . . . . . . . . . . 20
Réglages de CT. . . . . . . . . . . . . . . . . . . . . . 20
CD
Paramètres d’affichage. . . . . . . . . . . . . . . . 21
Lecture répétée et aléatoire . . . . . . . . . . . . 21
Périphériques USB
Lecture d’un périphérique USB . . . . . . . . . . . 21
Paramètres d’affichage. . . . . . . . . . . . . . . . 22
Lecture répétée et aléatoire . . . . . . . . . . . . 22
iPod
Lecture de l’iPod. . . . . . . . . . . . . . . . . . . . . . . 23
Paramètres d’affichage. . . . . . . . . . . . . . . . 23
Réglage du mode de lecture . . . . . . . . . . . . . . 24
Lecture répétée et aléatoire . . . . . . . . . . . . 24
Fonctionnement direct de l’iPod
— Commande passager . . . . . . . . . . . . . . . . . 24
Bluetooth (appels en mains libres
et transmission de musique en
continu)
Opérations Bluetooth . . . . . . . . . . . . . . . . . . . 25
Pairage . . . . . . . . . . . . . . . . . . . . . . . . . . . . . . 25
A propos des icônes Bluetooth. . . . . . . . . . 26
Connexion. . . . . . . . . . . . . . . . . . . . . . . . . . . . 26
Pour activer la sortie du signal Bluetooth
sur cet appareil . . . . . . . . . . . . . . . . . . . . . . 26
Connexion d’un téléphone mobile . . . . . . . 26
Connexion d’un périphérique audio. . . . . . 26
Appel en mains libres . . . . . . . . . . . . . . . . . . . 27
Réception d’appels. . . . . . . . . . . . . . . . . . . 27
Appels . . . . . . . . . . . . . . . . . . . . . . . . . . . . 27
Transfert d’appel . . . . . . . . . . . . . . . . . . . . 27
Activation de la composition vocale . . . . . 27
Transmission en continu de musique . . . . . . . 28
Ecoute de musique à partir d’un
périphérique audio . . . . . . . . . . . . . . . . . . . 28
Fonctionnement d’un périphérique audio
avec cet appareil. . . . . . . . . . . . . . . . . . . . . 28
Suppression de l’enregistrement de tous les
périphériques appariés . . . . . . . . . . . . . . . . . . 28

5
Autres fonctions
Modification des caractéristiques du son. . . . . 29
Réglage des caractéristiques du son . . . . . . 29
Personnalisation de la courbe de l’égaliseur
— EQ3 . . . . . . . . . . . . . . . . . . . . . . . . . . . . 29
Réglage des paramètres de configuration
— SET. . . . . . . . . . . . . . . . . . . . . . . . . . . . . . . 29
Utilisation d’un appareil en option . . . . . . . . . 31
Appareil audio auxiliaire . . . . . . . . . . . . . . 31
Microphone externe XA-MC10 . . . . . . . . . 31
Informations complémentaires
Précautions . . . . . . . . . . . . . . . . . . . . . . . . . . . 32
Remarques sur les disques . . . . . . . . . . . . . 32
Ordre de lecture des fichiers
MP3/WMA/AAC . . . . . . . . . . . . . . . . . . . . 32
A propos de iPod. . . . . . . . . . . . . . . . . . . . . 32
A propos de la fonction Bluetooth . . . . . . . 33
Entretien . . . . . . . . . . . . . . . . . . . . . . . . . . . . . 34
Retrait de l’appareil . . . . . . . . . . . . . . . . . . . . . 35
Spécifications . . . . . . . . . . . . . . . . . . . . . . . . . 35
Dépannage . . . . . . . . . . . . . . . . . . . . . . . . . . . . 36
Affichage des erreurs et messages . . . . . . . 39
Site d’assistance
Si vous avez des questions ou si vous souhaitez consulter les toutes dernières
informations techniques sur ce produit, rendez-vous sur le site Web suivant :
http://support.sony-europe.com/
Fournit des informations relatives aux :
• modèles et fabricants de lecteurs audio numériques compatibles ;
• fichiers MP3/WMA/AAC pris en charge ;
• modèles et fabricants de téléphones mobiles compatibles et FAQ sur la
fonction Bluetooth.
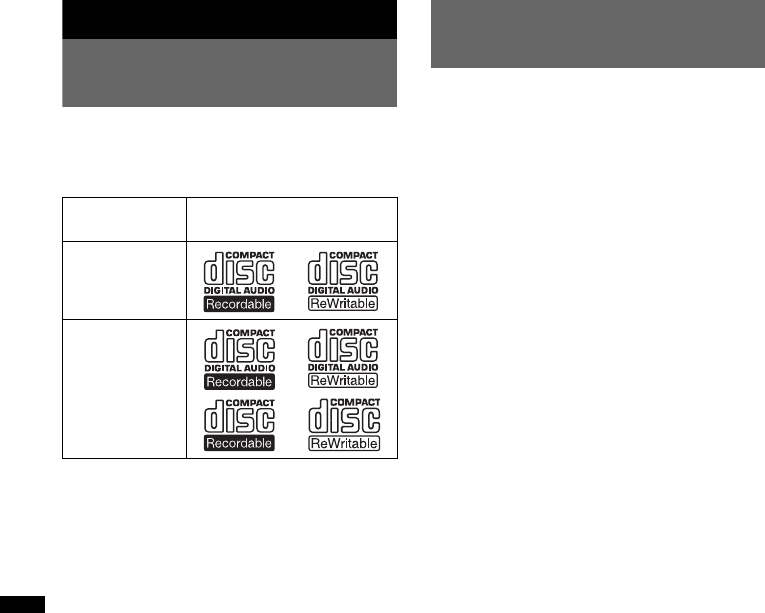
6
Préparation
Disques pouvant être lus sur cet
appareil
Vous pouvez lire sur cet appareil des CD-DA
(y compris ceux qui contiennent des
informations CD TEXT) et des CD-R/CD-RW
(fichiers MP3/WMA/AAC (page 32)).
Remarques sur la fonction
Bluetooth
Avertissement
SONY NE PEUT EN AUCUN CAS ETRE TENU
RESPONSABLE DE TOUT DOMMAGE DIRECT
OU INDIRECT OU DE TOUT AUTRE
DOMMAGE, Y COMPRIS, SANS LIMITATION,
TOUTE PERTE DE REVENU, DE DONNEES,
D’UTILISATION DU PRODUIT OU DE TOUT
EQUIPEMENT ASSOCIE, DU TEMPS D’ARRET
LIE A OU DECOULANT DE L’UTILISATION DE
CE PRODUIT, MATERIEL ET/OU LOGICIEL.
NOTIFICATION IMPORTANTE !
Utilisation efficace et en sécurité
Les modifications ou changements apportés à cet
appareil, qui ne sont pas approuvés expressément
par Sony, peuvent annuler le droit d’utilisation de
l’appareil.
Veuillez vérifier les exceptions, dues à des
exigences ou limitations nationales, relatives aux
équipements Bluetooth avant d’utiliser ce produit.
Conduite
Vérifiez la législation et la réglementation en
vigueur concernant l’utilisation des téléphones
mobiles et des équipements mains libres dans les
endroits où vous circulez.
Soyez toujours très attentif au volant et garez-vous
avant d’effectuer ou de répondre à un appel si les
conditions de circulation l’exigent.
Connexion à d’autres périphériques
Avant de connecter un autre périphérique, lisez
attentivement son mode d’emploi pour plus de
détails concernant les instructions de sécurité.
Type de disque Symbole indiqué sur le
disque
CD-DA
MP3
WMA
AAC
7
Exposition aux fréquences radio
Les signaux RF peuvent perturber des systèmes
électroniques automobiles mal installés ou
insuffisamment protégés, tels que les systèmes
d’injection électronique, les dispositifs
d’antiblocage de frein électroniques (ABS), les
systèmes de contrôle de vitesse électroniques ou les
systèmes airbag. Veuillez confier l’installation ou
l’entretien de cet appareil au constructeur ou au
concessionnaire de votre véhicule. Une installation
défectueuse ou un entretien mal fait peut être
dangereux et annuler toute garantie concernant cet
appareil.
Vérifiez auprès du constructeur de votre véhicule
que l’utilisation de votre téléphone mobile ne risque
pas d’affecter les systèmes électroniques
embarqués.
Vérifiez régulièrement que tous les équipements
périphériques sans fil installés dans votre véhicule
sont bien montés et fonctionnent correctement.
Appels d’urgence
Cet appareil mains libres Bluetooth et l’appareil
électronique connecté au système mains libres
fonctionnent grâce à des signaux radio, des réseaux
mobiles et terrestres, ainsi que grâce à des fonctions
programmées par l’utilisateur, qui ne peuvent
garantir la connexion dans toutes les conditions.
Par conséquent, ne vous reposez pas uniquement sur
les périphériques électroniques pour vos
communications importantes (telles que les
urgences médicales).
Rappelez-vous que pour passer ou recevoir des
appels, le périphérique mains libres et le
périphérique électronique connecté à celui-ci
doivent être activés dans une zone de service dans
laquelle la puissance des signaux cellulaires est
adaptée.
Les appels d’urgence peuvent ne pas être possibles
sur tous les téléphones mobiles ou lorsque certains
services de réseau ou certaines fonctions du
téléphone sont utilisés.
Consultez votre fournisseur de service local pour
plus de renseignements.
Réinitialisation de l’appareil
Avant la première mise en service de l’appareil
ou après avoir remplacé la batterie du véhicule
ou modifié les raccordements, vous devez
réinitialiser l’appareil.
Retirez la façade (page 8) et appuyez sur la
touche RESET (page 14) avec un objet pointu,
comme un stylo à bille.
Remarque
Une pression sur la touche RESET remet l’heure à
zéro et efface certaines informations mémorisées.
Annulation du mode DEMO
Vous pouvez désactiver l’affichage de
démonstration qui apparaît lors de la mise hors
tension de l’appareil.
1Appuyez sur la touche de sélection et
maintenez-la enfoncée.
L’écran de configuration apparaît.
2Appuyez plusieurs fois sur la touche
de sélection jusqu’à ce que « DEMO »
apparaisse.
3Tournez la molette de réglage pour
sélectionner « DEMO-OFF ».
4Appuyez sur la touche de sélection et
maintenez-la enfoncée.
Une fois le réglage terminé, la fenêtre
d’affichage revient au mode de réception/
lecture normale.
Préparation de la mini-
télécommande
Retirez la feuille isolante.
Conseil
Pour obtenir des informations sur la façon de
remplacer la pile, reportez-vous à la page 34.
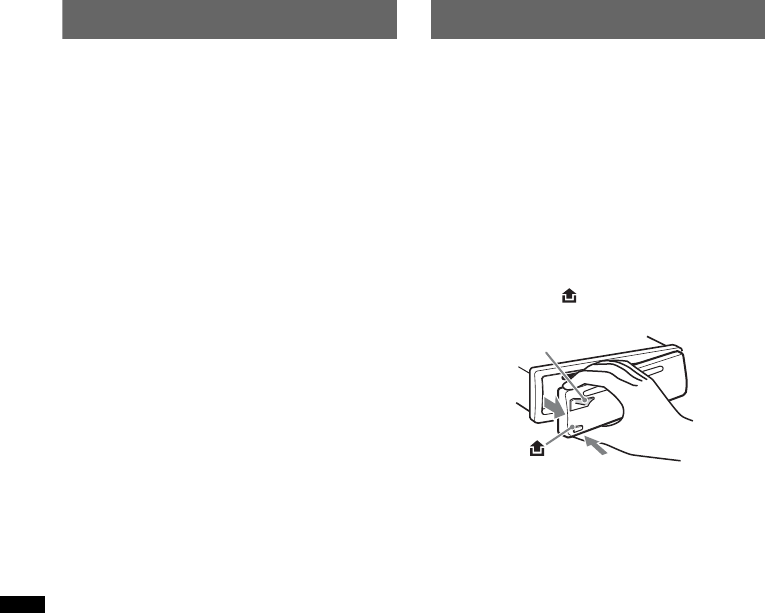
8
Réglage de l’horloge
L’horloge numérique fonctionne suivant un cycle
de 24 heures.
1Appuyez sur la touche de sélection et
maintenez-la enfoncée.
L’écran de configuration apparaît.
2Appuyez plusieurs fois sur la touche
de sélection jusqu’à ce que « CLOCK-
ADJ » apparaisse.
3Appuyez sur (SEEK) +.
L’indication des heures clignote.
4Tournez la molette de réglage pour
régler l’heure et les minutes.
Pour déplacer l’indication numérique,
appuyez sur (SEEK) –/+.
5Appuyez sur la touche de sélection
après avoir réglé les minutes.
La configuration est terminée et l’horloge
démarre.
Pour afficher l’horloge, appuyez sur (DSPL).
Appuyez de nouveau sur (DSPL) pour revenir à
l’affichage précédent.
Conseil
Vous pouvez régler l’horloge automatiquement au
moyen de la fonction RDS (page 20).
Retrait de la façade
Vous pouvez retirer la façade de cet appareil pour
le protéger du vol.
Alarme d’avertissement
Si vous mettez la clé de contact en position OFF
sans ôter la façade, l’alarme d’avertissement
retentit pendant quelques secondes.
L’alarme est émise uniquement lorsque
l’amplificateur intégré est utilisé.
1Appuyez sur la touche (SOURCE/OFF)
et maintenez-la enfoncée.
L’appareil est mis hors tension.
2Appuyez sur , puis sortez la façade
en tirant vers vous.
Remarques
•N’exercez pas de pression excessive sur la façade
ni sur la fenêtre d’affichage et ne la laissez pas
tomber.
•N’exposez pas la façade à des températures
élevées ou à l’humidité. Evitez de la laisser dans un
véhicule en stationnement, sur le tableau de bord ou
la plage arrière.
•Ne retirez pas la façade pendant la lecture du
périphérique USB, sinon les données USB risquent
d’être endommagées.
(SOURCE/OFF)
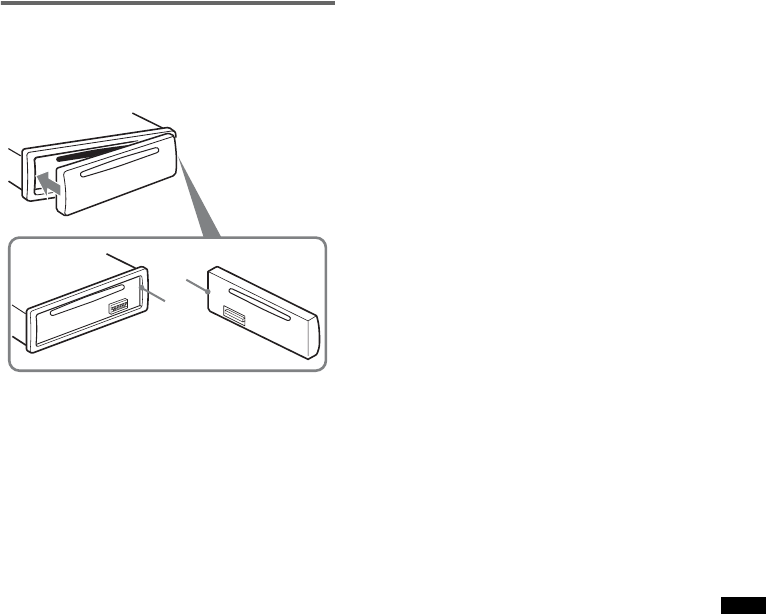
9
Installation de la façade
Insérez la partie A de la façade dans la partie B
de l’appareil, comme illustré, puis poussez sur le
côté gauche jusqu’au déclic indiquant qu’elle est
en position.
Remarque
Ne posez rien sur la face interne de la façade.
B
A
10
Présentation rapide de la fonction Bluetooth
Pour obtenir davantage de détails sur le fonctionnement, consultez la section « Bluetooth (appel en
mains libres et transmission en continu de musique) » (page 25), ainsi que le mode d’emploi du
périphérique Bluetooth.
La fonction Bluetooth en 3 étapes
1Pairage
Commencez par effectuer une reconnaissance (« pairage ») entre un périphérique Bluetooth
(téléphone mobile, etc.) et cet appareil. Le pairage n’est plus nécessaire à partir de la seconde fois.
2Connexion
Parfois le pairage permet une connexion automatique. Pour utiliser le périphérique une fois que le
pairage est effectué, lancez la connexion.
3Appel en mains libres/Transmission en continu de musique
Une fois la connexion établie, vous pouvez parler en mains libres et écouter de la musique.
Site d’assistance
http://support.sony-europe.com/
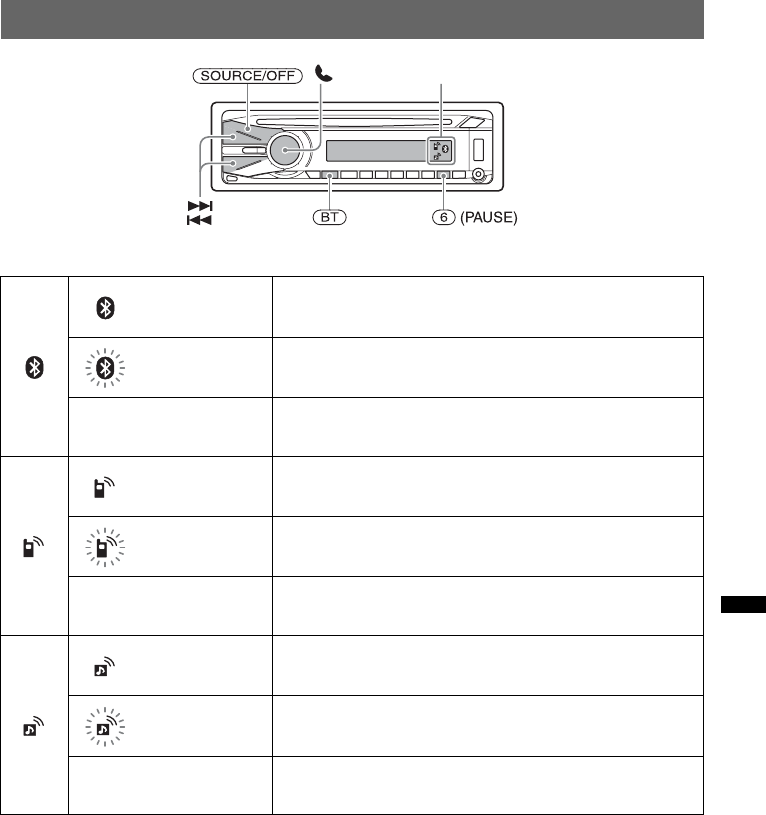
11
Touches et icônes
Descriptions de l’état des icônes
Allumé Signal Bluetooth activé
Clignotant Mode de veille de pairage
Aucun Signal Bluetooth désactivé
Allumé Connexion d’un téléphone mobile réussie
Clignotant Appareil en cours de connexion au téléphone mobile
Aucun Aucune connexion
Allumé Connexion d’un périphérique audio réussie
Clignotant Appareil en cours de connexion au périphérique audio
Aucun Aucune connexion
Icônes
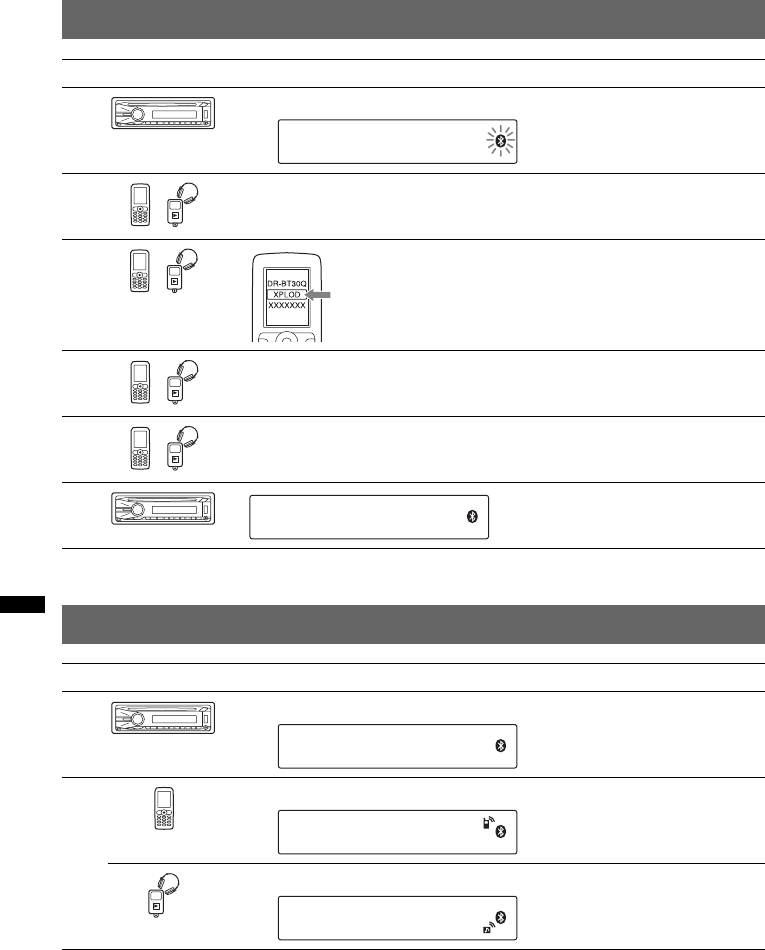
12
1Pairage
2Connexion
Remarque
Vous pouvez effectuer la connexion à un périphérique Bluetooth à partir de cet appareil (page 26).
Si vous ne parvenez pas à établir la connexion au périphérique Bluetooth à partir de cet appareil, recommencez le
pairage.
Appareil utilisé Procédure
1Appuyez sur (BT) et maintenez la pression pendant environ 5 secondes.
2Recherchez cet appareil.
3
4Saisissez la clé de sécurité « 0000 ».
5Suivez les indications affichées.
6
Appareil utilisé Procédure
1Appuyez sur (BT) et maintenez la pression pendant environ 3 secondes.
2Procédez à la connexion à cet appareil à l’aide d’un téléphone mobile.
Procédez à la connexion à cet appareil à l’aide d’un périphérique audio.
t
Sélectionnez « XPLOD ».
(Pairage réussi)
t
t
t
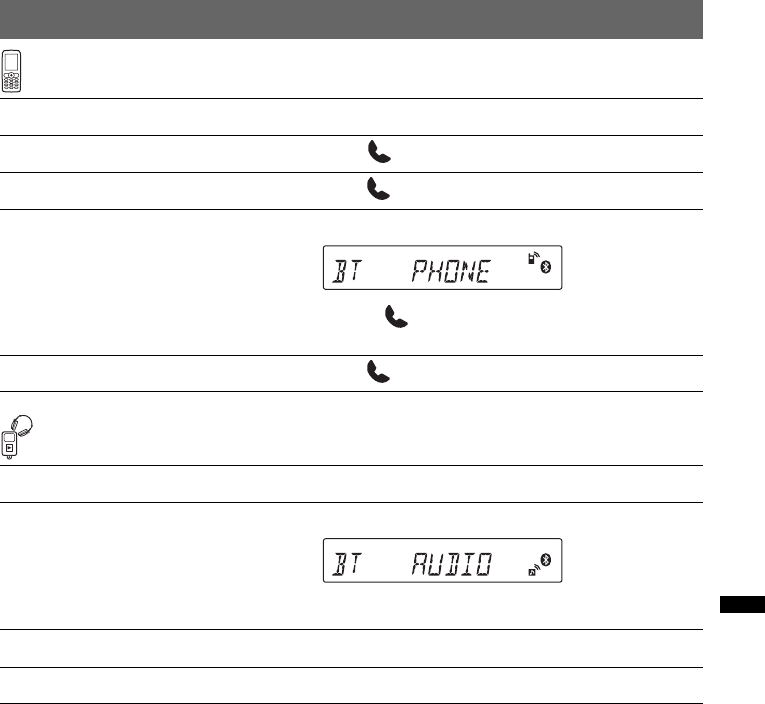
13
3Appel en mains libres et transmission en continu de musique
Appel en mains libres
Transmission en continu de musique
*Le fonctionnement peut être différent selon le périphérique audio.
Pour Procédez comme suit
recevoir un appel/terminer un appel Appuyez sur .
Rejeter un appel
Appuyez sur et maintenez la pression pendant 2 secondes.
Recomposer un numéro 1Appuyez sur (SOURCE/OFF).
2Appuyez sur et maintenez la pression pendant 3
secondes.
Pour transférer un appel
Appuyez sur et maintenez la pression pendant 2 secondes.
Pour Procédez comme suit
Ecouter 1Appuyez sur (SOURCE/OFF).
2Appuyez sur Démarrer la lecture sur le périphérique audio.
Lire/faire une pause (AVRCP)* Appuyez sur (6) (PAUSE).
Ignorer des plages (AVRCP)* Appuyez sur ./>.
t
t

14
Emplacement des commandes et opérations de base
Appareil principal
Façade retirée Cette section contient les instructions relatives à
l’emplacement des commandes et aux opérations
de base.
Pour plus de détails, reportez-vous aux numéros
de pages correspondants.
ATouches SEEK +/–
CD/USB :
Permet de sauter des plages (appuyez) ; de
sauter des plages successives (appuyez une
première fois, puis une seconde fois dans un
délai d’environ 1 seconde et en maintenant
enfoncée) ; d’avancer/reculer rapidement
dans une plage (appuyez sur la touche et
maintenez-la enfoncée).
Radio :
Permet de régler des stations
automatiquement (appuyez) ; de rechercher
une station manuellement (appuyez sur la
touche et maintenez-la enfoncée).
Appareil audio Bluetooth*1:
Permettent de sauter des plages (appuyez).
BTouche (BACK)/MODE page 17,
18, 23, 24
Appuyez sur cette touche pour revenir à
l’affichage précédent/sélectionner la bande
radio (FM/MW (PO)/LW (GO))/sélectionner
le mode de lecture de l’iPod.
Appuyez et maintenez la pression pour :
activer/désactiver la commande passager.
P
U
S
H
E
N
T
E
R
/
S
E
L
E
C
T
/
AUX
ALBM REP SHUF PAUSE
SOURCE
SEEK OFF
SCRL
ZAP
SEEK
123456
DSPL
PTY
AF
/
TA
BLUETOOTH
BT
MODE
MIC
9 q
;
q
a
q
d
q
s
q
f
q
h
2
q
j
q
g
1 83 4 5 6 7
RESET
qlqk
15
CTouche SOURCE/OFF*2
Appuyez sur cette touche pour mettre
l’appareil sous tension/changer de source
(Radio/CD/USB/AUX/Son Bluetooth/
Téléphone Bluetooth).
Appuyez pendant 1 seconde pour mettre
l’appareil hors tension.
Appuyez pendant 2 secondes minimum pour
mettre l’appareil hors tension et éteindre
l’affichage.
DMolette de réglage/touche de
sélection / (mains libres)
Permet de régler le volume (tournez) ; de
sélectionner des paramètres de configuration
(appuyez et tournez) ; de recevoir/terminer
un appel (appuyez).
EFente d’insertion des disques
Insérez le disque (côté imprimé vers le
haut) ; la lecture démarre.
FFenêtre d’affichage
GTouche Z (éjecter)
Permet d’éjecter le disque.
HConnecteur USB page 21, 23
Permet de raccorder le périphérique USB.
ITouche (déverrouillage de la
façade) page 8
JTouche (BROWSE) page 17
Permet de passer en mode Quick-BrowZer.
KTouche ZAP page 18
Permet de passer en mode ZAPPIN™.
LRécepteur de la mini-télécommande
MTouche BT (BLUETOOTH) page 25
Permet d’activer/de désactiver le signal
Bluetooth, le pairage.
NTouche AF (Fréquences alternatives)/
TA (Messages de radioguidage)/
PTY (Type de programme) page 19,
20
Permet de régler AF et TA (appuyez) ; de
sélectionner PTY (appuyez sur la touche et
maintenez-la enfoncée) en RDS.
OTouches numériques
CD/USB :
(1)/(2) : ALBM –/+ (pendant la lecture de
fichiers MP3/WMA/AAC)
Permettent de sauter des albums
(appuyez) ; de sauter des albums en
continu (appuyez sur la touche et
maintenez-la enfoncée).
(3) : REP*2 page 21, 22, 24
(4) : SHUF page 21, 22, 24
(6) : PAUSE
Permet d’interrompre la lecture.
Appuyez de nouveau sur cette touche
pour annuler.
Radio :
Permettent de capter les stations enregistrées
(appuyez) ; de mémoriser des stations
(appuyez sur la touche et maintenez-la
enfoncée).
Appareil audio Bluetooth*1:
(6) : PAUSE
Permet d’interrompre la lecture.
Appuyez de nouveau sur cette touche
pour annuler.
Téléphone Bluetooth :
(5) : MIC page 27
PTouche DSPL (affichage)/SCRL
(défilement) page 19, 21, 22, 23, 24
Permet de changer les paramètres
d’affichage (appuyez) ; de faire défiler les
paramètres d’affichage (appuyez sur la
touche et maintenez-la enfoncée).
QPrise d’entrée AUX page 31
Permet de raccorder un appareil audio
portatif.
RTouche RESET (située à l’arrière de la
façade) page 7
SMicrophone page 27
Remarque
Ne masquez pas le microphone, la fonction mains
libres risquerait de ne pas fonctionner
correctement.
*1 Lorsqu’un appareil audio Bluetooth (prenant en
charge le profil AVRCP de la technologie
Bluetooth) est connecté. Selon l’appareil, il est
possible que certaines opérations ne soient pas
disponibles.
*2 Cette touche est dotée d’un point tactile.
Remarque
Lors de l’éjection ou de l’insertion d’un disque, laissez
tous les périphériques USB débranchés, afin d’éviter
d’endommager le disque.
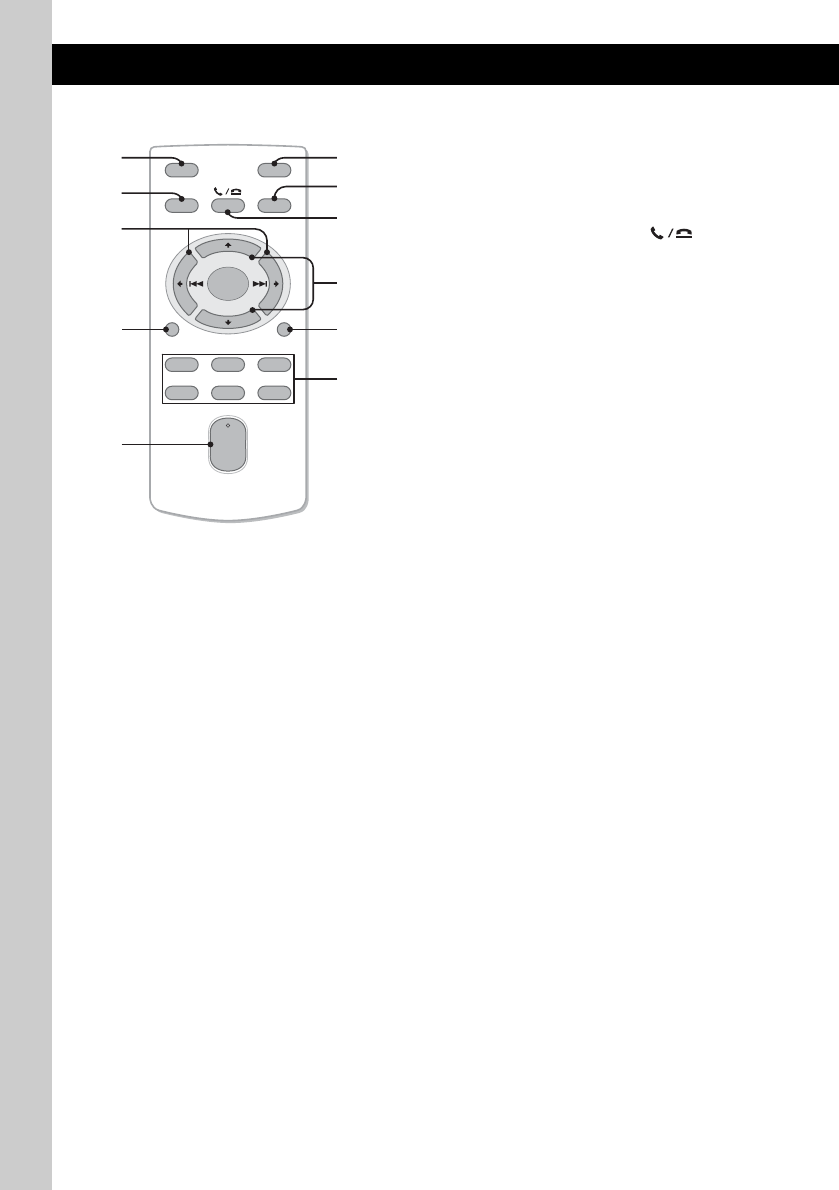
16
Mini-télécommande RM-X304
Retirez la feuille isolante avant l’utilisation
(page 7).
ATouche OFF
Permet de mettre l’appareil hors tension ;
d’arrêter la source.
BTouche SOURCE
Permet de mettre l’appareil sous tension ; de
changer la source (Radio/CD/USB/AUX/Son
Bluetooth/Téléphone Bluetooth).
CTouches < (.)/, (>)
Permettent de commander la radio/le lecteur
CD/le périphérique USB/le son Bluetooth,
identiques aux touches (SEEK) –/+ de
l’appareil.
Il est possible d’atteindre la configuration, le
réglage du son, etc., < ,.
DTouche DSPL (affichage)
Permet de modifier les paramètres
d’affichage.
ETouche VOL (volume) +*/–
Permet de régler le niveau du volume.
FTouche ATT (atténuer)
Permet d’atténuer le son. Appuyez de
nouveau sur cette touche pour annuler.
GTouche MODE
Appuyez sur cette touche pour sélectionner
la bande radio (FM/MW (PO)/LW (GO))/
sélectionner le mode de lecture de l’iPod.
Appuyez et maintenez la pression pour
activer/désactiver la commande passager.
HTouche SEL (sélection)/ (mains
libres)
Identique à la touche de sélection de
l’appareil.
ITouches M (+)/m (–)
Permettent de commander le lecteur CD/
périphérique USB, identiques aux touches
(1)/(2) (ALBM –/+) de l’appareil.
Il est possible d’atteindre la configuration, le
réglage du son, etc., avec M m.
JTouche SCRL (défilement)
Permet de faire défiler le paramètre
d’affichage.
KTouches numériques
Permettent de capter les stations enregistrées
(appuyez) ; de mémoriser des stations
(appuyez sur la touche et maintenez-la
enfoncée).
*Cette touche est dotée d’un point tactile.
Remarque
Si vous mettez l’appareil hors tension et que
l’affichage est désactivé, il ne peut plus être utilisé
avec la mini-télécommande sauf si la touche
(SOURCE/OFF) de l’appareil est enfoncée ou si un
disque est inséré dans le lecteur pour l’activer.
OFF
DSPL SCRL
SEL
SOURCE
MODE
132
465
ATT
VOL
+
–
+
–
28
7
1
0
3
6
5
4
qa
9
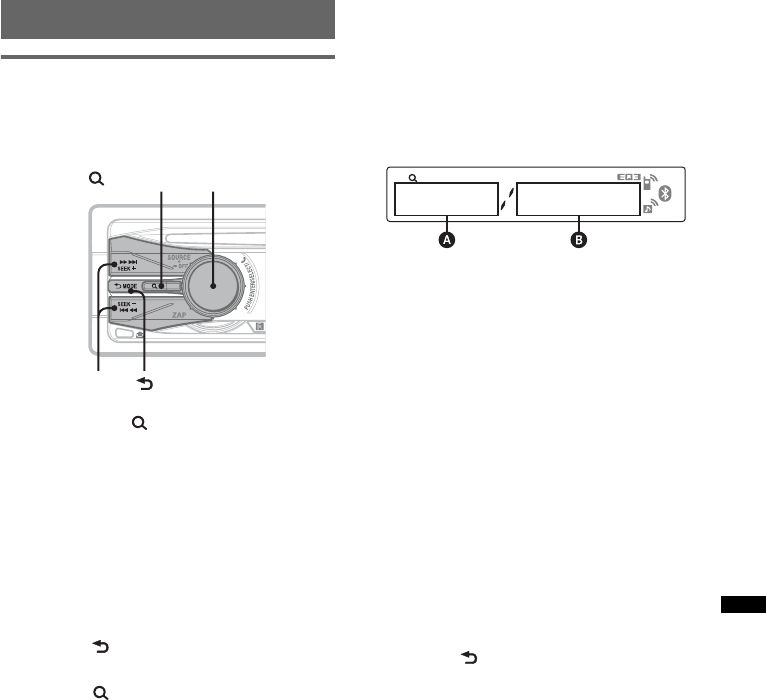
17
Recherche d’une plage
Recherche d’une plage par nom
— Quick-BrowZer
Vous pouvez facilement rechercher une plage sur
un CD ou un périphérique USB par catégorie.
1Appuyez sur (BROWSE).
L’appareil passe en mode Quick-BrowZer et
la liste des catégories de recherche apparaît.
2Tournez la molette de réglage pour
sélectionner la catégorie de recherche
souhaitée, puis appuyez dessus pour
valider.
3Répétez l’étape 2 jusqu’à ce que la
plage souhaitée soit sélectionnée.
La lecture commence.
Pour revenir à l’affichage précédent
Appuyez sur (BACK).
Pour quitter le mode Quick-BrowZer
Appuyez sur (BROWSE).
Remarque
Lorsque l’appareil passe en mode Quick-BrowZer, la
lecture répétée ou aléatoire est désactivée.
Recherche par saut d’éléments
— Mode Jump
Lorsqu’une catégorie comprend plusieurs
éléments, vous pouvez rechercher rapidement
l’élément souhaité.
1Appuyez sur (SEEK) + en mode Quick-
BrowZer.
L’affichage suivant apparaît.
ANuméro de l’élément actuel
BNombre total d’éléments dans la couche
actuelle
Puis, le nom de l’élément apparaît.
2Tournez la mollette de réglage pour
sélectionner l’élément souhaité ou un autre
élément proche.
Ceci permet d’effectuer des sauts par
incréments de 10 % de l’ensemble des
éléments.
3Appuyez sur la touche de sélection.
L’affichage revient en mode Quick-BrowZer et
l’élément sélectionné apparaît.
4Tournez la mollette de réglage pour
sélectionner l’élément souhaité, puis appuyez
dessus.
La lecture démarre si l’élément sélectionné est
une plage.
Pour annuler le mode Jump
Appuyez sur (BACK) ou sur (SEEK) –.
(BROWSE) Molette de réglage/
touche de sélection
(BACK)
SEEK +/–
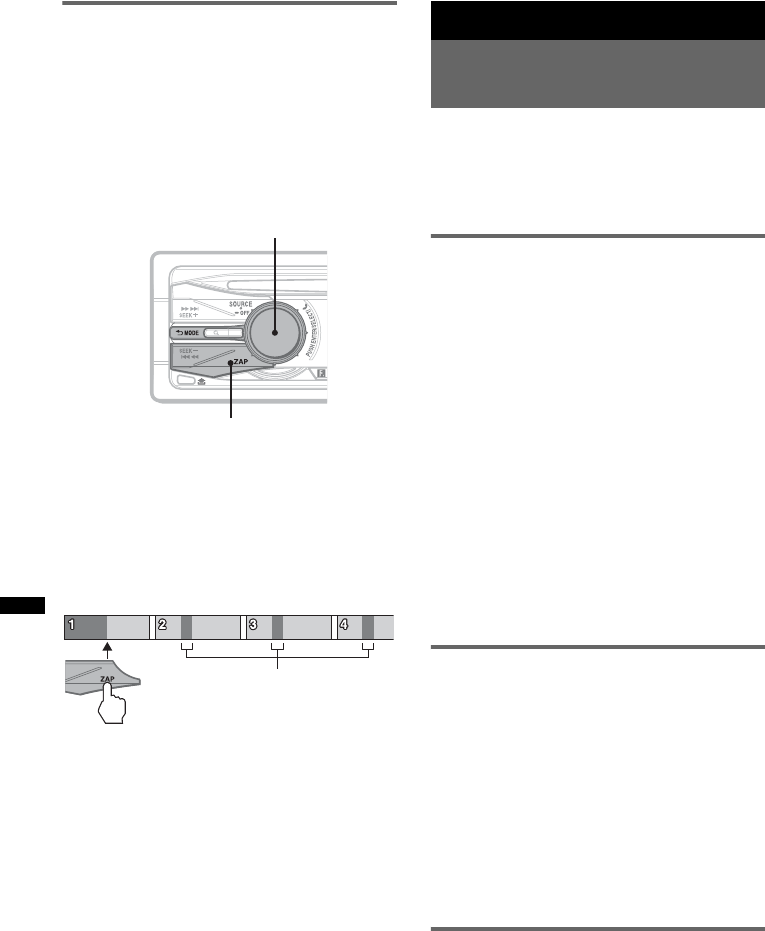
18
Recherche d’une plage en écoutant
des passages de la plage
— ZAPPIN™
Lors de la lecture séquentielle de courts passages
de plages sur un CD ou sur un périphérique USB,
vous pouvez rechercher une plage que vous
souhaitez écouter.
Le mode ZAPPIN convient à la recherche de
plages en mode de lecture aléatoire ou de lecture
répétée.
1Appuyez sur (ZAP) pendant la lecture.
Lorsque « ZAPPIN » apparaît sur l’affichage,
la lecture démarre à partir d’un passage de la
plage suivante.
Le passage est lu pendant la durée définie,
puis un clic retentit et le passage suivant
commence.
2Appuyez sur la touche de sélection ou
sur (ZAP) lorsqu’une plage que vous
souhaitez écouter est en cours de
lecture.
La plage sélectionnée revient au mode de
lecture normale à partir du début.
Pour rechercher de nouveau une plage en
mode ZAPPIN, répétez les étapes 1 et 2.
Conseils
•Vous pouvez sélectionnez la durée de lecture
(6 secondes/9 secondes/30 secondes) (page 30).
Vous ne pouvez pas sélectionner le passage de la
plage à lire.
•Appuyez sur (SEEK) +/– ou sur (1)/(2) (ALBM –/+)
en mode ZAPPIN pour sauter une plage ou un
album.
Radio
Mémorisation et réception des
stations
Avertissement
Pour syntoniser des stations pendant que vous
conduisez, utilisez la fonction de mémorisation
des meilleurs accords (BTM) afin d’éviter les
accidents.
Mémorisation automatique — BTM
1Appuyez plusieurs fois sur
(SOURCE/OFF) jusqu’à ce que
l’indication « TUNER » apparaissent.
Pour changer de bande, appuyez plusieurs
fois sur (MODE). Vous pouvez sélectionner
FM1, FM2, FM3, MW (PO) ou LW (GO).
2Appuyez sur la touche de sélection et
maintenez-la enfoncée.
L’écran de configuration apparaît.
3Appuyez plusieurs fois sur la touche
de sélection jusqu’à ce que « BTM »
apparaisse.
4Appuyez sur (SEEK) +.
L’appareil enregistre les stations sur les
touches numériques dans l’ordre des
fréquences.
Un bip retentit lorsque le réglage est
mémorisé.
Mémorisation manuelle
1Lorsque vous captez la station que
vous souhaitez mémoriser, appuyez
sur une touche numérique ((1) à (6))
et maintenez-la enfoncée jusqu’à ce
que « MEM » apparaisse.
Remarque
Si vous mémorisez une autre station sur la même
touche numérique, la station mémorisée
précédemment est effacée.
Conseil
Lorsqu’une station RDS est mémorisée, le réglage
AF/TA est également mémorisé (page 19).
Réception des stations
mémorisées
1Sélectionnez la bande, puis appuyez
sur une touche numérique ((1) à (6)).
ZAP
Touche de sélection
Partie de chaque plage à lire
en mode ZAPPIN.
Plage
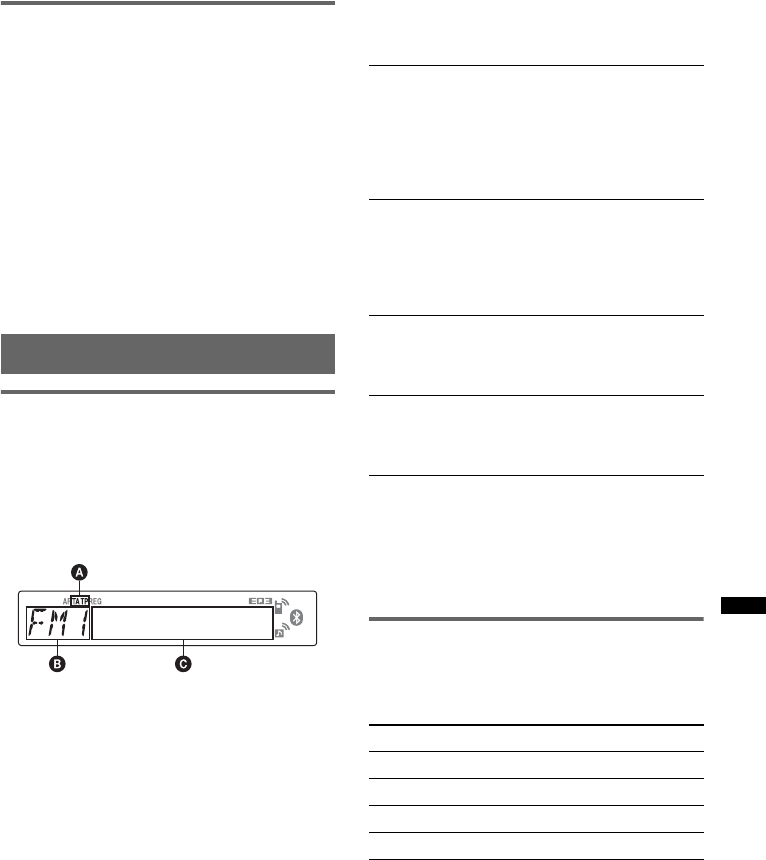
19
Recherche automatique des
fréquences
1Sélectionnez la bande, puis appuyez
sur (SEEK) +/– pour rechercher la
station.
Le balayage s’interrompt lorsque l’appareil
capte une station. Répétez cette procédure
jusqu’à ce que vous captiez la station
souhaitée.
Conseil
Si vous connaissez la fréquence de la station que
vous souhaitez écouter, appuyez sur la touche
(SEEK) +/– et maintenez-la enfoncée pour localiser la
fréquence approximativement, puis appuyez plusieurs
fois sur (SEEK) +/– pour régler la fréquence souhaitée
avec précision (syntonisation manuelle).
Fonction RDS
Aperçu
Les stations FM disposant du système RDS
(Système de radiocommunication de données)
transmettent des informations numériques
inaudibles en même temps que le signal normal
de leurs émissions radio.
Paramètres d’affichage
ATA/TP*1
BBande radio, fonction
CFréquence*2 (nom du service de l’émission),
numéro de présélection, horloge, données
RDS
*1 L’indication « TA » clignote pendant les messages
de radioguidage. L’indication « TP » s’allume
lorsqu’une de ces stations est captée.
*2 Lorsque vous captez la station RDS, « *» est
affiché à gauche de l’indication de la fréquence.
Pour modifier les paramètres d’affichage C,
appuyez sur (DSPL).
Services RDS
Cet appareil propose automatiquement les
services RDS, comme suit :
Remarques
•Selon le pays ou la région où vous vous trouvez, il
est possible que les services RDS ne soient pas
tous disponibles.
•La fonction RDS ne fonctionne pas correctement si
le signal de retransmission est faible ou si la station
syntonisée ne transmet pas de données RDS.
Réglages AF et TA
1Appuyez plusieurs fois sur (AF/TA)
jusqu’à ce que le réglage souhaité
apparaisse.
AF (Fréquences alternatives)
Permet de sélectionner et de régler de nouveau
la station ayant le signal le plus fort sur un
réseau. Cette fonction vous permet d’écouter la
même émission en continu pendant un voyage
longue distance sans avoir à régler de nouveau
cette station manuellement.
TA (Messages de radioguidage)/TP (Programme
de radioguidage)
Propose les messages et les programmes de
radioguidage disponibles à cet instant. Tout
message/programme reçu interrompt la source
sélectionnée en cours de diffusion.
PTY (Type d’émission)
Permet d’afficher le type de l’émission en
cours. Et de rechercher votre type d’émission
sélectionné.
CT (Heure)
Les données CT (heure) accompagnant la
transmission RDS assurent un réglage de
l’horloge.
Sélectionnez Pour
AF-ON activer AF et désactiver TA.
TA-ON activer TA et désactiver AF.
AF, TA-ON activer AF et TA.
AF, TA-OFF désactiver AF et TA.
suite à la page suivante t
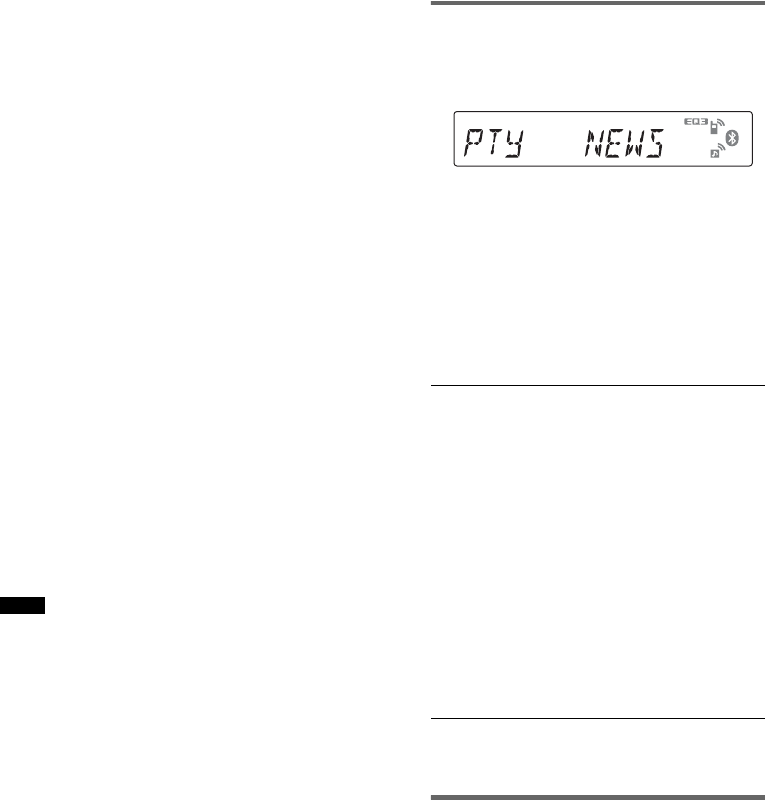
20
Mémorisation des stations RDS avec
les réglages AF et TA
Vous pouvez présélectionner les stations RDS
avec les réglages AF/TA. Si vous utilisez la
fonction BTM, seules les stations RDS sont
mémorisées avec les mêmes réglages AF/TA.
Si vous effectuez une présélection manuelle,
vous pouvez présélectionner à la fois des stations
RDS et non-RDS, avec leurs réglages AF/TA
respectifs.
1Réglez AF/TA, puis mémorisez la station à
l’aide de la fonction BTM ou manuellement.
Réception de messages d’urgence
Lorsque la fonction AF ou TA est activée, les
messages d’urgence interrompent
automatiquement la source sélectionnée en cours
de diffusion.
Conseil
Si vous réglez le niveau de volume pendant la
diffusion d’un message de radioguidage, ce niveau
sera enregistré dans la mémoire pour les messages
de radioguidage suivants, indépendamment du niveau
de volume normal.
Ecoute continue d’une émission
régionale — REG
Lorsque la fonction AF est activée : ce réglage
par défaut restreint la réception à une région
spécifique, afin qu’une station régionale ayant
une fréquence plus puissante ne soit pas captée.
Si vous quittez la zone de réception de cette
émission régionale, réglez « REG-OFF » lors de
la configuration en cours de réception FM
(page 30).
Remarque
Cette fonction est inopérante au Royaume-Uni et dans
certaines autres régions.
Fonction de liaison locale
(Royaume-Uni uniquement)
Cette fonction vous permet de sélectionner
d’autres stations locales de la région, même si
elles ne sont pas associées à vos touches
numériques.
1En réception FM, appuyez sur une touche
numérique ((1) à (6)) sur laquelle une
station locale est mémorisée.
2Dans les 5 secondes qui suivent, appuyez de
nouveau sur la touche numérique de la station
locale.
Répétez cette procédure jusqu’à ce que vous
captiez la station locale souhaitée.
Sélection de PTY
1Appuyez sur la touche (AF/TA) (PTY)
et maintenez-la enfoncée en cours de
réception FM.
Le nom du type d’émission diffusé apparaît si
la station transmet des données PTY.
2Appuyez plusieurs fois sur (AF/TA)
(PTY) jusqu’à ce que le type
d’émission souhaité apparaisse.
3Appuyez sur (SEEK) +/–.
L’appareil commence à rechercher une station
diffusant le type d’émission sélectionné.
Types d’émissions
Remarque
Cette fonction est inopérante dans certains pays ou
régions où les données PTY ne sont pas disponibles.
Réglages de CT
1Réglez « CT-ON » lors de la
configuration (page 30).
Remarques
•Il est possible que la fonction CT ne fonctionne pas,
même si une station RDS est captée.
•Il peut y avoir une différence entre l’heure réglée par
la fonction CT et l’heure réelle.
NEWS (Nouvelles), AFFAIRS (Dossiers
d’actualité), INFO (Informations), SPORT
(Sports), EDUCATE (Education), DRAMA
(Théâtre), CULTURE (Culture), SCIENCE
(Sciences), VARIED (Divers), POP M
(Musique pop), ROCK M (Rock), EASY M
(Musique légère), LIGHT M (Musique classique
légère), CLASSICS (Musique classique),
OTHER M (Autres styles de musique),
WEATHER (Météo), FINANCE (Finance),
CHILDREN (Emissions pour les enfants),
SOCIAL A (Affaires sociales), RELIGION
(Religion), PHONE IN (Emissions lignes
ouvertes), TRAVEL (Voyage), LEISURE
(Loisirs), JAZZ (Jazz), COUNTRY (Musique
Country), NATION M (Musique nationale),
OLDIES (Musique d’autrefois), FOLK M
(Musique folk), DOCUMENT (Documentaires)
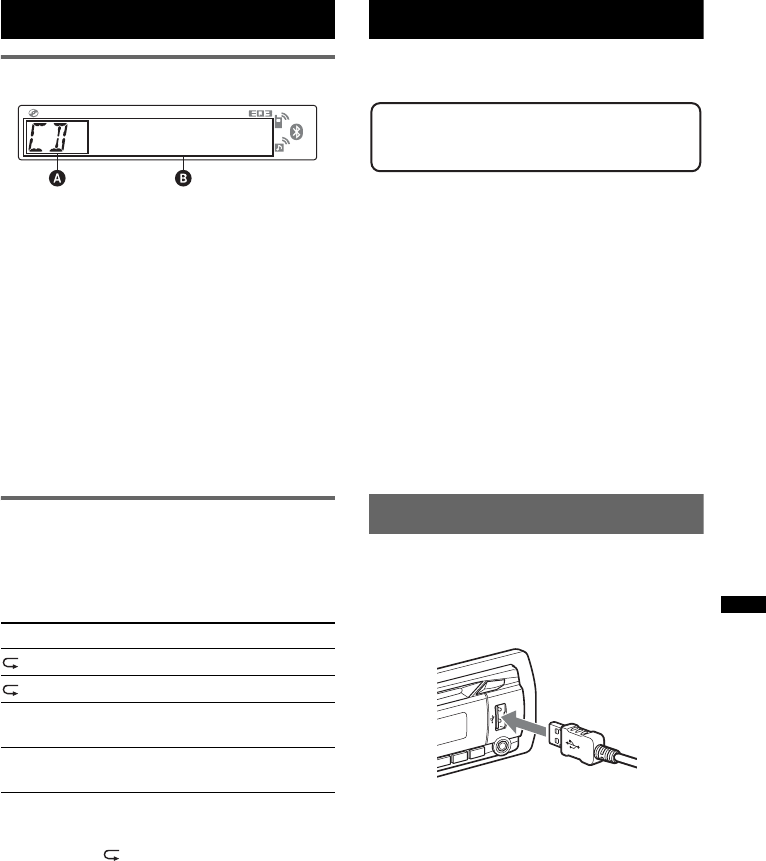
21
CD
Paramètres d’affichage
ASource
BNom de la plage*1, nom du disque/de
l’artiste*1, nom de l’artiste*1, numéro de
l’album*2, nom d’album*1, numéro de la
plage/temps de lecture écoulé, horloge
*1 Les données d’un CD TEXT ou d’un fichier MP3/
WMA/AAC sont affichées.
*2 Le numéro de l’album s’affiche uniquement lorsque
l’album est modifié.
Pour modifier les paramètres d’affichage B,
appuyez sur (DSPL).
Conseil
Les paramètres affichés peuvent varier selon le
modèle, le type de disque, le format d’enregistrement
et les réglages.
Lecture répétée et aléatoire
1En cours de lecture, appuyez
plusieurs fois sur (3) (REP) ou
(4) (SHUF) jusqu’à ce que le réglage
souhaité apparaisse.
*Lors de la lecture d’un fichier MP3/WMA/AAC.
Pour revenir en mode de lecture normal,
sélectionnez « OFF » ou « SHUF OFF ».
Périphériques USB
Pour plus de détails sur la compatibilité de votre
périphérique USB, consultez le site d’assistance.
• Les périphériques USB de type MSC
(périphériques de stockage de masse) et MTP
(Media Transfer Protocol) compatibles avec la
norme USB peuvent être utilisés.
• Le codec correspondant est MP3 (.mp3), WMA
(.wma) et AAC (.m4a).
• Il est recommandé d’effectuer des copies de
sauvegarde des données contenues dans le
périphérique USB.
Remarque
Raccordez le périphérique USB après avoir démarré
le moteur.
Selon le type de périphérique USB, un
dysfonctionnement ou des dommages peuvent être
causés si ce périphérique a été raccordé avant de
démarrer le moteur.
Lecture d’un périphérique USB
1Raccordez le périphérique USB au
connecteur USB.
Si vous utilisez un câble pour les
raccordements, utilisez le câble fourni avec le
périphérique USB.
La lecture commence.
Si un périphérique USB est déjà raccordé,
appuyez plusieurs fois sur (SOURCE/OFF)
jusqu’à ce que l’indication « USB » apparaisse
pour lancer la lecture.
Appuyez pendant 1 seconde sur (SOURCE/OFF)
pour arrêter la lecture.
Sélectionnez Pour lire
TRACK une plage en boucle.
ALBUM* un album en boucle.
SHUF ALBUM* un album dans un ordre
aléatoire.
SHUF DISC un disque dans un ordre
aléatoire.
suite à la page suivante t
Site d’assistance
http://support.sony-europe.com/
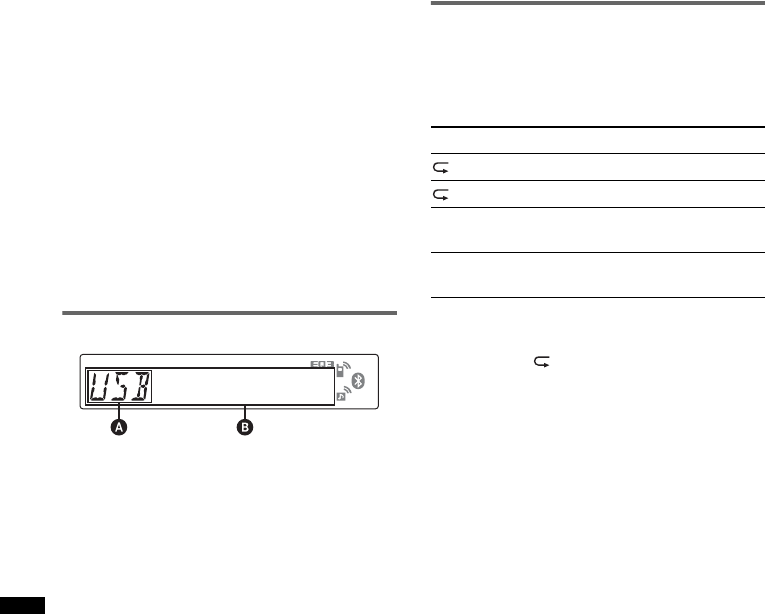
22
Retrait du périphérique USB
1Arrêtez la lecture du périphérique USB.
2Retirez le périphérique USB.
Si vous retirez le périphérique USB lors de la
lecture, ses données risquent d’être
endommagées.
Remarques
•N’utilisez pas de périphériques USB de grande taille
ou lourds, qui risquent de tomber à cause des
vibrations ou d’entraîner un raccordement peu
fiable.
•Ne retirez pas la façade pendant la lecture du
périphérique USB, sinon les données USB risquent
d’être endommagées.
•Cet appareil ne peut pas reconnaître de
périphérique USB via un concentrateur USB.
Paramètres d’affichage
ASource
BNom de la plage, nom de l’artiste, numéro de
l’album*, nom d’album, numéro de la plage/
temps de lecture écoulée, horloge
*Le numéro de l’album s’affiche uniquement lorsque
l’album est modifié.
Pour modifier les paramètres d’affichage B,
appuyez sur (DSPL).
Remarques
•Les paramètres affichés peuvent varier selon le type
de périphérique USB, le format d’enregistrement et
les réglages. Pour plus de détails, consultez le site
d’assistance.
•Le nombre maximum de données affichables est le
suivant :
– dossiers (albums) : 128
– fichiers (plages) par dossier : 500
•Ne laissez pas de périphérique USB dans un
véhicule en stationnement car cela pourrait
entraîner des problèmes de fonctionnement.
•Le démarrage de la lecture peut prendre un certain
temps, selon la quantité de données enregistrées.
•Les fichiers DRM (Gestion des droits numériques)
peuvent ne pas être lus.
•Lors de la lecture ou pendant l’avance ou le retour
rapide d’un fichier MP3/WMA/AAC VBR (Débit
variable), le temps de lecture écoulé qui s’affiche
peut être inexact.
•La lecture des fichiers MP3/WMA/AAC suivants
n’est pas prise en charge.
– fichiers comprimés sans perte
– fichiers contenant une protection des droits
d’auteur
Lecture répétée et aléatoire
1En cours de lecture, appuyez
plusieurs fois sur (3) (REP) ou
(4) (SHUF) jusqu’à ce que le réglage
souhaité apparaisse.
Le réglage est terminé après 3 secondes.
Pour revenir au mode de lecture normal,
sélectionnez « OFF » ou « SHUF OFF ».
Sélectionnez Pour lire
TRACK une plage en boucle.
ALBUM un album en boucle.
SHUF ALBUM un album dans un ordre
aléatoire.
SHUF DEVICE un périphérique dans un
ordre aléatoire.
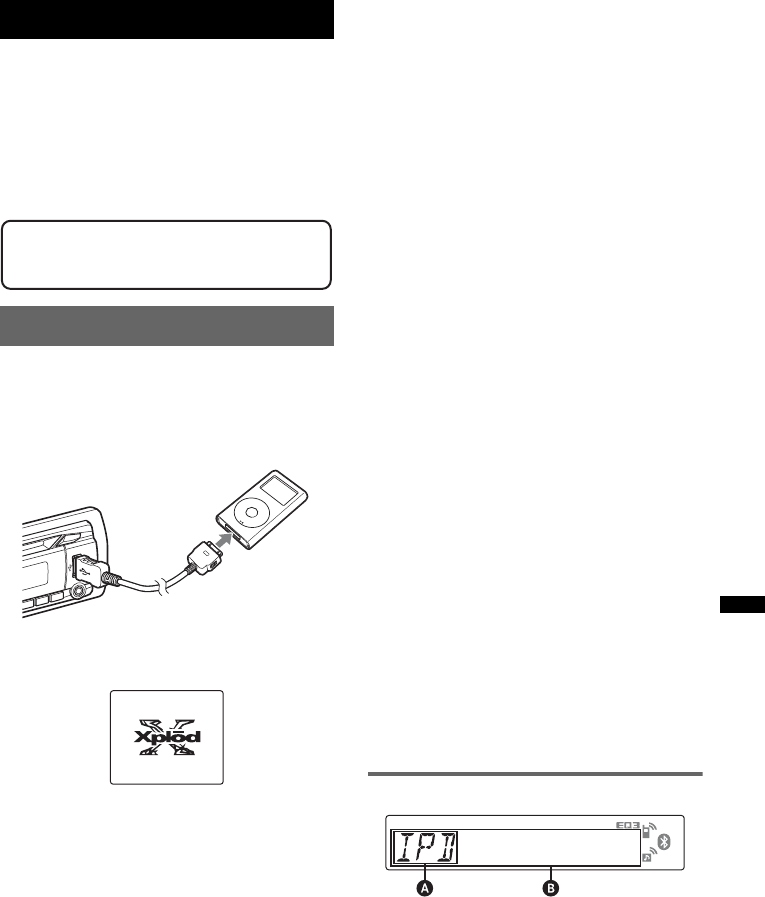
23
iPod
Pour plus de détails sur la compatibilité de votre
iPod, reportez-vous à la section « A propos de
iPod » à la page 32 ou consultez le site
d’assistance.
Dans ce mode d’emploi, « iPod » est utilisé
comme référence générale pour les fonctions
iPod de l’iPod et de l’iPhone, sauf indications
contraires dans le texte ou les illustrations.
Lecture de l’iPod
Avant de raccorder l’iPod, baissez le volume de
l’appareil.
1Raccordez l’iPod au connecteur USB à
l’aide du connecteur dock du câble
USB.
L’iPod s’allume automatiquement et
l’affichage suivant apparaît à l’écran de
l’iPod.*
Conseil
Nous vous recommandons d’utiliser le câble USB
RC-100IP (non fourni) pour raccorder le connecteur
dock.
La lecture des plages de l’iPod démarre
automatiquement à partir du dernier morceau
lu.
Si un iPod est déjà raccordé, appuyez
plusieurs fois sur (SOURCE/OFF) pour
démarrer la lecture jusqu’à ce que l’indication
« USB » apparaisse. (L’indication « IPD »
s’affiche lorsque l’iPod est reconnu.)
*En cas de raccordement d’un iPod touch ou d’un
iPhone ou si lors de la dernière lecture, l’iPod a été
utilisé à l’aide de la commande passager, le logo
n’apparaîtra pas à l’écran.
2Appuyez sur (MODE) pour
sélectionner le mode de lecture.
Le mode change comme suit :
RESUMING t ALBUM t TRACK t
PODCAST* t GENRE t PLAYLIST
t ARTIST
*Peut ne pas s’afficher selon le réglage de l’iPod.
3Réglez le volume.
Appuyez pendant 1 seconde sur (SOURCE/OFF)
pour arrêter la lecture.
Retrait de l’iPod
1Arrêtez la lecture de l’iPod.
2Retirez l’iPod.
Avertissement à propos de l’iPhone
Si vous raccordez un iPhone via un périphérique USB,
le volume du téléphone est contrôlé à partir de
l’iPhone. Afin d’éviter une augmentation brusque du
volume après un appel, n’augmentez pas le volume
de l’appareil pendant l’appel téléphonique.
Remarques
•Ne retirez pas la façade pendant la lecture de l’iPod,
sinon les données risquent d’être endommagées.
•Cet appareil ne peut pas reconnaître un iPod via un
concentrateur USB.
Conseils
•Lorsque la clé de contact est en position ACC et que
l’appareil est sous tension, l’iPod se recharge.
•Si vous débranchez l’iPod pendant la lecture,
l’indication « NO DEV » s’affiche sur l’écran de
l’appareil.
Mode de reprise
Si l’iPod est raccordé au connecteur dock, le
mode de l’appareil passe en mode reprise et la
lecture démarre au mode défini par l’iPod.
En mode reprise, les touches suivantes ne
fonctionnent pas.
– (3) (REP)
– (4) (SHUF)
Paramètres d’affichage
AIndication de la source (iPod)
BNom de la plage, nom de l’artiste, nom
d’album, numéro de la plage/temps de lecture
écoulé, horloge
Pour modifier les paramètres d’affichage B,
appuyez sur (DSPL).
Site d’assistance
http://support.sony-europe.com/
>
.
MENU
suite à la page suivante t
24
Conseil
Si l’album/le podcast/le genre/l’artiste/la liste de
lecture change, le numéro du paramètre
correspondant apparaît momentanément.
Remarque
Certaines lettres mémorisées dans l’iPod peuvent ne
pas s’afficher correctement.
Réglage du mode de lecture
1Appuyez sur (MODE) pendant la
lecture.
Le mode change comme suit :
ALBUM t TRACK t PODCAST* t
GENRE t PLAYLIST t ARTIST
*Peut ne pas s’afficher selon le réglage de l’iPod.
Saut d’albums, de podcasts, de
genres, de listes de lecture et
d’artistes
Lecture répétée et aléatoire
1En cours de lecture, appuyez
plusieurs fois sur (3) (REP) ou
(4) (SHUF) jusqu’à ce que le réglage
souhaité apparaisse.
Le réglage est terminé après 3 secondes.
Pour revenir en mode de lecture normal,
sélectionnez « OFF » ou « SHUF OFF ».
Fonctionnement direct de l’iPod
— Commande passager
Vous pouvez faire fonctionner directement un
iPod raccordé au connecteur dock.
1Appuyez sur la touche (MODE) et
maintenez-la enfoncée pendant la
lecture.
L’indication « MODE IPOD » apparaît et
vous pouvez alors faire fonctionner l’iPod
directement.
Pour changer les paramètres d’affichage
Appuyez sur (DSPL).
Les paramètres d’affichage changent comme suit :
Nom de la plage t Nom de l’artiste t
Nom d’album t MODE IPOD t Horloge
Pour quitter le mode commande
passager
Appuyez sur la touche (MODE) et maintenez-la
enfoncée.
L’indication « MODE AUDIO » apparaît alors et
le mode de lecture passe en mode
«RESUMING».
Remarques
•Le volume ne peut être réglé qu’à partir de
l’appareil.
•Si ce mode est annulé, la lecture répétée est
désactivée.
Pour Appuyez sur
Sauter (1)/(2) (ALBM –/+)
[appuyez une fois pour chaque]
Sauter en
continu
(1)/(2) (ALBM –/+)
[maintenez la touche jusqu’au
point de votre choix]
Sélectionnez Pour lire
TRACK une plage en boucle.
ALBUM un album en boucle.
PODCAST un podcast en boucle.
ARTIST un artiste en boucle.
PLAYLIST une liste de lecture en
boucle.
GENRE un genre en boucle.
SHUF ALBUM un album dans un ordre
aléatoire.
SHUF PODCAST un podcast dans un ordre
aléatoire.
SHUF ARTIST un artiste dans un ordre
aléatoire.
SHUF PLAYLIST une liste de lecture dans
un ordre aléatoire.
SHUF GENRE un genre dans un ordre
aléatoire.
SHUF DEVICE un périphérique dans un
ordre aléatoire.
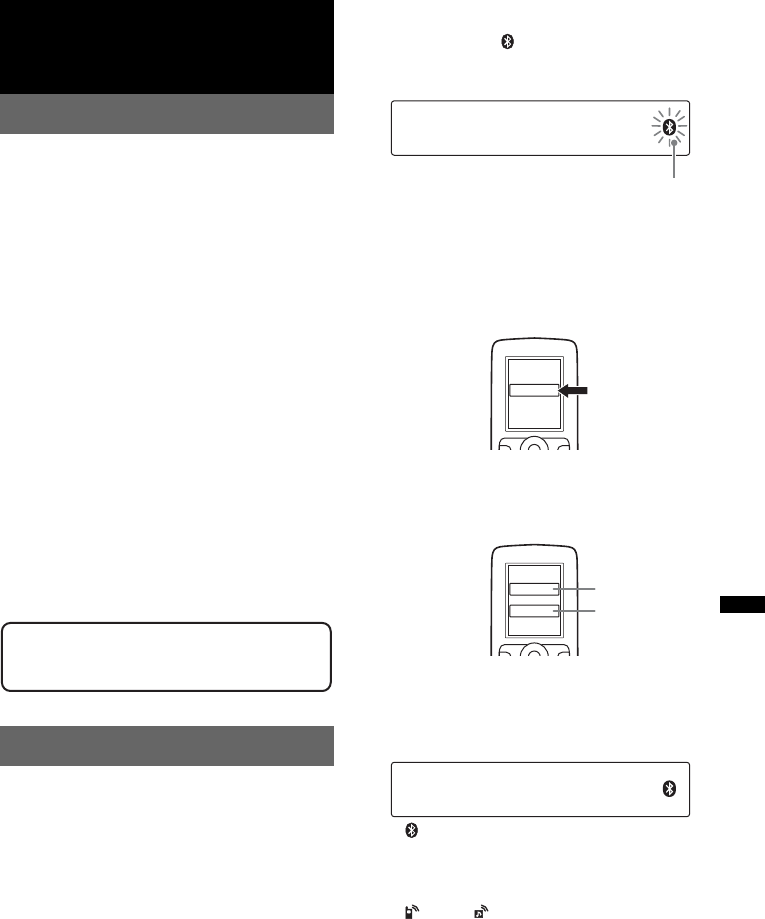
25
Bluetooth (appels en mains
libres et transmission de
musique en continu)
Opérations Bluetooth
La procédure suivante est nécessaire afin
d’utiliser la fonction Bluetooth.
1Pairage
Lorsque vous connectez des périphériques
Bluetooth pour la première fois, il est
nécessaire que les périphériques se
reconnaissent mutuellement. C’est ce qu’on
appelle le « pairage ». Cette reconnaissance
(pairage) est nécessaire la première fois
uniquement ; à partir de la seconde
connexion, cet appareil et le périphérique se
reconnaissent automatiquement. Le pairage
peut s’effectuer pour 8 appareils maximum.
(Selon le périphérique, il peut être nécessaire
de saisir une clé de sécurité à chaque
connexion.)
2Connexion
Pour utiliser le périphérique une fois que le
pairage est effectué, lancez la connexion.
Parfois le pairage permet une connexion
automatique.
3Appel en mains libres/Transmission
de musique en continu
Vous pouvez parler en mains libres et écouter
de la musique une fois la connexion effectuée.
Pairage
Commencez par effectuer une reconnaissance
(« pairage ») entre un périphérique Bluetooth
(téléphone mobile, etc.) et cet appareil. Le
pairage peut s’effectuer pour 8 appareils
maximum. Une fois le pairage effectué, il n’est
pas nécessaire de le recommencer.
1Placez le périphérique Bluetooth à 1 m
maximum de cet appareil.
2Appuyez sur la touche (BT) et
maintenez-la enfoncée jusqu’à ce que
l’indication « » clignote (environ
5 secondes).
L’appareil passe en mode de veille de pairage.
3Réglez le périphérique Bluetooth afin
qu’il recherche cet appareil.
Une liste des périphériques détectés apparaît
dans l’affichage du périphérique à connecter.
Cet appareil est désigné par « XPLOD » sur
le périphérique à connecter.
4Si la saisie d’une clé de sécurité* est
requise sur l’affichage du périphérique
à connecter, saisissez « 0000 ».
Cet appareil et le périphérique Bluetooth
mémorisent leurs informations respectives et
l’appareil est prêt pour la connexion au
périphérique une fois le pairage effectué.
« » clignote puis reste allumé une fois le
pairage effectué.
5Réglez le périphérique Bluetooth afin
qu’il se connecte à cet appareil.
« » ou « » s’affiche une fois la
connexion établie.
*La clé de sécurité peut également être nommée
« code d’authentification », « code PIN », « numéro
PIN » ou « mot de passe », etc., en fonction du
périphérique.
Remarque
Le mode de veille de pairage n’est pas désactivé
jusqu’à ce que la connexion soit établie.
Site d’assistance
http://support.sony-europe.com/
clignotant
XXXXXXX
DR-BT30Q
XPLOD
XXXX
Saisissez la
clé de
sécurité.
« 0000 »
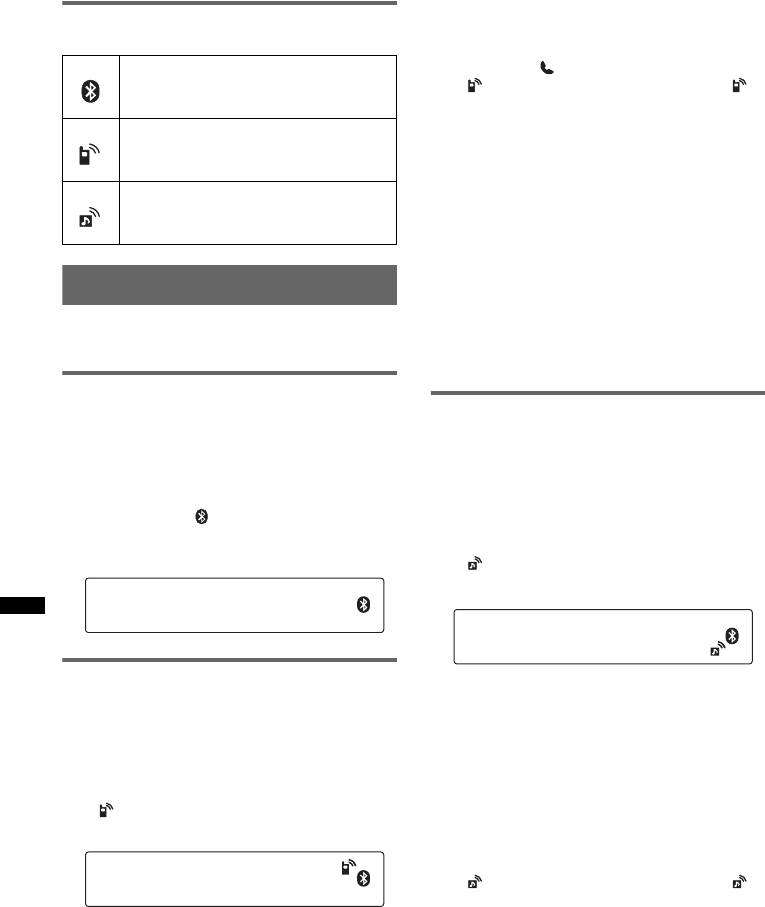
26
A propos des icônes Bluetooth
Cet appareil utilise les icônes suivantes.
Connexion
Si le pairage a déjà été effectué, commencez
l’opération à partir de ce point.
Pour activer la sortie du signal
Bluetooth sur cet appareil
Pour utiliser la fonction Bluetooth, activez le
signal Bluetooth de cet appareil.
1Appuyez sur la touche (BT) et
maintenez-la enfoncée jusqu’à ce que
l’indication « » s’allume (environ
3 secondes).
Le signal Bluetooth est activé.
Connexion d’un téléphone mobile
1Assurez-vous que les signaux
Bluetooth de cet appareil et du
téléphone mobile sont activés.
2Connectez-vous à cet appareil à l’aide
du téléphone mobile.
« » s’affiche, une fois la connexion
établie.
Connexion du dernier téléphone
mobile connecté à partir de cet
appareil
1Assurez-vous que les signaux Bluetooth de cet
appareil et du téléphone mobile sont activés.
2Appuyez plusieurs fois sur (SOURCE/OFF)
jusqu’à ce l’indication « BT PHONE »
apparaisse.
3Appuyez sur (mains libres).
« » clignote en cours de connexion. « »
reste ensuite allumé une fois la connexion
établie.
Remarque
En cours de transmission audio Bluetooth en continu,
vous ne pouvez pas vous connecter au téléphone
mobile à partir de cet appareil. Connectez-vous plutôt
du téléphone mobile à cet appareil. Des parasites de
connexion peuvent être audibles sur le son de lecture.
Conseil
Avec le signal Bluetooth activé : si la clé de contact est
réglée en position on, cet appareil se reconnecte
automatiquement au dernier téléphone mobile
connecté. Mais la connexion automatique dépend
également des spécifications du téléphone mobile. Si
cet appareil ne se reconnecte pas automatiquement,
connectez-le manuellement.
Connexion d’un périphérique
audio
1Veillez à ce que le signal Bluetooth
soit activé sur cet appareil et sur le
périphérique audio.
2Connectez-vous à cet appareil à l’aide
du périphérique audio.
« » s’affiche, une fois la connexion
établie.
Connexion du dernier périphérique
audio connecté à partir de cet
appareil
1Veillez à ce que le signal Bluetooth soit activé
sur cet appareil et sur le périphérique audio.
2Appuyez plusieurs fois sur (SOURCE/OFF)
jusqu’à ce l’indication « BT AUDIO »
apparaisse.
3Appuyez sur (6).
« » clignote en cours de connexion. « »
reste ensuite allumé une fois la connexion
établie.
allumé :
clignotant :
éteint :
Signal Bluetooth activé
Mode de veille de pairage
Signal Bluetooth désactivé
allumé :
clignotant :
éteint :
Connexion établie
Connexion en cours
Aucune connexion
allumé :
clignotant :
éteint :
Connexion établie
Connexion en cours
Aucune connexion
27
Appel en mains libres
Vérifiez au préalable que l’appareil et le
téléphone mobile sont connectés.
Réception d’appels
Lorsque vous recevez un appel, les haut-parleurs
de votre véhicule émettent une sonnerie.
1Appuyez sur (mains libres)
lorsqu’un appel est reçu avec une
sonnerie.
L’appel commence.
Pour terminer un appel
Réappuyez sur (mains libres).
Pour rejeter un appel entrant, appuyez sur
(mains libres) et maintenez la touche enfoncée
pendant 2 secondes.
Réglage du gain du micro
Vous pouvez commuter entre deux niveaux de
volume (« LOW » ou « HI ») afin de régler un
niveau approprié pour votre interlocuteur
pendant un appel.
1Appuyez sur (5) en cours d’appel.
Le paramètre change comme suit :
MIC-LOW y MIC-HI
Remarque
Le microphone de cet appareil est situé à l’arrière de
la façade (page 14). Ne masquez pas le microphone
avec du ruban adhésif, etc.
Appels
Si vous effectuez des appels à partir de cet
appareil, la recomposition du numéro est utilisée.
1Appuyez plusieurs fois sur
(SOURCE/OFF) jusqu’à ce l’indication
« BT PHONE » apparaisse.
2Appuyez sur la touche (mains
libres) et maintenez-la enfoncée
pendant 3 secondes minimum.
L’appel commence.
Pour terminer un appel
Réappuyez sur (mains libres).
Pour appeler un autre téléphone, utilisez votre
téléphone mobile, puis transférez l’appel.
Pour plus de détails sur le transfert d’appel,
consultez la section suivante.
Transfert d’appel
Pour activer/désactiver le périphérique adéquat
(cet appareil/le téléphone mobile) effectuez les
vérifications suivantes.
1Appuyez sur (mains libres) et
maintenez la touche enfoncée ou
utilisez votre téléphone mobile.
Pour plus de détails sur le fonctionnement du
téléphone mobile, reportez-vous au mode
d’emploi de ce dernier.
Remarque
Selon votre téléphone mobile, la connexion mains
libres peut être interrompue lorsque vous essayez
d’effectuer un transfert d’appel.
Activation de la composition
vocale
Vous pouvez activer la composition vocale avec
un téléphone mobile raccordé à cet appareil en
prononçant le repère vocal mémorisé sur le
téléphone mobile, puis en effectuant un appel.
1Appuyez plusieurs fois sur
(SOURCE/OFF) jusqu’à ce l’indication
« BT PHONE » apparaisse.
2Appuyez sur (mains libres).
Le téléphone mobile passe en mode de
composition vocale.
3Prononcez le repère vocal mémorisé
sur le téléphone mobile.
Votre voix est reconnue et l’appel est effectué.
Remarques
•Vérifiez au préalable que l’appareil et le téléphone
mobile sont connectés.
•Mémorisez préalablement un repère vocal sur votre
téléphone mobile.
•Si vous activez la composition vocale avec un
téléphone mobile connecté à cet appareil, cette
fonction peut parfois être inopérante.
•Des bruits comme le bruit du moteur peuvent
interférer avec la reconnaissance vocale. Afin
d’améliorer la reconnaissance, utilisez cette fonction
dans des conditions où le bruit est réduit.
•Il est possible que la composition vocale soit
inopérante dans certains cas, selon l’efficacité de la
fonction de reconnaissance du téléphone mobile.
Pour plus de détails, reportez-vous au site
d’assistance (page 25).
Conseils
•Parlez de la même façon que lorsque vous avez
mémorisé le repère vocal.
•Mémorisez un repère vocal au moyen de cet
appareil lorsque vous êtes installé dans la voiture,
avec la source « BT PHONE » sélectionnée.
28
Transmission en continu de
musique
Ecoute de musique à partir d’un
périphérique audio
Vous pouvez écouter de la musique lue sur un
périphérique audio sur cet appareil si le
périphérique audio prend en charge le profil
A2DP (Advanced Audio Distribution Profile) de
la technologie Bluetooth.
1Diminuez le volume de l’appareil.
2Appuyez plusieurs fois sur
(SOURCE/OFF) jusqu’à ce l’indication
« BT AUDIO » apparaisse.
3Faites fonctionner le périphérique
audio pour commencer la lecture.
4Réglez le volume sur cet appareil.
Réglage du niveau de volume
Le niveau de volume peut être réglé pour corriger
toutes les différences entre l’appareil et le
périphérique audio Bluetooth.
1Démarrez la lecture sur le périphérique audio
Bluetooth, à un niveau de volume moyen.
2Réglez votre appareil sur le volume d’écoute
habituel.
3Appuyez plusieurs fois sur la touche de
sélection jusqu’à ce que « BTA » apparaisse,
puis tournez la molette de réglage du volume
pour régler le niveau d’entrée (–8 dB à
+18 dB).
Fonctionnement d’un périphérique
audio avec cet appareil
Vous pouvez effectuer les opérations suivantes
sur cet appareil si le périphérique audio prend en
charge le profil AVRCP (Audio Video Remote
Control Profile) de la technologie Bluetooth. (Le
fonctionnement diffère selon le périphérique
audio.)
*En fonction du périphérique, il peut être nécessaire
d’appuyer deux fois sur la touche.
Les opérations autres que celles citées ci-dessus
doivent être effectuées à partir du périphérique
audio.
Remarques
•Pendant la lecture d’un périphérique audio, les
informations telles que le numéro de la plage/le
temps, le statut de lecture, etc., d’un périphérique
audio connecté n’apparaissent pas sur cet appareil.
•Même si la source change sur cet appareil, la
lecture ne s’interrompt pas sur le périphérique
audio.
Conseil
Vous pouvez connecter un téléphone mobile
compatible avec le profil A2DP (Advanced Audio
Distribution Profile) comme périphérique audio et
écouter de la musique.
Suppression de
l’enregistrement de tous les
périphériques appariés
1Appuyez sur la touche (SOURCE/OFF)
et maintenez-la enfoncée pendant 1
seconde pour mettre l’appareil hors
tension.
2Si « » s’affiche, appuyez sur la
touche (BT) et maintenez-la enfoncée
jusqu’a ce que « » s’éteigne.
3Appuyez sur la touche de sélection et
maintenez-la enfoncée.
4Appuyez plusieurs fois sur la touche
de sélection jusqu’à ce que « BT INIT »
apparaisse.
5Appuyez sur (SEEK) +.
L’initialisation commence.
L’annulation de tous les enregistrements
prend 3 secondes. Ne mettez pas l’appareil
hors tension lorsque « INITIAL » clignote.
Pour Appuyez sur
lire (6) (PAUSE)* sur cet appareil.
interrompre la
lecture
(6) (PAUSE)* sur cet appareil.
ignorer des
plages SEEK –/+ (./>) [une fois
pour chaque plage]
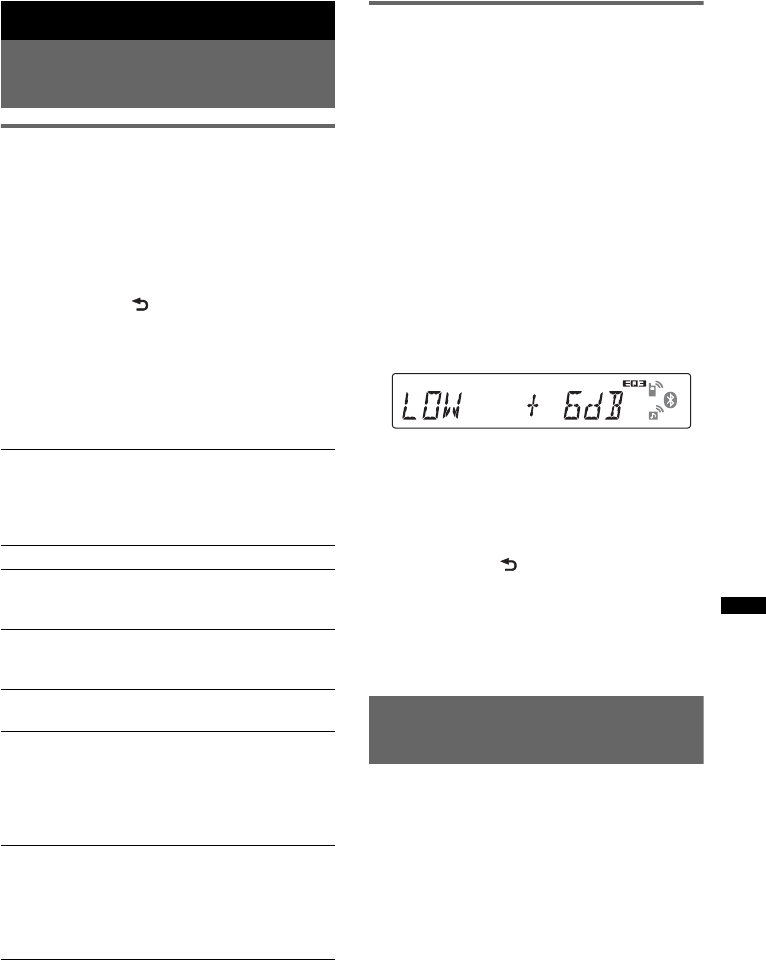
29
Autres fonctions
Modification des
caractéristiques du son
Réglage des caractéristiques du
son
1Appuyez plusieurs fois sur la touche
de sélection jusqu’à ce que le
paramètre souhaité s’affiche.
2Tournez la molette de réglage pour
régler le paramètre sélectionné.
3Appuyez sur (BACK).
Une fois le réglage terminé, la fenêtre
d’affichage revient au mode de réception/
lecture normal.
Les paramètres suivants peuvent être réglés
(reportez-vous à la page indiquée pour plus de
détails) :
Personnalisation de la courbe de
l’égaliseur — EQ3
Le paramètre « CUSTOM » de EQ3 vous permet
d’effectuer vos propres réglages de l’égaliseur.
1Sélectionnez une source, puis
appuyez plusieurs fois sur la touche
de sélection pour sélectionner
«EQ3».
2Tournez la molette de réglage pour
sélectionner « CUSTOM ».
3Appuyez plusieurs fois sur la touche
de sélection jusqu’à ce que « LOW »,
«MID» ou «HI» apparaisse.
4Tournez la molette de réglage pour
régler le paramètre sélectionné.
Le niveau de volume peut être réglé par
incréments de 1 dB, de – 10 dB à + 10 dB.
Répétez les étapes 3 et 4 pour régler la courbe
de l’égaliseur.
Pour restaurer la courbe par défaut de
l’égaliseur, appuyez sur la touche de sélection
et maintenez-la enfoncée avant la fin du
réglage.
5Appuyez sur (BACK).
Une fois le réglage terminé, la fenêtre
d’affichage revient au mode de réception/
lecture normal.
Conseil
D’autres types d’égaliseur peuvent aussi être réglés.
Réglage des paramètres de
configuration — SET
1Appuyez sur la touche de sélection et
maintenez-la enfoncée.
L’écran de configuration apparaît.
2Appuyez plusieurs fois sur la touche
de sélection jusqu’à ce que le
paramètre souhaité s’affiche.
3Tournez la molette de réglage pour
sélectionner le paramètre (par
exemple, « ON » ou « OFF »).
EQ3
Permet de sélectionner la courbe de l’égalisateur
parmi 7 types de musique. (XPLOD, VOCAL,
EDGE, CRUISE, SPACE, GRAVITY,
CUSTOM ou OFF).
LOW*1, MID*1, HI*1 (page 29)
BAL (Balance)
Permet de régler la balance du son des haut-
parleurs gauche et droit.
FAD (Equilibre avant-arrière)
Permet de régler le niveau relatif des haut-
parleurs avant et arrière.
SUB*2 (Volume du caisson de graves)
Permet de régler le volume du caisson de graves.
AUX*3 (Niveau AUX)
Permet de régler le niveau de volume de chaque
appareil auxiliaire raccordé : « +18 dB » –
« 0 dB » – « –8 dB ».
Ce réglage évite de régler le niveau de volume
entre les sources.
BTA*4 (BT-Niveau audio)
Permet de régler le niveau de volume pour
chaque appareil audio Bluetooth connecté :
« +18 dB » – « 0 dB » – « –8 dB ».
Ce réglage annule le besoin de régler le niveau
du volume entre les sources (page 28).
*1 Lorsque EQ3 est activé.
*2 « ATT » est affiché sur le réglage inférieur et peut
être réglé jusqu’à 21 incréments.
*3 Lorsque la source AUX est activée (page 31).
*4 Lorsque la source audio Bluetooth est activée
(page 28).
suite à la page suivante t
30
4Appuyez sur la touche de sélection et
maintenez-la enfoncée.
Une fois le réglage terminé, la fenêtre
d’affichage revient au mode de réception/
lecture normale.
Remarque
Les paramètres affichés diffèrent selon la source et le
réglage.
Les paramètres suivants peuvent être réglés
(reportez-vous à la page indiquée pour plus de
détails) :
*1 Lorsque l’appareil est hors tension.
*2 Lorsqu’une station FM est captée.
CLOCK-ADJ (Réglage de l’horloge) (page 8)
CT (Heure)
Permet d’activer la fonction CT : « ON »,
« OFF » (page 19, 20).
BEEP
Permet d’activer ou de désactiver le bip :
«ON», «OFF».
AUX-A*1 (Audio AUX)
Permet de régler l’affichage de la source AUX :
«ON», «OFF» (page31).
A.OFF (Arrêt automatique)
Permet une extinction automatique à l’issue
d’un délai souhaité lorsque l’appareil est mis
hors tension : « NO », « 30S » (Seconds),
« 30M » (Minutes), « 60M » (Minutes).
MIC*1 (Microphone)
– « EXT » : pour activer automatiquement le
microphone externe lorsque celui-ci est
raccordé.
– « INT » : pour sélectionner uniquement le
microphone interne.
DEMO
(Démonstration)
Permet d’activer la démonstration : « ON »,
«OFF».
DIM (Régulateur de luminosité)
Permet de modifier la luminosité de l’affichage :
«ON», «OFF».
A.SCRL (Défilement automatique)
Permet de faire défiler automatiquement les
paramètres d’affichage longs : « ON »,
«OFF».
LOCAL (Mode de recherche locale)
– « ON » : pour régler uniquement les stations
dont les signaux sont plus puissants.
– « OFF » : pour syntoniser en réception
normale.
MONO*2 (Mode monaural)
Pour améliorer la réception FM faible,
sélectionnez le mode de réception monaurale :
«ON», «OFF».
REG*2 (Régional)
Restreint la réception à une région spécifique :
«ON», «OFF» (page20).
Z.TIME (Durée Zappin)
Permet de sélectionner la durée de lecture pour
la fonction ZAPPIN.
– « Z.TIME-1 » (environ 6 secondes),
«Z.TIME-2» (environ 9secondes),
« Z.TIME-3 » (environ 30 secondes).
LPF (Filtre passe-bas)
Permet de sélectionner la fréquence de coupure
du caisson de graves : « OFF », « 80Hz »,
« 100Hz », « 120Hz », « 140Hz », « 160Hz ».
LPF NORM/REV (Filtre passe-bas normal/
inversé)
Permet de sélectionner la phase du caisson de
graves: «NORM», «REV».
HPF (Filtre passe-haut)
Permet de sélectionner la fréquence de coupure
des haut-parleurs avant/arrière : « OFF »,
« 80Hz », « 100Hz », « 120Hz », « 140Hz »,
« 160Hz ».
LOUD (Intensité sonore)
Permet d’amplifier les graves et les aigus
lorsque le volume est bas : « ON », « OFF ».
DM+
Pour activer la fonction DM+ : « ON »,
«OFF».
BTM (page 18)
BT INIT*1 (Initialisation Bluetooth) (page 28)
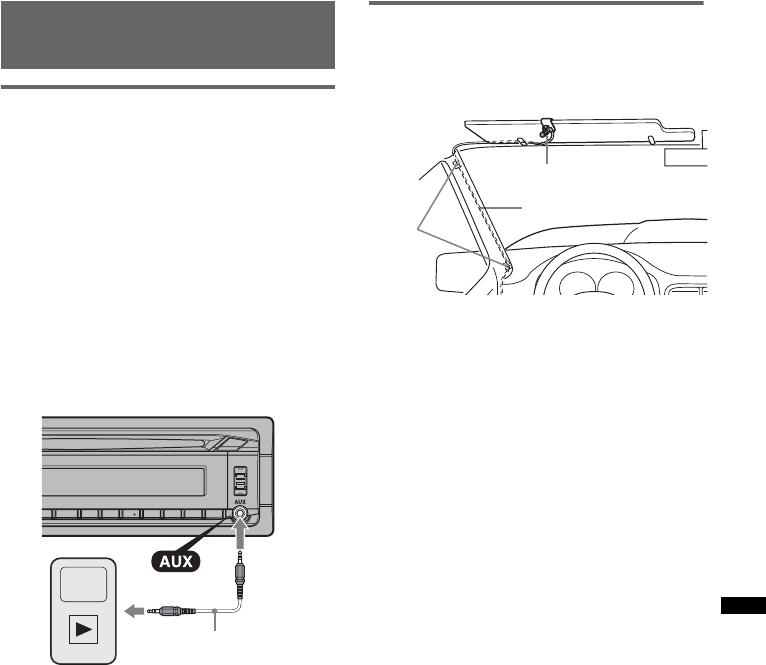
31
Utilisation d’un appareil en
option
Appareil audio auxiliaire
En raccordant un appareil audio portatif en
option à la prise d’entrée AUX (mini-prise
stéréo) de l’appareil, puis en sélectionnant
simplement la source, vous pouvez l’écouter par
l’intermédiaire des haut-parleurs du véhicule. Le
niveau de volume peut être réglé pour corriger
toutes les différences entre l’appareil et l’appareil
audio portatif. Suivez la procédure ci-dessous :
Raccordement de l’appareil audio
portatif
1Mettez l’appareil audio portatif hors tension.
2Diminuez le volume de l’appareil.
3Effectuez le raccordement à l’appareil.
*Veillez à utiliser une fiche de type droit.
Réglez le niveau de volume
Avant de commencer la lecture, n’oubliez pas de
régler le volume de chaque périphérique audio
raccordé.
1Diminuez le volume de l’appareil.
2Appuyez plusieurs fois sur (SOURCE/OFF)
jusqu’à ce que l’indication « AUX »
apparaisse.
Ensuite, « AUX FRONT IN » s’affiche.
3Démarrez la lecture sur l’appareil audio
portatif, à un niveau de volume moyen.
4Réglez votre appareil sur le volume d’écoute
habituel.
5Réglez le niveau d’entrée (page 29).
Microphone externe XA-MC10
En raccordant un microphone externe (en option)
au connecteur d’entrée du microphone, vous
pouvez améliorer la qualité du son alors qu’une
communication est en cours.
Conseil
Vous pouvez attribuer un ordre de priorité aux
microphones (page 30).
Remarque
Raccordez XA-MC10 en tant que microphone externe.
Il se peut que vous ne puissiez pas passer un appel
ou qu’un dysfonctionnement se produise si un autre
périphérique est raccordé.
Cordon de raccordement*
(non fourni)
Microphone externe
Cordon de raccordement
Attaches
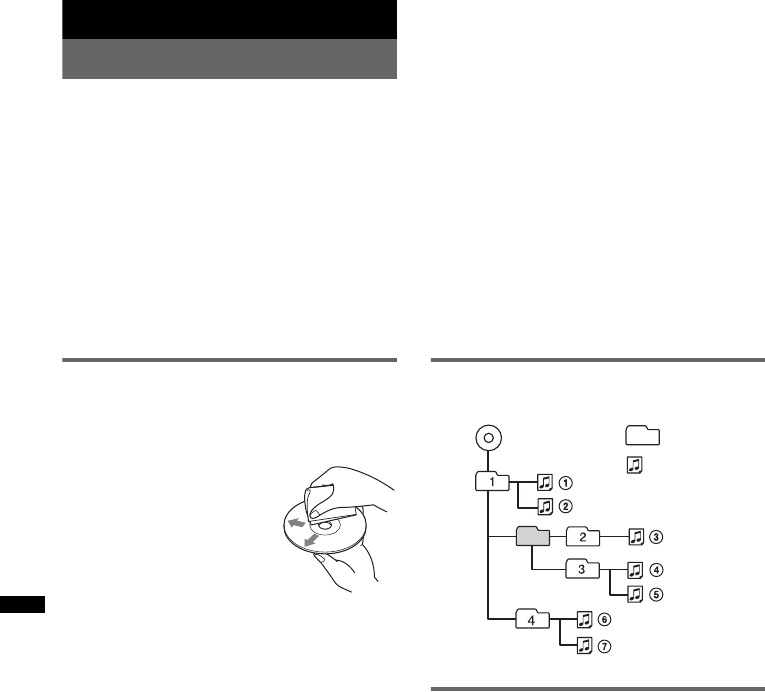
32
Informations complémentaires
Précautions
• Refroidissez l’appareil au préalable si votre
véhicule est resté garé en plein soleil.
• L’antenne électrique se déploie automatiquement.
Condensation
Si de la condensation s’est formée à l’intérieur de
l’appareil, retirez le disque et laissez-le sécher
pendant une heure environ ; sinon l’appareil ne
fonctionnera pas correctement.
Pour conserver un son de haute
qualité
Ne projetez pas de liquide sur l’appareil ou les
disques.
Remarques sur les disques
• N’exposez pas les disques à la lumière directe du
soleil ou à des sources de chaleur comme des
conduites d’air chaud et ne les laissez pas dans un
véhicule garé en plein soleil.
• Avant de lire les disques,
essuyez-les avec un chiffon de
nettoyage en partant du centre.
N’utilisez pas de solvants
comme de l’essence, du
dissolvant ou des nettoyants
disponibles dans le commerce.
• Cet appareil est conçu pour la
lecture des disques conformes à
la norme Compact Disc (CD). Les DualDiscs et
certains disques de musique encodés par des
technologies de protection des droits d’auteur ne
sont pas conformes à la norme Compact Disc
(CD), par conséquent, il est possible que ces
disques ne puissent pas être lus sur cet appareil.
•Disques NE POUVANT PAS être lus par cet
appareil
– Disques sur lesquels sont collés des étiquettes,
des autocollants, du ruban adhésif ou du papier.
L’utilisation de tels disques peut entraîner des
problèmes de fonctionnement ou les
endommager.
– Disques de forme non standard (ex. en forme de
cœur, de carré ou d’étoile). Vous risquez
d’endommager votre appareil si vous essayez de
le faire.
– Disques de 8 cm.
Remarques sur les disques CD-R et
CD-RW
• Nombre maximal de : (CD-R/CD-RW
uniquement)
– dossiers (albums) : 150 (y compris le répertoire
racine)
– fichiers (plages) et dossiers : 300 (lorsqu’un nom
de dossier ou de fichier contient un grand
nombre de caractères, ce nombre peut être
inférieur à 300)
– caractères pouvant être affichés pour un nom de
dossier/fichier : 32 (Joliet) ou 64 (Romeo)
• Si le disque en multisession commence par une
session CD-DA, celui-ci est reconnu en tant que
CD-DA et les autres sessions ne sont pas lues.
•Disques NE POUVANT PAS être lus par cet
appareil
– CD-R/CD-RW avec une faible qualité
d’enregistrement.
– CD-R/CD-RW enregistrés avec un appareil
d’enregistrement incompatible.
– CD-R/CD-RW non finalisés correctement.
– CD-R/CD-RW autres que ceux enregistrés au
format de musique CD ou MP3 conformément à
la norme ISO9660 Niveau 1/Niveau 2, Joliet/
Romeo ou multisession.
Ordre de lecture des fichiers
MP3/WMA/AAC
A propos de iPod
• Vous pouvez raccorder les modèles d’iPod
suivants. Mettez à jour vos iPods avec la dernière
version logicielle avant de les utiliser.
Made for
– iPod touch
– iPod touch (2ème génération)
– iPod classic
– iPod classi (120 Go)
– iPod avec vidéo*
– iPod nano (4ème génération)
– iPod nano (3ème génération)
– iPod nano (2ème génération)
– iPod nano (1ère génération)*
Works with
– iPhone
– iPhone 3G
– iPhone 3GS
*La commande passager n’est pas disponible avec
les iPod nano (1ère génération) ou les iPod avec
vidéo.
Dossier
(album)
Fichier MP3/
WMA/AAC
(plage)
MP3/WMA/AAC

33
• « Made for iPod » signifie qu’un accessoire
électronique a été conçu pour être raccordé
spécifiquement à un iPod et le développeur certifie
qu’il est conforme aux normes de performances
Apple.
• « Works with iPhone » signifie qu’un accessoire
électronique a été conçu pour être raccordé
spécifiquement à un iPhone et le développeur
certifie qu’il est conforme aux normes de
performances Apple.
• Apple n’est pas responsable du fonctionnement de
cet appareil ni de sa conformité aux
réglementations et normes de sécurité.
A propos de la fonction Bluetooth
Qu’est-ce que la technologie Bluetooth ?
• La technologie Bluetooth sans fil est une
technologie sans fil à courte portée permettant la
communication sans fil de données entre des
appareils numériques comme un téléphone mobile
et un casque. La technologie sans fil Bluetooth
fonctionne dans un rayon d’environ 10 m. Le
raccordement de deux appareils est courant, mais
certains appareils peuvent être raccordés à
plusieurs périphériques à la fois.
• Vous n’avez pas besoin d’utiliser un câble de
raccordement étant donné que la technologie
Bluetooth est une technologie sans fil, il n’est pas
non plus nécessaire que les appareils se trouvent
face à face, contrairement à la technologie
infrarouge. Vous pouvez par exemple utiliser un
appareil dans un sac ou une poche.
• La technologie Bluetooth est une norme
internationale prise en charge et utilisée par des
millions de sociétés à travers le monde.
Communication Bluetooth
• La technologie sans fil Bluetooth fonctionne dans
un rayon d’environ 10 m.
La portée de communication maximale peut varier
selon les obstacles (personne, métal, mur, etc.) ou
l’environnement électromagnétique.
• Les conditions suivantes peuvent affecter la
sensibilité de la communication Bluetooth :
– un obstacle, par exemple une personne, un objet
métallique ou un mur se trouve entre cet appareil
et le périphérique Bluetooth ;
– un appareil utilisant une fréquence de 2,4 GHz,
par exemple un périphérique LAN sans fil, un
téléphone sans fil ou un four à micro-ondes est
utilisé à proximité de cet appareil.
• Etant donné que les périphériques Bluetooth et les
périphériques LAN sans fil (IEEE802.11b/g)
utilisent la même fréquence, des interférences en
hyperfréquences peuvent survenir et entraîner une
dégradation de la vitesse de communication, des
parasites ou une connexion non valide si cet
appareil est utilisé à proximité d’un périphérique
LAN sans fil. En pareil cas, prenez les mesures
suivantes :
– utilisez cet appareil à au moins 10 m du
périphérique LAN sans fil ;
– si cet appareil est utilisé dans un rayon de 10 m
par rapport au périphérique LAN sans fil, mettez
ce dernier hors tension ;
– installez cet appareil et le périphérique
Bluetooth aussi près que possible l’un de l’autre.
• Les émissions d’hyperfréquences d’un
périphérique Bluetooth peuvent perturber le
fonctionnement des appareils médicaux
électroniques. Mettez cet appareil ainsi que les
autres périphériques Bluetooth situés dans les
endroits suivants hors tension afin d’éviter tout
accident :
– endroits où du gaz inflammable est présent, dans
un hôpital, un train, un avion ou une station
service ;
– à proximité de portes automatiques ou d’alarmes
incendie.
• Cet appareil prend en charge les capacités de
sécurité conformes à la norme Bluetooth pour
offrir une connexion sécurisée lors de l’utilisation
de la technologie sans fil Bluetooth ; cependant, la
sécurité peut être insuffisante selon le réglage.
Soyez prudent lorsque vous communiquez au
moyen de la technologie sans fil Bluetooth.
• Nous ne pouvons être tenus responsables de la
fuite d’informations lors d’une communication
Bluetooth.
• La connexion ne peut pas être garantie avec tous
les périphériques Bluetooth.
– Un périphérique doté de la fonction Bluetooth
doit être conforme à la norme Bluetooth
spécifiée par Bluetooth SIG et être authentifié.
– Même si le périphérique raccordé est conforme à
la norme Bluetooth précédemment mentionnée,
certains périphériques risquent de ne pas se
connecter ou de ne pas fonctionner
correctement, selon leurs caractéristiques ou
spécifications.
– Lors de communications téléphoniques en mains
libres, des parasites peuvent se produire, en
fonction du périphérique ou de l’environnement
de communication.
• Selon le périphérique à connecter, le délai avant le
début de la communication peut être plus ou
moins long.
Autres
• Le périphérique Bluetooth peut ne pas fonctionner
avec les téléphones mobiles, en fonction des
conditions des ondes radio et de l’endroit où
l’appareil est utilisé.
• Si vous éprouvez une gêne après avoir utilisé le
périphérique Bluetooth, cessez de l’utiliser
immédiatement. Si le problème persiste, consultez
votre revendeur Sony le plus proche.
Si vous avez des questions ou des problèmes
concernant cet appareil qui ne sont pas abordés dans
ce mode d’emploi, contactez votre revendeur Sony.
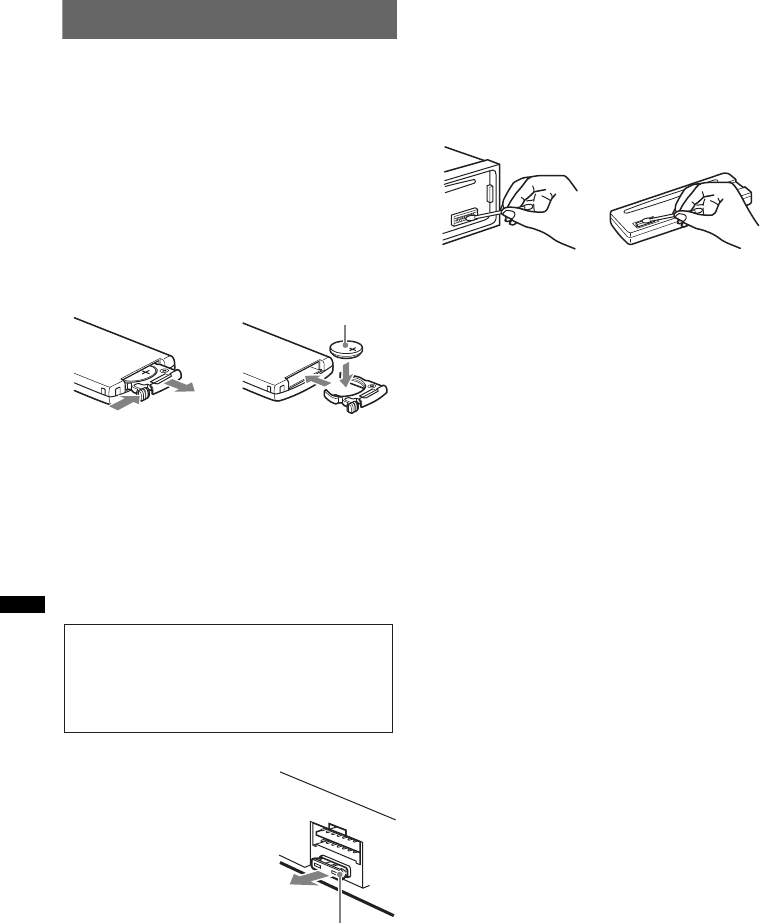
34
Entretien
Remplacement de la pile au lithium
de la mini-télécommande
Dans des conditions d’utilisation normales, la
pile dure environ 1 an. (En fonction des
conditions d’utilisation, sa durée de vie peut être
plus courte.)
Lorsque la pile est faible, la portée de la mini-
télécommande diminue. Remplacez la pile par
une pile au lithium CR2025 neuve. L’utilisation
de tout autre type de pile présente un risque
d’incendie ou d’explosion.
Remarques sur la pile au lithium
•Tenez la pile au lithium hors de la portée des
enfants. En cas d’ingestion de la pile, consultez
immédiatement un médecin.
•Essuyez la pile avec un chiffon sec pour assurer un
bon contact.
•Veillez à respecter la polarité lors de l’installation de
la pile.
•Ne tenez pas la pile avec des pinces métalliques,
car cela pourrait entraîner un court-circuit.
Remplacement du
fusible
Lorsque vous remplacez le
fusible, veillez à utiliser un
fusible dont l’intensité, en
ampères, correspond à la valeur
indiquée sur le fusible usagé. Si
le fusible saute, vérifiez le
branchement de l’alimentation
et remplacez-le. Si le nouveau
fusible saute également, il est
possible que l’appareil soit
défectueux. Dans ce cas, consultez votre revendeur
Sony le plus proche.
Nettoyage des connecteurs
L’appareil risque de ne pas fonctionner
correctement si les connecteurs entre l’appareil et la
façade sont souillés. Pour éviter cette situation,
enlevez la façade (page 8) et nettoyez les
connecteurs à l’aide d’un coton-tige. N’exercez pas
une pression excessive, sinon les connecteurs
risquent d’être endommagés.
Remarques
•Pour plus de sécurité, coupez le moteur avant de
nettoyer les connecteurs et retirez la clé du contact.
•Ne touchez jamais les connecteurs directement
avec les doigts ou avec un objet métallique.
1
2
Pôle + vers le haut
c
ATTENTION
Utilisée de façon incorrecte, la pile peut
exploser.
Ne pas la recharger, la démonter ni la jeter
au feu.
Fusible (10 A)
Appareil principal Arrière de la
façade
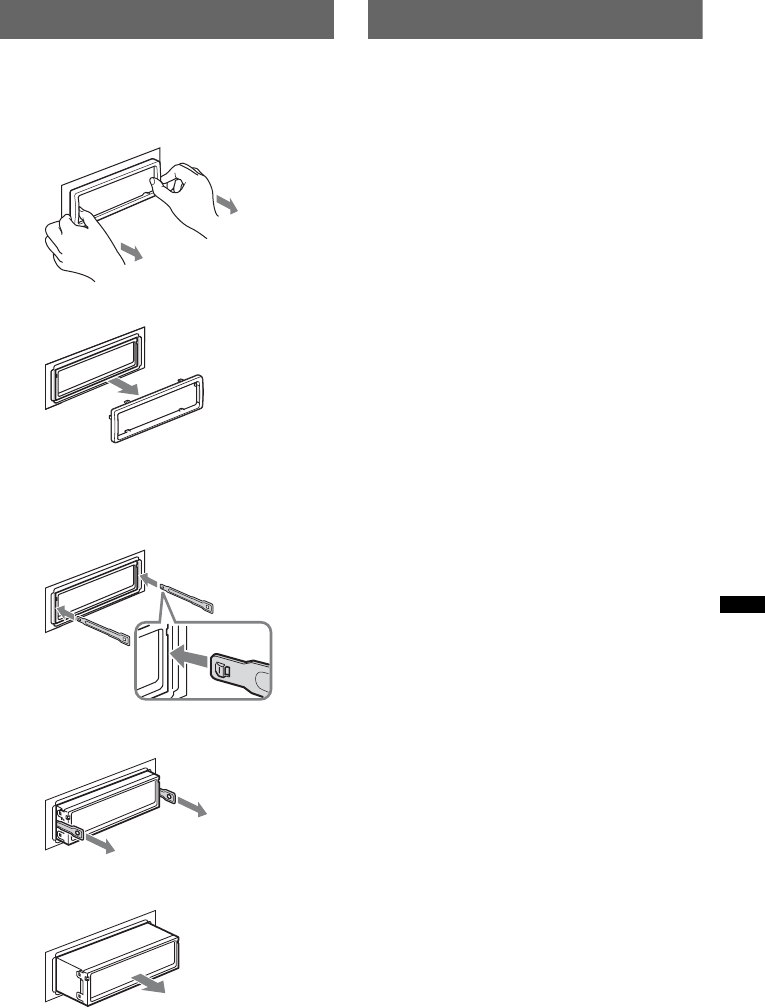
35
Retrait de l’appareil
1Retirez le tour de protection.
1Retirez la façade (page 8).
2Pincez les deux côtés du tour de
protection, puis tirez-le.
2Retirez l’appareil.
1Insérez simultanément deux clés de
déblocage jusqu’à ce qu’elles émettent un
déclic.
2Tirez sur les clés de déblocage pour
extraire l’appareil.
3Faites glisser l’appareil en dehors de son
support.
Spécifications
Radio
FM
Plage de syntonisation : 87,5 à 108,0 MHz
Borne d’antenne : connecteur d’antenne externe
Moyenne fréquence : 150 kHz
Sensibilité utile : 10 dBf
Sélectivité : 75 dB à 400 kHz
Rapport signal/bruit : 70 dB (mono)
Séparation : 40 dB à 1 kHz
Réponse en fréquence : 20 à 15 000 Hz
MW (PO)/LW (GO)
Plage de syntonisation :
MW (PO) : 531 à 1 602 kHz
LW (GO) : 153 à 279 kHz
Borne d’antenne : connecteur d’antenne externe
Moyenne fréquence : 25 kHz
Sensibilité : MW (PO) : 26 µV, LW (GO) : 45 µV
Lecteur CD
Rapport signal/bruit : 120 dB
Réponse en fréquence : 10 à 20 000 Hz
Pleurage et scintillement : en dessous du seuil
mesurable
Lecteur USB
Interface : USB (haute vitesse)
Courant maximal : 500 mA
Communication sans fil
Système de communication :
Norme Bluetooth version 2.0
Sortie :
Norme Bluetooth Power Class 2 (Max. +4 dBm)
Portée de communication maximale :
En ligne directe environ 10 m*1
Bande de fréquences :
Bande de 2,4 GHz (2,4000 à 2,4835 GHz)
Méthode de modulation : FHSS
Profils Bluetooth compatibles*2 :
A2DP (Advanced Audio Distribution Profile)
AVRCP (Audio Video Remote Control Profile)
HFP (Handsfree Profile) 1.5
HSP (Headset Profile)
*1 La portée réelle varie en fonction de nombreux
facteurs tels que la présence d’obstacles entre les
appareils, les champs magnétiques autour des
fours à micro-ondes, l’électricité statique, la
sensibilité de la réception, les performances de
l’antenne, le système d’exploitation, les
applications logicielles, etc.
*2 Les profils standard Bluetooth sont destinés à la
communication Bluetooth entre les périphériques.
x
Tournez le
crochet vers
l’intérieur.
suite à la page suivante t
36
Amplificateur de puissance
Sortie : sorties haut-parleurs (connecteurs de sécurité)
Impédance du haut-parleur : 4 à 8 ohms
Puissance de sortie maximale : 52 W × 4 (à 4 ohms)
Généralités
Sorties :
Borne de sorties audio (avant/arrière)
Borne de sortie du caisson de graves (mono)
Borne de commande de relais d’antenne électrique
Borne de commande d’amplificateur de puissance
Entrées :
Borne d’entrée de commande BUS
Borne d’entrée audio BUS
Borne de commande ATT téléphone
Borne d’entrée de commande à distance
Borne d’entrée de l’antenne
Borne d’entrée MIC
Prise d’entrée AUX (mini-prise stéréo)
Connecteur d’entrée du signal USB
Commandes de tonalité :
Graves : ±10 dB à 60 Hz (XPLOD)
Médiums : ±10 dB à 1 kHz (XPLOD)
Aigus : ±10 dB à 10 kHz (XPLOD)
Alimentation requise : batterie de véhicule 12 V CC
(masse négative)
Dimensions : environ 178 × 50 × 179 mm (l/h/p)
Dimensions du support : environ 182 × 53 × 162 mm
(l/h/p)
Poids : environ 1,2 kg
Accessoires fournis :
Mini-télécommande : RM-X304
Composants destinés à l’installation et au
raccordement (1 jeu)
Appareils/accessoires en option :
Câble BUS (fourni avec un cordon à broches
RCA) : RC-61 (1 m), RC-62 (2 m)
Sélecteur de source : XA-C40
Câble de connexion USB pour iPod : RC-100IP
Microphone externe : XA-MC10
Il est possible que votre revendeur ne dispose pas de
certains accessoires décrits ci-dessus. Demandez-lui
des informations détaillées.
La conception et les spécifications sont sujettes à
modification sans préavis.
Dépannage
La liste de contrôles suivante vous aidera à remédier
aux problèmes que vous pourriez rencontrer avec cet
appareil.
Avant de passer en revue la liste de contrôles ci-
dessous, vérifiez les procédures de raccordement et
d’utilisation.
Si le problème persiste, consultez le site
d’assistance suivant.
• Aucun retardateur de flamme halogéné n’est utilisé
dans certaines cartes à circuits imprimés.
• Aucun retardateur de flamme halogéné n’est utilisé
dans la composition des coques.
• Du papier est utilisé pour les cales d’emballage.
Généralités
L’appareil n’est pas alimenté.
• Vérifiez le raccordement ou le fusible.
• Si vous mettez l’appareil hors tension et que
l’affichage disparaît, vous ne pouvez pas le
commander avec la mini-télécommande.
tMettez l’appareil sous tension.
L’antenne électrique ne se déploie pas.
L’antenne électrique ne dispose pas d’un boîtier de
relais.
Aucun son.
• La fonction ATT est activée ou la fonction ATT du
téléphone (lorsque le câble d’interface d’un
téléphone embarqué est raccordé au fil ATT) est
activée.
• La position de la commande d’équilibre avant/arrière
« FAD » n’est pas réglée pour un système à 2
enceintes.
• Le périphérique audio Bluetooth est en mode de
pause.
tDésactivez le mode de pause.
Aucun bip n’est émis.
• Le bip est désactivé (page 30).
• Un amplificateur de puissance en option est raccordé
et vous n’utilisez pas l’amplificateur intégré.
Le contenu de la mémoire a été effacé.
• La touche RESET a été enfoncée.
tRecommencez la procédure d’enregistrement
dans la mémoire.
• Le câble d’alimentation ou la batterie a été
débranché(e) ou n’est pas branché(e) correctement.
Les stations mémorisées et l’heure sont
effacées.
Le fusible a sauté.
Emission de bruit lorsque la position de la clé
de contact est modifiée.
Les câbles ne sont pas raccordés correctement au
connecteur d’alimentation du véhicule destiné aux
accessoires.
Site d’assistance
http://support.sony-europe.com/
37
En cours de lecture ou de réception, le mode
de démonstration démarre.
Si aucune opération n’est effectuée pendant 5 minutes
alors que « DEMO-ON » est activé, le mode
démonstration démarre.
tRéglez « DEMO-OFF » (page 30).
L’affichage disparaît de la fenêtre d’affichage
ou il ne s’affiche pas.
• Le régulateur de luminosité est réglé sur « DIM-
ON » (page 30).
• L’affichage est désactivé si vous maintenez la touche
(SOURCE/OFF) enfoncée.
tAppuyez sur la touche (SOURCE/OFF) de
l’appareil jusqu’à ce que l’affichage apparaisse.
• Les connecteurs sont sales (page 34).
La fonction arrêt automatique est inopérante.
L’appareil est mis sous tension. La fonction arrêt
automatique s’active après la mise hors tension de
l’appareil.
tMettez l’appareil hors tension.
Réception radio
Impossible de capter des stations.
Le son comporte des parasites.
• La raccordement n’est pas correct.
tRaccordez un câble de commande d’antenne
électrique (bleu) ou un câble d’alimentation
d’accessoires (rouge) au câble d’alimentation de
l’amplificateur d’antenne de la voiture
(uniquement si votre voiture est équipée d’une
antenne FM/MW (PO)/LW (GO) intégrée dans la
vitre arrière/latérale).
tVérifiez le raccordement de l’antenne du
véhicule.
tL’antenne automatique ne se déploie pas, vérifiez
le raccordement du câble de commande
d’antenne électrique.
Impossible de capter une présélection.
• Enregistrez la fréquence correcte dans la mémoire.
• Le signal capté est trop faible.
Le réglage automatique des stations est
impossible.
• Le réglage du mode de recherche locale est incorrect.
tLa syntonisation s’arrête trop souvent :
Réglez « LOCAL-ON » (page 30).
tLa syntonisation ne s’arrête sur aucune station :
Réglez « LOCAL-OFF » (page 30).
• Le signal capté est trop faible.
tRéglez manuellement la fréquence.
En cours de réception FM, l’indication « ST »
clignote.
• Réglez la fréquence correctement.
• Le signal capté est trop faible.
tRéglez « MONO-ON » (page 30).
Un programme FM émis en stéréo est entendu
en mono.
L’appareil est en mode de réception mono.
tRéglez « MONO-OFF » (page 30).
Fonction RDS
Une recherche (SEEK) commence après
quelques secondes d’écoute.
La station ne diffuse pas de programmes de
radioguidage (fonction TP désactivée) ou le signal
capté est faible.
tDésactivez TA (page 19).
Aucun message de radioguidage.
• Activez TA (page 19).
• La station n’émet pas de messages de radioguidage,
malgré l’indication TP.
tRéglez la fréquence pour capter une autre station.
PTY affiche « - - - - - - - - ».
• La station actuellement captée n’est pas une station
RDS.
• Les données RDS n’ont pas été reçues.
• La station ne spécifie pas le type d’émission.
Lecture de CD
Impossible d’introduire le disque.
• Un autre disque est déjà en place.
• Le disque a été introduit de force à l’envers ou dans le
mauvais sens.
La lecture du disque ne commence pas.
• Le disque est défectueux ou sale.
• Les CD-R/CD-RW ne sont pas destinés à un usage
audio (page 32).
Impossible de lire des fichiers MP3/WMA/AAC.
Le disque n’est compatible ni avec le format, ni avec la
version MP3/WMA/AAC. Pour plus de détails sur les
disques et les formats pouvant être lus, consultez le site
d’assistance.
Certains fichiers MP3/WMA/AAC exigent un
délai plus long que d’autres avant le début de
la lecture.
La lecture des types de disques suivants exige un délai
de démarrage plus long :
– disques comportant une hiérarchie de dossiers
complexe ;
– disques enregistrés en multisession ;
– disques auxquels il est possible d’ajouter des
données.
Les paramètres d’affichage ne défilent pas.
• Pour les disques contenant un grand nombre de
caractères, le défilement peut être inopérant.
• « A.SCRL » est réglé sur « OFF ».
tRéglez « A.SCRL-ON » (page 30).
tAppuyez sur la touche (DSPL) (SCRL) et
maintenez-la enfoncée.
Le son saute.
• L’installation est incorrecte.
tInstallez l’appareil suivant un angle de moins de
45° dans un endroit stable de la voiture.
• Le disque est défectueux ou sale.
Les touches de commande sont inopérantes.
Le disque ne s’éjecte pas.
Appuyez sur la touche RESET (page 7).
suite à la page suivante t
38
Lecture USB
Cet appareil ne permet pas la lecture
d’éléments via un concentrateur USB.
Cet appareil ne peut pas reconnaître de périphérique
USB via un concentrateur USB.
Impossible de lire certains éléments.
Un périphérique USB ne fonctionne pas.
tRaccordez-le de nouveau.
Le périphérique USB exige un délai plus long
avant le début de la lecture.
Le périphérique USB contient des fichiers comportant
une hiérarchie de dossiers complexe.
Un bip retentit.
Le périphérique USB a été débranché pendant la
lecture.
tVeillez à arrêter la lecture avant de débrancher un
périphérique USB afin de protéger les données.
Le son est intermittent.
Il est possible que le son soit intermittent à un haut
débit binaire supérieur à 320 kbit/s.
Fonction Bluetooth
Le périphérique à connecter ne détecte pas cet
appareil.
• Avant d’effectuer le pairage, réglez cet appareil en
mode de veille de pairage.
• Lorsqu’il est connecté à un périphérique Bluetooth,
cet appareil ne peut pas être détecté par un autre
périphérique. Désactivez la connexion en cours et
recherchez l’appareil à partir de l’autre périphérique.
• Une fois le pairage du périphérique effectué, activez
la sortie du signal Bluetooth (page 26).
Impossible d’établir la connexion.
• Connectez cet appareil à partir d’un périphérique
Bluetooth ou vice versa. La connexion est contrôlée
d’un côté (cet appareil ou le périphérique Bluetooth),
mais pas des deux.
• Vérifiez les procédures de pairage et de connexion en
vous reportant au manuel de l’autre périphérique,
etc., puis effectuez à nouveau cette opération.
Le volume de la voix du correspondant est
faible.
Réglez le niveau de volume.
Un interlocuteur trouve le volume trop faible ou
trop élevé.
Réglez le volume en conséquence à l’aide du réglage
du gain du micro (page 27).
Il y a de l’écho ou des parasites pendant les
conversations téléphoniques.
• Baissez le volume.
• Si le bruit environnant, autre que le son de l’appel
téléphonique, est fort, essayez de réduire ce bruit.
Par exemple : si une fenêtre est ouverte et que le bruit
de la rue, etc. est fort, fermez la fenêtre. Si la
climatisation fait beaucoup de bruit, baissez-la.
Le téléphone n’est pas connecté.
Lorsque le son Bluetooth est lu, le téléphone n’est pas
connecté, même si vous appuyez sur (mains libres).
tConnectez cet appareil à partir du téléphone.
La qualité sonore du téléphone est mauvaise.
La qualité sonore du téléphone dépend des conditions
de réception du téléphone mobile.
tDéplacez votre véhicule dans un endroit où la
réception est meilleure si elle était mauvaise.
Le volume du périphérique audio connecté est
faible (élevé).
Le niveau de volume varie d’un périphérique audio à
l’autre.
tRéglez le volume du périphérique audio connecté
ou de cet appareil.
Le son saute en cours de lecture d’un
périphérique audio Bluetooth.
• Réduisez la distance entre l’appareil et le
périphérique audio Bluetooth.
• Si le périphérique audio Bluetooth est rangé dans un
étui qui interrompt le signal, sortez-le de cet étui pour
l’utiliser.
• Plusieurs périphériques Bluetooth ou autres
périphériques qui émettent des ondes radio sont
utilisés à proximité.
tMettez les autres périphériques hors tension.
tAugmentez la distance à partir des autres
périphériques.
• Le son de la lecture s’interrompt momentanément
lorsque la connexion entre cet appareil et le téléphone
mobile est en cours. Il ne s’agit pas d’un problème de
fonctionnement.
Impossible de commander le périphérique
audio Bluetooth connecté.
Vérifiez que le périphérique audio Bluetooth connecté
prend en charge le profil AVRCP.
Certaines fonctions ne sont pas activées.
Vérifiez que le périphérique à connecter prend en
charge les fonctions en question.
Un appel commence involontairement.
Le téléphone connecté est réglé pour répondre
automatiquement à un appel.
Aucun son n’est émis par les haut-parleurs du
véhicule lors d’un appel en mains libres.
Si le son est émis par le téléphone mobile, réglez ce
dernier de sorte qu’il émette le son via les haut-
parleurs du véhicule.
« OFF BT » apparaît lors de l’initialisation.
Appuyez sur la touche (BT) et maintenez-la enfoncée
jusqu’à ce que l’indication « » s’éteigne. Initialisez
ensuite à nouveau l’appareil (page 28).
Le microphone externe ne fonctionne pas.
Le réglage du microphone est incorrect.
tRéglez « MIC-EXT » (page 30).

39
Affichage des erreurs et messages
Si ces solutions ne permettent pas d’améliorer la
situation, contactez votre revendeur Sony le plus
proche.
Si vous portez l’appareil à réparer en raison d’un
problème de lecture de CD, apportez le disque
utilisé au moment où le problème s’est produit.
CHECKING
L’appareil confirme le raccordement d’un périphérique
USB.
tAttendez que la confirmation du raccordement soit
terminée.
ERROR
• Le disque est sale ou inséré à l’envers.
tNettoyez le disque ou insérez-le correctement.
• Un disque vierge a été inséré.
• Le disque ne peut pas être lu en raison d’un
problème.
tInsérez-en un autre.
• Le périphérique USB n’a pas été reconnu
automatiquement.
tRebranchez-le de nouveau.
• Appuyez Z pour retirer le disque.
FAILURE
Les haut-parleurs ou les amplificateurs ne sont pas
raccordés correctement.
tReportez-vous au manuel d’installation/
raccordements de ce modèle pour vérifier les
raccordements.
HUB NO SUPRT (HUB non pris en charge)
Les concentrateurs USB ne sont pas pris en charge par
cet appareil.
L. SEEK +/–
Le mode de recherche locale est activé en cours de
syntonisation automatique.
NO AF
Il n’existe aucune fréquence alternative pour la station
actuelle.
tAppuyez sur (SEEK) +/– pendant que le nom du
service de programme clignote. L’appareil
commence à rechercher une autre fréquence avec
les mêmes données d’identification de programme
(PI) (l’indication « PI SEEK » apparaît).
NO DEV (aucun périphérique)
USB est sélectionné en tant que source alors qu’aucun
périphérique USB n’est raccordé. Un périphérique
USB ou un câble USB a été débranché pendant la
lecture.
tVeillez à brancher un périphérique et un câble USB.
NO MUSIC
Le disque ou le périphérique USB ne contient pas de
fichier de musique.
tInsérez un CD audio dans cet appareil.
tRaccordez un périphérique USB comprenant un
fichier audio.
NO NAME
Aucun nom de disque/d’album/d’artiste/de plage n’est
écrit dans la plage.
NO TP
L’appareil continue à rechercher les stations diffusant
des messages de radioguidage (TP).
OFFSET
Il est possible qu’il y ait un problème de
fonctionnement.
tVérifiez le raccordement. Si le message d’erreur
reste affiché, contactez votre revendeur Sony le
plus proche.
OVERLOAD
Le périphérique USB est saturé.
tDébranchez le périphérique USB, puis modifiez la
source en appuyant sur (SOURCE/OFF).
tIndique que le périphérique USB ne fonctionne
plus ou qu’un périphérique non pris en charge est
raccordé.
READ
L’appareil lit toutes les informations de plage et
d’album sur le disque.
tAttendez que la lecture soit terminée et la lecture
commence automatiquement. Selon la structure du
disque, cette opération peut prendre plus d’une
minute.
RESET
Impossible de commander cet appareil ou le
périphérique USB en raison d’un problème.
tAppuyez sur la touche RESET (page 7).
USB NO SUPRT (USB non pris en charge)
Le périphérique USB raccordé n’est pas pris en charge.
tPour plus de détails sur la compatibilité de votre
périphérique USB, consultez le site d’assistance.
«» ou «»
Pendant le retour ou l’avance rapide, vous avez atteint
le début ou la fin du disque et vous ne pouvez pas aller
plus loin.
«»
Le caractère ne peut pas être affiché.
2
La targhetta indicante la tensione operativa e
informazioni simili è situata nella parte inferiore
del rivestimento.
Con la presente Sony Corp. dichiara che il
modello MEX-BT3800U è conforme ai requisiti
essenziali e ad altre disposizioni pertinenti
stabilite dalla direttiva 1999/5/CE.
Per ulteriori informazioni, accedere al seguente
indirizzo URL:
http://www.compliance.sony.de/
L’uso della presente apparecchiatura radio non è
consentito nell’area geografica compresa nel
raggio di 20 km a partire dal centro di
Ny-Alesund, Svalbard in Norvegia.
Si dichiara che l’apparecchio è stato fabbricato in
conformità all’art.2, Comma l del D.M.28.08.1995
n.548.
Per motivi di sicurezza, assicurarsi di
installare il presente apparecchio sul cruscotto
dell’auto. Per l’installazione e i collegamenti,
consultare il manuale per l’installazione e i
collegamenti in dotazione.
Questa etichetta è posta nella parte inferiore
della confezione.
Avviso per i clienti: le seguenti
informazioni riguardano esclusivamente
gli apparecchi venduti in paesi in cui
sono applicate le direttive UE
Il fabbricante di questo prodotto è Sony
Corporation, 1-7-1 Konan Minato-ku Tokyo,
108-0075, Giappone.
Il rappresentante autorizzato ai fini della
Compatibilità Elettromagnetica e della sicurezza
del prodotto è Sony Deutschland GmbH,
Hedelfinger Strasse 61, 70327, Stoccarda
Germania. Per qualsiasi problema relativo
all’assistenza o alla garanzia, si prega di fare
riferimento agli indirizzi indicati nei documenti
di assistenza e garanzia forniti con il prodotto.
Trattamento del dispositivo elettrico
od elettronico a fine vita
(applicabile in tutti i paesi
dell’Unione Europea e in altri paesi
europei con sistema di raccolta
differenziata)
Questo simbolo sul prodotto o sulla confezione indica che
il prodotto non deve essere considerato come un normale
rifiuto domestico, ma deve invece essere consegnato ad un
punto di raccolta appropriato per il riciclo di apparecchi
elettrici ed elettronici. Assicurandovi che questo prodotto
sia smaltito correttamente, voi contribuirete a prevenire
potenziali conseguenze negative per l’ambiente e per la
salute che potrebbero altrimenti essere causate dal suo
smaltimento inadeguato. Il riciclaggio dei materiali aiuta a
conservare le risorse naturali. Per informazioni più
dettagliate circa il riciclaggio di questo prodotto, potete
contattare l’ufficio comunale, il servizio locale di
smaltimento rifiuti oppure il negozio dove l’avete
acquistato.
Accessorio utilizzabile: telecomando
Trattamento delle pile esauste
(applicabile in tutti i paesi
dell’Unione Europea e in altri paesi
Europei con sistema di raccolta
differenziata)
Questo simbolo sul prodotto o sulla confezione indica che
la pila non deve essere considerata un normale rifiuto
domestico. Su alcuni tipi di pile questo simbolo potrebbe
essere utilizzato in combinazione con un simbolo chimico.
I simboli chimici per il mercurio (Hg) o per il piombo
(Pb) sono aggiunti, se la batteria contiene più dello
0,0005% di mercurio o dello 0,004% di piombo.
Assicurandovi che le pile siano smaltite correttamente,
contribuirete a prevenire potenziali conseguenze negative
per l’ambiente e per la salute che potrebbero altrimenti
essere causate dal loro inadeguato smaltimento. Il
riciclaggio dei materiali aiuta a conservare le risorse
naturali.
In caso di prodotti che per motivi di sicurezza, prestazione
o protezione dei dati richiedano un collegamento fisso ad
una pila interna, la stessa dovrà essere sostituita solo da
personale di assistenza qualificato. Consegnare il prodotto
a fine vita al punto di raccolta idoneo allo smaltimento di
apparecchiature elettriche ed elettroniche; questo assicura
che anche la pila al suo interno venga trattata
correttamente.
Per le altre pile consultate la sezione relativa alla
rimozione sicura delle pile. Conferire le pile esauste
presso i punti di raccolta indicati per il riciclo.
Per informazioni più dettagliate circa lo smaltimento della
pila esausta o del prodotto, potete contattare il Comune, il
servizio locale di smaltimento rifiuti oppure il negozio
dove l’avete acquistato.
3
Bluetooth e i relativi loghi sono di proprietà di
Bluetooth SIG, Inc. L’uso di tali marchi è
concesso in licenza a Sony Corporation. Tutti gli
altri marchi di fabbrica o marchi di fabbrica
registrati sono di proprietà delle rispettive
aziende.
ZAPPIN è un marchio di fabbrica di Sony
Corporation.
iPod è un marchio di fabbrica di Apple Inc.,
registrato negli Stati Uniti e in altri paesi.
iPhone è un marchio di fabbrica di Apple Inc.
Windows Media e il logo
Windows sono marchi di
fabbrica o marchi registrati di
Microsoft Corporation negli
Stati Uniti e/o in altri paesi.
Tecnologia di codifica audio MPEG Layer-3 e
brevetti su licenza del Fraunhofer IIS e della
Thomson.
Questo prodotto è tutelato da specifici diritti di
proprietà intellettuale di Microsoft Corporation.
L’uso o la distribuzione della tecnologia in
questione al di fuori del presente prodotto sono
vietati senza apposita licenza concessa da
Microsoft o da una filiale Microsoft autorizzata.
I fornitori di contenuti utilizzano la tecnologia di
gestione dei diritti digitali per Windows Media
contenuta nel presente dispositivo (“WM-DRM”)
per proteggere l’integrità dei contenuti
(“Contenuto Protetto”), cosicché non sia possibile
appropriarsi indebitamente della proprietà
intellettuale, incluso il copyright, in tali contenuti.
Il presente dispositivo utilizza il software WM-
DRM per riprodurre Contenuto Protetto
(“Software WM-DRM”). Qualora la protezione del
Software WM-DRM del presente dispositivo sia
stata compromessa, i proprietari di Contenuto
Protetto (“Proprietari del Contenuto Protetto”)
potranno richiedere che Microsoft revochi il diritto
del Software WM-DRM di acquistare nuove
licenze per la duplicazione, la visualizzazione e/o
la riproduzione di Contenuto Protetto. La revoca
non modifica la capacità del Software WM-DRM
di riprodurre contenuto non protetto. Un elenco di
Software WM-DRM revocati verrà inviato al
dispositivo dell’utente ogni qualvolta l’utente
scarichi da Internet o da un PC una licenza per il
Contenuto Protetto. Congiuntamente a tale licenza,
Microsoft potrà inoltre scaricare sul dispositivo
dell’utente per conto dei Proprietari di Contenuto
Protetto gli elenchi delle revoche.
Avvertenza relativa all’installazione su
un’auto sprovvista della posizione ACC
(accessoria) sul blocchetto di
accensione
Assicurarsi di impostare la funzione di
spegnimento automatico (pagina 31).
L’apparecchio si spegne completamente e in
modo automatico dopo l’intervallo di tempo
impostato dal relativo spegnimento, per evitare
lo scaricamento della batteria.
Se non viene impostata la funzione di
spegnimento automatico, tenere premuto
(SOURCE/OFF) fino a quando l’indicazione
non scompare ogni volta che il motore viene
spento.
Nota sulla batteria al litio
Non esporre la batteria a fonti di calore eccessive
q
uali la luce solare diretta, fuoco o simili.

4
Indice
Operazioni preliminari
Dischi riproducibili sull’unità . . . . . . . . . . . . . . 6
Note su Bluetooth . . . . . . . . . . . . . . . . . . . . . . . 6
Azzeramento dell’apparecchio . . . . . . . . . . . . . 7
Annullamento del modo DEMO . . . . . . . . . . . . 7
Preparazione del telecomando a scheda . . . . . . 7
Impostazione dell’orologio . . . . . . . . . . . . . . . . 8
Rimozione del pannello anteriore . . . . . . . . . . . 8
Installazione del pannello anteriore . . . . . . . 9
Guida rapida per la funzione
Bluetooth
3 fasi per utilizzare la funzione Bluetooth. . . . 10
Tasti e icone. . . . . . . . . . . . . . . . . . . . . . . . . . . 11
1Associazione. . . . . . . . . . . . . . . . . . . . . . . . 12
2Connessione . . . . . . . . . . . . . . . . . . . . . . . . 12
3Chiamate vivavoce e streaming
musicale. . . . . . . . . . . . . . . . . . . . . . . . . . . . . . 13
Posizione dei comandi e operazioni
di base
Unità principale. . . . . . . . . . . . . . . . . . . . . . 14
Telecomando a scheda RM-X304. . . . . . . . 16
Ricerca di un brano . . . . . . . . . . . . . . . . . . . . . 17
Ricerca di un brano in base al nome
— Quick-BrowZer . . . . . . . . . . . . . . . . . . . 17
Ricerca di un brano in base all’ascolto di
porzioni di brani — ZAPPIN™ . . . . . . . . . 18
Radio
Memorizzazione e ricezione delle stazioni . . . 18
Memorizzazione automatica — BTM . . . . 18
Memorizzazione manuale. . . . . . . . . . . . . . 18
Ricezione delle stazioni memorizzate. . . . . 18
Sintonizzazione automatica . . . . . . . . . . . . 19
RDS . . . . . . . . . . . . . . . . . . . . . . . . . . . . . . . . . 19
Cenni preliminari . . . . . . . . . . . . . . . . . . . . 19
Impostazione dei modi AF e TA. . . . . . . . . 20
Selezione del modo PTY . . . . . . . . . . . . . . 21
Impostazione del modo CT. . . . . . . . . . . . . 21
CD
Voci del display . . . . . . . . . . . . . . . . . . . . . 21
Riproduzione ripetuta e in
ordine casuale. . . . . . . . . . . . . . . . . . . . . . . 21
Dispositivi USB
Riproduzione del contenuto di un
dispositivo USB . . . . . . . . . . . . . . . . . . . . . . . 22
Voci del display . . . . . . . . . . . . . . . . . . . . . 22
Riproduzione ripetuta e in
ordine casuale. . . . . . . . . . . . . . . . . . . . . . . 23
iPod
Riproduzione tramite un iPod. . . . . . . . . . . . . 23
Voci del display . . . . . . . . . . . . . . . . . . . . . 24
Impostazione del modo di riproduzione . . . . . 24
Riproduzione ripetuta e in
ordine casuale. . . . . . . . . . . . . . . . . . . . . . . 25
Uso diretto dell’iPod
— Controllo passeggero . . . . . . . . . . . . . . . . . 25
Bluetooth (chiamate vivavoce e
streaming musicale)
Operazioni Bluetooth . . . . . . . . . . . . . . . . . . . 26
Associazione. . . . . . . . . . . . . . . . . . . . . . . . . . 26
Icone Bluetooth . . . . . . . . . . . . . . . . . . . . . 27
Connessione . . . . . . . . . . . . . . . . . . . . . . . . . . 27
Per attivare l’uscita del segnale Bluetooth
del presente apparecchio . . . . . . . . . . . . . . 27
Connessione a un telefono cellulare. . . . . . 27
Connessione di un dispositivo audio . . . . . 28
Funzione vivavoce . . . . . . . . . . . . . . . . . . . . . 28
Ricezione di chiamate . . . . . . . . . . . . . . . . 28
Come effettuare le chiamate. . . . . . . . . . . . 28
Trasferimento di chiamata . . . . . . . . . . . . . 28
Attivazione delle chiamate vocali . . . . . . . 29
Streaming musicale. . . . . . . . . . . . . . . . . . . . . 29
Ascolto di musica da un
dispositivo audio . . . . . . . . . . . . . . . . . . . . 29
Uso di un dispositivo audio tramite
il presente apparecchio. . . . . . . . . . . . . . . . 29
Annullamento della registrazione di tutti
i dispositivi associati. . . . . . . . . . . . . . . . . . . . 30
5
Altre funzioni
Modifica delle impostazioni audio . . . . . . . . . 30
Regolazione delle caratteristiche
dell’audio . . . . . . . . . . . . . . . . . . . . . . . . . . 30
Personalizzazione della curva
dell’equalizzatore — EQ3 . . . . . . . . . . . . . 31
Regolazione delle voci di impostazione
— SET. . . . . . . . . . . . . . . . . . . . . . . . . . . . . . . 31
Uso di apparecchi opzionali . . . . . . . . . . . . . . 32
Apparecchio audio ausiliare . . . . . . . . . . . . 32
Microfono esterno XA-MC10 . . . . . . . . . . 33
Informazioni aggiuntive
Precauzioni . . . . . . . . . . . . . . . . . . . . . . . . . . . 33
Note sui dischi . . . . . . . . . . . . . . . . . . . . . . 33
Ordine di riproduzione dei file
MP3/WMA/AAC . . . . . . . . . . . . . . . . . . . . 34
Informazioni sull’iPod . . . . . . . . . . . . . . . . 34
Funzione Bluetooth. . . . . . . . . . . . . . . . . . . 35
Manutenzione . . . . . . . . . . . . . . . . . . . . . . . . . 36
Rimozione dell’apparecchio . . . . . . . . . . . . . . 37
Caratteristiche tecniche . . . . . . . . . . . . . . . . . . 37
Guida alla soluzione dei problemi. . . . . . . . . . 38
Messaggi e indicazioni di errore. . . . . . . . . 41
Sito di assistenza clienti
In caso di domande o per le informazioni più aggiornate sul presente
prodotto, visitare il seguente sito Web:
http://support.sony-europe.com/
Nel sito sono fornite informazioni relative a:
• Modelli e produttori di lettori audio digitali compatibili
• File MP3/WMA/AAC supportati
• Modelli e i produttori dei telefoni cellulari compatibili e domande frequenti
relative alla funzione Bluetooth
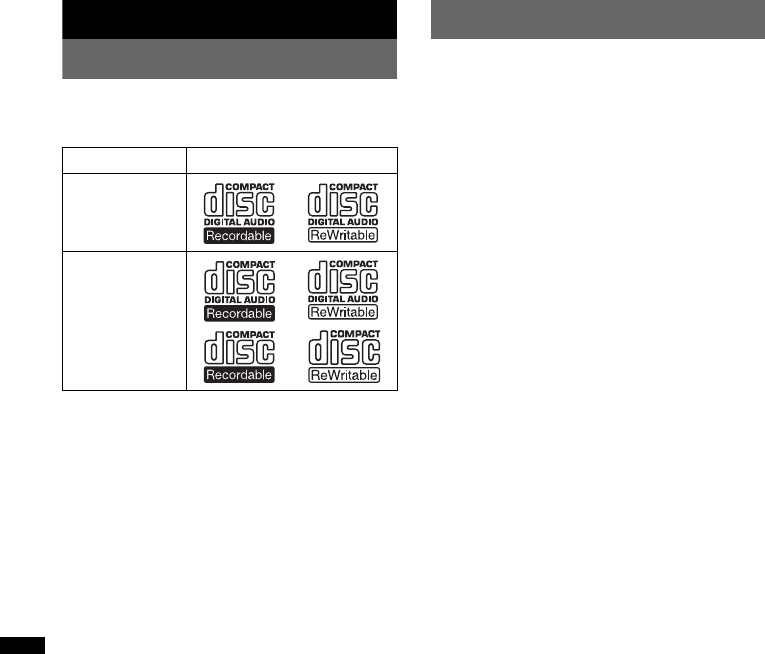
6
Operazioni preliminari
Dischi riproducibili sull’unità
È possibile riprodurre CD-DA (contenenti inoltre
CD TEXT), CD-R/CD-RW (file MP3/WMA/
AAC (pagina 34)).
Note su Bluetooth
Attenzione
IN NESSUN CASO SONY POTRÀ ESSERE
RITENUTA RESPONSABILE DI DANNI
ACCIDENTALI, INDIRETTI,
CONSEQUENZIALI O DI ALTRI DANNI
INCLUSI, SENZA ALCUNA LIMITAZIONE,
PERDITE DI PROFITTI, PERDITE DI
GUADAGNO, PERDITE DI DATI, PERDITE
DELL’UTILIZZO DEL PRODOTTO O DI
QUALSIASI APPARECCHIO ASSOCIATO E
TEMPI DI FERMO DOVUTI ALL’USO DEL
PRESENTE PRODOTTO O DEI RELATIVI
COMPONENTI HARDWARE E/O SOFTWARE.
NOTA IMPORTANTE
Uso sicuro e protetto
Eventuali modifiche o cambiamenti al presente
apparecchio non esplicitamente approvati da Sony
potrebbero invalidare l’autorizzazione all'uso
dell’apparecchio.
Prima di utilizzare il presente prodotto, controllare
le eccezioni dovute a requisiti o limitazioni
nazionali relative ai dispositivi Bluetooth.
Guida
Verificare le leggi e le normative che regolano l’uso
dei telefoni cellulari e degli apparecchi vivavoce in
vigore nelle aree in cui si guida.
Se le condizioni di guida lo richiedono, prestare
sempre la totale attenzione alla guida, lasciare la
strada e parcheggiare prima di effettuare o
rispondere ad una chiamata.
Connessione ad altri dispositivi
Prima di stabilire la connessione ad altri dispositivi,
leggere accuratamente le informazioni sulla
sicurezza contenute nelle relative istruzioni per
l’uso.
Tipo di dischi Etichetta sul disco
CD-DA
MP3
WMA
AAC
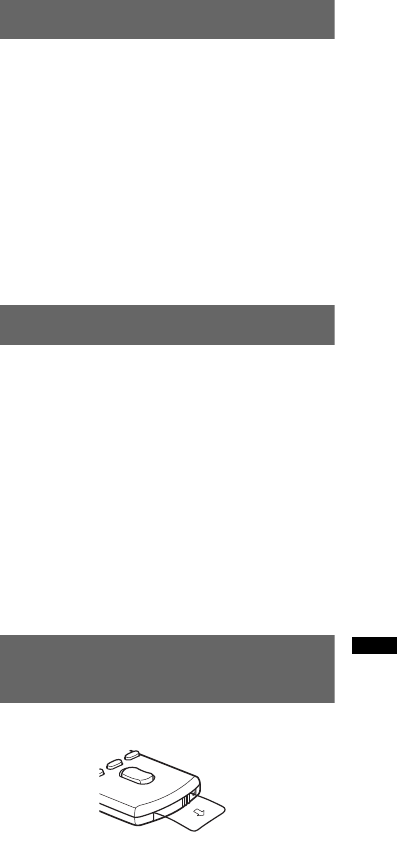
7
Esposizione alle radiofrequenze
I segnali RF possono influire su sistemi elettronici
in automobili installati in modo errato o schermati in
modo non adeguato, quali ad esempio sistemi a
iniezione diretta elettronici, sistemi ABS
antisbandamento (antiblocco) elettronici, sistemi di
controllo della velocità elettronici o sistemi con
airbag. Per informazioni sull’installazione o
l’assistenza del presente dispositivo, consultare il
produttore o i rappresentanti dell’automobile in
questione. L’installazione o interventi di
manutenzione errati potrebbero risultare pericolosi
nonché annullare la garanzia del dispositivo.
Consultare il produttore dell’automobile per
accertarsi che l’uso del telefono cellulare in
automobile non influisca sul sistema elettronico del
veicolo.
Verificare regolarmente che tutti gli apparecchi
senza fili nell’automobile siano installati e
funzionanti correttamente.
Chiamate di emergenza
Il presente apparecchio vivavoce e il dispositivo
elettronico ad esso connesso funzionano tramite reti
di segnali radio, cellulari e terrestri nonché tramite
una funzione programmata dall’utente. Per questo
motivo, non è possibile garantire la connessione in
tutte le condizioni.
Non confidare esclusivamente sui dispositivi
elettronici per le comunicazioni importanti (quali le
chiamate per emergenze mediche).
Per poter effettuare o ricevere le chiamate, è
necessario che l’apparecchio vivavoce e il
dispositivo elettronico ad esso connesso siano accesi
e si trovino in un’area con segnale cellulare
sufficientemente potente.
Le chiamate di emergenza potrebbero non venire
effettuate in alcune reti cellulari o durante l’uso di
servizi di rete e/o funzioni telefoniche specifici.
Per ulteriori informazioni, contattare il fornitore di
servizi locale.
Azzeramento dell’apparecchio
Prima di utilizzare l’apparecchio per la prima
volta, dopo la sostituzione della batteria dell’auto
o dopo avere effettuato modifiche ai
collegamenti, è necessario azzerare l’apparecchio
stesso.
Rimuovere il pannello anteriore (pagina 8),
quindi premere il tasto RESET (pagina 14)
utilizzando un oggetto appuntito, ad esempio una
penna a sfera.
Nota
Premendo il tasto RESET verranno cancellate le
impostazioni dell’orologio e alcune funzioni
memorizzate.
Annullamento del modo DEMO
È possibile annullare il display della
dimostrazione che viene visualizzato durante lo
spegnimento.
1Tenere premuto il tasto di selezione.
Viene visualizzato il display di impostazione.
2Premere più volte il tasto di selezione
fino a visualizzare “DEMO”.
3Ruotare la manopola di controllo per
selezionare “DEMO-OFF”.
4Tenere premuto il tasto di selezione.
L’impostazione è completata e il display torna
al modo di ricezione/riproduzione normale.
Preparazione del telecomando
a scheda
Rimuovere la protezione.
Suggerimento
Per ulteriori informazioni su come sostituire la pila,
vedere pagina 36.
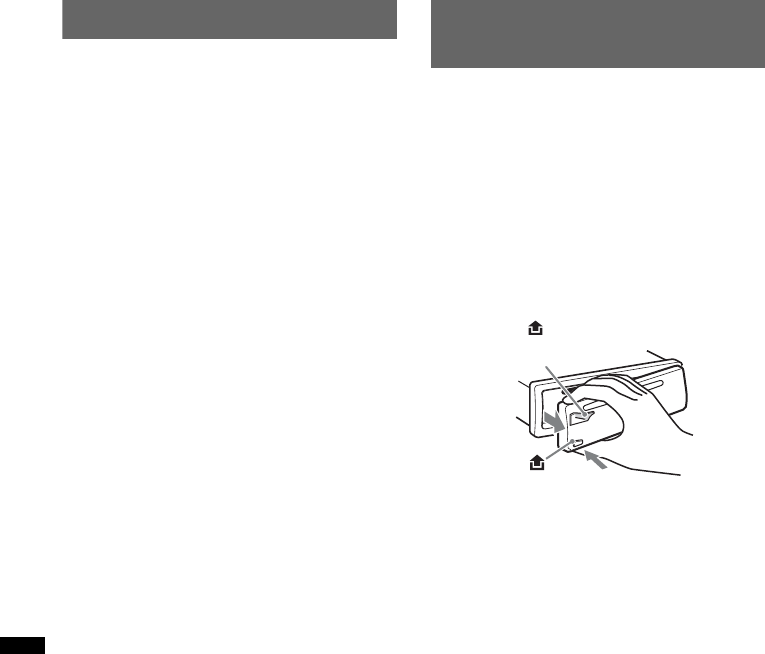
8
Impostazione dell’orologio
L’orologio mostra l’indicazione digitale dell’ora
in base al sistema delle 24 ore.
1Tenere premuto il tasto di selezione.
Viene visualizzato il display di impostazione.
2Premere più volte il tasto di selezione
fino a visualizzare “CLOCK-ADJ”.
3Premere (SEEK) +.
L’indicazione dell’ora lampeggia.
4Ruotare la manopola di controllo del
volume per impostare l’ora e i minuti.
Per passare da una cifra all’altra
dell’indicazione digitale, premere
(SEEK) –/+.
5Dopo aver impostato i minuti, premere
il tasto di selezione.
L’impostazione è completata e l’orologio
viene attivato.
Per visualizzare l’orologio, premere (DSPL).
Premere di nuovo (DSPL) per tornare al display
precedente.
Suggerimento
È possibile regolare l’orologio automaticamente
tramite la funzione RDS (pagina 21).
Rimozione del pannello
anteriore
Per evitare il furto dell’apparecchio, è possibile
estrarne il pannello anteriore.
Segnale di avvertimento
Se la chiave di accensione viene impostata sulla
posizione OFF senza che il pannello anteriore sia
stato rimosso, viene emesso per alcuni secondi
un segnale acustico di avvertimento.
Tale segnale viene emesso solo se è in uso
l’amplificatore incorporato.
1Tenere premuto (SOURCE/OFF).
L’apparecchio si spegne.
2Premere , quindi estrarlo.
Note
•Non fare cadere il pannello anteriore né esercitare
eccessiva pressione su quest’ultimo e sulla finestra
del display.
•Non esporre il pannello anteriore a calore,
temperature elevate o umidità. Evitare di lasciarlo
all’interno di auto parcheggiate oppure su cruscotti e
ripiani posteriori.
•Non rimuovere il pannello anteriore durante la
riproduzione del dispositivo USB. Diversamente, è
possibile che i dati USB vengano danneggiati.
(SOURCE/OFF)
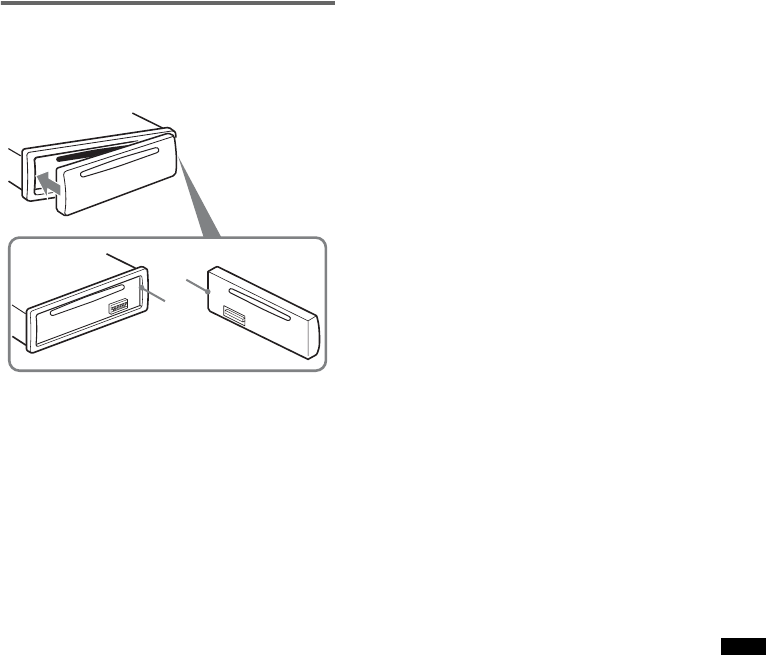
9
Installazione del pannello anteriore
Inserire la parte A del pannello anteriore nella
parte B dell’apparecchio, come illustrato, quindi
premere il lato sinistro finché non scatta in
posizione.
Nota
Non collocare alcun oggetto sulla superficie interna
del pannello anteriore.
B
A

10
Guida rapida per la funzione Bluetooth
Per ulteriori informazioni sul funzionamento, consultare la sezione “Bluetooth (chiamate vivavoce e
streaming musicale)” (pagina 26) e le istruzioni per l’uso del dispositivo Bluetooth.
3 fasi per utilizzare la funzione Bluetooth
1Associazione
Innanzitutto, occorre registrare (“associare”) un dispositivo Bluetooth (telefono cellulare e così
via) e il presente apparecchio. L’associazione non è più richiesta dopo la prima volta.
2Connessione
Talvolta l’associazione consente di effettuare la connessione automaticamente. Per utilizzare il
dispositivo una volta effettuata l’associazione, avviare la connessione.
3Chiamate vivavoce/streaming musicale
Una volta effettuata l’associazione, è possibile conversare in vivavoce e ascoltare musica.
Supporto
http://support.sony-europe.com/
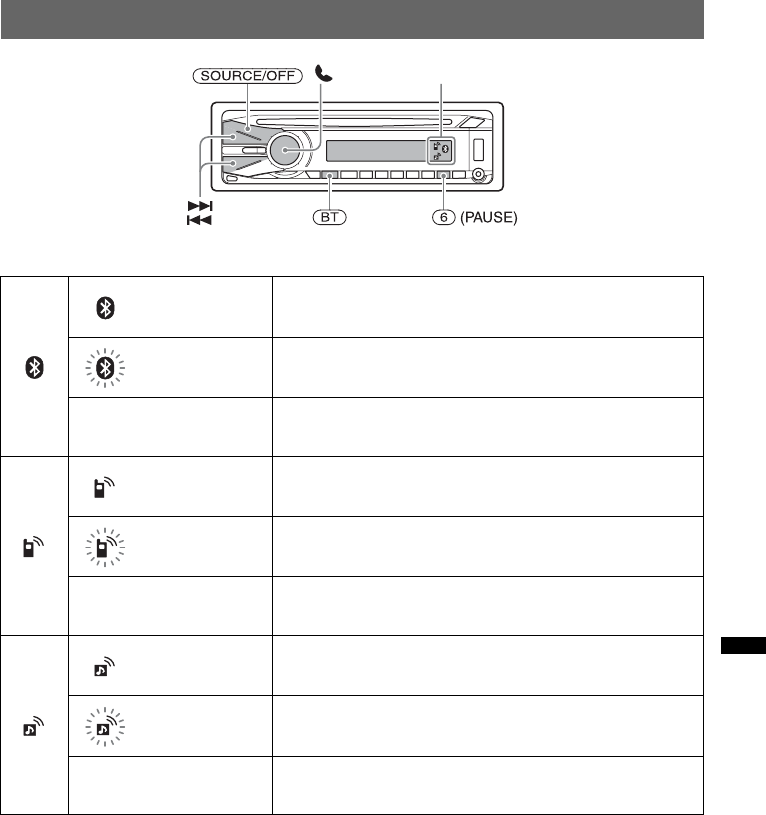
11
Tasti e icone
Descrizione dello stato dell’icona
Accesa Segnale Bluetooth attivato
Lampeggiante Modo di attesa dell’associazione
Nessuna Segnale Bluetooth disattivato
Accesa Connessione al telefono cellulare eseguita
Lampeggiante Connessione al telefono cellulare in corso
Nessuna Nessuna connessione
Accesa Connessione al dispositivo audio eseguita
Lampeggiante Connessione al dispositivo audio in corso
Nessuna Nessuna connessione
Icone
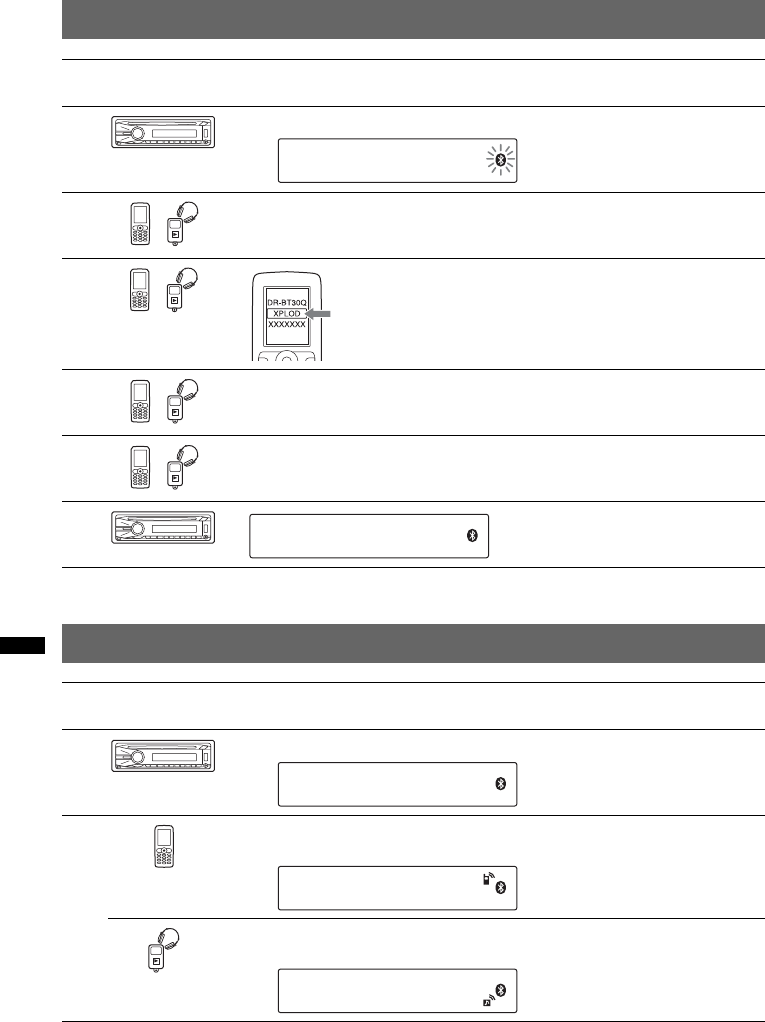
12
1Associazione
2Connessione
Nota
È possibile effettuare la connessione dal presente apparecchio a un dispositivo Bluetooth (pagina 27).
Se non è possibile effettuare la connessione, eseguire di nuovo l’associazione.
Apparecchio
utilizzato Operazione
1Tenere premuto (BT) per circa 5 secondi.
2Ricercare la presente unità.
3
4Immettere il codice di protezione “0000”.
5Seguire le istruzioni sul display.
6
Apparecchio
utilizzato Operazione
1Tenere premuto (BT) per circa 3 secondi.
2Effettuare la connessione al presente apparecchio utilizzando un telefono
cellulare.
Effettuare la connessione al presente apparecchio utilizzando un dispositivo
audio.
t
Selezionare “XPLOD”.
(associazione effettuata correttamente)
t
t
t
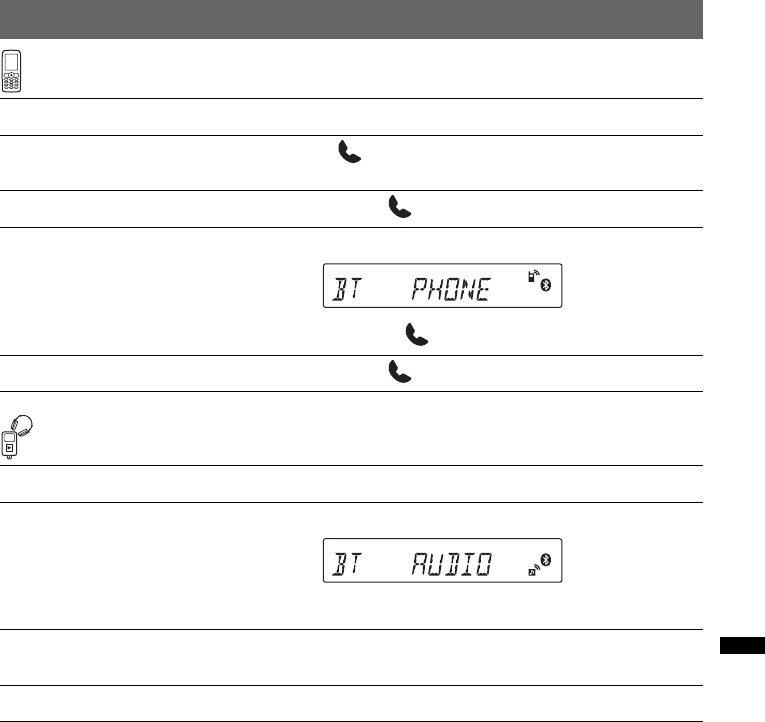
13
3Chiamate vivavoce e streaming musicale
Chiamate vivavoce
Streaming musicale
*L’operazione potrebbe variare in base al dispositivo audio.
Per Operazione
Ricevere una chiamata/terminare una
chiamata Premere .
Rifiutare una chiamata Tenere premuto per 2 secondi.
Comporre di nuovo un numero 1Premere (SOURCE/OFF).
2Tenere premuto per 3 secondi.
Trasferire una chiamata Tenere premuto per 2 secondi.
Per Operazione
Ascoltare 1Premere (SOURCE/OFF).
2Premere per avviare la riproduzione sul dispositivo audio.
Avviare la riproduzione/effettuare una
pausa (AVRCP)* Premere (6) (PAUSE).
Saltare brani (AVRCP)* Premere ./>.
t
t
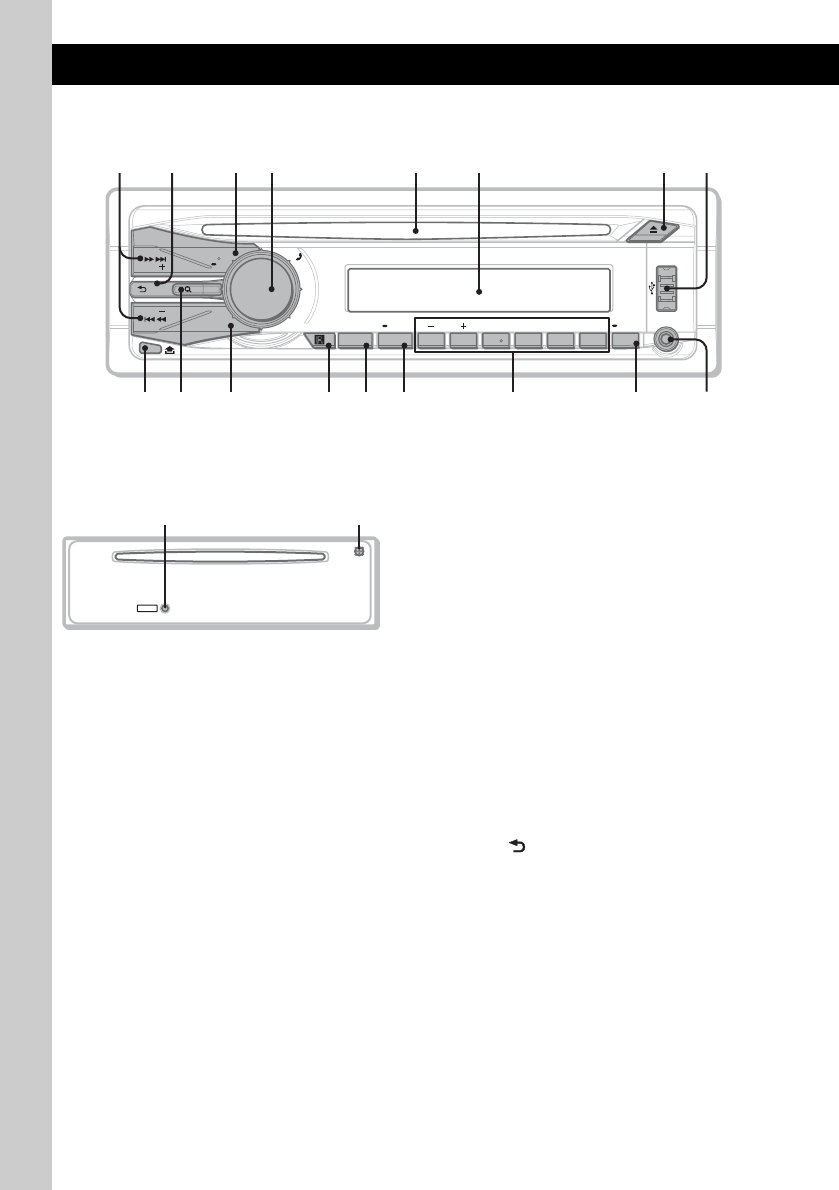
14
Posizione dei comandi e operazioni di base
Unità principale
Pannello anteriore rimosso La presente sezione contiene le istruzioni
riguardanti la posizione dei comandi e le
operazioni di base.
Per ulteriori informazioni, vedere le pagine
corrispondenti.
ATasti SEEK +/–
CD/USB:
Per saltare i brani (premere); per saltare i
brani in modo continuo (premere, quindi
premere di nuovo entro 1 secondo e tenere
premuto); per fare retrocedere o fare
avanzare rapidamente un brano (tenere
premuto).
Radio:
Per sintonizzare le stazioni in modo
automatico (premere); per ricercare una
stazione manualmente (tenere premuto).
Dispositivo audio Bluetooth*1:
Per saltare i brani (premere).
BTasto (BACK)/MODE pagina 17, 18,
24, 25
Premere per: tornare al display precedente/
selezionare la banda radio (FM/MW/LW)/
selezionare il modo di riproduzione
dell’iPod.
Tenere premuto per: impostare/disattivare il
controllo passeggero.
CTasto SOURCE/OFF*2
Premere per attivare l’alimentazione/
cambiare la sorgente (Radio/CD/USB/AUX/
audio Bluetooth/telefono Bluetooth).
Premere per 1 secondo per disattivare
l’alimentazione.
Premere per 2 secondi o più per disattivare
l’alimentazione e il display.
P
U
S
H
E
N
T
E
R
/
S
E
L
E
C
T
/
AUX
ALBM REP SHUF PAUSE
SOURCE
SEEK OFF
SCRL
ZAP
SEEK
123456
DSPL
PTY
AF
/
TA
BLUETOOTH
BT
MODE
MIC
9 q
;
q
a
q
d
q
s
q
f
q
h
2
q
j
q
g
1 83 4 5 6 7
RESET
qlqk

15
DManopola di controllo/tasto di
selezione/tasto (vivavoce)
Per regolare il volume (ruotare); per
selezionare le voci di impostazione (premere
e ruotare); per rispondere/terminare una
chiamata (premere).
EAlloggiamento del disco
Inserire il disco (lato con l’etichetta rivolto
verso l’alto). La riproduzione viene avviata.
FFinestra del display
GTasto Z (espulsione)
Per estrarre il disco.
HConnettore USB pagina 22, 23
Per il collegamento al dispositivo USB.
ITasto (rilascio pannello anteriore)
pagina 8
JTasto (BROWSE) pagina 17
Per impostare il modo Quick-BrowZer.
KTasto ZAP pagina 18
Per impostare il modo ZAPPIN™.
LRicettore del telecomando a scheda
MTasto BT (BLUETOOTH) pagina 26
Per attivare/disattivare il segnale Bluetooth o
effettuare l’associazione.
NTasto AF (frequenze alternative)/
TA (notiziari sul traffico)/
PTY (tipo di programma) pagina 20,
21
Per impostare le funzioni AF e TA
(premere), per selezionare il tipo di
programma (PTY) in RDS (tenere premuto).
OTasti numerici
CD/USB:
(1)/(2): ALBM –/+ (durante la
riproduzione di file MP3/WMA/AAC)
Per saltare gli album (premere); per
saltare gli album in modo continuo
(tenere premuto).
(3): REP*2 pagina 21, 23, 25
(4): SHUF pagina 21, 23, 25
(6): PAUSE
Per effettuare una pausa durante la
riproduzione. Per annullare
l’impostazione, premere di nuovo il
tasto.
Radio:
Per ricevere le stazioni memorizzate
(premere); per memorizzare le stazioni
(tenere premuto).
Dispositivo audio Bluetooth*1:
(6): PAUSE
Per effettuare una pausa durante la
riproduzione. Per annullare
l’impostazione, premere di nuovo il
tasto.
Telefono Blu etooth:
(5): MIC pagina 28
PTasto DSPL (display)/SCRL
(scorrimento) pagina 19, 21, 22, 24, 25
Per cambiare le voci del display (premere);
per scorrere le voci del display (tenere
premuto).
QIngresso AUX pagina 32
Per collegare un dispositivo audio portatile.
RTasto RESET (situato dietro al pannello
anteriore) pagina 7
SMicrofono pagina 28
Nota
Non coprire il microfono, onde evitare che la
funzione vivavoce operi in modo errato.
*1 Quando è collegato un dispositivo audio Bluetooth
(che supporta il profilo AVRCP della tecnologia
Bluetooth). A seconda del dispositivo, alcune
operazioni potrebbero non essere disponibili.
*2 Questo tasto dispone di un punto tattile.
Nota
Prima di rimuovere/inserisce un disco, assicurarsi di
scollegare tutti i dispositivi USB, onde evitare di
danneggiare il disco.

16
Telecomando a scheda
RM-X304
Prima dell’uso, rimuovere la protezione
(pagina 7).
ATasto OFF
Per spegnere; arrestare la sorgente.
BTasto SOURCE
Per accendere; cambiare la sorgente (Radio/
CD/USB/AUX/audio Bluetooth/telefono
Bluetooth).
CTasti < (.)/, (>)
Per controllare la radio/il CD/USB/l’audio
Bluetooth. Stessa funzione di (SEEK) –/+
sull’apparecchio.
È possibile utilizzare le impostazioni, le
impostazioni dell’audio e così via mediante
< ,.
DTasto DSPL (display)
Per cambiare le voci del display.
ETasto VOL (volume) +*/–
Per regolare il volume.
FTasto ATT (attenuazione audio)
Per attenuare l’audio. Per annullare
l’impostazione, premere di nuovo il tasto.
GTasto MODE
Premere per selezionare la banda radio
(FM/MW/LW)/selezionare il modo di
riproduzione dell’iPod.
Tenere premuto per impostare/disattivare il
controllo passeggero.
HTasto SEL (selezione)/
(vivavoce)
Equivale al tasto di selezione
sull’apparecchio.
ITasti M (+)/m (–)
Per controllare il CD/USB. Stessa funzione
di (1)/(2) (ALBM –/+) sull’apparecchio.
È possibile utilizzare le impostazioni, le
impostazioni dell’audio e così via mediante
M m.
JTasto SCRL (scorrimento)
Per scorrere le voci del display.
KTasti numerici
Per ricevere le stazioni memorizzate
(premere); per memorizzare le stazioni
(tenere premuto).
*Questo tasto dispone di un punto tattile.
Nota
Se l’apparecchio viene spento e il display disattivato,
non è possibile controllarlo mediante il telecomando a
scheda a meno che non venga premuto
(SOURCE/OFF) sull’apparecchio o che non venga
inserito un disco per accendere l’apparecchio stesso.
OFF
DSPL SCRL
SEL
SOURCE
MODE
132
465
ATT
VOL
+
–
+
–
28
7
1
0
3
6
5
4
qa
9
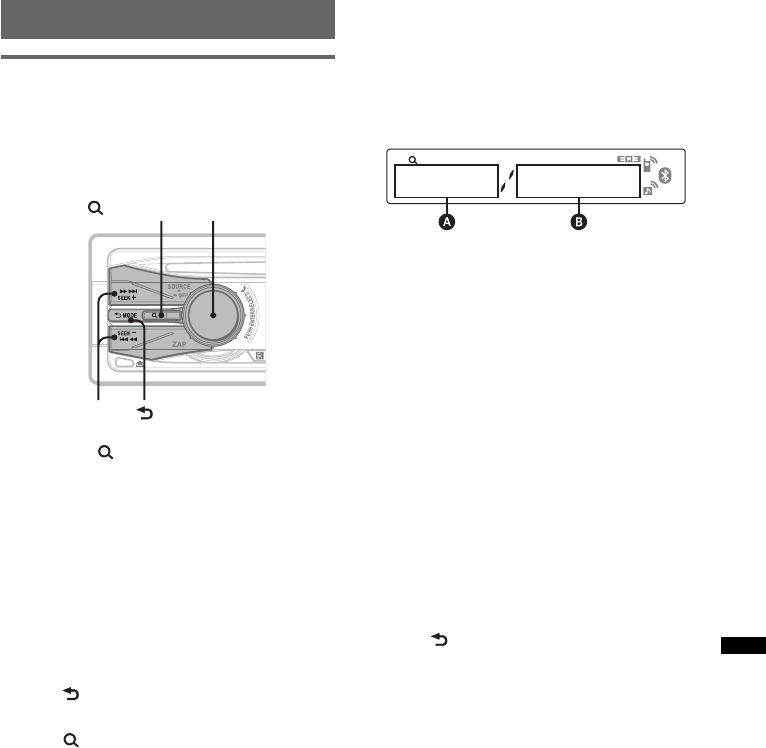
17
Ricerca di un brano
Ricerca di un brano in base al
nome — Quick-BrowZer
È possibile ricercare un brano contenuto in un
CD o in un dispositivo USB in modo semplice, in
base alla categoria.
1Premere (BROWSE).
L’apparecchio entra nel modo Quick-
BrowZer, quindi viene visualizzato l’elenco
delle categorie di ricerca.
2Ruotare la manopola di controllo per
selezionare la categoria di ricerca
desiderata, quindi premere la
manopola per confermare.
3Ripetere il punto 2 fino a quando non
viene visualizzato il brano desiderato.
Viene avviata la riproduzione.
Per tornare al display precedente
Premere (BACK).
Per annullare il modo Quick-BrowZer
Premere (BROWSE).
Nota
Impostando il modo Quick-BrowZer, la funzione di
riproduzione ripetuta/in ordine casuale viene
disattivata.
Ricerca mediante la modalità di salto
delle voci — Modo Jump
Se all’interno di una categoria sono presenti più
voci, è possibile ricercare rapidamente la voce
desiderata.
1Premere (SEEK) + nel modo Quick-BrowZer.
Viene visualizzato il seguente display.
ANumero della voce corrente
BNumero totale di voci incluse nello strato
corrente
Quindi, viene visualizzato il nome della voce.
2Ruotare la manopola di controllo per
selezionare la voce desiderata o una voce
vicina a quella desiderata.
Questa operazione consente di saltare in
incrementi pari al 10 % del numero totale di
voci.
3Premere il tasto di selezione.
Il display torna al modo Quick-BrowZer e
viene visualizzata la voce selezionata.
4Ruotare la manopola di controllo per
selezionare la voce desiderata, quindi premere
la manopola stessa.
Se la voce selezionata è un brano, viene
avviata la riproduzione.
Per disattivare il modo Jump
Premere (BACK) o (SEEK) –.
(BROWSE)
Manopola di
controllo/tasto di
selezione
(BACK)
SEEK +/–
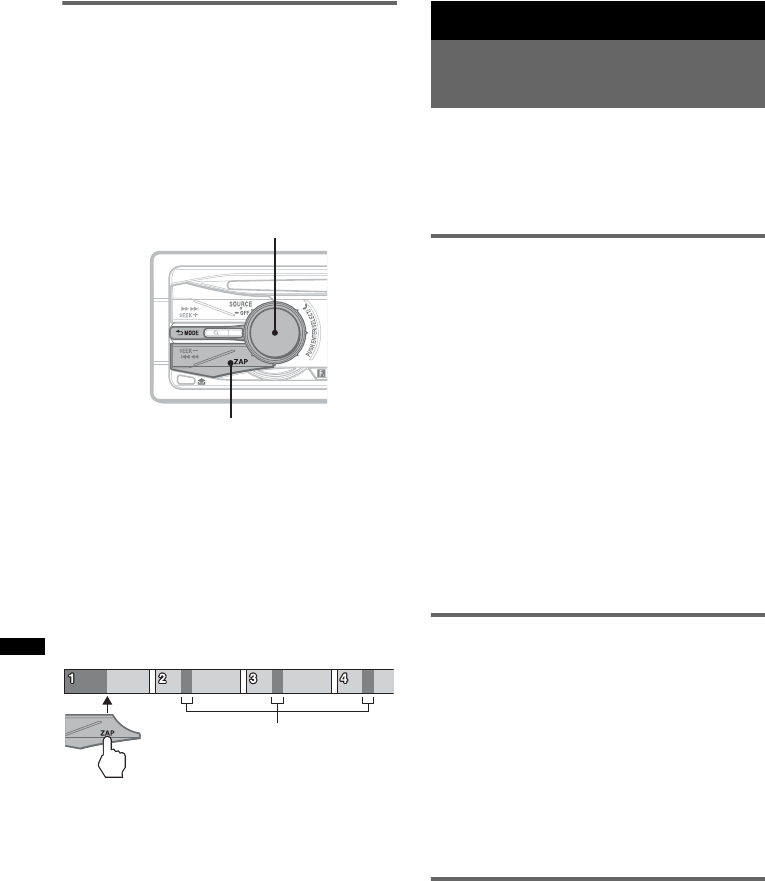
18
Ricerca di un brano in base
all’ascolto di porzioni di brani
— ZAPPIN™
È possibile ricercare il brano che si desidera
ascoltare durante la riproduzione in sequenza di
brevi porzioni di brani contenuti in un CD o in un
dispositivo USB.
Il modo ZAPPIN è particolarmente adatto per la
ricerca di un brano nel modo di riproduzione in
ordine casuale o di ripetizione in ordine casuale.
1Premere (ZAP) durante la
riproduzione.
Una volta visualizzata l’indicazione
“ZAPPIN” sul display, la riproduzione viene
avviata a partire da una porzione del brano
successivo.
La porzione viene riprodotta per l’intervallo
di tempo impostato, quindi viene emesso un
segnale acustico e viene avviata la porzione
successiva.
2Premere il tasto di selezione o (ZAP)
durante la riproduzione di un brano
che si desidera ascoltare.
Il brano selezionato torna al modo di
riproduzione normale e viene riprodotto
dall’inizio.
Per ricercare di nuovo un brano mediante il
modo ZAPPIN, ripetere i punti 1 e 2.
Suggerimenti
•È possibile selezionare un intervallo di riproduzione
pari a circa 6 secondi/9 secondi/30 secondi
(pagina 31). Non è possibile selezionare la porzione
del brano da riprodurre.
•Premere (SEEK) +/– o (1)/(2) (ALBM –/+) nel
modo ZAPPIN per saltare un brano o un album.
Radio
Memorizzazione e ricezione
delle stazioni
Attenzione
Per la sintonizzazione delle stazioni durante la
guida, utilizzare la funzione BTM
(memorizzazione automatica delle emittenti con
sintonia migliore) per evitare incidenti.
Memorizzazione automatica
— BTM
1Premere più volte (SOURCE/OFF) fino a
visualizzare “TUNER”.
Per cambiare la banda, premere più volte
(MODE). È possibile selezionare FM1, FM2,
FM3, MW o LW.
2Tenere premuto il tasto di selezione.
Viene visualizzato il display di impostazione.
3Premere più volte il tasto di selezione
fino a visualizzare “BTM”.
4Premere (SEEK) +.
L’apparecchio memorizza le stazioni in
corrispondenza dei tasti numerici in base
all’ordine delle frequenze.
Quando l’impostazione è stata memorizzata,
viene emesso un segnale acustico.
Memorizzazione manuale
1Durante la ricezione della stazione che
si desidera memorizzare, tenere
premuto un tasto numerico (da (1) a
(6)) fino a visualizzare “MEM”.
Nota
Se un’altra stazione viene memorizzata in
corrispondenza dello stesso tasto numerico, la
stazione memorizzata in precedenza viene sostituita.
Suggerimento
Se viene memorizzata una stazione RDS, viene
memorizzata anche l’impostazione AF/TA (pagina 20).
Ricezione delle stazioni
memorizzate
1Selezionare la banda, quindi premere
un tasto numerico (da (1) a (6)).
ZAP
Tasto di selezione
Parte di ogni brano da
riprodurre nel modo ZAPPIN.
Brano
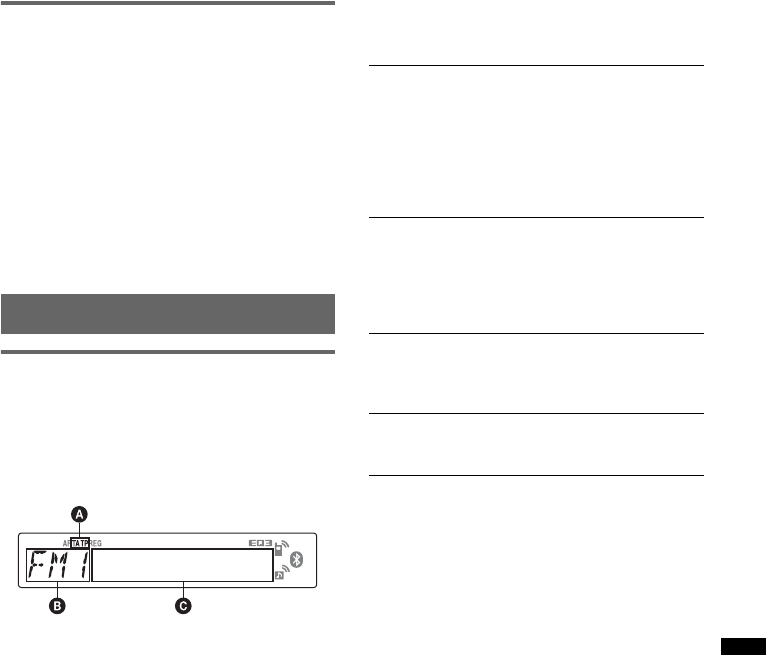
19
Sintonizzazione automatica
1Selezionare la banda, quindi premere
(SEEK) +/– per ricercare la stazione.
La ricerca si arresta non appena l’apparecchio
riceve una stazione. Ripetere questa
procedura fino alla ricezione della stazione
desiderata.
Suggerimento
Se si conosce la frequenza della stazione che si
desidera ascoltare, tenere premuto (SEEK) +/– per
individuare la frequenza approssimativa, quindi
premere più volte (SEEK) +/– per sintonizzarsi
esattamente sulla frequenza desiderata
(sintonizzazione manuale).
RDS
Cenni preliminari
RDS (sistema dati radio) è un servizio che
consente alle stazioni radio FM di trasmettere
informazioni digitali aggiuntive oltre al normale
segnale in radiofrequenza.
Voci del display
ATA/TP*1
BBanda radio, funzione
CFrequenza*2 (nome del servizio dei
programmi), numero di preselezione,
orologio, dati RDS
*1 “TA” lampeggia durante la ricezione di notiziari sul
traffico. “TP” si illumina durante la ricezione di una
stazione che fornisce programmi sul traffico.
*2 Durante la ricezione della stazione RDS, “ *” è
visualizzato a sinistra dell’indicazione della
frequenza.
Per cambiare le voci del display C, premere
(DSPL).
Servizi RDS
Il presente apparecchio fornisce i servizi RDS in
modo automatico come segue:
Note
•È possibile che non tutte le funzioni RDS siano
disponibili, a seconda del paese o della regione.
•La funzione RDS non è disponibile quando il
segnale è troppo debole o se la stazione
sintonizzata non trasmette dati RDS.
AF (frequenze alternative)
Consente di selezionare e sintonizzare di nuovo
la stazione con il segnale più potente.
Utilizzando questa funzione, è possibile
riprodurre in modo continuo lo stesso
programma durante un viaggio di lunga durata,
senza la necessità di sintonizzare di nuovo la
stessa stazione manualmente.
TA (notiziari sul traffico)/TP (programma sul
traffico)
Fornisce le informazioni o i programmi correnti
relativi al traffico. Qualsiasi informazione o
programma ricevuto interrompe la riproduzione
della sorgente selezionata.
PTY (tipo di programma)
Consente di visualizzare il tipo di programma
in fase di ricezione, nonché di ricercare il tipo
di programma selezionato.
CT (segnale orario)
L’orologio viene regolato mediante i dati CT
della trasmissione RDS.

20
Impostazione dei modi AF e TA
1Premere più volte (AF/TA) fino a
visualizzare l’impostazione desiderata.
Memorizzazione di stazioni RDS con
impostazione AF e TA
È possibile preselezionare le stazioni RDS
insieme all’impostazione AF/TA. Se viene
utilizzata la funzione BTM, vengono
memorizzate solo le stazioni RDS con la stessa
impostazione AF/TA.
Se si utilizza il modo di preselezione manuale, è
possibile preselezionare le stazioni RDS e non
RDS con impostazioni AF/TA distinte.
1Impostare AF/TA, quindi memorizzare la
stazione mediante la funzione BTM o
manualmente.
Ricezione dei notiziari di emergenza
Se è attivato il modo AF o TA, gli annunci di
emergenza interrompono automaticamente la
riproduzione della sorgente selezionata.
Suggerimento
Se si regola il livello del volume durante un notiziario
sul traffico, tale livello viene memorizzato per i
successivi notiziari sul traffico, indipendentemente dal
normale livello del volume.
Mantenimento di un programma
regionale — REG
Quando la funzione AF è attivata: le
impostazioni predefinite dell’apparecchio
limitano la ricezione a una regione specifica, in
modo che la stazione sintonizzata non venga
sostituita da una stazione regionale dal segnale
più potente.
Se si intende lasciare tale area di ricezione
regionale, impostare “REG-OFF” nelle
impostazioni durante la ricezione FM
(pagina 31).
Nota
Questa funzione non è disponibile nel Regno Unito e
in altre aree.
Funzione Local Link (solo per il
Regno Unito)
Questa funzione consente di selezionare altre
stazioni locali della stessa area, anche se non
sono memorizzate in corrispondenza dei tasti
numerici.
1Durante la ricezione FM, premere un tasto
numerico (da (1) a (6)) in corrispondenza
del quale è memorizzata una stazione locale.
2Entro 5 secondi, premere nuovamente il tasto
numerico della stazione locale.
Ripetere questa procedura fino alla ricezione
della stazione locale.
Selezionare Per
AF-ON attivare AF e disattivare TA.
TA-ON attivare TA e disattivare AF.
AF, TA-ON attivare entrambi i modi AF e
TA.
AF, TA-OFF disattivare entrambi i modi AF
e TA.
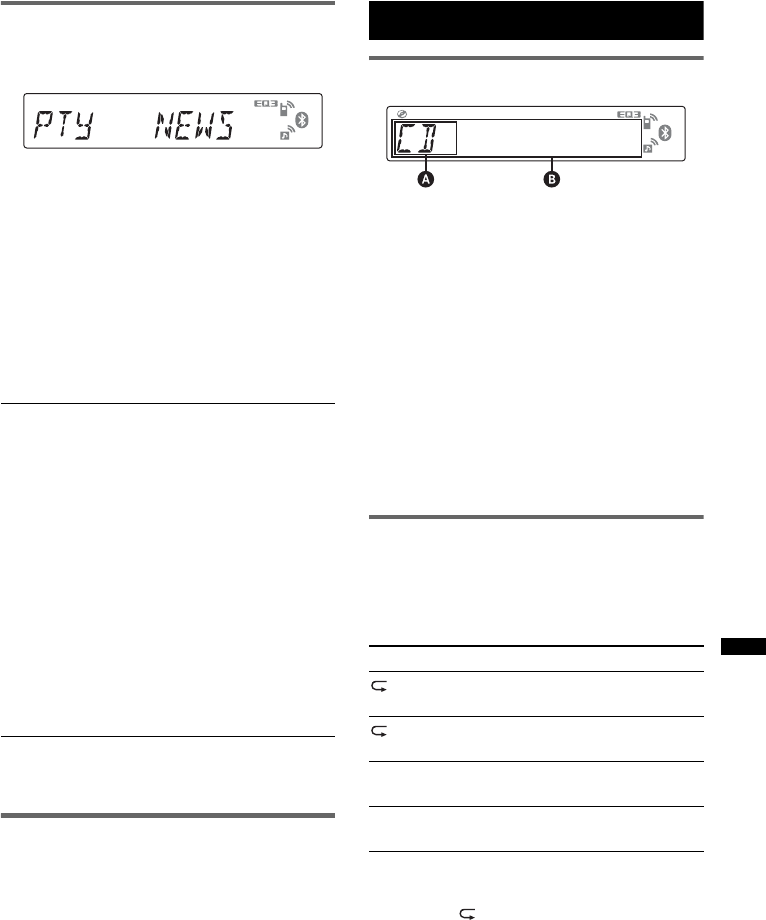
21
Selezione del modo PTY
1Tenere premuto (AF/TA) (PTY) durante
la ricezione FM.
Se la stazione sta trasmettendo dati PTY,
viene visualizzato il nome del tipo di
programma corrente.
2Premere più volte (AF/TA) (PTY) fino a
quando non viene visualizzato il tipo
di programma desiderato.
3Premere (SEEK) +/–.
L’apparecchio avvia la ricerca di una stazione
che trasmette il tipo di programma
selezionato.
Tipi di programma
Nota
Non è possibile utilizzare questa funzione in paesi/
regioni in cui non sono disponibili i dati PTY.
Impostazione del modo CT
1Impostare “CT-ON” nelle impostazioni
(pagina 31).
Note
•La funzione CT potrebbe non essere disponibile
anche durante la ricezione di una stazione RDS.
•L’ora impostata mediante la funzione CT e l’ora
corrente potrebbero non corrispondere.
CD
Voci del display
ASorgente
BTitolo del brano*1, titolo del disco/nome
dell’artista*1, nome dell’artista*1, numero di
album*2, titolo dell’album*1, numero del
brano/tempo di riproduzione trascorso,
orologio
*1 Vengono visualizzate le informazioni di un file CD
TEXT, MP3/WMA/AAC.
*2 Il numero dell’album viene visualizzato solo
quando si cambia album.
Per modificare le voci del display B, premere
(DSPL).
Suggerimento
Le voci visualizzate potrebbero non corrispondere, a
seconda del modello, del tipo di disco, del formato di
registrazione e delle impostazioni.
Riproduzione ripetuta e in ordine
casuale
1Durante la riproduzione, premere più
volte (3) (REP) o (4) (SHUF) fino a
visualizzare l’impostazione desiderata.
*Se viene riprodotto un file MP3/WMA/AAC.
Per tornare al modo di riproduzione normale,
selezionare “ OFF” o “SHUF OFF”.
NEWS (Notiziario), AFFAIRS (Attualità),
INFO (Informazioni), SPORT (Sport),
EDUCATE (Istruzione), DRAMA (Teatro),
CULTURE (Cultura), SCIENCE (Scienza),
VARIED (Vari), POP M (Musica pop),
ROCK M (Musica rock), EASY M (Musica
leggera), LIGHT M (Musica leggera),
CLASSICS (Musica classica), OTHER M
(Altri tipi di musica), WEATHER (Meteo),
FINANCE (Finanza), CHILDREN (Programmi
per bambini), SOCIAL A (Sociale),
RELIGION (Religione), PHONE IN (Chat
show), TRAVEL (Viaggi), LEISURE
(Divertimento e tempo libero), JAZZ (Musica
jazz), COUNTRY (Musica country),
NATION M (Musica nazionale), OLDIES
(Musica anni 50/60), FOLK M (Musica folk),
DOCUMENT (Documentari)
Selezionare Per riprodurre
TRACK un brano in modo
ripetuto.
ALBUM* un album in modo
ripetuto.
SHUF ALBUM* un album in modo
casuale.
SHUF DISC un disco in modo
casuale.
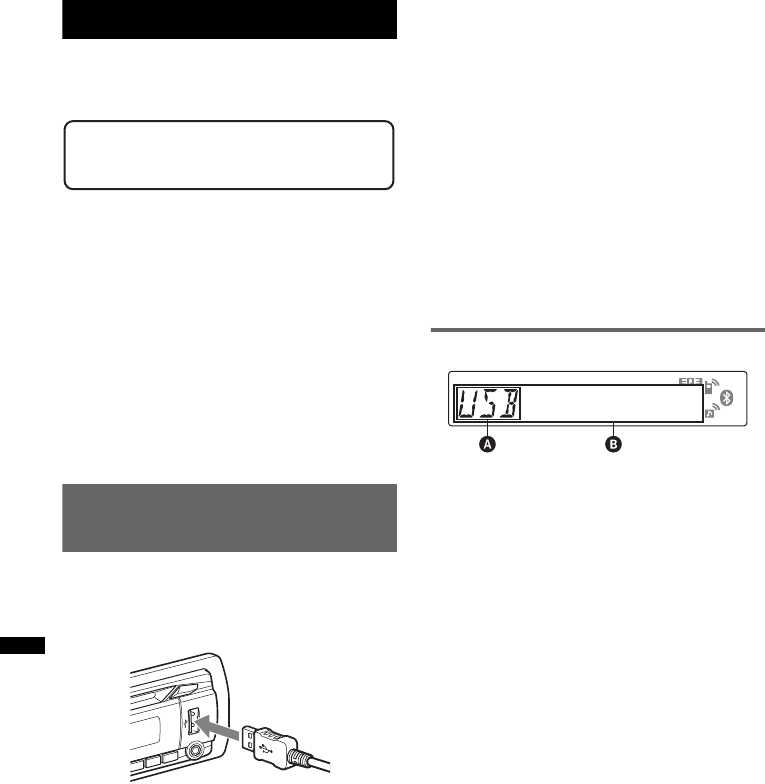
22
Dispositivi USB
Per ulteriori informazioni sulla compatibilità del
dispositivo USB in uso, visitare il sito di
assistenza.
• È possibile utilizzare dispositivi USB di tipo
MSC (Mass Storage Class) e MTP (Media
Transfer Protocol) compatibili con lo standard
USB.
• Il codec corrispondente è MP3 (.mp3), WMA
(.wma) e AAC (.m4a).
• Si consiglia di eseguire copie di backup dei dati
contenuti nel dispositivo USB.
Nota
Accertarsi di collegare il dispositivo USB dopo
l’accensione del motore.
Diversamente, a seconda del dispositivo USB,
potrebbe verificarsi un problema di funzionamento o
un danno.
Riproduzione del contenuto di
un dispositivo USB
1Collegare il dispositivo USB al
terminale USB.
Per i collegamenti, utilizzare esclusivamente
il cavo in dotazione con il dispositivo USB.
Viene avviata la riproduzione.
Se è già collegato un dispositivo USB, per
avviare la riproduzione, premere più volte
(SOURCE/OFF) fino a visualizzare “USB”.
Premere (SOURCE/OFF) per 1 secondo per
arrestare la riproduzione.
Rimozione del dispositivo USB
1Arrestare la riproduzione del dispositivo USB.
2Rimuovere il dispositivo USB.
Se durante la riproduzione viene rimosso il
dispositivo USB, è possibile che i dati
memorizzati nel dispositivo USB vengano
danneggiati.
Note
•Non utilizzare dispositivi USB di dimensioni o peso
eccessivi che potrebbero cadere a causa di
vibrazioni o causare un collegamento non
sufficientemente saldo.
•Non rimuovere il pannello anteriore durante la
riproduzione del dispositivo USB. Diversamente, è
possibile che i dati USB vengano danneggiati.
•Il presente apparecchio non è in grado di
riconoscere i dispositivi USB mediante un hub USB.
Voci del display
ASorgente
BTitolo del brano, nome dell’artista, numero
dell’album*, nome dell’album, numero del
brano/tempo di riproduzione trascorso,
orologio
*Il numero dell’album viene visualizzato solo quando
si cambia album.
Per modificare le voci del display B, premere
(DSPL).
Note
•Le voci visualizzate potrebbero non corrispondere, a
seconda del dispositivo USB, del formato di
registrazione e delle impostazioni effettuate. Per
ulteriori informazioni, visitare il sito di assistenza.
•Di seguito è riportato il numero massimo di dati
visualizzabili.
– cartelle (album): 128
– file (brani) per cartella: 500
•Non lasciare il dispositivo USB all’interno di auto
parcheggiate, onde evitare problemi di
funzionamento.
•A seconda della quantità di dati registrati, è possibile
che l’avvio della riproduzione richieda alcuni istanti.
•Non è possibile riprodurre i file DRM (gestione dei
diritti digitali).
•Durante la riproduzione di un file MP3/WMA/AAC
VBR (velocità di trasmissione variabile) o mentre si
procede rapidamente in avanti/all’indietro, è
possibile che il tempo di riproduzione trascorso non
venga visualizzato correttamente.
•Non è supportata la riproduzione dei file MP3/WMA/
AAC riportati di seguito.
– file con compressione senza perdita di dati
– file protetti da copyright
Sito di assistenza clienti
http://support.sony-europe.com/
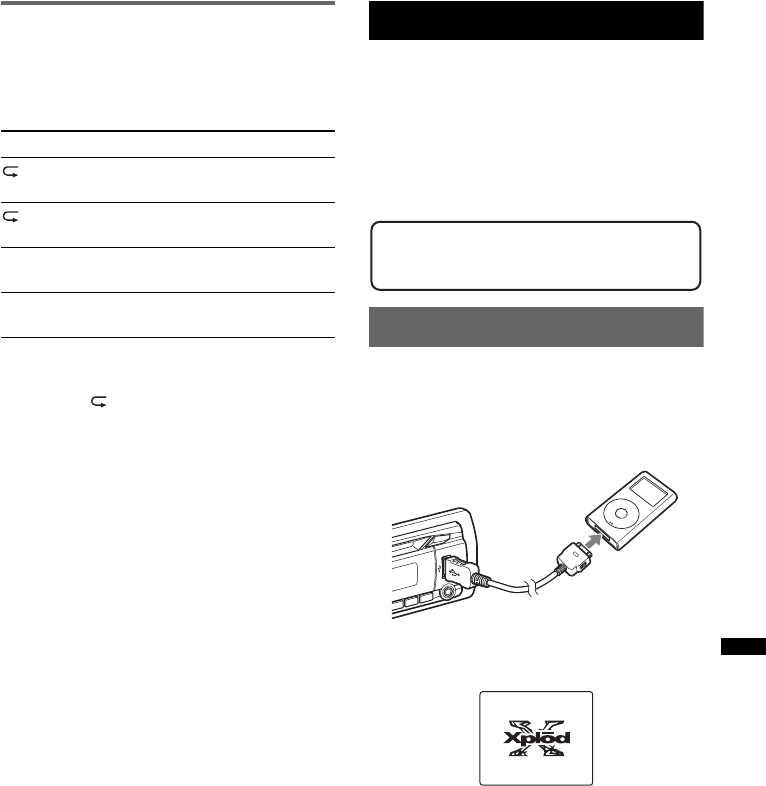
23
Riproduzione ripetuta e in ordine
casuale
1Durante la riproduzione, premere più
volte (3) (REP) o (4) (SHUF) fino a
visualizzare l’impostazione desiderata.
Dopo 3 secondi, l’impostazione è completata.
Per tornare al modo di riproduzione normale,
selezionare “ OFF” o “SHUF OFF”.
iPod
Per ulteriori informazioni sulla compatibilità
dell’iPod, vedere “Informazioni sull’iPod” a
pagina 34 oppure visitare il sito di assistenza.
In queste Istruzioni per l’uso, il termine “iPod”
viene utilizzato come riferimento generale alle
funzioni iPod dell’iPod e dell’iPhone, se non
specificato diversamente nel testo o nelle
illustrazioni.
Riproduzione tramite un iPod
Prima di collegare l’iPod, abbassare il volume
dell’apparecchio.
1Collegare l’iPod al connettore USB
tramite il connettore dock del cavo
USB.
L’iPod si accende automaticamente e sul
relativo display appare la seguente
schermata.*
Suggerimento
Per il collegamento del connettore dock, si consiglia di
utilizzare il cavo RC-100IP USB (non in dotazione).
I brani contenuti nell’iPod vengono riprodotti
automaticamente a partire dal punto in cui è
stata interrotta la riproduzione.
Se è già collegato un iPod, per avviare la
riproduzione, premere più volte
(SOURCE/OFF) fino a visualizzare “USB”.
Non appena l’iPod viene riconosciuto, sul
display appare l’indicazione “IPD”.
Selezionare Per riprodurre
TRACK un brano in modo
ripetuto.
ALBUM un album in modo
ripetuto.
SHUF ALBUM un album in modo
casuale.
SHUF DEVICE un dispositivo in modo
casuale.
continua alla pagina successiva t
Sito di assistenza clienti
http://support.sony-europe.com/
>
.
MENU
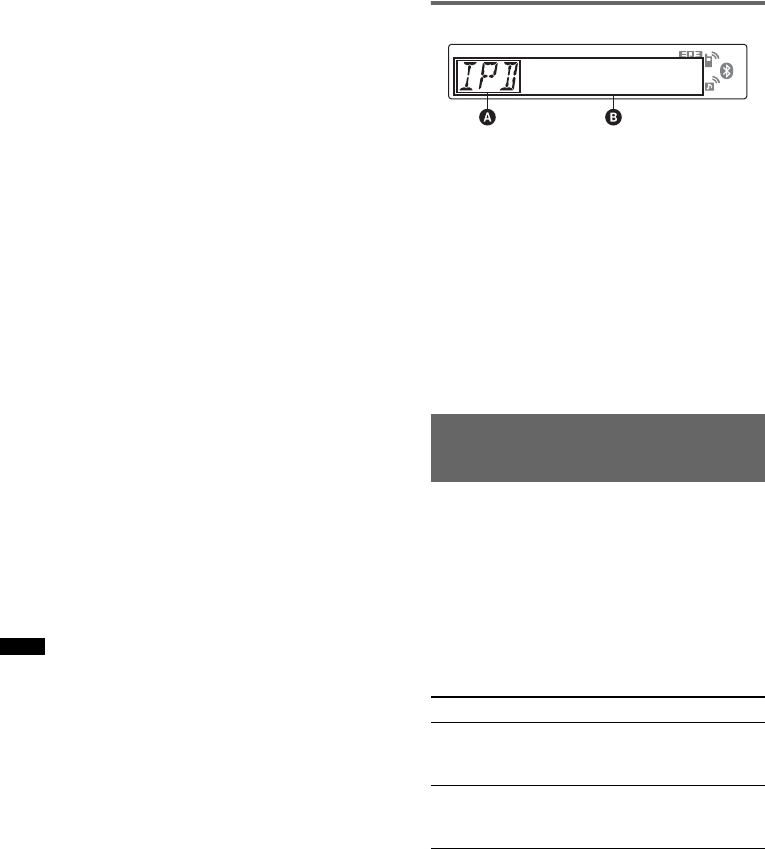
24
*Nel caso in cui un iPod touch o un iPhone venga
collegato o che l’iPod sia stato l’ultimo dispositivo
utilizzato per la riproduzione tramite il controllo del
passeggero, il logo non apparirà sullo schermo.
2Premere (MODE) per selezionare il
modo di riproduzione.
Il modo cambia come riportato di seguito:
RESUMING t ALBUM t TRACK t
PODCAST* t GENRE t PLAYLIST
t ARTIST
*È possibile che non venga visualizzato, a seconda
dell’impostazione dell’iPod.
3Regolare il volume.
Premere (SOURCE/OFF) per 1 secondo per
arrestare la riproduzione.
Rimozione dell’iPod
1Arrestare la riproduzione dell’iPod.
2Rimuovere l’iPod.
Avvertenza durante l’uso con iPhone
Se l’iPhone viene collegato tramite USB, il volume del
telefono è controllato dell’iPhone stesso. Per evitare
un aumento improvviso del volume dopo avere
effettuato una chiamata, non alzare il volume
sull’apparecchio durante la chiamata.
Note
•Non rimuovere il pannello anteriore durante la
riproduzione dell’iPod, onde evitare che i dati
vengano danneggiati.
•Il presente apparecchio non è in grado di
riconoscere l’iPod mediante un hub USB.
Suggerimenti
•Quando la chiave d’accensione è impostata sulla
posizione ACC e l’apparecchio è acceso, l’iPod
viene ricaricato.
•Se l’iPod viene scollegato durante la riproduzione,
nel display dell’apparecchio viene visualizzato “NO
DEV”.
Modo di ripristino
Se l’iPod è collegato al connettore dock, il
presente apparecchio passa al modo di ripristino
e la riproduzione viene avviata utilizzando il
modo impostato sull’iPod.
Nel modo di ripristino, i tasti riportati di seguito
non funzionano.
– (3) (REP)
– (4) (SHUF)
Voci del display
AIndicazione di sorgente (iPod)
BTitolo del brano, nome dell’artista, nome
dell’album, numero del brano/tempo di
riproduzione trascorso, orologio
Per modificare le voci del display B, premere
(DSPL).
Suggerimento
Quando si cambia album/podcast/genere/artista/
playlist, il relativo numero di voce viene visualizzato
brevemente.
Nota
È possibile che alcune lettere memorizzate nell’iPod
non vengano visualizzate in modo corretto.
Impostazione del modo di
riproduzione
1Durante la riproduzione, premere
(MODE).
Il modo cambia come riportato di seguito:
ALBUM t TRACK t PODCAST* t
GENRE t PLAYLIST t ARTIST
*È possibile che non venga visualizzato, a seconda
dell’impostazione dell’iPod.
Come saltare album, podcast, generi,
playlist e artisti
Per Premere
Saltare (1)/(2) (ALBM –/+)
[premere una volta per ogni
brano]
Saltare senza
interruzioni
(1)/(2) (ALBM –/+)
[tenere premuto fino al punto
desiderato]
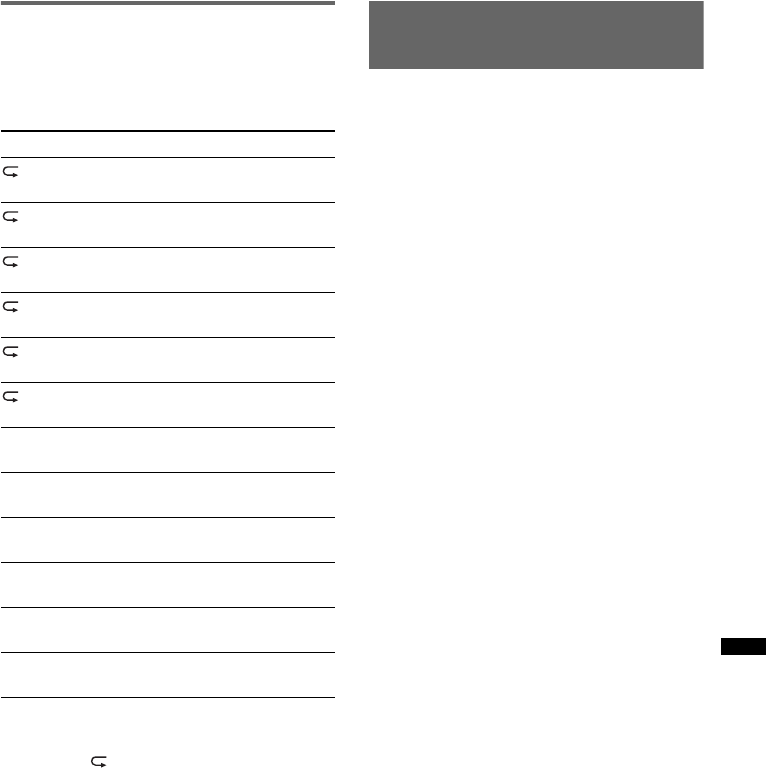
25
Riproduzione ripetuta e in ordine
casuale
1Durante la riproduzione, premere più
volte (3) (REP) o (4) (SHUF) fino a
visualizzare l’impostazione desiderata.
Dopo 3 secondi, l’impostazione è completata.
Per tornare al modo di riproduzione normale,
selezionare “ OFF” o “SHUF OFF”.
Uso diretto dell’iPod
— Controllo passeggero
È possibile utilizzare direttamente un iPod
collegato al connettore dock.
1Durante la riproduzione, tenere
premuto (MODE).
Viene visualizzato “MODE IPOD”, quindi è
possibile utilizzare direttamente l’iPod.
Per cambiare le voci del display
Premere (DSPL).
Le voci del display cambiano come riportato di
seguito:
Titolo del brano t Nome dell’artista t Nome
dell’album t MODE IPOD t Orologio
Per annullare il modo di controllo
passeggero
Tenere premuto (MODE).
Quindi, viene visualizzato “MODE AUDIO” e il
modo di riproduzione passa a “RESUMING”.
Note
•È possibile regolare il volume solo tramite
l’apparecchio.
•Se questo modo viene annullato, l’impostazione
della riproduzione ripetuta verrà disattivata.
Selezionare Per riprodurre
TRACK un brano in modo
ripetuto.
ALBUM un album in modo
ripetuto.
PODCAST un podcast in modo
ripetuto.
ARTIST un artista in modo
ripetuto.
PLAYLIST una playlist in modo
ripetuto.
GENRE un genere in modo
ripetuto.
SHUF ALBUM un album in modo
casuale.
SHUF PODCAST un podcast in modo
casuale.
SHUF ARTIST un artista in modo
casuale.
SHUF PLAYLIST una playlist in modo
casuale.
SHUF GENRE un genere in modo
casuale.
SHUF DEVICE un dispositivo in modo
casuale.
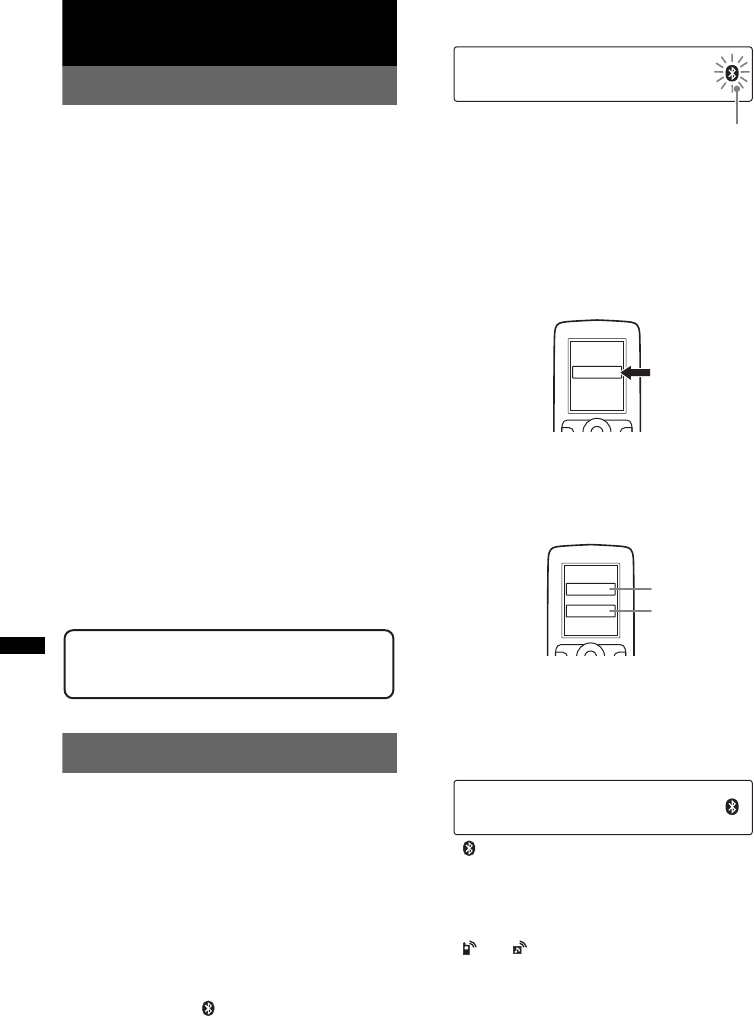
26
Bluetooth (chiamate vivavoce e
streaming musicale)
Operazioni Bluetooth
Per utilizzare la funzione Bluetooth, attenersi alla
seguente procedura.
1Associazione
Quando si stabilisce la connessione di
dispositivi Bluetooth per la prima volta, è
necessario che questi ultimi si registrino
reciprocamente. Questa operazione è
denominata “associazione” e deve essere
effettuata solo la prima volta, in quanto alla
successiva connessione il presente
apparecchio e gli altri dispositivi si
riconoscono in modo automatico. È possibile
effettuare l’associazione per un massimo di 8
dispositivi. (A seconda del dispositivo,
potrebbe essere necessario immettere un
codice di accesso per ogni connessione.)
2Connessione
Per utilizzare il dispositivo in seguito al
completamento dell’associazione, avviare la
connessione. Talvolta, una volta effettuata
l’associazione, è possibile connettersi
automaticamente.
3Funzione vivavoce/Streaming
musicale
Una volta effettuata la connessione, è
possibile parlare in vivavoce e ascoltare la
musica.
Associazione
Innanzitutto, procedere alla registrazione
(“associazione”) di un dispositivo Bluetooth
(telefono cellulare e così via) e del presente
apparecchio. È possibile effettuare l’associazione
per un massimo di 8 dispositivi. Una volta
effettuata l’associazione, non è necessario
ripetere l’operazione.
1Collocare il dispositivo Bluetooth
entro 1 m di distanza dal presente
apparecchio.
2Tenere premuto (BT) finché
l’indicazione “ ” non lampeggia
(circa 5 secondi).
L’apparecchio entra nel modo di attesa
dell’associazione.
3Impostare il dispositivo Bluetooth
affinché ricerchi il presente
apparecchio.
Nel display del dispositivo di connessione
viene visualizzato un elenco dei dispositivi
rilevati. Il presente apparecchio viene
visualizzato con il nome “XPLOD” nel
display del dispositivo di connessione.
4Se sul display del dispositivo da
connettere viene richiesto di
specificare il codice di accesso*,
immettere “0000”.
Sull’apparecchio e sul dispositivo Bluetooth
vengono memorizzate le reciproche
informazioni, quindi, una volta effettuata
l’associazione, l’apparecchio è pronto per la
connessione al dispositivo.
“ ” lampeggia, quindi rimane acceso al
completamento dell’associazione.
5Impostare il dispositivo Bluetooth per
la connessione al presente
apparecchio.
“ ” o “ ” vengono visualizzati quando la
connessione è stabilita.
*A seconda del dispositivo, è possibile che il codice di
accesso venga denominato “codice di protezione”,
“codice PIN”, “numero PIN” o “password” e così via.
Nota
Il modo di attesa dell’associazione non viene rilasciato
finché la connessione non è stabilita.
Sito di assistenza clienti
http://support.sony-europe.com/
lampeggia
XXXXXXX
DR-BT30Q
XPLOD
XXXX
Immettere il
codice di
accesso.
“0000”
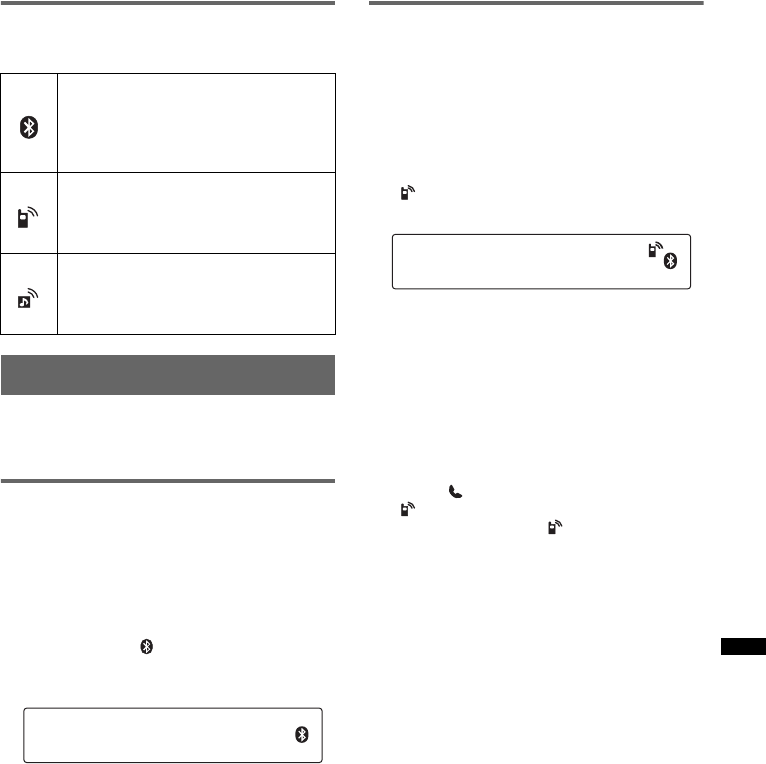
27
Icone Bluetooth
Sul presente apparecchio vengono utilizzate le
seguenti icone.
Connessione
Se la procedura di associazione è già stata
effettuata, iniziare le operazioni a partire da
questo punto.
Per attivare l’uscita del segnale
Bluetooth del presente
apparecchio
Per utilizzare la funzione Bluetooth, attivare
l’uscita del segnale Bluetooth del presente
apparecchio.
1Tenere premuto (BT) finché
l’indicazione “ ” non lampeggia
(circa 3 secondi).
La ricezione del segnale Bluetooth è attivata.
Connessione a un telefono
cellulare
1Accertarsi che l’apparecchio e il
telefono cellulare siano impostati per
la ricezione del segnale Bluetooth.
2Effettuare la connessione al presente
apparecchio utilizzando il telefono
cellulare.
“ ”viene visualizzato quando la
connessione è stabilita.
Connessione all’ultimo telefono
cellulare connesso a partire
dall’apparecchio
1Accertarsi che l’apparecchio e il telefono
cellulare siano impostati per la ricezione del
segnale Bluetooth.
2Premere più volte (SOURCE/OFF) fino a
visualizzare “BT PHONE”.
3Premere (vivavoce).
“ ” lampeggia nel corso del tentativo di
connessione. Quindi, “ ” rimane acceso
quando la connessione è stabilita.
Nota
Durante l’uso della funzione di streaming audio
Bluetooth, non è possibile stabilire la connessione dal
presente apparecchio al telefono cellulare. Effettuare
la connessione dal telefono cellulare all’apparecchio.
È possibile che sull’audio di riproduzione venga udito
il rumore della connessione.
Suggerimento
Con il segnale Bluetooth attivo: attivando la chiave di
accensione, il presente apparecchio si connette di
nuovo automaticamente all’ultimo telefono cellulare
connesso. La connessione automatica dipende inoltre
dalle specifiche del telefono cellulare. Se il presente
apparecchio non si riconnette automaticamente,
procedere manualmente.
accesa:
lampeggiante:
spenta:
segnale Bluetooth
attivo modo di attesa
dell’associazione
segnale Bluetooth non
attivo
accesa:
lampeggiante:
spenta:
connessione stabilita
correttamente
connessione in corso
nessuna connessione
accesa:
lampeggiante:
spenta:
connessione stabilita
correttamente
connessione in corso
nessuna connessione
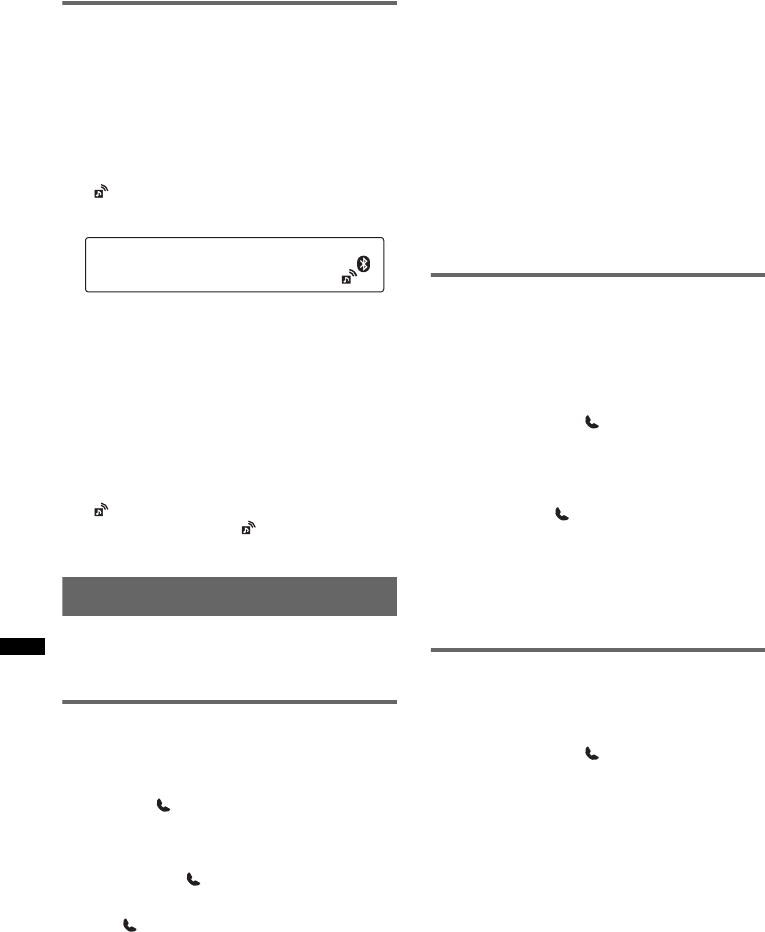
28
Connessione di un dispositivo
audio
1Accertarsi che l’apparecchio e il
dispositivo audio siano impostati per
la ricezione del segnale Bluetooth.
2Effettuare la connessione al presente
apparecchio utilizzando il dispositivo
audio.
“ ” viene visualizzato quando la
connessione è stabilita.
Connessione all’ultimo dispositivo
audio connesso tramite
l’apparecchio
1Accertarsi che l’apparecchio e il dispositivo
audio siano impostati per la ricezione del
segnale Bluetooth.
2Premere più volte (SOURCE/OFF) fino a
visualizzare “BT AUDIO”.
3Premere (6).
“ ” lampeggia nel corso del tentativo di
connessione. Quindi, “ ” rimane acceso
quando la connessione è stabilita.
Funzione vivavoce
Innanzitutto, verificare che il presente
apparecchio e il telefono cellulare siano
connessi.
Ricezione di chiamate
Quando si riceve una chiamata, dai diffusori
dell’auto viene emesso un tono di chiamata.
1Alla ricezione di una chiamata,
premere (vivavoce).
La chiamata telefonica viene avviata.
Per terminare una chiamata
Premere di nuovo (vivavoce).
Per rifiutare una chiamata in entrata, tenere
premuto (vivavoce) per 2 secondi.
Regolazione del guadagno del
microfono
È possibile selezionare due livelli di volume
(“LOW” o “HI”) in modo da impostare un livello
appropriato per l’interlocutore durante una
chiamata.
1Premere (5) durante una chiamata.
La voce cambia come riportato di seguito:
MIC-LOW y MIC-HI
Nota
Il microfono dell’apparecchio si trova sul retro del
pannello anteriore (pagina 14). Non coprire il
microfono con nastri e simili.
Come effettuare le chiamate
Per effettuare le chiamate dal presente
apparecchio, è possibile utilizzare la funzione di
ripetizione della selezione dei numeri telefonici.
1Premere più volte (SOURCE/OFF) fino a
visualizzare “BT PHONE”.
2Tenere premuto (vivavoce) per
almeno 3 secondi.
La chiamata telefonica viene avviata.
Per terminare una chiamata
Premere di nuovo (vivavoce).
Per effettuare una chiamata a un altro telefono,
utilizzare il telefono cellulare, quindi eseguire il
trasferimento di chiamata.
Per ulteriori informazioni sul trasferimento di
chiamata, consultare quanto segue.
Trasferimento di chiamata
Per attivare o disattivare il dispositivo
appropriato (apparecchio/telefono cellulare),
attenersi a quanto riportato di seguito.
1Tenere premuto (vivavoce) oppure
utilizzare il telefono cellulare.
Per ulteriori informazioni sul funzionamento del
telefono cellulare, consultare il relativo manuale.
Nota
A seconda del telefono cellulare in uso, è possibile
che la connessione vivavoce venga interrotta durante
il tentativo di trasferimento di chiamata.

29
Attivazione delle chiamate vocali
È possibile attivare la funzione di chiamata
vocale con un telefono cellulare connesso al
presente apparecchio pronunciando il tag vocale
memorizzato sul telefono stesso, quindi
effettuare la chiamata.
1Premere più volte (SOURCE/OFF) fino a
visualizzare “BT PHONE”.
2Premere (vivavoce).
Il telefono cellulare passa alla modalità di
chiamata vocale.
3Pronunciare il tag vocale memorizzato
sul telefono cellulare.
Viene riconosciuta la voce, quindi viene
effettuata la chiamata.
Note
•Innanzitutto, verificare che il presente apparecchio e
il telefono cellulare siano connessi.
•Memorizzare un tag vocale sul telefono cellulare.
•Se viene attivata la funzione di chiamata vocale con
un telefono cellulare connesso al presente
apparecchio, è possibile che in alcuni casi la
funzione non sia disponibile.
•Rumori, quali quello del motore acceso, potrebbero
interferire con il riconoscimento vocale. Per
migliorare il riconoscimento, utilizzare la funzione in
condizioni minime di rumore.
•In alcune circostanze, la funzione di chiamata vocale
potrebbe non essere disponibile, a seconda
dell’effettiva operatività della funzione stessa del
telefono cellulare. Per ulteriori informazioni, visitare il
sito di supporto (pagina 26).
Suggerimenti
•Pronunciare con lo stesso tono di voce utilizzato per
la registrazione del tag vocale.
•Memorizzare un tag vocale in auto mediante il
presente apparecchio con la sorgente “BT PHONE”
selezionata.
Streaming musicale
Ascolto di musica da un
dispositivo audio
Se il dispositivo audio supporta il profilo A2DP
(Advanced Audio Distribution Profile) della
tecnologia Bluetooth, è possibile ascoltare la
musica proveniente da tale dispositivo
utilizzando il presente apparecchio.
1Abbassare il volume sul presente
apparecchio.
2Premere più volte (SOURCE/OFF) fino a
visualizzare “BT AUDIO”.
3Avviare la riproduzione sul dispositivo
audio.
4Regolare il volume sul presente
apparecchio.
Regolazione del livello del volume
Il livello del volume è regolabile per intervenire
sulle differenze fra l’apparecchio e il dispositivo
audio Bluetooth.
1Avviare la riproduzione del dispositivo audio
Bluetooth ad un volume moderato.
2Impostare sull’apparecchio il consueto volume
di ascolto.
3Premere più volte il tasto di selezione fino a
visualizzare “BTA”, quindi ruotare la
manopola di controllo del volume per regolare
il livello di ingresso (da –8 dB a +18 dB).
Uso di un dispositivo audio tramite
il presente apparecchio
Se il dispositivo audio supporta il profilo AVRCP
(Audio Video Remote Control Profile) della
tecnologia Bluetooth, è possibile eseguire le
operazioni riportate di seguito sul presente
apparecchio (il funzionamento varia in base al
dispositivo audio).
*A seconda del dispositivo, potrebbe essere
necessario premere il tasto due volte.
Le operazioni diverse da quelle descritte sopra,
devono essere eseguite sul dispositivo audio.
Note
•Durante la riproduzione di un dispositivo audio, le
informazioni del dispositivo audio connesso quali
numero del brano/tempo, stato della riproduzione e
così via, non vengono visualizzate sul presente
apparecchio.
•Anche se si cambia sorgente sul presente
apparecchio, la riproduzione del dispositivo audio
non viene arrestata.
Suggerimento
È possibile connettere un telefono cellulare che
supporti il profilo A2DP (Advanced Audio Distribution
Profile) come dispositivo audio mediante cui ascoltare
la musica.
Per Premere
Riprodurre (6) (PAUSE)* sul presente
apparecchio.
Effettuare una
pausa
(6) (PAUSE)* sul presente
apparecchio.
Saltare i brani SEEK –/+ (./>) [una
volta per ogni brano]
30
Annullamento della
registrazione di tutti i
dispositivi associati
1Tenere premuto (SOURCE/OFF) per 1
secondo per disattivare
l’alimentazione.
2Se “ ” si accende, tenere premuto
(BT) fino a che “ ” non si spegne.
3Tenere premuto il tasto di selezione.
4Premere più volte il tasto di selezione
fino a visualizzare “BT INIT”.
5Premere (SEEK) +.
L’inizializzazione viene avviata.
L’annullamento della registrazione di tutti i
dispositivi richiede 3 secondi. Non disattivare
l’alimentazione durante il lampeggiamento di
“INITIAL”.
Altre funzioni
Modifica delle impostazioni
audio
Regolazione delle caratteristiche
dell’audio
1Premere più volte il tasto di selezione
fino a visualizzare la voce desiderata.
2Ruotare la manopola di controllo del
volume per regolare la voce
selezionata.
3Premere (BACK).
L’impostazione è completata e il display torna
al modo di riproduzione/ricezione normale.
È possibile impostare le seguenti voci (per
ulteriori informazioni, consultare la pagina di
riferimento):
EQ3
Per selezionare una curva dell’equalizzatore tra
7 tipi di musica (XPLOD, VOCAL, EDGE,
CRU ISE , S PAC E, G RAVITY, CU S TOM o
OFF).
LOW*1, MID*1, HI*1 (pagina 31)
BAL (bilanciamento)
Consente di regolare il bilanciamento audio tra i
diffusori sinistro e destro.
FAD (attenuatore)
Consente di regolare il livello relativo tra i
diffusori anteriore e posteriore.
SUB*2 (volume subwoofer)
Consente di regolare il volume del subwoofer.
AUX*3 (livello AUX)
Consente di regolare il livello del volume di
ciascun apparecchio ausiliario collegato: “+18
dB” – “0 dB” – “–8 dB.”
Questa impostazione elimina la necessità di
regolare il livello di volume tra sorgenti.
BTA*4 (livello audio BT)
Consente di regolare il livello del volume di
ciascun dispositivo audio Bluetooth collegato:
“+18 dB” – “0 dB” – “–8 dB”.
Questa impostazione elimina la necessità di
regolare il livello di volume tra sorgenti
(pagina 29).
*1 Se la funzione EQ3 è attivata.
*2 “ATT” viene visualizzato con il valore minimo e può
essere regolato fino a un massimo di 21
incrementi.
*3 Se la sorgente AUX è attivata (pagina 32).
*4 Se è attivata la sorgente audio Bluetooth
(pagina 29).
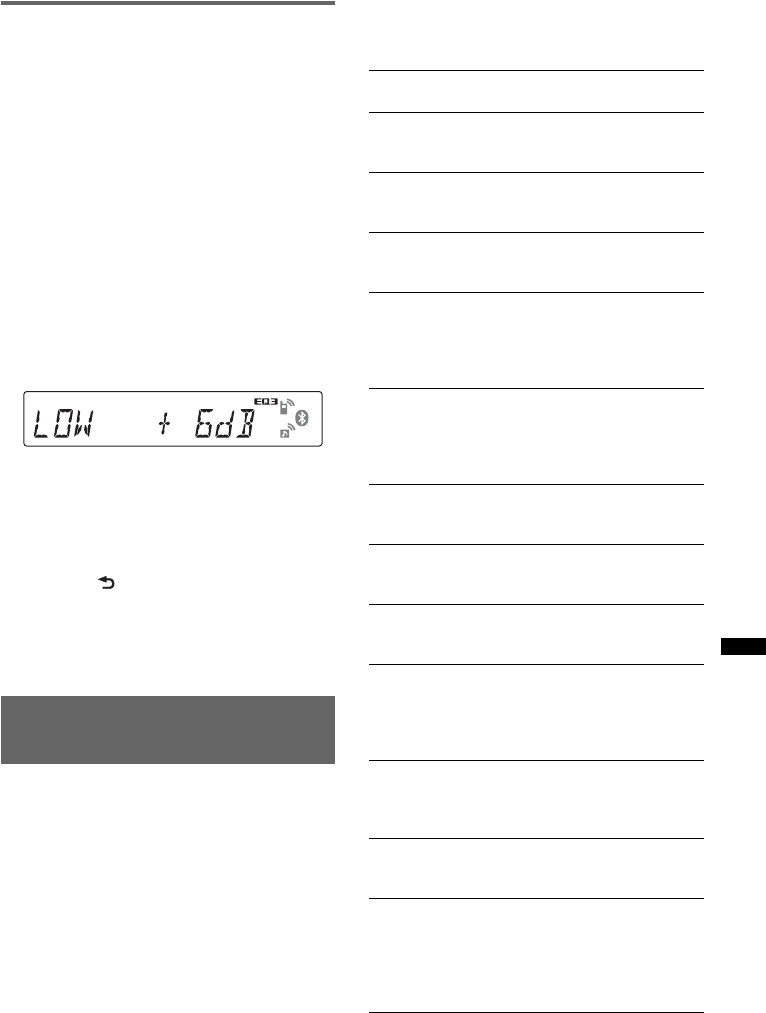
31
Personalizzazione della curva
dell’equalizzatore — EQ3
L’opzione “CUSTOM” di EQ3 consente di
effettuare impostazioni dell’equalizzatore
personalizzate.
1Selezionare una sorgente, quindi
premere più volte il tasto di selezione
per selezionare “EQ3”.
2Ruotare la manopola di controllo per
selezionare “CUSTOM”.
3Premere più volte il tasto di selezione
fino a visualizzare “LOW”, “MID” o
“HI”.
4Ruotare la manopola di controllo del
volume per regolare la voce
selezionata.
Il livello del volume può essere regolato per
unità di 1 dB da –10 dB a +10 dB.
Ripetere i punti 3 e 4 per regolare la curva
dell’equalizzatore.
Per ripristinare la curva dell’equalizzatore
impostata in fabbrica, tenere premuto il tasto
di selezione prima del completamento
dell’impostazione.
5Premere (BACK).
L’impostazione è completata e il display torna
al modo di ricezione/riproduzione normale.
Suggerimento
È possibile regolare anche altri tipi di equalizzatore.
Regolazione delle voci di
impostazione — SET
1Tenere premuto il tasto di selezione.
Viene visualizzato il display di impostazione.
2Premere più volte il tasto di selezione
fino a visualizzare la voce desiderata.
3Ruotare la manopola di controllo per
selezionare l’impostazione (ad
esempio “ON” o “OFF”).
4Tenere premuto il tasto di selezione.
L’impostazione è completata e il display torna
al modo di ricezione/riproduzione normale.
Nota
Le voci visualizzate sono diverse, a seconda della
sorgente e dell’impostazione.
È possibile impostare le seguenti voci (per
ulteriori informazioni, consultare la pagina di
riferimento):
CLOCK-ADJ (regolazione dell’orologio)
(pagina 8)
CT (segnale orario)
Consente di attivare la funzione CT: “ON”,
“OFF” (pagina 19, 21).
BEEP
Consente di attivare il segnale acustico: “ON”,
“OFF”.
AUX-A*1 (audio AUX)
Consente di attivare il display della sorgente
AUX: “ON”, “OFF” (pagina 32).
A.OFF (spegnimento automatico)
Consente di impostare lo spegnimento
automatico dell’apparecchio allo scadere di un
intervallo di tempo desiderato: “NO”, “30S”
(secondi), “30M” (minuti), “60M” (minuti).
MIC*1 (microfono)
– “EXT”: per passare automaticamente al
microfono esterno, se collegato.
– “INT”: per selezionare solo il microfono
interno.
DEMO
(dimostrazione)
Consente di attivare la dimostrazione: “ON”,
“OFF”.
DIM (attenuatore di luminosità)
Consente di modificare luminosità del display:
“ON”, “OFF”.
A.SCRL (scorrimento automatico)
Consente di scorrere automaticamente le voci
composte da molti caratteri: “ON”, “OFF”.
LOCAL (modo di ricerca locale)
– “ON”: per sintonizzarsi solo su stazioni con
segnali più potenti.
– “OFF”: per sintonizzarsi su stazioni con
ricezione normale.
MONO*2 (modo monofonico)
Consente di selezionare il modo di ricezione
monofonico per migliorare la ricezione FM:
“ON”, “OFF”.
REG*2 (regionale)
Consente di limitare la ricezione a una regione
specifica: “ON”, “OFF” (pagina 20).
Z.TIME (Zappin Time)
Consente di selezionare l’ora per la
riproduzione della funzione ZAPPIN.
– “ZAP.TIME-1” (circa 6 secondi),
“ZAP.TIME-2” (circa 9 secondi),
“ZAP.TIME-3” (circa 30 secondi).
continua alla pagina successiva t
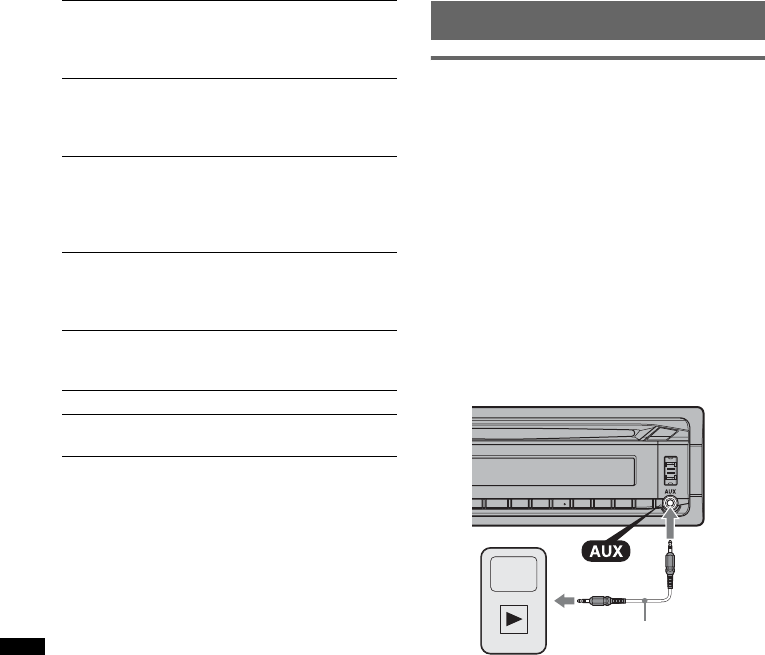
32
*1 Se l’apparecchio è spento.
*2 Durante la ricezione FM.
Uso di apparecchi opzionali
Apparecchio audio ausiliare
Collegando un dispositivo audio portatile
opzionale alla presa di ingresso AUX (minipresa
stereo) sull’apparecchio e quindi selezionando la
sorgente, è possibile ascoltare l’audio del
dispositivo portatile mediante i diffusori
dell’auto. Il livello del volume è regolabile per
intervenire sulle differenze fra l’apparecchio e i
dispositivo audio portatile. Seguire la seguente
procedura:
Collegamento del dispositivo audio
portatile
1Spegnere il dispositivo audio portatile.
2Abbassare il volume sull’apparecchio.
3Effettuare il collegamento all’apparecchio.
*Assicurarsi di utilizzare una spina diritta.
Regolazione del livello del volume
Regolare il volume di ogni apparecchio audio
collegato prima della riproduzione.
1Abbassare il volume sull’apparecchio.
2Premere più volte (SOURCE/OFF) fino a
visualizzare “AUX”.
Viene visualizzato “AUX FRONT IN”.
3Avviare la riproduzione del dispositivo audio
portatile ad un volume moderato.
4Impostare sull’apparecchio il consueto volume
di ascolto.
5Regolare il livello di ingresso (pagina 30).
LPF (Filtro passa basso)
Consente di selezionare la frequenza di taglio
del subwoofer: “OFF”, “80Hz”, “100Hz”,
“120Hz”, “140Hz”, “160Hz”.
LPF NORM/REV (filtro passa basso normale/
inverso)
Consente di selezionare la fase del subwoofer:
“NORM”, “REV”.
HPF (filtro passa alto)
Consente di selezionare la frequenza di taglio
del diffusore anteriore/posteriore: “OFF”,
“80Hz”, “100Hz”, “120Hz”, “140Hz”,
“160Hz”.
LOUD (enfasi dei bassi)
Consente di potenziare i bassi e gli acuti per
ottimizzare l’audio a livelli di volume ridotti:
“ON”, “OFF”.
DM+
Consente di attivare la funzione DM+: “ON”,
“OFF”.
BTM (pagina 18)
BT INIT*1 (inizializzazione Bluetooth)
(pagina 30)
Cavo di collegamento*
(non in dotazione)
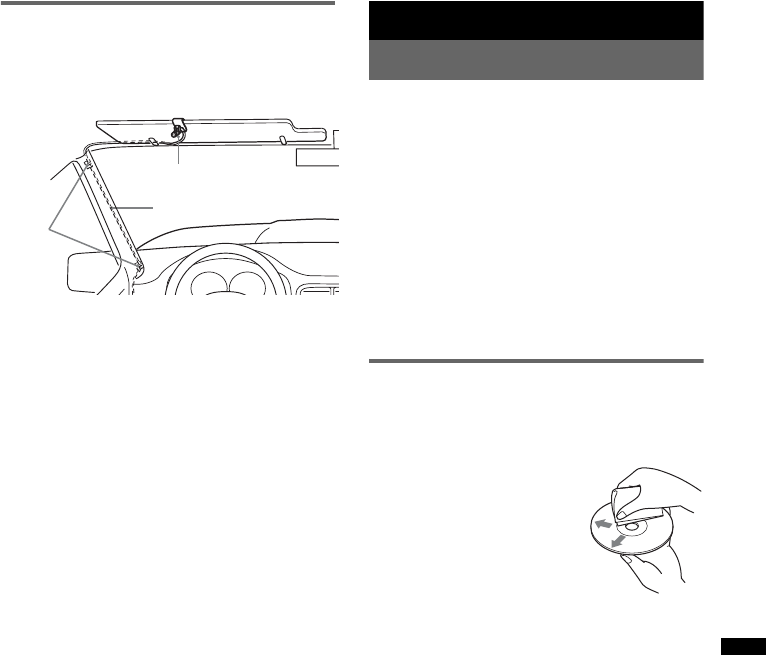
33
Microfono esterno XA-MC10
Collegando un microfono esterno opzionale al
connettore di ingresso del microfono, è possibile
migliorare la qualità audio durante le
conversazioni mediante l’apparecchio.
Suggerimento
È possibile impostare il livello di priorità dei microfoni
(pagina 31).
Nota
Collegare il modello XA-MC10 come microfono
esterno. Se viene collegato un altro dispositivo,
potrebbe non essere possibile effettuare chiamate o
potrebbero verificarsi problemi di funzionamento.
Informazioni aggiuntive
Precauzioni
• Se l’auto è stata parcheggiata alla luce solare
diretta, attendere che l’apparecchio si raffreddi
prima di utilizzarlo.
• L’antenna elettrica si estende automaticamente.
Formazione di condensa
Se all’interno dell’apparecchio si è formata della
condensa, rimuovere il disco e attendere per circa
un’ora fino a quando non si asciuga. Diversamente,
l’apparecchio non funzionerà correttamente.
Per mantenere una qualità audio
elevata
Non bagnare l’apparecchio o i dischi.
Note sui dischi
• Non esporre i dischi alla luce solare diretta o a
fonti di calore, quali condotti d’aria calda, né
lasciarli all’interno di un’auto parcheggiata alla
luce solare diretta.
• Prima della riproduzione, pulire
i dischi con un panno di pulizia
procedendo dal centro verso
l’esterno. Non utilizzare
solventi quali benzina,
acquaragia, detergenti
disponibili in commercio o
spray antistatici per dischi
analogici.
• Questo apparecchio è stato progettato per la
riproduzione di dischi conformi allo standard CD
(Compact Disc). I DualDisc e alcuni dischi audio
codificati mediante tecnologie di protezione dei
diritti d’autore non sono conformi allo standard
Compact Disc (CD), pertanto potrebbe non essere
possibile riprodurli mediante il presente
apparecchio.
•Dischi NON riproducibili mediante il
presente apparecchio
– Dischi su cui sono applicati etichette, adesivi o
nastro o carta adesivi. Diversamente, potrebbe
verificarsi un problema di funzionamento o
danneggiarsi il disco.
– Dischi dalla forma irregolare (ad esempio, a
forma di cuore, quadrato o stella), onde evitare
problemi di funzionamento all’apparecchio
stesso.
– Dischi da 8 cm.
Microfono esterno
Cavo di collegamento
Clip
continua alla pagina successiva t
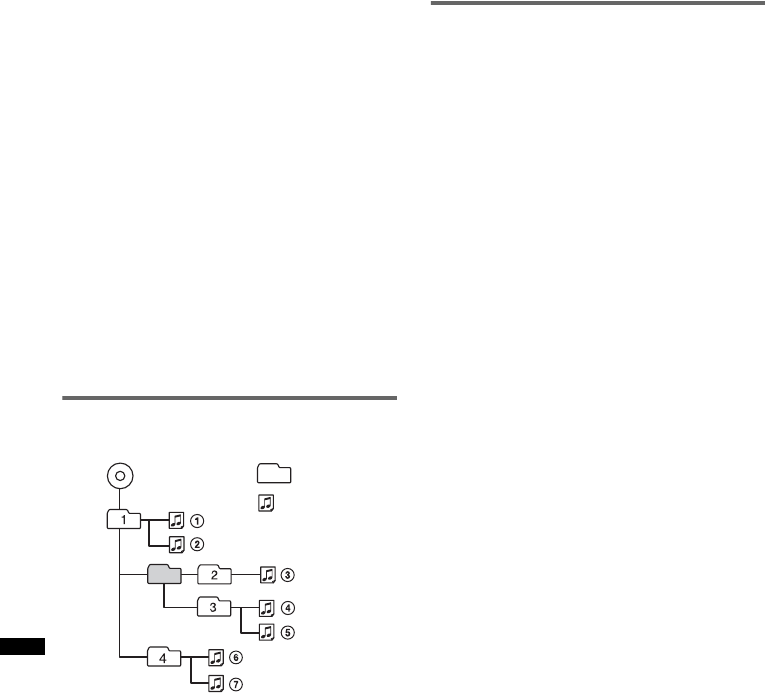
34
Note sui dischi CD-R/CD-RW
• Numero massimo di: (solo CD-R/CD-RW)
– cartelle (album): 150 (inclusa la cartella radice)
– file (brani) e cartelle: 300 (o un numero inferiore
a 300, se il nome di una cartella/di un file
contiene molti caratteri)
– caratteri visualizzabili per un nome di cartella/
file: 32 (Joliet)/64 (Romeo)
• Se il disco multisessione inizia con una sessione
CD-DA, viene riconosciuto come disco CD-DA e
le altre sessioni non vengono riprodotte.
•Dischi NON riproducibili mediante il
presente apparecchio
– CD-R/CD-RW con scarsa qualità di
registrazione.
– CD-R/CD-RW registrati mediante un dispositivo
di registrazione incompatibile.
– CD-R/CD-RW finalizzati in modo non corretto.
– CD-R/CD-RW diversi da quelli registrati nel
formato CD audio o nel formato MP3 conforme
allo standard ISO9660 Level 1/Level 2, Joliet/
Romeo o multisessione.
Ordine di riproduzione dei file
MP3/WMA/AAC
Informazioni sull’iPod
• È possibile effettuare il collegamento ai modelli di
iPod riportati di seguito. Prima di utilizzare l’iPod,
accertarsi di aggiornarlo all’ultima versione
software.
Made for
– iPod touch
– iPod touch (2a generazione)
– iPod classic
– iPod classic (120 GB)
– iPod con video*
– iPod nano (4a generazione)
– iPod nano (3a generazione)
– iPod nano (2a generazione)
– iPod nano (1a generazione)*
Works with
– iPhone
– iPhone 3G
– iPhone 3GS
*Per iPod nano (1a generazione) o iPod con video, la
funzione di controllo passeggero non è disponibile.
• “Made for iPod” significa che un accessorio
elettronico è stato progettato per essere collegato
specificatamente a iPod ed è stato certificato dallo
sviluppatore per soddisfare gli standard di
prestazioni di Apple.
• “Works with iPhone” significa che un accessorio
elettronico è stato progettato per essere collegato
specificatamente a iPhone ed è stato certificato
dallo sviluppatore per soddisfare gli standard di
prestazioni di Apple.
• Apple non è responsabile per l’uso del presente
dispositivo o per la relativa conformità agli
standard di sicurezza e alle normative.
Cartella
(album)
File MP3/
WMA/AAC
(brano)
MP3/WMA/AAC

35
Funzione Bluetooth
Informazioni sulla tecnologia Bluetooth
• La tecnologia senza fili Bluetooth è una tecnologia
senza fili a breve raggio che consente la
comunicazione di dati senza fili tra dispositivi
compatibili, quali un telefono cellulare e un
auricolare. La tecnologia senza fili Bluetooth
funziona entro un raggio di circa 10 m. Di solito
vengono collegati due dispositivi, sebbene alcuni
apparecchi supportino il collegamento di più
dispositivi contemporaneamente.
• Trattandosi di una tecnologia senza fili, con
Bluetooth non occorre utilizzare cavi, né disporre i
dispositivi uno di fronte all’altro come con la
tecnologia a infrarossi. Ad esempio, è possibile
utilizzare questi tipi di dispositivo in una borsa o
in una tasca.
• La tecnologia Bluetooth è uno standard
internazionale supportato da milioni di aziende
che la impiegano in tutto il mondo.
Informazioni sulla comunicazione
Bluetooth
• La tecnologia senza fili Bluetooth opera entro un
raggio di circa 10 m.
La distanza massima di comunicazione potrebbe
variare in base alla presenza di ostacoli (elementi
metallici, pareti, persone e così via) o di campi
elettromagnetici.
• Nei casi riportati di seguito, è possibile che la
sensibilità di comunicazione Bluetooth venga
alterata.
– Tra il presente apparecchio e il dispositivo
Bluetooth sono presenti ostacoli quali elementi
metallici, pareti o persone.
– In prossimità del presente apparecchio è in uso
un dispositivo che impiega frequenze a 2,4 GHz,
ad esempio un dispositivo LAN senza fili, un
telefono cordless o un forno a microonde.
• I dispositivi Bluetooth e le reti LAN senza fili
(IEEE802.11b/g) impiegano le stesse frequenze,
pertanto, se utilizzati entro brevi distanze, si
potrebbero verificare interferenze a microonde che
causerebbero alterazioni della velocità di
comunicazione, disturbi o connessioni errate. In
tal caso, effettuare quanto riportato di seguito.
– Utilizzare il presente apparecchio ad una
distanza minima di 10 m dal dispositivo LAN
senza fili.
– Se il presente apparecchio viene utilizzato entro
un raggio di 10 m da un dispositivo LAN senza
fili, spegnere quest’ultimo.
– Installare il presente apparecchio e il dispositivo
Bluetooth il più vicino possibile l’uno all’altro.
• Le microonde trasmesse da un dispositivo
Bluetooth potrebbero influire sul funzionamento
di apparecchiature mediche elettroniche. Spegnere
il presente apparecchio e altri dispositivi
Bluetooth nei seguenti luoghi, onde evitare di
causare incidenti.
– in presenza di gas infiammabili, all’interno di
ospedali, treni, aerei o stazioni di rifornimento
– in prossimità di porte automatiche o allarmi anti-
incendio
• Sebbene il presente apparecchio supporti funzioni
di protezione conformi allo standard Bluetooth per
garantire la connessione sicura durante l’uso della
tecnologia senza fili Bluetooth, a seconda
dell’impostazione la protezione potrebbe risultare
insufficiente. Per questo motivo, prestare
attenzione durante le comunicazioni mediante la
tecnologia senza fili Bluetooth.
• Sony non potrà essere ritenuta responsabile in
caso di eventuale dispersione di informazioni
durante le comunicazioni Bluetooth.
• Non è possibile garantire la connessione con tutti i
dispositivi Bluetooth.
– Per la conformità con lo standard Bluetooth
specificato da Bluetooth SIG e per
l’autenticazione, occorre disporre di un
dispositivo dotato della funzione Bluetooth.
– Anche se il dispositivo connesso è conforme con
lo standard Bluetooth di cui sopra, potrebbe non
essere possibile connettere alcuni dispositivi
oppure alcuni di essi potrebbero non funzionare
correttamente in base alle relative funzioni o
specifiche.
– Durante le conversazioni telefoniche mediante la
funzione vivavoce, a seconda del dispositivo o
dell’ambiente di comunicazione si potrebbero
verificare disturbi.
• A seconda del dispositivo da connettere, l’avvio
della comunicazione potrebbe richiedere tempo.
Altro
• A seconda delle condizioni delle onde radio e del
luogo in cui l’apparecchio viene utilizzato,
potrebbe non essere possibile utilizzare il
dispositivo Bluetooth con i telefoni cellulari.
• Se in seguito all’uso del dispositivo Bluetooth si
avvertono dei fastidi, interrompere
immediatamente l’uso. Se il problema persiste,
rivolgersi ad un rivenditore Sony.
Per eventuali domande o problemi riguardanti
l’apparecchio non trattati nel presente manuale,
rivolgersi al più vicino rivenditore Sony.

36
Manutenzione
Sostituzione della batteria al litio del
telecomando a scheda
In condizioni normali, la batteria dura circa 1
anno. Il ciclo di vita può risultare più breve in
funzione delle condizioni di utilizzo.
Quando la batteria si scarica, il raggio d’azione
del telecomando a scheda risulta ridotto.
Sostituire la batteria con una batteria al litio
CR2025 nuova. L’uso di batterie diverse
potrebbe comportare il rischio di incendi o
esplosioni.
Note sulla batteria al litio
•Tenere la batteria al litio fuori dalla portata dei
bambini. Se la batteria viene ingerita, consultare
immediatamente un medico.
•Pulire la batteria con un panno asciutto per
assicurare un perfetto contatto.
•Assicurarsi di rispettare la corretta polarità durante
l’inserimento della batteria.
•Non afferrare la batteria con pinze di metallo, in
quanto potrebbe verificarsi un corto circuito.
Sostituzione del
fusibile
Per la sostituzione del fusibile,
assicurarsi di utilizzare un
fusibile dello stesso
amperaggio di quello indicato
sull’originale. Se il fusibile si
brucia, controllare i
collegamenti
dell’alimentazione e sostituire
il fusibile. Se dopo la
sostituzione il fusibile si brucia
di nuovo, è possibile che si tratti di un problema
interno. In tal caso, rivolgersi al più vicino
rivenditore Sony.
Pulizia dei connettori
Se i connettori tra l’apparecchio e il pannello
anteriore sono sporchi, l’apparecchio potrebbe non
funzionare correttamente. Per evitare questo
problema, aprire il pannello anteriore, rimuoverlo
(pagina 8), quindi pulire i connettori con un
batuffolo di cotone. Non esercitare forza eccessiva.
Diversamente, i connettori potrebbero venire
danneggiati.
Note
•Per motivi di sicurezza, spegnere il motore prima di
pulire i connettori e rimuovere la chiave dal
blocchetto di accensione.
•Non toccare mai direttamente i connettori con le dita
o con oggetti di metallo.
1
2
Lato + verso l’alto
c
AVVERTENZA
La pila può esplodere se usata
scorrettamente.
Pertanto, non deve essere ricaricata,
smontata o gettata nel fuoco.
Fusibile (10 A)
Unità principale Lato posteriore del
pannello anteriore
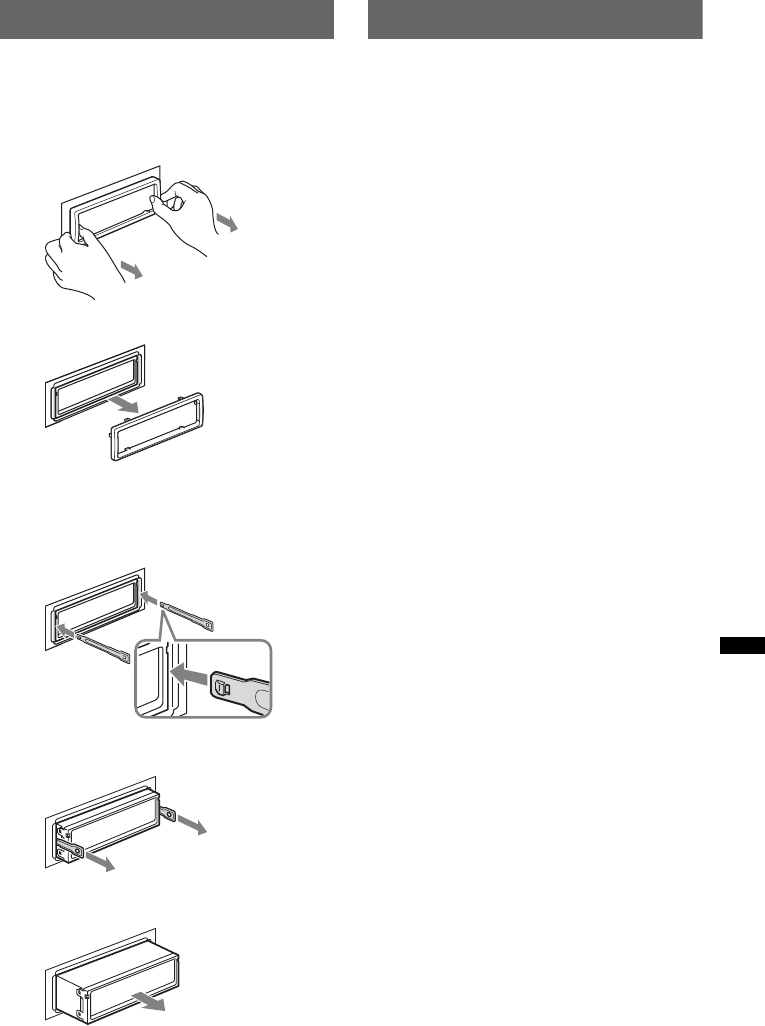
37
Rimozione dell’apparecchio
1Rimuovere la cornice protettiva.
1Rimuovere il pannello anteriore
(pagina 8).
2Afferrare entrambe le estremità della
cornice protettiva, quindi estrarla.
2Rimuovere l’apparecchio.
1Inserire contemporaneamente entrambe le
chiavi di rilascio fino a farle scattare in
posizione.
2Estrarre le chiavi di rilascio per sbloccare
l’apparecchio.
3Rimuovere l’apparecchio dalla struttura
facendolo scorrere.
Caratteristiche tecniche
Sintonizzatore*
FM
Gamma di frequenze: 87,5 – 108,0 MHz
Terminale dell’antenna:
Connettore dell’antenna esterna
Frequenza intermedia: 150 kHz
Sensibilità utilizzabile: 10 dBf
Selettività: 75 dB a 400 kHz
Rapporto segnale-rumore: 70 dB (mono)
Separazione: 40 dB a 1 kHz
Risposta in frequenza: 20 – 15.000 Hz
MW/LW
Gamma di frequenze:
MW: 531 – 1.602 kHz
LW: 153 – 279 kHz
Terminale dell’antenna:
Connettore dell’antenna esterna
Frequenza intermedia: 25 kHz
Sensibilità: MW: 26 µV, LW: 45 µV
Lettore CD
Rapporto segnale-rumore: 120 dB
Risposta in frequenza: 10 – 20.000 Hz
Wow e flutter: al di sotto del limite misurabile
Lettore USB
Interfaccia: USB (velocità massima)
Maximum current: 500 mA
Comunicazione senza fili
Sistema di comunicazione:
Bluetooth Standard versione 2.0
Uscita:
Bluetooth Standard Power Class 2 (max. +4 dBm)
Raggio di comunicazione massimo:
Circa 10 m*1 l’uno di fronte all’altro
Banda di frequenza:
Banda da 2,4 GHz (da 2,4000 a 2,4835 GHz)
Metodo di modulazione: FHSS
Compatible Bluetooth Profiles*2:
A2DP (Advanced Audio Distribution Profile)
AVRCP (Audio Video Remote Control Profile)
HFP (Handsfree Profile) 1.5
HSP (Headset Profile)
*1 Il raggio effettivo varia in base a fattori quali
ostacoli tra i dispositivi, campi magnetici attorno a
un forno a microonde, elettricità statica, sensibilità
della ricezione, prestazioni dell’antenna, sistema
operativo, applicazione software e così via.
*2 I profili standard Bluetooth indicano lo scopo della
comunicazione Bluetooth tra dispositivi.
x
Gancio rivolto
verso l’interno.
continua alla pagina successiva t
*
di cui al par. 3 dell’Allegato A al D.M. 25/06/85 e al
par. 3 dell’Allegato 1 al D.M. 27/08/87
38
Amplificatore di potenza
Uscita: uscite diffusori (connettori a tenuta)
Impedenza diffusori: 4 – 8 ohm
Potenza di uscita massima: 52 W × 4 (a 4 ohm)
Generali
Uscite:
Terminale delle uscite audio (anteriore/posteriore)
Terminale di uscita subwoofer (mono)
Terminale di controllo del relè dell’antenna
elettrica
Terminale di controllo dell’amplificatore di
potenza
Ingressi:
Terminale dell’ingresso di controllo BUS
Terminale di ingresso audio BUS
Terminale di controllo ATT del telefono
Terminale di ingresso del telecomando
Terminale di ingresso dell’antenna
Terminale di ingresso del microfono
Presa di ingresso AUX (minipresa stereo)
Connettore di ingresso del segnale USB
Comandi relativi al tono:
Bassi: ±10 dB a 60 Hz (XPLOD)
Medi: ±10 dB a 1 kHz (XPLOD)
Alti: ±10 dB a 10 kHz (XPLOD)
Requisiti di alimentazione: batteria auto da 12 V CC
(massa negativa)
Dimensioni: circa 178 × 50 × 179 mm (l/a/p)
Dimensioni di montaggio: circa 182 × 53 × 162 mm
(l/a/p)
Peso: circa 1,2 kg
Accessori in dotazione:
Telecomando a scheda: RM-X304
Elementi per l’installazione e i collegamenti (1 set)
Accessori/apparecchi opzionali:
Cavo BUS (in dotazione con un cavo a piedini
RCA): RC-61 (1 m), RC-62 (2 m)
Selettore di sorgente: XA-C40
Cavo di collegamento USB per iPod: RC-100IP
Microfono esterno: XA-MC10
Il rivenditore potrebbe non disporre di alcuni degli
accessori elencati. Richiedere ulteriori informazioni
al rivenditore.
Il design e le caratteristiche tecniche sono soggetti a
modifiche senza preavviso.
Guida alla soluzione dei
problemi
Fare riferimento alla seguente lista di verifica per
risolvere la maggior parte dei problemi che si
potrebbero verificare durante l’uso di questo
apparecchio.
Prima di esaminare l’elenco che segue, verificare le
procedure di collegamento e d’uso dell’apparecchio.
Se il problema persiste, visitare il sito di assistenza
riportato di seguito.
• Determinati circuiti stampati non contengono
ritardanti alla fiamma alogenati.
• Le parti estetiche non contengono ritardanti alla
fiamma alogenati.
• Come materiale di riempimento per l’imballaggio
viene utilizzata carta.
Generali
L’apparecchio non riceve alimentazione.
• Verificare il collegamento o il fusibile.
• Se l’apparecchio viene spento e il display disattivato,
non è possibile utilizzarlo mediante il telecomando.
tAccendere l’apparecchio.
L’antenna elettrica non si estende.
L’antenna elettrica non dispone di scatola a relè.
L’audio non viene emesso.
• È attivata la funzione ATT o la funzione ATT del
telefono (se il cavo di interfaccia di un telefono per
auto è collegato al cavo ATT).
• La posizione del comando di attenuazione “FAD”
non è appropriata per un sistema a 2 diffusori.
• Il dispositivo audio Bluetooth si trova nel modo di
pausa.
tAnnullare il modo di pausa.
Non viene emesso alcun segnale acustico.
• Il segnale acustico è disattivato (pagina 31).
• Un amplificatore di potenza opzionale è collegato e
l’amplificatore incorporato non viene utilizzato.
Il contenuto della memoria è stato cancellato.
• È stato premuto il tasto RESET.
tReinserire i dati in memoria.
• Il cavo di alimentazione o la pila sono stati rimossi o
non sono collegati correttamente.
Le stazioni memorizzate e l’ora esatta sono
cancellate.
Si è bruciato il fusibile.
Quando si cambia la posizione della chiave di
accensione, viene emesso un disturbo.
I cavi non sono collegati correttamente al connettore di
alimentazione accessoria dell’auto.
Durante la riproduzione o la ricezione, viene
attivato il modo di dimostrazione.
Se non viene eseguita alcuna operazione per 5 minuti
quando è impostata la funzione “DEMO ON”, viene
attivato il modo di dimostrazione.
tImpostare “DEMO-OFF” (pagina 31).
Sito di assistenza clienti
http://support.sony-europe.com/
39
Il display viene disattivato/non viene
visualizzato nella relativa finestra.
• L’attenuatore di luminosità è impostato su “DIM-
ON” (pagina 31).
• Il display scompare tenendo premuto
(SOURCE/OFF).
tTenere premuto (SOURCE/OFF)
sull’apparecchio fino a visualizzare il display.
• I connettori sono sporchi (pagina 36).
La funzione di spegnimento automatico non è
operativa.
L’apparecchio è acceso. La funzione di spegnimento
automatico si attiva dopo avere spento l’apparecchio.
tSpegnere l’apparecchio.
Ricezione radiofonica
Non è possibile ricevere le stazioni.
L’audio è disturbato.
• Il collegamento non è corretto.
tCollegare il cavo di controllo dell’antenna
elettrica (blu) o il cavo di alimentazione
accessoria (rosso) al cavo di alimentazione di un
amplificatore di potenza dell’antenna per auto
(solo se l’auto dispone di antenna FM/MW/LW
incorporata sul vetro posteriore/laterale).
tVerificare il collegamento dell’antenna dell’auto.
tSe l’antenna dell’auto non si estende, verificare il
collegamento del cavo di controllo dell’antenna
elettrica.
Non è possibile effettuare la sintonizzazione
preselezionata.
• Memorizzare la frequenza corretta.
• Il segnale di trasmissione è eccessivamente debole.
Non è possibile effettuare la sintonizzazione
automatica.
• L’impostazione del modo di ricerca locale non è stata
effettuata correttamente.
tLa sintonizzazione si arresta di frequente:
Impostare “LOCAL-ON” (pagina 31).
tLa sintonizzazione non si arresta in
corrispondenza di una stazione:
Impostare “LOCAL-OFF” (pagina 31).
• Il segnale di trasmissione è eccessivamente debole.
tEseguire la sintonizzazione manuale.
Durante la ricezione FM, lampeggia
l’indicazione “ST”.
• Sintonizzare la frequenza in modo corretto.
• Il segnale di trasmissione è eccessivamente debole.
tImpostare “MONO-ON” (pagina 31).
Un programma FM trasmesso in stereofonia
viene ricevuto in monofonia.
L’apparecchio è impostato sul modo di ricezione
monofonico.
tImpostare “MONO-OFF” (pagina 31).
RDS
Dopo alcuni secondi di ascolto, si avvia la
funzione SEEK.
La stazione non è TP oppure il segnale è debole.
tDisattivare il modo TA (pagina 20).
Non viene trasmesso alcun notiziario sul
traffico.
• Attivare il modo TA (pagina 20).
• La stazione non trasmette notiziari sul traffico pur
essendo una stazione TP.
tSintonizzarsi su un’altra stazione.
Il modo PTY visualizza “- - - - - - - -”.
• La stazione corrente non è una stazione RDS.
• I dati RDS non vengono ricevuti.
• La stazione non specifica il tipo di programma.
Riproduzione di CD
Non è possibile inserire un disco.
• Nell’alloggiamento è presente un altro disco.
• Il disco è stato inserito forzatamente in senso
contrario o nel modo sbagliato.
Il disco non viene riprodotto.
• Il disco è difettoso o sporco.
• I CD-R/CD-RW non sono per l’uso audio
(pagina 34).
Non è possibile riprodurre file in formato MP3/
WMA/AAC.
Il disco non è compatibile con il formato e la versione
MP3/WMA/AAC. Per ulteriori informazioni sui dischi
e sui formati riproducibili, visitare il sito di assistenza.
I file MP3/WMA/AAC necessitano di un tempo
maggiore prima di poter essere riprodotti.
Per i dischi indicati di seguito, l’avvio della
riproduzione necessita di un tempo maggiore:
– dischi registrati con una struttura ad albero
complessa.
– dischi registrati in multisessione.
– dischi ai quali è possibile aggiungere dati.
Le voci del display non scorrono.
• Per i dischi che presentano molti caratteri, tali voci
potrebbero non scorrere.
• “A.SCRL” è impostato su “OFF”.
tImpostare “A.SCRL-ON” (pagina 31).
tTenere premuto (DSPL) (SCRL).
L’audio salta.
• L’installazione non è corretta.
tInstallare l’apparecchio con un’angolazione
inferiore a 45° in una parte stabile dell’auto.
• Il disco è difettoso o sporco.
I tasti per le operazioni non funzionano.
Il disco non viene espulso.
Premere il tasto RESET (pagina 7).
Riproduzione USB
Non è possibile eseguire la riproduzione
mediante un hub USB.
Il presente apparecchio non è in grado di riconoscere i
dispositivi USB mediante un hub USB.
Non è possibile eseguire la riproduzione.
Un dispositivo USB non funziona.
tRicollegarlo.
continua alla pagina successiva t
40
Il dispositivo USB necessita di un tempo
maggiore per avviare la riproduzione.
Il dispositivo USB contiene file con una struttura ad
albero complessa.
Viene emesso un segnale acustico.
Il dispositivo USB è stato scollegato durante la
riproduzione.
tPrima di scollegare un dispositivo USB, accertarsi
di arrestare innanzitutto la riproduzione ai fini della
protezione dei dati.
L’audio viene trasmesso a intermittenza.
A velocità di trasmissione elevate o superiori a
320 kbps, è possibile che l’audio venga trasmesso a
intermittenza.
Funzione Bluetooth
Il dispositivo di connessione non rileva il
presente apparecchio.
• Prima di effettuare l’associazione, impostare
l’apparecchio sul modo di attesa dell’associazione.
• Durante la connessione a un dispositivo Bluetooth, il
presente apparecchio non può essere rilevato da un
altro dispositivo. Terminare la connessione corrente e
ricercare l’apparecchio da un altro dispositivo.
• Una volta associato il dispositivo, attivare la
trasmissione del segnale Bluetooth (pagina 27).
Non è possibile stabilire la connessione.
• Effettuare la connessione al presente apparecchio da
un dispositivo Bluetooth o viceversa. La connessione
viene controllata da un’unica parte (dall’apparecchio
o dal dispositivo Bluetooth), ma non da entrambi.
• Verificare le procedure di associazione e connessione
facendo riferimento al manuale dell’altro dispositivo
e così via, quindi eseguire di nuovo l’operazione.
Il volume della voce dell’interlocutore è basso.
Regolare il livello del volume.
Il volume dell’interlocutore è eccessivamente
basso o alto.
Regolare il volume in modo appropriato utilizzando la
funzione di regolazione del guadagno del microfono
(pagina 28).
Durante le conversazioni telefoniche si verifica
il fenomeno dell’eco o un disturbo.
• Abbassare il volume.
• Se il rumore ambientale risulta elevato durante la
chiamata telefonica, tentare di ridurlo.
Esempio: se una finestra è aperta e il rumore
proveniente dalla strada è eccessivamente alto,
chiudere la finestra. Se il rumore proveniente dal
condizionatore dell’aria è elevato, ridurre il livello
del condizionatore.
Il telefono non è connesso.
Durante la riproduzione audio Bluetooth, il telefono
non viene connesso anche se si preme (vivavoce).
tCollegare tramite il telefono.
La qualità audio del telefono è scarsa.
La qualità audio del telefono dipende dalle condizioni
di ricezione del telefono cellulare.
tSe la ricezione è scarsa, spostare l’auto in un luogo
in cui il segnale del telefono cellulare risulti più
potente.
Il livello di volume del dispositivo audio
connesso è basso (alto).
Il livello di volume varia in base al dispositivo audio.
tRegolare il livello di volume del dispositivo audio
connesso o del presente apparecchio.
L’audio salta durante la riproduzione di un
dispositivo audio Bluetooth.
• Ridurre la distanza tra l’apparecchio e il dispositivo
audio Bluetooth.
• Se il dispositivo audio Bluetooth si trova in una
custodia che causa l’interruzione del segnale,
rimuoverlo dalla custodia durante l’uso.
• Nelle vicinanze vengono utilizzati più dispositivi
Bluetooth o altri dispositivi che emettono onde radio.
tSpegnere gli altri dispositivi.
tIncrease the distance from the other devices.
• Durante la connessione tra il presente apparecchio e
il telefono cellulare, l’audio di riproduzione si
interrompe momentaneamente. Non si tratta di un
problema di funzionamento.
Non è possibile controllare il dispositivo audio
Bluetooth connesso.
Verificare che il dispositivo audio Bluetooth connesso
supporti il profilo AVRCP.
Non è possibile utilizzare alcune funzioni.
Verificare che il dispositivo di connessione supporti le
funzioni in questione.
Una chiamata viene accettata accidentalmente.
Sul telefono connesso è stata impostata la risposta
automatica ad una chiamata.
Durante le chiamate con funzione vivavoce,
l’audio non viene trasmesso dai diffusori
dell’auto.
Se l’audio viene trasmesso dal telefono cellulare,
impostare quest’ultimo affinché l’audio venga
trasmesso dai diffusori dell’auto.
Durante l’inizializzazione, viene visualizzato
“OFF BT”.
Tenere premuto (BT) fino a quando “ ” non si
disattiva. Quindi, avviare di nuovo l’inizializzazione
(pagina 30).
Il microfono esterno non funziona.
L’impostazione del microfono non è corretta.
tImpostare “MIC-EXT” (pagina 31).
41
Messaggi e indicazioni di errore
Se le soluzioni riportate non risolvono il problema,
rivolgersi al più vicino rivenditore Sony.
Se l’apparecchio viene portato in un centro di
assistenza a causa di un problema relativo alla
riproduzione di un CD, assicurarsi di portare il disco
utilizzato al momento in cui si è verificato il
problema.
CHECKING
È in corso il controllo del collegamento a un
dispositivo USB.
tAttendere il termine del controllo.
ERROR
• Il disco è sporco o è stato inserito in senso contrario.
tPulire il disco o inserirlo correttamente.
• È stato inserito un disco vuoto.
• Non è possibile riprodurre il disco a causa di un
problema.
tInserire un altro disco.
• Il dispositivo USB non è stato riconosciuto
automaticamente.
tRicollegarlo.
•Premere Z per rimuovere il disco.
FAILURE
I collegamenti di diffusori/amplificatori non sono
corretti.
tConsultare la guida all’installazione e i
collegamenti del presente modello per verificare i
collegamenti.
HUB NO SUPRT (HUB non supportato)
Il presente apparecchio non supporta hub USB.
L. SEEK +/–
Il modo di ricerca locale è attivato durante la
sintonizzazione automatica.
NO AF
Non esiste alcuna frequenza alternativa per la stazione
corrente.
tPremere (SEEK) +/– mentre il nome del servizio
programmi lampeggia. L’apparecchio avvia la
ricerca di un’altra frequenza con gli stessi dati PI
(identificativo programma) (viene visualizzato “PI
SEEK”).
NO DEV (Nessun dispositivo)
È stato selezionato USB come sorgente senza che fosse
collegato un dispositivo USB. Durante la riproduzione
sono stati scollegati un dispositivo o un cavo USB.
tAccertarsi di collegare un dispositivo e un cavo
USB.
NO MUSIC
Il disco o il dispositivo USB non contiene file musicali.
tInserire un CD musicale nel presente apparecchio.
tCollegare un dispositivo USB contenente file
musicali.
NO NAME
Il brano non contiene il titolo di un disco/album/brano/
il nome dell’artista.
NO TP
L’apparecchio continua la ricerca di stazioni TP
disponibili.
OFFSET
Potrebbe essersi verificato un problema interno.
tVerificare i collegamenti. Se l’indicazione di errore
rimane visualizzata, rivolgersi al più vicino
rivenditore Sony.
OVERLOAD
Il dispositivo USB è sovraccaricato.
tScollegare il dispositivo USB, quindi cambiare
sorgente premendo (SOURCE/OFF).
tIndica che il dispositivo USB presenta problemi di
funzionamento oppure che è stato collegato un
dispositivo non supportato.
READ
È in corso la lettura di tutte le informazioni relative a
tutti i brani e agli album del disco.
tUna volta terminata l’operazione, la riproduzione
viene avviata automaticamente. Potrebbe essere
necessario attendere alcuni minuti, a seconda della
struttura del disco.
RESET
L’unità o il dispositivo USB non funzionano a causa di
un problema.
tPremere il tasto RESET (pagina 7).
USB NO SUPRT (USB non supportato)
Il dispositivo USB collegato non è supportato.
tPer ulteriori informazioni sulla compatibilità del
dispositivo USB in uso, visitare il sito di assistenza.
“” o “”
Mentre si procede rapidamente in avanti/all’indietro,
sono stati raggiunti l’inizio o la fine del disco e non è
possibile andare oltre.
“”
L’apparecchio non supporta la visualizzazione di un
determinato carattere.
2
Het naamplaatje met de bedrijfsspanning,
enzovoort bevindt zich aan de onderkant van de
behuizing.
Hierbij verklaart Sony Corp. dat deze MEX-
BT3800U in overeenstemming is met de
essentiële eisen en andere relevante bepalingen
van richtlijn 1999/5/EG.
Nadere informatie kunt u vinden op:
http://www.compliance.sony.de/
Het gebruik van deze radioapparatuur is niet
toegestaan in het geografische gebied binnen een
straal van 20 km vanaf het centrum van Ny-
Alesund, Svalbard in Noorwegen.
Uit veiligheidsoverwegingen moet u dit
systeem in het dashboard van de auto
installeren. Raadpleeg de bijgeleverde
handleiding voor installatie/aansluitingen voor
meer informatie over de installatie en
aansluitingen.
Dit label bevindt zich aan de onderkant van het
apparaat.
Opmerking voor klanten: de volgende
informatie is enkel van toepassing voor
apparaten die verkocht worden in landen
die de EU-richtlijnen in acht nemen
De fabricant van dit product is Sony
Corporation, 1-7-1 Konan Minato-ku Tokyo,
108-0075 Japan.
De geauthoriseerde vertegenwoordiging voor
EMC en produkt veiligheid is Sony
Deutschland GmbH, Hedelfinger Strasse 61,
70327 Stuttgart, Duitsland. Voor service- of
garantiezaken verwijzen wij u graag naar de
addressen in de afzonderlijke service/garantie
documenten.
Verwijdering van oude elektrische
en elektronische apparaten
(Toepasbaar in de Europese Unie en
andere Europese landen met
gescheiden ophaalsystemen)
Het symbool op het product of op de
verpakking wijst erop dat dit product niet als
huishoudelijk afval mag worden behandeld. Het moet
echter naar een plaats worden gebracht waar elektrische
en elektronische apparatuur wordt gerecycled. Als u
ervoor zorgt dat dit product op de correcte manier wordt
verwijderd, voorkomt u voor mens en milieu negatieve
gevolgen die zich zouden kunnen voordoen in geval van
verkeerde afvalbehandeling. De recycling van materialen
draagt bij tot het vrijwaren van natuurlijke bronnen. Voor
meer details in verband met het recyclen van dit product,
neemt u contact op met de gemeentelijke instanties, het
bedrijf of de dienst belast met de verwijdering van
huishoudafval of de winkel waar u het product hebt
gekocht.
Accessoire waarop dit van toepassing is: Afstandsbediening
Verwijdering van oude batterijen (in
de Europese Unie en andere
Europese landen met afzonderlijke
inzamelingssystemen)
Dit symbool op de batterij of verpakking wijst erop dat de
meegeleverde batterij van dit product niet als
huishoudelijk afval behandeld mag worden. Op sommige
batterijen kan dit symbool voorkomen in combinatie met
een chemisch symbool. De chemische symbolen voor
kwik (Hg) of lood (Pb) worden toegevoegd als de batterij
meer dan 0,0005 % kwik of 0,004 % lood bevat.Door deze
batterijen op juiste wijze af te voeren, voorkomt u voor
mens en milieu negatieve gevolgen die zich zouden
kunnen voordoen in geval van verkeerde
afvalbehandeling. Het recycleren van materialen draagt bij
tot het vrijwaren van natuurlijke bronnen.
In het geval dat de producten om redenen van veiligheid,
prestaties dan wel in verband met data-integriteit een
permanente verbinding met batterij vereisen, dient deze
batterij enkel door gekwalificeerd servicepersoneel
vervangen te worden. Om ervoor te zorgen dat de batterij
op een juiste wijze zal worden behandeld, dient het
product aan het eind van zijn levenscyclus overhandigd te
worden aan het desbetreffende inzamelingspunt voor de
recyclage van elektrisch en elektronisch materiaal.
Voor alle andere batterijen verwijzen we u naar het
gedeelte over hoe de batterij veilig uit het product te
verwijderen. Overhandig de batterij bij het desbetreffende
inzamelingspunt voor de recyclage van batterijen.
Voor meer details in verband met het recyclen van dit
product of batterij, neemt u contact op met de
gemeentelijke instanties, het bedrijf of de dienst belast
met de verwijdering van huishoudafval of de winkel waar
u het product hebt gekocht.

3
Het woordmerk Bluetooth en de logo's van
Bluetooth zijn eigendom van Bluetooth SIG, Inc.
en Sony Corporation gebruikt deze items onder
licentie. Overige handelsmerken en merknamen
zijn eigendom van de respectieve eigenaars.
ZAPPIN is een handelsmerk van Sony
Corporation.
iPod is een handelsmerk van Apple Inc.,
gedeponeerd in de Verenigde Staten en andere
landen.
iPhone is een handelsmerk van Apple Inc.
Windows Media en het
Windows-logo zijn
handelsmerken of
gedeponeerde handelsmerken
van Microsoft Corporation in de Verenigde
Staten en/of andere landen.
MPEG Layer-3 audio-codeertechnologie en
-patenten gebruikt onder licentie van Fraunhofer
IIS en Thomson.
Dit product wordt beschermd door bepaalde
intellectuele eigendomsrechten van Microsoft
Corporation. Het gebruik of de verspreiding van
dergelijke technologie buiten dit product om is
verboden zonder een licentie van Microsoft of een
erkend dochterbedrijf van Microsoft.
Inhoudsleveranciers gebruiken de technologie voor
beheer van digitale rechten voor Windows Media die
in dit apparaat is opgenomen ("WM-DRM"), om de
integriteit van hun inhoud te beschermen
("Beschermde inhoud"), zodat hun intellectuele
eigendomsrechten, waaronder copyright, op
dergelijke inhoud niet ten onrechte worden gebruikt.
Dit apparaat gebruikt WM-DRM-software om
Beschermde inhoud ("WM-DRM-software") te
kunnen afspelen. Als de bescherming van de WM-
DRM-software in dit apparaat in gevaar is gebracht,
kunnen eigenaars van Beschermde inhoud
("Eigenaars van beschermde inhoud") Microsoft
verzoeken om het recht van de WM-DRM-software
om nieuwe licenties op te halen voor het kopiëren,
weergeven en/of afspelen van Beschermde inhoud,
in te trekken. Het intrekken van dergelijke rechten
heeft geen invloed op de mogelijkheid om niet-
beschermde inhoud af te spelen met de WM-DRM-
software. Er wordt een lijst met ingetrokken WM-
DRM-software naar uw apparaat verzonden wanneer
u een licentie voor Beschermde inhoud downloadt
van het internet of vanaf een computer. Microsoft
kan, in combinatie met een dergelijke licentie, ook
lijsten met ingetrokken software downloaden naar
uw apparaat uit naam van de Eigenaars van
beschermde inhoud.
Waarschuwing als het contactslot van
de auto geen ACC-positie heeft
Zorg ervoor dat u de functie voor automatisch
uitschakelen instelt (pagina 30).
Hiermee wordt het systeem na de ingestelde
tijdsduur automatisch volledig uitgeschakeld
nadat u het systeem hebt uitgeschakeld. Zo
voorkomt u dat de accu leegraakt.
Als u de functie voor automatisch uitschakelen
niet instelt, houdt u (SOURCE/OFF) ingedrukt
totdat het scherm verdwijnt wanneer u het
contactslot uitzet.
Opmerking over de lithiumbatterij
Stel de batterij niet bloot aan extreem hoge
temperaturen, zoals direct zonlicht, vuur, enzovoort.

4
Inhoudsopgave
Aan de slag
Discs die kunnen worden afgespeeld op dit
systeem . . . . . . . . . . . . . . . . . . . . . . . . . . . . . . . 6
Opmerkingen over Bluetooth . . . . . . . . . . . . . . 6
Het systeem opnieuw instellen . . . . . . . . . . . . . 7
De DEMO-stand annuleren . . . . . . . . . . . . . . . . 7
De kaartafstandsbediening voorbereiden. . . . . . 7
De klok instellen . . . . . . . . . . . . . . . . . . . . . . . . 8
Het voorpaneel verwijderen. . . . . . . . . . . . . . . . 8
Het voorpaneel bevestigen . . . . . . . . . . . . . . 9
Snelle startgids voor Bluetooth-
functie
3 stappen van de Bluetooth-functie . . . . . . . . . 10
Toetsen en pictogrammen . . . . . . . . . . . . . . . . 11
1Koppelen . . . . . . . . . . . . . . . . . . . . . . . . . . 12
2Verbinding . . . . . . . . . . . . . . . . . . . . . . . . . 12
3Handsfree bellen en muziek streamen . . . . 13
Bedieningselementen en algemene
handelingen
Hoofdeenheid . . . . . . . . . . . . . . . . . . . . . . . 14
Kaartafstandsbediening RM-X304 . . . . . . . 16
Zoeken naar een track . . . . . . . . . . . . . . . . . . . 17
Zoeken naar een track op naam
— Quick-BrowZer . . . . . . . . . . . . . . . . . . . 17
Zoeken naar een track door te luisteren
naar een gedeelte van een track
— ZAPPIN™ . . . . . . . . . . . . . . . . . . . . . . . 18
Radio
Zenders opslaan en ontvangen. . . . . . . . . . . . . 18
Automatisch opslaan — BTM . . . . . . . . . . 18
Handmatig opslaan . . . . . . . . . . . . . . . . . . . 18
De opgeslagen zenders ontvangen . . . . . . . 18
Automatisch afstemmen . . . . . . . . . . . . . . . 19
RDS . . . . . . . . . . . . . . . . . . . . . . . . . . . . . . . . . 19
Overzicht. . . . . . . . . . . . . . . . . . . . . . . . . . . 19
AF en TA instellen . . . . . . . . . . . . . . . . . . . 19
PTY selecteren . . . . . . . . . . . . . . . . . . . . . . 20
CT instellen. . . . . . . . . . . . . . . . . . . . . . . . . 20
CD
Schermitems. . . . . . . . . . . . . . . . . . . . . . . . 21
Herhaaldelijk en willekeurig afspelen . . . . 21
USB-apparaten
Een USB-apparaat afspelen . . . . . . . . . . . . . . 21
Schermitems. . . . . . . . . . . . . . . . . . . . . . . . 22
Herhaaldelijk en willekeurig afspelen . . . . 22
iPod
Een iPod afspelen . . . . . . . . . . . . . . . . . . . . . . 23
Schermitems. . . . . . . . . . . . . . . . . . . . . . . . 24
De weergavestand instellen . . . . . . . . . . . . . . 24
Herhaaldelijk en willekeurig afspelen . . . . 24
Een iPod rechtstreeks bedienen
— Passagiersbediening. . . . . . . . . . . . . . . . . . 24
Bluetooth (handsfree bellen en
muziek streamen)
Bluetooth-bewerkingen. . . . . . . . . . . . . . . . . . 25
Koppelen. . . . . . . . . . . . . . . . . . . . . . . . . . . . . 25
Informatie over
Bluetooth-pictogrammen . . . . . . . . . . . . . . 26
Verbinding . . . . . . . . . . . . . . . . . . . . . . . . . . . 26
De uitvoer van het Bluetooth-signaal
van dit systeem overschakelen naar
ingeschakeld. . . . . . . . . . . . . . . . . . . . . . . . 26
Een mobiele telefoon aansluiten . . . . . . . . 26
Een audioapparaat aansluiten. . . . . . . . . . . 26
Handsfree bellen . . . . . . . . . . . . . . . . . . . . . . . 27
Gesprekken ontvangen. . . . . . . . . . . . . . . . 27
Bellen . . . . . . . . . . . . . . . . . . . . . . . . . . . . . 27
Gespreksoverdracht . . . . . . . . . . . . . . . . . . 27
Spraakkeuze activeren . . . . . . . . . . . . . . . . 27
Muziek streamen. . . . . . . . . . . . . . . . . . . . . . . 28
Muziek van een audioapparaat
beluisteren . . . . . . . . . . . . . . . . . . . . . . . . . 28
Een audioapparaat bedienen met
dit systeem . . . . . . . . . . . . . . . . . . . . . . . . . 28
De registratie van alle gekoppelde apparaten
verwijderen . . . . . . . . . . . . . . . . . . . . . . . . . . . 28
5
Overige functies
De geluidsinstellingen wijzigen . . . . . . . . . . . 29
De geluidskenmerken aanpassen . . . . . . . . 29
De equalizercurve aanpassen — EQ3. . . . . 29
Instelitems aanpassen — SET . . . . . . . . . . . . . 29
Optionele apparaten gebruiken . . . . . . . . . . . . 30
Extra audioapparatuur. . . . . . . . . . . . . . . . . 30
Externe microfoon XA-MC10 . . . . . . . . . . 31
Aanvullende informatie
Voorzorgsmaatregelen. . . . . . . . . . . . . . . . . . . 31
Opmerkingen over discs . . . . . . . . . . . . . . . 31
Afspeelvolgorde van MP3-/WMA-/AAC-
bestanden . . . . . . . . . . . . . . . . . . . . . . . . . . 32
Informatie over iPod . . . . . . . . . . . . . . . . . . 32
Informatie over de Bluetooth-functie . . . . . 32
Onderhoud . . . . . . . . . . . . . . . . . . . . . . . . . . . . 33
Het systeem verwijderen . . . . . . . . . . . . . . . . . 34
Technische gegevens. . . . . . . . . . . . . . . . . . . . 35
Problemen oplossen. . . . . . . . . . . . . . . . . . . . . 36
Foutmeldingen/berichten . . . . . . . . . . . . . . 38
Ondersteuningssite
Als u vragen hebt of de recentste ondersteuningsinformatie over dit
product wilt hebben, gaat u naar de onderstaande website:
http://support.sony-europe.com/
Levert informatie over:
• Modellen en fabrikanten van compatibele digitale audiospelers
• Ondersteunde MP3-/WMA-/AAC-bestanden
• Modellen en fabrikanten van compatibele mobiele telefoons en veelgestelde
vragen over de Bluetooth-functie
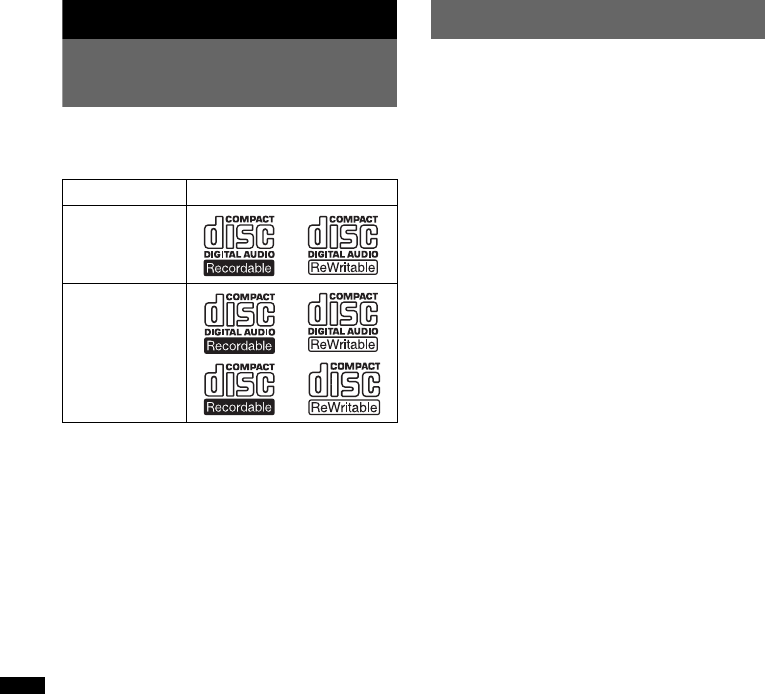
6
Aan de slag
Discs die kunnen worden
afgespeeld op dit systeem
U kunt CD-DA's (ook met CD TEXT) en
CD-R's/CD-RW's (MP3-/WMA-/AAC-
bestanden (pagina 32)) afspelen.
Opmerkingen over Bluetooth
Let op
IN GEEN GEVAL IS SONY AANSPRAKELIJK
VOOR ENIGE INCIDENTELE OF INDIRECTE
SCHADE, GEVOLGSCHADE OF ANDERE
SCHADE, INCLUSIEF MAAR NIET BEPERKT
TOT WINSTDERVING, INKOMSTENVERLIES,
GEGEVENSVERLIES, HET NIET KUNNEN
GEBRUIKEN VAN HET PRODUCT OF
BIJBEHORENDE APPARATUUR, UITVALTIJD
EN DE TIJD VAN DE AANKOPER
GERELATEERD AAN OF VOORTVLOEIEND
UIT HET GEBRUIK VAN DIT PRODUCT,
BIJBEHORENDE HARDWARE EN/OF
SOFTWARE.
BELANGRIJKE KENNISGEVING
Veilig en efficiënt gebruik
Wijzigingen of aanpassingen van dit systeem die
niet nadrukkelijk zijn goedgekeurd door Sony,
kunnen het gebruiksrecht van de gebruiker teniet
doen.
Controleer voordat u dit product gebruikt de
uitzonderingen, vanwege nationale vereisten of
beperkingen, met betrekking tot het gebruik van
Bluetooth-apparatuur.
Autorijden
Controleer de wetgeving en de voorschriften met
betrekking tot het gebruik van mobiele telefoons en
handsfree apparaten in de gebieden waar u rijdt.
Let altijd aandachtig op tijdens het autorijden en
verlaat de weg en parkeer de auto voordat u belt of
een gesprek ontvangt als de
verkeersomstandigheden dit noodzakelijk maken.
Soorten discs Label op de disc
CD-DA
MP3
WMA
AAC
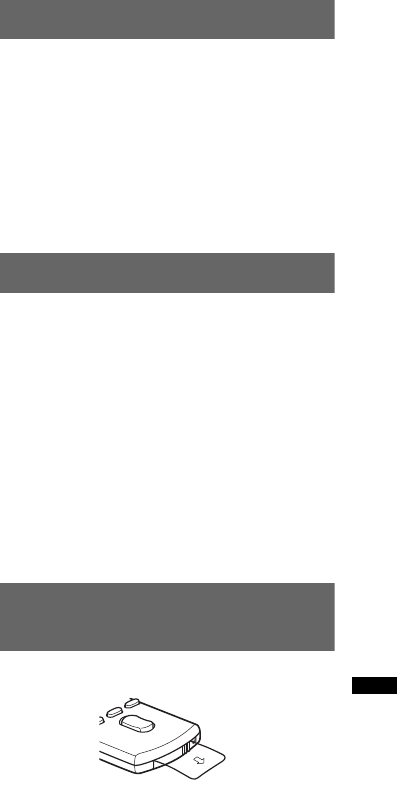
7
Verbinding maken met andere
apparaten
Wanneer u verbinding maakt met andere apparaten,
moet u eerst de bijbehorende gebruikershandleiding
lezen voor gedetailleerde veiligheidsinstructies.
Blootstelling aan radiofrequenties
RF-signalen beïnvloeden wellicht onjuist
geïnstalleerde of onvoldoende afgeschermde
elektronische systemen in auto's, zoals elektronische
brandstofinjectiesystemen, elektronische anti-
blokkeersystemen (anti-slip), elektronische
snelheidsbeperkingssystemen of airbagsystemen.
Voor installatie van of onderhoud aan dit systeem
kunt u het beste contact opnemen met de fabrikant
van uw auto of een vertegenwoordiger van de
fabrikant. Onjuiste installatie of onjuist onderhoud
kan gevaarlijk zijn en kan eventuele garanties die
van toepassing zijn op dit apparaat, ongeldig maken.
Raadpleeg de fabrikant van uw auto om te
controleren of het gebruik van uw mobiele telefoon
in de auto niet van invloed is op de elektronische
systemen van de auto.
Controleer regelmatig of alle onderdelen van het
draadloze apparaat correct in de auto zijn
gemonteerd en correct functioneren.
Noodoproepen
Dit handsfree Bluetooth-systeem voor in de auto en
het elektronische apparaat dat is aangesloten op het
handsfree systeem, maken gebruik van zowel
radiosignalen, mobiele telefoonnetwerken en vaste
telefoonnetwerken als door de gebruiker
geprogrammeerde functies, waardoor de verbinding
niet in alle omstandigheden kan worden
gegarandeerd.
Vertrouw daarom voor belangrijke communicatie
(zoals medische noodgevallen) niet alleen op
elektronische apparaten.
Houd er rekening mee dat als u wilt bellen of
gesprekken wilt ontvangen, het handsfree apparaat
en het elektronische apparaat dat is verbonden met
het handsfree apparaat, moeten zijn ingeschakeld in
een servicegebied met voldoende mobiele
ontvangst.
Noodoproepen zijn wellicht niet mogelijk op alle
mobiele telefoonnetwerken of wanneer bepaalde
netwerkdiensten en/of telefoonfuncties worden
gebruikt.
Controleer dit bij uw lokale serviceprovider.
Het systeem opnieuw instellen
Voordat u het systeem voor het eerst gebruikt of
na het vervangen van de accu of het wijzigen van
de aansluitingen, moet u het systeem opnieuw
instellen.
Maak het voorpaneel los (pagina 8) en druk met
een puntig voorwerp, zoals een balpen, op de
RESET toets (pagina 14).
Opmerking
Als u op RESET drukt, worden de klokinstelling en
bepaalde opgeslagen gegevens gewist.
De DEMO-stand annuleren
U kunt het demonstratiescherm annuleren dat
wordt weergegeven tijdens het uitschakelen.
1Houd de selectietoets ingedrukt.
Het installatievenster wordt weergegeven.
2Druk herhaaldelijk op de selectietoets
tot "DEMO" wordt weergegeven.
3Draai de regelknop om "DEMO-OFF"
te selecteren.
4Houd de selectietoets ingedrukt.
Het instellen is voltooid en het scherm keert
terug naar de normale ontvangst-/
weergavestand.
De kaartafstandsbediening
voorbereiden
Verwijder het beschermende laagje.
Tip
Zie pagina 33 voor meer informatie over het
vervangen van de batterij.
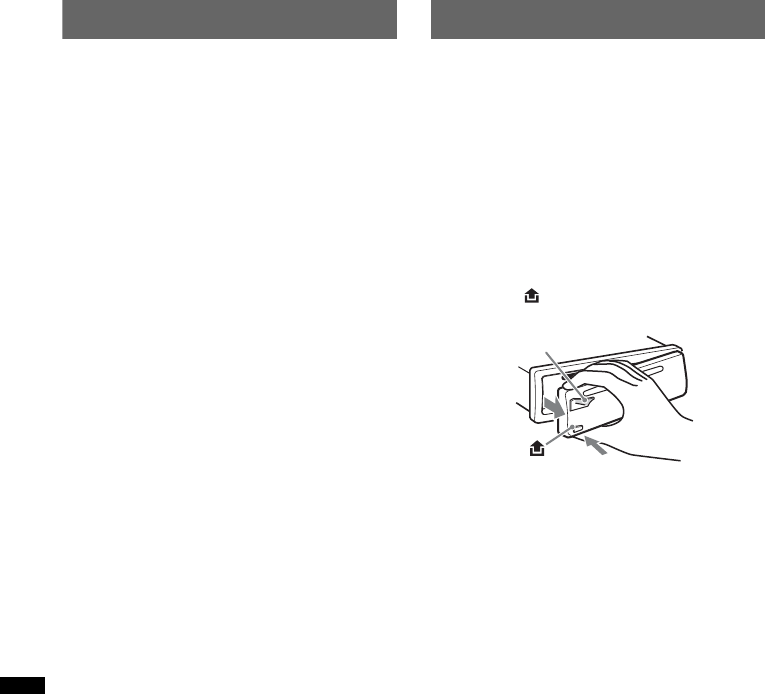
8
De klok instellen
De digitale klok werkt met het 24-uurs systeem.
1Houd de selectietoets ingedrukt.
Het installatievenster wordt weergegeven.
2Druk herhaaldelijk op de selectietoets
tot "CLOCK-ADJ" wordt weergegeven.
3Druk op (SEEK) +.
De aanduiding voor het uur gaat knipperen.
4Draai de regelknop om de uren en
minuten in te stellen.
Als u de digitale aanduiding wilt verplaatsen,
drukt u op (SEEK) –/+.
5Na het instellen van de minuten drukt
u op de selectietoets.
Het instellen is voltooid en de klok begint te
lopen.
Als u de klok wilt weergeven, drukt u op
(DSPL). Druk nogmaals op (DSPL) om terug te
keren naar het vorige scherm.
Tip
U kunt de klok automatisch instellen met de RDS-
functie (pagina 20).
Het voorpaneel verwijderen
U kunt het voorpaneel van het systeem
verwijderen om diefstal te voorkomen.
Waarschuwingstoon
Wanneer u het contact in de stand OFF zet
zonder het voorpaneel te verwijderen, hoort u
gedurende enkele seconden de
waarschuwingstoon.
U hoort de waarschuwingstoon alleen als de
ingebouwde versterker wordt gebruikt.
1Houd (SOURCE/OFF) ingedrukt.
Het systeem wordt uitgeschakeld.
2Druk op en trek het voorpaneel
naar u toe.
Opmerkingen
•Laat het voorpaneel niet vallen en druk niet te hard
op het voorpaneel en het display.
•Stel het voorpaneel niet bloot aan hitte/hoge
temperaturen of vocht. Laat het voorpaneel niet
achter in een geparkeerde auto of op het
dashboard/de hoedenplank.
•Verwijder het voorpaneel niet terwijl het USB-
apparaat wordt afgespeeld, anders kunnen de USB-
gegevens worden beschadigd.
(SOURCE/OFF)

9
Het voorpaneel bevestigen
Plaats deel A van het voorpaneel op deel B van
het systeem, zoals in de afbeelding wordt
weergegeven, en druk op de linkerzijde tot deze
vastklikt.
Opmerking
Plaats niets op de binnenkant van het voorpaneel.
B
A

10
Snelle startgids voor Bluetooth-functie
Raadpleeg "Bluetooth (handsfree bellen en muziek streamen)" (pagina 25) en de bijgeleverde
gebruiksaanwijzing en de gebruiksaanwijzing bij het Bluetooth-apparaat voor meer informatie over het
gebruik.
3 stappen van de Bluetooth-functie
1Koppelen
Registreer ("koppel") eerst onderling een Bluetooth-apparaat (mobiele telefoon, enzovoort) en dit
systeem. U hoeft de koppeling maar één keer uit te voeren.
2Verbinding
U kunt soms via koppelen automatisch verbinding maken. Als u het apparaat wilt gebruiken nadat
het is gekoppeld, maakt u verbinding.
3Handsfree bellen/Muziek streamen
U kunt handsfree bellen en naar muziek luisteren wanneer er verbinding is gemaakt.
Ondersteuningssite
http://support.sony-europe.com/
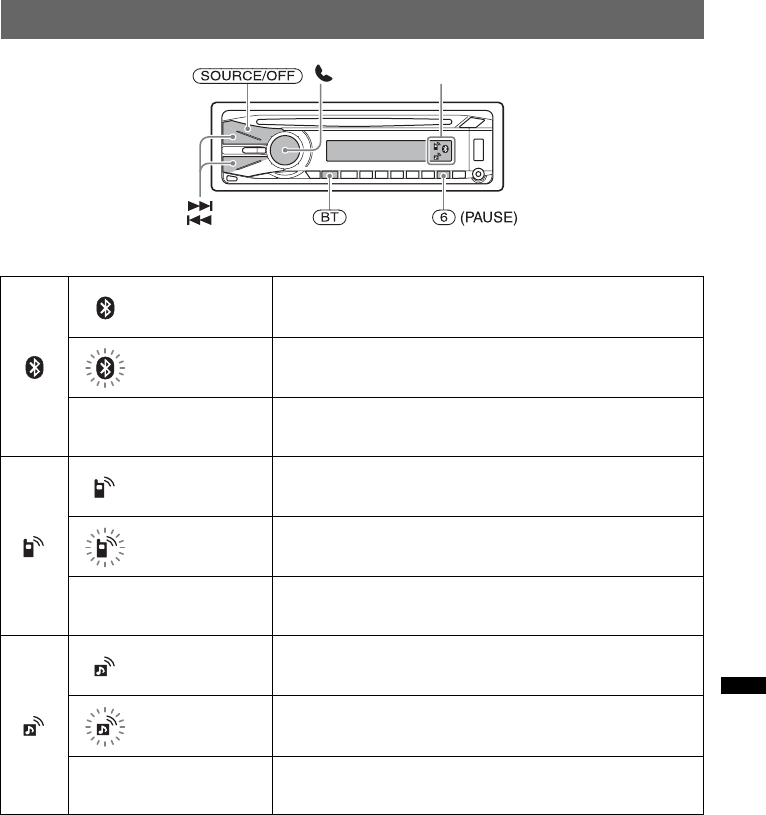
11
Toetsen en pictogrammen
Beschrijvingen van de pictogramstatus
Brandt Bluetooth-signaal ingeschakeld
Knippert Stand-bymodus voor koppelen
Geen Bluetooth-signaal uitgeschakeld
Brandt Verbinding met mobiele telefoon gemaakt
Knippert Systeem verbinden met mobiele telefoon
Geen Geen verbinding
Brandt Verbinding met audioapparaat gemaakt
Knippert Systeem verbinden met audioapparaat
Geen Geen verbinding
Pictogrammen
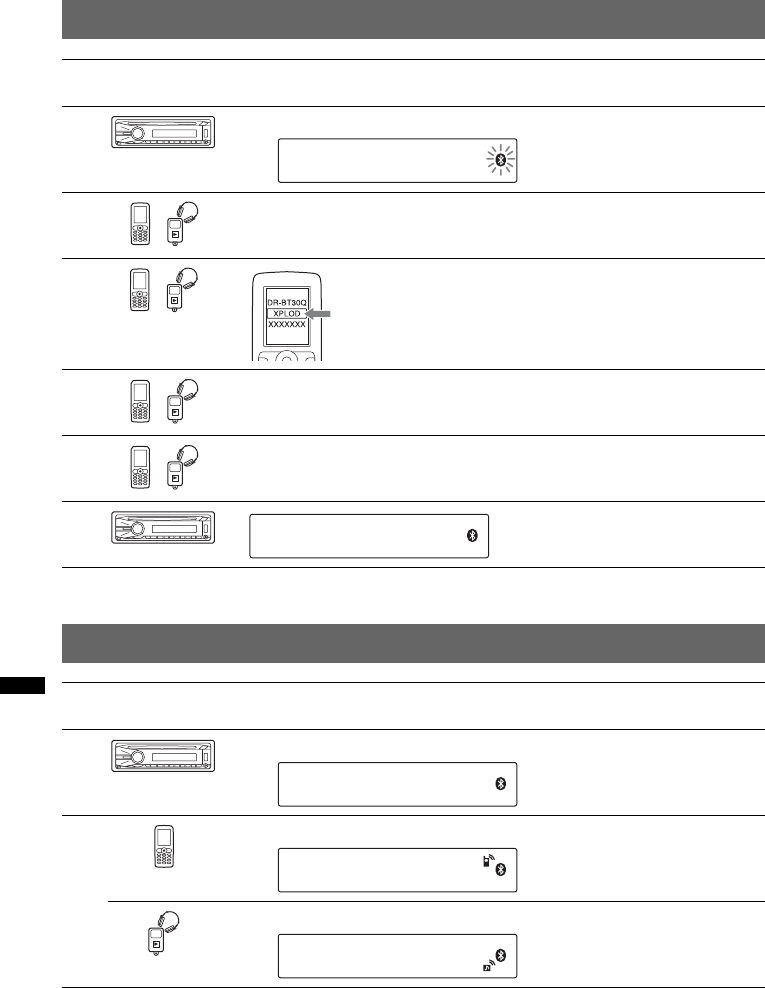
12
1Koppelen
2Verbinding
Opmerking
U kunt op dit systeem verbinding maken met een Bluetooth-apparaat (pagina 26).
Als u geen verbinding vanaf dit systeem kunt maken met een Bluetooth-apparaat, moet u de koppelingsprocedure
nogmaals uitvoeren.
Gebruikte
apparatuur Handeling
1Houd (BT) ongeveer 5 seconden ingedrukt.
2Zoek naar dit systeem.
3
4Geef de toegangscode "0000" op.
5Volg de instructies op het scherm.
6
Gebruikte
apparatuur Handeling
1Houd (BT) ongeveer 3 seconden ingedrukt.
2Maak verbinding met dit systeem met een mobiele telefoon.
Maak verbinding met dit systeem met een audioapparaat.
t
Selecteer "XPLOD".
(Koppelen geslaagd)
t
t
t
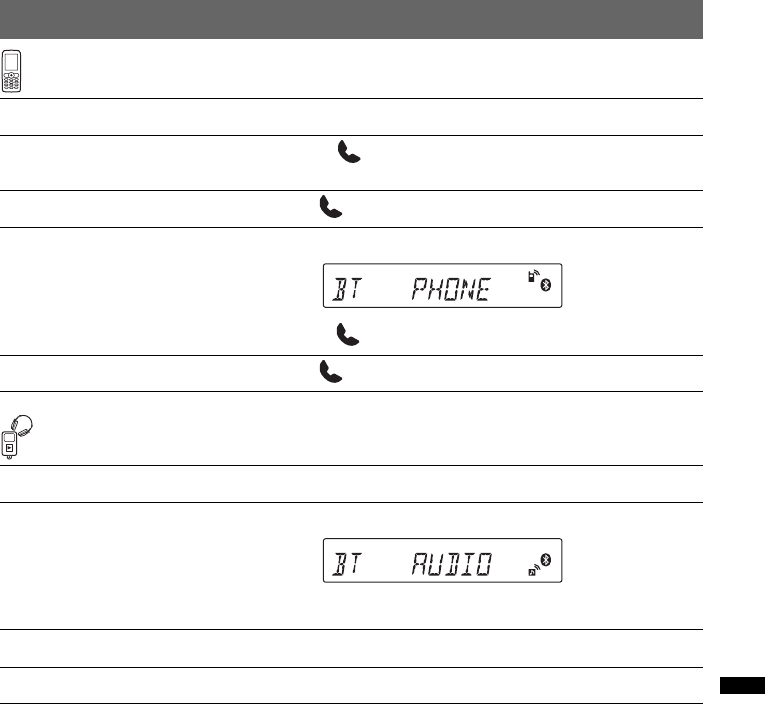
13
3Handsfree bellen en muziek streamen
Handsfree bellen
Muziek streamen
*De werking kan verschillen per audioapparaat.
Actie Handeling
Een gesprek ontvangen/een gesprek
beëindigen Druk op .
Een gesprek weigeren Houd ongeveer 2 seconden ingedrukt.
Nummer opnieuw bellen 1Druk op (SOURCE/OFF).
2Houd ongeveer 3 seconden ingedrukt.
Een gesprek doorschakelen Houd ongeveer 2 seconden ingedrukt.
Actie Handeling
Beluisteren 1Druk op (SOURCE/OFF).
2Start het afspelen op het audioapparaat.
Afspelen/onderbreken (AVRCP)* Druk op (6) (PAUSE).
Tracks overslaan (AVRCP)* Druk op ./>.
t
t
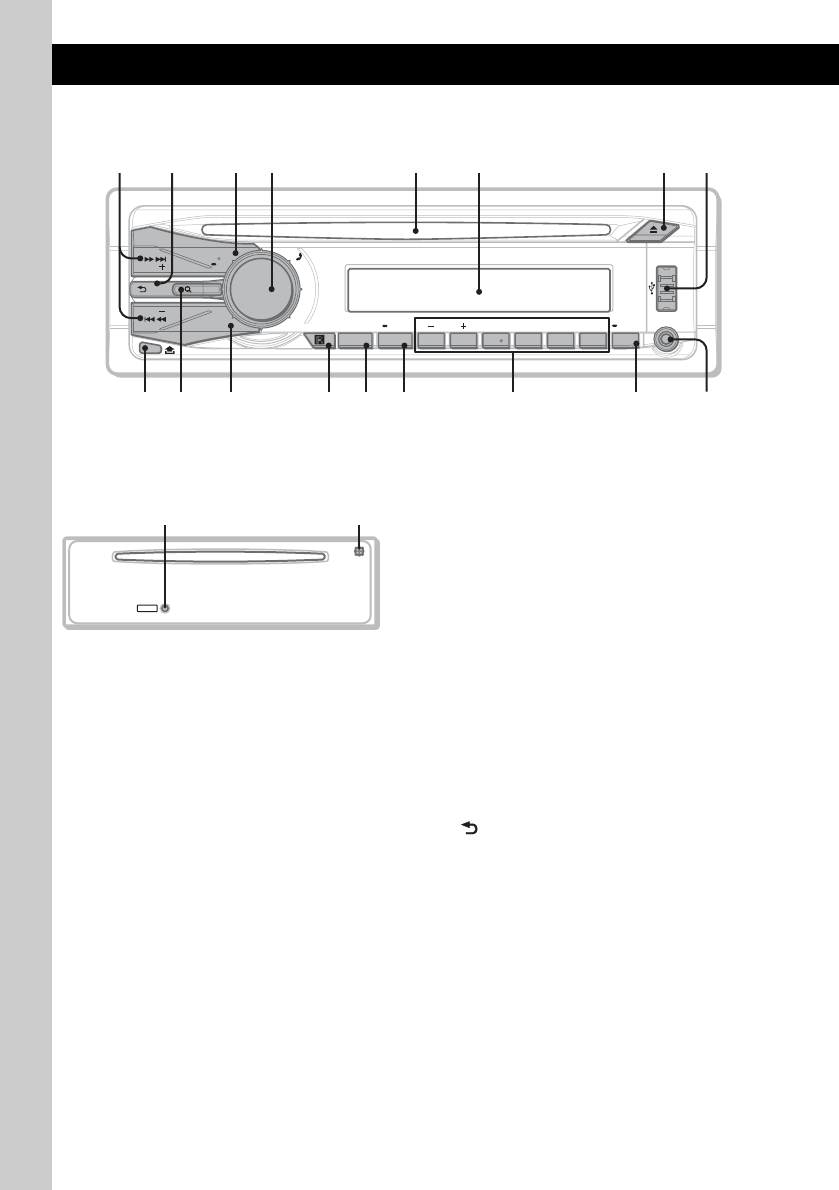
14
Bedieningselementen en algemene handelingen
Hoofdeenheid
Voorpaneel verwijderd In dit gedeelte vindt u informatie over de locatie
van bedieningselementen en instructies voor
algemene handelingen.
Bekijk de betreffende pagina's voor meer
informatie.
ASEEK +/– toetsen
CD/USB:
Tracks overslaan (indrukken); tracks blijven
overslaan (indrukken, vervolgens binnen 1
seconde nogmaals indrukken en
vasthouden); een track snel terug-/
vooruitspoelen (ingedrukt houden).
Radio:
Automatisch afstemmen op zenders
(indrukken); handmatig zoeken naar zenders
(ingedrukt houden).
Bluetooth-audioapparaat*1:
Tracks overslaan (indrukken).
B (BACK)/MODE toets pagina 17, 18,
23, 24
Indrukken: terugkeren naar het vorige
scherm/de radioband selecteren (FM/MW/
LW)/de weergavestand voor de iPod
selecteren.
Ingedrukt houden: passagiersbediening
inschakelen/annuleren.
CSOURCE/OFF toets*2
Indrukken om de stroom in te schakelen/de
bron te wijzigen (radio/CD/USB/AUX/
Bluetooth-audio/Bluetooth-telefoon).
Druk 1 seconde in om de stroom uit te
schakelen.
Druk ten minste 2 seconden in om de stroom
uit te schakelen en het scherm te laten
verdwijnen.
P
U
S
H
E
N
T
E
R
/
S
E
L
E
C
T
/
AUX
ALBM REP SHUF PAUSE
SOURCE
SEEK OFF
SCRL
ZAP
SEEK
123456
DSPL
PTY
AF
/
TA
BLUETOOTH
BT
MODE
MIC
9 q
;
q
a
q
d
q
s
q
f
q
h
2
q
j
q
g
1 83 4 5 6 7
RESET
qlqk
15
DRegelknop/selectie/ (handsfree)
toets
Het volume regelen (draaien); instelitems
selecteren (indrukken en draaien); gesprek
ontvangen/beëindigen (indrukken).
EDiscsleuf
Plaats de disc (met het label omhoog) en het
afspelen begint.
FDisplay
GZ (uitwerpen) toets
De disc uitwerpen.
HUSB-aansluiting pagina 21, 23
Kan worden aangesloten op het
USB-apparaat.
I (voorpaneel loslaten) toets
pagina 8
J (BROWSE) toets pagina 17
De Quick-BrowZer-stand openen.
KZAP toets pagina 18
De ZAPPIN™-stand openen.
LOntvanger voor de
kaartafstandsbediening
MBT (BLUETOOTH) toets pagina 25
Bluetooth-signaal in-/uitschakelen,
koppelen.
NAF (alternatieve frequenties)/
TA (verkeersinformatie)/
PTY (programmatype) toets
pagina 19, 20
AF en TA instellen (indrukken); PTY
selecteren (ingedrukt houden) in RDS.
OCijfertoetsen
CD/USB:
(1)/(2): ALBM –/+ (tijdens het afspelen
van MP3/WMA/AAC)
Albums overslaan (indrukken); albums
blijven overslaan (ingedrukt houden).
(3): REP*2 pagina 21, 22, 24
(4): SHUF pagina 21, 22, 24
(6): PAUSE
Afspelen onderbreken. Druk nogmaals
op de toets om te annuleren.
Radio:
De opgeslagen zenders ontvangen
(indrukken); zenders opslaan (ingedrukt
houden).
Bluetooth-audioapparaat*1:
(6): PAUSE
Afspelen onderbreken. Druk nogmaals
op de toets om te annuleren.
Bluetooth-telefoon:
(5): MIC pagina 27
PDSPL (scherm)/SCRL (rollen) toets
pagina 19, 21, 22, 24
Schermitems wijzigen (indrukken); het
schermitem rollen (ingedrukt houden).
QAUX-ingang pagina 30
Een draagbaar audioapparaat aansluiten.
RRESET toets (bevindt zich achter het
voorpaneel) pagina 7
SMicrofoon pagina 27
Opmerking
Dek de microfoon niet af. De handsfree functie
werkt dan mogelijk niet correct.
*1 Als een Bluetooth-audioapparaat is aangesloten
(moet het Bluetooth-profiel AVRCP ondersteunen).
Afhankelijk van het apparaat, zijn bepaalde
functies wellicht niet beschikbaar.
*2 Deze toets is voorzien van een voelstip.
Opmerking
Wanneer u een disc uitwerpt/plaatst, moet u ervoor
zorgen dat USB-apparaten zijn losgekoppeld om
schade aan de disc te voorkomen.
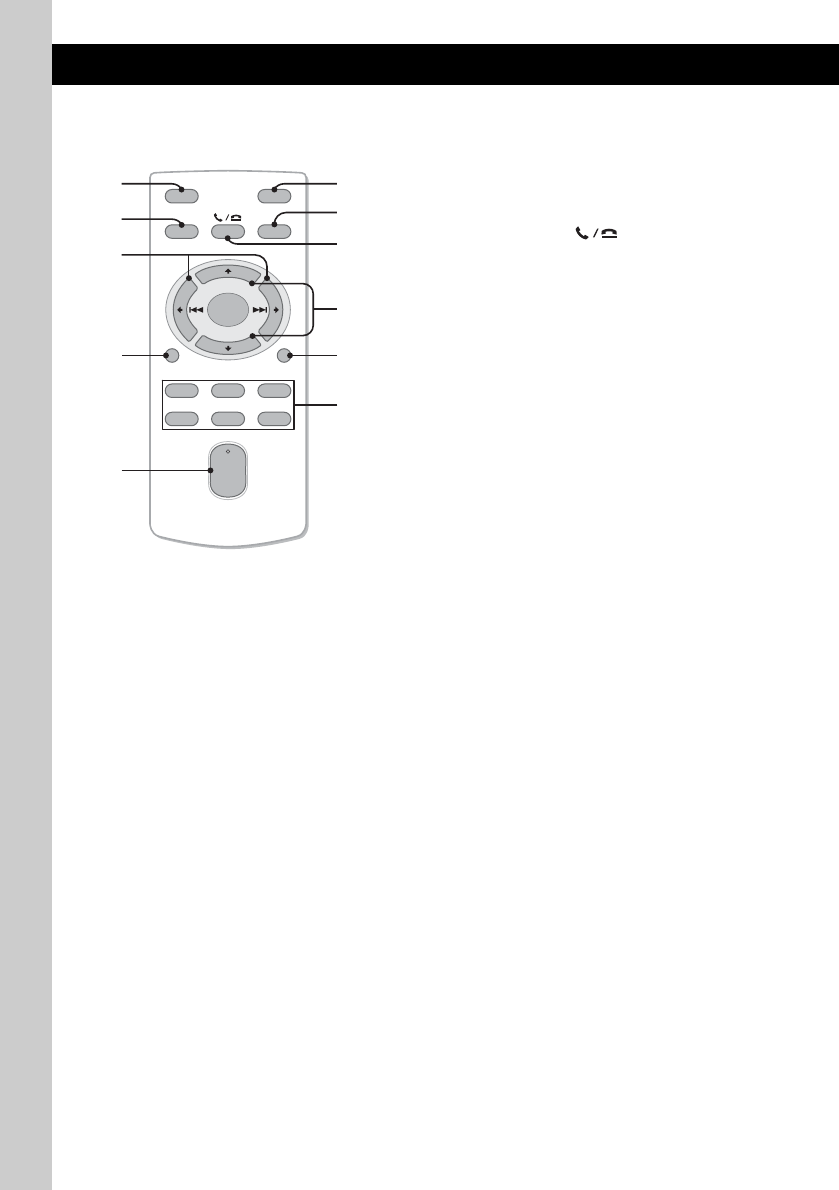
16
Kaartafstandsbediening
RM-X304
Verwijder het beschermende laagje vóór gebruik
(pagina 7).
AOFF toets
Uitschakelen; de bron stoppen.
BSOURCE toets
Inschakelen; de bron wijzigen (radio/CD/
USB/AUX/Bluetooth-audio/Bluetooth-
telefoon).
C< (.)/, (>) toetsen
Radio/CD/USB/Bluetooth-audio bedienen,
dezelfde functie als (SEEK) –/+ op het
systeem.
Instellingen, geluidsinstellingen, enzovoort
kunnen worden geregeld met < ,.
DDSPL (scherm) toets
De schermitems wijzigen.
EVOL (volume) +*/– toets
Het volume aanpassen.
FATT (dempen) toets
Het geluid dempen. Druk nogmaals op de
toets om te annuleren.
GMODE toets
Indrukken om de radioband te selecteren
(FM/MW/LW)/de weergavestand voor de
iPod te selecteren.
Ingedrukt houden om passagiersbediening in
te schakelen/te annuleren.
HSEL (selectie)/ (handsfree) toets
Dezelfde functie als de selectietoets op het
systeem.
IM (+)/m (–) toetsen
CD/USB bedienen, dezelfde functie als
(1)/(2) (ALBM –/+) op het systeem.
Instellingen, geluidsinstellingen, enzovoort
kunnen worden geregeld met M m.
JSCRL (scroll) toets
Het schermitem rollen.
KCijfertoetsen
De opgeslagen zenders ontvangen
(indrukken); zenders opslaan (ingedrukt
houden).
*Deze toets is voorzien van een voelstip.
Opmerking
Als het systeem wordt uitgeschakeld en het scherm
verdwijnt, kan het systeem niet worden bediend met
de kaartafstandsbediening, tenzij op (SOURCE/OFF)
op het systeem wordt gedrukt of er een disc wordt
geplaatst om het systeem eerst te activeren.
OFF
DSPL SCRL
SEL
SOURCE
MODE
132
465
ATT
VOL
+
–
+
–
28
7
1
0
3
6
5
4
qa
9
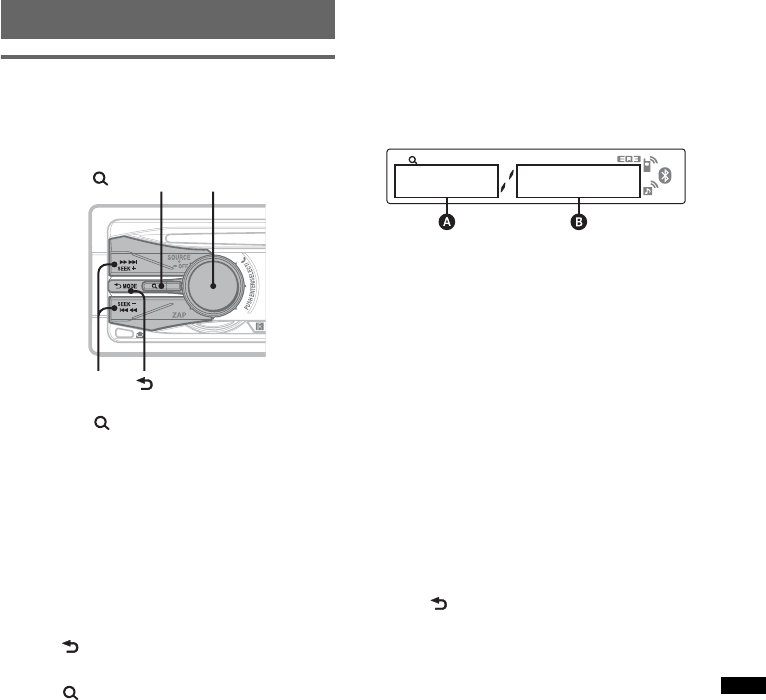
17
Zoeken naar een track
Zoeken naar een track op naam
— Quick-BrowZer
U kunt gemakkelijk op categorie zoeken naar een
track op een CD of USB-apparaat.
1Druk op (BROWSE).
De Quick-BrowZer-stand op het systeem
wordt geactiveerd en er wordt een lijst met
zoekcategorieën weergegeven.
2Draai de regelknop om het gewenste
zoekcategorie te selecteren en druk op
de regelknop om te bevestigen.
3Herhaal stap 2 tot de gewenste track
wordt geselecteerd.
Het afspelen wordt gestart.
Terugkeren naar het vorige scherm
Druk op (BACK).
De Quick-BrowZer-stand sluiten
Druk op (BROWSE).
Opmerking
Wanneer u de Quick-BrowZer-stand activeert, wordt
de instelling voor herhaaldelijk/willekeurig afspelen
geannuleerd.
Zoeken door items over te slaan
— Jump-stand
Wanneer er veel items in een categorie staan,
kunt u het gewenste item snel zoeken.
1Druk op (SEEK) + in de Quick-BrowZer-
stand.
Het volgende scherm wordt weergegeven.
AHuidig itemnummer
BTotaalaantal items in de huidige laag
De itemnaam wordt weergegeven.
2Draai de regelknop om het gewenste item, of
een item in de buurt van het gewenste item, te
selecteren.
Er worden gedeelten in stappen van 10% van
het totaalaantal items overgeslagen.
3Druk op de selectietoets.
Het scherm keert terug naar de Quick-
BrowZer-stand en het geselecteerde item
wordt weergegeven.
4Draai de regelknop om het gewenste item te
selecteren en druk op de regelknop.
Het afspelen wordt gestart als het
geselecteerde item een track is.
De Jump-stand annuleren
Druk op (BACK) of (SEEK) –.
(BROWSE) Regelknop/
selectietoets
(BACK)
SEEK +/–
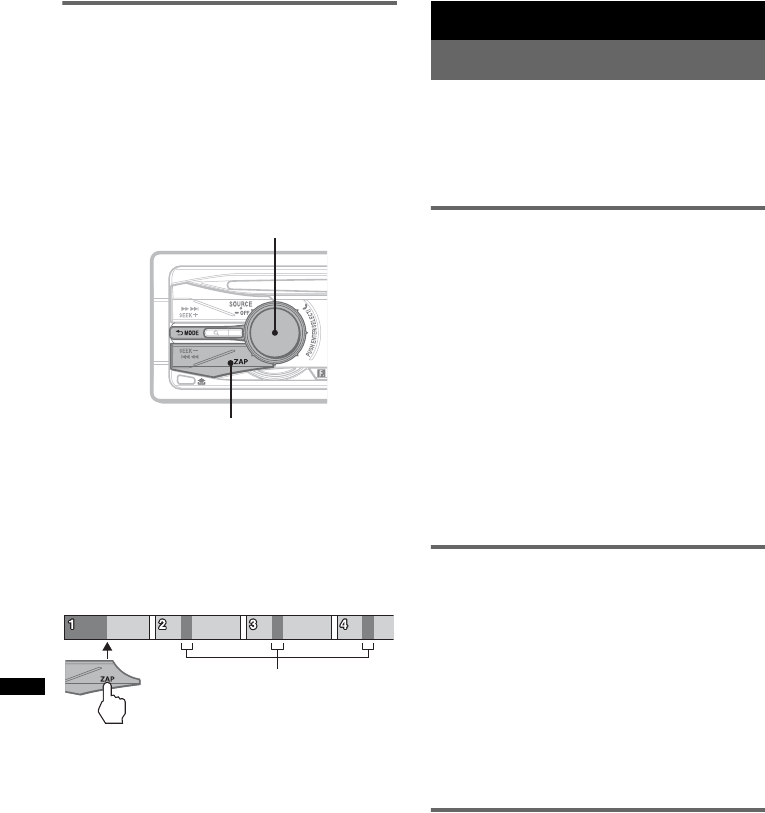
18
Zoeken naar een track door te
luisteren naar een gedeelte van
een track — ZAPPIN™
U kunt zoeken naar een track die u wilt
beluisteren door korte gedeelten van tracks op
een CD of USB-apparaat op volgorde af te
spelen.
De ZAPPIN-stand is geschikt voor het zoeken
naar een track in de standen voor willekeurige
volgorde of willekeurige volgorde herhalen.
1Druk op (ZAP) tijdens het afspelen.
Nadat "ZAPPIN" wordt weergegeven op het
scherm, wordt het afspelen gestart vanaf een
gedeelte van de volgende track.
Het gedeelte wordt een bepaalde tijd
afgespeeld, waarna u een klik hoort en het
volgende gedeelte wordt gestart.
2Druk op de selectietoets of (ZAP)
wanneer een track wordt afgespeeld
waarnaar u wilt luisteren.
De track die u selecteert, wordt in normale
weergavestand vanaf het begin afgespeeld.
Herhaal stap 1 en 2 om nogmaals naar een
track te zoeken in de ZAPPIN-stand.
Tips
•U kunt een afspeeltijd selecteren van ongeveer 6
seconden/9 seconden/30 seconden (pagina 30). U
kunt het gedeelte van de track dat wordt afgespeeld,
niet selecteren.
•Druk op (SEEK) +/– of (1)/(2) (ALBM –/+) in de
ZAPPIN-stand om een track of album over te slaan.
Radio
Zenders opslaan en ontvangen
Let op
Als u afstemt op zenders tijdens het rijden, moet
u de BTM-functie (geheugen voor beste
afstemming) gebruiken om ongelukken te
vermijden.
Automatisch opslaan — BTM
1Druk herhaaldelijk op (SOURCE/OFF)
tot "TUNER" wordt weergegeven.
Druk herhaaldelijk op (MODE) om de band
te wijzigen. U kunt FM1, FM2, FM3, MW of
LW selecteren.
2Houd de selectietoets ingedrukt.
Het installatievenster wordt weergegeven.
3Druk herhaaldelijk op de selectietoets
tot "BTM" wordt weergegeven.
4Druk op (SEEK) +.
Het systeem slaat de zenders in de volgorde
van frequentie op onder de cijfertoetsen.
Er klinkt een pieptoon wanneer de instelling
is opgeslagen.
Handmatig opslaan
1Als u de zender ontvangt die u wilt
opslaan, houdt u een cijfertoets ((1)
tot en met (6)) ingedrukt tot "MEM"
wordt weergegeven.
Opmerking
Als u een andere zender opslaat onder dezelfde
cijfertoets, wordt de eerder opgeslagen zender
vervangen.
Tip
Als een RDS-zender wordt opgeslagen, wordt de AF-/
TA-instelling ook opgeslagen (pagina 19).
De opgeslagen zenders ontvangen
1Selecteer de band en druk vervolgens
op een cijfertoets ((1) tot en met (6)).
ZAP
Selectietoets
Het gedeelte van elke track dat wordt
afgespeeld in de ZAPPIN-stand.
Track
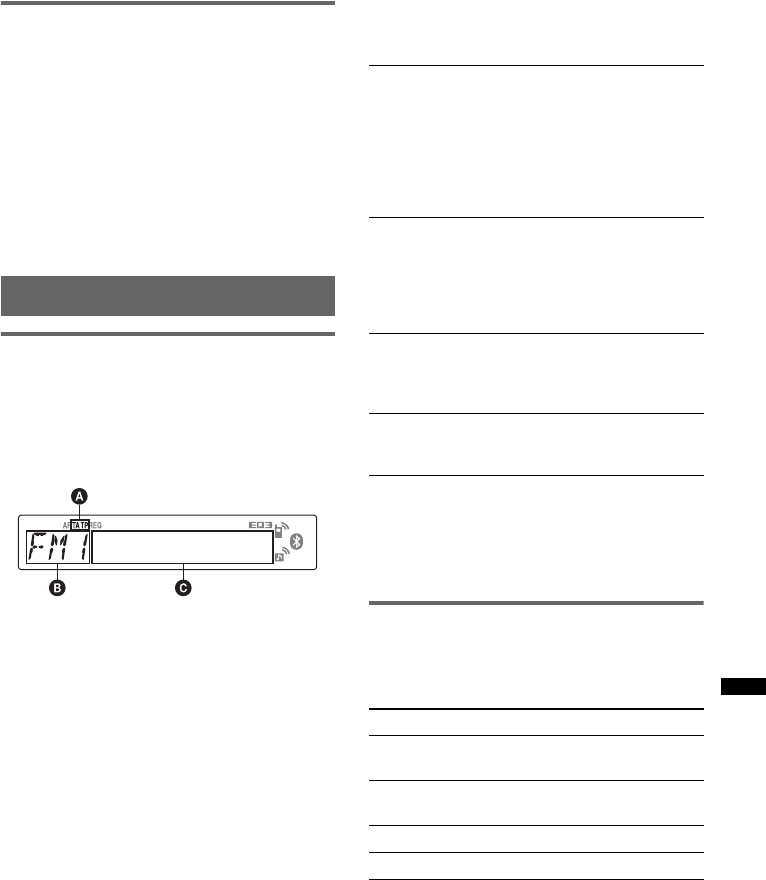
19
Automatisch afstemmen
1Selecteer de band en druk op
(SEEK) +/– om de zender te zoeken.
Het zoeken stopt zodra een zender wordt
ontvangen. Herhaal deze procedure tot de
gewenste zender wordt ontvangen.
Tip
Als u de frequentie kent van de zender die u wilt
beluisteren, houdt u (SEEK) +/– ingedrukt tot de
frequentie ongeveer is bereikt en drukt u vervolgens
herhaaldelijk op (SEEK) +/– om nauwkeurig af te
stemmen op de gewenste frequentie (handmatig
afstemmen).
RDS
Overzicht
FM-zenders met de RDS-dienst
(radiogegevenssysteem) sturen onhoorbare
digitale informatie mee met het gewone
radioprogrammasignaal.
Schermitems
ATA/TP*1
BRadioband, functie
CFrequentie*2 (programmaservicenaam),
voorinstelnummer, klok, RDS-gegevens
*1 "TA" knippert tijdens de verkeersinformatie. "TP"
gaat branden als dergelijke zenders worden
ontvangen.
*2 Als u de RDS-zender ontvangt, wordt " *" links van
de frequentieaanduiding weergegeven.
Als u de schermitems C wilt wijzigen, drukt u
op (DSPL).
RDS-diensten
Dit systeem biedt automatisch RDS-diensten op
de volgende manier:
Opmerkingen
•In bepaalde landen/regio's zijn wellicht niet alle
RDS-functies beschikbaar.
•RDS functioneert wellicht niet als het
ontvangstsignaal zwak is of als de zender waarop u
hebt afgestemd, geen RDS-gegevens verzendt.
AF en TA instellen
1Druk herhaaldelijk op (AF/TA) tot de
gewenste instelling wordt
weergegeven.
AF (alternatieve frequenties)
Hiermee wordt de zender met het sterkste
signaal in een netwerk geselecteerd en wordt
opnieuw op deze zender afgestemd. Als u deze
functie gebruikt, kunt u onafgebroken naar
hetzelfde programma luisteren tijdens een lange
rit zonder dat u steeds handmatig op dezelfde
zender hoeft af te stemmen.
TA (verkeersinformatie)/
TP (verkeersprogramma)
Hiermee ontvangt u de huidige
verkeersinformatie/-programma's. De huidige
bron wordt onderbroken door eventuele
verkeersinformatie/-programma's.
PTY (programmatypen)
Hiermee geeft u het ontvangen programmatype
weer. Hiermee zoekt u ook naar het
geselecteerde programmatype.
CT (kloktijd)
Met de CT-gegevens van de RDS-uitzending
wordt de klok ingesteld.
Selecteer Actie
AF-ON AF inschakelen en TA
uitschakelen.
TA-ON TA inschakelen en AF
uitschakelen.
AF, TA-ON AF en TA inschakelen.
AF, TA-OFF AF en TA uitschakelen.
vervolg op volgende pagina t
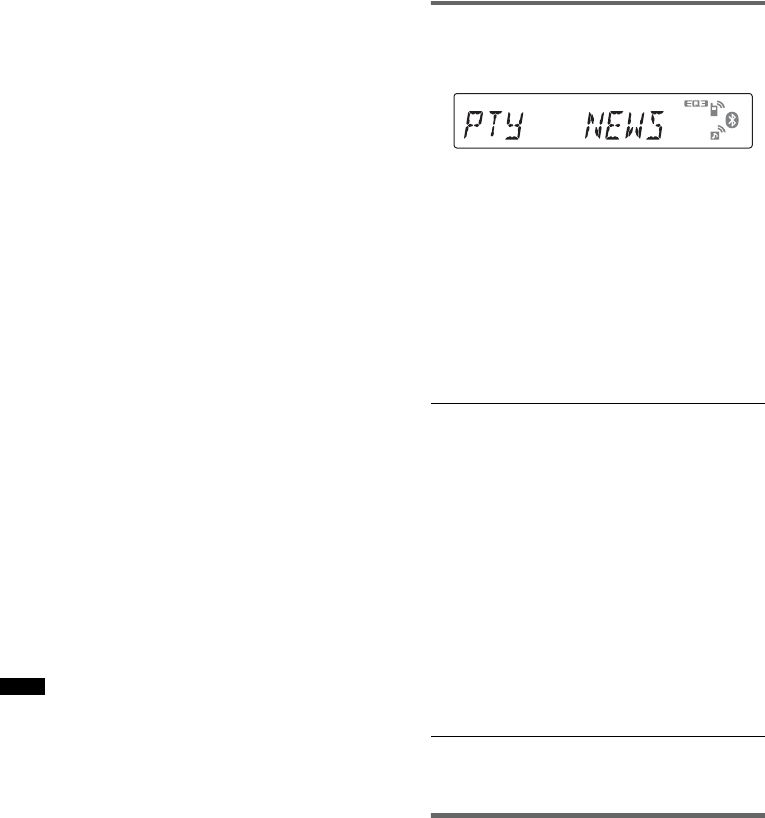
20
RDS-zenders met de AF- en TA-
instelling opslaan
U kunt RDS-zenders vooraf instellen met de AF-
/TA-instelling. Als u de BTM-functie gebruikt,
worden alleen RDS-zenders met dezelfde AF-/
TA-instelling opgeslagen.
Als u handmatig vooraf instelt, kunt u zowel
RDS- als niet-RDS-zenders instellen met elk hun
AF-/TA-instelling.
1Stel AF/TA in en sla de zender vervolgens met
BTM of handmatig op.
Noodberichten ontvangen
Als AF of TA is ingeschakeld, wordt de
geselecteerde bron automatisch onderbroken
door de noodberichten.
Tip
Als u het volume aanpast tijdens een verkeersbericht,
wordt dat volume opgeslagen in het geheugen voor
volgende verkeersberichten, onafhankelijk van het
normale volume.
Een regionaal programma
beluisteren — REG
Als de AF-functie is ingeschakeld: met de
fabrieksinstelling van het systeem wordt
ontvangst tot een bepaalde regio beperkt, zodat er
niet automatisch wordt overgeschakeld naar een
andere regionale zender met een sterkere
frequentie.
Wanneer u het ontvangstgebied van het regionale
programma verlaat, stelt u tijdens FM-ontvangst
"REG-OFF" in bij de instellingen (pagina 30).
Opmerking
Deze functie werkt niet in het Verenigd Koninkrijk en
bepaalde andere gebieden.
Local Link-functie (alleen voor het
Verenigd Koninkrijk)
Met deze functie kunt u andere lokale zenders in
het gebied selecteren, ook als deze niet zijn
opgeslagen onder de cijfertoetsen.
1Druk tijdens FM-ontvangst op een cijfertoets
((1) tot en met (6)) waaronder een lokale
zender is opgeslagen.
2Druk binnen 5 seconden nogmaals op de
cijfertoets van de lokale zender.
Herhaal dit tot de lokale zender wordt
ontvangen.
PTY selecteren
1Houd (AF/TA) (PTY) ingedrukt tijdens
FM-ontvangst.
De naam van het huidige programmatype
verschijnt als de zender PTY-gegevens
uitzendt.
2Druk herhaaldelijk op (AF/TA) (PTY) tot
het gewenste programmatype
verschijnt.
3Druk op (SEEK) +/–.
Het systeem begint te zoeken naar een zender
die het geselecteerde programmatype
uitzendt.
Programmatypen
Opmerking
U kunt deze functie niet gebruiken in bepaalde landen/
regio's waar geen PTY-gegevens beschikbaar zijn.
CT instellen
1Stel "CT-ON" in bij de instellingen
(pagina 30).
Opmerkingen
•Het is mogelijk dat de CT-functie niet werkt, ook al
wordt er wel een RDS-zender ontvangen.
•Er kan een verschil zijn tussen de tijd van de
CT-functie en de werkelijke tijd.
NEWS (Nieuws), AFFAIRS (Actualiteiten),
INFO (Informatie), SPORT (Sport),
EDUCATE (Educatieve programma's),
DRAMA (Toneel), CULTURE (Cultuur),
SCIENCE (Wetenschap), VARIED (Diversen),
POP M (Populaire muziek), ROCK M (Rock-
muziek), EASY M (Easy Listening), LIGHT M
(Licht klassiek), CLASSICS (Klassiek),
OTHER M (Ander type muziek), WEATHER
(Weerberichten), FINANCE (Financiën),
CHILDREN (Kinderprogramma’s), SOCIAL A
(Sociale zaken), RELIGION (Religie),
PHONE IN (Phone In), TRAVEL (Reizen),
LEISURE (Ontspanning), JAZZ (Jazz-muziek),
COUNTRY (Country-muziek), NATION M
(Nationale muziek), OLDIES (Oldies),
FOLK M (Folk-muziek), DOCUMENT
(Documentaires)

21
CD
Schermitems
ABron
BTracknaam*1, disc-/artiestennaam*1,
artiestennaam*1, albumnummer*2,
albumnaam*1, tracknummer/verstreken
speelduur, klok
*1 De informatie over een CD TEXT, MP3/WMA/AAC
wordt weergegeven.
*2 Het albumnummer wordt alleen weergegeven als
het album wordt gewijzigd.
Als u schermitems B wilt wijzigen, drukt u op
(DSPL).
Tip
De weergegeven items zijn afhankelijk van het model,
het disctype, de opname-indeling en de instellingen.
Herhaaldelijk en willekeurig
afspelen
1Druk tijdens het afspelen herhaaldelijk
op (3) (REP) of (4) (SHUF) tot de
gewenste instelling wordt
weergegeven.
*Bij het afspelen van een MP3-/WMA-/AAC-bestand.
Als u wilt terugkeren naar de normale
weergavestand, selecteert u " OFF" of "SHUF
OFF".
USB-apparaten
Ga naar de ondersteuningssite voor meer
informatie over de compatibiliteit van het
USB-apparaat.
• USB-apparaten van het type MSC (Mass
Storage Class; massaopslag) en MTP (Media
Transfer Protocol; protocol voor
mediaoverdracht) die voldoen aan de
USB-norm, kunnen worden gebruikt.
• De bijbehorende codecs zijn MP3 (.mp3),
WMA (.wma) en AAC (.m4a).
• U kunt het beste een reservekopie van de
gegevens op een USB-apparaat maken.
Opmerking
Sluit het USB-apparaat aan nadat u de motor hebt
gestart.
Afhankelijk van het USB-apparaat kan storing of
schade ontstaan wanneer het apparaat wordt
aangesloten voordat de motor wordt gestart.
Een USB-apparaat afspelen
1Sluit het USB-apparaat aan op de
USB-aansluiting.
Wanneer u een kabel gebruikt, moet u de
kabel gebruiken die bij het USB-apparaat is
geleverd voor de aansluiting.
Het afspelen wordt gestart.
Als er al een USB-apparaat is aangesloten, kunt u
het afspelen starten door herhaaldelijk op
(SOURCE/OFF) te drukken tot "USB" wordt
weergegeven.
Druk 1 seconde op (SOURCE/OFF) om het
afspelen te stoppen.
Selecteer Actie
TRACK Track herhaaldelijk
afspelen.
ALBUM* Album herhaaldelijk
afspelen.
SHUF ALBUM* Album in willekeurige
volgorde afspelen.
SHUF DISC Disc in willekeurige
volgorde afspelen.
vervolg op volgende pagina t
Ondersteuningssite
http://support.sony-europe.com/
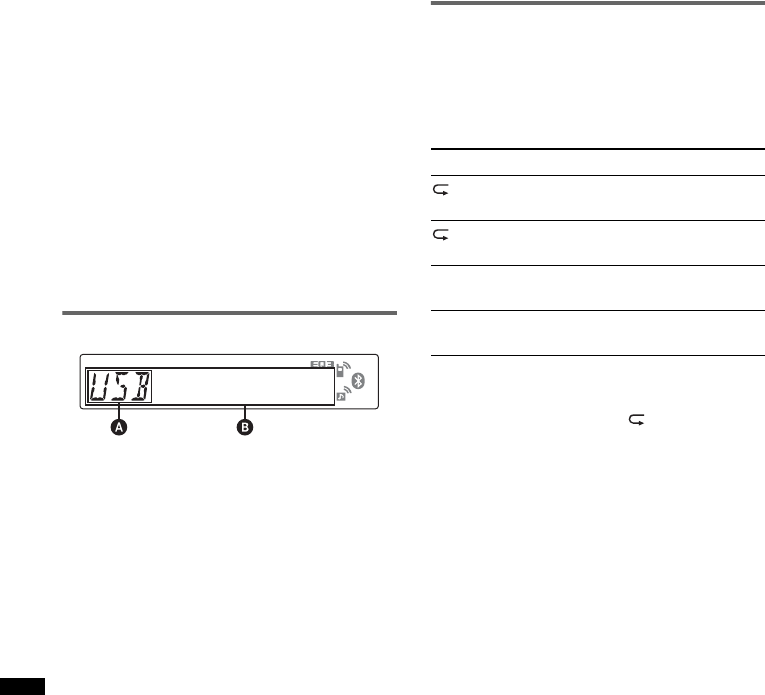
22
Het USB-apparaat verwijderen
1Stop het afspelen van het USB-apparaat.
2Verwijder het USB-apparaat.
Als u het USB-apparaat verwijdert terwijl het
wordt afgespeeld, kunnen de gegevens op het
USB-apparaat worden beschadigd.
Opmerkingen
•Gebruik geen USB-apparaten die zo groot of zwaar
zijn dat ze kunnen vallen als ze worden blootgesteld
aan trillingen of een losse aansluiting kunnen
veroorzaken.
•Verwijder het voorpaneel niet terwijl het
USB-apparaat wordt afgespeeld, anders kunnen de
USB-gegevens worden beschadigd.
•Dit systeem kan geen USB-apparaten via een
USB-hub herkennen.
Schermitems
ABron
BTracknaam, artiestennaam, albumnummer*,
albumnaam, tracknummer/verstreken
speelduur, klok
*Het albumnummer wordt alleen weergegeven als
het album wordt gewijzigd.
Als u schermitems B wilt wijzigen, drukt u op
(DSPL).
Opmerkingen
•De weergegeven items zijn afhankelijk van het
USB-apparaat, de opname-indeling en de
instellingen. Ga naar de ondersteuningssite voor
meer informatie.
•Het maximum aantal gegevens dat kan worden
weergegeven, is als volgt.
– mappen (albums): 128
– bestanden (tracks) per map: 500
•Laat een USB-apparaat niet in een geparkeerde
auto achter, omdat dit een storing tot gevolg kan
hebben.
•Het kan enige tijd duren voordat het afspelen wordt
gestart, afhankelijk van het aantal opgenomen
gegevens.
•DRM-bestanden (beheer van digitale rechten)
kunnen mogelijk niet worden afgespeeld.
•Als u een MP3-/WMA-/AAC-bestand met VBR
(variabele bitsnelheid) afspeelt of snel vooruit-/
terugspoelt, wordt de verstreken speelduur wellicht
niet nauwkeurig weergegeven.
•Het afspelen van de volgende MP3-/WMA-/AAC-
bestanden wordt niet ondersteund.
– compressie zonder gegevensverlies (lossless)
– auteursrechtelijk beveiligd
Herhaaldelijk en willekeurig
afspelen
1Druk tijdens het afspelen herhaaldelijk
op (3) (REP) of (4) (SHUF) tot de
gewenste instelling wordt
weergegeven.
Na 3 seconden is de instelling voltooid.
Als u wilt terugkeren naar de normale
weergavestand, selecteert u " OFF" of "SHUF
OFF".
Selecteer Actie
TRACK Track herhaaldelijk
afspelen.
ALBUM Album herhaaldelijk
afspelen.
SHUF ALBUM Album in willekeurige
volgorde afspelen.
SHUF DEVICE Apparaat in willekeurige
volgorde afspelen.

23
iPod
Zie "Informatie over iPod" op pagina 32 of ga
naar de ondersteuningssite voor meer informatie
over de compatibiliteit van de iPod.
In deze gebruiksaanwijzing wordt "iPod"
gebruikt als algemene verwijzing naar de
iPod-functies van de iPod en iPhone, tenzij
anders aangegeven in de tekst of afbeeldingen.
Een iPod afspelen
Zet het volume van het systeem zachter voordat u
de iPod aansluit.
1Sluit de iPod met de USB-kabel aan op
de USB-aansluiting via de
dockconnector.
De iPod wordt automatisch ingeschakeld en
het scherm van de iPod ziet er als volgt uit.*
Tip
We raden de RC-100IP USB-kabel aan (niet
bijgeleverd) om de dockconnector aan te sluiten.
De tracks op de iPod worden automatisch
afgespeeld vanaf het punt dat het laatst is
afgespeeld.
Als er al een iPod is aangesloten, kunt u het
afspelen starten door herhaaldelijk op
(SOURCE/OFF) te drukken tot "USB" wordt
weergegeven. ("IPD" wordt weergegeven
wanneer een iPod wordt herkend.)
*Als er een iPod touch of een iPhone wordt
aangesloten, of als de iPod de vorige keer is
afgespeeld met passagiersbediening, wordt het logo
niet op het scherm weergegeven.
2Druk op (MODE) om de weergavestand
te selecteren.
De stand wordt als volgt gewijzigd:
RESUMING t ALBUM t TRACK t
PODCAST* t GENRE t PLAYLIST
t ARTIST
*Wordt mogelijk niet weergegeven, afhankelijk van de
iPod-instelling.
3Pas het volume aan.
Druk 1 seconde op (SOURCE/OFF) om het
afspelen te stoppen.
De iPod verwijderen
1Stop het afspelen van de iPod.
2Verwijder de iPod.
Waarschuwing voor iPhone
Als u een iPhone via USB aansluit, wordt het
telefoonvolume geregeld op de iPhone zelf. Om
plotselinge harde geluiden na een gesprek te
voorkomen, moet u het volume op het systeem niet
verhogen tijdens een telefoongesprek.
Opmerkingen
•Verwijder het voorpaneel niet terwijl de iPod wordt
afgespeeld, anders kunnen de gegevens worden
beschadigd.
•Dit systeem kan geen iPod via een USB-hub
herkennen.
Tips
•Wanneer de contactsleutel in de ACC-positie is
gezet en het systeem is ingeschakeld, wordt de iPod
opgeladen.
•Als de iPod wordt losgekoppeld tijdens het afspelen,
wordt "NO DEV" op het scherm van het systeem
weergegeven.
Hervattingsstand
Als de iPod is aangesloten op de dockconnector,
wordt de stand van dit systeem gewijzigd in de
hervattingsstand en wordt het afspelen gestart in
de stand die is ingesteld met de iPod.
In de hervattingsstand werken de volgende
toetsen niet.
– (3) (REP)
– (4) (SHUF)
Ondersteuningssite
http://support.sony-europe.com/
>
.
MENU
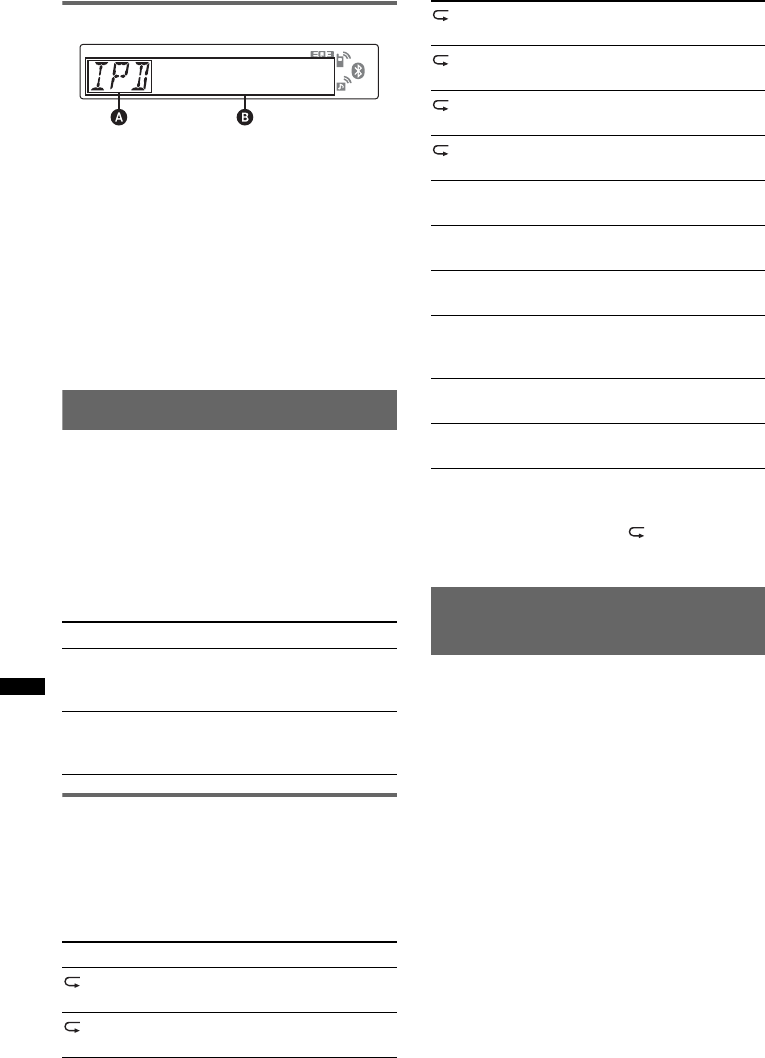
24
Schermitems
ABronaanduiding (iPod)
BTracknaam, artiestennaam, albumnaam,
tracknummer/verstreken speelduur, klok
Als u schermitems B wilt wijzigen, drukt u op
(DSPL).
Tip
Als album/podcast/genre/artiest/afspeellijst wordt
gewijzigd, wordt het itemnummer tijdelijk
weergegeven.
Opmerking
Het is mogelijk dat sommige letters die zijn
opgeslagen in de iPod niet juist worden weergegeven.
De weergavestand instellen
1Druk tijdens het afspelen op (MODE).
De stand wordt als volgt gewijzigd:
ALBUM t TRACK t PODCAST* t
GENRE t PLAYLIST t ARTIST
*Wordt mogelijk niet weergegeven, afhankelijk van de
iPod-instelling.
Albums, podcasts, genres,
afspeellijsten en artiesten overslaan
Herhaaldelijk en willekeurig
afspelen
1Druk tijdens het afspelen herhaaldelijk
op (3) (REP) of (4) (SHUF) tot de
gewenste instelling wordt
weergegeven.
Na 3 seconden is de instelling voltooid.
Als u wilt terugkeren naar de normale
weergavestand, selecteert u " OFF" of "SHUF
OFF".
Een iPod rechtstreeks bedienen
— Passagiersbediening
U kunt een iPod die is aangesloten op de
dockconnector rechtstreeks bedienen.
1Houd tijdens het afspelen (MODE)
ingedrukt.
"MODE IPOD" wordt weergegeven en u kunt
de iPod rechtstreeks bedienen.
Het schermitem wijzigen
Druk op (DSPL).
De schermitems worden als volgt gewijzigd:
Tracknaam t Artiestennaam t Albumnaam
t MODE IPOD t Klok
De passagiersbediening uitschakelen
Houd (MODE) ingedrukt.
"MODE AUDIO" wordt weergegeven en de
weergavestand wordt gewijzigd in
"RESUMING".
Opmerkingen
•Het volume kan alleen worden aangepast op het
systeem.
•Als deze modus wordt geannuleerd, wordt de
instelling voor herhalen uitgeschakeld.
Actie Toets
Overslaan (1)/(2) (ALBM –/+)
[één keer drukken voor elk
item]
Blijven
overslaan
(1)/(2) (ALBM –/+)
[ingedrukt houden tot gewenst
punt]
Selecteer Actie
TRACK Track herhaaldelijk
afspelen.
ALBUM Album herhaaldelijk
afspelen.
PODCAST Podcast herhaaldelijk
afspelen.
ARTIST Artiest herhaaldelijk
afspelen.
PLAYLIST Afspeellijst
herhaaldelijk afspelen.
GENRE Genre herhaaldelijk
afspelen.
SHUF ALBUM Album in willekeurige
volgorde afspelen.
SHUF PODCAST Podcast in willekeurige
volgorde afspelen.
SHUF ARTIST Artiest in willekeurige
volgorde afspelen.
SHUF PLAYLIST Afspeellijst in
willekeurige volgorde
afspelen.
SHUF GENRE Genre in willekeurige
volgorde afspelen.
SHUF DEVICE Apparaat in willekeurige
volgorde afspelen.
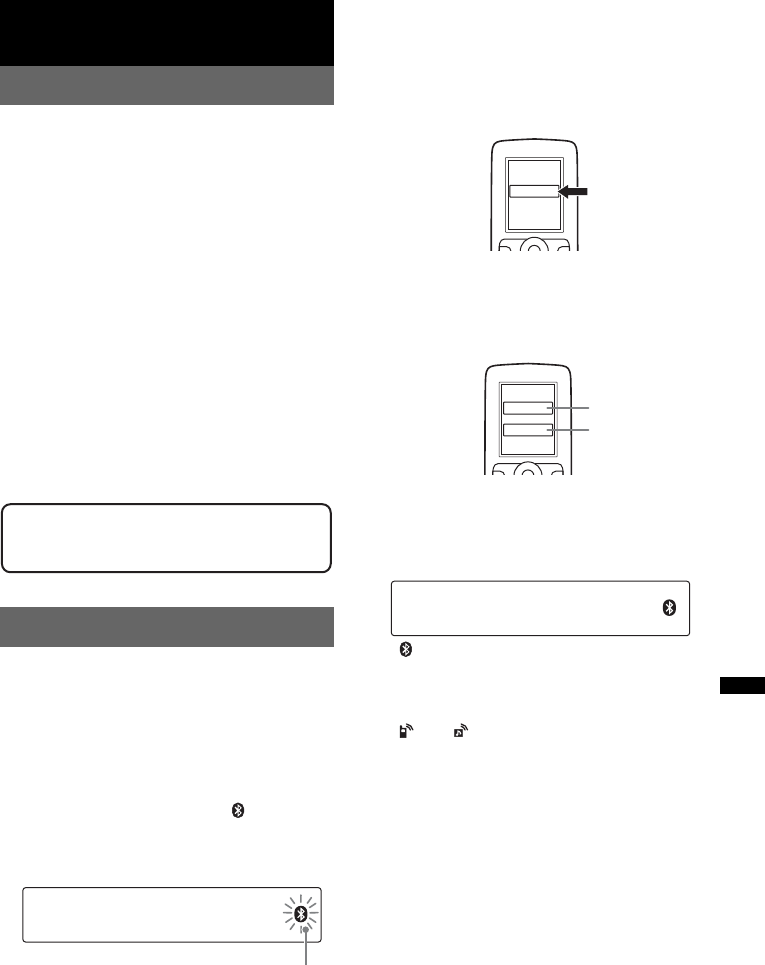
25
Bluetooth (handsfree bellen en
muziek streamen)
Bluetooth-bewerkingen
Als u de Bluetooth-functie wilt gebruiken, is de
volgende procedure vereist.
1Koppelen
Wanneer u Bluetooth-apparaten voor het eerst
aansluit, moeten de apparaten onderling
worden geregistreerd. Dit wordt "koppelen"
genoemd. Deze registratie (koppelen) is
alleen de eerste keer vereist. Daarna
herkennen dit systeem en de andere apparaten
elkaar automatisch. U kunt maximaal 8
apparaten koppelen. (Afhankelijk van het
apparaat moet u wellicht voor elke verbinding
een toegangscode invoeren.)
2Verbinding
Als u het apparaat wilt gebruiken nadat het is
gekoppeld, maakt u verbinding. U kunt soms
via koppelen automatisch verbinding maken.
3Handsfree bellen/Muziek streamen
U kunt handsfree bellen en naar muziek
luisteren wanneer er verbinding is gemaakt.
Koppelen
Registreer ("koppel") eerst een Bluetooth-
apparaat (mobiele telefoon, enzovoort) op dit
systeem en andersom. U kunt maximaal 8
apparaten koppelen. Zodra de koppeling is
gemaakt, hoeft u dit niet opnieuw te doen.
1Plaats het Bluetooth-apparaat binnen
1 m van dit systeem.
2Houd (BT) ingedrukt tot " " gaat
knipperen (ongeveer 5 seconden).
Het systeem schakelt over naar de stand-
bymodus voor koppelen.
3Stel het Bluetooth-apparaat in om te
zoeken naar dit systeem.
Een lijst met gevonden apparaten wordt op
het scherm van het aangesloten apparaat
weergegeven. Dit systeem wordt
weergegeven als "XPLOD" op het
aangesloten apparaat.
4Als er naar een toegangscode* wordt
gevraagd op het scherm van een
aangesloten apparaat, voert u "0000"
in.
Dit systeem en het Bluetooth-apparaat
onthouden de gegevens en wanneer de
koppeling is gemaakt, is dit systeem gereed
voor verbinding met het apparaat.
" " knippert en blijft vervolgens branden
nadat het koppelen is voltooid.
5Stel het Bluetooth-apparaat in om
verbinding te maken met dit systeem.
" " of " " wordt weergegeven wanneer de
verbinding is gemaakt.
*Toegangscode kan ook "wachtwoord", "PIN-code",
"PIN-nummer" of "wachtwoord", enzovoort worden
genoemd, afhankelijk van het apparaat.
Opmerking
De stand-bymodus voor koppelen wordt pas
uitgeschakeld als er verbinding is gemaakt.
Ondersteuningssite
http://support.sony-europe.com/
knippert
XXXXXXX
DR-BT30Q
XPLOD
XXXX
Geef de
toegangscode
op.
"0000"
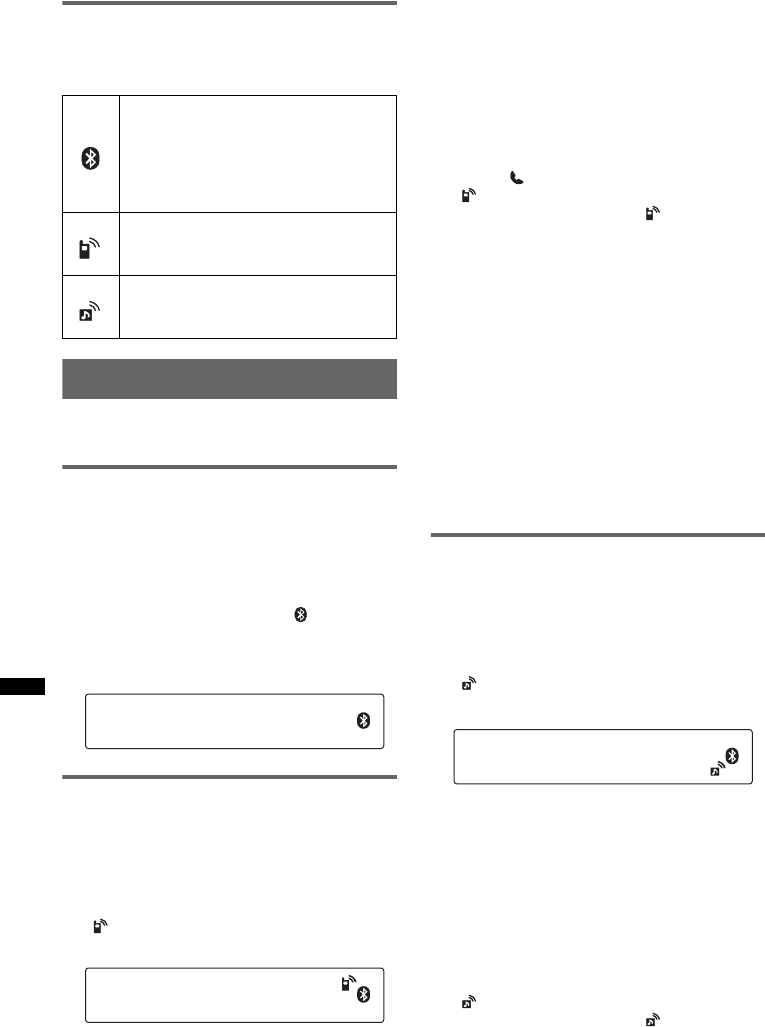
26
Informatie over Bluetooth-
pictogrammen
De volgende pictogrammen worden gebruikt
door dit systeem.
Verbinding
Als de koppeling al is gemaakt, begint u de
bewerking vanaf dit punt.
De uitvoer van het Bluetooth-
signaal van dit systeem
overschakelen naar ingeschakeld
Als u de Bluetooth-functie wilt gebruiken,
schakelt u de uitvoer van het Bluetooth-signaal
op dit systeem in.
1Houd (BT) ingedrukt tot " " gaat
branden (ongeveer 3 seconden).
Het Bluetooth-signaal wordt overgeschakeld
naar ingeschakeld.
Een mobiele telefoon aansluiten
1Zorg dat dit systeem en de mobiele
telefoon zijn overgeschakeld naar
Bluetooth-signaal ingeschakeld.
2Maak verbinding met dit systeem met
de mobiele telefoon.
" "wordt weergegeven wanneer de
verbinding is gemaakt.
Verbinding maken met de laatste
mobiele telefoon die verbinding heeft
gemaakt met dit systeem
1Zorg dat dit systeem en de mobiele telefoon
zijn overgeschakeld naar Bluetooth-signaal
ingeschakeld.
2Druk herhaaldelijk op (SOURCE/OFF) tot
"BT PHONE" wordt weergegeven.
3Druk op (handsfree).
" " knippert terwijl de verbinding wordt
gemaakt. Vervolgens blijft " " branden
wanneer de verbinding is gemaakt.
Opmerking
Wanneer u Bluetooth-audio streamt, kunt u vanaf dit
systeem geen verbinding maken met de mobiele
telefoon. Maak in plaats vanaf de mobiele telefoon
verbinding met het systeem. U hoort wellicht een
geluid van de verbinding door het geluid dat wordt
afgespeeld.
Tip
Bluetooth-signaal ingeschakeld: wanneer het contact
is ingeschakeld, maakt het systeem automatisch
opnieuw verbinding met de mobiele telefoon die het
laatst was aangesloten. De automatische verbinding is
echter ook afhankelijk van de technische gegevens
van de mobiele telefoon. Als dit systeem niet
automatisch verbinding maakt, maakt u handmatig
verbinding.
Een audioapparaat aansluiten
1Zorg dat dit systeem en het
audioapparaat zijn overgeschakeld
naar Bluetooth-signaal ingeschakeld.
2Maak verbinding vanaf dit systeem
met het audioapparaat.
" " wordt weergegeven wanneer de
verbinding is gemaakt.
Verbinding maken met het laatste
verbonden audioapparaat vanaf dit
systeem
1Zorg dat dit systeem en het audioapparaat zijn
overgeschakeld naar Bluetooth-signaal
ingeschakeld.
2Druk herhaaldelijk op (SOURCE/OFF) tot
"BT AUDIO" wordt weergegeven.
3Druk op (6).
" " knippert terwijl de verbinding wordt
gemaakt. Vervolgens blijft " " branden
wanneer de verbinding is gemaakt.
brandt:
knippert:
uit:
Bluetooth-signaal
ingeschakeld
Stand-bymodus voor
koppelen
Bluetooth-signaal
uitgeschakeld
brandt:
knippert:
uit:
Verbinding gemaakt
Verbinden
Geen verbinding
brandt:
knippert:
uit:
Verbinding gemaakt
Verbinden
Geen verbinding
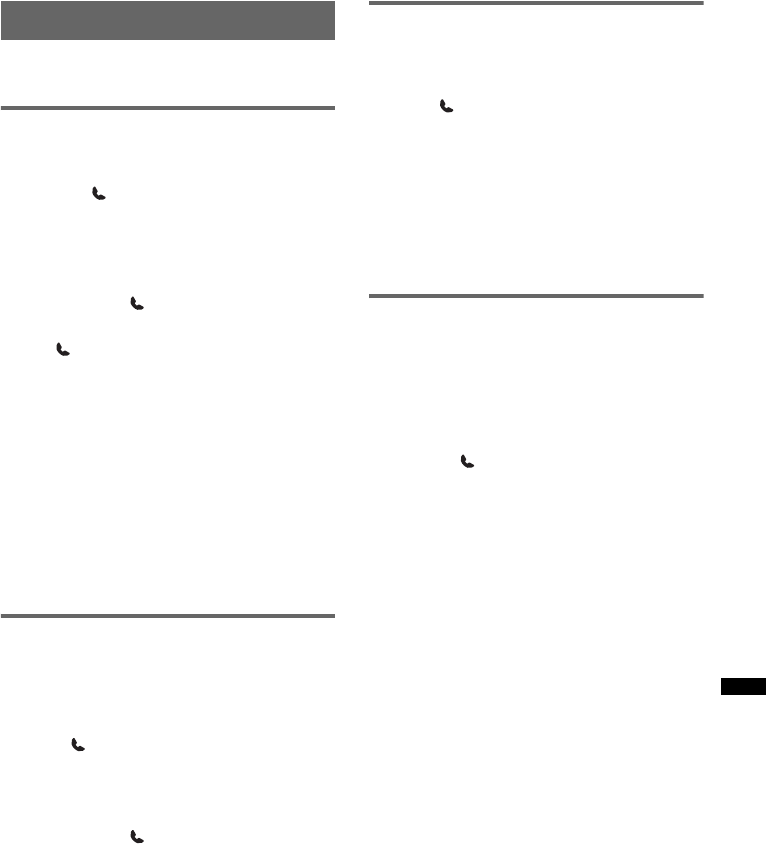
27
Handsfree bellen
Controleer vooraf of er verbinding is gemaakt
tussen dit systeem en de mobiele telefoon.
Gesprekken ontvangen
Als u een gesprek ontvangt, hoort u de beltoon
via de autoluidsprekers.
1Druk op (handsfree) wanneer een
gesprek wordt ontvangen met een
beltoon.
Het telefoongesprek wordt gestart.
Een gesprek beëindigen
Druk nogmaals op (handsfree).
Als u een binnenkomend gesprek wilt weigeren,
houdt u (handsfree) 2 seconden ingedrukt.
Microfoonsterkte aanpassen
U kunt schakelen tussen twee volumeniveaus
("LOW" of "HI") om een geschikt niveau voor de
andere persoon tijdens een gesprek in te stellen.
1Druk op (5) tijdens een gesprek.
Het item wordt als volgt gewijzigd:
MIC-LOW y MIC-HI
Opmerking
De microfoon van dit systeem bevindt zich aan de
achterkant van het voorpaneel (pagina 14). Dek de
microfoon niet af met tape, enzovoort.
Bellen
Als u belt vanaf dit systeem, wordt alleen
opnieuw bellen gebruikt.
1Druk herhaaldelijk op (SOURCE/OFF)
tot "BT PHONE" wordt weergegeven.
2Houd (handsfree) ten minste 3
seconden ingedrukt.
Het telefoongesprek wordt gestart.
Een gesprek beëindigen
Druk nogmaals op (handsfree).
Als u een andere telefoon wilt bellen, gebruikt u
uw mobiele telefoon en schakelt u het gesprek
vervolgens door.
Controleer het volgende voor
overdrachtgegevens van het gesprek.
Gespreksoverdracht
Als u het juiste apparaat (dit systeem/mobiele
telefoon) wilt inschakelen/uitschakelen,
controleert u het volgende.
1Houd (handsfree) ingedrukt of
gebruik de mobiele telefoon.
Raadpleeg de gebruiksaanwijzing van de
mobiele telefoon voor meer informatie over de
werking van de mobiele telefoon.
Opmerking
Afhankelijk van de mobiele telefoon, kan de handsfree
verbinding worden verbroken wanneer u probeert een
gesprek door te schakelen.
Spraakkeuze activeren
U kunt spraakkeuze activeren op een mobiele
telefoon die op dit systeem is aangesloten door
het spraaklabel uit te spreken dat op de mobiele
telefoon is opgeslagen, waarna er wordt gebeld.
1Druk herhaaldelijk op (SOURCE/OFF)
tot "BT PHONE" wordt weergegeven.
2Druk op (handsfree).
De spraakkeuzestand op de mobiele telefoon
wordt geactiveerd.
3Spreek het spraaklabel uit dat op de
mobiele telefoon is opgeslagen.
Uw stem wordt herkend en er wordt gebeld.
Opmerkingen
•Controleer vooraf of er verbinding is gemaakt tussen
dit systeem en de mobiele telefoon.
•Sla van tevoren een spraaklabel op uw mobiele
telefoon op.
•Als u spraakkeuze activeert op een mobiele telefoon
die op dit systeem is aangesloten, werkt deze
functie mogelijk niet in bepaalde gevallen.
•Lawaai, zoals een lopende motor, kunnen de
geluidsherkenning verstoren. Om de herkenning te
verbeteren, moet u de functie gebruiken bij
omstandigheden met zo min mogelijk lawaai.
•Spraakkeuze werkt mogelijk niet in bepaalde
situaties, afhankelijk van de effectiviteit van de
herkenningsfunctie van de mobiele telefoon.
Raadpleeg de ondersteuningssite voor meer
informatie (pagina 25).
Tips
•Spreek op dezelfde manier als toen u het
spraaklabel hebt opgeslagen.
•Sla een spraaklabel op terwijl u in de auto zit, via dit
systeem met "BT PHONE" geselecteerd als bron.

28
Muziek streamen
Muziek van een audioapparaat
beluisteren
U kunt op dit systeem luisteren naar muziek van
een audioapparaat als het audioapparaat het
Bluetooth-profiel A2DP (Advanced Audio
Distribution Profile) ondersteunt.
1Verlaag het volume op dit systeem.
2Druk herhaaldelijk op (SOURCE/OFF)
tot "BT AUDIO" wordt weergegeven.
3Start het afspelen op het
audioapparaat.
4Pas het volume aan op dit systeem.
Het volume aanpassen
Het volume kan worden aangepast voor elk
verschil tussen het systeem en het Bluetooth-
audioapparaat.
1Start het afspelen op het Bluetooth-
audioapparaat met een normaal volume.
2Stel uw gebruikelijke luistervolume in op het
systeem.
3Druk herhaaldelijk op de selectietoets tot
"BTA" wordt weergegeven en draai de
volumeknop om het ingangsniveau aan te
passen (–8 dB tot +18 dB).
Een audioapparaat bedienen met
dit systeem
U kunt de volgende bewerkingen uitvoeren op dit
systeem als het audioapparaat het Bluetooth-
profiel AVRCP (Audio Video Remote Control
Profile) ondersteunt. (De bediening verschilt per
audioapparaat.)
*Afhankelijk van het apparaat moet u wellicht twee
keer op deze toets drukken.
Bewerkingen die hierboven niet worden
genoemd, moeten op het audioapparaat worden
uitgevoerd.
Opmerkingen
•Tijdens het afspelen van een audioapparaat wordt
informatie, zoals tracknummer/tijd, afspeelstatus,
enzovoort, over een aangesloten audioapparaat niet
op dit systeem weergegeven.
•Zelfs als de bron wordt gewijzigd op dit systeem,
wordt het afspelen op het audioapparaat niet
gestopt.
Tip
U kunt een mobiele telefoon die ondersteuning biedt
voor A2DP (Advanced Audio Distribution Profile),
verbinden als audioapparaat en naar muziek luisteren.
De registratie van alle
gekoppelde apparaten
verwijderen
1Houd (SOURCE/OFF) 1 seconde
ingedrukt om de stroom uit te
schakelen.
2Als " " brandt, houdt u (BT)
ingedrukt tot " " wordt
uitgeschakeld.
3Houd de selectietoets ingedrukt.
4Druk herhaaldelijk op de selectietoets
tot "BT INIT" wordt weergegeven.
5Druk op (SEEK) +.
De initialisatie wordt gestart.
Het duurt 3 seconden voordat alle registraties
zijn geannuleerd. Schakel het systeem niet uit
terwijl "INITIAL" knippert.
Actie Toets
Afspelen (6) (PAUSE)* op dit systeem.
Onderbreken (6) (PAUSE)* op dit systeem.
Tracks
overslaan SEEK –/+ (./>) [één
keer voor elke track]
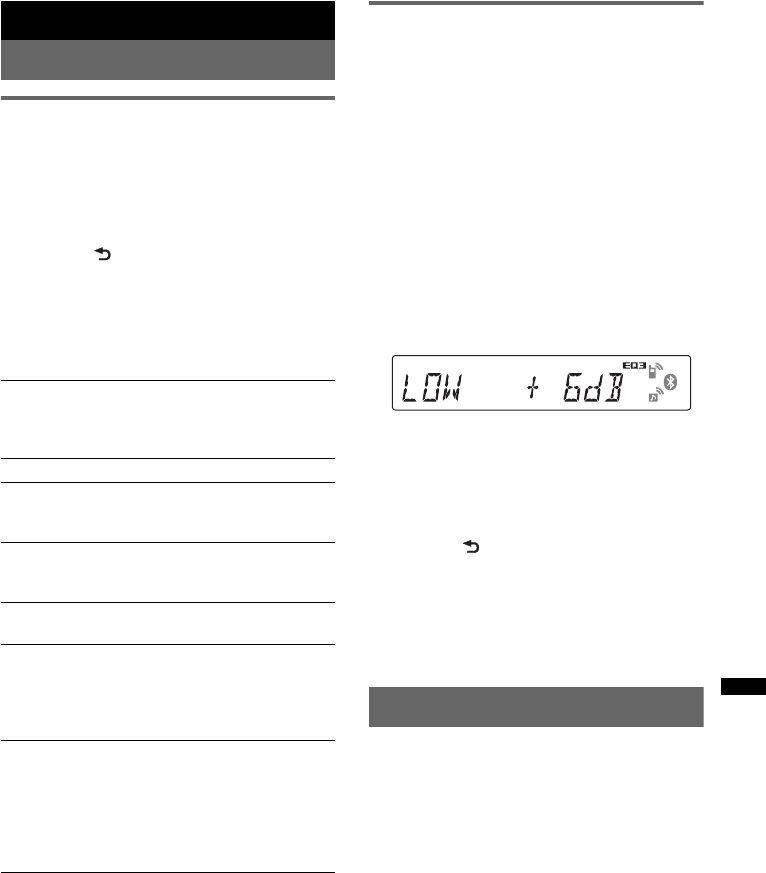
29
Overige functies
De geluidsinstellingen wijzigen
De geluidskenmerken aanpassen
1Druk herhaaldelijk op de selectietoets
tot het gewenste item wordt
weergegeven.
2Draai de regelknop om het
geselecteerde item aan te passen.
3Druk op (BACK).
De instelling is voltooid en het scherm keert
terug naar de normale ontvangst-/
weergavestand.
De volgende items kunnen worden ingesteld
(volg de paginaverwijzing voor meer informatie):
De equalizercurve aanpassen
— EQ3
Met "CUSTOM" bij EQ3 kunt u zelf
equalizerinstellingen opgeven.
1Selecteer een bron en druk
herhaaldelijk op de selectietoets om
"EQ3" te selecteren.
2Draai de regelknop om "CUSTOM" te
selecteren.
3Druk herhaaldelijk op de selectietoets
tot "LOW", "MID" of "HI" wordt
weergegeven.
4Draai de regelknop om het
geselecteerde item aan te passen.
Het volume kan worden aangepast in stappen
van 1 dB, van –10 dB tot +10 dB.
Herhaal stap 3 en 4 om de equalizercurve aan
te passen.
Als u de fabrieksinstelling voor de
equalizercurve wilt herstellen, houdt u de
selectietoets ingedrukt voordat het instellen is
voltooid.
5Druk op (BACK).
De instelling is voltooid en het scherm keert
terug naar de normale ontvangst-/
weergavestand.
Tip
Andere equalizertypen kunnen ook worden
aangepast.
Instelitems aanpassen — SET
1Houd de selectietoets ingedrukt.
Het installatievenster wordt weergegeven.
2Druk herhaaldelijk op de selectietoets
tot het gewenste item wordt
weergegeven.
3Draai de regelknop om de instelling
(bijvoorbeeld "ON" of "OFF") te
selecteren.
4Houd de selectietoets ingedrukt.
Het instellen is voltooid en het scherm keert
terug naar de normale ontvangst-/
weergavestand.
Opmerking
De weergegeven items zijn afhankelijk van de bron en
de instelling.
EQ3
Een equalizercurve selecteren uit 7 muziektypen
(XPLOD, VOCAL, EDGE, CRUISE, SPACE,
GRAVITY, CUSTOM of OFF).
LOW*1, MID*1, HI*1 (pagina 29)
BAL (balans)
De geluidsbalans tussen de linker- en
rechterluidsprekers aanpassen.
FAD (fader)
Het relatieve geluidsniveau tussen de voor- en
achterluidsprekers aanpassen.
SUB*2 (subwoofervolume)
Het volume van de subwoofer aanpassen.
AUX*3 (AUX-niveau)
Het volume aanpassen voor elk aangesloten
randapparaat: "+18 dB" – "0 dB" – "–8 dB".
Bij deze instelling hoeft het volume tussen
bronnen niet worden aangepast.
BTA*4 (BT-audioniveau)
Het volume van elk aangesloten Bluetooth-
audioapparaat aanpassen: "+18 dB" – "0 dB" –
"–8 dB".
Met deze instelling is het niet nodig om het
volume tussen bronnen aan te passen
(pagina 28).
*1 Als EQ3 is ingeschakeld.
*2 "ATT" wordt weergegeven bij de laagste instelling
en u kunt deze instelling maximaal 21 stappen
aanpassen.
*3 Als AUX-bron is ingeschakeld (pagina 30).
*4 Als de Bluetooth-audiobron is ingeschakeld
(pagina 28).
vervolg op volgende pagina t
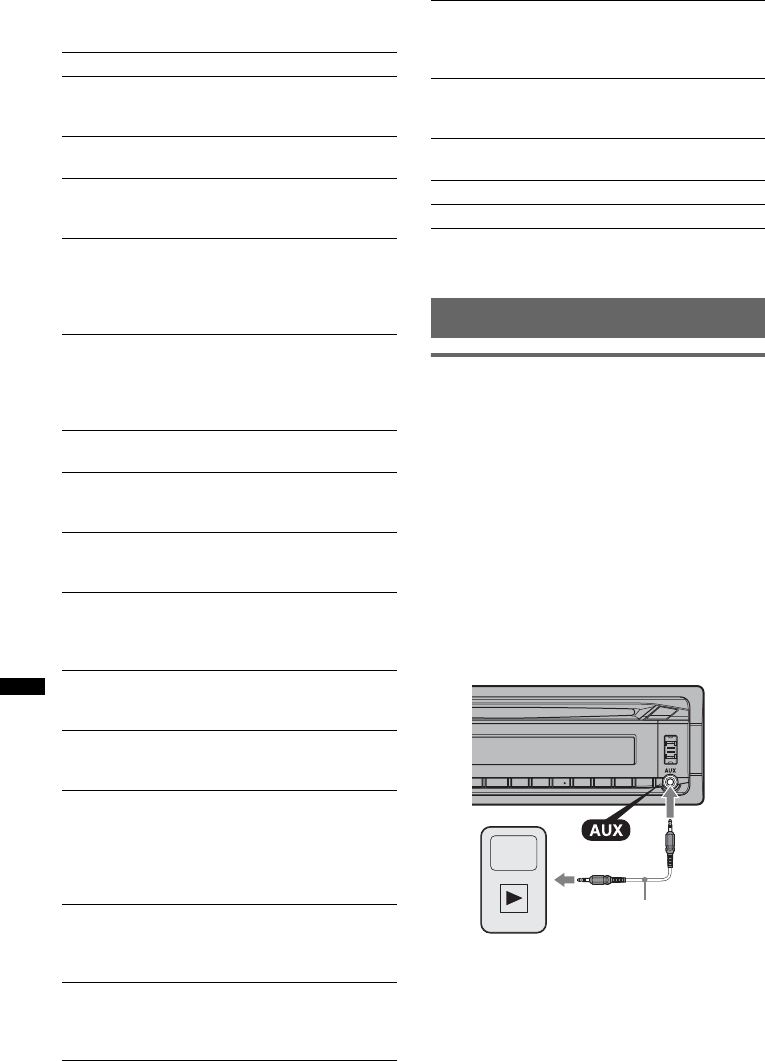
30
De volgende items kunnen worden ingesteld
(volg de paginaverwijzing voor meer informatie):
*1 Als het systeem is uitgeschakeld.
*2 Als FM wordt ontvangen.
Optionele apparaten gebruiken
Extra audioapparatuur
Door een optioneel draagbaar audioapparaat aan
te sluiten op de AUX-ingang (stereo mini-
aansluiting) op het systeem en vervolgens de
bron te selecteren, kunt u het audioapparaat
beluisteren via de autoluidsprekers. Het volume
kan worden aangepast voor elk verschil tussen
het systeem en het draagbare audioapparaat. Volg
de onderstaande procedure:
Een draagbaar audioapparaat
aansluiten
1Schakel het draagbare audioapparaat uit.
2Verlaag het volume op het systeem.
3Sluit het draagbare audioapparaat aan.
*Gebruik een rechte stekker.
CLOCK-ADJ (klok aanpassen) (pagina 8)
CT (kloktijd)
De CT-functie inschakelen: "ON", "OFF"
(pagina 19, 20).
BEEP
De pieptoon inschakelen: "ON", "OFF".
AUX-A*1 (AUX-audio)
Het AUX-bronscherm inschakelen: "ON",
"OFF" (pagina 30).
A.OFF (automatisch uitschakelen)
Automatisch uitschakelen na de gewenste tijd
wanneer het systeem is uitgeschakeld: "NO",
"30S" (seconden), "30M" (minuten), "60M"
(minuten).
MIC*1 (microfoon)
– "EXT": automatisch overschakelen naar de
externe microfoon wanneer deze wordt
aangesloten.
– "INT": alleen de interne microfoon selecteren.
DEMO
(demonstratie)
De demonstratie inschakelen: "ON", "OFF".
DIM (dimmer)
De helderheid van het scherm wijzigen: "ON",
"OFF".
A.SCRL (automatisch rollen)
Lange items automatisch laten rollen: "ON",
"OFF".
LOCAL (lokale zoekfunctie)
– "ON": alleen afstemmen op zenders met sterke
signalen.
– "OFF": afstemmen met normale ontvangst.
MONO*2 (monostand)
Mono-ontvangststand selecteren om slechte
FM-ontvangst te verbeteren: "ON", "OFF".
REG*2 (regionaal)
De ontvangst beperken tot een specifieke regio:
"ON", "OFF" (pagina 20).
Z.TIME (Zappin Time)
De afspeeltijd voor de ZAPPIN-functie
selecteren.
– "Z.TIME-1" (ongeveer 6 seconden), "Z.TIME-
2" (ongeveer 9 seconden), "Z.TIME-3"
(ongeveer 30 seconden).
LPF (laagdoorlaatfilter)
De kantelfrequentie van de subwoofer
selecteren: "OFF", "80Hz", "100Hz", "120Hz",
"140Hz", "160Hz".
LPF NORM/REV (laagdoorlaatfilter normaal/
omgekeerd)
De fase van de subwoofer selecteren: "NORM",
"REV".
HPF (hoogdoorlaatfilter)
De kantelfrequentie van de voor-/
achterluidspreker selecteren: "OFF", "80Hz",
"100Hz", "120Hz", "140Hz", "160Hz".
LOUD (loudness)
Hoge en lage tonen versterken voor helder
geluid bij lagere volumeniveaus: "ON", "OFF".
DM+
De DM+-functie inschakelen: "ON", "OFF".
BTM (pagina 18)
BT INIT*1 (Bluetooth initialiseren) (pagina 28)
Aansluitkabel*
(niet bijgeleverd)
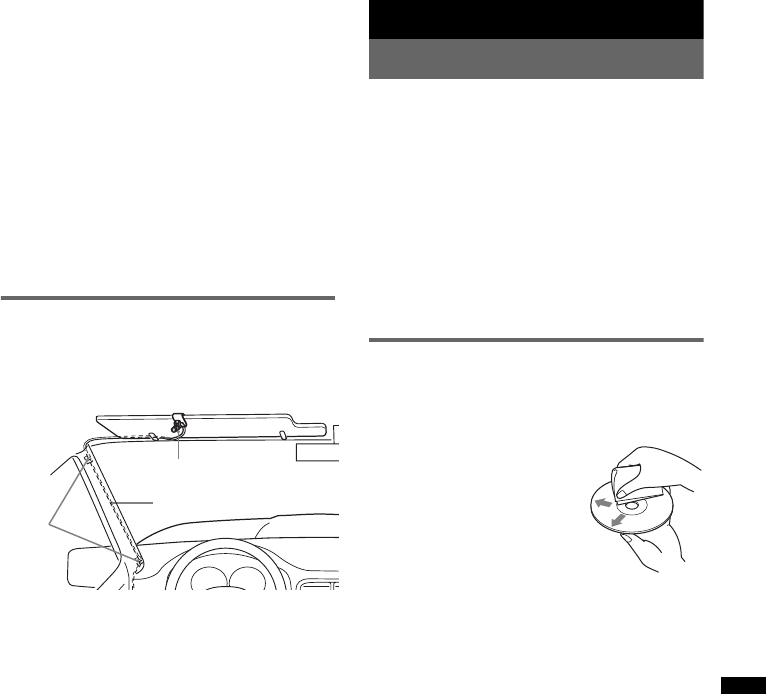
31
Het volume aanpassen
Pas vóór het afspelen voor elk aangesloten
audioapparaat het volume aan.
1Verlaag het volume op het systeem.
2Druk herhaaldelijk op (SOURCE/OFF) tot
"AUX" wordt weergegeven.
Daarna wordt "AUX FRONT IN"
weergegeven.
3Start het afspelen op het draagbare
audioapparaat met een normaal volume.
4Stel uw gebruikelijke luistervolume in op het
systeem.
5Pas het ingangsniveau aan (pagina 29).
Externe microfoon XA-MC10
Als u een optionele externe microfoon aansluit
op de microfooningang, kunt u de
geluidskwaliteit verbeteren wanneer u praat via
dit systeem.
Tip
U kunt de prioriteit voor de microfoons instellen
(pagina 30).
Opmerking
Sluit XA-MC10 aan als externe microfoon. U kunt
wellicht niet bellen of er kan een storing optreden als
er een ander apparaat is aangesloten.
Aanvullende informatie
Voorzorgsmaatregelen
• Laat het systeem afkoelen als de auto geparkeerd
heeft gestaan in de volle zon.
• De elektrisch bediende antenne schuift
automatisch uit.
Condensvorming
Als er vocht condenseert in het systeem, verwijdert
u de disc en wacht u ongeveer een uur tot het
systeem is gedroogd; anders kan de werking van het
systeem worden verstoord.
Optimale geluidskwaliteit behouden
Mors geen vocht op het systeem of de discs.
Opmerkingen over discs
• Stel een disc niet bloot aan direct zonlicht of
warmtebronnen, zoals heteluchtkanalen, en laat
deze niet achter in een auto die in de volle zon
staat geparkeerd.
• Veeg een disc van binnen naar
buiten schoon met een doekje
voordat u deze afspeelt.
Gebruik geen oplosmiddelen
zoals benzine, thinner en in de
handel verkrijgbare
reinigingsmiddelen.
• Dit systeem is ontworpen om
discs af te spelen die voldoen
aan de CD-norm (Compact Disc). DualDiscs en
sommige muziekdiscs die zijn gecodeerd met
copyrightbeveiligingstechnologieën voldoen niet
aan de CD-norm (Compact Disc) en kunnen
daarom mogelijk niet worden afgespeeld met dit
systeem.
•Discs die NIET kunnen worden afgespeeld
met dit systeem
– Discs waarop labels, stickers, tape of papier zijn
geplakt. Hierdoor kan de werking worden
verstoord of de disc worden beschadigd.
– Discs met afwijkende vormen (bijvoorbeeld hart,
vierkant, ster). Als u dit toch probeert, kan het
systeem worden beschadigd.
– 8-cm discs.
Externe microfoon
Verbindingskabel
Klem-
metjes
vervolg op volgende pagina t

32
Opmerkingen over CD-R's/CD-RW's
• Het maximumaantal: (alleen CD-R/CD-RW)
– mappen (albums): 150 (inclusief hoofdmap)
– bestanden (tracks) en mappen: 300 (misschien
minder dan 300 als de map-/bestandsnaam veel
tekens bevat)
– tekens die kunnen worden weergegeven voor de
naam van een map/bestand: 32 (Joliet)/
64 (Romeo)
• Als een disc met Multi Session (meerdere sessies)
begint met een CD-DA-sessie, wordt deze herkend
als een CD-DA-disc, en worden andere sessies
niet afgespeeld.
•Discs die NIET kunnen worden afgespeeld
met dit systeem
– CD-R's/CD-RW's met slechte opnamekwaliteit.
– CD-R's/CD-RW's die zijn opgenomen met een
incompatibel opnameapparaat.
– CD-R's/CD-RW's die onjuist zijn gefinaliseerd.
– CD-R's/CD-RW's die niet zijn opgenomen in de
muziek-CD-indeling of MP3-indeling conform
ISO9660 Level 1/Level 2, Joliet/Romeo of Multi
Session (meerdere sessies).
Afspeelvolgorde van MP3-/WMA-/
AAC-bestanden
Informatie over iPod
• U kunt de volgende iPod-modellen aansluiten.
Werk de software van uw iPod bij naar de
nieuwste versie vóór gebruik.
Made for
– iPod touch
– iPod touch (2e generatie)
– iPod classic
– iPod classic (120 GB)
– iPod met video*
– iPod nano (4e generatie)
– iPod nano (3e generatie)
– iPod nano (2e generatie)
– iPod nano (1e generatie)*
Works with
– iPhone
– iPhone 3G
– iPhone 3GS
*Passagiersbediening is niet beschikbaar voor iPod
nano (1e generatie) en iPod met video.
• "Made for iPod" betekent dat een elektronisch
accessoire speciaal is ontworpen voor aansluiting
op een iPod en dat de ontwikkelaar van het
accessoire verklaart dat het accessoire voldoet aan
de prestatienormen van Apple.
• "Works with iPhone" betekent dat een elektronisch
accessoire speciaal is ontworpen voor aansluiting
op een iPhone en dat de ontwikkelaar van het
accessoire verklaart dat het accessoire voldoet aan
de prestatienormen van Apple.
• Apple is niet verantwoordelijk voor de werking
van dit systeem of voor het voldoen aan de
veiligheids- en overheidsvoorschriften.
Informatie over de Bluetooth-
functie
Wat is Bluetooth-technologie?
• Draadloze Bluetooth-technologie is een draadloze
technologie met een klein bereik waarmee
draadloze communicatie van gegevens tussen
digitale apparaten, zoals een mobiele telefoon en
een hoofdtelefoon, mogelijk wordt gemaakt.
Draadloze Bluetooth-technologie functioneert
binnen een straal van ongeveer 10 meter. Meestal
worden er twee apparaten met elkaar verbonden,
maar sommige apparaten kunnen tegelijkertijd
met meerdere apparaten verbonden zijn.
• U hebt geen kabel nodig voor de verbinding omdat
Bluetooth-technologie een draadloze technologie
is. Het is ook niet nodig dat de apparaten naar
elkaar zijn gericht, zoals het geval is met
infraroodtechnologie. U kunt bijvoorbeeld
gegevens uitwisselen terwijl u een dergelijk
apparaat bijvoorbeeld in een tas of zak draagt.
• Bluetooth-technologie is een internationale norm
ondersteund door miljoenen bedrijven overal ter
wereld, en wordt door verschillende bedrijven
gebruikt.
Informatie over Bluetooth-communicatie
• Draadloze Bluetooth-technologie functioneert
binnen een straal van ongeveer 10 meter.
De maximale communicatieafstand is afhankelijk
van obstakels (personen, metalen voorwerpen,
muren, enzovoort) of elektromagnetische storing.
• De volgende omstandigheden kunnen van invloed
zijn op de gevoeligheid van Bluetooth-
communicatie.
– Er bevindt zich een obstakel, zoals een persoon,
een metalen voorwerp of een muur, tussen dit
systeem en het Bluetooth-apparaat.
– Er bevindt zich een apparaat dat de frequentie
2,4 GHz gebruikt, zoals een draadloos LAN-
apparaat, draadloze telefoon of magnetron, in de
buurt van dit systeem.
Map (album)
MP3-/WMA-/
AAC-bestand
(track)
MP3/WMA/AAC
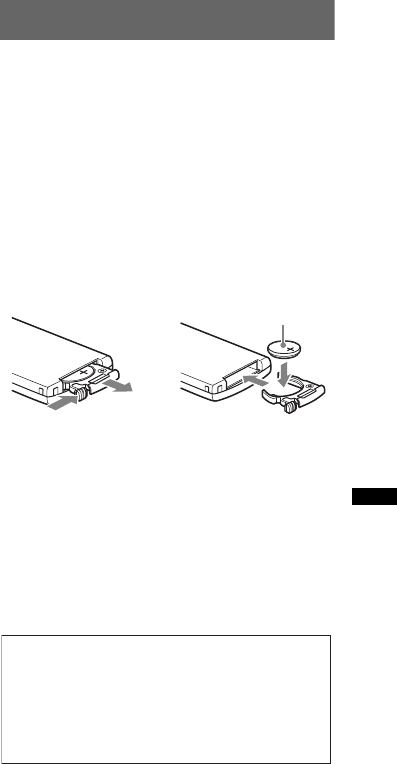
33
• Omdat Bluetooth-apparaten en draadloze LAN-
apparaten (IEEE802.11b/g) dezelfde frequentie
gebruiken, kan storing worden veroorzaakt door
microgolven. Als dit systeem in de buurt van een
draadloos LAN-apparaat wordt gebruikt, kan dit
een lagere communicatiesnelheid, ruis of een
ongeldige verbinding tot gevolg hebben. In dit
geval moet u het volgende doen.
– Gebruik dit systeem op ten minste 10 meter
afstand van het draadloze LAN-apparaat.
– Als dit systeem binnen 10 meter van een
draadloos LAN-apparaat wordt gebruikt,
schakelt u het draadloze LAN-apparaat uit.
– Plaats dit systeem en het Bluetooth-apparaat zo
dicht mogelijk bij elkaar in de buurt.
• Microgolven die afkomstig zijn van een
Bluetooth-apparaat, kunnen van invloed zijn op de
werking van elektronische medische apparaten.
Schakel dit systeem en andere Bluetooth-
apparaten uit op de volgende plaatsen, omdat dit
ongelukken kan veroorzaken.
– in de buurt van ontvlambare gassen, in
ziekenhuizen, treinen, vliegtuigen of
benzinestations
– in de buurt van automatische deuren of
brandalarmen
• Dit systeem ondersteunt
beveiligingsmogelijkheden die voldoen aan de
Bluetooth-norm voor een beveiligde verbinding
wanneer de draadloze Bluetooth-technologie
wordt gebruikt, maar afhankelijk van de instelling
is beveiliging wellicht niet genoeg. Wees
voorzichtig wanneer u communiceert via de
draadloze Bluetooth-technologie.
• We zijn niet verantwoordelijk voor het lekken van
informatie tijdens de Bluetooth-communicatie.
• We kunnen niet garanderen dat een verbinding tot
stand kan worden gebracht met alle Bluetooth-
apparaten.
– Apparaten met Bluetooth-functies moeten
voldoen aan de Bluetooth-norm die is
vastgesteld door Bluetooth SIG, en moeten zijn
geverifieerd.
– Zelfs als het aangesloten apparaat voldoet aan de
hierboven vermelde Bluetooth-norm, kan met
sommige apparaten wellicht geen verbinding
worden gemaakt of functioneert het apparaat
niet correct, afhankelijk van de kenmerken of
technische gegevens van het apparaat.
– Wanneer u handsfree belt via de telefoon, kan
ruis optreden, afhankelijk van het apparaat of de
omgeving.
• Afhankelijk van het apparaat dat wordt
aangesloten, kan het enige tijd duren voordat de
communicatie wordt gestart.
Overige
• De Bluetooth-functie van een mobiele telefoon
functioneert mogelijk niet correct, afhankelijk van
radiogolven en de locatie waar het apparaat wordt
gebruikt.
• Als u ongemakken ondervindt na het gebruik van
een Bluetooth-apparaat, moet u meteen stoppen
met het gebruik van het Bluetooth-apparaat. Als
het probleem daarmee niet is verholpen,
raadpleegt u de dichtstbijzijnde Sony-handelaar.
Met alle vragen of problemen met betrekking tot dit
systeem die niet aan bod komen in deze
gebruiksaanwijzing, kunt u terecht bij uw Sony-
handelaar.
Onderhoud
De lithiumbatterij van de
kaartafstandsbediening vervangen
Onder normale omstandigheden gaat de batterij
ongeveer 1 jaar mee. (Afhankelijk van de
gebruiksomstandigheden kan de levensduur
korter zijn.)
Wanneer de batterij verzwakt, wordt het bereik
van de kaartafstandsbediening kleiner. Vervang
de batterij door een nieuwe CR2025-
lithiumbatterij. Bij een andere batterij bestaat er
brand- of explosiegevaar.
Opmerkingen over de lithiumbatterij
•Houd de lithiumbatterij buiten het bereik van
kinderen. Raadpleeg meteen een arts wanneer een
batterij wordt ingeslikt.
•Veeg de batterij schoon met een droge doek voor
een goed contact.
•Houd bij het plaatsen van de batterij rekening met
de juiste polariteit.
•Houd de batterij niet vast met een metalen tang, om
kortsluiting te voorkomen.
vervolg op volgende pagina t
1
2
+ zijde omhoog
c
WAARSCHUWING
Bij oneigenlijk gebruik kan de batterij
ontploffen.
Probeer niet de batterij op te laden of te
openen; werp ook een lege batterij nooit in
het vuur.
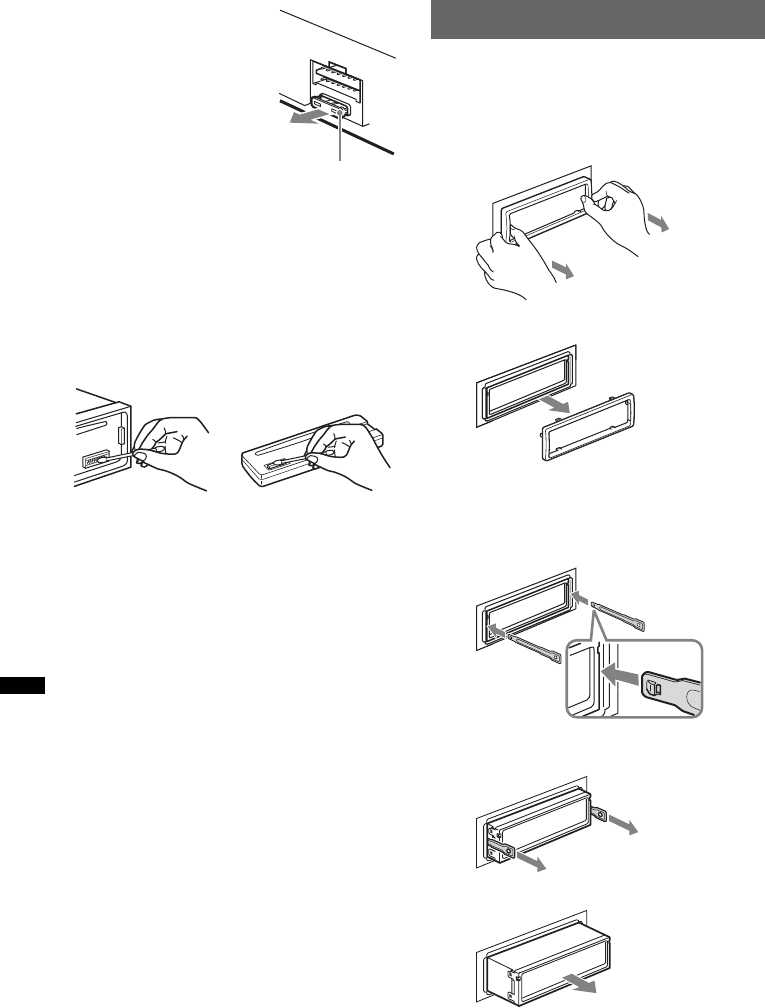
34
Zekeringen vervangen
Vervang een zekering altijd
door een identiek exemplaar.
Als de zekering doorbrandt,
moet u de voedingsaansluiting
controleren en de zekering
vervangen. Brandt de zekering
vervolgens nogmaals door, dan
kan er sprake zijn van een
defect in het systeem.
Raadpleeg in dat geval de
dichtstbijzijnde Sony-
handelaar.
Aansluitingen schoonmaken
De werking van het systeem kan worden verstoord
als de aansluitingen tussen het systeem en het
voorpaneel niet schoon zijn. U kunt dit voorkomen
door het voorpaneel (pagina 8) los te maken en de
aansluitingen te reinigen met een wattenstaafje.
Gebruik hierbij niet teveel kracht. Anders kunnen de
aansluitingen worden beschadigd.
Opmerkingen
•Uit veiligheidsoverwegingen moet u de motor
uitschakelen en de sleutel uit het contactslot halen
voordat u de aansluitingen reinigt.
•Raak de aansluitingen nooit rechtstreeks aan met
uw vingers of een metalen voorwerp.
Het systeem verwijderen
1Verwijder de beschermende rand.
1Maak het voorpaneel los (pagina 8).
2Knijp beide kanten van de
beschermingsrand in en trek de
beschermingsrand naar buiten.
2Verwijder het systeem.
1Plaats beide ontgrendelingssleutels
tegelijkertijd en duw hierop tot deze
vastklikken.
2Trek de ontgrendelingssleutels naar u toe
om het systeem los te maken.
3Schuif het systeem uit de houder.
Zekering (10 A)
Hoofdeenheid Achterkant van
het voorpaneel
x
Haakje wijst
naar binnen.

35
Technische gegevens
Tuner
FM
Afstembereik: 87,5 – 108,0 MHz
Antenne-aansluiting:
Aansluiting voor externe antenne
Tussenfrequentie: 150 kHz
Bruikbare gevoeligheid: 10 dBf
Selectiviteit: 75 dB bij 400 kHz
Signaal/ruis-afstand: 70 dB (mono)
Scheiding: 40 dB bij 1 kHz
Frequentiebereik: 20 – 15.000 Hz
MW/LW
Afstembereik:
MW: 531 – 1.602 kHz
LW: 153 – 279 kHz
Antenne-aansluiting:
Aansluiting voor externe antenne
Tussenfrequentie: 25 kHz
Gevoeligheid: MW: 26 µV, LW: 45 µV
CD-speler
Signaal/ruis-afstan: 120 dB
Frequentiebereik: 10 – 20.000 Hz
Snelheidsfluctuaties: Minder dan meetbare waarden
USB-speler
Interface: USB (Full-speed)
Maximale stroomsterkte: 500 mA
Draadloze communicatie
Communicatiesysteem: Bluetooth-norm versie 2.0
Uitvoer:
Bluetooth-norm klasse 2 (Max. +4 dBm)
Maximaal communicatiebereik:
Gezichtslijn ongeveer 10 m*1
Frequentieband:
2,4 GHz-band (2,4000 – 2,4835 GHz)
Modulatiemethode: FHSS
Compatibele Bluetooth-profielen*2:
A2DP (Advanced Audio Distribution Profile)
AVRCP (Audio Video Remote Control Profile)
HFP (Handsfree Profile) 1.5
HSP (Headset Profile)
*1 Het werkelijke bereik verschilt afhankelijk van
factoren, zoals obstakels tussen apparaten,
magnetische velden om een magnetron, statische
elektriciteit, ontvangstgevoeligheid, prestaties van
de antenne, het besturingssysteem, software,
enzovoort.
*2 De Bluetooth-standaardprofielen geven het doel
van Bluetooth-communicatie tussen apparaten
aan.
Versterker
Uitgang: Luidsprekeruitgangen (sure seal)
Luidsprekerimpedantie: 4 – 8 ohm
Maximaal uitgangsvermogen: 52 W × 4 (bij 4 ohm)
Algemeen
Uitgangen:
Audio-uitgangen (voor/achter)
Subwooferuitgang (mono)
Relaisaansluiting elektrische antenne
Aansluiting versterker
Ingangen:
BUS-bedieningsingang
BUS-audio-ingang
Telephone ATT-bedieningsaansluiting
Afstandsbedieningsingang
Antenne-ingang
MIC-ingang
AUX-ingang (stereo mini-aansluiting)
USB-signaalingang
Toonregelingen:
Laag: ±10 dB bij 60 Hz (XPLOD)
Midden: ±10 dB bij 1 kHz (XPLOD)
Hoog: ±10 dB bij 10 kHz (XPLOD)
Voe di ng: 12 V gelijkstroom accu
(negatieve aarde)
Afmetingen: Ongeveer 178 × 50 × 179 mm
(b/h/d)
Montageafmetingen: Ongeveer 182 × 53 × 162 mm
(b/h/d)
Gewicht: Ongeveer 1,2 kg
Bijgeleverde accessoires:
Kaartafstandsbediening: RM-X304
Onderdelen voor installatie en aansluitingen (1 set)
Optionele accessoires/apparaten:
BUS-kabel (geleverd met een RCA-kabel):
RC-61 (1 m), RC-62 (2 m)
Bronkeuzeschakelaar: XA-C40
USB-verbindingskabel voor iPod: RC-100IP
Externe microfoon: XA-MC10
Het is mogelijk dat uw handelaar niet beschikt over
sommige van de hierboven vermelde accessoires.
Vraag uw handelaar om meer informatie.
Wijzigingen in ontwerp en technische gegevens
voorbehouden zonder voorafgaande kennisgeving.
• Er werden geen halogene brandvertragende
producten gebruikt in de betreffende
printplaat/printplaten.
• In het omhulsel werden geen halogeen bevattende
brandvertragende producten gebruikt.
• Als beschermings- en opvulmateriaal werd er
papier gebruikt.
36
Problemen oplossen
De onderstaande controlelijst kan u helpen bij het
oplossen van problemen die zich met het systeem
kunnen voordoen.
Voordat u de onderstaande controlelijst doorneemt,
moet u eerst de aanwijzingen voor aansluiting en
gebruik controleren.
Als het probleem niet is opgelost, gaat u naar de
volgende ondersteuningssite.
Algemeen
Het systeem wordt niet van stroom voorzien.
• Controleer de aansluiting of de zekering.
• Als het systeem wordt uitgeschakeld en het scherm
verdwijnt, kan het systeem niet worden bediend met
de afstandsbediening.
tSchakel het systeem in.
De elektrisch bediende antenne schuift niet uit.
De elektrisch bediende antenne heeft geen relaisdoos.
Geen geluid.
• De ATT-functie is ingeschakeld of de Telephone
ATT-functie (als de interfacekabel of een
autotelefoon is aangesloten op de ATT-kabel) is
ingeschakeld.
• De positie van de faderregelaar "FAD" is niet
ingesteld op een systeem met 2 luidsprekers.
• Het afspelen op het Bluetooth-audioapparaat is
onderbroken.
tAnnuleer de onderbreking.
Geen pieptoon.
• De pieptoon is uitgeschakeld (pagina 30).
• Er is een optionele versterker aangesloten en u
gebruikt de ingebouwde versterker niet.
De geheugeninhoud is gewist.
• Er is op RESET gedrukt.
tSla opnieuw op in het geheugen.
• De voedingskabel of de accu is losgekoppeld of niet
juist aangesloten.
Opgeslagen zenders en tijd zijn gewist.
De zekering is doorgebrand.
Maakt geluid wanneer de positie van de
contactsleutel wordt gewijzigd.
De kabels zijn niet goed verbonden met de
voedingsaansluiting voor accessoires van de auto.
Tijdens het afspelen of radio-ontvangst wordt
de demonstratie gestart.
Als er 5 minuten geen handeling wordt uitgevoerd en
"DEMO-ON" is ingesteld, wordt de demonstratie
gestart.
tStel "DEMO-OFF" in (pagina 30).
Ondersteuningssite
http://support.sony-europe.com/
Het scherm verdwijnt van/verschijnt niet in het
display.
• De dimmer is ingesteld op "DIM-ON" (pagina 30).
• Het scherm verdwijnt als u op (SOURCE/OFF) drukt
en deze toets ingedrukt houdt.
tDruk op (SOURCE/OFF) op het systeem en houd
deze toets ingedrukt tot het scherm verschijnt.
• De aansluitingen zijn vuil (pagina 34).
De functie voor automatisch uitschakelen
werkt niet.
Het systeem is ingeschakeld. De functie voor het
automatisch uitschakelen wordt geactiveerd nadat het
systeem is uitgeschakeld.
tSchakel het systeem uit.
Radio-ontvangst
De zenders kunnen niet worden ontvangen.
Het geluid is gestoord.
• De aansluiting is niet juist.
tSluit de bedieningskabel elektrische antenne
(blauw) of voedingskabel voor accessoires (rood)
aan op de voedingskabel van de auto-
antenneversterker (alleen als uw auto is uitgerust
met een FM/MW/LW-antenne in de achter- of
zijruit).
tControleer de aansluiting van de auto-antenne.
tAls de automatische antenne niet uitschuift,
controleert u de aansluiting van de
bedieningskabel van de elektrische antenne.
Er kan niet worden afgestemd op
voorkeurzenders.
• Sla de juiste frequentie op in het geheugen.
• Het ontvangstsignaal is te zwak.
Er kan niet automatisch worden afgestemd op
zenders.
• De lokale zoekfunctie is niet correct ingesteld.
tHet afstemmen wordt te vaak onderbroken:
Stel "LOCAL-ON" in (pagina 30).
tHet afstemmen stopt niet bij een zender:
Stel "LOCAL-OFF" in (pagina 30).
• Het ontvangstsignaal is te zwak.
tStem handmatig af.
Tijdens FM-ontvangst knippert de aanduiding
"ST".
• Stem nauwkeurig af op de frequentie.
• Het ontvangstsignaal is te zwak.
tStel "MONO-ON" in (pagina 30).
Een stereo-uitzending van een FM-programma
wordt mono weergegeven.
Het systeem staat in de mono-ontvangststand.
tStel "MONO-OFF" in (pagina 30).
37
RDS
SEEK begint na enkele seconden weergave.
De zender is geen TP-zender of heeft een zwak
signaal.
tSchakel TA uit (pagina 19).
Geen verkeersinformatie.
• Schakel TA in (pagina 19).
• De zender is een TP-zender, maar zendt toch geen
verkeersinformatie uit.
tStem af op een andere zender.
PTY geeft "- - - - - - - -" weer.
• De huidige zender is geen RDS-zender.
• Er zijn geen RDS-gegevens ontvangen.
• De zender geeft het programmatype niet door.
CD's afspelen
De disc kan niet worden geplaatst.
• Er zit al een disc in het systeem.
• De disc is met kracht omgekeerd of in de verkeerde
richting geplaatst.
De disc wordt niet afgespeeld.
• Disc defect of vuil.
• De CD-R's/CD-RW's zijn niet geschikt voor
audiogebruik (pagina 32).
MP3-/WMA-/AAC-bestanden kunnen niet
worden afgespeeld.
De disc is niet compatibel met de MP3-/WMA-/AAC-
indeling en -versie. Voor meer informatie over de discs
en indelingen gaat u naar de ondersteuningssite.
MP3-/WMA-/AAC-bestanden worden minder
snel afgespeeld dan andere bestanden.
Bij de volgende discs duurt het langer voordat het
afspelen wordt gestart:
– discs opgenomen met een ingewikkelde structuur;
– discs die in meerdere sessies zijn opgenomen;
– discs waaraan gegevens kunnen worden toegevoegd.
De schermitems rollen niet.
• Bij sommige discs met heel veel tekens kunnen de
tekens niet rollen.
• "A.SCRL" is ingesteld op "OFF".
tStel "A.SCRL-ON" in (pagina 30).
tHoud (DSPL) (SCRL) ingedrukt.
Het geluid verspringt.
• Het systeem is niet goed geïnstalleerd.
tInstalleer het systeem onder een hoek van minder
dan 45° op een stabiele plaats in de auto.
• Disc defect of vuil.
De bedieningstoetsen werken niet.
De disc wordt niet uitgeworpen.
Druk op RESET (pagina 7).
USB afspelen
U kunt items niet via een USB-hub afspelen.
Dit systeem kan geen USB-apparaten via een USB-
hub herkennen.
Items kunnen niet worden afgespeeld.
Een USB-apparaat functioneert niet.
tSluit dit opnieuw aan.
Het USB-apparaat wordt minder snel
afgespeeld.
Het USB-apparaat bevat bestanden met een
ingewikkelde structuur.
U hoort een pieptoon.
Tijdens het afspelen is het USB-apparaat
losgekoppeld.
tVoordat u een USB-apparaat loskoppelt, moet u
eerst het afspelen stoppen ter bescherming van de
gegevens.
Het geluid wordt onderbroken.
Het geluid kan worden onderbroken bij een hoge
bitsnelheid van meer dan 320 kbps.
Bluetooth-functie
Het te verbinden apparaat kan dit systeem niet
vinden.
• Voordat de koppeling wordt gemaakt, stelt u dit
systeem in op de stand-bymodus voor koppelen.
• Als u verbinding hebt gemaakt met een Bluetooth-
apparaat, kan dit systeem niet worden herkend vanaf
een ander apparaat. Voor herkenning op een ander
apparaat verbreekt u de huidige verbinding en zoekt u
dit systeem vanaf het andere apparaat.
• Als u apparaten hebt gekoppeld, schakelt u de uitvoer
van het Bluetooth-signaal over naar ingeschakeld
(pagina 26).
Er kan geen verbinding worden gemaakt.
• Maak verbinding met dit systeem vanaf een
Bluetooth-apparaat of andersom. De verbinding
wordt bediend via één kant (dit systeem of een
Bluetooth-apparaat), maar niet via beide.
• Controleer de koppelings- en verbindingsprocedures
aan de hand van de handleiding van het andere
apparaat, enzovoort en voer de bewerking opnieuw
uit.
Het volume van de spreker is te zacht.
Pas het volume aan.
De persoon waarmee u belt, zegt dat het
volume te laag of te hoog is.
Pas het volume aan met de functie voor het aanpassen
van de microfoonsterkte (pagina 27).
Er treedt echo of ruis op in de
telefoongesprekken.
• Zet het volume zachter.
• Als ander omgevingsgeluid dan het geluid van het
telefoongesprek te hard is, probeert u dit geluid te
beperken.
Bijvoorbeeld: als er een raam open staat en het
verkeer veel lawaai maakt, sluit u het raam. Als de
airconditioning veel lawaai maakt, zet u de
airconditioning zachter.
De telefoon is niet aangesloten.
Wanneer Bluetooth-audio wordt afgespeeld, is de
telefoon niet verbonden, ook al drukt u op
(handsfree).
tMaak verbinding vanaf de telefoon.
vervolg op volgende pagina t
38
Foutmeldingen/berichten
De geluidskwaliteit van de telefoon is slecht.
De geluidskwaliteit van de telefoon is afhankelijk van
de ontvangstomstandigheden van de mobiele telefoon.
tVerplaats uw auto naar een plaats waar het signaal
van de mobiele telefoon sterker is als de ontvangst
slecht is.
Het volume van het verbonden audioapparaat
is laag (hoog).
Het volume is afhankelijk van het audioapparaat.
tPas het volume van het verbonden audioapparaat of
dit systeem aan.
Het geluid verspringt tijdens het afspelen op
een Bluetooth-audioapparaat.
• Verklein de afstand tussen het systeem en het
Bluetooth-audioapparaat.
• Als het Bluetooth-audioapparaat in een houder wordt
bewaard die het signaal kan verstoren, verwijdert u
het audioapparaat tijdens gebruik uit de houder.
• Er worden meerdere Bluetooth-apparaten of andere
apparaten die radiogolven uitzenden, in de buurt
gebruikt.
tSchakel de andere apparaten uit.
tVergroot de afstand tot de andere apparaten.
• Het afspelen van het geluid wordt tijdelijk gestopt
wanneer de verbinding tussen dit systeem en de
mobiele telefoon wordt gemaakt. Dit duidt niet op
een probleem.
Het verbonden Bluetooth-audioapparaat kan
niet worden bediend.
Controleer of het verbonden Bluetooth-audioapparaat
AVRCP ondersteunt.
Bepaalde functies werken niet.
Controleer of het verbonden apparaat de betreffende
functies ondersteunt.
Een gesprek wordt per ongeluk beantwoord.
De verbonden telefoon is ingesteld om een gesprek
automatisch te beantwoorden.
Tijdens handsfree bellen wordt er geen geluid
uitgevoerd via de autoluidsprekers.
Als het geluid wordt uitgevoerd via de mobiele
telefoon, moet u de mobiele telefoon instellen om het
geluid uit te voeren via de autoluidsprekers.
"OFF BT" wordt weergegeven tijdens het
initialiseren.
Houd (BT) ingedrukt tot " " uitgaat. Initialiseer
nogmaals (pagina 28).
De externe microfoon werkt niet.
De instelling van de microfoon is niet correct.
tStel "MIC-EXT" in (pagina 30).
CHECKING
Het systeem controleert de aansluiting van een
USB-apparaat.
tWacht tot de controle van de aansluiting is voltooid.
ERROR
• De disc is vuil of is omgekeerd geplaatst.
tReinig de disc of plaats deze op de juiste manier.
• Er is een lege disc in het systeem geplaatst.
• De disc kan niet worden afgespeeld wegens een
probleem.
tPlaats een andere disc.
• Het USB-apparaat is niet automatisch herkend.
tSluit het opnieuw aan.
• Druk op Z om de disc te verwijderen.
FAILURE
De luidsprekers of versterkers zijn niet correct
aangesloten.
tRaadpleeg de handleiding voor installatie/
aansluitingen van dit model om de aansluitingen te
controleren.
HUB NO SUPRT (geen HUB-ondersteuning)
Een USB-hub wordt niet ondersteund door dit
systeem.
L. SEEK +/–
De lokale zoekfunctie is ingeschakeld tijdens
automatisch afstemmen.
NO AF
Er is geen alternatieve frequentie voor de huidige
zender.
tDruk op (SEEK) +/– terwijl de
programmaservicenaam knippert. Het systeem gaat
zoeken naar een andere frequentie met dezelfde
PI-gegevens (programma-identificatie) ("PI SEEK"
wordt weergegeven).
NO DEV (geen apparaat)
USB is geselecteerd terwijl er geen USB-apparaat is
aangesloten. Een USB-apparaat of een USB-kabel is
losgeraakt tijdens het afspelen.
tZorg ervoor dat u een USB-apparaat en een
USB-kabel aansluit.
NO MUSIC
De disc of het USB-apparaat bevat geen
muziekbestanden.
tPlaats een muziek-CD in het systeem.
tSluit een USB-apparaat met muziekbestanden aan.
NO NAME
Er is geen naam voor de disc/artiest/track of het album
naar de track geschreven.
NO TP
Het systeem blijft zoeken naar beschikbare
TP-zenders.
39
Als deze oplossingen niet helpen, moet u de
dichtstbijzijnde Sony-handelaar raadplegen.
Als u het systeem ter reparatie wegbrengt omdat
CD's niet goed worden afgespeeld, kunt u het beste
de disc meenemen waarmee het probleem is
begonnen.
OFFSET
Er is wellicht een interne storing.
tControleer de aansluiting. Als de foutmelding op
het scherm blijft staan, moet u de dichtstbijzijnde
Sony-handelaar raadplegen.
OVERLOAD
Het USB-apparaat is overbelast.
tKoppel het USB-apparaat los en wijzig de bron met
(SOURCE/OFF).
tDit geeft aan dat het USB-apparaat buiten gebruik
is of dat een apparaat is aangesloten dat niet wordt
ondersteund.
READ
Alle track- en albuminformatie op de disc wordt
gelezen.
tWacht totdat het lezen is voltooid en het afspelen
automatisch wordt gestart. Afhankelijk van de
discstructuur kan dit meer dan een minuut in beslag
nemen.
RESET
Dit systeem of het USB-apparaat kan niet worden
bediend vanwege een probleem.
tDruk op RESET (pagina 7).
USB NO SUPRT (geen USB-ondersteuning)
Het aangesloten USB-apparaat wordt niet ondersteund.
tGa naar de ondersteuningssite voor meer informatie
over de compatibiliteit van het USB-apparaat.
"" of ""
Tijdens het snel terug- of vooruitspoelen hebt u het
begin of het einde van de disc bereikt en kunt u niet
verder.
""
Het teken kan niet worden weergegeven met het
systeem.
Tragen Sie die Seriennummer (SERIAL NO.) in dem
reservierten Feld ein. Sie finden diese auf einem
Aufkleber, der auf dem Gerätegehäuse angebracht ist.
Nehmen Sie den ausgefüllten Geräte-Pass
anschließend unbedingt aus der Bedienungsanleitung
heraus, falls Sie diese im Fahrzeug aufbewahren
möchten. Bitte bewahren Sie den Geräte-Pass an
einem sicheren Ort auf. Er kann im Falle eines
Diebstahls zur ldentifikation lhres Eigentums dienen.
caraudio
Geräte-Pass
Dieser Geräte-Pass dient als Eigentumsnachweis
für Ihr caraudio-Gerät im Falle eines Diebstahls.
Wir empfehlen, den Geräte-Pass nicht im
Fahrzeug aufzubewahren, um Missbrauch zu
verhindern.
Modellbezeichnung
MEX-BT3800U
Seriennummer (SERIAL NO.)
Sony Corporation Printed in Thailand
http://www.sony.net/
Register your product online now at:
Registrieren Sie Ihr Produkt jetzt bei:
Merci d’enregister votre produit en ligne sur :
Registra online il tuo prodotto su:
Registreer uw product nu online via:
www.sony-europe.com/myproducts
