Sony Handycam Hdr Hc9 Users Manual
HDR-HC9 HDR-HC9 SONY DIGITAL CAMCORDER - Manuals and Guides L0804249 View the owners manual for your SONY DIGITAL CAMCORDER #HDRHC9. Home:Electronics Parts:Sony Parts:Sony DIGITAL CAMCORDER Manual
SONY Digital Camcorder Manual L0804249 SONY Digital Camcorder Owner's Manual, SONY Digital Camcorder installation guides
2015-01-23
: Sony Sony-Handycam-Hdr-Hc9-Users-Manual-286595 sony-handycam-hdr-hc9-users-manual-286595 sony pdf
Open the PDF directly: View PDF ![]() .
.
Page Count: 128 [warning: Documents this large are best viewed by clicking the View PDF Link!]
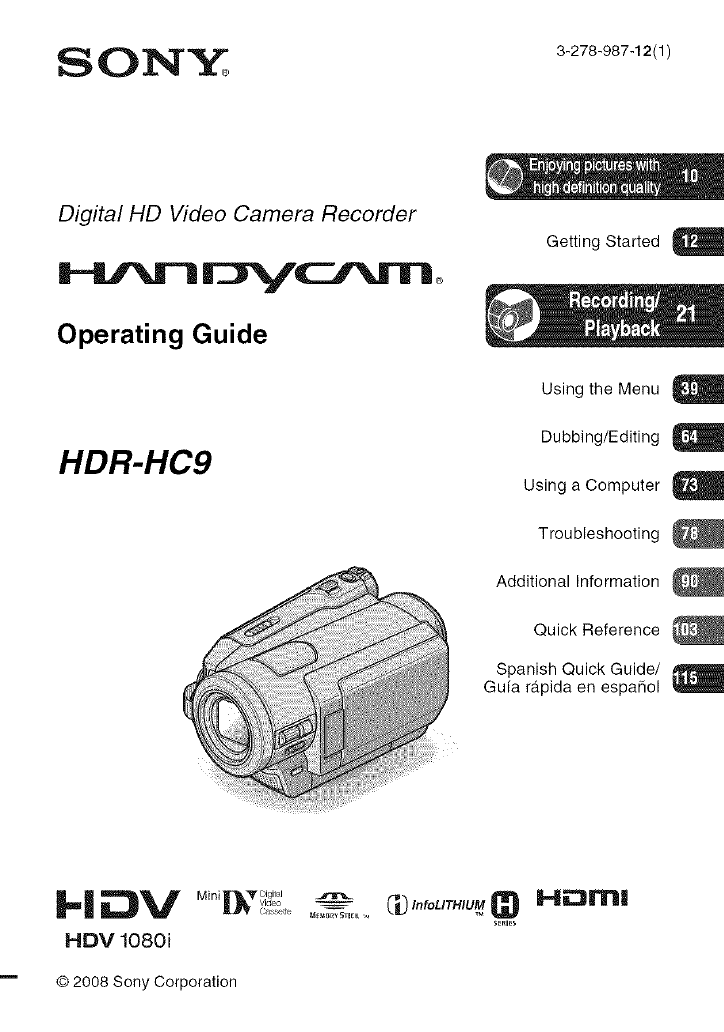
Digital HD Video Camera Recorder
Operating Guide
HDR-HC9
Getting Started
Using the Menu
Dubbing/Editing
Using a Computer
Troubleshooting
Additional Information
Quick Reference
Spanish Quick Guide/
Gufa rdtpida en espaSol
vi_eo _ InfoLITHIU
HDV 1080i
© 2008 Sony Corporation
To reduce fire or shock hazard, do
not expose the unit to rain or
moisture.
This symbol is intended to alert
the user to tile presence of
uninsulated "dangerous
w)ltage _' within the product's
enclosure thal may be of
sufficienl magnitude to
constitute a risk of electric
shock to persons.
This synlbol is intended to alert
tile user 1o file presence of
important operating and
maintenance (servicing)
insn uctions in tile lileramre
acconlpanying tile appliance.
IMPORTANT
SAFEGUARDS
For yottr protection, please read these safety
instructions completely bel\_re operating
the appliance, and keep this manual for
future reference.
Carefully observe :ill warnings, precautions
and instructions on the appliance, or the one
described in the operating inslructions attd
adhere to them.
PowerSources
This sel sllould be operatcd only from tile lype of
power source indicated on the marking label. If
you are not sure of file type of electrical power
supplied to your honle, consult your dealer or
local power company. For lllose sets designed 1o
operale liom battel 3, power, or olher sourc:cs, rel_:r
to file operating instructions,
Polarization
This set may be equipped with a polarized ac
power cord phlg (a phlg having one blade wider
than tile oilier),
This plug will fil into the power out]el only one
way. This is a salcly lbamre. If you are unable to
insert the phlg hilly into the outlel, try reversing
file plug. II the plug should still l_til to fit, colltact
your electrician to have a suitable outlet installed.
Do not del_at the salEly purpo_ ol the polarized
phlg by forcing it in.
Overloading
Do not overload wall otltlets, extension cords or
convenience receplacles beyond lheir capacity,
since Ibis can resuh in lire or eleclric silo&.
ObjectandLiquidEntry
Never push objects ol any kind inlo the set
lhrougl/openings as they may touch dangerous
voltage points or sllorl otlt parts that could l'estlh
in a fire or electric shock. Never spill lk]ukl ol ally
kind on ll/e set.
Attachments
Do not rise attachlnenls llOt leCOl/ll/lellded by the
l/lantlfacturer, as they may cause hazards.
Cleaning
Unplug tile set lroln the wall omlet belore
cleaning or polishing it. Do not use liquid cleaners
or aerosol cleaners. U_ a cloth lightly dampened
with water lbr cleaning the exterior ol tile set.
long periods of time. unplug it from tile wall
outlet and disconnect tile antenna or cable systeln.
This will prevent damage to file set due to
lighming and power-line surges.
Water and Moisture
Do not use power-line opcraled _ls near \rater
lbr example, near a bathlub, washbowl, kitchen
sink. or laundry tub. in a wet basement, or near a
swimming pool. etc.
Power-CordProtection
Route tile power cord so thai it is not likely to be
walked on or pinched by items placed upon or
against them, paying particular attention to tile
plugs, receptacles, and the point where the cord
exits lioln the appliance.
Accessories
Do not place tile set on an unstable cart. stand.
tripod, bracket, or table. Tile set may lall, causing
serious injury to a child or an adult, and serious
damage to tile set. Use only a carl. stand, tripod.
bracket, or table recommended by the
illanulucturcr.
Ventilation
Tile slots and openings in tile cabinet arc provided
lbr necessary velltilation. To ensure reliable
operalion of tile set, and lo protect il fl'oln
overheating, flmse slots and openings must never
be blocked or covered.
Never cover the slots and openings with a cloth
or olhcr inalerials,
Never block file slots and openings by placing
tile set on a bed, sol_. rug, or other similar
surlace.
Never place the set in a confined space, such as
a bookcase, or built-in cabinet, unless proper
vcntilatkm is provided.
Do not place tile set near or over a radiator or
heal register, or whm'c it is exposed to direct
sunlight.
Lightning
For added protection lor this set during _Llightning
storm, or when it is lell unattcnded and unused lor
DamageRequiringService
Unplug tile set |roln tile wall outlet and relcr
servicing to qualified service personnel under tile
lbllowing conditions:
When the power cord or plug is damaged or
fi'ayed.
If liquid llas been spilled or objects bye l_dlen
into tile set.
If tile set has been exposed to rain or water.
If tile _t has been subject to cxccssive shock by
being dropped, or the cabinet has been
damaged.
If file sel does not operate normally when
lollowing tile operating inslructions. Adjust
only fllose controls that arc specified in lhe
operating instruclions, hnproper adjustment of
othm controls may rcsu]l in damage and will
often require exlensive work by a qualified
techniciml to restore tile set to normal operation.
When lhe sel exhibits a dislinct cllange in
per%rmance this indicz,les a need %r service.
Servicing
Do not ilttenlpt to service tile set yourself us
opening or rcnlovhlg covers may expose you IO
dangerous voltage or other lla/ilrds.
Rel_:r all selMcing to qualified service personnel.
Replacementparts
Wllen replacement parts m'e required, be sure tile
service technician has used rcpl_Lcelnent pmts
specified by tile nlmmlacmrcr that have tile same
characteristics _Lstile original pro'Is.
Unauthorized substimtkms may rcsu]l in fire,
electric shock, or other hazaMs.
SafetyCheck
Upon con_pletion of rely ser_ ice or repairs to tile
set. ask tile selvice techniciml to l_erlolm routine
safi:ty checks (as specified by tile manuh,cturcr)
to detcmline that file set is ill sale operating
condilkm.

Readthis first
Be%re operating the unit, please read this
tnanual thoroughly, and retain it for future
reference.
Do not expose the batteries to
excessive heat such as sunshine,
fire or the like.
Excessive sound pressure from
earphones and headphones can
cause hearing loss.
Replace the battery with the
specified type only. Otherwise, fire
or injury may result.
RECYCLINGLITHIUM-IONBATTERIES
Liflfimn-lon batteries are rccyclable.
goll can help pre_rve oiir
ellvirollli/ent by relllrning your
used rechargeable batteries to the
collection and recycling location
nearesl you.
For more inlormatkm regarding
recycling of rechargeable batteries, call toll lre_ 1-
800-822- 8837, or visit hUp://www.rbrc.org/
Caution: Do not handle damaged or leaking
Lithiun>lon batteries.
Batterypack
This device complies with Part 15 ol tile FCC
Rules. Operation is subject to the lbllowing lwo
conditions:
(1) This device may not cause harmflfl
interlcrcnce, and (2) this device musl accepl any
intcrlcrence received, including inlerlcrcnce thai
may callse ilndesired operation.
This Class B digital apparatus complies with
Canadian ICES-003.
Owner'sRecord
Tile model and scrial numbers arc localed on tile
botlom. Record the serial number in lhe space
provkled below. Reh_r to these numbers whenever
you call your Sony dealcr regarding this product.
Model No. HDR-HC9
Serial Nit.
Model No. AC-
Serial Nit.
If you have any questions about this
product, you may call:
Sony Customer htformation Center 1-800-
222-SONY (7669).
The tmmber below is for the FCC related
matters only.
RegulatoryInformation
Declaration of Conformity
Trade Name: SONY
Model Nit.: HDR-HC9
Responsible Party: Sony Electronics Inc.
Address: 16530 Via Espfillo, San Diego, CA
92127 U.S.A.
Telephone nunlber: 858-942-2230
This device complies wilh Part 15 of file FCC
Rules.
Operation is subject to the lhllowing lwo
conditions:
(l) This device may not cause harmflfl
interlcrcnce, and (2) this device nmst accepl any
intcrlcrcnce received, including interlcrcnce
that nlay cau_ undesired operation.
Notes
HDR-HC9 is to be used with AC Adaptor Model
AC-L2OO/L211OB.
CAUTION
YOll arc catllioned thai ally changes or
modifications not expressly approved in this
manual could void your aulhorily 1o opelale this
equipnlenL
Note
This equiplncnt has been tested and lkmnd to
comply with the lilnits lor a Class B digital
device, pursuant to Part 15 of the FCC Rules.
These limits are designed to provide reasonable
protection against barmlul interlcrcncc in a
residential installation. This equipment generates.
uses, and can radiate radio liequency cnergy and.
if not installed and used in accordance with the
instructions, may cause harmful interlcrcllcg! to
radio colntllunications.
However. there is no guarantee that interlclvncc
will not occur in a particular installation. If this
equipmem does cause tlarmflll interlcrcncc to
radio or television rcccption, which can be
determined by mining the equipment off and on.
tile user is encouraged to tl T to correct the
imerlcrence by one or more of file lollowing
measures:
Rcoriem or relocate the receiving antenna.
lncrcase tile separation between the equipment
lind receiver.
ConlleCt the equipnlcllt into iln outlet Oil a
circuit dill;xrcnt b+onl that to which the receiver
is connected.
Consuh the dealer or all experienced radio/TV
technician li_r help.
Tile supplied interlace cable must be used with the
equipment ill ordcr to conlply with file limits lbr a
digital device pursuant to Subpart B of Part 15 of
FCC Rules.
Forthe State of California, USA only
Pcl'chlol'ate Material -speci+d lmndling may
apply, See
www.dtsc.ca._ov/hazardouswastc/perchlorate
Pcrctllorate Matcrial: Lithium battery contains
perchlorate.
ii+i!i
Your camcorderis suppliedwith two
kindsof manuals
"Operating Guide" (This m:mu:d)
"First Step Guide" for using your
camcorder while connected to a computer
(stored on tile supplied CD-ROM)
Type of cassetteyoucan use inyour
camcorder
You cml use mini DV cassettes;marked
with MilkY. Your camcorder is not
compatible with tile Cassette Memory
function (p. 911.
Types of "Memory Stick" you can use
in your camcorder
You can/ise "Menlory Stick" that have tile
logo shown below (p. 92).
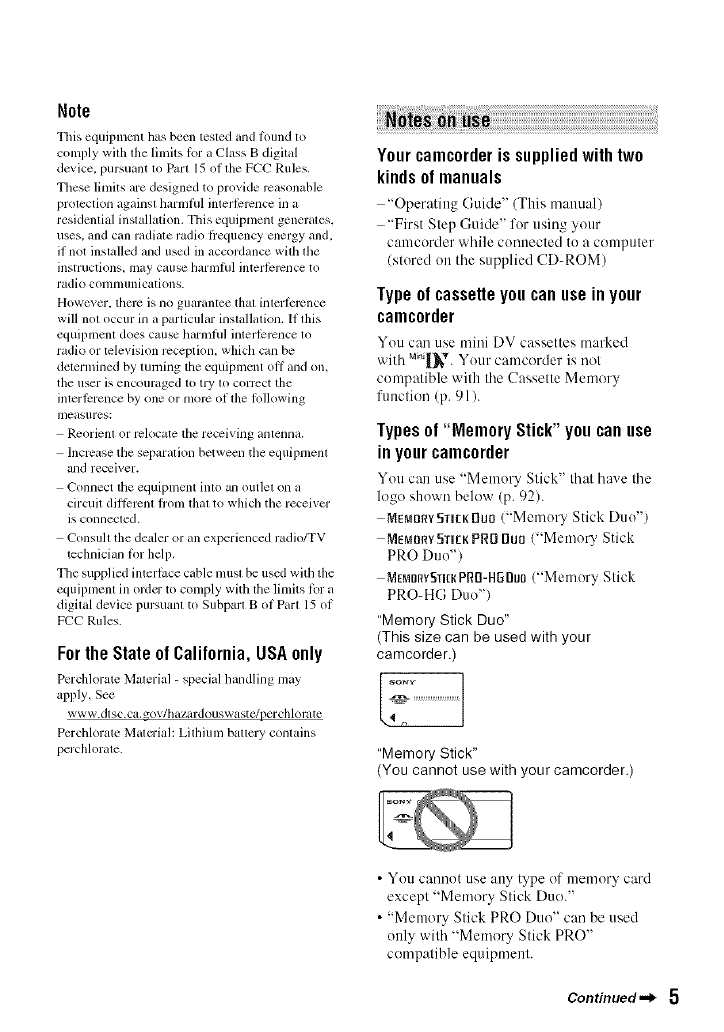
MemarYStick Dull ("Memory Stick Duo")
MemnrYSTleKPRDDun ("Memou Stick
PRO Duo")
Mem0rYSticl{PRn-HI3Duo("Mere ory Stick
PRO-HG Duo")
"Memory Stick Duo"
(This size can be used with your
camcorder.)
"Memory Stick"
(You cannot use with your camcorder.)
• You cannot use any type of memory card
except "Memory Stick Duo."
• "Memory Stick PRO Duo" can be used
only with "Memory Stick PRO"
compatible equipment.
Continued._ 5
Read this first (Co,timber)
• Do not attach a label or the like oil a
"Memory Stick Duo" or a Memory Stick
Duo adaptor.
Whenusinga "Memory StickDuo"
with "Memory Stick" compatible
equipment
Be sure to insert tile "Memory Stick Duo"
into tile Memory Stick Duo Adaptor.
MemoryStick DuoAdaptor
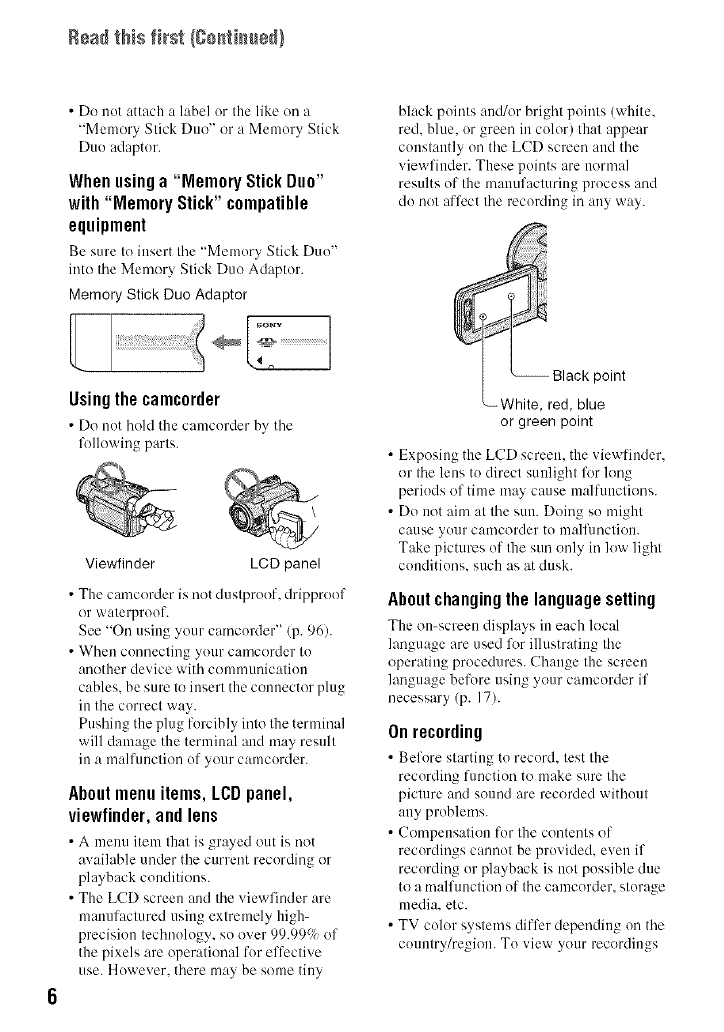
black points and/or bright points (white.
red. blue. or green in color) that appear
constantly on the LCD screen and the
viewfiuder. These points are normal
results of the manufacturing process and
do not affect the recording in any way.
Using the camcorder
• Do m_t hold the camcorder by the
following parts.
Viewfinder LCD panel
• The camcorder is not dustproof, dripproof
or waterproof.
See "On using your camcorder" (p. 96).
• When connecting your camcorder to
another device with communicatkm
cables, be sure to insert the connector plug
in the correct way.
Pushing the plug forcibly into the terminal
will damage the terminal and may result
in a malflmction of your camcorder.
About menu items, LCD panel,
viewfinder,and lens
•A nleuu item that is grayed out is not
available under the current recording or
playback conditions.
• The LCD screen and the viewfinder are
manufactured using extremely high-
precision technology, so over 99.99% of
the pixels are operational for effective
use. However, there may be some tiny
point
_White, red, blue
or green point
• Exposing the LCD screen, the viewfinder,
or the lens to direct sunlight %r long
periods of time may cause malfunctions.
• Do not aim at the sun. Doing so might
cause your camcorder to malfunctiou.
Take pictures of the sun only in low light
conditions, such as at dusk.
About changing the language setting
The on-screen disph.ys in each local
language are used lkw illustrating the
operating procedures. Change the screen
language before using your camcorder if
necessary (p. 17).
Onrecording
• Before starting to record, test the
recording fimction to make sure the
picture and sound are recorded without
any problems.
• Compensation for the contents of
recordings catmot be provided, even if
recording or playback is not possible due
to a malfunction of the camcorder, storage
media, etc.
• TV color systems differ depending on the
country/region. To view your recordings
oilaTV,youneedanNTSCsystem-based
TV.
•Televisionprograms,fihns,videotapes,
andothermaterialsmaybecopyrighted.
lJnauthorizedrecordingofsuchmaterials
maybecontrarytothecopyrightlaws.
OnplayingbackHDVtapesonother
devices
You cannot play back a tape recorded in the
HDV format on DV format vide() cameras
or on mini DV players (The screen appears
blue).
Check the contents of tapes by playing
them back on this camcorder prior to
playing them back on other devices.
Aboutthis manual
• The images of the LCD screen and the
viewfinder used in this manual for
illustration purposes are captured using a
digital still camera, and therefore may
appear different.
• Design and specifications of recording
media and other accessories are subject to
change without notice.
Aboutthe Carl Zeiss lens
Your camcorder is equipped with a Carl
Zeiss lens. which was developed jointly by
Carl Zeiss. in Germany, and Sony
Corporation. and produces superior images.
It adopts the MTF measurement system for
video cameras and offers a quality typical
of a Carl Zeiss lens. Also. the lens for your
camcorder is T*-coated to suppress
unwanted reflections and faithfully
reproduce colors.
MTF= Modulation Transfer Function
The mHnber value indicates the amount of
light from a subject coming into the lens.
Table of Contents Note on the icons used in this manual
HDV1080iFo_,_,,r_s_,,_i]_b]otorth_HDVformalonly
DVFeatures available for the DV fol_m;llonly
IMPORTANT SAFEGUARDS ........ 2
Read this first ................................. 4
Notes on use .................................. 5
Trying out the HDV format! .......... 10
Viewing video recorded in the HDV
format! ........................................ 11
Step 1: Checking supplied items
.................................................... 12
Step 2: Charging the battery pack
.................................................... 13
Step 3: Turning the power on and
setting the date and time ............ 16
Step 4: Making setting adjustments
before recording ......................... 18
Step 5: Inserting a tape or a "Memory
Stick Duo". .................................. 19
Easy Recording/Playback
(Easy Handycam) ....................... 21
Recording ..................................... 23
Zooming ...................................... 25
Recording high quality still images
during tape recording (Dual Rec)
................................................... 25
Controlling the image settings
manually with the CAM CTRL dial
................................................... 26
Using the flash ............................ 26
Recording in dark places
(NightShot) ................................ 27
Adjusting the exposure for backlit
subjects .................................... 27
Recording in mirror mode ........... 27
Playback ....................................... 28
Using PB zoom ............................ 30
Using the guide functions (USAGE
GUIDE) ....................................... 31
Searching for the starting point .... 32
Searching for the last scene of the
most recent recording (END
SEARCH) .................................. 32
Reviewing the most recently
recorded scenes (Rec review)
................................................... 32
Searching quickly for a desired
scene (Zero set memory) .......... 32
Searching for a scene by date of
recording (Date search) ........... 33
Playing the picture on a TV .......... 34
Selecting the appropriate
connection method (CNNECT
GUIDE) ...................................... 34
Connecting to a high definition TV
................................................... 35
Connecting to a 16:9 (wide) or 4:3 TV
................................................... 36
Using the menu items .......... 39
Menu items ................................... 40
{_ CAMERA SET menu .............. 42
Settings to adjust your camcorder to
the recording conditions
MEMORY SET menu ............. 49
Settings for the "Memory Stick Duo"
_: PICT.APPLI. menu ................ 52
Special effects on pictures or
additional functions on recording/
playback
_9 EDIT/PLAY menu ................. ,55
Settings for editing or playing back in
various modes
STANDARD SET menu ........ 56
Settings while recording on a tape or
other basic settings
_ TIME/LANGU. menu ............. 62
Customizing Personal Menu ........ 62
DubbingtoVCRorDVD/HDD
recorders.....................................64
RecordingpicturesfromaVCR,etc.
.....................................................67
Dubbingpicturesfromatapetoa
"MemoryStickDuo"....................69
Deletingrecordedpicturesfromthe
"MemoryStickDuo"....................69
Markingimagesonthe"MemoryStick
Duo"withspecificinformation(Print
mark/Imageprotection)...............70
Printingrecordedimages(PictBridge
compliantprinter)........................71
J
What you can do with Windows
computer ..................................... 73
Installing the "First Step Guide" and
software ...................................... 75
Viewing "First Step Guide". ........... 77
Using a Macintosh computer ........ 77
Troubleshooting ............................ 78
Warning indicators and messages
..................................................... 87
Identifying parts and controls ...... 103
Indicators displayed during reco_ing/
playback .................................... 107
Index ........................................... 111
Using your camcorder abroad ...... 90
Maintenance and precautions ...... 91
Usable cassette tapes ................ 91
About the "Memory Stick" ........... 92
About the "InfoLITHIUM" battery
pack .......................................... 93
About i.LINK ................................ 95
About x.v.Color ........................... 96
On using your camcorder ........... 96
Specifications ............................... 99
E_joyi_g pi_t_ms _i_hhfgh deffn#io_ q_ml#y
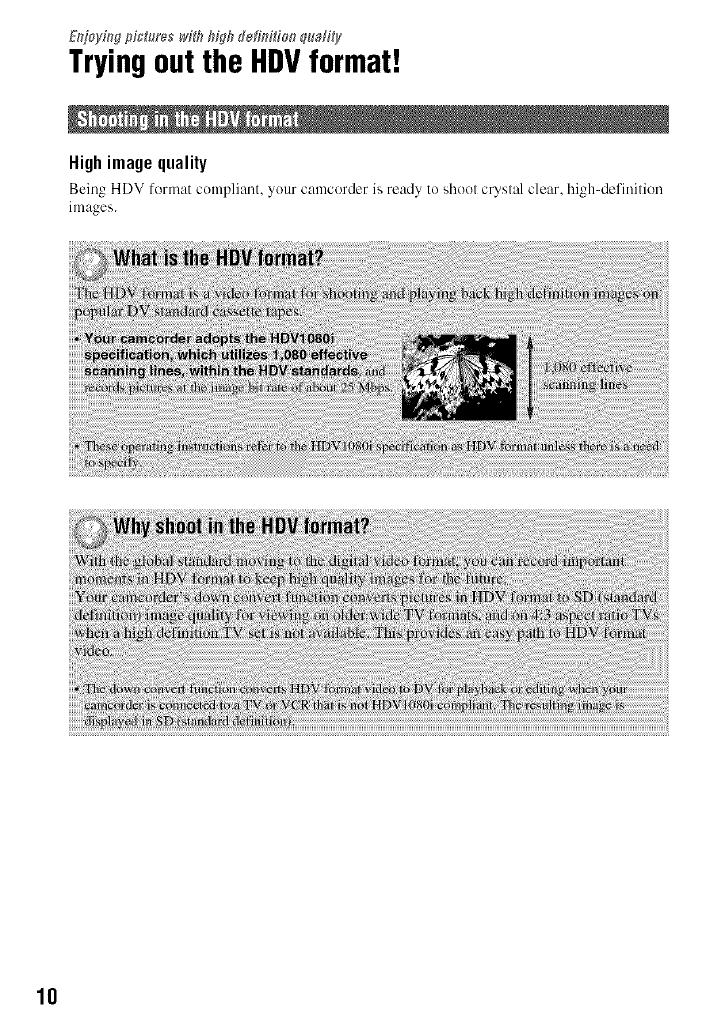
Tryingout the HDVformat!
Highimage quality
Being HDV form_t cOnll_li_mt, your camcorder is remedy to shoot cryst_d clear, high-definition
images.
10
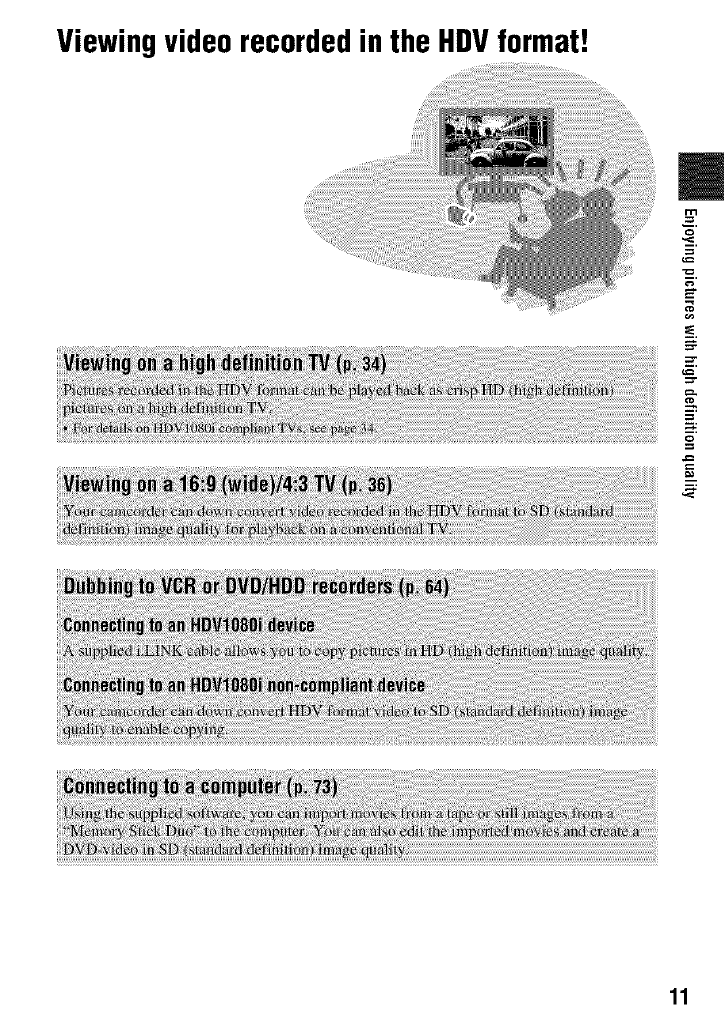
Viewingvideorecordedin the HDVformat!
=
=_
11
Ge_th_gSt_Hed
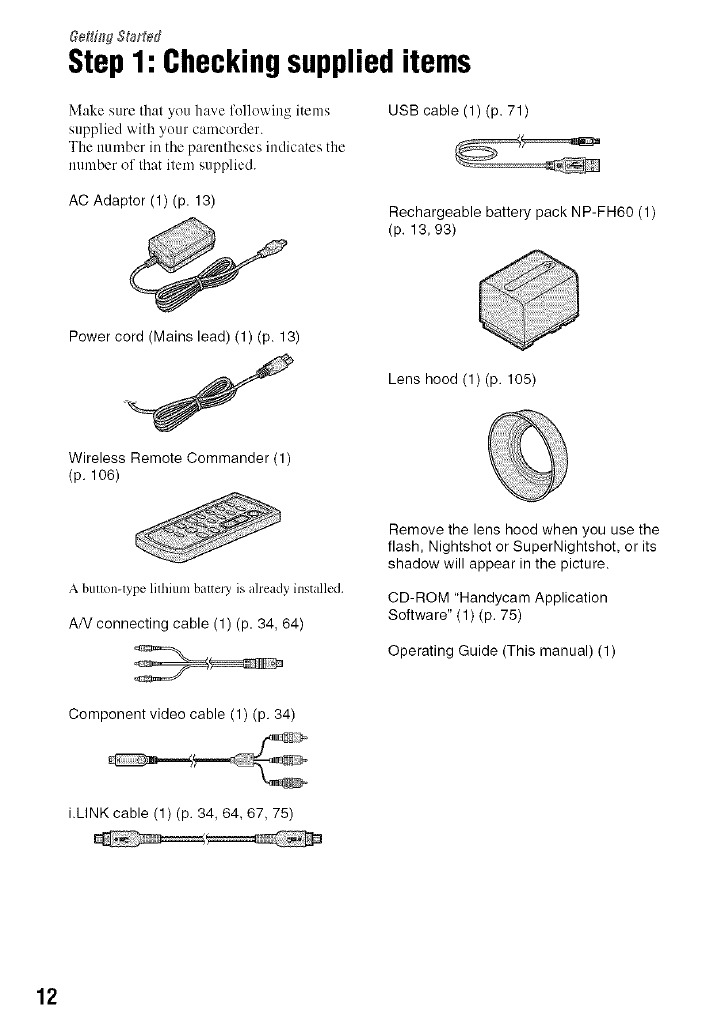
Step1: Checkingsupplieditems
Make sure that you have following items
supplied with your camcorder.
The number in the parentheses indicates the
number of that item supplied.
USB cable (1) (p. 71)
AC Adaptor (1) (p. 13) Rechargeable battery pack NP-FH60 (1)
(p. 13, 93)
Power cord (Mains lead) (1) (p. 13)
Wireless Remote Commander (1)
(p. 106)
Lens hood (1)(p. 105)
A buuon-lype lilhiun_ balrcJT is already installed.
AN connecting cable (1) (p. 34, 64)
Remove the lens hood when you use the
flash, Nightshot or SuperNightshot, or its
shadow will appear in the picture.
CD-ROM "Handycam Application
Software" (1) (p. 75)
Operating Guide (This manual) (1)
Component video cable (1) (p. 34)
i.LINK cable (1) (p. 34, 64, 67, 75)
12
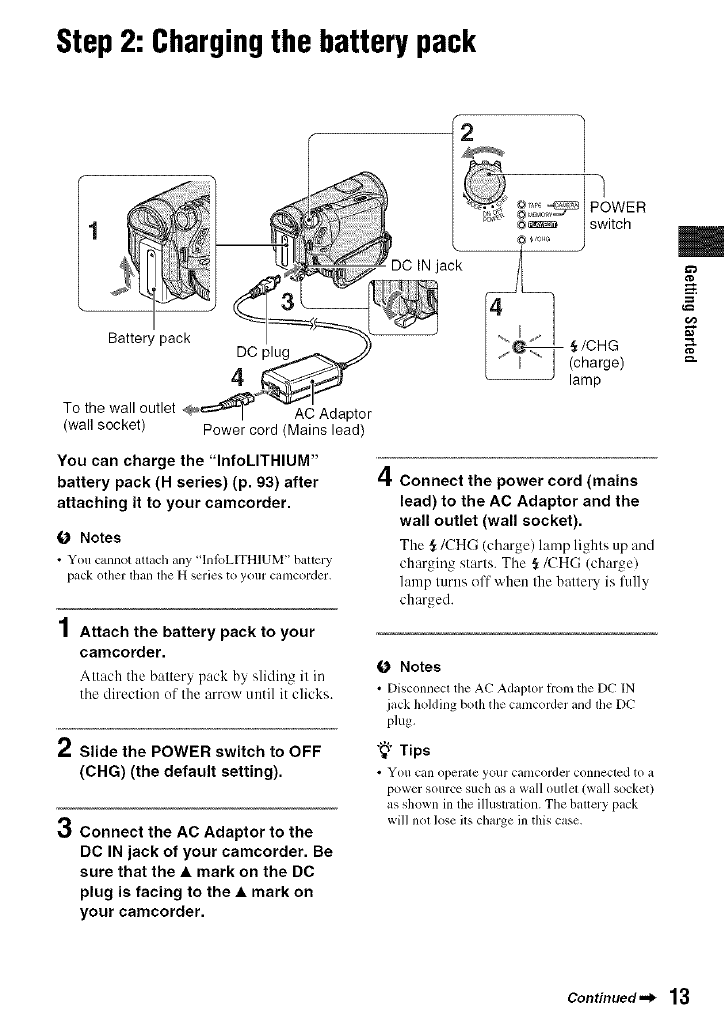
Step2: Chargingthe batterypack
Battery pack DC plug
4
To the wall outlet AC Adaptor
(wall socket) Power cord (Mains lead)
You can charge the "InfoLITHIUM"
battery pack (H series) (p, 93) after
attaching it to your camcorder,
O Notes
•You cannot am_ch any ' lnI_LITHIUM" battery
pack olhor [hall [he H SCl']es to your Cal]lCol'del'.
4
/ Attach the battery pack to your
camcorder.
Attach the baltery pack by sliding il in
tile direction of the arrow until it clicks.
2Slide the POWERswitch to OFF
(CHG) (the default setting).
OConnect the AC Adaptor to the
DC IN jack of your camcorder. Be
sure that the •mark on the DC
plug is facing to the •mark on
your camcorder.
2
POWER
_ switch
._) _/c4a
_ _/CHG
[:+ _ ](charge)
lamp
4Connect the power cord (mains
lead) to the AC Adaptor and the
wall outlet (wall socket).
The _,/CHG (ch_wge) hunp lights up and
charging starts. The $/CHG (charge)
lamp turns off when the battery is fully
charged.
O Notes
•Disconnect the AC Adaptor h'om d_e [)1+"IN
.i.ck holding both the cmncorder and the Dr"
plug,
"_° Tips
• gotl can operale your cat/lcorder COlllleCl_d to _1
power source such as awall outlet (wall socket)
as shown in the illustration. The battery pack
will not lose its charge in this case.
m
_+=
g+
Continued._ 13
Step2: ghaNic_ the battery park/Cecticued}
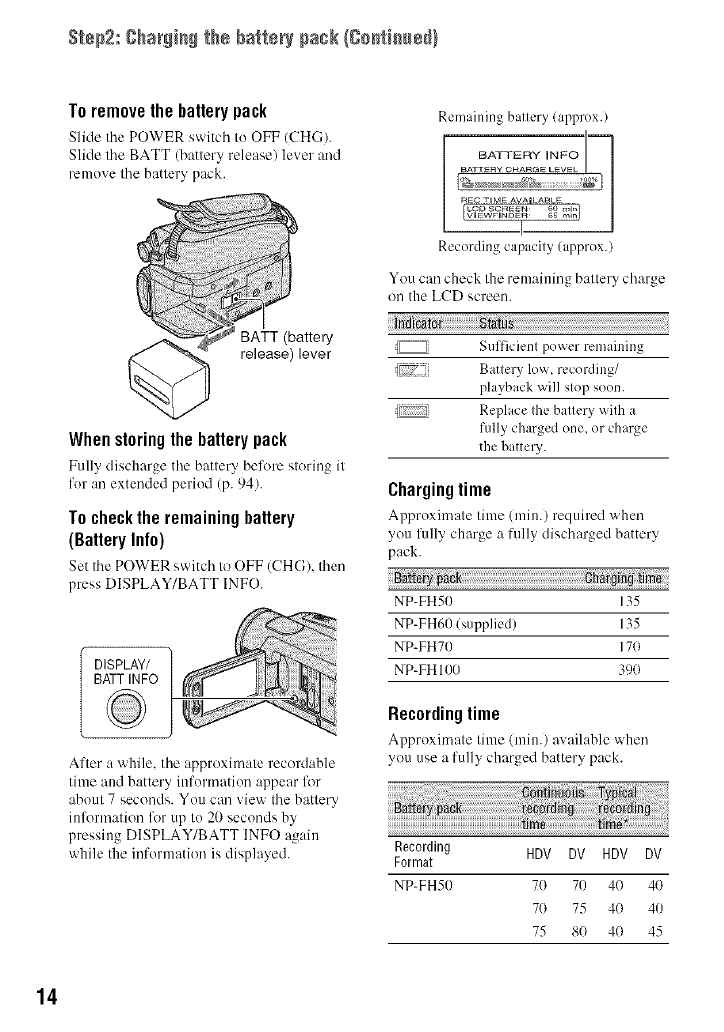
To remove the battery pack
Slide tile POWER switch to OFF (CH(;).
Slide tile BATT (battery release) lever and
remove tile battery pack.
When storingthe battery pack
Fullydischarge tile battery 'oelk_restoring it
for an extended period (p. 941.
Tocheckthe remaining battery
(BatteryInfo)
Set the POWER switch to OFF (CHG), then
press DISPLAY/BATT INFO.
DISPLAY/ ]
BATT INFO
Alter a while, the approximate recordable
time and battery information appear for
about 7 seconds. You can view the batte U
inlk_rmation lk_rup to 20 seconds by
pressing DISPLAY/BATT INFO again
while the information is displayed.
Remaining ballery (al)prox.)
BATF_RY GHARGE LEVEL -- ]
BATTERY INFO !
RE C T I ME AVAILABLE
LOB SC_EEN 60 rain
Ivl WFIND R 6S m_l
--I
Recording capacily (approx.)
You can check Ihe remaining ballery charge
on the LCD screen.
Sulficienl power remaining
_[[Z7 Batler'v low recording/
playback will slop soon.
Replace Ihe ballery wilh a
fully charged one, or charge
the battery.
Chargingtime
Approximate lime (rain.) required when
you fully charge a fully discharged battery
pack.
NP-FHSO 135
NP-FH6D (supplied) 135
NP-FH7D 17D
NP-FH 1DD 39D
Recordingtime
Approximate lime (luin.) a', ailable when
you use a ltdly charged battery pack.
Recording HDV DV HDV DV
Format
NP-FH50 7(} 70 4(} 4(}
7D 75 4D 40
75 8D 4D 45
14
Recording HDV DV HDV DV
Format
NP-FH60 90 95 50 50
/supplied) 95 I00 50 55
100 105 ->-> ->->
NP-FH70 150 155 80 85
155 165 85 90
160 170 85 90
NP-FHI00 345 365 185 195
365 385 195 21(1
375 395 205 215
* Typical rccording time shows the time when
you repeat recording start/stop, turning the
power on/oB and zoonling+
ONotes
•All times measured under tile lollow-ing
conditions:
Top: When the LCD backlight turns on.
Middle: When tile LCD backlight turns olli
Bottom: Recording with the viewfinder while
the LCD panel is closed,
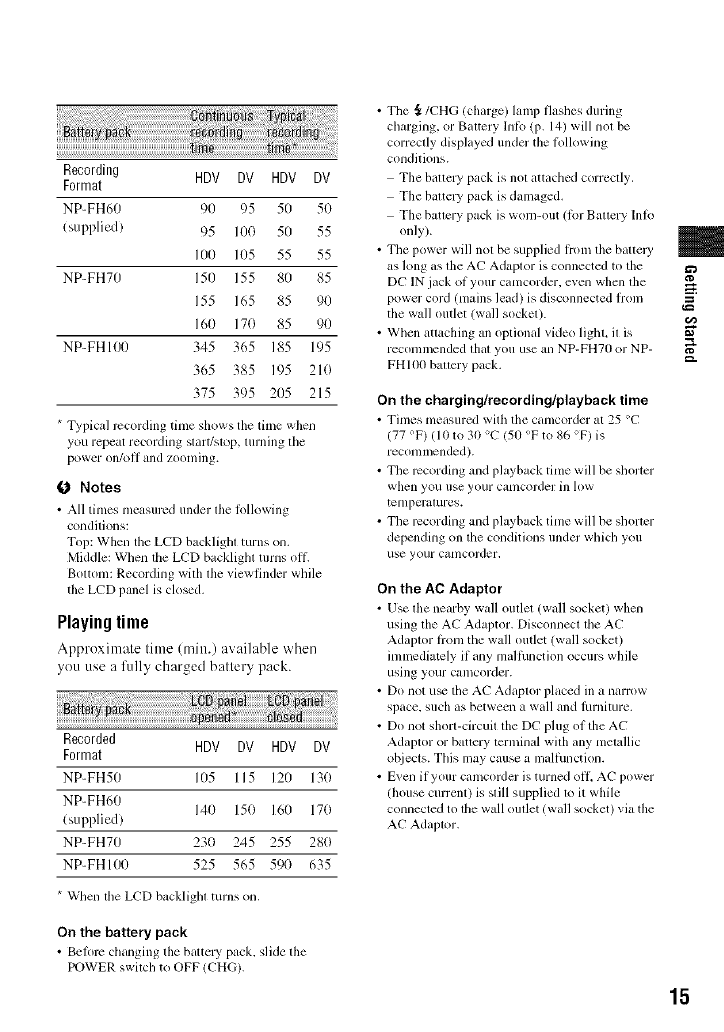
Playingtime
Approximate time (rain.) ax ailable when
you use a fully charged battery pack.
Recorded HDV DV HDV DV
Format
NP-FH50 105 115 120 130
NP-FH60 140 150 160 170
/supplied)
NP-FH70 230 245 255 280
NP-FHI00 525 565 59(} 635
* When the LCD backlight turns on,
On the battery pack
• Belorc changing tile battel T pack. slide the
POWER switch to OFF/CHG).
•Tile ,_/CHG/charge) lamp flashes during
charging, or Baucry lnlb (p. 14) will not be
correctly displayed under the lollowing
conditions.
The battery pack is not attached correctly.
The battery pack is damaged.
Tile battery pack is WOIll-out (l_)l +Battery Inlo
only).
• The power w'ill not be supplied irmn tile battely
as long as tile AC Adaptor is connected to tile
DC IN jack of your camcorder, even when tile
power cord (mains lead) is disconnected honl ,=
the wall outlet (wall socket).
• When attaching an optional vkleo light, it is _'
recommended that you use all NP-FH70 or NP-
FH 1(X)battery pack. =="
On the charging/recording/playback time
• Tinles measured with tile camcoMer at 25 °C
(77 °F) (10 to 30 °C 150 °F to 86 OF) is
recommended).
• The recording and playback time will be shortcr
when yo/i use yo/ir c_lnlcorder ill low
tetnpcralures+
• The recording and playback time will be shormr
depending on the conditions under which you
use your camcorder,
On the AC Adaptor
• Use tile nearby wall outlet (wall socket) when
using the AC Adaptor. Disconnect the AC
Adaptor liom the wall outlet (wall socket)
immediately if any mallhnction occurs while
using your camcorder+
• Do not u_ the AC Adaptor placed in a narrow
space, such as between a wall and lurnimre.
• Do not short-circuit the DC plug of the AC
Adaptor or battery terminal with any metallic
ot_iects. This may cause a nlallhnction.
• Even if your camcorder is turned off; AC power
(house current) is still supplied to it while
connected to tile wall outlet (wall socket) via the
AC Adaptor,
15
16
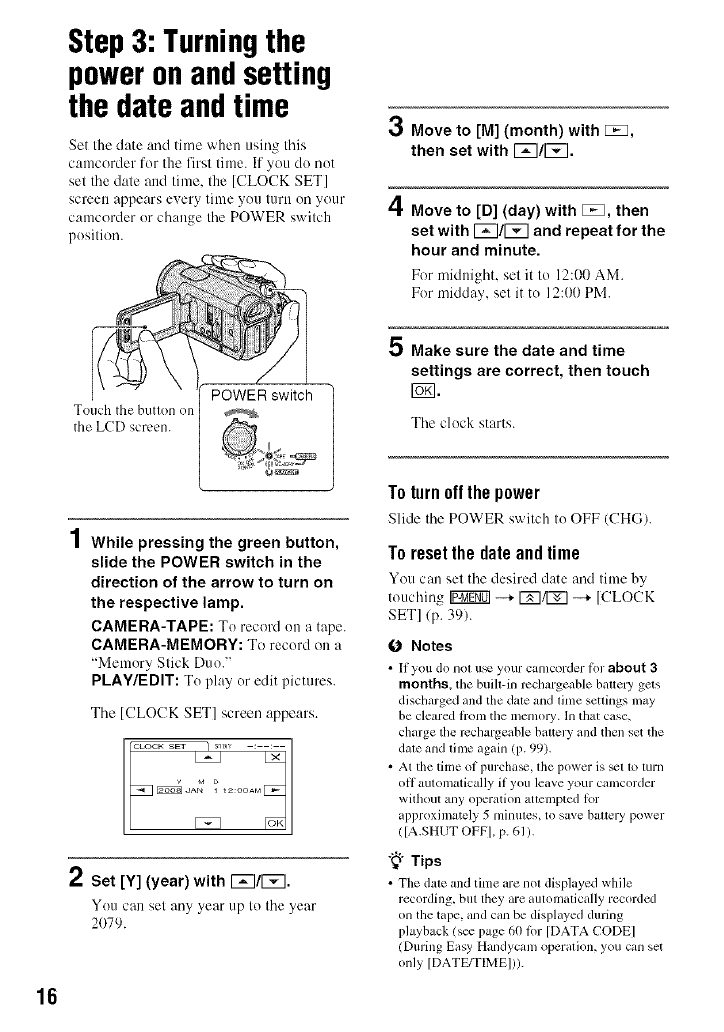
Step3: Turningthe
poweronandsetting
the date andtime
Set the date and time when using this
camcorder for the first time. If you do not
set the date attd time, the [CLOCK SET]
screen appears every time you ttlrll on your
camcorder or change the POWER switch
position.
d
Touch the button on
the LCD screen.
POWER_switch 1
4
/While pressing the green button,
slide the POWER switch in the
direction of the arrow to turn on
the respective lamp.
CAMERA-TAPE: To record on a tape.
CAMERA-MEMORY: To record on a
"Memory Stick Duo."
PLAY/EDIT: To play or edit pictures.
The [CLOCK SET] screen appears.
+200AM
2Set [Y] (year) with 1_7/[_.
You can set any year up to the year
2079.
3Move to [M] (month) with [_E3,
then set with I_/l_.
4Move to [D] (day) with [_E_,then
set with I_/l_ and repeat for the
hour and minute.
For midnight, set it to 12:00 AM.
For midday, set it to 12:00 PM.
5 Make sure the date and time
settings are correct, then touch
rb_].
The clock starts.
To turn offthe power
Slide the POWER switch tOOFF (CHG).
Toreset the date andtime
You can set the desired dale and lime by
touching Ig_gffOI--+ _/[_] --+ [CLOCK
SET] (p. 39).
0Notes
•Ilyou do not u_ your c_,mcorder lor about 3
months, the buih-in rcchargeable battel 3, gets
discharged and the dale and lime setlings may
be cleared liom the mmnory. In that case,
charge tile rcchargeable bal*ery and then set the
dale and lime again (p. 99).
• At the time of purcha_, lhe power is _t 1o turn
oll aulomatically if you leave your camcorder
without any operation attempted lot
approximately 5 minules, to save baltery power
([A.SHUT OFF I, p. 61).
"_° Tips
•The date and time are not displayed while
recording, but they are automatically recorded
on the tape, and can be displayed during
playback (s_ page 60 for [DATA CODEI
/During Easy Handycam operation, you can set
only [DATE/TIMEI/).
• The lens cover opens automatically when tile
POWER switch is set to CAMERA-TAPE or
CAMERA-MEMORY+
• If the buttons on the touch panel do not work
correctly, adjust the touch panel
(CALIBRATION) (p+ 98)+
You can change the on-screen displays to
show messages in :, specified l:mguage.
Touch _ -...*IMENU] -...*<_ (TIME/
LANGU.) -...*ILANGUAGE], then select
the desired langu:Jge.
m
g.
17
Step4: Makingsettingadjustmentsbefore
recording
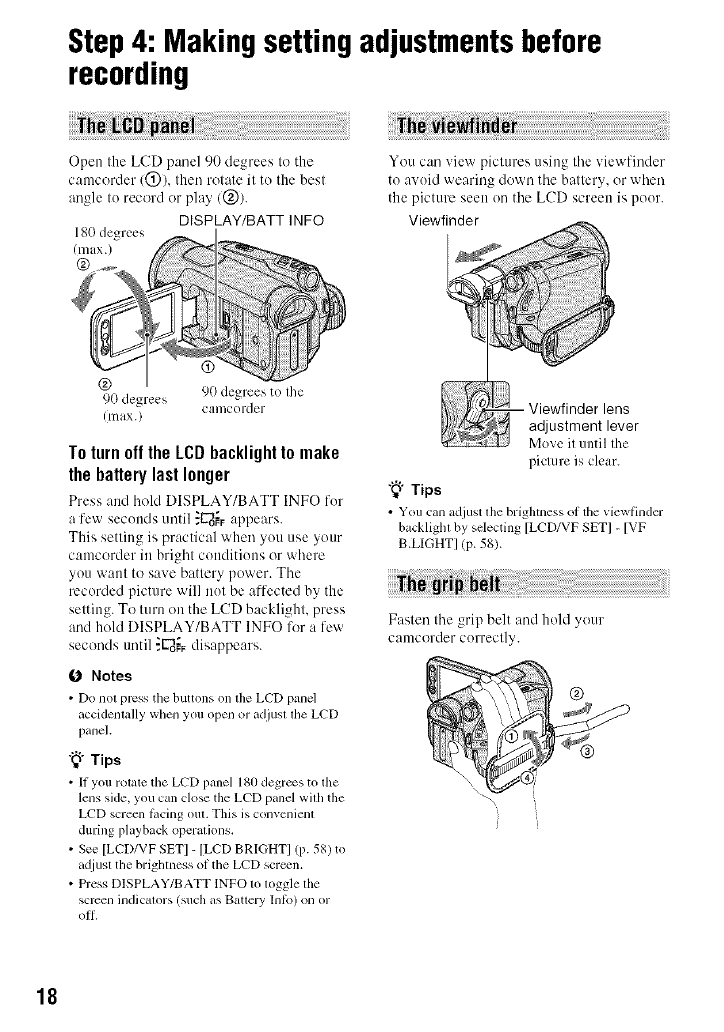
Open the LCD panel 90 degrees to the
camcorder/@), then rotate it to the best
angle to record or play/@/.
DISPLAY/BATT INFO
180 degrees
(max.)
@
@ 90 degrees to Ihe
9(1 degrees camcorder
( III{IX d
To turn off the LCD backlight to make
the battery last longer
Press :rod hohl DISPLAY/BATT INFO for
a few seconds until "g-do_Fappears.
This setting is practical when you use your
camcorder in bright conditions or where
you want to save battery power. The
recorded picture will not be affected by the
setting. To turn on the LCD backlight, press
and hold DISPLAY/BATT INFO for a few
seconds until _E"d_disappears.
0 Notes
•Do not press the buttons on the LCD pmlcl
accidentally when you open or adjust the LCD
panel.
"_° Tips
• [t you rotate tile LCD panel 180 degrees to the
lens side, you can close the LCD panel with the
LCD screen ti_cing ()tit. This is convenienl
during playback operalions.
• See [LCD/VF SETI - [LCD BRIGHTI/P- 58) to
Miusl tile brightness of tile LCD screen.
• Press DISPLAY/BATT INFO to loggle lhe
screen illdicalors (Stlch as Batlery [IIIL)) O11 or
oil.
¸:I
You can view pictures using the viewfinder
to avoid wearing down the battery, or when
the picture seen on the LCD screen is poor.
Viewfinder
lens
adjustment lever
Move it until the
picture is clear.
"_i° Tips
• You can adjust the brighmess ot tile viewfinder
backlighl by selecting [LCD/VF SETI - [VF
B.LIGHT] (p. 58).
Fasten the grip belt and hold your
camcorder correctly.
18
Step5: Insertinga tape ora "Memory Stick
DUO"
Mn
You can use mnn DV |_ cassenes enly
(p. 91).
ONotes
• The recordable time varies depending on 1_
REC MODEl (p. 571. DV
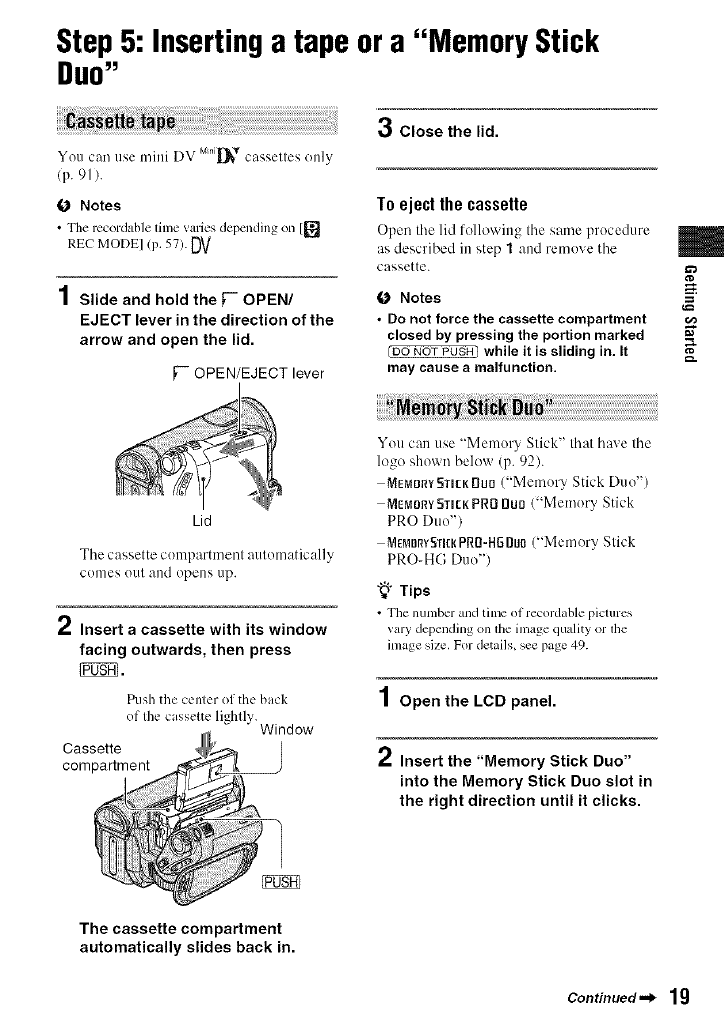
1Slide and hold the _-" OPEN/
EJECT lever in the direction of the
arrow and open the lid.
_-- OPEN/EJECT lever
Lid
Tile cassette c()mpartmenl automatically
colnes OUt and opens up.
," Insert a cassette with its window
facing outwards, then press
Pllsh the center of the back
of the cassette lightly.
Cassette _,, Window
compart
The cassette compartment
automatically slides back in.
3Close the lid.
To eject the cassette
Open the lid lollowing the same procedure
as described in step 1and remove the
cassette.
ONotes
•Do not force the cassette compartment
closed by pressing the portion marked
{Do NOT PUSH_ while it is sliding in. It
may cause a malfunction.
You can use "Memory Stick" that have the
logo shown below (p. 92).
MEMDR¥5TI[K DUO("Memory Stick Duo")
MEMORY5TI[KPR8 BUD("Memory Stick
PRO Duo")
Mg_IDr_YSTI[I{PRO-HfBu0("Memory Stick
PRO-HG Duo")
"_" Tips
• The number and time ot recordable pictures
varydepending on lhe inlagequality or file
imagesize. Fordetails, see page49.
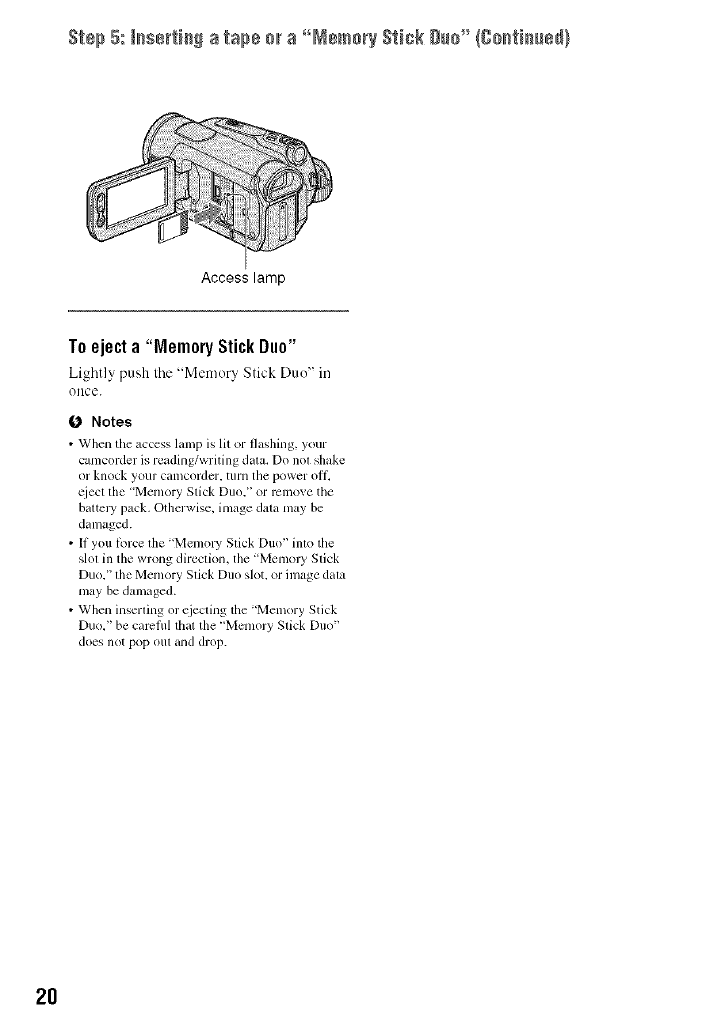
1Open the LCD panel.
2Insert the "Memory Stick Duo"
into the Memory Stick Duo slot in
the right direction until it clicks.
m
g
Continued._ 19
Step 5: leserticg a tape or a °°Nemer_Stick 8[_#" (gecticced}
Access lamp
Toeject a "Memory Stick Duo"
Lightly push tile "Memor_ Stick Duo" in
once.
(J Notes
• When the _lCl2_2gslamp is lit or flashing, your
camcorder is reading/writing data. Do not shake
or knock your camcordcr, turn the power oil
Kiect the "Memory Slick Duo." or remove the
haltel T pack. Othm-wise. image data may he
damaged.
• If you l_)rcc the 'Menlol T Slick Duo" into the
slol in the wrong direction, the "Memol T Slick
Duo." lhe Memory Slick Duo slot. or image dala
may be damaged.
• When inserting or ciecting the 'Memory Stick
Duo, '' be carcflll that the "Mcmory Slick Duo"
does not pop (111[and drop.
2O
T_e_o_dmg/Playba&
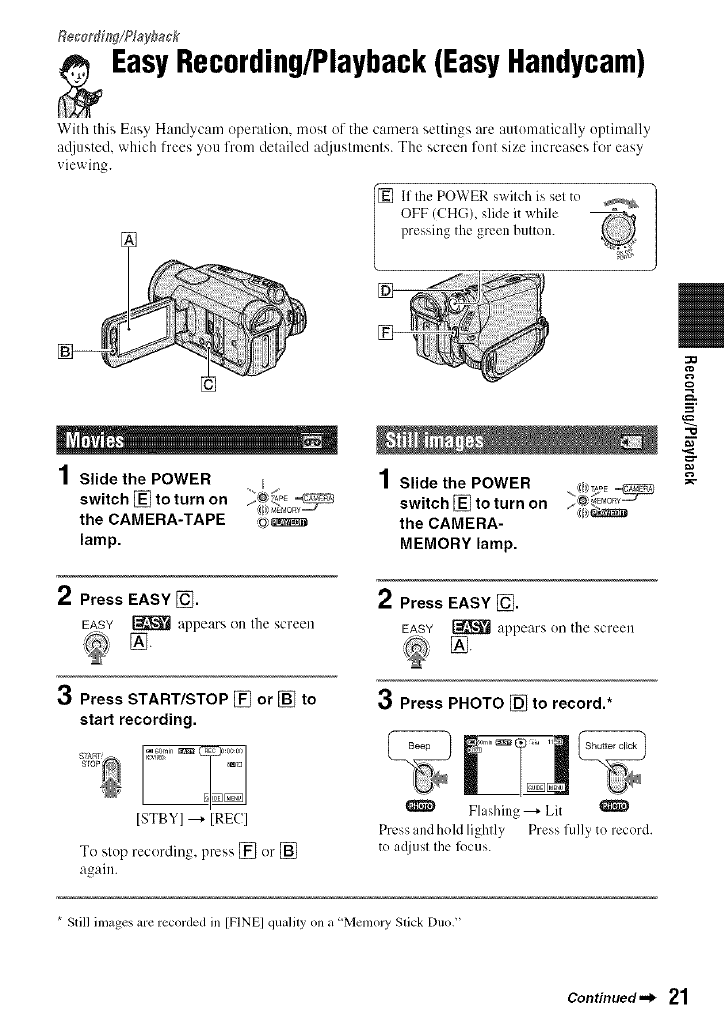
EasyRecording/Playback(EasyHandycam)
With this Easy Handycam operation, most of the camera settings are automatically optimally
atliusted, which frees you from detailed at]iustments. The screen font size increases for easy
viewing.
OFF (CHG), slkle it while
pressing the green bulton.
1Slidethe POWER , ,_
switch [] to turn on "@_
the CAMERA-TAPE ,_
lamp.
2Press EASY [_.
EASY _ appears on the screen
3Press START/STOP [] or [] to
start recording.
''NN
[STBY] ---+ [RE(;]
To stop recording, press [] or []
again.
1Slide the POWER
switch [] to turn on
the CAMERA-
MEMORY lamp.
2Press EASY [_.
EASY _ appears on the screen
@, [_.
3Press PHOTO [] to record.*
Flashing ---+ Lit
Press md hold lightly Press fully to record.
to a¢liusl Ihe l_)ctls.
:a
Q
"1o
*Still images are recorded in [FINE] qualily on a "Memoly Slick Duo?'
Continued._ 21

Eas_ReceNNg/Na_back {Eas_Hand,cam} {ge_ti_ued}
Slide the POWER switch [] to turn on the PLAY/EDIT lamp. Touch the buttons
on the touch panel [] as follows.
Movies
Touch [_ to rewind,
then touch _to start
playback.
Still images
Touch _--* 1_7/
[_ to select a picture.
O Stop
Q Play_ause toggles
Rewind/Fast R)rward
GUIDE (p. 31)
Tape playback
Previous/Next
Delete (p. 69)
•To cancel EasyHandycamoperation
Press EASY [] again. _ disappears from the screen.
•Adjustable menu settings during EasyHandycamoperation
Touch [MENU] to display :Jc[iustable menu settings. See page 39 for details on settings.
•Almost allthe settings return to their delault settings automatically (p. 40).
• [V2MEff0]is not displayed during Easy Handycamoperation,
• Cancel Easy Handycam operalion if you wahl to addany el]i:cls or _ltings 1o the images.
•Unavailable buttonsduring EasyHandycam
During Easy Handycam operation, the following buttons/dial are unavailable. [Invalid
during Easy Handycam operation] may appear if operations not available during Easy
Handycam are attempted.
• [] (back ligla) button/P- 27)
•Prcssing and holding DISPLAY/BATT INFO button (p. 18)
• CAM CTRL dial (p. 26)
• MANUAL butlon (p. 26)
22
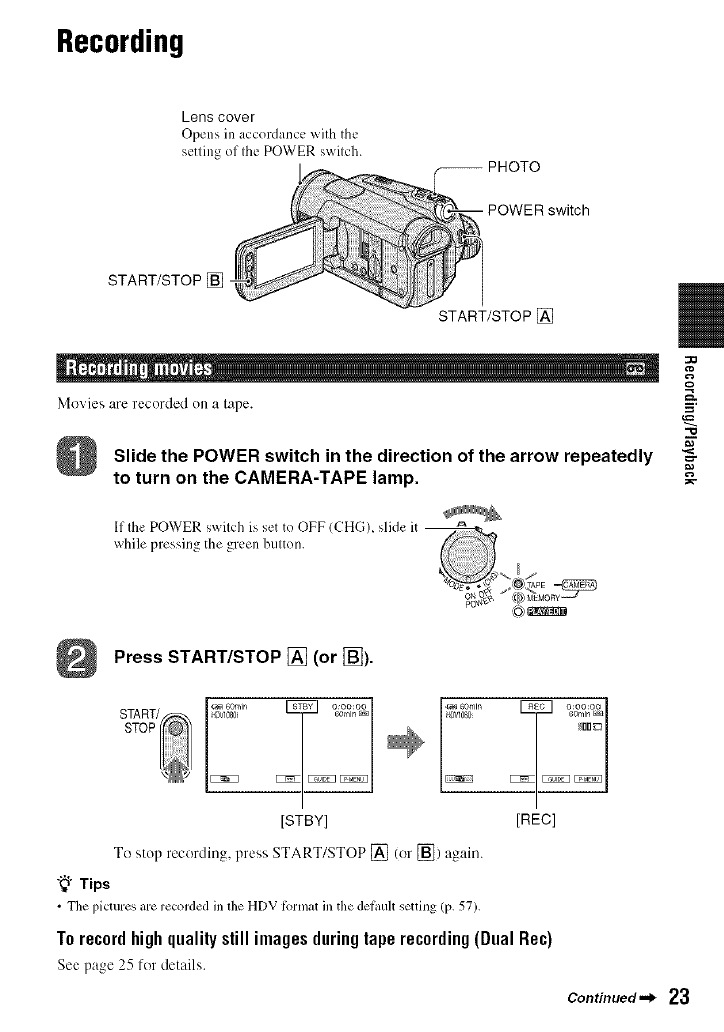
Recording
Lens cover
Opens in accordance whh the
setting of Ihe POWER swilch. -- PHOTO
POWER switch
START/STOP []
Movies are recorded ()it a lape.
Slide the POWER switch in the direction of the arrow repeatedly
to turn on the CAMERA-TAPE lamp.
If Ihe POWERpressingswilChgreeniSset to OFF (CHG), slide it
while the bulton.
%_S _ ,_)z_
"O
Press START/STOP [] (or [_).
START/_ _'_n /7 J_"°n°°STOP _,_,y _ _n n_,_ _°,°n°°_UlJ_
[STBY] [REC]
To stop recording, press START/STOP [] (or [_) again.
"_" Tips
• The pictures are recorded in file HDVlbrmat in the delault setting (p. 57).
T0 record high quality still images during tape recording (Dual Rec)
See page 25 for details.
Continued._ 23
Still images are recorded on the "Memory Stick Duo."
Slide the POWER switch in the direction of the arrow repeatedly
to turn on the CAMERA-MEMORY lamp.
lfthe POWER switch is sel Io OFF (CHG), slide il
while pressing Ihe green button.
Press and hold PHOTO lightly to adjust the focus, then press it
fully to record.
..... .....
Flashing ,*.Lights up
A shutter sound is heard. When JJJJJJJJdisal_pears, the image has been recorded.
Tocheckthe latest recordingona "Memory StickDuo"
Touch C_7. To delete the picture, touch _ _ [YES].
"_" Tips
• See page 49 tot the inl_ge qu_dity_ im_ge six,: mid the nunlber ot recor&Jb]e pictmcs.
24
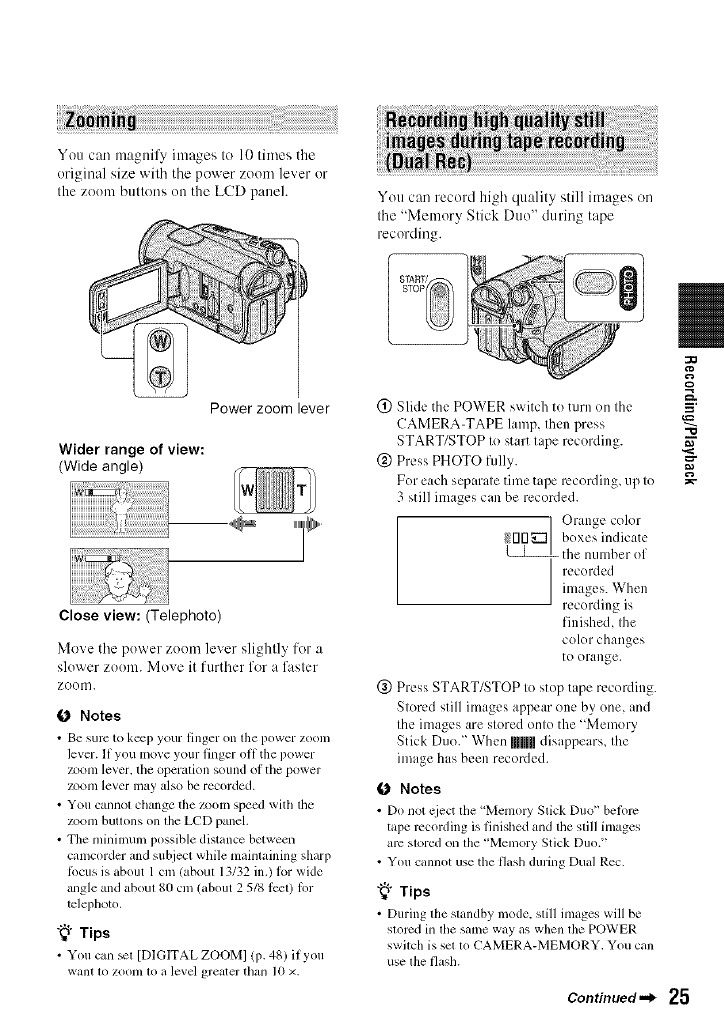
You can magttil3, images to 10 times the
original size with tile power z(mm lever or
the zoom bttttcms on the LCD paneh
Power zoom lever
Wider range of view:
(Wide angle)
Close view: (Telephoto)
Move tile power z(mm lever slightly for a
slower zoom. Move it fttrther for a faster
zoom.
ONotes
• Be sure lo keep your ling_'r on lhe power ZOOll/
lever. II you mine your linger oil the power
zoom lever, tile operalion sound of tile power
zoonl lever may also be recorded.
• You cannol cllange the zoom speed witll lhe
zoom bumms on lhe LCD panel.
• The minimum possible distance between
camcorder and subject while mainlaining sharp
locus is about 1 cm/aboul 13/32 in.) lor wide
angle and abou180 cm (about 2 5/8 lccl) lot
telel)lloto,
"_° Tips
• You can _1 [DIGITAL ZOOM] (p. 48) if you
want m zoonl [o a levd greater than l0 x.
You can record high qttality still images on
the "Memory Stick Dtto" during tape
recording.
(_) Slide the POWER switch to turn on the
CAMERA-TAPE lamp, then press
START/STOP to start tape recording.
@ Press PHOTO fillly.
For each separate time tape recording, up to
3 still images can be recorded.
] Orange color
_!DO_| boxes indicate
the number of
I recorded
images. When
recording is
finished, the
color changes
to orange.
@ Press START/STOP to stop tape recording.
Stored still images appear one by one, and
the images are stored onto the "Memory
Stick Duo." When [111111[disappears, the
image has been recorded.
0Notes
• Do not cject tile 'iVlenlol3, Slick Du(f' belorc
tape recording is lJnished and tile slill images
arc slv_redon lhe "Memory Stick Duo."
• You cannot use the flash during Dual Rec.
"_° Tips
• During the slandby mode, slill images will be
stored in lbe same way as when lhe POWER
swilch is set to CAMERA-MEMORY. You can
use lhe flash.
"10
Continued._ 25

• When tile POWER switch is set to CAMERA-
TAPE, still inlages will be recorded at image
size 4.6M in the HDV lormat. 3.4M (4:3) or
4.6M (16:9) in the DV lornlat.
26
It is usel'ul to assign a lhequently used metro
item to tile (!AM CTRL dial.
The following is an example of the
procedure when the [FOCUSI setting is
assigned (tile default setting).
CAM CTRL dial
(_) Press the MANUAL butten to activate the
manual a([justment mode.
The setting mode switches between
automatic and manual every time you press
the MAN UAL button.
@Retate the CAM CTRL dial to a([just the
fecus manually.
Menu itemsthat can he assigned
IFO_-'USI (p. 45)
[EXPOSURE] (p. 43)
[SHUTFR SPEED] lP. 44)
[AE SHIFT] lP. 451
[WB SHIFT I (p. 45)
To assignthe menu items to the CAM
CTRLdial
(_) Press and held the MANUAL button fer
several secends+
The [DIAL SET] screen appears.
@ Rotate the CAM CTRL dial and select a
menu item te be assigned.
@ Press the MANUAL button+
0Notes
• Tile Illelltl itcl/l setting _lillle belore will be
retained even if you scl other menu itenl settings
alter flint. If [EXPOSUREI is sct al_cr [AE
SHIFT] is set manually. [EXPOSUREI will
override [AE SHIFT].
• If you select [RESET] in step @, all the settings
set manually return to file delauh _lling.
"_° Tips
• During ph6,back, you cml adjust tile volume
using file CAM CTRL dial.
• You can also assign menu itcms using [DIAL
SET] (p+49)+
Flash
button
Press tile § (flash) button repeatedly to
select an appropriate setting.
No indication (Auto flash): Automatically
flashes when therc is insullJcient ambicnt
ligta.
._ (Forced flash): Always uses the flash
regardless of file surrounding briglaness.
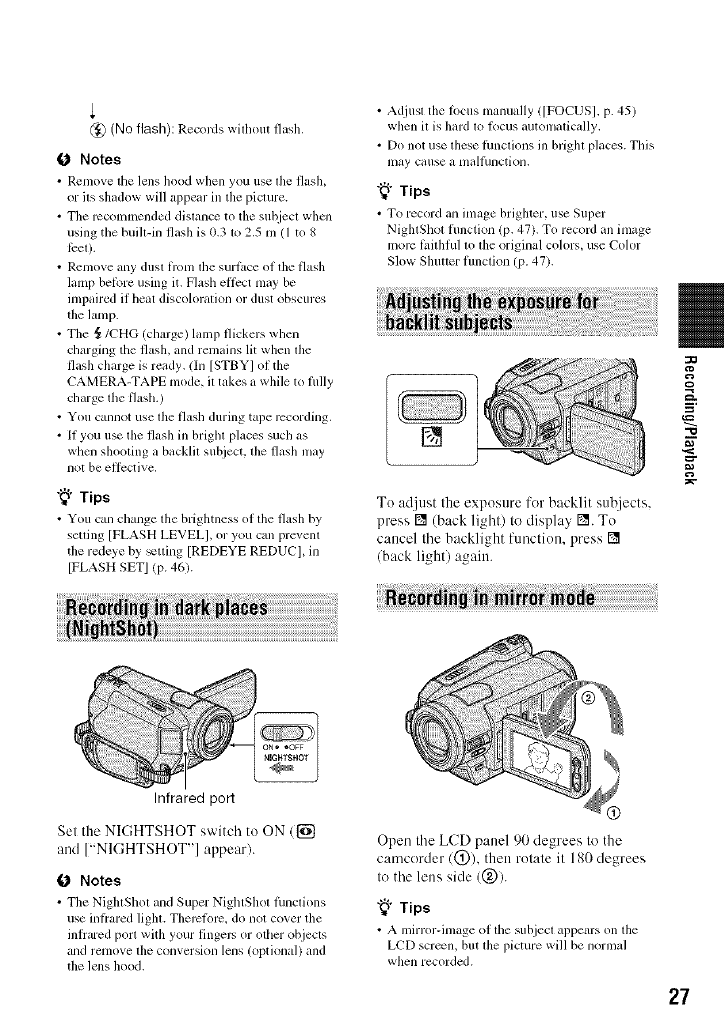
@(Noflash):Recordswithoutflash.
Notes
• Remove tile lens hood when you use tile flash,
or ils shadow will appear in the piclure.
• Tile rccolnmcnded distance to tile subject whcn
using the buill-in flash is (1.31o 2.5 m (1 to 8
l;:et).
• Rcnlove any dust l_'om tile surl_cc of tile flash
lamp belore using it. Flash ellPct may be
impaired if heat discoloralion or dust obscures
the lamp.
• The _/CHG (charge) lamp flickers when
charging the flash, and remains lit when lhe
flash charge is ready. (In [STBYI of the
CAMERA-TAPE mode. il takes a while to flllly
charge the flash.)
• You cannot use lhe flash during tape rccording.
• If you use the flash in brighl places such as
when shooting a backlil suhject, lhe flash may
not be ellcctive.
"_° Tips
• You can chzmge tile hrightness of tile flash by
selling [FLASH LEVEL J, or you can prevela
the redeye by _tting [REDEYE REDUCI, in
[FLASH SET] (p. 46).
• Adjust tile locus manually ([FOCUS]. p. 45)
when il is hard 1o locus automalically.
• Do not use these lhnclions in brighl places. This
may cause a nlall/lllctioll.
"_° Tips
• To recoM an image hrighter, use Super
NiglaShol flmction lP. 47). To record an image
morc li,illlful m the original colors, use Color
Slow Shutter flmction (p. 47).
[]
To adjttst the exposure for backlit SU'diects,
press [] (back light) to display []. To
cancel the backlight function, press []
(back light) again.
"10
Infrared port
Set the NIGHTSHOT switch to ON ({_
and ["NIGHTSHOT"] appear).
0 Notes
• Tile NightShol and Super NightShot lunctions
use inl_ared lighl. Thercl_nc. do not co_er tile
inlrared port with your lingers or other objecls
and remove the conversion lens (optional) and
the lens hood.
Open the LCD panel 90 degrees to the
camcorder (0), then rotate it 180 degrees
to the lens side (@).
"_° Tips
• A mirror-image of the suhjecl appem's on the
LCD screen, hut lhe picture will be normal
when recorded.
27
Playback
Slide the POWER switch in the direction of the arrow repeatedly to
turn on the PLAY/EDIT lamp.
If the POWER s_itch is set to OFF (CHG), slide it
while pressing the green button.
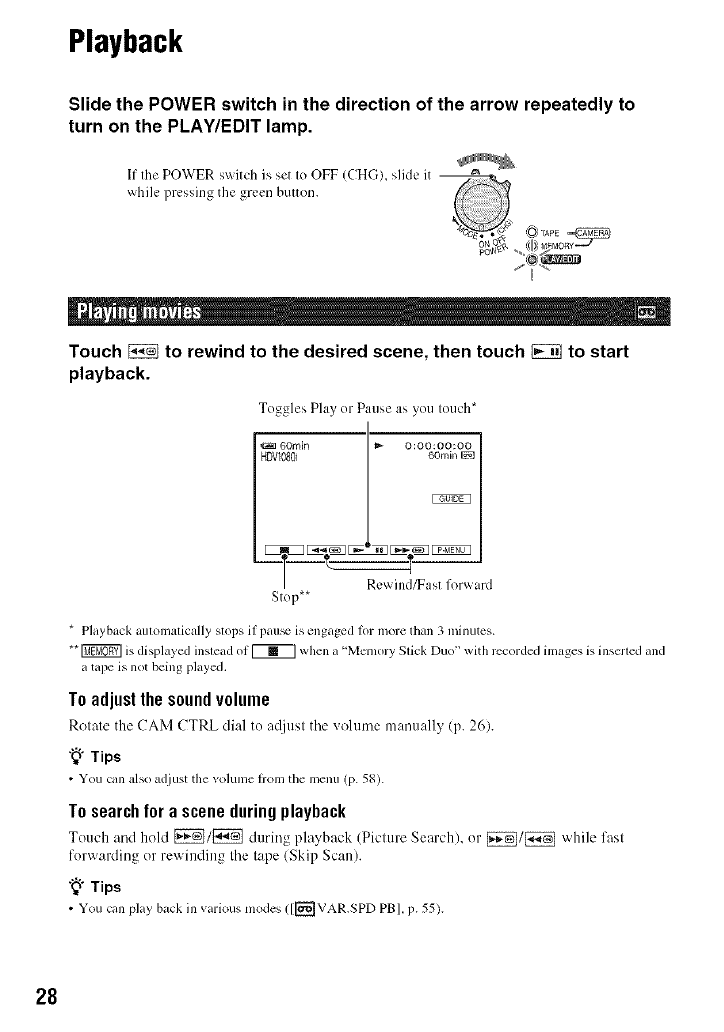
Touch _to rewind to the desired scene, then touch _to start
playback.
Toggles Play or Pause as you touch*
I
60min ,_ O:OO:OO:OO
HDVI080i 1 _ornmP_l
/ Rewind_ast forward
Stop**
* Playback aulomatically stops if pau_ is engaged lor more than 3 minutes.
**F gMOffq]is displayed inslead of_ when a 'Memory Slick Duo" with recorded images is inserled and
a tape is not being played.
Toadjustthesoundvolume
Rotate the CAM CTRL dial to a(ljust the volume manuall3 (p. 26).
"_" Tips
• You can also adjust the _olunle fl'onl tim menu (p. 58).
To search for a scene duringplayback
Touch and hold _/[_ during playback (Picture Search), or [_/_ while fast
forwarding or rewinding the tape (Skip Scan).
"_" Tips
• You can play, back in various modes ([[_']VAR.SPD PB], p. 55).
28
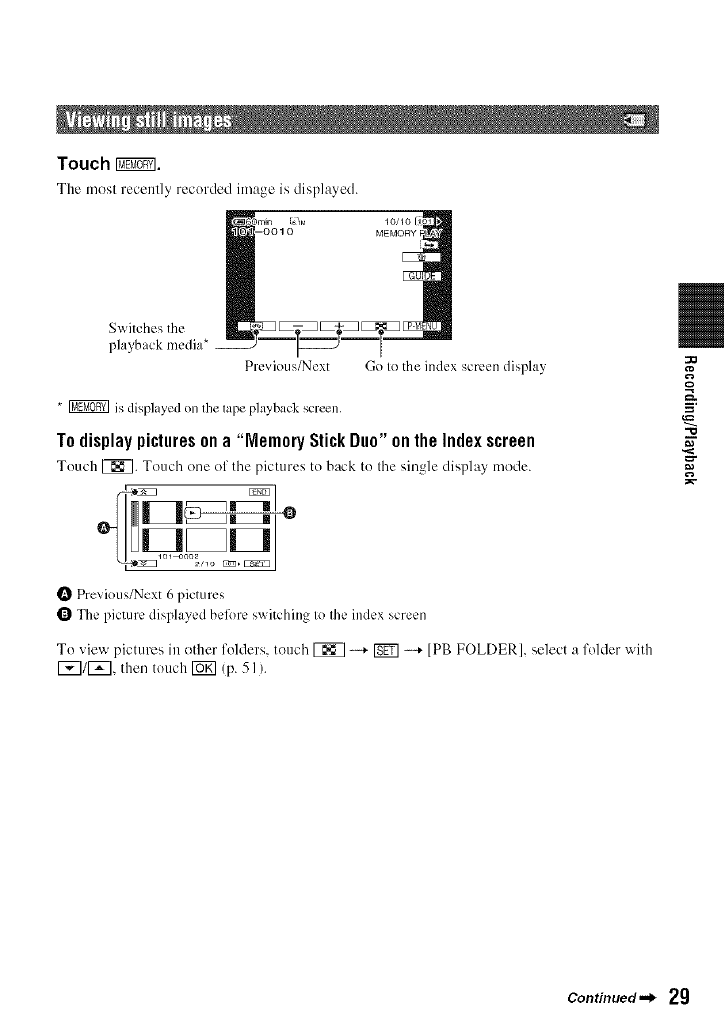
Touch I_.
The most recenlly recoMed image is displayed.
L_tM
Switches the
playback media
Previous/Next Go Io the index screen display
* _ is displayed on tile tape playback screen.
Todisplaypicturesona"MemoryStick Duo"ontheIndexscreen
Touch [_. Touch one of the pictures to back to the single display mode.
Previous/Next 6 pictures
The picture displayed belk)re switching to the index screen
To view pictures in other folders, touch _ -...+ _ -...+ [PB FOLDER ], select a folder with
I_]/1_], then touch _ (p. 51 ).
=.
"O
Continued._ 29
i
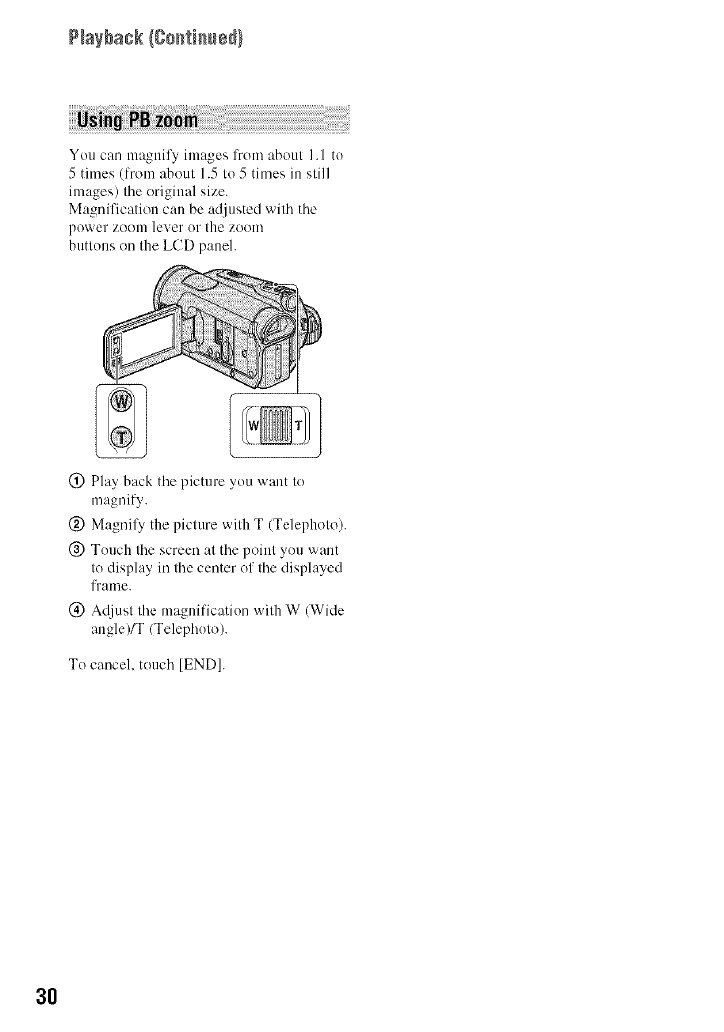
You can magnify images from about 1.I to
5 times (from about 1.5 to 5 times in still
images) the original size.
Magnification can be adjusted with the
power zoom lever or the zoom
buttons on the LCD paueh
(!) Play back the picture you want to
magnify.
(_) Magnil3_ the picture with T (Telephoto).
@ Tuuch the screen at the point you want
to display in the center of the displayed
frame.
(_) Adjust the magnificatiun with W (Wide
angle)IT/Telephuto).
Tu cancel, touch [END].
all
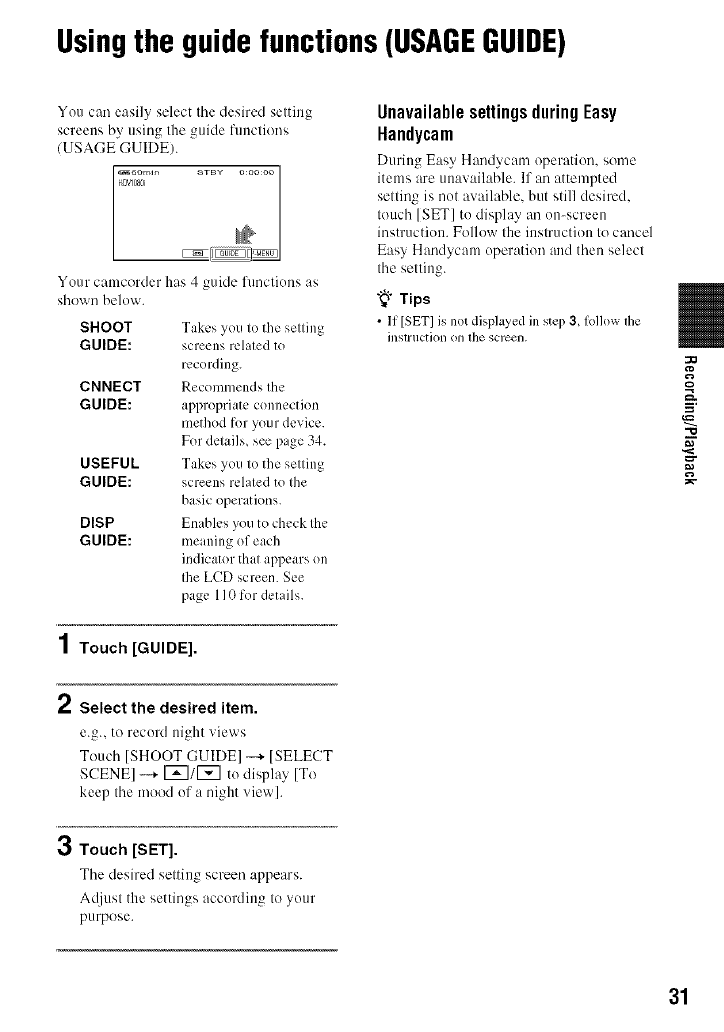
Usingthe guidefunctions(USAGEGUIDE)
You can easily select the desired selting
screens by using Ihe _uide fonctions
(USAGE GUIDE).
Your camcorder has 4 guide functions as
shown below.
SHOOT
GUIDE:
CNNECT
GUIDE:
USEFUL
GUIDE:
DISP
GUIDE:
Takes you to the setting
screens related to
recording.
Recommends the
appropriate connection
method for your device.
For details, see page 34.
Takes you to the setting
screens related to the
basic operations.
Enables you to check the
meaning of each
indicator that appears on
Ihe LCD screen. See
page 110 for details.
1Touch [GUIDE].
Unavailable settings during Easy
Handycam
During Easy Handycam operation, some
items are unavailable. If an attempted
setting is not available, but still desired.
touch [SET] to display an on-screen
instruction. Follow the instruction to cancel
Easy Handycam operation and then select
the setting.
"_" Tips
•It [SET] is not displayed in step 3, follow lhe
insfftlction Oll lhe gCle_311.
_t3
==t,
=__
"O
2Select the desired item.
e.g., to record night views
Touch [SHOOT GUIDE] --* [SELECT
SCENE] --+ [_]/1_] to display [To
keep the mood of a night view].
3Touch [SET].
The desired setting screen appears.
Adjusl the settings according to yore"
purpose.
31
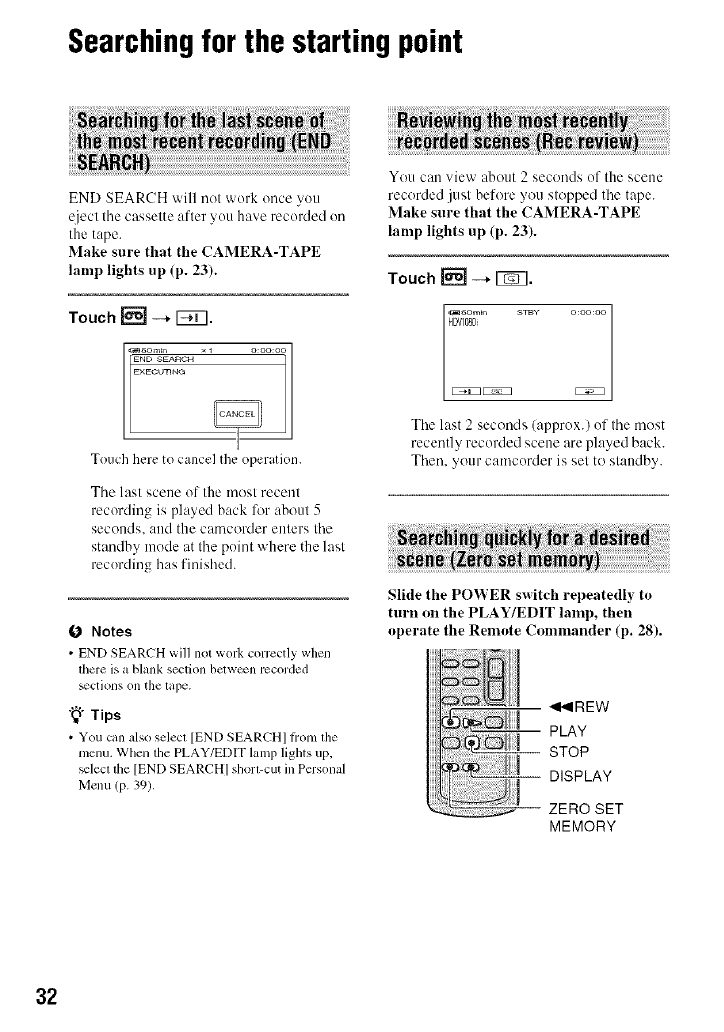
Searchingfor the startingpoint
END SEARCH will not work once you
eject tile cassette after you have recorded on
the tape.
Make sure that the CAMERA-TAPE
lamp lights up (p. 23).
Touch r_-=J--, r_.
Touch here to cancel the operation.
Tile last scene of the most recent
recording is played back %r about 5
secollds, aild the camcorder enters tile
standby mode at tile point where the last
recording has finished.
0 Notes
•END SEARCH will not work corrcctly when
lhere is a blank section bcl\v_n recorded
_ctions on the lape.
"_° Tips
• You can also selecl [END SEARCH] li'om llle
menu. When the PLAY/EDIT lamp lights up.
_lecl die [END SEARCHI shorl-cut in Personal
Menu/P- 39).
You can view about 2 seconds of the scene
recorded just before you stopped the tape.
Make sure that the CAMERA-TAPE
lamp lights up (p. 23).
Touch_--*_.
_o:oo:o
_:_,omin STBy
HDVIOSg
Tile last 2 seconds (approx.) of tile most
recently recorded scene are played back.
Then. your camcorder is sel to slandby.
Slide the POWER switch repeatedly to
turn Oll the PLAY/EDIT lalnp, then
operate the Relnate Conmmnder (p. 28).
_IREW
PLAY
STOP
DISPLAY
ZERO SET
MEMORY
32
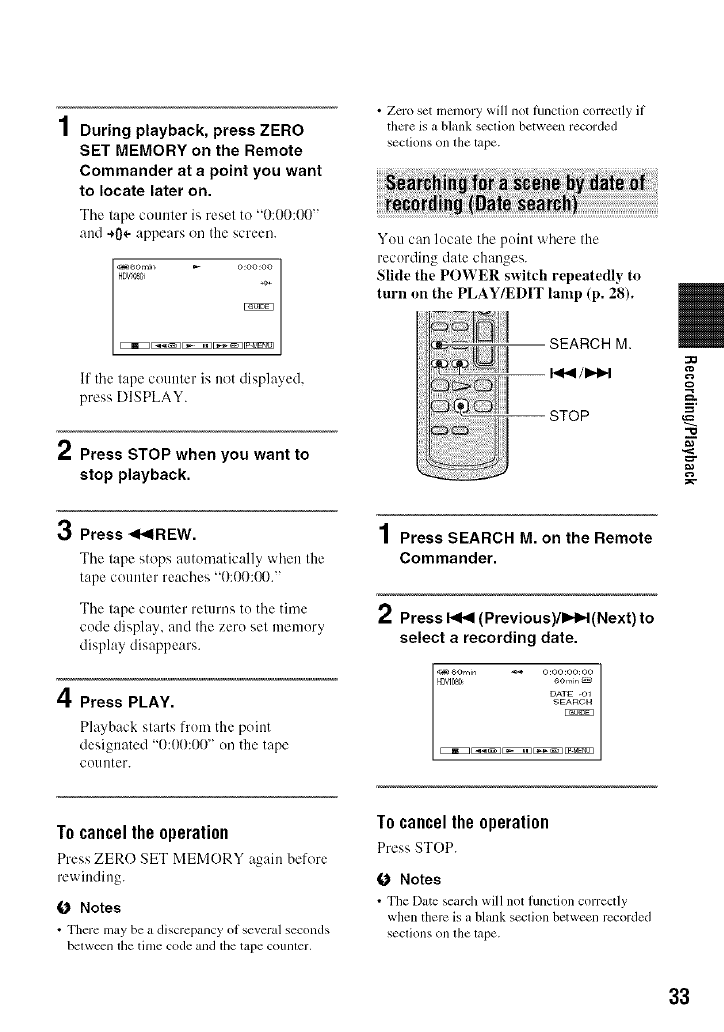
4
/ During playback, press ZERO
SET MEMORY on the Remote
Commander at a point you want
to locate later on.
Tile tape counter is reset to "0:00:00"
and ÷0÷ appears on the screen.
HOV_Oi +o*
_ _ []EZN] _ EN!N_
If the tape counter is not displayed,
press DISPLAY.
2Press STOP when you want to
stop playback.
3Press _I_IREW.
Tile tape stops autom,'-ttic,'-fllywhen the
tape counter reaches "O:O0:(X)."
Tile I:qgecounter relurns to the time
code display, and the zero set memory
display disappears.
4Press PLAY.
Playb_ck starts lrom the point
designated "0:00:00" on the tape
co[inter.
• Zero set memory will not thnction correctly if
there is a blank section between recorded
sections on the tape.
You can locate the point where the
recording date changes.
Slide the POWER switch repeatedly tu
turn on the PLAY/EDIT lalnp (p. 28).
4
| Press SEARCH M. on the Remote
Commander.
2Press I.,_1 (Previous)/l_l_,t (Next) to
select a recording date.
_ 60min _ O:O0:O0:O0
_DVI080 60min
DATE .Ol
=.
"10
To cancelthe operation
Press ZERO SET MEMORY ag_dn before
rewinding.
O Notes
• There may be a discrepmlcy ot several seconds
bet\v_n tile time code and tile tape counter,
I0 cancel the operation
Press STOP.
ONotes
• Tile Date search will not tullclion correctly
when there is a blank seclion between recorded
Sections on the tape.
33
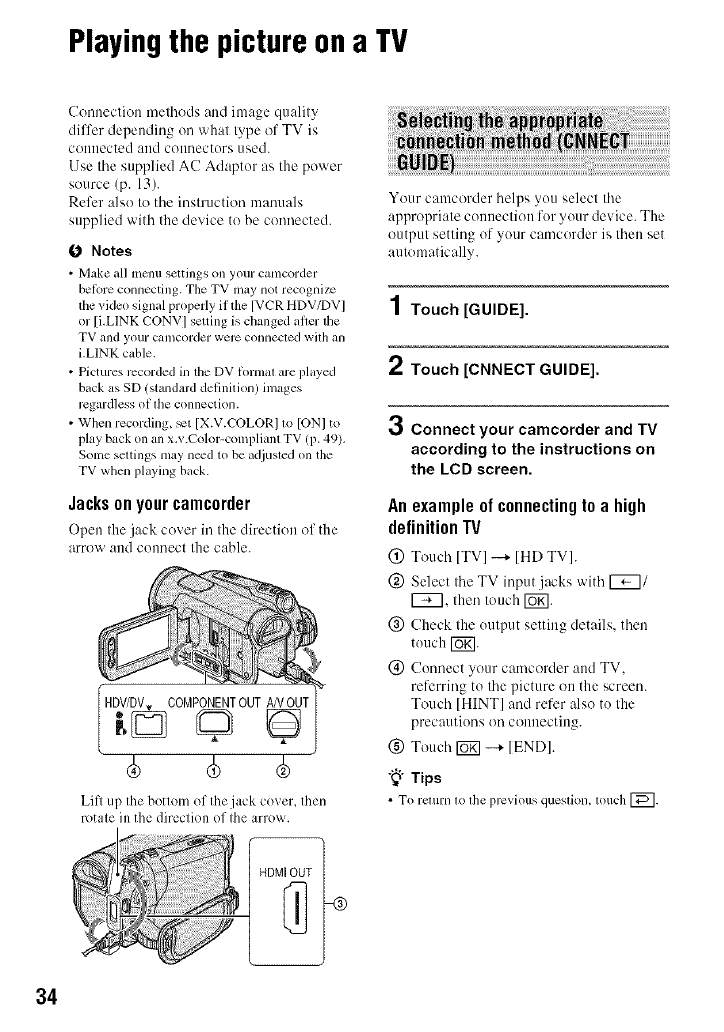
Playingthe pictureona TV
34
Connection methods and image quality
differ depending on what type of TV is
contracted alld connectors used.
Use the supplied AC Adaptor as the power
source (p. 13).
Refer also to the instruction manuals
supplied with the device to be connected.
O Notes
• Make allmcnu settings on your camcorder
belbre connecting. TileTV may not recognize
tile _ideo signal properly if tile [VCR HDV/DV]
or [LLINKCONVI setting is changed after the
TV and your camcorder were COllllecled with all
LLINK cable.
• Pictures rccorded in the DV Klrnlal are played
back as SD (standard deftnilion) images
regardless of file connection.
• When recording, _t [X.V.COLOR] to [ON] to
playback on an x.v.Color-compliant TV (p. 49).
Some settings mayneed m be adjusted on tile
TV when playing back.
Jacksonyourcamcorder
Open the jack cover in the direction of the
arrow and connect file cable.
HDV/DV,,,COMPONENTOUTA/VOUT
Lift up Ihe bottom of Ihe jack cover, Ihen
rotae in the direction of Ihe arrow.
Your camcorder helps you select the
appropriate connection for your device. The
output setting of your camcorder is then set
atttomatically.
1Touch [GUIDE].
2Touch [CNNECT GUIDE].
r,j
OConnect your camcorder and TV
according to the instructions on
the LCD screen.
Anexample0f connectingt0a high
definitionIV
(_) Touch [TV] --+ [HD TV].
(_) Select the TV input jacks with 1_7/
1_7, then touch [_ff].
@ Check the output setting details, then
touch [b_].
(_) Connect your camcorder attd TV.
referring to the picture on the screen.
Touch [HINT] and refer also to the
precatltions on connecting.
(_) Touch [UKI--+ [END].
"_" Tips
•To l'elllrll IO Ihe previolls queslioll, IOllch [_].
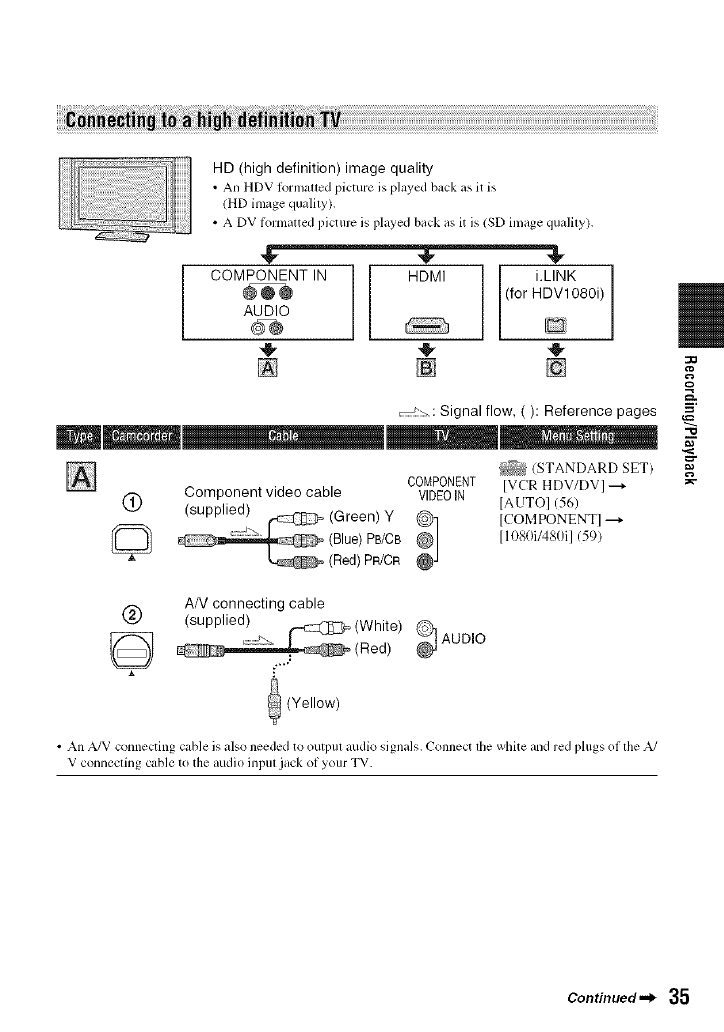
HD (high definition) image quality
• An HDV klrmalled picture is played back as it is
(HD image qualily).
• A DV lk)rnmtted picturc is played back as it is (SD image quality).
v "II"
i.LINK I
COMPONENT_ IN HDMI (for HDVl080i)
AUDIO D
[] [] []
, Signal flow, ( ): Reference pages
_N (STANDARD SET)
COMPONENT IVCR HDV/DVI _
(_) Component video cable VIDEOIN IAUTOI (56)
(supplied) _ (Green) Y _,] ICOMPONENT]---_
{_ (Blue) PB/CB I1O80i1480il t59)
(Red) PR/CR
AN connecting cable
Q (supplied) ,'_ _(White) _ AUDIO
.{_ (Red)
(Yellow)
• An A/V connecting cable is also needed to outpul audio signals. Connect the white and red plugs oi the A/
V connecling cable to the audio inpul ¸jack of your TV.
"10
Continued._ 35
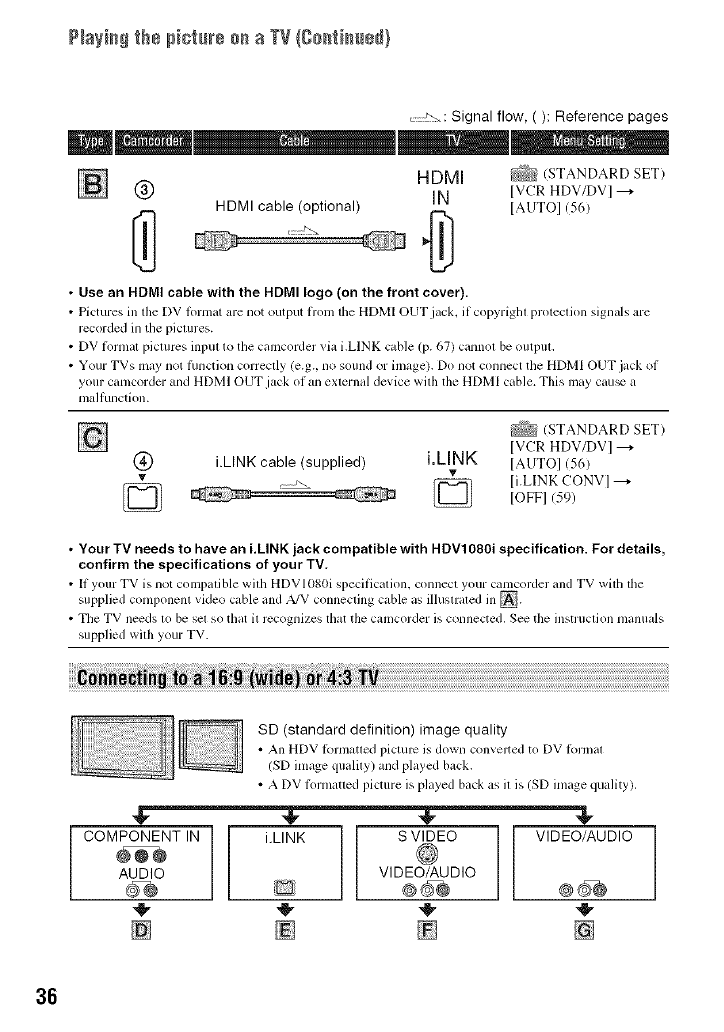
P+a++_+_the p++tm+÷++ a TV Ige+t+++÷+}
, ::,: Signal flow, ( ): Reference pages
N HDMI (_g4g (STANDARD SET)
@IN IVCR HDV/DVI---*
HDMI cable (optional) IAUTOI (56)
•Use an HDMI cable with the HDMI logo (on the front cover).
• Pictures in the DV lormat are not output l_+omtile HDMI OUT jack, il copyright protection signals are
rccorded in tile pictures+
• DV l_nmat pictures input to the camcorder via i.LINK cuble (p. 67) cannot be output.
• Your TVs may not lhnctkm correctly (e.g., no sound or image). Do not connect the HDMI OUT jack of
your camcorder and HDMI OUT jack of an external device with the HDMI cable. This may cau_ a
malfunction.
ISTANDARD SET)
IVCRHDV/DV] ---+
(_ i.LINK cable (supplied) i.LINK IAUTOI (Sb)
'*_ Q [OFF]IiLINKCONV]--+(59)
•Your TV needs to have an i.LINK jack compatible with HDV1080i specification. For details,
confirm the specifications of your TV.
• It your TV is not compatible with HDVI080i specification, connect your camcorder and TV with the
supplied component video cable +rodA/V connecting cable +_sillustrated in _+
• The TV needs to be set so that it rccognizes that the camcorder is connected. See the instruction manuals
supplied with your TV.
SD (standard definition) image quality
• An HDV Rnmatted picture is down convelted to DV Rmnat
(SD image quality) and played back.
• A DV formatted picture is played back as it is (SD image quality).
,@ ,@ ,@ ,_
COMPONENT IN ] i.LINK S VIDEO VIDEO/AUDIO
/
AUDIO VIDEO/AUDIO
[] [] []
36
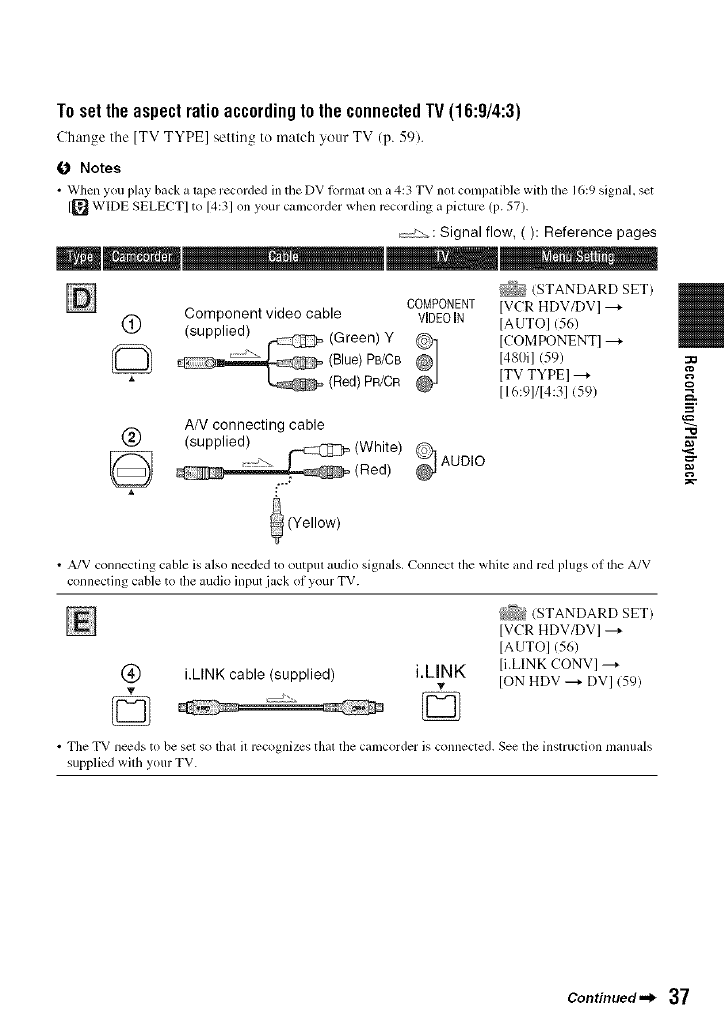
To setthe aspect ratio accordingto the connectedTV(16:9/4:3)
Change the TV TYPE setting to match your TV (p. 59).
O Notes
•When you play back a tape recoMed in tile DV iormat on a 4:3 TV not compatib]e witll tile 16:9 signal set
[_ WIDE SELECT] to [4:3] on your camcoMer when r_:coMing a picture (p. 57).
, _-.: Signal flow, ( ): Reference pages
/STANDARD SET)
[] COMPONENT IVCR HDV/DVI --_
Component video cable VIDEOIN IAUTOI (56)
(_ (supplied) _ (Green) Y
(Blue) PB/CB _] [COMPONENT] ---_
148Dil(59)
ITV TYPEI --_
(Red)PR/CR I I 6:91/14:31(59)
AN connecting cable
@ (supplied)
A[_ (White) 9
.... (Red) AUDIO
(Yellow)
• A/V connecting cable is also needed to output audio signals, Connect the while and red phlgs ol the A/V
connecting cable to lbe audio input jack of your TV.
(_ i.LINK cable (supplied) i.LINK
,it ,it
Q Q
(STANDARD SET)
IVCR HDV/DVI --_
IAUTOI (56)
li.LINK CONV] ---_
ION HDV --_ DVI (59)
• The TV needs to be set so thai it recognizes thai tile camcorder is connected. See tile instruction manuals
supplied wilh your TV.
33
=..
"1o
[
¢ontinued,,l, 37
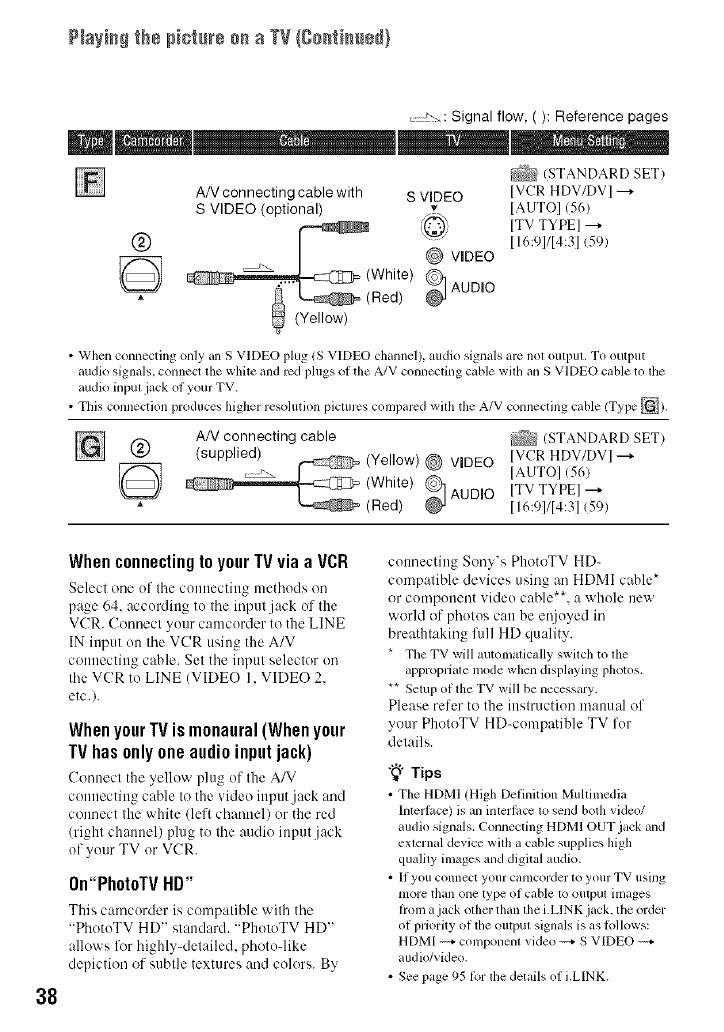
P+a+b+_the p+ctm+÷++ a TV Ige+t+++÷+}
_ :,: Signal flow, ( ): Reference pages
(STANDARD SET)
AN connecting cable with S VIDEO IVCR HDV/DV ] --_
S VIDEO (optional) v IAUTO1156)
@ _ _@_AUDmO [TV TYPE]
116:91/14:31159)
@ VIDEO
++18
"j_ (Red>
(Yellow)
•When connecting only an S VIDEO plug (S VIDEO channel), audio signals arc not output. To output
audio signals, connect the white and red plugs of the A/V connecting cable with an S VIDEO cable to the
audio input jack of your TV.
•This connection produces higher resolution pictures comparcd with the A/V connecting cable (Type _).
AN connecting cable ?_8 (STANDARD SET)
Q (Yellow) @ VIDEO [VCR HDV/DV]---_
(White) _ [AUTOI(5b
AUDIO ITVTYPE]---+
(Red) [ 16:91114:31(59)
38
Whenconnectingto yourTVvia aVCR
Select one of the connecting metbods on
page 64. according to tbe input jack of the
VCR. Connect your camcorder to the LINE
IN input on tbe VCR using the A/V
connecting cable. Set the input selector on
tbe VCR to LINE (VIDEO I. VIDEO 2.
etc.).
WhenyourTVismonaural(Whenyour
TVhasonly oneaudioinputjack)
Connect the yellow plug of the A/V
connecting cable to the video input jack and
connect the white (left channel) or the red
(right channel) plug to tbe audio input jack
of your TV or VCR.
On"PhotoTV HD"
This camcorder is compatible witb tbe
"PbotoTV HD" standard. "PhotoTV HD"
allows lkwhighly-detailed, pboto-like
depiction of subtle textures and colors. By
connecting Sony's PhoteTV HD-
compatible devices using an HDMI cable*
or component video cable**, a whole new
world of photos can be el_ioyed in
breathtaking full HD quality.
* The TV will automaticully switchto the
appropriate mode when displaying photos.
** Setupof the TV will be necessary.
Please refer to the instruction manual of
your PheteTV HD-compatible TV for
details.
"_° Tips
• Tile HDMI (High Definition Multimedia
lnterluce) is an interlace to sen(] both video/
audio signals. Connecting HDMI OUT.jack an(]
external device with a cable supplies high
quality images an(] digital audio.
• If you connect your camcorder to your TV using
more than one type of cable to output images
Irom a jack other than the i.LINK jack. tile order
of priority of tim outpul signals is as lo]lows:
HDMI --++component video ++++S VIDEO ++++
audio/video.
• See page 95 lor the details of i.LINK.
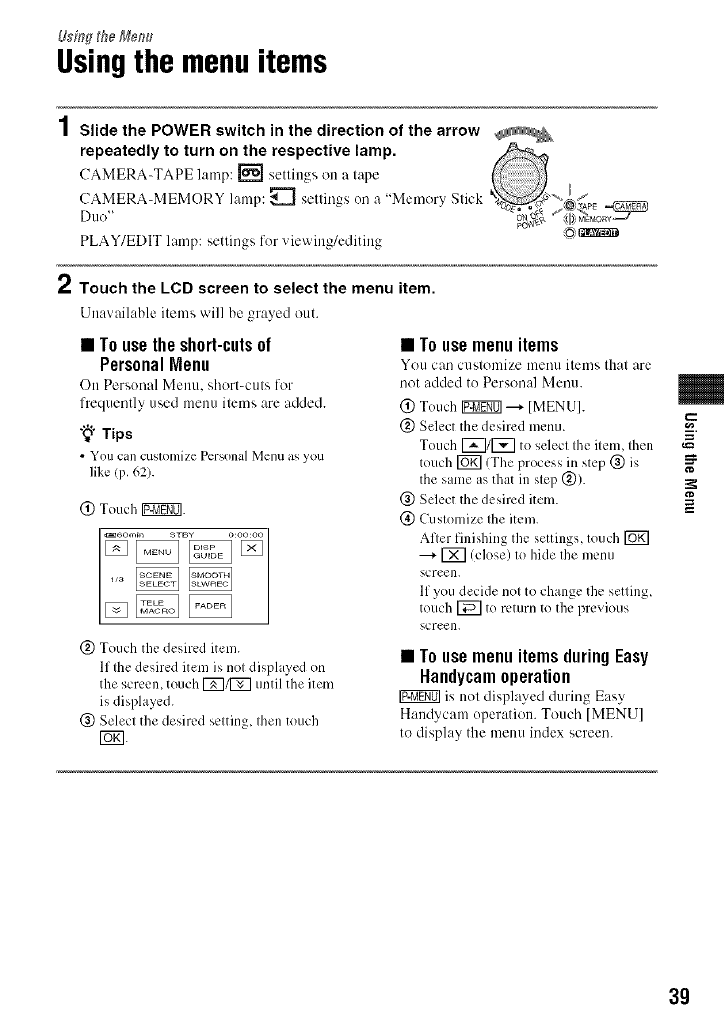
Us#_g _he #,dem_
Usingthe menuitems
1 Slide the POWER switch in the direction of the arrow
repeatedly to turn on the respective lamp.
CAMERA-TAPE lamp: _ settings on a tape
CAMERA-MEMORY lamp: _ settings on a "Memory Stick
D/io"
PLAY/EDIT lamp: settings for viewing/editing
2Touch the LCD screen to select the menu item.
Unavailable items will be grayed out.
• To use the short-cutsof
PersonalMenu
On Personal _len/i. s;hort-cuts for
frequently used menu items are added.
"_° Tips
• gotl c_ln cuslomize Personal IVlenu _ls you
like (p. 62).
@ Touch Ig2Mg_l.
(_) Touch the desired item.
If the desired item is not displayed on
the screem touch [_/[_ until the item
is displayed.
@ Select the desired setting, then touch
• To use menu items
YO/I can Cllstonlize nlen]l items that are
not added to Personal Menu.
(_) Touch IgSMgffOI---+ IMENUI.
@ Select the desircd menu.
Touch [_/[_ to select the item, then
touch [_ (The process in step @ is
the same as that in step @).
@ Select the desired item.
(_) Customize the item.
After finishing the settings, touch [_
--+ EX] (close) to hide the menu
screen.
If you decide not to change the setting,
touch [_ to return to the previous
screen.
•TousemenuitemsduringEasy
Handycamoperation
Ig2flNOIis not displayed during Easy
Handycam operation. Touch [MENU]
to display the menu index screen.
2
g
39
4O
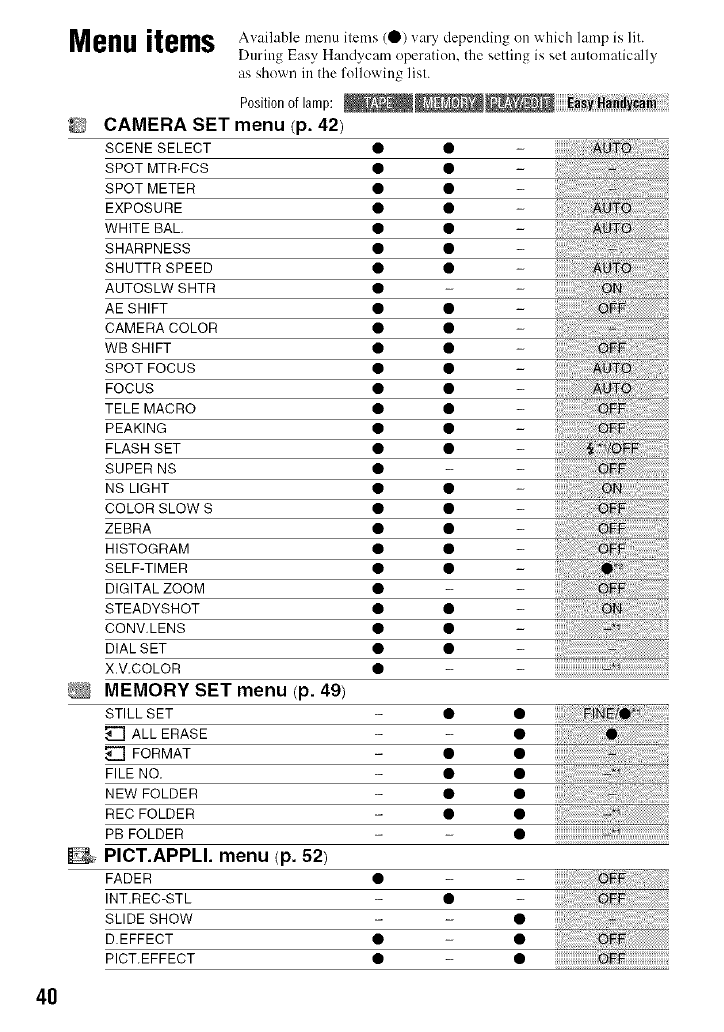
Menu items Available menu items (01 vary depending on which lamp is lit.
During Easy Handycam operation, the setting is set automatically
as shown in tile following list.
Positionof lamp:
8CAMERA SET menu (p. 42)
SCENE SELECT • •
SPOT MTR.FCS • •
SPOT METER • •
EXPOSURE • •
WHITE BAL. • •
SHARPNESS • •
SHUTTR SPEED • •
AUTOSLW SHTR • -
AE SHIFT • •
CAMERA COLOR • •
WB SHIFT • •
SPOT FOCUS • •
FOCUS • •
TELE MACRO • •
PEAKING • •
FLASH SET • •
SUPER NS • -
NS LIGHT • •
COLOR SLOW S • •
ZEBRA • •
HISTOGRAM • •
SELF-TIMER • •
DIGITAL ZOOM • -
STEADYSHOT • •
CONV.LENS • •
DIAL SET • •
X.V.COLOR
MEMORY SET menu (p. 49)
STILL SET - • •
_] ALL ERASE - - •
_] FORMAT - • •
FILE NO. - • •
NEW FOLDER - • •
REC FOLDER - • •
PB FOLDER - - •
PICT.APPLI. menu (p. 52)
FADER • -
INT.REC-STL - •
SLIDE SHOW - - •
DIEFFECT • - •
PICT.EFFECT • - •
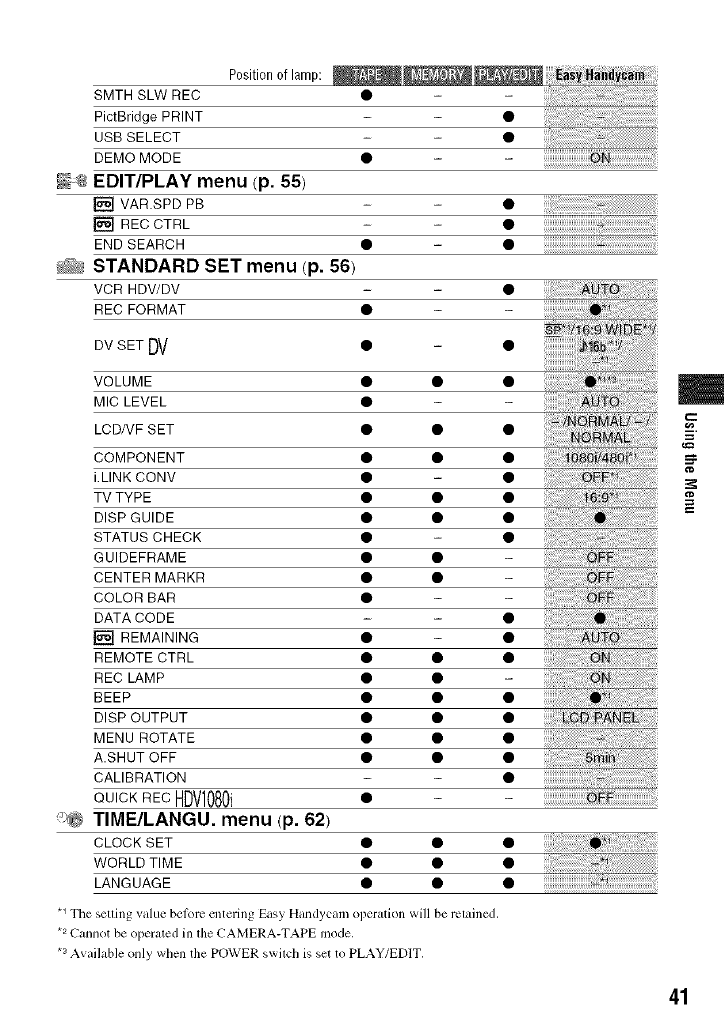
Positiooo__a,_,p:
SMTH SLW REC •-
PictBridge PRINT - •
USB SELECT - •
DEMO MODE • -
_-_ EDIT/PLAY menu (p. 55)
r_q VAR.SPD PB - •
[] REC CTRL - •
END SEARCH
_ STANDARD SET menu (p. 56)
VCR HDV/DV - •
REC FORMAT • -
DV SET DV • •
VOLUME • • •
MIC LEVEL • -
LCD/VF SET • • •
COMPONENT • • •
i.LINK CONV • •
TV TYPE • • •
DISP GUIDE • • •
STATUS CHECK • •
GUIDEFRAME • • -
CENTER MARKR • • -
COLOR BAR • -
DATA CODE - •
[] REMAINING • •
REMOTE CTRL • • •
REC LAMP • • -
BEEP • • •
DISP OUTPUT • • •
MENU ROTATE • • •
A.SHUT OFF • • •
CALIBRATION - •
QUICKRECHDV1080i • -
'_ TIME/LANGU. menu (p. 62)
CLOCK SET • • •
WORLD TIME • • •
LANGUAGE • • •
.1 The selling value bei_)re entering Easy Handycam operation will be relained,
2 )
* Cann(t be operated in lhe CAMERA-TAPE mode,
*_ Available only when the POWER swilcll is set to PLAY/EDIT,
m
¢D
41
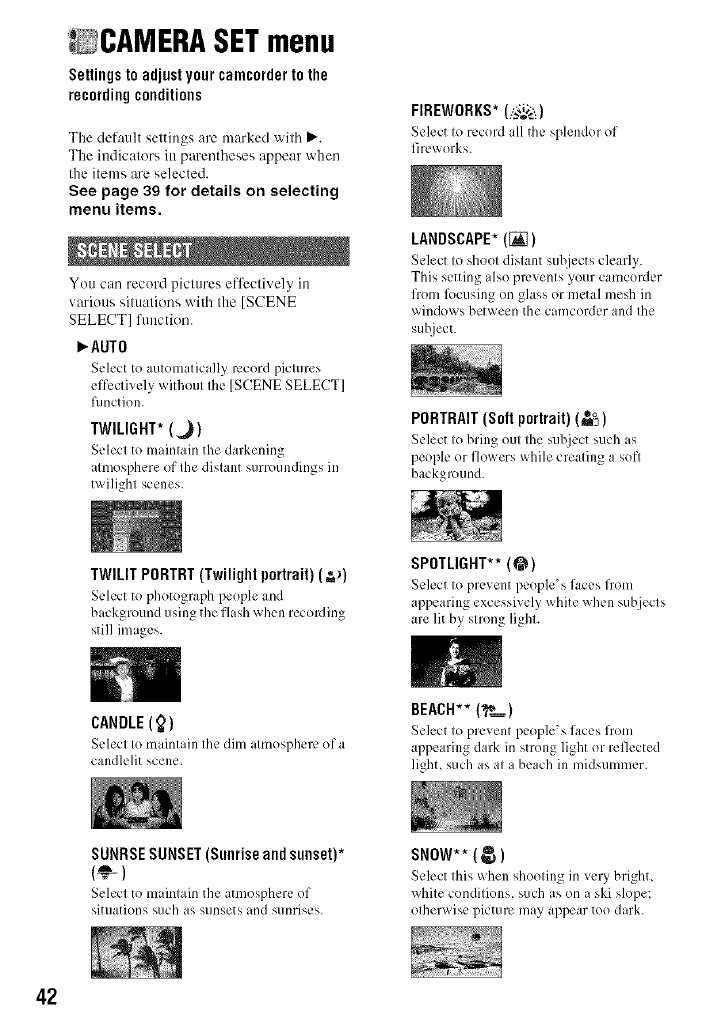
CAMERA SETmenu
Settings to adjust your camcorder to the
recordingconditions
The default settings are marked with _'.
The indicators in pm'entheses appear when
the items are selected.
See page 39 for details on selecting
menu items.
You can record pictures effectively in
various situations with the [SCENE
SELECT] function.
P,'AUTO
Select to automatic_l]ly record pictures
effectively without the [SCENE SELECT]
function.
TWILIGHT* 1_,)1
Select to maintain the darkening
atmosphere of the distant surroundings in
twilight scenes.
FIREWORKS* (/_;_ )
Select Io record all the splendor of
fireworks.
LANDSCAPE* (_)
Select to shoot distant subjects clearly.
This setting also prevents your camcorder
from lbcusing on glass or metal mesh in
windows between the camcorder and the
suhject.
PORTRAIT(Soft portrait) (=_-_)
Select to bring out the subject such as
people or flowers while creating a soft
background.
TWILIT PORTRT(Twilight portrait) (_'>)
Select to photograph people and
background using the flash when recording
still images.
CANDLE(_)
SPOTLIGHT** (@)
Select to prevent people's faces from
appearing excessively white when subjects
are lit by strong light.
Select Io m dnlain Ihe dim almosphere of a
candlelit scene.
BEACH** (__)
Select to prevent people's faces from
appearing dark in strong light or reflected
light, such as at a beach in midsummer.
SUNRSESUNSET(Sunriseand sunset)*
Select to maintain the atmosphere of
situations such as sunsets and sLinrises.
SNOW** ( _)
Select this when shooting in very bright,
white conditions, such as on a ski slope;
otherwise picture may appear too dark.
42
* Adjusted to lbcus on subjects liwther away
only.
**Adjusted not to locus on subjects a short
distance away.
O Notes
• llyou _1 [SCENE SELECT], the sellings of
[SHUTTR SPEEDI and ]WHITE BAL.I am
canceled.
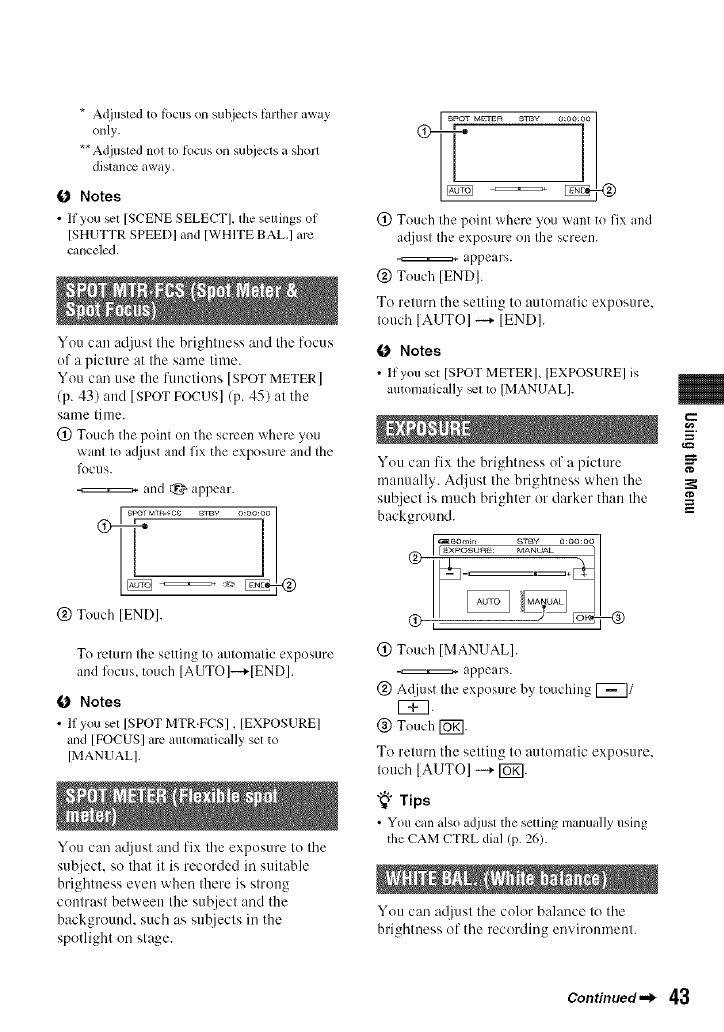
You can adjust the brightness and tile focus
of a picture at the santo time.
You call use the functions [SPOT METER[
(p. 43) and [SPOT FOCUS] (p. 45) at the
same time.
(_) Touch the point on the screen where you
want to a(!just and fix the exposure and the
lbcus.
and _. appear.
,_,;,o_,............. iol
@ Touch [END].
To relurn Ihe selling Io aUlOlllalic exposure
and ff)cus, touch [AUTOI--+[END].
0Notes
• If you _t ]SPOT MTR.FCS], ]EXPOSURE]
and [FOCUS] arc automatically set to
[MANUAL].
You call atliust and fix tile exposure to tile
sutzject, so that it is recorded ill suitable
brightness even when there is strong
contrast between the sut_ject and the
background, such as sutzjects ill the
spotlight on stage.
3
SPOT M_ER STrW O:00:00/
i i
(_) Touch the point where you want to fix and
a([just the exposure on the screen.
appears.
@ Touch [ENDI.
To return the setting to automatic exposure.
touch [AUTO] --+ [END].
O Notes
• If you set ]SPOT METER]. [EXPOSURE] is
automatically _t to [MANUALI.
You call fix tile brightness of a picture
manually. Adjust the brightness when the
subject is much brighter or darker than the
background.
@ Touch [MANUAL].
appears.
(g) A([just the exposure by touching [_/
V_q.
@ Touch [_].
To return the setting to automatic exposure,
touch [AUTO] --+ [UK].
-_i- Tips
• You can also adjust the setting manually using
the CAM CTRL dial (p. 26),
You can atljusl tile color balance to tile
brightness of tile recording environmenl.
g
Continued._ 43
_gANERA SET mesh {Co_i_ed}
44
_'AUTO
The white balance is ac[ju,4cd
automatically.
OUTDOOR (_)
The _ hit,-' balance is a??rol_riatcly
ac{justed for the fi)llowing recoMing
conditions:
Outdoors
Nighl views, neon signs and fireworks
Sunrise or sllnsel
Under daylighl fluorcscenl lamps
INDOOR (;_1
Tile white balance is appropriately
ac{justed for the Rfllowing recoMing
conditkms:
Indoors
AI party scenes or sllldios where the lighling
conditions change quickly
Under video lanlps in a studio, or under
sodium lanlps or incandescenl-like color
lamps
ONEPUSH(_IA)
Tile _bitc balance will bc ac!justed
according to the ambient light.
(_) Touch [ONE PUSH].
@Frame a white object such as a piece of
p iper, to fill the screen under the same
lighting conditions as you will shoot
the subject.
@ Touch I_I_].
Ixmziflashes quickly. When the _ hite
b dance has been acliusted and stored ill
the memory, the indicator stops
flashing.
Notes
•Set [WHITE BAL.] to [AUTO[ or adjust tile
color in [ONE PUSHI under white or cool white
fluorcscelll ]anlps.
• When you select [ONE PUSHI, keep flaming
wllile ohjects while LxmZlis flaslling quickly.
• txIz:l flashes slowly if [ONE PUSHI could not
be sel.
• When [ONE PUSHI was selected, if txmz_keeps
flashing after toucbmg [_, set [WHITE
BAL. I to [AUTOI.
• If you sel [WHITE BAL. I, [SCENE SELECTI
ivmrns to [AUTO].
"_° Tips
• It you have cllmlged the battc]y pack while
[AUTO] was _lecled, or laken your camcoMer
outdoors after inside use (or vice vcrsah selecl
[AUTOI and aim your camcorder at a nearby
while object lot aboul 10 seconds lor betler
color balance adjustment.
• Whml the white balance has been _1 wilh [ONE
PUSHI, if you change the [SCENE SELECTI
settings, or bring your camcorder ouldoors ftonl
inside the hou_, or vice versa, you need to rcdo
the [ONE PUSH] procedure to readjust the
while balance.
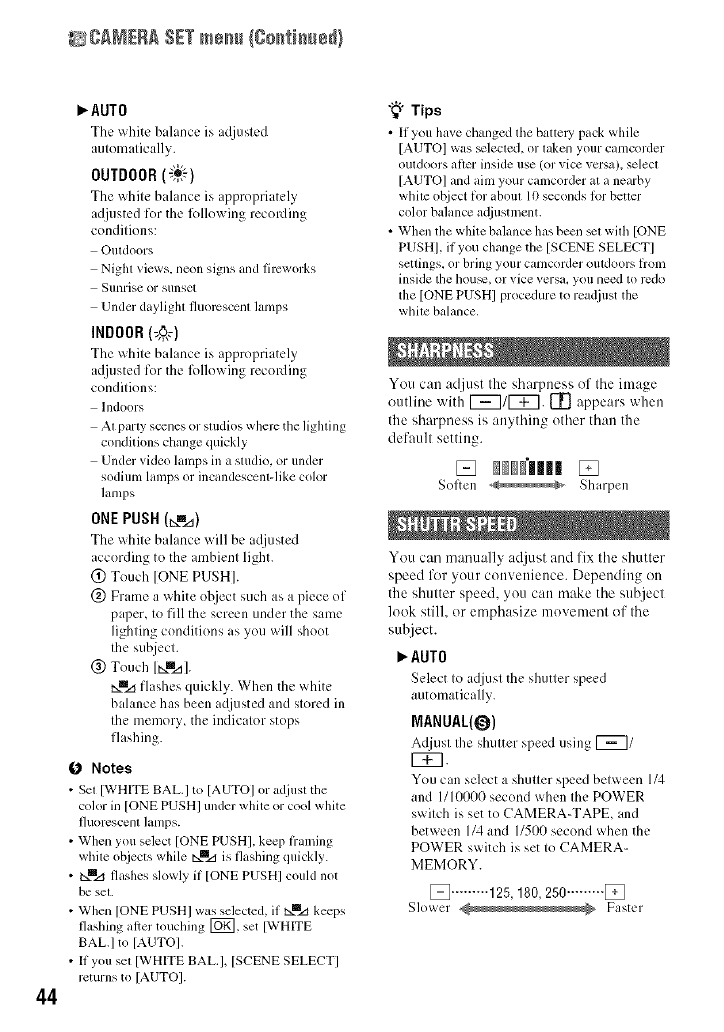
You can adjust the sharpness of the image
outline with _]/[_. [t] appears when
the sharpness is anything other than the
default setting.
Soften _ Sharpen
You can manually adjust and fix the shutter
speed lk_r your convenience. Depending on
the shutter speed, you can make the subject
look still, or emphasize movement of the
subject.
AUTO
Select to adjust the shutter s?ecd
automatically.
MANUAL(0)
Adjusl Ihe slmlter speed using [_/
C_q.
You can select a shutter speed between 1/4
and 1110000 second when the POWER
switch is set to CAMERA-TAPE, and
between 114 and 115110second when the
POWER switch is set to CAMERA-
MEMORY.
[] ......... 125,180,250......... []
Slower Faster
O Notes
•When the strutter speed is set between 1/725 to
I/ItRRR) second, st:ill ilnages cannol be recorded.
•For example, if you select 1/1110 second. [I 00]
aq_pears on tile screen.
• At a slow shutter speed, atllOrllatic k)cus may be
losl. Adjust the li)cus manually, using a tripod,
ct_2.
• When recording under a discharge tube such as
a lhlor_scelll lanlp, sodilltll lalnp or merculy
lamp, horizontal bands may appear in tile screen
depcnding on the shuttcr speed.
"_° Tips
• You cnr_uD*_u_/iust tile setting manually using
the CAM CTRL dial (p. 26).
When you sel [AUTOSLW SHTR] to
ION], the shutter speed is slowed down
automatically 1o 1130second in dark places.
You can a@tst the exposure using [_
(dark)/E_ (bright]. [_] and the setting
value appear when [AE SHIFT] is anything
other than the default setting.
"_° Tips
• Touch _ if tile subjecl is white or tile
backligllt is bright, or touch [_ if lhe subject
is Mack or the ligh_is dim.
• You can m]iust the automatic exposure level to
brighter or darker when [EXPOSUREI is set to
[AUTOI.
• You can also ac]iost the selting nlanual]y using
the CAMCTRL dial (p, 26).
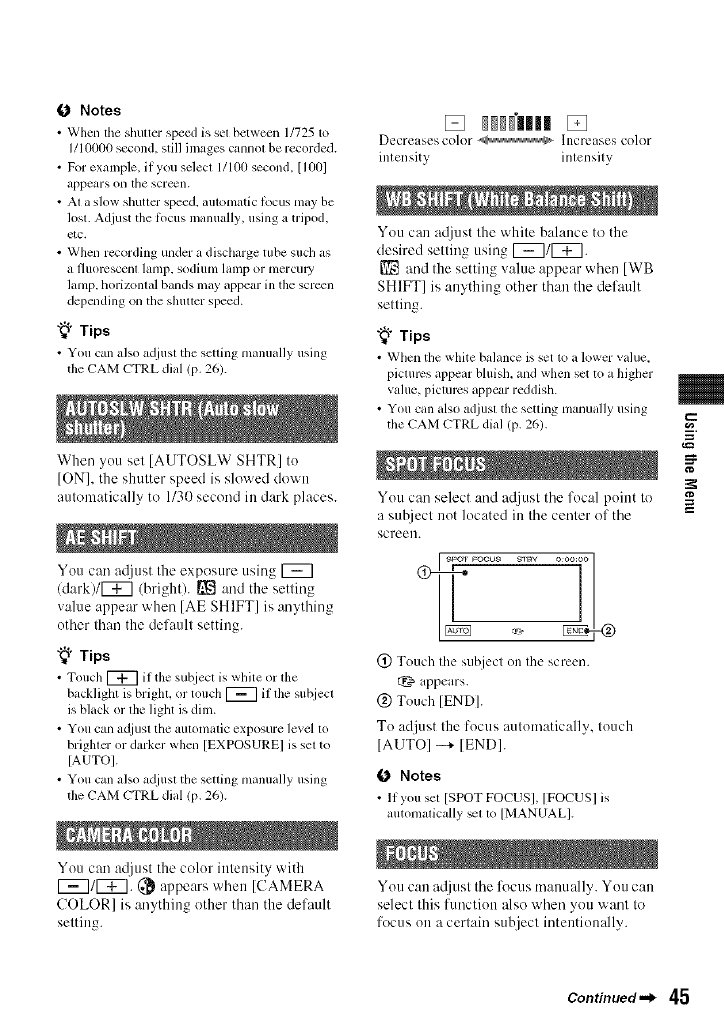
You can a@tst the color intensity with
_/[_. (_ appears when ]CAMERA
COLOR] is anything other than the defmtlt
setting.
Decrelsescolor _ ]ncrellses color
intensity inlensily
You can adjust the white balance to the
desired selling usin_ [_/[_7.
[] and the setting value appear when [WB
SHIFT] is anything other than the default
setting.
"_° Tips
• When tile v_,h_t_:bahmce is "v,:tt_ _ lower valu,:,
piclm'cs _q_pearbluish, mid when set to a higher
value, pictures appear reddish.
• You can also adjusl the setting mm_ually using
tile CAM CTRL dial (p. 26).
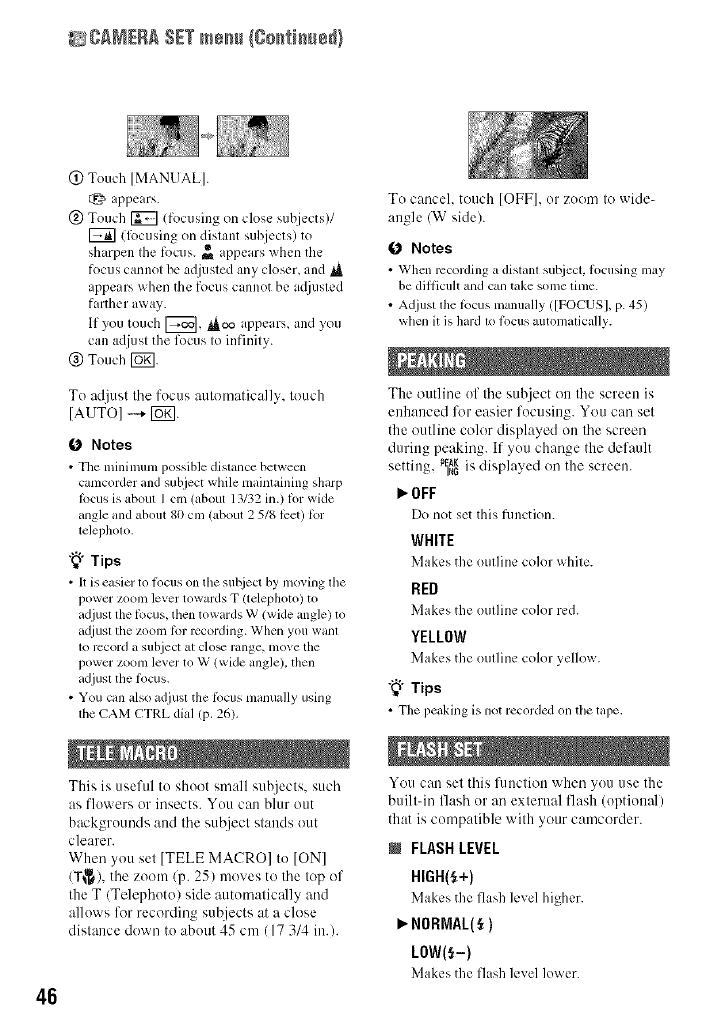
You can select and a(ljnst the focal point to
a subject not located in the center of the
screetl.
@ Touch the subject on the screen.
appears.
@ Touch [END].
To adjust the focus automatically, touch
[AUTO] --+ [END].
0Notes
• 11you set [SPOT FOC'US], [FOCUS] is
autolnalically _t to [MANUAL].
You can a_liust the focus tt'tanu:dly, You can
select Ihis ftlllCliOtl also when you _x/at'dIt}
focus on a cerlain subjecl intentionally.
I
gl
g
Continued'_ 45
gANERA SET mesh (Co_ti_e_}
46
(2) Touch [MANUAL].
appears.
@ Touch _ (l_)cusing on close subjects)/
[7_] (l_)cusing on distant subjects) to
sharpen Ihe focus. _ appears when the
focus cannot be adjusted any closer, and t_
appears when the focus cannot be a({justed
farther away.
If you touch [7_], _too appears, and you
can adjust the focus to infinity.
@ Touch Fogl.
To adjust the focus automatically, touch
]AUTOI -+ [U_.
(b Notes
• The minimum possible distance betwecn
camcorder and subject while nlaintaining sharp
locus is about I cm (about 13132 in.) lot wide
angle and about 80 cm (about 2 518 Jcet) lbr
telepholo.
"_° Tips
• It is easier to ti)cuson the sut_iectbyIno_ing file
power zoom lever towards T (telephoto) to
adjusl the lbcus, then towards W (wide angle) to
a_/iusltile zoom l_l"recording. When you wanl
1o record astlbject at clo_ range, nlove tile
pow-erzoonl levm to W (wide angle), then
adjusl the lk_cus.
• You can also adjust the lbcus nlanually using
lhe CAM CTRL dial (p. 26).
This is useful to shoot small subjects, such
as flowers or insects. You can blur out
backgrounds and the subject stands out
clearer.
When you set [TELL MACRO] to ]ONI
/T_), the zoom/p. 25) moves to the top of
the T/Telephoto) skle automatically and
allows lklr recording subjects at a close
distance down to about 45 cm (17 3/4 in.).
To canceh touch [OFF], or zoom to wide-
angle/W side).
(b Notes
• When =x_cordinga distant subject, ti_cusing may
be diflicuh and can take some tinle.
• Adjust the Rlcusmanually ([FOCUSI,p. 45)
when it is hard 1oli)cus automatically.
The outline of the subject on the screen is
enhanced l\_r easier focusing. You can set
the outline color displayed on the screen
during peaking. If you change the default
setting, P_ is displayed on the screen.
OFF
Do not set this function.
WHITE
Makes the outline color white.
RED
Makes the outline color red.
YELLOW
Makes the outline color yellow.
"_°Tips
• Tile peaking is not recorded on tile tape.
You can set this 15motion whetl you use the
builtqn flash or an external flash (optional)
that is compatible with yottr camcorder.
NFLASHLEVEL
HIGH(_+)
Makes the flash level higher.
NORMAL(_)
LOW(_-)
Makes the flash level lower.
NREDEYEREDUC
You can prevent redeye by activating the
flash before recording.
Set [REDEYE REDUC] tu [ON], then press
the ,_ (flash) button (p. 26) repeatedly to
select a setting.
O (Auto redeye rcductkm): Pre-flashes to
reduce redeye beibrc the flash automatically
flashes whcn lherc is insuflJcienl ambienl
light.
Q _ /Forced redeye reduction): Always uses
the flash and the rcdeye reducing pro-flash.
@/NO flash): Records without flash.
O Notes
• The rcdeye reduction may not produce the
desired ettcct due to individual diflcrcnces and
other conditions.
The picture will be recurded at a maximum
of 16 times the sensitivity of NightShot
recurdiug if you set [SUPER NS] to ION]
while the NIGHTSHOT switch (p. 27) is
also set tu ON.
S{_ and ["SUPER NIGHTSHOT"] appear
on the screen.
Tu return tu the normal setting, set [SUPER
NS] to [OFF], or set the NIGHTSHOT
switch to OFF.
O Notes
• Do not use NightShot/[SUPER NS] in brighl
places. This nmy cause a malfimclion,
• Do not cover the inliared port with your fingers
or other o[_iects (p. 105).
•Remove the conversion lens (optional) and lhe
lens hood.
• Adjusl the locus manually ([FOCUSI, p. 45)
when il is hard 1o lbcus automalically.
• The shultcr sp_d of your camcorder changes
depending on the brighmess. The molion of the
picture may slow down in this case,
When using either the NightShot (p. 27) or
[SUPER NS] (p. 47) function tu record, yuu
can record clearer pictures by setting [NS
LIGHT], which emits infrared light
/invisibleh to [ON]/the default setting).
O Notes
• Do not co_cr the inh'ared port with your lingers
or od_er objects (p. 105).
• Remove the convm:sion lens (optional) and tile
lens hood.
• The maxinmm shooting dislance using [NS
LIGHTI is about 3 m (10 lPet).
When you set [COLOR SLOW S] to [ON],
you can record an image brighter in color '_
even in dark places. _
___'_aud [COLOR SLOW SHUTTER] ==
appear uu the screen.
To cancel [COLOR SLOW S], touch
[OFF].
O Notes
• Adjust the locus manually ([FOCUS], p. 45)
when il is hard 1o locus automalically.
• The shuuer speed of your camcorder changes
depending on tile brightness. Tile motion of the
picture nmy slow down at lhis time.
Diagonal stripes appear in portions of the
screen where brightness is at a preset level.
This is useful as a guide when a_/iusting the
brightness. When you change the def:mlt
selling, [] is displayed. The zebra patlern
is not recorded.
_0FF
The zchra pattern is not displayed.
7O
The zebra pattern appears at a screen
brightness level of about 70 IRE.
Continued._ 47
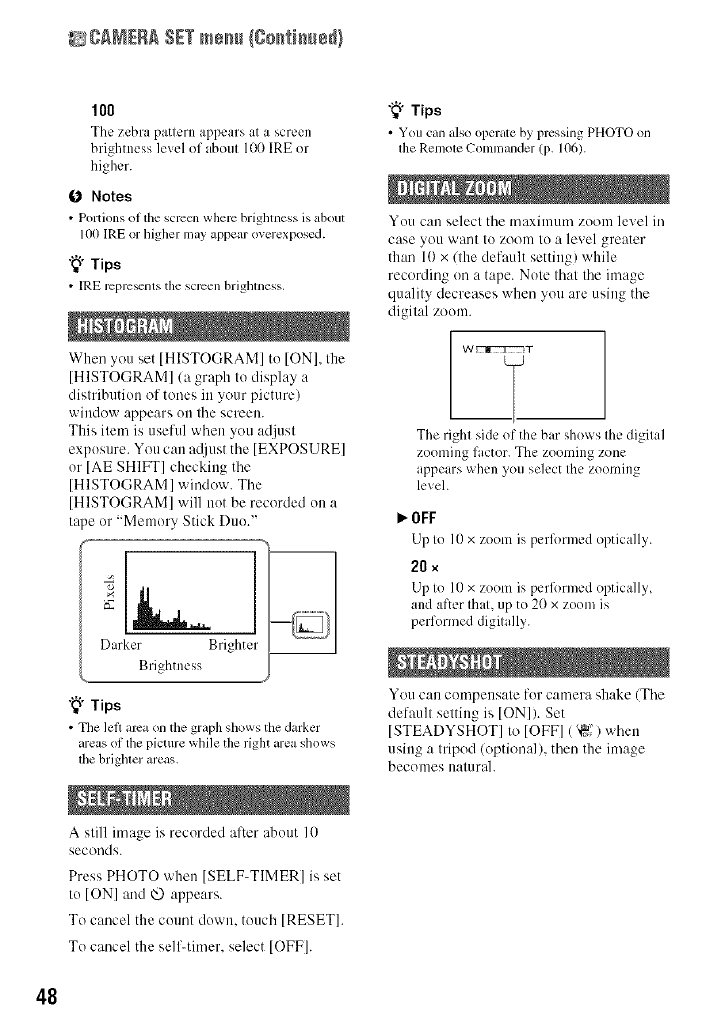
_gANERA SET mesh (Co_i_e_}
100
The zebra pattern appears at a screen
brightness level of about 100 IRE or
higher.
0 Notes
• Portions ot the screen where brighmess is about
lO0 IRE or higher may appear overexposed.
"_° Tips
•IRE repre_nts the screen brightness.
When you set IHISTOGRAMI to IONI, the
[HISTOGRAM]/a graph to display a
distribution of tones ill your picture)
window appears on tile screen.
This item is useful when you adjust
exposure. You call a([just tile [EXPOSURE]
or [AE SHIFT] checking tile
[HISTOGRAM] window. Tile
[HISTOGRAM] will not be recorded on a
tape or "Memory Stick Duo.'
Darker Brighter
Brightness
"_" Tips
•The letl alva onfile graph shows the darker
areas ot the picture while the right area shows
lhe brighler area,,.
A still image is recorded after about 10
seconds.
Press PHOTO when [SELF-TIMER] is set
to ION] and @ appears.
To cancel the count down, touch [RESET].
To cancel the self-timer, select [OFF].
"_° Tips
• You can also operate by pressing PHOTO on
lhe Remole Comnlander (p, 106).
You Call select tile maximum zoom level it/
case you want to zoom to a level greater
than 10 x/the default setting) while
recording on a tape. Note that tile image
quality decreases when you are using tile
digital zoom.
W_T
The right side of the bar shows the digital
zooming fi,ctor. The zooming zone
appears when you select tile zooming
level.
OFF
Lipto 10 x zoom is pcrlbrmcd optically.
211×
Up to 10 x zoom is perik)m/ed optically,
and after that, up to 2(1x ZOO1]/iS
performed digitally.
You can compensate for camera shake (Tile
default setting is IONI). Set
ISTEADYSHOT] to IOFF] ('_") when
using :1 tripod (optional), then the image
beconles naturah
48
When using an optional conversion lens.
use this function to record using the
optimllnl compensatioi/for canlera shake
for each lens.
_OFF
Select this when the conversion lens
/optional) is not used.
WIDECONV. (b'w)
Select this to use the wide conversion lens
(optional).
TELECONV.(N)
Select this to use the tclc conversion lens
(optional).
You can select a menu ilem to assign Io the
CAM CTRL dial. For details, see page 26.
When recording, set to [ON] to capture
wider range of colors.
Various colors such as the brilliant color of
flowers and turquoise blue of the sea can be
more faithfully reproduced.
ONotes
• Set [X.V.COLOR] to [ON] only when the
recorded content will be played back on an
x.v.Color-complianl TV.
• If the movie recorded with this function [ON] is
played back on a non-x.v.Color-compliant TV_
the color may not be reproduced correctly.
• [X.V.COLOR] cannot be set to [ON] whcn:
Recording in DV lbrmat
A movie is being recorded.
MEMORY SETmenu
Settings for the "Memory Stick Duo"
The def:mlt settings are marked with _'.
The indicators in parentheses appear when
the items are selected.
See page 39 for details on selecting
menu items.
N [] QUALITY
FINE(FINE)
Records still images at the fine image
quality level.
STANDARD(STD)
Records still images at the standard image
quality level.
ONotes
• Image quality is aulonmtically fixed to [FINE]
during Easy Handycam operation.
N [] IMAGE SiZE
_6.1M (_r.lU)
Records still images clearly.
4.6M (_M)
Records still images clearly in Ihe 16:9
(wide) ratio.
3.1M (3_1M)
Allows you to record more still images in
relatively clear quality.
VGA(&aM)(_)
Allows lbr the maximum number of
images to be recorded.
O Notes
• [[] IMAGE SIZE]can be set only when the
POWER switch is set to CAMERA-MEMORY.
g
Continued._ 4g
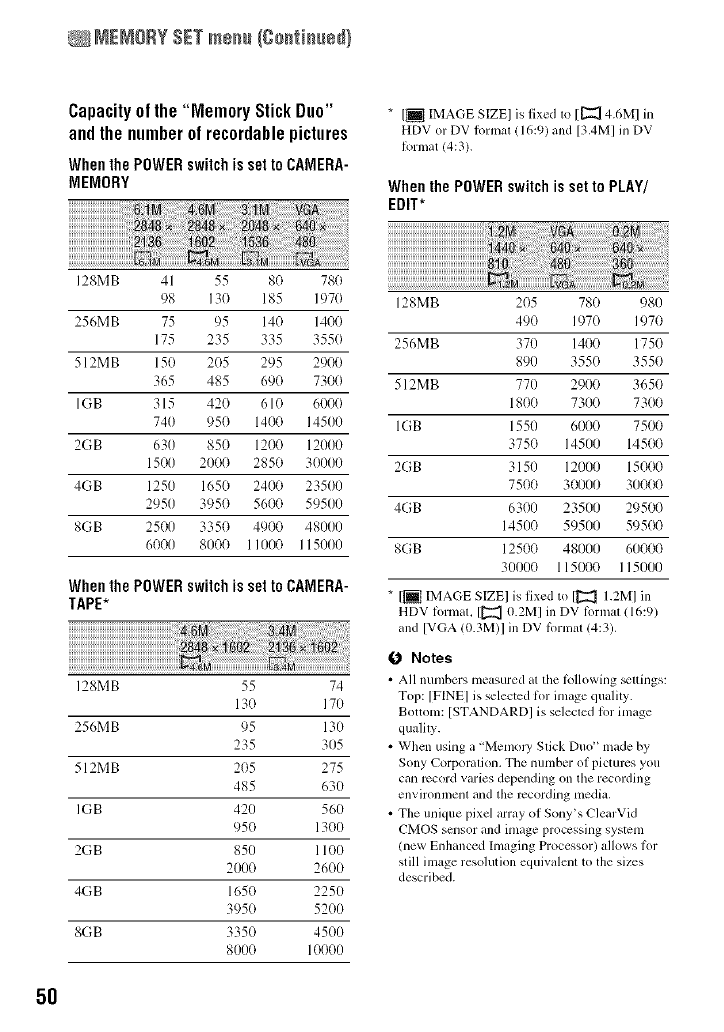
NENORYSETmem_(Continued)
Capacity of the "Memory Stick Duo"
andthe numberof recordable pictures
Whenthe POWERswitchis settoCAMERA-
MEMORY
* [i IMAGE SIZE] is fixed to [[22_ 4.6M1 in
HDV or DV lormat / 16:9) and [3.4M] in DV
Iormat 14:3).
WhenthePOWERswitchissettoPLAY/
EDIT*
128MB 41 55 80 780
98 130 185 197()
256MB 75 95 140 14(}0
175 235 335 355(}
512M B 150 2()5 295 2900
365 485 69() 7300
1GB315 420 610 6000
740 950 1400 14500
2GB 630 850 1200 12000
1501) 2000 2850 30000
4GB 1250 1650 2400 23500
2950 3950 5600 59500
8GB 2500 3350 4900 481)00
6000 8000 11000 I 15000
128MB 205 780 980
490 1970 1970
256MB 370 1400 1750
890 3550 3550
512MB 770 2900 3650
1800 7300 7300
IGB 1550 6000 7500
3750 14500 14500
2(;B 3150 12000 15000
7500 30000 31)000
4GB 6300 23500 29500
14500 59500 59500
8GB 12500 48000 60000
30000 115000 I 151)00
Whenthe POWERswitchis settoCAMERA-
TAPE*
128MB 55 74
130 170
256MB 95 130
235 305
512MB 205 275
485 630
IGB 420 560
950 1300
2GB 850 1100
2000 2601)
4GB 1650 2250
3950 5200
8GB 3350 4500
81)00 10000
* [i IMAGE SIZE] is fixed to [_2_ 1.2M] in
HDV lormat. [[22_ O.2M] in DV IPrmat 116:9)
and [VGA (0.3M)I in DV IPrlnz_t14:3).
0 Notes
• All numbers measured at the Ifillowing _ltings:
Top: [FINE] is selected I?>rimage qmdity.
Bottom: [STANDARD] is selected lor image
quality.
• When using a "MemoJy Stick Duo" made by
Sony Corporation. The number of pictures you
can record varies depending on the recording
environment and the recording media.
• The unique pixel array of Sony's ClearVid
CMOS sensor and image processing system
/new Enhanced hnaging Processor) allows Ii>r
still image resolution equivalent to the sizes
described.
5O
Deletes all Ihe pictures withuut image
prutecliun on a "Memory Stick Duu" or in
Ihe selecled fokler.
(!) Select [ALL FILES] or [CURRNT
FOLDER].
[ALE FLEES]: Deletes all the images on
tile "Memory Stick Duo."
[CURRNT FOLDER]: Deletes all the
images ill the selected folder.
@ Touch [YES] twice---+ [_.
(J Notes
•The tolder will nol be deleled even when you
ddete all the pictures in lhe ti)lder.
• Do nol do ally of tile R)llowing while [_
Erasing all dala...I is displayed:
Operate lhe POWER swilch/operafion
buttons.
Ejecl lhe "Memory Stick Duo,"
The "Memory Slick Duo" has been
formalled at the factury, and dues nut
require furmatting at purchase.
To execute lklrmatting, touch [YES] twice
--+ [_].
Formatting is cumpleted, and all the images
will be deleted.
(J Notes
• Do nol do any ot tile following willie [_
Ponnalting.., I is displayed:
Operate lhe POWER swilch/operafion
buttons.
Ejecl the "Memory Stick Duo,"
• Formatting erases evewthing on the "Memory
Stick Duo" including protected image data and
newly created tblders.
P,"SERIES
Assigns file numbers in sequence even if
the "Memory Stick Duo" is replaced with
another one. The file number is reset when
a new folder is cre aed or the recording
folder is replaced with another.
RESET
Resets the file number to (/OOleach time
the "Memory Stick Duo" is changed.
You can create a new folder / 102MSDCF
to 999MSDCF) on a "Memory Stick Duo."
When 9.999 images are stured in the current
folder, a new fulder is automatically created
for storing subsequent images.
Tuuch [YES] -"+ [_.
(J Notes
• You cannot delete tim created folders using your
camcorder. You will have to formal the
'Menlory Stick Duo" (p. 51 ), or delete them
using your computer.
• The number of rccordable picmrcs on a
"Memory Stick Duo" may decrease as file
number of h)lders increases.
Select the lk_lder to be used lk_r recording
with [_/[_], then tuuch [_.
O Notes
• As tile (let_ltl]l seuhlg, pictures are saved ill tile
101MSDCF tbldm'.
• Once you record u picture in a folder, the same
ti_lder will be set as the detauh tblder for
playback.
Select the playback fulder with [_1[_,
then touch [B_].
g
51
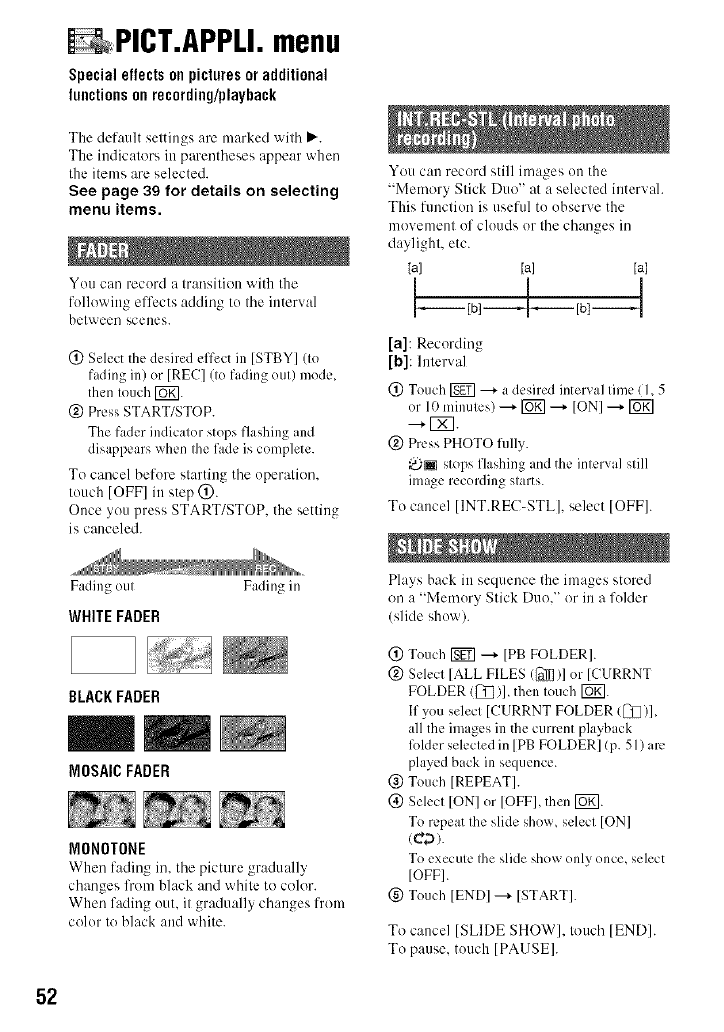
PICT.APPLI.menu
Special effectson picturesor additional
functionson recording/playback
The default settings are marked with P.'.
The indicators in parentheses appear when
the items are selected.
See page 39 for details on selecting
menu items.
You can record a transition with the
following effects adding to the interval
betweeu scelles.
(!) Select the desired effect in [STBY] (to
fading in) or [REC] (to fading out) mode,
then touch [_.
@ Press START/STOP.
The fader indicator stops flashing and
disappears when the fade is complete.
To cancel before starting the operation.
touch [OFF] in step @.
Once you press START/STOP. the setting
is canceled.
Fading otll
WHITE FADER
BLACKFADER
Fading in
MOSAICFADER
MONOTONE
When fading in, the picture graduall 3
changes from black and white to color.
When fading out, it gradually changes from
color to black and white.
You can record still images on the
"Memory Stick Duo" at a selected interwd.
This function is useful to observe the
movement of clouds or the changes in
daylight, etc.
[a] [a] [a]
I I I
[a]: Recording
[b]: Interval
(!) Touch [gg?] --+ a desired interval time (I, 5
or 10 minutes) --+ [_] --+ ION] _ [_]
--+ [_].
@ Press PHOTO fully.
_ stops flashing and the interval still
image recording starts.
To cancel [INT.REC-STL], select [OFF].
Plays back in sequence the images stored
on a "Memory Stick Duo." or in a folder
(slkle show).
@ Touch [ggTl---+ [PB FOLDER].
@ Select [ALL FILES (_{]!])]or [CURRNT
FOLDER (_])1, then touch [_.
If you select [CURRNT FOLDER l_)],
all the images in the current playback
li)lder selected in [PB FOLDER[ (p. 51) am
played back in sequence.
@ Touch [REPEAT].
(_) Select [ON] or [OFFI, then lug].
To repeat the slide show, select [ON]
(¢*g_).
To execute fileslide show only once, select
[OFF].
(g) Touch [ENDI ---+[START].
To cancel [SLIDE SHOW], touch [END].
To pause, touch [PAUSE].
52
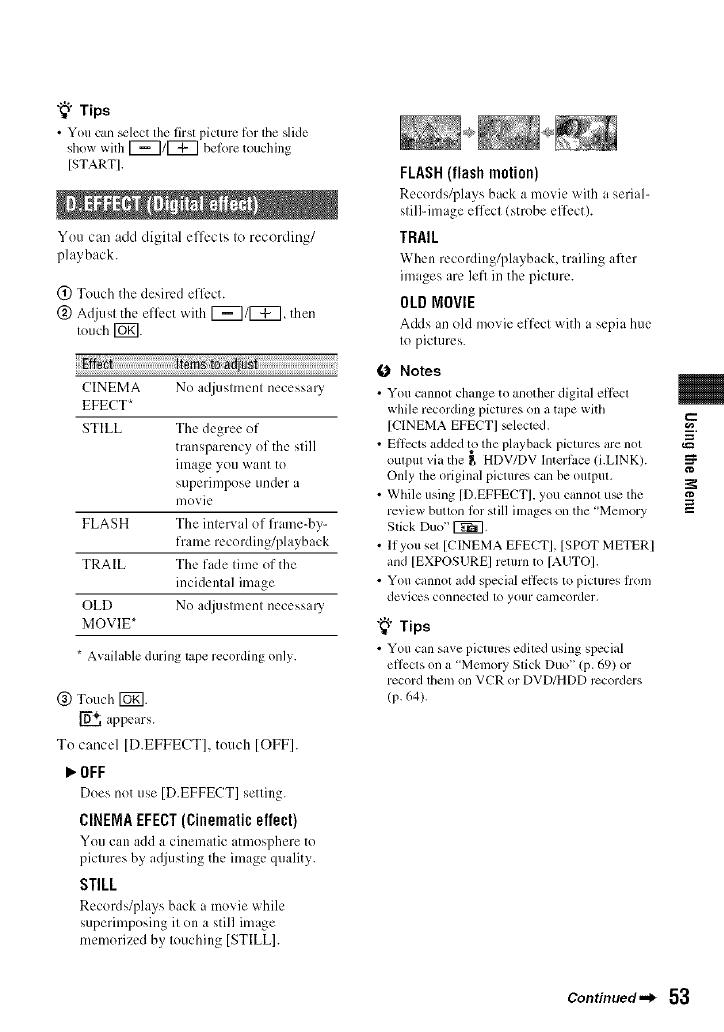
"_° Tips
•You can _lect the first picture _br tile slide
show with [_/[_] belore touching
ISTARTI.
You can add digilal effects Io recording/
playback.
FLASH(flashmotion)
Records/plays back a movie with a serial-
still-image effect (strobe effect).
TRAIL
When recording/playback, trailing after
images arc lefl in the picture.
OLDMOVIE
Adds an old movie effect with a sepia huc
to pictures.
(_) Touch the desired eflk:ct.
@ Adjust the eflk'ct with [_/[_, then
touch [_.
0 Notes
CINEMA No adjustnlcnt ncccssal T • You cannot change to another digital eflbcl
EFECT* while recording pictures on a tape witll
STILL The degree of [CINEMA EFECT] _lected.
transparency of the still • Elli_cts added t_t the playback pictures are not
image you want to ouq3ut via tile r, HDV/DV lnterfitce (i.LINK).
superimpose under a Only file original piclurcs can be oulput,
movie • Wllile using [[).EFFECT], you cannot u_ the
review button h)r still images on tile "Memory
FLASH The inlerval of frame-by- Slick Duo" _.
frame recording/playback • If you set [CINEMA EFECT], [SPOT METERI
TRAIL The fade time of the and [EXPOSURE] rmum to [AUTO].
incidental inlage • You cannol add special elIccls to pictures holl]
devices connecled 1o your cat/lcorder,
OLD No a(0ustment necessa U
MOVIE* "_° Tips
• Available during tape recording only. • You can save pictures edited using special
elIccts on a "Menlory Slick Duo" (p. 69) or
record them on VCR or DVD/HDD recorders
(p, 64),
@ Touch log].
i-6+, appears.
To cancel [D.EFFECT], touch [OFF].
_'OFF
Does not use [D.EFFECT] setting.
CINEMAEFECT(Cinematic effect)
You can add a cinematic atmosphere to
pictures by adjusting the image quality.
STILL
Records/plays back a movie while
superimposing it on a still image
memori/cd by touching [STILL].
g
Continued-_ 53
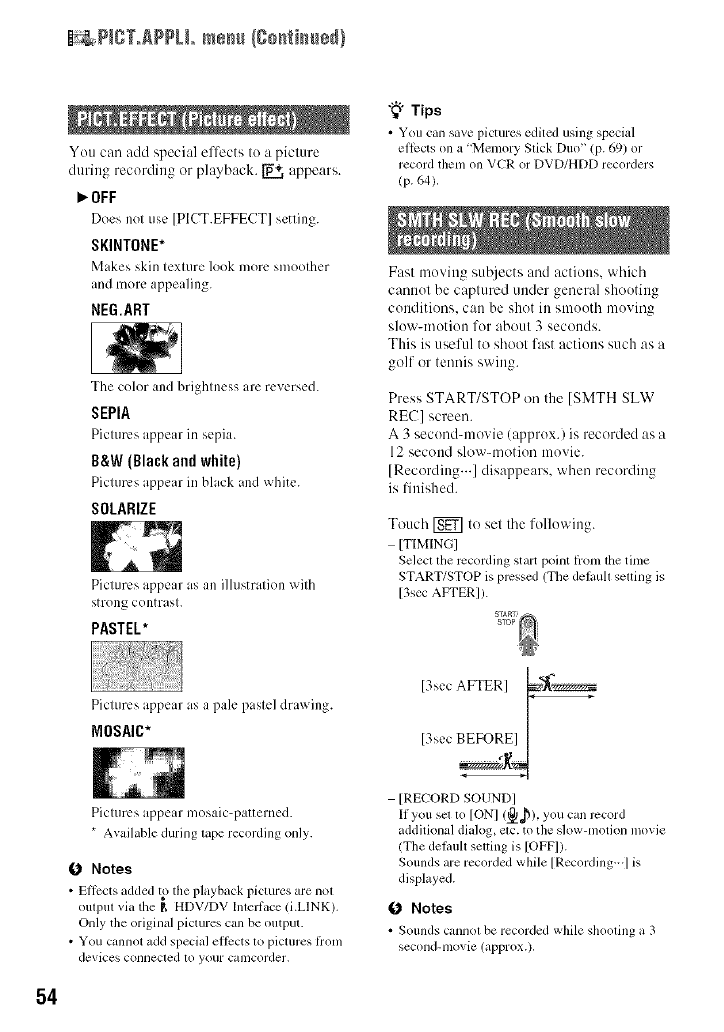
_ ?ET.gPPLL mesh (go_tim_÷d}
You can add special effects to a picture
during recording or playback. _+, appears.
I_OFF
Does not use [PICT.EFFECT] setting.
SKINTONE*
Makes skin texture look more smoother
and more appealing.
NEG,ART
The color and brightness are reversed.
SEPIA
Pictures appear in sepia.
B&W(Blackandwhite)
Pictures appear in black and white.
SOLARIZE
Piclures appear as an ilhlsmdion wilh
strong contlaSl.
PASTEL*
Picturesappearas a palepaslel drawing.
MOSAIC*
Piclures appear mosaic-patterned.
* Available during lape recording only.
0 Notes
• EffEcts added to the playback pictures are nol
oulpul via the I1, HDV/DV Intefi,Lce/i.LINK).
Only the original pictures can be output.
• You cannot add special ellccts to pictures li'om
devices connecled 1oyour Calllcorder.
-_i- Tips
• You can save pictures edited using special
efl_cts on a 'Memory Stick Duo" (p. 69) or
record them on VCR or DVD/HDD recorders
(p. 64).
Fast touring su_!iects and actions, which
cannut be captured under general shooting
conditiuns, can be shot in smooth moving
slow-motion for about 3 seconds.
This is useful to shoot fast actiuns such as a
golf or tennis swing.
Press START/STOP on the [SMTH SLW
REC] screen.
A 3 secund-movie (apprux.)is recorded as a
12second slow-motion movie.
[Recording...] disappears, when recording
is finished.
Touch ISEY] to set the folluwing.
ITIMINGI
Select file recording start point lionl lhe time
START/STOP is pressed (The delauh selting is
[3sec AFTERI).
[3sec AFTER] p_
13sc._BEFOREII
[RECORD SOUND]
If you set 1o [ON] (_ob), you can rccord
additional diidog, elc. to the slow-nlotion movie
(The dehmh selting is [OFFI).
Sounds are recorded while [Recording---] is
displayed.
0 Notes
• Sounds canllOl be recorded while shooling a 3
second-movie (approx.).
54
• Tile image quality of [SMTH SLW REC] is
sonlcwllat less than nornlill recording.
To cancel [SMTH SLW REC], select
[END].
See page 7 I.
You can connect the camcorder to a
personal computer with a USB cable and
import pictures to the computer. You can
also commct the camcorder to a PictBridge
compatible printer using this function.
Refer to "First Step Guide" on the supplied
CD-ROM for details.
_El[] NemoryStick
Select this to vie_ 1)icturcs on a "Memory
Stick Duo" on the computer or to import
them to the computer.
PictBridgePRINT
Select this when you connect the
camcorder to a PictBridge compatible
printer to print out directly (p. 71 ).
The default setting is [ON], allowing you to
view the dmnonstration about 10 minutes
after you have removed both a cassette and
a "Memory Stick Duo" t'rom your
camcorder, and slide the POWER switch to
mrn on the CAMERA_TAPE lamp.
"_" Tips
• Tile demonstration will be suspended in
simalions such as dlose described beh)w.
Whcn you touch tile screen during tim
denlonslration (Tile delnollstratioll slarls
again a/_cr about 10 minutes).
When a casselle or a 'Memory Stick Duo" is
in_rted.
Whcn tile POWER switch is sel to other than
CAMERA-TAPE.
N EDIT/PLAY menu
Settings for editing or playing back in
various modes
See page 39 for details on selecting
menu items.
You can play back in various modes while
viewing movies.
(!) Touch the following buttons during
pla)q_ack.
change the
playback _ (frame)
direction*
play back rKgcTq
slowly** To r,:verse direction:
(frame) ---+
rgcN_
play back frame [_ (frame) during
by frame playback pause.
To reverse direction:
[_ (frame) during
frame playback.
* Horizontal lines nlay appear at tile top,
bott_)tll, or in tile center of tile screen. This
is not a nlallhnction.
**Pictures output lioln the _, HDV/DV
Interlace (i.LINK) cannot be played back
smoothly in slow nlode.
(_) Touch [_ --+ [_.
To return to the normal playback mode,
touch _ (Play/Pause) twice (once from
frame playback).
0 Notes
• You will not hem tile recorded sound. You may
see mosaic-like inlages of file previously played
picmrc,
• Pictures in tile HDV lormal are nol output hom
the [_ HDV/DV lnlerb_ce (i.LINK) wllen dlcy
arc paused or played back in any mode otller
allan normal playback mode.
• Pictures in lhe HDV lbrmal nlay appear
distwrled during:
Continued.,_ 55
=
g
N*sED_T/PLAYmsss/Ssstisssd)
Picture search
Reverse playback
•Playing back slowly to tile reverse direction and
playing back frame by tralne m the rcver,,e
direclion arc nol available in HDV Iormal,
See page 67.
EXEC
The most recently recorded 1)icmre is
played back l_)r about 5 seconds and then
stops automatically.
CANCEL
Stops [END SEARCH].
0 Notes
• [END SEARCH] will nol work once you qiecl
tile casselte al}er you have rccorded on the lape.
STANDARDSET
menu
Settingswhilerecordingona tapeorother
basicsettings
The default settings are marked with P".
The indicators in parentheses appear when
the items are selected.
See page 39 for details on selecting
menu items.
Select the playback signal. Normally select
IAUTOI.
When your cnmcorder is connected to
another device using an i.LINK cable.
select the signal to iupuffoutput from the _,
HDV/DV Interface/i.LINK). The selected
signal is recorded or played back.
P,.AUTO
Switches the signals bct_ ecn HDV and
DV format automatically when playing
back a tape.
Wilh an i.LINK connection, switches the
signals between HDV and DV lbrmats
automatically, md inputs/outputs from the
_, HDV/DV Interface it.LINK).
HOV
Plays back only the portions recorded in
HDV format
With an i.LINK connection, inputs/outputs
only HDV formatted signals from the _,
HDV/DV Interface (i.LINKL and records/
plays back. You can also select this when
connecting the camcorder to a computer_
etc.
DV
Plays back only the portions recorded in
DV format
With an i.LINK connection, inputs/outputs
only DV lbrmatted signals from the _,
HDV/DV Interface It.LINK), and records/
plays back. You can also select this when
connecting tile camcorder to a comp/iter.
etc.
56
Notes
•Disconnect tile i.LINK cable betore changing
the [VCR HDV/DV] setting. Odmrwi_, tlae
connected device, such as a VCR. may not be
able to recognize tile video signal flom your
calncorder.
• When [AUTO] is selected, if lhe signal switches
belw_n HDV and DV t_)rmats, lhe picture and
sound arc inlerruptcd temporarily.
• When [i.LINK CONV] is set to [ON HDV -4
DV], pictures arc oulpul as to]lows:
al [AUTO], an HDV signal is converted 1othe
DV formal and outpul; a DV signal is output
as it is.
al [HDVI. an HDV signal is converted to lhe
DV torll/al and otltptll; a DV signal is not
out]NIt.
al [DVI, a DV signal is output as il is; an
HDV signal is not output,
You can select a recording format.
HDV1080i (HDVI080i)
Records in the HDV 1080i specification.
DV(DV)
Records in the DV l_)rmat.
O Notes
• If you outpul tile recording picture using an
i.LINK cable, sel [i.LINK CONV] accoMingly.
The following functions are available when
recording in DV format.
N [] REC NODE(Recording mode)
_SP (s_
Records in the SP (Standard Play/mode on
a cassette.
LP (_)
Increases the recording time to 1.5 times
the SP mode (Long Play).
O Notes
• If you record ill tile LP mode. pictures may
appear mosaicdike or sound may be interrupted
when you play back the tape on other
cmncordcrs or VCRs.
• When you mix recordings in the SP mode and in
the LP mode on one tape, the playback picture
may be distorted or the time code may not be
writrcn properly between tile scenes.
N [] WIDE SELECT
You can select the aspect ratio according
to the TV connected when recording. Relk.r
also to the instruction manuals supplied
with your TV.
P,.16:9 WIDE
Records _:ficturcs in the filll screen for a
16:9 (wide) TV screen.
4:3 (4"3)
Records pictures in the full screen [br a4:3
TV screen.
O Notes
• Set [TV TYPE] correctly according 1o llle TV
connected lor playback (p. 59).
N [] AUDIO MODE
_.12BIT
Records in the 12-bit mode (2 stereo
sounds).
16BIT (ah16b)
Records in the 16-bit mode (I stereo sound
with high quality/.
O Notes
• When recording in the HDV Iormat. sound is
automatically rccoMed in [I(,BIT] mode.
N [] AUDIOMIX
During tape phlyback, you can monitor the
sound recorded by other camcorders us;trig
audio dubbing or 4ch microphone
recording.
g
Continued._ 57
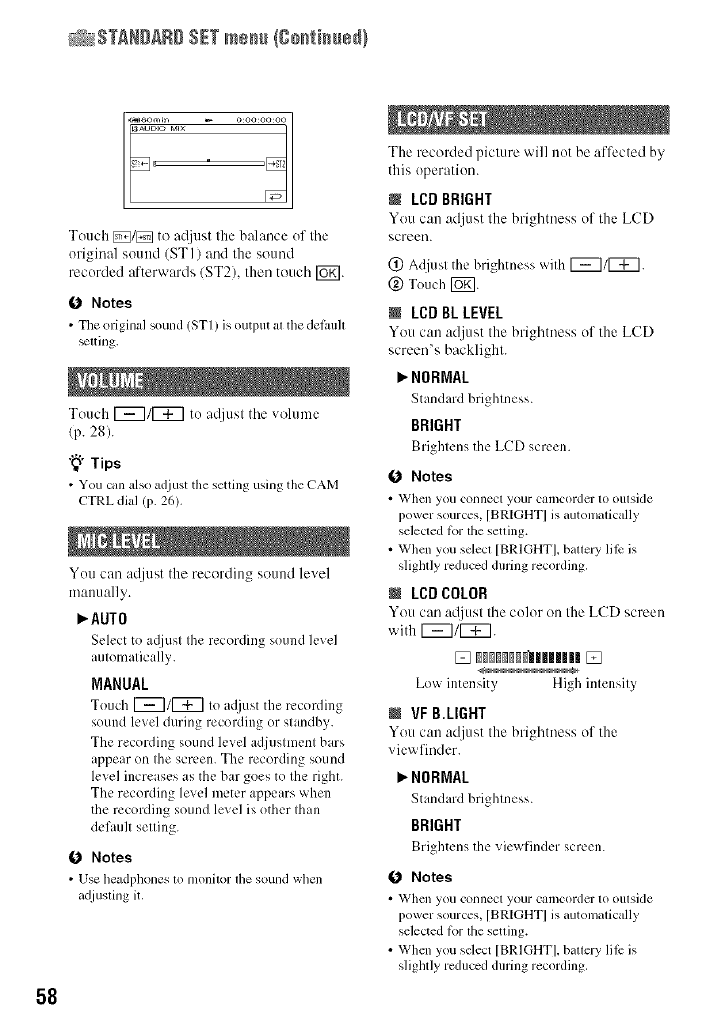
_STANDARD SETme_/go_i_ue_}
58
Touch _/_ to a(littst the balance of tile
original sound (STI) attd the sound
recorded afterwards/ST2), then touch [_g].
0 Notes
• Tile original sound (ST1) is output at the det_mh
_tting.
Touch 1_711_7 to a@tst the volume
(p. 28).
"_° Tips
• You can also adjust the setting using the CAM
CTRL dial (p. 26).
You can a@tst the recording sound level
manually.
_AUTO
Select to a@lst the recording so/ind level
automatically.
MANUAL
Touch [_/[_ Io I(liust the recording
sound level during recording or standby.
The recording sound level adjustment bars
appear on the screen. The recording sound
level increases as the bar goes to the right.
The recording level meter appears when
the recording sound level is other than
default setting.
0 Notes
• Use hemlphones to monitor the sound when
adjusting it.
The recorded picture will not be affected by
this operation.
NLCDBRIGHT
You c:m adjust the brightness of the L('D
s;creen.
(_) Adjust the brightness with 1_11_.
(g) Touch I_.
@ LCD BL LEVEL
You can adjust the brightness of the LCD
screens backlight.
P,"NORMAL
Standard brightness.
BRIGHT
Brightens the LCD screen.
0Notes
• "_Vllcl] you connect your C;llncorder to outside
power sources, [BRIGHT] is automatically
selected lbr the setting.
• Whcn you select [BRIGHT], bmtery lilt is
slightly reduced during recording.
@LCDCOLOR
You can mljust the color on the LCD screen
with 1_7/1_7.
Low intensity High intensity
@ VF B.LIGHT
"[OUCall adjus;t the brightness of the
view finder.
P,"NORMAL
Standard brightness.
BRIGHT
Brightens the viewfindcr screen.
0Notes
• "_Vllcl] you connect your C;tll]COlder [o outside
power sources, [BRIGHT] is automatically
selected lbr the setting.
• When you sdect [BRIGHT], battery lilc is
slightly reduced during recording.
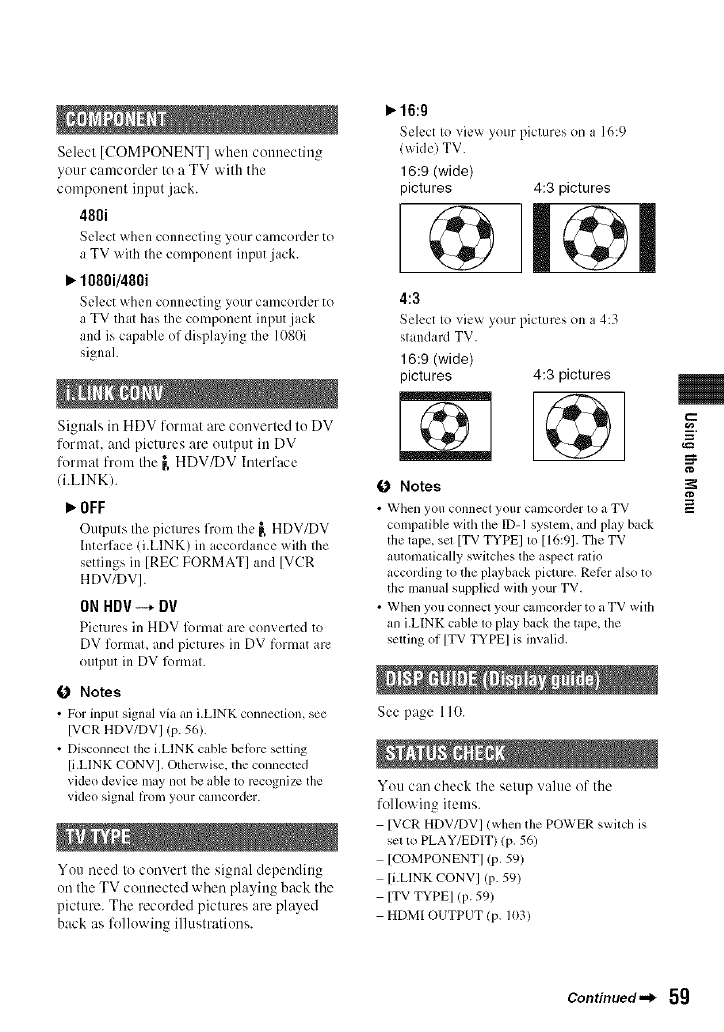
Select[COMPONENT]whenconnecting
yourcamcordertoaTVwithtile
compenentinputjack.
480i
Select when conuectiug your camcordcr to
a TV with the component input jack.
1080i/480i
Select when connecting your camcordcr to
a TV that has the component input jack
and is capable of displaying the 1686i
signah
Signals in HDV format areconverted to DV
format, and pictures are output in DV
format from the _,HDV/DV Interface
It.LINK).
_OFF
Outputs Ihe pictures from Ihc _ HDV/DV
Interface (i.LINK) in iccordance with the
settings in [REC FORMAT] and [VCR
HDV/DV].
ONHDV--* DV
Pictures in HDV lbrmat arc, converted to
DV format, and pictures in DV format are
output in DV lk)rmat.
0Notes
•For input signal via an i.LINK connection, see
[VCR HDV/DV] (p. 56).
• Disconnect the i.LINK cable belore setting
It.LINK CONVI. Otherwise. the connected
video device may not be able 1o rccogni/c tile
video signal Irom your camcorder.
You need to convert the signal depending
on the TV connected when playing back the
picture. The recorded pictures are played
back as lk_llowing illustrations.
_16:g
Seh.,ctto view your pictures on a 16:9
lwide) TV.
16:9 (wide)
pictures
@4:3 pictures
©
4:3
Seh:ct to vie_ your pictures on a 4:3
standard TV.
16:9 (wide)
pictures 4:3 pictures
0Notes
• _X!llen you connect your Call/corder to _1 TV
colnpalible witll tile ID- I syslcm, alld ph,y back
the tape, sct [TV TYPE[ 1o [16:91. The TV
autonlatically switches the aspecl ratio
according to tile playback picture. Rel_:r also to
tile manual supplied wilh your TV.
• When you COlllleCt your cunlcorder to a TV willl
an i.LIN K cable to play back the tape, the
setting of [TV TYPEI is invalid.
See page l lO.
You can check the setup value of the
following items.
[VCR HDV/DV I lwhen tile POWER switch is
set to PLAY/EDIT) lP- 56)
[COMPONENT] lP. 59)
[i.LINK CONVI (p. 59)
[TV TYPE]/P. 59)
HDMI OUTPUT lP. 103)
g
Continued._ 5g
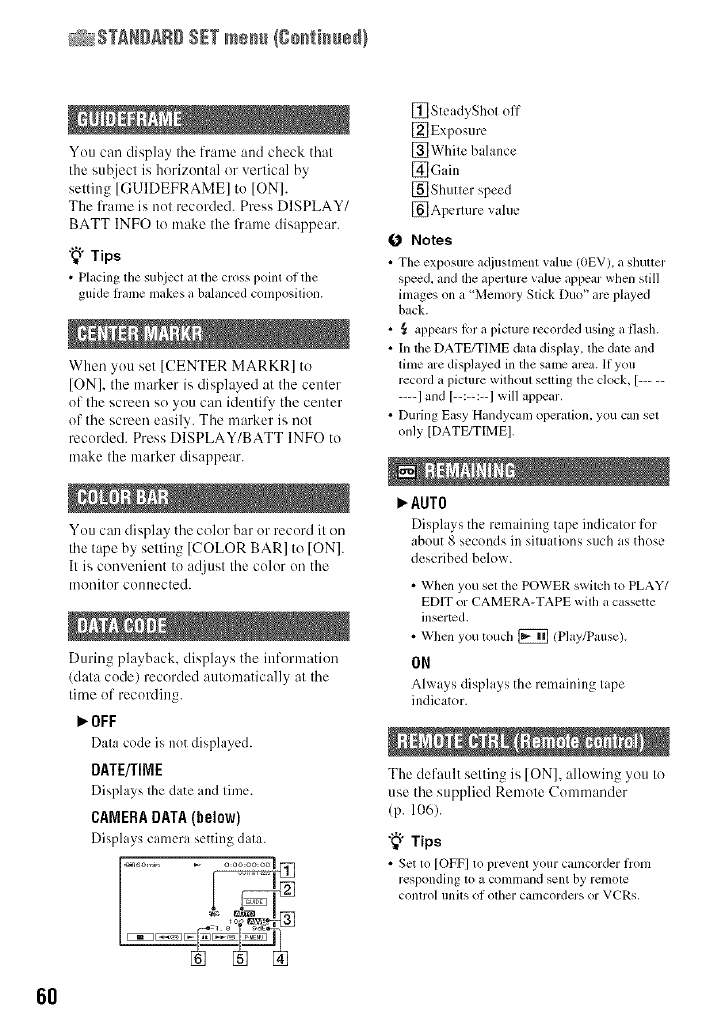
_STANDARD SETme_/go_ti_ue_}
6O
You can display tile frame attd check that
the subject is horizontal or vertical by
setting [GUIDEFRAME] to [ON].
The frame is not recorded. Press DISPLAY/
BATT INFO to tnake the frame disappear.
"_°Tips
• Placing the subject at tile cross point olthe
guide flame makes a balanced composilion.
When you set [(-?ENTER MARKR] to
[ON], the marker is displayed at the center
of the screen so you can identil3, the center
of the screen easily. The marker is not
recorded. Press DISPLAY/BATT INFO to
tnake the marker disappear.
You can display the color bar or record it on
the tape by setting [COLOR BAR] to [ON].
It is convenient to acljust the color on the
tnonitor connected.
During playback, displays the itfformation
/data code) recorded automatically at the
tithe of recording.
_OFF
Data code is not displayed.
DATE/TIME
Displays the date and time.
CAMERA DATA (below)
Displays cmncra setting data.
[] SteadyShot off
[_Exposurc
[] White balance
[_Gain
[] Shutter speed
[] Aperture vahle
Notes
• Tile exposure a_/justnlent _alue (0EV), a shutter
speed, and lhe aperture value appeal wllen still
images on a 'Memory Stick Duo" arc played
back.
• ._ al?pears lor a picture recorded using a flash.
• In tile DATE/TIME dala display, lhe date and
time arc displayed in tile same area. If you
record a picture withoul setling tile dock, [.....
.... I and [--:--:--I will appeal.
• During Easy Handycam operalion, you can sel
only [DATE/TIMEI.
AUTO
Displays the remaining tape indicator for
about 8 seconds in situations such as those
described below.
• When you sel the POWER switch to PLAY/
EDIT or CAMERA-TAPE wilh a cassette
inserted.
• When you toucll [_ !Play/Pause).
0R
Always displays the remaining tape
indicator.
The default selling is [ON], allowing yotl to
use the supplied Remole Commander
(p. 106).
"_° Tips
• Set to [OFF] to prevent your camcorder hom
responding to a COlllll/alld sent by rel/lOle
control Ilnils of other calncorders or VCRs.

The camera recording lamp will not light up
during recording when you set this to IOFFI
/The default setting is [ON]).
1,0N
A beeping sound starts when you start/stop
recording+ or operate the touch paneh
OFF
Cancels the beeping sound and shutter
sound.
LCDPANEL
Shows displays such as the time code on
the LCD screen and in the viewfinder.
V-OUT/PANEL
Shows displays such as tilL'time code on
the TV screen, LCD screen, and ill Ihe
viewfinder.
P,NORMAL
Scrolls the menu items downwilrds by
touching [_.
OPPOSITE
Scrolls the menu items upwards by
touching [_.
_Smin
The can/corder is automatically turned off
when you do not operate your camcorder
R)r morn than approximately 5 minutes.
NEVER
The camcorder is not automatically turned
off.
0Notes
• _XJllell you connl3ct your Ct/ll/Cold+3r to _1 wa]l
outlet/wall socket), [A.SHUT OFFI is
automatically _l to [NEVERI.
See page 98.
You can slightly reduce the recording start
point time when you start recording by
pressing START/STOP. This function is
useful to compensate lk_rtime lapse at the
click of the shutter.
_OFF ==
Takes more time to reach the recording
stal/poinL but a smooth transition can be
recorded.
ON(_1
Slightly reduces Ihe time it takes to start
recording when you attempt to record right
after you switch on the camcorder (set the
POWER switch to CAMERA-TAPE from
the OFF (CHG) position), or when you
attempt to record when the recording
stanby mode is canceled.
ONotes
•If [QUICK REC] is set to [ON]. the intciwal
betwecn scenes h_zes lbr a tllotnenl (editing on
your cOi/lpuler is reconlt/lended/.
"_" Tips
•If file recoMing slandby mode conlinues more
than approximately 3 minutes, the drum will
slop rolling, and the standby mode is canceled.
This is 1o protect the tape and to prcvenl liom
unnecessarily battely exhausting.
61
menu
See page 39 for details on selecting
menu items.
See page 16.
When using your camcorder abroad, you
can set the time diflerence by touching
F_7/[_, the clock will be a<liusted in
accordance with tile time differm[ce.
If you set tile time difference to 0. the clock
returns to tile originally set time.
You can select the language to be used on
the LCD screen.
• Your camcorder ott_:rs [ENG[SIMP]]
(simplified English) ior when you cannol find
y()llr nalive tOllgue illnOllg tile options.
CustomizingPersonal
Menu
You can add desired menu items to any
Personal Menu, and customize Personal
Menu settings for each POWER lamp
position. This is convmfim[t if you add
frequently used mmm items to Personal
Mmm.
You can add up to 28 menu items for each
POWER lamp position. Delete a less
important menu item, if you want to add
more.
4
/ Touch _-_+ [P-MENU SET UP]
-_ [ADD].
If the desired menu item is not
displayed, touch [W]/[_].
Select th÷ category ]
_. PECTAPPU
_l _ EDrr/Pt_¥
2Touch 1_7/1_7 to select a menu
category, then touch I_KI.
..............
SPOT METER
3Touch Fw]/Fv7 to select a menu
item, then touch [_ -_ [YES] -_
1_7.
Tile menu item is added to tile end of
the list.
62
1Touch IF:gg_]--+ [P-MENU SET UP]
--* [DELETE].
If tile desired menu item is nol
displayed, Iotlch [_]/[_].
Touch the menu item that you
want to delete.
Delete _hJsfrom
CAMERA TAPE mode's
P MENU?
3Touch [YES] -+ [_.
1Touch _-+ [P-MENU SET UP]
-+ [SORT].
If the desired menu item is not
displayed, touch I_]/[_].
2Touch the menu item you want to
move.
3Touch 1_7/_ to move the menu
item to the desired place.
4Touch I_.
To sort more items, repeat steps 2to 4.
5 Touch [END] -++ IX].
=z-
we
g
O Notes
•You canntlt delete [MENUI and [P-MENU SET
UPI.
O Notes
•You cannot move [P-MENU SET UP].
Touch _-+ [P-MENU SET UP] --*
[RESET] -+ [YES] -+ [YES] -+ 1_7.
If the desired menu item is not displayed,
touch [_]/[X].
63
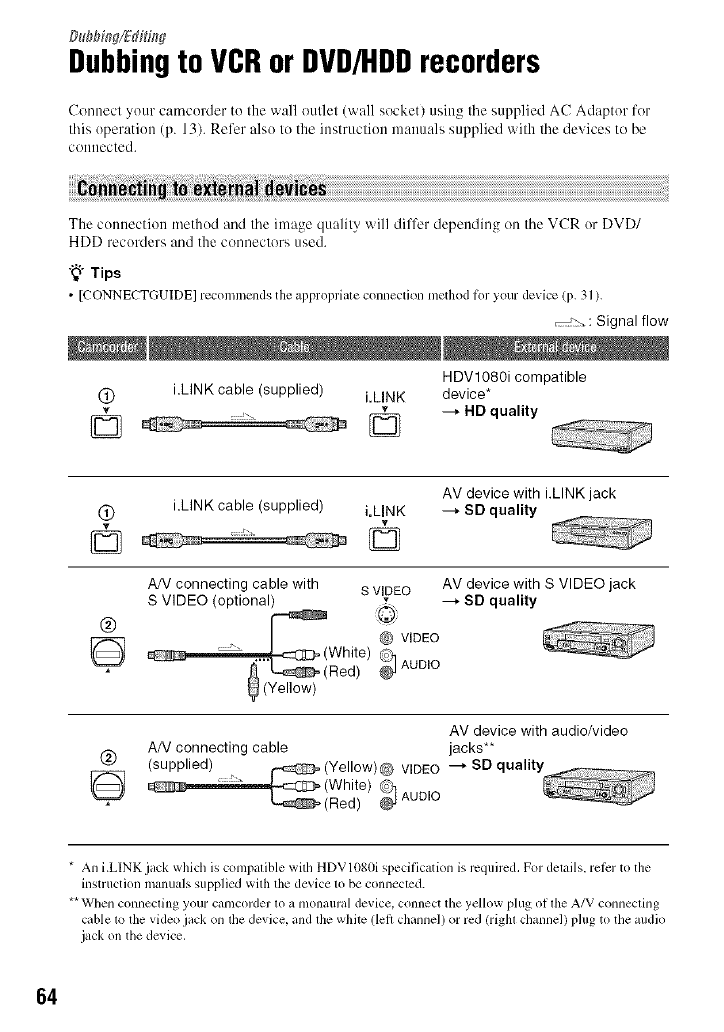
Duflflifl#/Ed dflg
Dubbingto VCRorDVD/HDDrecorders
Conuecl your camcorder to Ihe wall oullel (wall socket) using Ihe supplied AC Adaptor for
Ihis operatiuu (p. 13). Refer also lo the instruction naauuals supplied witla lhe de',ices to be
connected.
The connection method and Ihe image qualily will differ depending on Ihe VCR or DVD/
HDD recorders and the conneclors used.
"_° Tips
• [CONNECTGUIDE] recolnlncnds the appropriale connection method l])l 3,<)/11device (p. 31 ).
, >, : Signal flow
H DVt 080i compatible
(_ iLINK cable (supplied) i.LINK device*
,[_ --_ HD quality
(_) i.LINK cable (supplied) i.LINK
®
AV device with i.LINK jack
--_ SD quality
AN connecting cable with S VIDEO AV device with S VIDEO jack
S VIDEO (optional) --_ SD quality
@ VIDEO
White) 9
_(Red) AUDIO
(Yellow)
AV device with audio/video
(_ AN connecting cable jacks**
(supplied) , _(Yellow)@ VIDEO
_ (White) C_)_ ---_ SD quaht
-[_=_" (Red) _j AUDIO
* An i.LINK jack which is compalible with HDV1080i specification is rcquircd. For dmails, rel_:r to the
instruction manuals supplied with the device 1o be connectcd.
**When connecling your camcorder 1o a monaural device, connect the yellow plug of lhe A/V connecling
cable 1o lhe video jack on lhe device, and lhe white (left channel) or red (riglu channel) plug to the audio
jack on the device.
64
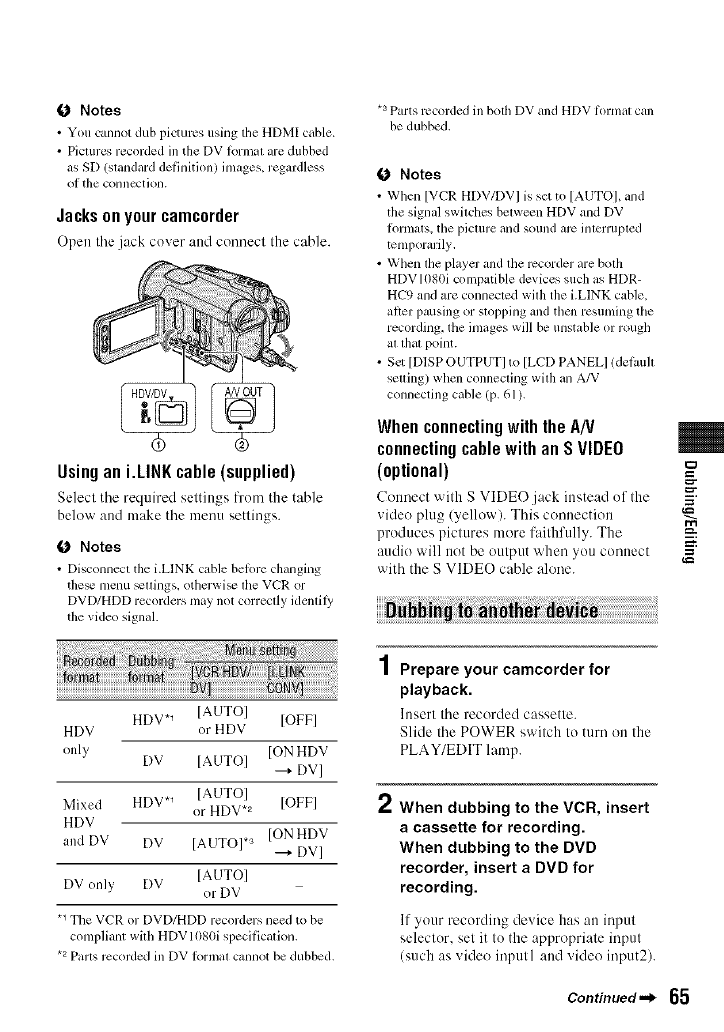
O Notes
• You cannot dub pictures using tile HDM[ cable.
• Picmrcs recorded in tile DV lonnat are dubbed
as SD (standard delhlition) images, regardless
of the colnlectiolL
Jacksonyourcamc0rder
Open the jack cover and connect the cable.
Usingan i.LINKcable(supplied)
Select the required settings from the table
below and make the menu settings.
O Notes
• Disconnect the i.LINK cable belore changing
the_ menu _ttings. othcrwi_ the VCR or
DVD/HDD recorders nmy not correctly identily
the video signal.
*a Parts recorded ill both DV and HDV formal can
be dubbed.
O Notes
• When [VCR HDV/DV] is set to [AUTO], and
the signal switclles between HDV and DV
lkmnats, tile picture and sound arc interrupted
temporarily.
• When the player and the recorder are both
HDV 1080i compatible devices such as HDR-
HC9 and are connected with the i.LINK cable,
ariel: pausing or stopping and tllen resuming tile
recording, the inmges will be unstable or rougll
at lhal point.
•Sct [DISP OUTPUTI to [LCD PANELI ldefimh
setting) when connecting with an A/V
connecting cable (p. 61).
WhenconnectingwiththeA/V
connectingcablewithanSVIDEO
(optional) gea
Connect with S VIDE()jack instead of the
_ideo plug (yellow). This connection
produces pictures more faiflffully. The =
audio will not be output when you connect =
with the S VIDEO cable alone.
HDV*_ [AUTO] [OFF]
HDV or HDV
only ION HDV
DV [AUTOI ---+DV]
Mixed HDV. 1 [AUTO]
or HDV.2 [OFF]
HDV
and DV DV [AUTO]. a [ONHDV
---+DV]
DV only DV [AUTO]
" or DV
.1 Tile VCR or DVD/HDD recorders need to be
compliant with HDVI080i specification.
"2 Parts recorded ill DV Iormat callllOt be dubbed.
4
/ Prepare your camcorder for
playback.
Insert the recorded cassette.
Slide the POWER switch to turn on the
PLAY/EDIT lamp.
2When dubbing to the VCR, insert
a cassette for recording.
When dubbing to the DVD
recorder, insert a DVD for
recording.
If your recording device has an input
seleclor, sel it to the appropriale inpul
(such as video input l and video input2).
Oontinued,,,_ 65
gubbi_ t+ VSB +r gVNHgg recorders(g+_ti_Be_}
3Connect your recording device
(VCR or DVDrHDD recorder) to
your camcorder.
See page 64 lot connection details.
,4
€-I.Start playback on your
camcorder, and recording on the
recording device.
Refer to the operating instructions
supplied with your recording device for
details.
5 When dubbing is complete, stop
your camcorder and the
recording device.
• Whcn dubbing to a DVD recorder from your
camcorder d/rough an i.LINK cable, you may
noI operate your C_llllcorder on your DVD
recorder even if its instruction manual says you
can,
It you can set tile input mode to HDV or DV on
your DVD recorder and can input/output
pictures, lollow tile sleps in "Dubbing to another
device."
• Whcn you use an i.LINK cable, tile video and
sound signals are transmittcd digitally,
producing lligh quality picmrc_,.
• When an i.LINK cable is connected, the lPrmat
ol the output signal (HDVouT _ or DVouT
) will be indicated on the LCD screen oi
your canlcorder.
66
0 Notes
•when connecting with an A/V connecting cable,
_t [TV TYPE] according to tile pl+@_ack
de_ ice/TV, etc.) (p. 59).
• To record tile data/time and camera sellings data
whcn connected by tile A/V connecting cable,
display them on the screen (p. 60).
•The lbllowing cannot be outpul via the _ HDV/
DV interlhcc/i.LINK):
Indicators
Pictures edited with [PICT.EFFECTI (p. 54)
or [D.EFFECT] (p. 53)
Titles that arc recorded on other camcoMers
• Pictures recorded in file HDV lbrmat are not
output lrolll the _ HDV/DV Interlace (i.LINK)
during playback pau_ or in any playback mode
()tiler Itlan normal playback.
• Note the li_llowing wllen connecting with an
i.LINK cable:
The recorded picture becomes rough when a
picture is paused on your cumcorder while
recording to a VCR or DVD/HDD recorder.
Data codes (date/time/camera settings data)
may not be displayed or recorded depending
on the dcvice or application,
go/i CallnOt record Ihe picture and SOllnd
separalely.
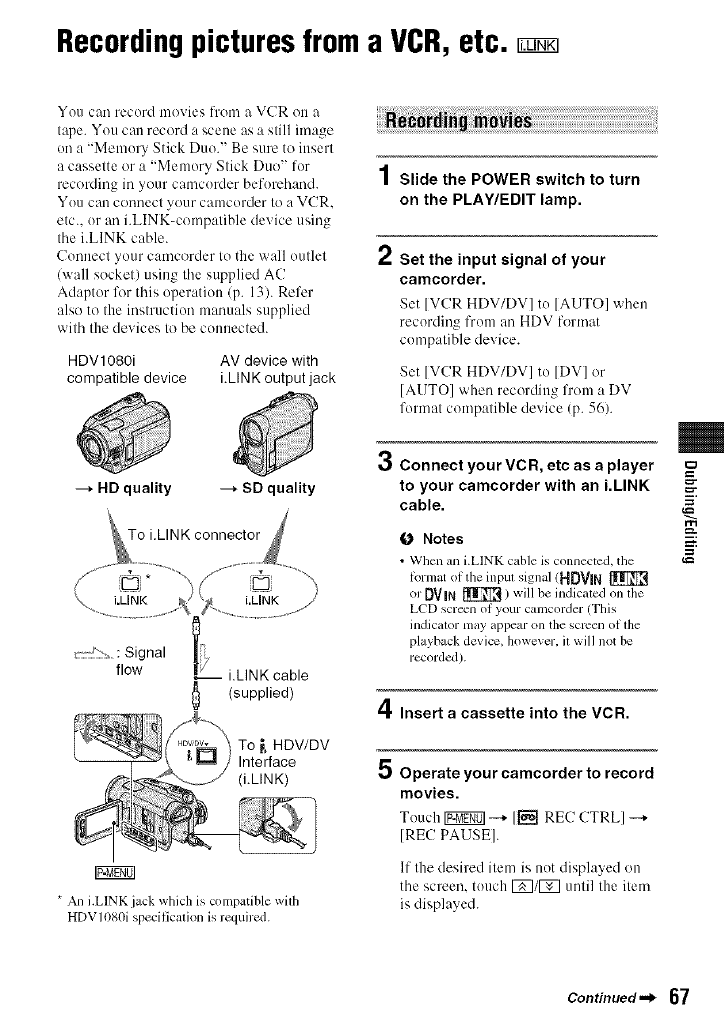
Recordingpicturesfroma VCR,etc.
You call record movies frolIl a VCR ou a
tape. You can record a scene as a still image
ou a "Memory Stick Duo." Be sure to insert
a cassette or a "Memory Stick Duo" for
recording ill your camcorder beforeband.
You can connect your camcorder to a VCR.
etc.. or all i.LINK-compatible device using
tbe i.LINK cable.
Connect your camcorder to the wall outlet
(wall socket) using tile supplied AC
Adaptor for tbis operation/p. 13). Refer
also to the instruction maouals supplied
witb the devices to be connected.
HDV1080i AV device with
compatible device i.LINK output jack
--_ HD quality --_ SD quality
(supplied)
4
/ Slide the POWER switch to turn
on the PLAY/EDIT lamp.
2Set the input signal of your
camcorder.
Set IVCR HDV/DV] to IAUTOI wben
recordin_ t-ronl an HDV format
compatible device.
Set [VCR HDV/DV] to [DV] or
[AUTO] wheo recording from a DV
formal compatible device (p. 56).
3Connect your VCR, etc as a player o
to your camcorder with an i.LINK _"
cable.
(J Notes
•When _lJli.LINK cable is connected, the
tbrmat otthe inpul signal IHDVN
or DVIN _ ) will be indicated on d_e
LCD screen of your camcorder (This
indicator m_ty appem"on the screen of the
playback device, however, it will not be
recorded).
4Insert a cassette into the VCR.
i.
g
r_gg_
*An i.LlNK.iack which is compatible with
HDV1080i speciticalion is required.
5 Operate yourcamcorder to record
movies.
ToucllIgNgff_-+ IlealRE(? CTRLI-+
[RE(: PAUSE].
If tile desired item is not displayed on
tile screen, touch [_/[_ until tile item
is displayed.
Continued._ 67
Reco_di_ pictures from a VCR, etc. {go_ti_ued}
OStart playing the cassette on your
VCR.
The piclure played (m file c(mnecled
device appears on the LCD screen of
yOUF c_ln]corder.
7Touch [REC START] at the point
you want to start recording.
8 Stop recording.
Tottch [_ (Slop) or [REC PAUSEI.
9Touch 1_7 -_+ [_.
1Perform steps 1 to 4 in
"Recording movies."
2Start playing the cassette.
The pictures on the VCR appear on the
screen of your canlcofd_l'.
3Press PHOTO lightly at the scene
you want to record. Check the
image and press it fully.
0 Notes
•You cunnot record TV progrilnls holn tile _
HDV/DV Interlace (i.LINK).
•You can record pictures irom DV devices only
in the DV lbrmat.
• Note the lollowing when connecting witll an
i.LINK cable:
The recorded picture becomes rougll when a
picture is paused on a VCR willie recording to
your camcorder.
You cannot record file picture and sound
separately.
If you pause or slop the rccoMing and rcslarl
il, lhe picture may not be rccoMed smoothly.
• When a 4:3 video signal is input, it appears with
black bands on the right and left sides on the
scrcen of your calncorder,
68
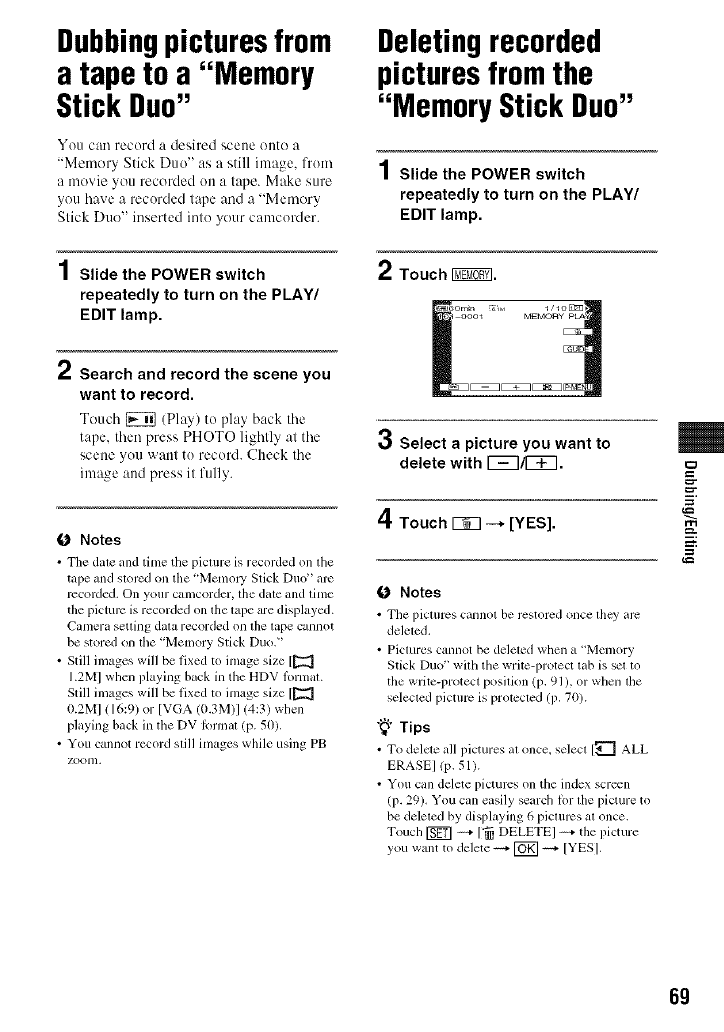
Dubbingpicturesfrom
a tapeto a "Memory
Stick Duo"
You c_ln record a desired sceue ()lit() a
"Memory Stick Duo" as a still image, from
a movie you recorded on a tape. Make sure
you have a recorded tape and a "Memory
Stick Duo" inserted into your camcorder.
1Slide the POWER switch
repeatedly to turn on the PLAY/
EDIT lamp.
rt
"Search and record the scene you
want to record.
Touch _ (Play) to play back tile
tape, then press PHOTO lightly at the
scene you want to record. Check the
image and press it fully.
0 Notes
•Tile dale m_d time the picture is recorded on tile
tape and slorcd on the "Memo W Stick Duo" arc
recorded. On your camcorder, the date and lime
the picture is recorded on the lape are displayed.
Canlera setting dala recorded on lhe lape cannot
be stored on lhe "Memory Stick Duo2'
• Still images will be fixed to image size [[_
1.2MI when playing back in tile HDV lormat.
Still images will be fixed to image size [l_]
0.2MI (16:9) or [VGA (0.3M)I (4:3) wllen
playing back in lhe DV lormal (p. 50).
• You cannot record still images while using PB
zoonl.
Deletingrecorded
picturesfromthe
"Memory Stick Duo"
1Slide the POWER switch
repeatedly to turn on the PLAY/
EDIT lamp.
2Touch _.
1_[_[1_,1oool ME_vlORy pLA
3Select a picture you want to
delete with r_7/[_.
4Touch _ --+ [YES].
0 Notes
• Tile pictures cannot be restored once they _u'c
deleted.
• Pictures cannot be deleled when a "Memory
Stick Duo" with the write-protect tab is set to
the write-protect posilion (p. 91 ), or wllen tile
selecled picture is protccled (p. 70).
"_° Tips
• To delete all pictures at once, select [_ ALL
ERASE] (p. 51).
• You call delete pictures on the index screen
(p. 29). You can easily search lot lhe pidure to
be deleted by displaying 6 pictures at once.
Touch [_ ----+['_ DELETE] ----+the picture
you want to delete ----+[_ ----+[YES].
=
g
69
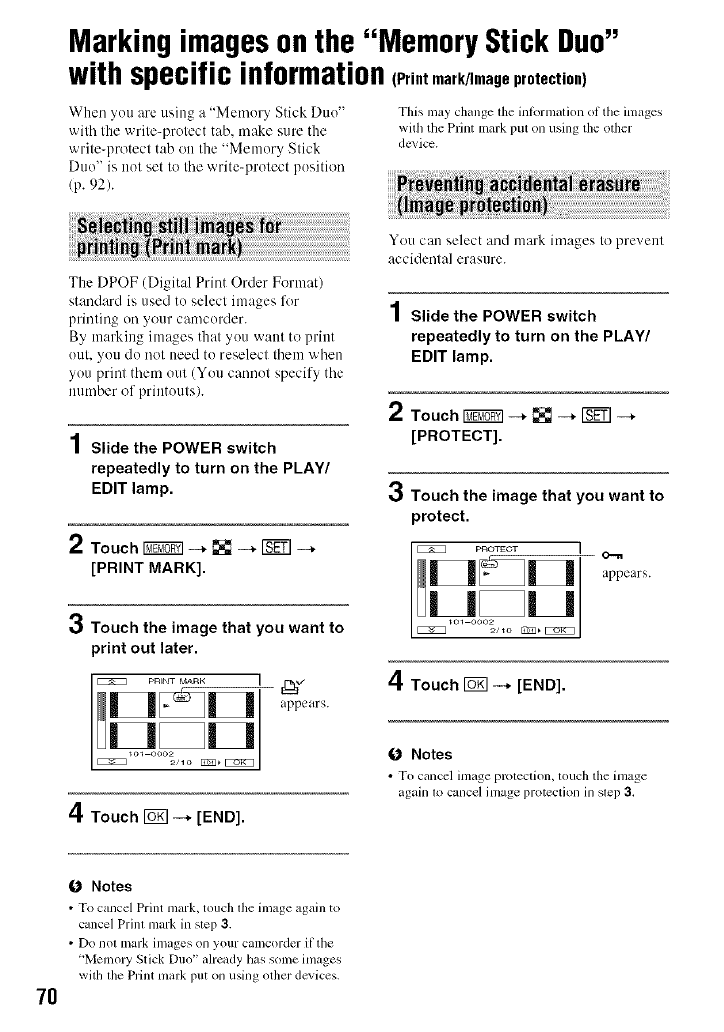
Marking imagesonthe "Memory Stick Duo"
with specific informationIp.etmark/Image protection)
When you are using a "Memory Stick Duo"
with the write-protect tab. make sure the
write-protect tab on the "Memory Stick
Duo" is not set to Ihe write-protect position
(p. 92).
This may change tile intbnnation of the images
with the Print mark put on using tile other
device.
The DPOF (Digital Print Order Format)
standard is used to select images lk_r
printing on your camcorder.
By marking images that you want to print
out. you do not need to reselect them when
you print them out (You cannot specify the
nuu/ber of printouts).
1Slide the POWER switch
repeatedly to turn on the PLAY/
EDIT lamp.
2Touch I_ ---* _ ---* 18_] ---*
[PRINT MARK].
3Touch the image that you want to
print out later.
1pRiNT MARK
appears.
4Touch [_ ---* [END].
Yotl Call select and mark images Io prevenl
accidental erasure.
1Slide the POWER switch
repeatedly to turn on the PLAY/
EDIT lamp.
2Touch IW_] --* _ --* ISET]--*
[PROTECT].
3Touch the image that you want to
protect.
pP_aTECT I
UUo ! I
4Touch _ ---* [END].
0Notes
• To cancel il/lage protection, touch tile h/lage
agaill to cancel inlage protection ill step 3,
7O
(J Notes
• To cancel Print mark, touch tile image ag_dn to
c_mcel Print mark in step 3.
• Do nol mark images on your camcorder il ll/e
"Memo W Stick Duo" already has some images
with the Print mark put on using othm" dcviccs.
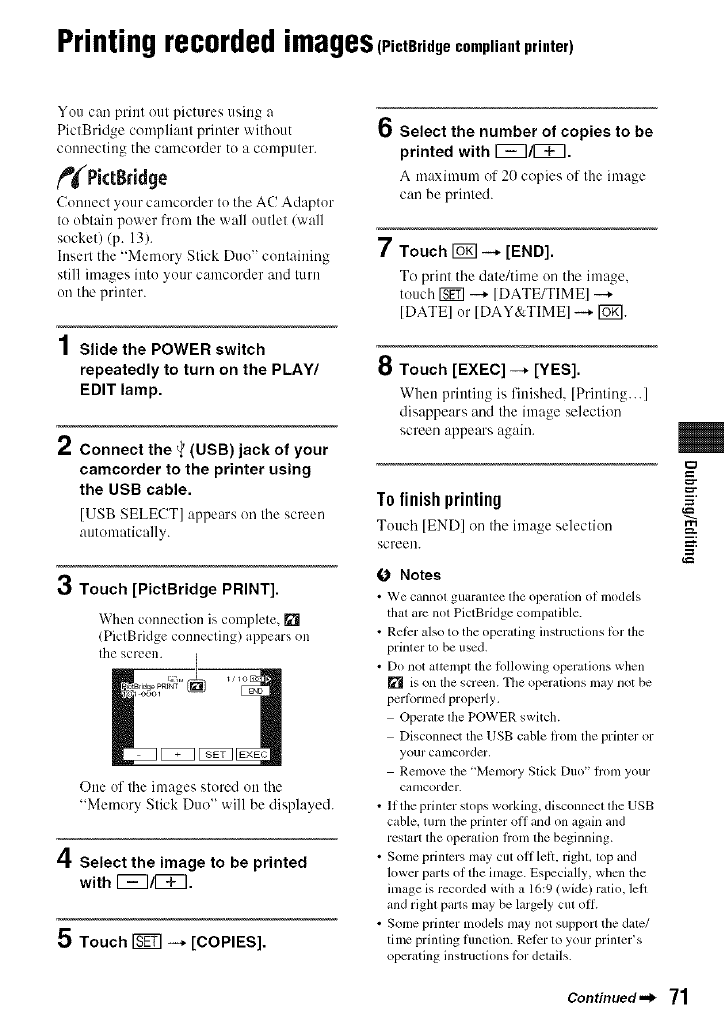
PrintingrecordedimageS(PictBridgecompliantprinter)
You can print ottt pictures using a
PictBridge conlpliant printer without
coonecting tile camcorder to a conlputer.
_PktBridge
Connect your camcorder to tile AC Adaptor
to obtain power from the wall outlet/wall
socket) (p. 13).
htsert tile "Memory Stick Duo" containing
still images into yottr camcorder and turn
on tile printer.
1Slide the POWER switch
repeatedly to turn on the PLAY/
EDIT lamp.
2Connect the _(USB) jack of your
camcorder to the printer using
the USB cable.
[USB SELECT] appears on tile screen
atttomatically.
3Touch [PictBridge PRINT].
When connection is complele, _[1
(PiclBridge connecling) appears ()11
[he sc FL'L'n.
Olle of lhe images slered Olllhe
"Memory Stick Duo" will be displayed.
4Select the image to be printed
with 1_7/[_.
5 Touch _ -+ [COPIES].
6Select the number of copies to be
printed with r_7/[3_.
A maxilmun ol 20 copies of the image
can be prinled.
7Touch I0_ -+* [END].
To print tiledale/time on tile inlage.
touch _ -+ [DATE/TIME] -+
[[)ATE] or[DAY&TIME] -...+lug].
8 Touch [EXEC] ---* [YES].
When printing is finished. [Printing... ]
disappears and tile image selection
screen appears again.
To finish printing
Touch lEND] on tile image selection
screen.
0 Notes
•We cannot guarantee tile operation of nlodels
thal arc nol PictBridge conlpatible.
•Rel_:ralso to tileoperating instructions lbr tile
printer to be used.
• Do not attempt the lolh)wingoperations when
[] is on tile screen. Tile operations may not be
perlormedproperly.
Opel'alethe POWER switch.
Disconnect the USB cable fiom lhe printer or
your Calllcorder,
Remove the "Memory Slick Duo" fl'omyour
camcorder.
• If theprinter slops working, disconnect the USB
cable, turn the printer off and on again and
restart the opcrafion b'om the beginning.
• Someprinters may cut off lelL rigllL lop and
lower paris of the image. Especially, wllcnthe
image is recorded with a 16:9(wide) ratio, lelt
and right parts maybe largely cut off.
• Someprinter models maynot support the date/
time prinling flmction. Ret)-rto your printer's
operating instruclions lbr details.
t_
=
g
Continued._ 71
PH+t+r+Sr+s++++÷++++mms+SI+++++t+++S+}
• We cannot guarantee the printing of images
i_corded with a device other than your
c+lnlcorder.
"_° Tips
• PictBridge is +mindustry standard established
by the Camera & Imaging Products Association
/CIPA). You can print still images without using
a COlnputer by connecting a printer directly to a
digital video cumera or digital still calnera+
regardless of model or manuluctul+cr.
• You can also operate by selecting in the
following orders:
Ig_ffff01_ [MENUI _ _ (PICT.APPLI.)
[USB SELECT] --+ [PictBridge PRINT].
Ig_gff0l _ [MENUI _ _ (PlCT.APPLI.)
[PictBridge PRINT].
72
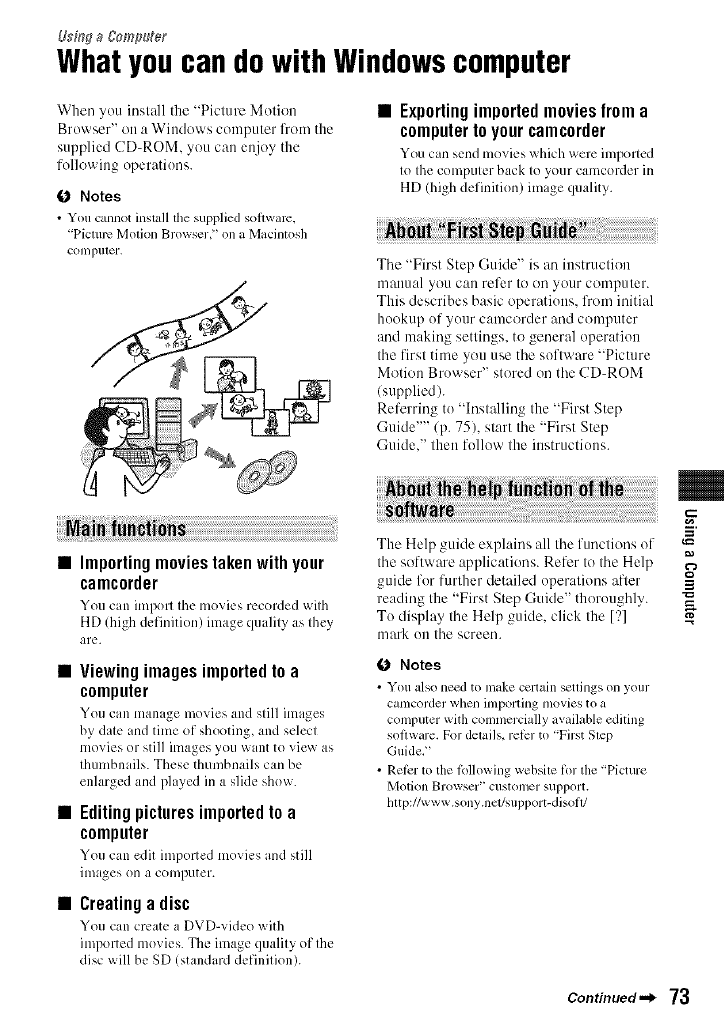
Usi,'_ga gomp_eg
Whatyoucandowith Windowscomputer
When you iustall the "Picture Motiott
Browser" ott a Wittdows computer ffon/the
supplied CD-ROM, you can enjoy the
following operations.
O Notes
• You cannot install the supplied sollwm'c,
' Picture Motion Browser," ona M_tcintosh
COll]pulel'.
•Exportingimportedmoviesfrom a
computertoyourcamcorder
You c;m send nlovics _ hich were imported
to the computer back to your camcorder in
HD (high definition) image quality.
The "First Step Guide" is an ittstruction
mauual you Call refer to Oil your computer.
This describes basic operatiotts, from initial
hookup of your camcorder and computer
and making settiugs, to geueral operatiott
tile first time you use tile software "Picture
Motion Browser" stored on tile CD-ROM
(supplied).
Referring to "Installing the "First Step
Guide'"'/p. 75), start the "First Step
Guide," then follow the ittstructiotts.
•Importingmoviestakenwithyour
camcorder
You can import the movies recorded with
HD Ihigh definition) image quality as they
are.
•Viewingimagesimportedto a
computer
You can manage movies and still images
by date and time of shooting, and select
movies or still images you want to view as
thumbnails. These thumbnails carl be
enhtrged and played in a slide show.
•Editing pictures imported to a
computer
You can edit imported movies and still
images o13 a computer.
•Creatinga disc
You can create a DVD-video with
imlx/rted movies. The image qualily of Ihe
disc will be SD (standard definilion).
The Help guide explains all tile functions of
tile software applications. Refer to tile Help
guide for further detailed operations after
reading the "First Step Guide" thoroughly.
To display tile Help guide, click the [?]
n/ark OU tile screeu.
O Notes
• You also need to in_Jkecertain seuings on your
catllcorder whell it/lpol'lillg movies to a
computer with commercially available editing
software. For delails, relEr to "First Slep
Guide2'
•Rel_:rto the lbllowing websile lk)rthe "Picture
molion Browser" cuslomer support.
hltp://www.sony.ncl/support-disofl/
m
g
Continued._ 73

What _aa car da with _i_dows cemput÷_(Ca.tiauad}
74
When using "Picture Motion Browser"
OS: Microsoft Wiudows 2(X)O
Professional SP4,
Wiudows XP SP2* or
Windows Vista*
*6g-bit editions and Starter (Editit)n)
are not supported.
Standard installation is required.
For processing HD footage,
Windows XP SP2 or Windows Vista
is required.
Operation is not assured if the above
OS has been upgraded or in a mtdti-
bout etwironment.
CPU: lntel Pentium 4 2.8 GHz CPU or
faster lintel Pentium 4 3.2 GHz or
faster, lntel Pentium D. or lntel Core
Duo is recommended.)
For processing SD/standard
definition) image quality content
only, an Intel Pentium Ill 1 GHz ()r
faster is necessary.
Application: DireclX 9.0c or later
(This product is based un DirectX
technology. It is necessary tu have
DirectX installed.)
Sound system: Direct Sound
compatible sound card
Memory: 512 MB or mure/l GB or
mr)re is recommended.)
For processing SD (standard
definition) image quality content
truly, 256 MB of memory or more is
uecessary.
Hard disk:
Disc _olutue required for
installation: Approximately 500 MB
Display: Minimum 1.024 x 768 dots
Others: _ USB purt (this must be
provided as standard. Hi-Speed USB
(USB 2.0 compatible) is
recommended), DV h_terface
(]EEE1394. i.LINK) (to connect via
an i.LINK cable), DVD burner/CD-
ROM drive is necessary for
installation)
When playing still imagesrecorded on a
"Memory Stick Duo" onacomputer
OS: Microsoft Windows 2000
Professional SP4.
Windows XP SP2* t)r
Windows Vista*
*Except fur 64-bit editions.
Standard installation is required.
Operation is nut assured if the above
OS has been upgraded.
Others: _' USB purl (Ihis tutlsl be
prt)v ided as stalldard )
0 Notes
•Operations art- not gtl_ll'_lnteed on a COlllputer
envirolllllellt thai does 11ol inee[ tile systeln
requirelnenls,
• Operations are not guaranteed on alllhe
reconllllended environments.
For example, other open or background
applications running on currently [nay limit
product perllmnance.
• Even in a conlpilter environtllent where lhe
operations are guaranteed, flames may be
dropped flom movies wilh HD/high definilion)
image quality, resuhing in uneven playback.
However, impolled images and images on discs
crealed subsequently will not be affected.
• If you use a Notebook PC, connect il to file AC
Adaptor as file power source. Otherwi_, the
software will nol work properly due lo lhe
power saving function of tile PC.
"_° Tips
• It your compuler has a Memory Stick sh)t. inserl
fl_e 'Memo O, Stick Duo" on which still images
arc recorded into tim Memory Stick Duo
Adaptor (optional), then inserl it into the
Memol3' Stick slot on your compuler to copy
still images to the computer.
• When using a "Memol3' Stick PRO Duo" and
your compuler is not conlpatible wdh it, connecl
your cgm_corder with the USB cable instead of
using the Memol3' Stick slot on tim computer.

Installingthe "First StepGuide"andsoftware
You need to install the "First Step Guide"
and software to your Windows computer
before connecting your camcorder
to the computer. The inst:dlation is
required only for the first time.
Contents to be installed and procedures
may differ depending on your OS.
"_" Tips
•See page 77 whenyou use a Macintosh
COlllputer.
4Click [FirstStepGuide].
5 Select the desired language and
the model name of your
camcorder from the pull-down
menu.
1Confirm that your camcorder is
not connected to the computer.
/Turn on the computer.
ONotes
• Logon as an Administrator tor inslallalion.
•€'lose all applications running on tile
computer betorc installingtile software.
3Place the supplied CD-ROM in the
disc drive of your computer.
The installation screen appears.
6Click [FirstStepGuide(HTML)].
hlstallation starts.
When [Sa_e is complete] appears, click
[OK] to finish tile installation.
Toview the "First Step Guide" in PDF
In step 6, click [FirstStcpGukle/PDF)].
To installthe software"Adobe
Reader"to displaythe PDFfile
In step 6, click [Adobe(R) Reader(R)].
m
_==
==
If the screen does not appear
(!) Click [Start], then click [My
Computer]. (For Windows 2001)_
double-click [My Computer].)
@ Double-click [SONYPICTUTIL IE:)]
(CD-ROM) (disc drive).*
* [)rive names (such as (E:)) may val 3'
depending ontile compuler.
1Perform steps 1 to 3 in "Installing
the "First Step Guide"" (p. 75).
2Click [Install].
3Select the language for the
application to be installed, then
click [Next].
Continued._ 75
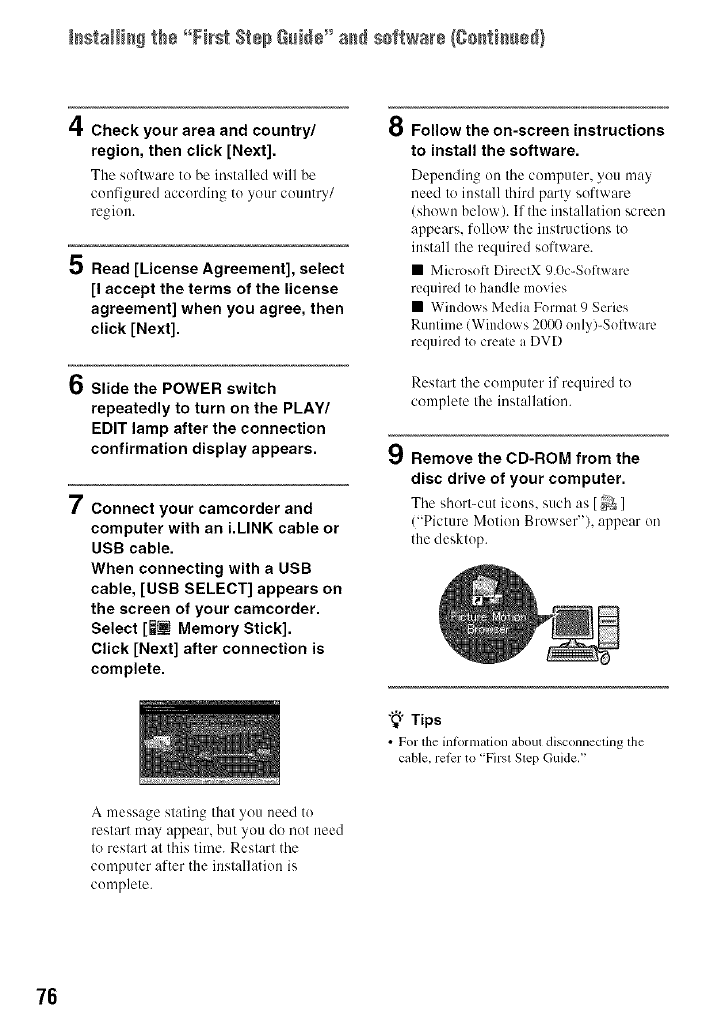
I_staH[_ the °°First S_÷pGNU÷" a_ s0f_war÷/Co_ti_ued)
4Check your area and country/ 8
region, then click [Next].
The software to he installed will be
configured according to your country/
region.
7
Read [License Agreement], select
[I accept the terms of the license
agreement] when you agree, then
click [Next].
Slide the POWER switch
repeatedly to turn on the PLAY/
EDIT lamp after the connection
confirmation display appears.
Connect your camcorder and
computer with an i.LINK cable or
USB cable.
When connecting with a USB
cable, [USB SELECT] appears on
the screen of your camcorder.
Select [_[] Memory Stick].
Click [Next] after connection is
complete.
9
Follow the on-screen instructions
to install the software.
Depending on tile computer, you may
need to install third party software
(shown below). If the installation screen
appears, follow the instructions to
install the required software.
• Microsoft DircctX 9.0c-Software
required to handle movies
• Windows Media Format 9 Series
Runtime (Windows 2000 only)-Softwarc
required to create a DVD
Restart tile computer if required to
complete the installation.
Remove the CD-ROM from the
disc drive of your computer.
Tile short-c/it icolls, such as I_ ]
("Picture Motion Browser"), appear on
the desktop.
"_" Tips
• For the inlbrmation about disconnecting the
cable, reti:r to 'First Step Guide."
A message stating that you need to
restart may appear, but you do not need
to restart at this time. Restart tile
computer after the installation is
complete.
76
Viewing"First Step
Guide"
To view "First Step Guide" on your
computer, Microsoft luternet Explorer
Vet.6.0 or later is recommended. Double-
click tile short-cut icon for your
camcorder's "First Step Guide" on the
desktop.
"_° Tips
• You can also stair by selecting [Start] ----+
[Progranls] (JAil Programs] lot Windows XP)
----+[Sony Picture Utilityl ----+[FirstStepGuidel
----+Your camcorder's folder ----+"Firsl Step
Guide" ill HTML.
• To view "Firsl Step Guide" ill HTML withoul
installing, copy tile desired language lolder fiom
the [FirstStepGuidel lokler on the CD-ROM,
mid then double-click [hldex.lmnll.
• Rel_r m your canlcorder's "First Step Guide" ill
PDF (p. 75) in the following cases:
When printing the desired topics ol "First
Step Guide"
When "First Step Guide" is not displayed
correctly due to tile browser setting even ill
reCOllllnellded ell_,,i roll ii/elll,
When tile HTML version ol "Firsl Step
Guide" cannol be installed.
Usinga Macintosh
computer
You can copy the still images from the
"Memory Stick Duo" to the Macintosh.
Install "First Step Gukle" ill the supplied
CD-ROM.
0 Notes
• Tile supplied sotiwm-e 'Picture Motion
Browser" does nol operale on Mac ON.
• You also need to make certain seoings on your
camcorder whell importing movies to a
computer with commerci.lly available editing
software. For details, reti:r to "First Step
Guide."
To copy still images from a"Memory
Stick Duo"
OS: Mac OS 9.119.2 or Mac OS X lvl0.1/
v 10.2Iv10.3Iv 10.4).
Others: _ USB port (lhis must be provided as
standard)
The "First Step Guide" is an instruction
manual you call refer to on your computer.
This describes basic operations, from initial
hookup of your camcorder and computer
and making settings, to general operation
the first time you use the software.
Referring to "Installing the "First Step
Guide'"', start the "First Step Gtfide," then
follow the instructions.
To install "First Step Guide"
Copy "FirstStepGuide(PDF)," stored in the
desired language folder ill the
[FirstStepGuide] l'okler, to your computer.
Toview "First Step Guide"
Double-click "FirstStepGuide(PDF)."
If software to view PDF files is not installed
on your computer, download Adobe Reader
from their website, below:
http://www.adobe.com/
m
77
Tro_bfes_metiW
Troubleshooting
If you run into any problems using your
camcorder, use the following table to
troubleshoot the problem. If the problem
persists, disconnect the power source and
contact your Sony dealer.
• Overall operalions/Easy Handycam/
Remote Commander .............................. 78
• Batteries/Power sources ........................ 79
LCD screen/viewfinder ......................... 79
Cassette tapes/"Memory Stick Duo".....80
Recording .............................................. 81
Playback ................................................ 83
Playing back on TV ............................... 84
Dubbing/Editing/Connecting to other
devices ................................................... 84
•Connecting to a computer ..................... 85
•Functions that cannot be used together
............................................................... _5
The power does not turn on.
• Attach a charged battery pack to the
camcorder (p. 13).
• Use the AC Adaptor to comlect to a wall
outlet (wall socket) (p. 13).
The camcorder does not operate
even when the power is set to on.
• Disconnect the AC Adaptor from the wall
outlet (wall socket) or remove the battery
pack, then reconnect it after about 1 minute.
•Press the RESET button (p. 104) using a
sharp-pointed object (If you press the
RESET button, all settings are reset, except
Personal Menu items).
Buttons do not work.
• During Easy Handycam opel;ition_ not all
buttons are limctional (p. 22).
Settings change during Easy
Handycam operation.
• During Easy H mdycam operation, the
settings of the lhnctions that are not
displayed on the screen return to their
defaults (p. 22, 40).
The menu item settings have
changed unexpectedly.
• The following settings return to the def:lult
settings automatically when you set the
POWER switch to OFF (CHG) for more
Ihan 12hours.
backlight
[SCENE SELECT[
[SPOT MTR.FCS]
[SPOT METER]
[EXPOSURE]
[WHITE BAL.]
[SHUTTR SPEED]
[SPOT FOCUS]
[FOCUS]
1_{_AUDIO MIX] of [DV SET] DV
[MIC LEVELI
The camcorder gets warm.
• The camcorder may get warmer while you
use it. This is not a malfunction.
The supplied Remote Commander
does not function.
• Set [REMOTECTRLI to [ON] (p. 60).
•Remove any obstructions between the
Renlote Commander and the renlote sensor.
• Keep strong light sources, such as sunlight
or overhead lighting, away from the remote
sensor, otherwise the Remote Commander
may not Rmction properly.
• Insert a fresh batteUin the compartment
with its +_ tenninals matching those of the
compartment (p. 106).
78
Another VCR malfunctions when you
use the supplied Remote
Commander.
• Select a con'unandcr mode ()tiler than VTR
2 for your VCR.
•Cover the sensor of your VCR with black
paper.
• Fully charge the hattery ag lin. If the
problem persists, filebattery may be worn-
out. Replace it with a new one (p. 13, 93).
• The indicated time may not be correct in
certain circtlnlstances. For examp]e, when
you open or close the LCD panel it takes
about 1 minute to display the correct
remaining battery time.
The power abruptly turns off.
• When approximately 5 minutes ha_e
elapsed while you do not operate your
camcorder, the camcorder is automatically
turned off (A.SHUT OFF). Change the
setting of [A.SHUT OFF] (p. 61), or turn
on the power again (p. 16), or use the AC
Adaptor.
• Charge the battery pack (p. 13).
The _/CHG (charge) lamp does not
light while the battery pack is being
charged.
• Slide tile POWER sx_itchto OFF (CHG)
(p. 13).
• Attach the hattery pack to the camcorder
correctly (p. 13).
• Connect Ihe power cord (mains lead) to the
wall outlet (wall socket) properly.
• The battery charge is completed lp. 13).
The _/CHG (charge) lamp flashes
while the battery pack is being
charged.
• Attach the battery Dack to the camcorder
correctly (p. 13). If the problem persists,
disconnect the AC Adaptor from the wall
outlet (wall socket) and contact your Sony
dealer. The battery pack may be damaged.
The remaining battery time indicator
does not indicate the correct time.
• Amhient temperature is too high or to() low,
or the hattery pack has not been ch irge(l
enough. This is not a malfunction.
The battery pack discharges too
quickly.
• Ambient temperature is too high or low, or
the battely, pack has not been charged
enough. This is not a malffmction.
• Fully charge the hattery again. If the
problem persists, the h ittery may be worn-
out. Replace it with a new one (p. 13, 93).
You cannot turn the LCD backlight
off.
• During Easy Handycam operation, you
cannot turn the LCD backlight on/offby
pressing and holding DISPLAY/BATT
INFO (p. 22).
You cannot turn off the indicator.
• You cannot turn olf_. Touch [_7 to
check the warning messages (p. 88).
The buttons do not appear on the
touch panel.
• Touch the LCD screen lightly.
• Press DISPLAY/BATT INFO on your
camcorder (or DISPLAY on the Remote
C()mmander) lp. I& 106).
The buttons on the touch panel do
not work correctly or do not work at
all.
• Adjust tile touch panel ([CALIBRATION])
(p. 98).
--4
Continued._ 7g
Trssb_sshsstisS/Ssstisssd}
8O
Menu items are grayed out.
• You cannot sch:ct grayed items in the
current recording/playback situation.
• Depending on the functions, you may not
be able to use them together (p. 85).
is not displayed.
• During Easy Handycum operation, not all
menu items are functionah Cancel Easy
Handycam operation (p. 22).
The picture in the viewfinder is not
clear.
• Move the viewfinder lens ac{justmentlever
until the picture appears clearly (p. 18).
The picture in the viewfinder has
disappeared.
• Close the LCD panch The picture is not
displayed in the viewfinder when the LCD
panel is open (p. 18).
The cassette cannot be ejected from
the compartment.
• Make sure the p()'_u_qsource (battery pack
or AC Adaptor) is connected correctly
(p. 13).
• Moisture condensation has occurred inside
the camcorder (p. 96).
The Cassette Memory indicator or
title display does not appear while
using a cassette with Cassette
Memory.
• This camcordcr does not support Cassette
Memory, so the indicator does not appear.
The remaining tape indicator is not
displayed.
• Set I_==1REMAINING] to [ONI to al'_xuys
display the remaining tape indicator (p. 6(I).
The cassette is noisier during
rewinding or fast-forwarding.
• When using the AC Adaptor, rewind/fast
R>rward speed increases (compared with
battery operation) and therefore increases
noise. This is not a malfunction.
You cannot operate functions using
a"Memory Stick Duo," even if a
"Memory Stick Duo" is inserted.
• Slklc the POWER switch to turn on the
CAMERA-MEMORY or PLAY/EDIT
lamp (p. 16).
• If you use a "Memo UStick Duo" R)rmatted
on a colilp/iter, format it again on your
camcorder (p. 5I).
You cannot delete the recorded
picture on the tape.
•You cannot dclctc a recorded picture on
tape; you can only rewind the tape and
record igain. The new recording over_ rites
the existing one.
You cannot delete pictures or format
a"Memory Stick Duo."
• Reh:ase the lock on the write-protect tab of
the "Memory Stick Duo" if there is one
(p. 92).
• Cancel image protection on the picture
(p. 70).
•The maximum number of pictures that you
can delete on the index screen at one time is
100.
Image protection cannot be applied,
or you cannot mark pictures for
print.
• Reh:ase the lock on the write-protect tab of
the "Memory Stick Duo" if there is one
(p. 92).
• Perform the operation again on the index
screen (p. 29, 70).
• The maximum number of pictures you can
mark for print is 999.
The data file name is not indicated
correctly, or flashes.
•The file is damaged.
• Use the file format compatible with your
camcorder (p. 92).
The recording image view looks
different.
• The recording image view may look
diflL.rent depending on the condition of
your camcorder. This is not a malfunction.
Refer also to "Cassette tapes/"Memory
Stick Duo'"' section (p. 80).
The tape does not start when you
press START/STOP.
• Slide the POWER s_itch to turn on the
CAMERA-TAPE lamp (p. 23).
• The tape has reached the end. Rewind iL or
insert a new cassette.
• Set the write-protect tab to REC or insert a
new cassette (p. 91).
• The tape is stuck to Ibe drum due to
moisture condensation. Remove the
cassette and leave your camcorder for at
least 1 hour, then reinsert the cassette
(p. 96).
You cannot record on the "Memory
Stick Duo."
• The "Memory Stick Duo" is fulh Insert
another "Memory Stick Duo" or format the
"Memory Stick Duo" (p. 51). Or, delete
/innecessal): pictLIl'eS recorded on the
"Memory Stick Duo" (p. 69).
• When the POWER switch is set to
CAMERA-TAPE, you cannot record still
images on the "Memory Stick Duo" with:
When [SHUTTR SPEED] is set between
1/725 to 1/10000 second
While executing [FADER]
[D.EFFECT]
[PICT.EFFECT]
[SMTH SLW REC]
[COLOR BAR]
You cannot record a smooth
transition on a tape from the last
recorded scene to the next.
• Perlbnn END SEARCH (p. 32).
• Do not remove the cassette (The picture
will be recorded continuously without a
break even when you turn the power off).
• Do not record pictures in the HDV and DV
formats on the sanle tape.
• Do not record pictures in SP mode and LP
mode on Ihe sanle tape. DV
• Avoid stopping then recording a movie in
the LP mode. DV
• When [QUICK REC] is set to [ONI,you
cannot record a smooth transition (p. 61).
HDV1080i
The flash does not work.
• You cannot use the flash during tape
recording.
• Even if auto flash or (_ (Auto redeye
reduction) is selected, you cannot use the
internal flash with:
[TWlLIGHT], [CANDLE], [SUNRSE
SUNSET], [FIREWORKS],
[LANDSCAPE], [SPOTLIGHT],
[BEACH] or [SNOW] of [SCENE
SELECT]
[SPOT MTR.FCS]
[SPOT METER]
[MANUAL] of [EXPOSURE]
[END SEARCH] does not work.
•Do not eject the cassette aflcr recording
(p. 32).
• There is nothing recorded on the cassette.
• There is a blank section hetween recorded
sections of the tape. This is not a
malfunction.
-'4
,::r
Continued._ 81
TrssNsshsstiss (Ssstisssd)
[COLOR SLOW S] does not operate
correctly.
•[COLOR SLOW S] may not operate
correctly in total darkness. Use NightShot
or ]SUPER NS].
You cannot use [SUPER NS].
• The NIGHTSHOT switch is not set to ON
(p. 27).
The auto focus does not function.
•Set ]FOCUS] to [AUTO] (p. 45).
• The recording conditions are not suitable
for auto focus. At[just the focus manually
(p 45).
[STEADYSHOT] does not function.
•Set [STEADYSHOT] to [ON] lp 48)
The backlight function does not
function.
•The backlight fimction does not work
during Easy Handycam operation/p. 22).
The [FLASH LEVEL] cannot be
changed.
•]FLASH LEVEL] (p. 46) cannotbe
changed during Easy Handycam operation.
Tiny spots in white, red, blue, or
green appear on the screen.
• The spots appear when the shutter speed is
slow or when you are recording in [SUPER
NS] or [COLOR SLOW S]. This is not a
malflmction.
The subjects passing fast by the
frame might appear crooked.
•This is called the focul phmc phenomenon.
This is not a malfimction. Because of the
way the image device (CMOS sensor) reads
out image signals, the sul_jects passing in
fi'ont of the lens rapidly might appear
crooked depending on the recording
conditions.
The color of the picture is not
correctly displayed.
• Dcacti_ate the NightShot function (p.27).
The screen picture is bright, and the
subject does not appear on the
screen.
• Set the NIGHTSHOT s_ itch (p. 27) to
OFF, or cancel the backlight hmction
(p. 27).
The screen picture is dark, and the
subject does not appear on the
screen.
• Press and hold DISPLAY/BATT INFO for
a l_-'wseconds to turn on the backlight
/p. 18).
Horizontal bands appear.
• This may occur when recordingpictures
under lighting from adischarge tube, such
as a fluorescent lamp, sodium lamp, or
mercu Ulamp. This is not a malfimction.
• This may be alleviated by a(0usting the
shutter speed (p. 44).
Black bands appear when you
record a TV screen or computer
screen.
• Adjust [SHUTTR SPEED] (p. 44).
82
Refer also to "Cassette tapes/"Memory
Stick Duo'"' section (p. 80).
You cannot play back a tape.
•Slide the POWER s_itch to turn on the
PLAY/EDIT lamp.
• Rewind the tape (p. 28).
You cannot play back in reverse
direction.
• Reverse playback is not possible with the
tape recorded in the HDV lbrmat.
Image data stored on a "Memory
Stick Duo" cannot be played back.
• hnagc data cannot he played hack if you
have modified file names or folders, or
have edited the data on a computer (In this
case, the file name flashes). This is not a
malfimction (p. 93).
• Pictures recorded on other devices rely not
be played back or may not appear in their
actual size. This is not a malfunction
/p. 93).
Horizontal lines appear on the
picture. The displayed pictures are
not clear or do not appear.
• Clean the head using the cleaning cassette
(optional) (p. 97).
You cannot hear the sound recorded
with 4CH MIC REC on another
camcorder. DV
•A(ljusl 1['_ AUDIO MIX] (p. 57).
Fine patterns flicker, diagonal lines
look jagged.
• A@,st [SHARPNESS] to the [_ (soflcn)
side (p. 44).
No sound or only a low sound is
heard.
•Turn up the w)lume (p. 28).
• Adjust I{_ AUDIO MIX] from the [ST2]
(additional sound) side until the sound is
heard appropriately (p. 57).
• lfyou are using an S VIDEO plug or
component video plug, make sure the red
and white plugs of the A/V connecting
cable are also connected (p. 34).
• Sounds cannot be recorded while shooting a
3 second-movie/approx.) using [SMTH
SLW REC].
The picture or sound breaks off.
• The tape _as recorded in both the HDV and
DV fornmts. This is not a malfunction.
The movies freeze for a while, or the
sound breaks off.
• This occurs if the tape or video head is dirty
(p. 97).
• Use the Sony mini DV cassette.
"---" is displayed on the screen.
• The tape you are playing was recorded
without setting tile date and time.
• A blank section on the tape is being played.
• The data code on a tape with a scratch or
noise cannot be read.
Noises appear and _ or _is
displayed on the screen.
• The tape_xasrecordedill a TV color system
other than that of your camcorder (NTSC).
This is not a mallhnction (p. 90).
Date Search does not work correctly.
• Be sure to record lllore than 2 minutes after
the date changed.If one day's recording is
too short, your C:llllcorder lilly not
accurately find the point where the
recording date changes.
Continued._ 83
Trssb_sshsstisS/Ssstisssd)
• There is a blank section between recorded
sections of the tape. This is not a
malfimction.
No picture appears during [END
SEARCH] or Rec Review.
• The tape was recorded in both HDV and
DV lbrmats. This is not a malfimction.
J_4ch-12bappears on the LCD screen.
• This appears when you play back a tape
recorded on other recording devices using a
4ch microphone (4CH MIC REC). This
camcorder does not comply with the 4ch
microphone recording standard.
You cannot view the picture on the
TV connected with the i.LINK cable.
•You cannot view the picture in the HD
(high definition) image quality on the TV
which is not compatible with the
HDV 1080i specification (p. 34). Reli:r to
the instruction manuals Sul)plied with your
TV.
• Down convert the pictures recorded in
HDV format to DV 12)rmatand play back ill
SD (standard definitionJ image quality
(p. 59).
• Play back pictures using another connecting
cable (p. 341.
You cannot view the picture or hear
the sound on the TV connected with
the component video cable.
• Set [COMPONENT] on tile
/STANDARD SET) menu according to the
requirements of the connected device
(p. 59).
• When you am using the component video
cable, make sure the red and white plugs of
the A/V connecting cable arc connected
(p. 34).
You cannot view the picture or hear
the sound on the TV connected with
the HDMI cable.
• Pictures in the DV format are not output
fiom the HDMI OUT jack, if copyright
protection signals are recorded in the
pictures.
• DV format pictures input to the camcorder
via i.LINK cable (p. 67) cannot be output.
• This occurs if you record on a tape in both
HDV and DV formats. Disconnect and
conneel the HDMI cable, or slide the
POWER switch to turn on your camcorder
again.
The picture appears distorted on a
4:3 TV.
• This happens when viewing a picture
recorded ill the 16:9 (wide) mode on a 4:3
TV. gel [TV TYPE] on the
(STANDARD SET) metal (p. 59) and play
back the picture.
Black bands appear at the top and
bottom on a 4:3 TV.
• This happens when viewing a picture
recorded in 16:9 (wide) mode on a 4:3 TV.
This is not amalflmction.
Pictures from connected devices
cannot be zoomed.
• You cannot zoom pictures from connected
devices on your camcorder (p. 301.
Time code and other information
appear on the display of the
connected device.
•Set [DISP OUTPUTI to [LCD PANELI
while connected with an A/V connecting
cable (p. 611.
84
You cannot dub correctly using the
AN connecting cable.
•You cunnot input externally from a device
connected with the A/V connecting cable.
• The A/V connecting cable is not connected
properly.
Make sure that the A/V connecting cable is
connected to the input jack of the other
device for dubbing a picture from your
canlcorder.
When connected using an i.LINK
cable, no picture appears on the
monitor screen or the picture is
distorted during dubbing.
• Sel [VCR HDV/DV] on the
(STANDARD SET) menu iccording to the
requirements of the connected device
lp. 56).
• If the device to be connected is not
compatible with HDV 1080i specification,
you cannot dub in HD (high definition)
image qualily (p. 64). For details, refer to
the instruction manuals supplied wflh the
device to be connected.
• Down convert the pictures recorded in
HDV format to DV format and dub in SD
(standard definition) image quality (p. 64).
You cannot add sound to the
recorded tape.
• You cannot add sound to the recorded tape
on this unit.
You cannot dub correctly using the
HDMI cable.
• You cunnot dub pictures using the HDMI
cable.
New sound added to a recorded tape
on another camcorder is not heard.
DV
• A@lst [[_ AUDIO MIXI from the [STll
(original sound) side until the sound is
heard appropriately (p. 57).
Still pictures cannot be dubbed from
a tape to a "Memory Stick Duo."
• You cannot record or a distorted picture
rely be recorded if the tape has been used
repeatedly for recording.
The computer does not recognize
your camcorder. _
• lnstull "Picture Motion Bro_ ser" (p. 73).
• Disconnect USB devices other than the
keyboard, the mouse, and the camcorder
from the _"(USB)jack on Ihe compuler.
• Disconnect the cable from the computer
and camcorder, restart the computer, then
connect them again correctly.
You cannot install the supplied
software, "Picture Motion Browser,"
on a Macintosh computer.
• You cannot use "Picture Motion Browser"
on a Macintosh computer.
Depending on the functions, you may not be
able to use them together. The lk_llowing list
shows examples of menu items and functions
that cannot be used at the same time.
backlight fimction [FIREWORKS],
[SPOT METER],
[MANUAL] of
[EXPOSUREI
[SCENE SELECT[ NightShot, [TELE
MACRO],
[SUPER NS],
[CINEMA EFECT],
[OLD MOVIE],
[COLORSLOWS]
Continued._ 85
=r
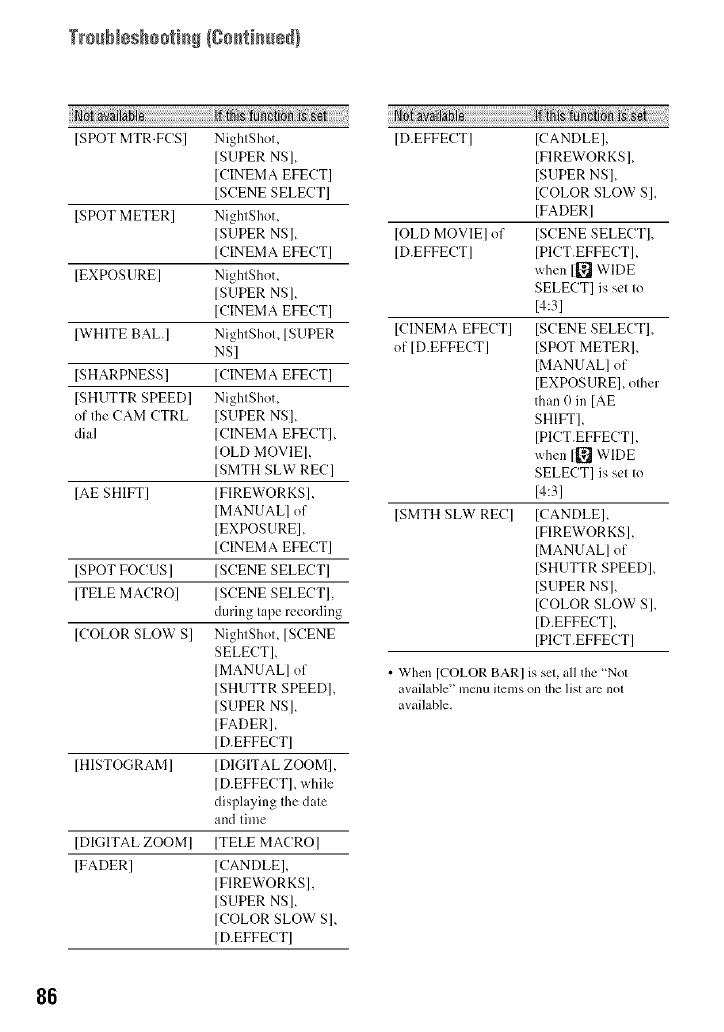
Trssb_sshsstisS/Ssstisssd)
}i]_i_i_!i!i_!iij_!_i_i_i_i_i_i_i_i_i_i_i_i_i_i_i_i_i_i_i_i_i_i_i_i_i_i_i_i_i_i_i_i_i_i_i_i_i_i!_!_!i]i_i_i_:i_ii_!_i_iii_i]i_{{!_!_i!i!i!i%
SPOT MTR.FCS] NightShoL
]SUPER NS],
[CINEMA EFECT]
[SCENE SELECT]
]SPOT METER] NightShot,
]SUPER NS],
]CINEMA EFECT]
EXPOSURE] NightShoL
]SUPER NS],
[CINEMA EFECT]
WHITE BALd NightShot, [SUPER
NS]
SHARPNESS] [CINEMA EFECT]
SHUTTR SPEED] NightShoL
of Ihe CAM CTRL ]SUPER NS],
dial [CINEMA EFECT],
[OLD MOVIE],
[SMTH SLW REC]
[AE SHIFT] [FIREWORKS],
[MANUALI of
[EXPOSURE],
]CINEMA EFECT]
]SPOT FOCUS] [SCENE SELECT]
[TELE MACRO] [SCENE SELECT],
during tape recording
[COLOR SLOW S] NightShot, [SCENE
SELECT],
[MANUALI of
[SHUTTR SPEED],
]SUPER NS],
[FADER],
[D.EFFECT]
HISTOGRAM] [DIGITAL ZOOM],
[D.EFFECT], while
displaying the date
and time
DIGITAL ZOOM] [TELE MACRO]
]FADER] [CANDLE],
]FIREWORKS],
]SUPER NS],
[COLOR SLOW S],
[D.EFFECT]
a {
[D.EFFECT] [CANDLE],
[FIREWORKS],
[SUPER NS],
[COLOR SLOW S],
]FADER]
[OLD MOVIEI of [SCENE SELECTI,
[D.EFFECTI [PICT.EFFECTI,
when [_ WIDE
SELECT] is set to
14:31
[CINEMA EFECT] [SCENE SELECTL
of [D.EFFECT] ]SPOT METER],
]MANUAL] of
[EXPOSURE], other
than 0 in [AE
SH[FT],
[PICT.EFFECT],
when [_ WIDE
SELECT] is set to
14:31
[SMTH SLW REC] [CANDLE]_
]FIREWORKS],
[MANUAL] of
[SHLITTR SPEED],
]SUPER NS],
[COLOR SLOW S],
[D.EFFECT],
[PICT.EFFECT]
• When [COLOR BAR] is set, all the "Not
available" menu items on the list arc not
available.
86
Warningindicatorsandmessages
If indicators appear on tile LCD screen or in
the viewfinder, check the l\_llowing.
Some symptoms you can fix by yourself. If
the problem persists even after you have
tried a couple of times, contact your Sony
dealer or local authorized Sony service
facility.
C:(or E:) r-IN:r-IN (Self-diagnosis
display)
C:04:F-ID
•The battery pack is not m
"InI_LITHIUM" batte W pack (H
series). Use an "InfoLITHIUM" battery
pack (H series) (p. 93).
• Connect Ihe DC plug of the AC
Adaptor to the DC IN jack of your
camcorder securely (p. 13).
C:21:F-ID
• Moisture condensation has occurred.
Remove the cassette and leave your
camcorder l_)r at least 1 hour, then re-
insert the cassette (p. 96).
C:22:r3D
• Clean the head using a ch..aning
cassette (optional) (p. 97).
C:31 :E3D /C:32:r3D
• Symptoms that arc not described abo'_c
have occurred. Remove and insert the
cassette, then operate your camcorder
again. Do not perform this procedure if
moisture condensation has occurred
(p. 96).
• Remove the power source. Reconnect it
and operate your camcorder again.
• Change the cassette. Press RESET
(p. 104), and operate your camcorder
again.
E:61 :r3D /E:62:r3D /E:91 :fin
• Contact your Sony dealer or local
authorized Sony service facility, lnform
them of the 5-digit code, which stal_.s
fronl "E."
101-1001 (Warning indicator
pertaining to files)
• The file is damaged.
• The file is unreadable (p. 92).
c\n (Battery level warning)
• The battery pack is nearly used up.
• Depending on the operating,
environment, or battery conditions, (-\_
may flash, even if there are
approximately 5 to 10 minutes
remaining.
[] (Moisture condensation warning)*
• l_jcct the cassette, remove the l)owcr
source, and then leave it l_r about 1
hour with the cassette lid open (p. 96).
(Warning indicator pertaining to
"Memory Stick Duo")
• A "Memory Stick Duo" is not inserted
(p. 19).
g_l (Warning indicators pertaining to
"Memory Stick Duo" formatting)*
• The "Memory Stick Duo" is damaged.
• The "Memory Stick Duo" is not
formatted correctly (p. 51.92).
(Warning indicator pertaining to
incompatible "Memory Stick Duo")*
• An incompatible "Memory Stick Duo"
is inserted (p. 92).
--I
Continued._ 87
WamiaS iadieate_s a_d messasss {gestia_÷d}
(Warning indicators aertaining to
the tape)
Slow flashing:
•There is less than .5 minutes remaining'.
on the tape.
•No cassette is inserted.*
•The write-protect tab on the cassette is
set to lock (p. 91).*
Fast flashing:
•The tape has run out.*
__ (Eiect cassette warning)*
Slow flashing:
•The _ rite-protect tab on the cassette is
set to lock (p. 91).
Fast flashing:
•Moisture condensation has occurred
(p. 96).
• The sell-diagnosis display code is
displayed (p. 87).
o--, (Warning indicator pertaining to
image deletion)*
•The image is protected (p. 70).
o-, (Warning indicator pertaining
to the write-protect of the "Memory
Stick Duo")*
•The _ rite-protect tab on Ihe "Memory
Stick Duo'' is set to lock (p. 92).
(Warning indicator pertaining to
the flash)
Slow flashing:
•Still charging
Fast flashing:
•The self-diagnosis display code is
displayed (p. 87).*
• There is something wrong with the
flash.
* You hear a melody when the warning indicators
appear on the screcn (p. 61).
If messages appear on the screen, follow the
inslruclions.
"#" Tips
•When [_ is displaycxhthe nlessage can be
turned into _ b'i touchin_ [_. Touch [@7
lo display the message again.
II Moisture condensation
[1]__ Moisture condensation. Eject
the cassette (p. 96)
Moisture condensation. Turn off
for 1H. (p. 96)
U Cassette/[ape
AReinsert the cassette. (p. 19)
• Check if the cassette is damaged.
_,_-- The tape is locked - check the
tab. (p. 91)
88
• "Memory Stick Duo"
_1 Reinsert the Memory Stick.
(p. 19)
•Reinsert the "Memory Stick Duo" a
few times. If even then the indicator
flashes, the "Memory Stick Duo" might
be damaged. Try with another
"Memory Stick Duo."
_l This Memory Stick is not
formatted correctly.
• Check tile format, then format the
"MemoUStick Duo" as necessa U
(p. 51,92).
Memory Stick folders are full.
• You cannot create folders exce_.'ding
999MSDCF. You cannot delete created
folders using your camcorder.
•You will have to format the "Memory
Stick Duo" (p. 51),or delete them using
your conlputer.
•DualRec
Cannot save still picture.
• Do not _.ject"Memory Stick Duo"
while still images are being stored onto
it (p. 25).
• PictBridgecompliantprinter
Check the connected device.
•Switch off the printer and switch it on
agaim then disconnect the USB cable
and reconnect it.
Cannot print. Check the printer.
• S_ itch off the printer and switch it on
agaim then disconnect the USB cable
and reconnect it.
89
Mdi_*_af _torx_afio_
Usingyourcamcorderabroad
Powersupply
You can useyour camcorder in any
country/region using tile AC Adaptor
supplied with your camcorder within the
AC 100 V to 240 V. 50160 Hz range.
llse a commercially available AC plug
adaptor [a], if necessary, depending on the
design of the wall uutlet/wall socket) [b].
AC-L2OO/L2OOB [a] [b]
OnTVcolorsystems
Your camcorder is NTSC system, so its
picture can only be viewed on an NTSC
system TV with an AUDIO/VIDEO input
jack.
NTSC Bahama Islands, Bolivia,
Canada, Central America, Chile,
(k)lombia, Ecuador, Guyana,
Jamaica, Japan, Korea, Mexico,
Peru, Surinam, Taiwan,
the Philippines, the U.S.A.,
Venezuela, etc.
PAL Australia, Austria, Belgium,
China, Czech Republic,
Denmark, Finland, Germany,
Holland, Hong Kong, HungaU,
Italy, Kuwait, Malaysia,
New Zealand, Norway, Poland,
Portugal, Singapore,
Slovak Republic, Spain,
Sweden, Switzerland, Thailand,
United Kingdom, etc.
PAL - M Brazil
PAL - N Argentina, Paraguay, Uruguay.
SECAM Bulgaria, France, Guiana, lran,
Iraq, Monaco, Russia, Ukraine,
etc.
Viewing HDV format pictures recorded
in HDV format HDV1080i
You need :m HDV 1080i cumpatible TV/or
monitor) with a component jack and
AUDIO/VIDEO input jack. A component
video cable and A/V cunnecting cable are
also needed.
Viewing DV formatpicturesrecorded
in DV formatDV
You need a TV lot monitor)with the
AUDIO/VIDEO input.jack. A connecting
cable is also needed.
Simplesettingofthe clockbytime
difference
You can easily set the clock to the local
time abroad by entering the time difference
between where yuu live and where you are.
Select ]WORLD TIME] in the _'_ (TIME/
LANGU.) menu. then set the time
difference (p. 62).
9O
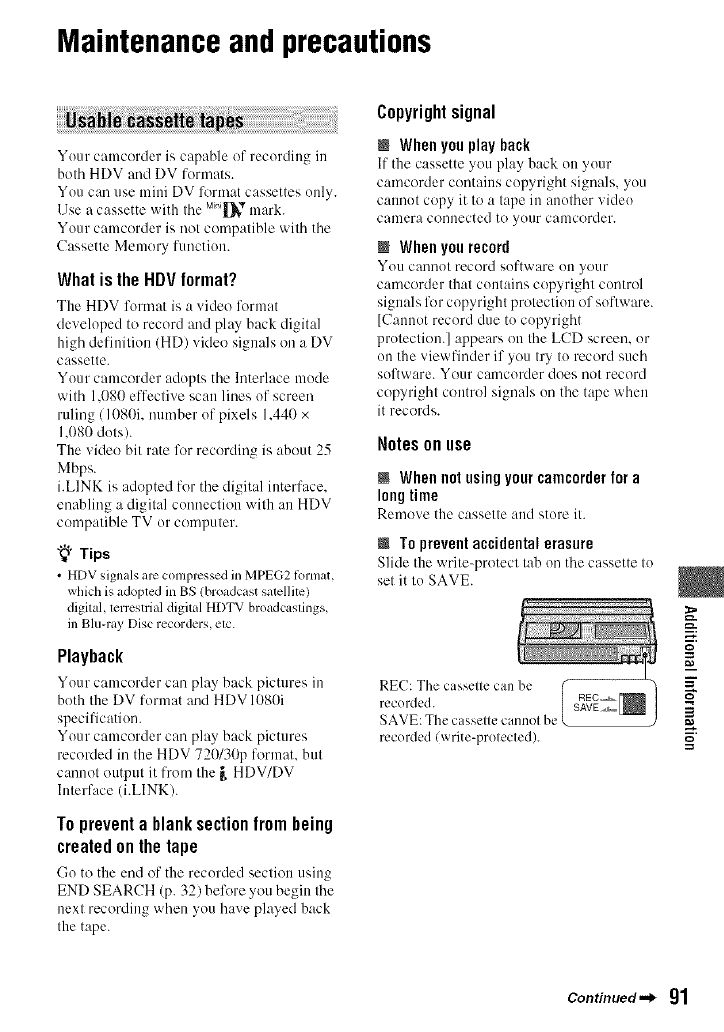
Maintenanceand precautions
i II¸
Your camcorder is capable of recording in
both HDV and DV formats.
You can use mini DV l\wmat cassettes only.
Use a cassette with tile ui_'v mark.
Your camcorder is not compatible with the
Cassette Memory function.
What is the HDV format?
The HDV format is Itvideo _rmat
developed to record and play back digital
high definition (HD) video signals on a DV
cassette.
Your camcorder adopts the Interlace mode
with 1.080 effective scan lines of screen
ruling/]080i, number of pixels 1.440 x
1.080 dots).
The video bit rate lk_rrecording is about 25
Mbps.
i.LINK is adopted for tile digital interface.
enabling a digital connection with an HDV
compatible TV or computer.
"_° Tips
• HDV signals arc compressedin MPEG2 tormat
which is adopted in BS (broadcast satellile)
digital, lerrcstrial digital HDTV broadcaslings.
m Blu-ray Disc recorders, elc.
Playback
Your canlcorder c:m play back picttu'es in
both the DV format and HDV 1080i
specification.
Your camcorder carl play back pictures
recorded in the HDV 720130p format, but
cannot otttput it from the _.HDV/DV
Interface (i.LINKI.
To prevent a blank section from being
created on the tape
Go to the end of the recorded section using
END SEARCH (p. 321 belk_re you begin the
next recording when you have played back
the tape.
Copyrightsignal
IWhenyou play back
If tile cassette you play back on your
camcorder contains copyright signals, you
cannot copy it to a tape in attother vide()
camera connected to yottr camcorder.
EWhenyou record
You cannot record software on your
camcorder that contains copyright control
signals l\_r copyright protection of software.
[Cannot record due to copyright
protection.] appears on the LCD screen, or
on the viewfinder if you try to record such
software. Your camcorder does not record
copyright control signals on the tape when
it records.
Notes onuse
I Whennot usingyourcamcorderfor a
longtime
Remove the cassette and store it.
To preventaccidental erasure
Slide Ihe wrile-protect lab on the cassette Io
sel it Io SAVE.
REC: The casseHe can be F REC_
FL'CO ldL'd. SAVE _[_
LSAVE: The casselle cannol be
recorded (write-prolecled).
g
i
Continued-_ 91
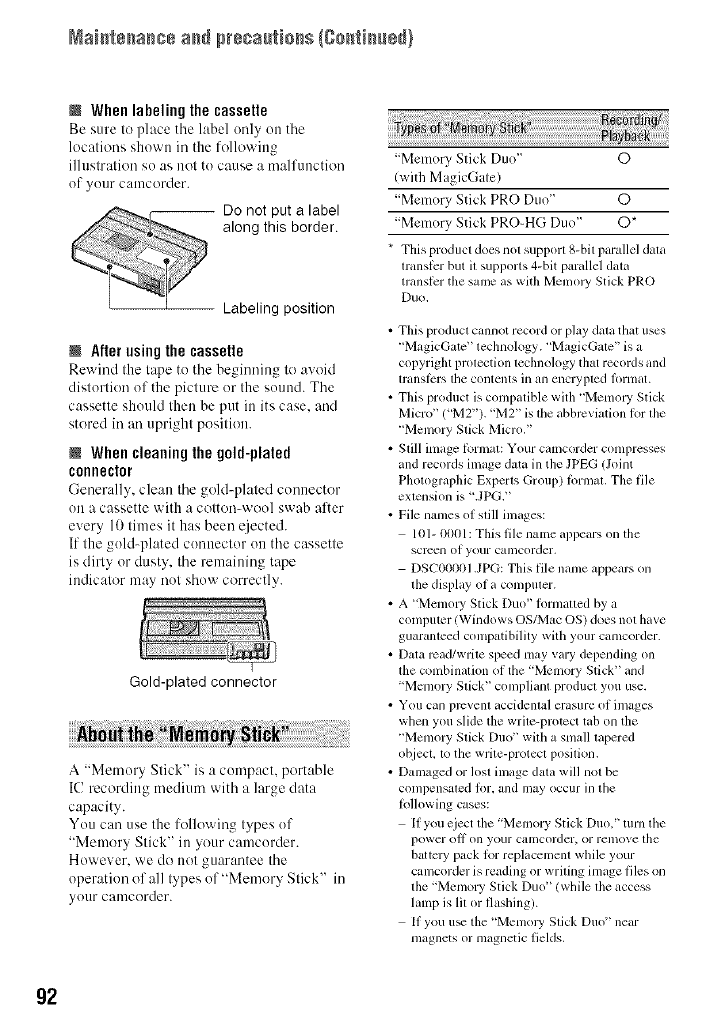
Naistssasss ass presa_[tisss {gsstiss÷_}
MWhen labelingthe cassette
Be sure to place tile label only on tile
locations shown in the following
illustration so as not to cause a malfunction
of your camcorder.
-- Do not put a label
along this border.
Labeling position
NAfter using the cassette
Rewind the tape to the beginning to avoid
distortion of the picture or the sound. Tbe
cassette should then be put in its case, and
stored in an upright position.
NWhen cleaning the gold-plated
connector
(-;eoeralls, clean the gold-plated connector
on a cassette with a cotton-wool swab after
every 10 times it has been eiected.
If the gold-plated connector on the cassette
is dirty or dusty, the remaining tape
indicator may not sbow correctly.
Gold-plated connector
filli!!i! iil iii !! _i illiiiiiii_iii!iil i;i
A "Memory Stick" is a compact, portable
IC recording medium with a large data
capacity.
You can use the following types of
"Memory Stick" in your camcorder.
However, we do uot guarantee the
operation of all types of "Memory Stick" in
your camcorder.
"Memory Stick Duo" 0
(with MagicGate)
"Memory Stick PRO Duo" O
"Memory Stick PRO-HG Duo" O*
* This product does not support 8-bil parallel dala
lranslcr but il supports 4-bit parallel dala
translcr the same as with Memol3' Stick PRO
Duo,
• This producl cannot record or play data that uses
"Mz_gicGatc" technology. "MagicGate" is a
copyright prolection lechnology that records and
lranstcrs the contents in an encrypled fi)nnat.
• This product is compatible with "Memo W Stick
Micro" ('M2"). "M2" is lhe abbreviation for lhe
"Memory Slick Micro."
• Still image tbrmat: Your camcorder compresses
and records image data in the JPEG (Joint
Photographic Experts Group) tPrnlzm The file
exlension is 'JPG."
•File names of slill images:
101- 0001: This file name appears on the
screen of your canlcorder,
DSC00001 .JPG: This file name appears on
lhe display of a compuler.
• A "MemolT Stick Duo" tormaued by a
computer/Windows OS/MzJc OS) does not have
guaranleed conlpatibility with your camcorder.
• Data rcad/wrile speed may vary depending on
lhe conlbination of the 'Memory Stick" and
'Memory Stick" compliant producl you use.
• You Call prcvenl accidenlal crasl/re of images
when you slide the wrile-protect tab on the
"Memory Stick Du<f' with a small tapered
ot!ject, 1o tile write-protecl posilion.
• Damaged or ]osl inlage dala will nol be
conlpens_lled for, and may occur ill the
Iollowing cases:
If you eject the "Memory Stick Duo," turn lhe
power oil on your camcorder, or relnove lhe
battcly p_,ck tot replacement while your
cumcorder is reading or writing image files on
lhe "Memory Stick Duo"/while lhe access
lamp is lit or flashing).
If you u_ the "MemolT Stick Duo" near
nmgnets or magnetic fields.
92
• It is recommended you make a back-up of
important dat_ on tile hard disk of a computer.
• Be careflfl not to apply excessive lorce when
writing on a menlo area on a "Memory Stick
Duo."
• Do not attacll a label or the like on a "Memo W
Stick DuIg' or a Memo W Stick Duo adaptor.
• When you carl3' or store a 'Mmnol3' Stick Duo,"
put it in its case.
• Do not toucll, or allow metallic objects to conle
into contact with tile terminals.
• Do not bend, drop or apply strong torce to the
"Mmnory Stick Duo,"
• Do not disassemble or modit}? tile "Memory
Stick Duo."
• Do not let tile "Memoly Stick DuIg' get wet.
• Be careflll to kecp 'Memory Stick Duo" media
out of tile reach of small children. There is
danger that a child might swallow it,
• Do not in_ert anything other than a "Memory
Stick Duo" into the Memory Stick Duo slot,
Doing so may cau_ a malthnction.
• Do not use or keq? the 'Memory Stick Duo" ill
the tk_llowing locations.
Places subject to extremely tligh teml)eraturc,
sucll as a car parked outside ill the summer.
Places under direct sunlight.
Places with extremely higll humklity or
subject to corrosive gg_ses.
NOntheMemoryStick Duoadaptor
• When using a "Memory Stick Duo" with a
'Menlory Slick" colnpliallt dex ice, be stlre 10
insert the "Memol3_ Stick Duo" into a Mcmoly
Stick Duo adaptor.
• When inscrting a "Memol T Stick Duo" into a
Memory Stick Duo adaptor, make sure tile
"Memory Slick Duo" is insertcd titcing in file
correct direction, then insert it all tile way in. If
you tk)rce tile "Memory Stick Duo" into tile
Memory Stick Duo adaptor in the wrong
dircction or insert it incompletely, it may cause
a malfunction.
• Do not inert a Memo W Stick Duo adaptor
without a "Memory Stick Duo" attached. Doing
so may resuh in malflmctkms of the unit.
N Ona"MemoryStickPRODuo"
• Tile tllaxilntllll memol 3, Cal?acity ot }l 'Memory
Stick PRO Duo" that call be used on your
camcorder is 8 GB.
Notes onusing"Memory StickMicro"
• To u_ a 'Memory Slick Micro" with the VCR,
you need a Duo-sized M2 Adaptor. Insert tile
'Memory Stick Micro" into tile Duo-sized M2
Adaptor, then hlsell the adaptor into the
Memol T Stick Duo slot. ]t you insert +t
'Memory Stick Micro" into tim VCR wifllout
using a Duo-sized ['./[2Adaptor, you might not
be able to remove it trom tile VCR.
• Do not leave t]le 'Memoly Stick Micro" wit]fin
tile reach of small chddren. They might
accidentally swallow it.
On image data compatibility
• Image data tiles recorded on a "Memory Stick
Dtl(g _ by yotlr Cillncorder cont_)lln to tile
'Design rule tPr Camera File system" uni_ crsal
standard established by tile JEITA (Japan
Electronics and lntonnation Tcclmok_gy
Industries Association).
• On your cameorder, you cannot play back still
images recorded on other devices (DCR-
TRV900 or DSC-D700/D770) that do not
contknm to tile universal standaM (The_
models are not sold in some regions).
• If you cannot use a 'Mclnory Slick Duo" that
has b_n used with another device, tormat it
wit h your camcorder (p. 51 ). Note that
tinmatting era_s all intbrmation on the
"Memory Stick Duo."
• You may not be able to play back images with
your camcorder:
When playing back image data moditied on
your comptller+
When playing back image data recorded with
othcr devices.
This unit is compatible with an
"Inlk_LITHIUM" battery pack (H series).
Your camcorder operates only with an
"Inlk_LITHIUM" battery pack.
"Inlk_LITHIUM" H series battery packs
have the _)l_our_u_ _ mark.
_=."
g
Continued._ 93
Maistssasss ass p_÷sa_[tisss {gsstiss÷_}
What is an "InfoLITHIUIVI" battery
pack?
An "InfoLITHIUM" battery pack is a
lithiumqon battery pack that has functions
for communicating information related to
operating conditiotts between your
camcorder and an optional AC Adaptor/
charger.
The "InfoLITHIUM" battery pack
calculates the power consumption
according to the operating conditions of
your camcorder, and displays the remaining
battery time in minutes.
With an AC Adaptor/charger. the remaining
battery time and charging time appear.
To chargethe battery pack
• Bc sure to charge the baltel T pack belorc you
shirt rising yotlr eaglcorder.
• We recommend charging d_e battely pack in an
ambient temperamrc of between 10 °C lo 30 °C
150 OFto 86 OF)until tile _/CHG (charge) lamp
lurns (ill. If you charge the batlery pack oulside
of Ibis temperature range, you may not be able
to dlarge it el]iciently.
• After charging is complete, disconnect the cable
hom the DC IN jack on your camcorder or
rcmove the battery pack.
To use the battery packeffectively
• Battel 3, pack perlormance decreases when the
surrounding temperamrc is l0 °C (50 OF) or
below, and tile lcngttl of time you can use file
battcly pack becomes sholler. In that case, do
one of tile lbllowing lo use the batlely pack lor a
longer time.
Put tile battery pack in a pockcl to warm it up,
and insert it in your canlcorder rigla belorc
you start taking shots.
U_ a large capacity battery pack: NP-FH70/
FH 100 (optkmal).
• Frequent use of the LCD screen or a lrequmlt
playback, fi_st forward or rewind operation
wears out the battery pack laster.
We recommend using a large capacity battery
pack: NP-PH70/FHIO0 (optional).
• Be sure to set the POWER switch to OFF
/CHG) wllen not rccording or playing back on
your camcorder. The battery pack is also
consullled when your calncorder is hi recordhlg
standby or playback pause.
• Have spare battel T packs ready fftr two or tllree
times the expected recording time. and make
trial recordings belorc making die actual
recording.
• Do nol expose tile ballery pack to waler. The
ballery pack is not water rcsislalnI,
Aboutthe remaining batterytime
indicator
• Whcn the power goes off even though the
remaining battel T time indicator indicates that
the battery pack has enough power to operate,
charge the battery pack ftflly again. Remaining
battery time will be indicated correctly. Note,
however, that the battcry indication will not be
restored if it is used in high temperatures tot a
long time. or if left in a fully charged state, or
wllen file battery pack is hequently used. Use
the remaining baltel T lime indication as a rough
guide only.
• The c\] mark that indicates low battery flashes
even if there are still 5 to 10 minutes of battery
time remaining, depending on the operating
condilions or anlbient lelllperatllrc,
Aboutstorageof the battery pack
• lithe battery pack is not used lbr a long finle,
fully charge the baltel 3, pack and use il up on
your cumcorder once a year to maintain proper
function. To storc tim battery pack. remo_ e it
Irom your camcorder and put it in itdly. cool
place.
• To discharge the battery pack on your
camcorder completely, _t [A.SHUT OFF] to
[NEVERI on file _ /STANDARD SET)
[llenll and leave yollr camcorder in tape
recording standby until the power goes off
(p. 61).
Aboutbatterylife
• Battery capacity decreases over time and
through repeated use. If decreased usage time
bclween charges becomes significant, it is
probably time to replace it with a new one.
• Each baltcl3'_s lilt is governed by slorage.
operating and environmental conditions.
g4
The HDV/DV Interface on this unit is an
i.LlNK-compliam Interface. This section
describes the i.LINK standard and its
features.
What is i.LINK?
i.LINK is a digital serial interface lkw
transferring digital video, digital audio, and
other data to other i.LINK-compatible
devices. You can also control other devices
using the i.LINK.
i.LlNK-compatible devices can be
connected using an i.LINK cable. Possible
applications are operations attd data
transactions with various digital AV
devices.
When two or more i.LlNK-compatible
devices are daisy-chained with the unit.
operation becomes possible lhom any
device in the chain. Note that operation
method may vary, or data transactions may
not be possible, depending on specifications
and characteristics of the connected
devices.
ONotes
•Normally, only one device can he connecled lo
this unit with an i.LINK cable. When
connecting this unil to an HDV/DV compatible
device having two or more _, HDV/DV
Interlaces, rct)r 1o tile operating instruclions of
the device to be connected.
"_° Tips
• i.LINK is a moretim_ilimlerm for lhe
IEEE1394 data transport bus proposed by Sony,
and is a trademark approved by many
corporations.
• IEEE1394 is an international standard
standardized by the Institule of Electrical and
Eleclronics Engineers.
About the i.LINK Baud rate
i.LINK's m:_xitnum baud rate v:uies
according to the device. There are 3 types.
SI00/approx. 100Mbps*)
$200 (approx. 200Mbps)
$400 (approx. 400Mbps)
The baud rate is listed under
"Specifications" in the operating
instructions of each piece of equipment. It
is also indicated near the i.LINK interface
OI1 some devices.
The baud rate tnay differ from the indicated
value when the unit is connected to a device
with a different maximum baud rate.
*Whatis Nhps?
Mbps stands for "megabits per second." or
the amount of data that can be sent or
received in one second. For example, a
baud rate of 100 Mbps means that 100
tnegabits of data can be sent in one second.
To use i.LINK functionson this unit
For details on how to dub when this unit is
connected to other video devices having an
i.LINK Interface. see page 64.
This unit can also be connected to other
i.LINK-compatible devices made by Sony
(e.g. a VAIO series personal computer) as
well as to video dexices.
Some i.L1NK compatible video devices.
such as Digital Televisions. DVD.
MICROMV or HDV recorders/players are _"
not compatible with this ttr_it.Before =
connecting to other devices, be sure to N"
confirm whether the device is compatible
with an HDV/DV device or not. For details
on precautions and compatible application _.
software, refer :dso to the operating
instructions for the device to be connected.
0Notes
• Whell COlllleClillg your C_ilncorder to ilnother
i.LlNK-compafible device, be sure to turn off
tile power of the dcvice and disconnect tile AC
Adaptor tiom tile wall outlet (wall socket)
betbm connecling or disconnecting tile i.LINK
cable.
Continued._ g5
Maistssasss ass p_÷sa_[tisss {gsstiss÷_}
g6
About the required i.LINK cable
Use tile Sony i.LINK 4-pin-to-4-pin cable
(during HDV/DV dubbing).
•x.v.Color is a more l_,miliar term R_r tim xvYCC
standard proposed by Sony, and is a trademark
of Sony.
• xvYCC is an international standard lot color
space in video. This standard can express a
wider color range than tile currently used
broadcast standard.
Onuseandcare
• Do nol u_ or sIor_" tile camcorder and
accessories in the lbllowing locations.
Anywhere extremely hot or cold. Never leave
thmn exposed tit temperatures above 60 °C
(140 °F). such as under direct sunligla, near
heatep, or in a car parked in tile sun. They
may mallunction or become delormed.
Near strong magnetic fields or mechanictd
vibration. The camcorder may mallunction.
Near strong radio waves or radiation. The
camcorder may not be able tit record properly.
Near AM receivers and video equipment.
Noise lnay Occur.
On a sandy beach or anywhere dusty. If sand
or dust gets ill your camcorder, it may
malflmction. Somelimes lhis mallhnction
cannot be repaired.
Near windows or outdoors, whm'e the LCD
scream, the vicwfinder, or the lens may be
exposed to direct sunligla. This damages the
inside of the viewfinder or llle LCD screen.
Anywhere very humid.
• Operale your camcordcr on DC 6.8 V/7.2 V
(battely pack) or DC 8.4 V (AC Adaptor).
• For DC or AC operation, use tile accessories
recommended in lhese operaling inslructions.
• Do not lel your camcordcr get wcl. lbr example.
tronl rain or sea waler. If your calncorder gets
wel, it may nlalflmction. Sometimes lhis
malfunction cannol be rcpaired.
• If any solid ot_iect or liquid gets inside lhe
closing, unplug your camcorder and have il
checked by a Sony dealer belbre operating il
ally lhlr hm-.
• Avoid rough handling, disassembling,
modilying, physical shock, or impacl such as
hammering, dropping or stcpping on lhe
produo. Be particularly carclul of tile lens.
• Keep lhe POWER switch selling lit OFF/CHG)
when you arc not using your calncorder,
• Do nol wrap your camcorder with a towel, lor
example, and operate it. Doing so migla cause
Ileal to buikl up inside.
• When disconnecting the power cord/mains
lead), pull it by the plug and nol the cord.
• Do nol damage the power cord/mains lead)
such as by placing anylhing heavy on il.
• Keep melal contacts clean.
• Keep tile Rcmole Commander and button-lype
battery out of children's reach. If the battely is
accidentally swallowed, consu]l a doctor
immedialely.
• If the battery electrolytic liquid has leaked.
consull your local authorized Sony selwice
lucility.
wash oH ally liquid lhal inzly have conlacted
your skin.
if any liquid gets in your eyes. wash with
plenly of water and consull a doclor.
IWhennotusingyourcamcorderfora
longtime
• Periodically turn on tile camcorder and play a
cassette litr about 3 minutes.
• Use up tile baltery pack completely belore
storing it.
Moisturecondensation
If your camcorder is brought directly from a
cold place to a warm place, moisture may
condense inside your camcorder, on the
surface of the tape. or on the lens. Ill this
state, the tape may stick to the head drttm
and be damaged or your camcorder may not
operate correctly. If there is moisture inside
your camcorder. [[!tA Moisture
condensation. Eject the cassette] or [[1[t
Moisture condensation. Turn off for IH.]
appears. The indicator will not appear when
the nloisture condeuses ou the ]ells.
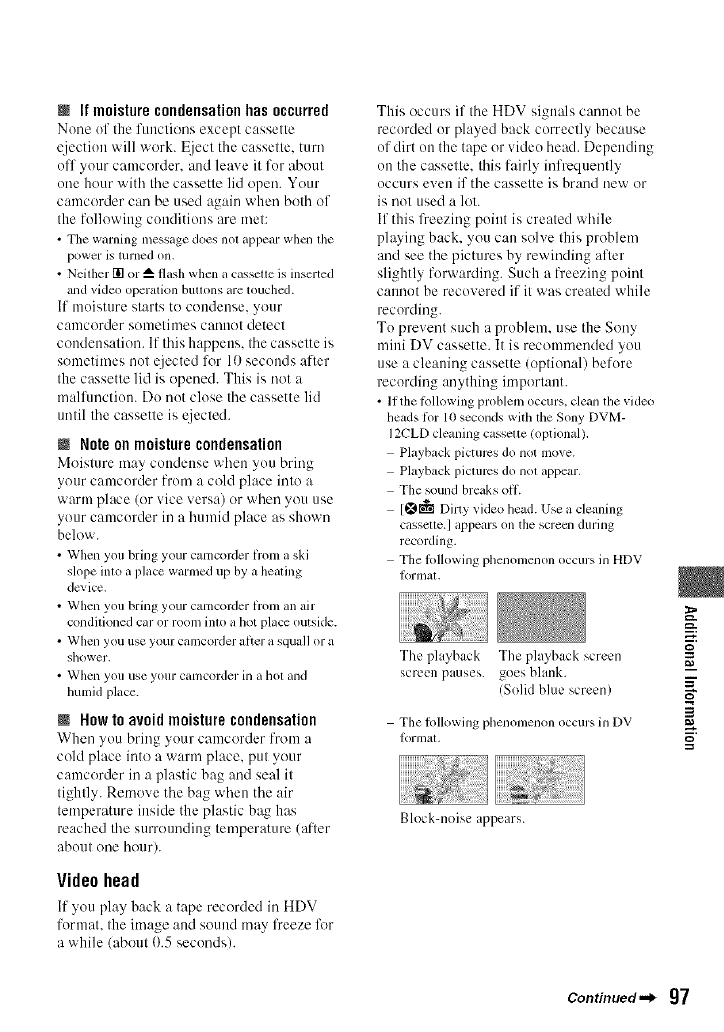
iIf moisture condensationhas occurred
None uf the functions except cassette
ejectiuu will work. lEject the cassette, turn
off your camcorder, and leave it for about
one hour with the cassette lid open. Your
camcorder carl be used again when both of
the following conditions are met:
• Tile warning message does not appear when the
power is turned on.
• Neither [] or Aflash when acasselte is inserted
and video operation buttons are touched.
If moisture starts to condense, your
camcorder sometimes cannot detect
condensation. If this happens, tile cassette is
sometimes not _iected li)r 10 seconds after
the cassette lid is opened. This is riot a
malRmctiuu. Do not close tile cassette lid
until tile cassette is ejected.
NNote on moisture condensation
Moisture may condense when you bring
your camcorder from a cold place into a
warlu phlce (or vice versa) or when you use
your camcorder in a humid place as shown
below.
• When you bring your camcorder liom a ski
slope into a place warmed up by a beating
dcvice.
• When you bring your camcorder liom an air
conditioned cal or room into ahot place outside.
•Whell you use your camcorder al_er a squall or a
shower+
• When you use your camcorder in a llot and
lmmid placc.
NHow to avoid moisture condensation
When you bring your camcorder from a
cold place into a warm place, put your
camcorder in a plastic bag and seal it
tightly. Remove tile bag wile)) tile air
temperature inside the plastic bag has
reached tile surrounding temperature (after
about one hour).
Videohead
If you play back a tape recorded in HDV
format, the image and sound may lheeze lk_r
a while (about 0.5 seconds).
This occurs if tile HDV signals cannot be
recurded or played back correctly because
uf dirt on the tape or vide() head. Depending
uu the cassette, this fairly infrequently
occurs even if the cassette is brand new or
is not used a lot.
If this lheezing point is created while
playing back, you can solve this problem
and see the pictures by rewinding afler
slightly forwarding. Such a freezing point
cannot be recovered if it was created while
recording.
To prevent such a problem, use the Sony
mini DV cassette. It is recommended you
use a cleaning cassette (optional) befure
recording anything important.
• If the lollowing problem occurs, clean tile video
beads li)r 10 seconds with the Sony DVM-
12CLD cleaning casseue !optional).
Playback picturcs do not move.
Playback pictures do not appear.
The sound breaks ollL
[_g'_ Dirty video bead. Use a cleaning
cassette.] appears on the screcn during
recording.
The lollowing phenomenon occurs in HDV
Iormat+
The playback The playback screen
screen pauses, goes blank.
(Solid blue screen)
Tile lollowing phenomenon occurs in DV
Iormal.
Block-noise appears.
_=..
g
Continued._ 97
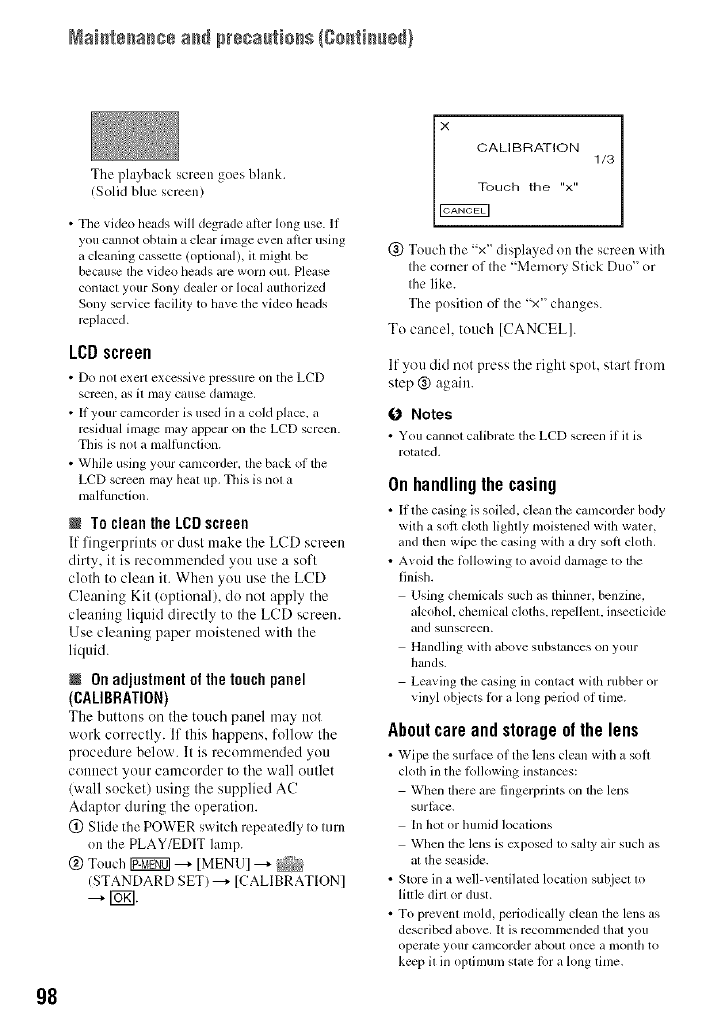
Naistssasss ass presa_[tisss {gsstiss÷t}
g8
The playback screen goes blank.
/Solid blue screen/
• The video beads will degrade aflcr hmg use. If
you cannot obtain a clear image even al_er using
a cleaning cassette (optional), it might be
because the video heads are worn out. Please
contact your Sony dealer or local authori/cd
Sony selwice lacility to have tim video heads
rcplaced.
LCDscreen
• Do noi exert exccssive pressure on the LCD
screen, as il may cause damage,
• If your camcorder is used in a cold place, a
residual image may appear on file LCD screcn.
This is not a mallhnction.
• While using your camcorder, lhe back of the
LCD screen may heat up. This is noi a
malfunction.
NTo clean the LCDscreen
If fingerprints or dust make the LCD screen
dirty, it is recommended you use a soft
cloth to clean it. When you use tile LCD
Cleaning Kit (optional), do not apply tile
cleaning liquid directly to tile LCD screen.
Use cleaning paper moistened with the
liquid.
NOnadjustmento! thetouchpanel
(CALIBRATION)
The huttuus (lll tile touch panel may uot
work correctly. If this happens, follow the
procedure below. It is recommended you
connect your camcorder to tile wall outlet
(wall socket) using the supplied AC
Adaptor during the operation.
(_) Slide the POWER switch repeatedly to turn
on the PLAY/EDIT lamp.
@ Touch Ig2ggff0]--+ IMENU]--+ _S{
/STANDARD SET) ---+ [CALIBRATION]
---+ I_gl.
X CALIBRATION
(_) Touch the "x" displayed on the screen with
the corner of the "Memory Stick Duo" or
the like.
The position of the "x" changes.
To canceh touch [CANCEL].
If you did not press the right spot. start from
step @ again.
0 Notes
• You cannol calibrale the LCD screen il il is
rotaled+
Onhandlingthe casing
• It the casing is soiled, clean tile c_,mcorder hody
with a soft cloth liglaly moistened w-iih water,
and then wipe the casing with a dry soft cloth.
• Avoid the li_llowing lo avoid damage to lhe
finish.
Using chemicals such as thinner, benzine,
alcohol, chemical cloths, repellent, insecticide
and sunscreen.
Handling with above subslances on your
hands.
Leaving the casing in contact with rubber or
vinyl objects li)r a long period of time.
Aboutcareandstorageofthelens
• Wipe the surlace of the lcns clean wilh a soil
clolh ill the R_llowing inslances:
When lhere arc fingerl)rints on lhe lens
surh,ce.
In hot or humid localions
When the lens is exposed 1o sahy air such as
at the seaside.
• Store in a well-ventilaled location suhjecl lo
lill]e dirl or dust.
• To prevenl mold, periodically clean lhe lens as
described above. It is recommended thai you
operale your camcorder about once a lnonlh to
ke_p il in oplinmn/stale lot a hmg time.
Onchargingthepre-installed
rechargeahlebattery
Your cmncorder has a preqnstalled
rechargeable battery to retain the date, time,
and other settings even when the POWER
switch is set to OFF (CHG). The pre-
installed rechargeable battery is always
charged while your camcorder is connected
to the wall outlet (wall socket) via the AC
Adaptor or while the battery pack is
inserted. The rechargeable battery will be
fully discharged in about 3 months if
you do not use your camcorder at :Ill
without tile AC Adaptor connected or the
battery pack attached. Use your camcorder
after charging tile pre-inst:dled
recharge:,ble battery.
However, even if tile pre-installed
rechargeable battery is not charged, tile
camcorder operation will not be affected as
long as you are not recording the date.
N Procedures
Connect your camcorder to a "aall outlet
(wall socket) using tile supplied AC
Adaptor. and leave it with the POWER
switch set to OFF (CHG) for more than 24
hours.
Specifications
System
Video recording systeln (HDV)
2 rotary heads. Helical scanning system
Video recording system (DV)
2 rotary heads. Helical scanning system
Still image recording system
Exif Vet. 2.2 *_
Audio recording system (HDV)
Rotary heads. MPEG- 1Audio Layer -2.
Quantization: 16 bits (Fs 48 kHz.
stereo)
transfer rate: 384 kbps
Audio recording system (DV)
Rotary heads. PCM system
Quantization: 12 bits (Fs 32 kHz. stereo
1.stereo 2), 16 bits (Es 48 kHz. stereo)
Video siglml
NTSC color. EIA standards
1080/60i specification
Usable cassette
Mini DV cassette with the _a_oE_,_mark
printed
Tape speed (HDV)
Approx. 18.81 mm/s
Tape speed (DV)
SP: Approx. 18.81 mm/s
LP: Approx. 12.56 mm/s
Recording/playback time (HDV)
60 rain (using a DVM60 cassette)
Recording/playback time (DV)
SP: 60 rain (using a DVM60 cassette)
LP: 90 rain (using a DVM60 cassette)
Fast li,rward/rewind time
Approx. 2 rain 40 s (using a DVM60
cassette :rod rechargeahle battery pack)
Approx. 1 rain 45 s (using a DVM60
cassette and AC Adaptor)
Viewfinder
Electric viewfinder (color)
_=."
g
m
Continued._ gg
hnage device
6.3 mm / 1/2.9 type) CMOS sensor
Recording pixels (still, 4:3):
Max. 6.1 mega 12 848 x 2 136) pixels .2
Gross: Approx. 3 2IX)000 pixels
Effective (movie, 16:9):
Approx. 2 280 I)00 pixels
Effective/movie, 4:3):
Approx. 1710 000 pixels
EITective (still, 16:9):
Approx. 2 280 000 pixels
Effective (still, 4:3):
Approx. 3 040 000 pixels
Lens
Carl Zeiss Vario-Sonnar T*
10 x (Optical), 20 x (Digital)
Focal length
1=5.4 ~ 54 Iron (7/32 ~ 2 1/4 ill.)
When converted to a 35 mm still
camera
Ill CAMERA-TAPE: 40 ~ 400 mm
/ 1 5/8 - 15 3/4 ill.) (16:9), 49 ~ 490 mm
/l 15/16 ~ 19 3/8 ill.) 14:3)
Ill CAMERA-MEMORY: 40 ~ 400 Into
/ l 5/8 ~ 15 3/4 in.) (16:9), 37 ~ 370 mm
/l 1/2 ~ 145/8 in.) (4:3)
FI.8 ~ 2.9
Filter diameter: 37 mm/l I/2 ill.)
Color temperature
[AUTO], [ONE P1JSHI, [INDOOR]
/3 200 K),
[OUTDOOR115 800 K)
Minimum illmnination
5 lx (lux) ([A1JTOSLW SHTRI [ON],
Shutter speed 1130 sec)
0 lx (lux) (during NightShot function)
*_"Exif" is a file furmat fur still images,
established by the JE[TA (Japan
Electronic sand lnl_rmation Technology
Industries Association). Files in this
format can have additional information
such as your camcorder's setting
information at the time of recording.
*2The unique pixel array of Sony's
ClearVid CMOS sensor and image
processing system (new Enhanced
hnaging Prucessor) allows for still
image resohltion equivalent to the sizes
described.
Input/Output connectors
Audio/Video output
I()-pill connector
Video signal: 1 Vp-p, 75 f2 (ohms)
Lunlinance signal: 1 Vp-p, 75 f2/ohnls)
Chromiuauce signal: 0.286 Vp-p, 75 f2
/ohms)
Audio signal: 327 mV (at load
impedance 47 kf2 (kflohms)), Output
impedance with less than 2.2 kf2
/kilohn/s)
COMPONENT OUT jack
Y: 1 Vp-p, 75 f2(l)hms)
PB/PR, CI3/CI_:_+350 mV, 75 f2/ohms)
HDMI OUT jack
TypeA / 19-pin)
Headphone jack
Stere() nlinijack/O 3.5 ram)
LANC jack
Stereo nlini-nlini.j:Jck (0 2.5 mm
USB jack
mini-B
MIC (PLUG IN POWER) ,jack
Stereo minijack (0 3.5 ram)
[_ HDV/DV jack
i.LINK Interface (IEEE1394. 4-tliu
connector S 100)
LCDscreen
Picture
6.7 cm (2.7 type, aspect ratio 16:91
Total dot number
21 I 200 (960 x 220)
100
General
Power reqnirenlents
DC 6.8 V/7.2 V (battery pack)
DC 8.4 V (AC Adaptor)
Average power consumption
During camera recording using the
viewfinder with normal brightness:
HDV recording 4.2 W
DV recording 4.0 W
During camera recording using the
LCD with normal brightness:
HDV recording 4.5 W
DV recording 4.3 W
Operating temperature
0 'C to +40 'C (32 'Fto 104 'F)
Storage temperature
-20 'C to + 60 'C (-4 'IF to + 140 'IF)
Dimensions (approx.)
82x82x 138mm
(3 1/4 x 3 1/4 x 5 1/2 in.) (w/h/d)
including the proiecting parts
82x82x 138mm
(3 1/4 x 3 1/4 x 5 1/2 in.) (w/h/d)
including the prqjecting parts with the
supplied battery pack NP-FH60
attached
Mass (approx.)
550 g (1 lb 3 oz) main unit only
650 g (1 lb 6 oz) including the NP-
FH60 rechargeable battery pack and
DVM60 cassette.
Supplied accessories
See page 12.
ACAdaptorAC-L200/L200B
Power reqnirenlents
AC 100 V - 240 V, 50/60 Hz
Current consumption
I).35 - 0.18 A
Power consumption
18W
Output wdtage
DC 8.4 V*
Operating temperature
0'C to+40 'C (32 'Fto IO4 'F)
Storage temperature
-20 'C to +60 'C (-4 'F to + 140 'F)
Dimensions (approx.)
48x29x81 mm(l 15/16x13/16x
3 1/4 in.) (w/hM) excluding the
projecting parts
Mass (approx.)
170 g (6.0 oz) excluding the power cord
(mains lead)
* S_ tile label on tile AC Adaptor lot otller
specifications.
Rechargeablebatterypack(NP-FH60)
Maxinnltnl output voltage
DC 8.4 V
Output voltage
DC 7.2 V
Capacity
7.2 Wh (l (X)OmAh)
Dimensions (approx.)
31.8 x 33.3 x 45.0 mm
(l 5/16x I 5/16x I 13/16 in.) (w/hM)
Mass (approx.)
80 g (2.9 oz)
Operating temperature
0'C to+40 'C (32 'Fto 104 'F)
TypeLithium ion
_=i."
g
m
Design and specifications arc subject to change
witllout notice. _"
Continued..,_ 101
Ontrademarks
• "Hal_dycam" and
registered trudmmtrk', of Sony Corporalion.
• HDV and lhe HDV logo arc u'ademarks of Sony
Corporation and Victor Company of Japan, Ltd.
• "Memoly SticL" "_ ,_,' "Memory Slick
Duo," "MEMORYSIiEl_ DUO," "Memory Slick
PRO Duo," 'NEb'iIIR'€ _I|IiK _l_g BUg,"
"Memol T Slick PRO-HG Duo,"
'MENORYSTI[RPRO-H[i DUO,""Memory Stick
Micro," "MagicGate." "IVIz_G Ic GZ_TE ."
"MagicGale Memo UStick" and "MagicGale
Memow Slick Duo" arc trademarks of Sony
Corporation,
• "InIoLITHIUM" is a trademark of Sony
Corporalion,
• i.LINK and _ arc trademarks of Sony
Corporation.
Mini I"_ _" *_hital
• II I_. Video iS a lradelnark.
ILIwT C_s_4>
• "x x.Color" is a trademark ot"Sony C<_rp<_ration.
• Microsoft. Windows, Windows Media,
Windows Visla, and DircctX are trademarks or
rcgislered trademarks of U.S. Microsoft
Corporation ill file U,S. and o[hcr countries,
° Macintosh and Mac OS are tradmnark_, of Apple
Inc. in the U,S. and olher coonlries.
• HDML the HDMI logo. and High-Definflion
Mullitnedia Interlace are trademarks or
rcgislered trademarks of HDMI Licensing LLC.
• lntcl, lnte| Core and Pentium are either
rcgislered trademarks or trademarks of Intel
Corporation and ils subsidiaries ill lhe Uniled
Stales and/or other countries.
• Adobe and Adobe Reader are eilhcr registered
trademarks or trademarks of Adot_o Syslcl-n_
Incorporaled in lhe Uniled Stales and/or olher
countries.
All other product names menlioned herein may be
the trademarks or registered tradelnarks of their
respeclive contpanies. Furthermore, rM and '®"
arc not mentioned ill each case in lhis manual.
Notes on the License
ANY USE OF THIS PRODUCT OTHER THAN
CONSUMER PERSONAL USE 1N ANY
MANNER THAT COMPLIES WITH THE
MPEG-2 STANDARD FOR ENCODING
VIDEO INFORMATION FOR PACKAGED
MEDIA IS EXPRESSLY PROHIBITED
WITHOUT A LICENSE UNDER APPLICABLE
PATENTS IN THE MPEG-2 PATENT
PORTFOLIO. WHICH LICENSE IS
AVAILABLE FROM MPEG LA. L.LC.. 250
STEELE STREET. SUITE 300, DENVER,
COLORADO 811206.
102
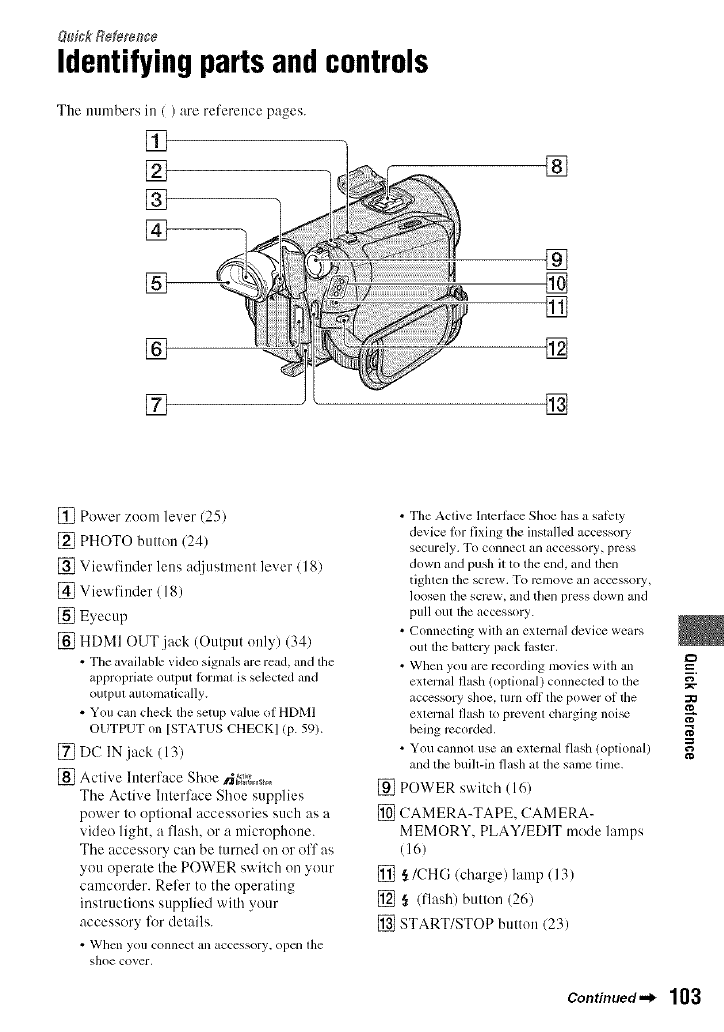
&_ickR_m_ce
Identifyingpartsandcontrols
The nunlbers in / ) are reference pa_es.
[]
[]
%
[]
[]
[]
[]
[]
[]
[]
[]
[] Power zuom lever (25)
[] PHOTO button (24)
[] Viewfiuder lens ac{iustn/eut lever / 18)
[] Viewfiuder/18)
[] Eyecup
[] HDMI OUT jack (Output only) (34)
• The available video signals are read, and the
appropriate output Ibrmat is selected and
outpul aulomalically.
• You call check the setup value of HDMI
OUTPUT on [STATUS CHECK] (P-59).
[] DC IN jack (13)
[] Active Interface Shoe _;,._s_0
The Active Interface Shue supplies
power to optional accessories such as a
video light, a flash, or a microphone.
The accessury can be turned on or off as
you operate the POWER switch un your
camcorder. Refer to the operating
instructions supplied with your
accessory lbr details.
• Whcll you c,onnect an acccssory, open lhe
shoe cover,
• TileActive Interlace Shoe has a salPty
device %r fixing the installed accessory
securely. To connect an acccssory, press
down and push il lo the end, and lhen
tiglacn tile screw, To rc21Ilove all accessoly,
loosen lhe screw, and then press down all(]
pull out the accessory.
• Connecting with an external device wears
(lilt tile battery pack laster,
• Wllen you are recording movies with an
external flash (optional) connecled 1othe
accessory shoe, turn off the power of the
exlernal flash 1oprcvenl charging noi_
being recorded,
• You cannot use all external flasll (optional)
andthe built-in flash at lhe same tinle.
[] POWER switch (16)
[] CAMERA-TAPE, CAMERA-
MEMORY, PLAY/EDIT mode lamps
(16)
[] ,_/CHG/charge) lamp (13)
[] § (flash) button (26)
[] START/STOP button (23)
=_
o}
N"
g
Continued._ 103
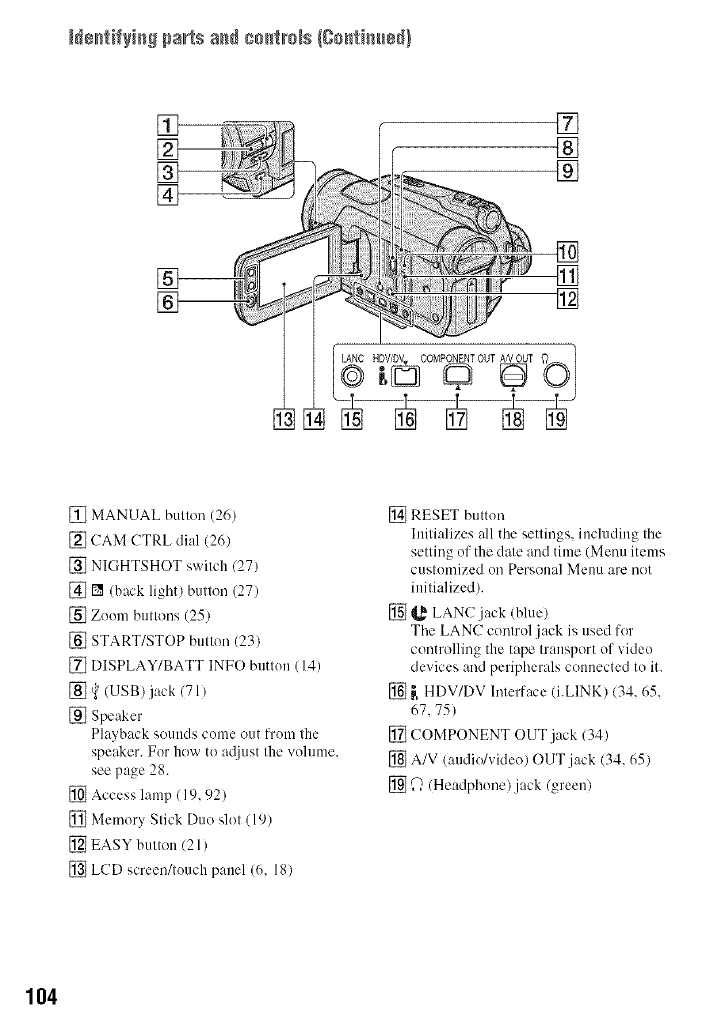
N÷_tifyi_S pa_ts a_ co_tm_s (Co,timber}
[]
%--
[]
[]
®
®
[]
[]
[]
[] MANUAL button (26)
[] CAM CTRL dial (26)
[] NIGHTSHOT switch (27)
[] [] (back light) button (27)
[] Zoom bottons (25)
[] START/STOP botton (23)
[] DISPLAY/BATT INFO button (I 4)
[] _ (USB) jack (71)
[] Speaker
Playback sounds come out l?x)m the
speaker. For how to a@lst the volume,
see page 28.
[] Access lamp (19, 92)
[] Mmnory Stick Duo slot (19)
[] EASY button (21)
[] LCD screen/touch panel (6, 18)
[] RESET button
Initializes all tile settings, including tile
setting of the date and time (Menu items
customized oil Persollal Mentl are not
initialized).
[] _ LANC jack (blue)
Tile LANC control .jack is used for
controlling the tape transport of video
devices and peripherals connected to it.
[] _ HDV/DV Interface (i.LINK) (34. 65.
67.75)
[] COMPONENT OUT jack (34)
[] A/V (audio/video) OUT.jack (34, 65)
[] @ (Headphone).jack (green)
104
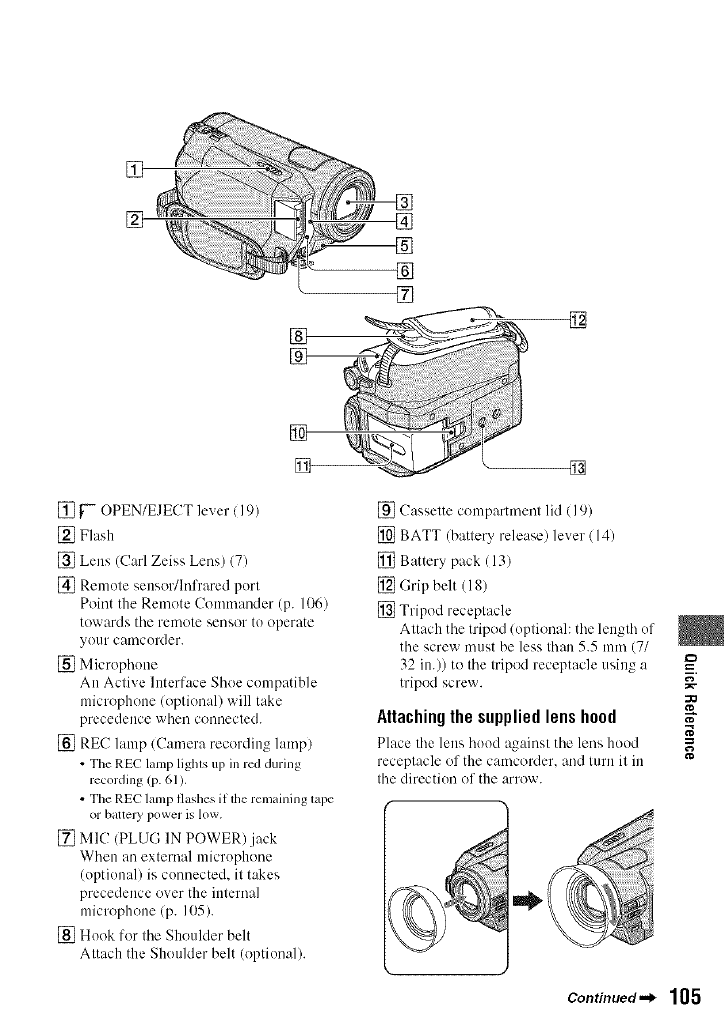
[]
[] []
[]
[]
[] }'-- OPEN/EJECT lever / 19)
[] Flash
[] Lens (Carl Zeiss Lens) (7)
[] Remote sensor/Infrared port
Point the Remote Commander (p. 106)
towards the remote sensor to operate
your camcorder.
[] Microphone
An Active Interface Shoe compatible
microphone/optional) will take
precedence when connected.
[] REC lamp/Camera recording lmnp)
•The REC lamp lighls tlI)in red (luring
recording/P- 61).
•The REC lamp flashes if lhe remaining lape
or battely power is low.
[] MIC (PLUG IN POWER).jack
When an external microphone
(optional) is c(mnected, it takes
precedence over the internal
microphone/p. 105).
[] Hook for the Shoulder belt
Attach the Shoulder belt (optional).
g_
[] Cassette compartment lid (l 9)
[] BATT (battery release) lever (14)
[] Battery pack (13)
[] (;rip belt (18)
[] Tripod receptacle
Attach the tripod/optional: the length of
the screw must be less than 5.5 mm (7/
32 in.)) to the tripod receptacle using a
tripod screw.
Attaching the supplied lens hood
Place the lens hood against the lens hood
receptacle of the camcorder, and turn it in
the direction of the arrow.
=_
i,
g
,J
Continued._ 105
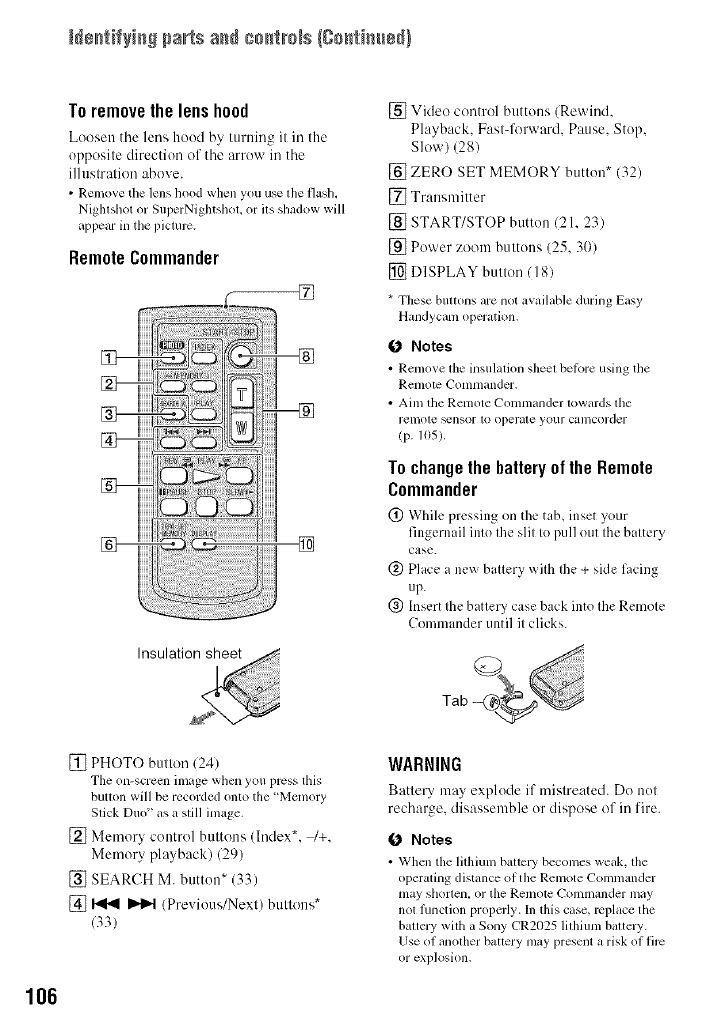
Ns_tifyi_S pa_ts a_ ++_tm_s(C+_tim_8_)
Toremove the lens hood
Loosen tile lens hood by turning it in the
opposite direction of the arrow in the
illustration above.
•Remove the lens hood when you use the flash,
Nightshot or SuperNightshot+or its shadow will
appear in the picturc.
RemoteCommander
[]
[] Video control buttons (Rewind,
Playback, Fastq'orward, Pause, Stop,
Slow) (28)
[] ZERO SET MEMORY button* (32)
[] Transmitter
[] START/STOP button 121, 23)
[] Power zoom buttons (25, 30)
[] DISPLAY button (18)
* These buttons armnot available during Easy
Handycam operation,
O Notes
• Renlo_, e lhe illsuhltion sheet belol'e ilsing tile
tm/lo)c (-'onllnander.
• Aim the Remote Conmlander towards the
relnole _nsor 1£) operate your camcorder
(p. 105).
Tochangethe batteryol the Remote
Commander
@ While pressing on the tab, inset your
fingernail into the slit to pull ()tit the battery
case.
(_) Place a new battery with Ihe + side facing
up.
@ Insert the battery case back into the Remote
Commander until it clicks.
[] PHOTO button (24)
The on-screen image when you press this
button will be recorded onto the 'Memory
Slick Duo" as a still image.
[] Memory control buttons (Index*, _+,
Memory playback) (29)
[] SEARCH M. button* (33)
[] _ _ (Previous/Next) buttons*
(33)
WARNING
Batter?, may explode if mistreated. Do not
recharge, disassemble or dispose of in fire.
O Notes
• When tile lithiunl battery beconles weak, tile
operating distance of tile Remote {_'O]lllll_lllder
may sllorten, or tile Remote Comlnander may
not function properly. In this case, replace the
battery with a Sony CR2025 lithium battery.
Use of another battery may present a risk of firc
or explosion.
106
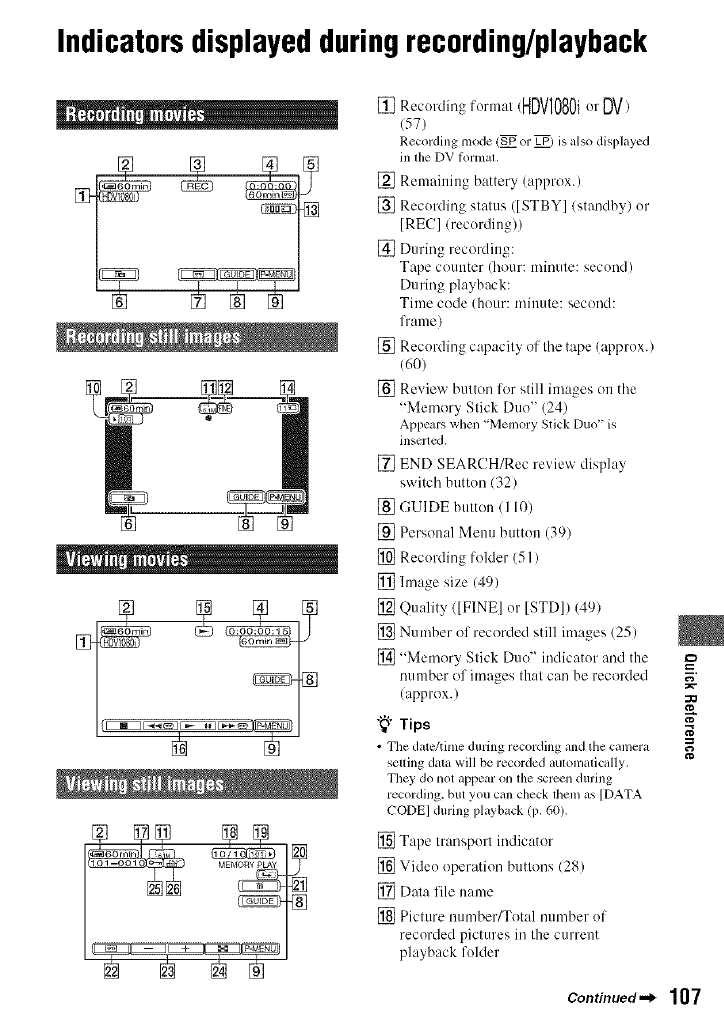
Indicatorsdisplayedduringrecording/playback
[] Recordingror,u.t(HDVI080iorDV)
(57)
Recordingmode (_ or _) is also displayed
in the DV Ik_rmat.
[] Remaining battery (approx.)
[] Recording status ([STBY]/standby) or
[RECI/recurdiug))
[] During recording:
Tape counter (hour: minute: secund)
During playback:
Tittle code lhour: tniuute: secoud:
frame/
[] Recording capacity of tile tape (approx.)
(60)
[] Review button for still images uu tile
"Memory Stick Duo" 124)
Appears when 'Memory Stick Duo" is
insertcd.
[] END SEARCH/Rec review display
switch buttun (32)
[] GUIDE button (110)
[] Personal Menu button (39)
[] Recurding folder (51 )
[] hnage size (49)
[] Quality ([FINEI or [STDI) (49)
[] Number of recorded still images (25)
[] "Memory Stick Duo" indicatur and the
number of images that can be recorded
(approx.)
"_° Tips
•The date/time during recording and the camera
seuing data will be recorded aulomalically.
They do not appear on lhe scrcen during
recording, but you can check lhem as [DATA
CODEI during playback lP. 60).
[] Tape transpurt indicator
[] Videu operation buttons (28)
[] Dala file name
[] Picture number/Total tmmber of
recorded pictures in the current
playback folder
=_
N"
g
Continued._ 107
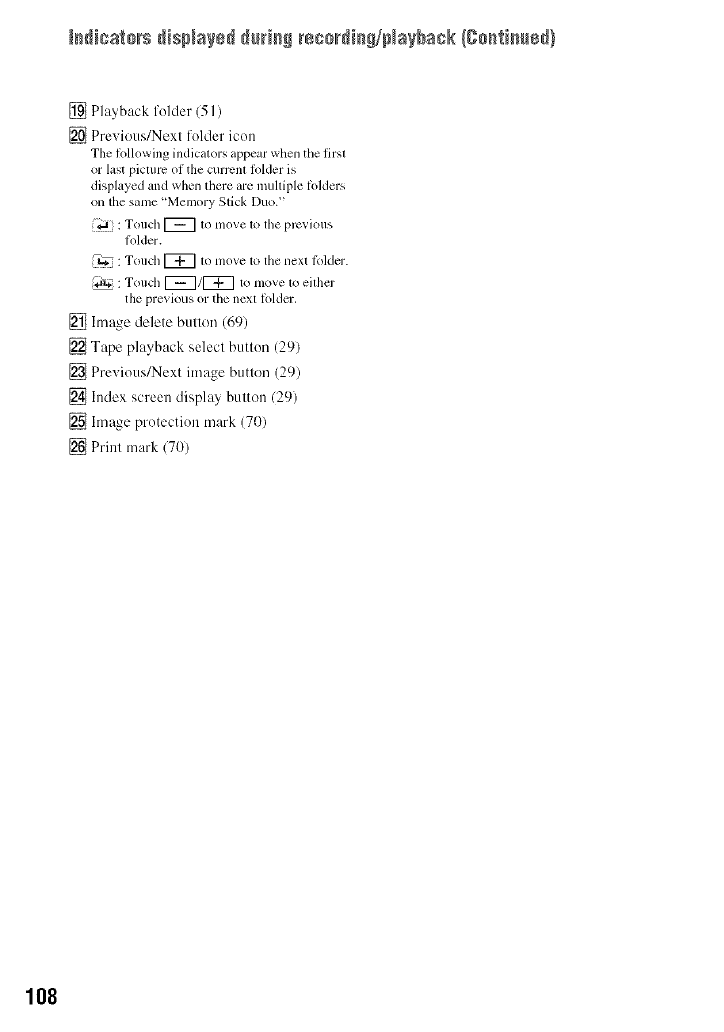
[s_icat+_s disp+a_sd_t_isS r+s+_di_S/p+aybask(C+_fi_+d}
[] Playback folder (51)
[] Previous/Next folder icon
The following indicators appear when the first
or last picture ot the current folder is
displayed and when there are muhiple tolders
on the same "Memory Stick Duo."
+_ : Touch [_ to move to the previous
folder.
U_- : Touch I_ to move to the next tolder.
;_it_ : Touch E_/I_ to move to either
the previous or the next lolder.
[] Image delete bull(ill (69)
[] Tape playback select button (29)
[] Preqous/Next image button (29)
[] Index screen display button (29)
[] Image protection mark (70)
[] Print mark 170)
108

Center
Upper left Upper right
Bottom Cemer
Upperleft
HDVI080iDV Recording format (56)
Jq_b AUDIO MODE* (57)
SP LP Recording mode* (57)
@ Self-timer recording (48)
4-_ WIDE SELECT* (57)
QUICK REC _* (61 )
_I)[W Interval pholo recording
152)
{r (!) {4. {- @ Flash light/
REDEX/E REDUU {46)
Upperright
HDVIN DVIN HDV inptll/
DV input (67)
HDVouTDVouT HDV outpul/
DV oulpul (34, 65)
i.LINK connectkm
(34, 65, 67, 74)
+0÷ Zero set memory (106)
_t] /'1]] C.D Slkle sho\x (523
_[Tda_F LCD backlighl olT (18)
E*_'J Color Slow Shutter (47)
_l PictBridgc connecting
(71)
cX'_ Warning (87)
[_ NightShot (27)
S{_ Super NightShot (47)
Bottom
AE SHIFT (45)
WB SHIFT (45)
Picture effect (54)
Digital effect (53)
_. _t _ Manual focus (45) /
SPOT FOCUS (45#
SPOT MTR.FCS (43)
3-" 'a-e--
:_2_,.);-'t[] I_'_ @SCENE SELECT (421
[] Sharpness (44)
I_I Backlight (27)
-_- @,_ ixmzl White balance (43)
_,,_ SteadyShot off (48)
[] Zebra 147)
T_t_ Tele macro (46)
(_ CAMERA COLOR (45)
_ Dr CONV.LENS (49)
{_OLOI_,) X.'V.COLOR** {49)
SPOT METER (43)/
EXPOSURE (43)/
SPOT MTR.FCS (43)
SHUTTR SPEED (44)
PEAK PEAKING (46)
* The settings can be made only for the pictures
ill tile [)_ forlllal.
12}
Continued"_ 109
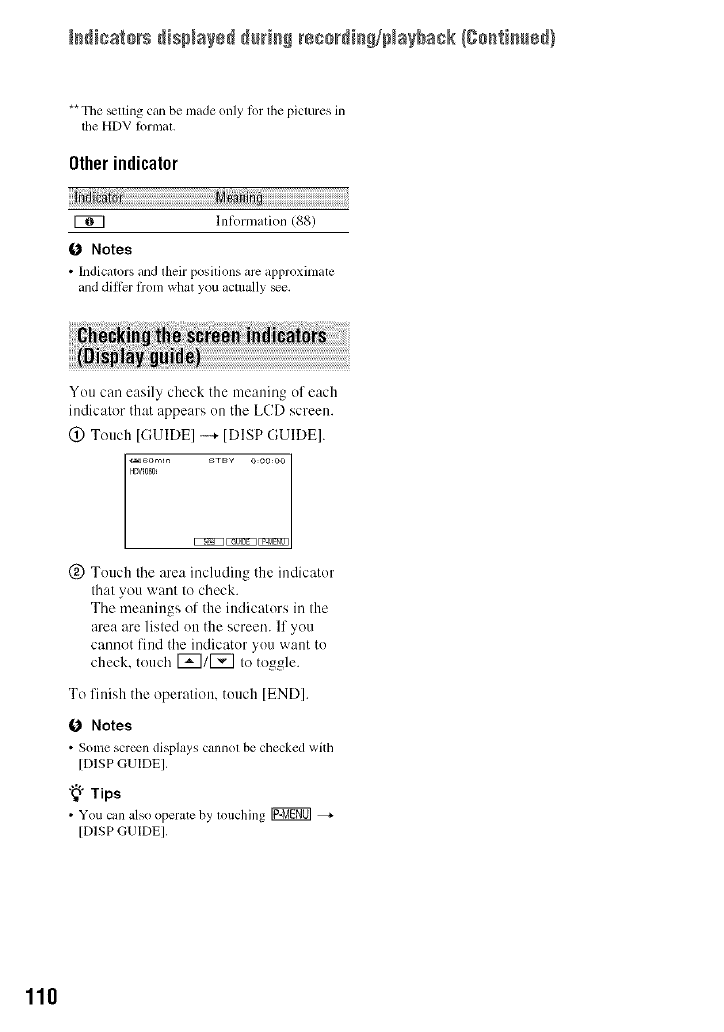
Is_icats_s disp+a_sd_t_isS rsss_di_S/piaybask {gs_tim_sd}
** The _tting can be nmde only lor the pictures in
the HDV format.
Other indicator
i;_+ P_+_ni_;+++++++++++++++++++++++++++++++++++++++++++++++++
g_7 Information (88)
0 Notes
• IndicatorsmMtheir positionsm+c+_ppro×hn+tte
+roddiftka"t_omwhat you _tctually_e+
You can easily check the meaning of each
indicator that appears on the LCD screen.
(!) Touch [GUIDEI -++ [DISP GUIDEI.
..............
_ [NNN_ [22_N_
(_) Touch the area including the indicator
that you want to check.
The meanings of the indicators in the
area are listed on the screen. If you
cannot find the indicator you want to
check, touch [_1[_ to toggle.
To finish the operation, touch [END].
0 Notes
• Sortie scrt3en displays c;lnllOt be checked with
[DISP GUIDEI,
"_"Tips
• You can also operate by touching _
[DISP (-;UIDE].
110
Index
Numeric
1080i/480i ............................. 59
12BIT .................................... 57
16BIT .................................... 57
480i ....................................... 59
A
AC Adaplor ........................... 13
AE SHIFT ....................... 45, 86
ALL ERASE ......................... 51
AUDIO MIX ......................... 57
AUDIO MODE ..................... 57
AUTOSLW SHTR
(Auto slow shutter) ............... 45
A.SHUT OFF (Auto slmt oil)
.............................................. 61
A/V connecling cable .....35, 64
A/V OUT jack ............... 34, 104
B
Backlighl ......................... 27, 82
Battely .................................. 13
BEACH ................................. 42
BEEP .................................... 61
C
CALIBRATION ................... 98
CAM CTRL dial ................... 26
CAMERA COLOR ............... 45
CAMERA DATA ................. 60
CAMERA SET menu ........... 42
CANDLE .............................. 42
Cassette ........................... 19, 91
CD-ROM .............................. 73
CENTER MARKR ............... 60
Charging time ....................... 14
Cleaning cassette .................. 97
CLOCK SET ......................... 16
CNNECT GUIDE ........... 31, 34
COLOR BAR ....................... 60
COLOR SLOW S
(Color Slow Shuuer) 47, 82. 86
COMPONENT ..................... 59
COMPONENT OUT jack
...................................... 34. 104
Component video c_b]e ........ 35
Computer .............................. 73
CONV.LENS ....................... 49
D
DATA CODE ................. 16. 60
Dale search ........................... 33
DATE/TIME .......... 16, 60. 107
Delete picturcs ...................... 69
DEMO MODE ..................... 55
DlAL SET ............................ 49
DIGITAL ZOOM ........... 48.86
DlSP GUlDE
(Display guide) ................... 110
DISP OUTPUT
(Display output) ................... 61
Display indicalors .............. 107
Down convert fimclion ......... 10
Dual Rec ............................... 25
Dubbing ................................ 64
DV lormal ............................ 56
DV SET ................................ 57
D.EFFECT
(Digital ella:el) ................ 53.86
E
Easy Handycam .............. 21.39
EDIT/PLAY menu ............... 55
END SEARCH ............... 32, 56
EXPOSURE ................... 43.86
F
FADER ........................... 52. 86
FILE NO. (File number) ...... 51
FIREWORKS ....................... 42
First Stcp Guide ............. 73.77
Flash ..................................... 81
FLASH LEVEL ............. 46. 82
FLASH SET ......................... 46
FLASH (Flash molion) ......... 53
FOCUS ........................... 45, 82
FORMAT ............................. 51
Frame-by4rame Playback ....55
G
Getting Starled ...................... 12
GUIDEFRAME .................... 60
H
HD (high definition) image
quality ................................... 35
HDMI cable .......................... 36
HDMI OUT jack ........... 34, 1(13
HDV lornlal .......................... 56
HDV 1080i ...................... 1t/, 57
HDV/DV Interlilce ....... 34, 1(14
I
hnage protectiorl ................... 70
hnage size (IMAGE SIZE)...49
INDOOR ............................... 44
"InloLITHIUM" battery pack
.............................................. 93
lnsla ..................... 75
INT.REC-STL
( Iev p "ecording).... 52
i.LINK .................................. 95 ::o
i.LINK cable ............. 36, 65, 76 _"
bLINK CONV ..................... 5 _) g
L
LANDSCAPE ....................... 42
LANGUAGE ........................ 62
LCD BL LEVEL
(LCD back lighl level) .......... 58
LCD BRIGHT ...................... 58
LCD COLOR ........................ 58
LCD/VF SET ........................ 58
Lens cover ...................... 17, 23
LP (Long Play) ..................... 57
Continuedm_ 111
112
IVi
Macinlosh ............................. 77
Maintenance and precautions
.............................................. 9]
MEMORY SET menu .......... 49
"Memory Slick". .................. 92
"Memory Stick Duo". ........... 19
FORMAT ...................... 51
Menu ..................................... 39
MIC LEVEL ......................... 58
Mirror mode ......................... 27
Moisture condensation ......... 96
MONOTONE ....................... 52
MOSAIC FADER ................ 52
N
NEG.ART ............................. 54
NEW FOLDER .................... 51
NS LIGHT
(NightShot Light) ................. 47
NTSC .............................. 83, 90
Numbcr of recordable pictures
.............................................. 50
0
OLD MOVIE ........................ 53
ONE PUSH ........................... 44
OUTDOOR .......................... 44
p
PAL ...................................... 90
PASTEL ............................... 54
PB FOLDER
(Playback lolder) .................. 51
PB zoom ............................... 30
PEAKING ............................ 46
Personal Menu ................ 39, 62
Picture Molion Browser ....... 73
PICT.APPLI. menu
(Picture Applicati,_m menu) ..52
PICT.EFFECT
(Picture ellcct) ...................... 54
Playback ............................... 28
Playing time ......................... 15
P-MENU ... See Personal Menu
PORTRAIT (Soft portrait)... 42
Power cord (Mains lead)...... 13
Prinl ...................................... 71
Prim mark ............................ 70
Q
QUALITY ............................ 49
QUICK REC
(Quick recording) ................. 61
R
REC CTRL
(Recording control) .............. 67
REC FOLDER (Recording
Iolder) ................................... 51
REC MODE
(Recording mode) ................ 57
Rec review ........................... 32
Recording ............................. 23
Recording linle ..................... 14
REDEYE REDUC ............... 47
REMAINING ....................... 60
Remaining baltery ........ 14, 107
Remote Commander. ......... 106
REMOTE CTRL
(Remole conlrol) .................. 60
Reversal Playback ................ 55
s
S VIDEO jack .......... 34, 36, 64
SCENE SELECT ........... 42, 85
SD (slandard definilion) image
quality .................................. 36
Searching lot the starling point
SELF-TIMER ...................... 48
SEPIA .................................. 54
SHARPNESS ................. 44, 86
SHUTTR SPEED ................. 44
SKINTONE ......................... 54
SLIDE SHOW ...................... 52
SMTH SLW REC (Smooth
slow rccording) ............... 54, 86
SNOW .................................. 42
SOLARIZE ........................... 54
SP (Standard Play) ............... 57
Specifications ....................... 99
SPOT FOCUS ................ 45, 86
SPOT METER
(Flexible spot meter)....,, 43, 86
SPOT MTR-FCS .................. 43
SPOTLIGHT ........................ 42
STANDARD ........................ 49
STANDARD SET menu ...... 56
STATUS CHECK ................ 59
STEADYSHOT .............. 48, 82
STILL ................................... 53
Still image .......... 24, 29, 49, 92
STILL SET ........................... 49
SUNRSE SUNSET
(Sunri_ and sunsel) ............. 42
SUPER NS
(Super NighlShot) ................ 47
T
Tape counler. ...................... 107
TELL MACRO .............. 46, 86
Time code ........................... 107
TIME/LANGU. menu .......... 62
TRAIL .................................. 53
Tripod ................................. 105
TV ......................................... 34
TV color systems .................. 90
TV TYPE .............................. 59
u
USAGE GUIDE ................... 31
USB jack ............................ 104
USB SELECT ...................... 55
Using abroad ........................ 90
V
VAR.SPD PB
(Various speed playback) .....55
VF B.LIGHT
(Viewlinder brightness) ........ 58
VOLUME ............................. 58
19
Warning indicalors ................ 87
Warning messages ................ 88
WB SHIFT
(While Balance Shill) ........... 45
WHITE BAL.
(While balance) ............... 43, 86
WHITE FADER ................... 52
Windows ......................... 73, 74
WORLD TIME ..................... 62
Write-protecl tab ................... 91
x
X.V.COLOR ................... 49, 96
Z
ZEBRA ................................. 47
Zero set memol3,. .................. 32
Z(_ oil] .................... 5) ................. 2.
=_
g
113

114
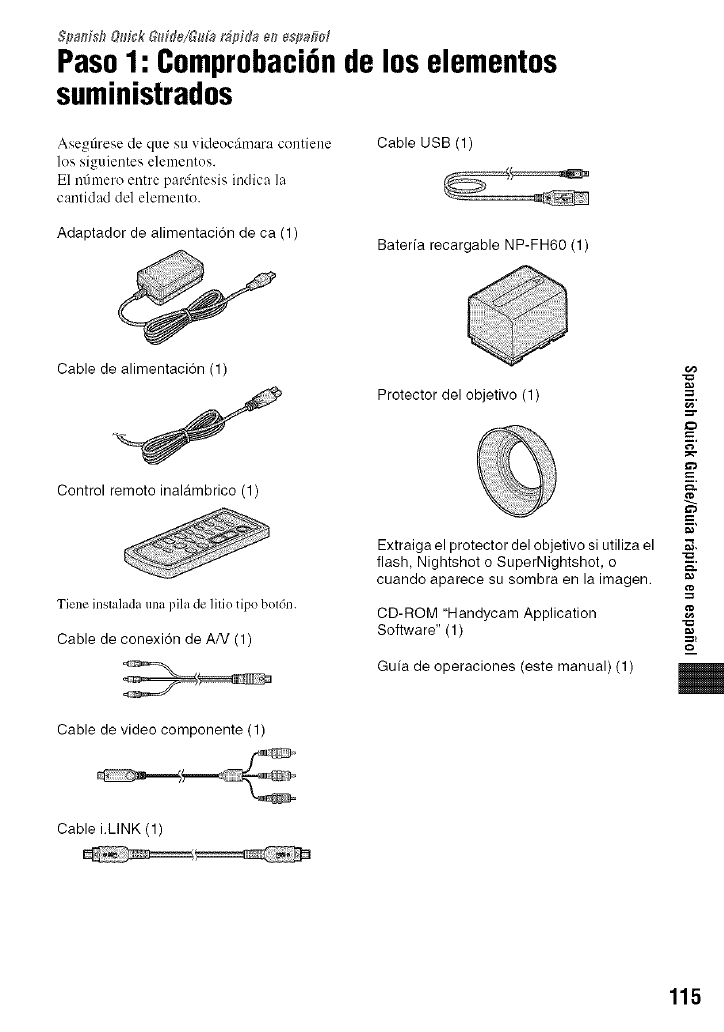
Spanish &#ok &dde/&da r_pida _n espa_d
Paso1: Comprobaci6nde loselementos
suministrados
Asegfirese de que su videocfimara centiene
los siguicntcs elementos.
E1 nfimero entre pardntesis indica la
cantidad dcl elemente.
Adaptador de alimentaci6n de ca (1)
Cable USB (1)
Bateria recargable NP-FH60 (1)
Cable de alimentaci6n (1)
Control remoto inalambrico (1)
Tiene inslalada una pila de lifio tipo boldn.
Cable de conexi6n de AN (1)
Protector del objetivo (1)
Extraiga el protector del objetivo si utiliza el
flash, Nightshot o SuperNightshot, o
cuando aparece su sombra en la imagen.
CD-ROM "Handycam Application
Software" (1)
Guia de operaciones (este manual) (1)
f
g
g
=,
Cable de video componente (1)
Cable i.LINK (1)
115
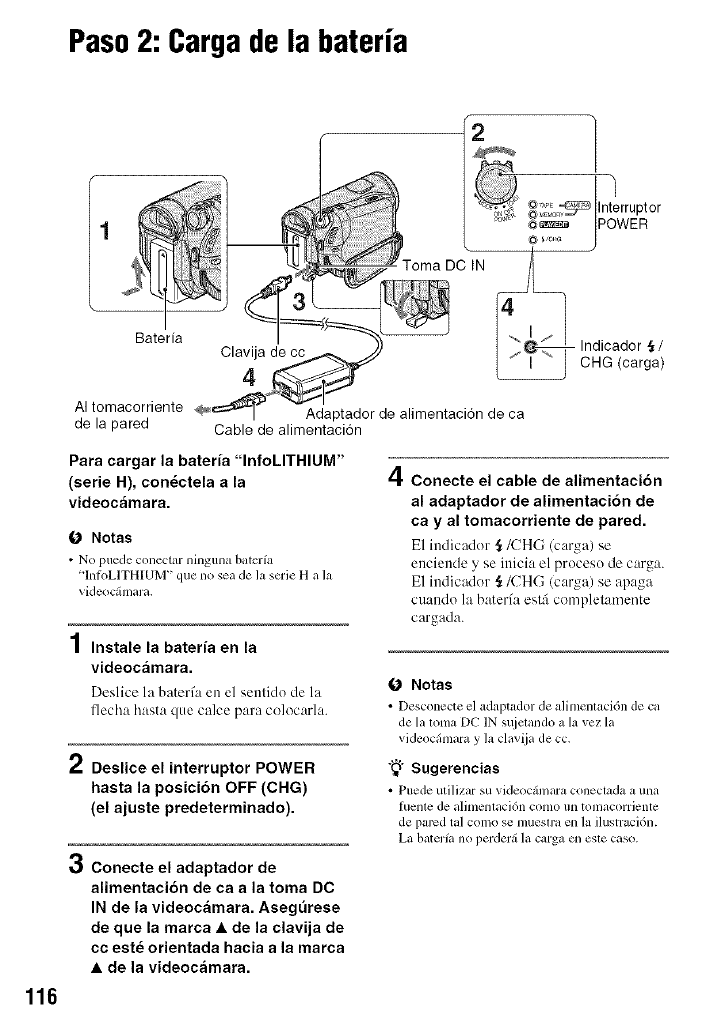
Paso2: Cargade la bateria
roma DC IN
. )
_ ;,_i_o_=_ Interruptor
_ POWER
116
Bateria
AI tomacorriente
de la pared
Clavija de
4
Adaptador de alimentaci6n de ca
Cable de alimentaci6n
Indicador { /
CHG (carga)
Para cargar la bater{a "InfoLITHIUM"
(serie H), condctela a la
videocamara.
O Notas
•No puede conectar ninguna batcrfa
'lnti_LITHIUM" flue no sea de la serie H a la
videocfimara.
Instale la bateria en la
videocamara.
Deslice la baterfa en el sentido de la
llecha hasta que calce para colocarla.
2Deslice el interruptor POWER
hasta la posici6n OFF (CHG)
(el ajuste predeterminado).
3Conecte el adaptador de
alimentacibn de ca a la toma DO
IN de la videocamara, AsegQrese
de que la marca •de la clavija de
cc est_ orientada hacia a la marca
•de la videocamara,
4Conecte el cable de alimentaci6n
al adaptador de alimentaci6n de
ca yal tomacorriente de pared.
E1 indicador ,{/CHG (carga) se
enciende y se inicia el proceso de carga.
E1 indicador §/CHG (carga) se apaga
cuando la baterfa est_i completamente
cargada.
ONotas
• Desconecte el adapt_Jdor de alimenlacidn de ca
de la loma DC IN s_ietando a la vez la
videocfimara y hJ clav(ia de cc.
"_° Sugerencias
• Puede utilizar su videocfimara conectada a una
fuenle de alimenlaci6n cOillO tin tonlacorriente
de parcd tal como se mueslra en la ilustraci6n.
La barerfa no perderfi la carga en esle caso.
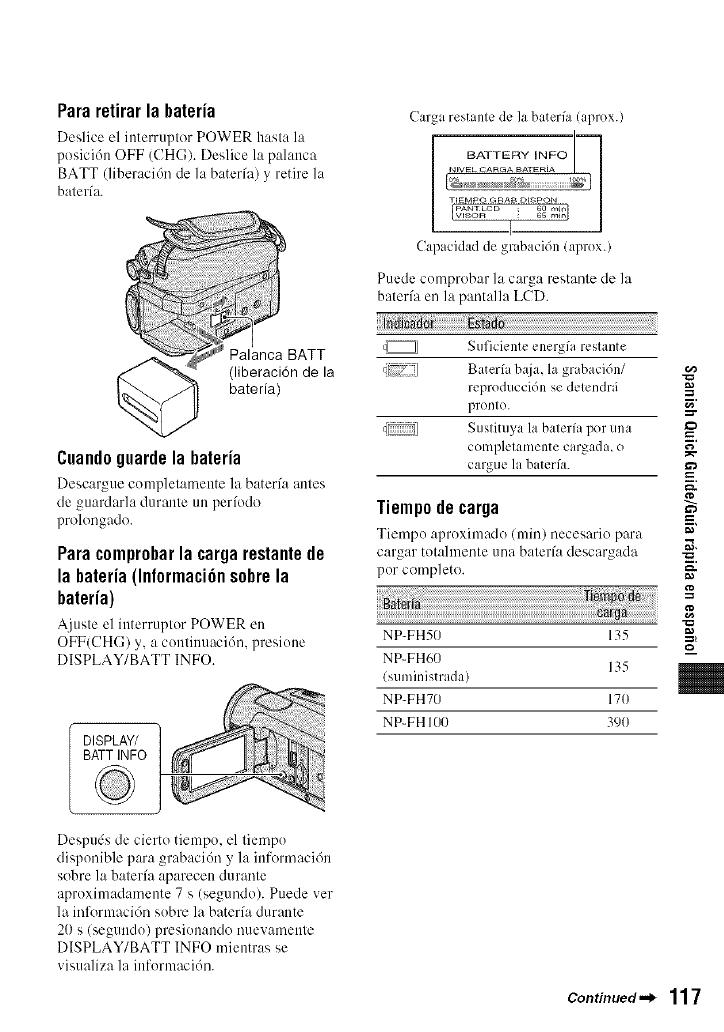
Pararetirarla bateria
Deslice el interruptor POWER hasta la
posici6n OFF (CHG). Deslice la palanca
BATT (liberaci6n de la baterfa) y retire llt
baterfa.
Palanca BATT
(liberaci6n de la
bateria)
Cuandoguardela bateria
Descargue complet:lnlente hi baterfa antes
de guardarla durante un perfodo
prolongado.
Para comprobarla cargarestantede
la bateria (Informaci6nsobrela
bateria)
Ajuste el interruptor POWER en
OFF(CH(i) y, a continuacidn, presione
DISPLAY/BATT INFO.
DISPLAY/
BATT INFO
Despuds de cierto tiempo, el tiempo
disponible para grabaci6n y la informacidn
sobre la bateri'a aparecen durante
aproximadamente 7 s (segundo). Puede vet
la inlk_rmaci6n sobre la bater/a durante
20 s (segundo) presionando nuevamente
DISPLAY/BATT INFO mientras se
visualiza la informacidn.
Carga restanle de llt bater/a (aprox.)
NEVEL CARGA BATE RIA I_
BATTERY INFO
TIEMPO GRAB DESPON
PANT LC D ; 60 rain
• m_n
Capacidad de grabaci(3n (aprox.)
Puede comprobar llt carga restanle de la
baterfa en la pantalla LCD.
q_ Suficienle energfa reslante
[TJ] Bater/a baja, llt grabacidn/
reproducci6n se delendr_i
pronlo.
c{ ] Suslituya la balerfa por una
complelamente cargada, 0
cargue la baterfa.
Tiempodecarga
Tiempo :,proximado (rain) necesario p:u'a
cargar totahnente una baterfa descargada
por completo.
NP-FH50 135
NP-FH60 135
(suministrada)
NP-FH70 170
NP-FH I00 390
f
r,'
#
g
g
g,
Continued._ 117
Paso 2: gar#a de _abate_a {go_i_uaci6N
Tiempodegrabaci6n
Tiempo aproximado (rain) disponible
cu:mdo utiliza un:l baterfa completamente
cargada.
Formato de HDV DV HDV DV
grabaci6n
NP-FH50 70 70 40 40
7O 75 4O 4O
75 80 40 45
NP-FH60 90 95 50 5(}
(suministmda) 95 100 50 55
100 105 55 55
NP-FH70 150 155 80 85
155 165 85 9(}
160 170 85 90
NP-FHI00 345 365 185 195
365 385 195 210
375 395 205 215
*E1 tiempo de grabaci6n normal muestra la hora
cuando _ rcpile la operaci6n de inicio/
detenci6n de la grabaci6n, al conectar y
desconectar la alimentaci6n y al usar la lhnci6n
de zoom.
fO Notas
•Todo los tiempos se calculm'on cn las siguienles
condiciones:
Superior: Con la luz de londo de la panlalla
LCD encendida.
Medio: Con la luz de lbndo de la panlalla LCD
apagada.
Inlcrior: Grabaci6n con el visor mienlras el
panel LCD se cncuenlla cvrrado.
Tiempodereproducci6n
Tiempo aproximado (rain) disponible
cuando utiliza una baterfa completamente
cargada.
Formato HDV DV HDV DV
grabado
NP-FH50 105 115 120 13(}
NP-FH60 140 150 160 17(1
(suministrada)
NP-FH70 230 245 255 28(}
NP-FHI00 525 565 590 635
* Con la luz de hmdo de la panlalla LCD
encendida.
Acerca de la bateria
•Ames de cambiar la balerfa, deslice el
interruplor POWER a la posicidn OFF (CHG).
• El indicador ._/CHG (carga) parpadearfi duranle
la carga o la iniormaci6n de la batcrfa no se
[/lostrar_ correclall/cllte en las siguienles
condiciones.
La balerfa no eslfi c()rlcctat/lenle coneclada.
La balerfa esl_ dafiada.
La baterfa estfi agotada (sdlo para la
inlormacidn de la baterfa).
• Cuando el adaptador de alimentaci6n de ca esld
conectado a la toma DC IN de la videocfimara.
la baterfa no suministrarfi alimenlacidn, aunque
el cable de alimentacidn est6 desconeclado del
lomacorrienle de parcd.
• Si instaia una luz de video optional, es
recomendable que utilice los modelos de baterfa
NP-PH70 o NP-PH 100.
Acerca del tiempo de carga/grabacion/
reproducci6n
• Tiempos medidos con la xideocfimara a una
lemperatura de 25 _'C
(se recomienda una temperamra de 10 a 30 °C).
• El tiempo de grabaci6n y de rcproducci6n serfi
[llaS corto cuando use la videocfimara a bajas
lelnperaturas.
• El tiempo de grabaci6n y de rcproducci6n serfi
mils corto cn Ihnci6n de las condiciones de us()
de la videocfimara.
118
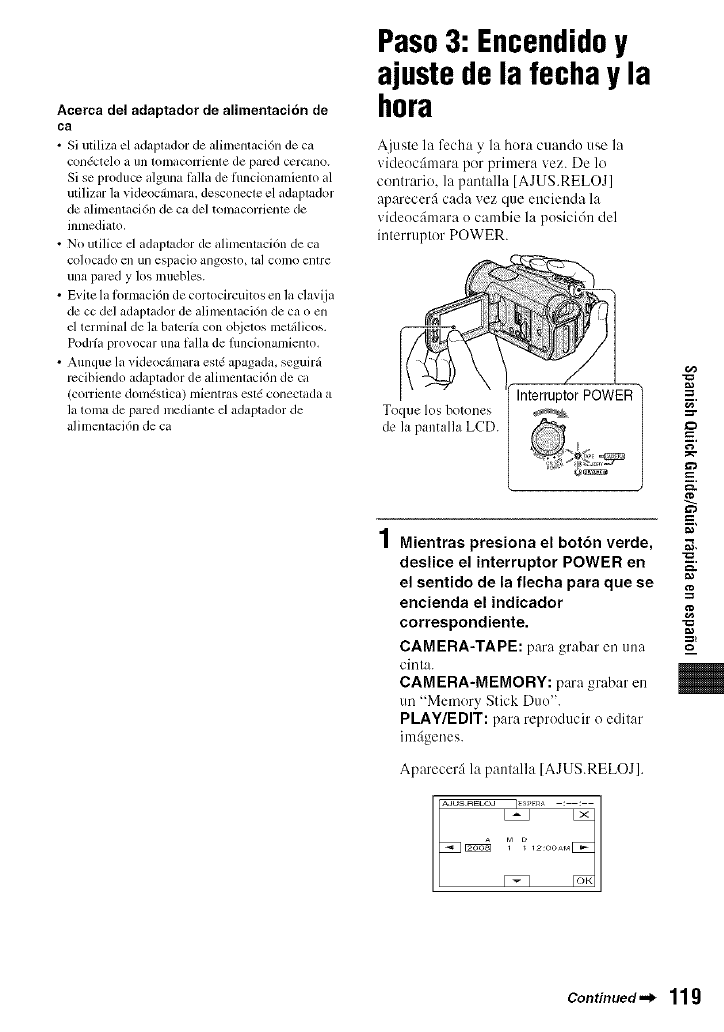
Acerca del adaptador de alimentaci6n de
ca
• Si utiliza el adaplador de alilnentaci6n de ca
con6ctelo a Ill] lomaconiente de pared cercano.
Si se produce alguna lMla de flmcionamiento al
utilizar la videocfimara, desconecte el adaplador
de alimcntaci6n de ca del tomucorrienle de
inmediato.
• Nit ufilice el adaptador de alimentaci6n de ca
colocado ell un espacio angosto, lal COlI/O enlre
una pared y los nmebles.
• Evite la litrmaci6n de cortocircuitos ell la claviia
de cc del adaptador de alimcntaci6n de ca o en
dterminal de la baterfa con objems metfilicos.
Podrfa provocar una l,dla de fimcionamiento.
• Aunque la videocfimara est6 apagada, seguirfi
rccibicndo adaptador de alimentaci6n de ca
(corrienle domdstica) mientras esl( conectada a
la toma de parcd mediante el adaptador de
alimenlaci6n de ca
Paso3: Encendidoy
ajustede la fecha y la
hora
Ajuste la fccha y la hora cuando use la
videocfimara pot primera vez. De lo
contrario, la pantalla [AJUS.RELOJ]
aparecerfi cada vez que encienda la
videocfimara o cambie la posici6n del
interruptor POWER.
Toque los botones
de la pantalla LCD.
Interruptor POWER
Mientras presiona el botdn verde,
deslice el interruptor POWER en
el sentido de la flecha para que se
encienda el indicador
correspondiente.
CAMERA-TAPE: para grab:Jr en una
cinta.
CAMERA-MEMORY: para grabar en
un "Memory Stick Duo'.
PLAY/EDIT: para reproducir o editar
im:igenes.
Aparecerfi la panlalla [AJUS.RELOJ].
r,'
#
g
g
g,
Continued._ 119
Pas+ 3: E++÷+N++ + ai+s_+ +[++a+++ha +g+ah+ra {g++_+++a++++}
Ajuste [A] (afro) con F_l/F_l.
Puede se]eccionar cua]quier afio hasta e]
afio 2079.
3Vaya hasta [M] (mes) con [_, y
aj_stelo con [_l/l_.
4Vaya hasta [D] (dia) con [2_,
ajl_stelo con 1_3/[_ y repita la
operaci6n para ajustar las horas y
los minutos.
Ajuste la medi:muche :, las 12:00 AM.
Ajuste el mediodfa alas 12:00 PM.
Asegl_rese de que los ajustes de
fecha y hora son correctos y, a
continuaci6n, toque Ib_l.
E1reloj se pone en funcionamiento.
ONotas
•Si no usa la vidcx)cfimara durante
aproximadamente 3meses, la batcrfa
recmg+_ble incorpor+td+t se descarg+t yes posible
que los itjustes de la lccba y la hora se borren de
la memoria. En este caso, cargue la baterfa
recargable y ¢iuste la lPcha y la hora
nuevalncnte+
• A1 momento de la compra, la alimentaci6n
+tiusta para desconectarse automfilicalnenle si no
S¢ opera la videocfimara duralltC unos
5 rain (minuto) para ahorrar energfa de la bater fa
([APAGADO AUTO]).
"_° Sugerencias
• L+tlPclla y hora no aparcccn durante h,
grabacidn, pero se graban automfiticamente en
la cinta y pueden visualizar+ durante la
reproducci6n ([CODIGO DATOSI (durante el
funcionamiento de Easy Handycam, sdlo puede
+tjustal+[FECHA/HORAI)).
• La tapa del objetivo se abre autonlfiticamente al
+tjustar el interruptor POWER en CAMERA-
TAPE o CAMERA-MEMORY.
• Si los botones del panel smlsible al tacto no
funcionan correctamente, +tjuste el panel
sensible al tacto (CALIBRACION).
Paraapagarla vide0c_mara
Deslice el iuterruptor POWER hasta la
posici6n OFF (CHG).
Pararestablecerla fechay la h0ra
P:,ra @1star la fecha y la hora deseadas.
toque 172_g0] _ [_1[_
[AJUS.RELOJ ].
Puede cambiar las indicaciones en pantalla
para que muestren mensajes en un idioma
en particular.
Toque Ig_gff01-+ [MENU] -+ _i_
(HORA/LANGU.) --_ [LANGUAGE], y
luego seleccione el idioma deseado.
120
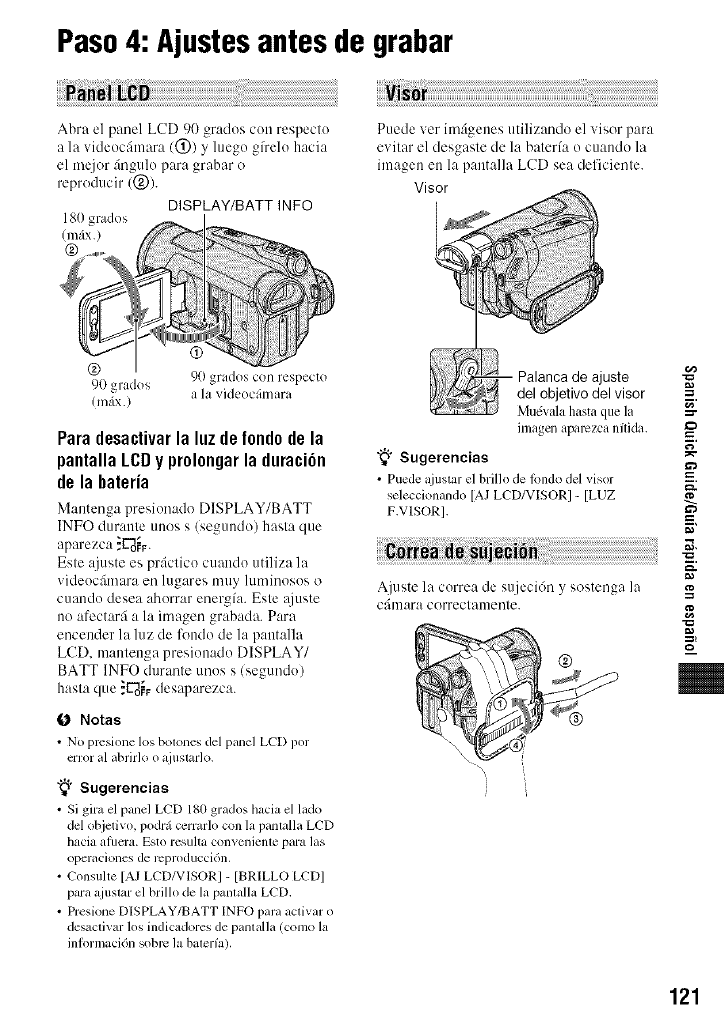
Paso4: Ajustesantesde grabar
Abra el panel LCD 90 grados con respecto
a la videocfimara (@) y luego gfrelo hacia
el m@_r gingulo para grabar o
reproducir (@).
DISPLAY/BATT INFO
180 grados
(infix.)
@
Puede ver im:igenes utilizando el "dsor para
ex ilar el desgasle de la balerfa o cuando la
imaoen_ en la pantalla LCD sea deficienle.
Visor
@ 90 grados con respecto
90 glados a la videocfimara
(infix.)
Para desactivarla luz de fondode la
pantalla LCDy prolongarla duraci6n
de la hateria
Mantenga presionado DISPLAY/BATT
INFO durante unos s (segundo) hasta que
aparezca }C"_o_v.
Este ajuste es pr&tico cuando utiliza la
videocfmara eo lugares muy lumioosos o
cuando desea ahorrar energfa. Este _{iuste
no afectarfi a la imagen grabada. Para
encender la luz de lkmdo de la pantalla
LCD. mantenga presionado DISPLAY/
BATT INFO durante unos s (segundo)
hasta que }if'dorydesaparezca.
0Notas
•No presione los bo(ones del panel LCD pot
error al abrMo o ajustarlo.
"_° Sugerencias
• Si gira el panel LCD 180 grados hacia el lado
del objetivo, podrfi cerrarlo con la panlalla LCD
hacia afimra. Esto resuha convenienle para las
operaciones de rcproducci6n.
• Consuhe [AJ LCD/VISOR] - [BRILLO LCD]
para ajusmr el brillo de la panmlla LCD.
• Presk>ne DISPLAY/BATT INFO para activar o
desacfivar los indicadores de panmlla (como la
inh)rmaci6n sobw la bmerfa).
juste
del objetivo del visor
Mu4wda hasra que la
imagen apm_zca nftida.
"_" Sugerencias
• Puede _tjustar el brillo de |ondo del visor
seleccionando [AJ LCD/VISOR] - [LUZ
F.VISOR].
Ajuste la correa de sujecidn y sostenga la
c;_mara correclamenle.
=,
g
g
g,
121
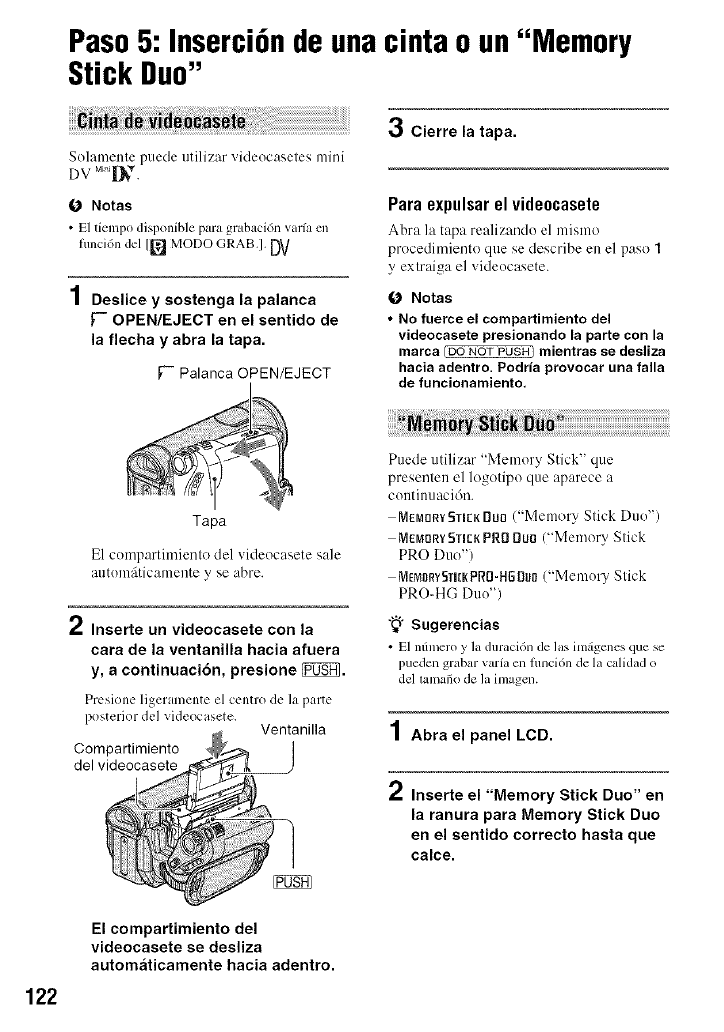
Paso5: Inserci6nde unacinta o un"Memory
Stick Duo"
Solamenle puede utilizar videocaseles mini
DV M_'T.
O Notas
• E1 tiempo disponible para grabaci6n varfa en
hmcidn del [[_ MODO GRAB,l, DV
1Deslice y sostenga la palanca
F- OPEN/EJECT en el sentido de
la flecha y abra la tapa.
F Palanca OPEN/EJECT
3Cierre la tapa.
Para expulsar el vide0casete
Abm ]a tapa realizando el mismo
procedimim/to que se describe en el paso 1
y extraiga el videocasete.
O Notas
•No fuerce el compartimiento del
videocasete presionando la parte con la
marca (Do NOT PUS@ mientras se desliza
hacia adentro. Podria provocar una falla
de funcionamiento.
122
Tapa
E1 comp:wtimienlo del videocasete sale
automfiticamente y se abre.
2Inserte un videocasete con la
cara de la ventanilla hacia afuera
y, a continuaci6n, presione _.
Prcsione ligeramente el centro de ]a parte
posterior del videocasete. Ventanilla
Compartimiento
del videocasete
El compartimiento del
videocasete se desliza
automaticamente hacia adentro.
Puede utilizar "Memory Stick" que
presenten el logotipo que aparece a
continuacidn.
MEP_DnY5n_KDuo ("Memory Stick Duo")
MEMORY5TIC_<PRDDuo ("Memory Stick
PRO Duo")
MeMorYStl[tPRO-HSBu0("Memory Stick
PRO-HG Duo')
"_" Sugerencias
•El nfimero y lit duracidn de las imfigenes que se
pueden grabar varfa en fimci6n de la calidad o
del lamafio de la imagen.
1Abra el panel LCD.
," Inserte el "Memory Stick Duo" en
la ranura para Memory Stick Duo
en el sentido correcto hasta que
calce.
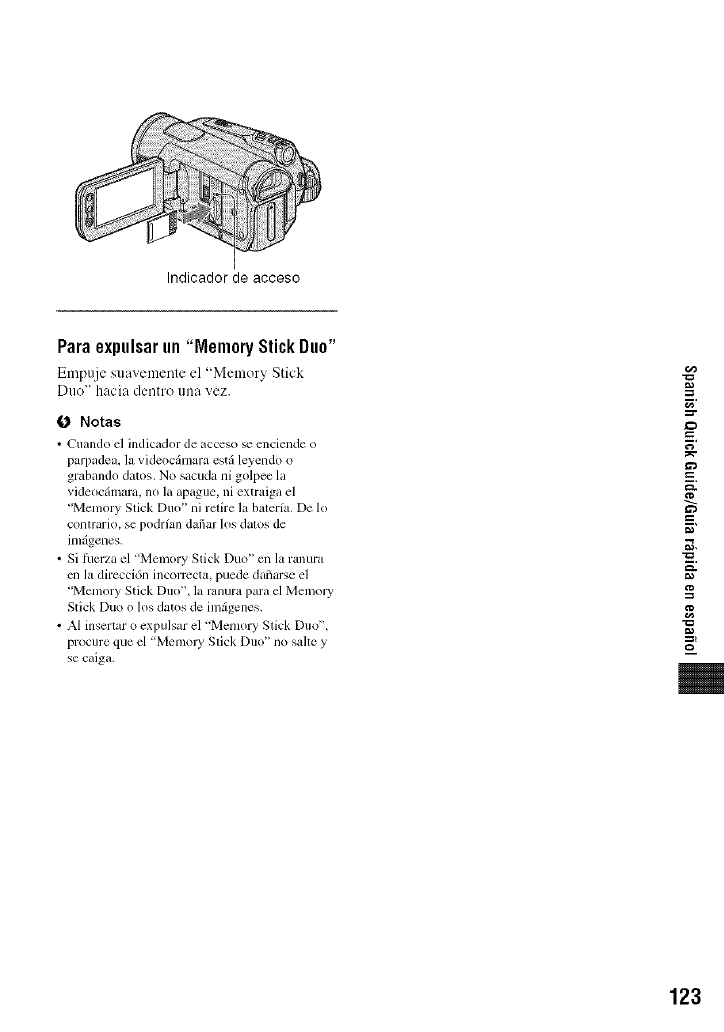
Indicador de acceso
Para expulsarun "Memory StickDuo"
Empuje suavemente el "Memory Stick
Duo" hacia dentro tlll_l vez.
0 Notas
•Cuando el indicndor de ucceso _ enciende o
parpadea, la videoc_imara estfi leyendo o
grabando datos. No sacuda ni golpee la
videocfimara, no la apague, ni extraiga el
"Memory Stick Duo" ni retire la baterfa. De 1o
conlrario, se podrfan dafiar los dalos de
imfigenes.
• Si tuerza el "Memory Slick Duo" en la ranura
cn la direcci6n incorrccta, puede dafiarse el
"Mmnory Stick Duo", la ranura para d Memol T
Stick Duo o los datos de imzigenes.
• AI insertar o expulsar el "Memory Stick Duo",
procure que el "Memol T Slick Duo" no sahe y
se caiga.
r,'
#
g
g
g,
123
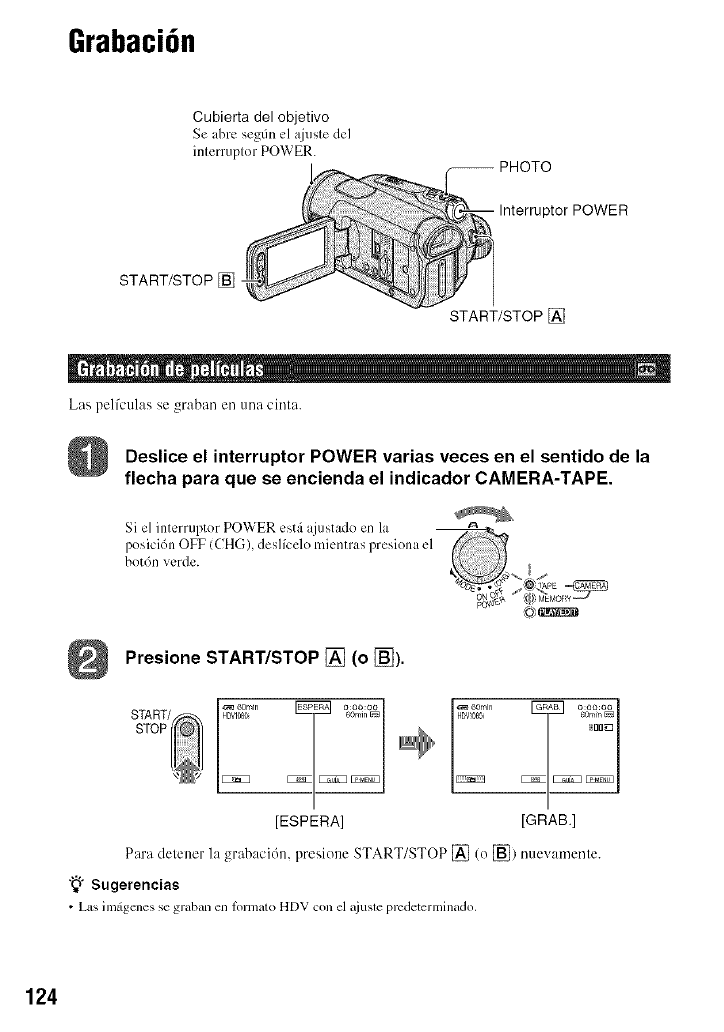
Grabaci6n
Cubierta del objetivo
Se abrc se_m cl ajusle de1
inlerruplor POWER.
_tor POWER
START/STOP []
START/STOP []
Las pel(culas se graban en una cinta.
Deslice el interruptor POWER varias veces en el sentido de la
flecha para que se encienda el indicador CAMERA-TAPE.
Si el interruptor POWER est_i ajustado en la
posicidn OFF (CHG), deslfcelo mientras presiona el
botdn verde.
Presione START/STOP [] (o [_).
START/sTOP 12 1......... _°¢_6°'/1in _ _1 21'n
[ESPERA]
_TE_B :°°:°°
60rain [_
I]lJ_
[GRAB,]
Para delener la grabacidn, presione START/STOP [] (o [_) nuevamente.
"_" Sugerencias
•Las imfigenes se graban en lormato HDV con el _iuste predeterminado,
124
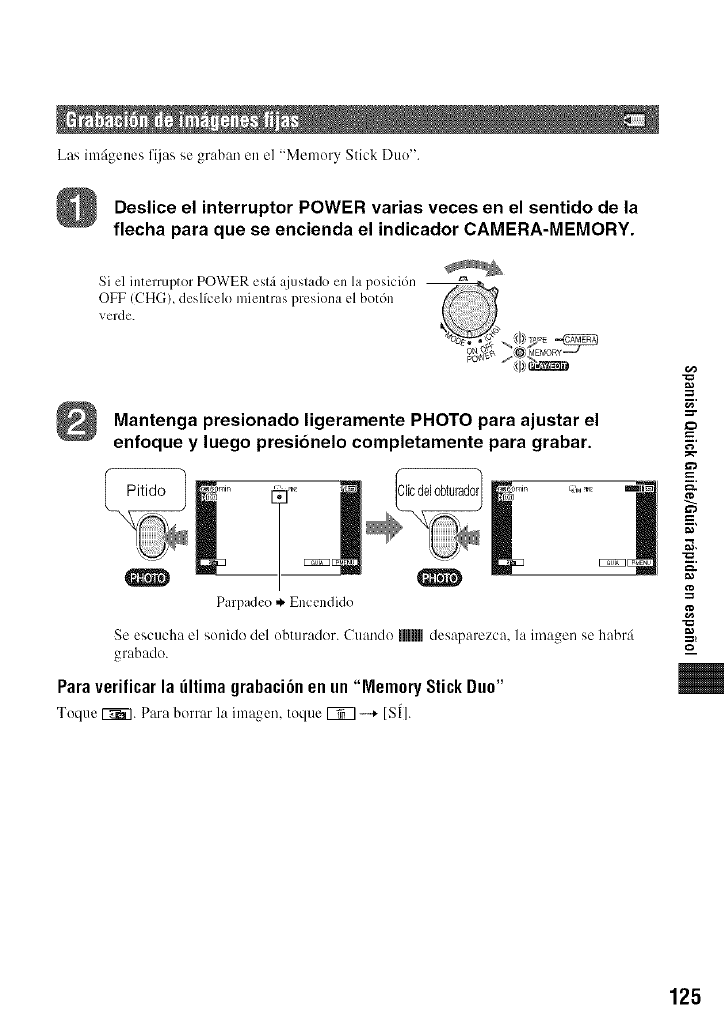
Las imfigenes fijas se graban en el "Memory Stick Duo".
Deslice el interruptor POWER varias veces en el sentido de la
flecha para que se encienda el indicador CAMERA-MEMORY.
Si el interruptor POWER eslfi ajuslado ell la posici6n
Mantenga presionado ligeramente PHOTO para ajustar el
enfoque y luego presionelo completamente para grabar.
Parpadeo * Encendido
Se escucha el sonido del obmrador. Cuando IMU desaparezca, la imagen se habr:i
jnbddo.
Paraverificarla ultimagrabaci6nenun"MemoryStickDuo"
Toque V7_7. Para borrar la im_gen, toque _ -...+ [S[].
f
r,'
125
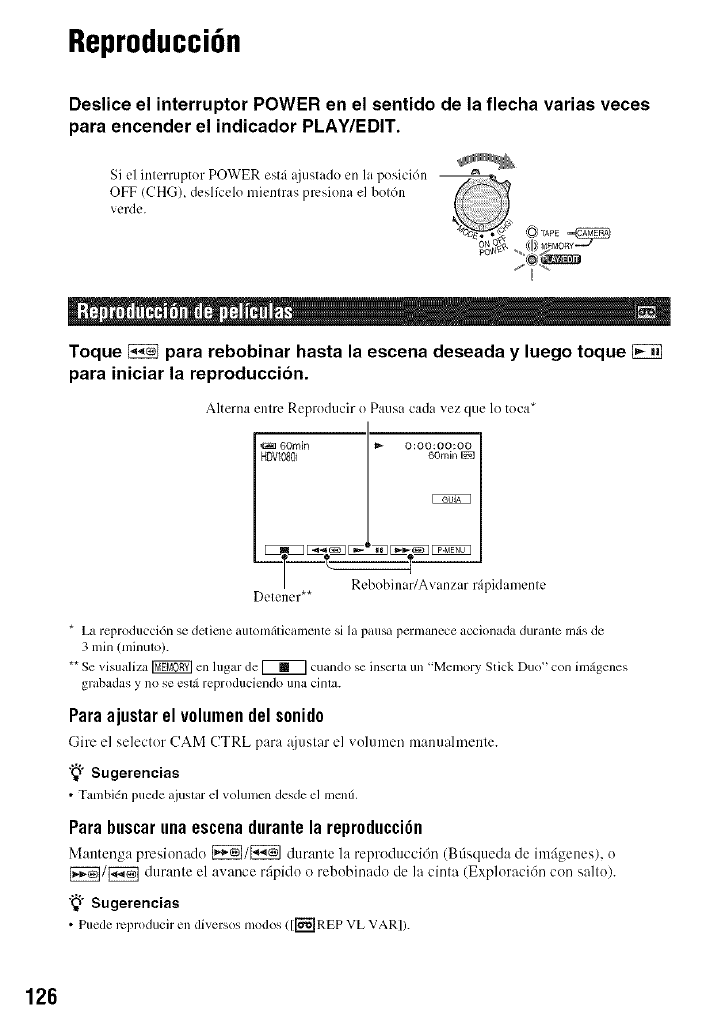
Reproducci6n
Deslice el interruptor POWER en el sentido de la flecha varias veces
para encender el indicador PLAY/EDIT.
Si el interruptor POWER est_i_tiustadoen la posici6n
OFF (CHG), deslfcelo mientras pmsiona el bot6n
verde.
Toque _para rebobinar hasta la escena deseada y luego toque
para iniciar la reproduccion.
Alterna entre Reproducir o Pausa cada vez que 1o toca*
I
60min ,_ O:OO:OO:OO
HDVI080i l _ornmP_l
/Rebobinar/Avanzar r@idamenle
Detener**
* La reproduccidn se detiene aulomfilicamcnte si la pausa pennanece accionada duranle inzisde
3 rain (minulo).
**Se visualiza _ ell lugar de _i_ cuando se inserla un "Memory Stick Duo '' con im_igenes
grabadas y no se esl_i reproduciendo un;l cinla.
Paraajustarel v01umendels0nid0
(-;ire el selector CAM CTRL para _tiustar el volumen manttalmente.
"_" Sugerencias
•Tambidn puede _ljuslm"el vohuncn desde el menti.
Parabuscarunaescenadurantela repr0duccidn
Manteng:, presionado [_/_] dttr:mte 1:, reprodttcci6n (Bdsqued:, de imfigenes), o
_11_ dttrante el avance rfipido o rebobinado de la cinta (Exploraci6n con salto).
"_" Sugerencias
• Puede rcproducir ell diversos modos ([[_']REP VL VARI).
126

Toque I_.
Se visualiz:l la imagen gr:lbada mils recielllemente.
Cambia enlre
los medios de
reproducci6n*
Anterior/Siguiente Vaya a la visualizaci6n de
la pantalla de fladice
* ]_Offg] aparece ell la panlalla de reproducci6n de cinlas.
Paravisualizarim;igenesde un"Memory StickDuo"enla pantalladeindice
Toque _. Toque una de las imfigenes para regresar al modo de presentaci6n sencilla.
O 6 imfigenes anteriores o siguientes
O hnagen mostrada antes de cambiar a la pantalla de fndice
Para xer imfigenes de otras carpetas, toque [_7 -.+ _ -.+ [REPR. CARP.], seleccione una
carpela con [_/[_ y luego toque [_.
r,'
g
g'
127

Additional information on tbis producl and answers
to frequendy asked questions can be found at our
Cuslomer Supporl Website.
http://www.sony.net/
Printed on 70% or more recycled paper
using VOC (Volatile Organic Compound)-
free vegetable oil based ink.
Printed in Japan 3278987120
