Sony Car Stereo System Xr F5005 Users Manual F5100/F5005
XR-F5100 to the manual 1cdf66ae-c3f0-41aa-8b8b-7bc875a4438b
2015-01-23
: Sony Sony-Sony-Car-Stereo-System-Xr-F5005-Users-Manual-288007 sony-sony-car-stereo-system-xr-f5005-users-manual-288007 sony pdf
Open the PDF directly: View PDF ![]() .
.
Page Count: 56
- GB
- Welcome !
- Table of Contents
- Location of controls
- Precautions
- Notes on Cassettes
- Getting Started
- Cassette Player
- Radio
- Other Functions
- CD/MD Unit (optional) (XR-F5100)
- Additional Information
- CT
F:\Data Disk\#sagyotyu\XR-F5100(E)OP\From
PF\0106\XRF5100F5005E_DATA\XRF5100F5005E_DATA\00GB+00COV-E.fm masterpage:Right
3-262-940-21 (1)
XR-F5100/F5005
3-262-940-21 (1)
© 2004 Sony Corporation
Operating Instructions
XR-F5100
XR-F5005
For installation and connections, see the supplied installation/connections manual.
CT
GB
FM
/
MW/SW
Cassette Car Stereo

2
XR-F5100/F5005
3-262-940-21 (1)
01GB01INT-E.fm masterpage:Left
Welcome !
Thank you for purchasing this Sony Cassette
Player. You can enjoy its various features even
more with:
XR-F5100
• Optional CD/MD units (both changers and
players)*1.
• CD TEXT information (displayed when a CD
TEXT disc*2 is played on a connected optional
CD unit with the CD TEXT function).
•Supplied controller accessory
Card remote commander RM-X115
•Optional controller accessory
Rotary commander RM-X4S
*1 This unit works with Sony products only.
*2 A CD TEXT disc is an audio CD that includes
information such as the disc name, artist name,
and track names. This information is recorded on
the disc.
XR-F5005
•Optional controller accessories
Card remote commander RM-X114
Rotary commander RM-X4S

3
00GB+00COV-ETOC.fm masterpage:Right
XR-F5100/F5005
3-262-940-21 (1)
Table of Contents
Location of controls . . . . . . . . . . . . . . . . . . . 4
Precautions . . . . . . . . . . . . . . . . . . . . . . . . . . 7
Notes on Cassettes. . . . . . . . . . . . . . . . . . . . . 7
Getting Started
Resetting the unit. . . . . . . . . . . . . . . . . . . . . . 8
Detaching the front panel . . . . . . . . . . . . . . . 8
Setting the clock . . . . . . . . . . . . . . . . . . . . . . 9
Cassette Player
Listening to a tape . . . . . . . . . . . . . . . . . . . . 10
Playing a tape in various functions . . . . . . . 10
Radio
Storing stations automatically
— Best Tuning Memory (BTM). . . . . . . 11
Receiving the stored stations. . . . . . . . . . . . 11
Storing only the desired stations . . . . . . . . . 12
Storing station names
— Station Memo. . . . . . . . . . . . . . . . . . . 12
Tuning in a station through a list
— List-up . . . . . . . . . . . . . . . . . . . . . . . . 13
Other Functions
Using the rotary commander . . . . . . . . . . . . 14
Adjusting the sound characteristics. . . . . . . 15
Quickly attenuating the sound. . . . . . . . . . . 15
Changing the sound and display settings. . . 16
Setting the equalizer (EQ3) . . . . . . . . . . . . . 17
Setting the Dynamic Soundstage Organizer
(DSO) . . . . . . . . . . . . . . . . . . . . . . . . . . . 18
CD/MD Unit (optional) (XR-F5100)
Playing a CD or MD . . . . . . . . . . . . . . . . . . 18
Display items . . . . . . . . . . . . . . . . . . . . . . . 19
Playing tracks repeatedly
— Repeat Play . . . . . . . . . . . . . . . . . . . . 20
Playing tracks in random order
— Shuffle Play. . . . . . . . . . . . . . . . . . . . 20
Labelling a CD
— Disc Memo . . . . . . . . . . . . . . . . . . . . 21
Locating a disc by name
— List-up . . . . . . . . . . . . . . . . . . . . . . . . 22
Additional Information
Maintenance . . . . . . . . . . . . . . . . . . . . . . . . 22
Removing the unit. . . . . . . . . . . . . . . . . . . . 23
Specifications . . . . . . . . . . . . . . . . . . . . . . . 24
Troubleshooting . . . . . . . . . . . . . . . . . . . . . 25
Error displays/Messages . . . . . . . . . . . . . . . 26
4
XR-F5100/F5005
3-262-940-21 (1)
01GB02CAS-E.fm masterpage:Left
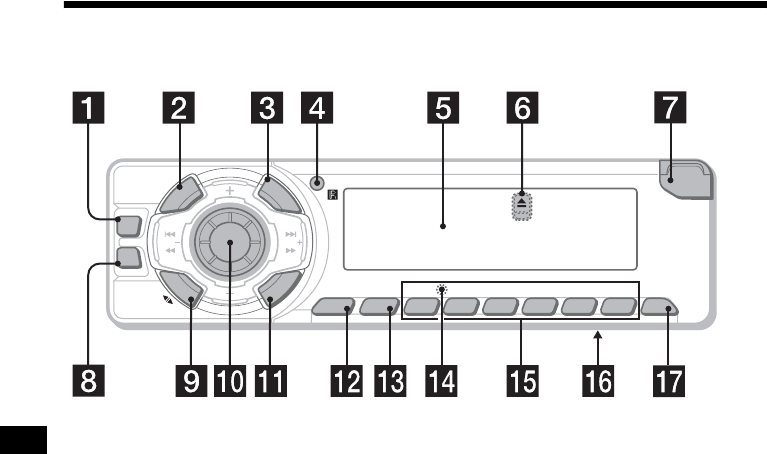
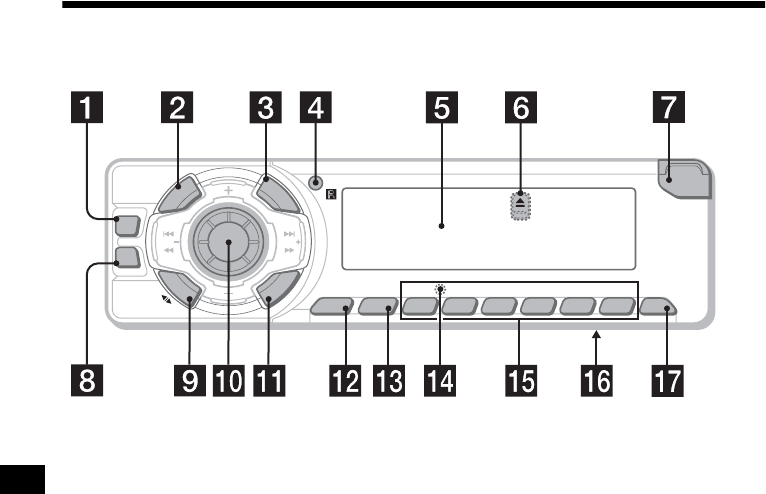
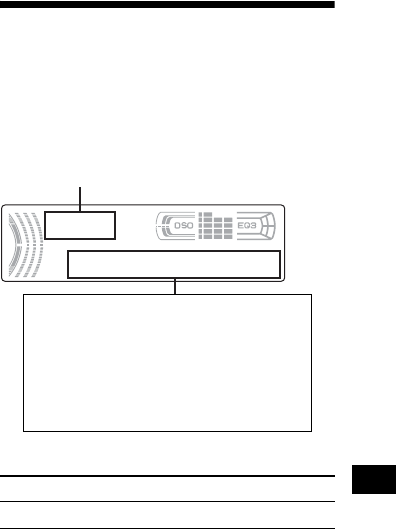
Location of controls
Refer to the pages listed for details.
aDSO button 18
bSOURCE (Power on/Radio/Tape/CD*1/
MD*1) button
To select the source.
cLIST button 12, 13, 21, 22
dReceptor for the card remote
commander
eDisplay window
fZ (eject) button (located on the front side
of the unit, behind the front panel) 10
gOPEN button 8, 10
hEQ3 button 17
iMODE (o) button
To change operation.
jVolume control dial/Select button
Rotate to:
– Adjust the volume.
– Adjust settings.
Press to:
– Select items.
kDSPL (display mode change) button
9, 13, 16, 19, 21
lSENS/MTL button 10, 11, 12
mBTM button 11
nRESET button (located on the front side of
the unit, behind the front panel) 8
oNumber buttons 16
Tape:
(3): REP 10
(5): BL SKIP 10
(6): ATA 10
Radio:
To store stations/receive stored stations.
CD*1/MD*1:
(3): REP 20
(4): SHUF 20
pFrequency select switch (located on the
bottom of the unit)
See “Frequency select switch” in the
Installation/Connections manual.
qOFF (Stop/Power off) button*2 8, 10,
18
*1 XR-F5100 only
*2 Warning when installing in a car without
an ACC (accessory) position on the
ignition switch
After turning off the ignition, be sure to press
and hold (OFF) on the unit until the display
disappears.
Otherwise, the display does not turn off and this
causes battery drain.
P
U
S
H
D
I
A
L
S
E
L
E
C
T
S
O
U
R
C
E
D
I
S
C
/
P
R
E
S
E
T
OPEN
6543
BBESHUF ATABL SKIPREPMTL
21
BTMSENS
EQ3
D
S
P
L
M
O
D
E
XR-F5100
XR-F5005
DSO
SEEK SEEK
L
I
S
T
OFF
5
01GB02CAS-E.fm masterpage:Right
XR-F5100/F5005
3-262-940-21 (1)
XR-F5100/F5005
3-262-940-21 (1)
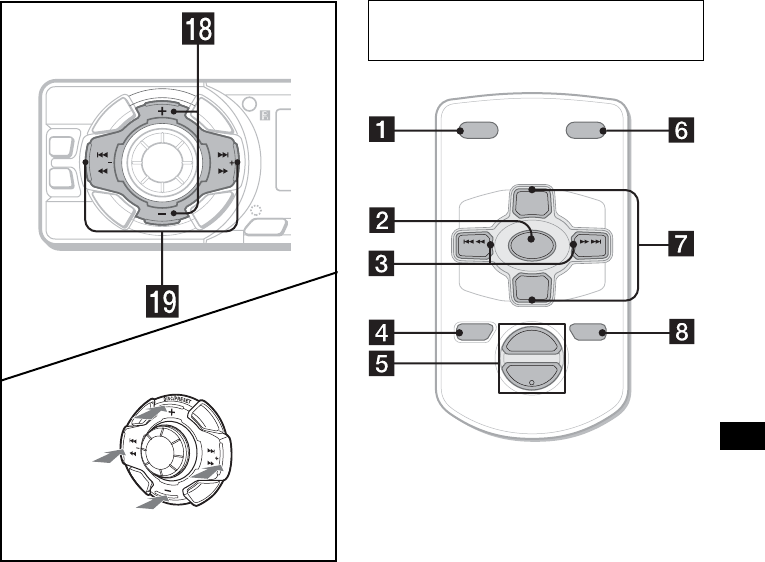
rDISC (ALBUM)/PRESET buttons (+/–)
To receive preset stations/change the disc*1,
skip albums*2.
XR-F5100 only
*1 When an optional CD/MD unit is connected.
*2 Available only when an optional CD unit with the
MP3 file control function is connected, and MP3
file is played.
sSEEK buttons (–/+)
To skip tracks/fast-forward, reverse a track/
tune in stations automatically, find a station
manually/select a setting.
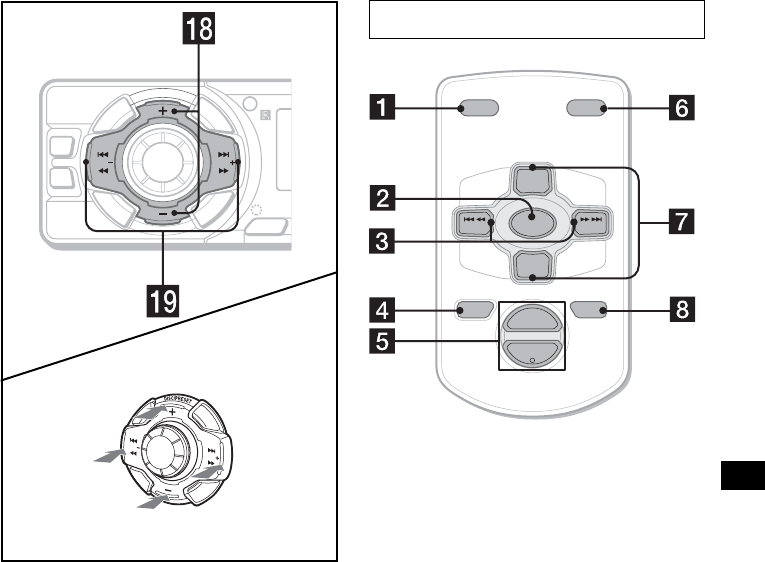
The corresponding buttons of the card
remote commander control the same
functions as those on this unit.
aDSPL button
bSOURCE button
cSEEK (–/+) buttons
dOFF button
eVOL (+/–) buttons
fMODE button
gPRESET (DISC/ALBUM) (+/–) buttons
hATT button
Note
If the display disappears by pressing (OFF), it cannot
be operated with the card remote commander unless
(SOURCE) on the unit is pressed, or a cassette tape is
inserted to activate the unit first.
Tip
For details on how to replace the battery, see
“Replacing the lithium battery” on page 23.
SEEK
SEEK
P
U
S
H
D
I
A
L
S
E
L
E
C
T
S
O
U
R
C
E
D
I
S
C
/
P
R
E
S
E
T
SENS
EQ3
D
S
P
L
M
O
D
E
DSO
SEEK SEEK
L
I
S
T
C
A
T
(SEEK)
(–): to select
leftwards/
.
(SEEK)
(+): to select
rightwards/
>
(DISC/PRESET)
(+): to select upwards
(DISC/PRESET)
(–): to select downwards
Card remote commander RM-X115
(XR-F5100)
continue to next page t
ATTOFF
DSPL MODE
SOURCE
VOL
+
–
PRESET
+
PRESET
–
SEEK
–
SEEK
+
6
XR-F5100/F5005
3-262-940-21 (1)
01GB02CAS-E.fm masterpage:Left
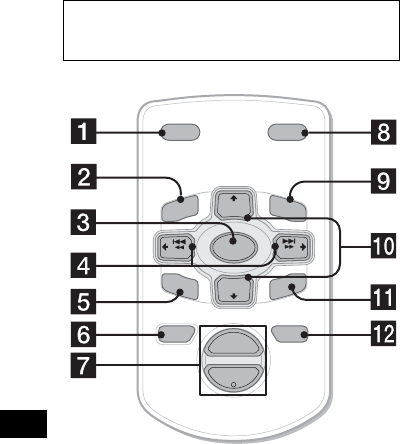
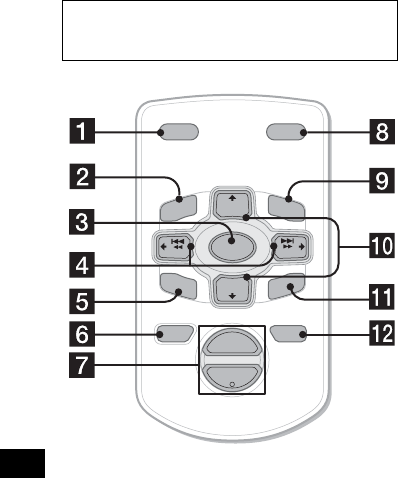
The corresponding buttons of the card
remote commander control the same
functions as those on this unit.
aDSPL button
bMENU button*
cSOURCE button
dSEEK (–/+) buttons
eSOUND button
fOFF button
gVOL (+/–) buttons
hMODE button
iLIST button
jDISC/PRESET (+/–) buttons
kENTER button*
lATT button
*Not available for this unit
Note
If the display disappears by pressing (OFF), it cannot
be operated with the card remote commander unless
(SOURCE) on the unit is pressed, or a cassette tape is
inserted to activate the unit first.
Tip
For details on how to replace the battery, see
“Replacing the lithium battery” on page 23.
Card remote commander RM-X114
(optional) (XR-F5005)
DISC
–
ATTOFF
DSPL MODE
SOURCE
DISC
+
VOL
+
–
PRESET
+
SEEK
+
SEEK
–
PRESET –
SOUND
ENTER
MENU
LIST
7
01GB02CAS-E.fm masterpage:Right
XR-F5100/F5005
3-262-940-21 (1)
XR-F5100/F5005
3-262-940-21 (1)
Precautions
• If your car was parked in direct sunlight, allow
the unit to cool off before operating it.
• If no power is being supplied to the unit, check
the connections first. If everything is in order,
check the fuse.
• If no sound comes from the speakers of a 2-
speaker system, set the fader control to the
centre position.
• When a tape is played back for a long period,
the cassette may become warm because of the
built-in power amplifier. However, this is not a
sign of malfunction.
If you have any questions or problems
concerning your unit that are not covered in this
manual, please consult your nearest Sony dealer.
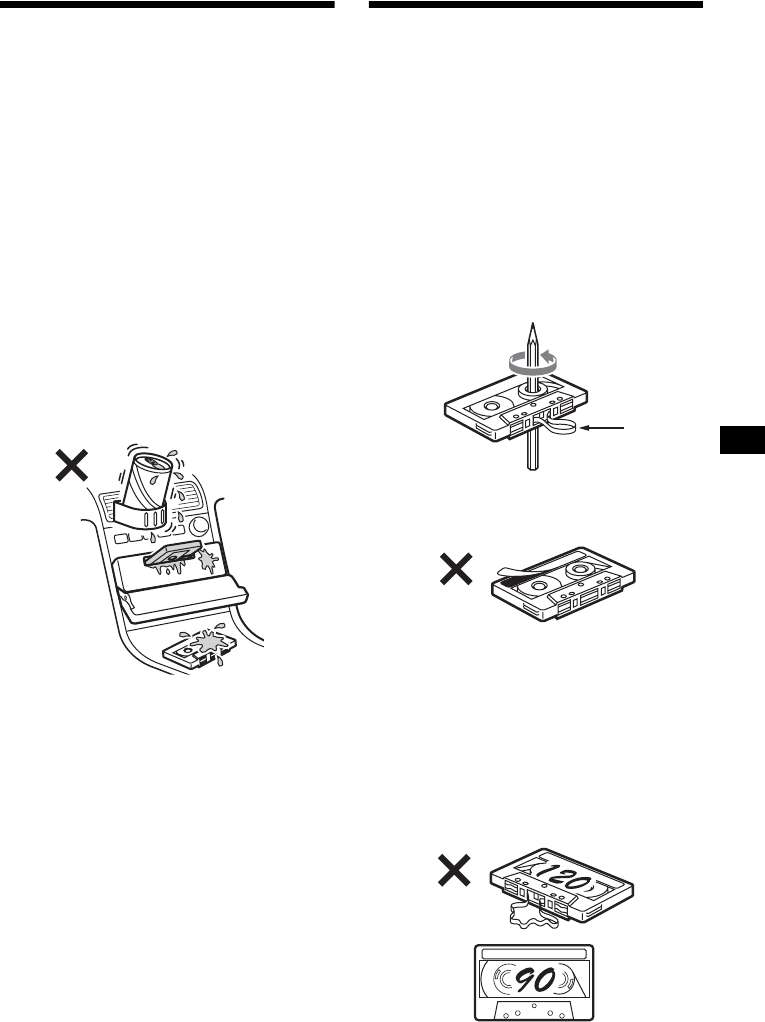
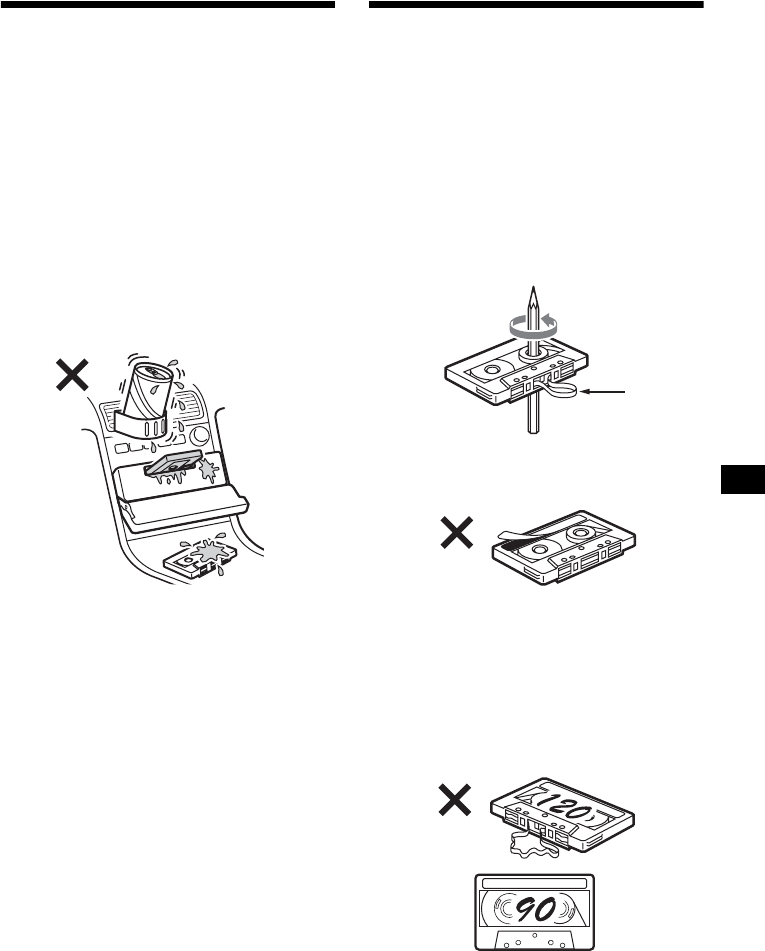
To maintain high sound quality
Be careful not to splash juice or other soft drinks
onto the unit or tapes.
Notes on Cassettes
Cassette care
• Do not touch the tape surface of a cassette, as
any dirt or dust will contaminate the heads.
• Keep cassettes away from equipment with
built-in magnets such as speakers and
amplifiers, as erasure or distortion on the
recorded tape could occur.
• Do not expose cassettes to direct sunlight,
extremely cold temperatures, or moisture.
• Slack in the tape may cause the tape to be
caught in the machine. Before you insert the
tape, use a pencil or similar object to turn the
reel and take up any slack.
• Distorted cassettes and loose labels can cause
problems when inserting or ejecting tapes.
Remove or replace loose labels.
• The sound may become distorted while playing
the cassette. The cassette player head should be
cleaned after each 50 hours of use.
The use of cassettes longer than 90 minutes
is not recommended except for long
continuous play
The tape used for these cassettes is very thin and
tends to stretch easily.
Frequent playing and stopping of these tapes
may cause them to become entangled in the
cassette deck mechanism.
Slack
8
XR-F5100/F5005
3-262-940-21 (1)
01GB02CAS-E.fm masterpage:Left
Getting Started
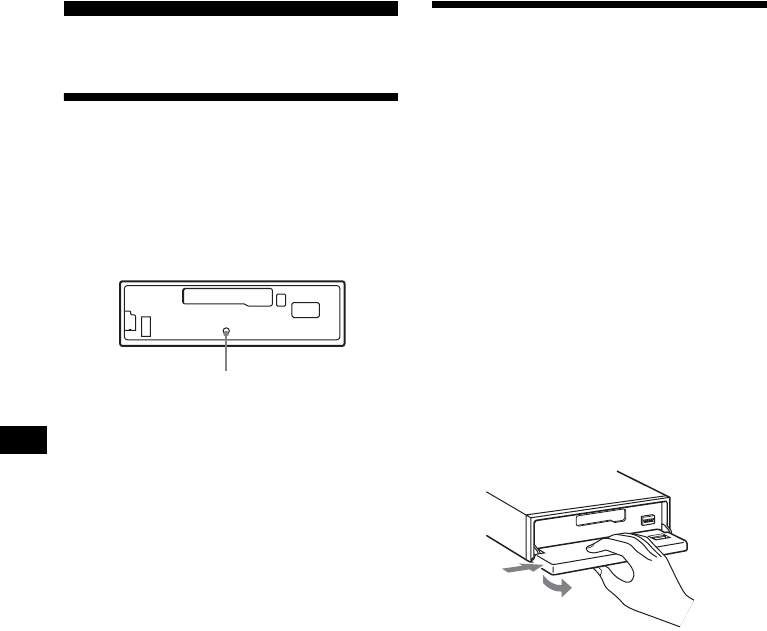
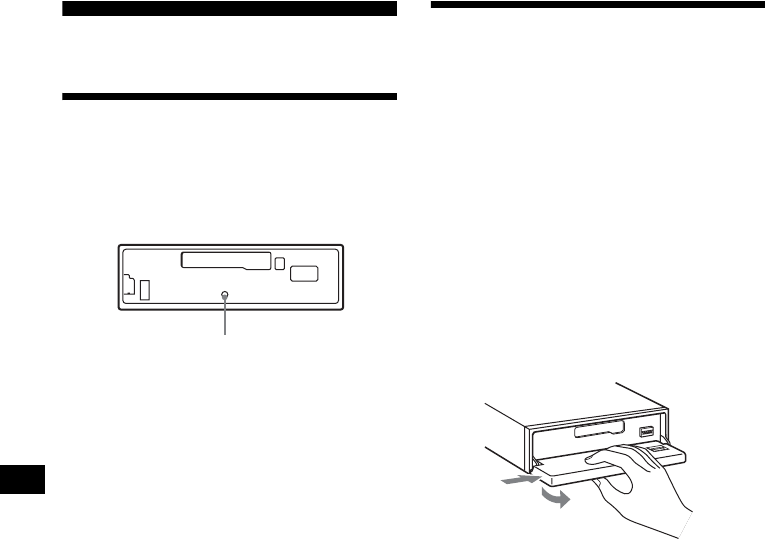
Resetting the unit
Before operating the unit for the first time, or
after replacing the car battery or changing the
connections, you must reset the unit.
Remove the front panel and press the RESET
button with a pointed object, such as a ballpoint
pen.
Note
Pressing the RESET button will erase the clock setting
and some stored contents.
Detaching the front panel
You can detach the front panel of this unit to
protect the unit from being stolen.
Caution alarm
If you turn the ignition switch to the OFF
position without removing the front panel, the
caution alarm will beep for a few seconds.
If you connect an optional amplifier and do not
use the built-in amplifier, the beep sound will be
deactivated.
1Press (OFF)*.
Tape playback or radio reception stops (the
key illumination and display remain on).
*If your car has no ACC (accessory) position on
the ignition switch, be sure to turn the unit off by
pressing (OFF) until the display disappears to
avoid car battery drain.
2Press (OPEN), then slide the front
panel to the right, and gently pull out
the left end of the front panel.
Notes
•If you detach the panel while the unit is still turned
on, the power will turn off automatically to prevent
the speakers from being damaged.
•Do not drop or put excessive pressure on the front
panel and its display window.
•Do not subject the front panel to heat/high
temperature or moisture. Avoid leaving it in a parked
car or on a dashboard/rear tray.
Tip
When carrying the front panel with you, use the
supplied front panel case.
RESET button
1
2
9
01GB02CAS-E.fm masterpage:Right
XR-F5100/F5005
3-262-940-21 (1)
XR-F5100/F5005
3-262-940-21 (1)
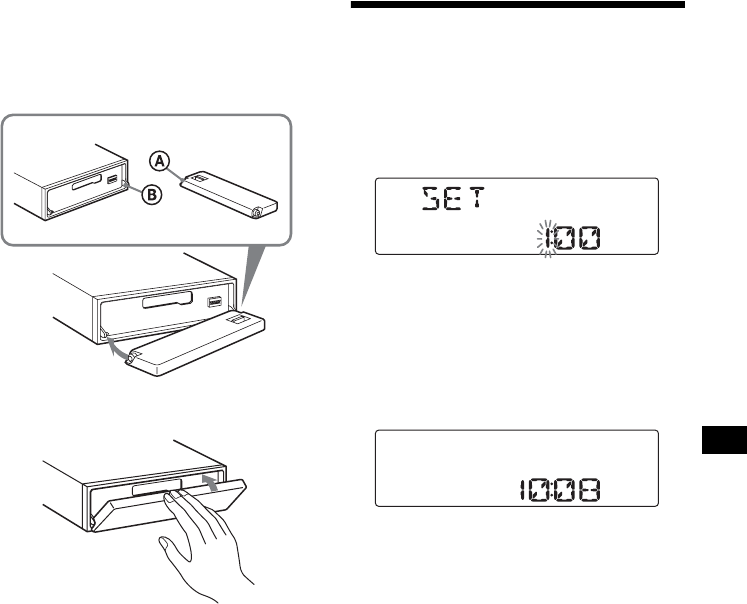
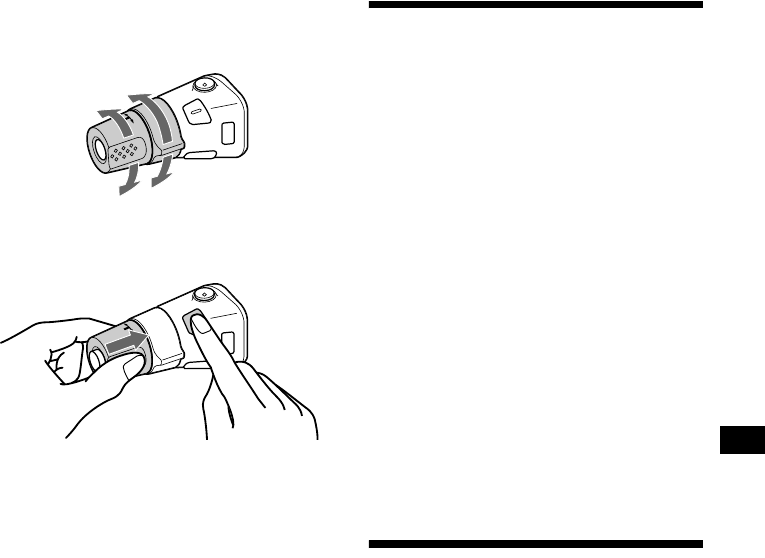
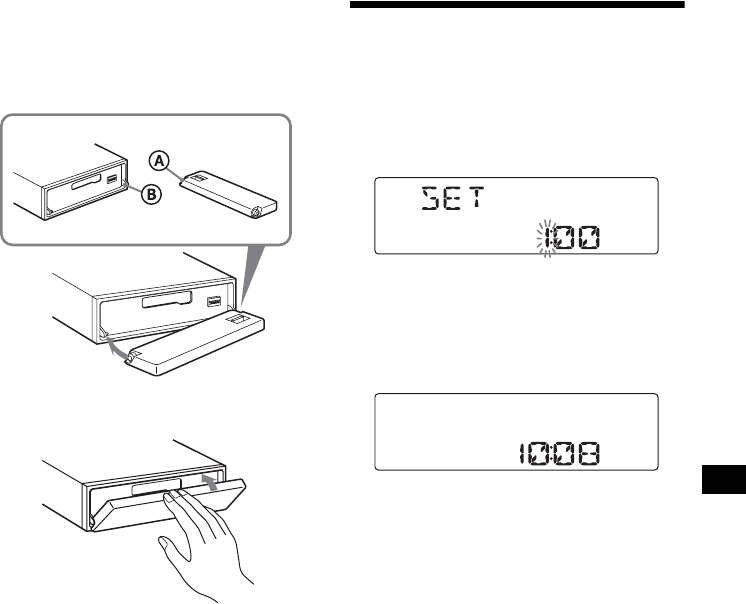
Attaching the front panel
Place hole A of the front panel onto the spindle
B on the unit, then lightly push the left side in.
Press (SOURCE) on the unit (or insert a
cassette) to operate the unit.
Note
Do not put anything on the inner surface of the front
panel.
Setting the clock
The clock uses a 12-hour digital indication.
Example: To set the clock to 10:08
1Press (DSPL) for 2 seconds.
The hour indication flashes.
1Rotate the volume control dial to set
the hour.
2Press the select button.
The minute indication flashes.
3Rotate the volume control dial to set
the minute.
2Press (DSPL).
The clock starts. After the clock setting is
complete, the display returns to normal play
mode.
x
10
XR-F5100/F5005
3-262-940-21 (1)
01GB02CAS-E.fm masterpage:Left
Cassette Player
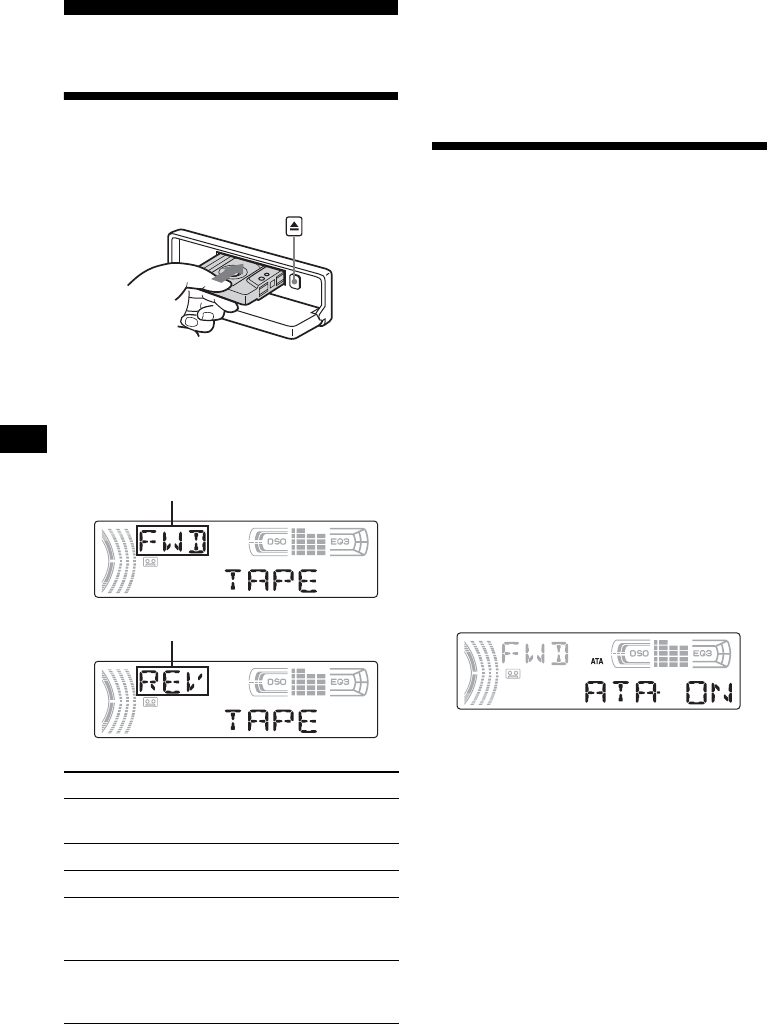
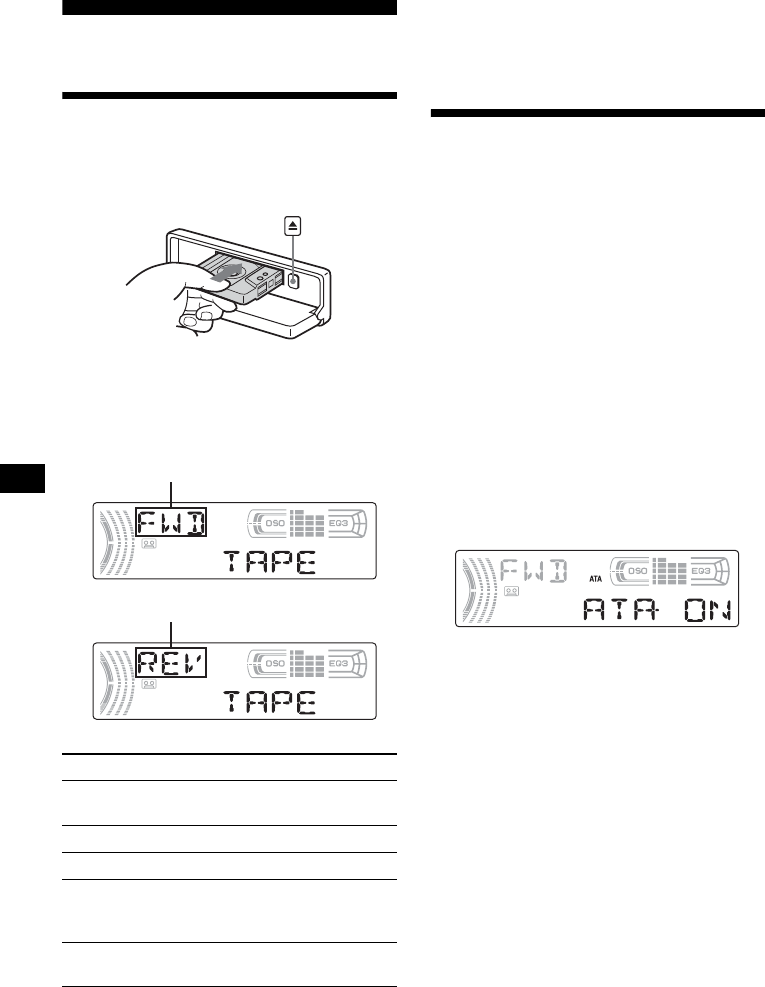
Listening to a tape
1Press (OPEN) and insert a cassette.
Playback starts automatically.
2Close the front panel.
If a cassette is already inserted, press (SOURCE)
repeatedly until “FWD” or “REV” appears to
start playback.
Note
The AMS function may not work when:
– the blanks between tracks are shorter than 4
seconds.
– there is noise between tracks.
– there are long sections of low volume or quiet
sections.
Playing a tape in various
functions
You can play the tape in various functions:
• REP (Repeat Play) repeats the current track.
• BL SKIP (Blank Skip) skips blanks longer than
8 seconds.
• ATA (Automatic Tuner Activation) turns on the
tuner automatically when fast-winding the tape.
• MTL (Metal) lets you play a metal or CrO2
tape.
During tape playback, press the
desired function button repeatedly
until “ON” in the display appears.
Function buttons
(3): REP
(5): BL SKIP
(6): ATA
(SENS): MTL
Example: ATA function
ATA function starts.
To return to normal play mode, select “OFF.”
To Press
Change the tape’s
playback direction (MODE) (o)
Stop playback (OFF)
Eject the cassette (OPEN) then Z
Skip tracks
– Automatic
Music Sensor
(SEEK) (./>)
[once for each track]
Fast-forward/
reverse
– Manual Search
(SEEK) (m/M)
[hold to desired point]
The side facing up is played.
The side facing down is played.
11
01GB02CAS-E.fm masterpage:Right
XR-F5100/F5005
3-262-940-21 (1)
XR-F5100/F5005
3-262-940-21 (1)
Radio
The unit can store up to 6 stations per band
(FM1, FM2, FM3, MW, SW1 and SW2).
Caution
When tuning in stations while driving, use Best
Tuning Memory to prevent accidents.
Storing stations
automatically
— Best Tuning Memory (BTM)
The unit selects the stations with the strongest
signals within the selected band, and stores them
in the order of their frequency.
1Press (SOURCE) repeatedly to select
the radio.
2Press (MODE) repeatedly to select the
band.
3Press (BTM) for 2 seconds.
The unit stores stations in the order of their
frequencies on the number buttons.
A beep sounds when the setting is stored.
Notes
•If only a few stations can be received due to weak
signals, some number buttons will retain their former
settings.
•When a number is indicated in the display, the unit
starts storing stations from the one currently
displayed.
Receiving the stored stations
1Press (SOURCE) repeatedly to select
the radio.
2Press (MODE) repeatedly to select the
band.
3Press the number button ((1) to (6))
on which the desired station is stored.
If preset tuning does not work
— Automatic tuning/Local Seek Mode
Automatic tuning:
Press (SEEK) (+) or (SEEK) (–) to
search for the station.
Scanning stops when the unit receives a
station. Repeat the operation until the desired
station is received.
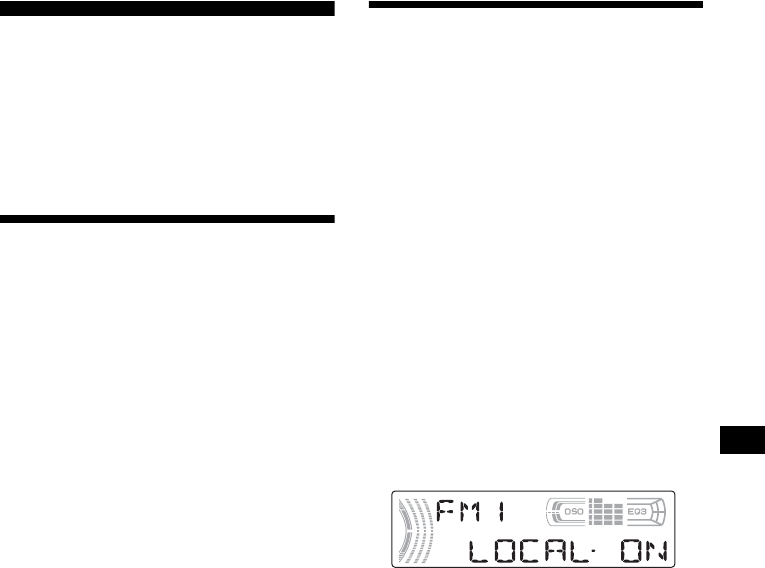
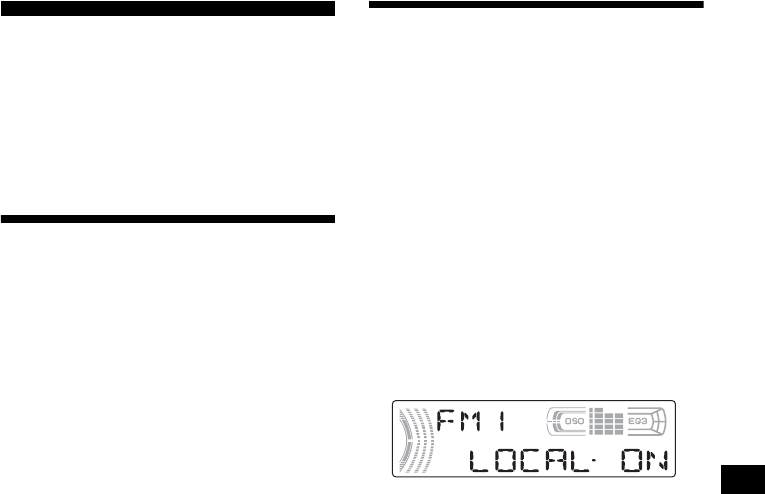
Local Seek Mode:
If the automatic tuning stops too
frequently, press (SENS) repeatedly
until “LOCAL-ON” appears.
Only the stations with relatively strong
signals will be tuned in.
To cancel the local seek mode, press (SENS)
twice when receiving FM.
Note
When receiving MW or SW, to cancel the local seek
mode, press (SENS) (“LOCAL-OFF” appears).
Tip
If you know the frequency of the station you want to
listen to, press and hold (SEEK) (+) or (SEEK) (–) to
locate the approximate frequency, then press
(SEEK) (+) or (SEEK) (–) repeatedly to fine adjust to
the desired frequency (manual tuning).
continue to next page t
12
XR-F5100/F5005
3-262-940-21 (1)
01GB02CAS-E.fm masterpage:Left
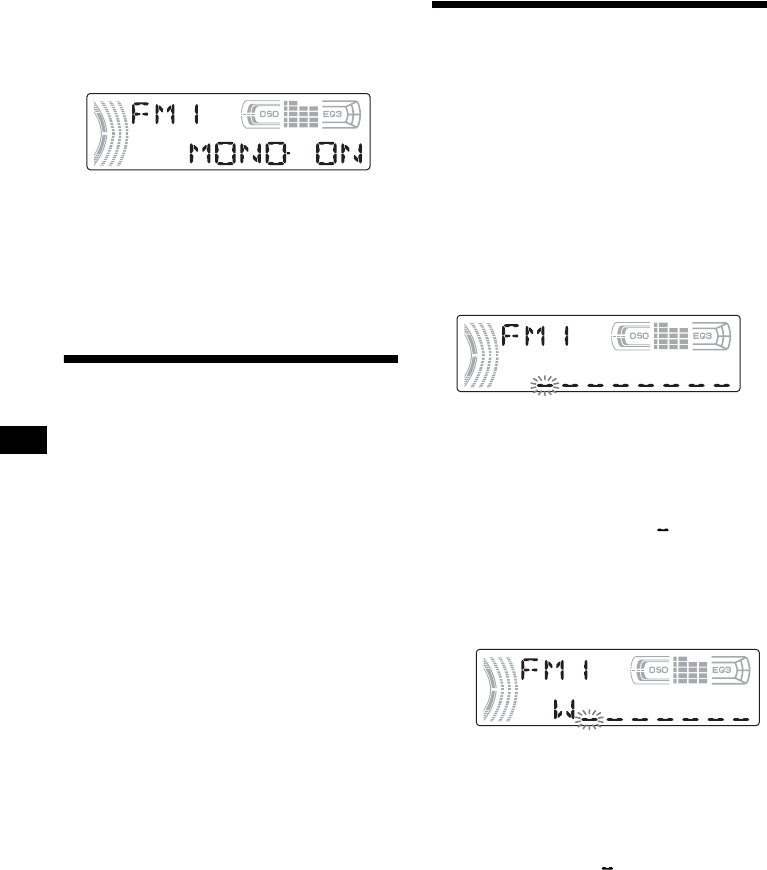
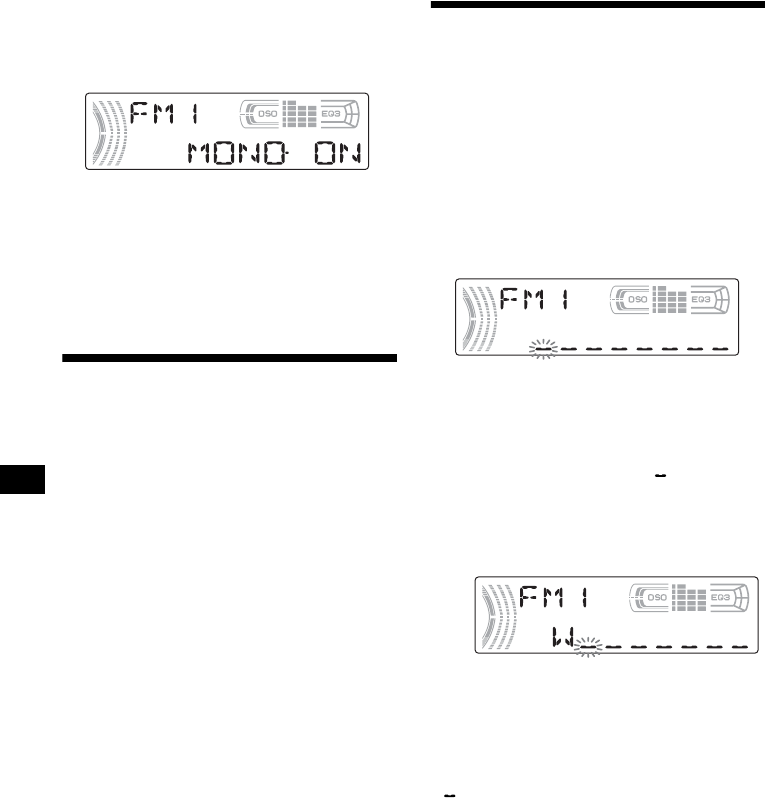
If FM stereo reception is poor
— Monaural Mode
During radio reception, press (SENS)
repeatedly until “MONO-ON” appears.
The sound improves, but becomes monaural
(“ST” disappears).
To return to normal radio reception mode, press
(SENS) (“MONO-OFF” appears).
Tip
If FM broadcasts are difficult to hear, set DSO to
“OFF” (page 18).
Storing only the desired
stations
You can manually preset the desired stations on
any chosen number button.
1Press (SOURCE) repeatedly to select
the radio.
2Press (MODE) repeatedly to select the
band.
3Press (SEEK) (+) or (SEEK) (–) to tune
in the station that you want to store.
4Press the desired number button ((1)
to (6)) for 2 seconds until “MEM”
appears.
The number button indication appears in the
display.
Note
If you try to store another station on the same number
button, the previously stored station will be erased.
Storing station names
— Station Memo
You can assign a name to each radio station and
store it in memory. The name of the station
currently tuned in appears in the display. You can
assign a name using up to 8 characters for a
station.
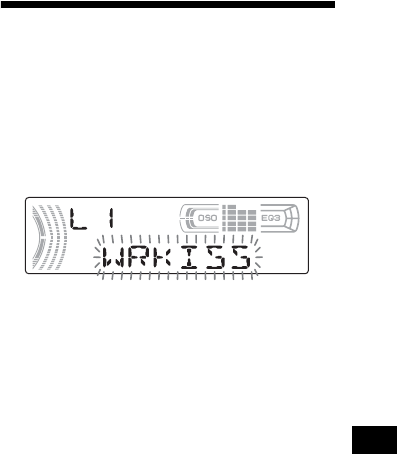
Storing the station names
1Tune in a station whose name you
want to store.
2Press (LIST) for 2 seconds.
3Enter the characters.
1Press the volume control dial to
select the desired character.
A y B y C ... y 0 y 1 y 2 ...
y + y – y * ... y * y A
*(blank space)
2Press the select button after
locating the desired character.
The next character flashes.
3Repeat steps 1 and 2 to enter the
entire name.
4To return to normal radio reception
mode, press (LIST) for 2 seconds.
Tip
Simply overwrite or enter “ ” to correct or erase a
character.
13
01GB02CAS-E.fm masterpage:Right
XR-F5100/F5005
3-262-940-21 (1)
XR-F5100/F5005
3-262-940-21 (1)
Erasing the station name
1Press (SOURCE) repeatedly to select
the radio.
2Press (MODE) repeatedly to select the
band.
3Press (LIST) for 2 seconds.
4Press (DSPL) for 2 seconds.
The stored names will appear.
5Press the volume control dial to select
the station name you want to erase.
6Press the select button for 2 seconds.
The name is erased.
Repeat steps 5 and 6 if you want to erase
other names.
7Press (LIST) for 2 seconds.
The unit returns to normal radio reception
mode.
Note
If you have already erased all of the station names,
“NO DATA” appears in step 6.
Tuning in a station through
a list
— List-up
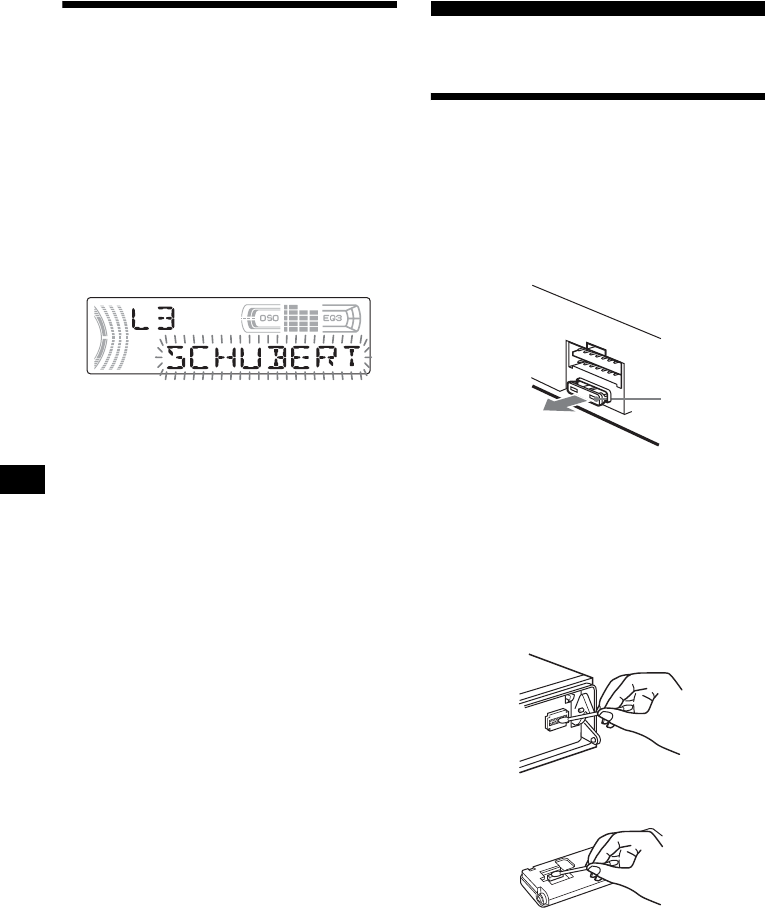
1During radio reception, press
(LIST).
The frequency appears in the display.
2Press (LIST) repeatedly until you find
the desired station.
3Press (SEEK) (+) or (SEEK) (–) to tune
in the desired station.
14
XR-F5100/F5005
3-262-940-21 (1)
01GB02CAS-E.fm masterpage:Left
Other Functions
You can also control the unit (and optional CD/
MD units*) with a rotary commander
(optional).
*XR-F5100 only
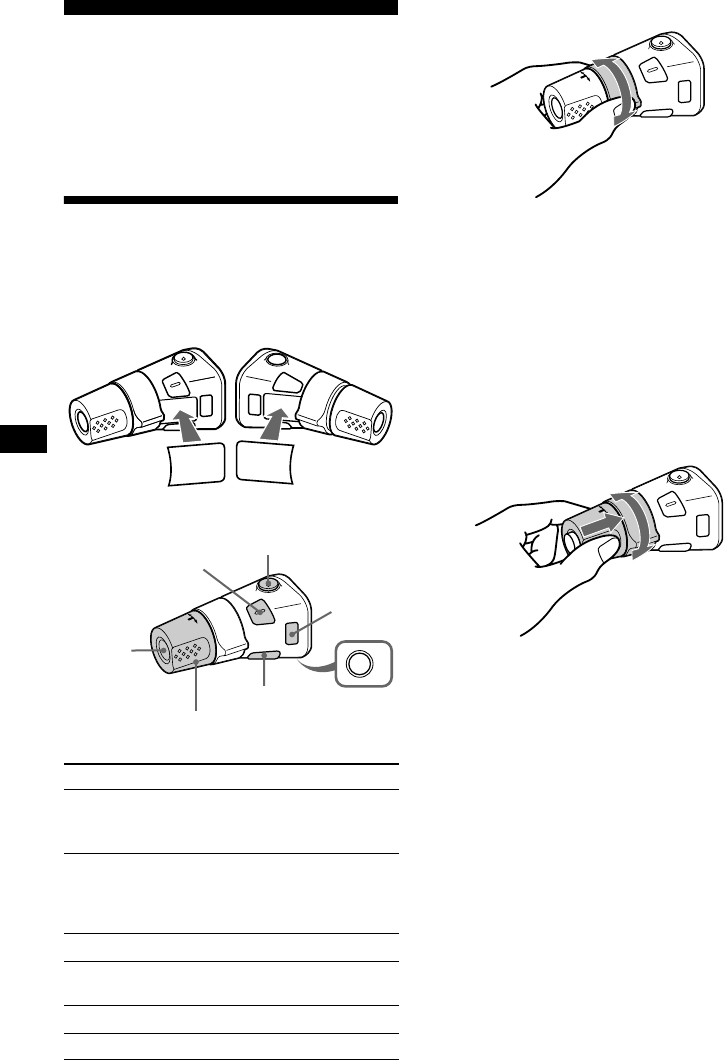
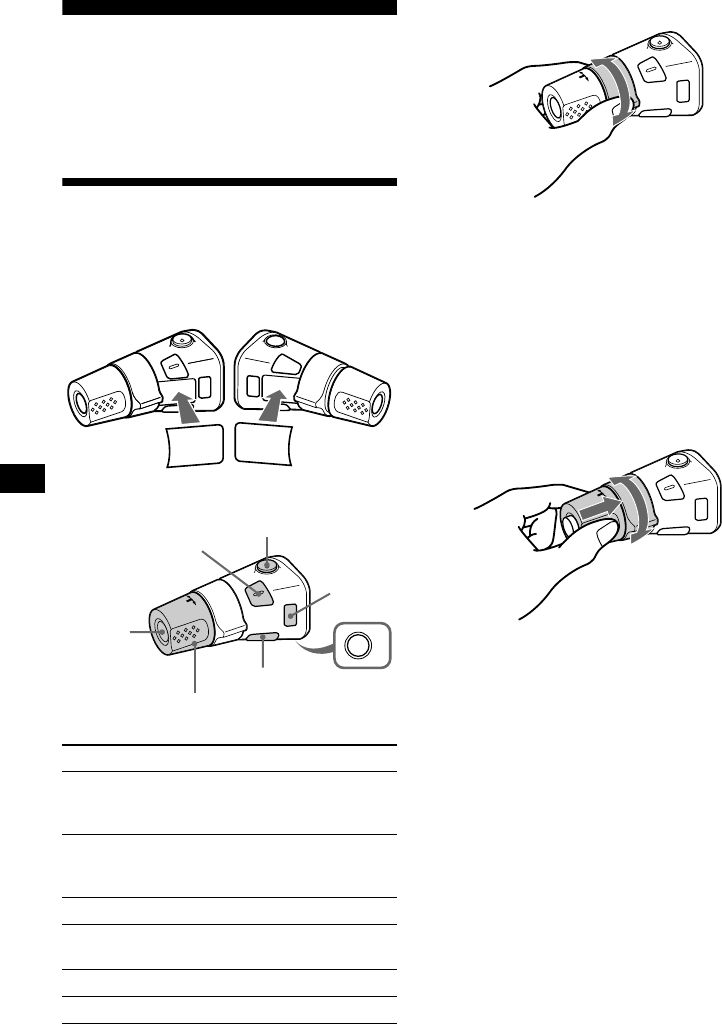
Using the rotary commander
First, attach the appropriate label depending on
how you want to mount the rotary commander.
The rotary commander works by pressing
buttons and/or rotating controls.
By pressing buttons
By rotating the control
Rotate and release to:
– Locate the beginning of tracks on the tape.
– Tune in stations automatically.
– Skip tracks on the disc*1.
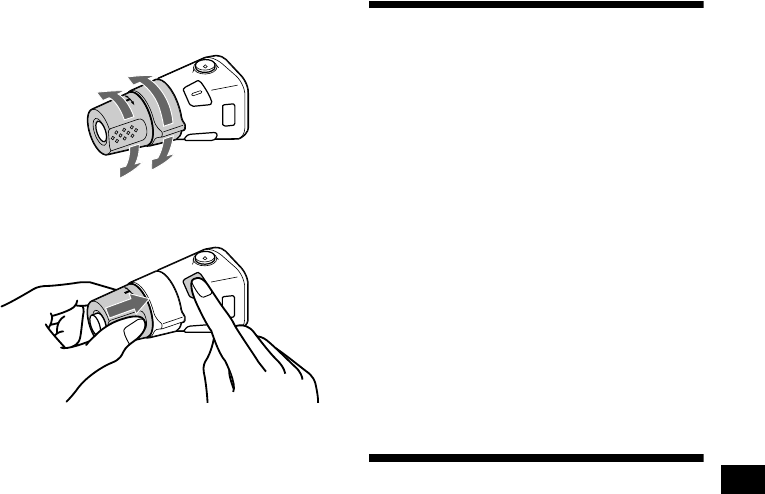
Rotate, hold, and release to:
– Fast-wind the tape.
– Find a station manually.
– Fast-forward/reverse a track*1.
Tip
To start playback while fast-winding the tape, press
(MODE).
By pushing in and rotating the control
Push in and rotate the control to:
– Receive preset stations.
– Change discs during CD (MD) playback*1.
During playback of a CD containing MP3
files*3
Push in and repeat rotating quickly to:
– Change discs one by one.
Push in, then rotate and hold to:
– Change albums*3.
*1 Only if the corresponding optional equipment is
connected (XR-F5100 only).
*2 If your car has no ACC (accessory) position on the
ignition key switch, after turning off the ignition, be
sure to press and hold (OFF) until the display
disappears.
*3 Available only when an optional CD unit with the
MP3 file control function is connected, and MP3 file
is played (XR-F5100 only).
Press To
(SOURCE) Change the source
(Radio/Tape/CD*1/MD*1)/
Power on
(MODE) Change operation
(Radio band/Tape playback
direction/CD unit*1/MD
unit*1)
(ATT) Attenuate the sound
(OFF)*2Stop playback or radio
reception/Power off
(SEL) Adjust and select
(DSPL) Change the display item
SEL
DSPL
MODE
SEL
DSPL
MODE
OFF
Rotate the VOL control
to adjust the volume.
(SOURCE)
(SEL)
(ATT)
(DSPL) (OFF)
(MODE)
SEEK/AMS
control
PRESET/DISC
control
15
01GB02CAS-E.fm masterpage:Right
XR-F5100/F5005
3-262-940-21 (1)
XR-F5100/F5005
3-262-940-21 (1)
Changing the operative direction
The operative direction of controls is factory-set
as shown below.
If you need to mount the rotary commander on
the right hand side of the steering column, you
can reverse the operative direction.
Press (SEL) for 2 seconds while
pushing the VOL control.
Adjusting the sound
characteristics
You can adjust the balance, fader, low pass filter
and subwoofer volume.
1Press the select button repeatedly
until “BAL,” “FAD,” “LPF” or “SUB”
appears.
Each time you press the select button, the
item changes as follows:
LOW*1 t MID*1 t HI*1 t
BAL (left-right) t FAD (front-rear) t
LPF (low pass filter)*2*3 t
SUB (subwoofer volume)*2*4
*1 When EQ3 is activated (page 17).
*2 When “SUB” is selected (page 16).
*3 The cut off frequency is adjustable to 78 Hz,
125 Hz or OFF.
*4 The volume level is adjustable between –10
and +10 steps. (Below –10, “ATT” is displayed.)
2Rotate the volume control dial to
adjust the selected item.
Note
Adjust within 3 seconds after selecting the item.
Quickly attenuating the
sound
(With the rotary commander or the card
remote commander)
Press (ATT).
After “ATT-ON” momentarily appears,
“ATT” appears in the display.
To restore the previous volume level, press
(ATT) again.
Tip
When the interface cable of a car telephone is
connected to the ATT lead, the unit decreases the
volume automatically when a telephone call comes in
(Telephone ATT function).
To increase
To decrease

16
XR-F5100/F5005
3-262-940-21 (1)
01GB02CAS-E.fm masterpage:Left
Changing the sound and
display settings
The following items can be set:
• REAR/SUB*1 — to switch the audio output
REAR or SUB.
– Select “REAR” to output to a power amplifier.
– Select “SUB” to output to a subwoofer.
• A.SCRL (Auto Scroll)*2 (page 19).
• M.DSPL (Motion Display) — to turn the
motion display on or off.
– Select “ON” to activate the motion display
(the moving pattern appears in the display).
– Select “OFF” to deactivate the motion display.
•DEMO*
1 — to turn the demonstration display
on or off.
– Select “ON” to activate the demonstration
display (The demonstration starts about 10
seconds after the unit is turned off).
– Select “OFF” to deactivate the
demonstration display.
•BEEP*
3 — to turn the beeps on or off.
• DIM — to change the brightness of the display.
– Select “ON” to dim the display.
– Select “OFF” to deactivate the Dimmer.
Switching the REAR/SUB*1
Press the select button and then rotate
the volume control dial.
After 3 seconds, the display returns to normal
play mode.
Selecting the desired item
Press the select button and the
desired button simultaneously.
select button + (3): A.SCRL*2
select button + (4): M.DSPL
select button + (4): DEMO*1
select button + (6): BEEP*3
select button + (DSPL): DIM
After the mode setting is complete, the display
returns to normal play mode.
To cancel the item, press the select button and the
desired button simultaneously again.
*1 When the unit is turned off.
*2 When an optional CD/MD unit is connected and
played (XR-F5100 only).
*3 The beep sound is output only when the built-in
amplifier is used.
17
01GB02CAS-E.fm masterpage:Right
XR-F5100/F5005
3-262-940-21 (1)
XR-F5100/F5005
3-262-940-21 (1)
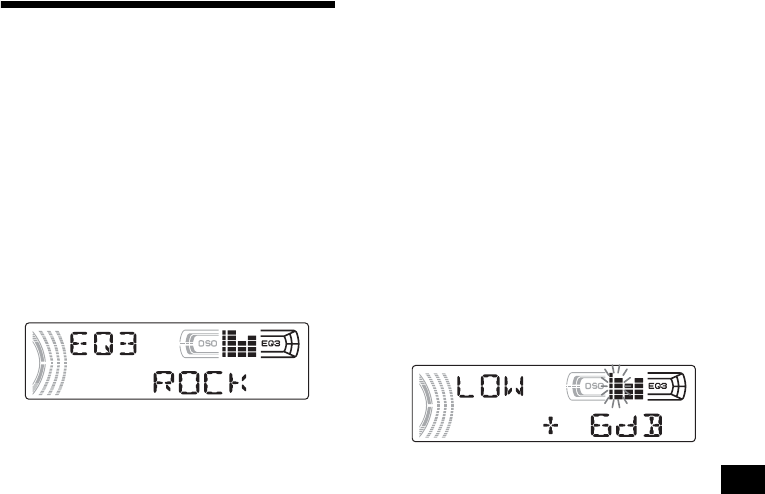
Setting the equalizer (EQ3)
You can select an equalizer curve for 7 music
types (XPLOD, VOCAL, CLUB, JAZZ, NEW
AGE, ROCK, CUSTOM and OFF (equalizer
OFF)).
You can store a different equalizer setting for
each source.
Selecting the equalizer curve
1Press (SOURCE) to select a source
(Radio, Tape, CD* or MD*).
2Press (EQ3) repeatedly to select the
desired equalizer curve.
Each time you press (EQ3), the item
changes.
To cancel the equalizing effect, select “OFF.”
Adjusting the equalizer curve
You can store and adjust the equalizer settings
for different tone ranges.
1Press (SOURCE) to select a source
(Radio, Tape, CD* or MD*).
2Press (EQ3) repeatedly to select the
desired equalizer curve.
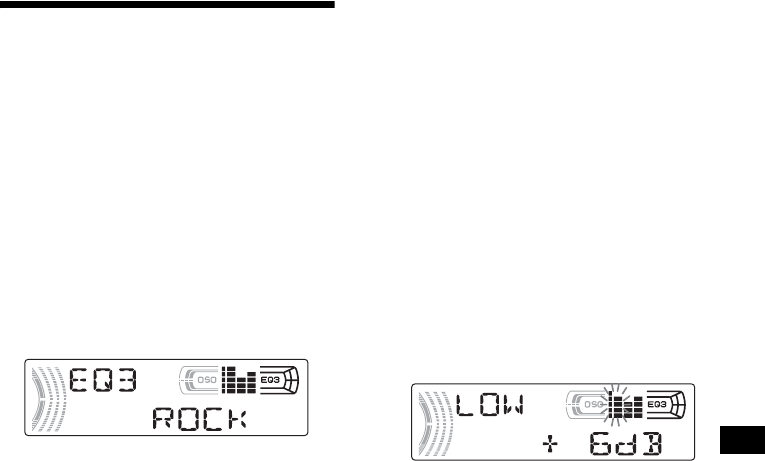
3Adjusting the equalizer curve.
1Press the select button repeatedly
to select the desired tone range.
Each time you press the select button, the
tone range changes.
LOW t MID t HI (t BAL t FAD t
LPF t SUB)
2Rotate the volume control dial to
adjust to the desired volume level.
The volume level is adjustable by 1 dB
steps from –10 dB to +10 dB.
3Repeat step 1 and 2 to adjust the
equalizer curve.
To restore the factory-set equalizer curve,
press the select button for 2 seconds.
*XR-F5100 only
Note
When EQ3 is set to “OFF,” you cannot adjust the
equalizer curve settings.
18
XR-F5100/F5005
3-262-940-21 (1)
01GB02CAS-E.fm masterpage:Left
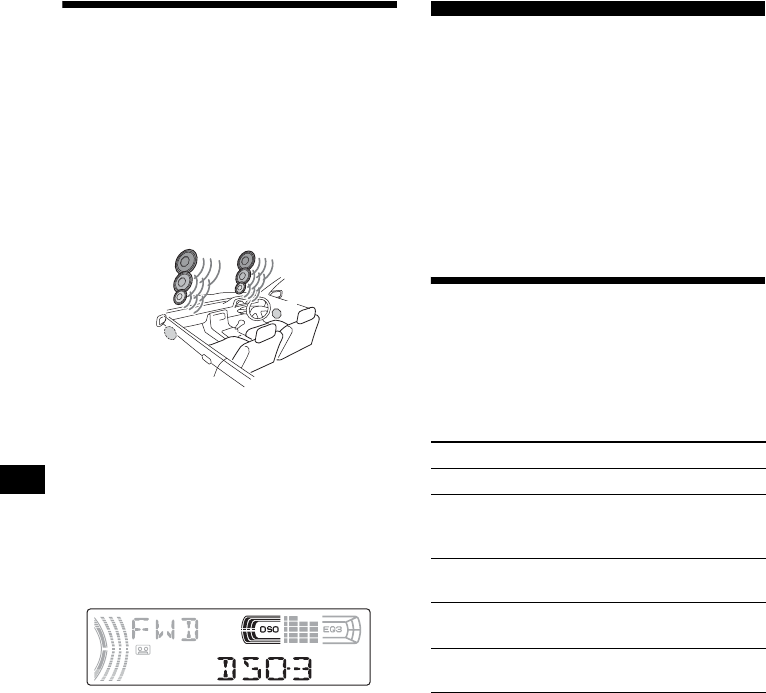
Setting the Dynamic
Soundstage Organizer (DSO)
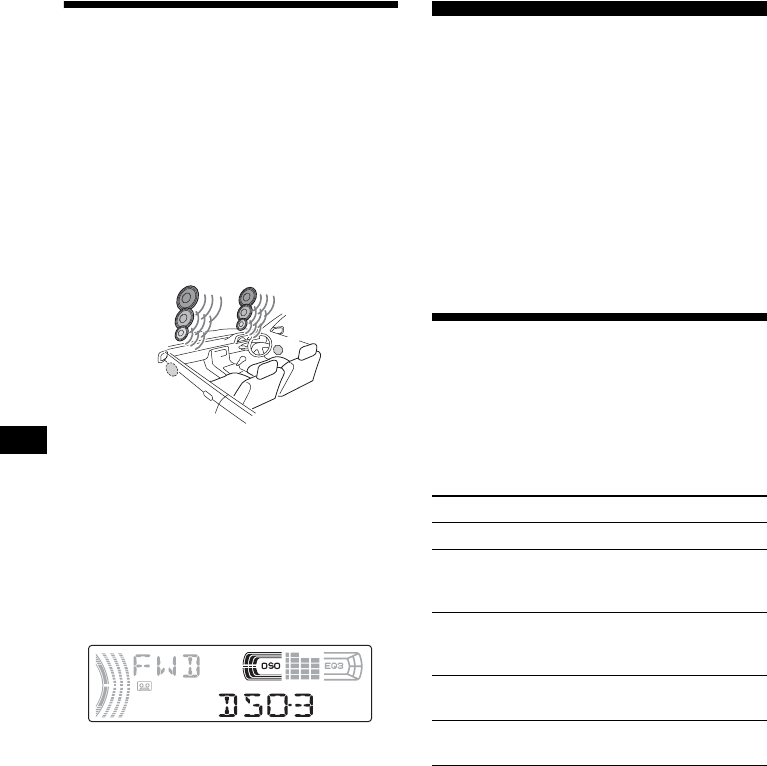
If your speakers are installed into the lower part
of the doors, the sound will come from below
and may not be clear.
The DSO (Dynamic Soundstage Organizer)
function creates a more ambient sound as if there
were speakers above the dashboard (virtual
speakers).
You can store the DSO setting for each source.
DSO mode and image of virtual speakers
*1 DSO-1
*2 DSO-2
*3 DSO-3
*4 DSO-OFF
1Press (SOURCE) to select a source
(Radio, Tape, CD* or MD*).
2Press (DSO) repeatedly until the
desired DSO setting appears.
Each time you press (DSO), the DSO setting
changes.
To cancel the DSO function, select “DSO-
OFF.” After 3 seconds, the display returns to
normal play mode.
*XR-F5100 only
Notes
•Depending on the type of car interior or type of
music, DSO may not have a desirable effect.
•If FM broadcasts are difficult to hear, set DSO to
“OFF.”
CD/MD Unit (optional)
(XR-F5100)
This unit can control external CD/MD units
(optional).
If you connect an optional CD unit with the CD
TEXT function and the CUSTOM FILE
function, the CD TEXT information will appear
in the display when you play a CD TEXT disc.
If you connect MP3 playable CD units (eg. MP3
CD changer), you can play MP3 files;
compressed audio files with quality sound.
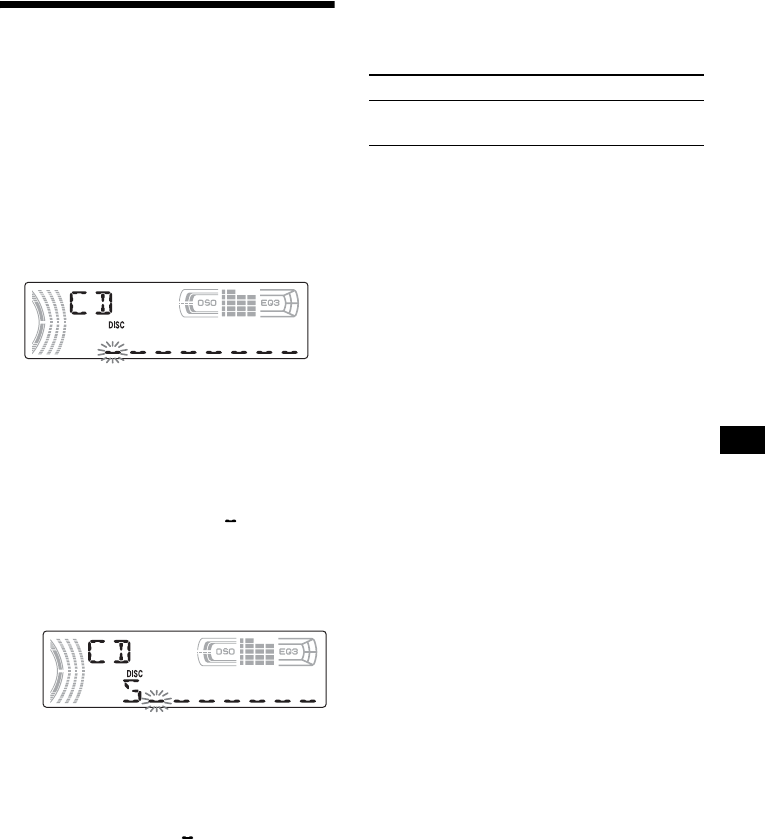
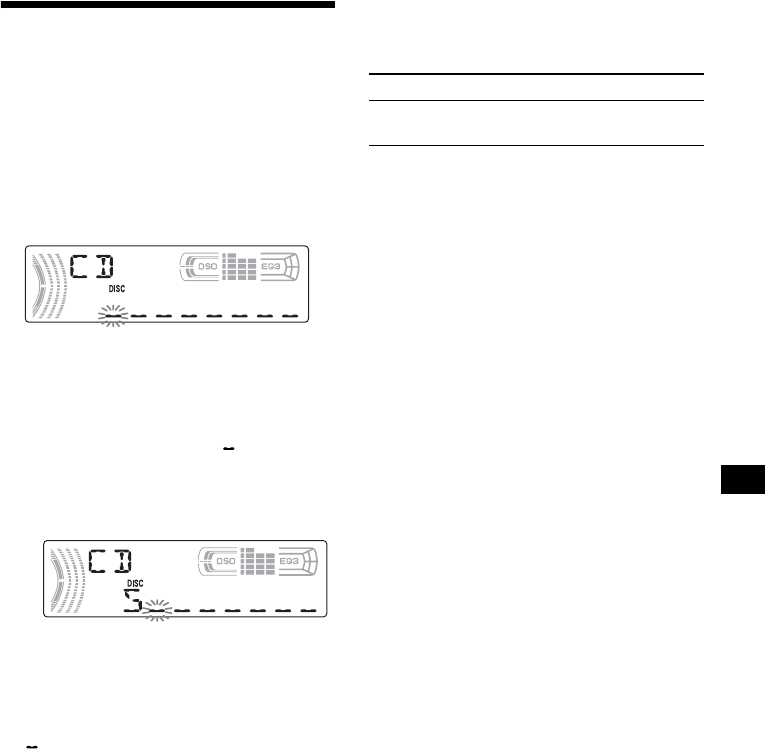
Playing a CD or MD
1Press (SOURCE) repeatedly to select
“CD” or “MD (MS*1).”
2Press (MODE) repeatedly until the
desired unit appears.
Playback starts.
When the last file on the disc is over
The file number indication returns to “1,” and
playback restarts from the first file of the disc.
*1 MS: MG Memory Stick System-up Player MGS-X1
*2 Available only when an optional CD unit with the
MP3 file control function is connected, and MP3 file
is played.
*3
*2
*1
*4
*4
*3
*2
*1
To Press
Stop playback (OFF)
Skip tracks
– Automatic
Music Sensor
(SEEK) (./>)
[once for each track]
Fast-forward/
reverse
– Manual Search
(SEEK) (m/M)
[hold to desired point]
Skip discs
– Disc selection (DISC/PRESET) (+/–)
[once for each disc]
Skip albums*2
– Album selection (DISC/PRESET) (+/–)
[hold to desired point]
19
01GB02CAS-E.fm masterpage:Right
XR-F5100/F5005
3-262-940-21 (1)
XR-F5100/F5005
3-262-940-21 (1)
Cautions when connecting MGS-X1 and MD unit(s)
This unit recognizes MGS-X1 as an MD unit.
•When you want to play MGS-X1, press (SOURCE) to
select “MS” or “MD.” When “MS” appears in the
source display, MGS-X1 starts to play. When “MD”
appears in the source display, press (MODE) to
select “MS,” to start playback.
•When you want to play an MD unit, press (SOURCE)
to select “MD” or “MS.” If your desired MD unit
appears in the source display, it starts to play. If “MS”
or another MD unit appears in the source display,
press (MODE) to select your desired MD unit, to
start playback.
Notes when connecting MP3 playable CD unit(s)
•If a disc with no MP3 files (tracks) is inserted, “NO
MUSIC” appears in the display and playback of the
next disc starts.
•Before playing a track, this unit reads all track and
album information on the disc. Depending on the
track structure, it may take more than a minute
before playback begins. During this time, “READ” is
displayed. Play will automatically start when reading
is complete.
Note
With an optional unit connected, playback of the same
source will continue on to the optional CD/MD unit.
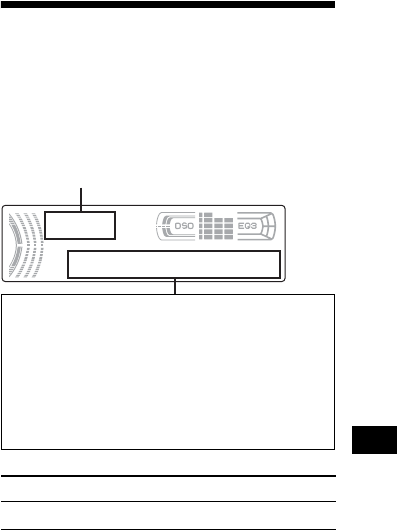
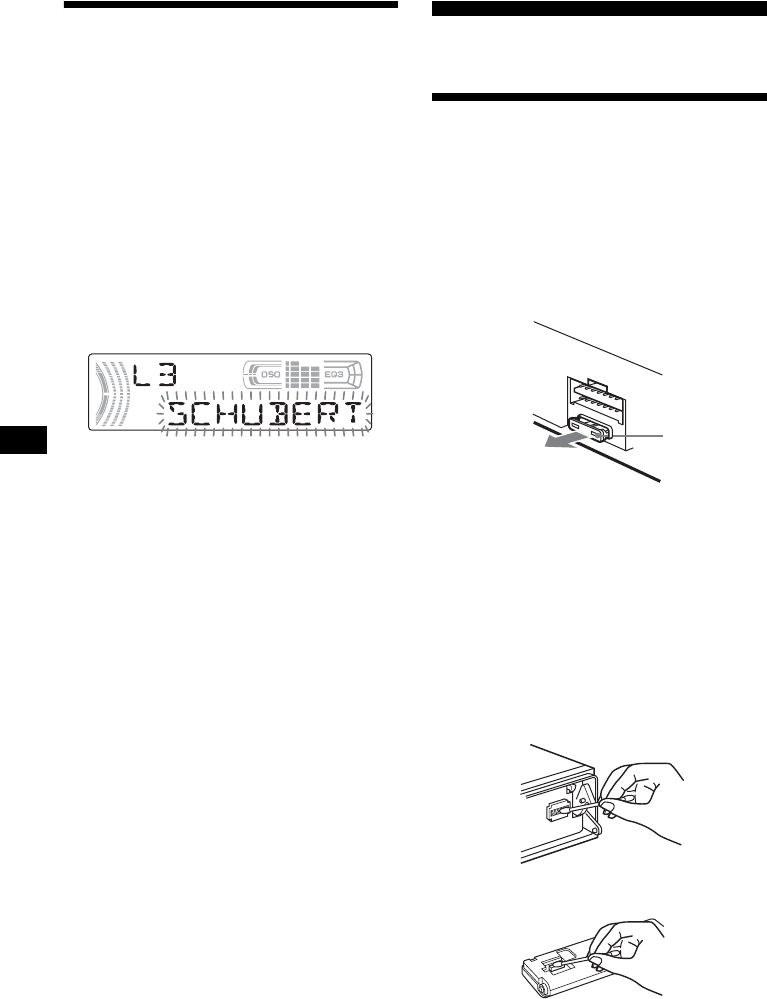
Display items
When the disc/album/track changes, any
prerecorded title*1 of the new disc/album/track is
automatically displayed. (If the A.SCRL (Auto
Scroll) function is set to “ON,” names exceeding
8 characters will be scrolled (page 16).)
*1 When pressing (DSPL), “NO NAME” indicates that
there is no Disc Memo (page 21) or no prerecorded
name to display.
*2 Only for CD TEXT discs with the artist name.
*3 Only for MP3 files.
Only track name/artist name/album name in ID3
tag is displayed.
When pressing (DSPL), “NO ID3” indicates that
there is no ID3 tag to display.
Notes
•Some characters cannot be displayed. Characters
and signs which cannot be displayed appear as “ *.”
•For some CD TEXT discs or ID3 tags with very
many characters, information may not scroll.
•This unit cannot display the artist name for each
track of a CD TEXT disc.
Tips
•When the A.SCRL (Auto Scroll) function is set to
“OFF” and the disc/album/track is changed, the disc/
album/track name or ID3 tag does not scroll.
•When an MP3 file is played and the album is
changed, the new album number is displayed.
To Press
Switch display item (DSPL)
Displayable items
•Disc number/Track number/Elapsed
playing time
•Disc name*1/Artist name*2
•Album (folder) name*3
•Track (file) name*1*3
•ID3 tag*3
•Clock
Source

20
XR-F5100/F5005
3-262-940-21 (1)
01GB02CAS-E.fm masterpage:Left
Playing tracks repeatedly
— Repeat Play
You can select:
• REP-TRACK — to repeat the current track.
•REP-ALBM*
1 — to repeat the tracks in the
current album.
•REP-DISC*
2 — to repeat the tracks in the
current disc.
*1 Available only when an optional CD unit with the
MP3 file control function is connected, and MP3 file
is played.
*2 Available only when one or more optional CD/MD
units are connected.
During playback, press (3) (REP)
repeatedly until the desired setting
appears in the display.
Repeat Play starts.
To return to normal play mode, select
“REP-OFF.”
Playing tracks in random
order
— Shuffle Play
You can select:
• SHUF-ALBM*1 — to play the tracks in the
current album in random order.
• SHUF-DISC — to play the tracks in the current
disc in random order.
• SHUF-CHGR*2 — to play the tracks in the
current optional CD (MD) changer in random
order.
• SHUF-ALL*3 — to play all the tracks in all
connected CD (MD) units in random order.
*1 Available only when an optional CD unit with the
MP3 file control function is connected, and MP3 file
is played.
*2 Available only when one or more optional CD (MD)
changers are connected.
*3 Available only when two or more optional CD (MD)
units are connected.
During playback, press (4) (SHUF)
repeatedly until the desired setting
appears in the display.
Shuffle Play starts.
To return to normal play mode, select
“SHUF-OFF.”
Note
“SHUF-ALL” will not shuffle tracks between CD units
and MD units.
21
01GB02CAS-E.fm masterpage:Right
XR-F5100/F5005
3-262-940-21 (1)
XR-F5100/F5005
3-262-940-21 (1)
Labelling a CD
— Disc Memo (When connecting a CD unit
with the CUSTOM FILE function)
You can label each disc with a custom name
(Disc Memo). You can enter up to 8 characters
for a disc. If you label a CD, you can locate the
disc by name (page 22).
1Start playing the disc you want to label
in a CD unit with the CUSTOM FILE
function.
2Press (LIST) for 2 seconds.
The unit will repeat the disc during the
labelling procedure.
3Enter the characters.
1Rotate the volume control dial to
select the desired character.
A y B y C ... y 0 y 1 y 2 ...
y + y – y * ... y * y A
*(blank space)
2Press the select button after
locating the desired character.
The next character flashes.
3Repeat steps 1 and 2 to enter the
entire name.
4To return to normal play mode, press
(LIST) for 2 seconds.
Tips
•Simply overwrite or enter “ ” to correct or erase a
character.
•You can label CDs on a unit without the CUSTOM
FILE function if that unit is connected along with a
CD unit that has the function. The Disc Memo will be
stored in the memory of the CD unit with the
CUSTOM FILE function.
Note
REP-TRACK/SHUF play is suspended until the name
edit is complete.
Viewing the Disc Memo
As a display item, the Disc Memo always takes
priority over any original CD TEXT information.
Tip
Other items can be displayed (page 19).
Erasing the Disc Memo
1Press (SOURCE) repeatedly to select
“CD.”
2Press (MODE) repeatedly to select the
CD unit storing the Disc Memo.
3Press (LIST) for 2 seconds.
4Press (DSPL) for 2 seconds.
The stored names will appear.
5Rotate the volume control dial to
select the disc name you want to
erase.
6Press the select button for 2 seconds.
The name is erased.
Repeat steps 5 and 6 if you want to erase
other names.
7Press (LIST) for 2 seconds.
The unit returns to normal play mode.
Notes
•When the Disc Memo for a CD TEXT disc is erased,
the original CD TEXT information is displayed.
•If you cannot find the Disc Memo you want to erase,
try selecting a different CD unit in step 2.
To Press
View (DSPL) during CD/CD
TEXT disc playback
22
XR-F5100/F5005
3-262-940-21 (1)
01GB02CAS-E.fm masterpage:Left
Locating a disc by name
— List-up (When connecting a CD unit with
the CD TEXT/CUSTOM FILE function, or an MD
unit)
You can use this function for discs that have been
assigned custom names*1 or for CD TEXT
discs*2.
*1 Locating a disc by its custom name: when you
assign a name for a CD (page 21) or an MD.
*2 Locating discs by the CD TEXT information: when
you play a CD TEXT disc on a CD unit with the CD
TEXT function.
1During playback, press (LIST).
The name assigned to the current disc appears
in the display.
2Press (LIST) repeatedly until you find
the desired disc.
3Press (SEEK) (+) or (SEEK) (–) to play
the disc.
Notes
•Once a disc name has been displayed for 5
seconds, the display goes back to its normal
playback mode.
•If there are no discs in the magazine, “NO DISC”
appears in the display.
•If a disc has not been assigned a custom file, “NO
NAME” appears in the display.
•The information appears only in upper case. There
are also some letters which cannot be displayed.
Additional Information
Maintenance
Fuse replacement
When replacing the fuse, be sure to use one
matching the amperage rating stated on the
original fuse. If the fuse blows, check the power
connection and replace the fuse. If the fuse blows
again after replacement, there may be an internal
malfunction. In such a case, consult your nearest
Sony dealer.
Warning
Never use a fuse with an amperage rating
exceeding the one supplied with the unit as this
could damage the unit.
Cleaning the connectors
The unit may not function properly if the
connectors between the unit and the front panel
are not clean. In order to prevent this, detach the
front panel (page 8) and clean the connectors
with a cotton swab dipped in alcohol. Do not
apply too much force. Otherwise, the connectors
may be damaged.
Fuse (10 A)
Main unit
Back of the front panel
23
01GB02CAS-E.fm masterpage:Right
XR-F5100/F5005
3-262-940-21 (1)
XR-F5100/F5005
3-262-940-21 (1)
Notes
•For safety, turn off the ignition before cleaning the
connectors, and remove the key from the ignition
switch.
•Never touch the connectors directly with your fingers
or with any metal device.
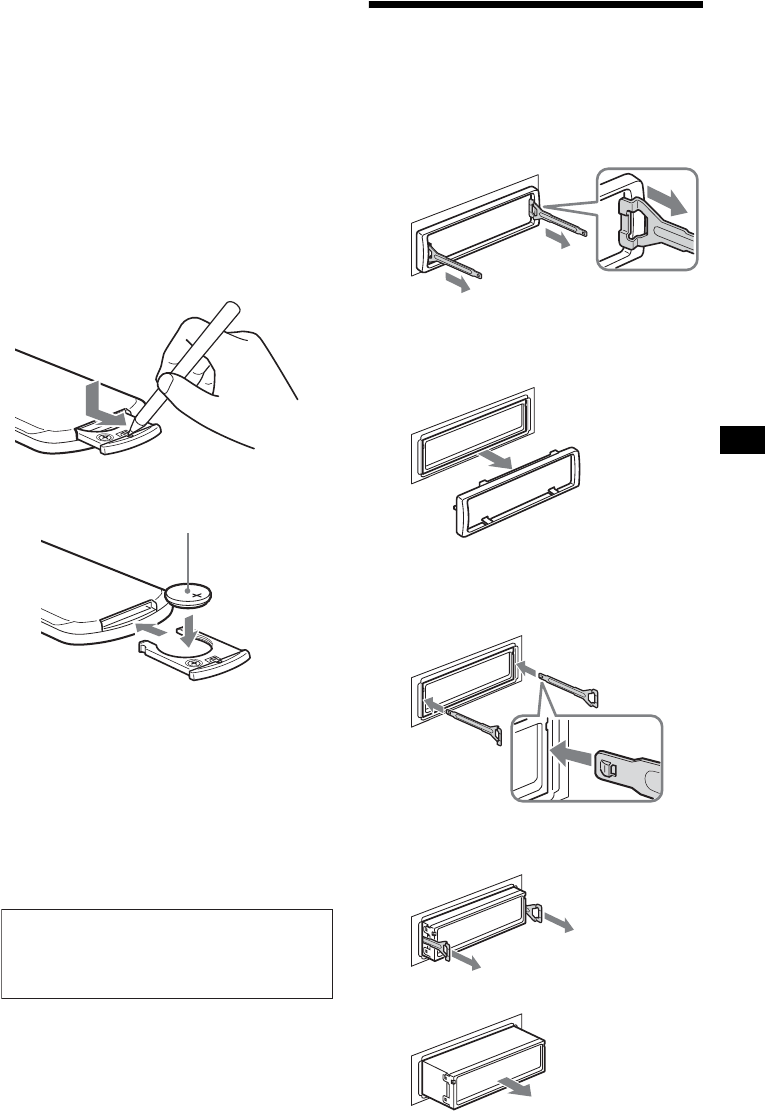
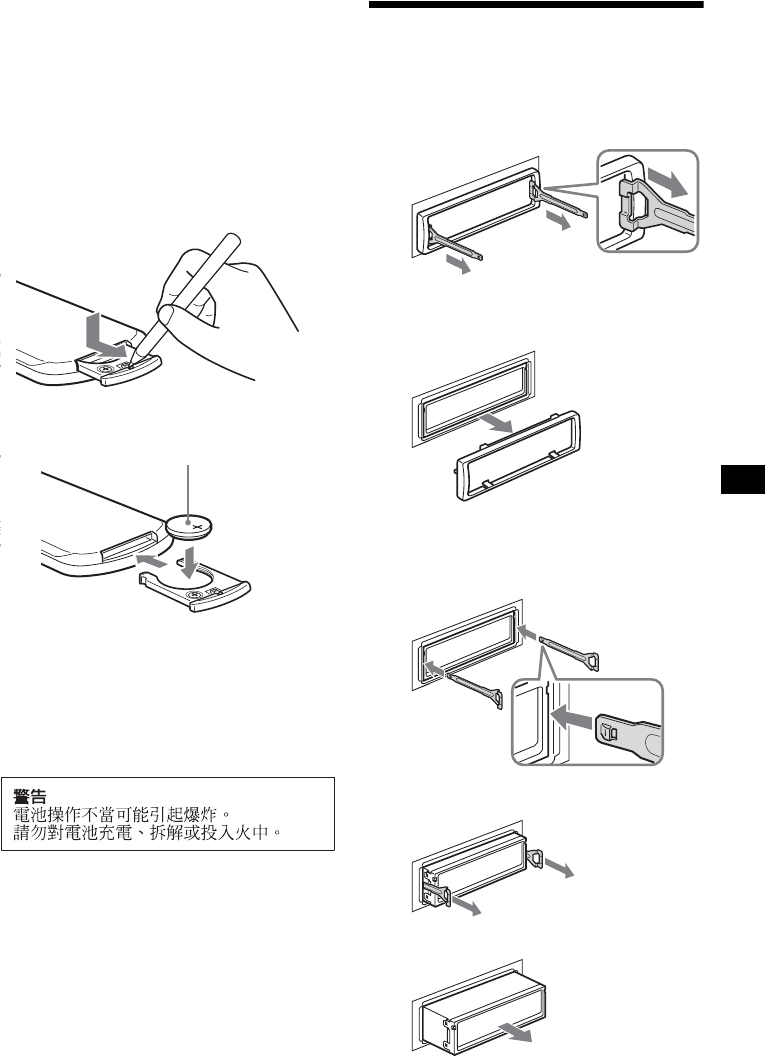
Replacing the lithium battery
Under normal conditions, battery will last
approximately 1 year. (The service life may be
shorter, depending on the conditions of use.)
When the battery becomes weak, the range of the
card remote commander becomes shorter.
Replace the battery with a new CR2025 lithium
battery. Use of any other battery may present a
risk of fire or explosion.
Notes on lithium battery
• Keep the lithium battery out of the reach of
children. Should the battery be swallowed,
immediately consult a doctor.
• Wipe the battery with a dry cloth to assure a
good contact.
• Be sure to observe the correct polarity when
installing the battery.
• Do not hold the battery with metallic tweezers,
otherwise a short-circuit may occur.
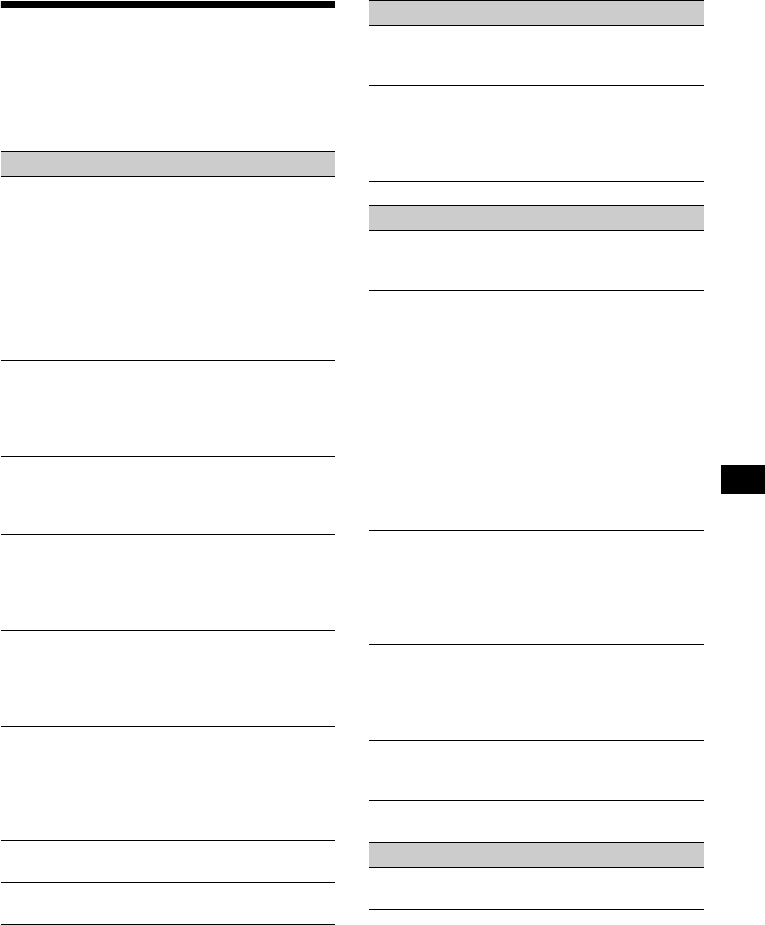
Removing the unit
1Remove the protection collar.
1Detach the front panel (page 8).
2Engage the release keys together
with the protection collar.
3Pull out the release keys to remove
the protection collar.
2Remove the unit.
1Insert both release keys together
until they click.
2Pull the release keys to unseat the
unit.
3Slide the unit out of the mounting.
x
+ side up
WARNING
Battery may explode if mistreated.
Do not recharge, disassemble, or dispose of
in fire.
Orient the release
key correctly.
Face the hook
inwards.
24
XR-F5100/F5005
3-262-940-21 (1)
01GB02CAS-E.fm masterpage:Left
Specifications
Cassette Player section
Tape track 4-track 2-channel stereo
Wow and flutter 0.08 % (WRMS)
Frequency response 30 – 18,000 Hz
Signal-to-noise ratio
Tuner section
FM
Tuning range FM tuning interval:
50 kHz/200 kHz switchable
87.5 – 108.0 MHz
(at 50 kHz step)
87.5 – 107.9 MHz
(at 200 kHz step)
Aerial terminal External aerial connector
Intermediate frequency 10.7 MHz/450 kHz
Usable sensitivity 9 dBf
Selectivity 75 dB at 400 kHz
Signal-to-noise ratio 67 dB (stereo),
69 dB (mono)
Harmonic distortion at 1 kHz
0.5 % (stereo),
0.3 % (mono)
Separation 35 dB at 1 kHz
Frequency response 30 – 15,000 Hz
MW
Tuning range MW tuning interval:
9 kHz/10 kHz switchable
531 – 1,602 kHz
(at 9 kHz step)
530 – 1,710 kHz
(at 10 kHz step)
Sensitivity 30 µV
SW
Tuning range SW tuning interval:
SW1: 2,940 – 7,735 kHz
SW2: 9,500 – 18,135 kHz
(except for
10,140 – 11,575 kHz)
Aerial terminal External aerial connector
Intermediate frequency 10.7 MHz/450 kHz
Sensitivity 30 µV
Power amplifier section
Outputs Speaker outputs
(sure seal connectors)
Speaker impedance 4 – 8 ohms
Maximum power output 52 W × 4 (at 4 ohms)
General
Outputs Audio output terminals
(rear/sub switchable)
Power aerial relay control
terminal
Power amplifier control
terminal
Inputs Telephone ATT control
terminal
Remote controller input
terminal
BUS control input terminal
(XR-F5100)
BUS audio input terminal
(XR-F5100)
Aerial input terminal
Tone controls Low:
±10 dB at 60 Hz (XPLOD)
Mid:
±10 dB at 1 kHz (XPLOD)
High:
±10 dB at 10 kHz (XPLOD)
Power requirements 12 V DC car battery
(negative earth)
Dimensions Approx. 178 × 50 × 177 mm
(w/h/d)
Mounting dimensions Approx. 182 × 53 × 161 mm
(w/h/d)
Mass Approx. 1.2 kg
Supplied accessories Card remote commander
RM-X115 (XR-F5100)
Parts for installation and
connections (1 set)
Front panel case (1)
Optional accessories Card remote commander
RM-X114 (XR-F5005)
Rotary commander
RM-X4S
BUS cable (supplied with
an RCA pin cord)
RC-61 (1 m), RC-62 (2 m)
(XR-F5100)
Optional equipment CD changer (10 discs)
(XR-F5100) CDX-757MX, CDX-656X
CD changer (6 discs)
CDX-T70MX
MD changer (6 discs)
MDX-66XLP
DVD changer
DVX-100S
Source selector
XA-C30
AUX-IN Selector
XA-300
Note
This unit cannot be connected to a digital preamplifier
or an equalizer which is Sony BUS system compatible.
Design and specifications are subject to change
without notice.
Cassette type
TYPE II, IV 61 dB
TYPE I 58 dB

25
01GB02CAS-E.fm masterpage:Right
XR-F5100/F5005
3-262-940-21 (1)
XR-F5100/F5005
3-262-940-21 (1)
Troubleshooting
The following checklist will help you remedy
problems you may encounter with your unit.
Before going through the checklist below, check
the connection and operating procedures.
General
No sound.
• Rotate the volume control dial to adjust the
volume.
• Cancel the ATT function.
• Set the fader control to the centre position for
a 2-speaker system.
XR-F5100
• You tried to play back MP3 files with an
optional CD unit which is incompatible with
MP3.
tPlay back with a Sony MP3 compatible
CD unit, such as the CDX-757MX.
The contents of the memory have been
erased.
• The RESET button has been pressed.
tStore again into the memory.
• The power lead or battery has been
disconnected.
• The power connecting lead is not connected
properly.
No beep sound.
• The beep sound is cancelled (page 16).
• An optional power amplifier is connected
and you are not using the built-in amplifier.
The display disappears from/does not
appear in the display window.
• The display disappears if you press and hold
(OFF).
tPress and hold (OFF) again until the
display appears.
• Remove the front panel and clean the
connectors. For details, see “Cleaning the
connectors” on page 22.
Stored stations and correct time are erased.
The fuse has blown.
Makes noise when the ignition key is in the
ON, ACC, or OFF position.
The leads are not matched correctly with the
car’s accessory power connector.
No power is being supplied to the unit.
• Check the connection. If everything is in
order, check the fuse.
• The car does not have an ACC position.
tPress (SOURCE) (or insert a cassette) to
turn on the unit.
The power is continuously supplied to the
unit.
The car does not have an ACC position.
The power aerial does not extend.
The power aerial does not have a relay box.
Tape playback
The sound is distorted.
The tape head is contaminated.
tClean the head with a commercially
available dry-tape cleaning cassette.
The AMS does not operate correctly.
• There is noise in the space between tracks.
• A blank space is too short (less than 4
seconds).
• A long pause, or a passage of low
frequencies or very low sound level is treated
as a blank space.
Radio reception
Preset tuning is not possible.
• Store the correct frequency in the memory.
• The broadcast signal is too weak.
The stations cannot be received.
The sound is hampered by noises.
• Connect a power aerial control lead (blue) or
accessory power supply lead (red) to the
power supply lead of a car’s aerial booster
(only when your car has built-in FM/MW/
SW aerial in the rear/side glass).
• Check the connection of the car aerial.
• The auto aerial will not go up.
tCheck the connection of the power aerial
control lead.
• Check the frequency.
• When the DSO mode is on, the sound is
sometimes hampered by noises.
tSet the DSO mode to “OFF” (page 18).
Automatic tuning is not possible.
• The local seek mode is set to “ON.”
tSet the local seek mode to “OFF”
(page 11).
• The broadcast signal is too weak.
tPerform manual tuning.
The “ST” indication flashes.
• Tune in the frequency accurately.
• The broadcast signal is too weak.
tSet the monaural reception mode to
“ON” (page 12).
A programme broadcast in stereo is heard
in monaural.
The unit is in monaural reception mode.
tCancel monaural reception mode
(page 12).
continue to next page t
26
XR-F5100/F5005
3-262-940-21 (1)
01GB02CAS-E.fm masterpage:Left
Error displays/Messages
*1 XR-F5100 only
*2 When an error occurs during playback of a CD or
MD, the disc number of the CD or MD does not
appear in the display.
*3 The disc number of the disc causing the error
appears in the display.
If these solutions do not help improve the
situation, consult your nearest Sony dealer.
XR-F5100
CD/MD playback
The sound skips.
Dirty or defective disc.
Error displays
(For this unit and optional CD/MD
changers*1)
The following indications will flash for about
5 seconds, and an alarm sound will be heard.
BLANK*2
No tracks have been recorded on an MD*3.
tPlay an MD with recorded tracks on it.
ERROR*2
• A CD is dirty or inserted upside down*3.
tClean or insert the CD correctly.
• A CD/MD cannot play because of some
problem.
tInsert another CD/MD.
FAILURE
The connection of speakers/amplifiers is
incorrect.
tSee the installation guide manual of this
model to check the connection.
NO DISC
No disc is inserted in the CD/MD unit.
tInsert discs in the CD/MD unit.
NO MAG
The disc magazine is not inserted in the CD
unit.
tInsert the magazine in the CD unit.
NO MUSIC
A CD which is not a music file is inserted in
the MP3 playable CD unit.
tInsert a music CD in the MP3 playable CD
unit.
NOTREADY
The lid of the MD unit is open or the MDs are
not inserted properly.
tClose the lid or insert the MDs properly.
OFFSET
There may be an internal malfunction.
tCheck the connection. If the error
indication remains on in the display,
consult your nearest Sony dealer.
RESET
The CD/MD unit cannot be operated because
of some problem.
tPress the RESET button on the unit.
Messages
L.SEEK +/–
The local seek mode is on during automatic
tuning (page 11).
“” or “”
You have reached the beginning or the end of
the disc and you cannot go any further.
XR-F5100/F5005
3-262-940-21 (1)
masterpage:None01GB02CAS-E.fm

2
鳴謝惠顧!
感謝您惠購 Sony 卡式磁帶播放機。 使用以
下附件,您更能涉趣於本機的多項功能:
XR-F5100
•選購的 CD/MD 裝置 (換碟機和播放機均在
內)*1。
•CD TEXT 資訊 (當 CD TEXT 光碟 *2在所連
接的具有 CD TEXT 功能的選購 CD 裝置中
播放時,該資訊顯示)。
•提供的操作附件
卡片式遙控器 RM-X115
•選購的操作附件
旋轉式控制器 RM-X4S
*1 此裝置僅與 Sony 產品一起使用。
*2 CD TEXT光碟是一種音頻CD,它包含了諸如唱碟名稱、
演員名和樂曲名稱之類的資訊。 這些資訊記錄在光
碟上。
XR-F5005
•選購的操作附件
卡片式遙控器 RM-X114
旋轉式控制器 RM-X4S

3
目錄
控制器位置 .........................4
使用前注意事項 ......................7
卡式磁帶的注意事項 ..................7
開始使用之前
復原本機 ............................8
拆卸前面板 ..........................8
設定時鐘 ............................9
卡式磁帶播放機
收聽磁帶 ...........................10
用各種功能播放磁帶 .................10
收音機
自動存儲電台
─ 最佳調諧記憶功能 (BTM) ......11
收聽已存儲的電台 ...................11
僅存儲所要的電台 ...................12
存儲電台名稱
─ 電台記憶 .....................12
通過列表調入電台
─ 列表功能 .....................13
其它功能
使用旋轉式控制器 ...................14
調節聲音特性 .......................15
快速減弱音量 .......................15
改變聲音和顯示設定 .................16
設定均衡器 (EQ3)..................17
設定動態攝影棚管理器 (DSO)........18
CD/MD 裝置 (選購件)(XR-F5100)
播放 CD 或 MD ..................... 18
顯示項目 .......................... 19
反覆播放樂曲
─ 重複播放 ..................... 20
以隨機順序播放樂曲
─ 任選播放 ..................... 20
標註 CD
─ 唱碟記憶功能 ................. 21
通過名稱找出光碟
─ 列表功能 ..................... 22
附加資訊
保養 .............................. 22
拆卸本機 .......................... 23
規格 ............................. 24
故障排除 .......................... 25
出錯顯示 / 資訊 .................... 26
4
控制器位置
詳細說明,請參見列出頁。
aDSO 按鈕 18
bSOURCE(電源打開 / 收音機 / 磁帶 /CD*1/
MD*1)按鈕
用來選擇音源。
cLIST 按鈕 12,13,21,22
d卡片式遙控器感應器
e顯示窗
fZ(退出)按鈕 (位於本機正面,前面
板後面) 10
gOPEN 按鈕 8,10
hEQ3 按鈕 17
iMODE (o)按鈕
用來改變操作。
j音量控制撥盤 / 選擇按鈕
旋轉,用來:
-調節音量。
-調節設定。
按下可以:
-選擇項目。
kDSPL(顯示方式變換)按鈕 9,13,16,
19,21
lSENS/MTL 按鈕 10,11,12
mBTM 按鈕 11
nRESET 按鈕(位於本機正面,前面板後面)
8
o數字按鈕 16
磁帶:
(3):REP 10
(5):BL SKIP 10
(6):ATA 10
收音機:
用來儲存電台 / 收聽已存儲的電台。
CD*1/MD*1:
(3):REP 20
(4):SHUF 20
p頻率選擇開關 (位於本機底部)
參見安裝∕連接說明書裡的“頻率選擇開
關”。
qOFF(停止 / 電源關閉)按鈕 *2 8,1 0,1 8
*1 僅適用於 XR-F5100
*2 將本機安裝在點火開關上沒有 ACC(附件)位
置的汽車上時的警告
關閉發動機後,必須按住裝置上的 (OFF) 不
放,直至顯示消失。
否則,顯示將一直開著從而消耗電池。
P
U
S
H
D
I
A
L
S
E
L
E
C
T
S
O
U
R
C
E
D
I
S
C
/
P
R
E
S
E
T
OPEN
6543
BBESHUF ATABL SKIPREPMTL
21
BTMSENS
EQ3
D
S
P
L
M
O
D
E
XR-F5100
XR-F5005
DSO
SEEK SEEK
L
I
S
T
OFF
5
rDISC (ALBUM)/PRESET 按鈕 (+/-)
接收預設電台 / 更換光碟 *1,跳過樂曲
集*2。
僅適用於 XR-F5100
*1 當連接有 CD/MD 選購裝置時。
*2 只有當連接了選購的具有 MP3 檔案控制功能的 CD
裝置,並在播放 MP3 檔案時才有效。
sSEEK 按鈕 (-/+)
用來跳過樂曲 / 快進,倒退一個樂曲 / 自
動調入電台,手動調台 / 選擇設定。
卡片式遙控器上與本機上對應的按鈕控制相
同的功能。
aDSPL 按鈕
bSOURCE 按鈕
cSEEK (-/+)按鈕
dOFF 按鈕
eVOL (+/-)按鈕
fMODE 按鈕
gPRESET (DISC/ALBUM)(+/-)按鈕
hATT 按鈕
註
如果通過按 (OFF) 使顯示消失,則只有先按裝置上的
(SOURCE) 或插入磁帶來啟動裝置,否則將無法用卡片
式遙控器操作裝置。
提示
關於如何更換電池,參見 “更換鋰電池”第 23 頁。
SEEK
SEEK
P
U
S
H
D
I
A
L
S
E
L
E
C
T
S
O
U
R
C
E
D
I
S
C
/
P
R
E
S
E
T
SENS
EQ3
D
S
P
L
M
O
D
E
DSO
SEEK SEEK
L
I
S
T
C
A
T
(SEEK)
(-):向左選擇 /
.
(SEEK)
(+):向右選擇 /
>
(DISC/PRESET)
(+):向上選擇
(DISC/PRESET)
(-):向下選擇
卡片式遙控器 RM-X115 (XR-F5100)
續下頁 t
ATTOFF
DSPL MODE
SOURCE
VOL
+
–
PRESET
+
PRESET
–
SEEK
–
SEEK
+
6
卡片式遙控器上與本機上對應的按鈕控制相
同的功能。
aDSPL 按鈕
bMENU 按鈕 *
cSOURCE 按鈕
dSEEK (-/+)按鈕
eSOUND 按鈕
fOFF 按鈕
gVOL (+/-)按鈕
hMODE 按鈕
iLIST 按鈕
jDISC/PRESET (+/-)按鈕
kENTER 按鈕 *
lATT 按鈕
*本機不可用
註
如果通過按 (OFF) 使顯示消失,則只有先按裝置上的
(SOURCE) 或插入磁帶來啟動裝置,否則將無法用卡片
式遙控器操作裝置。
提示
關於如何更換電池,參見 “更換鋰電池”第 23 頁。
卡片式遙控器 RM-X114 (選購件)
(XR-F5005)
DISC
–
ATTOFF
DSPL MODE
SOURCE
DISC
+
VOL
+
–
PRESET
+
SEEK
+
SEEK
–
PRESET –
SOUND
ENTER
MENU
LIST
7
使用前注意事項
•倘若您的座車停在直射陽光下,則在操作前
須先使本機充分冷卻。
•若本機沒有電源供給,請先檢查連接狀況。
若一切正常,則請檢查保險絲。
•若雙路揚聲器系統中的揚聲器不發聲,請將
衰減控制器置於中間位置。
•長時間播放一盤磁帶,磁帶可能因內置功率
放大器而發熱。 不過這並非故障。
若您有什麼關於本機的問題或困難,而本說明
書沒有提及,請向您附近的 Sony 經銷商諮詢。
為保持高品質聲音
時刻當心,切勿將果汁或其它飲料濺在本機或
磁帶上。
卡式磁帶的注意事項
卡式磁帶的保護
•請勿觸摸卡式磁帶中磁帶的表面,因為任何
髒物或灰塵會沾污磁頭。
•保持卡式磁帶遠離內含磁性物質的設備,如
揚聲器和放大器,以防止磁帶上所錄製的資
訊被抹或失真。
•請勿將卡式磁帶暴露於直射陽光、低溫或潮
濕的環境中。
•鬆弛的磁帶,可能會纏住走帶機構。 因此,
在裝磁帶前,請用鉛筆或類似的工具穿入磁
帶的轉軸中旋緊鬆弛的磁帶。
•變形的卡式磁帶和鬆動的標籤都可能在磁帶
插入或退出時發生問題。 請除去或更換鬆動
的標籤。
•播放卡式磁帶時,聲音可能會失真。 每使用
過 50 個小時,卡式磁帶播放機的磁頭便須
加以清潔。
除非需要長時間連續放音,否則不建議使用時間
長度超過 90 分鐘的磁帶
這類卡式磁帶所使用的磁帶非常薄,很容易被
拉長變形。
這類磁帶被頻繁地播放及停止,會造成磁帶纏
住卡式磁帶座里的機構。
鬆弛
8
開始使用之前
復原本機
在第一次使用本機前,或更換汽車電池或改變
連接後,必須使本機復原。
卸下前面板,並用帶尖頭的物体,如原子筆
等,按下 RESET 按鈕。
註
按 RESET 按鈕,將消除時鐘設定和某些已儲存的內容。
拆卸前面板
為防止本機被盜,您可拆下本機前面板。
報警
若您未拆除前面板即把點火開關旋轉至 OFF
檔,報警器將發出數秒鐘的 “嘟嘟”聲。
如您連接選購的放大器,而不用內置放大器,
則不會發出警報聲。
1按(OFF) 按鈕 *。
磁帶播放或無線電接收停止 (按鈕照明和
顯示仍保留)。
*如果您的汽車點火開關上沒有 ACC (附件)位置,
則必須通過按住 (OFF) 直至顯示消失將本裝置關
閉,以免耗費汽車電池。
2按(OPEN) 按鈕,然後將前面板向右滑動,
並輕輕將其左端拔出。
註
•若您在本機仍開著時卸下前面板,電源將會自動關閉
以防揚聲器受損。
•切勿摔落或猛按本機的前面板及顯示窗。
•切勿使前面板受熱 / 高溫或受潮。 避免將前面板遺留
在停泊的車廂內或儀表盤 / 後托架上。
提示
當您要攜帶前面板時,請將它放在附帶的前面板盒內攜
帶。
RESET 按鈕
1
2
9
安裝前面板
將前面板的 A孔對準本機上的支軸 B,然後
輕輕推入左側。
按本機上的 (SOURCE) 按鈕 (或裝入磁帶)
來進行操作。
註
不要在前面板內表面放任何東西。
設定時鐘
時鐘採用 12 小時制數字顯示。
例如:將時鐘設定為 10:08
1按住 (DSPL) 2 秒鐘。
小時指示閃爍。
1轉動音量控制撥盤設定小時。
2按選擇按鈕。
分鐘指示閃爍。
3轉動音量控制撥盤設定分鐘。
2按(DSPL) 按鈕。
時鐘開始走時。 時鐘設定完畢之後,顯示
即返回正常播放模式。
x
10
卡式磁帶播放機
收聽磁帶
1按(OPEN) 按鈕並插入卡式磁帶。
播放自動開始。
2關上前面板。
若已裝入卡式磁帶,要開始播放時,反覆按
(SOURCE) 按鈕直至顯示 “FWD”或 “REV”。
註
在下列情況下 AMS 功能可能不起作用:
- 樂曲之間空白短於 4 秒鐘。
- 樂曲之間有噪音。
- 有一大段低音量部分或靜音部分。
用各種功能播放磁帶
您可以用各種功能播放磁帶:
•REP (重放)重放當前樂曲。
•BL SKIP (跳過空白)功能可跳過超過 8 秒
的空白段。
•ATA (調諧器自動啟動)功能可在磁帶快捲
時自動開啟調諧器。
•MTL (金屬)功能可用來播放金屬磁帶或
CrO2 磁帶。
在磁帶播放中,反覆按所要的功能按鈕,
直至 “ON”出現在顯示幕上。
功能按鈕
(3):REP
(5):BL SKIP
(6):ATA
(SENS):MTL
例如:ATA 功能
ATA 功能啟動。
要返回正常播放模式時,則選擇 “OFF”。
要按
改變磁帶播放方
向
(MODE) (o)
停止播放 (OFF)
退出卡式磁帶 (OPEN) 然後 Z
跳過樂曲
-自動
音樂傳感器
(SEEK) (./>)
[ 一次跳過一首樂曲 ]
快進 / 後退
- 手動搜尋
(SEEK) (m/M)
[ 按住直至所要的位置 ]
播放朝上的面。
播放朝下的面。
11
收音機
在每一波段(FM1,FM2,FM3,MW,SW1 和 SW2)
上最多可存儲 6 個電台。
警告
當在駕車過程中要調諧電台時,須使用最佳調
諧記憶功能,以免發生事故。
自動存儲電台
─ 最佳調諧記憶功能 (BTM)
本機在選定的波段上篩選訊號最強的電台,並
按照它們的頻率順序進行存儲。
1反覆按 (SOURCE) 按鈕,選擇收音機。
2反覆按 (MODE) 按鈕選擇波段。
3按住 (BTM) 按鈕 2 秒鐘。
本機將各電台按其頻率順序存儲到數字按
鈕之中。
當設定存儲完畢時,本機發出 “嘟”的一
聲。
註
•若因訊號微弱之故僅能接收到很少電台,則某些數字
按鈕仍將保留其以前的設定。
•當顯示幕上顯示一個數字時,本機會從當前顯示的數
字開始存儲電台。
收聽已存儲的電台
1反覆按 (SOURCE) 按鈕,選擇收音機。
2反覆按 (MODE) 按鈕選擇波段。
3按存有所要電台的數字按鈕((1)至(6))。
如果預設的調諧無效
─ 自動調諧功能 / 本地搜索模式
自動調諧功能:
按(SEEK)(+)或 (SEEK)(-)按鈕搜索
電台。
當本機接收到一個電台時,掃描即停止。
如此反覆直至接收到所要的電台。
本地搜索模式:
若自動調諧經常停止,請反覆按 (SENS) 按
鈕直至顯示 “LOCAL-ON”。
僅具有較強訊號的電台會被調入。
要取消本地搜索模式,則在接收 FM 時請按兩
次(SENS) 按鈕。
註
收聽 MW 或 SW 時,要取消本地搜索模式,請按 (SENS)
按鈕 (顯示 “LOCAL-OFF”)。
提示
如果知道想要收聽的電台的頻率,請按住 (SEEK)(+)
或(SEEK) (-)定位到大致的頻率,然後反覆按
(SEEK) (+)或 (SEEK) (-)精細調整到想要的頻率
(手動調諧)。
續下頁 t
12
若 FM 立體聲的收音狀況不良
─ 單聲道模式
收聽電台時,反覆按 (SENS) 按鈕,直至
“MONO-ON”指示出現在顯示幕上。
聲音狀況得到改善,但變成了單聲道
(“ST”顯示消失)。
要回到正常收聽電台模式,請按 (SENS) 按鈕
(顯示 “MONO-OFF”)。
提示
如果很難收聽到 FM 廣播,請將 DSO 設定至 “OFF”
(第 18 頁)。
僅存儲所要的電台
您可在任何指定的數字按鈕上手動預設想要
的電台。
1反覆按 (SOURCE) 按鈕,選擇收音機。
2反覆按 (MODE) 按鈕選擇波段。
3按(SEEK) (+)或 (SEEK) (-)按鈕,調
諧想要存儲的電台。
4按住所要的數字按鈕((1) 至(6))持續 2
秒鐘,直至顯示 “MEM”。
數字按鈕指示即在顯示幕上出現。
註
若您試圖在已存儲有電台的數字按鈕上存儲另一個電
台,則以前存入的電台將被消除。
存儲電台名稱
─ 電台記憶
您可給每個無線電電台指定一個名稱並將它
存入記憶體中。 當前調入電台的名稱即出現
在顯示幕上。 您可為每個電台指定一個最多
可用 8 個字元的名稱。
存儲電台名稱
1調入您要存儲其名稱的電台。
2按住 (LIST) 2 秒鐘。
3輸入字元。
1按音量控制撥盤選擇所要的字元。
A y B y C ... y 0 y 1 y 2 ...
y + y - y * ... y * y A
*(空格)
2找到所需要的字元後按選擇按鈕。
下一個字元閃爍。
3重複步驟 1和2,輸入整個名稱。
4要回到正常收音機接收模式,請按 (LIST)
按鈕 2 秒鐘。
提示
要更正或消除一個字元,僅需覆蓋寫入新名稱或輸入
“”。

13
消除電台名稱
1反覆按 (SOURCE) 按鈕,選擇收音機。
2反覆按 (MODE) 按鈕選擇波段。
3按住 (LIST) 2 秒鐘。
4按住 (DSPL) 2 秒鐘。
出現儲存的名稱。
5按音量控制撥盤選擇您要刪除的電台名
稱。
6按住選擇按鈕 2 秒鐘。
該名稱即被消除。
若要刪除其它名稱,請重複步驟 5 和步驟
6 的操作。
7按住 (LIST) 按鈕 2 秒鐘。
本機返回至正常收音機接收模式。
註
若您已消除全部電台名稱,則在步驟 6 中顯示 “NO
DATA”。
通過列表調入電台
─ 列表功能
1在無線電接收中,按 (LIST) 按鈕。
頻率出現在顯示幕中。
2反覆按 (LIST) 直至您找到想要的電台。
3按(SEEK)(+)或 (SEEK)(-)調入所要
的電台。
14
其它功能
您也可用旋轉式控制器 (選購件)控制本機
(和選購的 CD/MD 裝置 *)。
*僅適用於 XR-F5100
使用旋轉式控制器
首先,根據您設想的旋轉式控制器安裝方式貼
上合適的標籤。
旋轉式控制器通過按按鈕和/或轉動控制器進
行操作。
通過按按鈕
通過轉動控制器
轉動然後鬆開,即可:
- 查找磁帶上樂曲的開頭位置。
- 自動調入電台。
- 跳過光碟上的樂曲 *1。
轉動、握住,然後鬆開,即可:
- 快速捲動磁帶。
- 手動尋找電台。
- 快進 / 倒轉一首樂曲 *1。
提示
要在磁帶快捲中開始播放,可按 (MODE) 按鈕。
通過推入並轉動控制器
推入並轉動控制器,即可:
- 收聽預設的電台。
- 在 CD (MD)播放過程中 *1更換光碟。
播放包含 MP3 檔案的 CD 過程中 *3
推入並反覆快速轉動控制器,即可:
- 逐個更換光碟。
推入,然後轉動並握住控制器,即可:
- 跳過樂曲集 *3。
*1 僅當連接有相應的選購裝置時
(僅適用於 XR-F5100)。
*2 如果您的汽車點火鑰匙開關上沒有 ACC (輔助)位
置,熄火後必須按住 (OFF) 直至顯示消失。
*3 只有當連接了選購的具有 MP3 檔案控制功能的 CD
裝置,並在播放 MP3 檔案時才有效 (僅適用於
XR-F5100)。
按要
(SOURCE) 改變音源
(收音機 / 磁帶 /CD*1/
MD*1)/ 電源開
(MODE) 改變操作
(收音機波段 / 磁帶播放方
向/CD 裝置 *1/MD 裝置 *1)
(ATT) 減弱音量
(OFF)*2停止播放或停止收音機
接收 / 關電源
(SEL) 調整並選擇
(DSPL) 改變顯示項目
SEL
DSPL
MODE
SEL
DSPL
MODE
OFF
轉動 VOL 控制器調節音量。
(SOURCE)
(SEL)
(ATT)
(DSPL) (OFF)
(MODE)
SEEK/AMS
控制器
PRESET/DISC
控制器
15
改變操作方向
控制器如下圖所示的操作方向為出廠設定。
若需要將旋轉式控制器安裝在汽車方向盤軸
的右側,您可以將控制器的操作方向反置。
在推動 VOL 控制器的同時按住 (SEL) 按鈕
2 秒鐘。
調節聲音特性
您可以調節平衡、音量衰減、低通濾波器和超
低音揚聲器的音量。
1反覆按選擇按鈕,直至出現 “BAL”、
“FAD”、“LPF”或 “SUB”。
每按一次選擇按鈕,項目變化如下:
LOW*1 t MID*1 t HI*1 t
BAL (左-右) t FAD (前-後) t
LPF (低通濾波器)*2*3 t
SUB (超低音揚聲器音量)*2*4
*1 當EQ3被激活(第17頁)。
*2 當選擇了 “SUB”(第 16 頁)。
*3 截止頻率可調節到 78 Hz、
125 Hz 或 OFF。
*4 音量電平可從 -10 至 +10 進行調節。
(低於 -10,顯示 “ATT”。)
2轉動音量控制撥盤調節選擇的項目。
註
選擇了項目之後,須在 3 秒內進行調節。
快速減弱音量
(用旋轉式控制器或卡片式遙控器)
按 (ATT)。
“ATT-ON”出現片刻之後,“ATT”出現在
顯示幕上。
要恢復原先的音量電平時,請再按一次 (ATT)
按鈕。
提示
當汽車電話的連接電纜連接在 ATT 導線上,則在有電話
打入時本機會自動減小音量 (電話機 ATT 功能)。
增加
減小

16
改變聲音和顯示設定
您可設定以下項目:
•REAR/SUB*1 -切換音頻輸出 REAR 或 SUB。
- 選擇 “REAR”以輸出到功率放大器。
- 選擇 “SUB”以輸出到超低音揚聲器。
•A.SCRL (自動滾動)*2(第 19 頁)。
•M.DSPL(運動顯示)-打開或關閉運動顯示。
- 選擇“ON”打開運動顯示(運動模式出現
在顯示幕上)。
- 選擇 “OFF”關閉運動顯示。
•DEMO (示範)*1-打開或關閉示範顯示。
- 選擇“ON”打開示範顯示(示範在本機關
閉後約 10 秒鐘開始顯示)。
- 選擇 “OFF”關閉示範顯示。
•BEEP*3-打開或關閉 “嘟嘟”警告聲。
•DIM -改變顯示幕亮度。
- 選擇 “ON”使顯示幕變暗。
- 選擇 “OFF”關閉調光器。
切換 REAR/SUB*1
按選擇按鈕,然後轉動音量控制撥盤。
3 秒鐘後,顯示幕返回正常播放模式。
選擇所要的項目
同時按選擇按鈕和想要的按鈕。
選擇按鈕 + (3):A.SCRL*2
選擇按鈕 + (4):M.DSPL
選擇按鈕 + (4):DEMO*1
選擇按鈕 + (6):BEEP*3
選擇按鈕 + (DSPL):DIM
完成模式設定之後,顯示幕即返回正常播放模
式。
要取消此項目,請再次同時按選擇按鈕和所要
的按鈕。
*1 當本機關閉時。
*2 當本機連接了 CD/MD 選購裝置並在播放時(僅適用於
XR-F5100)。
*3 僅當使用內置放大器時發出 “嘟嘟”警告聲。
17
設定均衡器 (EQ3)
您可選擇 7 種音樂類型(XPLOD、VOCAL、CLUB、
JAZZ、NEW AGE、ROCK、CUSTOM 和 OFF (均衡
器 OFF))的均衡曲線。
您可以為每個音源存儲不同的均衡設置。
選擇均衡曲線
1按(SOURCE) 按鈕選擇音源(收音機、磁
帶、CD * 或 MD *)。
2反覆按 (EQ3) 按鈕,選擇您所要的均衡曲
線。
每按一次 (EQ3) 按鈕,顯示項目便隨之改
變。
要取消均衡效果,請選擇 “OFF”。
調節均衡曲線
您可以存儲和調節均衡器設定的不同音調範
圍。
1按(SOURCE) 按鈕選擇音源 (收音機、磁
帶、CD * 或 MD *)。
2反覆按 (EQ3) 按鈕,選擇您所要的均衡曲
線。
3調節均衡曲線。
1反覆按選擇按鈕,選擇想要的音調範圍。
每按一次選擇按鈕,音調範圍將發生改
變。
LOW t MID t HI (t BAL t FAD t
LPF t SUB)
2轉動音量控制撥盤調節至所要的音量電
平。
音量電平以 1 dB 增減,從 -10 dB 至
+10 dB 進行調節。
3重複步驟 1和2,調整均衡曲線。
如要復原至出廠設定的均衡曲線,請按
住選擇按鈕 2 秒鐘。
*僅適用於 XR-F5100
註
當 EQ3 設為 “OFF”時,不能調整均衡曲線設置。
18
設定動態攝影棚管理器
(DSO)
若您的揚聲器裝在車門的較低部位,則聲音將
從下面傳出,且可能不清晰。
DSO (動態攝影棚管理器)功能創造出更加環
繞的聲音,好似在儀表板上裝有多個揚聲器
(虛擬揚聲器)。
您可以為每個音源存儲 DSO 設定。
DSO 模式和虛擬揚聲器示意圖
*1 DSO-1
*2 DSO-2
*3 DSO-3
*4 DSO-OFF
1按(SOURCE) 按鈕選擇音源 (收音機、磁
帶、CD * 或 MD *)。
2反覆按(DSO)按鈕,直至出現想要的DSO設
定。
每按一次 (DSO) 按鈕,DSO 設定便隨之改
變。
若要取消 DSO 功能,請選擇 “DSO-OFF”。
3 秒鐘後,顯示幕返回正常播放模式。
*僅適用於 XR-F5100
註
•根據不同的汽車內部類型或音樂類型,DSO功能不一定
能得到滿意的效果。
•如果很難收聽到 FM 廣播,請將 DSO 設定為 “OFF”。
CD/MD 裝置 (選購件)
(XR-F5100)
本機能控制外接的 CD/MD 裝置 (選購件)。
若連接一台選購的帶 CD TEXT 功能和用戶檔
案功能的 CD 裝置,當播放 CD TEXT 光碟時,
該 CD TEXT 資訊將出現在顯示幕上。
若連接可播放 MP3 的 CD 裝置 (如 MP3 CD
換碟機),就可以以較佳音質播放 MP3 檔案,
壓縮音頻檔案。
播放 CD 或 MD
1反覆按 (SOURCE) 按鈕,選擇“CD”或“MD
(MS*1)”。
2反覆按(MODE)按鈕直至顯示所要的裝置。
播放開始。
當光碟上的最後一個檔案結束時
檔案號碼指示返回 “1”,且播放從光碟的第
一個檔案重新開始。
*1 MS:MG Memory Stick System-up Player MGS-X1
*2 只有當連接了選購的具有 MP3 檔案控制功能的 CD
裝置,並在播放 MP3 檔案時才有效。
*3
*2
*1
*4
*4
*3
*2
*1
要按
停止播放 (OFF)
跳過樂曲
-自動
音樂傳感器
(SEEK) (./>)
[ 一次跳過一首樂曲 ]
快進 / 後退
- 手動搜尋
(SEEK) (m /M)
[ 按住直至所要的位置 ]
跳過光碟
- 唱碟選擇
(DISC/PRESET) (+/-)
[ 一次跳過一張光碟 ]
跳過樂曲集*2
- 樂曲集選擇
(DISC/PRESET) (+/-)
[ 按住直至所要的位置 ]
19
連接 MGS-X1 和 MD 裝置時的注意事項
本機將 MGS-X1 識別為一台 MD 裝置。
•當您想播放 MGS-X1 時,請按 (SOURCE) 按鈕選擇
“MS”或 “MD”。當 “MS”出現在音源顯示上,MGS-
X1 即開始播放。 如果 “MD”出現在音源顯示上,請
按(MODE) 按鈕選擇 “MS”開始播放。
•當您想播放一台 MD 裝置時,請按 (SOURCE) 按鈕選擇
“MD”或 “MS”。如果所要的 MD 裝置出現在音源顯示
上,即開始播放。 如果 “MS”或另一台 MD 裝置出現
在音源顯示上,請按 (MODE) 按鈕選擇所要的 MD 裝
置,即開始播放。
連接可播放 MP3 的 CD 裝置時的注意事項
•如果插入了沒有 MP3 檔案 (樂曲)的光碟,“NO
MUSIC”將會出現在顯示幕上,下一盤光碟將開始播
放。
•播放樂曲之前,本機將讀取光碟上的所有樂曲和樂曲
集資訊。視樂曲結構的不同,開始播放之前可能要等
待一分鐘以上。 此時,顯示 “READ”。 讀取結束時,
播放將自動開始。
註
當連接有選購裝置時,相同音源的播放也會在選購的
CD/MD 裝置上得以繼續。
顯示項目
當更改光碟 / 樂曲集 / 樂曲時,新光碟 / 樂曲
集 / 樂曲中任何預先錄製的標題 *1將自動顯
示。(若 A.SCRL (自動 滾動)功能設定 為
“ON”,則超過 8 個字元的名稱將被滾動
(第 16 頁)。)
*1 當按 (DSPL) 按鈕時,“NO NAME”表示無光碟記憶功
能 (第 21 頁)或預先錄製的名稱可供顯示。
*2 僅用於帶演員名的 CD TEXT 光碟。
*3 僅適用於 MP3 檔案。
僅顯示 ID3 標記內的樂曲名稱 / 演員名 / 樂曲集名
稱。
按(DSPL) 按鈕時,“NO ID3”表示沒有 ID3 標記可
供顯示。
註
•有些字元無法顯示。 無法顯示的字元和記號顯示為
“*”。
•對於一些帶很多字元的 CD TEXT 光碟或 ID3 標記,資訊
可能無法滾動顯示。
•本機不能顯示 CD TEXT 光碟上每個樂曲的演員名。
提示
•當 A.SCRL(自動滾動)功能設為“OFF”,並且 光碟 /
樂曲集 / 樂曲改變時,唱碟 / 樂曲集 / 樂曲名稱或 ID3
標記不會滾動顯示。
•當播放 MP3 檔案,並改變樂曲集時,將顯示新的樂曲集
號碼。
要按
切換顯示項目 (DSPL)
可顯示項目
•唱碟 號碼 / 樂曲號碼 / 已播放時間
•唱碟名稱 *1/ 演員名 *2
•樂曲集 (資料夾)名稱 *3
•樂曲 (檔案)名稱 *1*3
•ID3 標記 *3
•時鐘
音源

20
反覆播放樂曲
─ 重複播放
您可以選擇:
•REP-TRACK ─ 重複當前樂曲。
•REP-ALBM*1 ─ 重複當前樂曲集中的樂曲。
•REP-DISC*2 ─ 重複播放當前光碟中的樂曲。
*1 只有當連接了選購的具有 MP3 檔案控制功能的 CD
裝置,並在播放 MP3 檔案時才有效。
*2 僅適用於當連接一台或多台選購的 CD/MD 裝置時。
在播放過程中,反覆按 (3) (REP)按鈕,
直至所要的設定出現在顯示幕上。
重複播放開始。
要回到正常播放模式,請選擇 “REP-OFF”。
以隨機順序播放樂曲
─ 任選播放
您可以選擇:
•SHUF-ALBM*1 ─ 以隨機順序播放當前樂曲
集內的樂曲。
•SHUF-DISC ─ 以隨機順序播放當前光碟中
的樂曲。
•SHUF-CHGR*2 ─ 以隨機順序播放當前選購
CD (MD)換碟機中的樂曲。
•SHUF-ALL*3 ─ 以隨機順序播放當前所有已
連接的 CD (MD)裝置中的全部樂曲。
*1 只有當連接了選購的具有 MP3 檔案控制功能的 CD
裝置,並在播放 MP3 檔案時才有效。
*2 僅適用於當連接一台或多台選購的 CD (MD)換碟機
時。
*3 僅適用於當連接兩台或更多選購的 CD(MD)裝置時。
在播放過程中,反覆按 (4)(SHUF)按鈕,
直至所要的設定出現在顯示幕上。
任選播放開始。
要回到正常播放模式,請選擇 “SHUF-OFF”。
註
“SHUF-ALL”不會打亂 CD 裝置和 MD 裝置互相之間的樂
曲順序。
21
標註 CD
─ 唱碟記憶功能(當連接帶用戶檔案功能
的 CD 裝置時)
您能用自訂名稱標註每張光碟 (唱碟記憶功
能)。 您能給每盤光碟輸入最多 8 個字元。若
標註了CD,則可通過名稱找出光碟(第22頁)。
1開始播放帶用戶檔案功能的 CD 裝置中要標
註的光碟。
2按住 (LIST) 2 秒鐘。
在標註過程中,本機將反覆播放該光碟。
3輸入字元。
1轉動音量控制撥盤選擇所要的字元。
A y B y C ... y 0 y 1 y 2 ...
y + y - y * ... y * y A
*(空格)
2找到所需要的字元後按選擇按鈕。
下一個字元閃爍。
3重複步驟 1和2,輸入整個名稱。
4要回到正常播放模式,請按住 (LIST) 按鈕 2
秒鐘。
提示
•要更正或消除一個字元,僅需覆蓋寫入新名稱或輸入
“”。
•如果連接了帶用戶檔案功能的 CD 裝置,則可以在沒有
此功能的裝置中對 CD 進行標註。 唱碟記憶將儲存在
具有用戶檔案功能的 CD 裝置記憶體中。
註
在名稱編輯未完成時,重複 - 樂曲 / 隨機播放暫時中斷。
觀看唱碟記憶
唱碟記憶內容作為顯示項之一,其顯示總是優
先於光碟中原有的 CD TEXT 資訊。
提示
可以顯示其它項目 (第 19 頁)。
刪除唱碟記憶
1反覆按 (SOURCE) 按鈕,選擇 “CD”。
2反覆按 (MODE) 按鈕選擇存有唱碟記憶的
CD 裝置。
3按住 (LIST) 2 秒鐘。
4按住 (DSPL) 2 秒鐘。
出現儲存的名稱。
5轉動音量控制撥盤選擇您要刪除的唱片名
稱。
6按住選擇按鈕 2 秒鐘。
該名稱即被消除。
若要刪除其它名稱,請重複步驟 5 和步驟
6 的操作。
7按住 (LIST) 按鈕 2 秒鐘。
本機即回到正常播放模式。
註
•當CD TEXT光碟的唱碟記憶被刪除後,則將顯示原有的
CD TEXT 資訊。
•如果未找到您想要刪除的唱碟記憶,請嘗試在步驟 2
中選擇另一個 CD 裝置。
要按
觀看 在播放 CD/CD TEXT 光碟
時,按 (DSPL) 按鈕
22
通過名稱找出光碟
─ 列表功能 (當連接帶 CD TEXT/ 用戶檔
案功能的 CD 裝置,或 MD 裝置時)
您能對已被賦予自訂名稱 *1的光碟或對 CD
TEXT 光碟 *2使用此功能。
*1 通過其自訂名稱尋找光碟:當在對 CD(第 21 頁)或
MD 命名時。
*2 通過 CD TEXT 資訊尋找光碟:當您在具有 CD TEXT 功
能的 CD 裝置上播放 CD TEXT 光碟時。
1在播放過程中,按 (LIST) 按鈕。
為當前播放光碟命名的名稱出現在顯示幕
上。
2反覆按 (LIST) 直至您找到想要的光碟。
3按(SEEK)(+)或 (SEEK)(-)播放光碟。
註
•當唱片名稱已顯示了 5 秒鐘,顯示將回到正常播放模
式。
•如果光碟匣中沒有光碟,則顯示幕中將顯示 “NO
DISC”。
•如果光碟未指定一個自訂檔案,則顯示幕中將顯示
“NO NAME”。
•資訊僅以大寫字母出現。 也有一些字母無法顯示。
附加資訊
保養
更換保險絲
更換保險絲時,必須確保所使用的保險絲與原
保險絲的額定安培數相同。 若保險絲燒斷,請
檢查電源連接並再更換保險絲。 若保險絲更
換後又被燒斷,則可能是內部故障。 此時,請
向最近的 Sony 經銷商諮詢。
警告
切勿使用額定安培數超過本機附帶保險絲安
培數的保險絲,否則會損壞本機。
清潔連接器
若本機與前面板之間的連接器不乾淨,則本機
可能不能正常工作。 為防止這種情況發生,請
卸下前面板(第 8 頁),然後用蘸有酒精的棉
籤清潔連接器。 切勿施加太大的力量。 否則,
可能損壞連接器。
保險絲
(10 A)
主機
前面板的背部
23
註
•為了安全起見,在清潔連接器之前,應關閉發動機並
從點火開關上取出鑰匙。
•千万不要用手指或任何金屬工具直接觸摸連接器。
更換鋰電池
一般情況下,電池能維持大約一年的時間。
(使用壽命可能會變短,這取決於電池的使用
狀況。) 當電池的電力變弱時,卡片式遙控
器的操作距離將變短。 此時,請更換一個新
的 CR2025 鋰電池。 使用任何其它電池可能存
在火災或爆炸的危險。
鋰電池的注意事項
•鋰電池應放在兒童不易觸及的地方。 萬一誤
吞了電池,請立即找醫生。
•用乾布擦拭電池,以保持接觸良好。
•安裝電池時,必須保証極性正確。
•別用金屬鑷子去夾電池,否則會引起短路。
拆卸本機
1拆卸保護環。
1拆卸前面板 (第 8 頁)。
2將開鎖鑰匙與保護環嚙合。
3拉出開鎖鑰匙以拆下保護環。
2取出裝置。
1將兩把開鎖鑰匙一起插入,直至聽到喀
嗒聲。
2拉出開鎖鑰匙,使裝置脫離原位。
3將本機從安裝位置滑出。
x
+極面朝上
正確定位開鎖鑰匙。
掛鉤朝裡面。
24
規格
卡式磁帶播放機部分
磁帶音軌 4 - 音軌 2 - 聲道立體聲
抖晃率 0.08 %(WRMS)
頻率響應 30 - 18,000 Hz
訊噪比
調諧器部分
FM
調諧範圍 FM 調諧間隔:
可於 50 kHz/200 kHz 之間
轉換
87.5 - 108.0 MHz
(以 50 kHz 為一級)
87.5 - 107.9 MHz
(以 200 kHz 為一級)
天線終端 外接天線連接器
中頻 10.7 MHz/450 kHz
可用靈敏度 9 dBf
選擇度 400 kHz 時為 75 dB
訊噪比 67 dB (立體聲),
69 dB (單聲道)
1 kHz 時諧波失真 0.5 % (立體聲),
0.3 % (單聲道)
分離度 1 kHz 時 35 dB
頻率響應 30 - 15,000 Hz
MW
調諧範圍 MW 調諧間隔:
可於 9 kHz/10 kHz 之間轉
換
531 - 1,602 kHz
(以 9 kHz 為一級)
530 - 1,710 kHz
(以 10 kHz 為一級)
靈敏度 30 µV
SW
調諧範圍 SW 調諧間隔:
SW1:2,940 - 7,735 kHz
SW2:9,500 - 18,135 kHz
(除 10,140 - 11,575 kHz
之外)
天線端子 外接天線連接器
中頻 10.7 MHz/450 kHz
靈敏度 30 µV
功率放大器部分
輸出 揚聲器輸出
(可靠密封連接器)
揚聲器阻抗 4 - 8 Ω
最大功率輸出 52 W × 4 (4 Ω時)
一般情況
輸出 音頻輸出端子(可在後置 /
超低音間切換)
電動天線繼電控制端子
功率放大器控制端子
輸入 電話 ATT 控制端子
遙控器輸入端子
BUS 控制輸入端子
(XR-F5100)
BUS 音頻輸入端子
(XR-F5100)
天線輸入端子
音調控制 低音:
60 Hz 時 ±10 dB(XPLOD)
中音:
1 kHz 時 ±10 dB(XPLOD)
高音:
10 kHz 時 ±10 dB(XPLOD)
電源要求 12 V DC 汽車電池
(負接地)
尺寸 約 178 × 50 × 177 mm
(寬/高/深)
安裝尺寸 約 182 × 53 × 161 mm
(寬/高/深)
重量 約 1.2 kg
提供附件 卡片式遙控器 RM-X115
(XR-F5100)
安裝和連接用配件
(一套)
前面板盒 (1)
選購件 卡片式遙控器 RM-X114
(XR-F5005)
旋轉式控制器
RM-X4S
BUS 電纜 (附帶一根 RCA
針型導線)
RC-61 (1 m),
RC-62 (2 m)
(XR-F5100)
選購裝置 CD 換碟機 (10 碟式)
(XR-F5100) CDX-757MX,CDX-656X
CD換碟機(6碟式)
CDX-T70MX
MD換碟機(6碟式)
MDX-66XLP
DVD 換碟機
DVX-100S
音源選擇器
XA-C30
AUX-IN 選擇器
XA-300
註
本裝置不能連接至數位前置放大器或與 Sony BUS 系統
相容的均衡器。
設計和規格若有變更,恕不另行通知。
卡式磁帶類型
TYPE II,IV 61 dB
TYPE I 58 dB
25
故障排除
下列檢查表有助於解決您使用本機時可能遇
到的問題。
在使用下面的檢查表之前,請檢查連接和操作
步驟是否正確。
一般情況
無聲。
•轉動音量控制撥盤以調節音量。
•取消 ATT 功能。
•將雙路揚聲器系統的衰減控制設定在中心
位置。
XR-F5100
•您試圖用與 MP3不相容的選購 CD 裝置播放
MP3 檔案。
t請用 Sony MP3 相容 CD 裝置進行播放,
如 CDX-757MX。
記憶內容已被消除。
•已按下 RESET 按鈕。
t再將設定存入記憶中。
•電源線或電池已被斷開。
•電源連接導線未被正確連接。
無 “嘟嘟”聲。
•“嘟嘟”聲功能被取消 (第 16 頁)。
•連接了選購的功率放大器,而未使用內置
放大器。
畫面從顯示幕上消失 / 未出現在顯示幕上。
•如果按住 (OFF) 不放則顯示消失。
t再次按住 (OFF) 不放,直至顯示出現。
•拆卸前面板,然後清潔連接器。 詳細情
況,請參見 “清潔連接器”第 22 頁。
儲存之電台及正確走時被消除。
保險絲已熔斷。
點火鑰匙處於 ON、ACC 或 OFF 位置時,裝置會
產生噪聲。
導線與汽車附件電源連接器未正確匹配。
裝置無供電。
•檢查電源的連接。 若一切正常,則請檢
查保險絲。
•汽車不具有 ACC 位置。
t按(SOURCE) 按鈕 (或裝入一張光
碟),使裝置開啟。
本機始終處於通電狀態。
汽車不具有 ACC 位置。
電動伸縮天線未伸出。
電動伸縮天線未裝繼電器盒。
磁帶播放
聲音失真。
磁頭受污染了。
t請用市售的乾式磁頭清潔帶清洗磁頭。
AMS 運行不正確。
•樂曲間隔中有噪音。
•樂曲間隔太短 ( 少於 4 秒鐘 )。
•時間長的暫停,頻率很低或者聲音電平很
低的訊號被作為空白處理。
無線電接收
不能預設調諧。
•將正確的頻率存儲在記憶體內。
•廣播訊號太弱。
無法接收電台。
有噪音干擾。
•請連接電動天線控制導線 (藍色)或附
件電源導線 (紅色)至汽車天線升壓器
的電源導線 (僅當您的汽車在後 / 側玻
璃內有內置 FM/MW/SW 天線時)。
•檢查汽車天線的連接。
•自動天線不能上升。
t檢查電動天線控制導線的連接。
•檢查頻率。
•DSO 模式開啟時,聲音有時會受到噪音的
影響。
t將 DSO 模式設定為“OFF”(第 18 頁)。
不能自動調諧。
•本地搜尋模式設定在 “ON”。
t將本地搜尋模式設定在 “OFF”
(第 11 頁)。
•廣播訊號太弱。
t進行手動調諧。
“ST”指示閃爍。
•精確地調諧電台頻率。
•廣播訊號太弱。
t將單聲道接收模式設定為 “ON”
(第 12 頁)。
收聽到的立體聲廣播節目是單聲道。
本機處在單聲道接收模式。
t取消單聲道接收模式 (第 12 頁)。
XR-F5100
CD/MD 播放
跳音。
光碟髒了或有缺陷。
26
出錯顯示 / 資訊
*1 僅適用於 XR-F5100
*2 在 CD 或 MD 播放中出現錯誤時,CD或MD的唱碟號碼不
顯示在顯示幕上。
*3 造成錯誤的唱碟號碼出現在顯示幕上。
如果這些解答仍無法助您改善情況,請向距您
最近的 Sony 經銷商諮詢。
出錯顯示
(對於本機和選購的 CD/MD 換碟機 *1)
下述指示將閃爍 5 秒鐘左右,隨之將聽到警
告聲。
BLANK*2
MD*3上沒有錄製樂曲。
t播放錄製有樂曲的 MD。
ERROR*2
•CD 髒了或 CD 裝反了 *3。
t將 CD 擦拭乾淨或正確地裝入 CD。
•由於某些原因,CD/MD 不能播放。
t裝入另一張 CD/MD。
FAILURE
揚聲器 / 放大器連接不正確。
t請參閱本機型的安裝指導手冊以檢查線
路連接。
NO DISC
CD/MD 裝置中未裝入光碟。
t將光碟裝入 CD/MD 裝置。
NO MAG
光碟匣未裝入 CD 裝置。
t將光碟匣裝入 CD 裝置。
NO MUSIC
可播放 MP3 的 CD 裝置中裝入了非音樂檔案
的CD。
t將音樂 CD 裝入可播放 MP3 的 CD 裝置中。
NOTREADY
MD 裝置的蓋子被打開或 MD 未被正確地裝
入。
t關上蓋子或正確地裝入 MD。
OFFSET
可能發生內部故障。
t檢查電源的連接。 如果此出錯指示仍然
顯示在顯示幕中,請聯繫就近的 Sony
經銷商。
RESET
因某些原因 CD/MD 裝置不能工作。
t按下本機的 RESET 按鈕。
資訊
L.SEEK +/-
在自動調諧時,本地搜索模式為開啟狀態
(第 11 頁)。
“”或“”
您已到達光碟的開頭或結尾,無法再繼續
向前。

03GB+03BCO-E.fm masterpage:Right
XR-F5100/F5005
3-262-940-21 (1)
Sony Corporation Printed in Thailand
• Lead-free solder is used for soldering certain parts.
• Halogenated flame retardants are not used in the certain printed wiring boards.
• Halogenated flame retardants are not used in cabinets.
• Paper is used for the packaging cushions.
