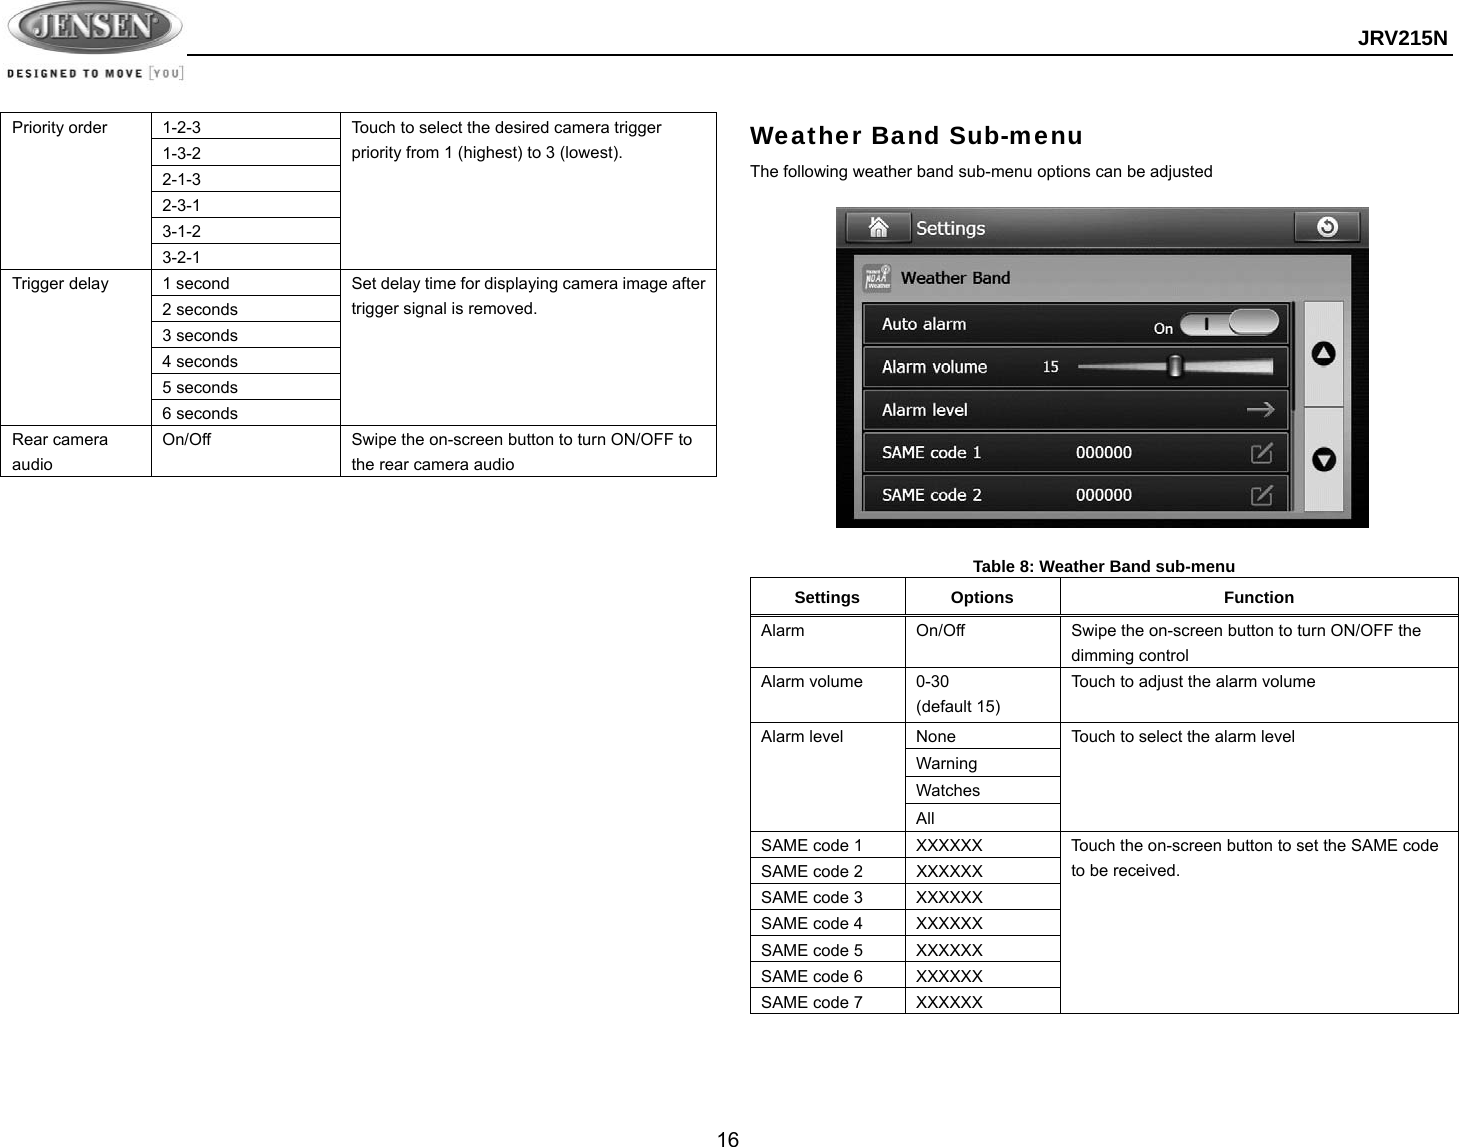
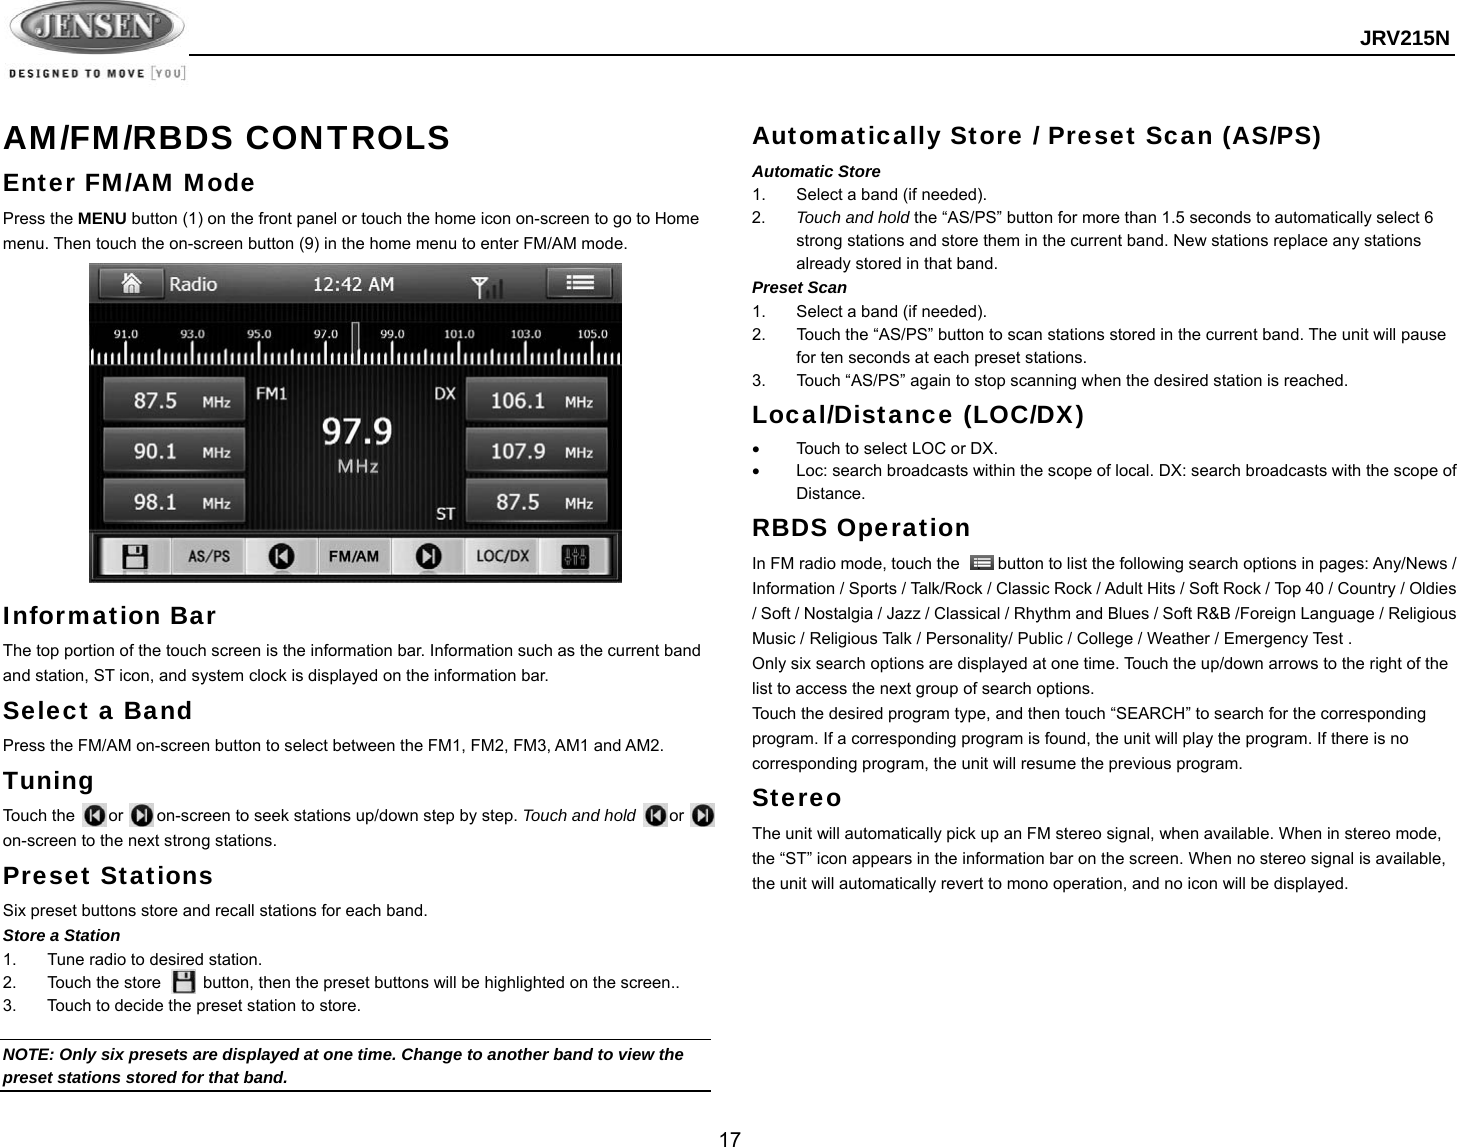
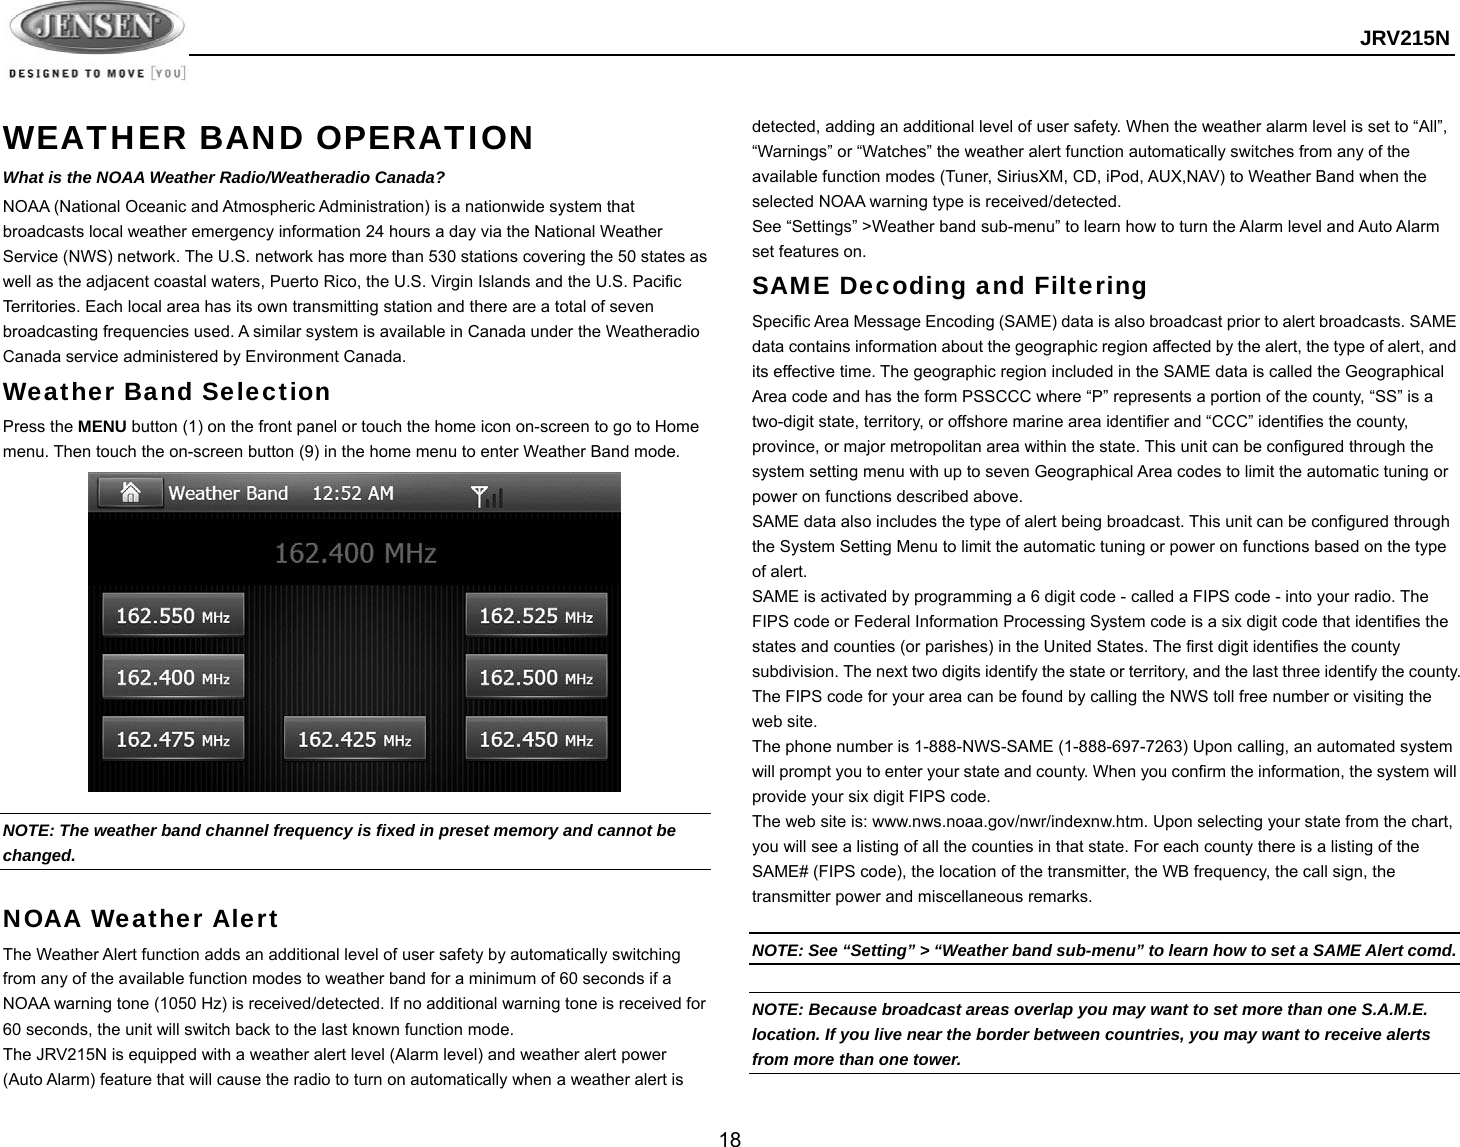
Sounding Audio JRV215N Car Stereo/Video with AM/FM/WXA/DVD/SXM/BT/USB/SD/GPS User Manual JRV215N UserManual 10th draft

Sounding Audio Industrial Ltd. Car Stereo/Video with AM/FM/WXA/DVD/SXM/BT/USB/SD/GPS JRV215N UserManual 10th draft

Users Manual

 JRV215N TOUCH SCREEN MOBILE NAVIGATION, MULTIMEDIA, AND OBSERVATION SYSTEM Installation and Operation Manual
 JRV215N  2  CONTENTS Legal and Safety Notices ............................................................................................................. 3Warnings and Precautions ........................................................................................................... 4 Safety Information ........................................................................................................................ 5 Installation .................................................................................................................................... 7Wiring ........................................................................................................................................... 9Basic Operation ......................................................................................................................... 11System Menu ............................................................................................................................. 13AM/FM/RBDS Controls .............................................................................................................. 17Weather Band Operation ........................................................................................................... 18DVD/VCD/CD/MP3 Operation ................................................................................................... 20SiriusXM® Radio Operation ........................................................................................................ 22iPhone/iPod/USB Operation ...................................................................................................... 27Bluetooth Operation ................................................................................................................... 29Zone 2 Operation ....................................................................................................................... 33Camera Operation ..................................................................................................................... 35Remote Control Operation ......................................................................................................... 36Care and Maintenance ............................................................................................................... 37Troubleshooting ......................................................................................................................... 38Specifications ............................................................................................................................. 39
 JRV215N  3  LEGAL AND SAFETY NOTICES Legal Notices Copyrights and Trademarks iPhone, iPod, iPod classic, iPod Nano, iPod shuffle, and iPod touch are trademarks of Apple Inc., registered in the U.S. and other countries. “Made for iPod” and “Made for iPhone” mean that an electronic accessory has been designed to connect specifically to iPod or iPhone respectively, and has been certified by the developer to meet Apple performance standards. Apple is not responsible for the operation of this device or its compliance with safety and regulatory standards. Please note that the use of this accessory with iPod or iPhone may affect wireless performance.  Sirius, XM and all related marks and logos are trademarks of Sirius XM Radio Inc. All rights reserved.                      Safety Information When Driving Keep the volume level low enough to be aware of the road and traffic conditions. Protect from Water Do not expose the product to water, as this can cause electrical shorts, fire or other damage Protect from High Temperatures Exposure to direct sunlight for an extended period of time can produce very high temperatures inside your vehicle. Give the interior a chance to cool down before starting playback. Do not mount radio with close proximity of engine compartment. Use the Proper Power Supply This product is designed to operate with a 12 volt DC negative ground battery system.  Protect the Disc Mechanism Avoid inserting any foreign objects into the disc slot. Misuse may cause malfunction or permanent damage due to the precise mechanism of this unit. CAUTION: THIS MOBILE DVD/CD PLAYER IS A CLASS I LASER PRODUCT. THIS UNIT USES A VISIBLE/INVISIBLE LASER BEAM WHICH COULD CAUSE HAZARDOUS RADIATION IF EXPOSED DIRECTLY. BE SURE TO OPERATE THE MOBILE CD PLAYER AS INSTRUCTED. USE OF CONTROLS OR ADJUSTMENTS OR PERFORMANCE OR PROCEDURES OTHER THAN THOSE SPECIFIED HEREIN MAY RESULT IN HAZARDOUS RADIATION EXPOSURE. DO NOT OPEN COVERS AND DO NOT REPAIR BY YOURSELF. PLEASE REFER SERVICING TO A QUALIFIED TECHNICIAN. WARNING:   TO REDUCE THE RISK OF FIRE OR ELECTRIC SHOCK, DO NOT EXPOSE THIS EQUIPMENT TO WATER.   TO REDUCE THE RISK OF ELECTRIC SHOCK AND INTERFERENCE, USE ONLY THE RECOMMENDED ACCESSORIES.   Camera-Monitor Warnings! 1.  Camera/monitor system aids in the use of, but does not replace vehicle side/rear-view mirrors. 2.  Objects in camera/monitor view are closer than they appear. When backing up, proceed cautiously and be prepared to stop
 JRV215N  4  WARNINGS AND PRECAUTIONS WARNING! Please read and follow the following safety precautions. Failure to follow the instructions below may increase your risk of collision and personal injury.  The Attention – Please Drive Safely! Screen is displayed each time the iGo primo software is turned ON as a reminder to make use of the systems navigational aids in a safe manner.  Before using the software, read this entire manual. Make sure that you are familiar with the system’s features and know how to operate the system. Proper use of the iGo primo software includes the following guidelines:  The iGo primo software is not a substitute for your personal judgment. The route suggestions should not supersede any local traffic regulation or your personal judgment and/or knowledge of safe diving practices. Prior to completing any maneuvers suggested by your iGo primo software (for example, a U-turn or a left turn), verify that you can legally and safely complete the maneuver. Do not follow route suggestions if they direct you to perform an unsafe or illegal maneuver, would place you in an unsafe situation, or would route you into an area that you would consider unsafe.  Glance at the screen only when necessary and safe to do so. Let the computer voice guide you. If prolonged viewing is necessary, pull of the road to a safe location.  Do not use the iGo primo software to locate emergency services (such as police, fire stations, hospitals, and clinics). The database may not include all emergency service providers. Use your own best judgment and ask for directions in these situations. If the vehicle is in motion, only a passenger should program the iGo primo software. The driver should not program the system unless the vehicle is parked in a safe location.  The iGo primo software’s map database provides information on suggested routes without regard to factors that may affect your driving experience or the time required to arrive at your destination. For example, the system does not reflect road detours, closures, or construction, some road characteristics (e.g., road surface, slope or grade, weight or height restrictions, etc.), temporary traffic congestion, weather conditions, and similar factors.  iGo primo software provides turn-by-turn visual and voice assistance to direct you to your selected destination. The software quickly calculates step-by-step directions to any destination available on the included navigation map.    The iGo primo software uses Global Positioning System (GPS) satellites, and a digital roadway map database to calculate and display travel directions. The system’s GPS antenna receives signals from a constellation of 24 satellites orbiting the earth and uses the strongest signals to determine your position to within meters.  Vehicle Position The iGo promo software’s computer considers vehicle speed and heading changes, together with longitude and latitude information, to accurately determine vehicle heading and position on a digital map.  Signals from GPS satellites are used to determine the vehicle location. Three (good) or four (best) satellites must be received to accurately determine location. The GPS reception status is indicated by the GPS symbol on the map.  Map and Information Database The map database used by your iGo promo software was created using high-resolution aerial and land based data collection.    Car navigation maps are frequently updated. While the database was judged to be as accurate as possible at the time of its release, a map database can never be 100% accurate. Road information that is maintained in the map databases, such as turn restrictions or road names may change over time.
 JRV215N  5  SAFETY INFORMATION  User Agreement When the unit is first turned on, you will see the following message, warning you to operate your navigation system appropriately:  You must agree to the above notice before using the navigation software.   Tap the Accept button to proceed to the Navigation Menu.       Driver Safety Rules The following safety rules must be followed to prevent accidents that can result in injury or death to yourself or others:   The driver should operate the device only when the vehicle is stopped. Only a vehicle passenger should operate the device while the vehicle is moving. When diving, the need to view the display is minimal. Voice prompts will guide you to your destinations   It is your responsibility to comply with all traffic laws.   The navigation software is designed to assist you in the process of reaching your destination. It is not a substitute for attentiveness and good judgment.   It is your responsibility to disregard any unsafe, hazardous, or illegal route suggestions.   The device does not include, analyze, process, consider, or reflect any of the following: a.  Legal restrictions (such as vehicular type, weight, height, width, load, and speed restrictions. b.  Road slope or grade, bridge height, width, weight, or other limits; c. Population density; d.  Neighborhood quality or safety; e.  Availability or proximity of law enforcement, emergency rescue, medical, or other assistance; f.  Construction work zones or hazards; g.  Road or lane closures; h.  Road, traffic, or traffic facilities’ safety or condition; i. Weather conditions; j.  Pavement characteristics or conditions; k. Special events; l. Traffic congestion.   While ever attempt is made to ensure that the database is accurate, roadways, points of interest, and business and service locations may change over time.   Do not use the unit to navigate to a police station, hospital, etc. in an emergency. Call 911 for assistance.   Laws in some states prohibit wearing stereo headphones or may prohibit use or placement of a navigation device while operation a motor vehicle. Please contact your state’s Department of Motor Vehicles for more information.
 JRV215N  6  DISC NOTES Depending on the recording status, conditions of the disc, and the equipment used for recording, some CD-Rs/CD-RWs may not play on this unit. For more reliable playback, please adhere to the following recommendations:   Use CD-RWs with speed 1x to 4x and write with speed 1x to 2x.   Use CD-Rs with speed 1x to 8x and write with speed 1x to 2x.   Do not play a CD-RW which has been written more than 5 times. Compatible Disc Types Table 1: General Disc Information Symbol  12cm Disc Properties  Max Play time    Single side single layer (DVD-5) Single side double layer (DVD-9) Double side single layer (DVD-10) Double side double layer (DVD-18) (MPEG 2 Method) 133 minutes 242 minutes 266 minutes 484 minutes   Single side single layer (VCD)  MPEG 1 Method 74 minutes   Single side single layer  74 minutes  NOTE: CD-R and CD-RW discs will not play unless the recording session is closed and the CD is finalized.  Disc Maintenance   A dirty or defective disc may cause sound dropouts while playing. Before playing, wipe the disc using a clean cloth, working from the center hole towards the outside edge. Never use benzene, thinners, cleaning fluids, anti-static liquids or any other solvent.       Insert label side up,  Do not bend.  Never touch the underside of the discWipe clean from this center to the edge.    Be sure to use only round CDs for this unit and do not use any special shape CDs. Use of special shape CDs may cause the unit to malfunction.   Do not stick paper or tape on the disc. Do not use CDs with labels or stickers attached or that have sticky residue from removed stickers.   Do not expose discs to direct sunlight or heat sources such as hot air-ducts, or leave them in a vehicle parked in direct sunlight where there can be a considerable rise in temperature inside the vehicle.  NOTE: A disc may become scratched (although not enough to make it unusable) depending on how you handle it and other conditions in the usage environment. These scratches are not an indication of a problem with the player.
 JRV215N  7  INSTALLATION Before you Begin 1.  Disconnect Battery Before you begin, always disconnect the battery negative terminal. 2.  Remove Transport Screws and discard. Important Notes   Before final installation, test the wiring connections to make sure the unit is connected properly and the system works.   Use only the parts included with the unit to ensure proper installation. The use of unauthorized parts can cause malfunctions.     Consult with your nearest dealer if installation requires the drilling of holes or other modifications to your vehicle.   Install the unit where it does not interfere with driving and cannot injure passengers if there is a sudden or emergency stop.   If the installation angle exceeds 30º from horizontal, the unit might not give optimum performance.   Avoid installing the unit where it will be subject to high temperatures from direct sunlight, hot air, or from a heater, or where it would be subject to excessive dust, dirt or vibration. 2-DIN Front Mount This unit can be installed in a dashboard with an opening of the following dimensions:  1.  Slide the mounting sleeve off of the chassis if it has not already been removed. If it is locked into position, use the removal keys (supplied) to disengage it. Insert the keys through the holes in the front panel as far as they will go, and then slide the sleeve off the back of the unit.   2.  Check the dashboard opening size by sliding the mounting sleeve into it. If the opening is not large enough, carefully cut or file as necessary until the sleeve easily slides into the opening. Do not force the sleeve into the opening or cause it to bend or bow. Check that there will be sufficient space behind the dashboard for the radio chassis. 3.  Locate the series of bend tabs along the top, bottom and sides of the mounting sleeve. With the sleeve fully inserted into the dashboard opening, bend as many of the tabs outward as necessary to firmly secure the sleeve to the dashboard. 4.  Place the radio in front of the dashboard opening so the wiring can be brought through the mounting sleeve. 5.  Follow the wiring diagram carefully and make certain all connections are secure and insulated with crimp connectors or electrical tape to ensure proper operation. 6.  After completing the wiring connections, reconnect battery and turn the unit on to confirm operation (vehicle ignition switch must be on). If the unit does not operate, recheck all wiring until the problem is corrected. Once proper operation is achieved, turn the ignition switch off and proceed with final mounting of the chassis. 7.  Carefully slide the radio into the mounting sleeve making sure it is right-side-up until it is fully seated and the spring clips lock it into place. 8.  Attach one end of the perforated support strap (supplied) to the screw stud on the rear of the chassis using the hex nut provided. Fasten the other end of the perforated strap to a secure part of the dashboard either above or below the radio using the screw and plain washer provided. Bend the strap, as necessary, to position it. Some vehicle installations provide cavity for rear support. In these applications, place the rubber bushing over the screw stud and insert the radio.
 JRV215N  8  CAUTION: The perforated rear support strap or rear rubber mounting bushing must be used in the installation of the radio. Installation without either may result in damage to the radio or the mounting surface and void the manufacturer’s warranty.                      9.  Test radio operation by referring to the operating instructions for the unit. Removing the unit To remove the radio after installation: 1.  Make sure the ignition is turned off, and then disconnect the cable from the vehicle’s battery negative (-) terminal. 2.  Insert the removal keys straight into the holes on the front of the unit, as far as they will go.  3.  Pull the radio straight out. Hardware Kit Contents               Reconnect Battery When wiring is completed, reconnect the battery negative terminal.   Thread Bolt RubberSerrated Hex Flange Nut, M5 Mounting Bracket Machine Screw M5 Key, EGI, T=1.00 (x2)
 JRV215N  9  WIRING                                   31300152 SHOWN ON PIN VIEW PIN NO. DESCRIPTION 1 GROUND 2  ILLUM (PARKING LIGHT) 3 P.CNTR 4 AMP REMOTE 5  RIGHT REAR SPEARKER (+) 6  RIGHT REAR SPEARKER (-) 7  LEFT REAR SPEARKER (+) 8  LEFT REAR SPEARKER (-) 9  LEFT FRONT SPEAKER (-) 10  LEFT FRONT SPEAKER (+) 11  RIGHT FRONT SPEAKER (-) 12  RIGHT FRONT SPEAKER (+) 13 NC 14 PARKING BRAKE 15 +12V ACC SWITCHED 16 +12V BATTERY WARNING! Do not connect the +12VDC ACC SWITCHED wire to the battery. This wire MUST be connected to the Accessory/Ignition wire or a +12 volts switched power source.WARNING! Do not connect the ILLUM wire to the dimmer. This wire MUST be connected to a parking light circuit that provides +12VDC when parking lights are active.
 JRV215N  10  Recommended Camera Installation Configurations    3 Cameras Setup 1 Rear Camera Setup
 JRV215N  11  BASIC OPERATION Power On/Off   Press the power VOL knob (3) to turn the unit on. The unit will resume at the last mode (Tuner, Aux, etc.). Press and hold the VOL knob to turn the unit off. While ON, press the knob to activate the MUTE function. Volume Control   To increase the volume, rotate the power VOL knob (3) clockwise.   To decrease the volume, rotate the power VOL knob counter-clockwise.   During adjustment, the volume level is displayed in the middle of the display as a horizontal bar graph with the associated number level setting from 0 (full mute) to 30 (0dB, no attenuation).   The screen will display the volume indicator bar for 5 seconds and then revert to the previous mode information. Reset Use a ball point pen or thin metal object to press the RESET button (4). The reset button should be activated for the following reasons:   initial installation of the unit when all wiring is completed   function buttons do not operate   error symbol on the display  Mute   Press the power VOL knob (3) to mute the audio output. “        ” will appear on the display.   Press the power VOL knob again to restore the audio output to the previous level. Menu  Press the MENU button (1) or touch the home icon on-screen in the home menu to access different modes (Cameras, Navigation, AM/FM, Disc, Bluetooth, USB, SiriusXM, Weather, AUX 1, AUX 2, Zone2, Settings, Panel off and Dimming). Press and hold MENU to toggle between day and night dimmer settings when dimming control is turned off in settings.   Swipe from right to left, or touch the 2nd dot at the bottom of the screen to go to page 2. Swipe from left to right, or touch the 1st dot at the bottom of the screen to return to page 1.   Touch the on-screen button to adjust the settings under the specific mode.
 JRV215N  12   Navigation  Press the NAV button (2) or touch the on-screen button (9) in the home menu to access navigation mode. Press NAV to toggle between current audio mode and navigation.   For more details, please refer to the separated navigation manual. Camera   Touch the “Cameras” option on-screen (9) to access camera mode.   Under camera mode, touch the screen to access camera 1, camera 2, and camera 3 and to enable/disable rear camera audio.                 To view or adjust the camera setup options, go to the “Settings” under the home menu. See “Camera Sub-menu” on page 10. Adjusting the Clock              The current date and time is displayed on the bottom of the LCD display (9).To adjust the clock: 1.  Touch the “Settings” > “Time” > “Time setting” option on-screen (9). 2.  Swipe the on-screen button on the top right to select between 12-hour clock and 24-hour clock. 3.  Use the on-screen arrows to adjust the Month, Day, Year, Hour, Minute and AM/PM (only when using a 12-hour clock). 4. Touch  when finished.   Auxiliary Input To access an auxiliary device: 1.  Connect an audio source to the AUX IN connector on the front panel (7) or to the AUX IN cables on the back of the radio. Video input is accessible for both the “AUX 1” and “AUX 2” mode through the VIDEO IN cable at the back of the unit. 2.  Touch the “AUX 1” (front AUX) or “AUX 2” (rear AUX) on-screen button to select front or rear auxiliary input.   3.  Connect the audio source with a 3.5mm video cable at the jack (7), the radio will automatically switch to AUX 1 mode. Remote Sensor   Point the remote control handset (sold separately) at the remote sensor IR (10) and press the function keys on the handset to control the system. Dimming/Display  1.  Touch the “Dimming” option on-screen (9) to adjust the dimming levels for day and night viewing of the display, display settings and standby clock display ON/OFF. 2.  Swipe the on-screen button to turn ON/OFF automatic dimming control (this requires
 JRV215N  13  connection of ILLUM wire).   3.  To adjust display backlight intensity, touch the “Dimming Day” and “Dimming Night” level settings. 4.  After Day & Night dimming levels have been set; toggle between them by pressing and holding the MENU (1) on the front panel. (Works ONLY if dimming control is off) 5.  To adjust contrast and chrominance of the display, touch “Display settings” and use the on-screen arrows to adjust the levels. 6.  Swipe the on-screen button to turn ON/OFF standby clock display. When standby mode is on, the LED indicator (4) will light up. SYSTEM MENU Press the MENU button (1) or touch the on-screen button (8) in the home menu to access different modes.               Table 2: Settings menu Options Function General  Touch to enter the General settings menu. Time  Touch to enter the Time settings menu. Panel  Touch to enter the Panel settings menu. Audio  Touch to enter the Audio settings menu. Camera  Touch to enter the Camera settings menu. Weather Band  Touch to enter the Weather Band settings menu.     General Sub-menu The following general sub-menu options can be adjusted              Table 3: General sub-menu Settings Options  Function Wallpaper  --  Touch to select the wallpaper preferred. FM region    Europe  Touch to select the FM region. United States DVD rating  ADULT (default)  Touch to set the parental control rating. Any content rated above the set rating cannot be viewed. NC-17 6R PG-R PG13  G KID SAFE Factory reset  Yes  Touch “Yes” to reset to factory default. No Software Version --  Touch to display the current software version. MCU/APP/MEPG/BT/BSP/SERVO
 JRV215N  14  Time Sub-menu The following time sub-menu options can be adjusted:               Table 4: Time sub-menu Settings Options  Function Time Setting  12HR/24HR  Touch to select 12-hour clock and 24-hour clock. Adjustment UI  Touch the on-screen arrows to adjust the month, date, hour, minute and year Navigation Time Sync On/Off  Swipe the on-screen button to turn ON/OFF synchronization with navigation clock.           Panel Sub-menu The following panel sub-menu options can be adjusted:  Table 5: General sub-menu Settings Options  Function Dimming control On/Off  Swipe the on-screen button to turn ON/OFF the dimming control. When ON, this will allow the display to automatically dim to NIGHT level when the vehicle’s headlights are on. Please note that not all vehicles support this feature. Dimming day  0-10  Touch to adjust the brightness of the display in the dimming day Dimming night  0-10  Touch to adjust the brightness of the display in the dimming night, Display settings  Contrast (default 10) Touch the on-screen arrows to adjust the level of screen contrast and screen chrominance from 0 to 20. Chrominance (default 10) Standby clock display On/Off  Touch to turn ON/OFF the standby clock display. ON will show the clock when radio is in standby. Touch panel calibration Yes  Touch “Yes” to enter the touch panel calibration. No
 JRV215N  15  Audio Sub-menu The following audio sub-menu options can be adjusted:                Table 6: General sub-menu Settings Options  Function Beep tone  On/Off  Swipe the on-screen button to turn ON/OFF the beep tone. Subwoofer  On/Off  Swipe the on-screen button to turn ON/OFF the subwoofer. BT Mic volume  0-30 (default 20) Touch to adjust the default volume of Bluetooth Handsfree Calling. Zone 2 volume  0-30 (default 15) Touch to adjust the output volume of Zone 2. Audio settings  Left-Right: L30 to R30 (default 0) Touch the on-screen arrows to adjust the audio volume of the 4 horns (Left and Right, Front and Rear).  Front-Rear: F30 to R30 (default 0) EQ: Rock/Classic/ Jazz/Dance/Pop/User/Flat (default flat) Touch the on-screen arrows to select your favorite preset EQ Loud On  Swipe the on-screen button to turn ON/OFF the loudness. Treble: -15 to +15 (default 0) Touch to adjust the Treble level. Mid: -15 to +15 (default 0) Touch to adjust the Middle level. Bass: -15 to +15 (default 0) Touch to adjust the Bass level. Sub: -15 to +15 (default 0) Touch to adjust the Subwoofer level. Camera Sub-menu The following camera sub-menu options can be adjusted:  Table 7: Camera sub-menu Settings Options  Function Camera mode  Camera 1 mode  Normal /Skipped (default Normal) Touch to select the output of Camera 1/2/3 image: in normal view or skipped. When the output of the camera is skipped, the camera image will not be displayed. Camera 2 mode  Normal /Skipped (default Normal)  Camera 3 mode  Normal /Skipped (default Normal)
 JRV215N  16  Priority order  1-2-3  Touch to select the desired camera trigger priority from 1 (highest) to 3 (lowest). 1-3-2 2-1-3 2-3-1 3-1-2 3-2-1 Trigger delay 1 second Set delay time for displaying camera image after trigger signal is removed. 2 seconds 3 seconds 4 seconds 5 seconds 6 seconds Rear camera audio On/Off Swipe the on-screen button to turn ON/OFF to the rear camera audio                 Weather Band Sub-menu The following weather band sub-menu options can be adjusted  Table 8: Weather Band sub-menu Settings Options  Function Alarm  On/Off  Swipe the on-screen button to turn ON/OFF the dimming control Alarm volume  0-30 (default 15) Touch to adjust the alarm volume Alarm level  None  Touch to select the alarm level Warning Watches All SAME code 1  XXXXXX  Touch the on-screen button to set the SAME code to be received. SAME code 2  XXXXXX SAME code 3 XXXXXX SAME code 4 XXXXXX SAME code 5 XXXXXX SAME code 6 XXXXXX SAME code 7 XXXXXX
 JRV215N  17  AM/FM/RBDS CONTROLS Enter FM/AM Mode Press the MENU button (1) on the front panel or touch the home icon on-screen to go to Home menu. Then touch the on-screen button (9) in the home menu to enter FM/AM mode.  Information Bar The top portion of the touch screen is the information bar. Information such as the current band and station, ST icon, and system clock is displayed on the information bar. Select a Band Press the FM/AM on-screen button to select between the FM1, FM2, FM3, AM1 and AM2. Tuning Touch the    or    on-screen to seek stations up/down step by step. Touch and hold    or   on-screen to the next strong stations. Preset Stations Six preset buttons store and recall stations for each band. Store a Station 1.  Tune radio to desired station. 2.  Touch the store          button, then the preset buttons will be highlighted on the screen.. 3.  Touch to decide the preset station to store.  NOTE: Only six presets are displayed at one time. Change to another band to view the preset stations stored for that band. Automatically Store / Preset Scan (AS/PS) Automatic Store   1.  Select a band (if needed). 2.  Touch and hold the “AS/PS” button for more than 1.5 seconds to automatically select 6 strong stations and store them in the current band. New stations replace any stations already stored in that band. Preset Scan 1.  Select a band (if needed). 2.  Touch the “AS/PS” button to scan stations stored in the current band. The unit will pause for ten seconds at each preset stations. 3.  Touch “AS/PS” again to stop scanning when the desired station is reached. Local/Distance (LOC/DX)   Touch to select LOC or DX.     Loc: search broadcasts within the scope of local. DX: search broadcasts with the scope of Distance. RBDS Operation In FM radio mode, touch the    .    button to list the following search options in pages: Any/News / Information / Sports / Talk/Rock / Classic Rock / Adult Hits / Soft Rock / Top 40 / Country / Oldies / Soft / Nostalgia / Jazz / Classical / Rhythm and Blues / Soft R&B /Foreign Language / Religious Music / Religious Talk / Personality/ Public / College / Weather / Emergency Test . Only six search options are displayed at one time. Touch the up/down arrows to the right of the list to access the next group of search options. Touch the desired program type, and then touch “SEARCH” to search for the corresponding program. If a corresponding program is found, the unit will play the program. If there is no corresponding program, the unit will resume the previous program. Stereo The unit will automatically pick up an FM stereo signal, when available. When in stereo mode, the “ST” icon appears in the information bar on the screen. When no stereo signal is available, the unit will automatically revert to mono operation, and no icon will be displayed.
 JRV215N  18  WEATHER BAND OPERATION What is the NOAA Weather Radio/Weatheradio Canada? NOAA (National Oceanic and Atmospheric Administration) is a nationwide system that broadcasts local weather emergency information 24 hours a day via the National Weather Service (NWS) network. The U.S. network has more than 530 stations covering the 50 states as well as the adjacent coastal waters, Puerto Rico, the U.S. Virgin Islands and the U.S. Pacific Territories. Each local area has its own transmitting station and there are a total of seven broadcasting frequencies used. A similar system is available in Canada under the Weatheradio Canada service administered by Environment Canada. Weather Band Selection Press the MENU button (1) on the front panel or touch the home icon on-screen to go to Home menu. Then touch the on-screen button (9) in the home menu to enter Weather Band mode.               NOTE: The weather band channel frequency is fixed in preset memory and cannot be changed.  NOAA Weather Alert The Weather Alert function adds an additional level of user safety by automatically switching from any of the available function modes to weather band for a minimum of 60 seconds if a NOAA warning tone (1050 Hz) is received/detected. If no additional warning tone is received for 60 seconds, the unit will switch back to the last known function mode. The JRV215N is equipped with a weather alert level (Alarm level) and weather alert power (Auto Alarm) feature that will cause the radio to turn on automatically when a weather alert is detected, adding an additional level of user safety. When the weather alarm level is set to “All”, “Warnings” or “Watches” the weather alert function automatically switches from any of the available function modes (Tuner, SiriusXM, CD, iPod, AUX,NAV) to Weather Band when the selected NOAA warning type is received/detected. See “Settings” >Weather band sub-menu” to learn how to turn the Alarm level and Auto Alarm set features on. SAME Decoding and Filtering Specific Area Message Encoding (SAME) data is also broadcast prior to alert broadcasts. SAME data contains information about the geographic region affected by the alert, the type of alert, and its effective time. The geographic region included in the SAME data is called the Geographical Area code and has the form PSSCCC where “P” represents a portion of the county, “SS” is a two-digit state, territory, or offshore marine area identifier and “CCC” identifies the county, province, or major metropolitan area within the state. This unit can be configured through the system setting menu with up to seven Geographical Area codes to limit the automatic tuning or power on functions described above. SAME data also includes the type of alert being broadcast. This unit can be configured through the System Setting Menu to limit the automatic tuning or power on functions based on the type of alert. SAME is activated by programming a 6 digit code - called a FIPS code - into your radio. The FIPS code or Federal Information Processing System code is a six digit code that identifies the states and counties (or parishes) in the United States. The first digit identifies the county subdivision. The next two digits identify the state or territory, and the last three identify the county. The FIPS code for your area can be found by calling the NWS toll free number or visiting the web site. The phone number is 1-888-NWS-SAME (1-888-697-7263) Upon calling, an automated system will prompt you to enter your state and county. When you confirm the information, the system will provide your six digit FIPS code. The web site is: www.nws.noaa.gov/nwr/indexnw.htm. Upon selecting your state from the chart, you will see a listing of all the counties in that state. For each county there is a listing of the SAME# (FIPS code), the location of the transmitter, the WB frequency, the call sign, the transmitter power and miscellaneous remarks.  NOTE: See “Setting” > “Weather band sub-menu” to learn how to set a SAME Alert comd.  NOTE: Because broadcast areas overlap you may want to set more than one S.A.M.E. location. If you live near the border between countries, you may want to receive alerts from more than one tower.
 JRV215N  19  Your radio is capable of being programmed with up to 7 different FIPS location codes. The default code has been programmed at the factory - 000000 – to respond to all messages within your area.
 JRV215N  20  DVD/CD/MP3 OPERATION DVD Operation Inserting a Disc Insert a disc, label-side up, into the disc slot (12) with the unit turned on. The unit will automatically draw the disc in, enter DVD mode, and play the first track of the disc. Elapsed playback time and track number of current track are displayed on the information bar at the top of the screen. Ejecting a Disc   Touch the eject button (11) to stop playing the disc and eject the disc. After the disc is ejected, the unit will automatically return to AM/FM mode. Pausing playback Touch the      button to suspend or resume playback. Track select Touch the      or      to advance to the next or previous track on the disc. The selected track number will appear on the display. Fast forward/Reverse Touch the      or      buttons or press the ◄ or ► on the remote control.     Speed selection: x2  x4  x8  x16  normal. Direct search Touch the            to select a chapter or title directly using the on-screen display direct entry menu display. Enter the Direct Search menu, enter the chapter or Title Digital, touch OK that starts the function. Repeat chapter/title Touch the            button on the control panel or the RPT button on the remote control multiple times during playback to select from the following repeat play options:   DVD: REP Chapter, REP Title, REP All. Audio settings Touch the        to open the Audio Settings menu. Menu play Touch the          to change to play the disc menu.   For DVD, touch this button to enter the disc MENU player.. For VCD, touch this button to enter the disc PBC MENU player. Subtitle Touch the      to select audio language if the disc is recorded in multiple languages. Touch to change to a different subtitle language each time. The subtitle function can be turned on or off.  Audio language selection Touch the      to DVD sound language selection During DVD playback, touch the            to select audio language if the disc is recorded in multiple languages.    CD/MP3 Operation Inserting a Disc Insert a disc, label-side up, into the disc slot (12) with the unit turned on. The unit will automatically draw and play the first track of the disc. Ejecting a Disc   Touch the eject button (11) to stop playing the disc and eject the disc. After the disc is ejected, the unit will automatically return to AM/FM mode. Pausing playback Touch the    or    button to suspend or resume playback. Track select Touch the        or        to advance to the next or previous track on the disc. The selected track number will appear on the display. Fast forward/Reverse Touch and hold the        or        buttons to fast forward or reverse. When released, the unit will resume normal playback Repeat one Touch the        button on the control panel or the RPT button on the remote control to repeat a track.
 JRV215N  21  Random shuffle (RDM) Touch the          button during disc play to play all tracks on a CD in random, shuffled order (RDM ON). Press          again to stop random play (RDM OFF). List Touch the    button to enter CD or MP3 list menu. Scroll up and down through the list using the arrows, and touch to enter the desired folder. Touch the desired track to start playback. Press the back arrow to navigate out of the folder.
 JRV215N  22  SiriusXM® RADIO OPERATION  About SiriusXM Everything worth listening to is on SiriusXM, including the most commercial-free music, plus the best sports, news, talk and entertainment. A SiriusXM Vehicle Tuner and Subscription are required. For more information, visit www.siriusxm.com in the US or www.siriusxm.ca in Canada.  Accessing SiriusXM Mode (Requires optional SiriusXM tuner) Press the MENU button (1) on the front panel or touch the home icon on-screen to go to Home menu. Then touch the on-screen button (9) in the home menu to enter SiriusXM mode. Accessing your SiriusXM Radio ID The SiriusXM Radio ID is required for activation. To display your SiriusXM radio ID:   1.  In SiriusXM mode, touch the          icon to select Direct Channel Entry mode. 2.  Enter channel "0" using the on-screen number pad then press the     icon. The SiriusXM User interface tuner screen displays the ID where the artist name is displayed.  NOTE: The Radio ID is 8 characters long and does not include the letters I, O, S or F.  Activating the SiriusXM Tuner Once you select SiriusXM mode, you should be able to tune and hear the SiriusXM Preview Channel on channel 1. You can then activate by phone or on-line. In the USA, contact SiriusXM Listener care:    Visit www.siriusxm.com/activatenow    Call SiriusXM Listener Care at 1-866-635-2349 For Canadian Subscriptions, please contact:  Visit www.siriusxm.ca/activatexm   Call XM customer Care at 1-877-438-9677 SiriusXM User Interface  Tune The available tune mode options are    ,    and INFO. Previous/Next Tuning   Touch the    or    icon to the previous or next channel. Direct Tuning 1.  Touch the          icon to select direct entry MENU. 2.  Enter the desired SiriusXM radio channel using the on-screen number pad then press the           icon. To delete an entry number, touch the red        icon. Preset Scan   Touch the          to scan through the preset channels. The tuner will pause for approximately 10 seconds on each channel. Touch scan again to listen to that channel. If scan is not touched, the tuner will automatically tune to the next preset channel. Store a Channel 1.  Select a channel. 2.  Touch the          icon to access the preset screen. 3.  Touch the preset number (SXM1 to SXM18) in which you would like to store the current channel. The channel will be stored in that preset and displayed on the SiriusXM user interface tuner screen. Audio settings Touch the          icon to enter the Audio Settings menu.
 JRV215N  23  Search by Channel 1.  Touch the channel icon to select channel. 2.  Touch a channel to tune to that channel. Search by Category Example of music group category includes Pop, Rock, Country, etc. To search by category: 1.  Touch the Category icon to select Category. 2.  Touch          or          to select a category. A list of channel will be shown on the screen. 3.  Touch to enter the channel.   Preset Touch the preset icon to enter the preset list, and then select a preset channel. SiriusXM Channel Lock Feature The Parental Control feature allows you to limit access to any SiriusXM channels, including those with mature content. When enabled, the Parental Control feature requires you to enter a passcode to tune to the locked channels. Information on setting up the user passcode, locking channels, and the method to access the locked channels is described below. 1.  Touch the Lock icon to enter the following screen:                2.  Enter a 4-digit password and then press the        icon. The screen will show the channel list. 3.  Touch to select the channel to be locked, then the locked channel will be highlighted with a lock icon indicating it is locked. Touch the locked channel again to unlock the channel. The lock icon will disappear. (see image)           Accessing a Locked Channel Touch to select a locked channel, the display will pop up a number pad. Enter the 4-digit password and then touch the          icon to unlock the channel and resume normal listening. Change Lock Password The Change Lock Password option allows you to change the password. The default password is 0000. 1.  Touch the Chg PW tab to enter the screen below:                2.  Enter your 4-digit password and touch the        icon. 3.  Enter the new 4-digit password and press the          icon. The new password is set. Confirm the new password.
 JRV215N  24  Reset SiriusXM Channel Lock Code If you forget your Parental Control lock code, use the following directions to reset the code to the default “0000”. Resetting the lock code will not affect the locked channels list. 1.  Turn on the JRV215N. 2.  Enter SiriusXM mode 3.  Press the Home icon, then enter Settings 4. Select Time 5. Select Time Settings 6.  Set the date as 01-01-2000, then press the  to save 7.  Press the home icon, and then return to SiriusXM mode 8.  Touch the        icon to bring up the direct-tune keypad 9.  Input “2000” and touch the  to confirm 10.  A popup message will appear confirming that the password has been reset to the default
 JRV215N  25  Advisory Messages Reported by the SiriusXM Vehicle Tuner On-Screen Display Advisory Message Cause  Explanation/Solution Check Antenna  Check Antenna  The radio has detected a fault with the SiriusXM antenna. The antenna cable is either disconnected or damaged.   Verify that the antenna cable is connected to the SiriusXM Connect Vehicle Tuner.   Inspect the antenna cable for damage and kinks. Replace the antenna if the cable is damaged. Check Tuner  Check Tuner  • The radio is having difficulty communicating with the SiriusXM Connect Vehicle Tuner. • The tuner may be disconnected or damaged.   Verify that the SiriusXM Connect Vehicle Tuner cable is securely connected to the radio SiriusXM mating connector/ cable.   If the problem persists, disconnect and reconnect the tuner and then contact your dealer. No signal  No signal  The SiriusXM Connect Vehicle Tuner is having difficulty receiving the SiriusXM satellite signal.   Verify that your vehicle is outdoors with a clear view of the southern sky.   Verify that the SiriusXM magnetic mount antenna is mounted on a metal surface on the outside the vehicle.   Move the SiriusXM antenna away from any obstructions.   Inspect the antenna cable for damage and kinks. Replace the antenna if the cable is damaged.   If the problem persists, disconnect and reconnect the tuner and then contact your dealer. Scrolling “Subscription Updated” – press any key to continue” Subscription Updated  The radio has detected a change in your SiriusXM subscription status.   Press any key to clear the message.   No further action is required.   Questions about your subscription in the United States please visit www.siriusxm.com/activatenow or call SiriusXM Listener Care at 1-866-635-2349   Questions about your subscription in Canada, please visit www.siriusxm.ca/activatexm or call XM Listener Care at 1-877-438-9677 Chan Unavailable  Channel Not Available The channel that you have requested is not a valid SiriusXM channel or the channel that you were listening to is no longer available. You may also see this message briefly when first connecting a new SiriusXM Connect Vehicle tuner. Visit www.siriusxm.com for more information about the SiriusXM channel lineup. Visit www.siriusxm.com/channellineup for more information about the SiriusXM channel lineup.    Ch Unsubscribed  Channel Not Subscribed The channel that you have requested is not included in your SiriusXM subscription package or the channel that you were listening to is no longer included in your SiriusXM subscription package.   Questions about your subscription in the United States please visit www.siriusxm.com/activatenow or call SiriusXM Listener Care at 1-866-635-2349.   Questions about your subscription in Canada please visit www.siriusxm.ca/activatexm or call XM Listener Care at 1-877-438-9677.
 JRV215N  26  On-Screen Display Advisory Message Cause  Explanation/Solution Channel Locked  Channel Locked  The channel that you have requested is Locked by the radio Parental Control feature. See the section on Parental Control, page 18 for more information on the Parental Control feature and how to access locked channels. “Enter Code?” followed by **** Enter Lock Code  User prompted to enter the lock/unlock code.  Enter the four digit code to play the audio. Wrong Code  Invalid Lock Code    The unlock code entered by the user is incorrect    Input the correct four digit code to unlock the channel. Reset lock code to default following instructions on page 11
 JRV215N  27  iPhone/iPod/USB OPERATION This unit is equipped with an iPod® ready function that will allow you to control your iPod (if compatible) using the control panel buttons. This unit is made for the following iPod models:   iPod Nano 5G, 6G, 7G  iPod Classic   iPhone 4, 4S, 5, 5C, 5S   iPod Touch 3G, 4G, 5G  NOTE: 1. iPod and iPhone playback only supports audio source, video and images are not supported. 2. Make sure that your iPod has the latest apple firmware installed to avoid any connectivity issue.  Accessing iPod Mode iPod will play automatically when connected to the unit. From the App Menu screen, press USB to access the USB connected iPod. “iPod” will appear in the upper left corner of the display. Turning the iPod On/Off The iPod power turns on automatically when the unit is turned on if iPod is connected via the iPod USB cable. Turn off the iPod by disconnecting it from the cable or by turning the ignition off. When the ignition is turned off, the iPod will pause and then enter sleep mode after 2 minutes.    . NOTE: The iPod will continuously recharge when connected to the unit, as long as the vehicle ignition is turned on.        Selecting a Playlist  1.  When an iPod is playing, touch the        button to display the playlists on the LCD. 2.  Touch to change the playlist between Playlist / Artist / Album / Genres / Songs / Composers. 3.  Touch the on-screen arrows or slide to navigate the selected playlist.   4.  Touch to select a file to play. Controlling Playback              Selecting Songs   Touch the        or        button to go to the next or previous file. The selected file number will appear on the information bar at the top of the screen. Pausing Playback   Touch pause    to suspend playback. Playback controls are disabled with paused.
 JRV215N  28    Touch play     again to resume playback Repeat Play   Touch the        during playback to repeat play the current file.   Touch    again for normal play. Shuffle Play   Touch the        during playback to play all files in random, shuffled order.   Touch    again for normal play. Audio Settings   Touch the        on-screen to open the Audio Sub-menu.
 JRV215N  29  BLUETOOTH OPERATION Bluetooth technology has the capability to wirelessly synchronize and transfer data among devices. The Bluetooth audio capabilities can be used for mobile phones hands free applications Bluetooth has many profiles and the unit is compatible with most Bluetooth enabled mobile phones. Before attempting to use the Bluetooth functions on the unit, please make sure your mobile phone supports Bluetooth functions.  NOTE: The line-of-sight distance between this unit and your mobile phone must be 8 feet (2.4 meters) or less for sending and receiving voice and data via Bluetooth wireless technology.  Please make sure your mobile phone supports Bluetooth functions (Headset or Handsfree profiles or both). Adhere to the following guidelines for successful operation.   Before using Bluetooth functions, you must pair your mobile phone to the "JRV215N" Head unit (see “Pairing a Bluetooth Device”).To ensure the best reception for pairing and re-connection, please make sure the mobile phone battery is fully charged before you begin.   Try to perform pairing within a few minutes of the mobile phone being turned on.   Once the unit has been paired with the mobile phone, the unit's model number"JRV215N" will be displayed on the mobile phone.   To achieve the best performance, always keep the mobile phone within 3 meters of the head unit.   Always keep a clear path between the mobile phone and the head unit. Never place a metal object or any other obstacle between the mobile phone and the head unit.   Some mobile phones (like Sony Ericsson) may have a "Power saving Mode” option. PLEASE DO NOT use the power saving mode with the JRV215N.   Before accepting or making a call, make sure your mobile phone's "Bluetooth function" is turned on.   To ensure the best conversation quality/performance, stay within one meter of the microphone when talking.   To manually disconnect the mobile phone from the head unit, touch the "Disconnect" icon and the device will be disconnected but still paired. Bluetooth User Interface Press the MENU button (1) on the front panel or touch the home icon on-screen to go to Home menu. Then touch the on-screen button (9) in the home menu to enter Bluetooth mode.          Pairing a Bluetooth Device Your mobile phone can initiate a search for new devices and pair to the unit. The following instructions describe the pairing process.  NOTE: The following procedures are generic. Procedures for pairing mobile phones from different manufacturers may vary.  1. Press the MENU button on the front panel to access the Home menu. 2.  Touch the Bluetooth icon to enter the Bluetooth mode. 3.  Touch pairing icon to enter pairing state 4.  Access the mobile phone Bluetooth function and set the function to ON. 5.  Set the mobile phone Bluetooth discover mode to ON. (Note: Some discovery modes have a time limit usually a minute before they are automatically turned off.) 6.  When the mobile device has completed its search, the mobile device will display the Bluetooth device name (JRV215N) 7.  A prompt to pair should appear on your mobile phone. Accept the request and initiate the process. (Note: Some mobile phones require a "pass key" or pairing code to connect. If your phone requires a pass key or pairing code, you will need to enter this number. The default pairing code for many mobile phones is"0000".The default code for the unit is"0000".) 8.  A prompt to enter a PIN number or passkey for the unit should appear. The default passkey for the unit is"0000" 9.  At this point a prompt stating that pairing was successful should appear. Another prompt should appear asking to connect to the unit, Yes or No. Press Yes. The mobile phone and the unit should connect. The mobile phone should display a message similar to "Device Connected" and the mobile phone and the unit are now connected.JRV215N will appear on the mobile phone list of devices.
 JRV215N  30  Managing Incoming Calls When connected to a Bluetooth enabled device and receiving an incoming call the JRV215N will mute audio output or pause CD playback, and change to the Bluetooth screen below. The incoming phone number or assigned name for that number will appear in the middle of the screen. An audible tone will sound from the unit incoming call display will appear.               1.  Touch the     icon to answer the phone. 2.  Touch the     to end or reject an incoming call. 3.  Touch the          icon to mute the microphone audio from the unit. Touch again to restore the microphone and audio from the unit. 4.  Touch the          icon to transfer a call back to the mobile phone. Touch again to transfer to the head unit.   Answering an Incoming Call To answer an incoming call, touch the          icon. For best reception, speak loudly and clearly into the microphone. To end the conversation, touch the          icon.   Rejecting an Incoming Call Touch the          icon to reject an incoming call. Call Transfer While talking, touch the            icon to transfer audio from the unit back to the mobile phone, touch the            icon again to return to the audio from the mobile phone to the unit. Volume Control While talking, turn the rotary knob on the front panel to increase or decrease the volume level. Making an Outgoing Call Outgoing calls can be performed by direct dialing using the unit’s touch screen keypad. The keypad screen is accessed by the        icon. Direct Dialing 1.  Touch the        icon to and the following screen will appear:                2.  Using the keypad, touch 0-9,*, #, to enter the phone number you wish to dial. If you enter an incorrect number, touch the          icon on the keypad to delete the incorrect number. 3.  Once the correct number appears on the screen, touch the        icon. To exit the direct entry screen, touch the          icon in the upper right corner of the screen. 4.  To end the call, touch the          icon on the previous screen. Call Log Touch the     icon to display an Answer/Dial/Missing calls list.   Answer calls The Answer calls list retrieves the list of numbers from your mobile phone if your mobile phone allows the function.The last Answer number is the first number on the list. To make a call from the received calls list, simply touch the call on the list.
 JRV215N  31  Dialed calls Touch the Dial icon to view the Dialed Calls list, The dialed calls list retrieves the list of dialed numbers from your mobile phone if your mobile phone allows the function,the last dialed number is the first number on the list. To make a call from the dialed calls list, touch the caller’s name/number entry and it will be dialed. Missing calls Touch the missing calls icon to view the missed calls list, The missed calls list retrieves the list of missed numbers from your mobile phone if your mobile phone allows the function. The most recent missing number is the first number on the list. To make a call from the missed calls list, touch the caller's name/number and it will be dialed. Phonebook  Touch the        icon to access the phone book.              The phone book is a copy of the contact list on your mobile phone which contains a listing of your important names and phone numbers, Touch the        or        icon to scroll up or down the contact list page. To make a call from the phone book, simply touch the contact name. Bluetooth Music Function Bluetooth provides an advanced audio distribution profile (A2DP) for streaming music from a mobile phone or a portable multimedia player (PMP), sometimes referred to as a MP3 player. The unit allows you to playback audio files from your mobile phone or a PMP using a Bluetooth connection.   NOTE: Please quit A2DP mode before attempting to make a phone call, as unexpected results may occur depending on your mobile phone mode. The unit can control a Bluetooth audio player via A2DP or AVRCP .Bluetooth audio players (or Bluetooth adapters) compatible with these profiles can be connected to this unit. Touch the           icon the following screen will appear:            While listening to the audio, the following functions are available: 1.  Pause/Play icon: Touch to pause playback. Touch again to resume playback. 2.  Previous icon: Touch to play the previous track. 3.  Next icon: Touch to play the next track.  Functionality varies depending on the profile used/supported:     A2DP: Stream audio from your Bluetooth compatible audio player and listen to the music through the unit.   AVRCP: Playback, pause, select songs, etc. while streaming audio from your Bluetooth compatible audio player to the unit.  When there is an incoming call, the song will be paused. After the incoming call is finished, the screen will return to the music function screen and playback will continue. Please note, it may be necessary to press the Play button to resume playback on some devices.
 JRV215N  32  Settings Touch the          icon to access Bluetooth settings menu.           1.  Pairing: Touch the pairing icon to begin pairing. 2.  Disconnect/connect: Touch to disconnect. Touch again to reconnect. 3.  Phonebook sync: Touch to sync the phonebook 4.  AutoConn: Touch to set the Auto Connect function on or off. 5.  AutoAnswer: Touch to set Auto Answer function on or off. 6.  Pairing list: Touch to see the list of paired devices. Touch the device to connect to it or press delete to remove the device from the list.
 JRV215N  33  ZONE 2 OPERATION               The Zone 2 function allows the radio to operate two different modes concurrently, one for the driver, and one for the passengers. For example, the driver is able to listening to the radio while the passengers are watching a DVD. There is no interference between Zone 1 and Zone 2. NOTE: The audio and video images of Zone 2 can only be delivered through external devices by Line out and Video out. The audio from Zone 2 cannot be delivered through the speakers of the radio and the video from Zone 2 cannot be delivered through the LCD display.   1. Press the MENU button (1) or touch the on-screen button (9) in the home menu to access Zone 2 menu. “Zone 2” is on page 2 2.  Under Zone 2 operation, there are 4 modes available: Disc/USB/AUX 1/AUX 2. 3.  Touch “Disc” to enter Disc playback mode. 4.  Touch “USB” to enter USB playback mode. 5.  Touch “AUX 1” to enter AUX 1 mode of Zone 2. 6.  Touch “AUX 2” to enter AUX 2 mode of Zone 2.  NOTE: When “Disc” or “USB” icon is in greyscale, that playback mode is currently unavailable.    Zone 2 disc DVD/VCD Operation Insert a disc label-side up into the disc slot (12) and go to “Zone 2” > ”Disc”, the LCD display will show the screen below:               1.  Touch the        icon on the control panel or the RPT button on the remote control multiple times during playback to select from the following repeat play options:   DVD: REP Chapter, REP Title, REP All   VCD: REP 1 (track), REP ALL (disc) 2.  Touch the        during playback to select the subtitle language if the disc is recorded in multiple languages. Touch to change to a different subtitle language each time. The subtitle function can also be turned on or off. 3.  Touch    or    to advance to the next or previous track on the disc. The selected track number will appear on the display 4.  Touch the    or    icon to suspend or resume disc play. 5.  Touch the        icon to access DVD select audio language, or switch the VCD channel.     During DVD playback, touch the        to select audio language if the disc is recorded in multiple languages. Touch to change to a different subtitle language each time.   During VCD playback, touch the        to select the audio channel: MONO L/MONO R/STEREO
 JRV215N  34  Zone 2 AUX 1 AUX 2 Operation Connect an audio source to the AUX IN connector on the front panel (7) or to the AUX IN cables on the back of the radio. Video input is accessible for both the “AUX 1” and “AUX 2” mode through the VIDEO IN cable at the back of the unit. Go to “Zone 2” > ”AUX 1” or :AUX 2” to enter the AUX 1 or AUX 2 mode. The LCD display will show the screen below:               The operation of Zone 2 AUX 1 and AUX 2 is the same as AUX 1 and AUX 2 on page 9.
 JRV215N  35  CAMERA OPERATION             Enter Camera Mode Connect the cameras to the unit using the CAMERA 1-3 connection cables at the back of the unit. Touch the Cameras icon on the Home menu to access camera mode. Camera Connection and Camera Trigger This unit can connect 3 cameras: CAM 1, CAM 2, and CAM 3. Each camera can be triggered separately and can be set in different trigger priority. There are 3 trigger wires at the back of the unit. If trigger signals are detected on more than one trigger wire, the channel that has the highest priority will be triggered first. Once a channel is triggered, the triggered channel video will be displayed on the full screen. Only CAM 1 has audio input. Auto Mic Enable When the Auto Mic Enable feature is set to “Yes,” the current playback audio will be muted and the microphone for camera 1 will be automatically turned on when the vehicle is placed in reverse gear. See setting “Rear camera audio” on page 13. Audio Output and Volume Adjustment In camera mode, if Camera 1 is not triggered, the front audio output will be the from the last audio source played. Rotate the VOL control (1) to adjust the volume of the audio source. When Camera 1 is triggered and the Auto Mic Enable feature is on, the Camera 1 video appears on the entire screen and the audio input from the camera is played. In this case, rotate the VOL control (1) to adjust the volume of the Camera 1 audio input. If the Auto Mic Enable option is off, no audio is available when Camera 1 is triggered. Camera Control Options   Touch the lower part of the screen to make the camera controls appear.                                          Touch the “CAM 1” button to view the Camera 1 video in full screen.   Touch the “CAM 2” button to view the Camera 2 video in full screen.   Touch the “CAM 3” button to view the Camera 3 video in full screen.   Touch the “AUDIO” button to turn the camera audio ON/OFF.   Touch the            button on the screen to select Contrast and Chrominance settings. Use the +/- buttons to adjust each setting from 0-20.  NOTE: The upper area of the screen is the current playback information bar area. Press the top of the screen to remove the bar or make the bar reappear.
 JRV215N  36  REMOTE CONTROL OPERATION    Included remote control can be used within line-of-sight of JRV215N head unit                            EJECT  Eject disc SRC  Change current source EQ  Change audio equalizer settings (Rock/Classic/ Jazz/Dance/Pop/User/Flat) POWER  On/Off  DISP  Display current playing information AUDIO  Change audio language or track (DVD) SUBTITLE  Change displayed subtitle (DVD) ANGLE  Change displayed Angle (DVD) BAND  Enter AM/FM Tuner, Change AM/FM band in tuner mode (AM1, AM2, FM1, FM2, FM3) ZOOM  Change the display size (1x, 2x, 3x, 4x, 1/2x, 1/3x, 1/4x) MENU  Enter disc menu (DVD) TITLE  Play disc title (DVD) GOTO  Go to chapter (DVD), Enter dial pad (Bluetooth) DIAL PHONE  Press to dial a phone number (Bluetooth) CLEAR  Press to clear dialed numbers (Bluetooth) HANG UP PHONE  Hang up call RPT  Repeat (directory, track, all)   RPT A-B  Repeat A-B (DVD) | Previous track (hold for Fast-Reverse) |  Next track (hold for Fast-Forward) SETUP  Enter settings menu  Navigate up (DVD), Tune next preset PIC  Adjust video settings VOL + Increase audio volume  Navigate left (DVD), Tune previous frequency /||  Play / Pause  Navigate right (DVD), Tune next frequency VOL – Decrease audio volume ENTER  Select current highlighted option (CD/DVD)  Navigate down (DVD), Tune previous preset ZONE 2  Stop playback (CD/DVD) MUTE  Mute audio 1 – 3  Select preset/chapter, input numbers  SCN  Preset Scan (Radio, SiriusXM), input  4 – 6  Select preset/chapter, input numbers # MIX  Shuffle On/Off (CD/USB), input # 7 – 0  Select preset/chapter, input numbers
 JRV215N  37  CARE AND MAINTENANCE   Keep the product dry. If it does get wet, wipe it dry immediately. Liquids might contain minerals that can corrode the electronic circuits.   Keep the product away from dust and dirt, which can cause premature wear of parts.   Handle the product gently and carefully. Dropping it can damage circuit boards and cases, and can cause the product to work improperly.   Wipe the product with a dampened cloth occasionally to keep it looking new. Do not use harsh chemicals, cleaning solvents, or strong detergents to clean the product.   Use and store the product only in normal temperature environments. High temperature can shorten the life of electronic devices, damage batteries, and distort or melt plastic parts. Ignition The most common source of noise in reception is the ignition system. This is often a result of the radio being placed relatively close to the ignition system (engine). This type of noise can be easily detected because it will vary in intensity of pitch with the speed of the engine. Usually, the ignition noise can be suppressed considerably by using a radio suppression type high voltage ignition wire and suppressor resistor in the ignition system. (Most vehicles employ this wire and resistor, but it may be necessary to check them for correct operation.) Another method of suppression is the use of additional noise suppressors. These can be obtained from most CB/A radio or electronic supply shops. Interference Radio reception in a moving environment is very different from reception in a stationary (home) environment. AM reception will deteriorate when passing under a bridge or when passing under high voltage lines. Noise can be picked up from passing automobiles. Although AM is subject to environmental noise, it can receive at great distances. This is because broadcasting signals follow the curvature of the earth and are reflected back by the upper atmosphere.
 JRV215N  38  TROUBLESHOOTING  Symptom Cause  Solution No power  The vehicle’s ignition is not on  If the power supply is properly connected to the vehicle accessory terminal, switch the ignition key to “ACC”. The fuse is blown  Replace the fuse. Disc cannot be loaded or ejected Presence of disc inside the player  Remove the disc in the player and insert the new one. Inserting the disc in reverse direction  Insert the compact disc with the label facing upward. Compact disc is extremely dirty or disc is defective Clean the disc or try to play a new one. Temperature inside the vehicle is too high Wait until the ambient temperature returns to normal. Condensation  Leave the player off for an hour or so, then try again. No sound  Volume is too slow  Adjust volume to audible level. Fader is set incorrectly  Access Audio Setting menu to adjust Fader settings. Wiring is not properly connected  Check wiring connections. Mute is on or Camera Mic is active in camera mode. Turn Mute Off or Turn Mic Off in camera mode. The operation keys do not work The built-in microcomputer is not operating properly due to noise Press the RESET button. Sound skips  The installation angle is more than 30 degrees. Adjust the installation angle to less than 30 degrees. The disc is dirty or defective.  Clean the disc and try to play again or use new disc. Cannot tune to radio station, auto-seek does not work The antenna cable is not connected  Insert the antenna cable firmly. The signals are too weak.  Select a station manually. Radio automatically switches to WB (Weather Band) This is a normal function. A Weather Band warning is being received. If you do not want this to occur, set the WB Alert setting to “Off” in the System Setup menu. Radio automatically turns on (ignition on) and tunes to WB (Weather Band) This is a normal function when the Alert Power feature is set to “On” in the System Setup menu. A Weather Band warning is being received. If you do not want this to occur, set the Alert Power setting to “Off” in the System Setup menu. Radio mutes audio when vehicle is in reverse gear. It is a normal function for the audio to mute when the vehicle is backing up. If the camera has a microphone, the camera audio will be played when in reverse gear.
 JRV215N  39  SPECIFICATIONS CD /DVD Signal to Noise Ratio . . . . . . . . . . . . . . . . . . . . . . . . . . . . . . . . . . . . . . . . . . . . . . . . . . . . . . . > 60dB Channel Separation. . . . . . . . . . . . . . . . . . . . . . . . . . . . . . . . . . . . . . . . . . . . . . . . . More than 50 dB Frequency Response . . . . . . . . . . . . . . . . . . . . . . . . . . . . . . . . . . . . . . . . . . . . . . . . . 40Hz - 18 KHz CD/DVD Format Compatibility . . . . . . . . . . . . . . . . . . . . . . . . . . . . . . . . . . . . . . . . . . . . . . . . . . . . . . . . . . . . . . . . . . . . . . . . . . . . . . . CD-DA, CD-R, CD-RW, DVD/DVD+R, DVD-RW, DVD-R, DVD-RW Video Video Output . . . . . . . . . . . . . . . . . . . . . . . . . . . . . . . . . . . . . . . . . . . . . . . . . . . . 1 Vp-p (75 Ω ohms) Video Input . . . . . . . . . . . . . . . . . . . . . . . . . . . . . . . . . . . . . . . . . . . . . . . . . . . . . 1 Vp-p (75 Ω ohms) Format . . . . . . . . . . . . . . . . . . . . . . . . . . . . . . . . . . . . . . . . . . . . . . . . . NTSC, PAL (auto-detection) FM Radio Frequency Coverage (USA) . . . . . . . . . . . . . . . . . . . . . . . . . . . . . . . . . . . . . . . . . 87.5 to 107.9 MHz Frequency Coverage (Europe) . . . . . . . . . . . . . . . . . . . . . . . . . . . . . . . . . . . . . . . 87.5 to 108 MHz Sensitivity (S/N=30dB) . . . . . . . . . . . . . . . . . . . . . . . . . . . . . . . . . . . . . . . . . . . . . . . . . . . . . . . 4 μV Image Rejection . . . . . . . . . . . . . . . . . . . . . . . . . . . . . . . . . . . . . . . . . . . . . . . . . . . . . . . . . . .>45 dB Stereo Separation . . . . . . . . . . . . . . . . . . . . . . . . . . . . . . . . . . . . . . . . . . . . . . . . . . . . . . . . . >25 dB AM/MW Frequency Range (USA). . . . . . . . . . . . . . . . . . . . . . . . . . . . . . . . . . . . . . . . . . . . . . . 520-1710 KHz Frequency Range (Europe). . . . . . . . . . . . . . . . . . . . . . . . . . . . . . . . . . . . . . . . . . . . . 522-1620 KHz Sensitivity (S/N=20dB) . . . . . . . . . . . . . . . . . . . . . . . . . . . . . . . . . . . . . . . . . . . . . . . . . . . . . 36 dB General Operating Voltage . . . . . . . . . . . . . . . . . . . . . . . . . . . . . . . . . . . . . . . . . . . . . . . .. . . . . . .DC 12 Volts Grounding System . . . . . . . . . . . . . . . . . . . . . . . . . . . . . . . . . . . . . . . . . . . . . . . . . Negative Ground Speaker Impedance . . . . . . . . . . . . . . . . . . . . . . . . . . . . . . . . . . . . . . . . . . .4-8 Ω ohms per channel Tone Controls: Bass (at 100 Hz) . . . . . . . . . . . . . . . . . . . . . . . . . . . . . . . . . . . . . . . . . . . . . . . . . . . . . . . . ±10 dB Treble (at 10 KHz) . . . . . . . . . . . . . . . . . . . . . . . . . . . . . . . . . . . . . . . . . . . . . . . . . . . . . . .±10 dB Power Output . . . . . . . . . . . . . . . . . . . . . . . . . . . . . . . . . . . . . . . . . . . . . . . . . . . . . . . . . . .50W x 4 Current Drain . . . . . . . . . . . . . . . . . . . . . . . . . . . . . . . . . . . . . . . . . . . . . . . . . . . . . 15 Ampere (max.) Dimensions . . . . . . . . . . . . . . . . . . . . . . . . . . . . . . . . . . . . . . . . . . . . . . . 80 (W) x 183 (D) x 100 (H) Digital Media File Format Compatibility . . . . . . . . . . . . . . . . . . . . . . . . . . . . . . . . . . . . . MP3, WMA             .
                                  ASA Electronics Corporation www.asaelectronics.com www.jensenrvdirect.com ©2014 ASA Electronics Corporation v.240614

Navigation menu