Sounding Audio VRCP65 2DIN Car Audio with CarPlay User Manual VRCP 65 Operation Instruction r9
Sounding Audio Industrial Ltd. 2DIN Car Audio with CarPlay VRCP 65 Operation Instruction r9
User manual
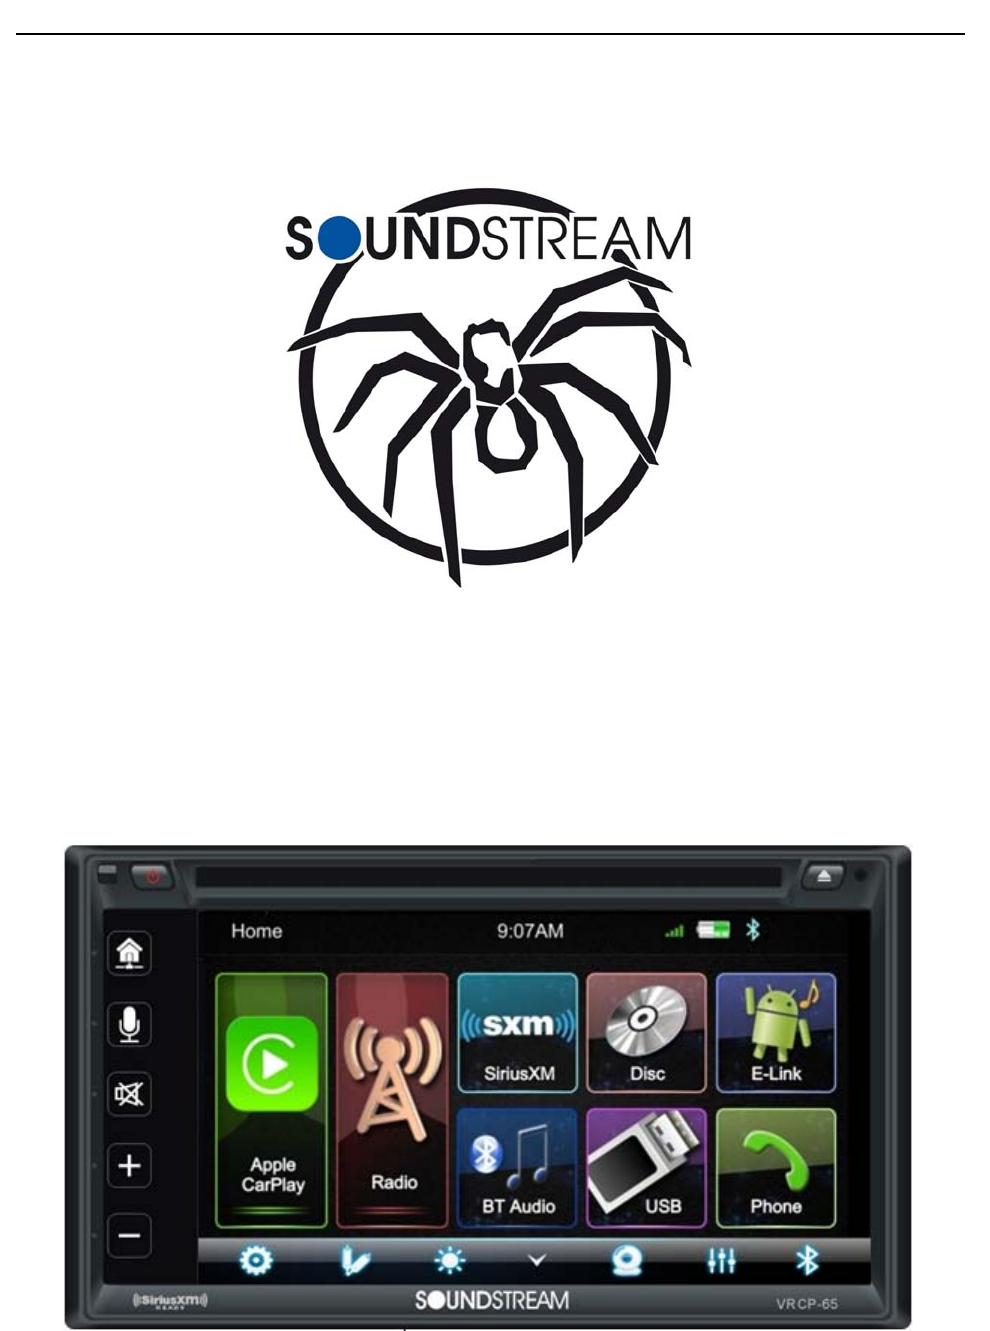
Page 1 of 37
Operation Instruction Manual VRCP-65
OperationInstructionManual
VRCP‐65

Page 2 of 37
Operation Instruction Manual VRCP-65
Content
1. Appearance‐‐‐‐‐‐‐‐‐‐‐‐‐‐‐‐‐‐‐‐‐‐‐‐‐‐‐‐‐‐‐‐‐‐‐‐‐‐‐‐‐‐‐‐‐‐‐‐‐‐‐‐‐‐‐‐‐‐‐‐‐‐‐3
2. WiringConnection‐‐‐‐‐‐‐‐‐‐‐‐‐‐‐‐‐‐‐‐‐‐‐‐‐‐‐‐‐‐‐‐‐‐‐‐‐‐‐‐‐‐‐‐‐‐‐‐‐‐‐‐‐‐4
3. Frontpaneldescription‐‐‐‐‐‐‐‐‐‐‐‐‐‐‐‐‐‐‐‐‐‐‐‐‐‐‐‐‐‐‐‐‐‐‐‐‐‐‐‐‐‐‐‐‐‐‐‐5
4. MainMenu‐‐‐‐‐‐‐‐‐‐‐‐‐‐‐‐‐‐‐‐‐‐‐‐‐‐‐‐‐‐‐‐‐‐‐‐‐‐‐‐‐‐‐‐‐‐‐‐‐‐‐‐‐‐‐‐‐‐‐‐‐‐‐‐6
5. Settings‐‐‐‐‐‐‐‐‐‐‐‐‐‐‐‐‐‐‐‐‐‐‐‐‐‐‐‐‐‐‐‐‐‐‐‐‐‐‐‐‐‐‐‐‐‐‐‐‐‐‐‐‐‐‐‐‐‐‐‐‐‐‐‐‐‐‐‐‐7
6. AppleCarPlay‐‐‐‐‐‐‐‐‐‐‐‐‐‐‐‐‐‐‐‐‐‐‐‐‐‐‐‐‐‐‐‐‐‐‐‐‐‐‐‐‐‐‐‐‐‐‐‐‐‐‐‐‐‐‐‐‐‐‐‐13
7. Radio‐‐‐‐‐‐‐‐‐‐‐‐‐‐‐‐‐‐‐‐‐‐‐‐‐‐‐‐‐‐‐‐‐‐‐‐‐‐‐‐‐‐‐‐‐‐‐‐‐‐‐‐‐‐‐‐‐‐‐‐‐‐‐‐‐‐‐‐‐‐‐14
8. SiriusXM®Operation‐‐‐‐‐‐‐‐‐‐‐‐‐‐‐‐‐‐‐‐‐‐‐‐‐‐‐‐‐‐‐‐‐‐‐‐‐‐‐‐‐‐‐‐‐‐‐‐‐‐‐‐‐15
9. DISC‐‐‐‐‐‐‐‐‐‐‐‐‐‐‐‐‐‐‐‐‐‐‐‐‐‐‐‐‐‐‐‐‐‐‐‐‐‐‐‐‐‐‐‐‐‐‐‐‐‐‐‐‐‐‐‐‐‐‐‐‐‐‐‐‐‐‐‐‐‐‐‐‐21
10. USB‐‐‐‐‐‐‐‐‐‐‐‐‐‐‐‐‐‐‐‐‐‐‐‐‐‐‐‐‐‐‐‐‐‐‐‐‐‐‐‐‐‐‐‐‐‐‐‐‐‐‐‐‐‐‐‐‐‐‐‐‐‐‐‐‐‐‐‐‐‐‐‐‐‐24
11. BTAudio‐‐‐‐‐‐‐‐‐‐‐‐‐‐‐‐‐‐‐‐‐‐‐‐‐‐‐‐‐‐‐‐‐‐‐‐‐‐‐‐‐‐‐‐‐‐‐‐‐‐‐‐‐‐‐‐‐‐‐‐‐‐‐‐‐‐‐‐26
12. BTPhone‐‐‐‐‐‐‐‐‐‐‐‐‐‐‐‐‐‐‐‐‐‐‐‐‐‐‐‐‐‐‐‐‐‐‐‐‐‐‐‐‐‐‐‐‐‐‐‐‐‐‐‐‐‐‐‐‐‐‐‐‐‐‐‐‐‐‐28
13. AuxIN‐‐‐‐‐‐‐‐‐‐‐‐‐‐‐‐‐‐‐‐‐‐‐‐‐‐‐‐‐‐‐‐‐‐‐‐‐‐‐‐‐‐‐‐‐‐‐‐‐‐‐‐‐‐‐‐‐‐‐‐‐‐‐‐‐‐‐‐‐‐‐31
14. RearCamera‐‐‐‐‐‐‐‐‐‐‐‐‐‐‐‐‐‐‐‐‐‐‐‐‐‐‐‐‐‐‐‐‐‐‐‐‐‐‐‐‐‐‐‐‐‐‐‐‐‐‐‐‐‐‐‐‐‐‐‐‐‐‐32
15. E‐Link‐‐‐‐‐‐‐‐‐‐‐‐‐‐‐‐‐‐‐‐‐‐‐‐‐‐‐‐‐‐‐‐‐‐‐‐‐‐‐‐‐‐‐‐‐‐‐‐‐‐‐‐‐‐‐‐‐‐‐‐‐‐‐‐‐‐‐‐‐‐‐‐33
16. RemoteControl‐‐‐‐‐‐‐‐‐‐‐‐‐‐‐‐‐‐‐‐‐‐‐‐‐‐‐‐‐‐‐‐‐‐‐‐‐‐‐‐‐‐‐‐‐‐‐‐‐‐‐‐‐‐‐‐‐‐‐34
17. Specification‐‐‐‐‐‐‐‐‐‐‐‐‐‐‐‐‐‐‐‐‐‐‐‐‐‐‐‐‐‐‐‐‐‐‐‐‐‐‐‐‐‐‐‐‐‐‐‐‐‐‐‐‐‐‐‐‐‐‐‐‐‐‐36
Sirius,XMandallmarksandlogosaretrademarksofSiriusXMRadioInc.Allrightsreserved.
Page 3 of 37
Operation Instruction Manual VRCP-65
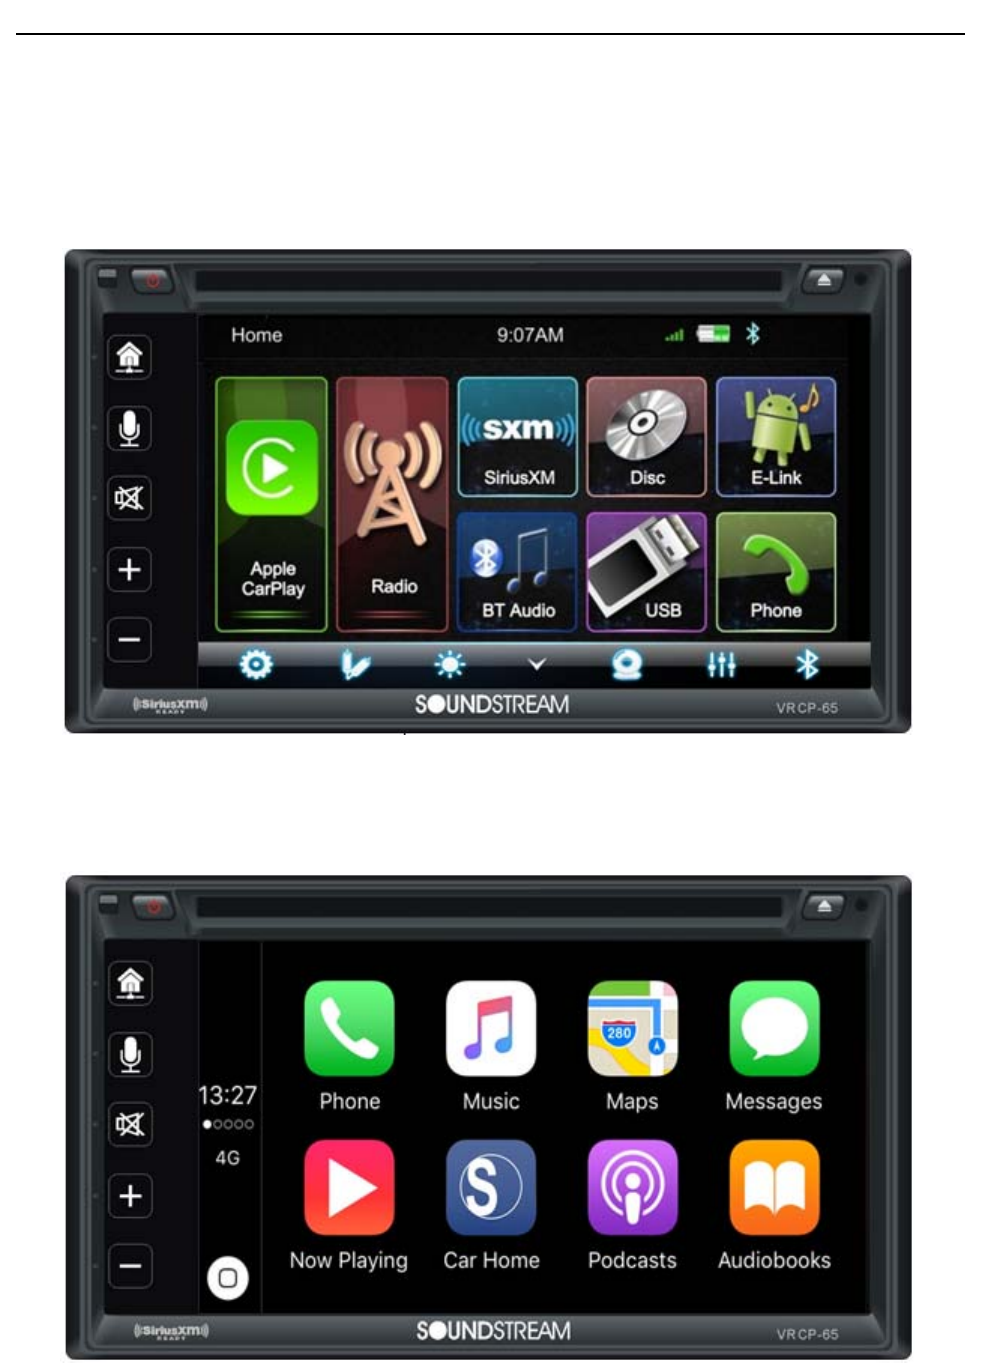
1. Appearance
MainMenu
CarPlayMenu
Page 4 of 37
Operation Instruction Manual VRCP-65
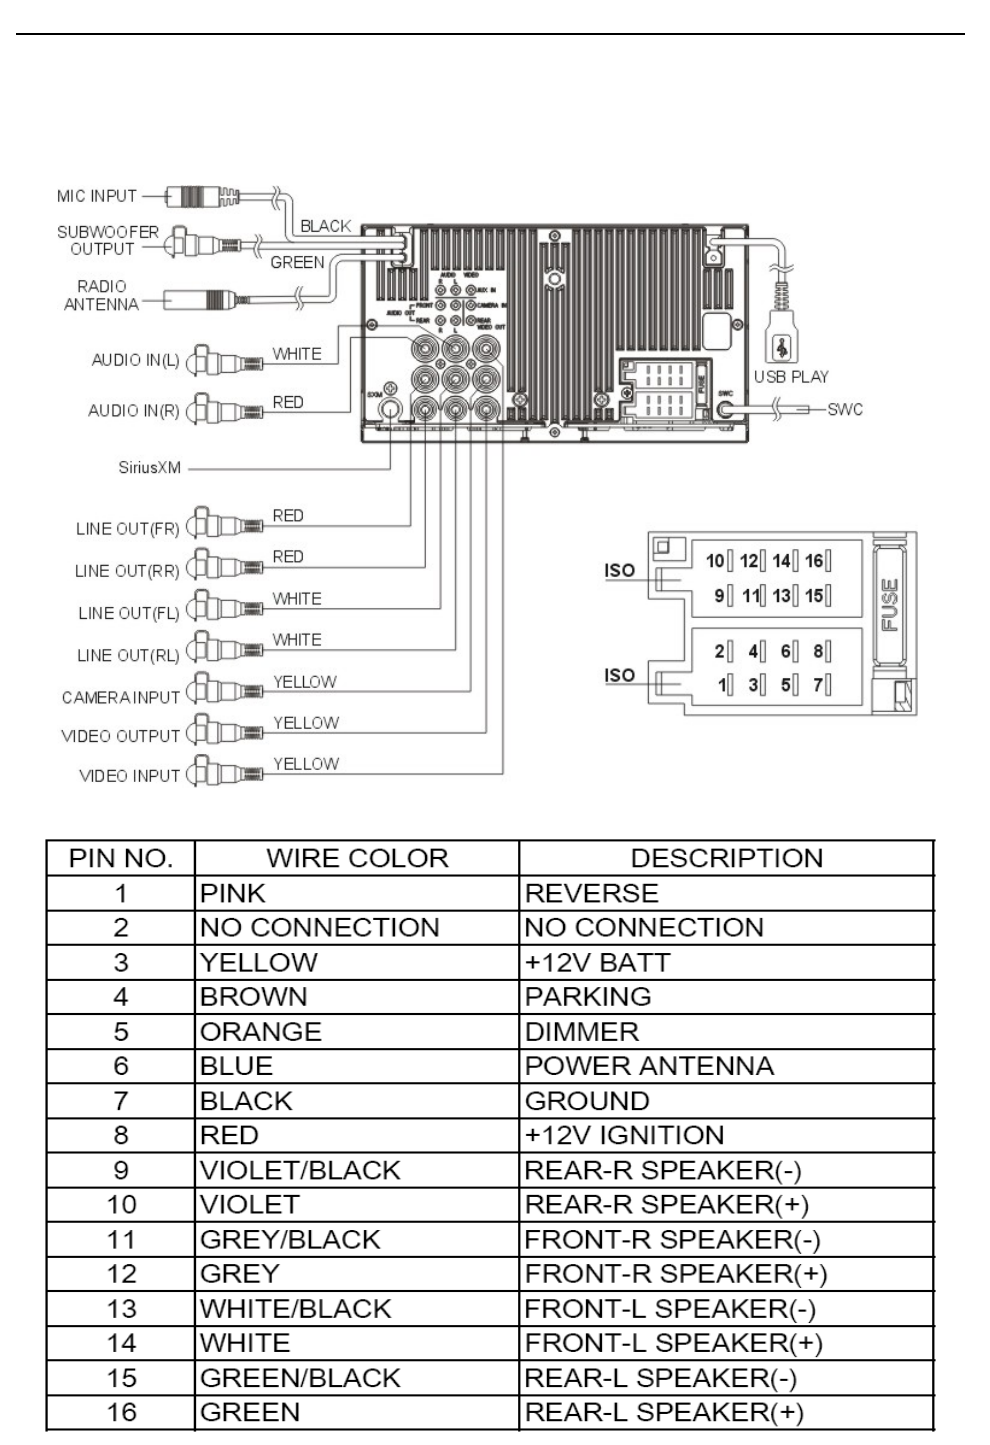
2. WIRINGCONNECTION
Page 5 of 37
Operation Instruction Manual VRCP-65
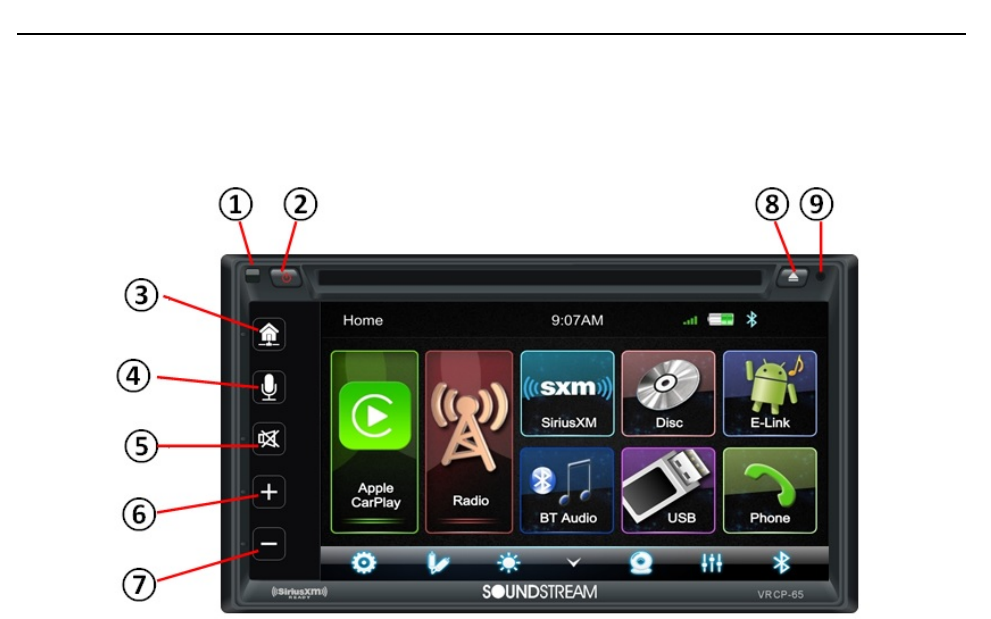
3. FRONTPANELDescription
①IRSENSOR
IRRemotecontrolsignalreceivingwindows.Maxdistanceis6‐8meters,in45degree.
②POWER
TurnPoweronoroff.DuringpowerOFF,pressPowerbuttontoturnONtheHeadunit.
DuringtheunitisON,longpresspowerbuttontoturnOFFtheHeadunit
③Home
Inanymode,touchtheHomebuttontoentertotheMainMenu.
④SIRI
InCarPlaymode,touchtheSIRIbuttontostarttheAppleSIRIfunction.
⑤MUTE
TotoggleMuteandunmute
⑥VOL+
IncrementtheVolumelevel(0~50).
⑦VOL‐
DecrementtheVolumelevel(50~0).
⑧EJECT
Insertorejectthedisc.
⑨RESET
ToresettheHeadunitforanyreason,useaballpenorpintopresstheRESETbutton.
Afterresettheheadunit,theheadunitwillberestart,allparameterandsettingwillbekept
asperviousstatus
Page 6 of 37
Operation Instruction Manual VRCP-65
4. MAINMENU
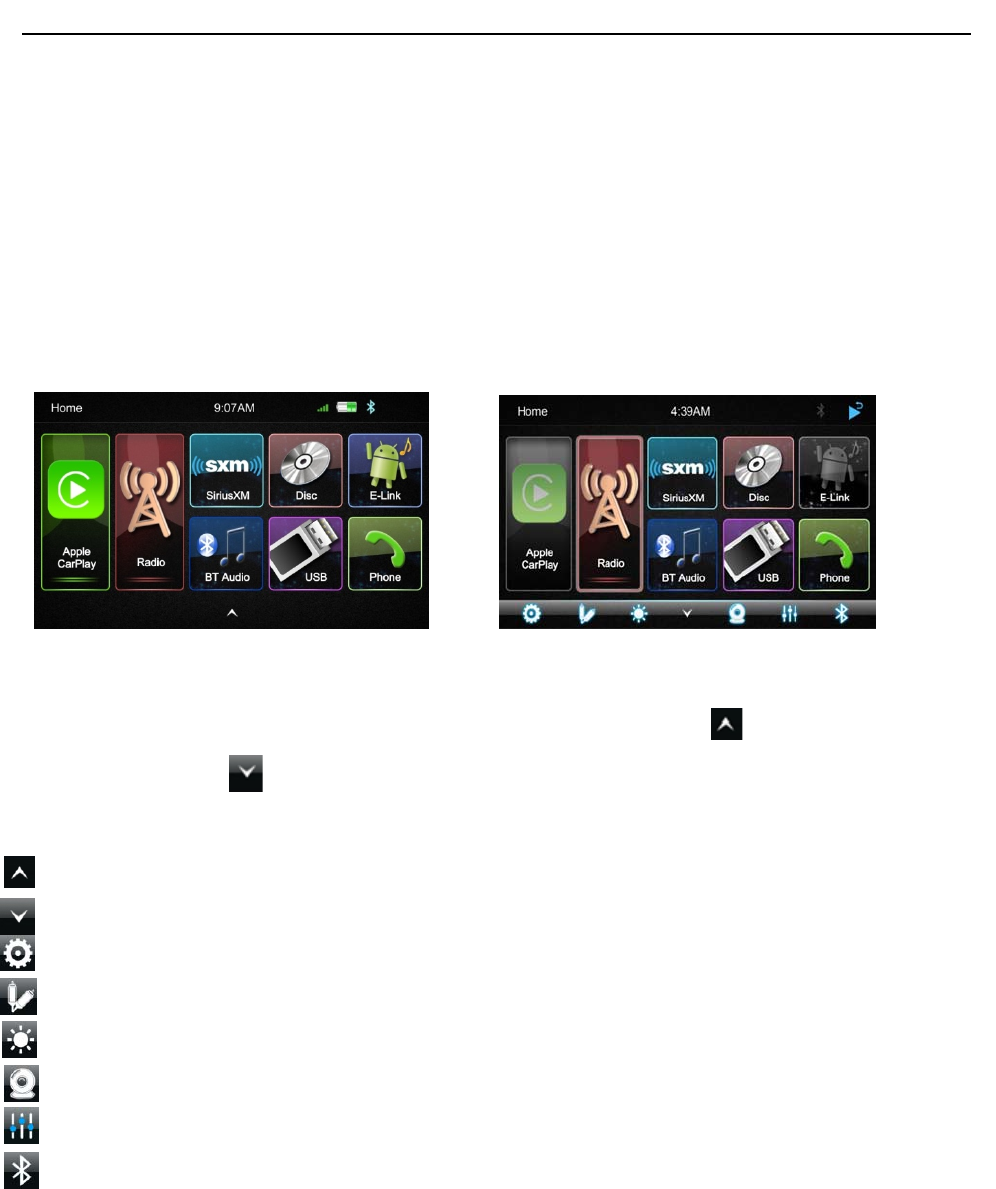
VRCP‐65isaTwoDinCarAudiowiththefollowingfunctions:
AppleCarPlay,Radio,SiriusXM®,BluetoothAudio,Disc(DVD),USB,E‐link(Android5.0orabove
smartphone)andPhone
TheMODEiconingreymeanthecorrespondingfunctionisnotreadyorproperdevicehavenot
beenconnected.
TouchthecorrespondingMODEicontoenterplayingmode.
Hiddensoftbuttonbar
Ahiddenpopupsoftbuttonbarislocatedatthebottom.Touchtheicontoshownthesoft
buttonbar.Touchthetohidden.
Popupthesoftbuttonbar
Hiddenthepopupsoftbuttonbar
Setup,toentertheSettingsMenu
AUXIN,toentertheAUXandA/VINinterface
Dimming,tochangeDaylightorNight(IflightingdetectisOFFinDisplaySetting)
RearCamera,toenterthecamerasettingmode
EQSetting,toentertheAudioEQsettingmenu
Bluetoothpairing
Page 7 of 37
Operation Instruction Manual VRCP-65
5. Settings
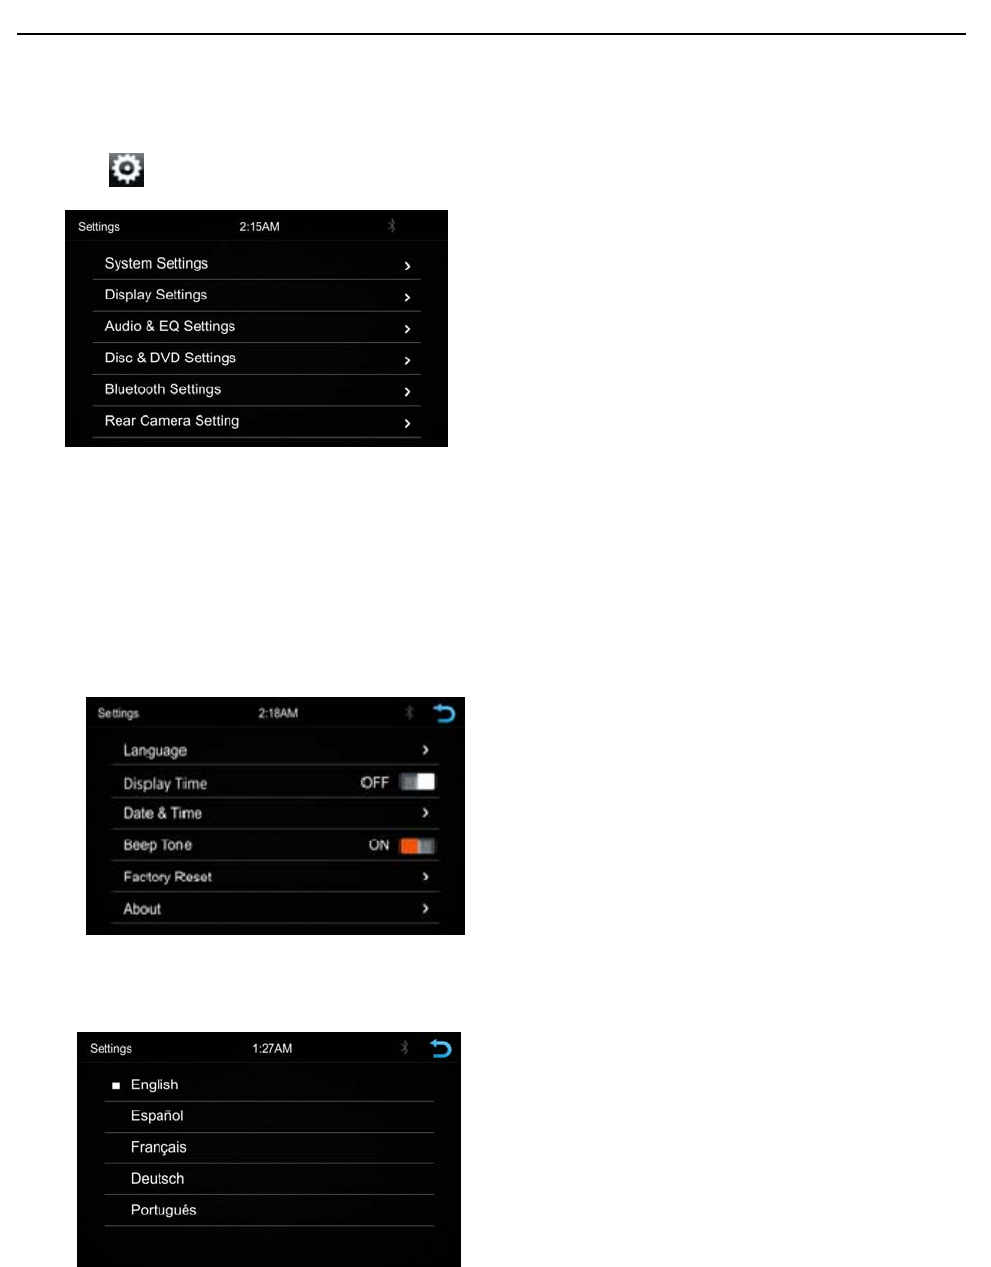
TouchtheicontoentertheSetupmenu.
TheSetupmenuisincludedSystemSettings,DisplaySettings,Audio&EQSettings,Disc&DVD
Settings,BluetoothSettingsandRearCameraSettings
SystemSettings
TheSystemSettingsallowtheusertosetuptheLanguage,DisplayTime,Date&Time,BeepTone,
FactoryResetandAbout
Language
DisplayTime:ON/OFF
‐ Toselectdisplayfullformatdatetime
Page 8 of 37
Operation Instruction Manual VRCP-65
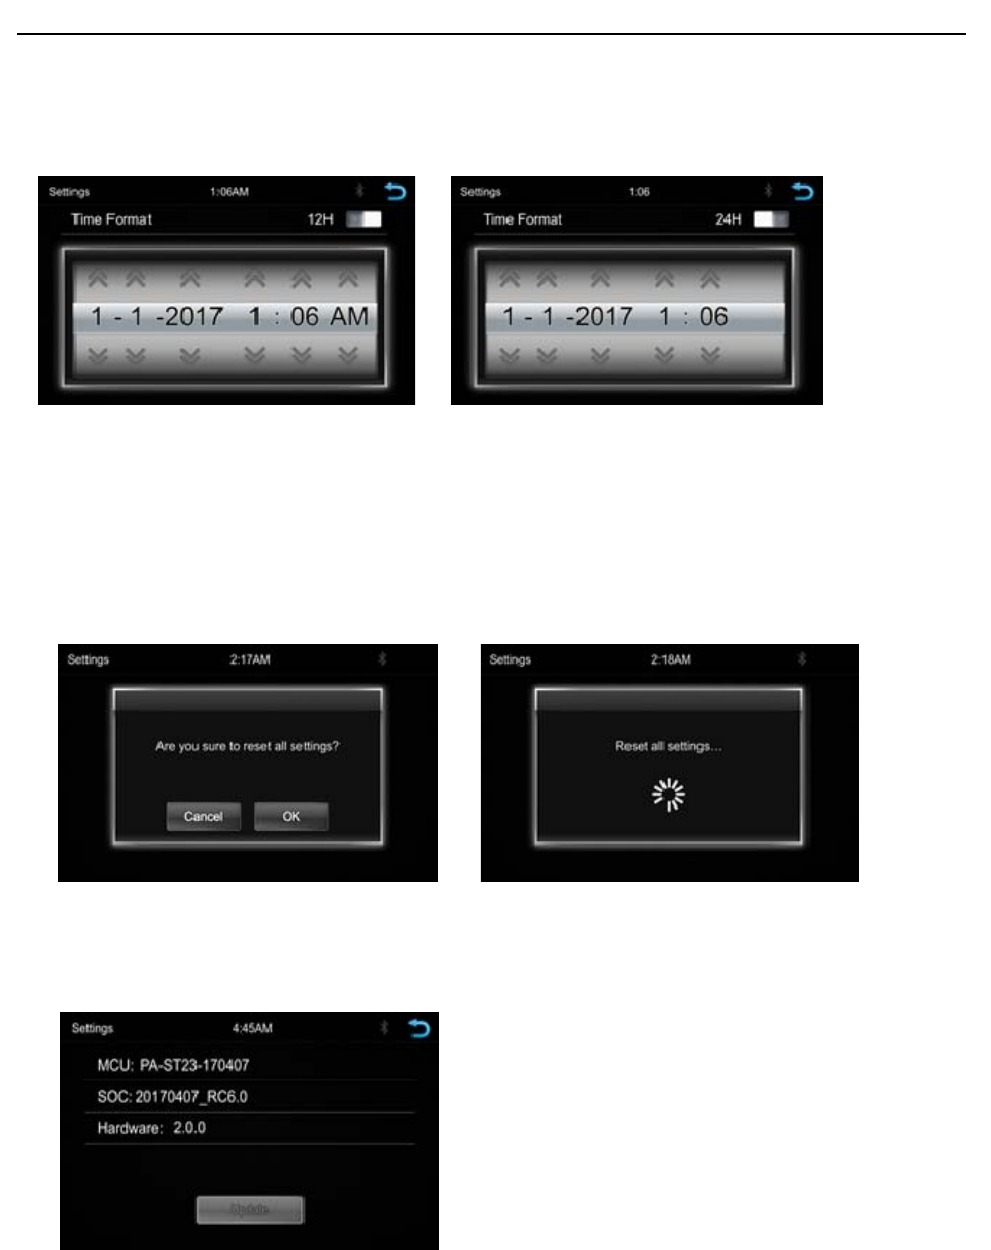
Date&Time:
‐ TosettingTimedisplayformat(12Hor24H),settingthedateandtime
BeepTone:On/Off
‐ TosetthetouchbuttonbeeptuneOnorOff
FactoryReset
‐ Toresetthedefaultfactorysetting.
About
‐ TodisplaytheUnitHardwareandFirmwareversion
Page 9 of 37
Operation Instruction Manual VRCP-65
DisplaySettings
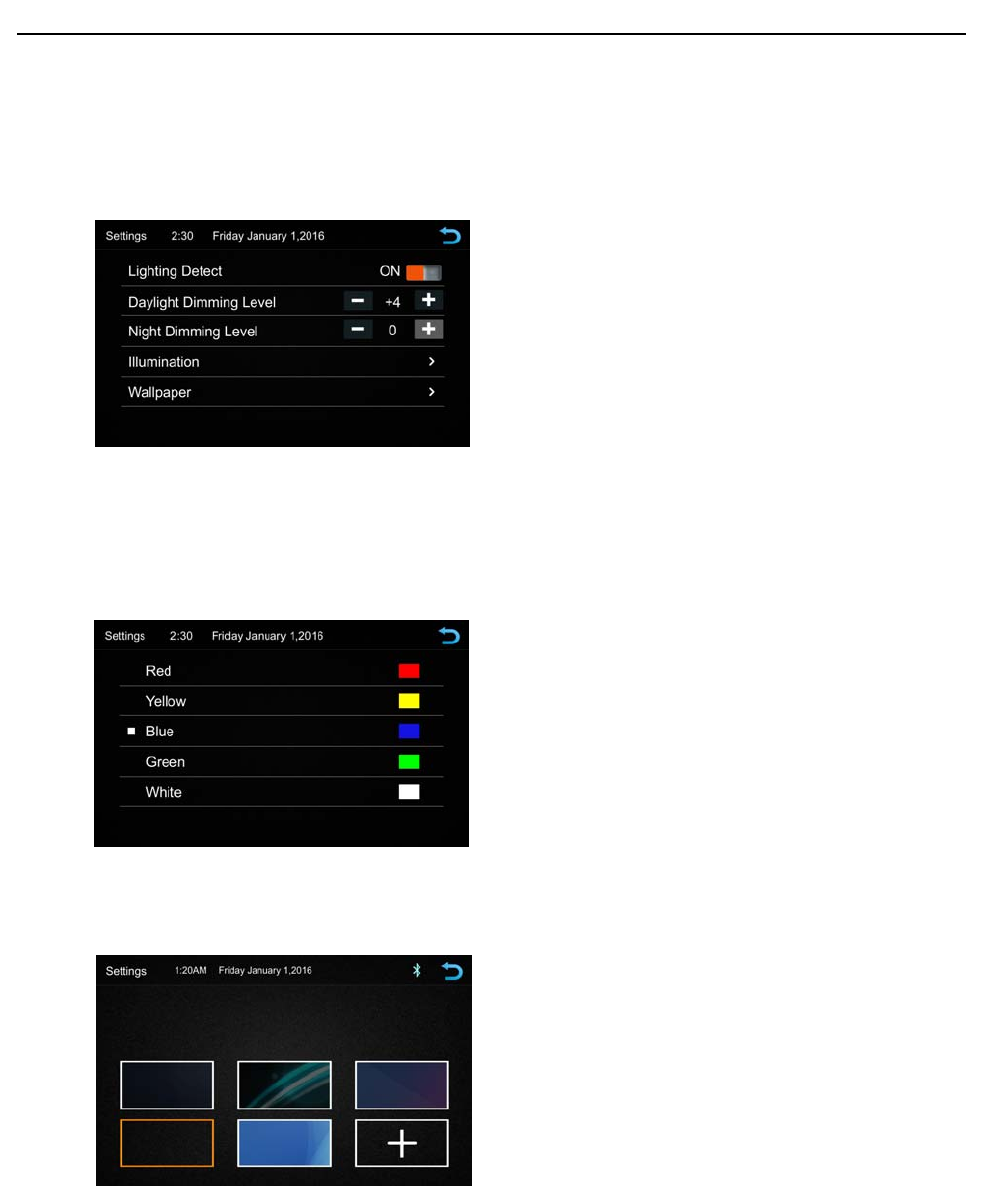
BelowistheDisplaysettingmenu,usercanselectLightingDetect,DaylightDimmingLevel,Night
DimmingLevel,IlluminationandWallpaper.
LightingDetect:On/Off
DaylightDimmingLevel:0–8
NightDimmingLevel:‐8–0
Illumination:Red/Yellow/Blue/Green/White
Wallpaper
UsercanselectthepresetwallpaperorselectthepictureinUSBdriverasthewallpaper.
Touchthecorrespondingpicturetoselectthepreferbackground.
Touch“+“,theheadunitwillsearchtheUSBphotofileforwallpaper.
SelectapictureandtouchOKtoaddthewallpaper
Page 10 of 37
Operation Instruction Manual VRCP-65
Audio&EQSettings
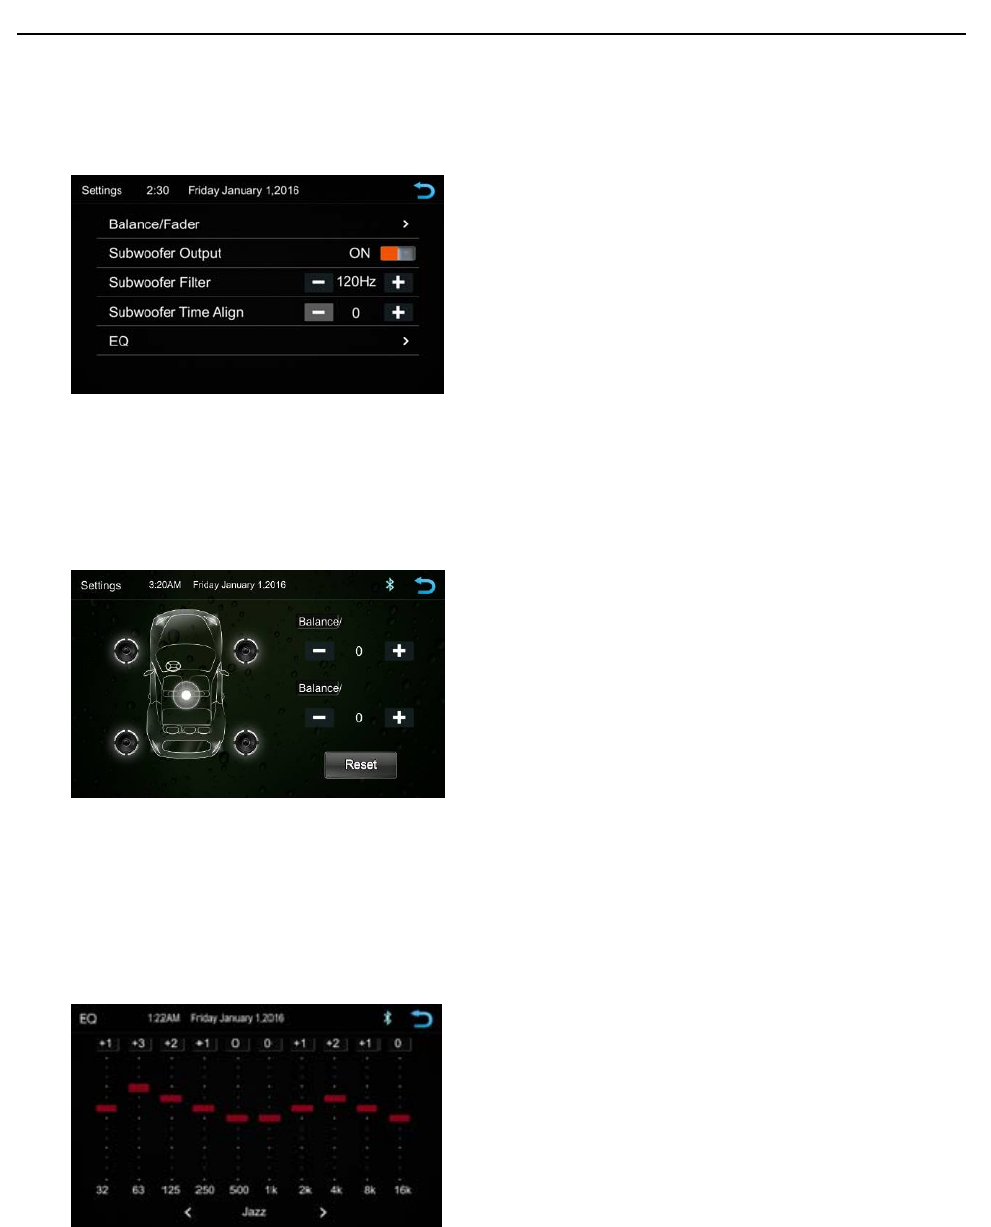
BelowshownistheAudioSettingMenu
Balance/Fader:
Touchthe+or–ofBalance/Fadetotuneforthedriverandpassengerpreference.
ThevalueofBalance(Left15–Right15)andFade(Front15–Rear15)
TouchResettosetbothBalanceandFadetozero
˙SubwooferOutput On/Off
˙SubwooferFilterOFF/50Hz/80Hz/120Hz/160Hz
˙SubwooferTimeAlign0–18ms
˙10‐BandEqualizer 10bandofEQtuning,slidetheEQbartotuneeachbandfrequency
levelaccordingtouserpreference.TouchResettosetallBandto0.
Orusercantouch<or>atthebottomtoselectthefollowingpresetEQ:
OFF/Custom/Jazz/Hip‐Hop/Pop/Rock/R&B
Page 11 of 37
Operation Instruction Manual VRCP-65
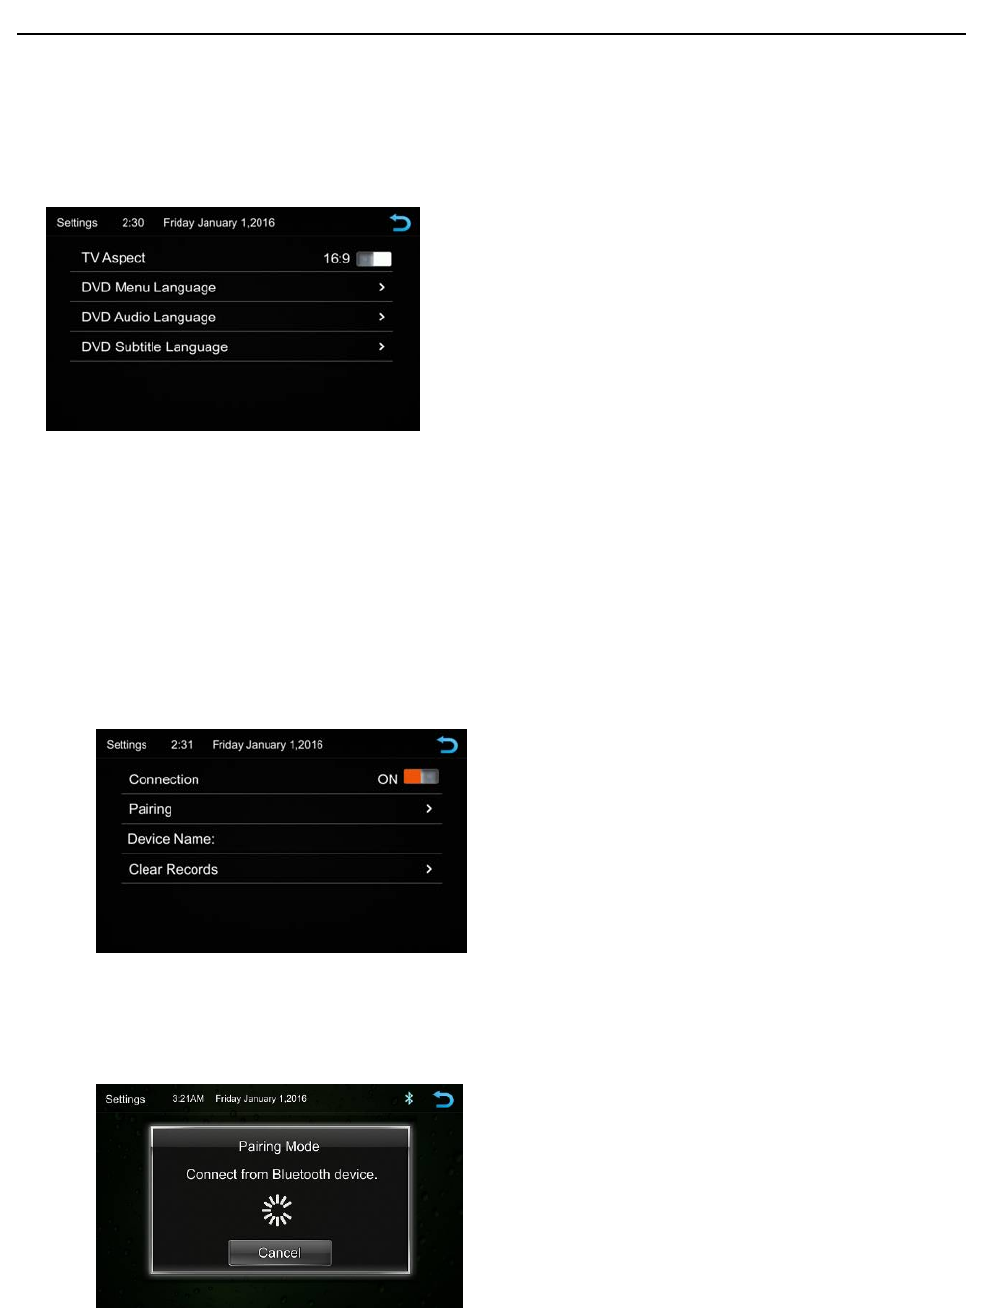
Disc&DVDSettings
TouchtheDisc/DVDSettingsfromthemenutoentertheDisc/DVDsettinginterface.
TVAspectSelectbetween16:9and4:3aspectratio
DVDMenuLanguage:
DVDAudioLanguage:
DVDSubtitleLanguage:
BluetoothSettings
TouchtheBluetoothSettingsfromthesettingmenuwillbeshownbelow
Connection:On/Off(SelectBluetoothconnectiononoroff)
Pairing>(Tostartthepairing)
DeviceName:showntheconnectedphoneordevice
ClearRecords(Toclearthedevicelistrecords)
Page 12 of 37
Operation Instruction Manual VRCP-65
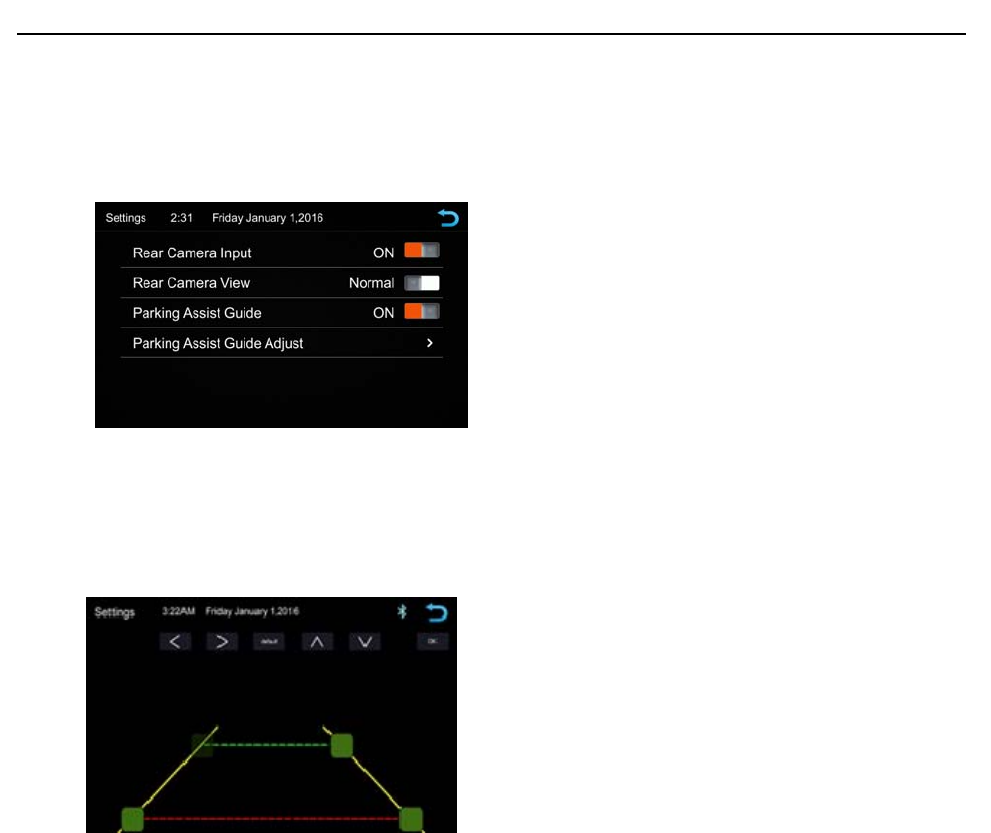
RearCameraSetting
TouchRearViewCameraintheSettingMenutoenterrearcamerasettinginterfaceasfollow:
RearCameraInput:On/Off
RearCameraView:Normal/Reverse
ParkingAssistGuide:On/Off
ParkingAssistGuideAdjustment
Touch>toenterParkingAssistGuideAdjustmentinterfacetoshowthebelowscreen
SelecttheadjustpositionandTouch˂/˃/˄/˅toadjust.
TouchResettoresumethedefaultParkingAssistLine
Page 13 of 37
Operation Instruction Manual VRCP-65
6. AppleCarPlay
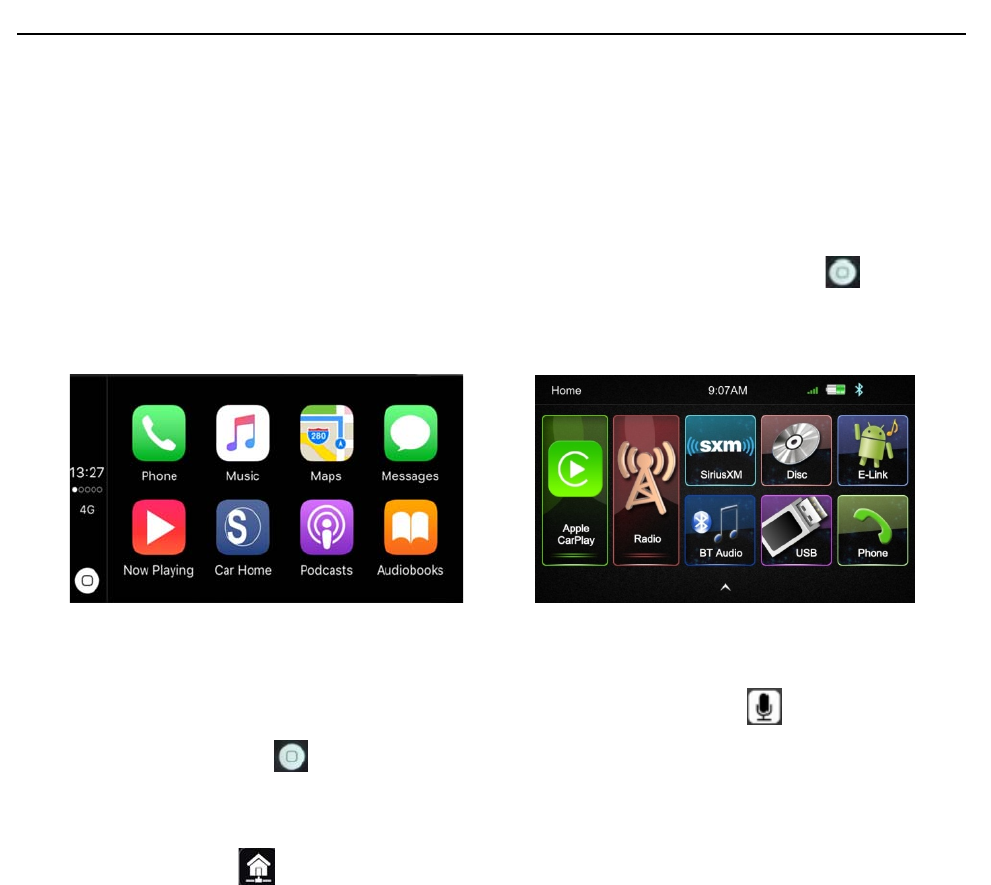
PlugtheiPhone(iPhone5orlattermodels,andiOS7.1orabove)throughthelighteningcableto
theUSBportoftheHeadunit.TheiPhonewillbeshownthe“CarPlay”.TheHeadunitwillenterthe
CarPlayinterface,theAPPthatsupporttheCarPlayfeaturewillbedisplayedontheHeadUnitas
shownbelow.TouchthecorrespondingAPPcanoperationtheoperation,touchthe buttonto
gobacktotheCarPlayinterface.
SIRI
InCarPlaymode,usercantalktoSIRItocontroltheCarPlayfunction.Pressbuttontostartthe
SIRIfunction,ortouchthebuttonfor2secondortheHOMEbuttonofiPhoneintheCarPlay
HomescreentotalktoSIRIforplayingmusic,GPS……
Notice:FortheSIRIfunctionintheHeadunit,theMicrophonehastobeenconnected.
InCarPlaymodel,touchbuttonorMainmenuicontoentertheHeadunitmainmenu
Page 14 of 37
Operation Instruction Manual VRCP-65
7. RadioMode
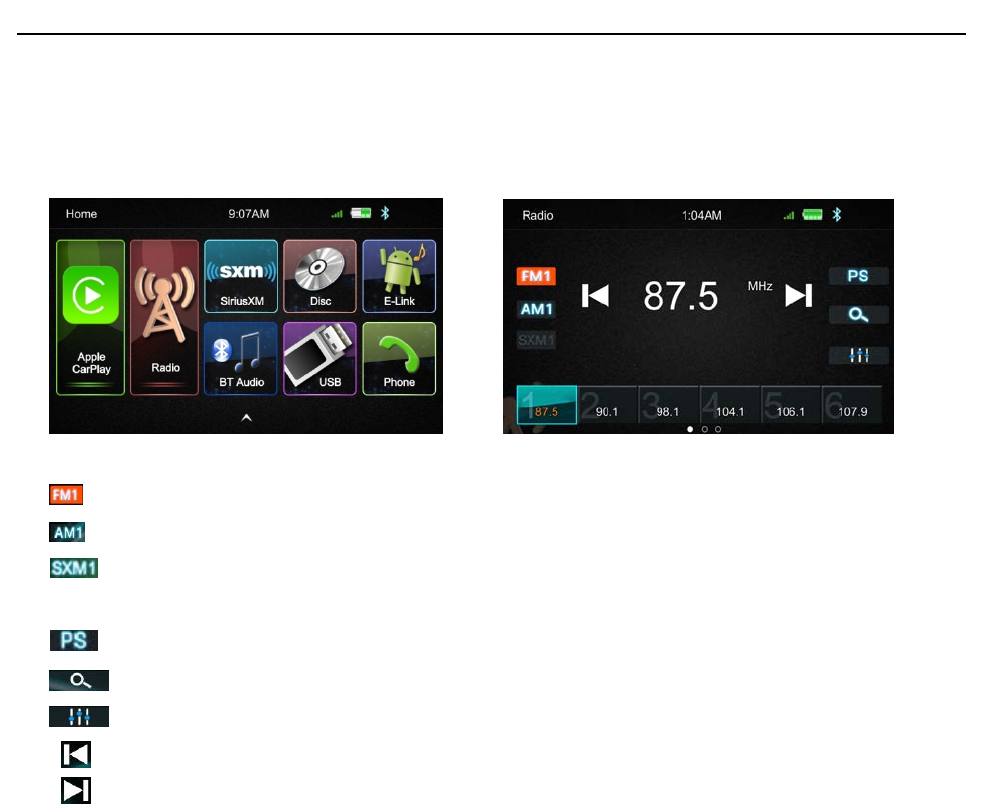
TouchtheRadiomodeicontoenterRadiomode
TouchFMcanchangebetweenFM1=>FM2=>FM3
TouchAMcanchangebetweenAM1=>AM2
TouchSiriusXMtoenterSiriusXMMode, ifaSiriusXMtunerisconnectedwiththeunit.
*Note - ASiriusXMConnectVehicleTunerandSubscriptionarerequiredandsoldseparatly.
TouchforPrescansearch,eachscannedstationwillbeplayfor3sec,touchagaintostop.
TouchitfortheAutoScansearching.
TouchittoenterEQsetting
ShorttouchforTune‐,longtouchforSeek‐.
ShorttouchforTune+,longtouchforSeek+.
Presetchannel,Sixpresetbuttonsstoreandrecallstationsforeachband.Touchandslidethepreset
channelcanswitchtonextbandFM1/FM2/FM3orAM1/AM2
SlidethefrequencytoSeek+/‐tonextstation
StoreaStation
1. Tuneradiotodesiredstation.
2. Touchandholdtheoneofthepresetchannelbuttonformorethan3seconds,thenthe
presetbuttonswillbehighlightedonthescreen,andthepresetstationwillbestore.
Page 15 of 37
Operation Instruction Manual VRCP-65
8. SiriusXMOperation
VRCP‐65isSiriusXMSatelliteRadioReady,tooperationthisfunction,connectanoptionalSiriusXM
ConnectVehicleTuner.
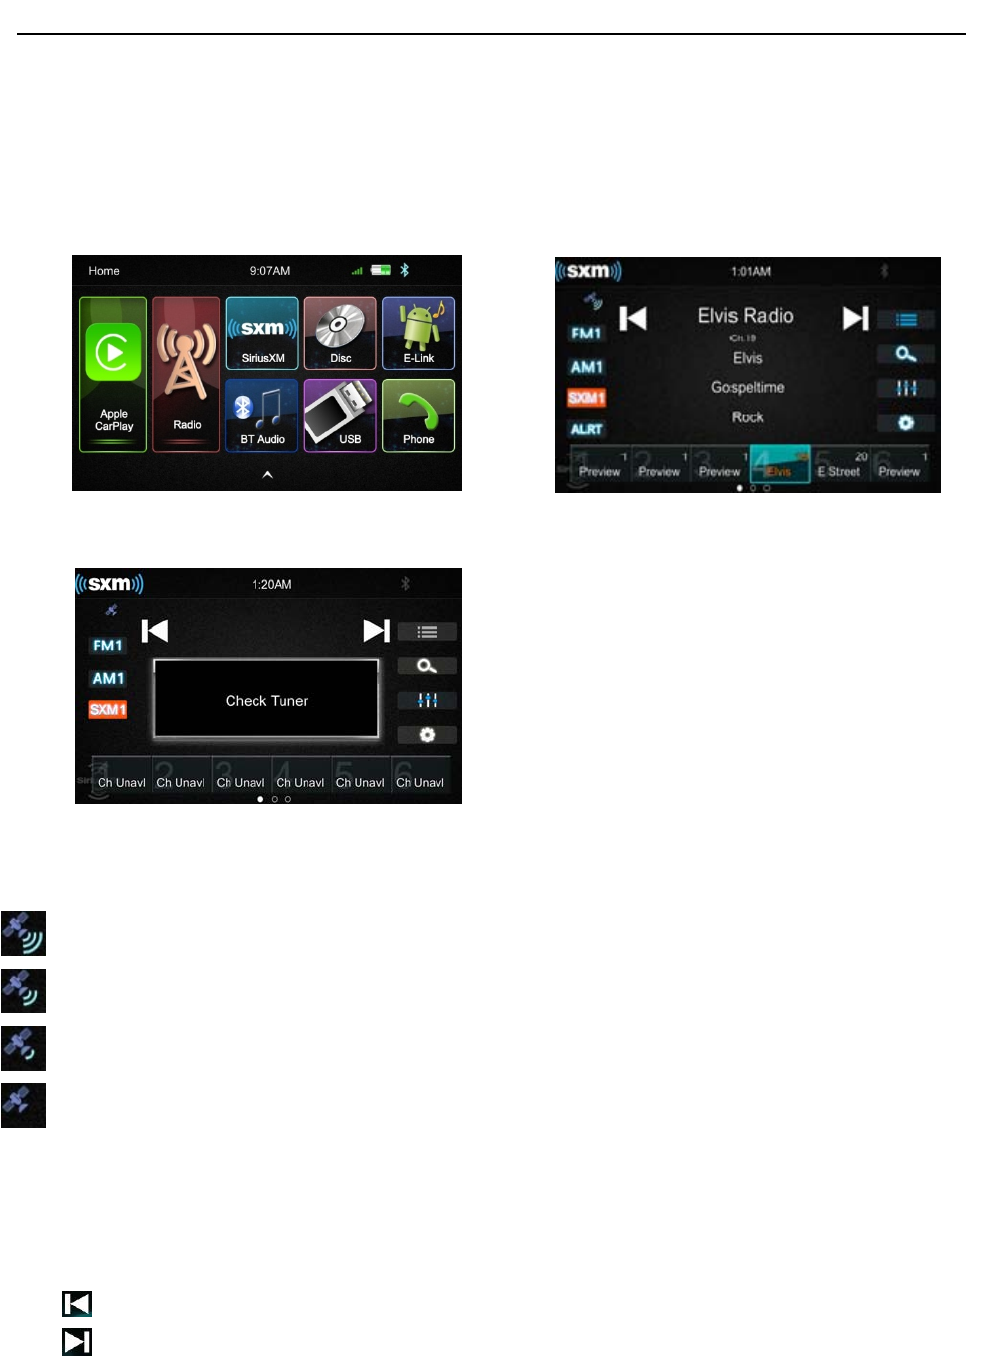
ToenterSiriusXMMode,touchtheSXMiconontheMainMenu.
Ifthescreenisshown“CheckTuner”asbelow,checktheSiriusXMtunerconnection.
SignalStrength
TheTopLeftcornerofthescreenisshowingtheSignalStrengthoftheSiriusXMsatellite
SiriusXMSignalisExcellent
SiriusXMSignalisGood
SiriusXMSignalisWeak
NoSiriusXMSignal
InSiriusXMmode,SiriusXMiconishighlighted.
TouchFM1togotoFMradio
TouchAM1togotoAMradio
Presstogotothenextchannel
Presstogototheperviouschannel
PresetStationsisshownatthebottom,sixpresetbuttonsstoreandrecallstationsforeachband.
Page 16 of 37
Operation Instruction Manual VRCP-65
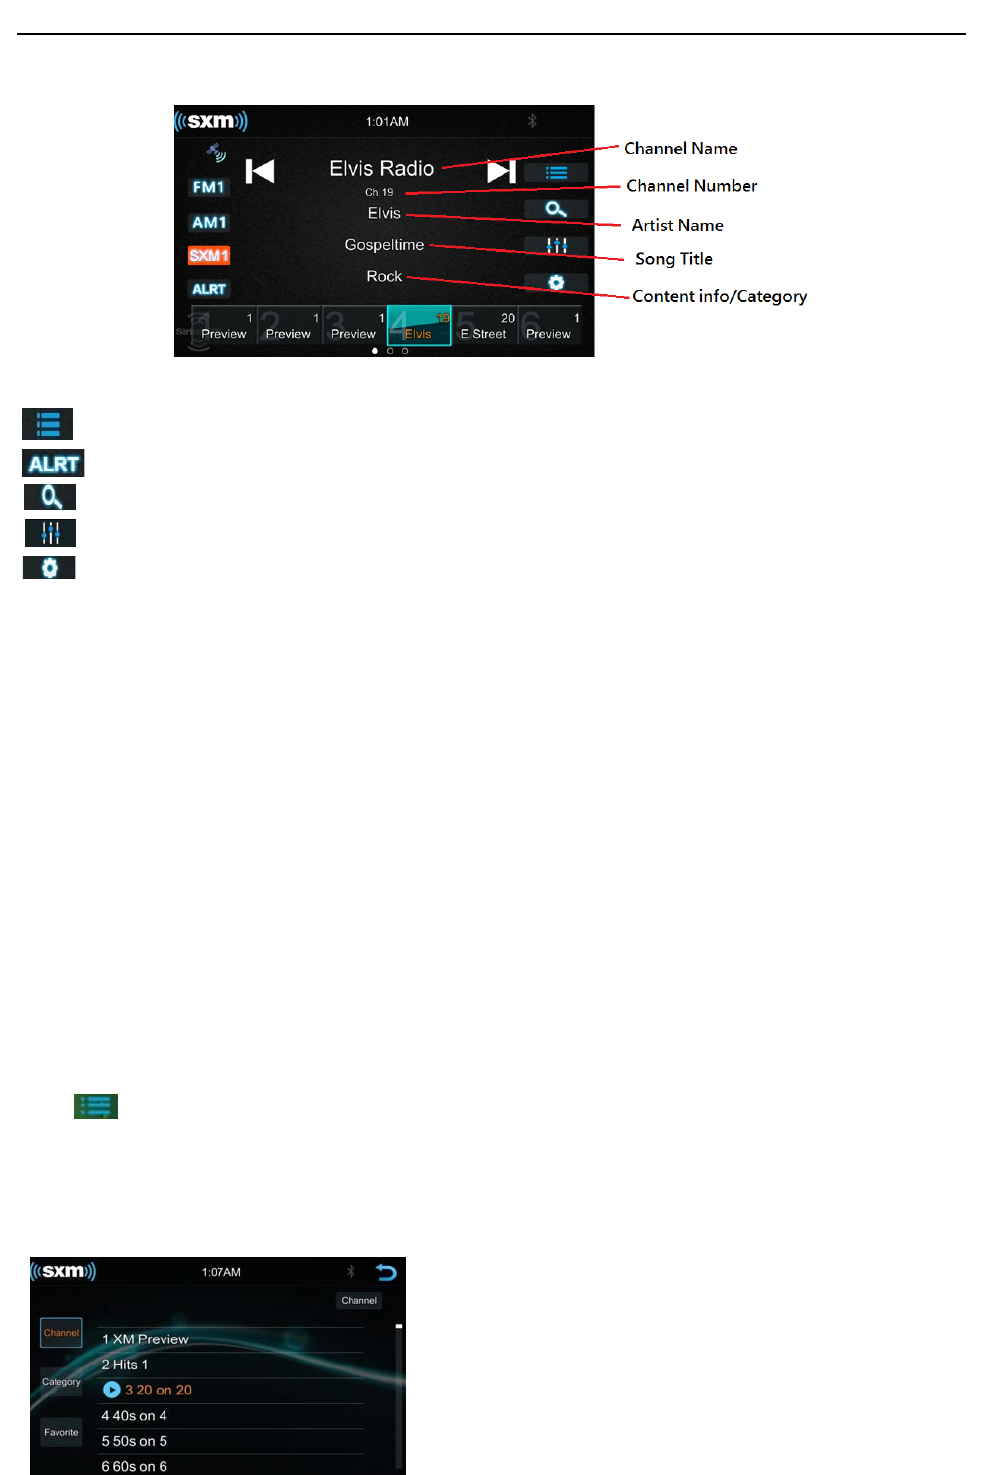
Thefollowingfunctionsarealsosupported
Browsefunction
FavoriteAlerts,Touchtolistthefavoritechanneltodirectselectthechannel
DirectTunefunction
EQSettingfunction
SiriusXMSettingMenu
ArtistandSongAltert
WhilelisteningtoSiriusXMSatelliteRadio,usercanmarkArtistsand/orSongsforwhichyouwishto
bealerted.TheradiowilldisplayanAlertmessagewhenamatchingartistorsongisfoundon
anotherchannel.Thenusercanchooseifyouwanttotunetothatfavoriteorusercanignorethe
alertandstayonyourcurrentchannel.
Tostoreanartistorsongtitle,touchonthe"artist"or"Song"metadataonthedisplay.Userwill
thenbepromptedtosetthealertfortheArtistortheSongTitle.
Userwillbealertedwhenoneofyourstoredartistsorsongsisplayingonanotherchannel.If
multilealertshappenatthesametime,orthealertgetsdismissed,usercantouchtheALRTbutton
tolistthechannelsthatarecurrentlyplayingyourartistorsong.
BrowserFunction
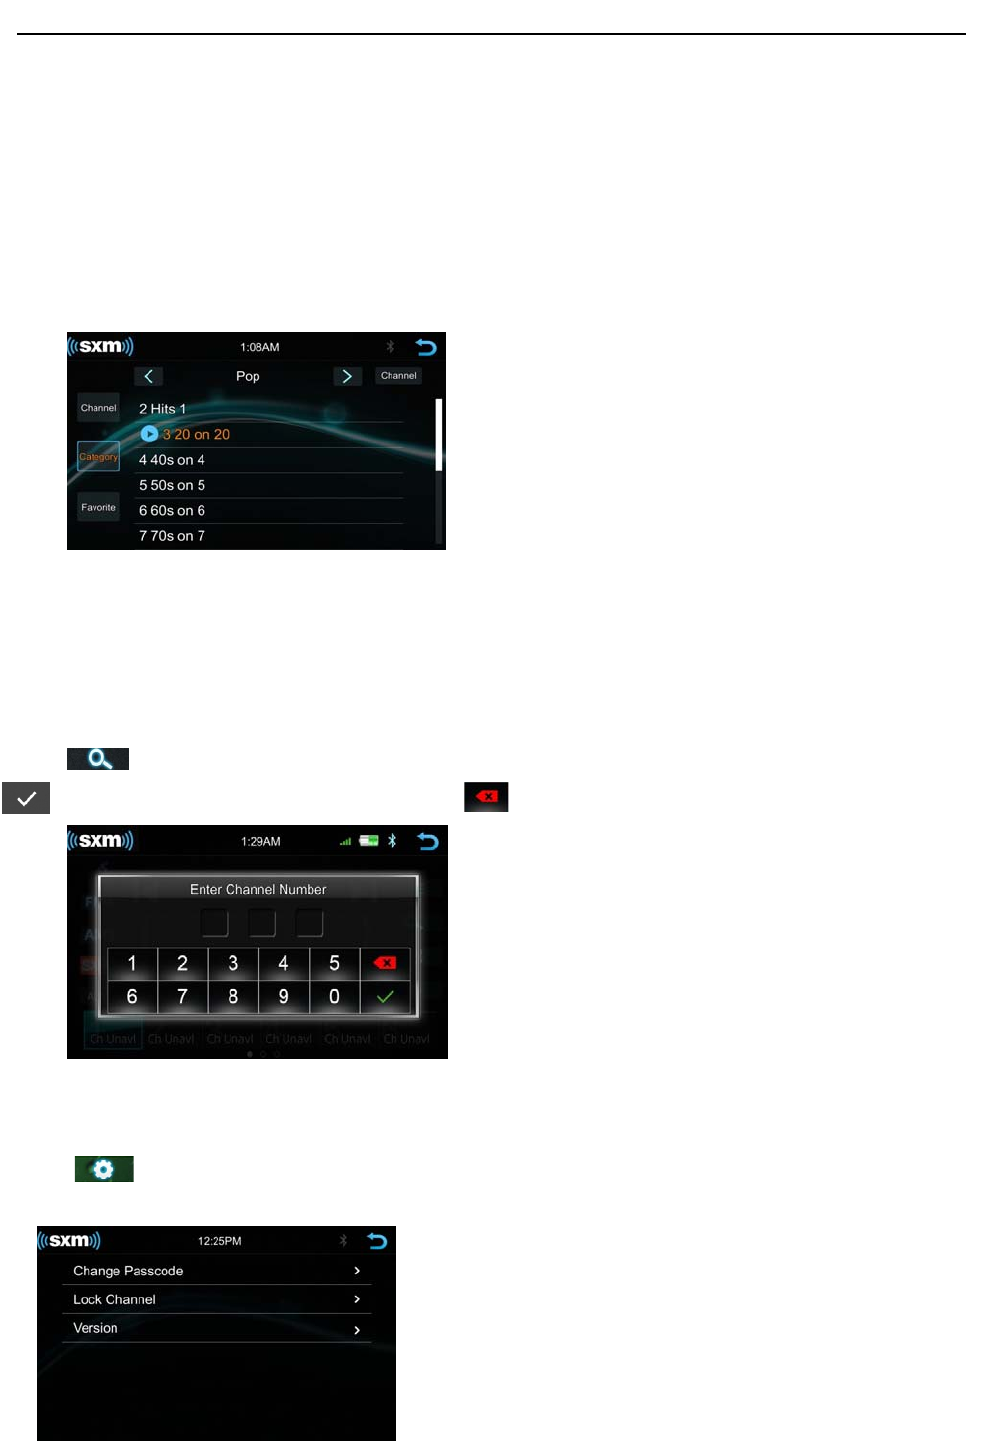
Touch to browse the channel. User can browse by select the Channel List and Category List.
ChannelList
Touch“Channel”buttonatLeftsidetoshowthechannellisting
Page 17 of 37
Operation Instruction Manual VRCP-65
Slidethebaratrighttobrowsethechannel
Touch“Channel”buttonattoprightcornertochangethedisplaydifferentMetadataasChannel
Name,SongTitle,Artist/CategoryName,ContentInfoandCategoryName
CategoryList
Touchthe“Category”fortheCategorylist
ThechannelwillbeshownaccordingtodifferentCategory.Touch<or>toselectdifferentCategory.
Touch“Channel”buttonattoprightcornertochangethedisplaydifferentMetadataasChannel
Name,SongTitle,Artist/CategoryNameandContentInfo.
DirectTune
Press toshownthedirecttuneinterface,usercandirectenterthechannelnumberand
touchtogotothedesirechannel.Pressbackspacetocleartheperviousdigit
SiriusXMSettingMenu
TouchtoentertheSiriusXMsettingmenu.ItallowsusertoChangePasscode,LockChannel
andchecktheVersion.
Page 18 of 37
Operation Instruction Manual VRCP-65
ChangePasscode
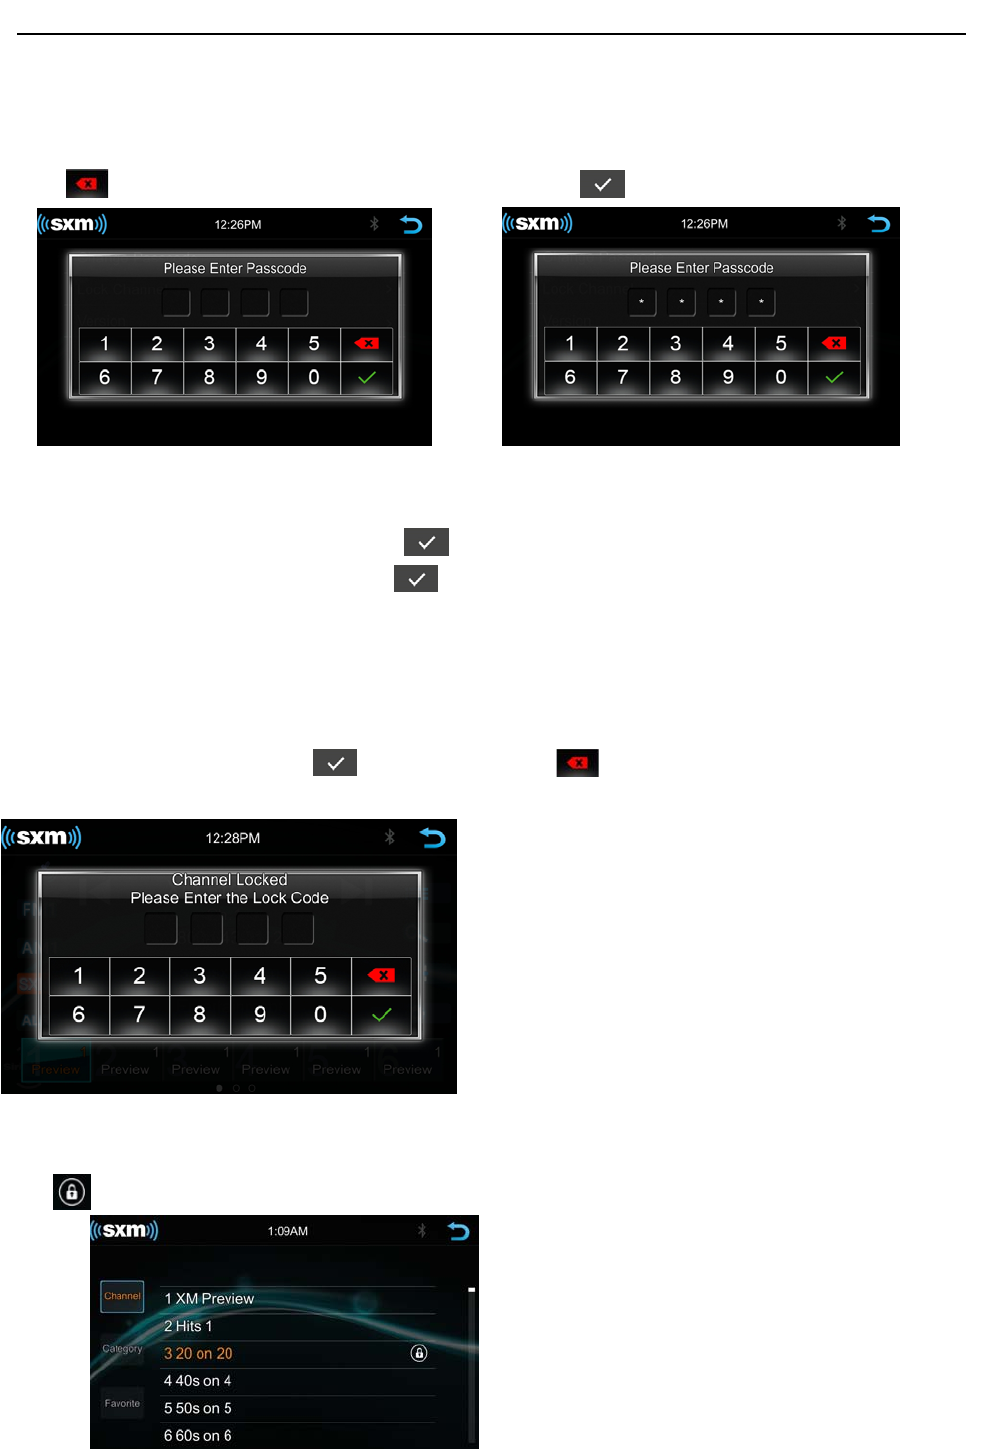
Touch>oftheChangePasscodetoshowthebelowscreen.Inputthepasscodebyusingthekeypad.
Presstocleartheperviousdigitifinputwrong.Touchtoconfirminput.
Ifthepasscodeiscorrect,thebelowscreenwillbeshowntoallowusertoEnterNEWPasscode.
Inputanew4digitspasscodeandselecttoconfirmthenewpasscode
Inputthepasscodeagainandpresstoconfirm,thenthepasscodecanbesuccessfully
changed.
LockChannel
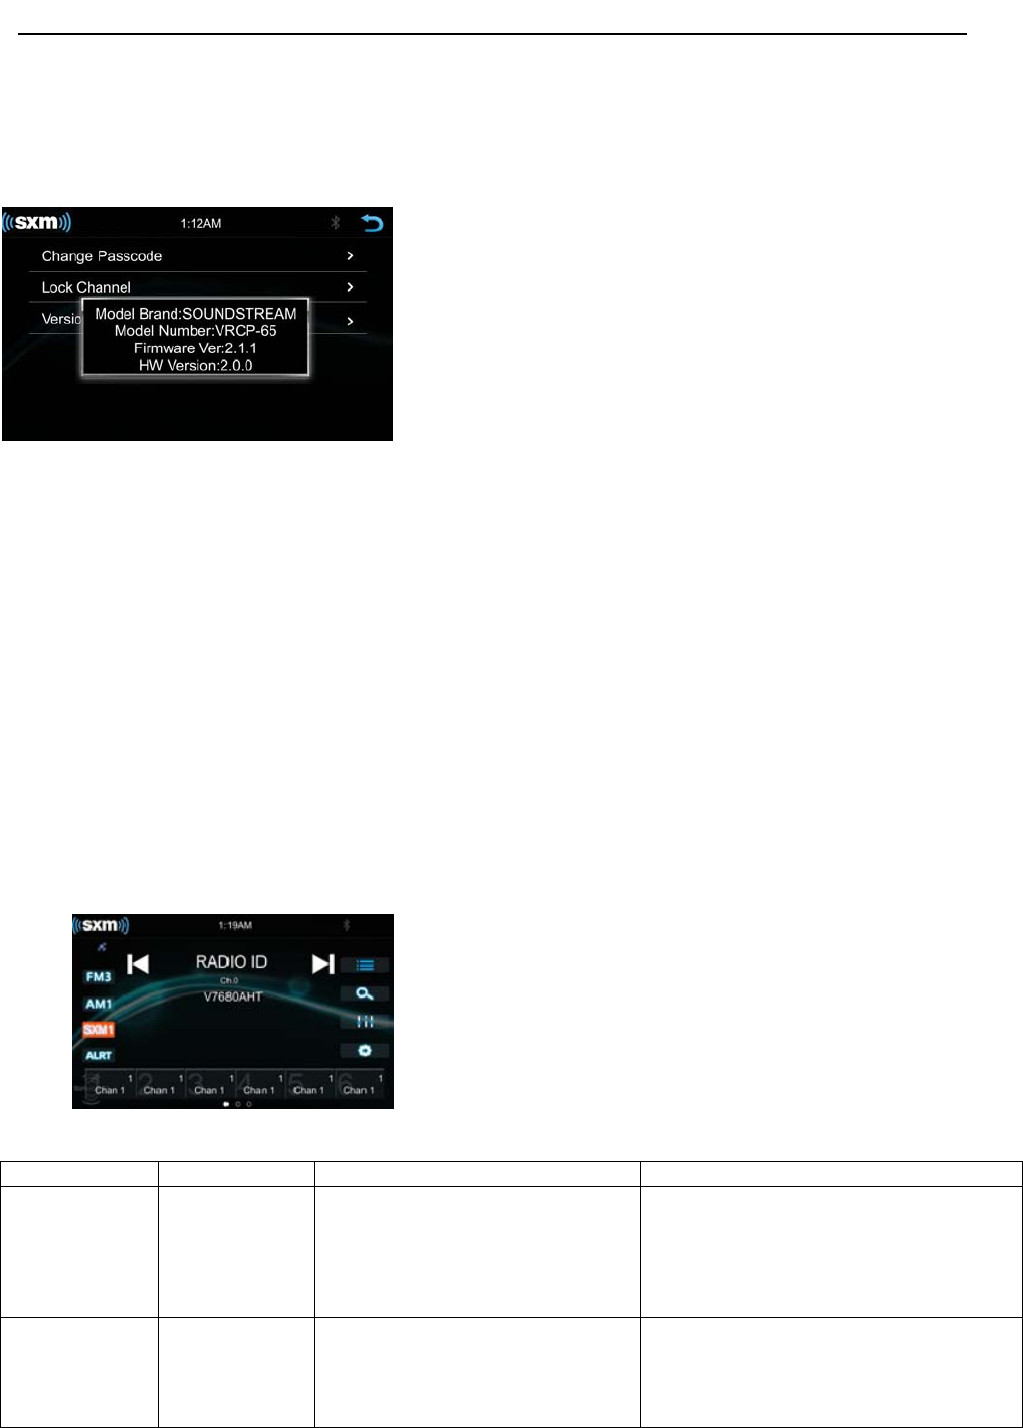
Press>oftheLockChannelinSiriusXMsettingmenutoentertheLockchannelinterfaceasbelow.
Inputthepasscodeandtouchtoconfirm,presstobackspacetoremovethepervious
digitifinputwrongly
Ifthepasscodeiscorrect,theunitwillenterthelockchannellist,selectthechannelforanychannel
thathasbeenlocked.Tapthelockedchannelagaintoremovefromthelockedchannellist.Thelock
iconwillbeshownthatthatyouwouldliketolock.
Page 19 of 37
Operation Instruction Manual VRCP-65
Version
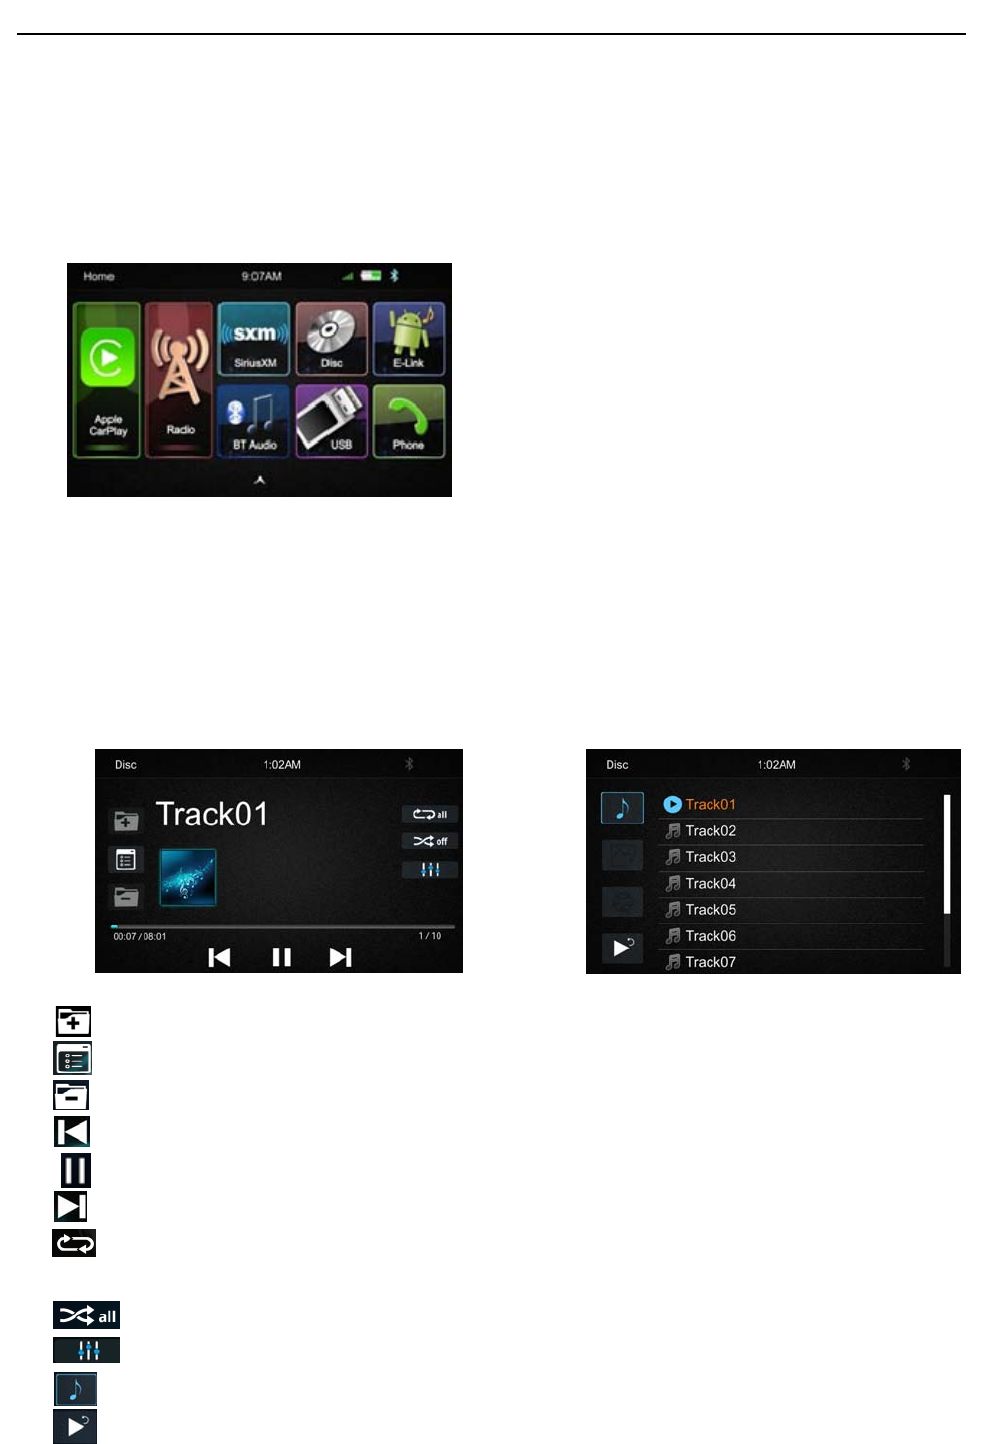
PressVersioninthemenu,thebelowscreenwillbeshowntheVRCP‐65Softwareversion
information
ResetSiriusXMpasscode
ThedefaultSiriusXMpasscodeis0000,Ifyouforgetthepasscode,followthestepsbelowtorestore
theunittothedefault.
1. EnterSettings;
2. Setthetimeformatis24Handthedate/timeto2001‐1‐1 01:01;
3. EnterSiriusXMmodeandselectdirecttune;
4. Inputthechannelnumber9992(thedisplayonlycanshow999);
5. PressconfirmtoresettheSiriusXMpasscodetodefault
RadioID
Tunetochannel0todisplaytheRadioID.youcanusechannelup/downordirecttune.
AdvisoryMessage
On‐ScreenDisplayAdvisoryMessageCauseExplanation/Solution
CheckAntennaCheckAntenna
Theradiohasdetectedafaultwiththe
SiriusXMantenna.Theantennacablemay
beeitherdisconnectedordamaged.
•Verifythattheantennacableisconnectedtothe
SiriusXMConnectVehicleTuner.
•Inspecttheantennacablefordamageandkinks.
Replacetheantennaifthecableisdamaged.
CheckTunerCheckTuner
•Theradiohasdifficultycommunicating
withtheSiriusXMConnectVehicleTuner.
•Thetunermaybedisconnectedor
damaged
•VerifythattheSiriusXMConnectVehicleTuner
cableissecurelyconnectedtotheradioSiriusXM
connector/cable.
•Iftheproblempersists,disconnectandreconnect
thetunerandthencontactyourdealer.

Page 20 of 37
Operation Instruction Manual VRCP-65
NoSignalNoSignal
TheSiriusXMConnectVehicleTunerhas
difficultyreceivingtheSiriusXMsatellite
signal.
•Verifythatyourvehicleisoutdoorswithaclear
viewofthesouthernsky.
•VerifythattheSiriusXMmagneticmountantenna
ismountedonametalsurfaceontheoutsidethe
vehicle.
•MovetheSiriusXMantennaawayfromany
obstructions.
•Inspecttheantennacablefordamageandkinks.
Replacetheantennaifthecableisdamaged.
•Iftheproblempersists,disconnectandreconnect
thetunerandthencontactyourdealer.
ChannelNot
Available
ChannelNot
Available
Thechannelthatyouhaverequestedisnot
avalidSiriusXMchannelorthechannel
thatyouwerelisteningtoisnolonger
available.Youmayalsoseethismessage
brieflywhenfirstconnectinganew
SiriusXMConnectVehicletuner.Visit
www.siriusxm.comformoreinformation
abouttheSiriusXMchannellineup.
Visitwww.siriusxm.com/channellineupformore
informationabouttheSiriusXMchannellineup.
ChannelNot
Subscribed
ChannelNot
Subscribed
Thechannelthatyouhaverequestedisnot
includedinyourSiriusXMsubscription
packageorthechannelthatyouwere
listeningtoisnolongerincludedinyour
SiriusXMsubscriptionpackage
•QuestionsaboutyoursubscriptionintheUnited
Statespleasevisit
http://www.siriusxm.com/activatenoworcall
SiriusXMListenerCareat1‐866‐635‐2349.
•QuestionsaboutyoursubscriptioninCanada
pleasevisit
http://www.siriusxm.ca/help/activation‐help/or
callXMListenerCareat1‐877‐438‐9677
ChannelLockedChannelLockedThechannelthatyouhaverequestedis
Lockedbytheradio
SeethesectiononLockChannel,page18formore
informationontheLockChannelfeatureandhow
toaccesslockedchannels
PleaseEnterthe
LockCode
PleaseEnterthe
LockCode
Userpromptedtoenterthelock/unlock
code.Enterthefourdigitcodetounlockthechannel
IncorrectPasscode
Entered
IncorrectPasscode
Entered
Theunlockcodeenteredbytheuseris
incorrect
•Inputthecorrectfourdigitcodetounlockthe
channel.
•Resetlockcodetodefaultfollowinginstructions
onpage19
Page 21 of 37
Operation Instruction Manual VRCP-65
9. Disc
InsertingaDisc
InsertaDisctotheslotoftheheadunit,pullthediscorpresstheEjectbuttontomakethediscinto
thedeck.TouchtheDisctoperformDiscplayingfunction.
EjectingaDisc
Duringdiscplayingorinsidethedeck,presstheEjectbuttontostopplayingthediscandejectthe
disc.AfterthediscisejectedandpresstheEjectbutton,thediscwillgoinsidetotheunit.
PlayingCD/MP3Disc
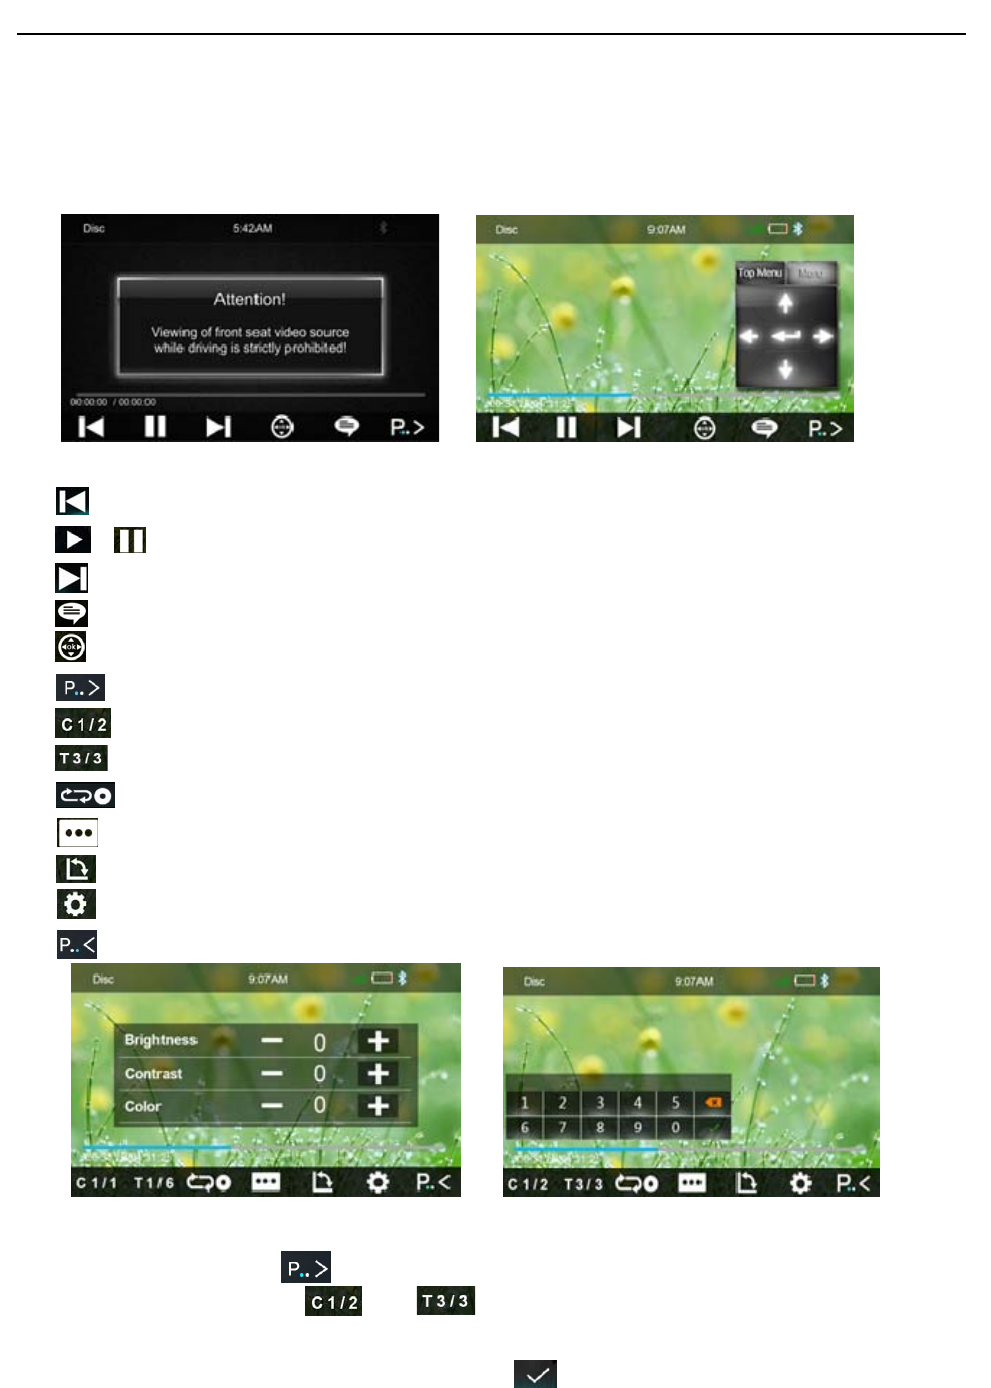
IfplayingtheCD/MP3Disc,thefollowingwillbeshown.
Pressittoskiptothenextfolder(forMP3)
Pressittosearchsongfilesorfolderlist.
Pressittoskiptothepreviousfolder(forMP3).
Shortpressittoskiptotheprevioustrack,longpressittofastreverse.
Pause/Playbutton.
Shortpressittoskiptothenexttrack,longpressittofastforward.
Repeat:ForCD:PressforswitchbetweenRepeatAllandRepeatOne
ForMP3:PressforselectRepeatAll,RepeatOneorRepeatDirectory
Pressittoturnon/offrandomplay.
Pressittoturnon/offtheAudioSettingsmenutoadjusttheEQ.
Pressittoselectsongs.
Returnbutton.
Page 22 of 37
Operation Instruction Manual VRCP-65
DVD/VCDPlayback
TheVideodisplaycanbewatchedonlyduringtheCarisParked
Parkingwiring:Highlevel(+12vorNC)isdriving;lowlevel(ground)isparking
Shortpressittoskiptotheprevioustrack,longpressittofastreverse.
/Pause/Playbutton.
Shortpressittoskiptothenexttrack,longpressittofastforward.
Touchittoselectsubtitlelanguage
Touchtoopen/closethenavigationbutton
Touchittoshowthetoolsbar
TouchittoselectChapter
TouchittoselectTitle
PressittoselectrepeatAll,RepeatOneandRepeatOff
Touchittoselectsubtitlelanguageorsuboff.
Touchittochangetheviewingangle.
TouchittoadjusttheBrightness/Contract/Color
Touchittohiddenthetoolsbar
Directsearch
1. Touchthebutton ,
2. Touchthebuttonortoselectachapterortitledirectlyusingthe
on‐screendisplaydirectentrymenudisplay.EntertheDirectSearchmenu,
3. EnterthechapterorTitleDigital,touch thatstartsthefunction.
Page 23 of 37
Operation Instruction Manual VRCP-65
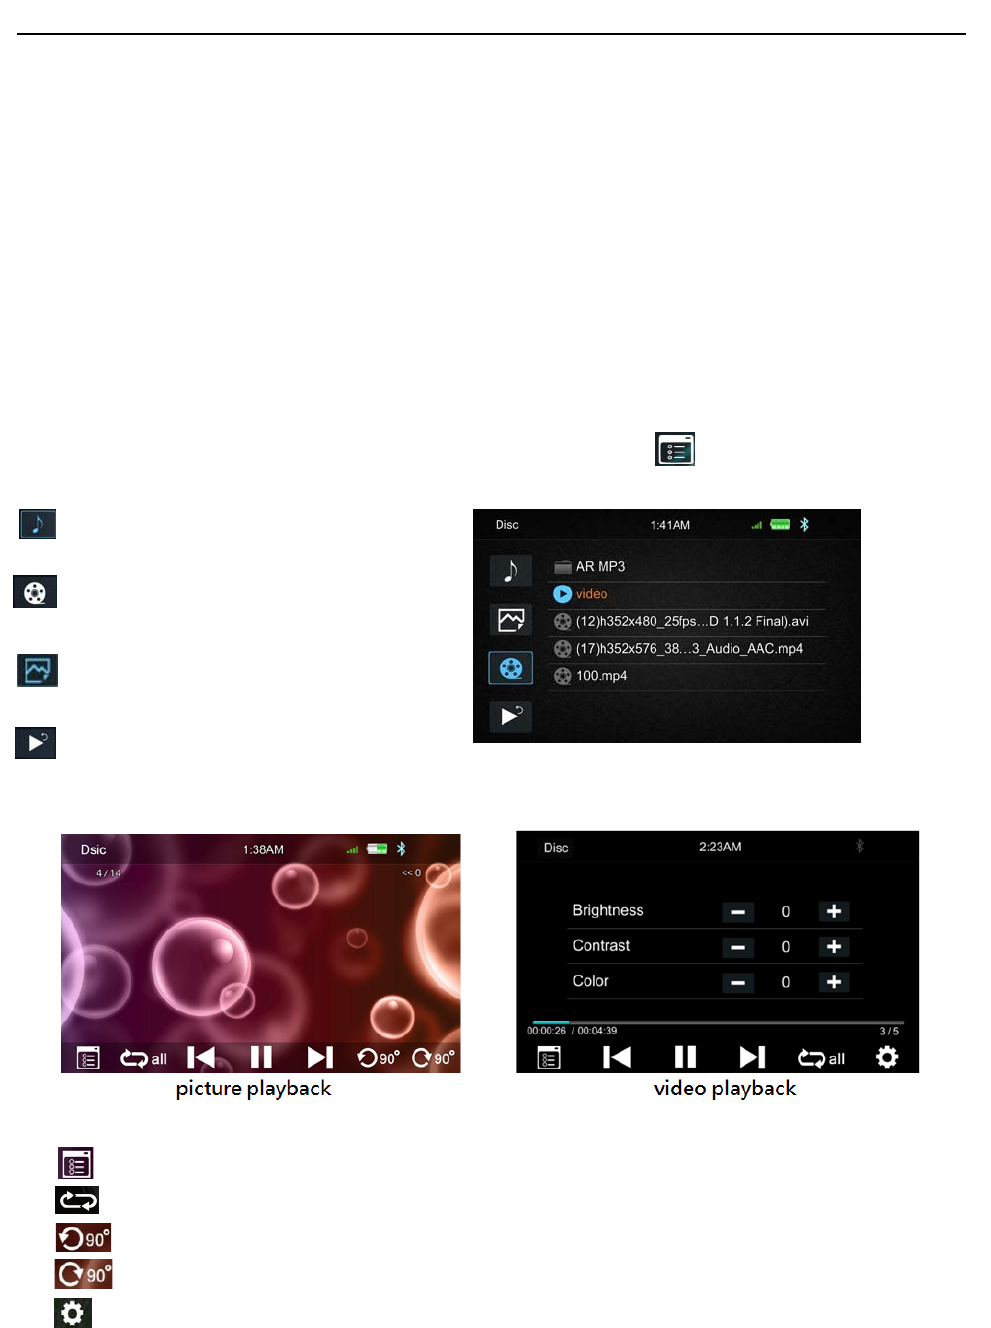
PlayingMultimediaFilesinDisc
VRCP‐65issupportingthebelowdisctypesandMultimediafileformat.
1. SupportedDISCFormat:CD‐DA/CD‐TEXT/VideoCD/DVD/Multisession
2. SupportedAudioFormat:PCM(.wav),MP3,WMA,Flac,DolbyDigital,DTS,
3. SupportedPictureFormat:JPEG,BMP,PNG.
‐ Maxfilesizeis10MbytesorMax.Resolution1200×1200.
4. SupportedVideoFormat:MPEG1/MPEG2/MPEG4SimpleProfile(.mp4(MPEG‐4SimpleProfile+
AAC),JPEG,DVD‐Video,DVD‐VR
WhenthediscisincludeddifferenttypeofMultimedia,Touch toshownthelist.
SelectAudioorMusicfiles
SelectMovieorVideofiles.
SelectPicturefiles
Returntoplayingperviousfile
Touchthecorrespondingicontolistthefiles,touchthefilenametoplaybackthefile.
Touc hittoreturntothefilelist
RepeatPlay,touchtoselectrepeatplayonce,directoryorall
Touchtorotatethepictureanti‐clockwisefor90degree(forpictureplayback)
Touchtorotatethepictureclockwisefor90degree(forpictureplayback)
TouchtosetthevideoBrightness,ContrastandColor(forvideoplayback)
Page 24 of 37
Operation Instruction Manual VRCP-65
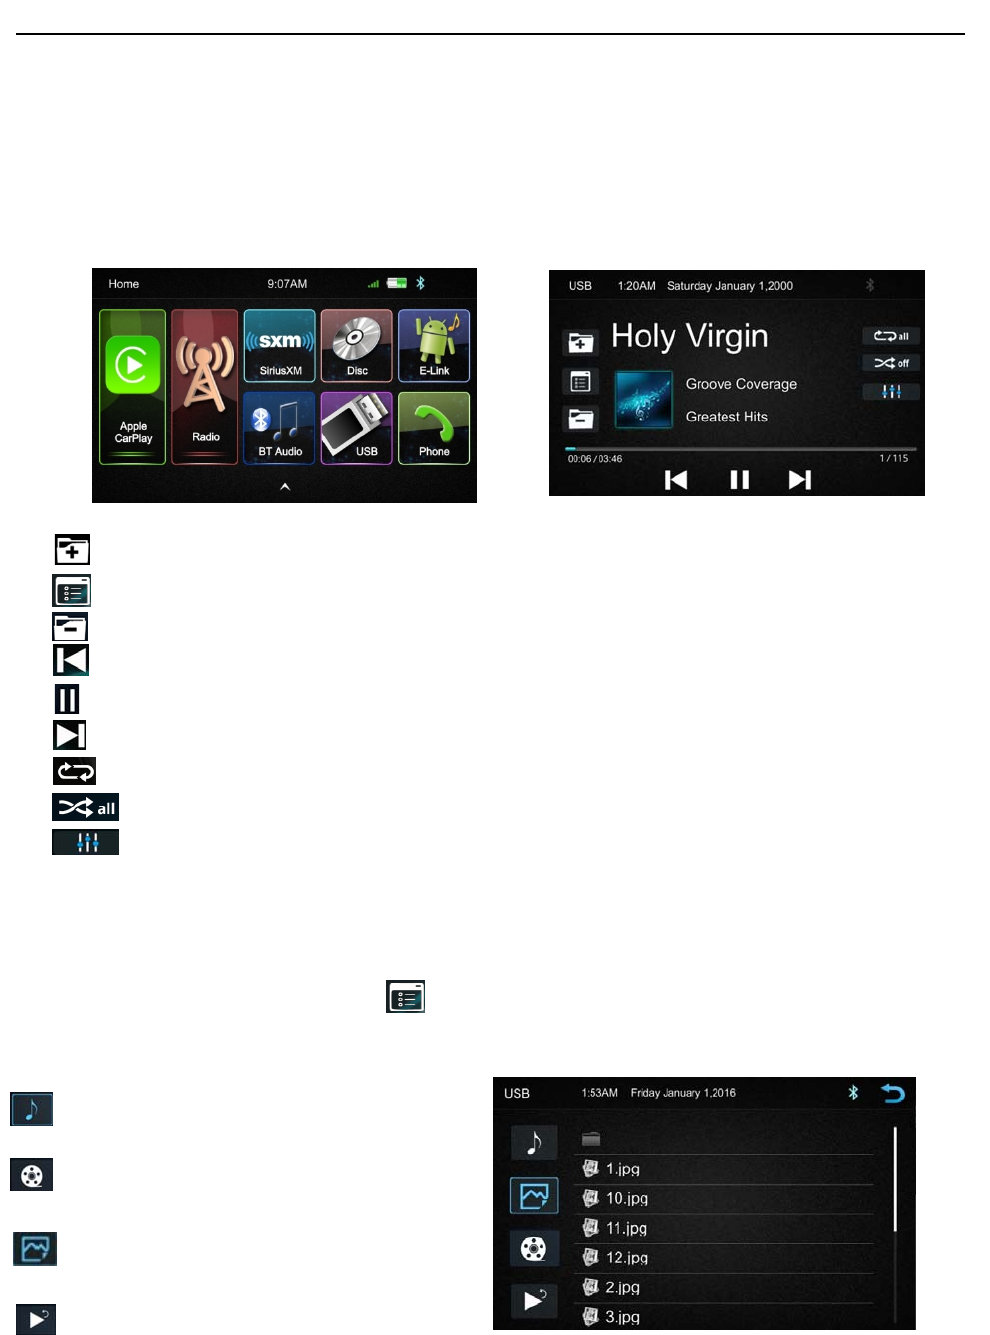
10. USB
PlugtheUSBtotheconnector,theUSBiconwillhavecolor.TouchtheUSBicontoenterthe
USBplaybackmode.TheHeadunitdefaulttoplaytheAudiointheUSBdriver.
Presstogotothenextfolder.
PresstosearchAudio,VideoorPicturefiles.
Presstogotothepreviousfolder.
Shortpressittoskiptotheprevioustrack,longpressittofastreverse.
Pause/Playbutton.
Shortpressittoskiptothenexttrack,longpressittofastforward.
RepeatPlayPressittoselectRepeatAll,RepeatOneorRepeatDirectory.
Pressittoturnon/offrandomplay.
PressittoselecttheAudiosettingorsetthepreferEQofeachbandinCustommode
Audio,Video,Pictureplayback
VRCP‐65isdefaultaudioplayback,italsosupporttoplaypictureandvideo.Ifthereisother
multimediafilesintheUSB,touch tobrowsethefolderandfilelistoftheUSBdriver.
Selectthemultimediatype
SelectAudioorMusicfiles
SelectMovieorVideofiles.
SelectPicturefiles
Returntoplayingperviousfile
Touchthecorrespondingicontoselectdifferenttypeofmultimediafilelistwillbeshown.
Selectthefiletoplay.
Page 25 of 37
Operation Instruction Manual VRCP-65
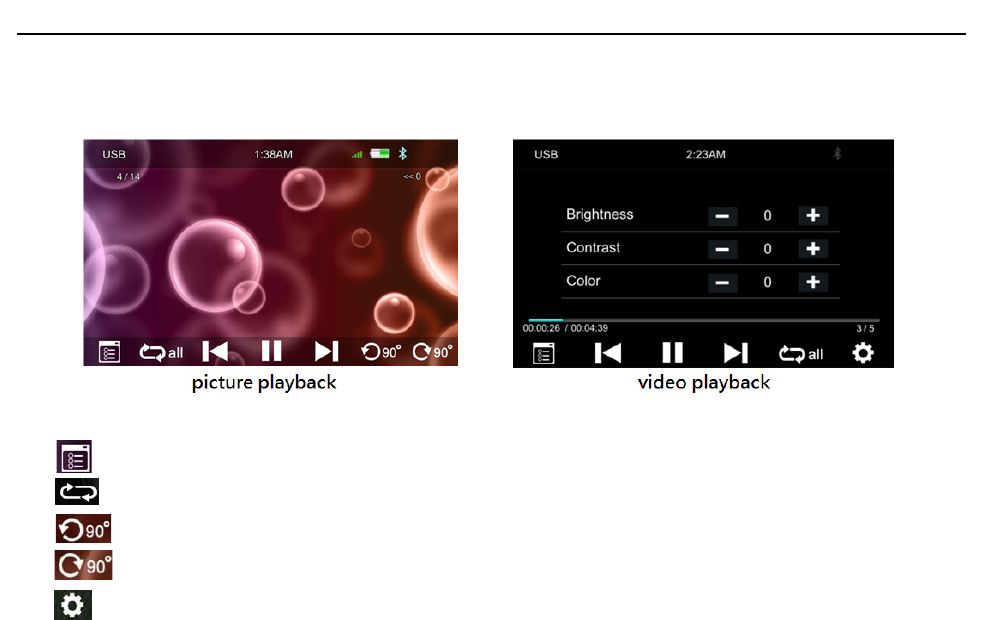
PictureandVideoPlayback
Touchittoreturntothefilelist
RepeatPlay,touchtoselectrepeatplayonce,directoryorall
Touchtorotatethepictureanti‐clockwisefor90degree(forpictureplayback)
Touchtorotatethepictureclockwisefor90degree(forpictureplayback)
TouchtosetthevideoBrightness,ContrastandColor(forvideoplayback)
Page 26 of 37
Operation Instruction Manual VRCP-65
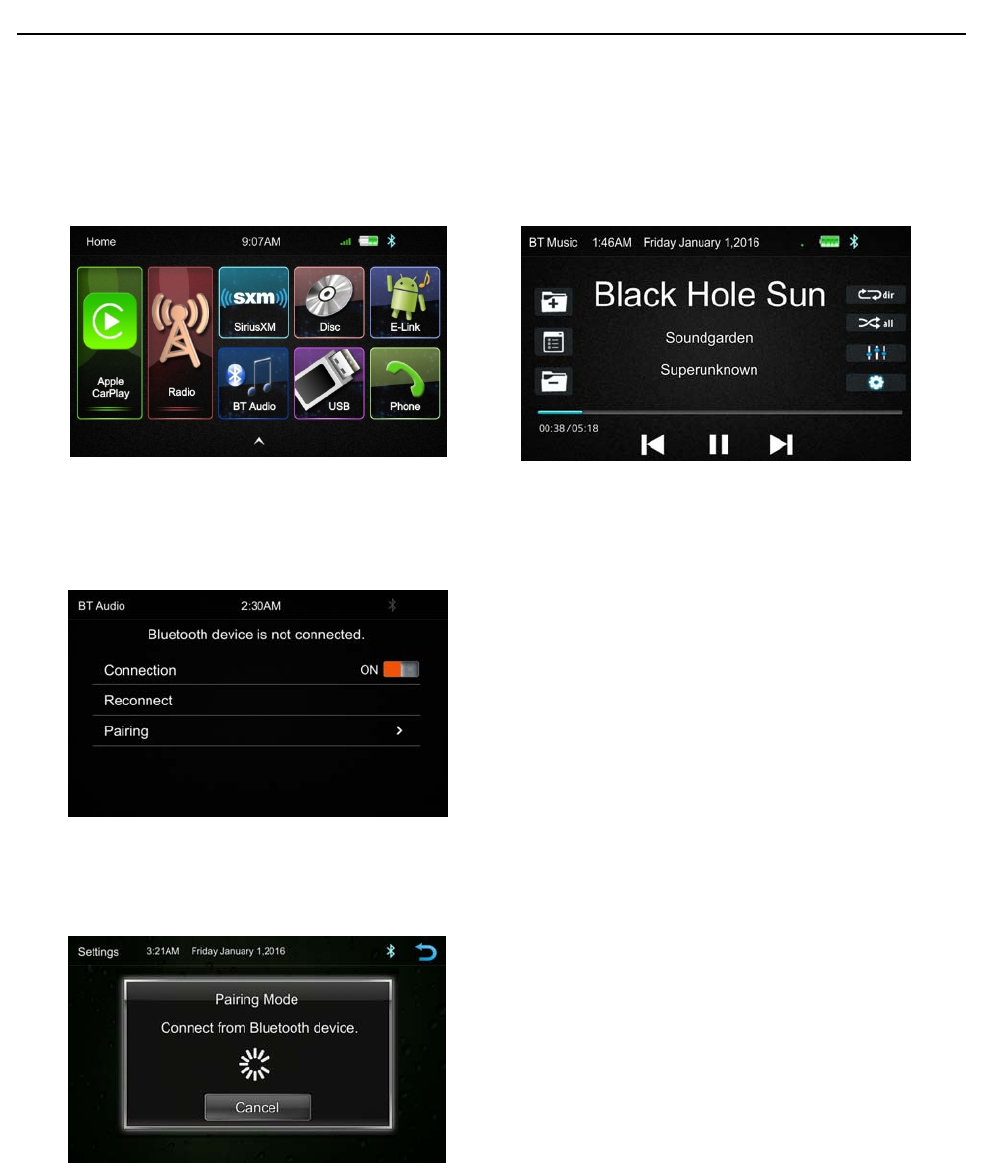
11. BluetoothAudio
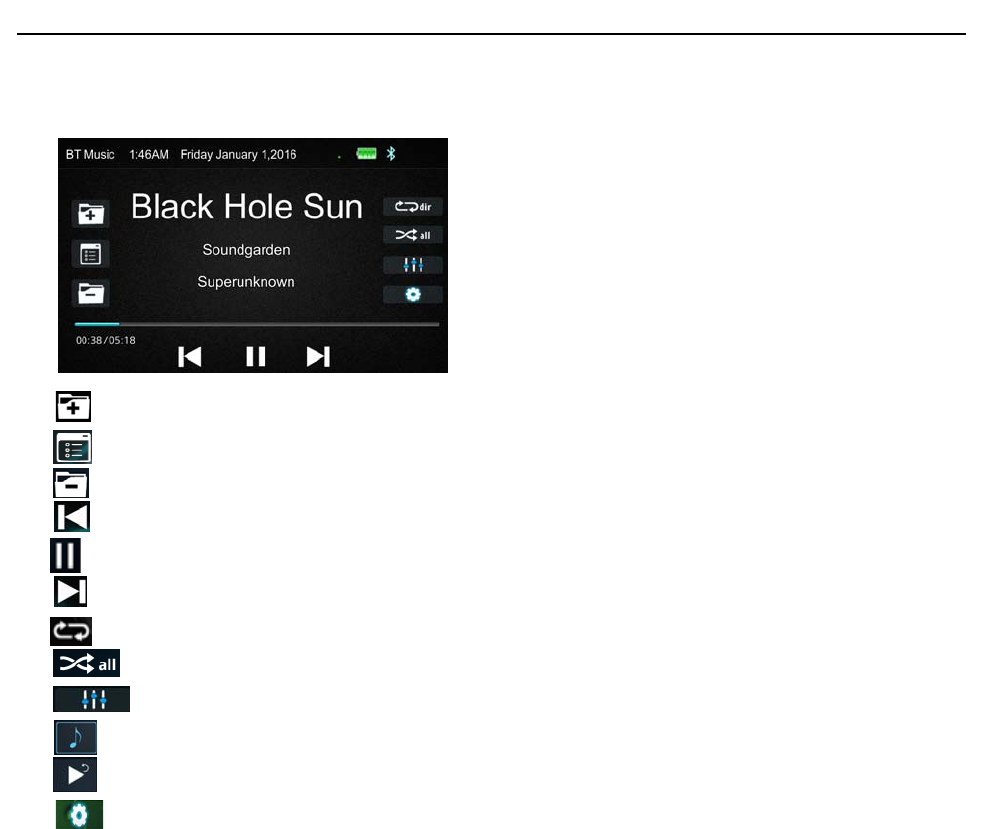
TouchtheBTAudioicontoenterBluetoothAudioplayingmode.IftheBluetoothisconnected,the
musicwillbeplayingasfollowingshown.
IftheBluetoothisnotconnected,pressReconnecttoconnectthepairedphoneorPairingtopair
thenewdevice.
BluetoothPairing
PressPairingthePairingModescreenwillbeshownasbelow
TurnOntheBluetoothoftheMobilephone/Bluetoothdevice,youcanseetheVRCP‐65.
SelecttheVRCP‐65forpairingandconnection
Page 27 of 37
Operation Instruction Manual VRCP-65
BluetoothAudioPlayback
Pressittoskiptothenextfolder.
Pressittoopenthemusicfilelistorfolder(supportiPhone).
Pressittoskiptothepreviousfolder.
Shortpressittoskiptotheprevioustrack.
Pause/Playbutton.
Shortpressittoskiptothenexttrack.
Repeat,pressforselectbetweenRepeatAll,RepeatOneorRepeatDirectory
Pressittoturnon/offrandomplay.
Pressittoturnon/offtheAudioSettingsmenutoadjusttheEQ.
Pressittoselectsongs.
Returnbutton.
SettingtheBluetoothoutputlevel
Page 28 of 37
Operation Instruction Manual VRCP-65
12. Phone
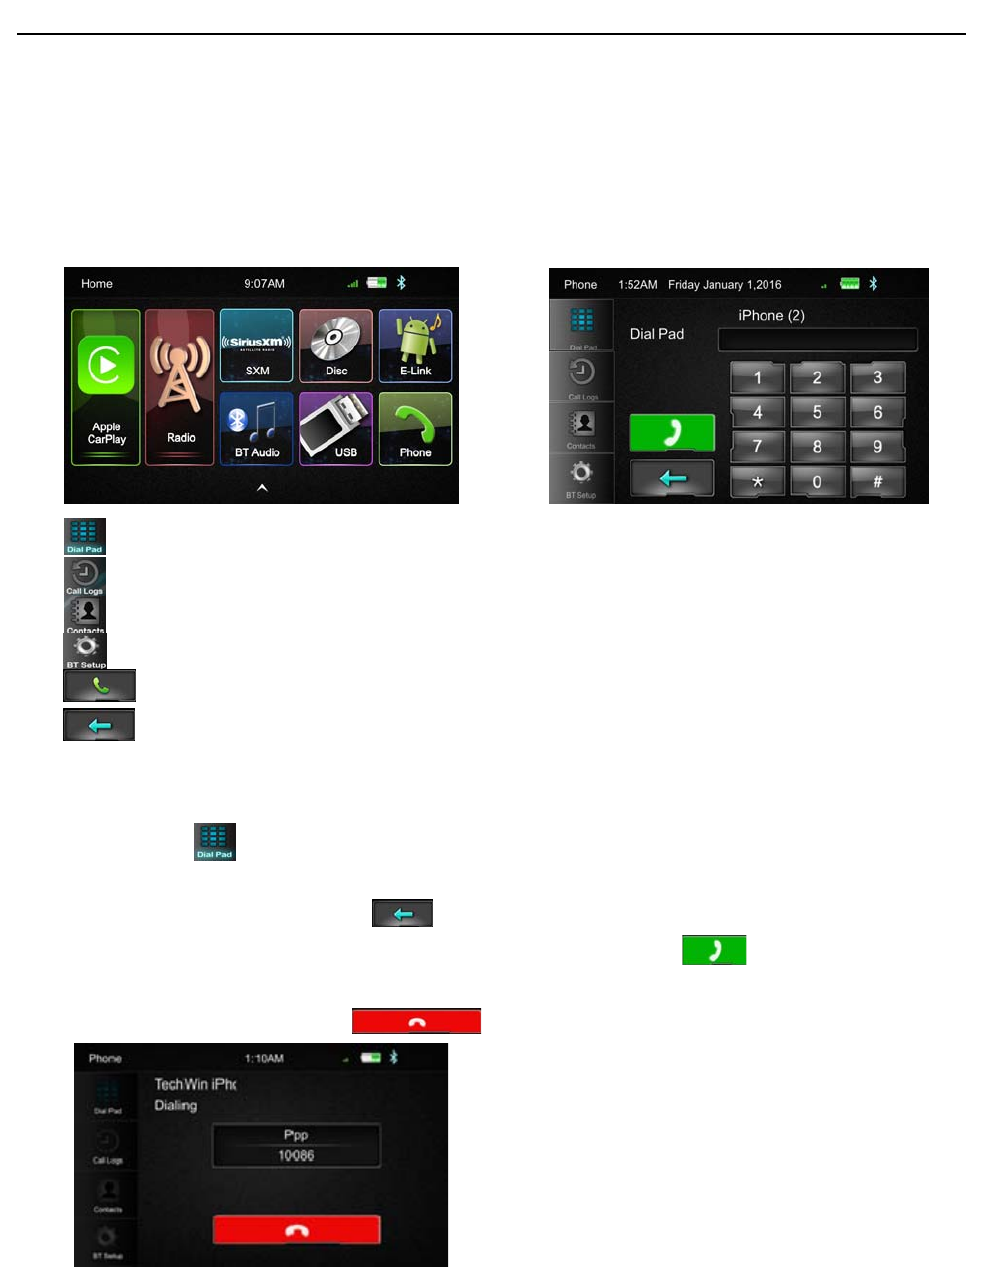
TouchthePhoneiconinmainmenutogotoPhonemode.AfterthephoneconnectedwiththeHead
UnitviaBluetooth(HFP),usercanthroughtheHeadunittomakeaphonecall.Pleasenoteitneeds
toconnectthemicrophoneforphonecall.
DialPad,tapDialpadbuttontoentercallmode
Calllogs,toshowthecallrecord,missed,receivedanddialedcalls
Contact,toshowthephonebookconnectedphone
BTSetup,tosetautoanswerandmicrophonegain
MakeaCallorAccepttheIncomingCall
Backspace,tocleartheperviousdialdigit
DialaCall
1. Touchthe icontotheabovescreenwillappear.
2. Usingthekeypad,touch0‐9,*,#,toenterthephonenumberyouwishtodial.Ifyouenter
anincorrectnumber,touchthe icononthekeypadtodeletetheincorrectnumber.
3. Oncethecorrectnumberappearsonthescreen,touchtheicon.Togobackdialing
interface,touchthereturniconattheupperrightcornerofthescreen.
4. Toendthecall,touchtheonthescreen
Page 29 of 37
Operation Instruction Manual VRCP-65
ReceiveanincomingCall
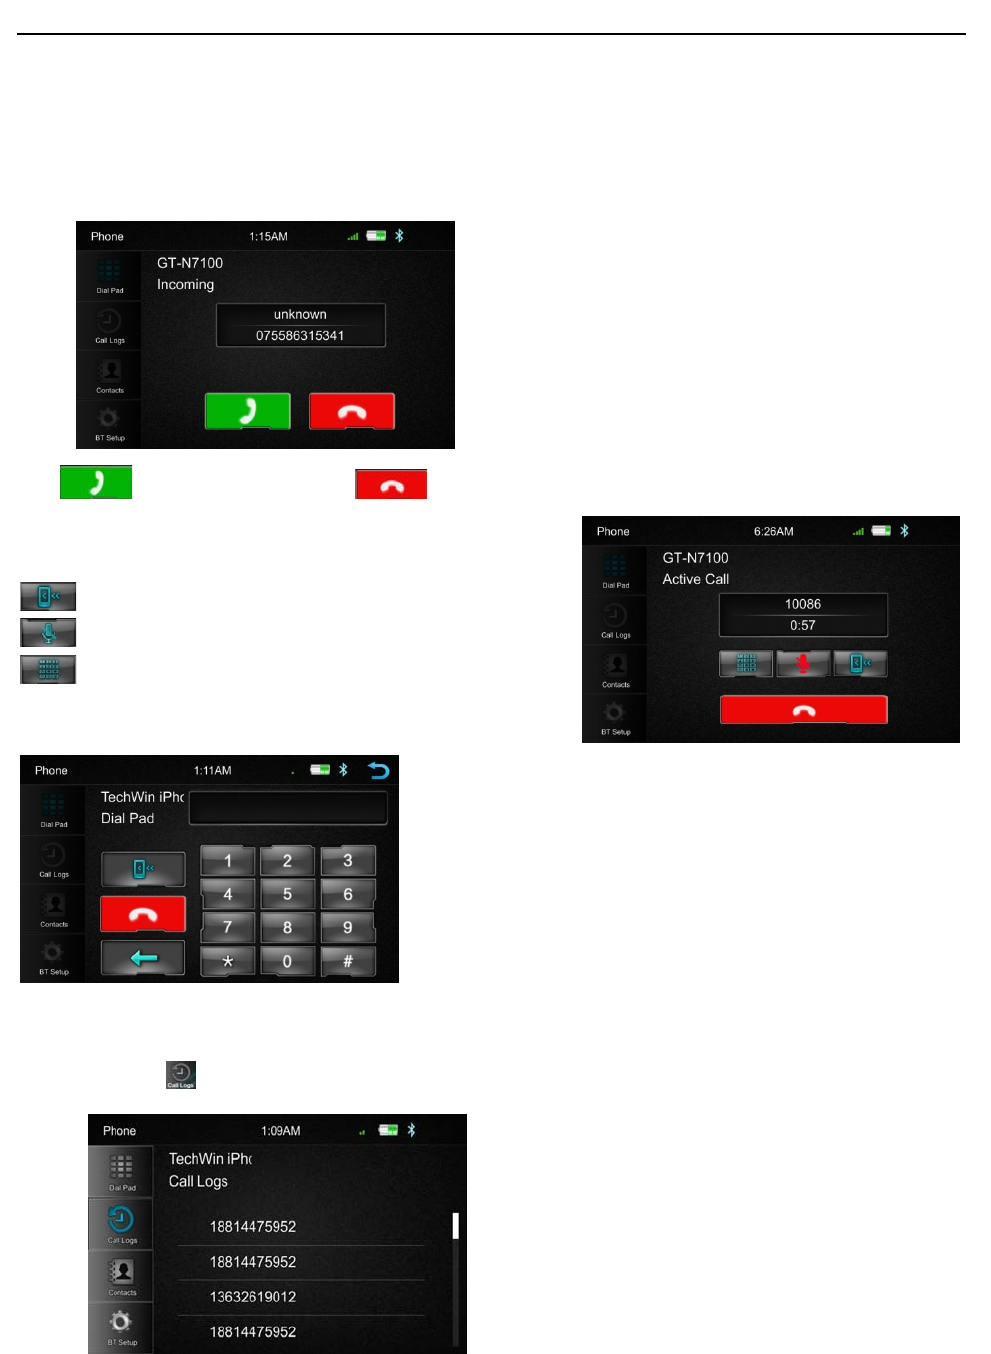
IfthePhoneisconnectwiththeunitviaBluetooth,whenanincomingcall,thebelowscreenwillbe
shown
PresstoreceivetheCallortohangthecall
Interchangebetweenphoneandheadunit
ON/OFFtheMicrophonefunction
DisplaytheDialPad
CallLogs
TouchtheicontodisplaytheCallCombinedlist.
SlidethebaratrightsideupanddowntodisplayaCalllogsupto20records.
Page 30 of 37
Operation Instruction Manual VRCP-65
Contacts
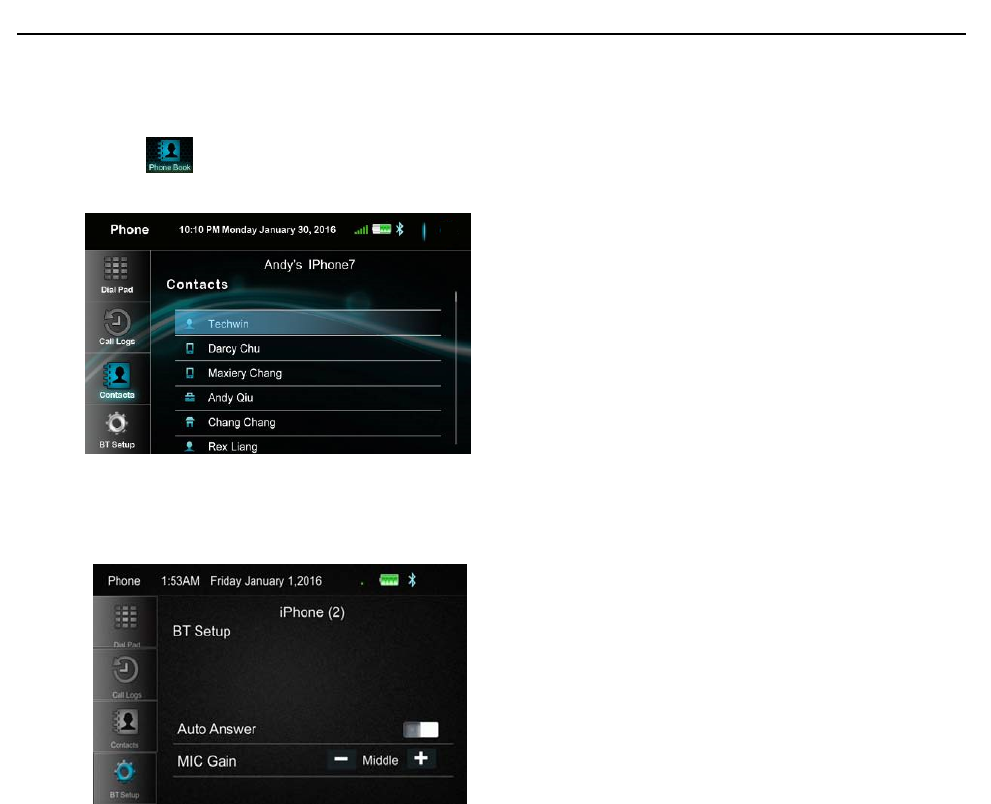
Touchtheicontoaccessthephonebookoftheconnectedphone.
Tomakeacallfromthephonebook,simplytouchthecontactname.
BTSetup
AutoAnswer On/Off
MicGain Low/Middle/High
Page 31 of 37
Operation Instruction Manual VRCP-65
13. AUXIN
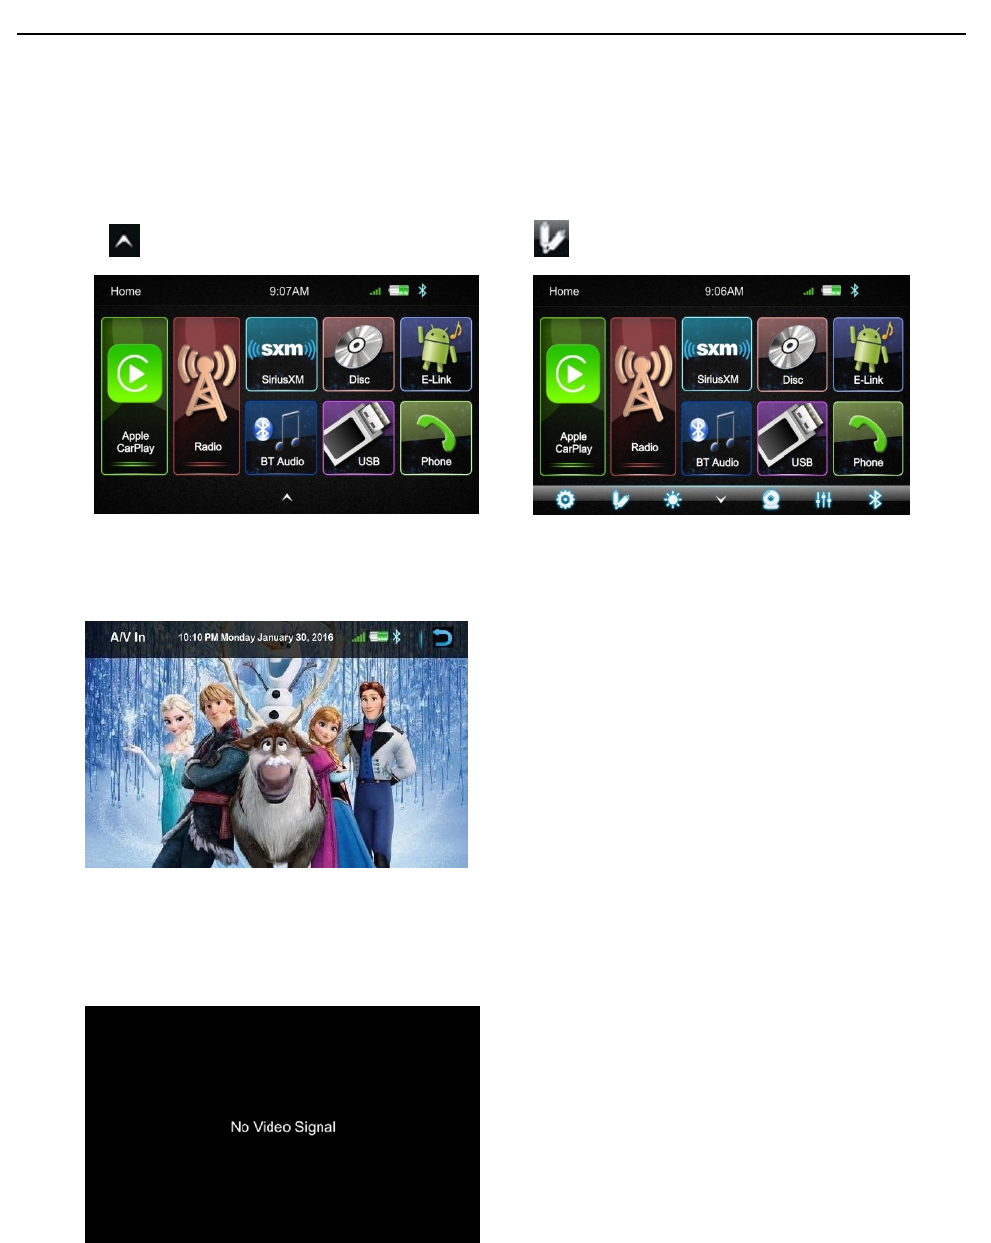
TheAudio/VideosourcewithRCAcablecanthroughtheHeadunittoplaytheAudio/Video.Plug
theRCAtothecorrespondingA/Vsocket.
TouchthetopopupthefunctionbarsandtouchtoviewtheplayingAudio/Video.
TheAudioandVideowillviatheRCAcabletotheHeadunit
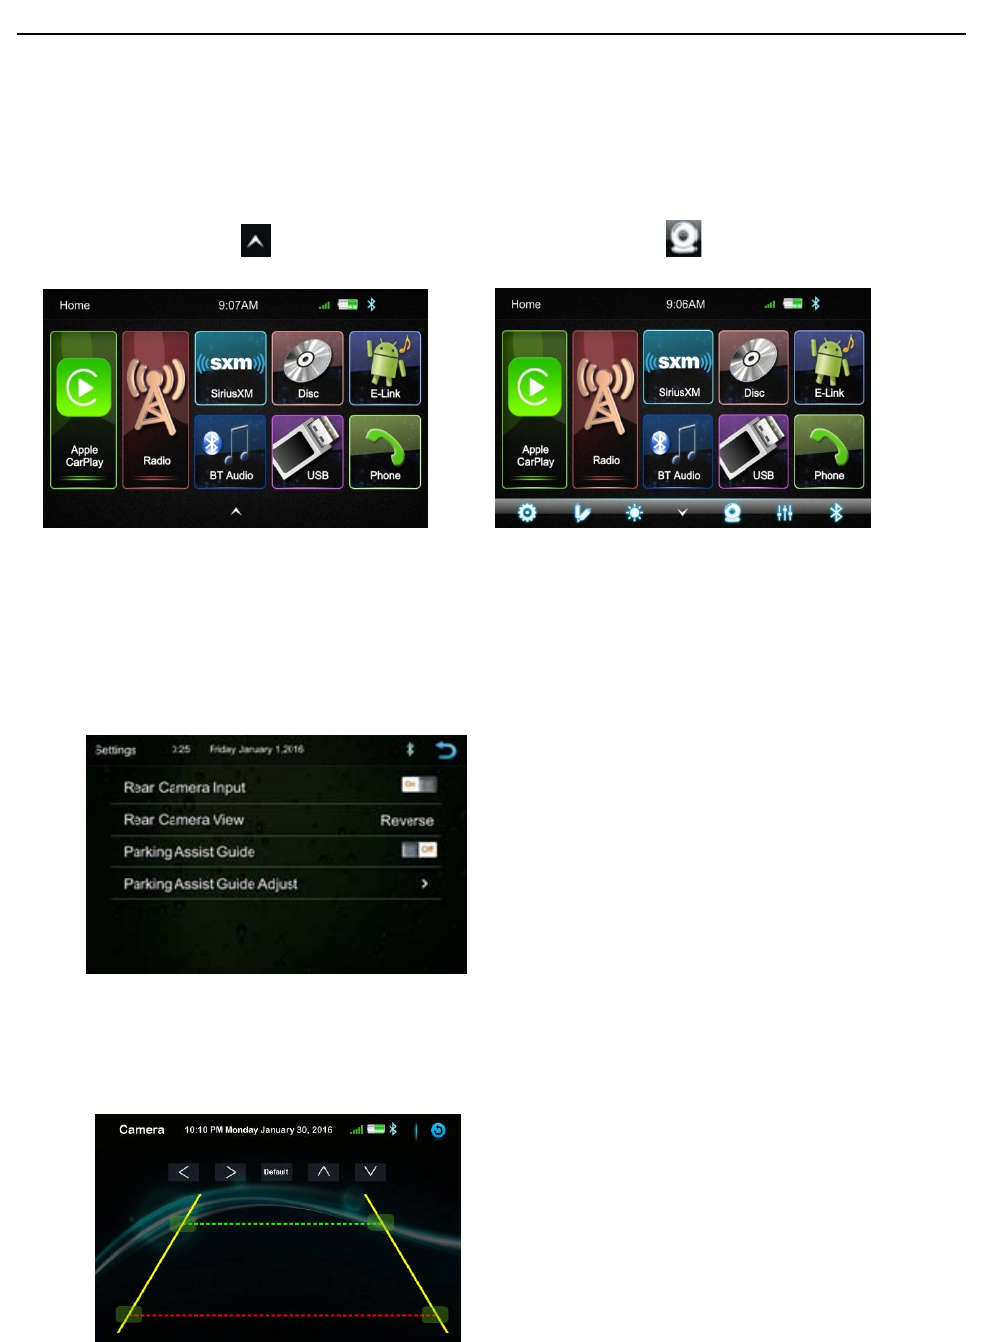
IfthereisnoVideosignalthebelowscreenwillbeshown
Page 32 of 37
Operation Instruction Manual VRCP-65
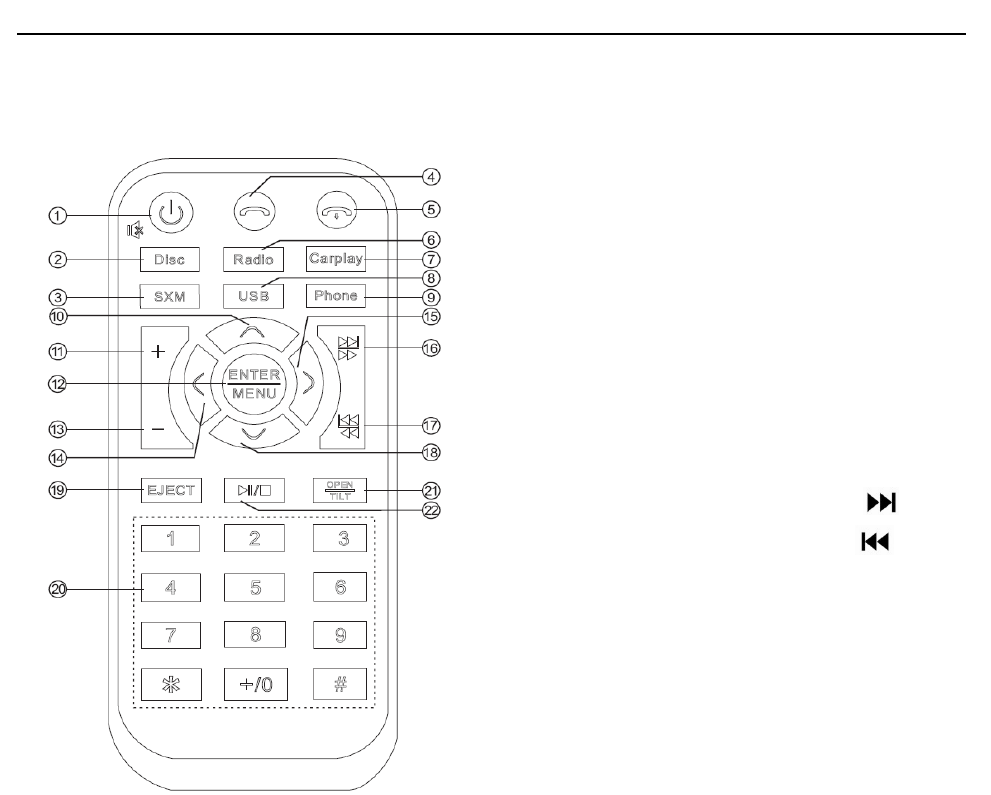
14. RearCamera
ThereisaRCAsocketfortheRearcameravideosignaltodisplayontheHeadunit.
TheReversewireinHighlevel(+12V)isreverse;lowlevel(groundorNC)isnormal
UseralsocantouchthetopopupthefunctionbarsandtouchtoviewtheRearcamera.
RearCameraSettingsmenu
RearCameraInput:On/Off
RearCameraview:Normal/Reverse
ParkingAssistGuide:On/Off
ParkingAssistGuideAdjust
Touchthe˂/˃/˄/˅butontoadjusttheassistlinetoguidethecarposition

Page 33 of 37
Operation Instruction Manual VRCP-65
15. E‐Link
TheVRCP‐65havetheE‐LinkfunctiontoallowtheAndroid5.0orabovesmartphonedisplayonthe
Headunitscreen.
InstallAutoLink
UserneedtoinstalltheAutolinkApptotheAndroidphone.WhentheAndroidphonefirsttime
connectedtotheVRCP‐65viaUSB,thephonewillshowawebsitelinktodownloadtheAutolink
applicationpack.DownloadandinstalltheapkfileontheAndroidphone.Afterinstalledthe
AutolinkApp,theAndroidphonecanusetheE‐Linkfunction.
Connection
ConnecttheAndroidphoneandheadunitviaUSBcable,theAndroidphonedisplaywillbeshown
ontheHeadunitscreen.Useralsoallowsusingthetouchpaneloftheheadunittocontrolthe
Androidphone.
Page 34 of 37
Operation Instruction Manual VRCP-65
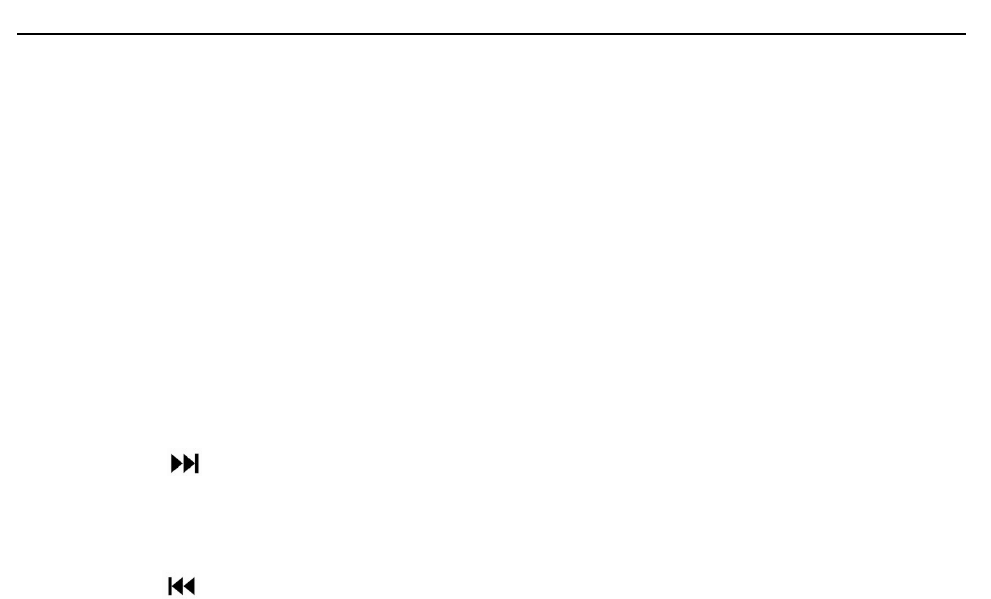
16. RemoteControl
1. Power
Longpressittopoweroff
2. Disc
Pressittoselectthediscplaymodeifthereisadiscintheunit.
3. SiriusXM
PressittoselecttheSiriusXMmodeiftheunitisconnectedwithaSiriusXMtuner.
4. Answer
BTphoneisconnected,pressittoacceptcall.
5. Hangup
BTphoneisconnected,pressittoendcall.
6. Radio
PressittoselecttheRadiomode.
7. Carplay
PressittoselecttheCarPlaymodeiftheunitisconnectedwithiPhone.
8. USB
PressittoselecttheUSBmodeifthereisaUSBdeviceintheunit.
9. Phone
PressittoselecttheBTPhonemode.
10. UP
Intheradiomode,pressittoselectapresetstationup.
IntheUSBmode,pressittoselectafolderup.
Inthediscmode,pressittoselecttheDVDmenuitemup.
① Power ④ Answer
② Disc ⑤ Hang up
③ SiriusXM ⑥ Radio
⑩ Up ⑦ Carplay
⑪ VOL+ ⑧ USB
⑫ ENTER/MENU ⑨ Phone
⑬ VOL- ⑮ Right
⑭ Left ⑯ SEEK+/
⑲ EJECT ⑰ SEEK-/
⑳ Number Key ⑱ Down
○
21 OPEN/TILT
○
22 Play/Pause
Page 35 of 37
Operation Instruction Manual VRCP-65
11. VOL+
Pressittoincrementvolumestep,longpresstovolumerapidup.
12. ENTER/MENU
Indiscmode,pressittoconfirmselectionorentersettingforDVDmenu.
13. VOL‐
Pressfordecrementthevolumestep,longpressforvolumerapiddown.
14. LEFT
Intheradiomode,shortpressforseek‐,longpressfortune‐.
Inthediscmode,presstoselecttheDVDmenuitemleft.
15. RIGHT
Intheradiomode,shortpressforseek+,longpressfortune+.
Inthediscmode,pressittoselecttheDVDmenuitemright.
16. SEEK+/
InRadiomode,shortpressfornextpresetchannel,longpressforSEEK+
InSiriusXMmode,shortpressfornextpresetchannel,longpresstobrowsethechannelup.
InUSB/BT/Discmode,shortpressfornexttrack,longpressforfastforward
17. SEEK‐/
InRadiomode,shortpressforperviouspresetchannel,longpressforSEEK‐
InSiriusXMmode,shortpressforperviouspresetchannel,longpresstobrowsethechannel
down
InUSB/BT/Discmode,shortpressforprevioustrack,longpressforfastreverse
18. DOWN
Intheradiomode,pressittoselectapresetstationdown.
IntheUSBmode,pressittoselectafolderdown.
Inthediscmode,pressittoselecttheDVDmenuitemdown.
19. EJECT
Pressittoejectthedisc,Pressittoagaintoinsertthedisc.
20. NumericKey
InRadioandSiriusXMmode,1to6canusetoselectthepresetchannel.
InBTPhonemode,thenumerickeycanactfornumberdialing
21. OPEN/TILT
NofunctionforVRCP‐65
22. PLAY/PAUSE
Play/Pausebutton

Page 36 of 37
Operation Instruction Manual VRCP-65
17. Specification
General
PowerSupply………………………….………………………………….……..………….DC10~16Volts
GroundingSystem…………………………………..……..……….………..……..NegativeGround
CurrentDrain………………………………….…………………………...……..….………….15A(Max.)
PowerOutput………………………………………….………………..…….4×40W/channel(Max.)
SpeakerImpedance……………………………………....…..…………….4~8ohmsperchannel
FrequencyResponse……………………………………..……….……………………….20Hz~20KHz
OperatingTemperature…………………………………..………………..................‐20~+60℃
TFTDisplay
TFTScreensize…………………………………………..……………………….…………………..6.2inch
Resolution………………………………………………………………..…..……………..800×480pixels
FMRadio
FrequencyRange(USA)………………………………………………...……..……87.5~107.9MHz
FrequencyRange(Europe)………………………….………………...…..…..……87.5~108MHz
UsableSensitivity(S/N=30dB)………..…………………………….…..…….…….…….…≦15dB
S/NRatio……………………………………………………………………..….....…………………≧55dB
StereoSeparation………………………………………...…..…………………..………………≧30dB
AM/MW
FrequencyRange(USA)………………………………………….…………..…….…530~1710KHz
FrequencyRange(Europe)………………………..………………..…..………….522~1620KHz
UsableSensitivity(S/N=20dB)……………….……………………………..……….…….…≦40dB
S/NRatio………………………………………………………………………….…..………………≧45dB
DVD/CD
S/NRatio……………………………………………………….………………………..……………≧60dB
ChannelSeparation……………………………….…………………………..……..……>50dB
Line‐Out/SubwooferOutput
MaximumOutputLevel(10Kohmsload)……………….……………..……..….…≧4Vrms
SubwooferTimeAlign……………………………………………………………….…………0~18ms

Page 37 of 37
Operation Instruction Manual VRCP-65
FCCWarning
AnyChangesormodificationsnotexpresslyapprovedbythepartyresponsiblefor
compliancecouldvoidtheuser’sauthoritytooperatetheequipment.
Thisdevicecomplieswithpart15oftheFCCRules.Operationissubjecttothe
followingtwoconditions:(1)Thisdevicemaynotcauseharmfulinterference,and(2)
thisdevicemustacceptanyinterferencereceived,includinginterferencethatmay
causeundesiredoperation.
FCCRadiationExposureStatement:
ThisequipmentcomplieswithFCCradiationexposurelimitssetforthforan
uncontrolledenvironment.Thisequipmentshouldbeinstalledandoperatedwith
minimumdistance20cmbetweentheradiator&yourbody.
Thistransmittermustnotbeco‐locatedoroperatinginconjunctionwithanyother
antennaortransmitter.
Note:ThisequipmenthasbeentestedandfoundtocomplywiththelimitsforaClass
Bdigitaldevice,pursuanttopart15oftheFCCRules.Theselimitsaredesignedto
providereasonableprotectionagainstharmfulinterferenceinaresidential
installation.Thisequipmentgeneratesusesandcanradiateradiofrequencyenergy
and,ifnotinstalledandusedinaccordancewiththeinstructions,maycauseharmful
interferencetoradiocommunications.However,thereisnoguaranteethat
interferencewillnotoccurinaparticularinstallation.Ifthisequipmentdoescause
harmfulinterferencetoradioortelevisionreception,whichcanbedeterminedby
turningtheequipmentoffandon,theuserisencouragedtotrytocorrectthe
interferencebyoneormoreofthefollowingmeasures:
Reorientorrelocatethereceivingantenna.
Increasetheseparationbetweentheequipmentandreceiver.
Connecttheequipmentintoanoutletonacircuitdifferentfromthattowhich
thereceiverisconnected.
Consultthedealeroranexperiencedradio/TVtechnicianforhelp.