SOUNDMAX ELECTRONICS CMS20 Car radio User Manual M508 QSG 20171208 indd
Soundmax Electronics Limited Car radio M508 QSG 20171208 indd
UserManual.wiki
>
SOUNDMAX ELECTRONICS
>
CMS20 User Manual
User Manual
Navigation menu
Upload a User Manual
Namespaces
Wiki Guide
HTML
PDF
Info
Views
User Manual
Discussion / Help
Navigation

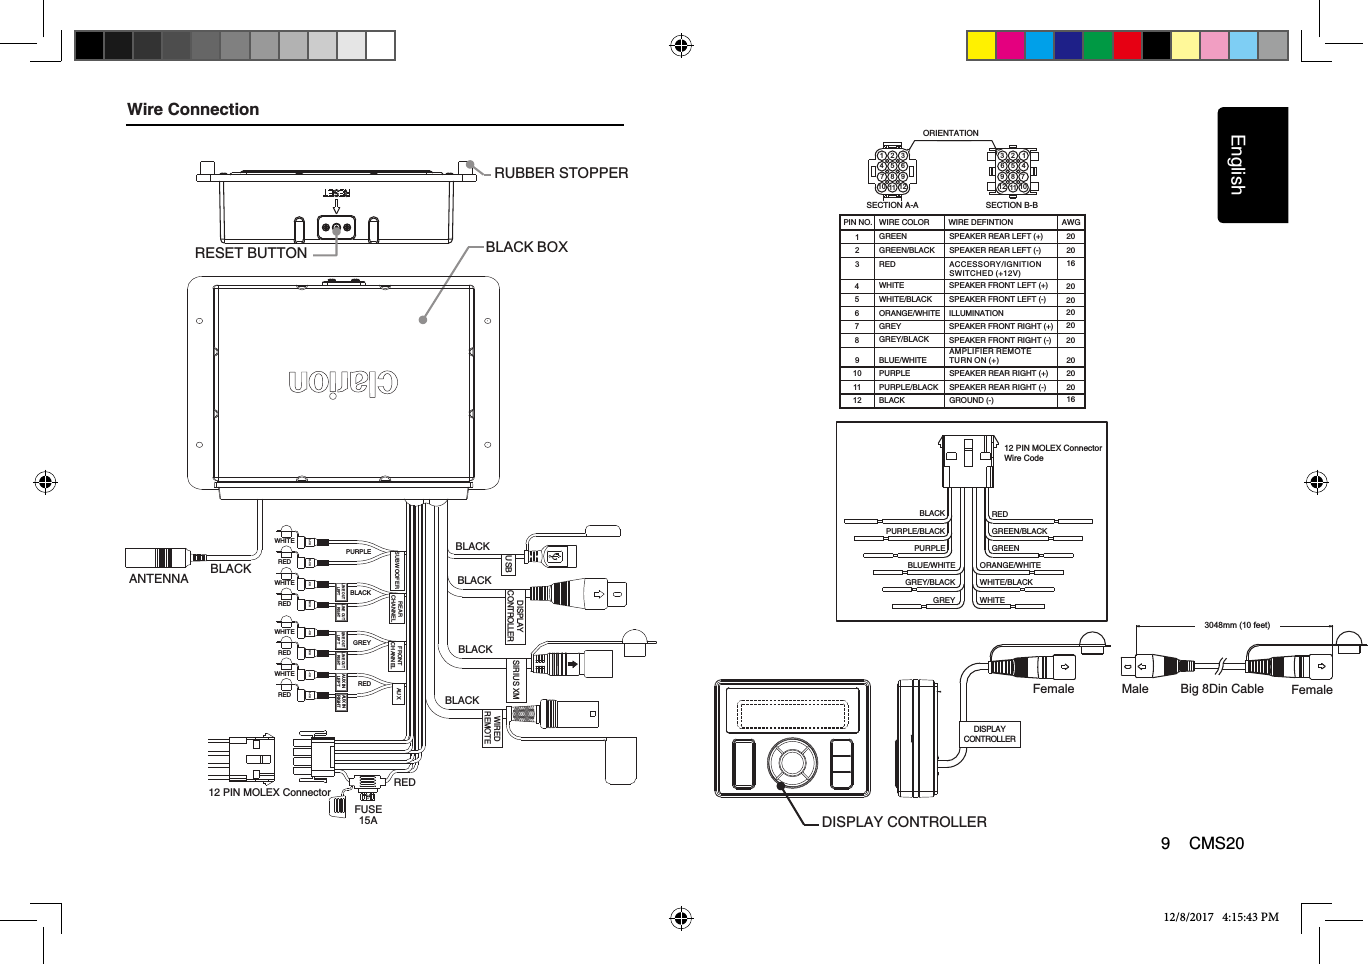
![English4 CMS20Operational PanelNames of Buttons[ / SRC ] Button• Toggle the audio source.• Power On/Off (Press and Hold).[ ] • Press to increase the volume.• Press to decrease the volume.[ MENU ] Button• Access menu items for necessaryIn differen modes, the menu items[ ] Button• USB/iPod/Bluetooth - Play / Pause• SiriusXM – Instant Replay Mode. In Instant Replay mode, Long Press for Live mode.[ / ] Buttons• Menu – Press to page up or down.• Tuner mode – SP Station Up/Down, LP Scan Up/Down.• SiriusXM mode – SP Channel Up/Down, LP Rapid Channel Up/Down SiriusXM Instant Replay - Skip forward or skip backwards, hold to fast forward/rewind 5/10/30 seconds.• USB/iPod – Press for next or previous track, Press and hold to fast forward or rewind. • BT – Press for next or previous track, Press and hold to fast forward or rewind.[ DISP ] Button• Adjust LCD backlight level, High or Low (LP)/Display information for digital sources (SP)12/8/2017 4:15:43 PMVOL+VOL-[ ] [MENU][ /SRC][DISP]ENTER[ ] [ ] [ ] [ ][ ][ ]VOL+[ ] KnobVOL-Mute or Unmute the audio output• Press to confirm operation.VOL+VOL-functions in every mode• are different. Please see the operation introduction of every mode for more details.[ ] Button• USB/iPod/Bluetooth - Play / Pause• SiriusXM – Instant Replay Mode. In Instant Replay mode, Long Press for Live mode.• Tuner -[ / ] Buttons• Menu – Press to page up or down.• Tuner mode – Advance to previous/• SiriusXM• USB – Press for next or previous folder, Press and hold to top/bottom folder.• BT/iPod – Press to browse up/down throughnext stored stationlist in menu mode – Advance to previous/next stored station; – Press to browse up/down throughlist in menuBlack BoxRESETDisplay Controller[ RESET ] Button• Press RESET button with a ball point pin to:1. Perform a complete system resetl 2. In the event that button do not respond or operate correctly.3. When an Error Code or Message is display](https://usermanual.wiki/SOUNDMAX-ELECTRONICS/CMS20/User-Guide-3739800-Page-4.png)
![English5 CMS20Turning the Power OnStart the engine. The power is supplied to this unit.Press [ SRC ] button on the panel to turn on the unit.Volume AdjustmentPress / button on the front panel to increase / decrease the volume.12/8/2017 4:15:43 PMSelecting a SourcePress the [ SRC ] button to change the operation mode. Sources are displayed in the following order: TUNER, SIRIUSXM, USB/IPOD, PANDORA, AUX IN, The adjustable range of volume is 0 to 46.NOTE:While boating, keep the volume at a level at which external sounds can still be heard.Display OFF/ONThis feature will allow the user to turn the display OFF in the event the display is too bright in different lighting conditions.To use this feature, please follow these steps:1. To turn the display OFF, press and hold the button and the display will turn OFF, [DISP]but the audio from the current source will continue to play.2. To turn the display ON, press any button and the display will turn back ON.Display System InformationPress the button on the front panel to switch the display information, System time and [DISP]playing source.**With the display OFF, the ability to change tracks and adjust volume will still remain.**BT AUDIO.,VOL +VOL-](https://usermanual.wiki/SOUNDMAX-ELECTRONICS/CMS20/User-Guide-3739800-Page-5.png)
![English6 CMS20Tuner OperationsSelecting Tuner ModePress [ SRC] button to select the TUNER mode.Manual TuneDuring manual tuning, the frequency will be changed in steps according to selected region.Press the [ ] or [ ] button to tune to a lower / higher station.Seek TunePress and hold the button to seek a lower / higher station.Saving a Preset Station1. Press and hold buttonwhich is 2. Press the button to select a preset Recalling a Stored Preset StationA total of 10 preset positions (P1~P10) exits.12/8/2017 4:15:43 PM [ ] or [ ]to store individual radio stations in memory.Press button to select the [ ] or [ ]desired preset station.When deciding to save a ratio staton:[ / ]3. Which is available, press the button[ / ]number. [ ]to store in radios memory.LO/DXWhen LOCAL seeking is ON, only those radio stations with strong radio signal could be received.1. Press the button into source menu2. Press the button until is[MENU][ / ] "LO/DX"displayed.3. Press the button to select local [ / ] (LO)or distant mode.(DX)Area SetThis option allows you to select the appropriate 1. Press the button into source menu2. Press the button until [MENU][ / ] "AREA U.S.A"is displayed.3. Press the scroll through the Area options. [ / ]frequency spacing for your area.USB OperationsPlay/Pause a Track1. Press the [] button to play or pause audio playback.Selecting a TrackTrack-up1. Press the [ ] button to move to the beginning of the next track.2. Each time the [ ] button is pressed, playback proceeds to another track in the advancing direction.Track-down1. Press the [ ] button to move to the beginning of the current track.2. Each time the [] button is pressed, playback proceeds to previous track in the reverse direction.Fast-forward/Fast-reverseFast-forwardPress and hold the [ ] button.Fast-reversePress and hold the [ ] button.NOTE:USB devices containing a large amount of audio files can take several moments to begin the search and increase the delay between tracks. Additionally, some errors may occur during playback.Connecting to your deviceiPod/iPhoneConnect an iPod, iPhone or to the USB connector via accessory cable for iPod/iPhone.When connecting a device, the unit will read the fi les automatically. The track information displays on the screen once playback starts.Auto StoreOnly stations with sufficient signal strength will be detected and stored in the memory.1. Press the button into source menu2. Press the button until [MENU]3. Press the button to start automatically[ / ][ ]select nine strong stations and store them into "AUTO STORE"is displayed.nine presets. The new stations replace anystations already stored in the band.This function allows you to select a folder Selecting a Foldercontaining MP3/WMA files and start playing from the first track in the folder. Press the button to select a folder.[ / ]](https://usermanual.wiki/SOUNDMAX-ELECTRONICS/CMS20/User-Guide-3739800-Page-6.png)
![Bluetooth OperationsBT Pairing1. Turn on Bluetooth function of your mobile device.2. Enter mobile device’s Bluetooth setup menu.3. Search for new Bluetooth devices.4. Select CMS20 from the pairing list on the mobile device.5. A f t e r p a i r i n g s u c c e s s f u l l y , “ B T CONNECTED” will appear on the display. 6. Press [ SRC] button to select “BT”.12/8/2017 4:15:43 PMPlay/Pause a Track1. Press the [] button to play or pause audio playback.Selecting a TrackTrack-up1. Press the [ ] button to move to the beginning of the next track.2. Each time the [ ] button is pressed, playback proceeds to another track in the advancing direction.Track-down1. Press the [ ] button to move to the beginning of the current track.2. Each time the [] button is pressed, playback proceeds to previous track in the reverse direction.Fast-forward/Fast-reverseFast-forwardPress and hold the [ ] button.Fast-reversePress and hold the [ ] button.English7 CMS20](https://usermanual.wiki/SOUNDMAX-ELECTRONICS/CMS20/User-Guide-3739800-Page-7.png)
![SiriusXM Satellite Radio OperationsDisplaying the Radio IDBefore you listen to satellite radio, you mustsubscribe to the service using the SiriusXMRadio ID number.1. Pres s the [/ SRC] button to ente r SirusXM mode.2. Press the [] or [ ] buttons and select channel “0”. The Unit displays the Radio ID.NOTE:1. The Radio ID is also located on the bottom of the SiriusXM Connect Vehicle Tuner.2. Please note that the SiriusXM Radio ID does not include the letters I, O, S or F.3. In the USA, to activate the SiriusXM Connect Vehicle Tuner go online to www.siriusxm.com/activatenow or call 1-866-635-2349.4. In Canada, to activate the SiriusXM Connect Vehicle Tuner go online to www.siriusxm.ca/activatexm or call 1-877-438-9677.Storing Channel Presets1. Press and the button to enter into2. Press the button to select a preset SiriusXM Replay™ functionThe Replay feature allows you to pause, rewind, and replay live SiriusXM Satellite Radio. 1. While listening to a SiriusXM channel, press the button to enter Replay mode. The display will show “PAUSE” when entering this mode.2. Press the button to resume playback of the stored audio from the point at which it was paused. During playback, the SiriusXM Tuner will continue to store the channel audio until you exit the Replay mode.During REPLAY playback • Fast rewind: Press and hold []• Fast forward: Press and hold []• To return to the beginning of the current song press []• To advance to the beginning of the next song press [ ].NOTE:• If you continue to press the [] button until the end, the Replay mode is canceled, and the unit will change to live SiriusXM radio mode.• • M508_QSG_20171208.indd EN:7 12/8/2017 4:15:43 PMthe Manual Store.3. Press the button to strore current Replay mode will not exit if you change toanother source and then back to SiriusXM.If you change channels while in Replay mode, the unit will exit Replay mode to live Satellite mode and clear the Replay memory.Channel Tune1. Press the [] button to advance to the next channel.2. Press the [ ] b utton to go t o the previous channel.Channel name->Artist name->Song Title->Changing the DisplayText information, such as the channel name, artist name, song title and content is availablewith each SiriusXM channel. The unit can displaythis text information as explained below:In SiriusXM mode, press the button. [DISP]Each time you press this button, the displaychanges as shown below:Content Info->Category Name->ClockNote:If there is not text information, nothing will bedisplayed.Software UpdatesPlease periodically check the Clarion website for software updates and improvements for your Clarion product. These updates can be found under the “Get Support” tab, then “Software Update / Download”. [ / ][ / ]number.[]channel into preset.Tuning To Channel Presets1. Press and the button to enter into2. Press the button to select the desired the Preset List.3. Press the button to confirm tune to[ / ][ / ][]Preset you wish to access.that channel.[][]Press and hold the button to exit []• Replay mode. Category Browse1. Pressthe [MENU] button to access the 2. Press the button unit is displayed.3. Press the button to enter Category Note: If no operation is performed for 10 seconds, the Category Browsing mode is canceled.4. Press the to scroll avaiable categories.Parental Controls:Mature Channel 1. Press the [MENU] button to access the SiriusXM Menu2. Press the button to select "MATURE CH".3. Press the button to select the"LOCK" or "UNLOCK"4. Press the button to enter passcode.The SiriusXM Parental Control feature allows you to prevent unauthorized access to maturecontent channels. When enabled the ParentalControl feature requires you to enter a passcodeto tune to the locked mature content channels.Information on setting up the passcode, settingup the mature content channels to be locked, and the method to access the locked channelsis described below.Direct Tuning1. ]Press the [MENU] button to access the SiriusXM menu.2. Press the buttons to select. Input desired locked To access the Mature Content channels, selectchannel by "DIRECT TUNE" "DIRECT TUNE" channel an input passcode, then you cantune to that locked channel.SiriusXM Menu.[ / ] "CATEGORY SCH"[]Search mode.[ / ]5. Press the to scroll channels with in the [ / ]category.6. Press the button to confirm to tune to []taht channel.[ / ][ / ][ / ][ / ]Parental Passcode1. Press the [MENU] button to access the SiriusXM Menu2. Press the button to select "PARENTAL".3. Press the button to access the4. Press the button to decide number chanage passcode mode.and then the NEW passcode.5. Press the to confirm the Newpasscode, enter it second time.6. If the passcode change is successful, theLCD will display "SUCCESSFUL"Note:The default passcode set fro the ParentalLock is "1111".[ / ][][ / ]and press to enter Old passcode[ / ].[]English8 CMS20](https://usermanual.wiki/SOUNDMAX-ELECTRONICS/CMS20/User-Guide-3739800-Page-8.png)