Specialty Technologies PW02 Prime Wireless SoundBase User Manual prime wireless certification manual ai
Specialty Technologies, LLC Prime Wireless SoundBase prime wireless certification manual ai
User manual
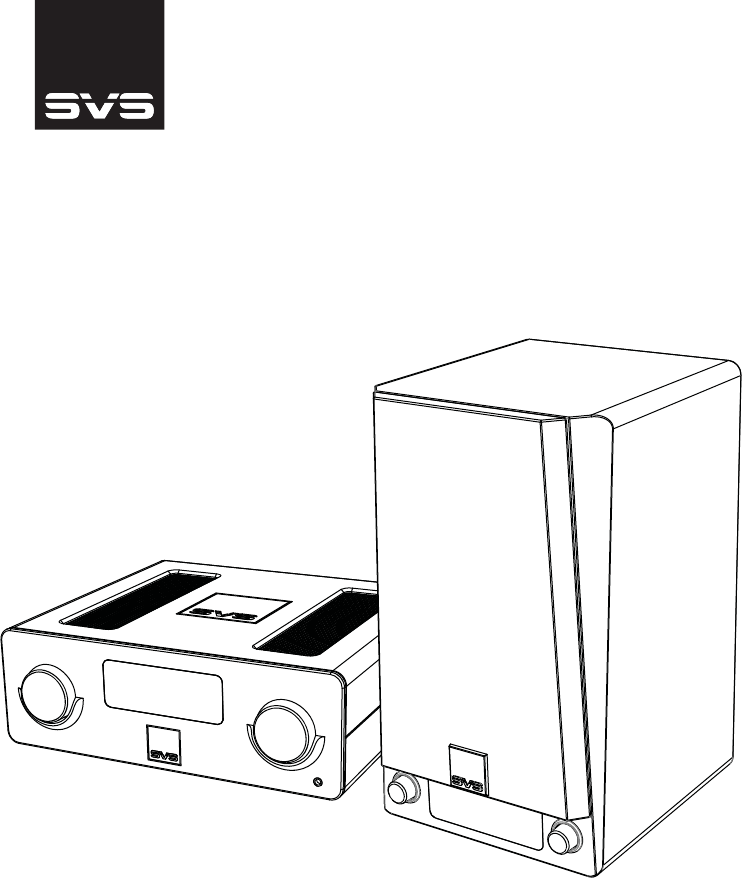
PRIME
WIRELESS
OWNER’S MANUAL
www.svsound.com
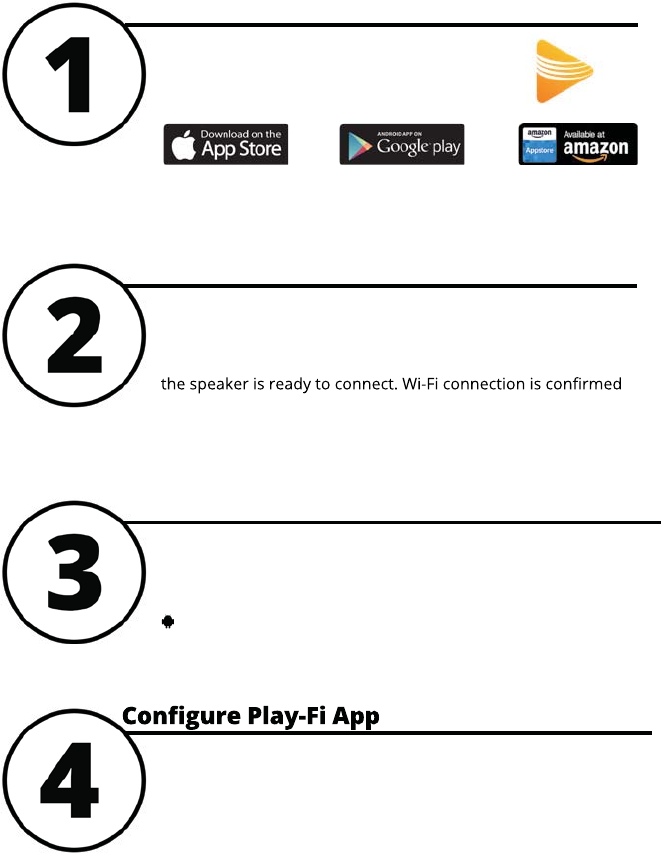
Open the Play-Fi app and follow the prompts to finish setting up
your Prime Wireless Speaker on your home Wi-Fi network.
iOS users must go to the “Settings” -> “Wi-Fi” and connect to
“PlayFiDevice...” like you would a normal Wi-Fi network.
Android users skip to step 4.
Connect Speaker to Wi-Fi Network
C
o
Once powered on, the speaker will automatically go into Wi-Fi
setup mode, indicated by a rapidly blinking yellow light on the
rear panel of the speaker. When the blinking light slows down,
when yellow light remains on permanently.
Start Speaker Wi-Fi Setup Mode
S
t
Search “Play-Fi” and download the free DTS
Play-Fi app to unlock the full functionality of
your SVS Prime Wireless Speakers.
Download Play-Fi App
D
o
Setting Up Wi-Fi
and the DTS Play-Fi App
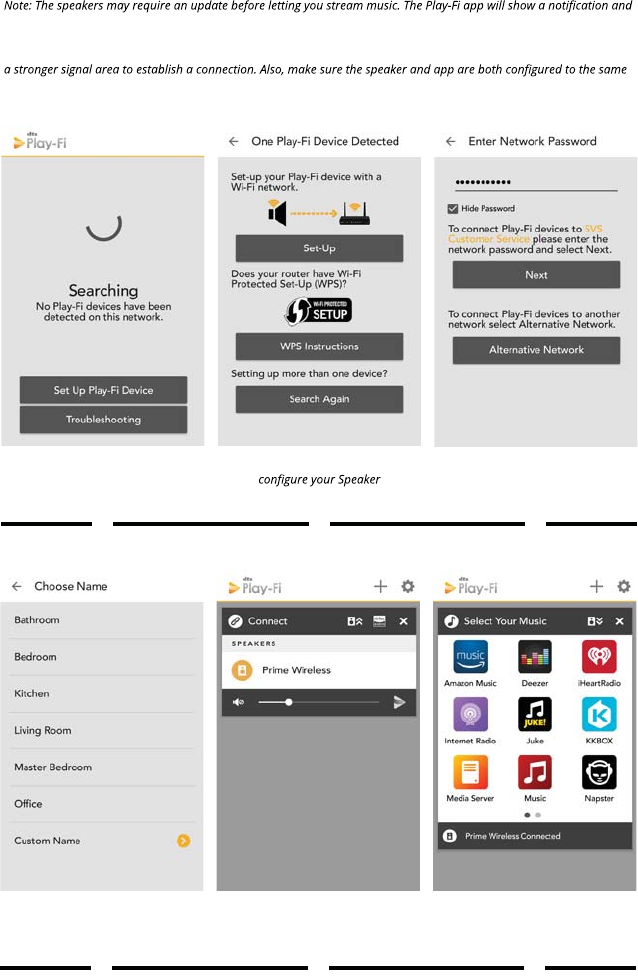
complete the update automatically. This is normal and can take 3-5 minutes.
If your SVS Prime Wireless speaker is not being discovered by the Wi-Fi network, try moving it closer to your router or to
Wi-Fi network in your home.
123
Select “Set Up Play-Fi
Device”
Choose “Set-Up” to
and Wi-Fi network.
Enter your Wi-Fi network
password and select
“Next”
Once your speakers are set up, you can access music from your devices and your
favorite streaming services. You can also enjoy full resolution Critical Listening Mode
Critical Listening Mode, create a multi-room audio system, and more.
456
Choose a name for your
Prime Wireless Speaker.
Select new device name
from Play-Fi menu.
Select your favorite
streaming method/
service
Current services available as presets. More options coming soon, check svsound.com/products/prime-wireless for updates.
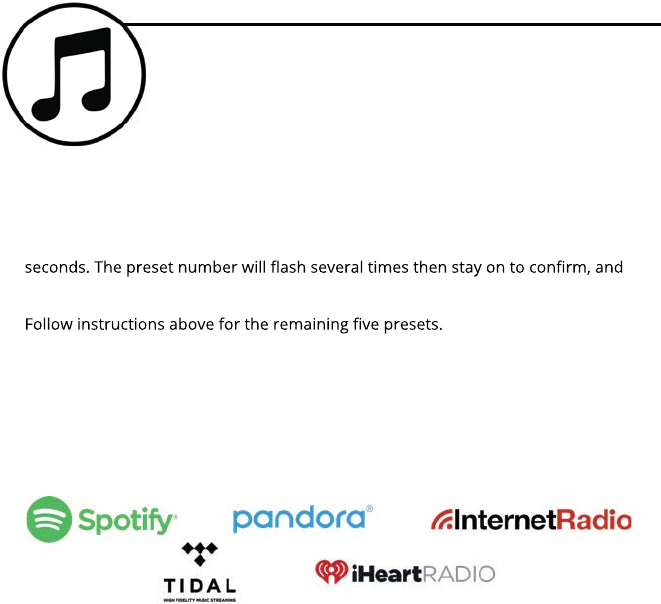
Up to six presets are available for instant access to your favorite
streaming music channels, playlists and other content.
1. From the Play-Fi app, start the streaming service you want to
set as a preset.
2. Press the left control knob A to select which preset B you want to set (1-6). Each
press will move to the next preset.
3. When desired preset number is selected, press and hold the preset knob for three
music will resume playing.
4.
5. You can now access your favorite content by pressing the left knob to toggle through
your presets at any time.
To reset a preset, repeat the steps 1 - 5.
NOTE: It takes a few seconds for the preset to connect to music services from your Wi-Fi network. This is normal.
Create Custom Presets
C
r
1. Read these instructions.
2. Keep these instructions.
3. Heed all warnings.
4. Follow all instructions.
5. Do not use this apparatus near water.
6. Clean only with dry cloth.
7. Do not block any ventilation openings. Install in accordance with the
manufacturer‘s instructions.
8. Do not install near any heat sources such as radiators, heat registers,
stoves, or other apparatus
(including amplifiers) that produce heat.
9. Do not defeat the safety purpose of the polarized or grounding-type
plug.
USA and Canada only: A polarized plug has two blades with one wider
than the other. A
grounding type plug has two blades and a third grounding prong. The
wide blade or the third
prong are provided for your safety.
If the provided plug does not fit into your outlet, consult an electrician for
replacement of the
obsolete outlet.
10. Protect the power cord from being walked on or pinched particularly
at plugs, convenience
receptacles, and the point where they exit from the apparatus.
11. Only use attachments/accessories specified by the manufacturer.
12. Unplug this apparatus during lightning storms or when unused for
long periods of time.
13. Refer all servicing to qualified service personnel. Servicing is required
when the apparatus has
been damaged in any way, such as power supply cord or plug is
damaged, liquid has been spilled
or objects have fallen into the apparatus, the apparatus has been
exposed to rain or moisture,
does not operate normally, or has been dropped.
14. WARNING: To reduce the risk of fire or electric shock, this apparatus
should not be exposed
to rain or moisture and objects filled with liquids, such as vases, should
not be placed on this
apparatus.
15. To completely disconnect this equipment from the mains, disconnect
the power supply cord plug
from the receptacle.
16. The mains plug of the power supply cord shall remain readily
operable.
NOTE: Both English and French are needed for above.
2. ERP
There are 2 ways to allow the unit to visit Internet .
one is Ethernet and the other is WIFI . if you want Ethernet method , you
just need to plug the network cable into the according port on the back of
the unit and then the connection will be built automatically . Otherwise,
you need to setup the wifi from the PlayFi APP .these are the steps as
following .
1.long press the wps button for 8s , there will be 2 tones you can hear .
2.After a while , the wifi LED will breath, which indicates you are allowed to
setup the wifi ;
3.In wifi list of your iPhone ,select the hot point named
“PlayFiDevicexxxxxx”;
4.Open the PlayFi app , then the app will automatically search the device
and you only need to follow the guidance of the APP to finish the setting .
If you want to disconnect the network, pls plug out the RJ45 or power off
the router.
If you want to build connection between BT clients and Mercury , you
should make the unit enter the pairing mode by short pressing the BT
button on the back.The BT led will fast blinking in that mode . then you will
be able to discover the unit in the BT clients . for example ,you can find
the unit in the BT device list on you iPhone After that , select the unit to
build the connection and then you can enjoy your music on Mercury .
Once the connection is OK and current source is BT ,the BT LED will be
solid on .
There are 2 ways to disconnect the BT connection :
1.making the unit enter BT pairing mode , The previous connection will be
disconnected automatically ;
2.Break the connection on the BT clients ,for example ,on cell phone;
The device is a HiNA equipment and never enter non-network standby
mode. If the current Input channel has no audio signal , the unit will enter
network standby mode after 10min.The power consumption in networked
standby mode is less than 8W.
3.FCC related warnings
This device complies with Part 15 of the FCC Rules / Industry Canada
licence-exempt RSS standard(s). Operation is subject to the following two
conditions: (1) this device may not cause harmful interference, and (2) this
device must accept any interference received, including interference that
may cause undesired operation.
Le présent appareil est conforme aux CNR d'Industrie Canada applicables
aux appareils radio exempts de licence. L'exploitation est autorisée aux
deux conditions
suivantes : (1) l'appareil ne doit pas produire de brouillage, et (2)
l'utilisateur de l'appareil doit accepter tout brouillage radioélectrique subi,
même si le brouillage est
susceptible d'en compromettre le fonctionnement.
Warning: Any changes or modifications to this unit not expressly
approved by the party responsible for compliance could void the
user's authority to operate the equipment.
NOTE: This equipment has been tested and found to comply with the
limits for a Class B digital device, pursuant to part 15 of the FCC Rules.
These limits are designed to provide reasonable protection against
harmful interference in a residential installation. This equipment
generates, uses and can radiate radio frequency energy and, if not
installed and used in accordance with the instructions, may cause
harmful interference to radio communications. However, there is no
guarantee that interference will not occur in a particular installation. If
this equipment does cause harmful interference to radio or television
reception, which can be determined by turning the equipment off and
on, the user is encouraged to try to correct the interference by one or
more of the following measures:
—Reorient or relocate the receiving antenna.
—Increase the separation between the equipment and receiver.
—Connect the equipment into an outlet on a circuit different from that
to which the receiver is connected.
—Consult the dealer or an experienced radio/TV technician for help.
To satisfy FCC / IC RF exposure requirements, a separation distance of
20 cm or
more should be maintained between the antenna of this device and
persons during
device operation.
To ensure compliance, operations at closer than this distance is not
recommended.
Les antennes installées doivent être situées de facon à ce que la
population ne puisse
y être exposée à une distance de moin de 20 cm. Installer les antennes
de facon à ce
que le personnel ne puisse approcher à 20 cm ou moins de la position
centrale de l’
antenne.
La FCC des éltats-unis stipule que cet appareil doit être en tout temps
éloigné d’au
moins 20 cm des personnes pendant son functionnement.
The device for operation in the band 5150-5250 MHz is only for indoor
use to reduce the potential for harmful interference to co-channel
mobile satellite systems;
les dispositifs fonctionnant dans la bande de 5 150 à 5 250 MHz sont
réservés uniquement pour une utilisation à l'intérieur afin de réduire
les risques de brouillage préjudiciable aux systèmes de satellites
mobiles utilisant les mêmes canaux;