Spin Master Toys Far East 44344RX49 RC Kite User Manual T44344 0001 20016787 GTL IS R1 eng
Spin Master Toys Far East Ltd. RC Kite T44344 0001 20016787 GTL IS R1 eng
User Manual
®
TM
Please read all warnings
and instructions completely
before assembling
and operating this toy.
Keep this instruction
manual for future reference.
BATTERIES REQUIRED (not included)
2 x AAA alkaline batteries for the kite
1 x 9 volt alkaline battery for the remote
LINE WINDER REMOTE KITE
Carefully unpack
all contents and
identify the parts
and features shown.
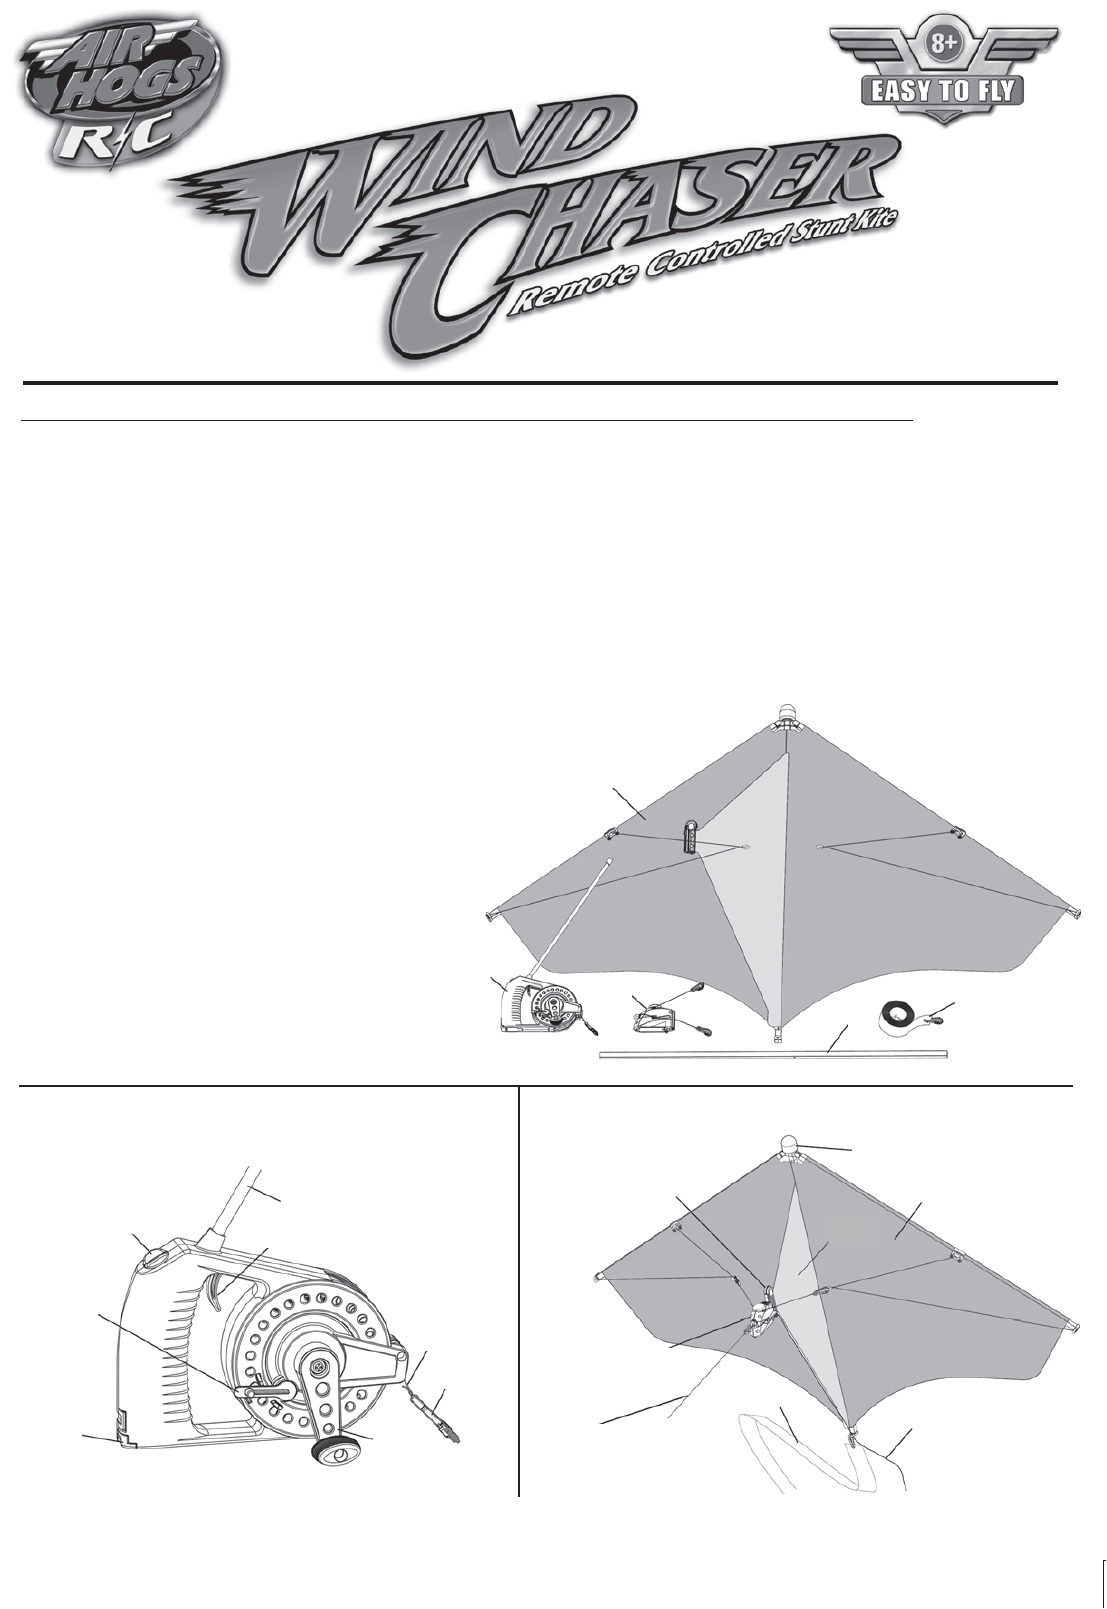
CONTENTS:
1. Kite
2. Line Winder Remote
3. Steering Servo
4. Horizontal Rod
5. Tail Ribbon
WARNING: Do not fly this toy near tall buildings, trees, or other objects that may cause the toy to
become entangled. Do not operate this toy in high winds, thunderstorms, or wet weather! Do not fly
near airports. Do not fly near overhead power lines. NEVER try to retrieve the kite from power lines
or a power pole. Call your local power company for help. Do not fly over people or pets.
IMPORTANT BATTERY INFORMATION:
Batteries should be installed by an adult.
Ensure battery polarity is correct (”+” positive & negative “-” orientaion).
New alkaline batteries are recommended for best performance.
Do not mix old and new batteries.
Do not mix alkaline, standard, rechargeable or different types of batteries.
Always turn Wind Chaser™ off before installing or removing batteries.
Battery compartment may be hot after use – allow to cool before handling.
Remove used up batteries.
Remove batteries from kite & remote when not in use or when storing kite.
Battery life may vary depending on battery brand.
Do not dispose of batteries in fire as batteries may explode or leak.
Do not recharge non-rechargeable batteries.
Do not short-circuit terminals.
Dispose of batteries safely.
ADULT SUPERVISION IS STRONGLY RECOMMENDED WHEN OPERATING THIS TOY
Page 1
INSTRUCTION
MANUAL
1
2
3
45
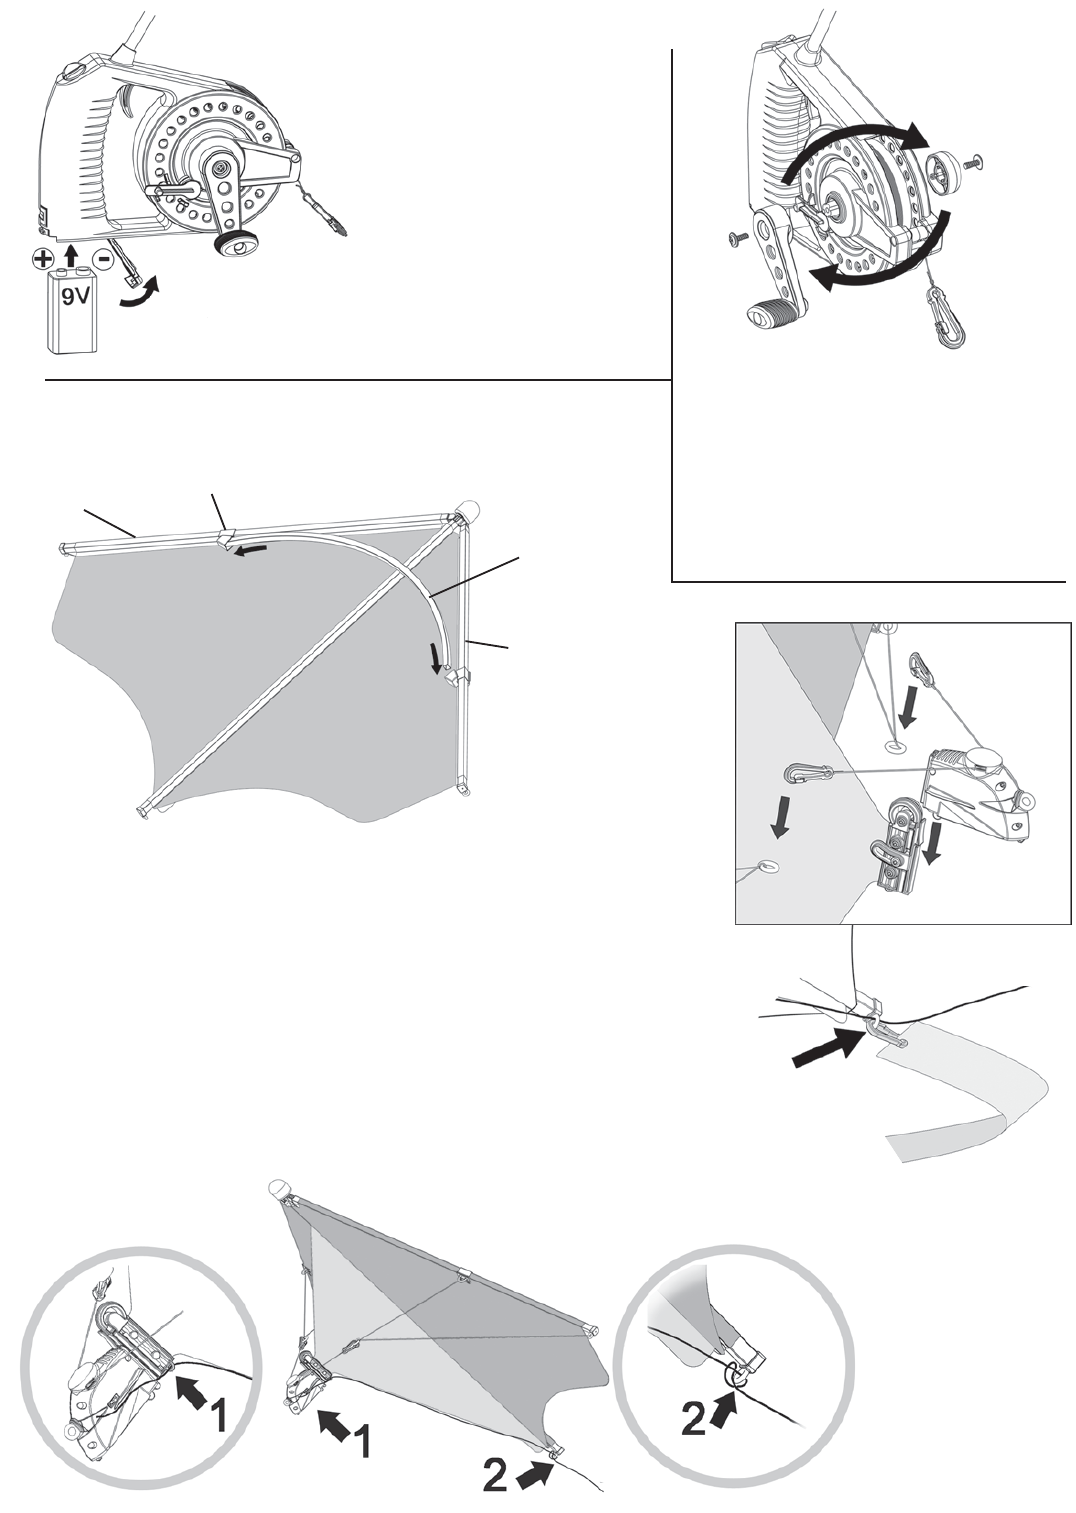
Radio Control
Stunt Switch
Spool
Lock Lever
Sliding
Battery
Door
1 x 9 volt alkaline
battery required
Flexible Antenna
Spool Tension Trigger
String
Connector
Spool
Crank Handle
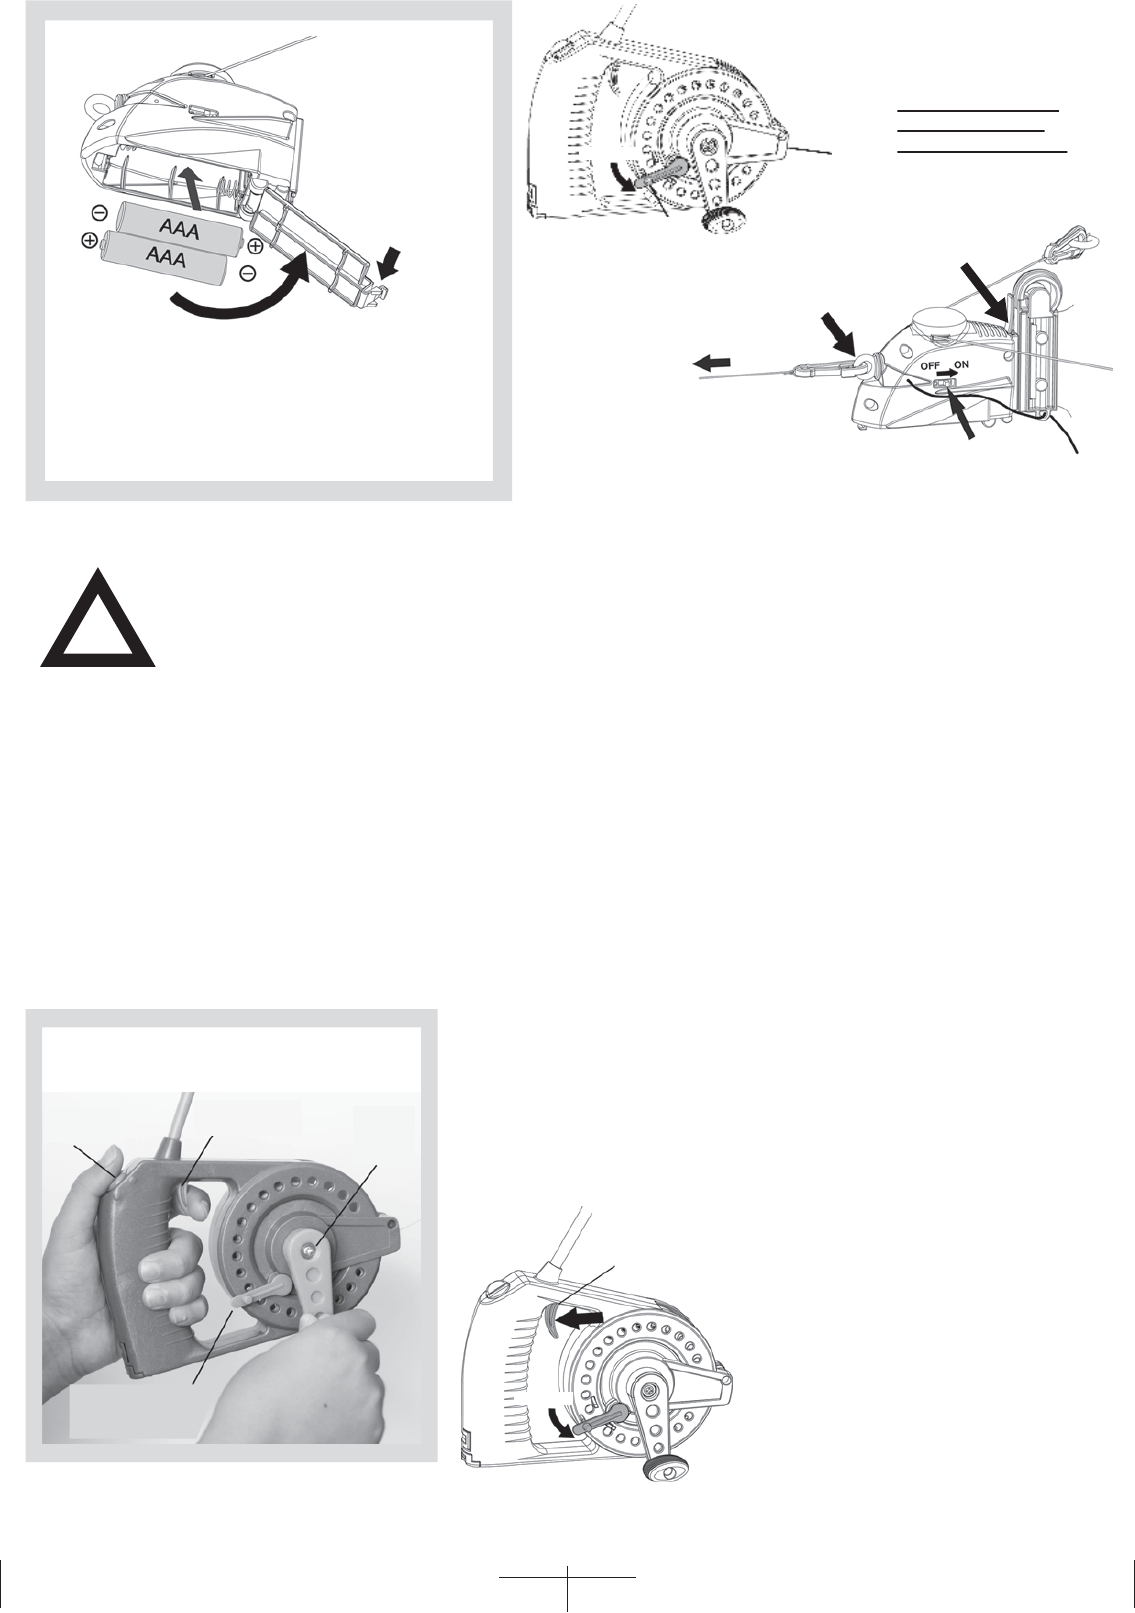
Steering Servo
Attachment
to Keel
Steering Servo
String from
Line Winder
Remote
Tail
Ribbon
Antenna Wire
(do not cut)
Soft Foam Nose
Kite
Keel
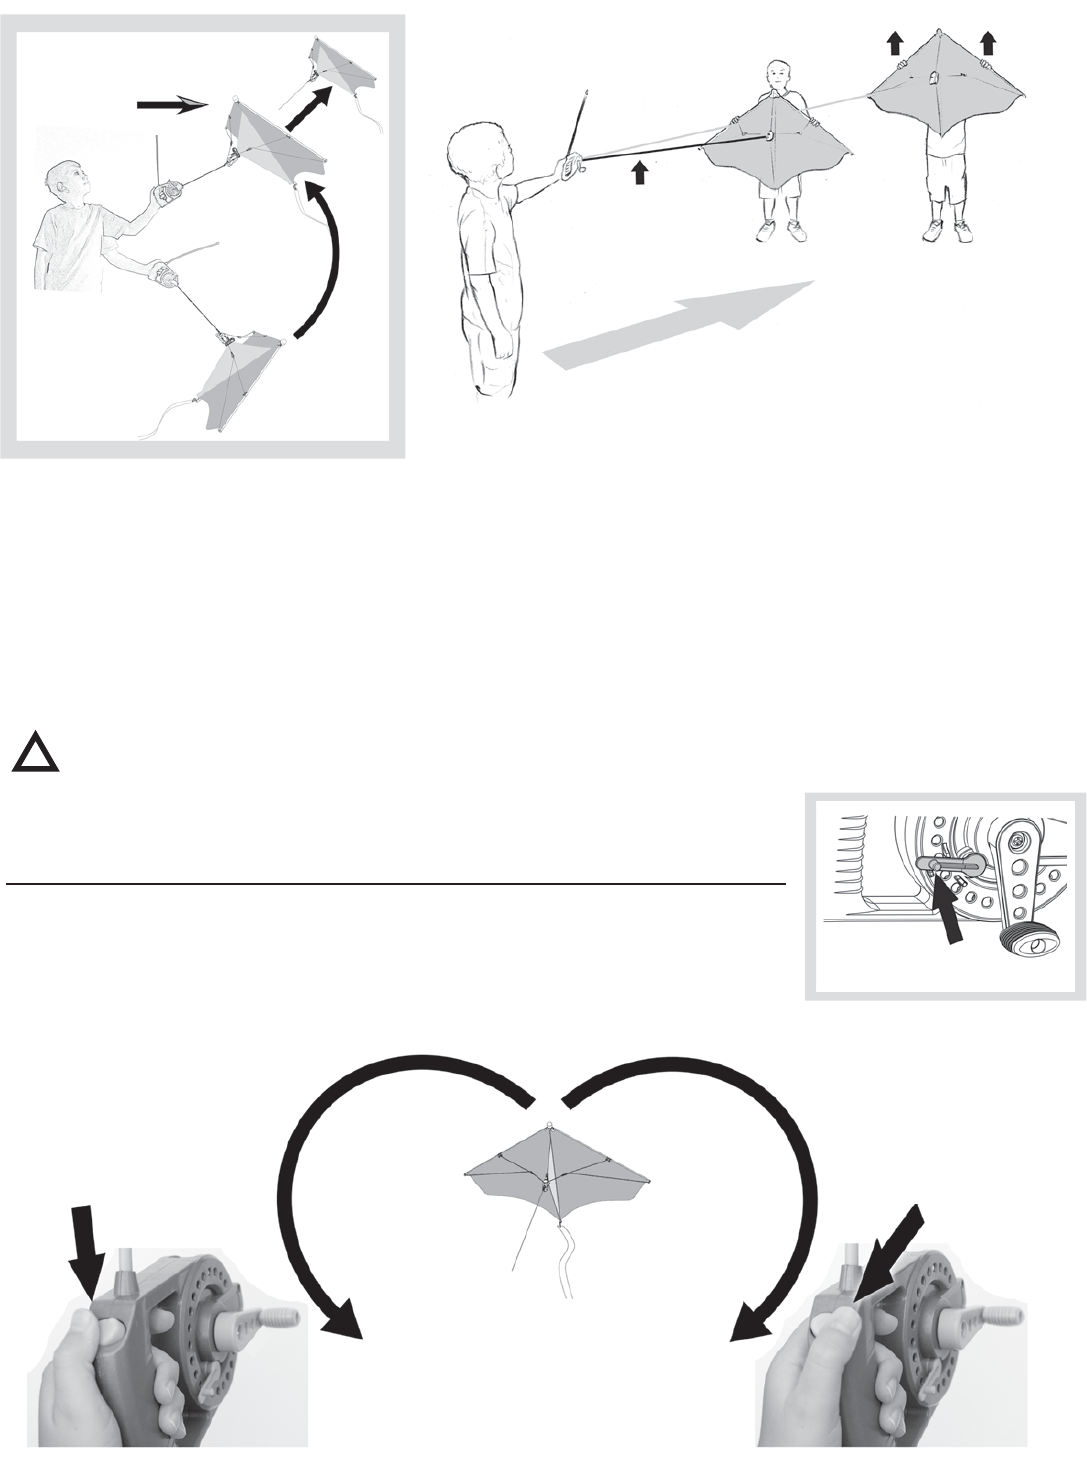
HOW TO INSTALL
THE 9 VOLT BATTERY
IN THE REMOTE
1. Start with a new 9 volt
alkaline battery.
2. Push & slide battery door open.
3. Insert battery following the
polarity (+) & (-) orientation
shown in the drawing.
4. Close battery door & slide to
lock in place.
OPTIONAL
LEFT HANDED
CONVERSION
Left-handed cranking is possible by
switching the cranking handle to the
opposite side of the remote (remove
two screws as shown).
NOTE: Left side cranking will prevent
Spool Lock Lever from locking
automatically when crank is turned.
Spool Lock Lever must be operated
manually.
HOW TO ASSEMBLE THE KITE
1. Open kite up.
2. Slightly bend Horizontal Rod & insert rod ends into Connectors
located on the Outside Rods as shown in Figure 1.
3. Slide Steering Servo onto attachment point on tip of Keel as shown in
Figure 2. (Steering Servo must slide all the way down to LOCK in place)
4. Attach left & right side Steering Clips from Steering Servo to left & right side
Rings on strings attached to the kite as shown in Figure 2.
5. Carefully insert RC antenna wire in the ring on the Steering Servo & then into
the ring at the bottom of the center rod of the kite as shown in Figure 3.
6. Attach Tail Ribbon onto the ring at bottom of center rod as shown in Figure 4.
(Tail Ribbon is necessary for stable flight)
Figure 1
Figure 2
Figure 3
Horizontal
Rod
Connector
Side Rod
Side Rod
Figure 4
Ring
Steering
Servo
Keel
Steering Clip
Page 2
Battery Door
New 9 volt alkaline battery
RC Antenna Wire Routing
(do not cut)
Steering Servo Wire
KITE
RC WIRE
TAIL RIBBON
Clip on at
bottom eyelet
Loosely
Tie Antenna
Wire to
Ring
WARNING:
Read Carefully
!
1. On the Line Winder Remote, push the Spool Lock Lever
to the DOWN position. The spool will now be unlocked
and string will pull easily from the spool. See Figure 5.
2. Attach the clip at the end of the string from the Line Winder
Remote to the Steering Servo Ring as shown in Figure 6.
3. Turn Kite “ON”. ON/OFF switch is on the Steering Servo.
IMPORTANT: Kite will move up & down and to left or right.
Please make sure there are NO obstacles or dangerous objects
in your flying area.
HOW TO FLY THE RC KITE
HOW TO HOLD
THE LINE WINDER REMOTE
Figure 7
IMPORTANT GUIDELINES FOR SAFE KITE OPERATION – ADULT SUPERVISION RECOMMENDED
Do not operate near electric wires, power lines or power poles due to risk of electric shock.
Do not operate in a small or confined space with people nearby.
Do not operate in stormy or wet weather – Avoid harsh winds and electrical storms.
Fly kite in a BIG open space with no obstacles, trees, buildings or people nearby.
At least 50 metres (55 yards) of open space is required in front and to the sides of the kite operator.
Large buildings or mountains may adversely affect kite flying due to wind turbulence.
Do not operate near water (ocean, river, pond, etc.).
For the best results, please operate kite while wind speed is 2-5 metres (2-5.5 yards) per second (5-12 miles per hour) maximum.
Wind speed higher than the recommended range will cause unstable flight, loss of control and crashing.
You may actually hear the kite string “hum” (a phenomenon called resonant frequency) in overly strong winds.
“Humming” noise is a sign that tells you the wind force is too strong. Retrieve the kite before loss of control.
1. Squeeze Latch to open Battery Door
at bottom of Steering Servo.
2. Insert 2 new AAA alkaline batteries
following the polarity (+ & -) orientation
shown in the drawing.
3. Close Battery Door – make sure it latches.
HOW TO
INSTALL
BATTERIES
IN STEERING
SERVO
Figure 5
Figure 6
1. Push Spool Lock Lever to DOWN
position to UNLOCK the spool as
shown in Figure 7 (turning the crank
will re-lock the spool).
2. Press Spool Tension Trigger as
string is pulled out so that string
never becomes too LOOSE causing
tangles on the spool.
3. Kite string can now be pulled
freely off the unlocked spool.
If a tangle occurs:
Turn crank to lock spool, press
trigger continuously, unlock spool,
& pull string out steadily until all
tangles are pulled out.
Page 3
Steering
Servo
Battery
Door
Latch
Line Winder Remote
Spool Lock Lever
UNLOCK
Kite String
Connection to
Steering Servo
To Line
Winder
Remote
Kite ON/OFF Switch
Press Spool
Tension Trigger
to keep tension
on outgoing
string
UNLOCK
RC Stunt
Switch
Spool Tension
Trigger Spool
Crank
Handle
Spool Lock Lever
(shown in the locked
position for flying)
KITE ASSEMBLY
(continued)
In case the Steering
Servo needs to be
repaired or replaced:
Squeeze Locking Tab to
slide Steering Servo up
and off the Keel as
shown.
EASY LAUNCHING FOR BEGINNERS:
!
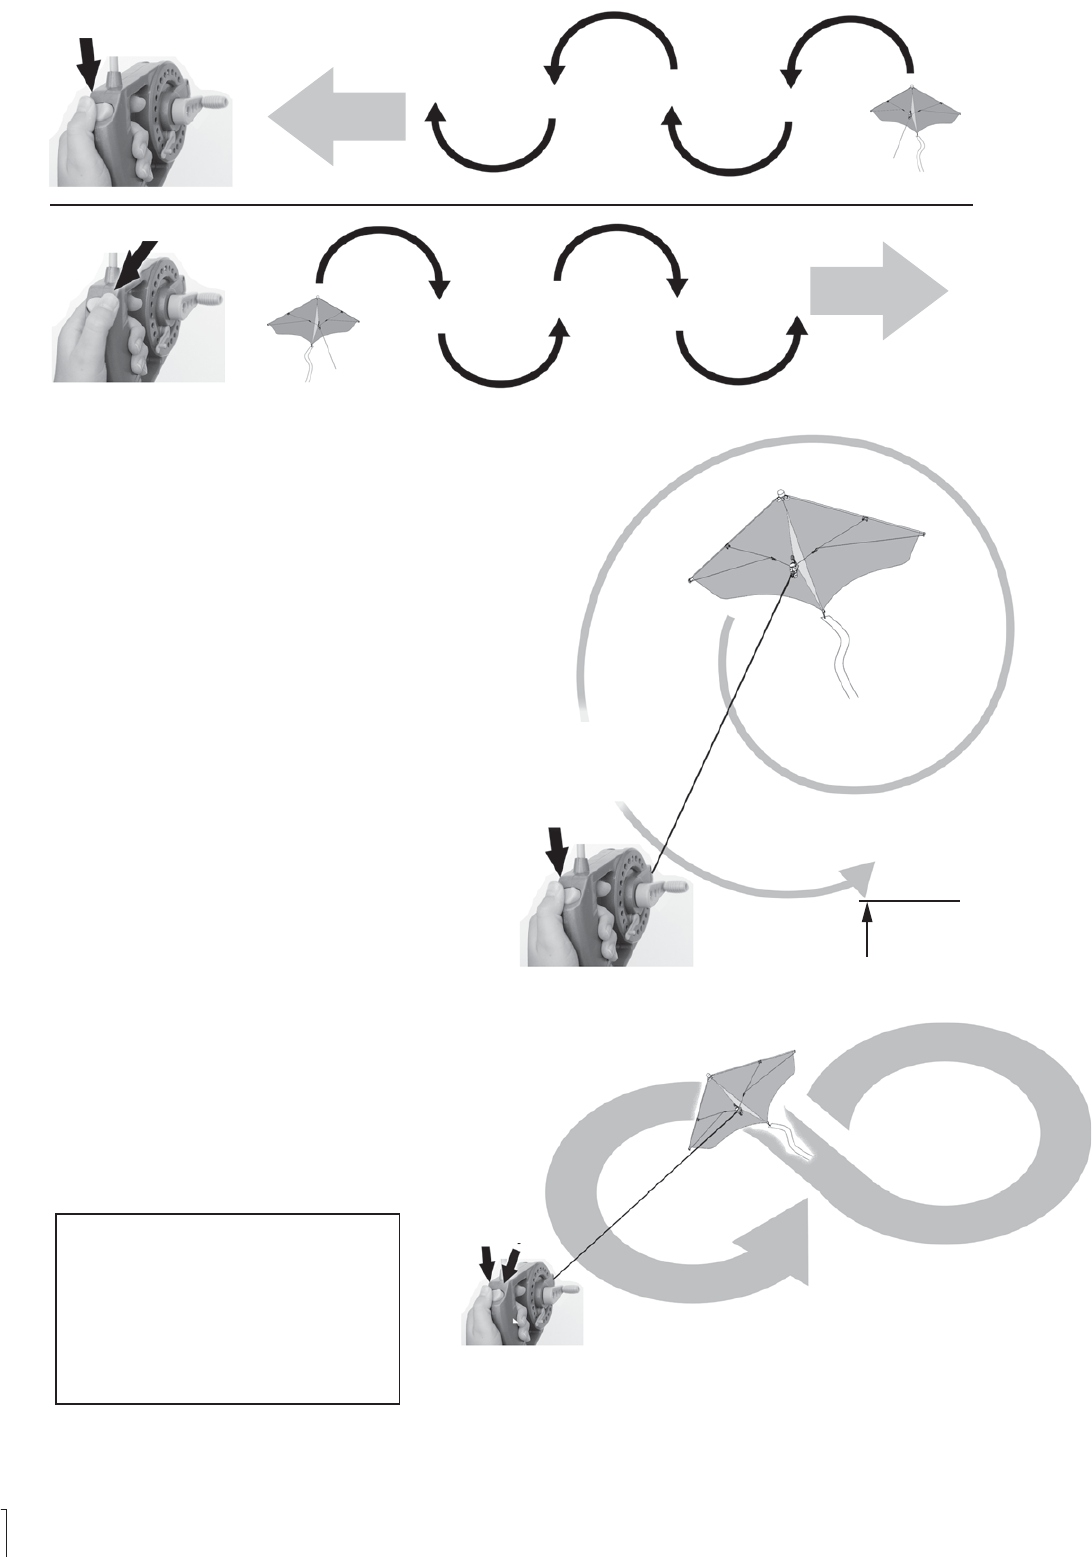
Wind Chaser™ Stunt Guide HOW TO TURN THE KITE
The kite starts turning left when left side of the RC switch is pressed on the remote.
The kite starts turning right when right side of the RC switch is pressed on the remote.
The kite starts climbing up naturally when the RC switch is released.
WARNING: When the string is being released from the remote,
please avoid touching or handling the string. Do not wrap the string
around your finger(s) or hand to avoid possible injury. The Wind Chaser™
Line Winder Remote handles the winding and release of string for you.
Figure 11
1. As an option, someone can assist you with launching
the kite – see Figure 9.
2. The assistant can hold the kite & walk back 20 metres (60 feet)
or more away from the operator in the direction of the wind.
3. The string must be stretched out.
4. The assistant can release the kite upwards.
5. The operator can walk into the wind to keep the kite airborne
& gaining altitude.
6. Once the kite reaches enough altitude, the Spool Lock Lever
can be shifted UP to the LOCKED position (turning the crank
clockwise will automatically lock the spool too) – see Figure 10.
7. If kite tends to move left or right, you can adjust the flight to be
“neutral” (steady and pointing up) by pressing left or right button
on remote. Point your remote antenna up.
Figure 10
LAUNCHING KITE WITH ASSISTANCE
Figure 8
Figure 9
1. Place your back to the wind – see Figure 8.
2. The length of string should be 1 metre (3 feet).
3. Swing kite up with nose pointing up.
4. Keep spool tension trigger pressed.
5. When the kite catches wind, carefully release
the trigger to let string go out.
6. Press the trigger as needed to keep the string
from becoming slack & the kite will gain altitude.
7. When wind is not strong enough, you can hold
kite above your head and walk or run into the
wind to get the kite to a flying altitude (height).
LAUNCHING
KITE
Page 4
WIND
Keep antenna pointed up
Keep string tight Release up
Wind direction
Press RC Stunt
Switch on Left
Side for Left Turn
Press RC Stunt
Switch on Right
Side for Right Turn
Right
Tu r n
Left
Tu r n
Spool Lock Lever
LOCKED in UP position for kite flying
20 metres (60 feet)
or more
IMPORTANT: The length of the string from the Remote to Kite must be a minimum of 30
metres (100 feet) or more for all stunts.
Wind Chaser™ Stunt Guide (continued)
HOW TO MAKE THE KITE TRAVEL LEFT OR RIGHT
You can move the kite to the left or right over a long distance
when left or right side of the RC switch on remote is pressed
and released (neutral position) repeatedly.
TRAVEL
TRAVEL
DO SUPER EASY SPIRALS
The kite will spiral if the left or right side
RC Stunt Switch is held down continuously.
IMPORTANT: As the kite spirals, it will lose
altitude & ultimately crash on the ground.
MAINTAIN a minimum altitude of 9.75 metres
(32 feet) at all times to prevent crashing.
WATCH the distance between the kite
and the ground ALWAYS.
If the kite is too close to the ground, simply
release the RC Stunt Switch to regain neutral,
upward flight.
Push the Spool Lock Lever DOWN to release
string from the spool to regain altitude. Apply
tension to the string by pressing the trigger.
Push the Spool Lock Lever UP to lock the
spool & start flying all over again.
Left Side
Right Side
DO FANTASTIC FIGURE 8’s
Press left & right sides of RC Stunt Switch
alternatively – the kite will trace a Figure 8
in the sky!
Kite turns in a tighter radius in a light
wind & turns in a larger radius in a
strong wind.
Please do not do stunts when the
kite is close to the ground.
It may suddenly crash.
If the kite starts falling down quickly
from a strong gust of wind, run toward
the kite immediately to loosen the string
between the kite and remote. The kite
will recover and start flying up again.
Page 5
LEFT
NEUTRAL
LEFT
RIGHT RIGHT
NEUTRAL
NEUTRAL NEUTRAL
HOLD DOWN
RC Stunt Switch
Left Side
Maintain 9.75
metres (32 feet)
or more minimum
altitude
Press Right
& Left Sides
of RC Switch
Alternately
IMPORTANT:
Maintain minimum altitude of
9.75 metres (32 feet) for this
& other stunts
Do not pull the string in with your bare hands.
Use the Line Winder Remote to crank it onto the spool.
Kite tends to fly left
or right on its own.
Press left or right RC switch on the Line Winder
Remote to achieve steady or neutral flight.
Poor range or
lack of RC function.
The TX antenna must be pointed up for best range.
Other RC devices, tall buildings, etc., may cause
radio interference – try a different location.
Ensure a NEW 9 volt battery is fully inserted
(correct polarity) into the Line Winder Remote.
Wind Chaser™ does not
start functioning.
Ensure NEW AAA alkaline batteries are fully inserted
(correct polarity) into Steering Servo & switch is “ON”.
PROBLEM SOLUTION
TROUBLESHOOTING GUIDE
WINDING UP THE STRING
Point the remote to the kite and rewind the string by turning
the Spool Crank Handle.
If you feel the kite is hard to reel in because of strong wind,
walk toward the kite and wind at the same time.
Pay attention not to rewind the string at one edge of Spool
all the time – wind the string onto the spool evenly.
Page 6
TM and © 2009 Spin Master Ltd. All rights reserved.
Air Hogs ® is a registered trademark of Spin Master
Ltd. All rights reserved. Conforms to product safety
standards ASTM F963, EN71 regulatory
requirements. Products and colours may vary.
Please retain this information for future
reference. Patent Pending.
MADE IN CHINA.
20016787, 20016788 GTL Eng REV 0
T44344_0001_20016787_GTL_IS_R1
Spin Master Ltd., 450 Front Street West, Toronto, ON M5V 1B6 Canada
Customer Care: 1-800-622-8339 www.spinmaster.com/customercare
Fax: 416-364-8005 Web: www.spinmaster.com Email: toys@spinmaster.com
Spin Master Inc., PMB #10053, 300 International Drive, Suite 100, Williamsville, NY 14221, USA
Spin Master Toys Far East Limited, Rm #1113, 11/F, Chinachem Golden Plaza, 77 Mody Rd.,
Tsimshatsui E., Kowloon, HK
Spin Master Toys UK Ltd., Meadowbank, Furlong Road, Bourne End, Bucks, SL8 5AJ, United Kingdom
Customer Service: 0870 850 8408 Email: ukservice@spinmaster.com
Spin Master France – 36 rue de Silly – 92100 Boulogne Billancourt – France
Service Après-Vente – Numéro vert : 0800 803 355 ou
E-mail : Jouets@spinmaster.com – Site internet : www.spinmaster.fr
If at any time in the future you should need to dispose of this
product please note that Waste Electrical Products should NOT be
disposed of with household waste. Please recycle where facilities
exist. Check with your Local Authority or retailer for recycling advice.
(Waste Electrical and Electronic Equipment Directive).
This Category II radiocommunication device complies with Industry Canada Standard RSS-310.
Carrier frequency: 27.145 MHz
Field Strength: 62.5dBuV/m at 3m
Carrier frequency: 49.860 MHz
Field Strength: 72.4dBuV/m at 3m
1177
Hereby, Spin Master Ltd., declares
that Wind Chaser™ is in compliance
with the essential requirements and
other relevant provisions of Directive
1999/5/EC
TM
FREQUENCIES: Your kite and remote operate on one of two frequencies: 27MHz or 49MHz (40MHz in some countries).
Do not operate two radio control kites on the same frequency in the same area, as they will interfere with each other.
FCC REQUIREMENTS
This device complies with part 15 of the FCC Rules. Operation is subject to the following two conditions: (1) This device
may not cause harmful interference, and (2) This device must accept any interference received, including interference
that may cause undesired operation.
Warning: Changes or modifications to this unit not expressly approved by the party responsible for compliance could
void the user’s authority to operate the equipment.
Note: This equipment has been tested and found to comply with the limits for a Class B digital device, pursuant to Part
15 of the FCC Rules. These limits are designed to provide reasonable protection against harmful interference in a
residential installation. This equipment generates, uses and can radiate radio frequency energy and, if not installed and
used in accordance with the instructions, may cause harmful interference to radio communications. However, there is
no guarantee that interference will not occur in a particular installation. If this equipment does cause harmful interfer-
ence to radio or television reception, which can be determined by turning the equipment off and on, the user is encour-
aged to try to correct the interference by one or more of the following measures:
sæ2EORIENTæORæRELOCATEæTHEæRECEIVINGæANTENNA
sæ)NCREASEæTHEæSEPARATIONæBETWEENæTHEæEQUIPMENTæANDæTHEæRECEIVER
sæ#ONNECTæTHEæEQUIPMENTæINTOæANæOUTLETæONæAæCIRCUITæDIFFERENTæFROMæTHATæTOæWHICHæTHEæRECEIVERæISæCONNECTED
sæ#ONSULTæTHEæDEALERæORæANæEXPERIENCEDæRADIOææ46æTECHNICIANæFORæHELP