Sportline 345 WV1056IS02SCC User Manual To The D8a7ac17 7a2d 4d96 9b66 F136b2680257
User Manual: Sportline 345 to the manual
Open the PDF directly: View PDF ![]() .
.
Page Count: 4

BUTTONS AND THEIR FUNCTIONS
The Sportline 345 Pedometer has 3 buttons for operating and programming: MODE/
RESET (located on the front of the unit below the display) and on the back panel of
the unit, the SET and the + (Adjust/increase) buttons.
MODE/RESET (MODE) BUTTON
• Operating Mode: Scrolls through display modes.
• Press & Hold: Resets pedometer data
• Programming Mode: Adjusts (decreases) information being adjusted.
SET BUTTON
• Operating Mode: Press & Hold to enter the Programming Sequence.
• Programming Mode: Accepts the information being adjusted and advances to the
next setting.
+ (ADJUST/INCREASE) BUTTON
• Programming Mode: Adjusts (increases) information being adjusted.
2- REMOVING BATTERY INSULATOR TAB 3- BUTTONS AND THEIR FUNCTIONS
1- INTRODUCTION
Back cover
345 PEDOMETER
USER GUIDE
/INSTRUCTION MANUAL
Congratulations on your purchase of a Sportline 345 Pedometer. The 345 Pedometer
features a highly advanced pedometer technology that accurately measures your
body movements when worn from multiple locations on the body and in multiple
orientations.
Please keep in mind your pedometer is a sensitive technical instrument. With
proper care and maintenance, it will last for many years. However, improper
care and handling can cause the various sensors to be damaged and to stop
functioning.
HOW TO USE THIS MANUAL
Please read all sections of this manual carefully and become fully familiar with
the operation of the pedometer before using it in the fi eld. Proper setup and
operation will greatly enhance the pedometer’s usefulness and your enjoyment.
The steps for the programming or operation are adjacent to the screen illustration.
Key points and important information are shown in highlighted blocks.
CUSTOMER SUPPORT
If you have questions, comments or need assistance with your Sportline
Pedometer, you may contact Customer Support by calling 1-866-694-4575.
NOTE: In order to activate your pedometer after purchase, you must remove the
battery insulator tab inside the battery compartment.
1. Locate the tab on the back of the pedometer.
2. Firmly grasp the tab and pull away from the pedometer until completely
removed from the unit.
3. Remove the label that appears on the pedometer display.
1 2
345 PEDOMETER
www.sportline.com
www.sportline.com
Walking Advantage by SportlineTM is distributed for EB Sport Group,
Yonkers, NY. in Canada by / Walking Advantage par SportlineTM
est distribué pour EB Sport Group, au Canada par ACI Brands Inc,
2616 Sheridan Drive, Oakville, Ontario L6J-7Z2.
All Rights Reserved/Touts droits reservé ©2012
WV1056IS02SCC
Fold 1
Fold 2Fold 3 Fold 3
5- PROGRAMMING THE PEDOMETER
4. Adjust Height by PRESSING the + or - buttons. PRESS the SET button to accept
value.
5. This pedometer has an automatic stride length calculator that sets your length
based on your height. PRESS the SET button to accept this value or you can
adjust your Stride Length (see “Determining Stride Length” on the opposite
page) by PRESSING the + or MODE buttons.
6. PRESS the SET button. The unit is now programmed and ready for use!
4 5 6
4- PROGRAMMING THE PEDOMETER
In order to ensure exercise data is as accurate as possible, you must complete the
following steps to enter your personal profi le. The display will prompt you what
information is being programmed. Adjust information by PRESSING + (to increase)
OR MODE/RESET (MODE) (to decrease). Accept value and advance to the next setting
by PRESSING SET.
1. Enter the Programming Sequence by PRESSING & HOLDING the SET button on
the back of the unit for approximately 3 seconds.
2. Select unit of measure (metric or imperial) by PRESSING the + or MODE buttons
on the back of the unit. PRESS the SET button again.
3. Adjust Weight (in pounds or kilograms) by PRESSING the + (to increase) or MODE
(to decrease) buttons. PRESS the SET button to accept value and advance to set
Height.
1 12 2 33
To adjust value:
PRESS + or MODE/RESET
To accept and advance:
PRESS SET
To adjust value:
PRESS + or MODE/RESET
To accept and advance:
PRESS SET
Scroll through display
modes:
PRESS MODE/RESET
6- OPERATING THE PEDOMETER 7- RESETTING PEDOMETER DATA
The 345 Pedometer automatically begins capturing data once movement
occurs. There are no Start or Stop buttons to push.
Scroll through display modes: STEPS, DISTANCE, CALORIES AND EXERCISE TIME
by PRESSING THE MODE/RESET BUTTON.
TO CLEAR ALL CURRENT PEDOMETER DATA:
1. PRESS & HOLD the MODE/RESET button on the front of the unit.
2. Continue holding as the display reads “RESET”.
3. When pedometer data reads zeros (O), RELEASE THE MODE/RESET button.
The unit is now ready for a new workout.
NOTE: Your personal profi le settings will be saved.
STEPS
EXERCISE TIME CALORIES
DISTANCE
WV1056IS02SCC
9/11/12
Ron

345 PEDOMETER
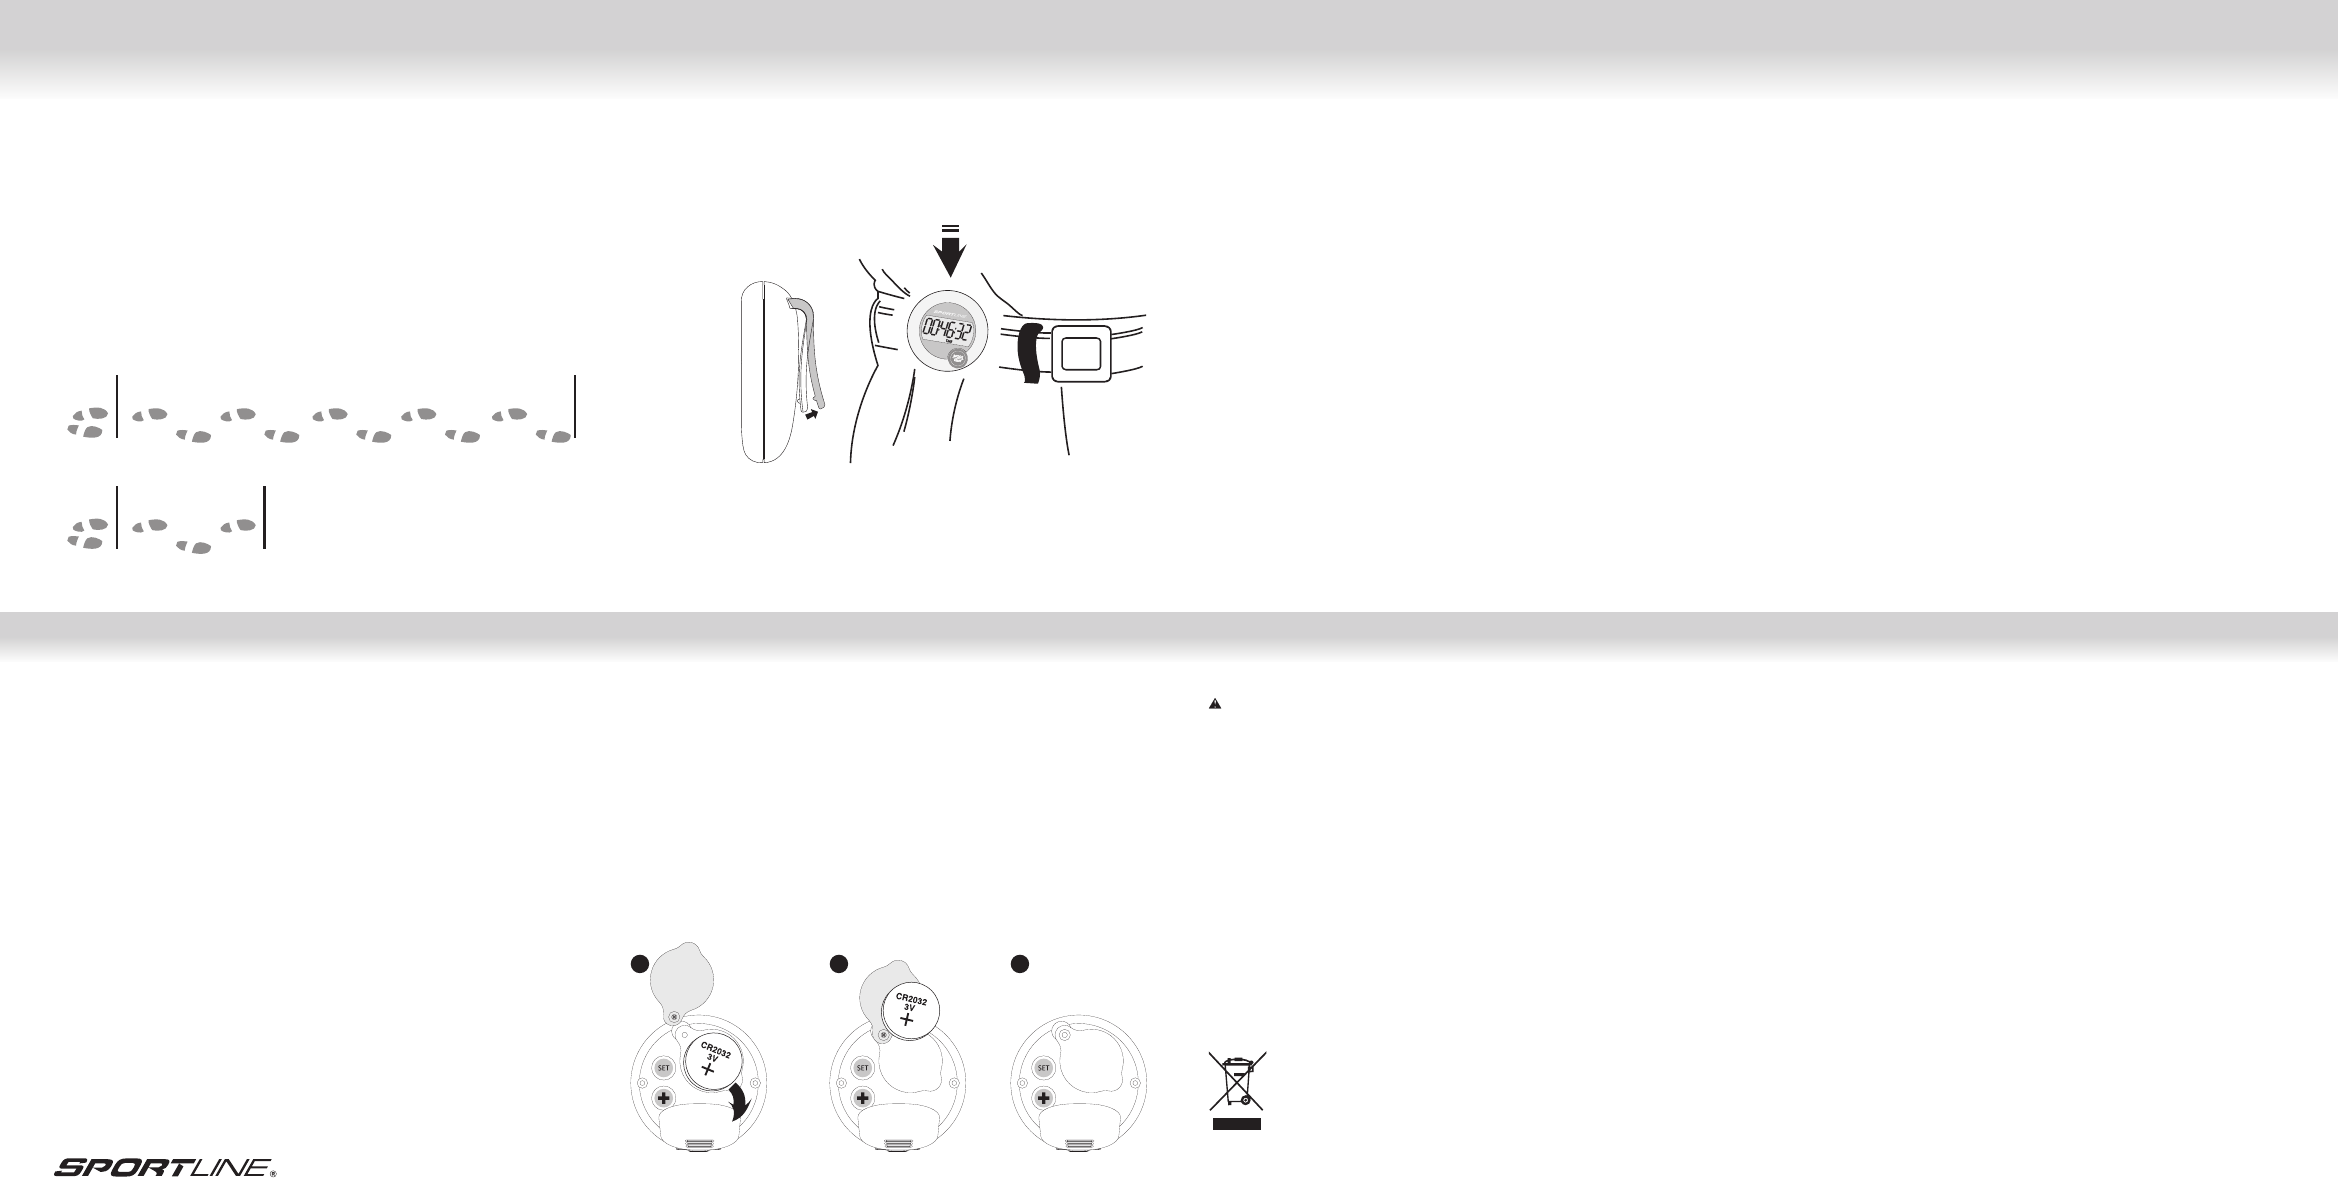
8- MEASURING STRIDE LENGTH
HOW TO MEASURE YOUR STRIDE LENGTH
The 345 Pedometer automatically sets your stride length based upon your height
input during the Set Up sequence. You may choose to adjust this stride length.
To obtain your personalized measurement, see below.
1. To fi nd out what your stride is, walk or run 10 steps and then measure the
distance with a tape measure from the fi rst step’s toe to the 10th step’s toe.
2. Divide your total distance by 10 to get your average stride length.
3. For a quick estimate, walk 3 steps, measure the distance, and divide by 3.
The more steps you take, the more accurate and realistic your stride will be.
An average walking stride for a female is 2 feet (24 in.), a male is 2.5 feet (30 in.).
START WALKING/RUNNING
BASE LINE DIVIDE TOTAL
DISTANCE BY 10
13579
246
810
11- CARE & MAINTENANCE
• NEVER get the pedometer wet. This unit is not water resistant.
• NEVER attempt to disassemble or service your unit.
• DO NOT expose the unit to extreme heat, shocks, magnetic fi elds, electrical noise,
strong vibration or long-term exposure to direct sunlight.
• DO NOT drop or step on the pedometer.
• TO CLEAN the unit: wipe with a lightly moistened cloth. Apply mild soap to the
area if there are stubborn stains or marks. Do not expose the unit to strong
chemicals such as gasoline, cleaning solvents, acetone, alcohol, or insect
repellents, as they may damage the unit’s seal, case and/or fi nish.
• STORE the unit in a dry place when you are not using it.
www.sportline.com
13- REPLACING THE BATTERY
The Sportline 345 Pedometer uses one CR2032 3V lithium battery.
Battery replacement will be required from time to time, and should occur when:
1. The display fades in part or completely
2. The pedometer function will not activate
TO REPLACE THE BATTERY:
1. Lift the spring-loaded belt clip on the back of the unit to expose the battery
compartment door. Unscrew the battery compartment door with a small Phillips
screwdriver.
2. Remove the exhausted battery from the unit, and insert a new battery (be sure to
place the positive (+) side of the battery facing up).
3. Replace the battery compartment cover and fasten by sliding back into place).
1 2 3
14- BATTERY SAFETY INFORMATION
CAUTION – BATTERY SAFETY INFORMATION
• Non-rechargeable batteries are not to be recharged
• Rechargeable batteries must be removed before recharging
• Rechargeable batteries should only be recharged under adult supervision
• Do not mix alkaline, standard (carbon-zinc), or rechargeable (nickel-cadmium)
batteries
• Exhausted batteries are to be removed
• Do not mix old and new batteries
• Do not dispose of batteries in fi re; batteries may explode or leak
• Do not dispose of product in fi re; batteries may explode or leak
• If this product will not be used for an extended period of time, remove the
batteries from the product
• The supply terminals are not to be short-circuited
• Batteries are to be inserted with correct polarity
• Clean the battery contacts and also those of the product prior to battery
installation
• As always, dispose of batteries in an eco-friendly manner
The purpose of the crossed-out wheelie bin symbol is to remind us that most electrical products,
and batteries, contain trace elements (including Mercury – Hg, Cadmium – Cd and Lead – Pb)
which could be harmful to our environment and therefore our health. We must all be careful to
dispose of them responsibly in a specifi cally designated way – either using a collection scheme or
into the correctly labeled civic amenity (NOT into general waste) – this will help your local
authority to arrange to recycle or dispose of them in the appropriate manner.
9- HOW TO WEAR THE PEDOMETER
This pedometer will be most accurate when worn close to the body, ideally on your
belt or waist line or inserting the unit into a tight, secure pocket. The pedometer can
also be worn around the neck attached to a lanyard.
10- WARNINGS & CAUTIONS
WARNING: Before starting any exercise program or performing any vigorous
physical activity, we strongly suggest you visit your doctor for a complete physical
and to discuss your plans.
CAUTION: Pedometers are not water resistant.
AVOID exposing the Pedometer to extreme conditions.
AVOID rough uses or severe impacts to the Pedometer.
CLEAN the Pedometer occasionally with a soft, dry cloth.
STORE the Pedometer in a dry place when it is not in use for a long time.
START WALKING/
RUNNING
BASE LINE DIVIDE TOTAL
DISTANCE BY 3
13
2
12- FCC COMPLIANCE
“The device complies with Part 15 of the FCC Rules. Operation is subject to the
following two conditions: (1) this device may not cause harmful interference, and (2)
this device must accept any interference received, including interference that may
cause undesired operation.”
1. “Changes or modifi cations not expressly approved by the party responsible for
compliance could void the user’s authority to operate the product.”
2. “NOTE: This product has been tested and found to comply with the limits for a
Class B digital device, pursuant to Part 15 of the FCC Rules. These limits are
designed to provide reasonable protection against harmful interference in a
residential installation. This product generates, uses and can radiate radio
frequency energy and, if not installed and used in accordance with the instructions,
may cause harmful interference to radio communications. However, there is no
guarantee that interference will not occur in a particular installation. If the product
does cause harmful interference to radio or television reception, which can be
determined by turning the equipment off and on, the user is encouraged to try to
correct the interference by one or more of the following measures:
• Reorient or relocate the receiving antenna.
• Increase the separation between the product and receiver.
• Connect the product into an outlet on a circuit different from that to which the
receiver is connected.
• Consult the dealer or an experienced radio/TV technician for help.”

Le podomètre 345 de Sportline a trois boutons pour l’utilisation et la programmation de
l’appareil : MODE/RESET [MODE/REMISE À ZÉRO] (situé sur le devant de l’appareil, sous
l’affi chage) et, au dos de l’appareil, les boutons SET [RÉGLER] et + (Ajuster/augmenter).
BOUTON MODE/RESET [MODE/REMISE À ZÉRO] (MODE)
• En mode fonctionnement, faites défi ler les modes d’affi chage.
• Appuyez et maintenez enfoncé pour remettre à zéro les données du podomètre.
• En mode programmation, ajustez (diminuer) la donnée que vous êtes en train de programmer.
BOUTON SET [RÉGLER]
• En mode fonctionnement, appuyez et maintenez enfoncé pour accéder à la
séquence de programmation.
• En mode programmation, acceptez la donnée que vous êtes en train d’ajuster et
passez au prochain réglage.
BOUTON + (AUGMENTER)
• En mode programmation, ajustez (augmenter) la donnée que vous êtes en train
de programmer.
BUTTONS AND THEIR FUNCTIONS2- RETRAIT DE LA LANGUETTE ISOLANTE
DE LA PILE
3- BOUTONS ET FONCTIONS
1- INTRODUCTION
Back cover
345 PODOMÈTRE
GUIDE DE
L’UTILISATEUR
/MODE D’EMPLOI
Nous vous félicitons d’avoir acheté un podomètre 345 de Sportline. Le podomètre
345 est muni d’une technologie de pointe propre aux podomètres qui mesure
précisément les mouvements du corps en divers points et sous de multiples angles.
Veuillez garder à l’esprit que votre podomètre est un instrument technique
sensible. Si vous l’utilisez et l’entretenez comme il se doit, il vous servira pendant
de nombreuses années. Un usage et un entretien inadéquats risquent en revanche
d’endommager les différents capteurs et de les empêcher de fonctionner.
MODE D’UTILISATION DU MANUEL
Avant de vous servir du podomètre, prenez le temps de lire attentivement chacune
des sections de ce manuel afi n de bien vous familiariser avec son fonctionnement.
Si vous réglez et utilisez le podomètre correctement, vous en améliorerez
considérablement l’utilité et l’apprécierez davantage. Les étapes à suivre pour
la programmation ou le fonctionnement sont décrites à côté de chacune des
illustrations. Les points et renseignements importants sont mis en évidence dans
des zones de texte.
SOUTIEN À LA CLIENTÈLE
Si vous avez des questions à poser, des commentaires à formuler ou encore
si vous avez besoin d’aide concernant votre appareil Sportline, vous pouvez
communiquer avec le Soutien à la clientèle au 1-866-694-4575.
REMARQUE : Pour pouvoir activer votre podomètre, vous devez retirer la languette
isolante qui se trouve dans le compartiment à pile.
1. Trouvez la languette au dos du podomètre.
2. Tenez-la fermement et tirez-la jusqu’à ce qu’elle soit complètement retirée de
l’appareil.
3. Décollez la pellicule qui recouvre l’écran du podomètre.
1 2
345 PODOMÈTREwww.sportline.com
www.sportline.com
Walking Advantage by SportlineTM is distributed for EB Sport Group,
Yonkers, NY. in Canada by / Walking Advantage par SportlineTM
est distribué pour EB Sport Group, au Canada par ACI Brands Inc,
2616 Sheridan Drive, Oakville, Ontario L6J-7Z2.
All Rights Reserved/Touts droits reservé ©2012
WV1056IS02SCC
Fold 1
Fold 2Fold 3 Fold 3
5- PROGRAMMATION DU PODOMÈTRE
4. Réglez la taille en APPUYANT sur les boutons + ou -. APPUYEZ sur le bouton
SET [RÉGLER] pour accepter la valeur.
5. Ce podomètre est muni d’un calculateur automatique qui règle la foulée en
fonction de la grandeur. APPUYEZ sur le bouton SET [RÉGLER] pour accepter
cette valeur ou, pour ajuster votre foulée (voir « Mesure de la longueur de la
foulée » sur la page opposée), APPUYEZ sur les boutons + ou MODE.
6. APPUYEZ sur le bouton SET [RÉGLER]. L’appareil est maintenant programmé
et prêt à utiliser!
4 5 6
4- PROGRAMMATION DU PODOMÈTRE
Pour être certain que les résultats de l’exercice sont aussi précis que possible,
vous devez suivre les étapes suivantes pour enregistrer votre profi l personnel :
L’affi chage vous indiquera quelle donnée vous devez programmer. Réglez chacune
de ces données en APPUYANT sur + (pour augmenter) ou sur MODE/RESET [MODE/
REMISE À ZÉRO] (MODE) (pour diminuer). Pour accepter la valeur et passer au
prochain réglage, APPUYEZ sur SET [RÉGLER].
1. Pour accéder à la séquence de programmation, APPUYEZ ET MAINTENEZ ENFONCÉ
pendant trois secondes le bouton SET [RÉGLER] situé au dos de l’appareil.
2. Pour sélectionner l’unité de mesure (système métrique ou impérial), APPUYEZ
sur les boutons + ou MODE situés à l’arrière de l’appareil. APPUYEZ à nouveau
sur le bouton SET [RÉGLER].
3. Réglez le poids (en livres ou en kilogrammes) en APPUYANT sur le bouton + (pour
augmenter) ou sur le bouton MODE (pour réduire). APPUYEZ sur le bouton SET
[RÉGLER] pour accepter la valeur et passer au réglage de la grandeur.
1 12 2 33
Pour ajuster la valeur :
Appuyez sur + ou sur
MODE/RESET.
Pour accepter et passer à
la donnée suivante :
APPUYEZ SUR SET.
Faire défi ler les modes
d’affi chage.
APPUYEZ sur MODE/RESET
6- FONCTIONNEMENT DU PODOMÈTRE 7- REMISE À ZÉRO DES DONNÉES DU
PODOMÈTRE
Le podomètre 345 commence automatiquement à enregistrer les données dès
qu’un mouvement se produit. Nul besoin d’appuyer sur un bouton pour
commencer ou arrêter l’enregistrement des données.
Pour faire défi ler les modes d’affi chage (STEPS [PAS], DISTANCE, CALORIES et
EXERCICE TIME [DURÉE DE L’EXERCICE], APPUYEZ sur le bouton MODE/RESET
[MODE/REMISE À ZÉRO].
POUR SUPPRIMER TOUTES LES DONNÉES COURANTES DU PODOMÈTRE :
1. APPUYEZ ET MAINTENEZ ENFONCÉ le bouton MODE/RESET [MODE/REMISE
À ZÉRO] sur le devant de l’appareil.
2. Continuez de maintenir le bouton enfoncé lorsque le mot « RESET » [REMISE À
ZÉRO] s’affi che.
3. RELÂCHEZ LE BOUTON MODE/RESET [MODE/REMISE À ZÉRO] lorsque les
données affi chées indiquent zéro (0). L’appareil est maintenant prêt pour une
nouvelle séance d’entraînement.
REMARQUE : Les réglages de votre profi l personnel seront sauvegardés.
PAS
DURÉE DE L’EXERCICE CALORIES
DISTANCE
Pour ajuster la valeur :
Appuyez sur + ou sur
MODE/RESET.
Pour accepter et passer à
la donnée suivante :
APPUYEZ SUR SET.
345 PODOMÈTRE
8- MESURE DE LA LONGUEUR DE LA
FOULÉE
COMMENT MESURER LA LONGUEUR DE VOTRE FOULÉE
Le podomètre 345 défi nit automatiquement la longueur de votre foulée en fonction
de la taille que vous avez entrée au cours de la séquence de réglage. Vous pouvez
modifi er cette longueur de foulée. Suivez les étapes énoncées ci-dessous pour
obtenir votre mesure personnalisée.
1. Pour connaître votre foulée, faites dix pas en marchant ou en courant, puis utilisez
un ruban à mesurer pour mesurer la distance entre l’orteil du premier pas et
celui du dixième pas.
1. Divisez la distance totale par dix pour obtenir la longueur moyenne de votre foulée.
1. Pour un calcul rapide, faites trois pas, mesurez la distance et divisez celle-ci
par trois. Plus vous faites de pas, plus la mesure de votre foulée sera précise et
réaliste. La foulée de marche moyenne d’une femme est de 60 cm (24 po) tandis
que celle d’un homme est de 76 cm (30 po).
COMMENCEZ À MARCHER/COURIR
LIGNE DE
DÉPART
DIVISEZ LE TOTAL DE
LA DISTANCE PAR 10
13579
246
810
11- ENTRETIEN
• ÉLOIGNEZ le podomètre de toute source d’eau. Cet appareil ne résiste pas à l’eau.
• N’essayez JAMAIS de démonter ou de réparer l’appareil.
• N’EXPOSEZ PAS l’appareil à des chaleurs extrêmes, aux chocs, à un champ
magnétique, au bruit électrique, aux vibrations fortes ou, pour une durée
prolongée, à la lumière directe du soleil.
• NE LAISSEZ PAS tomber le podomètre et ne marchez pas sur celui-ci.
• NETTOYAGE : Essuyez l’appareil à l’aide d’un chiffon légèrement humide.
Servez-vous d’un savon doux aux endroits qui comportent des taches ou des
marques rebelles. N’exposez pas l’instrument à des produits chimiques forts
comme l’essence, les solvants détachants, l’acétone, l’alcool ou les insectifuges,
car ils risquent d’endommager le joint d’étanchéité, le boîtier ou le fi ni.
• RANGEZ l’appareil dans un endroit sec quand vous ne vous en servez pas.
www.sportline.com
13- REMPLACEMENT DE LA PILE
Le podomètre 345 de Sportline fonctionne à l’aide d’une pile au lithium CR2032 de
3 volts.
La pile doit être remplacée de temps à autre, et dans les cas suivants :
1. L’affi chage perd de sa clarté ou disparaît complètement.
2. La fonction de podomètre ne s’active pas.
REMPLACEMENT DE LA PILE :
1. Soulevez l’agrafe de ceinture à ressort située à l’arrière de l’appareil pour exposer
le couvercle du compartiment à piles. Dévissez le couvercle du compartiment à
l’aide d’un petit tournevis Phillips.
2. Remplacez la pile à plat par une pile neuve en vous assurant de respecter la
polarité; le côté positif (+) doit être sur le dessus.
3. Replacez le couvercle du compartiment à piles en le glissant à sa place.
1 2 3
14- INFORMATION SUR LA SÉCURITÉ
CONCERNANT LES PILES
AVERTISSEMENT – INFORMATION SUR LA SÉCURITÉ CONCERNANT
LES PILES
• Ne rechargez pas les piles non rechargeables.
• Retirez les piles rechargeables avant de les recharger.
• Les piles rechargeables ne doivent être rechargées que sous la surveillance
d’un adulte.
• Ne mélangez pas des piles alcalines, standard (carbone-zinc) et rechargeables
(nickel-cadmium).
• Retirez les piles à plat.
• Ne mélangez pas des piles neuves et des piles usagées.
• Ne jetez pas les piles dans le feu, car elles pourraient fuir ou exploser.
• Ne jetez pas le produit dans le feu, car les piles pourraient exploser ou fuir.
• Si ce produit n’est pas utilisé pendant une période prolongée, retirez-en les piles.
• Les bornes d’alimentation ne doivent pas être court-circuitées.
• Les piles doivent être installées en respectant les polarités.
• Nettoyez les contacts du produit et ceux des piles avant d’installer ces dernières.
• Défaites-vous des piles usées en usant de moyens écologiques.
Le symbole représentant une poubelle à roulettes barrée d’une croix sert à nous rappeler que la
majorité des articles électriques, tout comme les piles, contiennent des éléments traces (notam-
ment le mercure – Hg, le cadmium – Cd et le plomb – Pb) qui pourraient nuire à l’environnement
et, par conséquent, à notre santé. Nous devons tâcher d’en disposer de façon responsable selon
une méthode conçue à cette fi n – soit par procédé de collecte, soit dans un contenant étiqueté
conformément dans des installations publiques de recyclage (et NON aux ordures générales) – ce
qui permettra aux autorités locales de prendre les dispositions nécessaires pour les recycler ou
les éliminer convenablement.
9- PORT DU PODOMÈTRE
Ce podomètre est plus précis lorsqu’il est porté près du corps, idéalement à la
ceinture ou à la taille, ou dans une poche bien serrée sur soi. Le podomètre peut
également être porté au cou, attaché à un cordon.
10- AVERTISSEMENTS ET MISES EN GARDE
MISE EN GARDE : Avant d’entreprendre un programme d’exercices physiques ou de
vous livrer à une activité physique intense, nous vous recommandons fortement de
consulter votre médecin afi n de lui faire part de vos intentions et de passer un
examen physique complet.
MISE EN GARDE : Les podomètres ne résistent pas à l’eau.
ÉVITEZ d’exposer le podomètre à des conditions extrêmes.
ÉVITEZ les gestes brusques et les chocs excessifs.
NETTOYEZ le podomètre de temps à autre à l’aide d’un tissu doux et sec.
RANGEZ le podomètre dans un endroit sec si vous ne comptez pas vous en servir
pendant une période prolongée.
COMMENCEZ À
MARCHER/COURIR
LIGNE DE
DÉPART
DIVISEZ LE TOTAL DE LA
DISTANCE PAR 3
13
2
12-COMPLIANCE
Cet appareil numérique respecte les limites de bruits radioeléctriques applicables
aux appareils numériques de Clase B prescrites dans la norme sur le materiel
brouilleur: “Appareils Numériques”, ICES-003 édictée par le minister des
communications.
